AWS re:Invent is a learning conference hosted by AWS for the global cloud computing community. This year’s re:Invent will be held in Las Vegas, Nevada, from November 28 to December 2.
AWS Glue is a serverless data integration service that makes it easier for analytics users to discover, prepare, move, and integrate data from multiple sources for analytics, machine learning, and application development. You can discover and connect to over 70 diverse data sources, manage your data in a centralized data catalog, and visually create, run, and monitor ETL (extract, transform, and load) pipelines to load data.
This post walks you through the details of all AWS Glue-related sessions and activities to help you plan your conference week accordingly. These sessions should appeal to data and analytics teams, data engineers, engineering teams, and technology leaders interested in cost-effective, scalable, serverless data integration and ETL.
To access the session catalog and reserve your seat for one of our data integration and ETL sessions, you must be registered for re:Invent. Register now!
Keynotes
Adam Selipsky, Chief Executive Officer of Amazon Web Services – Keynote
Tuesday November 29 | 8:30 AM – 10:30 AM PST | The Venetian
Join Adam Selipsky, Chief Executive Officer of Amazon Web Services, as he looks at the ways that forward-thinking builders are transforming industries and even our future, powered by AWS. He highlights innovations in data, infrastructure, and more that are helping customers achieve their goals faster, take advantage of untapped potential, and create a better future with AWS.
Swami Sivasubramanian, Vice President of AWS Data and Machine Learning – Keynote
Wednesday November 30 | 8:30 AM – 10:30 AM PST | The Venetian
Join Swami Sivasubramanian, Vice President of AWS Data and Machine Learning, as he reveals the latest AWS innovations that can help you transform your company’s data into meaningful insights and actions for your business. In this keynote, several speakers discuss the key components of a future-proof data strategy and how to empower your organization to drive the next wave of modern invention with data. Hear from leading AWS customers who are using data to bring new experiences to life for their customers.
Leadership sessions
ANT203-L (LVL 200) Unlock the value of your data with AWS analytics
Wednesday November 30 | 2:30 PM – 3:30 PM PST | The Venetian
Data fuels digital transformation and drives effective business decisions. To survive in an ever-changing world, organizations are turning to data to derive insights, create new experiences, and reinvent themselves so they can remain relevant today and in the future. AWS offers analytics services that allow organizations to gain faster and deeper insights from all their data. In this session, G2 Krishnamoorthy, VP of AWS Analytics, addresses the current state of analytics on AWS, covers the latest service innovations around data, and highlights customer successes with AWS analytics. Also, learn from organizations like FINRA and more who have turned to AWS for their digital transformation journey.
In this session, learn about the latest innovations in AWS Glue and hear how an AWS customer uses AWS Glue to enable self-service data preparation across their organization. Itau, Brazil’s largest private-sector bank, also shares their AWS Glue success story.
ANT205 (LVL 200) Achieving your modern data architecture
Tuesday November 29 | 1:15 PM – 2:15 PM PST | Mandalay Bay
Many organizations are developing roadmaps to help them achieve digital transformation. This session helps you understand how deploying a modern data architecture can help you navigate your data challenges, optimize analytics processes, and deliver faster insights to the people and applications that need it.
*This session will also be repeated Thursday December 1 | 7:00 PM – 8:00 PM PST | MGM Grand
ANT335 (LVL 300) How Disney used AWS Glue as a data integration and ETL framework
Monday November 28 | 04:45 PM – 05:45 PM PST | MGM Grant 121
Disney Parks, Experiences, and Products is one of the world’s leading providers of family travel and leisure experiences. Disney Parks, Experiences, and Products uses AWS Glue—a serverless data integration service—as a key component to replace thousands of Apache Hadoop, Spark, and Sqoop jobs. In this session, Disney and AWS Glue experts discuss some ways to scale AWS Glue beyond the traditional setup and how they configure AWS Glue for job monitoring and performance.
ANT322 (LVL 300) Simplifying ETL migration and data integration with AWS Glue
Monday November 28 | 1:45 PM – 2:45 PM PST | Mandalay Bay
Organizations are modernizing their data stacks with AWS. This chalk talk reviews how AWS Glue makes it easy to migrate your data integration and ETL workloads to the cloud using a serverless architecture that lets you focus on your data. See demos and a deep dive into some of the methods AWS Glue provides for migration.
*This session will also be repeated Friday December 2 | 10:00 AM – 11:00 AM PST | Cesar Palace
Workshops
ANT310 (LVL 300) Build a data mesh with AWS Lake Formation and AWS Glue
Wednesday November 30 | 05:30 PM – 07:30 PM PST | MGM Grand
In this workshop, learn how to build a data mesh architecture on AWS. Organizations are interested in implementing this architecture to move away from centralized data lakes and toward decentralized ownership and delivery of analytics solutions across business units. Learn about data mesh fundamentals and principles, how data mesh can impact your organization, and how data mesh architecture can be implemented with AWS services. Build your own data mesh using AWS Lake Formation, AWS Glue, and AWS CDK, and share data across business units. You must bring your laptop to participate.
ANT002 (Demo) Discover, prepare, and integrate your data with AWS Glue
Wednesday November 30 | 04:30 PM– 04:50 PM PST | The Venetian
AWS Glue is a serverless data integration service that makes it easier to discover, prepare, move, and integrate data from multiple sources. Attend this session and learn ways that AWS Glue can simplify how you create and manage your data pipelines.
Visit the booth 1335 in the AWS Village to meet with experts to dive deeper into the latest AWS Glue launches. You will be able to ask our experts questions and experience live demos for our newly launched capabilities.
Useful resources
Whether you plan on attending re:Invent in person or view available content virtually, you can always learn more about AWS Glue through these helpful resources.
Learn more and get started with AWS Glue!
About the author
Alona Nadler is AWS Glue Head of Product and is responsible for AWS Glue Service. She has a long history of working in the enterprise software and data services spaces. When not working, Alona enjoys traveling and playing tennis.
Mark your calendars for November 28 through December 2, 2022 to attend AWS re:Invent in Las Vegas – a learning conference hosted by AWS for the global cloud computing community.
To maximize the value of your data, you need to act upon it in real time, instead of waiting for hours, days, or week. AWS streaming data services offer unmatched, end to end capabilities to build real-time streaming data pipelines and applications to maximize the value of your data and act upon it in real time. You can leverage Kinesis Data Streams, Kinesis Video Streams and Amazon Managed Streaming for Apache Kafka (MSK) to collect and store data streams at scale; Kinesis Data Firehose to load real-time streams into data lakes, warehouses, and analytics services; and Kinesis Data Analytics to analyze streaming data in real time using Apache Flink. With streaming data architectures, customers can analyze data as soon as it is produced, get timely insights and make real-time decisions to capitalize on opportunities, enhance customer experiences, prevent networking failures, or update critical business metrics in real-time, just to name a few. This post walks you through the key sessions on streaming data and analytics that you cannot miss this year at reInvent to help you plan your conference week accordingly.
To access the session catalog and reserve your seat for one of our streaming data and analytics sessions, you must be registered for re:Invent. Register now!
Keynotes and leadership sessions you cannot miss!
Speakers have always been a key piece of the re:Invent puzzle. This year is no different, and you’ll have the chance to hear from some of the leading voices at AWS.
Adam Selipsky, Chief Executive Officer of Amazon Web Services – Keynote
Tuesday November 29 | 8:30 AM – 10:30 AM PST | The Venetian
Join Adam Selipsky, CEO of Amazon Web Services, as he looks at the ways that forward-thinking builders are transforming industries and even our future, powered by AWS. He highlights innovations in data, infrastructure, security, and more that are helping customers achieve their goals faster, take advantage of untapped potential, and create a better future with AWS.
Swami Sivasubramanian, Vice President of AWS Data and Machine Learning – Keynote
Wednesday November 30 | 8:30 AM – 10:30 AM PST | The Venetian
Join Swami Sivasubramanian, Vice President of AWS Data and Machine Learning, as he unveils some of the latest AWS innovations, designed to help you transform data into meaningful insights. Hear from leading AWS customers who are using data to bring new experiences to life for their customers.
AWS storage innovations at exabyte scale – Leadership session
Tuesday November 29 | 11:00 – 12:00 PM PST | The Venetian
Data is the change agent driving digital transformation. In this session, Mai-Lan Tomsen Bukovec, AWS Tech VP, and Andy Warfield, AWS Distinguished Engineer, share the latest AWS storage innovations and an inside look at how customers drive modern business on data lakes and with high-performance data.
Unlock the value of your data with AWS analytics – Leadership session
Wednesday November 30 | 2:30 – 3:30 PM PST | The Venetian
Data fuels digital transformation and drives effective business decisions. In this session, G2 Krishnamoorthy, VP of AWS Analytics, addresses the current state of analytics on AWS, covers the latest service innovations around data, and highlights customer successes with AWS analytics.
Join our customer sessions to learn first-hand how other organizations are maximizing the value of their data with real-time streaming data architectures, enabling them to untap new business opportunities, enhance processes, and deliver delightful customer experiences.
How Riot Games processes 20 TB of analytics data daily on AWS – Riot Games ingests about 20 TB of data every day on AWS. This data powers a wide range of services, including game matchmaking, in-game personalization, analytics, security, and player behavior management. Join this session to learn how Riot Games transformed their data ingestion pipeline to query data from 6 hours after it was produced down to just 5 minutes. Reserve your seat now!
How Samsung modernized architecture for real-time analytics – In this session, Samsung SmartThings shares how they modernized their streaming data analytics architecture for real-time analytics. Originally, Samsung developers spent most of their time managing infrastructure. After migrating to Amazon Kinesis Data Analytics, developers were able to focus on delivering business value without needing to worry about infrastructure management. Reserve your seat now!
Leveling up computer vision and artificial intelligence development – Seeing is believing, and Kami Vision is proof! In this session, Kami Vision speaks to how they utilized Amazon Kinesis Video Streams to do the undifferentiated video lifting so that they could develop KamiCare fall detection—an accurate way to monitor if a person has fallen to the floor and cannot get up. Reserve your seat now!
How Sony Orchard accelerated innovation with Amazon MSK – The Orchard, a subsidiary of Sony Music Entertainment, built a high-performing data synchronization solution using Amazon Managed Streaming for Apache Kafka (Amazon MSK). Learn how their data synchronization and search capabilities improved using this solution. Reserve your seat now!
How Poshmark accelerates growth via real-time analytics & personalization – Find out how Poshmark designed real-time personalization using real-time event capture to deliver tailored customer experiences, reduce security risks, and enable end-users to more confidently interact with the Poshmark app. Reserve your seat now!
Building and operating at scale with feature management (sponsored by LaunchDarkly) – LaunchDarkly customers deliver software applications that support millions of end-users at any given time. They rely on LaunchDarkly to launch, control, and measure those applications in real time without negative customer impact. In this session, we’ll discuss key architecture decisions and LaunchDarkly best practices. Reserve your seat now!
Breakout sessions
AWS re:Invent breakout sessions are lecture-style and one hour long. These sessions take place across the re:Invent campus and cover all topics at all levels.
What’s new in AWS streaming – Streaming data and analytics help your business make real-time contextual decisions, deliver personalized customer experiences, and untap new opportunities in real time. Join us to find out about the latest innovations in the AWS streaming portfolio. Reserve your seat now!
Build a managed analytics platform for your ecommerce business – With the increase in popularity of online shopping, building an analytics platform for ecommerce is important for any organization because it provides insights about the business, trends, and customer behavior. Join us to learn how to build a complete analytics platform in batch and real-time mode. Reserve your seat now!
Publishing real-time financial data feeds using Kafka – This session describes how to offer a real-time financial data feed as a service on AWS. With Amazon MSK, you can use Kafka to allow your customers to subscribe to message topics containing the financial data of interest. We will cover connectivity best practices for scalability, security options for a secure architecture, and lessons learned from customers that are using AWS to distribute financial data on AWS. Reserve your seat now!
Interact with streaming data using Amazon Kinesis Data Analytics Studio – Join us in this theater session to learn how analyzing streaming data provides the timely, actionable insights a business needs to grow. Reserve your seat now!
Chalk talks
Chalk talks are a highly interactive content format with a small audience. Each begins with a short lecture delivered by an AWS expert followed by a Q&A session with the audience.
Modern data exchange using AWS data streaming – We’ll explore how different systems sync low-latency data changes using Apache Hudi backed by Amazon Simple Storage Service (Amazon S3) in a data mesh architecture. This modern architecture allows developers to build streaming jobs that read, join, and aggregate data from multiple datasets and sync data changes to downstream data stores. Reserve your seat now!
Build a serverless streaming workload with Amazon Kinesis – Collecting, processing, and analyzing streaming data is easy with Amazon Kinesis services. Make plans for this chalk talk that will take your streaming capabilities to the next level. Reserve your seat now!
Workshops
Workshops are two-hour hands-on sessions where you work in teams to solve problems using AWS services. Workshops organize attendees into small groups and provide scenarios to encourage interaction, giving you the opportunity to learn from and teach each other. Don’t forget to bring your laptop!
Building a serverless Apache Kafka data pipeline – Serverless means “focus on what matters”! In this workshop, we’ll show how you can build a serverless data pipeline using Amazon MSK Serverless, deploy a Kafka client container-based AWS Lambda function, and much more! Reserve your seat now!
Event detection with Amazon MSK and Amazon Kinesis Data Analytics – When in Las Vegas, you do as Las Vegans do! In this workshop, you’ll see how casinos use Amazon MSK, Amazon Kinesis Data Analytics Studio, and AWS Lambda to enhance customer experiences. Reserve your seat now!
Build smart camera applications using Amazon Kinesis Video Streams WebRTC – Amazon Kinesis Video Streams WebRTC helps users to easily build low-latency video solutions such as smart doorbells, connected vehicles, surveillance cameras, and more. Join this workshop for hands-on experience building a complete real-world video solution, including setting up a device with a camera to transmit video. Reserve your seat now!
Fun, fun, and more fun!
All work and no play … not at re:Invent! Sure, we’ll work hard and learn a lot, but we also plan to have a great time while we’re together. Our gamified learning sessions will give you real-life learning opportunities through interactive events that promise to be fun and entertaining!
The fun continues with AWS Builder Labs, where you’ll have the opportunity to test your skills in sandbox settings while working alongside some of the leading minds from AWS!
And don’t forget to visit the Analytics kiosk within the AWS Village to meet with experts to dive deeper into AWS streaming data services such as Kinesis Data Streams, Kinesis Data Firehose, Kinesis Data Analytics and Amazon MSK. You will be able to ask our experts questions and experience live demos for our newly launched capabilities. Make sure to stop by the swag distribution table to grab free Analytics swag if you have attended either the Analytics kiosk or one of our breakout sessions, chalk talks, or workshops.
Register today
Keep your eyes on this post for more updates and exciting news. It’s going to be a simply amazing event and we can’t wait to see you at re:Invent 2022, the world’s premier tech event! Register now to secure your spot!
About the author
Anna Montalat is a Senior Product Marketing Manager for AWS streaming data services which includes Amazon Managed Streaming for Apache Kafka (MSK), Kinesis Data Streams, Kinesis Video Streams, Kinesis Data Firehose, and Kinesis Data Analytics. She is passionate about bringing new and emerging technologies to market, working closely with service teams and enterprise customers. Outside of work, Anna skis through winter time and sails through summer.
It’s now just two weeks to AWS re:Invent in Las Vegas, and the pace is picking up, both here on the News Blog, and throughout AWS as everyone get ready for the big event! I hope you get the chance to join us, and have shared links and other information at the bottom of this post. First, though, let’s dive straight in to this week’s review of news and announcements from AWS.
Last Week’s Launches As usual, let’s start with a summary of some launches from the last week that I want to remind you of:
New Switzerland Region – First and foremost, AWS has opened a new Region, this time in Switzerland. Check out Seb’s post here on the News Blog announcing the launch.
New AWS Resource Explorer – if you’ve ever spent time searching for specific resources in your AWS account, especially across Regions, be sure to take a look at the new AWS Resource Explorer, described in this post by Danilo. Once enabled, indexes of the resources in your account are built and maintained (you have control over which resources are indexed). Once the indexes are built, you can issue queries to more quickly arrive at the required resource without jumping between different Regions and service dashboards in the Management Console.
New models for Amazon SageMaker JumpStart – Two new state-of-the-art models have been released for Amazon SageMaker JumpStart. SageMaker JumpStart provides pretrained, open-source models covering a wide variety of problem types that help you get started with machine learning. The first new model, Bloom, can be used to complete sentences or generate long paragraphs of text in 46 different languages. The second model, Stable Diffusion, generates realistic images from given text. Find out more about the new models in this What’s New post.
Other AWS News Some other news items you may want to explore:
AWS Open Source News and Updates – This blog is published each week, and Installment 135 is now available, highlighting new open-source projects, tools, and demos from the AWS community.
Upcoming AWS Events AWS re:Invent 2022 – As I noted at the top of this post, we’re now just two weeks away from the event! Join us live in Las Vegas November 28–December 2 for keynotes, opportunities for training and certification, and over 1,500 technical sessions. If you are joining us, be sure to check out the re:Invent 2022 Attendee Guides, each curated by an AWS Hero, AWS industry team, or AWS partner.
If you can’t join us live in Las Vegas, be sure to join us online to watch the keynotes and leadership sessions. My cohosts and I on the AWS on Air show will also be livestreaming daily from the event, chatting with service teams and special guests about all the launches and other announcements. You can find us on Twitch.tv (we’ll be on the front page throughout the event), the AWS channel on LinkedIn Live, Twitter.com/awsonair, and YouTube Live.
And one final update for the event – if you’re a .NET developer, be sure to check out the XNT track in the session catalog to find details on the seven breakouts, three chalk talks, and the workshop we have available for you at the conference!
Check back next Monday for our last week in review before the start of re:Invent!
In the weeks leading up to AWS re:Invent 2022, I’m interviewing some of the humans who work in AWS Security, help keep our customers safe and secure, and also happen to be speaking at re:Invent. This interview is with Param Sharma, principal software engineer for AWS Private Certificate Authority (AWS Private CA). AWS Private CA enables you to create private certificate authority (CA) hierarchies, including root and subordinate CAs, without the investment and maintenance costs of operating an on-premises CA.
How long have you been at AWS and what do you do in your current role?
I’ve been here for more than eight years—I joined AWS in July 2014, working in AWS Security. These days, I work on public key infrastructure (PKI) and cryptography, focusing on products like AWS Certificate Manager (ACM) and AWS Private CA.
How did you get started in the world of security, specifically cryptography?
I had a very short stint with crypto during my university days—I presented a paper on steganography and cryptography back in 2002 or 2003. Security has been an integral part of developing and deploying large-scale web applications, which I’ve done throughout my career. But security took center stage in 2014 when I heard from an AWS recruiter about a new service being built that would make certificates easier. I had no clue what that service was, since it was confidential and hadn’t been launched yet, but it brought cryptography back into my life. I started working on this brand-new service, AWS Certificate Manager. I designed the operational security aspect of it and worked to make sure it could be used by millions of our customers and could be available and secure at the same time. I was the second person hired on the ACM team, and since then the team has grown significantly.
What was the most surprising or interesting thing you’ve worked on in your time at AWS?
It might not be surprising, but certainly interesting to me: I was the first engineer to be hired on the AWS Private CA team and I started studying the problem of how certificate authorities would work in the cloud. I had to think about how the customer experience would look, the service architecture design, the operational side of things like availability and security of customer data. Doing a 360-degree review of the service and writing the design document for a service that was eventually deployed in a multitude of AWS Regions was one of the most interesting things I have worked on at AWS. It continues to be an interesting challenge as we add new features—which tend to be like smaller AWS services in their own right even though they are features of AWS Private CA.
How do you explain to customers how to use AWS Private CA?
I start by explaining what a private certificate is. A private certificate provides a flexible way to identify almost anything in an organization without disclosing the name publicly. With AWS Private CA, AWS takes care of the undifferentiated heavy lifting involved in operating a private CA. We provide security configuration, management, and monitoring of highly available private CAs. The service also helps organizations avoid spending money on servers, hardware security modules (HSMs), operations, personnel, infrastructure, software training, and maintenance. Maintaining PKI administrators, for example, can cost hundreds or thousands of dollars per year. AWS Private CA simplifies the process of creating and managing these private CAs and certificates that are used to identify resources and provide a basis for trusted identity in communications.
In your opinion, what is the coolest feature of AWS Private CA?
That’s going to be really hard to pick! To me, the coolest feature is root CA, which gives customers the ability to create and manage root CAs in the cloud. Root CAs are used to create subordinate CAs for issuing identity certificates. And these private CAs can be used to identify resources in a private network within an organization. You can use these private certs on application services, devices, or even for identifying users for identity certificates.
AWS Private CA has evolved since its launch in 2018. What are some of the new ways you see customers using the service?
When AWS Private CA was launched in 2018, the primary feature was to create and manage subordinate CAs, which were signed offline outside of AWS Private CA. The secondary feature was to issue certificates for identifying endpoints for TLS/SSL communication. Over the last four or five years, I’ve seen use cases become more diversified, and the service has evolved as the customers’ needs have evolved. The biggest paradigm shift that I’ve seen is that customers are customizing certificates and using them to identify IoT devices or customer-managed Kubernetes clusters. The certificates can even be used on-premises for your Amazon Elastic Compute Cloud (Amazon EC2) instances or your on-premises servers, where you can use these services to encrypt the traffic in transit or at rest in certain cases. The other more recent use case I’ve started to see is customers using AWS Private CA with AWS Identity and Access Management Roles Anywhere, which launched in July 2022. Customers are using this combination to issue certificates for identity, which is tied to the credentials themselves.
I understand you’ll be speaking at re:Invent 2022. Can you tell us about your session there? What do you hope customers take away from your session?
I am doing two sessions at re:Invent this year. The first one, Understanding the evolution of cloud-based PKI use cases, is a chalk talk about how cloud-based PKI use cases have evolved over the last 5–10 years. This talk is mainly for PKI administrators, information security engineers, developers, managers, directors, and IoT security professionals who want to learn more about how X.509 digital certificates are used in the cloud. We will dive deep into how these certs are being used for normal TLS communication, device certificates, containers, or even certificates used for identity like in IAM Roles Anywhere. The second session is a breakout session called AWS data protection: Using locks, keys, signatures, and certificates. It puts a spotlight on what AWS offers in terms of cryptographic tools and PKI platforms that help our customers navigate their data protection and digital signing needs. This session will provide a ground-floor understanding of how to get this protection by default or when needed, and how can you build your own logs, keys, and signatures for you own cloud application.
What’s the thing you’re most proud of in your career?
I’m proud to work with some of the smartest people who, at the same time, are very humble and genuinely believe in making this world a better place for everyone.
Outside of your work in tech, what is something you’re interested in that might surprise people?
I have a five-year-old and a three-year-old, so whenever I get some time to myself between those two, I love to read and take long strolls. I’m a passionate advocate that every voice is unique and has value to share. I’m a diversity and inclusion ambassador at Amazon and as part of this program, I mentor underrepresented groups and help build a community with integrity and a willingness to listen to others, which provides a space for us to be ourselves without fear of judgement. I try to do volunteer work whenever possible, being involved in community service programs organized through my children’s school activities, or even participating in local community kitchens by cooking and serving food that is distributed through a local non-profit organization.
If you had to pick an industry outside of security, what would you want to do?
I would’ve been a teacher or worked with a non-profit organization mentoring and volunteering. I think volunteering gives me a sense of peace.
If you have feedback about this post, submit comments in the Comments section below. If you have questions about this post, contact AWS Support.
Want more AWS Security news? Follow us on Twitter.
With three weeks to go until AWS re:Invent opens in Las Vegas, the AWS News Blog Team is hard at work creating blog posts to share the latest launches and previews with you. As usual, we have a strong mix of new services, new features, and a surprise or two.
Last Week’s Launches Here are some launches that caught my eye last week:
Amazon SNS Data Protection and Masking – After a quick public preview, this cool feature is now generally available. It uses pattern matching, machine learning models, and content policies to help protect data at scale. You can find many different kinds of personally identifiable information (PII) and protected health information (PHI) in message bodies and either block message delivery or mask (de-identify) the sensitive data, all in real-time and on a per-topic basis. To learn more, read the blog post or the message data protection documentation.
Amazon Textract Updates – This service extracts text, handwriting, and data from any document or image. This past week we updated the AnalyzeID function so that it can now extract the machine readable zone (MRZ) on passports issued by the United States, and we added the entire OCR output to the API response. We also updated the machine learning models that power the AnalyzeDocument function, with a focus on single-character boxed forms commonly found on tax and immigration documents. Finally, we updated the AnalyzeExpense function with support for new fields and higher accuracy for existing fields, bringing the total field count to more than 40.
Another Amazon Braket Processor – Our quantum computing service now supports Aquila, a new 256-qubit quantum computer from QuEra that is based on a programmable array of neutral Rubidium atoms. According to the What’s New, Aquila supports the Analog Hamiltonian Simulation (AHS) paradigm, allowing it to solve for the static and dynamic properties of quantum systems composed of many interacting particles.
Amazon S3 on Outposts – This service now lets you use additional S3 Lifecycle rules to optimize capacity management. You can expire objects as they age or are replaced with newer versions, with control at the bucket level, or for subsets defined by prefixes, object tags, or object sizes. There’s more info in the What’s New and in the S3 documentation.
Amazon MemoryDB for Redis – You can now use data tiering as a lower cost way to to scale your clusters up to hundreds of terabytes of capacity. This new option uses a combination of instance memory and SSD storage in each cluster node, with all data stored durably in a multi-AZ transaction log. There’s more information in the What’s New and the blog post.
Amazon EC2 – You can now remove launch permissions for Amazon Machine Images (AMIs) that are directly shared with your AWS account.
X in Y – We launched existing AWS services and instance types in additional Regions:
Other AWS News Here are some additional news items that you may find interesting:
AWS Open Source News and Updates – My colleague Ricardo Sueiras highlights new open source projects, tools, and demos from the AWS Community. Read Installment 134 to see what’s going on!
New Case Study – A new AWS case study describes how Taggle (a company focused on smart water solutions in Australia) created an IoT platform that runs on AWS and uses Amazon Kinesis Data Streams to store & ingest data in real time. Using AWS allowed them to scale to accommodate 80,000 additional sensors that will roll out in 2022.
Upcoming AWS Events re:Invent 2022 – AWS re:Invent is just three weeks away! Join us live from November 28th to December 2nd for keynotes, training and certification opportunities, and over 1,500 technical sessions. If you cannot make it to Las Vegas you can also join us online to watch the keynotes and leadership sessions live. Be sure to check out the re:Invent 2022 Attendee Guides, each curated by an AWS Hero, AWS industry team, or AWS partner.
PeerTalk – If you will be attending re:Invent in person and are interested in meeting with me or any of our featured experts, be sure to check out PeerTalk, our new onsite networking program.
AWS re:Invent is a learning conference hosted by AWS for the global cloud computing community. This year’s re:Invent will be held in Las Vegas, Nevada, from November 28 to December 2.
Amazon QuickSight is the most popular cloud-native serverless BI service. This post walks you through the details of all QuickSight-related sessions and activities to help you plan your conference week accordingly. These sessions should appeal to data and analytics teams, product and engineering teams, and line of business and technology leaders interested in modernizing their BI capabilities to transform data into actionable insights for all.
To access the session catalog and reserve your seat for one of our BI sessions, you must be registered for re:Invent. Register now!
Keynotes
Adam Selipsky, Chief Executive Officer of Amazon Web Services – Keynote
Tuesday November 29 | 8:30 AM – 10:30 AM PST | The Venetian
Join Adam Selipsky, Chief Executive Officer of Amazon Web Services, as he looks at the ways that forward-thinking builders are transforming industries and even our future, powered by AWS. He highlights innovations in data, infrastructure, and more that are helping customers achieve their goals faster, take advantage of untapped potential, and create a better future with AWS.
Swami Sivasubramanian, Vice President of AWS Data and Machine Learning – Keynote
Wednesday November 30 | 8:30 AM – 10:30 AM PST | The Venetian
Join Swami Sivasubramanian, Vice President of AWS Data and Machine Learning, as he reveals the latest AWS innovations that can help you transform your company’s data into meaningful insights and actions for your business. In this keynote, several speakers discuss the key components of a future-proof data strategy and how to empower your organization to drive the next wave of modern invention with data. Hear from leading AWS customers who are using data to bring new experiences to life for their customers.
Leadership sessions
ANT203-L (LVL 200) Unlock the value of your data with AWS analytics
Wednesday November 30 | 2:30 – 3:30 PM PST | The Venetian
Data fuels digital transformation and drives effective business decisions. To survive in an ever-changing world, organizations are turning to data to derive insights, create new experiences, and reinvent themselves so they can remain relevant today and in the future. AWS offers analytics services that allow organizations to gain faster and deeper insights from all their data. In this session, G2 Krishnamoorthy, VP of AWS Analytics, addresses the current state of analytics on AWS, covers the latest service innovations around data, and highlights customer successes with AWS analytics. Also, learn from organizations like FINRA and more who have turned to AWS for their digital transformation journey. Reserve your seat now!
BSI201 (LVL 200) Reinvent how you derive value from your data with Amazon QuickSight
Tuesday November 29 | 2:00 PM – 3:00 PM PST | Mandalay Bay
In this session, learn how you can use AWS-native business analytics to provide your users with machine learning-powered interactive dashboards, natural language query (NLQ), and embedded analytics to provide insights to users at scale, when and where they need it. Join this session to also learn more about how Amazon uses QuickSight internally. Reserve your seat now!
Breakout sessions
BSI202 (LVL 200) Migrate to cloud-native business analytics with Amazon QuickSight
Wednesday November 30 | 2:30 PM – 3:30 PM PST | Encore
Legacy BI systems can hurt agile decision-making in the modern organization, with expensive licensing, outdated capabilities, and expensive infrastructure management. In this session, discover how migrating your BI to the cloud with cloud-native, fully managed business analytics capabilities from QuickSight can help you overcome these challenges. Learn how you can use QuickSight’s interactive dashboards and reporting capabilities to provide insights to every user in the organization, lowering your costs and enabling better decision-making. Join this session to also learn more about Siemens QuickSight use case. Reserve your seat now!
BSI207 (LVL 200) Get clarity on your data in seconds with Amazon QuickSight Q
Wednesday November 30 | 4:45 PM – 5:45 PM PST | MGM Grand
Amazon QuickSight Q is a machine learning–powered natural language capability that empowers business users to ask questions about all of their data using everyday business language and get answers in seconds. Q interprets questions to understand their intent and generates an answer instantly in the form of a visual without requiring authors to create graphics, dashboards, or analyses. In this session, the QuickSight Q team provides an overview and demonstration of Q in action. Join this session to also learn more about NASDAQ’s QuickSight use case. Reserve your seat now!
BSI203 (LVL 200) Differentiate your apps with Amazon QuickSight embedded analytics
Thursday December 1 | 12:30 PM – 1:30 PM PST | Caesars Forum
In this session, learn how to enable new monetization opportunities and grow your business with QuickSight embedded analytics. Discover how you can differentiate your end-user experience by embedding data visualizations, dashboards, and ML-powered natural language query into your applications at scale with no infrastructure to manage. Join this session to also learn more about Guardian Life and Showpad’s QuickSight use case. Reserve your seat now!
BSI304 (LVL 300) Optimize your AWS cost and usage with Cloud Intelligence Dashboards
Thursday December 1 | 3:30 PM – 4:30 PM PST | Encore
Do your engineers know how much they’re spending? Do you have insight into the details of your cost and usage on AWS? Are you taking advantage of all your cost optimization opportunities? Attend this session to learn how organizations are using the Cloud Intelligence Dashboards to start their FinOps journeys and create cost-aware cultures within their organizations. Dive deep into specific use cases and learn how you can use these insights to drive and measure your cost optimization efforts. Discover how unit economics, resource-level visibility, and periodic spend updates make it possible for FinOps practitioners, developers, and business executives to come together to make smarter decisions. Join this session to also learn more about Dolby laboratories’ QuickSight use case. Reserve your seat now!
Chalk talks
BSI302 (LVL 300) Deploy your BI assets at scale to thousands with Amazon QuickSight
Tuesday November 29 | 11:45 AM – 12:45 AM PST | Wynn As your user bases grow to hundreds or thousands of users, managing assets and user permissions at scale becomes increasingly important. In this chalk talk, learn about best practices for content development, promotion, authorization, organization, and cleanup to help ensure that your users are developing and sharing content in a safe and scalable manner. Reserve your seat now!
BSI301 (LVL 300) Architecting multi-tenancy for your apps with Amazon QuickSight
Tuesday November 29 | 2:45 PM – 3:45 PM PST | Caesars Forum
Whether you are deploying QuickSight internally in a centrally managed single account or developing a SaaS application with multiple external tenants, it is paramount to focus on security and governance and to isolate tenants from each other. In this chalk talk, learn about different architectures and security frameworks that you can use to deploy QuickSight to thousands of departments or clients in a scalable and controlled manner. Reserve your seat now!
*This session will also be repeated Wednesday November 30 | 7:45 PM – 8:45 PM PST | Wynn
BSI401 (LVL 400) Insightful dashboards through advanced calculations with QuickSight
Monday November 28 | 12:15 PM – 1:15 PM PST | MGM Grand Loading data into various charting types is very rarely the end goal for your users. When they find interesting patterns or trends, they tend to dig deeper into their data and use calculations to surface more underlying insights. In this chalk talk, learn about various ways to build insightful and creative dashboards using QuickSight’s new advanced calculation capabilities, such as level-aware calculation and period functions. Reserve your seat now!
Workshops
BSI205 (LVL 200) Build stunning customized dashboards with Amazon QuickSight
Monday November 28 | 10:45 AM – 12:45 PM PST | Wynn
Want to grow your dashboard building skills? In this workshop, the QuickSight team demonstrates the latest authoring functionality designed to empower you to build beautiful layouts and robust interactive experiences with other applications, right from within your dashboard. You must bring your laptop to participate. Reserve your seat now!
*This session will be also be repeated Thursday December 1 | 11:45 AM – 1:45 PM PST | Caesars Forum
BSI303 (LVL 300) Seamlessly embed analytics into your apps with Amazon QuickSight Wednesday November 30 | 5:30 PM – 7:30 PM PST | Wynn
In this workshop, learn how you can bring data insights to your internal teams and end customers by simply and seamlessly embedding rich, interactive data visualizations and dashboards into your web applications and portals. You must bring your laptop to participate. Reserve your seat now!
Partner session
PEX307 (LVL 300) Migrating business intelligence systems to Amazon QuickSight
Wednesday November 30 | 9:15 AM – 10:15 AM PST | Encore
QuickSight is a scalable, serverless, embeddable, machine learning–powered BI tool built for the cloud. If you’re building a cloud-native BI solution and are unsure how to migrate on AWS, this session is for you. Dive deep into BI best practices, tools, and methodologies for migrating BI dashboards to QuickSight, and learn how to use APIs and the AWS CLI to automate common migration tasks required to perform BI dashboard migration. This session is intended for AWS Partners. Reserve your seat now!
Additional activities
Business Intelligence kiosk in the AWS Village
Visit the Business Intelligence kiosk within the AWS Village to meet with experts to dive deeper into QuickSight capabilities such as Q and embedded analytics. You will be able to ask our experts questions and experience live demos for our newly launched capabilities.
Free QuickSight swag
Make sure to stop by the swag distribution table to grab free QuickSight swag if you have attended either the Business Intelligence kiosk or one of our breakout sessions, chalk talks, or workshops.
Useful resources
Whether you plan on attending re:Invent in person or view available content virtually, you can always learn more about QuickSight through these helpful resources:
Join the global cloud community at AWS re:Invent this year to meet, get inspired, and rethink what’s possible!
Reserved seating is available for registered attendees to secure seats in the sessions of their choice. You can reserve a seat in your favorite sessions by signing in to the attendee portal and navigating to Event > Sessions. For those who can’t make it in person, you can get your free online pass to watch live keynotes and leadership sessions by registering for a virtual-only access. This curated attendee guide helps data and analytics enthusiasts manage their schedule*, as well as navigate the AWS analytics and business intelligence tracks to get the best out of re:Invent.
KEY002 | Adam Selipsky (CEO, Amazon Web Services) | Tuesday, November 29 | 8:30 AM – 10:30 AM
Join Adam Selipsky, CEO of Amazon Web Services, as he looks at the ways that forward-thinking builders are transforming industries and even our future, powered by AWS.
KEY003 | Swami Sivasubramanian (Vice President, AWS Data and Machine Learning) | Wednesday, November 30 | 8:30 AM – 10:30 AM
Join Swami Sivasubramanian, Vice President of AWS Data and Machine Learning, as he reveals the latest AWS innovations that can help you transform your company’s data into meaningful insights and actions for your business.
Leadership sessions
ANT203-L | Unlock the value of your data with AWS analytics | G2 Krishnamoorthy, VP of AWS Analytics | Wednesday, November 30 | 2:30 PM – 3:30 PM
G2 addresses the current state of analytics on AWS, covers the latest service innovations around data, and highlights customer successes with AWS analytics. Also, learn from organizations like FINRA and more who have turned to AWS for their digital transformation journey.
Breakout sessions
AWS re:Invent breakout sessions are lecture-style and one hour long sessions delivered by AWS experts, customers, and partners.
Monday, Nov 28
Tuesday, Nov 29
Wednesday, Nov 30
Thursday, Dec 1
Friday, Dec 2
10:00 AM – 11:00 AM
ANT326 | How BMW, Intuit, and Morningstar are transforming with AWS and Amazon Athena
11:00 AM – 12:00 PM
ANT301 | Democratizing your organization’s data analytics experience
10:00 AM – 11:00 AM
ANT212 | How JPMC and LexisNexis modernize analytics with Amazon Redshift
ANT220 | Using Amazon AppFlow to break down data silos for analytics and ML
5:45 PM – 6:45 PM
ANT325 | Simplify running Apache Spark and Hive apps with Amazon EMR Serverless
5:30 PM – 6:30 PM
ANT317 | Self-service analytics with Amazon Redshift Serverless
.
.
Chalk talks
Chalk talks are an hour long, highly interactive content format with a small audience. Each begins with a short lecture delivered by an AWS expert, followed by a Q&A session with the audience.
Monday, Nov 28
Tuesday, Nov 29
Wednesday, Nov 30
Thursday, Dec 1
Friday, Dec 2
12:15 PM – 1:15 PM
ANT303 | Security and data access controls in Amazon EMR
11:00 AM – 12:00 PM
ANT318 [Repeat] | Build event-based microservices with AWS streaming services
9:15 AM – 10:15 AM
ANT320 [Repeat] | Get better price performance in cloud data warehousing with Amazon Redshift
11:45 AM – 12:45 PM
ANT329 | Turn data to insights in seconds with secure and reliable Amazon Redshift
9:15 AM – 10:15 AM
ANT314 [Repeat] | Why and how to migrate to Amazon OpenSearch Service
12:15 PM – 1:15 PM
BSI401 | Insightful dashboards through advanced calculations with QuickSight
11:45 AM – 12:45 PM
BSI302 | Deploy your BI assets at scale to thousands with Amazon QuickSight
10:45 AM – 11:45 AM
ANT330 [Repeat] | Run Apache Spark on Kubernetes with Amazon EMR on Amazon EKS
1:15 PM – 2:15 PM
ANT401 | Ingest machine-generated data at scale with Amazon OpenSearch Service
10:00 AM – 11:00 AM
ANT322 [Repeat] | Simplifying ETL migration and data integration with AWS Glue
1:00 PM – 2:00 PM
ANT323 [Repeat] | Break through data silos with Amazon Redshift
1:15 PM – 2:15 PM
ANT327 | Modernize your analytics architecture with Amazon Athena
12:15 PM – 1:15 PM
ANT323 [Repeat] | Break through data silos with Amazon Redshift
2:00 PM – 3:00 PM
ANT333 [Repeat] | Build a serverless data streaming workload with Amazon Kinesis
ANT318 [Repeat] | Build event-based microservices with AWS streaming services
.
.
Builders’ sessions
These are one-hour small-group sessions with up to nine attendees per table and one AWS expert. Each builders’ session begins with a short explanation or demonstration of what you’re going to build. Once the demonstration is complete, bring your laptop to experiment and build with the AWS expert.
Monday, Nov 28
Tuesday, Nov 29
Wednesday, Nov 30
Thursday, Dec 1
Friday, Dec 2
………………………….
11:00 AM – 12:00 PM
ANT402 | Human vs. machine: Amazon Redshift ML inferences
1:00 PM – 2:00 PM
ANT332 | Build a data pipeline using Apache Airflow and Amazon EMR Serverless
11:00 AM – 12:00 PM
ANT316 [Repeat] | How to build dashboards for machine-generated data
………………………
.
.
7:00 PM – 8:00 PM
ANT316 [Repeat] | How to build dashboards for machine-generated data
.
.
Workshops
Workshops are two-hour interactive sessions where you work in teams or individually to solve problems using AWS services. Each workshop starts with a short lecture, and the rest of the time is spent working the problem. Bring your laptop to build along with AWS experts.
Monday, Nov 28
Tuesday, Nov 29
Wednesday, Nov 30
Thursday, Dec 1
Friday, Dec 2
10:00 AM – 12:00 PM
ANT306 [Repeat] | Beyond monitoring: Observability with operational analytics
11:45 AM – 1:45 PM
ANT313 | Using Apache Spark for data science and ML workflows with Amazon EMR
8:30 AM – 10:30 AM
ANT307 | Improve search relevance with ML in Amazon OpenSearch Service
11:00 AM – 1:00 PM
ANT403 | Event detection with Amazon MSK and Amazon Kinesis Data Analytics
8:30 AM – 10:30 AM
ANT309 [Repeat]| Build analytics applications using Apache Spark with Amazon EMR Serverless
4:00 PM – 6:00 PM
ANT309 [Repeat]| Build analytics applications using Apache Spark with Amazon EMR Serverless
2:45 PM – 4:45 PM
ANT310 [Repeat] | Build a data mesh with AWS Lake Formation and AWS Glue
12:15 PM – 2:15 PM
ANT306 [Repeat] | Beyond monitoring: Observability with operational analytics
11:45 AM – 1:45 PM
BSI205 | Build stunning customized dashboards with Amazon QuickSight
.
.
.
12:15 PM – 2:15 PM
ANT312 | Near real-time ML inferences with Amazon Redshift
ANT310 [Repeat] | Build a data mesh with AWS Lake Formation and AWS Glue
.
.
.
.
5:30 PM – 7:30 PM
BSI303 | Seamlessly embed analytics into your apps with Amazon QuickSight
.
.
* All schedules are in PDT time zone.
AWS Analytics & Business Intelligence kiosks
Join us at the AWS Analytics Kiosk in the AWS Village at the Expo. Dive deep into AWS Analytics with AWS subject matter experts, see the latest demos, ask questions, or just drop by to socially connect with your peers.
About the author
Imtiaz (Taz) Sayed is the WW Tech Leader for Analytics at AWS. He enjoys engaging with the community on all things data and analytics. He can be reached via LinkedIn.
No tricks, just treats in this weekly roundup of news and announcements. Let’s switch our AWS Management Console into dark mode and dive right into it.
Last Week’s Launches Here are some launches that got my attention during the previous week:
AWS Local Zones in Hamburg and Warsaw now generally available – AWS Local Zones help you run latency-sensitive applications closer to end users. The AWS Local Zones in Hamburg, Germany, and Warsaw, Poland, are the first Local Zones in Europe. AWS Local Zones are now generally available in 20 metro areas globally, with announced plans to launch 33 additional Local Zones in metro areas around the world. See the full list of available and announced AWS Local Zones, and learn how to get started.
Amazon SageMaker multi-model endpoint (MME) now supports GPU instances – MME is a managed capability of SageMaker Inference that lets you deploy thousands of models on a single endpoint. MMEs can now run multiple models on a GPU core, share GPU instances behind an endpoint across multiple models, and dynamically load and unload models based on the incoming traffic. This can help you reduce costs and achieve better price performance. Learn how to run multiple deep learning models on GPU with Amazon SageMaker multi-model endpoints.
Amazon EC2 now lets you replace the root Amazon EBS volume for a running instance – You can now use the Replace Root Volume for patching features in Amazon EC2 to replace your instance root volume using an updated AMI without needing to stop the instance. This makes patching of the guest operating system and applications easier, while retraining the instance store data, networking, and IAM configuration. Check out the documentation to learn more.
AWS Fault Injection Simulator now supports network connectivity disruption – AWS Fault Injection Simulator (FIS) is a managed service for running controlled fault injection experiments on AWS. AWS FIS now has a new action type to disrupt network connectivity and validate that your applications are resilient to a total or partial loss of connectivity. To learn more, visit Network Actions in the AWS FIS user guide.
Amazon SageMaker Automatic Model Tuning now supports Grid Search – SageMaker Automatic Model Tuning helps you find the hyperparameter values that result in the best-performing model for a chosen metric. Until now, you could choose between random, Bayesian, and hyperband search strategies. Grid search now lets you cover every combination of the specified hyperparameter values for use cases in which you need reproducible tuning results. Learn how Amazon SageMaker Automatic Model Tuning now supports grid search.
Other AWS News Here are some additional news items that you may find interesting:
Celebrating over 20 years of AI/ML innovation – On October 25, we hosted the AWS AI/ML Innovation Day. Bratin Saha and other leaders in the field shared the great strides we have made in the past and discussed what’s next in the world of ML. You can watch the recording here.
AWS open-source news and updates – My colleague Ricardo Sueiras writes this weekly open-source newsletter in which he highlights new open-source projects, tools, and demos from the AWS Community. Read edition #133 here.
Upcoming AWS Events Check your calendars and sign up for these AWS events:
AWS re:Invent is only 4 weeks away! Join us live in Las Vegas from November 28–December 2 for keynote announcements, training and certification opportunities, access to 1,500+ technical sessions, and much more. Seats are still available to reserve, and walk-ups are available onsite. You can also join us online to watch live keynotes and leadership sessions.
On November 2, there is a virtual event for building modern .NET applications on AWS. You can register for free.
On November 11–12, AWS User Groups in India are hosting the AWS Community Day India 2022, with success stories, use cases, and much more from industry leaders. Sign up for free to join this virtual event.
That’s all for this week. Check back next Monday for another Week in Review!
AWS re:Invent 2022 is fast approaching, and this post can help you plan your agenda with a look at the sessions in the security track. AWS re:Invent, your opportunity to catch up on the latest technologies in cloud computing, will take place in person in Las Vegas, NV, from November 28 – December 2, 2022.
This post provides abbreviated abstracts for all of the security, identity, and compliance sessions. For the full description, visit the AWS re:Invent session catalog. If you plan to attend AWS re:Invent 2022, and you’re interested in connecting with a security, identity, or compliance product team, reach out to your AWS Account Team. Don’t have a ticket yet? Join us in Las Vegas by registering for re:Invent 2022.
Leadership session
SEC214-L: What we can learn from customers: Accelerating innovation at AWS Security CJ Moses, CISO at AWS, showcases part of the peculiar AWS culture of innovation—the working backwards process—and how new security products, services, and features are built with the customer in mind. AWS Security continuously innovates based directly on customer feedback so that organizations can accelerate their pace of innovation while integrating powerful security architecture into the heart of their business and operations.
Breakout sessions
Lecture-style presentations that cover topics at all levels (200-400) and are delivered by AWS experts, builders, customers, and partners.
SEC201: Proactive security: Considerations and approaches Security is our top priority at AWS. Discover how the partnership between builder experience and security helps everyone ship securely. Hear about the tools, mechanisms, and programs that help AWS builders and security teams.
SEC203: Revitalize your security with the AWS Security Reference Architecture As your team continually evolves its use of AWS services and features, it’s important to understand how AWS security services work together to improve your security posture. In this session, learn about the recently updated AWS Security Reference Architecture (AWS SRA), which provides prescriptive guidance for deploying the full complement of AWS security services in a multi-account environment.
SEC207: Simplify your existing workforce access with IAM Identity Center In this session, learn how to simplify operations and improve efficiencies by scaling and securing your workforce access. You can easily connect AWS IAM Identity Center (successor to AWS Single Sign-On) to your existing identity source. IAM Identity Center integrated with AWS Managed Microsoft Active Directory provides a centralized and scalable access management solution for your workplace users across multiple AWS accounts while improving the overall security posture of your organization.
SEC210: AWS and privacy engineering: Explore the possibilities Learn about the intersection of technology and governance, with an emphasis on solution building. With the privacy regulation landscape continuously changing, organizations need innovative technical solutions to help solve privacy compliance challenges. This session covers a series of unique customer challenges and explores how AWS services can be used as building blocks for privacy-enhancing solutions.
SEC212: AWS data protection: Using locks, keys, signatures, and certificates AWS offers a broad array of cryptographic tools and PKI platforms to help you navigate your data protection and digital signing needs. Discover how to get this by default and how to build your own locks, keys, signatures, and certificates when needed for your next cloud application. Learn best practices for data protection, data residency, digital sovereignty, and scalable certificate management, and get a peek into future considerations around crypto agility and encryption by default.
SEC309: Threat detection and incident response using cloud-native services Threat detection and incident response processes in the cloud have many similarities to on premises, but there are some fundamental differences. In this session, explore how cloud-native services can be used to support threat detection and incident response processes in AWS environments.
SEC310: Security alchemy: How AWS uses math to prove security AWS helps you strengthen the power of your security by using mathematical logic to answer questions about your security controls. This is known as provable security. In this session, explore the math that proves security systems of the cloud.
SEC312: Deploying egress traffic controls in production environments Private workloads that require access to resources outside of the VPC should be well monitored and managed. There are solutions that can make this easier, but selecting one requires evaluation of your security, reliability, and cost requirements. Learn how Robinhood evaluated, selected, and implemented AWS Network Firewall to shape network traffic, block threats, and detect anomalous activity on workloads that process sensitive financial data.
SEC313: Harness the power of IAM policies & rein in permissions with Access Analyzer Explore the power of IAM policies and discover how to use IAM Access Analyzer to set, verify, and refine permissions. Learn advanced skills that empower builders to apply fine-grained permissions across AWS. This session dives deep into IAM policies and explains IAM policy evaluation, policy types and their use cases, and critical access controls.
SEC327: Zero-privilege operations: Running services without access to data AWS works with organizations and regulators to host some of the most sensitive workloads in industry and government. Learn how AWS secures data, even from trusted AWS operators and services. Explore the AWS Nitro System and how it provides confidential computing and a trusted runtime environment, and dive deep into the cryptographic chains of custody that are built into AWS Identity and Access Management (IAM).
SEC329: AWS security services for container threat detection Containers are a cornerstone of many AWS customers’ application modernization strategies. The increased dependence on containers in production environments requires threat detection that is designed for container workloads. To help meet the container security and visibility needs of security and DevOps teams, new container-specific security capabilities have recently been added to Amazon GuardDuty, Amazon Inspector, and Amazon Detective. The head of cloud security at HBO Max will share container security monitoring best practices.
SEC332: Build Securely on AWS: Insights from the C-Suite Security shouldn’t be top of mind only when it’s a headline in the news. A strong security posture is a proactive one. In this panel session, hear how CISOs and CIOs are taking a proactive approach to security by building securely on AWS.
SEC403: Protecting secrets, keys, and data: Cryptography for the long term This session covers the range of AWS cryptography services and solutions, including AWS KMS, AWS CloudHSM, the AWS Encryption SDK, AWS libcrypto (AWS-LC), post-quantum hybrid algorithms, AWS FIPS accreditations, configurable security policies for Application Load Balancer and Amazon CloudFront, and more.
SEC404: A day in the life of a billion requests Every day, sites around the world authenticate their callers. That is, they verify cryptographically that the requests are actually coming from who they claim to come from. In this session, learn about unique AWS requirements for scale and security that have led to some interesting and innovative solutions to this need.
SEC405: Zero Trust: Enough talk, let’s build better security Zero Trust is a powerful new security model that produces superior security outcomes compared to the traditional network perimeter model. However, endless competing definitions and debates about what, Zero Trust is have kept many organizations’ Zero Trust efforts at or near the starting line. Hear from Delphix about how they put Zero Trust into production and the results and benefits they’ve achieved.
Builders’ sessions
Small-group sessions led by an AWS expert who guides you as you build the service or product on your own laptop. Use your laptop to experiment and build along with the AWS expert.
SEC202: Vulnerability management with Amazon Inspector and AWS Systems Manager Join this builders’ session to learn how to use Amazon Inspector and AWS Systems Manager Patch Manager to scan and patch software vulnerabilities on Amazon EC2 instances. Walk through how to understand, prioritize, suppress, and patch vulnerabilities using AWS security services.
SEC204: Analyze your network using Amazon VPC Network Access Analyzer In this builders’ session, review how the new Amazon VPC Network Access Analyzer can help you identify network configurations that might lead to unintended network access. Learn ways that you can improve your security posture while still allowing you and your organization to be agile and flexible.
SEC211: Disaster recovery and resiliency for AWS data protection services Resiliency is a core consideration when architecting cloud workloads. Preparing and implementing disaster recovery (DR) strategies is an important step for ensuring the resiliency of your solution in the face of regional disasters. Gain hands-on experience with implementing backup-restore and active-active DR strategies when working with AWS database services like Amazon DynamoDB and Amazon Aurora and data protection services like AWS KMS, AWS Secrets Manager, and AWS Backup.
SEC303: AWS CIRT toolkit for automating incident response preparedness When it comes to life in the cloud, there’s nothing more important than security. At AWS, the Customer Incident Response Team (CIRT) creates tools to support customers during active security events and to help them anticipate and respond to events using simulations. CIRT members demonstrate best practices for using these tools to enable service logs with Assisted Log Enabler for AWS, run a security event simulation using AWS CloudSaga, and analyze logs to respond to a security event with Amazon Athena.
SEC304: Machine-to-machine authentication on AWS This session offers hands-on learning around the pros and cons of several methods of machine-to-machine authentication. Examine how to implement and use Amazon Cognito, AWS Identity and Access Management (IAM), and Amazon API Gateway to authenticate services to each other with various types of keys and certificates.
SEC305: Kubernetes threat detection and incident response automation In this hands-on session, learn how to use Amazon GuardDuty and Amazon Detective to effectively analyze Kubernetes audit logs from Amazon EKS and alert on suspicious events or malicious access such as an increase in “403 Forbidden” or “401 Unauthorized” logs.
SEC308: Deploying repeatable, secure, and compliant Amazon EKS clusters Learn how to deploy, manage, and scale containerized applications that run Kubernetes on AWS with AWS Service Catalog. Walk through how to deploy the Kubernetes control plane into a virtual private cloud, connect worker nodes to the cluster, and configure a bastion host for cluster administrative operations.
Chalk talks
Highly interactive sessions with a small audience. Experts lead you through problems and solutions on a digital whiteboard as the discussion unfolds.
SEC206: Security operations metrics that matter Security tooling can produce thousands of security findings to act on. But what are the most important items and metrics to focus on? Learn about a framework you can use to develop and implement security operations metrics in order to prioritize the highest-risk issues across your AWS environment.
SEC209: Continuous innovation in AWS threat detection & monitoring services AWS threat detection teams continue to innovate and improve foundational security services for proactive and early detection of security events and posture management. Learn about recent launches that address use cases like container threat detection, protection from malware, and sensitive data identification. Services covered in this session include Amazon GuardDuty, Amazon Detective, Amazon Inspector, Amazon Macie, and centralized cloud security posture assessment with AWS Security Hub.
SEC311: Securing serverless workloads on AWS Walk through design patterns for building secure serverless applications on AWS. Learn how to handle secrets with AWS Lambda extensions and AWS Secrets Manager, detect vulnerabilities in code with Amazon CodeGuru, ensure security-approved libraries are used in the code with AWS CodeArtifact, provide security assurance in code with AWS Signer, and secure APIs on Amazon API Gateway.
SEC314: Automate security analysis and code reviews with machine learning Join this chalk talk to learn how developers can use machine learning to embed security during the development phase and build guardrails to automatically flag common issues that deviate from best practices. This session is tailored to developers and security professionals who are involved in improving the security of applications during the development lifecycle.
SEC315: Security best practices for Amazon Cognito applications Customer identity and access management (CIAM) is critical when building and deploying web and mobile applications for your business. To mitigate the risks of unauthorized access, you need to implement strong identity protections by using the right security measures, such as multi-factor authentication, activity monitoring and alerts, adaptive authentication, and web firewall integration.
SEC316: Establishing trust with cryptographically attested identity Cryptographic attestation is a mechanism for systems to make provable claims of their identity and state. Dive deep on the use of cryptographic attestation on AWS, powered by technologies such as NitroTPM and AWS Nitro Enclaves to assure system integrity and establish trust between systems. Come prepared for a lively discussion as you explore various use cases, architectures, and approaches for utilizing attestation to raise the security bar for workloads on AWS.
SEC317: Implementing traffic inspection capabilities at scale on AWS Learn about a broad range of security offerings that can help you integrate firewall services into your network, including AWS WAF, AWS Network Firewall, and partner appliances used in conjunction with a Gateway Load Balancer. Learn how to choose network architectures for these firewall options to protect inbound traffic to your internet-facing applications.
SEC318: Scaling the possible: Digitizing the audit experience Do you want to increase the speed and scale of your audits? As companies expand to new industries and markets, so does the scale of regulatory compliance. AWS undergoes hundreds of audits in a year. In this chalk talk, AWS experts discuss how they digitize and automate the regulator and auditor experience. Learn about pre-audit educational training, self-service of control evidence and walkthrough information, live chats with audit control owners, and virtual data center tours.
SEC319: Prevent unintended access with AWS IAM Access Analyzer policy validation In this chalk talk, walk through several approaches to building automated AWS Identity and Access Management (IAM) policy validation into your CI/CD pipeline. Consider some tools that can be used for policy validation, including AWS IAM Access Analyzer, and learn how mechanisms like AWS CloudFormation hooks and CI/CD pipeline controls can be used to incorporate these tools into your DevSecOps workflow.
SEC320: To Europe and beyond: Architecting for EU data protection regulation Companies innovating on AWS are expanding to geographies with new data transfer and privacy challenges. Explore how to navigate compliance with EU data transfer requirements and discuss how the GDPR certification initiative can simplify GDPR compliance. Dive deep in a collaborative whiteboarding session to learn how to build GDPR-certifiable architectures.
SEC321: Building your forensics capabilities on AWS You have a compromised resource on AWS. How do you acquire evidence and artifacts? Where do you transfer the data, and how do you store it? How do you analyze it safely within an isolated environment? Walk through building a forensics lab on AWS, methods for implementing effective data acquisition and analysis, and how to make sure you are getting the most out of your investigations.
SEC322: Transform builder velocity with security Learn how AWS Support uses data to measure security and make informed decisions to grow the people side of security culture while embedding security expertise within development teams. This is empowering developers to deliver production-quality code with the highest security standards at the speed of business.
SEC324: Reimagine the security perimeter with Zero Trust Zero Trust encompasses everything from the client to the cloud, so where do you start on your journey? In this chalk talk, learn how to look at your environment through a Zero Trust lens and consider architectural patterns that you can use to redefine your security perimeter.
SEC325: Beyond database password management: 5 use cases for AWS Secrets Manager AWS Secrets Manager is integrated with AWS managed databases to make it easy for you to create, rotate, consume, and monitor database user names and passwords. This chalk talk explores how client applications use Secrets Manager to manage private keys, API keys, and generic credentials.
SEC326: Establishing a data perimeter on AWS, featuring Goldman Sachs Organizations are storing an unprecedented and increasing amount of data on AWS for a range of use cases including data lakes, analytics, machine learning, and enterprise applications. They want to prevent intentional or unintentional transfers of sensitive non-public data for unauthorized use. Hear from Goldman Sachs about how they use data perimeter controls in their AWS environment to meet their security control objectives.
SEC328: Learn to create continuous detective security controls using AWS services A risk owner needs to ensure that no matter what your organization is building in the cloud, certain security invariants are in place. While preventive controls are great, they are not always sufficient. Deploying detective controls to enable early identification of configuration issues or availability problems not only adds defense in depth, but can also help detect changes in security posture as your workloads evolve. Learn how to use services like AWS Security Hub, AWS Config, and Amazon CloudWatch Synthetics to deploy canaries and perform continuous checks.
SEC330: Harness the power of temporary credentials with IAM Roles Anywhere Get an introduction to AWS Identity and Access Management (IAM) Roles Anywhere, and dive deep into how you can use IAM Roles Anywhere to access AWS services from outside of AWS. Learn how IAM Roles Anywhere securely delivers temporary AWS credentials to your workloads.
SEC331: Security at the industrial edge Industrial organizations want to process data and take actions closer to their machines at the edge, and they need innovative and highly distributed patterns for keeping their critical information and cyber-physical systems safe. In modern industrial environments, the exponential growth of IoT and edge devices brings enormous benefits but also introduces new risks.
SEC333: Designing compliance as a code with AWS security services Supporting regulatory compliance and mitigating security risks is imperative for most organizations. Addressing these challenges at scale requires automated solutions to identify compliance gaps and take continuous proactive measures. Hear about the architecture of compliance monitoring and remediation solutions, based on the example of the CPS 234 Information Security guidelines of the Australian Prudential Regulatory Authority (APRA), which are mandated for the financial services industry in Australia and New Zealand.
SEC334: Understanding the evolution of cloud-based PKI use cases Since AWS Private Certificate Authority (CA) launched in 2018, the service has evolved based on user needs. This chalk talk starts with a primer on certificate use for securing network connections and information. Learn about the predominant ways AWS customers are using ACM Private CA, and explore new use cases, including identifying IoT devices, customer-managed Kubernetes, and on premises.
SEC402: The anatomy of a ransomware event targeting data residing in Amazon S3 Ransomware events can cost governments, nonprofits, and businesses billions of dollars and interrupt operations. Early detection and automated responses are important steps that can limit your organization’s exposure. Walk through the anatomy of a ransomware event that targets data residing in Amazon S3 and hear detailed best practices for detection, response, recovery, and protection.
Workshops
Interactive learning sessions where you work in small teams to solve problems using AWS Cloud security services. Come prepared with your laptop and a willingness to learn!
SEC208: Executive security simulation This workshop features an executive security simulation, designed to take senior security management and IT or business executive teams through an experiential exercise that illuminates key decision points for a successful and secure cloud journey. During this team-based, game-like simulation, use an industry case study to make strategic security, risk, and compliance decisions and investments.
SEC301: Threat detection and response workshop This workshop takes you through threat detection and response using Amazon GuardDuty, AWS Security Hub, and Amazon Inspector. The workshop simulates different threats to Amazon S3, AWS Identity and Access Management (IAM), Amazon EKS, and Amazon EC2 and illustrates both manual and automated responses with AWS Lambda. Learn how to operationalize security findings.
SEC302: AWS Network Firewall and DNS Firewall security in multi-VPC architectures This workshop guides participants through configuring AWS Network Firewall and Amazon Route 53 Resolver DNS Firewall in an AWS multi-VPC environment. It demonstrates how VPCs can be interconnected with a centralized AWS Network Firewall and DNS Firewall configuration to ease the governance requirements of network security.
SEC306: Building a data perimeter to allow access to authorized users In this workshop, learn how to create a data perimeter by building controls that allow access to data only from expected network locations and by trusted identities. The workshop consists of five modules, each designed to illustrate a different AWS Identity and Access Management (IAM) principle or network control.
SEC307: Ship securely: Automated security testing for developers Learn how to build automated security testing into your CI/CD pipelines using AWS services and open-source tools. The workshop highlights how to identify and mitigate common risks early in the development cycle and also covers how to incorporate code review steps.
SEC323: Data discovery and classification on AWS Learn how to use Amazon Macie to discover and classify data in your Amazon S3 buckets. Dive deep into best practices as you follow the process of setting up Macie. Also use AWS Security Hub custom actions to set up a manual remediation, and investigate how to perform automated remediation using Amazon EventBridge and AWS Lambda.
SEC401: AWS Identity and Access Management (IAM) policy evaluation in action Dive deep into the logic of AWS Identity and Access Management (IAM) policy evaluation. Gain experience with hands-on labs that walk through IAM use cases and learn how different policies interact with each other.
Monday means it’s time for another Week in Review post, so, without further ado, let’s dive right in!
Last Week’s Launches Here’s some launch announcements from last week you may have missed.
AWS Directory Service for Microsoft Active Directory is now available on Windows Server 2019, and all new directories will run on this server platform. Those of you with existing directories can choose to update with either a few clicks on the AWS Managed Microsoft AD console, or you can update programmatically using an API. With either approach, you can update at a time convenient to you and your organization between now and March 2023. After March 2023, directories will be updated automatically.
AWS Activate is a program that offers free tools, resources, and the opportunity to apply for credits to smaller early stage businesses and also more advanced digital businesses, helping them get started quickly on AWS. The program is now open to any self-identified startup.
Amazon QuickSight users who employ row-level security (RLS) to control access to restricted datasets will be interested in a new feature that enables you to ask questions against topics in these datasets. User-based rules control the answers received to questions and any auto-complete suggestions provided when the questions are being framed. This ensures that users only ever receive answer data that they are granted permission to access.
Other AWS News This interesting blog post focus on the startup Pieces Technologies, who are putting predictive artificial intelligence (AI) and machine learning (ML) tools to work on AWS to predict and offer clinical insights on patient outcomes such as such as projected discharge dates, anticipated clinical and non-clinical barriers to discharge, and risk of readmission. To help healthcare teams work more efficiently, the insights are provided in natural language and seek to optimize overall clarity of a patient’s clinical issues.
As usual, there’s another AWS open-source and updates newsletter. The newsletter is published weekly to bring you up to date on the latest news on open-source projects, posts, and events.
Upcoming Events Speaking of upcoming events, the following are some you may be interested in joining, especially if you work with .NET:
Looking to modernize .NET workloads using Windows containers on AWS? There’s a free webinar, with follow-along lab, in just a couple of days on October 20. You can find more details and register here.
My .NET colleagues are also hosting another webinar on November 2 related to building modern .NET applications on AWS. If you’re curious about the hosting and development capabilities of AWS for .NET applications, this is a webinar you should definitely check out. You’ll find further information and registration here.
And finally, a reminder that reserved seating for sessions at AWS re:Invent 2022 is now open. We’re now just 6 weeks away from the event! There are lots of great sessions for your attention, but those of particular interest to me are the ones related to .NET, and at this year’s event we have seven breakouts, three chalk talks, and a workshop for you. You can find all the details using the .NET filter in the session catalog (the sessions all start with the prefix XNT, by the way).
That’s all for this week. Check back next Monday for another AWS Week in Review!
I had an amazing start to the week last week as I was speaking at the AWS Community Day NL. This event had 500 attendees and over 70 speakers, and Dr. Werner Vogels, Amazon CTO, delivered the keynote. AWS Community Days are community-led conferences organized by local communities, with a variety of workshops and sessions. I recommend checking your region for any of these events.
Last Week’s Launches Here are some launches that got my attention during the previous week.
Amazon S3 Object Lambdanow supports using your own code to change the results of HEAD and LIST requests, besides GET (which we launched last year). This feature now enables more capabilities for what you can do with S3 Object Lambda. Danilo made a Twitter thread with lots of use cases for this new launch.
Amazon SageMaker Clarifynow can provide near real-time explanations for ML predictions. SageMaker Clarify is a service that provides explainability by ML models individual predictions. These explanations are important for developers to get visibility into their training data and models to identify potential bias.
AWS Storage Gatewaynow supports 15 TiB tapes. It increased the maximum supported virtual tape size on Tape Gateway from 5 TiB to 15 TiB, so you can store more data on a single virtual tape, and you can reduce the number of tapes you need to manage.
AWS Config now supports 15 new resource types, including AWS DataSync, Amazon GuardDuty, Amazon Simple Email Service (Amazon SES), AWS AppSync, AWS Cloud Map, Amazon EC2, and AWS AppConfig. With this launch, you can use AWS Config to monitor configuration data for the supported resource types in your AWS account, and you can see how the configuration changes.
Other AWS News Some other updates and news that you may have missed:
This week an article about how AWS is leading a pilot project to turn the Greek island of Naxos into a smart island caught my attention. The project introduces smart solutions for mobility, primary healthcare, and the transport of goods. The solution has been built based on four pillars that were important for the island: sustainability, telehealth, leisure, and digital skills. Check out the whole article to learn what they are doing.
Podcast Charlas Técnicas de AWS – If you understand Spanish, this podcast is for you. Podcast Charlas Técnicas is one of the official AWS podcasts in Spanish, and every other week there is a new episode. The podcast is meant for builders, and it shares stories about how customers implemented and learned AWS services, how to architect applications, and how to use new services. You can listen to all the episodes directly from your favorite podcast app or at AWS Podcasts en español.
AWS open-source news and updates – This is a newsletter curated by my colleague Ricardo to bring you the latest open-source projects, posts, events, and more.
Upcoming AWS Events Check your calendars and sign up for these AWS events:
AWS re:Invent reserved seating opens on October 11. If you are planning to attend, book a spot in advance for your favorite sessions. AWS re:Invent is our biggest conference of the year, it happens in Las Vegas from November 28 to December 2, and registrations are open. Many writers of this blog have sessions at re:Invent, and you can search the event agenda using our names.
I started the post talking about AWS Community Days, and there is one in Warsaw, Poland, on October 14. If you are around Warsaw during this week, you can first check out the AWS Pop-up Hub in Warsaw that runs October 10-14 and then join for the Community Day.
On October 20, there is a virtual event for modernizing .NET workloads with Windows containers on AWS,You can register for free.
That’s all for this week. Check back next Monday for another Week in Review!
Many companies now believe that Zero Trust is the answer to common perimeter network infrastructure problems. But they sometimes struggle to make the progress they’d like, frequently pushing adoption timelines back.
The most common reason we hear from our customers is: “We aren’t sure how to get started.” There’s a lot of Zero Trust talk in the market, but comparatively little substance — leading to uncertainty about how to proceed.
Businesses need a strategy for tackling Zero Trust adoption and security modernization one step at a time. Cloudflare wants to help. So we’re hosting in-person discussions with security and IT leaders to do just that.
We’re hosting a series of Zero Trust Roadshows in various North American cities. These events will feature Cloudflare executives, industry experts, and other organizations like yours, and focus on ways of breaking the Zero Trust roadmap into manageable pieces, allowing organizations to make steps towards:
Augmenting (or replacing) a VPN: Provide simple, secure access to resources and maintain a great employee experience, while mitigating risk of lateral movement—a favorite hacker and ransomware tactic.
Streamlining SaaS security: Empower IT with the visibility and controls of SaaS apps and email they deserve to better care for their employees, catching shadow IT, misconfigurations, and business email compromise before it spirals out of control.
Strengthening threat and data protection: Keep your data safe against modern threats starting with simple DNS filtering, then extending Zero Trust principles to the Internet and email with remote browser isolation.
A new week and a new month just started. Curious which were the most significant AWS news from the previous seven days? I got you covered with this post.
Last Week’s Launches Here are the launches that got my attention last week:
Amazon Data Lifecycle Manager – You can now automatically archive Amazon EBS snapshots to save up to 75 percent on storage costs for those EBS snapshots that you intend to retain for more than 90 days and rarely access.
AWS App Runner – You can now build and run web applications and APIs from source code using the new Node.js 16 managed runtime.
Bottlerocket – The Linux-based operating system purpose-built to run container workloads is now supported by Amazon Inspector. Amazon Inspector can now recommend an update of Bottlerocket if it finds a vulnerability.
AWS Budgets – Use a simplified 1-click workflow for common budgeting scenarios with step-by-step tutorials on how to use each template.
Amazon Connect – Now provides an updated flow designer UI that makes it easier and faster to build personalized and automated end-customer experiences, as well as a queue dashboard to view and compare real-time queue performance through time series graphs.
Amazon WorkSpaces – You can now provision Ubuntu desktops and use virtual desktops for new categories of workloads, such as for your developers, engineers, and data scientists.
Building a GraphQL API with Java and AWS Lambda – This blog shows different options for resolving GraphQL queries using serverless technologies on AWS.
For AWS open-source news and updates, here’s the latest newsletter curated by Ricardo to bring you the most recent updates on open-source projects, posts, events, and more.
Upcoming AWS Events As usual, there are many opportunities to meet:
AWS Summits– Connect, collaborate, and learn about AWS at these free in-person events: Bogotá (October 4), and Singapore (October 6).
Organizations in many sectors and verticals have user bases to whom they send transactional SMS messages such as OTPs (one-time passwords), Notices, or transaction/purchase confirmations, among other things. Amazon Pinpoint enables customers to send transactional SMS messages to a global audience through a single API endpoint, and the messages are routed to recipients by the service. Amazon Pinpoint relies on downstream SMS providers and telecom operators to deliver the messages to end user’s device. While most of the times the SMS messages gets delivered to recipients but sometimes these messages could not get delivered due to carrier/telecom related issues which are transient in nature. This impacts customer’s brand name. As a result, customers need to implement a solution that allows them to retry the transmission of SMS messages that fail due to transitory problems caused by downstream SMS providers or telecom operators.
In this blog post, you will discover how to retry sending unsuccessfully delivered SMS messages caused by transitory problems at the downstream SMS provider or telecom operator side.
Prerequisites
For this post, you should be familiar with the following:
The architecture depicted below is a potential architecture for re-sending unsuccessful SMS messages at real time. The application sends the SMS message to Amazon Pinpoint for delivery using sendMessge API. Pinpoint receives the message and returns a receipt notification with the Message ID; the application records the message content and ID to a Datastore or DynamoDB. Amazon Pinpoint delivers messages to users and then receives SMS engagement events. The same SMS engagement events are provided to Amazon Kinesis Data Streams which as an event source for Lambda function that validates the event type, If the event type indicates that the SMS message was unable to be sent and it make sense to retry, the Lambda function logic retrieves respective “message id” from the SMS events and then retrieves the message body from the database. Then it sends the SMS message to Amazon Pinpoint for redelivery, you can choose same or an alternative origination number as origination identity while resending the SMS to end users. We recommend configuring the number of retries and adding a retry message tag within Pinpoint to analyse retries and also to avoid infinite loops. All events are also sent to Amazon Kinesis Firehose which then saved to your S3 data lake for later audit and analytics purpose.
Note: The Lambda concurrency and DynamoDB WCU/RCUs need to be provisioned accordingly. The AWS CloudFormation template provided in this post automatically sets up the different architecture components required to retry unsuccessful SMS messages
At the same time, if you use Amazon Kinesis Firehose delivery stream instead of Kinesis data stream to stream data to a storage location, you might consider utilising Transformation lambda as part of the kinesis Firehose delivery stream to retry unsuccessful messages. The architecture is as follows; application sends the SMS payload to Amazon Pinpoint using SendMessage API/SDK while also writing the message body to a persistent data store, in this case a DynamoDB database. The SMS related events are then sent to Amazon Kinesis Firehose, where a transformation lambda is setup. In essence, if SMS event type returns no errors, the event is returned to Firehose as-is. However, if an event type fails and it makes sense to retry, lambda logic sends another SendMessage until the retry count (specified to 5 within the code) is reached. If just one retry attempt is made, S3 storage is not loaded with an event (thus the result=Dropped). Since Pinpoint event do not contain actual SMS content, a call to DynamoDB is made to get the message body for a new SendMessage.
Amazon Pinpoint provides event response for each transactional SMS communications for retrying unsuccessful SMS connections, there are primarily two factors to consider in this architecture. 1/ Type of event (event_type) 2/ Record Status (record_status). So whenever the event_type is “_SMS.FAILURE” and record_status is any of “UNREACHABLE”, “UNKNOWN”, “CARRIER_UNREACHABLE”, “EXPIRED”. Then surely customer application need to retry the SMS message delivery. Following pseudo code snippet explains the conditional flow for failed SMS sending logic within the lambda function.
Prerequisite tasks to be completed before deploying the logging solution
Go to CloudFormation Console and Click Create Stack.
Select Amazon S3 Url redio button and provide the cloud formation link.
Click Next on Create Stack screen.
Specify Stack Name, for example “SMS-retry-stack”
Specify event stream configuration option, this will trigger the respective child cloud formation stack . There are three Event stream configuration you can choose from.
No Existing event stream setup – Select this option if you don’t have any event stream setup for Amazon Pinpoint.
Event stream setup with Amazon Kinesis Stream – Select this option if your Amazon Pinpoint project already have Amazon Kinesis as event stream destination.
Event stream setup with Amazon Kinesis Firehose – Select this option if you have configured Kinesis Firehose delivery stream as event stream destination.
Specify the Amazon Pinpoint project app ID (Pinpoint project ID), and click Next.
Click Next on Configure stack options screen.
Select “I acknowledge that AWS CloudFormation might create IAM resources” and click Create Stack.
Wait for the CloudFormation template to complete and then verify resources in the CloudFormation stack has been created. Click on individual resources and verify.
Parent stack-
Child Stack –
As described in the architectural overview session, the maxRetries configuration inside “RetryLambdaFunction” ensures that unsuccessful SMS messages are tried resending repeatedly. This number is set to 3 by default.” If you want to adjust the maxRetry count, go to the settings “RetryLambdaFunction” and change it to the desired number.
Notes :- The Cloudformation link in the blog specifically points to the parent cloudformation template, which has links to the child Cloudformation stack, these child stacks will be deployed automatically as you go through the patent stack.
Testing the solution
You can test the solution using “PinpointDDBProducerLambdaFunction” and SMS simulator numbers . PinpointDDBProducerLambdaFunction has sample code that shall trigger the SMS using Amazon Pinpoint.
Now follow the steps below to test the solution.
Go to environment variables for PinpointDDBProducerLambdaFunction
Update “destinationNumber” and “pinpointApplicationID,” where destination number is the recipient number for whom you wish to send the SMS as a failed attempt and Amazon Pinpoint application id is the Pinpoint Project ID for which the Pinpoint SMS channel has already been configured.
Deploy and test the Lambda function.
Check the “Pinpoint Message state” DyanamoDB table and open the Latest table ITEM.
If you observe the table Items, it states the retry_count=2 (SMS send retry has been attempted 2 times and all_retries_failed=true ( for both of the times the SMS could not get delivered.)
Notes :
If existing Kinesis stream has pre-defined destination lambda then current stack will not replace it but exit gracefully.
If existing Kinesis firehose has pre-existing transformation lambda then current stack shall not replace the current stack.
Remarks
This SMS retry solution is based on best effort. This means that the solution is dependent on event response data from SMS aggregators. If the SMS aggregator data is incorrect, this slotion may not produce the desired effec
Cost
Considering that the retry mechanism is applicable for 1000000 unsuccessful SMS messages per month, this solution will approximately cost around $20 per month. Here is AWS calculator link for reference
Clean up
When you’re done with this exercise, complete the following steps to delete your resources and stop incurring costs:
On the CloudFormation console, select your stack and choose Delete.
This cleans up all the resources created by the stack.
Conclusion
In this blog post, we have demonstrated how customers can retry sending the undelivered/failed SMS messages via Amazon Pinpoint. We explained how to leverage the Amazon kinesis data streams and AWS Lambda functions to assess the status of unsuccessful SMS messages and retry delivering them in an automatic manner.
Extending the solution
This blog provides a rightful frame work to Implement a solution to retry sending failed SMS messages. You can download the AWS Cloudformation templates, code, and scripts for this solution from our GitHub repository and modify it to fit your needs.
About the Authors Satyasovan Tripathy works as a Senior Specialist Solution Architect at AWS. He is situated in Bengaluru, India, and focuses on the AWS Digital User Engagement product portfolio. He enjoys reading and travelling outside of work.
Nikhil Khokhar is a Solutions Architect at AWS. He specializes in building and supporting data streaming solutions that help customers analyze and get value out of their data. In his free time, he makes use of his 3D printing skills to solve everyday problems.
Things are heating up in Seattle, with preparation for AWS re:Invent 2022 well underway. Later this month the entire News Blog team will participate in our now-legendary “speed storming” event. Over the course of three or four days, each of the AWS service teams with a launch in the works for re:Invent will give us an overview and share their PRFAQ (Press Release + FAQ) with us. After the meetings conclude, we’ll divvy up the launches and get to work on our blog posts!
Last Week’s Launches Here are some of the launches that caught my eye last week:
Amazon Lex Visual Conversation Builder – This new tool makes bot design easier than ever. You get a complete view of the conversation in one place, and you can manage complex conversations that have dynamic paths. To learn more and see the builder in action, read Announcing Visual Conversation Builder for Amazon Lex on the AWS Machine Learning Blog.
AWS Config Conformance Pack Price Reduction – We have reduced the price for evaluation of AWS Config Conformance Packs by up to 58%. These packs contain AWS Config rules and remediation actions that can be deployed as a single entity in account and a region, or across an entire organization. The price reduction took effect September 14, 2022; it lowers the cost per evaluation and decreases the number of evaluations needed to reach each pricing tier.
CDK (Cloud Development Kit) Tree View – The AWS CloudFormation console now includes a Constructs tree view that automatically organizes the resources that were synthesized by AWS CDK constructs. The top level of the tree view includes the named constructs and the second level includes all of the resources generated by the named construct. Read the What’s New to learn more!
AWS Incident Detection and Response – AWS Enterprise Support customers now have access to proactive monitoring and incident management for selected workloads running on AWS. As part of the onboarding process, AWS experts review workloads for reliability and operational excellence, and work with the customer to identify critical metrics and associated alarms. Incident Management Engineers then monitor the workloads, detect critical incidents, and initiate a call bridge to accelerate recovery. Read the AWS Incident Detection and Response page and the What’s New to learn more.
ECS Cluster Scale-In Speed – Auto-Scaled ECS clusters can now scale-in (reduce capacity) faster than ever before. Previously, each scale-in would reduce the capacity within an Auto Scaling Group (ASG) by 5% at a time. Now, capacity can be reduced by up to 50%. This change makes scaling more responsive to workload changes while still maintaining availability for spiky traffic patterns. Read Faster Scaling-In for Amazon ECS Cluster Auto Scaling and the What’s New to learn more.
AWS Outposts Rack Networking – AWS Outposts racks now support local gateway ingress routing to redirect incoming traffic to an Elastic Network Interface (ENI) attached to an EC2 instance before traffic reaches workloads running on the Outpost; read Deploying Local Gateway Ingress Routing on AWS Outposts to learn more. Outposts racks now also support direct VPC routing to simplify the process of communicating with your on-premises network; read the What’s New to learn more.
Amazon SWF Console Experience Updated – The new console experience for Amazon Simple Workflow Service (SWF) gives you better visibility of your SWF domains along with additional information about your workflow executions and events. You can efficiently manage high-volume workloads and quickly find the detailed information that helps you to operate at peak efficiency. Read the What’s New to learn more.
Dynamic Intermediate Certificate Authorities – According to a post on the AWS Security Blog, public certificates issued through AWS Certificate Manager (ACM) will soon (October 11, 2022) be issued from one of several intermediate certificate authorities managed by Amazon. This change will be transparent to most customers and applications, except those that make use of certificate pinning. In some cases, older browsers will need to be updated in order to properly trust the Amazon Trust Services CAs.
X in Y – We launched existing AWS services and instance types in additional regions:
New Case Study – Read this new case study to learn how the Deep Data Research Computing Center at Stanford University is creating tools designed to bridge the gap between biology and computer science in order to help researchers in precision medicine deliver tangible medical solutions.
Migration – In a two-part series on the AWS Compute Blog, Marcia showed you how to Lift and Shift a Web Application to AWS Serverless (Part 1, Part 2).
Upcoming AWS Events Check your calendar and sign up for an AWS event in your locale:
AWS Summits – Come together to connect, collaborate, and learn about AWS. Registration is open for the following in-person AWS Summits: Mexico City (September 21–22), Bogotá (October 4), and Singapore (October 6).
AWS Fest – This third-party event will feature AWS influencers, community heroes, industry leaders, and AWS customers, all sharing AWS optimization secrets (September 29th), register here.
Stay Informed I hope that you have enjoyed this look back at some of what took place in AWS-land last week! To better keep up with all of this news, please check out the following resources:
September 15, 2022 | Live at 9 am EDT | Virtual and Free
Join the open-source digital forensics and incident response (DFIR) community for a day-long, virtual summit as we DIG DEEPER TOGETHER!
Have you ever wanted to share your passion and interest in Velociraptor with the rest of the community? VeloCON is your chance! Come together with other DFIR experts and enthusiasts from around the world on September 15th as we delve into new ideas, workflows, and features that will take Velociraptor to the next level of endpoint management, detection, and response.
The first annual VeloCON summit will be held Thursday Sept 15th, 2022 at 9 am EDT. It is a 1-day event focused on the Velociraptor community – a forum to share experiences in using and developing Velociraptor to address the needs of the wider DFIR community. This year, the conference will be online and completely free! User-created presentations will be streamed live via Zoom webinar and on the Velociraptor YouTube channel, and will be archived on our Velociraptor website.
Registration is completely free. Here is the speaker list and agenda at a glance:
We look forward to seeing you at VeloCON. If you can’t make the event live, be sure to catch a replay of the event, which we’ll have posted to our website and YouTube channel.
Register for VeloCON today! Learn more about Velociraptor by visiting any of our web and social media channels below:
AWS Step Functions now has 14 new intrinsic functions that help you process data more efficiently and make it easier to perform data processing tasks such as array manipulation, JSON object manipulation, and math functions within your workflows without having to invoke downstream services or add Task states.
Amazon QuickSight launches a new user interface for dataset management that replaces the existing popup dialog modal with a full-page experience, providing a clearer breakdown of dataset management categories.
AWS GameKit adds Unity support. With this release for Unity, you can integrate cloud-based game features into Win64, MacOS, Android, or iOS games from both the Unreal and Unity engines with just a few clicks.
AWS and VMware announce VMware Cloud on AWS integration with Amazon FSx for NetApp ONTAP. Read more in Veliswa‘s blog post.
The AWS Region in the United Arab Emirates (UAE) is now open. More info in Marcia‘s blog post.
Other AWS News A few more blog posts you might have missed:
Easy analytics and cost-optimization with Amazon Redshift Serverless – Four different use cases of Redshift Serverless are discussed in this post.
Building cost-effective AWS Step Functions workflows – In this blog post, Ben explains the difference between Standard and Express Workflows, including costs, migrating from Standard to Express, and some interesting ways of using both together.
For AWS open-source news and updates, here’s the latest newsletter curated by Ricardo to bring you the most recent updates on open-source projects, posts, events, and more.
Upcoming AWS Events Depending on where you are on this planet, there are many opportunities to meet and learn:
AWS Summits – Come together to connect, collaborate, and learn about AWS. Registration is open for the following in-person AWS Summits: Ottawa (September 8), New Delhi (September 9), Mexico City (September 21–22), Bogotá (October 4), and Singapore (October 6).
I’ve just returned from data and machine learning (ML) conferences in Los Angeles and San Francisco, California. It’s been great to chat with customers and developers about the latest technology trends and use cases. This past week has also been packed with launches at AWS.
Last Week’s Launches Here are some launches that got my attention during the previous week:
Amazon QuickSight announces fine-grained visual embedding. You can now embed individual visuals from QuickSight dashboards in applications and portals to provide key insights to users where they’re needed most. Check out Donnie’s blog post to learn more, and tune into this week’s The Official AWS Podcast episode.
In addition, Amazon RDS for Oraclenow supports managed Oracle Data Guard Switchover and Automated Backups for replicas. With the Oracle Data Guard Switchover feature, you can reverse the roles between the primary database and one of its standby databases (replicas) with no data loss and a brief outage. You can also now create Automated Backups and manual DB snapshots of an RDS for Oracle replica, which reduces the time spent taking backups following a role transition.
Amazon Forecastnow supports what-if analyses. Amazon Forecast is a fully managed service that uses ML algorithms to deliver highly accurate time series forecasts. You can now use what-if analyses to quantify the potential impact of business scenarios on your demand forecasts.
Other AWS News Here are some additional news, blog posts, and fun code competitions you may find interesting:
Scaling AI and Machine Learning Workloads with Ray on AWS – This past week, I attended Ray Summit in San Francisco, California, and had great conversations with the community. Check out this blog post to learn more about AWS contributions to the scalability and operational efficiency of Ray on AWS.
New AWS Heroes – It’s great to see both new and familiar faces joining the AWS Heroes program, a worldwide initiative that acknowledges individuals who have truly gone above and beyond to share knowledge in technical communities. Get to know them in the blog post!
DFL Bundesliga Data Shootout – DFL Deutsche Fußball Liga launched a code competition, powered by AWS: the Bundesliga Data Shootout. The task: Develop a computer vision model to classify events on the pitch. Join the competition as an individual or in a team and win prizes.
Become an AWS GameDay World Champion – AWS GameDay is an interactive, team-based learning experience designed to put your AWS skills to the test by solving real-world problems in a gamified, risk-free environment. Developers of all skill levels can get in on the action, to compete for worldwide glory, as well as a chance to claim the top prize: an all-expenses-paid trip to AWS re:Invent Las Vegas 2022!
Learn more about the AWS Impact Accelerator for Black Founders from one of the inaugural members of the program in this blog post. The AWS Impact Accelerator is a series of programs designed to help high-potential, pre-seed start-ups led by underrepresented founders succeed.
Upcoming AWS Events Check your calendars and sign up for these AWS events:
AWS Global Summits – AWS Global Summits are free events that bring the cloud computing community together to connect, collaborate, and learn about AWS.
Registration is open for the following in-person AWS Summits that might be close to you in August and September: Canberra (August 31), Ottawa (September 8), New Delhi (September 9), and Mexico City (September 21–22), Bogotá (October 4), and Singapore (October 6).
AWS Community Days – AWS Community Day events are community-led conferences that deliver a peer-to-peer learning experience, providing developers with a venue for them to acquire AWS knowledge in their preferred way: from one another.
I’m back from my summer holidays and ready to get up to date with the latest AWS news from last week!
Last Week’s Launches Here are some launches that got my attention during the previous week.
Amazon CloudFront now supports HTTP/3 requests over QUIC. The main benefits of HTTP/3 are faster connection times and fewer round trips in the handshake process. HTTP/3 is available in all 410+ CloudFront edge locations worldwide, and there is no additional charge for using this feature. Read Channy’s blog post about this launch to learn more about it and how to enable it in your applications.
Amazon Chime has announced a couple of really cool features for their SDK. Now you can compose video by concatenating video with multiple attendees, including audio, content and transcriptions. Also, Amazon Chime SDK launched the live connector pipelines that send real-time video from your applications to streaming platforms such as Amazon Interactive Video Service (IVS) or AWS Elemental MediaLive. Now building real-time streaming applications becomes easier.
Amazon DynamoDBnow supports bulk imports from Amazon S3 to a new table. This new launch makes it easier to migrate and load data into a new DynamoDB table. This is a great use for migrations, to load test data into your applications, thereby simplifying disaster recovery, among other things.
Podcast Charlas Técnicas de AWS – If you understand Spanish, this podcast is for you. Podcast Charlas Técnicas is one of the official AWS podcasts in Spanish, and every other week there is a new episode. The podcast is meant for builders, and it shares stories about how customers implemented and learned to use AWS services, how to architect applications, and how to use new services. You can listen to all the episodes directly from your favorite podcast app or at AWS Podcast en español.
Upcoming AWS Events Check your calendars and sign up for these AWS events:
GOTO EDA Day 2022 – Registration is open for the in-person event about Event Driven Architectures (EDA) hosted in London on September 1. There will be a great line of speakers talking about the best practices for building EDA with serverless services.
AWS .NET Enterprise Developer Days 2022 – Registration for this free event is now open. This is a 2-day, in-person event on September 7-8 at the Palmer Events Center in Austin, Texas, and a 2-day virtual event on September 13-14.
That’s all for this week. Check back next Monday for another Week in Review!
Open-source security has been a hot topic in recent years, and it’s proven to be something of a double-edged sword. On the one hand, there’s an understanding of the potential that open-source tools hold for democratizing security, making industry best practices accessible to more organizations and helping keep everyone’s data better protected from attackers. On the other hand, open-source codebases have been the subject of some of the most serious and high-impact vulnerabilities we’ve seen over the past 12 months, namely Log4Shell and Spring4Shell.
While the feeling around open-source understandably wavers between excitement and trepidation, one thing is for sure: Open-source frameworks are here to stay, and it’s up to us to ensure they deliver on their potential and at the same time remain secure.
The future of open-source was common theme at Black Hat 2022, and two members of the Rapid7 research team — Lead Security Research Spencer McIntyre and Principal Security Researcher Curt Barnard — shined a light on the work they’ve been doing to improve and innovate with open-source tools. Here’s a look at their presentations from Black Hat, and how their efforts are helping push open-source security forward.
A more powerful Metasploit
Spencer, whose work focuses primarily on Rapid7’s widely used attacker emulation and penetration testing tool Metasploit, shared the latest and greatest improvements he and the broader team have made to the open-source framework in the past year. The upgrades they’ve made reflect a reality that security pros across the globe are feeling everyday: The perimeter is disappearing.
In a threat environment shaped by ransomware, supply chain attacks, and widespread vulnerabilities like Log4Shell, bad actors are increasingly stringing together complex attack workflows leveraging multiple vulnerabilities. These techniques allow adversaries to go from outside to within an organization’s network more quickly and easily than ever before.
The updates Spencer and team have made to Metasploit are intended to help security teams keep up with this shift, with more modern, streamlined workflows for testing the most common attack vectors. These recent improvements to Metasploit include:
Credential capturing: Credential capture is a key component of the attacker emulation toolkit, but previously, the process for this in Metasploit involved spinning up 13 different modules and managing and specifying configurations for each. Now, Metasploit offers a credential capture plugin that lets you configure all options from a single start/stop command, eliminating redundant work.
User interface (UI) optimization: URLs are commonly used to identify endpoints — particularly web applications — during attacker emulation. Until now, Metasploit required users to manually specify quite a few components when using URLs. The latest update to the Metasploit UI understands a URL’s format, so users can copy and paste them from anywhere, even right from their browser.
Payloadless session capabilities: When emulating attacks, exploits typically generate Meterpreter payloads, making them easy to spot for many antivirus and EDR solutions — and reducing their effectiveness for security testing. Metasploit now lets you run post-exploitation actions and operations without needing a payload. You can tunnel modules through SSH sessions or create a WinRM session for any Metasploit module compatible with the shell session type, removing the need for a payload like reverse shell or Meterpreter.
SMB server support: Metasploit Version 6 included SMB 3 server support, but only for client modules, which was limiting for users who were working with modern Windows targets that had disabled SMB 3 client support. Now, SMB 3 is available in all SMB server modules, so you can target modern Windows environments and have them fetch (often payload) files from Metasploit. This means you don’t need to install and configure an external service to test for certain types of vulnerabilities, including PrintNightmare.
Defaultinator: Find default credentials faster
Metasploit is at the heart of Rapid7’s commitment to open-source security, but we’re not stopping there. In addition to continually improving Metasploit, our research team works on new open-source projects that help make security more accessible for all. The latest of those is Defaultinator, a new tool that Curt Barnard announced the release of in his Black Hat Arsenal talk this year. (Curt also joined our podcast, Security Nation, to preview the announcement — check out that episode if you haven’t yet!)
Defaultinator is an open-source tool for looking up default usernames and passwords, providing an easy-to-search data repository in which security pros can query these commonly used credentials to find and eliminate them from their environment. This capability is becoming increasingly important for security teams, for a few key reasons:
Some commonly used pieces of hardware in IT environments come with default credentials that could give attackers an easily exploitable method of network access. Curt gave the example of the Raspberry Pi microcontroller board, which always comes with the username “pi” and password “raspberry” for initial login — a security flaw that resulted in a 10 CVSS vulnerability published in 2021.
Meanwhile, IoT devices have been proliferating, and many of these manufacturers don’t have security best practices at the front of their mind. That means hardcoded default credentials for first-time logins are common in this type of tool.
Many software engineers (Curt included) spend a lot of time in Stack Overflow, and many of the code snippets found there contain example usernames and passwords. If you aren’t careful when copying and pasting, default credentials could make their way into your production environment.
With a whopping 54 CVEs for hardcoded usernames and passwords released just in 2022 so far (by Curt’s count), security pros are in need of a fast, accurate way to audit for default credentials. But until now, the tools for these kinds of audits just haven’t been out there, let alone widely available.
That’s why it was so important to make Defaultinator, the first tool of its kind for querying default usernames and passwords, an open-source solution — to ensure broad accessibility and help as many defenders as possible. Defaultinator offers an API search-based utility or a web-based user interface if you prefer not to interact with the API. It runs in Docker, and the quickstart repository on Github takes just four lines of code to get up and running.
Watch the replays of Spencer’s and Curt’s presentations, as well as other great sessions from Black Hat 2022, at our replay page.
To provide the best experiences, we use technologies like cookies to store and/or access device information. Consenting to these technologies will allow us to process data such as browsing behavior or unique IDs on this site. Not consenting or withdrawing consent, may adversely affect certain features and functions.
Functional
Always active
The technical storage or access is strictly necessary for the legitimate purpose of enabling the use of a specific service explicitly requested by the subscriber or user, or for the sole purpose of carrying out the transmission of a communication over an electronic communications network.
Preferences
The technical storage or access is necessary for the legitimate purpose of storing preferences that are not requested by the subscriber or user.
Statistics
The technical storage or access that is used exclusively for statistical purposes.The technical storage or access that is used exclusively for anonymous statistical purposes. Without a subpoena, voluntary compliance on the part of your Internet Service Provider, or additional records from a third party, information stored or retrieved for this purpose alone cannot usually be used to identify you.
Marketing
The technical storage or access is required to create user profiles to send advertising, or to track the user on a website or across several websites for similar marketing purposes.


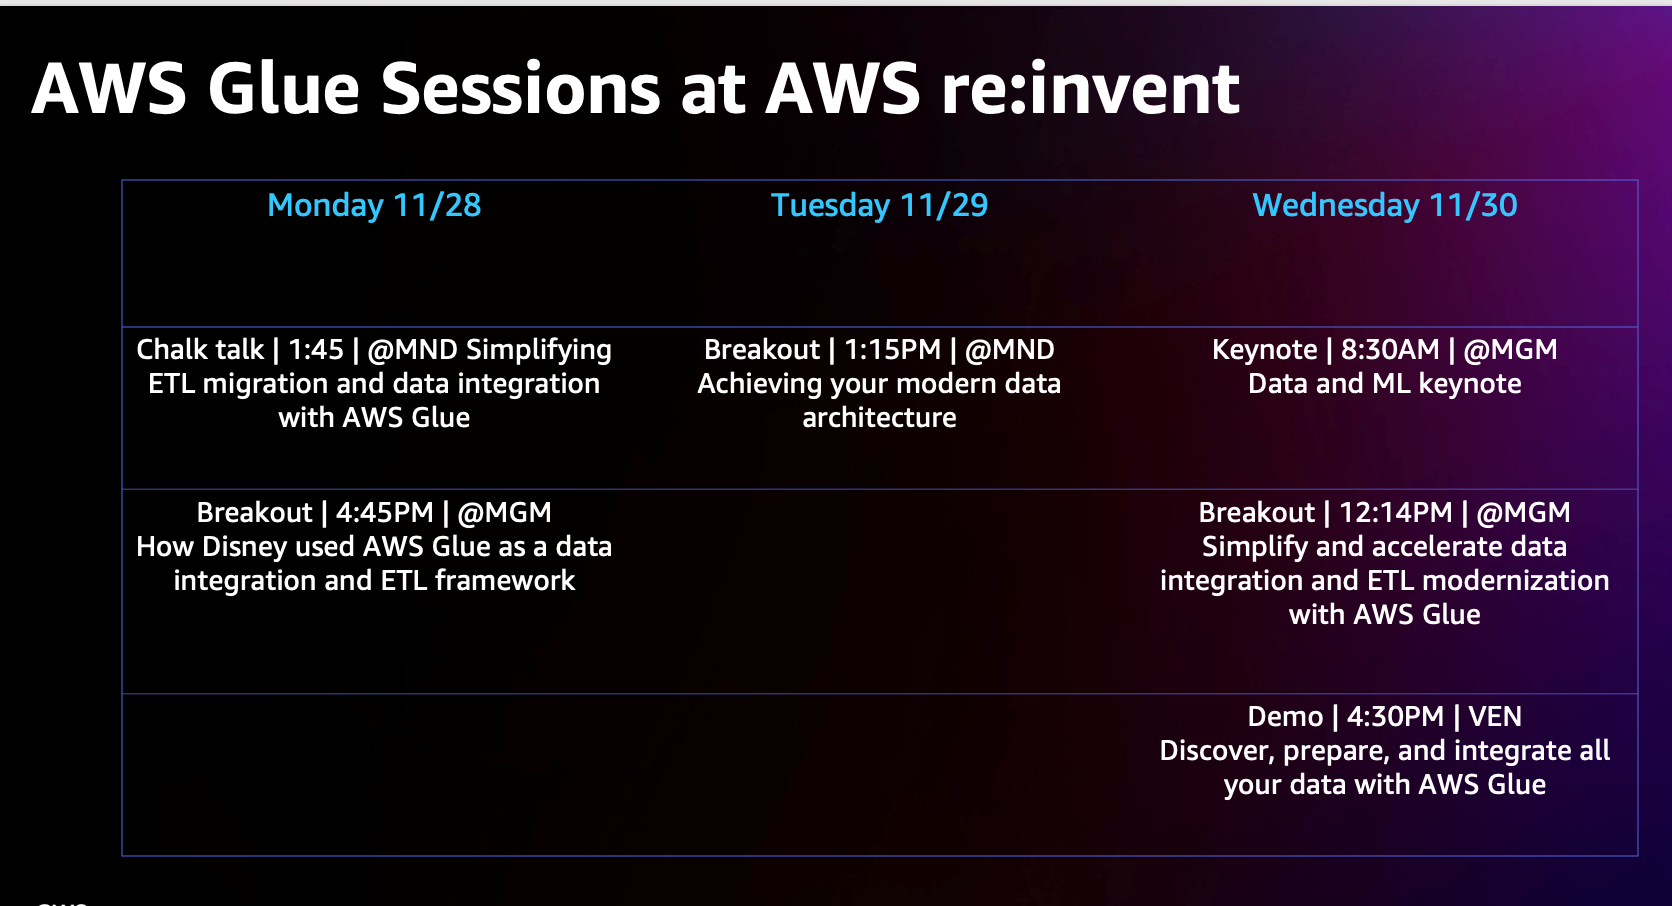
 Alona Nadler is AWS Glue Head of Product and is responsible for AWS Glue Service. She has a long history of working in the enterprise software and data services spaces. When not working, Alona enjoys traveling and playing tennis.


 Anna Montalat is a Senior Product Marketing Manager for AWS streaming data services which includes Amazon Managed Streaming for Apache Kafka (MSK), Kinesis Data Streams, Kinesis Video Streams, Kinesis Data Firehose, and Kinesis Data Analytics. She is passionate about bringing new and emerging technologies to market, working closely with service teams and enterprise customers. Outside of work, Anna skis through winter time and sails through summer.


 Satyasovan Tripathy works as a Senior Specialist Solution Architect at AWS. He is situated in Bengaluru, India, and focuses on the AWS Digital User Engagement product portfolio. He enjoys reading and travelling outside of work.
 Nikhil Khokhar is a Solutions Architect at AWS. He specializes in building and supporting data streaming solutions that help customers analyze and get value out of their data. In his free time, he makes use of his 3D printing skills to solve everyday problems.