While it’s still in its infancy, generative AI coding tools are already changing the way developers and companies build software. Generative AI can boost developer and business productivity by automating tasks, improving communication and collaboration, and providing insights that can inform better decision-making.
In this post, we’ll explore the full story of how companies are adopting generative AI to ship software faster, including:
Generative AI refers to a class of artificial intelligence (AI) systems designed to create new content similar to what humans produce. These systems are trained on large datasets of content that include text, images, audio, music, or code.
Generative AI is an extension of traditional machine learning, which trains models to predict or classify data based on existing patterns. But instead of simply predicting the outcome, generative AI models are designed to identify underlying patterns and structures of the data, and then use that knowledge to quickly generate new content. However, the main difference between the two is one of magnitude and the size of the prediction or generation. Machine learning typically predicts the next word. Generative AI can generate the next paragraph.
AI-generated image from Shutterstack of a developer using a generative AI tool to code faster.
Generative AI tools have attracted particular interest in the business world. From marketing to software development, organizational leaders are increasingly curious about the benefits of the new generative AI applications and products.
“I do think that all companies will adopt generative AI tools in the near future, at least indirectly,” said Albert Ziegler, principal machine learning engineer at GitHub. “The bakery around the corner might have a logo that the designer made using a generative transformer. The neighbor selling knitted socks might have asked Bing where to buy a certain kind of wool. My taxi driver might do their taxes with a certain Excel plugin. This adoption will only increase over time.”
What are some business uses of generative AI tools?
Software development: generative AI tools can assist engineers with building, editing, and testing code.
Content creation: writers can use generative AI tools to help personalize product descriptions and write ad copy.
Design creation: from generating layouts to assisting with graphics, generative AI design tools can help designers create entirely new designs.
Video creation: generative AI tools can help videographers with building, editing, or enhancing videos and images.
Language translation: translators can use generative AI tools to create communications in different languages.
Personalization: generative AI tools can assist businesses with personalizing products and services to meet the needs of individual customers.
Operations: from supply chain management to pricing, generative AI tools can help operations professionals drive efficiency.
How generative AI coding tools are changing the developer experience
Generative AI has big implications for developers, as the tools can enable them to code and ship software faster.
How is generative AI affecting software development?
Check out our guide to learn what generative AI coding tools are, what developers are using them for, and how they’re impacting the future of development.
GitHub Copilot is only continuing to improve. When the tool was first launched for individuals in June 2022, more than 27% of developers’ code was generated by GitHub Copilot, on average. Today, that number is 46% across all programming languages—and in Java, that jumps to 61%.
How can generative AI tools help you build software?
These tools can help:
Write boilerplate code for various programming languages and frameworks.
Find information in documentation to understand what the code does.
Identify security vulnerabilities and implement fixes.
Streamline code reviews before merging new or edited code.
Like all technologies, responsibility and ethics are important with generative AI.
In February 2023, a group of 10 companies including OpenAI, Adobe, the BBC, and others agreed upon a new set of recommendations on how to use generative AI content in a responsible way.
The recommendations were put together by the Partnership on AI (PAI), an AI research nonprofit, in consultation with more than 50 organizations. The guidelines call for creators and distributors of generative AI to be transparent about what the technology can and can’t do and disclose when users might be interacting with this type of content (by using watermarks, disclaimers, or traceable elements in an AI model’s training data).
Businesses should be aware that while generative AI tools can speed up the creation of content, they should not be solely relied upon as a source of truth. A recent study suggests that people can identify whether AI-generated content is real or fake only 50% of the time. Here at GitHub, we named our generative AI tool “GitHub Copilot” to signify just this—the tool can help, but at the end of the day, it’s just a copilot. The developer needs to take responsibility for ensuring that the finished code is accurate and complete.
How companies are using generative AI
Even as generative AI models and tools continue to rapidly advance, businesses are already exploring how to incorporate these into their day-to-day operations.
This is particularly true for software development teams.
“Going forward, tech companies that don’t adopt generative AI tools will have a significant productivity disadvantage,” Ziegler said. “Given how much faster this technology can help developers build, organizations that don’t adopt these tools or create their own will have a harder time in the marketplace.”
3 primary generative AI business models for organizations
Enterprises all over the world are using generative AI tools to transform how work gets done. Three of the business models organizations use include:
Model as a Service (MaaS): Companies access generative AI models through the cloud and use them to create new content. OpenAI employs this model, which licenses its GPT-3 AI model, the platform behind ChatGPT. This option offers low-risk, low-cost access to generative AI, with limited upfront investment and high flexibility.
Built-in apps: Companies build new—or existing—apps on top of generative AI models to create new experiences. GitHub Copilot uses this model, which relies on Codex to analyze the context of the code to provide intelligent suggestions on how to complete it. This option offers high customization and specialized solutions with scalability.
Vertical integration: Vertical integration leverages existing systems to enhance the offerings. For instance, companies may use generative AI models to analyze large amounts of data and make predictions about prices or improve the accuracy of their services.
Duolingo, one of the largest language-learning apps in the world, is one company that recently adopted generative AI capabilities. They chose GitHub’s generative AI tool, GitHub Copilot, to help their developers write and ship code faster, while improving test coverage. Duolingo’s CTO Severin Hacker said GitHub Copilot delivered immediate benefits to the team, enabling them to code quickly and deliver their best work.
”[The tool] stops you from getting distracted when you’re doing deep work that requires a lot of your brain power,” Hacker noted. “You spend less time on routine work and more time on the hard stuff. With GitHub Copilot, our developers stay in the flow state and keep momentum instead of clawing through code libraries or documentation.”
After adopting GitHub Copilot and the GitHub platform, Duolingo saw a:
25% increase in developer speed for those who are new to working with a specific repository
10% increase in developer speed for those who are familiar with the respective codebase
67% decrease in median code review turnaround time
“I don’t know of anything available today that’s remotely close to what we can get with GitHub Copilot,” Hacker said.
Looking forward
Generative AI is changing the world of software development. And it’s just getting started. The technology is quickly improving and more use cases are being identified across the software development lifecycle. With the announcement of GitHub Copilot X, our vision for the future of AI-powered software development, we’re committed to installing AI capabilities into every step of the developer workflow. There’s no better time to get started with generative AI at your company.
I could almost title this blog post the “AWS AI/ML Week in Review.” This past week, we announced several new innovations and tools for building with generative AI on AWS. Let’s dive right into it.
Last Week’s Launches Here are some launches that got my attention during the previous week:
Announcing Amazon Bedrock and Amazon Titan models – Amazon Bedrock is a new service to accelerate your development of generative AI applications using foundation models through an API without managing infrastructure. You can choose from a wide range of foundation models built by leading AI startups and Amazon. The new Amazon Titan foundation models are pre-trained on large datasets, making them powerful, general-purpose models. You can use them as-is or privately to customize them with your own data for a particular task without annotating large volumes of data. Amazon Bedrock is currently in limited preview. Sign up here to learn more.
Amazon EC2 Trn1n and Inf2 instances are now generally available – Trn1n instances, powered by AWS Trainium accelerators, double the network bandwidth (compared to Trn1 instances) to 1,600 Gbps of Elastic Fabric Adapter (EFAv2). The increased bandwidth delivers even higher performance for training network-intensive generative AI models such as large language models (LLMs) and mixture of experts (MoE). Inf2 instances, powered by AWS Inferentia2 accelerators, deliver high performance at the lowest cost in Amazon EC2 for generative AI models, including LLMs and vision transformers. They are the first inference-optimized instances in Amazon EC2 to support scale-out distributed inference with ultra-high-speed connectivity between accelerators. Compared to Inf1 instances, Inf2 instances deliver up to 4x higher throughput and up to 10x lower latency. Check out my blog posts on Trn1 instances and Inf2 instances for more details.
Amazon CodeWhisperer, free for individual use, is now generally available – Amazon CodeWhisperer is an AI coding companion that generates real-time single-line or full-function code suggestions in your IDE to help you build applications faster. With GA, we introduce two tiers: CodeWhisperer Individual and CodeWhisperer Professional. CodeWhisperer Individual is free to use for generating code. You can sign up with an AWS Builder ID based on your email address. The Individual Tier provides code recommendations, reference tracking, and security scans. CodeWhisperer Professional—priced at $19 per user, per month—offers additional enterprise administration capabilities. Steve’s blog post has all the details.
Amazon GameLift adds support for Unreal Engine 5 – Amazon GameLift is a fully managed solution that allows you to manage and scale dedicated game servers for session-based multiplayer games. The latest version of the Amazon GameLift Server SDK 5.0 lets you integrate your Unreal 5-based game servers with the Amazon GameLift service. In addition, the latest Amazon GameLift Server SDK with Unreal 5 plugin is built to work with Amazon GameLift Anywhere so that you can test and iterate Unreal game builds faster and manage game sessions across any server hosting infrastructure. Check out the release notes to learn more.
Amazon Rekognition launches Face Liveness to deter fraud in facial verification – Face Liveness verifies that only real users, not bad actors using spoofs, can access your services. Amazon Rekognition Face Liveness analyzes a short selfie video to detect spoofs presented to the camera, such as printed photos, digital photos, digital videos, or 3D masks, as well as spoofs that bypass the camera, such as pre-recorded or deepfake videos. This AWS Machine Learning Blog post walks you through the details and shows how you can add Face Liveness to your web and mobile applications.
Other AWS News Here are some additional news items and blog posts that you may find interesting:
Updates to the AWS Well-Architected Framework – The most recent content updates and improvements focus on providing expanded guidance across the AWS service portfolio to help you make more informed decisions when developing implementation plans. Services that were added or expanded in coverage include AWS Elastic Disaster Recovery, AWS Trusted Advisor, AWS Resilience Hub, AWS Config, AWS Security Hub, Amazon GuardDuty, AWS Organizations, AWS Control Tower, AWS Compute Optimizer, AWS Budgets, Amazon CodeWhisperer, and Amazon CodeGuru. This AWS Architecture Blog post has all the details.
Amazon releases largest dataset for training “pick and place” robots – In an effort to improve the performance of robots that pick, sort, and pack products in warehouses, Amazon has publicly released the largest dataset of images captured in an industrial product-sorting setting. Where the largest previous dataset of industrial images featured on the order of 100 objects, the Amazon dataset, called ARMBench, features more than 190,000 objects. Check out this Amazon Science Blog post to learn more.
AWS open-source news and updates – My colleague Ricardo writes this weekly open-source newsletter in which he highlights new open-source projects, tools, and demos from the AWS Community. Read edition #153 here.
Upcoming AWS Events Check your calendars and sign up for these AWS events:
#BuildOn Generative AI – Join our weekly live Build On Generative AI Twitch show. Every Monday morning, 9:00 US PT, my colleagues Emily and Darko take a look at aspects of generative AI. They host developers, scientists, startup founders, and AI leaders and discuss how to build generative AI applications on AWS.
In today’s episode, Emily walks us through the latest AWS generative AI announcements. You can watch the video here.
.NET Developer Day – .NET Enterprise Developer Day EMEA 2023 (April 25) is a free, one-day virtual event providing enterprise developers with the most relevant information to swiftly and efficiently migrate and modernize their .NET applications and workloads on AWS.
AWS Developer Innovation Day – AWS Developer Innovation Day (April 26) is a new, free, one-day virtual event designed to help developers and teams be productive and collaborate from discovery to delivery, to running software and building applications. Get a first look at exciting product updates, technical deep dives, and keynotes.
During a time when computers were solely used for computation, the engineer, Douglas Engelbart, gave the “mother of all demos,” where he reframed the computer as a collaboration tool capable of solving humanity’s most complex problems. At the start of his demo, he asked audience members how much value they would derive from a computer that could instantly respond to their actions.
You can ask the same question of generative AI models. If you had a highly responsive generative AI coding tool to brainstorm new ideas, break big ideas into smaller tasks, and suggest new solutions to problems, how much more creative and productive could you be?
This isn’t a hypothetical question. AI-assisted engineering workflows are quickly emerging with new generative AI coding tools that offer code suggestions and entire functions in response to natural language prompts and existing code. These tools, and what they can help developers accomplish, are changing fast. That makes it important for every developer to understand what’s happening now—and the implications for how software is and will be built.
In this article, we’ll give a rundown of what generative AI in software development looks like today by exploring:
The unique value generative AI brings to the developer workflow
AI and automation have been a part of the developer workflow for some time now. From machine learning-powered security checks to CI/CD pipelines, developers already use a variety of automation and AI tools, like CodeQL on GitHub, for example.
While there’s overlap between all of these categories, here’s what makes generative AI distinct from automation and other AI coding tools:
Automation: You know what needs to be done, and you know of a reliable way to get there every time.
Rules-based logic: You know the end goal, but there’s more than one way to achieve it.
Machine learning:
You know the end goal, but the amount of ways to achieve it scales exponentially.
Generative AI: You have big coding dreams, and want the freedom to bring them to life.
You want to make sure that any new code pushed to your repository follows formatting specifications before it’s merged to the main branch. Instead of manually validating the code, you use a CI/CD tool like GitHub Actions to trigger an automated workflow on the event of your choosing (like a commit or pull request).
You know some patterns of SQL injections, but it’s time consuming to manually scan for them in your code. A tool like Code QL uses a system of rules to sort through your code and find those patterns, so you don’t have to do it by hand.
You want to stay on top of security vulnerabilities, but the list of SQL injections continues to grow. A coding tool that uses a machine learning (ML) model, like Code QL, is trained to not only detect known injections, but also patterns similar to those injections in data it hasn’t seen before. This can help you increase recognition of confirmed vulnerabilities and predict new ones.
Generative AI coding tools leverage ML to generate novel answers and predict coding sequences. A tool like GitHub Copilot can reduce the amount of times you switch out of your IDE to look up boilerplate code or help you brainstorm coding solutions. Shifting your role from rote writing to strategic decision making, generative AI can help you reflect on your code at a higher, more abstract level—so you can focus more on what you want to build and spend less time worrying about how.
How are generative AI coding tools designed and built?
Building a generative AI coding tool requires training AI models on large amounts of code across programming languages via deep learning. (Deep learning is a way to train computers to process data like we do—by recognizing patterns, making connections, and drawing inferences with limited guidance.)
To emulate the way humans learn patterns, these AI models use vast networks of nodes, which process and weigh input data, and are designed to function like neurons. Once trained on large amounts of data and able to produce useful code, they’re built into tools and applications. The models can then be plugged into coding editors and IDEs where they respond to natural language prompts or code to suggest new code, functions, and phrases.
Before we talk about how generative AI coding tools are made, let’s define what they are first. It starts with LLMs, or large language models, which are sets of algorithms trained on large amounts of code and human language. Like we mentioned above, they can predict coding sequences and generate novel content using existing code or natural language prompts.
Today’s state-of-the-art LLMs are transformers. That means they use something called an attention mechanism to make flexible connections between different tokens in a user’s input and the output that the model has already generated. This allows them to provide responses that are more contextually relevant than previous AI models because they’re good at connecting the dots and big-picture thinking.
Here’s an example of how a transformer works. Let’s say you encounter the word log in your code. The transformer node at that place would use the attention mechanism to contextually predict what kind of log would come next in the sequence.
Let’s say, in the example below, you input the statement from math import log. A generative AI model would then infer you mean a logarithmic function.
And if you add the prompt from logging import log, it would infer that you’re using a logging function.
Though sometimes a log is just a log.
LLMs can be built using frameworks besides transformers. But LLMs using frameworks, like a recurrent neural network or long short-term memory, struggle with processing long sentences and paragraphs. They also typically require training on labeled data (making training a labor-intensive process). This limits the complexity and relevance of their outputs, and the data they can learn from.
Transformer LLMs, on the other hand, can train themselves on unlabeled data. Once they’re given basic learning objectives, LLMs take a part of the new input data and use it to practice their learning goals. Once they’ve achieved these goals on that portion of the input, they apply what they’ve learned to understand the rest of the input. This self-supervised learning process is what allows transformer LLMs to analyze massive amounts of unlabeled data—and the larger the dataset an LLM is trained on, the more they scale by processing that data.
Why should developers care about transformers and LLMs?
LLMs like OpenAI’s GPT-3, GPT-4, and Codex models are trained on an enormous amount of natural language data and publicly available source code. This is part of the reason why tools like ChatGPT and GitHub Copilot, which are built on these models, can produce contextually accurate outputs.
Here’s how GitHub Copilot produces coding suggestions:
All of the code you’ve written so far, or the code that comes before the cursor in an IDE, is fed to a series of algorithms that decide what parts of the code will be processed by GitHub Copilot.
Since it’s powered by a transformer-based LLM, GitHub Copilot will apply the patterns it’s abstracted from training data and apply those patterns to your input code.
The result: contextually relevant, original coding suggestions. GitHub Copilot will even filter out known security vulnerabilities, vulnerable code patterns, and code that matches other projects.
Keep in mind: creating new content such as text, code, and images is at the heart of generative AI. LLMs are adept at abstracting patterns from their training data, applying those patterns to existing language, and then producing language or a line of code that follows those patterns. Given the sheer scale of LLMs, they might generate a language or code sequence that doesn’t even exist yet. Just as you would review a colleague’s code, you should assess and validate AI-generated code, too.
Why context matters for AI coding tools
Developing good prompt crafting techniques is important because input code passes through something called a context window, which is present in all transformer-based LLMs. The context window represents the capacity of data an LLM can process. Though it can’t process an infinite amount of data, it can grow larger. Right now, the Codex model has a context window that allows it to process a couple of hundred lines of code, which has already advanced and accelerated coding tasks like code completion and code change summarization.
Developers use details from pull requests, a folder in a project, open issues—and the list goes on—to contextualize their code. So, when it comes to a coding tool with a limited context window, the challenge is to figure out what data, in addition to code, will lead to the best suggestions.
The order of the data also impacts a model’s contextual understanding. Recently, GitHub made updates to its pair programmer so that it considers not only the code immediately before the cursor, but also some of the code after the cursor. The paradigm—which is called Fill-In-the-Middle (FIM)—leaves a gap in the middle of the code for GitHub Copilot to fill, providing the tool with more context about the developer’s intended code and how it should align with the rest of the program. This helps produce higher quality code suggestions without any added latency.
Visuals can also contextualize code. Multimodal LLMs (MMLLMs) scale transformer LLMs so they process images and videos, as well as text. OpenAI recently released its new GPT-4 model—and Microsoft revealed its own MMLLM called Kosmos-1. These models are designed to respond to natural language and images, like alternating text and images, image-caption pairs, and text data.
GitHub’s senior developer advocate Christina Warren shares the latest on GPT-4 and the creative potential it holds for developers:
How developers are using generative AI coding tools
The field of generative AI is filled with experiments and explorations to uncover the technology’s full capabilities—and how they can enable effective developer workflows. Generative AI tools are already changing how developers write code and build software, from improving productivity to helping developers focus on bigger problems.
While generative AI applications in software development are still being actively defined, today, developers are using generative AI coding tools to:
Get a head start on complex code translation tasks. A study presented at the 2021 International Conference on Intelligent User Interfaces found that generative AI provided developers with a skeletal framework to translate legacy source code into Python. Even if the suggestions weren’t always correct, developers found it easier to assess and fix those mistakes than manually translate the source code from scratch. They also noted that this process of reviewing and correcting was similar to what they already do when working with code produced by their colleagues.
With GitHub Copilot Labs, developers can use the companion VS Code extension (that’s separate from but dependent on the GitHub Copilot extension) to translate code into different programming languages. Watch how GitHub Developer Advocate, Michelle Mannering, uses GitHub Copilot Labs to translate her Python code into Ruby in just a few steps.
Code more efficiently. While autocompletion has been in modern IDEs for years, LLMs can generate longer suggestions—sometimes multiple lines of code—that are often more relevant. A 2022 study published in the Proceedings of the Association for Computing Machinery on Programming Languages (PACMPL) observed 20 programmers who interacted with GitHub Copilot. They found that thanks to end-of-line suggestions for function calls and argument completions, developers were able to code faster and stay in the flow longer.
Our own research supports these findings, too. As we mentioned earlier, we found that developers who used GitHub Copilot coded up to 55% faster than those who didn’t. But productivity gains went beyond speed with 74% of developers reporting that they felt less frustrated when coding and were able to focus on more satisfying work.
Tackle new problems and get creative. The PACMPL study also found that developers used GitHub Copilot to find creative solutions when they were unsure of how to move forward. These developers searched for next possible steps and relied on the generative AI coding tool to assist with unfamiliar syntax, look up the right API, or discover the correct algorithm.
I was one of the developers who wrote GitHub Copilot, but prior to that work, I had never written a single line of TypeScript. That wasn’t a problem because I used the first prototype of GitHub Copilot to learn the language and, eventually, help ship the world’s first at-scale generative AI coding tool.
– Albert Ziegler, Principal Machine Learning Engineer // GitHub
Find answers without leaving their IDEs. Some participants in the PACMPL study also treated GitHub Copilot’s multi-suggestion pane like StackOverflow. Since they were able to describe their goals in natural language, participants could directly prompt GitHub Copilot to generate ideas for implementing their goals, and press Ctrl/Cmd + Enter to see a list of 10 suggestions. Even though this kind of exploration didn’t lead to deep knowledge, it helped one developer to effectively use an unfamiliar API.
Build better test coverage. Some generative AI coding tools excel in pattern recognition and completion. Developers are using these tools to build unit and functional tests—and even security tests—via natural language prompts. Some tools also offer security vulnerability filtering, so a developer will be alerted if they unknowingly introduce a vulnerability in their code.
Discover tricks and solutions they didn’t know they needed. Scarlett also wrote about eight unexpected ways developers can use GitHub Copilot—from prompting it to create a dictionary of two-letter ISO country codes and their contributing country name, to helping developers exit Vim, an editor with a sometimes finicky closing process. Want to learn more? Check out the full guide >
The bottom line
Generative AI provides humans with a new mode of interaction—and it doesn’t just alleviate the tedious parts of software development. It also inspires developers to be more creative, feel empowered to tackle big problems, and model large, complex solutions in ways they couldn’t before. From increasing productivity and offering alternative solutions, to helping you build new skills—like learning a new language or framework, or even writing clear comments and documentation—there are so many reasons to be excited about the next wave of software development. This is only the beginning.
Developers who feel more satisfied in their jobs are better positioned to be more productive. We also know developers can gain a sense of fulfillment by making an impact beyond the walls of their company and elevating their community. An opportunity exists, which developers can meet, to support those who lack access to the financial system. Many countries are working to drive financial inclusion through different motions—to which developers can contribute. GitHub provides a set of tools and services, which can support your developers working to address this need.
For example, in Australia, there is a huge opportunity to continue the work aimed at reaching those who are not currently included in the financial system. There are still a large number of people that don’t have access to important services that many of us take for granted—an opportunity that financial inclusion tries to solve.
Let’s explore these opportunities and how GitHub can help.
Financial inclusion explained
The World Bank defines financial inclusion as providing individuals and businesses access to affordable financial products to meet their needs. This includes products, such as checking accounts, credit cards, mortgages, and payments, which are still not available to over a billion unbanked people around the world. Many of these are women, people living in poverty, and those living outside of large cities.
Open Finance (or Open Banking) is an approach adopted by banks like NAB (National Australia Bank) to help include more individuals in the financial system by providing them access to the best products and services in a secure way that addresses their needs.
To enable financial inclusion and Open Finance, there needs to be a channel to exchange data and services between banks, customers, and trusted partners (fintechs, for example); that is where application programming interfaces (APIs) come in. The easiest way to understand an API is to think of it as a contract between two applications that need a standardized and secure way to talk to each other. Once the contract is created and secured, it can be used anywhere to share data or initiate a financial transaction.
This API-driven innovation lowers barriers for those individuals who may have limited physical access to banks, credit cards, or traditional financial products.
How GitHub can help
The tremendous opportunities for Australia, New Zealand, India, and other countries to enable financial inclusion to its population are dependent on the quality of the APIs. The quality and adoption of the APIs is dependent on creating a great developer experience because they are the ones building the APIs and applications that will leverage them.
GitHub is used by 100 million developers and is widely-recognized as the global home of open source. Developer experience is at the core of everything we do and it empowers developers to do their best work and be happy. But how does GitHub help enable financial inclusion and Open Finance?
The Open Bank Project released a report in 2020 highlighting how providing a great developer experience can drive growth of APIs that enable financial inclusion. Several topics which were highlighted and where GitHub can help are:
1. Create solutions to help people
This is an important motivator for developers. If developers create solutions that can help increase financial inclusion, they should make sure those solutions are available to as many people as possible through the open source community. Since we know that open source is the foundation of more than 90% of the world’s software, there is a great opportunity to collaborate globally and build on solutions that already exist.
Because GitHub is the home of open source and has 100 million developers, there is no better place for developers to create solutions that will make the biggest impact.
2. Running Hackathons
Hackathons, like the Global Open Finance Challenge, which NAB collaborated in and was won by an Aussie start-up, are important for developers to share ideas with other developers and large enterprises. They help developers see what APIs are currently available and enable innovation and collaboration with a global reach. To run a successful hackathon, developers will need to have access to code and documentation, which has been open sourced—and GitHub is a key component to enable this.
3. Recognition for developers
If a developer has worked on a solution that is helping enable financial inclusion, it’s important to ensure their effort is recognized and supported. The most important part of recognizing the awesome work developers do is to make sure there is a single platform where this work can be shared. Thankfully, that platform already exists and any developer, anywhere in the world, can access it for free—it’s GitHub!
At GitHub, we also know that sometimes recognition isn’t enough, and developers need support. This is why the GitHub Sponsors program was created. We also created our GitHub for Startups program which provides support to the startup community around the world—many of whom are important contributors to Open Banking.
4. Documentation
The success of an API is dependent on how easy it is for developers to understand and use. If developers are unable to quickly understand the context of the API, how to connect to it, or easily set it up to test it, then it probably won’t be successful.
The topic of API documentation and API Management is beyond the scope of this post, but it’s important to remember that open source is a key enabler of Open Finance and developers will need a platform to collaborate and share documentation and code. GitHub is the best platform for that, and we have seen at least a 50% increase in productivity when developers leverage documentation best practices enabled by GitHub.
Call to action
Developers have an amazing opportunity to contribute to the financial inclusion work that is happening in Australia and across the world. GitHub can help support developers to address this opportunity by giving them the tools and services they need to be productive and successful.
We’ve recently launched our weekly livestream on LinkedIn Live, GitHub in my Day Job, for those who want to learn more about how GitHub empowers developers across the community while providing guardrails to govern, and remain compliant. So, join us at https://gh.io/dayjob—we can’t wait to have you with us.
By now, you’ve heard of generative artificial intelligence (AI) tools like ChatGPT, DALL-E, and GitHub Copilot, among others. They’re gaining widespread interest thanks to the fact that they allow anyone to create content from email subject lines to code functions to artwork in a matter of moments.
This potential to revolutionize content creation across various industries makes it important to understand what generative AI is, how it’s being used, and who it’s being used by. In this article, we’ll explore what generative AI is, how it works, some real-world applications, and how it’s already changing the way people (and developers) work.
What is generative AI used for?
You may have heard the buzz around new generative AI tools like ChatGPT or the new Bing, but there’s a lot more to generative AI than any one single framework, project, or application.
Traditional AI systems are trained on large amounts of data to identify patterns, and they’re capable of performing specific tasks that can help people and organizations. But generative AI goes one step further by using complex systems and models to generate new, or novel, outputs in the form of an image, text, or audio based on natural language prompts.
Generative AI models and applications can, for example, be used for:
Text generation. Text generation, as a field, with AI tools has been in development since the 1970s—but more recently, AI researchers have been able to train generative adversarial networks (GANs) to produce text that models human-like speech. A prime example is OpenAI’s application ChatGPT, which has been trained on thousands of texts, books, articles, and code repositories, and can respond with full answers to natural language prompts and questions.
An example of text generation in ChatGPT
Image generation. Generative AI models can be used to create new images with natural language prompts, which is one of the most popular techniques with current tools and applications. The goal with text-to-image generation is to create an image that accurately represents the content of a given prompt. For example, when we give the text prompt, “impressionist style oil painting of a Shiba Inu dog giving a tarot card reading,” to the popular AI image generator DALL-E 2 we get something that looks like this (and yes, it’s a gem):
An AI-generated image from DALL-E 2 of a Shiba Inu dog giving a tarot card reading
Video generation. Generative AI models, like Stable Diffusion, are creating new videos from existing videos by applying specified styles through a text prompt or image reference. One project on GitHub, stable-diffusion-videos, offers helpful examples and tips on how to create music videos and videos that can morph between text prompts with Stable Diffusion.
Programming code generation. Rather than scouring the internet or developer community groups for help with code examples, generative AI models can be used to help generate new programming code with natural language prompts, complete partially written code with suggestions, or even translate code from one programming language to another. This is how, at a simple level, GitHub Copilot works: it uses OpenAI’sCodex model to offer code suggestions right from a developer’s editor. However, as you would with any software development tool, we encourage you to review generated code before merging into production.
Data generation. Creating new data—which is called synthetic data—and augmenting existing data sets is another common use case for generative AI. This involves generating new samples from an existing dataset to increase the dataset’s size and improve machine learning models trained on it, all while providing a layer of privacy since real user data is not being utilized to power models. Synthetic data generation provides a way to create useful, meaningful data for more than just ML training though—a number of self-driving car companies like Cruise and Waymoutilize AI-generated synthetic data for training perception systems to prepare vehicles for real-world situations while in operation.
Language translation. Natural-language understanding (NLU) models combined with generative AI have become increasingly popular to provide language translations on-the-fly. These types of tools help companies break language barriers and increase their scope of accessibility for customer bases by being able to provide things like support or documentation in their native language. Through complex, deep learning algorithms, generative AI is able to understand the context of a source text and linguistically construct those sentences in another language. This practice can also apply to coding languages, for example, translating a desired function from Python to Java.
The bottom line: Even though generative AI is a relatively new technology, it’s already being used in consumer and business applications. The use cases, as well as the quantity of applications created with it, will continue evolving to meet more distinct and specific needs.
How does generative AI work?
Generative AI models work by using neural networks to identify patterns from large sets of data, then generate new and original data or content.
But what are neural networks? In simple terms, they use interconnected nodes that are inspired by neurons in the human brain. These networks are the foundation of machine learning and deep learning models, which use a complex structure of algorithms to process large amounts of data such as text, code, or images. Training these neural networks involves adjusting the weights or parameters of the connections between neurons to minimize the difference between predicted and desired outputs, which allows the network to learn from mistakes and make more accurate predictions based on the data.
Algorithms are a key component of machine learning and generative AI models. But beyond helping machines learn from data, algorithms are also used to optimize accuracy of outputs and make decisions, or recommendations, based on input data.
While algorithms help automate these processes, building a generative AI model is incredibly complex due to the massive amounts of data and compute resources they require. People and organizations need large datasets to train these models, and generating high-quality data can be time-consuming and expensive.
To restate the obvious, these models are complicated. Need proof? Here are some common generative AI models and how they work:
Large language models (LLM): LLMs are a type of machine learning model that process and generate natural language text. One of the most significant advancements in the development of large language models has been the availability of vast amounts of text data, such as books, websites, and social media posts. This data can be used to train models that are capable of predicting and generating natural language responses in a variety of contexts. As a result, large language models have multiple practical applications, such as virtual assistants, chatbots, or text generators, like ChatGPT.
Generative adversarial networks (GAN): GANs are one of the most used models for generative AI, and they employ two different neural networks. GANs consist of two different types of neural networks: a generator and a discriminator. The generator network generates new data, such as images or audio, from a random noise signal while the discriminator is trained to distinguish between real data from the training set and the data produced by the generator.
During training, the generator tries to create data that can trick the discriminator network into thinking it’s real. This “adversarial” process will continue until the generator can produce data that is totally indistinguishable from real data in the training set. This process helps both networks improve at their respective tasks, which ultimately results in more realistic and higher-quality generated data.
A diagram illustrating how a generative adversarial network works. Image [CC BY-SA 4.0](https://creativecommons.org/licenses/by-sa/4.0/deed.en) האדם-החושב on wikipedia
Transformer-based models: A transformer-based model’s neural networks operate by learning context and meaning through tracking relationships of sequential data, which means these models are really good at natural language processing tasks like machine translation, language modeling, and answering questions. These models have been used in popular language models, such as GPT-4 (which stands for Generative Pre-trained Transformer 4), and have also been adapted for other such tasks that require the modeling of sequential data such as image recognition.
Variational autoencoder models (VAEs): These models are similar to GANs in that they work with two different neural networks: encoders and decoders. VAEs can take a large amount of data and compress it into a smaller representation, which can be used to create new data that is similar to the original data. VAEs are often used in image, video, and audio generation—and here’s a fun fact: you can train a VAE on datasets like CelebA, which contains over 200,000 images of celebrities, to create completely new portraits of people that don’t exist.
The smile vector, a concept vector discovered by Tom White using VAEs trained on the CelebA dataset.
The real-world applications of generative AI
The impact of generative AI is quickly becoming apparent—but it’s still in its early days. Despite this, we’re already seeing a proliferation of applications, products, and open source projects that are using generative AI models to achieve specific outcomes for people and organizations (and yes, developers, too).
Though generative AI is constantly evolving, it already has some solid real world applications. Here’s just a few of them:
Coding
New and seasoned developers alike can utilize generative AI to improve their coding processes. Generative AI coding tools can help automate some of the more repetitive tasks, like testing, as well as complete code or even generate brand new code. GitHub has its own AI-powered pair programmer, GitHub Copilot, which uses generative AI to provide developers with code suggestions. And GitHub also has announced GitHub Copilot X, which brings generative AI to more of the developer experience across the editor, pull requests, documentation, CLI, and more.
Accessibility
Generative AI has the potential to greatly impact and improve accessibility for folks with disabilities through a variety of modalities, such as speech-to-text transcription, text-to-speech audio generation, or assistive technologies. One of the most exciting facets of our GitHub Copilot tool is its voice-activated capabilities that allow developers with difficulties using a keyboard to code with their voice. By leveraging the power of generative AI, these types of tools are paving the way for a more inclusive and accessible future in technology.
Gaming
Generative AI can take gaming to the next level (get it? ) by generating new characters, storylines, design components, and more. Case in point: The developer behind the game, This Girl Does Not Exist, has said that every component of the game—from the storyline to the art and even the music—was generated entirely by AI. This use of generative AI can enable gaming studios to create new and exciting content for their users, all without increasing the developer workload, which frees them up to work on other aspects of the game, such as story development.
Web design
Designers can utilize generative AI tools to automate the design process and save significant time and resources, which allows for a more streamlined and efficient workflow. Additionally, incorporating these tools into the development process can lead to the creation of highly customized designs and logos, enhancing the overall user experience and engagement with the website or application. Generative AI tools can also be used to do some of the more tedious work, such as creating design layouts that are optimized and adaptable across devices. For example, designers can use tools like designs.ai to quickly generate logos, banners, or mockups for their websites.
Web search
Microsoft and other industry players are increasingly utilizing generative AI models in search to create more personalized experiences. This includes query expansion, which generates relevant keywords to reduce the number of searches. So, rather than the search engine returning a list of links, generative AI can help these new and improved models return search results in the form of natural language responses. Bing now includes AI-powered features in partnership with OpenAI that provide answers to complex questions and allow users to ask follow-up questions in a chatbox for more refined responses.
Healthcare
Interest has emerged around the potential applications of generative AI in the healthcare field to improve disease detection and diagnosis, advance medical research, and accelerate progress in the pharmaceutical space. Potentially, generative AI could be used to analyze large amounts of data to simulate chemical structures and predict new compounds will be the most effective for new drug discoveries. NVIDIA Clara is one example of a generative AI model specifically designed for medical imaging and healthcare research. (Plus, Gartner suggests more than 30 percent of new pharmaceutical drugs and materials will be discovered via generative AI models by 2025.)
In marketing, content is king—and generative AI is making it easier than ever to quickly create large amounts of it. A number of companies, agencies, and creators are already turning to generative AI tools to create images for social posts or write captions, product descriptions, blog posts, email subject lines, and more. Generative AI can also help companies personalize ad experiences by creating custom, engaging content for individuals at speed. Writers, marketers, and creators can leverage tools like Jasper to generate copy, Surfer SEO to optimize organic search, or albert.ai to personalize digital advertising content.
Art and design
As we’ve seen above, the power of AI can be harnessed to create some incredible portraits in a matter of moments (re: the future-telling Shiba ). Artists and designers alike are using these AI tools as a source of inspiration. For example, architects can quickly create 3D models of objects or environments and artists can breathe new life into their portraits by using AI to apply different styles, like adding a Cubist style to their original image. Need proof? Designers are already starting to use AI image generators, such as Midjourney and Microsoft Designer, to create high-quality images by simply typing out Discord commands.
Finance
In a recent discussion about tech trends and how they’ll affect the finance sector, Michael Schrage, a research fellow at the MIT Sloan School Initiative on the Digital Economy, said, “I think, increasingly, we’re going to be seeing generative AI used for financial forecasts and scenario generation.” This is a likely path forward—generative AI can be used to analyze large amounts of data to detect fraud, manage risk, and inform decision making. And that has obvious applications in the financial services industry.
Manufacturing
Manufacturers are starting to turn to generative AI solutions to help with product design, quality control, and predictive maintenance. Generative AI can be used to analyze historical data to improve machine failure predictions and help manufacturers with maintenance planning. According to research conducted by Capgemini, more than half of European manufacturers are implementing some AI solutions (although so far, these aren’t generative AI solutions). This is largely because the sheer amount of manufacturing data is easier for machines to analyze at speed than humans.
AI as a partner: Generative AI models and tools are narrow in focus, and work best at generating content, code, and images. In research at GitHub, we’ve found that GitHub Copilot helps developers code up to 55% faster, underscoring how generative AI models and tools can improve overall productivity and boost efficiency. Metrics like these show how generative AI tools are already changing how people and teams work—but they also underscore how these tools act as complement to human efforts.
Take this with you
Whether it’s creating visual assets for an ad campaign or augmenting medical images to help diagnose diseases, generative AI is helping us solve complex problems at speed. And the emergence of generative AI-based programming tools has revolutionized the way developers approach writing code.
While these models aren’t perfect yet, they’re getting better by the day—and that’s creating an exciting immediate future for developers and generative AI.
Since the beginning, GitHub.com has been a Ruby on Rails monolith. Today, the application is nearly two million lines of code and more than 1,000 engineers collaborate on it daily. We deploy as often as 20 times a day, and nearly every week one of those deploys is a Rails upgrade.
Upgrading Rails weekly
Every Monday a scheduled GitHub Action workflow triggers an automated pull request, which bumps our Rails version to the latest commit on the Rails main branch for that day. All our builds run on this new version of Rails. Once all the builds pass, we review the changes and ship it the next day. Starting an upgrade on Monday you will already have an open pull request linking the changes this Rails upgrade proposes and a completed build.
This process is a far stretch from how we did Rails upgrades only a few years ago. In the past, we spent months migrating from our custom fork of Rails to a newer stable release, and then we maintained two Gemfiles to ensure we’d remain compatible with the upcoming release. Now, upgrades take under a week. You can read more about this process in this 2018 blog post. We work closely with the community to ensure that each Rails release is running in production before the release is officially cut.
There are real tangible benefits to running the latest version of Rails:
We give developers at GitHub the very best version of our tools by providing the latest version of Rails. This ensures users can take advantage of all the latest improvements including better database connection handling, faster view rendering, and all the amazing work happening in Rails every day.
We have removed nearly all of our Rails patches. Since we are running on the latest version of Rails, instead of patching Rails and waiting for a change, developers can suggest the patch to Rails itself.
Working on Rails is now easier than ever to share with your team! Instead of telling your team you found something in Rails that will be fixed in the next release, you can work on something in Rails and see it the following week!
Maintaining more up-to-date dependencies gives us a better security posture. Since we already do weekly upgrades, adding an upgrade when there is a security advisory is standard practice and doesn’t require any extra work.
There are no “big bang” migrations. Since each Rails upgrade incorporates only a small number of changes, it’s easier to understand and dig into if there are incompatibilities. The worst issues from a tough upgrade are unexpected changes from an unknown location. These issues can be mitigated by this upgrade strategy.
Catching bugs in the main branch and contributing back strengthens our engineering team and helps our developers deepen their expertise and understanding of our application and its dependencies.
Testing Ruby continuously
Naturally, we have a similar process for Ruby upgrades. In February 2022, shortly after upgrading to Ruby 3.1, we started building and testing Ruby shas from 3.2-alpha in a parallel build. When CI runs for the GitHub Rails application, two versions of the builds run: one build uses the Ruby version we are running in production and one uses the latest Ruby commit including the latest changes in Ruby, which we update weekly.
While we build Ruby with every change, GitHub only ships numbered Ruby versions to production. The builds help us maintain compatibility with the upcoming Ruby version and give us insight into what Ruby changes are coming.
In early December 2022, with CI giving us confidence we were compatible before the usual Christmas release of Ruby 3.2, we were able to test Ruby release candidates with a portion of production traffic and give the Ruby team insights into any changes we noticed. For example, we could reproduce an increase in allocations due to keyword argument handling that was fixed before the release of Ruby 3.2 due to this process. We also identified a subtle change when to_str and #to_i is applied. Because we upgrade all the time, identifying and resolving these issues was standard practice.
This weekly upgrade process for Ruby allowed us to upgrade our monolith from Ruby 3.1 to Ruby 3.2 within a month of release. After all, we had already tested and run it in production! At this point, this was the fastest Ruby upgrade we had ever done. We broke this record with the release of Ruby 3.2.1, which we adopted on release day.
This upgrade process has proved to be invaluable for our collaboration with the Ruby core team. A nice side effect of having these builds is that we are able to easily test and profile our own Ruby changes before we suggest them upstream. This can make it easier for us to identify regressions in our own application and better understand the impact of changes on a production environment.
Should I do it, too?
Our ability to do frequent Ruby and Rails upgrades is due to some engineering maturity at GitHub. Doing weekly Rails upgrades requires a thorough test suite with many great engineers working to maintain and improve it. We also gain confidence from having great test environments along with progressive rollout deploys. Our test suite is likely to catch problems, and if it doesn’t, we are confident we will catch it during deploy before it reaches customers.
If you have these tools, you should also upgrade Rails weekly and test using the latest Ruby. GitHub is a better Rails app because of it and it has enabled work from my team that I am really proud of.
Ruby champion Eileen Uchitelle explains why investing in Rails is important in her Rails Conf 2022 Keynote:
Ultimately, if more companies treated the framework as an extension of the application, it would result in higher resilience and stability. Investment in Rails ensures your foundation will not crumble under the weight of your application. Treating it as an unimportant part of your application is a mistake and many, many leaders make this mistake.
Thanks to contributions from people around the world, using Ruby is better than ever. GitHub, along with hundreds of other companies, benefits from Ruby and Rails continuing to improve. Upgrading regularly and investing in our frameworks is a staple of the work we do on the Ruby Architecture team at GitHub. We are always grateful for the Ruby community and glad that we can give back in a way that improves our application and tools as much as it improves them for everyone else.
With AWS Service Catalog, you can create, govern, and manage a catalog of infrastructure as code (IaC) templates that are approved for use on AWS. These IaC templates can include everything from virtual machine images, servers, software, and databases to complete multi-tier application architectures. You can control which IaC templates and versions are available, what is configured by each version, and who can access each template based on individual, group, department, or cost center. End users such as engineers, database administrators, and data scientists can then quickly discover and self-service provision approved AWS resources that they need to use to perform their daily job functions.
When using Service Catalog, the first step is to create products based on your IaC templates. You can then collect products, together with configuration information, in a portfolio.
Starting today, you can define Service Catalog products and their resources using either AWS CloudFormation or Hashicorp Terraform and choose the tool that better aligns with your processes and expertise. You can now integrate your existing Terraform configurations into Service Catalog to have them part of a centrally approved portfolio of products and share it with the AWS accounts used by your end users. In this way, you can prevent inconsistencies and mitigate the risk of noncompliance.
When resources are deployed by Service Catalog, you can maintain least privilege access during provisioning and govern tagging on the deployed resources. End users of Service Catalog pick and choose what they need from the list of products and versions they have access to. Then, they can provision products in a single action regardless of the technology (CloudFormation or Terraform) used for the deployment.
The Service Catalog hub-and-spoke model that enables organizations to govern at scale can now be extended to include Terraform configurations. With the Service Catalog hub and spoke model, you can centrally manage deployments using a management/user account relationship:
One management account – Used to create Service Catalog products, organize them into portfolios, and share portfolios with user accounts
Multiple user accounts (up to thousands) – A user account is any AWS account in which the end users of Service Catalog are provisioning resources.
Let’s see how this works in practice.
Creating an AWS Service Catalog Product Using Terraform To get started, I install the Terraform Reference Engine (provided by AWS on GitHub) that configures the code and infrastructure required for the Terraform open-source engine to work with AWS Service Catalog. I only need to do this once, in the management account for Service Catalog, and the setup takes just minutes. I use the automated installation script:
./deploy-tre.sh -r us-east-1
To keep things simple for this post, I create a product deploying a single EC2 instance using AWS Graviton processors and the Amazon Linux 2023 operating system. Here’s the content of my main.tf file:
I sign in to the AWS Management Console in the management account for Service Catalog. In the Service Catalog console, I choose Product list in the Administration section of the navigation pane. There, I choose Create product.
In Product details, I select Terraform open source as Product type. I enter a product name and description and the name of the owner.
In the Version details, I choose to Upload a template file (using a tar.gz archive). Optionally, I can specify the template using an S3 URL or an external code repository (on GitHub, GitHub Enterprise Server, or Bitbucket) using an AWS CodeStar provider.
I enter support details and custom tags. Note that tags can be used to categorize your resources and also to check permissions to create a resource. Then, I complete the creation of the product.
Adding an AWS Service Catalog Product Using Terraform to a Portfolio Now that the Terraform product is ready, I add it to my portfolio. A portfolio can include both Terraform and CloudFormation products. I choose Portfolios from the Administrator section of the navigation pane. There, I search for my portfolio by name and open it. I choose Add product to portfolio. I search for the Terraform product by name and select it.
Terraform products require a launch constraint. The launch constraint specifies the name of an AWS Identity and Access Management (IAM) role that is used to deploy the product. I need to separately ensure that this role is created in every account with which the product is shared.
The launch role is assumed by the Terraform open-source engine in the management account when an end user launches, updates, or terminates a product. The launch role also contains permissions to describe, create, and update a resource group for the provisioned product and tag the product resources. In this way, Service Catalog keeps the resource group up-to-date and tags the resources associated with the product.
The launch role enables least privilege access for end users. With this feature, end users don’t need permission to directly provision the product’s underlying resources because your Terraform open-source engine assumes the launch role to provision those resources, such as an approved configuration of an Amazon Elastic Compute Cloud (Amazon EC2) instance.
In the Launch constraint section, I choose Enter role name to use a role I created before for this product:
The trust relationship of the role defines the entities that can assume the role. For this role, the trust relationship includes Service Catalog and the management account that contains the Terraform Reference Engine.
For permissions, the role allows to provision, update, and terminate the resources required by my product and to manage resource groups and tags on those resources.
I complete the addition of the product to my portfolio. Now the product is available to the end users who have access to this portfolio.
Launching an AWS Service Catalog Product Using Terraform End users see the list of products and versions they have access to and can deploy them in a single action. If you already use Service Catalog, the experience is the same as with CloudFormation products.
I sign in to the AWS Console in the user account for Service Catalog. The portfolio I used before has been shared by the management account with this user account. In the Service Catalog console, I choose Products from the Provisioning group in the navigation pane. I search for the product by name and choose Launch product.
I let Service Catalog generate a unique name for the provisioned product and select the product version to deploy. Then, I launch the product.
After a few minutes, the product has been deployed and is available. The deployment has been managed by the Terraform Reference Engine.
In the Associated tags tab, I see that Service Catalog automatically added information on the portfolio and the product.
In the Resources tab, I see the resources created by the provisioned product. As expected, it’s an EC2 instance, and I can follow the link to open the Amazon EC2 console and get more information.
End users such as engineers, database administrators, and data scientists can continue to use Service Catalog and launch the products they need without having to consider if they are provisioned using Terraform or CloudFormation.
Availability and Pricing AWS Service Catalog support for Terraform open-source configurations is available today in all AWS Regions where it is offered. There is no change in pricing when using Terraform. With Service Catalog, you pay for the API calls you make to the service, and you can start for free with the free tier. You also pay for the resources used and created by the Terraform Reference Engine. For more information, see Service Catalog Pricing.
This blog post is written by Sandeep Palavalasa, Sr. Specialist Containers SA, and Prathibha Datta-Kumar, Software Development Engineer
Spinnaker is an open source continuous delivery platform created by Netflix for releasing software changes rapidly and reliably. It enables teams to automate deployments into pipelines that are run whenever a new version is released with proven deployment strategies that are faster and more dependable with zero downtime. For many AWS customers, Spinnaker is a critical piece of technology that allows developers to deploy their applications safely and reliably across different AWS managed services.
Listening to customer requests on the Spinnaker open source project and in the Amazon EC2 Spot Instances integrations roadmap, we have further enhanced Spinnaker’s ability to deploy on Amazon Elastic Compute Cloud (Amazon EC2). The enhancements make it easier to combine Spot Instances with On-Demand, Reserved, and Savings Plans Instances to optimize workload costs with performance. You can improve workload availability when using Spot Instances with features such as allocation strategies and proactive Spot capacity rebalancing, when you are flexible about Instance types and Availability Zones. Combinations of these features offer the best possible experience when using Amazon EC2 with Spinnaker.
In this post, we detail the recent enhancements, along with a walkthrough of how you can use them following the best practices.
Amazon EC2 Spot Instances
EC2 Spot Instances are spare compute capacity in the AWS Cloud available at steep discounts of up to 90% when compared to On-Demand Instance prices. The primary difference between an On-Demand Instance and a Spot Instance is that a Spot Instance can be interrupted by Amazon EC2 with a two-minute notification when Amazon EC2 needs the capacity back. Amazon EC2 now sends rebalance recommendation notifications when Spot Instances are at an elevated risk of interruption. This signal can arrive sooner than the two-minute interruption notice. This lets you proactively replace your Spot Instances before it’s interrupted.
The best way to adhere to Spot best practices and instance fleet management is by using an Amazon EC2 Auto Scaling group When using Spot Instances in Auto Scaling group, enabling Capacity Rebalancing helps you maintain workload availability by proactively augmenting your fleet with a new Spot Instance before a running instance is interrupted by Amazon EC2.
Spinnaker concepts
Spinnaker uses three key concepts to describe your services, including applications, clusters, and server groups, and how your services are exposed to users is expressed as Load balancers and firewalls.
An application is a collection of clusters, a cluster is a collection of server groups, and a server group identifies the deployable artifact and basic configuration settings such as the number of instances, autoscaling policies, metadata, etc. This corresponds to an Auto Scaling group in AWS. We use Auto Scaling groups and server groups interchangeably in this post.
Spinnaker and Amazon EC2 Integration
In mid-2020, we started looking into customer requests and gaps in the Amazon EC2 feature set supported in Spinnaker. Around the same time, Spinnaker OSS added support for Amazon EC2 Launch Templates. Thanks to their effort, we could follow-up and expand the Amazon EC2 feature set supported in Spinnaker. Now that we understand the new features, let’s look at how to use some of them in the following tutorial spinnaker.io.
Here are some highlights of the features contributed recently:
Feature
Why use it? (Example use cases)
Multiple Instance Types
Tap into multiple capacity pools to achieve and maintain the desired scale using Spot Instances.
Combining On-Demand and Spot Instances
– Control the proportion of On-Demand and Spot Instances launched in your sever group.
– Combine Spot Instances with Amazon EC2 Reserved Instances or Savings Plans.
Amazon EC2 Auto Scaling allocation strategies
Reduce overall Spot interruptions by launching from Spot pools that are optimally chosen based on the available Spot capacity, using capacity-optimized Spot allocation strategy.
Capacity rebalancing
Improve your workload availability by proactively shifting your Spot capacity to optimal pools by enabling capacity rebalancing along with capacity-optimized allocation strategy.
We recommend using Spinnaker stable release 1.28.x for API users and 1.29.x for UI users. Here is the Git issue for related PRs and feature releases.
Now that we understand the new features, let’s look at how to use some of them in the following tutorial.
Example tutorial: Deploy a demo web application on an Auto Scaling group with On-Demand and Spot Instances
In this example tutorial, we setup Spinnaker to deploy to Amazon EC2, create an Application Load Balancer, and deploy a demo application on a server group diversified across multiple instance types and purchase options – this case On-Demand and Spot Instances.
We leverage Spinnaker’s API throughout the tutorial to create new resources, along with a quick guide on how to deploy the same using Spinnaker UI (Deck) and leverage UI to view them.
1.3.1 Get the SSH command to port forwarding for Deck – the browser-based UI (9000) and Gate – the API Gateway (8084) to access the Spinnaker UI and API.
1.3.2 Open a new terminal and use the SSH command (output from the previous command) to connect to the Spinnaker instance. After you successfully connect to the Spinnaker instance via SSH, access the Spinnaker UI here and API here.
2. Deploy a demo web application
Let’s make sure that we have the environment variables required in the shell before proceeding. If you’re using the same terminal window as before, then you might already have these variables.
STACK_NAME=spinnaker-blog
AWS_REGION=us-west-2 # use the same region as before
EC2_KEYPAIR_NAME=spinnaker-blog-${AWS_REGION}
VPC_ID=$(aws cloudformation describe-stacks --stack-name ${STACK_NAME} --region ${AWS_REGION} --query "Stacks[].Outputs[?OutputKey=='VPCID'].OutputValue" --output text)
2.1 Create a Spinnaker Application
We start by creating an application in Spinnaker, a placeholder for the service that we deploy.
Let’s create an Application Load Balanacer and a target group for port 80, spanning the three availability zones in our public subnet. We use the Demo-ALB-SecurityGroup for Firewalls to allow public access to the ALB on port 80.
As Spot Instances are interrupted with a two minute warning, you must adjust the Target Group’s deregistration delay to a slightly lower time. Recommended values are 90 seconds or less. This allows time for in-flight requests to complete and gracefully close existing connections before the instance is interrupted.
Before creating a server group (Auto Scaling group), here is a brief overview of the features used in the example:
onDemandBaseCapacity (default 0): The minimum amount of your ASG’s capacity that must be fulfilled by On-Demand instances (can also be applied toward Reserved Instances or Savings Plans). The example uses an onDemandBaseCapacity of three.
onDemandPercentageAboveBaseCapacity (default 100): The percentages of On-Demand and Spot Instances for additional capacity beyond OnDemandBaseCapacity. The example uses onDemandPercentageAboveBaseCapacity of 10% (i.e. 90% Spot).
spotAllocationStrategy: This indicates how you want to allocate instances across Spot Instance pools in each Availability Zone. The example uses the recommended Capacity Optimized strategy. Instances are launched from optimal Spot pools that are chosen based on the available Spot capacity for the number of instances that are launching.
launchTemplateOverridesForInstanceType: The list of instance types that are acceptable for your workload. Specifying multiple instance types enables tapping into multiple instance pools in multiple Availability Zones, designed to enhance your service’s availability. You can use the ec2-instance-selector, an open source AWS Command Line Interface(CLI) tool to narrow down the instance types based on resource criteria like vcpus and memory.
capacityRebalance: When enabled, this feature proactively manages the EC2 Spot Instance lifecycle leveraging the new EC2 Instance rebalance recommendation. This increases the emphasis on availability by automatically attempting to replace Spot Instances in an ASG before they are interrupted by Amazon EC2. We enable this feature in this example.
Let’s create a server group with a desired capacity of 12 instances diversified across current and previous generation instance types, attach the previously created ALB, use Demo-EC2-SecurityGroup for the Firewalls which allows http traffic only from the ALB, use the following bash script for UserData to install httpd, and add instance metadata into the index.html.
2.3.1 Save the userdata bash script into a file user-date.sh.
Note that Spinnaker only support base64 encoded userdata. We use base64 bash command to encode the file contents in the next step.
Spinnaker creates an Amazon EC2 Launch Template and an ASG with specified parameters and waits until the ALB health check passes before sending traffic to the EC2 Instances.
The server group and launch template that we just created will look like this in Spinnaker UI:
The UI also displays capacity type, such as the purchase option for each instance type in the Instance Information section:
3. Access the application
Copy the Application Load Balancer URL by selecting the tree icon in the right top corner of the server group, and access it in a browser. You can refresh multiple times to see that the requests are going to different instances every time.
Congratulations! You successfully deployed the demo application on an Amazon EC2 server group diversified across multiple instance types and purchase options.
Moreover, you can clone, modify, disable, and destroy these server groups, as well as use them with Spinnaker pipelines to effectively release new versions of your application.
Cost savings
Check the savings you realized by deploying your demo application on EC2 Spot Instances by going to EC2 console > Spot Requests > Saving Summary.
Cleanup
To avoid incurring any additional charges, clean up the resources created in the tutorial.
Frist, delete the server group, application load balancer and application in Spinnaker.
Wait for Spinnaker to delete all of the resources before proceeding further. You can confirm this either on the Spinnaker UI or AWS Management Console.
Then delete the Spinnaker infrastructure by running the following command:
aws ec2 delete-key-pair --key-name ${EC2_KEYPAIR_NAME} --region ${AWS_REGION}
rm ~/${EC2_KEYPAIR_NAME}.pem
aws s3api delete-objects \
--bucket ${S3_BUCKET_NAME} \
--delete "$(aws s3api list-object-versions \
--bucket ${S3_BUCKET_NAME} \
--query='{Objects: Versions[].{Key:Key,VersionId:VersionId}}')" #If error occurs, there are no Versions and is OK
aws s3api delete-objects \
--bucket ${S3_BUCKET_NAME} \
--delete "$(aws s3api list-object-versions \
--bucket ${S3_BUCKET_NAME} \
--query='{Objects: DeleteMarkers[].{Key:Key,VersionId:VersionId}}')" #If error occurs, there are no DeleteMarkers and is OK
aws s3 rb s3://${S3_BUCKET_NAME} --force #Delete Bucket
aws cloudformation delete-stack --region ${AWS_REGION} --stack-name ${STACK_NAME}
Conclusion
In this post, we learned about the new Amazon EC2 features recently added to Spinnaker, and how to use them to build diversified and optimized Auto Scaling Groups. We also discussed recommended best practices for EC2 Spot and how they can improve your experience with it.
We would love to hear from you! Tell us about other Continuous Integration/Continuous Delivery (CI/CD) platforms that you want to use with EC2 Spot and/or Auto Scaling Groups by adding an issue on the Spot integrations roadmap.
The open source Git project just released Git 2.40 with features and bug fixes from over 88 contributors, 30 of them new.
We last caught up with you on the latest in Git when 2.39 was released. To celebrate this most recent release, here’s GitHub’s look at some of the most interesting features and changes introduced since last time.
Longtime readers will recall our coverage of git jump from way back in our Highlights from Git 2.19 post. If you’re new around here, don’t worry: here’s a brief refresher.
git jump is an optional tool that ships with Git in its contrib directory. git jump wraps other Git commands, like git grep and feeds their results into Vim’s quickfix list. This makes it possible to write something like git jump grep foo and have Vim be able to quickly navigate between all matches of “foo” in your project.
git jump also works with diff and merge. When invoked in diff mode, the quickfix list is populated with the beginning of each changed hunk in your repository, allowing you to quickly scan your changes in your editor before committing them. git jump merge, on the other hand, opens Vim to the list of merge conflicts.
In Git 2.40, git jump now supports Emacs in addition to Vim, allowing you to use git jump to populate a list of locations to your Emacs client. If you’re an Emacs user, you can try out git jump by running:
If you’ve ever scripted around a Git repository, you may be familiar with Git’s cat-file tool, which can be used to print out the contents of arbitrary objects.
Back when v2.38.0 was released, we talked about how cat-file gained support to apply Git’s mailmap rules when printing out the contents of a commit. To summarize, Git allows rewriting name and email pairs according to a repository’s mailmap. In v2.38.0, git cat-file learned how to apply those transformations before printing out object contents with the new --use-mailmap option.
But what if you don’t care about the contents of a particular object, and instead want to know the size? For that, you might turn to something like --batch-check=%(objectsize), or -s if you’re just checking a single object.
But you’d be mistaken! In previous versions of Git, both the --batch-check and -s options to git cat-file ignored the presence of --use-mailmap, leading to potentially incorrect results when the name/email pairs on either side of a mailmap rewrite were different lengths.
In Git 2.40, this has been corrected, and git cat-file -s and --batch-check with will faithfully report the object size as if it had been written using the replacement identities when invoked with --use-mailmap.
While we’re talking about scripting, here’s a lesser-known Git command that you might not have used: git check-attr. check-attr is used to determine which gitattributes are set for a given path.
These attributes are defined and set by one or more .gitattributes file(s) in your repository. For simple examples, it’s easy enough to read them off from a .gitattributes file, like this:
$ head -n 2 .gitattributes
* whitespace=!indent,trail,space
*.[ch] whitespace=indent,trail,space diff=cpp
Here, it’s relatively easy to see that any file ending in *.c or *.h will have the attributes set above. But what happens when there are more complex rules at play, or your project is using multiple .gitattributes files? For those tasks, we can use check-attr:
In the past, one crucial limitation of check-attr is that it required an index, meaning that if you wanted to use check-attr in a bare repository, you had to resort to temporarily reading in the index, like so:
TEMP_INDEX="$(mktemp ...)"

git read-tree --index-output="$TEMP_INDEX" HEAD
GIT_INDEX_FILE="$TEMP_INDEX" git check-attr ...
This kind of workaround is no longer required in Git 2.40 and newer. In Git 2.40, check-attr supports a new --source= to scan for .gitattributes in, meaning that the following will work as an alternative to the above, even in a bare repository:
Over the years, there has been a long-running effort to rewrite old parts of Git from their original Perl or Shell implementations into more modern C equivalents. Aside from being able to use Git’s own APIs natively, consolidating Git commands into a single process means that they are able to run much more quickly on platforms that have a high process start-up cost, such as Windows.
On that front, there are a couple of highlights worth mentioning in this release:
In Git 2.40, git bisect is now fully implemented in C as a native builtin. This is the result of years of effort from many Git contributors, including a large handful of Google Summer of Code and Outreachy students.
Similarly, Git 2.40 retired the legacy implementation of git add --interactive, which also began as a Shell script and was re-introduced as a native builtin back in version 2.26, supporting both the new and old implementation behind an experimental add.interactive.useBuiltin configuration.
Since that default has been “true” since version 2.37, the Git project has decided that it is time to get rid of the now-legacy implementation entirely, marking the end of another years-long effort to improve Git’s performance and reduce the footprint of legacy scripts.
Last but not least, there are a few under-the-hood improvements to Git’s CI infrastructure. Git has a handful of long-running Windows-specific CI builds that have been disabled in this release (outside of the git-for-windows repository). If you’re a Git developer, this means that your CI runs should complete more quickly, and consume fewer resources per push.
On a similar front, you can now configure whether or not pushes to branches that already have active CI jobs running should cancel those jobs or not. This may be useful when pushing to the same branch multiple times while working on a topic.
This can be configured using Git’s ci-config mechanism, by adding a special script called skip-concurrent to a branch called ci-config. If your fork of Git has that branch then Git will consult the relevant scripts there to determine whether CI should be run concurrently or not based on which branch you’re working on.
That’s just a sample of changes from the latest release. For more, check out the release notes for 2.40, or any previous version in the Git repository.
Until recently, the site-search on GitHub Docs was an in-memory solution. While it was a great starting point, we ultimately needed a solution that would scale with our growing needs, so we rewrote it in Elasticsearch. In this blog post, we share how the implementation works and how you can impress users with your site-search by doing the same.
How it started
Our previous solution couldn’t scale because it required loading all of the records into memory (the Node.js code that Express.js runs). This means that we’d need to scrape all the searchable text—title, headings, breadcrumbs, content, etc.—and store that data somewhere so it could quickly be loaded in the Node process runtime. To store the data, we used the Git repository itself, so when we built the Docker image run in Azure, it would have access to all the searchable text from disk.
It would take a little while to load in all the searchable text, so we generated a serializedindex from the searchable text, and stored that on disk too. This solution is OKish if your data is small, but we have eight languages and five different versions per language.
Running Elasticsearch locally
The reason we picked Elasticsearch over other alternatives is a story for another day, but one compelling argument is that it’s possible to run it locally on your laptop. For the majority of contributors who make copy edits, the task of installing Elasticsearch locally isn’t necessary. So by default, our /api/search Express.js middleware looks something like this:
When someone uses http://localhost:4000/api/search on their laptop (or Codespaces) it simply forwards the Elasticsearch stuff to our production server. That way, engineers (like myself) who are debugging the search engine locally can start an Elasticsearch on http://localhost:9200 and set that in their .env file. Now engineers can quickly try new search query techniques entirely with their own local Elasticsearch.
The search implementation
A core idea in our search implementation is that we make only one single query to Elasticsearch, which contains our entire specification for how we want results ranked. Rather than sending a single request, we could try a more specific search query first, then, if there are too few results, we could attempt a second, less defined search query:
// NOTE! This is NOT what we do.

let result = await client.search({ index, body: searchQueryStrict })
if (result.hits.length === 0) {
  // nothing found when being strict, try again with a loose query
  result = await client.search({ index, body: searchQueryLoose })
}
To ensure we get the most exact results, we use boosts and a matrix of various matching techniques. In somewhat pseudo code it looks like this:
If the query is multiple terms (we’ll explain what _explicit means later):
Sure, it can look like a handful of queries, but Elasticsearch is fast. Most of the total time is the network time to send the query and receive the results. In fact, the time it takes to execute the entire search query (excluding the networking) hovers quite steadily at 20 milliseconds on our Elasticsearch server.
About 55% of all searches on docs.github.com are multi-term queries, for example, actions rest. Meaning that in roughly half the cases, we can use the simplified queries because we can omit things like the match_phrase parts of the total query.
Before getting into the various combinations of searches, there’s a section later about what “explicit” means. Essentially, each field is indexed twice. E.g. title and title_explicit. It’s the same content underneath but it’s tokenized differently, which affects how it matches to queries—and that difference is exploited by having different boostings.
The nodes that make up the matrix are:
Fields:
title (the <h1> text)
headings (the <h2> texts)
content (the bulk of the article text)
Analyzer:
explicit (no stemming and no synonyms)
regular (full Snowball stemming and possibly synonyms)
Matches: (on multi-term queries)
match_phrase
match with OR (docs that contain “foo” OR “bar”)
match with AND (docs that contain “foo” AND “bar”)
Each of these combinations has a unique boost number, which boosts the ranking of the matched result. The actual number doesn’t matter much, but what matters is that the boost numbers are different from each other. For example, a match on the title has a slightly higher boost than a match on the content. And a match where all words are present has a slightly higher boost than when only some of the words match. Another example: if the search term is docker action, the users would prefer to see “Creating a Docker container action” ahead of “Publishing Docker images” or “Metadata syntax for GitHub Actions.”
Each of the above nodes has a boost calculation that looks something like this:
So that’s what we send to Elasticsearch. It’s like a complex wishlist saying, “I want a bicycle for Christmas. But if you have a pink one, even better. And a pink one with blue stripes is even better still. Actually, bestest would be a pink one with blue stripes and a brass bell.”
What’s important, in terms of an ideal implementation and search result for users, is that we use our human and contextual intelligence to define these parameters. Some of it is fairly obvious and some is more subtle. For example, we think a phrase match on the title without the need for stemming is the best possible match, so that gets the highest boost.
Why explicit boost is important
If someone types “creating repositories” it should definitely match a title like “Create a private GitHub repository” because of the stems creating => creat <= create and repositories => repository <= repository. We should definitely include those matches that take stemming into account. But if there’s an article that explicitly uses the words that match what the user typed, like “Creating private GitHub repositories,” then we want to boost that article’s ranking because we think that’s more relevant to the searcher.
Another good example of this is the special keyword working-directory which is an actual exact term that can appear inside the content. If someone searches for working-directory, we don’t want to let an (example) title like “Directories that work” overpower the rankings when working-directory and “Directories that work” are both deconstructed to the same two stems [ 'work', 'directori' ].
The solution we rely on is to make two matches: one with stemming and one without. Each one has a different boost. It’s similar to saying, “I’m looking for a ‘Peter’ but if there’s a ‘Petter’ or ‘Pierre’ or ‘Piotr’ that’ll also do. But ideally, ‘Peter’ first and foremost. In fact, give me all the results, but ‘Peter’ first.” So this is what we do. The stemming is great but it can potentially “overpower” search results. This helps with specific keywords that might appear to be English prose. For example “working-directory” even looks like a regular English expression but it’s actually a hardcoded specific keyword.
Search is quickly becoming an art. It’s not enough to just match the terms and display a list of documents that match the terms of the input. For starters, the ranking is crucially important. This is especially true when a search term yields tens or hundreds of matching documents. Years of depending on Google has taught us all to expect the first search result to be the one we want.
To make this a great experience, we try to infer which document the user is genuinely looking for by using pageview metrics as a way to determine which page is most popular. Sure, if the most popular one is offered first, and gets the clicks, it’ll just get even more popular, but it’s a start. We get a lot of pageviews from users Googling something. But we also get regular pageview metrics from users simply navigating themselves to the pages they have figured out has the best information for them.
At the moment, we gather pageview metrics for the top 1,000 most popular URLs. Then we rank them and normalize it to a number between (and including) 0.0 to 1.0. Whatever the number is we add +1.0 and then we multiply this number in Elasticsearch with the match score.
Suppose a search query finds two documents that match, and their match score is 15.6 and 13.2 based on the search implementation mentioned above. Now, suppose that match of 13.2 is on a popular page, its popularity number might be 0.75, so it becomes 13.2 * (1 + 0.75) = 23.1. And the other one that matched a little bit better, has a popularity number of 0.44, so its final number becomes 15.6 * (1 + 0.44) = 22.5, which is less. In conclusion, it gives documents that might not be term-for-term as “matchy” as others a chance to rise above. This also ensures that a hugely popular document that only matched vaguely in the content won’t “overpower” other matches that might have matched in the title.
It’s a tricky challenge, but that’s what makes it so much fun. You have to bake in some human touch to the code as a way of trying to think like your users. It’s also an algorithm that will never reach perfection because even with more and better metrics, the landscape of users and where they come from, is constantly changing. But we’ll try to keep up.
What’s next?
Elasticsearch has a functionality where you can define aliases for words, which they call synonyms. (For example, repo = repository.) The challenge with this feature is how it’s managed and maintained by writers in a convenient and maintainable way.
Currently at GitHub, we base our popularity numbers by pageview metrics. It would be interesting to dig deeper into which page the user lands on. As an example, suppose the reader isn’t sure how to find what they need, so they start on a product landing page (we have about 20 of those) and slowly make their way deeper into the content and finally arrive on the page that supplied the knowledge or answer they want. This process would give each page an equal measure, and that’s not great.
Another exciting idea is to record all the times a search result URL is not clicked on, especially when it shows up higher in the ranking. That would decrease the risk of popular listings only getting more popular. If you record when something is “corrected” by humans, that could be a very powerful signal.
You could also tailor the underlying search based on other contextual variables. For example, if a user is currently inside the REST API docs you could infer that REST API-related docs are slightly preferred when searching for something ambiguous like “billing” (i.e. prefer REST API “About billing” not Billing and payments “Setting your billing email.”).
We use Prometheus to gain insight into all the different pieces of hardware and software that make up our global network. Prometheus allows us to measure health & performance over time and, if there’s anything wrong with any service, let our team know before it becomes a problem.
At the moment of writing this post we run 916 Prometheus instances with a total of around 4.9 billion time series. Here’s a screenshot that shows exact numbers:
That’s an average of around 5 million time series per instance, but in reality we have a mixture of very tiny and very large instances, with the biggest instances storing around 30 million time series each.
Operating such a large Prometheus deployment doesn’t come without challenges. In this blog post we’ll cover some of the issues one might encounter when trying to collect many millions of time series per Prometheus instance.
Metrics cardinality
One of the first problems you’re likely to hear about when you start running your own Prometheus instances is cardinality, with the most dramatic cases of this problem being referred to as “cardinality explosion”.
So let’s start by looking at what cardinality means from Prometheus’ perspective, when it can be a problem and some of the ways to deal with it.
Let’s say we have an application which we want to instrument, which means add some observable properties in the form of metrics that Prometheus can read from our application. A metric can be anything that you can express as a number, for example:
The speed at which a vehicle is traveling.
Current temperature.
The number of times some specific event occurred.
To create metrics inside our application we can use one of many Prometheus client libraries. Let’s pick client_python for simplicity, but the same concepts will apply regardless of the language you use.
from prometheus_client import Counter

# Declare our first metric.
# First argument is the name of the metric.
# Second argument is the description of it.
c = Counter(mugs_of_beverage_total, 'The total number of mugs drank.')

# Call inc() to increment our metric every time a mug was drank.
c.inc()
c.inc()
With this simple code Prometheus client library will create a single metric. For Prometheus to collect this metric we need our application to run an HTTP server and expose our metrics there. The simplest way of doing this is by using functionality provided with client_python itself – see documentation here.
When Prometheus sends an HTTP request to our application it will receive this response:
# HELP mugs_of_beverage_total The total number of mugs drank.
# TYPE mugs_of_beverage_total counter
mugs_of_beverage_total 2
This format and underlying data model are both covered extensively in Prometheus’ own documentation.
We can add more metrics if we like and they will all appear in the HTTP response to the metrics endpoint.
Prometheus metrics can have extra dimensions in form of labels. We can use these to add more information to our metrics so that we can better understand what’s going on.
With our example metric we know how many mugs were consumed, but what if we also want to know what kind of beverage it was? Or maybe we want to know if it was a cold drink or a hot one? Adding labels is very easy and all we need to do is specify their names. Once we do that we need to pass label values (in the same order as label names were specified) when incrementing our counter to pass this extra information.
Let’s adjust the example code to do this.
from prometheus_client import Counter

c = Counter(mugs_of_beverage_total, 'The total number of mugs drank.', ['content', 'temperature'])

c.labels('coffee', 'hot').inc()
c.labels('coffee', 'hot').inc()
c.labels('coffee', 'cold').inc()
c.labels('tea', 'hot').inc()
Our HTTP response will now show more entries:
# HELP mugs_of_beverage_total The total number of mugs drank.
# TYPE mugs_of_beverage_total counter
mugs_of_beverage_total{content="coffee", temperature="hot"} 2
mugs_of_beverage_total{content="coffee", temperature="cold"} 1
mugs_of_beverage_total{content="tea", temperature="hot"} 1
As we can see we have an entry for each unique combination of labels.
And this brings us to the definition of cardinality in the context of metrics. Cardinality is the number of unique combinations of all labels. The more labels you have and the more values each label can take, the more unique combinations you can create and the higher the cardinality.
Metrics vs samples vs time series
Now we should pause to make an important distinction between metrics and time series.
A metric is an observable property with some defined dimensions (labels). In our example case it’s a Counter class object.
A time series is an instance of that metric, with a unique combination of all the dimensions (labels), plus a series of timestamp & value pairs – hence the name “time series”. Names and labels tell us what is being observed, while timestamp & value pairs tell us how that observable property changed over time, allowing us to plot graphs using this data.
What this means is that a single metric will create one or more time series. The number of time series depends purely on the number of labels and the number of all possible values these labels can take.
Every time we add a new label to our metric we risk multiplying the number of time series that will be exported to Prometheus as the result.
In our example we have two labels, “content” and “temperature”, and both of them can have two different values. So the maximum number of time series we can end up creating is four (2*2). If we add another label that can also have two values then we can now export up to eight time series (2*2*2). The more labels we have or the more distinct values they can have the more time series as a result.
If all the label values are controlled by your application you will be able to count the number of all possible label combinations. But the real risk is when you create metrics with label values coming from the outside world.
If instead of beverages we tracked the number of HTTP requests to a web server, and we used the request path as one of the label values, then anyone making a huge number of random requests could force our application to create a huge number of time series. To avoid this it’s in general best to never accept label values from untrusted sources.
To make things more complicated you may also hear about “samples” when reading Prometheus documentation. A sample is something in between metric and time series – it’s a time series value for a specific timestamp. Timestamps here can be explicit or implicit. If a sample lacks any explicit timestamp then it means that the sample represents the most recent value – it’s the current value of a given time series, and the timestamp is simply the time you make your observation at.
If you look at the HTTP response of our example metric you’ll see that none of the returned entries have timestamps. There’s no timestamp anywhere actually. This is because the Prometheus server itself is responsible for timestamps. When Prometheus collects metrics it records the time it started each collection and then it will use it to write timestamp & value pairs for each time series.
That’s why what our application exports isn’t really metrics or time series – it’s samples.
Confusing? Let’s recap:
We start with a metric – that’s simply a definition of something that we can observe, like the number of mugs drunk.
Our metrics are exposed as a HTTP response. That response will have a list of samples – these are individual instances of our metric (represented by name & labels), plus the current value.
When Prometheus collects all the samples from our HTTP response it adds the timestamp of that collection and with all this information together we have a time series.
Cardinality related problems
Each time series will cost us resources since it needs to be kept in memory, so the more time series we have, the more resources metrics will consume. This is true both for client libraries and Prometheus server, but it’s more of an issue for Prometheus itself, since a single Prometheus server usually collects metrics from many applications, while an application only keeps its own metrics.
Since we know that the more labels we have the more time series we end up with, you can see when this can become a problem. Simply adding a label with two distinct values to all our metrics might double the number of time series we have to deal with. Which in turn will double the memory usage of our Prometheus server. If we let Prometheus consume more memory than it can physically use then it will crash.
This scenario is often described as “cardinality explosion” – some metric suddenly adds a huge number of distinct label values, creates a huge number of time series, causes Prometheus to run out of memory and you lose all observability as a result.
How is Prometheus using memory?
To better handle problems with cardinality it’s best if we first get a better understanding of how Prometheus works and how time series consume memory.
For that let’s follow all the steps in the life of a time series inside Prometheus.
Step one – HTTP scrape
The process of sending HTTP requests from Prometheus to our application is called “scraping”. Inside the Prometheus configuration file we define a “scrape config” that tells Prometheus where to send the HTTP request, how often and, optionally, to apply extra processing to both requests and responses.
It will record the time it sends HTTP requests and use that later as the timestamp for all collected time series.
After sending a request it will parse the response looking for all the samples exposed there.
Step two – new time series or an update?
Once Prometheus has a list of samples collected from our application it will save it into TSDB – Time Series DataBase – the database in which Prometheus keeps all the time series.
But before doing that it needs to first check which of the samples belong to the time series that are already present inside TSDB and which are for completely new time series.
As we mentioned before a time series is generated from metrics. There is a single time series for each unique combination of metrics labels.
This means that Prometheus must check if there’s already a time series with identical name and exact same set of labels present. Internally time series names are just another label called __name__, so there is no practical distinction between name and labels. Both of the representations below are different ways of exporting the same time series:
Since everything is a label Prometheus can simply hash all labels using sha256 or any other algorithm to come up with a single ID that is unique for each time series.
Knowing that it can quickly check if there are any time series already stored inside TSDB that have the same hashed value. Basically our labels hash is used as a primary key inside TSDB.
Step three – appending to TSDB
Once TSDB knows if it has to insert new time series or update existing ones it can start the real work.
Internally all time series are stored inside a map on a structure called Head. That map uses labels hashes as keys and a structure called memSeries as values. Those memSeries objects are storing all the time series information. The struct definition for memSeries is fairly big, but all we really need to know is that it has a copy of all the time series labels and chunks that hold all the samples (timestamp & value pairs).
Labels are stored once per each memSeries instance.
Samples are stored inside chunks using “varbit” encoding which is a lossless compression scheme optimized for time series data. Each chunk represents a series of samples for a specific time range. This helps Prometheus query data faster since all it needs to do is first locate the memSeries instance with labels matching our query and then find the chunks responsible for time range of the query.
By default Prometheus will create a chunk per each two hours of wall clock. So there would be a chunk for: 00:00 – 01:59, 02:00 – 03:59, 04:00 – 05:59, …, 22:00 – 23:59.
There’s only one chunk that we can append to, it’s called the “Head Chunk”. It’s the chunk responsible for the most recent time range, including the time of our scrape. Any other chunk holds historical samples and therefore is read-only.
There is a maximum of 120 samples each chunk can hold. This is because once we have more than 120 samples on a chunk efficiency of “varbit” encoding drops. TSDB will try to estimate when a given chunk will reach 120 samples and it will set the maximum allowed time for current Head Chunk accordingly.
If we try to append a sample with a timestamp higher than the maximum allowed time for current Head Chunk, then TSDB will create a new Head Chunk and calculate a new maximum time for it based on the rate of appends.
All chunks must be aligned to those two hour slots of wall clock time, so if TSDB was building a chunk for 10:00-11:59 and it was already “full” at 11:30 then it would create an extra chunk for the 11:30-11:59 time range.
Since the default Prometheus scrape interval is one minute it would take two hours to reach 120 samples.
What this means is that using Prometheus defaults each memSeries should have a single chunk with 120 samples on it for every two hours of data.
Going back to our time series – at this point Prometheus either creates a new memSeries instance or uses already existing memSeries. Once it has a memSeries instance to work with it will append our sample to the Head Chunk. This might require Prometheus to create a new chunk if needed.
Step four – memory-mapping old chunks
After a few hours of Prometheus running and scraping metrics we will likely have more than one chunk on our time series:
One “Head Chunk” – containing up to two hours of the last two hour wall clock slot.
One or more for historical ranges – these chunks are only for reading, Prometheus won’t try to append anything here.
Since all these chunks are stored in memory Prometheus will try to reduce memory usage by writing them to disk and memory-mapping. The advantage of doing this is that memory-mapped chunks don’t use memory unless TSDB needs to read them.
The Head Chunk is never memory-mapped, it’s always stored in memory.
Step five – writing blocks to disk
Up until now all time series are stored entirely in memory and the more time series you have, the higher Prometheus memory usage you’ll see. The only exception are memory-mapped chunks which are offloaded to disk, but will be read into memory if needed by queries.
This allows Prometheus to scrape and store thousands of samples per second, our biggest instances are appending 550k samples per second, while also allowing us to query all the metrics simultaneously.
But you can’t keep everything in memory forever, even with memory-mapping parts of data.
Every two hours Prometheus will persist chunks from memory onto the disk. This process is also aligned with the wall clock but shifted by one hour.
When using Prometheus defaults and assuming we have a single chunk for each two hours of wall clock we would see this:
02:00 – create a new chunk for 02:00 – 03:59 time range
03:00 – write a block for 00:00 – 01:59
04:00 – create a new chunk for 04:00 – 05:59 time range
05:00 – write a block for 02:00 – 03:59
…
22:00 – create a new chunk for 22:00 – 23:59 time range
23:00 – write a block for 20:00 – 21:59
Once a chunk is written into a block it is removed from memSeries and thus from memory. Prometheus will keep each block on disk for the configured retention period.
Blocks will eventually be “compacted”, which means that Prometheus will take multiple blocks and merge them together to form a single block that covers a bigger time range. This process helps to reduce disk usage since each block has an index taking a good chunk of disk space. By merging multiple blocks together, big portions of that index can be reused, allowing Prometheus to store more data using the same amount of storage space.
Step six – garbage collection
After a chunk was written into a block and removed from memSeries we might end up with an instance of memSeries that has no chunks. This would happen if any time series was no longer being exposed by any application and therefore there was no scrape that would try to append more samples to it.
A common pattern is to export software versions as a build_info metric, Prometheus itself does this too:
prometheus_build_info{version="2.42.0"} 1
When Prometheus 2.43.0 is released this metric would be exported as:
prometheus_build_info{version="2.43.0"} 1
Which means that a time series with version=”2.42.0” label would no longer receive any new samples.
Once the last chunk for this time series is written into a block and removed from the memSeries instance we have no chunks left. This means that our memSeries still consumes some memory (mostly labels) but doesn’t really do anything.
To get rid of such time series Prometheus will run “head garbage collection” (remember that Head is the structure holding all memSeries) right after writing a block. This garbage collection, among other things, will look for any time series without a single chunk and remove it from memory.
Since this happens after writing a block, and writing a block happens in the middle of the chunk window (two hour slices aligned to the wall clock) the only memSeries this would find are the ones that are “orphaned” – they received samples before, but not anymore.
What does this all mean?
TSDB used in Prometheus is a special kind of database that was highly optimized for a very specific workload:
Time series scraped from applications are kept in memory.
Samples are compressed using encoding that works best if there are continuous updates.
Chunks that are a few hours old are written to disk and removed from memory.
When time series disappear from applications and are no longer scraped they still stay in memory until all chunks are written to disk and garbage collection removes them.
This means that Prometheus is most efficient when continuously scraping the same time series over and over again. It’s least efficient when it scrapes a time series just once and never again – doing so comes with a significant memory usage overhead when compared to the amount of information stored using that memory.
If we try to visualize how the perfect type of data Prometheus was designed for looks like we’ll end up with this:
A few continuous lines describing some observed properties.
If, on the other hand, we want to visualize the type of data that Prometheus is the least efficient when dealing with, we’ll end up with this instead:
Here we have single data points, each for a different property that we measure.
Although you can tweak some of Prometheus’ behavior and tweak it more for use with short lived time series, by passing one of the hidden flags, it’s generally discouraged to do so. These flags are only exposed for testing and might have a negative impact on other parts of Prometheus server.
To get a better understanding of the impact of a short lived time series on memory usage let’s take a look at another example.
Let’s see what happens if we start our application at 00:25, allow Prometheus to scrape it once while it exports:
prometheus_build_info{version="2.42.0"} 1
And then immediately after the first scrape we upgrade our application to a new version:
prometheus_build_info{version="2.43.0"} 1
At 00:25 Prometheus will create our memSeries, but we will have to wait until Prometheus writes a block that contains data for 00:00-01:59 and runs garbage collection before that memSeries is removed from memory, which will happen at 03:00.
This single sample (data point) will create a time series instance that will stay in memory for over two and a half hours using resources, just so that we have a single timestamp & value pair.
If we were to continuously scrape a lot of time series that only exist for a very brief period then we would be slowly accumulating a lot of memSeries in memory until the next garbage collection.
Looking at memory usage of such Prometheus server we would see this pattern repeating over time:
The important information here is that short lived time series are expensive. A time series that was only scraped once is guaranteed to live in Prometheus for one to three hours, depending on the exact time of that scrape.
The cost of cardinality
At this point we should know a few things about Prometheus:
We know what a metric, a sample and a time series is.
We know that the more labels on a metric, the more time series it can create.
We know that each time series will be kept in memory.
We know that time series will stay in memory for a while, even if they were scraped only once.
With all of that in mind we can now see the problem – a metric with high cardinality, especially one with label values that come from the outside world, can easily create a huge number of time series in a very short time, causing cardinality explosion. This would inflate Prometheus memory usage, which can cause Prometheus server to crash, if it uses all available physical memory.
To get a better idea of this problem let’s adjust our example metric to track HTTP requests.
Our metric will have a single label that stores the request path.
from prometheus_client import Counter

c = Counter(http_requests_total, 'The total number of HTTP requests.', ['path'])

# HTTP request handler our web server will call
def handle_request(path):
  c.labels(path).inc()
  ...
If we make a single request using the curl command:
> curl https://app.example.com/index.html
We should see these time series in our application:
# HELP http_requests_total The total number of HTTP requests.
# TYPE http_requests_total counter
http_requests_total{path="/index.html"} 1
But what happens if an evil hacker decides to send a bunch of random requests to our application?
# HELP http_requests_total The total number of HTTP requests.
# TYPE http_requests_total counter
http_requests_total{path="/index.html"} 1
http_requests_total{path="/jdfhd5343"} 1
http_requests_total{path="/3434jf833"} 1
http_requests_total{path="/1333ds5"} 1
http_requests_total{path="/aaaa43321"} 1
With 1,000 random requests we would end up with 1,000 time series in Prometheus. If our metric had more labels and all of them were set based on the request payload (HTTP method name, IPs, headers, etc) we could easily end up with millions of time series.
Often it doesn’t require any malicious actor to cause cardinality related problems. A common class of mistakes is to have an error label on your metrics and pass raw error objects as values.
from prometheus_client import Counter

c = Counter(errors_total, 'The total number of errors.', [error])

def my_func:
  try:
    ...
  except Exception as err:
    c.labels(err).inc()
This works well if errors that need to be handled are generic, for example “Permission Denied”:
errors_total{error="Permission Denied"} 1
But if the error string contains some task specific information, for example the name of the file that our application didn’t have access to, or a TCP connection error, then we might easily end up with high cardinality metrics this way:
Once scraped all those time series will stay in memory for a minimum of one hour. It’s very easy to keep accumulating time series in Prometheus until you run out of memory.
Each time series stored inside Prometheus (as a memSeries instance) consists of:
Copy of all labels.
Chunks containing samples.
Extra fields needed by Prometheus internals.
The amount of memory needed for labels will depend on the number and length of these. The more labels you have, or the longer the names and values are, the more memory it will use.
The way labels are stored internally by Prometheus also matters, but that’s something the user has no control over. There is an open pull request which improves memory usage of labels by storing all labels as a single string.
Chunks will consume more memory as they slowly fill with more samples, after each scrape, and so the memory usage here will follow a cycle – we start with low memory usage when the first sample is appended, then memory usage slowly goes up until a new chunk is created and we start again.
You can calculate how much memory is needed for your time series by running this query on your Prometheus server:
Note that your Prometheus server must be configured to scrape itself for this to work.
Secondly this calculation is based on all memory used by Prometheus, not only time series data, so it’s just an approximation. Use it to get a rough idea of how much memory is used per time series and don’t assume it’s that exact number.
Thirdly Prometheus is written in Golang which is a language with garbage collection. The actual amount of physical memory needed by Prometheus will usually be higher as a result, since it will include unused (garbage) memory that needs to be freed by Go runtime.
Protecting Prometheus from cardinality explosions
Prometheus does offer some options for dealing with high cardinality problems. There are a number of options you can set in your scrape configuration block. Here is the extract of the relevant options from Prometheus documentation:
# An uncompressed response body larger than this many bytes will cause the
# scrape to fail. 0 means no limit. Example: 100MB.
# This is an experimental feature, this behaviour could
# change or be removed in the future.
[ body_size_limit: <size> | default = 0 ]
# Per-scrape limit on number of scraped samples that will be accepted.
# If more than this number of samples are present after metric relabeling
# the entire scrape will be treated as failed. 0 means no limit.
[ sample_limit: <int> | default = 0 ]

# Per-scrape limit on number of labels that will be accepted for a sample. If
# more than this number of labels are present post metric-relabeling, the
# entire scrape will be treated as failed. 0 means no limit.
[ label_limit: <int> | default = 0 ]

# Per-scrape limit on length of labels name that will be accepted for a sample.
# If a label name is longer than this number post metric-relabeling, the entire
# scrape will be treated as failed. 0 means no limit.
[ label_name_length_limit: <int> | default = 0 ]

# Per-scrape limit on length of labels value that will be accepted for a sample.
# If a label value is longer than this number post metric-relabeling, the
# entire scrape will be treated as failed. 0 means no limit.
[ label_value_length_limit: <int> | default = 0 ]

# Per-scrape config limit on number of unique targets that will be
# accepted. If more than this number of targets are present after target
# relabeling, Prometheus will mark the targets as failed without scraping them.
# 0 means no limit. This is an experimental feature, this behaviour could
# change in the future.
[ target_limit: <int> | default = 0 ]
Setting all the label length related limits allows you to avoid a situation where extremely long label names or values end up taking too much memory.
Going back to our metric with error labels we could imagine a scenario where some operation returns a huge error message, or even stack trace with hundreds of lines. If such a stack trace ended up as a label value it would take a lot more memory than other time series, potentially even megabytes. Since labels are copied around when Prometheus is handling queries this could cause significant memory usage increase.
Setting label_limit provides some cardinality protection, but even with just one label name and huge number of values we can see high cardinality. Passing sample_limit is the ultimate protection from high cardinality. It enables us to enforce a hard limit on the number of time series we can scrape from each application instance.
The downside of all these limits is that breaching any of them will cause an error for the entire scrape.
If we configure a sample_limit of 100 and our metrics response contains 101 samples, then Prometheus won’t scrape anything at all. This is a deliberate design decision made by Prometheus developers.
The main motivation seems to be that dealing with partially scraped metrics is difficult and you’re better off treating failed scrapes as incidents.
How does Cloudflare deal with high cardinality?
We have hundreds of data centers spread across the world, each with dedicated Prometheus servers responsible for scraping all metrics.
Each Prometheus is scraping a few hundred different applications, each running on a few hundred servers.
Combined that’s a lot of different metrics. It’s not difficult to accidentally cause cardinality problems and in the past we’ve dealt with a fair number of issues relating to it.
Basic limits
The most basic layer of protection that we deploy are scrape limits, which we enforce on all configured scrapes. These are the sane defaults that 99% of application exporting metrics would never exceed.
By default we allow up to 64 labels on each time series, which is way more than most metrics would use.
We also limit the length of label names and values to 128 and 512 characters, which again is more than enough for the vast majority of scrapes.
Finally we do, by default, set sample_limit to 200 – so each application can export up to 200 time series without any action.
What happens when somebody wants to export more time series or use longer labels? All they have to do is set it explicitly in their scrape configuration.
Those limits are there to catch accidents and also to make sure that if any application is exporting a high number of time series (more than 200) the team responsible for it knows about it. This helps us avoid a situation where applications are exporting thousands of times series that aren’t really needed. Once you cross the 200 time series mark, you should start thinking about your metrics more.
CI validation
The next layer of protection is checks that run in CI (Continuous Integration) when someone makes a pull request to add new or modify existing scrape configuration for their application.
These checks are designed to ensure that we have enough capacity on all Prometheus servers to accommodate extra time series, if that change would result in extra time series being collected.
For example, if someone wants to modify sample_limit, let’s say by changing existing limit of 500 to 2,000, for a scrape with 10 targets, that’s an increase of 1,500 per target, with 10 targets that’s 10*1,500=15,000 extra time series that might be scraped. Our CI would check that all Prometheus servers have spare capacity for at least 15,000 time series before the pull request is allowed to be merged.
This gives us confidence that we won’t overload any Prometheus server after applying changes.
Our custom patches
One of the most important layers of protection is a set of patches we maintain on top of Prometheus. There is an open pull request on the Prometheus repository. This patchset consists of two main elements.
First is the patch that allows us to enforce a limit on the total number of time series TSDB can store at any time. There is no equivalent functionality in a standard build of Prometheus, if any scrape produces some samples they will be appended to time series inside TSDB, creating new time series if needed.
This is the standard flow with a scrape that doesn’t set any sample_limit:
With our patch we tell TSDB that it’s allowed to store up to N time series in total, from all scrapes, at any time. So when TSDB is asked to append a new sample by any scrape, it will first check how many time series are already present.
If the total number of stored time series is below the configured limit then we append the sample as usual.
The difference with standard Prometheus starts when a new sample is about to be appended, but TSDB already stores the maximum number of time series it’s allowed to have. Our patched logic will then check if the sample we’re about to append belongs to a time series that’s already stored inside TSDB or is it a new time series that needs to be created.
If the time series already exists inside TSDB then we allow the append to continue. If the time series doesn’t exist yet and our append would create it (a new memSeries instance would be created) then we skip this sample. We will also signal back to the scrape logic that some samples were skipped.
This is the modified flow with our patch:
By running “go_memstats_alloc_bytes / prometheus_tsdb_head_series” query we know how much memory we need per single time series (on average), we also know how much physical memory we have available for Prometheus on each server, which means that we can easily calculate the rough number of time series we can store inside Prometheus, taking into account the fact the there’s garbage collection overhead since Prometheus is written in Go:
memory available to Prometheus / bytes per time series = our capacity
This doesn’t capture all complexities of Prometheus but gives us a rough estimate of how many time series we can expect to have capacity for.
By setting this limit on all our Prometheus servers we know that it will never scrape more time series than we have memory for. This is the last line of defense for us that avoids the risk of the Prometheus server crashing due to lack of memory.
The second patch modifies how Prometheus handles sample_limit – with our patch instead of failing the entire scrape it simply ignores excess time series. If we have a scrape with sample_limit set to 200 and the application exposes 201 time series, then all except one final time series will be accepted.
This is the standard Prometheus flow for a scrape that has the sample_limit option set:
The entire scrape either succeeds or fails. Prometheus simply counts how many samples are there in a scrape and if that’s more than sample_limit allows it will fail the scrape.
With our custom patch we don’t care how many samples are in a scrape. Instead we count time series as we append them to TSDB. Once we appended sample_limit number of samples we start to be selective.
Any excess samples (after reaching sample_limit) will only be appended if they belong to time series that are already stored inside TSDB.
The reason why we still allow appends for some samples even after we’re above sample_limit is that appending samples to existing time series is cheap, it’s just adding an extra timestamp & value pair.
Creating new time series on the other hand is a lot more expensive – we need to allocate new memSeries instances with a copy of all labels and keep it in memory for at least an hour.
This is how our modified flow looks:
Both patches give us two levels of protection.
The TSDB limit patch protects the entire Prometheus from being overloaded by too many time series.
This is because the only way to stop time series from eating memory is to prevent them from being appended to TSDB. Once they’re in TSDB it’s already too late.
While the sample_limit patch stops individual scrapes from using too much Prometheus capacity, which could lead to creating too many time series in total and exhausting total Prometheus capacity (enforced by the first patch), which would in turn affect all other scrapes since some new time series would have to be ignored. At the same time our patch gives us graceful degradation by capping time series from each scrape to a certain level, rather than failing hard and dropping all time series from affected scrape, which would mean losing all observability of affected applications.
It’s also worth mentioning that without our TSDB total limit patch we could keep adding new scrapes to Prometheus and that alone could lead to exhausting all available capacity, even if each scrape had sample_limit set and scraped fewer time series than this limit allows.
Extra metrics exported by Prometheus itself tell us if any scrape is exceeding the limit and if that happens we alert the team responsible for it.
This also has the benefit of allowing us to self-serve capacity management – there’s no need for a team that signs off on your allocations, if CI checks are passing then we have the capacity you need for your applications.
The main reason why we prefer graceful degradation is that we want our engineers to be able to deploy applications and their metrics with confidence without being subject matter experts in Prometheus. That way even the most inexperienced engineers can start exporting metrics without constantly wondering “Will this cause an incident?”.
Another reason is that trying to stay on top of your usage can be a challenging task. It might seem simple on the surface, after all you just need to stop yourself from creating too many metrics, adding too many labels or setting label values from untrusted sources.
In reality though this is as simple as trying to ensure your application doesn’t use too many resources, like CPU or memory – you can achieve this by simply allocating less memory and doing fewer computations. It doesn’t get easier than that, until you actually try to do it. The more any application does for you, the more useful it is, the more resources it might need. Your needs or your customers’ needs will evolve over time and so you can’t just draw a line on how many bytes or cpu cycles it can consume. If you do that, the line will eventually be redrawn, many times over.
In general, having more labels on your metrics allows you to gain more insight, and so the more complicated the application you’re trying to monitor, the more need for extra labels.
In addition to that in most cases we don’t see all possible label values at the same time, it’s usually a small subset of all possible combinations. For example our errors_total metric, which we used in example before, might not be present at all until we start seeing some errors, and even then it might be just one or two errors that will be recorded. This holds true for a lot of labels that we see are being used by engineers.
This means that looking at how many time series an application could potentially export, and how many it actually exports, gives us two completely different numbers, which makes capacity planning a lot harder.
Especially when dealing with big applications maintained in part by multiple different teams, each exporting some metrics from their part of the stack.
For that reason we do tolerate some percentage of short lived time series even if they are not a perfect fit for Prometheus and cost us more memory.
Documentation
Finally we maintain a set of internal documentation pages that try to guide engineers through the process of scraping and working with metrics, with a lot of information that’s specific to our environment.
Prometheus and PromQL (Prometheus Query Language) are conceptually very simple, but this means that all the complexity is hidden in the interactions between different elements of the whole metrics pipeline.
Managing the entire lifecycle of a metric from an engineering perspective is a complex process.
You must define your metrics in your application, with names and labels that will allow you to work with resulting time series easily. Then you must configure Prometheus scrapes in the correct way and deploy that to the right Prometheus server. Next you will likely need to create recording and/or alerting rules to make use of your time series. Finally you will want to create a dashboard to visualize all your metrics and be able to spot trends.
There will be traps and room for mistakes at all stages of this process. We covered some of the most basic pitfalls in our previous blog post on Prometheus – Monitoring our monitoring. In the same blog post we also mention one of the tools we use to help our engineers write valid Prometheus alerting rules.
Having good internal documentation that covers all of the basics specific for our environment and most common tasks is very important. Being able to answer “How do I X?” yourself without having to wait for a subject matter expert allows everyone to be more productive and move faster, while also avoiding Prometheus experts from answering the same questions over and over again.
Closing thoughts
Prometheus is a great and reliable tool, but dealing with high cardinality issues, especially in an environment where a lot of different applications are scraped by the same Prometheus server, can be challenging.
We had a fair share of problems with overloaded Prometheus instances in the past and developed a number of tools that help us deal with them, including custom patches.
But the key to tackling high cardinality was better understanding how Prometheus works and what kind of usage patterns will be problematic.
Having better insight into Prometheus internals allows us to maintain a fast and reliable observability platform without too much red tape, and the tooling we’ve developed around it, some of which is open sourced, helps our engineers avoid most common pitfalls and deploy with confidence.
Which programming language has been around for more than three decades and continues to grow in popularity each year?
If you guessed Python, you nailed it. In the 2022 Octoverse report, we found that Python remains the second most-used programming language on GitHub. Interestingly, Python’s use grew more than 22 percent year over year with more than four million developers on GitHub using it at some point in 2022.
In this article, we’ll dive into a brief history of Python, its benefits, its use cases, and seek to answer why a program language conceived in the 1980s continues to dominate development. And, since this is GitHub, we’ll also offer a few useful tips and tricks for developers new to—and experienced in—Python.
So, what is Python?
Python is a high-level, interpreted programming language with a simple syntax, which makes it easily readable and extremely user- and beginner-friendly. Originally built to satisfy Guido Van Rossum’s desire for a programming language that was simple to use and beautiful to look at, Python was first released to the world in 1991.
Since its development, it has grown to have widespread applicability for developers, data scientists, researchers, and more. But how, you may ask, can a coding language be simple and beautiful to look at? Here’s some proof:
Python
print("Hello world.")
vs.
Java
public class HelloWorld {
    public static void main (String[]args) {
      System.out.println.("Hello world");
    }
}
Since Python is a general-purpose language, it can be used in a variety of applications, and its uncomplicated nature makes it an excellent language for automating tasks, building websites or software, and analyzing data.
Python also has several other characteristics that make it popular amongst developers and engineers. These include:
It’s easy to read. Python code uses English keywords rather than punctuation, and its line breaks help define the code blocks. In practice, this means you can identify what the code is designed to do simply by looking at it.
It’s portable. Some languages require you to modify code to run on different platforms, but Python is a cross-platform language, which means you can run the same code on any operating system with a Python interpreter.
It’s extendable. Python code can be written in other languages (such as C++), and users can add low-level modules to the Python interpreter to customize and optimize their tools.
It has a broad standard library. This library is available for anyone to access and means that users don’t have to write code for every single function—they can access built-in modules that help with issues in everyday programming and more.
What is Python commonly used for?
Python can be used for just about anything, from web and software development to machine learning and artificial intelligence (AI). Let’s take a look at some of its most common use cases.
import antigravity

def main():
    antigravity.fly()

if __name__ == '__main__':
    main()
Run this command to check out an inside joke among Python developers.
Using Python for web and software development
Python is a popular language for web and software development because you can create complex, multi-protocol applications while maintaining concise, readable syntax. In fact, some of the most popular applications were built with Python. Plus, Python’s open source community provides developers with an extensive amount of reusable code, frameworks, and support. Case in point: Django is one of the most-used Python frameworks designed by experienced developers to help others accelerate their application build times and avoid issues that might balk their progress.
Using Python for task automation
One of Python’s key benefits is its ability to automate manual, repetitive tasks. With Python, you can learn how to automate just about anything by using either built-in modules or pre-written code from its robust library. Or you can write your own custom scripts to perform specific actions. For example, you can easily automate emails with the “smtplib” module or copy files with the “shutil” module. Python also has a robust set of testing frameworks, which makes it an excellent language for test automation. Frameworks such as Pytest, Behave, and Robot allow developers to write simple yet effective tests to ensure the quality of their builds.
Using Python for machine learning and data science
Here’s a fun fact: Python is the top preferred language for data science and research. Since its syntax is easily understandable and adaptable, people with little-to-no development experience can easily learn Python and use it to manipulate data for research, reporting, predictable or regression analyses, and more. Collecting and parsing data can be a time-consuming task for data scientists. Python is also one of the top languages for training machine learning (ML) models. Through specific algorithms, these models can analyze and identify patterns in data to make predictions or decisions based on that data. They also constantly evolve based on outputs of previous datasets to confront new variables. Data scientists and developers training ML models often utilize libraries, such as NumPy, Pandas, and Matplotlib, to automate functions like cleaning, data transformation, and visualization.
Using Python for financial analysis
Similar to how Python can assist data scientists with the heavy lift of large data sets, Python is widely used in the financial industry to quickly perform complex computations. Stock markets generate huge amounts of data, and Python can be used to import data on stock prices and generate strategies through algorithms to identify trading opportunities. The language can also be used for portfolio optimization, risk management, financial modeling and visualization, cryptocurrency analysis, and even fraud detection.
Using Python for and artificial intelligence
Python can also be found in some of the most complex, artificial intelligence (AI) technologies—and it’s actually one of the preferred languages for AI. Python’s concise and readable code allows developers to create consistent, reliable systems, and its vast library provides a number of frameworks like PyBrain, which offers developers powerful algorithms for machine learning tasks. Plus, Python’s visualization capabilities can help convert these large datasets for AI or ML into comprehensible graphs or reports. Interestingly enough, OpenAI, the artificial intelligence research lab, utilizes the Python framework, Pytorch, as their standard framework for deep learning, which trains its AI systems.
Why is Python so popular?
In addition to its relative simplicity to learn, there are a few other reasons why Python continues to consistently grow in popularity. These include:
It’s more productive. Compared to some other more complex programming languages like C++, Python’s syntax allows users to do more with less and cut down on time and effort to write the same lines of code.
It has an expansive, supportive community of users. Even the best developers run into problems— and this is where user communities can become an invaluable resource. Python has a huge community with documentation, tutorials, tips, and tricks to master the language. The Python community on GitHub, for example, offers everything from information on the latest version of the language to bug reports and update notes.
It’s academic. Python has become the go-to language in academia with some students even encountering Python as early as elementary school. (Believe it or not, there are children’s picture books dedicated to Python.) While computer science students are often taught Python, its use extends beyond that discipline into other areas of STEM and academic research. For example, Python can be used to solve differential equations, perform statistical analyses, simulate and track particle diffusion, and more.
It has high corporate demand. Because of its wide scale applicability in development and data analysis work, learning and knowing Python is often considered a top-skill among job seekers. According to Statista, Python was the third most demanded language in 2022 by recruiters worldwide.
The bottom line
Python is everywhere—and it’s been used to build a significant number of the technologies, websites, and even systems most people encounter on a daily basis. It powers everything from your favorite video streaming service to the ML algorithms that can help you make your next cryptocurrency trade. And for an even broader scope example (pun absolutely intended), NASA uses Python to power data analysis with its sophisticated James Webb Space Telescope, which makes it one of the few programming languages that is, quite literally, out of this world.
How to get started with Python
A quick Google search will yield hundreds of resources out there to jumpstart your Python journey—and that can quickly get a little overwhelming. To simplify things, here are a few helpful GitHub repositories to help you get started with Python:
Explore pre-built Python algorithms: From networking flows to physics and neural networks, this repository is a great guide to building algorithms in Python.
Learn Python in 30 days: This step-by-step guide will walk you through the basics of Python in 30 days.
Grab some tips from this cheatsheet: Check out this collection of Python scripts with code examples and explanations for learning the language.
Sharpen your Python skills: Pick up some tips from this study guide for both beginner and seasoned users built by a Python superfan!
GitHub offers two easier ways to start working with Python: GitHub Codespaces and GitHub Copilot.
You can start building today for free with GitHub Codespaces, which every developer on GitHub gets 60 free hours of use time per month to spin up a development environment in the cloud from any device at speed. Check out the Django quick start template to begin coding right in your browser!
You can also use GitHub Copilot, GitHub’s AI pair programmer, to write your first lines of Python. Here’s how:
Install the GitHub Copilot extension into your code editor.
Describe the purpose of your project in a comment.
Write a comment describing which libraries you may need.
Start tabbing and let GitHub Copilot suggest lines of code to help you learn new techniques or methods.
From machine learning to data analysis, Python’s versatility allows it to continue its explosive growth with developers and non-developers alike. Experiment with Python through GitHub or on your local machine to be part of this growth and get started today!
Grab’s real-time data platform team, Coban, has been managing infrastructure resources via Infrastructure-as-code (IaC). Through the IaC approach, Terraform is used to maintain infrastructure consistency, automation, and ease of deployment of our streaming infrastructure, notably:
With Grab’s exponential growth, there needs to be a better way to scale infrastructure automatically. Moving towards GitOps processes benefits us in many ways:
Versioned and immutable: With our source code being stored in Git repositories, the desired state of infrastructure is stored in an environment that enforces immutability, versioning, and retention of version history, which helps with auditing and traceability.
Faster deployment: By automating the process of deploying resources after code is merged, we eliminate manual steps and improve overall engineering productivity while maintaining consistency.
Easier rollbacks: It’s as simple as making a revert for a Git commit as compared to creating a merge request (MR) and commenting Atlantis commands, which add extra steps and contribute to a higher mean-time-to-resolve (MTTR) for incidents.
Background
Originally, Coban implemented automation on Terraform resources using Atlantis, an application that operates based on user comments on MRs.
Fig. 1 User flow with Atlantis
We have come a long way with Atlantis. It has helped us to automate our workflows and enable self-service capabilities for our engineers. However, there were a few limitations in our setup, which we wanted to improve:
Course grained: There is no way to restrict the kind of Terraform resources users can create, which introduces security issues. For example, if a user is one of the Code owners, they can create another IAM role with Admin privileges with approval from their own team anywhere in the repository.
Limited automation: Users are still required to make comments in their MR such as atlantis apply. This requires the learning of Atlantis commands and is prone to human errors.
Limited capability: Having to rely entirely on Terraform and Hashicorp Configuration Language (HCL) functions to validate user input comes with limitations. For example, the ability to validate an input variable based on the value of another has been a requested feature for a long time.
Not adhering to Don’t Repeat Yourself (DRY) principle: Users need to create an entire Terraform project with boilerplate codes such as Terraform environment, local variables, and Terraform provider configurations to create a simple resource such as a Kafka topic.
Solution
We have developed an in-house GitOps solution named Khone. Its name was inspired by the Khone Phapheng Waterfall. We have evaluated some of the best and most widely used GitOps products available but chose not to go with any as the majority of them aim to support Kubernetes native or custom resources, and we needed infrastructure provisioning that is beyond Kubernetes. With our approach, we have full control of the entire user flow and its implementation, and thus we benefit from:
Security: The ability to secure the pipeline with many customised scripts and workflows.
Simple user experience (UX): Simplified user flow and prevents human errors with automation.
DRY: Minimise boilerplate codes. Users only need to create a single Terraform resource and not an entire Terraform project.
Fig. 2 User flow with Khone
With all types of streaming infrastructure resources that we support, be it Kafka topics or Flink pipelines, we have identified they all have common properties such as namespace, environment, or cluster name such as Kafka cluster and Kubernetes cluster. As such, using those values as file paths help us to easily validate users input and de-couple them from the resource specific configuration properties in their HCL source code. Moreover, it helps to remove redundant information to maintain consistency. If the piece of information is in the file path, it won’t be elsewhere in resource definition.
Fig. 3 Khone directory structure
With this approach, we can utilise our pipeline scripts, which are written in Python and perform validations on the types of resources and resource names using Regular Expressions (Regex) without relying on HCL functions. Furthermore, we helped prevent human errors and improved developers’ efficiency by deriving these properties and reducing boilerplate codes by automatically parsing out other necessary configurations such as Kafka brokers endpoint from the cluster name and environment.
Pipeline stages
Khone’s pipeline implementation is designed with three stages. Each stage has different duties and responsibilities in verifying user input and securely creating the resources.
Fig. 4 An example of a Khone pipeline
Initialisation stage
At this stage, we categorise the changes into Deleted, Created or Changed resources and filter out unsupported resource types. We also prevent users from creating unintended resources by validating them based on resource path and inspecting the HCL source code in their Terraform module. This stage also prepares artefacts for subsequent stages.
Fig. 5 Terraform changes detected by Khone
Terraform stage
This is a downstream pipeline that runs either the Terraform plan or Terraform apply command depending on the state of the MR, which can either be pending review or merged. Individual jobs run in parallel for each resource change, which helps with performance and reduces the overall pipeline run time.
For each individual job, we implemented multiple security checkpoints such as:
Code inspection: We use the python-hcl2 library to read HCL content of Terraform resources to perform validation, restrict the types of Terraform resources users can create, and ensure that resources have the intended configurations. We also validate whitelisted Terraform module source endpoint based on the declared resource type. This enables us to inherit the flexibility of Python as a programming language and perform validations more dynamically rather than relying on HCL functions.
Resource validation: We validate configurations based on resource path to ensure users are following the correct and intended directory structure.
Linting and formatting: Perform HCL code linting and formatting using Terraform CLI to ensure code consistency.
Furthermore, our Terraform module independently validates parameters by verifying the working directory instead of relying on user input, acting as an additional layer of defence for validation.
In this stage, we consolidate previous jobs’ status and publish our pipeline metrics such as success or error rate.
For our metrics, we identified actual users by omitting users from Coban. This helps us measure success metrics more consistently as we could isolate metrics from test continuous integration/continuous deployment (CI/CD) pipelines.
For the second half of 2022, we achieved a 100% uptime for Khone pipelines.
Fig. 6 Khone’s success metrics for the second half of 2022
Preventing pipeline config tampering
By default, with each repository on GitLab that has CI/CD pipelines enabled, owners or administrators would need to have a pipeline config file at the root directory of the repository with the name .gitlab-ci.yml. Other scripts may also be stored somewhere within the repository.
With this setup, whenever a user creates an MR, if the pipeline config file is modified as part of the MR, the modified version of the config file will be immediately reflected in the pipeline’s run. Users can exploit this by running arbitrary code on the privileged GitLab runner.
In order to prevent this, we utilise GitLab’s remote pipeline config functionality. We have created another private repository, khone-admin, and stored our pipeline config there.
Fig. 7 Khone’s remote pipeline config
In Fig. 7, our configuration is set to a file called khone-gitlab-ci.yml residing in the khone-admin repository under snd group.
Preventing pipeline scripts tampering
We had scripts that ran before the MR and they were approved and merged to perform preliminary checks or validations. They were also used to run the Terraform plan command. Users could modify these existing scripts to perform malicious actions. For example, they could bypass all validations and directly run the Terraform apply command to create unintended resources.
This can be prevented by storing all of our scripts in the khone-admin repository and cloning them in each stage of our pipeline using the before_script clause.
Even though this adds an overhead to each of our pipeline jobs and increases run time, the amount is insignificant as we have optimised the process by using shallow cloning. The Git clone command included in the above script with depth=1 and single-branch flag has reduced the time it takes to clone the scripts down to only 0.59 seconds.
Testing our pipeline
With all the security measures implemented for Khone, this raises a question of how did we test the pipeline? We have done this by setting up an additional repository called khone-dev.
Fig. 8 Repositories relationship
Pipeline config
Within this khone-dev repository, we have set up a remote pipeline config file following this format:
<File Name>@<Repository Ref>:<Branch Name>
Fig. 9 Khone-dev’s remote pipeline config
In Fig. 9, our configuration is set to a file called khone-gitlab-ci.yml residing in the khone-admin repository under the snd group and under a branch named ci-test. With this approach, we can test our pipeline config without having to merge it to master branch that affects the main Khone repository. As a security measure, we only allow users within a certain GitLab group to push changes to this branch.
Pipeline scripts
Following the same method for pipeline scripts, instead of cloning from the master branch in the khone-admin repository, we have implemented a logic to clone them from the branch matching our lightweight directory access protocol (LDAP) user account if it exists. We utilised the GITLAB_USER_LOGIN environment variable that is injected by GitLab to each individual CI job to get the respective LDAP account to perform this logic.
default:
  before_script:
    - rm -rf khone_admin
    - |
      if git ls-remote --exit-code --heads "https://gitlab-ci-token:${CI_JOB_TOKEN}@gitlab.myteksi.net/snd/khone-admin.git" "$GITLAB_USER_LOGIN" > /dev/null; then
        echo "Cloning khone-admin from dev branch ${GITLAB_USER_LOGIN}"
        git clone --depth 1 --branch "$GITLAB_USER_LOGIN" --single-branch "https://gitlab-ci-token:${CI_JOB_TOKEN}@gitlab.myteksi.net/snd/khone-admin.git" khone_admin
      else
        echo "Dev branch ${GITLAB_USER_LOGIN} not found, cloning from master instead"
        git clone --depth 1 --single-branch "https://gitlab-ci-token:${CI_JOB_TOKEN}@gitlab.myteksi.net/snd/khone-admin.git" khone_admin
      fi
What’s next?
With security being our main focus for our Khone GitOps pipeline, we plan to abide by the principle of least privilege and implement separate GitLab runners for different types of resources and assign them with just enough IAM roles and policies, and minimal network security group rules to access our Kafka or Kubernetes clusters.
Furthermore, we also plan to maintain high standards and stability by including unit tests in our CI scripts to ensure that every change is well-tested before being deployed.
Special thanks to Fabrice Harbulot for kicking off this project and building a strong foundation for it.
Join us
Grab is the leading superapp platform in Southeast Asia, providing everyday services that matter to consumers. More than just a ride-hailing and food delivery app, Grab offers a wide range of on-demand services in the region, including mobility, food, package and grocery delivery services, mobile payments, and financial services across 428 cities in eight countries.
Powered by technology and driven by heart, our mission is to drive Southeast Asia forward by creating economic empowerment for everyone. If this mission speaks to you, join our team today!
A couple days ago, I had the honor of doing a live stream on generative AI, discussing recent innovations and concepts behind the current generation of large language and vision models and how we got there. In today’s roundup of news and announcements, I will share some additional information—including an expanded partnership to make generative AI more accessible, a blog post about diffusion models, and our weekly Twitch show on Generative AI. Let’s dive right into it!
Last Week’s Launches Here are some launches that got my attention during the previous week:
Integrated Private Wireless on AWS – The Integrated Private Wireless on AWS program is designed to provide enterprises with managed and validated private wireless offerings from leading communications service providers (CSPs). The offerings integrate CSPs’ private 5G and 4G LTE wireless networks with AWS services across AWS Regions, AWS Local Zones, AWS Outposts, and AWS Snow Family. For more details, read this Industries Blog post and check out this eBook. And, if you’re attending the Mobile World Congress Barcelona this week, stop by the AWS booth at the Upper Walkway, South Entrance, at the Fira Barcelona Gran Via, to learn more.
AWS Glue Crawlers – Now integrate with Lake Formation. AWS Glue Crawlers are used to discover datasets, extract schema information, and populate the AWS Glue Data Catalog. With this Glue Crawler and Lake Formation integration, you can configure a crawler to use Lake Formation permissions to access an S3 data store or a Data Catalog table with an underlying S3 location within the same AWS account or another AWS account. You can configure an existing Data Catalog table as a crawler’s target if the crawler and the Data Catalog table reside in the same account. To learn more, check out this Big Data Blog post.
Amazon SageMaker Model Monitor – You can now launch and configure Amazon SageMaker Model Monitor from the SageMaker Model Dashboard using a code-free point-and-click setup experience. SageMaker Model Dashboard gives you unified monitoring across all your models by providing insights into deviations from expected behavior, automated alerts, and troubleshooting to improve model performance. Model Monitor can detect drift in data quality, model quality, bias, and feature attribution and alert you to take remedial actions when such changes occur.
Amazon EKS – Now supports Kubernetes version 1.25. Kubernetes 1.25 introduced several new features and bug fixes, and you can now use Amazon EKS and Amazon EKS Distro to run Kubernetes version 1.25. You can create new 1.25 clusters or upgrade your existing clusters to 1.25 using the Amazon EKS console, the eksctl command line interface, or through an infrastructure-as-code tool. To learn more about this release named “Combiner,” check out this Containers Blog post.
Amazon Detective –New self-paced workshop available. You can now learn to use Amazon Detective with a new self-paced workshop in AWS Workshop Studio. AWS Workshop Studio is a collection of self-paced tutorials designed to teach practical skills and techniques to solve business problems. The Amazon Detective workshop is designed to teach you how to use the primary features of Detective through a series of interactive modules that cover topics such as security alert triage, security incident investigation, and threat hunting. Get started with the Amazon Detective Workshop.
Other AWS News Here are some additional news items and blog posts that you may find interesting:
AWS and Hugging Face collaborate to make generative AI more accessible and cost-efficient – This previous week, we announced an expanded collaboration between AWS and Hugging Face to accelerate the training, fine-tuning, and deployment of large language and vision models used to create generative AI applications. Generative AI applications can perform a variety of tasks, including text summarization, answering questions, code generation, image creation, and writing essays and articles. For more details, read this Machine Learning Blog post.
If you are interested in generative AI, I also recommend reading this blog post on how to Fine-tune text-to-image Stable Diffusion models with Amazon SageMaker JumpStart. Stable Diffusion is a deep learning model that allows you to generate realistic, high-quality images and stunning art in just a few seconds. This blog post discusses how to make design choices, including dataset quality, size of training dataset, choice of hyperparameter values, and applicability to multiple datasets.
AWS open-source news and updates – My colleague Ricardo writes this weekly open-source newsletter in which he highlights new open-source projects, tools, and demos from the AWS Community. Read edition #146 here.
Upcoming AWS Events Check your calendars and sign up for these AWS events:
#BuildOn Generative AI – Join our weekly live Build On Generative AI Twitch show. Every Monday morning, 9:00 US PT, my colleagues Emily and Darko take a look at aspects of generative AI. They host developers, scientists, startup founders, and AI leaders and discuss how to build generative AI applications on AWS.
In today’s episode, my colleague Chris walked us through an end-to-end ML pipeline from data ingestion to fine-tuning and deployment of generative AI models. You can watch the video here.
AWS Pi Day – Join me on March 14 for the third annual AWS Pi Day live, virtual event hosted on the AWS On Air channel on Twitch as we celebrate the 17th birthday of Amazon S3 and the cloud.
We will discuss the latest innovations across AWS Data services, from storage to analytics and AI/ML. If you are curious about how AI can transform your business, register here and join my session.
AWS Innovate Data and AI/ML edition – AWS Innovate is a free online event to learn the latest from AWS experts and get step-by-step guidance on using AI/ML to drive fast, efficient, and measurable results. Register now for EMEA (March 9) and the Americas (March 14).
Given the pace of Amazon Web Services (AWS) innovation, it can be challenging to stay up to date on the latest AWS service and feature launches. AWS provides services and tools to help you protect your data, accounts, and workloads from unauthorized access. AWS data protection services provide encryption capabilities, key management, and sensitive data discovery. Last year, we saw growth and evolution in AWS data protection services as we continue to give customers features and controls to help meet their needs. Protecting data in the AWS Cloud is a top priority because we know you trust us to help protect your most critical and sensitive asset: your data. This post will highlight some of the key AWS data protection launches in the last year that security professionals should be aware of.
AWS Key Management Service Create and control keys to encrypt or digitally sign your data
In April, AWS Key Management Service (AWS KMS) launched hash-based message authentication code (HMAC) APIs. This feature introduced the ability to create AWS KMS keys that can be used to generate and verify HMACs. HMACs are a powerful cryptographic building block that incorporate symmetric key material within a hash function to create a unique keyed message authentication code. HMACs provide a fast way to tokenize or sign data such as web API requests, credit card numbers, bank routing information, or personally identifiable information (PII). This technology is used to verify the integrity and authenticity of data and communications. HMACs are often a higher performing alternative to asymmetric cryptographic methods like RSA or elliptic curve cryptography (ECC) and should be used when both message senders and recipients can use AWS KMS.
At AWS re:Invent in November, AWS KMS introduced the External Key Store (XKS), a new feature for customers who want to protect their data with encryption keys that are stored in an external key management system under their control. This capability brings new flexibility for customers to encrypt or decrypt data with cryptographic keys, independent authorization, and audit in an external key management system outside of AWS. XKS can help you address your compliance needs where encryption keys for regulated workloads must be outside AWS and solely under your control. To provide customers with a broad range of external key manager options, AWS KMS developed the XKS specification with feedback from leading key management and hardware security module (HSM) manufacturers as well as service providers that can help customers deploy and integrate XKS into their AWS projects.
AWS Nitro System A combination of dedicated hardware and a lightweight hypervisor enabling faster innovation and enhanced security
In November, we published The Security Design of the AWS Nitro System whitepaper. The AWS Nitro System is a combination of purpose-built server designs, data processors, system management components, and specialized firmware that serves as the underlying virtualization technology that powers all Amazon Elastic Compute Cloud (Amazon EC2) instances launched since early 2018. This new whitepaper provides you with a detailed design document that covers the inner workings of the AWS Nitro System and how it is used to help secure your most critical workloads. The whitepaper discusses the security properties of the Nitro System, provides a deeper look into how it is designed to eliminate the possibility of AWS operator access to a customer’s EC2 instances, and describes its passive communications design and its change management process. Finally, the paper surveys important aspects of the overall system design of Amazon EC2 that provide mitigations against potential side-channel vulnerabilities that can exist in generic compute environments.
AWS Secrets Manager Centrally manage the lifecycle of secrets
In February, AWS Secrets Manager added the ability to schedule secret rotations within specific time windows. Previously, Secrets Manager supported automated rotation of secrets within the last 24 hours of a specified rotation interval. This new feature added the ability to limit a given secret rotation to specific hours on specific days of a rotation interval. This helps you avoid having to choose between the convenience of managed rotations and the operational safety of application maintenance windows. In November, Secrets Manager also added the capability to rotate secrets as often as every four hours, while providing the same managed rotation experience.
In May, Secrets Manager started publishing secrets usage metrics to Amazon CloudWatch. With this feature, you have a streamlined way to view how many secrets you are using in Secrets Manager over time. You can also set alarms for an unexpected increase or decrease in number of secrets.
At the end of December, Secrets Manager added support for managed credential rotation for service-linked secrets. This feature helps eliminate the need for you to manage rotation Lambda functions and enables you to set up rotation without additional configuration. Amazon Relational Database Service (Amazon RDS) has integrated with this feature to streamline how you manage your master user password for your RDS database instances. Using this feature can improve your database’s security by preventing the RDS master user password from being visible during the database creation workflow. Amazon RDS fully manages the master user password’s lifecycle and stores it in Secrets Manager whenever your RDS database instances are created, modified, or restored. To learn more about how to use this feature, see Improve security of Amazon RDS master database credentials using AWS Secrets Manager.
AWS Private Certificate Authority Create private certificates to identify resources and protect data
In September, AWS Private Certificate Authority (AWS Private CA) launched as a standalone service. AWS Private CA was previously a feature of AWS Certificate Manager (ACM). One goal of this launch was to help customers differentiate between ACM and AWS Private CA. ACM and AWS Private CA have distinct roles in the process of creating and managing the digital certificates used to identify resources and secure network communications over the internet, in the cloud, and on private networks. This launch coincided with the launch of an updated console for AWS Private CA, which includes accessibility improvements to enhance screen reader support and additional tab key navigation for people with motor impairment.
In October, AWS Private CA introduced a short-lived certificate mode, a lower-cost mode of AWS Private CA that is designed for issuing short-lived certificates. With this new mode, public key infrastructure (PKI) administrators, builders, and developers can save money when issuing certificates where a validity period of 7 days or fewer is desired. To learn more about how to use this feature, see How to use AWS Private Certificate Authority short-lived certificate mode.
Additionally, AWS Private CA supported the launches of certificate-based authentication with Amazon AppStream 2.0 and Amazon WorkSpaces to remove the logon prompt for the Active Directory domain password. AppStream 2.0 and WorkSpaces certificate-based authentication integrates with AWS Private CA to automatically issue short-lived certificates when users sign in to their sessions. When you configure your private CA as a third-party root CA in Active Directory or as a subordinate to your Active Directory Certificate Services enterprise CA, AppStream 2.0 or WorkSpaces with AWS Private CA can enable rapid deployment of end-user certificates to seamlessly authenticate users. To learn more about how to use this feature, see How to use AWS Private Certificate Authority short-lived certificate mode.
AWS Certificate Manager Provision and manage SSL/TLS certificates with AWS services and connected resources
In early November, ACM launched the ability to request and use Elliptic Curve Digital Signature Algorithm (ECDSA) P-256 and P-384 TLS certificates to help secure your network traffic. You can use ACM to request ECDSA certificates and associate the certificates with AWS services like Application Load Balancer or Amazon CloudFront. Previously, you could only request certificates with an RSA 2048 key algorithm from ACM. Now, AWS customers who need to use TLS certificates with at least 120-bit security strength can use these ECDSA certificates to help meet their compliance needs. The ECDSA certificates have a higher security strength—128 bits for P-256 certificates and 192 bits for P-384 certificates—when compared to 112-bit RSA 2048 certificates that you can also issue from ACM. The smaller file footprint of ECDSA certificates makes them ideal for use cases with limited processing capacity, such as small Internet of Things (IoT) devices.
Amazon Macie Discover and protect your sensitive data at scale
Amazon Macie introduced two major features at AWS re:Invent. The first is a new capability that allows for one-click, temporary retrieval of up to 10 samples of sensitive data found in Amazon Simple Storage Service (Amazon S3). With this new capability, you can more readily view and understand which contents of an S3 object were identified as sensitive, so you can review, validate, and quickly take action as needed without having to review every object that a Macie job returned. Sensitive data samples captured with this new capability are encrypted by using customer-managed AWS KMS keys and are temporarily viewable within the Amazon Macie console after retrieval.
Additionally, Amazon Macie introduced automated sensitive data discovery, a new feature that provides continual, cost-efficient, organization-wide visibility into where sensitive data resides across your Amazon S3 estate. With this capability, Macie automatically samples and analyzes objects across your S3 buckets, inspecting them for sensitive data such as personally identifiable information (PII) and financial data; builds an interactive data map of where your sensitive data in S3 resides across accounts; and provides a sensitivity score for each bucket. Macie uses multiple automated techniques, including resource clustering by attributes such as bucket name, file types, and prefixes, to minimize the data scanning needed to uncover sensitive data in your S3 buckets. This helps you continuously identify and remediate data security risks without manual configuration and lowers the cost to monitor for and respond to data security risks.
Support for new open source encryption libraries
In February, we announced the availability of s2n-quic, an open source Rust implementation of the QUIC protocol, in our AWS encryption open source libraries. QUIC is a transport layer network protocol used by many web services to provide lower latencies than classic TCP. AWS has long supported open source encryption libraries for network protocols; in 2015 we introduced s2n-tls as a library for implementing TLS over HTTP. The name s2n is short for signal to noise and is a nod to the act of encryption—disguising meaningful signals, like your critical data, as seemingly random noise. Similar to s2n-tls, s2n-quic is designed to be small and fast, with simplicity as a priority. It is written in Rust, so it has some of the benefits of that programming language, such as performance, threads, and memory safety.
Cryptographic computing for AWS Clean Rooms (preview)
At re:Invent, we also announced AWS Clean Rooms, currently in preview, which includes a cryptographic computing feature that allows you to run a subset of queries on encrypted data. Clean rooms help customers and their partners to match, analyze, and collaborate on their combined datasets—without sharing or revealing underlying data. If you have data handling policies that require encryption of sensitive data, you can pre-encrypt your data by using a common collaboration-specific encryption key so that data is encrypted even when queries are run. With cryptographic computing, data that is used in collaborative computations remains encrypted at rest, in transit, and in use (while being processed).
With AWS, you control your data by using powerful AWS services and tools to determine where your data is stored, how it is secured, and who has access to it. In 2023, we will further the AWS Digital Sovereignty Pledge, our commitment to offering AWS customers the most advanced set of sovereignty controls and features available in the cloud.
You can join us at our security learning conference, AWS re:Inforce 2023, in Anaheim, CA, June 13–14, for the latest advancements in AWS security, compliance, identity, and privacy solutions.
Geohash is an encoding system with a unique identifier for each region on the planet. Therefore, all geohash units can be associated with an individual set of digits and letters.
Geohash is a plugin built by Grab that is available in the Java OpenStreetMap Editor (JOSM) tool, which comes in handy for those who work on precise areas based on geohash units.
Background
Up until recently, users of the Geohash JOSM plugin were unable to stop the displaying of new geohashes with every zoom-in or zoom-out. This meant that every time they changed the zoom, new geohashes would be displayed, and this became bothersome for many users when it was unneeded. The previous behaviour of the plugin when zooming in and out is depicted in the following short video:
This led to the implementation of the zoom freeze feature, which helps users toggle between Enable zoom freeze and Disable zoom freeze, based on their needs.
Solution
As you can see in the following image, a new label was created with the purpose of freezing or unfreezing the display of new geohashes with each zoom change:
By default, this label says “Enable zoom freeze”, and when zoom freezing is enabled, the label changes to “Disable zoom freeze”.
In order to see how zoom freezing works, let’s consider the following example: a user wants to zoom inside the geohash with the code w886hu, without triggering the display of smaller geohashes inside of it. For this purpose, the user will enable the zoom freezing feature by clicking on the label, and then they will proceed with the zoom. The map will look like this:
It is apparent from the image that no new geohashes were created. Now, let’s say the user has finished what they wanted to do, and wants to go back to the “normal” geohash visualisation mode, which means disabling the zoom freeze option. After clicking on the label that now says ‘Disable zoom freeze’, new, smaller geohashes will be displayed, according to the current zoom level:
The functionality is illustrated in the following short video:
Another effect that enabling zoom freeze has is that it disables the ‘Display larger geohashes’ and ‘Display smaller geohashes’ options, since the geohashes are now fixed. The following images show how these options work before and after disabling zoom freeze:
To conclude, we believe that the release of this new feature will benefit users by making it more comfortable for them to zoom in and out of a map. By turning off the display of new geohashes when this is unwanted, map readability is improved, and this translates to a better user experience.
Impact/Limitations
In order to start using this new feature, users need to update the Geohash JOSM plugin.
Grab is the leading superapp platform in Southeast Asia, providing everyday services that matter to consumers. More than just a ride-hailing and food delivery app, Grab offers a wide range of on-demand services in the region, including mobility, food, package and grocery delivery services, mobile payments, and financial services across 428 cities in eight countries.
Powered by technology and driven by heart, our mission is to drive Southeast Asia forward by creating economic empowerment for everyone. If this mission speaks to you, join our team today!
Today marks an important day for Rapid7, for the state of Florida, and if we may be so bold, for the future of our industry. The announcement of a joint research lab between Rapid7 and the University of South Florida (USF) reaffirms our commitment to driving a deeper understanding of the challenges we face in protecting our shared digital space, while ushering in new talent to ensure that the cyber workforce of tomorrow is as diverse as the individuals who create the shared digital space we set out to protect.
With the Rapid7 Cybersecurity Foundation, we are proud to announce the opening of the Rapid7 Cyber Threat Intelligence Lab in Tampa, at USF. We intend for the lab to be an integral component in real-time threat tracking by leveraging our extensive network of sensors, and incorporating this intelligence not only into our products and customers, but to make actionable indicators available to the wider community. This project also reaffirms our commitment to making cybersecurity more accessible to everyone through our support of research, disclosure, and open source, including projects such as Metasploit, Recog, and Velociraptor to name a few.
We believe that providing USF faculty and students this breadth of intelligence will not only support their journey in learning, but fundamentally provide a clearer path in determining areas to focus in their careers. We are hopeful that working side by side with Rapid7 analysts can help propel this journey, and enhance the meaningful research developed by the university.
As part of the commitment for this investment—and consistent with the guiding principles of the Rapid7 Cybersecurity Foundation—we intend to promote diversity within the cybersecurity workforce. In particular, we plan on opening doors to individuals from historically underrepresented groups within the cybersecurity workforce. With the objective to ensure that research projects are inclusive of those from all backgrounds, we are optimistic that not only will this introduce hands-on technical content to those who may not otherwise have such opportunities, but also, in the longer term, encourage greater diversity within the cybersecurity industry as a whole. We remain steadfast in our commitment to broadening the opportunities within cybersecurity to all those with a passion for creating a more secure and prosperous digital future.
We are deeply thankful to USF for their shared vision, and look forward to a partnership that benefits all students and faculty while producing actionable intelligence that can support the entire internet and the broader industry. Ultimately, the threatscape is such that we recognise no one organization can stop attackers on their own. This partnership remains part of our commitment to establish the relationships between private industry and partners that include academia.
If you are looking for a new year challenge, the Serverless Developer Advocate team launched the 30 days of Serverless. You can follow the hashtag #30DaysServerless on LinkedIn, Twitter, or Instagram or visit the challenge page and learn a new Serverless concept every day.
Last Week’s Launches Here are some launches that got my attention during the previous week.
List the URLs of the Amazon API Gateway or AWS Lambda function URL. $ sam list endpoints
List the outputs of the deployed stack. $ sam list outputs
List the resources in the local stack. If a stack name is provided, it also shows the corresponding deployed resources and the ids. $ sam list resources
Amazon RDS – Now supports increasing the allocated storage size when creating read replicas or when restoring a database from snapshots. This is very useful when your primary instances are near their maximum allocated storage capacity.
Amazon QuickSight – Allows you to create Radar charts. Radar charts are a way to visualize multivariable data that are used to plot one or more groups of values over multiple common variables.
AWS Systems Manager Automation – Now integrates with Systems Manager Change Calendar. Now you can reduce the risks associated with changes in your production environment by allowing Automation runbooks to run during an allowed time window configured in the Change Calendar.
Other AWS News Some other updates and news that you may have missed:
AWS Cloud Clubs – Cloud Clubs are peer-to-peer user groups for students and young people aged 18–28. In these clubs, you can network, attend career-building events, earn benefits like AWS credits, and more. Learn more about the clubs in your region in the AWS student portal.
Get AWS Certified: Profesional challenge – You can register now for the certification challenge. Prepare for your AWS Professional Certification exam and get a 50 percent discount for the certification exam. Learn more about the challenge on the official page.
Podcast Charlas Técnicas de AWS – If you understand Spanish, this podcast is for you. Podcast Charlas Técnicas is one of the official AWS podcasts in Spanish, and every other week, there is a new episode. The podcast is for builders, and it shares stories about how customers implemented and learned AWS services, how to architect applications, and how to use new services. You can listen to all the episodes directly from your favorite podcast app or at AWS Podcasts en Español.
AWS Open-Source News and Updates – This is a newsletter curated by my colleague Ricardo to bring you the latest open-source projects, posts, events, and more.
Upcoming AWS Events Check your calendars and sign up for these AWS events:
AWS re:Invent recaps – We had a lot of announcements during re:Invent. If you want to learn them all in your language and in your area, check the re: Invent recaps. All the upcoming ones are posted on this site, so check it regularly to find an event nearby.
AWS Innovate Data and AI/ML edition – AWS Innovate is a free online event to learn the latest from AWS experts and get step-by-step guidance on using AI/ML to drive fast, efficient, and measurable results.
AWS Innovate Data and AI/ML edition for Asia Pacific and Japan is taking place on February 22, 2023. Register here.
Registrations for AWS Innovate EMEA (March 9, 2023) and the Americas (March 14, 2023) will open soon. Check the AWS Innovate page for updates.
At GitHub, the branch deploy model is ubiquitous and it is the standard way we ship code to production, and it has been for years. We released details about how we perform branch deployments with ChatOps all the way back in 2015.
We are able to use ChatOps to perform branch deployments for most of our repositories, but there are a few situations where ChatOps simply won’t work for us. What if developers want to leverage branch deployments but don’t have a full ChatOps stack integrated with their repositories? We wanted to set out to find a way for all developers to be able to take advantage of branch deployments with ease, right from their GitHub repository, and so the branch-deploy Action was born!
How Does GitHub use this Action?
GitHub primarily uses ChatOps with Hubot to facilitate branch deployments where we can. If ChatOps isn’t an option, we use this branch-deploy Action instead. The majority of our use cases include Infrastructure as Code (IaC) repositories where we use Terraform to deploy infrastructure changes. GitHub uses this Action in many internal repositories and so does npm. There are also many other public, open source, and corporate organizations adopting this Action, as well, to help ship their code to production!
Understanding the branch deploy model
Before we dive into the branch-deploy Action, let’s first understand what the branch deploy model is and why it is so useful.
To really understand the branch deploy model, let’s first take a look at a traditional deploy → merge model. It goes like this:
Create a branch.
Add commits to your branch.
Open a pull request.
Gather feedback plus peer reviews.
Merge your branch.
A deployment starts from the main branch.
Now, let’s take a look at the branch deploy model:
Create a branch.
Add commits to your branch.
Open a pull request.
Gather feedback plus peer reviews.
Deploy your change.
Validate.
Merge your branch to the main / master branch.
The merge deploy model is inherently riskier because the main branch is never truly a stable branch. If a deployment fails, or we need to roll back, we follow the entire process again to roll back our changes. However, in the branch deploy model, the main branch is always in a “good” state and we can deploy it at any time to revert the deployment from a branch deploy. In the branch deploy model, we only merge our changes into main once the branch has been successfully deployed and validated.
Note: this is sometimes referred to as the GitHub flow.
Key concepts
Key concepts of the branch deploy model:
The main branch is always considered to be a stable and deployable branch.
All changes are deployed to production before they are merged to the main branch.
To roll back a branch deployment, you deploy the main branch.
By now you may be sold on the branch deploy methodology. How do we implement it? Introducing IssueOps with GitHub Actions!
IssueOps
The best way to define IssueOps is to compare it to something similar, ChatOps. You may be familiar with the concept, ChatOps, already; if not, here is a quick definition:
ChatOps is the process of interacting with a chat bot to execute commands directly in a chat platform. For example, with ChatOps you might do something like .ping example.org to check the status of a website.
IssueOps adopts the same mindset but through a different medium. Rather than using a chat service (Discord, Slack, etc.) to invoke the commands we use comments on a GitHub Issue or pull request. GitHub Actions is the runtime that executes our desired logic when an IssueOps command is invoked.
GitHub Actions
How does it work? This section will go into detail about how this Action works and hopefully inspire you to leverage it in your own projects. The full source code and further documentation can be found on GitHub.
Let’s walk through the process using the demo configuration of a branch-deploy Action below.
1. Create this file under .github/workflows/branch-deploy.yml in your GitHub repository:
name: "branch deploy demo"

# The workflow will execute on new comments on pull requests - example: ".deploy" as a comment
on:
  issue_comment:
    types: [created]

jobs:
  demo:
    if: ${{ github.event.issue.pull_request }} # only run on pull request comments (no need to run on issue comments)
    runs-on: ubuntu-latest
    steps:
      # Execute IssueOps branch deployment logic, hooray!
      # This will be used to "gate" all future steps below and conditionally trigger steps/deployments
      - uses: github/[email protected] # replace X.X.X with the version you want to use
        id: branch-deploy # it is critical you have an id here so you can reference the outputs of this step
        with:
          trigger: ".deploy" # the trigger phrase to look for in the comment on the pull request

      # Run your deployment logic for your project here - examples seen below

      # Checkout your project repository based on the ref provided by the branch-deploy step
      - uses: actions/[email protected]
        if: ${{ steps.branch-deploy.outputs.continue == 'true' }} # skips if the trigger phrase is not found
        with:
          ref: ${{ steps.branch-deploy.outputs.ref }} # uses the detected branch from the branch-deploy step

      # Do some fake "noop" deployment logic here
      # conditionally run a noop deployment
      - name: fake noop deploy
        if: ${{ steps.branch-deploy.outputs.continue == 'true' && steps.branch-deploy.outputs.noop == 'true' }} # only run if the trigger phrase is found and the branch-deploy step detected a noop deployment
        run: echo "I am doing a fake noop deploy"

      # Do some fake "regular" deployment logic here
      # conditionally run a regular deployment
      - name: fake regular deploy
        if: ${{ steps.branch-deploy.outputs.continue == 'true' && steps.branch-deploy.outputs.noop != 'true' }} # only run if the trigger phrase is found and the branch-deploy step detected a regular deployment
        run: echo "I am doing a fake regular deploy"
2. Trigger a noop deploy by commenting .deploy noop on a pull request.
A noop deployment is detected so this action outputs the noop variable to true. If you have the correct permissions to execute the IssueOps command, the action outputs the continue variable to true as well. The step named fake noop deploy runs, while the fake regular deploy step is skipped.
3. After your noop deploy completes, you would typically run .deploy to execute the actual deployment, fake regular deploy.
Features
The best part about the branch-deploy Action is that it is highly customizable for any deployment targets and use cases. Here are just a few of the features that this Action comes bundled with:
Detects when IssueOps commands are used on a pull request.
Configurable: choose your command syntax, environment, noop trigger, base branch, reaction, and more.
Respects your branch protection settings configured for the repository.
Comments and reacts to your IssueOps commands.
Triggers GitHub deployments for you with simple configuration.
Deploy locks to prevent multiple deployments from clashing.
Configurable environment targets.
The repository also comes with a usage guide, which can be referenced by you and your team to quickly get familiar with available IssueOps commands and how they work.
Examples
The branch-deploy Action is customizable and suited for a wide range of projects. Here are a few examples of how you can use the branch-deploy Action to deploy to different services:
If you are looking to enhance your DevOps experience, have better reliability in your deployments, or ship changes faster, then branch deployments are for you!
Hopefully, you now have a better understanding of why the branch deploy model is a great option for shipping your code to production.
By using GitHub plus Actions plus IssueOps you can leverage the branch deploy model in any repository!
In the last post, OfferUp modernized its DevOps platform with Amazon EKS and Flagger to accelerate time to market, we talked about hypergrowth and the technical challenges encountered by OfferUp in its existing DevOps platform. As a reminder, we presented how OfferUp modernized its DevOps platform with Amazon Elastic Kubernetes Service (Amazon EKS) and Flagger to gain developer’s velocity, automate faster deployment, and achieve lower cost of ownership.
In this post, we discuss the technical steps to build a DevOps platform that enables the progressive deployment of microservices on Amazon Managed Amazon EKS. Progressive delivery exposes a new version of the software incrementally to ingress traffic and continuously measures the success rate of the metrics before allowing all of the new traffics to a newer version of the software. Flagger is the Graduate project of Cloud Native Computing Foundations (CNCF) that enables progressive canary delivery, along with bule/green and A/B Testing, while measuring metrics like HTTP/gRPC request success rate and latency. Flagger shifts and routes traffic between app versions using a service mesh or an Ingress controller
We leverage Gloo Ingress Controller for traffic routing, Prometheus, Datadog, and Amazon CloudWatch for application metrics analysis and Slack to send notification. Flagger will post messages to slack when a deployment has been initialized, when a new revision has been detected, and if the canary analysis failed or succeeded.
Prerequisite steps to build the modern DevOps platform
You need an AWS Account and AWS Identity and Access Management (IAM) user to build the DevOps platform. If you don’t have an AWS account with Administrator access, then create one now by clicking here. Create an IAM user and assign admin role. You can build this platform in any AWS region however, I will you us-west-1 region throughout this post. You can use a laptop (Mac or Windows) or an Amazon Elastic Compute Cloud (AmazonEC2) instance as a client machine to install all of the necessary software to build the GitOps platform. For this post, I launched an Amazon EC2 instance (with Amazon Linux2 AMI) as the client and install all of the prerequisite software. You need the awscli, git, eksctl, kubectl, and helm applications to build the GitOps platform. Here are the prerequisite steps,
Create a named profile(eks-devops) with the config and credentials file:
aws configure --profile eks-devops
AWS Access Key ID [None]: xxxxxxxxxxxxxxxxxxxxxx
AWS Secret Access Key [None]: xxxxxxxxxxxxxxxxxx
Default region name [None]: us-west-1
Default output format [None]:
View and verify your current IAM profile:
export AWS_PROFILE=eks-devops
aws sts get-caller-identity
If the Amazon EC2 instance doesn’t have git preinstalled, then install git in your Amazon EC2 instance:
sudo yum update -y
sudo yum install git -y
Check git version
git version
Git clone the repo and download all of the prerequisite software in the home directory.
Amazon ECR is a fully-managed container registry that makes it easy for developers to share and deploy container images and artifacts. ecr setup.sh script will create a new Amazon ECR repository and also push the podinfo images (6.0.0, 6.0.1, 6.0.2, 6.1.0, 6.1.5 and 6.1.6) to the Amazon ECR. Run ecr-setup.sh script with the parameter, “ECR repository name” (e.g. ps-flagger-repository) and region (e.g. us-west-1)
Technical steps to build the modern DevOps platform
This post shows you how to use the Gloo Edge ingress controller and Flagger to automate canary releases for progressive deployment on the Amazon EKS cluster. Flagger requires a Kubernetes cluster v1.16 or newer and Gloo Edge ingress 1.6.0 or newer. This post will provide a step-by-step approach to install the Amazon EKS cluster with managed node group, Gloo Edge ingress controller, and Flagger for Gloo in the Amazon EKS cluster. Now that the cluster, metrics infrastructure, and Flagger are installed, we can install the sample application itself. We’ll use the standard Podinfo application used in the Flagger project and the accompanying loadtester tool. The Flagger “podinfo” backend service will be called by Gloo’s “VirtualService”, which is the root routing object for the Gloo Gateway. A virtual service describes the set of routes to match for a set of domains. We’ll automate the canary promotion, with the new image of the “podinfo” service, from version 6.0.0 to version 6.0.1. We’ll also create a scenario by injecting an error for automated canary rollback while deploying version 6.0.2.
Use myeks-cluster.yaml to create your Amazon EKS cluster with managed nodegroup. myeks-cluster.yaml deployment file has “cluster name” value as ps-eks-66, region value as us-west-1, availabilityZones as [us-west-1a, us-west-1b], Kubernetes version as 1.24, and nodegroup Amazon EC2 instance type as m5.2xlarge. You can change this value if you want to build the cluster in a separate region or availability zone.
Create a namespace “gloo-system” and Install Gloo with Helm Chart. Gloo Edge is an Envoy-based Kubernetes-native ingress controller to facilitate and secure application traffic.
[Optional] If you’re using Datadog as a monitoring tool, then deploy Datadog agents as a DaemonSet using the Datadog Helm chart. Replace RELEASE_NAME and DATADOG_API_KEY accordingly. If you aren’t using Datadog, then skip this step. For this post, we leverage the Prometheus open-source monitoring tool.
Integrate Amazon EKS/ K8s Cluster with the Datadog Dashboard – go to the Datadog Console and add the Kubernetes integration.
[Optional] If you’re using Slack communication tool and have admin access, then Flagger can be configured to send alerts to the Slack chat platform by integrating the Slack alerting system with Flagger. If you don’t have admin access in Slack, then skip this step.
Create a namespace “apps”, and applications and load testing service will be deployed into this namespace.
kubectl create ns apps
Create a deployment and a horizontal pod autoscaler for your custom application or service for which canary deployment will be done.
kubectl -n apps apply -k app
kubectl get deployment -A
kubectl get hpa -n apps
Deploy the load testing service to generate traffic during the canary analysis.
kubectl -n apps apply -k tester
kubectl get deployment -A
kubectl get svc -n apps
Use apps-vs.yaml to create a Gloo virtual service definition that references a route table that will be generated by Flagger.
kubectl apply -f ./apps-vs.yaml
kubectl get vs -n apps
[Optional] If you have your own domain name, then open apps-vs.yaml in vi editor and replace podinfo.example.com with your own domain name to run the app in that domain.
Use canary.yaml to create a canary custom resource. Review the service, analysis, and metrics sections of the canary.yaml file.
kubectl apply -f ./canary.yaml
After a couple of seconds, Flagger will create the canary objects. When the bootstrap finishes, Flagger will set the canary status to “Initialized”.
kubectl -n apps get canary podinfo
NAME STATUS WEIGHT LASTTRANSITIONTIME
podinfo Initialized 0 2023-xx-xxTxx:xx:xxZ
Gloo automatically creates an ELB. Once the load balancer is provisioned and health checks pass, we can find the sample application at the load balancer’s public address. Note down the ELB’s Public address:
kubectl get svc -n gloo-system --field-selector 'metadata.name==gateway-proxy' -o=jsonpath='{.items[0].status.loadBalancer.ingress[0].hostname}{"\n"}'
Validate if your application is running, and you’ll see an output with version 6.0.0.
curl <load balancer’s public address> -H "Host:podinfo.example.com"
Trigger progressive deployments and monitor the status
You can Trigger a canary deployment by updating the application container image from 6.0.0 to 6.01.
kubectl -n apps set image deployment/podinfo podinfod=<ECR URI>:6.0.1
Flagger detects that the deployment revision changed and starts a new rollout.
kubectl -n apps describe canary/podinfo
Monitor all canaries, as the promoted status condition can have one of the following statuses: initialized, Waiting, Progressing, Promoting, Finalizing, Succeeded, and Failed.
watch kubectl get canaries --all-namespaces
curl < load balancer’s public address> -H "Host:podinfo.example.com"
Once canary is completed, validate your application. You can see that the version of the application is changed from 6.0.0 to 6.0.1.
[Optional] Open podinfo application from the laptop browser
Find out both of the IP addresses associated with load balancer.
dig < load balancer’s public address >
Open /etc/hosts file in the laptop and add both of the IPs of load balancer in the host file.
sudo vi /etc/hosts
<Public IP address of LB Target node> podinfo.example.com
e.g.
xx.xx.xxx.xxx podinfo.example.com
xx.xx.xxx.xxx podinfo.example.com
Type “podinfo.example.com” in your browser and you’ll find the application in form similar to this:
Figure 1: Greetings from podinfo v6.0.1
Automated rollback
While doing the canary analysis, you’ll generate HTTP 500 errors and high latency to check if Flagger pauses and rolls back the faulted version. Flagger performs automatic Rollback in the case of failure.
Introduce another canary deployment with podinfo image version 6.0.2 and monitor the status of the canary.
kubectl -n apps set image deployment/podinfo podinfod=<ECR URI>:6.0.2
Run HTTP 500 errors or a high-latency error from a separate terminal window.
Generate HTTP 500 errors:
watch curl -H 'Host:podinfo.example.com' <load balancer’s public address>/status/500
Generate high latency:
watch curl -H 'Host:podinfo.example.com' < load balancer’s public address >/delay/2
When the number of failed checks reaches the canary analysis threshold, the traffic is routed back to the primary, the canary is scaled to zero, and the rollout is marked as failed.
kubectl get canaries --all-namespaces
kubectl -n apps describe canary/podinfo
Cleanup
When you’re done experimenting, you can delete all of the resources created during this series to avoid any additional charges. Let’s walk through deleting all of the resources used.
Delete Amazon EKS Cluster After you’ve finished with the cluster and nodes that you created for this tutorial, you should clean up by deleting the cluster and nodes with the following command:
This post explained the process for setting up Amazon EKS cluster and how to leverage Flagger for progressive deployments along with Prometheus and Gloo Ingress Controller. You can enhance the deployments by integrating Flagger with Slack, Datadog, and webhook notifications for progressive deployments. Amazon EKS removes the undifferentiated heavy lifting of managing and updating the Kubernetes cluster. Managed node groups automate the provisioning and lifecycle management of worker nodes in an Amazon EKS cluster, which greatly simplifies operational activities such as new Kubernetes version deployments.
We encourage you to look into modernizing your DevOps platform from monolithic architecture to microservice-based architecture with Amazon EKS, and leverage Flagger with the right Ingress controller for secured and automated service releases.
Further Reading
Journey to adopt Cloud-Native DevOps platform Series #1: OfferUp modernized DevOps platform with Amazon EKS and Flagger to accelerate time to market
About the authors:
The collective thoughts of the interwebz
Manage Consent
To provide the best experiences, we use technologies like cookies to store and/or access device information. Consenting to these technologies will allow us to process data such as browsing behavior or unique IDs on this site. Not consenting or withdrawing consent, may adversely affect certain features and functions.
Functional
Always active
The technical storage or access is strictly necessary for the legitimate purpose of enabling the use of a specific service explicitly requested by the subscriber or user, or for the sole purpose of carrying out the transmission of a communication over an electronic communications network.
Preferences
The technical storage or access is necessary for the legitimate purpose of storing preferences that are not requested by the subscriber or user.
Statistics
The technical storage or access that is used exclusively for statistical purposes.The technical storage or access that is used exclusively for anonymous statistical purposes. Without a subpoena, voluntary compliance on the part of your Internet Service Provider, or additional records from a third party, information stored or retrieved for this purpose alone cannot usually be used to identify you.
Marketing
The technical storage or access is required to create user profiles to send advertising, or to track the user on a website or across several websites for similar marketing purposes.


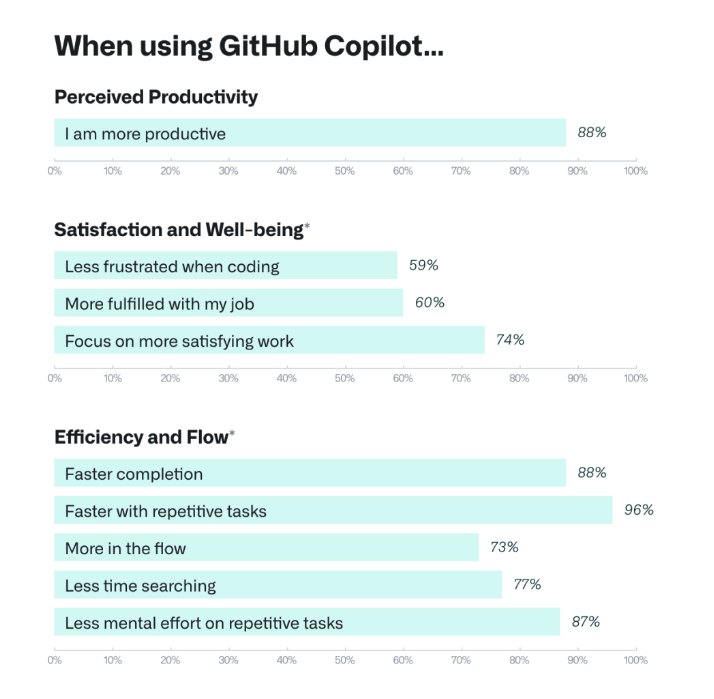


 .NET Developer Day –
 AWS Global Summits – Check your calendars and sign up for the AWS Summit close to where you live or work:


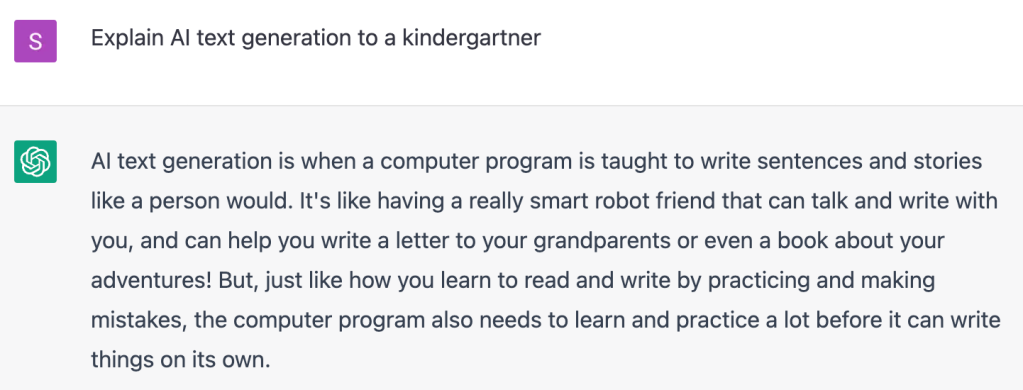

.](https://github.blog/wp-content/uploads/2023/04/image3.gif)
 האדם-החושב on wikipedia](https://github.blog/wp-content/uploads/2023/04/image4-1.png?w=1024&fit=1024%2C1024)
 using VAEs trained on the CelebA dataset.](https://github.blog/wp-content/uploads/2023/04/image6.jpg?w=539&fit=1024%2C1024)
 ) by generating new characters, storylines, design components, and more. Case in point: The developer behind the game,
  ). Artists and designers alike are using these AI tools as a source of inspiration. For example, architects can quickly create 3D models of objects or environments and artists can breathe new life into their portraits by using AI to apply different styles, like adding a Cubist style to their original image. Need proof? Designers are already starting to use AI image generators, such as


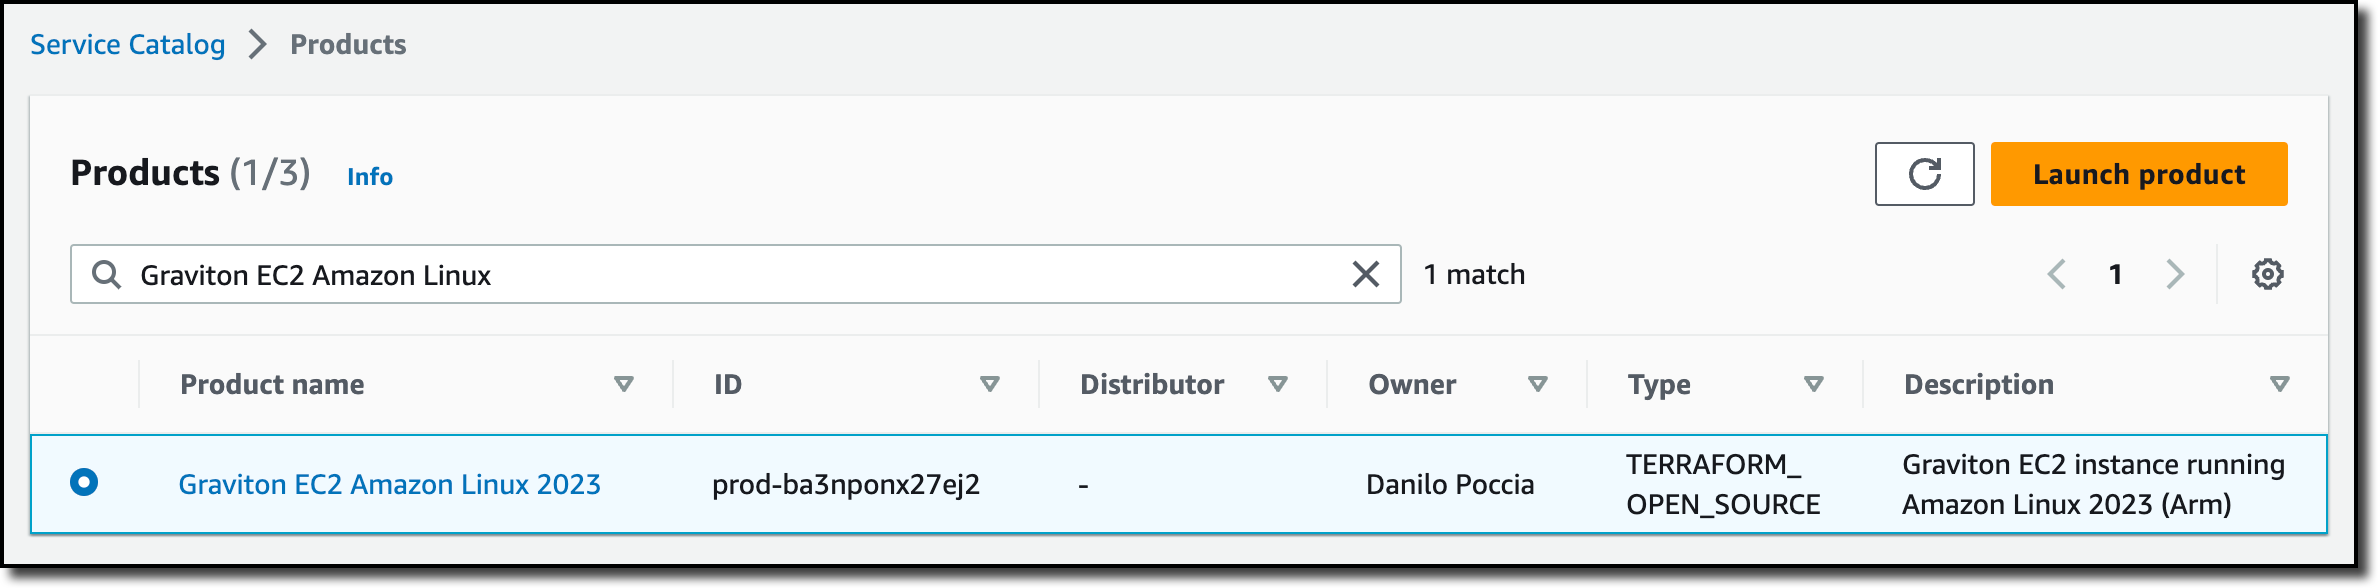

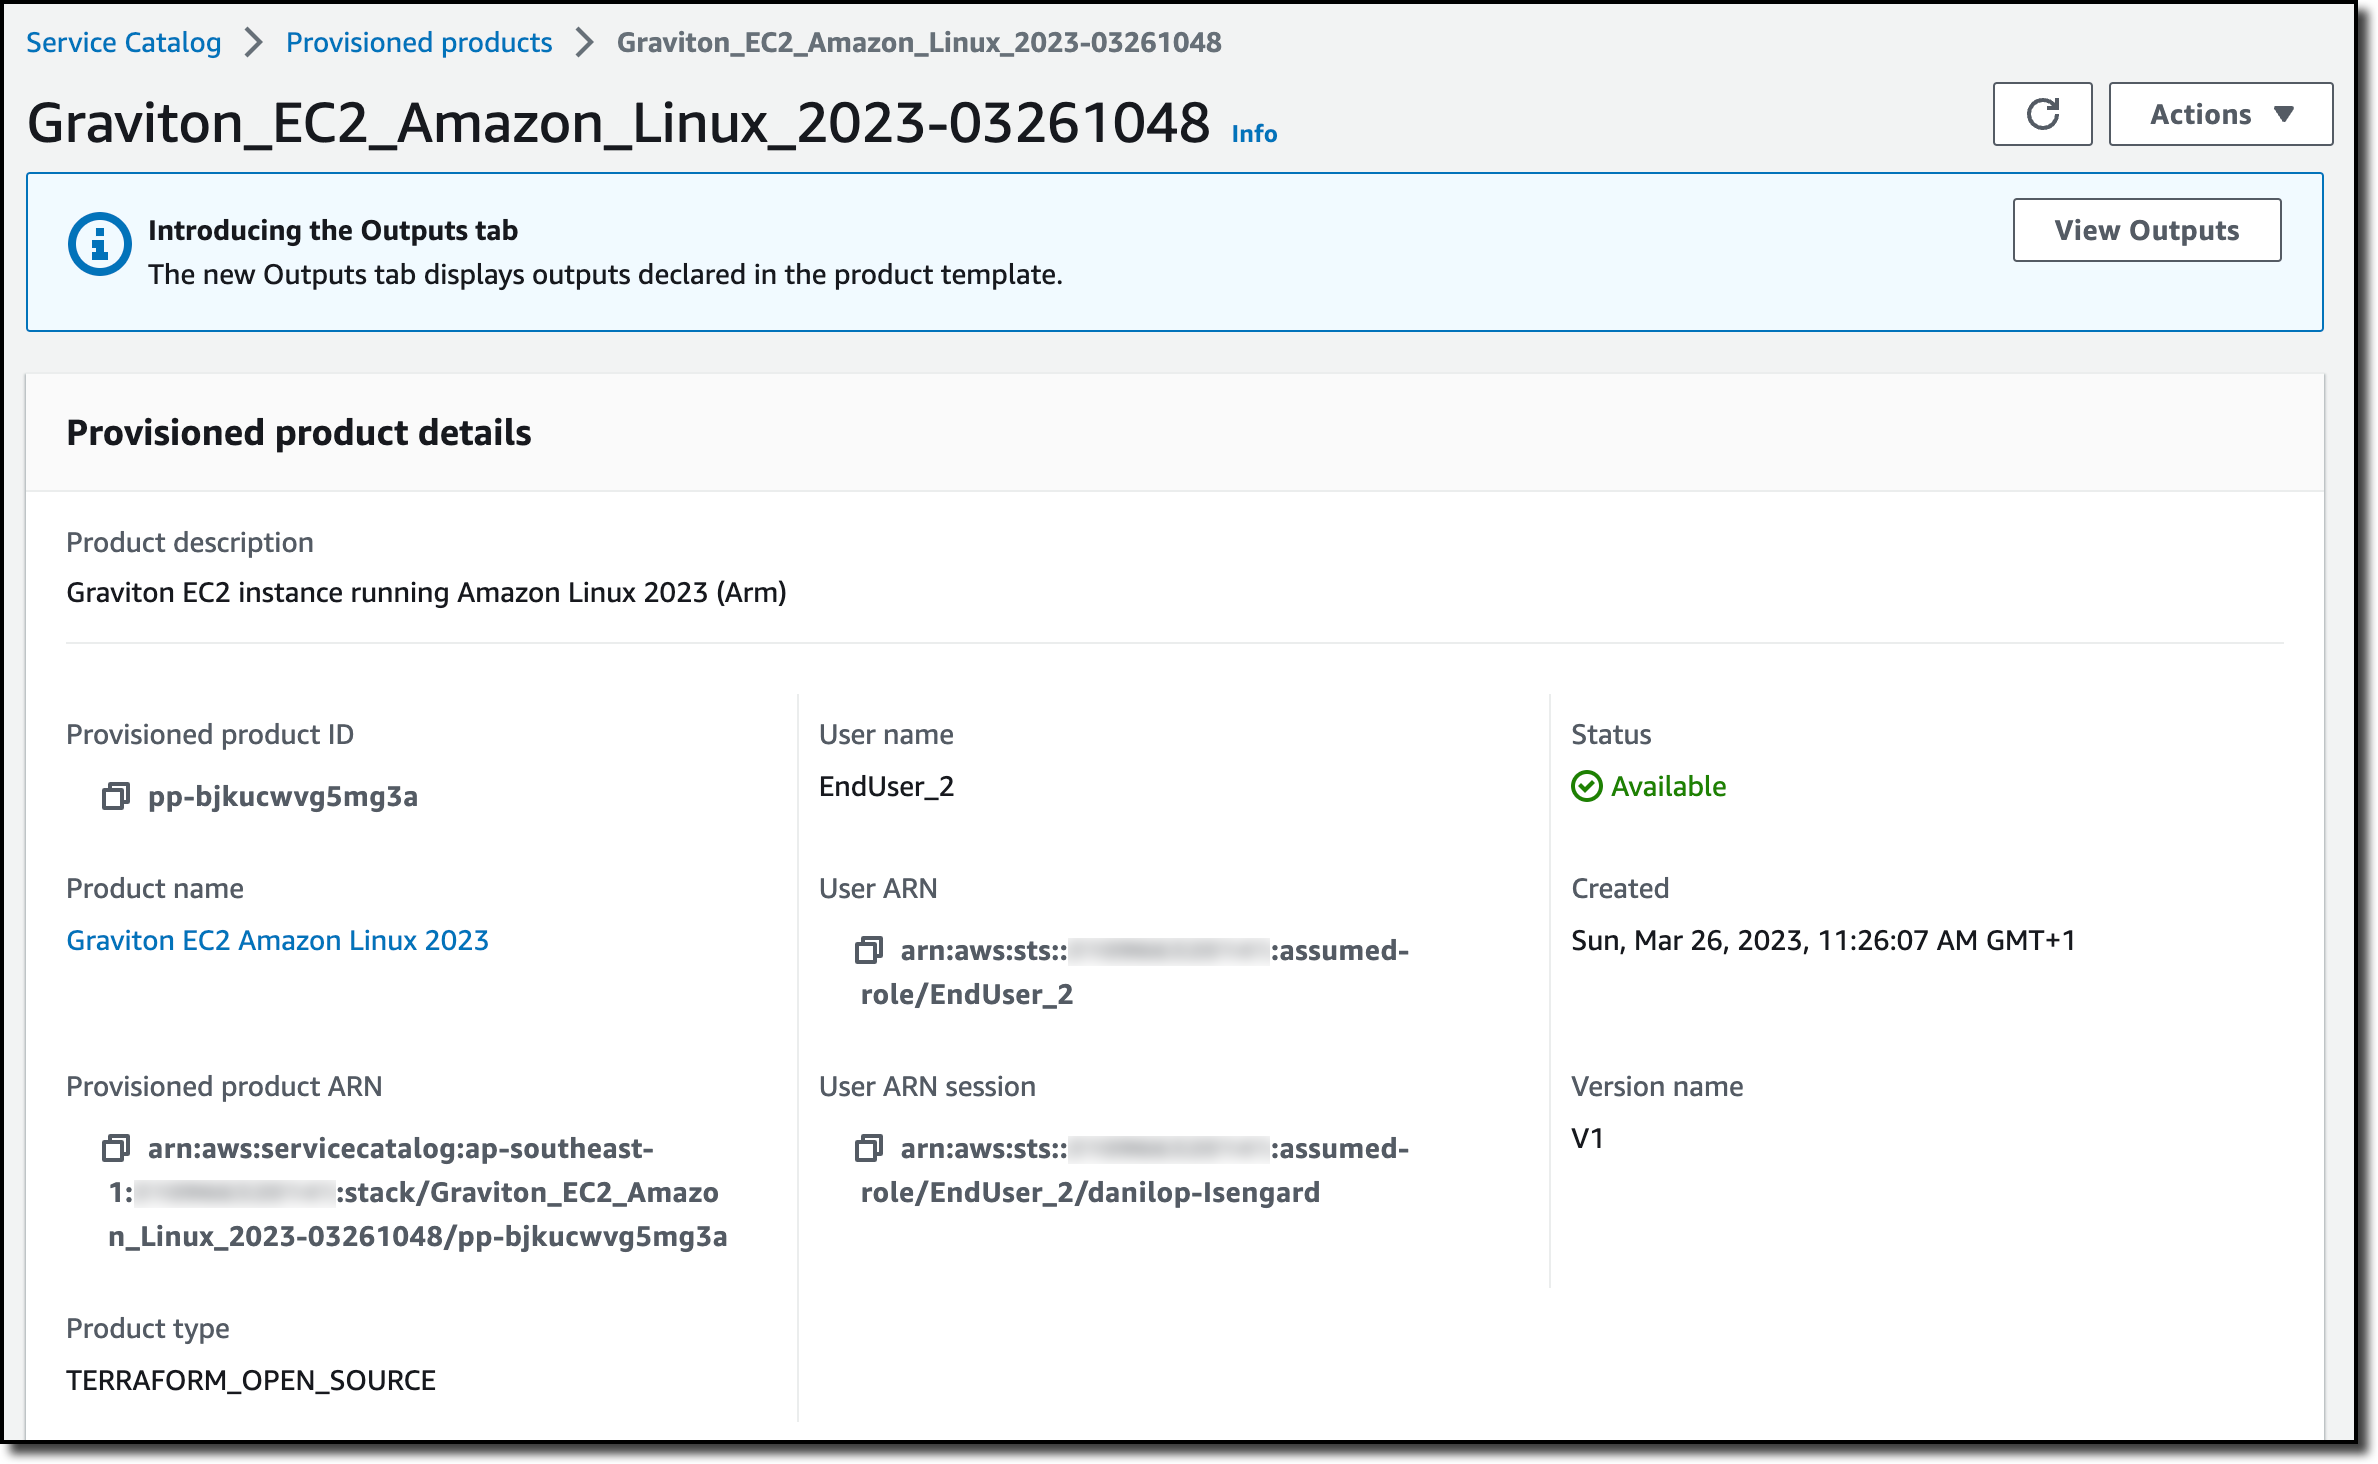


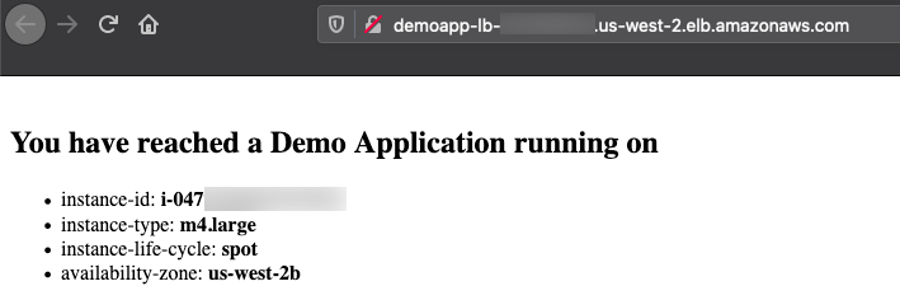
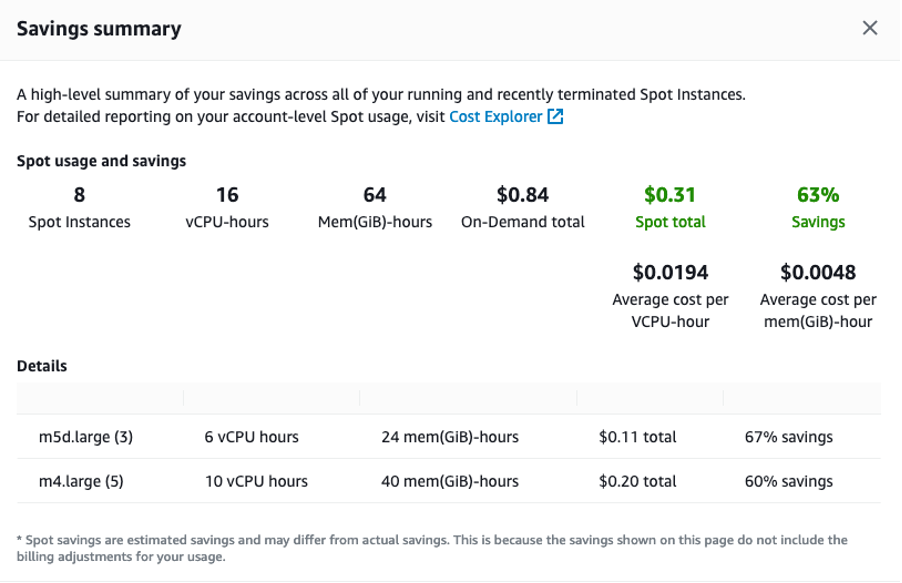


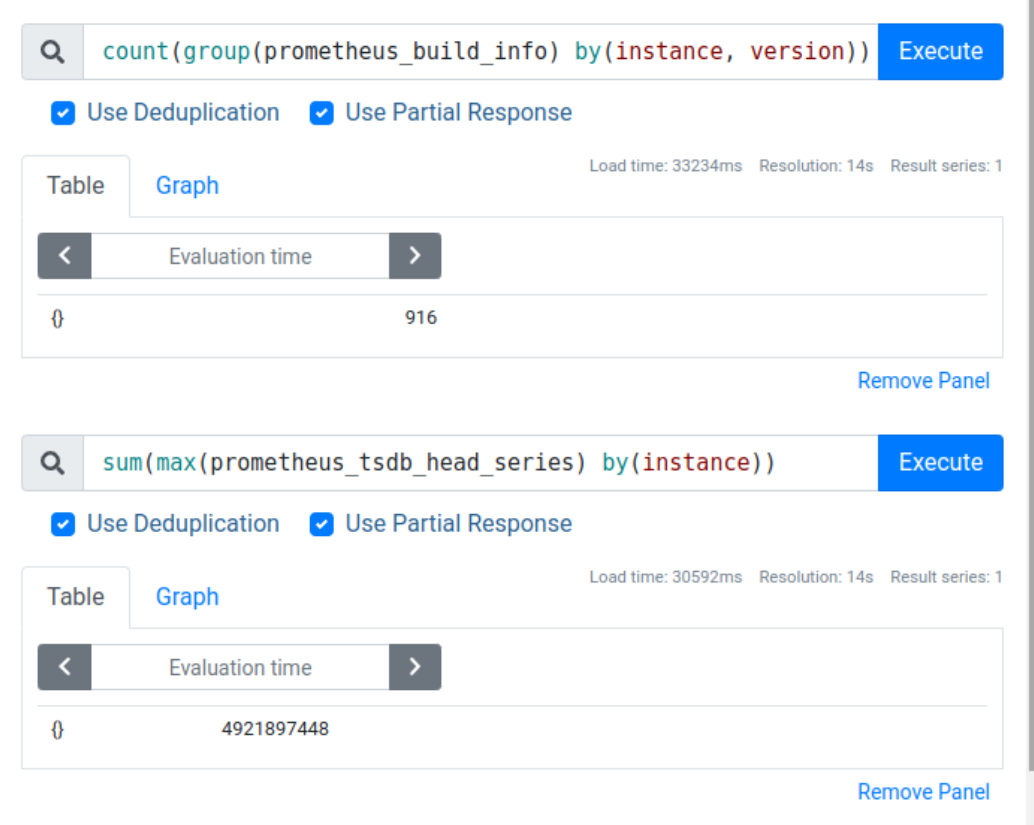
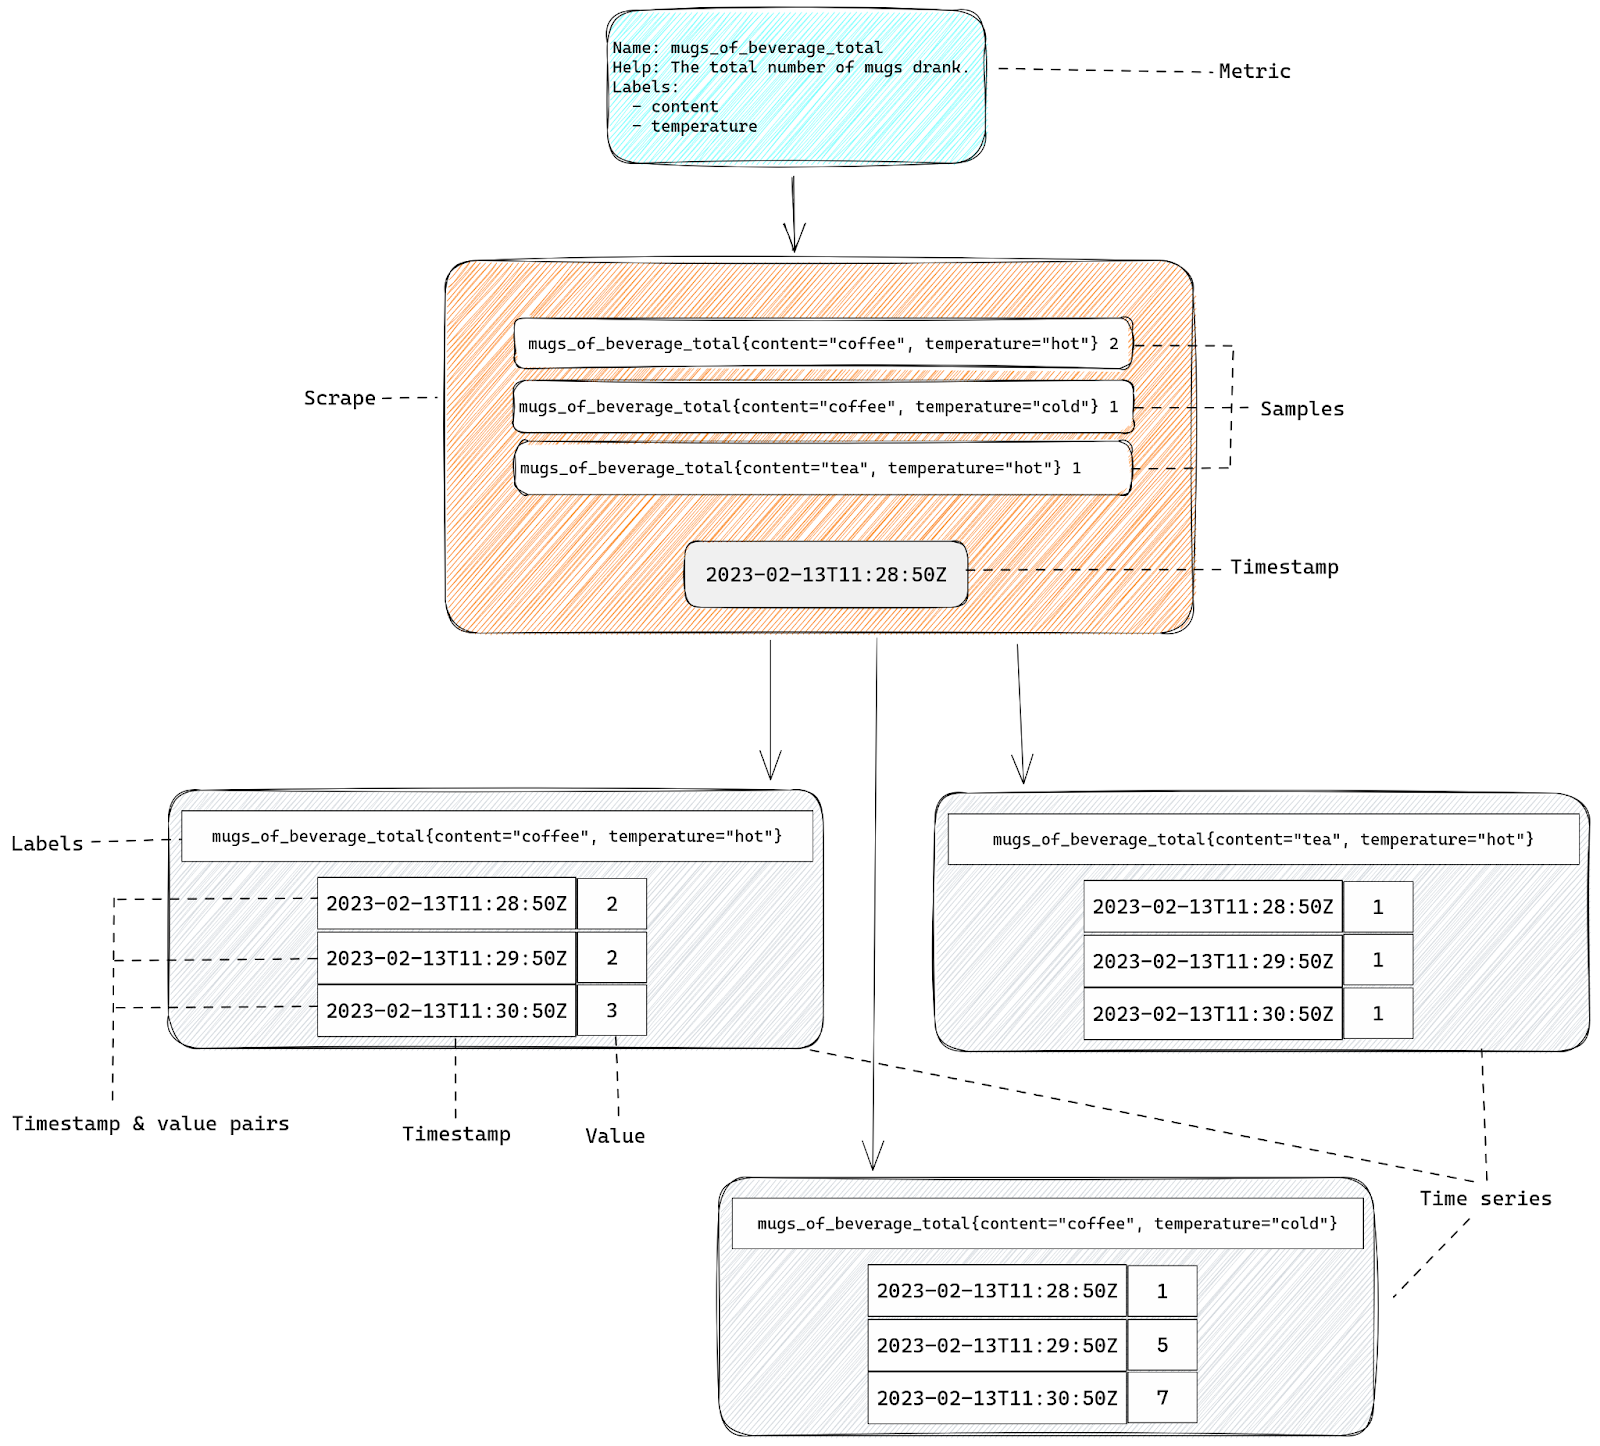
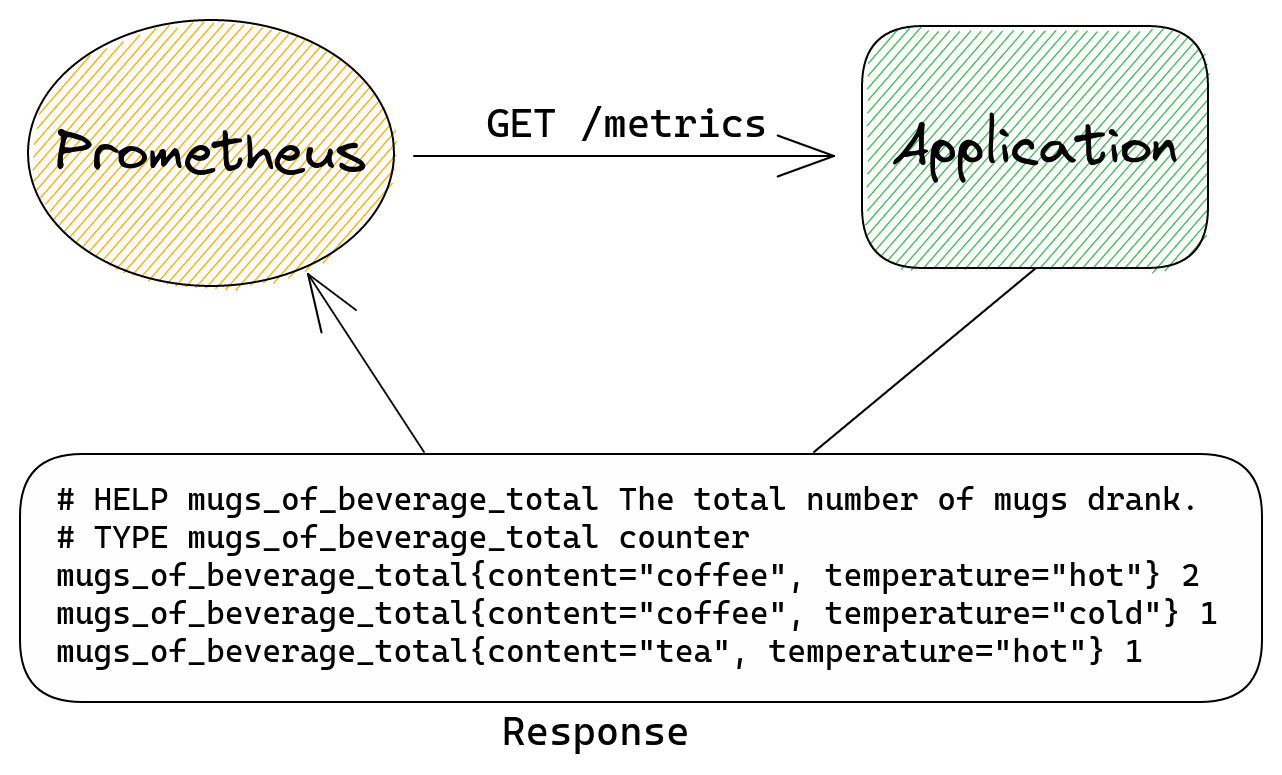
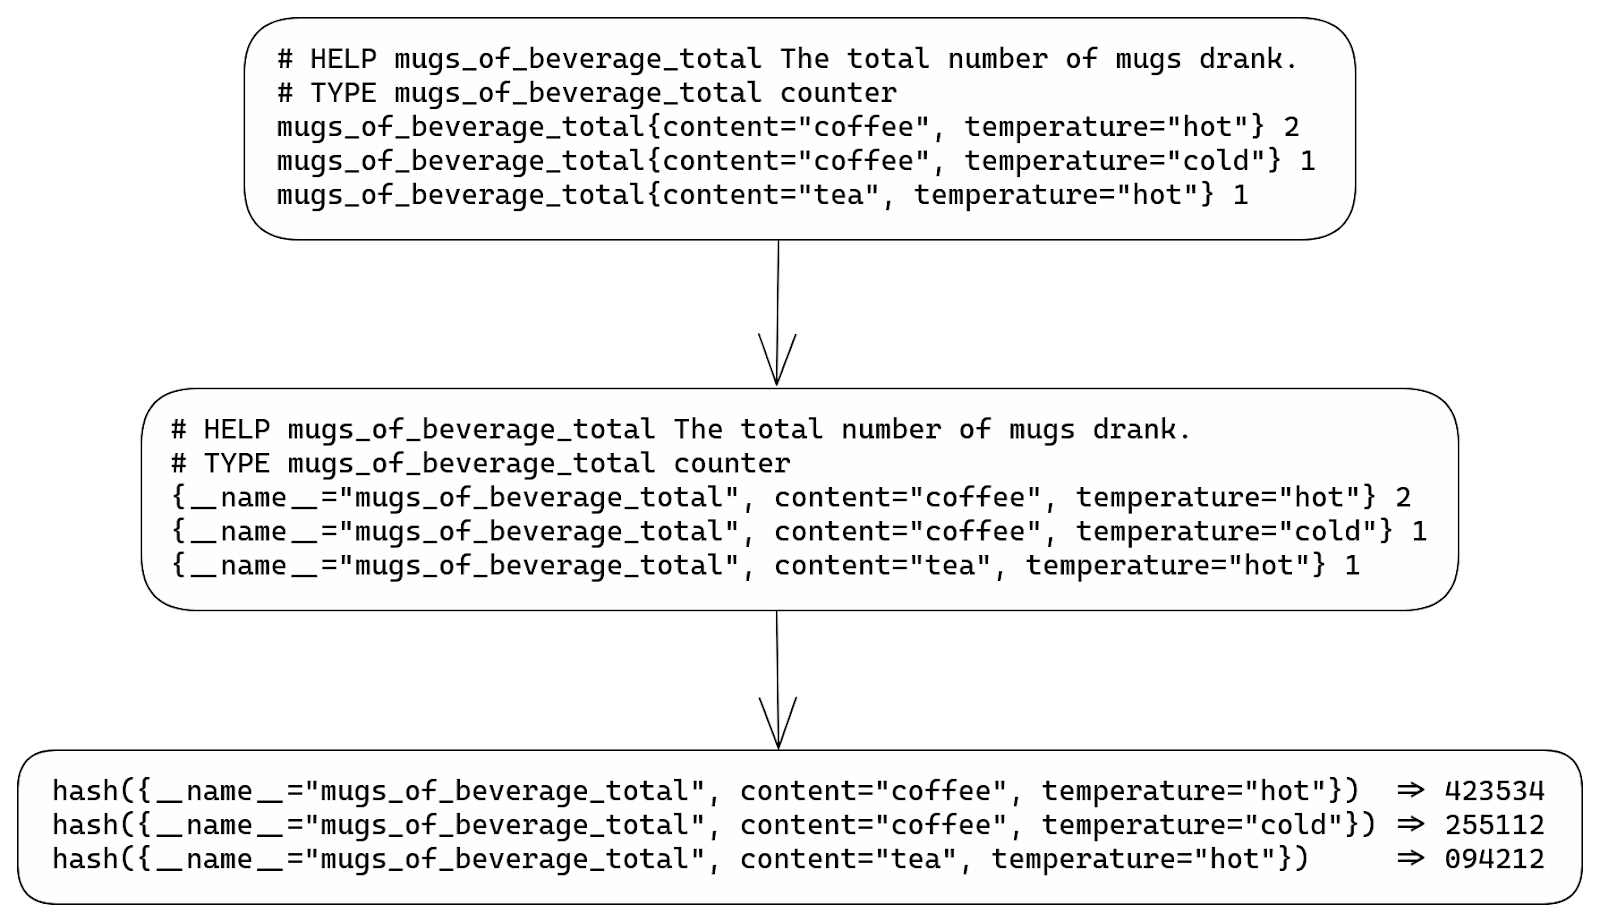


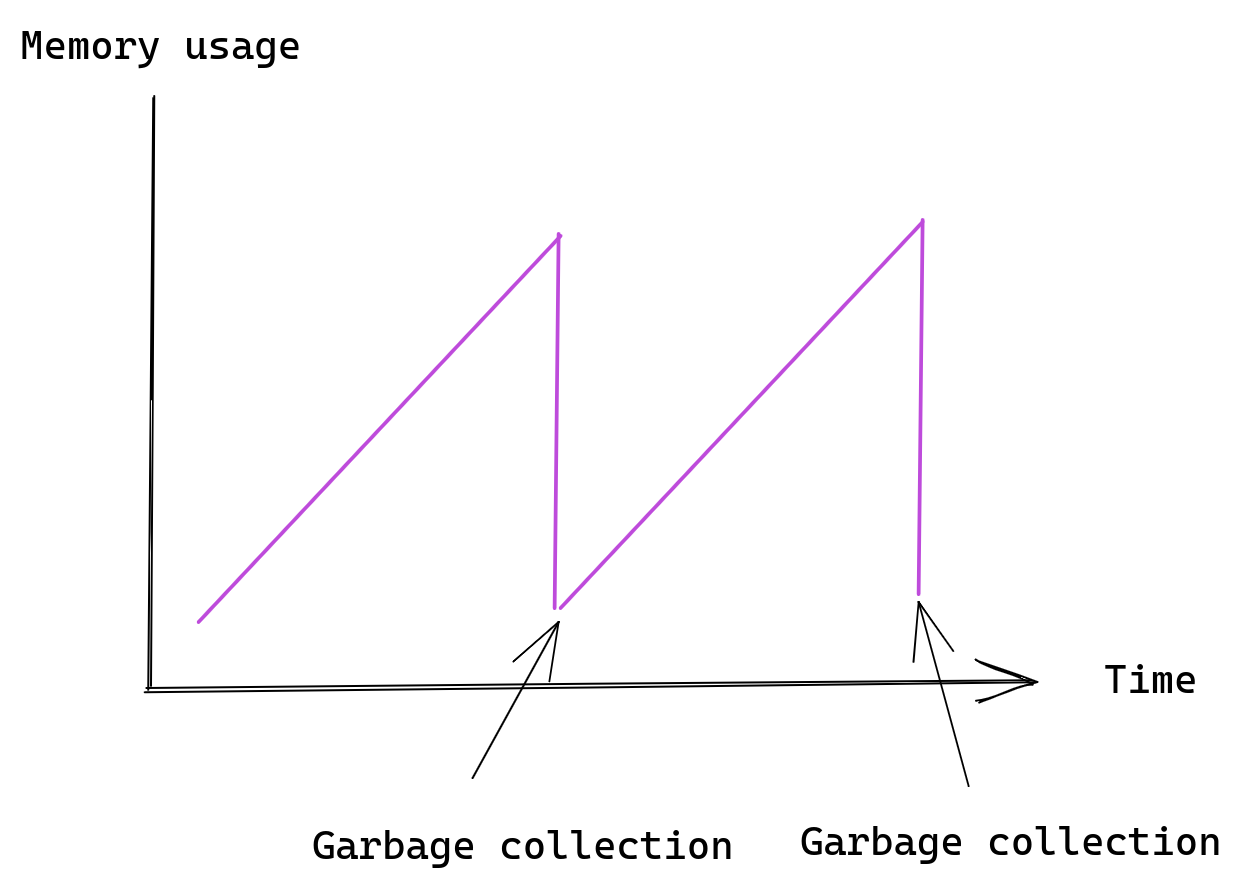
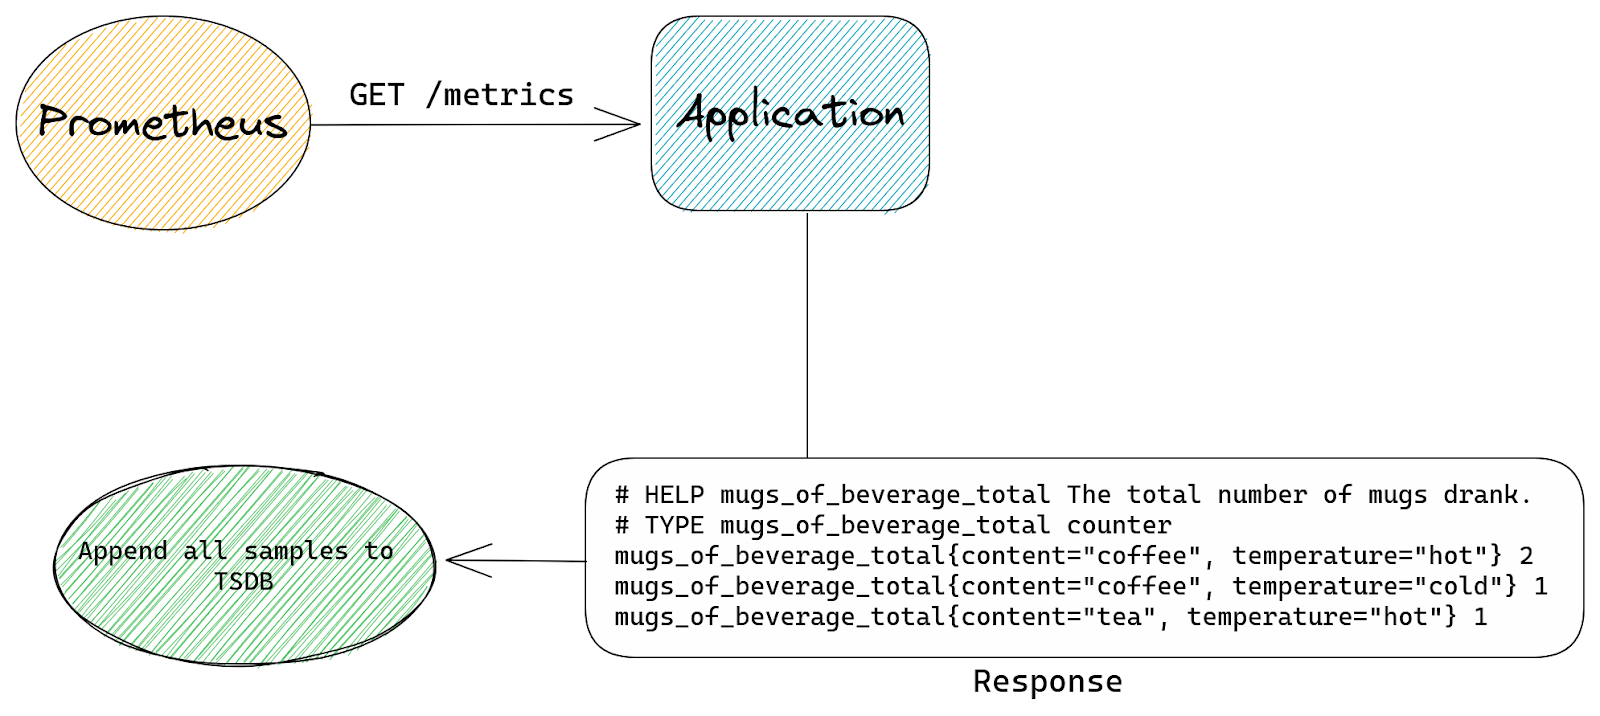
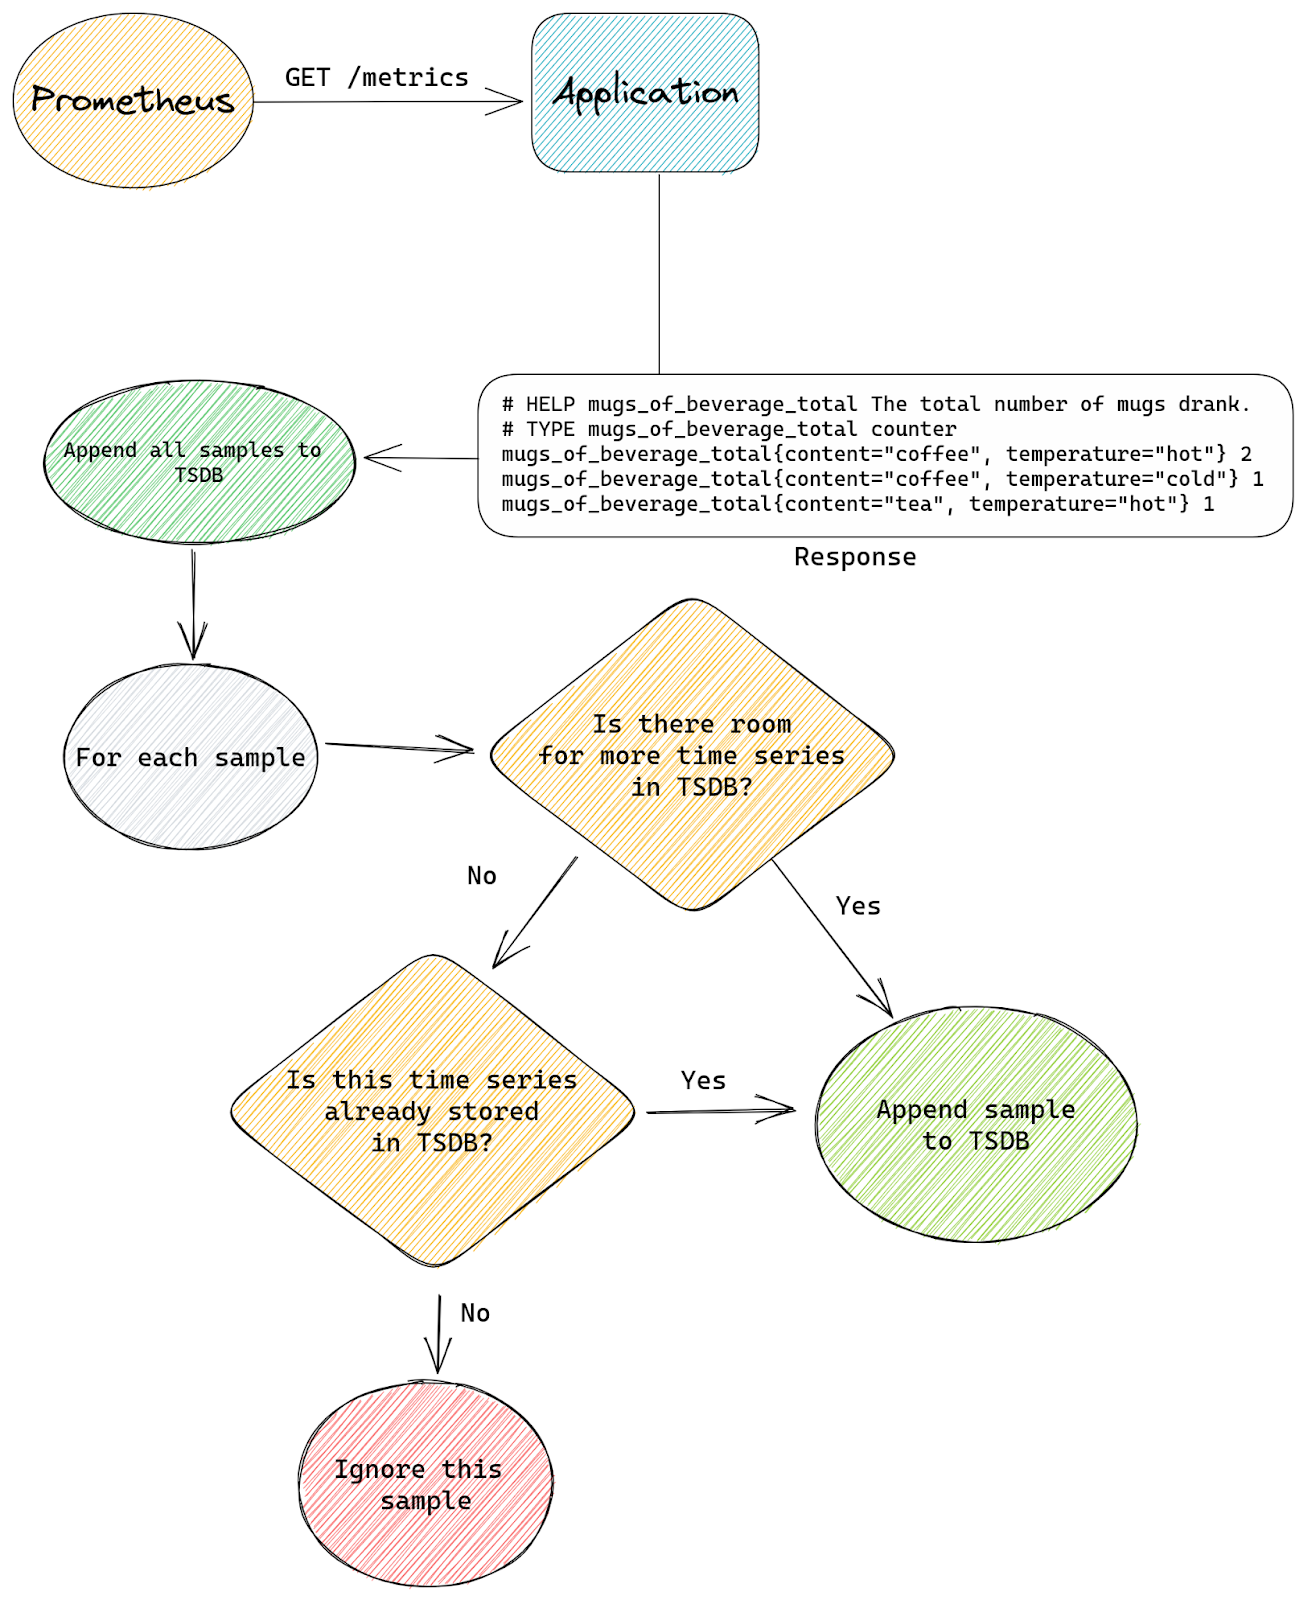
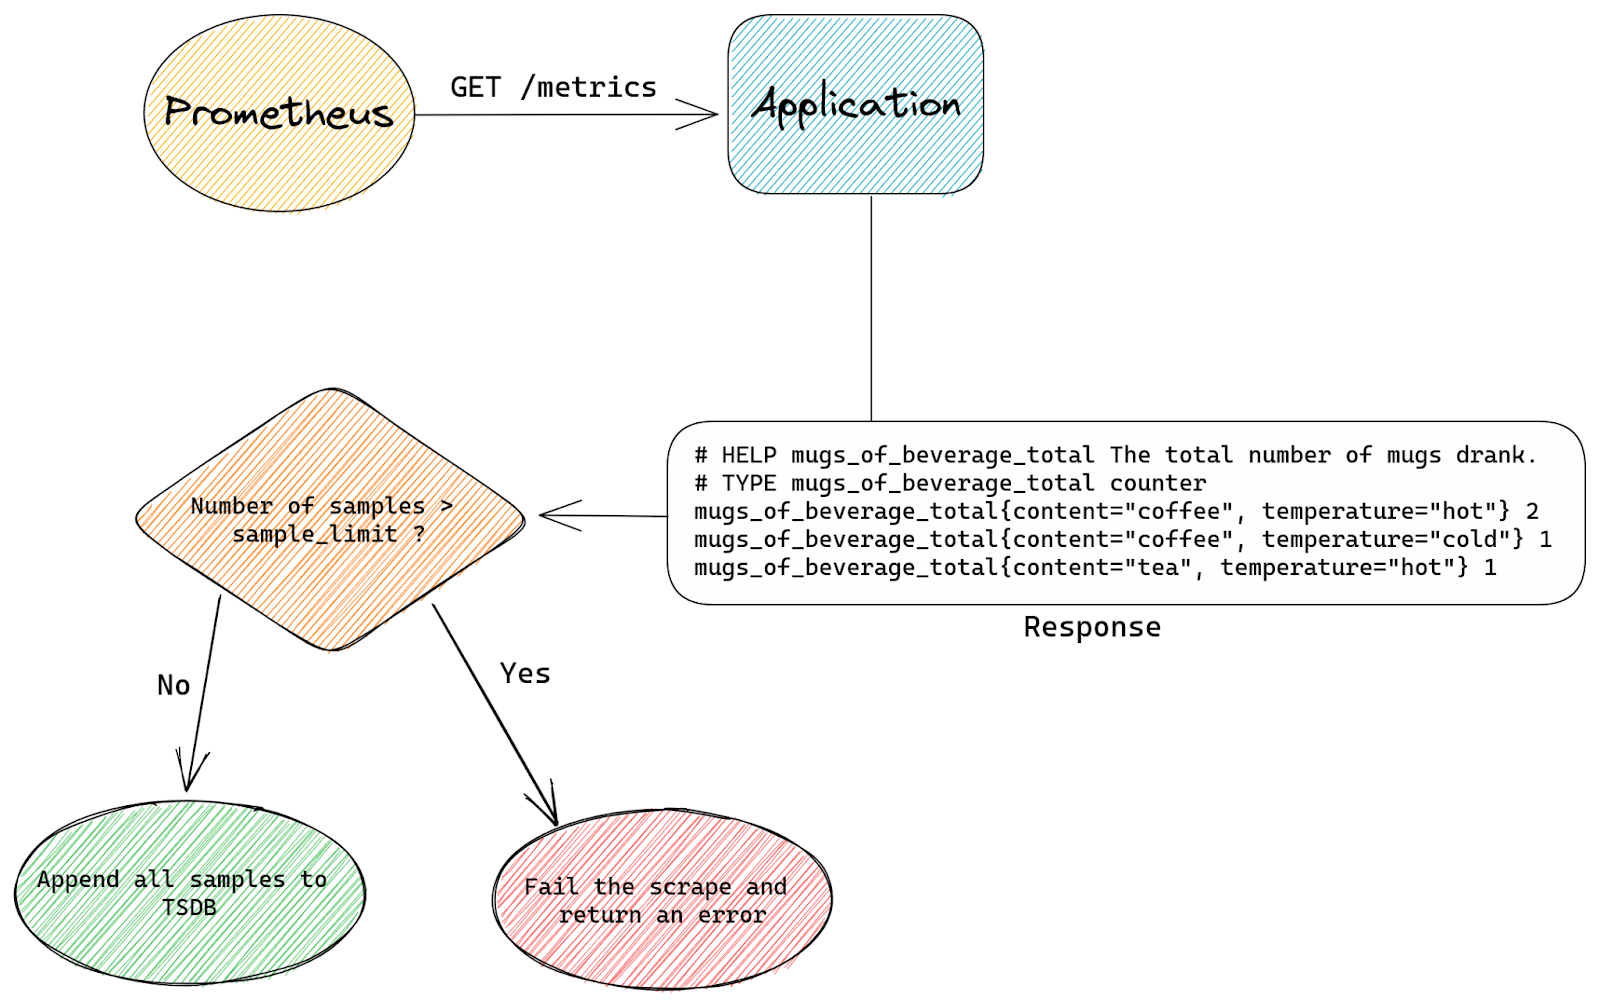
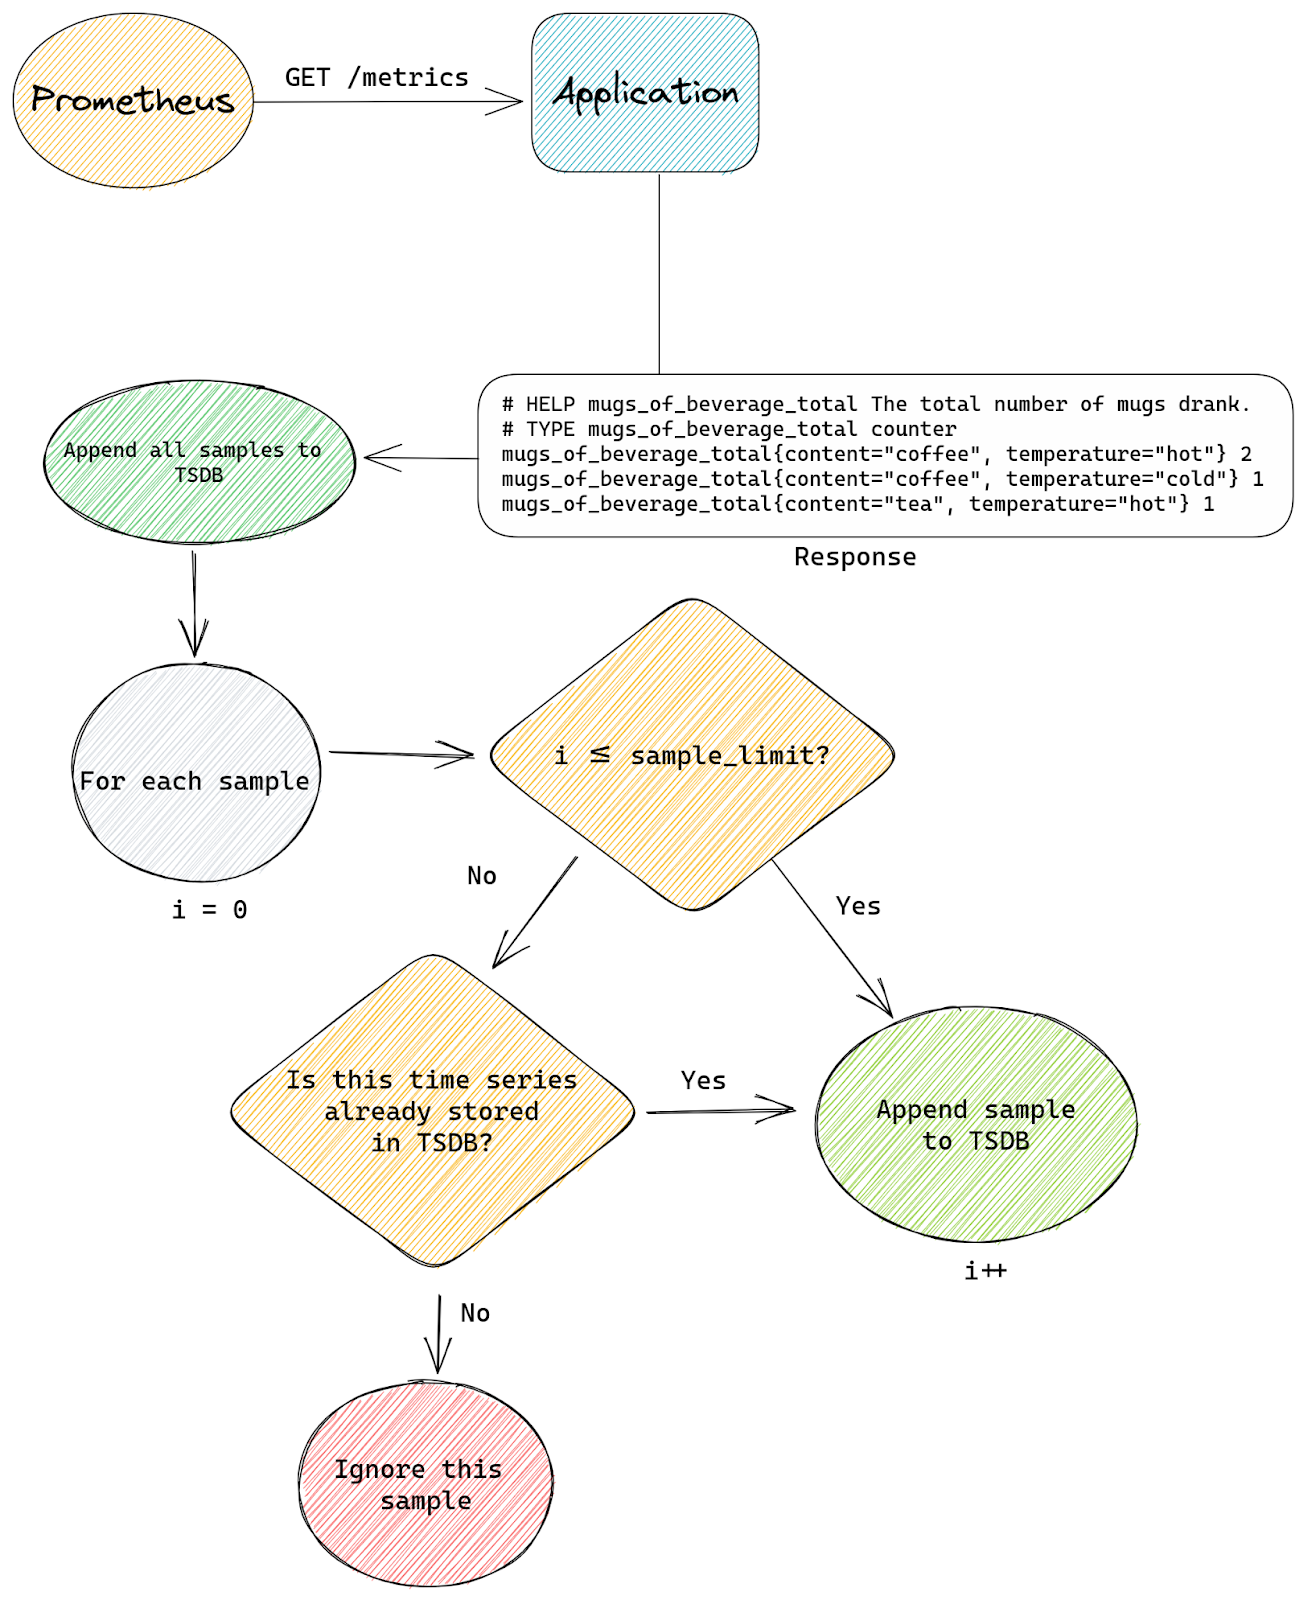


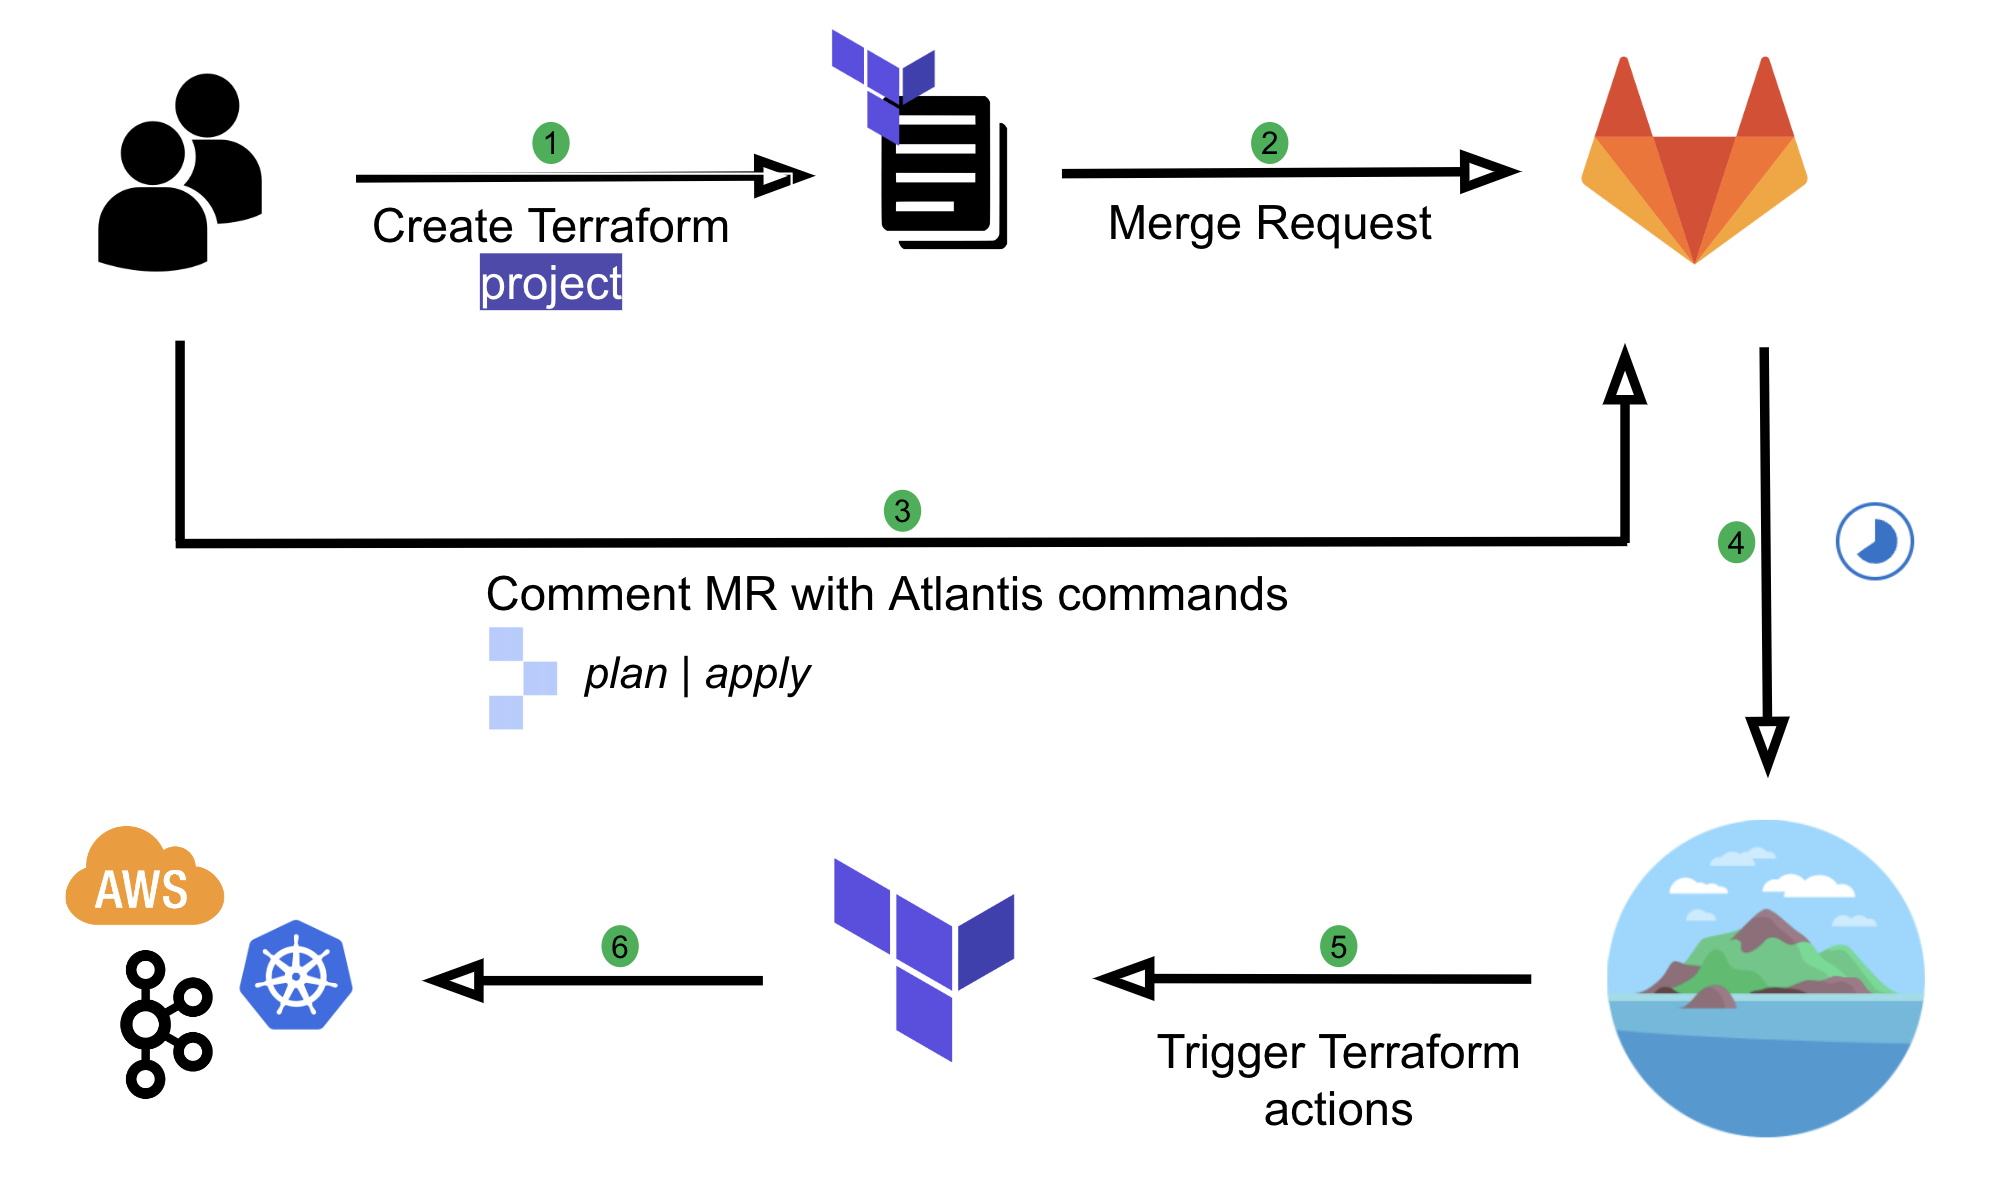
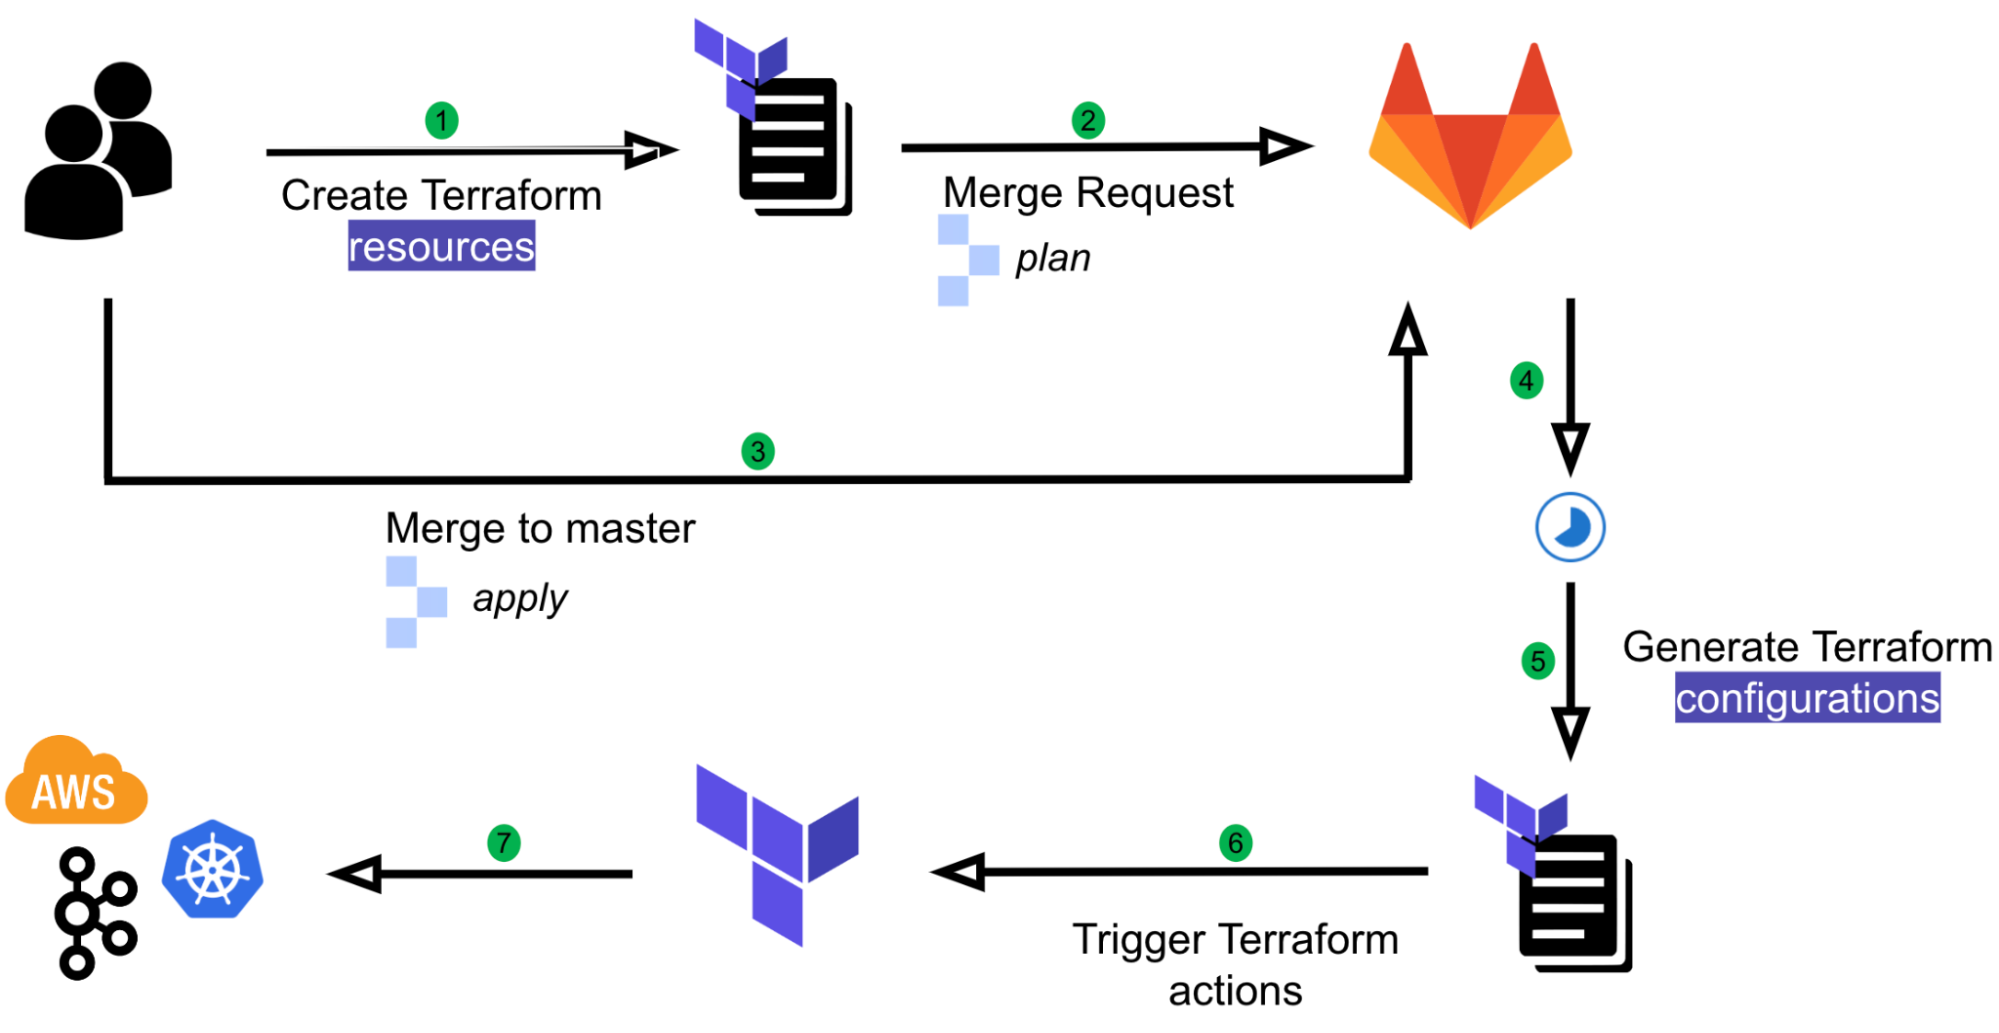
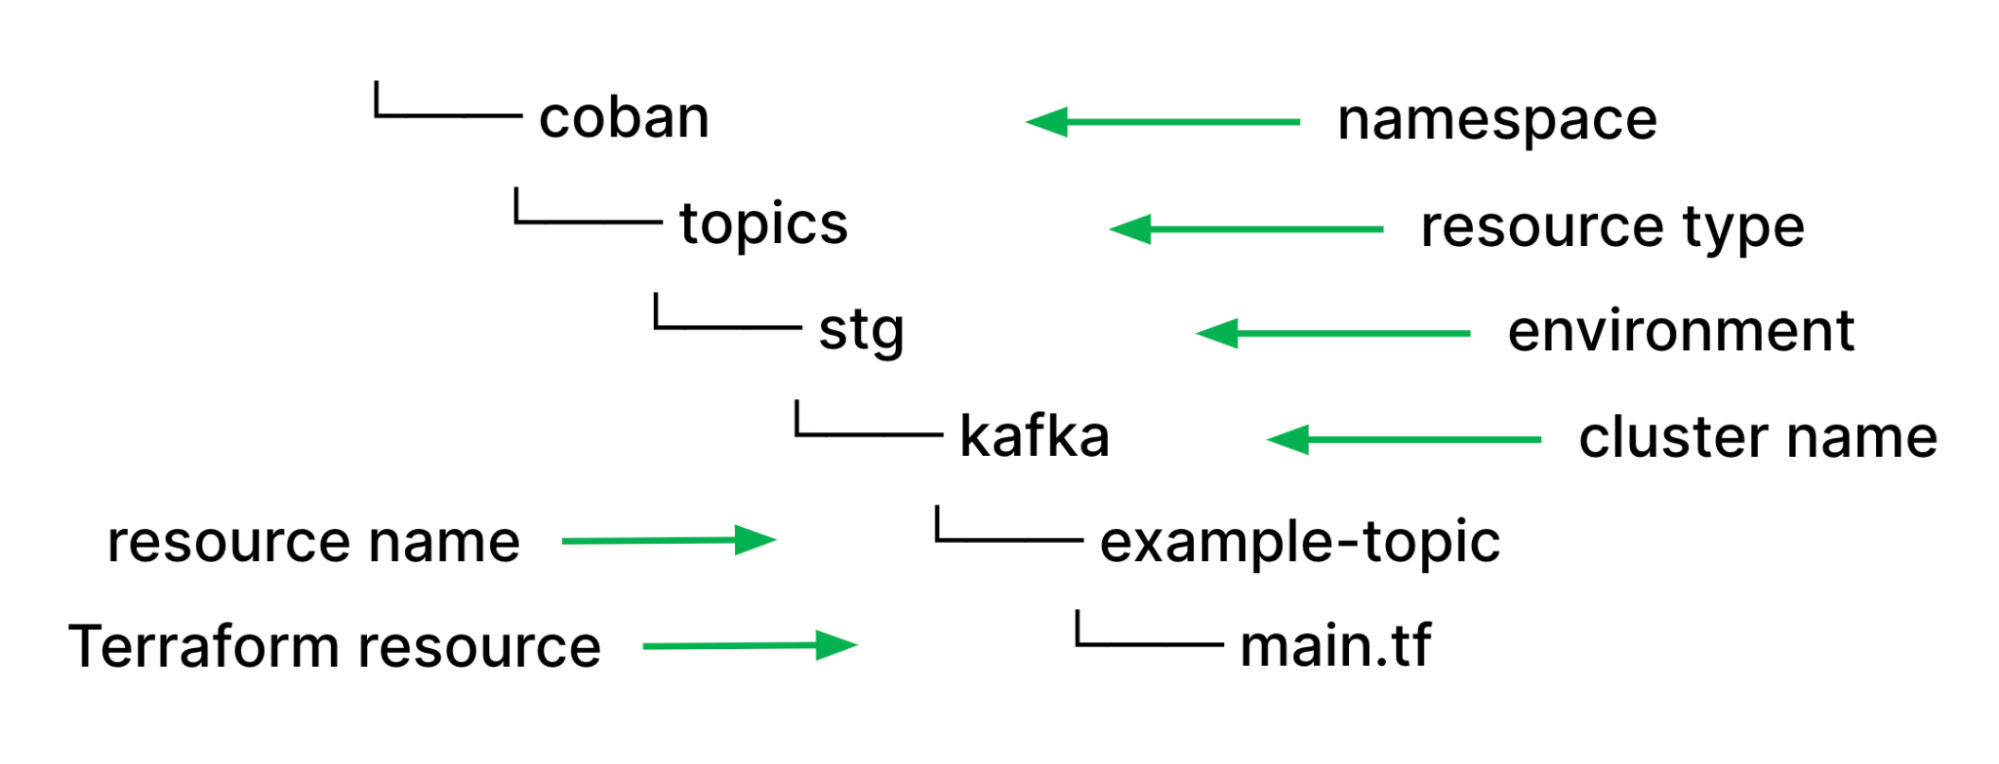
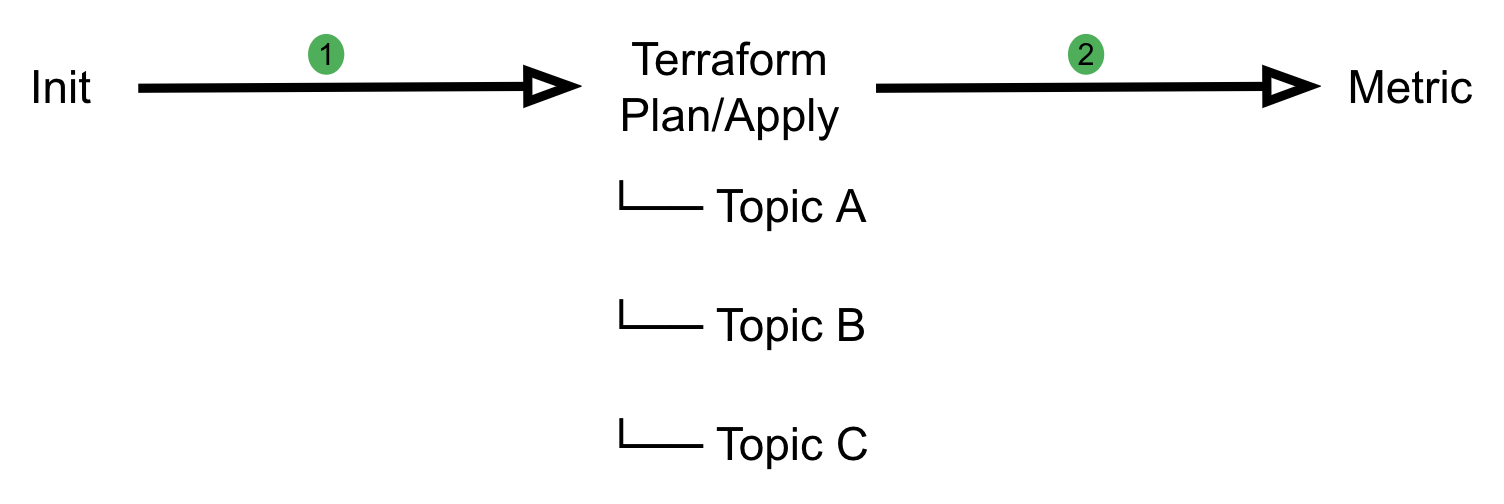
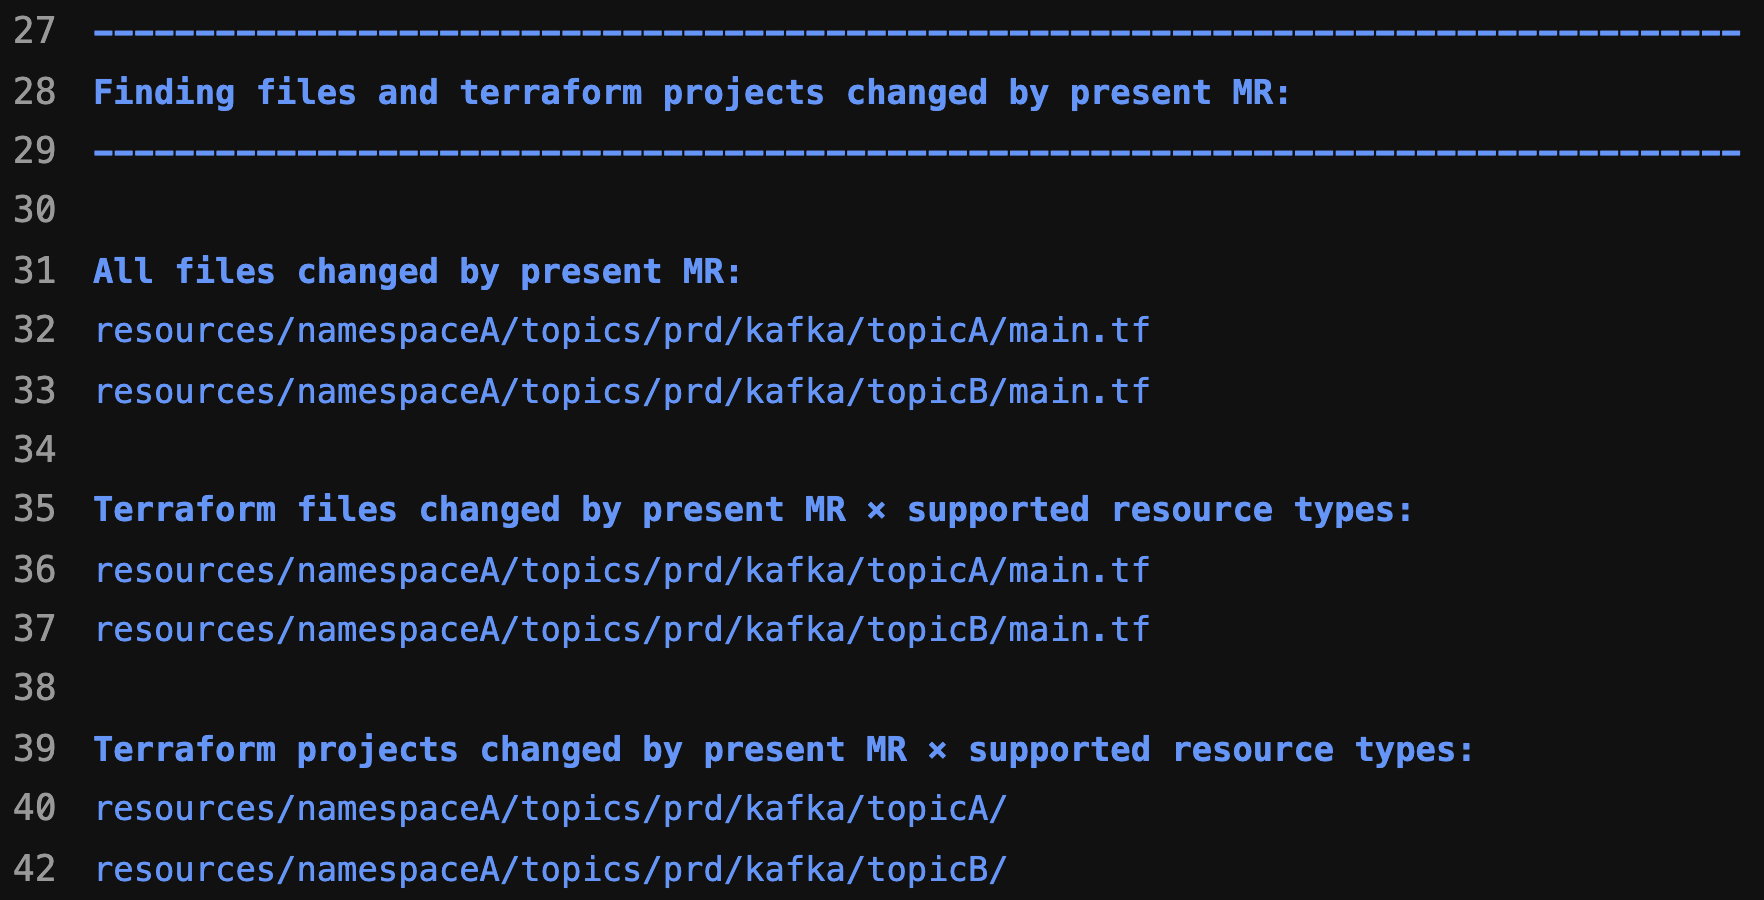
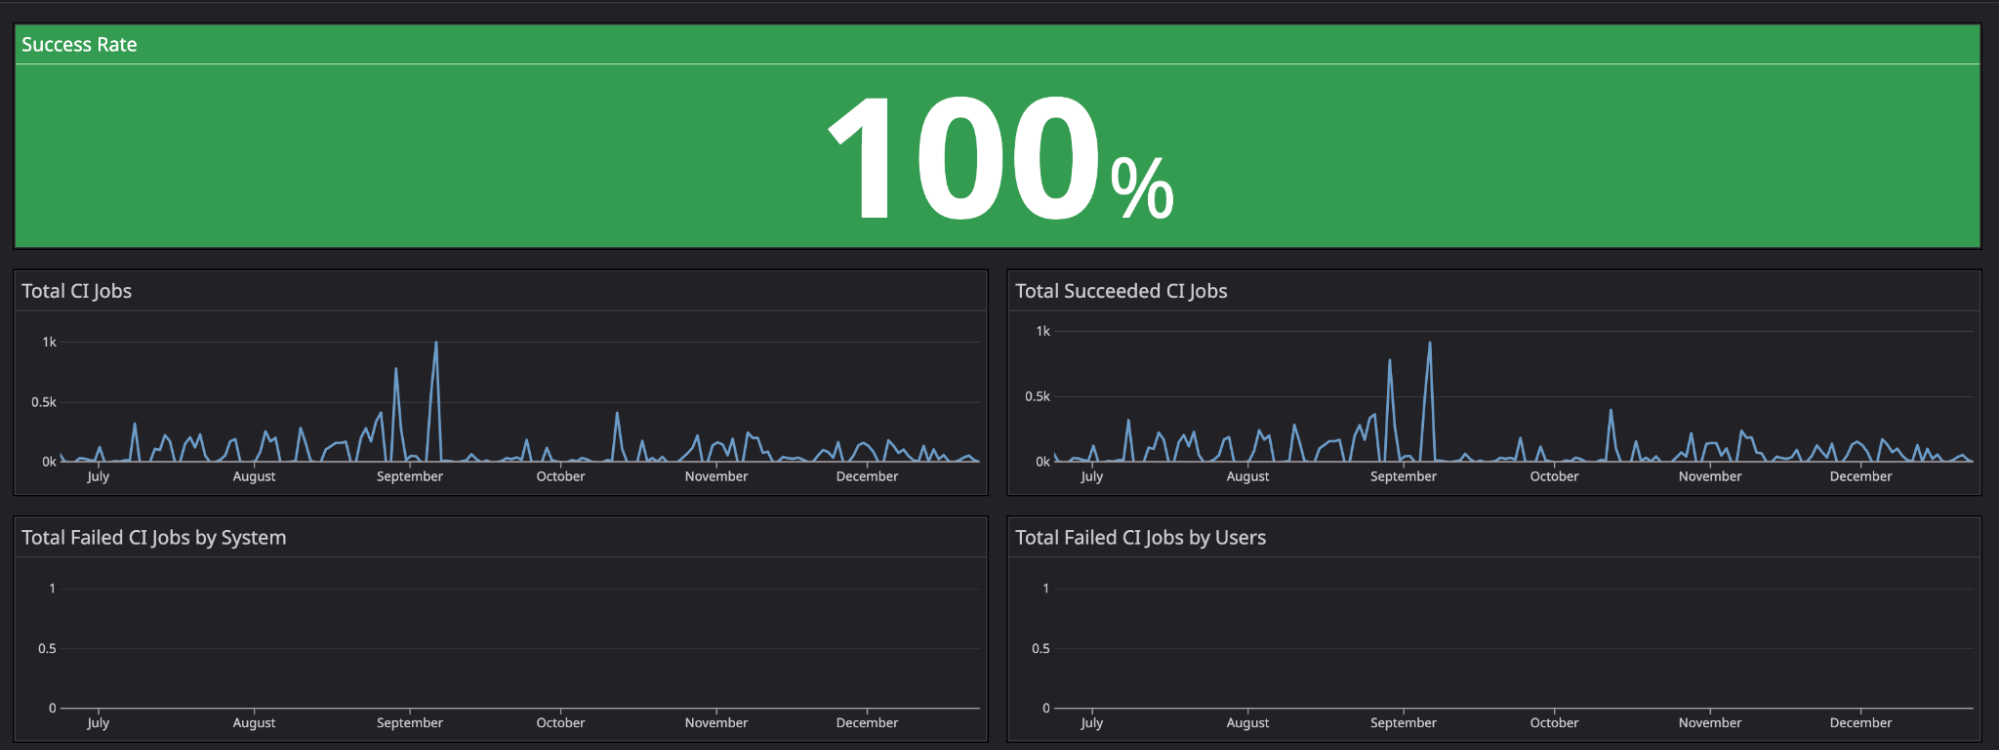

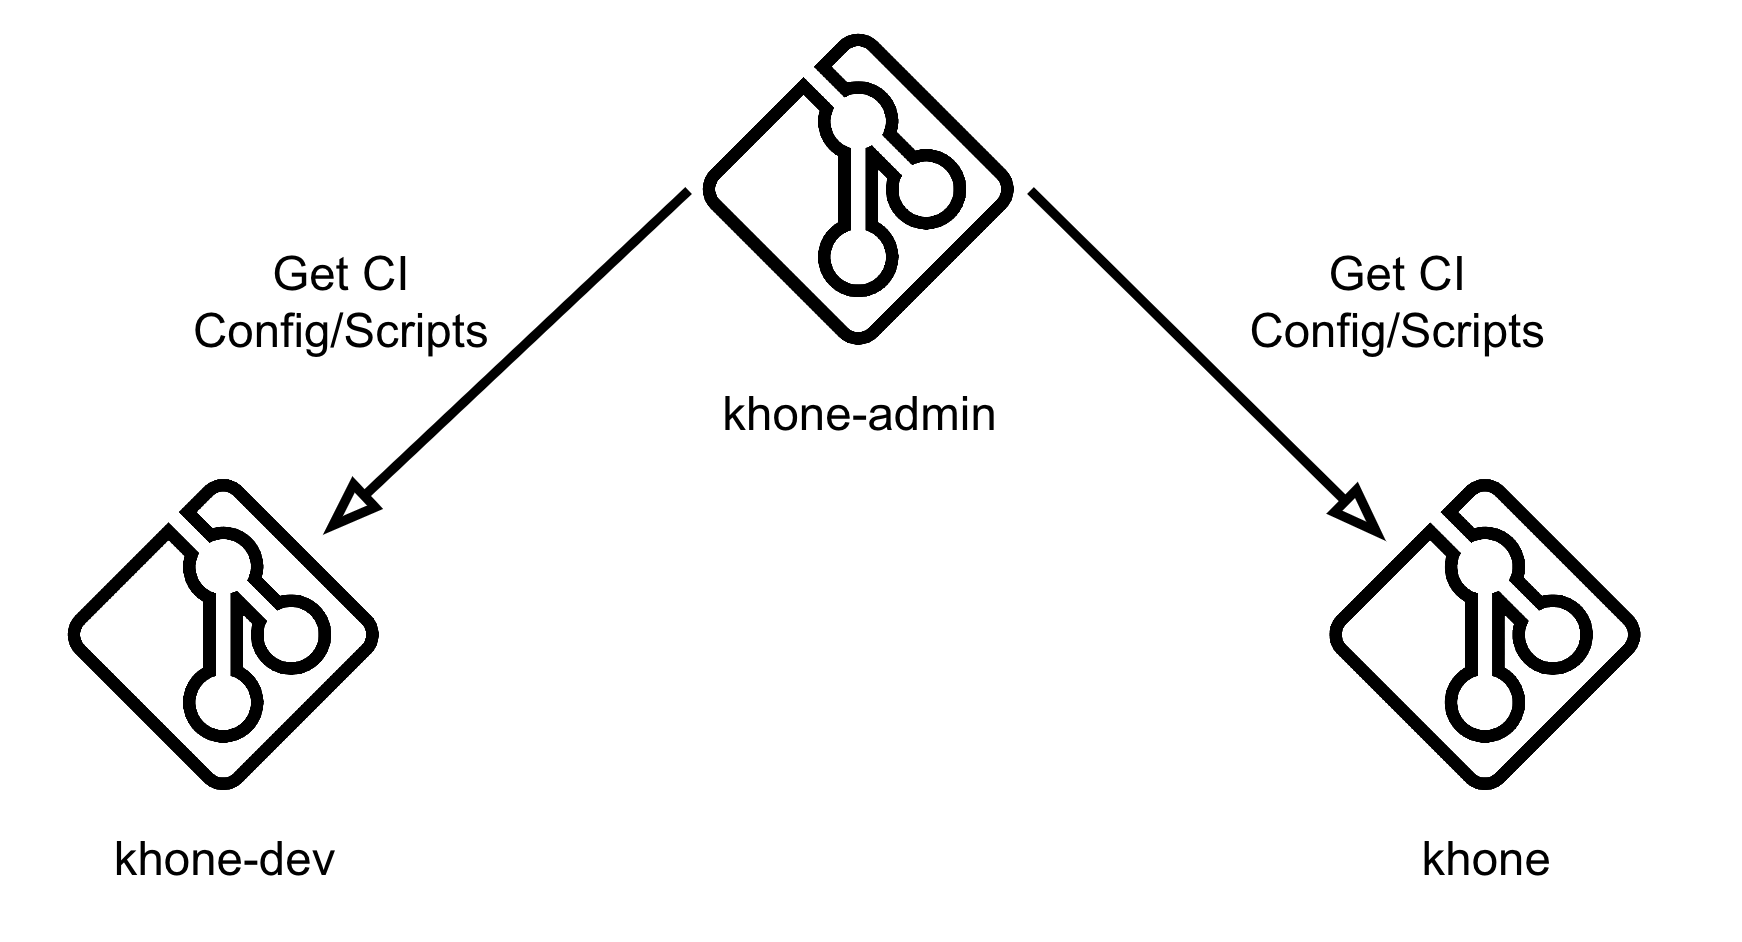

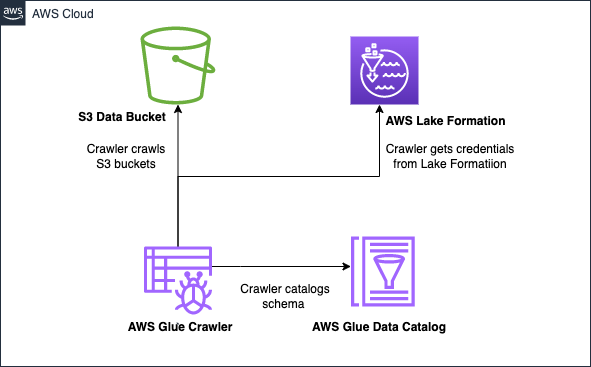


 AWS and Hugging Face collaborate to make generative AI more accessible and cost-efficient – This previous week, we announced an expanded collaboration between AWS and
  AWS Pi Day – Join me on March 14 for the third annual


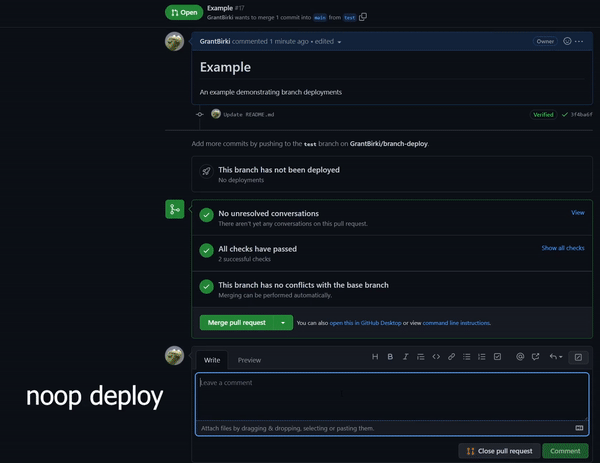


 Detects when IssueOps commands are used on a pull request.
  Configurable: choose your command syntax, environment, noop trigger, base branch, reaction, and more.
 Respects your branch protection settings configured for the repository.
 Comments and reacts to your IssueOps commands.
 Deploy locks to prevent multiple deployments from clashing.