Cloudforce One is our threat operations and research team. Its primary objective: track and disrupt threat actors targeting Cloudflare and the customer systems we protect. Cloudforce One customers can engage directly with analysts on the team to help understand and stop the specific threats targeting them.
Today, we are releasing in general availability two new tools that will help Cloudforce One customers get the best value out of the service by helping us prioritize and organize the information that matters most to them: Requests for Information (RFIs) and Priority Intelligence Requirements (PIRs). We’d also like to review how we’ve used the Cloudflare Workers and Pages platform to build our internal pipeline to not only perform investigations on behalf of our customers, but conduct our own internal investigations of the threats and attackers we track.
What are Requests for Information (RFIs)?
RFIs are designed to streamline the process of accessing critical intelligence. They provide an avenue for users to submit specific queries and requests directly into Cloudforce One’s analysis queue. Essentially, they are a well-structured way for you to tell the team what to focus their research on to best support your security posture.
Each RFI filed is routed to an analyst and treated as a targeted call for information on specific threat elements. From malware analysis to DDoS attack analysis, we have a group of seasoned threat analysts who can provide deeper insight into a wide array of attacks. Those who have found RFIs invaluable typically belong to Security Operation Centers, Incident Response Teams, and Threat Research/Intelligence teams dedicated to supporting internal investigations within an organization. This approach proves instrumental in unveiling potential vulnerabilities and enhancing the understanding of the security posture, especially when confronting complex risks.
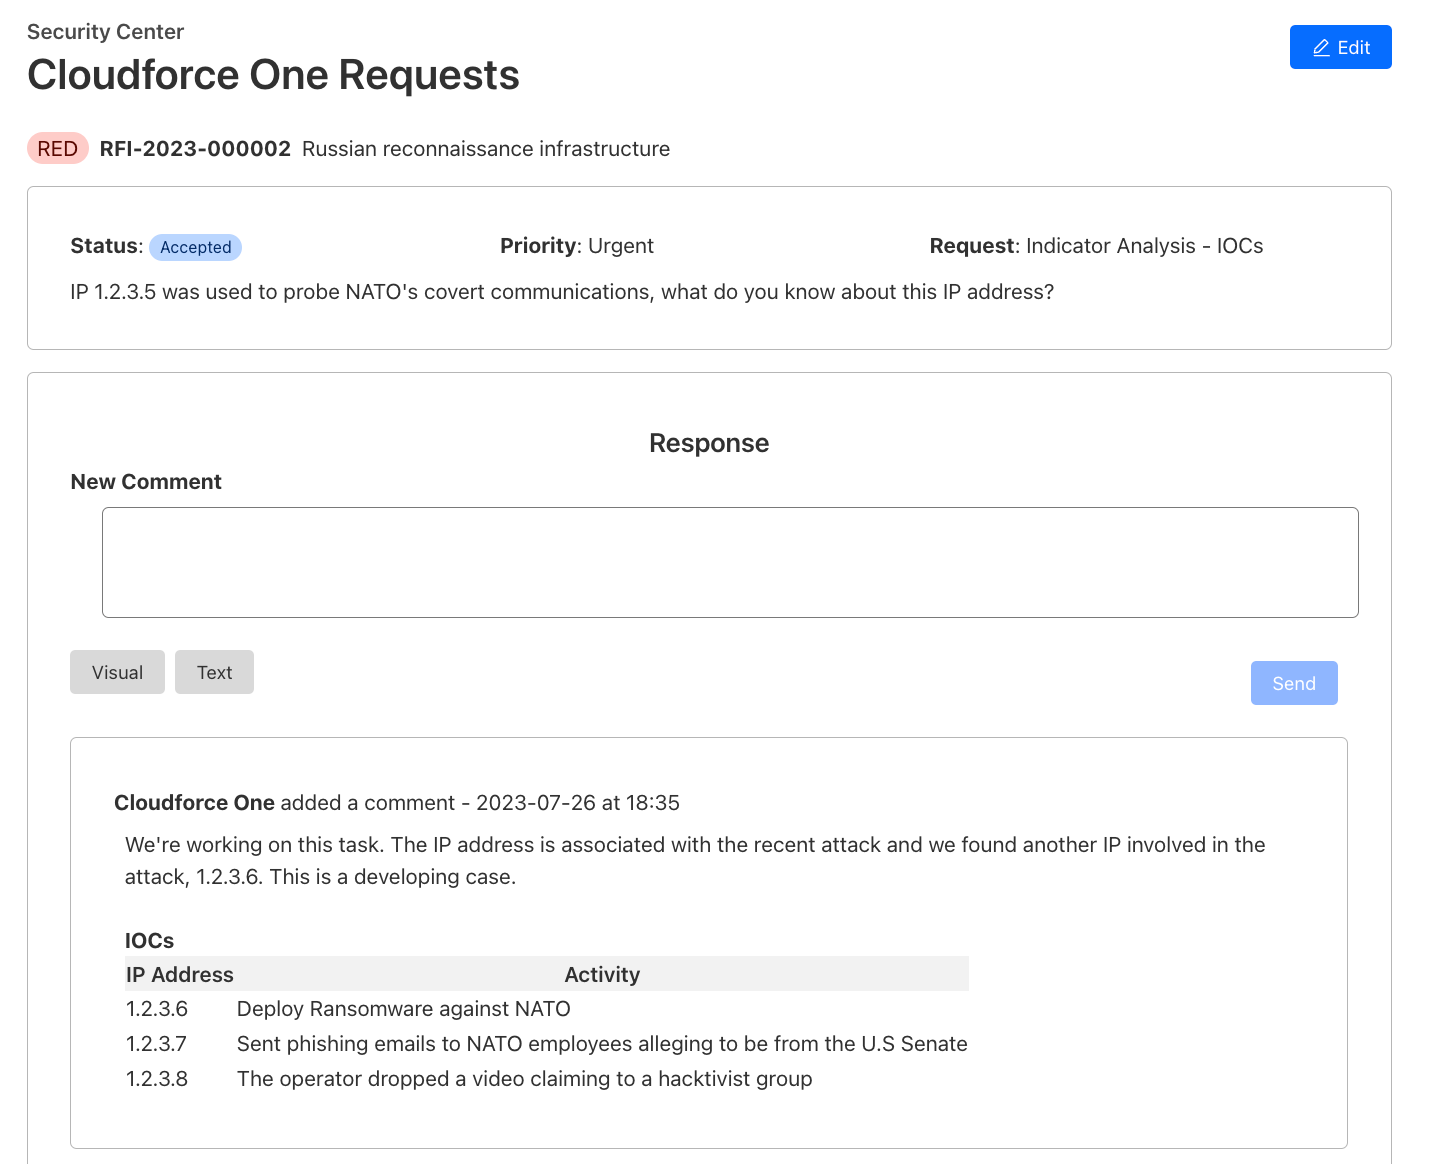
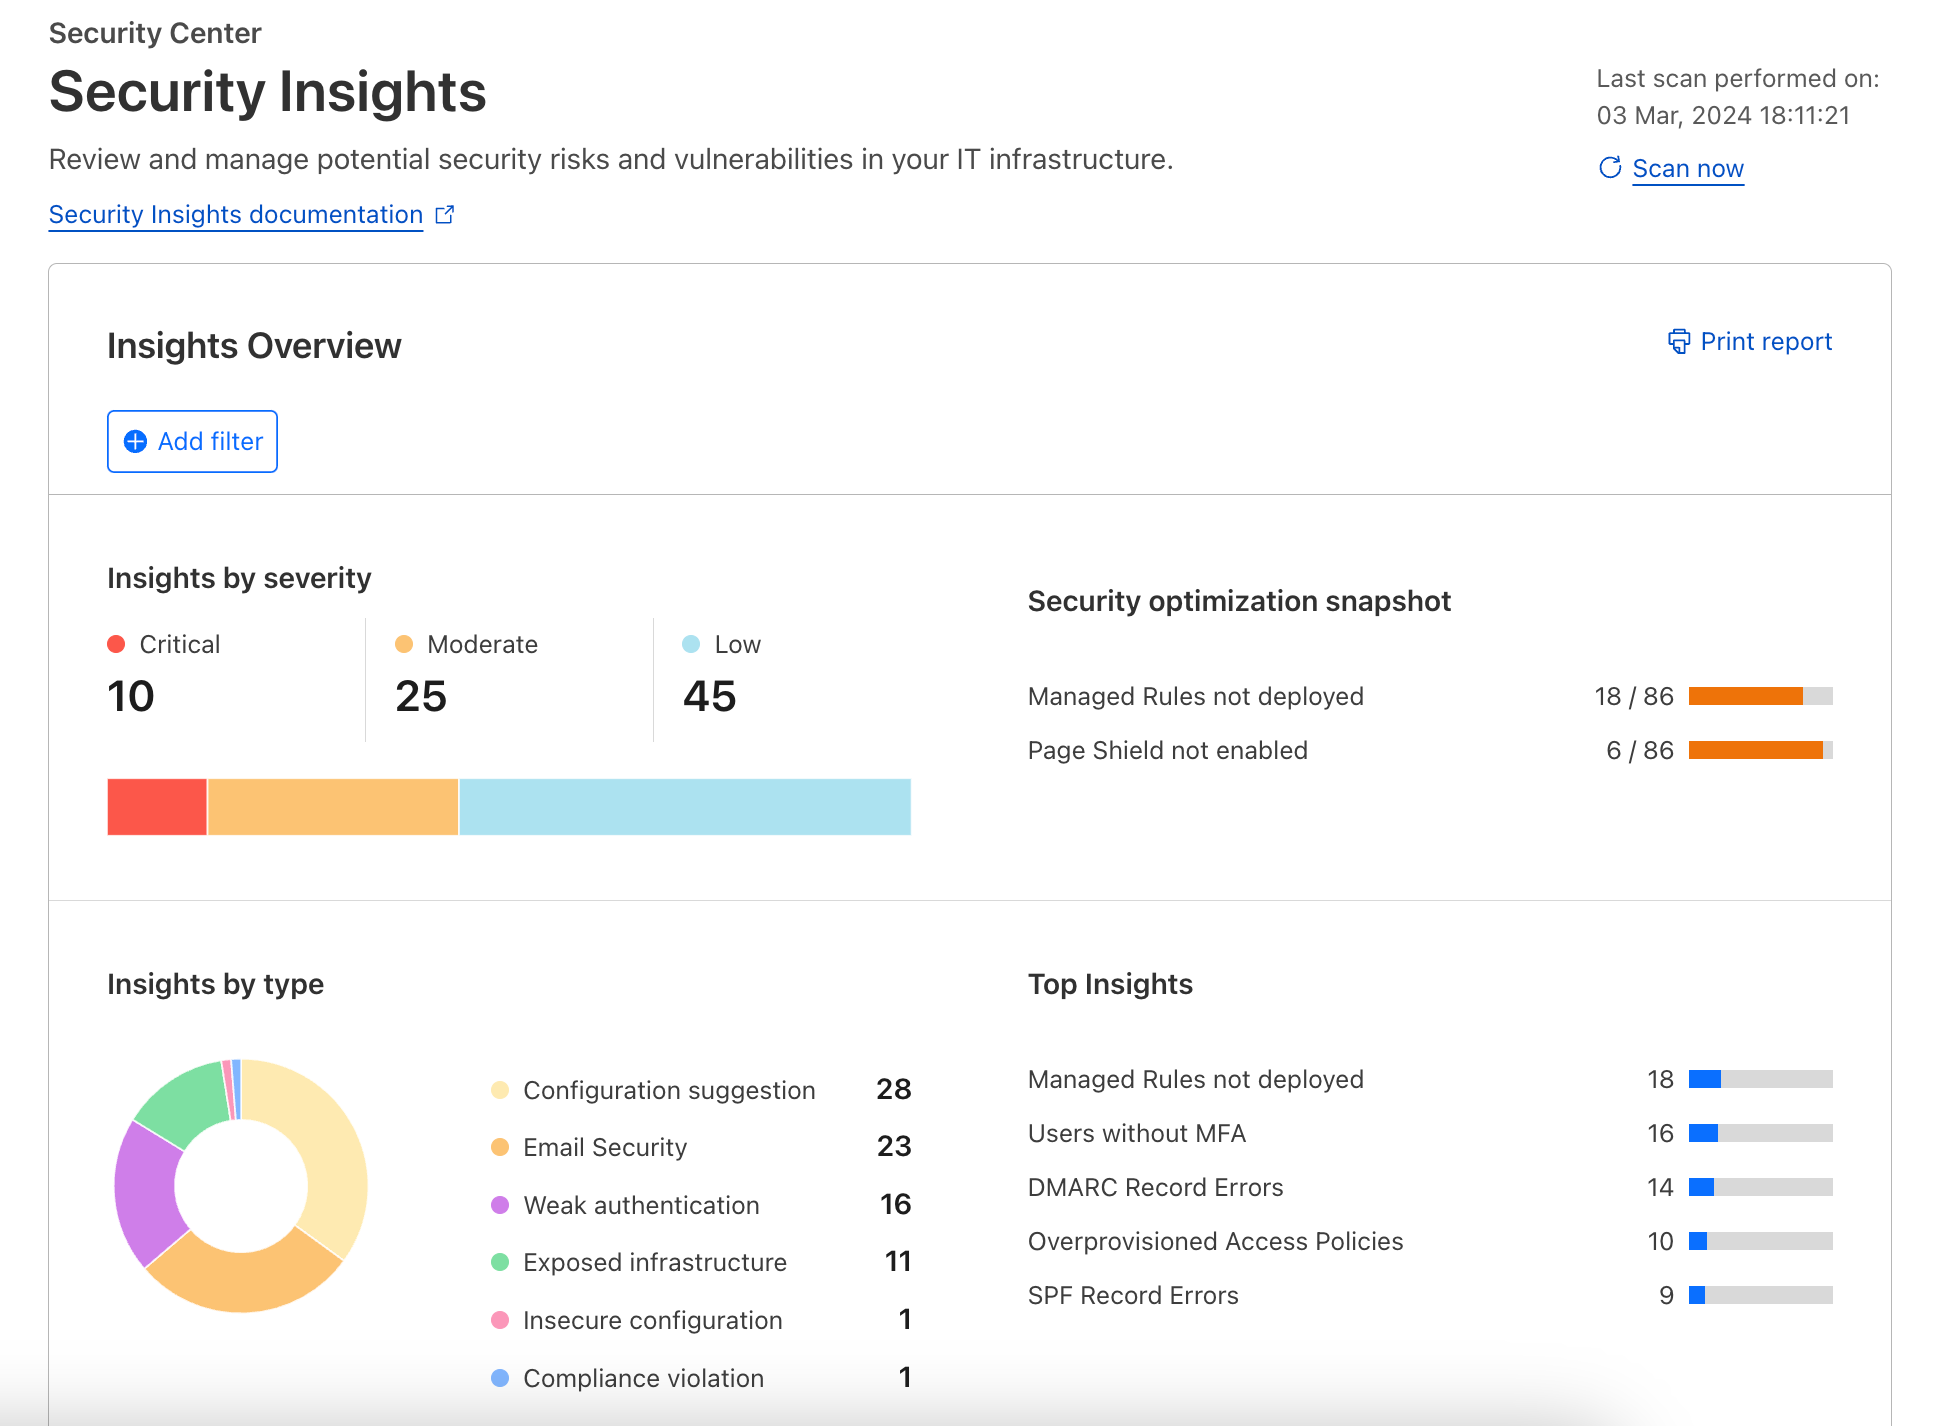
Creating an RFI is straightforward. Through the Security Center dashboard, users can create and track their RFIs:
Submission: Submit requests via Cloudforce One RFI Dashboard:
a. Threat: The threat or campaign you would like more information on
b. Priority: routine, high or urgent
c. Type: Binary Analysis, Indicator Analysis, Traffic Analysis, Threat Detection Signature, Passive DNS Resolution, DDoS Attack or Vulnerability
d. Output: Malware Analysis Report, Indicators of Compromise, or Threat Research Report
Tracking: Our Threat Research team begins work and the customer can track progress (open, in progress, pending, published, complete) via the RFI Dashboard. Automated alerts are sent to the customer with each status change.
Delivery: Customers can access/download the RFI response via the RFI Dashboard.
Fabricated example of the detailed view of an RFI and communication with the Cloudflare Threat Research Team
Once an RFI is submitted, teams can stay informed about the progress of their requests through automated alerts. These alerts, generated when a Cloudforce One analyst has completed the request, are delivered directly to the user’s email or to a team chat channel via a webhook.
What are Priority Intelligence Requirements (PIRs)?
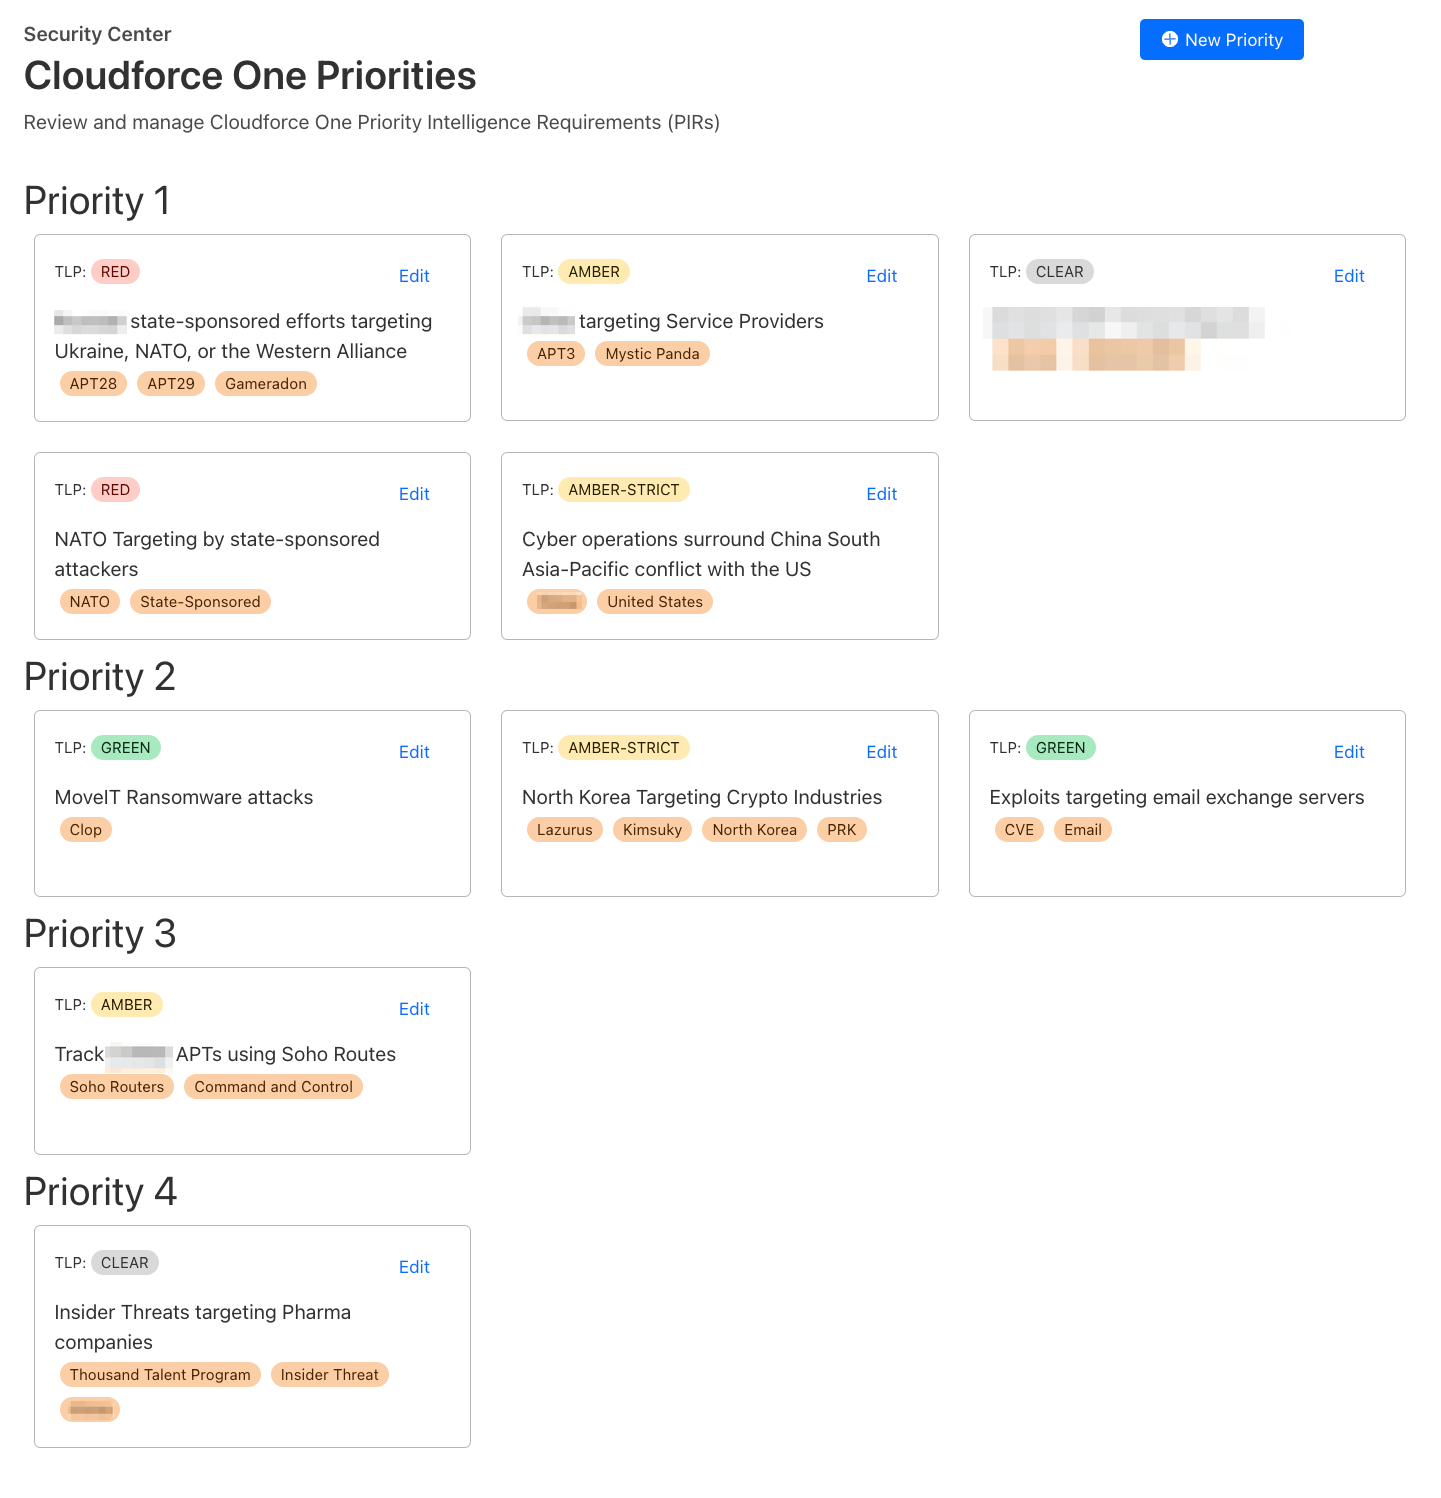
Priority Intelligence Requirements (PIRs) are a structured approach to identifying intelligence gaps, formulating precise requirements, and organizing them into categories that align with Cloudforce One’s overarching goals. For example, you can create a PIR signaling to the Cloudforce One team what topic you would like more information on.
PIR dashboard with fictitious examples of priority intelligence requirements
PIRs help target your intelligence collection efforts toward the most relevant insights, enabling you to make informed decisions and strengthen your organization’s cybersecurity posture.
While PIRs currently offer a framework for prioritizing intelligence requirements, our vision extends beyond static requirements. Looking ahead, our plan is to evolve PIRs into dynamic tools that integrate real-time intelligence from Cloudforce One. Enriching PIRs by integrating them with real-time intelligence from Cloudforce One will provide immediate insights into your Cloudflare environment, facilitating a direct and meaningful connection between ongoing threat intelligence and your predefined intelligence needs.
What drives Cloudforce One?
Since our inception, Cloudforce One has been actively collaborating with our Security Incident Response Team (SIRT) and Trust and Safety (T&S) team, aiming to provide valuable insights into attacks targeting Cloudflare and counteract the misuse of Cloudflare services. Throughout these investigations, we recognized the need for a centralized platform to capture insights from Cloudflare’s unique perspective on the Internet, aggregate data, and correlate reports.
In the past, our approach would have involved deploying a frontend UI and backend API in a core data center, leveraging common services like Postgres, Redis, and a Ceph storage solution. This conventional route would have entailed managing Docker deployments, constantly upgrading hosts for vulnerabilities, and dealing with a complex environment where we must juggle secrets, external service configurations, and maintaining availability.
Instead, we welcomed being Customer Zero for Cloudflare and fully embraced Cloudflare’s Workers and Pages platforms to construct a powerful threat investigation tool, and since then, we haven’t looked back. For anyone that has used Workers in the past, much of what we have done is not revolutionary, but almost commonplace given the ease of configuring and implementing the features in Cloudflare Workers. We routinely store file data in R2, metadata in KV, and indexed data in D1. That being said, we do have a few non-standard deployments as well, further outlined below.
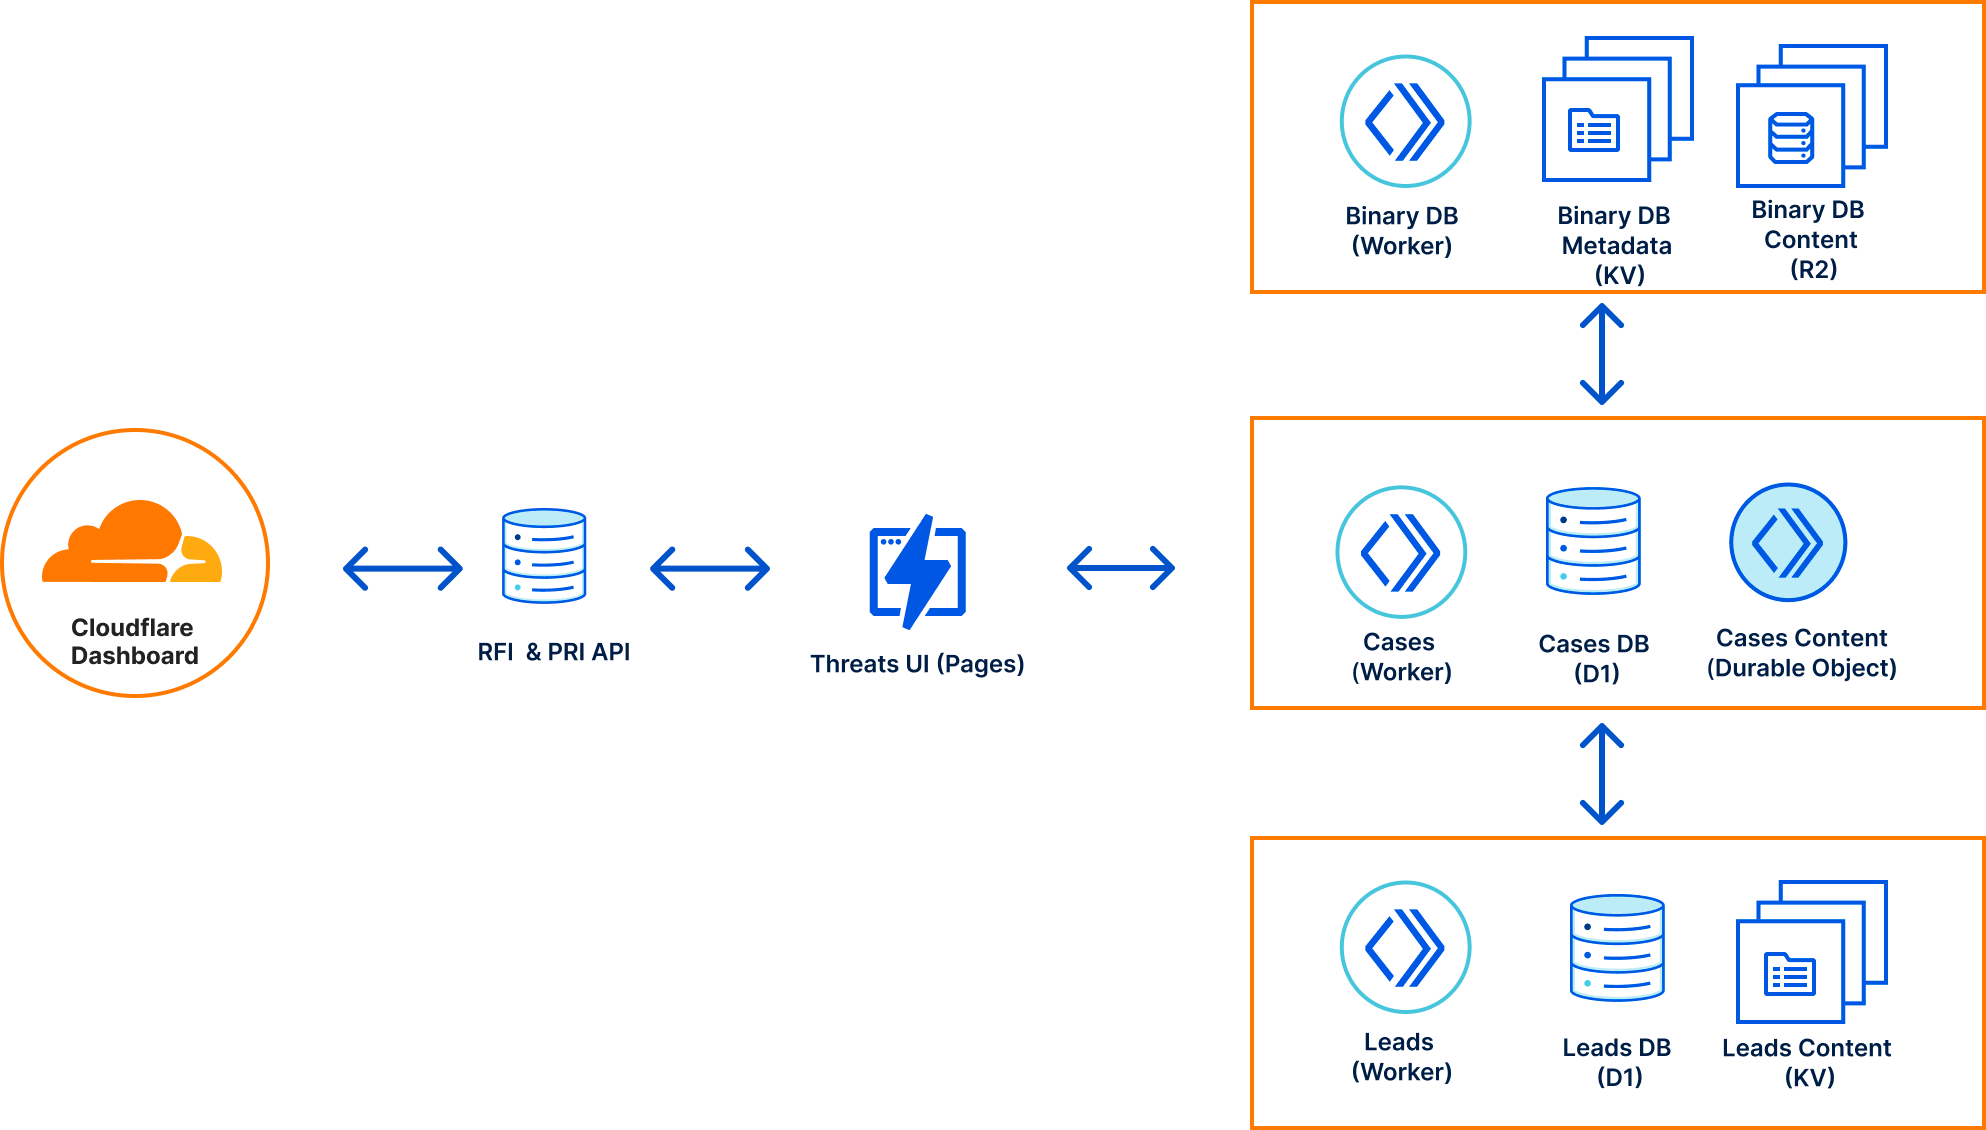
Altogether, our Threats Investigation architecture consists of five services, four of which are deployed at the edge with the other one deployed in our core data centers due to data dependency constraints.
RFIs & PIRs: This API manages our formal Cloudforce One requests and customer priorities submitted via the Cloudflare Dashboard.
Threats: Our UI, deployed via Pages, serves as the interface for interacting with all of our Cloudforce One services, Cloudflare internal services, and the RFIs and PIRs submitted by our customers.
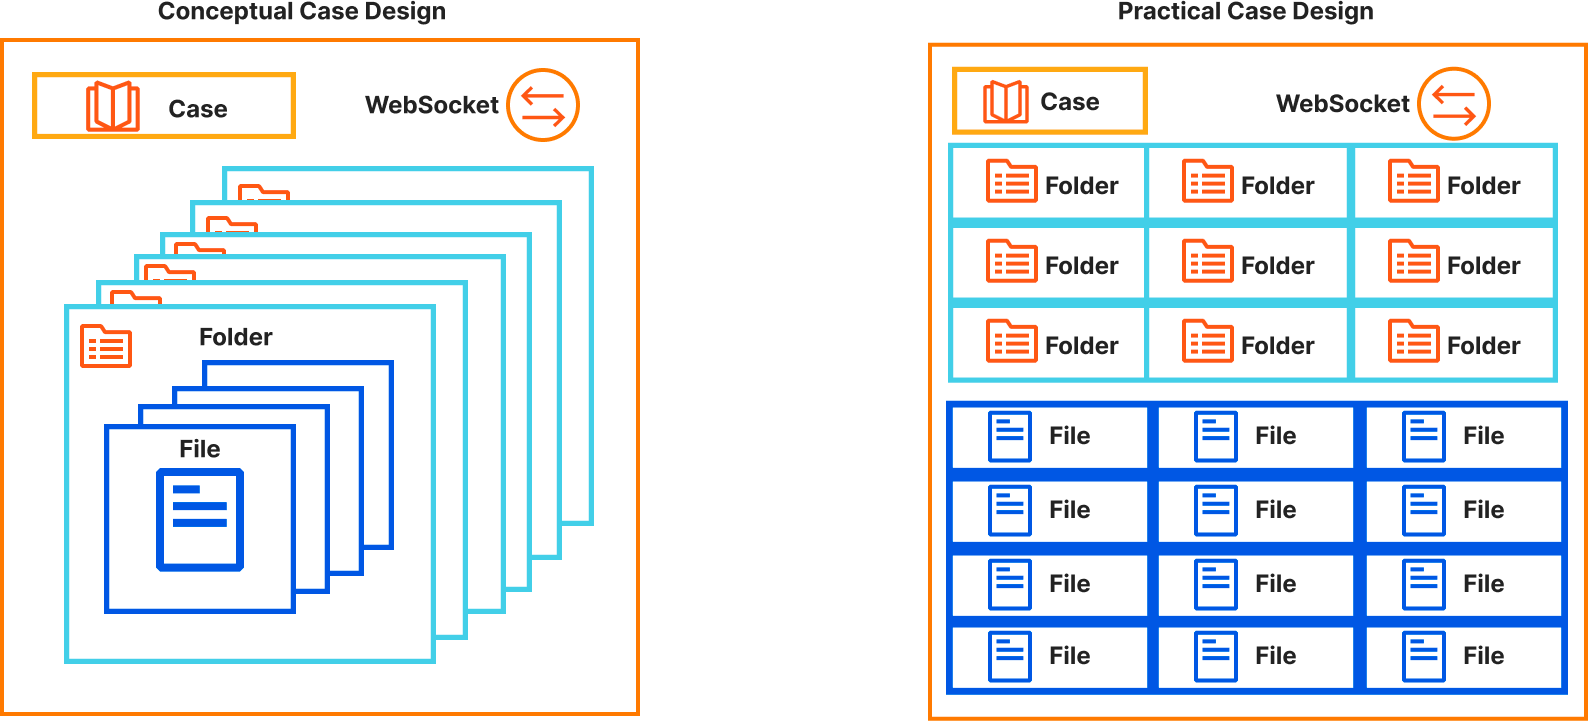
Cases: A case management system that allows analysts to store notes, Indicators of Compromise (IOCs), malware samples, and data analytics related to an attack. The service provides live updates to all analysts viewing the case, facilitating real-time collaboration. Each case is a Durable Object that is connected to via a Websocket that stores “files” and “file content” in the Durable Object’s persistent storage. Metadata for the case is made searchable via D1.
Leads: A queue of informal internal and external requests that may be reviewed by Cloudforce One when doing threat hunting discovery. Lead content is stored into KV, while metadata and extracted IOCs are stored in D1.
Binary DB:A raw binary file warehouse for any file we come across during our investigation. Binary DB also serves as the repository for malware samples used in some of our machine learning training. Each file is stored in R2, with its associated metadata stored in KV.
Cloudforce One Threat Investigation Architecture
At the heart of our Threats ecosystem is our case management service built on Workers and Durable Objects. We were inspired to build this tool because we often had to jump into collaborative documents that were not designed to store forensic data, organize it, mark sections with Traffic Light Protocol (TLP) releasability codes, and relate analysis to existing RFIs or Leads.
Our concept of cases is straightforward — each case is a Durable Object that can accept HTTP REST API or WebSocket connections. Upon initiating a WebSocket connection, it is seamlessly incorporated into the Durable Object’s in-memory state, allowing us to instantly broadcast real-time events to all users engaged with the case. Each case comprises distinct folders, each housing a collection of files containing content, releasability information, and file metadata.
Practically, our Durable Object leverages its persistent storage with each storage key prefixed with the value type: “case”, “folder”, or “file” followed by the UUID assigned to the file. Each case value has metadata associated with the case and a list of folders that belong to the case. Each folder has the folder’s name and a list of files that belong to it.
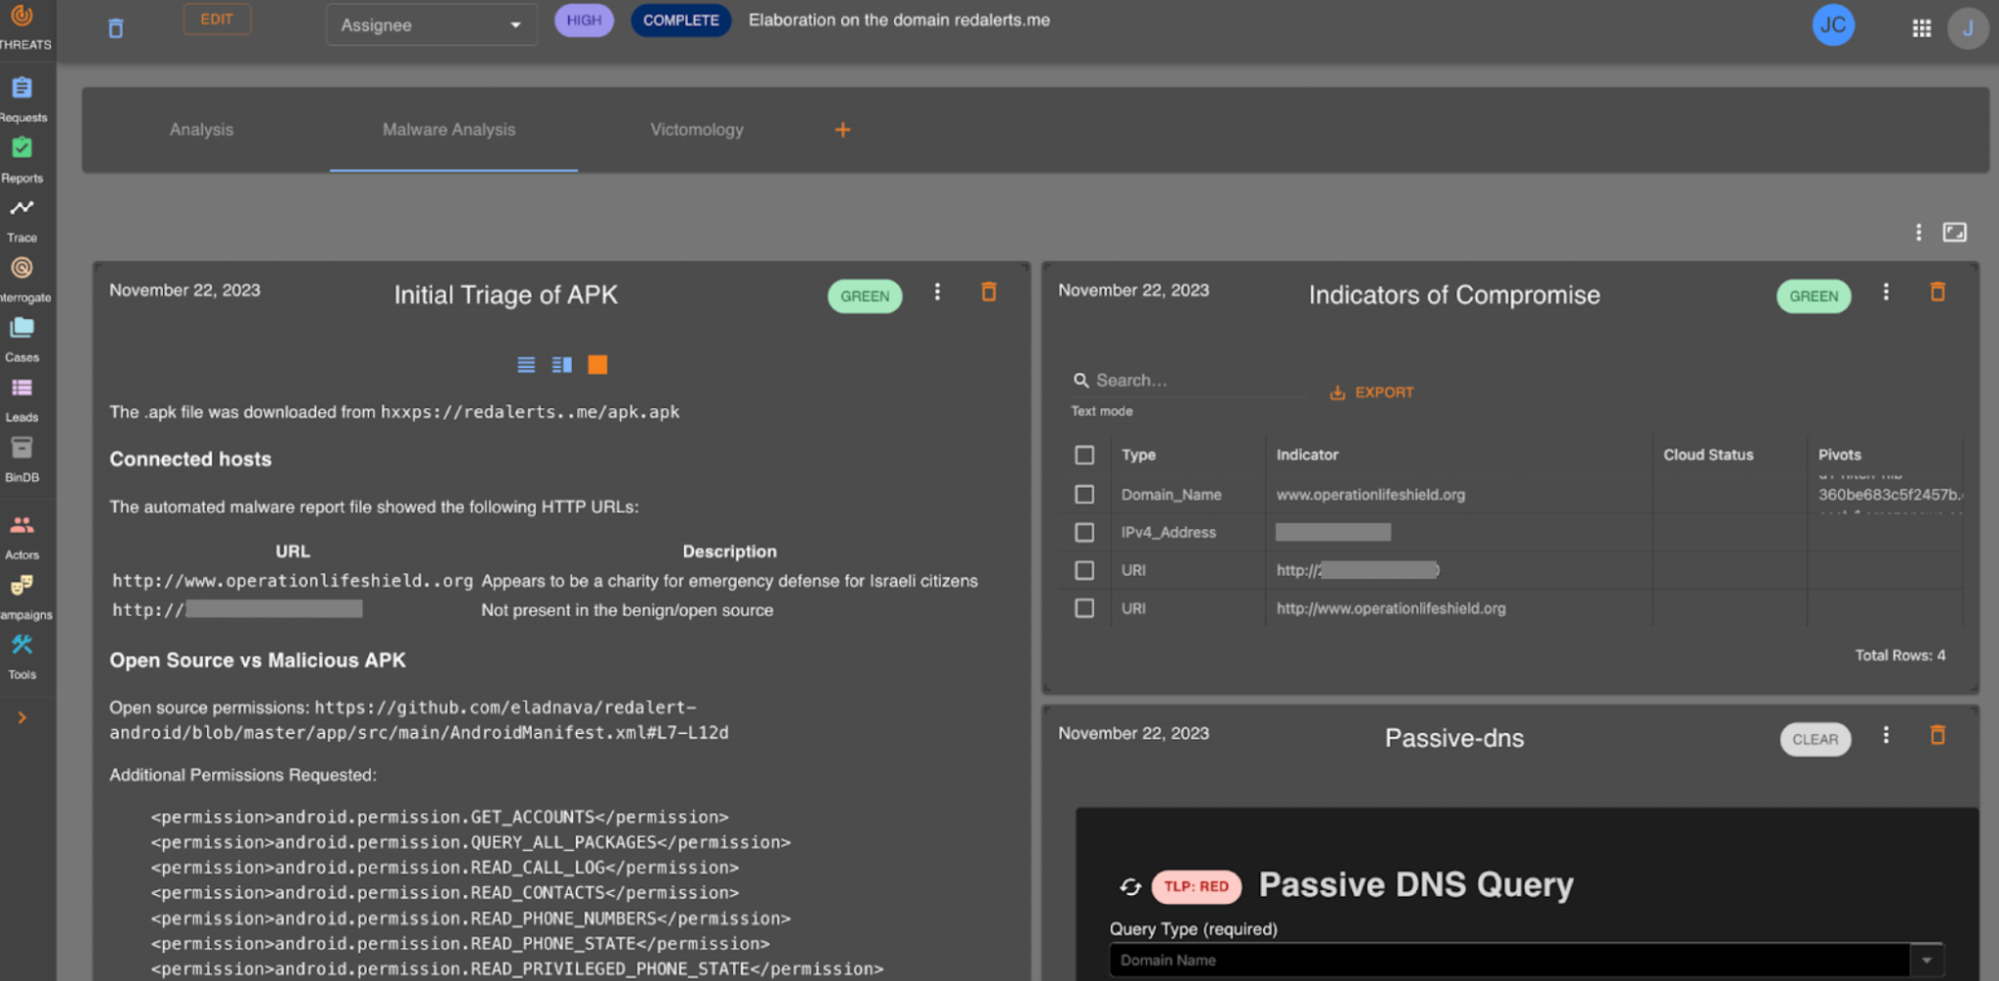
Our internal Threats UI helps us tie together the service integrations with our threat hunting analysis. It is here we do our day-to-day work which allows us to bring our unique insights into Cloudflare attacks. Below is an example of our Case Management in action where we tracked the RedAlerts attack before we formalized our analysis into the blog.
What good is all of this if we can’t search it? The Workers AI team launched Vectorize and enabled inference on the edge, so we decided to go all in on Workers and began indexing all case files as they’re being edited so that they can be searched. As each case file is being updated in the Durable Object, the content of the file is pushed to Cloudflare Queues. This data is consumed by an indexing engine consumer that does two things: extracts and indexes indicators of compromise, and embeds the content into a vector and pushes it into Vectorize. Both of the search mechanisms also pass the reference case and file identifiers so that the case may be found upon searching.
Given how easy it is to set up Workers AI, we took the final step of implementing a full Retrieval Augmented Generation (RAG) AI to allow analysts to ask questions about our previous analysis. Each question undergoes the same process as the content that is indexed. We pull out any indicators of compromise and embed the question into a vector, so we can use both results to search our indexes and Vectorize respectively, and provide the most relevant results for the request. Lastly, we send the vector data to a text-generation model using Workers AI that then returns a response to our analysts.
Using RFIs and PIRs
Imagine submitting an RFI for “Passive DNS Resolution – IOCs” and receiving real-time updates directly within the PIR, guiding your next steps.
Our workflow ensures that the intelligence you need is not only obtained but also used optimally. This approach empowers your team to tailor your intelligence gathering, strengthening your cybersecurity strategy and security posture.
Our mission for Cloudforce One is to equip organizations with the tools they need to stay one step ahead in the rapidly changing world of cybersecurity. The addition of RFIs and PIRs marks another milestone in this journey, empowering users with enhanced threat intelligence capabilities.
Getting started
Cloudforce One customers can already see the PIR and RFI Dashboard in their Security Center, and they can also use the API if they prefer that option. Click to see more documentation about our RFI and our PIR APIs.
If you’re looking to try out the new RFI and PIR capabilities within the Security Center, contact your Cloudflare account team or fill out this form and someone will be in touch. Finally, if you’re interested in joining the Cloudflare team, check out our open job postings here.
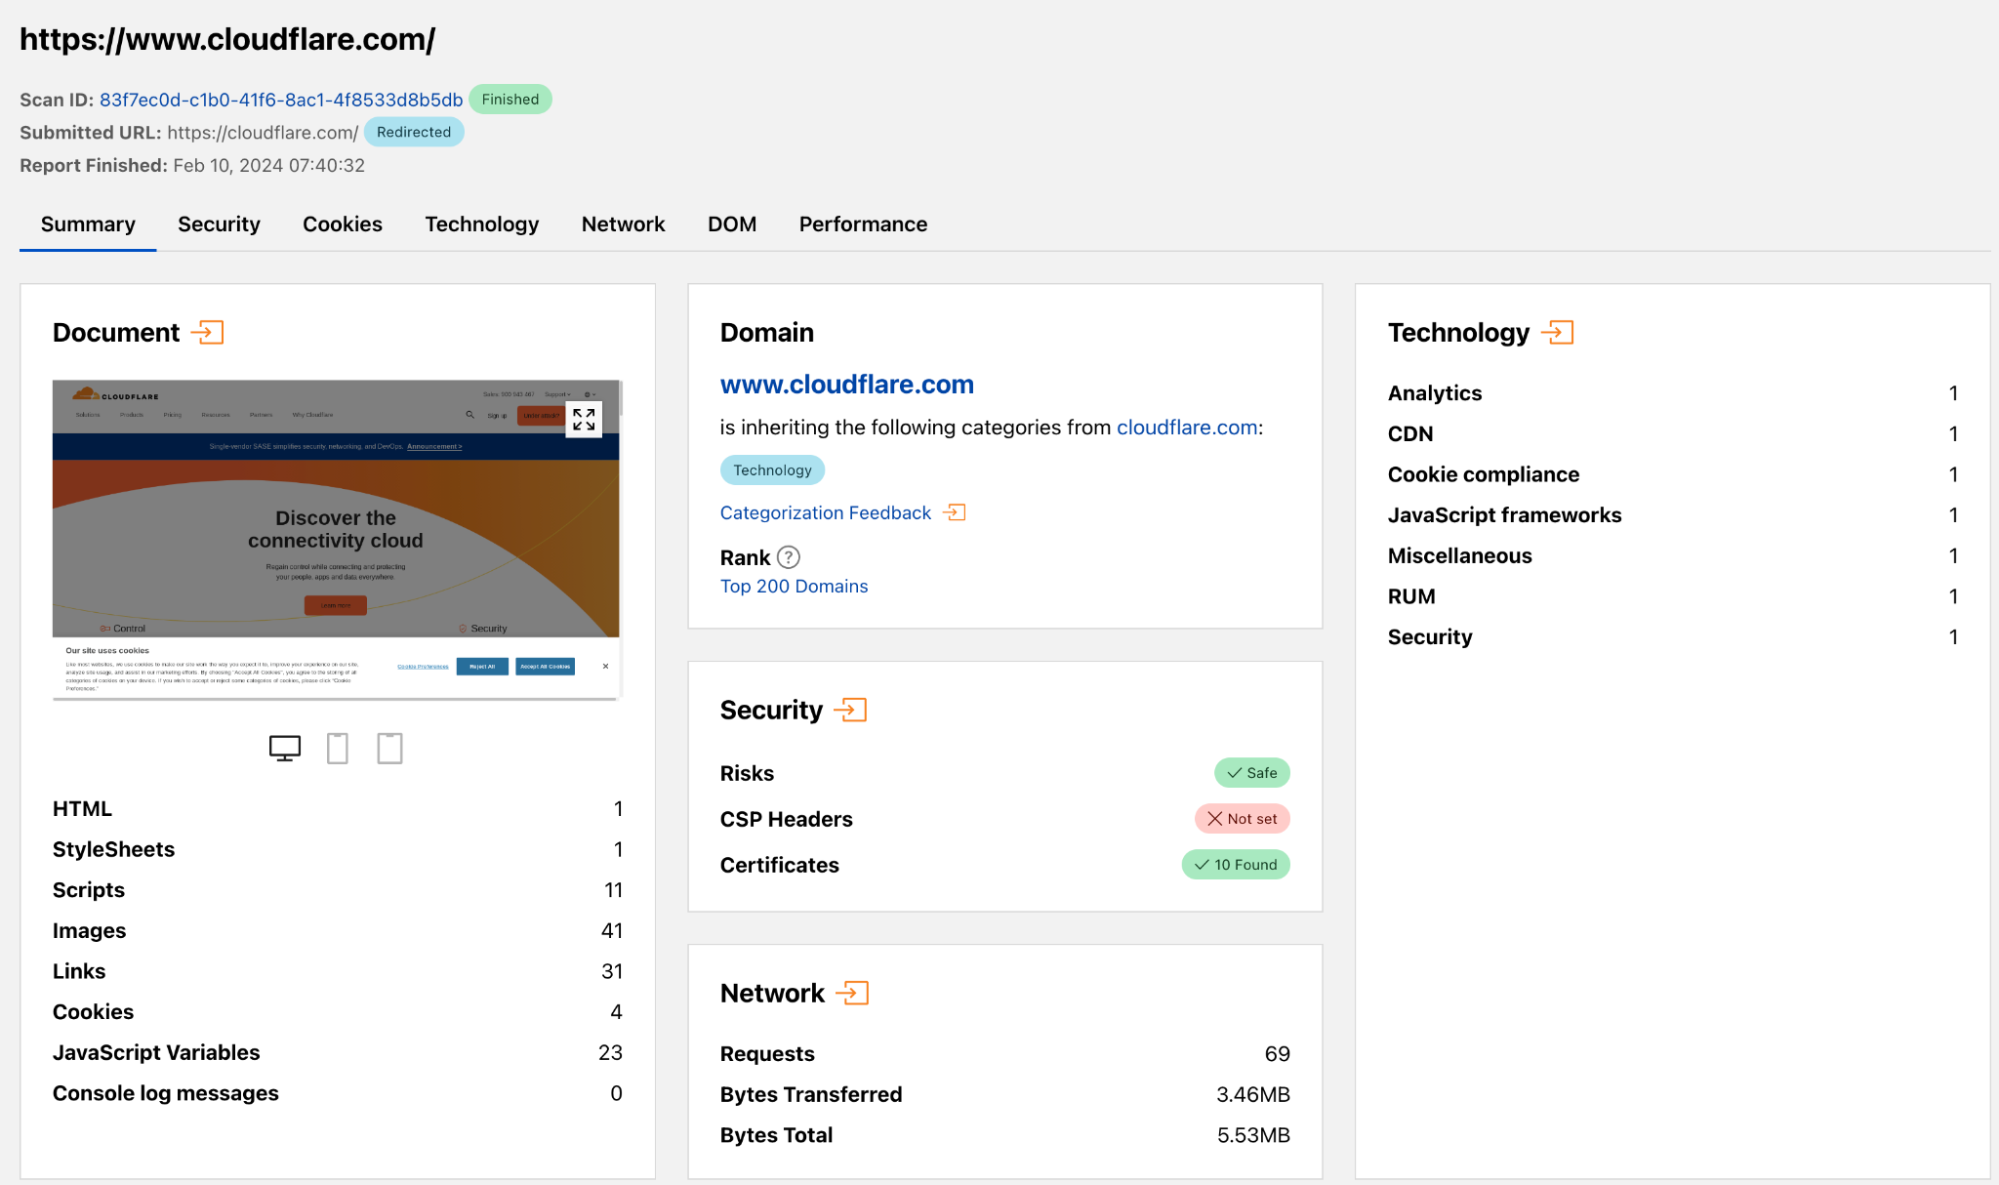
Today, we’re excited to talk about URL Scanner, a tool that helps everyone from security teams to everyday users to detect and safeguard against malicious websites by scanning and analyzing them. URL Scanner has executed almost a million scans since its launch last March on Cloudflare Radar, driving us to continuously innovate and enhance its capabilities. Since that time, we have introduced unlisted scans, detailed malicious verdicts, enriched search functionality, and now, integration with Security Center and an official API, all built upon the robust foundation of Cloudflare Workers, Durable Objects, and the Browser Rendering API.
Integration with the Security Center in the Cloudflare Dashboard
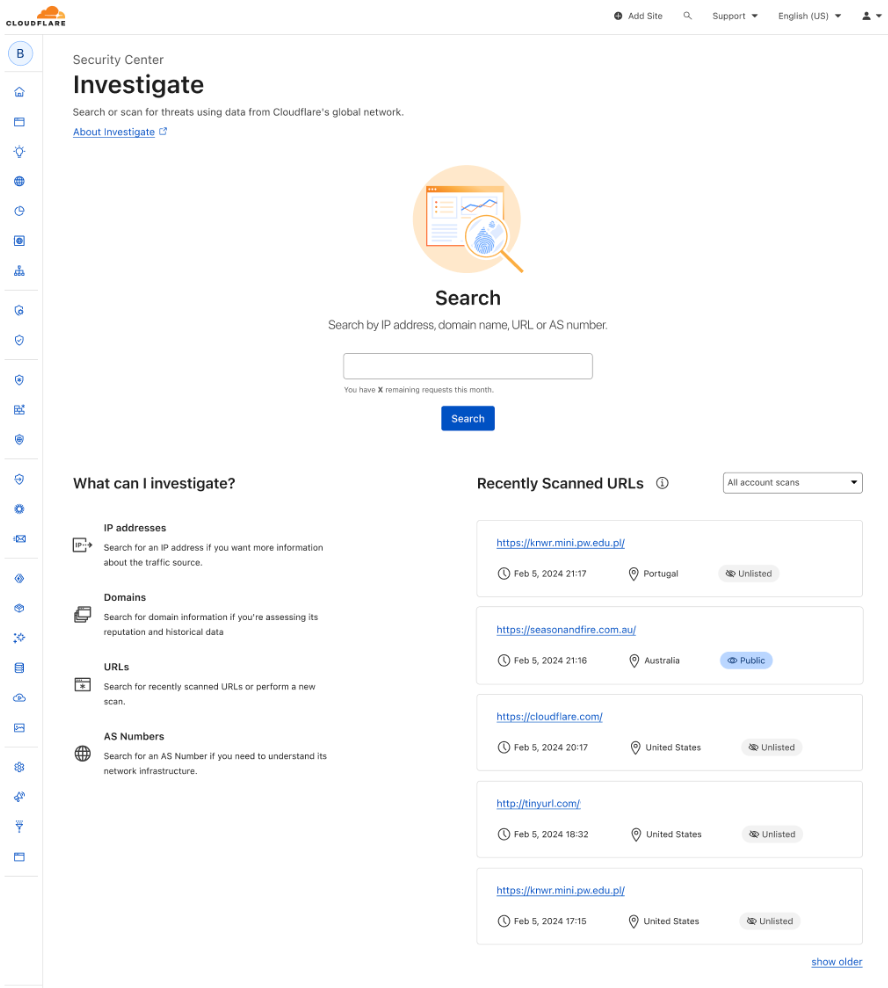
Security Center is the single place in the Cloudflare Dashboard to map your attack surface, identify potential security risks, and mitigate risks with a few clicks. Its users can now access the URL scanner directly from the Investigate Portal, enhancing their cybersecurity workflow. These scans will be unlisted by default, ensuring privacy while facilitating a deep dive into website security. Users will be able to see their historic scans and access the related reports when they need to, and they will benefit from automatic screenshots for multiple screen sizes, enriching the context of each scan.
Customers with Cloudflare dashboard access will enjoy higher API limits and faster response times, crucial for agile security operations. Integration with internal workflows becomes seamless, allowing for sophisticated network and user protection strategies.
Security Center in the Cloudflare Dashboard
Unlocking the potential of the URL Scanner API
The URL Scanner API is a powerful asset for developers, enabling custom scans to detect phishing or malware risks, analyze website technologies, and much more. With new features like custom HTTP headers and multi-device screenshots, developers gain a comprehensive toolkit for thorough website assessment.
Submitting a scan request
Using the API, here’s the simplest way to submit a scan request:
New features include the option to set custom HTTP headers, like User-Agent and Authorization, request multiple target device screenshots, like mobile and desktop, as well as set the visibility level to “unlisted”. This essentially marks the scan as private and was often requested by developers who wanted to keep their investigations confidential. Public scans, on the other hand, can be found by anyone through search and are useful to share results with the wider community. You can find more details in our developer documentation.
Once a scan concludes, fetch the final report and the full network log. Recently added features include the `verdict` property, indicating the site’s malicious status, and the `securityViolations` section detailing CSP or SRI policy breaches — as a developer, you can also scan your own website and see our recommendations. Expect improvements on verdict accuracy over time, as this is an area we’re focusing on.
Enhanced search functionality
Developers can now search scans by hostname, a specific URL or even any URL the page connected to during the scan. This allows, for example, to search for websites that use a JavaScript library named jquery.min.js (‘?path=jquery.min.js’). Future plans include additional features like searching by IP address, ASN, and malicious website categorisation.
The URL Scanner can be used for a diverse range of applications. These include capturing a website’s evolving state over time (such as tracking changes to the front page of an online newspaper), analyzing technologies employed by a website, preemptively assessing potential risks (as when scrutinizing shortened URLs), and supporting the investigation of persistent cybersecurity threats (such as identifying affected websites hosting a malicious JavaScript file).
How we built the URL Scanner API
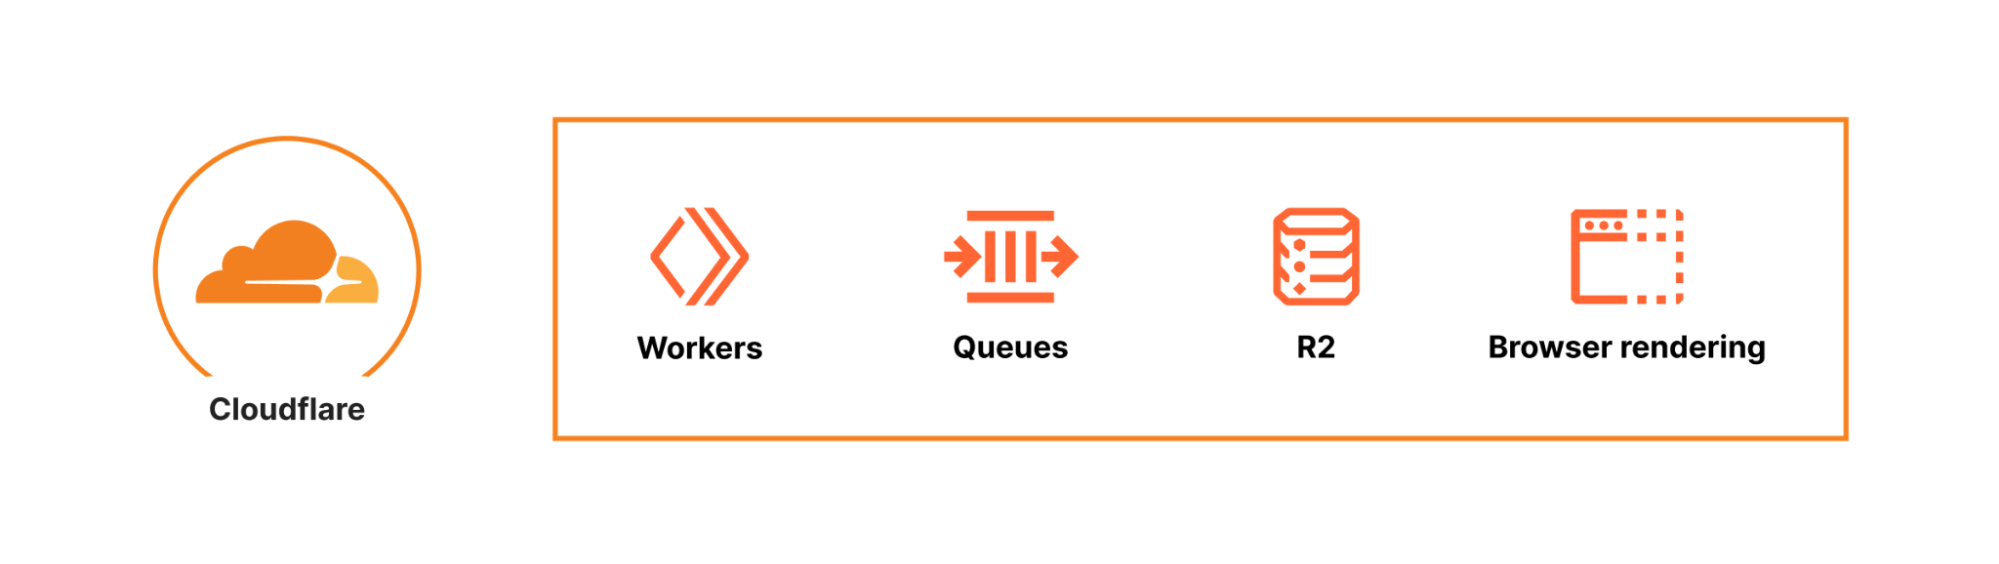
In recounting the process of developing the URL Scanner, we aim to showcase the potential and versatility of Cloudflare Workers as a platform. This story is more than a technical journey, but a testament to the capabilities inherent in our platform’s suite of APIs. By dogfooding our own technology, we not only demonstrate confidence in its robustness but also encourage developers to harness the same capabilities for building sophisticated applications. The URL Scanner exemplifies how Cloudflare Workers, Durable Objects, and the Browser Rendering API seamlessly integrate.
High level overview of theCloudflare URL Scanner technology stack
As seen above, Cloudflare’s runtime infrastructure is the foundation the system runs on. Cloudflare Workers serves the public API, Durable Objects handles orchestration, R2 acts as the primary storage solution, and Queues efficiently handles batch operations, all at the edge. However, what truly enables the URL Scanner’s capabilities is the Browser Rendering API. It’s what initially allowed us to release in such a short time frame, since we didn’t have to build and manage an entire fleet of Chrome browsers from scratch. We simply request a browser, and then using the well known Puppeteer library, instruct it to fetch the webpage and process it in the way we want. This API is at the heart of the entire system.
Scanning a website
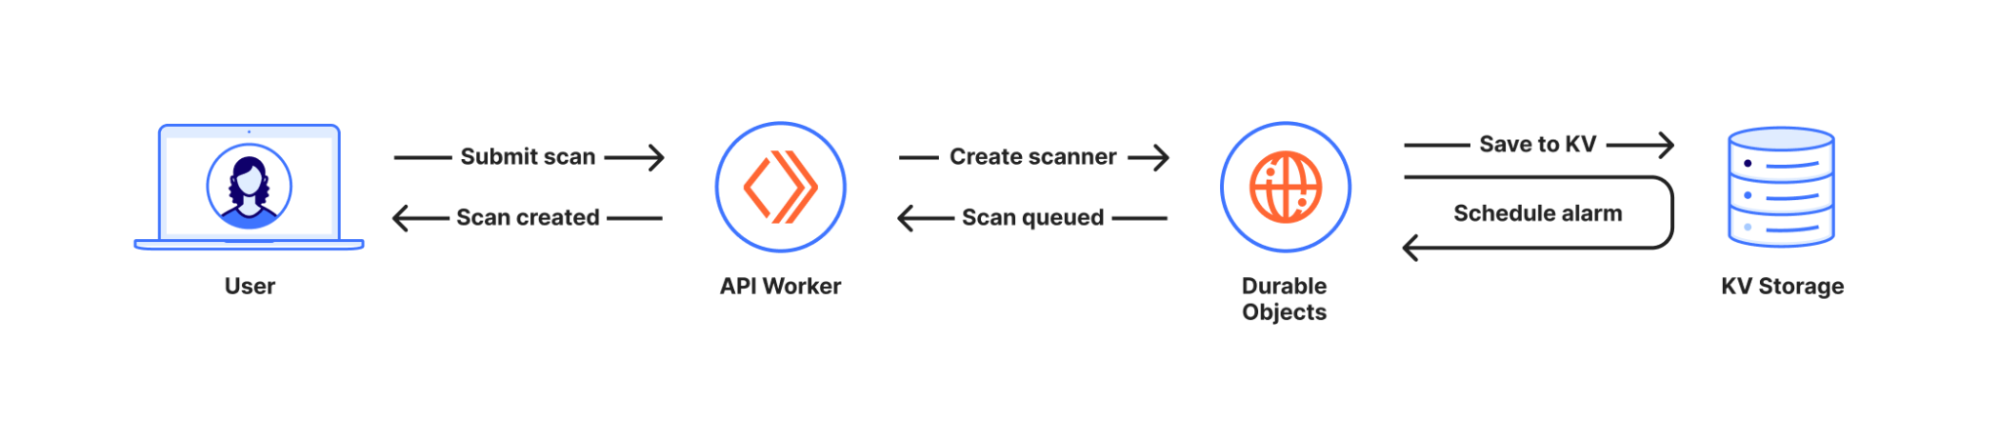
The entire process of scanning a website, can be split into 4 phases:
Queue a scan
Browse to the website and compile initial report
Post-process: compile additional information and build final report
Store final report, ready for serving and searching
In short, we create a Durable Object, the Scanner, unique to each scan, which is responsible for orchestrating the scan from start to finish. Since we want to respond immediately to the user, we save the scan to the Durable Object’s transactional Key-Value storage, and schedule an alarm so we can perform the scan asynchronously a second later. We then respond to the user, informing them that the scan request was accepted.
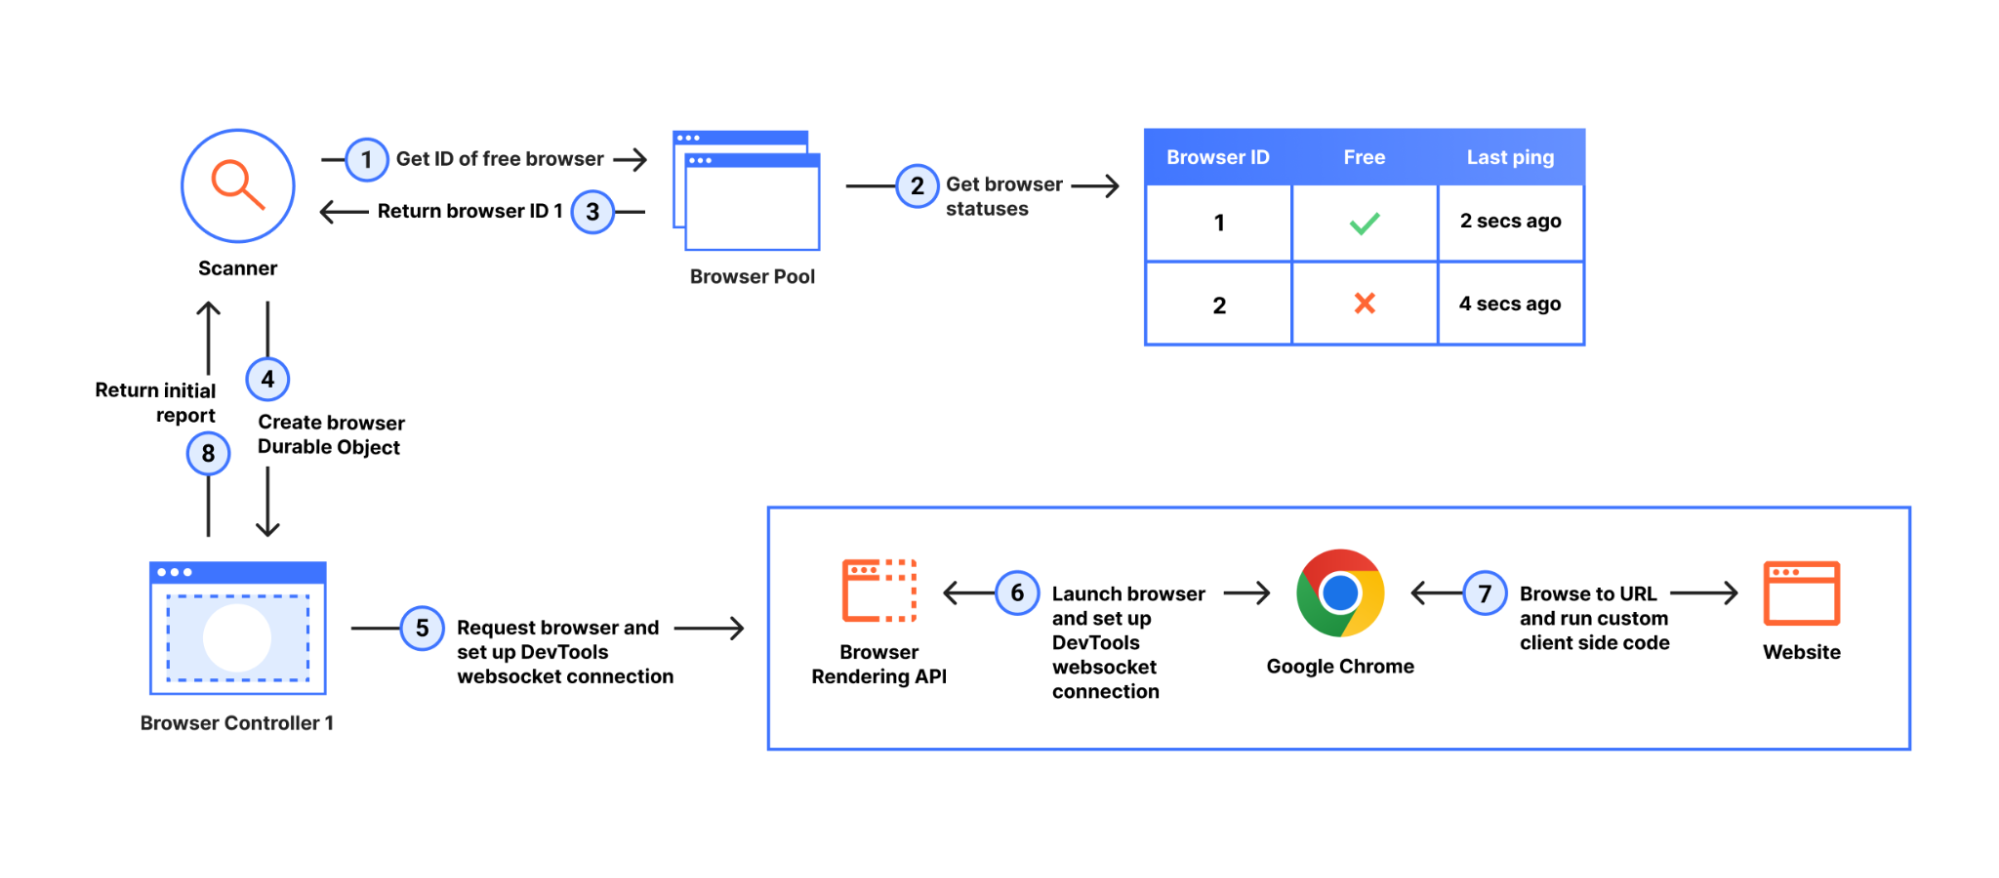
When the Scanner’s alarm triggers, we enter the second phase:
There are 3 components at work in this phase, the Scanner, the Browser Pool and the Browser Controller, all Durable Objects.
In the initial release, for each new scan we would launch a brand-new browser. However, This operation would take time and was inefficient, so after review, we decided to reuse browsers across multiple scans. This is why we introduced both the Browser Pool and the Browser Controller components. The Browser Pool keeps track of what browsers we have open, when they last pinged the browser pool (so it knows they’re alive), and whether they’re free to accept a new scan. The Browser Controller is responsible for keeping the browser instance alive, once it’s launched, and orchestrating (ahem, puppeteering) the entire browsing session. Here’s a simplified version of our Browser Controller code:
export class BrowserController implements DurableObject {
	//[..]
	private async handleNewScan(url: string) {
		if (!this.browser) {
			// Launch browser: 1st request to durable object
			this.browser = await puppeteer.launch(this.env.BROWSER)
			await this.state.storage.setAlarm(Date.now() + 5 * 1000)
		}
		// Open new page and navigate to url
		const page = await this.browser.newPage()
		await page.goto(url, { waitUntil: 'networkidle2', timeout: 5000, })

		// Capture DOM
		const dom = await page.content()

		// Clean up
		await page.close()

		return {
			dom: dom,
		}
	}

	async alarm() {
		if (!this.browser) {
			return
		}
		await this.browser.version() // stop websocket connection to Chrome from going idle

		// ping browser pool, let it know we're alive

		// Keep durable object alive
		await this.state.storage.setAlarm(Date.now() + 5 * 1000)
	}
}
Launching a browser (Step 6) and maintaining a connection to it is abstracted away from us thanks to the Browser Rendering API. This API is responsible for all the infrastructure required to maintain a fleet of Chrome browsers, and led to a much quicker development and release of the URL Scanner. It also allowed us to use a well-known library, Puppeteer, to communicate with Google Chrome via the DevTools protocol.
The initial report is made up of the network log of all requests, captured in HAR (HTTP Archive) format. HAR files, essentially JSON files, provide a detailed record of all interactions between a web browser and a website. As an established standard in the industry, HAR files can be easily shared and analyzed using specialized tools. In addition to this network log, we augment our dataset with an array of other metadata, including base64-encoded screenshots which provide a snapshot of the website at the moment of the scan.
Having this data, we transition to phase 3, where the Scanner Durable Object initiates a series of interactions with a few other Cloudflare APIs in order to collect additional information, like running a phishing scanner over the web page’s Document Object Model (DOM), fetching DNS records, and extracting information about categories and Radar rank associated with the main hostname.
This process ensures that the final report is enriched with insights coming from different sources, making the URL Scanner more efficient in assessing websites. Once all the necessary information is collected, we compile the final report and store it as a JSON file within R2, Cloudflare’s object storage solution. To empower users with efficient scan searches, we use Postgres.
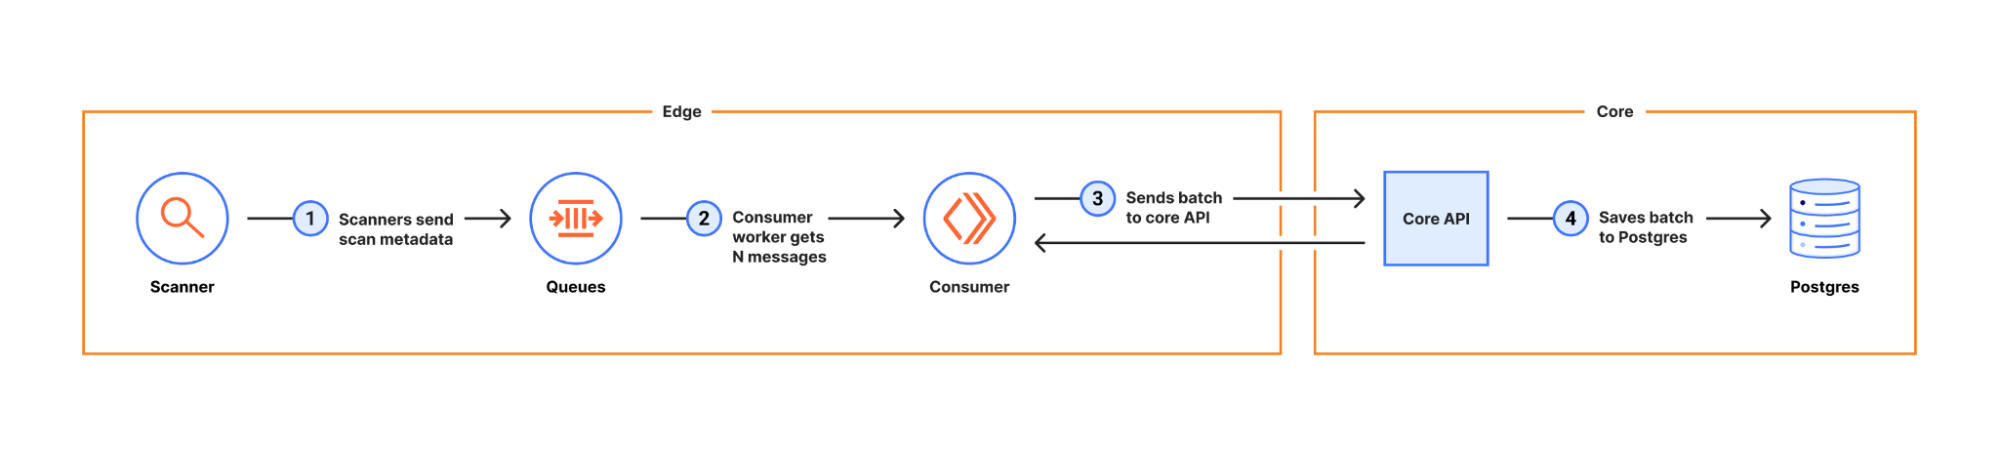
While the initial approach involved sending each completed scan promptly to the core API for immediate storage in Postgres, we realized that, as the rate of scans grew, a more efficient strategy would be to batch those operations, and for that, we use Worker Queues:
This allows us to better manage the write load on Postgres. We wanted scans available as soon as possible to those who requested them, but it’s ok if they’re only available in search results at a slightly later point in time (seconds to minutes, depending on load).
In short, Durable Objects together with the Browser Rendering API power the entire scanning process. Once that’s finished, the Cloudflare Worker serving the API will simply fetch it from R2 by ID. All together, Workers, Durable Objects, and R2 scale seamlessly and will allow us to grow as demand evolves.
Last but not least
While we’ve extensively covered the URL scanning workflow, we’ve yet to delve into the construction of the API worker itself. Developed with Typescript, it uses itty-router-openapi, a Javascript router with Open API 3 schema generation and validation, originally built for Radar, but that’s been improving ever since with contributions from the community. Here’s a quick example of how to set up an endpoint, with input validation built in:
In the example above, the ScanMetadataCreate endpoint will make sure to validate the incoming POST data to match the defined schema before calling the ‘async handle(request,env,context,data)’ function. This way you can be sure that if your code is called, the data argument will always be validated and formatted.
You can learn more about the project on its GitHub page.
Future plans and new features
Looking ahead, we’re committed to further elevating the URL Scanner’s capabilities. Key upcoming features include geographic scans, where users can customize the location that the scan is done from, providing critical insights into regional security threats and content compliance; expanded scan details, including more comprehensive headers and security details; and continuous performance improvements and optimisations, so we can deliver faster scan results.
The evolution of the URL Scanner is a reflection of our commitment to Internet safety and innovation. Whether you’re a developer, a security professional, or simply invested in the safety of the digital landscape, the URL Scanner API offers a comprehensive suite of tools to enhance your efforts. Explore the new features today, and join us in shaping a safer Internet for everyone.
Remember, while Security Center’s new capabilities offer advanced tools for URL Scanning for Cloudflare’s existing customers, the URL Scanner remains accessible for basic scans to the public on Cloudflare Radar, ensuring our technology benefits a broad audience.
If you’re considering a new career direction, check out our open positions. We’re looking for individuals who want to help make the Internet better; learn more about our mission here.
In 2024, more than 80 national elections are slated to occur, directly impacting approximately 4.2 billion individuals in places such as Indonesia, the United States, India, the European Union, and more. This marks the most extensive election cycle worldwide until the year 2048. Elections are a cornerstone of democracy, providing citizens with the means to shape their government, hold leaders accountable, and participate in the political process.
At Cloudflare, we’ve been supporting state and local governments that run elections for free for the last seven years. As we look at the upcoming elections around the world, we are reminded how important our services are in keeping information related to elections reliable and secure from those looking to disrupt these processes. Unfortunately, the problems that election officials face in keeping elections secure has only gotten more complicated and requires facilitating information sharing, capacity building, and joint efforts to safeguard democratic processes.
At Cloudflare, we support a range of players in the election space by providing security, performance, and reliability tools to help facilitate the democratic process. With Cloudflare Impact projects, we have found a way to protect a range of stakeholders who play an important role in the election process and better prepare them for the unexpected. As we have grown our various Impact projects to protect more than 2,900 domains, we have learned how best to protect vulnerable groups online.
During Security Week, we want to provide a look at how we are preparing groups that work in elections around the world for 2024, as well as exploring emerging threat trends.
A look at the year ahead
State and local governments play a critical role in various aspects of the election process. From voter registration to candidate filing, polling place setup, distribution of ballots, tabulations of voters, and reporting of election results, they ensure that elections are conducted fairly, securely, and efficiently.
If we have learned anything from the last seven years, it is that election officials have even more on their plate when it comes to conducting free and fair elections. Countries conducting elections this year are likely to face a complicated array of threats, from voter manipulation to physical violence. Unfortunately, in many countries, people have been blamed for election results that displeased certain politicians and constituents, and numerous election officials have encountered death threats, online harassment, and mistreatment. In April 2023, the Brennan Center found that 45% of local election officials said they fear for the safety of their colleagues.
When it comes to safeguarding online infrastructure, securing voter registration systems, ensuring the integrity of election-related information, and planning effective incident response are necessary as online threats grow more and more sophisticated. For example, in the three months leading up to the 2022 US midterm elections, Cloudflare prevented around 150,000 phishing emails targeting campaign officials.
How we use our services to promote free and fair elections
The core principle driving our work in the election space is the idea that access to accurate voting information, as provided by state and local governments, is fundamental to the proper functioning of democracy. We see ourselves as one piece of a larger puzzle when it comes to safeguarding elections.
Protecting election entities is an enormous task, and there is strength in partnerships that provide with a broad range of roles and expertise. We have seen groups such as the Cybersecurity and Infrastructure Security Agency increase their role in boosting election security efforts throughout the last few years. There have been partnerships between governments, organizations, and private companies assisting election officials with the tools and expertise on the best ways to secure the democratic process.
In 2020, we partnered with the International Foundation for Electoral Systems to find a way to expand our protections to election management bodies outside the United States. In our partnership, we have been able to provide our Enterprise-level services to six election management bodies, including the Central Election Commission of Kosovo, State Election Commission of North Macedonia, and many local election bodies in Canada.
“Cloudflare is a technology enabler for the State Election Committee (SEC) in North Macedonia, and its tools help us ensure that early election results will be accessible to the general population, thus promoting visibility and transparency.” – Vladislav Bidikov, Cybersecurity Task Force Member, State Election Commission of North Macedonia
Internet trends during elections
Looking at Internet trends during elections, we have seen in several countries that Internet traffic typically drops during the day, when people are going to the polling booths. That was the case in France and Brazil in 2022, for example. After the polling booths close, traffic usually increases, when citizens are looking for results — a spotlight also shared with the traditional TV channels.
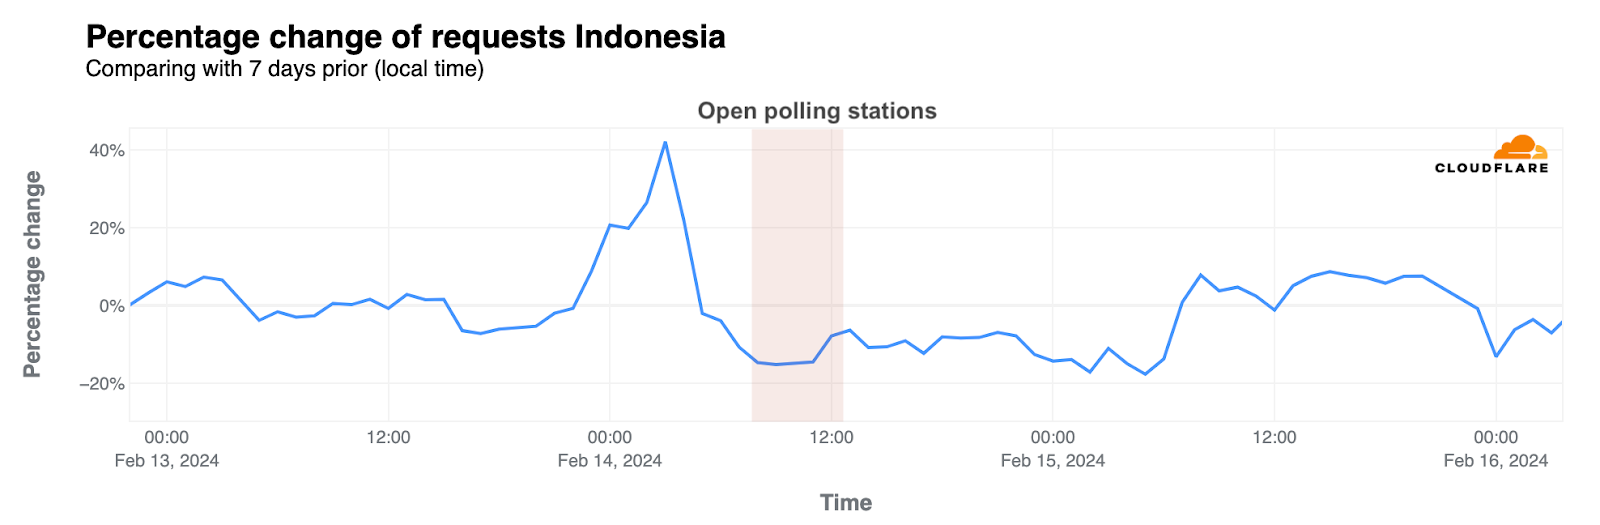
Indonesia, a country with more than 200 million voters (and a population of 275 million) and over 17,000 islands, held general elections on Wednesday, February 14. On that day, daily traffic dropped 5% compared with the previous week. Hourly traffic during the day dropped as much as 15% between 08:00 and 13:00 local time (Western Indonesia time, where most of the population lives), when polling stations were open. Traffic was lower than in the previous week during that day, and only picked up on the following day.
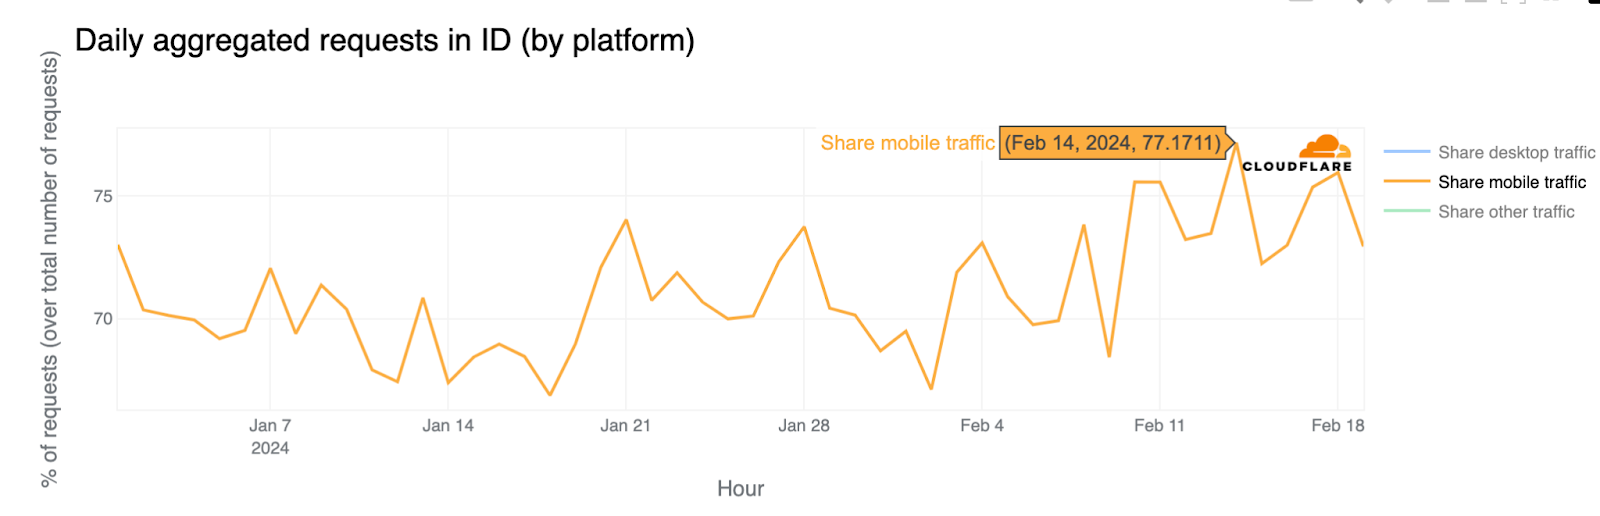
On the other hand, mobile device usage was at its highest point of 2024 to date on February 14, representing 77% of all requests from the country.
Pakistan election day Internet outage
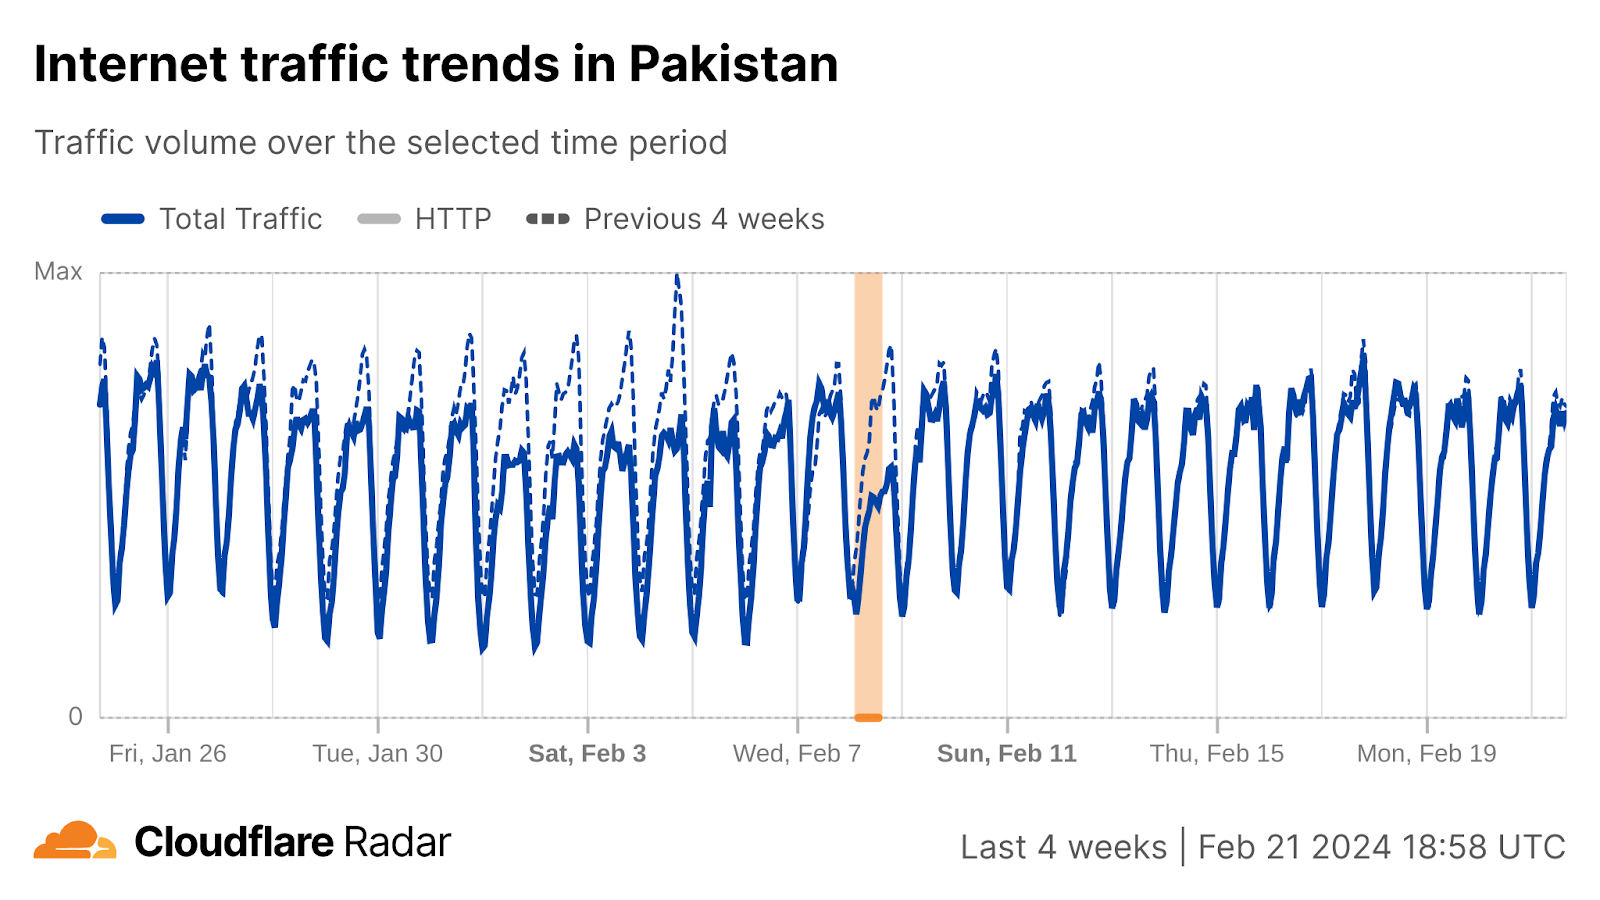
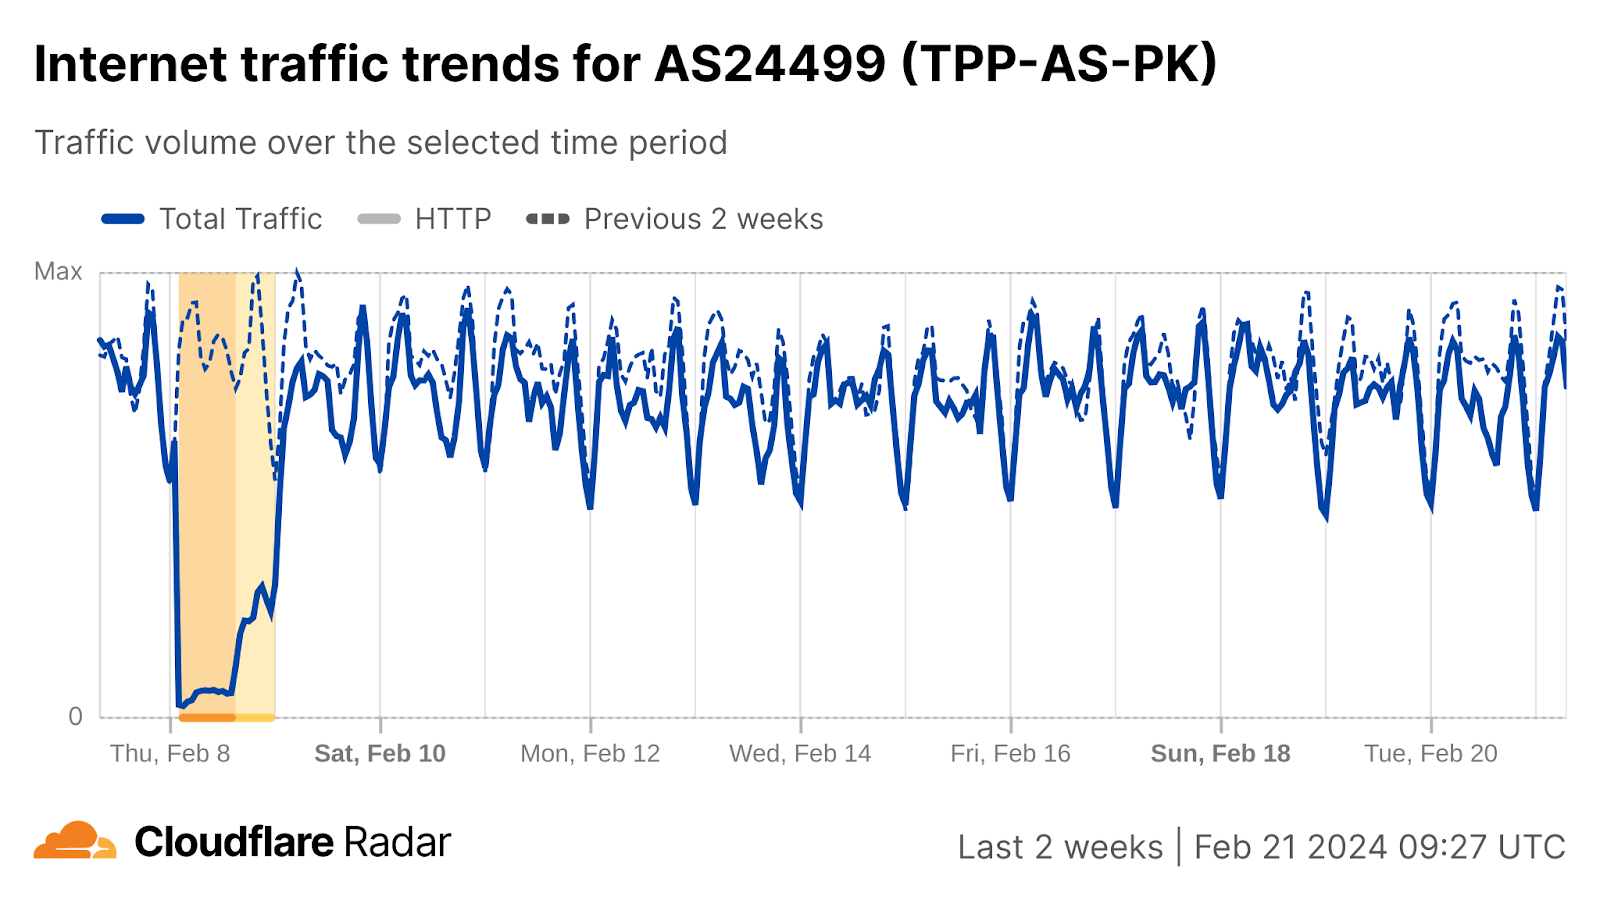
In Pakistan, general elections were held on February 8. During this time, our data shows an outage that started around 02:00 UTC, recovering after 15:00. The Internet shutdown targeted mobile networks and was criticized by Amnesty International.
The Telenor (AS24499), Jazz (AS45669), and Zong (AS59257) mobile networks were impacted. For example, here is a view of the Telenor network:
In addition, social media platform X experienced a national-scale disruption following protests ignited by allegations of vote rigging in the general elections. When it comes to Internet shutdowns, we see complete Internet blackouts represent the most severe type of Internet shutdowns, but limitations on the usage of social media and messaging applications, especially during elections, also pose large obstacles. Many of these platforms have become indispensable for journalists and the media, serving as an important channel to connect with audiences, share and publicize their content, and securely communicate with their sources.
How do you prepare for the unexpected?
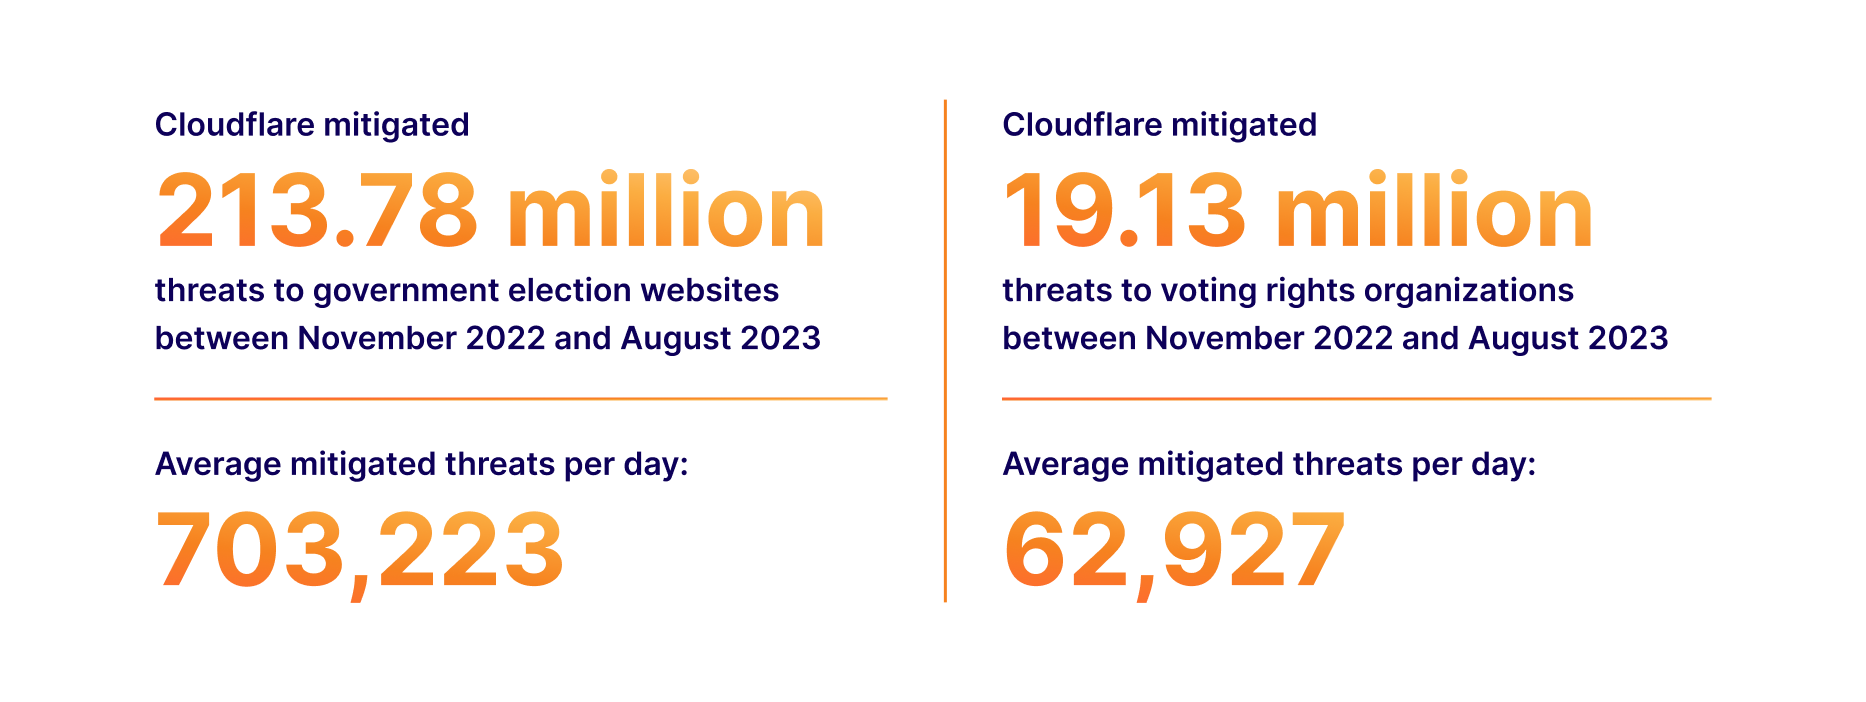
We have detailed our work during many elections in the United States, including how we protected the 2020 elections during times of uncertainty. As we prepare for the 2024 election, we will continue collaborating with experts on how to best provide our services. Last year, we conducted an analysis on threats to election groups. Highlights include:
Early in 2024, we conducted webinars for state and local governments under the Athenian Project to identify configuration recommendations and provide lessons learned during the 2020 and 2022 midterms in the United States. We discussed topics such as preventing website defacement, and security checklist items such as checking domain and SSL certificate expiration dates. We are happy to report that many of these efforts in assisting state and local governments on configurations to make sure they are getting the most of our free Cloudflare products have been successful, with more than 92% of domains under the project using our proxy services to protect their website. But we still have a long way to go. We found that 2FA is still a problem, and we strongly encourage participants to enable it to protect accounts and sensitive information.
Ahead of the elections, we have also heard from larger election entities, such as secretaries of state, nonprofit organizations supporting election officials, and government agencies, who have reached out for our expertise on how to better support smaller election groups.
What keeps state and local election officials up at night?
To help prepare for the 2024 general elections in the United States, we wanted to learn more from state and local governments protected under the Athenian Project about what worries them in terms of online security threats. We sent out a brief survey to participants and found:
A majority of participants believe that the use of generative AI tools will have a significant impact on the 2024 election.
80% of participants surveyed indicated that their team has experienced an email phishing attack in the last year.
Trust and reputation is the highest concern when it comes to a cyber attack with election operations as a close second.
We asked participants what they wished more people understood about their efforts in election security and reliability, and one county’s response stood out. To paraphrase, they said that election officials are also citizens and residents in their communities, and they strive to have safe, fair elections. We look forward to learning more about threats to these groups and how our products can help keep their internal data safe from attacks.
Super Tuesday
Because Super Tuesday in the United States involves several states, including California, Alabama, Iowa, North Carolina, and more, that hold their primaries or caucuses on the same day, it is often seen as a critical turning point in the presidential primary process.
On March 6, 2024, CISA reported there had been no credible digital threats to Super Tuesday, to the relief of many security experts. These comments came after Meta reported an outage that which caused Facebook, Messenger, and Instagram to be inaccessible to many users in the United States.
During Super Tuesday, we had the opportunity to witness firsthand the benefits of having access to free cybersecurity services to a range of elections groups. We are happy to report that during this time, we did not see any major cyberattacks against these groups. As part of this, we want to share updated insights into trends we have identified against election groups we protect to identify the types of attacks that they face with the hope of better securing them online.
Athenian Project
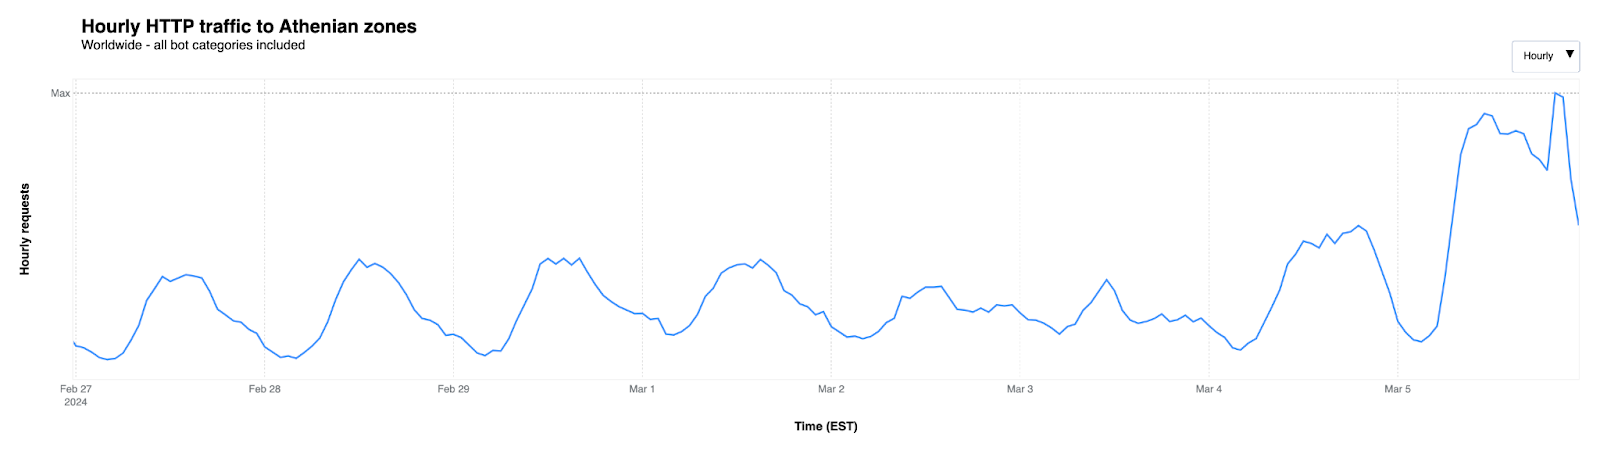
Under the Athenian Project, we protect more than 400 state and local government websites in 32 states that run elections. We identified 100 websites in the 16 states conducting elections on Super Tuesday and observed a considerable increase in traffic after Monday, March 4th.
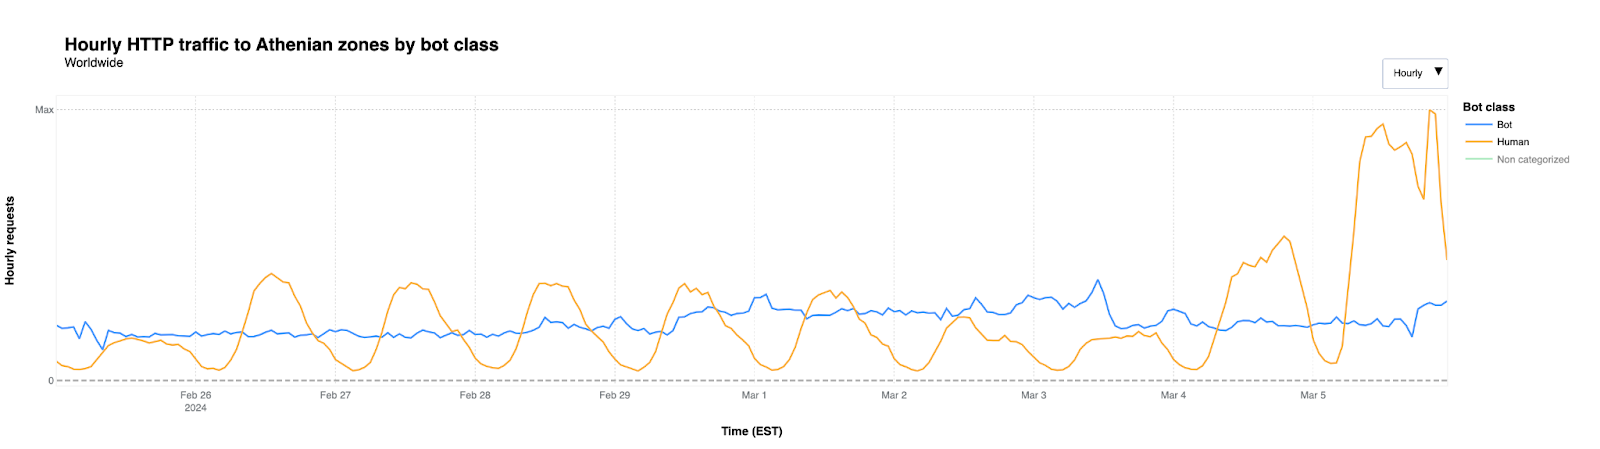
When it comes to automated traffic to these websites, the figure below shows that we saw traffic classified as bot traffic maintain a relatively steady pattern between February 26 and March 5th. Bot traffic describes any non-human traffic to a website or an app, and it is important to note that not all bot traffic is malicious. Legitimate bot traffic includes activities like search engine indexing, while malicious bot traffic is designed to engage in fraudulent activities such as spamming, scraping content for unauthorized use, or launching distributed denial-of-service (DDoS) attacks.
As March 5th began, an increase in “human” traffic was clearly visible, with a significant increase starting at 05:00 EST and decreasing around 23:00. This is typical of what we see in the election space, as many people are visiting these websites to identify their polling place locations, or view up-to-date election results.
On Super Tuesday, Cloudflare mitigated over 18.9 million requests on March 5th, 2024, against state and local governments under the Athenian project.
Cloudflare for Campaigns
In 2020, we partnered with Defending Digital Campaigns, a nonprofit organization dedicated to providing cyber security resources and assistance to political campaigns and committees in the United States. Through our partnership, we have been able to provide more than $3 million in Cloudflare products. For this analysis, we identified 49 websites protected by Cloudflare for Campaigns that are located in the states that conducted an election during Super Tuesday. In total, we protect 97 campaign websites and 27 political party websites.
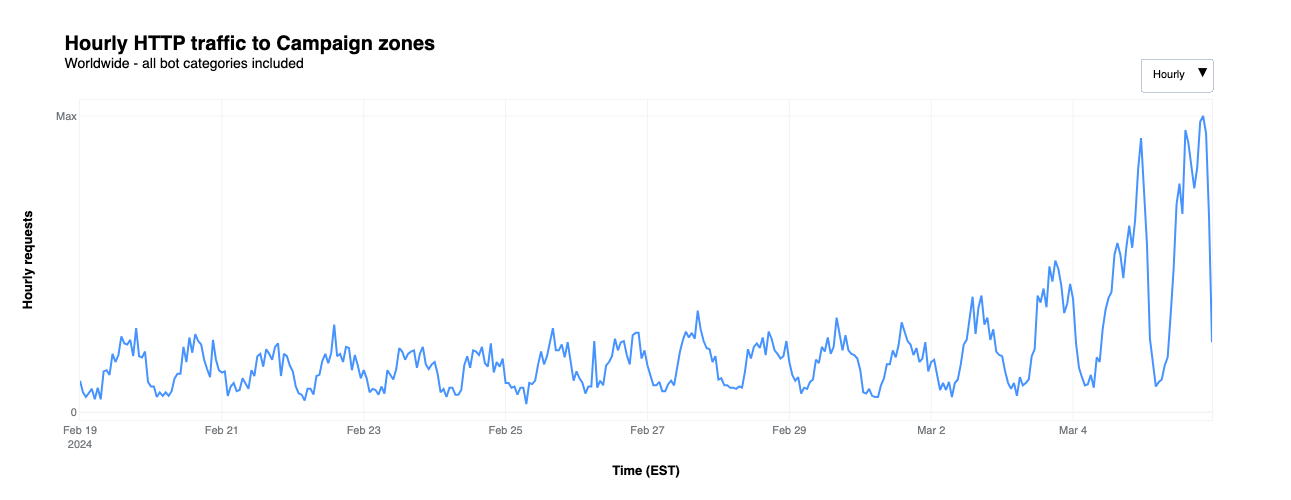
Overall traffic to these websites remained fairly consistent through the latter half of February and into March, but started to grow the weekend ahead of Super Tuesday, as seen in the figure below. Peaks were seen at 23:00 EST on March 4 and 20:00 EST on March 5.
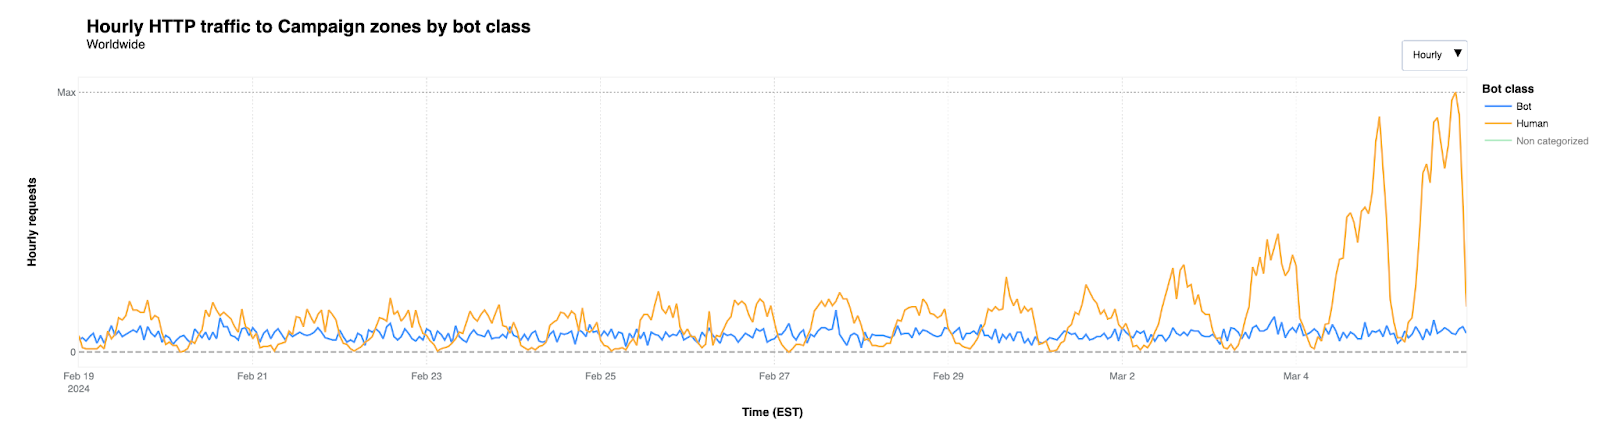
We’ve noticed that these websites under Cloudflare for Campaign zones experience low, constant bot traffic, although it increased slightly during the first days of March. But the figure below shows that the overall increase in traffic discussed above was driven by a significant increase in request traffic identified as coming from actual users (that is, “human”).
A majority of the traffic was to political parties protected under the project in these Super Tuesday states, with 53% of the traffic identified going to these party websites.
Project Galileo
Cloudflare protects more than 65 Internet properties in the United States that work on a range of topics related to voting rights and promoting free and fair elections. Super Tuesday resulted in a considerable spike in traffic to these websites around 09:00 EST of 3.22M requests, which far surpassed the previous maximum value of 1.56M on February 20th at 11:00 EST, a 2x increase.
This spike was determined to be from user-driven traffic (not bot) and caused by a single zone related to a nonpartisan nonprofit organization that provides online voter guides for every state, including voter registration forms. The organization has been protected under Project Galileo since 2017. Their request traffic experienced a 1360% increase in traffic between 07:00 and 09:00 am EST. This is a clear example on the importance of access to cybersecurity tools in advance of a major event, as spikes in traffic can be unpredictable.
2024 and beyond
As we approach the 2024 election cycle, Cloudflare is ready to provide support to election officials, voting rights groups, political campaigns, and parties involved in elections.
With a year full of elections and given the global attention on election security, engagement of seasoned professionals with expertise is essential to safeguard the democratic process. Through continued collaboration with stakeholders in the election space, we continuously develop strategies for effectively securing web infrastructure and internal teams. Our commitment persists in safeguarding resources throughout the voting process and fostering trust in democratic institutions around the world.
We want to ensure that all groups working to promote democracy around the world have the tools they need to stay secure online. If you work in the election space and need our help, please apply at https://www.cloudflare.com/election-security.
Tune in for more news, announcements and thought-provoking discussions! Don’t miss the full Security Week hub page.
Balancing developer velocity and security against bots is a constant challenge. Deploying your changes as quickly and easily as possible is essential to stay ahead of your (or your customers’) needs and wants. Ensuring your website is safe from malicious bots — without degrading user experience with alien hieroglyphics to decipher just to prove that you are a human — is no small feat. With Pages and Turnstile, we’ll walk you through just how easy it is to have the best of both worlds!
Cloudflare Pages offer a seamless platform for deploying and scaling your websites with ease. You can get started right away with configuring your websites with a quick integration using your git provider, and get set up with unlimited requests, bandwidth, collaborators, and projects.
Cloudflare Turnstile is Cloudflare’s CAPTCHA alternative solution where your users don’t ever have to solve another puzzle to get to your website, no more stop lights and fire hydrants. You can protect your site without having to put your users through an annoying user experience. If you are already using another CAPTCHA service, we have made it easy for you to migrate over to Turnstile with minimal effort needed. Check out the Turnstile documentation to get started.
Alright, what are we building?
In this tutorial, we’ll walk you through integrating Cloudflare Pages with Turnstile to secure your website against bots. You’ll learn how to deploy Pages, embed the Turnstile widget, validate the token on the server side, and monitor Turnstile analytics. Let’s build upon this tutorial from Cloudflare’s developer docs, which outlines how to create an HTML form with Pages and Functions. We’ll also show you how to secure it by integrating with Turnstile, complete with client-side rendering and server-side validation, using the Turnstile Pages Plugin!
Step 1: Deploy your Pages
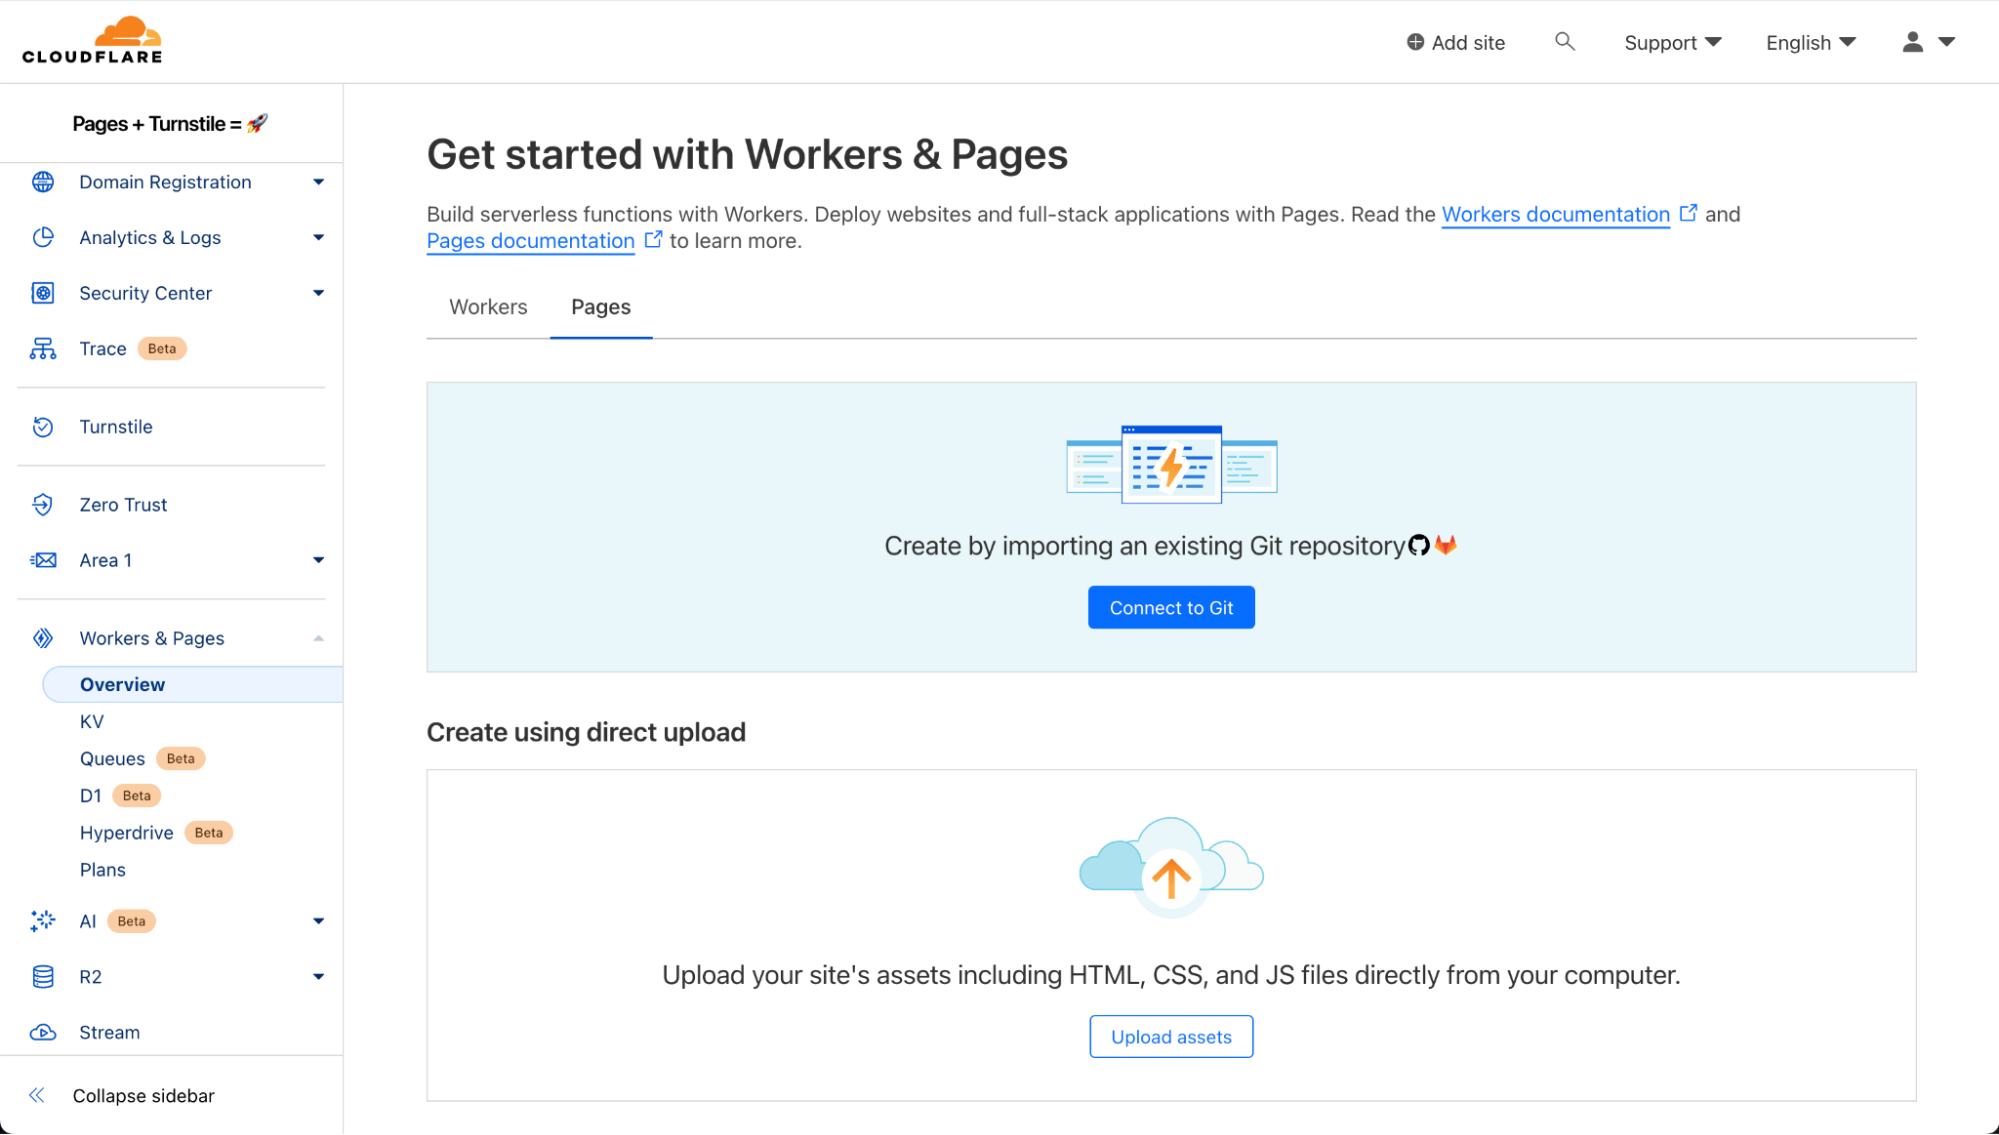
On the Cloudflare Dashboard, select your account and go to Workers & Pages to create a new Pages application with your git provider. Choose the repository where you cloned the tutorial project or any other repository that you want to use for this walkthrough.
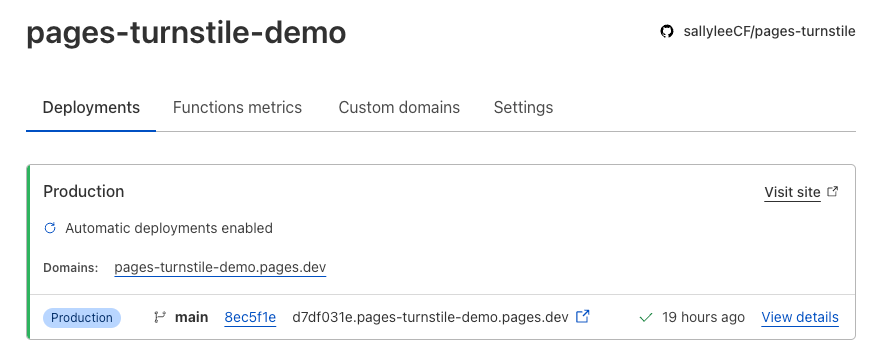
Once you select “Save and Deploy”, all the magic happens under the hood and voilà! The form is already deployed.
Step 2: Embed Turnstile widget
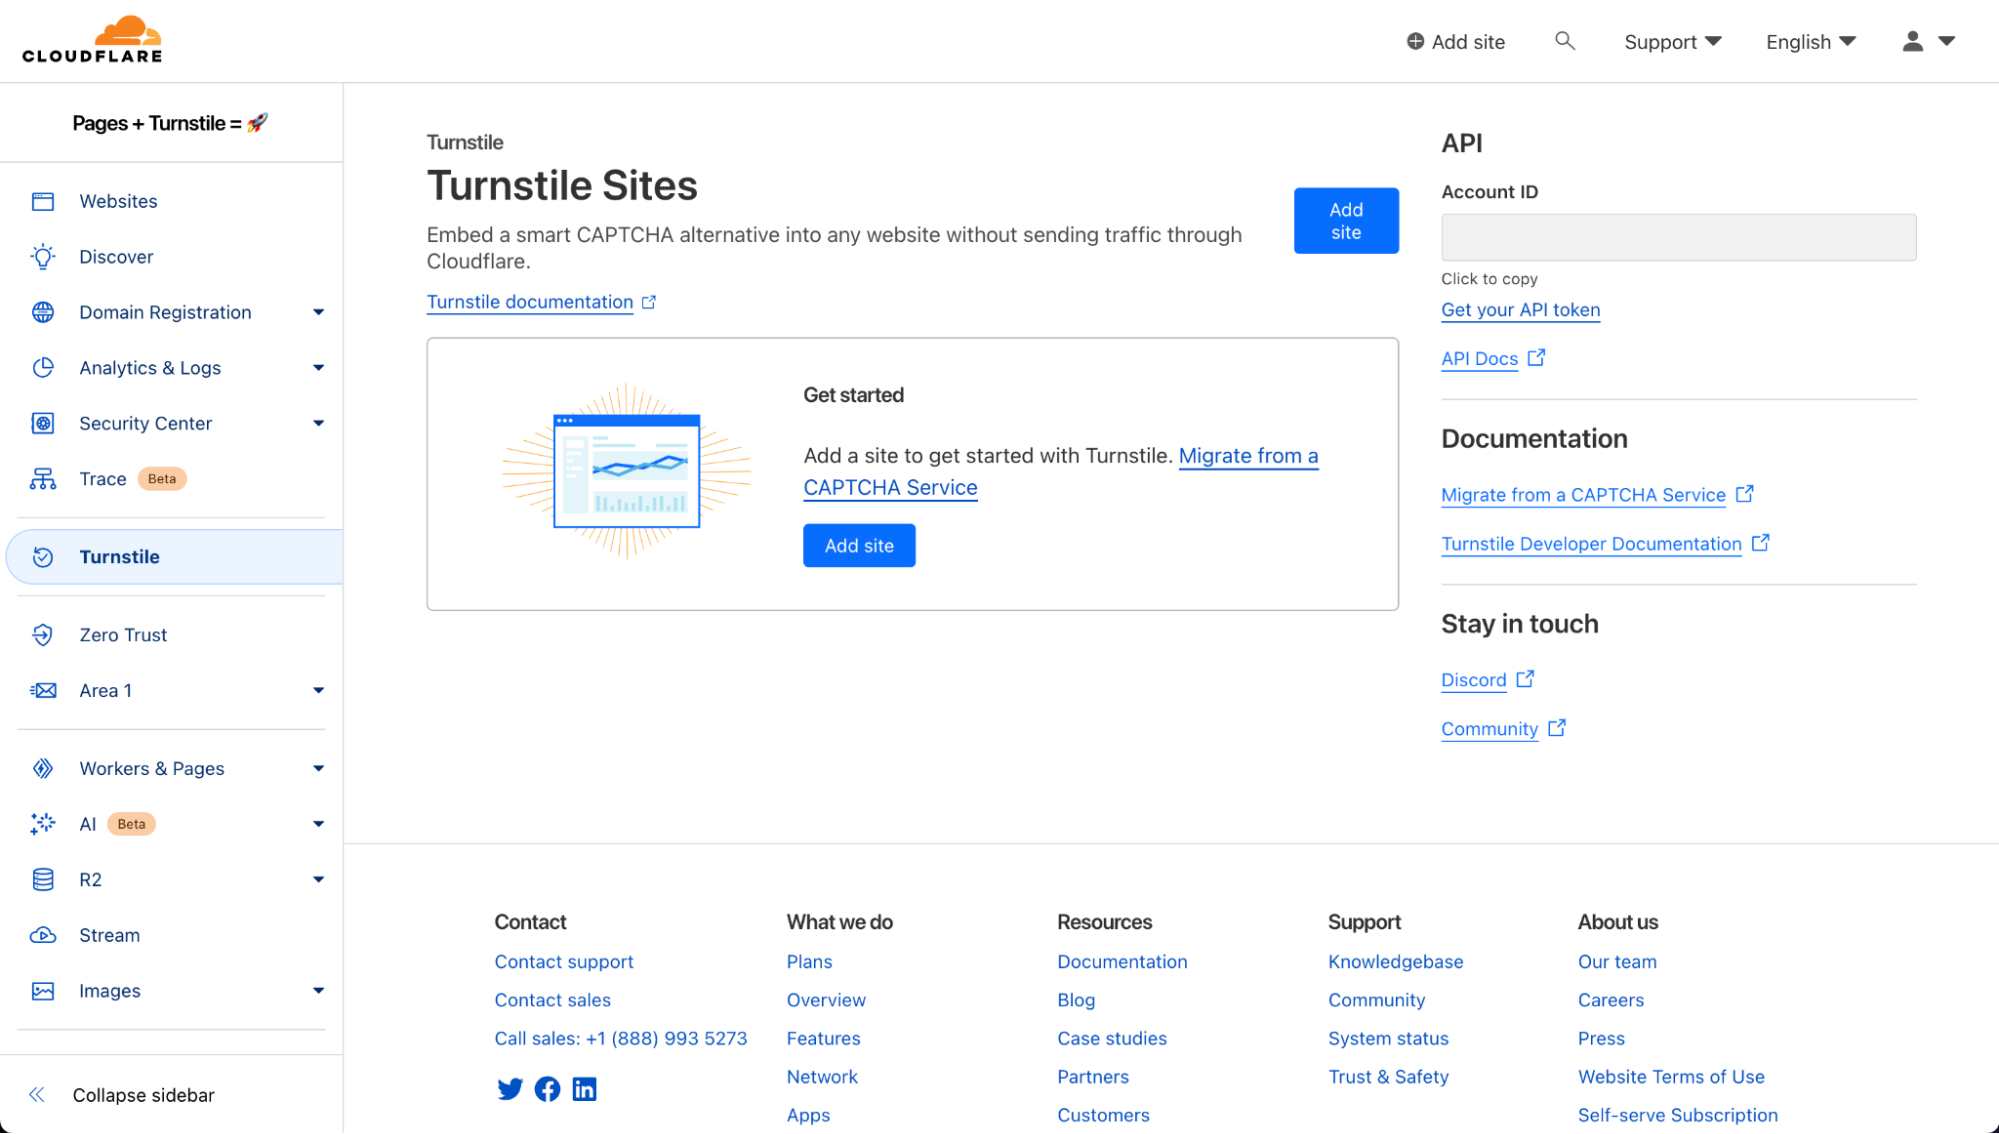
Now, let’s navigate to Turnstile and add the newly created Pages site.
Here are the widget configuration options:
Domain: All you need to do is add the domain for the Pages application. In this example, it’s “pages-turnstile-demo.pages.dev”. For each deployment, Pages generates a deployment specific preview subdomain. Turnstile covers all subdomains automatically, so your Turnstile widget will work as expected even in your previews. This is covered more extensively in our Turnstile domain management documentation.
Widget Mode: There are three types of widget modes you can choose from.
Managed: This is the recommended option where Cloudflare will decide when further validation through the checkbox interaction is required to confirm whether the user is a human or a bot. This is the mode we will be using in this tutorial.
Non-interactive: This mode does not require the user to interact and check the box of the widget. It is a non-intrusive mode where the widget is still visible to users but requires no added step in the user experience.
Invisible: Invisible mode is where the widget is not visible at all to users and runs in the background of your website.
Pre-Clearance setting: With a clearance cookie issued by the Turnstile widget, you can configure your website to verify every single request or once within a session. To learn more about implementing pre-clearance, check out this blog post.
Once you create your widget, you will be given a sitekey and a secret key. The sitekey is public and used to invoke the Turnstile widget on your site. The secret key should be stored safely for security purposes.
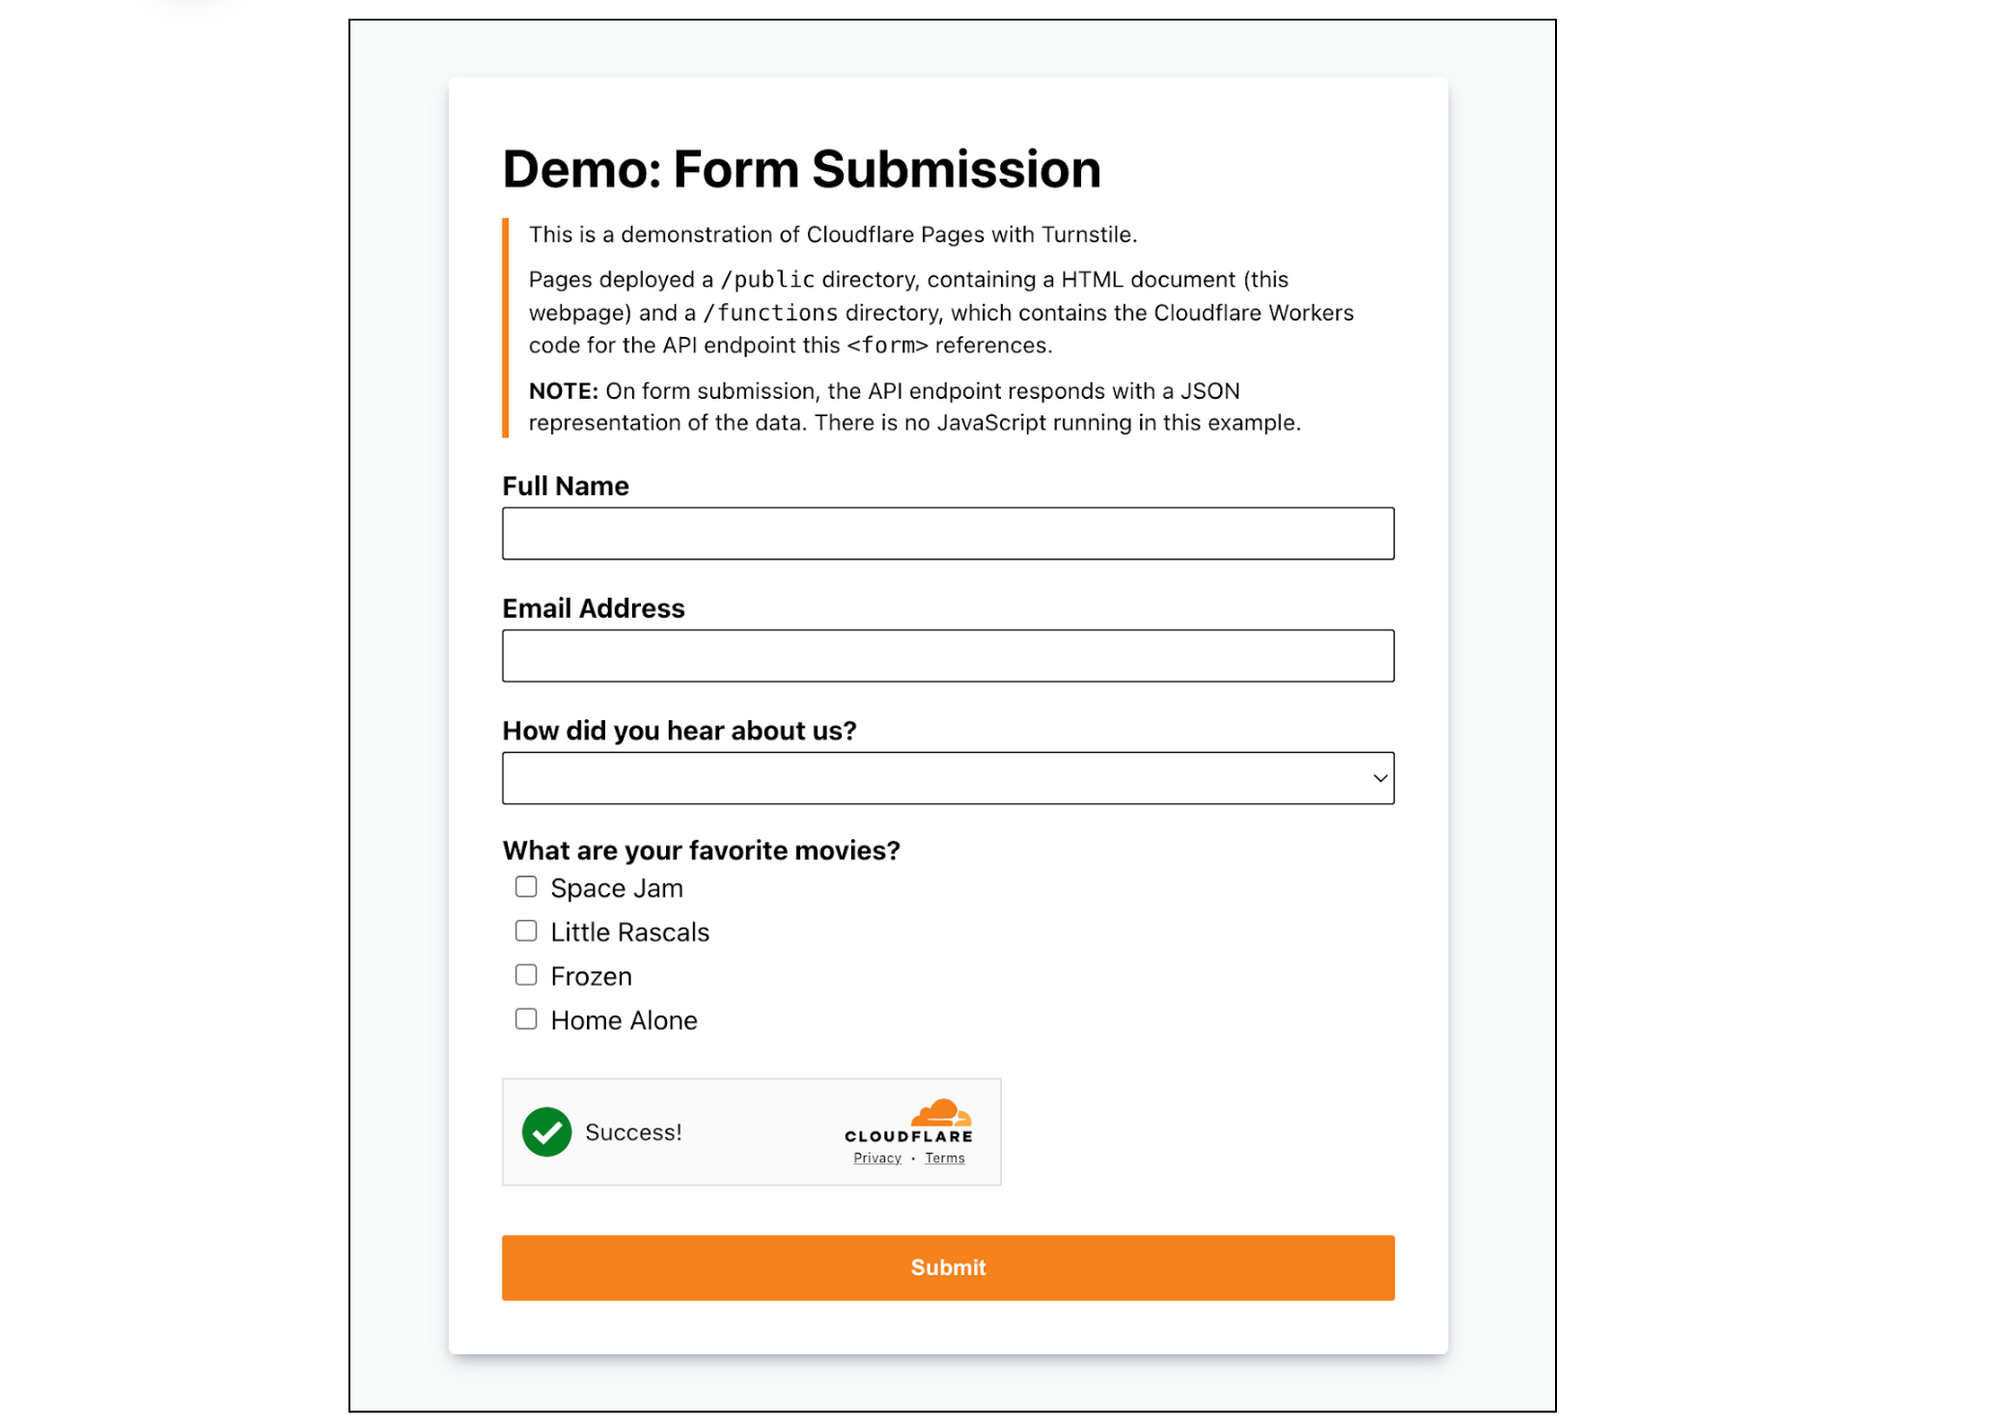
Let’s embed the widget above the Submit button. Your index.html should look like this:
<!doctype html>
<html lang="en">
<head>
<meta charset="utf8">
<title>Cloudflare Pages | Form Demo</title>
<meta name="theme-color" content="#d86300">
<meta name="mobile-web-app-capable" content="yes">
<meta name="apple-mobile-web-app-capable" content="yes">
<meta name="viewport" content="width=device-width,initial-scale=1">
<link rel="icon" type="image/png" href="https://www.cloudflare.com/favicon-128.png">
<link rel="stylesheet" href="/index.css">
<script src="https://challenges.cloudflare.com/turnstile/v0/api.js?onload=_turnstileCb" defer></script>
</head>
<body>
<main>
<h1>Demo: Form Submission</h1>
<blockquote>
<p>This is a demonstration of Cloudflare Pages with Turnstile.</p>
<p>Pages deployed a <code>/public</code> directory, containing a HTML document (this webpage) and a <code>/functions</code> directory, which contains the Cloudflare Workers code for the API endpoint this <code><form></code> references.</p>
<p><b>NOTE:</b> On form submission, the API endpoint responds with a JSON representation of the data. There is no JavaScript running in this example.</p>
</blockquote>
<form method="POST" action="/api/submit">
<div class="input">
<label for="name">Full Name</label>
<input id="name" name="name" type="text" />
</div>
<div class="input">
<label for="email">Email Address</label>
<input id="email" name="email" type="email" />
</div>
<div class="input">
<label for="referers">How did you hear about us?</label>
<select id="referers" name="referers">
<option hidden disabled selected value></option>
<option value="Facebook">Facebook</option>
<option value="Twitter">Twitter</option>
<option value="Google">Google</option>
<option value="Bing">Bing</option>
<option value="Friends">Friends</option>
</select>
</div>
<div class="checklist">
<label>What are your favorite movies?</label>
<ul>
<li>
<input id="m1" type="checkbox" name="movies" value="Space Jam" />
<label for="m1">Space Jam</label>
</li>
<li>
<input id="m2" type="checkbox" name="movies" value="Little Rascals" />
<label for="m2">Little Rascals</label>
</li>
<li>
<input id="m3" type="checkbox" name="movies" value="Frozen" />
<label for="m3">Frozen</label>
</li>
<li>
<input id="m4" type="checkbox" name="movies" value="Home Alone" />
<label for="m4">Home Alone</label>
</li>
</ul>
</div>
<div id="turnstile-widget" style="padding-top: 20px;"></div>
<button type="submit">Submit</button>
</form>
</main>
<script>
// This function is called when the Turnstile script is loaded and ready to be used.
// The function name matches the "onload=..." parameter.
function _turnstileCb() {
console.debug('_turnstileCb called');
turnstile.render('#turnstile-widget', {
sitekey: '0xAAAAAAAAAXAAAAAAAAAAAA',
theme: 'light',
});
}
</script>
</body>
</html>
You can embed the Turnstile widget implicitly or explicitly. In this tutorial, we will explicitly embed the widget by injecting the JavaScript tag and related code, then specifying the placement of the widget.
Make sure that the div id you assign is the same as the id you specify in turnstile.render call. In this case, let’s use “turnstile-widget”. Once that’s done, you should see the widget show up on your site!
Now that the Turnstile widget is rendered on the front end, let’s validate it on the server side and check out the Turnstile outcome. We need to make a call to the /siteverify API with the token in the submit function under ./functions/api/submit.js.
First, grab the token issued from Turnstile under cf-turnstile-response. Then, call the /siteverify API to ensure that the token is valid. In this tutorial, we’ll attach the Turnstile outcome to the response to verify everything is working well. You can decide on the expected behavior and where to direct the user based on the /siteverify response.
/**
 * POST /api/submit
 */

import turnstilePlugin from "@cloudflare/pages-plugin-turnstile";

// This is a demo secret key. In prod, we recommend you store
// your secret key(s) safely.
const SECRET_KEY = '0x4AAAAAAASh4E5cwHGsTTePnwcPbnFru6Y';

export const onRequestPost = [
    turnstilePlugin({
    	secret: SECRET_KEY,
    }),
    (async (context) => {
    	// Request has been validated as coming from a human
    	const formData = await context.request.formData()

    	var tmp, outcome = {};
	for (let [key, value] of formData) {
		tmp = outcome[key];
		if (tmp === undefined) {
			outcome[key] = value;
		} else {
			outcome[key] = [].concat(tmp, value);
		}
	}

	// Attach Turnstile outcome to the response
	outcome["turnstile_outcome"] = context.data.turnstile;

	let pretty = JSON.stringify(outcome, null, 2);

      	return new Response(pretty, {
      		headers: {
      			'Content-Type': 'application/json;charset=utf-8'
      		}
      	});
    })
];
Since Turnstile accurately decided that the visitor was not a bot, the response for “success” is “true” and “interactive” is “false”. The “interactive” being “false” means that the checkbox was automatically checked by Cloudflare as the visitor was determined to be human. The user was seamlessly allowed access to the website without having to perform any additional actions. If the visitor looks suspicious, Turnstile will become interactive, requiring the visitor to actually click the checkbox to verify that they are not a bot. We used the managed mode in this tutorial but depending on your application logic, you can choose the widget mode that works best for you.
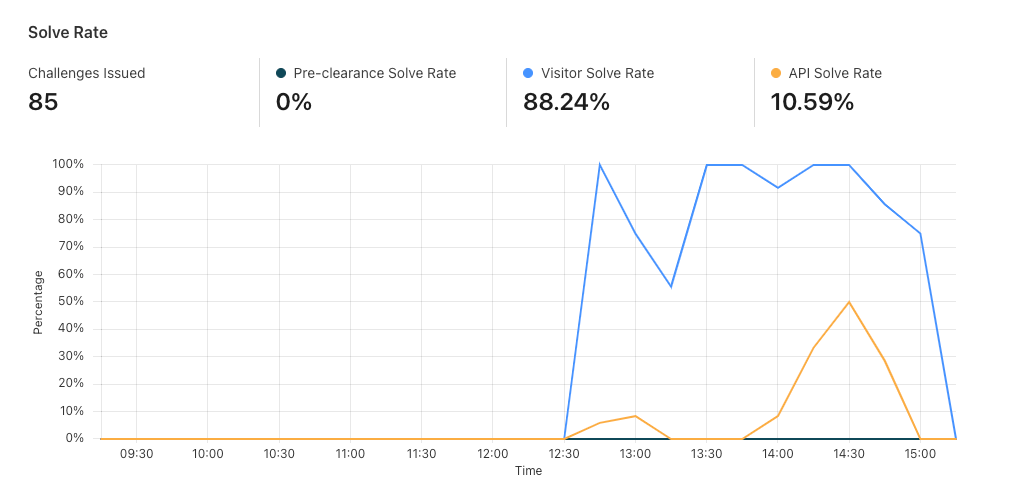
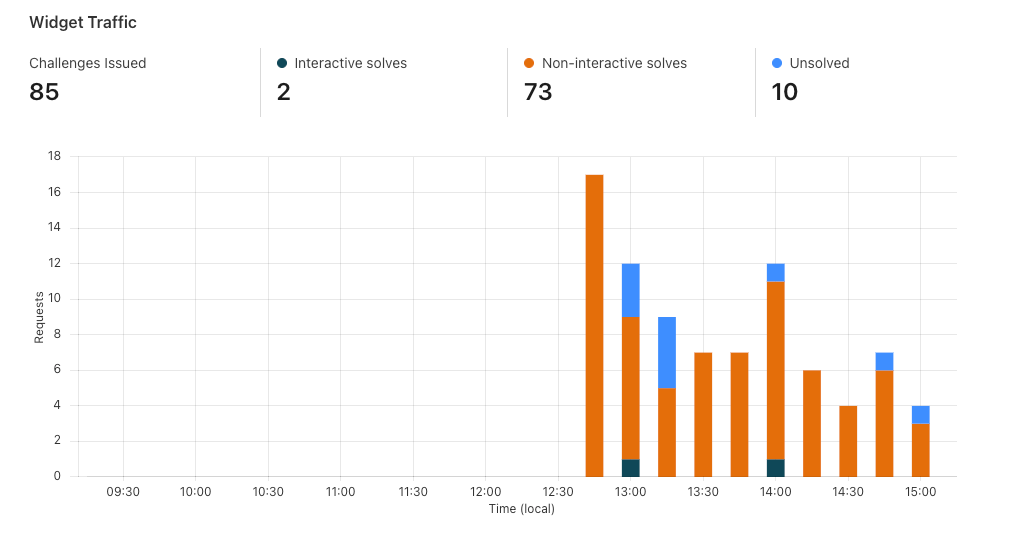
Now that we’ve set up Turnstile, we can head to Turnstile analytics in the Cloudflare Dashboard to monitor the solve rate and widget traffic. Visitor Solve Rate indicates the percentage of visitors who successfully completed the Turnstile widget. A sudden drop in the Visitor Solve Rate could indicate an increase in bot traffic, as bots may fail to complete the challenge presented by the widget. API Solve Rate measures the percentage of visitors who successfully validated their token against the /siteverify API. Similar to the Visitor Solve Rate, a significant drop in the API Solve Rate may indicate an increase in bot activity, as bots may fail to validate their tokens. Widget Traffic provides insights into the nature of the traffic hitting your website. A high number of challenges requiring interaction may suggest that bots are attempting to access your site, while a high number of unsolved challenges could indicate that the Turnstile widget is effectively blocking suspicious traffic.
And that’s it! We’ve walked you through how to easily secure your Pages with Turnstile. Pages and Turnstile are currently available for free for every Cloudflare user to get started right away. If you are looking for a seamless and speedy developer experience to get a secure website up and running, protected by Turnstile, head over to the Cloudflare Dashboard today!
A key component of effective corporate network security is establishing end to end visibility across all traffic that flows through the network. Every network engineer needs a complete overview of their network traffic to confirm their security policies work, to identify new vulnerabilities, and to analyze any shifts in traffic behavior. Often, it’s difficult to build out effective network monitoring as teams struggle with problems like configuring and tuning data collection, managing storage costs, and analyzing traffic across multiple visibility tools.
Today, we’re excited to announce that a free version of Cloudflare’s network flow monitoring product, Magic Network Monitoring, is available to all Enterprise Customers. Every Enterprise Customer can configure Magic Network Monitoring and immediately improve their network visibility in as little as 30 minutes via our self-serve onboarding process.
Enterprise Customers can visit the Magic Network Monitoring product page, click “Talk to an expert”, and fill out the form. You’ll receive access within 24 hours of submitting the request. Over the next month, the free version of Magic Network Monitoring will be rolled out to all Enterprise Customers. The product will automatically be available by default without the need to submit a form.
How it works
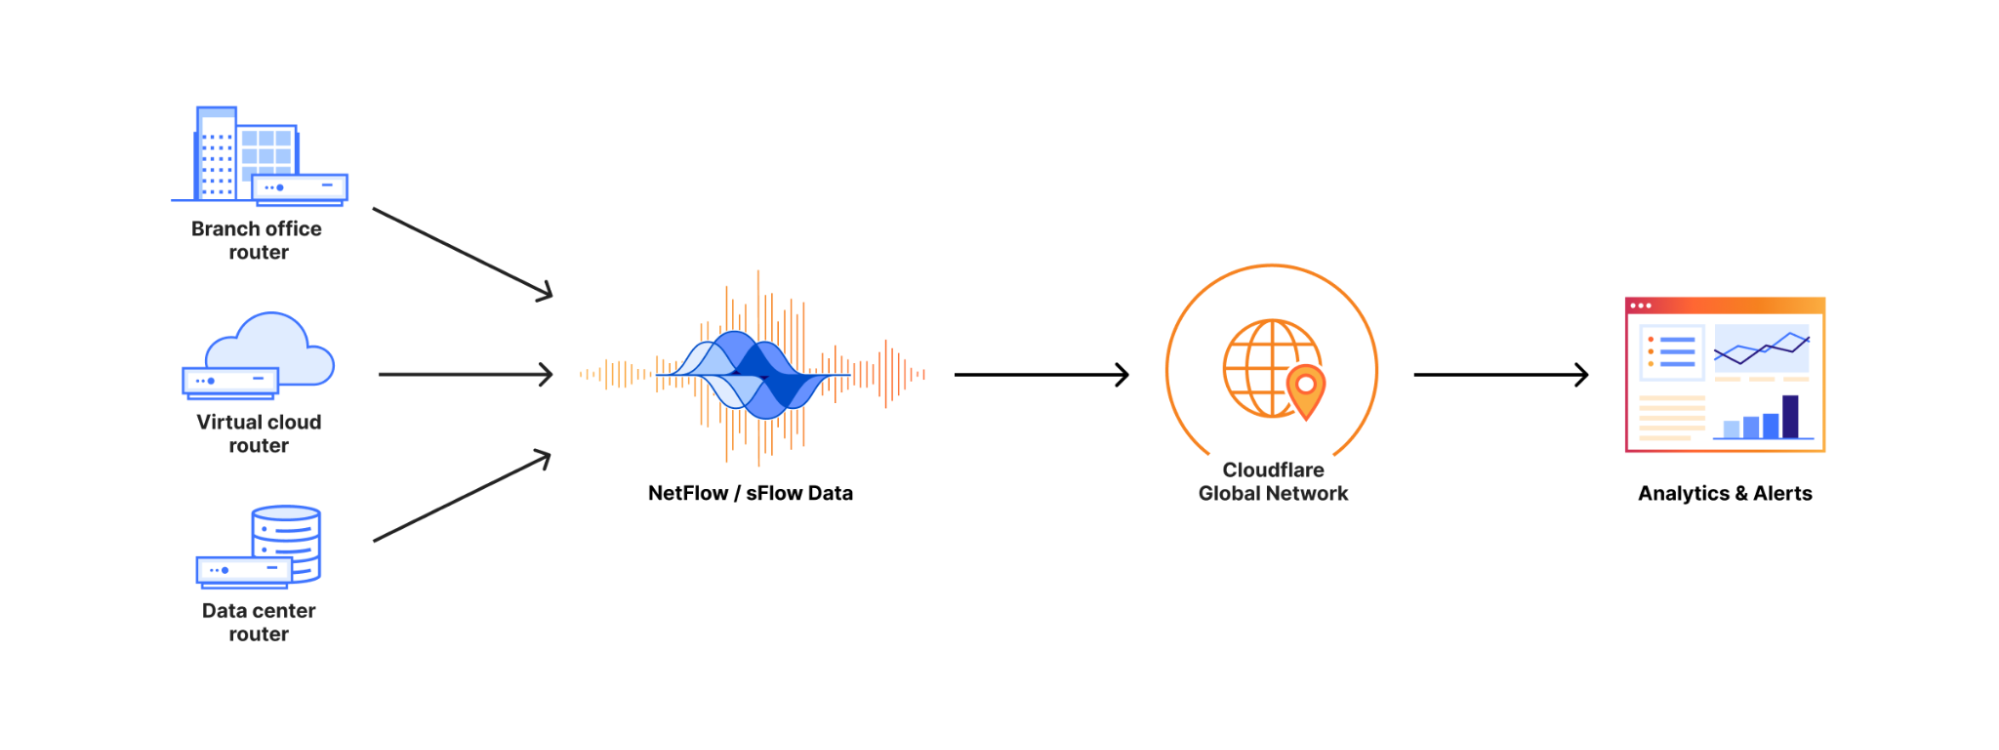
Cloudflare customers can send their network flow data (either NetFlow or sFlow) from their routers to Cloudflare’s network edge.
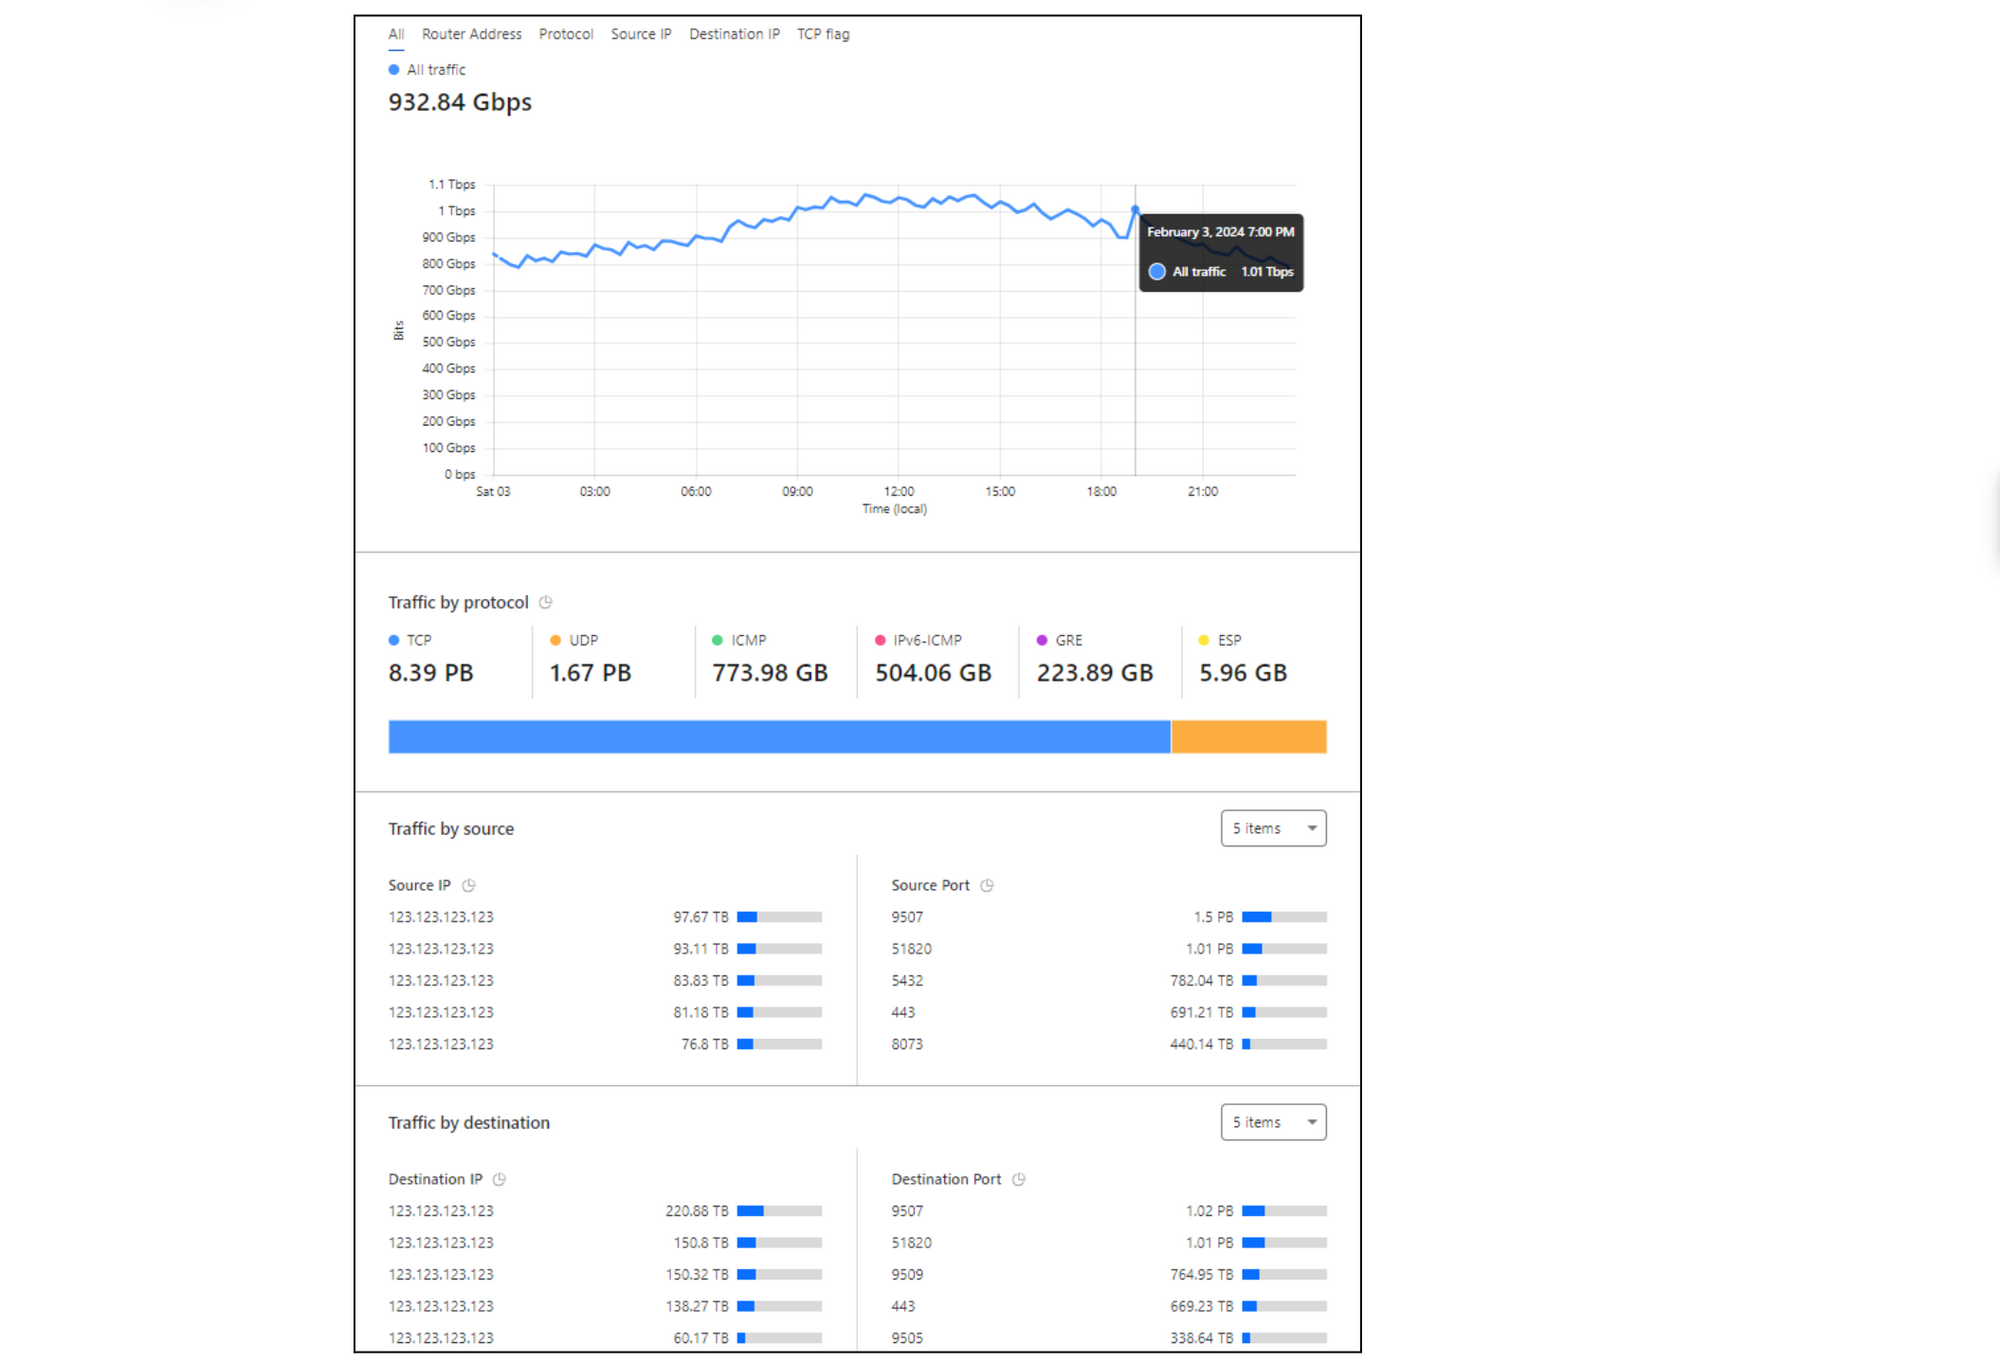
Magic Network Monitoring will pick up this data, parse it, and instantly provide insights and analytics on your network traffic. These analytics include traffic volume overtime in bytes and packets, top protocols, sources, destinations, ports, and TCP flags.
Dogfooding Magic Network Monitoring during the remediation of the Thanksgiving 2023 security incident
Let’s review a recent example of how Magic Network Monitoring improved Cloudflare’s own network security and traffic visibility during the Thanksgiving 2023 security incident. Our security team needed a lightweight method to identify malicious packet characteristics in our core data center traffic. We monitored for any network traffic sourced from or destined to a list of ASNs associated with the bad actor. Our security team setup Magic Network Monitoring and established visibility into our first core data center within 24 hours of the project kick-off. Today, Cloudflare continues to use Magic Network Monitoring to monitor for traffic related to bad actors and to provide real time traffic analytics on more than 1 Tbps of core data center traffic.
Magic Network Monitoring – Traffic Analytics
Monitoring local network traffic from IoT devices
Magic Network Monitoring also improves visibility on any network traffic that doesn’t go through Cloudflare. Imagine that you’re a network engineer at ACME Corporation, and it’s your job to manage and troubleshoot IoT devices in a factory that are connected to the factory’s internal network. The traffic generated by these IoT devices doesn’t go through Cloudflare because it is destined to other devices and endpoints on the internal network. Nonetheless, you still need to establish network visibility into device traffic over time to monitor and troubleshoot the system.
To solve the problem, you configure a router or other network device to securely send encrypted traffic flow summaries to Cloudflare via an IPSec tunnel. Magic Network Monitoring parses the data, and instantly provides you with insights and analytics on your network traffic. Now, when an IoT device goes down, or a connection between IoT devices is unexpectedly blocked, you can analyze historical network traffic data in Magic Network Monitoring to speed up the troubleshooting process.
Monitoring cloud network traffic
As cloud networking becomes increasingly prevalent, it is essential for enterprises to invest in visibility across their cloud environments. Let’s say you’re responsible for monitoring and troubleshooting your corporation’s cloud network operations which are spread across multiple public cloud providers. You need to improve visibility into your cloud network traffic to analyze and troubleshoot any unexpected traffic patterns like configuration drift that leads to an exposed network port.
To improve traffic visibility across different cloud environments, you can export cloud traffic flow logs from any virtual device that supports NetFlow or sFlow to Cloudflare. In the future, we are building support for native cloud VPC flow logs in conjunction with Magic Cloud Networking. Cloudflare will parse this traffic flow data and provide alerts plus analytics across all your cloud environments in a single pane of glass on the Cloudflare dashboard.
Improve your security posture today in less than 30 minutes
If you’re an existing Enterprise customer, and you want to improve your corporate network security, you can get started right away. Visit the Magic Network Monitoring product page, click “Talk to an expert”, and fill out the form. You’ll receive access within 24 hours of submitting the request. You can begin the self-serve onboarding tutorial, and start monitoring your first batch of network traffic in less than 30 minutes.
Over the next month, the free version of Magic Network Monitoring will be rolled out to all Enterprise Customers. The product will be automatically available by default without the need to submit a form.
If you’re interested in becoming an Enterprise Customer, and have more questions about Magic Network Monitoring, you can talk with an expert. If you’re a free customer, and you’re interested in testing a limited beta of Magic Network Monitoring, you can fill out this form to request access.
We’re proud to introduce the Advanced DNS Protection system, a robust defense mechanism designed to protect against the most sophisticated DNS-based DDoS attacks. This system is engineered to provide top-tier security, ensuring your digital infrastructure remains resilient in the face of evolving threats.
Our existing systems have been successfully detecting and mitigating ‘simpler’ DDoS attacks against DNS, but they’ve struggled with the more complex ones. The Advanced DNS Protection system is able to bridge that gap by leveraging new techniques that we will showcase in this blog post.
Advanced DNS Protection is currently in beta and available for all Magic Transit customers at no additional cost. Read on to learn more about DNS DDoS attacks, how the new system works, and what new functionality is expected down the road.
Register your interest to learn more about how we can help keep your DNS servers protected, available, and performant.
A third of all DDoS attacks target DNS servers
Distributed Denial of Service (DDoS) attacks are a type of cyber attack that aim to disrupt and take down websites and other online services. When DDoS attacks succeed and websites are taken offline, it can lead to significant revenue loss and damage to reputation.
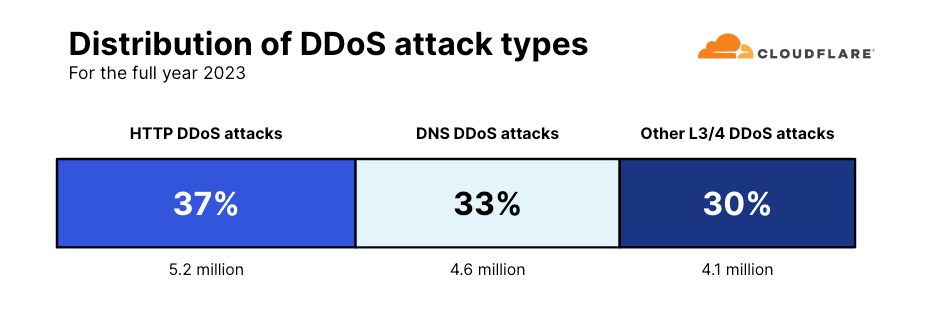
Distribution of DDoS attack types for 2023
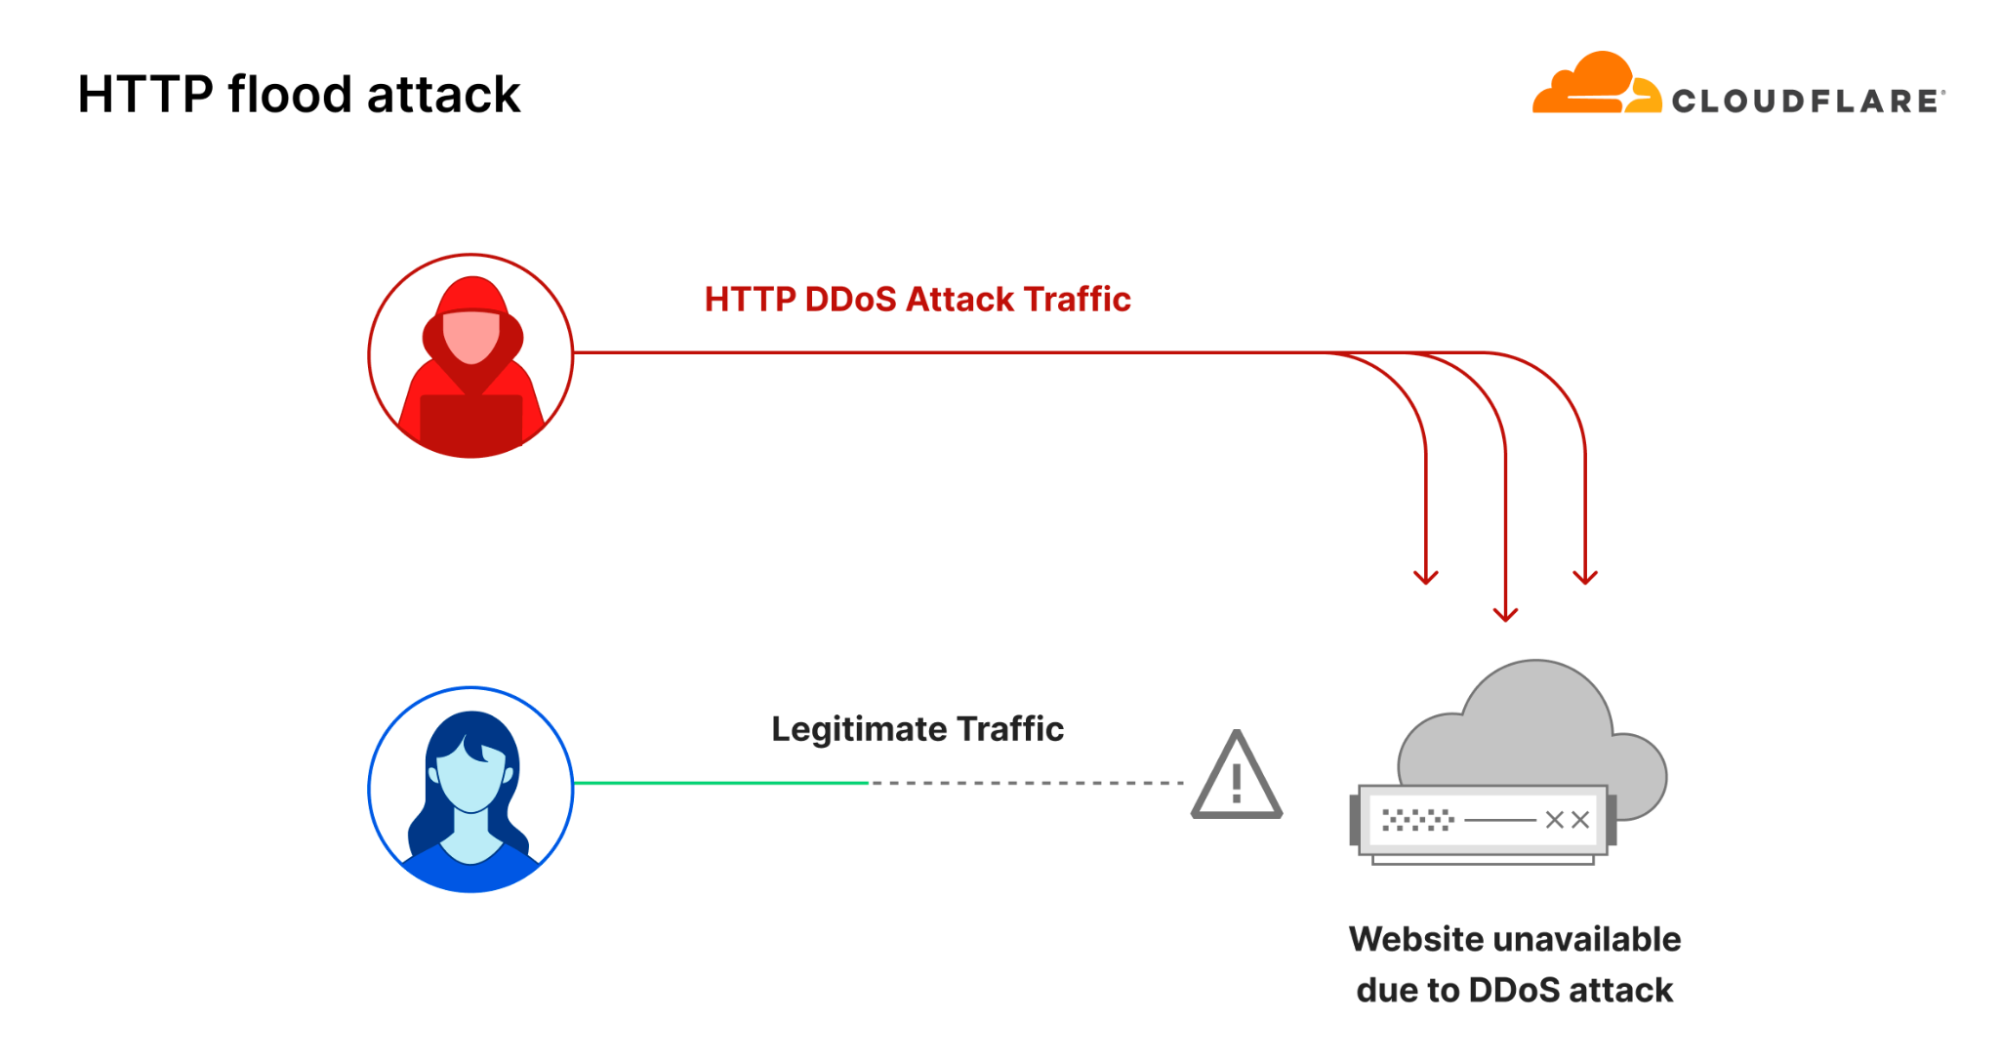
One common way to disrupt and take down a website is to flood its servers with more traffic than it can handle. This is known as an HTTP flood attack. It is a type of DDoS attack that targets the website directly with a lot of HTTP requests. According to our last DDoS trends report, in 2023 our systems automatically mitigated 5.2 million HTTP DDoS attacks — accounting for 37% of all DDoS attacks.
Diagram of an HTTP flood attack
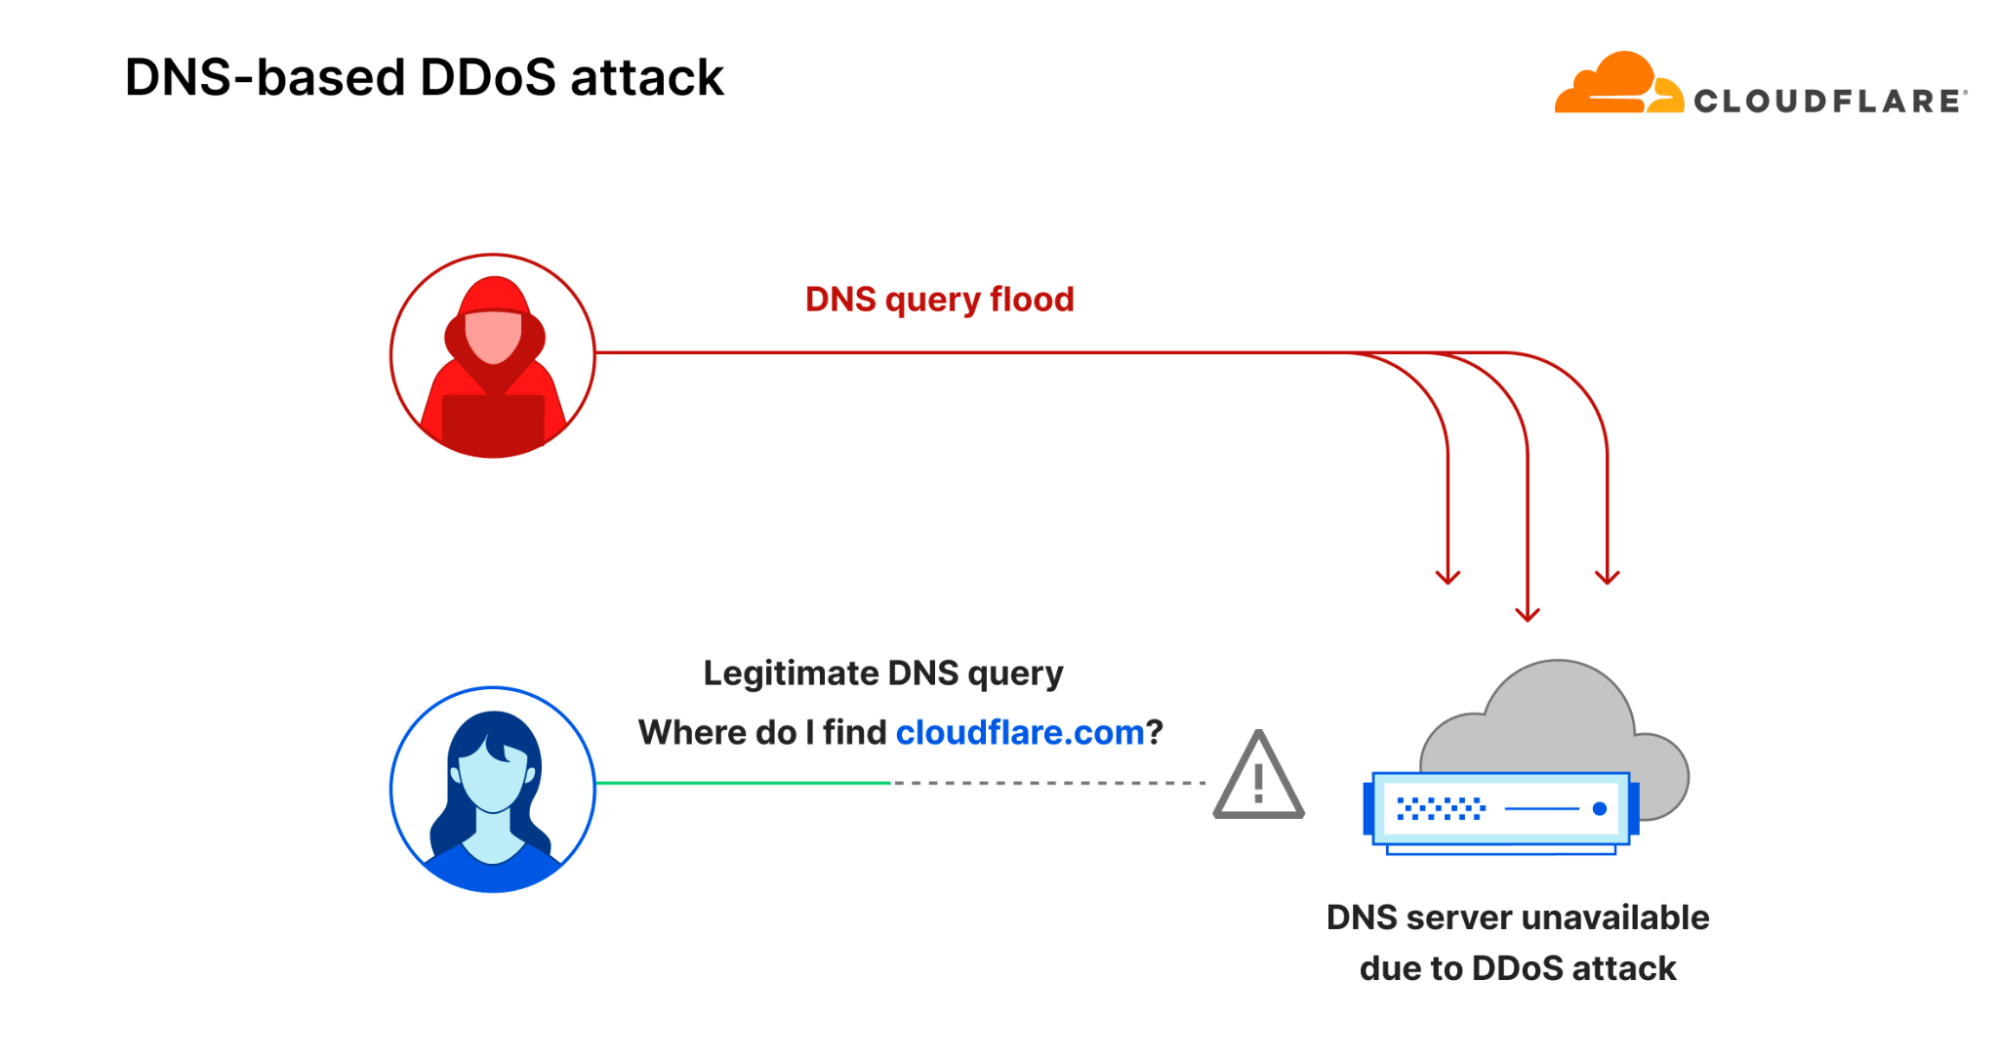
However, there is another way to take down websites: by targeting them indirectly. Instead of flooding the website servers, the threat actor floods the DNS servers. If the DNS servers are overwhelmed with more queries than their capacity, hostname to IP address translation fails and the website experiences an indirectly inflicted outage because the DNS server cannot respond to legitimate queries.
One notable example is the attack that targeted Dyn, a DNS provider, in October 2016. It was a devastating DDoS attack launched by the infamous Mirai botnet. It caused disruptions for major sites like Airbnb, Netflix, and Amazon, and it took Dyn an entire day to restore services. That’s a long time for service disruptions that can lead to significant reputation and revenue impact.
Over seven years later, Mirai attacks and DNS attacks are still incredibly common. In 2023, DNS attacks were the second most common attack type — with a 33% share of all DDoS attacks (4.6 million attacks). Attacks launched by Mirai-variant botnets were the fifth most common type of network-layer DDoS attack, accounting for 3% of all network-layer DDoS attacks.
Diagram of a DNS query flood attack
What are sophisticated DNS-based DDoS attacks?
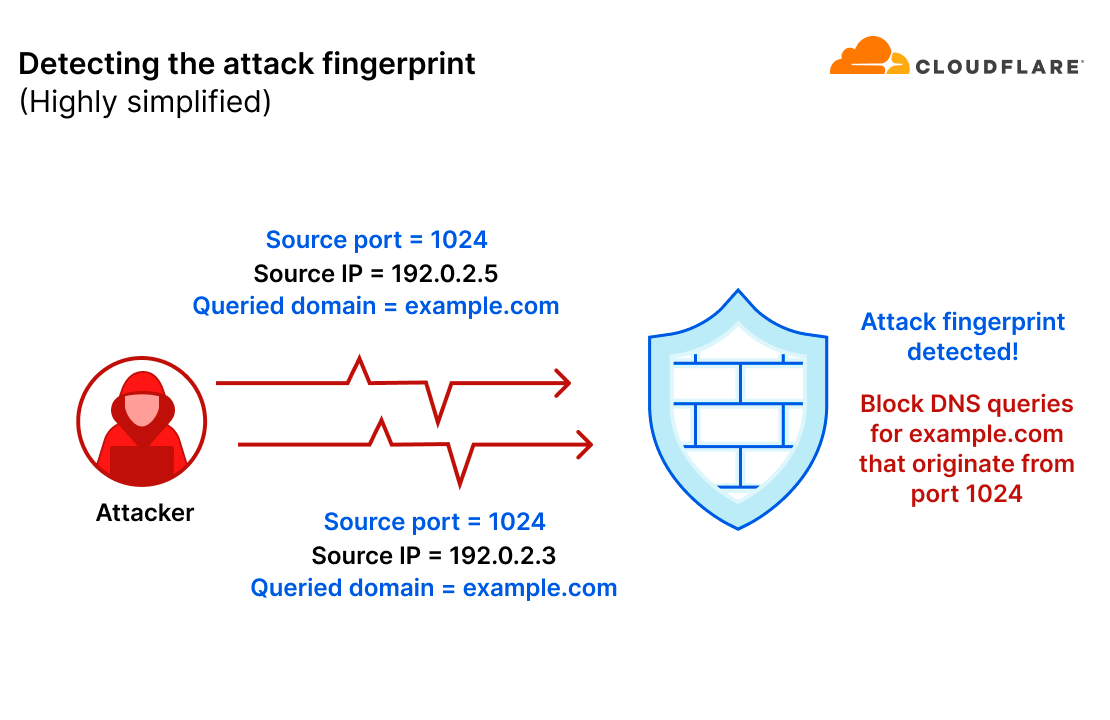
DNS-based DDoS attacks can be easier to mitigate when there is a recurring pattern in each query. This is what’s called the “attack fingerprint”. Fingerprint-based mitigation systems can identify those patterns and then deploy a mitigation rule that surgically filters the attack traffic without impacting legitimate traffic.
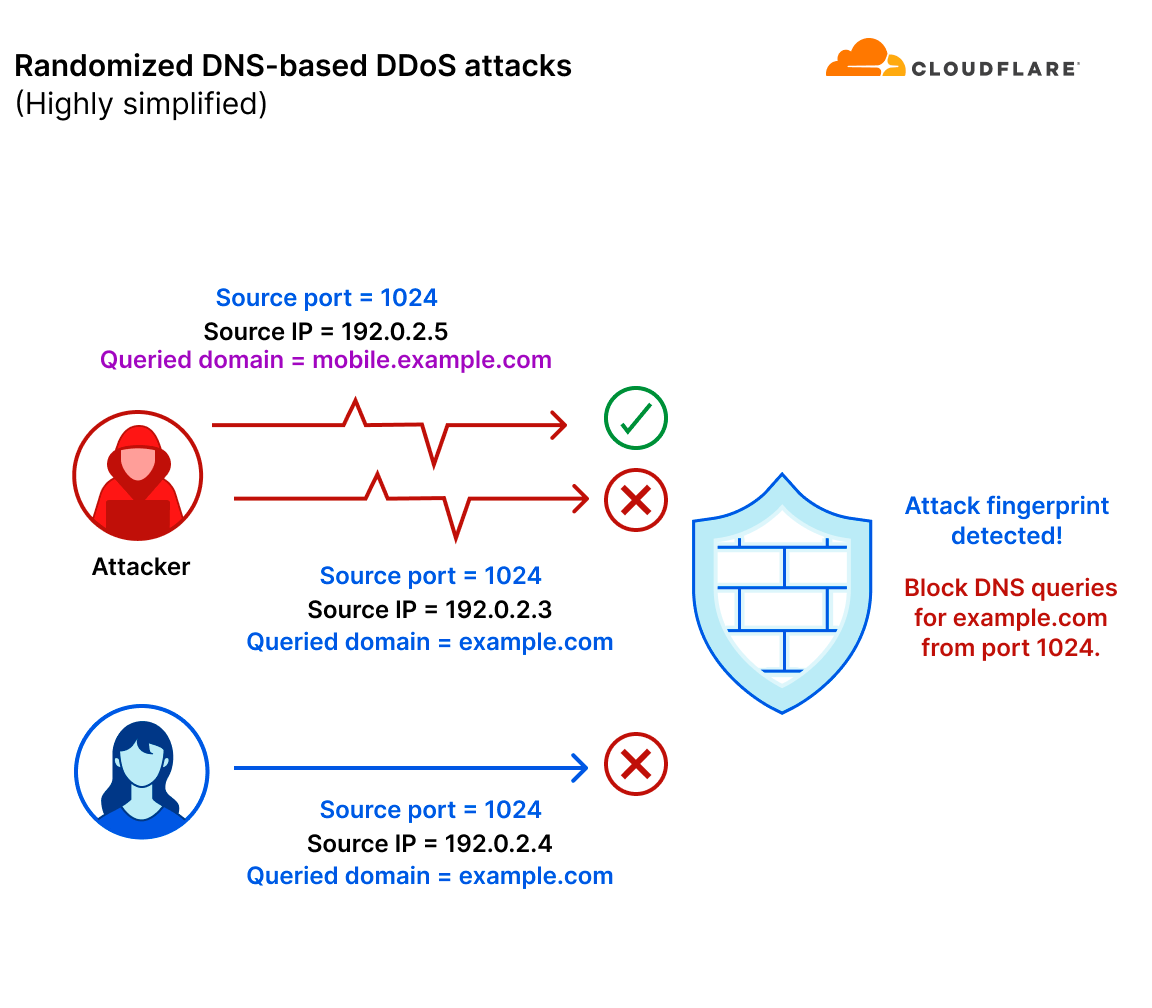
For example, let’s take a scenario where an attacker sends a flood of DNS queries to their target. In this example, the attacker only randomized the source IP address. All other query fields remained consistent. The mitigation system detected the pattern (source port is 1024 and the queried domain is example.com) and will generate an ephemeral mitigation rule to filter those queries.
A simplified diagram of the attack fingerprinting concept
However, there are DNS-based DDoS attacks that are much more sophisticated and randomized, lacking an apparent attack pattern. Without a consistent pattern to lock on to, it becomes virtually impossible to mitigate the attack using a fingerprint-based mitigation system. Moreover, even if an attack pattern is detected in a highly randomized attack, the pattern would probably be so generic that it would mistakenly mitigate legitimate user traffic and/or not catch the entire attack.
In this example, the attacker also randomized the queried domain in their DNS query flood attack. Simultaneously, a legitimate client (or server) is also querying example.com. They were assigned a random port number which happened to be 1024. The mitigation system detected a pattern (source port is 1024 and the queried domain is example.com) that caught only the part of the attack that matched the fingerprint. The mitigation system missed the part of the attack that queried other hostnames. Lastly, the mitigation system mistakenly caught legitimate traffic that happened to appear similar to the attack traffic.
A simplified diagram of a randomized DNS flood attack
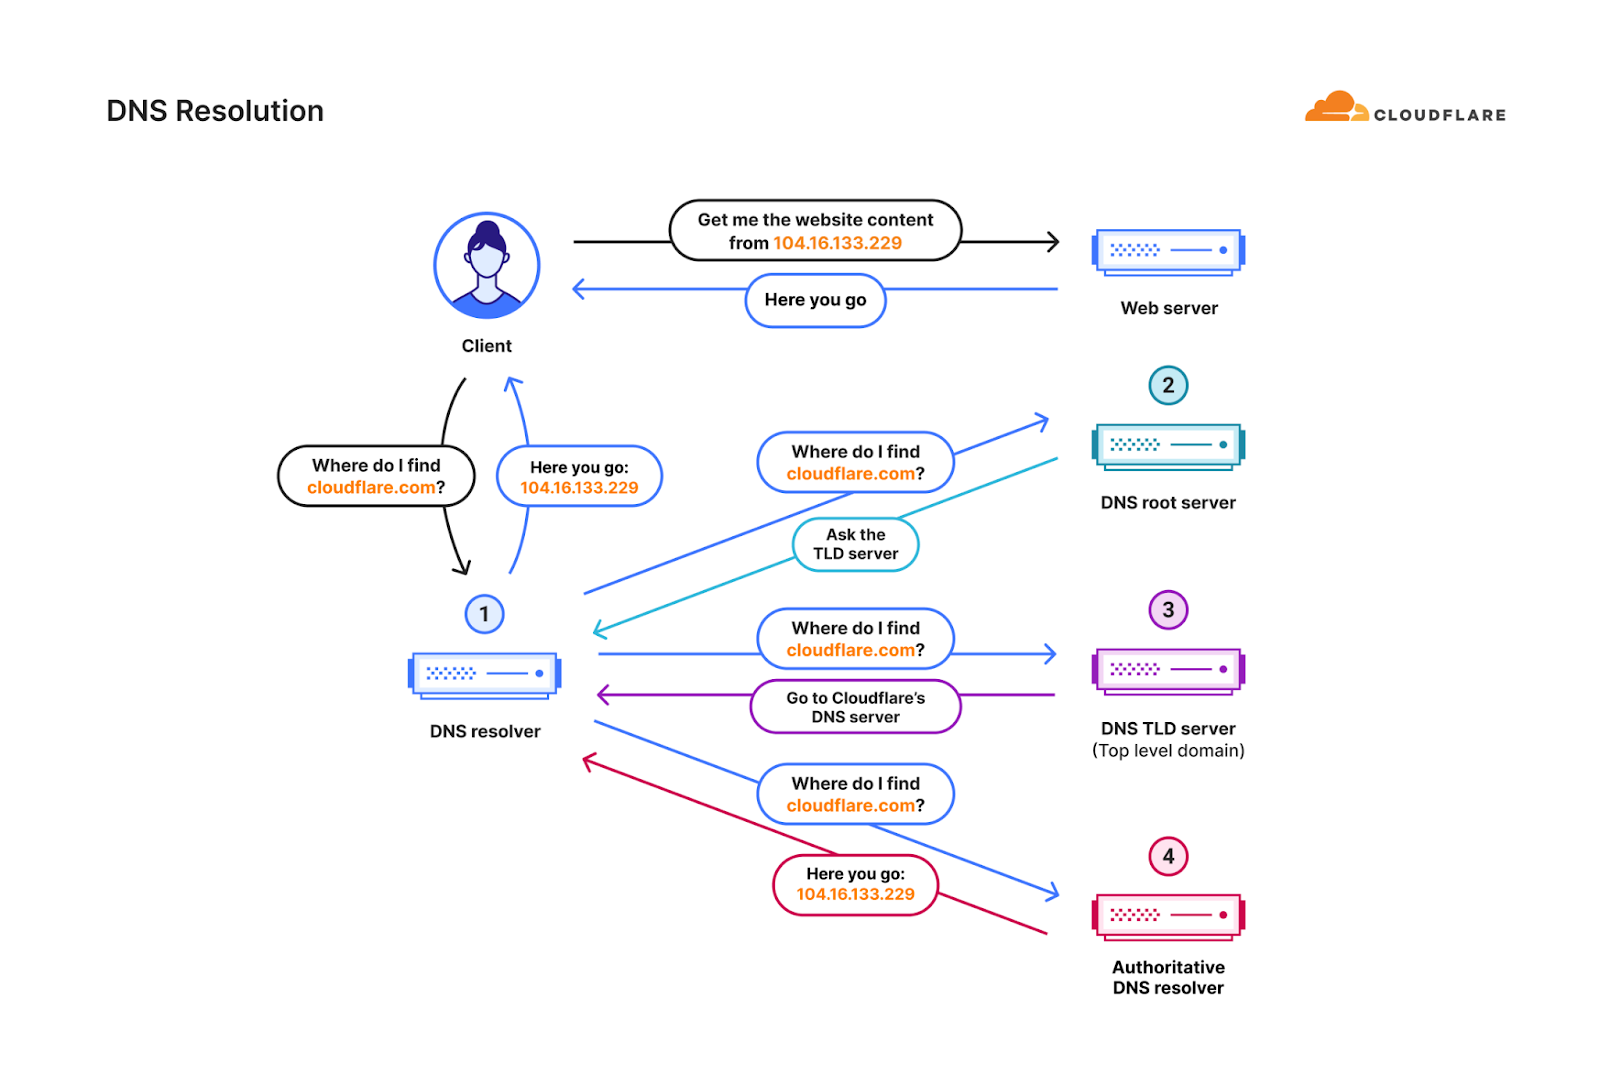
This is just one very simple example of how fingerprinting can fail in stopping randomized DDoS attacks. This challenge is amplified when attackers “launder” their attack traffic through reputable public DNS resolvers (a DNS resolver, also known as a recursive DNS server, is a type of DNS server that is responsible for tracking down the IP address of a website from various other DNS servers). This is known as a DNS laundering attack.
Diagram of the DNS resolution process
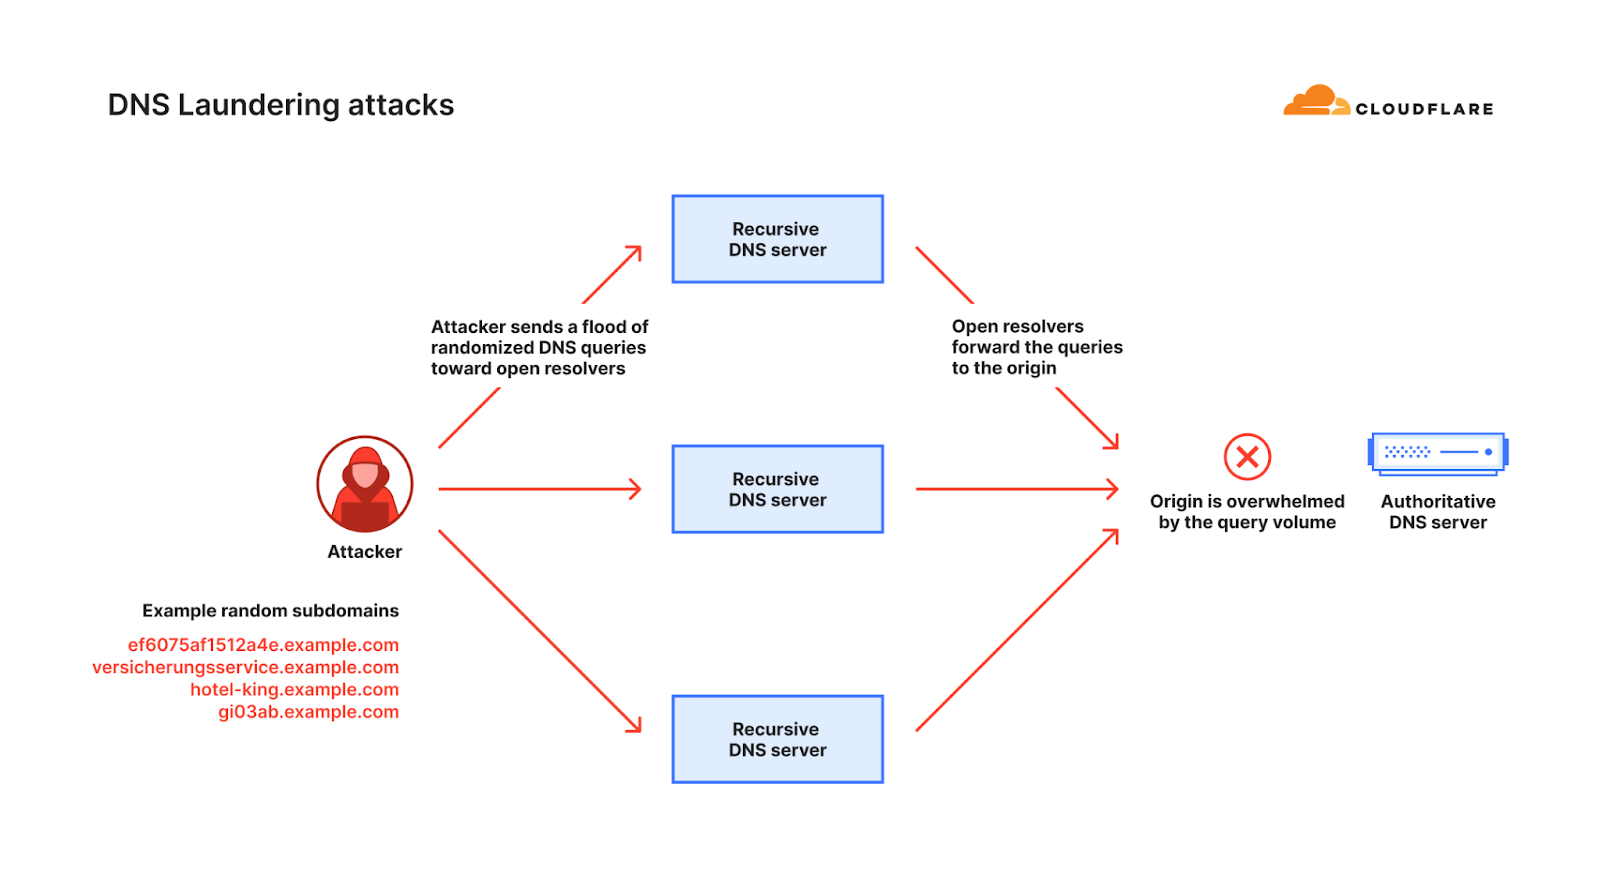
During a DNS laundering attack, the attacker queries subdomains of a real domain that is managed by the victim’s authoritative DNS server. The prefix that defines the subdomain is randomized and is never used more than once. Due to the randomization element, recursive DNS servers will never have a cached response and will need to forward the query to the victim’s authoritative DNS server. The authoritative DNS server is then bombarded by so many queries until it cannot serve legitimate queries or even crashes altogether.
Diagram of a DNS Laundering attack
The complexity of sophisticated DNS DDoS attacks lies in their paradoxical nature: while they are relatively easy to detect, effectively mitigating them is significantly more difficult. This difficulty stems from the fact that authoritative DNS servers cannot simply block queries from recursive DNS servers, as these servers also make legitimate requests. Moreover, the authoritative DNS server is unable to filter queries aimed at the targeted domain because it is a genuine domain that needs to remain accessible.
Mitigating sophisticated DNS-based DDoS attacks with the Advanced DNS Protection system
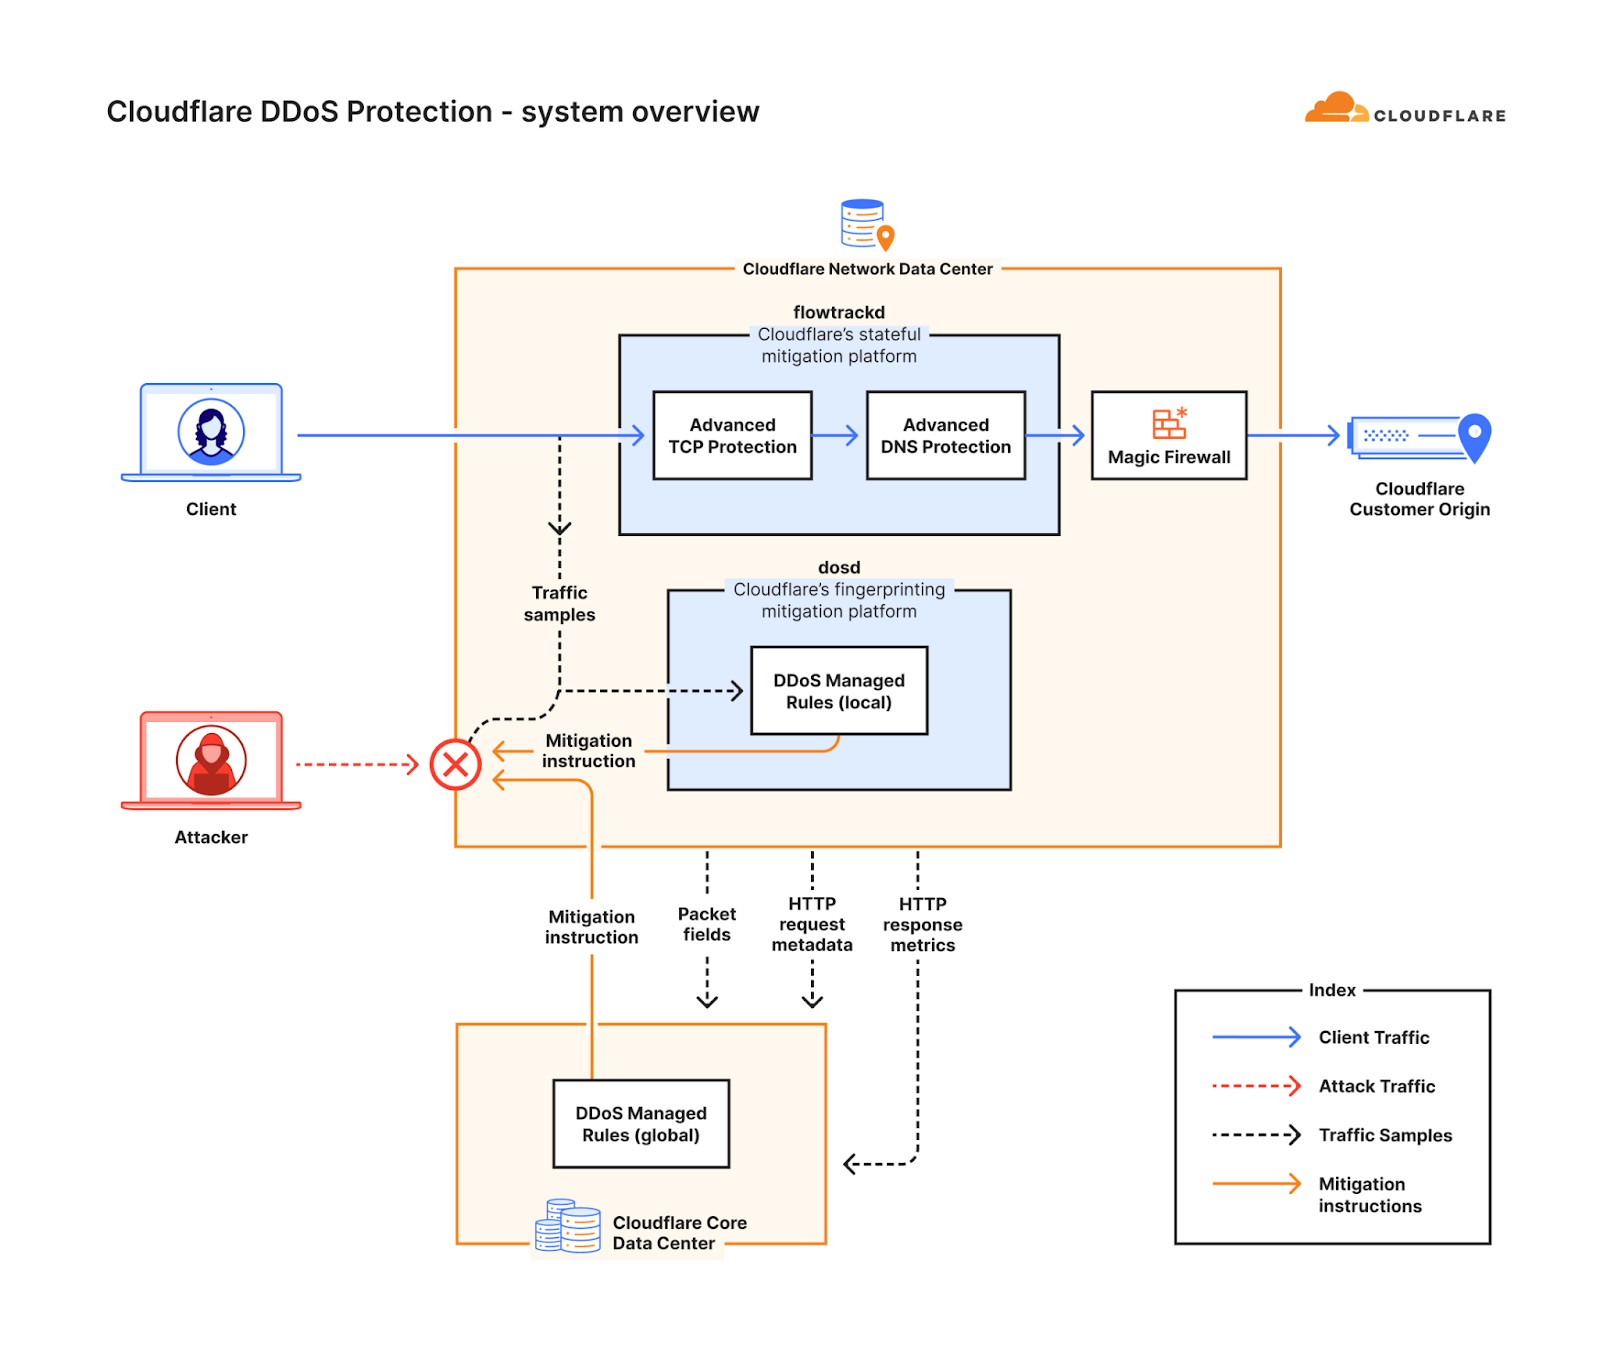
The rise in these types of sophisticated DNS-based DDoS attacks motivated us to develop a new solution — a solution that would better protect our customers and bridge the gap of more traditional fingerprinting approaches. This solution came to be the Advanced DNS Protection system. Similar to the Advanced TCP Protection system, it is a software-defined system that we built, and it is powered by our stateful mitigation platform, flowtrackd (flow tracking daemon).
The Advanced DNS Protection system complements our existing suite of DDoS defense systems. Following the same approach as our other DDoS defense systems, the Advanced DNS Protection system is also a distributed system, and an instance of it runs on every Cloudflare server around the world. Once the system has been initiated, each instance can detect and mitigate attacks autonomously without requiring any centralized regulation. Detection and mitigation is instantaneous (zero seconds). Each instance also communicates with other instances on other servers in a data center. They gossip and share threat intelligence to deliver a comprehensive mitigation within each data center.
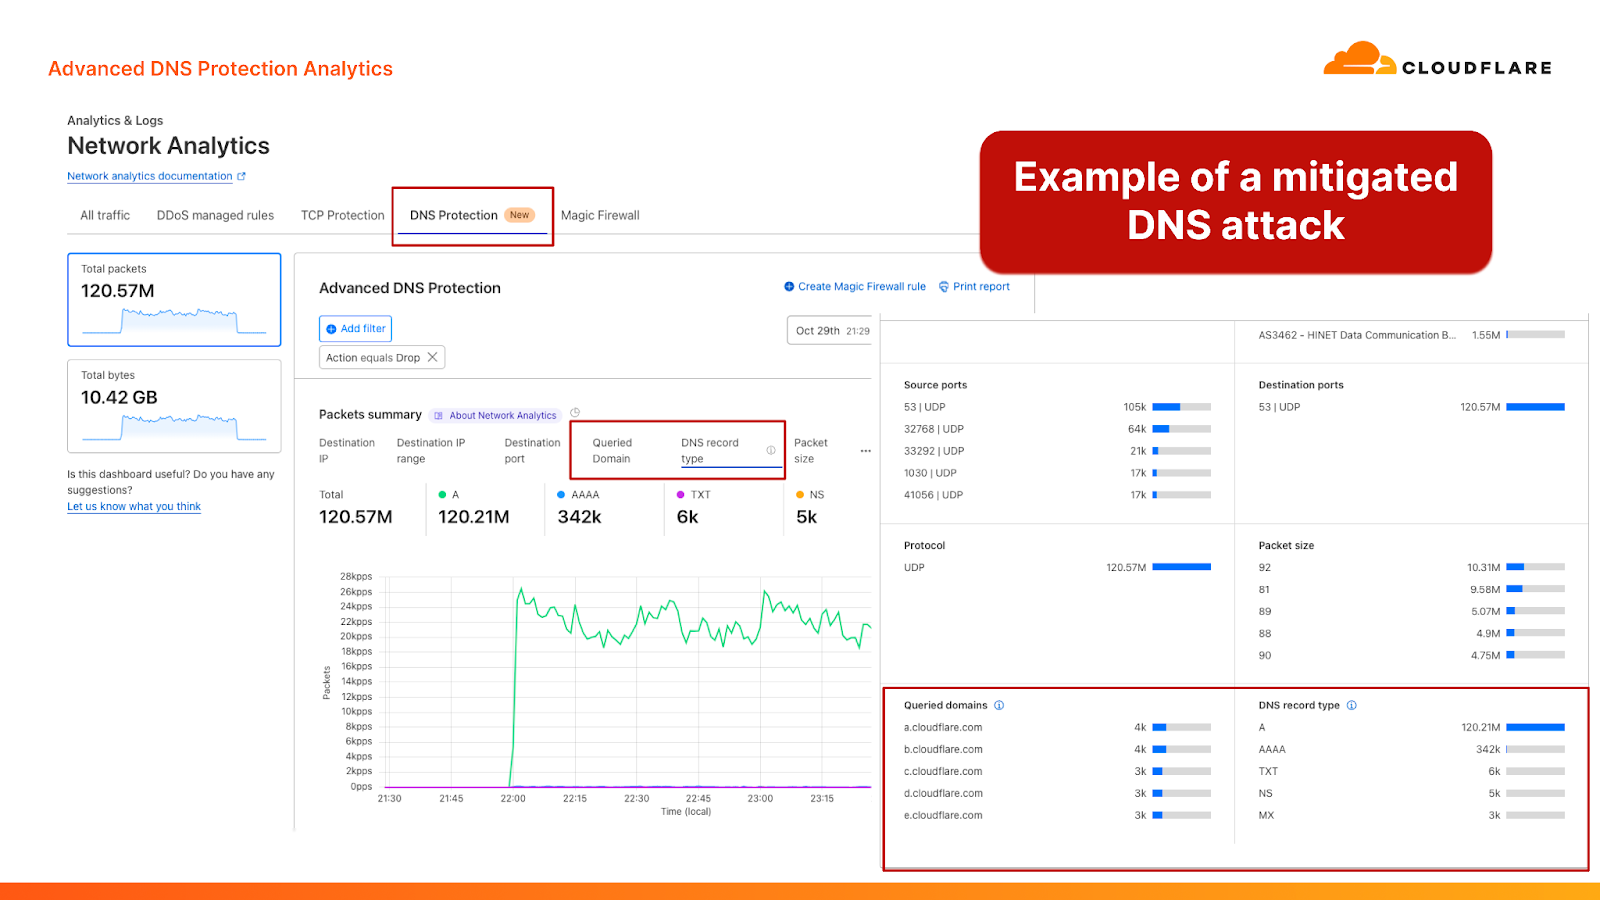
Screenshots from the Cloudflare dashboard showcasing a DNS-based DDoS attack that was mitigated by the Advanced DNS Protection system
Together, our fingerprinting-based systems (the DDoS protection managed rulesets) and our stateful mitigation systems provide a robust multi-layered defense strategy to defend against the most sophisticated and randomized DNS-based DDoS attacks. The system is also customizable, allowing Cloudflare customers to tailor it for their needs. Review our documentation for more information on configuration options.
Diagram of Cloudflare’s DDoS protection systems
We’ve also added new DNS-centric data points to help customers better understand their DNS traffic patterns and attacks. These new data points are available in a new “DNS Protection” tab within the Cloudflare Network Analytics dashboard. The new tab provides insights about which DNS queries are passed and dropped, as well as the characteristics of those queries, including the queried domain name and the record type. The analytics can also be fetched by using the Cloudflare GraphQL API and by exporting logs into your own monitoring dashboards via Logpush.
DNS queries: discerning good from bad
To protect against sophisticated and highly randomized DNS-based DDoS attacks, we needed to get better at deciding which DNS queries are likely to be legitimate for our customers. However, it’s not easy to infer what’s legitimate and what’s likely to be a part of an attack just based on the query name. We can’t rely solely on fingerprint-based detection mechanisms, since sometimes seemingly random queries, like abc123.example.com, can be legitimate. The opposite is true as well: a query for mailserver.example.com might look legitimate, but can end up not being a real subdomain for a customer.
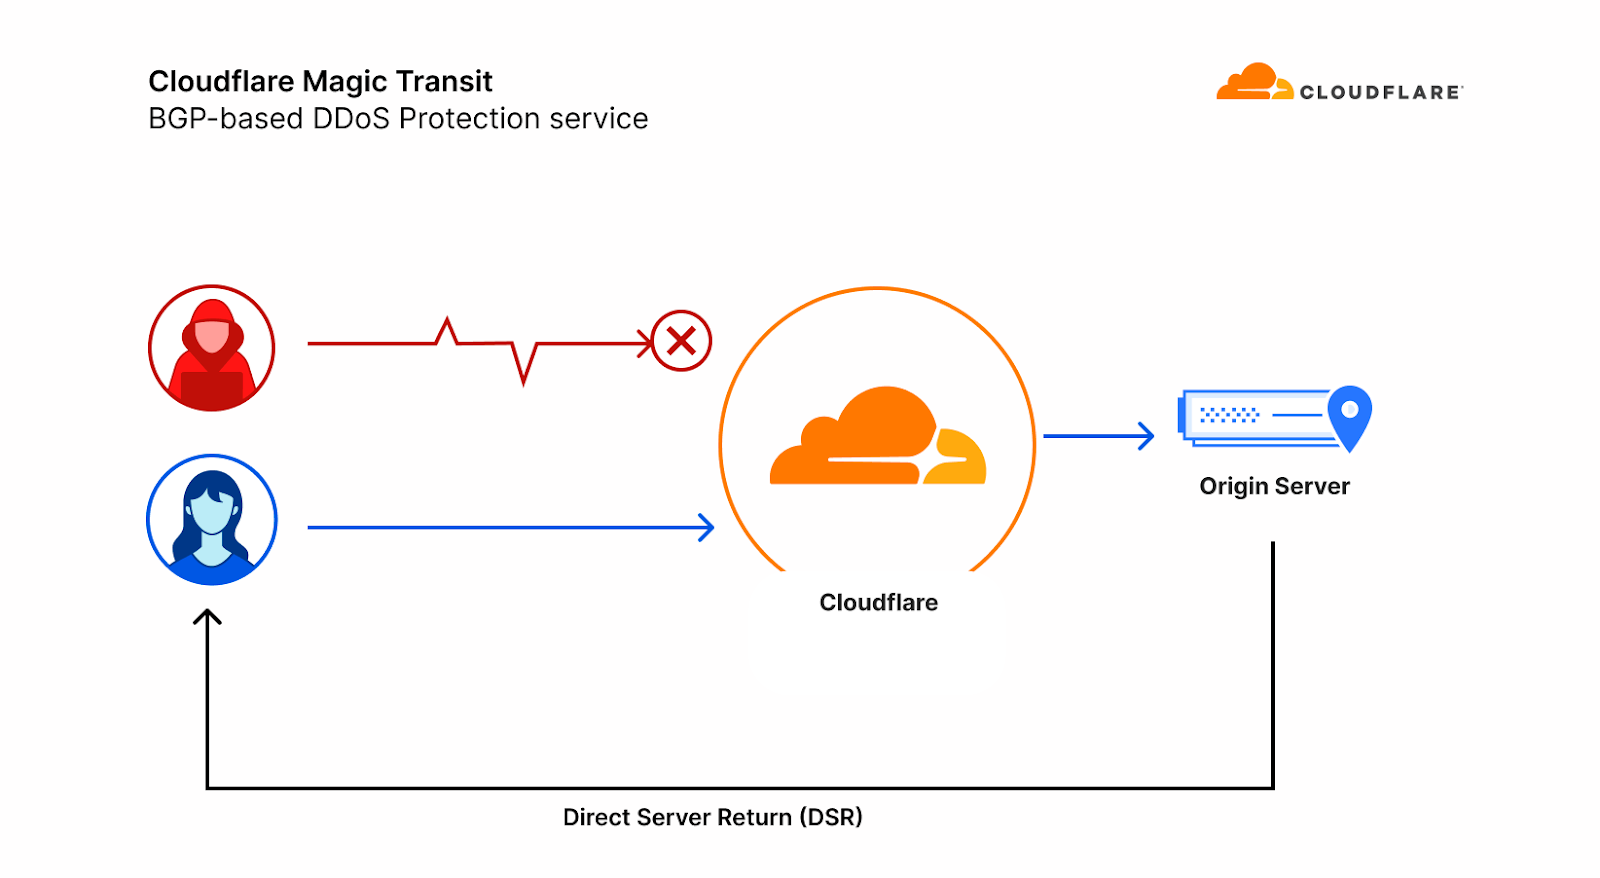
To make matters worse, our Layer 3 packet routing-based mitigation service, Magic Transit, uses direct server return (DSR), meaning we can not see the DNS origin server’s responses to give us feedback about which queries are ultimately legitimate.
Diagram of Magic Transit with Direct Server Return (DSR)
We decided that the best way to combat these attacks is to build a data model of each customer’s expected DNS queries, based on a historical record that we build. With this model in hand, we can decide with higher confidence which queries are likely to be legitimate, and drop the ones that we think are not, shielding our customer’s DNS servers.
This is the basis of Advanced DNS Protection. It inspects every DNS query sent to our Magic Transit customers, and passes or drops them based on the data model and each customer’s individual settings.
To do so, each server at our global network continually sends certain DNS-related data such as query type (for example, A record) and the queried domains (but not the source of the query) to our core data centers, where we periodically compute DNS query traffic profiles for each customer. Those profiles are distributed across our global network, where they are consulted to help us more confidently and accurately decide which queries are good and which are bad. We drop the bad queries and pass on the good ones, taking into account a customer’s tolerance for unexpected DNS queries based on their configurations.
Solving the technical challenges that emerged when designing the Advanced DNS Protection system
In building this system, we faced several specific technical challenges:
Data processing
We process tens of millions of DNS queries per day across our global network for our Magic Transit customers, not counting Cloudflare’s suite of other DNS products, and use the DNS-related data mentioned above to build custom query traffic profiles. Analyzing this type of data requires careful treatment of our data pipelines. When building these traffic profiles, we use sample-on-write and adaptive bitrate technologies when writing and reading the necessary data, respectively, to ensure that we capture the data with a fine granularity while protecting our data infrastructure, and we drop information that might impact the privacy of end users.
Compact representation of query data
Some of our customers see tens of millions of DNS queries per day alone. This amount of data would be prohibitively expensive to store and distribute in an uncompressed format. To solve this challenge, we decided to use a counting Bloom filter for each customer’s traffic profile. This is a probabilistic data structure that allows us to succinctly store and distribute each customer’s DNS profile, and then efficiently query it at packet processing time.
Data distribution
We periodically need to recompute and redistribute every customer’s DNS traffic profile between our data centers to each server in our fleet. We used our very own R2 storage service to greatly simplify this task. With regional hints and custom domains enabled, we enabled caching and used only a handful of R2 buckets. Each time we need to update the global view of the customer data models across our edge fleet, 98% of the bits transferred are served from cache.
Built-in tolerance
When new domain names are put into service, our data models will not immediately be aware of them because queries with these names have never been seen before. This and other reasons for potential false positives mandate that we need to build a certain amount of tolerance into the system to allow through potentially legitimate queries. We do so by leveraging token bucket algorithms. Customers can configure the size of the token buckets by changing the sensitivity levels of the Advanced DNS Protection system. The lower the sensitivity, the larger the token bucket — and vice versa. A larger token bucket provides more tolerance for unexpected DNS queries and expected DNS queries that deviate from the profile. A high sensitivity level translates to a smaller token bucket and a stricter approach.
Leveraging Cloudflare’s global software-defined network
At the end of the day, these are the types of challenges that Cloudflare is excellent at solving. Our customers trust us with handling their traffic, and ensuring their Internet properties are protected, available and performant. We take that trust extremely seriously.
The Advanced DNS Protection system leverages our global infrastructure and data processing capabilities alongside intelligent algorithms and data structures to protect our customers.
If you are not yet a Cloudflare customer, let us know if you’d like to protect your DNS servers. Existing Cloudflare customers can enable the new systems by contacting their account team or Cloudflare Support.
File upload is a common feature in many web applications. Applications may allow users to upload files like images of flood damage to file an insurance claim, PDFs like resumes or cover letters to apply for a job, or other documents like receipts or income statements. However, beneath the convenience lies a potential threat, since allowing unrestricted file uploads can expose the web server and your enterprise network to significant risks related to security, privacy, and compliance.
Cloudflare recently introduced WAF Content Scanning, our in-line malware file detection and prevention solution to stop malicious files from reaching the web server, offering our Enterprise WAF customers an additional line of defense against security threats.
Today, we’re pleased to announce that the feature is now generally available. It will be automatically rolled out to existing WAF Content Scanning customers before the end of March 2024.
In this blog post we will share more details about the new version of the feature, what we have improved, and reveal some of the technical challenges we faced while building it. This feature is available to Enterprise WAF customers as an add-on license, contact your account team to get it.
What to expect from the new version?
The feedback from the early access version has resulted in additional improvements. The main one is expanding the maximum size of scanned files from 1 MB to 15 MB. This change required a complete redesign of the solution’s architecture and implementation. Additionally, we are improving the dashboard visibility and the overall analytics experience.
Let’s quickly review how malware scanning operates within our WAF.
Behind the scenes
WAF Content Scanning operates in a few stages: users activate and configure it, then the scanning engine detects which requests contain files, the files are sent to the scanner returning the scan result fields, and finally users can build custom rules with these fields. We will dig deeper into each step in this section.
Activate and configure
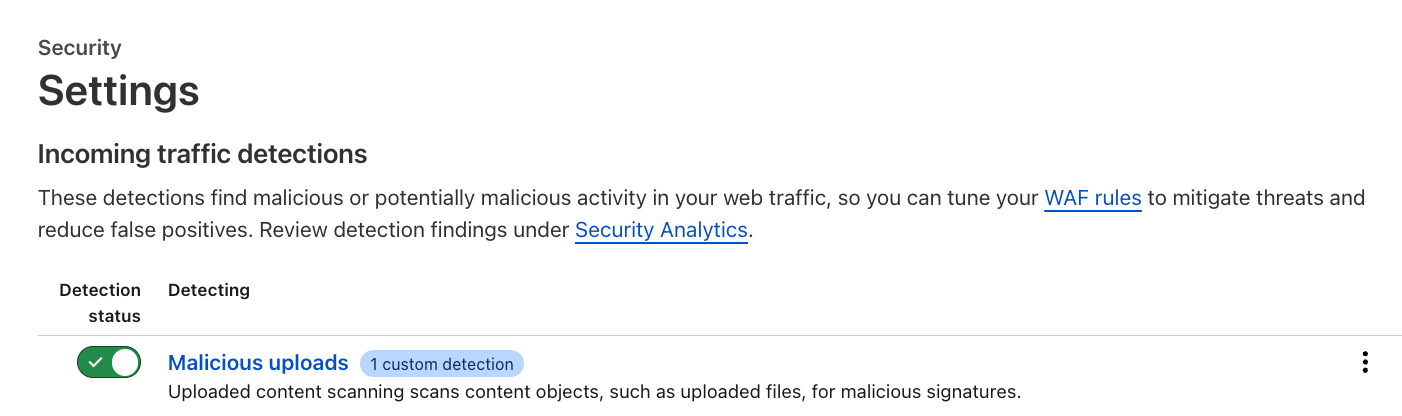
Customers can enable the feature via the API, or through the Settings page in the dashboard (Security → Settings) where a new section has been added for incoming traffic detection configuration and enablement. As soon as this action is taken, the enablement action gets distributed to the Cloudflare network and begins scanning incoming traffic.
Customers can also add a custom configuration depending on the file upload method, such as a base64 encoded file in a JSON string, which allows the specified file to be parsed and scanned automatically.
In the example below, the customer wants us to look at JSON bodies for the key “file” and scan them.
As soon as the feature is activated and configured, the scanning engine runs the pre-scanning logic, and identifies content automatically via heuristics. In this case, the engine logic does not rely on the Content-Type header, as it’s easy for attackers to manipulate. When relevant content or a file has been found, the engine connects to the antivirus (AV) scanner in our Zero Trust solution to perform a thorough analysis and return the results of the scan. The engine uses the scan results to propagate useful fields that customers can use.
Integrate with WAF
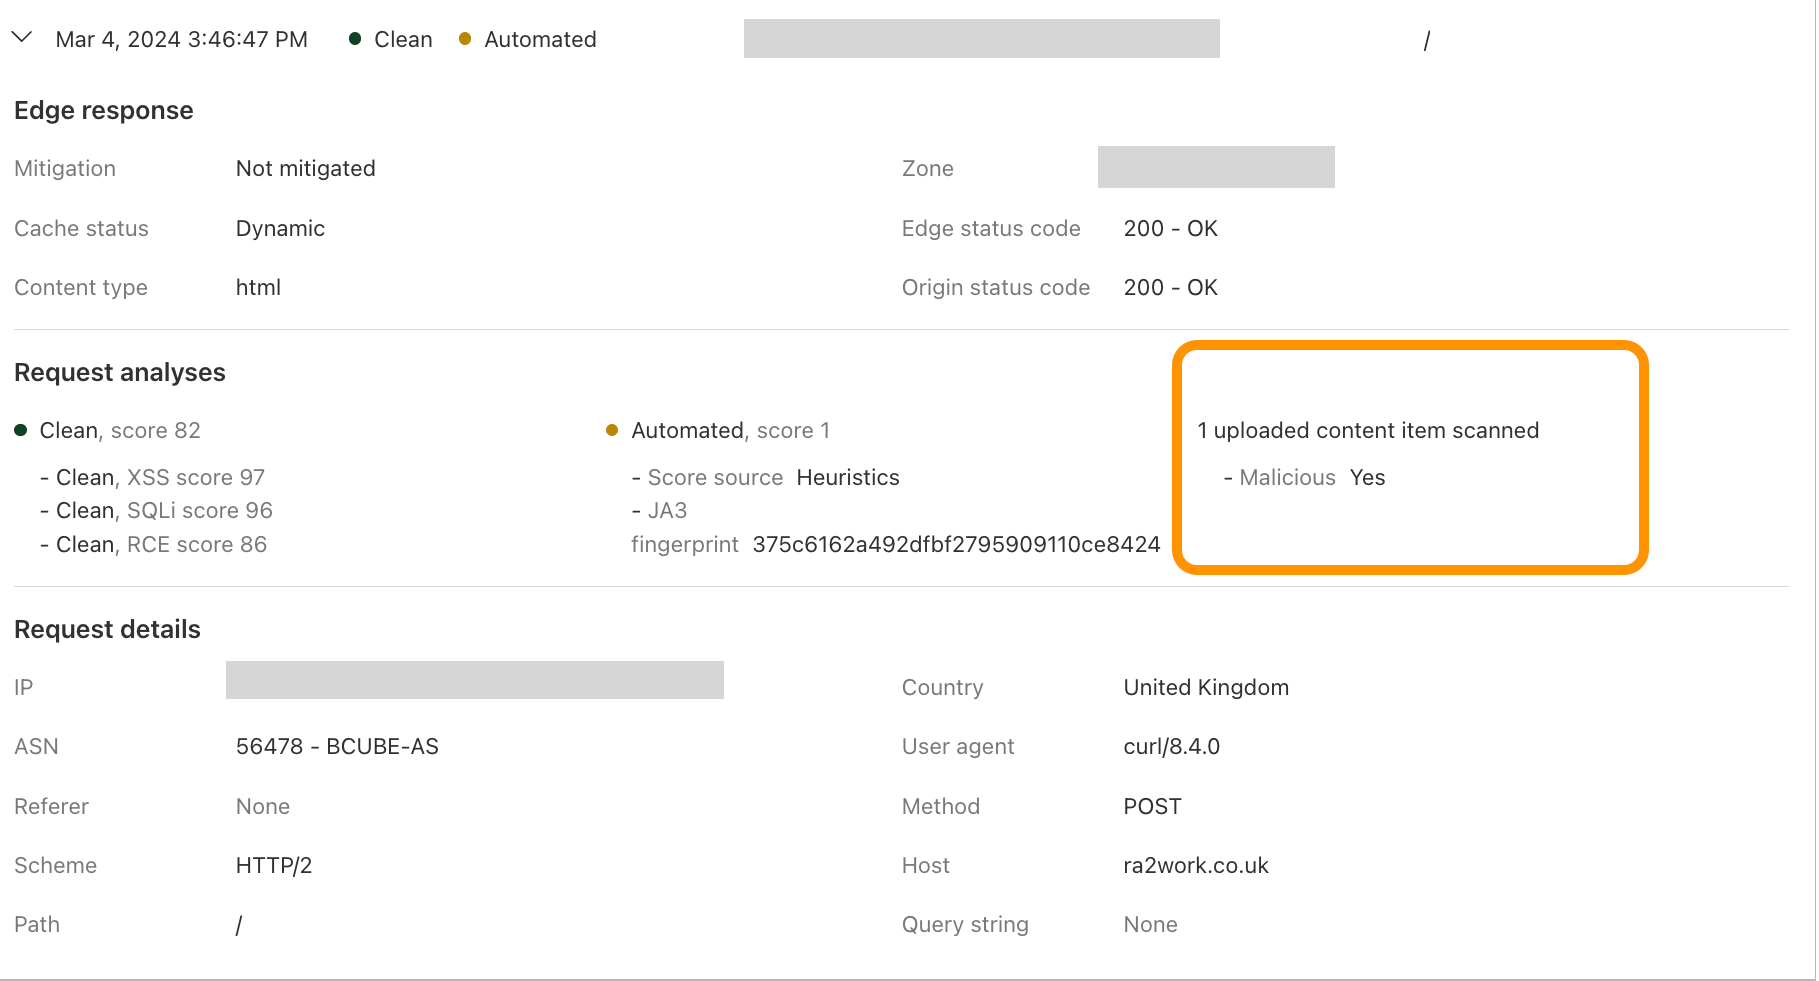
For every request where a file is found, the scanning engine returns various fields, including:
The scanning engine integrates with the WAF where customers can use those fields to create custom WAF rules to address various use cases. The basic use case is primarily blocking malicious files from reaching the web server. However, customers can construct more complex logic, such as enforcing constraints on parameters such as file sizes, file types, endpoints, or specific paths.
In-line scanning limitations and file types
One question that often comes up is about the file types we detect and scan in WAF Content Scanning. Initially, addressing this query posed a challenge since HTTP requests do not have a definition of a “file”, and scanning all incoming HTTP requests does not make sense as it adds extra processing and latency. So, we had to decide on a definition to spot HTTP requests that include files, or as we call it, “uploaded content”.
The WAF Content Scanning engine makes that decision by filtering out certain content types identified by heuristics. Any content types not included in a predefined list, such as text/html, text/x-shellscript, application/json, and text/xml, are considered uploaded content and are sent to the scanner for examination. This allows us to scan a wide range of content types and file types without affecting the performance of all requests by adding extra processing. The wide range of files we scan includes:
Executable (e.g., .exe, .bat, .dll, .wasm)
Documents (e.g., .doc, .docx, .pdf, .ppt, .xls)
Compressed (e.g., .7z, .gz, .zip, .rar)
Image (e.g., .jpg, .png, .gif, .webp, .tif)
Video and audio files within the 15 MB file size range.
The file size scanning limit of 15 Megabytes comes from the fact that the in-line file scanning as a feature is running in real time, which offers safety to the web server and instant access to clean files, but also impacts the whole request delivery process. Therefore, it’s crucial to scan the payload without causing significant delays or interruptions; namely increased CPU time and latency.
Scaling the scanning process to 15 MB
In the early design of the product, we built a system that could handle requests with a maximum body size of 1 MB, and increasing the limit to 15 MB had to happen without adding any extra latency. As mentioned, this latency is not added to all requests, but only to the requests that have uploaded content. However, increasing the size with the same design would have increased the latency by 15x for those requests.
In this section, we discuss how we previously managed scanning files embedded in JSON request bodies within the former architecture as an example, and why it was challenging to expand the file size using the same design, then compare the same example with the changes made in the new release to overcome the extra latency in details.
Old architecture used for the Early Access release
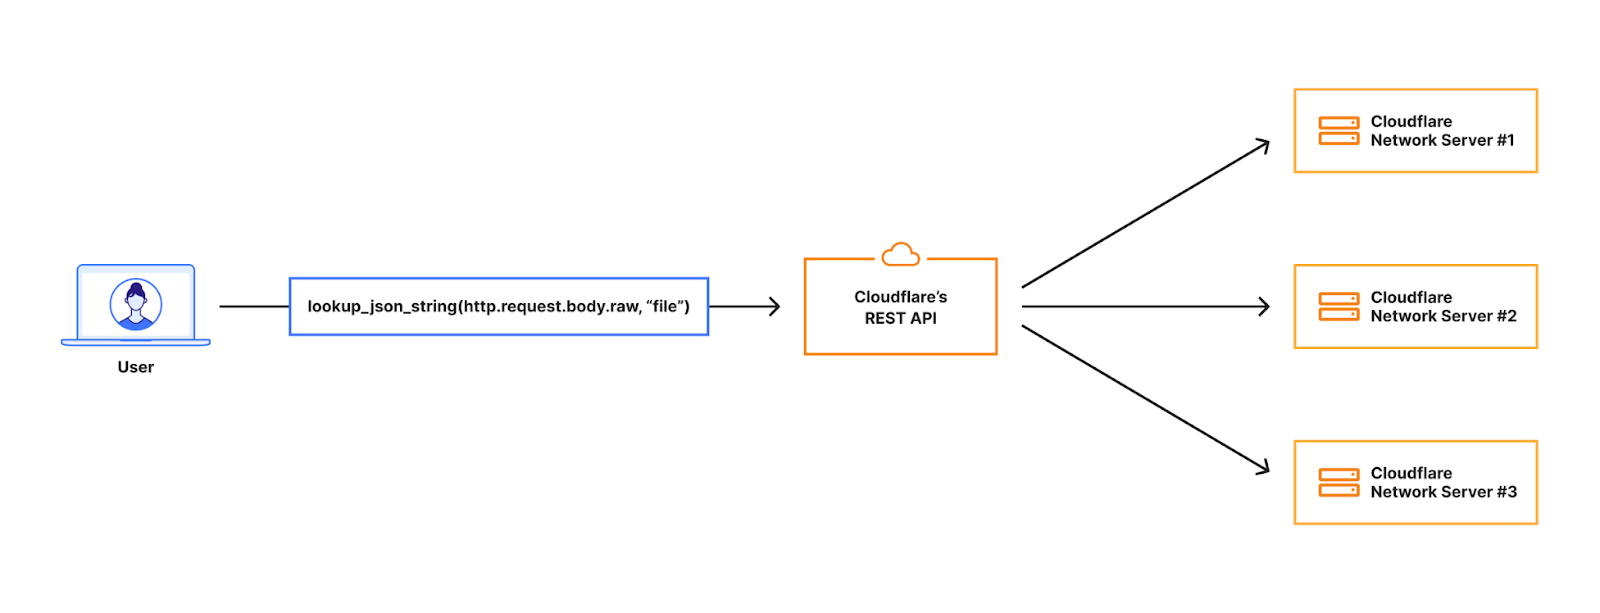
In order for customers to use the content scanning functionality in scanning files embedded in JSON request bodies, they had to configure a rule like:
lookup_json_string(http.request.body.raw, “file”)
This means we should look in the request body but only for the “file” key, which in the image below contains a base64 encoded string for an image.
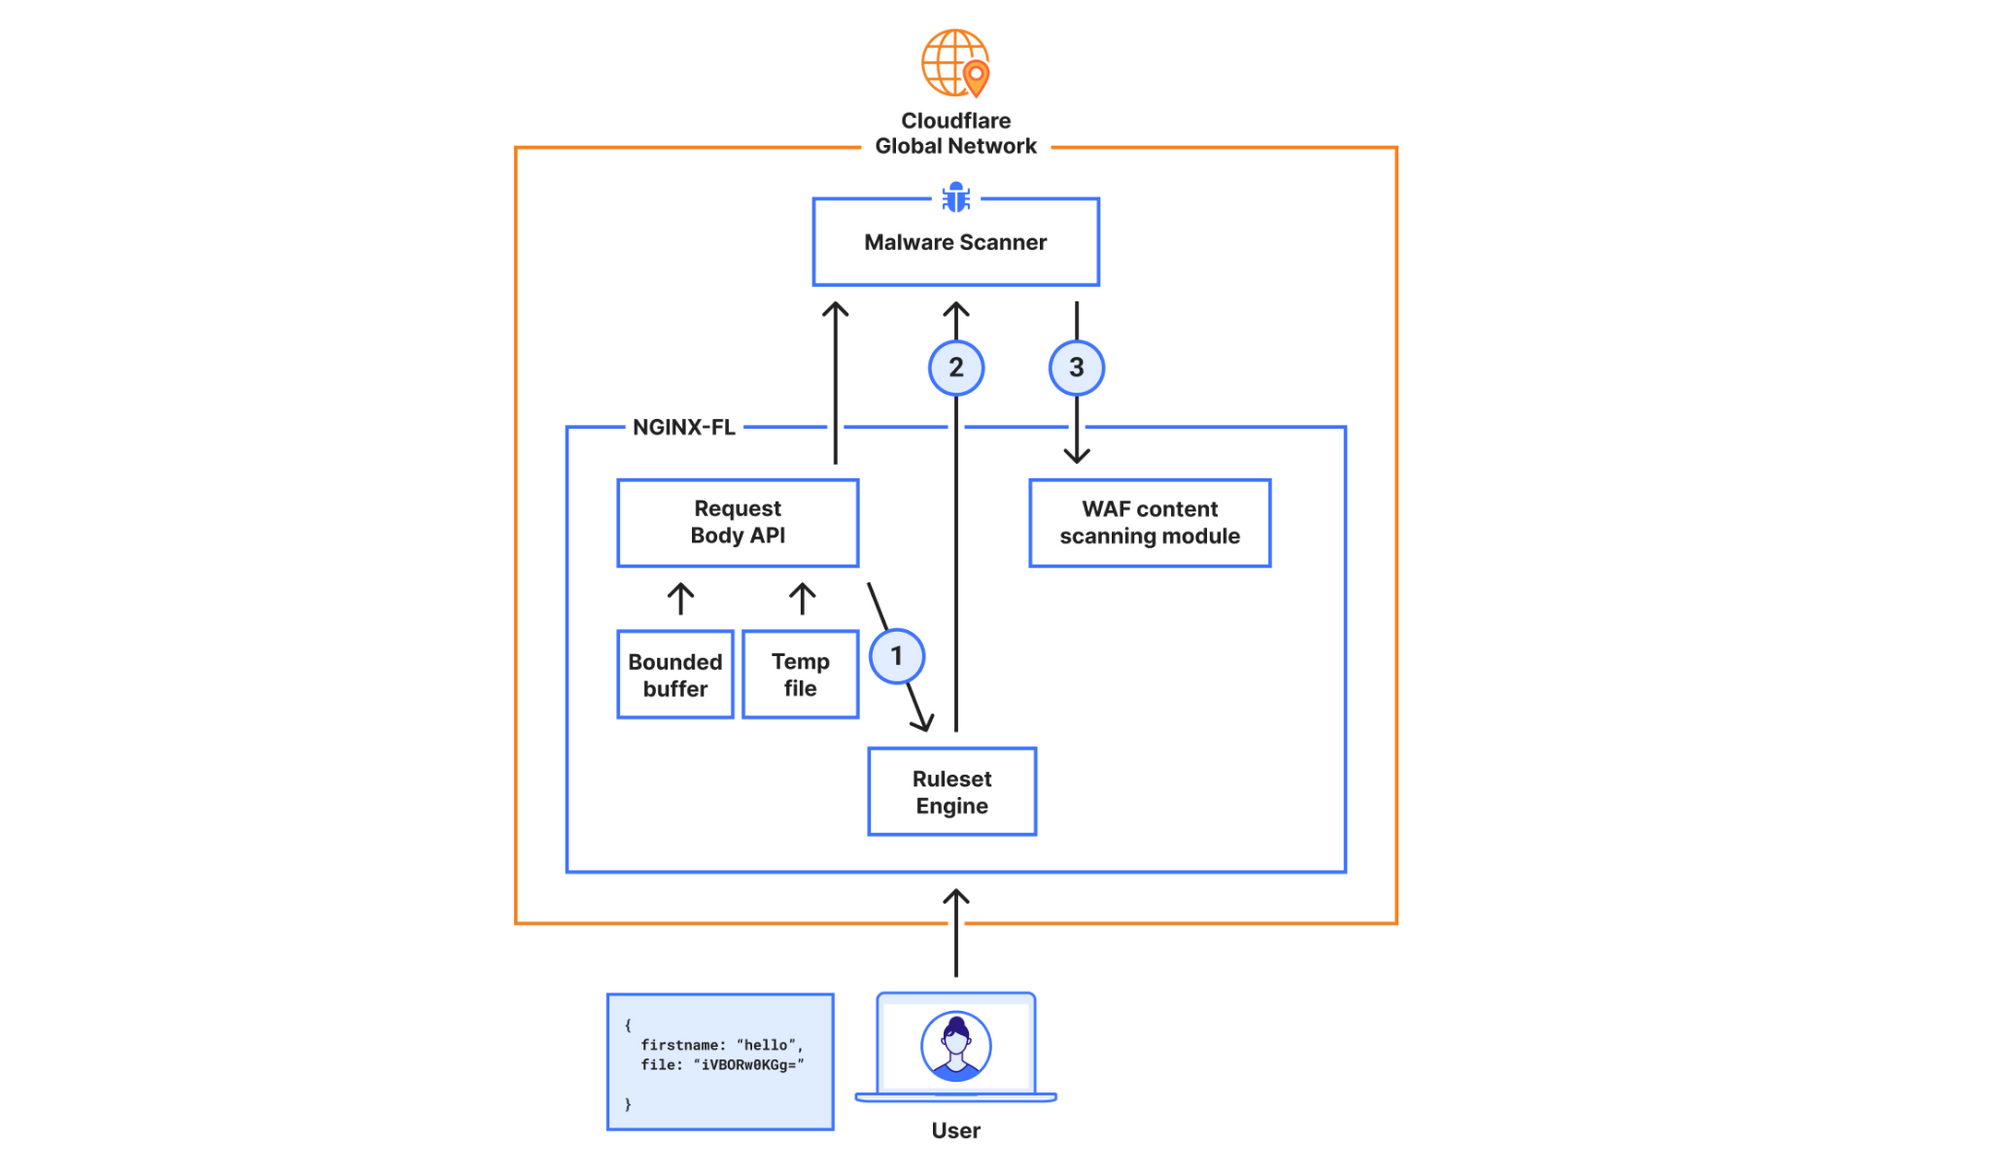
When the request hits our Front Line (FL) NGINX proxy, we buffer the request body. This will be in an in-memory buffer, or written to a temporary file if the size of the request body exceeds the NGINX configuration of client_body_buffer_size. Then, our WAF engine executes the lookup_json_string function and returns the base64 string which is the content of the file key. The base64 string gets sent via Unix Domain Sockets to our malware scanner, which does MIME type detection and returns a verdict to the file upload scanning module.
This architecture had a bottleneck that made it hard to expand on: the expensive latency fees we had to pay. The request body is first buffered in NGINX and then copied into our WAF engine, where rules are executed. The malware scanner will then receive the execution result — which, in the worst scenario, is the entire request body — over a Unix domain socket. This indicates that once NGINX buffers the request body, we send and buffer it in two other services.
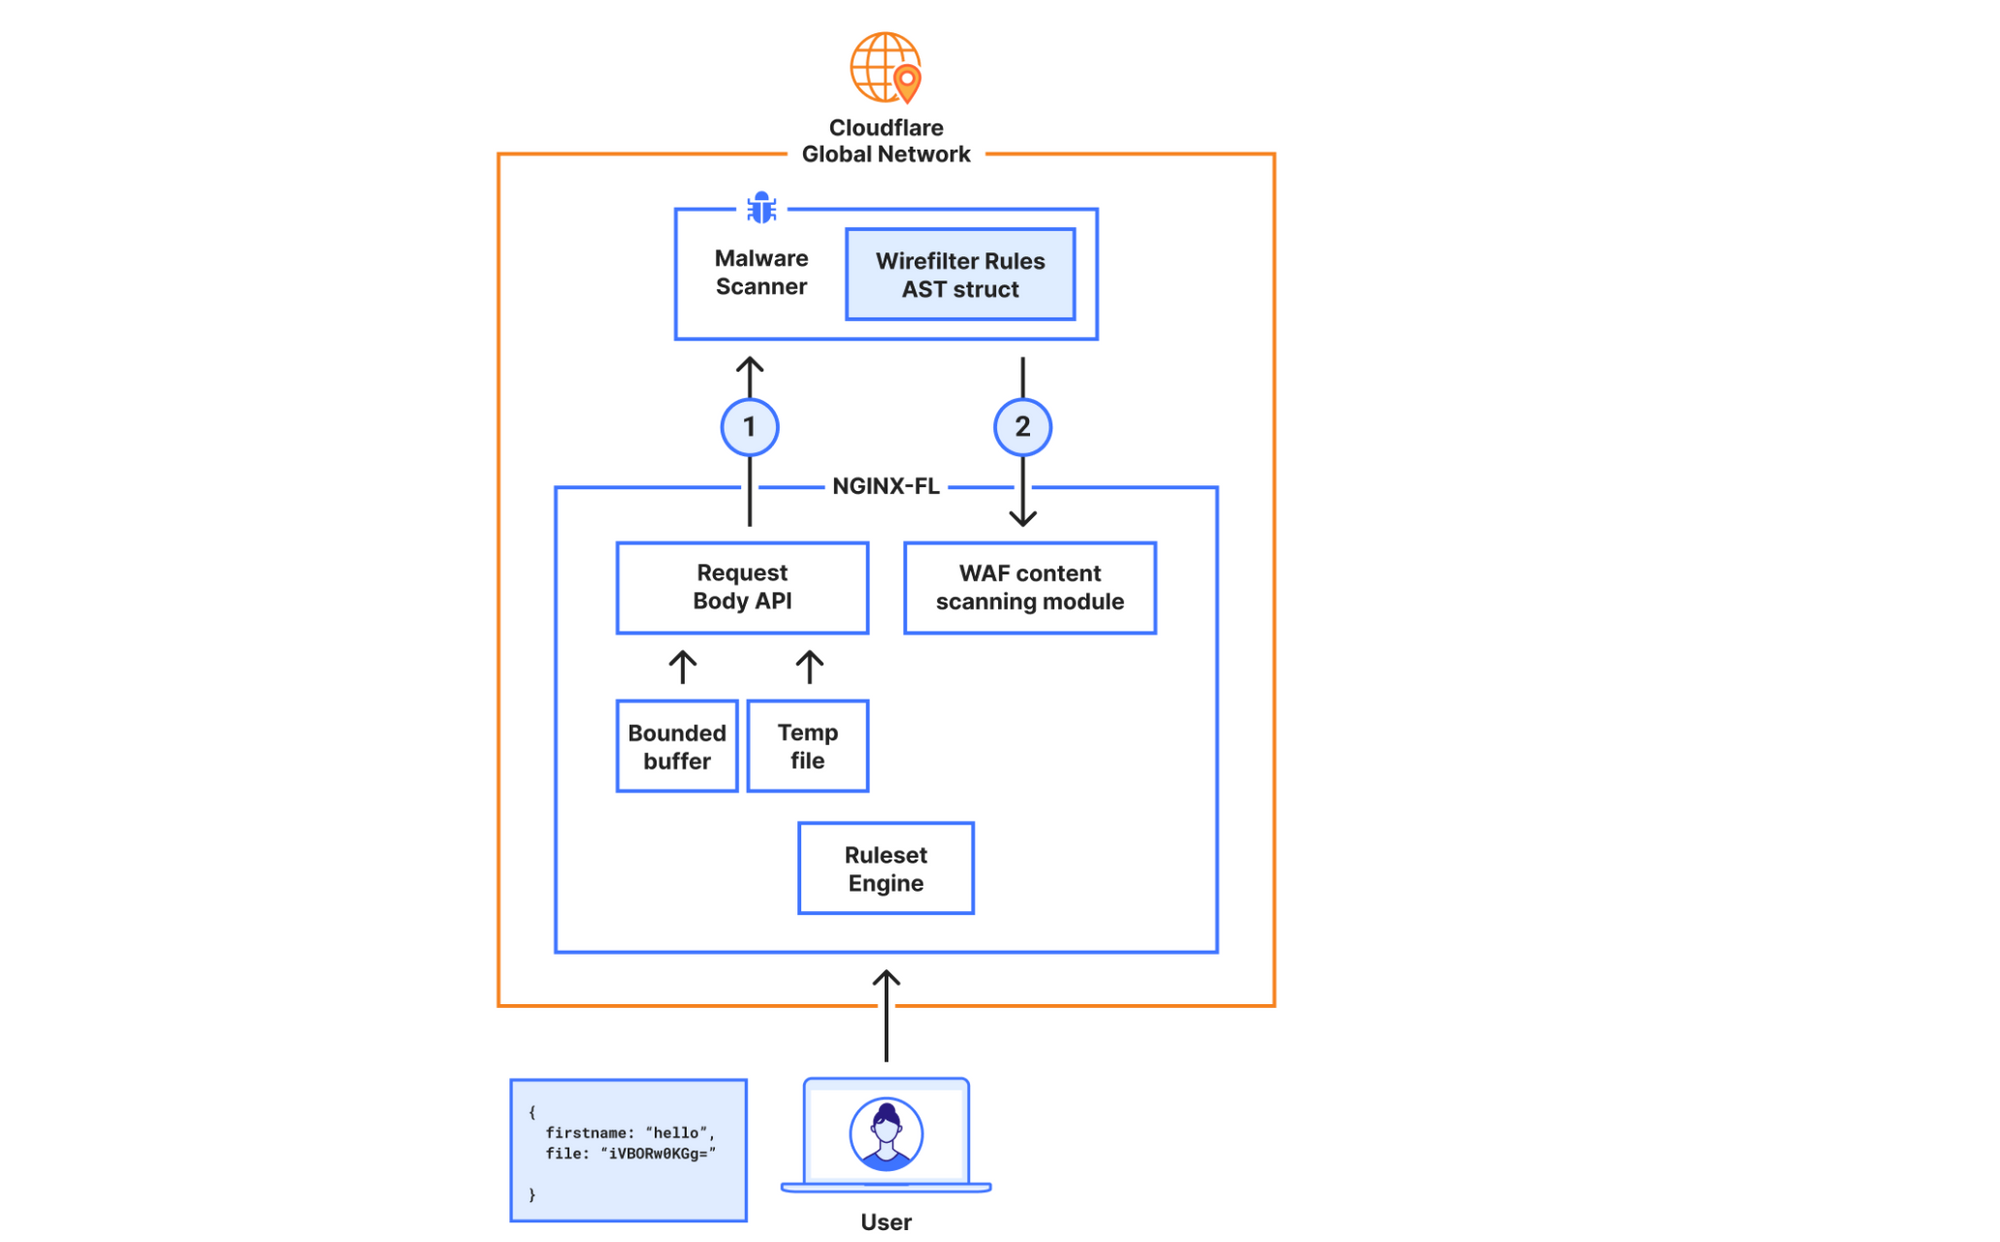
New architecture for the General Availability release
In the new design, the requirements were to scan larger files (15x larger) while not compromising on performance. To achieve this, we decided to bypass our WAF engine, which is where we introduced the most latency.
In the new architecture, we made the malware scanner aware of what is needed to execute the rule, hence bypassing the Ruleset Engine (RE). For example, the configuration “lookup_json_string(http.request.body.raw, “file”)”, will be represented roughly as:
{
   Function: lookup_json_string
   Args: [“file”]
}
This is achieved by walking the Abstract Syntax Tree (AST) when the rule is configured, and deploying the sample struct above to our global network. The struct’s values will be read by the malware scanner, and rule execution and malware detection will happen within the same service. This means we don’t need to read the request body, execute the rule in the Ruleset Engine (RE) module, and then send the results over to the malware scanner.
The malware scanner will now read the request body from the temporary file directly, perform the rule execution, and return the verdict to the file upload scanning module.
The file upload scanning module populates these fields, so they can be used to write custom rules and take actions. For example:
This module also enriches our logging pipelines with these fields, which can then be read in Log Push, Edge Log Delivery, Security Analytics, and Firewall Events in the dashboard. For example, this is the security log in the Cloudflare dashboard (Security → Analytics) for a web request that triggered WAF Content Scanning:
WAF content scanning detection visibility
Using the concept of incoming traffic detection, WAF Content Scanning enables users to identify hidden risks through their traffic signals in the analytics before blocking or mitigating matching requests. This reduces false positives and permits security teams to make decisions based on well-informed data. Actually, this isn’t the only instance in which we apply this idea, as we also do it for a number of other products, like WAF Attack Score and Bot Management.
We have integrated helpful information into our security products, like Security Analytics, to provide this data visibility. The Content Scanning tab, located on the right sidebar, displays traffic patterns even if there were no WAF rules in place. The same data is also reflected in the sampled requests, and you can create new rules from the same view.
On the other hand, if you want to fine-tune your security settings, you will see better visibility in Security Events, where these are the requests that match specific rules you have created in WAF.
Last but not least, in our Logpush datastream, we have included the scan fields that can be selected to send to any external log handler.
What’s next?
Before the end of March 2024, all current and new customers who have enabled WAF Content Scanning will be able to scan uploaded files up to 15 MB. Next, we’ll focus on improving how we handle files in the rules, including adding a dynamic header functionality. Quarantining files is also another important feature we will be adding in the future. If you’re an Enterprise customer, reach out to your account team for more information and to get access.
Cookies are small files of information that a web server generates and sends to a web browser. For example, a cookie stored in your browser will let a website know that you are already logged in, so instead of showing you a login page, you would be taken to your account page welcoming you back.
Though cookies are very useful, they are also used for tracking and advertising, sometimes with repercussions for user privacy. Cookies are a core tool, for example, for all advertising networks. To protect users, privacy laws may require website owners to clearly specify what cookies are being used and for what purposes, and, in many cases, to obtain a user’s consent before storing those cookies in the user’s browser. A key example of this is the ePrivacy Directive.
Herein lies the problem: often website administrators, developers, or compliance team members don’t know what cookies are being used by their website. A common approach for gaining a better understanding of cookie usage is to set up a scanner bot that crawls through each page, collecting cookies along the way. However, many websites requiring authentication or additional security measures do not allow for these scans, or require custom security settings to allow the scanner bot access.
To address these issues, we developed Page Shield Cookie Monitor, which provides a full single dashboard view of all first-party cookies being used by your websites. Over the next few weeks, we are rolling out Page Shield Cookie Monitor to all paid plans, no configuration or scanners required if Page Shield is enabled.
HTTP cookies
HTTP cookies are designed to allow persistence for the stateless HTTP protocol. A basic example of cookie usage is to identify a logged-in user. The browser submits the cookie back to the website whenever you access it again, letting the website know who you are, providing you a customized experience. Cookies are implemented as HTTP headers.
Cookies can be classified as first-party or third-party.
First-party cookies are normally set by the website owner1, and are used to track state against the given website. The logged in example above falls into this category. First party cookies are normally restricted and sent to the given website only and won’t be visible by other sites.
Third-party cookies, on the other hand, are often set by large advertising networks, social networks, or other large organizations that want to track user journeys across the web (across domains). For example, some websites load advertisement objects from a different domain that may set a third-party cookie associated with that advertising network.
Cookies are used for tracking
Growing concerns around user privacy has led browsers to start blocking third-party cookies by default. Led by Firefox and Safari a few years back, Google Chrome, which currently has the largest browser market share, and whose parent company owns Google Ads, the dominant advertising network, started restricting third-party cookies beginning in January of this year.
However, this does not mean the end of tracking users for advertising purposes; the technology has advanced allowing tracking to continue based on first-party cookies. Facebook Pixel, for example, started offering to set first-party cookies alongside third-party cookies in 2018 when being embedded in a website, in order “to be more accurate in measurement and reporting”.
Scanning for cookies?
To inventory all the cookies used when your website is accessed, you can open up any modern browser’s developer console and review which cookie is being set and sent back per HTTP request. However, collecting cookies with this approach won’t be practical unless your website is rather static, containing few external snippets.
Screen capture of Chrome’s developer console listing cookies being set and sent back when visiting a website.
To resolve this, a cookie scanner can be used to automate cookie collection. Depending on your security setup, additional configurations are sometimes required in order to let the scanner bots pass through protection and/or authentication. This may open up a potential attack surface, which isn’t ideal.
Introducing Page Shield Cookie Monitor
With Page Shield enabled, all the first-party cookies, whether set by your website or by external snippets, are collected and displayed in one place, no scanner required. With the click of a button, the full list can be exported in CSV format for further inventory processing.
If you run multiple websites like a marketing website and an admin console that require different cookie strategies, you can simply filter the list based on either domain or path, under the same view. This includes the websites that require authentication such as the admin console.
Dashboard showing a table of cookies seen, including key details such as cookie name, domain and path, and which host set the cookie.
To examine a particular cookie, clicking on its name takes you to a dedicated page that includes all the cookie attributes. Furthermore, similar to Script Monitor and Connection Monitor, we collect the first seen and last seen time and pages for easier tracking of your website’s behavior.
Detailed view of a captured cookie in the dashboard, including all cookie attributes as well as under which host and path this cookie has been set.
Last but not least, we are adding one more alert type specifically for newly seen cookies. When subscribed to this alert, we will notify you through either email or webhook as soon as a new cookie is detected with all the details mentioned above. This allows you to trigger any workflow required, such as inventorying this new cookie for compliance.
How Cookie Monitor works
Let’s imagine you run an e-commerce website example.com. When a user logs in to view their ongoing orders, your website would send a header with key Set-Cookie, and value to identify each user’s login activity:
login_id=ABC123; Domain=.example.com
To analyze visitor behaviors, you make use of Google Analytics that requires embedding a code snippet in all web pages. This snippet will set two more cookies after the pages are loaded in the browser:
_ga=GA1.2; Domain=.example.com;
_ga_ABC=GS1.3; Domain=.example.com;
As these two cookies from Google Analytics are considered first-party given their domain attribute, they are automatically included together with the logged-in cookie sent back to your website. The final cookie sent back for a logged-in user would be Cookie: login_id=ABC123; _ga=GA1.2; _ga_ABC=GS1.3 with three cookies concatenated into one string, even though only one of them is directly consumed by your website.
If your website happens to be proxied through Cloudflare already, we will observe oneSet-Cookie header with cookie name of login_id during response, while receiving three cookies back: login_id, _ga, and _ga_ABC. Comparing one cookie set with three returned cookies, the overlapping login_id cookie is then tagged as set by your website directly. The same principle applies to all the requests passing through Cloudflare, allowing us to build an overview of all the first-party cookies used by your websites.
All cookies in one jar
Inventorying all cookies set through using your websites is a first step towards protecting your users’ privacy, and Page Shield makes this step just one click away. Sign up now to be notified when Page Shield Cookie Monitor becomes available!
…
1Technically, a first-party cookie is a cookie scoped to the given domain only (so not cross domain). Such a cookie can also be set by a third party snippet used by the website to the given domain.
Today we are excited to announce Magic Cloud Networking, supercharged by Cloudflare’s recent acquisition of Nefeli Networks’ innovative technology. These new capabilities to visualize and automate cloud networks will give our customers secure, easy, and seamless connection to public cloud environments.
Public clouds offer organizations a scalable and on-demand IT infrastructure without the overhead and expense of running their own datacenter. Cloud networking is foundational to applications that have been migrated to the cloud, but is difficult to manage without automation software, especially when operating at scale across multiple cloud accounts. Magic Cloud Networking uses familiar concepts to provide a single interface that controls and unifies multiple cloud providers’ native network capabilities to create reliable, cost-effective, and secure cloud networks.
Nefeli’s approach to multi-cloud networking solves the problem of building and operating end-to-end networks within and across public clouds, allowing organizations to securely leverage applications spanning any combination of internal and external resources. Adding Nefeli’s technology will make it easier than ever for our customers to connect and protect their users, private networks and applications.
Why is cloud networking difficult?
Compared with a traditional on-premises data center network, cloud networking promises simplicity:
Much of the complexity of physical networking is abstracted away from users because the physical and ethernet layers are not part of the network service exposed by the cloud provider.
There are fewer control plane protocols; instead, the cloud providers deliver a simplified software-defined network (SDN) that is fully programmable via API.
There is capacity — from zero up to very large — available instantly and on-demand, only charging for what you use.
However, that promise has not yet been fully realized. Our customers have described several reasons cloud networking is difficult:
Poor end-to-end visibility: Cloud network visibility tools are difficult to use and silos exist even within single cloud providers that impede end-to-end monitoring and troubleshooting.
Faster pace: Traditional IT management approaches clash with the promise of the cloud: instant deployment available on-demand. Familiar ClickOps and CLI-driven procedures must be replaced by automation to meet the needs of the business.
Different technology: Established network architectures in on-premises environments do not seamlessly transition to a public cloud. The missing ethernet layer and advanced control plane protocols were critical in many network designs.
New cost models: The dynamic pay-as-you-go usage-based cost models of the public clouds are not compatible with established approaches built around fixed cost circuits and 5-year depreciation. Network solutions are often architected with financial constraints, and accordingly, different architectural approaches are sensible in the cloud.
New security risks: Securing public clouds with true zero trust and least-privilege demands mature operating processes and automation, and familiarity with cloud-specific policies and IAM controls.
Multi-vendor: Oftentimes enterprise networks have used single-vendor sourcing to facilitate interoperability, operational efficiency, and targeted hiring and training. Operating a network that extends beyond a single cloud, into other clouds or on-premises environments, is a multi-vendor scenario.
Nefeli considered all these problems and the tensions between different customer perspectives to identify where the problem should be solved.
Trains, planes, and automation
Consider a train system. To operate effectively it has three key layers:
tracks and trains
electronic signals
a company to manage the system and sell tickets.
A train system with good tracks, trains, and signals could still be operating below its full potential because its agents are unable to keep up with passenger demand. The result is that passengers cannot plan itineraries or purchase tickets.
The train company eliminates bottlenecks in process flow by simplifying the schedules, simplifying the pricing, providing agents with better booking systems, and installing automated ticket machines. Now the same fast and reliable infrastructure of tracks, trains, and signals can be used to its full potential.
Solve the right problem
In networking, there are an analogous set of three layers, called the networking planes:
Data Plane: the network paths that transport data (in the form of packets) from source to destination.
Control Plane: protocols and logic that change how packets are steered across the data plane.
Management Plane: the configuration and monitoring interfaces for the data plane and control plane.
In public cloud networks, these layers map to:
Cloud Data Plane: The underlying cables and devices are exposed to users as the Virtual Private Cloud (VPC) or Virtual Network (VNet) service that includes subnets, routing tables, security groups/ACLs and additional services such as load-balancers and VPN gateways.
Cloud Control Plane: In place of distributed protocols, the cloud control plane is a software defined network (SDN) that, for example, programs static route tables. (There is limited use of traditional control plane protocols, such as BGP to interface with external networks and ARP to interface with VMs.)
Cloud Management Plane: An administrative interface with a UI and API which allows the admin to fully configure the data and control planes. It also provides a variety of monitoring and logging capabilities that can be enabled and integrated with 3rd party systems.
Like our train example, most of the problems that our customers experience with cloud networking are in the third layer: the management plane.
Nefeli simplifies, unifies, and automates cloud network management and operations.
Avoid cost and complexity
One common approach to tackle management problems in cloud networks is introducing Virtual Network Functions (VNFs), which are virtual machines (VMs) that do packet forwarding, in place of native cloud data plane constructs. Some VNFs are routers, firewalls, or load-balancers ported from a traditional network vendor’s hardware appliances, while others are software-based proxies often built on open-source projects like NGINX or Envoy. Because VNFs mimic their physical counterparts, IT teams could continue using familiar management tooling, but VNFs have downsides:
VMs do not have custom network silicon and so instead rely on raw compute power. The VM is sized for the peak anticipated load and then typically runs 24x7x365. This drives a high cost of compute regardless of the actual utilization.
High-availability (HA) relies on fragile, costly, and complex network configuration.
Service insertion — the configuration to put a VNF into the packet flow — often forces packet paths that incur additional bandwidth charges.
VNFs are typically licensed similarly to their on-premises counterparts and are expensive.
VNFs lock in the enterprise and potentially exclude them benefitting from improvements in the cloud’s native data plane offerings.
For these reasons, enterprises are turning away from VNF-based solutions and increasingly looking to rely on the native network capabilities of their cloud service providers. The built-in public cloud networking is elastic, performant, robust, and priced on usage, with high-availability options integrated and backed by the cloud provider’s service level agreement.
In our train example, the tracks and trains are good. Likewise, the cloud network data plane is highly capable. Changing the data plane to solve management plane problems is the wrong approach. To make this work at scale, organizations need a solution that works together with the native network capabilities of cloud service providers.
Nefeli leverages native cloud data plane constructs rather than third party VNFs.
Introducing Magic Cloud Networking
The Nefeli team has joined Cloudflare to integrate cloud network management functionality with Cloudflare One. This capability is called Magic Cloud Networking and with it, enterprises can use the Cloudflare dashboard and API to manage their public cloud networks and connect with Cloudflare One.
End-to-end
Just as train providers are focused only on completing train journeys in their own network, cloud service providers deliver network connectivity and tools within a single cloud account. Many large enterprises have hundreds of cloud accounts across multiple cloud providers. In an end-to-end network this creates disconnected networking silos which introduce operational inefficiencies and risk.
Imagine you are trying to organize a train journey across Europe, and no single train company serves both your origin and destination. You know they all offer the same basic service: a seat on a train. However, your trip is difficult to arrange because it involves multiple trains operated by different companies with their own schedules and ticketing rates, all in different languages!
Magic Cloud Networking is like an online travel agent that aggregates multiple transportation options, books multiple tickets, facilitates changes after booking, and then delivers travel status updates.
Through the Cloudflare dashboard, you can discover all of your network resources across accounts and cloud providers and visualize your end-to-end network in a single interface. Once Magic Cloud Networking discovers your networks, you can build a scalable network through a fully automated and simple workflow.
Resource inventory shows all configuration in a single and responsive UI
Taming per-cloud complexity
Public clouds are used to deliver applications and services. Each cloud provider offers a composable stack of modular building blocks (resources) that start with the foundation of a billing account and then add on security controls. The next foundational layer, for server-based applications, is VPC networking. Additional resources are built on the VPC network foundation until you have compute, storage, and network infrastructure to host the enterprise application and data. Even relatively simple architectures can be composed of hundreds of resources.
The trouble is, these resources expose abstractions that are different from the building blocks you would use to build a service on prem, the abstractions differ between cloud providers, and they form a web of dependencies with complex rules about how configuration changes are made (rules which differ between resource types and cloud providers). For example, say I create 100 VMs, and connect them to an IP network. Can I make changes to the IP network while the VMs are using the network? The answer: it depends.
Magic Cloud Networking handles these differences and complexities for you. It configures native cloud constructs such as VPN gateways, routes, and security groups to securely connect your cloud VPC network to Cloudflare One without having to learn each cloud’s incantations for creating VPN connections and hubs.
Continuous, coordinated automation
Returning to our train system example, what if the railway maintenance staff find a dangerous fault on the railroad track? They manually set the signal to a stop light to prevent any oncoming trains using the faulty section of track. Then, what if, by unfortunate coincidence, the scheduling office is changing the signal schedule, and they set the signals remotely which clears the safety measure made by the maintenance crew? Now there is a problem that no one knows about and the root cause is that multiple authorities can change the signals via different interfaces without coordination.
The same problem exists in cloud networks: configuration changes are made by different teams using different automation and configuration interfaces across a spectrum of roles such as billing, support, security, networking, firewalls, database, and application development.
Once your network is deployed, Magic Cloud Networking monitors its configuration and health, enabling you to be confident that the security and connectivity you put in place yesterday is still in place today. It tracks the cloud resources it is responsible for, automatically reverting drift if they are changed out-of-band, while allowing you to manage other resources, like storage buckets and application servers, with other automation tools. And, as you change your network, Cloudflare takes care of route management, injecting and withdrawing routes globally across Cloudflare and all connected cloud provider networks.
Magic Cloud Networking is fully programmable via API, and can be integrated into existing automation toolchains.
The interface warns when cloud network infrastructure drifts from intent
Ready to start conquering cloud networking?
We are thrilled to introduce Magic Cloud Networking as another pivotal step to fulfilling the promise of the Connectivity Cloud. This marks our initial stride in empowering customers to seamlessly integrate Cloudflare with their public clouds to get securely connected, stay securely connected, and gain flexibility and cost savings as they go.
Join us on this journey for early access: learn more and sign up here.
The Linux kernel is the heart of many modern production systems. It decides when any code is allowed to run and which programs/users can access which resources. It manages memory, mediates access to hardware, and does a bulk of work under the hood on behalf of programs running on top. Since the kernel is always involved in any code execution, it is in the best position to protect the system from malicious programs, enforce the desired system security policy, and provide security features for safer production environments.
In this post, we will review some Linux kernel security configurations we use at Cloudflare and how they help to block or minimize a potential system compromise.
Secure boot
When a machine (either a laptop or a server) boots, it goes through several boot stages:
Within a secure boot architecture each stage from the above diagram verifies the integrity of the next stage before passing execution to it, thus forming a so-called secure boot chain. This way “trustworthiness” is extended to every component in the boot chain, because if we verified the code integrity of a particular stage, we can trust this code to verify the integrity of the next stage.
We have previously covered how Cloudflare implements secure boot in the initial stages of the boot process. In this post, we will focus on the Linux kernel.
Secure boot is the cornerstone of any operating system security mechanism. The Linux kernel is the primary enforcer of the operating system security configuration and policy, so we have to be sure that the Linux kernel itself has not been tampered with. In our previous post about secure boot we showed how we use UEFI Secure Boot to ensure the integrity of the Linux kernel.
But what happens next? After the kernel gets executed, it may try to load additional drivers, or as they are called in the Linux world, kernel modules. And kernel module loading is not confined just to the boot process. A module can be loaded at any time during runtime — a new device being plugged in and a driver is needed, some additional extensions in the networking stack are required (for example, for fine-grained firewall rules), or just manually by the system administrator.
However, uncontrolled kernel module loading might pose a significant risk to system integrity. Unlike regular programs, which get executed as user space processes, kernel modules are pieces of code which get injected and executed directly in the Linux kernel address space. There is no separation between the code and data in different kernel modules and core kernel subsystems, so everything can access everything. This means that a rogue kernel module can completely nullify the trustworthiness of the operating system and make secure boot useless. As an example, consider a simple Debian 12 (Bookworm installation), but with SELinux configured and enforced:
ignat@dev:~$ lsb_release --all
No LSB modules are available.
Distributor ID:	Debian
Description:	Debian GNU/Linux 12 (bookworm)
Release:	12
Codename:	bookworm
ignat@dev:~$ uname -a
Linux dev 6.1.0-18-cloud-amd64 #1 SMP PREEMPT_DYNAMIC Debian 6.1.76-1 (2024-02-01) x86_64 GNU/Linux
ignat@dev:~$ sudo getenforce
Enforcing
From the above, we can see that if the kernel configuration has CONFIG_SECURITY_SELINUX_DEVELOP enabled, the structure would have a boolean variable enforcing, which controls the enforcement status of SELinux at runtime. This is exactly what the above $ sudo getenforce command returns. We can double check that the Debian kernel indeed has the configuration option enabled:
Good! Now that we have a variable in the kernel, which is responsible for some security enforcement, we can try to attack it. One problem though is the __randomize_layout attribute: since CONFIG_SECURITY_SELINUX_DISABLE is actually not set for our Debian kernel, normally enforcing would be the first member of the struct. Thus if we know where the struct is, we immediately know the position of the enforcing flag. With __randomize_layout, during kernel compilation the compiler might place members at arbitrary positions within the struct, so it is harder to create generic exploits. But arbitrary struct randomization within the kernel may introduce performance impact, so is often disabled and it is disabled for the Debian kernel:
We can also confirm the compiled position of the enforcing flag using the pahole tool and either kernel debug symbols, if available, or (on modern kernels, if enabled) in-kernel BTF information. We will use the latter:
With these two files we can build a full fledged kernel module according to the official kernel docs:
ignat@dev:~$ cd mymod/
ignat@dev:~/mymod$ ls
Kbuild  mymod.c
ignat@dev:~/mymod$ make -C /lib/modules/`uname -r`/build M=$PWD
make: Entering directory '/usr/src/linux-headers-6.1.0-18-cloud-amd64'
  CC [M]  /home/ignat/mymod/mymod.o
  MODPOST /home/ignat/mymod/Module.symvers
  CC [M]  /home/ignat/mymod/mymod.mod.o
  LD [M]  /home/ignat/mymod/mymod.ko
  BTF [M] /home/ignat/mymod/mymod.ko
Skipping BTF generation for /home/ignat/mymod/mymod.ko due to unavailability of vmlinux
make: Leaving directory '/usr/src/linux-headers-6.1.0-18-cloud-amd64'
If we try to load this module now, the system may not allow it due to the SELinux policy:
ignat@dev:~/mymod$ sudo insmod mymod.ko
insmod: ERROR: could not load module mymod.ko: Permission denied
We can workaround it by copying the module into the standard module path somewhere:
Not only did we disable the SELinux protection via a malicious kernel module, we did it quietly. Normal sudo setenforce 0, even if allowed, would go through the official selinuxfs interface and would emit an audit message. Our code manipulated the kernel memory directly, so no one was alerted. This illustrates why uncontrolled kernel module loading is very dangerous and that is why most security standards and commercial security monitoring products advocate for close monitoring of kernel module loading.
But we don’t need to monitor kernel modules at Cloudflare. Let’s repeat the exercise on a Cloudflare production kernel (module recompilation skipped for brevity):
ignat@dev:~/mymod$ uname -a
Linux dev 6.6.17-cloudflare-2024.2.9 #1 SMP PREEMPT_DYNAMIC Mon Sep 27 00:00:00 UTC 2010 x86_64 GNU/Linux
ignat@dev:~/mymod$ sudo insmod /lib/modules/`uname -r`/kernel/crypto/mymod.ko
insmod: ERROR: could not insert module /lib/modules/6.6.17-cloudflare-2024.2.9/kernel/crypto/mymod.ko: Key was rejected by service
We get a Key was rejected by service error when trying to load a module, and the kernel log will have the following message:
ignat@dev:~/mymod$ sudo dmesg | tail -n 1
[41515.037031] Loading of unsigned module is rejected
For completeness it is worth noting that the Debian stock kernel also supports module signatures, but does not enforce it:
ignat@dev:~$ grep MODULE_SIG /boot/config-6.1.0-18-cloud-amd64
CONFIG_MODULE_SIG_FORMAT=y
CONFIG_MODULE_SIG=y
# CONFIG_MODULE_SIG_FORCE is not set
…
The above configuration means that the kernel will validate a module signature, if available. But if not – the module will be loaded anyway with a warning message emitted and the kernel will be tainted.
Key management for kernel module signing
Signed kernel modules are great, but it creates a key management problem: to sign a module we need a signing keypair that is trusted by the kernel. The public key of the keypair is usually directly embedded into the kernel binary, so the kernel can easily use it to verify module signatures. The private key of the pair needs to be protected and secure, because if it is leaked, anyone could compile and sign a potentially malicious kernel module which would be accepted by our kernel.
But what is the best way to eliminate the risk of losing something? Not to have it in the first place! Luckily the kernel build system will generate a random keypair for module signing, if none is provided. At Cloudflare, we use that feature to sign all the kernel modules during the kernel compilation stage. When the compilation and signing is done though, instead of storing the key in a secure place, we just destroy the private key:
So with the above process:
The kernel build system generated a random keypair, compiles the kernel and modules
The public key is embedded into the kernel image, the private key is used to sign all the modules
The private key is destroyed
With this scheme not only do we not have to worry about module signing key management, we also use a different key for each kernel we release to production. So even if a particular build process is hijacked and the signing key is not destroyed and potentially leaked, the key will no longer be valid when a kernel update is released.
There are some flexibility downsides though, as we can’t “retrofit” a new kernel module for an already released kernel (for example, for a new piece of hardware we are adopting). However, it is not a practical limitation for us as we release kernels often (roughly every week) to keep up with a steady stream of bug fixes and vulnerability patches in the Linux Kernel.
KEXEC
KEXEC (or kexec_load()) is an interesting system call in Linux, which allows for one kernel to directly execute (or jump to) another kernel. The idea behind this is to switch/update/downgrade kernels faster without going through a full reboot cycle to minimize the potential system downtime. However, it was developed quite a while ago, when secure boot and system integrity was not quite a concern. Therefore its original design has security flaws and is known to be able to bypass secure boot and potentially compromise system integrity.
struct kexec_segment {
	const void *buf;
	size_t bufsz;
	const void *mem;
	size_t memsz;
};
...
long kexec_load(unsigned long entry, unsigned long nr_segments, struct kexec_segment *segments, unsigned long flags);
So the kernel expects just a collection of buffers with code to execute. Back in those days there was not much desire to do a lot of data parsing inside the kernel, so the idea was to parse the to-be-executed kernel image in user space and provide the kernel with only the data it needs. Also, to switch kernels live, we need an intermediate program which would take over while the old kernel is shutting down and the new kernel has not yet been executed. In the kexec world this program is called purgatory. Thus the problem is evident: we give the kernel a bunch of code and it will happily execute it at the highest privilege level. But instead of the original kernel or purgatory code, we can easily provide code similar to the one demonstrated earlier in this post, which disables SELinux (or does something else to the kernel).
At Cloudflare we have had kexec_load() disabled for some time now just because of this. The advantage of faster reboots with kexec comes with a (small) risk of improperly initialized hardware, so it was not worth using it even without the security concerns. However, kexec does provide one useful feature — it is the foundation of the Linux kernel crashdumping solution. In a nutshell, if a kernel crashes in production (due to a bug or some other error), a backup kernel (previously loaded with kexec) can take over, collect and save the memory dump for further investigation. This allows to more effectively investigate kernel and other issues in production, so it is a powerful tool to have.
Luckily, since the original problems with kexec were outlined, Linux developed an alternative secure interface for kexec: instead of buffers with code it expects file descriptors with the to-be-executed kernel image and initrd and does parsing inside the kernel. Thus, only a valid kernel image can be supplied. On top of this, we can configure and require kexec to ensure the provided images are properly signed, so only authorized code can be executed in the kexec scenario. A secure configuration for kexec looks something like this:
ignat@dev:~$ grep KEXEC /boot/config-`uname -r`
CONFIG_KEXEC_CORE=y
CONFIG_HAVE_IMA_KEXEC=y
# CONFIG_KEXEC is not set
CONFIG_KEXEC_FILE=y
CONFIG_KEXEC_SIG=y
CONFIG_KEXEC_SIG_FORCE=y
CONFIG_KEXEC_BZIMAGE_VERIFY_SIG=y
…
Above we ensure that the legacy kexec_load() system call is disabled by disabling CONFIG_KEXEC, but still can configure Linux Kernel crashdumping via the new kexec_file_load() system call via CONFIG_KEXEC_FILE=y with enforced signature checks (CONFIG_KEXEC_SIG=y and CONFIG_KEXEC_SIG_FORCE=y).
Note that stock Debian kernel has the legacy kexec_load() system call enabled and does not enforce signature checks for kexec_file_load() (similar to module signature checks):
ignat@dev:~$ grep KEXEC /boot/config-6.1.0-18-cloud-amd64
CONFIG_KEXEC=y
CONFIG_KEXEC_FILE=y
CONFIG_ARCH_HAS_KEXEC_PURGATORY=y
CONFIG_KEXEC_SIG=y
# CONFIG_KEXEC_SIG_FORCE is not set
CONFIG_KEXEC_BZIMAGE_VERIFY_SIG=y
…
Kernel Address Space Layout Randomization (KASLR)
Even on the stock Debian kernel if you try to repeat the exercise we described in the “Secure boot” section of this post after a system reboot, you will likely see it would fail to disable SELinux now. This is because we hardcoded the kernel address of the selinux_state structure in our malicious kernel module, but the address changed now:
ignat@dev:~$ sudo grep selinux_state /proc/kallsyms
ffffffffb41bcae0 B selinux_state
This is to combat targeted exploitation (like the malicious module in this post) based on the knowledge of the location of internal kernel structures and code. It is especially useful for popular Linux distribution kernels, like the Debian one, because most users use the same binary and anyone can download the debug symbols and the System.map file with all the addresses of the kernel internals. Just to note: it will not prevent the module loading and doing harm, but it will likely not achieve the targeted effect of disabling SELinux. Instead, it will modify a random piece of kernel memory potentially causing the kernel to crash.
Both the Cloudflare kernel and the Debian one have this feature enabled:
While KASLR helps with targeted exploits, it is quite easy to bypass since everything is shifted by a single random offset as shown on the diagram above. Thus if the attacker knows at least one runtime kernel address, they can recover this offset by subtracting the runtime address from the compile time address of the same symbol (function or data structure) from the kernel’s System.map file. Once they know the offset, they can recover the addresses of all other symbols by adjusting them by this offset.
Therefore, modern kernels take precautions not to leak kernel addresses at least to unprivileged users. One of the main tunables for this is the kptr_restrict sysctl. It is a good idea to set it at least to 1 to not allow regular users to see kernel pointers:
(shell/bash)
ignat@dev:~$ sudo grep selinux_state /proc/kallsyms
ffffffffb41bcae0 B selinux_state
Similar to kptr_restrict sysctl there is also dmesg_restrict, which if set, would prevent regular users from reading the kernel log (which may also leak kernel pointers via its messages). While you need to explicitly set kptr_restrict sysctl to a non-zero value on each boot (or use some system sysctl configuration utility, like this one), you can configure dmesg_restrict initial value via the CONFIG_SECURITY_DMESG_RESTRICT kernel configuration option. Both the Cloudflare kernel and the Debian one enforce dmesg_restrict this way:
Worth noting that /proc/kallsyms and the kernel log are not the only sources of potential kernel pointer leaks. There is a lot of legacy in the Linux kernel and [new sources are continuously being found and patched]. That’s why it is very important to stay up to date with the latest kernel bugfix releases.
Lockdown LSM
Linux Security Modules (LSM) is a hook-based framework for implementing security policies and Mandatory Access Control in the Linux Kernel. We have [covered our usage of another LSM module, BPF-LSM, previously].
BPF-LSM is a useful foundational piece for our kernel security, but in this post we want to mention another useful LSM module we use — the Lockdown LSM. Lockdown can be in three states (controlled by the /sys/kernel/security/lockdown special file):
none is the state where nothing is enforced and the module is effectively disabled. When Lockdown is in the integrity state, the kernel tries to prevent any operation, which may compromise its integrity. We already covered some examples of these in this post: loading unsigned modules and executing unsigned code via KEXEC. But there are other potential ways (which are mentioned in the LSM’s man page), all of which this LSM tries to block. confidentiality is the most restrictive mode, where Lockdown will also try to prevent any information leakage from the kernel. In practice this may be too restrictive for server workloads as it blocks all runtime debugging capabilities, like perf or eBPF.
Let’s see the Lockdown LSM in action. On a barebones Debian system the initial state is none meaning nothing is locked down:
ignat@dev:~$ uname -a
Linux dev 6.1.0-18-cloud-amd64 #1 SMP PREEMPT_DYNAMIC Debian 6.1.76-1 (2024-02-01) x86_64 GNU/Linux
ignat@dev:~$ cat /sys/kernel/security/lockdown
[none] integrity confidentiality
It is worth noting that we can only put the system into a more restrictive state, but not back. That is, once in integrity mode we can only switch to confidentiality mode, but not back to none:
ignat@dev:~$ echo none | sudo tee /sys/kernel/security/lockdown
none
tee: /sys/kernel/security/lockdown: Operation not permitted
Now we can see that even on a stock Debian kernel, which as we discovered above, does not enforce module signatures by default, we cannot load a potentially malicious unsigned kernel module anymore:
ignat@dev:~$ sudo insmod mymod/mymod.ko
insmod: ERROR: could not insert module mymod/mymod.ko: Operation not permitted
And the kernel log will helpfully point out that this is due to Lockdown LSM:
ignat@dev:~$ sudo dmesg | tail -n 1
[21728.820129] Lockdown: insmod: unsigned module loading is restricted; see man kernel_lockdown.7
As we can see, Lockdown LSM helps to tighten the security of a kernel, which otherwise may not have other enforcing bits enabled, like the stock Debian one.
ignat@dev:~$ grep LOCK_DOWN /boot/config-6.6.17-cloudflare-2024.2.9
# CONFIG_LOCK_DOWN_KERNEL_FORCE_NONE is not set
CONFIG_LOCK_DOWN_KERNEL_FORCE_INTEGRITY=y
# CONFIG_LOCK_DOWN_KERNEL_FORCE_CONFIDENTIALITY is not set
Conclusion
In this post we reviewed some useful Linux kernel security configuration options we use at Cloudflare. This is only a small subset, and there are many more available and even more are being constantly developed, reviewed, and improved by the Linux kernel community. We hope that this post will shed some light on these security features and that, if you haven’t already, you may consider enabling them in your Linux systems.
Watch on Cloudflare TV
Tune in for more news, announcements and thought-provoking discussions! Don’t miss the full Security Week hub page.
We understand that your VeloCloud deployment may be partially or even fully deployed. You may be experiencing discomfort from SASE anxiety. Symptoms include:
Irregular priorities and strategies – With the number of times that VMware reorganized its various networking and security products into different business units, it’s now about to embark on yet another as Broadcom pursues single vendor SASE.
If you’re a VeloCloud customer, we are here to help you with your transition to Magic WAN, with planning, products and services. You’ve experienced the turbulence, and that’s why we are taking steps to help. First, it’s necessary to illustrate what’s fundamentally wrong with the architecture by acquisition model in order to define the right path forward. Second, we document the steps involved for making a transition from VeloCloud to Cloudflare. Third, we are offering a helping hand to help VeloCloud customers to get their SASE strategies back on track.
Architecture is the key to SASE
Your IT organization must deliver stability across your information systems, because the future of your business depends on the decisions that you make today. You need to make sure that your SASE journey is backed by vendors that you can depend on. Indecisive vendors and unclear strategies rarely inspire confidence, and it’s driving organizations to reconsider their relationship.
It’s not just VeloCloud that’s pivoting. Many vendors are chasing the brass ring to meet the requirement for Single Vendor SASE, and they’re trying to reduce their time to market by acquiring features on their checklist, rather than taking the time to build the right architecture for consistent management and user experience. It’s led to rapid consolidation of both startups and larger product stacks, but now we’re seeing many many instances of vendors having to rationalize their overlapping product lines. Strange days indeed.
But the thing is, Single Vendor SASE is not a feature checklist game. It’s not like shopping for PC antivirus software where the most attractive option was the one with the most checkboxes. It doesn’t matter if you acquire a large stack of product acronyms (ZTNA, SD-WAN, SWG, CASB, DLP, FWaaS, SD-WAN to name but a few) if the results are just as convoluted as the technology it aims to replace.
If organizations are new to SASE, then it can be difficult to know what to look for. However, one clear sign of trouble is taking an SSE designed by one vendor and combining it with SD-WAN from another. Because you can’t get a converged platform out of two fundamentally incongruent technologies.
Why SASE Math Doesn’t Work
The conceptual model for SASE typically illustrates two half circles, with one consisting of cloud-delivered networking and the other being cloud-delivered security. With this picture in mind, it’s easy to see how one might think that combining an implementation of cloud-delivered networking (VeloCloud SD-WAN) and an implementation of cloud-delivered security (Symantec Network Protection – SSE) might satisfy the requirements. Does Single Vendor SASE = SD-WAN + SSE?
In practice, networking and network security do not exist in separate universes, but SD-WAN and SSE implementations do, especially when they were designed by different vendors. That’s why the math doesn’t work, because even with the requisite SASE functionality, the implementation of the functionality doesn’t fit. SD-WAN is designed for network connectivity between sites over the SD-WAN fabric, whereas SSE largely focuses on the enforcement of security policy for user->application traffic from remote users or traffic leaving (rather than traversing) the SD-WAN fabric. Therefore, to bring these two worlds together, you end up with security inconsistency, proxy chains which create a burden on latency, or implementing security at the edge rather than in the cloud.
Why Cloudflare is different
At Cloudflare, the basis for our approach to single vendor SASE starts from building a global network designed with private data centers, overprovisioned network and compute capacity, and a private backbone designed to deliver our customer’s traffic to any destination. It’s what we call any-to-any connectivity. It’s not using the public cloud for SASE services, because the public cloud was designed as a destination for traffic rather than being optimized for transit. We are in full control of the design of our data centers and network and we’re obsessed with making it even better every day.
It’s from this network that we deliver networking and security services. Conceptually, we implement a philosophy of composability, where the fundamental network connection between the customer’s site and the Cloudflare data center remains the same across different use cases. In practice, and unlike traditional approaches, it means no downtime for service insertion when you need more functionality — the connection to Cloudflare remains the same. It’s the services and the onboarding of additional destinations that changes as organizations expand their use of Cloudflare.
From the perspective of branch connectivity, use Magic WAN for the connectivity that ties your business together, no matter which way traffic passes. That’s because we don’t treat the directions of your network traffic as independent problems. We solve for consistency by on-ramping all traffic through one of Cloudflare’s 310+ anycasted data centers (whether inbound, outbound, or east-west) for enforcement of security policy. We solve for latency by eliminating the need to forward traffic to a compute location by providing full compute services in every data center. We implement SASE using a light edge / heavy cloud model, with services delivered within the Cloudflare connectivity cloud rather than on-prem.
How to transition from VeloCloud to Cloudflare
Start by contacting us to get a consultation session with our solutions architecture team. Our architects specialize in network modernization and can map your SASE goals across a series of smaller projects. We’ve worked with hundreds of organizations to achieve their SASE goals with the Cloudflare connectivity cloud and can build a plan that your team can execute on.
For product education, join one of our product workshops on Magic WAN to get a deep dive into how it’s built and how it can be rolled out to your locations. Magic WAN uses a light edge, heavy cloud model that has multiple network insertion models (whether a tunnel from an existing device, using our turnkey Magic WAN Connector, or deploying a virtual appliance) which can work in parallel or as a replacement for your branch connectivity needs, thus allowing you to migrate at your pace. Our specialist teams can help you mitigate transitionary hardware and license costs as you phase out VeloCloud and accelerate your rollout of Magic WAN.
The Magic WAN technical engineers have a number of resources to help you build product knowledge as well. This includes reference architectures and quick start guides that address your organization’s connectivity goals, whether sizing down your on-prem network in favor of the emerging “coffee shop networking” philosophy, retiring legacy SD-WAN, and full replacement of conventional MPLS.
For services, our customer success teams are ready to support your transition, with services that are tailored specifically for Magic WAN migrations both large and small.
Your next move
Interested in learning more? Contact us to get started, and we’ll help you with your SASE journey. Contact us to learn how to replace VeloCloud with Cloudflare Magic WAN and use our network as an extension of yours.
On January 19, 2024, the Cybersecurity & Infrastructure Security Agency (CISA) issued Emergency Directive 24-01: Mitigate Ivanti Connect Secure and Ivanti Policy Secure Vulnerabilities. CISA has the authority to issue emergency directives in response to a known or reasonably suspected information security threat, vulnerability, or incident. U.S. Federal agencies are required to comply with these directives.
Federal agencies were directed to apply a mitigation against two recently discovered vulnerabilities; the mitigation was to be applied within three days. Further monitoring by CISA revealed that threat actors were continuing to exploit the vulnerabilities and had developed some workarounds to earlier mitigations and detection methods. On January 31, CISA issued Supplemental Direction V1 to the Emergency Directive instructing agencies to immediately disconnect all instances of Ivanti Connect Secure and Ivanti Policy Secure products from agency networks and perform several actions before bringing the products back into service.
This blog post will explore the threat actor’s tactics, discuss the high-value nature of the targeted products, and show how Cloudflare’s Secure Access Service Edge (SASE) platform protects against such threats.
As a side note and showing the value of layered protections, Cloudflare’s WAF had proactively detected the Ivanti zero-day vulnerabilities and deployed emergency rules to protect Cloudflare customers.
Threat Actor Tactics
Forensic investigations (see the Volexity blog for an excellent write-up) indicate that the attacks began as early as December 2023. Piecing together the evidence shows that the threat actors chained two previously unknown vulnerabilities together to gain access to the Connect Secure and Policy Secure appliances and achieve unauthenticated remote code execution (RCE).
CVE-2023-46805 is an authentication bypass vulnerability in the products’ web components that allows a remote attacker to bypass control checks and gain access to restricted resources. CVE-2024-21887 is a command injection vulnerability in the products’ web components that allows an authenticated administrator to execute arbitrary commands on the appliance and send specially crafted requests. The remote attacker was able to bypass authentication and be seen as an “authenticated” administrator, and then take advantage of the ability to execute arbitrary commands on the appliance.
By exploiting these vulnerabilities, the threat actor had near total control of the appliance. Among other things, the attacker was able to:
Harvest credentials from users logging into the VPN service
Use these credentials to log into protected systems in search of even more credentials
Modify files to enable remote code execution
Deploy web shells to a number of web servers
Reverse tunnel from the appliance back to their command-and-control server (C2)
Avoid detection by disabling logging and clearing existing logs
Little Appliance, Big Risk
This is a serious incident that is exposing customers to significant risk. CISA is justified in issuing their directive, and Ivanti is working hard to mitigate the threat and develop patches for the software on their appliances. But it also serves as another indictment of the legacy “castle-and-moat” security paradigm. In that paradigm, remote users were outside the castle while protected applications and resources remained inside. The moat, consisting of a layer of security appliances, separated the two. The moat, in this case the Ivanti appliance, was responsible for authenticating and authorizing users, and then connecting them to protected applications and resources. Attackers and other bad actors were blocked at the moat.
This incident shows us what happens when a bad actor is able to take control of the moat itself, and the challenges customers face to recover control. Two typical characteristics of vendor-supplied appliances and the legacy security strategy highlight the risks:
Administrators have access to the internals of the appliance
Authenticated users indiscriminately have access to a wide range of applications and resources on the corporate network, increasing the risk of bad actor lateral movement
A better way: Cloudflare’s SASE platform
Cloudflare One is Cloudflare’s SSE and single-vendor SASE platform. While Cloudflare One spans broadly across security and networking services (and you can read about the latest additions here), I want to focus on the two points noted above.
First, Cloudflare One employs the principles of Zero Trust, including the principle of least privilege. As such, users that authenticate successfully only have access to the resources and applications necessary for their role. This principle also helps in the event of a compromised user account as the bad actor does not have indiscriminate network-level access. Rather, least privilege limits the range of lateral movement that a bad actor has, effectively reducing the blast radius.
Second, while customer administrators need to have access to configure their services and policies, Cloudflare One does not provide any external access to the system internals of Cloudflare’s platform. Without that access, a bad actor would not be able to launch the types of attacks executed when they had access to the internals of the Ivanti appliance.
It’s time to eliminate the legacy VPN
If your organization is impacted by the CISA directive, or you are just ready to modernize and want to augment or replace your current VPN solution, Cloudflare is here to help. Cloudflare’s Zero Trust Network Access (ZTNA) service, part of the Cloudflare One platform, is the fastest and safest way to connect any user to any application.
Contact us to get immediate onboarding help or to schedule an architecture workshop to help you augment or replace your Ivanti (or any) VPN solution. Not quite ready for a live conversation? Read our learning path article on how to replace your VPN with Cloudflare or our SASE reference architecture for a view of how all of our SASE services and on-ramps work together.
We’re excited to announce the largest update to Cloudflare Network Interconnect (CNI) since its launch, and because we’re making CNIs faster and easier to deploy, we’re calling this Express CNI. At the most basic level, CNI is a cable between a customer’s network router and Cloudflare, which facilitates the direct exchange of information between networks instead of via the Internet. CNIs are fast, secure, and reliable, and have connected customer networks directly to Cloudflare for years. We’ve been listening to how we can improve the CNI experience, and today we are sharing more information about how we’re making it faster and easier to order CNIs, and connect them to Magic Transit and Magic WAN.
Interconnection services and what to consider
Interconnection services provide a private connection that allows you to connect your networks to other networks like the Internet, cloud service providers, and other businesses directly. This private connection benefits from improved connectivity versus going over the Internet and reduced exposure to common threats like Distributed Denial of Service (DDoS) attacks.
Cost is an important consideration when evaluating any vendor for interconnection services. The cost of an interconnection is typically comprised of a fixed port fee, based on the capacity (speed) of the port, and the variable amount of data transferred. Some cloud providers also add complex inter-region bandwidth charges.
Other important considerations include the following:
How much capacity is needed?
Are there variable or fixed costs associated with the port?
Is the provider located in the same colocation facility as my business?
Are they able to scale with my network infrastructure?
Are you able to predict your costs without any unwanted surprises?
What additional products and services does the vendor offer?
Cloudflare does not charge a port fee for Cloudflare Network Interconnect, nor do we charge for inter-region bandwidth. Using CNI with products like Magic Transit and Magic WAN may even reduce bandwidth spending with Internet service providers. For example, you can deliver Magic Transit-cleaned traffic to your data center with a CNI instead of via your Internet connection, reducing the amount of bandwidth that you would pay an Internet service provider for.
To underscore the value of CNI, one vendor charges nearly \$20,000 a year for a 10 Gigabit per second (Gbps) direct connect port. The same 10 Gbps CNI on Cloudflare for one year is $0. Their cost also does not include any costs related to the amount of data transferred between different regions or geographies, or outside of their cloud. We have never charged for CNIs, and are committed to making it even easier for customers to connect to Cloudflare, and destinations beyond on the open Internet.
3 Minute Provisioning
Our first big announcement is a new, faster approach to CNI provisioning and deployment. Starting today, all Magic Transit and Magic WAN customers can order CNIs directly from their Cloudflare account. The entire process is about 3 clicks and takes less than 3 minutes (roughly the time to make coffee). We’re going to show you how simple it is to order a CNI.
The first step is to find out whether Cloudflare is in the same data center or colocation facility as your routers, servers, and network hardware. Let’s navigate to the new “Interconnects” section of the Cloudflare dashboard, and order a new Direct CNI.
Search for the city of your data center, and quickly find out if Cloudflare is in the same facility. I’m going to stand up a CNI to connect my example network located in Ashburn, VA.
It looks like Cloudflare is in the same facility as my network, so I’m going to select the location where I’d like to connect.
As of right now, my data center is only exchanging a few hundred Megabits per second of traffic on Magic Transit, so I’m going to select a 1 Gigabit per second interface, which is the smallest port speed available. I can also order a 10 Gbps link if I have more than 1 Gbps of traffic in a single location. Cloudflare also supports 100 Gbps CNIs, but if you have this much traffic to exchange with us, we recommend that you coordinate with your account team.
After selecting your preferred port speed, you can name your CNI, which will be referenceable later when you direct your Magic Transit or Magic WAN traffic to the interconnect. We are given the opportunity to verify that everything looks correct before confirming our CNI order.
Once we click the “Confirm Order” button, Cloudflare will provision an interface on our router for your CNI, and also assign IP addresses for you to configure on your router interface. Cloudflare will also issue you a Letter of Authorization (LOA) for you to order a cross connect with the local facility. Cloudflare will provision a port on our router for your CNI within 3 minutes of your order, and you will be able to ping across the CNI as soon as the interface line status comes up.
After downloading the Letter of Authorization (LOA) to order a cross connect, we’ll navigate back to our Interconnects area. Here we can see the point to point IP addressing, and the CNI name that is used in our Magic Transit or Magic WAN configuration. We can also redownload the LOA if needed.
Simplified Magic Transit and Magic WAN onboarding
Our second major announcement is that Express CNI dramatically simplifies how Magic Transit and Magic WAN customers connect to Cloudflare. Getting packets into Magic Transit or Magic WAN in the past with a CNI required customers to configure a GRE (Generic Routing Encapsulation) tunnel on their router. These configurations are complex, and not all routers and switches support these changes. Since both Magic Transit and Magic WAN protect networks, and operate at the network layer on packets, customers rightly asked us, “If I connect directly to Cloudflare with CNI, why do I also need a GRE tunnel for Magic Transit and Magic WAN?”
Starting today, GRE tunnels are no longer required with Express CNI. This means that Cloudflare supports standard 1500-byte packets on the CNI, and there’s no need for complex GRE or MSS adjustment configurations to get traffic into Magic Transit or Magic WAN. This significantly reduces the amount of configuration required on a router for Magic Transit and Magic WAN customers who can connect over Express CNI. If you’re not familiar with Magic Transit, the key takeaway is that we’ve reduced the complexity of changes you must make on your router to protect your network with Cloudflare.
What’s next for CNI?
We’re excited about how Express CNI simplifies connecting to Cloudflare’s network. Some customers connect to Cloudflare through our Interconnection Platform Partners, like Equinix and Megaport, and we plan to bring the Express CNI features to our partners too.
We have upgraded a number of our data centers to support Express CNI, and plan to upgrade many more over the next few months. We are rapidly expanding the number of global locations that support Express CNI as we install new network hardware. If you’re interested in connecting to Cloudflare with Express CNI, but are unable to find your data center, please let your account team know.
If you’re on an existing classic CNI today, and you don’t need Express CNI features, there is no obligation to migrate to Express CNI. Magic Transit and Magic WAN customers have been asking for BGP support to control how Cloudflare routes traffic back to their networks, and we expect to extend BGP support to Express CNI first, so keep an eye out for more Express CNI announcements later this year.
Get started with Express CNI today
As we’ve demonstrated above, Express CNI makes it fast and easy to connect your network to Cloudflare. If you’re a Magic Transit or Magic WAN customer, the new “Interconnects” area is now available on your Cloudflare dashboard. To deploy your first CNI, you can follow along with the screenshots above, or refer to our updated interconnects documentation.
In June 2023, we told you that we were building a new protocol, MASQUE, into WARP. MASQUE is a fascinating protocol that extends the capabilities of HTTP/3 and leverages the unique properties of the QUIC transport protocol to efficiently proxy IP and UDP traffic without sacrificing performance or privacy
At the same time, we’ve seen a rising demand from Zero Trust customers for features and solutions that only MASQUE can deliver. All customers want WARP traffic to look like HTTPS to avoid detection and blocking by firewalls, while a significant number of customers also require FIPS-compliant encryption. We have something good here, and it’s been proven elsewhere (more on that below), so we are building MASQUE into Zero Trust WARP and will be making it available to all of our Zero Trust customers — at WARP speed!
This blog post highlights some of the key benefits our Cloudflare One customers will realize with MASQUE.
Before the MASQUE
Cloudflare is on a mission to help build a better Internet. And it is a journey we’ve been on with our device client and WARP for almost five years. The precursor to WARP was the 2018 launch of 1.1.1.1, the Internet’s fastest, privacy-first consumer DNS service. WARP was introduced in 2019 with the announcement of the 1.1.1.1 service with WARP, a high performance and secure consumer DNS and VPN solution. Then in 2020, we introduced Cloudflare’s Zero Trust platform and the Zero Trust version of WARP to help any IT organization secure their environment, featuring a suite of tools we first built to protect our own IT systems. Zero Trust WARP with MASQUE is the next step in our journey.
The current state of WireGuard
WireGuard was the perfect choice for the 1.1.1.1 with WARP service in 2019. WireGuard is fast, simple, and secure. It was exactly what we needed at the time to guarantee our users’ privacy, and it has met all of our expectations. If we went back in time to do it all over again, we would make the same choice.
But the other side of the simplicity coin is a certain rigidity. We find ourselves wanting to extend WireGuard to deliver more capabilities to our Zero Trust customers, but WireGuard is not easily extended. Capabilities such as better session management, advanced congestion control, or simply the ability to use FIPS-compliant cipher suites are not options within WireGuard; these capabilities would have to be added on as proprietary extensions, if it was even possible to do so.
Plus, while WireGuard is popular in VPN solutions, it is not standards-based, and therefore not treated like a first class citizen in the world of the Internet, where non-standard traffic can be blocked, sometimes intentionally, sometimes not. WireGuard uses a non-standard port, port 51820, by default. Zero Trust WARP changes this to use port 2408 for the WireGuard tunnel, but it’s still a non-standard port. For our customers who control their own firewalls, this is not an issue; they simply allow that traffic. But many of the large number of public Wi-Fi locations, or the approximately 7,000 ISPs in the world, don’t know anything about WireGuard and block these ports. We’ve also faced situations where the ISP does know what WireGuard is and blocks it intentionally.
This can play havoc for roaming Zero Trust WARP users at their local coffee shop, in hotels, on planes, or other places where there are captive portals or public Wi-Fi access, and even sometimes with their local ISP. The user is expecting reliable access with Zero Trust WARP, and is frustrated when their device is blocked from connecting to Cloudflare’s global network.
Now we have another proven technology — MASQUE — which uses and extends HTTP/3 and QUIC. Let’s do a quick review of these to better understand why Cloudflare believes MASQUE is the future.
Unpacking the acronyms
HTTP/3 and QUIC are among the most recent advancements in the evolution of the Internet, enabling faster, more reliable, and more secure connections to endpoints like websites and APIs. Cloudflare worked closely with industry peers through the Internet Engineering Task Force on the development of RFC 9000 for QUIC and RFC 9114 for HTTP/3. The technical background on the basic benefits of HTTP/3 and QUIC are reviewed in our 2019 blog post where we announced QUIC and HTTP/3 availability on Cloudflare’s global network.
Most relevant for Zero Trust WARP, QUIC delivers better performance on low-latency or high packet loss networks thanks to packet coalescing and multiplexing. QUIC packets in separate contexts during the handshake can be coalesced into the same UDP datagram, thus reducing the number of receive and system interrupts. With multiplexing, QUIC can carry multiple HTTP sessions within the same UDP connection. Zero Trust WARP also benefits from QUIC’s high level of privacy, with TLS 1.3 designed into the protocol.
MASQUE unlocks QUIC’s potential for proxying by providing the application layer building blocks to support efficient tunneling of TCP and UDP traffic. In Zero Trust WARP, MASQUE will be used to establish a tunnel over HTTP/3, delivering the same capability as WireGuard tunneling does today. In the future, we’ll be in position to add more value using MASQUE, leveraging Cloudflare’s ongoing participation in the MASQUE Working Group. This blog post is a good read for those interested in digging deeper into MASQUE.
OK, so Cloudflare is going to use MASQUE for WARP. What does that mean to you, the Zero Trust customer?
Proven reliability at scale
Cloudflare’s network today spans more than 310 cities in over 120 countries, and interconnects with over 13,000 networks globally. HTTP/3 and QUIC were introduced to the Cloudflare network in 2019, the HTTP/3 standard was finalized in 2022, and represented about 30% of all HTTP traffic on our network in 2023.
We are also using MASQUE for iCloud Private Relay and other Privacy Proxy partners. The services that power these partnerships, from our Rust-based proxy framework to our open source QUIC implementation, are already deployed globally in our network and have proven to be fast, resilient, and reliable.
Cloudflare is already operating MASQUE, HTTP/3, and QUIC reliably at scale. So we want you, our Zero Trust WARP users and Cloudflare One customers, to benefit from that same reliability and scale.
Connect from anywhere
Employees need to be able to connect from anywhere that has an Internet connection. But that can be a challenge as many security engineers will configure firewalls and other networking devices to block all ports by default, and only open the most well-known and common ports. As we pointed out earlier, this can be frustrating for the roaming Zero Trust WARP user.
We want to fix that for our users, and remove that frustration. HTTP/3 and QUIC deliver the perfect solution. QUIC is carried on top of UDP (protocol number 17), while HTTP/3 uses port 443 for encrypted traffic. Both of these are well known, widely used, and are very unlikely to be blocked.
We want our Zero Trust WARP users to reliably connect wherever they might be.
Compliant cipher suites
MASQUE leverages TLS 1.3 with QUIC, which provides a number of cipher suite choices. WireGuard also uses standard cipher suites. But some standards are more, let’s say, standard than others.
NIST, the National Institute of Standards and Technology and part of the US Department of Commerce, does a tremendous amount of work across the technology landscape. Of interest to us is the NIST research into network security that results in FIPS 140-2 and similar publications. NIST studies individual cipher suites and publishes lists of those they recommend for use, recommendations that become requirements for US Government entities. Many other customers, both government and commercial, use these same recommendations as requirements.
Our first MASQUE implementation for Zero Trust WARP will use TLS 1.3 and FIPS compliant cipher suites.
How can I get Zero Trust WARP with MASQUE?
Cloudflare engineers are hard at work implementing MASQUE for the mobile apps, the desktop clients, and the Cloudflare network. Progress has been good, and we will open this up for beta testing early in the second quarter of 2024 for Cloudflare One customers. Your account team will be reaching out with participation details.
Continuing the journey with Zero Trust WARP
Cloudflare launched WARP five years ago, and we’ve come a long way since. This introduction of MASQUE to Zero Trust WARP is a big step, one that will immediately deliver the benefits noted above. But there will be more — we believe MASQUE opens up new opportunities to leverage the capabilities of QUIC and HTTP/3 to build innovative Zero Trust solutions. And we’re also continuing to work on other new capabilities for our Zero Trust customers. Cloudflare is committed to continuing our mission to help build a better Internet, one that is more private and secure, scalable, reliable, and fast. And if you would like to join us in this exciting journey, check out our open positions.
We understand that one of the significant hurdles faced by our customers, especially larger organizations, is obtaining a clear view of the deployment of Cloudflare services throughout their vast and complex infrastructures. The question isn’t just whether Cloudflare is deployed, but whether it’s fully optimized across every asset and service. Addressing this challenge head-on, we’re rolling out a new feature set designed to provide better visibility and control over your security posture.
The problem we are addressing
The core problem we’re tackling is the growing complexity of cyber threats and the expanding attack surface, which complicates maintaining a strong security posture for our customers.
It’s not uncommon for organizations to deploy a variety of security solutions, including ours, without fully optimizing and implementing their configurations. This results in a false sense of security, underutilized investments and, more critically, exposed vulnerabilities. Our customers frequently express concerns about not having a clear picture of their security posture across their entire infrastructure, uncertain if critical assets are adequately protected or if specific Cloudflare security features could be better leveraged.
We want to bring users comprehensive visibility into their security configurations and the state of their deployments across Cloudflare’s suite of products. By providing actionable insights into underconfigured areas, unassigned resources, or unutilized features, we aim to close the security gaps and enhance the overall defense mechanisms of our customers’ digital ecosystems. This improvement is not just about leveraging technology but about promoting a culture of proactive security management, where every piece of the digital infrastructure is consistently and optimally protected.
How we’re solving this inside Security Center
More than two years ago, we took on the mission to consolidate our extensive suite of security products, security expertise, and our unique insights into Internet threats into one comprehensive solution — the Cloudflare Security Center. Launched with the vision to simplify attack surface management and make advanced security intelligence actionable for organizations of all sizes, Security Center has since become the one-stop quick view to evaluate your security posture.
Today, we build on this foundation to address a pain point for many of our large customers: ensuring complete Cloudflare protection across their entire digital infrastructure.
Our latest update in the Security Center focuses on delivering detailed insights into Cloudflare’s deployment status across your digital assets. This encompasses identifying applications where critical services like WAF, Access, and other security protection tools might not be fully configured or optimized, thereby weakening your security posture.
In addition to these insights, we are introducing a quick view within Security Center Insights, designed to offer CISOs and security teams a quick and comprehensive view of their current Cloudflare product configurations at any given moment, along with recommendations for enhancements, under the Security optimization snapshot on the dashboard.
Leveraging these new insights, Cloudflare users can now take proactive steps to close any gaps in their security framework. By offering a granular view of where specific Cloudflare services can be better utilized, we’re not just solving a visibility problem — we’re delivering actionable security intelligence. This means decisions can be made swiftly, ensuring that your defenses not only keep pace with, but stay ahead of, potential threats.
For instance, we’ll highlight if WAF is deployed on only a portion of your zones, where Email Security could be leveraged, or if certain assets are unprotected by Access controls. We’re also making it easier for you to see if you are missing any critical setup like Page Shield, ensuring the product is configured, so you are not just one step closer to becoming compliant with standards like PCI DSS, but are also protected against evolving threats. We are outlining newly discovered API endpoints that require your attention as well.
Finally, users can now export their Security Insights using our public API, and will soon be able to do the same directly from the Cloudflare Dashboard, with a simple click of a button!
Accessing Security Center Insights
Security Center Insights is available to all Cloudflare dashboard users that are Administrators of their Cloudflare account.
Regardless of the size or scope of your deployment, our goal is to empower every user with the tools needed to achieve a robust security posture, which they can continuously influence by improving existing configurations, adding new solutions, and discovering new vulnerabilities.
Future Security Center roadmap
We’re constantly adding other relevant security insights to help improve your security posture, covering exposed infrastructure, insecure configurations, optimisations, new products, and more, including the ability to easily export these for reporting purposes. Moreover, stay tuned for a completely new reporting platform that will automatically deliver curated and contextualized security insights directly into your inbox — showcasing the power of Cloudflare’s security portfolio. The periodic reports will be complemented by a personalized interactive in-dashboard reporting experience.
Check out your security insights under your account’s Security Center now and take action to improve your security posture with Cloudflare!
If you would like to join us in building the Security Center or other exciting Cloudflare products, see our open positions and learn more about life@Cloudflare.
Cloudflare is committed to providing our customers with industry-leading network security solutions. At the same time, we recognize that establishing robust security measures involves identifying potential threats by using processes that may involve scrutinizing sensitive or personal data, which in turn can pose a risk to privacy. As a result, we work hard to balance privacy and security by building privacy-first security solutions that we offer to our customers and use for our own network.
In this post, we’ll walk through how we deployed Cloudflare products like Access and our Zero Trust Agent in a privacy-focused way for employees who use the Cloudflare network. Even though global legal regimes generally afford employees a lower level of privacy protection on corporate networks, we work hard to make sure our employees understand their privacy choices because Cloudflare has a strong culture and history of respecting and furthering user privacy on the Internet. We’ve found that many of our customers feel similarly about ensuring that they are protecting privacy while also securing their networks.
So how do we balance our commitment to privacy with ensuring the security of our internal corporate environment using Cloudflare products and services? We start with the basics: We only retain the minimum amount of data needed, we de-identify personal data where we can, we communicate transparently with employees about the security measures we have in place on corporate systems and their privacy choices, and we retain necessary information for the shortest time period needed.
How we secure Cloudflare using Cloudflare
We take a comprehensive approach to securing our globally distributed hybrid workforce with both organizational controls and technological solutions. Our organizational approach includes a number of measures, such as a company-wide Acceptable Use Policy, employee privacy notices tailored by jurisdiction, required annual and new-hire privacy and security trainings, role-based access controls (RBAC), and least privilege principles. These organizational controls allow us to communicate expectations for both the company and the employees that we can implement with technological controls and that we enforce through logging and other mechanisms.
Our technological controls are rooted in Zero Trust best practices and start with a focus on our Cloudflare One services to secure our workforce as described below.
Securing access to applications
Cloudflare secures access to self-hosted and SaaS applications for our workforce, whether remote or in-office, using our own Zero Trust Network Access (ZTNA) service, Cloudflare Access, to verify identity, enforce multi-factor authentication with security keys, and evaluate device posture using the Zero Trust client for every request. This approach evolved over several years and has enabled Cloudflare to more effectively protect our growing workforce.
As we have evolved our hybrid work and office configurations, our security teams have benefited from additional controls and visibility for forward-proxied Internet traffic, including:
Granular HTTP controls: Our security teams inspect HTTPS traffic to block access to specific websites identified as malicious by our security team, conduct antivirus scanning, and apply identity-aware browsing policies.
Selectively isolating Internet browsing: With remote browser isolated (RBI) sessions, all web code is run on Cloudflare’s network far from local devices, insulating users from any untrusted and malicious content. Today, Cloudflare isolates social media, news outlets, personal email, and other potentially risky Internet categories, and we have set up feedback loops for our employees to help us fine-tune these categories.
Geography-based logging: Seeing where outbound requests originate helps our security teams understand the geographic distribution of our workforce, including our presence in high-risk areas.
Data Loss Prevention: To keep sensitive data inside our corporate network, this tool allows us to identify data we’ve flagged as sensitive in outbound HTTP/S traffic and prevent it from leaving the network.
Cloud Access Security Broker: This tool allows us to monitor our SaaS apps for misconfigurations and sensitive data that is potentially exposed or shared too broadly.
Protecting inboxes with cloud email security
Additionally, we have deployed our Cloud Email Security solution to protect our workforce from increased phishing and business email compromise attacks that we have not only seen directed against our employees, but that are plaguing organizations globally. One key feature we use is email link isolation, which uses RBI and email security functionality to open potentially suspicious links in an isolated browser. This allows us to be slightly more relaxed with blocking suspicious links without compromising security. This is a big win for productivity for our employees and the security team, as both sets of employees aren’t having to deal with large volumes of false positives.
The very nature of these powerful security technologies Cloudflare has created and deployed underscores the responsibility we have to use privacy-first principles in handling this data, and to recognize that the data should be respected and protected at all times.
The journey to respecting privacy starts with the products themselves. We develop products that have privacy controls built in at their foundation. To achieve this, our product teams work closely with Cloudflare’s product and privacy counsels to practice privacy by design. A great example of this collaboration is the ability to manage personally identifiable information (PII) in the Secure Web Gateway logs. You can choose to exclude PII from Gateway logs entirely or redact PII from the logs and gain granular control over access to PII with the Zero Trust PII Role.
In addition to building privacy-first security products, we are also committed to communicating transparently with Cloudflare employees about how these security products work and what they can – and can’t – see about traffic on our internal systems. This empowers employees to see themselves as part of the security solution, rather than set up an “us vs. them” mentality around employee use of company systems.
For example, while our employee privacy policies and our Acceptable Use Policy provide broad notice to our employees about what happens to data when they use the company’s systems, we thought it was important to provide even more detail. As a result, our security team collaborated with our privacy team to create an internal wiki page that plainly explains the data our security tools collect and why. We also describe the privacy choices available to our employees. This is particularly important for the “bring your own device” (BYOD) employees who have opted for the convenience of using their personal mobile device for work. BYOD employees must install endpoint management (provided by a third party) and Cloudflare’s Zero trust client on their devices if they want to access Cloudflare systems. We described clearly to our employees what this means about what traffic on their devices can be seen by Cloudflare teams, and we explained how they can take steps to protect their privacy when they are using their devices for purely personal purposes.
For the teams that develop for and support our Zero Trust services, we ensure that data is available only on a strict, need-to-know basis and is restricted to Cloudflare team members that require access as an essential part of their job. The set of people with access are required to take training that reminds them of their responsibility to respect this data and provides them with best practices for handling sensitive data. Additionally, to ensure we have full auditability, we log all the queries run against this database and by whom they are run.
Cloudflare has also made it easy for our employees to express any concerns they may have about how their data is handled or what it is used for. We have mechanisms in place that allow employees to ask questions or express concerns about the use of Zero Trust Security on Cloudflare’s network.
In addition, we make it easy for employees to reach out directly to the leaders responsible for these tools. All of these efforts have helped our employees better understand what information we collect and why. This has helped to expand our strong foundation for security and privacy at Cloudflare.
Encouraging privacy-first security for all
We believe firmly that great security is critical for ensuring data privacy, and that privacy and security can co-exist harmoniously. We also know that it is possible to secure a corporate network in a way that respects the employees using those systems.
For anyone looking to secure a corporate network, we encourage focusing on network security products and solutions that build in personal data protections, like our Zero Trust suite of products. If you are curious to explore how to implement these Cloudflare services in your own organizations, request a consultation here.
We also urge organizations to make sure they communicate clearly with their users. In addition to making sure company policies are transparent and accessible, it is important to help employees understand their privacy choices. Under the laws of almost every jurisdiction globally, individuals have a lower level of privacy on a company device or a company’s systems than they do on their own personal accounts or devices, so it’s important to communicate clearly to help employees understand the difference. If an organization has privacy champions, works councils, or other employee representation groups, it is critical to communicate early and often with these groups to help employees understand what controls they can exercise over their data.
Today, Cloudflare is launching early access to the Deskope Program, a new set of tooling to help migrate existing Netskope customers to Cloudflare One for a faster and easier security experience. In addition, we’re also thrilled to announce the expansion of the Descaler Program to Authorized Service Delivery Partners, who will now have exclusive access to the Descaler toolkit to help customers move safely and quickly to Cloudflare.
Introducing Deskope — Migrate from Netskope to Cloudflare One
To set the stage, Cloudflare One is our Secure Access Service Edge (SASE) platform that combines network connectivity services with Zero Trust security on one of the fastest, most resilient, and most composable global networks. The Descaler Program was announced in early 2023 as a frictionless path to migrate existing Zscaler customers to Cloudflare One. Today, we are announcing the Deskope Program as a new and equally effortless path to migrate existing Netskope customers to Cloudflare One.
The Deskope Program follows the same approach as the Descaler process, including the tools, process, and partners you need for a frictionless technical migration. This program is completed through architecture workshops, technical migration tooling, and when requested, trusted partner engagements.
Deskope’s approach is based on minimizing manual effort and reducing the potential for error, allowing for a migration experience that is both fast and reliable. Combining automated tools and expert support, we ensure that your Netskope configurations are accurately translated and optimized for Cloudflare’s environment. Following an extract, transform, and load sequence using API calls to your current Netskope account, the Deskope toolkit will export your current Netskope Next Gen Secure Web Gateway (SWG) configuration and transform it to be Cloudflare One-compatible before migrating it into a new Cloudflare One account (or an existing one, if you’d prefer).
Drawing from the success of the Descaler process and migrating customers in just a few hours, Cloudflare is now expanding the offering to customers who wish to migrate from Netskope to Cloudflare One.
Why Deskope? Speed and simplicity
When it comes to speed, Cloudflare Gateway, our secure web gateway, is simply faster.
During 2023’s Speed Week, we published a blog called Spotlight on Zero Trust: we’re fastest and here’s the proof comparing secure web gateway products. This data shows that Cloudflare’s Gateway is faster to more websites from more places than any of our competitors. To quote from the blog:
“In one exercise we pitted the Cloudflare Gateway and WARP client against Zscaler, Netskope, and Palo Alto which all have products that perform the same functions. Cloudflare users benefit from Gateway and Cloudflare’s network being embedded deep into last mile networks close to users, being peered with over 12,000 networks. That heightened connectivity shows because Cloudflare Gateway is the fastest network in 42% of tested scenarios:”
But speed without control can be dangerous. The good news is that all the speed is easy to manage and deploy.
When it comes to simplicity, Cloudflare One is a unified, cloud-native platform that is easy to set up and manage, with a single onboarding wizard that further streamlines setup for both policy and the single-agent deployment to endpoints. This is in contrast to Netskope, where the policy creation process can slow administrators down as they have to first build reusable objects from scratch, so even a basic Secure Web Gateway policy requires many different elements to get started. Cloudflare’s Gateway policy builder is streamlined to allow administrators to quickly set a policy’s scope by defining conditions for Gateway to match traffic against. Traffic, identity, and even device posture conditions can be joined with logical operators ‘AND’ or ‘OR’ to easily manage what would otherwise be complex filtering controls.
Cloudflare is equally committed to making the migration process as cost-effective as possible using flexible financial options for customers wanting to migrate over.
As we introduce the Deskope Program, we are equally excited to accelerate Descaler even further by inviting Authorized Service Delivery Partners to leverage the Descaler toolkit to help more customers move to Cloudflare One.
Welcome Authorized Service Delivery Partners to Descaler
In a May 2023 blog post detailing our global services partner strategy and the momentum of our Authorized Service Delivery Partner program, we showcased our partnership with service providers all around the world, highlighting the strategic importance of the program in delivering unparalleled Cloudflare solutions through our trusted network of service providers.
We are thrilled to announce that our Authorized Service Delivery Partners now have the option to access the Descaler toolkit, along with training and support materials we have developed from our global experience with key customers. This initiative is designed to empower our authorized partners, complementing their existing skills and unique service offerings.
With access to the Descaler tool, our partners will be even better equipped to assist with your critical migration requirements to Cloudflare. Plans are underway to launch exclusive Descaler training for our partners in March 2024. Access to this training, as well as the Descaler tool itself, will be by invitation only, extended to our authorized partners.
How to get started Deskoping (or Descaling)
For customers and prospects, joining the Descaler or early access Deskope Programs are as easy as signing up using the link below. From there, the Cloudflare team will reach out to you for further enrollment details. By providing details about your current SSE deployment, ongoing challenges, and future Zero Trust or SASE goals, we’ll be able to hit the ground running. To get started, sign up here.
For partners, to get detailed information and to express interest in participating, connect with your assigned Channel Account Manager or Partner Service Delivery Manager. We look forward to supporting our partners in delivering high-quality services and enhancing their capability to meet the evolving needs of the market. If you are a partner with experience in delivering Cloudflare services and would like to become an Authorized Service Delivery Partner, please use this checklist to get started.
Today, we are happy to announce that Cloudflare customers can protect their APIs from broken authentication attacks by validating incoming JSON Web Tokens (JWTs) with API Gateway. Developers and their security teams need to control who can communicate with their APIs. Using API Gateway’s JWT Validation, Cloudflare customers can ensure that their Identity Provider previously validated the user sending the request, and that the user’s authentication tokens have not expired or been tampered with.
What’s new in this release?
After our beta release in early 2023, we continued to gather feedback from customers on what they needed from JWT validation in API Gateway. We uncovered four main feature requests and shipped updates in this GA release to address them all:
Old, Beta limitation
New, GA release capability
Only supported validating the raw JWT
Support for the Bearer token format
Only supported one JWKS configuration
Create up to four different JWKS configs to support different environments per zone
Only supported validating JWTs sent in HTTP headers
Validate JWTs if they are sent in a cookie, not just an HTTP header
JWT validation ran on all requests to the entire zone
Exclude any number of managed endpoints in a JWT validation rule
What is the threat?
Broken authentication is the #1 threat on the OWASP Top 10 and the #2 threat on the OWASP API Top 10. We’ve written before about how flaws in API authentication and authorization at Optus led to a threat actor offering 10 million user records for sale, and government agencies have warned about these exact API attacks.
According to Gartner®1, “attacks and data breaches involving poorly secured application programming interfaces (APIs) are occurring frequently.” Getting authentication correct for your API users can be challenging, but there are best practices you can employ to cover your bases. JSON Web Token Validation in API Gateway fulfills one of these best practices by enforcing a positive security model for your authenticated API users.
A primer on authentication and authorization
Authentication establishes identity. Imagine you’re collaborating with multiple colleagues and writing a document in Google Docs. When you’re all authors of the document, you have the same privileges, and you can overwrite each other’s text. You can all see each other’s name next to your respective cursor while you’re typing. You’re all authenticated to Google Docs, so Docs can show all the users on a document who everyone is.
Authorization establishes ownership or permissions to objects. Imagine you’re collaborating with your colleague in Docs again, but this time they’ve written a document ahead of time and simply wish for you to review it and add comments without changing the document. As the owner of the document, your colleague sets an authorization policy to only allow you ‘comment’ access. As such, you cannot change their writing at all, but you can still view the document and leave comments.
While the words themselves might sound similar, the differences between them are hugely important for security. It’s not enough to simply check that a user logging in has the correct login credentials (authentication). If you never check their permissions (authorization), they would be free to overwrite, add, or delete other users’ content. When this happens for APIs, OWASP calls it a Broken Object Level Authorization attack.
A primer on API access tokens
Users authenticate to services in many different ways on the web today. Let’s take a look at the history of authentication with username and password authentication, API key authentication, and JWT authentication before we mention how JWTs can help stop API attacks.
In the early days, the web used HTTP Basic Authentication, where browsers transmitted username and password pairs as an HTTP header, posing significant security risks and making credentials visible to any observer when the application failed to adopt SSL/TLS certificates. Basic authentication also complicated API access, requiring hard-coded credentials and potentially giving broad authorization policies to a single user.
The introduction of API access keys improved security by detaching authentication from user credentials and instead sending secret text strings along with requests. This approach allowed for more nuanced access control by key instead of by user ID, though API keys still faced risks from man-in-the-middle attacks and problematic storage of secrets in source code.
JSON Web Tokens (JWTs) address these issues by removing the need to send long-lived secrets on every request, introducing cryptographically verifiable, auto-expiring, short-lived sessions. Think of a JWT like a tamper-evident seal on a bottle of medication. Along with the seal, medication also has an expiration date printed on it. Users notice when the seal is tampered with or missing altogether, and when the medication expires.
These attributes enhance security any time a JWT is used instead of a long-lived shared secret. JWTs are not an end-all-be-all solution, but they do represent an evolution in authentication technology and are widely used for authentication and authorization on the Internet today.
What’s the structure of a JWT?
JWTs are composed of three fields separated by periods. The first field is a header, the second a payload, and the third a signature:
If we base64 decode the first two sections, we arrive at the following structure (comments added for clarity):
{
  "alg": "RS256",     // JWT signature algorithm
  "typ": "JWT"        // JWT type
}

{
  "iss": "MyDemoIDP", // Which identity provider issued this JWT
  "sub": "johndoe",   // Which user this JWT identifies
  "aud": "MyApp",     // Which app this JWT is destined for
  "iat": 1708985601,  // When this JWT was issued
  "exp": 1709986201,  // When this JWT expires
  "class": "admin"    // Extra, customer-defined metadata
}
We can then use the algorithm mentioned in the header (RS256) as well as the Identity Provider’s public key (example below) to check the last segment in the JWT, the signature (code not shown).
-----BEGIN PUBLIC KEY-----
MIIBIjANBgkqhkiG9w0BAQEFAAOCAQ8AMIIBCgKCAQEA3exXmNOELAnrtejo3jb2
S6p+GFR5FFlO0AqC4lA4HjNX9stgxX8tcbzv1yl5CT6VWl4kpnBweJzdBsNOauPz
uiCFQ0PtTfS0wDZm3inRPR1bTvJEuqsRTbsCxw/nRLU2+Dvu0zF41Wo4OkAbuKGS
3FwfdKOY/rX5tzjhnTe7uhWTarJG3nVnwmuD03INeNI+fbTgbUrOaVFT06Ussb9L
NNe6BHGQjs6NfG037Jk36dGY1Yiy/rutj6nJ7WkEK5ktQgWrvMMoXW9TfpYHi6sC
mnSEdaxNS8jtFodqpURUaLDIdTOGGgpUZsvzv3jDMYo5IxQK+6y+HUV8eRyDYd/o
rQIDAQAB
-----END PUBLIC KEY-----
The signature is what makes a JWT special. The token issuer, taking into account the claims, generates a signature based on a private secret or a public/private key pair. The public key can be published online, allowing anyone to check if a JWT was legitimately issued by an organization.
Proper authentication and authorization stop API attacks
No developer wants to release an insecure application, and no security team wants their developers to skip secure coding practices, but we know both happen. In the Enterprise Strategy Group report “Securing the API Attack Surface”2, a survey found that 39% of developers skip security processes due to the faster development cycles of continuous integration and continuous delivery (CI/CD). The same survey found more than half (57%) of responding organizations faced multiple security incidents related to insecure APIs in the last 12 months, and 35% of responding organizations faced at least one incident within the last year.
Along with its accompanying database, permissions, and user roles, your origin application is the ultimate security backstop of your API. However, Cloudflare can assist in keeping attacks away from your origin when you configure API Gateway with the correct context. Let’s examine three different API attacks and how to protect against them.
Missing or broken authentication
The ability for a user to send or receive data to an API and entirely bypass authentication falls into ‘broken authentication’. It’s easy to think of the expected use cases your users will take with your application. You may assume that just because a user logs in and your application is written so that users can only access their own data in their dashboard, that all users are logged in and would only access their own data. This assumption fails to account for a user making an HTTP request outside your application requesting or modifying another user’s data and there being nothing in the way to stop your API from replying. In the worst case, a lack of authorization policy checks can enable an API client to change data without an authentication token at all!
Ensuring that incoming requests have an authentication token attached to them and dropping the requests that don’t is a great way to stop the simplest API attacks.
Expired token reuse
Maybe your application already uses JWTs for user authentication. Your application decodes the JWT and looks for user claims for group membership, and you validate the claims before allowing customers access to your API. But are you checking the JWT expiration time?
Imagine a user pays for your service, but they secretly know they will soon downgrade to a free account. If the user’s tier is stored within the JWT and the application or gateway doesn’t validate the expiration time of the JWT, the user could save an old JWT and replay it to continue their access to their paid benefits. Validating JWT expiration time can prevent this type of replay attack.
Let’s say you’re using JWTs for authentication, validating the claims inside them, and also validating expiration time. But do you verify the JWT signature? Practically every JWT is signed by its issuer such that API admins and security teams that know the issuer’s signing key can verify that the JWT hasn’t been tampered with. Without the API Gateway or application checking the JWT signature, a malicious user could change their JWT claims, elevating their privileges to assume an administrator role in an application by starting with a normal, non-privileged user account.
JWT Validation from API Gateway safeguards your API from broken authentication and authorization attacks by checking that JWT signatures are intact, expiry times haven’t yet passed, and that authentication tokens are present to begin with.
Don’t other Cloudflare products do this?
Other Cloudflare products also use JWTs. Cloudflare Access is part of our suite of Zero Trust products, and is meant to tie into your Identity Provider. As a best practice, customers should validate the JWT that Access creates and sends to the origin.
Conversely, JWT Validation for API Gateway is a security layer compatible with any API without changing the setup, management, or expectation of the existing user flow. API Gateway’s JWT Validation is meant to validate pre-existing JWTs that may be used by any number of services at your API origin. You really need both: Access for your internal users or employees and API Gateway for your external users.
In addition, some customers use a custom Cloudflare Worker to validate JWTs, which is a great use case for the Workers platform. However, for straightforward use cases customers may find the JWT Validation experience of API Gateway easier to interact with and manage over the lifecycle of their application. If you are validating JWTs with a Worker and today’s release of JWT Validation isn’t yet at feature parity for your custom Worker, let your account representative know. We’re interested in expanding our capabilities to meet your requirements.
What’s next?
In a future release, we will go beyond checking pre-existing JWTs, and customers will be able to generate and enforce authorization policies entirely within API Gateway. We’ll also upgrade our on-demand developer portal creation with the ability to issue keys and authentication tokens to your development team directly, streamlining API management with Cloudflare.
In addition, stay tuned for future API Gateway feature launches where we’ll use our knowledge of API traffic norms to automatically suggest security policies that highlight and stop Broken Object/Function Level Authorization attacks outside the JWT Validation use case.
Existing API Gateway customers can try the new feature now. Enterprise customers without API Gateway should sign up for the trial to try the latest from API Gateway.
—
1Gartner, “API Security: What You Need to Do to Protect Your APIs”, Analyst(s) Mark O’Neill, Dionisio Zumerle, Jeremy D’Hoinne, January 13, 2023 2Enterprise Strategy Group, “Securing the API Attack Surface”, Analyst, Melinda Marks, May 2023
We are excited to announce two enhancements to Cloudflare’s Data Loss Prevention (DLP) service: support for Optical Character Recognition (OCR) and predefined source code detections. These two highly requested DLP features make it easier for organizations to protect their sensitive data with granularity and reduce the risks of breaches, regulatory non-compliance, and reputational damage:
With OCR, customers can efficiently identify and classify sensitive information contained within images or scanned documents.
With predefined source code detections, organizations can scan inline traffic for common code languages and block those HTTP requests to prevent data leaks, as well as detecting the storage of code in repositories such as Google Drive.
OCR enables the extraction of text from images. It converts the text within those images into readable text data that can be easily edited, searched, or analyzed, unlike images.
Sensitive data regularly appears in image files. For example, employees are often asked to provide images of identification cards, passports, or documents as proof of identity or work status. Those images can contain a plethora of sensitive and regulated classes of data, including Personally Identifiable Information (PII) — for example, passport numbers, driver’s license numbers, birthdates, tax identification numbers, and much more.
OCR can be leveraged within DLP policies to prevent the unauthorized sharing or leakage of sensitive information contained within images. Policies can detect when sensitive text content is being uploaded to cloud storage or shared through other communication channels, and block the transaction to prevent data loss. This assists in enforcing compliance with regulatory requirements related to data protection and privacy.
About source code detection
Source code fuels digital business and contains high-value intellectual property, including proprietary algorithms and encrypted secrets about a company’s infrastructure. Source code has been and will continue to be a target for theft by external attackers, but customers are also increasingly concerned about the inadvertent exposure of this information by internal users. For example, developers may accidentally upload source code to a publicly available GitHub repository or to generative AI tools like ChatGPT. While these tools have their place (like using AI to help with debugging), security teams want greater visibility and more precise control over what data flows to and from these tools.
To help customers, Cloudflare now offers predefined DLP profiles for common code languages — specifically C, C++, C#, Go, Haskell, Java, Javascript, Lua, Python, R, Rust, and Swift. These machine learning-based detections train on public repositories for algorithm development, ensuring they remain up to date. Cloudflare’s DLP inspects the HTTP body of requests for these DLP profiles, and security teams can block traffic accordingly to prevent data leaks.
How to use these capabilities
Cloudflare offers you flexibility to determine what data you are interested in detecting via DLP policies. You can use predefined profiles created by Cloudflare for common types of sensitive or regulated data (e.g. credentials, financial data, health data, identifiers), or you can create your own custom detections.
To implement inline blocking of source code, simply select the DLP profiles for the languages you want to detect. For example, if my organization uses Rust, Go, and JavaScript, I would turn on those detections:
I would then create a blocking policy via our secure web gateway to prevent traffic containing source code. Here, we block source code from being uploaded to ChatGPT:
Adding OCR to any detection is similarly easy. Below is a profile looking for sensitive data that could be stored in scanned documents.
With the detections selected, simply enable the OCR toggle, and wherever you are applying DLP inspections, images in your content will be scanned for sensitive data. The detections work the same in images as they do in the text, including Match Counts and Context Analysis, so no additional logic or settings are needed.
Consistency across use cases is a core principle of our DLP solution, so as always, this feature is available for both data at rest, available via CASB, and data in transit, available via Gateway.
Today, nearly two percent of all TLS 1.3 connections established with Cloudflare are secured with post-quantum cryptography. We expect to see double-digit adoption by the end of 2024. Apple announced in February 2024 that it will secure iMessage with post-quantum cryptography before the end of the year, and Signal chats are already secured. What once was the topic of futuristic tech demos will soon be the new security baseline for the Internet.
A lot has been happening in the field over the last few years, from mundane name changes (ML-KEM is the new name for Kyber), to new proposed algorithms in the signatures onramp, to the catastrophic attack on SIKE. Plenty that has been written merely three years ago now feels quite out of date. Thus, it is high time for an update: in this blog post we’ll take measure of where we are now in early 2024, what to expect for the coming years, and what you can do today.
Fraction of TLS 1.3 connections established with Cloudflare that are secured with post-quantum cryptography.
The quantum threat
First things first: why are we migrating our cryptography? It’s because of quantum computers. These marvelous devices, instead of restricting themselves to zeroes and ones, compute using more of what nature actually affords us: quantum superposition, interference, and entanglement. This allows quantum computers to excel at certain very specific computations, notably simulating nature itself, which will be very helpful in developing new materials.
Quantum computers are not going to replace regular computers, though: they’re actually much worse than regular computers at most tasks. Think of them as graphic cards — specialized devices for specific computations.
Unfortunately, quantum computers also excel at breaking key cryptography that’s in common use today. Thus, we will have to move to post-quantum cryptography: cryptography designed to be resistant against quantum attack. We’ll discuss the exact impact on the different types of cryptography later on. For now quantum computers are rather anemic: they’re simply not good enough today to crack any real-world cryptographic keys.
That doesn’t mean we shouldn’t worry yet: encrypted traffic can be harvested today, and decrypted with a quantum computer in the future.
Quantum numerology
When will they be good enough? Like clockwork, every year there are news stories of new quantum computers with record-breaking number of qubits. This focus on counting qubits is quite misleading. To start, quantum computers are analogue machines, and there is always some noise interfering with the computation.
There are big differences between the different types of technology used to build quantum computers: silicon-based quantum computers seem to scale well, are quick to execute instructions, but have very noisy qubits. This does not mean they’re useless: with quantum error correcting codes one can effectively turn tens of millions of noisy silicon qubits into a few thousand high-fidelity ones, which could be enough to break RSA. Trapped-ion quantum computers, on the other hand, have much less noise, but have been harder to scale. Only a few hundred-thousand trapped-ion qubits could potentially draw the curtain on RSA.
State-of-art in quantum computing measured by qubit count and noise in 2021, 2022, and 2023. Once the shaded gray area hits the left-most red line, we’re in trouble. Red line is expected to move to the left. Compiled by Samuel Jaques of the University of Waterloo.
We’re only scratching the surface with the number of qubits and noise. For instance, a quirk of many quantum computers is that only adjacent qubits can interact — something that most estimates do not take into account. On the other hand, for a specific quantum computer, a tailored algorithm can perform much better than a generic one. We can only guess what a future quantum computer will look like, and today’s estimates are most likely off by at least an order of magnitude.
When will quantum computers break real-world cryptography?
So, when do we expect the demise of RSA-2048 which is in common use today? In a 2022 survey, over half the interviewed experts thought it’d be more probable than not that by 2037 such a cryptographically relevant quantum computer would’ve been built.
We can also look at the US government’s timeline for the migration to post-quantum cryptography. The National Security Agency (NSA) aims to finish its migration before 2033, and will start to prefer post-quantum ready vendors for many products in 2025. The US government has a similarly ambitious timeline for the country as a whole: the aim is to be done by 2035.
NSA timeline for migrating third-party software to post-quantum cryptography.
More anecdotally, at industry conferences on the post-quantum migration, I see particularly high participation of the automotive branch. Not that surprising, considering that the median age of a car on the road is 14 years, a lot of money is on the line, and not all cryptography used in cars can be upgraded easily once on the road.
So when will it arrive? Whether it’s 2034 or 2050, it will be too soon. The immense success of cryptography means it’s all around us now, from dishwasher, to pacemaker, to satellite. Most upgrades will be easy, and fit naturally in the product’s lifecycle, but there will be a long tail of difficult and costly upgrades.
Two migrations
To help prioritize, it is important to understand that there is a big difference in the difficulty, impact, and urgency of the post-quantum migration for the different kinds of cryptography required to create secure connections. In fact, for most organizations there will be two post-quantum migrations: key agreement and signatures / certificates.
Let’s explain this for the case of creating a secure connection when visiting a website in a browser. The workhorse is a symmetric cipher such as AES-GCM. It’s what you would think of when thinking of cryptography: both parties, in this case the browser and server, have a shared key, and they encrypt / decrypt their messages with the same key. Unless you have that key, you can’t read anything, or modify anything.
The good news is that symmetric ciphers, such as AES-GCM, are already post-quantum secure. There is a common misconception that Grover’s quantum algorithm requires us to double the length of symmetric keys. On closer inspection of the algorithm, it’s clear that it is not practical. The way NIST, the US National Institute for Standards and Technology (who have been spearheading the standardization of post-quantum cryptography) defines their post-quantum security levels is very telling. They define a specific security level by saying the scheme should be as hard to crack using either a classical or quantum computer as an existing symmetric cipher as follows:
Level
Definition, as least as hard to break as …
Example
1
To recover the key of AES-128 by exhaustive search
ML-KEM-512, SLH-DSA-128s
2
To find a collision in SHA256 by exhaustive search
ML-DSA-44
3
To recover the key of AES-192 by exhaustive search
ML-KEM-768
4
To find a collision in SHA384 by exhaustive search
5
To recover the key of AES-256 by exhaustive search
ML-KEM-1024, SLH-DSA-256s
NIST PQC security levels, higher is harder to break (“more secure”). The examples ML-DSA, SLH-DSA and ML-KEM are covered below.
There are good intentions behind suggesting doubling the key lengths of symmetric cryptography. In many use cases, the extra cost is not that high, and it mitigates any theoretical risk completely. Scaling symmetric cryptography is cheap: double the bits is typically far less than half the cost. So on the surface, it is simple advice.
But if we insist on AES-256, it seems only logical to insist on NIST PQC level 5 for the public key cryptography as well. The problem is that public key cryptography does not scale very well. Depending on the scheme, going from level 1 to level 5 typically more than doubles data usage and CPU cost. As we’ll see, deploying post-quantum signatures at level 1 is already painful, and deploying them at level 5 is problematic.
A second reason is that upgrading symmetric cryptography isn’t always easy. If it requires replacing hardware, it can be costly indeed. An organization that cannot migrate all its cryptography in time simply can’t afford to waste its time doubling symmetric key lengths.
First migration: key agreement
Symmetric ciphers are not enough on their own: how do I know which key to use when visiting a website for the first time? The browser can’t just send a random key, as everyone listening in would see that key as well. You’d think it’s impossible, but there is some clever math to solve this, so that the browser and server can agree on a shared key. Such a scheme is called a key agreement mechanism, and is performed in the TLS handshake. Today almost all traffic is secured with X25519, a Diffie–Hellman-style key agreement, but its security is completely broken by Shor’s algorithm on a quantum computer. Thus, any communication secured today with Diffie–Hellman, when stored, can be decrypted in the future by a quantum computer.
This makes it urgent to upgrade key agreement today. As we will see, luckily, post-quantum key agreement is relatively straight-forward to deploy.
Second migration: signatures / certificates
The key agreement allows secure agreement on a key, but there is a big gap: we do not know with whom we agreed on the key. If we only do key agreement, an attacker in the middle can do separate key agreements with the browser and server, and re-encrypt any exchanged messages. To prevent this we need one final ingredient: authentication.
This is achieved using signatures. When visiting a website, say cloudflare.com, the web server presents a certificate signed by a certification authority (CA) that vouches that the public key in that certificate is controlled by cloudflare.com. In turn, the web server signs the handshake and shared key using the private key corresponding to the public key in the certificate. This allows the client to be sure that they’ve done a key agreement with cloudflare.com.
RSA and ECDSA are commonly used traditional signature schemes. Again, Shor’s algorithm makes short work of them, allowing a quantum attacker to forge any signature. That means that a MitM (man-in-the-middle) can break into any connection that uses a signature scheme that is not post-quantum secure. This is of course an active attack: if the attacker isn’t in the middle as the handshake happens, the connection is not affected.
This makes upgrading signature schemes for TLS on the face of it less urgent, as we only need to have everyone migrated by the time the cryptographically-relevant quantum computer arrives. Unfortunately, we will see that migration to post-quantum signatures is much more difficult, and will require more time.
Timeline
Before we dive into the technical challenges of migrating the Internet to post-quantum cryptography, let’s have a look at how we got here, and what to expect in the coming years. Let’s start with how post-quantum cryptography came to be.
Origin of post-quantum cryptography
Physicists Feynman and Manin independently proposed quantum computers around 1980. It took another 14 years before Shor published his algorithm attacking public key cryptography. Most post-quantum cryptography predates Shor’s famous algorithm.
There are various branches of post-quantum cryptography, of which the most prominent are lattice-based, hash-based, multivariate, code-based, and isogeny-based. Except for isogeny-based cryptography, none of these were initially conceived as post-quantum cryptography. In fact, early code-based and hash-based schemes are contemporaries of RSA, being proposed in the 1970s, and comfortably predate the publication of Shor’s algorithm in 1994. Also, the first multivariate scheme from 1988 is comfortably older than Shor’s algorithm. It is a nice coincidence that the most successful branch, lattice-based cryptography, is Shor’s closest contemporary, being proposed in 1996. For comparison, elliptic curve cryptography, which is widely used today, was first proposed in 1985.
In the years after the publication of Shor’s algorithm, cryptographers took measure of the existing cryptography: what’s clearly broken, and what could be post-quantum secure? In 2006, the first annual International Workshop on Post-Quantum Cryptography took place. From that conference, an introductory text was prepared, which holds up rather well as an introduction to the field. A notable caveat is the demise of the Rainbow signature scheme. In that same year, the elliptic-curve key-agreement X25519 was proposed, which now secures the vast majority of all Internet connections.
NIST PQC competition
Ten years later, in 2016, NIST, the US National Institute of Standards and Technology, launched a public competition to standardize post-quantum cryptography. They’re using a similar open format as was used to standardize AES in 2001, and SHA3 in 2012. Anyone can participate by submitting schemes and evaluating the proposals. Cryptographers from all over the world submitted algorithms. To focus attention, the list of submissions were whittled down over three rounds. From the original 82, based on public feedback, eight made it into the final round. From those eight, in 2022, NIST chose to pick four to standardize first: one KEM (for key agreement) and three signature schemes.
Old name
New name
Branch
Kyber
ML-KEM (FIPS 203) Module-lattice based Key-Encapsulation Mechanism Standard
Lattice-based
Dilithium
ML-DSA (FIPS 204) Module-lattice based Digital Signature Standard
Lattice-based
SPHINCS+
SLH-DSA (FIPS 205) Stateless Hash-Based Digital Signature Standard
Hash-based
Falcon
FN-DSA FFT over NTRU lattices Digital Signature Standard
Lattice-based
First four selected post-quantum algorithms from NIST competition.
ML-KEM is the only post-quantum key agreement close to standardization now, and despite some occasional difficulty with its larger key sizes, in many cases it allows for a drop-in upgrade.
The situation is rather different with the signatures: it’s quite telling that NIST chose to standardize three already. And there are even more signatures set to be standardized in the future. The reason is that none of the proposed signatures are close to ideal. In short, they all have much larger keys and signatures than we’re used to. From a security standpoint SLH-DSA is the most conservative choice, but also the worst performer. For public key and signature sizes, FN-DSA is the best of the worst, but is difficult to implement safely because of floating-point arithmetic. This leaves ML-DSA as the default pick. More in depth comparisons are included below.
Name changes
Undoubtedly Kyber is the most familiar name, as it’s a preliminary version of Kyber that has already been deployed by Chrome and Cloudflare among others to counter store-now/decrypt-later. We will have to adjust, though. Just like Rijndael is most well-known as AES, and Keccak is SHA3 to most, ML-KEM is set to become the catchy new moniker for Kyber going forward.
Final standards
Although we know NIST will standardize these four, we’re not quite there yet. In August 2023, NIST released three draft standards for the first three with minor changes, and solicited public feedback. FN-DSA is delayed for now, as it’s more difficult to standardize and deploy securely.
For timely adopters, it’s important to be aware that based on the feedback on the first three drafts, there might be a few small tweaks before the final standards are released. These changes will be minor, but the final versions could well be incompatible on the wire with the current draft standards. These changes are mostly immaterial, only requiring a small update, and do not meaningfully affect the brunt of work required for the migration, including organizational engagement, inventory, and testing. Before shipping, there can be good reasons to wait for the final standards: support for preliminary versions is not widespread, and it might be costly to support both the draft and final standards. Still, many organizations have not started work on the post-quantum migration at all, citing the lack of standards — a situation that has been called crypto procrastination.
So, when can we expect the final standards? There is no set timeline, but we expect the first three standards to be out around mid-2024.
Predicting protocol and software support
Having NIST’s final standards is not enough. The next step is to standardize the way the new algorithms are used in higher level protocols. In many cases, such as key agreement in TLS, this is as simple as assigning an identifier to the new algorithms. In other cases, such as DNSSEC, it requires a bit more thought. Many working groups at the IETF have been preparing for years for the arrival of NIST’s final standards, and I expect that many protocol integrations will be available before the end of 2024. For the moment, let’s focus on TLS.
The next step is software support. Not all ecosystems can move at the same speed, but we have seen a lot of preparation already. We expect several major open ecosystems to have post-quantum cryptography and TLS support available early 2025, if not earlier.
Again, for TLS there is a big difference again between key agreement and signatures. For key agreement, the server and client can add and enable support for post-quantum key agreement independently. Once enabled on both sides, TLS negotiation will use post-quantum key agreement. We go into detail on TLS negotiation in this blog post. If your product just uses TLS, your store-now/decrypt-now problem could be solved by a simple software update of the TLS library.
Post-quantum TLS certificates are more of a hassle. Unless you control both ends, you’ll need to install two certificates: one post-quantum certificate for the new clients, and a traditional one for the old clients. If you aren’t using automated issuance of certificates yet, this might be a good reason to check that out. TLS allows the client to signal which signature schemes it supports so that the server can choose to serve a post-quantum certificate only to those clients that support it. Unfortunately, although almost all TLS libraries support setting up multiple certificates, not all servers expose that configuration. If they do, it will still require a configuration change in most cases. (Although undoubtedly caddy will do it for you.)
Talking about post-quantum certificates: it will take some time before Certification Authorities (CAs) can issue them. Their HSMs will first need (hardware) support, which then will need to be audited. Also, the CA/Browser forum needs to approve the use of the new algorithms. Of these, the audits are likely to be the bottleneck, as there will be a lot of submissions after the publication of the NIST standards. It’s unlikely we will see a post-quantum certificate issued by a CA before 2026.
This means that it is not unlikely that come 2026, we are in an interesting in-between time, where almost all Internet traffic is protected by post-quantum key agreement, but not a single public post-quantum certificate is used.
More post-quantum standards
NIST is not quite done standardizing post-quantum cryptography. There are two more post-quantum competitions running: round 4 and the signatures onramp.
Round 4
From the post-quantum competition, NIST is still considering standardizing one or more of the code-based key agreements BIKE, HQC, Classic McEliece in a fourth round. The performance of BIKE and HQC, both in key sizes and computational efficiency, is much worse than ML-KEM. NIST is considering standardizing one as a backup KEM, in case there is a cryptanalytic breakthrough against lattice-based cryptography, such as ML-KEM.
Classic McEliece does not compete with ML-KEM directly as a general purpose KEM. Instead, it’s a specialist: Classic McEliece public keys are very large (268kB), but it has (for a post-quantum KEM) very small ciphertexts (128 bytes). This makes Classic McEliece very attractive for use cases where the public key can be distributed in advance, such as to secure a software update mechanism.
Signatures onramp
In late 2022, after announcing the first four picks, NIST also called a new competition, dubbed the signatures onramp, to find additional signature schemes. The competition has two goals. The first is hedging against cryptanalytic breakthroughs against lattice-based cryptography. NIST would like to standardize a signature that performs better than SLH-DSA, but is not based on lattices. Secondly, they’re looking for a signature scheme that might do well in use cases where the current roster doesn’t do well: we will discuss those at length later on in this post.
In July 2023, NIST posted the 40 submissions they received for a first round of public review. The cryptographic community got to work, and as is quite normal for a first round, at the time of writing (February 2024) have managed to break 10 submissions completely, and weaken a couple of others drastically. Thom Wiggers maintains a useful website comparing the submissions.
There are some very promising submissions. We will touch briefly upon them later on. It is worth mentioning that just like the main post-quantum competition, the selection process will take many years. It is unlikely that any of these onramp signature schemes will be standardized before 2027 — if they’re not broken in the first place.
Before we dive into the nitty-gritty of migrating the Internet to post-quantum cryptography, it’s instructive to look back at some past migrations.
Looking back: migrating to TLS 1.3
One of the big recent migrations on the Internet was the switch from TLS 1.2 to TLS 1.3. Work on the new protocol started around 2014. The goal was ambitious: to start anew, cut a lot of cruft, and have a performant clean transport protocol of the future. After a few years of hard work, the protocol was ready for field tests. In good spirits, in September 2016, we announced that we support TLS 1.3.
Adoption of TLS 1.3 in December 2017: less than 0.06%.
It turned out that revision 11 of TLS 1.3 was completely undeployable in practice, breaking a few percent of all users. The reason? Protocol ossification. TLS was designed with flexibility in mind: the client sends a list of TLS versions it supports, so that the connection can be smoothly upgraded to the newest crypto. That’s the theory, but if you never move the joint, it rusts: for one, it turned out that a lot of server software and middleware simply crashed on just seeing an unknown version. Others would ignore the version number completely, and try to parse the messages as if it was TLS 1.2 anyway. In practice, the version negotiation turned out to be completely broken. So how was this fixed?
In revision 22 of the TLS 1.3 draft, changes were made to make TLS 1.3 look like TLS 1.2 on the wire: in particular TLS 1.3 advertises itself as TLS 1.2 with the normal version negotiation. Also, a lot of unnecessary fields are included in the TLS 1.3 ClientHello just to appease any broken middleboxes that might be peeking in. A server that doesn’t understand TLS 1.3 wouldn’t even see that an attempt was made to negotiate TLS 1.3. Using a sneaky new extension, a second version negotiation mechanism was added. For the details, check out the December 2017 blog post linked above.
Today TLS 1.3 is a huge success, and is used by more than 93% of the connections.
TLS 1.3 adoption in February 2024. QUIC uses TLS 1.3 under the hood.
To help prevent ossification in the future, new protocols such as TLS 1.3 and QUIC use GREASE, where clients send unknown identifiers on purpose, including cryptographic algorithm identifiers, to help catch similar bugs, and keep the flexibility.
Migrating the Internet to post-quantum key agreement
Now that we understand what we’re dealing with on a high level, let’s dive into upgrading key agreement on the Internet. First, let’s have a closer look at NIST’s first and so far only post-quantum key agreement: ML-KEM.
ML-KEM was submitted under the name CRYTALS-Kyber. Even though it will be a US standard, its designers work in industry and academia across France, Switzerland, the Netherlands, Belgium, Germany, Canada, and the United States. Let’s have a look at its performance.
ML-KEM versus X25519
Today the vast majority of clients use the traditional key agreement X25519. Let’s compare that to ML-KEM.
Keyshares size(in bytes)
Ops/sec (higher is better)
Algorithm
PQ
Client
Server
Client
Server
ML-KEM-512
✅
800
768
45,000
70,000
ML-KEM-768
✅
1,184
1,088
29,000
45,000
ML-KEM-1024
✅
1,568
1,568
20,000
30,000
X25519
❌
32
32
19,000
19,000
Size and CPU compared between X25519 and ML-KEM. Performance varies considerably by hardware platform and implementation constraints, and should be taken as a rough indication only.
ML-KEM-512, -768 and -1024 aim to be as resistant to (quantum) attack as AES-128, -192 and -256 respectively. Even at the AES-128 level, ML-KEM is much bigger than X25519, requiring 1,568 bytes over the wire, whereas X25519 requires a mere 64 bytes.
On the other hand, even ML-KEM-1024 is typically significantly faster than X25519, although this can vary quite a bit depending on your platform.
ML-KEM-768 and X25519
At Cloudflare, we are not taking advantage of that speed boost just yet. Like many other early adopters, we like to play it safe and deploy a hybrid key-agreement combining X25519 and (a preliminary version of) ML-KEM-768. This combination might surprise you for two reasons.
Why combine X25519 (“128 bits of security”) with ML-KEM-768 (“192 bits of security”)?
Why bother with the non post-quantum X25519?
The apparent security level mismatch is a hedge against improvements in cryptanalysis in lattice-based cryptography. There is a lot of trust in the (non post-quantum) security of X25519: matching AES-128 is more than enough. Although we are comfortable in the security of ML-KEM-512 today, over the coming decades cryptanalysis could improve. Thus, we’d like to keep a margin for now.
The inclusion of X25519 has two reasons. First, there is always a remote chance that a breakthrough renders all variants of ML-KEM insecure. In that case, X25519 still provides non post-quantum security, and our post-quantum migration didn’t make things worse.
More important is that we do not only worry about attacks on the algorithm, but also on the implementation. A noteworthy example where we dodged a bullet is that of KyberSlash, a timing attack that affected many implementations of Kyber (an earlier version of ML-KEM), including our own. Luckily KyberSlash does not affect Kyber as it is used in TLS. A similar implementation mistake that would actually affect TLS, is likely to require an active attacker. In that case, the likely aim of the attacker wouldn’t be to decrypt data decades down the line, but steal a cookie or other token, or inject a payload. Including X25519 prevents such an attack.
So how well do ML-KEM-768 and X25519 together perform in practice?
Performance and protocol ossification
Browser experiments
Being well aware of potential compatibility and performance issues, Google started a first experiment with post-quantum cryptography back in 2016, the same year NIST started their competition. This was followed up by a second larger joint experiment by Cloudflare and Google in 2018. We tested two different hybrid post-quantum key agreements: CECPQ2, which is a combination of the lattice-based NTRU-HRSS and X25519, and CECPQ2b, a combination of the isogeny-based SIKE and again X25519. NTRU-HRSS is very similar to ML-KEM in size, but is computationally somewhat more taxing on the client-side. SIKE on the other hand, has very small keys, is computationally very expensive, and was completely broken in 2022. With respect to TLS handshake times, X25519+NTRU-HRSS performed very well, being hard to distinguish by eye from the control connections.
Handshake times compared between X25519 (blue), X25519+SIKE (green) and X25519+NTRU-HRSS (orange).
Unfortunately, a small but significant fraction of clients experienced broken connections with NTRU-HRSS. The reason: the size of the NTRU-HRSS keyshares. In the past, when creating a TLS connection, the first message sent by the client, the so-called ClientHello, almost always fit within a single network packet. The TLS specification allows for a larger ClientHello, however no one really made use of that. Thus, protocol ossification strikes again as there are some middleboxes, load-balancers, and other software that tacitly assume the ClientHello always fits in a single packet.
Over the subsequent years, Chrome kept running their PQ experiment at a very low rate, and did a great job reaching out to vendors whose products were incompatible. If it were not for these compatibility issues, we would’ve likely seen Chrome ramp up post-quantum key agreement five years earlier.
Today the situation looks better. At the time of writing, Chrome has enabled post-quantum key-agreement for 10% of all users. That accounts for about 1.8% of all our TLS 1.3 connections, as shown in the figure below. That’s a lot, but we’re not out of the woods yet. There could well be performance and compatibility issues that prevent a further rollout.
Fraction of TLS 1.3 connections established with Cloudflare that are secured with post-quantum cryptography. At the moment, it’s more than 99% from Chrome.
Nonetheless, we feel it’s more probable than not that we will see Chrome enable post-quantum key agreement for more users this year.
Other browsers
In January 2024, Firefox landed the code to support post-quantum key agreement in nightly, and it’s likely it will land in Firefox proper later in 2024. For Chrome-derived browsers, such as Edge and Brave, it’s easy to piggyback on the work of Chrome, and we could well see them follow suit when Chrome turns on post-quantum key-agreement by default.
However, browser to server connections aren’t the only connections important to the Internet.
Testing connections to customer origins
In September 2023, we added support for our customers to enable post-quantum key agreement on connections from Cloudflare to their origins. That’s connection (3) in the following diagram. This can be done in two ways: the fast way, and the slow but safer way. In both cases, if the origin does not support it, we fall back to traditional key-agreement. We explain the details of these in the blog post, but in short, in the fast way we send the post-quantum keyshare immediately, and in the slow but safe way we let the origin ask for post-quantum using a HelloRetryRequest message. Chrome, by the way, is deploying post-quantum key agreement the fast way.
Typical connection flow when a visitor requests an uncached page.
At the same time, we started regularly testing our customer origins to see if they would support us offering post-quantum key agreement. We found all origins supported the safe but slow method. The fast method didn’t fare as well, as we found that 0.34% of connections would break. That’s higher than the failure rates seen by browsers.
Unsurprisingly, many failures seem to be caused by the large ClientHello. Interestingly, the majority are caused by servers not correctly implementing HelloRetryRequest. To investigate the cause, we have reached out to customers to ascertain the cause. We’re very grateful to those that have responded, and we’re currently working through the data.
Outlook
As we’ve seen, post-quantum key agreement, despite protocol ossification, is relatively straightforward to deploy. We’re also on a great trajectory, as we might well see double-digit client support for post-quantum key agreement later this year.
Let’s turn to the second, more difficult migration.
Migrating the Internet to post-quantum signatures
Now, we’ll turn our attention to upgrading the signatures used on the Internet.
The zoo of post-quantum signatures
Let’s start by sizing up the post-quantum signatures we have available today at the AES-128 security level: ML-DSA-44, FN-DSA-512, and the two variants of SLH-DSA. As a comparison, we also include the venerable Ed25519 and RSA-2048 in wide use today, as well as a sample of five promising signature schemes from the signatures onramp.
Sizes (bytes)
CPU time (lower is better)
PQ
Public key
Signature
Signing
Verification
Standardized
Ed25519
❌
32
64
1 (baseline)
1 (baseline)
RSA-2048
❌
256
256
70
0.3
NIST drafts
ML-DSA-44
✅
1,312
2,420
4.8
0.5
FN-DSA-512
✅
897
666
8 ⚠️
0.5
SLH-DSA-128s
✅
32
7,856
8,000
2.8
SLH-DSA-128f
✅
32
17,088
550
7
Sample from signatures onramp
MAYOone
✅
1,168
321
4.7
0.3
MAYOtwo
✅
5,488
180
5
0.2
SQISign I
✅
64
177
60,000
500
UOV Is-pkc
✅
66,576
96
2.5
2
HAWK512
✅
1,024
555
2
1
Comparison of various signature schemes at the security level of AES-128. CPU times vary significantly by platform and implementation constraints and should be taken as a rough indication only. ⚠️FN-DSA signing time when using fast but dangerous floating-point arithmetic — see warning below.
It is immediately clear that none of the post-quantum signature schemes comes even close to being a drop-in replacement for Ed25519 (which is comparable to ECDSA P-256) as most of the signatures are simply much bigger. The exceptions are SQISign, MAYO, and UOV from the onramp, but they’re far from ideal. MAYO and UOV have large public keys, and SQISign requires an immense amount of computation.
When to use SLH-DSA
As mentioned before, today we only have drafts for SLH-DSA and ML-DSA. In every relevant performance metric, ML-DSA beats SLH-DSA handily. (Even the small public keys of SLH-DSA are not any advantage. If you include the ML-DSA public key with its signature, it’s still smaller than an SLH-DSA signature, and in that case you can use the short hash of the ML-DSA public key as a short public key.)
The advantage of SLH-DSA is that there is a lot of trust in its security. To forge an SLH-DSA signature you need to break the underlying hash function quite badly. It is not enough to break the collision resistance of the hash, as has been done with SHA-1 and MD5. In fact, as of February 2024, an SHA-1 based SLH-DSA would still be considered secure. Of course, SLH-DSA does not use SHA-1, and instead uses SHA2 and SHA3, against which not a single practical attack is known.
If you can shoulder the cost, SLH-DSA has the best security guarantee, which might be crucial when dealing with long-lasting signatures, or deployments where upgrades are impossible.
Be careful with FN-DSA
Looking ahead a bit: the best of the worst seems to be FN-DSA-512. FN-DSA-512’s signatures and public key together are only 1,563 bytes, with somewhat reasonable signing time. FN-DSA has an achilles heel though — for acceptable signing performance, it requires fast floating-point arithmetic. Without it, signing is about 20 times slower. But speed is not enough, as the floating-point arithmetic has to run in constant time — without it, the FN-DSA private key can be recovered by timing signature creation. Writing safe FN-DSA implementations has turned out to be quite challenging, which makes FN-DSA dangerous when signatures are generated on the fly, such as in a TLS handshake. It is good to stress that this only affects signing. FN-DSA verification does not require floating-point arithmetic (and during verification there wouldn’t be a private key to leak anyway.)
There are many signatures on the web
The biggest pain-point of migrating the Internet to post-quantum signatures, is that there are a lot of signatures even in a single connection. When you visit this very website for the first time, we send six signatures and two public keys.
The majority of these are for the certificate chain: the CA signs the intermediate certificate, which signs the leaf certificate, which in turn signs the TLS transcript to prove the authenticity of the server. If you’re keeping count: we’re still three signatures short.
Two of these are for SCTs required for certificate transparency. Certificate transparency is a key, but lesser known, part of the Web PKI, the ecosystem that secures browser connections. Its goal is to publicly log every certificate issued, so that misissuances can be detected after the fact. It works by having independent parties run CT logs. Before issuing a certificate, a CA must first submit it to at least two different CT logs. An SCT is a signature of a CT log that acts as a proof, a receipt, that the certificate has been logged.
The final signature is an OCSP staple, which proves that the leaf certificate hasn’t been revoked in the last few days.
Tailoring signature schemes
There are two aspects of how a signature can be used that are worthwhile to highlight: whether the public key is included with the signature, and whether the signature is online or offline.
For the SCTs and the signature of the root on the intermediate, the public key is not transmitted during the handshake. Thus, for those, a signature scheme with smaller signatures but larger public keys, such as MAYO or UOV, would be particularly well-suited. For the other signatures, the public key is included, and it’s more important to minimize the sizes of the combined public key and signature.
The handshake signature is the only signature that is created online — all the other signatures are created ahead of time. The handshake signature is created and verified only once, whereas the other signatures are typically verified many times by different clients. This means that for the handshake signature, it’s advantageous to balance signing and verification time which are both in the hot path, whereas for the other signatures having better verification time at the cost of slower signing is worthwhile. This is one of the advantages RSA still enjoys over elliptic curve signatures today.
Putting together different signature schemes is a fun puzzle, but it also comes with some drawbacks. Using multiple different schemes increases the attack surface because an algorithmic or implementation vulnerability in one compromises the whole. Also, the whole ecosystem needs to implement and optimize multiple algorithms, which is a significant burden.
Putting it together
So, what are some reasonable combinations to try?
With NIST’s current picks
With the draft standards available today, we do not have a lot of options.
If we simply switch to ML-DSA-44 for all signatures, we’re adding 17kB of data that needs to be transmitted from the server to the client during the TLS handshake. Is that a lot? Probably. We will address that later on.
If we wait a bit and replace all but the handshake signature with FN-DSA-512, we’re looking at adding only 8kB. That’s much better, but I have to repeat that it’s difficult to implement FN-DSA-512 signing safely without timing side channels, and there is a good chance we’ll shoot ourselves in the foot if we’re not careful.
Another way to shoot ourselves in the foot today is with stateful hash-based signatures.
Stateful hash-based signatures
Apart from symmetric cryptography, there are already post-quantum signature schemes standardized today: LMS / HRSS and XMSS(MT). Just like SLH-DSA, these are hash-based signature schemes, and thus, algorithmically they’re very conservative.
But they come with a major drawback: you need to remember the state. What is this state? When generating a keypair, you prepare a fixed number of one-time-use slots, and you need to remember which one you’ve used. If you use the same prepared slot twice, then anyone can create a forgery with those two. Managing this state is not impossible, but quite tricky. What if the server was restored from a backup? The state can be distributed over multiple servers, but that changes the usual signature flow quite a bit, and it’s unclear whether regulators will allow this approach, as the state is typically considered part of the private key.
So, how do they perform? It’s hard to give a definite answer. These hash-based signature schemes have a lot of knobs to turn and can be fine-tuned to their use case. You can see for yourself, and play around with the parameters on this website. With standardized variants (with security parameter n=24) for the offline signatures, we can beat ML-DSA-44 in data on the wire, but can’t outperform FN-DSA-512. With security parameter n=16, which has not been standardized, stateful hash-based signatures are competitive with FN-DSA-512, and can even beat it on size. However, n=16 comes with yet another footgun: it allows the signer to create a single signature that validates two different messages — there is no non-repudiation.
All in all, FN-DSA-512 and stateful hash-based signatures tempt us with a similar and clear performance benefit over ML-DSA-44, but are difficult to use safely.
Signatures on the horizon
There are some very promising new signature schemes submitted to the NIST onramp.
UOV (unbalanced oil and vinegar) is an old multivariate scheme with a large public key (66.5kB), but small signatures (96 bytes). If we combine UOV for the root and SCTs with ML-DSA-44 for the others, we’re looking at only 10kB — close to FN-DSA-512.
Over the decades, there have been many attempts to add some structure to UOV public keys, to get a better balance between public key and signature size. Many of these so-called structured multivariate schemes, which includes Rainbow and GeMMS, unfortunately have been broken.
MAYO is the latest proposal for a structured multivariate scheme, designed by the cryptographer that broke Rainbow. As a structured multivariate scheme, its security requires careful scrutiny, but its utility (given it is not broken) is very appealing.
MAYO allows for a fine-grained tradeoff between signature and public key size. For the submission, to keep things simple, the authors proposed two concrete variants: MAYOone with balanced signature (321 bytes) and public key (1.1kB) sizes, and MAYOtwo that has signatures of 180 bytes, while keeping the public key manageable at 5.4kB. Verification times are excellent, while signing times are somewhat slower than ECDSA, but far better than RSA. Combining both variants in the obvious way, we’re only looking at 3.3kB.
Purely looking at sizes, SQISign I is the clear winner, even beating RSA-2048. Unfortunately, the computation required for signing, and crucially verification, are way too high. For niche applications, SQISign might be useful, but for general adoption verification times need to improve significantly, even if that requires a larger signature.
Finally, I would like to mention HAWK512. HAWK is a lattice-based scheme similar to FN-DSA-512, but does not require floating-point arithmetic. This makes HAWK an appealing alternative to FN-DSA. NIST has repeatedly stated that the main purpose of the onramp is to standardize a signature scheme that is not based on lattices — a description HAWK does not fit. We might see some innovations of HAWK be included in the final version of FN-DSA, but it is unclear whether that will solve all of FN-DSA implementation concerns.
There are more promising submissions in the onramp, but those discussed are a fairly representative sample of those interesting to TLS. For instance, SNOVA is similar to MAYO, and TUOV is similar to UOV. Explore the submissions for yourself on Thom’s webpage.
Do we really care about the extra bytes?
It will take 17kB extra to swap in ML-DSA-44. That’s a lot compared to the typical handshake today, but it’s not a lot compared to the JavaScript and images served on many web pages. The key point is that the change we must make here affects every single TLS connection, whether it’s used for a bloated website, or a time-critical API call. Also, it’s not just about waiting a bit longer. If you have spotty cellular reception, that extra data can make the difference between being able to load a page, and having the connection time out. (As an aside, talking about bloat: many apps perform a surprisingly high number of TLS handshakes.)
Just like with key agreement, performance isn’t our only concern: we also want the connection to succeed in the first place. Back in 2021, we ran an experiment artificially enlarging the certificate chain to simulate larger post-quantum certificates. We give a short summary of the key result below, but for the details, check out the full blog post.
Initially, we wanted to run the experiment on a small sample of regular traffic, in order to get unbiased data. Unfortunately, we found that large certificate chains broke some connections. Thus, to avoid breaking customer connections, we set up the experiment to use background connections launched from our challenge pages. For each participant, we launched two background connections: one with a larger certificate chain (live) and one with a normal chain(control). The graph on the right shows the number of control connections that are missing a corresponding live connection. There are jumps around 10kB and 30kB, suggesting that there are clients or middleboxes that break when certificate chains grow by more than 10kB or 30kB.
Missing requests when artificially inflating certificate chain size to simulate post-quantum certificates.
This does not mean that the ML-DSA-44-only route is necessarily unviable. Just like with key agreement, browsers can slowly turn on support for post-quantum certificates. As we hit issues with middleboxes, we can work with vendors to fix what is broken. It is crucial here that servers are configured to be able to serve either a small traditional chain, or a larger post-quantum chain.
These issues are problematic for a single-certificate migration strategy. In this approach, the server installs a single traditional certificate that contains a separate post-quantum certificate in a so-called non-critical extension. A client that does not support post-quantum certificates will ignore the extension. In this approach, installing the single certificate will immediately break all clients with compatibility issues, making it a non-starter.
What about performance? We saw the following impact on TLS handshake time.
Performance when artificially inflating certificate chain size to simulate post-quantum certificates.
The jump at around 40kB is caused by an extra round-trip due to a full congestion window. In the 2021 blog post we go into detail on what that is all about. There is an important caveat: at Cloudflare, because we’re close to the client, we use a larger congestion window. With a typical congestion window, the jump would move to around 10kB. Also, the jump would be larger as typical round-trip times are higher.
Thus, when adding 9KB, we’re looking at a slowdown of about 15%. Crossing the 10kB boundary, we are likely to incur an extra roundtrip, which could well lead to a slowdown of more than 60%. That completely negates the much touted performance benefit that TLS 1.3 has over TLS 1.2, and it’s too high to be enabled by default.
Is 9kB too much? Enabling post-quantum key agreement wasn’t free either, but enabling post-quantum key agreement was cheaper and actually gets us a tangible security benefit today. However, this thinking is dangerous. If we wait too long before enabling post-quantum certificates by default, we might find ourselves out of time when the quantum computer arrives.
Way forward
Over the coming years, we’ll be working with browsers to test the viability and performance impact of post-quantum authentication in TLS. We expect to add support for post-quantum certificates as soon as they arrive (probably around 2026), but not enable them by default.
At the same time, we’re exploring various ideas to reduce the number of signatures.
Reducing number of signatures
Over the last few years, there have been several proposals to reduce the number of signatures used.
Leaving out intermediate certificates
CAs report the intermediate certificates they use in the CCADB. Most browsers ship with the list of intermediates (of CAs they trust). Using that list, a browser is able to establish a connection with a server that forgot to install the intermediate. If a server can leave out the intermediate, then why bother with it?
There are three competing proposals to leave out the intermediate certificate. The original 2019 proposal is by Martin Thomson, who suggests simply having the browser send a single bit to indicate that it has an up-to-date list of all intermediates. In that case, the server will leave out the intermediates. This will work well in the majority of cases, but could lead to some hard-to-debug issues in corner cases. For one, not all intermediates are listed in the CCADB, and these missing intermediates aren’t even from custom CAs. Another reason is that the browser could be mistaken about whether it’s up-to-date. A more esoteric issue is that the browser could reconstruct a different chain of certificates than the server had in mind.
To address these issues, in 2023, Dennis Jackson put forward a more robust proposal. In this proposal, every year a fixed list of intermediates is compiled from the CCADB. Instead of a single flag, the browser will send the named lists of intermediates it has. The server will not simply leave out matching intermediates, but rather replace them by the sequence number at which they appear in the list. He also did a survey of the most popular websites, and found that just by leaving out the intermediates today, we can save more than 2kB compared to certificate compression for half of them. That’s with today’s certificates: yes, X509 certificates are somewhat bloated.
Finally, there is the more general TLS trust expressions proposal that allows a browser to signal more in a more fine-grained manner which CAs and intermediates it trusts.
It’s likely some form of intermediate suppression will be adopted in the coming years. This will push the cost of a ML-DSA-44-only deployment down to less than 13kB.
KEMTLS
Another approach is to change TLS more rigorously by replacing the signature algorithm in the leaf certificate by a KEM. This is called KEMTLS (or AuthKEM at the IETF). The server proves it controls the leaf certificate, by being able to decrypt a challenge sent by the client. This is not an outlandishly new idea, as older versions of TLS would encrypt a shared key to an RSA certificate.
KEMTLS does add quite a bit of complexity to TLS 1.3, which was purposely designed to simplify TLS 1.2. Adding complexity adds security concerns, but we soften that by extending TLS 1.3 machine-checked security proof to KEMTLS. Nonetheless, adopting KEMTLS will be a significant engineering effort, and its gains should be worthwhile.
If we replace an ML-DSA-44 handshake signature of 2,420 bytes by KEMTLS using ML-KEM-512, we save 852 bytes in the total bytes transmitted by client and server. Looking just at the server, we save 1,620 bytes. If that’s 1.6kB saved on 17kB, it’s not very impressive. Also, KEMTLS is of little benefit if small post-quantum signatures such as MAYOone are available for the handshake.
KEMTLS shines in the case that 1.6kB savings pushes the server within the congestion window, such as when UOV is used for all but the handshake and leaf signature. Another advantage of KEMTLS, especially for embedded devices, is that it could reduce the number of algorithms that need to be implemented: you need a KEM for the key agreement anyway, and that could replace the signature scheme you would’ve only used for the handshake signature.
At the moment, deploying KEMTLS isn’t the lowest hanging fruit, but it could well come into its own, depending on which signature schemes are standardized, and which other protocol changes are made.
Merkle tree certificates
An even more ambitious and involved proposal is Merkle tree certificates (MTC). In this proposal, all signatures except the handshake signature are replaced by a short <800 byte Merkle tree certificate. This sounds too good to be true, and there is indeed a catch. MTC doesn’t work in all situations, and for those you will need to fall back to old-fashioned X509 certificates and certificate transparency. So, what’s assumed?
No direct certificate issuance. You can’t get a Merkle tree certificate immediately: you will have to ask for one, and then wait for at least a day before you can use it.
Clients (in MTC parlance relying parties) can only check a Merkle tree certificate if they stay up to date with a transparency service. Browsers have an update-mechanism that can be used for this, but a browser that hasn’t been used in a while might be stale.
MTC should be seen as an optimisation for the vast majority of cases.
An overview of a Merkle Tree certificate deployment
In MTC, CAs issues assertions in a batch in a fixed rhythm. Say once every hour. An example of an assertion is “you can trust P-256 public key ab….23 when connecting to example.com”. Basically an assertion is a certificate without the signature. If a subscriber wants to get a certificate, it sends the assertion to the CA, which vets it, and then queues it for issuance.
On this batch of assertions, the CA computes a Merkle tree. We have an explainer of Merkle trees in our blog post introducing certificate transparency. The short of it is that you can summarize a batch into a single hash by creating a tree hashing pairwise. The root is the summary. The nice thing about Merkle trees is that you can prove that something was in the batch to someone who only has the root, by revealing just a few hashes up the tree, which is called the Merkle tree certificate.
Each assertion is valid for a fixed number of batches — say 336 batches for a validity of two weeks. This is called the validity window. When issuing a batch, the CA not only publishes the assertions, but also a signature on the roots of all batches that are currently valid, called the signed validity window.
After the MTC CA has issued the new batch, the subscriber that asked for the certificate to be issued can pull the Merkle tree certificate from the CA. The subscriber can then install it, next to its X509 certificate, but will have to wait a bit before it’s useful.
Every hour, the transparency services, including those run by browser vendors,pull the new assertions and signed validity window from the CAs they trust. They check whether everything is consistent, including whether the new signed validity window matches with the old one. When satisfied, they republish the batches and signed validity window themselves.
Every hour, browsers download the latest roots from their trusted transparency service. Now, when connecting to a server, the client will essentially advertise which CAs it trusts, and the sequence number of the latest batch for which it has the roots. The server can then send either a new MTC, an older MTC (if the client is a bit stale), or fall back to a X509 certificate.
Outlook
The path for migrating the Internet to post-quantum authentication is much less clear than with key agreement. In the short term, we expect early adoption of post-quantum authentication across the Internet around 2026, but few will turn it on by default. Unless we can get performance much closer to today’s authentication, we expect the vast majority to keep post-quantum authentication disabled, unless motivated by regulation.
Not just TLS, authentication, and key agreement
Despite its length, in this blog post, we have only really touched upon migrating TLS. And even TLS we did not cover completely, as we have not discussed Encrypted ClientHello (we didn’t forget about it). Although important, TLS is not the only protocol key to the security of the Internet. We want to briefly mention a few other challenges, but cannot go into detail. One particular challenge is DNSSEC, which is responsible for securing the resolution of domain names.
Although key agreement and signatures are the most widely used cryptographic primitives, over the last few years we have seen the adoption of more esoteric cryptography to serve more advanced use cases, such as unlinkable tokens with Privacy Pass / PAT, anonymous credentials, and attribute based encryption to name a few. For most of these advanced cryptographic schemes, there is no known practical post-quantum alternative yet.
What you can do today
To finish, let’s review what you can do today. For most organizations the brunt of the work is in the preparation. Where is cryptography used in the first place? What software libraries / what hardware? What are the timelines of your vendors? Do you need to hire expertise? What’s at risk, and how should it be prioritized? Even before you can answer all those, create engagement within the organization. All this work can be started before NIST finishes their standards or software starts shipping with post-quantum cryptography.
You can also start testing right now since the performance characteristics of the final standards will not be meaningfully different from the preliminary ones available today. If it works with the preliminary ones today in your test environment, the final standards will most likely work just fine in production. We’ve collected a list of software and forks that already support preliminary post-quantum key agreement here.
Also on that page, we collected instructions on how to turn on post-quantum key agreement in your browser today. (For Chrome it’s enable-tls13-kyber in chrome://flags.)
Good luck with your migration, and if you hit any issues, do reach out: [email protected]
The collective thoughts of the interwebz
Manage Consent
To provide the best experiences, we use technologies like cookies to store and/or access device information. Consenting to these technologies will allow us to process data such as browsing behavior or unique IDs on this site. Not consenting or withdrawing consent, may adversely affect certain features and functions.
Functional
Always active
The technical storage or access is strictly necessary for the legitimate purpose of enabling the use of a specific service explicitly requested by the subscriber or user, or for the sole purpose of carrying out the transmission of a communication over an electronic communications network.
Preferences
The technical storage or access is necessary for the legitimate purpose of storing preferences that are not requested by the subscriber or user.
Statistics
The technical storage or access that is used exclusively for statistical purposes.The technical storage or access that is used exclusively for anonymous statistical purposes. Without a subpoena, voluntary compliance on the part of your Internet Service Provider, or additional records from a third party, information stored or retrieved for this purpose alone cannot usually be used to identify you.
Marketing
The technical storage or access is required to create user profiles to send advertising, or to track the user on a website or across several websites for similar marketing purposes.