All posts by Julian Wood

Implementing mutual TLS for Java-based AWS Lambda functions

Post Syndicated from Julian Wood original https://aws.amazon.com/blogs/compute/implementing-mutual-tls-for-java-based-aws-lambda-functions-2/

This post is written by Dhiraj Mahapatro, Senior Specialist SA, Serverless and Christian Mueller, Principal Solutions Architect

Modern secure applications establish network connections to other services through HTTPS. This ensures that the application connects to the right party and encrypts the data before sending it over the network.

You might not want unauthenticated users to connect to your service as a service provider. One solution to this requirement is to use mutual TLS (Transport Layer Security). Mutual TLS (or mTLS) is a common security mechanism that uses client certificates to add an authentication layer. This allows the service provider to verify the client’s identity cryptographically.

The purpose of mutual TLS in serverless

mTLS refers to two parties authenticating each other at the same time when establishing a connection. By default, the TLS protocol only proves the identity of the server to a client using X.509 certificates. With mTLS, a client must prove its identity to the server to communicate. This helps support a zero-trust policy to protect against adversaries like man-in-the-middle attacks.

mTLS is often used in business-to-business (B2B) applications and microservices, where interservice communication needs mutual authentication of parties. In Java, you see the following error when the server expects a certificate, but the client does not provide one:

PKIX path building failed: sun.security.provider.certpath.SunCertPathBuilderException: unable to find valid certification path to requested target

This blog post explains multiple ways to implement a Java-based AWS Lambda function that uses mTLS to authenticate with a third-party internal or external service. The sample application and this post explain the advantages and tradeoffs of each approach.

The KeyStore and TrustStore in Java

The TrustStore is used to store certificate public keys from a certificate authority (CA) or trusted servers. A client can verify the public certificate presented by the server in a TLS connection. A KeyStore stores private key and identity certificates that a specific application uses to prove the client’s identity.

The stores contain opposite certificates. The TrustStore holds the identification certificates that identify others, while the KeyStore holds the identification certificates that identify itself.

Overview

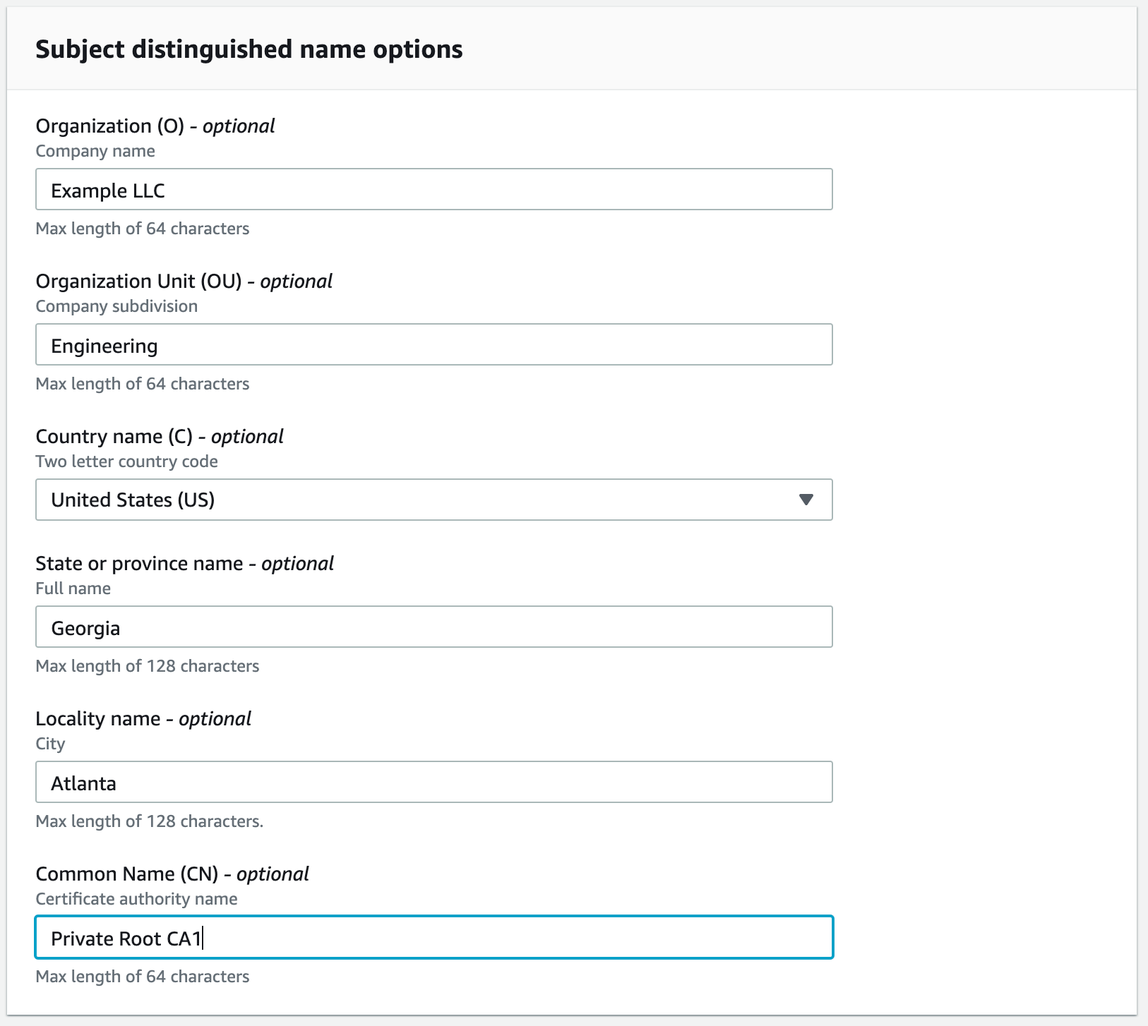
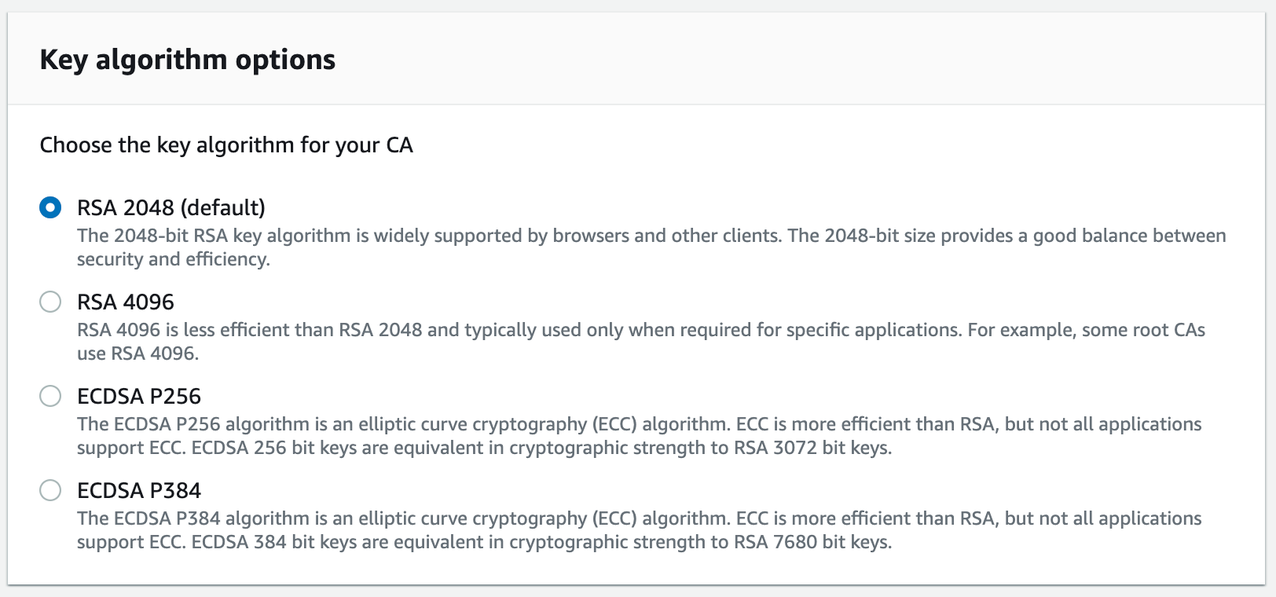
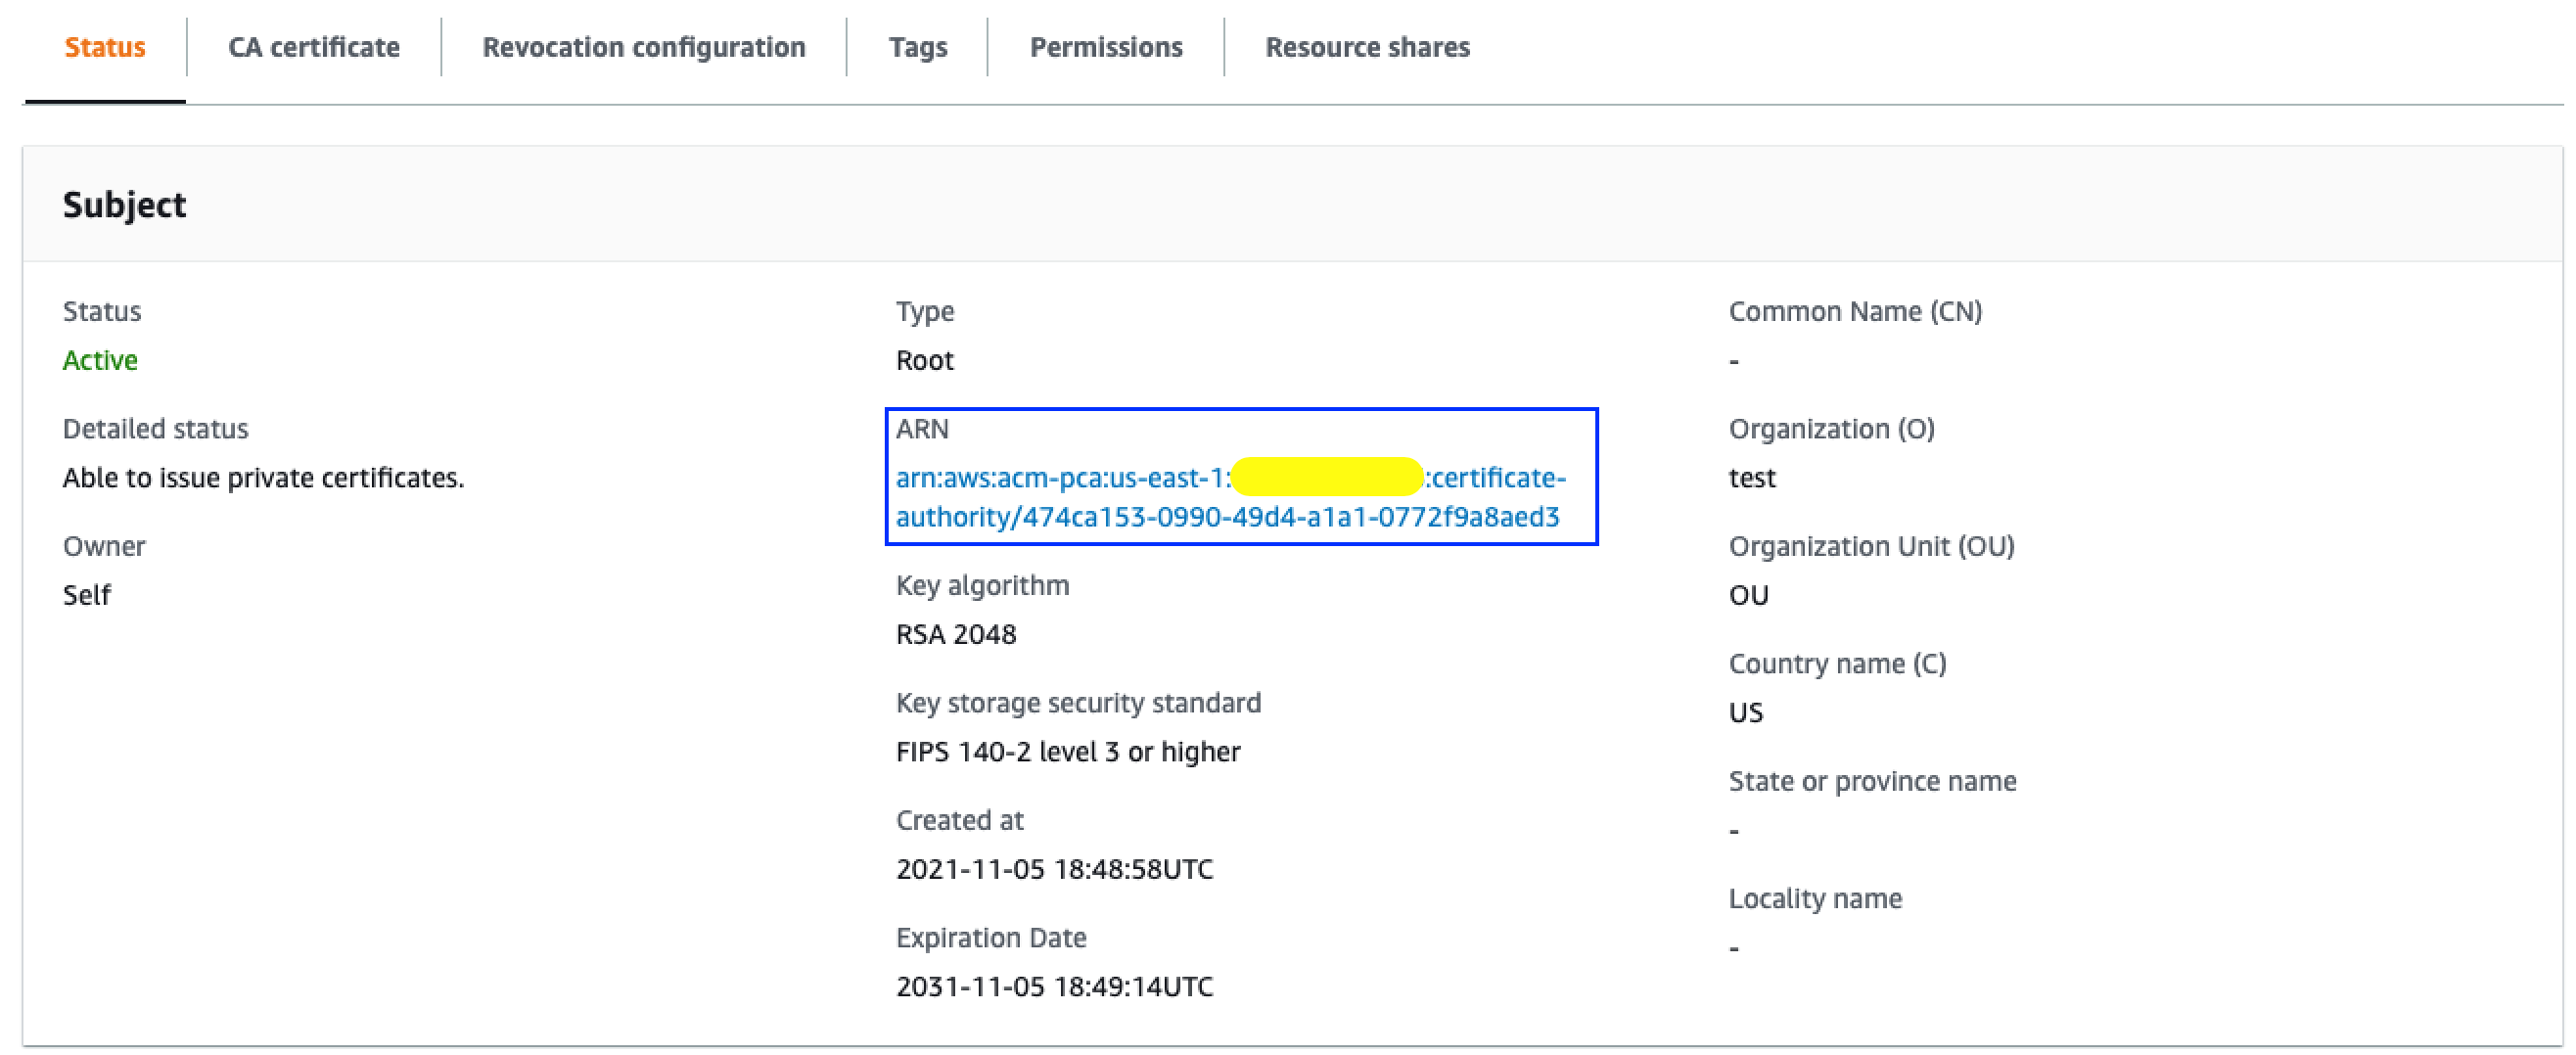
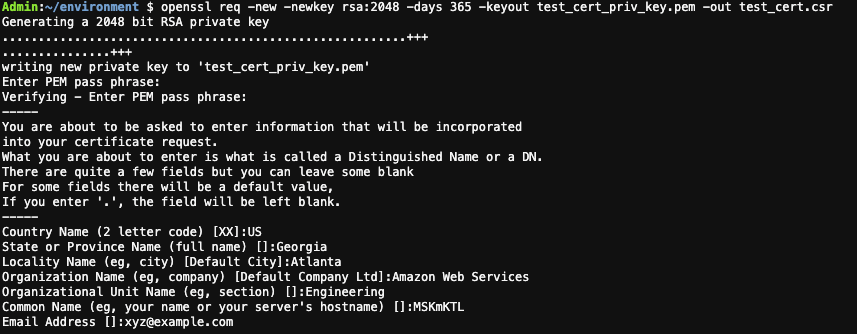
To start, you create certificates. For brevity, this sample application uses a script that uses OpenSSL and Java’s keytool for self-signed certificates from a CA. You store the generated keys in Java KeyStore and TrustStore. However, the best practice for creating and maintaining certificates and private CA is to use AWS Certificate Manager and AWS Certificate Manager Private Certificate Authority.

You can find the details of the script in the README file.

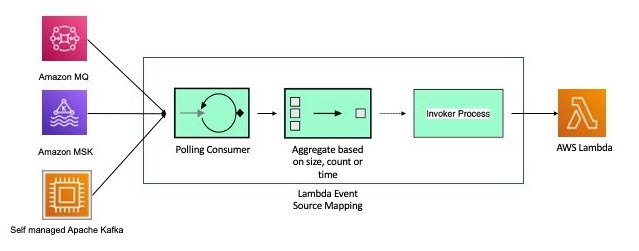
The following diagram shows the use of KeyStore and TrustStore in the client Lambda function, and the server running on Fargate.

KeyStore and TrustStore

KeyStore and TrustStore

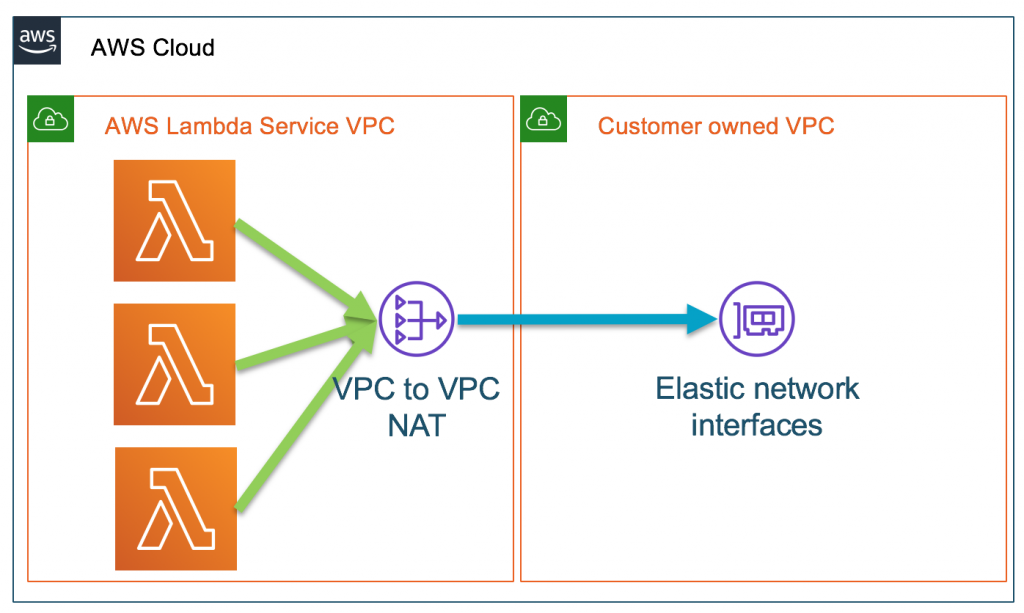
The demo application contains several Lambda functions. The Lambda functions act as clients to services provided by Fargate behind an Amazon Network Load Balancer (NLB) running in a private Amazon VPC. Amazon Route 53 private hosted zones are used to resolve selected hostnames. You attach the Lambda functions to this VPC to resolve the hostnames for the NLB. To learn more, read how AWS Lambda uses Hyperplane elastic network interfaces to work with custom VPC.

The following examples refer to portions of InfrastructureStack.java and the implementation in the corresponding Lambda functions.

Providing a client certificate in a Lambda function artifact

The first option is to provide the KeyStore and TrustStore in a Lambda functions’ .zip artifact. You provide specific Java environment variables within the Lambda configuration to instruct the JVM to load and trust your provided Keystore and TrustStore. The JVM uses these settings instead of the Java Runtime Environment’s (JRE) default settings (use a stronger password for your use case):

"-Djavax.net.ssl.keyStore=./client_keystore_1.jks -Djavax.net.ssl.keyStorePassword=secret -Djavax.net.ssl.trustStore=./client_truststore.jks -Djavax.net.ssl.trustStorePassword=secret"

The JRE uses this KeyStore and TrustStore to build a default SSLContext. The HttpClient uses this default SSLContext to create a TLS connection to the backend service running on Fargate.

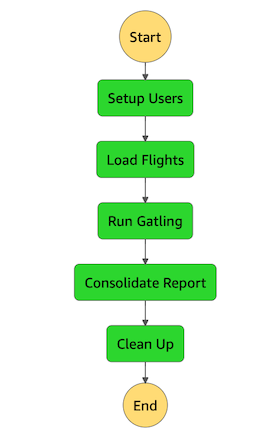
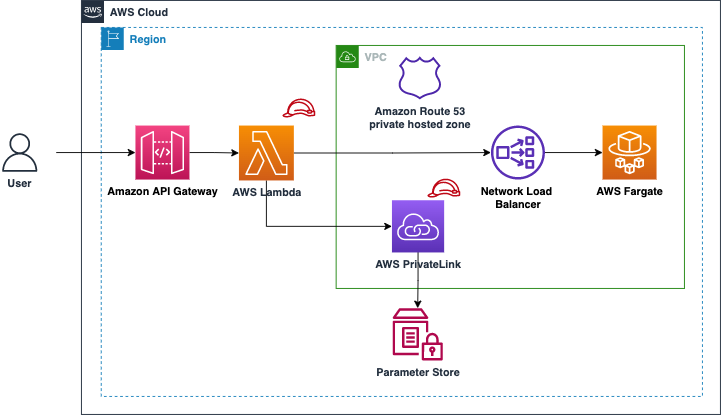
The following architecture diagram shows the sample implementation. It consists of an Amazon API Gateway endpoint with a Lambda proxy integration that calls a backend Fargate service running behind an NLB.

Providing a client certificate in a Lambda function artifact

Providing a client certificate in a Lambda function artifact

This is a basic approach for a prototype. However, it has a few shortcomings related to security and separation of duties. The KeyStore contains the private key, and the password is exposed to the source code management (SCM) system, which is a security concern. Also, it is the Lambda function owner’s responsibility to update the certificate before its expiration. You can address these concerns about separation of duties with the following approach.

Providing the client certificate in a Lambda layer

In this approach, you separate the responsibility between two entities. The Lambda function owner and the KeyStore and TrustStore owner.

The KeyStore and TrustStore owner provides the certificates securely to the function developer who may be working in a separate AWS environment. For simplicity, the demo application uses the same AWS account.

The KeyStore and TrustStore owner achieves this by using AWS Lambda layers. The KeyStore and TrustStore owner packages and uploads the certificates as a Lambda layer and only allows access to authorized functions. The Lambda function owner does not access the KeyStore or manage its lifecycle. The KeyStore and TrustStore owner’s responsibility is to release a new version of this layer when necessary and inform users.

Providing the client certificate in a Lambda layer

Providing the client certificate in a Lambda layer

The KeyStore and TrustStore are extracted under the path /opt as part of including a Lambda layer. The Lambda function can now use the layer as:

Function lambdaLayerFunction = new Function(this, "LambdaLayerFunction", FunctionProps.builder()
  .functionName("lambda-layer")
  .handler("com.amazon.aws.example.AppClient::handleRequest")
  .runtime(Runtime.JAVA_11)
  .architecture(ARM_64)
  .layers(singletonList(lambdaLayerForService1cert))
  .vpc(vpc)
  .code(Code.fromAsset("../software/2-lambda-using-separate-layer/target/lambda-using-separate-layer.jar"))
  .memorySize(1024)
  .environment(Map.of(
    "BACKEND_SERVICE_1_HOST_NAME", BACKEND_SERVICE_1_HOST_NAME,
    "JAVA_TOOL_OPTIONS", "-Djavax.net.ssl.keyStore=/opt/client_keystore_1.jks -Djavax.net.ssl.keyStorePassword=secret -Djavax.net.ssl.trustStore=/opt/client_truststore.jks -Djavax.net.ssl.trustStorePassword=secret"
  ))
  .timeout(Duration.seconds(10))
  .logRetention(RetentionDays.ONE_WEEK)
  .build());

The KeyStore and TrustStore passwords are still supplied as environment variables and stored in the SCM system, which is against best practices. You can address this with the next approach.

Storing passwords securely in AWS Systems Manager Parameter Store

AWS Systems Manager Parameter Store provides secure, hierarchical storage for configuration data and secret management. You can use Parameter Store to store the KeyStore and TrustStore passwords instead of environment variables. The Lambda function uses an IAM policy to access Parameter Store and gets the passwords as a secure string during the Lambda initialization phase.

With this approach, you build a custom SSLContext after retrieving the KeyStore and TrustStore passwords from the Parameter Store. Once you create SSLContext, provide that to the HttpClient you use to connect with the backend service:

HttpClient client = HttpClient.newBuilder()
  .version(HttpClient.Version.HTTP_2)
  .connectTimeout(Duration.ofSeconds(5))
  .sslContext(sslContext)
  .build();

You can also use a VPC interface endpoint for AWS Systems Manager to keep the traffic from your Lambda function to Parameter Store internal to AWS. The following diagram shows the interaction between AWS Lambda and Parameter Store.

Storing passwords securely in AWS Systems Manager Parameter Store

Storing passwords securely in AWS Systems Manager Parameter Store

This approach works for Lambda functions interacting with a single backend service requiring mTLS. However, it is common in a modern microservices architecture to integrate with multiple backend services. Sometimes, these services require a client to assume different identities by using different KeyStores. The next approach explains how to handle the multiple services scenario.

Providing multiple client certificates in Lambda layers

You can provide multiple KeyStore and TrustStore pairs within multiple Lambda layers. All layers attached to a function are merged when provisioning the function. Ensure your KeyStore and TrustStore names are unique. A Lambda function can use up to five Lambda layers.

Similar to the previous approach, you load multiple KeyStores and TrustStores to construct multiple SSLContext objects. You abstract the common logic to create an SSLContext object in another Lambda layer. Now, the Lambda function calling two different backend services uses 3 Lambda layers:

  • Lambda layer for backend service 1 (under /opt)
  • Lambda layer for backend service 2 (under /opt)
  • Lambda layer for the SSL utility that takes the KeyStore, TrustStore, and their passwords to return an SSLContext object

SSL utility Lambda layer provides the getSSLContext default method in a Java interface. The Lambda function implements this interface. Now, you create a dedicated HTTP client per service.

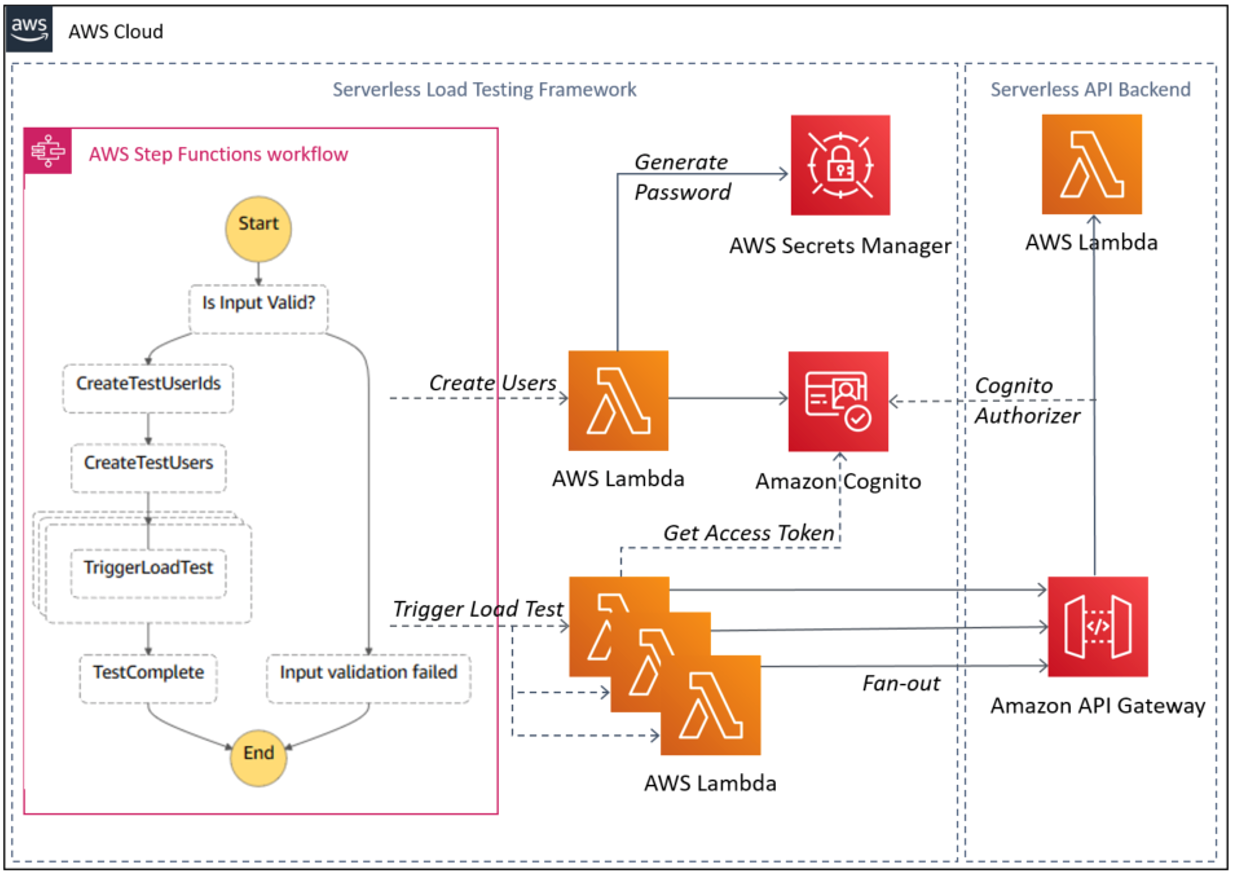
The following diagram shows your final architecture:

Providing multiple client certificates in Lambda layers

Providing multiple client certificates in Lambda layers

Prerequisites

To run the sample application, you need:

  1. CDK v2
  2. Java 11
  3. AWS CLI
  4. Docker
  5. jq

To build and provision the stack:

  1. Clone the git repository.
  2. git clone https://github.com/aws-samples/serverless-mutual-tls.git
    cd serverless-mutual-tls
  3. Create the two root CA’s, client, and server certificates.
  4. ./scripts/1-create-certificates.sh
  5. Build and package all examples.
  6. ./scripts/2-build_and_package-functions.sh
  7. Provision the AWS infrastructure (make sure that Docker is running).
  8. ./scripts/3-provision-infrastructure.sh

Verification

Verify that the API endpoints are working and using mTLS by running these commands from the base directory:

export API_ENDPOINT=$(cat infrastructure/target/outputs.json | jq -r '.LambdaMutualTLS.apiendpoint')

To see the error when mTLS is not used in the Lambda function, run:

curl -i $API_ENDPOINT/lambda-no-mtls

The preceding curl command responds with an HTTP status code 500 and plain body as:

PKIX path building failed: sun.security.provider.certpath.SunCertPathBuilderException: unable to find valid certification path to requested target

For successful usage of mTLS as shown in the previous use cases, run:

curl -i $API_ENDPOINT/lambda-only
curl -i $API_ENDPOINT/lambda-layer
curl -i $API_ENDPOINT/lambda-parameter-store
curl -i $API_ENDPOINT/lambda-multiple-certificates

The last curl command responds with an HTTP status code 200 and body as:

[
 {"hello": "from backend service 1"}, 
 {"hello": "from backend service 2"}
]

Additional security

You can add additional controls via Java environment variables. Compliance standards like PCI DSS in financial services require customers to exercise more control over the underlying negotiated protocol and ciphers.

Some of the useful Java environment variables to troubleshoot SSL/TLS connectivity issues in a Lambda function are:

-Djavax.net.debug=all
-Djavax.net.debug=ssl,handshake
-Djavax.net.debug=ssl:handshake:verbose:keymanager:trustmanager
-Djavax.net.debug=ssl:record:plaintext

You can enforce a specific minimum version of TLS (for example, v1.3) to meet regulatory requirements:

-Dhttps.protocols=TLSv1.3

Alternatively, programmatically construct your SSLContext inside the Lambda function:

SSLContext sslContext = SSLContext.getInstance("TLSv1.3");

You can also use the following Java environment variable to limit the use of weak cipher suites or unapproved algorithms, and explicitly provide the supported cipher suites:

-Dhttps.cipherSuites=TLS_ECDHE_ECDSA_WITH_AES_128_GCM_SHA256,TLS_ECDHE_ECDSA_WITH_AES_256_GCM_SHA384,TLS_ECDHE_ECDSA_WITH_AES_128_CBC_SHA,TLS_ECDHE_ECDSA_WITH_AES_256_CBC_SHA,TLS_ECDHE_ECDSA_WITH_AES_128_CBC_SHA256,TLS_ECDHE_ECDSA_WITH_AES_256_CBC_SHA384,TLS_ECDHE_RSA_WITH_AES_128_GCM_SHA256,TLS_ECDHE_RSA_WITH_AES_256_GCM_SHA384,TLS_ECDHE_RSA_WITH_AES_128_CBC_SHA,TLS_ECDHE_RSA_WITH_AES_256_CBC_SHA,TLS_ECDHE_RSA_WITH_AES_128_CBC_SHA256,TLS_ECDHE_RSA_WITH_AES_256_CBC_SHA384,TLS_DHE_RSA_WITH_AES_128_GCM_SHA256,TLS_DHE_RSA_WITH_AES_256_GCM_SHA384,TLS_DHE_RSA_WITH_AES_128_CBC_SHA,TLS_DHE_RSA_WITH_AES_256_CBC_SHA,TLS_DHE_RSA_WITH_AES_128_CBC_SHA256,TLS_DHE_RSA_WITH_AES_256_CBC_SHA256

You achieve the same programmatically with the following code snippet:

httpClient = HttpClient.newBuilder()
  .version(HttpClient.Version.HTTP_2)
  .connectTimeout(Duration.ofSeconds(5))
  .sslContext(sslContext)
  .sslParameters(new SSLParameters(new String[]{
    "TLS_ECDHE_ECDSA_WITH_AES_128_GCM_SHA256",
    "TLS_ECDHE_ECDSA_WITH_AES_256_GCM_SHA384",
    "TLS_ECDHE_ECDSA_WITH_AES_128_CBC_SHA",
    ………
  }))
  .build();

Cleaning up

The stack creates a custom VPC and other related resources. Clean up after usage to avoid the ongoing cost of running these services. To clean up the infrastructure and the self-generated certificates, run:

./scripts/4-delete-certificates.sh
./scripts/5-deprovision-infrastructure.sh

Conclusion

mTLS in Java using KeyStore and TrustStore is a well-established approach for using client certificates to add an authentication layer. This blog highlights the four approaches that you can take to implement mTLS using Java-based Lambda functions.

Each approach addresses the separation of concerns required while implementing mTLS with additional security features. Use an approach that suits your needs, organizational security best practices, and enterprise requirements. Refer to the demo application for additional details.

For more serverless learning resources, visit Serverless Land.

Migrating AWS Lambda functions to Arm-based AWS Graviton2 processors

Post Syndicated from Julian Wood original https://aws.amazon.com/blogs/compute/migrating-aws-lambda-functions-to-arm-based-aws-graviton2-processors/

AWS Lambda now allows you to configure new and existing functions to run on Arm-based AWS Graviton2 processors in addition to x86-based functions. Using this processor architecture option allows you to get up to 34% better price performance. This blog post highlights some considerations when moving from x86 to arm64 as the migration process is code and workload dependent.

Functions using the Arm architecture benefit from the performance and security built into the Graviton2 processor, which is designed to deliver up to 19% better performance for compute-intensive workloads. Workloads using multithreading and multiprocessing, or performing many I/O operations, can experience lower invocation time, which reduces costs.

Duration charges, billed with millisecond granularity, are 20 percent lower when compared to current x86 pricing. This also applies to duration charges when using Provisioned Concurrency. Compute Savings Plans supports Lambda functions powered by Graviton2.

The architecture change does not affect the way your functions are invoked or how they communicate their responses back. Integrations with APIs, services, applications, or tools are not affected by the new architecture and continue to work as before.

The following runtimes, which use Amazon Linux 2, are supported on Arm:

  • Node.js 12 and 14
  • Python 3.8 and 3.9
  • Java 8 (java8.al2) and 11
  • .NET Core 3.1
  • Ruby 2.7
  • Custom runtime (provided.al2)

Lambda@Edge does not support Arm as an architecture option.

You can create and manage Lambda functions powered by Graviton2 processor using the AWS Management Console, AWS Command Line Interface (AWS CLI), AWS CloudFormation, AWS Serverless Application Model (AWS SAM), and AWS Cloud Development Kit (AWS CDK). Support is also available through many AWS Lambda Partners.

Understanding Graviton2 processors

AWS Graviton processors are custom built by AWS. Generally, you don’t need to know about the specific Graviton processor architecture, unless your applications can benefit from specific features.

The Graviton2 processor uses the Neoverse-N1 core and supports Arm V8.2 (include CRC and crypto extensions) plus several other architectural extensions. In particular, Graviton2 supports the Large System Extensions (LSE), which improve locking and synchronization performance across large systems.

Migrating x86 Lambda functions to arm64

Many Lambda functions may only need a configuration change to take advantage of the price/performance of Graviton2. Other functions may require repackaging the Lambda function using Arm-specific dependencies, or rebuilding the function binary or container image.

You may not require an Arm processor on your development machine to create Arm-based functions. You can build, test, package, compile, and deploy Arm Lambda functions on x86 machines using AWS SAM and Docker Desktop. If you have an Arm-based system, such as an Apple M1 Mac, you can natively compile binaries.

Functions without architecture-specific dependencies or binaries

If your functions don’t use architecture-specific dependencies or binaries, you can switch from one architecture to the other with a single configuration change. Many functions using interpreted languages such as Node.js and Python, or functions compiled to Java bytecode, can switch without any changes. Ensure you check binaries in dependencies, Lambda layers, and Lambda extensions.

To switch functions from x86 to arm64, you can change the Architecture within the function runtime settings using the Lambda console.

Edit AWS Lambda function Architecture

Edit AWS Lambda function Architecture

If you want to display or log the processor architecture from within a Lambda function, you can use OS specific calls. For example, Node.js process.arch or Python platform.machine().

When using the AWS CLI to create a Lambda function, specify the --architectures option. If you do not specify the architecture, the default value is x86-64. For example, to create an arm64 function, specify --architectures arm64.

aws lambda create-function \
    --function-name MyArmFunction \
    --runtime nodejs14.x \
    --architectures arm64 \
    --memory-size 512 \
    --zip-file fileb://MyArmFunction.zip \
    --handler lambda.handler \
    --role arn:aws:iam::123456789012:role/service-role/MyArmFunction-role

When using AWS SAM or CloudFormation, add or amend the Architectures property within the function configuration.

MyArmFunction:
  Type: AWS::Lambda::Function
  Properties:
    Runtime: nodejs14.x
    Code: src/
    Architectures:
  	- arm64
    Handler: lambda.handler
    MemorySize: 512

When initiating an AWS SAM application, you can specify:

sam init --architecture arm64

When building Lambda layers, you can specify CompatibleArchitectures.

MyArmLayer:
  Type: AWS::Lambda::LayerVersion
  Properties:
    ContentUri: layersrc/
    CompatibleArchitectures:
      - arm64

Building function code for Graviton2

If you have dependencies or binaries in your function packages, you must rebuild the function code for the architecture you want to use. Many packages and dependencies have arm64 equivalent versions. Test your own workloads against arm64 packages to see if your workloads are good migration candidates. Not all workloads show improved performance due to the different processor architecture features.

For compiled languages like Rust and Go, you can use the provided.al2 custom runtime, which supports Arm. You provide a binary that communicates with the Lambda Runtime API.

When compiling for Go, set GOARCH to arm.

GOOS=linux GOARCH=arm go build

When compiling for Rust, set the target.

cargo build --release -- target-cpu=neoverse-n1

The default installation of Python pip on some Linux distributions is out of date (<19.3). To install binary wheel packages released for Graviton, upgrade the pip installation using:

sudo python3 -m pip install --upgrade pip

The Arm software ecosystem is continually improving. As a general rule, use later versions of compilers and language runtimes whenever possible. The AWS Graviton Getting Started GitHub repository includes known recent changes to popular packages that improve performance, including ffmpeg, PHP, .Net, PyTorch, and zlib.

You can use https://pkgs.org/ as a package repository search tool.

Sometimes code includes architecture specific optimizations. These can include code optimized in assembly using specific instructions for CRC, or enabling a feature that works well on particular architectures. One way to see if any optimizations are missing for arm64 is to search the code for __x86_64__ ifdefs and see if there is corresponding arm64 code included. If not, consider alternative solutions.

For additional language-specific considerations, see the links within the GitHub repository.

The Graviton performance runbook is a performance profiling reference by the Graviton to benchmark, debug, and optimize application code.

Building functions packages as container images

Functions packaged as container images must be built for the architecture (x86 or arm64) they are going to use. There are arm64 architecture versions of the AWS provided base images for Lambda. To specify a container image for arm64, use the arm64 specific image tag, for example, for Node.js 14:

  • public.ecr.aws/lambda/nodejs:14-arm64
  • public.ecr.aws/lambda/nodejs:latest-arm64
  • public.ecr.aws/lambda/nodejs:14.2021.10.01.16-arm64

Arm64 Images are also available from Docker Hub.

You can also use arbitrary Linux base images in addition to the AWS provided Amazon Linux 2 images. Images that support arm64 include Alpine Linux 3.12.7 or later, Debian 10 and 11, Ubuntu 18.04 and 20.04. For more information and details of other supported Linux versions, see Operating systems available for Graviton based instances.

Migrating a function

Here is an example of how to migrate a Lambda function from x86 to arm64 and take advantage of newer software versions to improve price and performance. You can follow a similar approach to test your own code.

I have an existing Lambda function as part of an AWS SAM template configured without an Architectures property, which defaults to x86_64.

  Imagex86Function:
    Type: AWS::Serverless::Function
    Properties:
      CodeUri: src/
      Handler: app.lambda_handler
      Runtime: python3.9

The Lambda function code performs some compute intensive image manipulation. The code uses a dependency configured with the following version:

{
  "dependencies": {
    "imagechange": "^1.1.1"
  }
}

I duplicate the Lambda function within the AWS SAM template using the same source code and specify arm64 as the Architectures.

  ImageArm64Function:
    Type: AWS::Serverless::Function
    Properties:
      CodeUri: src/
      Handler: app.lambda_handler
      Runtime: python3.9
      Architectures:
        - arm64

I use AWS SAM to build both Lambda functions. I specify the --use-container flag to build each function within its architecture-specific build container.

sam build –use-container

I can use sam local invoke to test the arm64 function locally even on an x86 system.

AWS SAM local invoke

AWS SAM local invoke

I then use sam deploy to deploy the functions to the AWS Cloud.

The AWS Lambda Power Tuning open-source project runs your functions using different settings to suggest a configuration to minimize costs and maximize performance. The tool allows you to compare two results on the same chart and incorporate arm64-based pricing. This is useful to compare two versions of the same function, one using x86 and the other arm64.

I compare the performance of the X86 and arm64 Lambda functions and see that the arm64 Lambda function is 12% cheaper to run:

Compare x86 and arm64 with dependency version 1.1.1

Compare x86 and arm64 with dependency version 1.1.1

I then upgrade the package dependency to use version 1.2.1, which has been optimized for arm64 processors.

{
  "dependencies": {
    "imagechange": "^1.2.1"
  }
}

I use sam build and sam deploy to redeploy the updated Lambda functions with the updated dependencies.

I compare the original x86 function with the updated arm64 function. Using arm64 with a newer dependency code version increases the performance by 30% and reduces the cost by 43%.

Compare x86 and arm64 with dependency version 1.2.1

Compare x86 and arm64 with dependency version 1.2.1

You can use Amazon CloudWatch,to view performance metrics such as duration, using statistics. You can then compare average and p99 duration between the two architectures. Due to the Graviton2 architecture, functions may be able to use less memory. This could allow you to right-size function memory configuration, which also reduces costs.

Deploying arm64 functions in production

Once you have confirmed your Lambda function performs successfully on arm64, you can migrate your workloads. You can use function versions and aliases with weighted aliases to control the rollout. Traffic gradually shifts to the arm64 version or rolls back automatically if any specified CloudWatch alarms trigger.

AWS SAM supports gradual Lambda deployments with a feature called Safe Lambda deployments using AWS CodeDeploy. You can compile package binaries for arm64 using a number of CI/CD systems. AWS CodeBuild supports building Arm based applications natively. CircleCI also has Arm compute resource classes for deployment. GitHub Actions allows you to use self-hosted runners. You can also use AWS SAM within GitHub Actions and other CI/CD pipelines to create arm64 artifacts.

Conclusion

Lambda functions using the Arm/Graviton2 architecture provide up to 34 percent price performance improvement. This blog discusses a number of considerations to help you migrate functions to arm64.

Many functions can migrate seamlessly with a configuration change, others need to be rebuilt to use arm64 packages. I show how to migrate a function and how updating software to newer versions may improve your function performance on arm64. You can test your own functions using the Lambda PowerTuning tool.

Start migrating your Lambda functions to Arm/Graviton2 today.

For more serverless learning resources, visit Serverless Land.

Introducing AWS Lambda batching controls for message broker services

Post Syndicated from Julian Wood original https://aws.amazon.com/blogs/compute/introducing-aws-lambda-batching-controls-for-message-broker-services/

This post is written by Mithun Mallick, Senior Specialist Solutions Architect.

AWS Lambda now supports configuring a maximum batch window for instance-based message broker services to fine tune when Lambda invocations occur. This feature gives you an additional control on batching behavior when processing data. It applies to Amazon Managed Streaming for Apache Kafka (Amazon MSK), self-hosted Apache Kafka, and Amazon MQ for Apache ActiveMQ and RabbitMQ.

Apache Kafka is an open source event streaming platform used to support workloads such as data pipelines and streaming analytics. It is conceptually similar to Amazon Kinesis. Amazon MSK is a fully managed, highly available service that simplifies the setup, scaling, and management of clusters running Kafka.

Amazon MQ is a managed, highly available message broker service for Apache ActiveMQ and RabbitMQ that makes it easier to set up and operate message brokers on AWS. Amazon MQ reduces your operational responsibilities by managing the provisioning, setup, and maintenance of message brokers for you.

Amazon MSK, self-hosted Apache Kafka and Amazon MQ for ActiveMQ and RabbitMQ are all available as event sources for AWS Lambda. You configure an event source mapping to use Lambda to process items from a stream or queue. This allows you to use these message broker services to store messages and asynchronously integrate them with downstream serverless workflows.

In this blog, I explain how message batching works. I show how to use the new maximum batching window control for the managed message broker services and self-managed Apache Kafka.

Understanding batching

For event source mappings, the Lambda service internally polls for new records or messages from the event source, and then synchronously invokes the target Lambda function. Lambda reads the messages in batches and provides these to your function as an event payload. Batching allows higher throughput message processing, up to 10,000 messages in a batch. The payload limit of a single invocation is 6 MB.

Previously, you could only use batch size to configure the maximum number of messages Lambda would poll for. Once a defined batch size is reached, the poller invokes the function with the entire set of messages. This feature is ideal when handling a low volume of messages or batches of data that take time to build up.

Batching window

The new Batch Window control allows you to set the maximum amount of time, in seconds, that Lambda spends gathering records before invoking the function. This brings similar batching functionality that AWS supports with Amazon SQS to Amazon MQ, Amazon MSK and self-managed Apache Kafka. The Lambda event source mapping batching functionality can be described as follows.

Batching controls with Lambda event source mapping

Batching controls with Lambda event source mapping

Using MaximumBatchingWindowInSeconds, you can set your function to wait up to 300 seconds for a batch to build before processing it. This allows you to create bigger batches if there are enough messages. You can manage the average number of records processed by the function with each invocation. This increases the efficiency of each invocation, and reduces the frequency.

Setting MaximumBatchingWindowInSeconds to 0 invokes the target Lambda function as soon as the Lambda event source receives a message from the broker.

Message broker batching behavior

For ActiveMQ, the Lambda event source mapping uses the Java Message Service (JMS) API to receive messages. For RabbitMQ, Lambda uses a RabbitMQ client library to get messages from the queue.

The Lambda event source mappings act as a consumer when polling the queue. The batching pattern for all instance-based message broker services is the same. As soon as a message is received, the batching window timer starts. If there are more messages, the consumer makes additional calls to the broker and adds them to a buffer. It keeps a count of the number of messages and the total size of the payload.

The batch is considered complete if the addition of a new message makes the batch size equal to or greater than 6 MB, or the batch window timeout is reached. If the batch size is greater than 6 MB, the last message is returned back to the broker.

Lambda then invokes the target Lambda function synchronously and passes on the batch of messages to the function. The Lambda event source continues to poll for more messages and as soon as it retrieves the next message, the batching window starts again. Polling and invocation of the target Lambda function occur in separate processes.

Kafka uses a distributed append log architecture to store messages. This works differently from ActiveMQ and RabbitMQ as messages are not removed from the broker once they have been consumed. Instead, consumers must maintain an offset to the last record or message that was consumed from the broker. Kafka provides several options in the consumer API to simplify the tracking of offsets.

Amazon MSK and Apache Kafka store data in multiple partitions to provide higher scalability. Lambda reads the messages sequentially for each partition and a batch may contain messages from different partitions.  Lambda then commits the offsets once the target Lambda function is invoked successfully.

Configuring the maximum batching window

To reduce Lambda function invocations for existing or new functions, set the MaximumBatchingWindowInSeconds value close to 300 seconds. A longer batching window can introduce additional latency. For latency-sensitive workloads set the MaximumBatchingWindowInSeconds value to an appropriate setting.

To configure Maximum Batching on a function in the AWS Management Console, navigate to the function in the Lambda console. Create a new Trigger, or edit an existing once. Along with the Batch size you can configure a Batch window. The Trigger Configuration page is similar across the broker services.

Max batching trigger window

Max batching trigger window

You can also use the AWS CLI to configure the --maximum-batching-window-in-seconds parameter.

For example, with Amazon MQ:

aws lambda create-event-source-mapping --function-name my-function \
--maximum-batching-window-in-seconds 300 --batch-size 100 --starting-position AT_TIMESTAMP \
--event-source-arn arn:aws:mq:us-east-1:123456789012:broker:ExampleMQBroker:b-24cacbb4-b295-49b7-8543-7ce7ce9dfb98

You can use AWS CloudFormation to configure the parameter. The following example configures the MaximumBatchingWindowInSeconds as part of the AWS::Lambda::EventSourceMapping resource for Amazon MQ:

  LambdaFunctionEventSourceMapping:
    Type: AWS::Lambda::EventSourceMapping
    Properties:
      BatchSize: 10
      MaximumBatchingWindowInSeconds: 300
      Enabled: true
      Queues:
        - "MyQueue"
      EventSourceArn: !GetAtt MyBroker.Arn
      FunctionName: !GetAtt LambdaFunction.Arn
      SourceAccessConfigurations:
        - Type: BASIC_AUTH
          URI: !Ref secretARNParameter

You can also use AWS Serverless Application Model (AWS SAM) to configure the parameter as part of the Lambda function event source.

MQReceiverFunction:
      Type: AWS::Serverless::Function 
      Properties:
        FunctionName: MQReceiverFunction
        CodeUri: src/
        Handler: app.lambda_handler
        Runtime: python3.9
        Events:
          MQEvent:
            Type: MQ
            Properties:
              Broker: !Ref brokerARNParameter
              BatchSize: 10
              MaximumBatchingWindowInSeconds: 300
              Queues:
                - "workshop.queueC"
              SourceAccessConfigurations:
                - Type: BASIC_AUTH
                  URI: !Ref secretARNParameter

Error handling

If your function times out or returns an error for any of the messages in a batch, Lambda retries the whole batch until processing succeeds or the messages expire.

When a function encounters an unrecoverable error, the event source mapping is paused and the consumer stops processing records. Any other consumers can continue processing, provided that they do not encounter the same error.  If your Lambda event records exceed the allowed size limit of 6 MB, they can go unprocessed.

For Amazon MQ, you can redeliver messages when there’s a function error. You can configure dead-letter queues (DLQs) for both Apache ActiveMQ, and RabbitMQ. For RabbitMQ, you can set a per-message TTL to move failed messages to a DLQ.

Since the same event may be received more than once, functions should be designed to be idempotent. This means that receiving the same event multiple times does not change the result beyond the first time the event was received.

Conclusion

Lambda supports a number of event sources including message broker services like Amazon MQ and Amazon MSK. This post explains how batching works with the event sources and how messages are sent to the Lambda function.

Previously, you could only control the batch size. The new Batch Window control allows you to set the maximum amount of time, in seconds, that Lambda spends gathering records before invoking the function. This can increase the overall throughput of message processing and reduces Lambda invocations, which may improve cost.

For more serverless learning resources, visit Serverless Land.

Introducing Amazon Simple Queue Service dead-letter queue redrive to source queues

Post Syndicated from Julian Wood original https://aws.amazon.com/blogs/compute/introducing-amazon-simple-queue-service-dead-letter-queue-redrive-to-source-queues/

This blog post is written by Mark Richman, a Senior Solutions Architect for SMB.

Today AWS is launching a new capability to enhance the dead-letter queue (DLQ) management experience for Amazon Simple Queue Service (SQS). DLQ redrive to source queues allows SQS to manage the lifecycle of unconsumed messages stored in DLQs.

SQS is a fully managed message queuing service that enables you to decouple and scale microservices, distributed systems, and serverless applications. Using Amazon SQS, you can send, store, and receive messages between software components at any volume without losing messages or requiring other services to be available.

To use SQS, a producer sends messages to an SQS queue, and a consumer pulls the messages from the queue. Sometimes, messages can’t be processed due to a number of possible issues. These can include logic errors in consumers that cause message processing to fail, network connectivity issues, or downstream service failures. This can result in unconsumed messages remaining in the queue.

Understanding SQS dead-letter queues (DLQs)

SQS allows you to manage the life cycle of the unconsumed messages using dead-letter queues (DLQs).

A DLQ is a separate SQS queue that one or many source queues can send messages that can’t be processed or consumed. DLQs allow you to debug your application by letting you isolate messages that can’t be processed correctly to determine why their processing didn’t succeed. Use a DLQ to handle message consumption failures gracefully.

When you create a source queue, you can specify a DLQ and the condition under which SQS moves messages from the source queue to the DLQ. This is called the redrive policy. The redrive policy condition specifies the maxReceiveCount. When a producer places messages on an SQS queue, the ReceiveCount tracks the number of times a consumer tries to process the message. When the ReceiveCount for a message exceeds the maxReceiveCount for a queue, SQS moves the message to the DLQ. The original message ID is retained.

For example, a source queue has a redrive policy with maxReceiveCount set to 5. If the consumer of the source queue receives a message 6, without successfully consuming it, SQS moves the message to the dead-letter queue.

You can configure an alarm to alert you when any messages are delivered to a DLQ. You can then examine logs for exceptions that might have caused them to be delivered to the DLQ. You can analyze the message contents to diagnose consumer application issues. Once the issue has been resolved and the consumer application recovers, these messages can be redriven from the DLQ back to the source queue to process them successfully.

Previously, this required dedicated operational cycles to review and redrive these messages back to their source queue.

DLQ redrive to source queues

DLQ redrive to source queues enables SQS to manage the second part of the lifecycle of unconsumed messages that are stored in DLQs. Once the consumer application is available to consume the failed messages, you can now redrive the messages from the DLQ back to the source queue. You can optionally review a sample of the available messages in the DLQ. You redrive the messages using the Amazon SQS console. This allows you to more easily recover from application failures.

Using redrive to source queues

To show how to use the new functionality there is an existing standard source SQS queue called MySourceQueue.

SQS does not create DLQs automatically. You must first create an SQS queue and then use it as a DLQ. The DLQ must be in the same region as the source queue.

Create DLQ

  1. Navigate to the SQS Management Console and create a standard SQS queue for the DLQ called MyDLQ. Use the default configuration. Refer to the SQS documentation for instructions on creating a queue.
  2. Navigate to MySourceQueue and choose Edit.
  3. Navigate to the Dead-letter queue section and choose Enabled.
  4. Select the Amazon Resource Name (ARN) of the MyDLQ queue you created previously.
  5. You can configure the number of times that a message can be received before being sent to a DLQ by setting Set Maximum receives to a value between 1 and 1,000. For this demo enter a value of 1 to immediately drive messages to the DLQ.
  6. Choose Save.
Configure source queue with DLQ

Configure source queue with DLQ

The console displays the Details page for the queue. Within the Dead-letter queue tab, you can see the Maximum receives value and DLQ ARN.

DLQ configuration

DLQ configuration

Send and receive test messages

You can send messages to test the functionality in the SQS console.

  1. Navigate to MySourceQueue and choose Send and receive messages
  2. Send a number of test messages by entering the message content in Message body and choosing Send message.
  3. Send and receive messages

    Send and receive messages

  4. Navigate to the Receive messages section where you can see the number of messages available.
  5. Choose Poll for messages. The Maximum message count is set to 10 by default If you sent more than 10 test messages, poll multiple times to receive all the messages.
Poll for messages

Poll for messages

All the received messages are sent to the DLQ because the maxReceiveCount is set to 1. At this stage you would normally review the messages. You would determine why their processing didn’t succeed and resolve the issue.

Redrive messages to source queue

Navigate to the list of all queues and filter if required to view the DLQ. The queue displays the approximate number of messages available in the DLQ. For standard queues, the result is approximate because of the distributed architecture of SQS. In most cases, the count should be close to the actual number of messages in the queue.

Messages available in DLQ

Messages available in DLQ

  1. Select the DLQ and choose Start DLQ redrive.
  2. DLQ redrive

    DLQ redrive

    SQS allows you to redrive messages either to their source queue(s) or to a custom destination queue.

  3. Choose to Redrive to source queue(s), which is the default.
  4. Redrive has two velocity control settings.

  • System optimized sends messages back to the source queue as fast as possible
  • Custom max velocity allows SQS to redrive messages with a custom maximum rate of messages per second. This feature is useful for minimizing the impact to normal processing of messages in the source queue.

You can optionally inspect messages prior to redrive.

  • To redrive the messages back to the source queue, choose DLQ redrive.
  • DLQ redrive

    DLQ redrive

    The Dead-letter queue redrive status panel shows the status of the redrive and percentage processed. You can refresh the display or cancel the redrive.

    Dead-letter queue redrive status

    Dead-letter queue redrive status

    Once the redrive is complete, which takes a few seconds in this example, the status reads Successfully completed.

    Redrive status completed

    Redrive status completed

  • Navigate back to the source queue and you can see all the messages are redriven back from the DLQ to the source queue.
  • Messages redriven from DLQ to source queue

    Messages redriven from DLQ to source queue

    Conclusion

    Dead-letter queue redrive to source queues allows you to effectively manage the life cycle of unconsumed messages stored in dead-letter queues. You can build applications with the confidence that you can easily examine unconsumed messages, recover from errors, and reprocess failed messages.

    You can redrive messages from their DLQs to their source queues using the Amazon SQS console.

    Dead-letter queue redrive to source queues is available in all commercial regions, and coming soon to GovCloud.

    To get started, visit https://aws.amazon.com/sqs/

    For more serverless learning resources, visit Serverless Land.

    Introducing mutual TLS authentication for Amazon MSK as an event source

    Post Syndicated from Julian Wood original https://aws.amazon.com/blogs/compute/introducing-mutual-tls-authentication-for-amazon-msk-as-an-event-source/

    This post is written by Uma Ramadoss, Senior Specialist Solutions Architect, Integration.

    Today, AWS Lambda is introducing mutual TLS (mTLS) authentication for Amazon Managed Streaming for Apache Kafka (Amazon MSK) and self-managed Kafka as an event source.

    Many customers use Amazon MSK for streaming data from multiple producers. Multiple subscribers can then consume the streaming data and build data pipelines, analytics, and data integration. To learn more, read Using Amazon MSK as an event source for AWS Lambda.

    You can activate any combination of authentication modes (mutual TLS, SASL SCRAM, or IAM access control) on new or existing clusters. This is useful if you are migrating to a new authentication mode or must run multiple authentication modes simultaneously. Lambda natively supports consuming messages from both self-managed Kafka and Amazon MSK through event source mapping.

    By default, the TLS protocol only requires a server to authenticate itself to the client. The authentication of the client to the server is managed by the application layer. The TLS protocol also offers the ability for the server to request that the client send an X.509 certificate to prove its identity. This is called mutual TLS as both parties are authenticated via certificates with TLS.

    Mutual TLS is a commonly used authentication mechanism for business-to-business (B2B) applications. It’s used in standards such as Open Banking, which enables secure open API integrations for financial institutions. It is one of the popular authentication mechanisms for customers using Kafka.

    To use mutual TLS authentication for your Kafka-triggered Lambda functions, you provide a signed client certificate, the private key for the certificate, and an optional password if the private key is encrypted. This establishes a trust relationship between Lambda and Amazon MSK or self-managed Kafka. Lambda supports self-signed server certificates or server certificates signed by a private certificate authority (CA) for self-managed Kafka. Lambda trusts the Amazon MSK certificate by default as the certificates are signed by Amazon Trust Services CAs.

    This blog post explains how to set up a Lambda function to process messages from an Amazon MSK cluster using mutual TLS authentication.

    Overview

    Using Amazon MSK as an event source operates in a similar way to using Amazon SQS or Amazon Kinesis. You create an event source mapping by attaching Amazon MSK as event source to your Lambda function.

    The Lambda service internally polls for new records from the event source, reading the messages from one or more partitions in batches. It then synchronously invokes your Lambda function, sending each batch as an event payload. Lambda continues to process batches until there are no more messages in the topic.

    The Lambda function’s event payload contains an array of records. Each array item contains details of the topic and Kafka partition identifier, together with a timestamp and base64 encoded message.

    Kafka event payload

    Kafka event payload

    You store the signed client certificate, the private key for the certificate, and an optional password if the private key is encrypted in the AWS Secrets Manager as a secret. You provide the secret in the Lambda event source mapping.

    The steps for using mutual TLS authentication for Amazon MSK as event source for Lambda are:

    1. Create a private certificate authority (CA) using AWS Certificate Manager (ACM) Private Certificate Authority (PCA).
    2. Create a client certificate and private key. Store them as secret in AWS Secrets Manager.
    3. Create an Amazon MSK cluster and a consuming Lambda function using the AWS Serverless Application Model (AWS SAM).
    4. Attach the event source mapping.

    This blog walks through these steps in detail.

    Prerequisites

    1. Creating a private CA.

    To use mutual TLS client authentication with Amazon MSK, create a root CA using AWS ACM Private Certificate Authority (PCA). We recommend using independent ACM PCAs for each MSK cluster when you use mutual TLS to control access. This ensures that TLS certificates signed by PCAs only authenticate with a single MSK cluster.

    1. From the AWS Certificate Manager console, choose Create a Private CA.
    2. In the Select CA type panel, select Root CA and choose Next.
    3. Select Root CA

      Select Root CA

    4. In the Configure CA subject name panel, provide your certificate details, and choose Next.
    5. Provide your certificate details

      Provide your certificate details

    6. From the Configure CA key algorithm panel, choose the key algorithm for your CA and choose Next.
    7. Configure CA key algorithm

      Configure CA key algorithm

    8. From the Configure revocation panel, choose any optional certificate revocation options you require and choose Next.
    9. Configure revocation

      Configure revocation

    10. Continue through the screens to add any tags required, allow ACM to renew certificates, review your options, and confirm pricing. Choose Confirm and create.
    11. Once the CA is created, choose Install CA certificate to activate your CA. Configure the validity of the certificate and the signature algorithm and choose Next.
    12. Configure certificate

      Configure certificate

    13. Review the certificate details and choose Confirm and install. Note down the Amazon Resource Name (ARN) of the private CA for the next section.
    14. Review certificate details

      Review certificate details

    2. Creating a client certificate.

    You generate a client certificate using the root certificate you previously created, which is used to authenticate the client with the Amazon MSK cluster using mutual TLS. You provide this client certificate and the private key as AWS Secrets Manager secrets to the AWS Lambda event source mapping.

    1. On your local machine, run the following command to create a private key and certificate signing request using OpenSSL. Enter your certificate details. This creates a private key file and a certificate signing request file in the current directory.
    2. openssl req -new -newkey rsa:2048 -days 365 -keyout key.pem -out client_cert.csr -nodes
      OpenSSL create a private key and certificate signing request

      OpenSSL create a private key and certificate signing request

    3. Use the AWS CLI to sign your certificate request with the private CA previously created. Replace Private-CA-ARN with the ARN of your private CA. The certificate validity value is set to 300, change this if necessary. Save the certificate ARN provided in the response.
    4. aws acm-pca issue-certificate --certificate-authority-arn Private-CA-ARN --csr fileb://client_cert.csr --signing-algorithm "SHA256WITHRSA" --validity Value=300,Type="DAYS"
    5. Retrieve the certificate that ACM signed for you. Replace the Private-CA-ARN and Certificate-ARN with the ARN you obtained from the previous commands. This creates a signed certificate file called client_cert.pem.
    6. aws acm-pca get-certificate --certificate-authority-arn Private-CA-ARN --certificate-arn Certificate-ARN | jq -r '.Certificate + "\n" + .CertificateChain' >> client_cert.pem
    7. Create a new file called secret.json with the following structure
    8. {
      "certificate":"",
      "privateKey":""
      }
      
    9. Copy the contents of the client_cert.pem in certificate and the content of key.pem in privatekey. Ensure that there are no extra spaces added. The file structure looks like this:
    10. Certificate file structure

      Certificate file structure

    11. Create the secret and save the ARN for the next section.
    aws secretsmanager create-secret --name msk/mtls/lambda/clientcert --secret-string file://secret.json

    3. Setting up an Amazon MSK cluster with AWS Lambda as a consumer.

    Amazon MSK is a highly available service, so it must be configured to run in a minimum of two Availability Zones in your preferred Region. To comply with security best practice, the brokers are usually configured in private subnets in each Region.

    You can use AWS CLI, AWS Management Console, AWS SDK and AWS CloudFormation to create the cluster and the Lambda functions. This blog uses AWS SAM to create the infrastructure and the associated code is available in the GitHub repository.

    The AWS SAM template creates the following resources:

    1. Amazon Virtual Private Cloud (VPC).
    2. Amazon MSK cluster with mutual TLS authentication.
    3. Lambda function for consuming the records from the Amazon MSK cluster.
    4. IAM roles.
    5. Lambda function for testing the Amazon MSK integration by publishing messages to the topic.

    The VPC has public and private subnets in two Availability Zones with the private subnets configured to use a NAT Gateway. You can also set up VPC endpoints with PrivateLink to allow the Amazon MSK cluster to communicate with Lambda. To learn more about different configurations, see this blog post.

    The Lambda function requires permission to describe VPCs and security groups, and manage elastic network interfaces to access the Amazon MSK data stream. The Lambda function also needs two Kafka permissions: kafka:DescribeCluster and kafka:GetBootstrapBrokers. The policy template AWSLambdaMSKExecutionRole includes these permissions. The Lambda function also requires permission to get the secret value from AWS Secrets Manager for the secret you configure in the event source mapping.

      ConsumerLambdaFunctionRole:
        Type: AWS::IAM::Role
        Properties:
          AssumeRolePolicyDocument:
            Version: "2012-10-17"
            Statement:
              - Effect: Allow
                Principal:
                  Service: lambda.amazonaws.com
                Action: sts:AssumeRole
          ManagedPolicyArns:
            - arn:aws:iam::aws:policy/service-role/AWSLambdaMSKExecutionRole
          Policies:
            - PolicyName: SecretAccess
              PolicyDocument:
                Version: "2012-10-17"
                Statement:
                  - Effect: Allow
                    Action: "SecretsManager:GetSecretValue"
                    Resource: "*"

    This release adds two new SourceAccessConfiguration types to the Lambda event source mapping:

    1. CLIENT_CERTIFICATE_TLS_AUTH – (Amazon MSK, Self-managed Apache Kafka) The Secrets Manager ARN of your secret key containing the certificate chain (PEM), private key (PKCS#8 PEM), and private key password (optional) used for mutual TLS authentication of your Amazon MSK/Apache Kafka brokers. A private key password is required if the private key is encrypted.

    2. SERVER_ROOT_CA_CERTIFICATE – This is only for self-managed Apache Kafka. This contains the Secrets Manager ARN of your secret containing the root CA certificate used by your Apache Kafka brokers in PEM format. This is not applicable for Amazon MSK as Amazon MSK brokers use public AWS Certificate Manager certificates which are trusted by AWS Lambda by default.

    Deploying the resources:

    To deploy the example application:

    1. Clone the GitHub repository
    2. git clone https://github.com/aws-samples/aws-lambda-msk-mtls-integration.git
    3. Navigate to the aws-lambda-msk-mtls-integration directory. Copy the client certificate file and the private key file to the producer lambda function code.
    4. cd aws-lambda-msk-mtls-integration
      cp ../client_cert.pem code/producer/client_cert.pem
      cp ../key.pem code/producer/client_key.pem
    5. Navigate to the code directory and build the application artifacts using the AWS SAM build command.
    6. cd code
      sam build
    7. Run sam deploy to deploy the infrastructure. Provide the Stack Name, AWS Region, ARN of the private CA created in section 1. Provide additional information as required in the sam deploy and deploy the stack.
    8. sam deploy -g
      Running sam deploy -g

      Running sam deploy -g

      The stack deployment takes about 30 minutes to complete. Once complete, note the output values.

    9. Create the event source mapping for the Lambda function. Replace the CONSUMER_FUNCTION_NAME and MSK_CLUSTER_ARN from the output of the stack created by the AWS SAM template. Replace SECRET_ARN with the ARN of the AWS Secrets Manager secret created previously.
    10. aws lambda create-event-source-mapping --function-name CONSUMER_FUNCTION_NAME --batch-size 10 --starting-position TRIM_HORIZON --topics exampleTopic --event-source-arn MSK_CLUSTER_ARN --source-access-configurations '[{"Type": "CLIENT_CERTIFICATE_TLS_AUTH","URI": "SECRET_ARN"}]'
    11. Navigate one directory level up and configure the producer function with the Amazon MSK broker details. Replace the PRODUCER_FUNCTION_NAME and MSK_CLUSTER_ARN from the output of the stack created by the AWS SAM template.
    12. cd ../
      ./setup_producer.sh MSK_CLUSTER_ARN PRODUCER_FUNCTION_NAME
    13. Verify that the event source mapping state is enabled before moving on to the next step. Replace UUID from the output of step 5.
    14. aws lambda get-event-source-mapping --uuid UUID
    15. Publish messages using the producer. Replace PRODUCER_FUNCTION_NAME from the output of the stack created by the AWS SAM template. The following command creates a Kafka topic called exampleTopic and publish 100 messages to the topic.
    16. ./produce.sh PRODUCER_FUNCTION_NAME exampleTopic 100
    17. Verify that the consumer Lambda function receives and processes the messages by checking in Amazon CloudWatch log groups. Navigate to the log group by searching for aws/lambda/{stackname}-MSKConsumerLambda in the search bar.
    Consumer function log stream

    Consumer function log stream

    Conclusion

    Lambda now supports mutual TLS authentication for Amazon MSK and self-managed Kafka as an event source. You now have the option to provide a client certificate to establish a trust relationship between Lambda and MSK or self-managed Kafka brokers. It supports configuration via the AWS Management Console, AWS CLI, AWS SDK, and AWS CloudFormation.

    To learn more about how to use mutual TLS Authentication for your Kafka triggered AWS Lambda function, visit AWS Lambda with self-managed Apache Kafka and Using AWS Lambda with Amazon MSK.

    Building well-architected serverless applications: Optimizing application costs

    Post Syndicated from Julian Wood original https://aws.amazon.com/blogs/compute/building-well-architected-serverless-applications-optimizing-application-costs/

    This series of blog posts uses the AWS Well-Architected Tool with the Serverless Lens to help customers build and operate applications using best practices. In each post, I address the serverless-specific questions identified by the Serverless Lens along with the recommended best practices. See the introduction post for a table of contents and explanation of the example application.

    COST 1. How do you optimize your serverless application costs?

    Design, implement, and optimize your application to maximize value. Asynchronous design patterns and performance practices ensure efficient resource use and directly impact the value per business transaction. By optimizing your serverless application performance and its code patterns, you can directly impact the value it provides, while making more efficient use of resources.

    Serverless architectures are easier to manage in terms of correct resource allocation compared to traditional architectures. Due to its pay-per-value pricing model and scale based on demand, a serverless approach effectively reduces the capacity planning effort. As covered in the operational excellence and performance pillars, optimizing your serverless application has a direct impact on the value it produces and its cost. For general serverless optimization guidance, see the AWS re:Invent talks, “Optimizing your Serverless applications” Part 1 and Part 2, and “Serverless architectural patterns and best practices”.

    Required practice: Minimize external calls and function code initialization

    AWS Lambda functions may call other managed services and third-party APIs. Functions may also use application dependencies that may not be suitable for ephemeral environments. Understanding and controlling what your function accesses while it runs can have a direct impact on value provided per invocation.

    Review code initialization

    I explain the Lambda initialization process with cold and warm starts in “Optimizing application performance – part 1”. Lambda reports the time it takes to initialize application code in Amazon CloudWatch Logs. As Lambda functions are billed by request and duration, you can use this to track costs and performance. Consider reviewing your application code and its dependencies to improve the overall execution time to maximize value.

    You can take advantage of Lambda execution environment reuse to make external calls to resources and use the results for subsequent invocations. Use TTL mechanisms inside your function handler code. This ensures that you can prevent additional external calls that incur additional execution time, while preemptively fetching data that isn’t stale.

    Review third-party application deployments and permissions

    When using Lambda layers or applications provisioned by AWS Serverless Application Repository, be sure to understand any associated charges that these may incur. When deploying functions packaged as container images, understand the charges for storing images in Amazon Elastic Container Registry (ECR).

    Ensure that your Lambda function only has access to what its application code needs. Regularly review that your function has a predicted usage pattern so you can factor in the cost of other services, such as Amazon S3 and Amazon DynamoDB.

    Required practice: Optimize logging output and its retention

    Considering reviewing your application logging level. Ensure that logging output and log retention are appropriately set to your operational needs to prevent unnecessary logging and data retention. This helps you have the minimum of log retention to investigate operational and performance inquiries when necessary.

    Emit and capture only what is necessary to understand and operate your component as intended.

    With Lambda, any standard output statements are sent to CloudWatch Logs. Capture and emit business and operational events that are necessary to help you understand your function, its integration, and its interactions. Use a logging framework and environment variables to dynamically set a logging level. When applicable, sample debugging logs for a percentage of invocations.

    In the serverless airline example used in this series, the booking service Lambda functions use Lambda Powertools as a logging framework with output structured as JSON.

    Lambda Powertools is added to the Lambda functions as a shared Lambda layer in the AWS Serverless Application Model (AWS SAM) template. The layer ARN is stored in Systems Manager Parameter Store.

    Parameters:
      SharedLibsLayer:
        Type: AWS::SSM::Parameter::Value<String>
        Description: Project shared libraries Lambda Layer ARN
    Resources:
        ConfirmBooking:
            Type: AWS::Serverless::Function
            Properties:
                FunctionName: !Sub ServerlessAirline-ConfirmBooking-${Stage}
                Handler: confirm.lambda_handler
                CodeUri: src/confirm-booking
                Layers:
                    - !Ref SharedLibsLayer
                Runtime: python3.7
    …
    

    The LOG_LEVEL and other Powertools settings are configured in the Globals section as Lambda environment variable for all functions.

    Globals:
        Function:
            Environment:
                Variables:
                    POWERTOOLS_SERVICE_NAME: booking
                    POWERTOOLS_METRICS_NAMESPACE: ServerlessAirline
                    LOG_LEVEL: INFO 
    

    For Amazon API Gateway, there are two types of logging in CloudWatch: execution logging and access logging. Execution logs contain information that you can use to identify and troubleshoot API errors. API Gateway manages the CloudWatch Logs, creating the log groups and log streams. Access logs contain details about who accessed your API and how they accessed it. You can create your own log group or choose an existing log group that could be managed by API Gateway.

    Enable access logs, and selectively review the output format and request fields that might be necessary. For more information, see “Setting up CloudWatch logging for a REST API in API Gateway”.

    API Gateway logging

    API Gateway logging

    Enable AWS AppSync logging which uses CloudWatch to monitor and debug requests. You can configure two types of logging: request-level and field-level. For more information, see “Monitoring and Logging”.

    AWS AppSync logging

    AWS AppSync logging

    Define and set a log retention strategy

    Define a log retention strategy to satisfy your operational and business needs. Set log expiration for each CloudWatch log group as they are kept indefinitely by default.

    For example, in the booking service AWS SAM template, log groups are explicitly created for each Lambda function with a parameter specifying the retention period.

    Parameters:
        LogRetentionInDays:
            Type: Number
            Default: 14
            Description: CloudWatch Logs retention period
    Resources:
        ConfirmBookingLogGroup:
            Type: AWS::Logs::LogGroup
            Properties:
                LogGroupName: !Sub "/aws/lambda/${ConfirmBooking}"
                RetentionInDays: !Ref LogRetentionInDays
    

    The Serverless Application Repository application, auto-set-log-group-retention can update the retention policy for new and existing CloudWatch log groups to the specified number of days.

    For log archival, you can export CloudWatch Logs to S3 and store them in Amazon S3 Glacier for more cost-effective retention. You can use CloudWatch Log subscriptions for custom processing, analysis, or loading to other systems. Lambda extensions allows you to process, filter, and route logs directly from Lambda to a destination of your choice.

    Good practice: Optimize function configuration to reduce cost

    Benchmark your function using a different set of memory size

    For Lambda functions, memory is the capacity unit for controlling the performance and cost of a function. You can configure the amount of memory allocated to a Lambda function, between 128 MB and 10,240 MB. The amount of memory also determines the amount of virtual CPU available to a function. Benchmark your AWS Lambda functions with differing amounts of memory allocated. Adding more memory and proportional CPU may lower the duration and reduce the cost of each invocation.

    In “Optimizing application performance – part 2”, I cover using AWS Lambda Power Tuning to automate the memory testing process to balances performance and cost.

    Best practice: Use cost-aware usage patterns in code

    Reduce the time your function runs by reducing job-polling or task coordination. This avoids overpaying for unnecessary compute time.

    Decide whether your application can fit an asynchronous pattern

    Avoid scenarios where your Lambda functions wait for external activities to complete. I explain the difference between synchronous and asynchronous processing in “Optimizing application performance – part 1”. You can use asynchronous processing to aggregate queues, streams, or events for more efficient processing time per invocation. This reduces wait times and latency from requesting apps and functions.

    Long polling or waiting increases the costs of Lambda functions and also reduces overall account concurrency. This can impact the ability of other functions to run.

    Consider using other services such as AWS Step Functions to help reduce code and coordinate asynchronous workloads. You can build workflows using state machines with long-polling, and failure handling. Step Functions also supports direct service integrations, such as DynamoDB, without having to use Lambda functions.

    In the serverless airline example used in this series, Step Functions is used to orchestrate the Booking microservice. The ProcessBooking state machine handles all the necessary steps to create bookings, including payment.

    Booking service state machine

    Booking service state machine

    To reduce costs and improves performance with CloudWatch, create custom metrics asynchronously. You can use the Embedded Metrics Format to write logs, rather than the PutMetricsData API call. I cover using the embedded metrics format in “Understanding application health” – part 1 and part 2.

    For example, once a booking is made, the logs are visible in the CloudWatch console. You can select a log stream and find the custom metric as part of the structured log entry.

    Custom metric structured log entry

    Custom metric structured log entry

    CloudWatch automatically creates metrics from these structured logs. You can create graphs and alarms based on them. For example, here is a graph based on a BookingSuccessful custom metric.

    CloudWatch metrics custom graph

    CloudWatch metrics custom graph

    Consider asynchronous invocations and review run away functions where applicable

    Take advantage of Lambda’s event-based model. Lambda functions can be triggered based on events ingested into Amazon Simple Queue Service (SQS) queues, S3 buckets, and Amazon Kinesis Data Streams. AWS manages the polling infrastructure on your behalf with no additional cost. Avoid code that polls for third-party software as a service (SaaS) providers. Rather use Amazon EventBridge to integrate with SaaS instead when possible.

    Carefully consider and review recursion, and establish timeouts to prevent run away functions.

    Conclusion

    Design, implement, and optimize your application to maximize value. Asynchronous design patterns and performance practices ensure efficient resource use and directly impact the value per business transaction. By optimizing your serverless application performance and its code patterns, you can reduce costs while making more efficient use of resources.

    In this post, I cover minimizing external calls and function code initialization. I show how to optimize logging output with the embedded metrics format, and log retention. I recap optimizing function configuration to reduce cost and highlight the benefits of asynchronous event-driven patterns.

    This post wraps up the series, building well-architected serverless applications, where I cover the AWS Well-Architected Tool with the Serverless Lens . See the introduction post for links to all the blog posts.

    For more serverless learning resources, visit Serverless Land.


    Building well-architected serverless applications: Optimizing application performance – part 3

    Post Syndicated from Julian Wood original https://aws.amazon.com/blogs/compute/building-well-architected-serverless-applications-optimizing-application-performance-part-3/

    This series of blog posts uses the AWS Well-Architected Tool with the Serverless Lens to help customers build and operate applications using best practices. In each post, I address the serverless-specific questions identified by the Serverless Lens along with the recommended best practices. See the introduction post for a table of contents and explanation of the example application.

    PERF 1. Optimizing your serverless application’s performance

    This post continues part 2 of this security question. Previously, I look at designing your function to take advantage of concurrency via asynchronous and stream-based invocations. I cover measuring, evaluating, and selecting optimal capacity units.

    Best practice: Integrate with managed services directly over functions when possible

    Consider using native integrations between managed services as opposed to AWS Lambda functions when no custom logic or data transformation is required. This can enable optimal performance, requires less resources to manage, and increases security. There are also a number of AWS application integration services that enable communication between decoupled components with microservices.

    Use native cloud services integration

    When using Amazon API Gateway APIs, you can use the AWS integration type to connect to other AWS services natively. With this integration type, API Gateway uses Apache Velocity Template Language (VTL) and HTTPS to directly integrate with other AWS services.

    Timeouts and errors must be managed by the API consumer. For more information on using VTL, see “Amazon API Gateway Apache Velocity Template Reference”. For an example application that uses API Gateway to read and write directly to/from Amazon DynamoDB, see “Building a serverless URL shortener app without AWS Lambda”.

    API Gateway direct service integration

    API Gateway direct service integration

    There is also a tutorial available, Build an API Gateway REST API with AWS integration.

    When using AWS AppSync, you can use VTL, direct integration with Amazon Aurora, Amazon Elasticsearch Service, and any publicly available HTTP endpoint. AWS AppSync can use multiple integration types and can maximize throughput at the data field level. For example, you can run full-text searches on the orderDescription field against Elasticsearch while fetching the remaining data from DynamoDB. For more information, see the AWS AppSync resolver tutorials.

    In the serverless airline example used in this series, the catalog service uses AWS AppSync to provide a GraphQL API for searching flights. AWS AppSync uses DynamoDB as a database, and all compute logic is contained in the Apache Velocity Template (VTL).

    Serverless airline catalog service using VTL

    Serverless airline catalog service using VTL

    AWS Step Functions integrates with multiple AWS services using service Integrations. For example, this allows you to fetch and put data into DynamoDB, or run an AWS Batch job. You can also publish messages to Amazon Simple Notification Service (SNS) topics, and send messages to Amazon Simple Queue Service (SQS) queues. For more details on the available integrations, see “Using AWS Step Functions with other services”.

    Using Amazon EventBridge, you can connect your applications with data from a variety of sources. You can connect to various AWS services natively, and act as an event bus across multiple AWS accounts to ease integration. You can also use the API destination feature to route events to services outside of AWS. EventBridge handles the authentication, retries, and throughput. For more details on available EventBridge targets, see the documentation.

    Amazon EventBridge

    Amazon EventBridge

    Good practice: Optimize access patterns and apply caching where applicable

    Consider caching when clients may not require up to date data. Optimize access patterns to only fetch data that is necessary to end users. This improves the overall responsiveness of your workload and makes more efficient use of compute and data resources across components.

    Implement caching for suitable access patterns

    For REST APIs, you can use API Gateway caching to reduce the number of calls made to your endpoint and also improve the latency of requests to your API. When you enable caching for a stage or method, API Gateway caches responses for a specified time-to-live (TTL) period. API Gateway then responds to the request by looking up the endpoint response from the cache, instead of making a request to your endpoint.

    API Gateway caching

    API Gateway caching

    For more information, see “Enabling API caching to enhance responsiveness”.

    For geographically distributed clients, Amazon CloudFront or your third-party CDN can cache results at the edge and further reducing network round-trip latency.

    For GraphQL APIs, AWS AppSync provides built-in server-side caching at the API level. This reduces the need to access data sources directly by making data available in a high-speed in-memory cache. This improves performance and decreases latency. For queries with common arguments or a restricted set of arguments, you can also enable caching at the resolver level to improve overall responsiveness. For more information, see “Improving GraphQL API performance and consistency with AWS AppSync Caching”.

    When using databases, cache results and only connect to and fetch data when needed. This reduces the load on the downstream database and improves performance. Include a caching expiration mechanism to prevent serving stale records. For more information on caching implementation patterns and considerations, see “Caching Best Practices”.

    For DynamoDB, you can enable caching with Amazon DynamoDB Accelerator (DAX). DAX enables you to benefit from fast in-memory read performance in microseconds, rather than milliseconds. DAX is suitable for use cases that may not require strongly consistent reads. Some examples include real-time bidding, social gaming, and trading applications. For more information, read “Use cases for DAX“.

    For general caching purposes, Amazon ElastiCache provides a distributed in-memory data store or cache environment. ElastiCache supports a variety of caching patterns through key-value stores using the Redis and Memcache engines. Define what is safe to cache, even when using popular caching patterns like lazy caching or write-through. Set a TTL and eviction policy that fits your baseline performance and access patterns. This ensures that you don’t serve stale records or cache data that should have a strongly consistent read. For more information on ElastiCache caching and time-to-live strategies, see the documentation.

    For additional serverless caching suggestions, see the AWS Serverless Hero blog post “All you need to know about caching for serverless applications”.

    Reduce overfetching and underfetching

    Over-fetching is when a client downloads too much data from a database or endpoint. This results in data in the response that you don’t use. Under-fetching is not having enough data in the response. The client then needs to make additional requests to receive the data. Overfetching and underfetching can both affect performance.

    To fetch a collection of items from a DynamoDB table, you can perform a query or a scan. A scan operation always scans the entire table or secondary index. It then filters out values to provide the result you want, essentially adding the extra step of removing data from the result set. A query operation finds items directly based on primary key values.

    For faster response times, design your tables and indexes so that your applications can use query instead of scan. Use both Global Secondary Index (GSI) in addition to composite sort keys to help you query hierarchical relationships in your data. For more information, see “Best Practices for Querying and Scanning Data”.

    Consider GraphQL and AWS AppSync for interactive web applications, mobile, real-time, or for use cases where data drives the user interface. AWS AppSync provides data fetching flexibility, which allows your client to query only for the data it needs, in the format it needs it. Ensure you do not make too many nested queries where a long response may result in timeouts. GraphQL helps you adapt access patterns as your workload evolves. This makes it more flexible as it allows you to move to purpose-built databases if necessary.

    Compress payload and data storage

    Some AWS services allow you to compress the payload or compress data storage. This can improve performance by sending and receiving less data, and can save on data storage, which can also reduce costs.

    If your content supports deflate, gzip or identity content encoding, API Gateway allows your client to call your API with compressed payloads. By default, API Gateway supports decompression of the method request payload. However, you must configure your API to enable compression of the method response payload. Compression in API Gateway and decompression in the client might increase overall latency and require more computing times. Run test cases against your API to determine an optimal value. For more information, see “Enabling payload compression for an API”.

    Amazon Kinesis Data Firehose supports compressing streaming data using gzip, snappy, or zip. This minimizes the amount of storage used at the destination. The Amazon Kinesis Data Firehose FAQs has more information on compression. Kinesis Data Firehose also supports converting your streaming data from JSON to Apache Parquet or Apache ORC before storing the data in Amazon S3. Parquet and ORC are columnar data formats that save space and enable faster queries compared to row-oriented formats like JSON.

    Conclusion

    Evaluate and optimize your serverless application’s performance based on access patterns, scaling mechanisms, and native integrations. You can improve your overall experience and make more efficient use of the platform in terms of both value and resources.

    In part 1, I cover measuring and optimizing function startup time. I explain cold and warm starts and how to reuse the Lambda execution environment to improve performance. I explain how only importing necessary libraries and dependencies increases application performance.

    In part 2, I look at designing your function to take advantage of concurrency via asynchronous and stream-based invocations. I cover measuring, evaluating, and selecting optimal capacity units.

    In this post, I look at integrating with managed services directly over functions when possible. I cover optimizing access patterns and applying caching where applicable.

    In the next post in the series, I cover the cost optimization pillar from the Well-Architected Serverless Lens.

    For more serverless learning resources, visit Serverless Land.

    Building well-architected serverless applications: Optimizing application performance – part 2

    Post Syndicated from Julian Wood original https://aws.amazon.com/blogs/compute/building-well-architected-serverless-applications-optimizing-application-performance-part-2/

    This series of blog posts uses the AWS Well-Architected Tool with the Serverless Lens to help customers build and operate applications using best practices. In each post, I address the serverless-specific questions identified by the Serverless Lens along with the recommended best practices. See the introduction post for a table of contents and explanation of the example application.

    PERF 1. Optimizing your serverless application’s performance

    This post continues part 1 of this security question. Previously, I cover measuring and optimizing function startup time. I explain cold and warm starts and how to reuse the Lambda execution environment to improve performance. I show a number of ways to analyze and optimize the initialization startup time. I explain how only importing necessary libraries and dependencies increases application performance.

    Good practice: Design your function to take advantage of concurrency via asynchronous and stream-based invocations

    AWS Lambda functions can be invoked synchronously and asynchronously.

    Favor asynchronous over synchronous request-response processing.

    Consider using asynchronous event processing rather than synchronous request-response processing. You can use asynchronous processing to aggregate queues, streams, or events for more efficient processing time per invocation. This reduces wait times and latency from requesting apps and functions.

    When you invoke a Lambda function with a synchronous invocation, you wait for the function to process the event and return a response.

    Synchronous invocation

    Synchronous invocation

    As synchronous processing involves a request-response pattern, the client caller also needs to wait for a response from a downstream service. If the downstream service then needs to call another service, you end up chaining calls that can impact service reliability, in addition to response times. For example, this POST /order request must wait for the response to the POST /invoice request before responding to the client caller.

    Example synchronous processing

    Example synchronous processing

    The more services you integrate, the longer the response time, and you can no longer sustain complex workflows using synchronous transactions.

    Asynchronous processing allows you to decouple the request-response using events without waiting for a response from the function code. This allows you to perform background processing without requiring the client to wait for a response, improving client performance. You pass the event to an internal Lambda queue for processing and Lambda handles the rest. An external process, separate from the function, manages polling and retries. Using this asynchronous approach can also make it easier to handle unpredictable traffic with significant volumes.

    Asynchronous invocation

    Asynchronous invocation

    For example, the client makes a POST /order request to the order service. The order service accepts the request and returns that it has been received, without waiting for the invoice service. The order service then makes an asynchronous POST /invoice request to the invoice service, which can then process independently of the order service. If the client must receive data from the invoice service, it can handle this separately via a GET /invoice request.

    Example asynchronous processing

    Example asynchronous processing

    You can configure Lambda to send records of asynchronous invocations to another destination service. This helps you to troubleshoot your invocations. You can also send messages or events that can’t be processed correctly into a dedicated Amazon Simple Queue Service (SQS) dead-letter queue for investigation.

    You can add triggers to a function to process data automatically. For more information on which processing model Lambda uses for triggers, see “Using AWS Lambda with other services”.

    Asynchronous workflows handle a variety of use cases including data Ingestion, ETL operations, and order/request fulfillment. In these use-cases, data is processed as it arrives and is retrieved as it changes. For example asynchronous patterns, see “Serverless Data Processing” and “Serverless Event Submission with Status Updates”.

    For more information on Lambda synchronous and asynchronous invocations, see the AWS re:Invent presentation “Optimizing your serverless applications”.

    Tune batch size, batch window, and compress payloads for high throughput

    When using Lambda to process records using Amazon Kinesis Data Streams or SQS, there are a number of tuning parameters to consider for performance.

    You can configure a batch window to buffer messages or records for up to 5 minutes. You can set a limit of the maximum number of records Lambda can process by setting a batch size. Your Lambda function is invoked whichever comes first.

    For high volume SQS standard queue throughput, Lambda can process up to 1000 concurrent batches of records per second. For more information, see “Using AWS Lambda with Amazon SQS”.

    For high volume Kinesis Data Streams throughput, there are a number of options. Configure the ParallelizationFactor setting to process one shard of a Kinesis Data Stream with more than one Lambda invocation simultaneously. Lambda can process up to 10 batches in each shard. For more information, see “New AWS Lambda scaling controls for Kinesis and DynamoDB event sources.” You can also add more shards to your data stream to increase the speed at which your function can process records. This increases the function concurrency at the expense of ordering per shard. For more details on using Kinesis and Lambda, see “Monitoring and troubleshooting serverless data analytics applications”.

    Kinesis enhanced fan-out can maximize throughput by dedicating a 2 MB/second input/output channel per second per consumer instead of 2 MB per shard. For more information, see “Increasing stream processing performance with Enhanced Fan-Out and Lambda”.

    Kinesis stream producers can also compress records. This is at the expense of additional CPU cycles for decompressing the records in your Lambda function code.

    Required practice: Measure, evaluate, and select optimal capacity units

    Capacity units are a unit of consumption for a service. They can include function memory size, number of stream shards, number of database reads/writes, request units, or type of API endpoint. Measure, evaluate and select capacity units to enable optimal configuration of performance, throughput, and cost.

    Identify and implement optimal capacity units.

    For Lambda functions, memory is the capacity unit for controlling the performance of a function. You can configure the amount of memory allocated to a Lambda function, between 128 MB and 10,240 MB. The amount of memory also determines the amount of virtual CPU available to a function. Adding more memory proportionally increases the amount of CPU, increasing the overall computational power available. If a function is CPU-, network- or memory-bound, then changing the memory setting can dramatically improve its performance.

    Choosing the memory allocated to Lambda functions is an optimization process that balances performance (duration) and cost. You can manually run tests on functions by selecting different memory allocations and measuring the time taken to complete. Alternatively, use the AWS Lambda Power Tuning tool to automate the process.

    The tool allows you to systematically test different memory size configurations and depending on your performance strategy – cost, performance, balanced – it identifies what is the most optimum memory size to use. For more information, see “Operating Lambda: Performance optimization – Part 2”.

    AWS Lambda Power Tuning report

    AWS Lambda Power Tuning report

    Amazon DynamoDB manages table processing throughput using read and write capacity units. There are two different capacity modes, on-demand and provisioned.

    On-demand capacity mode supports up to 40K read/write request units per second. This is recommended for unpredictable application traffic and new tables with unknown workloads. For higher and predictable throughputs, provisioned capacity mode along with DynamoDB auto scaling is recommended. For more information, see “Read/Write Capacity Mode”.

    For high throughput Amazon Kinesis Data Streams with multiple consumers, consider using enhanced fan-out for dedicated 2 MB/second throughput per consumer. When possible, use Kinesis Producer Library and Kinesis Client Library for effective record aggregation and de-aggregation.

    Amazon API Gateway supports multiple endpoint types. Edge-optimized APIs provide a fully managed Amazon CloudFront distribution. These are better for geographically distributed clients. API requests are routed to the nearest CloudFront Point of Presence (POP), which typically improves connection time.

    Edge-optimized API Gateway deployment

    Edge-optimized API Gateway deployment

    Regional API endpoints are intended when clients are in the same Region. This helps you to reduce request latency and allows you to add your own content delivery network if necessary.

    Regional endpoint API Gateway deployment

    Regional endpoint API Gateway deployment

    Private API endpoints are API endpoints that can only be accessed from your Amazon Virtual Private Cloud (VPC) using an interface VPC endpoint. For more information, see “Creating a private API in Amazon API Gateway”.

    For more information on endpoint types, see “Choose an endpoint type to set up for an API Gateway API”. For more general information on API Gateway, see the AWS re:Invent presentation “I didn’t know Amazon API Gateway could do that”.

    AWS Step Functions has two workflow types, standard and express. Standard Workflows have exactly once workflow execution and can run for up to one year. Express Workflows have at-least-once workflow execution and can run for up to five minutes. Consider the per-second rates you require for both execution start rate and the state transition rate. For more information, see “Standard vs. Express Workflows”.

    Performance load testing is recommended at both sustained and burst rates to evaluate the effect of tuning capacity units. Use Amazon CloudWatch service dashboards to analyze key performance metrics including load testing results. I cover performance testing in more detail in “Regulating inbound request rates – part 1”.

    For general serverless optimization information, see the AWS re:Invent presentation “Serverless at scale: Design patterns and optimizations”.

    Conclusion

    Evaluate and optimize your serverless application’s performance based on access patterns, scaling mechanisms, and native integrations. You can improve your overall experience and make more efficient use of the platform in terms of both value and resources.

    This post continues from part 1 and looks at designing your function to take advantage of concurrency via asynchronous and stream-based invocations. I cover measuring, evaluating, and selecting optimal capacity units.

    This well-architected question will continue in part 3 where I look at integrating with managed services directly over functions when possible. I cover optimizing access patterns and applying caching where applicable.

    For more serverless learning resources, visit Serverless Land.

    Building well-architected serverless applications: Optimizing application performance – part 1

    Post Syndicated from Julian Wood original https://aws.amazon.com/blogs/compute/building-well-architected-serverless-applications-optimizing-application-performance-part-1/

    This series of blog posts uses the AWS Well-Architected Tool with the Serverless Lens to help customers build and operate applications using best practices. In each post, I address the serverless-specific questions identified by the Serverless Lens along with the recommended best practices. See the introduction post for a table of contents and explanation of the example application.

    PERF 1. Optimizing your serverless application’s performance

    Evaluate and optimize your serverless application’s performance based on access patterns, scaling mechanisms, and native integrations. This allows you to continuously gain more value per transaction. You can improve your overall experience and make more efficient use of the platform in terms of both value and resources.

    Good practice: Measure and optimize function startup time

    Evaluate your AWS Lambda function startup time for both performance and cost.

    Take advantage of execution environment reuse to improve the performance of your function.

    Lambda invokes your function in a secure and isolated runtime environment, and manages the resources required to run your function. When a function is first invoked, the Lambda service creates an instance of the function to process the event. This is called a cold start. After completion, the function remains available for a period of time to process subsequent events. These are called warm starts.

    Lambda functions must contain a handler method in your code that processes events. During a cold start, Lambda runs the function initialization code, which is the code outside the handler, and then runs the handler code. During a warm start, Lambda runs the handler code.

    Lambda function cold and warm starts

    Lambda function cold and warm starts

    Initialize SDK clients, objects, and database connections outside of the function handler so that they are started during the cold start process. These connections then remain during subsequent warm starts, which improves function performance and cost.

    Lambda provides a writable local file system available at /tmp. This is local to each function but shared between subsequent invocations within the same execution environment. You can download and cache assets locally in the /tmp folder during the cold start. This data is then available locally by all subsequent warm start invocations, improving performance.

    In the serverless airline example used in this series, the confirm booking Lambda function initializes a number of components during the cold start. These include the Lambda Powertools utilities and creating a session to the Amazon DynamoDB table BOOKING_TABLE_NAME.

    import boto3
    from aws_lambda_powertools import Logger, Metrics, Tracer
    from aws_lambda_powertools.metrics import MetricUnit
    from botocore.exceptions import ClientError
    
    logger = Logger()
    tracer = Tracer()
    metrics = Metrics()
    
    session = boto3.Session()
    dynamodb = session.resource("dynamodb")
    table_name = os.getenv("BOOKING_TABLE_NAME", "undefined")
    table = dynamodb.Table(table_name)

    Analyze and improve startup time

    There are a number of steps you can take to measure and optimize Lambda function initialization time.

    You can view the function cold start initialization time using Amazon CloudWatch Logs and AWS X-Ray. A log REPORT line for a cold start includes the Init Duration value. This is the time the initialization code takes to run before the handler.

    CloudWatch Logs cold start report line

    CloudWatch Logs cold start report line

    When X-Ray tracing is enabled for a function, the trace includes the Initialization segment.

    X-Ray trace cold start showing initialization segment

    X-Ray trace cold start showing initialization segment

    A subsequent warm start REPORT line does not include the Init Duration value, and is not present in the X-Ray trace:

    CloudWatch Logs warm start report line

    CloudWatch Logs warm start report line

    X-Ray trace warm start without showing initialization segment

    X-Ray trace warm start without showing initialization segment

    CloudWatch Logs Insights allows you to search and analyze CloudWatch Logs data over multiple log groups. There are some useful searches to understand cold starts.

    Understand cold start percentage over time:

    filter @type = "REPORT"
    | stats
      sum(strcontains(
        @message,
        "Init Duration"))
      / count(*)
      * 100
      as coldStartPercentage,
      avg(@duration)
      by bin(5m)
    Cold start percentage over time

    Cold start percentage over time

    Cold start count and InitDuration:

    filter @type="REPORT" 
    | fields @memorySize / 1000000 as memorySize
    | filter @message like /(?i)(Init Duration)/
    | parse @message /^REPORT.*Init Duration: (?<initDuration>.*) ms.*/
    | parse @log /^.*\/aws\/lambda\/(?<functionName>.*)/
    | stats count() as coldStarts, median(initDuration) as avgInitDuration, max(initDuration) as maxInitDuration by functionName, memorySize
    
    Cold start count and InitDuration

    Cold start count and InitDuration

    Once you have measured cold start performance, there are a number of ways to optimize startup time. For Python, you can use the PYTHONPROFILEIMPORTTIME=1 environment variable.

    PYTHONPROFILEIMPORTTIME environment variable

    PYTHONPROFILEIMPORTTIME environment variable

    This shows how long each package import takes to help you understand how packages impact startup time.

    Python import time

    Python import time

    Previously, for the AWS Node.js SDK, you enabled HTTP keep-alive in your code to maintain TCP connections. Enabling keep-alive allows you to avoid setting up a new TCP connection for every request. Since AWS SDK version 2.463.0, you can also set the Lambda function environment variable AWS_NODEJS_CONNECTION_REUSE_ENABLED=1 to make the SDK reuse connections by default.

    You can configure Lambda’s provisioned concurrency feature to pre-initialize a requested number of execution environments. This runs the cold start initialization code so that they are prepared to respond immediately to your function’s invocations.

    Use Amazon RDS Proxy to pool and share database connections to improve function performance. For additional options for using RDS with Lambda, see the AWS Serverless Hero blog post “How To: Manage RDS Connections from AWS Lambda Serverless Functions”.

    Choose frameworks that load quickly on function initialization startup. For example, prefer simpler Java dependency injection frameworks like Dagger or Guice over more complex framework such as Spring. When using the AWS SDK for Java, there are some cold start performance optimization suggestions in the documentation. For further Java performance optimization tips, see the AWS re:Invent session, “Best practices for AWS Lambda and Java”.

    To minimize deployment packages, choose lightweight web frameworks optimized for Lambda. For example, use MiddyJS, Lambda API JS, and Python Chalice over Node.js Express, Python Django or Flask.

    If your function has many objects and connections, consider splitting the function into multiple, specialized functions. These are individually smaller and have less initialization code. I cover designing smaller, single purpose functions from a security perspective in “Managing application security boundaries – part 2”.

    Minimize your deployment package size to only its runtime necessities

    Smaller functions also allow you to separate functionality. Only import the libraries and dependencies that are necessary for your application processing. Use code bundling when you can to reduce the impact of file system lookup calls. This also includes deployment package size.

    For example, if you only use Amazon DynamoDB in the AWS SDK, instead of importing the entire SDK, you can import an individual service. Compare the following three examples as shown in the Lambda Operator Guide:

    // Instead of const AWS = require('aws-sdk'), use: +
    const DynamoDB = require('aws-sdk/clients/dynamodb')
    
    // Instead of const AWSXRay = require('aws-xray-sdk'), use: +
    const AWSXRay = require('aws-xray-sdk-core')
    
    // Instead of const AWS = AWSXRay.captureAWS(require('aws-sdk')), use: +
    const dynamodb = new DynamoDB.DocumentClient() +
    AWSXRay.captureAWSClient(dynamodb.service)
    

    In testing, importing the DynamoDB library instead of the entire AWS SDK was 125 ms faster. Importing the X-Ray core library was 5 ms faster than the X-Ray SDK. Similarly, when wrapping a service initialization, preparing a DocumentClient before wrapping showed a 140-ms gain. Version 3 of the AWS SDK for JavaScript supports modular imports, which can further help reduce unused dependencies.

    For additional options when for optimizing AWS Node.js SDK imports, see the AWS Serverless Hero blog post.

    Conclusion

    Evaluate and optimize your serverless application’s performance based on access patterns, scaling mechanisms, and native integrations. You can improve your overall experience and make more efficient use of the platform in terms of both value and resources.

    In this post, I cover measuring and optimizing function startup time. I explain cold and warm starts and how to reuse the Lambda execution environment to improve performance. I show a number of ways to analyze and optimize the initialization startup time. I explain how only importing necessary libraries and dependencies increases application performance.

    This well-architected question will be continued is part 2 where I look at designing your function to take advantage of concurrency via asynchronous and stream-based invocations. I cover measuring, evaluating, and selecting optimal capacity units.

    For more serverless learning resources, visit Serverless Land.

    Building well-architected serverless applications: Building in resiliency – part 2

    Post Syndicated from Julian Wood original https://aws.amazon.com/blogs/compute/building-well-architected-serverless-applications-building-in-resiliency-part-2/

    This series of blog posts uses the AWS Well-Architected Tool with the Serverless Lens to help customers build and operate applications using best practices. In each post, I address the serverless-specific questions identified by the Serverless Lens along with the recommended best practices. See the introduction post for a table of contents and explanation of the example application.

    Reliability question REL2: How do you build resiliency into your serverless application?

    This post continues part 1 of this reliability question. Previously, I cover managing failures using retries, exponential backoff, and jitter. I explain how DLQs can isolate failed messages. I show how to use state machines to orchestrate long running transactions rather than handling these in application code.

    Required practice: Manage duplicate and unwanted events

    Duplicate events can occur when a request is retried or multiple consumers process the same message from a queue or stream. A duplicate can also happen when a request is sent twice at different time intervals with the same parameters. Design your applications to process multiple identical requests to have the same effect as making a single request.

    Idempotency refers to the capacity of an application or component to identify repeated events and prevent duplicated, inconsistent, or lost data. This means that receiving the same event multiple times does not change the result beyond the first time the event was received. An idempotent application can, for example, handle multiple identical refund operations. The first refund operation is processed. Any further refund requests to the same customer with the same payment reference should not be processes again.

    When using AWS Lambda, you can make your function idempotent. The function’s code must properly validate input events and identify if the events were processed before. For more information, see “How do I make my Lambda function idempotent?

    When processing streaming data, your application must anticipate and appropriately handle processing individual records multiple times. There are two primary reasons why records may be delivered more than once to your Amazon Kinesis Data Streams application: producer retries and consumer retries. For more information, see “Handling Duplicate Records”.

    Generate unique attributes to manage duplicate events at the beginning of the transaction

    Create, or use an existing unique identifier at the beginning of a transaction to ensure idempotency. These identifiers are also known as idempotency tokens. A number of Lambda triggers include a unique identifier as part of the event:

    You can also create your own identifiers. These can be business-specific, such as transaction ID, payment ID, or booking ID. You can use an opaque random alphanumeric string, unique correlation identifiers, or the hash of the content.

    A Lambda function, for example can use these identifiers to check whether the event has been previously processed.

    Depending on the final destination, duplicate events might write to the same record with the same content instead of generating a duplicate entry. This may therefore not require additional safeguards.

    Use an external system to store unique transaction attributes and verify for duplicates

    Lambda functions can use Amazon DynamoDB to store and track transactions and idempotency tokens to determine if the transaction has been handled previously. DynamoDB Time to Live (TTL) allows you to define a per-item timestamp to determine when an item is no longer needed. This helps to limit the storage space used. Base the TTL on the event source. For example, the message retention period for SQS.

    Using DynamoDB to store idempotent tokens

    Using DynamoDB to store idempotent tokens

    You can also use DynamoDB conditional writes to ensure a write operation only succeeds if an item attribute meets one of more expected conditions. For example, you can use this to fail a refund operation if a payment reference has already been refunded. This signals to the application that it is a duplicate transaction. The application can then catch this exception and return the same result to the customer as if the refund was processed successfully.

    Third-party APIs can also support idempotency directly. For example, Stripe allows you to add an Idempotency-Key: <key> header to the request. Stripe saves the resulting status code and body of the first request made for any given idempotency key, regardless of whether it succeeded or failed. Subsequent requests with the same key return the same result.

    Validate events using a pre-defined and agreed upon schema

    Implicitly trusting data from clients, external sources, or machines could lead to malformed data being processed. Use a schema to validate your event conforms to what you are expecting. Process the event using the schema within your application code or at the event source when applicable. Events not adhering to your schema should be discarded.

    For API Gateway, I cover validating incoming HTTP requests against a schema in “Implementing application workload security – part 1”.

    Amazon EventBridge rules match event patterns. EventBridge provides schemas for all events that are generated by AWS services. You can create or upload custom schemas or infer schemas directly from events on an event bus. You can also generate code bindings for event schemas.

    SNS supports message filtering. This allows a subscriber to receive a subset of the messages sent to the topic using a filter policy. For more information, see the documentation.

    JSON Schema is a tool for validating the structure of JSON documents. There are a number of implementations available.

    Best practice: Consider scaling patterns at burst rates

    Load testing your serverless application allows you to monitor the performance of an application before it is deployed to production. Serverless applications can be simpler to load test, thanks to the automatic scaling built into many of the services. For more information, see “How to design Serverless Applications for massive scale”.

    In addition to your baseline performance, consider evaluating how your workload handles initial burst rates. This ensures that your workload can sustain burst rates while scaling to meet possibly unexpected demand.

    Perform load tests using a burst strategy with random intervals of idleness

    Perform load tests using a burst of requests for a short period of time. Also introduce burst delays to allow your components to recover from unexpected load. This allows you to future-proof the workload for key events when you do not know peak traffic levels.

    There are a number of AWS Marketplace and AWS Partner Network (APN) solutions available for performance testing, including Gatling FrontLine, BlazeMeter, and Apica.

    In regulating inbound request rates – part 1, I cover running a performance test suite using Gatling, an open source tool.

    Gatling performance results

    Gatling performance results

    Amazon does have a network stress testing policy that defines which high volume network tests are allowed. Tests that purposefully attempt to overwhelm the target and/or infrastructure are considered distributed denial of service (DDoS) tests and are prohibited. For more information, see “Amazon EC2 Testing Policy”.

    Review service account limits with combined utilization across resources

    AWS accounts have default quotas, also referred to as limits, for each AWS service. These are generally Region-specific. You can request increases for some limits while other limits cannot be increased. Service Quotas is an AWS service that helps you manage your limits for many AWS services. Along with looking up the values, you can also request a limit increase from the Service Quotas console.

    Service Quotas dashboard

    Service Quotas dashboard

    As these limits are shared within an account, review the combined utilization across resources including the following:

    • Amazon API Gateway: number of requests per second across all APIs. (link)
    • AWS AppSync: throttle rate limits. (link)
    • AWS Lambda: function concurrency reservations and pool capacity to allow other functions to scale. (link)
    • Amazon CloudFront: requests per second per distribution. (link)
    • AWS IoT Core message broker: concurrent requests per second. (link)
    • Amazon EventBridge: API requests and target invocations limit. (link)
    • Amazon Cognito: API limits. (link)
    • Amazon DynamoDB: throughput, indexes, and request rates limits. (link)

    Evaluate key metrics to understand how workloads recover from bursts

    There are a number of key Amazon CloudWatch metrics to evaluate and alert on to understand whether your workload recovers from bursts.

    • AWS Lambda: Duration, Errors, Throttling, ConcurrentExecutions, UnreservedConcurrentExecutions. (link)
    • Amazon API Gateway: Latency, IntegrationLatency, 5xxError, 4xxError. (link)
    • Application Load Balancer: HTTPCode_ELB_5XX_Count, RejectedConnectionCount, HTTPCode_Target_5XX_Count, UnHealthyHostCount, LambdaInternalError, LambdaUserError. (link)
    • AWS AppSync: 5XX, Latency. (link)
    • Amazon SQS: ApproximateAgeOfOldestMessage. (link)
    • Amazon Kinesis Data Streams: ReadProvisionedThroughputExceeded, WriteProvisionedThroughputExceeded, GetRecords.IteratorAgeMilliseconds, PutRecord.Success, PutRecords.Success (if using Kinesis Producer Library), GetRecords.Success. (link)
    • Amazon SNS: NumberOfNotificationsFailed, NumberOfNotificationsFilteredOut-InvalidAttributes. (link)
    • Amazon Simple Email Service (SES): Rejects, Bounces, Complaints, Rendering Failures. (link)
    • AWS Step Functions: ExecutionThrottled, ExecutionsFailed, ExecutionsTimedOut. (link)
    • Amazon EventBridge: FailedInvocations, ThrottledRules. (link)
    • Amazon S3: 5xxErrors, TotalRequestLatency. (link)
    • Amazon DynamoDB: ReadThrottleEvents, WriteThrottleEvents, SystemErrors, ThrottledRequests, UserErrors. (link)

    Conclusion

    This post continues from part 1 and looks at managing duplicate and unwanted events with idempotency and an event schema. I cover how to consider scaling patterns at burst rates by managing account limits and show relevant metrics to evaluate

    Build resiliency into your workloads. Ensure that applications can withstand partial and intermittent failures across components that may only surface in production. In the next post in the series, I cover the performance efficiency pillar from the Well-Architected Serverless Lens.

    For more serverless learning resources, visit Serverless Land.

    Building well-architected serverless applications: Building in resiliency – part 1

    Post Syndicated from Julian Wood original https://aws.amazon.com/blogs/compute/building-well-architected-serverless-applications-building-in-resiliency-part-1/

    This series of blog posts uses the AWS Well-Architected Tool with the Serverless Lens to help customers build and operate applications using best practices. In each post, I address the serverless-specific questions identified by the Serverless Lens along with the recommended best practices. See the introduction post for a table of contents and explanation of the example application.

    Reliability question REL2: How do you build resiliency into your serverless application?

    Evaluate scaling mechanisms for serverless and non-serverless resources to meet customer demand. Build resiliency into your workload to make your serverless application resilient to withstand partial and intermittent failures across components that may only surface in production.

    Required practice: Manage transaction, partial, and intermittent failures

    Whenever one service or system calls another, there is a chance that failures can happen. Services or systems often don’t fail as a single unit, but rather suffer partial or transient failures. Applications should be designed to handle component failures as part of the architecture. The system should be designed to detect failure and, ideally, automatically heal itself.

    Transaction failures can occur when a component is unavailable or under high load. Partial failures can occur when a percentage of requests succeeds, including during batch processing. Intermittent failures might occur when a request fails for a short period of time due to network or other transient issues.

    AWS serverless services, including AWS Lambda, are fault-tolerant and designed to handle failures. If a service invokes a Lambda function and there is a service disruption, Lambda invokes the function in a different Availability Zone.

    When you invoke a function directly, you determine the strategy for handling errors. You can retry, send the event to a destination or queue for debugging, or ignore the error. Clients such as the AWS Command Line Interface (CLI) and the AWS SDK retry on client timeouts, throttling errors (429), and other errors that are not caused by a bad request.

    When you invoke a function indirectly, you must be aware of the retry behavior of the invoker and any service that the request encounters along the way. For more information, see “Error handling and automatic retries in AWS Lambda”. You can configure Maximum Retry Attempts and Maximum Event Age for asynchronous invocations.

    When reading from Amazon Kinesis Data Streams and Amazon DynamoDB Streams, Lambda retries the entire batch of items. Retries continue until the records expire or exceed the maximum age that you configure on the event source mapping. You can also configure the event source mapping to split a failed batch into two batches. Retrying with smaller batches isolates bad records and works around timeout issues.

    Partial failures can occur in non-atomic operations. PutRecords for Kinesis and BatchWriteItem for DynamoDB return a successful response if at least one record is ingested successfully. Always inspect the response when using such operations and programmatically deal with partial failures.

    Use exponential backoff with jitter

    The simplest technique for dealing with failures in a networked environment is to retry calls until they succeed. This technique increases the reliability of the application and reduces operational costs for the developer.

    However, it is not always safe to retry. A retry can further increase the load on the system being called if the system is already failing due to an overload. To avoid this problem, use backoff. Instead of retrying immediately and aggressively, the client waits some amount of time between tries. The most common pattern is an exponential backoff, which uses exponentially longer wait times between retries. This is typically capped to a maximum delay and number of retries.

    If all backoff retries are still happening at the same time, this can still overload a system or cause contention. To avoid this problem, use jitter. Jitter adds some amount of randomness to the backoff to spread the retries around in time. This can help prevent large bursts by spreading out the rate when clients connect. For more information see the Amazon Builders’ Library article “Timeouts, retries, and backoff with jitter” and AWS Architecture blog post “Exponential Backoff And Jitter”.

    Exponential backoff and jitter

    Exponential backoff and jitter

    When your application responds to callers in fail-fast scenarios and when performance is degraded, inform the caller via headers or metadata when they can retry.

    Each AWS SDK implements automatic retry logic including exponential backoff. For downstream calls, you can adjust AWS and third-party SDK retries, backoffs, TCP, and HTTP timeouts. This helps you decide when to stop retrying. For more information, see the documentation and troubleshooting steps for Lambda and the AWS SDK.

    Use a dead-letter queue mechanism to retain, investigate and retry failed transactions

    There are a number of ways to handle message failures including destinations and dead-letter queues.

    You can configure Lambda to send records of asynchronous invocations to another destination service. These include Amazon Simple Queue Service (SQS), Amazon Simple Notification Service (SNS), Lambda, and Amazon EventBridge. You can configure separate destinations for events that fail processing and events that are successfully processed. The invocation record contains details about the event, the response, and the reason that the record was sent.

    The following example shows a function that sends a record of a successful invocation to an EventBridge event bus. When an event fails all processing attempts, Lambda sends an invocation record to an SQS queue. It includes the function’s response in the invocation record.

    AWS Lambda destinations for asynchronous invocation

    AWS Lambda destinations for asynchronous invocation

    SNS, SQS, Lambda, and EventBridge support dead-letter queues (DLQs). DLQs make your applications more resilient and durable by storing messages or events that can’t be processed correctly into a dedicated SQS queue. This helps you debug your application by isolating the problematic messages to determine why their processing failed. One you have resolved the issue, re-process the failed message. For more information, see “When should I use a dead-letter queue?” There is an example serverless application to redrive the messages from an SQS DLQ back to its source SQS queue.

    For Lambda, DLQs provide an alternative to a failure destination. Lambda destinations is preferable for asynchronous invocations.

    Good practice: Orchestrate long-running transactions

    Long-running transactions can be processed by one or multiple components. Consider implementing the saga pattern using state machines for these types of transactions.

    The saga pattern coordinates transactions between multiple microservices as part of a state machine. Each service that performs a transaction publishes an event to trigger the next transaction in the saga. This continues until the transaction chain is complete. If a transaction fails, saga orchestrates a series of compensating transactions that undo the changes that were made by the preceding transactions.

    This is preferable to handling complex or long-running transactions within application code. State machines prevent cascading failures and avoid tightly coupling components with orchestrating logic and business logic.

    Use a state machine to visualize distributed transactions, and to separate business logic from orchestration logic.

    AWS Step Functions lets you coordinate multiple AWS services into serverless workflows via state machines. Within Step Functions, you can set separate retries, backoff rates, max attempts, intervals, and timeouts. These are set for every step of your state machine using a declarative language.

    In the serverless airline example used in this series, Step Functions is used to orchestrate the Booking microservice. The ProcessBooking state machine handles all the necessary steps to create bookings, including payment.

    Booking service Step Functions state machine

    Booking service Step Functions state machine

    The state machine uses a combination of service integrations using DynamoDB, SQS, and Lambda functions to coordinate transactions and handle failures.

    For example, the Reserve Booking task invokes a Lambda function. The task has retry and error handling configured as part of the task definition.

    "Reserve Booking": {
    	"Type": "Task",
    	"Resource": "${ReserveBooking.Arn}",
    	"TimeoutSeconds": 5,
    	"Retry": [
    		{
    			"ErrorEquals": [
    				"BookingReservationException"
    			],
    			"IntervalSeconds": 1,
    			"BackoffRate": 2,
    			"MaxAttempts": 2
    		}
    	],
    	"Catch": [
    		{
    			"ErrorEquals": [
    				"States.ALL"
    			],
    			"ResultPath": "$.bookingError",
    			"Next": "Cancel Booking"
    		}
    	],
    	"ResultPath": "$.bookingId",
    	"Next": "Collect Payment"
    },
    

    Step Functions supports direct service integrations, including DynamoDB. The Reserve Flight task directly updates the flightTable without requiring a Lambda function.

    "Reserve Flight": {
    	"Type": "Task",
    	"Resource": "arn:aws:states:::dynamodb:updateItem",
    	"Parameters": {
    		"TableName.$": "$.flightTable",
    		"Key": {
    			"id": {
    				"S.$": "$.outboundFlightId"
    			}
    		},
    		"UpdateExpression": "SET seatCapacity = seatCapacity - :dec",
    		"ExpressionAttributeValues": {
    			":dec": {
    				"N": "1"
    			},
    			":noSeat": {
    				"N": "0"
    			}
    		},
    		"ConditionExpression": "seatCapacity > :noSeat"
    	},
    

    By default, when a state reports an error, Step Functions causes the execution to fail entirely.

    Utilize dead-letter queues in response to failed state machine executions

    Any state within the Step Functions workflow can encounter runtime errors. These include state machine definition issues, task failures such as Lambda function exceptions, or transient issues such as network connectivity issues. For more information, see “Error handling in Step Functions”.

    Use the Step Functions service integration with SQS to send failed transactions to a DLQ as the final step. This adds a higher level of durability within your state machines.

    For example, the airline Notify Failed Booking final task catches failed states from four previous steps. It sends the results to the Booking DLQ.

    Booking service Step Functions DLQ

    Booking service Step Functions DLQ

    The message includes the output of the previous failed states for further troubleshooting.

    "Booking DLQ": {
    	"Type": "Task",
    	"Resource": "arn:aws:states:::sqs:sendMessage",
    	"Parameters": {
    		"QueueUrl": "${BookingsDLQ}",
    		"MessageBody.$": "$"
    	},
    	"ResultPath": "$.deadLetterQueue",
    	"Next": "Booking Failed"
    },
    

    The Step Functions documentation has more information on calling SQS.

    Conclusion

    Build resiliency into your workloads. This makes sure that your application can withstand partial and intermittent failures across components that may only surface in production.

    In this post, I cover managing failures using retries, exponential backoff, and jitter. I explain how DLQs can isolate failed messages. I show how to use state machines to orchestrate long running transactions rather than handling these in application code.

    This well-architected question continues in part 2 where I look at managing duplicate and unwanted events with idempotency and an event schema. I cover how to consider scaling patterns at burst rates by managing account limits and show relevant metrics to evaluate.

    For more serverless learning resources, visit Serverless Land.

    Building well-architected serverless applications: Regulating inbound request rates – part 2

    Post Syndicated from Julian Wood original https://aws.amazon.com/blogs/compute/building-well-architected-serverless-applications-regulating-inbound-request-rates-part-2/

    This series of blog posts uses the AWS Well-Architected Tool with the Serverless Lens to help customers build and operate applications using best practices. In each post, I address the serverless-specific questions identified by the Serverless Lens along with the recommended best practices. See the introduction post for a table of contents and explanation of the example application.

    Reliability question REL1: How do you regulate inbound request rates?

    This post continues part 1 of this security question. Previously, I cover controlling inbound request rates using throttling. I go through how to use throttling to control steady-rate and burst rate requests. I show some solutions for performance testing to identify the request rates that your workload can sustain before impacting performance.

    Good practice: Use, analyze, and enforce API quotas

    API quotas limit the maximum number of requests a given API key can submit within a specified time interval. Metering API consumers provides a better understanding of how different consumers use your workload at sustained and burst rates at any point in time. With this information, you can determine fine-grained rate limiting for multiple quota limits. These can be done according to a group of consumer needs, and can adjust their limits on a regular basis.

    Segregate API consumers steady-rate requests and their quota into multiple buckets or tiers

    Amazon API Gateway usage plans allow your API consumer to access selected APIs at agreed-upon request rates and quotas. These help your consumers meet their business requirements and budget constraints. Create and attach API keys to usage plans to control access to certain API stages. I show how to create usage plans and how to associate them with API keys in “Building well-architected serverless applications: Controlling serverless API access – part 2”.

    API key associated with usage plan

    API key associated with usage plan

    You can extract utilization data from usage plans to analyze API usage on a per-API key basis. In the example, I show how to use usage plans to see how many requests are made.

    View API key usage

    View API key usage

    This allows you to generate billing documents and determine whether your customers need higher or lower limits. Have a mechanism to allow customers to request higher limits preemptively. When customers anticipate greater API usage, they can take action proactively.

    API Gateway Lambda authorizers can dynamically associate API keys to a given request. This can be used where you do not control API consumers, or want to associate API keys based on your own criteria. For more information, see the documentation.

    You can also visualize usage plans with Amazon QuickSight using enriched API Gateway access logs.

    Visualize usage plans with Amazon QuickSight

    Visualize usage plans with Amazon QuickSight

    Define whether your API consumers are end users or machines

    Understanding your API consumers helps you manage how they connect to your API. This helps you define a request access pattern strategy, which can distinguish between end users or machines.

    Machine consumers make automated connections to your API, which may require a different access pattern to end users. You may decide to prioritize end user consumers to provide a better experience. Machine consumers may be able to handle request throttling automatically.

    Best practice: Use mechanisms to protect non-scalable resources

    Limit component throughput by enforcing how many transactions it can accept

    AWS Lambda functions can scale faster than traditional resources, such as relational databases and cache systems. Protect your non-scalable resources by ensuring that components that scale quickly do not exceed the throughput of downstream systems. This can prevent system performance degrading. There are a number of ways to achieve this, either directly or via buffer mechanisms such as queues and streams.

    For relational databases such as Amazon RDS, you can limit the number of connections per user, in addition to the global maximum number of connections. With Amazon RDS Proxy, your applications can pool and share database connections to improve their ability to scale.

    Amazon RDS Proxy

    Amazon RDS Proxy

    For additional options for using RDS with Lambda, see the AWS Serverless Hero blog post “How To: Manage RDS Connections from AWS Lambda Serverless Functions”.

    Cache results and only connect to, and fetch data from databases when needed. This reduces the load on the downstream database. Adjust the maximum number of connections for caching systems. Include a caching expiration mechanism to prevent serving stale records. For more information on caching implementation patterns and considerations, see “Caching Best Practices”.

    Lambda provides managed scaling. When a function is first invoked, the Lambda service creates an instance of the function to process the event. This is called a cold start. After completion, the function remains available for a period of time to process subsequent events. These are called warm starts. If other events arrive while the function is busy, Lambda creates more instances of the function to handle these requests concurrently as cold starts. The following example shows 10 events processed in six concurrent requests.

    Lambda concurrency

    Lambda concurrency

    You can control the number of concurrent function invocations to both reserve and limit the maximum concurrency your function can achieve. You can configure reserved concurrency to set the maximum number of concurrent instances for the function. This can protect downstream resources such as a database by ensuring Lambda can only scale up to the number of connections the database can support.

    For example, you may have a traditional database or external API that can only support a maximum of 50 concurrent connections. You can set the maximum number of concurrent Lambda functions using the function concurrency settings. Setting the value to 50 ensures that the traditional database or external API is not overwhelmed.

    Edit Lambda concurrency

    Edit Lambda concurrency

    You can also set the Lambda function concurrency to 0, which disables the Lambda function in the event of anomalies.

    Another solution to protect downstream resources is to use an intermediate buffer. A buffer can persistently store messages in a stream or queue until a receiver processes them. This helps you control how fast messages are processed, which can protect the load on downstream resources.

    Amazon Kinesis Data Streams allows you to collect and process large streams of data records in real time, and can act as a buffer. Streams consist of a set of shards that contain a sequence of data records. When using Lambda to process records, it processes one batch of records at a time from each shard.

    Kinesis Data Streams control concurrency at the shard level, meaning that a single shard has a single concurrent invocation. This can reduce downstream calls to non-scalable resources such as a traditional database. Kinesis Data Streams also support batch windows up to 5 minutes and batch record sizes. These can also be used to control how frequent invocations can occur.

    To learn how to manage scaling with Kinesis, see the documentation. To learn more how Lambda works with Kinesis, read the blog series “Building serverless applications with streaming data”.

    Lambda and Kinesis shards

    Lambda and Kinesis shards

    Amazon Simple Queue Service (SQS) is a fully managed serverless message queuing service that enables you to decouple and scale microservices. You can offload tasks from one component of your application by sending them to a queue and processing them asynchronously.

    SQS can act as a buffer, using a Lambda function to process the messages. Lambda polls the queue and invokes your Lambda function synchronously with an event that contains queue messages. Lambda reads messages in batches and invokes your function once for each batch. When your function successfully processes a batch, Lambda deletes its messages from the queue.

    You can protect downstream resources using the Lambda concurrency controls. This limits the number of concurrent Lambda functions that pull messages off the queue. The messages persist in the queue until Lambda can process them. For more information see, “Using AWS Lambda with Amazon SQS

    Lambda and SQS

    Lambda and SQS

    Conclusion

    Regulating inbound requests helps you adapt different scaling mechanisms based on customer demand. You can achieve better throughput for your workloads and make them more reliable by controlling requests to a rate that your workload can support.

    In this post, I cover using, analyzing, and enforcing API quotas using usage plans and API keys. I show mechanisms to protect non-scalable resources such as using RDS Proxy to protect downstream databases. I show how to control the number of Lambda invocations using concurrency controls to protect downstream resources. I explain how you can use streams and queues as an intermediate buffer to store messages persistently until a receiver processes them.

    In the next post in the series, I cover the second reliability question from the Well-Architected Serverless Lens, building resiliency into serverless applications.

    For more serverless learning resources, visit Serverless Land.

    Building well-architected serverless applications: Regulating inbound request rates – part 1

    Post Syndicated from Julian Wood original https://aws.amazon.com/blogs/compute/building-well-architected-serverless-applications-regulating-inbound-request-rates-part-1/

    This series of blog posts uses the AWS Well-Architected Tool with the Serverless Lens to help customers build and operate applications using best practices. In each post, I address the serverless-specific questions identified by the Serverless Lens along with the recommended best practices. See the introduction post for a table of contents and explanation of the example application.

    Reliability question REL1: How do you regulate inbound request rates?

    Defining, analyzing, and enforcing inbound request rates helps achieve better throughput. Regulation helps you adapt different scaling mechanisms based on customer demand. By regulating inbound request rates, you can achieve better throughput, and adapt client request submissions to a request rate that your workload can support.

    Required practice: Control inbound request rates using throttling

    Throttle inbound request rates using steady-rate and burst rate requests

    Throttling requests limits the number of requests a client can make during a certain period of time. Throttling allows you to control your API traffic. This helps your backend services maintain their performance and availability levels by limiting the number of requests to actual system throughput.

    To prevent your API from being overwhelmed by too many requests, Amazon API Gateway throttles requests to your API. These limits are applied across all clients using the token bucket algorithm. API Gateway sets a limit on a steady-state rate and a burst of request submissions. The algorithm is based on an analogy of filling and emptying a bucket of tokens representing the number of available requests that can be processed.

    Each API request removes a token from the bucket. The throttle rate then determines how many requests are allowed per second. The throttle burst determines how many concurrent requests are allowed. I explain the token bucket algorithm in more detail in “Building well-architected serverless applications: Controlling serverless API access – part 2

    Token bucket algorithm

    Token bucket algorithm

    API Gateway limits the steady-state rate and burst requests per second. These are shared across all APIs per Region in an account. For further information on account-level throttling per Region, see the documentation. You can request account-level rate limit increases using the AWS Support Center. For more information, see Amazon API Gateway quotas and important notes.

    You can configure your own throttling levels, within the account and Region limits to improve overall performance across all APIs in your account. This restricts the overall request submissions so that they don’t exceed the account-level throttling limits.

    You can also configure per-client throttling limits. Usage plans restrict client request submissions to within specified request rates and quotas. These are applied to clients using API keys that are associated with your usage policy as a client identifier. You can add throttling levels per API route, stage, or method that are applied in a specific order.

    For more information on API Gateway throttling, see the AWS re:Invent presentation “I didn’t know Amazon API Gateway could do that”.

    API Gateway throttling

    API Gateway throttling

    You can also throttle requests by introducing a buffering layer using Amazon Kinesis Data Stream or Amazon SQS. Kinesis can limit the number of requests at the shard level while SQS can limit at the consumer level. For more information on using SQS as a buffer with Amazon Simple Notification Service (SNS), read “How To: Use SNS and SQS to Distribute and Throttle Events”.

    Identify steady-rate and burst rate requests that your workload can sustain at any point in time before performance degraded

    Load testing your serverless application allows you to monitor the performance of an application before it is deployed to production. Serverless applications can be simpler to load test, thanks to the automatic scaling built into many of the services. During a load test, you can identify quotas that may act as a limiting factor for the traffic you expect and take action.

    Perform load testing for a sustained period of time. Gradually increase the traffic to your API to determine your steady-state rate of requests. Also use a burst strategy with no ramp up to determine the burst rates that your workload can serve without errors or performance degradation. There are a number of AWS Marketplace and AWS Partner Network (APN) solutions available for performance testing, Gatling Frontline, BlazeMeter, and Apica.

    In the serverless airline example used in this series, you can run a performance test suite using Gatling, an open source tool.

    To deploy the test suite, follow the instructions in the GitHub repository perf-tests directory. Uncomment the deploy.perftest line in the repository Makefile.

    Perf-test makefile

    Perf-test makefile

    Once the file is pushed to GitHub, AWS Amplify Console rebuilds the application, and deploys an AWS CloudFormation stack. You can run the load tests locally, or use an AWS Step Functions state machine to run the setup and Gatling load test simulation.

    Performance test using Step Functions

    Performance test using Step Functions

    The Gatling simulation script uses constantUsersPerSec and rampUsersPerSec to add users for a number of test scenarios. You can use the test to simulate load on the application. Once the tests run, it generates a downloadable report.

    Gatling performance results

    Gatling performance results

    Artillery Community Edition is another open-source tool for testing serverless APIs. You configure the number of requests per second and overall test duration, and it uses a headless Chromium browser to run its test flows. For Artillery, the maximum number of concurrent tests is constrained by your local computing resources and network. To achieve higher throughput, you can use Serverless Artillery, which runs the Artillery package on Lambda functions. As a result, this tool can scale up to a significantly higher number of tests.

    For more information on how to use Artillery, see “Load testing a web application’s serverless backend”. This runs tests against APIs in a demo application. For example, one of the tests fetches 50,000 questions per hour. This calls an API Gateway endpoint and tests whether the AWS Lambda function, which queries an Amazon DynamoDB table, can handle the load.

    Artillery performance test

    Artillery performance test

    This is a synchronous API so the performance directly impacts the user’s experience of the application. This test shows that the median response time is 165 ms with a p95 time of 201 ms.

    Performance test API results

    Performance test API results

    Another consideration for API load testing is whether the authentication and authorization service can handle the load. For more information on load testing Amazon Cognito and API Gateway using Step Functions, see “Using serverless to load test Amazon API Gateway with authorization”.

    API load testing with authentication and authorization

    API load testing with authentication and authorization

    Conclusion

    Regulating inbound requests helps you adapt different scaling mechanisms based on customer demand. You can achieve better throughput for your workloads and make them more reliable by controlling requests to a rate that your workload can support.

    In this post, I cover controlling inbound request rates using throttling. I show how to use throttling to control steady-rate and burst rate requests. I show some solutions for performance testing to identify the request rates that your workload can sustain before performance degradation.

    This well-architected question will be continued where I look at using, analyzing, and enforcing API quotas. I cover mechanisms to protect non-scalable resources.

    For more serverless learning resources, visit Serverless Land.

    Building well-architected serverless applications: Implementing application workload security – part 2

    Post Syndicated from Julian Wood original https://aws.amazon.com/blogs/compute/building-well-architected-serverless-applications-implementing-application-workload-security-part-2/

    This series of blog posts uses the AWS Well-Architected Tool with the Serverless Lens to help customers build and operate applications using best practices. In each post, I address the serverless-specific questions identified by the Serverless Lens along with the recommended best practices. See the introduction post for a table of contents and explanation of the example application.

    Security question SEC3: How do you implement application security in your workload?

    This post continues part 1 of this security question. Previously, I cover reviewing security awareness documentation such as the Common Vulnerabilities and Exposures (CVE) database. I show how to use GitHub security features to inspect and manage code dependencies. I then show how to validate inbound events using Amazon API Gateway request validation.

    Required practice: Store secrets that are used in your code securely

    Store secrets such as database passwords or API keys in a secrets manager. Using a secrets manager allows for auditing access, easier rotation, and prevents exposing secrets in application source code. There are a number of AWS and third-party solutions to store and manage secrets.

    AWS Partner Network (APN) member Hashicorp provides Vault to keep secrets and application data secure. Vault has a centralized workflow for tightly controlling access to secrets across applications, systems, and infrastructure. You can store secrets in Vault and access them from an AWS Lambda function to, for example, access a database. You can use the Vault Agent for AWS to authenticate with Vault, receive the database credentials, and then perform the necessary queries. You can also use the Vault AWS Lambda extension to manage the connectivity to Vault.

    AWS Systems Manager Parameter Store allows you to store configuration data securely, including secrets, as parameter values.

    AWS Secrets Manager enables you to replace hardcoded credentials in your code with an API call to Secrets Manager to retrieve the secret programmatically. You can protect, rotate, manage, and retrieve database credentials, API keys, and other secrets throughout their lifecycle. You can also generate secure secrets. By default, Secrets Manager does not write or cache the secret to persistent storage.

    Parameter Store integrates with Secrets Manager. For more information, see “Referencing AWS Secrets Manager secrets from Parameter Store parameters.”

    To show how Secrets Manager works, deploy the solution detailed in “How to securely provide database credentials to Lambda functions by using AWS Secrets Manager”.

    The AWS Cloud​Formation stack deploys an Amazon RDS MySQL database with a randomly generated password. This is stored in Secrets Manager using a secret resource. A Lambda function behind an API Gateway endpoint returns the record count in a table from the database, using the required credentials. Lambda function environment variables store the database connection details and which secret to return for the database password. The password is not stored as an environment variable, nor in the Lambda function application code.

    Lambda environment variables for Secrets Manager

    Lambda environment variables for Secrets Manager

    The application flow is as follows:

    1. Clients call the API Gateway endpoint
    2. API Gateway invokes the Lambda function
    3. The Lambda function retrieves the database secrets using the Secrets Manager API
    4. The Lambda function connects to the RDS database using the credentials from Secrets Manager and returns the query results

    View the password secret value in the Secrets Manager console, which is randomly generated as part of the stack deployment.

    Example password stored in Secrets Manager

    Example password stored in Secrets Manager

    The Lambda function includes the following code to retrieve the secret from Secrets Manager. The function then uses it to connect to the database securely.

    secret_name = os.environ['SECRET_NAME']
    rds_host = os.environ['RDS_HOST']
    name = os.environ['RDS_USERNAME']
    db_name = os.environ['RDS_DB_NAME']
    
    session = boto3.session.Session()
    client = session.client(
    	service_name='secretsmanager',
    	region_name=region_name
    )
    get_secret_value_response = client.get_secret_value(
    	SecretId=secret_name
    )
    ...
    secret = get_secret_value_response['SecretString']
    j = json.loads(secret)
    password = j['password']
    ...
    conn = pymysql.connect(
    	rds_host, user=name, passwd=password, db=db_name, connect_timeout=5)
    

    Browsing to the endpoint URL specified in the Cloud​Formation output displays the number of records. This confirms that the Lambda function has successfully retrieved the secure database credentials and queried the table for the record count.

    Lambda function retrieving database credentials

    Lambda function retrieving database credentials

    Audit secrets access through a secrets manager

    Monitor how your secrets are used to confirm that the usage is expected, and log any changes to them. This helps to ensure that any unexpected usage or change can be investigated, and unwanted changes can be rolled back.

    Hashicorp Vault uses Audit devices that keep a detailed log of all requests and responses to Vault. Audit devices can append logs to a file, write to syslog, or write to a socket.

    Secrets Manager supports logging API calls with AWS CloudTrail. CloudTrail captures all API calls for Secrets Manager as events. This includes calls from the Secrets Manager console and from code calling the Secrets Manager APIs.

    Viewing the CloudTrail event history shows the requests to secretsmanager.amazonaws.com. This shows the requests from the console in addition to the Lambda function.

    CloudTrail showing access to Secrets Manager

    CloudTrail showing access to Secrets Manager

    Secrets Manager also works with Amazon EventBridge so you can trigger alerts when administrator-specified operations occur. You can configure EventBridge rules to alert on deleted secrets or secret rotation. You can also create an alert if anyone tries to use a secret version while it is pending deletion. This can identify and alert when there is an attempt to use an out-of-date secret.

    Enforce least privilege access to secrets

    Access to secrets must be tightly controlled because the secrets contain sensitive information. Create AWS Identity and Access Management (IAM) policies that enable minimal access to secrets to prevent credentials being accidentally used or compromised. Secrets that have policies that are too permissive could be misused by other environments or developers. This can lead to accidental data loss or compromised systems. For more information, see “Authentication and access control for AWS Secrets Manager”.

    Rotate secrets frequently.

    Rotating your workload secrets is important. This prevents misuse of your secrets since they become invalid within a configured time period.

    Secrets Manager allows you to rotate secrets on a schedule or on demand. This enables you to replace long-term secrets with short-term ones, significantly reducing the risk of compromise. Secrets Manager creates a CloudFormation stack with a Lambda function to manage the rotation process for you. Secrets Manager has native integrations with Amazon RDS, Amazon Redshift, and Amazon DocumentDB. It populates the function with the Amazon Resource Name (ARN) of the secret. You specify the permissions to rotate the credentials, and how often you want to rotate the secret.

    The CloudFormation stack creates a MySecretRotationSchedule resource with a MyRotationLambda function to rotate the secret every 30 days.

    MySecretRotationSchedule:
        Type: AWS::SecretsManager::RotationSchedule
        DependsOn: SecretRDSInstanceAttachment
        Properties:
        SecretId: !Ref MyRDSInstanceRotationSecret
        RotationLambdaARN: !GetAtt MyRotationLambda.Arn
        RotationRules:
            AutomaticallyAfterDays: 30
    MyRotationLambda:
        Type: AWS::Serverless::Function
        Properties:
        Runtime: python3.7
        Role: !GetAtt MyLambdaExecutionRole.Arn
        Handler: mysql_secret_rotation.lambda_handler
        Description: 'This is a lambda to rotate MySql user passwd'
        FunctionName: 'cfn-rotation-lambda'
        CodeUri: 's3://devsecopsblog/code.zip'      
        Environment:
            Variables:
            SECRETS_MANAGER_ENDPOINT: !Sub 'https://secretsmanager.${AWS::Region}.amazonaws.com'
    

    View and edit the rotation settings in the Secrets Manager console.

    Secrets Manager rotation settings

    Secrets Manager rotation settings

    Manually rotate the secret by selecting Rotate secret immediately. This invokes the Lambda function, which updates the database password and updates the secret in Secrets Manager.

    View the updated secret in Secrets Manager, where the password has changed.

    Secrets Manager password change

    Secrets Manager password change

    Browse to the endpoint URL to confirm you can still access the database with the updated credentials.

    Access endpoint with updated Secret Manager password

    Access endpoint with updated Secret Manager password

    You can provide your own code to customize a Lambda rotation function for other databases or services. The code includes the commands required to interact with your secured service to update or add credentials.

    Conclusion

    Implementing application security in your workload involves reviewing and automating security practices at the application code level. By implementing code security, you can protect against emerging security threats. You can improve the security posture by checking for malicious code, including third-party dependencies.

    In this post, I continue from part 1, looking at securely storing, auditing, and rotating secrets that are used in your application code.

    In the next post in the series, I start to cover the reliability pillar from the Well-Architected Serverless Lens with regulating inbound request rates.

    For more serverless learning resources, visit Serverless Land.

    Building well-architected serverless applications: Implementing application workload security – part 1

    Post Syndicated from Julian Wood original https://aws.amazon.com/blogs/compute/building-well-architected-serverless-applications-implementing-application-workload-security-part-1/

    This series of blog posts uses the AWS Well-Architected Tool with the Serverless Lens to help customers build and operate applications using best practices. In each post, I address the serverless-specific questions identified by the Serverless Lens along with the recommended best practices. See the introduction post for a table of contents and explanation of the example application.

    Security question SEC3: How do you implement application security in your workload?

    Review and automate security practices at the application code level, and enforce security code review as part of development workflow. By implementing security at the application code level, you can protect against emerging security threats and reduce the attack surface from malicious code, including third-party dependencies.

    Required practice: Review security awareness documents frequently

    Stay up to date with both AWS and industry security best practices to understand and evolve protection of your workloads. Having a clear understanding of common threats helps you to mitigate them when developing your workloads.

    The AWS Security Blog provides security-specific AWS content. The Open Web Application Security Project (OWASP) Top 10 is a guide for security practitioners to understand the most common application attacks and risks. The OWASP Top 10 Serverless Interpretation provides information specific to serverless applications.

    Review and subscribe to vulnerability and security bulletins

    Regularly review news feeds from multiple sources that are relevant to the technologies used in your workload. Subscribe to notification services to be informed of critical threats in near-real time.

    The Common Vulnerabilities and Exposures (CVE) program identifies, defines, and catalogs publicly disclosed cybersecurity vulnerabilities. You can search the CVE list directly, for example “Python”.

    CVE Python search

    CVE Python search

    The US National Vulnerability Database (NVD) allows you to search by vulnerability type, severity, and impact. You can also perform advanced searching by vendor name, product name, and version numbers. GitHub also integrates with CVE, which allows for advanced searching within the CVEproject/cvelist repository.

    AWS Security Bulletins are a notification system for security and privacy events related to AWS services. Subscribe to the security bulletin RSS feed to keep up to date with AWS security announcements.

    The US Cybersecurity and Infrastructure Security Agency (CISA) provides alerts about current security issues, vulnerabilities, and exploits. You can receive email alerts or subscribe to the RSS feed.

    AWS Partner Network (APN) member Palo Alto Networks provides the “Serverless architectures Security Top 10” list. This is a security awareness and education guide to use while designing, developing, and testing serverless applications to help minimize security risks.

    Good practice: Automatically review a workload’s code dependencies/libraries

    Regularly reviewing application and code dependencies is a good industry security practice. This helps detect and prevent non-certified application code, and ensure that third-party application dependencies operate as intended.

    Implement security mechanisms to verify application code and dependencies before using them

    Combine automated and manual security code reviews to examine application code and its dependencies to ensure they operate as intended. Automated tools can help identify overly complex application code, and common security vulnerability exposures that are already cataloged.

    Manual security code reviews, in addition to automated tools, help ensure that application code works as intended. Manual reviews can include business contextual information and integrations that automated tools may not capture.

    Before adding any code dependencies to your workload, take time to review and certify each dependency to ensure that you are adding secure code. Use third-party services to review your code dependencies on every commit automatically.

    OWASP has a code review guide and dependency check tool that attempt to detect publicly disclosed vulnerabilities within a project’s dependencies. The tool has a command line interface, a Maven plugin, an Ant task, and a Jenkins plugin.

    GitHub has a number of security features for hosted repositories to inspect and manage code dependencies.

    The dependency graph allows you to explore the packages that your repository depends on. Dependabot alerts show information about dependencies that are known to contain security vulnerabilities. You can choose whether to have pull requests generated automatically to update these dependencies. Code scanning alerts automatically scan code files to detect security vulnerabilities and coding errors.

    You can enable these features by navigating to the Settings tab, and selecting Security & analysis.

    GitHub configure security and analysis features

    GitHub configure security and analysis features

    Once Dependabot analyzes the repository, you can view the dependencies graph from the Insights tab. In the serverless airline example used in this series, you can view the Loyalty service package.json dependencies.

    Serverless airline loyalty dependencies

    Serverless airline loyalty dependencies

    Dependabot alerts for security vulnerabilities are visible in the Security tab. You can review alerts and see information about how to resolve them.

    Dependabot alert

    Dependabot alert

    Once Dependabot alerts are enabled for a repository, you can also view the alerts when pushing code to the repository from the terminal.

    Dependabot terminal alert

    Dependabot terminal alert

    If you enable security updates, Dependabot can automatically create pull requests to update dependencies.

    Dependabot pull requests

    Dependabot pull requests

    AWS Partner Network (APN) member Snyk has an integration with AWS Lambda to manage the security of your function code. Snyk determines what code and dependencies are currently deployed for Node.js, Ruby, and Java projects. It tests dependencies against their vulnerability database.

    If you build your functions using container images, you can use Amazon Elastic Container Registry’s (ECR) image scanning feature. You can manually scan your images, or scan them on each push to your repository.

    Elastic Container Registry image scanning example results

    Elastic Container Registry image scanning example results

    Best practice: Validate inbound events

    Sanitize inbound events and validate them against a predefined schema. This helps prevent errors and increases your workload’s security posture by catching malformed events or events intentionally crafted to be malicious. The OWASP Input validation cheat sheet includes guidance for providing input validation security functionality in your applications.

    Validate incoming HTTP requests against a schema

    Implicitly trusting data from clients could lead to malformed data being processed. Use data type validators or web application frameworks to ensure data correctness. These should include regular expressions, value range, data structure, and data normalization.

    You can configure Amazon API Gateway to perform basic validation of an API request before proceeding with the integration request to add another layer of security. This ensures that the HTTP request matches the desired format. Any HTTP request that does not pass validation is rejected, returning a 400 error response to the caller.

    The Serverless Security Workshop has a module on API Gateway input validation based on the fictional Wild Rydes unicorn raid hailing service. The example shows a REST API endpoint where partner companies of Wild Rydes can submit unicorn customizations, such as branded capes, to advertise their company. The API endpoint should ensure that the request body follows specific patterns. These include checking the ImageURL is a valid URL, and the ID for Cape is a numeric value.

    In API Gateway, a model defines the data structure of a payload, using the JSON schema draft 4. The model ensures that you receive the parameters in the format you expect. You can check them against regular expressions. The CustomizationPost model specifies that the ImageURL and Cape schemas should contain the following valid patterns:

        "imageUrl": {
          "type": "string",
          "title": "The Imageurl Schema",
          "pattern": "^https?:\/\/[-a-zA-Z0-9@:%_+.~#?&//=]+$"
        },
        "sock": {
          "type": "string",
          "title": " The Cape Schema ",
          "pattern": "^[0-9]*$"
        },
        …
    

    The model is applied to the /customizations/post method as part of the Method Request. The Request Validator is set to Validate body and the CustomizationPost model is set for the Request Body.

    API Gateway request validator

    API Gateway request validator

    When testing the POST /customizations API with valid parameters using the following input:

    {  
       "name":"Cherry-themed unicorn",
       "imageUrl":"https://en.wikipedia.org/wiki/Cherry#/media/File:Cherry_Stella444.jpg",
       "sock": "1",
       "horn": "2",
       "glasses": "3",
       "cape": "4"
    }
    

    The result is a valid response:

    {"customUnicornId":<the-id-of-the-customization>}

    Testing validation to the POST /customizations API using invalid parameters shows the input validation process.

    The ImageUrl is not a valid URL:

     {  
        "name":"Cherry-themed unicorn",
        "imageUrl":"htt://en.wikipedia.org/wiki/Cherry#/media/File:Cherry_Stella444.jpg",
        "sock": "1" ,
        "horn": "2" ,
        "glasses": "3",
        "cape": "4"
     }
    

    The Cape parameter is not a number, which shows a SQL injection attempt.

     {  
        "name":"Orange-themed unicorn",
        "imageUrl":"https://en.wikipedia.org/wiki/Orange_(fruit)#/media/File:Orange-Whole-%26-Split.jpg",
        "sock": "1",
        "horn": "2",
        "glasses": "3",
        "cape":"2); INSERT INTO Cape (NAME,PRICE) VALUES ('Bad color', 10000.00"
     }
    

    These return a 400 Bad Request response from API Gateway before invoking the Lambda function:

    {"message": "Invalid request body"}

    To gain further protection, consider adding an AWS Web Application Firewall (AWS WAF) access control list to your API endpoint. The workshop includes an AWS WAF module to explore three AWS WAF rules:

    • Restrict the maximum size of request body
    • SQL injection condition as part of the request URI
    • Rate-based rule to prevent an overwhelming number of requests
    AWS WAF ACL

    AWS WAF ACL

    AWS WAF also includes support for custom responses and request header insertion to improve the user experience and security posture of your applications.

    For more API Gateway security information, see the security overview whitepaper.

    Also add further input validation logic to your Lambda function code itself. For examples, see “Input Validation for Serverless”.

    Conclusion

    Implementing application security in your workload involves reviewing and automating security practices at the application code level. By implementing code security, you can protect against emerging security threats. You can improve the security posture by checking for malicious code, including third-party dependencies.

    In this post, I cover reviewing security awareness documentation such as the CVE database. I show how to use GitHub security features to inspect and manage code dependencies. I then show how to validate inbound events using API Gateway request validation.

    This well-architected question will be continued where I look at securely storing, auditing, and rotating secrets that are used in your application code.

    For more serverless learning resources, visit Serverless Land.

    Building well-architected serverless applications: Managing application security boundaries – part 2

    Post Syndicated from Julian Wood original https://aws.amazon.com/blogs/compute/building-well-architected-serverless-applications-managing-application-security-boundaries-part-2/

    This series uses the AWS Well-Architected Tool with the Serverless Lens to help customers build and operate applications using best practices. In each post, I address the nine serverless-specific questions identified by the Serverless Lens along with the recommended best practices. See the introduction post for a table of contents and explanation of the example application.

    Security question SEC2: How do you manage your serverless application’s security boundaries?

    This post continues part 1 of this security question. Previously, I cover how to evaluate and define resource policies, showing what policies are available for various serverless services. I show some of the features of AWS Web Application Firewall (AWS WAF) to protect APIs. Then then go through how to control network traffic at all layers. I explain how AWS Lambda functions connect to VPCs, and how to use private APIs and VPC endpoints. I walk through how to audit your traffic.

    Required practice: Use temporary credentials between resources and components

    Do not share credentials and permissions policies between resources to maintain a granular segregation of permissions and improve the security posture. Use temporary credentials that are frequently rotated and that have policies tailored to the access the resource needs.

    Use dynamic authentication when accessing components and managed services

    AWS Identity and Access Management (IAM) roles allows your applications to access AWS services securely without requiring you to manage or hardcode the security credentials. When you use a role, you don’t have to distribute long-term credentials such as a user name and password, or access keys. Instead, the role supplies temporary permissions that applications can use when they make calls to other AWS resources. When you create a Lambda function, for example, you specify an IAM role to associate with the function. The function can then use the role-supplied temporary credentials to sign API requests.

    Use IAM for authorizing access to AWS managed services such as Lambda or Amazon S3. Lambda also assumes IAM roles, exposing and rotating temporary credentials to your functions. This enables your application code to access AWS services.

    Use IAM to authorize access to internal or private Amazon API Gateway API consumers. See this list of AWS services that work with IAM.

    Within the serverless airline example used in this series, the loyalty service uses a Lambda function to fetch loyalty points and next tier progress. AWS AppSync acts as the client using an HTTP resolver, via an API Gateway REST API /loyalty/{customerId}/get resource, to invoke the function.

    To ensure only AWS AppSync is authorized to invoke the API, IAM authorization is set within the API Gateway method request.

    Viewing API Gateway IAM authorization

    Viewing API Gateway IAM authorization

    The IAM role specifies that appsync.amazonaws.com can perform an execute-api:Invoke on the specific API Gateway resource arn:aws:execute-api:${AWS::Region}:${AWS::AccountId}:${LoyaltyApi}/*/*/*

    For more information, see “Using an IAM role to grant permissions to applications”.

    Use a framework such as the AWS Serverless Application Model (AWS SAM) to deploy your applications. This ensures that AWS resources are provisioned with unique per resource IAM roles. For example, AWS SAM automatically creates unique IAM roles for every Lambda function you create.

    Best practice: Design smaller, single purpose functions

    Creating smaller, single purpose functions enables you to keep your permissions aligned to least privileged access. This reduces the risk of compromise since the function does not require access to more than it needs.

    Create single purpose functions with their own IAM role

    Single purpose Lambda functions allow you to create IAM roles that are specific to your access requirements. For example, a large multipurpose function might need access to multiple AWS resources such as Amazon DynamoDB, Amazon S3, and Amazon Simple Queue Service (SQS). Single purpose functions would not need access to all of them at the same time.

    With smaller, single purpose functions, it’s often easier to identify the specific resources and access requirements, and grant only those permissions. Additionally, new features are usually implemented by new functions in this architectural design. You can specifically grant permissions in new IAM roles for these functions.

    Avoid sharing IAM roles with multiple cloud resources. As permissions are added to the role, these are shared across all resources using this role. For example, use one dedicated IAM role per Lambda function. This allows you to control permissions more intentionally. Even if some functions have the same policy initially, always separate the IAM roles to ensure least privilege policies.

    Use least privilege access policies with your users and roles

    When you create IAM policies, follow the standard security advice of granting least privilege, or granting only the permissions required to perform a task. Determine what users (and roles) must do and then craft policies that allow them to perform only those tasks.

    Start with a minimum set of permissions and grant additional permissions as necessary. Doing so is more secure than starting with permissions that are too lenient and then trying to tighten them later. In the unlikely event of misused credentials, credentials will only be able to perform limited interactions.

    To control access to AWS resources, AWS SAM uses the same mechanisms as AWS CloudFormation. For more information, see “Controlling access with AWS Identity and Access Management” in the AWS CloudFormation User Guide.

    For a Lambda function, AWS SAM scopes the permissions of your Lambda functions to the resources that are used by your application. You add IAM policies as part of the AWS SAM template. The policies property can be the name of AWS managed policies, inline IAM policy documents, or AWS SAM policy templates.

    For example, the serverless airline has a ConfirmBooking Lambda function that has UpdateItem permissions to the specific DynamoDB BookingTable resource.

    Parameters:
        BookingTable:
            Type: AWS::SSM::Parameter::Value<String>
            Description: Parameter Name for Booking Table
    Resources:
        ConfirmBooking:
            Type: AWS::Serverless::Function
            Properties:
                FunctionName: !Sub ServerlessAirline-ConfirmBooking-${Stage}
                Policies:
                    - Version: "2012-10-17"
                      Statement:
                          Action: dynamodb:UpdateItem
                          Effect: Allow
                          Resource: !Sub "arn:${AWS::Partition}:dynamodb:${AWS::Region}:${AWS::AccountId}:table/${BookingTable}"

    One of the fastest ways to scope permissions appropriately is to use AWS SAM policy templates. You can reference these templates directly in the AWS SAM template for your application, providing custom parameters as required.

    The serverless patterns collection allows you to build integrations quickly using AWS SAM and AWS Cloud Development Kit (AWS CDK) templates.

    The booking service uses the SNSPublishMessagePolicy. This policy gives permission to the NotifyBooking Lambda function to publish a message to an Amazon Simple Notification Service (Amazon SNS) topic.

        BookingTopic:
            Type: AWS::SNS::Topic
    
        NotifyBooking:
            Type: AWS::Serverless::Function
            Properties:
                Policies:
                    - SNSPublishMessagePolicy:
                          TopicName: !Sub ${BookingTopic.TopicName}
            …

    Auditing permissions and removing unnecessary permissions

    Audit permissions regularly to help you identify unused permissions so that you can remove them. You can use last accessed information to refine your policies and allow access to only the services and actions that your entities use. Use the IAM console to view when last an IAM role was used.

    IAM last used

    IAM last used

    Use IAM access advisor to review when was the last time an AWS service was used from a specific IAM user or role. You can view last accessed information for IAM on the Access Advisor tab in the IAM console. Using this information, you can remove IAM policies and access from your IAM roles.

    IAM access advisor

    IAM access advisor

    When creating and editing policies, you can validate them using IAM Access Analyzer, which provides over 100 policy checks. It generates security warnings when a statement in your policy allows access AWS considers overly permissive. Use the security warning’s actionable recommendations to help grant least privilege. To learn more about policy checks provided by IAM Access Analyzer, see “IAM Access Analyzer policy validation”.

    With AWS CloudTrail, you can use CloudTrail event history to review individual actions your IAM role has performed in the past. Using this information, you can detect which permissions were actively used, and decide to remove permissions.

    AWS CloudTrail

    AWS CloudTrail

    To work out which permissions you may need, you can generate IAM policies based on access activity. You configure an IAM role with broad permissions while the application is in development. Access Analyzer reviews your CloudTrail logs. It generates a policy template that contains the permissions that the role used in your specified date range. Use the template to create a policy that grants only the permissions needed to support your specific use case. For more information, see “Generate policies based on access activity”.

    IAM Access Analyzer

    IAM Access Analyzer

    Conclusion

    Managing your serverless application’s security boundaries ensures isolation for, within, and between components. In this post, I continue from part 1, looking at using temporary credentials between resources and components. I cover why smaller, single purpose functions are better from a security perspective, and how to audit permissions. I show how to use AWS SAM to create per-function IAM roles.

    For more serverless learning resources, visit https://serverlessland.com.

    Using GitHub Actions to deploy serverless applications

    Post Syndicated from Julian Wood original https://aws.amazon.com/blogs/compute/using-github-actions-to-deploy-serverless-applications/

    This post is written by Gopi Krishnamurthy, Senior Solutions Architect.

    Continuous integration and continuous deployment (CI/CD) is one of the major DevOps components. This allows you to build, test, and deploy your applications rapidly and reliably, while improving quality and reducing time to market.

    GitHub is an AWS Partner Network (APN) with the AWS DevOps Competency. GitHub Actions is a GitHub feature that allows you to automate tasks within your software development lifecycle. You can use GitHub Actions to run a CI/CD pipeline to build, test, and deploy software directly from GitHub.

    The AWS Serverless Application Model (AWS SAM) is an open-source framework for building serverless applications. It provides shorthand syntax to express functions, APIs, databases, and event source mappings. With a few lines per resource, you can define the application you want and model it using YAML.

    During deployment, AWS SAM transforms and expands the AWS SAM syntax into AWS CloudFormation syntax, enabling you to build serverless applications faster. The AWS SAM CLI allows you to build, test, and debug applications locally, defined by AWS SAM templates. You can also use the AWS SAM CLI to deploy your applications to AWS. For AWS SAM example code, see the serverless patterns collection.

    In this post, you learn how to create a sample serverless application using AWS SAM. You then use GitHub Actions to build, and deploy the application in your AWS account.

    New GitHub action setup-sam

    A GitHub Actions runner is the application that runs a job from a GitHub Actions workflow. You can use a GitHub hosted runner, which is a virtual machine hosted by GitHub with the runner application installed. You can also host your own runners to customize the environment used to run jobs in your GitHub Actions workflows.

    AWS has released a GitHub action called setup-sam to install AWS SAM, which is pre-installed on GitHub hosted runners. You can use this action to install a specific, or the latest AWS SAM version.

    This demo uses AWS SAM to create a small serverless application using one of the built-in templates. When the code is pushed to GitHub, a GitHub Actions workflow triggers a GitHub CI/CD pipeline. This builds, and deploys your code directly from GitHub to your AWS account.

    Prerequisites

    1. A GitHub account: This post assumes you have the required permissions to configure GitHub repositories, create workflows, and configure GitHub secrets.
    2. Create a new GitHub repository and clone it to your local environment. For this example, create a repository called github-actions-with-aws-sam.
    3. An AWS account with permissions to create the necessary resources.
    4. Install AWS Command Line Interface (CLI) and AWS SAM CLI locally. This is separate from using the AWS SAM CLI in a GitHub Actions runner. If you use AWS Cloud9 as your integrated development environment (IDE), AWS CLI and AWS SAM are pre-installed.
    5. Create an Amazon S3 bucket in your AWS account to store the build package for deployment.
    6. An AWS user with access keys, which the GitHub Actions runner uses to deploy the application. The user also write requires access to the S3 bucket.

    Creating the AWS SAM application

    You can create a serverless application by defining all required resources in an AWS SAM template. AWS SAM provides a number of quick-start templates to create an application.

    1. From the CLI, open a terminal, navigate to the parent of the cloned repository directory, and enter the following:
    2. sam init -r python3.8 -n github-actions-with-aws-sam --app-template "hello-world"
    3. When asked to select package type (zip or image), select zip.

    This creates an AWS SAM application in the root of the repository named github-actions-with-aws-sam, using the default configuration. This consists of a single AWS Lambda Python 3.8 function invoked by an Amazon API Gateway endpoint.

    To see additional runtimes supported by AWS SAM and options for sam init, enter sam init -h.

    Local testing

    AWS SAM allows you to test your applications locally. AWS SAM provides a default event in events/event.json that includes a message body of {\"message\": \"hello world\"}.

      1. Invoke the HelloWorldFunction Lambda function locally, passing the default event:
      2. sam local invoke HelloWorldFunction -e events/event.json
      3. The function response is:
      4. {"message": "hello world"}

      5. Test the API Gateway functionality in front of the Lambda function by first starting the API locally:
      6. sam local start-api
      7. AWS SAM launches a Docker container with a mock API Gateway endpoint listening on localhost:3000.
      8. Use curl to call the hello API:
      curl http://127.0.0.1:3000/hello

      The API response should be:

      {"message": "hello world"}

      Creating the sam-pipeline.yml file

      GitHub CI/CD pipelines are configured using a YAML file. This file configures what specific action triggers a workflow, such as push on main, and what workflow steps are required.

      In the root of the repository containing the files generated by sam init, create the directory: .github/workflows.

      1. Create a new file called sam-pipeline.yml under the .github/workflows directory.
      2. sam-pipeline.yml file

        sam-pipeline.yml file

      3. Edit the sam-pipeline.yml file and add the following:
      4. on:
          push:
            branches:
              - main
        jobs:
          build-deploy:
            runs-on: ubuntu-latest
            steps:
              - uses: actions/checkout@v2
              - uses: actions/setup-python@v2
              - uses: aws-actions/setup-sam@v1
              - uses: aws-actions/configure-aws-credentials@v1
                with:
                  aws-access-key-id: ${{ secrets.AWS_ACCESS_KEY_ID }}
                  aws-secret-access-key: ${{ secrets.AWS_SECRET_ACCESS_KEY }}
                  aws-region: ##region##
              # sam build 
              - run: sam build --use-container
        
        # Run Unit tests- Specify unit tests here 
        
        # sam deploy
              - run: sam deploy --no-confirm-changeset --no-fail-on-empty-changeset --stack-name sam-hello-world --s3-bucket ##s3-bucket## --capabilities CAPABILITY_IAM --region ##region## 
        
      5. Replace ##s3-bucket## with the name of the S3 bucket previously created to store the deployment package.
      6. Replace both ##region## with your AWS Region.

      The configuration triggers the GitHub Actions CI/CD pipeline when code is pushed to the main branch. You can amend this if you are using another branch. For a full list of supported events, refer to GitHub documentation page.

      You can further customize the sam build –use-container command if necessary. By default the Docker image used to create the build artifact is pulled from Amazon ECR Public. The default Python 3.8 image in this example is based on the language specified during sam init. To pull a different container image, use the --build-image option as specified in the documentation.

      The AWS CLI and AWS SAM CLI are installed in the runner using the GitHub action setup-sam. To install a specific version, use the version parameter.

      uses: aws-actions/setup-sam@v1
      with:
        version: 1.23.0

      As part of the CI/CD process, we recommend you scan your code for quality and vulnerabilities in bundled libraries. You can find these security offerings from our AWS Lambda Technology Partners.

      Configuring AWS credentials in GitHub

      The GitHub Actions CI/CD pipeline requires AWS credentials to access your AWS account. The credentials must include AWS Identity and Access Management (IAM) policies that provide access to Lambda, API Gateway, AWS CloudFormation, S3, and IAM resources.

      These credentials are stored as GitHub secrets within your GitHub repository, under Settings > Secrets. For more information, see “GitHub Actions secrets”.

      In your GitHub repository, create two secrets named AWS_ACCESS_KEY_ID and AWS_SECRET_ACCESS_KEY and enter the key values. We recommend following IAM best practices for the AWS credentials used in GitHub Actions workflows, including:

      • Do not store credentials in your repository code. Use GitHub Actions secrets to store credentials and redact credentials from GitHub Actions workflow logs.
      • Create an individual IAM user with an access key for use in GitHub Actions workflows, preferably one per repository. Do not use the AWS account root user access key.
      • Grant least privilege to the credentials used in GitHub Actions workflows. Grant only the permissions required to perform the actions in your GitHub Actions workflows.
      • Rotate the credentials used in GitHub Actions workflows regularly.
      • Monitor the activity of the credentials used in GitHub Actions workflows.

      Deploying your application

      Add all the files to your local git repository, commit the changes, and push to GitHub.

      git add .
      git commit -am "Add AWS SAM files"
      git push

      Once the files are pushed to GitHub on the main branch, this automatically triggers the GitHub Actions CI/CD pipeline as configured in the sam-pipeline.yml file.

      The GitHub actions runner performs the pipeline steps specified in the file. It checks out the code from your repo, sets up Python, and configures the AWS credentials based on the GitHub secrets. The runner uses the GitHub action setup-sam to install AWS SAM CLI.

      The pipeline triggers the sam build process to build the application artifacts, using the default container image for Python 3.8.

      sam deploy runs to configure the resources in your AWS account using the securely stored credentials.

      To view the application deployment progress, select Actions in the repository menu. Select the workflow run and select the job name build-deploy.

      GitHub Actions progress

      GitHub Actions progress

      If the build fails, you can view the error message. Common errors are:

      • Incompatible software versions such as the Python runtime being different from the Python version on the build machine. Resolve this by installing the proper software versions.
      • Credentials could not be loaded. Verify that AWS credentials are stored in GitHub secrets.
      • Ensure that your AWS account has the necessary permissions to deploy the resources in the AWS SAM template, in addition to the S3 deployment bucket.

      Testing the application

      1. Within the workflow run, expand the Run sam deploy section.
      2. Navigate to the AWS SAM Outputs section. The HelloWorldAPI value shows the API Gateway endpoint URL deployed in your AWS account.
      AWS SAM outputs

      AWS SAM outputs

    1. Use curl to test the API:
    curl https://<api-id>.execute-api.us-east-1.amazonaws.com/Prod/hello/

    The API response should be:
    {"message": "hello world"}

    Cleanup

    To remove the application resources, navigate to the CloudFormation console and delete the stack. Alternatively, you can use an AWS CLI command to remove the stack:

    aws cloudformation delete-stack --stack-name sam-hello-world

    Empty, and delete the S3 deployment bucket.

    Conclusion

    GitHub Actions is a GitHub feature that allows you to run a CI/CD pipeline to build, test, and deploy software directly from GitHub. AWS SAM is an open-source framework for building serverless applications.

    In this post, you use GitHub Actions CI/CD pipeline functionality and AWS SAM to create, build, test, and deploy a serverless application. You use sam init to create a serverless application and tested the functionality locally. You create a sam-pipeline.yml file to define the pipeline steps for GitHub Actions.

    The GitHub action setup-sam installed AWS SAM on the GitHub hosted runner. The GitHub Actions workflow uses sam build to create the application artifacts and sam deploy to deploy them to your AWS account.

    For more serverless learning resources, visit https://serverlessland.com.

    Building well-architected serverless applications: Managing application security boundaries – part 1

    Post Syndicated from Julian Wood original https://aws.amazon.com/blogs/compute/building-well-architected-serverless-applications-managing-application-security-boundaries-part-1/

    This series of blog posts uses the AWS Well-Architected Tool with the Serverless Lens to help customers build and operate applications using best practices. In each post, I address the serverless-specific questions identified by the Serverless Lens along with the recommended best practices. See the introduction post for a table of contents and explanation of the example application.

    Security question SEC2: How do you manage your serverless application’s security boundaries?

    Defining and securing your serverless application’s boundaries ensures isolation for, within, and between components.

    Required practice: Evaluate and define resource policies

    Resource policies are AWS Identity and Access Management (IAM) statements. They are attached to resources such as an Amazon S3 bucket, or an Amazon API Gateway REST API resource or method. The policies define what identities have fine-grained access to the resource. To see which services support resource-based policies, see “AWS Services That Work with IAM”. For more information on how resource policies and identity policies are evaluated, see “Identity-Based Policies and Resource-Based Policies”.

    Understand and determine which resource policies are necessary

    Resource policies can protect a component by restricting inbound access to managed services. Use resource policies to restrict access to your component based on a number of identities, such as the source IP address/range, function event source, version, alias, or queues. Resource policies are evaluated and enforced at IAM level before each AWS service applies it’s own authorization mechanisms, when available. For example, IAM resource policies for API Gateway REST APIs can deny access to an API before an AWS Lambda authorizer is called.

    If you use multiple AWS accounts, you can use AWS Organizations to manage and govern individual member accounts centrally. Certain resource policies can be applied at the organizations level, providing guardrail for what actions AWS accounts within the organization root or OU can do. For more information see, “Understanding how AWS Organization Service Control Policies work”.

    Review your existing policies and how they’re configured, paying close attention to how permissive individual policies are. Your resource policies should only permit necessary callers.

    Implement resource policies to prevent unauthorized access

    For Lambda, use resource-based policies to provide fine-grained access to what AWS IAM identities and event sources can invoke a specific version or alias of your function. Resource-based policies can also be used to control access to Lambda layers. You can combine resource policies with Lambda event sources. For example, if API Gateway invokes Lambda, you can restrict the policy to the API Gateway ID, HTTP method, and path of the request.

    In the serverless airline example used in this series, the IngestLoyalty service uses a Lambda function that subscribes to an Amazon Simple Notification Service (Amazon SNS) topic. The Lambda function resource policy allows SNS to invoke the Lambda function.

    Lambda resource policy document

    Lambda resource policy document

    API Gateway resource-based policies can restrict API access to specific Amazon Virtual Private Cloud (VPC), VPC endpoint, source IP address/range, AWS account, or AWS IAM users.

    Amazon Simple Queue Service (SQS) resource-based policies provide fine-grained access to certain AWS services and AWS IAM identities (users, roles, accounts). Amazon SNS resource-based policies restrict authenticated and non-authenticated actions to topics.

    Amazon DynamoDB resource-based policies provide fine-grained access to tables and indexes. Amazon EventBridge resource-based policies restrict AWS identities to send and receive events including to specific event buses.

    For Amazon S3, use bucket policies to grant permission to your Amazon S3 resources.

    The AWS re:Invent session Best practices for growing a serverless application includes further suggestions on enforcing security best practices.

    Best practices for growing a serverless application

    Best practices for growing a serverless application

    Good practice: Control network traffic at all layers

    Apply controls for controlling both inbound and outbound traffic, including data loss prevention. Define requirements that help you protect your networks and protect against exfiltration.

    Use networking controls to enforce access patterns

    API Gateway and AWS AppSync have support for AWS Web Application Firewall (AWS WAF) which helps protect web applications and APIs from attacks. AWS WAF enables you to configure a set of rules called a web access control list (web ACL). These allow you to block, or count web requests based on customizable web security rules and conditions that you define. These can include specified IP address ranges, CIDR blocks, specific countries, or Regions. You can also block requests that contain malicious SQL code, or requests that contain malicious script. For more information, see How AWS WAF Works.

    private API endpoint is an API Gateway interface VPC endpoint that can only be accessed from your Amazon Virtual Private Cloud (Amazon VPC). This is an elastic network interface that you create in a VPC. Traffic to your private API uses secure connections and does not leave the Amazon network, it is isolated from the public internet. For more information, see “Creating a private API in Amazon API Gateway”.

    To restrict access to your private API to specific VPCs and VPC endpoints, you must add conditions to your API’s resource policy. For example policies, see the documentation.

    By default, Lambda runs your functions in a secure Lambda-owned VPC that is not connected to your account’s default VPC. Functions can access anything available on the public internet. This includes other AWS services, HTTPS endpoints for APIs, or services and endpoints outside AWS. The function cannot directly connect to your private resources inside of your VPC.

    You can configure a Lambda function to connect to private subnets in a VPC in your account. When a Lambda function is configured to use a VPC, the Lambda function still runs inside the Lambda service VPC. The function then sends all network traffic through your VPC and abides by your VPC’s network controls. Functions deployed to virtual private networks must consider network access to restrict resource access.

    AWS Lambda service VPC with VPC-to-VPT NAT to customer VPC

    AWS Lambda service VPC with VPC-to-VPT NAT to customer VPC

    When you connect a function to a VPC in your account, the function cannot access the internet, unless the VPC provides access. To give your function access to the internet, route outbound traffic to a NAT gateway in a public subnet. The NAT gateway has a public IP address and can connect to the internet through the VPC’s internet gateway. For more information, see “How do I give internet access to my Lambda function in a VPC?”. Connecting a function to a public subnet doesn’t give it internet access or a public IP address.

    You can control the VPC settings for your Lambda functions using AWS IAM condition keys. For example, you can require that all functions in your organization are connected to a VPC. You can also specify the subnets and security groups that the function’s users can and can’t use.

    Unsolicited inbound traffic to a Lambda function isn’t permitted by default. There is no direct network access to the execution environment where your functions run. When connected to a VPC, function outbound traffic comes from your own network address space.

    You can use security groups, which act as a virtual firewall to control outbound traffic for functions connected to a VPC. Use security groups to permit your Lambda function to communicate with other AWS resources. For example, a security group can allow the function to connect to an Amazon ElastiCache cluster.

    To filter or block access to certain locations, use VPC routing tables to configure routing to different networking appliances. Use network ACLs to block access to CIDR IP ranges or ports, if necessary. For more information about the differences between security groups and network ACLs, see “Compare security groups and network ACLs.”

    In addition to API Gateway private endpoints, several AWS services offer VPC endpoints, including Lambda. You can use VPC endpoints to connect to AWS services from within a VPC without an internet gateway, NAT device, VPN connection, or AWS Direct Connect connection.

    Using tools to audit your traffic

    When you configure a Lambda function to use a VPC, or use private API endpoints, you can use VPC Flow Logs to audit your traffic. VPC Flow Logs allow you to capture information about the IP traffic going to and from network interfaces in your VPC. Flow log data can be published to Amazon CloudWatch Logs or S3 to see where traffic is being sent to at a granular level. Here are some flow log record examples. For more information, see “Learn from your VPC Flow Logs”.

    Block network access when required

    In addition to security groups and network ACLs, third-party tools allow you to disable outgoing VPC internet traffic. These can also be configured to allow traffic to AWS services or allow-listed services.

    Conclusion

    Managing your serverless application’s security boundaries ensures isolation for, within, and between components. In this post, I cover how to evaluate and define resource policies, showing what policies are available for various serverless services. I show some of the features of AWS WAF to protect APIs. Then I review how to control network traffic at all layers. I explain how Lambda functions connect to VPCs, and how to use private APIs and VPC endpoints. I walk through how to audit your traffic.

    This well-architected question will be continued where I look at using temporary credentials between resources and components. I cover why smaller, single purpose functions are better from a security perspective, and how to audit permissions. I show how to use AWS Serverless Application Model (AWS SAM) to create per-function IAM roles.

    For more serverless learning resources, visit https://serverlessland.com.

    Caching data and configuration settings with AWS Lambda extensions

    Post Syndicated from Julian Wood original https://aws.amazon.com/blogs/compute/caching-data-and-configuration-settings-with-aws-lambda-extensions/

    This post is written by Hari Ohm Prasath Rajagopal, Senior Modernization Architect and Vamsi Vikash Ankam, Technical Account Manager

    In this post, I show how to build a flexible in-memory AWS Lambda caching layer using Lambda extensions. Lambda functions use REST API calls to access the data and configuration from the cache. This can reduce latency and cost when consuming data from AWS services such as Amazon DynamoDB, AWS Systems Manager Parameter Store, and AWS Secrets Manager.

    Applications making frequent API calls to retrieve static data can benefit from a caching layer. This can reduce the function’s latency, particularly for synchronous requests, as the data is retrieved from the cache instead of an external service. The cache can also reduce costs by reducing the number of calls to downstream services.

    There are two types of cache to consider in this situation:

    Lambda extensions are a new way for tools to integrate more easily into the Lambda execution environment and control and participate in Lambda’s lifecycle. They use the Extensions API, a new HTTP interface, to register for lifecycle events during function initialization, invocation, and shutdown.

    They can also use environment variables to add options and tools to the runtime, or use wrapper scripts to customize the runtime startup behavior. The Lambda cache uses Lambda extensions to run as a separate process.

    To learn more about how to use extensions with your functions, read “Introducing AWS Lambda extensions”.

    Creating a cache using Lambda extensions

    To set up the example, visit the GitHub repo, and follow the instructions in the README.md file.

    The demo uses AWS Serverless Application Model (AWS SAM) to deploy the infrastructure. The walkthrough requires AWS SAM CLI (minimum version 0.48) and an AWS account.

    To install the example:

    1. Create an AWS account if you do not already have one and login.
    2. Clone the repo to your local development machine:
    3. git clone https://github.com/aws-samples/aws-lambda-extensions
      cd aws-lambda-extensions/cache-extension-demo/
    4. If you are not running in a Linux environment, ensure that your build architecture matches the Lambda execution environment by compiling with GOOS=linux and GOARCH=amd64.
    5. GOOS=linux GOARCH=amd64
    6. Build the Go binary extension with the following command:
    7. go build -o bin/extensions/cache-extension-demo main.go
    8. Ensure that the extensions files are executable:
    9. chmod +x bin/extensions/cache-extension-demo
    10. Update the parameters region value in ../example-function/config.yaml with the Region where you are deploying the function.
    11. parameters:
        - region: us-west-2
    12. Build the function dependencies.
    13. cd SAM
      sam build
      AWS SAM build

      AWS SAM build

    14. Deploy the AWS resources specified in the template.yml file:
    15. sam deploy --guided
    16. During the prompts:
    17. Enter a stack name cache-extension-demo.
    18. Enter the same AWS Region specified previously.
    19. Accept the default DatabaseName. You can specify a custom database name, and also update the ../example-function/config.yaml and index.js files with the new database name.
    20. Enter MySecret as the Secrets Manager secret.
    21. Accept the defaults for the remaining questions.
    22. AWS SAM Deploy

      AWS SAM Deploy

      AWS SAM deploys:

      • A DynamoDB table.
      • The Lambda function ExtensionsCache-DatabaseEntry, which puts a sample item into the DynamoDB table.
      • An AWS Systems Manager Parameter Store parameter called CacheExtensions_Parameter1 with a value of MyParameter.
      • An AWS Secrets Manager secret called secret_info with a value of MySecret.
      • A Lambda layer called Cache_Extension_Layer.
      • A Lambda function using Nodejs.12 called ExtensionsCache-SampleFunction. This reads the cached values via the extension from either the DynamoDB table, Parameter Store, or Secrets Manager.
      • IAM permissions

      The cache extension is delivered as a Lambda layer and added to ExtensionsCache-SampleFunction.

      It is written as a self-contained binary in Golang, which makes the extension compatible with all of the supported runtimes. The extension caches the data from DynamoDB, Parameter Store, and Secrets Manager, and then runs a local HTTP endpoint to service the data. The Lambda function retrieves the configuration data from the cache using a local HTTP REST API call.

      Here is the architecture diagram.

      Extensions cache architecture diagram

      Extensions cache architecture diagram

      Once deployed, the extension performs the following steps:

      1. On start-up, the extension reads the config.yaml file, which determines which resources to cache. The file is deployed as part of the Lambda function.
      2. The boolean CACHE_EXTENSION_INIT_STARTUP Lambda environment variable specifies whether to load into cache the items specified in config.yaml. If false, the extension initializes an empty map with the names.
      3. The extension retrieves the required data based on the resources in the config.yaml file. This includes the data from DynamoDB, the configuration from Parameter Store, and the secret from Secrets Manager. The data is stored in memory.
      4. The extension starts a local HTTP server using TCP port 4000, which serves the cache items to the function. The Lambda function accesses the local in-memory cache by invoking the following endpoint: http://localhost:4000/<cachetype>?name=<name>.
      5. If the data is not available in the cache, or has expired, the extension accesses the corresponding AWS service to retrieve the data. It is cached first and then returned to the Lambda function. The CACHE_EXTENSION_TTL Lambda environment variable defines the refresh interval (defined based on Go time format, for example: 30s, 3m, etc.)

      This sequence diagram explains the data flow:

      Extensions cache sequence diagram

      Extensions cache sequence diagram

      Testing the example application

      Once the AWS SAM template is deployed, navigate to the AWS Lambda console.

      1. Select the function starting with the name ExtensionsCache-SampleFunction. Within the function code, the options array specifies which data to return from the cache. This is initially set to path: '/dynamodb?name=DynamoDbTable-pKey1-sKey1'
      2. Choose Configure test events to configure a test event.
      3. Enter a name for the Event name, accept the default payload, and select Create.
      4. Select Test to invoke the function. This returns the cached data from DynamoDB and logs the output.
      5. Successfully retrieve DynamoDB data from cache

        Successfully retrieve DynamoDB data from cache

      6. In the index.js file, amend the path statement to retrieve the Parameter Store configuration:
      7. const options = {
          "hostname": "localhost",
          "port": 4000,
          "path": "/parameters?name=CacheExtensions_Parameter1",
          "method": "GET"
        }
      8. Select Deploy to save the function configuration and select Test. The function returns the Parameter Store configuration item:
      9. Successfully retrieve Parameter Store data from cache

        Successfully retrieve Parameter Store data from cache

      10. In the function code, amend the path statement to retrieve the Secrets Manager secret:
      11. const options = {
          "hostname": "localhost",
          "port": 4000,
          "path": "/parameters?name=/aws/reference/secretsmanager/secret_info",
          "method": "GET"
        }
      12. Select Deploy to save the function configuration and select Test. The function returns the secret:
      Successfully retrieve Secrets Manager data from cache

      Successfully retrieve Secrets Manager data from cache

      The benefits of using Lambda extensions

      There are a number of benefits to using a Lambda extension for this solution:

      1. Improved Lambda function performance as data is cached in memory by the extension during initialization.
      2. Fewer AWS API calls to external services, this can reduce costs and helps avoid throttling limits if services are accessed frequently.
      3. Cache data is stored in memory and not in a file within the Lambda execution environment. This means that no additional process is required to manage the lifecycle of the file. In-memory is also more secure, as data is not persisted to disk for subsequent function invocations.
      4. The function requires less code, as it only needs to communicate with the extension via HTTP to retrieve the data. The function does not have to have additional libraries installed to communicate with DynamoDB, Parameter Store, Secrets Manager, or the local file system.
      5. The cache extension is a Golang compiled binary and the executable can be shared with functions running other runtimes like Node.js, Python, Java, etc.
      6. Using a YAML template to store the details of what to cache makes it easier to configure and add additional services.

      Comparing the performance benefit

      To test the performance of the cache extension, I compare two tests:

      1. A Golang Lambda function that accesses a secret from AWS Secrets Manager for every invocation.
      2. The ExtensionsCache-SampleFunction, previously deployed using AWS SAM. This uses the cache extension to access the secrets from Secrets Manager, the function reads the value from the cache.

      Both functions are configured with 512 MB of memory and the function timeout is set to 30 seconds.

      I use Artillery to load test both Lambda functions. The load runs for 100 invocations over 2 minutes. I use Amazon CloudWatch metrics to view the function average durations.

      Test 1 shows a duration of 43 ms for the first invocation as a cold start. Subsequent invocations average 22 ms.

      Test 1 performance results

      Test 1 performance results

      Test 2 shows a duration of 16 ms for the first invocation as a cold start. Subsequent invocations average 3 ms.

      Test 2 performance results

      Test 2 performance results

      Using the Lambda extensions caching layer shows a significant performance improvement. Cold start invocation duration is reduced by 62% and subsequent invocations by 80%.

      In this example, the CACHE_EXTENSION_INIT_STARTUP environment variable flag is not configured. With the flag enabled for the extension, data is pre-fetched during extension initialization and the cold start time is further reduced.

      Conclusion

      Using Lambda extensions is an effective way to cache static data from external services in Lambda functions. This reduces function latency and costs. This post shows how to build both a data and configuration cache using DynamoDB, Parameter Store, and Secrets Manager.

      To set up the walkthrough demo in this post, visit the GitHub repo, and follow the instructions in the README.md file.

      The extension uses a local configuration file to determine which values to cache, and retrieves the items from the external services. A Lambda function retrieves the values from the local cache using an HTTP request, without having to communicate with the external services directly. In this example, this results in an 80% reduction in function invocation time.

      For more serverless learning resources, visit https://serverlessland.com.

    Working with Lambda layers and extensions in container images

    Post Syndicated from Julian Wood original https://aws.amazon.com/blogs/compute/working-with-lambda-layers-and-extensions-in-container-images/

    In this post, I explain how to use AWS Lambda layers and extensions with Lambda functions packaged and deployed as container images.

    Previously, Lambda functions were packaged only as .zip archives. This includes functions created in the AWS Management Console. You can now also package and deploy Lambda functions as container images.

    You can use familiar container tooling such as the Docker CLI with a Dockerfile to build, test, and tag images locally. Lambda functions built using container images can be up to 10 GB in size. You push images to an Amazon Elastic Container Registry (ECR) repository, a managed AWS container image registry service. You create your Lambda function, specifying the source code as the ECR image URL from the registry.

    Lambda container image support

    Lambda container image support

    Lambda functions packaged as container images do not support adding Lambda layers to the function configuration. However, there are a number of solutions to use the functionality of Lambda layers with container images. You take on the responsible for packaging your preferred runtimes and dependencies as a part of the container image during the build process.

    Understanding how Lambda layers and extensions work as .zip archives

    If you deploy function code using a .zip archive, you can use Lambda layers as a distribution mechanism for libraries, custom runtimes, and other function dependencies.

    When you include one or more layers in a function, during initialization, the contents of each layer are extracted in order to the /opt directory in the function execution environment. Each runtime then looks for libraries in a different location under /opt, depending on the language. You can include up to five layers per function, which count towards the unzipped deployment package size limit of 250 MB. Layers are automatically set as private, but they can be shared with other AWS accounts, or shared publicly.

    Lambda Extensions are a way to augment your Lambda functions and are deployed as Lambda layers. You can use Lambda Extensions to integrate functions with your preferred monitoring, observability, security, and governance tools. You can choose from a broad set of tools provided by AWS, AWS Lambda Ready Partners, and AWS Partners, or create your own Lambda Extensions. For more information, see “Introducing AWS Lambda Extensions – In preview.”

    Extensions can run in either of two modes, internal and external. An external extension runs as an independent process in the execution environment. They can start before the runtime process, and can continue after the function invocation is fully processed. Internal extensions run as part of the runtime process, in-process with your code.

    Lambda searches the /opt/extensions directory and starts initializing any extensions found. Extensions must be executable as binaries or scripts. As the function code directory is read-only, extensions cannot modify function code.

    It helps to understand that Lambda layers and extensions are just files copied into specific file paths in the execution environment during the function initialization. The files are read-only in the execution environment.

    Understanding container images with Lambda

    A container image is a packaged template built from a Dockerfile. The image is assembled or built from commands in the Dockerfile, starting from a parent or base image, or from scratch. Each command then creates a new layer in the image, which is stacked in order on top of the previous layer. Once built from the packaged template, a container image is immutable and read-only.

    For Lambda, a container image includes the base operating system, the runtime, any Lambda extensions, your application code, and its dependencies. Lambda provides a set of open-source base images that you can use to build your container image. Lambda uses the image to construct the execution environment during function initialization. You can use the AWS Serverless Application Model (AWS SAM) CLI or native container tools such as the Docker CLI to build and test container images locally.

    Using Lambda layers in container images

    Container layers are added to a container image, similar to how Lambda layers are added to a .zip archive function.

    There are a number of ways to use container image layering to add the functionality of Lambda layers to your Lambda function container images.

    Use a container image version of a Lambda layer

    A Lambda layer publisher may have a container image format equivalent of a Lambda layer. To maintain the same file path as Lambda layers, the published container images must have the equivalent files located in the /opt directory. An image containing an extension must include the files in the /opt/extensions directory.

    An example Lambda function, packaged as a .zip archive, is created with two layers. One layer contains shared libraries, and the other layer is a Lambda extension from an AWS Partner.

    aws lambda create-function –region us-east-1 –function-name my-function \

    aws lambda create-function --region us-east-1 --function-name my-function \  
        --role arn:aws:iam::123456789012:role/lambda-role \
        --layers \
            "arn:aws:lambda:us-east-1:123456789012:layer:shared-lib-layer:1" \
            "arn:aws:lambda:us-east-1:987654321987:extensions-layer:1" \
        …
    

    The corresponding Dockerfile syntax for a function packaged as a container image includes the following lines. These pull the container image versions of the Lambda layers and copy them into the function image. The shared library image is pulled from ECR and the extension image is pulled from Docker Hub.

    FROM public.ecr.aws/myrepo/shared-lib-layer:1 AS shared-lib-layer
    # Layer code
    WORKDIR /opt
    COPY --from=shared-lib-layer /opt/ .
    
    FROM aws-partner/extensions-layer:1 as extensions-layer
    # Extension  code
    WORKDIR /opt/extensions
    COPY --from=extensions-layer /opt/extensions/ .
    

    Copy the contents of a Lambda layer into a container image

    You can use existing Lambda layers, and copy the contents of the layers into the function container image /opt directory during docker build.

    You need to build a Dockerfile that includes the AWS Command Line Interface to copy the layer files from Amazon S3.

    The Dockerfile to add two layers into a single image includes the following lines to copy the Lambda layer contents.

    FROM alpine:latest
    
    ARG AWS_DEFAULT_REGION=${AWS_DEFAULT_REGION:-"us-east-1"}
    ARG AWS_ACCESS_KEY_ID=${AWS_ACCESS_KEY_ID:-""}
    ARG AWS_SECRET_ACCESS_KEY=${AWS_SECRET_ACCESS_KEY:-""}
    ENV AWS_DEFAULT_REGION=${AWS_DEFAULT_REGION}
    ENV AWS_ACCESS_KEY_ID=${AWS_ACCESS_KEY_ID}
    ENV AWS_SECRET_ACCESS_KEY=${AWS_SECRET_ACCESS_KEY}
    
    RUN apk add aws-cli curl unzip
    
    RUN mkdir -p /opt
    
    RUN curl $(aws lambda get-layer-version-by-arn --arn arn:aws:lambda:us-east-1:1234567890123:layer:shared-lib-layer:1 --query 'Content.Location' --output text) --output layer.zip
    RUN unzip layer.zip -d /opt
    RUN rm layer.zip
    
    RUN curl $(aws lambda get-layer-version-by-arn --arn arn:aws:lambda:us-east-1:987654321987:extensions-layer:1 --query 'Content.Location' --output text) --output layer.zip
    RUN unzip layer.zip -d /opt
    RUN rm layer.zip
    

    To run the AWS CLI, specify your AWS_ACCESS_KEY, and AWS_SECRET_ACCESS_KEY, and include the required AWS_DEFAULT_REGION as command-line arguments.

    docker build . -t layer-image1:latest \
    --build-arg AWS_DEFAULT_REGION=us-east-1 \
    --build-arg AWS_ACCESS_KEY_ID=AKIAIOSFODNN7EXAMPLE \
    --build-arg AWS_SECRET_ACCESS_KEY=wJalrXUtnFEMI/K7MDENG/bPxRfiCYEXAMPLEKEY
    

    This creates a container image containing the existing Lambda layer and extension files. This can be pushed to ECR and used in a function.

    Build a container image from a Lambda layer

    You can repackage and publish Lambda layer file content as container images. Creating separate container images for different layers allows you to add them to multiple functions, and share them in a similar way as Lambda layers.

    You can create a separate container image containing the files from a single layer, or combine the files from multiple layers into a single image. If you create separate container images for layer files, you then add these images into your function image.

    There are two ways to manage language code dependencies. You can pre-build the dependencies and copy the files into the container image, or build the dependencies during docker build.

    In this example, I migrate an existing Python application. This comprises a Lambda function and extension, from a .zip archive to separate function and extension container images. The extension writes logs to S3.

    You can choose how to store images in repositories. You can either push both images to the same ECR repository with different image tags, or push to different repositories. In this example, I use separate ECR repositories.

    To set up the example, visit the GitHub repo and follow the instructions in the README.md file.

    The existing example extension uses a makefile to install boto3 using pip install with a requirements.txt file. This is migrated to the docker build process. I must add a Python runtime to be able to run pip install as part of the build process. I use python:3.8-alpine as a minimal base image.

    I create separate Dockerfiles for the function and extension. The extension Dockerfile contains the following lines.

    FROM python:3.8-alpine AS installer
    #Layer Code
    COPY extensionssrc /opt/
    COPY extensionssrc/requirements.txt /opt/
    RUN pip install -r /opt/requirements.txt -t /opt/extensions/lib
    
    FROM scratch AS base
    WORKDIR /opt/extensions
    COPY --from=installer /opt/extensions .
    

    I build, tag, login, and push the extension container image to an existing ECR repository.

    docker build -t log-extension-image:latest  .
    docker tag log-extension-image:latest 123456789012.dkr.ecr.us-east-1.amazonaws.com/log-extension-image:latest
    aws ecr get-login-password --region us-east-1 | docker login --username AWS --password-stdin 123456789012.dkr.ecr.us-east-1.amazonaws.com
    docker push 123456789012.dkr.ecr.us-east-1.amazonaws.com/log-extension-image:latest
    

    The function Dockerfile contains the following lines, which add the files from the previously created extension image to the function image. There is no need to run pip install for the function as it does not require any additional dependencies.

    FROM 123456789012.dkr.ecr.us-east-1.amazonaws.com/log-extension-image:latest AS layer
    FROM public.ecr.aws/lambda/python:3.8
    # Layer code
    WORKDIR /opt
    COPY --from=layer /opt/ .
    # Function code
    WORKDIR /var/task
    COPY app.py .
    CMD ["app.lambda_handler"]
    

    I build, tag, and push the function container image to a separate existing ECR repository. This creates an immutable image of the Lambda function.

    docker build -t log-extension-function:latest  .
    docker tag log-extension-function:latest 123456789012.dkr.ecr.us-east-1.amazonaws.com/log-extension-function:latest
    docker push 123456789012.dkr.ecr.us-east-1.amazonaws.com/log-extension-function:latest
    

    The function requires a unique S3 bucket to store the logs files, which I create in the S3 console. I create a Lambda function from the ECR repository image, and specify the bucket name as a Lambda environment variable.

    aws lambda create-function --region us-east-1  --function-name log-extension-function \
    --package-type Image --code ImageUri=123456789012.dkr.ecr.us-east-1.amazonaws.com/log-extension-function:latest \
    --role "arn:aws:iam:: 123456789012:role/lambda-role" \
    --environment  "Variables": {"S3_BUCKET_NAME": "s3-logs-extension-demo-logextensionsbucket-us-east-1"}
    

    For subsequent extension code changes, I need to update both the extension and function images. If only the function code changes, I need to update the function image. I push the function image as the :latest image to ECR. I then update the function code deployment to use the updated :latest ECR image.

    aws lambda update-function-code --function-name log-extension-function --image-uri 123456789012.dkr.ecr.us-east-1.amazonaws.com/log-extension-function:latest

    Using custom runtimes with container images

    With .zip archive functions, custom runtimes are added using Lambda layers. With container images, you no longer need to copy in Lambda layer code for custom runtimes.

    You can build your own custom runtime images starting with AWS provided base images for custom runtimes. You can add your preferred runtime, dependencies, and code to these images. To communicate with Lambda, the image must implement the Lambda Runtime API. We provide Lambda runtime interface clients for all supported runtimes, or you can implement your own for additional runtimes.

    Running extensions in container images

    A Lambda extension running in a function packaged as a container image works in the same way as a .zip archive function. You build a function container image including the extension files, or adding an extension image layer. Lambda looks for any external extensions in the /opt/extensions directory and starts initializing them. Extensions must be executable as binaries or scripts.

    Internal extensions modify the Lambda runtime startup behavior using language-specific environment variables, or wrapper scripts. For language-specific environment variables, you can set the following environment variables in your function configuration to augment the runtime command line.

    • JAVA_TOOL_OPTIONS (Java Corretto 8 and 11)
    • NODE_OPTIONS (Node.js 10 and 12)
    • DOTNET_STARTUP_HOOKS (.NET Core 3.1)

    An example Lambda environment variable for JAVA_TOOL_OPTIONS:

    -javaagent:"/opt/ExampleAgent-0.0.jar"

    Wrapper scripts delegate the runtime start-up to a script. The script can inject and alter arguments, set environment variables, or capture metrics, errors, and other diagnostic information. The following runtimes support wrapper scripts: Node.js 10 and 12, Python 3.8, Ruby 2.7, Java 8 and 11, and .NET Core 3.1

    You specify the script by setting the value of the AWS_LAMBDA_EXEC_WRAPPER environment variable as the file system path of an executable binary or script, for example:

    /opt/wrapper_script

    Conclusion

    You can now package and deploy Lambda functions as container images in addition to .zip archives. Lambda functions packaged as container images do not directly support adding Lambda layers to the function configuration as .zip archives do.

    In this post, I show a number of solutions to use the functionality of Lambda layers and extensions with container images, including example Dockerfiles.

    I show how to migrate an existing Lambda function and extension from a .zip archive to separate function and extension container images. Follow the instructions in the README.md file in the GitHub repository.

    For more serverless learning resources, visit https://serverlessland.com.