Post Syndicated from Seth Eliot original https://aws.amazon.com/blogs/architecture/verify-the-resilience-of-your-workloads-using-chaos-engineering/
The following is an early preview of new guidance to be published as part of updates to the AWS Well-Architected content:
Chaos Engineering enables us to find shortcomings before our customers find them and therefore, provides us with the opportunity to create a better customer experience. Chaos Engineering does not introduce chaos into your systems, instead, it finds the chaos that is already there. By definition, chaos experiments should be fail-safe and tolerated by the system. It is therefore key that you use tools that allow for controlled experiments. A controlled experiment has a clear scope of impact, built in rollback mechanisms, and tight integration with monitoring that provides deep insights to the impact of the experiment in real-time. Chaos Engineering allows you to inject real-world cloud provider faults that give you insights on what you need to improve in regards to observability, incident response, and architecture to be resilient against faults that you cannot predict. To help you with this journey, we have adjusted our guidance in the Well-Architected Reliability Pillar, enabling you to build more robust and resilient workloads on AWS.
Well-Architected Reliability best practice: verify the resilience of your workloads using Chaos Engineering
Chaos Engineering provides your teams with capabilities to continuously inject real world disruptions (simulations) in a controlled way at the service provider, infrastructure, workload, and component levels, with minimal to no impact to your customers. It allows your teams to learn from faults and observe, measure, and improve the resilience of your workloads, as well as validate that alerts fire and teams get notified in the case of an event. When run continuously, Chaos Engineering can highlight deficiencies in your workloads that, if left unaddressed, could negatively affect availability and operation.
| Chaos Engineering is the discipline of experimenting on a system in order to build confidence in the system’s capability to withstand turbulent conditions in production. – Principles of Chaos Engineering |
If a system is able to withstand these disruptions, the chaos experiment should be maintained as an automated regression test. In this way, chaos experiments should be run as part of your software development lifecycle (SDLC) and as part of your CI/CD pipeline.
To ensure that your workload can survive component failure, inject real-world events as part of your experiments. For example, experiment with the loss of EC2 instances or failover of the primary Amazon RDS database instance, and verify that your workload is not impacted (or only minimally impacted). Use a combination of component faults to simulate events that may be caused by a disruption in an Availability Zone.
For application-level faults (such as crashes), you can start with stressors such as memory and CPU exhaustion.
To validate fallback or failover mechanisms for external dependencies due to intermittent network disruptions, your components should simulate such an event by blocking access to the third-party providers for a specified duration that might last from seconds to hours.
Other modes of degradation might cause reduced functionality and slow responses, often resulting in a disruption of your services. Common sources of this type of degradation are increased latency on critical services and unreliable network communication (dropped packets). Experiments with these faults, including networking effects such as latency, dropped messages, and DNS failures, could include the inability to resolve a name, reach the DNS service, or establish connections to dependent services.
Chaos Engineering tools
AWS Fault Injection Simulator (AWS FIS) is a fully managed service for running fault injection experiments that can be used as part of your CD pipeline, or outside of the pipeline. AWS FIS is a good choice to use during Chaos Engineering game days. It supports simultaneously introducing faults across different types of resources including Amazon EC2, Amazon ECS, Amazon EKS, and Amazon RDS. These faults include termination of resources, forcing failovers, stressing CPU or memory, throttling, latency, and packet loss. Since it is integrated with Amazon CloudWatch alarms, you can set up stop conditions as guardrails to rollback an experiment if it causes an unexpected impact (Figure 1).

Figure 1. AWS Fault Injection Simulator integrates with AWS resources to enable you to run fault injection experiments for your workloads
To expand the scope of faults that can be injected on AWS, AWS FIS integrates with Chaos Mesh and Litmus Chaos, enabling you to coordinate fault injection workflows among multiple tools. For example, you can run a stress test on a pod’s CPU using Chaos Mesh or Litmus faults while terminating a randomly selected percentage of cluster nodes using AWS FIS fault actions.
Implementation steps
1. Determine which faults to use for experiments
Assess the design of your workload for resiliency. Such designs (created using the best practices of the Well-Architected Framework) consider risks based on critical dependencies, past events, known issues, and compliance requirements. List each element of the design intended to maintain resilience and the faults it is designed to mitigate. For more information about creating such lists, see the Operational Readiness Review whitepaper, which guides you on how to create a process to prevent reoccurrence of previous incidents. The Failure Modes & Effects Analysis (FMEA) process provides a framework for performing a component-level analysis of failures and how they impact your workload. FMEA is outlined in more detail in Failure Modes and Continuous Resilience by Adrian Cockcroft.
2. Assign a priority to each fault
To assess priority, consider the frequency of the fault and the impact of failure to the overall workload. It is fine to start with a coarse categorization, such as high, medium, or low, and refine it.
When considering frequency of a given fault, analyze past data for this workload when available. If not available, use data from other workloads running in a similar environment.
When considering impact of a given fault, the larger the scope of the fault, generally the larger the impact. Also consider the workload design and purpose. For example, the ability to access the source data stores is critical for a workload doing data transformation and analysis. In this case, you would prioritize experiments for access faults, as well as throttled access and latency insertion.
Post-incident analyses are a good source of data to understand both frequency and impact of failure modes.
Use the assigned priority to determine which faults to experiment with first and the order with which to develop new fault injection experiments.
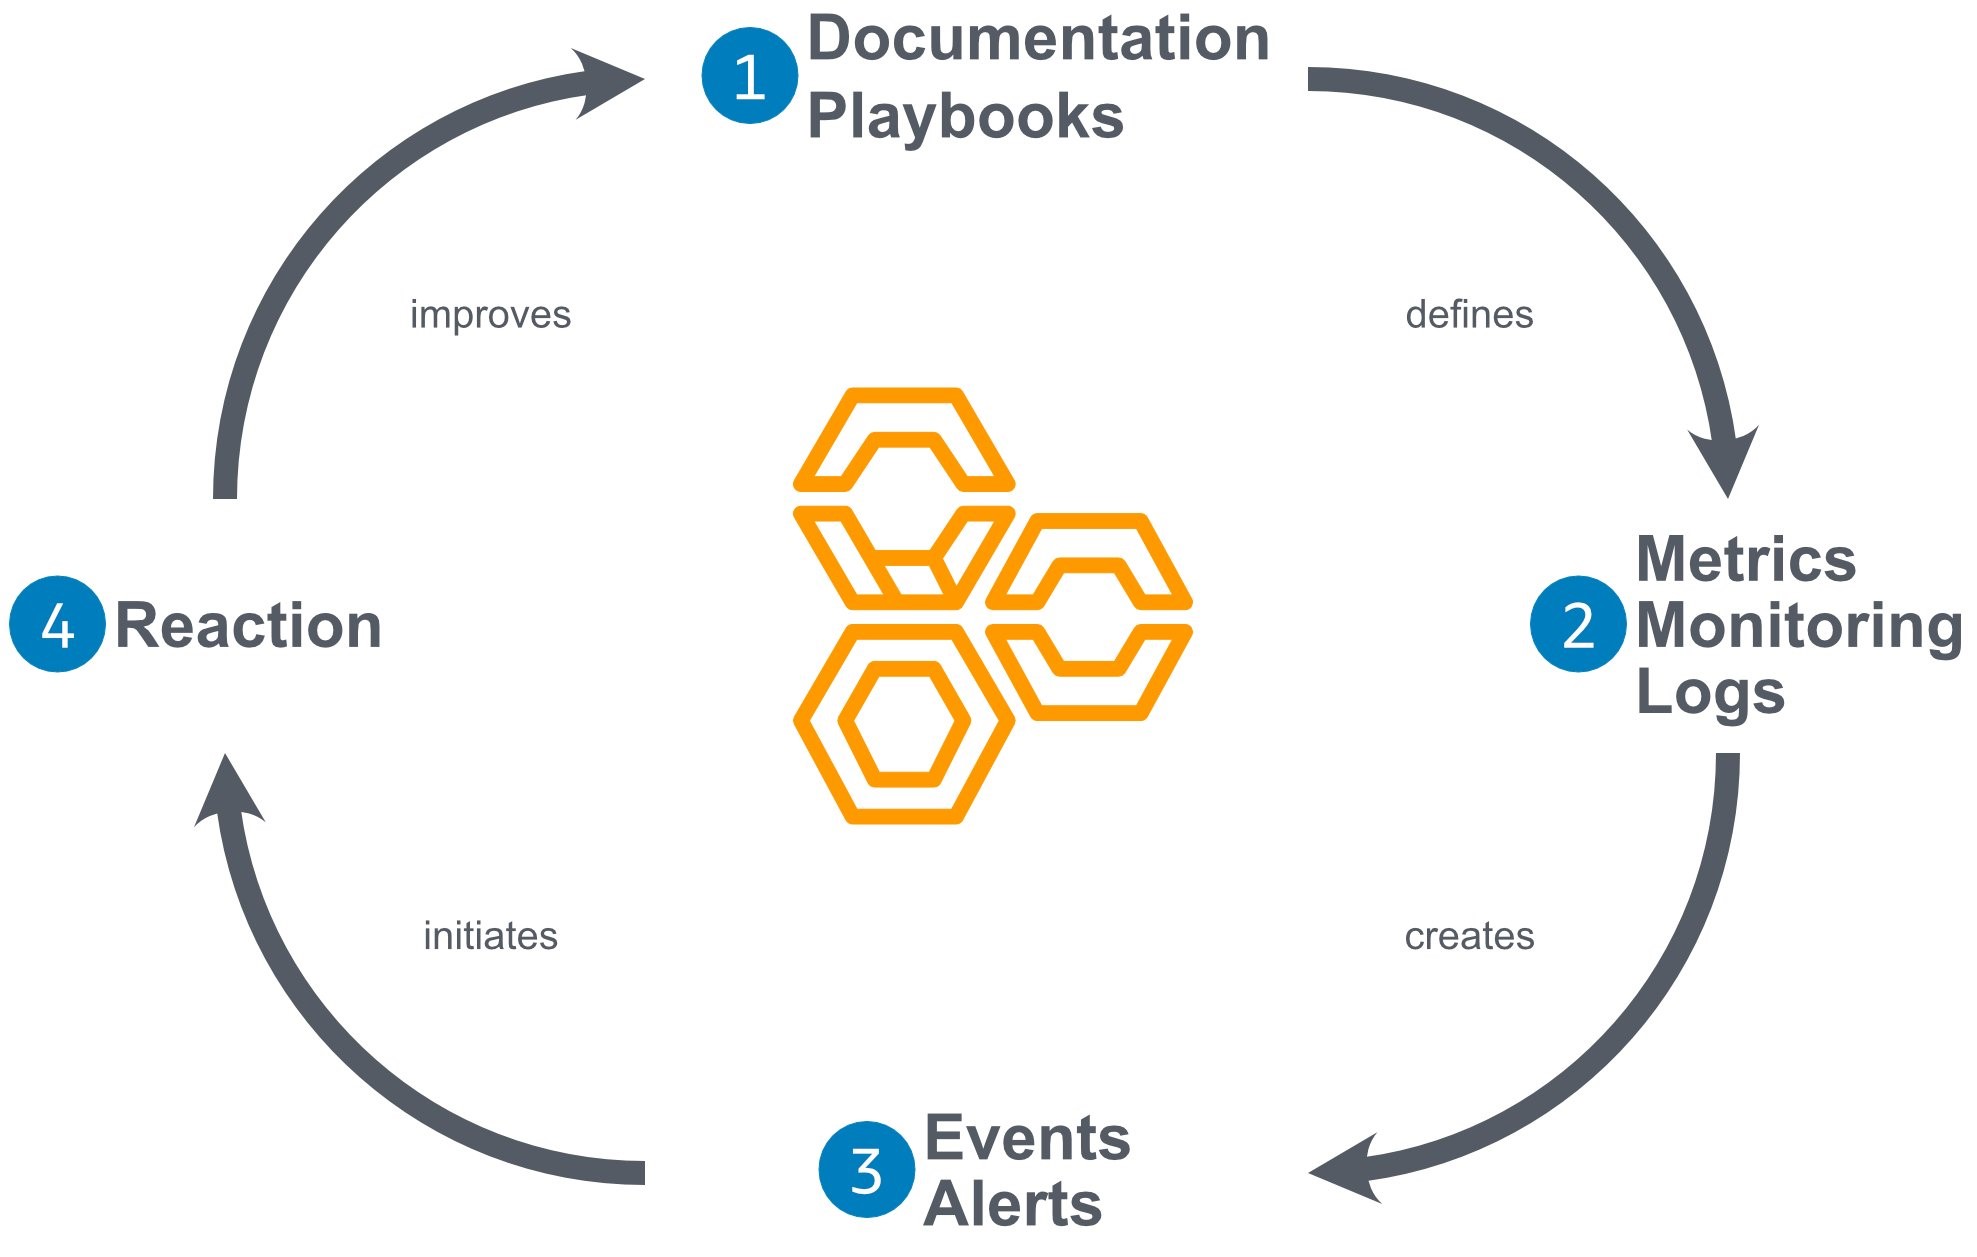
3. For each experiment that you will execute, follow the Chaos Engineering/continuous resilience flywheel (Figure 2)

Figure 2. Chaos Engineering/continuous resilience flywheel, using the scientific method by Adrian Hornsby
3A. Define steady state as some measurable output of a workload that indicates normal behavior
Your workload exhibits steady state if it is operating reliably and as expected. Therefore, validate that your workload is healthy before defining steady state. Steady state does not necessarily mean that there is no impact to the workload when a fault occurs, as a certain percentage in faults could be within acceptable limits. The steady state is your baseline that you will observe during the experiment, which will highlight anomalies if your hypothesis defined in the next step does not turn out as expected.
For example, a steady state of a payments system can be defined as the processing of 300 transactions per second (TPS) with a 99% success rate and round-trip time of 500 ms.
3B. Form a hypothesis about how the workload will react to the fault
A good hypothesis is based on how the workload is expected to mitigate the fault to maintain the steady state. The hypothesis states that given the fault of a specific type, the system or workload will continue steady state, because the workload was designed with specific mitigations. The specific type of fault and mitigations should be specified in the hypothesis.
The following template can be used for the hypothesis (but other wording is also acceptable):
| If [specific fault] occurs the [workload name] workload will [describe mitigating controls] to maintain [business or technical metric]. |
For example:
- If 20% of the nodes in the EKS node-group are taken down, the Transaction Create API continues to serve the 99th percentile of requests in under 100 ms (steady state). The EKS nodes will recover within five minutes, and pods will get scheduled and process traffic within eight minutes after the initiation of the experiment. Alerts will fire within three minutes.
- If a single EC2 instance failure occurs, the order system’s Elastic Load Balancer (ELB) health check will cause the ELB to only send requests to the remaining healthy instances while the EC2 Auto scaling replaces the failed instance, maintaining a less than 0.01% increase in server-side (5xx) errors (steady state).
- If the primary RDS database instance fails, the supply chain data collection workload will failover and connect to the standby RDS database instance to maintain less than one minute of database read/write errors (steady state).
3C. Run the experiment by injecting the fault
An experiment should, by default, be fail-safe and tolerated by the workload. If you know that the workload will fail, do not run the experiment. Chaos Engineering should be used to find known-unknowns or unknown-unknowns. Known-unknowns are things you are aware of but don’t fully understand, and unknown-unknowns are things you are neither aware of nor fully understand. Experimenting against a workload that you know is broken won’t provide you with new insights. Your experiment should be carefully planned, have a clear scope of impact, and provide a roll back mechanism that can be run in case of unexpected turbulence. If your due diligence shows that your workload should survive the experiment, move forward with running the experiment. There are several options for injecting the faults. For workloads on AWS, AWS FIS provides many pre-defined fault simulations called actions. You can also define custom actions that run in AWS FIS using AWS Systems Manager documents.
We discourage the use of custom scripts for chaos experiments, unless the scripts have the capabilities to understand current state of the workload, are able to emit logs, and provide mechanisms for roll backs and stop conditions where possible.
An effective framework or toolset that supports Chaos Engineering should track the current state of an experiment, emit logs, and provide rollback mechanisms, to support the controlled running of an experiment. Start with an established service like AWS FIS that allows you to run experiments with a clearly defined scope and safety mechanisms that rollback the experiment if the experiment introduces unexpected turbulence. To learn about a wider variety of experiments using AWS FIS, see the Resilient and Well-Architected Apps with Chaos Engineering lab. Also, AWS Resilience Hub will analyze your workload and create experiments that you can choose to implement and run in AWS FIS.
| For every experiment, clearly understand its scope and its impact. We recommend that faults should be simulated first on a non-production environment before being run in production. |
It is ideal to ultimately run in production under real-world load via canary deployments that spin up both a control and experimental system deployment, where feasible. Running experiments during off-peak times is a good practice to mitigate potential impact when first experimenting in production. Also, if using actual customer traffic poses too much risk, you can run experiments using synthetic traffic on production infrastructure against the control and experimental deployments. When using production is not possible, run experiments in pre-production environments that are as close to production as possible.
You must establish and monitor guardrails to ensure that the experiment does not impact production traffic or other systems beyond acceptable limits. Establish stop conditions to stop an experiment if it reaches a threshold on a guardrail metric that you define. This should include the metrics for steady state for the workload, as well as the metric against the components into which you’re injecting the fault. A synthetic monitor (also known as a “user canary”) is one metric you should usually include as a user proxy. Stop conditions for AWS FIS are supported as part of the experiment template, enabling up to five stop-conditions per template.
One of the Principles of Chaos Engineering is to minimize the scope of the experiment and its impact, specifically “While there must be an allowance for some short-term negative impact, it is the responsibility and obligation of the Chaos Engineer to ensure the fallout from experiments are minimized and contained”. A method to verify the scope and potential impact is to run the experiment in a non-production environment first, verifying that thresholds for stop conditions occur as expected during an experiment and observability is in place to catch an exception, instead of directly experimenting in production.
When running fault injection experiments, verify that all responsible parties are well informed. Communicate with appropriate teams, such as the operations teams, service reliability teams, and customer support, to let them know when experiments will be run and what to expect. Give these teams communication tools to inform those running the experiment if they see any adverse effects.
You must restore the workload and its underlying systems back to the original known-good state. Often, the resilient design of the workload will self-heal. But some fault designs or failed experiments can leave your workload in an unexpected failed state. By the end of the experiment, you must be aware of this and restore the workload and systems. With AWS FIS, you can set a rollback configuration (also called a post action) within the action parameters. A post action returns the target to the state that it was in before the action was run. Whether automated (such as using AWS FIS) or manual, these post actions should be part of a playbook that describes how to detect and handle failures.
3D. Verify the hypothesis
The Principles of Chaos Engineering gives this guidance on how to verify steady state of your workload: “Focus on the measurable output of a system, rather than internal attributes of the system. Measurements of that output over a short period of time constitute a proxy for the system’s steady state. The overall system’s throughput, error rates, latency percentiles, etc. could all be metrics of interest representing steady state behavior. By focusing on systemic behavior patterns during experiments, Chaos verifies that the system does work, rather than trying to validate how it works.”
In our two examples from Step 3B, we include the steady state metrics:
- Less than 0.01% increase in server-side (5xx) errors
- Less than 1 minute of database read/write errors
The 5xx errors are a good metric because they are a consequence of the failure mode that a client of the workload will experience directly. The database errors measurement is good as a direct consequence of the fault, but should also be supplemented with a client impact measurement such as failed customer requests or errors surfaced to the client. Additionally, include a synthetic monitor (also known as a “user canary”) on any APIs or URIs directly accessed by the client of your workload.
3E. Improve the workload design for resilience
If steady state was not maintained, then investigate how the workload design can be improved to mitigate the fault, applying the best practices of the AWS Well-Architected Reliability Pillar. Additional guidance and resources can be found in the AWS Builder’s Library, which hosts articles about how to improve your health checks and employ retries with backoff in your application code, among others.
After these changes have been implemented, run the experiment again (shown by the dotted line in Figure 2) to determine their effectiveness. If the verify step indicates the hypothesis holds true, then the workload will be in steady state, and the cycle in Figure 2 continues.
4. Run experiments regularly
A chaos experiment is a cycle, and experiments should be run regularly as part of Chaos Engineering. After a workload meets the experiment’s hypothesis, the experiment should be automated to run continuously as a regression part of your CI/CD pipeline. To learn how to do this, explore this blog on how to run AWS FIS experiments using AWS CodePipeline. This lab on recurrent AWS FIS experiments in a CI/CD pipeline enables you to work hands-on with this.
Fault injection experiments are also a part of game days. Game days simulate a failure or event to verify systems, processes, and team responses. The purpose of game days is to actually perform the actions that the team would perform as if an exceptional event happened.
5. Capture and store experiment results
Results for fault injection experiments must be captured and persisted. Include all necessary data necessary (such as time, workload, and conditions) to be able to later analyze experiment results and trends. Examples of results might include screenshots of dashboards, CSV dumps from your metrics database, or a hand-recorded record of events and observations from the experiment. Experiment logging with AWS FIS can be part of this data capture.
This blog post gives early access to the updated implementation guidance on Chaos Engineering we are publishing as part of updates to the AWS Well-Architected content. Using the implementation steps described in this post, you can begin using Chaos Engineering to verify the resilience of your workloads.