Tag Archives: open source

Announcing Amazon Managed Service for Apache Flink Renamed from Amazon Kinesis Data Analytics

Post Syndicated from Channy Yun original https://aws.amazon.com/blogs/aws/announcing-amazon-managed-service-for-apache-flink-renamed-from-amazon-kinesis-data-analytics/

Today we are announcing the rename of Amazon Kinesis Data Analytics to Amazon Managed Service for Apache Flink, a fully managed and serverless service for you to build and run real-time streaming applications using Apache Flink.

We continue to deliver the same experience in your Flink applications without any impact on ongoing operations, developments, or business use cases. All your existing running applications in Kinesis Data Analytics will work as is without any changes.

Many customers use Apache Flink for data processing, including support for diverse use cases with a vibrant open-source community. While Apache Flink applications are robust and popular, they can be difficult to manage because they require scaling and coordination of parallel compute or container resources. With the explosion of data volumes, data types, and data sources, customers need an easier way to access, process, secure, and analyze their data to gain faster and deeper insights without compromising on performance and costs.

Using Amazon Managed Service for Apache Flink, you can set up and integrate data sources or destinations with minimal code, process data continuously with sub-second latencies from hundreds of data sources like Amazon Kinesis Data Streams and Amazon Managed Streaming for Apache Kafka (Amazon MSK), and respond to events in real-time. You can also analyze streaming data interactively with notebooks in just a few clicks with Amazon Managed Service for Apache Flink Studio with built-in visualizations powered by Apache Zeppelin.

With Amazon Managed Service for Apache Flink, you can deploy secure, compliant, and highly available applications. There are no servers and clusters to manage, no compute and storage infrastructure to set up, and you only pay for the resources your applications consume.

A History to Support Apache Flink
Since we launched Amazon Kinesis Data Analytics based on a proprietary SQL engine in 2016, we learned that SQL alone was not sufficient to provide the capabilities that customers needed for efficient stateful stream processing. So, we started investing in Apache Flink, a popular open-source framework and engine for processing real-time data streams.

In 2018, we provided support for Amazon Kinesis Data Analytics for Java as a programmable option for customers to build streaming applications using Apache Flink libraries and choose their own integrated development environment (IDE) to build their applications. In 2020, we repositioned Amazon Kinesis Data Analytics for Java to Amazon Kinesis Data Analytics for Apache Flink to emphasize our continued support for Apache Flink. In 2021, we launched Kinesis Data Analytics Studio (now, Amazon Managed Service for Apache Flink Studio) with a simple, familiar notebook interface for rapid development powered by Apache Zeppelin and using Apache Flink as the processing engine.

Since 2019, we have worked more closely with the Apache Flink community, increasing code contributions in the area of AWS connectors for Apache Flink such as those for Kinesis Data Streams and Kinesis Data Firehose, as well as sponsoring annual Flink Forward events. Recently, we contributed Async Sink to the Flink 1.15 release, which improved cloud interoperability and added more sink connectors and formats, among other updates.

Beyond connectors, we continue to work with the Flink community to contribute availability improvements and deployment options. To learn more, see Making it Easier to Build Connectors with Apache Flink: Introducing the Async Sink in the AWS Open Source Blog.

New Features in Amazon Managed Service for Apache Flink
As I mentioned, you can continue to run your existing Flink applications in Kinesis Data Analytics (now Amazon Managed Apache Flink) without making any changes. I want to let you know about a part of the service along with the console change and new feature,  a blueprint where you create an end-to-end data pipeline with just one click.

First, you can use the new console of Amazon Managed Service for Apache Flink directly under the Analytics section in AWS. To get started, you can easily create Streaming applications or Studio notebooks in the new console, with the same experience as before.

To create a streaming application in the new console, choose Create from scratch or Use a blueprint. With a new blueprint option, you can create and set up all the resources that you need to get started in a single step using AWS CloudFormation.

The blueprint is a curated collection of Apache Flink applications. The first of these has demo data being read from a Kinesis Data Stream and written to an Amazon Simple Storage Service (Amazon S3) bucket.

After creating the demo application, you can configure, run, and open the Apache Flink dashboard to monitor your Flink application’s health with the same experiences as before. You can change a code sample in the GitHub repository to perform different operations using the Flink libraries in your own local development environment.

Blueprints are designed to be extensible, and you can leverage them to create more complex applications to solve your business challenges based on Amazon Managed Service for Apache Flink. Learn more about how to use Apache Flink libraries in the AWS documentation.

You can also use a blueprint to create your Studio notebook using Apache Zeppelin as a new setup option. With this new blueprint option, you can also create and set up all the resources that you need to get started in a single step using AWS CloudFormation.

This blueprint includes Apache Flink applications with demo data being sent to an Amazon MSK topic and read in Managed Service for Apache Flink. With an Apache Zeppelin notebook, you can view, query, and analyze your streaming data. Deploying the blueprint and setting up the Studio notebook takes about ten minutes. Go get a cup of coffee while we set it up!

After creating the new Studio notebook, you can open an Apache Zeppelin notebook to run SQL queries in your note with the same experiences as before. You can view a code sample in the GitHub repository to learn more about how to use Apache Flink libraries.

You can run more SQL queries on this demo data such as user-defined functions, tumbling and hopping windows, Top-N queries, and delivering data to an S3 bucket for streaming.

You can also use Java, Python, or Scala to power up your SQL queries and deploy your note as a continuously running application, as shown in the blog posts, how to use the Studio notebook and query your Amazon MSK topics.

To learn more blueprint samples, see GitHub repositories such as reading from MSK Serverless and writing to Amazon S3, reading from MSK Serverless and writing to MSK Serverless, and reading from MSK Serverless and writing to Amazon S3.

Now Available
You can now use Amazon Managed Service for Apache Flink, renamed from Amazon Kinesis Data Analytics. All your existing running applications in Kinesis Data Analytics will work as is without any changes.

To learn more, visit the new product page and developer guide. You can send feedback to AWS re:Post for Amazon Managed Service for Apache Flink, or through your usual AWS Support contacts.

Channy

How we designed Cedar to be intuitive to use, fast, and safe

Post Syndicated from Emina Torlak original https://aws.amazon.com/blogs/security/how-we-designed-cedar-to-be-intuitive-to-use-fast-and-safe/

This post is a deep dive into the design of Cedar, an open source language for writing and evaluating authorization policies. Using Cedar, you can control access to your application’s resources in a modular and reusable way. You write Cedar policies that express your application’s permissions, and the application uses Cedar’s authorization engine to decide which access requests to allow. This decouples access control from the application logic, letting you write, update, audit, and reuse authorization policies independently of application code.

Cedar’s authorization engine is built to a high standard of performance and correctness. Application developers report typical authorization latencies of less than 1 ms, even with hundreds of policies. The resulting authorization decision — Allow or Deny — is provably correct, thanks to the use of verification-guided development. This high standard means your application can use Cedar with confidence, just like Amazon Web Services (AWS) does as part of the Amazon Verified Permissions and AWS Verified Access services.

Cedar’s design is based on three core tenets: usability, speed, and safety. Cedar policies are intuitive to read because they’re defined using your application’s vocabulary—for example, photos organized into albums for a photo-sharing application. Cedar’s policy structure reflects common authorization use cases and enables fast evaluation. Cedar’s semantics are intuitive and safer by default: policies combine to allow or deny access according to rules you already know from AWS Identity and Access Management (IAM).

This post shows how Cedar’s authorization semantics, data model, and policy syntax work together to make the Cedar language intuitive to use, fast, and safe. We cover each of these in turn and highlight how their design reflects our tenets.

The Cedar authorization semantics: Default deny, forbid wins, no ordering

We show how Cedar works on an example application for sharing photos, called PhotoFlash, illustrated in Figure 1.

Figure 1: An example PhotoFlash account. User Jane has two photos, four albums, and three user groups

Figure 1: An example PhotoFlash account. User Jane has two photos, four albums, and three user groups

PhotoFlash lets users like Jane upload photos to the cloud, tag them, and organize them into albums. Jane can also share photos with others, for example, letting her friends view photos in her trips album. PhotoFlash provides a point-and-click interface for users to share access, and then stores the resulting permissions as Cedar policies.

When a user attempts to perform an action on a resource (for example, view a photo), PhotoFlash calls the Cedar authorization engine to determine whether access is allowed. The authorizer evaluates the stored policies against the request and application-specific data (such as a photo’s tags) and returns Allow or Deny. If it returns Allow, PhotoFlash proceeds with the action. If it returns Deny, PhotoFlash reports that the action is not permitted.

Let’s look at some policies and see how Cedar evaluates them to authorize requests safely and simply.

Default deny

To let Jane’s friends view photos in her trips album, PhotoFlash generates and stores the following Cedar permit policy:

// Policy A: Jane's friends can view photos in Jane's trips album.
permit(
  principal in Group::"jane/friends", 
  action == Action::"viewPhoto",
  resource in Album::"jane/trips");

Cedar policies define who (the principal) can do what (the action) on what asset (the resource). This policy allows the principal (a PhotoFlash User) in Jane’s friends group to view the resources (a Photo) in Jane’s trips album.

Cedar’s authorizer grants access only if a request satisfies a specific permit policy. This semantics is default deny: Requests that don’t satisfy any permit policy are denied.

Given only our example Policy A, the authorizer will allow Alice to view Jane’s flower.jpg photo. Alice’s request satisfies Policy A because Alice is one of Jane’s friends (see Figure 1). But the authorizer will deny John’s request to view this photo. That’s because John isn’t one of Jane’s friends, and there is no other permit that grants John access to Jane’s photos.

Forbid wins

While PhotoFlash allows individual users to choose their own permissions, it also enforces system-wide security rules.

For example, PhotoFlash wants to prevent users from performing actions on resources that are owned by someone else and tagged as private. If a user (Jane) accidentally permits someone else (Alice) to view a private photo (receipt.jpg), PhotoFlash wants to override the user-defined permission and deny the request.

In Cedar, such guardrails are expressed as forbid policies:

// Policy B: Users can't perform any actions on private resources they don't own.
forbid(principal, action, resource)
when {
  resource.tags.contains("private") &&
  !(resource in principal.account)
};

This PhotoFlash policy says that a principal is forbidden from taking an action on a resource when the resource is tagged as private and isn’t contained in the principal’s account.

Cedar’s authorizer makes sure that forbids override permits. If a request satisfies a forbid policy, it’s denied regardless of what permissions are satisfied.

For example, the authorizer will deny Alice’s request to view Jane’s receipt.jpg photo. This request satisfies Policy A because Alice is one of Jane’s friends. But it also satisfies the guardrail in Policy B because the photo is tagged as private. The guardrail wins, and the request is denied.

No ordering

Cedar’s authorization decisions are independent of the order the policies are evaluated in. Whether the authorizer evaluates Policy A first and then Policy B, or the other way around, doesn’t matter. As you’ll see later, the Cedar language design ensures that policies can be evaluated in any order to reach the same authorization decision. To understand the combined meaning of multiple Cedar policies, you need only remember that access is allowed if the request satisfies a permit policy and there are no applicable forbid policies.

Safe by default and intuitive

We’ve proved (using automated reasoning) that Cedar’s authorizer satisfies the default denyforbids override permits, and order independence properties. These properties help make Cedar’s behavior safe by default and intuitive. Amazon IAM has the same properties. Cedar builds on more than a decade of IAM experience by formalizing and enforcing these properties as parts of its design.

Now that we’ve seen how Cedar authorizes requests, let’s look at how its data model and syntax support writing policies that are quick to read and evaluate.

The Cedar data model: entities with attributes, arranged in a hierarchy

Cedar policies are defined in terms of a vocabulary specific to your application. For example, PhotoFlash organizes photos into albums and users into groups while a task management application organizes tasks into lists. You reflect this vocabulary into Cedar’s data model, which organizes entities into a hierarchy. Entities correspond to objects within your application, such as photos and users. The hierarchy reflects grouping of entities, such as nesting of photos into albums. Think of it as a directed-acyclic graph. Figure 2 shows the entity hierarchy for PhotoFlash that matches Figure 1.

Figure 2: An example hierarchy for PhotoFlash, matching the illustration in Figure 1

Figure 2: An example hierarchy for PhotoFlash, matching the illustration in Figure 1

Entities are stored objects that serve as principals, resources, and actions in Cedar policies. Policies refer to these objects using entity references, such as Album::”jane/art”.

Policies use the in operator to check if the hierarchy relates two entities. For example, Photo::”flower.jpg” in Account::”jane” is true for the hierarchy in Figure 2, but Photo::”flower.jpg” in Album::”jane/conference” is not. PhotoFlash can persist the entity hierarchy in a dedicated entity store, or compute the relevant parts as needed for an authorization request.

Each entity also has a record that maps named attributes to values. An attribute stores a Cedar value: an entity reference, record, string, 64-bit integer, boolean, or a set of values. For example, Photo::”flower.jpg” has attributes describing the photo’s metadata, such as tags, which is a set of strings, and raw, which is an entity reference to another Photo. Cedar supports a small collection of operators that can be applied to values; these operators are carefully chosen to enable efficient evaluation.

Built-in support for role and attribute-based access control

If the concepts you’ve seen so far seem familiar, that’s not surprising. Cedar’s data model is designed to allow you to implement time-tested access control models, including role-based and attribute-based access control (RBAC and ABAC). The entity hierarchy and the in operator support RBAC-style roles as groups, while entity records and the . operator let you express ABAC-style permissions using per-object attributes.

The Cedar syntax: Structured, loop-free, and stateless

Cedar uses a simple, structured syntax for writing policies. This structure makes Cedar policies simple to understand and fast to authorize at scale. Let’s see how by taking a closer look at Cedar’s syntax.

Structure for readability and scalable authorization

Figure 3 illustrates the structure of Cedar policies: an effect and scope, optionally followed by one or more conditions.

The effect of a policy is to either permit or forbid access. The scope can use equality (==) or membership (in) constraints to restrict the principals, actions, and resources to which the policy applies. Policy conditions are expressions that further restrict when the policy applies.

This structure makes policies straightforward to read and understand: The scope expresses an RBAC rule, and the conditions express ABAC rules. For example, PhotoFlash Policy A has no conditions and expresses a single RBAC rule. Policy B has an open (unconstrained) scope and expresses a single ABAC rule. A quick glance is enough to see if a policy is just an RBAC rule, just an ABAC rule, or a mix of both.

Figure 3: Cedar policy structure, illustrated on PhotoFlash Policy A and B

Figure 3: Cedar policy structure, illustrated on PhotoFlash Policy A and B

Scopes also enable scalable authorization for large policy stores through policy slicing. This is a property of Cedar that lets applications authorize a request against a subset of stored policies, supporting real-time decisions even for stores with thousands of policies. With slicing, an application needs to pass a policy to the authorizer only when the request’s principal and resource are descendants of the principal and resource entities specified in the policy’s scope. For example, PhotoFlash needs to include Policy A only for requests that involve the descendants of Group::”jane/friends” and Album::”jane/trips”. But Policy B must be included for all requests because of its open scope.

No loops or state for fast evaluation and intuitive decisions

Policy conditions are Boolean-valued expressions. The Cedar expression language has a familiar syntax that includes if-then-else expressions, short-circuiting Boolean operators (!, &&, ||), and basic operations on Cedar values. Notably, there is no way to express looping or to change the application state (for example, mutate an attribute).

Cedar excludes loops to bound authorization latency. With no loops or costly built-in operators, Cedar policies terminate in O(n2) steps in the worst case (when conditions contain certain set operations), or O(n) in the common case.

Cedar also excludes stateful operations for performance and understandability. Since policies can’t change the application state, their evaluation can be parallelized for better performance, and you can reason about them in any order to see what accesses are allowed.

Learn more

In this post, we explored how Cedar’s design supports intuitive, fast, and safe authorization. With Cedar, your application’s access control rules become standalone policies that are clear, auditable, and reusable. You enforce these policies by calling Cedar’s authorizer to decide quickly and safely which requests are allowed. To learn more, see how to use Cedar to secure your app, and how we built Cedar to a high standard of assurance. You can also visit the Cedar website and blog, try it out in the Cedar playground, and join us on Cedar’s Slack channel.

 
If you have feedback about this post, submit comments in the Comments section below. If you have questions about this post, contact AWS Support.

Want more AWS Security news? Follow us on Twitter.

Emina Torlak

Emina Torlak

Emina is a Senior Principal Applied Scientist at Amazon Web Services and an Associate Professor at the University of Washington. Her research aims to help developers build better software more easily. She develops languages and tools for program verification and synthesis. Emina co-leads the development of Cedar.

AWS Weekly Roundup – AWS AppSync, AWS CodePipeline, Events and More – August 21, 2023

Post Syndicated from Marcia Villalba original https://aws.amazon.com/blogs/aws/aws-weekly-roundup-aws-appsync-aws-codepipeline-events-and-more-august-21-2023/

In a few days, I will board a plane towards the south. My tour around Latin America starts. But I won’t be alone in this adventure, you can find some other News Blog authors, like Jeff or Seb, speaking at AWS Community Days and local events in Peru, Argentina, Chile, and Uruguay. If you see us, come and say hi. We would love to meet you.

Latam Community in reInvent 2022

Last Week’s Launches
Here are some launches that got my attention during the previous week.

AWS AppSync now supports JavaScript for all resolvers in GraphQL APIs – Last year, we announced that AppSync now supports JavaScript pipeline resolvers. And starting last week, developers can use JavaScript to write unit resolvers, pipeline resolvers, and AppSync functions that are run on the AppSync Javascript runtime.

AWS CodePipeline now supports GitLabNow you can use your GitLab.com source repository to build, test, and deploy code changes using AWS CodePipeline, in addition to other providers like AWS CodeCommit, Bitbucket, GitHub.com, and GitHub Enterprise Server.

Amazon CloudWatch Agent adds support for OpenTelemetry traces and AWS X-Ray With the new version of the agent you are now able to collect metrics, logs, and traces with a single agent, not only for CloudWatch but also for OpenTelemetry and AWS X-Ray. Simplifying the installation, configuration, and management of telemetry collection.

New instance types: Amazon EC2 M7a and Amazon EC2 Hpc7a – The new Amazon EC2 M7a is a general purpose instance type powered by 4th Gen AMD EPYC processor. In the announcement blog, you can find all the specifics for this instance type. The new Amazon EC2 Hpc7a instances are also powered by 4th Gen AMD EPYC processors. These instance types are optimized for high performance computing and Channy Yun wrote a blog post describing the different characteristics of the Amazon EC2 Hpc7a instance type.

AWS DeepRacer Educator PlaybooksLast week we introduced the AWS DeepRacer educator playblooks, these are a tool for educators to integrate foundational machine learning (ML) curriculum and labs into their classrooms. Educators can use these playbooks to easily upskill students in the basics of ML with autonomous vehicles.

For a full list of AWS announcements, be sure to keep an eye on the What’s New at AWS page.

Other AWS News
Some other updates and news that you might have missed:

Guide for using AWS Lambda to process Apache Kafka StreamsJulian Wood just published the most complete guide you can find on how to use Lambda with Apache Kafka. If you are an Amazon Kinesis user, don’t worry. We’ve got you covered with this video series where you will find similar topics.

Using AWS Lambda with Kafka guide

The Official AWS Podcast – Listen each week for updates on the latest AWS news and deep dives into exciting use cases. There are also official AWS podcasts in several languages. Check out the ones in FrenchGermanItalian, and Spanish.

AWS Open-Source News and Updates – This is a newsletter curated by my colleague Ricardo to bring you the latest open source projects, posts, events, and more.

Upcoming AWS Events
Check your calendars and sign up for these AWS events:

Join AWS Hybrid Cloud & Edge Day to learn how to deploy your applications in the everywhere cloud

AWS Global SummitsAWS Summits – The 2023 AWS Summits season is almost ending with the last two in-person events in Mexico City (August 30) and Johannesburg (September 26).

AWS re:Invent reInvent(November 27–December 1) – But don’t worry because re:Invent season is coming closer. Join us to hear the latest from AWS, learn from experts, and connect with the global cloud community. Registration is now open.

AWS Community Days AWS Community Day– Join a community-led conference run by AWS user group leaders in your region:Taiwan (August 26), Aotearoa (September 6), Lebanon (September 9), Munich (September 14), Argentina (September 16), Spain (September 23), and Chile (September 30). Check all the upcoming AWS Community Days here.

CDK Day (September 29) – A community-led fully virtual event with tracks in English and in Spanish about CDK and related projects. Learn more in the website.

That’s all for this week. Check back next Monday for another Week in Review!

This post is part of our Week in Review series. Check back each week for a quick roundup of interesting news and announcements from AWS!

— Marcia

Highlights from Git 2.42

Post Syndicated from Taylor Blau original https://github.blog/2023-08-21-highlights-from-git-2-42/

The open source Git project just released Git 2.42 with features and bug fixes from over 78 contributors, 17 of them new. We last caught up with you on the latest in Git back when 2.41 was released.

To celebrate this most recent release, here’s GitHub’s look at some of the most interesting features and changes introduced since last time.

Faster object traversals with bitmaps

Many long-time readers of these blog posts will recall our coverage of reachability bitmaps. Most notably, we covered Git’s new multi-pack reachability bitmaps back in our coverage of the 2.34 release towards the end of 2021.

If this is your first time here, or you need a refresher on reachability bitmaps, don’t worry. Reachability bitmaps allow Git to quickly determine the result set of a reachability query, like when serving fetches or clones. Git stores a collection of bitmaps for a handful of commits. Each bit position is tied to a specific object, and the value of that bit indicates whether or not it is reachable from the given commit.

This often allows Git to compute the answers to reachability queries using bitmaps much more quickly than without, particularly for large repositories. For instance, if you want to know the set of objects unique to some branch relative to another, you can build up a bitmap for each endpoint (in this case, the branch we’re interested in, along with main), and compute the AND NOT between them. The resulting bitmap has bits set to “1” for exactly the set of objects unique to one side of the reachability query.

But what happens if one side doesn’t have bitmap coverage, or if the branch has moved on since the last time it was covered with a bitmap?

In previous versions of Git, the answer was that Git would build up a complete bitmap for all reachability tips relative to the query. It does so by walking backwards from each tip, assembling its own bitmap, and then stopping as soon as it finds an existing bitmap in history. Here’s an example of the existing traversal routine:

Figure 1: Bitmap-based traversal computing the set of objects unique to `main` in Git 2.41.0.

There’s a lot going on here, but let’s break it down. Above we have a commit graph, with five branches and one tag. Each of the commits are indicated by circles, and the references are indicated by squares pointing at their respective referents. Existing bitmaps can be found for both the v2.42.0 tag, and the branch bar.

In the above, we’re trying to compute the set of objects which are reachable from main, but aren’t reachable from any other branch. By inspection, it’s clear that the answer is {C₆, C₇}, but let’s step through how Git would arrive at the same result:

  • For each branch that we want to exclude from the result set (in this case, foo, bar, baz, and quux), we walk along the commit graph, marking each of the corresponding bits in our have‘s bitmap in the top-left.
  • If we happen to hit a portion of the graph that we’ve covered already, we can stop early. Likewise, if we find an existing bitmap (like what happens when we try to walk beginning at branch bar), we can OR in the bits from that commit’s bitmap into our have‘s set, and move on to the next branch.
  • Then, we repeat the same process for each branch we do want to keep (in this case, just main), this time marking or ORing bits into the have‘s bitmap.
  • Finally, once we have a complete bitmap representing each side of the reachability query, we can compute the result by AND NOTing the two bitmaps together, leaving us with the set of objects unique to main.

We can see that in the above, having existing bitmap coverage (as is the case with branch bar) is extremely beneficial, since they allow us to discover the set of objects reachable from a certain point in the graph immediately without having to open up and parse objects.

But what happens when bitmap coverage is sparse? In that case, we end up having to walk over many objects in order to find an existing bitmap. Oftentimes, the additional overhead of maintaining a series of bitmaps outweighs the benefits of using them in the first place, particularly when coverage is poor.

In this release, Git introduces a new variant of the bitmap traversal algorithm that often out performs the existing implementation, particularly when bitmap coverage is sparse.

The new algorithm represents the unwanted side of the reachability query as a bitmap from the query’s boundary, instead of the union of bitmap(s) from the individual tips on the unwanted side. The exact definition of what a query boundary is is slightly technical, but for our purposes you can think of it as the first commit in the wanted set of objects which is also reachable from at least one unwanted object.

In the above example, this is commit C₅, which is reachable from both main (which is in the wanted half of the reachability query) along with bar and baz (both of which are in the unwanted half). Let’s step through computing the same result using the boundary-based approach:

Figure 2: The same traversal as above, instead using the boundary commit-based approach.

The approach here is similar to the above, but not quite the same. Here’s the process:

  • We first discover the boundary commit(s), in this case C₅.
  • We then walk backwards from the set of boundary commit(s) we just discovered until we find a reachability bitmap (or reach the beginning of history). At each stage along the walk, we mark the corresponding bit in the have‘s bitmap.
  • Then, we build up a complete bitmap on the want‘s side by starting a walk from main until either we hit an existing bitmap, the beginning of history, or an object marked in the previous step.
  • Finally, as before, we compute the AND NOT between the two bitmaps, and return the results.

When there are bitmaps close to the boundary commit(s), or the unwanted half of the query is large, this algorithm often vastly outperforms the existing traversal. In the toy example above, you can see we compute the answer much more quickly when using the boundary-based approach. But in real-world examples, between a 2- and 15-fold improvement can be observed between the two algorithms.

You can try out the new algorithm by running:

$ git repack -ad --write-bitmap-index
$ git config pack.useBitmapBoundaryTraversal true

in your repository (using Git 2.42), and then using git rev-list with the --use-bitmap-index flag.

[source]

Exclude references by pattern in for-each-ref

If you’ve ever scripted around Git before, you are likely familiar with its for-each-ref command. If not, you likely won’t be surprised to learn that this command is used to enumerate references in your repository, like so:

$ git for-each-ref --sort='-*committerdate' refs/tags
264b9b3b04610cb4c25e01c78d9a022c2e2cdf19 tag    refs/tags/v2.42.0-rc2
570f1f74dee662d204b82407c99dcb0889e54117 tag    refs/tags/v2.42.0-rc1
e8f04c21fdad4551047395d0b5ff997c67aedd90 tag    refs/tags/v2.42.0-rc0
32d03a12c77c1c6e0bbd3f3cfe7f7c7deaf1dc5e tag    refs/tags/v2.41.0
[...]

for-each-ref is extremely useful for listing references, finding which references point at a given object (with --points-at), which references have been merged into a given branch (with --merged), or which references contain a given commit (with --contains).

Git relies on the same machinery used by for-each-ref across many different components, including the reference advertisement phase of pushes. During a push, the Git server first advertises a list of references that it wants the client to know about, and the client can then exclude those objects (and anything reachable from them) from the packfile they generate during the push.

Suppose that you have some references that you don’t want to advertise to clients during a push? For example, GitHub maintains a pair of references for each open pull request, like refs/pull/NNN/head and refs/pull/NNN/merge, which aren’t advertised to pushers. Luckily, Git has a mechanism that allows server operators to exclude groups of references from the push advertisement phase by configuring the transfer.hideRefs variable.

Git implements the functionality configured by transfer.hideRefs by enumerating all references, and then inspecting each one to see whether or not it should advertise that reference to pushers. Here’s a toy example of a similar process:

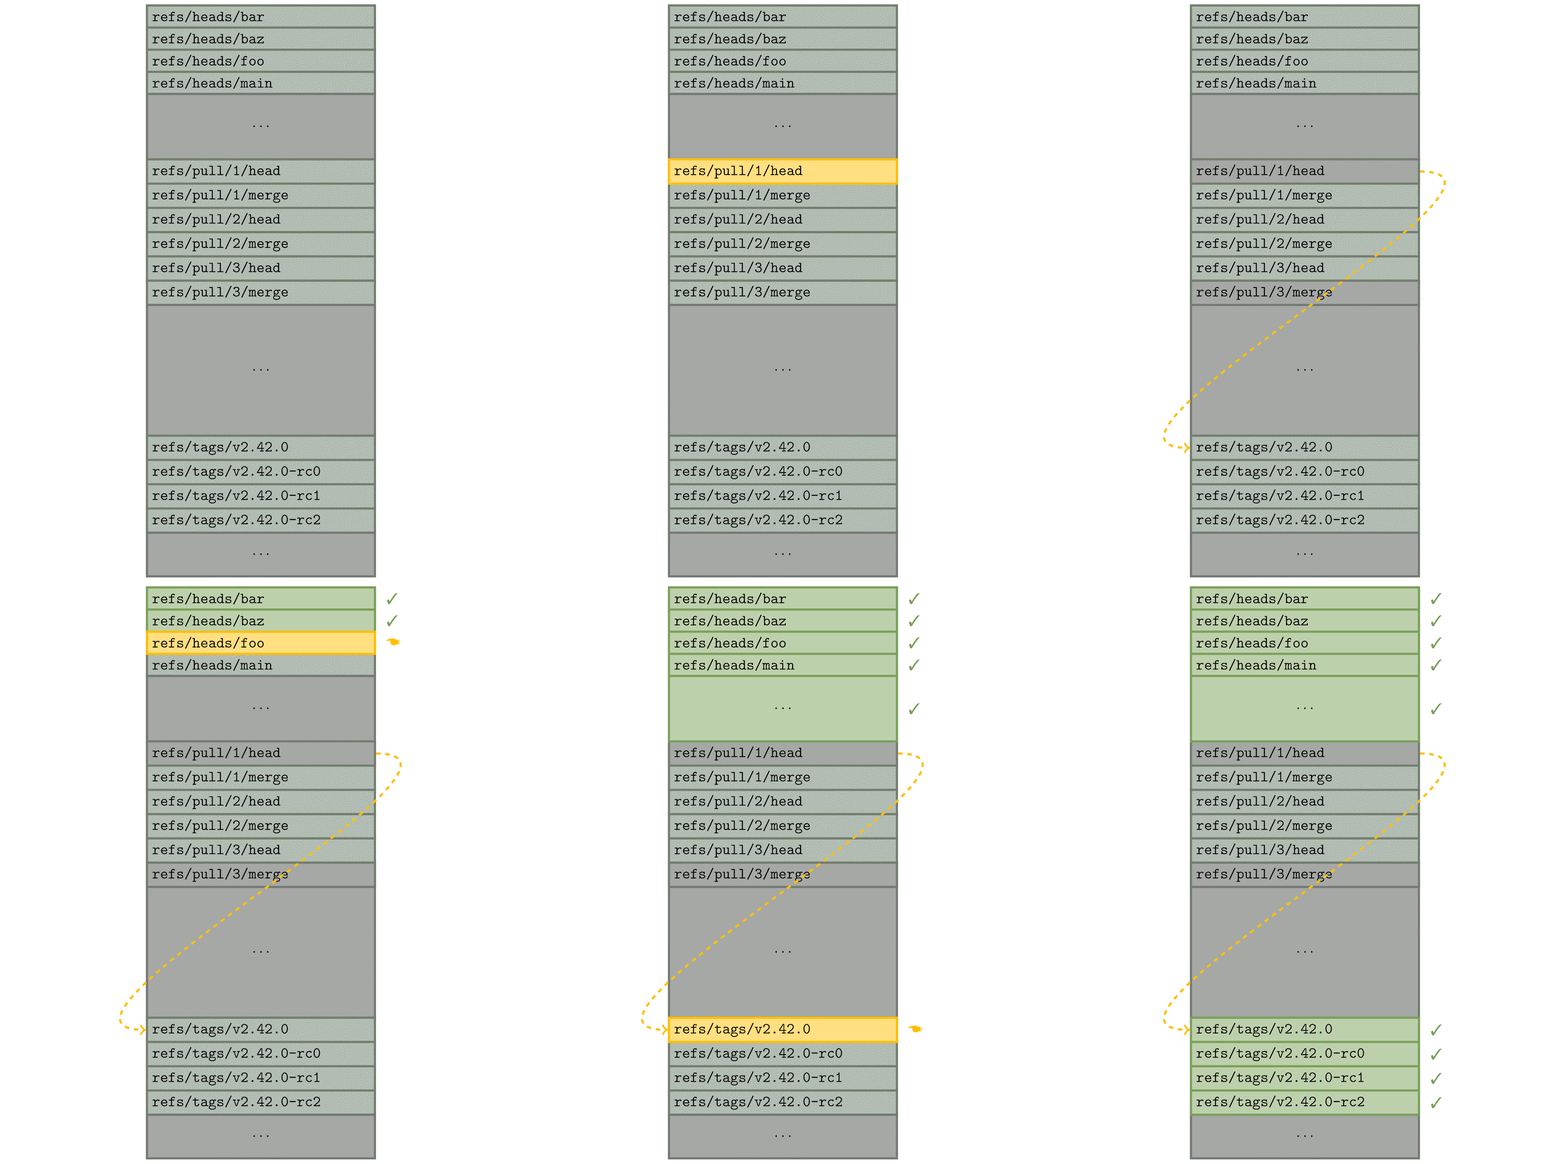
Figure 3: Running `for-each-ref` while excluding the `refs/pull/` hierarchy.

Here, we want to list every reference that doesn’t begin with refs/pull/. In order to do that, Git enumerates each reference one-by-one, and performs a prefix comparison to determine whether or not to include it in the set.

For repositories that have a small number of hidden references, this isn’t such a big deal. But what if you have thousands, tens of thousands, or even more hidden references? Performing that many prefix comparisons only to throw out a reference as hidden can easily become costly.

In Git 2.42, there is a new mechanism to more efficiently exclude references. Instead of inspecting each reference one-by-one, Git first locates the start and end of each excluded region in its packed-refs file. Once it has this information, it creates a jump list allowing it to skip over whole regions of excluded references in a single step, rather than discarding them one by one, like so:

Figure 4: The same `for-each-ref` invocation as above, this time using a jump list as in Git 2.42.

Like the previous example, we still want to discard all of the refs/pull references from the result set. To do so, Git finds the first reference beginning with refs/pull (if one exists), and then performs a modified binary search to find the location of the first reference after all of the ones beginning with refs/pull.

It can then use this information (indicated by the dotted yellow arrow) to avoid looking at the refs/pull hierarchy entirely, providing a measurable speed-up over inspecting and discarding each hidden reference individually.

In Git 2.42, you can try out this new functionality with git for-each-ref‘s new --exclude option. This release also uses this new mechanism to improve the reference advertisement above, as well as analogous components for fetching. In extreme examples, this can provide a 20-fold improvement in the CPU cost of advertising references during a push.

Git 2.42 also comes with a pair of new options in the git pack-refs command, which is responsible for updating the packed-refs file with any new loose references that aren’t stored. In certain scenarios (such as a reference being frequently updated or deleted), it can be useful to exclude those references from ever entering the packed-refs file in the first place.

git pack-refs now understands how to tweak the set of references it packs using its new --include and --exclude flags.

[source, source]

Preserving precious objects from garbage collection

In our last set of release highlights, we talked about a new mechanism for collecting unreachable objects in Git known as cruft packs. Git uses cruft packs to collect and track the age of unreachable objects in your repository, gradually letting them age out before eventually being pruned from your repository.

But Git doesn’t simply delete every unreachable object (unless you tell it to with --prune=now). Instead, it will delete every object except those that meet one of the below criteria:

  1. The object is reachable, in which case it cannot be deleted ever.
  2. The object is unreachable, but was modified after the pruning cutoff.
  3. The object is unreachable, and hasn’t been modified since the pruning cutoff, but is reachable via some other unreachable object which has been modified recently.

But what do you do if you want to hold onto an object (or many objects) which are both unreachable and haven’t been modified since the pruning cutoff?

Historically, the only answer to this question was that you should point a reference at those object(s). That works if you have a relatively small set of objects you want to hold on to. But what if you have more precious objects than you could feasibly keep track of with references?

Git 2.42 introduces a new mechanism to preserve unreachable objects, regardless of whether or not they have been modified recently. Using the new gc.recentObjectsHook configuration, you can configure external program(s) that Git will run any time it is about to perform a pruning garbage collection. Each configured program is allowed to print out a line-delimited sequence of object IDs, each of which is immune to pruning, regardless of its age.

Even if you haven’t started using cruft packs yet, this new configuration option works even when using loose objects to hold unreachable objects which have not yet aged out of your repository.

This makes it possible to store a potentially large set of unreachable objects which you want to retain in your repository indefinitely using an external mechanism, like a SQLite database. To try out this new feature for yourself, you can run:

$ git config gc.recentObjectsHook /path/to/your/program
$ git gc --prune=<approxidate>

[source, source]


  • If you’ve read these blog posts before, you may recall our coverage of the sparse index feature, which allows you to check out a narrow cone of your repository instead of the whole thing.

    Over time, many commands have gained support for working with the sparse index. For commands that lacked support for the sparse index, invoking those commands would cause your repository to expand the index to cover the entire repository, which can be a potentially expensive operation.

    This release, the diff-tree command joined the group of commands with full support for the sparse index, meaning that you can now use diff-tree without expanding your index.

    This work was contributed by Shuqi Liang, one of the Git project’s Google Summer of Code (GSoC) students. You can read more about their project here, and follow along with their progress on their blog.

    [source]

  • If you’ve gotten this far in the blog post and thought that we were done talking about git for-each-ref, think again! This release enhances for-each-ref‘s --format option with a handful of new ways to format a reference.

    The first set of new options enables for-each-ref to show a handful of GPG-related information about commits at reference tips. You can ask for the GPG signature directly, or individual components of it, like its grade, the signer, key, fingerprint, and so on. For example,

    $ git for-each-ref --format='%(refname) %(signature:key)' \
        --sort=v:refname 'refs/remotes/origin/release-*' | tac
    refs/remotes/origin/release-3.1 4AEE18F83AFDEB23
    refs/remotes/origin/release-3.0 4AEE18F83AFDEB23
    refs/remotes/origin/release-2.13 4AEE18F83AFDEB23
    [...]
    

    This work was contributed by Kousik Sanagavarapu, another GSoC student working on Git! You can read more about their project here, and keep up to date with their work on their blog.

    [source, source]

  • Earlier in this post, we talked about git rev-list, a low-level utility for listing the set of objects contained in some query.

    In our early examples, we discussed a straightforward case of listing objects unique to one branch. But git rev-list supports much more complex modifiers, like --branches, --tags, --remotes, and more.

    In addition to specifying modifiers like these on the command-line, git rev-list has a --stdin mode which allows for reading a line-delimited sequence of commits (optionally prefixed with ^, indicating objects reachable from those commit(s) should be excluded) from the command’s standard input.

    Previously, support for --stdin extended only to referring to commits by their object ID, without support for more complex modifiers like the ones listed earlier. In Git 2.42, git rev-list --stdin can now accept the same set of modifiers given on the command line, making it much more useful when scripting.

    [source]

  • Picture this: you’re working away on your repository, typing up a tag message for a tag named foo. Suppose that in the background, you have some repeating task that fetches new commits from your remote repository. If you happen to fetch a tag foo/bar while writing the tag message for foo, Git will complain that you cannot have both tag foo and foo/bar.

    OK, so far so good: Git does not support this kind of tag hierarchy1. But what happened to your tag message? In previous versions of Git, you’d be out of luck, since your in-progress message at $GIT_DIR/TAG_EDITMSG is deleted before the error is displayed. In Git 2.42, Git delays deleting the TAG_EDITMSG until after the tag is successfully written, allowing you to recover your work later on.

    [source]

  • In other git tag-related news, this release comes with a fix for a subtle bug that appeared when listing tags. git tag can list existing tags with the -l option (or when invoked with no arguments). You can further refine those results to only show tags which point at a given object with the --points-at option.

    But what if you have one or more tags that point at the given object through one or more other tags instead of directly? Previous versions of Git would fail to report those tags. Git 2.42 addresses this by dereferencing tags through multiple layers before determining whether or not it points to a given object.

    [source]

  • Finally, back in Git 2.38, git cat-file --batch picked up a new -z flag, allowing you to specify NUL-delimited input instead of delimiting your input with a standard newline. This flag is useful when issuing queries which themselves contain newlines, like trying to read the contents of some blob by path, if the path contains newlines.

    But the new -z option only changed the rules for git cat-file‘s input, leaving the output still delimited by newlines. Ordinarily, this won’t cause any problems. But if git cat-file can’t locate an object, it will print out ” missing”, followed by a newline.

    If the given query itself contains a newline, the result is unparseable. To address this, git cat-file has a new mode, -Z (as opposed to its lowercase variant, -z) which changes both the input and output to be NUL-delimited.

    [source]

The rest of the iceberg

That’s just a sample of changes from the latest release. For more, check out the release notes for 2.42, or any previous version in the Git repository.

Notes


  1. Doing so would introduce a directory/file-conflict. Since Git stores loose tags at paths like $GIT_DIR/refs/tags/foo/bar, it would be impossible to store a tag foo, since it would need to live at $GIT_DIR/refs/tags/foo, which already exists as a directory. 

The post Highlights from Git 2.42 appeared first on The GitHub Blog.

Join us for VeloCON 2023: Digging Deeper Together!

Post Syndicated from Carlos Canto original https://blog.rapid7.com/2023/08/17/join-us-for-velocon-2023-digging-deeper-together/

September 13, 2023 at 9 am ET

Join us for VeloCON 2023: Digging Deeper Together!

Rapid7 is thrilled to announce that the 2nd annual VeloCON: Digging Deeper Together virtual summit will be held this September 13th at 9 am ET. Once again, the conference will be online and completely free!

VeloCON is a one-day event focused on the Velociraptor community. It’s a place to share experiences in using and developing Velociraptor to address the needs of the wider DFIR community and an opportunity to take a look ahead at the future of our platform.

This year’s event calls for even more of the stimulating and informative content that made last year’s VeloCON so much fun. Don’t miss your chance at being a part of the marquee event of the open-source DFIR calendar.

Registration is now OPEN!  Click here to register and get event updates and start time reminders.

Last year’s event was a tremendous success, with over 500 unique participants enjoying fascinating discussions, tech talks and the opportunity to get to know real members of our own community.

Leading Edge Panel

Rapid7 and the Velociraptor team have invited industry leading DFIR professionals, community advocates and thought leaders to host an exciting presentation panel.  Proposals underwent a thorough review process to select presentations of maximum interest to VeloCON attendees and the wider Velociraptor community.

VeloCON focuses on work that pushes the envelope of what is currently possible using Velociraptor. Potential topics to be addressed by the panel include, but are not limited to:

  • Use cases of Velociraptor in real investigations
  • Novel deployment modes to cater for specific requirements
  • Contributions to Velociraptor to address new capabilities
  • Potential future ideas and features that Velociraptor
  • Integration of Velociraptor with other tools/frameworks
  • Analysis and acquisition on novel Forensic Artifacts

Register Today

Please register for VeloCON 2023 by following this link.  You’ll be able to preview panelist bios as well as receive email confirmations and reminders as we get closer to the event.

Learn more about Velociraptor by visiting any of our web and social media channels below:

AWS Weekly Roundup – Amazon MWAA, EMR Studio, Generative AI, and More – August 14, 2023

Post Syndicated from Antje Barth original https://aws.amazon.com/blogs/aws/aws-weekly-roundup-amazon-mwaa-emr-studio-generative-ai-and-more-august-14-2023/

While I enjoyed a few days off in California to get a dose of vitamin sea, a lot has happened in the AWS universe. Let’s take a look together!

Last Week’s Launches
Here are some launches that got my attention:

Amazon MWAA now supports Apache Airflow version 2.6Amazon Managed Workflows for Apache Airflow (Amazon MWAA) is a managed orchestration service for Apache Airflow that you can use to set up and operate end-to-end data pipelines in the cloud. Apache Airflow version 2.6 introduces important security updates and bug fixes that enhance the security and reliability of your workflows. If you’re currently running Apache Airflow version 2.x, you can now seamlessly upgrade to version 2.6.3. Check out this AWS Big Data Blog post to learn more.

Amazon EMR Studio adds support for AWS Lake Formation fine-grained access controlAmazon EMR Studio is a web-based integrated development environment (IDE) for fully managed Jupyter notebooks that run on Amazon EMR clusters. When you connect to EMR clusters from EMR Studio workspaces, you can now choose the AWS Identity and Access Management (IAM) role that you want to connect with. Apache Spark interactive notebooks will access only the data and resources permitted by policies attached to this runtime IAM role. When data is accessed from data lakes managed with AWS Lake Formation, you can enforce table and column-level access using policies attached to this runtime role. For more details, have a look at the Amazon EMR documentation.

AWS Security Hub launches 12 new security controls AWS Security Hub is a cloud security posture management (CSPM) service that performs security best practice checks, aggregates alerts, and enables automated remediation. With the newly released controls, Security Hub now supports three additional AWS services: Amazon Athena, Amazon DocumentDB (with MongoDB compatibility), and Amazon Neptune. Security Hub has also added an additional control against Amazon Relational Database Service (Amazon RDS). AWS Security Hub now offers 276 controls. You can find more information in the AWS Security Hub documentation.

Additional AWS services available in the AWS Israel (Tel Aviv) Region – The AWS Israel (Tel Aviv) Region opened on August 1, 2023. This past week, AWS Service Catalog, Amazon SageMaker, Amazon EFS, and Amazon Kinesis Data Analytics were added to the list of available services in the Israel (Tel Aviv) Region. Check the AWS Regional Services List for the most up-to-date availability information.

For a full list of AWS announcements, be sure to keep an eye on the What’s New at AWS page.

Other AWS News
Here are some additional blog posts and news items that you might find interesting:

AWS recognized as a Leader in 2023 Gartner Magic Quadrant for Contact Center as a Service with Amazon Connect – AWS was named a Leader for the first time since Amazon Connect, our flexible, AI-powered cloud contact center, was launched in 2017. Read the full story here. 

Generate creative advertising using generative AI –  This AWS Machine Learning Blog post shows how to generate captivating and innovative advertisements at scale using generative AI. It discusses the technique of inpainting and how to seamlessly create image backgrounds, visually stunning and engaging content, and reducing unwanted image artifacts.

AWS open-source news and updates – My colleague Ricardo writes this weekly open-source newsletter in which he highlights new open-source projects, tools, and demos from the AWS Community.

Upcoming AWS Events
Check your calendars and sign up for these AWS events:

Build On AWS - Generative AIBuild On Generative AI – Your favorite weekly Twitch show about all things generative AI is back for season 2 today! Every Monday, 9:00 US PT, my colleagues Emily and Darko look at new technical and scientific patterns on AWS, inviting guest speakers to demo their work and show us how they built something new to improve the state of generative AI.

In today’s episode, Emily and Darko discussed the latest models LlaMa-2 and Falcon, and explored them in retrieval-augmented generation design patterns. You can watch the video here. Check out show notes and the full list of episodes on community.aws.

AWS NLP Conference 2023 – Join this in-person event on September 13–14 in London to hear about the latest trends, ground-breaking research, and innovative applications that leverage natural language processing (NLP) capabilities on AWS. This year, the conference will primarily focus on large language models (LLMs), as they form the backbone of many generative AI applications and use cases. Register here.

AWS Global Summits – The 2023 AWS Summits season is almost coming to an end with the last two in-person events in Mexico City (August 30) and Johannesburg (September 26).

AWS Community Days – Join a community-led conference run by AWS user group leaders in your region: West Africa (August 19), Taiwan (August 26), Aotearoa (September 6), Lebanon (September 9), and Munich (September 14).

AWS re:Invent 2023AWS re:Invent (November 27 – December 1) – Join us to hear the latest from AWS, learn from experts, and connect with the global cloud community. Registration is now open.

You can browse all upcoming in-person and virtual events.

That’s all for this week. Check back next Monday for another Weekly Roundup!

— Antje

P.S. We’re focused on improving our content to provide a better customer experience, and we need your feedback to do so. Take this quick survey to share insights on your experience with the AWS Blog. Note that this survey is hosted by an external company, so the link doesn’t lead to our website. AWS handles your information as described in the AWS Privacy Notice.

AWS Week in Review – Agents for Amazon Bedrock, Amazon SageMaker Canvas New Capabilities, and More – July 31, 2023

Post Syndicated from Donnie Prakoso original https://aws.amazon.com/blogs/aws/aws-week-in-review-agents-for-amazon-bedrock-amazon-sagemaker-canvas-new-capabilities-and-more-july-31-2023/

This July, AWS communities in ASEAN wrote a new history. First, the AWS User Group Malaysia recently held the first AWS Community Day in Malaysia.

Another significant milestone has been achieved by the AWS User Group Philippines. They just celebrated their tenth anniversary by running 2 days of AWS Community Day Philippines. Here are a few photos from the event, including Jeff Barr sharing his experiences attending AWS User Group meetup, in Manila, Philippines 10 years ago.

Big congratulations to AWS Community Heroes, AWS Community Builders, AWS User Group leaders and all volunteers who organized and delivered AWS Community Days! Also, thank you to everyone who attended and help support our AWS communities.

Last Week’s Launches
We had interesting launches last week, including from AWS Summit, New York. Here are some of my personal highlights:

(Preview) Agents for Amazon Bedrock – You can now create managed agents for Amazon Bedrock to handle tasks using API calls to company systems, understand user requests, break down complex tasks into steps, hold conversations to gather more information, and take actions to fulfill requests.

(Coming Soon) New LLM Capabilities in Amazon QuickSight Q – We are expanding the innovation in QuickSight Q by introducing new LLM capabilities through Amazon Bedrock. These Generative BI capabilities will allow organizations to easily explore data, uncover insights, and facilitate sharing of insights.

AWS Glue Studio support for Amazon CodeWhisperer – You can now write specific tasks in natural language (English) as comments in the Glue Studio notebook, and Amazon CodeWhisperer provides code recommendations for you.

(Preview) Vector Engine for Amazon OpenSearch Serverless – This capability empowers you to create modern ML-augmented search experiences and generative AI applications without the need to handle the complexities of managing the underlying vector database infrastructure.

Last week, Amazon SageMaker Canvas also released a set of new capabilities:

AWS Open-Source Updates
As always, my colleague Ricardo has curated the latest updates for open-source news at AWS. Here are some of the highlights.

cdk-aws-observability-accelerator is a set of opinionated modules to help you set up observability for your AWS environments with AWS native services and AWS-managed observability services such as Amazon Managed Service for Prometheus, Amazon Managed Grafana, AWS Distro for OpenTelemetry (ADOT) and Amazon CloudWatch.

iac-devtools-cli-for-cdk is a command line interface tool that automates many of the tedious tasks of building, adding to, documenting, and extending AWS CDK applications.

Upcoming AWS Events
There are upcoming events that you can join to learn. Let’s start with AWS events:

And let’s learn from our fellow builders and join AWS Community Days:

Open for Registration for AWS re:Invent
We want to be sure you know that AWS re:Invent registration is now open!


This learning conference hosted by AWS for the global cloud computing community will be held from November 27 to December 1, 2023, in Las Vegas.

Pro-tip: You can use information on the Justify Your Trip page to prove the value of your trip to AWS re:Invent trip.

Give Us Your Feedback
We’re focused on improving our content to provide a better customer experience, and we need your feedback to do so. Please take this quick survey to share insights on your experience with the AWS Blog. Note that this survey is hosted by an external company, so the link does not lead to our website. AWS handles your information as described in the AWS Privacy Notice.

That’s all for this week. Check back next Monday for another Week in Review.

Happy building!

Donnie

This post is part of our Week in Review series. Check back each week for a quick round-up of interesting news and announcements from AWS!


P.S. We’re focused on improving our content to provide a better customer experience, and we need your feedback to do so. Please take this quick survey to share insights on your experience with the AWS Blog. Note that this survey is hosted by an external company, so the link does not lead to our website. AWS handles your information as described in the AWS Privacy Notice.

Scaling merge-ort across GitHub

Post Syndicated from Matt Cooper original https://github.blog/2023-07-27-scaling-merge-ort-across-github/

At GitHub, we perform a lot of merges and rebases in the background. For example, when you’re ready to merge your pull request, we already have the resulting merge assembled. Speeding up merge and rebase performance saves both user-visible time and backend resources. Git has recently learned some new tricks which we’re using at scale across GitHub. This post walks through what’s changed and how the experience has improved.

Our requirements for a merge strategy

There are a few non-negotiable parts of any merge strategy we want to employ:

  • It has to be fast. At GitHub’s scale, even a small slowdown is multiplied by the millions of activities going on in repositories we host each day.
  • It has to be correct. For merge strategies, what’s “correct” is occasionally a matter of debate. In those cases, we try to match what users expect (which is often whatever the Git command line does).
  • It can’t check out the repository. There are both scalability and security implications to having a working directory, so we simply don’t.

Previously, we used libgit2 to tick these boxes: it was faster than Git’s default merge strategy and it didn’t require a working directory. On the correctness front, we either performed the merge or reported a merge conflict and halted. However, because of additional code related to merge base selection, sometimes a user’s local Git could easily merge what our implementation could not. This led to a steady stream of support tickets asking why the GitHub web UI couldn’t merge two files when the local command line could. We weren’t meeting those users’ expectations, so from their perspective, we weren’t correct.

A new strategy emerges

Two years ago, Git learned a new merge strategy, merge-ort. As the author details on the mailing list, merge-ort is fast, correct, and addresses many shortcomings of the older default strategy. Even better, unlike merge-recursive, it doesn’t need a working directory. merge-ort is much faster even than our optimized, libgit2-based strategy. What’s more, merge-ort has since become Git’s default. That meant our strategy would fall even further behind on correctness.

It was clear that GitHub needed to upgrade to merge-ort. We split this effort into two parts: first deploy merge-ort for merges, then deploy it for rebases.

merge-ort for merges

Last September, we announced that we’re using merge-ort for merge commits. We used Scientist to run both code paths in production so we can compare timing, correctness, etc. without risking much. The customer still gets the result of the old code path, while the GitHub feature team gets to compare and contrast the behavior of the new code path. Our process was:

  1. Create and enable a Scientist experiment with the new code path.
  2. Roll it out to a fraction of traffic. In our case, we started with some GitHub-internal repositories first before moving to a percentage-based rollout across all of production.
  3. Measure gains, check correctness, and fix bugs iteratively.

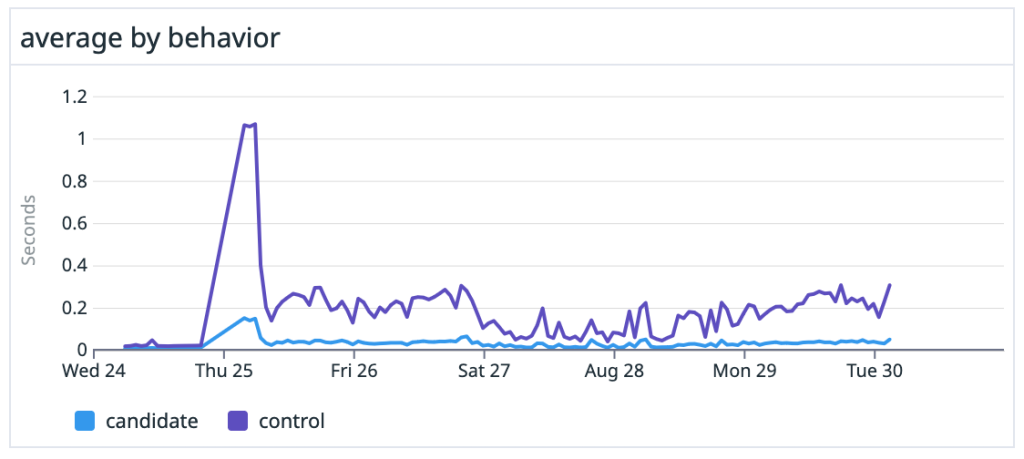
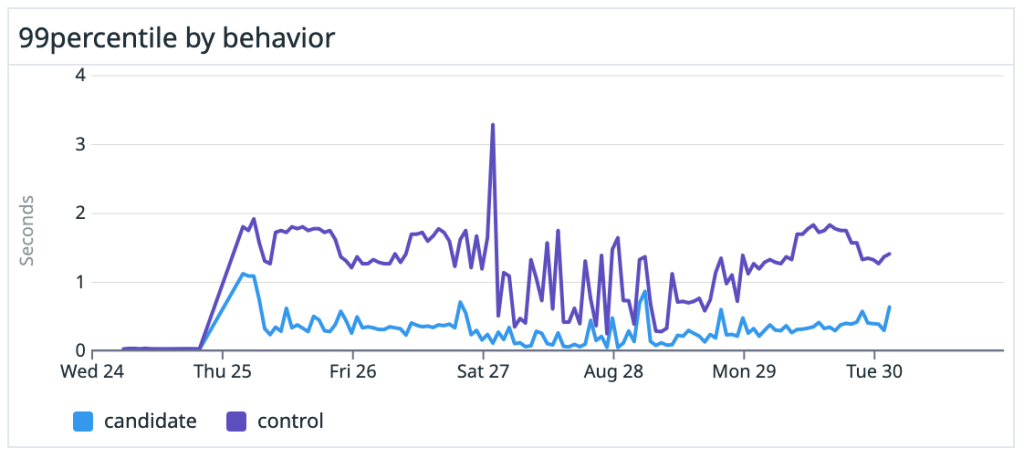
We saw dramatic speedups across the board, especially on large, heavily-trafficked repositories. For our own github/github monolith, we saw a 10x speedup in both the average and P99 case. Across the entire experiment, our P50 saw the same 10x speedup and P99 case got nearly a 5x boost.

Chart showing experimental candidate versus control at P50. The candidate implementation fairly consistently stays below 0.1 seconds.

Chart showing experimental candidate versus control at P99. The candidate implementation follows the same spiky pattern as the control, but its peaks are much lower.

Dashboard widgets showing P50 average times for experimental candidate versus control. The control averages 71.07 milliseconds while the candidate averages 7.74 milliseconds.

Dashboard widgets showing P99 average times for experimental candidate versus control. The control averages 1.63 seconds while the candidate averages 329.82 milliseconds.

merge-ort for rebases

Like merges, we also do a huge number of rebases. Customers may choose rebase workflows in their pull requests. We also perform test rebases and other “behind the scenes” operations, so we also brought merge-ort to rebases.

This time around, we powered rebases using a new Git subcommand: git-replay. git replay was written by the original author of merge-ort, Elijah Newren (a prolific Git contributor). With this tool, we could perform rebases using merge-ort and without needing a worktree. Once again, the path was pretty similar:

  1. Merge git-replay into our fork of Git. (We were running the experiment with Git 2.39, which didn’t include the git-replay feature.)
  2. Before shipping, leverage our test suite to detect discrepancies between the old and the new implementations.
  3. Write automation to flush out bugs by performing test rebases of all open pull requests in github/github and comparing the results.
  4. Set up a Scientist experiment to measure the performance delta between libgit2-powered rebases and monitor for unexpected mismatches in behavior.
  5. Measure gains, check correctness, and fix bugs iteratively.

Once again, we were amazed at the results. The following is a great anecdote from testing, as relayed by @wincent (one of the GitHub engineers on this project):

Another way to think of this is in terms of resource usage. We ran the experiment over 730k times. In that interval, our computers spent 2.56 hours performing rebases with libgit2, but under 10 minutes doing the same work with merge-ort. And this was running the experiment for 0.5% of actors. Extrapolating those numbers out to 100%, if we had done all rebases during that interval with merge-ort, it would have taken us 2,000 minutes, or about 33 hours. That same work done with libgit2 would have taken 512 hours!

What’s next

While we’ve covered the most common uses, this is not the end of the story for merge-ort at GitHub. There are still other places in which we can leverage its superpowers to bring better performance, greater accuracy, and improved availability. Squashing and reverting are on our radar for the future, as well as considering what new product features it could unlock down the road.

Appreciation

Many thanks to all the GitHub folks who worked on these two projects. Also, GitHub continues to be grateful for the hundreds of volunteer contributors to the Git open source project, including Elijah Newren for designing, implementing, and continually improving merge-ort.

Metrics for issues, pull requests, and discussions

Post Syndicated from Zack Koppert original https://github.blog/2023-07-19-metrics-for-issues-pull-requests-and-discussions/

Data-driven insights

At GitHub, we believe that data-driven insights are the keys to success for any software development project. Understanding the health and progress of your issues, pull requests, and discussions is crucial for effective collaboration, maintainership, and project management.

That is why we’re excited to announce the release of the Issue Metrics GitHub Action, a powerful tool that empowers developers and teams to measure key metrics and gain valuable insights into their projects.

With the new Issue Metrics GitHub Action, you can now easily track and monitor important metrics related to issues, pull requests, and discussions, such as time to first response, time to close, and more for any given time period.

Whether you’re an individual developer, a small team, or a large organization, these metrics will help you gauge the overall health, progress, and engagement of your projects.

Sample report

A sample report showing 2 tables. The first table contains overall metrics like average time to first response, anda corresponding value of 50 minutes and 44 seconds. The second table contains a list of the issues measured, with links to the issue and the metrics as measured on the individual issue.

Common use cases

Maintainers: ensuring proper attention

As a maintainer, it is essential to give reasonable attention to the issues and pull requests in the repositories you maintain. With the Issue Metrics GitHub Action, you can track metrics, such as the number of open issues, closed issues, open pull requests, and merged pull requests.

These metrics can provide you with a clear overview of the workload for a project over a given week, month, or even year. The action can also allow you to consider how you or your team prioritize time and attention effectively while also highlighting potentially overlooked requests in need of attention.

First responders: timely user contact

As a first responder in a repository, it’s part of the job description to ensure that users receive contact in a reasonable amount of time. By utilizing the Issue Metrics GitHub Action, you can keep track of metrics like the number of discussions awaiting replies, unresolved issues, or pull requests waiting for reviews. These metrics enable you to maintain a high level of responsiveness, fostering a positive user experience and timely problem resolution. These can be used to build a to-do list or retrospectively to reflect on how long users had to wait for a response during a given time period.

Open Source Program Office (OSPO): streamlining open source requests

An important part of what OSPOs do is making the open source release process easy and efficient while adhering to company policy. This process usually involves employees opening an issue, pull request, or discussion. With the Issue Metrics GitHub Action, OSPOs can gain valuable insights into the number of requests, the ratio of open to closed requests, and metrics related to the time it takes to navigate the open-source process to completion.

These metrics empower you to streamline your workflows, optimize response times, and ensure a smooth open-source collaboration experience. Optimizing the open source release process encourages employees to continue to produce open source projects on the organization’s behalf.

Product development teams: optimizing pull request reviews

Product development teams rely heavily on the code review process to collaborate and build high-quality software. By leveraging the Issue Metrics GitHub Action, teams can measure metrics such as the time it takes to get pull request reviews. These insights allow you to reflect on the data during retrospectives, identify areas for improvement, and optimize the review process to enhance team collaboration and accelerate development cycles.

Certain aspects of efficiency and flow may be hard to measure but often it is possible to spot and remove inefficiencies in the value stream.

– Forsgren et al. 2021

Setup and workflow integration

Setting up the Issue Metrics GitHub Action takes a few minutes, compared to the few hours it takes to calculate these metrics manually. You also only need to set up the action once, and it will run on a regular basis of your own choosing. It integrates into your existing GitHub Actions workflow or you can create a new workflow specifically for metrics tracking.

The action provides a wide range of customizable options, allowing you to tailor the issues, pull requests, and discussions measured by utilizing GitHub’s powerful search filtering. Ready to use configurations have been tested and used internally at GitHub and are now available for you to try out as well.

Here is one such example that runs monthly to report on metrics for issues created last month:

name: Monthly issue metrics
on:
  workflow_dispatch:
  schedule:
    - cron: '3 2 1 * *'

jobs:
  build:
    name: issue metrics
    runs-on: ubuntu-latest

    steps:

    - name: Get dates for last month
      shell: bash
      run: |
        # Get the current date
        current_date=$(date +'%Y-%m-%d')

        # Calculate the previous month
        previous_date=$(date -d "$current_date -1 month" +'%Y-%m-%d')

        # Extract the year and month from the previous date
        previous_year=$(date -d "$previous_date" +'%Y')
        previous_month=$(date -d "$previous_date" +'%m')

        # Calculate the first day of the previous month
        first_day=$(date -d "$previous_year-$previous_month-01" +'%Y-%m-%d')

        # Calculate the last day of the previous month
        last_day=$(date -d "$first_day +1 month -1 day" +'%Y-%m-%d')

        echo "$first_day..$last_day"
        echo "last_month=$first_day..$last_day" >> "$GITHUB_ENV"

    - name: Run issue-metrics tool
      uses: github/issue-metrics@v2
      env:
        GH_TOKEN: ${{ secrets.GH_TOKEN }}
        SEARCH_QUERY: 'repo:owner/repo is:issue created:${{ env.last_month }} -reason:"not planned"'

    - name: Create issue
      uses: peter-evans/create-issue-from-file@v4
      with:
        title: Monthly issue metrics report
        content-filepath: ./issue_metrics.md
        assignees: <YOUR_GITHUB_HANDLE_HERE>

Ready to start leveling up your GitHub project management?

Head over to the Issue Metrics GitHub Action repository to explore the documentation, installation instructions, and examples. The repository provides a comprehensive README file that guides you through the setup process and showcases the wide range of metrics you can measure. If you need additional help, feel free to open an issue in the repository.

GitHub is committed to providing developers with the best tools to enhance collaboration and productivity. The Issue Metrics GitHub Action is a significant step towards empowering teams to measure key metrics related to issues, pull requests, and discussions. By gaining valuable insights into the pulse of your projects, you can drive continuous improvement and deliver exceptional software. We are using this in several places internally across GitHub to help us continually improve and hope this action can help you as well. Happy coding!

GitHub CLI project command is now generally available!

Post Syndicated from Ariel Deitcher original https://github.blog/2023-07-11-github-cli-project-command-is-now-generally-available/

Effective planning and tracking is essential for developer teams of all shapes and sizes. Last year, we announced the general availability of GitHub Projects, connecting your planning directly to the work your teams are doing in GitHub. Today, we’re making GitHub Projects faster and more powerful. The project command for the gh CLI is now generally available!

In this blog, we’ll take a look at how to get started with the new command, share some examples you can try on the command line and in GitHub Actions, and list the steps to upgrade from the archived gh-projects extension. Let’s take a look at how you can conveniently manage and collaborate on GitHub Projects from the command line.

The components of GitHub Projects

Let’s start by familiarizing ourselves with the key components of GitHub Projects. A project is made up of three components—the Project, Project field(s), and Project item(s).

A Project belongs to an owner (which can be either a user or an organization), and is identified by a project number. As an example, the GitHub public roadmap project is number 4247 in the github organization. We’ll use this project in some of our examples later on.

Project fields belong to a Project and have a type such as Status, Assignee, or Number, while field values are set on an item. See understanding fields for more details.

Project items are one of type draft issue, issue, or pull request. An item of type draft issue belongs to a single Project, while items of type issue and pull request can be added to multiple projects.

These three components make up the subcommands of gh project, for example:

  • Project subcommands include: create, copy, list, and view.
  • Project field subcommands include: field-create, field-list , and field-delete.
  • Project item subcommands include: item-add, item-edit, item-archive, and item-list.

For the full list of project commands, check out the manual.

Permissions check

In order to get started with the new command, you’ll need to ensure you have the right permissions. The project command requires the project auth scope, which isn’t part of the default scopes of the gh auth token.

In your terminal, you can check your current scopes with this command:

$ gh auth status
github.com
✓ Logged in to github.com as mntlty (keyring)
✓ Git operations for github.com configured to use https protocol.
✓ Token: gho_************************************
✓ Token scopes: gist, read:org, repo, workflow

If you don’t see project in the list of token scopes, you can add it by following the interactive prompts from this command:

$ gh auth refresh -s project

In GitHub Actions, you must choose one of the options from the documentation to make a token with the project scope available.

Running project commands

Now that you have the permissions you need, let’s look at some examples of running project commands using my user and the GitHub public roadmap project, which you can adapt to your team’s use cases.

List the projects owned by the current user (note that no --owner flag is set):

$ gh project list
NUMBER TITLE STATE ID
1 my first project open PVT_kwxxx
2 @mntlty's second project open PVT_kwxxx

Create a project owned by mntlty:

$ gh project create --owner mntlty --title 'my project'

View the GitHub public roadmap project:

$ gh project view --owner github 4247

Title

GitHub public roadmap

## Description

--

## Visibility

Public

## URL

<https://github.com/orgs/github/projects/4247>

## Item count

208

## Readme

--

## Field Name (Field Type)

Title (ProjectV2Field)

Assignees (ProjectV2Field)

Status (ProjectV2SingleSelectField)

Labels (ProjectV2Field)

Repository (ProjectV2Field)

Milestone (ProjectV2Field)

Linked pull requests (ProjectV2Field)

Reviewers (ProjectV2Field)

Tracks (ProjectV2Field)

Tracked by (ProjectV2Field)

List the items in the GitHub public roadmap project:

$ gh project item-list --owner github 4247

TYPE TITLE NUMBER REPOSITORY ID
Issue Kotlin security analysis support in CodeQL code scanning
(public beta) 207 github/roadmap
PVTI_lADNJr_NE13OAALQgw
Issue Swift security analysis support in CodeQL code scanning
(beta) 206 github/roadmap
PVTI_lADNJr_NE13OAALQhA
Issue Fine-grained PATs (v2 PATs) - [Public Beta]
184 github/roadmap PVTI_lADNJr_NE13OAALQmw

Copy the GitHub public roadmap project structure to a new project owned by mntlty:

$ gh project copy 4247 --source-owner github --target-owner mntlty --title 'my roadmap'

https://github.com/users/mntlty/projects/1

Note that if you are using a TTY and do not pass a --owner flag or the project number argument to a command which requires those values, an interactive prompt will be shown from which you can select those values.

JSON format

Now, let’s look at how to format the command output in JSON, which displays more information for use in scripting, automation, and piping into other commands. Every project subcommand supports outputting to JSON format by setting the --format=json flag:

$ gh project view --owner github 4247 --format=json
{"number":4247,"url":"<https://github.com/orgs/github/projects/4247","shortDescription":"", "public":true,"closed":false,"title":"GitHub> public roadmap","id":"PVT_kwDNJr_NE10","readme":"","items":{"totalCount":208},"fields":{"totalCount":10},"owner":{"type":"Organization","login":"github"}}%

Combining JSON formatted output with a tool such as jq enables you to unlock even more capabilities. For example, you can create a list of the URLs from all of the Issues on the GitHub public roadmap project that have status “Future”:

$ gh project item-list --owner github 4247 --format=json | jq '.items[] |
select(.status=="Future" and .content.type == "Issue") | .content.url'

"<https://github.com/github/roadmap/issues/188>"
"<https://github.com/github/roadmap/issues/187>"
"<https://github.com/github/roadmap/issues/166>"

GitHub Actions

You can also level up your team’s usage of GitHub Projects with project commands in your GitHub Actions workflows to enhance automation, generate on demand reports, and react to events such as when a project item is modified. For example, you can create a workflow which is triggered by a workflow_dispatch event and will close all projects that are owned by mntlty and which have no items:

on: 
  workflow_dispatch:

jobs:
  close_empty:
    runs-on: ubuntu-latest
    env:
      GH_TOKEN: ${{ secrets.PROJECT_TOKEN }}
    steps:
      - run: |
          gh project list --owner mntlty --format=json \
          | jq '.projects[] | select(.items.totalCount == 0) | .number' \
          | xargs -n1 gh project close --owner mntlty 

The latest version of gh is automatically available in the GitHub Actions environment. For more information on using GitHub Actions, see https://docs.github.com/en/actions.

Upgrading from the gh-projects extension

Now that the project command is officially part of the CLI, the gh-projects extension repository has been archived. If you’re currently using the extension, you don’t need to change anything. You can continue installing and using the gh-projects extension; however, it won’t receive any future enhancements. Fortunately, it’s very simple to make the transition from the gh-project extension to the project command:

  • Upgrade to the latest version of gh.
  • Replace flags for --user and --org with --owner in project commands. owner is the login of the project owner, which is either a user or an organization.
  • Replace gh projects with gh project.

To avoid confusion, I also recommend removing the extension by running the following command:

$ gh ext remove gh-projects

Thank you to the community, @mislav, @samcoe, and @vilmibm for providing invaluable feedback and support on gh-projects!

Get started with GitHub CLI project command today

If you’re interested in learning more or giving us feedback, check out these links:

Upgrade to the latest version of the gh CLI to level up your usage of GitHub Projects!

Our Code Editor is open source

Post Syndicated from Phil Howell original https://www.raspberrypi.org/blog/code-editor-open-source/

A couple of months ago we announced that you can test the online text-based Code Editor we’re building to help young people aged 7 and older learn to write code. Now we’ve made the code for the Editor open source so people can repurpose and contribute to it.

The interface of the beta version of the Raspberry Pi Foundation's Code Editor.

How can you use the Code Editor?

You and your learners can try out the Code Editor in the first two projects of our ‘Intro to Python’ path. We’ve included a feedback form for you to let us know what you think about the Editor.

  • The Editor lets you run code straight in the browser, with no setup required.
  • It makes getting started with text-based coding easier thanks to its simple and intuitive interface.
  • If you’re logged into your Raspberry Pi Foundation account, your code in the Editor is automatically saved.
  • If you’re not logged in, your code changes persist for the session, so you can refresh or close the tab without losing your work.
  • You can download your code to your computer too.

Since the Editor lets learners save their code using their Raspberry Pi Foundation account, it’s easy for them to build on projects they’ve started in the classroom or at home, or bring a project they’ve started at home to their coding club.

Three learners working at laptops.

Python is the first programming language our Code Editor supports because it’s popular in schools, CoderDojos, and Code Clubs, as well as in industry. We’ll soon be adding support for web development languages (HTML/CSS).

A text output in the beta version of the Raspberry Pi Foundation's Code Editor.

Putting ease of use and accessibility front and centre

We know that starting out with new programming tools can be tricky and add to the cognitive load of learning new subject matter itself. That’s why our Editor has a simple and accessible user interface and design:

  • You can easily find key functions, such as how to write and run code, how to save or download your code, and how to check your code.
  • You can switch between dark and light mode.
  • You can enlarge or reduce the text size in input and output, which is especially useful for people with visual impairments and for educators and volunteers who want to demonstrate something to a group of learners.

We’ll expand the Editor’s functionalities as we go. For example, at the moment we’re looking at how to improve the Editor’s user interface (UI) for better mobile support.

If there’s a feature you think would help the Editor become more accessible and more suitable for young learners, or make it better for your classroom or club, please let us know via the feedback form.

The open-source code for the Code Editor

Our vision is that every young person develops the knowledge, skills, and confidence to use digital technologies effectively, and to be able to critically evaluate these technologies and confidently engage with technological change. We’re part of a global community that shares that vision, so we’ve made the Editor available as an open-source project. That means other projects and organisations focussed on helping people learn about coding and digital technologies can benefit from the work.

How did we build the Editor? An overview

To support the widest possible range of learners, we’ve designed the Code Editor application to work well on constrained devices and low-bandwidth connections. Safeguarding, accessibility, and data privacy are also key considerations when we build digital products at the Foundation. That’s why we decided to design the front end of the Editor to work in a standalone capacity, with Python executed through Skulpt, an entirely in-browser implementation of Python, and code changes persisted in local storage by default. Learners have the option of using a Raspberry Pi Foundation account to save their work, with changes then persisted via calls to a back end application programming interface (API).

As safeguarding is always at the core of what we do, we only make features available that comply with our safeguarding policies as well as the ICO’s age-appropriate design code. We considered supporting functionality such as image uploads and code sharing, but at the time of writing have decided to not add these features given that, without proper moderation, they present risks to safeguarding.

There’s an amazing community developing a wealth of open-source libraries. We chose to build our text-editor interface using CodeMirror, which has out-of-the-box mobile and tablet support and includes various useful features such as syntax highlighting and keyboard shortcuts. This has enabled us to focus on building the best experience for learners, rather than reinventing the wheel.

Diving a bit more into the technical details:

  • The UI front end is built in React and deployed using Cloudflare Pages
  • The API back end is built in Ruby on Rails
  • The text-editor panel uses CodeMirror, which has best-in-class accessibility through mobile device and screen-reader support, and includes functionality such as syntax highlighting, keyboard shortcuts, and autocompletion
  • Python functionality is built using Skulpt to enable in-browser execution of code, with custom extensions built to support our learning content
  • Project code is persisted through calls to our back end API using a mix of REST and GraphQL endpoints
  • Data is stored in PostgreSQL, which is hosted on Heroku along with our back end API

Accessing the open-source code

You can find out more about our Editor’s code for both the UI front end and API back end in our GitHub readme and contributions documentation. These kick-starter docs will help you get up and running faster:

The Editor’s front end is licensed as permissively as possible under the Apache Licence 2.0, and we’ve chosen to license the back end under the copyleft AGPL V3 licence. Copyleft licences mean derived works must be licensed under the same terms, including making any derived projects also available to the community.

We’d greatly appreciate your support with developing the Editor further, which you can give by:

  • Providing feedback on our code or raising a bug as a GitHub Issue in the relevant repository.
  • Submitting contributions by raising a pull request against the relevant repository.
    • On the back end repository we’ll ask you to allow the Raspberry Pi Foundation to reserve the right to re-use your contribution.
    • You’ll retain the copyright for any contributions on either repository.
  • Sharing feedback on using the Editor itself through the feedback form.

Our work to develop and publish the Code Editor as an open-source project has been funded by Endless. We thank them for their generous support.

If you are interested in partnering with us to fund this key work, or you are part of an organisation that would like to make use of the Code Editor, please reach out to us via email.

The post Our Code Editor is open source appeared first on Raspberry Pi Foundation.

AWS Week in Review – AWS Glue Crawlers Now Supports Apache Iceberg, Amazon RDS Updates, and More – July 10, 2023

Post Syndicated from Antje Barth original https://aws.amazon.com/blogs/aws/aws-week-in-review-aws-glue-crawlers-now-supports-apache-iceberg-amazon-rds-updates-and-more-july-10-2023/

The US celebrated Independence Day last week on July 4 with fireworks and barbecues across the country. But fireworks weren’t the only thing that launched last week. Let’s have a look!

Last Week’s Launches
Here are some launches that got my attention:

AWS GlueAWS Glue Crawlers now supports Apache Iceberg tables. Apache Iceberg is an open-source table format for data stored in data lakes. You can now automatically register Apache Iceberg tables into AWS Glue Data Catalog by running the Glue Crawler. You can then query Glue Catalog Iceberg tables across various analytics engines and apply AWS Lake Formation fine-grained permissions when querying from Amazon Athena. Check out the AWS Glue Crawler documentation to learn more.

Amazon Relational Database Service (Amazon RDS) for PostgreSQL – PostgreSQL 16 Beta 2 is now available in the Amazon RDS Database Preview Environment. The PostgreSQL community released PostgreSQL 16 Beta 2 on June 29, 2023, which enables logical replication from standbys and includes numerous performance improvements. You can deploy PostgreSQL 16 Beta 2 in the preview environment and start evaluating the pre-release of PostgreSQL 16 on Amazon RDS for PostgreSQL.

In addition, Amazon RDS for PostgreSQL Multi-AZ Deployments with two readable standbys now supports logical replication. With logical replication, you can stream data changes from Amazon RDS for PostgreSQL to other databases for use cases such as data consolidation for analytical applications, change data capture (CDC), replicating select tables rather than the entire database, or for replicating data between different major versions of PostgreSQL. Check out the Amazon RDS User Guide for more details.

Amazon CloudWatch – Amazon CloudWatch now supports Service Quotas in cross-account observability. With this, you can track and visualize resource utilization and limits across various AWS services from multiple AWS accounts within a region using a central monitoring account. You no longer have to track the quotas by logging in to individual accounts, instead from a central monitoring account, you can create dashboards and alarms for the AWS service quota usage across all your source accounts from a central monitoring account. Setup CloudWatch cross-account observability to get started.

Amazon SageMaker – You can now associate a SageMaker Model Card with a specific model version in SageMaker Model Registry. This lets you establish a single source of truth for your registered model versions, with comprehensive, centralized, and standardized documentation across all stages of the model’s journey on SageMaker, facilitating discoverability and promoting governance, compliance, and accountability throughout the model lifecycle. Learn more about SageMaker Model Cards in the developer guide.

For a full list of AWS announcements, be sure to keep an eye on the What’s New at AWS page.

Other AWS News
Here are some additional blog posts and news items that you might find interesting:

Building generative AI applications for your startup – In this AWS Startups Blog post, Hrushikesh explains various approaches to build generative AI applications, and reviews their key component. Read the full post for the details.

Components of the generative AI landscape

Components of the generative AI landscape.

How Alexa learned to speak with an Irish accent – If you’re curious how Amazon researchers used voice conversation to generate Irish-accented training data in Alexa’s own voice, check out this Amazon Science Blog post. 

AWS open-source news and updates – My colleague Ricardo writes this weekly open-source newsletter in which he highlights new open-source projects, tools, and demos from the AWS Community.

Upcoming AWS Events
Check your calendars and sign up for these AWS events:

AWS Global Summits – Check your calendars and sign up for the AWS Summit close to where you live or work: Hong Kong (July 20), New York City (July 26), Taiwan (August 2-3), São Paulo (August 3), and Mexico City (August 30).

AWS Community Days – Join a community-led conference run by AWS user group leaders in your region: Malaysia (July 22), Philippines (July 29-30), Colombia (August 12), and West Africa (August 19).

AWS re:Invent 2023AWS re:Invent (November 27 – December 1) – Join us to hear the latest from AWS, learn from experts, and connect with the global cloud community. Registration is now open.

You can browse all upcoming in-person and virtual events.

That’s all for this week. Check back next Monday for another Week in Review!

— Antje

This post is part of our Week in Review series. Check back each week for a quick roundup of interesting news and announcements from AWS!

Let’s Architect! Open-source technologies on AWS

Post Syndicated from Vittorio Denti original https://aws.amazon.com/blogs/architecture/lets-architect-open-source-technologies-on-aws/

We brought you a Let’s Architect! blog post about open-source on AWS that covered some technologies with development led by AWS/Amazon, as well as well-known solutions available on managed AWS services. Today, we’re following the same approach to share more insights about the process itself for developing open-source. That’s why the first topic we discuss in this post is a re:Invent talk from Heitor Lessa, Principal Solutions Architect at AWS, explaining some interesting approaches for developing and scaling successful open-source projects.

This edition of Let’s Architect! also touches on observability with Open Telemetry, Apache Kafka on AWS, and Infrastructure as Code with an hands-on workshop on AWS Cloud Development Kit (AWS CDK).

Powertools for AWS Lambda: Lessons from the road to 10 million downloads

Powertools for AWS Lambda is an open-source library to help engineering teams implement serverless best practices. In two years, Powertools went from an initial prototype to a fast-growing project in the open-source world. Rapid growth along with support from a wide community led to challenges from balancing new features with operational excellence to triaging bug reports and RFCs and scaling and redesigning documentation.

In this session, you can learn about Powertools for AWS Lambda to understand what it is and the problems it solves. Moreover, there are many valuable lessons to learn how to create and scale a successful open-source project. From managing the trade-off between releasing new features and achieving operational stability to measuring the impact of the project, there are many challenges in open-source projects that require careful thought.

Take me to this video!

Heitor Lessa describing one the key lessons: development and releasing new features should be as important as the other activities (governance, operational excellence, and more)

Heitor Lessa describing one of the key lessons: development and releasing new features should be as important as the other activities (governance, operational excellence, and more).

Observability the open-source way

The recent blog post Let’s Architect! Monitoring production systems at scale talks about the importance of monitoring. Setting up observability is critical to maintain application and infrastructure health, but instrumenting applications to collect monitoring signals such as metrics and logs can be challenging when using vendor-specific SDKs.

This video introduces you to OpenTelemetry, an open-source observability framework. OpenTelemetry provides a flexible, single vendor-agnostic SDK based on open-source specifications that developers can use to instrument and collect signals from applications. This resource explains how it works in practice and how to monitor microservice-based applications with the OpenTelemetry SDK.

Take me to this video!

With AWS Distro for OpenTelemetry, you can collect data from your AWS resources.

With AWS Distro for OpenTelemetry, you can collect data from your AWS resources.

Best practices for right-sizing your Apache Kafka clusters to optimize performance and cost

Apache Kafka is an open-source streaming data store that decouples applications producing streaming data (producers) into its data store from applications consuming streaming data (consumers) from its data store. Amazon Managed Streaming for Apache Kafka (Amazon MSK) allows you to use the open-source version of Apache Kafka with the service managing infrastructure and operations for you.

This blog post explains how the underlying infrastructure configuration can affect Apache Kafka performance. You can learn strategies on how to size the clusters to meet the desired throughput, availability, and latency requirements. This resource helps you discover strategies to find the optimal sizing for your resources, and learn the mental models adopted to conduct the investigation and derive the conclusions.

Take me to this blog!

Comparisons of put latencies for three clusters with different broker sizes

Comparisons of put latencies for three clusters with different broker sizes

AWS Cloud Development Kit workshop

AWS Cloud Development Kit (AWS CDK) is an open-source software development framework that allows you to provision cloud resources programmatically (Infrastructure as Code or IaC) by using familiar programming languages such as Python, Typescript, Javascript, Java, Go, and C#/.Net.

CDK allows you to create reusable template and assets, test your infrastructure, make deployments repeatable, and make your cloud environment stable by removing manual (and error-prone) operations. This workshop introduces you to CDK, where you can learn how to provision an initial simple application as well as become familiar with more advanced concepts like CDK constructs.

Take me to this workshop!

This construct can be attached to any Lambda function that is used as an API Gateway backend. It counts how many requests were issued to each URL.

This construct can be attached to any Lambda function that is used as an API Gateway backend. It counts how many requests were issued to each URL.

See you next time!

Thanks for joining our conversation! To find all the blogs from this series, you can check out the Let’s Architect! list of content on the AWS Architecture Blog.

Choosing an open table format for your transactional data lake on AWS

Post Syndicated from Shana Schipers original https://aws.amazon.com/blogs/big-data/choosing-an-open-table-format-for-your-transactional-data-lake-on-aws/

A modern data architecture enables companies to ingest virtually any type of data through automated pipelines into a data lake, which provides highly durable and cost-effective object storage at petabyte or exabyte scale. This data is then projected into analytics services such as data warehouses, search systems, stream processors, query editors, notebooks, and machine learning (ML) models through direct access, real-time, and batch workflows. Data in customers’ data lakes is used to fulfil a multitude of use cases, from real-time fraud detection for financial services companies, inventory and real-time marketing campaigns for retailers, or flight and hotel room availability for the hospitality industry. Across all use cases, permissions, data governance, and data protection are table stakes, and customers require a high level of control over data security, encryption, and lifecycle management.

This post shows how open-source transactional table formats (or open table formats) can help you solve advanced use cases around performance, cost, governance, and privacy in your data lakes. We also provide insights into the features and capabilities of the most common open table formats available to support various use cases.

You can use this post for guidance when looking to select an open table format for your data lake workloads, facilitating the decision-making process and potentially narrowing down the available options. The content of this post is based on the latest open-source releases of the reviewed formats at the time of writing: Apache Hudi v0.13.0, Apache Iceberg 1.2.0, and Delta Lake 2.3.0.

Advanced use cases in modern data lakes

Data lakes offer one of the best options for cost, scalability, and flexibility to store data, allowing you to retain large volumes of structured and unstructured data at a low cost, and to use this data for different types of analytics workloads—from business intelligence reporting to big data processing, real-time analytics, and ML—to help guide better decisions.

Despite these capabilities, data lakes are not databases, and object storage does not provide support for ACID processing semantics, which you may require to effectively optimize and manage your data at scale across hundreds or thousands of users using a multitude of different technologies. For example:

  • Performing efficient record-level updates and deletes as data changes in your business
  • Managing query performance as tables grow to millions of files and hundreds of thousands of partitions
  • Ensuring data consistency across multiple concurrent writers and readers
  • Preventing data corruption from write operations failing partway through
  • Evolving table schemas over time without (partially) rewriting datasets

These challenges have become particularly prevalent in use cases such as CDC (change data capture) from relational database sources, privacy regulations requiring deletion of data, and streaming data ingestion, which can result in many small files. Typical data lake file formats such as CSV, JSON, Parquet, or Orc only allow for writes of entire files, making the aforementioned requirements hard to implement, time consuming, and costly.

To help overcome these challenges, open table formats provide additional database-like functionality that simplifies the optimization and management overhead of data lakes, while still supporting storage on cost-effective systems like Amazon Simple Storage Service (Amazon S3). These features include:

  • ACID transactions – Allowing a write to completely succeed or be rolled back in its entirety
  • Record-level operations – Allowing for single rows to be inserted, updated, or deleted
  • Indexes – Improving performance in addition to data lake techniques like partitioning
  • Concurrency control – Allowing for multiple processes to read and write the same data at the same time
  • Schema evolution – Allowing for columns of a table to be added or modified over the life of a table
  • Time travel – Enabling you to query data as of a point in time in the past

In general, open table formats implement these features by storing multiple versions of a single record across many underlying files, and use a tracking and indexing mechanism that allows an analytics engine to see or modify the correct version of the records they are accessing. When records are updated or deleted, the changed information is stored in new files, and the files for a given record are retrieved during an operation, which is then reconciled by the open table format software. This is a powerful architecture that is used in many transactional systems, but in data lakes, this can have some side effects that have to be addressed to help you align with performance and compliance requirements. For instance, when data is deleted from an open table format, in some cases only a delete marker is stored, with the original data retained until a compaction or vacuum operation is performed, which performs a hard deletion. For updates, previous versions of the old values of a record may be retained until a similar process is run. This can mean that data that should be deleted isn’t, or that you store a significantly larger number of files than you intend to, increasing storage cost and slowing down read performance. Regular compaction and vacuuming must be run, either as part of the way the open table format works, or separately as a maintenance procedure.

The three most common and prevalent open table formats are Apache Hudi, Apache Iceberg, and Delta Lake. AWS supports all three of these open table formats, and in this post, we review the features and capabilities of each, how they can be used to implement the most common transactional data lake use cases, and which features and capabilities are available in AWS’s analytics services. Innovation around these table formats is happening at an extremely rapid pace, and there are likely preview or beta features available in these file formats that aren’t covered here. All due care has been taken to provide the correct information as of time of writing, but we also expect this information to change quickly, and we’ll update this post frequently to contain the most accurate information. Also, this post focuses only on the open-source versions of the covered table formats, and doesn’t speak to extensions or proprietary features available from individual third-party vendors.

How to use this post

We encourage you to use the high-level guidance in this post with the mapping of functional fit and supported integrations for your use cases. Combine both aspects to identify what table format is likely a good fit for a specific use case, and then prioritize your proof of concept efforts accordingly. Most organizations have a variety of workloads that can benefit from an open table format, but today no single table format is a “one size fits all.” You may wish to select a specific open table format on a case-by-case basis to get the best performance and features for your requirements, or you may wish to standardize on a single format and understand the trade-offs that you may encounter as your use cases evolve.

This post doesn’t promote a single table format for any given use case. The functional evaluations are only intended to help speed up your decision-making process by highlighting key features and attention points for each table format with each use case. It is crucial that you perform testing to ensure that a table format meets your specific use case requirements.

This post is not intended to provide detailed technical guidance (e.g. best practices) or benchmarking of each of the specific file formats, which are available in AWS Technical Guides and benchmarks from the open-source community respectively.

Choosing an open table format

When choosing an open table format for your data lake, we believe that there are two critical aspects that should be evaluated:

  • Functional fit – Does the table format offer the features required to efficiently implement your use case with the required performance? Although they all offer common features, each table format has a different underlying technical design and may support unique features. Each format can handle a range of use cases, but they also offer specific advantages or trade-offs, and may be more efficient in certain scenarios as a result of its design.
  • Supported integrations – Does­ the table format integrate seamlessly with your data environment? When evaluating a table format, it’s important to consider supported engine integrations on dimensions such as support for reads/writes, data catalog integration, supported access control tools, and so on that you have in your organization. This applies to both integration with AWS services and with third-party tools.

General features and considerations

The following table summarizes general features and considerations for each file format that you may want to take into account, regardless of your use case. In addition to this, it is also important to take into account other aspects such as the complexity of the table format and in-house skills.

. Apache Hudi Apache Iceberg Delta Lake
Primary API
  • Spark DataFrame
  • SQL
  • Spark DataFrame
Write modes
  • Copy On Write approach only
Supported data file formats
  • Parquet
  • ORC
  • HFile
  • Parquet
  • ORC
  • Avro
  • Parquet
File layout management
  • Compaction to reorganize data (sort) and merge small files together
Query optimization
S3 optimizations
  • Metadata reduces file listing operations
Table maintenance
  • Automatic within writer
  • Separate processes
  • Separate processes
  • Separate processes
Time travel
Schema evolution
Operations
  • Hudi CLI for table management, troubleshooting, and table inspection
  • No out-of-the-box options
Monitoring
  • No out-of-the-box options that are integrated with AWS services
  • No out-of-the-box options that are integrated with AWS services
Data Encryption
  • Server-side encryption on Amazon S3 supported
  • Server-side encryption on Amazon S3 supported
Configuration Options
  • High configurability:

Extensive configuration options for customizing read/write behavior (such as index type or merge logic) and automatically performed maintenance and optimizations (such as file sizing, compaction, and cleaning)

  • Medium configurability:

Configuration options for basic read/write behavior (Merge On Read or Copy On Write operation modes)

  • Low configurability:

Limited configuration options for table properties (for example, indexed columns)

Other
  • Savepoints allow you to restore tables to a previous version without having to retain the entire history of files
  • Iceberg supports S3 Access Points in Spark, allowing you to implement failover across AWS Regions using a combination of S3 access points, S3 cross-Region replication, and the Iceberg Register Table API
  • Shallow clones allow you to efficiently run tests or experiments on Delta tables in production, without creating copies of the dataset or affecting the original table.
AWS Analytics Services Support*
Amazon EMR Read and write Read and write Read and write
AWS Glue Read and write Read and write Read and write
Amazon Athena (SQL) Read Read and write Read
Amazon Redshift (Spectrum) Read Currently not supported Read
AWS Glue Data Catalog Yes Yes Yes

* For table format support in third-party tools, consult the official documentation for the respective tool.
Amazon Redshift only supports Delta Symlink tables (see Creating external tables for data managed in Delta Lake for more information).
Refer to Working with other AWS services in the Lake Formation documentation for an overview of table format support when using Lake Formation with other AWS services.

Functional fit for common use cases

Now let’s dive deep into specific use cases to understand the capabilities of each open table format.

Getting data into your data lake

In this section, we discuss the capabilities of each open table format for streaming ingestion, batch load and change data capture (CDC) use cases.

Streaming ingestion

Streaming ingestion allows you to write changes from a queue, topic, or stream into your data lake. Although your specific requirements may vary based on the type of use case, streaming data ingestion typically requires the following features:

  • Low-latency writes – Supporting record-level inserts, updates, and deletes, for example to support late-arriving data
  • File size management – Enabling you to create files that are sized for optimal read performance (rather than creating one or more files per streaming batch, which can result in millions of tiny files)
  • Support for concurrent readers and writers – Including schema changes and table maintenance
  • Automatic table management services – Enabling you to maintain consistent read performance

In this section, we talk about streaming ingestion where records are just inserted into files, and you aren’t trying to update or delete previous records based on changes. A typical example of this is time series data (for example sensor readings), where each event is added as a new record to the dataset. The following table summarizes the features.

. Apache Hudi Apache Iceberg Delta Lake
Functional fit
Considerations Hudi’s default configurations are tailored for upserts, and need to be tuned for append-only streaming workloads. For example, Hudi’s automatic file sizing in the writer minimizes operational effort/complexity required to maintain read performance over time, but can add a performance overhead at write time. If write speed is of critical importance, it can be beneficial to turn off Hudi’s file sizing, write new data files for each batch (or micro-batch), then run clustering later to create better sized files for read performance (using a similar approach as Iceberg or Delta).
  • Iceberg doesn’t optimize file sizes or run automatic table services (for example, compaction or clustering) when writing, so streaming ingestion will create many small data and metadata files. Frequent table maintenance needs to be performed to prevent read performance from degrading over time.
  • Delta doesn’t optimize file sizes or run automatic table services (for example, compaction or clustering) when writing, so streaming ingestion will create many small data and metadata files. Frequent table maintenance needs to be performed to prevent read performance from degrading over time.
Supported AWS integrations
  • Amazon EMR (Spark Structured Streaming (streaming sink and forEachBatch), Flink, Hudi DeltaStreamer)
  • AWS Glue (Spark Structured Streaming (streaming sink and forEachBatch), Hudi DeltaStreamer)
  • Amazon Kinesis Data Analytics
  • Amazon Managed Streaming for Apache Kafka (MSK Connect)
  • Amazon EMR (Spark Structured Streaming (only forEachBatch), Flink)
  • AWS Glue (Spark Structured Streaming (only forEachBatch))
  • Amazon Kinesis Data Analytics
Conclusion Good functional fit for all append-only streaming when configuration tuning for append-only workloads is acceptable. Good fit for append-only streaming with larger micro-batch windows, and when operational overhead of table management is acceptable. Good fit for append-only streaming with larger micro-batch windows, and when operational overhead of table management is acceptable.

When streaming data with updates and deletes into a data lake, a key priority is to have fast upserts and deletes by being able to efficiently identify impacted files to be updated.

. Apache Hudi Apache Iceberg Delta Lake
Functional fit
  • Iceberg offers a Merge On Read strategy to enable fast writes.
  • Streaming upserts into Iceberg tables are natively supported with Flink, and Spark can implement streaming ingestion with updates and deletes using a micro-batch approach with MERGE INTO.
  • Using column statistics, Iceberg offers efficient updates on tables that are sorted on a “key” column.
  • Streaming ingestion with updates and deletes into OSS Delta Lake tables can be implemented using a micro-batch approach with MERGE INTO.
  • Using data skipping with column statistics, Delta offers efficient updates on tables that are sorted on a “key” column.
Considerations
  • Hudi’s automatic optimizations in the writer (for example, file sizing) add performance overhead at write time.
  • Reading from Merge On Read tables is generally slower than Copy On Write tables due to log files. Frequent compaction can be used to optimize read performance.
  • Iceberg uses a MERGE INTO approach (a join) for upserting data. This is more resource intensive and less performant for streaming data ingestion with frequent commits on (large unsorted) tables, because full table or partition scans would be performed on unsorted tables.
  • Iceberg does not optimize file sizes or run automatic table services (for example, compaction) when writing, so streaming ingestion will create many small data and metadata files. Frequent table maintenance needs to be performed to prevent read performance from degrading over time.
  • Reading from tables using the Merge On Read approach is generally slower than tables using only the Copy On Write approach due to delete files. Frequent compaction can be used to optimize read performance.
  • Iceberg Merge On Read currently does not support dynamic file pruning using its column statistics during merges and updates. This has impact on write performance, resulting in full table joins.
  • Delta uses a Copy On Write strategy that is not optimized for fast (streaming) writes, as it rewrites entire files for record updates.
  • Delta uses a MERGE INTO approach (a join). This is more resource intensive (less performant) and not suited for streaming data ingestion with frequent commits on large unsorted tables, because full table or partition scans would be performed on unsorted tables.
  • No auto file sizing is performed; separate table management processes are required (which can impact writes).
Supported AWS integrations
  • Amazon EMR (Spark Structured Streaming (streaming sink and forEachBatch), Flink, Hudi DeltaStreamer)
  • AWS Glue (Spark Structured Streaming (streaming sink and forEachBatch), Hudi DeltaStreamer)
  • Amazon Kinesis Data Analytics
  • Amazon Managed Streaming for Apache Kafka (MSK Connect)
  • Amazon EMR (Spark Structured Streaming (only forEachBatch), Flink)
  • Amazon Kinesis Data Analytics
  • Amazon EMR (Spark Structured Streaming (only forEachBatch))
  • AWS Glue (Spark Structured Streaming (only forEachBatch))
  • Amazon Kinesis Data Analytics
Conclusion Good fit for lower-latency streaming with updates and deletes thanks to native support for streaming upserts, indexes for upserts, and automatic file sizing and compaction. Good fit for streaming with larger micro-batch windows and when the operational overhead of table management is acceptable. Can be used for streaming data ingestion with updates/deletes if latency is not a concern, because a Copy-On-Write strategy may not deliver the write performance required by low latency streaming use cases.

Change data capture

Change data capture (CDC) refers to the process of identifying and capturing changes made to data in a database and then delivering those changes in real time to a downstream process or system—in this case, delivering CDC data from databases into Amazon S3.

In addition to the aforementioned general streaming requirements, the following are key requirements for efficient CDC processing:

  • Efficient record-level updates and deletes – With the ability to efficiently identify files to be modified (which is important to support late-arriving data).
  • Native support for CDC – With the following options:
  • CDC record support in the table format – The table format understands how to process CDC-generated records and no custom preprocessing is required for writing CDC records to the table.
  • CDC tools natively supporting the table format – CDC tools understand how to process CDC-generated records and apply them to the target tables. In this case, the CDC engine writes to the target table without another engine in between.

Without support for the two CDC options, processing and applying CDC records correctly into a target table will require custom code. With a CDC engine, each tool likely has its own CDC record format (or payload). For example, Debezium and AWS Database Migration Service (AWS DMS) each have their own specific record formats, and need to be transformed differently. This must be considered when you are operating CDC at scale across many tables.

All three table formats allow you to implement CDC from a source database into a target table. The difference for CDC with each format lies mainly in the ease of implementing CDC pipelines and supported integrations.

. Apache Hudi Apache Iceberg Delta Lake
Functional fit
  • Hudi’s DeltaStreamer utility provides a no-code/low-code option to efficiently ingest CDC records from different sources into Hudi tables.
  • Upserts using indexes allow you to quickly identify the target files for updates, without having to perform a full table join.
  • Unique record keys and deduplication natively enforce source databases’ primary keys and prevent duplicates in the data lake.
  • Out of order records are handled via the pre-combine feature.
  • Native support (through record payload formats) is offered for CDC formats like AWS DMS and Debezium, eliminating the need to write custom CDC preprocessing logic in the writer application to correctly interpret and apply CDC records to the target table. Writing CDC records to Hudi tables is as simple as writing any other records to a Hudi table.
  • Partial updates are supported, so the CDC payload format does not need to include all record columns.
  • Flink CDC is the most convenient way to set up CDC from downstream data sources into Iceberg tables. It supports upsert mode and can interpret CDC formats such as Debezium natively.
  • Using column statistics, Iceberg offers efficient updates on tables that are sorted on a “key” column.
  • CDC into Delta tables can be implemented using third-party tools or using Spark with custom processing logic.
  • Using data skipping with column statistics, Delta offers efficient updates on tables that are sorted on a “key” column.
Considerations
  • Natively supported payload formats can be found in the Hudi code repo. For other formats, consider creating a custom payload or adding custom logic to the writer application to correctly process and apply CDC records of that format to target Hudi tables.
  • Iceberg uses a MERGE INTO approach (a join) for upserting data. This is more resource intensive and less performant, particularly on large unsorted tables where a MERGE INTO operation could require a full table scan.
  • Regular compaction should be implemented to maintain sort order over time in order to prevent MERGE INTO performance degrading.
  • Iceberg has no native support for CDC payload formats (for example, AWS DMS or Debezium). When using other engines than Flink CDC (such as Spark), custom logic needs to be added to the writer application in order to correctly process and apply CDC records to target Iceberg tables (for example, deduplication or ordering based on operation).
  • Deduplication to enforce primary key constraints needs to be handled in the Iceberg writer application.
  • No support for out of order records handling.
  • Delta does not use indexes for upserts, but uses a MERGE INTO approach instead (a join). This is more resource intensive and less performant on large unsorted tables because those would require full table or partition scans.
  • Regular clustering should be implemented to maintain sort order over time in order to prevent MERGE INTO performance degrading.
  • Delta Lake has no native support for CDC payload formats (for example, AWS DMS or Debezium). When using Spark for ingestion, custom logic needs to be added to the writer application in order to correctly process and apply CDC records to target Delta tables (for example, deduplication or ordering based on operation).
  • Record updates on unsorted Delta tables results in full table or partition scans
  • No support for out of order records handling.
Natively supported CDC formats
  • AWS DMS
  • Debezium
  • None
  • None
CDC tool integrations
  • DeltaStreamer
  • Flink CDC
  • Debezium
  • Flink CDC
  • Debezium
  • Debezium
Conclusion All three formats can implement CDC workloads. Apache Hudi offers the best overall technical fit for CDC workloads as well as the most options for efficient CDC pipeline design: no-code/low-code with DeltaStreamer, third-party CDC tools offering native Hudi integration, or a Spark/Flink engine using CDC record payloads offered in Hudi.

Batch loads

If your use case requires only periodic writes but frequent reads, you may want to use batch loads and optimize for read performance.

Batch loading data with updates and deletes is perhaps the simplest use case to implement with any of the three table formats. Batch loads typically don’t require low latency, allowing them to benefit from the operational simplicity of a Copy On Write strategy. With Copy On Write, data files are rewritten to apply updates and add new records, minimizing the complexity of having to run compaction or optimization table services on the table.

. Apache Hudi Apache Iceberg Delta Lake
Functional fit
  • Copy On Write is supported.
  • Automatic file sizing while writing is supported, including optimizing previously written small files by adding new records to them.
  • Multiple index types are provided to optimize update performance for different workload patterns.
  • Copy On Write is supported.
  • File size management is performed within each incoming data batch (but it is not possible to optimize previously written data files by adding new records to them).
  • Copy On Write is supported.
  • File size can be indirectly managed within each data batch by setting the max number of records per file (but it is not possible to optimize previously written data files by adding new records to them).
Considerations
  • Configuring Hudi according to your workload pattern is imperative for good performance (see Apache Hudi on AWS for guidance).
  • Data deduplication needs to be handled in the writer application.
  • If a single data batch does not contain sufficient data to reach a target file size, compaction can be performed to merge smaller files together afterwards.
  • Ensuring data is sorted on a “key” column is imperative for good update performance. Regular sorting compaction should be considered to maintain sorted data over time.
  • Data deduplication needs to be handled in the writer application.
  • If a single data batch does not contain sufficient data to reach a target file size, compaction can be performed to merge smaller files together afterwards.
  • Ensuring data is sorted on a “key” column is imperative for good update performance. Regular clustering should be considered to maintain sorted data over time.
Supported AWS integrations
  • Amazon EMR (Spark)
  • AWS Glue (Spark)
  • Amazon EMR (Spark, Presto, Trino, Hive)
  • AWS Glue (Spark)
  • Amazon Athena (SQL)
  • Amazon EMR (Spark, Trino)
  • AWS Glue (Spark)
Conclusion All three formats are well suited for batch loads. Apache Hudi supports the most configuration options and may increase the effort to get started, but provides lower operational effort due to automatic table management. On the other hand, Iceberg and Delta are simpler to get started with, but require some operational overhead for table maintenance.

Working with open table formats

In this section, we discuss the capabilities of each open table format for common use cases when working with open table formats: optimizing read performance, incremental data processing and processing deletes to comply with privacy regulations.

Optimizing read performance

The preceding sections primarily focused on write performance for specific use cases. Now let’s explore how each open table format can support optimal read performance. Although there are some cases where data is optimized purely for writes, read performance is typically a very important dimension on which you should evaluate an open table format.

Open table format features that improve query performance include the following:

  • Indexes, (column) statistics, and other metadata – Improves query planning and file pruning, resulting in reduced data scanned
  • File layout optimization – Enables query performance:
  • File size management – Properly sized files provide better query performance
  • Data colocation (through clustering) according to query patterns – Reduces the amount of data scanned by queries
. Apache Hudi Apache Iceberg Delta Lake
Functional fit
  • Auto file sizing when writing results in good file sizes for read performance. On Merge On Read tables, automatic compaction and clustering improves read performance.
  • Metadata tables eliminate slow S3 file listing operations. Column statistics in the metadata table can be used for better file pruning in query planning (data skipping feature).
  • Clustering data for better data colocation with hierarchical sorting or z-ordering.
  • Hidden partitioning prevents unintentional full table scans by users, without requiring them to specify partition columns explicitly.
  • Column and partition statistics in manifest files speed up query planning and file pruning, and eliminate S3 file listing operations.
  • Optimized file layout for S3 object storage using random prefixes is supported, which minimizes chances of S3 throttling.
  • Clustering data for better data colocation with hierarchical sorting or z-ordering.
  • File size can be indirectly managed within each data batch by setting the max number of records per file (but not optimizing previously written data files by adding new records to existing files).
  • Generated columns avoid full table scans.
  • Data skipping is automatically used in Spark.
  • Clustering data for better data colocation using z-ordering.
Considerations
  • Data skipping using metadata column stats has to be supported in the query engine (currently only in Apache Spark).
  • Snapshot queries on Merge On Read tables have higher query latencies than on Copy On Write tables. This latency impact can be reduced by increasing the compaction frequency.
  • Separate table maintenance needs to be performed to maintain read performance over time.
  • Reading from tables using a Merge On Read approach is generally slower than tables using only a Copy On Write approach due to delete files. Frequent compaction can be used to optimize read performance.
  • Currently, only Apache Spark can use data skipping.
  • Separate table maintenance needs to be performed to maintain read performance over time.
Optimization & Maintenance Processes
  • Compaction of log files in Merge On Read tables can be run as part of the writing application or as a separate job using Spark on Amazon EMR or AWS Glue. Compaction does not interfere with other jobs or queries.
  • Clustering runs as part of the writing application or in a separate job using Spark on Amazon EMR or AWS Glue because clustering can interfere with other transactions.
  • See Apache Hudi on AWS for guidance.
  • Compaction API in Delta Lake can group small files or cluster data, and it can interfere with other transactions.
  • This process has to be scheduled separately by the user on a time or event basis.
  • Spark can be used to perform compaction in services like Amazon EMR or AWS Glue.
Conclusion For achieving good read performance, it’s important that your query engine supports the optimization features offered by the table formats. When using Spark, all three formats provide good read performance when properly configured. When using Trino (and therefore Athena as well), Iceberg will likely provide better query performance because the data skipping feature of Hudi and Delta is not supported in the Trino engine. Make sure to evaluate this feature support for your query engine of choice.

Incremental processing of data on the data lake

At a high level, incremental data processing is the movement of new or fresh data from a source to a destination. To implement incremental extract, transform, and load (ETL) workloads efficiently, we need to be able to retrieve only the data records that have been changed or added since a certain point in time (incrementally) so we don’t need to reprocess unnecessary data (such as entire partitions). When your data source is an open table format table, we can take advantage of incremental queries to facilitate more efficient reads in these table formats.

. Apache Hudi Apache Iceberg Delta Lake
Functional fit
  • Full incremental pipelines can be built using Hudi’s incremental queries, which capture record-level changes on a Hudi table (including updates and deletes) without the need to store and manage change data records.
  • Hudi’s DeltaStreamer utility offers simple no-code/low-code options to build incremental Hudi pipelines.
  • Iceberg incremental queries can only read new records (no updates) from upstream Iceberg tables and replicate to downstream tables.
  • Incremental pipelines with record-level changes (including updates and deletes) can be implemented using the changelog view procedure.
  • Full incremental pipelines can be built using Delta’s Change Data Feed (CDF) feature, which captures record-level changes (including updates and deletes) using change data records.
Considerations
  • ETL engine used needs to support Hudi’s incremental query type.
  • A view has to be created to incrementally read data between two table snapshots containing updates and deletes.
  • A new view has to be created (or recreated) for reading changes from new snapshots.
  • Record-level changes can only be captured from the moment CDF is turned on.
  • CDF stores change data records on storage, so a storage overhead is incurred and lifecycle management and cleaning of change data records is required.
Supported AWS integrations Incremental queries are supported in:

  • Amazon EMR (Spark, Flink, Hive, Hudi DeltaStreamer)
  • AWS Glue (Spark, Hudi DeltaStreamer)
  • Amazon Kinesis Data Analytics
Incremental queries supported in:

  • Amazon EMR (Spark, Flink)
  • AWS Glue (Spark)
  • Amazon Kinesis Data Analytics

CDC view supported in:

  • Amazon EMR (Spark)
  • AWS Glue (Spark)
CDF supported in:

  • Amazon EMR (Spark)
  • AWS Glue (Spark)
Conclusion Best functional fit for incremental ETL pipelines using a variety of engines, without any storage overhead. Good fit for implementing incremental pipelines using Spark if the overhead of creating views is acceptable. Good fit for implementing incremental pipelines using Spark if the additional storage overhead is acceptable.

Processing deletes to comply with privacy regulations

Due to privacy regulations like the General Data Protection Regulation (GDPR) and California Consumer Privacy Act (CCPA), companies across many industries need to perform record-level deletes on their data lake for “right to be forgotten” or to correctly store changes to consent on how their customers’ data can be used.

The ability to perform record-level deletes without rewriting entire (or large parts of) datasets is the main requirement for this use case. For compliance regulations, it’s important to perform hard deletes (deleting records from the table and physically removing them from Amazon S3).

. Apache Hudi Apache Iceberg Delta Lake
Functional fit Hard deletes are performed by Hudi’s automatic cleaner service. Hard deletes can be implemented as a separate process. Hard deletes can be implemented as a separate process.
Considerations Hudi cleaner needs to be configured according to compliance requirements to automatically remove older file versions in time (within a compliance window), otherwise time travel or rollback operations could recover deleted records. Previous snapshots need to be (manually) expired after the delete operation, otherwise time travel operations could recover deleted records. The vacuum operation needs to be run after the delete, otherwise time travel operations could recover deleted records.
Conclusion This use case can be implemented using all three formats, and in each case, you must ensure that your configuration or background pipelines implement the cleanup procedures required to meet your data retention requirements.

Conclusion

Today, no single table format is the best fit for all use cases, and each format has its own unique strengths for specific requirements. It’s important to determine which requirements and use cases are most crucial and select the table format that best meets those needs.

To speed up the selection process of the right table format for your workload, we recommend the following actions:

  • Identify what table format is likely a good fit for your workload using the high-level guidance provided in this post
  • Perform a proof of concept with the identified table format from the previous step to validate its fit for your specific workload and requirements

Keep in mind that these open table formats are open source and rapidly evolve with new features and enhanced or new integrations, so it can be valuable to also take into consideration product roadmaps when deciding on the format for your workloads.

AWS will continue to innovate on behalf of our customers to support these powerful file formats and to help you be successful with your advanced use cases for analytics in the cloud. For more support on building transactional data lakes on AWS, get in touch with your AWS Account Team, AWS Support, or review the following resources:


About the Authors

Shana Schipers is an Analytics Specialist Solutions Architect at AWS, focusing on big data. She supports customers worldwide in building transactional data lakes using open table formats like Apache Hudi, Apache Iceberg and Delta Lake on AWS.

Ian Meyers is a Director of Product Management for AWS Analytics Services. He works with many of AWS largest customers on emerging technology needs, and leads several data and analytics initiatives within AWS including support for Data Mesh.


Carlos Rodrigues is a Big Data Specialist Solutions Architect at AWS. He helps customers worldwide building transactional data lakes on AWS using open table formats like Apache Hudi and Apache Iceberg.

Velociraptor 0.6.9 Release: Digging Even Deeper with SMB Support, Azure Storage and Lockdown Server Mode

Post Syndicated from Mike Cohen original https://blog.rapid7.com/2023/06/07/velociraptor-0-6-9-release-digging-even-deeper-with-smb-support-azure-storage-and-lockdown-server-mode/

Velociraptor 0.6.9 Release: Digging Even Deeper with SMB Support, Azure Storage and Lockdown Server Mode

Carlos Canto contributed to this article.

Rapid7 is very excited to announce version 0.6.9 of Velociraptor is now LIVE and available for download.  Much of what went into this release was about expanding capabilities and improving workflows.

We’ll now explore some of the interesting new features in detail.

GUI Improvements

The GUI was updated in this release to improve user workflow and accessibility.

Table Filtering and Sorting
Previously, table filtering and sorting required a separate dialog. In this release, the filtering controls were moved to the header of each column making it more natural to use.

Velociraptor 0.6.9 Release: Digging Even Deeper with SMB Support, Azure Storage and Lockdown Server Mode
Filtering tables

VFS GUI Improvements

The VFS GUI allows the user to collect files from the endpoint in a familiar tree-based user interface. In previous versions, it was only possible to schedule a single download at a time. This proved problematic when the client was offline or transferring a large file, because the user had no way to kick off the next download until the first file was fully fetched.

In this release, the GUI was revamped to support multiple file downloads at the same time. Additionally it is now possible to schedule a file download by right clicking the download column in the file table and selecting “Download from client”.

Velociraptor 0.6.9 Release: Digging Even Deeper with SMB Support, Azure Storage and Lockdown Server Mode
Initiating file download in the VFS. Note multiple files can be scheduled at the same time, and the bottom details pane can be closed

Hex Viewer and File Previewer GUI

In release 0.6.9, a new hex viewer was introduced. This viewer makes it possible to quickly triage uploaded files from the GUI itself, implementing some common features:

  1. The file can be viewed as a hex dump or a strings-style output.
  2. The viewer can go to an arbitrary offset within the file, or page forward or backwards.
  3. The viewer can search forward or backwards in the file for a Regular Expression, String, or a Hex String.The hex viewer is available for artifacts that define a column of type preview_uploads including the File Upload table within the flow GUI.
Velociraptor 0.6.9 Release: Digging Even Deeper with SMB Support, Azure Storage and Lockdown Server Mode
The hex viewer UI can be used to quickly inspect an uploaded file

Artifact Pack Import GUI Improvements

Velociraptor allows uploading an artifact pack – a simple Zip file containing artifact definitions. For example, the artifact exchange is simply a zip file with artifact definitions.

Previously, artifact packs could only be uploaded in their entirety and always had an “Exchange” prefix prepended. However, in this release the GUI was revamped to allow only some artifacts to be imported from the pack and to customize the prefix.

Velociraptor 0.6.9 Release: Digging Even Deeper with SMB Support, Azure Storage and Lockdown Server Mode
It is now possible to import specific artifacts in a pack

Direct SMB Support

Windows file sharing is implemented over the SMB protocol. Within the OS, accessing remote file shares happens transparently, for example by mapping the remote share to a drive using the  net use command or accessing a file name starting with a UNC path (e.g. \\ServerName\Share\File.exe).

While Velociraptor can technically also access UNC shares by using the usual file APIs and providing a UNC path, in reality this does not work because Velociraptor is running as the local System user. The system user normally does not have network credentials, so it can not map remote shares.

This limitation is problematic, because sometimes we need to access remote shares (e.g. to verify hashes, perform YARA scans etc). Until this release, the only workaround for this limitation was to install the Velociraptor user as a domain user account with credentials.

As of the 0.6.9 release, SMB is supported directly within the Velociraptor binary as an accessor. This means that all plugins that normally operate on files can also operate on a remote SMB share transparently.

Velociraptor does not rely on the OS to provide credentials to the remote share, instead credentials can be passed directly to the smb accessor to access the relevant smb server.

The new accessor can be used in any VQL that needs to use a file, but to make it easier there is a new artifact called Windows.Search.SMBFileFinder that allows for flexible file searches on an SMB share.

Velociraptor 0.6.9 Release: Digging Even Deeper with SMB Support, Azure Storage and Lockdown Server Mode
Searching a remote SMB share

Using SMB For Distributing Tools

Velociraptor can manage third-party tools within its collected artifacts by instructing the endpoint to download the tool from an external server or the velociraptor server itself.

It is sometimes convenient to download external tools from an external server (e.g. a cloud bucket) due to bandwidth considerations.

Previously, this server could only be a HTTP server, but in many deployments it is actually simpler to download external tools from an SMB share.

In this release, Velociraptor accepts an SMB URL as the Serve URL parameter within the tool configuration screen.

You can configure the remote share with read-only permissions (read these instructions for more details on configuring SMB).

Velociraptor 0.6.9 Release: Digging Even Deeper with SMB Support, Azure Storage and Lockdown Server Mode
Serving a third-party tool from an SMB server

The Offline Collector

The offline collector is a popular mode of running Velociraptor. In this mode, the artifacts to collect are pre-programmed into the collector, which stores the results in a zip file. The offline collector can be pre-configured to encrypt and upload the collection automatically to a remote server without user interaction, making it ideal for using remote agents or people to manually run the collector without needing further training.

In this release, the Velociraptor offline collector adds two more upload targets. It is now possible to upload to an SMB server and to Azure Blob Storage.

SMB Server Uploads
Because the offline collector is typically used to collect large volumes of data, it is beneficial to upload the data to a networked server close to the collected machine. This avoids cloud network costs and bandwidth limitations. It works very well in air gapped networks, as well.

You can now simply create a new share on any machine, by adding a local Windows user with password credentials, exporting a directory as a share, and adjusting the upload user’s permissions to only be able to write on the share and not read from it. It is now safe to embed these credentials in the offline collector, which can upload data but cannot read or delete other data.

Read the full instructions of how to configure the offline collector for SMB uploads.

Azure Blob Storage Service
Velociraptor can now upload collections to an Amazon S3 or Google Cloud Storage bucket. Many users requested direct support for Azure blob storage, which is now in 0.6.9.

Read about how to configure Azure for safe uploads. Similar to the other methods, credentials embedded in the offline collector can only be used to upload data and not read or delete data in the storage account.

Debugging VQL Queries

One of the points of feedback we received from our annual user survey was that although VQL is an extremely powerful language, users struggle with debugging and understanding how the query proceeds.

Unlike a more traditional programming language (e.g. Python), there is no debugger that allows users to pause execution and inspect variables, or add print statements to see what data is passed between parts of the query.

We took this feedback to heart and in release 0.6.9 the EXPLAIN keyword was introduced. The EXPLAIN keyword can be added before any SELECT in the VQL statement to place that SELECT statement into tracing mode.

As a recap, the general syntax of the VQL statement is:

SELECT vql_fun(X=1, Y=2), Foo, Bar
FROM plugin(A=1, B=2)
WHERE X = 1 

When a query is in tracing mode:

  1. All rows emitted from the plugin are logged with their types
  2. All parameters into any function are also logged
  3. When a row is filtered because it did not pass the WHERE clause this is also logged

This additional tracing information can be used to understand how data flows throughout the query.

Velociraptor 0.6.9 Release: Digging Even Deeper with SMB Support, Azure Storage and Lockdown Server Mode
Explaining a query reveals details information on how the VQL engine handles data flows

You can use the EXPLAIN statement in a notebook or within an artifact as collected from the endpoint (although be aware that it can lead to extremely verbose logging).

Velociraptor 0.6.9 Release: Digging Even Deeper with SMB Support, Azure Storage and Lockdown Server Mode
Inspect the details by clicking on the logs button

For example in the above query we can see:

The clients() plugin generates a row

  1. The timestamp() function received the last_seen_at value
  2. The WHERE condition rejected the row because the last_seen_at time was more than 60 seconds ago

Locking Down The Server

Another concern raised in our survey was the perceived risk of having Velociraptor permanently installed due to its high privilege and efficient scaling.

While this risk is not higher than any other domain-wide administration tool, in some deployment scenarios, Velociraptor does not need this level of access all the time. While in an incident response situation, however, it is necessary to promote Velociraptor’s level of access easily.

In the 0.6.9 release, Velociraptor has introduced lock down mode. When a server is locked down certain permissions are removed (even from administrators). The lockdown is set in the config file, helping to mitigate the risk of a Velociraptor server admin account compromise.

After initial deployment and configuration, the administrator can set the server in lockdown by adding the following configuration directive to the server.config.yaml and restarting the server:

lockdown: true

After the server is restarted the following permissions will be denied:

  • ARTIFACT_WRITER
  • SERVER_ARTIFACT_WRITER
  • COLLECT_CLIENT
  • COLLECT_SERVER
  • EXECVE
  • SERVER_ADMIN
  • FILESYSTEM_WRITE
  • FILESYSTEM_READ
  • MACHINE_STATE

Therefore it will still be possible to read existing collections, and continue collecting client monitoring data, but it will not be possible to edit artifacts or start new hunts or collections.

During an active IR, the server may be taken out of lockdown by removing the directive from the configuration file and restarting the service. Usually, the configuration file is only writable by root and the Velociraptor server process is running as a low privilege account that can not write to the config file. This combination makes it difficult for a compromised Velociraptor administrator account to remove the lockdown and use Velociraptor as a lateral movement vehicle.

Audit Events

Velociraptor maintains a number of log files over its operation, normally stored in the <filestore>/logs directory. While the logs are rotated and separated into different levels, the most important log type is the audit log which records auditable events. Within Velociraptor auditable events are security critical events such as:

  • Starting a new collection from a client
  • Creating a new hunt
  • Modifying an artifact
  • Updating the client monitoring configuration

Previous versions of Velociraptor simply wrote those events to the logging directory. However, the logging directory can be deleted if the server becomes compromised.

In 0.6.9 there are two ways to forward auditable events off the server

  1. Using remote syslog services
  2. Uploading to external log management systems e.g. Opensearch/Elastic using the Elastic.Events.Upload artifact.Additionally, auditable events are now emitted as part of the Server.Audit.Logs artifact so they can be viewed or searched in the GUI by any user.
Velociraptor 0.6.9 Release: Digging Even Deeper with SMB Support, Azure Storage and Lockdown Server Mode
The server’s audit log is linked from the Welcome page
Velociraptor 0.6.9 Release: Digging Even Deeper with SMB Support, Azure Storage and Lockdown Server Mode
Inspecting user activity through the audit log

Because audit events are available now as part of the server monitoring artifact, it is possible for users to develop custom VQL server monitoring artifacts to forward or respond to auditable events just like any other event on the client or the server. This makes it possible to forward events (e.g. to Slack or Discord) as demonstrated by the `Elastic.Events.Upload` artifact above.

Tool Definitions Can Now Specify An Expected Hash

Velociraptor supports pushing tools to external endpoints. A Velociraptor artifact can define an external tool, allowing the server to automatically fetch the tool and upload it to the endpoint.

Previously, the artifact could only specify the URL where the tool should be downloaded from. However, in this release, it is also possible to declare the expected hash of the tool. This prevents potential substitution attacks effectively by pinning the third-party binary hash.

While sometimes the upstream file may legitimately change (e.g. due to a patch), Velociraptor will not automatically accept the new file when the hash does not match the expected hash.

Velociraptor 0.6.9 Release: Digging Even Deeper with SMB Support, Azure Storage and Lockdown Server Mode
Mismatched hash

In the above example we modified the expected hash to be slightly different from the real tool hash. Velociraptor refuses to import the binary but provides a button allowing the user to accept this new hash instead. This should only be performed if the administrator is convinced the tool hash was legitimately updated.

Conclusions

There are many more new features and bug fixes in the 0.6.9 release. If you’re interested in any of these new features, we welcome you to take Velociraptor for a spin by downloading it from our release page. It’s available for free on GitHub under an open-source license.

As always, please file bugs on the GitHub issue tracker or submit questions to our mailing list by emailing [email protected]. You can also chat with us directly on our Discord server.

Learn more about Velociraptor by visiting any of our web and social media channels below:

If you want to master Velociraptor, consider joining us at a week-long Velociraptor training course held this year at the BlackHat USA 2023 Conference and delivered by the Velociraptor developers themselves.Details are here: https://docs.velociraptor.app/announcements/2023-trainings/

Open-Source LLMs

Post Syndicated from Bruce Schneier original https://www.schneier.com/blog/archives/2023/06/open-source-llms.html

In February, Meta released its large language model: LLaMA. Unlike OpenAI and its ChatGPT, Meta didn’t just give the world a chat window to play with. Instead, it released the code into the open-source community, and shortly thereafter the model itself was leaked. Researchers and programmers immediately started modifying it, improving it, and getting it to do things no one else anticipated. And their results have been immediate, innovative, and an indication of how the future of this technology is going to play out. Training speeds have hugely increased, and the size of the models themselves has shrunk to the point that you can create and run them on a laptop. The world of AI research has dramatically changed.

This development hasn’t made the same splash as other corporate announcements, but its effects will be much greater. It will wrest power from the large tech corporations, resulting in both much more innovation and a much more challenging regulatory landscape. The large corporations that had controlled these models warn that this free-for-all will lead to potentially dangerous developments, and problematic uses of the open technology have already been documented. But those who are working on the open models counter that a more democratic research environment is better than having this powerful technology controlled by a small number of corporations.

The power shift comes from simplification. The LLMs built by OpenAI and Google rely on massive data sets, measured in the tens of billions of bytes, computed on by tens of thousands of powerful specialized processors producing models with billions of parameters. The received wisdom is that bigger data, bigger processing, and larger parameter sets were all needed to make a better model. Producing such a model requires the resources of a corporation with the money and computing power of a Google or Microsoft or Meta.

But building on public models like Meta’s LLaMa, the open-source community has innovated in ways that allow results nearly as good as the huge models—but run on home machines with common data sets. What was once the reserve of the resource-rich has become a playground for anyone with curiosity, coding skills, and a good laptop. Bigger may be better, but the open-source community is showing that smaller is often good enough. This opens the door to more efficient, accessible, and resource-friendly LLMs.

More importantly, these smaller and faster LLMs are much more accessible and easier to experiment with. Rather than needing tens of thousands of machines and millions of dollars to train a new model, an existing model can now be customized on a mid-priced laptop in a few hours. This fosters rapid innovation.

It also takes control away from large companies like Google and OpenAI. By providing access to the underlying code and encouraging collaboration, open-source initiatives empower a diverse range of developers, researchers, and organizations to shape the technology. This diversification of control helps prevent undue influence, and ensures that the development and deployment of AI technologies align with a broader set of values and priorities. Much of the modern internet was built on open-source technologies from the LAMP (Linux, Apache, mySQL, and PHP/PERL/Python) stack—a suite of applications often used in web development. This enabled sophisticated websites to be easily constructed, all with open-source tools that were built by enthusiasts, not companies looking for profit. Facebook itself was originally built using open-source PHP.

But being open-source also means that there is no one to hold responsible for misuse of the technology. When vulnerabilities are discovered in obscure bits of open-source technology critical to the functioning of the internet, often there is no entity responsible for fixing the bug. Open-source communities span countries and cultures, making it difficult to ensure that any country’s laws will be respected by the community. And having the technology open-sourced means that those who wish to use it for unintended, illegal, or nefarious purposes have the same access to the technology as anyone else.

This, in turn, has significant implications for those who are looking to regulate this new and powerful technology. Now that the open-source community is remixing LLMs, it’s no longer possible to regulate the technology by dictating what research and development can be done; there are simply too many researchers doing too many different things in too many different countries. The only governance mechanism available to governments now is to regulate usage (and only for those who pay attention to the law), or to offer incentives to those (including startups, individuals, and small companies) who are now the drivers of innovation in the arena. Incentives for these communities could take the form of rewards for the production of particular uses of the technology, or hackathons to develop particularly useful applications. Sticks are hard to use—instead, we need appealing carrots.

It is important to remember that the open-source community is not always motivated by profit. The members of this community are often driven by curiosity, the desire to experiment, or the simple joys of building. While there are companies that profit from supporting software produced by open-source projects like Linux, Python, or the Apache web server, those communities are not profit driven.

And there are many open-source models to choose from. Alpaca, Cerebras-GPT, Dolly, HuggingChat, and StableLM have all been released in the past few months. Most of them are built on top of LLaMA, but some have other pedigrees. More are on their way.

The large tech monopolies that have been developing and fielding LLMs—Google, Microsoft, and Meta—are not ready for this. A few weeks ago, a Google employee leaked a memo in which an engineer tried to explain to his superiors what an open-source LLM means for their own proprietary tech. The memo concluded that the open-source community has lapped the major corporations and has an overwhelming lead on them.

This isn’t the first time companies have ignored the power of the open-source community. Sun never understood Linux. Netscape never understood the Apache web server. Open source isn’t very good at original innovations, but once an innovation is seen and picked up, the community can be a pretty overwhelming thing. The large companies may respond by trying to retrench and pulling their models back from the open-source community.

But it’s too late. We have entered an era of LLM democratization. By showing that smaller models can be highly effective, enabling easy experimentation, diversifying control, and providing incentives that are not profit motivated, open-source initiatives are moving us into a more dynamic and inclusive AI landscape. This doesn’t mean that some of these models won’t be biased, or wrong, or used to generate disinformation or abuse. But it does mean that controlling this technology is going to take an entirely different approach than regulating the large players.

This essay was written with Jim Waldo, and previously appeared on Slate.com.

EDITED TO ADD (6/4): Slashdot thread.

Highlights from Git 2.41

Post Syndicated from Taylor Blau original https://github.blog/2023-06-01-highlights-from-git-2-41/

The open source Git project just released Git 2.41 with features and bug fixes from over 95 contributors, 29 of them new. We last caught up with you on the latest in Git back when 2.40 was released.

To celebrate this most recent release, here’s GitHub’s look at some of the most interesting features and changes introduced since last time.

Improved handling of unreachable objects

At the heart of every Git repository lies a set of objects. For the unfamiliar, you can learn about the intricacies of Git’s object model in this post. In general, objects are the building blocks of your repository. Blobs represent the contents of an individual file, and trees group many blobs (and other trees!) together, representing a directory. Commits tie everything together by pointing at a specific tree, representing the state of your repository at the time when the commit was written.

Git objects can be in one of two states, either “reachable” or “unreachable.” An object is reachable when you can start at some branch or tag in your repository and “walk” along history, eventually ending up at that object. Walking merely means looking at an individual object, and seeing what other objects are immediately related to it. A commit has zero or more other commits which it refers to as parents. Conversely, trees point to many blobs or other trees that make up their contents.

Objects are in the “unreachable” state when there is no branch or tag you could pick as a starting point where a walk like the one above would end up at that object. Every so often, Git decides to remove some of these unreachable objects in order to compress the size of your repository. If you’ve ever seen this message:

Auto packing the repository in background for optimum performance.
See "git help gc" for manual housekeeping.

or run git gc directly, then you have almost certainly removed unreachable objects from your repository.

But Git does not necessarily remove unreachable objects from your repository the first time git gc is run. Since removing objects from a live repository is inherently risky1, Git imposes a delay. An unreachable object won’t be eligible for deletion until it has not been written since a given (via the –prune argument) cutoff point. In other words, if you ran git gc --prune=2.weeks.ago, then:

  • All reachable objects will get collected together into a single pack.
  • Any unreachable objects which have been written in the last two weeks will be stored separately.
  • Any remaining unreachable objects will be discarded.

Until Git 2.37, Git kept track of the last write time of unreachable objects by storing them as loose copies of themselves, and using the object file’s mtime as a proxy for when the object was last written. However, storing unreachable objects as loose until they age out can have a number of negative side-effects. If there are many unreachable objects, they could cause your repository to balloon in size, and/or exhaust the available inodes on your system.

Git 2.37 introduced “cruft packs,” which store unreachable objects together in a packfile, and use an auxiliary *.mtimes file stored alongside the pack to keep track of object ages. By storing unreachable objects together, Git prevents inode exhaustion, and allows unreachable objects to be stored as deltas.

Diagram of a cruft pack, along with its corresponding *.idx and *.mtimes file.

The figure above shows a cruft pack, along with its corresponding *.idx and *.mtimes file. Storing unreachable objects together allows Git to store your unreachable data more efficiently, without worry that it will put strain on your system’s resources.

In Git 2.41, cruft pack generation is now on by default, meaning that a normal git gc will generate a cruft pack in your repository. To learn more about cruft packs, you can check out our previous post, “Scaling Git’s garbage collection.”

[source]

On-disk reverse indexes by default

Starting in Git 2.41, you may notice a new kind of file in your repository’s .git/objects/pack directory: the *.rev file.

This new file stores information similar to what’s in a packfile index. If you’ve seen a file in the pack directory above ending in *.idx, that is where the pack index is stored.

Pack indexes map between the positions of all objects in the corresponding pack among two orders. The first is name order, or the index at which you’d find a given object if you sorted those objects according to their object ID (OID). The other is pack order, or the index of a given object when sorting by its position within the packfile itself.

Git needs to translate between these two orders frequently. For example, say you want Git to print out the contents of a particular object, maybe with git cat-file -p. To do this, Git will look at all *.idx files it knows about, and use a binary search to find the position of the given object in each packfile’s name order. When it finds a match, it uses the *.idx to quickly locate the object within the packfile itself, at which point it can dump its contents.

But what about going the other way? How does Git take a position within a packfile and ask, “What object is this”? For this, it uses the reverse index, which maps objects from their pack order into the name order. True to its name, this data structure is the inverse of the packfile index mentioned above.

representation of the reverse index

The figure above shows a representation of the reverse index. To discover the lexical (index) position of, say, the yellow object, Git reads the corresponding entry in the reverse index, whose value is the lexical position. In this example, the yellow object is assumed to be the fourth object in the pack, so Git reads the fourth entry in the .rev file, whose value is 1. Reading the corresponding value in the *.idx file gives us back the yellow object.

In previous versions of Git, this reverse index was built on-the-fly by storing a list of pairs (one for each object, each pair contains that object’s position in name and packfile order). This approach has a couple of drawbacks, most notably that it takes time and memory in order to materialize and store this structure.

In Git 2.31, the on-disk reverse index was introduced. It stores the same contents as above, but generates it once and stores the result on disk alongside its corresponding packfile as a *.rev file. Pre-computing and storing reverse indexes can dramatically speed-up performance in large repositories, particularly for operations like pushing, or determining the on-disk size of an object.

In Git 2.41, Git will now generate these reverse indexes by default. This means that the next time you run git gc on your repository after upgrading, you should notice things get a little faster. When testing the new default behavior, the CPU-intensive portion of a git push operation saw a 1.49x speed-up when pushing the last 30 commits in torvalds/linux. Trivial operations, like computing the size of a single object with git cat-file --batch='%(objectsize:disk)' saw an even greater speed-up of nearly 77x.

To learn more about on-disk reverse indexes, you can check out another previous post, “Scaling monorepo maintenance,” which has a section on reverse indexes.

[source]


  • You may be familiar with Git’s credential helper mechanism, which is used to provide the required credentials when accessing repositories stored behind a credential. Credential helpers implement support for translating between Git’s credential helper protocol and a specific credential store, like Keychain.app, or libsecret. This allows users to store credentials using their preferred mechanism, by allowing Git to communicate transparently with different credential helper implementations over a common protocol.Traditionally, Git supports password-based authentication. For services that wish to authenticate with OAuth, credential helpers typically employ workarounds like passing the bearer token through basic authorization instead of authenticating directly using bearer authorization.

    Credential helpers haven’t had a mechanism to understand additional information necessary to generate a credential, like OAuth scopes, which are typically passed over the WWW-Authenticate header.

    In Git 2.41, the credential helper protocol is extended to support passing WWW-Authenticate headers between credential helpers and the services that they are trying to authenticate with. This can be used to allow services to support more fine-grained access to Git repositories by letting users scope their requests.

    [source]

  • If you’ve looked at a repository’s branches page on GitHub, you may have noticed the indicators showing how many commits ahead and behind a branch is relative to the repository’s default branch. If you haven’t noticed, no problem: here’s a quick primer. A branch is “ahead” of another when it has commits that the other side doesn’t. The amount ahead it is depends on the number of unique such commits. Likewise, a branch is “behind” another when it is missing commits that are unique to the other side.

    Previous versions of Git allowed this comparison by running two reachability queries: git rev-list --count main..my-feature (to count the number of commits unique to my-feature) and git rev-list --count my-feature..main (the opposite). This works fine, but involves two separate queries, which can be awkward. If comparing many branches against a common base (like on the /branches page above), Git may end up walking over the same commits many times.

    In Git 2.41, you can now ask for this information directly via a new for-each-ref formatting atom, %(ahead-behind:<base>). Git will compute its output using only a single walk, making it far more efficient than in previous versions.

    For example, suppose I wanted to list my unmerged topic branches along with how far ahead and behind they are relative to upstream’s mainline. Before, I would have had to write something like:

    $ git for-each-ref --format='%(refname:short)' --no-merged=origin/HEAD \
      refs/heads/tb |
      while read ref
      do
        ahead="$(git rev-list --count origin/HEAD..$ref)"
        behind="$(git rev-list --count $ref..origin/HEAD)"
        printf "%s %d %d\n" "$ref" "$ahead" "$behind"
      done | column -t
    tb/cruft-extra-tips 2 96
    tb/for-each-ref--exclude 16 96
    tb/roaring-bitmaps 47 3
    

    which takes more than 500 milliseconds to produce its results. Above, I first ask git for-each-ref to list all of my unmerged branches. Then, I loop over the results, computing their ahead and behind values manually, and finally format the output.

    In Git 2.41, the same can be accomplished using a much simpler invocation:

    $ git for-each-ref --no-merged=origin/HEAD \
      --format='%(refname:short) %(ahead-behind:origin/HEAD)' \
      refs/heads/tb/ | column -t
    tb/cruft-extra-tips 2 96
    tb/for-each-ref--exclude 16 96
    tb/roaring-bitmaps 47 3
    [...]
    

    That produces the same output (with far less scripting!), and performs a single walk instead of many. By contrast to earlier versions, the above takes only 28 milliseconds to produce output, a more than 17-fold improvement.

    [source]

  • When fetching from a remote with git fetch, Git’s output will contain information about which references were updated from the remote, like:
    + 4aaf690730..8cebd90810 my-feature -> origin/my-feature (forced update)
    

    While convenient for a human to read, it can be much more difficult for a machine to parse. Git will shorten the reference names included in the update, doesn’t print the full before and after values of the reference being updated, and columnates its output, all of which make it more difficult to script around.

    In Git 2.41, git fetch can now take a new --porcelain option, which changes its output to a form that is much easier to script around. In general, the --porcelain output looks like:

    <flag> <old-object-id> <new-object-id> <local-reference>
    

    When invoked with --porcelain, git fetch does away with the conveniences of its default human readable output, and instead emits data that is much easier to parse. There are four fields, each separated by a single space character. This should make it much easier to script around the output of git fetch.

    [source, source]

  • Speaking of git fetch, Git 2.41 has another new feature that can improve its performance: fetch.hideRefs. Before we get into it, it’s helpful to recall our previous coverage of git rev-list’s --exclude-hidden option. If you’re new around here, don’t worry: this option was originally introduced to improve the performance of Git’s connectivity check, the process that checks that an incoming push is fully connected, and doesn’t reference any objects that the remote doesn’t already have, or are included in the push itself.

    Git 2.39 sped-up the connectivity check by ignoring parts of the repository that weren’t advertised to the pusher: its hidden references. Since these references weren’t advertised to the pusher, it’s unlikely that any of these objects will terminate the connectivity check, so keeping track of them is usually just extra bookkeeping.

    Git 2.41 introduces a similar option for git fetch on the client side. By setting fetch.hideRefs appropriately, you can exclude parts of the references in your local repository from the connectivity check that your client performs to make sure the server didn’t send you an incomplete set of objects.

    When checking the connectedness of a fetch, the search terminates at the branches and tags from any remote, not just the one you’re fetching from. If you have a large number of remotes, this can take a significant amount of time, especially on resource-constrained systems.

    In Git 2.41, you can narrow the endpoints of the connectivity check to focus just on the remote you’re fetching from. (Note that transfer.hideRefs values that start with ! are interpreted as un-hiding those references, and are applied in reverse order.) If you’re fetching from a remote called $remote, you can do this like so:

    $ git -c fetch.hideRefs=refs -c fetch.hideRefs=!refs/remotes/$remote \
    fetch $remote
    

    The above first hides every reference from the connectivity check (fetch.hideRefs=refs) and then un-hides just the ones pertaining to that specific remote (fetch.hideRefs=!refs/remotes/$remote). On a resource constrained machine with repositories that have many remote tracking references, this takes the time to complete a no-op fetch from 20 minutes to roughly 30 seconds.

    [source]

  • If you’ve ever been on the hunt for corruption in your repository, you are undoubtedly aware of git fsck. This tool is used to check that the objects in your repository are intact and connected. In other words, that your repository doesn’t have any corrupt or missing objects.git fsck can also check for more subtle forms of repository corruption, like malicious looking .gitattributes or .gitmodules files, along with malformed objects (like trees that are out of order, or commits with a missing author). The full suite of checks it performs can be found under the fsck. configuration.

    In Git 2.41, git fsck learned how to check for corruption in reachability bitmaps and on-disk reverse indexes. These checks detect and warn about incorrect trailing checksums, which indicate that the preceding data has been mangled. When examining on-disk reverse indexes, git fsck will also check that the *.rev file holds the correct values.

    To learn more about the new kinds of fsck checks implemented, see the git fsck documentation.

    [source, source]

The whole shebang

That’s just a sample of changes from the latest release. For more, check out the release notes for 2.41, or any previous version in the Git repository.

Notes


  1. The risk is based on a number of factors, most notably that a concurrent writer will write an object that is either based on or refers to an unreachable object. This can happen when receiving push whose content depends on an object that git gc is about to remove. If a new object is written which references the deleted one, the repository can become corrupt. If you’re curious to learn more, this section is a good place to start. 

AWS Week in Review – AWS Wickr, Amazon Redshift, Generative AI, and More – May 29, 2023

Post Syndicated from Donnie Prakoso original https://aws.amazon.com/blogs/aws/aws-week-in-review-aws-wickr-amazon-redshift-generative-ai-and-more-may-29-2023/

This edition of Week in Review marks the end of the month of May. In addition, we just finished all of the in-person AWS Summits in Asia-Pacific and Japan starting from AWS Summit Sydney and AWS Summit Tokyo in April to AWS Summit ASEAN, AWS Summit Seoul, and AWS Summit Mumbai in May.

Thank you to everyone who attended our AWS Summits in APJ, especially the AWS Heroes, AWS Community Builders, and AWS User Group leaders, for your collaboration in supporting activities at AWS Summit events.

Last Week’s Launches
Here are some launches that caught my attention last week:

AWS Wickr is now HIPAA eligible — AWS Wickr is an end-to-end encrypted enterprise messaging and collaboration tool that enables one-to-one and group messaging, voice and video calling, file sharing, screen sharing, and location sharing, without increasing organizational risk. With this announcement, you can now use AWS Wickr for workloads that are within the scope of HIPAA. Visit AWS Wickr to get started.

Amazon Redshift announces support for auto-commit statements in stored procedure — If you’re using stored procedures in Amazon Redshift, you now have enhanced transaction controls that enable you to automatically commit the statements inside the procedure. This new NONATOMIC mode can be used to handle exceptions inside a stored procedure. You can also use the new PL/pgSQL statement RAISE to programmatically raise the exception, which helps prevent disruptions in applications due to an error inside a stored procedure. For more information on using this feature, refer to Managing transactions.

AWS Chatbot supports access to Amazon CloudWatch dashboards and logs insights in chat channels — With this launch, you now can receive Amazon CloudWatch alarm notifications for an incident directly in your chat channel, analyze the diagnostic data from the dashboards, and remediate directly from the chat channel without switching context. Visit the AWS Chatbot page to learn more.

For a full list of AWS announcements, be sure to keep an eye on the What’s New at AWS page.

AWS Open Source Updates
As always, my colleague Ricardo has curated the latest updates for open source news at AWS. Here are some of the highlights:

OpenEMR on AWS Fargate — OpenEMR is a popular Electronic Health and Medical Practice management solution. If you’re looking to deploy OpenEMR on AWS, then this repo will help you to get your OpenEMR up and running on AWS Fargate using Amazon ECS.

Cloud-Radar — If you’re working with AWS Cloudformation and looking for performing unit tests, then you might want to try Cloud-Radar. You can also perform functional testing with Cloud-Radar as this tool also acts a wrapper around Taskcat.

Amazon and Generative AI
Using generative AI to improve extreme multilabel classification — In their research on extreme multilabel classification (XMC), Amazon scientists explored a generative approach, in which a model generates a sequence of labels for input sequences of words. The generative models with clustering consistently outperformed them. This demonstrates the effectiveness of incorporating hierarchical clustering in improving XMC performance.

Upcoming AWS Events
Don’t miss upcoming AWS-led events happening soon:

Also, let’s learn from our fellow builders and give them support by attending AWS Community Days:

That’s all for this week. Check back next Monday for another Week in Review!

Happy building
— Donnie

This post is part of our Week in Review series. Check back each week for a quick roundup of interesting news and announcements from AWS!

VeloCON 2023: Submissions Wanted!

Post Syndicated from Carlos Canto original https://blog.rapid7.com/2023/05/23/velocon-2023-submissions-wanted/

VeloCON 2023: Submissions Wanted!

Rapid7 is thrilled to announce that the 2nd annual VeloCON virtual summit will be held this September (date TBD), with times oriented to the continental USA time zones. Once again, the conference will be online and completely free!

VeloCON is a one-day event focused on the Velociraptor community. It’s a place to share experiences in using and developing Velociraptor to address the needs of the wider DFIR community and an opportunity to take a look ahead at the future of our platform.

This year’s event calls for even more of the stimulating and informative content that made last year’s VeloCON so much fun. Don’t miss your chance at being a part of this year’s marquee event of the open-source DFIR calendar.

The call for presentations closes Monday, July 17, 2023 (see details below).

Last year’s event was a tremendous success, with over 500 unique participants enjoying our lineup of fascinating discussions, tech talks and the opportunity to get to know real members of our own community.

Call for presentations (CFP)

VeloCON invites contributions in the form of a 30-45 minute presentation. We require a brief proposal (~500 words; not a paper). These proposals undergo a review process to select presentations of maximum interest to VeloCON attendees and the wider Velociraptor community and to filter out sales pitches.

VeloCON focuses on work that pushes the envelope of what is currently possible using Velociraptor. Potential topics to be addressed by submissions include, but are not limited to:

  • Use cases of Velociraptor in real investigations
  • Novel deployment modes to cater for specific requirements
  • Contributions to Velociraptor to address new capabilities
  • Potential future ideas and features that Velociraptor
  • Integration of Velociraptor with other tools/frameworks
  • Analysis and acquisition on novel Forensic Artifacts

Submission process

Please email your submission to [email protected] and include the following details:

  1. Your name and email address (if different from the sending email)
  2. Company/affiliation and title to be included on the agenda
  3. Presentation title
  4. A short abstract (~500 words) to be included in the agenda

Deadline

Submissions are due Monday, July 17, 2023 and a decision will be announced shortly afterwards.

AWS Week in Review – New Open-Source Updates for Snapchange, Cedar, and Jupyter Community Contributions – May 15, 2023

Post Syndicated from Channy Yun original https://aws.amazon.com/blogs/aws/aws-week-in-review-new-open-source-updates-for-snapchange-cedar-and-jupyter-community-contributions-may-15-2023/

A new week has begun. Last week, there was a lot of news related to AWS. I have compiled a few announcements you need to know. Let’s get started right away!

Last Week’s Launches
Let’s take a look at some launches from the last week that I want to remind you of:

New Amazon EC2 I4g Instances – Powered by AWS Graviton2 processors, Amazon Elastic Compute Cloud (Amazon EC2) I4g instances improve real-time storage performance up to 2x compared to prior generation storage-optimized instances. Based on AWS Nitro SSDs that are custom-built by AWS and reduce both latency and latency variability, I4g instances are optimized for workloads that perform a high mix of random read/write and require very low I/O latency, such as transactional databases and real-time analytics. To learn more, see Jeff’s post.

Amazon Aurora I/O-Optimized – You can now choose between two storage configurations for Amazon Aurora DB clusters: Aurora Standard or Aurora I/O-Optimized. For applications with low-to-moderate I/Os, Aurora Standard is a cost-effective option.

For applications with high I/Os, Aurora I/O-Optimized provides improved price performance, predictable pricing, and up to 40 percent costs savings. To learn more, see my full blog post.

AWS Management Console Private Access – This is a new security feature that allows you to limit access to the AWS Management Console from your Virtual Private Cloud (VPC) or connected networks to a set of trusted AWS accounts and organizations. It is built on VPC endpoints, which use AWS PrivateLink to establish a private connection between your VPC and the console.

https://docs.aws.amazon.com/images/awsconsolehelpdocs/latest/gsg/images/console-private-access-verify.png

AWS Management Console Private Access is useful when you want to prevent users from signing in to unexpected AWS accounts from within your network. To learn more, see the AWS Management Console getting started guide.

One-Click Security Protection on the Amazon CloudFront Console – You can now secure your web applications and APIs with AWS WAF with a single click on the Amazon CloudFront console. CloudFront handles creating and configuring AWS WAF for you with out-of-the-box protections recommended by AWS and this simple and convenient way to protect applications at the time you create or edit your distribution.

You may continue to select a preconfigured AWS WAF web access control list (ACL) when you prefer to use an existing web ACL. To learn more, see Using AWS WAF to control access to your content in the AWS documentation.

Tracing AWS Lambda SnapStart Functions with AWS X-Ray – You can use AWS X-Ray traces to gain deeper visibility into your function’s performance and execution lifecycle, helping you identify errors and performance bottlenecks for your latency-sensitive Java applications built using SnapStart-enabled functions.

With X-Ray support for SnapStart-enabled functions, you can now see trace data about the restoration of the execution environment and execution of your function code. You can enable X-Ray for Java-based SnapStart-enabled Lambda functions running on Amazon Corretto 11 or 17. To learn more about X-Ray for SnapStart-enabled functions, visit the Lambda Developer Guide or read Marcia’s blog post.

For a full list of AWS announcements, be sure to keep an eye on the What’s New at AWS page.

Open Source Updates
Last week, we introduced new open-source projects and significant roadmap contributions to the Jupyter community.

Snapchange – Snapchange is a new open-source project to make fuzzing of a memory snapshot easier using KVM written by Rust. Snapchange enables a target binary to be fuzzed with minimal modifications, providing useful introspection that aids in fuzzing. Snapchange utilizes the features of the Linux kernel’s built-in virtual machine manager known as kernel virtual machine or KVM. To learn more, see the announcement post and GitHub repository.

Cedar – Cedar is a new open-source language for defining permissions as policies, which describes who should have access to what, and evaluating those policies. You can use Cedar to control access to resources such as photos in a photo-sharing app, compute nodes in a microservices cluster, or components in a workflow automation system. Cedar is also authorization-policy language used by the Amazon Verified Permissions, a scalable, fine-grained permissions management and authorization service for custom applications and AWS Verified Access managed services to validate each application request before granting access. To learn more, see the announcement post , Amazon Science blog post and Cedar playground to test sample policies.

Jupyter Community Contributions – We announced new contributions to Jupyter community to democratize generative artificial intelligence (AI) and scale machine learning (ML) workloads. We contributed two Jupyter extensions – Jupyter AI to bring generative AI to Jupyter notebooks and Amazon CodeWhisperer Jupyter extension to generate code suggestions for Python notebooks in JupyterLab. We also contributed three new capabilities to help you scale ML development faster: notebooks scheduling, SageMaker open-source distribution, and Amazon CodeGuru Jupyter extension. To learn more, see the announcement post and Jupyter on AWS.

To learn about weekly updates for open source at AWS, check out the latest AWS open source newsletter by Ricardo.

Upcoming AWS Events
Check your calendars and sign up for these AWS-led events:

AWS Serverless Innovation Day on May 17 – Join us for a free full-day virtual event to learn about AWS Serverless technologies and event-driven architectures from customers, experts, and leaders. Marcia outlined the agenda and main topics of this event in her post. You can register on the event page.

AWS Data Insights Day on May 24 – Join us for another virtual event to discover ways to innovate faster and more cost-effectively with data. Whether your data is stored in operational data stores, data lakes, streaming engines, or within your data warehouse, Amazon Redshift helps you achieve the best performance with the lowest spend. This event focuses on customer voices, deep-dive sessions, and best practices of Amazon Redshift. You can register on the event page.

AWS Silicon Innovation Day on June 21 – Join AWS leaders and experts showcasing AWS innovations in custom-designed EC2 chips built for high performance and scale in the cloud. AWS has designed and developed purpose-built silicon specifically for the cloud. You can understand AWS Silicons and how they can use AWS’s unique EC2 chip offerings to their benefit. You can register on the event page.

AWS re:Inforce 2023 – You can still register for AWS re:Inforce, in Anaheim, California, June 13–14.

AWS Global Summits – Sign up for the AWS Summit closest to your city: Hong Kong (May 23), India (May 25), Amsterdam (June 1), London (June 7), Washington DC (June 7-8), Toronto (June 14), Madrid (June 15), and Milano (June 22).

AWS Community Day – Join community-led conferences driven by AWS user group leaders closest to your city: Chicago (June 15), and Philippines (June 29–30).

You can browse all upcoming AWS-led in-person and virtual events, and developer-focused events such as AWS DevDay.

That’s all for this week. Check back next Monday for another Week in Review!

Channy

This post is part of our Week in Review series. Check back each week for a quick roundup of interesting news and announcements from AWS!