Tag Archives: Security Blog

Managing identity source transition for AWS IAM Identity Center

Post Syndicated from Xiaoxue Xu original https://aws.amazon.com/blogs/security/managing-identity-source-transition-for-aws-iam-identity-center/

AWS IAM Identity Center manages user access to Amazon Web Services (AWS) resources, including both AWS accounts and applications. You can use IAM Identity Center to create and manage user identities within the Identity Center identity store or to connect seamlessly to other identity sources.

Organizations might change the configuration of their identity source in IAM Identity Center for various reasons. These include switching identity providers (IdPs), expanding their identity footprint, adopting new features, and so on. These transitions can disrupt user access and require planning to minimize downtime.

In this blog post, we walk you through the process of switching from one identity source to another and provide sample code that you can use to assist with the transition.

Background

The identity source configured in IAM Identity Center determines where users and groups are created and managed. Each organization can connect to only one identity source at a time. Identity Center supports three main identity source options:

  1. Identity Center directory: This is the default identity store for IAM Identity Center. You can use it to directly create and administer your users and groups within Identity Center without relying on an external provider.
  2. Active Directory: You can configure integration with an on-premises Active Directory or with AWS Managed Microsoft AD using AWS Directory Service. This integration enables you to use your existing Active Directory identities and group memberships.
  3. External IdP: You can continue using your current third-party IdPs that support SAML 2.0, such as Okta Universal Directory or Microsoft Entra ID (formerly Azure AD).

Understanding these identity source options can help you choose the source that best fits your user management needs based on your existing infrastructure and authentication requirements.

Figure 1 explains the flow of users and groups accessing AWS resources. This access is granted through the following:

Figure 1: Granting access to AWS resources for users and groups managed by an identity source in IAM Identity Center

Figure 1: Granting access to AWS resources for users and groups managed by an identity source in IAM Identity Center

When you change the identity source, the work required varies depending on the original and new sources. AWS documentation details these considerations. In minimal impact scenarios, assignments remain intact, although you need to force password resets or verify correct assertions from the new source. More disruptive scenarios delete users, groups, and their assignments. In those scenarios, you need to restore the deleted entries after changing the identity source.

Sample deployment

This deployment covers permission sets and application assignments’ backup and restore. These scripts associate assignments with unique user attributes such as UserName, and group attributes such as DisplayName. Attributes that might change during the user and group restoration process, such as UserId and GroupId, aren’t used.

What isn’t covered includes users, groups, permission sets, and applications backup and restore.

  • Users and groups backup and restore aren’t covered because they depend heavily on the format of the source and target IdPs.
  • Because we’re working with identity source switching, the permission sets will remain unchanged and applications will not be deleted.
  • If you’re changing IdPs as part of an AWS Region , the IAM Identity Center instance will be deleted. The applications and permission sets will be deleted in addition to assignments. In this case, you must redeploy the applications. See How to automate the review and validation of permissions for users and groups in AWS IAM Identity Center for information about backing up permission sets.

The sample scripts and detailed steps are available on GitHub.

Note: This solution is available in the GitHub aws-samples repository. You can report bugs or make feature requests through GitHub Issues. The builders of this solution can help with GitHub issues. Enterprise Support customers can reach out to their Technical Account Manager (TAM) for further questions or feature requests.

Walkthrough

In this section, we walk you through the process of transitioning to a new identity source in IAM Identity Center.

Step 1: Backup users, groups, and assignments from the current identity source

This step is critical to preserve users’ information and their associated access scope.

How to backup users and groups:

Note: For some external IdPs, there are native integrations with Active Directory, such as Okta AD integration and Ping One AD Connect. You can set up a native integration and sync users and groups data without needing to backup and restore that data.

Assignments can be backed up by running the backup.py file from GitHub. Replace <IDC_STORE_ID> with your Identity Store ID (it looks like d-1234567890), and replace <IDC_ARN> with the Amazon Resource Name (ARN) for your IAM Identity Center instance.

python3 backup.py --idc-id <IDC_STORE_ID> --idc-arn <IDC_ARN>

This script uses both IAM Identity Center APIs and Identity Store APIs as shown in Figure 2 that generates permission set assignments backup files (UserAssignments.json and GroupAssignments.json) and an application assignments backup file (AppAssignments.json).

Figure 2: APIs used for backing up assignments

Figure 2: APIs used for backing up assignments

Step 2: Restore and validate the backed-up users and groups in the target identity source

The target will become the new authoritative identity source. When done, verify that the group memberships and attributes have been correctly transferred.

  • If the target is an IAM Identity Center directory, use APIs such as CreateUser, CreateGroup, and CreateGroupMembership to restore from the previous backup file.
  • If the target is Active Directory or an external IdP, use the corresponding native import features or integration tools to restore.

Step 3: Configure IAM Identity Center to connect to the new identity source and synchronize users and groups

Update your IAM Identity Center configuration to point to the new source. If applicable, use tools such as configurable AD sync or automatic provisioning with SCIM to synchronize your restored identities.

WARNING: While the directory is being rebuilt, your users will not have access to AWS accounts or applications through IAM Identity Center until all assignments are restored in Step 4.

Step 4: Restore assignments to users and groups in the new identity source

The APIs used to restore assignments are as shown in Figure 3.

Figure 3: APIs used for restoring assignments

Figure 3: APIs used for restoring assignments

Assignments can be restored by running the restore.py file from GitHub. Replace <NEW_IDC_STORE_ID> with your newly configured Identity Store ID (it looks like d-1234567890) and replace <IDC_ARN> with the ARN for your IAM Identity Center instance.

python3 restore.py --idc-id <NEW_IDC_STORE_ID> --idc-arn <IDC_ARN>

This script uses the APIs illustrated in Figure 2 and picks up backup files (UserAssignments.json, GroupAssignments.json, and AppAssignments.json) from Step 1 by default. Account permission set assignment results are automatically retrieved five times using exponential backoff. If the result is other than SUCCEEDED after five retries, the principal ID will be marked as failed and exported in error logs.

Note: For AWS managed applications that maintain a separate identity source, using the CreateApplicationAssignments API to restore application assignments will not preserve user access. These applications typically have dependencies on the original identity source ID, or dependencies on UserId and GroupId from the original identity source. This dependency is represented by importing users or groups from IAM Identity Center during the AWS managed application creation process. Example AWS managed applications include Amazon SageMaker Studio and Amazon Q Developer. These applications must be restored on a case-by-case basis and can require redeployment of the application.

Step 5: Validate user access using the new identity source

Make sure that users can still access the expected accounts and applications.

Conclusion

Transitioning your identity source in IAM Identity Center requires careful planning and implementation. This post outlined the steps to manage this transition. By following these steps, you can streamline the transition process, providing a smooth and efficient transfer of user access with minimal downtime. To get started, see the GitHub repository. For related posts, visit the AWS Security Blog channel and search for IAM Identity Center.

 
If you have feedback about this post, submit comments in the Comments section below. If you have questions about this post, contact AWS Support.
 

Xiaoxue Xu
Xiaoxue Xu

Xiaoxue Xu is a Solutions Architect for AWS based in Toronto. She primarily works with Financial Services customers to help secure their workload and design scalable solutions on the AWS Cloud.
Kanwar Bajwa
Kanwar Bajwa

Kanwar Bajwa is a Principal Technical Account Manager at AWS who works with customers to optimize their use of AWS services and achieve their business objectives.
Yee Fei Ooi
Yee Fei Ooi

Yee Fei is a Solutions Architect supporting independent software vendor (ISV) customers in Singapore and is part of the Containers TFC. She enjoys helping her customers to grow their businesses and build solutions that automate, innovate, and improve efficiency.

2024 H1 IRAP report is now available on AWS Artifact for Australian customers

Post Syndicated from Patrick Chang original https://aws.amazon.com/blogs/security/2024-h1-irap-report-is-now-available-on-aws-artifact-for-australian-customers/

Amazon Web Services (AWS) is excited to announce that a new Information Security Registered Assessors Program (IRAP) report (2024 H1) is now available through AWS Artifact. An independent Australian Signals Directorate (ASD) certified IRAP assessor completed the IRAP assessment of AWS in August 2024.

The new IRAP report includes an additional seven AWS services that are now assessed at the PROTECTED level under IRAP. This brings the total number of services assessed at the PROTECTED level to 158.

The following are the seven newly assessed services:

For the full list of services, see the IRAP tab on the AWS Services in Scope by Compliance Program page.

Many Australian customers are looking to experiment with how generative AI applications can help them better serve the Australian public. Customers can use two of the newly assessed services—Amazon Bedrock and Amazon DataZone—to help align with their governance, sovereignty, and security requirements up to the PROTECTED level:

  • Amazon Bedrock is a fully managed service that offers a choice of high-performing large language models (LLMs) and other foundation models (FMs) from leading AI companies like AI21 Labs, Anthropic, Cohere, Meta, Mistral AI, Stability AI, as well as Amazon through a single API. Amazon Bedrock also provides a broad set of capabilities customers need to build generative AI applications with security, privacy, and responsible AI.
  • Amazon DataZone is a data management service that makes it faster and simpler for customers to catalog, discover, share, and govern data stored across AWS, on premises, and third-party sources.

AWS has developed an IRAP documentation pack to help Australian customers and their partners to plan, architect, and assess risk for their workloads when they use AWS Cloud services.

We developed this pack in accordance with the Australian Cyber Security Centre (ACSC) Cloud Security Guidance and Cloud Assessment and Authorisation framework, which addresses guidance within the Australian Government’s Information Security Manual (ISM, September 2023 version), the Department of Home Affairs’ Protective Security Policy Framework (PSPF), and the Digital Transformation Agency’s Secure Cloud Strategy.

The IRAP pack on AWS Arti­­fact also includes newly updated versions of the AWS Consumer Guide and the whitepaper Reference Architectures for ISM PROTECTED Workloads in the AWS Cloud.

Reach out to your AWS representatives to let us know which additional services you would like to see in scope for upcoming IRAP assessments. We strive to bring more services into scope at the PROTECTED level under IRAP to support your requirements.

 
If you have feedback about this post, submit comments in the Comments section below. If you have questions about this post, contact AWS Support.
 

Patrick Chang
Patrick Chang

Patrick is the APJ Audit Lead based in Sydney. He leads security audits, certifications, and compliance programs across the APJ region. He is a technology risk and audit professional with over a decade of experience. He is passionate about delivering assurance programs that build trust with customers and provide them assurance on cloud security.

How AWS WAF threat intelligence features help protect the player experience for betting and gaming customers

Post Syndicated from Harith Gaddamanugu original https://aws.amazon.com/blogs/security/how-aws-waf-threat-intelligence-features-help-protect-the-player-experience-for-betting-and-gaming-customers/

The betting and gaming industry has grown into a data-rich landscape that presents an enticing target for sophisticated bots. The sensitive personally identifiable information (PII) that is collected and the financial data involved in betting and in-game economies is especially valuable. Microtransactions and in-game purchases are frequently  targeted, making them an ideal case for safeguarding with AWS WAF.

In this blog post, we’ll explore some of these threats in more detail and explain how a layered bot mitigation strategy that uses AWS WAF can minimize the risk and impact of bot activity.

Understanding common automated threats

Automations deployed by threat actors can perform web scraping, perform betting arbitrage to gain an unfair advantage, and use automated techniques to undermine fair competition. Aggressive web scraping can also lead to application overload, service disruptions, and degraded user experience. At AWS, we routinely identify and mitigate automated threats for betting and gaming customers. Some of the common tactics we see in this space include the following:

Scraping tactics

Scraper bots often use fake accounts or compromised credentials to systematically harvest betting odds and other competitive data from multiple sites. A common example of scraping is arbitrage betting, where the scraped data is used to place simultaneous bets in different venues in order to make profits from tiny differences in the asset’s listed price. There are also competitive scraper bots that use this data to improve their betting applications.

Account-related tactics

Account creation fraud aims at claiming sign-up bonuses or other incentives at scale by using bot-generated accounts. Account takeover fraud aims at logging into user accounts to change account details, make purchases, withdraw funds, steal personal information or loyalty points, or use this data to access other accounts on different websites. A common form of this tactic is automated brute force login techniques, such as credential stuffing.

Denial-of-service tactics

Volumetric floods can cause betting and gaming sites to experience slow page-loads, downtime, and damaged brand reputation. DDoS attacks are another common security concern for many customers.

In-game tactics

In-game bots can use automated cheating or expediting techniques to manipulate resources and gain unfair advantages. These bots typically manipulate client applications and make malicious API requests.

AWS WAF intelligent threat mitigation features

To help protect customers from such automated tactics, AWS WAF offers the following intelligent threat mitigation features.

AWS WAF Common Bot Control managed rule group

The AWS WAF Common Bot Control managed rule group uses static analysis to identify web requests and header information that is correlated with known good bots and bad bots. These techniques are helpful in detecting a variety of self-identifying bots, such as web scraping frameworks, search engines, and automated browsers. Using these predetermined patterns and signatures can help gaming customers to identify and block known bot behaviors.

CAPTCHA and challenge rule actions

CAPTCHA rule action – Configured rules in AWS WAF can have a CAPTCHA action. When a rule is configured with a CAPTCHA action, users are required to solve a puzzle to prove that a human being is sending the request. When a user successfully solves a CAPTCHA challenge, a token is placed on their browser so it won’t challenge future requests, using a configurable immunity time. Learn about best practices for configuring CAPTCHA.

Challenge rule action – Challenge scripts run a silent challenge that requires the client session to verify that it’s a browser and not a bot. The verification runs in the background without involving the end user. Challenge-based bot detection can check each visitor’s ability to run JavaScript and store cookies. When a challenge is solved correctly, AWS WAF vends out an AWS WAF token, as seen in Figure 1, which allows bot control to track user activity across sessions. A reduced ability to process these challenges is a sign of bot traffic. The challenge action is a good option for verifying clients that you suspect of being invalid. You can use this feature by setting a selected AWS WAF rule action to CHALLENGE or by using a targeted bot control managed rule group. To learn more about protecting against bots with the AWS WAF challenge and CAPTCHA actions, see this blog post.

Figure 1: A sequence diagram explaining the flow of requests when Challenge is set as a rule action for an AWS WAF rule

Figure 1: A sequence diagram explaining the flow of requests when Challenge is set as a rule action for an AWS WAF rule

Client application integration

AWS WAF provides the following levels of integration.

Intelligent threat integration

To improve the user experience and reduce latency for mobile and API-driven applications, AWS WAF provides client-side application APIs to integrate with your application. These integrations help verify that the client applications that send web requests to your protected resources are the intended clients and that your end users are human beings. This functionality is available for JavaScript and for Android and iOS mobile applications. As shown in Figure 2, the token acquisition process is similar to a challenge action, but slightly different. The basic approach for using the SDK is to create a token provider by using a configuration object, then to use the token provider to retrieve tokens from AWS WAF. By default, the token provider includes the retrieved tokens in your web requests to your protected resource. The intelligent threat integration APIs work with web access control lists (ACLs) that use the intelligent threat rule groups to enable the full functionality of these advanced managed rule groups. You can use the AWS WAF mobile SDKs to implement AWS WAF intelligent threat integration SDKs for Android and iOS mobile applications.

Figure 2: A sequence diagram explaining the flow of requests when AWS WAF intelligent threat mitigation SDKs are configured

Figure 2: A sequence diagram explaining the flow of requests when AWS WAF intelligent threat mitigation SDKs are configured

CAPTCHA JavaScript integration

You can also verify end users by making them solve customized CAPTCHA puzzles that you manage in your application. This is similar to the functionality provided by the AWS WAF CAPTCHA rule action, but with added control over the puzzle placement and behavior. This integration uses the JavaScript intelligent threat integration to run silent challenges and provide AWS WAF tokens to the customer’s page.

AWS WAF Targeted Bot Control

The AWS WAF Targeted Bot Control tier includes the common-level protections described earlier and adds targeted detection for sophisticated bots that don’t self-identify. Targeted protections mitigate bot activity by using a combination of rate limiting and CAPTCHA and background browser challenges. Targeted protections use detection techniques such as the following:

  • Implementing browser fingerprinting – Browser fingerprinting is a powerful tracking and identification technique employed by online gaming sites to gain deep insights into their players’ computing setups. This technique involves probing the unique characteristics and configuration of each gamer’s browser. By collecting dozens of browser data points, a fingerprint can be generated that allows the requests coming from that specific browser to be identified and tracked across gaming sessions. Even if players try to randomize or spoof some browser attributes, perhaps in an attempt to bypass certain restrictions or gain an unfair advantage, the overall fingerprint still allows detection of such attempts. For example, if the user agent claims to be Chrome on Windows but other fingerprint attributes indicate Linux and Firefox, that suggests an attempted spoofing by the player, which can then be flagged by the gaming site’s security measures.

    By using browser fingerprinting and looking for discrepancies, gaming and betting sites gain tools to help detect and block sophisticated bots even when the bots try to mask their true identity and intent. AWS WAF uses tokens for detecting browser inconsistencies, such as when the characteristics of a browser do not match the user agent. The AWS Targeted Bot Control rule group offers this functionality by emitting labels like TGT_SignalBrowserInconsistency, and the recommended mitigation action for inconsistent browsers is to serve a CAPTCHA puzzle.

  • Detecting browser automation – Many threat actors who operate automated programs use scripting languages to carry out their tasks, such as data scraping or launching exploits. They often employ tools that mimic the behavior of a web browser to bypass security measures. To address these challenges, AWS WAF Bot Control offers solutions to help detect and block automated software that simulates browser activity. It uses specific rules like TGT_SignalAutomatedBrowser to examine requests for signs that suggest the browser is not operated by a human, helping to identify and mitigate potential threats from automated systems.
  • Understand normal volumetric activity with unique browser ID tracking – AWS WAF Targeted Bot Control monitors application visitors by assigning each one a unique browser ID (UBID) embedded in a token. It establishes baselines for the number of requests a client sends within a five-minute session and sets three thresholds per device: high, medium, and low. The system identifies clients that exceed normal request rates and challenges them with a CAPTCHA puzzle using the TGT_VolumetricSession rule. For verified bots, the rule group takes no action but labels the traffic with awswaf:managed:aws:bot-control:bot:verified.
  • Using real-time machine learning models for clustering and behavior analysis – Traditional solutions to fight advanced bots faced limitations: handling massive amounts of player traffic, accurately identifying bots without labeling every request (ground truth), and staying cost-effective. To address these challenges, the AWS WAF team created a machine learning model. This model finds hidden bot networks by analyzing patterns in website traffic. It automatically analyzes traffic statistics to identify suspicious activity that suggests coordinated bot activity.

    The model aggregates data at different levels, including the client, session, and behavioral cluster levels. It uses features like session statistics, behavioral cluster information (derived from clustering), and relative entropy to identify suspicious behavior. This feature analyzes web traffic every few minutes and optimizes the analysis for the detection of low intensity, long-duration bots that are distributed across many IP addresses. AWS WAF emits the labels TGT_ML_CoordinatedActivityMedium and TGT_ML_CoordinatedActivityHigh, based on the confidence level of the detection.

    This machine learning capability is included by default in the AWS WAF Targeted Bot Control rules, but you can choose to disable it if needed.

AWS WAF Fraud Control: Account creation fraud prevention

Fraudulent account creation involves the creation of fake accounts for activities such as bonus abuse, impersonation, and phishing. These fake accounts can damage your reputation and expose you to financial fraud. To help prevent account creation fraud, we recommend using the AWS WAF Fraud Control account creation fraud prevention (ACFP) feature. This feature is available in the AWS Managed Rules rule group AWSManagedRulesACFPRuleSet, along with companion application integration SDKs. By integrating this feature into your system, you can effectively monitor and control account creation attempts, helping to provide a safer and more secure environment for your customers.

AWS WAF Fraud Control: Account takeover prevention

Threat actors might try to gain unauthorized access to a player’s account by using stolen credentials, guessing passwords through brute-force exploits, or other means. After they gain access, they can steal money, information, or services, or even pose as the victim to gain access to other accounts. This can lead to financial loss and damage to your reputation. To help prevent account takeovers, we recommend using the AWS WAF Fraud Control account takeover prevention (ATP) feature. This feature is available in the AWS Managed Rules rule group AWSManagedRulesATPRuleSet, along with companion application integration SDKs.

Conclusion

Bot management involves choosing controls to identify traffic coming from bots, and then blocking undesired traffic. The more threat actors are motivated to target a web application, the more they will invest in detection evasion techniques, requiring more advanced mitigation capabilities. We recommend that you adopt a layered approach to managing bots, with differentiated tooling that is adapted to specific bot tactics.

Ready to start putting the tools in place to protect your gaming or betting application from sophisticated bot threats? Check out our solution overview guide for AWS WAF and the Implementing a bot control strategy on AWS whitepaper to learn more about deploying a layered bot mitigation strategy on AWS. You can also sign up for an AWS Activation Day to work directly with our experts on implementing capabilities like AWS WAF, AWS WAF Bot Control, and AWS Shield for your specific use case. For hands-on experience, try our bot mitigation workshops—you can enable managed rule groups like Bot Control in just a few steps. Start your proof-of-concept by contacting your AWS account representative today.

 
If you have feedback about this post, submit comments in the Comments section below. If you have questions about this post, contact AWS Support.
 

Harith Gaddamanugu
Harith Gaddamanugu

Harith is a Senior Edge Specialist Solutions Architect at AWS, specializing in AWS Perimeter Protection and Edge services. With over a decade of experience in network engineering, content delivery networks, and security, he helps customers improve their application security and performance. Outside of work, Harith enjoys spending time outdoors with friends and family.
Kaustubh Phatak
Kaustubh Phatak

Kaustubh is a seasoned product leader with over 11 years of experience in developing scalable solutions and driving operational excellence. He currently leads the AWS WAF Bot Control and Fraud Control initiatives, where he helps to develop cutting-edge security solutions that protect applications. Kaustubh is passionate about sports, particularly soccer and cricket, and loves spending time with his wife and kid.

Six tips to improve the security of your AWS Transfer Family server

Post Syndicated from John Jamail original https://aws.amazon.com/blogs/security/six-tips-to-improve-the-security-of-your-aws-transfer-family-server/

AWS Transfer Family is a secure transfer service that lets you transfer files directly into and out of Amazon Web Services (AWS) storage services using popular protocols such as AS2, SFTP, FTPS, and FTP. When you launch a Transfer Family server, there are multiple options that you can choose depending on what you need to do. In this blog post, I describe six security configuration options that you can activate to fit your needs and provide instructions for each one.

Use our latest security policy to help protect your transfers from newly discovered vulnerabilities

By default, newly created Transfer Family servers use our strongest security policy, but for compatibility reasons, existing servers require that you update your security policy when a new one is issued. Our latest security policy, including our FIPS-based policy, can help reduce your risks of known vulnerabilities such as CVE-2023-48795, also known as the Terrapin Attack. In 2020, we had already removed support for the ChaCha20-Poly1305 cryptographic construction and CBC with Encrypt-then-MAC (EtM) encryption modes, so customers using our later security policies did not need to worry about the Terrapin Attack. Transfer Family will continue to publish improved security policies to offer you the best possible options to help ensure the security of your Transfer Family servers. See Edit server details for instructions on how to update your Transfer Family server to the latest security policy.

Use slashes in session policies to limit access

If you’re using Amazon Simple Storage Service (Amazon S3) as your data store with a Transfer Family server, the session policy for your S3 bucket grants and limits access to objects in the bucket. Amazon S3 is an object store and not a file system, so it has no concept of directories, only prefixes. You cannot, for example, set permissions on a directory the way you might on a file system. Instead, you set session policies on prefixes.

Even though there isn’t a file system, the slash character still plays an important role. Imagine you have a bucket named DailyReports and you’re trying to authorize certain entities to access the objects in that bucket. If your session policy is missing a slash in the Resource section, such as arn:aws:s3:::$DailyReports*, then you should add a slash to make it arn:aws:s3:::$DailyReports/*. Without the slash (/) before the asterisk (*), your session policy might allow access to buckets you don’t intend. For example, if you also have buckets named DailyReports-archive and DailyReports-testing, then a role with permission arn:aws:s3:::$DailyReports* will also grant access to objects in those buckets, which is probably not what you want. A role with permission arn:aws:s3:::$DailyReports/* won’t grant access to objects in your DailyReports-archive bucket, because the slash (/) makes it clear that only objects whose prefix begins with DailyReports/ will match, and all objects in DailyReports-archive will have a prefix of DailyReports-archive/, which won’t match your pattern. To check to see if this is an issue, follow the instructions in Creating a session policy for an Amazon S3 bucket to find your AWS Identity and Access Management (IAM) session policy.

Use scope down policies to back up logical directory mappings

When creating a logical directory mapping with a role that has more access than you intend to give your users, it’s important to use session policies to tailor the access appropriately. This provides an extra layer of protection against accidental changes to your logical directory mapping opening access to files you didn’t intend.

Details on how to construct a session policy for an S3 bucket can be found in Creating a session policy for an Amazon S3 bucket, and Create fine-grained session permissions using IAM managed policies provides additional context. Amazon S3 also offers IAM Access Analyzer to assist with this process.

Don’t place NLBs in front of a Transfer Family server

We’ve spoken with many customers who have configured a Network Load Balancer (NLB) to route traffic to their Transfer Family server. Usually, they’ve done this either because they created their server before we offered a way to access it from both inside their VPC and from the internet, or to support FTP on the internet. This not only increases the cost for the customer, it can cause other issues, which we describe in this section.

If you’re using this configuration, we encourage you to move to a VPC endpoint and use an Elastic IP. Placing an NLB in front of your Transfer Family server removes your ability to see the source IP of your users, because Transfer Family will see only the IP address of your NLB. This not only degrades your ability to audit who is accessing your server, it can also impact performance. Transfer Family uses the source IP to shard your connections across our data plane. In the case of FTPS, this means that instead of being able to have 10,000 simultaneous connections, a Transfer Family server with an NLB in front of it would be limited to only 300 simultaneous connections. If you have a use case that requires you to place an NLB in front of your Transfer Family server, reach out to the Transfer Family Product Management team through AWS Support or discuss issues on AWS re:Post, so we can look for options to help you take full advantage of our service.

Protect your API Gateway instance with WAF

If you’re using the custom identity provider capability of Transfer Family, you connect your identity provider through Amazon API Gateway. As a best practice, Transfer Family recommends use AWS Web Application Firewall (WAF) to help protect your API Gateway. This will allow you to create access control lists (ACLs) for your API Gateway instance to allow access for only AWS and anyone in the ACL. To help protect your API Gateway instance, see Securing AWS Transfer Family with AWS Web Application Firewall and Amazon API Gateway.

FTPS customers should use TLS session resumption

One of the security challenges with FTPS is that it uses two separate ports to process read/write requests. An analogy to this in the physical world would be going through a drive-thru window where you pay for your food and someone else can cut in front of you to receive your order at the second window. For this reason, security measures have been added to the FTPS protocol over time. In a client-server protocol, there are server-side configurations and client-side configurations.

TLS session resumption helps protect client connections as they hand off between the FTPS control port and the data port. The server sends a unique identifier for each session on the control port, and the client is meant to send that same session identifier back on the data port. This gives the server confidence that it’s talking to the same client on the data port that initiated the session on the control port. Transfer Family endpoints provide three options for session resumption:

  1. Disabled – The server ignores whether the client sends a session ID and doesn’t check that it’s correct, if it is sent. This option exists for backward compatibility reasons, but we don’t recommend it.
  2. Enabled – The server will transmit session IDs and will enforce session IDs if the client uses them, but clients who don’t use session IDs are still allowed to connect. We only recommend this as a transitional state to Enforced to verify client compatibility.
  3. Enforced – Clients must support TLS session resumption, or the server won’t transmit data to them. This is our default and recommended setting.

To use the console to see your TLS session resumption settings:

  1. Sign in to the AWS Management Console in the account where your transfer server runs and go to AWS Transfer Family. Be sure to select the correct AWS Region.
  2. To find your Transfer Family server endpoint, find your Transfer Family server in the console and choose Main Server Details.
  3. Select Additional Details.
  4. Under TLS Session Resumption, you will see if your server is enforcing TLS session resumption.
  5. If some of your users don’t have access to modern FTPS clients that support TLS, you can choose Edit to choose a different option.

Conclusion

Transfer Family offers many benefits to help secure your managed file transfer (MFT) solution as the threat landscape evolves. The steps in this post can help you get the most out of Transfer Family to help protect your file transfers. As the requirements for a secure, compliant architecture for file transfers evolve and threats become more sophisticated, Transfer Family will continue to offer optimized solutions and provide actionable advice on how you can use them. For more information, see Security in AWS Transfer Family and take our self-paced security workshop.

If you have feedback about this post, submit comments in the Comments section below. If you have questions about this post, start a new thread on the AWS Transfer Family re:Post or contact AWS Support.
 

John Jamail
John Jamail

John is the Head of Engineering for AWS Transfer Family. Prior to joining AWS, he spent eight years working in data security focused on security incident and event monitoring (SIEM), governance, risk, and compliance (GRC), and data loss prevention (DLP).

Automate detection and response to website defacement with Amazon CloudWatch Synthetics

Post Syndicated from Agus Komang original https://aws.amazon.com/blogs/security/automate-detection-and-response-to-website-defacement-with-amazon-cloudwatch-synthetics/

Website defacement occurs when threat actors gain unauthorized access to a website, most commonly a public website, and replace content on the site with their own messages. In this blog post, we show you how to detect website defacement, and then automate both defacement verification and your defacement response by using Amazon CloudWatch Synthetics visual monitoring canaries. Canaries are configurable scripts that run on a schedule and compare screenshots taken during a canary run with screenshots taken during a baseline canary run. If the discrepancy between the two screenshots exceeds a threshold percentage, the canary fails. We will show you how to quickly deploy a maintenance page through AWS WAF after you verify the defacement.

Common causes of defacement include unauthorized access, SQL injection, cross-site scripting (XSS), or malware. You can use AWS services such as AWS WAF, Amazon Route 53, and Amazon GuardDuty to put additional mechanisms in place to help improve your security posture.

Solution overview

The architectural diagram in Figure 1 shows a typical web application where users access the application by using Amazon CloudFront protected by AWS WAF.

Figure 1: Defacement detection and response with CloudWatch Synthetics

Figure 1: Defacement detection and response with CloudWatch Synthetics

As shown in the diagram, the solution consists of two parts: 1) visual monitoring for defacement detection, and 2) automation of the verification and defacement response.

Part 1: Visual monitoring for defacement detection

Defacement detection uses CloudWatch Synthetics visual monitoring canaries to perform visual monitoring. You can create canaries in CloudWatch Synthetics that periodically take a screenshot of the monitored URLs. Because the canaries only need network access to the monitored URLs, you can implement this solution without affecting the application or modifying its code. For more details on how to create CloudWatch Synthetics visual monitoring canaries, see Visual monitoring of applications with Amazon CloudWatch Synthetics.

You can use the CloudWatch Synthetics visual monitoring blueprint to compare screenshots taken during a canary run with screenshots taken during a baseline canary run. This solution is suitable for static a target=”_blank” hrefs where a discrepancy between the two screenshots that exceeds a threshold percentage could indicate a possible defacement attempt, causing the canary to trigger a failure event.

The threshold percentage is defined by the visual variance that occurs when the current screenshot differs from the baseline screenshot that was captured during the first run of the canary. To reduce false positives, you can adjust the threshold for detecting visual variance.

In the following script, we updated the visual variance to 5% in the visual monitoring blueprint:

# Setting Threshold to 5%
syntheticsConfiguration.withVisualVarianceThresholdPercentage(5);

Figure 2 shows the first baseline screenshot of a webpage with visual variance set to 5%.

Figure 2: Image taken during a baseline canary run

Figure 2: Image taken during a baseline canary run

Figure 3 shows the visual variance of a defaced webpage. In this case, the visual variance was set to 5% in the script, and the visual variance detected was 30.92%.

Figure 3: Failed canary run due to differences from the baseline screenshot

Figure 3: Failed canary run due to differences from the baseline screenshot

Figure 4 shows a webpage with dynamic content that triggered a false positive because the visual monitoring canary was unable to differentiate between real dynamic content and variation from the baseline. In this case, the visual variance was set to 5% in the script, and the visual variance detected was 5.25%.

Figure 4: Dynamic content in Feedback form that triggered canary failure

Figure 4: Dynamic content in Feedback form that triggered canary failure

You can select the dynamic content to exclude it from the visual comparison for subsequent canary runs. To exclude the dynamic content, edit the baseline screenshot in CloudWatch Synthetics. Using a simple click-drag, you can select the area to exclude from visual comparison for subsequent canary runs, as shown in Figure 5.

Figure 5: Exclusion of dynamic content

Figure 5: Exclusion of dynamic content

If your applications have additional areas with dynamic content, you can select more than one area to exclude from comparison.

Figure 6 shows a successful canary run after exclusion of the area that contains the dynamic content.

Figure 6: Canary succeeded after the exclusion of dynamic content

Figure 6: Canary succeeded after the exclusion of dynamic content

You can automate the defacement response by using Amazon EventBridge rules to trigger Amazon Simple Notification Service (Amazon SNS) when a canary run fails. By using the publish-subscribe pattern, you can customize and add on the response functions based on your organization’s needs.

The following shows the event pattern script in EventBridge. Make sure to update the canary name with the name of the CloudWatch Synthetics visual monitoring canary that you created earlier to serve as the event source.

 // Event patterns in EventBridge to get event source from canary

{
  "source": ["aws.synthetics"],
  "detail-type": ["Synthetics Canary TestRun Failure"],
  "detail": {
    "canary-name": ["<replace-with-canary-name>"]
  }
}

When the event pattern matches the rules that you configured in EventBridge, the Amazon SNS topic triggers the approval flow, as shown in Figure 7. This begins automation of the verification and defacement response, which we describe in the next section.

Figure 7: Amazon SNS topic triggered when the event pattern matches

Figure 7: Amazon SNS topic triggered when the event pattern matches

Part 2: Automation of the verification and defacement response

Figure 8 outlines how to automate the verification and defacement response. When alerts are received upon detection of defacement, the notified team can choose to verify the defacement. This defacement monitor uses CloudWatch Synthetics while maintaining the flexibility to configure and verify threshold settings through manual verification. If you are confident in your thresholds, you can bypass the approval flow and directly block site traffic by using an AWS WAF rule during a defacement attempt.

Figure 8: Defacement detection and response with CloudWatch Synthetics

Figure 8: Defacement detection and response with CloudWatch Synthetics

As shown in the diagram, this is what the traffic flow looks like during a defacement:

  1. The canary from the CloudWatch Synthetics visual monitor identifies defacement through visual variance against the baseline screenshot taken during the first canary run and emits an event.
  2. If the emitted event matches the rules configured in EventBridge, Amazon SNS is triggered. This triggers the subscribed AWS Lambda function that sends a Slack notification with the event details asking for approval.
  3. The notified team receives a Slack message about the defacement and makes an approval decision.
  4. If approval is granted, an AWS WAF rule is added to block traffic and a maintenance page is served to users.
  5. The user that accessed the origin is shown a maintenance page served by AWS WAF.

Although this example shows the use of Slack as an approval mechanism, you can use the communication mechanism of your choice.

Conclusion

In this post, you learned how to use CloudWatch Synthetics to monitor for defacement and display a maintenance page through AWS WAF and CloudFront while you work on recovering the service. You also learned how to use manual approval to identify the optimal threshold and exclude the area that contains dynamic content to reduce false positives.

Although most web applications already use CloudFront and AWS WAF, you can integrate this solution to your existing environment without affecting the application or modifying its code. This solution helps detect potential defacement, providing you with an additional layer of protection for your environment.

We recommend that you explore the capabilities of CloudWatch Synthetics monitoring to detect and use the capabilities of the cloud through services such as EventBridge, Amazon SNS, and Lambda to enable automation. This can help you proactively protect your application against defacement attempts.

 
If you have feedback about this post, submit comments in the Comments section below. If you have questions about this post, contact AWS Support.

Agus Komang
Agus Komang

Agus is a Principal Solutions Architect (Security) at AWS. He helps public sector customers to build secure, resilient, and compliant workloads in the cloud.
Jessica Ang
Jessica Ang

Jessica is a Solutions Architect at AWS specializing in security. She helps customers to innovate securely and efficiently through the use of AWS services and security automation.

AWS renews its GNS Portugal certification for classified information with 66 services

Post Syndicated from Daniel Fuertes original https://aws.amazon.com/blogs/security/aws-renews-its-gns-portugal-certification-for-classified-information-with-66-services/

Amazon Web Services (AWS) announces that it has successfully renewed the Portuguese GNS (Gabinete Nacional de Segurança, National Security Cabinet) certification in the AWS Regions and edge locations in the European Union. This accreditation confirms that AWS cloud infrastructure, security controls, and operational processes adhere to the stringent requirements set forth by the Portuguese government for handling classified information at the National Reservado level (equivalent to the NATO Restricted level).

The GNS certification is based on the NIST SP800-53 Rev. 5 and CSA CCM v4 frameworks. It demonstrates the AWS commitment to providing the most secure cloud services to public-sector customers, particularly those with the most demanding security and compliance needs. By achieving this certification, AWS has demonstrated its ability to safeguard classified data up to the Reservado (Restricted) level, in accordance with the Portuguese government’s rigorous security standards.

AWS was evaluated by an authorized and independent third-party auditor, Adyta Lda, and by the Portuguese GNS itself. With the GNS certification, AWS customers in Portugal, including public sector organizations and defense contractors, can now use the full extent of AWS cloud services to handle national restricted information. This enables these customers to take advantage of AWS scalability, reliability, and cost-effectiveness, while safeguarding data in alignment with GNS standards.

We’re happy to announce the addition of 40 services to the scope of our GNS certification, for a new total of 66 services in scope. To view the complete list of services included in the scope, see the AWS Services in Scope by Compliance Program – GNS National Restricted Certification page.

The Certificate of Compliance illustrating the compliance status of AWS is available on the GNS Certifications page and through AWS Artifact.

For more information about GNS, see the AWS Compliance page GNS National Restricted Certification.

If you have feedback about this post, submit comments in the Comments section below.
 

Daniel Fuertes
Daniel Fuertes

Daniel is a Security Audit Program Manager at AWS, based in Madrid, Spain. Daniel leads multiple security audits, attestations, and certification programs in Spain, Portugal, and other EMEA countries. Daniel has ten years of experience in security assurance and compliance, including previous experience as an auditor for the PCI DSS security framework. He also holds the CISSP, PCIP, and ISO 27001 Lead Auditor certifications.

Refine unused access using IAM Access Analyzer recommendations

Post Syndicated from Stéphanie Mbappe original https://aws.amazon.com/blogs/security/refine-unused-access-using-iam-access-analyzer-recommendations/

As a security team lead, your goal is to manage security for your organization at scale and ensure that your team follows AWS Identity and Access Management (IAM) security best practices, such as the principle of least privilege. As your developers build on AWS, you need visibility across your organization to make sure that teams are working with only the required privileges. Now, AWS Identity and Access Management Analyzer offers prescriptive recommendations with actionable guidance that you can share with your developers to quickly refine unused access.

In this post, we show you how to use IAM Access Analyzer recommendations to refine unused access. To do this, we start by focusing on the recommendations to refine unused permissions and show you how to generate the recommendations and the actions you can take. For example, we show you how to filter unused permissions findings, generate recommendations, and remediate issues. Now, with IAM Access Analyzer, you can include step-by-step recommendations to help developers refine unused permissions quickly.

Unused access recommendations

IAM Access Analyzer continuously analyzes your accounts to identify unused access and consolidates findings in a centralized dashboard. The dashboard helps review findings and prioritize accounts based on the volume of findings. The findings highlight unused IAM roles and unused access keys and passwords for IAM users. For active IAM roles and users, the findings provide visibility into unused services and actions. You can learn more about unused access analysis through the IAM Access Analyzer documentation.

For unused IAM roles, access keys, and passwords, IAM Access Analyzer provides quick links in the console to help you delete them. You can use the quick links to act on the recommendations or use export to share the details with the AWS account owner. For overly permissive IAM roles and users, IAM Access Analyzer provides policy recommendations with actionable steps that guide you to refine unused permissions. The recommended policies retain resource and condition context from existing policies, helping you update your policies iteratively.

Throughout this post, we use an IAM role in an AWS account and configure the permissions by doing the following:

  1. Attaching the AWS managed policy AmazonBedrockReadOnly.
  2. Attaching the AWS managed policy AmazonS3ReadOnlyAccess.
  3. Embedding an inline policy with the permissions described in the following code and named InlinePolicyListLambda.

Content of inline policy InlinePolicyListLambda:

{
    "Version": "2012-10-17",
    "Statement": [
        {
            "Sid": "InlinePolicyLambda",
            "Effect": "Allow",
            "Action": [
                "lambda:ListFunctions",
                "lambda:ListLayers",
                "lambda:ListAliases",
                "lambda:ListFunctionUrlConfigs"
            ],
            "Resource": "*",
            "Condition": {
                "NotIpAddress": {
                    "aws:SourceIp": "1.100.150.200/32"
                }
            }
        }
    ]
}

We use an inline policy to demonstrate that IAM Access Analyzer unused access recommendations are applicable for that use case. The recommendations are also applicable when using AWS managed policies and customer managed policies.

In your AWS account, after you have configured an unused access analyzer, you can select an IAM role that you have used recently and see if there are unused access permissions findings and recommendations.

Prerequisites

Before you get started, you must create an unused access analyzer for your organization or account. Follow the instructions in IAM Access Analyzer simplifies inspection of unused access in your organization to create an unused access analyzer.

Generate recommendations for unused permissions

In this post we explore three options for generating recommendations for IAM Access Analyzer unused permissions findings: the console, AWS CLI, and AWS API.

Generate recommendations for unused permissions using the console

After you have created an unused access analyzer as described in the prerequisites, wait a few minutes to see the analysis results. Then use the AWS Management Console to view the proposed recommendations for the unused permissions.

To list unused permissions findings

  1. Go to the IAM console and under Access Analyzer, choose Unused access from the navigation pane.
  2. Search for active findings with the type Unused permissions in the search box.
    1. Select Active from the Status drop-down list.
    2. In the search box, select Findings type under Properties.
    3. Select Equals as Operators.
    4. Select Findings Type = Unused permissions.
    5. This list shows the active findings for IAM resources with unused permissions.

    Figure 1: Filter on unused permissions in the IAM console

    Figure 1: Filter on unused permissions in the IAM console

  3. Select a finding to learn more about the unused permissions granted to a given role or user.

To obtain recommendations for unused permissions

  1. On the findings detail page, you will see a list of the unused permissions under Unused permissions.
  2. Following that, there is a new section called Recommendations. The Recommendations section presents two steps to remediate the finding:
    1. Review the existing permissions on the resource.
    2. Create new policies with the suggested refined permissions and detach the existing policies.

    Figure 2: Recommendations section

    Figure 2: Recommendations section

  3. The generation of recommendations is on-demand and is done in the background when you’re using the console. The message Analysis in progress indicates that recommendations are being generated. The recommendations exclude the unused actions from the recommended policies.
  4. When an IAM principal, such as an IAM role or user, has multiple permissions policies attached, an analysis of unused permissions is made for each of permissions policies:
    • If no permissions have been used, the recommended action is to detach the existing permissions policy.
    • If some permissions have been used, only the used permissions are kept in the recommended policy, helping you apply the principle of least privilege.
  5. The recommendations are presented for each existing policy in the column Recommended policy. In this example, the existing policies are:
    • AmazonBedrockReadOnly
    • AmazonS3ReadOnlyAccess
    • InlinePolicyListLambda

    And the recommended policies are:

    • None
    • AmazonS3ReadOnlyAccess-recommended
    • InlinePolicyListLambda-recommended

    Figure 3: Recommended policies

    Figure 3: Recommended policies

  6. There is no recommended policy for AmazonBedrockReadOnly because the recommended action is to detach it. When hovering over None, the following message is displayed: There are no recommended policies to create for the existing permissions policy.
  7. AmazonS3ReadOnlyAccess and InlinePolicyListLambda and their associated recommended policy can be previewed by choosing Preview policy.

To preview a recommended policy

IAM Access Analyzer has proposed two recommended policies based on the unused actions.

  1. To preview each recommended policy, choose Preview policy for that policy to see a comparison between the existing and recommended permissions.
    1. Choose Preview policy for AmazonS3ReadOnlyAccess-recommended.
      1. The existing policy has been analyzed and the broad permissions—s3:Get* and s3:List*—have been scoped down to detailed permissions in the recommended policy.
      2. The permissions s3:Describe*, s3-object-lambda:Get*, and s3-object-lambda:List* can be removed because they weren’t used.

      Figure 4: Preview of the recommended policy for AmazonS3ReadOnlyAccess

      Figure 4: Preview of the recommended policy for AmazonS3ReadOnlyAccess

    2. Choose Preview policy for InlinePolicyListLambda-recommended to see a comparison between the existing inline policy InlinePolicyListLambda and its recommended version.
      1. The existing permissions, lambda:ListFunctions and lambda:ListLayers, are kept in the recommended policy, as well as the existing condition.
      2. The permissions in lambda:ListAliases and lambda:ListFunctionUrlConfigs can be removed because they weren’t used.
      Figure 5: Preview the recommended policy for the existing inline policy InlinePolicyListLambda

      Figure 5: Preview the recommended policy for the existing inline policy InlinePolicyListLambda

To download the recommended policies file

  1. Choose Download JSON to download the suggested recommendations locally.

    Figure 6: Download the recommended policies

    Figure 6: Download the recommended policies

  2. A .zip file that contains the recommended policies in JSON format will be downloaded.

    Figure 7: Downloaded recommended policies as JSON files

    Figure 7: Downloaded recommended policies as JSON files

  3. The content of the AmazonS3ReadOnlyAccess-recommended-1-2024-07-22T20/08/44.793Z.json file the same as the recommended policy shown in Figure 4.

Generate recommendations for unused permissions using AWS CLI

In this section, you will see how to generate recommendations for unused permissions using AWS Command Line Interface (AWS CLI).

To list unused permissions findings

  1. Use the following code to refine the results by filtering on the type UnusedPermission and selecting only the active findings. Copy the Amazon Resource Name (ARN) of your unused access analyzer and use it to replace the ARN in the following code:
    aws accessanalyzer list-findings-v2 \
      --analyzer-arn "arn:aws:access-analyzer:<region>:<123456789012>:analyzer/<analyzer_name>" \
      --region <region> \
      --filter '{"findingType": {"eq": ["UnusedPermission"]}, "status": {"eq": ["ACTIVE"]}}'

  2. You will obtain results similar to the following.
    {
        "findings": [
            {
                "analyzedAt": "2024-05-29T07:25:34+00:00",
                "createdAt": "2024-05-23T19:20:59+00:00",
                "id": "0fa3f5a1-bd92-4193-8ca4-aba12cd91370",
                "resource": "arn:aws:iam::123456789012:user/demoIAMUser",
                "resourceType": "AWS::IAM::User",
                "resourceOwnerAccount": "123456789012",
                "status": "ACTIVE",
                "updatedAt": "2024-05-29T07:25:35+00:00",
                "findingType": "UnusedPermission"
            },
            {
                "analyzedAt": "2024-05-29T07:25:34+00:00",
                "createdAt": "2024-05-23T19:20:59+00:00",
                "id": "1e952245-bcf3-48ad-a708-afa460df794b",
                "resource": "arn:aws:iam::123456789012:role/demoIAMRole",
                "resourceType": "AWS::IAM::Role",
                "resourceOwnerAccount": "123456789012",
                "status": "ACTIVE",
                "updatedAt": "2024-05-29T07:25:37+00:00",
                "findingType": "UnusedPermission"
            },
            ...
        ]
    }

To generate unused permissions finding recommendations

After you have a list of findings for unused permissions, you can generate finding recommendations.

  1. Run the following, replacing the analyzer ARN and the finding ID to generate the suggested recommendations.
    aws accessanalyzer generate-finding-recommendation \
      --analyzer-arn "arn:aws:access-analyzer:<region>:<123456789012>:analyzer/<analyzer_name>" \
      --region <region> \
      --id "ab123456-bcd0-78ab-a012-afa460df794b"

  2. You will get an empty response if your command ran successfully. The process is running in the background.

To obtain the generated recommendations

After the recommendations are generated, you need to make a separate API call to view the recommendations details.

  1. The following command returns the recommended remediation.
    aws accessanalyzer get-finding-recommendation \
      --analyzer-arn "arn:aws:access-analyzer:<region>:<123456789012>:analyzer/<analyzer_name>" \
      --region <region> \
      --id "ab123456-bcd0-78ab-a012-afa460df794b"

  2. This command provides the following results. For more information about the meaning and structure of the recommendations, see Anatomy of a recommendation later in this post.

    Note: The recommendations consider AWS managed policies, customer managed policies, and inline policies. The IAM conditions in the initial policy are maintained in the recommendations if the actions they’re related to are used.

    The remediations suggested are to do the following:

    1. Detach AmazonBedrockReadOnly policy because it is unused: DETACH_POLICY
    2. Create a new recommended policy with scoped down permissions from the managed policy AmazonS3ReadOnlyAccess: CREATE_POLICY
    3. Detach AmazonS3ReadOnlyAccess: DETACH_POLICY
    4. Embed a new recommended policy with scoped down permissions from the inline policy: CREATE_POLICY
    5. Delete the inline policy.
    {
        "recommendedSteps": [
            {
                "unusedPermissionsRecommendedStep": {
                    "policyUpdatedAt": "2023-12-06T15:48:19+00:00",
                    "recommendedAction": "DETACH_POLICY",
                    "existingPolicyId": "arn:aws:iam::aws:policy/AmazonBedrockReadOnly"
                }
            },
            {
                "unusedPermissionsRecommendedStep": {
                    "policyUpdatedAt": "2023-08-10T21:31:39+00:00",
                    "recommendedAction": "CREATE_POLICY",
                    "recommendedPolicy": "{\"Version\":\"2012-10-17\",\"Statement\":[{\"Effect\":\"Allow\",\"Action\":[\"s3:GetBucketObjectLockConfiguration\",\"s3:GetBucketOwnershipControls\",\"s3:GetBucketTagging\",\"s3:GetBucketVersioning\",\"s3:GetJobTagging\",\"s3:GetObject\",\"s3:GetObjectAcl\",\"s3:GetObjectLegalHold\",\"s3:GetObjectRetention\",\"s3:GetObjectTagging\",\"s3:GetObjectTorrent\",\"s3:GetObjectVersion*\",\"s3:GetStorage*\",\"s3:ListAllMyBuckets\",\"s3:ListBucket\",\"s3:ListBucketVersions\",\"s3:ListMultipartUploadParts\",\"s3:ListStorageLensGroups\",\"s3:ListTagsForResource\"],\"Resource\":\"*\"}]}",
                    "existingPolicyId": "arn:aws:iam::aws:policy/AmazonS3ReadOnlyAccess"
                }
            },
            {
                "unusedPermissionsRecommendedStep": {
                    "policyUpdatedAt": "2023-08-10T21:31:39+00:00",
                    "recommendedAction": "DETACH_POLICY",
                    "existingPolicyId": "arn:aws:iam::aws:policy/AmazonS3ReadOnlyAccess"
                }
            },
            {
                "unusedPermissionsRecommendedStep": {
                    "recommendedAction": "CREATE_POLICY",
                    "recommendedPolicy": "{\"Version\":\"2012-10-17\",\"Statement\":[{\"Sid\":\"InlinePolicyLambda\",\"Effect\":\"Allow\",\"Action\":[\"lambda:ListFunctions\",\"lambda:ListLayers\"],\"Resource\":\"*\",\"Condition\":{\"NotIpAddress\":{\"aws:SourceIp\":\"1.100.150.200/32\"}}}]}",
                    "existingPolicyId": "InlinePolicyListLambda"
                }
            },
            {
                "unusedPermissionsRecommendedStep": {
                    "recommendedAction": "DETACH_POLICY",
                    "existingPolicyId": "InlinePolicyListLambda"
                }
            }
        ],
        "status": "SUCCEEDED",
        "error": null,
        "completedAt": "2024-07-22T20:40:58.413698+00:00",
        "recommendationType": "UNUSED_PERMISSION_RECOMMENDATION",
        "resourceArn": "arn:aws:iam::123456789012:role/IAMRole_IA2_Blog_EC2Role",
        "startedAt": "2024-07-22T20:40:54+00:00"
    }

Generate recommendations for unused permissions using EventBridge and AWS API

We have described how to use AWS CLI and the console to find unused permissions findings and to generate recommendations.

In this section, we show you how to use an Amazon EventBridge rule to find the active unused permissions findings from IAM Access Analyzer. Then we show you how to generate recommendations using two IAM Access Analyzer APIs to generate the finding recommendations and get the finding recommendations.

To create an EventBridge rule to detect unused permissions findings

Create an EventBridge rule to detect new unused permissions findings from IAM Access Analyzer.

  1. Go to the Amazon EventBridge console.
  2. Choose Rules, and then choose Create rule.
  3. Enter a name for your rule. Leave the Event bus value as the default.
  4. Under Rule type, select Rule with an event pattern.
  5. In the Event Source section, select AWS events or EventBridge partner events.
  6. For Creation method, select Use pattern form.
  7. Under Event pattern:
    1. For Event source, select AWS services.
    2. For AWS service, select Access Analyzer.
    3. For Event type, select Unused Access Finding for IAM entities.

    Note: There is no event for generated recommendations, only for unused access findings.

    Figure 8: Listing unused permissions by filtering events using an EventBridge rule

    Figure 8: Listing unused permissions by filtering events using an EventBridge rule

  8. Configure the Event pattern by changing the default values to the following:
    1. resources: Enter the ARN of your unused access analyzer.
    2. status: ACTIVE indicates that you are only looking for active findings.
    3. findingType: UnusedPermission.
  9. You can select a target Amazon Simple Notification Service (Amazon SNS) to be notified of new active findings for a specific analyzer for unused permissions.

To generate recommendations for unused permissions using the IAM Access Analyzer API

The findings are generated on-demand. For that purpose, IAM Access Analyzer API GenerateFindingRecommendation can be called with two parameters: the ARN of the analyzer and the finding ID.

  1. You can use AWS Software Development Kit (SDK) for Python(boto3) for the API call.
  2. Run the call as follows:
    ia2_client = boto3.client('accessanalyzer')
    response = ia2_client.generate_finding_recommendation(
        analyzerArn=analyzer,
        id=findingId
        )

To obtain the finding recommendations

  1. After the recommendations are generated, they can be obtained by calling the API GetFindingRecommendation with the same parameters: the ARN of the analyzer and the finding ID.
  2. Use AWS SDK for Python (boto3) for the API call as follows:
    ia2_client = boto3.client('accessanalyzer')
    response = ia2_client.get_finding_recommendation(
        analyzerArn=analyzer,
        id=findingId
    )

Remediate based on the generated recommendations

The recommendations are generated as actionable guidance that you can follow. They propose new IAM policies that exclude the unused actions, helping you rightsize your permissions.

Anatomy of a recommendation

The recommendations are usually presented in the following way:

  • Date and time: startedAt, completedAt. Respectively when the API call was made and when the analysis was completed and the results were provided.
  • Resource ARN: The ARN of the resource being analyzed.
  • Recommended steps: The recommended steps, such as creating a new policy based on the actions used and detaching the existing policy.
  • Recommendation type: UNUSED_PERMISSION_RECOMMENDATION.
  • Status: The status of retrieving the finding recommendation. The status values include SUCCEEDED, FAILED, and IN_PROGRESS.

For more information about the structure of recommendations, see the output section of get-finding-recommendation.

Recommended policy review

You must review the recommended policy. The recommended actions depend on the original policy. The original policy will be one of the following:

  • An AWS managed policy: You need to create a new IAM policy using recommendedPolicy. Attach this newly created policy to your IAM role. Then detach the former policy.
  • A customer managed policy or an inline policy: Review the policy, verify its scope, consider how often it’s attached to other principals (customer managed policy only), and when you are confident to proceed, use the recommended policy to create a new policy and detach the former policy.

Use cases to consider when reviewing recommendations

During your review process, keep in mind that the unused actions are determined based on the time defined in your tracking period. The following are some use cases you might have where a necessary role or action might be identified as unused (this is not an exhaustive list of use cases). It’s important to review the recommendations based on your business needs. You can also archive some findings related to the use cases such as the ones that follow:

  • Backup activities: If your tracking period is 28 days and you have a specific role for your backup activities running at the end of each month, you might discover that after 29 days some of the permissions for that backup role are identified as unused.
  • IAM permissions associated to an infrastructure as code deployment pipeline: You should also consider the permissions associated to specific IAM roles such an IAM for infrastructure as code (IaC) deployment pipeline. Your pipeline can be used to deploy Amazon Simple Storage Service (Amazon S3) buckets based on your internal guidelines. After deployment is complete, the pipeline permissions can become unused after your tracking period, but removing those unused permissions can prevent you from updating your S3 buckets configuration or from deleting it.
  • IAM roles associated with disaster recovery activities: While it’s recommended to have a disaster recovery plan, the IAM roles used to perform those activities might be flagged by IAM Access Analyzer for having unused permissions or being unused roles.

To apply the suggested recommendations

Of the three original policies attached to IAMRole_IA2_Blog_EC2Role, AmazonBedrockReadOnly can be detached and AmazonS3ReadOnlyAccess and InlinePolicyListLambda can be refined.

  1. Detach AmazonBedrockReadOnly

    No permissions are used in this policy, and the recommended action is to detach it from your IAM role. To detach it, you can use the IAM console, the AWS CLI, or the AWS API.

  2. Create a new policy called AmazonS3ReadOnlyAccess-recommended and detach AmazonS3ReadOnlyAccess.

    The unused access analyzer has identified unused permissions in the managed policy AmazonS3ReadOnlyAccess and proposed a new policy AmazonS3ReadOnlyAccess-recommended that contains only the used actions. This is a step towards least privilege because the unused actions can be removed by using the recommended policy.

    1. Create a new IAM policy named AmazonS3ReadOnlyAccess-recommended that contains only the following recommended policy or one based on the downloaded JSON file.
      {
        "Version": "2012-10-17",
        "Statement": [
          {
            "Effect": "Allow",
            "Action": [
              "s3:getbuckettagging",
              "s3:getjobtagging",
              "s3:getobject",
              "s3:getobjectacl",
              "s3:getobjectlegalhold",
              "s3:getobjectretention",
              "s3:getobjecttagging",
              "s3:getobjecttorrent",
              "s3:getobjectversion",
              "s3:getobjectversionacl",
              "s3:getobjectversionattributes",
              "s3:getobjectversionforreplication",
              "s3:getobjectversiontagging",
              "s3:getobjectversiontorrent",
              "s3:getstoragelensconfigurationtagging",
              "s3:getstoragelensgroup",
              "s3:listbucket",
              "s3:listbucketversions",
              "s3:listmultipartuploadparts",
              "s3:liststoragelensgroups",
              "s3:listtagsforresource"
            ],
            "Resource": "*"
          }
        ]
      }

    2. Detach the managed policy AmazonS3ReadOnlyAccess.
  3. Embed a new inline policy InlinePolicyListLambda-recommended and delete InlinePolicyListLambda. This inline policy lists AWS Lambda aliases, functions, layers, and function URLs only when coming from a specific source IP address.
    1. Embed the recommended inline policy.

      The recommended policy follows. You can embed an inline policy for the IAM role using the console, AWS CLI, or the AWS API PutRolePolicy.

      {
        "Version": "2012-10-17",
        "Statement": [
          {
            "Sid": "InlinePolicyLambda",
            "Effect": "Allow",
            "Action": [
              "lambda:ListFunctions",
              "lambda:ListLayers"
            ],
            "Resource": "*",
            "Condition": {
              "NotIpAddress": {
                "aws:SourceIp": "1.100.150.200/32"
              }
            }
          }
        ]
      }

    2. Delete the inline policy.
  4. After updating the policies based on the Recommended policy proposed, the finding Status will change from Active to Resolved.

    Figure 9: The finding is resolved

    Figure 9: The finding is resolved

Pricing

There is no additional pricing for using the prescriptive recommendations after you have enabled unused access findings.

Conclusion

As a developer writing policies, you can use the actionable guidance provided in recommendations to continually rightsize your policies to include only the roles and actions you need. You can export the recommendations through the console or set up automated workflows to notify your developers about new IAM Access Analyzer findings.

This new IAM Access Analyzer unused access recommendations feature streamlines the process towards least privilege by selecting the permissions that are used and retaining the resource and condition context from existing policies. It saves an impressive amount of time by the actions used by your principals and guiding you to refine them.

By using the IAM Access Analyzer findings and access recommendations, you can quickly see how to refine the permissions granted. We have shown in this blog post how to generate prescriptive recommendations with actionable guidance for unused permissions using AWS CLI, API calls, and the console.

 
If you have feedback about this post, submit comments in the Comments section below. If you have questions about this post, contact AWS Support.

P. Stéphanie Mbappe

P. Stéphanie Mbappe
Stéphanie is a Security Consultant with Amazon Web Services. She delights in assisting her customers at any step of their security journey. Stéphanie enjoys learning, designing new solutions, and sharing her knowledge with others.

Mathangi Ramesh

Mathangi Ramesh
Mathangi is the product manager for AWS Identity and Access Management. She enjoys talking to customers and working with data to solve problems. Outside of work, Mathangi is a fitness enthusiast and a Bharatanatyam dancer. She holds an MBA degree from Carnegie Mellon University.

Using Amazon Detective for IAM investigations

Post Syndicated from Ahmed Adekunle original https://aws.amazon.com/blogs/security/using-amazon-detective-for-iam-investigations/

Uncovering  AWS Identity and Access Management (IAM) users and roles potentially involved in a security event can be a complex task, requiring security analysts to gather and analyze data from various sources, and determine the full scope of affected resources.

Amazon Detective includes Detective Investigation, a feature that you can use to investigate IAM users and roles to help you determine if a resource is involved in a security event and obtain an in-depth analysis. It automatically analyzes resources in your Amazon Web Services (AWS) environment using machine learning and threat intelligence to identify potential indicators of compromise (IoCs) or suspicious activity. This allows analysts to identify patterns and identify which resources are impacted by security events, offering a proactive approach to threat identification and mitigation. Detective Investigation can help determine if IAM entities have potentially been compromised or involved in known tactics, techniques, and procedures (TTPs) from the MITRE ATT&CK framework, a well adopted framework for security and threat detection. MITRE TTPs are the terms used to describe the behaviors, processes, actions, and strategies used by threat actors engaged in cyberattacks.

In this post, I show you how to use Detective Investigation and how to interpret and use the information provided from an IAM investigation.

Prerequisites

The following are the prerequisites to follow along with this post:

Use Detective Investigation to investigate IAM users and roles

To get started with an investigation, sign in to the console. The walkthrough uses three scenarios:

  1. Automated investigations
  2. Investigator persona
  3. Threat hunter persona

In addition to Detective, some of these scenarios also use Amazon GuardDuty, which is an intelligent threat detection service.

Scenario 1: Automated investigations

Automatic investigations are available in Detective. Detective only displays investigation information when you’re running an investigation. You can use the Detective console to see the number of IAM roles and users that were impacted by security events over a set period. In addition to the console, you can use the StartInvestigation API to initiate a remediation workflow or collect information about IAM entities involved or AWS resources compromised.

The Detective summary dashboard, shown in Figure 1, automatically shows you the number of critical investigations, high investigations, and the number of IAM roles and users found in suspicious activities over a period of time. Detective Investigation uses machine learning models and threat intelligence to surface only the most critical issues, allowing you to focus on high-level investigations. It automatically analyzes resources in your AWS environment to identify potential indicators of compromise or suspicious activity.

To get to the dashboard using the Detective console, choose Summary from the navigation pane.

Figure 1: AWS roles and users impacted by a security event

Figure 1: AWS roles and users impacted by a security event

Note: If you don’t have automatic investigations listed in Detective, the View active investigations link won’t display any information. To run a manual investigation, follow the steps in Running a Detective Investigation using the console or API.

If you have an active automatic investigation, choose View active investigations on the Summary dashboard to go to the Investigations page (shown in Figure 2), which shows potential security events identified by Detective. You can select a specific investigation to view additional details in the investigations report summary.

Figure 2: Active investigations that are related to IAM entities

Figure 2: Active investigations that are related to IAM entities

Select a report ID to view its details. Figure 3 shows the details of the selected event under Indicators of compromise along with the AWS role that was involved, period of time, role name, and the recommended mitigation action. The indicators of compromise list includes observed tactics from the MITRE ATT&CK framework, flagged IP addresses involved in potential compromise (if any), impossible travel under the indicators, and the finding group. You can continue your investigation by selecting and reviewing the details of each item from the list of indicators of compromise.

Figure 3: Summary of the selected investigation

Figure 3: Summary of the selected investigation

Figure 4 shows the lower portion of the selected investigation. Detective maps the investigations to TTPs from the MITRE ATT&CK framework. TTPs are classified according to their severity. The console shows the techniques and actions used. When selecting a specific TTP, you can see the details in the right pane. In this example, the valid cloud credential has IP addresses involved in 34 successful API call attempts.

Figure 4: TTP mappings

Figure 4: TTP mappings

Scenario 2: Investigator persona

For this scenario, you have triaged the resources associated with a GuardDuty finding informing you that an IAM user or role has been identified in an anomalous behavior. You need to investigate and analyze the impact this security issue might have had on other resources and ensure that nothing else needs to be remediated.

The example for this use case starts by going to the GuardDuty console and choosing Findings from the navigation pane, selecting a GuardDuty IAM finding, and then choosing the Investigate with Detective link.

Figure 5: List of findings in GuardDuty

Figure 5: List of findings in GuardDuty

Let’s now investigate an IAM user associated with the GuardDuty finding. As shown in Figure 6, you have multiple options for pivoting to Detective, such as the GuardDuty finding itself, the AWS account, the role session, and the internal and external IP addresses.

Figure 6: Options for pivoting to Detective

Figure 6: Options for pivoting to Detective

From the list of Detective options, you can choose Role session, which will help you investigate the IAM role session that was in use when the GuardDuty finding was created. Figure 7 shows the IAM role session page.

Before moving on to the next section, you would scroll down to Resources affected in the GuardDuty finding details panel on the right side of the screen and take note of the Principal ID.

Figure 7: IAM role session page in Detective

Figure 7: IAM role session page in Detective

A role session consists of an instantiation of an IAM role and the associated set of short-term credentials. A role session involves the following:

When investigating a role session, consider the following questions:

  • How long has the role been active?
  • Is the role routinely used?
  • Has activity changed over that use?
  • Was the role assumed by multiple users?
  • Was it assumed by a large number of users? A narrowly used role session might guide your investigation differently from a role session with overlapping use.

You can use the principal ID to get more in-depth details using the Detective search function. Figure 8 shows the search results of an IAM role’s details. To use the search function, choose Search from the navigation pane, select Role session as the type, and enter an exact identifier or identifier with wildcard characters to search for. Note that the search is case sensitive.

When you select the assumed role link, additional information about the IAM role will be displayed, helping to verify if the role has been involved in suspicious activities.

Figure 8: Results of an IAM role details search

Figure 8: Results of an IAM role details search

Figure 9 shows other findings related to the role. This information is displayed by choosing the Assumed Role link in the search results.

Now you should see a new screen with information specific to the role entity that you selected. Look through the role information and gather evidence that would be important to you if you were investigating this security issue.

Were there other findings associated to the role? Was there newly observed activity during this time in terms of new behavior? Were there resource interaction associated with the role? What permissions did this role have?

Figure 9: Other findings related to the role

Figure 9: Other findings related to the role

In this scenario, you used Detective to investigate an IAM role session. The information that you have gathered about the security findings will help give you a better understanding of other resources that need to be remediated, how to remediate, permissions that need to be scoped down, and root cause analysis insight to include in your action reports.

Scenario 3: Threat hunter persona

Another use case is to aid in threat hunting (searching) activities. In this scenario, suspicious activity has been detected in your organization and you need to find out what resources (that is, what IAM entities) have been communicating with a command-and-control IP address. You can check from the Detective summary page for roles and users with the highest API call volume, which automatically lists the IAM roles and users that were impacted by security events over a set time scope, as shown in Figure 10.

Figure 10: Roles and users with the highest API call volume

Figure 10: Roles and users with the highest API call volume

From the list of Principal (role or user) options, choose the user or role that you find interesting based on the data presented. Things to consider when choosing the role or user to examine:

  • Is there a role with a large amount of failed API calls?
  • Is there a role with an unusual data trend?

After choosing a role from the DetectiveSummary page, you’re taken to the role overview page. Scroll down to the Overall API call volume section to view the overall volume of API calls issued by the resource during the scope time. Detective presents this information to you in a graphical interface without the need to create complex queries.

Figure 11: Graph showing API call volume

Figure 11: Graph showing API call volume

In the Overall API call volume, choose the display details for time scope button at the bottom of the section to search through the observed IP addresses, API method by service, and resource.

Figure 12: <strong>Overall API call volume</strong> during the specified scope time” width=”780″ class=”size-full wp-image-35810″ style=”border: 1px solid #bebebe”></p>
<p id=
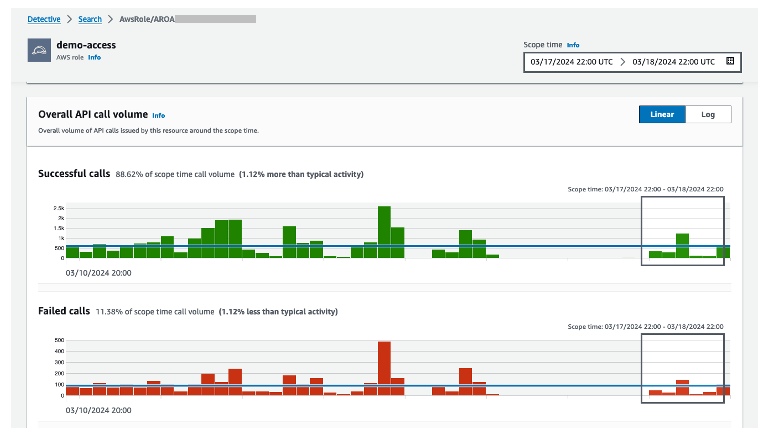
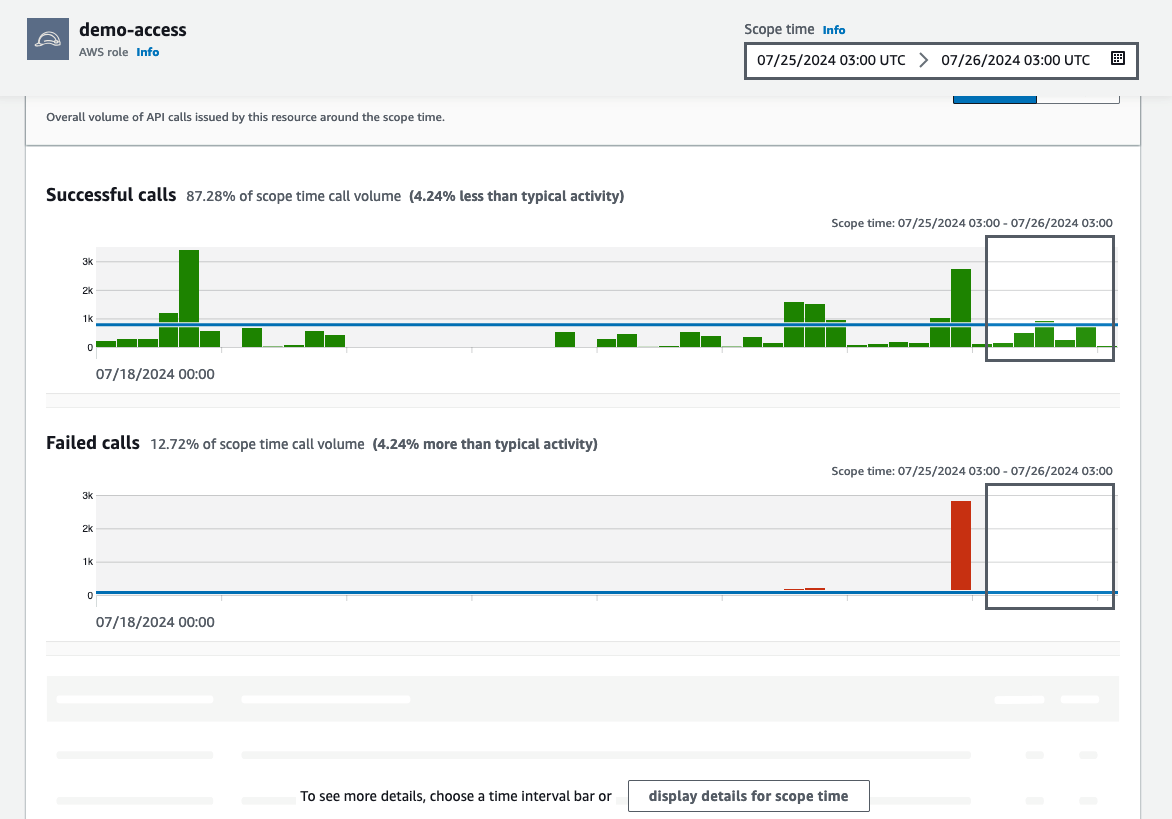
Figure 12: Overall API call volume during the specified scope time

To see the details for a specific IP address, use the Overall API call volume panel to search through different locations and to determine where the failed API calls came from. Select an IP address to get more granular details (as shown in Figure 13). When looking through this information, think about what this might tell you in your own environment.

  • Do you know who normally uses this role?
  • What is this role used for?
  • Should this role be making calls from various geolocations?
Figure 13: Granular details for the selected IP address

Figure 13: Granular details for the selected IP address

In this scenario, you used Detective to review potentially suspicious activity in your environment related to information assumed to be malicious. If adversaries have assumed the same role with different session names, this gives you more information about how this IAM role was used. If you find information related to the suspicious resources in question, you should conduct a formal search according to your internal incident response playbooks.

Conclusion

In this blog post, I walked you through how to investigate IAM entities (IAM users or rules) using Amazon Detective. You saw different scenarios on how to investigate IAM entities involved in a security event. You also learned about the Detective investigations for IAM feature, which you can use to automatically investigate IAM entities for indicators of compromise (IOCs), helping security analysts determine whether IAM entities have potentially been compromised or involved in known TTPs from the MITRE ATT&CK framework.

There’s no additional charge for this capability, and it’s available today for existing and new Detective customers in AWS Regions that support Detective. If you don’t currently use Detective, you can start a free 30-day trial. For more information about Detective investigations, see Detective Investigation.

 
If you have feedback about this post, submit comments in the Comments section below. If you have questions about this post, contact AWS Support.
 

Ahmed Adekunle
Ahmed Adekunle

Ahmed is a Security Specialist Solutions Architect focused on detection and response services at AWS. Before AWS, his background was in business process management and AWS tech consulting, helping customers use cloud technology to transform their business. Outside of work, Ahmed enjoys playing soccer, supporting less privileged activities, traveling, and eating spicy food, specifically African cuisine.

Get to know Amazon GuardDuty Runtime Monitoring for Amazon EC2

Post Syndicated from Scott Ward original https://aws.amazon.com/blogs/security/get-to-know-amazon-guardduty-runtime-monitoring-for-amazon-ec2/

In this blog post, I take you on a deep dive into Amazon GuardDuty Runtime Monitoring for EC2 instances and key capabilities that are part of the feature. Throughout the post, I provide insights around deployment strategies for Runtime Monitoring and detail how it can deliver security value by detecting threats against your Amazon Elastic Compute Cloud (Amazon EC2) instances and the workloads you run on them. This post builds on the post by Channy Yun that outlines how to enable Runtime Monitoring, how to view the findings that it produces, and how to view the coverage it provides across your EC2 instances.

Amazon Web Services (AWS) launched Amazon GuardDuty at re:Invent 2017 with a focus on providing customers managed threat detection capabilities for their AWS accounts and workloads. When enabled, GuardDuty takes care of consuming and processing the necessary log data. Since its launch, GuardDuty has continued to expand its threat detection capabilities. This expansion has included identifying new threat types that can impact customer environments, identifying new threat tactics and techniques within existing threat types and expanding the log sources consumed by GuardDuty to detect threats across AWS resources. Examples of this expansion include the ability to detect EC2 instance credentials being used to invoke APIs from an IP address that’s owned by a different AWS account than the one that the associated EC2 instance is running in, and the ability to identify threats to Amazon Elastic Kubernetes Services (Amazon EKS) clusters by analyzing Kubernetes audit logs.

GuardDuty has continued to expand its threat detection capabilities beyond AWS log sources, providing a more comprehensive coverage of customers’ AWS resources. Specifically, customers needed more visibility around threats that might occur at the operating system level of their container and compute instances. To address this customer need, GuardDuty released the Runtime Monitoring feature, beginning with support on Amazon Elastic Kubernetes Service (Amazon EKS) workloads. Runtime Monitoring provides operating system insight for GuardDuty to use in detecting potential threats to workloads running on AWS and enabled the operating system visibility that customers were asking for. At re:Invent 2023, GuardDuty expanded Runtime Monitoring to include Amazon Elastic Container Service (Amazon ECS)—including serverless workloads running on AWS Fargate, and previewed support for Amazon EC2, which became generally available earlier this year. The release of EC2 Runtime Monitoring enables comprehensive compute coverage for GuardDuty across containers and EC2 instances, delivering breadth and depth for threat detection in these areas.

Features and functions

GuardDuty EC2 Runtime Monitoring relies on a lightweight security agent that collects operating system events—such as file access, processes, command line arguments, and network connections—from your EC2 instance and sends them to GuardDuty. After the operating system events are received by GuardDuty, they’re evaluated to identify potential threats related to the EC2 instance. In this section, we explore how GuardDuty is evaluating the runtime events it receives and how GuardDuty presents identified threat information.

Command arguments and event correlation

The runtime security agent enables GuardDuty to create findings that can’t be created using the foundational data sources of VPC Flow Logs, DNS logs, and CloudTrail logs. The security agent can collect detailed information about what’s happening at the instance operating system level that the foundational data sources don’t contain.

With the release of EC2 Runtime Monitoring, additional capabilities have been added to the runtime agent and to GuardDuty. The additional capabilities include collecting command arguments and correlation of events for an EC2 instance. These new capabilities help to rule out benign events and more accurately generate findings that are related to activities that are associated with a potential threat to your EC2 instance.

Command arguments

The GuardDuty security agent collects information on operating system runtime commands (curl, systemctl, cron, and so on) and uses this information to generate findings. The security agent now also collects the command arguments that were used as part of running a command. This additional information gives GuardDuty more capabilities to detect threats because of the additional context related to running a command.

For example, the agent will not only identify that systemctl (which is used to manage services on your Linux instance) was run but also which parameters the command was run with (stop, start, disable, and so on) and for which service the command was run. This level of detail helps identify that a threat actor might be changing security or monitoring services to evade detection.

Event correlation

GuardDuty can now also correlate multiple events collected using the runtime agent to identify scenarios that present themselves as a threat to your environment. There might be events that happen on your instance that, on their own, don’t present themselves as a clear threat. These are referred to as weak signals. However, when these weak signals are considered together and the sequence of commands aligns to malicious activity, GuardDuty uses that information to generate a finding. For example, a download of a file would present itself as a weak signal. If that download of a file is then piped to a shell command and the shell command begins to interact with additional operating system files or network configurations, or run known malware executables, then the correlation of all these events together can lead to a GuardDuty finding.

GuardDuty finding types

GuardDuty Runtime Monitoring currently supports 41 finding types to indicate potential threats based on the operating system-level behavior from the hosts and containers in your Amazon EKS clusters on Amazon EC2, Amazon ECS on Fargate and Amazon EC2, and EC2 instances. These findings are based on the event types that the security agent collects and sends to the GuardDuty service.

Five of these finding types take advantage of the new capabilities of the runtime agent and GuardDuty, which were discussed in the previous section of this post. These five new finding types are the following:

Each GuardDuty finding begins with a threat purpose, which is aligned with MITRE ATT&CK tactics. The Execution finding types are focused on observed threats to the actual running of commands or processes that align to malicious activity. The DefenseEvasion finding types are focused on situations where commands are run that are trying to disable defense mechanisms on the instance, which would normally be used to identify or help prevent the activity of a malicious actor on your instance.

In the following sections, I go into more detail about the new Runtime Monitoring finding types and the types of malicious activities that they are identifying.

Identifying suspicious tools and commands

The SuspiciousTool, SuspiciousCommand, and PtraceAntiDebugging finding types are focused on suspicious activities, or those that are used to evade detection. The approach to identify these types of activities is similar. The SuspiciousTool finding type is focused on tools such as backdoor tools, network scanners, and network sniffers. GuardDuty helps to identify the cases where malicious activities related to these tools are occurring on your instance.

The SuspiciousCommand finding type identifies suspicious commands with the threat purposes of DefenseEvasion or Execution. The DefenseEvasion findings are an indicator of an unauthorized user trying to hide their actions. These actions could include disabling a local firewall, modifying local IP tables, or removing crontab entries. The Execution findings identify when a suspicious command has been run on your EC2 instance. The findings related to Execution could be for a single suspicious command or a series of commands, which, when combined with a series of other commands along with additional context, becomes a clearer indicator of suspicious activity. An example of an Execution finding related to combining multiple commands could be when a file is downloaded and is then run in a series of steps that align with a known malicious pattern.

For the PtraceAntiDebugging finding, GuardDuty is looking for cases where a process on your instance has used the ptrace system call with the PTRACE_TRACEME option, which causes an attached debugger to detach from the running process. This is a suspicious activity because it allows a process to evade debugging using ptrace and is a known technique that malware uses to evade detection.

Identifying running malicious files

The updated GuardDuty security agent can also identify when malicious files are run. With the MaliciousFileExecuted finding type, GuardDuty can identify when known malicious files might have been run on your EC2 instance, providing a strong indicator that malware is present on your instance. This capability is especially important because it allows you to identify known malware that might have been introduced since your last malware scan.

Finding details

All of the findings mentioned so far are consumable through the AWS Management Console for GuardDuty, through the GuardDuty APIs, as Amazon EventBridge messages, or through AWS Security Hub. The findings that GuardDuty generates are meant to not only tell you that a suspicious event has been observed on your instance, but also give you enough context to formulate a response to the finding.

The GuardDuty security agent collects a variety of events from the operating system to use for threat detection. When GuardDuty generates a finding based on observed runtime activities, it will include the details of these observed events, which can help with confirmation on what the threat is and provide you a path for possible remediation steps based on the reported threat. The information provided in a GuardDuty runtime finding can be broken down into three main categories:

  • Information about the impacted AWS resource
  • Information about the observed processes that were involved in the activity
  • Context related to the runtime events that were observed

Impacted AWS resources

In each finding that GuardDuty produces, information about the impacted AWS resource will be included. For EC2 Runtime Monitoring, the key information included will be information about the EC2 instance (such as name, instance type, AMI, and AWS Region), tags that are assigned to the instance, network interfaces, and security groups. This information will help guide your response and investigation to the specific instance that’s identified for the observed threat. It’s also useful in assessing key network configurations of the instance that could assist with confirming whether the network configuration of the instance is correct or assessing how the network configuration might factor into the response.

Process details

For each runtime finding, GuardDuty includes the details that were observed about the process attributed to the threat that the finding is for. Common items that you should expect to see include the name of the executable and the path to the executable that resulted in the finding being created, the ID of the operating system process, when the process started, and which operating system user ran the process. Additionally, process lineage is included in the finding. Process lineage helps identify operating system processes that are related to each other and provides insight into the parent processes that were run leading up to the identified process. Understanding this lineage can give you valuable insight into what the root cause of the malicious process identified in the finding might be; for example, being able to identify which other commands were run that ultimately led to the activation of the executable or command identified in the finding. If the process attributed to the finding is running inside a container, the finding also provides container details such as the container ID and image.

Runtime context

Runtime context provides insight on things such as file system type, flags that were used to control the behavior of the event, name of the potentially suspicious tool, path to the script that generated the finding, and the name of the security service that was disabled. The context information in the finding is intended to help you further understand the runtime activity that was identified as a threat and determine its potential impact and what your response might be. For example, a command that is detected by using the systemctl command to disable the apparmor utility would report the process information related to running the systemctl command, and then the runtime context would contain the name of the actual service that was impacted by the systemctl command call and the options used with the command.

See Runtime Monitoring finding details for a full list of the process and context details that might be present in your runtime findings.

Responding to runtime findings

With GuardDuty findings, it’s a best practice to enable an event-based response that can be invoked as soon as the runtime finding is generated. This approach holds true for runtime related findings as well. For every runtime finding that GuardDuty generates, a copy of the finding is sent to EventBridge. If you use Security Hub, a copy of the finding is sent to Security Hub as well. With EventBridge, you can define a rule with a pattern that matches the finding attributes you want to prioritize and respond to. This pattern could be very broad in looking for all runtime-related findings. Or, it could be more specific, only looking for certain finding types, findings of a certain severity, or even certain attributes related to the process or runtime context of a finding.

After the rule pattern is established, you can define a target that the finding should be sent to. This target can be one of over 20 AWS services, which gives you lots of flexibility in routing the finding into the operational tools or processes that are used by your company. The target could be an AWS Lambda function that’s responsible for evaluating the finding, adding some additional data to the finding, and then sending it to a ticketing or chat tool. The target could be an AWS Systems Manager runbook, which would be used on the actual operating system to perform additional forensics or to isolate or disable any processes that are identified in the finding.

Many customers take a stepped approach in their response to GuardDuty findings. The first step might be to make sure that the finding is enriched with as many supporting details as possible and sent to the right individual or team. This helps whoever’s investigating the finding to confirm that the finding is a true positive, further informing the decision on what action to take.

In addition to having an event-based response to GuardDuty findings, you can investigate each GuardDuty runtime finding in the GuardDuty or Security Hub console. Through the console, you can research the details of the finding and use the information to inform the next steps to respond to or remediate the finding.

Speed to detection

With its close proximity to your workloads, the GuardDuty security agent can produce findings more quickly when compared to processing log sources such as VPC Flow Logs and DNS logs. The security agent collects operating system events and forwards them directly to the GuardDuty service, examining events and generating findings more quickly. This helps you to formulate a response sooner so that you can isolate and stop identified threats to your EC2 instances.

Let’s examine a finding type that can be detected by both the runtime security agent and by the foundational log sources of AWS CloudTrail, VPC Flow Logs, and DNS logs. Backdoor:EC2/C&CActivity.B!DNS and Backdoor:Runtime/C&CActivity.B!DNS are the same finding with one coming from DNS logs and one coming from the runtime security agent. While GuardDuty doesn’t have a service-level agreement (SLA) on the time it takes to consume the findings for a log source or the security agent, testing for these finding types reveals that the runtime finding is generated in just a few minutes. Log file-based findings will take around 15 minutes to produce because of the latency of log file delivery and processing. In the end, these two findings mean the same thing, but the runtime finding will arrive faster and with additional process and context information, helping you implement a response to the threat sooner and improve your ability to isolate, contain, and stop the threat.

Runtime data and flow logs data

When exploring the Runtime Monitoring feature and its usefulness for your organization, a key item to understand is the foundational level of protection for your account and workloads. When you enable GuardDuty the foundational data sources of VPC Flow Logs, DNS logs, and CloudTrail logs are also enabled, and those sources cannot be turned off without fully disabling GuardDuty. Runtime Monitoring provides contextual information that allows for more precise findings that can help with targeted remediation compared to the information provided in VPC Flow Logs. When the Runtime Monitoring agent is deployed onto an instance, the GuardDuty service still processes the VPC Flow Logs and DNS logs for that instance. If, at any point in time, an unauthorized user tampers with your security agent or an instance is deployed without the security agent, GuardDuty will continue to use VPC Flow Logs and DNS logs data to monitor for potential threats and suspicious activity, providing you defense in depth to help ensure you have visibility and coverage for detecting threats.

Note: GuardDuty doesn’t charge you for processing VPC Flow Logs while the Runtime Monitoring agent is active on an instance.

Deployment strategies

There are multiple strategies that you can use to install the GuardDuty security agent on an EC2 instance, and it’s important to use the one that fits best based on how you deploy and maintain instances in your environment. The following are agent installation options that cover managed installation, tag-based installation, and manual installation techniques. The managed installation approach is a good fit for most customers, but the manual options are potentially better if you have existing processes that you want to maintain or you want the more fine-grained features provided by agent installation compared to the managed approach.

Note: GuardDuty requires that each VPC, with EC2 instances running the GuardDuty agent, has a VPC endpoint that allows the agent to communicate with the GuardDuty service. You aren’t charged for the cost of these VPC endpoints. When you’re using the GuardDuty managed agent feature, GuardDuty will automatically create and operate these VPC endpoints for you. For the other agent deployment options listed in this section, or other approaches that you take, you must manually configure the VPC endpoint for each VPC where you have EC2 instances that will run the GuardDuty agent. See Creating VPC endpoint manually for additional details.

GuardDuty-managed installation

If you want to use security agents to monitor runtime activity on your EC2 instances but don’t want to manage the installation and lifecycle of the agent on specific instances, then Automated agent configuration is the option for you. For GuardDuty to successfully manage agent installation, each EC2 instance must meet the operating system architectural requirements of the security agent. Additionally, each instance must have the Systems Manager agent installed and configured with the minimal instance permissions that System Manager requires.

In addition to making sure that your instances are configured correctly, you also need to enable automated agent configuration for your EC2 instances in the Runtime Monitoring section of the GuardDuty console. Figure 1 shows what this step looks like.

Figure 1: Enable GuardDuty automated agent configuration for Amazon EC2

Figure 1: Enable GuardDuty automated agent configuration for Amazon EC2

After you have enabled automated agent configuration and have your instances correctly configured, GuardDuty will install and manage the security agent for every instance that is configured.

GuardDuty-managed with explicit tagging

If you want to selectively manage installation of the GuardDuty agent but still want automated deployment and updates, you can use inclusion or exclusion tags to control which instances the agent is installed to.

  • Inclusion tags allow you to specify which EC2 instances the GuardDuty security agent should be installed to without having to enable automated agent configuration. To use inclusion tags, each instance where the security agent should be installed needs to have a key-value pair of GuardDutyManaged/true. While you don’t need to turn on automated agent configuration to use inclusion tags, each instance that you tag for agent installation needs to have the Systems Manager agent installed and the appropriate permissions attached to the instance using an instance role.
  • Exclusion tags allow you to enable automated agent configuration, and then selectively manage which instances the agent shouldn’t be deployed to. To use exclusion tags, each instance that shouldn’t have an instance installed needs to have a key-value pair of GuardDutyManaged/false.

You can use selective installation for a variety of use cases. If you’re doing a proof of concept with EC2 Runtime Monitoring, you might want to deploy the solution to a subset of your instances and then gradually onboard additional instances. At times, you might want to limit agent installation to instances that are deployed into certain environments or applications that are a priority for runtime monitoring. Tagging resources associated with these workloads helps ensure that monitoring is in place for resources that you want to prioritize for runtime monitoring. This strategy gives you more fine-grained control but also requires more work and planning to help ensure that the strategy is implemented correctly.

With a tag-based strategy it is important to understand who is allowed to add or remove tags to your EC2 instances as this influences when security controls are enabled or disabled. A review of your IAM roles and policies for tagging permissions is recommended to help ensure that the appropriate principals have access to this tagging capability. This IAM document provides an example of how you may limit tagging capabilities within a policy. The approach you take will depend on how you are using policies within your environment.

Manual agent installation options

If you don’t want to run the Systems Manager agent that powers the automated agent configuration, or if you have your own strategy to install and configure software on your EC2 instances, there are other deployment options that are better suited for your situation. The following are multiple approaches that you can use to manually install the GuardDuty agent for Runtime Monitoring. See Installing the security agent manually for general pointers on the recommended manual installation steps. With manual installation, you’re responsible for updating the GuardDuty security agent when new versions of the agent are released. Updating the agent can often be performed using the same techniques as installing the agent.

EC2 Image Builder

Your EC2 deployment strategy might be to build custom Amazon EC2 machine images that are then used as the approved machine images for your organization’s workloads. One option for installing the GuardDuty runtime agent as part of a machine image build is to use EC2 Image Builder. Image Builder simplifies the building, testing, and deployment of virtual machine and container images for use on AWS. With Image Builder, you define an image pipeline that includes a recipe with a build component for installing the GuardDuty Runtime Monitoring RPM. This approach with Image Builder helps ensure that your pre-built machine image includes the necessary components for EC2 Runtime Monitoring so that the necessary security monitoring is in place as soon as your instances are launched.

Bootstrap

Some customers prefer to configure their EC2 instances as they’re launched. This is commonly done through the user data field of an EC2 instance definition. For EC2 Runtime Monitoring agent installation, you would add the steps related to download and install of the runtime RPM as part of your user data script. The steps that you would add to your user data script are outlined in the Linux Package Managers method of Installing the security agent manually.

Other tools

In addition to the preceding steps, there are other tools that you can use when you want to incorporate the installation of the GuardDuty runtime monitoring agent. Tools such as Packer for building EC2 images, and Ansible, Chef, and Puppet for instance automation can be used to run the necessary steps to install the runtime agent onto the necessary EC2 instances. See Installing the security agent manually for guidance on the installation commands you would use with these tools.

Conclusion

Through customer feedback, GuardDuty has enhanced its threat detection capabilities with the Runtime Monitoring feature and you can now use it to deploy the same security agent across different compute services in AWS for runtime threat detection. Runtime monitoring provides an additional level of visibility that helps you achieve your security goals for your AWS workloads.

This post outlined the GuardDuty EC2 Runtime Monitoring feature, how you can implement the feature on your EC2 instances, and the security value that the feature provides. The insight provided in this post is intended to help you better understand how EC2 Runtime Monitoring can benefit you in achieving your security goals related to identifying and responding to threats.

To learn more about GuardDuty and its Runtime Monitoring capabilities, see Runtime Monitoring in GuardDuty.

 
If you have feedback about this post, submit comments in the Comments section below. If you have questions about this post, contact AWS Support.

Scott Ward


Scott Ward

Scott is a Principal Solutions Architect with the External Security Services (ESS) product team and has been with Amazon for over 20 years. Scott provides technical guidance to customers on how to use security services to protect their AWS environments. Past roles include technical lead for the AWS Security Partner segment and member of the Amazon.com global financial systems technical team.

Methodology for incident response on generative AI workloads

Post Syndicated from Anna McAbee original https://aws.amazon.com/blogs/security/methodology-for-incident-response-on-generative-ai-workloads/

The AWS Customer Incident Response Team (CIRT) has developed a methodology that you can use to investigate security incidents involving generative AI-based applications. To respond to security events related to a generative AI workload, you should still follow the guidance and principles outlined in the AWS Security Incident Response Guide. However, generative AI workloads require that you also consider some additional elements, which we detail in this blog post.

We start by describing the common components of a generative AI workload and discuss how you can prepare for an event before it happens. We then introduce the Methodology for incident response on generative AI workloads, which consists of seven elements that you should consider when triaging and responding to a security event on a generative AI workload. Lastly, we share an example incident to help you explore the methodology in an applied scenario.

Components of a generative AI workload

As shown in Figure 1, generative AI applications include the following five components:

  • An organization that owns or is responsible for infrastructure, generative AI applications, and the organization’s private data.
  • Infrastructure within an organization that isn’t specifically related to the generative AI application itself. This can include databases, backend servers, and websites.
  • Generative AI applications, which include the following:
    • Foundation models – AI models with a large number of parameters and trained on a massive amount of diverse data.
    • Custom models – models that are fine-tuned or trained on an organization’s specific data and use cases, tailored to their unique requirements.
    • Guardrails – mechanisms or constraints to help make sure that the generative AI application operates within desired boundaries. Examples include content filtering, safety constraints, or ethical guidelines.
    • Agents – workflows that enable generative AI applications to perform multistep tasks across company systems and data sources.
    • Knowledge bases – repositories of domain-specific knowledge, rules, or data that the generative AI application can access and use.
    • Training data – data used to train, fine-tune, or augment the generative AI application’s models, including data for techniques such as retrieval augmented generation (RAG).

      Note: Training data is distinct from an organization’s private data. A generative AI application might not have direct access to private data, although this is configured in some environments.

    • Plugins – additional software components or extensions that you can integrate with the generative AI application to provide specialized functionalities or access to external services or data sources.
  • Private data refers to the customer’s privately stored, confidential data that the generative AI resources or applications aren’t intended to interact with during normal operation.
  • Users are the identities that can interact with or access the generative AI application. They can be human or non-human (such as machines).

Figure 1: Common components of an AI/ML workload

Figure 1: Common components of an AI/ML workload

Prepare for incident response on generative AI workloads

You should prepare for a security event across three domains: people, process, and technology. For a summary of how to prepare, see the preparation items from the Security Incident Response Guide. In addition, your preparation for a security event that’s related to a generative AI workload should include the following:

Important: Logs can contain sensitive information. To help protect this information, you should set up least privilege access to these logs, like you do for your other security logs. You can also protect sensitive log data with data masking. In Amazon CloudWatch, you can mask data natively through log group data protection policies.

Methodology for incident response on generative AI workloads

After you complete the preparation items, you can use the Methodology for incident response on generative AI workloads for active response, to help you rapidly triage an active security event involving a generative AI application.

The methodology has seven elements, which we detail in this section. Each element describes a method by which the components can interact with another component or a method by which a component can be modified. Consideration of these elements will help guide your actions during the Operations phase of a security incident, which includes detection, analysis, containment, eradication, and recovery phases.

  • Access – Determine the designed or intended access patterns for the organization that hosts the components of the generative AI application, and look for deviations or anomalies from those patterns. Consider whether the application is accessible externally or internally because that will impact your analysis.

    To help you identify anomalous and potential unauthorized access to your AWS environment, you can use Amazon GuardDuty. If your application is accessible externally, the threat actor might not be able to access your AWS environment directly and thus GuardDuty won’t detect it. The way that you’ve set up authentication to your application will drive how you detect and analyze unauthorized access.

    If evidence of unauthorized access to your AWS account or associated infrastructure exists, determine the scope of the unauthorized access, such as the associated privileges and timeline. If the unauthorized access involves service credentials—for example, Amazon Elastic Compute Cloud (Amazon EC2) instance credentials—review the service for vulnerabilities.

  • Infrastructure changes – Review the supporting infrastructure, such as servers, databases, serverless computing instances, and internal or external websites, to determine if it was accessed or changed. To investigate infrastructure changes, you can analyze CloudTrail logs for modifications of in-scope resources, or analyze other operating system logs or database access logs.
  • AI changes – Investigate whether users have accessed components of the generative AI application and whether they made changes to those components. Look for signs of unauthorized activities, such as the creation or deletion of custom models, modification of model availability, tampering or deletion of generative AI logging capabilities, tampering with the application code, and removal or modification of generative AI guardrails.
  • Data store changes – Determine the designed or intended data access patterns, whether users accessed the data stores of your generative AI application, and whether they made changes to these data stores. You should also look for the addition or modification of agents to a generative AI application.
  • Invocation – Analyze invocations of generative AI models, including the strings and file inputs, for threats, such as prompt injection or malware. You can use the OWASP Top 10 for LLM as a starting point to understand invocation related threats, and you can use invocation logs to analyze prompts for suspicious patterns, keywords, or structures that might indicate a prompt injection attempt. The logs also capture the model’s outputs and responses, enabling behavioral analysis to help identify uncharacteristic or unsafe model behavior indicative of a prompt injection. You can use the timestamps in the logs for temporal analysis to help detect coordinated prompt injection attempts over time and collect information about the user or system that initiated the model invocation, helping to identify the source of potential exploits.
  • Private data – Determine whether the in-scope generative AI application was designed to have access to private or confidential data. Then look for unauthorized access to, or tampering with, that data.
  • Agency – Agency refers to the ability of applications to make changes to an organization’s resources or take actions on a user’s behalf. For example, a generative AI application might be configured to generate content that is then used to send an email, invoking another resource or function to do so. You should determine whether the generative AI application has the ability to invoke other functions. Then, investigate whether unauthorized changes were made or if the generative AI application invoked unauthorized functions.

The following table lists some questions to help you address the seven elements of the methodology. Use your answers to guide your response.

Topic Questions to address
Access Do you still have access to your computing environment?
Is there continued evidence of unauthorized access to your organization?
Infrastructure changes Were supporting infrastructure resources accessed or changed?
AI changes Were your AI models, code, or resources accessed or changed?
Data store changes Were your data stores, knowledge bases, agents, plugins, or training data accessed or tampered with?
Invocation What data, strings, or files were sent as input to the model?
What prompts were sent?
What responses were produced?
Private data What private or confidential data do generative AI resources have access to?
Was private data changed or tampered with?
Agency Can the generative AI application resources be used to start computing services in an organization, or do the generative AI resources have the authority to make changes?
Were unauthorized changes made?

Example incident

To see how to use the methodology for investigation and response, let’s walk through an example security event where an unauthorized user compromises a generative AI application that’s hosted on AWS by using credentials that were exposed on a public code repository. Our goal is to determine what resources were accessed, modified, created, or deleted.

To investigate generative AI security events on AWS, these are the main log sources that you should review:

Access

Analysis of access for a generative AI application is similar to that for a standard three-tier web application. To begin, determine whether an organization has access to their AWS account. If the password for the AWS account root user was lost or changed, reset the password. Then, we strongly recommended that you immediately enable a multi-factor authentication (MFA) device for the root user—this should block a threat actor from accessing the root user.

Next, determine whether unauthorized access to the account persists. To help identify mutative actions logged by AWS Identity and Access Management (IAM) and AWS Security Token Service (Amazon STS), see the Analysis section of the Compromised IAM Credentials playbook on GitHub. Lastly, make sure that access keys aren’t stored in public repositories or in your application code; for alternatives, see Alternatives to long-term access keys.

Infrastructure changes

To analyze the infrastructure changes of an application, you should consider both the control plane and data plane. In our example, imagine that Amazon API Gateway was used for authentication to the downstream components of the generative AI application and that other ancillary resources were interacting with your application. Although you could review control plane changes to these resources in CloudTrail, you would need additional logging to be turned on to review changes made on the operating system of the resource. The following are some common names for control plane events that you could find in CloudTrail for this element:

  • ec2:RunInstances
  • ec2:StartInstances
  • ec2:TerminateInstances
  • ecs:CreateCluster
  • cloudformation:CreateStack
  • rds:DeleteDBInstance
  • rds:ModifyDBClusterSnapshotAttribute

AI changes

Unauthorized changes can include, but are not limited to, system prompts, application code, guardrails, and model availability. Internal user access to the generative AI resources that AWS hosts are logged in CloudTrail and appear with one of the following event sources:

  • amazonaws.com
  • amazonaws.com
  • amazonaws.com
  • amazonaws.com

The following are a couple examples of the event names in CloudTrail that would represent generative AI resource log tampering in our example scenario:

  • bedrock:PutModelInvocationLoggingConfiguration
  • bedrock:DeleteModelInvocationLoggingConfiguration

The following are some common event names in CloudTrail that would represent access to the AI/ML model service configuration:

  • bedrock:GetFoundationModelAvailability
  • bedrock:ListProvisionedModelThroughputs
  • bedrock:ListCustomModels
  • bedrock:ListFoundationModels
  • bedrock:ListProvisionedModelThroughput
  • bedrock:GetGuardrail
  • bedrock:DeleteGuardrail

In our example scenario, the unauthorized user has gained access to the AWS account. Now imagine that the compromised user has a policy attached that grants them full access to all resources. With this access, the unauthorized user can enumerate each component of Amazon Bedrock and identify the knowledge base and guardrails that are part of the application.

The unauthorized user then requests model access to other foundation models (FMs) within Amazon Bedrock and removes existing guardrails. The access to other foundation models could indicate that the unauthorized user intends to use the generative AI application for their own purposes, and the removal of guardrails minimizes filtering or output checks by the model. AWS recommends that you implement fine-grained access controls by using IAM policies and resource-based policies to restrict access to only the necessary Amazon Bedrock resources, AWS Lambda functions, and other components that the application requires. Also, you should enforce the use of MFA for IAM users, roles, and service accounts with access to critical components such as Amazon Bedrock and other components of your generative AI application.

Data store changes

Typically, you use and access a data store and knowledge base through model invocation, and for Amazon Bedrock, you include the API call bedrock:InvokeModel.

However, if an unauthorized user gains access to the environment, they can create, change, or delete the data sources and knowledge bases that the generative AI applications integrate with. This could cause data or model exfiltration or destruction, as well as data poisoning, and could create a denial-of-service condition for the model. The following are some common event names in CloudTrail that would represent changes to AI/ML data sources in our example scenario:

  • bedrock:CreateDataSource
  • bedrock:GetKnowledgeBase
  • bedrock:DeleteKnowledgeBase
  • bedrock:CreateAgent
  • bedrock:DeleteAgent
  • bedrock:InvokeAgent
  • bedrock:Retrieve
  • bedrock:RetrieveAndGenerate

For the full list of possible actions, see the Amazon Bedrock API Reference.

In this scenario, we have established that the unauthorized user has full access to the generative AI application and that some enumeration took place. The unauthorized user then identified the S3 bucket that was the knowledge base for the generative AI application and uploaded inaccurate data, which corrupted the LLM. For examples of this vulnerability, see the section LLM03 Training Data Poisoning in the OWASP TOP 10 for LLM Applications.

Invocation

Amazon Bedrock uses specific APIs to register model invocation. When a model in Amazon Bedrock is invoked, CloudTrail logs it. However, to determine the prompts that were sent to the generative AI model and the output response that was received from it, you must have configured model invocation logging.

These logs are crucial because they can reveal important information, such as whether a threat actor tried to get the model to divulge information from your data stores or release data that the model was trained or fine-tuned on. For example, the logs could reveal if a threat actor attempted to prompt the model with carefully crafted inputs that were designed to extract sensitive data, bypass security controls, or generate content that violates your policies. Using the logs, you might also learn whether the model was used to generate misinformation, spam, or other malicious outputs that could be used in a security event.

Note: For services such as Amazon Bedrock, invocation logging is disabled by default.  We recommend that you enable data events and model invocation logging for generative AI services, where available. However, your organization might not want to capture and store invocation logs for privacy and legal reasons. One common concern is users entering sensitive data as input, which widens the scope of assets to protect. This is a business decision that should be taken into consideration.

In our example scenario, imagine that model invocation wasn’t enabled, so the incident responder couldn’t collect invocation logs to see the model input or output data for unauthorized invocations. The incident responder wouldn’t be able to determine the prompts and subsequent responses from the LLM. Without this logging enabled, they also couldn’t see the full request data, response data, and metadata associated with invocation calls.

Event names in model invocation logs that would represent model invocation logging in Amazon Bedrock include:

  • bedrock:InvokeModel
  • bedrock:InvokeModelWithResponseStream
  • bedrock:Converse
  • bedrock:ConverseStream

The following is a sample log entry for Amazon Bedrock model invocation logging:

Figure 2: sample model invocation log including prompt and response

Figure 2: sample model invocation log including prompt and response

Private data

From an architectural standpoint, generative AI applications shouldn’t have direct access to an organization’s private data. You should classify data used to train a generative AI application or for RAG use as data store data and segregate it from private data, unless the generative AI application uses the private data (for example, in the case where a generative AI application is tasked to answer questions about medical records for a patient). One way to help make sure that an organization’s private data is segregated from generative AI applications is to use a separate account and to authenticate and authorize access as necessary to adhere to the principle of least privilege.

Agency

Excessive agency for an LLM refers to an AI system that has too much autonomy or decision-making power, leading to unintended and potentially harmful consequences. This can happen when an LLM is deployed with insufficient oversight, constraints, or alignment with human values, resulting in the model making choices that diverge from what most humans would consider beneficial or ethical.

In our example scenario, the generative AI application has excessive permissions to services that aren’t required by the application. Imagine that the application code was running with an execution role with full access to Amazon Simple Email Service (Amazon SES). This could allow for the unauthorized user to send spam emails on the users’ behalf in response to a prompt. You could help prevent this by limiting permission and functionality of the generative AI application plugins and agents. For more information, see OWASP Top 10 for LLM, evidence of LLM08 Excessive Agency.

During an investigation, while analyzing the logs, both the sourceIPAddress and the userAgent fields will be associated with the generative AI application (for example, sagemaker.amazonaws.com, bedrock.amazonaws.com, or q.amazonaws.com). Some examples of services that might commonly be called or invoked by other services are Lambda, Amazon SNS, and Amazon SES.

Conclusion

To respond to security events related to a generative AI workload, you should still follow the guidance and principles outlined in the AWS Security Incident Response Guide. However, these workloads also require that you consider some additional elements.

You can use the methodology that we introduced in this post to help you address these new elements. You can reference this methodology when investigating unauthorized access to infrastructure where the use of generative AI applications is either a target of unauthorized use, the mechanism for unauthorized use, or both. The methodology equips you with a structured approach to prepare for and respond to security incidents involving generative AI workloads, helping you maintain the security and integrity of these critical applications.

For more information about best practices for designing your generative AI application, see Generative AI for the AWS Security Reference Architecture. For information about tactical mitigations for a common generative AI application, see the Blueprint for secure design and anti-pattern mitigation.

If you have feedback about this post, submit comments in the Comments section below. If you have questions about this post, start a new thread on the AWS Security, Identity, & Compliance re:Post or contact AWS Support.
 

Anna McAbee


Anna McAbee

Anna is a Security Specialist Solutions Architect focused on financial services, generative AI, and incident response at AWS. Outside of work, Anna enjoys Taylor Swift, cheering on the Florida Gators football team, wine tasting, and traveling the world.
Steve De Vera


Steve De Vera

Steve is a manager in the AWS Customer Incident Response Team (CIRT). He is passionate about American-style BBQ and is a certified competition BBQ judge. He has a dog named Brisket.
AJ Evans


AJ Evans

AJ is a Security Engineer with the AWS Customer Incident Response Team (CIRT). He uses his experience as a former U.S. Secret Service Special Agent, where he focused on financial crimes and network intrusions, to protect AWS customers. When he’s not responding to the latest cyber threats, AJ enjoys gaming, playing music, building custom PCs, and 3D printing his own creations.
Jennifer Paz


Jennifer Paz

Jennifer is a Security Engineer with over a decade of experience, currently serving on the AWS Customer Incident Response Team (CIRT). Jennifer enjoys helping customers tackle security challenges and implementing complex solutions to enhance their security posture. When not at work, Jennifer is an avid walker, jogger, pickleball enthusiast, traveler, and foodie, always on the hunt for new culinary adventures.

Create security observability using generative AI with Security Lake and Amazon Q in QuickSight

Post Syndicated from Priyank Ghedia original https://aws.amazon.com/blogs/security/create-security-observability-using-generative-ai-with-security-lake-and-amazon-q-in-quicksight/

Generative artificial intelligence (AI) is now a household topic and popular across various public applications. Users enter prompts to get answers to questions, write code, create images, improve their writing, and synthesize information. As people become familiar with generative AI, businesses are looking for ways to apply these concepts to their enterprise use cases in a simple, scalable, and cost-effective way. These same needs are shared by a variety of security stakeholders. For example, if security directors want to summarize their security posture in natural language, a security architect will need to triage alerts or findings and investigate AWS CloudTrail logs to identify high priority remediation actions or detect potential threat actors by identifying potentially malicious activity. There are many ways to deploy solutions for these use cases.

In this blog post, we review a fully serverless solution for querying data stored in Amazon Security Lake using natural language (human language) with Amazon Q in QuickSight. This solution has multiple use cases, such as generating visualizations and querying vulnerability information for vulnerability management using tools such as Amazon Inspector that feed into AWS Security Hub. The solution helps reduce the time from detection to investigation by using natural language to query CloudTrail logs and Amazon Virtual Private Cloud (VPC) Flow Logs, resulting in quicker response to threats in your environment.

Amazon Security Lake is a fully managed security data lake service that automatically centralizes security data from AWS environments, software as a service (SaaS) providers, and on-premises and cloud sources into a purpose-built data lake that’s stored in your AWS account. The data lake is backed by Amazon Simple Storage Service (Amazon S3) buckets, and you retain ownership over your data. Security Lake converts ingested data into Apache Parquet format and a standard open source schema called the Open Cybersecurity Schema Framework (OCSF). With OCSF support, Security Lake normalizes and combines security data from AWS and a broad range of enterprise security data sources.

Amazon QuickSight is a cloud-scale business intelligence (BI) service that delivers insights to stakeholders, wherever they are. QuickSight connects to your data in the cloud and combines data from a variety of different sources. With QuickSight, users can meet varying analytic needs from the same source of truth through interactive dashboards, reports, natural language queries, and embedded analytics. With Amazon Q in QuickSight, business analysts and users can use natural language to build, discover, and share meaningful insights.

The recent announcements for Amazon Q in QuickSight, Security Lake, and the OCSF present a unique opportunity to apply generative AI to fully managed hybrid multi-cloud security related logs and findings from over 100 independent software vendors and partners.

Solution overview

The solution uses Security Lake as the data lake which has native ingestion for CloudTrail, VPC Flow Logs, and Security Hub findings as shown in Figure 1. Logs from these sources are sent to S3 buckets in your AWS account and are maintained by Security Lake. We then create Amazon Athena views from tables created by Security Lake for Security Hub findings, CloudTrail logs, and VPC Flow Logs to define the interesting fields from each of the log sources. Each of these views are ingested into a QuickSight dataset. From these datasets, we generate analyses and dashboards. We use Amazon Q topics to label columns in the dataset that are human-readable and create a named entity to present contextual and multi-visual answers in response to questions. After the topics are created, users can perform their analysis using Q topics, QuickSight analyses, or QuickSight dashboards.

Figure 1: Solution architecture

Figure 1: Solution architecture

You can use the rollup AWS Region feature in Security Lake to aggregate logs from multiple Regions into a single Region. Specifying a rollup Region can help you adhere to regional compliance requirements. If you use rollup Regions, you must set up the solution described in this post for datasets only in rollup Regions. If you don’t use a rollup Region, you must deploy this solution for each Region you that want to collect data from.

Prerequisites

To implement the solution described in this post, you must meet the following requirements:

  1. Basic understanding of Security Lake, Athena, and QuickSight.
  2. Security Lake is already deployed and accepting CloudTrail management events, VPC Flow Logs, and Security Hub findings as sources. If you haven’t deployed Security Lake yet, we recommend following the best practices established in the security reference architecture.
  3. This solution uses Security Lake data source version 2 to create the dashboards and visualizations. If you aren’t already using data source version 2, you will see a banner in your Security Lake console with instructions to update.
  4. An existing QuickSight deployment that will be used to visualize Security Lake data or an account that is able to sign up for QuickSight to create visualizations.
  5. QuickSight Author Pro and Reader Pro licenses are needed for using Amazon Q features in QuickSight. Non-pro Authors and Readers can still access Q topics if an Author Pro or Admin Pro user shares the topic with them. Non-pro Authors and Readers can also access data stories if a Reader Pro, Author Pro, or Admin Pro shares one with them. Review Generative AI features supported by each QuickSight licensing tiers.
  6. AWS Identity and Access Manager (IAM) permissions for QuickSight, Athena, Lake Formation, Security Lake, and AWS Resource Access Manager.

In the following section, we walk through the steps to ingest Security Lake data into QuickSight using Athena views and then using Amazon Q in QuickSight to create visualizations and query data using natural language.

Provide cross-account query access

In alignment with our security reference architecture, it’s a best practice to isolate the Security Lake account from the accounts that are running the visualization and querying workloads. It’s recommended that QuickSight for security use cases be deployed in the security tooling account. See How to visualize Amazon Security Lake findings with Amazon QuickSight for information on how to set up cross-account query access. Follow the steps in the Configure a Security Lake subscriber section and configure Athena to visualize your data section.

When you get to the create resource link steps, create a resource link for data source version 2 for Security Hub, CloudTrail, and VPC flow log tables for a total of three resource links. The way to identify data source version 2 tables is by their name; it ends in _2_0. For example:

  • amazon_security_lake_table_us_east_1_sh_findings_2_0
  • amazon_security_lake_table_us_east_1_cloud_trail_mgmt_2_0
  • amazon_security_lake_table_us_east_1_vpc_flow_2_0

For the remainder of this post, we will be referencing the database name security_lake_visualization and the resource link names for Security Hub findings, CloudTrail logs, and VPC Flow Logs respectively, as shown in Figure 2:

  • securitylake_shared_resourcelink_securityhub_2_0_us_east_1
  • securitylake_shared_resourcelink_cloudtrail_2_0_us_east_1
  • securitylake_shared_resourcelink_vpcflow_2_0_us_east_1

Figure 2: Lake Formation table snapshot

Figure 2: Lake Formation table snapshot

We will call the QuickSight account the visualization account. If you plan to use same account as the Security Lake delegated administrator and QuickSight, then skip this step and go to the next section where you will create views in Athena.

Create views in Athena

A view in Athena is a logical table that helps simplify your queries by working with only a subset of the relevant data. Follow these steps to create three views in Athena, one each for Security Hub findings, CloudTrail logs, and the VPC Flow Logs in the visualization account.

These queries default to the previous week’s data starting from the previous day, but you can change the time frame by modifying the last line in the query from 8 to the number of days you prefer. Keep in mind that there is a limitation on the size of each SPICE table of 1 TB. If you want to limit the volume of data, you can delete the rows that you find unnecessary. We included the fields customers have identified as relevant to reduce the burden of writing the parsing details yourself.

To create views:

  1. Sign in to the AWS Management Console in the visualization account and navigate to the Athena console.
  2. If a Security Lake rollup Region is used, select the rollup Region.
  3. Choose Launch Query Editor.
  4. If this is the first time you’re using Athena, you will need to choose a bucket to store your query results.
    1. Choose Edit Settings.
    2. Choose Browse S3.
    3. Search for your bucket name.
    4. Select the radio button next to the name of your bucket.
    5. Select Choose.
  5. For Data Source, select AWSDataCatalog.
  6. Select Database as security_lake_visualization. If you used a different name for the database for cross account query access, then select that database.

    Figure 3: Athena database selection

    Figure 3: Athena database selection

  7. Copy the query for the security_hub_view from the GitHub repo for this post. If you’re using a different name for the database and table resource link than the one specified in this post, edit the FROM statement at the bottom of the query to reflect the correct names.
  8. Paste the query in the query editor and then choose Run. The name of the view is set in the first line of the query which is security_insights_security_hub_vw2.
  9. To confirm this view was created correctly, choose the three dots next to the view that was created and select Preview View.

    Figure 4: Previewing the view

    Figure 4: Previewing the view

  10. Repeat steps 5–9 to create the CloudTrail and VPC Flow Logs views. The queries for each can be found in the GitHub repo.

    Figure 5: Athena views

    Figure 5: Athena views

Create QuickSight dataset

Now that you’ve created the views, use Athena as the data source to create a dataset in QuickSight. Repeat these steps for the Security Hub findings, CloudTrail logs, and VPC Flow Logs. Start by creating a dataset for the Security Hub findings.

To configure permissions on tables:

  1. Sign in to the QuickSight console in the visualization account. If a Security Lake rollup Region is used, select the rollup Region.
  2. If this is the first time you’re using QuickSight, you must sign up for a QuickSight subscription.
  3. Although there are multiple ways to sign in to QuickSight, we used IAM based access to build the dashboards. To use QuickSight with Athena and Lake Formation, you first need to authorize connections through Lake Formation.
  4. When using a cross-account configuration with AWS Glue Data Catalog, you need to configure permissions on tables that are shared through Lake Formation. For the use case in this post, use the following steps to grant access on the cross-account tables in the Glue Catalog. You must perform these steps for each of the Security Hub, CloudTrail, and VPC Flow Logs tables that you created in the preceding cross-account query access section. Because granting permissions on a resource link doesn’t grant permissions on the target (linked) database or table, you will grant permission twice, once to the target (linked table) and then to the resource link.
    1. In the Lake Formation console, navigate to the Tables section and select the resource link for the Security Hub table. For example:

      securitylake_shared_resourcelink_securityhub_2_0_us_east_1

    2. Select Actions. Under Permissions, select Grant on target.
    3. For the next step, you need the Amazon Resource Name (ARN) of the QuickSight users or groups that need access to the table. To obtain the ARN through the AWS Command Line Interface (AWS CLI), run following commands (replacing account ID and Region with that of the visualization account.) You can use AWS CloudShell for this purpose.
      1. For users

        aws quicksight list-users --aws-account-id 111122223333 --namespace default --region us-east-1

      2. For groups

        aws quicksight list-groups --aws-account-id 111122223333 --namespace default --region us-east-1

    4. After you have the ARN of the user or group, copy it and go back to the LakeFormation console Grant on Target page. For Principals, select SAML users and groups, and then add the QuickSight user’s ARN.

      Figure 6: Selecting principals

      Figure 6: Selecting principals

    5. For LF-Tags or catalog resources, keep the default settings.

      Figure 7: Table grant on target permissions

      Figure 7: Table grant on target permissions

    6. For Table permissions, select Select for both Table Permissions and Grantable Permissions, and then choose Grant.

      Figure 8: Selecting table permissions

      Figure 8: Selecting table permissions

    7. Navigate back to the Tables section and select the resource link for the Security Hub table. For example:

      securitylake_shared_resourcelink_securityhub_2_0_us_east_1

    8. Select Actions. This time under Permissions, and then choose Grant.
    9. For Principals, select SAML users and groups, and then add the QuickSight user’s ARN captured earlier.
    10. For the LF-Tags or catalog resources section, use the default settings.
    11. For Resource link permissions choose Describe for both Table Permissions and Grantable Permissions.
    12. Repeat steps a–k for the CloudTrail and VPC Flow Logs resource links.

To create datasets from views:

  1. After permissions are in place, you create three datasets from the views created earlier. Because both Quicksight and Lake Formation are Regional services, verify that you’re using QuickSight in the same Region where Lake Formation is sharing the data. The simplest way to determine your Region is to check the QuickSight URL in your web browser. The Region will be at the beginning of the URL, such as us-east-1. To change the Region, select the settings icon in the top right of the QuickSight screen and select the correct Region from the list of available Regions in the drop-down menu.
  2. Navigate back to the QuickSight console.
  3. Select Datasets, and then choose New dataset.
  4. Select Athena from the list of available data sources.
  5. Enter a Data source name, for example security_lake_securityhub_dataset and leave the Athena workgroup as [primary]. Choose Create data source.
  6. At the Choose your table prompt, for Catalog, select AwsDataCatalog. For Database, select security_lake_visualization. If you used a different name for the database for cross-account query access, then select that database. For Tables, select the view name security_insights_security_hub_vw2 to build your dashboards for Security Hub findings. Then choose Select.

    Figure 9: Choose a table during QuickSight dataset creation

    Figure 9: Choose a table during QuickSight dataset creation

  7. At the Finish dataset creation prompt, select Import to SPICE for quicker analytics. Choose Visualize. This will create a new dataset in QuickSight using the name of the Athena view, which is security_insights_security_hub_vw2. You will be taken to the Analysis page, exit out of it.
  8. Go back to the QuickSight console and repeat steps 3–8 for the CloudTrail and VPC Flow Log datasets.

Create a topic

Now that you have created a dataset, you can create a topic. Q topics are collections of one or more datasets that represent a subject area for your business users to ask questions. Topics allow users to ask questions in natural language and to build visualizations using natural language.

To create a Q topic:

  1. Navigate to the QuickSight console.
  2. Choose Topics in the left navigation pane.

    Figure 10: QuickSight navigation pane

    Figure 10: QuickSight navigation pane

  3. Choose New topic. Create one topic each for the Security Hub findings, CloudTrail logs, and VPC Flow Logs

    Figure 11: QuickSight topic creation

    Figure 11: QuickSight topic creation

  4. On the New topic page, do the following:
    1. For Topic name, enter a descriptive name for the topic. Name the first one SecurityHubTopic. Your business users will identify the topic by this name and use it to ask questions.
    2. For Description, enter a description for the topic. Your users can use this description to get more details about the topic.
    3. Choose Continue.
  5. On the Add data to topic page, choose the dataset you created in the Create a QuickSight dataset section. Start with the Security Hub dataset security_insights_security_hub_vw2.
  6. Choose Continue. It will take a few minutes to create the topic.
  7. Now that your topic has been created, navigate to the Data tab of the topic.
  8. Your Data Fields sub-tab should be selected already. If not, choose Data Fields.

    Figure 12: Topics data fields

    Figure 12: Topics data fields

  9. For each of the fields in the list, turn on Include to make sure that all fields are included. For this example, we selected all fields, but you can adjust the included columns as needed for your use case. Note, you might see a banner at the top of the page indicating that the indexing is in progress. Depending on the size of your data, it might take some time for Q to make those fields available for querying. Most of the time, indexing is complete in less than 15 minutes.
  10. Review the Synonyms column. These alternate representations of your column name are automatically generated by Amazon Q. You can add and remove synonyms as needed for your use case.
  11. At this point, you’re ready to ask questions about your data using Amazon Q in QuickSight. Choose Ask a question about SecurityHubTopic at the top of the page.

    Figure 13: Ask questions using Q

    Figure 13: Ask questions using Q

  12. You can now ask questions about Security Hub findings in the prompt. Enter Show me findings with compliance status failed along with control id.

    Figure 14: Q answers

    Figure 14: Q answers

  13. Under the question, you will see how it was interpreted by QuickSight.
  14. Repeat steps 1–13 to create CloudTrail and VPC Flow Log QuickSight topics.

Create named entities for your topics

Now that you’ve created your topics, you will now add named entities. Named entities are optional, but we’re using them in the solution to help make queries more effective. The information contained in named entities, the ordering of fields, and their ranking make it possible to present contextual, multi-visual answers in response to even vague questions.

To create a named entity:

  1. In the QuickSight console, navigate to Topics.
  2. Select the Security Hub topic that you created in the previous section.
  3. Under the Data tab, select the Named Entity subtab, and choose Add Named Entity.

    Figure 15: Named entity subtab

    Figure 15: Named entity subtab

  4. Enter Security Findings as the entity name.
  5. Select the following datafields: Status, Metadata Product Name, Finding Info Title, Region, Severity, Cloud Account Uid, Time Dt, Compliance Status, and AccountId. The order of the fields helps Q to prioritize the data, so rearrange your data fields as needed.

    Figure 16: Security hub finding names entity creation

    Figure 16: Security hub finding names entity creation

  6. Choose Save in the top right corner to save your results.
  7. Repeat steps 1–6 with the CloudTrail dataset using the following datafields: API operation, Time Dt, Region, Status, AccountId, API Response Error, Actor User Credential Uid, Actor User Name, Actor User Type, Api Service Name, Actor Idp Name, Cloud Provider, Session Issuer, and Unmapped.

    Figure 17: CloudTrail named entity creation

    Figure 17: CloudTrail named entity creation

  8. Repeat steps 1–6 with the VPC Flow Log dataset using the following datafields: Src Endpoint IP, Src Endpoint Port, Dst Endpoint IP, Dst Endpoint Port, Connection Info Direction, Traffic Bytes, Action, Accountid, Time Dt, and Region.

    Figure 18: VPC Flow log named entity creation

    Figure 18: VPC Flow log named entity creation

Create visualizations using natural language

After your topic is done indexing, you can start creating visualizations using natural language. In QuickSight, an analysis is the same thing as a dashboard, but is only accessible by the authors. You can keep it private and make it as robust and detailed as you want. When you decide to publish it, the shared version is called a dashboard.

To create visualizations:

  1. Open the QuickSight console and navigate to the Analysis tab.
  2. In the top right, select New analysis.
  3. Select the dataset you created previously, it will have the same naming convention as the Athena view. For reference, the Athena view query created a Security Hub dataset called security_insights_security_hub_vw2.
  4. Validate the information about the data set you’re going to use in the analysis and choose USE IN ANALYSIS.
  5. On the pop up, select the interactive sheet option and choose Create.
  6. For datasets that have a corresponding Q topic, which you created in a previous step, choose Build visual at the top of the screen.

    Figure 19: Build visual using natural language

    Figure 19: Build visual using natural language

  7. Enter your prompt and choose BUILD. For example, enter findings with product security hub group by control id include count. Q automatically generates a visualization.

    Figure 20: Q response

    Figure 20: Q response

  8. To add to your dashboard, choose ADD TO ANALYSIS to see your new visualization module in your current analysis.
  9. The supplied questions are targeted towards a Security Hub findings topic, where you can ask questions about your security hub findings data. For example, show all Security Hub findings for critical severity for a specific resource or ARN.
  10. If you use Amazon Inspector for software vulnerability management and you want to monitor top common vulnerabilities and exposures (CVEs) affecting your organization, choose Build visual and enter show all ACTIVE findings with product inspector group by Title add count in the prompt. We used the keyword ACTIVE because ACTIVE is a finding state in Security Hub that indicates the finding is still active as per the finding source and Amazon Inspector has not closed the finding yet. If Amazon Inspector has closed the finding, the finding will have a state of ARCHIVED.

    Figure 21: Q Response for an Amazon Inspector findings question

    Figure 21: Q Response for an Amazon Inspector findings question

  11. After you add visualization to the analysis, you can customize it further using various QuickSight visualization options.
  12. To add the remaining datasets, which allows you to visualize data from multiple datasets in a single view, select the dropdown in the left navigation under Dataset.
    1. Select Add a new dataset.
    2. Search the name of the remaining datasets you created previously.
    3. Select anywhere on the name of the dataset to make the radial button blue for the single dataset you want to add. Choose Select.
  13. Repeat steps 7–12 in this section to add all the corresponding datasets you created previously.

Note: When you add additional datasets to the same Analysis and use Build visual to generate visualizations using natural language, the corresponding datasets with Q Topics are populated in the drop down under the prompt. Be sure to choose the correct dataset when asking questions.

Figure 22: Choosing a QuickSight dataset

Figure 22: Choosing a QuickSight dataset

To create dashboards:

  1. After you’ve created the visual and are ready to publish the analysis as a dashboard, select PUBLISH in the top right corner.
    1. Enter a name for your dashboard.
    2. Choose Publish Dashboard.
  2. After your dashboard is published, your users can ask questions about the data through the dashboard as well. This dashboard can be shared with other users. Users with QuickSight Reader Pro licenses can ask questions using Amazon Q.

To ask questions using the dashboard:

  1. Navigate to the Dashboards section on the left navigation.
  2. Select the dashboard you previously published.
  3. Select Ask a question about [Topic Name] at the top of the screen. A module will open from the side of your screen. Questions can only be addressed to a single topic. To change the topic, select the name of the topic and a drop-down will appear. Select the name of the current topic to see other options and select the topic you want to ask a question about. For this example, select CloudTrailTopic.

    Figure 23: Selecting a topic

    Figure 23: Selecting a topic

  4. Enter a question in the prompt. For this example, enter show top API operations in the last 24 hours with accessdenied.

    Figure 24: CloudTrail question 1

    Figure 24: CloudTrail question 1

  5. Enter show all activity by user johndoe in the last 3 days.

    Figure 25: CloudTrail question 2

    Figure 25: CloudTrail question 2

  6. Q will automatically build a small dashboard based on the questions provided.
  7. Now change the topic to VPCFlowTopic as described in step 3.
  8. Enter show me the top 5 dst ip by bytes for outbound traffic with dst port 443.

    Figure 26: VPC Flow Log question

    Figure 26: VPC Flow Log question

You can build executive summaries using QuickSight data stories, which also use generative AI. Data stories use Amazon Q prompts and visuals to produce a draft that incorporates the details that you provide. For example, you can create a data story about how a specific CVE affects your organization by asking Q questions, then add visuals from analyses you already created.

Conclusion

In this blog post, you learned how to use generative AI for your security use cases. We showed you how to use cross-account query access to allow a QuickSight visualization account to subscribe to Security Lake data for Security Hub findings, CloudTrail logs, and VPC Flow Logs. We then provided instructions for creating, Athena views, QuickSight datasets, Q topics, named entities, and for using natural language to build dashboards and query your data. You can customize the Athena views to create, update, or delete columns and column names as needed for your use case. You can also customize the Q topics and named entities to use naming conventions and structure responses based on your organization’s needs.

 
If you have feedback about this post, submit comments in the Comments section below. If you have questions about this post, contact AWS Support.

Priyank Ghedia
Priyank Ghedia

Priyank is a Senior Security Specialist Solutions Architect focused on threat detection and incident response. Priyank helps customers meet their security visibility and response objectives by building architectures using AWS security services and tools. Before AWS, he spent eight years advising customers on global networking and security operations.
Matt Meck
Matt Meck

Matt is a Sr. Worldwide Security Specialist in New York, covering the AWS Detection and Response domain and advises customers on how they can enhance their security posture and shares feedback to service teams about how AWS can enhance its services. Hiking, competitive soccer, skiing, and being with friends and family are his favorite pass times.
Anthony Harvey
Anthony Harvey

Anthony is a Senior Security Specialist Solutions Architect for AWS in the worldwide public sector group. Prior to joining AWS, he was a chief information security officer in local government for half a decade. He has a passion for figuring out how to do more with less and using that mindset to enable customers in their security journey.

Introducing the APRA CPS 230 AWS Workbook for Australian financial services customers

Post Syndicated from Krish De original https://aws.amazon.com/blogs/security/introducing-the-apra-cps-230-aws-workbook-for-australian-financial-services-customers/

The Australian Prudential Regulation Authority (APRA) has established the CPS 230 Operational Risk Management standard to verify that regulated entities are resilient to operational risks and disruptions. CPS 230 requires regulated financial entities to effectively manage their operational risks, maintain critical operations during disruptions, and manage the risks associated with service providers.

Amazon Web Services (AWS) is excited to announce the launch of the AWS Workbook for the APRA CPS 230 standard to support AWS customers as they work to meet applicable CPS 230 requirements. The workbook describes operational resilience, AWS and the Shared Responsibility Model, AWS compliance programs, and relevant AWS services and whitepapers that relate to regulatory requirements.

This workbook is complementary to the AWS User Guide to Financial Services Regulations and Guidelines in Australia and is available through AWS Artifact.

As the regulatory environment continues to evolve, we’ll provide further updates regarding AWS offerings in this area on the AWS Security Blog and the AWS Compliance page. The AWS Workbook for the APRA CPS 230 adds to the resources AWS provides about financial services regulation across the world. You can find more information on cloud-related regulatory compliance at the AWS Compliance Center. You can also reach out to your AWS account manager for help finding the resources you need.

 
If you have feedback about this post, submit comments in the Comments section below. If you have questions about this post, contact AWS Support.

Krish De
Krish De

Krish is a Principal Solutions Architect with a focus on financial services. He works with AWS customers, their regulators, and AWS teams to safely accelerate customers’ cloud adoption, with prescriptive guidance on governance, risk, and compliance. Krish has over 20 years of experience working in governance, risk, and technology across the financial services industry in Australia, New Zealand, and the United States.

Podcast: Empowering organizations to address their digital sovereignty requirements with AWS

Post Syndicated from Marta Taggart original https://aws.amazon.com/blogs/security/podcast-empowering-organizations-to-address-their-digital-sovereignty-requirements-with-aws/

Developing strategies to navigate the evolving digital sovereignty landscape is a top priority for organizations operating across industries and in the public sector. With data privacy, security, and compliance requirements becoming increasingly complex, organizations are seeking cloud solutions that provide sovereign controls and flexibility. Recently, Max Peterson, Amazon Web Services (AWS) Vice President of Sovereign Cloud, sat down with Daniel Newman, CEO of The Futurum Group and co-founder of Six Five Media, to explore how customers are meeting their unique digital sovereignty needs with AWS. Their thought-provoking conversation delves into the factors that are driving digital sovereignty strategies, the key considerations for customers, and AWS offerings that are designed to deliver control, choice, security, and resilience in the cloud. The podcast includes a discussion of AWS innovations, including the AWS Nitro System, AWS Dedicated Local Zones, AWS Key Management Service External Key Store, and the upcoming AWS European Sovereign Cloud. Check out the episode to gain valuable insights that can help you effectively navigate the digital sovereignty landscape while unlocking the full potential of cloud computing.

Visit Digital Sovereignty at AWS to learn how AWS can help you address your digital sovereignty needs.

 
If you have feedback about this post, submit comments in the Comments section below. If you have questions about this post, contact AWS Support.

Marta Taggart
Marta Taggart

Marta is a Principal Product Marketing Manager focused on digital sovereignty in AWS Security Product Marketing. Outside of work, you’ll find her trying to make sure that her rescue dog, Jack, lives his best life.

Reduce risks of user sign-up fraud and SMS pumping with Amazon Cognito user pools

Post Syndicated from Edward Sun original https://aws.amazon.com/blogs/security/reduce-risks-of-user-sign-up-fraud-and-sms-pumping-with-amazon-cognito-user-pools/

If you have a customer facing application, you might want to enable self-service sign-up, which allows potential customers on the internet to create an account and gain access to your applications. While it’s necessary to allow valid users to sign up to your application, self-service options can open the door to unintended use or sign-ups. Bad actors might leverage the user sign-up process for unintended purposes, launching large-scale distributed denial of service (DDoS) attacks to disrupt access for legitimate users or committing a form of telecommunications fraud known as SMS pumping. SMS pumping is when bad actors purchase a block of high-rate phone numbers from a telecom provider and then coerces unsuspecting services into sending SMS messages to those numbers.

Amazon Cognito is a managed OpenID Connect (OIDC) identity provider (IdP) that you can use to add self-service sign-up, sign-in, and control access features to your web and mobile applications. AWS customers who use Cognito might encounter SMS pumping if SMS functions are enabled to send SMS messages, for example, perform user phone number verification during the registration process, to facilitate SMS multi-factor authentication (MFA) flows, or to support account recovery using SMS. In this blog post, we explore how SMS pumping may be perpetrated and options to reduce risks, including blocking unexpected user registration, detecting anomalies, and responding to risk events with your Cognito user pool.

Cognito user sign-up process

After a user has signed up in your application with an Amazon Cognito user pool, their account is placed in the Registered (unconfirmed) state in your user pool and the user won’t be able to sign in yet. You can use the Cognito-assisted verification and confirmation process to verify user-provided attributes (such as email or phone number) and then confirm the user’s status. This verified attribute is also used for MFA and account recovery purposes. If you choose to verify the user’s phone number, Cognito sends SMS messages with a one-time password (OTP). After a user has provided the correct OTP, their email or phone number is marked as verified and the user can sign in to your application.

Figure 1: Amazon Cognito sign-up process

Figure 1: Amazon Cognito sign-up process

If the sign-up process isn’t protected, bad actors can create scripts or deploy bots to sign up a large number of accounts, resulting in a significant volume of SMS messages sent in a short period of time. We dive deep into prevention, detection, and remediation mechanisms and strategies that you can apply to help protect against SMS pumping based on your use case.

Protect the sign-up flow

In this section, we review several prevention strategies to help protect against SMS sign-up frauds and help reduce the amount of SMS messages sent to bad actors.

Implement bot mitigation

Implementing bot mitigation techniques, such as CAPTCHA, can be very effective in preventing simple bots from pumping user creation flows. You can integrate a CAPTCHA framework on your application’s frontend and validate that the client initiating the sign-up request is operated by a human user. If the user has passed the verification, you then pass the CAPTCHA user response token in ClientMetadata together with user attributes to an Amazon Cognito SignUp API call. As part of the sign-up process, Cognito invokes an AWS Lambda function called pre sign-up Lambda trigger, which you can use to reject sign-up requests if there isn’t a valid CAPTCHA token presented. This will slow down bots and help reduce unintended account creation in your Cognito user pool.

Validate phone number before user sign-up

Another layer of mitigation is to identify the actor’s phone number early in your application’s sign-up process. You can validate the user provided phone number in the backend to catch incorrectly formatted phone numbers and add logic to help filter out unwanted phone numbers prior to sending text messages. Amazon Pinpoint offers a Phone Number Validate feature that can help you determine if a user-provided phone number is valid, determine phone number type (such as mobile, landline, or VoIP), and identify the country and service provider the phone number is associated with. The returned phone number metadata can be used to decide whether the user will continue the sign-up process and send an SMS message to that user. Note that there’s an additional charge for using the phone number validation service. For more information, see Amazon Pinpoint pricing.

To build this validation check into the Amazon Cognito sign-up process, you can customize the pre sign-up Lambda trigger, which Cognito uses to invoke your code before allowing users to sign-up and sending out an SMS OTP. The Lambda trigger invokes the Amazon Pinpoint phone number validate API, and based on the validation response, you can build a custom pattern that fits your application to continue or reject the user sign-up. For example, you can reject user sign-ups with VoIP numbers or reject users who provide a phone number that’s associated with countries that you don’t operate in, or even reject certain cellular service providers. After you reject a user sign-up using the Lambda trigger, Cognito will deny the user sign-up request and will not invoke user confirmation flow nor send out an SMS message.

Example validation command using AWS CLI

aws pinpoint phone-number-validate --number-validate-request PhoneNumber=+155501001234

When you send a request to the Amazon Pinpoint phone number validation service, it returns the following metadata about the phone number. The following example represents a valid mobile phone number data set:

{
    "NumberValidateResponse": {
        "Carrier": "ExampleCorp Mobile",
        "City": "Seattle",
        "CleansedPhoneNumberE164": "+155501001234",
        "CleansedPhoneNumberNational": "55501001234",
        "Country": "United States",
        "CountryCodeIso2": "US",
        "CountryCodeNumeric": "1",
        "OriginalPhoneNumber": "+155501001234",
        "PhoneType": "MOBILE",
        "PhoneTypeCode": 0,
        "Timezone": "America/Seattle",
        "ZipCode": "98109"
    }
}

Note that PhoneType includes type MOBILE, LANDLINE, VOIP, INVALID, or OTHER. INVALID phone numbers don’t include information about the carrier or location associated with the phone number and are unlikely to belong to actual recipients. This helps you decide when to reject user sign-ups and reduces SMS messages to undesired phone numbers. You can see details about other responses in the Amazon Pinpoint developer guide.

Example pre sign-up Lambda function to block user sign-up except with a valid MOBILE number

The following pre sign-up Lambda function example invokes the Amazon Pinpoint phone number validation service and rejects user sign-ups unless the validation service returns a valid mobile phone number.

import { PinpointClient, PhoneNumberValidateCommand } from "@aws-sdk/client-pinpoint"; // ES Modules import

const validatePhoneNumber = async (phoneNumber) => {
  const pinpoint = new PinpointClient();
  const input = { // PhoneNumberValidateRequest
    NumberValidateRequest: { // NumberValidateRequest
      PhoneNumber: phoneNumber,
    },
  };
  const command = new PhoneNumberValidateCommand(input);
  const response = await pinpoint.send(command);

  return response;
};

const handler = async (event, context, callback) => {

  const phoneNumber = event.request.userAttributes.phone_number;
  const validationResponse = await validatePhoneNumber(phoneNumber);

  if (validationResponse.NumberValidateResponse.PhoneType != "MOBILE") {
    var error = new Error("Cannot register users without a mobile number");
    // Return error to Amazon Cognito
    callback(error, event);
  }
  // Return to Amazon Cognito
  callback(null, event);
};

export { handler };

Use a custom user-initiated confirmation flow or alternative OTP delivery method

In your user pool configurations, you can opt out of using Amazon Cognito-assisted verification and confirmation to send SMS messages to confirm users. Instead, you can build a custom reverse OTP flow to ask your users to initiate the user confirmation process. For example, instead of automatically sending SMS messages to a user when they sign up, your application can display an OTP and direct the user to initiate the SMS conversation by texting the OTP to your service number. After your application has received the SMS message and confirmed the correct OTP is provided, invoke a service such as a Lambda function to call the AdminConfirmSignUp administrative API operation to confirm user, then call AdminUpdateUserAttributes to set the phone_number_verified attribute as true to indicate that the user phone number is verified.

You can also choose to deliver an OTP using other methods, such as email, especially if your application doesn’t require the user’s phone number. During the user sign-up process, you can configure a custom SMS sender Lambda trigger in Amazon Cognito to send a user verification code through email or another method. Additionally, you can use the Cognito email MFA feature to send MFA codes through email.

Detect SMS pumping

When you’re considering the various prevention options, it’s important to set up detection mechanisms to identify SMS pumping as they arise. In this section, we show you how to use AWS CloudTrail and Amazon CloudWatch to monitor your Amazon Cognito user pool and detect anomalies that could lead to SMS pumping. Note that building detection mechanism based on anomalies requires knowing your average or baseline traffic and the difference in metrics that represent regular activity and metrics that can indicate unauthorized or unintended activity.

Service quotas dashboard and CloudWatch alarms

Bad actors may attempt to leverage either the sign-up confirmation or the reset password functionality of Amazon Cognito. As shown previously in Figure 1, when a new user signs up to your Cognito user pool, the SignUp API operation is invoked. When the user provides the OTP confirmation code, the ConfirmSignUp API operation is invoked. The call rate of both APIs is tracked collectively under Rate of UserCreation requests under Amazon Cognito service in the service quotas dashboard.

You can set up Amazon CloudWatch alarms to monitor and issue notifications when you’re close to a quota value threshold. These alarms could be an early indication of a sudden usage increase, and you can use them to triage potential incidents.

Additionally, when your services are sending SMS messages, those transactions count towards the Amazon Simple Notification Service (Amazon SNS) service quota. You should set up alarms to monitor the Transactional SMS Message Delivery Rate per Second quota and the SMS Message Spending in USD quota.

CloudTrail event history

When bad actors plan SMS pumping, they are likely attempting to trick you to send as many SMS messages as possible rather than completing the user confirmation process. Under the context of a user sign-up event, you might notice in the CloudTrail event history that there are more SignUp and ResendConfirmationCode events—which send out SMS messages—than ConfirmSignUp operations; indicating a user has initiated but not completed the sign-up process. You can use Amazon Athena or CloudWatch Logs Insights to search and analyze your Amazon Cognito CloudTrail events and identify if there’s a significant reduction in finishing the user sign-up process.

Figure 2: SignUp API logged in CloudTrail event history

Figure 2: SignUp API logged in CloudTrail event history

Similarly, you can apply this observability towards the user password reset flow by analyzing the ForgotPassword API and ConfirmForgotPassword API operations for deviations.

Note that the slight deviations in user completion flow in the CloudTrail event history alone might not be an indication of unauthorized activity, however a substantial deviation above the regular baseline might be a signal of unintended use.

Monitor excessive billing

Another opportunity for detecting and identifying unauthorized Amazon Cognito activity is by using AWS Cost Explorer. You can use this interface to visualize, understand, and manage your AWS costs and usage over time, which might assist by highlighting the source of excessive billing in your AWS account. Be aware that charges in your account can take up to 24 hours to be displayed, so while this method can help provide some assistance in identifying SMS pumping activity, it should only be used as a supplement to other detection methods.

To use Cost Explorer:

  1. Open the AWS Management Console, and go to Billing and Cost Management.
  2. In the navigation pane, under Cost Analysis, choose Cost Explorer.
  3. In the Cost and Usage Report, under Report Parameters, select Date Range to include the start and end date of the time period that you want to apply a filter to. In Figure 3 that follows, we use an example date range between 2024-07-03 and 2024-07-17.
  4. In the same Report Parameter area, under Filters, for Service, select SNS (Simple Notification Service). Because Amazon Cognito uses Amazon SNS for delivery of SMS messages, filtering on SNS can help you identify excessive billing.

Figure 3: Reviewing billing charges by service

Figure 3: Reviewing billing charges by service

Apply AWS WAF rules as mitigation approaches

It’s recommended that you apply AWS WAF with your Amazon Cognito user pool to protect against common threats. In this section, we show you a few advanced options using AWS WAF rules to block or throttle specific bad actor’s traffic when you have observed irregular sign-up attempts and suspect they were part of fraudulent activities.

Target a specific bad actor’s IP address

When building AWS WAF remediation strategies, you can start by building an IP deny list to block traffic from known malicious IP addresses. This method is straightforward and can be highly effective in preventing unwanted access. For detailed instructions on how to set up an IP deny list, see Creating an IP set.

Target a specific phone number area code regex pattern

In an SMS pumping scheme, bad actors often purchase blocks of cell phone numbers from a wireless service provider and use phone numbers with the same area code. If you observe a pattern and identify that these attempts use the same area code, you can apply an AWS WAF rule to block that specific traffic.

To configure an AWS WAF web ACL to block using an area code regex pattern:

  1. Open the AWS WAF console.
  2. In the navigation pane, under AWS WAF, choose WAF ACLs.
  3. Choose Create web ACL. Under Web ACL details, select Regional resources, and select the AWS Region as your Amazon Cognito user pool. Under Associated AWS resources, select Add AWS resources, and choose your Cognito user pool. Choose Next.
  4. On the Add rules and rule groups page, choose Add rules, Add my own rules and rule groups, and Rule builder.
  5. Create a rule in Rule builder.
    1. For If a request, select matches the statement.
    2. For Inspect, select Body.
    3. For Match type, select Matches regular expression.
    4. For Regular expression, enter a match for the observed pattern. For example, the regular expression ^303|^\+1303|^001303 will match requests that include the digits 303, +1303, or 001303 at the beginning of any string in the body of a request:

    Figure 4: Creating a web ACL

    Figure 4: Creating a web ACL

  6. Under Action, choose Block. Then, choose Add rule.
  7. Continue with Set rule priority and Configure metrics, then choose Create web ACL.

Be aware that this method will block all user sign-up requests that contain phone numbers matching the regex pattern for the target area code and could prevent legitimate users whose numbers match the defined pattern from signing up. For example, the rule above will apply to all users with phone numbers starting with 303, +1303, or 001303. You should consider implementing this method as an as-needed solution to address an ongoing SMS pumping attack.

Target a specific bad actor’s client fingerprint

Another method is to examine an actor’s TLS traffic. If your application UI is hosted using Amazon CloudFront or Application Load Balancer (ALB), you can build AWS WAF rules to match the client’s JA3 fingerprint. The JA3 fingerprint is a 32-character MD5 hash derived from the TLS three-way handshake when the client sends a ClientHello packet to the server. It serves as a unique identifier for the client’s TLS configuration because various attributes such as TLS version, cipher suites, and extensions are derived to calculate the fingerprint, allowing for the unique detection of clients even when the source IP and other commonly used identification information might have changed.

Fraudulent activities, such as SMS pumping, are typically carried out using automated tools and scripts. These tools often have a consistent SSL/TLS handshake pattern, resulting in a unique JA3 fingerprint. By configuring an AWS WAF web ACL rule to match the JA3 fingerprint associated with this traffic, you can identify clients with a high degree of accuracy, even if they change other attributes, such as IP addresses.

AWS WAF has introduced support for JA3 fingerprint matching, which you can use to identify and differentiate clients based on the way they initiate TLS connections, enabling you to inspect incoming requests for their JA3 fingerprints. You can build the remediation strategy by first evaluating AWS WAF logs to extract JA3 fingerprints for potential malicious hosts, then proceed with creating rules to block requests where the fingerprint matches the malicious JA3 fingerprint associated with previous attacks.

To configure an AWS WAF web ACL to block using JA3 fingerprint matching for CloudFront resources:

  1. Open the AWS WAF console.
  2. In the navigation pane, under AWS WAF, choose WAF ACLs.
  3. Choose Create web ACL. Under Web ACL details, select Amazon CloudFront distributions. Under Associated AWS resources, select Add AWS resources, and select your CloudFront distribution. Choose Next.
  4. On the Add rules and rule groups page, choose Add rules, Add my own rules and rule groups, and Rule builder.
  5. In Rule builder:
    1. For If a request, select matches the statement.
    2. For Inspect, select JA3 fingerprint.
    3. For Match type, keep Exactly matches string.
    4. For String to match, enter the JA3 fingerprint that you want to block.
    5. For Text transformation, choose None.
    6. For Fallback for missing JA3 fingerprint, select a fallback match status for cases where no JA3 fingerprint is detected. We recommend choosing No match to prevent unintended traffic blocking.
    7. If you need to block multiple JA3 fingerprints, include each one in the rule and for If a request select matches at least one of the statements (OR).

      Figure 5: Creating an AWS WAF statement for a JA3 fingerprint

      Figure 5: Creating an AWS WAF statement for a JA3 fingerprint

    8. Under Action, select Block, and choose Add rule. You can choose other actions such as COUNT or CAPTCHA that suit your use case.
  6. Continue with Set rule priority and Configure metrics, then choose Create web ACL.

Note that JA3 fingerprints can change over time due to the randomization of TLS ClientHello messages by modern browsers. It’s important to dynamically update your web ACL rules or manually review logs to update the JA3 fingerprint search string in your match rule when applicable.

AWS WAF remediation considerations

These AWS WAF remediation approaches help to block potential threats by providing mechanisms to filter out malicious traffic. It’s essential to continually review the effectiveness of these rules to minimize the risk of blocking legitimate sources and make dynamic adjustments to the rules when you detect new bad actors and patterns.

Summary

In this blog post, we introduced mechanisms that you can use to detect and protect your Amazon Cognito user pool against unintended user sign-up and SMS pumping. By implementing these strategies, you can enhance the security of your web and mobile applications and help to safeguard your services from potential abuse and financial loss. We suggest that you apply a combination of these prevention, detection, and mitigation approaches to protect your Cognito user pools.

 
If you have feedback about this post, submit comments in the Comments section below. If you have questions about this post, contact AWS Support.

Edward Sun
Edward Sun

Edward is a Security Specialist Solutions Architect focused on identity and access management. He loves helping customers throughout their cloud transformation journey with architecture design, security best practices, migration, and cost optimizations. Outside of work, Edward enjoys hiking, golfing, and cheering for his alma mater, the Georgia Bulldogs.
Steve de Vera
Steve de Vera

Steve is a manager in the AWS Customer Incident Response Team (CIRT). He is passionate about American-style BBQ and is a certified competition BBQ judge. He has a dog named Brisket.
Tony Suarez
Tony Suarez

Tony Suarez is a San Diego, CA based Solutions Architect with over 15 years of experience in IT operations. As a member of the AWS VMware technical field community, Tony enjoys helping customers solve challenging problems in innovative ways. Enabling customers to efficiently manage, automate, and orchestrate large-scale hybrid infrastructure projects is Tony’s passion.

New whitepaper available: Building security from the ground up with Secure by Design

Post Syndicated from Bertram Dorn original https://aws.amazon.com/blogs/security/new-whitepaper-available-building-security-from-the-ground-up-with-secure-by-design/

Developing secure products and services is imperative for organizations that are looking to strengthen operational resilience and build customer trust. However, system design often prioritizes performance, functionality, and user experience over security. This approach can lead to vulnerabilities across the supply chain.

As security threats continue to evolve, the concept of Secure by Design (SbD) is gaining importance in the effort to mitigate vulnerabilities early, minimize risks, and recognize security as a core business requirement. We’re excited to share a whitepaper we recently authored with SANS Institute called Building Security from the Ground up with Secure by Design, which addresses SbD strategy and explores the effects of SbD implementations.

The whitepaper contains context and analysis that can help you take a proactive approach to product development that facilitates foundational security. Key considerations include the following:

  • Integrating SbD into the software development lifecycle (SDLC)
  • Supporting SbD with automation
  • Reinforcing defense-in-depth
  • Applying SbD to artificial intelligence (AI)
  • Identifying threats in the design phase with threat modeling
  • Using SbD to simplify compliance with requirements and standards
  • Planning for the short and long term
  • Establishing a culture of security

While the journey to a Secure by Design approach is an iterative process that is different for every organization, the whitepaper details five key action items that can help set you on the right path. We encourage you to download the whitepaper and gain insight into how you can build secure products with a multi-layered strategy that meaningfully improves your technical and business outcomes. We look forward to your feedback and to continuing the journey together.

Download Building Security from the Ground up with Secure by Design.

 
If you have feedback about this post, submit comments in the Comments section below.

Bertram Dorn
Bertram Dorn

Bertram is a Principal within the Office of the CISO at AWS, based in Munich, Germany. He helps internal and external AWS customers and partners navigate AWS security-related topics. He has over 30 years of experience in the technology industry, with a focus on security, networking, storage, and database technologies. When not helping customers, Bertram spends time working on his solo piano and multimedia performances.
Paul Vixie
Paul Vixie

Paul is a VP and Distinguished Engineer who joined AWS Security after a 29-year career as the founder and CEO of five startup companies covering the fields of DNS, anti-spam, internet exchange, internet carriage and hosting, and internet security. He earned his PhD in Computer Science from Keio University in 2011, and was inducted into the Internet Hall of Fame in 2014. Paul is also known as an author of open source software, including Cron. As a VP, Distinguished Engineer, and Deputy CISO at AWS, Paul and his team in the Office of the CISO use leadership and technical expertise to provide guidance and collaboration on the development and implementation of advanced security strategies and risk management.

AWS achieves HDS certification in four additional AWS Regions

Post Syndicated from Janice Leung original https://aws.amazon.com/blogs/security/aws-achieves-hds-certification-in-four-additional-aws-regions/

Amazon Web Services (AWS) is pleased to announce that four additional AWS Regions—Asia Pacific (Hong Kong), Asia Pacific (Osaka), Asia Pacific (Hyderabad), and Israel (Tel Aviv)—have been granted the Health Data Hosting (Hébergeur de Données de Santé, HDS) certification, increasing the scope to 24 global AWS Regions.

The Agence du Numérique en Santé (ANS), the French governmental agency for health, introduced the HDS certification to strengthen the security and protection of personal health data. By achieving this certification, AWS demonstrates our continuous commitment to adhere to the heightened expectations for cloud service providers.

The following 24 Regions are in scope for this certification:

  • US East (N. Virginia)
  • US East (Ohio)
  • US West (N. California)
  • US West (Oregon)
  • Asia Pacific (Hong Kong)
  • Asia Pacific (Hyderabad)
  • Asia Pacific (Jakarta)
  • Asia Pacific (Mumbai)
  • Asia Pacific (Osaka)
  • Asia Pacific (Seoul)
  • Asia Pacific (Singapore)
  • Asia Pacific (Sydney)
  • Asia Pacific (Tokyo)
  • Canada (Central)
  • Europe (Frankfurt)
  • Europe (Ireland)
  • Europe (London)
  • Europe (Milan)
  • Europe (Paris)
  • Europe (Stockholm)
  • Europe (Zurich)
  • Middle East (UAE)
  • Israel (Tel Aviv)
  • South America (São Paulo)

The HDS certification demonstrates that AWS provides a framework for technical and governance measures to secure and protect personal health data according to HDS requirements. Our customers who handle personal health data can continue to manage their workloads in HDS-certified Regions with confidence.

Independent third-party auditors evaluated and certified AWS on September 3, 2024. The HDS Certificate of Compliance demonstrating AWS compliance status is available on the Agence du Numérique en Santé (ANS) website and AWS Artifact. AWS Artifact is a self-service portal for on-demand access to AWS compliance reports. Sign in to AWS Artifact in the AWS Management Console, or learn more at Getting Started with AWS Artifact.

For up-to-date information, including when additional Regions are added, visit the AWS Compliance Programs page and choose HDS.

AWS strives to continuously meet your architectural and regulatory needs. If you have questions or feedback about HDS compliance, reach out to your AWS account team.

To learn more about our compliance and security programs, see AWS Compliance Programs. As always, we value your feedback and questions; reach out to the AWS Compliance team through the Contact Us page.

If you have feedback about this post, submit comments in the Comments section below.

Author

Janice Leung
Janice is a Security Assurance Program Manager at AWS based in New York. She leads various commercial security certifications, within the automobile, healthcare, and telecommunications sectors across Europe. In addition, she leads the AWS infrastructure security program worldwide. Janice has over 10 years of experience in technology risk management and audit at leading financial services and consulting company.

Tea Jioshvili

Tea Jioshvili
Tea is a Security Assurance Manager at AWS, based in Berlin, Germany. She leads various third-party audit programs across Europe. She previously worked in security assurance and compliance, business continuity, and operational risk management in the financial industry for multiple years.

Build a mobile driver’s license solution based on ISO/IEC 18013-5 using AWS Private CA and AWS KMS

Post Syndicated from Ram Ramani original https://aws.amazon.com/blogs/security/build-a-mobile-drivers-license-solution-based-on-iso-iec-18013-5-using-aws-private-ca-and-aws-kms/

A mobile driver’s license (mDL) is a digital representation of a physical driver’s license that’s stored on a mobile device. An mDL is a significant improvement over physical credentials, which can be lost, stolen, counterfeited, damaged, or contain outdated information, and can expose unconsented personally identifiable information (PII). Organizations are working together to use mDLs across various situations, ranging from validating identity during airplane boarding to sharing information for age-restricted activities.

The trust in the mDL system is based on public-private key cryptography where mDLs are signed by issuing authorities using their private key and verified using the issuing authority’s public key. In this blog post, we show you how to build an mDL issuing authority in Amazon Web Services (AWS) using AWS Private Certificate Authority and AWS Key Management Service (AWS KMS) according to mDL specification ISO/IEC 18013-5:2021. These AWS services align with the cryptographic requirements placed on the issuing authorities by ISO/IEC 18013-5. While we have tailored this post to an mDL use case, the sign and verify mechanism using AWS Private CA and AWS KMS can be used for multiple kinds of digital identity verification.

Solution overview

AWS Private CA provides you with a highly available private certificate authority (CA) service without the initial investment and ongoing maintenance costs of operating your own private CA. CA administrators can use AWS Private CA to create a complete CA hierarchy, including online root and subordinate CAs, without needing external CAs. You can issue, rotate, and revoke certificates that are trusted within your organization using AWS Private CA.

AWS Private CA can issue certificates formatted as required by ISO/IEC 18013-5. You can build a certificate authority (CA) in AWS Private CA—referred to as the issuing authority certificate authority (IACA) in ISO/IEC 18013-5. We create an IACA self-signed root certificate and an mDL document signing certificate in AWS Private CA.

AWS KMS is a managed service that you can use to create and control the cryptographic keys that are used to protect your data. AWS KMS uses FIPS 140-2 Level 3 validated hardware security modules (HSMs) to protect AWS KMS keys, which is a requirement for building an issuing authority as described in ISO/IEC 18013-5. We create an asymmetric key pair in AWS KMS for signing and verification of the mDL document. We programmatically create a certificate signing request (CSR) that’s signed by the asymmetric key pair stored in AWS KMS. The CSR is sent to the AWS Private CA service for issuing the mDL document signing certificate that matches the certificate profile requirement specified for the document signing certificate in ISO/IEC 18013-5.

We sign an mDL document using the private key of the asymmetric key pair created in AWS KMS with a KeyUsage value of SIGN_VERIFY. The signed mDL document is delivered to a mobile device where it’s stored in a digital wallet and produced for verification by mDL readers. The mDL readers are configured with IACA certificates from various issuing authorities that allow them to verify the mDL documents signed by respective issuing authorities. An example of an issuing authority could be a state government agency that issues driver’s licenses.

Least privilege

The solution in this post uses AWS KMS and AWS Private CA services. Before you implement the process described in this post, ensure that the AWS Identity and Access Management (IAM) principal you choose follows the principle of least privilege and that permissions are scoped to the minimum required permissions required. See Security best practices in IAM to learn more.

Solution architecture

A sample solution architecture for building an mDL issuing authority in AWS is shown in Figure 1. The figure shows the step-by-step process starting from setting up a private CA and issuing an mDL document signing certificate to mDL issuance and verification. The infrastructure that’s built using this architecture includes a root certificate authority, which issues a document signer certificate. You can find the certificate requirements in section B.1 Certificate Profile of ISO/IEC 18013-5.

Figure 1: mDL issuing authority architecture and process flow in AWS

Figure 1: mDL issuing authority architecture and process flow in AWS

In this post, we use AWS Command Line Interface (AWS CLI) commands, but these can be replaced by AWS SDK API calls if needed. Along with the AWS CLI steps, a GitHub sample is provided that’s used to programmatically create and sign an mDL document signing CSR using AWS KMS.

See the AWS CLI commands documentation for AWS Private CA and AWS KMS for detailed information on the commands used in this solution.

Solution walkthrough

Use the following steps to create the infrastructure needed for mDL signing and verification.

Step 1: Create IACA CA in AWS Private CA

In this step, the root of trust IACA (issuing authority CA) will be created. The IACA root CA is the root of trust that will be used for verification of the mDL.

  1. Create a local ca_config.txt file with the following content. The contents of this file are derived from the Certificate profiles section (Annex B) within ISO/IEC 18013-5. You can change the Country and CommonName values in the file as needed for your requirements.
    {
      "KeyAlgorithm": "EC_prime256v1",
      "SigningAlgorithm": "SHA256WITHECDSA",
      "Subject": {
        "Country": "US",
        "CommonName": "mDL IACA Root"
      }
    }

  2. The IACA root certificate will be paired with a certificate revocation list (CRL). See Planning a certificate revocation list (CRL) for information about configuring CRLs. Create a local file called revocation_config.txt with the following information to configure a CRL. The values for CustomCname and S3BucketName are examples, update them with the values that you have created within your AWS account. Update ExpirationInDays to fit your requirements. We recommend configuring encryption on the Amazon Simple Storage Service (Amazon S3) bucket containing your CRLs.
    {
      "CrlConfiguration": {
        "CustomCname": "example.com",
        "Enabled": true,
        "S3BucketName": "crlmdlbucket",
        "ExpirationInDays": 5000,  
      }
    }

  3. Invoke an AWS CLI command to create a private certificate authority. Replace the region parameter as needed. Update the file:// paths in the following command to the locations where you’ve stored the ca_config.txt and revocation_config.txt files.
    aws acm-pca create-certificate-authority \ 
        --region us-west-1 \
        --certificate-authority-configuration file://ca_config.txt \
        --revocation-configuration file://revocation_config.txt \
        —-certificate-authority-type "ROOT"

  4. The command should produce the following output. The output contains the Amazon Resource Name (ARN) of the created CA. You will need this ARN in subsequent steps.
    {
        "CertificateAuthorityArn": "arn:aws:acm-pca:us-west-1:123412345678:certificate-authority/0116z123-dv7a-59b1-x7be-1231v7257113"
    }

Step 2: Retrieve the CSR for IACA root certificate

You’ll create an IACA root certificate, which starts with retrieving a CSR. This step retrieves the CSR for the IACA root certificate. The certificate-authority-arn parameter carries the CA ARN that was generated in Step 1.

  1. The following command will output a Privacy-Enhanced Mail (PEM) formatted CSR.
    aws acm-pca get-certificate-authority-csr \
        --region us-west-1 \
        --output text \
        --certificate-authority-arn arn:aws:acm-pca:us-west-1:123412345678:certificate-authority/0116z123-dv7a-59b1-x7be-1231v7257113

  2. The following is the format of the output CSR:
    -----BEGIN CERTIFICATE REQUEST-----
    ..
    -----END CERTIFICATE REQUEST-----

  3. Store the output text in a file called IACA.csr.

Step 3: Generate root certificate

  1. This step issues the IACA root certificate. Create a file named extensions.txt using the following contents, which are derived from the Certificate profiles section of ISO/IEC 18013-5.

    The KeyUsage extension with KeyCertSign and CRLSign should be set to true. A custom extension for the CRL distribution point is set and the validity of the certificate should be set to 9 years or 3285 days (set in the next step). Because the IACA root certificate is only used to issued mDLs, a maximum validity period of 9 years is sufficient, as indicated in Table B.1 of ISO/IEC 18013-5. Additionally, a CRL distribution point extension must be present. In the following example, the CRL URL encoded in the CDP extension is http://example.com/crl/0116z123-dv7a-59b1-x7be-1231v72571136.crl, aligning with both the CA CRL configuration applied to the CA at creation and to the CA ID. For base-64 encoding of the CDP extension, you can refer to this java sample.

    {
      "Extensions": {
        "KeyUsage": {
          "KeyCertSign": true,
          "CRLSign": true
        },
        "CustomExtensions": [
          {
            "ObjectIdentifier": "2.5.29.31",
            "Value": "MEgwRqBEoEKGQGh0dHA6Ly9leGFtcGxlLmNvbS9jcmwvMDExNnoxMjMtZHY3YS01OWIxLXg3YmUtMTIzMXY3MjU3MTEzNi5jcmw="
           }
        ]
      }
    }

  2. Issue the following command to AWS Private CA to create the certificate.
    aws acm-pca issue-certificate \
        --region us-west-1 \
        --certificate-authority-arn arn:aws:acm-pca:us-west-1:123412345678:certificate-authority/0116z123-dv7a-59b1-x7be-1231v7257113 \
        --template-arn "arn:aws:acm-pca:::template/BlankRootCACertificate_PathLen0_APIPassthrough/V1" \
        --signing-algorithm "SHA256WITHECDSA" \
        --csr fileb://IACA.csr \
        --validity Value=3285,Type="DAYS" \
        --api-passthrough file://extensions.txt

  3. The preceding command will produce the following output:
    {
      "CertificateArn": "arn:aws:acm-pca:us-west-1:123412345678:certificate-authority/0116z123-dv7a-59b1-x7be-1231v7257113/certificate/34a1dab03117f0e89c54b1234fe13318"
    }

Note that the IACA root CA created with AWS Private CA currently doesn’t have a CRL distribution point (CDP) extension by default. However, that is a mandatory extension according to the IACA root certificate profile in ISO/IEC 18013-5. To implement this, we use a custom extension passed in using API passthrough, which embeds the CDP extension. The distribution point specified in that extension must be based on the CA ID, which is 0116z123-dv7a-59b1-x7be-1231v7257113 derived from the CA ARN that was created in Step 1.

Step 4: Retrieve root certificate

This step retrieves the IACA root certificate in PEM format.

  1. Use the following code to retrieve the IACA root certificate:
    aws acm-pca get-certificate \
        --region us-west-1 \
        --certificate-authority-arn arn:aws:acm-pca:us-west-1:123412345678:certificate-authority/0116z123-dv7a-59b1-x7be-1231v7257113 \
        --certificate-arn arn:aws:acm-pca:us-west-1:123412345678:certificate-authority/0116z123-dv7a-59b1-x7be-1231v7257113/certificate/34a1dab03117f0e89c54b1234fe13318 \
        --output text

  2. The command output will be a PEM formatted certificate similar to the following:
    -----BEGIN CERTIFICATE-----
    ..
    -----END CERTIFICATE-----

  3. Store the output text in a file named IACA-Root-CA-Cert.pem.

Step 5: Import root certificate

Use the following code to import the root certificate into AWS Private CA and make the certificate authority active and ready to issue certificates.

aws acm-pca import-certificate-authority-certificate \
    --region us-west-1 \
    --certificate-authority-arn arn:aws:acm-pca:us-west-1:123412345678:certificate-authority/0116z123-dv7a-59b1-x7be-1231v7257113 \
    --certificate fileb://IACA-Root-CA-Cert.pem

You should see success after running the command.

Step 6: Create an asymmetric key in AWS KMS

In this step, create an asymmetric signing key in AWS KMS which will be used to sign the mDL document signing CSR.

  1. Use the following command to create an asymmetric key:
    aws kms create-key \
        --region us-west-1 \
        --key-spec ECC_NIST_P256 \
        --key-usage SIGN_VERIFY

  2. The command should produce the following output:
    {
      "KeyMetadata": {
        "AWSAccountId": "123412345678",
        "KeyId": "3ab87971-1fe2-45d9-955a-5dc7f65558zf",
        "Arn": "arn:aws:kms:us-west-1:123412345678:key/3ab87971-1fe2-45d8-955c-5dc7f65558ef",
        "CreationDate": "2024-05-18T19:53:27.318000+00:00",
        "Enabled": true,
        "Description": "",
        "KeyUsage": "SIGN_VERIFY",
        "KeyState": "Enabled",
        "Origin": "AWS_KMS",
        "KeyManager": "CUSTOMER",
        "CustomerMasterKeySpec": "ECC_NIST_P256",
        "KeySpec": "ECC_NIST_P256",
        "SigningAlgorithms": [
          "ECDSA_SHA_256"
        ],
        "MultiRegion": false
      }
    }

  3. Note the Arn value from the output. You will use it in Step 7 to configure the CSR creation utility for the mDL document signing certificate.

Step 7: Use the CSR creation utility to generate the document signing CSR

We published a sample utility in GitHub that creates a CSR signed by an AWS asymmetric key.

  1. Clone the GitHub repository and then follow the instructions in the README file from the repository to configure and run it.
  2. This program will output a PEM formatted CSR similar to the following:
    -----BEGIN CERTIFICATE REQUEST-----
    ..
    -----END CERTIFICATE REQUEST-----

  3. Copy the output and store it in a file named document-signing-kms.csr. You will use the file in Step 8 to create the mDL document signing certificate based on this CSR.

Step 8: Generate an mDL document signing certificate

This step creates the document signing certificate from the CSR that’s signed using the AWS KMS asymmetric key.

  1. Create a file named extensionSigner.txt with the following contents. The contents of this file are derived from the Certificate profiles section of ISO/IEC 18013-5. The JSON snippet that follows shows the extension structure containing the KeyUsage extension with DigitalSignature field set to true.
    {
         "Extensions": {
             "KeyUsage": {
                 "DigitalSignature": true
             },
             "ExtendedKeyUsage": [
                 {
                     "ExtendedKeyUsageObjectIdentifier": "1.0.18013.5.1.2"
                 }
             ]
         }
    }

  2. Use the following AWS CLI command to create the certificate.
    aws acm-pca issue-certificate \
        --region us-west-1 \
        --certificate-authority-arn arn:aws:acm-pca:us-west-1:123412345678:certificate-authority/0116z123-dv7a-59b1-x7be-1231v7257113 \
        --template-arn "arn:aws:acm-pca:::template/BlankEndEntityCertificate_APIPassthrough/V1" \
        --signing-algorithm "SHA256WITHECDSA" \
        --csr fileb://document-signing-kms.csr \
        --validity Value=1825,Type="DAYS" \
        --api-passthrough file://extensionSigner.txt

  3. Output:
    {
        "CertificateArn": "arn:aws:acm-pca:us-west-1:123412345678:certificate-authority/0116z123-dv7a-59b1-x7be-1231v7257113/certificate/d462fcd3b9h3beb45c7c312241d42fba"
    }

  4. You will use the CertificateArn from the output in Step 9 to retrieve the mDL document signing certificate.

Step 9: Retrieve the mDL document signing certificate

This step retrieves the document signing certificate in PEM format from AWS Private CA.

  1. Use the following command to retrieve the document signing certificate:
    aws acm-pca get-certificate \
        --region us-west-1 \
        --certificate-authority-arn arn:aws:acm-pca:us-west-1:123412345678:certificate-authority/0116z123-dv7a-59b1-x7be-1231v7257113 \
        --certificate-arn arn:aws:acm-pca:us-west-1:123412345678:certificate-authority/0116z123-dv7a-59b1-x7be-1231v7257113/certificate/d462fcd3b9h3beb45c7c312241d42fba \
        --output text

  2. Store the output text in document_signing_cert.pem.

You now have the mDL document signing certificate for packaging later with the Concise Binary Object Representation (CBOR) structure required by ISO/IEC 18013-5.

Step 10: mDL reader ingests issuing authority’s mDL signing certificate chain

An mDL reader can trust the mDL presented by a user after cryptographically verifying the mDL. This verification requires the reader to possess the mDL signing certificate chain of the issuing authority that issued the user the mDL. As required by the decentralized public key infrastructure (PKI) trust model specified in ISO/IEC 18013-5, the mDL reader will ingest the mDL signing certificate chain of the issuing authority.

Step 11: User makes an mDL signing request to the issuing authority

The user makes a request to the issuing authority to sign the mDL.

Step 12: Issuing authority issues signed mDL to the user

The issuing authority will authenticate the user’s identity and issue a signed mDL. The issuing authority provisions mDL data to the user’s device along with a CBOR encoded object known as a mobile security object (MSO). MSOs contain a digest algorithm, individual digests of mDL data elements, and a validity period. After this MSO has been generated and encoded as required by ISO/IEC 18013-5:2021 section 9.1.2.4, the MSO can be signed by the issuing authority. This signature can be generated in AWS KMS as shown in the following command. Generating the encoded MSO is out of scope for this post.

  1. Use the following command to produce the SHA-256 digest of encoded MSO object using the sha256sum utility.
    sha256sum < EncodedMSO > EncodedMSODigest

  2. Sign the digest using the AWS KMS asymmetric key created in Step 6.
    aws kms sign \
     --region us-west-1 \
     --key-id 3ab87971-1fe2-45d8-955c-5dc7f65558ef \
     --message fileb://EncodedMSODigest \
     --message-type DIGEST \
     --signing-algorithm ECDSA_SHA_256 \
     --output text \
     --query Signature | base64 --decode

  3. This signature will be combined with the issuing authority certificate and the MSO to form a CBOR Object Signing and Encryption (COSE) signed message and will be presented with the mDL data elements to readers. Readers can validate this signature to confirm the integrity of the MSO.

Step 13: User presents their mDL to an mDL reader

The user presents their mDL to the mDL reader for identity verification, such as at an airport. This process is called mDL Initialization in ISO/IEC 18013-5:2021 section 6.3.2.2. The mDL is activated during this initialization step.

Step 14: An mDL reader requests mDL data from a user’s mobile device

The mDL reader issues an mDL retrieval request to the user’s mobile device. A key feature of mDLs is that they allow mDL holders to present a subset of their PII. An mDL reader will request specific attributes such as name and date of birth, requiring the mDL holder to consent to the release of this information. The mDL reader’s request contains the list of PII data element identifiers that it is requesting the mDL holder to share.

Step 15: User consents to share their mDL data

The user receives a prompt notifying them of mDL sharing request. This prompt shows the user the list of PII data elements that are being requested. The user consents to the request and the mDL data that includes the MSO is shared with the reader.

Step 16: Reader validates mDL integrity

The reader receives the mDL data and validates it for integrity. The inclusion of the MSO with the mDL data elements provides mDL readers with a mechanism for validating the integrity of the data they’ve received. The mDL reader can then hash and verify individual mDL data elements presented by the device. If all data elements match their corresponding entries in the MSO, the mDL device reader can attest that the data hasn’t been tampered with.

As an example, assume that the mDL contains the following data elements:

24(<<
  {
    "digestID": 0,
    "random": h'BBA394B98088CAE238D35979F7210E18DFAF70354524D86149CA20046E4321B1',
    "elementIdentifer": "given_name",
    "elementValue": "John"
  }
>>),
24(<<
  {
    "digestID": 1,
    "random": h'901F63FD880A15B30EDCEEFA857201C52FB9EAD1D39C15BB592829D16CB8A368',
    "elementIdentifer": "family_name",
    "elementValue": "Doe"
  }
>>)

And a Mobile Security Object containing the following data element digests:

24(<<
  {
    "version": "1.0",
    "digestAlgorithm": "SHA-256",
    "valueDigests":
    {
      "org.iso.18013.5.1":
      {
        0: h’D6AA81E454036313A9A681809151DDDBDF702289094F18286DDC591C41C6434E',
        1: h'4C3D83940CA8C5DE8060A23EB649C175E79B745B6A7D9939B4D16B3E46BB14D5'
      }
    }
  }
>>)

The MSO’s integrity would first confirm that the validity period of the MSO (not shown) has not expired. It can then verify the signature (not shown) with the issuing authority’s public key. After this has been established, both data elements need to be verified. The CBOR representation of each element (digestID, random, elementIdentifier, and elementValue) is encoded as bytes and then hashed using SHA-256. For example, the following should equal D6AA81E454036313A9A681809151DDDBDF702289094F18286DDC591C41C6434E.

SHA256(CBOR byte representation of 24(<<
    {
      "digestID": 0,
      "random": h'BBA394B98088CAE238D35979F7210E18DFAF70354524D86149CA20046E4321B1',
      "elementIdentifer": "given_name",
      "elementValue": "John"
    }
  >>))
)

Likewise, the following example should equal
4C3D83940CA8C5DE8060A23EB649C175E79B745B6A7D9939B4D16B3E46BB14D5.

SHA256(CBOR byte representation of 24(<<
    {
      "digestID": 1,
      "random": h'901F63FD880A15B30EDCEEFA857201C52FB9EAD1D39C15BB592829D16CB8A368',
      "elementIdentifer": "family_name",
      "elementValue": "Doe"
    }
  >>)))

If all data elements pass this hash verification check, then the presented mDL contents can be trusted by the mDL reader.

Summary

As you saw in this solution, mobile driver’s licenses (mDLs) provide increased security and flexible consent management to preserve privacy for individuals. The principles of cryptographic signing and verification aren’t new and both AWS KMS and AWS Private CA are well suited for supporting digital identity applications, whether it’s a driver’s license or some other kind of identification. To learn more about AWS KMS asymmetric keys and AWS Private CA, see Digital signing with the new asymmetric keys feature of AWS KMS and How to host and manage an entire private certificate infrastructure in AWS.

If you have feedback about this post, submit comments in the Comments section below. If you have questions about this post, start a new thread on the AWS Certificate Manager re:Post and AWS AWS Key Management Service re:Post, or contact AWS Support.

Ram Ramani
Ram Ramani

Ram is a Principal Security architect in AWS, responsible for leading the data protection and privacy focus areas. Prior to this role, Ram held software developer positions at various organizations with a focus on applied math and machine learning.
Raj Jain
Raj Jain

Raj is a Senior Software Engineer in the Amazon FinTech organization, responsible for developing security and compliance services that underlie the AWS and broader Amazon infrastructure. Raj is a published author in the Bell Labs Technical Journal, has authored IETF standards, AWS security blogs, and holds twelve patents.
Kyle Schultheiss
Kyle Schultheiss

Kyle is a Senior Software Engineer on the AWS Cryptography team. He has been working on the ACM Private Certificate Authority service since its inception in 2018. In prior roles, he contributed to other AWS services such as Amazon Virtual Private Cloud, Amazon EC2, and Amazon Route 53.

Automatically replicate your card payment keys across AWS Regions

Post Syndicated from Ruy Cavalcanti original https://aws.amazon.com/blogs/security/automatically-replicate-your-card-payment-keys-across-aws-regions/

In this blog post, I dive into a cross-Region replication (CRR) solution for card payment keys, with a specific focus on the powerful capabilities of AWS Payment Cryptography, showing how your card payment keys can be securely transported and stored.

In today’s digital landscape, where online transactions have become an integral part of our daily lives, ensuring the seamless operation and security of card payment transactions is of utmost importance. As customer expectations for uninterrupted service and data protection continue to rise, organizations are faced with the challenge of implementing robust security measures and disaster recovery strategies that can withstand even the most severe disruptions.

For large enterprises dealing with card payments, the stakes are even higher. These organizations often have stringent requirements related to disaster recovery (DR), resilience, and availability, where even a 99.99 percent uptime isn’t enough. Additionally, because these enterprises deliver their services globally, they need to ensure that their payment applications and the associated card payment keys, which are crucial for securing card data and payment transactions, are securely replicated and stored across AWS Regions.

Furthermore, I explore an event-driven, serverless architecture and the use of AWS PrivateLink to securely move keys through the AWS backbone, providing additional layers of security and efficiency. Overall, this blog post offers valuable insights into using AWS services for secure and resilient data management across AWS Regions.

Card payment key management

If you examine key management, you will notice that card payment keys are shared between devices and third parties today the same as they were around 40 years ago.

A key ceremony is the process held when parties want to securely exchange keys. It involves key custodians responsible for transporting and entering, key components that have been printed on pieces of paper into a hardware security module (HSM). This is necessary to share initial key encryption keys.

Let’s look at the main issues with the current key ceremony process:

  • It requires a secure room with a network-disconnected Payment HSM
  • The logistics are difficult: Three key custodians in the same place at the same time
  • Timewise, it usually takes weeks to have all custodians available, which can interfere with a project release
  • The cost of the operation which includes maintaining a secure room and the travel of the key custodians
  • Lost or stolen key components

Now, let’s consider the working keys used to encrypt sensitive card data. They rely on those initial keys to protect them. If the initial keys are compromised, their associated working keys are also considered compromised. I also see companies using key management standards from the 1990s, such as ANSI X9.17 / FIPS 171, to share working keys. NIST withdrew the FIPS 171 standard in 2005.

Analyzing the current scenario, you’ll notice security risks because of the way keys are shared today and sometimes because organizations are using deprecated standards.

So, let’s get card payment security into the twenty-first century!

Solution overview

AWS Payment Cryptography is a highly available and scalable service that currently operates within the scope of an individual Region. This means that the encryption keys and associated metadata are replicated across multiple Availability Zones within that Region, providing redundancy and minimizing the risk of downtime caused by failures within a single Region.

While this regional replication across multiple Availability Zones provides a higher level of availability and fault tolerance compared to traditional on-premises HSM solutions, some customers with stringent business continuity requirements have requested support for multi-Region replication.

By spanning multiple Regions, organizations can achieve a higher level of resilience and disaster recovery capabilities because data and services can be replicated and failover mechanisms can be implemented across geographically dispersed locations.

This Payment Cryptography CRR solution addresses the critical requirements of high availability, resilience, and disaster recovery for card payment transactions. By replicating encryption keys and associated metadata across multiple Regions, you can maintain uninterrupted access to payment services, even in the event of a regional outage or disaster.

Note: When planning your replication strategy, check the available Payment Cryptography service endpoints.

Here’s how it works:

  1. Primary Region: Encryption keys are generated and managed in a primary Region using Payment Cryptography.
  2. Replication: The generated encryption keys are securely replicated to a secondary Region, creating redundant copies for failover purposes.
  3. Failover: In the event of a regional outage or disaster in the primary Region, payment operations can seamlessly failover to a secondary Region, using the replicated encryption keys to continue processing transactions without interruption.

This cross-Region replication approach enhances availability and resilience and facilitates robust disaster recovery strategies, allowing organizations to quickly restore payment services in a new Region if necessary.

Figure 1: Cross-Region replication (CRR) solution architecture

Figure 1: Cross-Region replication (CRR) solution architecture

The elements of the CRR architecture are as follows:

  1. Payment Cryptography control plane events are sent to an AWS CloudTrail trail.
  2. The CloudTrail trail is configured to send logs to an Amazon CloudWatch Logs log group.
  3. This log group contains an AWS Lambda subscription filter that filters the following events from Payment Cryptography: CreateKey, DeleteKey and ImportKey.
  4. When one of the events is detected, a Lambda function is launched to start key replication.
  5. The Lambda function performs key export and import processes in a secure way using TR-31, which uses an initial key securely generated and shared using TR-34. This initial key is generated when the solution is enabled.
  6. Communication between the primary (origin) Region and the Payment Cryptography service endpoint at the secondary (destination) Region is done through an Amazon Virtual Private Cloud (Amazon VPC) peering connection, over VPC interface endpoints from PrivateLink.
  7. Metadata information is saved on Amazon DynamoDB tables.

Walkthrough

The CRR solution is deployed in several steps, and it’s essential to understand the underlying processes involved, particularly TR-34 (ANSI X9.24-2) and TR-31 (ANSI X9.143-2022), which play crucial roles in ensuring the secure replication of card payment keys across Regions.

  1. Clone the solution repository from GitHub.
  2. Verify that the prerequisites are in place.
  3. Define which Region the AWS Cloud Development Kit (AWS CDK) stack will be deployed in. This is the primary Region that Payment Cryptography keys will be replicated from.
  4. Enable CRR. This step involves the TR-34 process, which is a widely adopted standard for the secure distribution of symmetric keys using asymmetric techniques. In the context of this solution, TR-34 is used to securely exchange the initial key-encrypting key (KEK) between the primary and secondary Regions. This KEK is then used to encrypt and securely transmit the card payment keys (also called working keys) during the replication process. TR-34 uses asymmetric cryptographic algorithms, such as RSA, to maintain the confidentiality, integrity and authenticity of the exchanged keys.

    Figure 2: TR-34 import key process

    Figure 2: TR-34 import key process

  5. Create, import, and delete keys in the primary Region to check that keys will be automatically replicated. This step uses the TR-31 process, which is a standard for the secure exchange of cryptographic keys and related data. In this solution, TR-31 is employed to securely replicate the card payment keys from the primary Region to the secondary Region, using the previously established KEK for encryption. TR-31 incorporates various cryptographic algorithms, such as AES and HMAC, to protect the confidentiality and integrity of the replicated keys during transit

    Figure 3: TR-31 import key process

    Figure 3: TR-31 import key process

  6. Clean up when needed.

Detailed information about key blocks can be found on the related ANSI documentation. To summarize, the TR-31 key block specification and the TR-34 key block specification, which is based on the TR-31 key block specification, consists of three parts:

  1. Key block header (KBH) – Contains attribute information about the key and the key block.
  2. Encrypted data – This is the key (initial key encryption key for TR-34 and working key for TR-31) being exchanged.
  3. Signature (MAC) – Calculated over the KBH and encrypted data.

Figure 4 presents the entire TR-31 and TR-34 key block parts. It is also called key binding method, which is the technique used to protect the key block secrecy and integrity. On both key blocks, the key, its length, and padding fields are encrypted, maintaining the key block secrecy. Signing of the entire key block fields verifies its integrity and authenticity. The signed result is appended to the end of the block.

Figure 4: TR-31 and TR-34 key block formats

Figure 4: TR-31 and TR-34 key block formats

By adhering to industry-standard protocols like TR-34 and TR-31, this solution helps to ensure that the replication of card payment keys across Regions is performed in a secure manner that delivers confidentiality, integrity, and authenticity. It’s worth mentioning that Payment Cryptography fully supports and implements these standards, providing a solution that adheres to PCI standards for secure key management and replication.

If you want to dive deep into this key management processes, see the service documentation page on import and export keys.

Prerequisites

The Payment Cryptography CRR solution will be deployed through the AWS CDK. The code was developed in Python and assumes that there is a python3 executable in your path. It’s also assumed that the AWS Command Line Interface (AWS CLI) and AWS CDK executables exist in the path system variable of your local computer.

Download and install the following:

It’s recommended that you use the latest stable versions. Tests were performed using the following versions:

  • Python: 3.12.2 (MacOS version)
  • jq: 1.7.1 (MacOS version)
  • AWS CLI: aws-cli/2.15.29 Python/3.11.8 Darwin/22.6.0 exe/x86_64 prompt/off
  • AWS CDK: 2.132.1 (build 9df7dd3)

To set up access to your AWS account, see Configure the AWS CLI.

Note: Tests and commands in the following sections where run on a MacOS operating system.

Deploy the primary resources

The solution is deployed in two main parts:

  1. Primary Region resources deployment
  2. CRR setup, where a secondary Region is defined for deployment of the necessary resources

This section will cover the first part:

Figure 5: Primary Region resources

Figure 5: Primary Region resources

Figure 5 shows the resources that will be deployed in the primary Region:

  1. A CloudTrail trail for write-only log events.
  2. CloudWatch Logs log group associated with the CloudTrail trail. An Amazon Simple Storage Service (Amazon S3) bucket is also created to store this trail’s log events.
  3. A VPC, private subnets, a security group, Lambda functions, and VPC endpoint resources to address private communication inside the AWS backbone.
  4. DynamoDB tables and DynamoDB Streams to manage key replication and orchestrate the solution deployment to the secondary Region.
  5. Lambda functions responsible for managing and orchestrating the solution deployment and setup.

Some parameters can be configured before deployment. They’re located in the cdk.json file (part of the GitHub solution to be downloaded) inside the solution base directory.

The parameters reside inside the context.ENVIRONMENTS.dev key:

{
  ...
  "context": {
    ...
    "ENVIRONMENTS": {
      "dev": {
        "origin_vpc_cidr": "10.2.0.0/16",
        "origin_vpc_name": "origin-vpc",
        "origin_subnets_mask": 22,
        "origin_subnets_prefix_name": "origin-subnet-private"
      }
    }
  }
}

Note: You can change the parameters origin_vpc_cidr, origin_vpc_name and origin_subnets_prefix_name.

Validate that there aren’t VPCs already created with the same CIDR range as the one defined in this file. Currently, the solution is set to be deployed in only two Availability Zones, so the suggestion is to keep the origin_subnet_mask value as is.

To deploy the primary resources:

  1. Download the solution folder from GitHub:
    $ git clone https://github.com/aws-samples/automatically-replicate-your-card-payment-keys.git && cd automatically-replicate-your-card-payment-keys

  2. Inside the solution directory, create a python virtual environment:
    $ python3 -m venv .venv

  3. Activate the python virtual environment:
    $ source .venv/bin/activate

  4. Install the dependencies:
    $ pip install -r requirements.txt

  5. If this is the first time deploying resources with the AWS CDK to your account in the selected AWS Region, run:
    $ cdk bootstrap

  6. Deploy the solution using the AWS CDK:
    $ cdk deploy

    Expected output:

    Do you wish to deploy these changes (y/n)? y  
    apc-crr: deploying... [1/1]  
    apc-crr: creating CloudFormation changeset...
     ✅  apc-crr
    ✨  Deployment time: 307.88s
    Stack ARN:
    arn:aws:cloudformation:<aws_region>:<aws_account>:stack/apc-crr/<stack_id>
    ✨  Total time: 316.06s

  7. If the solution is correctly deployed, an AWS CloudFormation stack with the name apc-crr will have a status of CREATE_COMPLETE status. You can check that by running the following command:
    $ aws cloudformation list-stacks --stack-status CREATE_COMPLETE

    Expected output:

    {
        "StackSummaries": [
            {
                "StackId": "arn:aws:cloudformation:us-east-1:111122223333:stack/apc-crr/5933bc00-f5c1-11ee-9bb2-12ef8d00991b",
                "StackName": "apc-crr",
                "CreationTime": "2024-04-08T16:02:07.413000+00:00",
                "LastUpdatedTime": "2024-04-08T16:02:21.439000+00:00",
                "StackStatus": "CREATE_COMPLETE",
                "DriftInformation": {
                    "StackDriftStatus": "NOT_CHECKED"
                }
            },
            {
                "StackId": "arn:aws:cloudformation:us-east-1:111122223333:stack/CDKToolkit/781e5390-e528-11ee-823a-0a6d63bbc467",
                "StackName": "CDKToolkit",
                "TemplateDescription": "This stack includes resources needed to deploy AWS CDK apps into this environment",
                "CreationTime": "2024-03-18T13:07:27.472000+00:00",
                "LastUpdatedTime": "2024-03-18T13:07:35.060000+00:00",
                "StackStatus": "CREATE_COMPLETE",
                "DriftInformation": {
                    "StackDriftStatus": "NOT_CHECKED"
                }
            }
        ]
    }

Set up cross-Region replication

Some parameters can be configured before initiating the setup. They’re located in the enable-crr.json file in the ./application folder.

The contents of the enable-crr.json file are:

{
  "enabled": true,
  "dest_region": "us-east-1",
  "kek_alias": "CRR_KEK_DO-NOT-DELETE_",
  "key_algo": "TDES_3KEY",
  "kdh_alias": "KDH_SIGN_KEY_DO-NOT-DELETE_",
  "krd_alias": "KRD_SIGN_KEY_DO-NOT-DELETE_",
  "dest_vpc_name": "apc-crr/destination-vpc",
  "dest_vpc_cidr": "10.3.0.0/16",
  "dest_subnet1_cidr": "10.3.0.0/22",
  "dest_subnet2_cidr": "10.3.4.0/22",
  "dest_subnets_prefix_name": "apc-crr/destination-vpc/destination-subnet-private",
  "dest_rt_prefix_name": "apc-crr/destination-vpc/destination-rtb-private"
}

You can change the dest_region, dest_vpc_name, dest_vpc_cidr, dest_subnet1_cidr, dest_subnet2_cidr, dest_subnets_prefix_name and dest_rt_prefix_name parameters.

Validate that there are no VPCs or subnets already created with the same CIDR ranges as are defined in this file.

To enable CRR and monitor its deployment process

  1. Enable CRR.

    From the solution base folder, navigate to the application directory:

    $ cd application

    Run the enable script.

    $ ./enable-crr.sh

    Expected output:

    START RequestId: 8aad062a-ff0b-4963-8ca0-f8078346854f Version: $LATEST  
    Setup has initiated. A CloudFormation template will be deployed in us-west-2.  
    Please check the apcStackMonitor log to follow the deployment status.  
    You can do that by checking the CloudWatch Logs Log group /aws/apc-crr/apcStackMonitor in the Management Console,  
    or by typing on a shell terminal: aws logs tail "/aws/lambda/apcStackMonitor" --follow  
    You can also check the CloudFormation Stack in the Management Console: Account 111122223333, Region us-west-2  
    END RequestId: 8aad062a-ff0b-4963-8ca0-f8078346854f  
    REPORT RequestId: 8aad062a-ff0b-4963-8ca0-f8078346854f  Duration: 1484.53 ms  Billed Duration: 1485 ms  Memory Size: 128 MB Max Memory Used: 79 MB  Init Duration: 400.95 ms

    This will launch a CloudFormation stack to be deployed in the AWS Region that the keys will be replicated to (secondary Region). Logs will be presented in the /aws/lambda/apcStackMonitor log (terminal from step 2).

    If the stack is successfully deployed (CREATE_COMPLETE state), then the KEK setup will be invoked. Logs will be presented in the /aws/lambda/apcKekSetup log (terminal from step 3).

    If the following message is displayed in the apcKekSetup log, then it means that the setup was concluded and new working keys created, deleted, or imported will be replicated.

    Keys Generated, Imported and Deleted in <Primary (Origin) Region> are now being automatically replicated to <Secondary (Destination) Region>

    There should be two keys created in the Region where CRR is deployed and two keys created where the working keys will be replicated. Use the following commands to check the keys:

    $ aws payment-cryptography list-keys --region us-east-1

    Command output showing the keys generated in the primary Region (us-east-1 in the example):

    {
        "Keys": [
            {
                "Enabled": true,
                "KeyArn": "arn:aws:payment-cryptography:us-east-1:111122223333:key/oevdxprw6szesmfx",
                "KeyAttributes": {
                    "KeyAlgorithm": "RSA_4096",
                    "KeyClass": "PUBLIC_KEY",
                    "KeyModesOfUse": {
                        "Decrypt": false,
                        "DeriveKey": false,
                        "Encrypt": false,
                        "Generate": false,
                        "NoRestrictions": false,
                        "Sign": false,
                        "Unwrap": false,
                        "Verify": true,
                        "Wrap": false
                    },
                    "KeyUsage": "TR31_S0_ASYMMETRIC_KEY_FOR_DIGITAL_SIGNATURE"
                },
                "KeyState": "CREATE_COMPLETE"
            },
            {
                "Enabled": true,
                "Exportable": true,
                "KeyArn": "arn:aws:payment-cryptography:us-east-1:111122223333:key/ey63g3an7u4ifz7u",
                "KeyAttributes": {
                    "KeyAlgorithm": "TDES_3KEY",
                    "KeyClass": "SYMMETRIC_KEY",
                    "KeyModesOfUse": {
                        "Decrypt": true,
                        "DeriveKey": false,
                        "Encrypt": true,
                        "Generate": false,
                        "NoRestrictions": false,
                        "Sign": false,
                        "Unwrap": true,
                        "Verify": false,
                        "Wrap": true
                    },
                    "KeyUsage": "TR31_K0_KEY_ENCRYPTION_KEY"
                },
                "KeyCheckValue": "7FB069",
                "KeyState": "CREATE_COMPLETE"
            }
        ]
    }
    
    $ aws payment-cryptography list-keys --region us-west-2

    The following is the command output showing the keys generated in the secondary Region (us-west-2 in the example):

    {
        "Keys": [
            {
                "Enabled": true,
                "Exportable": true,
                "KeyArn": "arn:aws:payment-cryptography:us-west-2:111122223333:key/4luahnz4ubuioq4s",
                "KeyAttributes": {
                    "KeyAlgorithm": "RSA_2048",
                    "KeyClass": "ASYMMETRIC_KEY_PAIR",
                    "KeyModesOfUse": {
                        "Decrypt": true,
                        "DeriveKey": false,
                        "Encrypt": true,
                        "Generate": false,
                        "NoRestrictions": false,
                        "Sign": false,
                        "Unwrap": true,
                        "Verify": false,
                        "Wrap": true
                    },
                    "KeyUsage": "TR31_D1_ASYMMETRIC_KEY_FOR_DATA_ENCRYPTION"
                },
                "KeyCheckValue": "56739D06",
                "KeyState": "CREATE_COMPLETE"
            },
            {
                "Enabled": true,
                "Exportable": true,
                "KeyArn": "arn:aws:payment-cryptography:us-west-2:111122223333:key/5gao3i6qvuyqqtzk",
                "KeyAttributes": {
                    "KeyAlgorithm": "TDES_3KEY",
                    "KeyClass": "SYMMETRIC_KEY",
                    "KeyModesOfUse": {
                        "Decrypt": true,
                        "DeriveKey": false,
                        "Encrypt": true,
                        "Generate": false,
                        "NoRestrictions": false,
                        "Sign": false,
                        "Unwrap": true,
                        "Verify": false,
                        "Wrap": true
                    },
                    "KeyUsage": "TR31_K0_KEY_ENCRYPTION_KEY"
                },
                "KeyCheckValue": "7FB069",
                "KeyState": "CREATE_COMPLETE"
            }
        ]
    }

  2. Monitor the resources deployment in the secondary Region. Open a terminal to tail the apcStackMonitor Lambda log and check the deployment of the resources in the secondary Region.
    $ aws logs tail "/aws/lambda/apcStackMonitor" --follow

    The expected output is:

    2024-03-05T15:18:17.870000+00:00 2024/03/05/apcStackMonitor[$LATEST]6e6762b029cb4f7d8963c3206226deac INIT_START Runtime Version: python:3.11.v29  Runtime Version ARN: arn:aws:lambda:us-east-1::runtime:2fb93380dac14772d30092f109b1784b517398458eef71a3f757425231fe6769  
    2024-03-05T15:18:18.321000+00:00 2024/03/05/apcStackMonitor[$LATEST]6e6762b029cb4f7d8963c3206226deac START RequestId: 1bdd37b4-e95b-43bd-a49b-9da55e603845 Version: $LATEST  
    2024-03-05T15:18:18.933000+00:00 2024/03/05/apcStackMonitor[$LATEST]6e6762b029cb4f7d8963c3206226deac Stack creation in progress. Status: CREATE_IN_PROGRESS  
    2024-03-05T15:18:24.017000+00:00 2024/03/05/apcStackMonitor[$LATEST]6e6762b029cb4f7d8963c3206226deac Stack creation in progress. Status: CREATE_IN_PROGRESS  
    2024-03-05T15:18:29.108000+00:00 2024/03/05/apcStackMonitor[$LATEST]6e6762b029cb4f7d8963c3206226deac Stack creation in progress. Status: CREATE_IN_PROGRESS  
    ...  
    2024-03-05T15:21:32.302000+00:00 2024/03/05/apcStackMonitor[$LATEST]6e6762b029cb4f7d8963c3206226deac Stack creation in progress. Status: CREATE_IN_PROGRESS  
    2024-03-05T15:21:37.390000+00:00 2024/03/05/apcStackMonitor[$LATEST]6e6762b029cb4f7d8963c3206226deac Stack creation completed. Status: CREATE_COMPLETE  
    2024-03-05T15:21:38.258000+00:00 2024/03/05/apcStackMonitor[$LATEST]6e6762b029cb4f7d8963c3206226deac Stack successfully deployed. Status: CREATE_COMPLETE  
    2024-03-05T15:21:38.354000+00:00 2024/03/05/apcStackMonitor[$LATEST]6e6762b029cb4f7d8963c3206226deac END RequestId: 1bdd37b4-e95b-43bd-a49b-9da55e603845  
    2024-03-05T15:21:38.354000+00:00 2024/03/05/apcStackMonitor[$LATEST]6e6762b029cb4f7d8963c3206226deac REPORT RequestId: 1bdd37b4-e95b-43bd-a49b-9da55e603845Duration: 200032.11 ms Billed Duration: 200033 ms  Memory Size: 128 MB Max Memory Used: 93 MB  Init Duration: 450.87 ms

  3. Monitor the setup of the KEKs between the primary and secondary Regions. Open another terminal to tail the apcKekSetup Lambda log and check the setup of the KEK between the key distribution host (Payment Cryptography in the primary Region) and the key receiving devices (Payment Cryptography in the secondary Region).

    This process uses the TR-34 norm.

    $ aws logs tail "/aws/lambda/apcKekSetup" -–follow

    The expected output is:

    2024-03-12T14:58:18.954000+00:00 2024/03/12/apcKekSetup[$LATEST]ea4c6a7c85ac42da8a043aa8626d2897 INIT_START Runtime Version: python:3.11.v29  Runtime Version ARN: arn:aws:lambda:us-west-2::runtime:2fb93380dac14772d30092f109b1784b517398458eef71a3f757425231fe6769  
    2024-03-12T14:58:19.399000+00:00 2024/03/12/apcKekSetup[$LATEST]ea4c6a7c85ac42da8a043aa8626d2897 START RequestId: a9b60171-dfaf-433a-954c-b0a332d22f50 Version: $LATEST  
    2024-03-12T14:58:19.596000+00:00 2024/03/12/apcKekSetup[$LATEST]ea4c6a7c85ac42da8a043aa8626d2897 ##### Step 1. Generating Key Encryption Key (KEK) - Key that will be used to encrypt the Working Keys  
    2024-03-12T14:58:19.850000+00:00 2024/03/12/apcKekSetup[$LATEST]ea4c6a7c85ac42da8a043aa8626d2897 ##### Step 2. Getting APC Import Parameters from us-east-1  
    2024-03-12T14:58:21.680000+00:00 2024/03/12/apcKekSetup[$LATEST]ea4c6a7c85ac42da8a043aa8626d2897 ##### Step 3. Importing the Root Wrapping Certificates in us-west-2  
    2024-03-12T14:58:21.826000+00:00 2024/03/12/apcKekSetup[$LATEST]ea4c6a7c85ac42da8a043aa8626d2897 ##### Step 4. Getting APC Export Parameters from us-west-2  
    2024-03-12T14:58:23.193000+00:00 2024/03/12/apcKekSetup[$LATEST]ea4c6a7c85ac42da8a043aa8626d2897 ##### Step 5. Importing the Root Signing Certificates in us-east-1  
    2024-03-12T14:58:23.439000+00:00 2024/03/12/apcKekSetup[$LATEST]ea4c6a7c85ac42da8a043aa8626d2897 ##### Step 6. Exporting the KEK from us-west-2  
    2024-03-12T14:58:23.555000+00:00 2024/03/12/apcKekSetup[$LATEST]ea4c6a7c85ac42da8a043aa8626d2897 ##### Step 7. Importing the Wrapped KEK to us-east-1  
    2024-03-12T14:58:23.840000+00:00 2024/03/12/apcKekSetup[$LATEST]ea4c6a7c85ac42da8a043aa8626d2897 ##### Initial Key Exchange Successfully Completed.  
    2024-03-12T14:58:23.840000+00:00 2024/03/12/apcKekSetup[$LATEST]ea4c6a7c85ac42da8a043aa8626d2897 Keys Generated, Imported and Deleted in us-west-2 are now being automatically replicated to us-east-1  
    2024-03-12T14:58:23.840000+00:00 2024/03/12/apcKekSetup[$LATEST]ea4c6a7c85ac42da8a043aa8626d2897 Keys already present in APC won't be replicated. If you want to, it must be done manually.  
    2024-03-12T14:58:23.844000+00:00 2024/03/12/apcKekSetup[$LATEST]ea4c6a7c85ac42da8a043aa8626d2897 END RequestId: a9b60171-dfaf-433a-954c-b0a332d22f50  
    2024-03-12T14:58:23.844000+00:00 2024/03/12/apcKekSetup[$LATEST]ea4c6a7c85ac42da8a043aa8626d2897 REPORT RequestId: a9b60171-dfaf-433a-954c-b0a332d22f50 Duration: 4444.78 ms  Billed Duration: 4445 ms  Memory Size: 5120 MB  Max Memory Used: 95 MB  Init Duration: 444.73 ms

Testing

Now it’s time to test the solution. The idea is to simulate an application that manages keys in the service. You will use AWS CLI to send commands directly from a local computer to the Payment Cryptography public endpoints.

Check if the user or role being used has the necessary permissions to manage keys in the service. The following AWS Identity and Access Management (IAM) policy example shows an IAM policy that can be attached to the user or role that will run the commands in the service.

{
      "Version": "2012-10-17",
      "Statement": [
            {
               "Effect": "Allow",
               "Action": [
                  "payment-cryptography:CreateKey",
                  "payment-cryptography:ImportKey",
                  "payment-cryptography:DeleteKey"
               ],
               "Resource": [
                  "*"
               ]
            }   
      ]
   }

Note: As an add-on, you can change the *(asterisk) to the Amazon Resource Name (ARN) of the created key.

For information about IAM policies, see the Identity and access management for Payment Cryptography documentation.

To test the solution

  1. Prepare to monitor the replication processes. Open a new terminal to monitor the apcReplicateWk log and verify that keys are being replicated from one Region to the other.
    $ aws logs tail "/aws/lambda/apcReplicateWk" --follow

  2. Create, import, and delete working keys. Start creating and deleting keys in the account and Region where the CRR solution was deployed (primary Region).

    Currently, the solution only listens to the CreateKey, ImportKey and DeleteKey commands. CreateAlias and DeleteAlias commands aren’t yet implemented, so the aliases won’t replicate.

    It takes some time for the replication function to be invoked because it relies on the following steps:

    1. A Payment Cryptography (CreateKey, ImportKey, or DeleteKey) log event is delivered to a CloudTrail trail.
    2. The log event is sent to the CloudWatch Logs log group, which invokes the subscription filter and the Lambda function associated with it is run.

    CloudTrail typically delivers logs within about 5 minutes of an API call. This time isn’t guaranteed. See the AWS CloudTrail Service Level Agreement for more information.

    Example 1: Create a working key

    Run the following command:

    aws payment-cryptography create-key --exportable --key-attributes KeyAlgorithm=TDES_2KEY,\
    KeyUsage=TR31_C0_CARD_VERIFICATION_KEY,KeyClass=SYMMETRIC_KEY, \
    KeyModesOfUse='{Generate=true,Verify=true}'

    Command output:

    {
        "Key": {
            "CreateTimestamp": "2022-10-26T16:04:11.642000-07:00",
            "Enabled": true,
            "Exportable": true,
            "KeyArn": "arn:aws:payment-cryptography:us-east-1:111122223333:key/hjprdg5o4jtgs5tw",
            "KeyAttributes": {
                "KeyAlgorithm": "TDES_2KEY",
                "KeyClass": "SYMMETRIC_KEY",
                "KeyModesOfUse": {
                    "Decrypt": false,
                    "DeriveKey": false,
                    "Encrypt": false,
                    "Generate": true,
                    "NoRestrictions": false,
                    "Sign": false,
                    "Unwrap": false,
                    "Verify": true,
                    "Wrap": false
                },
                "KeyUsage": "TR31_C0_CARD_VERIFICATION_KEY"
            },
            "KeyCheckValue": "B72F",
            "KeyCheckValueAlgorithm": "ANSI_X9_24",
            "KeyOrigin": "AWS_PAYMENT_CRYPTOGRAPHY",
            "KeyState": "CREATE_COMPLETE",
            "UsageStartTimestamp": "2022-10-26T16:04:11.559000-07:00"
        }
    }

    From the terminal where the /aws/lambda/apcReplicateWk log is being tailed, the expected output is:

    2024-03-05T15:57:13.871000+00:00 2024/03/05/apcReplicateWk[$LATEST]66dae4eef2bf42f6afd0e4cc70b48606 INIT_START Runtime Version: python:3.11.v29   Runtime Version ARN: arn:aws:lambda:us-east-1::runtime:2fb93380dac14772d30092f109b1784b517398458eef71a3f757425231fe6769  
    2024-03-05T15:57:14.326000+00:00 2024/03/05/apcReplicateWk[$LATEST]66dae4eef2bf42f6afd0e4cc70b48606 START RequestId: c7670e9b-6db0-494e-86c4-4c64126695ee Version: $LATEST  
    2024-03-05T15:57:14.327000+00:00 2024/03/05/apcReplicateWk[$LATEST]66dae4eef2bf42f6afd0e4cc70b48606 This is a WK! Sync in progress...  
    2024-03-05T15:57:14.717000+00:00 2024/03/05/apcReplicateWk[$LATEST]66dae4eef2bf42f6afd0e4cc70b48606 ##### Step 1. Exporting SYMMETRIC_KEY arn:aws:payment-cryptography:us-east-1:111122223333:key/hjprdg5o4jtgs5tw from us-east-1 using alias/CRR_KEK_DO-NOT-DELETE_6e3606a32690 Key Encryption Key  
    2024-03-05T15:57:15.044000+00:00 2024/03/05/apcReplicateWk[$LATEST]66dae4eef2bf42f6afd0e4cc70b48606 ##### Step 2. Importing the Wrapped Key to us-west-2  
    2024-03-05T15:57:15.661000+00:00 2024/03/05/apcReplicateWk[$LATEST]66dae4eef2bf42f6afd0e4cc70b48606 Imported SYMMETRIC_KEY key: arn:aws:payment-cryptography:us-west-2:111122223333:key/bykk4cwnbyfu3exo as TR31_C0_CARD_VERIFICATION_KEY in us-west-2  
    2024-03-05T15:57:15.794000+00:00 2024/03/05/apcReplicateWk[$LATEST]66dae4eef2bf42f6afd0e4cc70b48606 END RequestId: c7670e9b-6db0-494e-86c4-4c64126695ee  
    2024-03-05T15:57:15.794000+00:00 2024/03/05/apcReplicateWk[$LATEST]66dae4eef2bf42f6afd0e4cc70b48606 REPORT RequestId: c7670e9b-6db0-494e-86c4-4c64126695ee        Duration: 1468.13 ms    Billed Duration: 1469 ms        Memory Size: 128 MB     Max Memory Used: 78 MB  Init Duration: 454.02 ms

    Example 2: Delete a working key:

    Run the following command:

    aws payment-cryptography delete-key \
    --key-identifier arn:aws:payment-cryptography:us-east-1:111122223333:key/hjprdg5o4jtgs5tw

    Command output:

    {
        "Key": {
            "KeyArn": "arn:aws:payment-cryptography:us-east-2:111122223333:key/kwapwa6qaifllw2h",
            "KeyAttributes": {
                "KeyUsage": "TR31_C0_CARD_VERIFICATION_KEY",
                "KeyClass": "SYMMETRIC_KEY",
                "KeyAlgorithm": "TDES_2KEY",
                "KeyModesOfUse": {
                    "Encrypt": false,
                    "Decrypt": false,
                    "Wrap": false,
                    "Unwrap": false,
                    "Generate": true,
                    "Sign": false,
                    "Verify": true,
                    "DeriveKey": false,
                    "NoRestrictions": false
                }
            },
            "KeyCheckValue": "",
            "KeyCheckValueAlgorithm": "ANSI_X9_24",
            "Enabled": false,
            "Exportable": true,
            "KeyState": "DELETE_PENDING",
            "KeyOrigin": "AWS_PAYMENT_CRYPTOGRAPHY",
            "CreateTimestamp": "2023-06-05T12:01:29.969000-07:00",
            "UsageStopTimestamp": "2023-06-05T14:31:13.399000-07:00",
            "DeletePendingTimestamp": "2023-06-12T14:58:32.865000-07:00"
        }
    }

    From the terminal where the /aws/lambda/apcReplicateWk log is being tailed, the expected output is:

    2024-03-05T16:02:56.892000+00:00 2024/03/05/apcReplicateWk[$LATEST]66dae4eef2bf42f6afd0e4cc70b48606 START RequestId: d557cb28-6974-4888-bb7b-9f8aa4b78640 Version: $LATEST  
    2024-03-05T16:02:56.894000+00:00 2024/03/05/apcReplicateWk[$LATEST]66dae4eef2bf42f6afd0e4cc70b48606 This is not CreateKey or ImportKey!  
    2024-03-05T16:02:57.621000+00:00 2024/03/05/apcReplicateWk[$LATEST]66dae4eef2bf42f6afd0e4cc70b48606 arn:aws:payment-cryptography:us-west-2: 111122223333:key/bykk4cwnbyfu3exo deleted from us-west-2.  
    2024-03-05T16:02:57.691000+00:00 2024/03/05/apcReplicateWk[$LATEST]66dae4eef2bf42f6afd0e4cc70b48606 END RequestId: d557cb28-6974-4888-bb7b-9f8aa4b78640  
    2024-03-05T16:02:57.691000+00:00 2024/03/05/apcReplicateWk[$LATEST]66dae4eef2bf42f6afd0e4cc70b48606 REPORT RequestId: d557cb28-6974-4888-bb7b-9f8aa4b78640        Duration: 802.89 ms     Billed Duration: 803 ms Memory Size: 128 MB     Max Memory Used: 79 MB

    See the service documentation for more information about key management operations.

Clean up

You can disable the solution (keys will stop being replicated, but the resources from the primary Region will remain deployed) or destroy the resources that were deployed.

Note: Completing only Step 3, destroying the stack, won’t delete the resources deployed in the secondary Region or the keys that have been generated.

  1. Disable the CRR solution.

    The KEKs created during the enablement process will be disabled and marked for deletion in both the primary and secondary Regions. The waiting period before deletion is 3 days.

    From the base directory where the solution is deployed, run the following commands:

    $ source .venv/bin/activate
    $ cd application
    $ ./disable-crr.sh

    Expected output:

    START RequestId: bc96659c-3063-460a-8b29-2aa21b967c9a Version: $LATEST  
    Deletion has initiated...  
    Please check the apcKekSetup log to check if the solution has been successfully disabled.  
    You can do that by checking the CloudWatch Logs Log group /aws/apc-crr/apcKekSetup in the Management Console,  
    or by typing on a shell terminal: aws logs tail "/aws/lambda/apcKekSetup" --follow  
      
    Please check the apcStackMonitor log to follow the stack deletion status.  
    You can do that by checking the CloudWatch Logs Log group /aws/apc-crr/apcStackMonitor in the Management Console,  
    or by typing on a shell terminal: aws logs tail "/aws/lambda/apcStackMonitor" --follow  
    END RequestId: bc96659c-3063-460a-8b29-2aa21b967c9a  
    REPORT RequestId: bc96659c-3063-460a-8b29-2aa21b967c9a  Duration: 341.94 ms Billed Duration: 342 ms Memory Size: 128 MB Max Memory Used: 76 MB  Init Duration: 429.87 ms

  2. Monitor the Lambda functions logs.

    Open two other terminals.

    1. On the first terminal, run:
      $ aws logs tail "/aws/lambda/apcKekSetup" --follow

    2. On the second terminal, run:
      $ aws logs tail "/aws/lambda/apcStackMonitor" --follow

    Keys created during the exchange of the KEK will be deleted and the logs will be presented in the /aws/lambda/apcKekSetup log group.

    Expected output:

    2024-03-05T16:40:23.510000+00:00 2024/03/05/apcKekSetup[$LATEST]1c97946d8bc747b19cc35d9b1472ff8d INIT_START Runtime Version: python:3.11.v28  Runtime Version ARN: arn:aws:lambda:us-east-1::runtime:7893bafe1f7e5c0681bc8da889edf656777a53c2a26e3f73436bdcbc87ccfbe8  
    2024-03-05T16:40:23.971000+00:00 2024/03/05/apcKekSetup[$LATEST]1c97946d8bc747b19cc35d9b1472ff8d START RequestId: fc10b303-f028-4a94-a2cf-b8c0a762ea16 Version: $LATEST  
    2024-03-05T16:40:23.971000+00:00 2024/03/05/apcKekSetup[$LATEST]1c97946d8bc747b19cc35d9b1472ff8d Disabling CRR and Deleting KEKs  
    2024-03-05T16:40:25.276000+00:00 2024/03/05/apcKekSetup[$LATEST]1c97946d8bc747b19cc35d9b1472ff8d Keys and aliases deleted from APC.  
    2024-03-05T16:40:25.294000+00:00 2024/03/05/apcKekSetup[$LATEST]1c97946d8bc747b19cc35d9b1472ff8d DB status updated.  
    2024-03-05T16:40:25.297000+00:00 2024/03/05/apcKekSetup[$LATEST]1c97946d8bc747b19cc35d9b1472ff8d END RequestId: fc10b303-f028-4a94-a2cf-b8c0a762ea16  
    2024-03-05T16:40:25.297000+00:00 2024/03/05/apcKekSetup[$LATEST]1c97946d8bc747b19cc35d9b1472ff8d REPORT RequestId: fc10b303-f028-4a94-a2cf-b8c0a762ea16 Duration: 1326.39 ms  Billed Duration: 1327 ms  Memory Size: 5120 MB  Max Memory Used: 94 MB  Init Duration: 460.29 ms

    Second, the CloudFormation stack will be deleted with its associated resources.
    Logs will be presented in the /aws/lambda/apcStackMonitor Log group.

    Expected output:

    2024-03-05T16:40:25.854000+00:00 2024/03/05/apcStackMonitor[$LATEST]2cb4c9044a08474894ff5fa81940dbec START RequestId: 6b0b8207-19ae-40a1-b889-c92f8a5c243c Version: $LATEST  
    2024-03-05T16:40:26.486000+00:00 2024/03/05/apcStackMonitor[$LATEST]2cb4c9044a08474894ff5fa81940dbec De-provisioning Resources in the Destination Region. StackName: apc-setup-orchestrator-77aecbcf-1e4f-4e2a-8faa-6e3606a32690  
    2024-03-05T16:40:26.805000+00:00 2024/03/05/apcStackMonitor[$LATEST]2cb4c9044a08474894ff5fa81940dbec Stack deletion in progress. Status: DELETE_IN_PROGRESS  
    2024-03-05T16:40:31.889000+00:00 2024/03/05/apcStackMonitor[$LATEST]2cb4c9044a08474894ff5fa81940dbec Stack deletion in progress. Status: DELETE_IN_PROGRESS  
    2024-03-05T16:40:36.977000+00:00 2024/03/05/apcStackMonitor[$LATEST]2cb4c9044a08474894ff5fa81940dbec Stack deletion in progress. Status: DELETE_IN_PROGRESS  
    2024-03-05T16:40:42.065000+00:00 2024/03/05/apcStackMonitor[$LATEST]2cb4c9044a08474894ff5fa81940dbec Stack deletion in progress. Status: DELETE_IN_PROGRESS  
    2024-03-05T16:40:47.152000+00:00 2024/03/05/apcStackMonitor[$LATEST]2cb4c9044a08474894ff5fa81940dbec Stack deletion in progress. Status: DELETE_IN_PROGRESS  
    ...  
    2024-03-05T16:44:10.598000+00:00 2024/03/05/apcStackMonitor[$LATEST]2cb4c9044a08474894ff5fa81940dbec Stack deletion in progress. Status: DELETE_IN_PROGRESS  
    2024-03-05T16:44:15.683000+00:00 2024/03/05/apcStackMonitor[$LATEST]2cb4c9044a08474894ff5fa81940dbec Stack deletion in progress. Status: DELETE_IN_PROGRESS  
    2024-03-05T16:44:20.847000+00:00 2024/03/05/apcStackMonitor[$LATEST]2cb4c9044a08474894ff5fa81940dbec Stack deletion completed. Status: DELETE_COMPLETE  
    2024-03-05T16:44:21.043000+00:00 2024/03/05/apcStackMonitor[$LATEST]2cb4c9044a08474894ff5fa81940dbec Resources successfully deleted. Status: DELETE_COMPLETE  
    2024-03-05T16:44:21.601000+00:00 2024/03/05/apcStackMonitor[$LATEST]2cb4c9044a08474894ff5fa81940dbec END RequestId: 6b0b8207-19ae-40a1-b889-c92f8a5c243c  
    2024-03-05T16:44:21.601000+00:00 2024/03/05/apcStackMonitor[$LATEST]2cb4c9044a08474894ff5fa81940dbec REPORT RequestId: 6b0b8207-19ae-40a1-b889-c92f8a5c243cDuration: 235746.42 ms Billed Duration: 235747 ms  Memory Size: 128 MB Max Memory Used: 94 MB

  3. Destroy the CDK stack.
    $ cd ..
    $ cdk destroy

    Expected output:

    Are you sure you want to delete: apc-crr (y/n)? y  
    apc-crr: destroying... [1/1]  
     ✅  apc-crr: destroyed

  4. Delete all remaining working keys from the primary Region. If keys generated in the primary Region weren’t deleted before disabling the solution, then they’ll also exist in the secondary Region. To clean up keys in both Regions, get the key ARNS that have a status of CREATE_COMPLETE and delete them.
    $ aws payment-cryptography list-keys --region <Primary (Origin) Region>
    
    $ aws payment-cryptography delete-key \
    --key-identifier <key arn> --region <Primary (Origin) Region>
    
    $ aws payment-cryptography list-keys --region <Secondary (Destination) Region>
    
    $ aws payment-cryptography delete-key \
    --key-identifier <key arn> --region <Secondary (Destination) Region>

Security considerations

While using this Payment Cryptography CRR solution, it is crucial that you follow security best practices to maintain the highest level of protection for sensitive payment data:

  • Least privilege access: Implement strict access controls and follow the principle of least privilege, granting access to payment cryptography resources only to authorized personnel and services.
  • Encryption in transit and at rest: Make sure that sensitive data, including encryption keys and payment card data, is encrypted both in transit and at rest using industry-standard encryption algorithms.
  • Audit logging and monitoring: Activate audit logging and continuously monitor activity logs for suspicious or unauthorized access attempts.
  • Regular key rotation: Implement a key rotation strategy to periodically rotate encryption keys, reducing the risk of key compromise and minimizing potential exposure.
  • Incident response plan: Develop and regularly test an incident response plan to promote efficient and coordinated actions in the event of a security breach or data compromise.

Conclusion

In the rapidly evolving world of card payment transactions, maintaining high availability, resilience, robust security, and disaster recovery capabilities is crucial for maintaining customer trust and business continuity. AWS Payment Cryptography offers a solution that is tailored specifically for protecting sensitive payment card data.

By using the CRR solution, organizations can confidently address the stringent requirements of the payment industry, safeguarding sensitive data while providing continued access to payment services, even in the face of regional outages or disasters. With Payment Cryptography, organizations are empowered to deliver seamless and secure payment experiences to their customers.

To go further with this solution, you can modify it to fit your organization architecture by, for example, adding replication for the CreateAlias command. This will allow the Payment Cryptography keys alias to also be replicated between the primary and secondary Regions.

References

 
If you have feedback about this post, submit comments in the Comments section below. If you have questions about this post, contact AWS Support.

Ruy Cavalcanti
Ruy Cavalcanti

Ruy is a Senior Security Architect for the Latin American financial market at AWS. He has worked in IT and Security for over 19 years, helping customers create secure architectures and solve data protection and compliance challenges. When he’s not architecting secure solutions, he enjoys jamming on his guitar, cooking Brazilian-style barbecue, and spending time with his family and friends.

2024 ISO and CSA STAR certificates now available with three additional services

Post Syndicated from Atulsing Patil original https://aws.amazon.com/blogs/security/2024-iso-and-csa-star-certificates-now-available-with-three-additional-services/

Amazon Web Services (AWS) successfully completed an onboarding audit with no findings for ISO 9001:2015, 27001:2022, 27017:2015, 27018:2019, 27701:2019, 20000-1:2018, and 22301:2019, and Cloud Security Alliance (CSA) STAR Cloud Controls Matrix (CCM) v4.0. Ernst and Young CertifyPoint auditors conducted the audit and reissued the certificates on July 22, 2024. The objective of the audit was to assess the level of compliance with the requirements of the applicable international standards.

During the audit, we added the following three AWS services to the scope of the certification:

For a full list of AWS services that are certified under ISO and CSA Star, see the AWS ISO and CSA STAR Certified page. Customers can also access the certifications in the AWS Management Console through AWS Artifact.

If you have feedback about this post, submit comments in the Comments section below.

Atul Patil

Atulsing Patil
Atulsing is a Compliance Program Manager at AWS. He has 27 years of consulting experience in information technology and information security management. Atulsing holds a master of science in electronics degree and professional certifications such as CCSP, CISSP, CISM, CDPSE, ISO 27001 Lead Auditor, HITRUST CSF, Archer Certified Consultant, and AWS CCP.

Nimesh Ravas

Nimesh Ravasa
Nimesh is a Compliance Program Manager at AWS. He leads multiple security and privacy initiatives within AWS. Nimesh has 15 years of experience in information security and holds CISSP, CDPSE, CISA, PMP, CSX, AWS Solutions Architect – Associate, and AWS Security Specialty certifications.

Chinmaee Parulekar

Chinmaee Parulekar
Chinmaee is a Compliance Program Manager at AWS. She has 5 years of experience in information security. Chinmaee holds a master of science degree in management information systems and professional certifications such as CISA.

Summer 2024 SOC report now available with 177 services in scope

Post Syndicated from Brownell Combs original https://aws.amazon.com/blogs/security/summer-2024-soc-report-now-available-with-177-services-in-scope/

We continue to expand the scope of our assurance programs at Amazon Web Services (AWS) and are pleased to announce that the Summer 2024 System and Organization Controls (SOC) 1 report is now available. The report covers 177 services over the 12-month period of July 1, 2023–June 30, 2024, so that customers have a full year of assurance with the report. This report demonstrates our continuous commitment to adhere to the heightened expectations for cloud service providers.

Going forward, we will issue SOC reports covering a 12-month period each quarter as follows:

Report Period covered
Spring SOC 1, 2, and 3 April 1–March 31
Summer SOC 1 July 1–June 30
Fall SOC 1, 2, and 3 October 1–September 30
Winter SOC 1 January 1–December 31

Customers can download the Summer 2024 SOC report through AWS Artifact, a self-service portal for on-demand access to AWS compliance reports. Sign in to AWS Artifact in the AWS Management Console, or learn more at Getting Started with AWS Artifact.

AWS strives to continuously bring services into the scope of its compliance programs to help you meet your architectural and regulatory needs. If you have questions or feedback about SOC compliance, reach out to your AWS account team.

To learn more about our compliance and security programs, see AWS Compliance Programs. As always, we value your feedback and questions; reach out to the AWS Compliance team through the Contact Us page.

If you have feedback about this post, submit comments in the Comments section below.

Brownell Combs
Brownell Combs

Brownell is a Compliance Program Manager at AWS. He leads multiple security and privacy initiatives within AWS. Brownell holds a master of science degree in computer science from University of Virginia and a bachelor of science degree in computer science from Centre College. He has over 20 years of experience in IT risk management and CISSP, CISA, CRISC, and GIAC GCLD certifications.
Paul Hong
Paul Hong

Paul is a Compliance Program Manager at AWS. He leads multiple security, compliance, and training initiatives within AWS, and has 10 years of experience in security assurance. Paul holds CISSP, CEH, and CPA certifications. He has a master’s degree in accounting information systems and a bachelor’s degree in business administration from James Madison University, Virginia.
Tushar Jain
Tushar Jain

Tushar is a Compliance Program Manager at AWS. He leads multiple security, compliance, and training initiatives within AWS. Tushar holds a master of business administration from Indian Institute of Management Shillong, and a bachelor of technology in electronics and telecommunication engineering from Marathwada University. He has over 12 years of experience in information security and holds CCSK and CSXF certifications.
Michael Murphy
Michael Murphy

Michael is a Compliance Program Manager at AWS. He leads multiple security and privacy initiatives within AWS. Michael has 12 years of experience in information security. He holds a master’s degree and a bachelor’s degree in computer engineering from Stevens Institute of Technology. He also holds CISSP, CRISC, CISA, and CISM certifications.
Nathan Samuel
Nathan Samuel

Nathan is a Compliance Program Manager at AWS. He leads multiple security and privacy initiatives within AWS. Nathan has a bachelor of commerce degree from the University of the Witwatersrand, South Africa, and has over 21 years of experience in security assurance. He holds the CISA, CRISC, CGEIT, CISM, CDPSE, and Certified Internal Auditor certifications.
ryan wilks
Ryan Wilks

Ryan is a Compliance Program Manager at AWS. He leads multiple security and privacy initiatives within AWS. Ryan has 13 years of experience in information security. He has a bachelor of arts degree from Rutgers University and holds ITIL, CISM, and CISA certifications.