Tag Archives: Amazon OpenSearch Service

Petabyte-scale log analytics with Amazon S3, Amazon OpenSearch Service, and Amazon OpenSearch Ingestion

Post Syndicated from Jagadish Kumar original https://aws.amazon.com/blogs/big-data/petabyte-scale-log-analytics-with-amazon-s3-amazon-opensearch-service-and-amazon-opensearch-ingestion/

Organizations often need to manage a high volume of data that is growing at an extraordinary rate. At the same time, they need to optimize operational costs to unlock the value of this data for timely insights and do so with a consistent performance.

With this massive data growth, data proliferation across your data stores, data warehouse, and data lakes can become equally challenging. With a modern data architecture on AWS, you can rapidly build scalable data lakes; use a broad and deep collection of purpose-built data services; ensure compliance via unified data access, security, and governance; scale your systems at a low cost without compromising performance; and share data across organizational boundaries with ease, allowing you to make decisions with speed and agility at scale.

You can take all your data from various silos, aggregate that data in your data lake, and perform analytics and machine learning (ML) directly on top of that data. You can also store other data in purpose-built data stores to analyze and get fast insights from both structured and unstructured data. This data movement can be inside-out, outside-in, around the perimeter or sharing across.

For example, application logs and traces from web applications can be collected directly in a data lake, and a portion of that data can be moved out to a log analytics store like Amazon OpenSearch Service for daily analysis. We think of this concept as inside-out data movement. The analyzed and aggregated data stored in Amazon OpenSearch Service can again be moved to the data lake to run ML algorithms for downstream consumption from applications. We refer to this concept as outside-in data movement.

Let’s look at an example use case. Example Corp. is a leading Fortune 500 company that specializes in social content. They have hundreds of applications generating data and traces at approximately 500 TB per day and have the following criteria:

  • Have logs available for fast analytics for 2 days
  • Beyond 2 days, have data available in a storage tier that can be made available for analytics with a reasonable SLA
  • Retain the data beyond 1 week in cold storage for 30 days (for purposes of compliance, auditing, and others)

In the following sections, we discuss three possible solutions to address similar use cases:

  • Tiered storage in Amazon OpenSearch Service and data lifecycle management
  • On-demand ingestion of logs using Amazon OpenSearch Ingestion
  • Amazon OpenSearch Service direct queries with Amazon Simple Storage Service (Amazon S3)

Solution 1: Tiered storage in OpenSearch Service and data lifecycle management

OpenSearch Service supports three integrated storage tiers: hot, UltraWarm, and cold storage. Based on your data retention, query latency, and budgeting requirements, you can choose the best strategy to balance cost and performance. You can also migrate data between different storage tiers.

Hot storage is used for indexing and updating, and provides the fastest access to data. Hot storage takes the form of an instance store or Amazon Elastic Block Store (Amazon EBS) volumes attached to each node.

UltraWarm offers significantly lower costs per GiB for read-only data that you query less frequently and doesn’t need the same performance as hot storage. UltraWarm nodes use Amazon S3 with related caching solutions to improve performance.

Cold storage is optimized to store infrequently accessed or historical data. When you use cold storage, you detach your indexes from the UltraWarm tier, making them inaccessible. You can reattach these indexes in a few seconds when you need to query that data.

For more details on data tiers within OpenSearch Service, refer to Choose the right storage tier for your needs in Amazon OpenSearch Service.

Solution overview

The workflow for this solution consists of the following steps:

  1. Incoming data generated by the applications is streamed to an S3 data lake.
  2. Data is ingested into Amazon OpenSearch using S3-SQS near-real-time ingestion through notifications set up on the S3 buckets.
  3. After 2 days, hot data is migrated to UltraWarm storage to support read queries.
  4. After 5 days in UltraWarm, the data is migrated to cold storage for 21 days and detached from any compute. The data can be reattached to UltraWarm when needed. Data is deleted from cold storage after 21 days.
  5. Daily indexes are maintained for easy rollover. An Index State Management (ISM) policy automates the rollover or deletion of indexes that are older than 2 days.

The following is a sample ISM policy that rolls over data into the UltraWarm tier after 2 days, moves it to cold storage after 5 days, and deletes it from cold storage after 21 days:

{
    "policy": {
        "description": "hot warm delete workflow",
        "default_state": "hot",
        "schema_version": 1,
        "states": [
            {
                "name": "hot",
                "actions": [
                    {
                        "rollover": {
                            "min_index_age": "2d",
                            "min_primary_shard_size": "30gb"
                        }
                    }
                ],
                "transitions": [
                    {
                        "state_name": "warm"
                    }
                ]
            },
            {
                "name": "warm",
                "actions": [
                    {
                        "replica_count": {
                            "number_of_replicas": 5
                        }
                    }
                ],
                "transitions": [
                    {
                        "state_name": "cold",
                        "conditions": {
                            "min_index_age": "5d"
                        }
                    }
                ]
            },
            {
                "name": "cold",
                "actions": [
                    {
                        "retry": {
                            "count": 5,
                            "backoff": "exponential",
                            "delay": "1h"
                        },
                        "cold_migration": {
                            "start_time": null,
                            "end_time": null,
                            "timestamp_field": "@timestamp",
                            "ignore": "none"
                        }
                    }
                ],
                "transitions": [
                    {
                        "state_name": "delete",
                        "conditions": {
                            "min_index_age": "21d"
                        }
                    }
                ]
            },
            {
                "name": "delete",
                "actions": [
                    {
                        "retry": {
                            "count": 3,
                            "backoff": "exponential",
                            "delay": "1m"
                        },
                        "cold_delete": {}
                    }
                ],
                "transitions": []
            }
        ],
        "ism_template": {
            "index_patterns": [
                "log*"
            ],
            "priority": 100
        }
    }
}

Considerations

UltraWarm uses sophisticated caching techniques to enable querying for infrequently accessed data. Although the data access is infrequent, the compute for UltraWarm nodes needs to be running all the time to make this access possible.

When operating at PB scale, to reduce the area of effect of any errors, we recommend decomposing the implementation into multiple OpenSearch Service domains when using tiered storage.

The next two patterns remove the need to have long-running compute and describe on-demand techniques where the data is either brought when needed or queried directly where it resides.

Solution 2: On-demand ingestion of logs data through OpenSearch Ingestion

OpenSearch Ingestion is a fully managed data collector that delivers real-time log and trace data to OpenSearch Service domains. OpenSearch Ingestion is powered by the open source data collector Data Prepper. Data Prepper is part of the open source OpenSearch project.

With OpenSearch Ingestion, you can filter, enrich, transform, and deliver your data for downstream analysis and visualization. You configure your data producers to send data to OpenSearch Ingestion. It automatically delivers the data to the domain or collection that you specify. You can also configure OpenSearch Ingestion to transform your data before delivering it. OpenSearch Ingestion is serverless, so you don’t need to worry about scaling your infrastructure, operating your ingestion fleet, and patching or updating the software.

There are two ways that you can use Amazon S3 as a source to process data with OpenSearch Ingestion. The first option is S3-SQS processing. You can use S3-SQS processing when you require near-real-time scanning of files after they are written to S3. It requires an Amazon Simple Queue Service (Amazon S3) queue that receives S3 Event Notifications. You can configure S3 buckets to raise an event any time an object is stored or modified within the bucket to be processed.

Alternatively, you can use a one-time or recurring scheduled scan to batch process data in an S3 bucket. To set up a scheduled scan, configure your pipeline with a schedule at the scan level that applies to all your S3 buckets, or at the bucket level. You can configure scheduled scans with either a one-time scan or a recurring scan for batch processing.

For a comprehensive overview of OpenSearch Ingestion, see Amazon OpenSearch Ingestion. For more information about the Data Prepper open source project, visit Data Prepper.

Solution overview

We present an architecture pattern with the following key components:

  • Application logs are streamed into to the data lake, which helps feed hot data into OpenSearch Service in near-real time using OpenSearch Ingestion S3-SQS processing.
  • ISM policies within OpenSearch Service handle index rollovers or deletions. ISM policies let you automate these periodic, administrative operations by triggering them based on changes in the index age, index size, or number of documents. For example, you can define a policy that moves your index into a read-only state after 2 days and then deletes it after a set period of 3 days.
  • Cold data is available in the S3 data lake to be consumed on demand into OpenSearch Service using OpenSearch Ingestion scheduled scans.

The following diagram illustrates the solution architecture.

The workflow includes the following steps:

  1. Incoming data generated by the applications is streamed to the S3 data lake.
  2. For the current day, data is ingested into OpenSearch Service using S3-SQS near-real-time ingestion through notifications set up in the S3 buckets.
  3. Daily indexes are maintained for easy rollover. An ISM policy automates the rollover or deletion of indexes that are older than 2 days.
  4. If a request is made for analysis of data beyond 2 days and the data is not in the UltraWarm tier, data will be ingested using the one-time scan feature of Amazon S3 between the specific time window.

For example, if the present day is January 10, 2024, and you need data from January 6, 2024 at a specific interval for analysis, you can create an OpenSearch Ingestion pipeline with an Amazon S3 scan in your YAML configuration, with the start_time and end_time to specify when you want the objects in the bucket to be scanned:

version: "2"
ondemand-ingest-pipeline:
  source:
    s3:
      codec:
        newline:
      compression: "gzip"
      scan:
        start_time: 2023-12-28T01:00:00
        end_time: 2023-12-31T09:00:00
        buckets:
          - bucket:
              name: <bucket-name>
      aws:
        region: "us-east-1"
        sts_role_arn: "arn:aws:iam::<acct num>:role/PipelineRole"
    
    acknowledgments: true
  processor:
    - parse_json:
    - date:
        from_time_received: true
        destination: "@timestamp"           
  sink:
    - opensearch:                  
        index: "logs_ondemand_20231231"
        hosts: [ "https://search-XXXX-domain-XXXXXXXXXX.us-east-1.es.amazonaws.com" ]
        aws:                  
          sts_role_arn: "arn:aws:iam::<acct num>:role/PipelineRole"
          region: "us-east-1"

Considerations

Take advantage of compression

Data in Amazon S3 can be compressed, which reduces your overall data footprint and results in significant cost savings. For example, if you are generating 15 PB of raw JSON application logs per month, you can use a compression mechanism like GZIP, which can reduce the size to approximately 1PB or less, resulting in significant cost savings.

Stop the pipeline when possible

OpenSearch Ingestion scales automatically between the minimum and maximum OCUs set for the pipeline. After the pipeline has completed the Amazon S3 scan for the specified duration mentioned in the pipeline configuration, the pipeline continues to run for continuous monitoring at the minimum OCUs.

For on-demand ingestion for past time durations where you don’t expect new objects to be created, consider using supported pipeline metrics such as recordsOut.count to create Amazon CloudWatch alarms that can stop the pipeline. For a list of supported metrics, refer to Monitoring pipeline metrics.

CloudWatch alarms perform an action when a CloudWatch metric exceeds a specified value for some amount of time. For example, you might want to monitor recordsOut.count to be 0 for longer than 5 minutes to initiate a request to stop the pipeline through the AWS Command Line Interface (AWS CLI) or API.

Solution 3: OpenSearch Service direct queries with Amazon S3

OpenSearch Service direct queries with Amazon S3 (preview) is a new way to query operational logs in Amazon S3 and S3 data lakes without needing to switch between services. You can now analyze infrequently queried data in cloud object stores and simultaneously use the operational analytics and visualization capabilities of OpenSearch Service.

OpenSearch Service direct queries with Amazon S3 provides zero-ETL integration to reduce the operational complexity of duplicating data or managing multiple analytics tools by enabling you to directly query your operational data, reducing costs and time to action. This zero-ETL integration is configurable within OpenSearch Service, where you can take advantage of various log type templates, including predefined dashboards, and configure data accelerations tailored to that log type. Templates include VPC Flow Logs, Elastic Load Balancing logs, and NGINX logs, and accelerations include skipping indexes, materialized views, and covered indexes.

With OpenSearch Service direct queries with Amazon S3, you can perform complex queries that are critical to security forensics and threat analysis and correlate data across multiple data sources, which aids teams in investigating service downtime and security events. After you create an integration, you can start querying your data directly from OpenSearch Dashboards or the OpenSearch API. You can audit connections to ensure that they are set up in a scalable, cost-efficient, and secure way.

Direct queries from OpenSearch Service to Amazon S3 use Spark tables within the AWS Glue Data Catalog. After the table is cataloged in your AWS Glue metadata catalog, you can run queries directly on your data in your S3 data lake through OpenSearch Dashboards.

Solution overview

The following diagram illustrates the solution architecture.

This solution consists of the following key components:

  • The hot data for the current day is stream processed into OpenSearch Service domains through the event-driven architecture pattern using the OpenSearch Ingestion S3-SQS processing feature
  • The hot data lifecycle is managed through ISM policies attached to daily indexes
  • The cold data resides in your Amazon S3 bucket, and is partitioned and cataloged

The following screenshot shows a sample http_logs table that is cataloged in the AWS Glue metadata catalog. For detailed steps, refer to Data Catalog and crawlers in AWS Glue.

Before you create a data source, you should have an OpenSearch Service domain with version 2.11 or later and a target S3 table in the AWS Glue Data Catalog with the appropriate AWS Identity and Access Management (IAM) permissions. IAM will need access to the desired S3 buckets and have read and write access to the AWS Glue Data Catalog. The following is a sample role and trust policy with appropriate permissions to access the AWS Glue Data Catalog through OpenSearch Service:

{
    "Version": "2012-10-17",
    "Statement": [
        {
            "Effect": "Allow",
            "Principal": {
                "Service": "directquery.opensearchservice.amazonaws.com"
            },
            "Action": "sts:AssumeRole"
        }
    ]
}

The following is a sample custom policy with access to Amazon S3 and AWS Glue:

{
    "Version": "2012-10-17",
    "Statement": [
        {
            "Sid": "Statement1",
            "Effect": "Allow",
            "Action": "es:ESHttp*",
            "Resource": "arn:aws:es:*:<acct_num>:domain/*"
        },
        {
            "Sid": "Statement2",
            "Effect": "Allow",
            "Action": [
                "s3:Get*",
                "s3:List*",
                "s3:Put*",
                "s3:Describe*"
            ],
            "Resource": [
                "arn:aws:s3:::<bucket-name>",
                "arn:aws:s3:::<bucket-name>/*"
            ]
        },
        {
            "Sid": "GlueCreateAndReadDataCatalog",
            "Effect": "Allow",
            "Action": [
                "glue:GetDatabase",
                "glue:CreateDatabase",
                "glue:GetDatabases",
                "glue:CreateTable",
                "glue:GetTable",
                "glue:UpdateTable",
                "glue:DeleteTable",
                "glue:GetTables",
                "glue:GetPartition",
                "glue:GetPartitions",
                "glue:CreatePartition",
                "glue:BatchCreatePartition",
                "glue:GetUserDefinedFunctions"
            ],
            "Resource": [
                "arn:aws:glue:us-east-1:<acct_num>:catalog",
                "arn:aws:glue:us-east-1:<acct_num>:database/*",
                "arn:aws:glue:us-east-1:<acct_num>:table/*"
            ]
        }
    ]
}

To create a new data source on the OpenSearch Service console, provide the name of your new data source, specify the data source type as Amazon S3 with the AWS Glue Data Catalog, and choose the IAM role for your data source.

After you create a data source, you can go to the OpenSearch dashboard of the domain, which you use to configure access control, define tables, set up log type-based dashboards for popular log types, and query your data.

After you set up your tables, you can query your data in your S3 data lake through OpenSearch Dashboards. You can run a sample SQL query for the http_logs table you created in the AWS Glue Data Catalog tables, as shown in the following screenshot.

Best practices

Ingest only the data you need

Work backward from your business needs and establish the right datasets you’ll need. Evaluate if you can avoid ingesting noisy data and ingest only curated, sampled, or aggregated data. Using these cleaned and curated datasets will help you optimize the compute and storage resources needed to ingest this data.

Reduce the size of data before ingestion

When you design your data ingestion pipelines, use strategies such as compression, filtering, and aggregation to reduce the size of the ingested data. This will permit smaller data sizes to be transferred over the network and stored in your data layer.

Conclusion

In this post, we discussed solutions that enable petabyte-scale log analytics using OpenSearch Service in a modern data architecture. You learned how to create a serverless ingestion pipeline to deliver logs to an OpenSearch Service domain, manage indexes through ISM policies, configure IAM permissions to start using OpenSearch Ingestion, and create the pipeline configuration for data in your data lake. You also learned how to set up and use the OpenSearch Service direct queries with Amazon S3 feature (preview) to query data from your data lake.

To choose the right architecture pattern for your workloads when using OpenSearch Service at scale, consider the performance, latency, cost and data volume growth over time in order to make the right decision.

  • Use Tiered storage architecture with Index State Management policies when you need fast access to your hot data and want to balance the cost and performance with UltraWarm nodes for read-only data.
  • Use On Demand Ingestion of your data into OpenSearch Service when you can tolerate ingestion latencies to query your data not retained in your hot nodes. You can achieve significant cost savings when using compressed data in Amazon S3 and ingesting data on demand into OpenSearch Service.
  • Use Direct query with S3 feature when you want to directly analyze your operational logs in Amazon S3 with the rich analytics and visualization features of OpenSearch Service.

As a next step, refer to the Amazon OpenSearch Developer Guide to explore logs and metric pipelines that you can use to build a scalable observability solution for your enterprise applications.


About the Authors

Jagadish Kumar (Jag) is a Senior Specialist Solutions Architect at AWS focused on Amazon OpenSearch Service. He is deeply passionate about Data Architecture and helps customers build analytics solutions at scale on AWS.


Muthu Pitchaimani
is a Senior Specialist Solutions Architect with Amazon OpenSearch Service. He builds large-scale search applications and solutions. Muthu is interested in the topics of networking and security, and is based out of Austin, Texas.


Sam Selvan
is a Principal Specialist Solution Architect with Amazon OpenSearch Service.

Top Architecture Blog Posts of 2023

Post Syndicated from Andrea Courtright original https://aws.amazon.com/blogs/architecture/top-architecture-blog-posts-of-2023/

2023 was a rollercoaster year in tech, and we at the AWS Architecture Blog feel so fortunate to have shared in the excitement. As we move into 2024 and all of the new technologies we could see, we want to take a moment to highlight the brightest stars from 2023.

As always, thanks to our readers and to the many talented and hardworking Solutions Architects and other contributors to our blog.

I give you our 2023 cream of the crop!

#10: Build a serverless retail solution for endless aisle on AWS

In this post, Sandeep and Shashank help retailers and their customers alike in this guided approach to finding inventory that doesn’t live on shelves.

Building endless aisle architecture for order processing

Figure 1. Building endless aisle architecture for order processing

Check it out!

#9: Optimizing data with automated intelligent document processing solutions

Who else dreads wading through large amounts of data in multiple formats? Just me? I didn’t think so. Using Amazon AI/ML and content-reading services, Deependra, Anirudha, Bhajandeep, and Senaka have created a solution that is scalable and cost-effective to help you extract the data you need and store it in a format that works for you.

AI-based intelligent document processing engine

Figure 2: AI-based intelligent document processing engine

Check it out!

#8: Disaster Recovery Solutions with AWS managed services, Part 3: Multi-Site Active/Passive

Disaster recovery posts are always popular, and this post by Brent and Dhruv is no exception. Their creative approach in part 3 of this series is most helpful for customers who have business-critical workloads with higher availability requirements.

Warm standby with managed services

Figure 3. Warm standby with managed services

Check it out!

#7: Simulating Kubernetes-workload AZ failures with AWS Fault Injection Simulator

Continuing with the theme of “when bad things happen,” we have Siva, Elamaran, and Re’s post about preparing for workload failures. If resiliency is a concern (and it really should be), the secret is test, test, TEST.

Architecture flow for Microservices to simulate a realistic failure scenario

Figure 4. Architecture flow for Microservices to simulate a realistic failure scenario

Check it out!

#6: Let’s Architect! Designing event-driven architectures

Luca, Laura, Vittorio, and Zamira weren’t content with their four top-10 spots last year – they’re back with some things you definitely need to know about event-driven architectures.

Let's Architect

Figure 5. Let’s Architect artwork

Check it out!

#5: Use a reusable ETL framework in your AWS lake house architecture

As your lake house increases in size and complexity, you could find yourself facing maintenance challenges, and Ashutosh and Prantik have a solution: frameworks! The reusable ETL template with AWS Glue templates might just save you a headache or three.

Reusable ETL framework architecture

Figure 6. Reusable ETL framework architecture

Check it out!

#4: Invoking asynchronous external APIs with AWS Step Functions

It’s possible that AWS’ menagerie of services doesn’t have everything you need to run your organization. (Possible, but not likely; we have a lot of amazing services.) If you are using third-party APIs, then Jorge, Hossam, and Shirisha’s architecture can help you maintain a secure, reliable, and cost-effective relationship among all involved.

Invoking Asynchronous External APIs architecture

Figure 7. Invoking Asynchronous External APIs architecture

Check it out!

#3: Announcing updates to the AWS Well-Architected Framework

The Well-Architected Framework continues to help AWS customers evaluate their architectures against its six pillars. They are constantly striving for improvement, and Haleh’s diligence in keeping us up to date has not gone unnoticed. Thank you, Haleh!

Well-Architected logo

Figure 8. Well-Architected logo

Check it out!

#2: Let’s Architect! Designing architectures for multi-tenancy

The practically award-winning Let’s Architect! series strikes again! This time, Luca, Laura, Vittorio, and Zamira were joined by Federica to discuss multi-tenancy and why that concept is so crucial for SaaS providers.

Let's Architect

Figure 9. Let’s Architect

Check it out!

And finally…

#1: Understand resiliency patterns and trade-offs to architect efficiently in the cloud

Haresh, Lewis, and Bonnie revamped this 2022 post into a masterpiece that completely stole our readers’ hearts and is among the top posts we’ve ever made!

Resilience patterns and trade-offs

Figure 10. Resilience patterns and trade-offs

Check it out!

Bonus! Three older special mentions

These three posts were published before 2023, but we think they deserve another round of applause because you, our readers, keep coming back to them.

Thanks again to everyone for their contributions during a wild year. We hope you’re looking forward to the rest of 2024 as much as we are!

Introducing Terraform support for Amazon OpenSearch Ingestion

Post Syndicated from Rahul Sharma original https://aws.amazon.com/blogs/big-data/introducing-terraform-support-for-amazon-opensearch-ingestion/

Today, we are launching Terraform support for Amazon OpenSearch Ingestion. Terraform is an infrastructure as code (IaC) tool that helps you build, deploy, and manage cloud resources efficiently. OpenSearch Ingestion is a fully managed, serverless data collector that delivers real-time log, metric, and trace data to Amazon OpenSearch Service domains and Amazon OpenSearch Serverless collections. In this post, we explain how you can use Terraform to deploy OpenSearch Ingestion pipelines. As an example, we use an HTTP source as input and an Amazon OpenSearch Service domain (Index) as output.

Solution overview

The steps in this post deploy a publicly accessible OpenSearch Ingestion pipeline with Terraform, along with other supporting resources that are needed for the pipeline to ingest data into Amazon OpenSearch. We have implemented the Tutorial: Ingesting data into a domain using Amazon OpenSearch Ingestion, using Terraform.

We create the following resources with Terraform:

The pipeline that you create exposes an HTTP source as input and an Amazon OpenSearch sink to save batches of events.

Prerequisites

To follow the steps in this post, you need the following:

  • An active AWS account.
  • Terraform installed on your local machine. For more information, see Install Terraform.
  • The necessary IAM permissions required to create the AWS resources using Terraform.
  • awscurl for sending HTTPS requests through the command line with AWS Sigv4 authentication. For instructions on installing this tool, see the GitHub repo.

Create a directory

In Terraform, infrastructure is managed as code, called a project. A Terraform project contains various Terraform configuration files, such as main.tf, provider.tf, variables.tf, and output.df . Let’s create a directory on the server or machine that we can use to connect to AWS services using the AWS Command Line Interface (AWS CLI):

mkdir osis-pipeline-terraform-example

Change to the directory.

cd osis-pipeline-terraform-example

Create the Terraform configuration

Create a file to define the AWS resources.

touch main.tf

Enter the following configuration in main.tf and save your file:

terraform {
  required_providers {
    aws = {
      source  = "hashicorp/aws"
      version = "~> 5.36"
    }
  }

  required_version = ">= 1.2.0"
}

provider "aws" {
  region = "eu-central-1"
}

data "aws_region" "current" {}
data "aws_caller_identity" "current" {}
locals {
    account_id = data.aws_caller_identity.current.account_id
}

output "ingest_endpoint_url" {
  value = tolist(aws_osis_pipeline.example.ingest_endpoint_urls)[0]
}

resource "aws_iam_role" "example" {
  name = "exampleosisrole"
  assume_role_policy = jsonencode({
    Version = "2012-10-17"
    Statement = [
      {
        Action = "sts:AssumeRole"
        Effect = "Allow"
        Sid    = ""
        Principal = {
          Service = "osis-pipelines.amazonaws.com"
        }
      },
    ]
  })
}

resource "aws_opensearch_domain" "test" {
  domain_name           = "osi-example-domain"
  engine_version = "OpenSearch_2.7"
  cluster_config {
    instance_type = "r5.large.search"
  }
  encrypt_at_rest {
    enabled = true
  }
  domain_endpoint_options {
    enforce_https       = true
    tls_security_policy = "Policy-Min-TLS-1-2-2019-07"
  }
  node_to_node_encryption {
    enabled = true
  }
  ebs_options {
    ebs_enabled = true
    volume_size = 10
  }
 access_policies = <<EOF
{
  "Version": "2012-10-17",
  "Statement": [
    {
      "Effect": "Allow",
      "Principal": {
        "AWS": "${aws_iam_role.example.arn}"
      },
      "Action": "es:*"
    }
  ]
}

EOF

}

resource "aws_iam_policy" "example" {
  name = "osis_role_policy"
  description = "Policy for OSIS pipeline role"
  policy = jsonencode({
    Version = "2012-10-17",
    Statement = [
        {
          Action = ["es:DescribeDomain"]
          Effect = "Allow"
          Resource = "arn:aws:es:${data.aws_region.current.name}:${local.account_id}:domain/*"
        },
        {
          Action = ["es:ESHttp*"]
          Effect = "Allow"
          Resource = "arn:aws:es:${data.aws_region.current.name}:${local.account_id}:domain/osi-test-domain/*"
        }
    ]
})
}

resource "aws_iam_role_policy_attachment" "example" {
  role       = aws_iam_role.example.name
  policy_arn = aws_iam_policy.example.arn
}

resource "aws_cloudwatch_log_group" "example" {
  name = "/aws/vendedlogs/OpenSearchIngestion/example-pipeline"
  retention_in_days = 365
  tags = {
    Name = "AWS Blog OSIS Pipeline Example"
  }
}

resource "aws_osis_pipeline" "example" {
  pipeline_name               = "example-pipeline"
  pipeline_configuration_body = <<-EOT
            version: "2"
            example-pipeline:
              source:
                http:
                  path: "/test_ingestion_path"
              processor:
                - date:
                    from_time_received: true
                    destination: "@timestamp"
              sink:
                - opensearch:
                    hosts: ["https://${aws_opensearch_domain.test.endpoint}"]
                    index: "application_logs"
                    aws:
                      sts_role_arn: "${aws_iam_role.example.arn}"   
                      region: "${data.aws_region.current.name}"
        EOT
  max_units                   = 1
  min_units                   = 1
  log_publishing_options {
    is_logging_enabled = true
    cloudwatch_log_destination {
      log_group = aws_cloudwatch_log_group.example.name
    }
  }
  tags = {
    Name = "AWS Blog OSIS Pipeline Example"
  }
  }

Create the resources

Initialize the directory:

terraform init

Review the plan to see what resources will be created:

terraform plan

Apply the configuration and answer yes to run the plan:

terraform apply

The process might take around 7–10 minutes to complete.

Test the pipeline

After you create the resources, you should see the ingest_endpoint_url output displayed. Copy this value and export it in your environment variable:

export OSIS_PIPELINE_ENDPOINT_URL=<Replace with value copied>

Send a sample log with awscurl. Replace the profile with your appropriate AWS profile for credentials:

awscurl --service osis --region eu-central-1 -X POST -H "Content-Type: application/json" -d '[{"time":"2014-08-11T11:40:13+00:00","remote_addr":"122.226.223.69","status":"404","request":"GET http://www.k2proxy.com//hello.html HTTP/1.1","http_user_agent":"Mozilla/4.0 (compatible; WOW64; SLCC2;)"}]' https://$OSIS_PIPELINE_ENDPOINT_URL/test_ingestion_path

You should receive a 200 OK as a response.

To verify that the data was ingested in the OpenSearch Ingestion pipeline and saved in the OpenSearch, navigate to the OpenSearch and get its domain endpoint. Replace the <OPENSEARCH ENDPOINT URL> in the snippet given below and run it.

awscurl --service es --region eu-central-1 -X GET https://<OPENSEARCH ENDPOINT URL>/application_logs/_search | json_pp 

You should see the output as below:

Clean up

To destroy the resources you created, run the following command and answer yes when prompted:

terraform destroy

The process might take around 30–35 minutes to complete.

Conclusion

In this post, we showed how you can use Terraform to deploy OpenSearch Ingestion pipelines. AWS offers various resources for you to quickly start building pipelines using OpenSearch Ingestion and use Terraform to deploy them. You can use various built-in pipeline integrations to quickly ingest data from Amazon DynamoDB, Amazon Managed Streaming for Apache Kafka (Amazon MSK), Amazon Security Lake, Fluent Bit, and many more. The following OpenSearch Ingestion blueprints allow you to build data pipelines with minimal configuration changes and manage them with ease using Terraform. To learn more, check out the Terraform documentation for Amazon OpenSearch Ingestion.


About the Authors

Rahul Sharma is a Technical Account Manager at Amazon Web Services. He is passionate about the data technologies that help leverage data as a strategic asset and is based out of New York city, New York.

Farhan Angullia is a Cloud Application Architect at AWS Professional Services, based in Singapore. He primarily focuses on modern applications with microservice software patterns, and advocates for implementing robust CI/CD practices to optimize the software delivery lifecycle for customers. He enjoys contributing to the open source Terraform ecosystem in his spare time.

Arjun Nambiar is a Product Manager with Amazon OpenSearch Service. He focusses on ingestion technologies that enable ingesting data from a wide variety of sources into Amazon OpenSearch Service at scale. Arjun is interested in large scale distributed systems and cloud-native technologies and is based out of Seattle, Washington.

Muthu Pitchaimani is a Search Specialist with Amazon OpenSearch Service. He builds large-scale search applications and solutions. Muthu is interested in the topics of networking and security, and is based out of Austin, Texas.

Use Amazon OpenSearch Ingestion to migrate to Amazon OpenSearch Serverless

Post Syndicated from Muthu Pitchaimani original https://aws.amazon.com/blogs/big-data/use-amazon-opensearch-ingestion-to-migrate-to-amazon-opensearch-serverless/

Amazon OpenSearch Serverless is an on-demand auto scaling configuration for Amazon OpenSearch Service. Since its release, the interest for OpenSearch Serverless had been steadily growing. Customers prefer to let the service manage its capacity automatically rather than having to manually provision capacity. Until now, customers have had to rely on using custom code or third-party solutions to move the data between provisioned OpenSearch Service domains and OpenSearch Serverless.

We recently introduced a feature with Amazon OpenSearch Ingestion (OSI) to make this migration even more effortless. OSI is a fully managed, serverless data collector that delivers real-time log, metric, and trace data to OpenSearch Service domains and OpenSearch Serverless collections.

In this post, we outline the steps to make migrate the data between provisioned OpenSearch Service domains and OpenSearch Serverless. Migration of metadata such as security roles and dashboard objects will be covered in another subsequent post.

Solution overview

The following diagram shows the necessary components for moving data between OpenSearch Service provisioned domains and OpenSearch Serverless using OSI. You will use OSI with OpenSearch Service as source and an OpenSearch Serverless collection as sink.

Prerequisites

Before getting started, complete the following steps to create the necessary resources:

  1. Create an AWS Identity and Access Management (IAM) role that the OpenSearch Ingestion pipeline will assume to write to the OpenSearch Serverless collection. This role needs to be specified in the sts_role_arn parameter of the pipeline configuration.
  2. Attach a permissions policy to the role to allow it to read data from the OpenSearch Service domain. The following is a sample policy with least privileges:
    {
       "Version":"2012-10-17",
       "Statement":[
          {
             "Effect":"Allow",
             "Action":"es:ESHttpGet",
             "Resource":[
                "arn:aws:es:us-east-1:{account-id}:domain/{domain-name}/",
                "arn:aws:es:us-east-1:{account-id}:domain/{domain-name}/_cat/indices",
                "arn:aws:es:us-east-1:{account-id}:domain/{domain-name}/_search",
                "arn:aws:es:us-east-1:{account-id}:domain/{domain-name}/_search/scroll",
                "arn:aws:es:us-east-1:{account-id}:domain/{domain-name}/*/_search"
             ]
          },
          {
             "Effect":"Allow",
             "Action":"es:ESHttpPost",
             "Resource":[
                "arn:aws:es:us-east-1:{account-id}:domain/{domain-name}/*/_search/point_in_time",
                "arn:aws:es:us-east-1:{account-id}:domain/{domain-name}/*/_search/scroll"
             ]
          },
          {
             "Effect":"Allow",
             "Action":"es:ESHttpDelete",
             "Resource":[
                "arn:aws:es:us-east-1:{account-id}:domain/{domain-name}/_search/point_in_time",
                "arn:aws:es:us-east-1:{account-id}:domain/{domain-name}/_search/scroll"
             ]
          }
       ]
    }

  3. Attach a permissions policy to the role to allow it to send data to the collection. The following is a sample policy with least privileges:
    {
      "Version": "2012-10-17",
      "Statement": [
        {
          "Action": [
            "aoss:BatchGetCollection",
            "aoss:APIAccessAll"
          ],
          "Effect": "Allow",
          "Resource": "arn:aws:aoss:{region}:{your-account-id}:collection/{collection-id}"
        },
        {
          "Action": [
            "aoss:CreateSecurityPolicy",
            "aoss:GetSecurityPolicy",
            "aoss:UpdateSecurityPolicy"
          ],
          "Effect": "Allow",
          "Resource": "*",
          "Condition": {
            "StringEquals": {
              "aoss:collection": "{collection-name}"
            }
          }
        }
      ]
    }

  4. Configure the role to assume the trust relationship, as follows:
    {
            "Version": "2012-10-17",
            "Statement": [
                {
                    "Effect": "Allow",
                    "Principal": {
                        "Service": "osis-pipelines.amazonaws.com"
                    },
                    "Action": "sts:AssumeRole"
                }
            ]
        }

  5. It’s recommended to add the aws:SourceAccount and aws:SourceArn condition keys to the policy for protection against the confused deputy problem:
    "Condition": {
        "StringEquals": {
            "aws:SourceAccount": "{your-account-id}"
        },
        "ArnLike": {
            "aws:SourceArn": "arn:aws:osis:{region}:{your-account-id}:pipeline/*"
        }
    }

  6. Map the OpenSearch Ingestion domain role ARN as a backend user (as an all_access user) to the domain user. We show a simplified example to use the all_access role. For production scenarios, make sure to use a role with just enough permissions to read and write.
  7. Create an OpenSearch Serverless collection, which is where data will be ingested.
  8. Associate a data policy, as shown in the following code, to grant the OpenSearch Ingestion role permissions on the collection:
    [
      {
        "Rules": [
          {
            "Resource": [
              "index/collection-name/*"
            ],
            "Permission": [
              "aoss:CreateIndex",
              "aoss:UpdateIndex",
              "aoss:DescribeIndex",
              "aoss:WriteDocument",
            ],
            "ResourceType": "index"
          }
        ],
        "Principal": [
          "arn:aws:iam::{account-id}:role/pipeline-role"
        ],
        "Description": "Pipeline role access"
      }
    ]

  9. If the collection is defined as a VPC collection, you need to create a network policy and configure it in the ingestion pipeline.

Now you’re ready to move data from your provisioned domain to OpenSearch Serverless.

Move data from provisioned domains to Serverless

Setup Amazon OpenSearch Ingestion
To get started, you must have an active OpenSearch Service domain (source) and OpenSearch Serverless collection (sink). Complete the following steps to set up an OpenSearch Ingestion pipeline for migration:

  1. On the OpenSearch Service console, choose Pipeline under Ingestion in the navigation pane.
  2. Choose Create a pipeline.
  3. For Pipeline name, enter a name (for example, octank-migration).
  4. For Pipeline capacity, you can define the minimum and maximum capacity to scale up the resources. For now, you can leave the default minimum as 1 and maximum as 4.
  5. For Configuration Blueprint, select AWS-OpenSearchDataMigrationPipeline.
  6. Update the following information for the source:
    1. Uncomment hosts and specify the endpoint of the existing OpenSearch Service endpoint.
    2. Uncomment distribution_version if your source cluster is an OpenSearch Service cluster with compatibility mode enabled; otherwise, leave it commented.
    3. Uncomment indices, include, index_name_regex, and add an index name or pattern that you want to migrate (for example, octank-iot-logs-2023.11.0*).
    4. Update region under aws where your source domain is (for example, us-west-2).
    5. Update sts_role_arn under aws to the role that has permission to read data from the OpenSearch Service domain (for example, arn:aws:iam::111122223333:role/osis-pipeline). This role should be added as a backend role within the OpenSearch Service security roles.
  7. Update the following information for the sink:
    1. Uncomment hosts and specify the endpoint of the existing OpenSearch Serverless endpoint.
    2. Update sts_role_arn under aws to the role that has permission to write data into the OpenSearch Serverless collection (for example, arn:aws:iam::111122223333:role/osis-pipeline). This role should be added as part of the data access policy in the OpenSearch Serverless collection.
    3. Update the serverless flag to be true.
    4. For index, you can leave it as default, which will get the metadata from the source index and write to the same name in the destination as of the sources. Alternatively, if you want to have a different index name at the destination, modify this value with your desired name.
    5. For document_id, you can get the ID from the document metadata in the source and use the same in the target. Note that custom document IDs are supported only for the SEARCH type of collection; if you have your collection as TIMESERIES or VECTORSEARCH, you should comment this line.
  8. Next, you can validate your pipeline to check the connectivity of source and sink to make sure the endpoint exists and is accessible.
  9. For Network settings, choose your preferred setting:
    1. Choose VPC access and select your VPC, subnet, and security group to set up the access privately.
    2. Choose Public to use public access. AWS recommends that you use a VPC endpoint for all production workloads, but this walkthrough, select Public.
  10. For Log Publishing Option, you can either create a new Amazon CloudWatch group or use an existing CloudWatch group to write the ingestion logs. This provides access to information about errors and warnings raised during the operation, which can help during troubleshooting. For this walkthrough, choose Create new group.
  11. Choose Next, and verify the details you specified for your pipeline settings.
  12. Choose Create pipeline.

It should take a couple of minutes to create the ingestion pipeline.
The following graphic gives a quick demonstration of creating the OpenSearch Ingestion pipeline via the preceding steps.

Verify ingested data in the target OpenSearch Serverless collection

After the pipeline is created and active, log in to OpenSearch Dashboards for your OpenSearch Serverless collection and run the following command to list the indexes:

GET _cat/indices?v

The following graphic gives a quick demonstration of listing the indexes before and after the pipeline becomes active.

Conclusion

In this post, we saw how OpenSearch Ingestion can ingest data into an OpenSearch Serverless collection without the need to use the third-party solutions. With minimal data producer configuration, it automatically ingested data to the collection. OSI also allows you to transform or reindex the data from ES7.x version before ingestion to an OpenSearch Service domain or OpenSearch Serverless collection. OSI eliminates the need to provision, scale, or manage servers. AWS offers various resources for you to quickly start building pipelines using OpenSearch Ingestion. You can use various built-in pipeline integrations to quickly ingest data from Amazon DynamoDB, Amazon Managed Streaming for Apache Kafka (Amazon MSK), Amazon Security Lake, Fluent Bit, and many more. The following OpenSearch Ingestion blueprints enable you to build data pipelines with minimal configuration changes.


About the Authors

Muthu Pitchaimani is a Search Specialist with Amazon OpenSearch Service. He builds large-scale search applications and solutions. Muthu is interested in the topics of networking and security, and is based out of Austin, Texas.

Prashant Agrawal is a Sr. Search Specialist Solutions Architect with Amazon OpenSearch Service. He works closely with customers to help them migrate their workloads to the cloud and helps existing customers fine-tune their clusters to achieve better performance and save on cost. Before joining AWS, he helped various customers use OpenSearch and Elasticsearch for their search and log analytics use cases. When not working, you can find him traveling and exploring new places. In short, he likes doing Eat → Travel → Repeat.

Rahul Sharma is a Technical Account Manager at Amazon Web Services. He is passionate about the data technologies that help leverage data as a strategic asset and is based out of New York city, New York.

Enable advanced search capabilities for Amazon Keyspaces data by integrating with Amazon OpenSearch Service

Post Syndicated from Rajesh Kantamani original https://aws.amazon.com/blogs/big-data/enable-advanced-search-capabilities-for-amazon-keyspaces-data-by-integrating-with-amazon-opensearch-service/

Amazon Keyspaces (for Apache Cassandra) is a fully managed, serverless, and Apache Cassandra-compatible database service offered by AWS. It caters to developers in need of a highly available, durable, and fast NoSQL database backend. When you start the process of designing your data model for Amazon Keyspaces, it’s essential to possess a comprehensive understanding of your access patterns, similar to the approach used in other NoSQL databases. This allows for the uniform distribution of data across all partitions within your table, thereby enabling your applications to achieve optimal read and write throughput. In cases where your application demands supplementary query features, such as conducting full-text searches on the data stored in a table, you may explore the utilization of alternative services like Amazon OpenSearch Service to meet these particular needs.

Amazon OpenSearch Service is a powerful and fully managed search and analytics service. It empowers businesses to explore and gain insights from large volumes of data quickly. OpenSearch Service is versatile, allowing you to perform text and geospatial searches. Amazon OpenSearch Ingestion is a fully managed, serverless data collection solution that efficiently routes data to your OpenSearch Service domains and Amazon OpenSearch Serverless collections. It eliminates the need for third-party tools to ingest data into your OpenSearch service setup. You simply configure your data sources to send information to OpenSearch Ingestion, which then automatically delivers the data to your specified destination. Additionally, you can configure OpenSearch Ingestion to apply data transformations before delivery.

In this post, we explore the process of integrating  Amazon Keyspaces and Amazon OpenSearch Service using AWS Lambda and Amazon OpenSearch Ingestion to enable advanced search capabilities. The content includes a reference architecture, a step-by-step guide on infrastructure setup, sample code for implementing the solution within a use case, and an AWS Cloud Development Kit (AWS CDK) application for deployment.

Solution overview

AnyCompany, a rapidly growing eCommerce platform, faces a critical challenge in efficiently managing its extensive product and item catalog while enhancing the shopping experience for its customers. Currently, customers struggle to find specific products quickly due to limited search capabilities. AnyCompany aims to address this issue by implementing advanced search functionality that enables customers to easily search for the products. This enhancement is expected to significantly improve customer satisfaction and streamline the shopping process, ultimately boosting sales and retention rates.

The following diagram illustrates the solution architecture.

The workflow includes the following steps:

  1. Amazon API Gateway is set up to issue a POST request to the Amazon Lambda function when there is a need to insert, update, or delete data in Amazon Keyspaces.
  2. The Lambda function passes this modification to Amazon Keyspaces and holds the change, waiting for a success return code from Amazon Keyspaces that confirms the data persistence.
  3. After it receives the 200 return code, the Lambda function initiates an HTTP request to the OpenSearch Ingestion data pipeline asynchronously.
  4. The OpenSearch Ingestion process moves the transaction data to the OpenSearch Serverless collection.
  5. We then utilize the dev tools in OpenSearch Dashboards to execute various search patterns.

Prerequisites

Complete the following prerequisite steps:

  1. Ensure the AWS Command Line Interface (AWS CLI) is installed and the user profile is set up.
  2. Install Node.js, npm and the AWS CDK Toolkit.
  3. Install Python and jq.
  4. Use an integrated developer environment (IDE), such as Visual Studio Code.

Deploy the solution

The solution is detailed in an AWS CDK project. You don’t need any prior knowledge of AWS CDK. Complete the following steps to deploy the solution:

  1. Clone the GitHub repository to your IDE and navigate to the cloned repository’s directory:This project is structured like a standard Python project.
    git clone <repo-link>
    cd <repo-dir>

  2. On MacOS and Linux, complete the following steps to set up your virtual environment:
    • Create a virtual environment
      $ python3 -m venv .venv

    • After the virtual environment is created, activate it:
      $ source .venv/bin/activate

  3. For Windows users, activate the virtual environment as follows.
    % .venv\\\\Scripts\\\\activate.bat

  4. After you activate the virtual environment, install the required dependencies:
    (.venv) $ pip install -r requirements.txt

  5. Bootstrap AWS CDK in your account:(.venv) $ cdk bootstrap aws://<aws_account_id>/<aws_region>

After the bootstrap process completes, you’ll see a CDKToolkit AWS CloudFormation stack on the AWS CloudFormation console. AWS CDK is now ready for use.

  1. You can synthesize the CloudFormation template for this code:
    (.venv) $ export CDK_DEFAULT_ACCOUNT=$(aws sts get-caller-identity --query Account --output text)
    (.venv) $ export CDK_DEFAULT_REGION=<aws_region>
    (.venv) $ cdk synth -c iam_user_name=<your-iam-user-name> --all
    

  2. Use the cdk deploy command to create the stack:
    (.venv) $ cdk deploy -c iam_user_name=<your-iam-user-name> --all
    

    When the deployment process is complete, you’ll see the following CloudFormation stacks on the AWS CloudFormation console:

  • OpsApigwLambdaStack
  • OpsServerlessIngestionStack
  • OpsServerlessStack
  • OpsKeyspacesStack
  • OpsCollectionPipelineRoleStack

CloudFormation stack details

The CloudFormation template deploys the following components:

  1. An API named keyspaces-OpenSearch-Endpoint in API Gateway, which handles mutations (inserts, updates, and deletes) via the POST method to Lambda, compatible with OpenSearch Ingestion.
  2. A keyspace named productsearch, along with a table called product_by_item. The chosen partition key for this table is product_id. The following screenshot shows an example of the table’s attributes and data provided for reference using the CQL editor.
  3. A Lambda function called OpsApigwLambdaStack-ApiHandler* that will forward the transaction to Amazon Keyspaces. After the transaction is committed in keyspaces, we send a response code of 200 to the client as well as asynchronously send the transaction to the OpenSearch Ingestion pipeline.
  4. The OpenSearch ingestion pipeline, named serverless-ingestion. This pipeline publishes records to an OpenSearch Serverless collection under an index named products. The key for this collection is product_id. Additionally, the pipeline specifies the actions it can handle. The delete action supports delete operations; the index action is the default action, which supports insert and update operations.

We have chosen an OpenSearch Serverless collection as our target, so we included serverless: true in our configuration file. To keep things simple, we haven’t altered the network_policy_name settings, but you have the option to specify a different network policy name if needed. For additional details on how to set up network access for OpenSearch Serverless collections, refer to Creating network policies (console).

version: "2"
product-pipeline:
  source:
    http:
      path: "/${pipelineName}/test_ingestion_path"
  processor:
    - date:
        from_time_received: true
        destination: "@timestamp"
  sink:
    - opensearch:
        hosts: [ "<OpenSearch_Endpoint>" ]
        document_root_key: "item"
        index_type: custom
        index: "products"
        document_id_field: "item/product_id"
        flush_timeout: -1
        actions:
          - type: "delete"
            when: '/operation == "delete"'
          - type: "index"                      
        aws:
          sts_role_arn: "arn:aws:iam::<account_id>:role/OpenSearchCollectionPipelineRole"
          region: "us-east-1"
          serverless: true
        # serverless_options:
            # Specify a name here to create or update network policy for the serverless collection
            # network_policy_name: "network-policy-name"

You can incorporate a dead-letter queue (DLQ) into your pipeline to handle and store events that fail to process. This allows for easy access and analysis of these events. If your sinks refuse data due to mapping errors or other problems, redirecting this data to the DLQ will facilitate troubleshooting and resolving the issue. For detailed instructions on configuring DLQs, refer to Dead-letter queues. To reduce complexity, we don’t configure the DLQs in this post.

Now that all components have been deployed, we can test the solution and conduct various searches on the OpenSearch Service index.

Test the solution

Complete the following steps to test the solution:

  1. On the API Gateway console, navigate to your API and choose the ANY method.
  2. Choose the Test tab.
  3. For Method type¸ choose POST.

This is the only supported method by OpenSearch Ingestion for any inserts, deletes, or updates.

  1. For Request body, enter the input.

The following are some of the sample requests:

{"operation": "insert", "item": {"product_id": 1, "product_name": "Reindeer sweater", "product_description": "A Christmas sweater for everyone in the family." } }
{"operation": "insert", "item": {"product_id": 2, "product_name": "Bluetooth Headphones", "product_description": "High-quality wireless headphones with long battery life."}}
{"operation": "insert", "item": {"product_id": 3, "product_name": "Smart Fitness Watch", "product_description": "Advanced watch tracking fitness and health metrics."}}
{"operation": "insert", "item": {"product_id": 4, "product_name": "Eco-Friendly Water Bottle", "product_description": "Durable and eco-friendly bottle for hydration on-the-go."}}
{"operation": "insert", "item": {"product_id": 5, "product_name": "Wireless Charging Pad", "product_description": "Convenient pad for fast wireless charging of devices."}}

If the test is successful, you should see a return code of 200 in API Gateway. The following is a sample response:

{"message": "Ingestion completed successfully for {'operation': 'insert', 'item': {'product_id': 100, 'product_name': 'Reindeer sweater', 'product_description': 'A Christmas sweater for everyone in the family.'}}."}

If the test is successful, you should see the updated records in the Amazon Keyspaces table.

  1. Now that you have loaded some sample data, run a sample query to confirm the data that you loaded using API Gateway is actually being persisted to OpenSearch Service. The following is a query against the OpenSearch Service index for product_name = sweater:
awscurl --service aoss --region us-east-1 -X POST "<OpenSearch_Endpoint>/products/_search" -H "Content-Type: application/json" -d '
{
"query": {
"term": {
"product_name": "sweater"
     }
   } 
}'  | jq '.'

  1. To update a record, enter the following in the API’s request body. If the record doesn’t already exist, this operation will insert the record.
  2. To delete a record, enter the following in the API’s request body.

Monitoring

You can use Amazon CloudWatch to monitor the pipeline metrics. The following graph shows the number of documents successfully sent to OpenSearch Service.

Run queries on Amazon Keyspaces data in OpenSearch Service

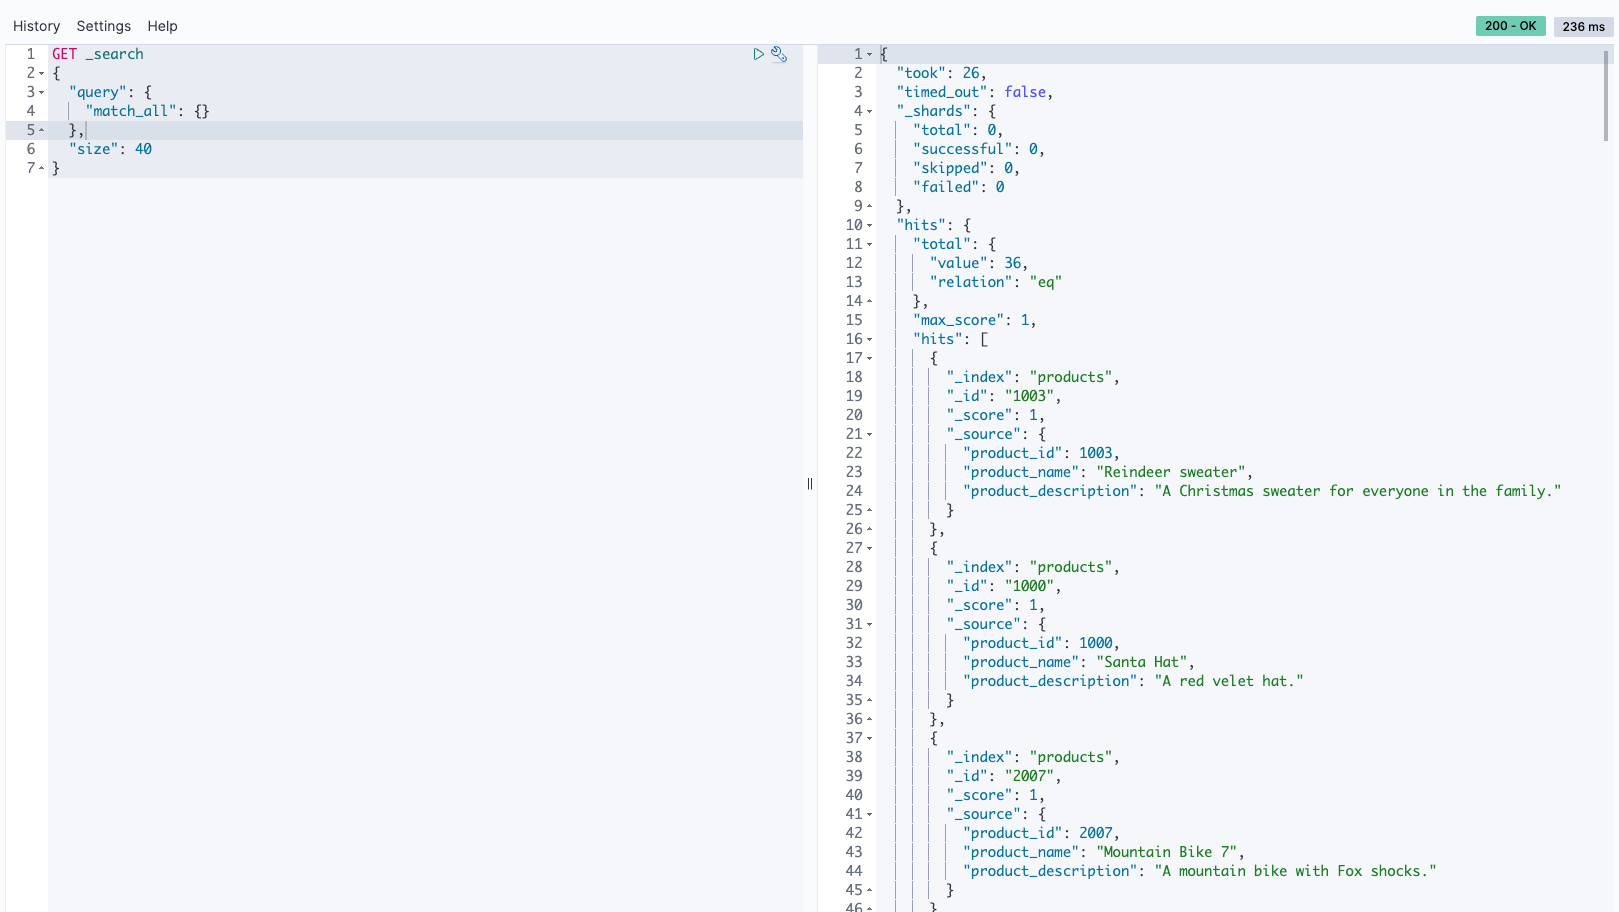
There are several methods to run search queries against an OpenSearch Service collection, with the most popular being through awscurl or the dev tools in the OpenSearch Dashboards. For this post, we will be utilizing the dev tools in the OpenSearch Dashboards.

To access the dev tools, Navigate to the OpenSearch collection dashboards  and select the dashboard radio button, which is highlighted in the screenshot adjacent to the ingestion-collection.

Once on the OpenSearch Dashboards page, click on the Dev Tools radio button as highlighted

This action brings up the Dev Tools console, enabling you to run various search queries, either to validate the data or simply to query it.

Type in your query and use the size parameter to determine how many records you want to be displayed. Click the play icon to execute the query. Results will appear in the right pane.

The following are some of the different search queries that you can run against the ingestion-collection for different search needs. For more search methods and examples, refer to Searching data in Amazon OpenSearch Service.

Full text search

In a search for Bluetooth headphones, we adopted an exacting full-text search approach. Our strategy involved formulating a query to align precisely with the term “Bluetooth Headphones,” searching through an extensive product database. This method allowed us to thoroughly examine and evaluate a broad range of Bluetooth headphones, concentrating on those that best met our search parameters. See the following code:

Fuzzy search

We used a fuzzy search query to navigate through product descriptions, even when they contain variations or misspellings of our search term. For instance, by setting the value to “chrismas” and the fuzziness to AUTO, our search could accommodate common misspellings or close approximations in the product descriptions. This approach is particularly useful in making sure that we capture a wider range of relevant results, especially when dealing with terms that are often misspelled or have multiple variations. See the following code:

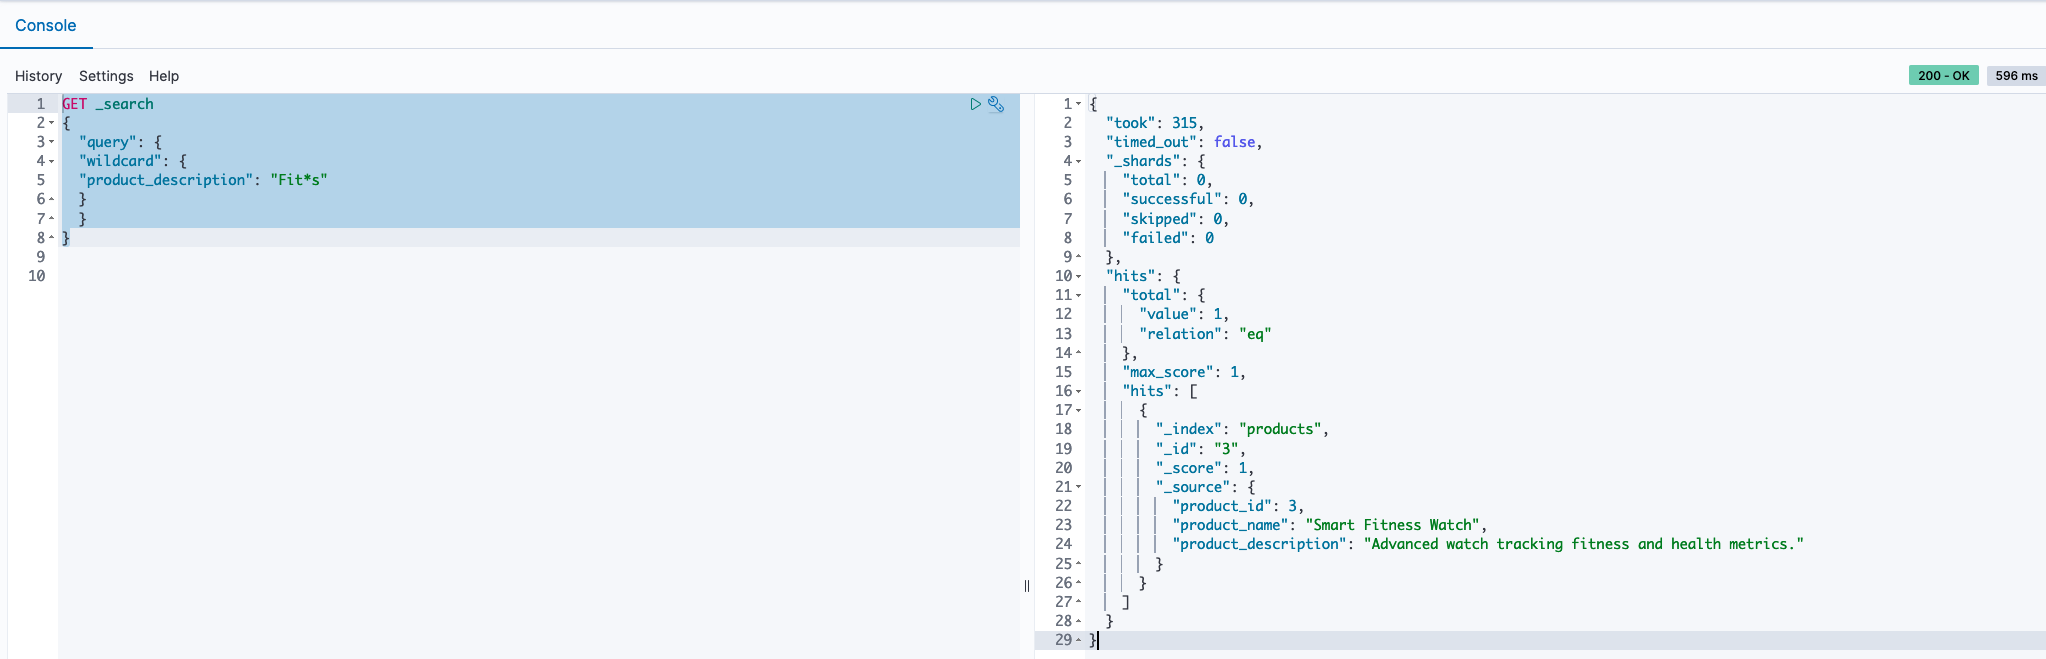
Wildcard search

In our approach to discovering a variety of products, we employed a wildcard search technique within the product descriptions. By using the query Fit*s, we signaled our search tool to look for any product descriptions that begin with “Fit” and end with “s,” allowing for any characters to appear in between. This method is effective for capturing a range of products that have similar naming patterns or attributes, making sure that we don’t miss out on relevant items that fit within a certain category but may have slightly different names or features. See the following code:

It is essential to comprehend that queries incorporating wildcard characters often exhibit reduced performance, as they require iterating through an extensive array of terms. Consequently, it is advisable to refrain from positioning wildcard characters at the beginning of a query, given that this approach can lead to operations that significantly strain both computational resources and time.

Troubleshooting

A status code other than 200 indicates a problem either in the Amazon Keyspaces operation or the OpenSearch Ingestion operation. View the CloudWatch logs of the Lambda function OpsApigwLambdaStack-ApiHandler* and the OpenSearch Ingestion pipeline logs to troubleshoot the failure.

You will see the following errors in the ingestion pipeline logs. This is because the pipeline endpoint is publicly accessible, and not accessible via VPC. They are harmless. As a best practice you can enable VPC access for the serverless collection, which provides an inherent layer of security.

  • 2024-01-23T13:47:42.326 [armeria-common-worker-epoll-3-1] ERROR com.amazon.osis.HttpAuthorization - Unauthenticated request: Missing Authentication Token
  • 2024-01-23T13:47:42.327 [armeria-common-worker-epoll-3-1] ERROR com.amazon.osis.HttpAuthorization - Authentication status: 401

Clean up

To prevent additional charges and to effectively remove resources, delete the CloudFormation stacks by running the following command:

(.venv) $ cdk destroy -c iam_user_name=<your-iam-user-name> --force --all

Verify the following CloudFormation stacks are deleted from the CloudFormation console:

Finally, delete the CDKToolkit CloudFormation stack to remove the AWS CDK resources.

Conclusion

In this post, we delved into enabling diverse search scenarios on data stored in Amazon Keyspaces by using the capabilities of OpenSearch Service. Through the use of Lambda and OpenSearch Ingestion, we managed the data movement seamlessly. Furthermore, we provided insights into testing the deployed solution using a CloudFormation template, ensuring a thorough grasp of its practical application and effectiveness.

Test the procedure that is outlined in this post by deploying the sample code provided and share your feedback in the comments section.


About the authors

Rajesh, a Senior Database Solution Architect. He specializes in assisting customers with designing, migrating, and optimizing database solutions on Amazon Web Services, ensuring scalability, security, and performance. In his spare time, he loves spending time outdoors with family and friends.

Sylvia, a Senior DevOps Architect, specializes in designing and automating DevOps processes to guide clients through their DevOps transformation journey. During her leisure time, she finds joy in activities such as biking, swimming, practicing yoga, and photography.

Knowledge Bases for Amazon Bedrock now supports Amazon Aurora PostgreSQL and Cohere embedding models

Post Syndicated from Antje Barth original https://aws.amazon.com/blogs/aws/knowledge-bases-for-amazon-bedrock-now-supports-amazon-aurora-postgresql-and-cohere-embedding-models/

During AWS re:Invent 2023, we announced the general availability of Knowledge Bases for Amazon Bedrock. With a knowledge base, you can securely connect foundation models (FMs) in Amazon Bedrock to your company data for Retrieval Augmented Generation (RAG).

In my previous post, I described how Knowledge Bases for Amazon Bedrock manages the end-to-end RAG workflow for you. You specify the location of your data, select an embedding model to convert the data into vector embeddings, and have Amazon Bedrock create a vector store in your AWS account to store the vector data, as shown in the following figure. You can also customize the RAG workflow, for example, by specifying your own custom vector store.

Knowledge Bases for Amazon Bedrock

Since my previous post in November, there have been a number of updates to Knowledge Bases, including the availability of Amazon Aurora PostgreSQL-Compatible Edition as an additional custom vector store option next to vector engine for Amazon OpenSearch Serverless, Pinecone, and Redis Enterprise Cloud. But that’s not all. Let me give you a quick tour of what’s new.

Additional choice for embedding model
The embedding model converts your data, such as documents, into vector embeddings. Vector embeddings are numeric representations of text data within your documents. Each embedding aims to capture the semantic or contextual meaning of the data.

Cohere Embed v3 – In addition to Amazon Titan Text Embeddings, you can now also choose from two additional embedding models, Cohere Embed English and Cohere Embed Multilingual, each supporting 1,024 dimensions.

Knowledge Bases for Amazon Bedrock

Check out the Cohere Blog to learn more about Cohere Embed v3 models.

Additional choice for vector stores
Each vector embedding is put into a vector store, often with additional metadata such as a reference to the original content the embedding was created from. The vector store indexes the stored vector embeddings, which enables quick retrieval of relevant data.

Knowledge Bases gives you a fully managed RAG experience that includes creating a vector store in your account to store the vector data. You can also select a custom vector store from the list of supported options and provide the vector database index name as well as index field and metadata field mappings.

We have made three recent updates to vector stores that I want to highlight: The addition of Amazon Aurora PostgreSQL-Compatible and Pinecone serverless to the list of supported custom vector stores, as well as an update to the existing Amazon OpenSearch Serverless integration that helps to reduce cost for development and testing workloads.

Amazon Aurora PostgreSQL – In addition to vector engine for Amazon OpenSearch Serverless, Pinecone, and Redis Enterprise Cloud, you can now also choose Amazon Aurora PostgreSQL as your vector database for Knowledge Bases.

Knowledge Bases for Amazon Bedrock

Aurora is a relational database service that is fully compatible with MySQL and PostgreSQL. This allows existing applications and tools to run without the need for modification. Aurora PostgreSQL supports the open source pgvector extension, which allows it to store, index, and query vector embeddings.

Many of Aurora’s features for general database workloads also apply to vector embedding workloads:

  • Aurora offers up to 3x the database throughput when compared to open source PostgreSQL, extending to vector operations in Amazon Bedrock.
  • Aurora Serverless v2 provides elastic scaling of storage and compute capacity based on real-time query load from Amazon Bedrock, ensuring optimal provisioning.
  • Aurora global database provides low-latency global reads and disaster recovery across multiple AWS Regions.
  • Blue/green deployments replicate the production database in a synchronized staging environment, allowing modifications without affecting the production environment.
  • Aurora Optimized Reads on Amazon EC2 R6gd and R6id instances use local storage to enhance read performance and throughput for complex queries and index rebuild operations. With vector workloads that don’t fit into memory, Aurora Optimized Reads can offer up to 9x better query performance over Aurora instances of the same size.
  • Aurora seamlessly integrates with AWS services such as Secrets Manager, IAM, and RDS Data API, enabling secure connections from Amazon Bedrock to the database and supporting vector operations using SQL.

For a detailed walkthrough of how to configure Aurora for Knowledge Bases, check out this post on the AWS Database Blog and the User Guide for Aurora.

Pinecone serverless – Pinecone recently introduced Pinecone serverless. If you choose Pinecone as a custom vector store in Knowledge Bases, you can provide either Pinecone or Pinecone serverless configuration details. Both options are supported.

Reduce cost for development and testing workloads in Amazon OpenSearch Serverless
When you choose the option to quickly create a new vector store, Amazon Bedrock creates a vector index in Amazon OpenSearch Serverless in your account, removing the need to manage anything yourself.

Since becoming generally available in November, vector engine for Amazon OpenSearch Serverless gives you the choice to disable redundant replicas for development and testing workloads, reducing cost. You can start with just two OpenSearch Compute Units (OCUs), one for indexing and one for search, cutting the costs in half compared to using redundant replicas. Additionally, fractional OCU billing further lowers costs, starting with 0.5 OCUs and scaling up as needed. For development and testing workloads, a minimum of 1 OCU (split between indexing and search) is now sufficient, reducing cost by up to 75 percent compared to the 4 OCUs required for production workloads.

Usability improvement – Redundant replicas disabled is now the default selection when you choose the quick-create workflow in Knowledge Bases for Amazon Bedrock. Optionally, you can create a collection with redundant replicas by selecting Update to production workload.

Knowledge Bases for Amazon Bedrock

For more details on vector engine for Amazon OpenSearch Serverless, check out Channy’s post.

Additional choice for FM
At runtime, the RAG workflow starts with a user query. Using the embedding model, you create a vector embedding representation of the user’s input prompt. This embedding is then used to query the database for similar vector embeddings to retrieve the most relevant text as the query result. The query result is then added to the original prompt, and the augmented prompt is passed to the FM. The model uses the additional context in the prompt to generate the completion, as shown in the following figure.

Knowledge Bases for Amazon Bedrock

Anthropic Claude 2.1 – In addition to Anthropic Claude Instant 1.2 and Claude 2, you can now choose Claude 2.1 for Knowledge Bases. Compared to previous Claude models, Claude 2.1 doubles the supported context window size to 200 K tokens.

Knowledge Bases for Amazon Bedrock

Check out the Anthropic Blog to learn more about Claude 2.1.

Now available
Knowledge Bases for Amazon Bedrock, including the additional choice in embedding models, vector stores, and FMs, is available in the AWS Regions US East (N. Virginia) and US West (Oregon).

Learn more

Read more about Knowledge Bases for Amazon Bedrock

— Antje

Build SAML identity federation for Amazon OpenSearch Service domains within a VPC

Post Syndicated from Mahdi Ebrahimi original https://aws.amazon.com/blogs/big-data/build-saml-identity-federation-for-amazon-opensearch-service-domains-within-a-vpc/

Amazon OpenSearch Service is a fully managed search and analytics service powered by the Apache Lucene search library that can be operated within a virtual private cloud (VPC). A VPC is a virtual network that’s dedicated to your AWS account. It’s logically isolated from other virtual networks in the AWS Cloud. Placing an OpenSearch Service domain within a VPC enables a secure communication between OpenSearch Service and other services within the VPC without the need for an internet gateway, NAT device, or a VPN connection. All traffic remains securely within the AWS Cloud, providing a safe environment for your data. To connect to an OpenSearch Service domain running inside a private VPC, enterprise customers use one of two available options: either integrate their VPC with their enterprise network through VPN or AWS Direct Connect, or make the cluster endpoint publicly accessible through a reverse proxy. Refer to How can I access OpenSearch Dashboards from outside of a VPC using Amazon Cognito authentication for a detailed evaluation of the available options and the corresponding pros and cons.

For managing access to OpenSearch Dashboards in enterprise customers’ environments, OpenSearch Service supports Security Assertion Markup Language (SAML) integration with the customer’s existing identity providers (IdPs) to offer single sign-on (SSO). Although SAML integration for publicly accessible OpenSearch Dashboards works out of the box, enabling SAML for OpenSearch Dashboards within a VPC requires careful design with various configurations.

This post outlines an end-to-end solution for integrating SAML authentication for OpenSearch Service domains running in a VPC. It provides a step-by-step deployment guideline and is accompanied by AWS Cloud Development Kit (AWS CDK) applications, which automate all the necessary configurations.

Overview of solution

The following diagram describes the step-by-step authentication flow for accessing a private OpenSearch Service domain through SSO using SAML identity federation. The access is enabled over public internet through private NGINX reverse proxy servers running on Amazon Elastic Container Service (Amazon ECS) for high availability.

Solution overview

The workflow consists of the following steps:

  1. The user navigates to the OpenSearch Dashboards URL in their browser.
  2. The browser resolves the domain IP address and sends the request.
  3. AWS WAF rules make sure that only allow listed IP address ranges are allowed.
  4. Application Load Balancer forwards the request to NGINX reverse proxy.
  5. NGINX adds the necessary headers and forwards the request to OpenSearch Dashboards.
  6. OpenSearch Dashboards detects that the request is not authenticated. It replies with a redirect to the integrated SAML IdP for authentication.
  7. The user is redirected to the SSO login page.
  8. The IdP verifies the user’s identity and generates a SAML assertion token.
  9. The user is redirected back to the OpenSearch Dashboards URL.
  10. The request goes through the Steps 1–5 again until it reaches OpenSearch. This time, OpenSearch Dashboards detects the accompanying SAML assertion and allows the request.

In the following sections, we set up a NGINX reverse proxy in private subnets to provide access to OpenSearch Dashboards for a domain deployed inside VPC private subnets. We then enable SAML authentication for OpenSearch Dashboards using a SAML 2.0 application and use a custom domain endpoint to access OpenSearch Dashboards to see the SAML authentication in action.

Prerequisites

Before you get started, complete the prerequisite steps in this section.

Install required tools

First, install the AWS CDK. For more information, refer to the AWS CDK v2 Developer Guide.

Prepare required AWS resources

Complete the following steps to set up your AWS resources:

  1. Create an AWS account.
  2. Create an Amazon Route 53 public hosted zone such as mydomain.com to be used for routing internet traffic to your domain. For instructions, refer to Creating a public hosted zone.
  3. Request an AWS Certificate Manager (ACM) public certificate for the hosted zone. For instructions, refer to Requesting a public certificate.
  4. Create a VPC with public and private subnets.
  5. Enable AWS IAM Identity Center. For instructions, refer to Enable IAM Identity Center.

Prepare your OpenSearch Service cluster

This post is accompanied with a standalone AWS CDK application (opensearch-domain) that deploys a sample OpenSearch Service domain in private VPC subnets. The deployed domain is for demonstration purposes only, and is optional.

If you have an existing OpenSearch Service domain in VPC that you want to use for SAML integration, apply the following configurations:

  1. On the Cluster configuration tab, choose Edit and select Enable custom endpoint in the Custom endpoint section.
  2. For Custom hostname, enter a fully qualified domain name (FQDN) such as opensearch.mydomain.com, which you want to use to access your cluster. Note that the domain name of the provided FQDN (for example, mydomain.com) must be the same as the public hosted zone you created earlier.
  3. For AWS certificate, choose the SSL certificate you created earlier.
  4. In the Summary section, optionally enable dry run analysis and select Dry run or deselect it and choose Save changes.

Otherwise, download the accompanied opensearch-domain AWS CDK application and unzip it. Then, edit the cdk.json file on the root of the unzipped folder and configure the required parameters:

  • vpc_cidr – The CIDR block in which to create the VPC. You may leave the default of 10.0.0.0/16.
  • opensearch_cluster_name – The name of the OpenSearch Service cluster. You may leave the default value of opensearch. It will also be used, together with the hosted_zone_name parameter, to build the FQDN of the custom domain URL.
  • hosted_zone_id – The Route 53 public hosted zone ID.
  • hosted_zone_name – The Route 53 public hosted zone name (for example, mydomain.com). The result FQDN with the default example values will then be opensearch.mydomain.com.

Finally, run the following commands to deploy the AWS CDK application:

cd opensearch-domain

# Create a Python environment and install the reuired dependencies
python3 -m venv .venv
source .venv/bin/activate
pip install -r requirements-dev.txt
pip install -r requirements.txt

# Deploy the CDK application
cdk deploy

With the prerequisites in place, refer to the following sections for a step-by-step guide to deploy this solution.

Create a SAML 2.0 application

We use IAM Identity Center as the source of identity for our SAML integration. The same configuration should apply to other SAML 2.0-compliant IdPs. Consult your IdP documentation.

  1. On the IAM Identity Center console, choose Groups in the navigation pane.
  2. Create a new group called Opensearch Admin, and add users to it.
    This will be the SAML group that receives full permissions in OpenSearch Dashboards. Take note of the group ID.OpenSearch Admin Group
  3. Choose Applications in the navigation pane.
  4. Create a new custom SAML 2.0 application.Create SAML application
  5. Download the IAM Identity Center SAML metadata file to use in a later step.IAM Identity Center SAML metadata
  6. For Application start URL, enter [Custom Domain URL]/_dashboards/.
    The custom domain URL is composed of communication protocol (https://) followed by the FQDN, which you used for your OpenSearch Service cluster in the prerequisites (for example, https://opensearch.mydomain.com). Look under your OpenSearch Service cluster configurations, if in doubt.
  7. For Application ACS URL, enter [Custom Domain URL]/_dashboards/_opendistro/_security/saml/acs.
  8. For Application SAML audience, enter [Custom Domain URL] (without any trailing slash).
    OpenSearch domain SAML properties
  9. Choose Submit.
  10. In the Assigned users section, select Opensearch Admin and choose Assign Users.Assign admin group to SAML application
  11. On the Actions menu, choose Edit attribute mappings.Edit SAML application's attribute mapping
  12. Define attribute mappings as shown in the following screenshot and choose Save changes.Configure SAML application's attribute mappings

Deploy the AWS CDK application

Complete the following steps to deploy the AWS CDK application:

  1. Download and unzip the opensearch-domain-saml-integration AWS CDK application.
  2. Add your private SSL key and certificate to AWS Secrets Manager and create two secrets called Key and Crt. For example, see the following code:
    KEY=$(cat private.key | base64) && aws secretsmanager create-secret --name Key --secret-string $KEY
    CRT=$(cat certificate.crt | base64) && aws secretsmanager create-secret --name Crt --secret-string $CRT

    You can use the following command to generate a self-signed certificate. This is for testing only; do not use this for production environments.

    openssl req -new -newkey rsa:4096 -days 1095 -nodes -x509 -subj '/' -keyout private.key -out certificate.crt

  3. Edit the cdk.json file and set the required parameters inside the nested config object:
  • aws_region – The target AWS Region for your deployment (for example, eu-central-1).
  • vpc_id – The ID of the VPC into which the OpenSearch Service domain has been deployed.
  • opensearch_cluster_security_group_id – The ID of the security group used by the OpenSearch Service domain or any other security group that allows inbound connections to that domain on port 80 and 443. This group ID will be used by the Application Load Balancer to forward traffic to your OpenSearch Service domain.
  • hosted_zone_id – The Route 53 public hosted zone ID.
  • hosted_zone – The Route 53 public hosted zone name (for example, mydomain.com).
  • opensearch_custom_domain_name – An FQDN such as opensearch.mydomain.com, which you want to use to access your cluster. Note that the domain name of the provided FQDN (mydomain.com) must be the same as the hosted_zone parameter.
  • opensearch_custom_domain_certificate_arn – The ARN of the certificate stored in ACM.
  • opensearch_domain_endpoint – The OpenSearch Service VPC domain endpoint (for example, vpc-opensearch-abc123.eu-central-1.es.amazonaws.com).
  • vpc_dns_resolver – This must be 10.0.0. if your VPC CIDR is 10.0.0.0/16. See Amazon DNS server for further details.
  • alb_waf_ip_whitelist_cidrs – This is an optional list of zero or more IP CIDR ranges that will be automatically allow listed in AWS WAF to permit access to the OpenSearch Service domain. If not specified, after the deployment you will need to manually add relevant IP CIDR ranges to the AWS WAF IP set to allow access. For example, ["1.2.3.4/32", "5.6.7.0/24"].
  1. Deploy the OpenSearch Service domain SAML integration AWS CDK application:
    cd opensearch-domain-saml-integration
    
    # Create a Python environment and install the required dependencies
    python3 -m venv .venv
    source .venv/bin/activate
    pip install -r requirements-dev.txt
    pip install -r requirements.txt
    
    # Deploy the CDK application
    cdk deploy

Enable SAML authentication for your OpenSearch Service cluster

When the application deployment is complete, enable SAML authentication for your cluster:

  1. On the OpenSearch Service console, navigate to your domain.
  2. On the Security configuration tab, choose Edit.Enable SAML authentication for OpenSearch domain
  3. Select Enable SAML authentication.
  4. Choose Import from XML file and import the IAM Identity Center SAML metadata file that you downloaded in an earlier step.
  5. For SAML master backend role, use the group ID you saved earlier.
  6. Expand the Additional settings section and for Roles, enter the SAML 2.0 attribute name you mapped earlier when you created the SAML 2.0 application in AWS Identity Center.
  7. Configure the domain access policy for SAML integration.
  8. Submit changes and wait for OpenSearch Service to apply the configurations before proceeding to the next section.

Test the solution

Complete the following steps to see the solution in action:

  1. On the IAM Identity Center console, choose Dashboard in the navigation pane.
  2. In the Settings summary section, choose the link under AWS access portal URL.Login to IAM Identity Centre
  3. Sign in with your user name and password (register your password if this is your first login).
    If your account was successfully added to the admin group, a SAML application logo is visible.
  4. Choose Custom SAML 2.0 application to be redirected to the OpenSearch Service dashboards through SSO without any additional login attempts.Open SAML application
    Alternatively, you could skip logging in to the access portal and directly point your browser to the OpenSearch Dashboards URL. In that case, OpenSearch Dashboards would first redirect you to the access portal to log in, which would redirect you back to the OpenSearch Dashboards UI after a successful login, resulting in the same outcome as shown in the following screenshot.OpenSearch Dashboards UI after successful login

Troubleshooting

Your public-facing IP must be allow listed by the AWS WAF rule, otherwise a 403 Forbidden error will be returned. Allow list your IP CIDR range via the AWS CDK alb_waf_ip_whitelist_cidrs property as described in the installation guide and redeploy the AWS CDK application for changes to take effect.

Clean up

When you’re finished with this configuration, clean up the resources to avoid future charges.

  1. On the OpenSearch Service console, navigate to the Security configuration tab of your OpenSearch Service domain and choose Edit.
  2. Deselect Enable SAML authentication and choose Save changes.
  3. After the Amazon SAML integration is disabled, delete the opensearch-domain-saml-integration stack using cdk destroy.
  4. Optionally, if you used the provided OpenSearch Service sample AWS CDK stack (opensearch-domain), delete it using cdk destroy.

Conclusion

OpenSearch Service allows enterprise customers to use their preferred federated IdPs such as SAML using IAM Identity Center for clusters running inside private VPC subnets following AWS best practices.

In this post, we showed you how to integrate an OpenSearch Service domain within a VPC with an existing SAML IdP for SSO access to OpenSearch Dashboards using IAM Identity Center. The provided solution securely manages network access to the resources using AWS WAF to restrict access only to authorized network segments or specific IP addresses.

To get started, refer to How can I access OpenSearch Dashboards from outside of a VPC using Amazon Cognito authentication for further comparison of OpenSearch Service domain in private VPC access patterns.


About the Authors

Mahdi Ebrahimi is a Senior Cloud Infrastructure Architect with Amazon Web Services. He excels in designing distributed, highly-available software systems. Mahdi is dedicated to delivering cutting-edge solutions that empower his customers to innovate in the rapidly evolving landscape in the automotive industry.

Dmytro Protsiv is a Cloud Applications Architect for with Amazon Web Services. He is passionate about helping customers to solve their business challenges around application modernization.

Luca Menichetti is a Big Data Architect with Amazon Web Services. He helps customers develop performant and reusable solutions to process data at scale. Luca is passioned about managing organisation’s data architecture, enabling data analytics and machine learning. Having worked around the Hadoop ecosystem for a decade, he really enjoys tackling problems in NoSQL environments.

Krithivasan Balasubramaniyan is a Principal Consultant with Amazon Web Services. He enables global enterprise customers in their digital transformation journey and helps architect cloud native solutions.

Muthu Pitchaimani is a Search Specialist with Amazon OpenSearch Service. He builds large-scale search applications and solutions. Muthu is interested in the topics of networking and security, and is based out of Austin, Texas.

Track Amazon OpenSearch Service configuration changes more easily with new visibility improvements

Post Syndicated from Siddhant Gupta original https://aws.amazon.com/blogs/big-data/track-amazon-opensearch-service-configuration-with-improved-visibility/

Amazon OpenSearch Service offers multiple domain configuration settings to meet your workload-specific requirements. As part of standard service operations, you may be required to update these configuration settings on a regular basis. Recently, Amazon OpenSearch Service launched visibility improvements that allow you to track configuration changes more effectively. We’ve introduced granular and more descriptive configuration statuses that enable you to set up alarms and use them in automation to minimize manual monitoring.

We recommend that you take advantage of these visibility improvements in your applications. These changes are backward compatible, and if your automations rely on the legacy processing parameter to determine configuration change status, then they should still continue to work without any disruption. To simplify tracking of multiple in-flight configuration change requests, Amazon OpenSearch Service allows configuration request only when Domain Processing Status is Active. Additional details are in section ‘Single configuration change at a time’.

Solution overview

Earlier, configuration change status visibility was available through processing parameters in the OpenSearch Service APIs (Application Programming Interface), and as a Domain Status field in the OpenSearch Service console. We have now introduced the following changes to improve the configuration update experience:

  • Introduced two new parameters, DomainProcessingStatus and ConfigChangeStatus, in the API responses. Similarly, added Domain Processing Status and Configuration Change Status fields in the console. These changes provide better visibility through multiple, intuitive statuses. Earlier statuses were limited to only two values: Active and Processing.
  • Ability to easily compare active and in-flight configurations for clarity. Earlier, it required multiple steps.
  • Amazon OpenSearch Service has now adopted the approach of allowing a single configuration change request at a time. There is no limit on the number of domain configuration changes you can bundle in a single request. However, you can submit the next configuration request when the previous request is complete and the domain processing status becomes Active. This improvement streamlines configuration updates and addresses previous challenges of tracking multiple, in-flight configuration change requests.
  • Ability to cancel a change request in case of a validation failure. Previously, when instances were unavailable, domains remained in processing state. Now, upon encountering any validation failure, you can cancel the change request and retry after some time.
  • Domain processing status turns to Active only after all the background activities, including shard movement is complete. This means that you can confidently use newly introduced statuses in your automation scripts without needing to infer if all the internal processes, such as data movement, are complete.

How do you get granular details to track the configuration update status?

As part of recent improvements, Amazon OpenSearch Service introduced DomainProcessingStatus and ConfigChangeStatus parameters in the APIs along with the respective Domain Processing Status and Configuration Change Status fields in the console. You can rely on these statuses to get accurate and consistent information during different configuration change scenarios, like when configuration changes involve blue/green operations or without blue/green operations, and when configuration changes are triggered by the operator or by the OpenSearch Service. Let us explore these enhanced visibility experiences.

  1. Domain processing status visibility: You can track the staus of domain-level configuration changes through the Domain Processing Status field in the console. Similarly, API responses include the DomainProcessingStatus parameter. The values and a brief description are provided in the following details:
    1. Active: No configuration change is in progress. You can submit a new configuration change request.
    2. Creating: New domain creation is in progress.
    3. Modifying: This status indicates that one or more configuration changes, such as new data node addition, Amazon Elastic Block Store (Amazon EBS) GP3 storage provisioning, or setting up KMS keys, are in progress. In other words, changes made through the UpdateDomainConfig API, set the status to modifying. The ‘Modifying’ status also covers situations where domains require shard movement to complete configuration changes. Note: For backward compatibility, we have kept the behavior of the processing parameter unchanged in the API responses, and it is set to false as soon as the core configuration changes are complete, without waiting for shard movement completion.
    4. Upgrading Engine Version: Engine version upgrades are in progress, such as from Elasticsearch version 7.9 to OpenSearch version 1.0.
    5. Updating Service Software: This status refers to configuration changes related to service software updates.
    6. Deleting: Domain deletion is progressing.
    7. Isolated: This represents domains that are suspended due to a variety of reasons, such as account-related billing issues or domains that are not compliant with critical security patch updates.
  2. Configuration change status visibility: Configuration changes can be initiated by the user (e.g., new data node addition, instance type change) or by the Service (e.g., AutoTune and mandatory service software updates). You can find the latest status details through Configuration Change Status field in the console, and through the ConfigChangeStatus parameter in API responses. Below are the values and a brief description:
    1. Pending: Indicates that a configuration change request has been submitted.
    2. Initializing: Service is initializing a configuration change request.
    3. Validating: Service is validating the requested changes and resources required.
    4. Validation Failed: Requested changes failed validation. At this point, no configuration changes are applied. Some possible validation failures could be the presence of red indices in the domain, unavailability of a chosen instance type, and low disk space. Here is a list of potential validation failures. During a validation failure event, you can cancel, retry, or edit configuration changes.
    5. Awaiting user inputs: Scenarios where user may be able to fix validation errors such as invalid KMS key. At this status, user can edit the configuration changes.
    6. Applying changes: Service is applying requested configuration changes.
    7. Cancelled: During validation failed status, you can either click on the Cancel button in the console or call the CancelDomainConfigChange API. All the applied changes that were part of the change request will be rolled back.
    8. Completed: Requested configuration changes have been successfully completed.

Console enhancements

The Amazon OpenSearch Service console offers enhanced visibility to track configuration change progress. Below are a few screenshots to give you an idea of these improvements.

  • Amazon OpenSearch Service console provides Domain Processing Status, Configuration Change Status, and Change ID fields. Note: To know the change details associated with the Change ID, you can use the DescribeDomainChangeProgress API.

  • Configuration change summary. To see a side by side comparison of your active configurations and requested changes, on the domain detail page, navigate to the cluster configuration tab, scroll down to the configuration change summary section. Pending Changes field shows the status of the pending properties at that time and does not include changes that have been applied. You can also get similar details from the DescribeDomain and DescribeDomainConfig APIs through theModifyingProperties parameter.

Cancelling during validation failure. In the below screenshots, you can see a new option to cancel a change request when a configuration change request fails validations. For example, when you encounter SubnetNotFound error, you can use the Cancel request button to roll back to the previous active configuration, fix the issue and then retry the configuration update.

Single configuration change at a time

Previously, it was not straightforward to track the success and failure of individual change requests, when several requests were made. To provide a simplified experience, OpenSearch Service now limits you to only a single change request at a time. In a single configuration change request, you can bundle multiple changes at once. Once a configuration change request is submitted, it must be completed before you can request the next configuration change through the console, or through the UpdateDomainConfig API. This simplified experience makes it easier to keep track of changes that have been requested and their most recent status. If your automation is written to call configuration change update APIs multiple times, then it should be updated to group multiple configuration changes in a single update call, or wait for individual updates to complete before you submit the next configuration change. You can update domain configuration when domain processing status becomes active. For a list of changes that might need a blue/green deployment, please see here.

The below screenshot shows an example alert on the ‘Edit domain’ page informing the user that another change or update is in progress. OpenSearch Service no longer allows you to submit new configuration update requests, and the ‘Apply change’ button is disabled until the change in progress is completed.

API changes

You can use the DescribeDomain, DescribeDomainChangeProgress, and DescribeDomainConfig APIs to get detailed configuration update statuses. In addition, you can use CancelDomainConfigChange to cancel the change request in the event of a validation failures. You can refer Amazon OpenSearch Service API documentation here.

Conclusion

In this post, we showed you how to get granular information about a configuration update request. These newly introduced changes will help you gain better visibility into the progress of configuration change requests, and easily distinguish between applied changes and pending ones. You need to ensure that the DomainProcessingStatus processing status value is Active before submitting configuration change requests. The ability to cancel changes in the event of validation failures gives you better control in getting your domain out of processing state in a self-service manner. Visit product documentation to learn more.


About the Authors

Siddhant Gupta is a Sr. Technical Product Manager at Amazon Web Services based in Hyderabad, India. Siddhant has been with Amazon for over six years and is currently working with the OpenSearch Service team, helping with new region launches, pricing strategy, and bringing EC2 and EBS innovations to OpenSearch Service customers. He is passionate about analytics and machine learning. In his free time, he loves traveling, fitness activities, spending time with his family and reading non-fiction books.

Deniz Ercelebi is a Sr. UX Designer at Amazon OpenSearch Service. In her role she contributes to the creation, implementation, and successful delivery of design solutions for complex problems. Her personal drive is fueled by a passion for user experience, a dedication to customer-centric solutions, and a firm belief in collaborative innovation.

Shashank Gupta is a Sr. Software Developer at Amazon OpenSearch Service, specializing in the enhancement of the Managed service aspect of the platform. His primary focus is on optimizing the managed experience, spanning from the console to APIs and resource provisioning in an efficient manner. With a dedicated commitment to innovation, Shashank aims to elevate the overall customer experience by introducing inventive solutions within the service.

Power neural search with AI/ML connectors in Amazon OpenSearch Service

Post Syndicated from Aruna Govindaraju original https://aws.amazon.com/blogs/big-data/power-neural-search-with-ai-ml-connectors-in-amazon-opensearch-service/

With the launch of the neural search feature for Amazon OpenSearch Service in OpenSearch 2.9, it’s now effortless to integrate with AI/ML models to power semantic search and other use cases. OpenSearch Service has supported both lexical and vector search since the introduction of its k-nearest neighbor (k-NN) feature in 2020; however, configuring semantic search required building a framework to integrate machine learning (ML) models to ingest and search. The neural search feature facilitates text-to-vector transformation during ingestion and search. When you use a neural query during search, the query is translated into a vector embedding and k-NN is used to return the nearest vector embeddings from the corpus.

To use neural search, you must set up an ML model. We recommend configuring AI/ML connectors to AWS AI and ML services (such as Amazon SageMaker or Amazon Bedrock) or third-party alternatives. Starting with version 2.9 on OpenSearch Service, AI/ML connectors integrate with neural search to simplify and operationalize the translation of your data corpus and queries to vector embeddings, thereby removing much of the complexity of vector hydration and search.

In this post, we demonstrate how to configure AI/ML connectors to external models through the OpenSearch Service console.

Solution Overview

Specifically, this post walks you through connecting to a model in SageMaker. Then we guide you through using the connector to configure semantic search on OpenSearch Service as an example of a use case that is supported through connection to an ML model. Amazon Bedrock and SageMaker integrations are currently supported on the OpenSearch Service console UI, and the list of UI-supported first- and third-party integrations will continue to grow.

For any models not supported through the UI, you can instead set them up using the available APIs and the ML blueprints. For more information, refer to Introduction to OpenSearch Models. You can find blueprints for each connector in the ML Commons GitHub repository.

Prerequisites

Before connecting the model via the OpenSearch Service console, create an OpenSearch Service domain. Map an AWS Identity and Access Management (IAM) role by the name LambdaInvokeOpenSearchMLCommonsRole as the backend role on the ml_full_access role using the Security plugin on OpenSearch Dashboards, as shown in the following video. The OpenSearch Service integrations workflow is pre-filled to use the LambdaInvokeOpenSearchMLCommonsRole IAM role by default to create the connector between the OpenSearch Service domain and the model deployed on SageMaker. If you use a custom IAM role on the OpenSearch Service console integrations, make sure the custom role is mapped as the backend role with ml_full_access permissions prior to deploying the template.

Deploy the model using AWS CloudFormation

The following video demonstrates the steps to use the OpenSearch Service console to deploy a model within minutes on Amazon SageMaker and generate the model ID via the AI connectors. The first step is to choose Integrations in the navigation pane on the OpenSearch Service AWS console, which routes to a list of available integrations. The integration is set up through a UI, which will prompt you for the necessary inputs.

To set up the integration, you only need to provide the OpenSearch Service domain endpoint and provide a model name to uniquely identify the model connection. By default, the template deploys the Hugging Face sentence-transformers model, djl://ai.djl.huggingface.pytorch/sentence-transformers/all-MiniLM-L6-v2.

When you choose Create Stack, you are routed to the AWS CloudFormation console. The CloudFormation template deploys the architecture detailed in the following diagram.

The CloudFormation stack creates an AWS Lambda application that deploys a model from Amazon Simple Storage Service (Amazon S3), creates the connector, and generates the model ID in the output. You can then use this model ID to create a semantic index.

If the default all-MiniLM-L6-v2 model doesn’t serve your purpose, you can deploy any text embedding model of your choice on the chosen model host (SageMaker or Amazon Bedrock) by providing your model artifacts as an accessible S3 object. Alternatively, you can select one of the following pre-trained language models and deploy it to SageMaker. For instructions to set up your endpoint and models, refer to Available Amazon SageMaker Images.

SageMaker is a fully managed service that brings together a broad set of tools to enable high-performance, low-cost ML for any use case, delivering key benefits such as model monitoring, serverless hosting, and workflow automation for continuous training and deployment. SageMaker allows you to host and manage the lifecycle of text embedding models, and use them to power semantic search queries in OpenSearch Service. When connected, SageMaker hosts your models and OpenSearch Service is used to query based on inference results from SageMaker.

View the deployed model through OpenSearch Dashboards

To verify the CloudFormation template successfully deployed the model on the OpenSearch Service domain and get the model ID, you can use the ML Commons REST GET API through OpenSearch Dashboards Dev Tools.

The GET _plugins REST API now provides additional APIs to also view the model status. The following command allows you to see the status of a remote model:

GET _plugins/_ml/models/<modelid>

As shown in the following screenshot, a DEPLOYED status in the response indicates the model is successfully deployed on the OpenSearch Service cluster.

Alternatively, you can view the model deployed on your OpenSearch Service domain using the Machine Learning page of OpenSearch Dashboards.

This page lists the model information and the statuses of all the models deployed.

Create the neural pipeline using the model ID

When the status of the model shows as either DEPLOYED in Dev Tools or green and Responding in OpenSearch Dashboards, you can use the model ID to build your neural ingest pipeline. The following ingest pipeline is run in your domain’s OpenSearch Dashboards Dev Tools. Make sure you replace the model ID with the unique ID generated for the model deployed on your domain.

PUT _ingest/pipeline/neural-pipeline
{
  "description": "Semantic Search for retail product catalog ",
  "processors" : [
    {
      "text_embedding": {
        "model_id": "sfG4zosBIsICJFsINo3X",
        "field_map": {
           "description": "desc_v",
           "name": "name_v"
        }
      }
    }
  ]
}

Create the semantic search index using the neural pipeline as the default pipeline

You can now define your index mapping with the default pipeline configured to use the new neural pipeline you created in the previous step. Ensure the vector fields are declared as knn_vector and the dimensions are appropriate to the model that is deployed on SageMaker. If you have retained the default configuration to deploy the all-MiniLM-L6-v2 model on SageMaker, keep the following settings as is and run the command in Dev Tools.

PUT semantic_demostore
{
  "settings": {
    "index.knn": true,  
    "default_pipeline": "neural-pipeline",
    "number_of_shards": 1,
    "number_of_replicas": 1
  },
  "mappings": {
    "properties": {
      "desc_v": {
        "type": "knn_vector",
        "dimension": 384,
        "method": {
          "name": "hnsw",
          "engine": "nmslib",
          "space_type": "cosinesimil"
        }
      },
      "name_v": {
        "type": "knn_vector",
        "dimension": 384,
        "method": {
          "name": "hnsw",
          "engine": "nmslib",
          "space_type": "cosinesimil"
        }
      },
      "description": {
        "type": "text" 
      },
      "name": {
        "type": "text" 
      } 
    }
  }
}

Ingest sample documents to generate vectors

For this demo, you can ingest the sample retail demostore product catalog to the new semantic_demostore index. Replace the user name, password, and domain endpoint with your domain information and ingest raw data into OpenSearch Service:

curl -XPOST -u 'username:password' 'https://domain-end-point/_bulk' --data-binary @semantic_demostore.json -H 'Content-Type: application/json'

Validate the new semantic_demostore index

Now that you have ingested your dataset to the OpenSearch Service domain, validate if the required vectors are generated using a simple search to fetch all fields. Validate if the fields defined as knn_vectors have the required vectors.

Compare lexical search and semantic search powered by neural search using the Compare Search Results tool

The Compare Search Results tool on OpenSearch Dashboards is available for production workloads. You can navigate to the Compare search results page and compare query results between lexical search and neural search configured to use the model ID generated earlier.

Clean up

You can delete the resources you created following the instructions in this post by deleting the CloudFormation stack. This will delete the Lambda resources and the S3 bucket that contain the model that was deployed to SageMaker. Complete the following steps:

  1. On the AWS CloudFormation console, navigate to your stack details page.
  2. Choose Delete.

  1. Choose Delete to confirm.

You can monitor the stack deletion progress on the AWS CloudFormation console.

Note that, deleting the CloudFormation stack doesn’t delete the model deployed on the SageMaker domain and the AI/ML connector created. This is because these models and the connector can be associated with multiple indexes within the domain. To specifically delete a model and its associated connector, use the model APIs as shown in the following screenshots.

First, undeploy the model from the OpenSearch Service domain memory:

POST /_plugins/_ml/models/<model_id>/_undeploy

Then you can delete the model from the model index:

DELETE /_plugins/_ml/models/<model_id>

Lastly, delete the connector from the connector index:

DELETE /_plugins/_ml/connectors/<connector_id>

Conclusion

In this post, you learned how to deploy a model in SageMaker, create the AI/ML connector using the OpenSearch Service console, and build the neural search index. The ability to configure AI/ML connectors in OpenSearch Service simplifies the vector hydration process by making the integrations to external models native. You can create a neural search index in minutes using the neural ingestion pipeline and the neural search that use the model ID to generate the vector embedding on the fly during ingest and search.

To learn more about these AI/ML connectors, refer to Amazon OpenSearch Service AI connectors for AWS services, AWS CloudFormation template integrations for semantic search, and Creating connectors for third-party ML platforms.


About the Authors

Aruna Govindaraju is an Amazon OpenSearch Specialist Solutions Architect and has worked with many commercial and open source search engines. She is passionate about search, relevancy, and user experience. Her expertise with correlating end-user signals with search engine behavior has helped many customers improve their search experience.

Dagney Braun is a Principal Product Manager at AWS focused on OpenSearch.

Detect, mask, and redact PII data using AWS Glue before loading into Amazon OpenSearch Service

Post Syndicated from Michael Hamilton original https://aws.amazon.com/blogs/big-data/detect-mask-and-redact-pii-data-using-aws-glue-before-loading-into-amazon-opensearch-service/

Many organizations, small and large, are working to migrate and modernize their analytics workloads on Amazon Web Services (AWS). There are many reasons for customers to migrate to AWS, but one of the main reasons is the ability to use fully managed services rather than spending time maintaining infrastructure, patching, monitoring, backups, and more. Leadership and development teams can spend more time optimizing current solutions and even experimenting with new use cases, rather than maintaining the current infrastructure.

With the ability to move fast on AWS, you also need to be responsible with the data you’re receiving and processing as you continue to scale. These responsibilities include being compliant with data privacy laws and regulations and not storing or exposing sensitive data like personally identifiable information (PII) or protected health information (PHI) from upstream sources.

In this post, we walk through a high-level architecture and a specific use case that demonstrates how you can continue to scale your organization’s data platform without needing to spend large amounts of development time to address data privacy concerns. We use AWS Glue to detect, mask, and redact PII data before loading it into Amazon OpenSearch Service.

Solution overview

The following diagram illustrates the high-level solution architecture. We have defined all layers and components of our design in line with the AWS Well-Architected Framework Data Analytics Lens.

os_glue_architecture

The architecture is comprised of a number of components:

Source data

Data may be coming from many tens to hundreds of sources, including databases, file transfers, logs, software as a service (SaaS) applications, and more. Organizations may not always have control over what data comes through these channels and into their downstream storage and applications.

Ingestion: Data lake batch, micro-batch, and streaming

Many organizations land their source data into their data lake in various ways, including batch, micro-batch, and streaming jobs. For example, Amazon EMR, AWS Glue, and AWS Database Migration Service (AWS DMS) can all be used to perform batch and or streaming operations that sink to a data lake on Amazon Simple Storage Service (Amazon S3). Amazon AppFlow can be used to transfer data from different SaaS applications to a data lake. AWS DataSync and AWS Transfer Family can help with moving files to and from a data lake over a number of different protocols. Amazon Kinesis and Amazon MSK also have capabilities to stream data directly to a data lake on Amazon S3.

S3 data lake

Using Amazon S3 for your data lake is in line with the modern data strategy. It provides low-cost storage without sacrificing performance, reliability, or availability. With this approach, you can bring compute to your data as needed and only pay for capacity it needs to run.

In this architecture, raw data can come from a variety of sources (internal and external), which may contain sensitive data.

Using AWS Glue crawlers, we can discover and catalog the data, which will build the table schemas for us, and ultimately make it straightforward to use AWS Glue ETL with the PII transform to detect and mask or and redact any sensitive data that may have landed in the data lake.

Business context and datasets

To demonstrate the value of our approach, let’s imagine you’re part of a data engineering team for a financial services organization. Your requirements are to detect and mask sensitive data as it is ingested into your organization’s cloud environment. The data will be consumed by downstream analytical processes. In the future, your users will be able to safely search historical payment transactions based on data streams collected from internal banking systems. Search results from operation teams, customers, and interfacing applications must be masked in sensitive fields.

The following table shows the data structure used for the solution. For clarity, we have mapped raw to curated column names. You’ll notice that multiple fields within this schema are considered sensitive data, such as first name, last name, Social Security number (SSN), address, credit card number, phone number, email, and IPv4 address.

Raw Column Name Curated Column Name Type
c0 first_name string
c1 last_name string
c2 ssn string
c3 address string
c4 postcode string
c5 country string
c6 purchase_site string
c7 credit_card_number string
c8 credit_card_provider string
c9 currency string
c10 purchase_value integer
c11 transaction_date date
c12 phone_number string
c13 email string
c14 ipv4 string

Use case: PII batch detection before loading to OpenSearch Service

Customers who implement the following architecture have built their data lake on Amazon S3 to run different types of analytics at scale. This solution is suitable for customers who don’t require real-time ingestion to OpenSearch Service and plan to use data integration tools that run on a schedule or are triggered through events.

batch_architecture

Before data records land on Amazon S3, we implement an ingestion layer to bring all data streams reliably and securely to the data lake. Kinesis Data Streams is deployed as an ingestion layer for accelerated intake of structured and semi-structured data streams. Examples of these are relational database changes, applications, system logs, or clickstreams. For change data capture (CDC) use cases, you can use Kinesis Data Streams as a target for AWS DMS. Applications or systems generating streams containing sensitive data are sent to the Kinesis data stream via one of the three supported methods: the Amazon Kinesis Agent, the AWS SDK for Java, or the Kinesis Producer Library. As a last step, Amazon Kinesis Data Firehose helps us reliably load near-real-time batches of data into our S3 data lake destination.

The following screenshot shows how data flows through Kinesis Data Streams via the Data Viewer and retrieves sample data that lands on the raw S3 prefix. For this architecture, we followed the data lifecycle for S3 prefixes as recommended in Data lake foundation.

kinesis raw data

As you can see from the details of the first record in the following screenshot, the JSON payload follows the same schema as in the previous section. You can see the unredacted data flowing into the Kinesis data stream, which will be obfuscated later in subsequent stages.

raw_json

After the data is collected and ingested into Kinesis Data Streams and delivered to the S3 bucket using Kinesis Data Firehose, the processing layer of the architecture takes over. We use the AWS Glue PII transform to automate detection and masking of sensitive data in our pipeline. As shown in the following workflow diagram, we took a no-code, visual ETL approach to implement our transformation job in AWS Glue Studio.

glue studio nodes

First, we access the source Data Catalog table raw from the pii_data_db database. The table has the schema structure presented in the previous section. To keep track of the raw processed data, we used job bookmarks.

glue catalog

We use the AWS Glue DataBrew recipes in the AWS Glue Studio visual ETL job to transform two date attributes to be compatible with OpenSearch expected formats. This allows us to have a full no-code experience.

We use the Detect PII action to identify sensitive columns. We let AWS Glue determine this based on selected patterns, detection threshold, and sample portion of rows from the dataset. In our example, we used patterns that apply specifically to the United States (such as SSNs) and may not detect sensitive data from other countries. You may look for available categories and locations applicable to your use case or use regular expressions (regex) in AWS Glue to create detection entities for sensitive data from other countries.

It’s important to select the correct sampling method that AWS Glue offers. In this example, it’s known that the data coming in from the stream has sensitive data in every row, so it’s not necessary to sample 100% of the rows in the dataset. If you have a requirement where no sensitive data is allowed to downstream sources, consider sampling 100% of the data for the patterns you chose, or scan the entire dataset and act on each individual cell to ensure all sensitive data is detected. The benefit you get from sampling is reduced costs because you don’t have to scan as much data.

PII Options

The Detect PII action allows you to select a default string when masking sensitive data. In our example, we use the string **********.

selected_options

We use the apply mapping operation to rename and remove unnecessary columns such as ingestion_year, ingestion_month, and ingestion_day. This step also allows us to change the data type of one of the columns (purchase_value) from string to integer.

schema

From this point on, the job splits into two output destinations: OpenSearch Service and Amazon S3.

Our provisioned OpenSearch Service cluster is connected via the OpenSearch built-in connector for Glue. We specify the OpenSearch Index we’d like to write to and the connector handles the credentials, domain and port. In the screen shot below, we write to the specified index index_os_pii.

opensearch config

We store the masked dataset in the curated S3 prefix. There, we have data normalized to a specific use case and safe consumption by data scientists or for ad hoc reporting needs.

opensearch target s3 folder

For unified governance, access control, and audit trails of all datasets and Data Catalog tables, you can use AWS Lake Formation. This helps you restrict access to the AWS Glue Data Catalog tables and underlying data to only those users and roles who have been granted necessary permissions to do so.

After the batch job runs successfully, you can use OpenSearch Service to run search queries or reports. As shown in the following screenshot, the pipeline masked sensitive fields automatically with no code development efforts.

You can identify trends from the operational data, such as the amount of transactions per day filtered by credit card provider, as shown in the preceding screenshot. You can also determine the locations and domains where users make purchases. The transaction_date attribute helps us see these trends over time. The following screenshot shows a record with all of the transaction’s information redacted appropriately.

json masked

For alternate methods on how to load data into Amazon OpenSearch, refer to Loading streaming data into Amazon OpenSearch Service.

Furthermore, sensitive data can also be discovered and masked using other AWS solutions. For example, you could use Amazon Macie to detect sensitive data inside an S3 bucket, and then use Amazon Comprehend to redact the sensitive data that was detected. For more information, refer to Common techniques to detect PHI and PII data using AWS Services.

Conclusion

This post discussed the importance of handling sensitive data within your environment and various methods and architectures to remain compliant while also allowing your organization to scale quickly. You should now have a good understanding of how to detect, mask, or redact and load your data into Amazon OpenSearch Service.


About the authors

Michael Hamilton is a Sr Analytics Solutions Architect focusing on helping enterprise customers modernize and simplify their analytics workloads on AWS. He enjoys mountain biking and spending time with his wife and three children when not working.

Daniel Rozo is a Senior Solutions Architect with AWS supporting customers in the Netherlands. His passion is engineering simple data and analytics solutions and helping customers move to modern data architectures. Outside of work, he enjoys playing tennis and biking.

Achieve high availability in Amazon OpenSearch Multi-AZ with Standby enabled domains: A deep dive into failovers

Post Syndicated from Anshu Agarwal original https://aws.amazon.com/blogs/big-data/achieve-high-availability-in-amazon-opensearch-multi-az-with-standby-enabled-domains-a-deep-dive-into-failovers/

Amazon OpenSearch Service recently introduced Multi-AZ with Standby, a deployment option designed to provide businesses with enhanced availability and consistent performance for critical workloads. With this feature, managed clusters can achieve 99.99% availability while remaining resilient to zonal infrastructure failures.

In this post, we explore how search and indexing works with Multi-AZ with Standby and delve into the underlying mechanisms that contribute to its reliability, simplicity, and fault tolerance.

Background

Multi-AZ with Standby deploys OpenSearch Service domain instances across three Availability Zones, with two zones designated as active and one as standby. This configuration ensures consistent performance, even in the event of zonal failures, by maintaining the same capacity across all zones. Importantly, this standby zone follows a statically stable design, eliminating the need for capacity provisioning or data movement during failures.

During regular operations, the active zone handles coordinator traffic for both read and write requests, as well as shard query traffic. The standby zone, on the other hand, only receives replication traffic. OpenSearch Service utilizes a synchronous replication protocol for write requests. This enables the service to promptly promote a standby zone to active status in the event of a failure (mean time to failover <= 1 minute), known as a zonal failover. The previously active zone is then demoted to standby mode, and recovery operations commence to restore its healthy state.

Search traffic routing and failover to guarantee high availability

In an OpenSearch Service domain, a coordinator is any node that handles HTTP(S) requests, especially indexing and search requests. In a Multi-AZ with Standby domain, the data nodes in the active zone act as coordinators for search requests.

During the query phase of a search request, the coordinator determines the shards to be queried and sends a request to the data node hosting the shard copy. The query is run locally on each shard and matched documents are returned to the coordinator node. The coordinator node, which is responsible for sending the request to nodes containing shard copies, runs the process in two steps. First, it creates an iterator that defines the order in which nodes need to be queried for a shard copy so that traffic is uniformly distributed across shard copies. Subsequently, the request is sent to the relevant nodes.

In order to create an ordered list of nodes to be queried for a shard copy, the coordinator node uses various algorithms. These algorithms include round-robin selection, adaptive replica selection, preference-based shard routing, and weighted round-robin.

For Multi-AZ with Standby, the weighted round-robin algorithm is used for shard copy selection. In this approach, active zones are assigned a weight of 1, and the standby zone is assigned a weight of 0. This ensures that no read traffic is sent to data nodes in the standby Availability Zone.

The weights are stored in cluster state metadata as a JSON object:

"weighted_shard_routing": {
    "awareness": {
        "zone": {
            "us-east-1b": 0,
            "us-east-1d": 1,
            "us-east-1c": 1
         }
     },
     "_version": 3
}

As shown in the following screenshot, the us-east-1b Region has its zone status as StandBy, indicating that the data nodes in this Availability Zone are in standby state and don’t receive search or indexing requests from the load balancer.

Availability Zone status in AWS Console

To maintain steady-state operations, the standby Availability Zone is rotated every 30 minutes, ensuring all network parts are covered across Availability Zones. This proactive approach verifies the availability of read paths, further enhancing the system’s resilience during potential failures. The following diagram illustrates this architecture.

Steady State Operation

In the preceding diagram, Zone-C has a weighted round-robin weight set to zero. This ensures that the data nodes in the standby zone don’t receive any indexing or search traffic. When the coordinator queries data nodes for shard copies, it uses a weighted round-robin weight to decide on the order in which nodes to be queried. Because the weight is zero for the standby Availability Zone, coordinator requests are not sent.

In an OpenSearch Service cluster, the active and standby zones can be checked at any time using Availability Zone rotation metrics, as shown in the following screenshot.

Availability Zone rotation metrics

During zonal outages, the standby Availability Zone seamlessly switches to fail-open mode for search requests. This means that the shard query traffic is routed to all Availability Zones, even those in standby, when a healthy shard copy is unavailable in the active Availability Zone. This fail-open approach safeguards search requests from disruption during failures, ensuring continuous service. The following diagram illustrates this architecture.

Read Failover during Zonal Failure

In the preceding diagram, during the steady state, the shard query traffic is sent to the data node in the active Availability Zones (Zone-A and Zone-B). Due to node failures in Zone-A, the standby Availability Zone (Zone-C) fails open to take shard query traffic so that there isn’t any impact to the search requests. Eventually, Zone-A is detected as unhealthy and the read failover switches the standby to Zone-A.

How failover ensures high availability during write impairment

The OpenSearch Service replication model follows a primary backup model, characterized by its synchronous nature, where acknowledgement from all shard copies is necessary before a write request can be acknowledged to the user. One notable drawback of this replication model is its susceptibility to slowdowns in the event of any impairment in the write path. These systems rely on an active leader node to identify failures or delays and then broadcast this information to all nodes. The duration it takes to detect these issues (mean time to detect) and subsequently resolve them (mean time to repair) largely determines how long the system will operate in an impaired state. Additionally, any networking event that affects inter-zone communications can significantly impede write requests due to the synchronous nature of replication.

OpenSearch Service utilizes an internal node-to-node communication protocol for replicating write traffic and coordinating metadata updates through an elected leader. Consequently, putting the zone experiencing stress in standby wouldn’t effectively address the issue of write impairment.

Zonal write failover: Cutting off inter-zone replication traffic

For Multi-AZ with Standby, to mitigate potential performance issues caused during unforeseen events like zonal failures and networking events, zonal write failover is an effective approach. This approach involves graceful removal of nodes in the impacted zone from the cluster, effectively cutting off ingress and egress traffic between zones. By severing the inter-zone replication traffic, the impact of zonal failures can be contained within the affected zone. This provides a more predictable experience for customers and ensures that the system continues to operate reliably.

Graceful write failover

The orchestration of a write failover within OpenSearch Service is carried out by the elected leader node through a well-defined mechanism. This mechanism involves a consensus protocol for cluster state publication, ensuring unanimous agreement among all nodes to designate a single zone (at all times) for decommissioning. Importantly, metadata related to the affected zone is replicated across all nodes to ensure its persistence, even during a full restart in the event of an outage.

Furthermore, the leader node ensures a smooth and graceful transition by initially placing the nodes in the impacted zones on standby for a duration of 5 minutes before initiating I/O fencing. This deliberate approach prevents any new coordinator traffic or shard query traffic from being directed to the nodes within the impacted zone. This, in turn, allow these nodes to complete their ongoing tasks gracefully and gradually handle any inflight requests before being taken out of service. The following diagram illustrates this architecture.

Write Failover during Networking Event

In the process of implementing a write failover for a leader node, OpenSearch Service follows these key steps:

  • Leader abdication – If the leader node happens to be located in a zone scheduled for write failover, the system ensures that the leader node voluntarily steps down from its leadership role. This abdication is carried out in a controlled manner, and the entire process is handed over to another eligible node, which then takes charge of the actions required.
  • Prevent reelection of to-be-decommissioned leader – To prevent the reelection of a leader from a zone marked for write failover, when the eligible leader node initiates the write failover action, it takes measures to ensure that any to-be-decommissioned leader nodes do not participate in any further elections. This is achieved by excluding the to-be-decommissioned leader node from the voting configuration, effectively preventing it from voting during any critical phase of the cluster’s operation.

Metadata related to the write failover zone is stored within the cluster state, and this information is published to all nodes in the distributed OpenSearch Service cluster as follows:

"decommissionedAttribute": {
    "awareness": {
        "zone": "us-east-1c"
     },
     "status": "successful",
     "requestID": "FLoyf5v9RVSsaAquRNKxIw"
}

The following screenshot depicts that during a networking slowdown in a zone, write failover helps recover availability.

Write Failover helps recovering availability

Zonal recovery after write failover

The process of zonal recommissioning plays a crucial role in the recovery phase following a zonal write failover. After the impacted zone has been restored and is considered stable, the nodes that were previously decommissioned will rejoin the cluster. This recommissioning typically occurs within a time frame of 2 minutes after the zone has been recommissioned.

This enables them to synchronize with their peer nodes and initiates the recovery process for replica shards, effectively restoring the cluster to its desired state.

Conclusion

The introduction of OpenSearch Service Multi-AZ with Standby provides businesses with a powerful solution to achieve high availability and consistent performance for critical workloads. With this deployment option, businesses can enhance their infrastructure’s resilience, simplify cluster configuration and management, and enforce best practices. With features like weighted round-robin shard copy selection, proactive failover mechanisms, and fail-open standby Availability Zones, OpenSearch Service Multi-AZ with Standby ensures a reliable and efficient search experience for demanding enterprise environments.

For more information about Multi-AZ with Standby, refer to Amazon OpenSearch Service Under the Hood: Multi-AZ with Standby.


About the Author


Anshu Agarwal
 is a Senior Software Engineer working on AWS OpenSearch at Amazon Web Services. She is passionate about solving problems related to building scalable and highly reliable systems.


Rishab Nahata
 is a Software Engineer working on OpenSearch at Amazon Web Services. He is fascinated about solving problems in distributed systems. He is active contributor to OpenSearch.


Bukhtawar Khan
is a Principal Engineer working on Amazon OpenSearch Service. He is interested in distributed and autonomous systems. He is an active contributor to OpenSearch.


Ranjith Ramachandra
is an Engineering Manager working on Amazon OpenSearch Service at Amazon Web Services.

Amazon OpenSearch Service search enhancements: 2023 roundup

Post Syndicated from Dagney Braun original https://aws.amazon.com/blogs/big-data/amazon-opensearch-service-search-enhancements-2023-roundup/

What users expect from search engines has evolved over the years. Just returning lexically relevant results quickly is no longer enough for most users. Now users seek methods that allow them to get even more relevant results through semantic understanding or even search through image visual similarities instead of textual search of metadata. Amazon OpenSearch Service includes many features that allow you to enhance your search experience. We are excited about the OpenSearch Service features and enhancements we’ve added to that toolkit in 2023.

2023 was a year of rapid innovation within the artificial intelligence (AI) and machine learning (ML) space, and search has been a significant beneficiary of that progress. Throughout 2023, Amazon OpenSearch Service invested in enabling search teams to use the latest AI/ML technologies to improve and augment your existing search experiences, without having to rewrite your applications or build bespoke orchestrations, resulting in unlocking rapid development, iteration, and productization. These investments include the introduction of new search methods as well as functionality to simplify implementation of the methods available, which we review in this post.

Background: Lexical and semantic search

Before we get started, let’s review lexical and semantic search.

Lexical search

In lexical search, the search engine compares the words in the search query to the words in the documents, matching word for word. Only items that have words the user typed match the query. Traditional lexical search, based on term frequency models like BM25, is widely used and effective for many search applications. However, lexical search techniques struggle to go beyond the words included in the user’s query, resulting in highly relevant potential results not always being returned.

Semantic search

In semantic search, the search engine uses an ML model to encode text or other media (such as images and videos) from the source documents as a dense vector in a high-dimensional vector space. This is also called embedding the text into the vector space. It similarly codes the query as a vector and then uses a distance metric to find nearby vectors in the multi-dimensional space to find matches. The algorithm for finding nearby vectors is called k-nearest neighbors (k-NN). Semantic search doesn’t match individual query terms—it finds documents whose vector embedding is near the query’s embedding in the vector space and therefore semantically similar to the query. This allows you to return highly relevant items even if they don’t contain any of the words that were in the query.

OpenSearch has provided vector similarity search (k-NN and approximate k-NN) for several years, which has been valuable for customers who adopted it. However, not all customers who have the opportunity to benefit from k-NN have adopted it, due to the significant engineering effort and resources required to do so.

2023 releases: Fundamentals

In 2023 several features and improvements were launched on OpenSearch Service, including new features which are fundamental building blocks for continued search enhancements.

The OpenSearch Compare Search Results tool

The Compare Search Results tool, generally available in OpenSearch Service version 2.11, allows you to compare search results from two ranking techniques side by side, in OpenSearch Dashboards, to determine whether one query produces better results than the other. For customers who are interested in experimenting with the latest search methods powered by ML-assisted models, the ability to compare search results is critical. This can include comparing lexical search, semantic search, and hybrid search techniques to understand the benefits of each technique against your corpus, or adjustments such as field weighting and different stemming or lemmatization strategies.

The following screenshot shows an example of using the Compare Search Results tool.


To learn more about semantic search and cross-modal search and experiment with a demo of the Compare Search Results tool, refer to Try semantic search with the Amazon OpenSearch Service vector engine.

Search pipelines

Search practitioners are looking to introduce new ways to enhance search queries as well as results. With the general availability of search pipelines, starting in OpenSearch Service version 2.9, you can build search query and result processing as a composition of modular processing steps, without complicating your application software. By integrating processors for functions such as filters, and with the ability to add a script to run on newly indexed documents, you can make your search applications more accurate and efficient and reduce the need for custom development.

Search pipelines incorporate three built-in processors: filter_query, rename_field, and script request, as well as new developer-focused APIs to enable developers who want to build their own processors to do so. OpenSearch will continue adding additional built-in processors to further expand on this functionality in the coming releases.

The following diagram illustrates the search pipelines architecture.

Byte-sized vectors in Lucene

Until now, the k-NN plugin in OpenSearch has supported indexing and querying vectors of type float, with each vector element occupying 4 bytes. This can be expensive in memory and storage, especially for large-scale use cases. With the new byte vector feature in OpenSearch Service version 2.9, you can reduce memory requirements by a factor of 4 and significantly reduce search latency, with minimal loss in quality (recall). To learn more, refer to Byte-quantized vectors in OpenSearch.

Support for new language analyzers

OpenSearch Service previously supported language analyzer plugins such as IK (Chinese), Kuromoji (Japanese), and Seunjeon (Korean), among several others. We added support for Nori (Korean), Sudachi (Japanese), Pinyin (Chinese), and STConvert Analysis (Chinese). These new plugins are available as a new package type, ZIP-PLUGIN, along with the previously supported TXT-DICTIONARY package type. You can navigate to the Packages page of the OpenSearch Service console to associate these plugins to your cluster, or use the AssociatePackage API.

2023 releases: Ease-of-use enhancements

The OpenSearch Service also made improvements in 2023 to enhance ease of use within key search features.

Semantic search with neural search

Previously, implementing semantic search meant that your application was responsible for the middleware to integrate text embedding models into search and ingest, orchestrating the encoding the corpus, and then using a k-NN search at query time.

OpenSearch Service introduced neural search in version 2.9, enabling builders to create and operationalize semantic search applications with significantly reduced undifferentiated heavy lifting. Your application no longer needs to deal with the vectorization of documents and queries; semantic search does that, and invokes k-NN during query time. Semantic search via the neural search feature transforms documents or other media into vector embeddings and indexes both the text and its vector embeddings in a vector index. When you use a neural query during search, neural search converts the query text into a vector embedding, uses vector search to compare the query and document embeddings, and returns the closest results. This functionality was initially released as experimental in OpenSearch Service version 2.4, and is now generally available with version 2.9.

AI/ML connectors to enable AI-powered search features

With OpenSearch Service 2.9, you can use out-of-the-box AI connectors to AWS AI and ML services and third-party alternatives to power features like neural search. For instance, you can connect to external ML models hosted on Amazon SageMaker, which provides comprehensive capabilities to manage models successfully in production. If you want to use the latest foundation models via a fully managed experience, you can use connectors for Amazon Bedrock to power use cases like multimodal search. Our initial release includes a connector to Cohere Embed, and through SageMaker and Amazon Bedrock, you have access to more third-party options. You can configure some of these integrations on your domains through the OpenSearch Service console integrations (see the following screenshot), and even automate model deployment to SageMaker.

Integrated models are cataloged in your OpenSearch Service domain, so that your team can discover the variety of models that are integrated and readily available for use. You even have the option to enable granular security controls on your model and connector resources to govern model and connector level access.

To foster an open ecosystem, we created a framework to empower partners to easily build and publish AI connectors. Technology providers can simply create a blueprint, which is a JSON document that describes secure RESTful communication between OpenSearch and your service. Technology partners can publish their connectors on our community site, and you can immediately use these AI connectors—whether for a self-managed cluster or on OpenSearch Service. You can find blueprints for each connector in the ML Commons GitHub repository.

Hybrid search supported by score combination

Semantic technologies such as vector embeddings for neural search and generative AI large language models (LLMs) for natural language processing have revolutionized search, reducing the need for manual synonym list management and fine-tuning. On the other hand, text-based (lexical) search outperforms semantic search in some important cases, such as part numbers or brand names. Hybrid search, the combination of the two methods, gives 14% higher search relevancy (as measured by NDCG@10—a measure of ranking quality) than BM25 alone, so customers want to use hybrid search to get the best of both. For more information about detailed benchmarking score accuracy and performance, refer to Improve search relevance with hybrid search, generally available in OpenSearch 2.10.

Until now, combining them has been challenging given the different relevancy scales for each method. Previously, to implement a hybrid approach, you had to run multiple queries independently, then normalize and combine scores outside of OpenSearch. With the launch of the new hybrid score combination and normalization query type in OpenSearch Service 2.11, OpenSearch handles score normalization and combination in one query, making hybrid search easier to implement and a more efficient way to improve search relevance.

New search methods

Lastly, OpenSearch Service now features new search methods.

Neural sparse retrieval

OpenSearch Service 2.11 introduced neural sparse search, a new kind of sparse embedding method that is similar in many ways to classic term-based indexing, but with low-frequency words and phrases better represented. Sparse semantic retrieval uses transformer models (such as BERT) to build information-rich embeddings that solve for the vocabulary mismatch problem in a scalable way, while having similar computational cost and latency to lexical search. This new sparse retrieval functionality with OpenSearch offers two modes with different advantages: a document-only mode and a bi-encoder mode. The document-only mode can deliver low-latency performance more comparable to BM25 search, with limitations for advanced syntax as compared to dense methods. The bi-encoder mode can maximize search relevance while performing at higher latencies. With this update, you can now choose the method that works best for your performance, accuracy, and cost requirements.

Multi-modal search

OpenSearch Service 2.11 introduces text and image multimodal search using neural search. This functionality allows you to search image and text pairs, like product catalog items (product image and description), based on visual and semantic similarity. This enables new search experiences that can deliver more relevant results. For instance, you can search for “white blouse” to retrieve products with images that match that description, even if the product title is “cream colored shirt.” The ML model that powers this experience is able to associate semantics and visual characteristics. You can also search by image to retrieve visually similar products or search by both text and image to find the products most similar to a particular product catalog item.

You can now build these capabilities into your application to connect directly to multimodal models and run multimodal search queries without having to build custom middleware. The Amazon Titan Multimodal Embeddings model can be integrated with OpenSearch Service to support this method. Refer to Multimodal search for guidance on how to get started with multimodal semantic search, and look out for more input types to be added in future releases. You can also try out the demo of cross-modal textual and image search, which shows searching for images using textual descriptions.

Summary

OpenSearch Service offers an array of different tools to build your search application, but the best implementation will depend on your corpus and your business needs and goals. We encourage search practitioners to begin testing the search methods available in order to find the right fit for your use case. In 2024 and beyond, you can expect to continue to see this fast pace of search innovation in order to keep the latest and greatest search technologies at the fingertips of OpenSearch search practitioners.


About the Authors

Dagney Braun is a Senior Manager of Product at Amazon Web Services OpenSearch Team. She is passionate about improving the ease of use of OpenSearch, and expanding the tools available to better support all customer use-cases.

Stavros Macrakis is a Senior Technical Product Manager on the OpenSearch project of Amazon Web Services. He is passionate about giving customers the tools to improve the quality of their search results.

Dylan Tong is a Senior Product Manager at Amazon Web Services. He leads the product initiatives for AI and machine learning (ML) on OpenSearch including OpenSearch’s vector database capabilities. Dylan has decades of experience working directly with customers and creating products and solutions in the database, analytics and AI/ML domain. Dylan holds a BSc and MEng degree in Computer Science from Cornell University.

Amazon OpenSearch Serverless now supports automated time-based data deletion 

Post Syndicated from Satish Nandi original https://aws.amazon.com/blogs/big-data/amazon-opensearch-serverless-now-supports-automated-time-based-data-deletion/

We recently announced a new enhancement to OpenSearch Serverless for managing data retention of Time Series collections and Indexes. OpenSearch Serverless for Amazon OpenSearch Service makes it straightforward to run search and analytics workloads without having to think about infrastructure management. With the new automated time-based data deletion feature, you can specify how long they want to retain data and OpenSearch Serverless automatically manages the lifecycle of the data based on this configuration.

To analyze time series data such as application logs and events in OpenSearch, you must create and ingest data into indexes. Typically, these logs are generated continuously and ingested frequently, such as every few minutes, into OpenSearch. Large volumes of logs can consume a lot of the available resources such as storage in the clusters and therefore need to be managed efficiently to maximize optimum performance. You can manage the lifecycle of the indexed data by using automated tooling to create daily indexes. You can then use scripts to rotate the indexed data from the primary storage in clusters to a secondary remote storage to maintain performance and control costs, and then delete the aged data after a certain retention period.

The new automated time-based data deletion feature in OpenSearch Serverless minimizes the need to manually create and manage daily indexes or write data lifecycle scripts. You can now create a single index and OpenSearch Serverless will handle creating a timestamped collection of indexes under one logical grouping automatically. You only need to configure the desired data retention policies for your time series data collections. OpenSearch Serverless will then efficiently roll over indexes from primary storage to Amazon Simple Storage Service(Amazon S3) as they age, and automatically delete aged data per the configured retention policies, reducing the operational overhead and saving costs.

In this post we discuss the new data lifecycle polices and how to get started with these polices in OpenSearch Serverless

Solution Overview

Consider a use case where the fictitious  company Octank Broker collects logs from its web services and ingests them into OpenSearch Serverless for service availability analysis. The company is interested in tracking web access and root cause when failures are seen with error types 4xx and 5xx. Generally, the server issues are of interest within an immediate timeframe, say in a few days. After 30 days, these logs are no longer of interest.

Octank wants to retain their log data for 7 days. If the collections or indexes are configured for 7 days’ data retention, then after 7 days, OpenSearch Serverless deletes the data. The indexes are no longer available for search. Note: Document counts in search results might reflect data that is marked for deletion for a short time.

You can configure data retention by creating a data lifecycle policy. The retention time can be unlimited, or a you can provide a specific time length in Days and Hours with a minimum retention of 24 hours and a maximum of 10 years. If the retention time is unlimited, as the name suggests, no data is deleted.

To start using data lifecycle policies in OpenSearch Serverless, you can follow the steps outlined in this post.

Prerequisites

This post assumes that you have already set up an OpenSearch Serverless collection. If not, refer to Log analytics the easy way with Amazon OpenSearch Serverless for instructions.

Create a data lifecycle policy

You can create a data lifecycle policy from the AWS Management Console, the AWS Command Line Interface (AWS CLI), AWS CloudFormation, AWS Cloud Development Kit (AWS CDK), and Terraform. To create a data lifecycle policy via the console, complete the following steps:

  • On the OpenSearch Service console, choose Data lifecycle policies under Serverless in the navigation pane.
  • Choose Create data lifecycle policy.
  • For Data lifecycle policy name, enter a name (for example, web-logs-policy).
  • Choose Add under Data lifecycle.
  • Under Source Collection, choose the collection to which you want to apply the policy (for example, web-logs-collection).
  • Under Indexes, enter the index or index patterns to apply the retention duration (for example, web-logs).
  • Under Data retention, disable Unlimited (to set up the specific retention for the index pattern you defined).
  • Enter the hours or days after which you want to delete data from Amazon S3.
  • Choose Create.

The following graphic gives a quick demonstration of creating the OpenSearch Serverless Data lifecycle policies via the preceding steps.

View the data lifecycle policy

After you have created the data lifecycle policy, you can view the policy by completing the following steps:

  • On the OpenSearch Service console, choose Data lifecycle policies under Serverless in the navigation pane.
  • Select the policy you want to view (for example, web-logs-policy).
  • Choose the hyperlink under Policy name.

This page will show you the details such as the index pattern and its retention period for a specific index and collection. The following graphic gives a quick demonstration of viewing the OpenSearch Serverless data lifecycle policies via the preceding steps.

Update the data lifecycle policy

After you have created the data lifecycle policy, you can modify and update it to add more rules. For example, you can add another index pattern or add a new collection with a new index pattern to set up the retention. The following example shows the steps to add another rule in the policy for syslog index under syslogs-collection.

  • On the OpenSearch Service console, choose Data lifecycle policies under Serverless in the navigation pane.
  • Select the policy you want to edit (for example, web-logs-policy), then choose Edit.
  • Choose Add under Data lifecycle.
  • Under Source Collection, choose the collection you are going to use for setting up the data lifecycle policy (for example, syslogs-collection).
  • Under Indexes, enter index or index patterns you are going to set retention for (for example, syslogs).
  • Under Data retention, disable Unlimited (to set up specific retention for the index pattern you defined).
  • Enter the hours or days after which you want to delete data from Amazon S3.
  • Choose Save.

The following graphic gives a quick demonstration of updating existing data lifecycle policies via the preceding steps.

Delete the data lifecycle policy

Delete the existing data lifecycle policy with the following steps:

  • On the OpenSearch Service console, choose Data lifecycle policies under Serverless in the navigation pane.
  • Select the policy you want to edit (for example, web-logs-policy).
  • Choose Delete.

Data lifecycle policy rules

In a data lifecycle policy, you specify a series of rules. The data lifecycle policy lets you manage the retention period of data associated to indexes or collections that match these rules. These rules define the retention period for data in an index or group of indexes. Each rule consists of a resource type (index), a retention period, and a list of resources (indexes) that the retention period applies to.

You define the retention period with one of the following formats:

  • “MinIndexRetention”: “24h” – OpenSearch Serverless retains the index data for a specified period in hours or days. You can set this period to be from 24 hours (24h) to 3,650 days (3650d).
  • “NoMinIndexRetention”: true – OpenSearch Serverless retains the index data indefinitely.

When data lifecycle policy rules overlap, within or across policies, the rule with a more specific resource name or pattern for an index overrides a rule with a more general resource name or pattern for any indexes that are common to both rules. For example, in the following policy, two rules apply to the index index/sales/logstash. In this situation, the second rule takes precedence because index/sales/log* is the longest match to index/sales/logstash. Therefore, OpenSearch Serverless sets no retention period for the index.

Summary

Data lifecycle policies provide a consistent and straightforward way to manage indexes in OpenSearch Serverless. With data lifecycle policies, you can automate data management and avoid human errors. Deleting non-relevant data without manual intervention reduces your operational load, saves storage costs, and helps keep the system performant for search.


About the authors

Prashant Agrawal is a Senior Search Specialist Solutions Architect with Amazon OpenSearch Service. He works closely with customers to help them migrate their workloads to the cloud and helps existing customers fine-tune their clusters to achieve better performance and save on cost. Before joining AWS, he helped various customers use OpenSearch and Elasticsearch for their search and log analytics use cases. When not working, you can find him traveling and exploring new places. In short, he likes doing Eat → Travel → Repeat.

Satish Nandi is a Senior Product Manager with Amazon OpenSearch Service. He is focused on OpenSearch Serverless and has years of experience in networking, security and ML/AI. He holds a Bachelor degree in Computer Science and an MBA in Entrepreneurship. In his free time, he likes to fly airplanes, hang gliders and ride his motorcycle.

Accelerate analytics on Amazon OpenSearch Service with AWS Glue through its native connector

Post Syndicated from Basheer Sheriff original https://aws.amazon.com/blogs/big-data/accelerate-analytics-on-amazon-opensearch-service-with-aws-glue-through-its-native-connector/

As the volume and complexity of analytics workloads continue to grow, customers are looking for more efficient and cost-effective ways to ingest and analyse data. Data is stored from online systems such as the databases, CRMs, and marketing systems to data stores such as data lakes on Amazon Simple Storage Service (Amazon S3), data warehouses in Amazon Redshift, and purpose-built stores such as Amazon OpenSearch Service, Amazon Neptune, and Amazon Timestream.

OpenSearch Service is used for multiple purposes, such as observability, search analytics, consolidation, cost savings, compliance, and integration. OpenSearch Service also has vector database capabilities that let you implement semantic search and Retrieval Augmented Generation (RAG) with large language models (LLMs) to build recommendation and media search engines. Previously, to integrate with OpenSearch Service, you could use open source clients for specific programming languages such as Java, Python, or JavaScript or use REST APIs provided by OpenSearch Service.

Movement of data across data lakes, data warehouses, and purpose-built stores is achieved by extract, transform, and load (ETL) processes using data integration services such as AWS Glue. AWS Glue is a serverless data integration service that makes it straightforward to discover, prepare, and combine data for analytics, machine learning (ML), and application development. AWS Glue provides both visual and code-based interfaces to make data integration effortless. Using a native AWS Glue connector increases agility, simplifies data movement, and improves data quality.

In this post, we explore the AWS Glue native connector to OpenSearch Service and discover how it eliminates the need to build and maintain custom code or third-party tools to integrate with OpenSearch Service. This accelerates analytics pipelines and search use cases, providing instant access to your data in OpenSearch Service. You can now use data stored in OpenSearch Service indexes as a source or target within the AWS Glue Studio no-code, drag-and-drop visual interface or directly in an AWS Glue ETL job script. When combined with AWS Glue ETL capabilities, this new connector simplifies the creation of ETL pipelines, enabling ETL developers to save time building and maintaining data pipelines.

Solution overview

The new native OpenSearch Service connector is a powerful tool that can help organizations unlock the full potential of their data. It enables you to efficiently read and write data from OpenSearch Service without needing to install or manage OpenSearch Service connector libraries.

In this post, we demonstrate exporting the New York City Taxi and Limousine Commission (TLC) Trip Record Data dataset into OpenSearch Service using the AWS Glue native connector. The following diagram illustrates the solution architecture.

By the end of this post, your visual ETL job will resemble the following screenshot.

Prerequisites

To follow along with this post, you need a running OpenSearch Service domain. For setup instructions, refer to Getting started with Amazon OpenSearch Service. Ensure it is public, for simplicity, and note the primary user and password for later use.

Note that as of this writing, the AWS Glue OpenSearch Service connector doesn’t support Amazon OpenSearch Serverless, so you need to set up a provisioned domain.

Create an S3 bucket

We use an AWS CloudFormation template to create an S3 bucket to store the sample data. Complete the following steps:

  1. Choose Launch Stack.
  2. On the Specify stack details page, enter a name for the stack.
  3. Choose Next.
  4. On the Configure stack options page, choose Next.
  5. On the Review page, select I acknowledge that AWS CloudFormation might create IAM resources.
  6. Choose Submit.

The stack takes about 2 minutes to deploy.

Create an index in the OpenSearch Service domain

To create an index in the OpenSearch service domain, complete the following steps:

  1. On the OpenSearch Service console, choose Domains in the navigation pane.
  2. Open the domain you created as a prerequisite.
  3. Choose the link under OpenSearch Dashboards URL.
  4. On the navigation menu, choose Dev Tools.
  5. Enter the following code to create the index:
PUT /yellow-taxi-index
{
  "mappings": {
    "properties": {
      "VendorID": {
        "type": "integer"
      },
      "tpep_pickup_datetime": {
        "type": "date",
        "format": "epoch_millis"
      },
      "tpep_dropoff_datetime": {
        "type": "date",
        "format": "epoch_millis"
      },
      "passenger_count": {
        "type": "integer"
      },
      "trip_distance": {
        "type": "float"
      },
      "RatecodeID": {
        "type": "integer"
      },
      "store_and_fwd_flag": {
        "type": "keyword"
      },
      "PULocationID": {
        "type": "integer"
      },
      "DOLocationID": {
        "type": "integer"
      },
      "payment_type": {
        "type": "integer"
      },
      "fare_amount": {
        "type": "float"
      },
      "extra": {
        "type": "float"
      },
      "mta_tax": {
        "type": "float"
      },
      "tip_amount": {
        "type": "float"
      },
      "tolls_amount": {
        "type": "float"
      },
      "improvement_surcharge": {
        "type": "float"
      },
      "total_amount": {
        "type": "float"
      },
      "congestion_surcharge": {
        "type": "float"
      },
      "airport_fee": {
        "type": "integer"
      }
    }
  }
}

Create a secret for OpenSearch Service credentials

In this post, we use basic authentication and store our authentication credentials securely using AWS Secrets Manager. Complete the following steps to create a Secrets Manager secret:

  1. On the Secrets Manager console, choose Secrets in the navigation pane.
  2. Choose Store a new secret.
  3. For Secret type, select Other type of secret.
  4. For Key/value pairs, enter the user name opensearch.net.http.auth.user and the password opensearch.net.http.auth.pass.
  5. Choose Next.
  6. Complete the remaining steps to create your secret.

Create an IAM role for the AWS Glue job

Complete the following steps to configure an AWS Identity and Access Management (IAM) role for the AWS Glue job:

  1. On the IAM console, create a new role.
  2. Attach the AWS managed policy GlueServiceRole.
  3. Attach the following policy to the role. Replace each ARN with the corresponding ARN of the OpenSearch Service domain, Secrets Manager secret, and S3 bucket.
{
    "Version": "2012-10-17",
    "Statement": [
        {
            "Sid": "OpenSearchPolicy",
            "Effect": "Allow",
            "Action": [
                "es:ESHttpPost",
                "es:ESHttpPut"
            ],
            "Resource": [
                "arn:aws:es:<region>:<aws-account-id>:domain/<amazon-opensearch-domain-name>"
            ]
        },
        {
            "Sid": "GetDescribeSecret",
            "Effect": "Allow",
            "Action": [
                "secretsmanager:GetResourcePolicy",
                "secretsmanager:GetSecretValue",
                "secretsmanager:DescribeSecret",
                "secretsmanager:ListSecretVersionIds"
            ],
            "Resource": "arn:aws:secretsmanager:<region>:<aws-account-id>:secret:<secret-name>"
        },
        {
            "Sid": "S3Policy",
            "Effect": "Allow",
            "Action": [
                "s3:GetBucketLocation",
                "s3:ListBucket",
                "s3:GetBucketAcl",
                "s3:GetObject",
                "s3:PutObject",
                "s3:DeleteObject"
            ],
            "Resource": [
                "arn:aws:s3:::<bucket-name>",
                "arn:aws:s3:::<bucket-name>/*"
            ]
        }
    ]
}

Create an AWS Glue connection

Before you can use the OpenSearch Service connector, you need to create an AWS Glue connection for connecting to OpenSearch Service. Complete the following steps:

  1. On the AWS Glue console, choose Connections in the navigation pane.
  2. Choose Create connection.
  3. For Name, enter opensearch-connection.
  4. For Connection type, choose Amazon OpenSearch.
  5. For Domain endpoint, enter the domain endpoint of OpenSearch Service.
  6. For Port, enter HTTPS port 443.
  7. For Resource, enter yellow-taxi-index.

In this context, resource means the index of OpenSearch Service where the data is read from or written to.

  1. Select Wan only enabled.
  2. For AWS Secret, choose the secret you created earlier.
  3. Optionally, if you’re connecting to an OpenSearch Service domain in a VPC, specify a VPC, subnet, and security group to run AWS Glue jobs inside the VPC. For security groups, a self-referencing inbound rule is required. For more information, see Setting up networking for development for AWS Glue.
  4. Choose Create connection.

Create an ETL job using AWS Glue Studio

Complete the following steps to create your AWS Glue ETL job:

  1. On the AWS Glue console, choose Visual ETL in the navigation pane.
  2. Choose Create job and Visual ETL.
  3. On the AWS Glue Studio console, change the job name to opensearch-etl.
  4. Choose Amazon S3 for the data source and Amazon OpenSearch for the data target.

Between the source and target, you can optionally insert transform nodes. In this solution, we create a job that has only source and target nodes for simplicity.

  1. In the Data source properties section, specify the S3 bucket where the sample data is located, and choose Parquet as the data format.
  2. In the Data sink properties section, specify the connection you created in the previous section (opensearch-connection).
  3. Choose the Job details tab, and in the Basic properties section, specify the IAM role you created earlier.
  4. Choose Save to save your job, and choose Run to run the job.
  5. Navigate to the Runs tab to check the status of the job. When it is successful, the run status should be Succeeded.
  6. After the job runs successfully, navigate to OpenSearch Dashboards, and log in to the dashboard.
  7. Choose Dashboards Management on the navigation menu.
  8. Choose Index patterns, and choose Create index pattern.
  9. Enter yellow-taxi-index for Index pattern name.
  10. Choose tpep_pickup_datetime for Time.
  11. Choose Create index pattern. This index pattern will be used to visualize the index.
  12. Choose Discover on the navigation menu, and choose yellow-taxi-index.


You have now created an index in OpenSearch Service and loaded data into it from Amazon S3 in just a few steps using the AWS Glue OpenSearch Service native connector.

Clean up

To avoid incurring charges, clean up the resources in your AWS account by completing the following steps:

  1. On the AWS Glue console, choose ETL jobs in the navigation pane.
  2. From the list of jobs, select the job opensearch-etl, and on the Actions menu, choose Delete.
  3. On the AWS Glue console, choose Data connections in the navigation pane.
  4. Select opensearch-connection from the list of connectors, and on the Actions menu, choose Delete.
  5. On the IAM console, choose Roles in the navigation page.
  6. Select the role you created for the AWS Glue job and delete it.
  7. On the CloudFormation console, choose Stacks in the navigation pane.
  8. Select the stack you created for the S3 bucket and sample data and delete it.
  9. On the Secrets Manager console, choose Secrets in the navigation pane.
  10. Select the secret you created, and on the Actions menu, choose Delete.
  11. Reduce the waiting period to 7 days and schedule the deletion.

Conclusion

The integration of AWS Glue with OpenSearch Service adds the powerful ability to perform data transformation when integrating with OpenSearch Service for analytics use cases. This enables organizations to streamline data integration and analytics with OpenSearch Service. The serverless nature of AWS Glue means no infrastructure management, and you pay only for the resources consumed while your jobs are running. As organizations increasingly rely on data for decision-making, this native Spark connector provides an efficient, cost-effective, and agile solution to swiftly meet data analytics needs.


About the authors

Basheer Sheriff is a Senior Solutions Architect at AWS. He loves to help customers solve interesting problems leveraging new technology. He is based in Melbourne, Australia, and likes to play sports such as football and cricket.

Shunsuke Goto is a Prototyping Engineer working at AWS. He works closely with customers to build their prototypes and also helps customers build analytics systems.

AWS Weekly Roundup — AWS Lambda, AWS Amplify, Amazon OpenSearch Service, Amazon Rekognition, and more — December 18, 2023

Post Syndicated from Donnie Prakoso original https://aws.amazon.com/blogs/aws/aws-weekly-roundup-aws-lambda-aws-amplify-amazon-opensearch-service-amazon-rekognition-and-more-december-18-2023/

My memories of Amazon Web Services (AWS) re:Invent 2023 are still fresh even when I’m currently wrapping up my activities in Jakarta after participating in AWS Community Day Indonesia. It was a great experience, from delivering chalk talks and having thoughtful discussions with AWS service teams, to meeting with AWS Heroes, AWS Community Builders, and AWS User Group leaders. AWS re:Invent brings the global AWS community together to learn, connect, and be inspired by innovation. For me, that spirit of connection is what makes AWS re:Invent always special.

Here’s a quick look of my highlights at AWS re:Invent and AWS Community Day Indonesia:

If you missed AWS re:Invent, you can watch the keynotes and sessions on demand. Also, check out the AWS News Editorial Team’s Top announcements of AWS re:Invent 2023 for all the major launches.

Recent AWS launches
Here are some of the launches that caught my attention in the past two weeks:

Query MySQL and PostgreSQL with AWS Amplify – In this post, Channy wrote how you can now connect your MySQL and PostgreSQL databases to AWS Amplify with just a few clicks. It generates a GraphQL API to query your database tables using AWS CDK.

Migration Assistant for Amazon OpenSearch Service – With this self-service solution, you can smoothly migrate from your self-managed clusters to Amazon OpenSearch Service managed clusters or serverless collections.

AWS Lambda simplifies connectivity to Amazon RDS and RDS Proxy – Now you can connect your AWS Lambda to Amazon RDS or RDS proxy using the AWS Lambda console. With a guided workflow, this improvement helps to minimize complexities and efforts to quickly launch a database instance and correctly connect a Lambda function.

New no-code dashboard application to visualize IoT data – With this announcement, you can now visualize and interact with operational data from AWS IoT SiteWise using a new open source Internet of Things (IoT) dashboard.

Amazon Rekognition improves Face Liveness accuracy and user experience – This launch provides higher accuracy in detecting spoofed faces for your face-based authentication applications.

AWS Lambda supports additional concurrency metrics for improved quota monitoring – Add CloudWatch metrics for your Lambda quotas, to improve visibility into concurrency limits.

AWS Malaysia now supports 3D-Secure authentication – This launch enables 3DS2 transaction authentication required by banks and payment networks, facilitating your secure online payments.

Announcing AWS CloudFormation template generation for Amazon EventBridge Pipes – With this announcement, you can now streamline the deployment of your EventBridge resources with CloudFormation templates, accelerating event-driven architecture (EDA) development.

Enhanced data protection for CloudWatch Logs – With the enhanced data protection, CloudWatch Logs helps identify and redact sensitive data in your logs, preventing accidental exposure of personal data.

Send SMS via Amazon SNS in Asia Pacific – With this announcement, now you can use SMS messaging across Asia Pacific from the Jakarta Region.

Lambda adds support for Python 3.12 – This launch brings the latest Python version to your Lambda functions.

CloudWatch Synthetics upgrades Node.js runtime – Now you can use Node.js 16.1 runtimes for your canary functions.

Manage EBS Volumes for your EC2 fleets – This launch simplifies attaching and managing EBS volumes across your EC2 fleets.

See you next year!
This is the last AWS Weekly Roundup for this year, and we’d like to thank you for being our wonderful readers. We’ll be back to share more launches for you on January 8, 2024.

Happy holidays!

Donnie

Introducing highly durable Amazon OpenSearch Service clusters with 30% price/performance improvement

Post Syndicated from Jeff Barr original https://aws.amazon.com/blogs/aws/introducing-highly-durable-amazon-opensearch-service-clusters-with-30-price-performance-improvement/

You can use the new OR1 instances to create Amazon OpenSearch Service clusters that use Amazon Simple Storage Service (Amazon S3) for primary storage. You can ingest, store, index, and access just about any imaginable amount of data, while also enjoying a 30% price/performance improvement over existing instance types, eleven nines of data durability, and a zero-time Recovery Point Objective (RPO). You can use this to perform interactive log analytics, monitor application in real time, and more.

New OR1 Instances
These benefits are all made possible by the new OR1 instances, which are available in eight sizes and used for the data nodes of the cluster:

Instance Name vCPUs
Memory
EBS Storage Max (gp3)
or1.medium.search 1 8 GiB 400 GiB
or1.large.search 2 16 GiB 800 GiB
or1.xlarge.search 4 32 GiB 1.5 TiB
or1.2xlarge.search 8 64 GiB 3 TiB
or1.4xlarge.search 16 128 GiB 6 TiB
or1.8xlarge.search 32 256 GiB 12 TiB
or1.12xlarge.search 48 384 GiB 18 TiB
or1.16xlarge.search 64 512 GiB 24 TiB

To choose a suitable instance size, read Sizing Amazon OpenSearch Service domains.

The Amazon Elastic Block Store (Amazon EBS) volumes are used for primary storage, with data copied synchronously to S3 as it arrives. The data in S3 is used to create replicas and to rehydrate EBS after shards are moved between instances as a result of a node failure or a routine rebalancing operation. This is made possible by the remote-backed storage and segment replication features that were recently released for OpenSearch.

Creating a Domain
To create a domain I open the Amazon OpenSearch Service Console, select Managed clusters, and click Create domain:

I enter a name for my domain (my-domain), select Standard create, and use the Production template:

Then I choose the Domain with standby deployment option. This option will create active data nodes in two Availability Zones and a standby one in a third. I also choose the latest engine version:

Then I select the OR1 instance family and (for my use case) configure 500 GiB of EBS storage per data node:

I set the other settings as needed, and click Create to proceed:

I take a quick lunch break and when i come back my domain is ready:

Things to Know
Here are a couple of things to know about this new storage option:

Engine Versions – Amazon OpenSearch Service engines version 2.11 and above support OR1 instances.

Regions – The OR1 instance family is available for use with OpenSearch in the US East (Ohio, N. Virginia), US West (N. California, Oregon), Asia Pacific (Mumbai, Singapore, Sydney, Tokyo), and Europe (Frankfurt, Ireland, Spain, Stockholm) AWS Regions.

Pricing – You pay On-Demand or Reserved prices for data nodes, and you also pay for EBS storage. See the Amazon OpenSearch Service Pricing page for more information.

Jeff;

Announcing Amazon OpenSearch Service zero-ETL integration with Amazon S3 (preview)

Post Syndicated from Channy Yun original https://aws.amazon.com/blogs/aws/amazon-opensearch-service-zero-etl-integration-with-amazon-s3-preview/

Today we are announcing a preview of Amazon OpenSearch Service zero-ETL integration with Amazon S3, a new way to query operational logs in Amazon S3 and S3-based data lakes without needing to switch between services. You can now analyze infrequently queried data in cloud object stores and simultaneously use the operational analytics and visualization capabilities of OpenSearch Service.

Amazon OpenSearch Service direct queries with Amazon S3 provides a zero-ETL integration to reduce the operational complexity of duplicating data or managing multiple analytics tools by enabling customers to directly query their operational data, reducing costs and time to action. This zero-ETL integration will be configurable within OpenSearch Service, where you can take advantage of various log type templates, including predefined dashboards, and configure data accelerations tailored to that log type. Templates include VPC Flow Logs, Elastic Load Balancing logs, and NGINX logs, and accelerations include skipping indexes, materialized views, and covered indexes.

With direct queries with Amazon S3, you can perform complex queries critical to security forensic and threat analysis that correlate data across multiple data sources, which aids teams in investigating service downtime and security events. After creating an integration, you can start querying their data directly from the OpenSearch Dashboards or OpenSearch API. You can easily audit connections to ensure that they are set up in a scalable, cost-efficient, and secure way.

Getting started with direct queries with Amazon S3
You can easily get started by creating a new Amazon S3 direct query data source for OpenSearch Service through the AWS Management Console or the API. Each new data source uses AWS Glue Data Catalog to manage tables that represent S3 buckets. Once you create a data source, you can configure Amazon S3 tables and data indexing and query data in OpenSearch Dashboards.

1. Create a data source in OpenSearch Service
Before you create a data source, you should have an OpenSearch Service domain with version 2.11 or later and a target Amazon S3 table in AWS Glue Data Catalog with the appropriate IAM permissions. IAM will need access to the desired S3 bucket(s) and read and write access to AWS Glue Data Catalog. To learn more about IAM prerequisites, see Creating a data source in the AWS documentation.

Go to the OpenSearch Service console and choose the domain you want to set up a new data source for. In the domain details page, choose the Connections tab below the general information and see the Direct Query section.

To create a new data source, choose Create, input the name of your new data source, select the data source type as Amazon S3 with AWS Glue Data Catalog, and choose the IAM role for your data source.

Once you create a data source, you can go to the OpenSearch Dashboards of the domain, which you use to configure access control, define tables, set up log type–based dashboards for popular log types, and query your data.

2. Configuring your data source in OpenSearch Dashboards
To configure data source in OpenSearch Dashboards, choose Configure in the console and go to OpenSearch Dashboards. In the left-hand navigation of OpenSearch Dashboards, under Management, choose Data sources. Under Manage data sources, choose the name of the data source you created in the console.

Direct queries from OpenSearch Service to Amazon S3 use Spark tables within AWS Glue Data Catalog. To create a new table you want to direct query, go to the Query Workbench in the Open Search Plugins menu.

Now run as in the following SQL statement to create http_logs table and run MSCK REPAIR TABLE mys3.default.http_logs command to update the metadata in the catalog

CREATE EXTERNAL TABLE IF NOT EXISTS mys3.default.http_logs (
   `@timestamp` TIMESTAMP,
    clientip STRING,
    request STRING, 
    status INT, 
    size INT, 
    year INT, 
    month INT, 
    day INT) 
USING json PARTITIONED BY(year, month, day) OPTIONS (path 's3://mys3/data/http_log/http_logs_partitioned_json_bz2/', compression 'bzip2')

To ensure a fast experience with your data in Amazon S3, you can set up any of three different types of accelerations to index data into OpenSearch Service, such as skipping indexes, materialized views, and covering indexes. To create OpenSearch indexes from external data connections for better performance, choose the Accelerate Table.

  • Skipping indexes allow you to index only the metadata of the data stored in Amazon S3. Skipping indexes help quickly identify data stored by narrowing down a specific location of where the data is stored.
  • Materialized views enable you to use complex queries such as aggregations, which can be used for querying or powering dashboard visualizations. Materialized views ingest data into OpenSearch Service for anomaly detection or geospatial capabilities.
  • Covering indexes will ingest all the data from the specified table column. Covering indexes are the most performant of the three indexing types.

3. Query your data source in OpenSearch Dashboards
After you set up your tables, you can query your data using Discover. You can run a sample SQL query for the http_logs table you created in AWS Glue Data Catalog tables.

To learn more, see Working with Amazon OpenSearch Service direct queries with Amazon S3 in the AWS documentation.

Join the preview
Amazon OpenSearch Service zero-ETL integration with Amazon S3 is now previewed in the AWS US East (Ohio), US East (N. Virginia), US West (Oregon), Asia Pacific (Tokyo), Europe (Frankfurt), and Europe (Ireland) Regions.

OpenSearch Service separately charges for only the compute needed as OpenSearch Compute Units to query your external data as well as maintain indexes in OpenSearch Service. For more information, see Amazon OpenSearch Service Pricing.

Give it a try and send feedback to the AWS re:Post for Amazon OpenSearch Service or through your usual AWS Support contacts.

Channy

Vector engine for Amazon OpenSearch Serverless is now available

Post Syndicated from Channy Yun original https://aws.amazon.com/blogs/aws/vector-engine-for-amazon-opensearch-serverless-is-now-generally-available/

Today we are announcing the general availability of the vector engine for Amazon OpenSearch Serverless with new features. In July 2023, we introduced the preview release of the vector engine for Amazon OpenSearch Serverless, a simple, scalable, and high-performing similarity search capability. The vector engine makes it easy for you to build modern machine learning (ML) augmented search experiences and generative artificial intelligence (generative AI) applications without needing to manage the underlying vector database infrastructure.

You can now store, update, and search billions of vector embeddings with thousands of dimensions in milliseconds. The highly performant similarity search capability of vector engine enables generative AI-powered applications to deliver accurate and reliable results with consistent milliseconds-scale response times.

The vector engine also enables you to optimize and tune results with hybrid search by combining vector search and full-text search in the same query, removing the need to manage and maintain separate data stores or a complex application stack. The vector engine provides a secure, reliable, scalable, and enterprise-ready platform to cost effectively build a prototyping application and then seamlessly scale to production.

You can now get started in minutes with the vector engine by creating a specialized vector engine–based collection, which is a logical grouping of embeddings that works together to support a workload.

The vector engine uses OpenSearch Compute Units (OCUs), compute capacity unit, to ingest and run similarity search queries. One OCU can handle up to 2 million vectors for 128 dimensions or 500,000 for 768 dimensions at 99 percent recall rate.

The vector engine built on OpenSearch Serverless is a highly available service by default. It requires a minimum of four OCUs (2 OCUs for the ingest, including primary and standby, and 2 OCUs for the search with two active replicas across Availability Zones) for the first collection in an account. All subsequent collections using the same AWS Key Management Service (AWS KMS) key can share those OCUs.

What’s new at GA?
Since the preview, the vector engine for Amazon OpenSearch Serverless became one of the vector database options in the knowledge base of Amazon Bedrock to build generative AI applications using a Retrieval Augmented Generation (RAG) concept.

Here are some new or improved features for this GA release:

Disable redundant replica (development and test focused) option
As we announced in our preview blog post, this feature eliminates the need to have redundant OCUs in another Availability Zone solely for availability purposes. A collection can be deployed with two OCUs – one for indexing and one for search. This cuts the costs in half compared to default deployment with redundant replicas. The reduced cost makes this configuration suitable and economical for development and testing workloads.

With this option, we will still provide durability guarantees since the vector engine persists all the data in Amazon S3, but single-AZ failures would impact your availability.

If you want to disable a redundant replica, uncheck Enable redundancy when creating a new vector search
collection.

Fractional OCU for the development and test focused option
Support for fractional OCU billing for development and test focused workloads (that is, no redundant replica option) reduces the floor price for vector search collection. The vector engine will initially deploy smaller 0.5 OCUs while providing the same capabilities at lower scale and will scale up to a full OCU and beyond to meet your workload demand. This option will further reduce the monthly costs when experimenting with using the vector engine.

Automatic scaling for a billion scale
With vector engine’s seamless auto-scaling, you no longer have to reindex for scaling purposes. At preview, we were supporting about 20 million vector embeddings. With the general availability of vector engine, we have raised the limits to support a billion vector scale.

Now available
The vector engine for Amazon OpenSearch Serverless is now available in all AWS Regions where Amazon OpenSearch Serverless is available.

To get started, you can refer to the following resources:

Give it a try and send feedback to AWS re:Post for Amazon OpenSearch Service or through your usual AWS support contacts.

Channy

Amazon DynamoDB zero-ETL integration with Amazon OpenSearch Service is now available

Post Syndicated from Channy Yun original https://aws.amazon.com/blogs/aws/amazon-dynamodb-zero-etl-integration-with-amazon-opensearch-service-is-now-generally-available/

Today, we are announcing the general availability of Amazon DynamoDB zero-ETL integration with Amazon OpenSearch Service, which lets you perform a search on your DynamoDB data by automatically replicating and transforming it without custom code or infrastructure. This zero-ETL integration reduces the operational burden and cost involved in writing code for a data pipeline architecture, keeping the data in sync, and updating code with frequent application changes, enabling you to focus on your application.

With this zero-ETL integration, Amazon DynamoDB customers can now use the powerful search features of Amazon OpenSearch Service, such as full-text search, fuzzy search, auto-complete, and vector search for machine learning (ML) capabilities to offer new experiences that boost user engagement and improve satisfaction with their applications.

This zero-ETL integration uses Amazon OpenSearch Ingestion to synchronize the data between Amazon DynamoDB and Amazon OpenSearch Service. You choose the DynamoDB table whose data needs to be synchronized and Amazon OpenSearch Ingestion synchronizes the data to an Amazon OpenSearch managed cluster or serverless collection within seconds of it being available.

You can also specify index mapping templates to ensure that your Amazon DynamoDB fields are mapped to the correct fields in your Amazon OpenSearch Service indexes. Also, you can synchronize data from multiple DynamoDB tables into one Amazon OpenSearch Service managed cluster or serverless collection to offer holistic insights across several applications.

Getting started with this zero-ETL integration
With a few clicks, you can synchronize data from DynamoDB to OpenSearch Service. To create an integration between DynamoDB and OpenSearch Service, choose the Integrations menu in the left pane of the DynamoDB console and the DynamoDB table whose data you want to synchronize.

You must turn on point-in-time recovery (PITR) and the DynamoDB Streams feature. This feature allows you to capture item-level changes in your table and push the changes to a stream. Choose Turn on for PITR and enable DynamoDB Streams in the Exports and streams tab.

After turning on PITR and DynamoDB Stream, choose Create to set up an OpenSearch Ingestion pipeline in your account that replicates the data to an OpenSearch Service managed domain.

In the first step, enter a unique pipeline name and set up pipeline capacity and compute resources to automatically scale your pipeline based on the current ingestion workload.

Now you can configure the pre-defined pipeline configuration in YAML file format. You can browse resources to look up and paste information to build the pipeline configuration. This pipeline is a combination of a source part from DyanmoDB settings and a sink part for OpenSearch Service.

You must set multiple IAM roles (sts_role_arn) with the necessary permissions to read data from the DynamoDB table and write to an OpenSearch domain. This role is then assumed by OpenSearch Ingestion pipelines to ensure that the right security posture is always maintained when moving the data from source to destination. To learn more, see Setting up roles and users in Amazon OpenSearch Ingestion in the AWS documentation.

After entering all required values, you can validate the pipeline configuration to ensure that your configuration is valid. To learn more, see Creating Amazon OpenSearch Ingestion pipelines in the AWS documentation.

Take a few minutes to set up the OpenSearch Ingestion pipeline, and you can see your integration is completed in the DynamoDB table.

Now you can search synchronized items in the OpenSearch Dashboards.

Things to know
Here are a couple of things that you should know about this feature:

  • Custom schema – You can specify your custom data schema along with the index mappings used by OpenSearch Ingestion when writing data from Amazon DynamoDB to OpenSearch Service. This experience is added to the console within Amazon DynamoDB so that you have full control over the format of indices that are created on OpenSearch Service.
  • Pricing – There will be no additional cost to use this feature apart from the cost of the existing underlying components. Note that Amazon OpenSearch Ingestion charges OpenSearch Compute Units (OCUs) which will be used to replicate data between Amazon DynamoDB and Amazon OpenSearch Service. Furthermore, this feature uses Amazon DynamoDB streams for the change data capture (CDC) and you will incur the standard costs for Amazon DynamoDB Streams.
  • Monitoring – You can monitor the state of the pipelines by checking the status of the integration on the DynamoDB console or using the OpenSearch Ingestion dashboard. Additionally, you can use Amazon CloudWatch to provide real-time metrics and logs, which lets you to set up alerts in case of a breach of user-defined thresholds.

Now available
Amazon DynamoDB zero-ETL integration with Amazon OpenSearch Service is now generally available in all AWS Regions where OpenSearch Ingestion is available today.

Channy

Introducing persistent buffering for Amazon OpenSearch Ingestion

Post Syndicated from Muthu Pitchaimani original https://aws.amazon.com/blogs/big-data/introducing-persistent-buffering-for-amazon-opensearch-ingestion/

Amazon OpenSearch Ingestion is a fully managed, serverless pipeline that delivers real-time log, metric, and trace data to Amazon OpenSearch Service domains and OpenSearch Serverless collections.

Customers use Amazon OpenSearch Ingestion pipelines to ingest data from a variety of data sources, both pull-based and push-based. When ingesting data from pull-based sources, such as Amazon Simple Storage Service (Amazon S3) and Amazon MSK using Amazon OpenSearch Ingestion, the source handles the data durability and retention. Push-based sources, however, stream records directly to ingestion endpoints, and typically don’t have a means of persisting data once it is generated.

To address this need for such sources, a common architectural pattern is to add a persistent standalone buffer for enhanced durability and reliability of data ingestion. A durable, persistent buffer can mitigate the impact of ingestion spikes, buffer data during downtime, and reduce the need to expand capacity using in-memory buffers which can overflow. Customers use popular buffering technologies like Apache Kafka or RabbitMQ to add durability to their data flowing through their Amazon OpenSearch Ingestion pipelines. However, these tools add complexity to the data ingestion pipeline architecture and can be time consuming to setup, right-size, and maintain.

Solution overview

Today we’re introducing persistent buffering for Amazon OpenSearch Ingestion to enhance data durability and simplify data ingestion architectures for Amazon OpenSearch Service customers. You can use persistent buffering to ingest data for all push-based sources supported by Amazon OpenSearch Ingestion without the need to set up a standalone buffer. These include HTTP sources and OTEL sources for logs, traces and metrics. Persistent buffering in Amazon OpenSearch Ingestion is serverless and scales elastically to meet the throughput needs of even the most demanding workloads. You can now focus on your core business logic when ingesting data at scale in Amazon OpenSearch Service without worrying about the undifferentiated heavy lifting of provisioning and managing servers to add durability to your ingest pipeline.

Walkthrough

Enable persistent buffering

You can turn on the persistent buffering for existing or new pipelines using the AWS Management Console, AWS Command Line Interface (AWS CLI), or AWS SDK. If you choose not to enable persistent buffering, then the pipelines continue to use an in-memory buffer.

By default, persistent data is encrypted at rest with a key that AWS owns and manages for you. You can optionally choose your own customer managed key (KMS key) to encrypt data by selecting the checkbox labeled Customize encryption settings and selecting Choose a different AWS KMS key. Please note that if you choose a different KMS key, your pipeline needs additional permission to decrypt and generate data keys. The following snippet shows an example AWS Identity and Access Management (AWS IAM) permission policy that needs to be attached to a role used by the pipeline.

{
    "Version": "2012-10-17",
    "Statement": [
        {
            "Sid": "KeyAccess",
            "Effect": "Allow",
            "Action": [
              "kms:Decrypt",
              "kms:GenerateDataKeyWithoutPlaintext"
            ],
            "Resource": "arn:aws:kms:us-west-2:111122223333:key/1234abcd-12ab-34cd-56ef-1234567890ab"
        }
    ]
}

Provision for persistent buffering

Once persistent buffering is enabled, data is retained in the buffer for 72 hours. Amazon OpenSearch Ingestion keeps track of the data written into a sink and automatically resumes writing from the last successful check point should there be an outage in the sink or other issues that prevents data from being successfully written. There are no additional services or components needed for persistent buffers other than minimum and maximum OpenSearch compute Units (OCU) set for the pipeline. When persistent buffering is turned on, each Ingestion-OCU is now capable of providing persistent buffering along with its existing ability to ingest, transform, and route data. Amazon OpenSearch Ingestion dynamically allocates the buffer from the minimum and maximum allocation of OCUs that you define for the pipelines.

The number of Ingestion-OCUs used for persistent buffering is dynamically calculated based on the source, the transformations on the streaming data, and the sink that the data is written to. Because a portion of the Ingestion-OCUs now applies to persistent buffering, in order to maintain the same ingestion throughput for your pipeline, you need to increase the minimum and maximum Ingestion-OCUs when turning on persistent buffering. This amount of OCUs that you need with persistent buffering depends on the source that you are ingesting data from and also on the type of processing that you are performing on the data. The following table shows the number of OCUs that you need with persistent buffering with different sources and processors.

Sources and processors Ingestion-OCUs with buffering Compared to number of OCUs without persistent buffering needed to achieve similar data throughput
HTTP with no processors 3 times
HTTP wit Grok 2 times
OTel Trace 2 times
OTel Metrics 2 times

You have complete control over how you want to set up OCUs for your pipelines and decide between increasing OCUs for higher throughput or reducing OCUs for cost control at a lower throughput. Also, when you turn on persistent buffering, the minimum OCUs for a pipeline go up from one to two.

Availability and pricing

Persistent buffering is available in the all the AWS Regions where Amazon OpenSearch Ingestion is available as of November 17 2023. These includes US East (Ohio), US East (N. Virginia), US West (Oregon), US West (N. California), Europe (Ireland), Europe (London), Europe (Frankfurt), Asia Pacific (Tokyo), Asia Pacific (Sydney), Asia Pacific (Singapore), Asia Pacific (Mumbai), Asia Pacific (Seoul), and Canada (Central).

Ingestion-OCUs remains at the same price of $0.24 cents per hour. OCUs are billed on an hourly basis with per-minute granularity. You can control the costs OCUs incur by configuring maximum OCUs that a pipeline is allowed to scale.

Conclusion

In this post, we showed you how to configure persistent buffering for Amazon OpenSearch Ingestion to enhance data durability, and simplify data ingestion architecture for Amazon OpenSearch Service. Please refer to the documentation to learn other capabilities provided by Amazon OpenSearch Ingestion to a build sophisticated architecture for your ingestion needs.


About the Authors

Muthu Pitchaimani is a Search Specialist with Amazon OpenSearch Service. He builds large-scale search applications and solutions. Muthu is interested in the topics of networking and security, and is based out of Austin, Texas.

Arjun Nambiar is a Product Manager with Amazon OpenSearch Service. He focusses on ingestion technologies that enable ingesting data from a wide variety of sources into Amazon OpenSearch Service at scale. Arjun is interested in large scale distributed systems and cloud-native technologies and is based out of Seattle, Washington.

Jay is Customer Success Engineering leader for OpenSearch service. He focusses on overall customer experience with the OpenSearch. Jay is interested in large scale OpenSearch adoption, distributed data store and is based out of Northern Virginia.

Rich Giuli is a Principal Solutions Architect at Amazon Web Service (AWS). He works within a specialized group helping ISVs accelerate adoption of cloud services. Outside of work Rich enjoys running and playing guitar.