Post Syndicated from Sandeep Adwankar original https://aws.amazon.com/blogs/big-data/accelerate-your-analytics-with-amazon-s3-tables-and-amazon-sagemaker-lakehouse/
Amazon SageMaker Lakehouse is a unified, open, and secure data lakehouse that now seamlessly integrates with Amazon S3 Tables, the first cloud object store with built-in Apache Iceberg support. With this integration, SageMaker Lakehouse provides unified access to S3 Tables, general purpose Amazon S3 buckets, Amazon Redshift data warehouses, and data sources such as Amazon DynamoDB or PostgreSQL. You can then query, analyze, and join the data using Redshift, Amazon Athena, Amazon EMR, and AWS Glue. In addition to your familiar AWS services, you can access and query your data in-place with your choice of Iceberg-compatible tools and engines, providing you the flexibility to use SQL or Spark-based tools and collaborate on this data the way you like. You can secure and centrally manage your data in the lakehouse by defining fine-grained permissions with AWS Lake Formation that are consistently applied across all analytics and machine learning(ML) tools and engines.
Organizations are becoming increasingly data driven, and as data becomes a differentiator in business, organizations need faster access to all their data in all locations, using preferred engines to support rapidly expanding analytics and AI/ML use cases. Let’s take an example of a retail company that started by storing their customer sales and churn data in their data warehouse for business intelligence reports. With massive growth in business, they need to manage a variety of data sources as well as exponential growth in data volume. The company builds a data lake using Apache Iceberg to store new data such as customer reviews and social media interactions.
This enables them to cater to their end customers with new personalized marketing campaigns and understand its impact on sales and churn. However, data distributed across data lakes and warehouses limits their ability to move quickly, as it may require them to set up specialized connectors, manage multiple access policies, and often resort to copying data, that can increase cost in both managing the separate datasets as well as redundant data stored. SageMaker Lakehouse addresses these challenges by providing secure and centralized management of data in data lakes, data warehouses, and data sources such as MySQL, and SQL Server by defining fine-grained permissions that are consistently applied across data in all analytics engines.
In this post, we guide you how to use various analytics services using the integration of SageMaker Lakehouse with S3 Tables. We begin by enabling integration of S3 Tables with AWS analytics services. We create S3 Tables and Redshift tables and populate them with data. We then set up SageMaker Unified Studio by creating a company specific domain, new project with users, and fine-grained permissions. This lets us unify data lakes and data warehouses and use them with analytics services such as Athena, Redshift, Glue, and EMR.
Solution overview
To illustrate the solution, we are going to consider a fictional company called Example Retail Corp. Example Retail’s leadership is interested in understanding customer and business insights across thousands of customer touchpoints for millions of their customers that will help them build sales, marketing, and investment plans. Leadership wants to conduct an analysis across all their data to identify at-risk customers, understand impact of personalized marketing campaigns on customer churn, and develop targeted retention and sales strategies.
Alice is a data administrator in Example Retail Corp who has embarked on an initiative to consolidate customer information from multiple touchpoints, including social media, sales, and support requests. She decides to use S3 Tables with Iceberg transactional capability to achieve scalability as updates are streamed across billions of customer interactions, while providing same durability, availability, and performance characteristics that S3 is known for. Alice already has built a large warehouse with Redshift, which contains historical and current data about sales, customers prospects, and churn information.
Alice supports an extended team of developers, engineers, and data scientists who require access to the data environment to develop business insights, dashboards, ML models, and knowledge bases. This team includes:
Bob, a data analyst who needs to access to S3 Tables and warehouse data to automate building customer interactions growth and churn across various customer touchpoints for daily reports sent to leadership.
Charlie, a Business Intelligence analyst who is tasked to build interactive dashboards for funnel of customer prospects and their conversions across multiple touchpoints and make those available to thousands of Sales team members.
Doug, a data engineer responsible for building ML forecasting models for sales growth using the pipeline and/or customer conversion across multiple touchpoints and make those available to finance and planning teams.
Alice decides to use SageMaker Lakehouse to unify data across S3 Tables and Redshift data warehouse. Bob is excited about this decision as he can now build daily reports using his expertise with Athena. Charlie now knows that he can quickly build Amazon QuickSight dashboards with queries that are optimized using Redshift’s cost-based optimizer. Doug, being an open source Apache Spark contributor, is excited that he can build Spark based processing with AWS Glue or Amazon EMR to build ML forecasting models.
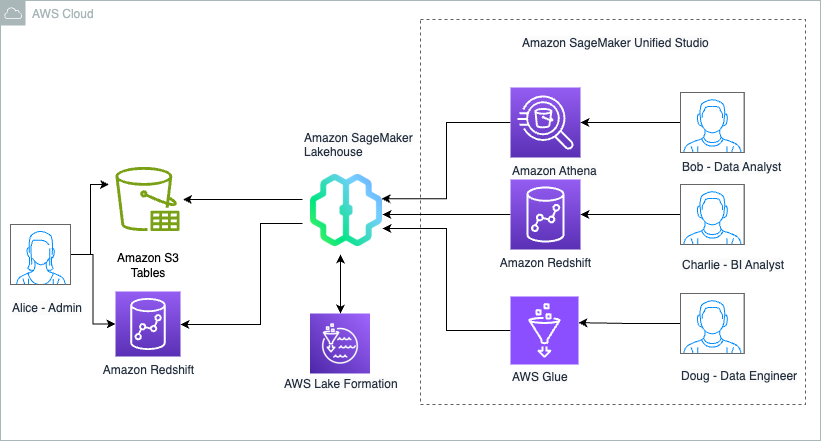
The following diagram illustrates the solution architecture.

Implementing this solution consists of the following high-level steps. For Example Retail, Alice as a data Administrator performs these steps:
- Create a table bucket. S3 Tables stores Apache Iceberg tables as S3 resources, and customer details are managed in S3 Tables. You can then enable integration with AWS analytics services, which automatically sets up the SageMaker Lakehouse integration so that the tables bucket is shown as a child catalog under the federated
s3tablescatalog in the AWS Glue Data Catalog and is registered with AWS Lake Formation for access control. Next, you create a table namespace or database which is a logical construct that you group tables under and create a table using Athena SQL CREATE TABLE statement.
- Publish your data warehouse to Glue Data Catalog. Churn data is managed in a Redshift data warehouse, which is published to the Data Catalog as a federated catalog and is available in SageMaker Lakehouse.
- Create a SageMaker Unified Studio project. SageMaker Unified Studio integrates with SageMaker Lakehouse and simplifies analytics and AI with a unified experience. Start by creating a domain and adding all users (Bob, Charlie, Doug). Then create a project in the domain, choosing project profile that provisions various resources and the project AWS Identity and Access Management (IAM) role that manages resource access. Alice adds Bob, Charlie, and Doug to the project as members.
- Onboard S3 Tables and Redshift tables to SageMaker Unified Studio. To onboard the S3 Tables to the project, in Lake Formation, you grant permission on the resource to the SageMaker Unified Studio project role. This enables the catalog to be discoverable within the lakehouse data explorer for users (Bob, Charlie, and Doug) to start querying tables .SageMaker Lakehouse resources can now be accessed from computes like Athena, Redshift, and Apache Spark based computes like Glue to derive churn analysis insights, with Lake Formation managing the data permissions.
Prerequisites
To follow the steps in this post, you must complete the following prerequisites:
Alice completes the following steps to create the S3 Table bucket for the new data she plans to add/import into an S3 Table.
- AWS account with access to the following AWS services:
- Amazon S3 including S3 Tables
- Amazon Redshift
- AWS Identity and Access Management (IAM)
- Amazon SageMaker Unified Studio
- AWS Lake Formation and AWS Glue Data Catalog
- AWS Glue
- Create a user with administrative access.
- Have access to an IAM role that is a Lake Formation data lake administrator. For instructions, refer to Create a data lake administrator.
- Enable AWS IAM Identity Center in the same AWS Region where you want to create your SageMaker Unified Studio domain. Set up your identity provider (IdP) and synchronize identities and groups with AWS IAM Identity Center. For more information, refer to IAM Identity Center Identity source tutorials.
- Create a read-only administrator role to discover the Amazon Redshift federated catalogs in the Data Catalog. For instructions, refer to Prerequisites for managing Amazon Redshift namespaces in the AWS Glue Data Catalog.
- Create an IAM role named
DataTransferRole. For instructions, refer to Prerequisites for managing Amazon Redshift namespaces in the AWS Glue Data Catalog.
- Create an Amazon Redshift Serverless namespace called
churnwg. For more information, see Get started with Amazon Redshift Serverless data warehouses.
Create a table bucket and enable integration with analytics services
Alice completes the following steps to create the S3 Table bucket for the new data she plans to add/import into an S3 Tables.
Follow the below steps to create a table bucket to enable integration with SageMaker Lakehouse:
- Sign in to the S3 console as user created in prerequisite step 2.
- Choose Table buckets in the navigation pane and choose Enable integration.

- Choose Table buckets in the navigation pane and choose Create table bucket.
- For Table bucket name, enter a name such as
blog-customer-bucket.
- Choose Create table bucket.

- Choose Create table with Athena.
- Select Create a namespace and provide a namespace (for example,
customernamespace).
- Choose Create namespace.

- Choose Create table with Athena.
- On the Athena console, run the following SQL script to create a table:
CREATE TABLE customer (
  `c_salutation` string,
  `c_preferred_cust_flag` string,
  `c_first_sales_date_sk` int,
  `c_customer_sk` int,
  `c_login` string,
  `c_current_cdemo_sk` int,
  `c_first_name` string,
  `c_current_hdemo_sk` int,
  `c_current_addr_sk` int,
  `c_last_name` string,
  `c_customer_id` string,
  `c_last_review_date_sk` int,
  `c_birth_month` int,
  `c_birth_country` string,
  `c_birth_year` int,
  `c_birth_day` int,
  `c_first_shipto_date_sk` int,
  `c_email_address` string)
  TBLPROPERTIES ('table_type' = 'iceberg')


INSERT INTO customer VALUES
('Dr.','N',2452077,13251813,'Y',1381546,'Joyce',2645,2255449,'Deaton','AAAAAAAAFOEDKMAA',2452543,1,'GREECE',1987,29,2250667,'[email protected]'),
('Dr.','N',2450637,12755125,'Y',1581546,'Daniel',9745,4922716,'Dow','AAAAAAAAFLAKCMAA',2432545,1,'INDIA',1952,3,2450667,'[email protected]'),
('Dr.','N',2452342,26009249,'Y',1581536,'Marie',8734,1331639,'Lange','AAAAAAAABKONMIBA',2455549,1,'CANADA',1934,5,2472372,'[email protected]'),
('Dr.','N',2452342,3270685,'Y',1827661,'Wesley',1548,11108235,'Harris','AAAAAAAANBIOBDAA',2452548,1,'ROME',1986,13,2450667,'[email protected]'),
('Dr.','N',2452342,29033279,'Y',1581536,'Alexandar',8262,8059919,'Salyer','AAAAAAAAPDDALLBA',2952543,1,'SWISS',1980,6,2650667,'[email protected]'),
('Miss','N',2452342,6520539,'Y',3581536,'Jerry',1874,36370,'Tracy','AAAAAAAALNOHDGAA',2452385,1,'ITALY',1957,8,2450667,'[email protected]')
This is just an example of adding a few rows to the table, but generally for production use cases, customers use engines such as Spark to add data to the table.
S3 Tables customer is now created, populated with data and integrated with SageMaker Lakehouse.
Set up Redshift tables and publish to the Data Catalog
Alice completes the following steps to connect the data in Redshift to be published into the data catalog. We’ll also demonstrate how the Redshift table is created and populated, but in Alice’s case Redshift table already exists with all the historic data on sales revenue.
- Sign in to the Redshift endpoint
churnwg as an admin user.
- Run the following script to create a table under the
dev database under the public schema:
CREATE TABLE customer_churn (
customer_id BIGINT,
tenure INT,
monthly_charges DECIMAL(5,1),
total_charges DECIMAL(5,1),
contract_type VARCHAR(100),
payment_method VARCHAR(100),
internet_service VARCHAR(100),
has_phone_service BOOLEAN,
is_churned BOOLEAN
);

INSERT INTO customer_churn VALUES
(10251783, 12, 70.5, 850.0, 'Month-to-Month', 'Credit Card', 'Fiber Optic', true, true),
(13251813, 36, 55.0, 1980.0, 'One Year', 'Bank Transfer', 'DSL', true, false),
(12755125, 6, 90.0, 540.0, 'Month-to-Month', 'Mailed Check', 'Fiber Optic', false, true),
(26009249, 12, 70.5, 850.0, 'One Year', 'Credit Card', 'DSL', true, false),
(3270685, 36, 55.0, 1980.0, 'One Year', 'Bank Transfer', 'DSL', true, false),
(29033279, 6, 90.0, 540.0, 'Month-to-Month', 'Mailed Check', 'Fiber Optic', false, true),
(6520539, 24, 60.0, 1440.0, 'Two Year', 'Electronic Check', 'DSL', true, false);
This is just an example of adding a few rows to the table, but generally for production use cases, customers use several ways to add data to the table as documented in Loading data in Amazon Redshift.
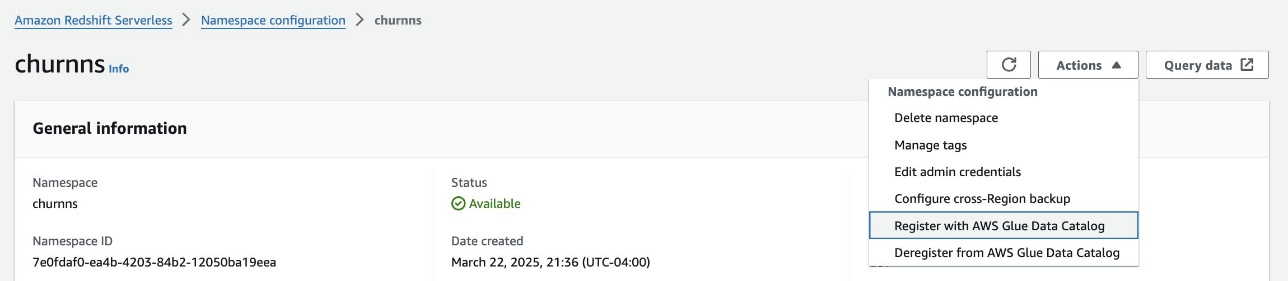
- On the Redshift Serverless console, navigate to the namespace.
- On the Action dropdown menu, choose Register with AWS Glue Data Catalog to integrate with SageMaker Lakehouse.
- Choose Register.

- Sign in to the Lake Formation console as the data lake administrator.
- Under Data Catalog in the navigation pane, choose Catalogs and Pending catalog invitations.
- Select the pending invitation and choose Approve and create catalog.

- Provide a name for the catalog (for example,
churn_lakehouse).
- Under Access from engines, select Access this catalog from Iceberg-compatible engines and choose
DataTransferRole for the IAM role.
- Choose Next.
- Choose Add permissions.
- Under Principals, choose the
datalakeadmin role for IAM users and roles, Super user for Catalog permissions, and choose Add.
- Choose Create catalog.
Redshift Table customer_churn is now created, populated with data and integrated with SageMaker Lakehouse.
Create a SageMaker Unified Studio domain and project
Alice now sets up SageMaker Unified Studio domain and projects so that she can bring users (Bob, Charlie and Doug) together in the new project.
Complete the following steps to create a SageMaker domain and project using SageMaker Unified Studio:
- On the SageMaker Unified Studio console, create a SageMaker Unified Studio domain and project using the All Capabilities profile template. For more details, refer to Setting up Amazon SageMaker Unified Studio. For this post, we create a project named
churn_analysis.
- Setup AWS Identity center with users Bob, Charlie and Doug, Add them to domain and project.
- From SageMaker Unified Studio, navigate to the project overview and on the Project details tab, note the project role Amazon Resource Name (ARN).

- Sign in to the IAM console as an admin user.
- In the navigation pane, choose Roles.
- Search for the project role and add AmazonS3TablesReadOnlyAccess by choosing Add permissions.
SageMaker Unified Studio is now setup with domain, project and users.
Onboard S3 Tables and Redshift tables to the SageMaker Unified Studio project
Alice now configures SageMaker Unified Studio project role for fine-grained access control to determine who on her team gets to access what data sets.
Grant the project role full table access on customer dataset. For that, complete the following steps:
- Sign in to the Lake Formation console as the data lake administrator.
- In the navigation pane, choose Data lake permissions, then choose Grant.
- In the Principals section, for IAM users and roles, choose the project role ARN noted earlier.
- In the LF-Tags or catalog resources section, select Named Data Catalog resources:
- Choose
<account_id>:s3tablescatalog/blog-customer-bucket for Catalogs.
- Choose
customernamespace for Databases.
- Choose customer for Tables.
- In the Table permissions section, select Select and Describe for permissions.
- Choose Grant.
Now grant the project role access to subset of columns from customer_churn dataset.
- In the navigation pane, choose Data lake permissions, then choose Grant.
- In the Principals section, for IAM users and roles, choose the project role ARN noted earlier.
- In the LF-Tags or catalog resources section, select Named Data Catalog resources:
- Choose
<account_id>:churn_lakehouse/dev for Catalogs.
- Choose public for Databases.
- Choose
customer_churn for Tables.
- In the Table Permissions section, select Select.
- In the Data Permissions section, select Column-based access.
- For Choose permission filter, select Include columns and choose
customer_id, internet_service, and is_churned.
- Choose Grant.

All users in the project churn_analysis in SageMaker Unified Studio are now setup. They have access to all columns in the table and fine-grained access permissions for Redshift table where they have access to only three columns.
Verify data access in SageMaker Unified Studio
Alice can now do a final verification if the data is all available to ensure that each of her team members are set up to access the datasets.
Now you can verify data access for different users in SageMaker Unified Studio.
- Sign in to SageMaker Unified Studio as Bob and choose the
churn_analysis
- Navigate to the Data explorer to view
s3tablescatalog and churn_lakehouse under Lakehouse.

Data Analyst uses Athena for analyzing customer churn
Bob, the data analyst can now logs into to the SageMaker Unified Studio, chooses the churn_analysis project and navigates to the Build options and choose Query Editor under Data Analysis & Integration.

Bob chooses the connection as Athena (Lakehouse), the catalog as s3tablescatalog/blog-customer-bucket, and the database as customernamespace. And runs the following SQL to analyze the data for customer churn:
select * from "churn_lakehouse/dev"."public"."customer_churn" a,
"s3tablescatalog/blog-customer-bucket"."customernamespace"."customer" b
where a.customer_id=b.c_customer_sk limit 10;

Bob can now join the data across S3 Tables and Redshift in Athena and now can proceed to build full SQL analytics capability to automate building customer growth and churn leadership daily reports.
BI Analyst uses Redshift engine for analyzing customer data
Charlie, the BI Analyst can now logs into the SageMaker Unified Studio and chooses the churn_analysis project. He navigates to the Build options and choose Query Editor under Data Analysis & Integration. He chooses the connection as Redshift (Lakehouse), Databases as dev, Schemas as public.

He then runs the follow SQL to perform his specific analysis.
select * from "dev@churn_lakehouse"."public"."customer_churn" a,
"blog-customer-bucket@s3tablescatalog"."customernamespace"."customer" b
where a.customer_id=b.c_customer_sk limit 10;
 Charlie can now further update the SQL query and use it to power QuickSight dashboards that can be shared with Sales team members.
Data engineer uses AWS Glue Spark engine to process customer data
Finally, Doug logs in to SageMaker Unified Studio as Doug and chooses the churn_analysis project to perform his analysis. He navigates to the Build options and choose JupyterLab under IDE & Applications. He downloads the churn_analysis.ipynb notebook and upload it into the explorer. He then runs the cells by selecting compute as project.spark.compatibility.
He runs the following SQL to analyze the data for customer churn:

Doug, now can use Spark SQL and start processing data from both S3 tables and Redshift tables and start building forecasting models for customer growth and churn
Cleaning up
If you implemented the example and want to remove the resources, complete the following steps:
- Clean up S3 Tables resources:
- Delete the table.
- Delete the namespace in the table bucket.
- Delete the table bucket.
- Clean up the Redshift data resources:
- On the Lake Formation console, choose Catalogs in the navigation pane.
- Delete the
churn_lakehouse catalog.
- Delete SageMaker project, IAM roles, Glue resources, Athena workgroup, S3 buckets created for domain.
- Delete SageMaker domain and VPC created for the setup.
Conclusion
In this post, we showed how you can use SageMaker Lakehouse to unify data across S3 Tables and Redshift data warehouses, which can help you build powerful analytics and AI/ML applications on a single copy of data. SageMaker Lakehouse gives you the flexibility to access and query your data in-place with Iceberg-compatible tools and engines. You can secure your data in the lakehouse by defining fine-grained permissions that are enforced across analytics and ML tools and engines.
For more information, refer to Tutorial: Getting started with S3 Tables, S3 Tables integration, and Connecting to the Data Catalog using AWS Glue Iceberg REST endpoint. We encourage you to try out the S3 Tables integration with SageMaker Lakehouse integration and share your feedback with us.
About the authors
 Sandeep Adwankar is a Senior Technical Product Manager at AWS. Based in the California Bay Area, he works with customers around the globe to translate business and technical requirements into products that enable customers to improve how they manage, secure, and access data.
Srividya Parthasarathy is a Senior Big Data Architect on the AWS Lake Formation team. She works with the product team and customers to build robust features and solutions for their analytical data platform. She enjoys building data mesh solutions and sharing them with the community.
Aditya Kalyanakrishnan is a Senior Product Manager on the Amazon S3 team at AWS. He enjoys learning from customers about how they use Amazon S3 and helping them scale performance. Adi’s based in Seattle, and in his spare time enjoys hiking and occasionally brewing beer.


 Sandeep Adwankar is a Senior Product Manager at AWS. Based in the California Bay Area, he works with customers around the globe to translate business and technical requirements into products that enable customers to improve how they manage, secure, and access data.
 Srividya Parthasarathy is a Senior Big Data Architect on the AWS Lake Formation team. She enjoys building data mesh solutions and sharing them with the community.


 A photo taken by Thembile Martis in AWS Summit Amsterdam 2025


 Charlie can now further update the SQL query and use it to power QuickSight dashboards that can be shared with Sales team members.
 Sandeep Adwankar is a Senior Technical Product Manager at AWS. Based in the California Bay Area, he works with customers around the globe to translate business and technical requirements into products that enable customers to improve how they manage, secure, and access data.
 Srividya Parthasarathy is a Senior Big Data Architect on the AWS Lake Formation team. She works with the product team and customers to build robust features and solutions for their analytical data platform. She enjoys building data mesh solutions and sharing them with the community.


 Ramesh H Singh is a Senior Product Manager Technical (External Services) at AWS in Seattle, Washington, currently with the Amazon SageMaker team. He is passionate about building high-performance ML/AI and analytics products that enable enterprise customers to achieve their critical goals using cutting-edge technology. Connect with him on
  Pradeep Misra is a Principal Analytics Solutions Architect at AWS. He works across Amazon to architect and design modern distributed analytics and AI/ML platform solutions. He is passionate about solving customer challenges using data, analytics, and AI/ML. Outside of work, Pradeep likes exploring new places, trying new cuisines, and playing board games with his family. He also likes doing science experiments, building LEGOs and watching anime with his daughters.
 Rajat Mathur is a Software Development Manager at AWS, leading the Amazon DataZone and SageMaker Unified Studio engineering teams. His team designs, builds, and operates services which make it faster and easier for customers to catalog, discover, share, and govern data. With deep expertise in building distributed data systems at scale, Rajat plays a key role in advancing AWS’s data analytics and AI/ML capabilities.
 Jie Lan is a Software Engineer at AWS based in New York, where he works on the Amazon SageMaker team. He is passionate about developing cutting-edge solutions in the big data and AI space, helping customers leverage cloud technology to solve complex problems.
