Post Syndicated from Adam Keller original https://aws.amazon.com/blogs/devops/how-organizations-are-modernizing-for-cloud-operations/
Over the past decade, we’ve seen a rapid evolution in how IT operations teams and application developers work together. In the early days, there was a clear division of responsibilities between the two teams, with one team focused on providing and maintaining the servers and various components (i.e., storage, DNS, networking, etc.) for the application to run, while the other primarily focused on developing the application’s features, fixing bugs, and packaging up their artifacts for the operations team to deploy. Ultimately, this division led to a siloed approach which presented glaring challenges. These siloes hindered communication between the teams, which would often result in developers being ready to ship code and passing it over to the operations teams with little to no collaboration prior. In turn, operations teams were often left scrambling trying to deliver on the requirements at the last minute. This would lead to bottlenecks in software delivery, delaying features and bug fixes from being shipped. Aside from software delivery, operations teams were primarily responsible for handling on-call duties, which encompassed addressing issues arising from both applications and infrastructure. Consequently, when incidents occurred, the operations teams were the ones receiving alerts, irrespective of the source of the problem. This raised the question: what motivates the software developers to create resilient and dependable software? Terms such as “throw it over the wall” and “it works on my laptop” were coined because of this and are still commonly referenced in discussion today.
The DevOps movement emerged in response to these challenges, aiming to build a bridge between developers and operations teams. DevOps focuses on collaboration between the two teams through communication and integration by fostering a culture of shared responsibility. This approach promotes the use of automation of infrastructure and application code leveraging continuous integration (CI) and continuous delivery (CD), microservices architectures, and visibility through monitoring, logging and tracing. The end result of operating in a DevOps model provides quicker and more reliable release cycles. While the ideology is well intentioned, implementing a DevOps practice is not easy as organizations struggle to adapt and adhere to the cultural expectations. In addition, teams can struggle to find the right balance between speed and stability, which often times results in reverting back to old behaviors due to fear of downtime and instability of their environments. While DevOps is very focused on culture through collaboration and automation, not all developers want to be involved in operations and vice versa. This poses the question: how do organizations centralize a frictionless developer experience, with guardrails and best practices baked in, while providing a golden path for developers to self serve? This is where platform engineering comes in.
Platform engineering has emerged as a critical discipline for organizations, which is driving the next evolution of infrastructure and operations, while simultaneously empowering developers to create and deliver robust, scalable applications. It aims to improve developer experience by providing self service mechanisms that provide some level of abstraction for provisioning resources, with good practices baked in. This builds on top of DevOps practices by enabling the developer to have full control of their resources through self service, without having to throw it over the wall. There are various ways that platform engineering teams implement these self service interfaces, from leveraging a GitOps focused strategy to building Internal Developer Platforms with a UI and/or API. With the increasing demand for faster and more agile development, many organizations are adopting this model to streamline their operations, gain visibility, reduce costs, and lower the friction of onboarding new applications.
In this blog post, we will explore the common operational models used within organizations today, where platform engineering fits within these models, the common patterns used to build and develop these self-service platforms, and what lies ahead for this emerging field.
Operational Models
It’s important for us to start by understanding how we see technology teams operate today and the various ways they support development teams from instantiating infrastructure to defining pipelines and deploying application code. In the below diagram we highlight the four common operational models and will discuss each to understand the benefits and challenges they bring. This is also critical in understanding where platform teams fit, and where they don’t.

Centralized Provisioning
In a centralized provisioning model, the responsibility for architecting, deploying, and managing infrastructure falls primarily on a centralized team. Organizations assign enforcement of controls into specific roles with narrow scope, including release management, process management, and segmentation of siloed teams (networking, compute, pipelines, etc). The request model generally requires a ticket or request to be sent to the central or dedicated siloed team, ticket enters a backlog, and the developers wait until resources can be provisioned on their behalf. In an ideal world, the central teams can quickly provision the resources and pipelines to get the developers up and running; but, in reality these teams are busy with work and have to prioritize accordingly which often times leaves development teams waiting or having to predict what they need well in advance.
While this model provides central control over resource provisioning, it introduces bottlenecks into the delivery process and generally results in slower deployment cycles and feedback loops. This model becomes especially challenging when supporting a large number of development teams with varying requirements and use cases. Ultimately this model can lead to frustration and friction between teams and hence why organizations after some time look to move away from operating in this model. This leads us to segue into the next model, which is the Platform-enabled Golden Path.
Platform-enabled Golden Path
The platform-enabled golden path model is an approach that allows for developer to have some form of customization while still maintaining consistency by following a set of standards. In this model, platform engineers clearly lay out “preferred” standards with sane defaults, guardrails, and good practices based on common architectures that development teams can use as-is. Sophisticated platform teams may implement their own customizations on top of this framework in the following ways:
The platform engineering team is responsible for creating and updating the templates, with maintenance responsibilities typically being shared. This approach strikes a balance between consistency and flexibility, allowing for some customization while still maintaining standards. However, it can be challenging to maintain visibility across the organization, as development teams have more freedom to customize their infrastructure. This becomes especially challenging when platform teams want a change to propagate across resources deployed by the various development teams building on top of these patterns.
Embedded DevOps
Embedded DevOps is a model in which DevOps engineers are directly aligned with development teams to define, provision, and maintain their infrastructure. There are a couple of common patterns around how organizations use this model.
- Floating model: A central DevOps team can leverage a floating model where a DevOps engineer will be directly embedded onto a development team early in the development process to help build out the required pipelines and infrastructure resources, and jump to another team once everything is up and running.
- Permanent embedded model: Alternatively, a development team can have a permanent DevOps engineer on the team to help support early iterations as well as maintenance as the application evolves. The DevOps engineer is ideally there from the beginning of the project and continues to support and improve the infrastructure and automation based on feature requests and bug fixes.
A central platform and/or architecture team may define the acceptable configurations and resources, while DevOps engineers decide how to best use them to meet the needs of their development team. Individual teams are responsible for maintenance and updating of the templates and pipelines. This model offers greater agility and flexibility, but also requires the funding to hire DevOps engineers per development team, which can become costly as development teams scale. It’s important that when operating in this model to maintain collaboration between members of the DevOps team to ensure that best practices can be shared.
Decentralized DevOps
Lastly, the decentralized DevOps model gives development teams full end-to-end ownership and responsibility for defining and managing their infrastructure and pipelines. A central team may be focused on building out guardrails and boundaries to ensure that they limit the blast radius within the boundaries. They can also create a process to ensure that infrastructure deployed meets company standards, while ensuring development teams are free to make design decisions and remain autonomous. This approach offers the greatest agility and flexibility, but also the highest risk of inconsistency, errors, and security vulnerabilities. Additionally, this model requires a cultural shift in the organization because the development teams now own the entire stack, which results in more responsibility. This model can be a deterrent to developers, especially if they are unfamiliar with building resources in the cloud and/or don’t want to do it.
Overall, each model has its strengths and weaknesses, and the purpose of this blog is to educate on the patterns that are emerging. Ultimately the right approach depends on the organization’s specific needs and goals as well as their willingness to shift culturally. Of the above patterns, the two that are emerging as the most common are Platform-enabled Golden Path and Decentralized DevOps. Furthermore, we’re seeing that more often than not platform teams are finding themselves going back and forth between the two patterns within the same organization. This is in part due to technology making infrastructure creation in the cloud more accessible through abstraction and automation (think of tools like the AWS Cloud Development Kit (CDK), AWS Serverless Application Model (SAM) CLI, AWS Copilot, Serverless framework, etc). Let’s now look at the technology patterns that are emerging to support these use cases.
Emerging patterns
Of the trends that are on the rise, Internal Developer Platforms and GitOps practices are becoming increasingly popular in the industry due to their ability to streamline the software development process and improve collaboration between development and platform teams. Internal Developer Platforms provide a centralized platform for developers to access resources and tools needed to build, test, deploy, and monitor applications and associated infrastructure resources. By providing a self-service interface with pre-approved patterns (via UI, API, or Git), internal developer platforms empower development teams to work independently and collaborate with one another more effectively. This reduces the burden on IT and operations teams while also increasing the agility and speed of development as developers aren’t required to wait in line to get resources provisioned. The paradigm shifts with Internal Developer Platforms because the platform teams are focused on building the blueprints and defining the standards for backend resources that development teams centrally consume via the provided interfaces. The platform team should view the internal developer platform as a product and look at developers as their customer.
While internal developer platforms provide a lot of value and abstraction through a UI and API’s, some organizations prefer to use Git as the center of deployment orchestration, and this is where leveraging GitOps can help. GitOps is a methodology that leverages Git as the source of orchestrating and managing the deployment of infrastructure and applications. With GitOps, infrastructure is defined declaratively as code, and changes are tracked in Git, allowing for a more standardized and automated deployment process. Using git for deployment orchestration is not new, but there are some concepts with GitOps that take Git orchestration to a new level.
Let’s look at the principles of GitOps, as defined by OpenGitOps:
- Declarative
- A system managed by GitOps must have its desired state expressed declaratively.
- Versioned and Immutable
- Desired state is stored in a way that enforces immutability, versioning and retains a complete version history.
- Pulled Automatically
- Software agents automatically pull the desired state declarations from the source.
- Continuously Reconciled
- Software agents continuously observe actual system state and attempt to apply the desired state.
GitOps helps to reduce the risk of errors and improve consistency across the organization as all change is tracked centrally. Additionally this provides developers with a familiar interface in git as well as the ability to store the desired state of their infrastructure and applications in one place. Lastly, GitOps is focused on ensuring that the desired state in git is always maintained, and if drift occurs, an external process will reconcile the state of the resources. GitOps was born in the Kubernetes ecosystem using tools like Flux and ArgoCD.
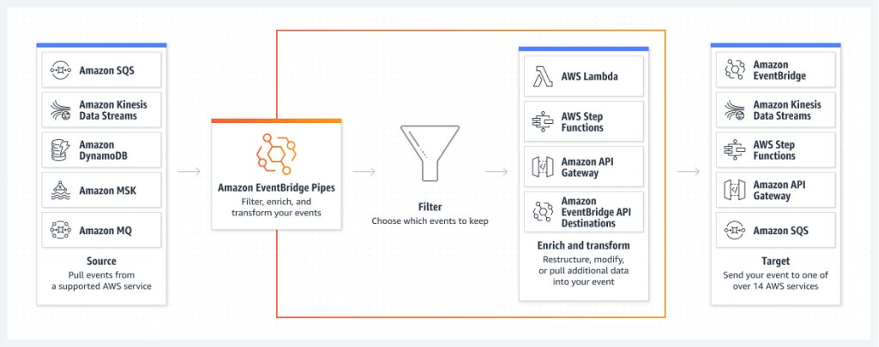
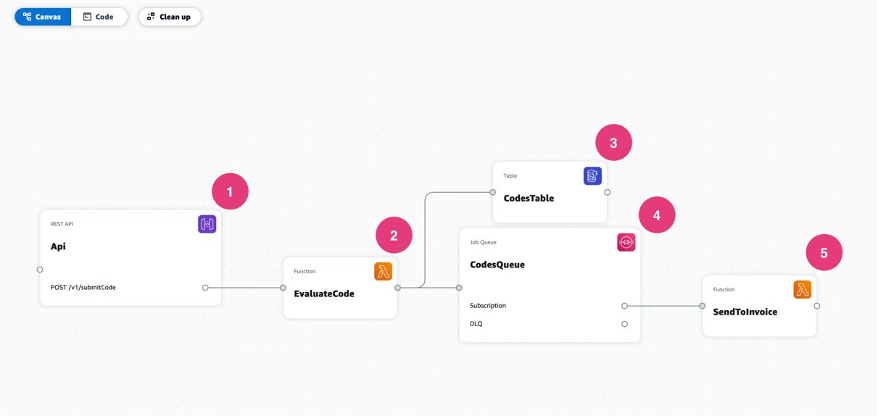
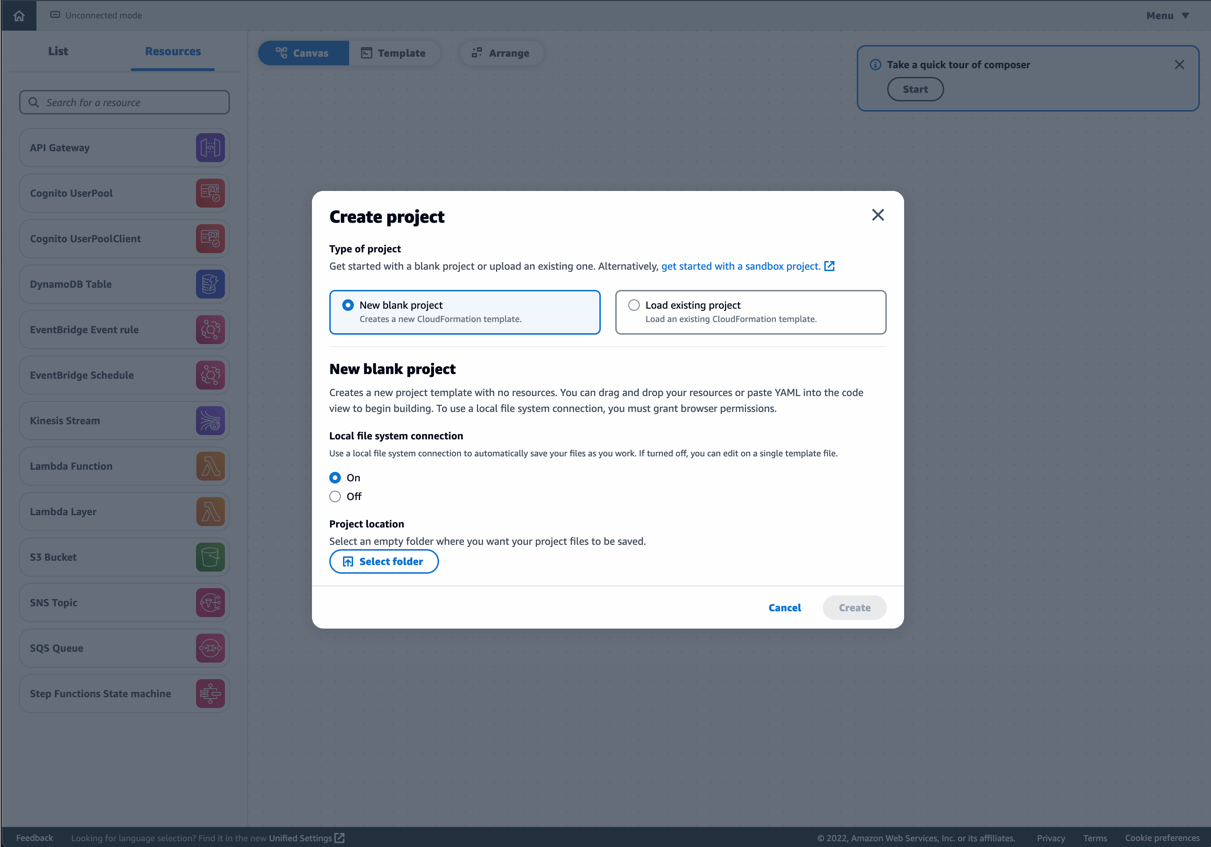
The final emerging trend to discuss is particularly relevant to teams functioning within a decentralized DevOps model, possessing end-to-end responsibility for the stack, encompassing infrastructure and application delivery. The amount of cognitive load required to connect the underlying cloud resources together while also being an expert in building out business logic for the application is extremely high, and hence why teams look to harness the power of abstraction and automation for infrastructure provisioning. While this may appear analogous to previously mentioned practices, the key distinction lies in the utilization of tools specifically designed to enhance the developer experience. By abstracting various components (such as networking, identity, and stitching everything together), these tools eliminate the necessity for interaction with centralized teams, empowering developers to operate autonomously and assume complete ownership of the infrastructure. This trend is exemplified by the adoption of innovative tools such as AWS App Composer, AWS CodeCatalyst, SAM CLI, AWS Copilot CLI, and the AWS Cloud Development Kit (CDK).
Looking ahead
If there is one thing that we can ascertain it’s that the journey to successful developer enablement is ongoing, and it’s clear that finding that balance of speed, security, and flexibility can be difficult to achieve. Throughout all of these evolutionary trends in technology, Git has remained as the nucleus of infrastructure and application deployment automation. This is not new; however, the processes being built around Git such as GitOps are. The industry continues to gravitate towards this model, and at AWS we are looking at ways to enable builders to leverage git as the source of truth with simple integrations. For example, AWS Proton has built integrations with git for central template storage with a feature called template sync and recently released a feature called service sync, which allows developers to configure and deploy their Proton services using Git. These features empower the platform team and developers to seamlessly store their templates and desired infrastructure resource states within Git, requiring no additional effort beyond the initial setup.
We also see that interest in building internal developer platforms is on a sharp incline, and it’s still in the early days. With tools like AWS Proton, AWS Service Catalog, Backstage, and other SaaS providers, platform teams are able to define patterns centrally for developers to self serve patterns via a library or “shopping cart”. As mentioned earlier, it’s vital that the teams building out the internal developer platforms think of ways to enable the developer to deploy supplemental resources that aren’t defined in the central templates. While the developer platform can solve the majority of the use cases, it’s nearly impossible to solve them all. If you can’t enable developers to deploy resources on top of their platform deployed services, you’ll find that you’re back to the original problem statement outlined in the beginning of this blog which can ultimately result in a failed implementation. AWS Proton solves this through a feature we call components, which enables developers to bring their own IaC templates to deploy on top of their services deployed through Proton.
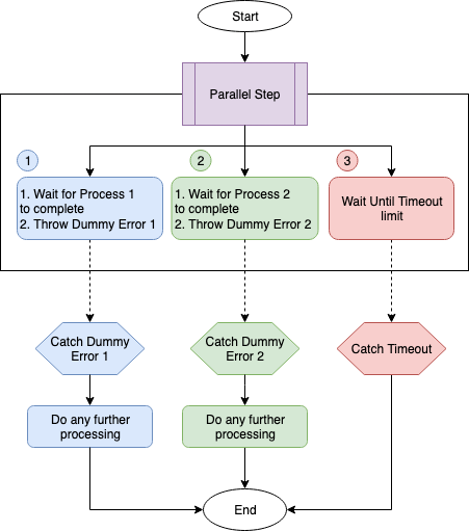
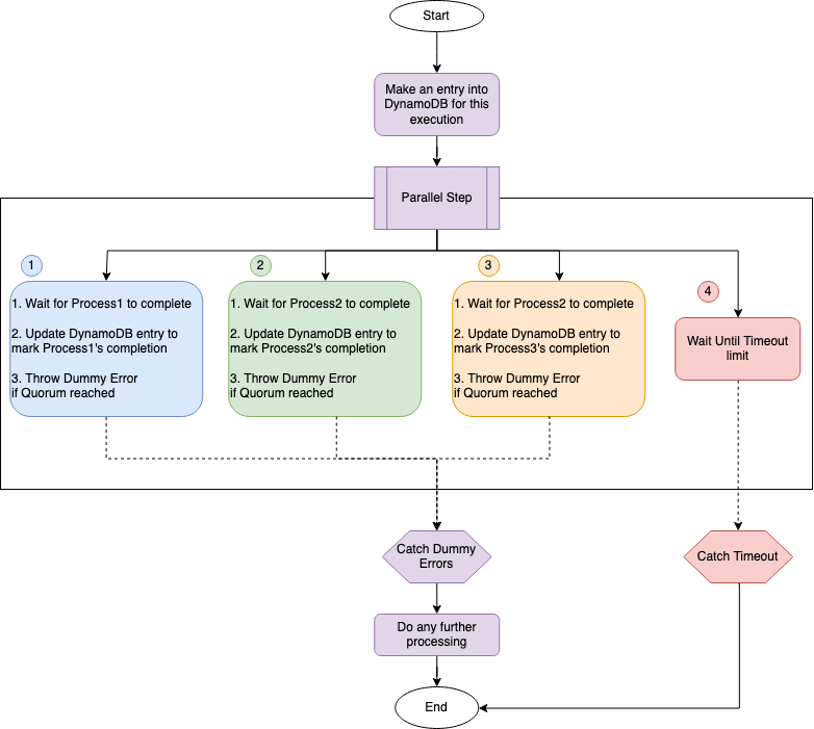
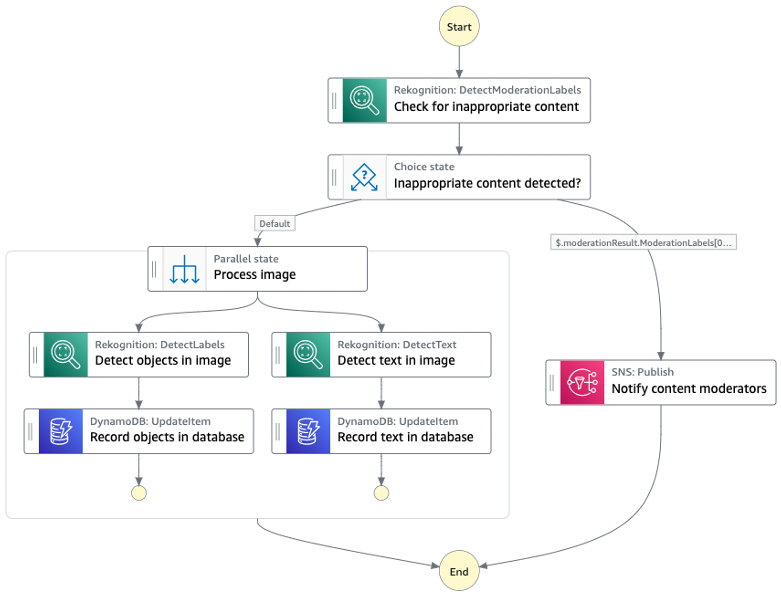
The rising popularity of the aforementioned patterns reveals an unmet need for developers who seek to tailor their cloud resources according to the specific requirements of their applications and the demands of platform/central teams that require governance. This is particularly prevalent in serverless workloads, where developers often integrate their application and infrastructure code, utilizing services such as AWS Step Functions to transfer varying degrees of logic from the application layer to the managed service itself. Centralizing these resources becomes increasingly challenging due to their dynamic nature, which adapts to the evolving requirements of business logic. Consequently, it is nearly impossible to consolidate these patterns into a universally applicable blueprint for reuse across diverse business scenarios.
As the distinction between cloud resources and application code becomes increasingly blurred, developers are compelled to employ tools that streamline the underlying logic, enabling them to achieve their desired outcomes swiftly and securely. In this context, it is crucial for platform teams to identify and incorporate these tools, ensuring that organizational safeguards and expectations are upheld. By doing so, they can effectively bridge the gap between developers’ preferences and the essential governance required by the platform or central team.
Wrapping up
We’ve explored the various operating models and emerging trends designed to facilitate these models. Platform Engineering represents the ongoing evolution of DevOps, aiming to enhance the developer experience for rapid and secure deployments. It is crucial to recognize that developers possess varying skill sets and preferences, even within the same organization. As previously discussed, some developers prefer complete ownership of the entire stack, while others concentrate solely on writing code without concerning themselves with infrastructure. Consequently, the platform engineering practice must continuously adapt to accommodate these patterns in a manner that fosters enablement rather than posing as obstacles. To achieve this, the platform must be treated as a product, with developers as its customers, ensuring that their needs and preferences are prioritized and addressed effectively.
To determine where your organization fits within the discussed operational models, we encourage you to initiate a self-assessment and have internal discussions. Evaluate your current infrastructure provisioning, deployment processes, and development team support. Consider the benefits and challenges of each model and how they align with your organization’s specific needs, goals, and cultural willingness to shift.
To facilitate this process, gather key stakeholders from various teams, including leadership, platform engineering, development, and DevOps, for a collaborative workshop. During this workshop, review the four operational models (Centralized Provisioning, Platform-enabled Golden Path, Embedded DevOps, and Decentralized DevOps) and discuss the following:
- How closely does each model align with your current organizational structure and processes?
- What are the potential benefits and challenges of adopting or transitioning to each model within your organization?
- What challenges are you currently facing with the model that you operate under?
- How can technology be leveraged to optimize infrastructure creation and deployment automation?
By conducting this self-assessment and engaging in open dialogue, your organization can identify the most suitable operational model and develop a strategic plan to optimize collaboration, efficiency, and agility within your technology teams. If a more guided approach is preferred, reach out to our solutions architects and/or AWS partners to assist.


 Amazon EventBridge Scheduler | Schedule tasks over +200 targets!


