Amazon Web Services (AWS) is pleased to announce that 20 additional AWS services have achieved Provisional Authority to Operate (P-ATO) from the Federal Risk and Authorization Management Program (FedRAMP) Joint Authorization Board (JAB). The following are the 20 AWS services with FedRAMP authorization for the U.S. federal government and organizations with regulated workloads:
AWS App Mesh provides application-level networking to help your services communicate with each other across multiple types of compute infrastructure.
AWS Audit Manager helps you to continuously audit your AWS usage to simplify how risk and compliance are assessed with regulations and industry standards.
AWS Chatbot is an interactive agent that helps you monitor, operate, and troubleshoot AWS workloads in your chat channels.
Amazon Chime SDK is a collection of client software development kits that use resources in your AWS account to add collaborative audio calling, video calling, and screen share features to your web or mobile applications.
AWS Cloud9 is a cloud-based integrated development environment (IDE) that helps you write, run, and debug your code with just a browser.
Amazon Detective helps you analyze, investigate, and quickly identify the root cause of potential security issues or suspicious activities.
EC2 Image Builder simplifies the building, testing, and deployment of virtual machine and container images for use on AWS or on-premises.
Amazon FinSpace is a data management and analytics service that is purpose built for the financial services industry (FSI).
AWS Firewall Manager is a security management service that allows you to centrally configure and manage firewall rules across your accounts and applications in AWS Organizations.
Amazon Forecast is a fully managed service that uses machine learning to deliver highly accurate forecasts.
Amazon MQ is a managed message broker service for Apache ActiveMQ and RabbitMQ to help you set up and operate message brokers on AWS.
Amazon Neptune is a fast, reliable, fully managed graph database service that helps you build and run applications that work with highly connected datasets.
Amazon Quantum Ledger Database (Amazon QLDB) is a purpose-built ledger database that provides a complete and cryptographically verifiable history of changes made to your application data.
Amazon Timestream is a fast, scalable, and serverless time series database service for AWS IoT Core and operational applications that can help you to store and analyze trillions of events per day up to 1,000 times faster and at as little as 1/10th the cost of relational databases.
AWS is continually expanding the scope of our compliance programs to help customers use authorized services for sensitive and regulated workloads. AWS now offers 123 AWS services authorized in the AWS US East/West Regions under FedRAMP Moderate Authorization, and 105 services authorized in the AWS GovCloud (US) Regions under FedRAMP High Authorization.
With AWS Security Hub you are able to manage your security posture in AWS, perform security best practice checks, aggregate alerts, and automate remediation. Now you are able to use Amazon Simple Notification Service (Amazon SNS) to subscribe to the new Security Hub Announcements topic to receive updates about new Security Hub services and features, newly supported standards and controls, and other Security Hub changes.
Introducing the Security Hub Announcements topic
Amazon SNS follows the publish/subscribe (pub/sub) messaging model, in which notifications are delivered to you by using a push mechanism that eliminates the need for you to periodically check or poll for new information and updates. You can now use this push mechanism to receive notifications about Security Hub by subscribing to the dedicated Security Hub Announcements topic.
The Security Hub Announcements topic publishes the following types of notifications:
General notifications
Upcoming standards and controls
New AWS Regions supported
New standards and controls
Updated standards and controls
Retired standards and controls
Updates to the AWS Security Finding Format (ASFF)
New integrations
New features
Changes to existing features
How to use the Security Hub Announcements topic
You can subscribe to the SNS topic for Security Hub Announcements to receive notification messages about newly released finding types, updates to the existing finding types, and other functionality changes. By subscribing to the SNS topic, you will receive Security Hub Announcements messages as soon as they are published. The notifications are available in all protocols that Amazon SNS supports, such as email and SMS. For more information about supported protocols in Amazon SNS, see Subscribing to an Amazon SNS topic.
The Security Hub Announcements topic is available in all AWS Regions in the aws and aws-cn partitions, but is not yet available in the AWS GovCloud (US) Regions (the aws-us-gov partition). Later in this post, we’ll show you how to subscribe to the Security Hub Announcements topic in a specific AWS Region by using the topic Amazon Resource Name (ARN) for that Region. The SNS topic messages are the same across Regions in a partition, so you can choose to subscribe to only one Region in a partition to avoid receiving duplicate information.
However, if you want to invoke an AWS Lambda function in reaction to a Security Hub Announcements message, you must subscribe to the topic ARN that is in the same Region as the Lambda function. The Lambda function can receive the SNS topic message payload as an input parameter and manipulate the information in the message, publish the message to other SNS topics, or send the message to other AWS services. For more information, see Subscribing a function to a topic in the Amazon SNS Developer Guide.
The same is true if you want to subscribe an Amazon Simple Queue Service (Amazon SQS) queue to the Security Hub Announcements topic, you must use a topic ARN that is in the same Region as the SQS queue. The SQS queue can be used to persist announcement SNS topic messages in the queue for other applications to process at a later time. For more information, see Subscribing an Amazon SQS queue to an Amazon SNS topic in the Amazon SQS Developer Guide.
IAM permissions
Your user account must have sns::subscribe AWS Identity and Access Management (IAM) permissions to subscribe to an SNS topic. For more information on IAM permissions for Amazon SNS, see Using identity-based policies with Amazon SNS.
Subscribe to the Security Hub Announcements topic
The following is the list of Security Hub Announcements topic ARNs for each currently supported Region. The examples in this post use the US West (Oregon) Region (us-west-2), but you can update the procedures with one of the following ARNs to use a different supported Region.
The two procedures that follow show you how to subscribe an email address to the Security Hub Announcements topic by using the AWS Management Console and the AWS CLI.
To subscribe an email address to the Security Hub Announcements topic (console)
For Endpoint, enter an email address that you can use to receive the notification.
Choose Create subscription.
In your email application, open the message from AWS Notifications and open the link to confirm your subscription. Your web browser displays a confirmation response from Amazon SNS, similar to that shown in Figure 1.
The following steps show you how to subscribe an email address to the Security Hub Announcements topic by using the AWS Command Line Interface (AWS CLI).
To subscribe an email address to the Security Hub Announcements topic (AWS CLI)
Run the following command in the AWS CLI, replacing <[email protected]> with your email address, and optionally replacing the ARN and reference to us-west-2 if you want to use a different Region: aws sns --region us-west-2 subscribe --topic-arn arn:aws:sns:us-west-2:393883065485:SecurityHubAnnouncements --protocol email --notification-endpoint<[email protected]>
In your email application, open the message from AWS Notifications and open the link to confirm your subscription.
Your web browser displays a confirmation response from Amazon SNS, similar to that shown in Figure 1.
Example subscription responses
The following sections contain examples of a message announcing new standard controls supported by Security Hub in email and sqs protocol types.
Example message from an email subscription (protocol type: email)
{"AnnouncementType":"NEW_STANDARDS_CONTROLS", “Title”:”[New Controls] 36 new Security Hub controls added to the AWS Foundational Security Best Practices standard”, "Description":"We have added 36 new controls to the AWS Foundational Security Best Practices standard. These include controls for Amazon Auto Scaling (AutoScaling.3, AutoScaling.4, AutoScaling.6), AWS CloudFormation (CloudFormation.1), Amazon CloudFront (CloudFront.10), Amazon Elastic Compute Cloud (Amazon EC2) (EC2.23, EC2.24, EC2.27), Amazon Elastic Container Registry (Amazon ECR) (ECR.1, ECR.2), Amazon Elastic Container Service (Amazon ECS) (ECS.3, ECS.4, ECS.5, ECS.8, ECS.10, ECS.12), Amazon Elastic File System (Amazon EFS) (EFS.3, EFS.4), Amazon Elastic Kubernetes Service (Amazon EKS) (EKS.2), Elastic Load Balancing (ELB.12, ELB.13, ELB.14), Amazon Kinesis (Kinesis.1), AWS Network Firewall (NetworkFirewall.3, NetworkFirewall.4, NetworkFirewall.5), Amazon OpenSearch Service (Opensearch.7), Amazon Redshift (Redshift.9), Amazon Simple Storage Service (Amazon S3) (S3.13), Amazon Simple Notification Service (SNS.2), AWF WAF (WAF.2, WAF.3, WAF.4, WAF.6, WAF.7, WAF.8). If you enabled the AWS Foundational Security Best Practices standard in an account and configured Security Hub to automatically enable new controls, these controls are enabled by default. Availability of controls can vary by Region."}
Example message from an SQS queue subscription (protocol type: sqs)
The following message shows the additional metadata included with an SQS subscription to the Security Hub Announcements topic. For more information about the metadata included in an SNS topic message delivered to an SQS queue, see Fanout to Amazon SQS Queues.
{
  "Type" : "Notification",
  "MessageId" : "c9c03e46-69df-5c3c-84e9-6520708ac394",
  "TopicArn" : "arn:aws:sns:us-west-2:393883065485:SecurityHubAnnouncements",
  "Message" : "{\"AnnouncementType\":\"NEW_STANDARDS_CONTROLS\",\"Title\":\"[New Controls] 36 new Security Hub controls added to the AWS Foundational Security Best Practices standard\",\"Description\":\"We have added 36 new controls to the AWS Foundational Security Best Practices standard. These include controls for Amazon Auto Scaling (AutoScaling.3, AutoScaling.4, AutoScaling.6), AWS CloudFormation (CloudFormation.1), Amazon CloudFront (CloudFront.10), Amazon Elastic Compute Cloud (Amazon EC2) (EC2.23, EC2.24, EC2.27), Amazon Elastic Container Registry (Amazon ECR) (ECR.1, ECR.2), Amazon Elastic Container Service (Amazon ECS) (ECS.3, ECS.4, ECS.5, ECS.8, ECS.10, ECS.12), Amazon Elastic File System (Amazon EFS) (EFS.3, EFS.4), Amazon Elastic Kubernetes Service (Amazon EKS) (EKS.2), Elastic Load Balancing (ELB.12, ELB.13, ELB.14), Amazon Kinesis (Kinesis.1), AWS Network Firewall (NetworkFirewall.3, NetworkFirewall.4, NetworkFirewall.5), Amazon OpenSearch Service (Opensearch.7), Amazon Redshift (Redshift.9), Amazon Simple Storage Service (Amazon S3) (S3.13), Amazon Simple Notification Service (SNS.2), AWF WAF (WAF.2, WAF.3, WAF.4, WAF.6, WAF.7, WAF.8). If you enabled the AWS Foundational Security Best Practices standard in an account and configured Security Hub to automatically enable new controls, these controls are enabled by default. Availability of controls can vary by Region. \"}",
  "Timestamp" : "2022-08-04T18:59:33.319Z",
  "SignatureVersion" : "1",
  "Signature" : "GdKokPEUexpKZn5da5u/p5eZF1cE3JUyL0uPVKmPnDzd3orkk5jJ211VsOflUFi6V9lSXF/V6RBpQN/9f3+JBFBprng7BRQwT9I4jSa1xOn1L3xKXEVGvWI6nl1oDqBl21Pj3owV+NZ+Exd2W0dpgg8B1LG4bYq5T73MjHjWGtelcBa15TpIz/+rynqanXCKCvc/50V/XZLjA5M7gU6Dzs9CULIjkdEpCsw5FvSxbtkEd6Ktx4LH7Zq6FlPKNli3EaEHRKh9uYPo6sR/yvF4RWg3E9O4dVsK7A8uTdR+pwVCU1M601KMRxO1OWF8VIdvyPINJND8Nu/70GRA2L+MRA==",
  "SigningCertURL" : "https://sns.us-west-2.amazonaws.com/SimpleNotificationService-56e67fcb41f6fec09b0196692625d385.pem",
  "UnsubscribeURL" : "https://sns.us-west-2.amazonaws.com/?Action=Unsubscribe&SubscriptionArn=arn:aws:sns:us-west-2:393883065485:SecurityHubAnnouncements:1eb29a83-8726-4366-891c-293ad5e35a53"
}
Note: You need to set up the SQS access policy in order for SNS to push message to the SNS queue. For more information, see Basic examples of Amazon SQS policies.
Available now
The SNS topic for Security Hub Announcements is available today in the Regions described in this post. Subscribe now to stay informed of Security Hub updates. With Amazon SNS, there is no minimum fee, and you pay only for what you use. For more information, see the Amazon SNS pricing page.
If you have feedback about this post, submit comments in the Comments section below. If you have questions about this post, contact AWS Support. You can also start a new thread on AWS Security Hub re:Post to get answers from the community.
Want more AWS Security news? Follow us on Twitter.
The NIST 800-53 framework is a regulatory standard that defines the minimum baseline of security controls for U.S. federal information systems. In 2020, NIST released Revision 5 of the framework to improve security standards for industry partners and government agencies. The set of NIST 800-53 controls provides a foundation for additional laws and regulations within the U.S. government.
AWS meets the NIST 800-53 Revision 4 regulatory standards mandated by government authorities. NIST added numerous security enhancements, such as privacy and supply chain management, to Revision 5 to keep abreast of emerging threats to federal information systems.
In preparation for federal regulators to accept NIST 800-53 Revision 5 as the new requirement standard, AWS has begun efforts to adapt to the new security controls, processes, and procedures. AWS security compliance teams have analyzed the new requirements and launched a project to implement the updates. Although AWS is not required to migrate to the new Revision 5 standard until NIST announces the official regulatory compliance deadline, we are already taking steps to meet the deadline.
AWS Network Firewall helps make it easier for you to secure virtual networks at scale inside Amazon Web Services (AWS). Without having to worry about availability, scalability, or network performance, you can now deploy Network Firewall with the AWS Firewall Manager service. Firewall Manager allows administrators in your organization to apply network firewalls across accounts. This post will take you through different deployment models and demonstrate with step-by-step instructions how this can be achieved.
Here’s a quick overview of the services used in this blog post:
Amazon Virtual Private Cloud (Amazon VPC) is a logically isolated virtual network. It has inbuilt network security controls and routing between VPC subnets by design. An internet gateway is a horizontally scaled, redundant, and highly available VPC component that allows communication between your VPC and the internet.
AWS Transit Gateway is a service that connects your VPCs to each other, to on-premises networks, to virtual private networks (VPNs), and to the internet through a central hub.
AWS Network Firewall is a service that secures network traffic at the organization and account levels. AWS Network Firewall policies govern the monitoring and protection behavior of these firewalls. The specifics of these policies are defined in rule groups. A rule group consists of rules that define reusable criteria for inspecting and processing network traffic. Network Firewall can support thousands of rules that can be based on a domain, port, protocol, IP address, or pattern matching.
AWS Firewall Manager is a security management service that acts as a central place for you to configure and deploy firewall rules across AWS Regions, accounts, and resources in AWS Organizations. Firewall Manager helps you to ensure that all firewall rules are consistently enforced, even as new accounts and resources are created. Firewall Manager integrates with AWS Network Firewall, Amazon Route 53 Resolver DNS Firewall, AWS WAF, AWS Shield Advanced, and Amazon VPC security groups.
Deployment models overview
When it comes to securing multiple AWS accounts, security teams categorize firewall deployment into centralized or distributed deployment models. Firewall Manager supports Network Firewall deployment in both modes. There are multiple additional deployment models available with Network Firewall. For more information about these models, see the blog post Deployment models for AWS Network Firewall.
Centralized deployment model
Network Firewall can be centrally deployed as an Amazon VPC attachment to a transit gateway that you set up with AWS Transit Gateway. Transit Gateway acts as a network hub and simplifies the connectivity between VPCs as well as on-premises networks. Transit Gateway also provides inter-Region peering capabilities to other transit gateways to establish a global network by using the AWS backbone. In a centralized transit gateway model, Firewall Manager can create one or more firewall endpoints for each Availability Zone within an inspection VPC. Network Firewall deployed in a centralized model covers the following use cases:
Filtering and inspecting traffic within a VPC or in transit between VPCs, also known as east-west traffic.
Filtering and inspecting ingress and egress traffic to and from the internet or on-premises networks, also known as north-south traffic.
Distributed deployment model
With the distributed deployment model, Firewall Manager creates endpoints into each VPC that requires protection. Each VPC is protected individually and VPC traffic isolation is retained. You can either customize the endpoint location by specifying which Availability Zones to create firewall endpoints in, or Firewall Manager can automatically create endpoints in those Availability Zones that have public subnets. Each VPC does not require connectivity to any other VPC or transit gateway. Network Firewall configured in a distributed model addresses the following use cases:
Protect traffic between a workload in a public subnet (for example, an EC2 instance) and the internet. Note that the only recommended workloads that should have a network interface in a public subnet are third-party firewalls, load balancers, and so on.
Protect and filter traffic between an AWS resource (for example Application Load Balancers or Network Load Balancers) in a public subnet and the internet.
Deploying Network Firewall in a centralized model with Firewall Manager
The following steps provide a high-level overview of how to configure Network Firewall with Firewall Manager in a centralized model, as shown in Figure 1.
Create an Inspection VPC in each Firewall Manager member account. Firewall Manager will use these VPCs to create firewalls. Follow the steps to create a VPC.
Create the stateless and stateful rule groups that you want to centrally deploy as an administrator. For more information, see Rule groups in AWS Network Firewall.
Build and deploy Firewall Manager policies for Network Firewall, based on the rule groups you defined previously. Firewall Manager will now create firewalls across these accounts.
Finish deployment by updating the related VPC route tables in the member account, so that traffic gets routed through the firewall for inspection.
Figure 1: Network Firewall centralized deployment model
The following steps provide a detailed description of how to configure Network Firewall with Firewall Manager in a centralized model.
To deploy network firewall policy centrally with Firewall Manager (console)
Sign in to your Firewall Manager delegated administrator account and open the Firewall Manager console under AWS WAF and Shield services.
In the navigation pane, under AWS Firewall Manager, choose Security policies.
On the Filter menu, select the AWS Region where your application is hosted, and choose Create policy. In this example, we choose US East (N. Virginia).
As shown in Figure 2, under Policy details, choose the following:
For AWS services, choose AWS Network Firewall.
For Deployment model, choose Centralized.
Figure 2: Network Firewall Manager policy type and Region for centralized deployment
Choose Next.
Enter a policy name.
In the AWS Network Firewall policy configuration pane, you can choose to configure both stateless and stateful rule groups along with their logging configurations. In this example, we are not creating any rule groups and keep the default configurations, as shown in Figure 3. If you would like to add a rule group, you can create rule groups here and add them to the policy.
For Inspection VPC configuration, select the account and add the VPC ID of the inspection VPC in each of the member accounts that you previously created, as shown in Figure 4. In the centralized model, you can only select one VPC under a specific account as the inspection VPC.
Figure 4: Inspection VPC configuration
For Availability Zones, select the Availability Zones in which you want to create the Network Firewall endpoint(s), as shown in Figure 5. You can select by Availability Zone name or Availability Zone ID. Optionally, if you want to specify the CIDR for each Availability Zone, or specify the subnets for firewall subnets, then you can add the CIDR blocks. If you don’t provide CIDR blocks, Firewall Manager queries your VPCs for available IP addresses to use. If you provide a list of CIDR blocks, Firewall Manager searches for new subnets only in the CIDR blocks that you provide.
Figure 5: Network Firewall endpoint Availability Zones configuration
Choose Next.
For Policy scope, choose VPC, as shown in Figure 6.
For Resource cleanup, choose Automatically remove protections from resources that leave the policy scope. When you select this option, Firewall Manager will automatically remove Firewall Manager managed protections from your resources when a member account or a resource leaves the policy scope. Choose Next.
For Policy tags, you don’t need to add any tags. Choose Next.
Review the security policy, and then choose Create policy.
To route traffic for inspection, you manually update the route configuration in the member accounts. Exactly how you do this depends on your architecture and the traffic that you want to filter. For more information, see Route table configurations for AWS Network Firewall.
Note: In current versions of Firewall Manager, centralized policy only supports one inspection VPC per account. If you want to have multiple inspection VPCs in an account to inspect multiple firewalls, you cannot deploy all of them through Firewall Manager centralized policy. You have to manually deploy to the network firewalls in each inspection VPC.
Deploying Network Firewall in a distributed model with Firewall Manager
The following steps provide a high-level overview of how to configure Network Firewall with Firewall Manager in a distributed model, as shown in Figure 7.
Create a new VPC with a desired tag in each Firewall Manager member account. Firewall Manager uses these VPC tags to create network firewalls in tagged VPCs. Follow these steps to create a VPC.
Create the stateless and stateful rule groups that you want to centrally deploy as an administrator. For more information, see Rule groups in AWS Network Firewall.
Build and deploy Firewall Manager policy for network firewalls into tagged VPCs based on the rule groups that you defined in the previous step.
Finish deployment by updating the related VPC route tables in the member accounts to begin routing traffic through the firewall for inspection.
Figure 7: Network Firewall distributed deployment model
The following steps provide a detailed description how to configure Network Firewall with Firewall Manager in a distributed model.
To deploy Network Firewall policy distributed with Firewall Manager (console)
Create new VPCs in member accounts and tag them. In this example, you launch VPCs in the US East (N. Virginia) Region. Create a new VPC in a member account by using the VPC wizard, as follows.
Choose VPC with a Single Public Subnet. For this example, select a subnet in the us-east-1a Availability Zone.
Add a desired tag to this VPC. For this example, use the key Network Firewall and the value yes. Make note of this tag key and value, because you will need this tag to configure the policy in the Policy scope step.
Sign in to your Firewall Manager delegated administrator account and open the Firewall Manager console under AWS WAF and Shield services.
In the navigation pane, under AWS Firewall Manager, choose Security policies.
On the Filter menu, select the AWS Region where you created VPCs previously and choose Create policy. In this example, you choose US East (N. Virginia).
For AWS services, choose AWS Network Firewall.
For Deployment model, choose Distributed, and then choose Next.
Figure 8: Network Firewall Manager policy type and Region for distributed deployment
Enter a policy name.
On the AWS Network Firewall policy configuration page, you can configure both stateless and stateful rule groups, along with their logging configurations. In this example you are not creating any rule groups, so you choose the default configurations, as shown in Figure 9. If you would like to add a rule group, you can create rule groups here and add them to the policy.
Figure 9: Network Firewall policy configuration
Choose Next.
In the Configure AWS Network Firewall Endpoint section, as shown in Figure 10, you can choose Custom endpoint configuration or Automatic endpoint configuration. In this example, you choose Custom endpoint configuration and select the us-east-1a Availability Zone. Optionally, if you want to specify the CIDR for each Availability Zone or specify the subnets for firewall subnets, then you can add the CIDR blocks. If you don’t provide CIDR blocks, Firewall Manager queries your VPCs for available IP addresses to use. If you provide a list of CIDR blocks, Firewall Manager searches for new subnets only in the CIDR blocks that you provide.
Figure 10: Network Firewall endpoint Availability Zones configuration
Choose Next.
For AWS Network Firewall route configuration, choose the following options, as shown in Figure 11. This will monitor the route configuration using the administrator account, to help ensure that traffic is routed as expected through the network firewalls.
For Route management, choose Monitor.
Under Traffic type, for Internet gateway, choose Add to firewall policy.
Select the checkbox for Allow required cross-AZ traffic, and then choose Next.
Important: Be careful when defining the policy scope. Each policy creates Network Firewall endpoints in all the VPCs and their Availability Zones that are within the policy scope. If you select an inappropriate scope, it could result in the creation of a large number of network firewalls and incur significant charges for AWS Network Firewall.
For Resource cleanup, select the Automatically remove protections from resources that leave the policy scope check box, and then choose Next.
For Policy tags, you don’t need to add any tags. Choose Next.
Review the security policy, and then choose Create policy.
To route traffic for inspection, you need to manually update the route configuration in the member accounts. Exactly how you do this depends on your architecture and the traffic that you want to filter. For more information, see Route table configurations for AWS Network Firewall.
Clean up
To avoid incurring future charges, delete the resources you created for this solution.
To delete Firewall Manager policy (console)
Sign in to your Firewall Manager delegated administrator account and open the Firewall Manager console under AWS WAF and Shield services
In the navigation pane, choose Security policies.
Choose the option next to the policy that you want to delete.
Choose Delete all policy resources, and then choose Delete. If you do not select Delete all policy resources, then only the firewall policy on the administrator account will be deleted, not network firewalls deployed in the other accounts in AWS Organizations.
In this blog post, you learned how you can use either a centralized or a distributed deployment model for Network Firewall, so developers in your organization can build firewall rules, create security policies, and enforce them in a consistent, hierarchical manner across your entire infrastructure. As new applications are created, Firewall Manager makes it easier to bring new applications and resources into a consistent state by enforcing a common set of security rules.
If you have feedback about this post, submit comments in the Comments section below. If you have questions about this post, start a new thread on the AWS Firewall Manager re:Post or contact AWS Support.
Want more AWS Security news? Follow us on Twitter.
Maintaining AWS Identity and Access Management (IAM) resources is similar to keeping your garden healthy over time. Having visibility into your IAM resources, especially the resources that are no longer used, is important to keep your AWS environment secure. Proactively detecting and responding to unused IAM roles helps you prevent unauthorized entities from gaining access to your AWS resources. In this post, I will show you how to apply resource tags on IAM roles and deploy serverless technologies on AWS to detect unused IAM roles and to require the owner of the IAM role (identified through tags) to take action.
You can use this solution to check for unused IAM roles in a standalone AWS account. As you grow your workloads in the cloud, you can run this solution for multiple AWS accounts by using AWS Organizations. In this solution, you use AWS Control Tower to create an AWS Organizations organization with a Security organizational unit (OU), and a Security account in this OU. In this blog post, you deploy the solution in the Security account belonging to a Security OU of an organization.
For more information and recommended best practices, see the blog post Managing the multi-account environment using AWS Organizations and AWS Control Tower. Following this best practice, you can create a Security OU, in which you provision one or more Security and Audit accounts that are dedicated for security automation and audit activities on behalf of the entire organization.
Solution architecture
The architecture diagram in Figure 1 demonstrates the solution workflow.
Figure 1: Solution workflow for standalone account or member account of an AWS Organization.
The solution is triggered periodically by an Amazon EventBridgescheduled rule and invokes a series of actions. You specify the frequency (in number of days) when you create the EventBridge rule. There are two options to run this solution, based on the needs of your organization.
Option 1: For a standalone account
Choose this option if you would like to check for unused IAM roles in a single AWS account. This AWS account might or might not belong to an organization or OU. In this blog post, I refer to this account as the standalone account.
You should deploy the solution to the standalone Security account, which has appropriate admin permission to audit other accounts and manage security automation.
Because this solution uses AWS CloudFormationStackSets, you need to grant self-managed permissions to create stack sets in standalone accounts. Specifically, you need to establish a trust relationship between the standalone Security account and the standalone account by creating the AWSCloudFormationStackSetAdministrationRole IAM role in the standalone Security account, and the AWSCloudFormationStackSetExecutionRole IAM role in the standalone account.
You need to have AWS Security Hub enabled in your standalone Security account, and you need to deploy the solution in the same AWS Region as your Security Hub dashboard.
You need a tagging enforcement in place for IAM roles. This solution uses an IAM tag key Owner to identify the email address of the owner. The value of this tag key should be the email address associated with the owner of the IAM role. If the Owner tag isn’t available, the notification email is sent to the email address that you provided in the parameter ITSecurityEmail when you provisioned the CloudFormation stack.
This solution uses Amazon Simple Email Service (Amazon SES) to send emails to the owner of the IAM roles. The destination address needs to be verified with Amazon SES. With Amazon SES, you can verify identity at the individual email address or at the domain level.
An EventBridge rule triggers the AWS Lambda function LambdaCheckIAMRole in the standalone Security account. The LambdaCheckIAMRolefunction assumes a role in the standalone account. This role is named after the Cloudformation stack name that you specify when you provision the solution. Then LambdaCheckIAMRole calls the IAM API action GetAccountAuthorizationDetails to get the list of IAM roles in the standalone account, and parses the data type RoleLastUsed to retrieve the date, time, and the Region in which the roles were last used. If the last time value is not available, the IAM role is skipped. Based on the CloudFormation parameter MaxDaysForLastUsed that you provide, LambdaCheckIAMRole determines if the last time used is greater than the MaxDaysForLastUsed value. LambdaCheckIAMRole also extracts tags associated with the IAM roles, and retrieves the email address of the IAM role owner from the value of the tag key Owner. If there is no Owner tag, then LambdaCheckIAMRole sends an email to a default email address provided by you from the CloudFormation parameter ITSecurityEmail.
Option 2: For all member accounts that belong to an organization or an OU
Choose this option if you want to check for unused IAM roles in every member account that belongs to an AWS Organizations organization or OU.
Prerequisites
You need to have an AWS Organizations organization with a dedicated Security account that belongs to a Security OU. For this blog post, I refer to this account as the Security account.
You should deploy the solution to the Security account that has appropriate admin permission to audit other accounts and to manage security automation.
Because this solution uses CloudFormation StackSets to create stack sets in member accounts of the organization or OU that you specify, the Security account in the Security OU needs to be granted CloudFormation delegated admin permission to create AWS resources in this solution.
You need Security Hub enabled in your Security account, and you need to deploy the solution in the same Region as your Security Hub dashboard.
You need tagging enforcement in place for IAM roles. This solution uses the IAM tag key Owner to identify the owner email address. The value of this tag key should be the email address associated with the owner of the IAM role. If the Owner tag isn’t available, the notification email will be sent to the email address that you provided in the parameter ITSecurityEmail when you provisioned the CloudFormation stack.
This solution uses Amazon SES to send emails to the owner of the IAM roles. The destination address needs to be verified with Amazon SES. With Amazon SES, you can verify identity at the individual email address or at the domain level.
An EventBridge rule triggers the Lambda function LambdaGetAccounts in the Security account to collect the account IDs of member accounts that belong to the organization or OU. LambdaGetAccounts sends those account IDs to an SNS topic. Each account ID invokes the Lambda function LambdaCheckIAMRole once.
Similar to the process for Option 1, LambdaCheckIAMRole in the Security account assumes a role in the member account(s) of the organization or OU, and checks the last time that IAM roles in the account were used.
In both options, if an IAM role is not currently used, the function LambdaCheckIAMRole generates a Security Hub finding, and performs BatchImportFindings for all findings to Security Hub in the Security account. At the same time, the Lambda function starts an AWS Step Functions state machine execution. Each execution is for an unused IAM role following this naming convention: [target-account-id]-[unused IAM role name]-[time the execution created in Unix format]
You should avoid running this solution against special IAM roles, such as a break-glass role or a disaster recovery role. In the CloudFormation parameter RolePatternAllowedlist, you can provide a list of role name patterns to skip the check.
Use a Step Functions state machine to process approval
Figure 2 shows the state machine workflow for owner approval.
Figure 2: Owner approval state machine workflow
After the solution identifies an unused IAM role, it creates a Step Functions state machine execution. Figure 2 demonstrates the workflow of the execution. After the execution starts, the first Lambda taskNotifyOwner (powered by the Lambda function NotifyOwnerFunction) sends an email to notify the IAM role owner. This is a callback task that pauses the execution until a taskToken is returned. The maximum pause for a callback task is 1 year. The execution waits until the owner responds with a decision to delete or keep the role, which is captured by a private API endpoint in Amazon API Gateway. You can configure a timeout to avoid waiting for callback task execution.
With a private API endpoint, you can build a REST API that is only accessible within your Amazon Virtual Private Cloud (Amazon VPC), or within your internal network connected to your VPC. Using a private API endpoint will prevent anyone from outside of your internal network from selecting this link and deleting the role. You can implement authentication and authorization with API Gateway to make sure that only the appropriate owner can delete a role.
If the owner denies role deletion, then the role remains intact until the next automation cycle runs, and the state machine execution stops immediately with a Fail status. If the owner approves role deletion, the next Lambda task Approve (powered by the function ApproveFunction) checks again if the role is not currently used. If the role isn’t in use, the Lambda task Approve attaches an IAM policy DenyAllCheckUnusedIAMRoleSolution to deny the role to perform any actions, and waits for 30 days. During this wait time, you can restore the IAM role by removing the IAM policy DenyAllCheckUnusedIAMRoleSolution from the role. The Step Functions state machine execution for this role is still in progress until the wait time expires.
After the wait time expires, the state machine execution invokes the Validate task. The Lambda function ValidateFunction checks again if the role is not in use after the amount of time calculated by adding MaxDaysForLastUsed and the preceding wait time. It also checks if the IAM policy DenyAllCheckUnusedIAMRoleSolution is attached to the role. If both of these conditions are true, the Lambda function follows a process to detach the IAM policies and delete the role permanently. The role can’t be recovered after deletion.
Note: To restore a role that has been marked for deletion, detach the DenyAll IAM policy from the role.
To deploy the solution using the AWS CLI
Clone git repo from AWS Samples to get source code and CloudFormation templates.
git clone https://github.com/aws-samples/aws-blog-automate-iam-role-deletion
cd /aws-blog-automate-iam-role-deletion
Run the AWS CLI command below to upload CloudFormation templates and Lambda code to a S3 bucket in the Security Account. The S3 bucket needs to be in the same Region where you will deploy the solution.
To deploy the solution for a single account, use the following commands. Be sure to replace <YOUR_BUCKET_NAME> and <PATH_TO_UPLOAD_CODE> with your own values.
#Deploy solution for a single target AWS Account
aws cloudformation package \
--template-file solution_scope_account.yml \
--s3-bucket <YOUR_BUCKET_NAME> \
--s3-prefix <PATH_TO_UPLOAD_CODE> \
--output-template-file solution_scope_account.template
To deploy the solution for an organization or OU, use the following commands. Be sure to replace <YOUR_BUCKET_NAME> and <PATH_TO_UPLOAD_CODE> with your own values.
#Deploy solution for an Organization/OU
aws cloudformation package \
--template-file solution_scope_organization.yml \
--s3-bucket <YOUR_BUCKET_NAME> \
--s3-prefix <PATH_TO_UPLOAD_CODE> \
--output-template-file solution_scope_organization.template
Validate the template generated by the CloudFormation package.
To validate the solution for a single account, use the following commands.
#Deploy solution for a single target AWS Account
aws cloudformation validate-template —template-body file://solution_scope_account.template
To validate the solution for an organization or OU, use the following commands.
#Deploy solution for an Organization/OU
aws cloudformation validate-template —template-body file://solution_scope_organization.template
Deploy the solution in the same Region that you use for Security Hub. The stack takes 30 minutes to complete deployment.
To deploy the solution for a single account, use the following commands. Be sure to replace all of the placeholders with your own values.
#Deploy solution for a single target AWS Account
aws cloudformation deploy \
--template-file solution_scope_account.template \
--stack-name <UNIQUE_STACK_NAME> \
--region <REGION> \
--capabilities CAPABILITY_NAMED_IAM CAPABILITY_AUTO_EXPAND \
--parameter-overrides AccountId='<STANDALONE ACCOUNT ID>' \
Frequency=<DAYS> MaxDaysForLastUsed=<DAYS> \
ITSecurityEmail='<YOUR IT TEAM EMAIL>' \
RolePatternAllowedlist='<ALLOWED PATTERN>'
To deploy the solution for an organization, run the following commands to create CloudFormation stack in the Security Account of the organization.
The solution is triggered by an EventBridge scheduled rule, so it doesn’t perform the checks immediately. To test the solution right away after the CloudFormation stacks are successfully created, follow these steps.
To manually trigger the automation for a single account
Navigate to the AWS Lambda console and choose the function <CloudFormation stackname>-LambdaCheckIAMRole.
Choose Test.
Choose New event.
For Name, enter a name for the event, and provide the current time in UTC Date Time format YYYY-MM-DDTHH:MM:SSZ. For example{“time”: “2022-01-22T04:36:52Z”}. The Lambda function uses this value to calculate how much time has passed since the last time that a role was used. Figure 5 shows an example of configuring a test event.
Figure 5: Configure test event for standalone account
Choose Test.
To manually trigger the automation for an organization or OU
Choose the function [CloudFormation stackname]-LambdaGetAccounts.
Choose Test.
Choose New event.
For Name, enter a name for the event. Leave the default values for the remaining fields.
Choose Test.
Respond to unused IAM roles
After you’ve triggered the Lambda function, the automation runs the necessary checks. For each unused IAM role, it creates a Step Functions state machine execution.
To see the list of Step Functions state machine executions
Choose state machine [CloudFormation stackname]OnwerApprovalStateMachine.
Under the Executions tab, you will see the list of executions in running state following this naming convention: [target-account-id]-[unused IAM role name]-[time the execution created in Unix format]. Figure 6 shows an example list of executions.
Figure 6: Each unused IAM role generates an execution in the Step Functions state machine
Each execution sends out an email notification to the IAM role owner (if available through the Owner tag) or to the IT security email address that you provided in the CloudFormation stack parameter ITSecurityEmail. The email content is:
Subject: Please take action on this unused IAM Role

Hello!

This IAM Role arn:aws:iam::<AWS account>:role/<role name> is not in use for
more than 60 days.

Can you please delete the role by following this link: Approve link

Or keep this role by following this link: Deny Link
In the email, the Approve link and Deny link is the hyperlink to a private API endpoint with a parameter taskToken. If you try to access these links publicly, they won’t work. When you access the link, the taskToken is provided to the private API endpoint, which updates the Step Functions state machine.
To test the approval action using an API Gateway test
Navigate to the AWS Step Functions console. Under State machines, choose the state machine that has the name [CloudFormation stackname]OwnerApprovalStateMachine
On the Executions tab, there is a list of executions. Each execution represents a workflow for one IAM role, as shown in Figure 6. Choose the execution name that includes the IAM role name in the email that you received earlier.
Scroll down to Execution event history.
Expand the Step Notify Owner, enter TaskScheduled, find the item taskToken, and copy its value to a notepad, as shown in Figure 7.
Choose the API that has a name similar to [CloudFormation stackname]-PrivateAPIGW-[unique string]-ApprovalEndpoint.
Choose which action to test: Deny or Approve.
To test the Deny action, under /deny resource, choose the GET method.
To test the Approve action, under /approve resource, choose the GET method.
Choose Test.
Under Query Strings, enter taskToken= and paste the taskToken you copied earlier from the state machine execution. Figure 8 shows how to pass the taskToken to API Gateway.
Figure 8: Provide taskToken to API Gateway Method
Choose Test. After you test, the state machine resumes the workflow and finishes the automation. You won’t be able to change the action.
Navigate to the AWS Step Functions console. Choose the state machine and go to the state machine execution.
If you choose to deny the role deletion, the execution immediately stops as Fail.
If you choose to approve the role deletion, the execution moves to the Wait task. This task removes IAM policies associated to the role and waits for a period of time before moving to the next task. By default, the wait time is 30 days. To change this number, go to the Lambda function [CloudFormation stackname]ApproveFunction, and update the variable wait_time_stamp.
After the waiting period expires, the state machine triggers the Validate task to do a final validation on the role before deleting it. If the Validate task decides that the role is being used, it leaves the role intact. Otherwise, it deletes the role permanently.
Conclusion
In this blog post, you learned how serverless services such as Lambda, Step Functions, and API Gateway can work together to build security automation. We recommend testing this solution as a starting point. Then, you can build more features on top of the sample code and templates to customize it to perform checks, following guidance from your IT security team.
Here are a few suggestions that you can take to extend this solution.
This solution uses a private API Gateway to handle the approval response from the IAM role owner. You need to establish private connectivity between your internal network and AWS to invoke a private API Gateway. For instructions, see How to invoke a private API.
Your organization can use AWS Security Hub to gain a comprehensive view of your security and compliance posture across your Amazon Web Services (AWS) environment. Security Hub receives security findings from AWS security services and supported third-party products and centralizes them, providing a single view for identifying and analyzing security issues. Security Hub correlates findings and breaks them down into five severity categories: INFORMATIONAL, LOW, MEDIUM, HIGH, and CRITICAL. In this blog post, we provide step-by-step instructions for tracking Security Hub findings in each severity category against service-level agreements (SLAs) through visual dashboards.
SLAs are defined collaboratively by the Business, IT, and Security and Compliance teams within an organization. You can track Security Hub findings against your specific SLAs, and any findings that are in breach of an SLA can be escalated. You can also apply automation to alert the owners of the resources and remediate common security findings to improve your overall security posture.
Prerequisites
Security Hub uses service-linked AWS Config rules to perform security checks behind the scenes. To support these controls, you must enable AWS Config on all accounts, including the administrator and member accounts, in each AWS Region where Security Hub is enabled.
In this solution, you will learn two different ways to track your findings in Security Hub against the pre-defined SLA for each severity category.
Option 1: Use custom insights
Security Hub offers managed insights, which include a collection of related findings that identify a security issue that requires attention and intervention. You can view and take action on the insight findings. In addition to the managed insights, you can create custom insights to track issues and findings related to your resources in your environment.
Create a custom insight for SLA tracking
In this example, you set an SLA of 30 days for HIGH severity findings. This example will provide you with a view of the HIGH severity findings that were generated within the last 30 days and haven’t been resolved.
To create a custom insight to view HIGH severity findings from the last 30 days
On the Insights page, choose Create insight, as shown in Figure 1.
Figure 1: Create insight in the Security Hub console
On the Create insight page, in the search box, leave the following default filters: Workflow status is NEW, Workflow status is NOTIFIED, and Record state is ACTIVE, as show in Figure 2.
To select the required grouping attribute for the insight, choose the search box to display the filter options. In the search box, choose the following filters and settings:
Choose the Group by filter, and select WorkflowStatus.
Figure 2: Create insights using filters
Choose the Severity label filter and enter HIGH.
Choose the Created at filter and enter 30 to indicate the number of days you want to set as your SLA.
Choose Create insight again.
For Insightname, enter a meaningful name (for this example, we entered UnresolvedHighSevFindings), and then choose Create insight again.
You can repeat the same steps for other finding severities – CRITICAL, MEDIUM, LOW, and INFORMATIONAL; you can change the number of days you specify for the Created at filter to meet your SLA requirements; or specify different workflow status settings. Note that the workflow status can have the following values:
NEW – The initial state of a finding before you review it.
NOTIFIED – Indicates that the resource owner has been notified about the security issue.
SUPPRESSED – Indicates that you have reviewed the finding and no action is required.
RESOLVED – Indicates that the finding has been reviewed and remediated.
Your custom insight will show the findings that meet the criteria you defined. For more information about creating custom insights, see Module 2: Custom Insights in the Security Hub Workshop.
Option 2: Build visualizations for Security Hub findings data by using Amazon QuickSight
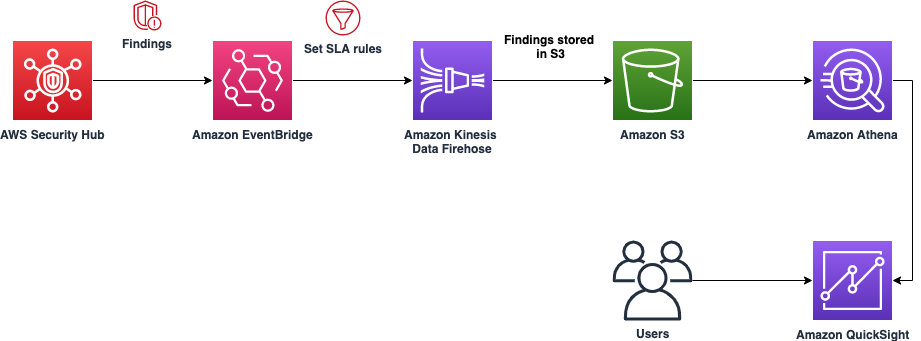
We hear from our customers that your organizations are looking for a solution where you can quickly visualize the status of your Security Hub findings, to see which findings you need to take action on (NEW and NOTIFIED) and which you do not (SUPPRESSED and RESOLVED). You can achieve this by building a data analytics pipeline that uses Amazon EventBridge, Amazon Kinesis Data Firehose, Amazon Simple Storage Service (Amazon S3), Amazon Athena, and Amazon QuickSight. The data analytics pipeline enables you to detect, analyze, contain, and mitigate issues quickly.
This solution integrates Security Hub with EventBridge to set SLA rules to a specified period of your choice for each severity level. For example, you can set the SLA to 5 days for CRITICAL severity findings, 10 days for HIGH severity findings, 14 days for MEDIUM severity findings, 30 days for LOW severity findings, and 60 days for INFORMATIONAL severity findings.
Architecture overview
Figure 3 shows the architectural overview of the QuickSight solution workflow.
Figure 3: Architecture diagram for option 2, the QuickSight solution
In the QuickSight solution, Security Hub publishes the findings to EventBridge, and then an EventBridge rule (based on the SLA) is configured to deliver the findings to Kinesis Data Firehose. For example, if the SLA is 14 days for all MEDIUM severity findings, then those findings will be filtered by the rule and sent to Kinesis Data Firehose. Security Hub findings follow the AWS Security Finding Format (ASFF).
The following is a sample EventBridge rule that filters the Security Hub findings for MEDIUM severity and workflow status NEW, before publishing the findings to Kinesis Data Firehose, and then finally to Amazon S3 for storage. A workflow status of NEW and NOTIFIED should be included to catch all findings that require action.
After the findings are exported and stored in Amazon S3, you can use Athena to run queries on the data and you can use Amazon QuickSight to display the findings that violate your organization’s SLA. With Athena, you can create views of the original table as a logical table. You can also create a view for CRITICAL, HIGH, MEDIUM, LOW, and INFORMATIONAL severity findings.
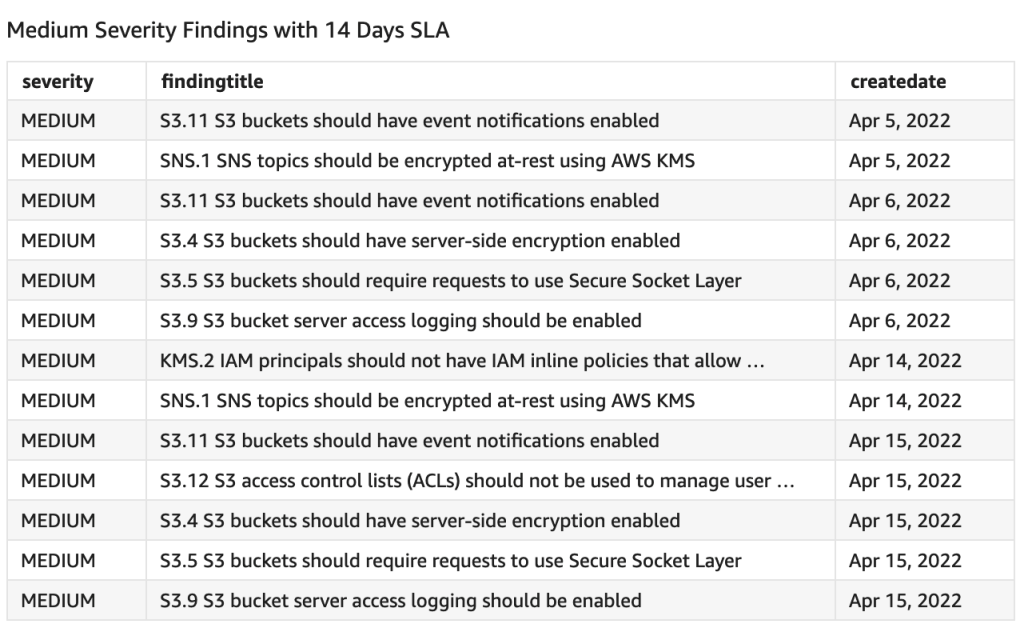
The QuickSight dashboard shown in Figure 4 is an example that shows all the MEDIUM severity findings that should be resolved within a 14 day SLA.
Figure 4: QuickSight table showing medium severity findings over a 14-day SLA
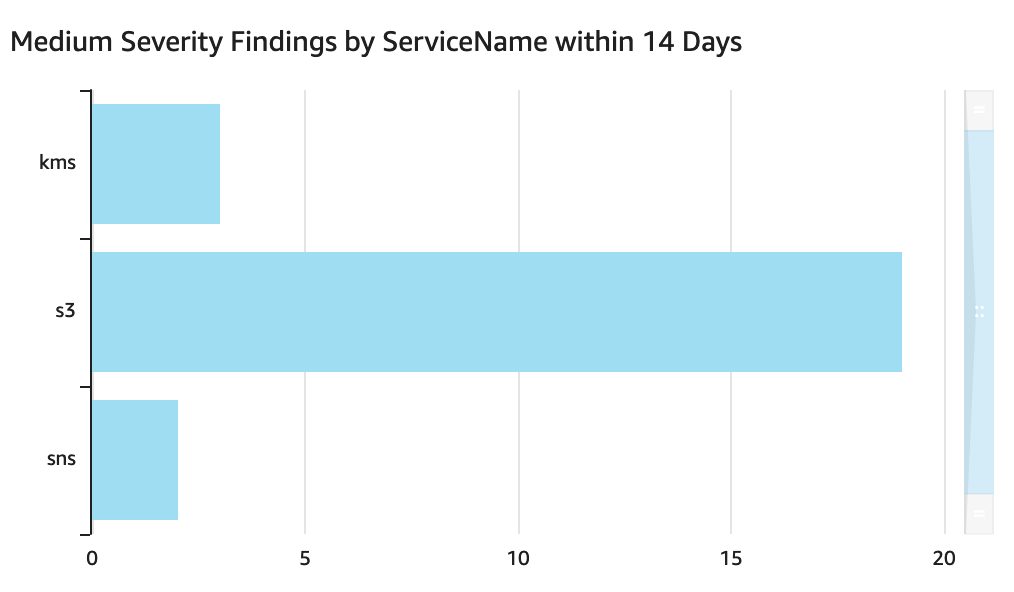
Using QuickSight, you can create different types of data visualizations to represent the exported Security Hub findings, which enables the decision makers in your organization to explore and interpret information in an interactive visual environment. For example, Figure 5 shows findings categorized by service.
Figure 5: QuickSight visual showing MEDIUM severity findings for each service
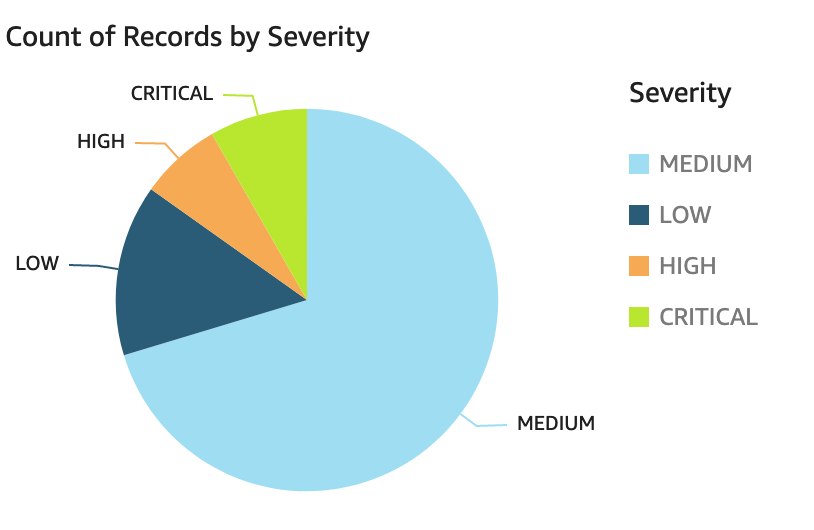
As another example, Figure 6 shows findings categorized by severity.
Figure 6: QuickSight visual showing findings by severity
Over time, your organization might discover that there are certain findings that should be tracked at a lower or higher severity level than what is auto-generated from Security Hub. You can implement EventBridge rules with AWS Lambda functions to automatically update the severity of the findings as soon as they are generated.
Figure 7: Create an EventBridge rule in the console
Define the event pattern, including the finding generator ID or any other identifying fields for which you want to redefine the severity. Review the fields in the format, and choose your desired filters. The following is a sample of the event pattern.
Specify the target as a Lambda function that will host the code to update the finding severity.
Figure 8: Select a target Lambda function
In the Lambda function, use the BatchUpdateFindings API action to update the severity label as desired.
The following example Lambda code will update finding severity to INFORMATIONAL. This function requires Amazon CloudWatch write permissions, and requires permissions to invoke the Security Hub API action BarchUpdateFindings.
import logging
import json, boto3
import botocore.exceptions as boto3exceptions

logger = logging.getLogger()
logger.setLevel(os.environ.get('LOGLEVEL', 'INFO').upper())

def lambda_handler(event, context):

    finding_id = ""
    product_arn = ""

    logger.info(event)

    for finding in event['detail']['findings']:

        #determine and log this Finding's ID
        finding_id = finding["Id"]
        product_arn = finding["ProductArn"]
        logger.info("Finding ID: " + finding_id)


        #determine and log this Finding's resource type
        resource_type = finding["Resources"][0]["Type"]
        logger.info("Resource Type is: " + resource_type)

        try:
            sec_hub_client = boto3.client('securityhub')
            response = sec_hub_client.batch_update_findings(
                FindingIdentifiers=[
                {
                    'Id': finding_id,
                    'ProductArn': product_arn
                }
                ],
                    Severity={"Label": "INFORMATIONAL"}

                )

        except boto3exceptions.ClientError as error:
            logger.exception(f"Client error invoking batch update findings {error}")
        except boto3exceptions.ParamValidationError as error:
            logger.exception(f"The parameters you provided are incorrect: {error}")

    return {"statusCode": 200}
The finding is generated with a new severity level, as updated in the Lambda function. For example, Figure 9 shows a finding that is generated as MEDIUM by default, but the configured EventBridge rule and Lambda function update the severity level to INFORMATIONAL.
Figure 9: Security Hub findings generated with updated severity level
Conclusion
This blog post walked you through two different solutions for setting up and tracking the SLAs for the findings generated by Security Hub. Reporting Security Hub findings for a given SLA in a dashboard view can help you prioritize findings and track whether findings are being remediated on time. This post also provided example code that you can use to modify the Security Hub severity for a specific finding. To further extend the solution and enable custom actions to remediate the findings, see the following:
Since the broad launch of our multi-factor authentication (MFA) security key program, customers have been enthusiastic about the program and how they will use it to improve their organizations’ security posture. Given the level of interest, we’re expanding eligibility for the program to allow more US-based AWS account root users and payer accounts to take advantage of the offer. Previously, eligibility required that US-based root users and payer accounts spend a minimum of $100 per month over the past 3 months. Now, we are expanding eligibility to US-based root users and payer accounts who have spent a minimum of $300 over the past 3 months. If you are a US-based customer who meets the expanded eligibility requirements, we encourage you to place an order for your free security key. As a reminder, you can use the following steps to order your free key.
To order your free security key
Confirm your eligibility at the ordering portal. You will be prompted to sign in if you haven’t already. Sign in with your AWS account root user or payer account credentials.
Choose your free security key from the available options.
Provide your email address for order confirmation and your shipping address.
Place your order.
MFA as a core security best practice is one of the key messages emphasized at the recent AWS re:Inforce conference. Using MFA is one of the simplest ways for anyone, personally or professionally, to help improve their security online. For example, if credentials become compromised on GitHub, users have an extra layer of protection if MFA is enabled. Or, if your login details are compromised for your bank account, MFA acts a second factor to protect your account.
If you’re not eligible for a free security key at this time, but would still like a security key, check out our MFA recommendations. These are available for purchase from many sellers, including Amazon. For more information about the MFA program, see our Free MFA Security Key page.
If you have feedback about this post, submit comments in the Comments section below. If you have questions about this post, contact AWS Support.
Want more AWS Security news? Follow us on Twitter.
AWS Security Hub is a central dashboard for security, risk management, and compliance findings from AWS Audit Manager, AWS Firewall Manager, Amazon GuardDuty, IAM Access Analyzer, Amazon Inspector, and many other AWS and third-party services. You can use the insights from Security Hub to get an understanding of your compliance posture across multiple AWS accounts. It is not unusual for a single AWS account to have more than a thousand Security Hub findings. Multi-account and multi-Region environments may have tens or hundreds of thousands of findings. With so many findings, it is important for you to get a summary of the most important ones. Navigating through duplicate findings, false positives, and benign positives can take time.
In this post, we demonstrate how to export those findings to comma separated values (CSV) formatted files in an Amazon Simple Storage Service (Amazon S3) bucket. You can analyze those files by using a spreadsheet, database applications, or other tools. You can use the CSV formatted files to change a set of status and workflow values to align with your organizational requirements, and update many or all findings at once in Security Hub.
The solution described in this post, called CSV Manager for Security Hub, uses an AWS Lambda function to export findings to a CSV object in an S3 bucket, and another Lambda function to update Security Hub findings by modifying selected values in the downloaded CSV file from an S3 bucket. You use an Amazon EventBridge scheduled rule to perform periodic exports (for example, once a week). CSV Manager for Security Hub also has an update function that allows you to update the workflow, customer-specific notation, and other customer-updatable values for many or all findings at once. If you’ve set up a Region aggregator in Security Hub, you should configure the primary CSV Manager for Security Hub stack to export findings only from the aggregator Region. However, you may configure other CSV Manager for Security Hub stacks that export findings from specific Regions or from all applicable Regions in specific accounts. This allows application and account owners to view their own Security Hub findings without having access to other findings for the organization.
How it works
CSV Manager for Security Hub has two main features:
Export Security Hub findings to a CSV object in an S3 bucket
Update Security Hub findings from a CSV object in an S3 bucket
Overview of the export function
The overview of the export function CsvExporter is shown in Figure 1.
Figure 1: Architecture diagram of the export function
Figure 1 shows the following numbered steps:
In the AWS Management Console, you invoke the CsvExporter Lambda function with a test event.
The export function calls the Security Hub GetFindings API action and gets a list of findings to export from Security Hub.
The export function converts the most important fields to identify and sort findings to a 37-column CSV format (which includes 12 updatable columns) and writes to an S3 bucket.
Overview of the update function
To update existing Security Hub findings that you previously exported, you can use the update function CsvUpdater to modify the respective rows and columns of the CSV file you exported, as shown in Figure 2. There are 12 modifiable columns out of 37 (any changes to other columns are ignored), which are described in more detail in Step 3: View or update findings in the CSV file later in this post.
Figure 2: Architecture diagram of the update function
Figure 2 shows the following numbered steps:
You download the CSV file that the CsvExporter function generated from the S3 bucket and update as needed.
You upload the CSV file that contains your updates to the S3 bucket.
In the AWS Management Console, you invoke the CsvUpdater Lambda function with a test event containing the URI of the CSV file.
CsvUpdater reads the updated CSV file from the S3 bucket.
CsvUpdater identifies the minimum set of updates and invokes the Security Hub BatchUpdateFindings API action.
Step 1: Use the CloudFormation template to deploy the solution
You can find the latest code in the aws-security-hub-csv-manager GitHub repository, where you can also contribute to the sample code. The following commands show how to deploy the solution by using the AWS CDK. First, the AWS CDK initializes your environment and uploads the AWS Lambda assets to an S3 bucket. Then, you deploy the solution to your account by using the following commands. Replace <INSERT_AWS_ACCOUNT> with your account number, and replace <INSERT_REGION> with the AWS Region that you want the solution deployed to, for example us-east-1.
Choose the following Launch Stack button to open the AWS CloudFormation console pre-loaded with the template for this solution:
In the Parameters section, as shown in Figure 3, enter your values.
Figure 3: CloudFormation template variables
For What folder for CSV Manager for Security Hub Lambda code, leave the default Code. For What folder for CSV Manager for Security Hub exports, leave the default Findings.
These are the folders within the S3 bucket that the CSV Manager for Security Hub CloudFormation template creates to store the Lambda code, as well as where the findings are exported by the Lambda function.
For Frequency, for this solution you can leave the default value cron(0 8 ? * SUN *). This default causes automatic exports to occur every Sunday at 8:00 AM local time using an EventBridge scheduled rule. For more information about how to update this value to meet your needs, see Schedule Expressions for Rules in the Amazon CloudWatch Events User Guide.
The values you enter for the Regions field depend on whether you have configured an aggregation Region in Security Hub.
If you have configured an aggregation Region, enter only that Region code, for example eu-north-1, as shown in Figure 3.
If you haven’t configured an aggregation Region, enter a comma-separated list of Regions in which you have enabled Security Hub, for example us-east-1, eu-west-1, eu-west-2.
If you would like to export findings from all Regions where Security Hub is enabled, leave the Regions field blank. Regions where Security Hub is not enabled will generate a message and will be skipped.
Choose Next.
The CloudFormation stack deploys the necessary resources, including an EventBridge scheduling rule, AWS System Managers Automation documents, an S3 bucket, and Lambda functions for exporting and updating Security Hub findings.
After you deploy the CloudFormation stack
After you create the CSV Manager for Security Hub stack, you can do the following:
Perform a bulk update of Security Hub findings by following the instructions in Step 3: View or update findings in the CSV file later in this post. You can make changes to one or more of the 12 updatable columns of the CSV file, and perform the update function to update some or all Security Hub findings.
Step 2: Export Security Hub findings to a CSV file
You can export Security Hub findings from the AWS Lambda console. To do this, you create a test event and invoke the CsvExporter Lambda function. CsvExporter exports all Security Hub findings from all applicable Regions to a single CSV file in the S3 bucket for CSV Manager for Security Hub.
To export Security Hub findings to a CSV file
In the AWS Lambda console, find the CsvExporter Lambda function and select it.
On the Code tab, choose the down arrow at the right of the Test button, as shown in Figure 4, and select Configure test event.
Figure 4: The down arrow at the right of the Test button
To create an empty test event, on the Configure test event page, do the following:
Choose Create a new event.
Enter an event name; in this example we used testEvent.
For Template, leave the default hello-world.
For Event JSON, enter the JSON object {} as shown in Figure 5.
Figure 5: Creating an empty test event
Choose Save to save the empty test event.
To invoke the Lambda function, choose the Test button, as shown in Figure 6.
Figure 6: Test button to invoke the Lambda function
On the Execution Results tab, note the following details, which you will need for the next step.
Locate the CSV object that matches the value of “exportKey” (in this example, DOC-EXAMPLE-OBJECT) in the S3 bucket that matches the value of “bucket” (in this example, DOC-EXAMPLE-BUCKET).
Now you can view or update the findings in the CSV file, as described in the next section.
Step 3: (Optional) Using filters to limit CSV results
In your test event, you can specify any filter that is accepted by the GetFindings API action. You do this by adding a filter key to your test event. The filter key can either contain the word HighActive (which is a predefined filter configured as a default for selecting active high-severity and critical findings, as shown in Figure 8), or a JSON filter object.
Figure 8 depicts an example JSON filter that performs the same filtering as the HighActive predefined filter.
To use filters to limit CSV results
In the AWS Lambda console, find the CsvExporter Lambda function and select it.
On the Code tab, choose the down arrow at the right of the Test button, as shown in Figure 7, and select Configure test event.
Figure 7: The down arrow at the right of the Test button
To create a test event containing a filter, on the Configure test event page, do the following:
Choose Create a new event.
Enter an event name; in this example we used filterEvent.
For Template, select testEvent,
For Event JSON, enter the following JSON object, as shown in Figure 8.
Locate the CSV object that matches the value of “exportKey” (in this example, DOC-EXAMPLE-OBJECT) in the S3 bucket that matches the value of “bucket” (in this example, DOC-EXAMPLE-BUCKET).
The results in this CSV file should be a filtered set of Security Hub findings according to the filter you specified above. You can now proceed to step 4 if you want to view or update findings.
Step 4: View or update findings in the CSV file
You can use any program that allows you to view or edit CSV files, such as Microsoft Excel. The first row in the CSV file are the column names. These column names correspond to fields in the JSON objects that are returned by the GetFindings API action.
Warning: Do not modify the first two columns, Id (column A) or ProductArn (column B). If you modify these columns, Security Hub will not be able to locate the finding to update, and any other changes to that finding will be discarded.
You can locally modify any of the columns in the CSV file, but only 12 columns out of 37 columns will actually be updated if you use CsvUpdater to update Security Hub findings. The following are the 12 columns you can update. These correspond to columns C through N in the CSV file.
Column name
Spreadsheet column
Description
Criticality
C
An integer value between 0 and 100.
Confidence
D
An integer value between 0 and 100.
NoteText
E
Any text you wish
NoteUpdatedBy
F
Automatically updated with your AWS principal user ID.
CustomerOwner*
G
Information identifying the owner of this finding (for example, email address).
CustomerIssue*
H
A Jira issue or another identifier tracking a specific issue.
CustomerTicket*
I
A ticket number or other trouble/problem tracking identification.
ProductSeverity**
J
A floating-point number from 0.0 to 99.9.
NormalizedSeverity**
K
An integer between 0 and 100.
SeverityLabel
L
One of the following:
INFORMATIONAL
LOW
MEDIUM
HIGH
HIGH
CRITICAL
VerificationState
M
One of the following:
UNKNOWN — Finding has not been verified yet.
TRUE_POSITIVE — This is a valid finding and should be treated as a risk.
FALSE_POSITIVE — This an incorrect finding and should be ignored or suppressed.
BENIGN_POSITIVE — This is a valid finding, but the risk is not applicable or has been accepted, transferred, or mitigated.
Workflow
N
One of the following:
NEW — This is a new finding that has not been reviewed.
NOTIFIED — The responsible party or parties have been notified of this finding.
RESOLVED — The finding has been resolved.
SUPPRESSED — A false or benign finding has been suppressed so that it does not appear as a current finding in Security Hub.
* These columns are stored inside the UserDefinedFields field of the updated findings. The column names imply a certain kind of information, but you can put any information you wish.
** These columns are stored inside the Severity field of the updated findings. These values have a fixed format and will be rejected if they do not meet that format.
Columns with fixed text values (L, M, N) in the previous table can be specified in mixed case and without underscores—they will be converted to all uppercase and underscores added in the CsvUpdater Lambda function. For example, “false positive” will be converted to “FALSE_POSITIVE”.
Step 5: Create a test event and update Security Hub by using the CSV file
If you want to update Security Hub findings, make your changes to columns C through N as described in the previous table. After you make your changes in the CSV file, you can update the findings in Security Hub by using the CSV file and the CsvUpdater Lambda function.
Use the following procedure to create a test event and run the CsvUpdater Lambda function.
To create a test event and run the CsvUpdaterLambda function
In the AWS Lambda console, find the CsvUpdater Lambda function and select it.
On the Code tab, choose the down arrow to the right of the Test button, as shown in Figure 10, and select Configure test event.
Figure 10: The down arrow to the right of the Test button
To create a test event as shown in Figure 11, on the Configure test event page, do the following:
Choose Create a new event.
Enter an event name; in this example we used testEvent.
Replace <s3ObjectUri> with the full URI of the S3 object where the updated CSV file is located.
Replace <aggregationRegionName> with your Security Hub aggregation Region, or the primary Region in which you initially enabled Security Hub.
Figure 11: Create and save a test event for the CsvUpdater Lambda function
Choose Save.
Choose the Test button, as shown in Figure 12, to invoke the Lambda function.
Figure 12: Test button to invoke the Lambda function
To verify that the Lambda function ran successfully, on the Execution Results tab, review the results for “message”: “Success”, as shown in the following example. Note that the results may be thousands of lines long.
The processed array lists every successfully updated finding by Id and ProductArn.
If any of the findings were not successfully updated, their Id and ProductArn appear in the unprocessed array. In the previous example, no findings were unprocessed.
The value s3://DOC-EXAMPLE-BUCKET/DOC-EXAMPLE-OBJECT is the URI of the S3 object from which your updates were read.
Cleaning up
To avoid incurring future charges, first delete the CloudFormation stack that you deployed in Step 1: Use the CloudFormation template to deploy the solution. Next, you need to manually delete the S3 bucket deployed with the stack. For instructions, see Deleting a bucket in the Amazon Simple Storage Service User Guide.
Conclusion
In this post, we showed you how you can export Security Hub findings to a CSV file in an S3 bucket and update the exported findings by using CSV Manager for Security Hub. We showed you how you can automate this process by using AWS Lambda, Amazon S3, and AWS Systems Manager. Full documentation for CSV Manager for Security Hub is available in the aws-security-hub-csv-manager GitHub repository. You can also investigate other ways to manage Security Hub findings by checking out our blog posts about Security Hub integration with Amazon OpenSearch Service, Amazon QuickSight, Slack, PagerDuty, Jira, or ServiceNow.
If you have feedback about this post, submit comments in the Comments section below. If you have questions about this post, start a new thread on the Security Hub re:Post. To learn more or get started, visit AWS Security Hub.
Want more AWS Security news? Follow us on Twitter.
AWS re:Inforce returned to Boston, MA, in July after 2 years, and we were so glad to be back in person with customers. The conference featured over 250 sessions and hands-on labs, 100 AWS partner sponsors, and over 6,000 attendees over 2 days. If you weren’t able to join us in person, or just want to revisit some of the themes, this blog post is for you. It summarizes all the key announcements and points to where you can watch the event keynote, sessions, and partner lightning talks on demand.
Key announcements
Here are some of the announcements that we made at AWS re:Inforce 2022.
Free MFA token ordering portal – We’ve made our free multi-factor authentication (MFA) security key program easier. We now have an ordering portal in the AWS Management Console where eligible customers can order their token. In response to customer demand, we’ve streamlined the ordering process, especially for linked accounts. At this time, only US-based AWS account root users who have spent more than $100 each month over the past 3 months are eligible to place an order.
IAM Roles Anywhere – This new feature extends the capabilities of AWS Identity and Access Management (IAM) roles to workloads outside of AWS. You can use IAM Roles Anywhere to provide a secure way for on-premises servers, containers, or applications to obtain temporary AWS credentials and remove the need for creating and managing long-term AWS credentials.
AWS Marketplace Vendor Insights – This new feature helps simplify third-party software risk assessments by compiling security and compliance information in a unified dashboard.
AWS Cloud Audit Academy – PCI DSS on AWS – Cloud Audit Academy (CAA) PCI DSS on AWS is the third course in the AWS security auditing learning path. This path is designed for those who are in auditing, risk, and compliance roles and who are involved in assessing regulated workloads in the cloud.
New workshop – Threat modeling the right way for builders – This workshop introduces you to the background of threat modeling and why to do it, as well as some of the tools and techniques for modeling systems, identifying threats, and selecting mitigations.
Enable secure communication with end-to-end encryption with AWS Wickr, and collaborate on calls with confidence. AWS Wickr encrypts messages, calls, and files with a proprietary, 256-bit end-to-end encryption protocol. No one but intended recipients can decrypt them, reducing the risk of person-in-the-middle attacks.
Watch on demand
You can also watch these talks and learning sessions on demand.
Keynotes and leadership sessions
Watch the AWS re:Inforce 2022 keynote where Amazon Chief Security Officer Stephen Schmidt, AWS Chief Information Security Officer CJ Moses, Vice President of AWS Platform Kurt Kufeld, and MongoDB Chief Information Security Officer Lena Smart share the latest innovations in cloud security from AWS and what you can do to foster a culture of security in your business. Additionally, you can review all the leadership sessions to learn best practices for managing security, compliance, identity, and privacy in the cloud.
Breakout sessions and partner lightning talks
Data Protection and Privacy track – See how AWS, customers, and partners work together to protect data. Learn about trends in data management, cryptography, data security, data privacy, encryption, and key rotation and storage.
Governance, Risk, and Compliance track – Dive into the latest hot topics in governance and compliance for security practitioners, and discover how to automate compliance tools and services for operational use.
Identity and Access Management track – Hear from AWS, customers, and partners on how to use AWS Identity Services to manage identities, resources, and permissions securely and at scale. Learn how to configure fine-grained access controls for your employees, applications, and devices and deploy permission guardrails across your organization.
Network and Infrastructure Security track – Gain practical expertise on the services, tools, and products that AWS, customers, and partners use to protect the usability and integrity of their networks and data.
Threat Detection and Incident Response track – Learn how AWS, customers, and partners get the visibility they need to improve their security posture, reduce the risk profile of their environments, identify issues before they impact business, and implement incident response best practices.
Session presentation downloads are also available on our AWS Event Contents page. Consider joining us for more in-person security learning opportunities by registering for AWS re:Invent 2022, which will be held November 28 through December 2 in Las Vegas. We look forward to seeing you there!
If you’d like to discuss how these new announcements can help your organization improve its security posture, AWS is here to help. Contact your AWS account team today.
If you have feedback about this post, submit comments in the Comments section below. If you have questions about this post, contact AWS Support.
Want more AWS Security news? Follow us on Twitter.
Network and security teams often need to evaluate the internet accessibility of all their resources on AWS and block any non-essential internet access. Validating who has access to what can be complicated—there are several different controls that can prevent or authorize access to resources in your Amazon Virtual Private Cloud (Amazon VPC). The recently launched Amazon VPC Network Access Analyzer helps you understand potential network paths to and from your resources without having to build automation or manually review security groups, network access control lists (network ACLs), route tables, and Elastic Load Balancing (ELB) configurations. You can use this information to add security layers, such as moving instances to a private subnet behind a NAT gateway or moving APIs behind AWS PrivateLink, rather than use public internet connectivity. In this blog post, we show you how to use Network Access Analyzer to identify publicly accessible resources.
Network Access Analyzer uses automated reasoning to produce findings of potential network paths that don’t meet your network security policy. Network Access Analyzer reasons about all of your Amazon VPC configurations together rather than in isolation. For example, it produces findings for paths from an EC2 instance to an internet gateway only when the following conditions are met: the security group allows outbound traffic, the network ACL allows outbound traffic, and the instance’s route table has a route to an internet gateway (possibly through a NAT gateway, network firewall, transit gateway, or peering connection). Network Access Analyzer produces actionable findings with more context such as the entire network path from the source to the destination, as compared to the isolated rule-based checks of individual controls, such as security groups or route tables.
Sample environment
Let’s walk through a real-world example of using Network Access Analyzer to detect publicly accessible resources in your environment. Figure 1 shows an environment for this evaluation, which includes the following resources:
An EC2 instance in a public subnet allowing inbound public connections on port 80/443 (HTTP/HTTPS).
An EC2 instance in a private subnet allowing connections from an Application Load Balancer on port 80/443.
An Application Load Balancer in a public subnet with a Target Group connected to the private web server, allowing public connections on port 80/443.
An Amazon Aurora database in a public subnet allowing public connections on port 3306 (MySQL).
An Aurora database in a private subnet.
An EC2 instance in a public subnet allowing public connections on port 9200 (OpenSearch/Elasticsearch).
An Amazon EMR cluster allowing public connections on port 8080.
A Windows EC2 instance in a public subnet allowing public connections on port 3389 (Remote Desktop Protocol).
Figure 1: Example environment of web servers hosted on EC2 instances, remote desktop servers hosted on EC2, Relational Database Service (RDS) databases, Amazon EMR cluster, and OpenSearch cluster on EC2
Let us assume that your organization’s security policy requires that your databases and analytics clusters not be directly accessible from the internet, whereas certain workload such as instances for web services can have internet access only through an Application Load Balancer over ports 80 and 443. Network Access Analyzer allows you to evaluate network access to resources in your VPCs, including database resources such as Amazon RDS and Amazon Aurora clusters, and analytics resources such as Amazon OpenSearch Service clusters and Amazon EMR clusters. This allows you to govern network access to your resources on AWS, by identifying network access that does not meet your security policies, and creating exclusions for paths that do have the appropriate network controls in place.
Configure Network Access Analyzer
In this section, you will learn how to create network scopes, analyze the environment, and review the findings produced. You can create network access scopes by using the AWS Command Line Interface (AWS CLI) or AWS Management Console. When creating network access scopes using the AWS CLI, you can supply the scope by using a JSON document. This blog post provides several network access scopes as JSON documents that you can deploy to your AWS accounts.
In the navigation pane, under Network Analysis, choose Network Access Analyzer.
Under Network Access Scopes, select the checkboxes next to the scopes that you want to analyze, and then choose Analyze, as shown in Figure 2.
Figure 2: Custom network scopes created for Network Access Analyzer
If Network Access Analyzer detects findings, the console indicates the status Findings detected for each scope, as shown in Figure 3.
Figure 3: Network Access Analyzer scope status
To review findings for a scope (console)
On the Network Access Scopes page, under Network Access Scope ID, select the link for the scope that has the findings that you want to review. This opens the latest analysis, with the option to review past analyses, as shown in Figure 4.
Figure 4: Finding summary identifying Amazon Aurora instance with public access to port 3306
To review the path for a specific finding, under Findings, select the radio button to the left of the finding, as shown in Figure 4. Figure 5 shows an example of a path for a finding.
Figure 5: Finding details showing access to the Amazon Aurora instance from the internet gateway to the elastic network interface, allowed by a network ACL and security group.
Choose any resource in the path for detailed information, as shown in Figure 6.
Figure 6: Resource detail within a finding outlining a specific security group allowing access on port 3306
How to remediate findings
After deploying network scopes and reviewing findings for publicly accessible resources, you should next limit access to those resources and remove public access. Use cases vary, but the scopes outlined in this post identify resources that you should share publicly in a more secure manner or remove public access entirely. The following techniques will help you align to the Protecting Networks portion of the AWS Well-Architected Framework Security Pillar.
When creating web servers in EC2, you should not place web servers directly in a public subnet with security groups allowing HTTP and HTTPS ports from all internet addresses. Instead, you should place your EC2 instances in private subnets and use Application Load Balancers in a public subnet. From there, you can attach a security group that allows HTTP/HTTPS access from public internet addresses to your Application Load Balancer, and attach a security group that allows HTTP/HTTPS from your Load Balancer security group to your web server EC2 instances. You can also associate AWS WAF web ACLs to the load balancer to protect your web applications or APIs against common web exploits and bots that may affect availability, compromise security, or consume excessive resources.
Similarly, if you have OpenSearch/Elasticsearch running on EC2 or Amazon OpenSearch Service, or are using Amazon EMR, you can share these resources using PrivateLink. Use the Amazon EMR block public access configuration to verify that your EMR clusters are not shared publicly.
To connect to Remote Desktop on EC2 instances, you should use AWS Systems Manager to connect using Fleet Manager. Connecting with Fleet Manager only requires your Windows EC2 instances to be a managed node. When connecting using Fleet Manager, the security group requires no inbound ports, and the instance can be in a private subnet. For more information, see the Systems Manager prerequisites.
Conclusion
This blog post demonstrates how you can identify and remediate publicly accessible resources. Amazon VPC Network Access Analyzer helps you identify available network paths by using automated reasoning technology and user-defined access scopes. By using these scopes, you can define non-permitted network paths, identify resources that have those paths, and then take action to increase your security posture. To learn more about building continuous verification of network compliance at scale, see the blog post Continuous verification of network compliance using Amazon VPC Network Access Analyzer and AWS Security Hub. Take action today by deploying the Network Access Analyzer scopes in this post to evaluate your environment and add layers of security to best fit your needs.
If you have feedback about this post, submit comments in the Comments section below. If you have questions about this post, contact AWS Support.
Want more AWS Security news? Follow us on Twitter.
As customers mature their security posture on Amazon Web Services (AWS), they are adopting multiple ways to detect suspicious behavior and notify response teams or workflows to take action. One example is using Amazon GuardDuty to monitor AWS accounts and workloads for malicious activity and deliver detailed security findings for visibility and remediation. Another tactic is to deploy decoys, also called honeypots, as an effective way to detect suspicious behavior.
In this blog post, we’ll show how you can create low-cost private decoy AWS resources in your AWS accounts and configure them to generate alerts when they are accessed. These decoy resources appear legitimate but don’t contain any useful or sensitive data and typically are not accessed in the normal course of business by your users and systems. Any attempt to access them is a clear signal of suspicious activity that should be investigated. You can use data sources like AWS CloudTrail, services like Amazon Detective, and your own security incident and event monitoring (SIEM) systems to investigate the activity further. This post is aimed at experienced AWS users and security professionals.
Detecting suspicious activity
Imagine that an unauthorized user has obtained credentials for your account. This could also be an insider, malicious or careless, using their valid credentials inappropriately. The unauthorized user might use these credentials to invoke AWS API calls to list resources in your account. As the next step, they might try to access resources that are commonly used to store sensitive data—such as objects in Amazon Simple Storage Service (Amazon S3) buckets, secrets in AWS Secrets Manager, or items in Amazon DynamoDB. They might also try to elevate their privileges by assuming other Identity and Access Management (IAM) roles in your account. In your role as a security professional, your task is to detect this suspicious behaviour and take actions in response. One approach is to learn the baseline of activities of the IAM users and roles in your account and flag any deviations from the learned baseline—this is the approach taken by GuardDuty when it generates findings such as Discovery:IAMUser/AnomalousBehavior.
This post focuses on another approach of creating private decoy resources in your account that are intended to look legitimate, but don’t have any useful or sensitive data and are not exposed publicly. These decoys are designed to alert you about suspicious activities that could indicate AWS credentials exposure or account compromise. You can use the decoys in conjunction with other techniques, such as creating deception environments and public and private honeypots to better detect suspicious activity in your accounts and applications.
The Fidelity-Isolation-Cost trilemma
In an ACM Queue article titled Lamboozling Attackers: A New Generation of Deception, Kelly Shortridge and Ryan Petrich introduced the Fidelity-Isolation-Cost (FIC) trilemma that “captures the most important dimensions of designing deception systems: fidelity, isolation, and cost.” Using their definition of the FIC trilemma, we see that decoy AWS resources can be well suited to designing deception systems:
Fidelity – Because the decoys are actual AWS resources, they behave like other legitimate resources and have high fidelity. For example, a decoy S3 bucket behaves exactly like any other S3 bucket, with the only exception being that the object data it contains is dummy and not useful. However, the unauthorized user only discovers this fact after downloading the object data and generating an automated alert to your security team.
Isolation – You can simply isolate the decoy AWS resources from other resources in the same account. For example, an S3 bucket is inherently isolated from other S3 buckets in the same account. An unauthorized user that can read the decoy S3 bucket does not, by doing so, get the ability to access or impact the availability of other resources in the account. The credentials obtained by the unauthorized user might have permissions to actions on other services, but the presence of the decoy S3 bucket doesn’t add to those permissions in any way.
Cost – You can keep the cost of deception low by choosing AWS resources that have no cost or low cost to deploy, are deployed by means of automation, and require no further operation or maintenance effort. For example, an S3 bucket with several files that are a few MB in size costs a fraction of a US cent per month for storage. The API request cost should be zero, because the bucket is designed never to be accessed in the normal course of business. Choosing similar zero or low-cost resources can make it cost-effective and feasible to create such decoy resources in multiple accounts, including in Production accounts, where it’s especially important to detect suspicious activity.
Examples of private decoy AWS resources
The following table shows examples of private decoy AWS resources that are high-fidelity, high-isolation, low-cost and are suitable to be deployed in an account that has sensitive data or applications. The table also lists the CloudTrail event fields that provide the source and name for accesses to each resource. You can use these CloudTrail events to create corresponding Amazon EventBridge rules that will generate alerts and notifications.
Private decoy resource
CloudTrail event source
CloudTrail event names
Considerations
S3 bucket and S3 objects with dummy data
s3.amazonaws.com
GetObject HeadObject
Ensure that the S3 objects do not contain any sensitive data.
S3 data events must be enabled in CloudTrail for the decoy S3 bucket
IAM role that should never be assumed
sts.amazonaws.com
AssumeRole
Ensure that the IAM policies attached to this role allow access only to decoy resources and no other data or resources.
Ensure that the IAM role’s trust policy only trusts principals in the same account to assume the role.
Secrets Manager secret (See Note at end of table)
kms.amazonaws.com
Decrypt
Ensure that the secret value does not contain any sensitive data.
Ensure that the item does not have any sensitive data.
DynamoDB data events must be enabled in CloudTrail for the decoy DynamoDB table.
Note: When CloudTrail Management API events are sent to EventBridge, read-only events such as Get*, List*, and Describe* are filtered out and not processed. In order to get findings for secrets and Systems Manager parameters that are being accessed, you need to alert on GetSecretValue and GetParameter API calls. Since these are not processed by EventBridge, you can instead use the fact that secrets and secure string parameters are encrypted by using AWS Key Management Service (AWS KMS), and match on the corresponding AWS KMS Decrypt API calls. This means that successful calls from an unauthorized user to GetSecretValue and GetParameter are able to be matched and alerted on.
Notifications from matching EventBridge rules can be sent to an AWS Lambda function that generates custom findings in Security Hub. These findings can then be sent to downstream systems that you might have configured in your environment, such as your SIEM system or an automated response workflow in your Security Orchestration, Automation, and Response system. Figure 1 shows this workflow.
We’ve provided an AWS CloudFormation template that you can use to deploy the solution. The template creates the following private decoy AWS resources in your account:
In addition, the CloudFormation template deploys the following resources in your account to detect accesses to the decoys and send custom findings to Security Hub:
A CloudTrail data events trail that includes only data events from the decoy S3 bucket and DynamoDB table
Six EventBridge rules to match specific CloudTrail API events
Two Lambda functions with corresponding IAM roles:
The WriteData Lambda function is a CloudFormation custom resource that is used to create the decoy S3 object and the Systems Manager SecureString parameter
The Data Lambda function is a target for the EventBridge rules, and it sends custom findings to Security Hub when the decoy resources are accessed
Prerequisites
The prerequisites to deploying the solution are as follows:
Security Hub must be enabled in the AWS Regions where the private decoys will be deployed, in order to receive custom findings.
You must have created a CloudTrail trail to log management events for the AWS account in the Region where you deploy the private decoys. This trail can be created locally in the account or can be an organization trail. Ensure that you have enabled both read and write events, and enabled all AWS KMS events in the trail (this is the default configuration).
Deploy the solution
After you have the prerequisites set up, you can launch the CloudFormation template to deploy the private decoys.
To launch the template
Choose the following Launch Stack button to launch a CloudFormation stack in your account.
Note: The stack will launch in the N. Virginia (us-east-1) Region. To deploy this solution into other AWS Regions, download the solution’s CloudFormation template, modify it, and deploy it to the selected Region. In order to get maximum coverage for detecting suspicious activity, we recommend that you deploy the solution into your key production accounts and Regions.
On the Specify stack details page, enter the stack name, then choose Next.
The CloudFormation template will use the stack name as part of the naming of the resources that are created. We recommend that you use your organization’s existing naming conventions for stack names, and not make reference to decoy resources, because this could alert any unauthorized user to the real purpose of the resources they’re attempting to access.
Figure 2: Specify stack details
Configure any tags or other organization-specific stack options you need, or accept the default settings, and then choose Next.
Review the CloudFormation settings and select the box acknowledging that AWS CloudFormation might create IAM resources with custom names, and then choose Create stack.
After the stack has completed deployment, the CloudFormation stack output will show the Amazon Resource Names (ARNs) of the decoy resources that were created.
Figure 3: CloudFormation stack outputs
Estimated costs
This solution has been designed to keep costs as low as possible, by using services that have no associated costs (such as IAM roles or any parameters stored in Systems Manager Parameter Store), and keeping the use of paid for services (such as S3 and DynamoDB) to a minimum.
Deploying the solution as outlined in this blog post should result in a cost of less than $1 per month for a single account deployment, however please refer to the AWS Pricing Calculator where you can create a pricing estimate based on your deployment using the most up-to-date pricing information.
Test the alerts
In normal circumstances, after you configure the decoys, there will be no attempted access to these resources, and no findings will be sent to Security Hub in your account. To test that the configuration is working as expected, you can issue the following commands from a device that has programmatic access to your account where the private decoy resources have been deployed. To run each command, replace the bracketed, italicized text with your own information. You can find the details for each of the resources in the outputs section of the CloudFormation stack after it has been deployed successfully.
An example of what these test-generated findings looks like is shown in Figure 4.
Figure 4: Security Hub findings
Considerations
Consider the following as you deploy decoy AWS resources:
You should consider decoy AWS resources as enhancements to your foundational security controls. Your foundational controls should include these measures:
Identify and investigate alerts generated by decoy resources by implementing detective controls.
Implement incident response mechanisms to respond to and mitigate the potential impact of security incidents, such as a decoy AWS resource being accessed.
You should ensure that your monitoring services and tools are configured to query the configuration of resources and not the data stored in resources. Otherwise, you might get a large volume of false positives because every time a resource is accessed, a custom finding is created in Security Hub. For example, consider a service like Security Hub Security Standards checks, or a cloud security posture management (CSPM) tool that monitors your S3 buckets by describing the properties of all buckets in your account. Such tools will find the decoy S3 bucket and will interrogate its configuration by making calls such as GetBucketPolicy and GetBucketLogging. However, as long as these tools don’t try to read data in the bucket through calls such as GetObject, the EventBridge rules that are configured as described in this post won’t generate a finding.
The solution generates custom findings in Security Hub only for successful accesses of Secrets Manager secrets and Systems Manager parameters. However, both successful and unsuccessful accesses of S3 objects and DynamoDB items, and IAM role assumption, will generate custom findings in Security Hub.
Conclusion
In this post, we discussed the advantages of using private decoy AWS resources to detect suspicious activities within your account and how these decoys can complement your existing security solutions. You learned how to create private decoys, set up alerting, and ingest (and test) these alerts as custom findings into Security Hub for central visibility across your AWS environment. The solution deployment included a set of common resources as private decoys; however, the necessary code and templates can be found in our GitHub repository, and you can extend and customize these to add other resources that you want to include in your accounts.
At Amazon Web Services (AWS), we’re continuously expanding our compliance programs to provide you with more tools and resources to perform effective due diligence on AWS. We’re excited to announce the availability of the AWS CyberVadis report to help you reduce the burden of performing due diligence on your third-party suppliers.
With the increase in adoption of cloud products and services across multiple sectors and industries, AWS is a critical component of customers’ third-party environments. Regulated customers, such as those in the financial services sector, are held to high standards by regulators and auditors when it comes to exercising effective due diligence on third parties.
Many customers use third-party cyber risk management (TPCRM) services such as CyberVadis to better manage risks from their evolving third-party environments and to drive operational efficiencies. To help with such efforts, AWS has completed the CyberVadis assessment of its security posture. CyberVadis security analysts perform the assessment and validate the results annually.
CyberVadis is a comprehensive third-party risk assessment process that combines the speed and scalability of automation with the certainty of analyst validation. The CyberVadis cybersecurity rating methodology assesses the maturity of a company’s information security management system (ISMS) through its policies, implementation measures, and results.
CyberVadis integrates responses from AWS with analytics and risk models to provide an in-depth view of the AWS security posture. The CyberVadis methodology maps to major international compliance standards, including the following:
Customers can download the AWS CyberVadis report at no additional cost. For details on how to access the report, see our AWS CyberVadis report page.
As always, we value your feedback and questions. Reach out to the AWS Compliance team through the Contact Us page. If you have feedback about this post, submit comments in the Comments section below. To learn more about our other compliance and security programs, see AWS Compliance Programs.
Want more AWS Security news? Follow us on Twitter.
Are you looking for a simpler way to manage permissions across all your AWS accounts? Perhaps you federate your identity provider (IdP) to each account and divide permissions and authorization between cloud and identity teams, but want a simpler administrative model. Maybe you use AWS IAM Identity Center (successor to AWS Single Sign-On) but are running out of room in your permission set policies; or need a way to keep the role models you have while tailoring the policies in each account to reference their specific resources. Or perhaps you are considering IAM Identity Center as an alternative to per-account federation, but need a way to reuse the customer managed policies that you have already created. Great news! Now you can use customer managed policies (CMPs) and permissions boundaries (PBs) to help with these more advanced situations.
In this blog post, we explain how you can use CMPS and PBs with IAM Identity Center to address these considerations. We describe how IAM Identity Center works, how these types of policies work with IAM Identity Center, and how to best use CMPs and PBs with IAM Identity Center. We also show you how to configure and use CMPs in your IAM Identity Center deployment.
IAM Identity Center background
With IAM Identity Center, you can centrally manage access to multiple AWS accounts and business applications, while providing your workplace users a single sign-on experience with your choice of identity system. Rather than manage identity in each account individually, IAM Identity Center provides one place to connect an existing IdP, Microsoft Active Directory Domain Services (AD DS), or workforce users that you create directly in AWS. Because IAM Identity Center integrates with AWS Organizations, it also provides a central place to define your roles, assign them to your users and groups, and give your users a portal where they can access their assigned accounts.
With AWS Identity Center, you manage access to accounts by creating and assigning permission sets. These are AWS Identity and Access Management (IAM) role templates that define (among other things) which policies to include in a role. If you’re just getting started, you can attach AWS managed policies to the permission set. These policies, created by AWS service teams, enable you to get started without having to learn how to author IAM policies in JSON.
For more advanced cases, where you are unable to express policies sufficiently using inline policies, you can create a custom policy in the permission set. When you assign a permission set to users or groups in a specified account, IAM Identity Center creates a role from the template and then controls single sign-on access to the role. During role creation, IAM Identity Center attaches any specified AWS managed policies, and adds any custom policy to the role as an inline policy. These custom policies must be within the 10,240 character IAM quota of inline policies.
IAM provides two other types of custom policies that increase flexibility when managing access in AWS accounts. Customer managed policies (CMPs) are standalone policies that you create and can attach to roles in your AWS accounts to grant or deny access to AWS resources. Permissions boundaries (PBs) provide an advanced feature that specifies the maximum permissions that a role can have. For both CMPs and PBs, you create the custom policy in your account and then attach it to roles. IAM Identity Center now supports attaching both of these to permission sets so you can handle cases where AWS Managed Policies and inline policies may not be enough.
How CMPs and PBs work with IAM Identity Center
Although you can create IAM users to manage access to AWS accounts and resources, AWS recommends that you use roles instead of IAM users for this purpose. Roles act as an identity (sometimes called an IAM principal), and you assign permissions (identity-based policies) to the role. If you use the AWS Management Console or the AWS Command Line Interface to assume a role, you get the permissions of the role that you assumed. With its simpler way to maintain your users and groups in one AWS location and its ability to centrally manage and assign roles, AWS recommends that you use IAM Identity Center to manage access to your AWS accounts.
With this new IAM Identity Center release, you have the option to specify the names of CMPs and one PB in your permission set (role definition). Doing so modifies how IAM Identity Center provisions roles into accounts. When you assign a user or group to a permission set, IAM Identity Center checks the target account to verify that all specified CMPs and the PB are present. If they are all present, IAM Identity Center creates the role in the account and attaches the specified policies. If any of the specified CMPs or the PB are missing, IAM Identity Center fails the role creation.
This all sounds simple enough, but there are important implications to consider.
If you modify the permission set, IAM Identity Center updates the corresponding roles in all accounts to which you assigned the permission set. What is different when using CMPs and PBs is that IAM Identity Center is uninvolved in the creation or maintenance of the CMPs or PBs. It’s your responsibility to make sure that the CMPs and PBs are created and managed in all of the accounts to which you assign permission sets that use the CMPs and PBs. This means that you must be careful in how you name, create, and maintain these policies in your accounts, to avoid unintended consequences. For example, if you do not apply changes to CMPs consistently across all your accounts, the behavior of an IAM Identity Center created role will vary between accounts.
What CMPs do for you
By using CMPs with permission sets, you gain four main benefits:
If you federate to your accounts directly and have CMPs already, you can reuse your CMPs with permission sets in IAM Identity Center. We describe exceptions later in this post.
If you are running out of space in your permission set inline policies, you can add permission sets to increase the aggregate size of your policies.
Policies often need to refer to account-specific resources by Amazon Resource Name (ARN). Designing an inline policy that does this correctly across all your accounts can be challenging and, in some cases, may not be possible. By specifying a CMP in a permission set, you can tailor the CMPs in each of your accounts to reference the resources of the account. When IAM Identity Center creates the role and attaches the CMPs of the account, the policies used by the IAM Identity Center–generated role are now specific to the account. We highlight this example later in this post.
You get the benefit of a central location to define your roles, which gives you visibility of all the policies that are in use across the accounts where you assigned permission sets. This enables you to have a list of CMP and PB names that you should monitor for change across your accounts. This helps you ensure that you are maintaining your policies correctly.
Considerations and best practices
Start simple, avoid complex – If you’re just starting out, try using AWS managed policies first. With managed policies, you don’t need to know JSON policy to get started. If you need more advanced policies, start by creating identity-based inline custom policies in the permission set. These policies are provisioned as inline policies, and they will be identical in all your accounts. If you need larger policies or more advanced capabilities, use CMPs as your next option. In most cases, you can accomplish what you need with inline and customer managed policies. When you can’t achieve your objective using CMPs, use PBs. For information about intended use cases for PBs, see the blog post When and where to use IAM permissions boundaries.
Permissions boundaries don’t constrain IAM Identity Center admins who create permission sets – IAM Identity Center administrators (your staff) that you authorize to create permission sets can create inline policies and attach CMPs and PBs to permission sets, without restrictions. Permissions boundary policies set the maximum permissions of a role and the maximum permissions that the role can grant within an account through IAM only. For example, PBs can set the maximum permissions of a role that uses IAM to create other roles for use by code or services. However, a PB doesn’t set maximum permissions of the IAM Identity Center permission set creator. What does that mean? Suppose you created an IAM Identity Center Admin permission set that has a PB attached, and you assigned it to John Doe. John Doe can then sign in to IAM Identity Center and modify permission sets with any policy, regardless of what you put in the PB. The PB doesn’t restrict the policies that John Doe can put into a permission set.
In short, use PBs only for roles that need to create IAM roles for use by code or services. Don’t use PBs for permission sets that authorize IAM Identity Center admins who create permission sets.
Create and use a policy naming plan – IAM Identity Center doesn’t consider the content of a named policy that you attach to a permission set. If you assign a permission set in multiple accounts, make sure that all referenced policies have the same intent. Failure to do this will result in unexpected and inconsistent role behavior between different accounts. Imagine a CMP named “S3” that grants S3 read access in account A, and another CMP named “S3” that grants S3 administrative permissions over all S3 buckets in account B. A permission set that attaches the S3 policy and is assigned in accounts A and B will be confusing at best, because the level access is quite different in each of the accounts. It’s better to have more specific names, such as “S3Reader” and “S3Admin,” for your policies and ensure they are identical except for the account-specific resource ARNs.
Use automation to provision policies in accounts – Using tools such as AWS CloudFormation stacksets, or other infrastructure-as-code tools, can help ensure that naming and policies are consistent across your accounts. It also helps reduce the potential for administrators to modify policies in undesirable ways.
Policies must match the capabilities of IAM Identity Center – Although IAM Identity Center supports most IAM semantics, there are exceptions:
If you use an identity provider as your identity source, IAM Identity Center passes only PrincipalTag attributes that come through SAML assertions to IAM. IAM Identity Center doesn’t process or forward other SAML assertions to IAM. If you have CMPs or PBs that rely on other information from SAML assertions, they won’t work. For example, IAM Identity Center doesn’t provide multi-factor authentication (MFA) context keys or SourceIdentity.
Resource policies that reference role names or tags as part of trust policies don’t work with IAM Identity Center. You can use resource policies that use attribute-based access control (ABAC). IAM Identity Center role names are not static, and you can’t tag the roles that IAM Identity Center creates from its permission sets.
How to use CMPs with permission sets
Now that you understand permission sets and how they work with CMPs and PBs, let’s take a look at how you can configure a permission set to use CMPs.
In this example, we show you how to use one or more permission sets that attach a CMP that enables Amazon CloudWatch operations to the log group of specified accounts. Specifically, the AllowCloudWatch_permission set attaches a CMP named AllowCloudWatchForOperations. When we assign the permission set in two separate accounts, the assigned users can perform CloudWatch operations against the log groups of the assigned account only. Because the CloudWatch operations policies are in CMPs rather than inline policies, the log groups can be account specific, and you can reuse the CMPs in other permission sets if you want to have CloudWatch operations available through multiple permission sets.
Note: For this blog post, we demonstrate using CMPs by utilizing the IAM Management Console to create policies and assignments. We recommend that after you learn how to do this, you create your policies through automation for production environments. For example, use AWS CloudFormation. The intent of this example is to demonstrate how you can have a policy in two separate accounts that refer to different resources; something that is harder to accomplish using inline policies. The use case itself is not that advanced, but the use of CMPs to have different resources referenced in each account is a more advanced idea. We kept this simple to make it easier to focus on the feature than the use case.
Prerequisites
In this example, we assume that you know how to use the AWS Management Console, create accounts, navigate between accounts, and create customer managed policies. You also need administrative privileges to enable IAM Identity Center and to create policies in your accounts.
Configure an IAM Identity Center permission set to use a CMP
Follow these four procedures to use a CMP with a permission set:
Create CMPs with consistent names in your target accounts
Create a permission set that references the CMP that you created
Assign groups or users to the permission set in accounts where you created CMPs
Test your assignments
Step 1: Create CMPs with consistent names in your target accounts
In this step, you create a customer managed policy named AllowCloudWatchForOperations in two member accounts. The policy allows your cloud operations users to access a predefined CloudWatch log group in the account.
To create CMPs in your target accounts
Sign into AWS.
Note: You can sign in to IAM Identity Center if you have existing permission sets that enable you to create policies in member accounts. Alternatively, you can sign in using IAM federation or as an IAM user that has access to roles that enable you to navigate to other accounts where you can create policies. Your sign-in should also give you access to a role that can administer IAM Identity Center permission sets.
Navigate to an AWS Organizations member account.
Note: If you signed in through IAM Identity Center, use the user portal page to navigate to the account and role. If you signed in by using IAM federation or as an IAM user, choose your sign-in name that is displayed in the upper right corner of the AWS Management Console and then choose switch role, as shown in Figure 1.
Figure 1: Switch role for IAM user or IAM federation
In the upper right of the page, choose Create policy.
On the Create Policy page, choose the JSON tab.
Paste the following policy into the JSON text box. Replace <account-id> with the ID of the account in which the policy is created.
Tip: To copy your account number, choose your sign-in name that is displayed in the upper right corner of the AWS Management Console, and then choose the copy icon next to the account ID, as shown in Figure 2.
On the Create Policy/Review Policy page, in the Name field, enter AllowCloudWatchForOperations. This is the name that you will use when you attach the CMP to the permission set in the next procedure (Step 2).
Repeat steps 1 through 7 in at least one other member account. Be sure to replace the <account-id> element in the policy with the account ID of each account where you create the policy. The only difference between the policies in each account is the <account-id> in the policy.
Step 2: Create a permission set that references the CMP that you created
At this point, you have at least two member accounts containing the same policy with the same policy name. However, the ResourceARN in each policy refers to log groups that belong to the respective accounts. In this step, you create a permission set and attach the policy to the permission set. Importantly, you attach only the name of the policy to the permission set. The actual attachment of the policy to the role that IAM Identity Center creates, happens when you assign the permission set to a user or group in Step 3.
To create a permission set that references the CMP
Sign in to the Organizations management account or the IAM Identity Center delegated administration account.
On the Select Permission set type screen, select Custom permission Set and choose Next.
Figure 3: Select custom permission set
On the Specify policies and permissions boundary page, expand the Customer managed policies option, and choose Attach policies.
Figure 4: Specify policies and permissions boundary
For Policy names, enter the name of the policy. This name must match the name of the policy that you created in Step 1. In our example, the name is AllowCloudWatchForOperations. Choose Next.
On the Permission set details page, enter a name for your permission set. In this example, use AllowCloudWatch_PermissionSet. You can alspecify additional details for your permission sets, such as session duration and relay state (these are a link to a specific AWS Management Console page of your choice).
Figure 5: Permission set details
Choose Next, and then choose Create.
Step 3: Assign groups or users to the permission set in accounts where you created your CMPs
In the preceding steps, you created a customer managed policy in two or more member accounts, and a permission set with the customer managed policy attached. In this step, you assign users to the permission set in your accounts.
To assign groups or users to the permission set
Sign in to the Organizations management account or the IAM Identity Center delegated administration account.
For testing purposes, in the AWS Organization section, select all the accounts where you created the customer managed policy. This means that any users or groups that you assign during the process will have access to the AllowCloudWatch_PermissionSet role in each account. Then, on the top right, choose Assign users or groups.
Choose the Users or Groups tab and then select the users or groups that you want to assign to the permission set. You can select multiple users and multiple groups in this step. For this example, we recommend that you select a single user for which you have credentials, so that you can sign in as that user to test the setup later. After selecting the users or groups that you want to assign, choose Next.
Figure 7: Assign users and groups to AWS accounts
Select the permission set that you created in Step 2 and choose Next.
Review the users and groups that you are assigning and choose Submit.
You will see a message that IAM Identity Center is configuring the accounts. In this step, IAM Identity Center creates roles in each of the accounts that you selected. It does this for each account, so it looks in the account for the CMP that you specified in the permission set. If the name of the CMP that you specified in the permission set matches the name that you provided when creating the CMP, IAM Identity Center creates a role from the permission set. If the names don’t match or if the CMP isn’t present in the account to which you assigned the permission set, you see an error message associated with that account. After successful submission, you will see the following message: We reprovisioned your AWS accounts successfully and applied the updated permission set to the accounts.
Step 4: Test your assignments
Congratulations! You have successfully created CMPs in multiple AWS accounts, created a permission set and attached the CMPs by name, and assigned the permission set to users and groups in the accounts. Now it’s time to test the results.
Copy the user portal URL, and then paste the user portal URL into your browser.
At the sign-in prompt, sign in as one of the users that you assigned to the permission set.
The IAM Identity Center user portal shows the accounts and roles that you can access. In the example shown in Figure 8, the user has access to the AllowCloudWatch_PermissionSet created in two accounts.
Figure 8: User portal
If you choose AllowCloudWatch_PermissionSet in the member-account, you will have access to the CloudWatch log group in the member-account account. If you choose the role in member-account-1, you will have access to CloudWatch Log group in member-account-1.
Test the access by choosing Management Console for the AllowCloudWatch_PermissionSet in the member-account.
In the navigation pane, choose Log groups. You should be able to access log groups, as shown in Figure 9.
Figure 9: CloudWatch log groups
Open the IAM console. You shouldn’t have permissions to see the details on this console, as shown in figure 10. This is because AllowCloudWatch_PermissionSet only provided CloudWatch log access.
Figure 10: Blocked access to the IAM console
Return to the IAM Identity Center user portal.
Repeat steps 4 through 8 using member-account-1.
Answers to key questions
What happens if I delete a CMP or PB that is attached to a role that IAM Identity Center created? IAM prevents you from deleting policies that are attached to IAM roles.
How can I delete a CMP or PB that is attached to a role that IAM Identity Center created? Remove the CMP or PB reference from all your permission sets. Then re-provision the roles in your accounts. This detaches the CMP or PB from IAM Identity Center–created roles. If the policies are unused by other IAM roles in your account or by IAM users, you can delete the policy.
What happens if I modify a CMP or PB that is attached to an IAM Identity Center provisioned role? The IAM Identity Center role picks up the policy change the next time that someone assumes the role.
Conclusion
In this post, you learned how IAM Identity Center works with customer managed policies and permissions boundaries that you create in your AWS accounts. You learned different ways that this capability can help you, and some of the key considerations and best practices to succeed in your deployments. That includes the principle of starting simple and avoiding unnecessarily complex configurations. Remember these four principles:
In most cases, you can accomplish everything you need by starting with custom (inline) policies.
Use customer managed policies for more advanced cases.
Use permissions boundary policies only when necessary.
Use CloudFormation to manage your customer managed policies and permissions boundaries rather than having administrators deploy them manually in accounts.
To learn more about this capability, see the IAM Identity Center User Guide. If you have feedback about this post, submit comments in the Comments section below. If you have questions about this post, start a new thread on the AWS IAM re:Post or contact AWS Support.
Want more AWS Security news? Follow us on Twitter.
AWS is excited to announce the launch of the AWS Wickr ATAK Plugin, which makes it easier for ATAK users to maintain secure communications.
The Android Team Awareness Kit (ATAK)—also known as Android Tactical Assault Kit (ATAK) for military use—is a smartphone geospatial infrastructure and situational awareness application. It provides mapping, messaging, and geofencing capabilities to enable safe collaboration over geography.
ATAK users, referred to as operators, can view the location of other operators and potential hazards—a major advantage over relying on hand-held radio transmissions. While ATAK was initially designed for use in combat zones, the technology has been adapted to fit the missions of local, state, and federal agencies.
ATAK is currently in use by over 40,000 US Department of Defense (DoD) users—including the Air Force, Army, Special Operations, and National Guard—along with the Department of Justice (DOJ), the Department of Homeland Security (DHS), and 32,000 nonfederal users.
Using AWS Wickr with ATAK
AWS Wickr is a secure collaboration service that provides enterprises and government agencies with advanced security and administrative controls to help them meet security and compliance requirements. The AWS Wickr service is now in preview.
With AWS Wickr, communication mechanisms such as one-to-one and group messaging, audio and video calling, screen sharing, and file sharing are protected with 256-bit end-to-end encryption (E2EE). Encryption takes place locally, on the endpoint. Every message, call, and file is encrypted with a new random key, and no one but the intended recipients can decrypt them. Flexible administrative features enable organizations to deploy at scale, and facilitate information governance.
AWS Wickr supports many agencies that use ATAK. However, until now, ATAK operators have had to leave the ATAK application in order to use AWS Wickr, which creates operational risk.
AWS Wickr ATAK Plugin
AWS Wickr has developed a plugin that enhances ATAK with secure communications features. ATAK operators are provided with a Wickr Enterprise or Wickr Pro account, so they can use AWS Wickr within ATAK for secure messaging, calling, and file transfer. This helps reduce interruptions, and the complexity of configuration with ATAK chat features.
Use cases
The AWS Wickr ATAK Plugin has multiple use cases.
Military
The military uses ATAK for blue force tracking to locate team members, red force tracking to locate enemies, terrain and weather analysis, and to visually communicate their movements to friendly forces.
The AWS Wickr ATAK Plugin enhances the ability of military personnel to maintain the situational awareness ATAK provides, while quickly receiving and reacting to Wickr communications. Ephemeral messaging options allow unit leaders to send mission plans, GPS points of interest, and set burn-on-read and expiration timers. Information can be deleted from the device, while being retained on the AWS Wickr service to help meet compliance requirements, and facilitate the creation of after-action reports.
Law enforcement
ATAK is a powerful tool for team tracking and mission planning that promotes a safer and better response to critical law enforcement and public-safety events.
The AWS Wickr ATAK Plugin adds to the capabilities of ATAK by supporting secure communications between tactical, negotiation, and investigative teams.
First responders
ATAK aids in search-and-rescue and multi-jurisdictional natural disaster responses, such as hurricane relief efforts.
The AWS Wickr ATAK Plugin provides secure, uninterrupted communication between all levels of first responders to help them get oriented quickly, and support complex coordination needs.
Using certificates to authenticate and encrypt data is vital to any enterprise security. For example, companies rely on certificates to provide TLS encryption for web applications so that client data is protected. However, not all certificates need to be issued from a publicly trusted certificate authority (CA). A privately trusted CA can be leveraged to issue certificates to help protect data in transit on resources such as load-balancers and also device authentication for endpoints and IoT devices. Many organizations already have that privately trusted CA running in their Microsoft Active Directory architecture via Active Directory Certificate Services (ADCS).
AWS Certificate Manager Private Certificate Authority (ACM Private CA or ACM PCA) is a private CA service that extends ACM certificate management capabilities to both public and private certificates. ACM PCA provides a highly available private CA service without the upfront investment and ongoing maintenance costs of operating your own private CA. ACM PCA allows developers to be more agile by providing them with APIs to create and deploy private certificates programmatically. You also have the flexibility to create private certificates for applications that require custom certificate lifetimes or resource names.
Why use ACM PCA with Windows Active Directory?
Many enterprises already use Active Directory to manage their IT resources. Whether it is on-premises or built into your AWS accounts, Active Directory’s built-in CA can be extended by ACM PCA. Using your ADCS to sign an ACM PCA means that members of your Active Directory automatically trust certificates issued by that ACM PCA. Keep in mind that these are still private certificates, and they are intended to be used just like certificates from ADCS itself. They will not be trusted by unmanaged devices, because these are not signed by a publicly trusted external CA. Therefore, systems like Mac and Linux may require that you manually deploy the ADCS certificate chain in order to trust certificates issued by your new ACM PCA.
This means it is more efficient for you to rapidly deploy certificates to your endpoint workstations for authentication. Or you can protect internal-only workloads with certificates that are constrained to your internal domain namespace. These tasks can be done conveniently through AWS APIs and the AWS SDK.
Solution overview
In the following sections, we will configure Microsoft ADCS to be able to sign a subordinate CA, deploy and sign ACM PCA, and then test the solution using a private website that is protected by a TLS certificate issued from the ACM PCA.
Configure Microsoft ADCS
Microsoft ADCS is normally deployed as part of your Windows Active Directory architecture. It can be extended to do multiple different types of certificate signing depending on your environment’s needs. Each of these different types of certificates is defined by a template that you must enable and configure. Each template contains configuration information about how Microsoft ADCS will issue the certificate type. You can copy and configure templates differently depending on your environment’s requirements. The specifics of each type of template is outside the scope of this blog post.
To configure ADCS to sign subordinate CAs
On the CA server that will be signing the private CA certificate, open the Certification Authority Microsoft Management Console (MMC).
In the left-side tree view, expand the name of the server.
Open the context (right-click) menu for Certificate Templates and choose Manage.
Figure 1: Navigating to the Manage option for the certificate templates
This opens the Certificate Template Console, which is populated with the list of optional templates.
Scroll down, open the context (right-click) menu for Subordinate Certification Authority, and choose Duplicate Template, as shown in Figure 2. This will create a duplicate of the template that you can alter for your needs, while leaving the original template unaltered for future use. Selecting Duplicate Template immediately opens the configuration for the new template.
Figure 2: Select Duplicate Template to create a copy of the Subordinate Certification Authority template
To configure and use the new template
On the new template configuration page, choose the General tab, and change the template display name to something that uniquely identifies it. The example in this post uses the name Subordinate Certification Authority – Private CA.
Select the check box for Publish certificate in Active Directory, and then choose OK. The new template appears in the list of available templates. Close the Certificate Templates Console.
Return to the Certification Authority MMC. Open the context (right-click) menu for Certificate Templates again, but this time choose New -> Certificate Template to Issue.
Figure 3: Issue the new Certificate Template you created for subordinate Cas
In the dialog box that appears, choose the new template you created in Step 1 of this procedure, and then choose OK.
That’s all that’s needed! Your CA is now ready to issue certificates for subordinate CAs in your public key infrastructure. Open a browser from either the ADCS CA server itself or through a network connection to the ADCS CA server, and use the following URL to access the certificate server’s certificate signing interface.
Now you can see that in the Certificate Templates list, you can choose the Subordinate Certification Authority template that you created, as shown in Figure 4.
Figure 4: The interface to sign certificates on your CA now shows the new certificate template you created
Deploy and sign the ACM Private CA’s certificate
In this step, you will deploy the ACM PCA, which is the first step to create a subordinate CA to deploy in your AWS account. The process of deploying the ACM PCA is well documented, so this post will not go into depth about the deployment itself. Instead, this procedure focuses on the steps for taking the certificate signing request (CSR) and signing it against the ADCS, and then covers the additional steps to convert the certificates that ADCS produces into the certificate format that ACM PCA expects.
After the ACM PCA is initially deployed, it needs to have a certificate signed to authenticate it. ACM PCA offers two options for signing the new instance’s certificate. You can choose to sign either through another ACM PCA instance, or via an external CA. Since you are using ADCS in this walkthrough, you will use the process of an external CA. The ACM PCA deployment is now at a point where it needs its CSR signed by Microsoft ADCS. You should see that it is ready in the AWS Management Console for ACM PCA.
To deploy and sign the ACM PCA’s certificate
When the ACM PCA is ready, in the ACM PCA console, begin the Install subordinate CA certificate process by choosing External private CA for the CA type.
Figure 5: Options for signing the new instance’s certificate
You will then be provided the certificate signing request (CSR) for the ACM PCA. Copy and paste the CSR content into the ADCS CA signing URL you visited earlier on the CA server. Then choose Next. The next page is where you will paste in the new signed certificate and certchain in a later step.
From the ADCS CA URL, be sure that the new Subordinate Certification Authority template is selected, and then choose Submit. The new certificate will be issued to you. The ADCS issuing page provides two different formats for the certificate, either as Distinguished Encoding Rules (DER) or base64-encoded.
Copy the base64-encoded files for both the certificate and the certchain to your local computer. The certificate is already in Privacy Enhanced Mail (PEM) format, and its contents can be pasted into the ACM PCA certificate input in the console. However, you must convert the certchain into the format required by the ACM PCA by following these steps:
To convert the format of the certchain, use the openssl tool from the command line. The process of installing the openssl tool is outside the scope of this blog post. Refer to the OpenSSL site documentation for installation options for your operating system.
Use the following command to convert the certchain file from Public Key Cryptographic Standards #7 (PKCS7) to PEM.
Using a text editor, open the certchain.pem file and copy the last certificate block from the file, starting with —–BEGIN CERTIFICATE—– and ending with —–END CERTIFICATE—–. You will notice that the file begins with the signed certificate and includes subject= and issuer= statements. ACM PCA only accepts the content that is the certificate chain.
Return to the ACM PCA console page from Step 1, and paste the text the you just copied into the input area provided for the certificate chain. After this step is complete, the private CA is now signed by your corporate PKI.
Test the solution
Now that the ACM PCA is online, one of the things it can do is issue certificates via ACM that are trusted by your corporate Active Directory joined clients. These certificates can be used in services such as Application Load Balancers to provide TLS protected endpoints that are unique to your organization and trusted only by your internal clients.
From a client joined to our test Active Directory, Internet Explorer shows that it trusts the TLS certificate issued by AWS Certificate Manager and used on the Application Load Balancer for a private site.
Figure 6: Internet Explorer showing that it trusts the TLS certificate
For this demo, we created a test web server that is hosting an example webpage. The web server is behind an AWS Application Load Balancer. The TLS certificate attached to the Application Load Balancer is issued from the new ACM PCA.
Conclusion
Organizations that have Microsoft Active Directory deployed can use Active Directory’s Certificate Services to issue certificates for private resources. This blog post shows how you can extend that certificate trust to AWS Certificate Manager Private CA. This provides a way for your developers to issue private certificates automatically, which are trusted by your Active Directory domain-joined clients or clients that have the ADCS certificate chain installed.
For more information on hybrid public key infrastructure (PKI) on AWS, refer to these blog posts:
In today’s fast-changing security environment, security professionals must continuously monitor, detect, respond to, and mitigate new and existing security issues. To do so, security teams must be able to analyze security-relevant telemetry and log data by using multiple tools, technologies, and vendors. The complex and heterogeneous nature of this task drives up costs and may slow down detection and response times. Our mission is to innovate on behalf of our customers so they can more quickly analyze and protect their environment when the need arises.
With that goal in mind, alongside a number of partner organizations, we’re pleased to announce the release of the Open Cybersecurity Schema Framework (OCSF) project, which includes an open specification for the normalization of security telemetry across a wide range of security products and services, as well as open-source tools that support and accelerate the use of the OCSF schema. As a co-founder of the OCSF effort, we’ve helped create the specifications and tools that are available to all industry vendors, partners, customers, and practitioners. Joining us in this announcement is an array of key security vendors, beginning with Splunk, the co-founder with AWS of the OCSF project, and also including Broadcom, Salesforce, Rapid7, Tanium, Cloudflare, Palo Alto Networks, DTEX, CrowdStrike, IBM Security, JupiterOne, Zscaler, Sumo Logic, IronNet, Securonix, and Trend Micro. Going forward, anyone can participate in the evolution of the specification and tooling at https://github.com/ocsf.
Our customers have told us that interoperability and data normalization between security products is a challenge for them. Security teams have to correlate and unify data across multiple products from different vendors in a range of proprietary formats; that work has a growing cost associated with it. Instead of focusing primarily on detecting and responding to events, security teams spend time normalizing this data as a prerequisite to understanding and response. We believe that use of the OCSF schema will make it easier for security teams to ingest and correlate security log data from different sources, allowing for greater detection accuracy and faster response to security events. We see value in contributing our engineering efforts and also projects, tools, training, and guidelines to help standardize security telemetry across the industry. These efforts benefit our customers and the broader security community.
Although we as an industry can’t directly control the behavior of threat actors, we can improve our collective defenses by making it easier for security teams to do their jobs more efficiently. At AWS, we are excited to see the industry come together to use the OCSF project to make it easier for security professionals to focus on the things that are important to their business: identifying and responding to events, then using that data to proactively improve their security posture.
When building serverless applications using AWS Lambda, there are a number of considerations regarding security, governance, and compliance. This post highlights how Lambda, as a serverless service, simplifies cloud security and compliance so you can concentrate on your business logic. It covers controls that you can implement for your Lambda workloads to ensure that your applications conform to your organizational requirements.
The Shared Responsibility Model
The AWS Shared Responsibility Model distinguishes between what AWS is responsible for and what customers are responsible for with cloud workloads. AWS is responsible for “Security of the Cloud” where AWS protects the infrastructure that runs all the services offered in the AWS Cloud. Customers are responsible for “Security in the Cloud”, managing and securing their workloads. When building traditional applications, you take on responsibility for many infrastructure services, including operating systems and network configuration.
Traditional application shared responsibility
One major benefit when building serverless applications is shifting more responsibility to AWS so you can concentrate on your business applications. AWS handles managing and patching the underlying servers, operating systems, and networking as part of running the services.
Serverless application shared responsibility
For Lambda, AWS manages the application platform where your code runs, which includes patching and updating the managed language runtimes. This reduces the attack surface while making cloud security simpler. You are responsible for the security of your code and AWS Identity and Access Management (IAM) to the Lambda service and within your function.
Lambda functions run in separate isolated AWS accounts that are dedicated to the Lambda service. Lambda invokes your code in a secure and isolated runtime environment within the Lambda service account. A runtime environment is a collection of resources running in a dedicated hardware-virtualized Micro Virtual Machines (MVM) on a Lambda worker node.
Lambda workers are bare metalEC2 Nitro instances, which are managed and patched by the Lambda service team. They have a maximum lease lifetime of 14 hours to keep the underlying infrastructure secure and fresh. MVMs are created by Firecracker, an open source virtual machine monitor (VMM) that uses Linux’s Kernel-based Virtual Machine (KVM) to create and manage MVMs securely at scale.
MVMs maintain a strong separation between runtime environments at the virtual machine hardware level, which increases security. Runtime environments are never reused across functions, function versions, or AWS accounts.
Isolation model for AWS Lambda workers
Network security
Lambda functions always run inside secure Amazon Virtual Private Cloud (Amazon VPCs) owned by the Lambda service. This gives the Lambda function access to AWS services and the public internet. There is no direct network inbound access to Lambda workers, runtime environments, or Lambda functions. All inbound access to a Lambda function only comes via the Lambda Invoke API, which sends the event object to the function handler.
You can configure a Lambda function to connect to private subnets in a VPC in your account if necessary, which you can control with IAM condition keys . The Lambda function still runs inside the Lambda service VPC but sends all network traffic through your VPC. Function outbound traffic comes from your own network address space.
AWS Lambda service VPC with VPC-to-VPC NAT to customer VPC
To give your VPC-connected function access to the internet, route outbound traffic to a NAT gateway in a public subnet. Connecting a function to a public subnet doesn’t give it internet access or a public IP address, as the function is still running in the Lambda service VPC and then routing network traffic into your VPC.
All internal AWS traffic uses the AWS Global Backbone rather than traversing the internet. You do not need to connect your functions to a VPC to avoid connectivity to AWS services over the internet. VPC connected functions allow you to control and audit outbound network access.
You can use security groups to control outbound traffic for VPC-connected functions and network ACLs to block access to CIDR IP ranges or ports. VPC endpoints allow you to enable private communications with supported AWS services without internet access.
You can use VPC Flow Logs to audit traffic going to and from network interfaces in your VPC.
Runtime environment re-use
Each runtime environment processes a single request at a time. After Lambda finishes processing the request, the runtime environment is ready to process an additional request for the same function version. For more information on how Lambda manages runtime environments, see Understanding AWS Lambda scaling and throughput.
Data can persist in the local temporary filesystem path, in globally scoped variables, and in environment variables across subsequent invocations of the same function version. Ensure that you only handle sensitive information within individual invocations of the function by processing it in the function handler, or using local variables. Do not re-use files in the local temporary filesystem to process unencrypted sensitive data. Do not put sensitive or confidential information into Lambda environment variables, tags, or other freeform fields such as Name fields.
AWS recommends using multiple accounts to isolate your resources because they provide natural boundaries for security, access, and billing. Use AWS Organizations to manage and govern individual member accounts centrally. You can use AWS Control Tower to automate many of the account build steps and apply managed guardrails to govern your environment. These include preventative guardrails to limit actions and detective guardrails to detect and alert on non-compliance resources for remediation.
Lambda access controls
Lambda permissions define what a Lambda function can do, and who or what can invoke the function. Consider the following areas when applying access controls to your Lambda functions to ensure least privilege:
Execution role
Lambda functions have permission to access other AWS resources using execution roles. This is an AWS principal that the Lambda service assumes which grants permissions using identity policy statements assigned to the role. The Lambda service uses this role to fetch and cache temporary security credentials, which are then available as environment variables during a function’s invocation. It may re-use them across different runtime environments that use the same execution role.
Ensure that each function has its own unique role with the minimum set of permissions..
Identity/user policies
IAM identity policies are attached to IAM users, groups, or roles. These policies allow users or callers to perform operations on Lambda functions. You can restrict who can create functions, or control what functions particular users can manage.
Resource policies
Resource policies define what identities have fine-grained inbound access to managed services. For example, you can restrict which Lambda function versions can add events to a specific Amazon EventBridge event bus. You can use resource-based policies on Lambda resources to control what AWS IAM identities and event sources can invoke a specific version or alias of your function. You also use a resource-based policy to allow an AWS service to invoke your function on your behalf. To see which services support resource-based policies, see “AWS services that work with IAM”.
Attribute-based access control (ABAC)
With attribute-based access control (ABAC), you can use tags to control access to your Lambda functions. With ABAC, you can scale an access control strategy by setting granular permissions with tags without requiring permissions updates for every new user or resource as your organization scales. You can also use tag policies with AWS Organizations to standardize tags across resources.
Permissions boundaries
Permissions boundaries are a way to delegate permission management safely. The boundary places a limit on the maximum permissions that a policy can grant. For example, you can use boundary permissions to limit the scope of the execution role to allow only read access to databases. A builder with permission to manage a function or with write access to the applications code repository cannot escalate the permissions beyond the boundary to allow write access.
Service control policies
When using AWS Organizations, you can use Service control policies (SCPs) to manage permissions in your organization. These provide guardrails for what actions IAM users and roles within the organization root or OUs can do. For more information, see the AWS Organizations documentation, which includes example service control policies.
Code signing
As you are responsible for the code that runs in your Lambda functions, you can ensure that only trusted code runs by using code signing with the AWS Signer service. AWS Signer digitally signs your code packages and Lambda validates the code package before accepting the deployment, which can be part of your automated software deployment process.
Auditing Lambda configuration, permissions and access
You should audit access and permissions regularly to ensure that your workloads are secure. Use the IAM console to view when an IAM role was last used.
IAM last used
IAM access advisor
Use IAM access advisor on the Access Advisor tab in the IAM console to review when was the last time an AWS service was used from a specific IAM user or role. You can use this to remove IAM policies and access from your IAM roles.
You can validate policies using IAM Access Analyzer, which provides over 100 policy checks with security warnings for overly permissive policies. To learn more about policy checks provided by IAM Access Analyzer, see “IAM Access Analyzer policy validation”.
You can also generate IAM policies based on access activity from CloudTrail logs, which contain the permissions that the role used in your specified date range.
IAM Access Analyzer
AWS Config
AWS Config provides you with a record of the configuration history of your AWS resources. AWS Config monitors the resource configuration and includes rules to alert when they fall into a non-compliant state.
For Lambda, you can track and alert on changes to your function configuration, along with the IAM execution role. This allows you to gather Lambda function lifecycle data for potential audit and compliance requirements. For more information, see the Lambda Operators Guide.
Lambda makes cloud security simpler by taking on more responsibility using the AWS Shared Responsibility Model. Lambda implements strict workload security at scale to isolate your code and prevent network intrusion to your functions. This post provides guidance on assessing and implementing best practices and tools for Lambda to improve your security, governance, and compliance controls. These include permissions, access controls, multiple accounts, and code security. Learn how to audit your function permissions, configuration, and access to ensure that your applications conform to your organizational requirements.
For more serverless learning resources, visit Serverless Land.
We’re continuing to expand the scope of our assurance programs at Amazon Web Services (AWS) and are pleased to announce that seven new services have been added to the scope of our Payment Card Industry Data Security Standard (PCI DSS) certification. This provides our customers with more options to process and store their payment card data and architect their cardholder data environment (CDE) securely in AWS.
We were evaluated by Coalfire, a third-party Qualified Security Assessor (QSA). Customers can access the Attestation of Compliance (AOC) report demonstrating AWS’ PCI compliance status through AWS Artifact.
To learn more about our PCI program and other compliance and security programs, see the AWS Compliance Programs page. As always, we value your feedback and questions; reach out to the AWS Compliance team through the Contact Us page.
If you have feedback about this post, submit comments in the Comments section below. If you have questions about this post, contact AWS Support.
Want more AWS Security news? Follow us on Twitter.
We are excited to announce that Amazon Web Services (AWS) has released the latest 2022 Payment Card Industry 3-D Secure (PCI 3DS) attestation to support our customers in the financial services sector. Although AWS doesn’t perform 3DS functions directly, the AWS PCI 3DS attestation of compliance can help customers to attain their own PCI 3DS compliance for their services running on AWS.
All AWS Regions in scope for PCI DSS were included in the 3DS attestation. AWS was assessed by Coalfire, an independent Qualified Security Assessor (QSA).
AWS compliance reports, including this latest PCI 3DS attestation, are available on demand through AWS Artifact. The 3DS package available in AWS Artifact includes the 3DS Attestation of Compliance (AOC) and Shared Responsibility Guide. To learn more about our PCI program and other compliance and security programs, visit the AWS Compliance Programs page.
We value your feedback and questions. If you have feedback about this post, or want to reach out to our team, submit comments through the Contact Us page.
Want more AWS Security news? Follow us on Twitter.
We’re happy to announce that an updated version of the AWS Security Reference Architecture (AWS SRA) is now available. The AWS SRA is a holistic set of guidelines for deploying the full complement of AWS security services in a multi-account environment. You can use it to help your organization to design, implement, and manage AWS security services so that they align with AWS best practices. The guidance is deeply informed by our collective experiences with AWS enterprise customers.
The AWS SRA update includes seven additional services and features, as well as updated guidance on all services in the AWS SRA with a special focus on service integrations. The AWS SRA update also includes new content about how your organization can use the AWS SRA to design, review, and assess your security architecture. We used direct customer feedback and our experience helping customers use the AWS SRA, as well as including new AWS service and feature releases, to make these updates.
At the core of the AWS SRA documentation is the AWS Security Reference Architecture, a one-page architecture diagram that includes all the security services in a multi-account environment, as shown in Figure 1.
Figure 1: AWS SRA one-page architecture diagram
In the AWS SRA, you’ll find additional documentation about the AWS SRA architecture diagram that dives deep into account structure, the reasoning behind why a specific security service is deployed in a particular account, and how the security services connect and relate to each other.
Update highlights
Based on direct customer feedback, new service and feature releases, and our experience helping customers use the AWS SRA, we’ve included the following changes in the AWS SRA update:
Updated the guidance about using the AWS SRA to design your security architecture. This includes topics such as applying security services across AWS Organizations, balancing distributed and centralized security service guardrails, and using a delegated administrator for AWS security services.
In addition to the architecture diagram and documented guidance, the AWS SRA code repository is regularly updated and has evolved considerably since its initial release. Highlights of the repository include a Quick Setup that uses a centralized AWS CloudFormation template, simplified deployment of the example solutions using nested stacks, updated documentation with diagrams and templates for all solutions, AWS Config management account solution, a Security Hub organization solution, an account alternate contacts solution, and more.
Getting started with the AWS SRA
There are different ways to use the AWS SRA, depending on where you are in your cloud adoption journey. The following are some recommendations to help you get the most value out of the AWS SRA:
Define the target state of your security architecture.
Review the designs and capabilities that you’ve already designed.
Bootstrap the implementation of your security architecture.
Learn more about AWS security services and features.
Start a discussion about organizational governance and responsibilities for security.
We greatly value feedback and contributions from our community. To share your thoughts and insights about the AWS SRA guide, your experience using it, and what you want to see in future versions of the AWS SRA, complete the AWS Proscriptive Guidance feedback form online. If you have feedback about the example code in the GitHub repository, open a GitHub Issue.
If you have feedback about this post, submit comments in the Comments section below. If you have questions about this post, contact AWS Support.
Want more AWS Security news? Follow us on Twitter.
The collective thoughts of the interwebz
Manage Consent
To provide the best experiences, we use technologies like cookies to store and/or access device information. Consenting to these technologies will allow us to process data such as browsing behavior or unique IDs on this site. Not consenting or withdrawing consent, may adversely affect certain features and functions.
Functional
Always active
The technical storage or access is strictly necessary for the legitimate purpose of enabling the use of a specific service explicitly requested by the subscriber or user, or for the sole purpose of carrying out the transmission of a communication over an electronic communications network.
Preferences
The technical storage or access is necessary for the legitimate purpose of storing preferences that are not requested by the subscriber or user.
Statistics
The technical storage or access that is used exclusively for statistical purposes.The technical storage or access that is used exclusively for anonymous statistical purposes. Without a subpoena, voluntary compliance on the part of your Internet Service Provider, or additional records from a third party, information stored or retrieved for this purpose alone cannot usually be used to identify you.
Marketing
The technical storage or access is required to create user profiles to send advertising, or to track the user on a website or across several websites for similar marketing purposes.