Tag Archives: security

Introducing SSL/TLS Recommender

Post Syndicated from Suleman Ahmad original https://blog.cloudflare.com/ssl-tls-recommender/

Introducing SSL/TLS Recommender

Introducing SSL/TLS Recommender

Seven years ago, Cloudflare made HTTPS availability for any Internet property easy and free with Universal SSL. At the time, few websites — other than those that processed sensitive data like passwords and credit card information — were using HTTPS because of how difficult it was to set up.

However, as we all started using the Internet for more and more private purposes (communication with loved ones, financial transactions, shopping, healthcare, etc.) the need for encryption became apparent. Tools like Firesheep demonstrated how easily attackers could snoop on people using public Wi-Fi networks at coffee shops and airports. The Snowden revelations showed the ease with which governments could listen in on unencrypted communications at scale. We have seen attempts by browser vendors to increase HTTPS adoption such as the recent announcement by Chromium for loading websites on HTTPS by default. Encryption has become a vital part of the modern Internet, not just to keep your information safe, but to keep you safe.

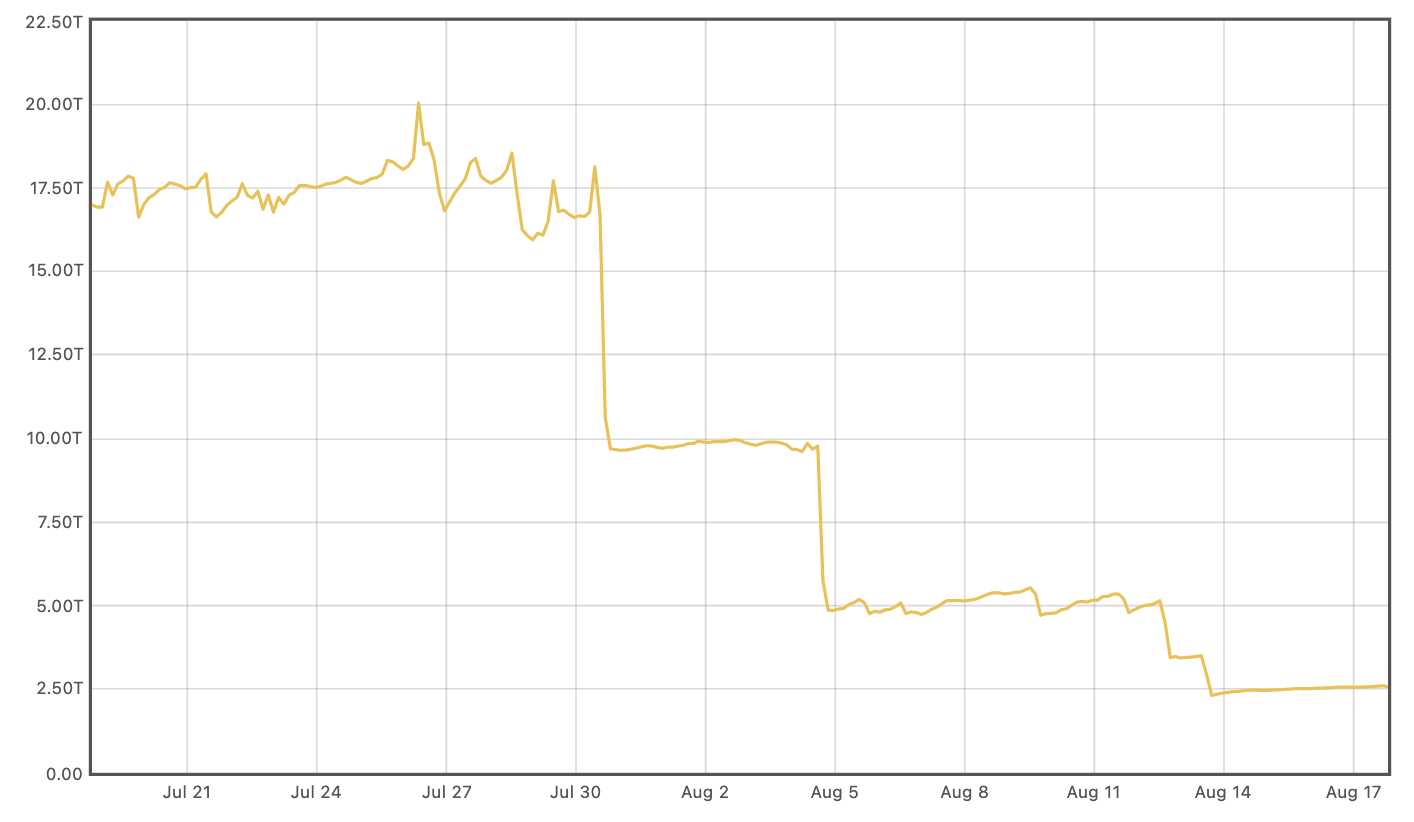
When it was launched, Universal SSL doubled the number of sites on the Internet using HTTPS. We are building on that with SSL/TLS Recommender, a tool that guides you to stronger configurations for the backend connection from Cloudflare to origin servers. Recommender has been available in the SSL/TLS tab of the Cloudflare dashboard since August 2020 for self-serve customers. Over 500,000 zones are currently signed up. As of today, it is available for all customers!

How Cloudflare connects to origin servers

Cloudflare operates as a reverse proxy between clients (“visitors”) and customers’ web servers (“origins”), so that Cloudflare can protect origin sites from attacks and improve site performance. This happens, in part, because visitor requests to websites proxied by Cloudflare are processed by an “edge” server located in a data center close to the client. The edge server either responds directly back to the visitor, if the requested content is cached, or creates a new request to the origin server to retrieve the content.

Introducing SSL/TLS Recommender

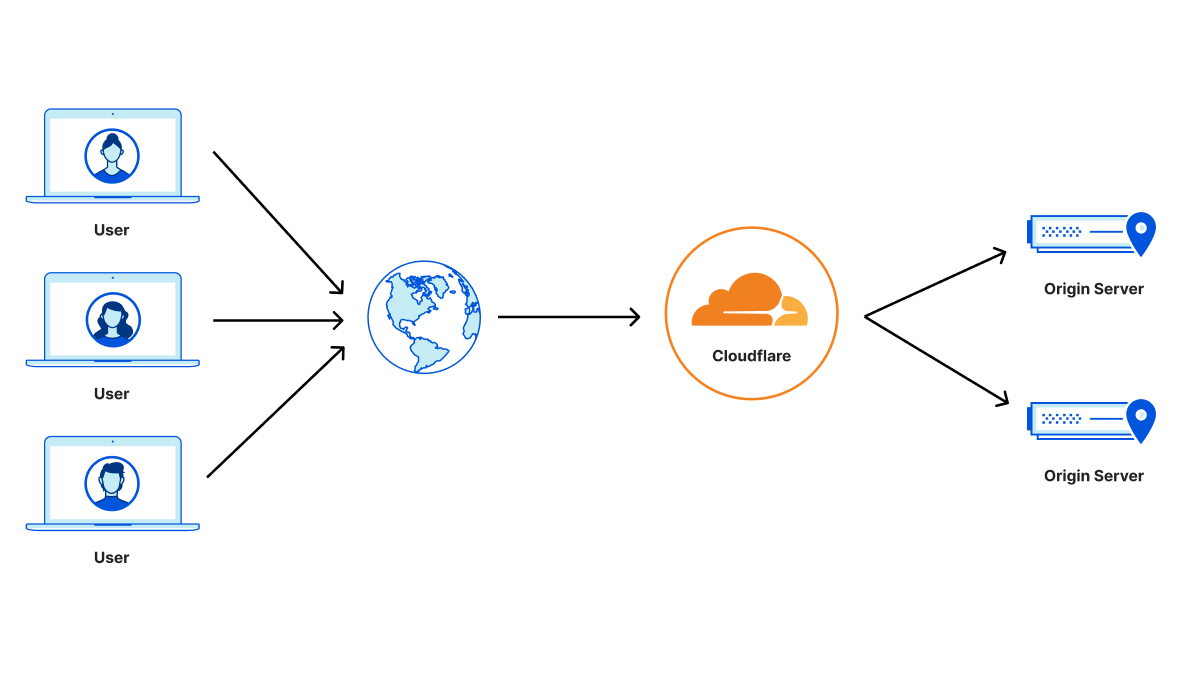
The backend connection to the origin can be made with an unencrypted HTTP connection or with an HTTPS connection where requests and responses are encrypted using the TLS protocol (historically known as SSL). HTTPS is the secured form of HTTP and should be used whenever possible to avoid leaking information or allowing content tampering by third-party entities. The origin server can further authenticate itself by presenting a valid TLS certificate to prevent active monster-in-the-middle attacks. Such a certificate can be obtained from a certificate authority such as Let’s Encrypt or Cloudflare’s Origin CA. Origins can also set up authenticated origin pull, which ensures that any HTTPS requests outside of Cloudflare will not receive a response from your origin.

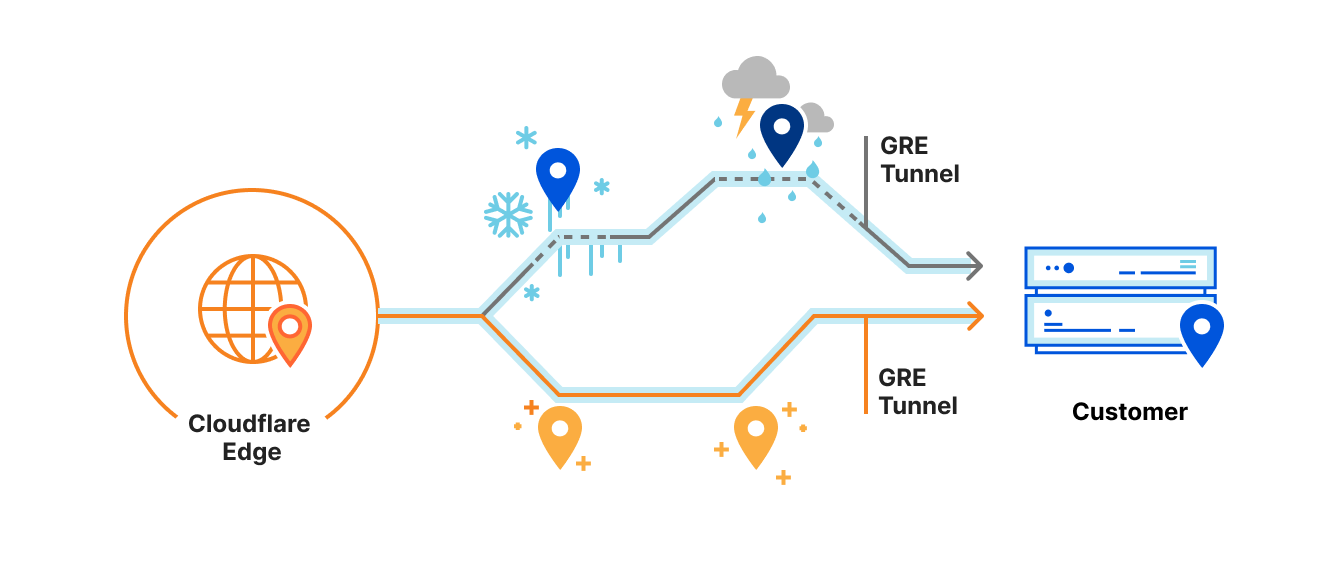
Cloudflare Tunnel provides an even more secure option for the connection between Cloudflare and origins. With Tunnel, users run a lightweight daemon on their origin servers that proactively establishes secure and private tunnels to the nearest Cloudflare data centers. With this configuration, users can completely lock down their origin servers to only receive requests routed through Cloudflare. While we encourage customers to set up tunnels if feasible, it’s important to encourage origins with more traditional configurations to adopt the strongest possible security posture.

Detecting HTTPS support

You might wonder, why doesn’t Cloudflare always connect to origin servers with a secure TLS connection? To start, some origin servers have no TLS support at all (for example, certain shared hosting providers and even government sites have been slow adopters) and rely on Cloudflare to ensure that the client request is at least encrypted over the Internet from the browser to Cloudflare’s edge.

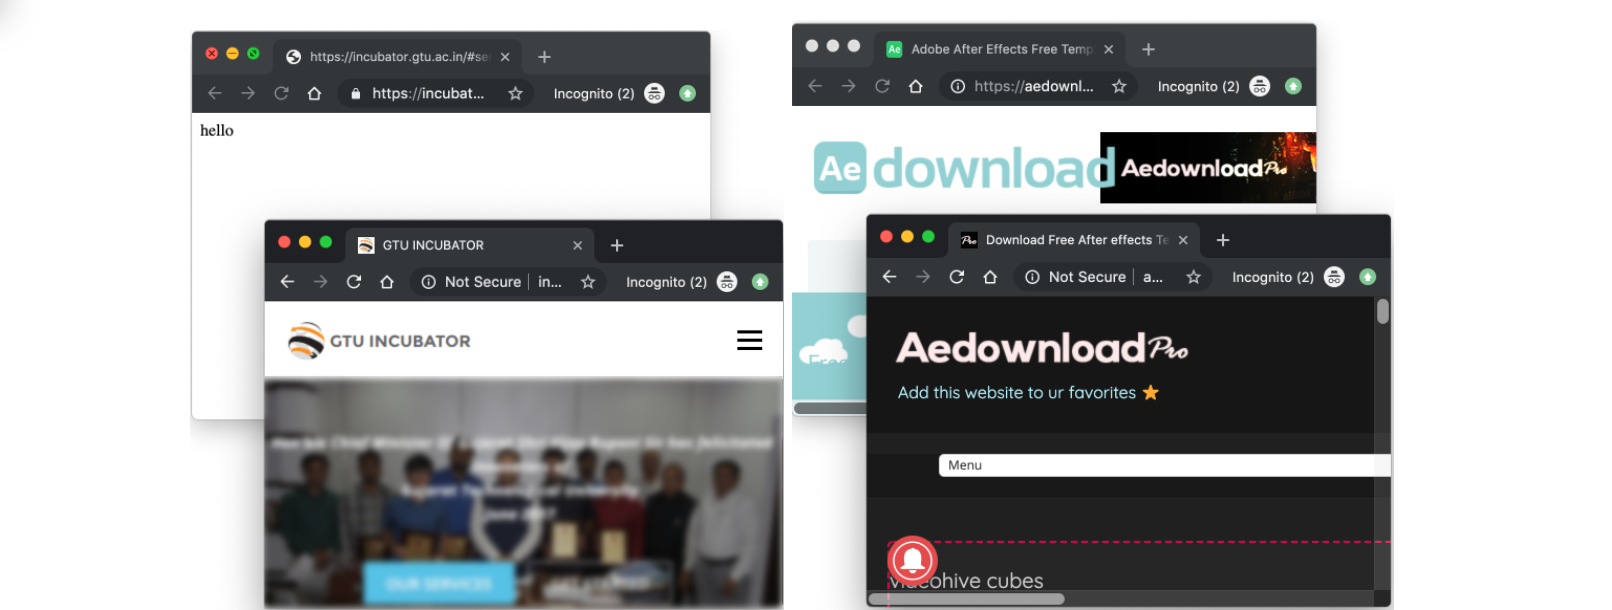
Then why don’t we simply probe the origin to determine if TLS is supported? It turns out that many sites only partially support HTTPS, making the problem non-trivial. A single customer site can be served from multiple separate origin servers with differing levels of TLS support. For instance, some sites support HTTPS on their landing page but serve certain resources only over unencrypted HTTP. Further, site content can differ when accessed over HTTP versus HTTPS (for example, http://example.com and https://example.com can return different results).

Such content differences can arise due to misconfiguration on the origin server, accidental mistakes by developers when migrating their servers to HTTPS, or can even be intentional depending on the use case.

A study by researchers at Northeastern University, the Max Planck Institute for Informatics, and the University of Maryland highlights reasons for some of these inconsistencies. They found that 1.5% of surveyed sites had at least one page that was unavailable over HTTPS — despite the protocol being supported on other pages — and 3.7% of sites served different content over HTTP versus HTTPS for at least one page. Thus, always using the most secure TLS setting detected on a particular resource could result in unforeseen side effects and usability issues for the entire site.

We wanted to tackle all such issues and maximize the number of TLS connections to origin servers, but without compromising a website’s functionality and performance.

Introducing SSL/TLS Recommender
Content differences on sites when loaded over HTTPS vs HTTP; images taken from https://www.cs.umd.edu/~dml/papers/https_tma20.pdf with author permission

Configuring the SSL/TLS encryption mode

Cloudflare relies on customers to indicate the level of TLS support at their origins via the zone’s SSL/TLS encryption mode. The following SSL/TLS encryption modes can be configured from the Cloudflare dashboard:

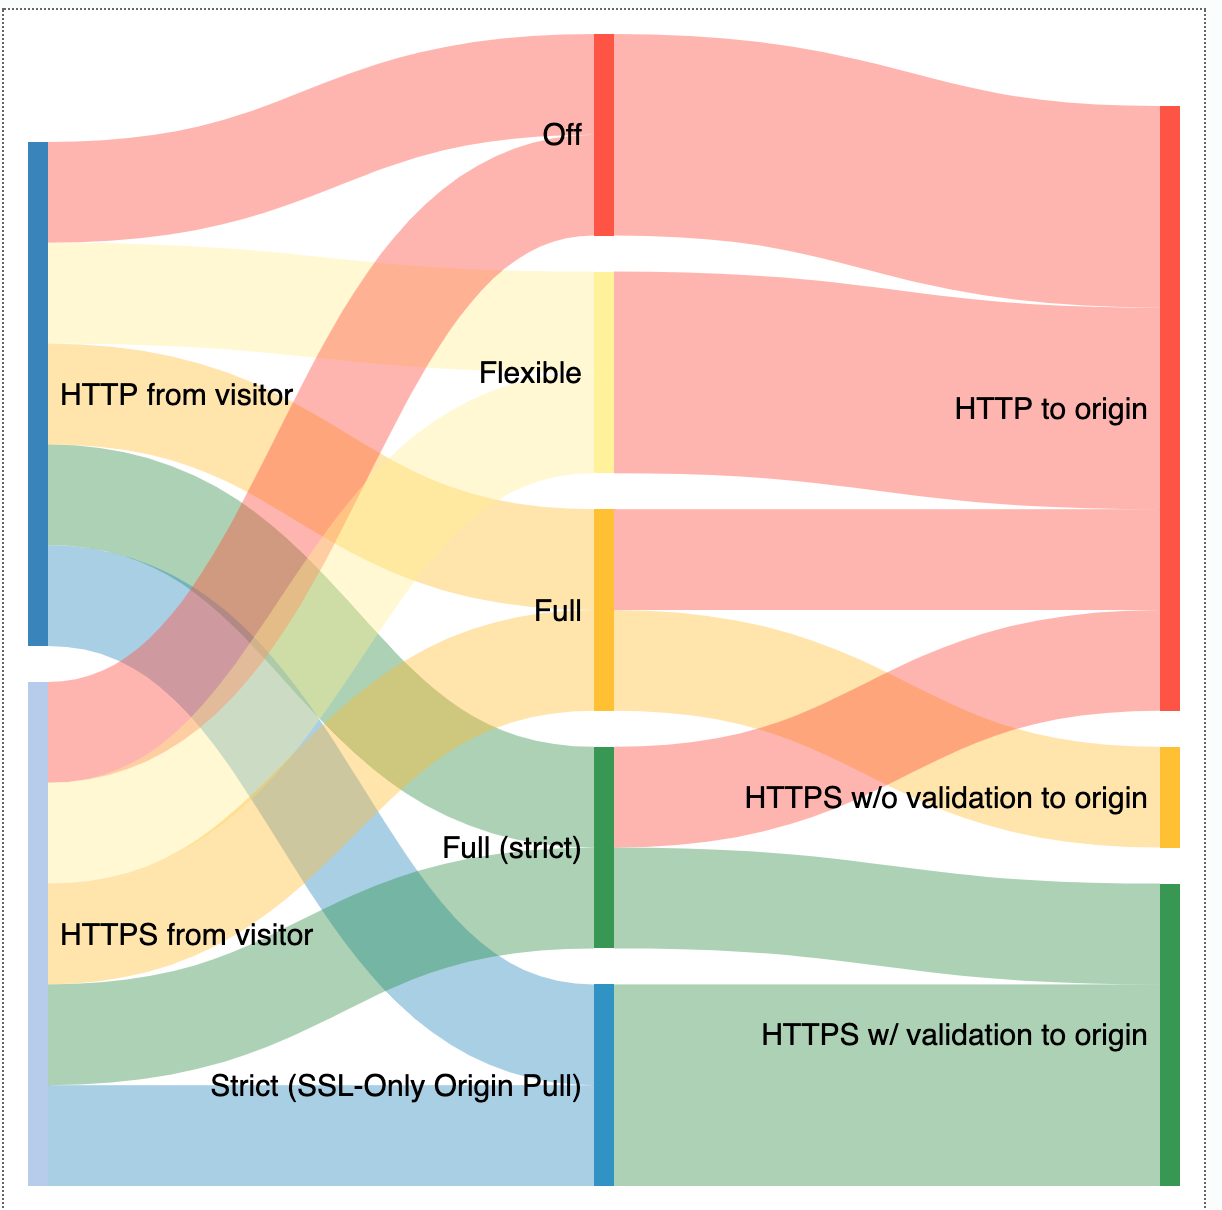
  • Off indicates that client requests reaching Cloudflare as well as Cloudflare’s requests to the origin server should only use unencrypted HTTP. This option is never recommended, but is still in use by a handful of customers for legacy reasons or testing.
  • Flexible allows clients to connect to Cloudflare’s edge via HTTPS, but requests to the origin are over HTTP only. This is the most common option for origins that do not support TLS. However, we encourage customers to upgrade their origins to support TLS whenever possible and only use Flexible as a last resort.
  • Full enables encryption for requests to the origin when clients connect via HTTPS, but Cloudflare does not attempt to validate the certificate. This is useful for origins that have a self-signed or otherwise invalid certificate at the origin, but leaves open the possibility for an active attacker to impersonate the origin server with a fake certificate. Client HTTP requests result in HTTP requests to the origin.
  • Full (strict) indicates that Cloudflare should validate the origin certificate to fully secure the connection. The origin certificate can either be issued by a public CA or by Cloudflare Origin CA. HTTP requests from clients result in HTTP requests to the origin, exactly the same as in Full mode. We strongly recommend Full (strict) over weaker options if supported by the origin.
  • Strict (SSL-Only Origin Pull) causes all traffic to the origin to go over HTTPS, even if the client request was HTTP. This differs from Full (strict) in that HTTP client requests will result in an HTTPS request to the origin, not HTTP. Most customers do not need to use this option, and it is available only to Enterprise customers. The preferred way to ensure that no HTTP requests reach your origin is to enable Always Use HTTPS in conjunction with Full or Full (strict) to redirect visitor HTTP requests to the HTTPS version of the content.
Introducing SSL/TLS Recommender
SSL/TLS encryption modes determine how Cloudflare connects to origins

The SSL/TLS encryption mode is a zone-wide setting, meaning that Cloudflare applies the same policy to all subdomains and resources. If required, you can configure this setting more granularly via Page Rules. Misconfiguring this setting can make site resources unavailable. For instance, suppose your website loads certain assets from an HTTP-only subdomain. If you set your zone to Full or Full (strict), you might make these assets unavailable for visitors that request the content over HTTPS, since the HTTP-only subdomain lacks HTTPS support.

Importance of secure origin connections

When an end-user visits a site proxied by Cloudflare, there are two connections to consider: the front-end connection between the visitor and Cloudflare and the back-end connection between Cloudflare and the customer origin server. The front-end connection typically presents the largest attack surface (for example, think of the classic example of an attacker snooping on a coffee shop’s Wi-Fi network), but securing the back-end connection is equally important. While all SSL/TLS encryption modes (except Off) secure the front-end connection, less secure modes leave open the possibility of malicious activity on the backend.

Consider a zone set to Flexible where the origin is connected to the Internet via an untrustworthy ISP. In this case, spyware deployed by the customer’s ISP in an on-path middlebox could inspect the plaintext traffic from Cloudflare to the origin server, potentially resulting in privacy violations or leaks of confidential information. Upgrading the zone to Full or a stronger mode to encrypt traffic to the ISP would help prevent this basic form of snooping.

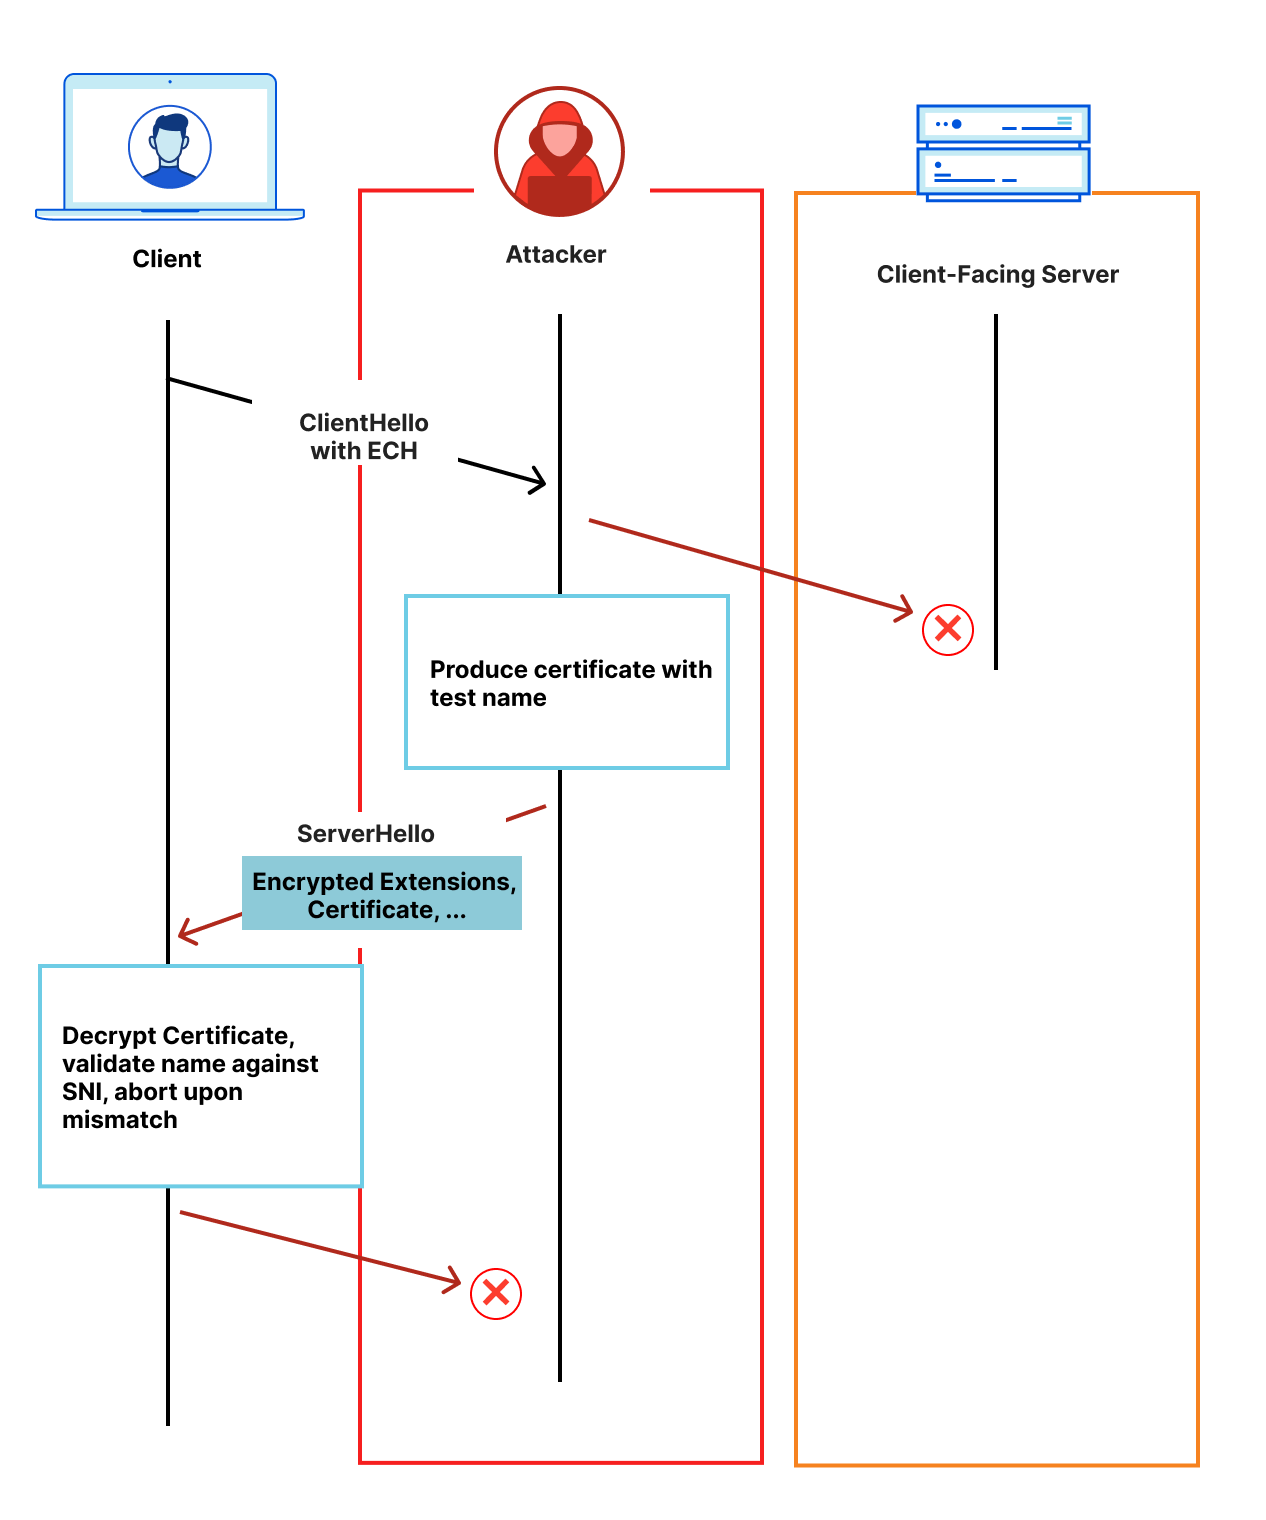
Similarly, consider a zone set to Full where the origin server is hosted in a shared hosting provider facility. An attacker colocated in the same facility could generate a fake certificate for the origin (since the certificate isn’t validated for Full) and deploy an attack technique such as ARP spoofing to direct traffic intended for the origin server to an attacker-owned machine instead. The attacker could then leverage this setup to inspect and filter traffic intended for the origin, resulting in site breakage or content unavailability. The attacker could even inject malicious JavaScript into the response served to the visitor to carry out other nefarious goals. Deploying a valid Cloudflare-trusted certificate on the origin and configuring the zone to use Full (strict) would prevent Cloudflare from trusting the attacker’s fake certificate in this scenario, preventing the hijack.

Since a secure backend only improves your website security, we strongly encourage setting your zone to the highest possible SSL/TLS encryption mode whenever possible.

Balancing functionality and security

When Universal SSL was launched, Cloudflare’s goal was to get as many sites away from the status quo of HTTP as possible. To accomplish this, Cloudflare provisioned TLS certificates for all customer domains to secure the connection between the browser and the edge. Customer sites that did not already have TLS support were defaulted to Flexible, to preserve existing site functionality. Although Flexible is not recommended for most zones, we continue to support this option as some Cloudflare customers still rely on it for origins that do not yet support TLS. Disabling this option would make these sites unavailable. Currently, the default option for newly onboarded zones is Full if we detect a TLS certificate on the origin zone, and Flexible otherwise.

Further, the SSL/TLS encryption mode configured at the time of zone sign-up can become suboptimal as a site evolves. For example, a zone might switch to a hosting provider that supports origin certificate installation. An origin server that is able to serve all content over TLS should at least be on Full. An origin server that has a valid TLS certificate installed should use Full (strict) to ensure that communication between Cloudflare and the origin server is not susceptible to monster-in-the-middle attacks.

The Research team combined lessons from academia and our engineering efforts to make encryption easy, while ensuring the highest level of security possible for our customers. Because of that goal, we’re proud to introduce SSL/TLS Recommender.

SSL/TLS Recommender

Cloudflare’s mission is to help build a better Internet, and that includes ensuring that requests from visitors to our customers’ sites are as secure as possible. To that end, we began by asking ourselves the following question: how can we detect when a customer is able to use a more secure SSL/TLS encryption mode without impacting site functionality?

To answer this question, we built the SSL/TLS Recommender. Customers can enable Recommender for a zone via the SSL/TLS tab of the Cloudflare dashboard. Using a zone’s currently configured SSL/TLS option as the baseline for expected site functionality, the Recommender performs a series of checks to determine if an upgrade is possible. If so, we email the zone owner with the recommendation. If a zone is currently misconfigured — for example, an HTTP-only origin configured on Full — Recommender will not recommend a downgrade.

Introducing SSL/TLS Recommender

The checks that Recommender runs are determined by the site’s currently configured SSL/TLS option.

The simplest check is to determine if a customer can upgrade from Full to Full (strict). In this case, all site resources are already served over HTTPS, so the check comprises a few simple tests of the validity of the TLS certificate for the domain and all subdomains (which can be on separate origin servers).

The check to determine if a customer can upgrade from Off or Flexible to Full is more complex. A site can be upgraded if all resources on the site are available over HTTPS and the content matches when served over HTTP versus HTTPS. Recommender carries out this check as follows:

  • Crawl customer sites to collect links. For large sites where it is impractical to scan every link, Recommender tests only a subset of links (up to some threshold), leading to a trade-off between performance and potential false positives. Similarly, for sites where the crawl turns up an insufficient number of links, we augment our results with a sample of links from recent visitors requests to the zone to provide a high-confidence recommendation. The crawler uses the user agent Cloudflare-SSLDetector and has been added to Cloudflare’s list of known good bots. Similar to other Cloudflare crawlers, Recommender ignores robots.txt (except for rules explicitly targeting the crawler’s user agent) to avoid negatively impacting the accuracy of the recommendation.
  • Download the content of each link over both HTTP and HTTPS. Recommender makes only idempotent GET requests when scanning origin servers to avoid modifying server resource state.
  • Run a content similarity algorithm to determine if the content matches. The algorithm is adapted from a research paper called “A Deeper Look at Web Content Availability and Consistency over HTTP/S” (TMA Conference 2020) and is designed to provide an accurate similarity score even for sites with dynamic content.

Recommender is conservative with recommendations, erring on the side of maintaining current site functionality rather than risking breakage and usability issues. If a zone is non-functional, the zone owner blocks all types of bots, or if misconfigured SSL-specific Page Rules are applied to the zone, then Recommender will not be able to complete its scans and provide a recommendation. Therefore, it is not intended to resolve issues with website or domain functionality, but rather maximize your zone’s security when possible.

Please send questions and feedback to [email protected]. We’re excited to continue this line of work to improve the security of customer origins!

Mentions

While this work is led by the Research team, we have been extremely privileged to get support from all across the company!

Special thanks to the incredible team of interns that contributed to SSL/TLS Recommender. Suleman Ahmad (now full-time), Talha Paracha, and Ananya Ghose built the current iteration of the project and Matthew Bernhard helped to lay the groundwork in a previous iteration of the project.

Dynamic Process Isolation: Research by Cloudflare and TU Graz

Post Syndicated from Kenton Varda original https://blog.cloudflare.com/spectre-research-with-tu-graz/

Dynamic Process Isolation: Research by Cloudflare and TU Graz

Dynamic Process Isolation: Research by Cloudflare and TU Graz

Last year, I wrote about the Cloudflare Workers security model, including how we fight Spectre attacks. In that post, I explained that there is no known complete defense against Spectre — regardless of whether you’re using isolates, processes, containers, or virtual machines to isolate tenants. What we do have, though, is a huge number of tools to increase the cost of a Spectre attack, to the point where it becomes infeasible. Cloudflare Workers has been designed from the very beginning with protection against side channel attacks in mind, and because of this we have been able to incorporate many defenses that other platforms — such as virtual machines and web browsers — cannot. However, the performance and scalability requirements of edge compute make it infeasible to run every Worker in its own private process, so we cannot rely on the usual defenses provided by the operating system kernel and address space separation.

Given our different approach, we cannot simply rely on others to tell us if we are safe. We had to do our own research. To do this we partnered with researchers at Graz Technical University (TU Graz) to study the impact of Spectre on our environment. The team at TU Graz are some of the foremost experts on the topic, having co-discovered Spectre initially as well as discovered several follow-on bugs like NetSpectre, ZombieLoad, Fallout, and others.

Today we are publishing a paper describing our findings, authored by Martin Schwarzl, Pietro Borrello, Andreas Kogler, Thomas Schuster, Daniel Gruss, Michael Schwarz, and myself. This paper covers research done in 2019 and early 2020. The research both tests the possibility of attacking Workers using Spectre, and proposes a new defense mechanism, which we now employ in production.

For this research, the team at TU Graz had full access to the Workers Runtime source code and were able to compile and run it locally for testing.

The research has two basic components.

Part 1: Develop an attack

A side channel attack (of which Spectre is one variety) is kind of like playing poker with a CPU. In poker, players try to understand what their opponents are thinking by looking for subtle unconscious behaviors, such as a nervous look or a hand motion. These behaviors are called “tells”. In a side channel attack, the attacker wants to find out secrets that the CPU knows. The CPU won’t reveal these secrets directly, but they can sometimes subtly affect how long the CPU spends to perform certain operations, kind of like a poker tell. If an attacker can carefully time the CPU’s actions, they can potentially discover the underlying secrets. Spectre attacks in particular focus on side channels that result from the CPU’s use of speculative execution, in which the CPU executes code that it is not yet sure should be executed, and then attempts to roll it back if not. Speculative execution is a particularly potent tool in side channel attacks because it essentially allows the attacker to program custom side channels in speculatively-executed code.

Many Spectre defenses focus on eliminating the “tells” by trying to prevent the variability in the CPU’s timing. This is hard, because CPUs are extremely complex and there are many ways that their timing can be affected. While many specific “tells” have been found and mitigated, there are undoubtedly many more that haven’t been disclosed. This has led to a game of whack-a-mole, where researchers continuously find new “tells” while CPU vendors rush out kernel and microcode patches to solve them — often with large performance losses as a side effect.

In Workers, we have focused on a different approach: preventing the attacker from seeing the “tells”. The Workers Runtime is designed to prevent a Worker from measuring its own execution time, as well as to prevent other forms of non-deterministic behavior like multithreading that could be used in place of a timer. I described these techniques in detail in last year’s post.

However, this approach can’t be perfect as long as Workers are allowed to talk to the rest of the world. A Worker could always communicate with a remote time server to measure time. Such communications will be far less accurate than a local timer, and since the timing differences are extremely small, they will be hard to measure this way. But, by using amplification techniques to improve the strength of the signal, repeating the attack many times and applying statistics, it could still be possible to derive secrets.

We therefore set out to develop an attack based on this approach. Upon applying the best techniques available to us, we were indeed able to produce a working Spectre variant 1 attack that could leak memory at a rate of 120 bits per hour. Compared to attacks demonstrated on many other platforms, 120 bits per hour is pretty slow. However, it’s obviously still fast enough to be a problem.

It’s important to note, though, that this speed was achieved in an ideal scenario:

  • Since the Workers Runtime prevents Workers from measuring their own execution time, any attack would need to rely on a remote time server. But for the purpose of our test, the “remote” server was in fact located on the same machine. In a real-world scenario, such a server would need to be accessed over the Internet, making the timing less accurate.
  • The machine running the test had no other load. A real-world machine would be processing hundreds or thousands of requests concurrently, creating noise.
  • The attack only demonstrated that it could read some bits that it shouldn’t. In order to read interesting bits, an attacker would first need to locate those bits, which likely would require reading hundreds or thousands of other bits first.

In the real world, these factors appear to make an attack too slow to be interesting. If an attack takes days or weeks to carry out, the contents of memory are highly likely to change before it can read them. For example, we update the Workers Runtime code at least once a week, which causes a restart of all processes.

That said, we did not feel comfortable relying on this argument as our defense. Instead, we set out to do better.

Part 2: Enhance our defenses

In the second part of the research, we designed and implemented a novel Spectre defense which we call Dynamic Process Isolation.

Dynamic Process Isolation was described in my blog post last year. At the time, this system was still in testing, but it has since been fully deployed in production.

In short, our defense uses hardware performance counters to detect Workers whose performance characteristics could be indicative of an attack. Before the attack has had enough time to leak any bits, we move the Worker into a separate operating system process, thus taking advantage of the additional defenses implemented by the OS kernel. Crucially, since a benign Worker can still operate normally while in an isolated process, we are able to use a detector that produces false positives, as long as the rate is relatively low. This affordance made it possible for us to develop a working classifier where previous work in the area had struggled.

Specifically, we developed a detector based on measuring branch mispredictions. Spectre variant 1 attacks — the fastest and easiest kind of Spectre attack — work by fooling the CPU’s branch predictor to trigger speculative code execution. Such an attack, when running in our environment, must trigger repeated mispredictions in a loop, in order to get enough data to apply statistics to overcome the noise floor. We can see these mispredictions in the hardware performance counters. While an attack could try to evade the detector by spreading out its trials over a longer time period, doing so would slow down the attack by orders of magnitude, which is exactly our goal. Classifiers for other Spectre variants might be straightforward to build as well, however, we find other variants already produce much lower bandwidth or are otherwise effectively mitigated by our existing defenses.

This defense successfully detects and mitigates the attack we developed. We also tested it against a number of Spectre proofs of concept and found it caught all of them. Meanwhile, the rate of false positives is well within the range we can tolerate: Out of many thousands of Workers running on our platform, we see only about 20 being falsely detected as attacks.

For more details, check out the paper and my blog post from last year.

Read the Paper

Collaborating with TU Graz was a great experience. We are very happy to work with some of the world’s foremost experts on this problem, and to have produced not just an attack but also a constructive defense.

For more details, download the full paper on arXiv.

Handshake Encryption: Endgame (an ECH update)

Post Syndicated from Christopher Wood original https://blog.cloudflare.com/handshake-encryption-endgame-an-ech-update/

Handshake Encryption: Endgame (an ECH update)

Handshake Encryption: Endgame (an ECH update)

Privacy and security are fundamental to Cloudflare, and we believe in and champion the use of cryptography to help provide these fundamentals for customers, end-users, and the Internet at large. In the past, we helped specify, implement, and ship TLS 1.3, the latest version of the transport security protocol underlying the web, to all of our users. TLS 1.3 vastly improved upon prior versions of the protocol with respect to security, privacy, and performance: simpler cryptographic algorithms, more handshake encryption, and fewer round trips are just a few of the many great features of this protocol.

TLS 1.3 was a tremendous improvement over TLS 1.2, but there is still room for improvement. Sensitive metadata relating to application or user intent is still visible in plaintext on the wire. In particular, all client parameters, including the name of the target server the client is connecting to, are visible in plaintext. For obvious reasons, this is problematic from a privacy perspective: Even if your application traffic to crypto.cloudflare.com is encrypted, the fact you’re visiting crypto.cloudflare.com can be quite revealing.

And so, in collaboration with other participants in the standardization community and members of industry, we embarked towards a solution for encrypting all sensitive TLS metadata in transit. The result: TLS Encrypted ClientHello (ECH), an extension to protect this sensitive metadata during connection establishment.

Last year, we described the current status of this standard and its relation to the TLS 1.3 standardization effort, as well as ECH’s predecessor, Encrypted SNI (ESNI). The protocol has come a long way since then, but when will we know when it’s ready? There are many ways by which one can measure a protocol. Is it implementable? Is it easy to enable? Does it seamlessly integrate with existing protocols or applications? In order to assess these questions and see if the Internet is ready for ECH, the community needs deployment experience. Hence, for the past year, we’ve been focused on making the protocol stable, interoperable, and, ultimately, deployable. And today, we’re pleased to announce that we’ve begun our initial deployment of TLS ECH.

What does ECH mean for connection security and privacy on the network? How does it relate to similar technologies and concepts such as domain fronting? In this post, we’ll dig into ECH details and describe what this protocol does to move the needle to help build a better Internet.

Connection privacy

For most Internet users, connections are made to perform some type of task, such as loading a web page, sending a message to a friend, purchasing some items online, or accessing bank account information. Each of these connections reveals some limited information about user behavior. For example, a connection to a messaging platform reveals that one might be trying to send or receive a message. Similarly, a connection to a bank or financial institution reveals when the user typically makes financial transactions. Individually, this metadata might seem harmless. But consider what happens when it accumulates: does the set of websites you visit on a regular basis uniquely identify you as a user? The safe answer is: yes.

This type of metadata is privacy-sensitive, and ultimately something that should only be known by two entities: the user who initiates the connection, and the service which accepts the connection. However, the reality today is that this metadata is known to more than those two entities.

Making this information private is no easy feat. The nature or intent of a connection, i.e., the name of the service such as crypto.cloudflare.com, is revealed in multiple places during the course of connection establishment: during DNS resolution, wherein clients map service names to IP addresses; and during connection establishment, wherein clients indicate the service name to the target server. (Note: there are other small leaks, though DNS and TLS are the primary problems on the Internet today.)

As is common in recent years, the solution to this problem is encryption. DNS-over-HTTPS (DoH) is a protocol for encrypting DNS queries and responses to hide this information from onpath observers. Encrypted Client Hello (ECH) is the complementary protocol for TLS.

The TLS handshake begins when the client sends a ClientHello message to the server over a TCP connection (or, in the context of QUIC, over UDP) with relevant parameters, including those that are sensitive. The server responds with a ServerHello, encrypted parameters, and all that’s needed to finish the handshake.

Handshake Encryption: Endgame (an ECH update)

The goal of ECH is as simple as its name suggests: to encrypt the ClientHello so that privacy-sensitive parameters, such as the service name, are unintelligible to anyone listening on the network. The client encrypts this message using a public key it learns by making a DNS query for a special record known as the HTTPS resource record. This record advertises the server’s various TLS and HTTPS capabilities, including ECH support. The server decrypts the encrypted ClientHello using the corresponding secret key.

Conceptually, DoH and ECH are somewhat similar. With DoH, clients establish an encrypted connection (HTTPS) to a DNS recursive resolver such as 1.1.1.1 and, within that connection, perform DNS transactions.

Handshake Encryption: Endgame (an ECH update)

With ECH, clients establish an encrypted connection to a TLS-terminating server such as crypto.cloudflare.com, and within that connection, request resources for an authorized domain such as cloudflareresearch.com.

Handshake Encryption: Endgame (an ECH update)

There is one very important difference between DoH and ECH that is worth highlighting. Whereas a DoH recursive resolver is specifically designed to allow queries for any domain, a TLS server is configured to allow connections for a select set of authorized domains. Typically, the set of authorized domains for a TLS server are those which appear on its certificate, as these constitute the set of names for which the server is authorized to terminate a connection.

Basically, this means the DNS resolver is open, whereas the ECH client-facing server is closed. And this closed set of authorized domains is informally referred to as the anonymity set. (This will become important later on in this post.) Moreover, the anonymity set is assumed to be public information. Anyone can query DNS to discover what domains map to the same client-facing server.

Why is this distinction important? It means that one cannot use ECH for the purposes of connecting to an authorized domain and then interacting with a different domain, a practice commonly referred to as domain fronting. When a client connects to a server using an authorized domain but then tries to interact with a different domain within that connection, e.g., by sending HTTP requests for an origin that does not match the domain of the connection, the request will fail.

From a high level, encrypting names in DNS and TLS may seem like a simple feat. However, as we’ll show, ECH demands a different look at security and an updated threat model.

A changing threat model and design confidence

The typical threat model for TLS is known as the Dolev-Yao model, in which an active network attacker can read, write, and delete packets from the network. This attacker’s goal is to derive the shared session key. There has been a tremendous amount of research analyzing the security of TLS to gain confidence that the protocol achieves this goal.

The threat model for ECH is somewhat stronger than considered in previous work. Not only should it be hard to derive the session key, it should also be hard for the attacker to determine the identity of the server from a known anonymity set. That is, ideally, it should have no more advantage in identifying the server than if it simply guessed from the set of servers in the anonymity set. And recall that the attacker is free to read, write, and modify any packet as part of the TLS connection. This means, for example, that an attacker can replay a ClientHello and observe the server’s response. It can also extract pieces of the ClientHello — including the ECH extension — and use them in its own modified ClientHello.

Handshake Encryption: Endgame (an ECH update)

The design of ECH ensures that this sort of attack is virtually impossible by ensuring the server certificate can only be decrypted by either the client or client-facing server.

Something else an attacker might try is masquerade as the server and actively interfere with the client to observe its behavior. If the client reacted differently based on whether the server-provided certificate was correct, this would allow the attacker to test whether a given connection using ECH was for a particular name.

Handshake Encryption: Endgame (an ECH update)

ECH also defends against this attack by ensuring that an attacker without access to the private ECH key material cannot actively inject anything into the connection.

The attacker can also be entirely passive and try to infer encrypted information from other visible metadata, such as packet sizes and timing. (Indeed, traffic analysis is an open problem for ECH and in general for TLS and related protocols.) Passive attackers simply sit and listen to TLS connections, and use what they see and, importantly, what they know to make determinations about the connection contents. For example, if a passive attacker knows that the name of the client-facing server is crypto.cloudflare.com, and it sees a ClientHello with ECH to crypto.cloudflare.com, it can conclude, with reasonable certainty, that the connection is to some domain in the anonymity set of crypto.cloudflare.com.

The number of potential attack vectors is astonishing, and something that the TLS working group has tripped over in prior iterations of the ECH design. Before any sort of real world deployment and experiment, we needed confidence in the design of this protocol. To that end, we are working closely with external researchers on a formal analysis of the ECH design which captures the following security goals:

  1. Use of ECH does not weaken the security properties of TLS without ECH.
  2. TLS connection establishment to a host in the client-facing server’s anonymity set is indistinguishable from a connection to any other host in that anonymity set.

We’ll write more about the model and analysis when they’re ready. Stay tuned!

There are plenty of other subtle security properties we desire for ECH, and some of these drill right into the most important question for a privacy-enhancing technology: Is this deployable?

Focusing on deployability

With confidence in the security and privacy properties of the protocol, we then turned our attention towards deployability. In the past, significant protocol changes to fundamental Internet protocols such as TCP or TLS have been complicated by some form of benign interference. Network software, like any software, is prone to bugs, and sometimes these bugs manifest in ways that we only detect when there’s a change elsewhere in the protocol. For example, TLS 1.3 unveiled middlebox ossification bugs that ultimately led to the middlebox compatibility mode for TLS 1.3.

While itself just an extension, the risk of ECH exposing (or introducing!) similar bugs is real. To combat this problem, ECH supports a variant of GREASE whose goal is to ensure that all ECH-capable clients produce syntactically equivalent ClientHello messages. In particular, if a client supports ECH but does not have the corresponding ECH configuration, it uses GREASE. Otherwise, it produces a ClientHello with real ECH support. In both cases, the syntax of the ClientHello messages is equivalent.

This hopefully avoids network bugs that would otherwise trigger upon real or fake ECH. Or, in other words, it helps ensure that all ECH-capable client connections are treated similarly in the presence of benign network bugs or otherwise passive attackers. Interestingly, active attackers can easily distinguish — with some probability — between real or fake ECH. Using GREASE, the ClientHello carries an ECH extension, though its contents are effectively randomized, whereas a real ClientHello using ECH has information that will match what is contained in DNS. This means an active attacker can simply compare the ClientHello against what’s in the DNS. Indeed, anyone can query DNS and use it to determine if a ClientHello is real or fake:

$ dig +short crypto.cloudflare.com TYPE65
\# 134 0001000001000302683200040008A29F874FA29F884F000500480046 FE0D0042D500200020E3541EC94A36DCBF823454BA591D815C240815 77FD00CAC9DC16C884DF80565F0004000100010013636C6F7564666C 6172652D65736E692E636F6D00000006002026064700000700000000 0000A29F874F260647000007000000000000A29F884F

Despite this obvious distinguisher, the end result isn’t that interesting. If a server is capable of ECH and a client is capable of ECH, then the connection most likely used ECH, and whether clients and servers are capable of ECH is assumed public information. Thus, GREASE is primarily intended to ease deployment against benign network bugs and otherwise passive attackers.

Note, importantly, that GREASE (or fake) ECH ClientHello messages are semantically different from real ECH ClientHello messages. This presents a real problem for networks such as enterprise settings or school environments that otherwise use plaintext TLS information for the purposes of implementing various features like filtering or parental controls. (Encrypted DNS protocols like DoH also encountered similar obstacles in their deployment.) Fundamentally, this problem reduces to the following: How can networks securely disable features like DoH and ECH? Fortunately, there are a number of approaches that might work, with the more promising one centered around DNS discovery. In particular, if clients could securely discover encrypted recursive resolvers that can perform filtering in lieu of it being done at the TLS layer, then TLS-layer filtering might be wholly unnecessary. (Other approaches, such as the use of canary domains to give networks an opportunity to signal that certain features are not permitted, may work, though it’s not clear if these could or would be abused to disable ECH.)

We are eager to collaborate with browser vendors, network operators, and other stakeholders to find a feasible deployment model that works well for users without ultimately stifling connection privacy for everyone else.

Next steps

ECH is rolling out for some FREE zones on our network in select geographic regions. We will continue to expand the set of zones and regions that support ECH slowly, monitoring for failures in the process. Ultimately, the goal is to work with the rest of the TLS working group and IETF towards updating the specification based on this experiment in hopes of making it safe, secure, usable, and, ultimately, deployable for the Internet.

ECH is one part of the connection privacy story. Like a leaky boat, it’s important to look for and plug all the gaps before taking on lots of passengers! Cloudflare Research is committed to these narrow technical problems and their long-term solutions. Stay tuned for more updates on this and related protocols.

Privacy Pass v3: the new privacy bits

Post Syndicated from Pop Chunhapanya original https://blog.cloudflare.com/privacy-pass-v3/

Privacy Pass v3: the new privacy bits

Privacy Pass v3: the new privacy bits

In November 2017, we released our implementation of a privacy preserving protocol to let users prove that they are humans without enabling tracking. When you install Privacy Pass’s browser extension, you get tokens when you solve a Cloudflare CAPTCHA which can be used to avoid needing to solve one again… The redeemed token is cryptographically unlinkable to the token originally provided by the server. That is why Privacy Pass is privacy preserving.

In October 2019, Privacy Pass reached another milestone. We released Privacy Pass Extension v2.0 that includes a new service provider (hCaptcha) which provides a way to redeem a token not only with CAPTCHAs in the Cloudflare challenge pages but also hCaptcha CAPTCHAs in any website. When you encounter any hCaptcha CAPTCHA in any website, including the ones not behind Cloudflare, you can redeem a token to pass the CAPTCHA.

We believe Privacy Pass solves an important problem — balancing privacy and security for bot mitigation— but we think there’s more to be done in terms of both the codebase and the protocol. We improved the codebase by redesigning how the service providers interact with the core extension. At the same time, we made progress on the standardization at IETF and improved the protocol by adding metadata which allows us to do more fabulous things with Privacy Pass.

Announcing Privacy Pass Extension v3.0

The current implementation of our extension is functional, but it is difficult to maintain two Privacy Pass service providers: Cloudflare and hCaptcha. So we decided to refactor the browser extension to improve its maintainability. We also used this opportunity to make following improvements:

  • Implement the extension using TypeScript instead of plain JavaScript.
  • Build the project using a module bundler instead of custom build scripts.
  • Refactor the code and define the API for the cryptographic primitive.
  • Treat provider-specific code as an encapsulated software module rather than a list of configuration properties.

As a result of the improvements listed above, the extension will be less error-prone and each service provider will have more flexibility and can be integrated seamlessly with other providers.

In the new extension we use TypeScript instead of plain JavaScript because its syntax is a kind of extension to JavaScript, and we already use TypeScript in Workers. One of the things that makes TypeScript special is that it has features that are only available in modern programming languages, like null safety.

Support for Future Service Providers

Another big improvement in v3.0 is that it is designed for modularity, meaning that it will be very easy to add a new potential service provider in the future. A new provider can use an API provided by us to implement their own request flow to use the Privacy Pass protocol and to handle the HTTP requests. By separating the provider-specific code from the core extension code using the API, the extension will be easier to update when there is a need for more service providers.

On a technical level, we allow each service provider to have its own WebRequest API event listeners instead of having central event listeners for all the providers. This allows providers to extend the browser extension’s functionality and implement any request handling logic they want.

Another major change that enables us to do this is that we moved away from configuration to programmable modularization.

Configuration vs Modularization

As mentioned in 2019, it would be impossible to expect different service providers to all abide by the same exact request flow, so we decided to use a JSON configuration file in v2.0 to define the request flow. The configuration allows the service providers to easily modify the extension characteristics without dealing too much with the core extension code. However, recently we figured out that we can improve it without using a configuration file, and using modules instead.

Using a configuration file limits the flexibility of the provider by the number of possible configurations. In addition, when the logic of each provider evolves and deviates from one another, the size of configuration will grow larger and larger which makes it hard to document and keep track of. So we decided to refactor how we determine the request flow from using a configuration file to using a module file written specifically for each service provider instead.

Privacy Pass v3: the new privacy bits

By using a programmable module, the providers are not limited by the available fields in the configuration. In addition, the providers can use the available implementations of the necessary cryptographic primitives in any point of the request flow because we factored out the crypto bits into a separate module which can be used by any provider. In the future, if the cryptographic primitives ever change, the providers can update the code and use it any time.

Towards Standard Interoperability

The Privacy Pass protocol was first published at the PoPETS symposium in 2018. As explained in this previous post, the core of the Privacy Pass protocol is a secure way to generate tokens between server and client. To that end, the protocol requires evaluating a pseudorandom function that is oblivious and verifiable. The first property prevents the server from learning information about the client’s tokens, while the client learns nothing about the server’s private key. This is useful to protect the privacy of users. The token generation must also be verifiable in the sense that the client can attest to the fact that its token was minted using the server’s private key.

The original implementation of Privacy Pass has seen real-world use in our browser extension, helping to reduce CAPTCHAs for hundreds of thousands of people without compromising privacy. But to guarantee interoperability between services implementing Privacy Pass, what’s required is an accurate specification of the protocol and its operations. With this motivation, the Privacy Pass protocol was proposed as an Internet draft at the Internet Engineering Task Force (IETF) — to know more about our participation at IETF look at the post.

In March 2020, the protocol was presented at IETF-107 for the first time. The session was a Birds-of-a-Feather, a place where the IETF community discusses the creation of new working groups that will write the actual standards. In the session, the working group’s charter is presented and proposes to develop a secure protocol for redeeming unforgeable tokens that attest to the validity of some attribute being held by a client. The charter was later approved, and three documents were integrated covering the protocol, the architecture, and an HTTP API for supporting Privacy Pass. The working group at IETF can be found at https://datatracker.ietf.org/wg/privacypass/.

Additionally, to its core functionality, the Privacy Pass protocol can be extended to improve its usability or to add new capabilities. For instance, adding a mechanism for public verifiability will allow a third party, someone who did not participate in the protocol, to verify the validity of tokens. Public verifiability can be implemented using a blind-signature scheme — this is a special type of digital signatures firstly proposed by David Chaum in which signers can produce signatures on messages without learning the content of the message. A diversity of algorithms to implement blind-signatures exist; however, there is still work to be done to define a good candidate for public verifiability.

Another extension for Privacy Pass is the support for including metadata in the tokens. As this is a feature with high impact on the protocol, we devote a larger section to explain the benefits of supporting metadata in the face of hoarding attacks.

Future work: metadata

What is research without new challenges that arise? What does development look like if there are no other problems to solve? During the design and development of Privacy Pass (both as a service, as an idea, and as a protocol), a potential vector for abuse was noted, which will be referred to as a “hoarding” or “farming” attack. This attack consists of individual users or groups of users that can gather tokens over a long period of time and redeem them all at once with the aim of, for example, overwhelming a website and making the service unavailable for other users. In a more complex scenario, an attacker can build up a stock of tokens that they could then redistribute amongst other clients. This redistribution ability is possible as tokens are not linked to specific clients, which is a property of the Privacy Pass protocol.

There have been several proposed solutions to this attack. One can, for example, make the verification of tokens procedure very efficient, so attackers will need to hoard an even larger amount of tokens in order to overwhelm a service. But the problem is not only about making verification times faster, and, therefore, this does not completely solve the problem. Note that in Privacy Pass, a successful token redemption could be exchanged for a single-origin cookie. These cookies allow clients to avoid future challenges for a particular domain without using more tokens. In the case of a hoarding attack, an attacker could trade in their hoarded number of tokens for a number of cookies. An attacker can, then, mount a layer 7 DDoS attack with the “hoarded” cookies, which would render the service unavailable.

In the next sections, we will explore other different solutions to this attack.

A simple solution and its limitations: key rotation

What does “key rotation” mean in the context of Privacy Pass? In Privacy Pass, each token is attested by keys held by the service. These keys are further used to verify the honesty of a token presented by a client when trying to access a challenge-protected service. “Key rotation” means updating these keys with regard to a chosen epoch (meaning, for example, that every two weeks — the epoch —, the keys will be rotated). Regular key rotation, then, implies that tokens belong to these epochs and cannot be used outside them, which prevents stocks of tokens from being useful for longer than the epoch they belong to.

Keys, however, should not be rotated frequently as:

  • Rotating a key can lead to security implications
  • Establishing trust in a frequently-rotating key service can be a challenging problem
  • The unlinkability of the client when using tokens can be diminished

Let’s explore these problems one by one now:

Rotating a key can lead to security implications, as past keys need to be deleted from secure storage locations and replaced with new ones. This process is prone to failure if done regularly, and can lead to potential key material leakage.

Establishing trust in a frequently-rotating key service can be a challenging problem, as keys will have to be verified by the needed parties each time they are regenerated. Keys need to be verified as it has to be attested that they belong to the entity one is trying to communicate with. If keys rotate too frequently, this verification procedure will have to happen frequently as well, so that an attacker will not be able to impersonate the honest entity with a “fake” public key.

The unlinkability of the client when using tokens can be diminished as a savvy attacker (a malicious server, for example) could link token generation and token future-use. In the case of a malicious server, it can, for example, rotate their keys too often to violate unlinkability or could pick a separate public key for each client issuance. In these cases, this attack can be solved by the usage of public mechanisms to record which server’s public keys are used; but this requires further infrastructure and coordination between actors. Other cases are not easily solvable by this “public verification”: if keys are rotated every minute, for example, and a client was the only one to visit a “privacy pass protected” site in that minute, then, it’s not hard to infer (to “link”) that the token came only from this specific client.

A novel solution: Metadata

A novel solution to this “hoarding” problem that does not require key rotation or further optimization of verification times is the addition of metadata. This approach was introduced in the paper “A Fast and Simple Partially Oblivious PRF, with Applications”, and it is called the “POPRF with metadata” construction. The idea is to add a metadata field to the token generation procedure in such a way that tokens are cryptographically linked to this added metadata. The added metadata can be, for example, a number that signals which epoch this token belongs to. The service, when presented with this token on verification, promptly checks that it corresponds to its internal epoch number (this epoch number can correspond to a period of time, a threshold of number of tokens issued, etc.). If it does not correspond, this token is expired and cannot be further used. Metadata, then, can be used to expire tokens without performing key rotations, thereby avoiding some issues outlined above.

Other kinds of metadata can be added to the Partially Oblivious PRF (PO-PRF) construction as well. Geographic location can be added, which signals that tokens can only be used in a specific region.

The limits of metadata

Note, nevertheless, that the addition of this “metadata” should be carefully considered as adding, in the case of “time-metadata”, an explicit time bound signal will diminish the unlikability set of the tokens. If an explicit time-bound signal is added (for example, the specific time — year, month, day, hour, minute and seconds — in which this token was generated and the amount of time it is valid for), it will allow a malicious server to link generation and usage. The recommendation is to use “opaque metadata”: metadata that is public to both client and service but that only the service knows its precise meaning. A server, for example, can set a counter that gets increased after a period of time (for example, every two weeks). The server will add this counter as metadata rather than the period of time. The client, in this case, publicly knows what this counter is but does not know to which period it refers to.

Geographic location metadata should be coarse as well: it should refer to a large geographical area, such as a continent, or political and economic union rather than an explicit location.

Wrap up

The Privacy Pass protocol provides users with a secure way for redeeming tokens. At Cloudflare, we use the protocol to reduce the number of CAPTCHAs improving the user experience while browsing websites. A natural evolution of the protocol is expected, ranging from its standardization to innovating with new capabilities that help to prevent abuse of the service.

On the service side, we refactored the Privacy Pass browser extension aiming to improve the quality of the code, so bugs can be detected in earlier phases of the development. The code is available at the challenge-bypass-extension repository, and we invite you to try the release candidate version.

An appealing extension for Privacy Pass is the inclusion of metadata as it provides a non-cumbersome way to solve hoarding attacks, while preserving the anonymity (in general, the privacy) of the protocol itself. Our paper provides you more information about the technical details behind this idea.

The application of the Privacy Pass protocol in other use cases or to create other service providers requires a certain degree of compatibility. People wanting to implement Privacy Pass must be able to have a standard specification, so implementations can interoperate. The efforts along these lines are centered on the Privacy Pass working group at IETF, a space open for anyone to participate in delineating the future of the protocol. Feel free to be part of these efforts too.

We are continuously working on new ways of improving our services and helping the Internet be a better and a more secure place. You can join us on this effort and can reach us at research.cloudflare.com. See you next time.

Helping Apache Servers stay safe from zero-day path traversal attacks (CVE-2021-41773)

Post Syndicated from Michael Tremante original https://blog.cloudflare.com/helping-apache-servers-stay-safe-from-zero-day-path-traversal-attacks/

Helping Apache Servers stay safe from zero-day path traversal attacks (CVE-2021-41773)

Helping Apache Servers stay safe from zero-day path traversal attacks (CVE-2021-41773)

On September 29, 2021, the Apache Security team was alerted to a path traversal vulnerability being actively exploited (zero-day) against Apache HTTP Server version 2.4.49. The vulnerability, in some instances, can allow an attacker to fully compromise the web server via remote code execution (RCE) or at the very least access sensitive files. CVE number 2021-41773 has been assigned to this issue. Both Linux and Windows based servers are vulnerable.

An initial patch was made available on October 4 with an update to 2.4.50, however, this was found to be insufficient resulting in an additional patch bumping the version number to 2.4.51 on October 7th (CVE-2021-42013).

Customers using Apache HTTP Server versions 2.4.49 and 2.4.50 should immediately update to version 2.4.51 to mitigate the vulnerability. Details on how to update can be found on the official Apache HTTP Server project site.

Any Cloudflare customer with the setting normalize URLs to origin turned on have always been protected against this vulnerability.

Additionally, customers who have access to the Cloudflare Web Application Firewall (WAF), receive additional protection by turning on the rule with the following IDs:

  • 1c3d3022129c48e9bb52e953fe8ceb2f (for our new WAF)
  • 100045A (for our legacy WAF)

The rule can also be identified by the following description:

Rule message: Anomaly:URL:Query String - Multiple Slashes, Relative Paths, CR, LF or NULL.

Given the nature of the vulnerability, attackers would normally try to access sensitive files (for example /etc/passwd), and as such, many other Cloudflare Managed Rule signatures are also effective at stopping exploit attempts depending on the file being accessed.

How the vulnerability works

The vulnerability leverages missing path normalization logic. If the Apache server is not configured with a require all denied directive for files outside the document root, attackers can craft special URLs to read any file on the file system accessible by the Apache process. Additionally, this flaw could also leak the source of interpreted files like CGI scripts and, in some cases, also allow the attacker to take over the web server by executing shell scripts.

For example, the following path:

$hostname/cgi-bin/../../../etc/passwd

would allow the attacker to climb the directory tree (../ indicates parent directory) outside of the web server document root and then subsequently access /etc/passwd.

Well implemented path normalization logic would correctly collapse the path into the shorter $hostname/etc/passwd by normalizing all ../ character sequences nullifying the attempt to climb up the directory tree.

Correct normalization is not easy as it also needs to take into consideration character encoding, such as percent encoded characters used in URLs. For example, the following path is equivalent to the first one provided:

$hostname/cgi-bin/.%2e/%2e%2e/%2e%2e/etc/passwd

as the characters %2e represent the percent encoded version of dot “.”. Not taking this properly into account was the cause of the vulnerability.

The PoC for this vulnerability is straightforward and simply relies on attempting to access sensitive files on vulnerable Apache web servers.

Exploit Attempts

Cloudflare has seen a sharp increase in attempts to exploit and find vulnerable servers since October 5.

Helping Apache Servers stay safe from zero-day path traversal attacks (CVE-2021-41773)

Most exploit attempts observed have been probing for static file paths — indicating heavy scanning activity before attackers (or researchers) may have attempted more sophisticated techniques that could lead to remote code execution. The most commonly attempted file paths are reported below:

/cgi-bin/.%2e/.git/config
/cgi-bin/.%2e/app/etc/local.xml
/cgi-bin/.%2e/app/etc/env.php
/cgi-bin/.%2e/%2e%2e/%2e%2e/etc/passwd

Conclusion

Keeping web environments safe is not an easy task. Attackers will normally gain access and try to exploit vulnerabilities even before PoCs become widely available — we reported such a case not too long ago with Atlassian’s Confluence OGNL vulnerability.

It is vital to employ all security measures available. Cloudflare features such as our URL normalization and the WAF, are easy to implement and can buy time to deploy any relevant patches offered by the affected software vendors.

May I ask who’s calling, please? A recent rise in VoIP DDoS attacks

Post Syndicated from Patrick R. Donahue original https://blog.cloudflare.com/attacks-on-voip-providers/

May I ask who’s calling, please? A recent rise in VoIP DDoS attacks

May I ask who’s calling, please? A recent rise in VoIP DDoS attacks

Over the past month, multiple Voice over Internet Protocol (VoIP) providers have been targeted by Distributed Denial of Service (DDoS) attacks from entities claiming to be REvil. The multi-vector attacks combined both L7 attacks targeting critical HTTP websites and API endpoints, as well as L3/4 attacks targeting VoIP server infrastructure. In some cases, these attacks resulted in significant impact to the targets’ VoIP services and website/API availability.

Cloudflare’s network is able to effectively protect and accelerate voice and video infrastructure because of our global reach, sophisticated traffic filtering suite, and unique perspective on attack patterns and threat intelligence.

If you or your organization have been targeted by DDoS attacks, ransom attacks and/or extortion attempts, seek immediate help to protect your Internet properties. We recommend not paying the ransom, and to report it to your local law enforcement agencies.

Voice (and video, emojis, conferences, cat memes and remote classrooms) over IP

Voice over IP (VoIP) is a term that’s used to describe a group of technologies that allow for communication of multimedia over the Internet. This technology enables your FaceTime call with your friends, your virtual classroom lessons over Zoom and even some “normal” calls you make from your cell phone.

May I ask who’s calling, please? A recent rise in VoIP DDoS attacks

The principles behind VoIP are similar to traditional digital calls over circuit-switched networks. The main difference is that the encoded media, e.g., voice or video, is partitioned into small units of bits that are transferred over the Internet as the payloads of IP packets according to specially defined media protocols.

This “packet switching” of voice data, as compared to traditional “circuit switching”, results in much more efficient use of network resources. As a result, calling over VoIP can be much more cost-effective than calls made over the POTS (“plain old telephone service”). Switching to VoIP can cut down telecom costs for businesses by more than 50%, so it’s no surprise that one in every three businesses has already adopted VoIP technologies. VoIP is flexible, scalable, and has been especially useful in bringing people together remotely during the pandemic.

A key protocol behind most VoIP calls is the heavily adopted Signal Initiation Protocol (SIP). SIP was originally defined in RFC-2543 (1999) and designed to serve as a flexible and modular protocol for initiating calls (“sessions”), whether voice or video, or two-party or multiparty.

Speed is key for VoIP

Real-time communication between people needs to feel natural, immediate and responsive. Therefore, one of the most important features of a good VoIP service is speed. The user experiences this as natural sounding audio and high definition video, without lag or stutter. Users’ perceptions of call quality are typically closely measured and tracked using metrics like Perceptual Evaluation of Speech Quality and Mean Opinion Scores. While SIP and other VoIP protocols can be implemented using TCP or UDP as the underlying protocols, UDP is typically chosen because it’s faster for routers and servers to process them.

May I ask who’s calling, please? A recent rise in VoIP DDoS attacks

UDP is a protocol that is unreliable, stateless and comes with no Quality of Service (QoS) guarantees. What this means is that the routers and servers typically use less memory and computational power to process UDP packets and therefore can process more packets per second. Processing packets faster results in quicker assembly of the packets’ payloads (the encoded media), and therefore a better call quality.

Under the guidelines of faster is better, VoIP servers will attempt to process the packets as fast as possible on a first-come-first-served basis. Because UDP is stateless, it doesn’t know which packets belong to existing calls and which attempt to initiate a new call. Those details are in the SIP headers in the form of requests and responses which are not processed until further up the network stack.

When the rate of packets per second increases beyond the router’s or server’s capacity, the faster is better guideline actually turns into a disadvantage. While a traditional circuit-switched system will refuse new connections when its capacity is reached and attempt to maintain the existing connections without impairment, a VoIP server, in its race to process as many packets as possible, will not be able to handle all packets or all calls when its capacity is exceeded. This results in latency and disruptions for ongoing calls, and failed attempts of making or receiving new calls.

Without proper protection in place, the race for a superb call experience comes at a security cost which attackers learned to take advantage of.

DDoSing VoIP servers

Attackers can take advantage of UDP and the SIP protocol to overwhelm unprotected VoIP servers with floods of specially-crafted UDP packets. One way attackers overwhelm VoIP servers is by pretending to initiate calls. Each time a malicious call initiation request is sent to the victim, their server uses computational power and memory to authenticate the request. If the attacker can generate enough call initiations, they can overwhelm the victim’s server and prevent it from processing legitimate calls. This is a classic DDoS technique applied to SIP.

May I ask who’s calling, please? A recent rise in VoIP DDoS attacks

A variation on this technique is a SIP reflection attack. As with the previous technique, malicious call initiation requests are used. However, in this variation, the attacker doesn’t send the malicious traffic to the victim directly. Instead, the attacker sends them to many thousands of random unwitting SIP servers all across the Internet, and they spoof the source of the malicious traffic to be the source of the intended victim. That causes thousands of SIP servers to start sending unsolicited replies to the victim, who must then use computational resources to discern whether they are legitimate. This too can starve the victim server of resources needed to process legitimate calls, resulting in a widespread denial of service event for users. Without the proper protection in place, VoIP services can be extremely susceptible to DDoS attacks. Once against a classic DDoS attack type being used against SIP.

The graph below shows a recent multi-vector UDP DDoS attack that targeted VoIP infrastructure protected by Cloudflare’s Magic Transit service. The attack peaked just above 70 Gbps and 16M packets per second. While it’s not the largest attack we’ve ever seen, attacks of this size can have large impact on unprotected infrastructure. This specific attack lasted a bit over 10 hours and was automatically detected and mitigated.

May I ask who’s calling, please? A recent rise in VoIP DDoS attacks

[Alt text: Graph of a 70 Gbps DDoS attack against a VoIP provider]

Below are two additional graphs of similar attacks seen last week against SIP infrastructure. In the first chart we see multiple protocols being used to launch the attack, with the bulk of traffic coming from (spoofed) DNS reflection and other common amplification and reflection vectors. These attacks peaked at over 130 Gbps and 17.4M pps.

May I ask who’s calling, please? A recent rise in VoIP DDoS attacks

May I ask who’s calling, please? A recent rise in VoIP DDoS attacks

[Alt text: Graph of a 130 Gbps DDoS attack against a different VoIP provider]

Protecting VoIP services without sacrificing performance

One of the most important factors for delivering a quality VoIP service is speed. The lower the latency, the better. Cloudflare’s Magic Transit service can help protect critical VoIP infrastructure without impacting latency and call quality.

May I ask who’s calling, please? A recent rise in VoIP DDoS attacks

[alt text: Diagram of Cloudflare Magic Transit routing]

Cloudflare’s Anycast architecture, coupled with the size and scale of our network, minimizes and can even improve latency for traffic routed through Cloudflare versus the public Internet. Check out our recent post from Cloudflare’s Speed Week for more details on how this works, including test results demonstrating a performance improvement of 36% on average across the globe for a real customer network using Magic Transit.

May I ask who’s calling, please? A recent rise in VoIP DDoS attacks

[alt text: World map of Cloudflare locations

Furthermore, every packet that is ingested in a Cloudflare data center is analyzed for DDoS attacks using multiple layers of out-of-path detection to avoid latency. Once an attack is detected, the edge generates a real-time fingerprint that matches the characteristics of the attack packets. The fingerprint is then matched in the Linux kernel eXpress Data Path (XDP) to quickly drop attack packets at wirespeed without inflicting collateral damage on legitimate packets. We have also recently deployed additional specific mitigation rules to inspect UDP traffic to determine whether it is valid SIP traffic.

May I ask who’s calling, please? A recent rise in VoIP DDoS attacks

The detection and mitigation is done autonomously within every single Cloudflare edge server — there is no “scrubbing center” with limited capacity and limited deployment scope in the equation. Additionally, threat intelligence is automatically shared across our network in real-time to ‘teach’ other edge servers about the attack.

Edge detections are also completely configurable. Cloudflare Magic Transit customers can use the L3/4 DDoS Managed Ruleset to tune and optimize their DDoS protection settings, and also craft custom packet-level (including deep packet inspection) firewall rules using the Magic Firewall to enforce a positive security model.

Bringing people together, remotely

Cloudflare’s mission is to help build a better Internet. A big part of that mission is making sure that people around the world can communicate with their friends, family and colleagues uninterrupted — especially during these times of COVID. Our network is uniquely positioned to help keep the world connected, whether that is by helping developers build real-time communications systems or by keeping VoIP providers online.

Our network’s speed and our always-on, autonomous DDoS protection technology helps VoIP providers to continue serving their customers without sacrificing performance or having to give in to ransom DDoS extortionists.

Talk to a Cloudflare specialist to learn more.

Under attack? Contact our hotline to speak with someone immediately.

Data at Cloudflare just got a lot faster: Announcing Live-updating Analytics and Instant Logs

Post Syndicated from Jon Levine original https://blog.cloudflare.com/instant-logs/

Data at Cloudflare just got a lot faster: Announcing Live-updating Analytics and Instant Logs

Data at Cloudflare just got a lot faster: Announcing Live-updating Analytics and Instant Logs

Today, we’re excited to introduce Live-updating Analytics and Instant Logs. For Pro, Business, and Enterprise customers, our analytics dashboards now update live to show you data as it arrives. In addition to this, Enterprise customers can now view their HTTP request logs instantly in the Cloudflare dashboard.

Cloudflare’s data products are essential for our customers’ visibility into their network and applications. Having this data in real time makes it even more powerful — could you imagine trying to navigate using a GPS that showed your location a minute ago? That’s the power of real time data!

Real time data unlocks entirely new use cases for our customers. They can respond to threats and resolve errors as soon as possible, keeping their applications secure and minimising disruption to their end users.

Lightning fast, in-depth analytics

Cloudflare products generate petabytes of log data daily and are designed for scale. To make sense of all this data, we summarize it using analytics — the ability to see time series data, tops Ns, and slices and dices of the data generated by Cloudflare products. This allows customers to identify trends and anomalies and drill deep into problems.

We take it a step further from just showing you high-level metrics. With Cloudflare Analytics you have the ability to quickly drill down into the most important data — narrow in on a specific time period and add a chain of filters to slice your data further and see all the reflecting analytics.

Data at Cloudflare just got a lot faster: Announcing Live-updating Analytics and Instant Logs
Video of Cloudflare analytics showing live updating and drill down capabilities

Let’s say you’re a developer who’s made some recent changes to your website, you’ve deleted some old content and created new web pages. You want to know as soon as possible if these changes have led to any broken links, so you can quickly identify them and make fixes. With live-updating analytics, you can monitor your traffic by status code. If you notice an uptick in 404 errors add a filter to get details on all 404s and view the top referrers causing the errors. From there, take steps to resolve the problem whether by creating a redirect page rule or fixing broken links on your own site.

Instant Logs at your fingertips

While Analytics are a great way to see data at an aggregate level, sometimes you need event level information, too. Logs are powerful because they record every single event that flows through a network, so you can figure out what occurred on a granular level.

Our Logpush system is already able to get logs from our global edge network to a customer’s storage destination or analytics provider within seconds. However, setting this up has a lot of overhead and often customers incur long processing times at their destination. We wanted logs to be instant — instant to set up, deliver and take action on.

It’s that easy.

With Instant Logs, customers can actively monitor the traffic that’s flowing through their network and make key decisions that affect their applications now. Real time data unlocks totally new use cases:

  • For Security Engineers: Stop an attack as it’s developing. For example, apply a Firewall rule and see it’s impact — get answers within seconds. If it’s not what you were intending, try another rule and check again.
  • For Developers: Roll out a config change — to Cloudflare, or to your origin — and have piece of mind to watch as your error rates stay flat (we hope!).

(By the way, if you’re a fan of Workers and want to see real time Workers logging, check out the recently released dashboard for Workers logs.)

Logs at the speed of sight

“Real time” or “instant” can mean different things to different people in different contexts. At Cloudflare, we’re striving to make it as close to the speed of sight as possible. For us, this means we wanted the “glass-to-glass” time — from when you hit “enter” in your browser until when the logs appear — to be under one second.

How did we do?

Today, Cloudflare’s Instant Logs have an average delay of two seconds, and we’re continuing to make improvements to drive that down.

“Real-time” is a very fuzzy term. Looking at other services we see Akamai talking about real-time data as “within minutes” or “latency of 10 minutes”, Amazon talks about “near real-time” for CloudWatch, Google Cloud Logging provides log tailing with a configurable buffer “up to 60 seconds” to deal with potential out-of-order log delivery, and we benchmarked Fastly logs at 25 seconds.

Our goal is to drive down the delay as much as possible (within the laws of physics). We’re happy to have shipped Instant Logs that arrive in two seconds, but we’re not satisfied and will continue to bring that number down.

In time sensitive scenarios such as an attack or an outage, a few minutes or even 30 seconds of delay can have a big impact on customers. At Cloudflare, our goal is to get our customer’s data into their hands as fast as possible  — and we’re just getting started.

How to get access?

Live-updating Analytics is available now on all Pro, Business, and Enterprise plans. Select the “Last 30 minutes” view of your traffic in the Analytics tab to start monitoring your analytics live.

We’ll be starting our Beta for Instant Logs in a couple of weeks. Join the waitlist to get notified about when you can get access!

If you’re eager for details on the inner workings of Instant Logs, check out our blog post about how we built Instant Logs.

What’s next

We’re hard at work to make Instant Logs available for all Enterprise customers — stay tuned after joining our waitlist. We’re also planning to bring all of our datasets to Instant Logs, including Firewall Events. In addition, we’re working on the next set of features like the ability to download logs from your session and compute running aggregates from logs.

For a peek into what we have our sights on next, we know how important it is to perform analysis on not only up-to-date data, but also historical data. We want to give customers the ability to analyze logs, draw insights and perform forensics straight from the Cloudflare platform.

If this sounds cool, we’re hiring engineers for our data team in Lisbon, London and San Francisco — would love to have you help us build the future of data at Cloudflare.

The Show Must Go On: Securing Netflix Studios At Scale

Post Syndicated from Netflix Technology Blog original https://netflixtechblog.com/the-show-must-go-on-securing-netflix-studios-at-scale-19b801c86479

Written by Jose Fernandez, Arthur Gonigberg, Julia Knecht, and Patrick Thomas

Netflix Zuul Open Source Logo

In 2017, Netflix Studios was hitting an inflection point from a period of merely rapid growth to the sort of explosive growth that throws “how do we scale?” into every conversation. The vision was to create a “Studio in the Cloud”, with applications supporting every part of the business from pitch to play. The security team was working diligently to support this effort, faced with two apparently contradictory priorities:

  • 1) streamline any security processes so that we could get applications built and deployed to the public internet faster
  • 2) raise the overall security bar so that the accumulated risk of this giant and growing portfolio of newly internet-facing, high-sensitivity assets didn’t exceed its value

The journey to resolve that contradiction has been a collaboration that we’re proud of, and that we think exemplifies how Netflix approaches infrastructure product development and product security partnerships. You’ll hear from two teams here: first Application Security, and then Cloud Gateway.

Julia & Patrick (Netflix Application Security): In deciding how to address this, we focused on two observations. The first was that there were too many security things that each software team needed to think about — things like TLS certificates, authentication, security headers, request logging, rate limiting, among many others. There were security checklists for developers, but they were lengthy and mostly manual, neither of which contributed to the goal of accelerating development. Adding to the complexity, many of the checklist items themselves had a variety of different options to fulfill them (“new apps do this, but legacy apps do that”; “Java apps should use this approach, but Ruby apps should try one of these four things”… yes, there were flowcharts inside checklists. Ouch.). For development teams, just working through the flowcharts of requirements and options was a monumental task. Supporting developers through those checklists for edge cases, and then validating that each team’s choices resulted in an architecture with all the desired security properties, was similarly not scalable for our security engineers.

Our second observation centered on strong authentication as our highest-leverage control. Missing or incomplete authentication in an application was the most critical type of issue we regularly faced, while at the same time, an application that had a bulletproof authentication story was an application we considered to be lower risk. Concepts like Zero Trust, Beyond Corp, and Identity Aware Proxies all seemed to point the same way: there is powerful assurance in making 100% authentication a property of the architecture of the application rather than an implementation detail within an application.

With both of these observations in hand, we looked at the challenge through a lens that we have found incredibly valuable: how do we productize it? Netflix engineers talk a lot about the concept of a “Paved Road”. One especially attractive part of a Paved Road approach for security teams with a large portfolio is that it helps turn lots of questions into a boolean proposition: Instead of “Tell me how your app does this important security thing?”, it’s just “Are you using this paved road product that handles that?”. So, what would a product look like that could tackle most of the security checklist for a team, and that also could give us that architectural property of guaranteed authentication? With these lofty goals in mind, we turned to our central engineering teams to help get us there.

Partnering to Productize Security

Jose & Arthur (Netflix Cloud Gateway): The Cloud Gateway team develops and operates Netflix’s “Front Door”. Historically we have been responsible for connecting, routing, and steering internet traffic from Netflix subscribers to services in the cloud. Our gateways are powered by our flagship open-source technology Zuul. When Netflix Studios and our security partners approached us, the proposal was conceptually simple and a good fit for our modular, filter-based approach. To try it out, we deployed a custom Zuul build (which we named “API Wall” and eventually, more affectionately, “Wall-E”) with a new filter for Netflix’s Single-Sign-On provider, enabled it for all requests, and boom! — an application deployment strategy that guarantees authentication for services behind it.

Wall-E logical diagram showing a proxy with distinct filters

Killing the Checklist

Once we worked together to integrate our SSO with Wall-E, we had established a pretty exciting pattern of adding security requirements as filters. We thought back to our checklist through the lens of: which of these things are consistent enough across applications to add as a required filter? Our web application firewall (WAF), DDoS prevention, security header validation, and durable logging all fit the bill. One by one, we saw our checklists’ requirements bite the dust, and shift from ‘individual app developer-owned’ to ‘Wall-E owned’ (and consistently implemented!).

By this point, it was clear that we had achieved the vision in the AppSec team’s original request. We eventually were able to add so much security leverage into Wall-E that the bulk of the “going internet-facing” checklist for Studio applications boiled down to one item: Will you use Wall-E?

A small section of our go-external security questionnaire and checklist for studio apps before Wall-E and after Wall-E.

The Early Adopter Challenge

Wall-E’s early adopters were handpicked and nudged along by the Application Security team. Back then, the Cloud Gateway team had to work closely with application developers to provide a seamless migration without disrupting users. These joint efforts took several weeks for both parties. During our initial consultations, it was clear that developers preferred prioritizing product work over security or infrastructure improvements. Our meetings usually ended like this: “Security suggested we talk to you, and we like the idea of improving our security posture, but we have product goals to meet. Let’s talk again next quarter”. These conversations surfaced a couple of problems we knew we had to overcome to address this early adopter challenge:

  1. Setting up Wall-E for an application took too much time and effort, and the hands-on approach would not scale.
  2. Security improvements alone were not enough to drive organic adoption in Netflix’s “context not control” culture.

We were under pressure to improve our adoption numbers and decided to focus first on the setup friction by improving the developer experience and automating the onboarding process.

Scaling With Developer Experience

Developers in the Netflix streaming world compose the customer-facing Netflix experience out of hundreds of microservices, reachable by complex routing rules. On the Netflix Studio side, in Content Engineering, each team develops distinct products with simpler routing needs. To support that much different model, we did another thing that seemed simple at the time but has had an outsized impact over the years: we asked app teams to integrate with us by creating a version-controlled YAML file. Originally this was intended as a simplified and developer-friendly way to help collect domain names and some routing rules into a versionable package, but we quickly realized we had stumbled into a powerful model: we were harvesting developer intent.

An interactive Wall-E configuration wizard, and a concise declarative format for an application’s routing, resource, and authentication decisions

This small change was a kind of magic, and completely flipped our relationship with development teams: since we had a concise, standardized definition of the app they intended to expose, we could proactively automate a lot of the setup. Specify a domain name? Wall-E can ensure that it automagically exists, with DNS and TLS configured correctly. Iterating on this experience eventually led to other intent-based streamlining, like asking about intended user populations and related applications (to select OAuth configs and claims). We could now tell developers that setting up Wall-E would only take a few minutes and that our tooling would automate everything.

Going Faster, Faster

As all of these pieces came together, app teams outside Studio took notice. For a typical paved road application with no unusual security complications, a team could go from “git init” to a production-ready, fully authenticated, internet accessible application in a little less than 10 minutes. The automation of the infrastructure setup, combined with reducing risk enough to streamline security review saves developers days, if not weeks, on each application. Developers didn’t necessarily care that the original motivating factor was about security: what they saw in practice was that apps using Wall-E could get in front of users sooner, and iterate faster.

This created that virtuous cycle that core engineering product teams get incredibly excited about: more users make the amortized platform investment more valuable, but they also bring more ideas and clarity for feature ideas, which in turn attract more users. This set the tone for the next year of development, along two tracks: fixing adoption blockers, and turning more “developer intent” into product features to just handle things for them.

For adoption, both the security team and our team were asking the same question of developers: Is there anything that prevents you from using Wall-E? Each time we got an answer to that question, we tried to figure out how we could address it. Nearly all of the blockers related to systems in which (usually for historical reasons) some application team was solving both authentication and application routing in a custom way. Examples include legacy mTLS and various webhook schemes​. With Wall-E as a clear, durable, paved road choice, we finally had enough of a carrot to move these teams away from supporting unique, potentially risky features. The value proposition wasn’t just “let us help you migrate and you’ll only ever have to deal with incoming traffic that is already properly authenticated”, it was also “you can throw away the services and manual processes that handled your custom mechanisms and offload any responsibility for authentication, WAF integration and monitoring, and DDoS protection to the platform”. Overall, we cannot overstate the value of organizationally committing to a single paved road product to handle these kinds of concerns. It creates an amazing clarity and strategic pressure that helps align actual services that teams operate to the charters and expertise that define them. The difference between 2–4 “right-ish” ways and a single paved road one is powerful.

Also, with fewer exceptions and clearer criteria for apps that should adopt this paved road, our AppSec Engineering and User Focused Security Engineering (UFSE) teams could automate security guidance to give more appropriate automated nudges for adoption. Every leader’s security risk dashboard now includes a Wall-E adoption metric, and roughly ⅔ of recommended apps have chosen to adopt it. Wall-E now fronts over 350 applications, and is adding roughly 3 new production applications (mostly internet-facing) per week.

Automated guidance data, showing the percentage of applications recommended to use Wall-E which have taken it up. The jumpiness in the number of apps recommended for adoption is real: as adoption blockers were discovered then eventually solved, and as we standardized guidance across the company, our automated recommendations reflected these developments.

As adoption continued to increase, we looked at various signals of developer intent for good functionality to move from development-team-owned to platform-owned. One particularly pleasing example turned out to be UI hosting: it popped up over and over again as both an awkward exception to our “full authentication” goal, and also oftentimes the only thing that required Single Page App (SPA) UI teams to run actual cloud instances and have to be on-call for infrastructure. This eventually matured into an opinionated, declarative asset service that abstracts static file hosting for application teams: developers get fast static asset deployments, security gets strong guardrails around UI applications, and Netflix overall has fewer cloud instances to manage (and pay for!). Wall-E became a requirement for the best UI developer experience, and that drove even more adoption.

A productized approach also meant that we could efficiently enable lots of complex but “nice to have” features to enhance the developer experience, like Atlas metrics for free, and integration with our request tracing tool, Edgar.

From Product to Platform

You may have noticed a word sneak into the conversation up there… “platform”. Netflix has a Developer Productivity organization: teams dedicated to helping other developers be more effective. A big part of their work is this idea of harvesting developer intent and automating the necessary touchpoints across our systems. As these teams came to see Wall-E as the clear answer for many of their customers, they started integrating their tools to configure Wall-E from the even higher level developer intents they were harvesting. In effect, this moves authentication and traffic routing (and everything else that Wall-E handles) from being a specific product that developers need to think about and make a choice about, to just a fact that developers can trust and generally ignore. In 2019, essentially 100% of the Wall-E app configuration was done manually by developers. In 2021, that interaction has changed dramatically: now more than 50% of app configuration in WallE is done by automated tools (which are acting on higher-level abstractions on behalf of developers).

This scale and standardization again multiplies value: our internal risk quantification forecasts show compelling annualized savings in risk and incident response costs across the Wall-E portfolio. These applications have fewer, less severe, and less exploitable bugs compared to non-Wall-E apps, and we rarely need an urgent response from app owners (we call this not-getting-paged-at-midnight-as-a-service). Developer time saved on initial application setup and unneeded services additionally adds up on the order of team-months of productivity per year.

Looking back to the core need that started us down this road (“streamline any security processes […]” and “raise the overall security bar […]”), Wall-E’s evolution to being part of the platform cements and extends the initial success. Going forward, more and more apps and developers can benefit from these security assurances while needing to think less and less about them. It’s an outcome we’re quite proud of.

Let’s Do More Of That

To briefly recap, here’s a few of the things that we take away from this journey:

  • If you can do one thing to manage a large product security portfolio, do bulletproof authentication; preferably as a property of the architecture
  • Security teams and central engineering teams can and should have a collaborative, mutually supportive partnership
  • “Productizing” a capability (eg: clearly articulated; defined value proposition; branded; measured), even for internal tools, is useful to drive adoption and find further value
  • A specific product makes the “paved road” clearer; a boolean “uses/doesn’t use” is strongly preferable to various options with subtle caveats
  • Hitch the security wagon to developer productivity
  • Harvesting intent is powerful; it lets many teams add value

What’s Next

We see incredible power in this kind of security/infrastructure partnership work, and we’re excited to leverage these wins into our next goal: to truly become an infrastructure-as-service provider by building a full-fledged Gateway API, thereby handing off ownership of the developer experience to our partner teams in the Developer Productivity organization. This will allow us to focus on the challenges that will come on our way to the next milestone: 1000 applications behind Wall-E.

If this kind of thing is exciting to you, we are hiring for both of these teams: Senior Software Engineer and Engineering Manager on Application Networking; and Senior Security Partner and Appsec Senior Software Engineer.

With special thanks to Cloud Gateway and InfoSec team members past and present, especially Sunil Agrawal, Mikey Cohen, Will Rose, Dilip Kancharla, our partners on Studio & Developer Productivity, and the early Wall-E adopters that provided valuable feedback and ideas. And also to Queen for the song references we slipped in; tell us if you find ’em all.


The Show Must Go On: Securing Netflix Studios At Scale was originally published in Netflix TechBlog on Medium, where people are continuing the conversation by highlighting and responding to this story.

How Cloudflare helped mitigate the Atlassian Confluence OGNL vulnerability before the PoC was released

Post Syndicated from Michael Tremante original https://blog.cloudflare.com/how-cloudflare-helped-mitigate-the-atlassian-confluence-ognl-vulnerability-before-the-poc-was-released/

How Cloudflare helped mitigate the Atlassian Confluence OGNL vulnerability before the PoC was released

How Cloudflare helped mitigate the Atlassian Confluence OGNL vulnerability before the PoC was released

On August 25, 2021, Atlassian released a security advisory for their Confluence Server and Data Center. The advisory highlighted an Object-Graph Navigation Language (OGNL) injection that would result in an unauthenticated attacker being able to execute arbitrary code.

A full proof of concept (PoC) of the attack was made available by a security researcher on August 31, 2021. Cloudflare immediately reviewed the PoC and prepared a mitigation rule via an emergency release. The rule, once tested, was deployed on September 1, 2021, at 15:32 UTC with a default action of BLOCK and the following IDs:

  • 100400 (for our legacy WAF)
  • e8c550810618437c953cf3a969e0b97a (for our new WAF)

All customers using the Cloudflare WAF to protect their self-hosted Confluence applications have automatically been protected since the new rule was deployed last week. Additionally, the Cloudflare WAF started blocking a high number of potentially malicious requests to Confluence applications even before the rule was deployed.

And customers who had deployed Cloudflare Access in front of their Confluence applications were already protected even before the emergency release. Access checks every request made to a protected hostname for a JSON Web Token (JWT) containing a user’s identity. Any unauthenticated users attempting this exploit would have been blocked before they could reach the Confluence server.

Customers must, however, immediately update their self-hosted Confluence installations to the versions listed in the advisory to ensure full protection.

This vulnerability was assigned the CVE number 2021-26084 and has a base score of 9.8 — critical. A detailed technical write-up of the vulnerability along with the PoC can be found on GitHub.

Timeline of Events

A timeline of events is provided below:

2021-08-25 at 17:00 UTC Atlassian security advisory released
2021-08-28 Cloudflare WAF starts seeing and blocking malicious traffic targeting vulnerable endpoints related to the security advisory
2021-08-31 at 22:22 UTC A PoC becomes widely available
2021-09-01 at 15:32 UTC Additional Cloudflare WAF rule to target CVE-2021-26084

How soon were attackers probing vulnerable endpoints?

High profile vulnerabilities tend to be exploited very quickly by attackers once a PoC or a patch becomes available. Cloudflare maintains aggregated and sampled data on WAF blocks1 that can be used to explore how quickly vulnerable endpoints start receiving malicious traffic, highlighting the importance of deploying patches as quickly as possible.

Cloudflare data suggests that scanning for the vulnerability started up to three days before the first publicly available PoC was published, as high WAF activity was observed on vulnerable endpoints beginning August 28, 2021. This activity may indicate that attackers or researchers had successfully reverse engineered the patch within that time frame.

It also shows that, even without the specific WAF rule that we rolled out for this vulnerability, Cloudflare was blocking attempts to exploit it. Other WAF rules picked up the suspect behavior.

For this vulnerability, two endpoints are highlighted that can be used to explore attack traffic:

  • /pages/doenterpagevariables.action
  • /pages/createpage-entervariables.action

The following graph shows traffic matching Cloudflare’s WAF security feature from August 21 to September 5, 2021. Specifically:

  • In blue: HTTP requests blocked by Cloudflare’s WAF matching the two chosen paths.
  • In red: HTTP requests blocked by Cloudflare’s WAF matching the two paths and the specific rule deployed to cover this vulnerability.
How Cloudflare helped mitigate the Atlassian Confluence OGNL vulnerability before the PoC was released

By looking at the data, an increase in activity can be seen starting from August 28, 2021 — far beyond normal Internet background noise levels. Additionally, more than 64% of the traffic increase was detected and blocked by the Cloudflare WAF as malicious on the day the PoC was available.

What were attackers trying before a PoC was widely available?

Just before a PoC became widely available, an increasing number of requests were blocked by customer configured IP based rules, followed by our Managed Rulesets and rate limiting. Most custom WAF rules and IP based rules are created by customers either in response to malicious activity in the WAF logs, or as a positive security model to lock down applications that should simply not have public access from the Internet.

We can zoom into the Managed WAF rule matches to explore what caused the WAF to trigger before the specific rule was deployed:

How Cloudflare helped mitigate the Atlassian Confluence OGNL vulnerability before the PoC was released

Command injection based attacks were the most common vector attempted before a PoC was made widely available, indicating again that some attackers may have been at least partially aware of the nature of the vulnerability. These attacks are aimed at executing remote code on the target application servers and are often platform specific. Other attack types observed, in order of frequency were:

  • Request Port Anomalies: these are HTTP requests to uncommon ports that are normally not exposed for HTTP traffic.
  • Fake Bot Signatures: these requests matched many of our rules aimed at detecting user agents spoofing themselves as popular bots such as Google, Yandex, Bing and others.
  • OWASP Inbound Anomaly Score Exceeded: these are requests that were flagged by our implementation of the OWASP ModSecurity Core Ruleset. The OWASP ruleset is a score based system that scans requests for patterns of characters that normally identify malicious requests;
  • HTTP Request Anomalies: these requests triggered many of our HTTP based validation checks including but not limited to RFC compliance checks.

Conclusions

Patching zero-day attacks as quickly as possible is vital for security. No single approach can be 100% successful at mitigating intrusion attempts. By observing patterns and triggers for this specific CVE, it is clear that a layered approach is most effective for protecting critical infrastructure. Cloudflare data also implies that, at least in part, some attackers or researchers were aware of the nature of the vulnerability at least since August 28, 2021, three days before a PoC was made widely available.

1The WAF block data consists of sampled matches of request fields including path, geography, rule ID, timestamp and other similar metadata.

Ransomware mitigation: Top 5 protections and recovery preparation actions

Post Syndicated from Brad Dispensa original https://aws.amazon.com/blogs/security/ransomware-mitigation-top-5-protections-and-recovery-preparation-actions/

In this post, I’ll cover the top five things that Amazon Web Services (AWS) customers can do to help protect and recover their resources from ransomware. This blog post focuses specifically on preemptive actions that you can take.

#1 – Set up the ability to recover your apps and data

In order for a traditional encrypt-in-place ransomware attempt to be successful, the actor responsible for the attempt must be able to prevent you from accessing your data, and then hold your data for ransom. The first thing that you should do to protect your account is to ensure that you have the ability to recover your data, regardless of how it was made inaccessible. Backup solutions protect and restore data, and disaster recovery (DR) solutions offer fast recovery of data and workloads.

AWS makes this process significantly easier for you with services like AWS Backup, or CloudEndure Disaster Recovery, which offer robust infrastructure DR. I’ll go over how you can use both of these services to help recover your data. When you choose a data backup solution, simply creating a snapshot of an Amazon Elastic Compute Cloud (Amazon EC2) instance isn’t enough. A powerful function of the AWS Backup service is that when you create a backup vault, you can use a different customer master key (CMK) in the AWS Key Management Service (AWS KMS). This is powerful because the CMK can have a key policy that allows AWS operators to use the key to encrypt the backup, but you can limit decryption to a completely different principal.

In Figure 1, I show an account that locally encrypted their EC2 Amazon Elastic Block Store (Amazon EBS) volume by using CMK A, but AWS Backup uses CMK B. If the user in account A with a decrypt grant on CMK A attempts to access the backup, even if the user is authorized by the AWS Identity and Access Management (IAM) principal access policy, the CMK policy won’t allow access to the encrypted data.
 

Figure 1: An account using AWS Backup that stores data in a separate account with different key material

Figure 1: An account using AWS Backup that stores data in a separate account with different key material

If you place the backup or replication into a separate account that is dedicated just for backup, this also helps to reduce the likelihood that a threat actor would be able to destroy or tamper with the backup. AWS Backup now natively supports this cross-account capability, which makes the backup process even easier. The AWS Backup Developer Guide provides instructions for using this functionality, as well as the policy that you will need to apply.

Make sure that you’re backing up your data in all supported services and that your backup schedule is based on your business recovery time objective (RTO) and recovery point objective (RPO).

Now, let’s take a look at how CloudEndure Disaster Recovery works.
 

Figure 2: An overview of how CloudEndure Disaster Recovery works

Figure 2: An overview of how CloudEndure Disaster Recovery works

The high-level architecture diagram in Figure 2 illustrates how CloudEndure Disaster Recovery keeps your entire on-premises environment in sync with replicas in AWS and ready to fail over to AWS at any time, with aggressive recovery objectives and significantly reduced total cost of ownership (TCO). On the left is the source environment, which can be composed of different types of applications—in this case, I give Oracle databases and SQL Servers as examples. And although I’m highlighting DR from on-premises to AWS in this example, CloudEndure Disaster Recovery can provide the same functionality and improved recovery performance between AWS Regions for your workloads that are already in AWS.

The CloudEndure Agent is deployed on the source machines without requiring any kind of reboot and without impacting performance. That initiates nearly continuous replication of that data into AWS. CloudEndure Disaster Recovery also provisions a low-cost staging area that helps reduce the cost of cloud infrastructure during replication, and until that machine actually needs to be spun up during failover or disaster recovery tests.

When a customer experiences an outage, CloudEndure Disaster Recovery launches the machines in the appropriate AWS Region VPC and target subnets of your choice. The dormant lightweight state, called the Staging Area, is now launched into the actual servers that have been migrated from the source environment (the Oracle databases and SQL Servers, in this example). One of the features of CloudEndure Disaster Recovery is point-in-time recovery, which is important in the event of a ransomware event, because you can use this feature to recover your environment to a previous consistent point in time of your choosing. In other words, you can go back to the environment you had prior to the event.

The machine conversion technology in CloudEndure Disaster Recovery means that those replicated machines can run natively within AWS, and the process typically takes just minutes for the machines to boot. You can also conduct frequent DR readiness tests without impacting replication or user activities.

Another service that’s useful for data protection is the AWS object storage service, Amazon Simple Storage Service (Amazon S3), where you can use features such as object versioning to help prevent objects from being overwritten with ransomware-encrypted files, or Object Lock, which provides a write once, read many (WORM) solution to help prevent objects from ever being modified or overwritten.

For more information on developing a DR plan and a business continuity plan, see the following pages:

#2 – Encrypt your data

In addition to holding data for ransom, more recent ransomware events increasingly use double extortion schemes. A double extortion is when the actor not only encrypts the data, but exfiltrates the data and threatens to release the data if the ransom isn’t paid.

To help protect your data, you should always enable encryption of the data and segment your workflow so that authorized systems and users have limited access to use the key material to decrypt the data.

As an example, let’s say that you have a web application that uses an API to write data objects into an S3 bucket. Rather than allowing the application to have full read and write permissions, limit the application to just a single operation (for example, PutObject). Smaller, more reusable code is also easier to manage, so segmenting the workflow also helps developers to be able to work more quickly. An example of this type of workflow, in which separate CMK policies are used for read operations and write operations to limit access, is laid out in Figure 3.
 

Figure 3: A serverless workflow that uses separate CMK policies for read operations and write operations

Figure 3: A serverless workflow that uses separate CMK policies for read operations and write operations

It’s important to note that although AWS managed CMKs can help you to meet regulatory requirements for data at rest encryption, they don’t support customer key policies. Customers who want to control how their key material is used must use a customer managed CMK.

For data that is stored locally on Amazon EBS, remember that while the blocks are encrypted by using AWS KMS, after the server boots, your data is unencrypted locally at the operating system level. If you have sensitive data that is being stored as part of your application locally, consider using tooling like the AWS Encryption SDK or Encryption CLI to store that data in an encrypted format.

As Amazon Chief Technology Officer Werner Vogels says, encrypt everything!
 

Figure 4: Amazon Chief Technology Officer Werner Vogels wants customers to encrypt everything

Figure 4: Amazon Chief Technology Officer Werner Vogels wants customers to encrypt everything

#3 – Apply critical patches

In order for an actor to get access to a system, they must take advantage of a vulnerability or misconfiguration. Although many organizations patch their infrastructure, some only do so on a weekly or monthly basis, and that can be inadequate for patching critical systems that require 24/7 operation. Increasingly, threat actors have the ability to reverse engineer patches or common vulnerability exposure (CVE) announcements in hours. You should deploy security-related patches, especially those that are high severity, with the least amount of delay possible.

AWS Systems Manager can help you to automate this process in the cloud and on premises. With Systems Manager patch baselines, you can apply patches based on machine tags (for example, development versus production) but also based on patch type. For example, the predefined patch baseline AWS-AmazonLinuxDefaultPatchBaseline approves all operating system patches that are classified as “Security” and that have a severity level of “Critical” or “Important.” Patches are auto-approved seven days after release. The baseline also auto-approves all patches with a classification of “Bugfix” seven days after release.

If you want a more aggressive patching posture, you can instead create a custom baseline. For example, in Figure 5, I’ve created a baseline for all Windows versions with a critical severity.
 

Figure 5: An example of the creation of a custom patch baseline for Systems Manager

Figure 5: An example of the creation of a custom patch baseline for Systems Manager

I can then set up an hourly scheduled event to scan all or part of my fleet and patch based on this baseline. In Figure 6, I show an example of this type of workflow taken from this AWS blog post, which gives an overview of the patch baseline process and covers how to use it in your cloud environment.
 

Figure 6: Example workflow showing how to scan, check, patch, and report by using Systems Manager

Figure 6: Example workflow showing how to scan, check, patch, and report by using Systems Manager

In addition, if you’re using AWS Organizations, this blog post will show you how you can apply this method organization-wide.

AWS offers many tools to make patching easier, and making sure that your servers are fully patched will greatly reduce your susceptibility to ransomware.

#4 – Follow a security standard

Don’t guess whether your environment is secure. Most commercial and public-sector customers are subject to some form of regulation or compliance standard. You should be measuring your security and risk posture against recognized standards in an ongoing practice. If you don’t have a framework that you need to follow, consider using the AWS Well-Architected Framework as your baseline.

With AWS Security Hub, you can view data from AWS security services and third-party tools in a single view and also benchmark your account against standards or frameworks like the CIS AWS Foundations Benchmark, the Payment Card Industry Data Security Standard (PCI DSS), and the AWS Foundational Security Best Practices. These are automated scans of your environment that can alert you when drifts in compliance occur. You can also choose to use AWS Config conformance packs to automate a subset of controls for NIST 800-53, Health Insurance Portability and Accountability Act (HIPAA), Korea – Information Security Management System (ISMS), as well as a growing list of over 60 conformance pack templates at the time of this publication.

Another important aspect of following best practices is to implement least privilege at all levels. In AWS, you can use IAM to write policies that enforce least privilege. These policies, when applied through roles, will limit the actor’s capability to advance in your environment. Access Analyzer is a new feature of IAM that allows you to more easily generate least privilege permissions, and it is covered in this blog post.

#5 – Make sure you’re monitoring and automating responses

Make sure you have robust monitoring and alerting in place. Each of the items I described earlier is a powerful tool to help you to protect against a ransomware event, but none will work unless you have strong monitoring in place to validate your assumptions.

Here, I want to provide some specific examples based on the examples earlier in this post.

If you’re backing up your data by using AWS Backup, as described in item #1 (Set up the ability to recover your apps and data), you should have Amazon CloudWatch set up to send alerts when a backup job fails. When an alert is triggered, you also need to act on it. If your response to an AWS alert email would be to re-run the job, you should automate that workflow by using AWS Lambda. If a subsequent failure occurs, open a ticket in your ticketing service automatically or page your operations team.

If you’re encrypting all of your data, as described in item #2 (Encrypt your data), are you watching AWS CloudTrail to see when AWS KMS denies permission to an operation?

Additionally, are you monitoring and acting on patch management baselines as described in item #3 (Apply critical patches) and responding when a patch isn’t able to successfully deploy?

Last, are you watching the compliance status of your Security Hub compliance reports and taking action on findings? You also need to monitor your environment for suspicious activity, investigate, and act quickly to mitigate risks. This is where Amazon GuardDuty, Security Hub, and Amazon Detective can be valuable.

AWS makes it easier to create automated responses to the alerts I mentioned earlier. The multi-account response solution in this blog post provides a good starting point that you can use to customize a response based on the needs of your workload.

Conclusion

In this blog post, I showed you the top five actions that you can take to protect and recover from a ransomware event.

In addition to the advice provided here, NIST has recently published guidance on the prevention of ransomware, which you can view in the NIST SP1800-25 publication.

If you have feedback about this post, submit comments in the Comments section below.

Want more AWS Security how-to content, news, and feature announcements? Follow us on Twitter.

Author

Brad Dispensa

Brad is a principal security specialist solutions architect for Amazon Web Services in the worldwide public sector group.

Confidential computing: an AWS perspective

Post Syndicated from David Brown original https://aws.amazon.com/blogs/security/confidential-computing-an-aws-perspective/

Customers around the globe—from governments and highly regulated industries to small businesses and start-ups—trust Amazon Web Services (AWS) with their most sensitive data and applications. At AWS, keeping our customers’ workloads secure and confidential, while helping them meet their privacy and data sovereignty requirements, is our highest priority. Our investments in security technologies and rigorous operational practices meet and exceed even our most demanding customers’ confidential computing and data privacy standards. Over the years, we’ve made many long-term investments in purpose-built technologies and systems to keep raising the bar of security and confidentiality for our customers.

In the past year, there has been an increasing interest in the phrase confidential computing in the industry and in our customer conversations. We’ve observed that this phrase is being applied to various technologies that solve very different problems, leading to confusion about what it actually means. With the mission of innovating on behalf of our customers, we want to offer you our perspective on confidential computing.

At AWS, we define confidential computing as the use of specialized hardware and associated firmware to protect customer code and data during processing from outside access. Confidential computing has two distinct security and privacy dimensions. The most important dimension—the one we hear most often from customers as their key concern—is the protection of customer code and data from the operator of the underlying cloud infrastructure. The second dimension is the ability for customers to divide their own workloads into more-trusted and less-trusted components, or to design a system that allows parties that do not, or cannot, fully trust one another to build systems that work in close cooperation while maintaining confidentiality of each party’s code and data.

In this post, I explain how the AWS Nitro System intrinsically meets the requirements of the first dimension by providing those protections to customers who use Nitro-based Amazon Elastic Compute Cloud (Amazon EC2) instances, without requiring any code or workload changes from the customer side. I also explain how AWS Nitro Enclaves provides a way for customers to use familiar toolsets and programming models to meet the requirements of the second dimension. Before we get to the details, let’s take a closer look at the Nitro System.

What is the Nitro System?

The Nitro System, the underlying platform for all modern Amazon EC2 instances, is a great example of how we have invented and innovated on behalf of our customers to provide additional confidentiality and privacy for their applications. For ten years, we have been reinventing the EC2 virtualization stack by moving more and more virtualization functions to dedicated hardware and firmware, and the Nitro System is a result of this continuous and sustained innovation. The Nitro System is comprised of three main parts: the Nitro Cards, the Nitro Security Chip, and the Nitro Hypervisor. The Nitro Cards are dedicated hardware components with compute capabilities that perform I/O functions, such as the Nitro Card for Amazon Virtual Private Cloud (Amazon VPC), the Nitro Card for Amazon Elastic Block Store (Amazon EBS), and the Nitro Card for Amazon EC2 instance storage.

Nitro Cards—which are designed, built, and tested by Annapurna Labs, our in-house silicon development subsidiary—enable us to move key virtualization functionality off the EC2 servers—the underlying host infrastructure—that’s running EC2 instances. We engineered the Nitro System with a hardware-based root of trust using the Nitro Security Chip, allowing us to cryptographically measure and validate the system. This provides a significantly higher level of trust than can be achieved with traditional hardware or virtualization systems. The Nitro Hypervisor is a lightweight hypervisor that manages memory and CPU allocation, and delivers performances that is indistinguishable from bare metal (we recently compared it against our bare metal instances in the Bare metal performance with the AWS Nitro System post).

The Nitro approach to confidential computing

There are three main types of protection provided by the Nitro System. The first two protections underpin the key dimension of confidential computing—customer protection from the cloud operator and from cloud system software—and the third reinforces the second dimension—division of customer workloads into more-trusted and less-trusted elements.

  1. Protection from cloud operators: At AWS, we design our systems to ensure workload confidentiality between customers, and also between customers and AWS. We’ve designed the Nitro System to have no operator access. With the Nitro System, there’s no mechanism for any system or person to log in to EC2 servers (the underlying host infrastructure), read the memory of EC2 instances, or access any data stored on instance storage and encrypted EBS volumes. If any AWS operator, including those with the highest privileges, needs to do maintenance work on the EC2 server, they can do so only by using a strictly limited set of authenticated, authorized, and audited administrative APIs. None of these APIs have the ability to access customer data on the EC2 server. Because these technological restrictions are built into the Nitro System itself, no AWS operator can bypass these controls and protections. For additional defense-in-depth against physical attacks at the memory interface level, we offer memory encryption on various EC2 instances. Today, memory encryption is enabled by default on all Graviton2-based instances (T4g, M6g, C6g, C6gn, R6g, X2g), and Intel-based M6i instances, which have Total Memory Encryption (TME). Upcoming EC2 platforms based on the AMD Milan processor will feature Secure Memory Encryption (SME).
  2. Protection from AWS system software: The unique design of the Nitro System utilizes low-level, hardware-based memory isolation to eliminate direct access to customer memory, as well as to eliminate the need for a hypervisor on bare metal instances.

    • For virtualized EC2 instances (as shown in Figure 1), the Nitro Hypervisor coordinates with the underlying hardware-virtualization systems to create virtual machines that are isolated from each other as well as from the hypervisor itself. Network, storage, GPU, and accelerator access use SR-IOV, a technology that allows instances to interact directly with hardware devices using a pass-through connection securely created by the hypervisor. Other EC2 features such as instance snapshots and hibernation are all facilitated by dedicated agents that employ end-to-end memory encryption that is inaccessible to AWS operators.

      Figure 1: Virtualized EC2 instances

      Figure 1: Virtualized EC2 instances

    • For bare metal EC2 instances (as shown in Figure 2), there’s no hypervisor running on the EC2 server, and customers get dedicated and exclusive access to all of the underlying main system board. Bare metal instances are designed for customers who want access to the physical resources for applications that take advantage of low-level hardware features—such as performance counters and Intel® VT—that aren’t always available or fully supported in virtualized environments, and also for applications intended to run directly on the hardware or licensed and supported for use in non-virtualized environments. Bare metal instances feature the same storage, networking, and other EC2 capabilities as virtualized instances because the Nitro System implements all of the system functions normally provided by the virtualization layer in an isolated and independent manner using dedicated hardware and purpose-built system firmware. We used the very same technology to create Amazon EC2 Mac instances. Because the Nitro System operates over an independent bus, we can attach Nitro cards directly to Apple’s Mac mini hardware without any other physical modifications.

      Figure 2: Bare metal EC2 instance

      Figure 2: Bare metal EC2 instance

  3. Protection of sensitive computing and data elements from customers’ own operators and software: Nitro Enclaves provides the second dimension of confidential computing. Nitro Enclaves is a hardened and highly-isolated compute environment that’s launched from, and attached to, a customer’s EC2 instance. By default, there’s no ability for any user (even a root or admin user) or software running on the customer’s EC2 instance to have interactive access to the enclave. Nitro Enclaves has cryptographic attestation capabilities that allow customers to verify that all of the software deployed to their enclave has been validated and hasn’t been tampered with. A Nitro enclave has the same level of protection from the cloud operator as a normal Nitro-based EC2 instance, but adds the capability for customers to divide their own systems into components with different levels of trust. A Nitro enclave provides a means of protecting particularly sensitive elements of customer code and data not just from AWS operators but also from the customer’s own operators and other software.As the main goal of Nitro Enclaves is to protect against the customers’ own users and software on their EC2 instances, a Nitro enclave considers the EC2 instance to reside outside of its trust boundary. Therefore, a Nitro enclave shares no memory or CPU cores with the customer instance. To significantly reduce the attack surface area, a Nitro enclave also has no IP networking and offers no persistent storage. We designed Nitro Enclaves to be a platform that is highly accessible to all developers without the need to have advanced cryptography knowledge or CPU micro-architectural expertise, so that these developers can quickly and easily build applications to process sensitive data. At the same time, we focused on creating a familiar developer experience so that developing the trusted code that runs in a Nitro enclave is as easy as writing code for any Linux environment.

Summary

To summarize, the Nitro System’s unique approach to virtualization and isolation enables our customers to secure and isolate sensitive data processing from AWS operators and software at all times. It provides the most important dimension of confidential computing as an intrinsic, on-by-default, set of protections from the system software and cloud operators, and optionally via Nitro Enclaves even from customers’ own software and operators.

What’s next?

As mentioned earlier, the Nitro System represents our almost decade-long commitment to raising the bar for security and confidentiality for compute workloads in the cloud. It has allowed us to do more for our customers than is possible with off-the-shelf technology and hardware. But we’re not stopping here, and will continue to add more confidential computing capabilities in the coming months.

If you have feedback about this post, submit comments in the Comments section below.

Want more AWS Security how-to content, news, and feature announcements? Follow us on Twitter.

Author

David Brown

David is the Vice President of Amazon EC2, a web service that provides secure, resizable compute capacity in the cloud. He joined AWS in 2007, as a software developer based in Cape Town, working on the early development of Amazon EC2. Over the last 12 years, he has had several roles within Amazon EC2, working on shaping the service into what it is today. Prior to joining Amazon, David worked as a software developer within a financial industry startup.

Making Magic Transit health checks faster and more responsive

Post Syndicated from Meyer Zinn original https://blog.cloudflare.com/making-magic-transit-health-checks-faster-and-more-responsive/

Making Magic Transit health checks faster and more responsive

Making Magic Transit health checks faster and more responsive

Magic Transit advertises our customer’s IP prefixes directly from our edge network, applying DDoS mitigation and firewall policies to all traffic destined for the customer’s network. After the traffic is scrubbed, we deliver clean traffic to the customer over GRE tunnels (over the public Internet or Cloudflare Network Interconnect). But sometimes, we experience inclement weather on the Internet: network paths between Cloudflare and the customer can become unreliable or go down. Customers often configure multiple tunnels through different network paths and rely on Cloudflare to pick the best tunnel to use if, for example, some router on the Internet is having a stormy day and starts dropping traffic.

Making Magic Transit health checks faster and more responsive

Because we use Anycast GRE, every server across Cloudflare’s 200+ locations globally can send GRE traffic to customers. Every server needs to know the status of every tunnel, and every location has completely different network routes to customers. Where to start?

In this post, I’ll break down my work to improve the Magic Transit GRE tunnel health check system, creating a more stable experience for customers and dramatically reducing CPU and memory usage at Cloudflare’s edge.

Everybody has their own weather station

To decide where to send traffic, Cloudflare edge servers need to periodically send health checks to each customer tunnel endpoint.

When Magic Transit was first launched, every server sent a health check to every tunnel once per minute. This naive, “shared-nothing” approach was simple to implement and served customers well, but would occasionally deliver less than optimal health check behavior in two specific ways.

Way #1: Inconsistent weather reports

Sometimes a server just runs into bad luck, and a check randomly fails. From there, the server would mark the tunnel as degraded and immediately start shifting traffic towards a fallback tunnel. Imagine you and I were standing right next to each other under a clear sky, and I felt a single drop of water and declared, “It’s raining!” whereas you felt no raindrops and declared, “It’s all clear!”

With relatively minimal data per server, it means that health determinations can be imprecise. It also means that individual servers could overreact to individual failures. From a customer’s point of view, it’s like Cloudflare detected a problem with the primary tunnel. But, in reality, the server just got a bad weather forecast and made a different judgement call.

Way #2: Slow to respond to storms

Even when tunnel states are consistent across servers, they can be slow to respond. In this case, if a server runs a health check which succeeds, but a second later the tunnel goes down, the next health check won’t happen for another 59 seconds. Until that next health check fails, the server has no idea anything is wrong, so it keeps sending traffic over unhealthy tunnels, leading to packet loss and latency for the customer.

Much like how a live, up-to-the-minute rain forecast helps you decide when to leave to avoid the rain, servers that send tunnel checks more frequently get a finer view of the Internet weather and can respond faster to localized storms. But if every server across Cloudflare’s edge sent health checks too frequently, we would very quickly start to overwhelm our customers’ networks.

All of the weather stations nearby start sharing observations

Clearly, we needed to hammer out some kinks. We wanted servers in the same location to come to the same conclusions about where to send traffic, and we wanted faster detection of issues without increasing the frequency of tunnel checks.

Health checks sent from servers in the same data center take the same route across the Internet. Why not share the results among them?

Instead of a single raindrop causing me to declare that it’s raining, I’d tell you about the raindrop I felt, and you’d tell me about the clear sky you’re looking at. Together, we come to the same conclusion: there isn’t enough rain to open an umbrella.

There is even a special networking protocol that allows us to easily share information between servers in the same private network. From the makers of Unicast and Anycast, now presenting: Multicast!

A single IP address does not necessarily represent a single machine in a network. The Internet Protocol specifies a way to send one message that gets delivered to a group of machines, like writing to an email list. Every machine has to opt into the group—we can’t just enroll people at random for our email list—but once a machine joins, it receives a copy of any message sent to the group’s address.

Making Magic Transit health checks faster and more responsive

The servers in a Cloudflare edge data center are part of the same private network, so for “version 2” of our health check system, we had each server in a data center join a multicast group and share their health check results with one another. Each server still made an independent assessment for each tunnel, but that assessment was based on data collected by all servers in the same location.

This second version of tunnel health checks resulted in more consistent  tunnel health determinations by servers in the same data center. It also resulted in faster response times—especially in large data centers where servers receive updates from their peers very rapidly.

However, we started seeing scaling problems. As we added more customers, we added more tunnel endpoints where we need to check the weather. In some of our larger data centers, each server was receiving close to half a billion messages per minute.

Imagine it’s not just you and me telling each other about the weather above us. You’re in a crowd of hundreds of people, and now everyone is shouting the weather updates for thousands of cities around the world!

One weather station to rule them all

As an engineering intern on the Magic Transit team, my project this summer has been developing a third approach. Rather than having every server infrequently check the weather for every tunnel and shouting the observation to everyone else, now every server tunnel can frequently check the weather for a few tunnels. With this new approach, servers would then only tell the others about the overall weather report—not every individual measurement.

That scenario sounds more efficient, but we need to distribute the task of sending tunnel health checks across all the servers in a location so one server doesn’t get an overwhelming amount of work. So how can we assign tunnels to servers in a way that doesn’t require a centralized orchestrator or shared database? Enter consistent hashing, the single coolest distributed computing concept I got to apply this summer.

Every server sends a multicast “heartbeat” every few seconds. Then, by listening for multicast heartbeats, each server can construct a list of the IP addresses of peers known to be alive, including its own address, sorted by taking the hash of each address. Every server in a data center has the same list of peers in the same order.

When a server needs to decide which tunnels it is responsible for sending health checks to, the server simply hashes each tunnel to an integer and searches through the list of peer addresses to find the peer with the smallest hash greater than the tunnel’s hash, wrapping around to the first peer if no peer is found. The server is responsible for sending health checks to the tunnel when the assigned peer’s address equals the server’s address.

If a server stops sending messages for a long enough period of time, the server gets removed from the known peers list. As a consequence, the next time another server tries to hash a tunnel the removed peer was previously assigned, the tunnel simply gets reassigned to the next peer in the list.

And like magic, we have devised a scheme to consistently assign tunnels to servers in a way that is resilient to server failures and does not require any extra coordination between servers beyond heartbeats. Now, the assigned server can send health checks way more frequently, compose more precise weather forecasts, and share those forecasts without being drowned out by the crowd.

Results

Releasing the new health check system globally reduced Magic Transit’s CPU usage by over 70% and memory usage by nearly 85%.

Memory usage (measured in terabytes):

Making Magic Transit health checks faster and more responsive

CPU usage (measured in CPU-seconds per two minute interval, averaged over two days):

Making Magic Transit health checks faster and more responsive

Reducing the number of multicast messages means that servers can now keep up with the Internet weather, even in the largest data centers. We’re now poised for the next stage of Magic Transit’s growth, just in time for our two-year anniversary.

If you want to help build the future of networking, join our team.

More devices, fewer CAPTCHAs, happier users

Post Syndicated from Wesley Evans original https://blog.cloudflare.com/cap-expands-support/

More devices, fewer CAPTCHAs, happier users

More devices, fewer CAPTCHAs, happier users

Earlier this year we announced that we are committed to making online human verification easier for more users, all around the globe. We want to end the endless loops of selecting buses, traffic lights, and convoluted word diagrams. Not just because humanity wastes 500 years per day on solving other people’s machine learning problems, but because we are dedicated to making an Internet that is fast, transparent, and private for everyone. CAPTCHAs are not very human-friendly, being hard to solve for even the most dedicated Internet users. They are extremely difficult to solve for people who don’t speak certain languages, and people who are on mobile devices (which is most users!).

Today, we are taking another step in helping to reduce the Internet’s reliance on CAPTCHAs to prove that you are not a robot. We are expanding the reach of our Cryptographic Attestation of Personhood experiment by adding support for a much wider range of devices. This includes biometric authenticators — like Apple’s Face ID, Microsoft Hello, and Android Biometric Authentication. This will let you solve challenges in under five seconds with just a touch of your finger or a view of your face — without sending this private biometric data to anyone.

You can try it out on our demo site cloudflarechallenge.com and let us know your feedback.

In addition to support for hardware biometric authenticators, we are also announcing support for many more hardware tokens today in the Cryptographic Attestation of Personhood experiment. We support all USB and NFC keys that are both certified by the FIDO alliance and have no known security issues according to the FIDO Alliance Metadata service (MDS 3.0).

Privacy First

Privacy is at the center of Cryptographic Attestation of Personhood. Information about your biometric data is never shared with, transmitted to, or processed by Cloudflare. We simply never see it, at all. All of your sensitive biometric data is processed on your device. While each operating system manufacturer has a slightly different process, they all rely on the idea of a Trusted Execution Environment (TEE) or Trusted Platform Module (TPM). TEEs and TPMs allow only your device to store and use your encrypted biometric information. Any apps or software running on the device never have access to your data, and can’t transmit it back to their systems. If you are interested in digging deeper into how each major operating system implements their biometric security, read the articles we have linked below:

Apple (Face ID and Touch ID)

Face ID and Touch ID Privacy
Secure Enclave Overview

Microsoft (Windows Hello)

Windows Hello Overview
Windows Hello Technical Deep Dive

Google (Android Biometric Authentication)

Biometric Authentication
Measuring Biometric Unlock Security

Our commitment to privacy doesn’t just end at the device. The WebAuthn API also prevents the transmission of biometric information. If a user interacts with a biometric key (like Apple TouchID or Windows Hello), no third party — such as Cloudflare — can receive any of that biometric data: it remains on your device and is never transmitted by your browser. To get an even deeper understanding of how the Cryptographic Attestation of Personhood protects your private information, we encourage you to read our initial announcement blog post.

Making a Great Privacy Story Even Better

While building out this technology, we have always been committed to providing the best possible privacy guarantees. The existing assurances are already quite strong: as described in our previous post, when using CAP, you may disclose a small amount of information about your authentication hardware — at most, its make and model. By design, this information is not unique to you: the underlying standard requires that this be indistinguishable from thousands of others, which hides you in a crowd of identical hardware.

Even though this is a great start, we wanted to see if we could push things even farther. Could we learn just the one fact that we need — that you have a valid security key — without learning anything else?

We are excited to announce that we have made great strides on answering that question by using a form of the next generation of cryptography called Zero Knowledge Proofs (ZKP). ZKP prevents us from discovering anything from you, other than the fact that you have a device that can generate an approved certificate that proves that you are human.

If you are interested in learning more about Zero Knowledge Proofs, we highly recommend reading about it here.

Driven by Speed, Ease of Use, and Bot Defense

At the start of this project we set out three goals:

  1. How can we dramatically improve the user experience of proving that you are a human?
  2. How can we make sure that any solution that we develop centers around ease of use, and increases global accessibility on the Internet?
  3. How do we make a solution that does not harm our existing bot management system?

Before we deployed this new evolution of our CAPTCHA solution, we did a proof of concept test with some real users, to confirm whether this approach was worth pursuing (just because something sounds great in theory doesn’t mean it will work out in practice!). Our testing group tried our Cryptographic Attestation of Personhood solution using Face ID and told us what they thought. We learned that solving times with Face ID and Touch ID were significantly faster than selecting pictures, with almost no errors. People vastly preferred this alternative, and provided suggestions for improvements in the user experience that we incorporated into our deployment.

This was even more evident in our production usage data. While we did not enable attestation with biometrics providers during our first phase of the CAP roll out, we did record when people attempted to use a biometric authentication service. The highest recorded attempt solve rate besides YubiKeys was Face ID on iOS, and Android Biometric Authentication. We are excited to offer those mobile users their first choice of challenge for proving their humanity.

One of the things we heard about in testing was — not surprisingly — concerns around privacy. As we explained in our initial launch, the WebAuthn technology underpinning our solution provides a high level of privacy protection. Cloudflare is able to view an identifier shared by thousands of similar devices, which provides general make and model information. This cannot be used to uniquely identify or track you — and that’s exactly how we like it.

Now that we have opened up our solution to more device types, you’re able to use biometric readers as well. Rest assured that the same privacy protections apply — we never see your biometric data: that remains on your device. Once your device confirms a match, it sends only a basic attestation message, just as it would for any security key. In effect, your device sends a message proving that “yes, someone correctly entered a fingerprint on this trustworthy device”, and never sends the fingerprint itself.

We have also been reviewing feedback from people who have been testing out CAP on either our demo site or through routine browsing. We appreciate the helpful comments you’ve been sending, and we’d love to hear more, so we can continue to make improvements. We’ve set up a survey at our demo site. Your input is key to ensuring that we get usability right, so please let us know what you think.

Understanding VPC links in Amazon API Gateway private integrations

Post Syndicated from Eric Johnson original https://aws.amazon.com/blogs/compute/understanding-vpc-links-in-amazon-api-gateway-private-integrations/

This post is written by Jose Eduardo Montilla Lugo, Security Consultant, AWS.

A VPC link is a resource in Amazon API Gateway that allows for connecting API routes to private resources inside a VPC. A VPC link acts like any other integration endpoint for an API and is an abstraction layer on top of other networking resources. This helps simplify configuring private integrations.

This post looks at the underlying technologies that make VPC links possible. I further describe what happens under the hood when a VPC link is created for both REST APIs and HTTP APIs. Understanding these details can help you better assess the features and benefits provided by each type. This also helps you make better architectural decisions when designing API Gateway APIs.

This article assumes you have experience in creating APIs in API Gateway. The main purpose is to provide a deeper explanation of the technologies that make private integrations possible. For more information on creating API Gateway APIs with private integrations, refer to the Amazon API Gateway documentation.

Overview

AWS Hyperplane and AWS PrivateLink

There are two types of VPC links: VPC links for REST APIs and VPC links for HTTP APIs. Both provide access to resources inside a VPC. They are built on top of an internal AWS service called AWS Hyperplane. This is an internal network virtualization platform, which supports inter-VPC connectivity and routing between VPCs. Internally, Hyperplane supports multiple network constructs that AWS services use to connect with the resources in customers’ VPCs. One of those constructs is AWS PrivateLink, which is used by API Gateway to support private APIs and private integrations.

AWS PrivateLink allows access to AWS services and services hosted by other AWS customers, while maintaining network traffic within the AWS network. Since the service is exposed via a private IP address, all communication is virtually local and private. This reduces the exposure of data to the public internet.

In AWS PrivateLink, a VPC endpoint service is a networking resource in the service provider side that enables other AWS accounts to access the exposed service from their own VPCs. VPC endpoint services allow for sharing a specific service located inside the provider’s VPC by extending a virtual connection via an elastic network interface in the consumer’s VPC.

An interface VPC endpoint is a networking resource in the service consumer side, which represents a collection of one or more elastic network interfaces. This is the entry point that allows for connecting to services powered by AWS PrivateLink.

Comparing private APIs and private integrations

Private APIs are different to private integrations. Both use AWS PrivateLink but they are used in different ways.

A private API means that the API endpoint is reachable only through the VPC. Private APIs are accessible only from clients within the VPC or from clients that have network connectivity to the VPC. For example, from on-premises clients via AWS Direct Connect. To enable private APIs, an AWS PrivateLink connection is established between the customer’s VPC and API Gateway’s VPC.

Clients connect to private APIs via an interface VPC endpoint, which routes requests privately to the API Gateway service. The traffic is initiated from the customer’s VPC and flows through the AWS PrivateLink to the API Gateway’s AWS account:

Consumer connected to provider through VPC Link

Consumer connected to provider through VPC Link

When the VPC endpoint for API Gateway is enabled, all requests to API Gateway APIs made from inside the VPC go through the VPC endpoint. This is true for private APIs and public APIs. Public APIs are still accessible from the internet and private APIs are accessible only from the interface VPC endpoint. Currently, you can only configure REST APIs as private.

A private integration means that the backend endpoint resides within a VPC and it’s not publicly accessible. With a private integration, API Gateway service can access the backend endpoint in the VPC without exposing the resources to the public internet.

A private integration uses a VPC link to encapsulate connections between API Gateway and targeted VPC resources. VPC links allow access to HTTP/HTTPS resources within a VPC without having to deal with advanced network configurations. Both REST APIs and HTTP APIs offer private integrations but only VPC links for REST APIs use AWS PrivateLink internally.

VPC links for REST APIs

When you create a VPC link for a REST API, a VPC endpoint service is also created, making the AWS account a service provider. The service consumer in this case is API Gateway’s account. The API Gateway service creates an interface VPC endpoint in their account for the Region where the VPC link is being created. This establishes an AWS PrivateLink from the API Gateway VPC to your VPC. The target of the VPC endpoint service and the VPC link is a Network Load Balancer, which forwards requests to the target endpoints:

VPC Link for REST APIs

VPC Link for REST APIs

Before establishing any AWS PrivateLink connection, the service provider must approve the connection request. Requests from the API Gateway accounts are automatically approved in the VPC link creation process. This is because the AWS accounts that serve API Gateway for each Region are allow-listed in the VPC endpoint service.

When a Network Load Balancer is associated with an endpoint service, the traffic to the targets is sourced from the NLB. The targets receive the private IP addresses of the NLB, not the IP addresses of the service consumers.

This is helpful when configuring the security groups of the instances behind the NLB for two reasons. First, you do not know the IP address range of the VPC that’s connecting to the service. Second, NLB’s elastic network interfaces do not have any security groups attached. This means that they cannot be used as a source in the security groups of the targets. To learn more, read how to find the internal IP addresses assigned to an NLB.

To create a private API with a private integration, two AWS PrivateLink connections are established. The first is from a customer VPC to API Gateway’s VPC so that clients in the VPC can reach the API Gateway service endpoint. The other is from API Gateway’s VPC to the customer VPC so that API Gateway can reach the backend endpoint. Here is an example architecture:

Private API with private integrations

Private API with private integrations

VPC links for HTTP APIs

HTTP APIs are the latest type of API Gateway APIs that are cheaper and faster than REST APIs. VPC links for HTTP APIs do not require the creation of VPC endpoint services so a Network Load Balancer is not necessary. With VPC Links for HTTP APIs, you can now use an ALB or an AWS Cloud Map service to target private resources. This allows for more flexibility and scalability in the configuration required on both sides.

Configuring multiple integration targets is also easier with VPC links for HTTP APIs. For example, VPC links for REST APIs can be associated only with a single NLB. Configuring multiple backend endpoints requires some workarounds such as using multiple listeners on the NLB, associated with different target groups.

In contrast, a single VPC link for HTTP APIs can be associated with multiple backend endpoints without additional configuration. Also, with the new VPC link, customers with containerized applications can use ALBs instead of NLBs and take advantage of layer-7 load-balancing capabilities and other features such as authentication and authorization.

AWS Hyperplane supports multiple types of network virtualization constructs, including AWS PrivateLink. VPC links for REST APIs rely on AWS PrivateLink. However, VPC links for HTTP APIs use VPC-to-VPC NAT, which provides a higher level of abstraction.

The new construct is conceptually similar to a tunnel between both VPCs. These are created via elastic network interface attachments on the provider and consumer ends, which are both managed by AWS Hyperplane. This tunnel allows a service hosted in the provider’s VPC (API Gateway) to initiate communications to resources in a consumer’s VPC. API Gateway has direct connectivity to these elastic network interfaces and can reach the resources in the VPC directly from their own VPC. Connections are permitted according to the configuration of the security groups attached to the elastic network interfaces in the customer side.

Although it seems to provide the same functionality as AWS PrivateLink, these constructs differ in implementation details. A service endpoint in AWS PrivateLink allows for multiple connections to a single endpoint (the NLB), whereas the new approach allows a source VPC to connect to multiple destination endpoints. As a result, a single VPC link can integrate with multiple Application Load Balancers, Network Load Balancers, or resources registered with an AWS Cloud Map service on the customer side:

VPC Link for HTTP APIs

VPC Link for HTTP APIs

This approach is similar to the way that other services such as Lambda access resources inside customer VPCs.

Conclusion

This post explores how VPC links can set up API Gateway APIs with private integrations. VPC links for REST APIs encapsulate AWS PrivateLink resources such as interface VPC endpoints and VPC endpoint services to configure connections from API Gateway’s VPC to customer’s VPC to access private backend endpoints.

VPC links for HTTP APIs use a different construct in the AWS Hyperplane service to provide API Gateway with direct network access to VPC private resources. Understanding the differences between the two is important when adding private integrations as part of your API architecture design.

For more serverless learning resources, visit Serverless Land.

Helping Keep Governments Safe and Secure

Post Syndicated from Sam Rhea original https://blog.cloudflare.com/helping-keep-governments-safe-and-secure/

Helping Keep Governments Safe and Secure

Helping Keep Governments Safe and Secure

Today, we are excited to share that Cloudflare and Accenture Federal Services (AFS) have been selected by the Department of Homeland Security (DHS) to develop a joint solution to help the federal government defend itself against cyberattacks. The solution consists of Cloudflare’s protective DNS resolver which will filter DNS queries from offices and locations of the federal government and stream events directly to Accenture’s analysis platform.

Located within DHS, the Cybersecurity and Infrastructure Security Agency (CISA) operates as “the nation’s risk advisor.”1 CISA works with partners across the public and private sector to improve the security and reliability of critical infrastructure; a mission that spans across the federal government, State, Local, Tribal, and Territorial partnerships and the private sector to provide solutions to emerging and ever-changing threats.

Over the last few years, CISA has repeatedly flagged the cyber risk posed by malicious hostnames, phishing emails with malicious links, and untrustworthy upstream Domain Name System (DNS) resolvers.2 Attackers can compromise devices or accounts, and ultimately data, by tricking a user or system into sending a DNS query for a specific hostname. Once that query is resolved, those devices establish connections that can lead to malware downloads, phishing websites, or data exfiltration.

In May 2021, CISA and the National Security Agency (NSA) proposed that teams deploy protective DNS resolvers to prevent those attacks from becoming incidents. Unlike standard DNS resolvers, protective DNS resolvers check the hostname being resolved to determine if the destination is malicious. If that is the case, or even if the destination is just suspicious, the resolver can stop answering the DNS query and block the connection.

Earlier this year, CISA announced they are not only recommending a protective DNS resolver — they have launched a program to offer a solution to their partners. After a thorough review process, CISA has announced that they have selected Cloudflare and AFS to deliver a joint solution that can be used by departments and agencies of any size within the Federal Civilian Executive Branch.

Helping keep governments safer

Attacks against the critical infrastructure in the United States are continuing to increase. Cloudflare Radar, where we publish insights from our global network, consistently sees the U.S. as one of the most targeted countries for DDoS attacks. Attacks like phishing campaigns compromise credentials to sensitive systems. Ransomware bypasses traditional network perimeters and shuts down target systems.

The sophistication of those attacks also continues to increase. Last year’s SolarWinds Orion compromise represents a new type of supply chain attack where trusted software becomes the backdoor for data breaches. Cloudflare’s analysis of the SolarWinds incident observed compromise patterns that were active over eight months, during which the destinations used grew to nearly 5,000 unique subdomains.

The increase in volume and sophistication has driven a demand for the information and tools to defend against these types of threats at all levels of the US government. Last year, CISA advised over 6,000 state and local officials, as well as federal partners, on mechanisms to protect their critical infrastructure.

At Cloudflare, we have observed a similar pattern. In 2017, Cloudflare launched the Athenian Project to provide state, county, or municipal governments with security for websites that administer elections or report results. In 2020, 229 state and local governments, in 28 states, trusted Cloudflare to help defend their election websites. State and local government websites served by Cloudflare’s Athenian Project increased by 48% last year.

As these attacks continue to evolve, one thing many have in common is their use of a DNS query to a malicious hostname. From SolarWinds to last month’s spearphishing attack against the U.S. Agency for International Development, attackers continue to rely on one of the most basic technologies used when connecting to the Internet.

Delivering a protective DNS resolver

User activity on the Internet typically starts with a DNS query to a DNS resolver. When users visit a website in their browser, open a link in an email, or use a mobile application, their device first sends a DNS query to convert the domain name of the website or server into the Internet Protocol (IP) address of the host serving that site. Once their device has the IP address, they can establish a connection.

Helping Keep Governments Safe and Secure
Figure 1. Complete DNS lookup and web page query

Attacks on the Internet can also start the same way. Devices that download malware begin making DNS queries to establish connections and leak information. Users that visit an imposter website input their credentials and become part of a phishing attack.

These attacks are successful because DNS resolvers, by default, trust all destinations. If a user sends a DNS query for any hostname, the resolver returns the IP address without determining if that destination is suspicious.

Some hostnames are known to security researchers, including hostnames used in previous attacks or ones that use typos of popular hostnames. Other attacks start from unknown or new threats. Detecting those requires monitoring DNS query behavior, detecting patterns to new hostnames, or blocking newly seen and registered domains altogether.

Protective DNS resolvers apply a Zero Trust model to DNS queries. Instead of trusting any destination, protective resolvers check the hostname of every query and IP address of every response against a list of known malicious destinations. If the hostname or IP address is in that list, the resolver will not return the result to the user and the connection will fail.

Building a solution with Accenture Federal Services

The solution being delivered to CISA, Cloudflare Gateway, builds on Cloudflare’s network to deliver a protective DNS resolver that does not compromise performance. It starts by sending all DNS queries from enrolled devices and offices to Cloudflare’s network. While more of the HTTP Internet continues to be encrypted, the default protocol for sending DNS queries on most devices is still unencrypted. Cloudflare Gateway’s protective DNS resolver supports encrypted options like DNS over HTTPS (DoH) and DNS over TLS (DoT).

Next, blocking DNS queries to malicious hostnames starts with knowing what hostnames are potentially malicious. Cloudflare’s network provides our protective DNS resolver with unique visibility into threats on the Internet. Every day, Cloudflare’s network handles over 800 billion DNS queries. Our infrastructure responds to 25 million HTTP requests per second. We deploy that network in more than 200 cities in over 100 countries around the world, giving our team the ability to see attack patterns around the world.

We convert that data into the insights that power our security products. For example, we analyze the billions of DNS queries we handle to detect anomalous behavior that would indicate a hostname is being used to leak data through a DNS tunneling attack. For the CISA solution, Cloudflare’s datasets are further enriched by applying additional cybersecurity research along with Accenture’s Cyber Threat Intelligence (ACTI) feed to provide signals to detect new and changing threats on the internet. This dataset is further analyzed by data scientists using advanced business intelligence tools powered by artificial intelligence and machine learning.

Working towards a FedRAMP future

Our Public Sector team is focused on partnering with Federal, State and Local Governments to provide a safe and secure digital experience. We are excited to help CISA deliver an innovative, modern, and cost-efficient solution to the entire civilian federal government.

We will continue this path following our recent announcement that we are currently “In Process” in the Federal Risk and Authorization Management Program (FedRAMP) Marketplace. The government’s rigorous security assessment will allow other federal agencies to adopt Cloudflare’s Zero Trust Security solutions in the future.

What’s next?

We are looking forward to working with Accenture Federal Services to deliver this protective DNS resolver solution to CISA. This contract award demonstrates CISA’s belief in the importance of having protective DNS capabilities as part of a layered defense. We applaud CISA for taking this step and allowing us to partner with the US Government to deliver this solution.

Like CISA, we believe that teams large and small should have the tools they need to protect their critical systems. Your team can also get started using Cloudflare to secure your organization today. Cloudflare Gateway, part of Cloudflare for Teams, is available to organizations of any size.

1https://www.cisa.gov/about-cisa
2See, for example, https://www.cisa.gov/sites/default/files/publications/Addressing_DNS_Resolution_on_Federal_Networks_Memo.pdf; https://media.defense.gov/2021/Mar/03/2002593055/-1/-1/0/CSI_Selecting-Protective-DNS_UOO11765221.PDF

Use the Snyk CLI to scan Python packages using AWS CodeCommit, AWS CodePipeline, and AWS CodeBuild

Post Syndicated from BK Das original https://aws.amazon.com/blogs/devops/snyk-cli-scan-python-codecommit-codepipeline-codebuild/

One of the primary advantages of working in the cloud is achieving agility in product development. You can adopt practices like continuous integration and continuous delivery (CI/CD) and GitOps to increase your ability to release code at quicker iterations. Development models like these demand agility from security teams as well. This means your security team has to provide the tooling and visibility to developers for them to fix security vulnerabilities as quickly as possible.

Vulnerabilities in cloud-native applications can be roughly classified into infrastructure misconfigurations and application vulnerabilities. In this post, we focus on enabling developers to scan vulnerable data around Python open-source packages using the Snyk Command Line Interface (CLI).

The world of package dependencies

Traditionally, code scanning is performed by the security team; they either ship the code to the scanning instance, or in some cases ship it to the vendor for vulnerability scanning. After the vendor finishes the scan, the results are provided to the security team and forwarded to the developer. The end-to-end process of organizing the repositories, sending the code to security team for scanning, getting results back, and remediating them is counterproductive to the agility of working in the cloud.

Let’s take an example of package A, which uses package B and C. To scan package A, you scan package B and C as well. Similar to package A having dependencies on B and C, packages B and C can have their individual dependencies too. So the dependencies for each package get complex and cumbersome to scan over time. The ideal method is to scan all the dependencies in one go, without having manual intervention to understand the dependencies between packages.

Building on the foundation of GitOps and Gitflow

GitOps was introduced in 2017 by Weaveworks as a DevOps model to implement continuous deployment for cloud-native applications. It focuses on the developer ability to ship code faster. Because security is a non-negotiable piece of any application, this solution includes security as part of the deployment process. We define the Snyk scanner as declarative and immutable AWS Cloud Development Kit (AWS CDK) code, which instructs new Python code committed to the repository to be scanned.

Another continuous delivery practice that we base this solution on is Gitflow. Gitflow is a strict branching model that enables project release by enforcing a framework for managing Git projects. As a brief introduction on Gitflow, typically you have a main branch, which is the code sent to production, and you have a development branch where new code is committed. After the code in development branch passes all tests, it’s merged to the main branch, thereby becoming the code in production. In this solution, we aim to provide this scanning capability in all your branches, providing security observability through your entire Gitflow.

AWS services used in this solution

We use the following AWS services as part of this solution:

  • AWS CDK – The AWS CDK is an open-source software development framework to define your cloud application resources using familiar programming languages. In this solution, we use Python to write our AWS CDK code.
  • AWS CodeBuild – CodeBuild is a fully managed build service in the cloud. CodeBuild compiles your source code, runs unit tests, and produces artifacts that are ready to deploy. CodeBuild eliminates the need to provision, manage, and scale your own build servers.
  • AWS CodeCommit – CodeCommit is a fully managed source control service that hosts secure Git-based repositories. It makes it easy for teams to collaborate on code in a secure and highly scalable ecosystem. CodeCommit eliminates the need to operate your own source control system or worry about scaling its infrastructure. You can use CodeCommit to securely store anything from source code to binaries, and it works seamlessly with your existing Git tools.
  • AWS CodePipeline – CodePipeline is a continuous delivery service you can use to model, visualize, and automate the steps required to release your software. You can quickly model and configure the different stages of a software release process. CodePipeline automates the steps required to release your software changes continuously.
  • Amazon EventBridge – EventBridge rules deliver a near-real-time stream of system events that describe changes in AWS resources. With simple rules that you can quickly set up, you can match events and route them to one or more target functions or streams.
  • AWS Systems Manager Parameter Store – Parameter Store, a capability of AWS Systems Manager, provides secure, hierarchical storage for configuration data management and secrets management. You can store data such as passwords, database strings, Amazon Machine Image (AMI) IDs, and license codes as parameter values.

Prerequisites

Before you get started, make sure you have the following prerequisites:

  • An AWS account (use a Region that supports CodeCommit, CodeBuild, Parameter Store, and CodePipeline)
  • A Snyk account
  • An existing CodeCommit repository you want to test on

Architecture overview

After you complete the steps in this post, you will have a working pipeline that scans your Python code for open-source vulnerabilities.

We use the Snyk CLI, which is available to customers on all plans, including the Free Tier, and provides the ability to programmatically scan repositories for vulnerabilities in open-source dependencies as well as base image recommendations for container images. The following reference architecture represents a general workflow of how Snyk performs the scan in an automated manner. The design uses DevSecOps principles of automation, event-driven triggers, and keeping humans out of the loop for its run.

As developers keep working on their code, they continue to commit their code to the CodeCommit repository. Upon each commit, a CodeCommit API call is generated, which is then captured using the EventBridge rule. You can customize this event rule for a specific event or feature branch you want to trigger the pipeline for.

When the developer commits code to the specified branch, that EventBridge event rule triggers a CodePipeline pipeline. This pipeline has a build stage using CodeBuild. This stage interacts with the Snyk CLI, and uses the token stored in Parameter Store. The Snyk CLI uses this token as authentication and starts scanning the latest code committed to the repository. When the scan is complete, you can review the results on the Snyk console.

This code is built for Python pip packages. You can edit the buildspec.yml to incorporate for any other language that Snyk supports.

The following diagram illustrates our architecture.

snyk architecture codepipeline

Code overview

The code in this post is written using the AWS CDK in Python. If you’re not familiar with the AWS CDK, we recommend reading Getting started with AWS CDK before you customize and deploy the code.

Repository URL: https://github.com/aws-samples/aws-cdk-codecommit-snyk

This AWS CDK construct uses the Snyk CLI within the CodeBuild job in the pipeline to scan the Python packages for open-source package vulnerabilities. The construct uses CodePipeline to create a two-stage pipeline: one source, and one build (the Snyk scan stage). The construct takes the input of the CodeCommit repository you want to scan, the Snyk organization ID, and Snyk auth token.

Resources deployed

This solution deploys the following resources:

For the deployment, we use the AWS CDK construct in the codebase cdk_snyk_construct/cdk_snyk_construct_stack.py in the AWS CDK stack cdk-snyk-stack. The construct requires the following parameters:

  • ARN of the CodeCommit repo you want to scan
  • Name of the repository branch you want to be monitored
  • Parameter Store name of the Snyk organization ID
  • Parameter Store name for the Snyk auth token

Set up the organization ID and auth token before deploying the stack. Because these are confidential and sensitive data, you should deploy them as a separate stack or manual process. In this solution, the parameters have been stored as a SecureString parameter type and encrypted using the AWS-managed KMS key.

You create the organization ID and auth token on the Snyk console. On the Settings page, choose General in the navigation page to add these parameters.

snyk settings console


You can retrieve the names of the parameters on the Systems Manager console by navigating to Parameter Store and finding the name on the Overview tab.

SSM Parameter Store

Create a requirements.txt file in the CodeCommit repository

We now create a repository in CodeCommit to store the code. For simplicity, we primarily store the requirements.txt file in our repository. In Python, a requirements file stores the packages that are used. Having clearly defined packages and versions makes it easier for development, especially in virtual environments.

For more information on the requirements file in Python, see Requirement Specifiers.

To create a CodeCommit repository, run the following AWS Command Line Interface (AWS CLI) command in your AWS accounts:

aws codecommit create-repository --repository-name snyk-repo \
--repository-description "Repository for Snyk to scan Python packages"

Now let’s create a branch called main in the repository using the following command:

aws codecommit create-branch --repository-name snyk-repo \
--branch-name main

After you create the repository, commit a file named requirements.txt with the following content. The following packages are pinned to a particular version that they have a vulnerability with. This file is our hypothetical vulnerable set of packages that have been committed into your development code.

PyYAML==5.3.1
Pillow==7.1.2
pylint==2.5.3
urllib3==1.25.8


For instructions on committing files in CodeCommit, see Connect to an AWS CodeCommit repository.

When you store the Snyk auth token and organization ID in Parameter Store, note the parameter names—you need to pass them as parameters during the deployment step.

Now clone the CDK code from the GitHub repository with the command below:

git clone https://github.com/aws-samples/aws-cdk-codecommit-snyk.git

After the cloning is complete you should see a directory named aws-cdk-codecommit-snyk on your machine.

When you’re ready to deploy, enter the aws-cdk-codecommit-snyk directory, and run the following command with the appropriate values:

cdk deploy cdk-snyk-stack \
--parameters RepoName=<name-of-codecommit-repo> \
--parameters RepoBranch=<branch-to-be-scanned>  \
--parameters SnykOrgId=<value> \
--parameters SnykAuthToken=<value>

After the stack deployment is complete, you can see a new pipeline in your AWS account, which is configured to be triggered every time a commit occurs on the main branch.

You can view the results of the scan on the Snyk console. After the pipeline runs, log in to snyk.io and you should see a project named as per your repository (see the following screenshot).

snyk dashboard


Choose the repo name to get a detailed view of the vulnerabilities found. Depending on what packages you put in your requirements.txt, your report will differ from the following screenshot.

snyk-vuln-details


To fix the vulnerability identified, you can change the version of these packages in the requirements.txt file. The edited requirements file should look like the following:

PyYAML==5.4
Pillow==8.2.0
pylint==2.6.1
urllib3==1.25.9

After you update the requirements.txt file in your repository, push your changes back to the CodeCommit repository you created earlier on the main branch. The push starts the pipeline again.

After the commit is performed to the targeted branch, you don’t see the vulnerability reported on the Snyk dashboard because the pinned version 5.4 doesn’t contain that vulnerability.

Clean up

To avoid accruing further cost for the resources deployed in this solution, run cdk destroy to remove all the AWS resources you deployed through CDK.

As the CodeCommit repository was created using AWS CLI, the following command deletes the CodeCommit repository:

aws codecommit delete-repository --repository-name snyk-repo

Conclusion

In this post, we provided a solution so developers can self- remediate vulnerabilities in their code by monitoring it through Snyk. This solution provides observability, agility, and security for your Python application by following DevOps principles.

A similar architecture has been used at NFL to shift-left the security of their code. According to the shift-left design principle, security should be moved closer to the developers to identify and remediate security issues earlier in the development cycle. NFL has implemented a similar architecture which made the total process, from committing code on the branch to remediating 15 times faster than their previous code scanning setup.

Here’s what NFL has to say about their experience:

“NFL used Snyk to scan Python packages for a service launch. Traditionally it would have taken 10days to scan the packages through our existing process but with Snyk we were able to follow DevSecOps principles and get the scans completed, and reviewed within matter of days. This simplified our time to market while maintaining visibility into our security posture.” – Joe Steinke (Director, Data Solution Architect)

Cloudflare’s Handling of an RCE Vulnerability in cdnjs

Post Syndicated from Jonathan Ganz original https://blog.cloudflare.com/cloudflares-handling-of-an-rce-vulnerability-in-cdnjs/

Cloudflare's Handling of an RCE Vulnerability in cdnjs

Cloudflare's Handling of an RCE Vulnerability in cdnjs

cdnjs provides JavaScript, CSS, images, and fonts assets for websites to reference with more than 4,000 libraries available. By utilizing cdnjs, websites can load faster with less strain on one’s own origin server as files are served directly from Cloudflare’s edge. Recently, a blog post detailed a vulnerability in the way cdnjs’ backend automatically keeps the libraries up to date.

This vulnerability allowed the researcher to execute arbitrary code, granting the ability to modify assets. This blog post details how Cloudflare responded to this report, including the steps we took to block exploitation, investigate potential abuse, and remediate the vulnerability.

This vulnerability is not related to Cloudflare CDN. The cdnjs project is a platform that leverages Cloudflare’s services, but the vulnerability described below relates to cdnjs’ platform only. To be clear, no existing libraries were modified using this exploit. The researcher published a new package which demonstrated the vulnerability and our investigation concluded that the integrity of all assets hosted on cdnjs remained intact.

Disclosure Timeline

As outlined in RyotaK’s blog post, the incident began on 2021-04-06. At around 1100 GMT, RyotaK published a package to npm exploiting the vulnerability. At 1129 GMT, cdnjs processed this package, resulting in a leak of credentials. This triggered GitHub alerting which notified Cloudflare of the exposed secrets.

Cloudflare disabled the auto-update service and revoked all credentials within an hour. In the meantime, our security team received RyotaK’s remote code execution report through HackerOne. A new version of the auto-update tool which prevents exploitation of the vulnerability RyotaK reported was released within 24 hours.

Having taken action immediately to prevent exploitation, we then proceeded to redesign the auto-update pipeline. Work to completely redesign it was completed on 2021-06-03.

Blocking Exploitation

Before RyotaK reported the vulnerability via HackerOne, Cloudflare had already taken action. When GitHub notified us that credentials were leaked, one of our engineers took immediate action and revoked them all. Additionally, the GitHub token associated with this service was automatically revoked by GitHub.

The second step was to bring the vulnerable service offline to prevent further abuse while we investigated the incident. This prevented exploitation but also made it impossible for legitimate developers to publish updates to their libraries. We wanted to release a fixed version of the pipeline used for retrieving and hosting new library versions so that developers could continue to benefit from caching. However, we understood that a stopgap was not a long term fix, and we decided to review the entire current solution to identify a better design that would improve the overall security of cdnjs.

Investigation

Any sort of investigation requires access to logs and all components of our pipeline generate extensive logs that prove valuable for forensics efforts. Logs produced by the auto-update process are collected in a GitHub repository and sent to our logging pipeline. We also collect and retain logs from cdnjs’ Cloudflare account. Our security team began reviewing this information as soon as we received RyotaK’s initial report. Based on access logs, API token usage, and file modification metadata, we are confident that only RyotaK exploited this vulnerability during his research and only on test files. To rule out abuse, we reviewed the list of source IP addresses that accessed the Workers KV token prior to revoking it and only found one, which belongs to the cdnjs auto-update bot.

The cdnjs team also reviewed files that were pushed to the cdnjs/cdnjs GitHub repository around that time and found no evidence of any other abuse across cdnjs.

Remediating the Vulnerability

Around half of the libraries on cdnjs use npm to auto-update. The primary vector in this attack was the ability to craft a .tar.gz archive with a symbolic link and publish it to the npm registry. When our pipeline extracted the content it would follow symlinks and overwrite local files using the pipeline user privileges. There are two fundamental issues at play here: an attacker can perform path traversal on the host processing untrusted files, and the process handling the compressed file is overly privileged.

We addressed the path traversal issue by checking that the destination of each file in the tarball will be contained within the target directory that the update process has designated for that package. If the file’s full canonical path doesn’t begin with the destination directory’s full path, we log this as a warning and skip extracting that file. This works fairly well, but as noted in the comment above this check, if the compressed file uses UTF-8 encoding for filenames, this check may not properly canonicalize the path. If this canonicalization does not occur, the path may contain path traversal, even though it starts with the correct destination path.

To ensure that other vulnerabilities in cdnjs’ publication pipeline cannot be exploited, we configured an AppArmor profile for it. This limits the capabilities of the service, so even if an attacker successfully instructed the process to perform an action, the operating system (kernel / security feature) will not allow any action outside of what it is allowed to do.

For illustration, here’s an example:

/path/to/bin {
  network,
  signal,
  /path/to/child ix,
  /tmp/ r,
  /tmp/cache** rw,
  ...
}

In this example, we only allow the binary (/path/to/bin) to:

  • access all networking
  • use all signals
  • execute /path/to/child (which will inherit the AppArmor profile)
  • read from /tmp
  • read+write under /tmp/cache.

Any attempt to access anything else will be denied. You can find the complete list of capabilities and more information on AppArmor’s manual page.

In the case of cdnjs’ autoupdate tool, we limit execution of applications to a very specific set, and we limit where files can be written.

Fixing the path traversal and implementing the AppArmor profile prevents similar issues from being exploited. However, having a single layer of defense wasn’t enough. We decided to completely redesign the auto-update process entirely to isolate each step, as well as each library it processes, thus preventing this entire class of attacks.

Redesigning the system

The main idea behind the redesign of the pipeline was to move away from the monolithic auto-update process. Instead, various operations are done using microservices or daemons which have well-defined scopes. Here’s an overview of the steps:

Cloudflare's Handling of an RCE Vulnerability in cdnjs

First, to detect new library versions, two daemons (for both npm and git based updates) are regularly running. Once a new version has been detected, the files will be downloaded as an archive and placed into the incoming storage bucket.

Writing a new version in the incoming bucket triggers a function that adds all the information we need to update the library. The function also generates a signed URL allowing for writing in the outgoing bucket, but only in a specific folder for a given library, reducing the blast radius. Finally, a message is placed into a queue to indicate that the new version of the given library is ready to be published.

A daemon listens for incoming messages and spawns an unprivileged Docker container to handle dangerous operations (archive extraction, minifications, and compression). After the sandbox exits, the daemon will use the signed URL to store the processed files in the outgoing storage bucket.

Finally, multiple daemons are triggered when the finalized package is written to the outgoing bucket. These daemons publish the assets to cdnjs.cloudflare.com and to the main cdnjs repository. The daemons also publish the version specific URL, cryptographic hash, and other information to Workers KV, cdnjs.com, and the API.

In this revised design, exploiting a similar vulnerability would happen in the sandbox (Docker container) context. The attacker would have access to container files, but nothing else. The container is minimal, ephemeral, has no secrets included, and is dedicated to a single library update, so it cannot affect other libraries’ files.

Our Commitment to Security

Beyond maintaining a vulnerability disclosure program, we regularly perform internal security reviews and hire third-party firms to audit the software we develop. But it is through our vulnerability disclosure program that we receive some of the most interesting and creative reports. Each report has helped us improve the security of our services. In this case, we worked with RyotaK to not only address the vulnerability, but to also ensure that their blog post was detailed and accurate. We invite those that find a security issue in any of Cloudflare’s services to report it to us through HackerOne.

DDoS attack trends for 2021 Q2

Post Syndicated from Vivek Ganti original https://blog.cloudflare.com/ddos-attack-trends-for-2021-q2/

DDoS attack trends for 2021 Q2

DDoS attack trends for 2021 Q2

Recent weeks have witnessed massive ransomware and ransom DDoS (Distributed Denial of Service) attack campaigns that interrupted aspects of critical infrastructure around the world, including one of the largest petroleum pipeline system operators, and one of the world’s biggest meat processing companies. Earlier this quarter, more than 200 organizations across Belgium, including the government and parliament websites and other services, were also DDoS’d.

And when most of the United States were celebrating Independence Day on July 4, hundreds of US companies were hit by a ransomware attack demanding 70 million USD in Bitcoin. Attackers known to be affiliated with REvil, a Russian ransomware group, exploited multiple previously unknown vulnerabilities in IT management software. The targets included schools, small public-sector bodies, travel and leisure organizations, and credit unions, to name a few. While the threat of ransomware and ransom DDoS is not new (read our posts on ransomware and ransom DDoS from 2021 Q1), the latest attacks on Internet properties ranging from wineries, professional sports teams, ferry services and hospitals has brought them from just being background noise to front page headlines affecting our day-to-day lives. In fact, recent attacks have propelled ransomware and DDoS to the top of US President Biden’s national security agenda.

The DDoS attack trends observed over Cloudflare’s network in 2021 Q2 paint a picture that reflects the overall global cyber threat landscape. Here are some highlights.

  • Over 11% of our surveyed customers who were targeted by a DDoS attack reported receiving a threat or ransom letter threatening in advance, in the first six months of this year. Emergency onboarding of customers under an active DDoS attack increased by 41.8% in 2021 H1 compared to 2020 H2.
  • HTTP DDoS attacks targeting government administration/public sector websites increased by 491%, making it the second most targeted industry after Consumer Services whose DDoS activity increased by 684% QoQ.
  • China remains the country with the most DDoS activity originating from within their borders — 7 out of every 1,000 HTTP requests originating from China were part of an HTTP DDoS attack targeting websites, and more than 3 out of every 100 bytes that were ingested in our data centers in China were part of a network-layer DDoS attack.
  • Emerging threats included amplification DDoS attacks that abused the Quote of the Day (QOTD) protocol which increased by 123% QoQ. Additionally, as the adoption of QUIC protocol continues to increase, so do attacks over QUIC — registering a whopping 109% QoQ surge in 2021 Q2.
    The number of network-layer DDoS attacks in the range of 10-100 Gbps increased by 21.4% QoQ. One customer that was attacked is Hypixel, an American gaming company. Hypixel remained online with no downtime and no performance penalties to their gamer users, even when under an active DDoS attack campaign larger than 620 Gbps. Read their story here.

To view all DDoS attack insights across all regions and industries worldwide, visit Cloudflare’s interactive Radar DDoS dashboard.

Application-layer DDoS attacks

Application-layer DDoS attacks, specifically HTTP DDoS attacks, are attacks that usually aim to disrupt an HTTP server by making it unable to process legitimate user requests. If a server is bombarded with more requests than it can process, the server will drop legitimate requests or even crash resulting in performance penalties or a denial of service event for legitimate users.

DDoS attack trends for 2021 Q2

DDoS activity per market industry

When we analyze attacks, we calculate the ‘DDoS activity’ rate, which is the percentage of attack traffic out of the total traffic (attack + clean). This allows us to normalize the data points and avoid biases towards, for example, a larger data center that naturally handles more traffic and therefore also more attacks.

In 2021 Q2, Consumer Services was the most targeted industry followed by Government Administration and Marketing & Advertising.

DDoS attack trends for 2021 Q2

DDoS activity per source country

To understand the origin of the HTTP attacks we observed over Cloudflare’s network, we look at the source IP address of the client generating the attack HTTP requests. Unlike network-layer attacks, source IPs cannot be spoofed in HTTP attacks. A high DDoS activity rate in a given country indicates large botnets operating from within.

China and the US remain in the first and second places, respectively, regarding the percentage of DDoS activity originating from within their territories. In China, more than 7 out of every 1,000 HTTP requests were part of an HTTP DDoS attack, while in the US almost 5 out of 1,000 HTTP requests were part of an attack.

DDoS attack trends for 2021 Q2

DDoS activity per target country

In order to identify which countries the targets of the DDoS attacks resided in, we break down the DDoS activity by our customers’ billing countries. Note that Cloudflare does not charge for attack traffic and has pioneered providing unmetered and unlimited DDoS protection since 2017. By cross-referencing the attack data with our customers’ billing country, we can identify which countries were attacked the most.

Data observed in 2021 Q2 suggest that organizations in the US and China were the most targeted by HTTP DDoS attacks. In fact, one out of every 200 HTTP requests destined to US-based organizations was part of a DDoS attack.

DDoS attack trends for 2021 Q2

Network-layer DDoS attacks

While application-layer attacks strike the application (Layer 7 of the OSI model) running the service end users are trying to access, network-layer attacks target network infrastructure (such as in-line routers and other network servers) and the Internet link itself.

DDoS attack trends for 2021 Q2
The chart above shows the distribution of network-layer DDoS attacks in 2021 Q2.

Distribution of attacks by size (packet rate and bit rate)

There are different ways of measuring the size of a L3/4 DDoS attack. One is the volume of traffic it delivers, measured as the bit rate (specifically, gigabits-per-second). Another is the number of packets it delivers, measured as the packet rate (specifically, packets-per-second). Attacks with high bit rates attempt to saturate the Internet link, while attacks with high packet rates attempt to overwhelm the servers, routers or other in-line hardware appliances.

The distribution of attacks by their size (in bit rate) and month is shown below. As observed in the chart, all attacks over 300 Gbps were observed in the month of June.

DDoS attack trends for 2021 Q2

In terms of bit rate, attacks under 500 Mbps constituted a majority of all DDoS attacks observed in 2021 Q2.

DDoS attack trends for 2021 Q2

Similarly, looking from the lens of packet rate, nearly 94% of attacks were under 50K pps. Even though attacks from 1-10M pps constituted only 1% of all DDoS attacks observed, this number is 27.5% higher than that observed in the previous quarter, suggesting that larger attacks are not diminishing either — but rather increasing.

DDoS attack trends for 2021 Q2

Note that while attacks under 500 Mbps and 50K pps might seem ‘small’ compared to other headline-making large attacks, they are often sufficient to create major disruptions for Internet properties that are not protected by an always-on, automated cloud-based DDoS protection service. Moreso, many organisations have uplinks provided by their service providers with a bandwidth capacity smaller than 1 Gbps. Assuming their public-facing network interface also serves legitimate traffic, DDoS attacks smaller than 500 Mbps are often capable of taking down exposed Internet properties.

Distribution by attack duration

Cloudflare continues to see a large percentage of DDoS attacks that last under an hour. In Q2, over 97% of all DDoS attacks lasted less than an hour.

Short burst attacks may attempt to cause damage without being detected by DDoS detection systems. DDoS services that rely on manual analysis and mitigation may prove to be useless against these types of attacks because they are over before the analyst even identifies the attack traffic.

DDoS attack trends for 2021 Q2

Alternatively, the use of short attacks may be used to probe the cyber defenses of the target. Load-testing tools and automated DDoS tools, that are widely available on the dark web, can generate short bursts of a SYN flood, for example, and then follow up with another short attack using a different attack vector. This allows attackers to understand the security posture of their targets before they decide to launch larger attacks at larger rates and longer durations — which come at a cost.

In other cases, attackers generate small DDoS attacks as proof and warning to the target organization of the attacker’s ability to cause real damage later on. It’s often followed by a ransom email to the target organization, demanding payment to avoid suffering an attack that could more thoroughly cripple network infrastructure.

This highlights the need for an always on, automated DDoS protection approach. DDoS protection services that rely on manual re-routing, analysis and mitigation may prove to be useless against these types of attacks because they are over before the analyst can even identify the attack traffic.

Distribution of attacks by attack vectors

An attack vector is the term used to describe the method that the attacker utilizes in their attempt to cause a denial of service event.

As observed in previous quarters, attacks utilizing SYN floods and UDP-based protocols remain the most popular methods by attackers.

DDoS attack trends for 2021 Q2

What is a SYN flood attack? It’s a DDoS attack that exploits the very foundation of the TCP protocol. A stateful TCP connection between a client and a server begins with a 3-way TCP handshake. The client sends an initial connection request packet with a synchronize flag (SYN). The server responds with a packet that contains a synchronized acknowledgment flag (SYN-ACK). Finally, the client responds with an acknowledgment (ACK) packet. At this point, a connection is established and data can be exchanged until the connection is closed. This stateful process can be abused by attackers to cause denial of service events.

By repeatedly sending SYN packets, the attacker attempts to overwhelm a server or the router’s connection table that tracks the state of TCP connections. The router replies with a SYN-ACK packet, allocates a certain amount of memory for each given connection, and falsely waits for the client to respond with the final ACK. Given a sufficient number of connections occupying the router’s memory, the router is unable to allocate further memory for legitimate clients, causing the router to crash or preventing it from handling legitimate client connections, i.e., a denial of service event.

Emerging threats

Emerging threats included amplification DDoS attacks that abuse the Quote of the Day (QOTD) service which increased by 123% QoQ. QOTD was defined in RFC-865 (1983) and can be sent over either the UDP or TCP protocols. It was originally designed for debugging and as a measurement tool, with no specific syntax for the quote. The RFC does however recommend the use of ASCII characters and to limit the length to 512 characters.

Furthermore, we’ve seen a 107% increase QoQ in UDP Portmap and Echo attacks — all of which are really old attack vectors. This may indicate attackers digging up old methods and attack tools to try and overcome protection systems.
As we’ve seen in previous quarters, the adoption of the QUIC protocol continues to increase. Consequently, so do attacks over QUIC, or more specifically floods and amplification attacks of non-QUIC traffic in places where we’d expect to see QUIC traffic. In 2021 Q2, these types of attacks increased by 109% QoQ. This continued trend may indicate that attackers are attempting to abuse the QUIC-designated ports and gateways into organizations’ networks — searching for vulnerabilities and security holes.

DDoS attack trends for 2021 Q2

DDoS activity by Cloudflare data center country

In 2021 Q2, our data center in Haiti observed the largest percentage of network-layer DDoS attack traffic, followed by Brunei (almost 3 out of every 100 packets were part of an attack) and China.

Note that when analyzing network-layer DDoS attacks, we bucket the traffic by the Cloudflare edge data center locations where the traffic was ingested, and not by the source IP. The reason for this is that, when attackers launch network-layer attacks, they can spoof the source IP address in order to obfuscate the attack source and introduce randomness into the attack properties, which may make it harder for simple DDoS protection systems to block the attack. Hence, if we were to derive the source country based on a spoofed source IP, we would get a spoofed country. Cloudflare is able to overcome the challenges of spoofed IPs by displaying the attack data by the location of Cloudflare’s data center in which the attack was observed. We’re able to achieve geographical accuracy in our report because we have data centers in over 200 cities around the world.

DDoS attack trends for 2021 Q2

To view all regions and countries, check out the Radar DDoS Report dashboard’s interactive map.

A note on ransomware and ransom DDoS — a growing global threat

The last few weeks have seen a resurgence of ransom-driven cyber threats: ransomware and ransom DDoS (RDDoS).

So what is ransomware and ransom DDoS, and how are they different?

Ransomware is malicious software that encrypts an organization’s systems and databases, rendering them inaccessible and unusable. Malware is usually introduced into an organization’s systems via phishing emails — tricking employees to click on a link or download a file. Once the malware is installed on the employee’s device, it encrypts the device and can propagate to the entire network of the organization’s servers and employee devices. The attacker will demand money, usually in the form of Bitcoin, in exchange for decrypting the organization’s systems and granting them access back to their systems.

Unlike a ransomware attack, a ransom DDoS attack does not encrypt a company’s systems; it aims to knock them offline if the ransom is not paid. What makes ransom DDoS attacks even more dangerous is that they do not require the attacker to gain access to a business’s internal systems to execute the attack. However, with a strong DDoS protection strategy in place, a ransom DDoS attack has little to no effect on businesses.

Ransomware and ransom DDoS threats are impacting most industries across the globe — the financial industry, transportation, oil and gas, consumer goods, and even education and healthcare.

Entities claiming to be ‘Fancy Lazarus’, ‘Fancy Bear’, ‘Lazarus Group’, and ‘REvil’ are once again launching ransomware and ransom-DDoS attacks against organizations’ websites and network infrastructure unless a ransom is paid before a given deadline. In the case of DDoS threats, prior to the ransom note, a small DDoS attack is usually launched as a form of demonstration. The demonstration attack is typically over UDP, lasting roughly 30-120 minutes.

The ransom note is typically sent to the common group email aliases of the company that are publicly available online such as noc@, support@, help@, legal@, abuse@, etc. In several cases, it has ended up in spam. In other cases, we’ve seen employees disregard the ransom note as spam, increasing the organization’s response time which resulted in further damage to their online properties.

Cloudflare’s recommendation for organizations that receive a threat or ransom note:

  1. Do not panic, and we recommend you do not pay the ransom: Paying ransom only encourages and funds bad actors. There’s also no guarantee that you won’t be attacked again anyway.
  2. Contact local law enforcement: Be ready to provide a copy of the ransom letter you received and any other logs or packet captures.
  3. Activate an effective DDoS protection strategy: Cloud-based DDoS protection can be quickly onboarded in the event of an active threat, and with a team of security experts on your side, risks can be mitigated quickly and effectively.

Here’s a short video by Cloudflare CTO, John Graham-Cumming addressing the threat of ransom DDoS attacks.

Cloudflare protects Hypixel against a massive DDoS attack campaign

At Cloudflare, our teams have been exceptionally busy this past quarter rapidly onboarding (onto our Magic Transit service) a multitude of new and existing customers that have either received a ransom letter or were under an active DDoS attack.

One such customer is Hypixel Inc, the development studio behind the world’s largest Minecraft minigame server. With over 24M total unique logins to date and a world record 216,000+ concurrent players on PC, the Hypixel team works hard to add value to the experience of millions of players across the globe.

The gaming industry is often subject to some of the largest volumetric DDoS attacks — and as a marquee brand, Hypixel attracts more than its fair share. Uptime and high performance are fundamental to the functioning of Hypixel’s servers. Any perceived downtime or noticeable lag could result in an exodus of gamers.

When Hypixel was under a massive DDoS attack campaign, they turned to Cloudflare to extend their services with Cloudflare to include Magic Transit, Cloudflare’s BGP-based DDoS protection service for network infrastructure. After rapidly onboarding them overnight, Cloudflare was automatically able to detect and mitigate DDoS attacks targeting their network — several of which were well over 620 Gbps. The DDoS attack comprised mostly TCP floods and UDP amplification attacks. In the graph, the various colors represent the multiple Cloudflare systems that contribute to detecting and mitigating the multi-vector attack — emphasising the value of our multi-layered DDoS approach.

DDoS attack trends for 2021 Q2

Even as attack patterns changed in real-time, Magic Transit shielded Hypixel’s network. In fact, because all their clean traffic routed over Cloudflare’s high performing low-latency network, Hypixel’s users noticed no change in gamer experience — even during an active volumetric DDoS attack.

During the attack campaign, Cloudflare automatically detected and mitigated over 5,000 DDoS attacks: 53% were ACK floods, 39% were UDP-based attacks and 8% SYN floods.

DDoS attack trends for 2021 Q2

We had several attacks of well over 620 Gbps with no impact at all on our players. Their gaming experience remained uninterrupted and fast, thanks to Cloudflare Magic Transit.”
Simon Collins-Laflamme, CEO, Hypixel Inc.

Hypixel’s journey with Cloudflare began with them employing Cloudflare Spectrum to help protect their gaming infrastructure against DDoS attacks. As their user base grew, they adopted additional Cloudflare products to bolster the robustness and resilience of all of their critical infrastructure. Today, they use multiple Cloudflare products including CDN, Rate Limiting, Spectrum, Argo Smart Routing, and Load Balancing to build and secure infrastructure that provides gamers around the world the real-time gaming experiences they need.

Get holistic protection against cyber attacks of any kind

DDoS attacks constitute just one facet of the many cyber threats organizations are facing today. As businesses shift to a Zero Trust approach, network and security buyers will face larger threats related to network access, and a continued surge in the frequency and sophistication of bot-related and ransomware attacks.

A key design tenet while building products at Cloudflare is integration. Cloudflare One is a solution that uses a Zero Trust security model to provide companies a better way to protect devices, data, and applications — and is deeply integrated with our existing platform of security and DDoS solutions.

In fact, Cloudflare offers an integrated solution that comprises an all-star cast featuring the following to name a few:

  • DDoS: LEADER in Forrester Wave™ for DDoS Mitigation Solutions, Q1 20211
  • WAF: Cloudflare is a CHALLENGER in the 2020 Gartner Magic Quadrant for Web Application Firewall (receiving the highest placement in the ‘Ability to Execute’)2
  • Zero Trust: Cloudflare is a LEADER in the Omdia Market Radar: Zero-Trust Access Report, 20203
  • Web protection: Innovation leader in the Global Holistic Web Protection Market for 2020 by Frost & Sullivan4

Cloudflare’s global (and growing) network is uniquely positioned to deliver DDoS protection and other security, performance, and reliability services with unparalleled scale, speed, and smarts.

To learn more about Cloudflare’s DDoS solution contact us or get started.

____

1Forrester Wave™: DDoS Mitigation Solutions, Q1 2021, Forrester Research, Inc., March 3, 2021. Access the report at https://www.cloudflare.com/forrester-wave-ddos-mitigation-2021/
2Gartner, “Magic Quadrant for Web Application Firewalls”, Analyst(s): Jeremy D’Hoinne, Adam Hils, John Watts, Rajpreet Kaur, October 19, 2020. https://www.cloudflare.com/gartner-mq-waf-2020/
3 https://www.cloudflare.com/lp/omdia-zero-trust
4https://www.cloudflare.com/lp/frost-radar-holistic-web/

Multi-Cloud and Hybrid Threat Protection with Sumo Logic Cloud SIEM Powered by AWS

Post Syndicated from Danilo Poccia original https://aws.amazon.com/blogs/aws/hybrid-threat-protection-with-sumo-logic-cloud-siem-powered-by-aws/

IT security teams need to have a real-time understanding of what’s happening with their infrastructure and applications. They need to be able to find and correlate data in this continuous flood of information to identify unexpected behaviors or patterns that can lead to a security breach.

To simplify and automate this process, many solutions have been implemented over the years. For example:

  • Security information management (SIM) systems collect data such as log files into a central repository for analysis.
  • Security event management (SEM) platforms simplify data inspection and the interpretation of logs or events.

Many years ago these two approaches were merged to address both information analysis and interpretation of events. These security information and event management (SIEM) platforms provide real-time analysis of security alerts generated by applications, network hardware, and domain specific security tools such as firewalls and endpoint protection tools).

Today, I’d like to introduce a solution created by one of our partners: Sumo Logic Cloud SIEM powered by AWS. Sumo Logic Cloud SIEM provides deep security analytics and contextualized threat data across multi-cloud and hybrid environments to reduce the time to detect and respond to threats. You can use this solution to quickly detect and respond to the higher-priority issues, including malicious activities that negatively impact your business or brand. The solution comes with more than 300 out-of-the-box integrations, including key AWS services, and can help reduce time and effort required to conduct compliance audits for regulations such as PCI and HIPAA.

Sumo Logic Cloud SIEM is available in AWS Marketplace and you can use a free trial to evaluate the solution. Before having a look at how this works in practice, let’s see how it’s being used.

Customer Case Study – Medidata
I had the chance to meet a very interesting customer to talk about how they use Sumo Logic Cloud SIEM. Scott Sumner is the VP and CISO at Medidata, a company that is redefining what’s possible in clinical trials. Medidata is processing patient data for clinical trials of the Moderna and Johnson & Johnson COVID-19 vaccines, so you can see why security is a priority for them. With such critical workloads, the company must keep the trust of the people participating in those trials.

Scott told me, “There is an old saying: If you can’t measure it, you can’t manage it.” In fact, when he joined Medidata in 2015, one of the first things Scott did was to implement a SIEM. Medidata has been using Sumo Logic for more than five years now. They appreciate that it’s a cloud-native solution, and that has made it easier for them to follow the evolution of the tool over the years.

“Not having transparency in the environment you process data is not good for security professionals.” Scott wanted his team to be able to respond quickly and, to do so, they needed to be able to look at a single screen that displays all IP calls, network flows, and any relevant information. For example, Medidata has very aggressive checks for security scans and any kind of external access. To do so, they have to look not just at the perimeter, but at the entire environment. Sumo Logic Cloud SIEM allows them to react without breaking anything in their corporate environment, including the resources they have in more than 45 AWS accounts.

“One of the metrics that is floated around by security specialists is that you have up to five hours to respond to a tentative intrusion,” Scott says. “With Sumo Logic Cloud SIEM, we can match that time aggressively, and most of the times we respond within five minutes.” The ability to respond quickly allows Medidata to keep patient trust. This is very important for them, because delaying a clinical trial can affect people’s health.

Medidata security response is managed by a global team through three levels. Level 1 is covered by a partner who is empowered to block simple attacks. For the next level of escalation, Level 2, Medidata has a team in each region. Beyond that there is Level 3: a hardcore team of forensics examiners distributed across the US, Europe, and Asia who deal with more complicated attacks.

Availability is also important to Medidata. In addition to providing the Cloud SIEM functionality, Sumo Logic helps them monitor availability issues, such as web server failover, and very quickly figure out possible problems as they happen. Interestingly, they use Sumo Logic to better understand how applications talk with each other. These different use cases don’t complicate their setup because the security and application teams are segregated and use Sumo Logic as a single platform to share information seamlessly between the two teams when needed.

I asked Scott Sumner if Medidata was affected by the move to remote work in 2020 due to the COVID-19 pandemic. It’s an important topic for them because at that time Medidata was already involved in clinical trials to fight the pandemic. “We were a mobile environment anyway. A significant part of the company was mobile before. So, we were ready and not being impacted much by working remotely. All our tools are remote, and that helped a lot. Not sure we’d done it easily with an on-premises solution.”

Now, let’s see how this solution works in practice.

Setting Up Sumo Logic Cloud SIEM
In AWS Marketplace I search for “Sumo Logic Cloud SIEM” and look at the product page. I can either subscribe or start the one-month free trial. The free trial includes 1GB of log ingest for security and observability. There is no automatic conversion to paid offer when the free trials expires. After the free trial I have the option to either buy Sumo Logic Cloud SIEM from AWS Marketplace or remain as a free user. I create and accept the contract and set up my Sumo Logic account.

Console screenshot.

In the setup, I choose the Sumo Logic deployment region to use. The Sumo Logic documentation provides a table that describes the AWS Regions used by each Sumo Logic deployment. I need this information later when I set up the integration between AWS security services and Sumo Logic Cloud SIEM. For now, I select US2, which corresponds to the US West (Oregon) Region in AWS.

When my Sumo Logic account is ready, I use the Sumo Logic Security Integrations on AWS Quick Start to deploy the required integrations in my AWS account. You’ll find the source files used by this Quick Start in this GitHub repository. I open the deployment guide and follow along.

This architecture diagram shows the environment deployed by this Quick Start:

Architectural diagram.

Following the steps in the deployment guide, I create an access key and access ID in my Sumo Logic account, and write down my organization ID. Then, I launch the Quick Start to deploy the integrations.

The Quick Start uses an AWS CloudFormation template to create a stack. First, I check that I am in the right AWS Region. I use US West (Oregon) because I am using US2 with Sumo Logic. Then, I leave all default values and choose Next. In the parameters, I select US2 as my Sumo Logic deployment region and enter my Sumo Logic access ID, access key, and organization ID.

Console screenshot.

After that, I enable and configure the integrations with AWS security services and tools such as AWS CloudTrail, Amazon GuardDuty, VPC Flow Logs, and AWS Config.

Console screenshot.

If you have a delegate administrator with GuardDuty, you can enabled multiple member accounts as long as they are a part of the same AWS organization. With that, all findings from member accounts are vended to the delegate administrator and then to Sumo Logic Cloud SIEM through the GuardDuty events processor.

In the next step, I leave the stack options to their default values. I review the configuration and acknowledge the additional capabilities required by this stack (such as the creation of IAM resources) and then choose Create stack.

When the stack creation is complete, the integration with Sumo Logic Cloud SIEM is ready. If I had a hybrid architecture, I could connect those resources for a single point of view and analysis of my security events.

Using Sumo Logic Cloud SIEM
To see how the integration with AWS security services works, and how security events are handled by the SIEM, I use the amazon-guardduty-tester open-source scripts to generate security findings.

First, I use the included CloudFormation template to launch an Amazon Elastic Compute Cloud (Amazon EC2) instance in an Amazon Virtual Private Cloud (VPC) private subnet. The stack also includes a bastion host to provide external access. When the stack has been created, I write down the IP addresses of the two instances from the stack output.

Console screenshot.

Then, I use SSH to connect to the EC2 instance in the private subnet through the bastion host. There are easy-to-follow instructions in the README file. I use the guardduty_tester.sh script, installed in the instance by CloudFormation, to generate security findings for my AWS account.

$ ./guardduty_tester.sh

SSH screenshot.

GuardDuty processes these findings and the events are sent to Sumo Logic through the integration I just set up. In the Sumo Logic GuardDuty dashboard, I see the threats ready to be analyzed and addressed.

Console screenshot.

Availability and Pricing
Sumo Logic Cloud SIEM powered by AWS is a multi-tenant Software as a Service (SaaS) available in AWS Marketplace that ingests data over HTTPS/TLS 1.2 on the public internet. You can connect data from any AWS Region and from multi-cloud and hybrid architectures for a single point of view of your security events.

Start a free trial of Sumo Logic Cloud SIEM and see how it can help your security team.

Read the Sumo Logic team’s blog post here for more information on the service. 

Danilo

Protect public clients for Amazon Cognito by using an Amazon CloudFront proxy

Post Syndicated from Mahmoud Matouk original https://aws.amazon.com/blogs/security/protect-public-clients-for-amazon-cognito-by-using-an-amazon-cloudfront-proxy/

In Amazon Cognito user pools, an app client is an entity that has permission to call unauthenticated API operations (that is, operations that don’t have an authenticated user), such as operations to sign up, sign in, and handle forgotten passwords. In this post, I show you a solution designed to protect these API operations from unwanted bots and distributed denial of service (DDoS) attacks.

To protect Amazon Cognito services and customers, Amazon Cognito applies request rate quotas on all API categories, and throttles rapid calls that exceed the assigned quota. For that reason, you must ensure your applications control who can call unauthenticated API operations and at what rate, so that user calls aren’t throttled because of unwanted or misconfigured clients that call these API operations at high rates.

App clients fall into one of two categories: public clients (used from web or mobile applications) and private or confidential clients (used from a secured backend). Public clients shouldn’t have secrets, because it isn’t possible to protect secrets in these types of clients. Confidential clients, on the other hand, use a secret to authorize calls to unauthenticated operations. In these clients, the secret can be protected in the backend.

The benefit of using a confidential app client with a secret in Amazon Cognito is that unauthenticated API operations will accept only the calls that include the secret hash for this client, and will drop calls with an invalid or missing secret. In this way, you control who calls these API operations. Public applications can use a confidential app client by implementing a lightweight proxy layer in front of the Amazon Cognito endpoint, and then using this proxy to add a secret hash in relevant requests before passing the requests to Amazon Cognito.

There are multiple options that you can use to implement this proxy. One option is to use Amazon CloudFront and Lambda@Edge to add the secret hash to the incoming requests. When you use a CloudFront proxy, you can also use AWS WAF, which gives you tools to detect and block unwanted clients. From Lambda@Edge, you can also integrate with other services (like Amazon Fraud Detector or third-party bot detection services) to help you detect possible fraudulent requests and block them. The CloudFront proxy, with the right set of security tools, helps protect your Amazon Cognito user pool from unwanted clients.

Solution overview

To implement this lightweight proxy pattern, you need to create an application client with a secret. Unauthenticated API calls to this client must include the secret hash which is added to the request from the proxy layer. Client applications use an SDK like AWS Amplify, the Amazon Cognito Identity SDK, or a mobile SDK to communicate with Amazon Cognito. By default, the SDK sends requests to the Regional Amazon Cognito endpoint. Your application must override the default endpoint by manually adding an “Endpoint” property in the app configuration. See the Integrate the client application with the proxy section later in this post for more details.

Figure 1 shows how this works, step by step.
 

Figure 1: A proxy solution to the Amazon Cognito Regional endpoint

Figure 1: A proxy solution to the Amazon Cognito Regional endpoint

The workflow is as follows:

  1. You configure the client application (mobile or web client) to use a CloudFront endpoint as a proxy to an Amazon Cognito Regional endpoint. You also create an application client in Amazon Cognito with a secret. This means that any unauthenticated API call must have the secret hash.
  2. Clients that send unauthenticated API calls to the Amazon Cognito endpoint directly are blocked and dropped because of the missing secret.
  3. You use Lambda@Edge to add a secret hash to the relevant incoming requests before passing them on to the Amazon Cognito endpoint.
  4. From Lambda@Edge, you must have the app client secret to be able to calculate the secret hash and add it to the request. It’s recommended that you keep the secret in AWS Secrets Manager and cache it for the lifetime of the function.
  5. You use AWS WAF with CloudFront distribution to enforce rate limiting, allow and deny lists, and other rule groups according to your security requirements.

When to use this pattern

It’s a best practice to use this proxy pattern with clients that use SDKs to integrate with Amazon Cognito user pools. Examples include mobile applications that use the iOS or Android SDK, or web applications that use client-side libraries like Amplify or the Amazon Cognito Identity SDK to integrate with Amazon Cognito.

You don’t need to use a proxy pattern with server-side applications that use an AWS SDK to integrate with Amazon Cognito user pools from a protected backend, because server-side applications can natively use confidential clients and protect the secret in the backend.

You can’t use this solution with applications that use Hosted UI and OAuth 2.0 endpoints to integrate with Amazon Cognito user pools. This includes federation scenarios where users sign in with an external identity provider (IdP).

Implementation and deployment details

Before you deploy this solution, you need a user pool and an application client that has the client secret. When you have these in place, choose the following Launch Stack button to launch a CloudFormation stack in your account and deploy the proxy solution.

Select the Launch Stack button to launch the template

Note: The CloudFormation stack must be created in the us-east-1 AWS Region, but the user pool itself can exist in any supported Region.

The template takes the parameters shown in Figure 2 below.
 

Figure 2: CloudFormation stack creation with initial parameters

Figure 2: CloudFormation stack creation with initial parameters

The parameters in Figure 2 include:

  • AdvancedSecurityEnabled is a flag that indicates whether advanced security is enabled in the user pool or not. This flag determines which version of the Lambda function is deployed. Notice that if you change this flag as part of a stack update, it overrides the function code, so if you have any manual changes, make sure to back up your changes.
  • AppClientSecret is the secret for your application client. This secret is stored in Secrets Manager and accessed from Lambda@Edge as needed.
  • LambdaS3BucketName is the bucket that hosts the Lambda code package. You don’t need to change this parameter unless you have a requirement to modify or extend the solution with your own Lambda function.
  • RateLimit is the maximum number of calls from a single IP address that are allowed within a 5 minute period. Values between 100 requests and 20 million requests are valid for RateLimit.
  • Important: provide a value suitable for your application and security requirements.

  • UserPoolId is the ID of your user pool. This value is used by Lambda@Edge when needed (for example, to call admin APIs, which require the user pool ID).
  • UserPoolRegion is the AWS Region where you created your user pool. This value is used to determine which Amazon Cognito Regional endpoint to proxy the calls to.

This template creates several resources in your AWS account, as follows:

  1. A CloudFront distribution that serves as a proxy to an Amazon Cognito Regional endpoint.
  2. An AWS WAF web access control list (ACL) with rules for the allow list, deny list, and rate limit.
  3. A Lambda function to be deployed at the edge and assigned to the origin request event.
  4. A secret in Secrets Manager, to hold the values of the application client secret and user pool ID.

After you create the stack, the CloudFront distribution domain name is available on the Outputs tab in the CloudFront console, as shown in Figure 3. This is the value that’s used as the Endpoint property in your client-side application. You can optionally add an alternative domain name to the CloudFront distribution if you prefer to use your own custom domain.
 

Figure 3: The output of the CloudFormation stack creation, displaying the CloudFront domain name

Figure 3: The output of the CloudFormation stack creation, displaying the CloudFront domain name

Use Lambda@Edge to add a secret hash to the request

As explained earlier, the purpose of having this proxy is to be able to inject the secret hash in unauthenticated API calls before passing them to the Amazon Cognito endpoint. This injection is achieved by a Lambda function that intercepts incoming requests at the edge (the CloudFront distribution) before passing them to the origin (the Amazon Cognito Regional endpoint).

The Lambda function that is deployed to the edge has two versions. One is a simple pass-through proxy that only adds the secret hash, and this version is used if Amazon Cognito advanced security isn’t enabled. The other version is a proxy that uses the AdminInitiateAuth and AdminRespondToAuthChallenge API operations instead of unauthenticated API operations for the user authentication and challenge response. This allows the proxy layer to propagate the client IP address to the Amazon Cognito endpoint, which guides the adaptive authentication features of advanced security. The version that is deployed by the stack is determined by the AdvancedSecurityEnabled flag when you create or update the CloudFormation stack.

You can extend this solution by manually modifying the Lambda function with your own processing logic. For example, you can integrate with fraud detection or bot detection services to evaluate the request and decide to proceed or reject the call. Note that after making any change to the Lambda function code, you must deploy a new version to the edge location. To do that from the Lambda console, navigate to Actions, choose Deploy to Lambda@Edge, and then choose Use existing CloudFront trigger on this function.

Important: If you update the stack from CloudFormation and change the value of the AdvancedSecurityEnabled flag, the new value overrides the Lambda code with the default version for the choice. In that case, all manual changes are lost.

Allow or block requests

The template that is provided in this blog post creates a web ACL with three rules: AllowList, DenyList, and RateLimit. These rules are evaluated in order and determine which requests are allowed or blocked. The template also creates four IP sets, as shown in Figure 4, to hold the values of allowed or blocked IPs for both IPv4 and IPv6 address types.
 

Figure 4: The CloudFormation template creates IP sets in the AWS WAF console for allow and deny lists

Figure 4: The CloudFormation template creates IP sets in the AWS WAF console for allow and deny lists

If you want to always allow requests from certain clients, for example, trusted enterprise clients or server-side clients in cases where a large volume of requests is coming from the same IP address like a VPN gateway, add these IP addresses to the corresponding AllowList IP set. Similarly, if you want to always block traffic from certain IPs, add those IPs to the corresponding DenyList IP set.

Requests from sources that aren’t on the allow list or deny list are evaluated based on the volume of calls within 5 minutes, and sources that exceed the defined rate limit within 5 minutes are automatically blocked. If you want to change the defined rate limit, you can do so by updating the CloudFormation stack and providing a different value for the RateLimit parameter. Or you can modify this value directly in the AWS WAF console by editing the RateLimit rule.

Note: You can also use AWS Managed Rules for AWS WAF to add additional protection according to your security needs.

Integrate the client application with the proxy

You can integrate the client application with the proxy by changing the Endpoint in your client application to use the CloudFront distribution domain name. The domain name is located in the Outputs section of the CloudFormation stack.

You then need to edit your client-side code to forward calls to Amazon Cognito through the proxy endpoint. For example, if you’re using the Identity SDK, you should change this property as follows.

var poolData = {
  UserPoolId: '<USER-POOL-ID>',
  ClientId: '<APP-CLIENT-ID>',
  endpoint: 'https://<CF-DISTRIBUTION-DOMAIN>'
};

If you’re using AWS Amplify, you can change the endpoint in the aws-exports.js file by overriding the property aws_cognito_endpoint. Or, if you configure Amplify Auth in your code, you can provide the endpoint as follows.

Amplify.Auth.configure({
  userPoolId: '<USER-POOL-ID>',
  userPoolWebClientId: '<APP-CLIENT-ID>',
  endpoint: 'https://<CF-DISTRIBUTION-DOMAIN>'
});

If you have a mobile application that uses the Amplify mobile SDK, you can override the endpoint in your configuration as follows (don’t include AppClientSecret parameter in your configuration). Note that the Endpoint value contains the domain name only, not the full URL. This feature is available in the latest releases of the iOS and Android SDKs.

"CognitoUserPool": {
  "Default": {
    "AppClientId": "<APP-CLIENT-ID>",
    "Endpoint": "<CF-DISTRIBUTION-DOMAIN>",
    "PoolId": "<USER-POOL-ID>",
    "Region": "<REGION>"
  }
}

Warning: The Amplify CLI overwrites customizations to the awsconfiguration.json and amplifyconfiguration.json files if you do an amplify push or amplify pull operation. You must manually re-apply the Endpoint customization and remove the AppClientSecret if you use the CLI to modify your cloud backend.

Solution limitations

This solution has these limitations:

  • If advanced security features are enabled for the user pool, Amazon Cognito calculates risk for user events. If you use this proxy pattern, the IP address that is propagated in user events is the proxy IP address, which causes risk calculation for SignUp, ForgotPassword, and ResendCode events to be inaccurate. On the other hand, Sign-In events still have the client IP address propagated correctly, and risk calculation and adaptive authentication for Sign-In events aren’t affected by the use of this proxy.
  • This solution is not applicable to Hosted UI, OAuth 2.0 endpoints, and federation flows.
  • Authenticated and admin API operations (which require developer credentials or an access token) aren’t covered in this solution. These API operations don’t require a secret hash, and they use other authentication mechanisms.
  • Using this proxy solution with mobile apps requires an update to the application. The update might take time to be available in the relevant app store, and you must depend on end users to update their app. Plan ahead of time to use the solution with mobile apps.

How to detect unusual behavior

In this section, I share with you the steps to detect, quickly analyze and respond to unwanted clients. It’s a best practice to configure monitoring and alarms that help you to detect unexpected spikes in activity. Additionally, I show you how to be ready to quickly identify clients that are calling your resources at a higher-than-usual rate.

Monitor utilization compared to quotas

Amazon Cognito integrates with Service Quotas, which monitor service utilization compared to quotas. These metrics help you detect unexpected spikes and be alerted if you’re approaching your quota for a certain API category. Approaching your quota indicates that there is a risk that calls from legitimate users will be throttled.

To view utilization versus quota metrics

  1. In the Service Quotas console, choose Service Quotas, choose AWS Services, and then choose Amazon Cognito User Pools.
  2. Under Service quotas, enter the search term rate of. This shows you the list of API categories and the assigned quotas for each category.
     
    Figure 5: The Service Quotas console showing Amazon Cognito API category rate quotas

    Figure 5: The Service Quotas console showing Amazon Cognito API category rate quotas

  3. Choose any of the API categories to see utilization versus quota metrics.
     
    Figure 6: The Service Quotas console showing utilization vs quota metrics for Amazon Cognito UserCreation APIs

    Figure 6: The Service Quotas console showing utilization vs quota metrics for Amazon Cognito UserCreation APIs

  4. You can also create alarms from this page to alert you if utilization is above a pre-defined threshold. You can create alarms starting at 50 percent utilization. It’s recommended that you create multiple alarms, for example at the 50 percent, 70 percent, and 90 percent thresholds, and configure CloudWatch alarms as appropriate.
     
    Figure 7: Creating an alarm for the utilization of the UserCreation API category

    Figure 7: Creating an alarm for the utilization of the UserCreation API category

Analyze CloudTrail logs with Athena

If you detect an unexpected spike in traffic to a certain API category, the next step is to identify the sources of this spike. You can do that by using CloudTrail logs or, after you deploy and use this proxy solution, CloudFront logs as sources of information. You can then analyze these logs by using Amazon Athena queries.

The first step is to create Athena tables from CloudTrail and CloudFront logs. You can do that by following these steps for CloudTrail and similar steps for CloudFront. After you have these tables created, you can create a set of queries that help you identify unwanted clients. Here are a couple of examples:

  • Use the following query to identify clients with the highest call rate to the InitiateAuth API operation within the timeframe you noticed the spike (change the eventtime value to reflect the attack window).
    SELECT sourceipaddress, count(*)
    FROM "default"."cloudtrail_logs"
    WHERE eventname='InitiateAuth'
    AND eventtime >= '2021-03-01T00:00:00Z'and eventtime < '2021-03-31T00:00:00Z'
    GROUP BY sourceipaddress
    LIMIT 10
    

  • Use the following query to identify clients that come through CloudFront with the highest error rate.
    SELECT count(*) as count, request_ip
    FROM "default"."cloudfront_logs"
    WHERE status>500
    GROUP BY request_ip
    

After you identify sources that are calling your service with a higher-than-usual rate, you can block these clients by adding them to the DenyList IP set that was created in AWS WAF.

Analyze CloudTrail events with CloudWatch Logs Insights

It’s a best practice to configure your trail to send events to CloudWatch Logs. After you do this, you can interactively search and analyze your Amazon Cognito CloudTrail events with CloudWatch Logs Insights to identify errors, unusual activity, or unusual user behavior in your account.

Conclusion

In this post, I showed you how to implement a lightweight proxy to an Amazon Cognito endpoint, which can be used with an application client secret to control access to unauthenticated API operations. This approach, together with security tools such as AWS WAF, helps provide protection for these API operations from unwanted clients. I also showed you strategies to help detect an ongoing attack and quickly analyze, identify, and block unwanted clients.

For more strategies for DDoS mitigation, see the AWS Best Practices for DDoS Resiliency.

If you have feedback about this post, submit comments in the Comments section below. If you have questions about this post, start a new thread on the Amazon Cognito forum or contact AWS Support.

Want more AWS Security how-to content, news, and feature announcements? Follow us on Twitter.

Author

Mahmoud Matouk

Mahmoud is a Senior Solutions Architect with the Amazon Cognito team. He helps AWS customers build secure and innovative solutions for various identity and access management scenarios.