Tag Archives: Uncategorized

Including Hackers in NATO Wargames

Post Syndicated from Bruce Schneier original https://www.schneier.com/blog/archives/2021/01/including-hackers-in-nato-wargames.html

This essay makes the point that actual computer hackers would be a useful addition to NATO wargames:

The international information security community is filled with smart people who are not in a military structure, many of whom would be excited to pose as independent actors in any upcoming wargames. Including them would increase the reality of the game and the skills of the soldiers building and training on these networks. Hackers and cyberwar experts would demonstrate how industrial control systems such as power supply for refrigeration and temperature monitoring in vaccine production facilities are critical infrastructure; they’re easy targets and should be among NATO’s priorities at the moment.

Diversity of thought leads to better solutions. We in the information security community strongly support the involvement of acknowledged nonmilitary experts in the development and testing of future cyberwar scenarios. We are confident that independent experts, many of whom see sharing their skills as public service, would view participation in these cybergames as a challenge and an honor.

New iMessage Security Features

Post Syndicated from Bruce Schneier original https://www.schneier.com/blog/archives/2021/01/new-imessage-security-features.html

Apple has added added security features to mitigate the risk of zero-click iMessage attacks.

Apple did not document the changes but Groß said he fiddled around with the newest iOS 14 and found that Apple shipped a “significant refactoring of iMessage processing” that severely cripples the usual ways exploits are chained together for zero-click attacks.

Groß notes that memory corruption based zero-click exploits typically require exploitation of multiple vulnerabilities to create exploit chains. In most observed attacks, these could include a memory corruption vulnerability, reachable without user interaction and ideally without triggering any user notifications; a way to break ASLR remotely; a way to turn the vulnerability into remote code execution;; and a way to break out of any sandbox, typically by exploiting a separate vulnerability in another operating system component (e.g. a userspace service or the kernel).

Police Have Disrupted the Emotet Botnet

Post Syndicated from Bruce Schneier original https://www.schneier.com/blog/archives/2021/01/police-have-disrupted-the-emotet-botnet.html

A coordinated effort has captured the command-and-control servers of the Emotet botnet:

Emotet establishes a backdoor onto Windows computer systems via automated phishing emails that distribute Word documents compromised with malware. Subjects of emails and documents in Emotet campaigns are regularly altered to provide the best chance of luring victims into opening emails and installing malware ­ regular themes include invoices, shipping notices and information about COVID-19.

Those behind the Emotet lease their army of infected machines out to other cyber criminals as a gateway for additional malware attacks, including remote access tools (RATs) and ransomware.

[…]

A week of action by law enforcement agencies around the world gained control of Emotet’s infrastructure of hundreds of servers around the world and disrupted it from the inside.

Machines infected by Emotet are now directed to infrastructure controlled by law enforcement, meaning cyber criminals can no longer exploit machines compromised and the malware can no longer spread to new targets, something which will cause significant disruption to cyber-criminal operations.

[…]

The Emotet takedown is the result of over two years of coordinated work by law enforcement operations around the world, including the Dutch National Police, Germany’s Federal Crime Police, France’s National Police, the Lithuanian Criminal Police Bureau, the Royal Canadian Mounted Police, the US Federal Bureau of Investigation, the UK’s National Crime Agency, and the National Police of Ukraine.

Dutch Insider Attack on COVID-19 Data

Post Syndicated from Bruce Schneier original https://www.schneier.com/blog/archives/2021/01/dutch-insider-attack-on-covid-19-data.html

Insider data theft:

Dutch police have arrested two individuals on Friday for allegedly selling data from the Dutch health ministry’s COVID-19 systems on the criminal underground.

[…]

According to Verlaan, the two suspects worked in DDG call centers, where they had access to official Dutch government COVID-19 systems and databases.

They were working from home:

“Because people are working from home, they can easily take photos of their screens. This is one of the issues when your administrative staff is working from home,” Victor Gevers, Chair of the Dutch Institute for Vulnerability Disclosure, told ZDNet in an interview today.

All of this remote call-center work brings with it additional risks.

Building a Jenkins Pipeline with AWS SAM

Post Syndicated from Eric Johnson original https://aws.amazon.com/blogs/compute/building-a-jenkins-pipeline-with-aws-sam/

This post is courtesy of Tarun Kumar Mall, SDE at AWS.

This post shows how to set up a multi-stage pipeline on a Jenkins host for a serverless application, using the AWS Serverless Application Model (AWS SAM).

Overview

This tutorial uses Jenkins Pipeline plugin. A commit to the main branch of the repository starts and deploys the application, using the AWS SAM CLI. This tutorial deploys a small serverless API application called HelloWorldApi.

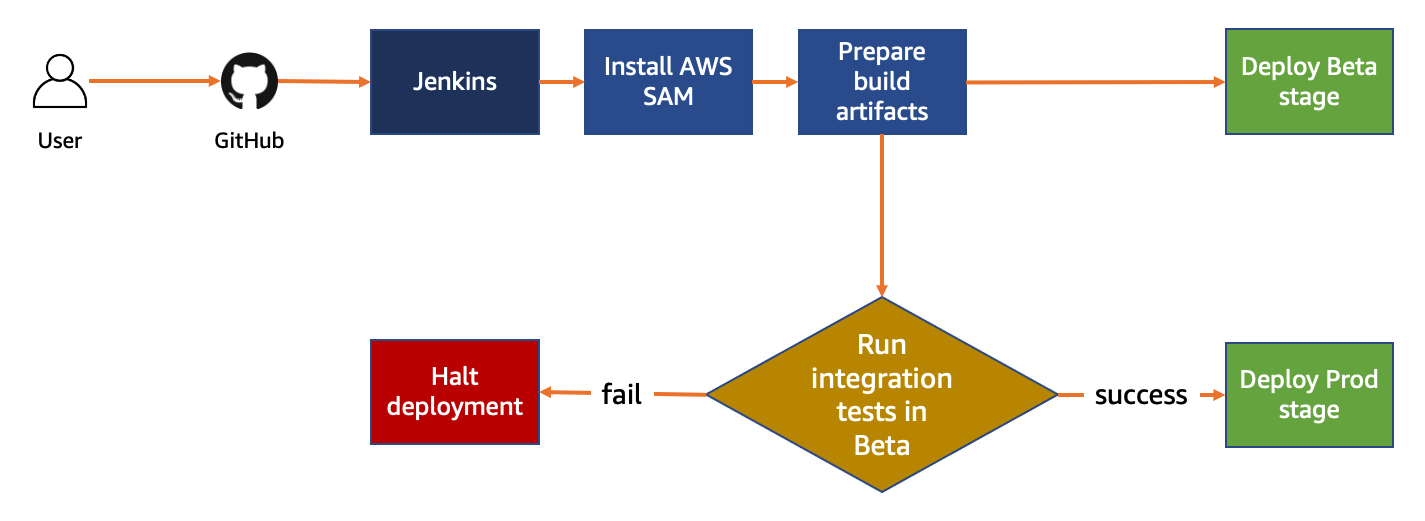
The pipeline consists of stages to build and deploy the application. Jenkins first ensures that the build environment is set up and installs any necessary tools. Next, Jenkins prepares the build artifacts. It promotes the artifacts to the next stage, where they are deployed to a beta environment using the AWS SAM CLI. Integration tests are run after deployment. If the tests pass, the application is deployed to the production environment.

CICD workflow diagram

CICD workflow diagram

The following prerequisites are required:

Setting up the backend application and development stack

Using AWS CloudFormation to define the infrastructure, you can create multiple environments or stacks from the same infrastructure definition. A “dev stack” is a copy of production infrastructure deployed to a developer account for testing purposes.

As serverless services use a pay-for-value model, it can be cost effective to use a high-fidelity copy of your production stack. Dev stacks are created by each developer as needed and deleted without having any negative impact on production.

For complex applications, it may not be feasible for every developer to have their own stack. However, for this tutorial, setting up the dev stack first for testing is recommended. Setting up a dev stack takes you through a manual process of how a stack is created. Later, this process is used to automate the setup using Jenkins.

To create a dev stack:

  1. Clone backend application repository https://github.com/aws-samples/aws-sam-jenkins-pipeline-tutorial
    git clone https://github.com/aws-samples/aws-sam-jenkins-pipeline-tutorial.git
  2. Build the application and run the guided deploy command:
    cd aws-sam-jenkins-pipeline-tutorial
    sam build
    sam deploy --guided

    AWS SAM guided deploy output

    AWS SAM guided deploy output

This sets up a development stack and saves the settings in the samconfig.toml file with configuration environment specific to a user. This also triggers a deployment.

  1. After deployment, make a small code change. For example, in the file hello-world/app.js change the message Hello world to Hello world from user <your name>.
  2. Deploy the updated code:
    sam build
    sam deploy -–config-env <your_username>

With this command, each developer can create their own configuration environment. They can use this for deploying to their development stack and testing changes before pushing changes to the repository.

Once deployment finishes, the API endpoint is displayed in the console output. You can use this endpoint to make GET requests and test the API manually.

Deployment output

Deployment output

To update and run the integration test:

  1. Open the hello-world/tests/integ/test-integ-api.js file.
  2. Update the assert statement in line 32 to include <your name> from the previous step:
    it("verifies if response contains my username", async () => {
      assert.include(apiResponse.data.message, "<your name>");
    });
  3. Open package.json and add the line in bold:
    {
      ...
      "scripts": {
        "test": "mocha tests/unit/",
        "integ-test": "mocha tests/integ/"
      }
      ...
    }
  4. From the terminal, run the following commands:
    cd hello-world
    npm install
    AWS_REGION=us-west-2 STACK_NAME=sam-app-user1-dev-stack npm run integ-test
    If you are using Microsoft Windows, instead run:
    cd hello-world
    npm install
    set AWS_REGION=us-west-2
    set STACK_NAME=sam-app-user1-dev-stack
    npm run integ-test

    Test results

    Test results

You have deployed a fully configured development stack with working integration tests. To push the code to GitHub:

  1. Create a new repository in GitHub.
    1. From the GitHub account homepage, choose New.
    2. Enter a repository name and choose Create Repository.
    3. Copy the repository URL.
  2. From the root directory of the AWS SAM project, run:
    git init
    git commit -am “first commit”
    git remote add origin <your-repository-url>
    git push -u origin main

Creating an IAM user for Jenkins

To create an IAM user for the Jenkins deployment:

  1. Sign in to the AWS Management Console and navigate to IAM.
  2. Select Users from side navigation and choose Add user.
  3. Enter the User name as sam-jenkins-demo-credentials and grant Programmatic access to this user.
  4. On the next page, select Attach existing policies directly and choose Create Policy.
  5. Select the JSON tab and enter the following policy. Replace <YOUR_ACCOUNT_ID> with your AWS account ID:
    {
        "Version": "2012-10-17",
        "Statement": [
            {
                "Sid": "CloudFormationTemplate",
                "Effect": "Allow",
                "Action": [
                    "cloudformation:CreateChangeSet"
                ],
                "Resource": [
                    "arn:aws:cloudformation:*:aws:transform/Serverless-2016-10-31"
                ]
            },
            {
                "Sid": "CloudFormationStack",
                "Effect": "Allow",
                "Action": [
                    "cloudformation:CreateChangeSet",
                    "cloudformation:DeleteStack",
                    "cloudformation:DescribeChangeSet",
                    "cloudformation:DescribeStackEvents",
                    "cloudformation:DescribeStacks",
                    "cloudformation:ExecuteChangeSet",
                    "cloudformation:GetTemplateSummary"
                ],
                "Resource": [
                    "arn:aws:cloudformation:*:<YOUR_ACCOUNT_ID>:stack/*"
                ]
            },
            {
                "Sid": "S3",
                "Effect": "Allow",
                "Action": [
                    "s3:CreateBucket",
                    "s3:GetObject",
                    "s3:PutObject"
                ],
                "Resource": [
                    "arn:aws:s3:::*/*"
                ]
            },
            {
                "Sid": "Lambda",
                "Effect": "Allow",
                "Action": [
                    "lambda:AddPermission",
                    "lambda:CreateFunction",
                    "lambda:DeleteFunction",
                    "lambda:GetFunction",
                    "lambda:GetFunctionConfiguration",
                    "lambda:ListTags",
                    "lambda:RemovePermission",
                    "lambda:TagResource",
                    "lambda:UntagResource",
                    "lambda:UpdateFunctionCode",
                    "lambda:UpdateFunctionConfiguration"
                ],
                "Resource": [
                    "arn:aws:lambda:*:<YOUR_ACCOUNT_ID>:function:*"
                ]
            },
            {
                "Sid": "IAM",
                "Effect": "Allow",
                "Action": [
                    "iam:AttachRolePolicy",
                    "iam:CreateRole",
                    "iam:DeleteRole",
                    "iam:DetachRolePolicy",
                    "iam:GetRole",
                    "iam:PassRole",
                    "iam:TagRole"
                ],
                "Resource": [
                    "arn:aws:iam::<YOUR_ACCOUNT_ID>:role/*"
                ]
            },
            {
                "Sid": "APIGateway",
                "Effect": "Allow",
                "Action": [
                    "apigateway:DELETE",
                    "apigateway:GET",
                    "apigateway:PATCH",
                    "apigateway:POST",
                    "apigateway:PUT"
                ],
                "Resource": [
                    "arn:aws:apigateway:*::*"
                ]
            }
        ]
    }
  6. Choose Review Policy and add a policy name on the next page.
  7. Choose Create Policy button.
  8. Return to the previous tab to continue creating the IAM user. Choose Refresh and search for the policy name you created. Select the policy.
  9. Choose Next Tags and then Review.
  10. Choose Create user and save the Access key ID and Secret access key.

Configuring Jenkins

To configure AWS credentials in Jenkins:

  1. On the Jenkins dashboard, go to Manage Jenkins > Manage Plugins in the Available tab. Search for the Pipeline: AWS Steps plugin and choose Install without restart.
  2. Navigate to Manage Jenkins > Manage Credentials > Jenkins (global) > Global Credentials > Add Credentials.
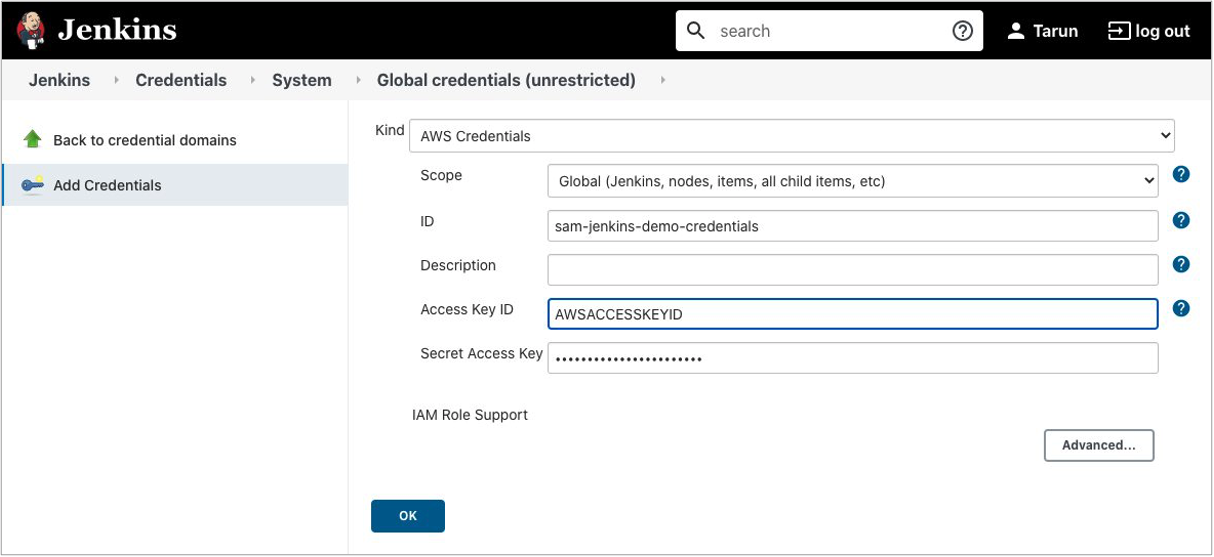
  3. Select Kind as AWS credentials and use the ID sam-jenkins-demo-credentials.
  4. Enter the access key ID and secret access key and choose OK.

    Jenkins credential configuration

    Jenkins credential configuration

  5. Create Amazon S3 buckets for each Region in the pipeline. S3 bucket names must be unique within a partition:
    aws s3 mb s3://sam-jenkins-demo-us-west-2-<your_name> --region us-west-2
    aws s3 mb s3://sam-jenkins-demo-us-east-1-<your_name> --region us-east-1
  6. Create a file named Jenkinsfile at the root of the project and add:
    pipeline {
      agent any
     
      stages {
        stage('Install sam-cli') {
          steps {
            sh 'python3 -m venv venv && venv/bin/pip install aws-sam-cli'
            stash includes: '**/venv/**/*', name: 'venv'
          }
        }
        stage('Build') {
          steps {
            unstash 'venv'
            sh 'venv/bin/sam build'
            stash includes: '**/.aws-sam/**/*', name: 'aws-sam'
          }
        }
        stage('beta') {
          environment {
            STACK_NAME = 'sam-app-beta-stage'
            S3_BUCKET = 'sam-jenkins-demo-us-west-2-user1'
          }
          steps {
            withAWS(credentials: 'sam-jenkins-demo-credentials', region: 'us-west-2') {
              unstash 'venv'
              unstash 'aws-sam'
              sh 'venv/bin/sam deploy --stack-name $STACK_NAME -t template.yaml --s3-bucket $S3_BUCKET --capabilities CAPABILITY_IAM'
              dir ('hello-world') {
                sh 'npm ci'
                sh 'npm run integ-test'
              }
            }
          }
        }
        stage('prod') {
          environment {
            STACK_NAME = 'sam-app-prod-stage'
            S3_BUCKET = 'sam-jenkins-demo-us-east-1-user1'
          }
          steps {
            withAWS(credentials: 'sam-jenkins-demo-credentials', region: 'us-east-1') {
              unstash 'venv'
              unstash 'aws-sam'
              sh 'venv/bin/sam deploy --stack-name $STACK_NAME -t template.yaml --s3-bucket $S3_BUCKET --capabilities CAPABILITY_IAM'
            }
          }
        }
      }
    }
  7. Commit and push the code to the GitHub repository by running following commands:
    git commit -am “Adding Jenkins pipeline config.”
    git push origin -u main

Next, create a Jenkins Pipeline project:

  1. From the Jenkins dashboard, choose New Item, select Pipeline, and enter the project name sam-jenkins-demo-pipeline.

    Jenkins Pipeline creation wizard

    Jenkins Pipeline creation wizard

  2. Under Build Triggers, select Poll SCM and enter * * * * *. This polls the repository for changes every minute.

    Jenkins build triggers configuration

    Jenkins build triggers configuration

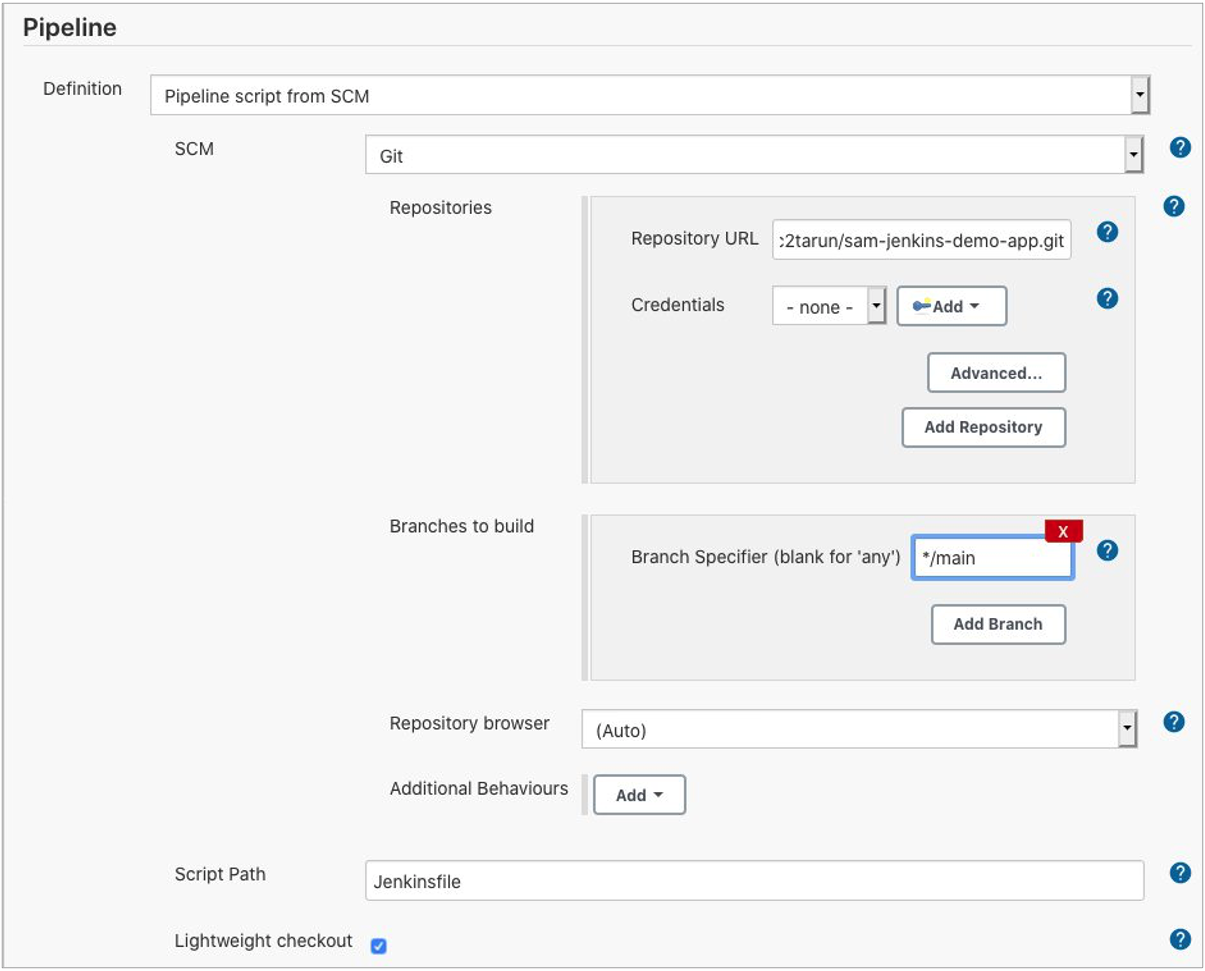
  3. Under the Pipeline section, select Definition as Pipeline script from SCM.
    • Select GIT under SCM and enter the repository URL.
    • Set Branches to build to */main.
    • Set the Script Path to Jenkinsfile.

      Jenkins pipeline configuration

      Jenkins pipeline configuration

  4. Save the project.

After the build finishes, you see the pipeline:

Jenkins pipeline stages

Jenkins pipeline stages

Review the logs for the beta stage to check that the integration test is completed successfully.

Jenkins stage logs

Jenkins stage logs

Conclusion

This tutorial uses a Jenkins Pipeline to add an automated CI/CD pipeline to an AWS SAM-generated example application. Jenkins automatically builds, tests, and deploys the changes after each commit to the repository.

Using Jenkins, developers can gain the benefits of continuous integration and continuous deployment of serverless applications to the AWS Cloud with minimal configuration.

For more information, see the Jenkins Pipeline and AWS Serverless Application Model documentation.

We want to hear your feedback! Is this approach useful for your organization? Do you want to see another implementation? Contact us on Twitter @edjgeek or via comments!

Insider Attack on Home Surveillance Systems

Post Syndicated from Bruce Schneier original https://www.schneier.com/blog/archives/2021/01/insider-attack-on-home-surveillance-systems.html

No one who reads this blog regularly will be surprised:

A former employee of prominent home security company ADT has admitted that he hacked into the surveillance feeds of dozens of customer homes, doing so primarily to spy on naked women or to leer at unsuspecting couples while they had sex.

[…]

Authorities say that the IT technician “took note of which homes had attractive women, then repeatedly logged into these customers’ accounts in order to view their footage for sexual gratification.” He did this by adding his personal email address to customer accounts, which ultimately hooked him into “real-time access to the video feeds from their homes.”

Slashdot thread.

Building PHP Lambda functions with Docker container images

Post Syndicated from Benjamin Smith original https://aws.amazon.com/blogs/compute/building-php-lambda-functions-with-docker-container-images/

At re:Invent 2020, AWS announced that you can package and deploy AWS Lambda functions as container images. Packaging AWS Lambda functions as container images brings some notable benefits for developers running custom runtimes, such as PHP. This blog post explains those benefits and shows how to use the new container image support for Lambda functions to build serverless PHP applications.

Overview

Many PHP developers are familiar with building applications as containers to create a portable artifact for easier deployment. Packaging applications as containers helps to maintain consistent PHP versions, package versions, and configurations settings across multiple environments.

The new container image support for Lambda allows you to use familiar container tooling to build your applications. It also allows you to transition your applications into a serverless event-driven model. This brings the benefits of having no infrastructure to manage, automated scalability and a pay-per-use billing.

The advantages of an event-driven model for PHP applications are explained across the blog series “The serverless LAMP stack”. It explores the concepts, methods, and reasons for creating serverless applications with PHP. The architectural patterns and service limits in this blog series apply to functions packaged using both container image and zip archive formats, with some key exceptions:

Zip archive Container image
Maximum package size 250 MB 10 GB
Lambda layers Supported Include in image
Lambda Extensions Supported Include in image

Custom runtimes with container images

For custom runtimes such as PHP, Lambda provides base images containing the required Amazon Linux or Amazon Linux 2 operating system. Extend this to include your own runtime by implementing the Lambda Runtime API in a bootstrap file.

Before container image support for Lambda, a custom runtime is packaged using the .zip format. This required the developer to:

  1. Set up an Amazon Linux environment compatible with the Lambda execution environment.
  2. Install compilation dependencies and compile a version of PHP.
  3. Save the compiled PHP binary together with a bootstrap file and package as a .zip.
  4. Publish the .zip as a runtime layer.
  5. Add the runtime layer to a Lambda function.

Any edits to the custom runtime such as new packages, PHP versions, modules, or dependences require the process to be repeated. This process can be time consuming and prone to error.

Creating a custom PHP runtime using the new container image support for Lambda can simplify changing the runtime environment. Dockerfiles allow you to have a fully scripted, faster, and portable build process without setting up an Amazon Linux environment.

This GitHub repository contains a custom PHP runtime for Lambda functions packaged as a container image. The following Dockerfile uses the base image for Amazon Linux provided by AWS. The instructions perform the following:

  • Install system-wide Linux packages (zip, curl, tar).
  • Download and compile PHP.
  • Download and install composer dependency manager and dependencies.
  • Move PHP binaries, bootstrap, and vendor dependencies into a directory that Lambda can read from.
  • Set the container entrypoint.
#Lambda base image Amazon Linux
FROM public.ecr.aws/lambda/provided as builder 
# Set desired PHP Version
ARG php_version="7.3.6"
RUN yum clean all && \
    yum install -y autoconf \
                bison \
                bzip2-devel \
                gcc \
                gcc-c++ \
                git \
                gzip \
                libcurl-devel \
                libxml2-devel \
                make \
                openssl-devel \
                tar \
                unzip \
                zip

# Download the PHP source, compile, and install both PHP and Composer
RUN curl -sL https://github.com/php/php-src/archive/php-${php_version}.tar.gz | tar -xvz && \
    cd php-src-php-${php_version} && \
    ./buildconf --force && \
    ./configure --prefix=/opt/php-7-bin/ --with-openssl --with-curl --with-zlib --without-pear --enable-bcmath --with-bz2 --enable-mbstring --with-mysqli && \
    make -j 5 && \
    make install && \
    /opt/php-7-bin/bin/php -v && \
    curl -sS https://getcomposer.org/installer | /opt/php-7-bin/bin/php -- --install-dir=/opt/php-7-bin/bin/ --filename=composer

# Prepare runtime files
# RUN mkdir -p /lambda-php-runtime/bin && \
    # cp /opt/php-7-bin/bin/php /lambda-php-runtime/bin/php
COPY runtime/bootstrap /lambda-php-runtime/
RUN chmod 0755 /lambda-php-runtime/bootstrap

# Install Guzzle, prepare vendor files
RUN mkdir /lambda-php-vendor && \
    cd /lambda-php-vendor && \
    /opt/php-7-bin/bin/php /opt/php-7-bin/bin/composer require guzzlehttp/guzzle

###### Create runtime image ######
FROM public.ecr.aws/lambda/provided as runtime
# Layer 1: PHP Binaries
COPY --from=builder /opt/php-7-bin /var/lang
# Layer 2: Runtime Interface Client
COPY --from=builder /lambda-php-runtime /var/runtime
# Layer 3: Vendor
COPY --from=builder /lambda-php-vendor/vendor /opt/vendor

COPY src/ /var/task/

CMD [ "index" ]

To deploy this Lambda function, follow the instructions in the GitHub repository.

All runtime-related instructions are saved in the Dockerfile, which makes the custom runtime simpler to manage, update, and test. You can add additional Linux packages by appending to the yum install command. To install alternative PHP versions, change the php_version argument. Import additional PHP modules by adding to the compile command.

View the complete application in the following file tree:

project/
┣ runtime/
┃ ┗ bootstrap
┣ src/
┃ ┗ index.php
┗ Dockerfile

The Lambda function code is stored in the src directory in a file named index.php. This contains the Lambda function handler “index()”.

A bootstrap file is in the ‘runtime’ directory. This uses the Lambda runtime API to communicate with the Lambda execution environment.

The shebang hash sequence at the beginning of the bootstrap script instructs Lambda to run the file with the PHP executable, set by the Dockerfile.

All environment variables used in the bootstrap are set by the Lambda execution environment when running in the AWS Cloud. When running locally, the Lambda Runtime Interface Emulator (RIE) sets these values.

#!/var/lang/bin/php

Testing locally with the Lambda RIE

Using container image support for Lambda makes it easier for PHP developers to test Lambda functions locally. The previous container image example builds from the Lambda base image provided by AWS. This base image contains the Lambda RIE.

This is a proxy for Lambda’s Runtime and Extensions APIs. It acts as a lightweight web server that converts HTTP requests to JSON events and maintains functional parity with the Lambda Runtime API in the AWS Cloud. This allows developers to test functions locally using familiar tools such as cURL and the Docker CLI.

  1. Build the previous custom runtime image using the Docker build command:
    docker build -t phpmyfuntion .
  2. Run the function locally using the Docker run command, bound to port 9000:
    docker run -p 9000:8080 phpmyfuntion:latest
  3. This command starts up a local endpoint at:
    localhost:9000/2015-03-31/functions/function/invocations
  4. Post an event to this endpoint using a curl command. The Lambda function payload is provided by using the -d flag. This is a valid Json object required by the Runtime Interface Emulator:
    curl "http://localhost:9000/2015-03-31/functions/function/invocations" -d '{"queryStringParameters": {"name":"Ben"}}'
  5. A 200 status response is returned:

Building web applications with Bref container images

Bref is an open source runtime Lambda layer for PHP. Using the bref-fpm layer, you can build applications with traditional PHP frameworks such as Symfony and Laravel. Bref’s implementation of the FastCGI protocol returns an HTTP response instead of a JSON response. When using the zip archive format to package Lambda functions, Bref’s custom runtime is provided to the function as a Lambda layer. Functions packaged as container images do not support adding Lambda layers to the function configuration. In addition to runtime layers, Bref also provides a number of Docker images. These images use the Lambda runtime API to form a runtime interface client that communicates with the Lambda execution environment.

The following example shows how to compose a Dockerfile that uses the bref php-74-fpm container image:

# Uses PHP 74-fpm.0, as the base image
FROM bref/php-74-fpm
# download composer for dependency management
RUN curl -s https://getcomposer.org/installer | php
# install bref using composer
RUN php composer.phar require bref/bref
# copy the project files into a Location that the Lambda service can read from
COPY . /var/task
#set the function handler entry point
CMD _HANDLER=index.php /opt/bootstrap
  1. The first line sets the base image to use bref/php-74-fpm.
  2. Composer, a dependency manager for PHP is installed.
  3. Composer’s require command is used to add the bref package to the composer.json file.
  4. The project files are then copied into the /var/task directory, where the function code runs from.
  5. The function handler is set along with Bref’s bootstrap file.

The steps to build and deploy this image to the Amazon Elastic Container Registry are the same for any runtime, and explained in this announcement blog post.

Conclusion

The new container image support for Lambda functions allows developers to package Lambda functions of up to 10 GB in size. Using the container image format and a Dockerfile can make it easier to build and update functions with custom runtimes such as PHP.

Developers can include specific language versions, modules, and package dependencies. The Amazon Linux and Amazon Linux 2 base images give developers a starting point to customize the runtime. With the Lambda Runtime Interface Emulator, it’s simpler for developers to test Lambda functions locally. PHP developers can use existing third-party images, such as bref-fpm, to create web applications in a single Lambda function.

Visit serverlessland.com for more information on building serverless PHP applications.

SVR Attacks on Microsoft 365

Post Syndicated from Bruce Schneier original https://www.schneier.com/blog/archives/2021/01/svr-attacks-on-microsoft-365.html

FireEye is reporting the current known tactics that the SVR used to compromise Microsoft 365 cloud data as part of its SolarWinds operation:

Mandiant has observed UNC2452 and other threat actors moving laterally to the Microsoft 365 cloud using a combination of four primary techniques:

  • Steal the Active Directory Federation Services (AD FS) token-signing certificate and use it to forge tokens for arbitrary users (sometimes described as Golden SAML). This would allow the attacker to authenticate into a federated resource provider (such as Microsoft 365) as any user, without the need for that user’s password or their corresponding multi-factor authentication (MFA) mechanism.
  • Modify or add trusted domains in Azure AD to add a new federated Identity Provider (IdP) that the attacker controls. This would allow the attacker to forge tokens for arbitrary users and has been described as an Azure AD backdoor.
  • Compromise the credentials of on-premises user accounts that are synchronized to Microsoft 365 that have high privileged directory roles, such as Global Administrator or Application Administrator.
  • Backdoor an existing Microsoft 365 application by adding a new application or service principal credential in order to use the legitimate permissions assigned to the application, such as the ability to read email, send email as an arbitrary user, access user calendars, etc.

Lots of details here, including information on remediation and hardening.

The more we learn about the this operation, the more sophisticated it becomes.

In related news, MalwareBytes was also targeted.

Using Route 53 Private Hosted Zones for Cross-account Multi-region Architectures

Post Syndicated from Anandprasanna Gaitonde original https://aws.amazon.com/blogs/architecture/using-route-53-private-hosted-zones-for-cross-account-multi-region-architectures/

This post was co-written by Anandprasanna Gaitonde, AWS Solutions Architect and John Bickle, Senior Technical Account Manager, AWS Enterprise Support

Introduction

Many AWS customers have internal business applications spread over multiple AWS accounts and on-premises to support different business units. In such environments, you may find a consistent view of DNS records and domain names between on-premises and different AWS accounts useful. Route 53 Private Hosted Zones (PHZs) and Resolver endpoints on AWS create an architecture best practice for centralized DNS in hybrid cloud environment. Your business units can use flexibility and autonomy to manage the hosted zones for their applications and support multi-region application environments for disaster recovery (DR) purposes.

This blog presents an architecture that provides a unified view of the DNS while allowing different AWS accounts to manage subdomains. It utilizes PHZs with overlapping namespaces and cross-account multi-region VPC association for PHZs to create an efficient, scalable, and highly available architecture for DNS.

Architecture Overview

You can set up a multi-account environment using services such as AWS Control Tower to host applications and workloads from different business units in separate AWS accounts. However, these applications have to conform to a naming scheme based on organization policies and simpler management of DNS hierarchy. As a best practice, the integration with on-premises DNS is done by configuring Amazon Route 53 Resolver endpoints in a shared networking account. Following is an example of this architecture.

Route 53 PHZs and Resolver Endpoints

Figure 1 – Architecture Diagram

The customer in this example has on-premises applications under the customer.local domain. Applications hosted in AWS use subdomain delegation to aws.customer.local. The example here shows three applications that belong to three different teams, and those environments are located in their separate AWS accounts to allow for autonomy and flexibility. This architecture pattern follows the option of the “Multi-Account Decentralized” model as described in the whitepaper Hybrid Cloud DNS options for Amazon VPC.

This architecture involves three key components:

1. PHZ configuration: PHZ for the subdomain aws.customer.local is created in the shared Networking account. This is to support centralized management of PHZ for ancillary applications where teams don’t want individual control (Item 1a in Figure). However, for the key business applications, each of the teams or business units creates its own PHZ. For example, app1.aws.customer.local – Application1 in Account A, app2.aws.customer.local – Application2 in Account B, app3.aws.customer.local – Application3 in Account C (Items 1b in Figure). Application1 is a critical business application and has stringent DR requirements. A DR environment of this application is also created in us-west-2.

For a consistent view of DNS and efficient DNS query routing between the AWS accounts and on-premises, best practice is to associate all the PHZs to the Networking Account. PHZs created in Account A, B and C are associated with VPC in Networking Account by using cross-account association of Private Hosted Zones with VPCs. This creates overlapping domains from multiple PHZs for the VPCs of the networking account. It also overlaps with the parent sub-domain PHZ (aws.customer.local) in the Networking account. In such cases where there is two or more PHZ with overlapping namespaces, Route 53 resolver routes traffic based on most specific match as described in the Developer Guide.

2. Route 53 Resolver endpoints for on-premises integration (Item 2 in Figure): The networking account is used to set up the integration with on-premises DNS using Route 53 Resolver endpoints as shown in Resolving DNS queries between VPC and your network. Inbound and Outbound Route 53 Resolver endpoints are created in the VPC in us-east-1 to serve as the integration between on-premises DNS and AWS. The DNS traffic between on-premises to AWS requires an AWS Site2Site VPN connection or AWS Direct Connect connection to carry DNS and application traffic. For each Resolver endpoint, two or more IP addresses can be specified to map to different Availability Zones (AZs). This helps create a highly available architecture.

3. Route 53 Resolver rules (Item 3 in Figure): Forwarding rules are created only in the networking account to route DNS queries for on-premises domains (customer.local) to the on-premises DNS server. AWS Resource Access Manager (RAM) is used to share the rules to accounts A, B and C as mentioned in the section “Sharing forwarding rules with other AWS accounts and using shared rules” in the documentation. Account owners can now associate these shared rules with their VPCs the same way that they associate rules created in their own AWS accounts. If you share the rule with another AWS account, you also indirectly share the outbound endpoint that you specify in the rule as described in the section “Considerations when creating inbound and outbound endpoints” in the documentation. This implies that you use one outbound endpoint in a region to forward DNS queries to your on-premises network from multiple VPCs, even if the VPCs were created in different AWS accounts. Resolver starts to forward DNS queries for the domain name that’s specified in the rule to the outbound endpoint and forward to the on-premises DNS servers. The rules are created in both regions in this architecture.

This architecture provides the following benefits:

  1. Resilient and scalable
  2. Uses the VPC+2 endpoint, local caching and Availability Zone (AZ) isolation
  3. Minimal forwarding hops
  4. Lower cost: optimal use of Resolver endpoints and forwarding rules

In order to handle the DR, here are some other considerations:

  • For app1.aws.customer.local, the same PHZ is associated with VPC in us-west-2 region. While VPCs are regional, the PHZ is a global construct. The same PHZ is accessible from VPCs in different regions.
  • Failover routing policy is set up in the PHZ and failover records are created. However, Route 53 health checkers (being outside of the VPC) require a public IP for your applications. As these business applications are internal to the organization, a metric-based health check with Amazon CloudWatch can be configured as mentioned in Configuring failover in a private hosted zone.
  • Resolver endpoints are created in VPC in another region (us-west-2) in the networking account. This allows on-premises servers to failover to these secondary Resolver inbound endpoints in case the region goes down.
  • A second set of forwarding rules is created in the networking account, which uses the outbound endpoint in us-west-2. These are shared with Account A and then associated with VPC in us-west-2.
  • In addition, to have DR across multiple on-premises locations, the on-premises servers should have a secondary backup DNS on-premises as well (not shown in the diagram).
    This ensures a simple DNS architecture for the DR setup, and seamless failover for applications in case of a region failure.

Considerations

  • If Application 1 needs to communicate to Application 2, then the PHZ from Account A must be shared with Account B. DNS queries can then be routed efficiently for those VPCs in different accounts.
  • Create additional IP addresses in a single AZ/subnet for the resolver endpoints, to handle large volumes of DNS traffic.
  • Look at Considerations while using Private Hosted Zones before implementing such architectures in your AWS environment.

Summary

Hybrid cloud environments can utilize the features of Route 53 Private Hosted Zones such as overlapping namespaces and the ability to perform cross-account and multi-region VPC association. This creates a unified DNS view for your application environments. The architecture allows for scalability and high availability for business applications.

Sophisticated Watering Hole Attack

Post Syndicated from Bruce Schneier original https://www.schneier.com/blog/archives/2021/01/sophisticated-watering-hole-attack.html

Google’s Project Zero has exposed a sophisticated watering-hole attack targeting both Windows and Android:

Some of the exploits were zero-days, meaning they targeted vulnerabilities that at the time were unknown to Google, Microsoft, and most outside researchers (both companies have since patched the security flaws). The hackers delivered the exploits through watering-hole attacks, which compromise sites frequented by the targets of interest and lace the sites with code that installs malware on visitors’ devices. The boobytrapped sites made use of two exploit servers, one for Windows users and the other for users of Android

The use of zero-days and complex infrastructure isn’t in itself a sign of sophistication, but it does show above-average skill by a professional team of hackers. Combined with the robustness of the attack code — ­which chained together multiple exploits in an efficient manner — the campaign demonstrates it was carried out by a “highly sophisticated actor.”

[…]

The modularity of the payloads, the interchangeable exploit chains, and the logging, targeting, and maturity of the operation also set the campaign apart, the researcher said.

No attribution was made, but the list of countries likely to be behind this isn’t very large. If you were to ask me to guess based on available information, I would guess it was the US — specifically, the NSA. It shows a care and precision that it’s known for. But I have no actual evidence for that guess.

All the vulnerabilities were fixed by last April.

Send localized messages using Amazon Pinpoint templates and standard demographic attributes

Post Syndicated from Mohit Palriwal original https://aws.amazon.com/blogs/messaging-and-targeting/send-localized-messages-using-pinpoint-templates-and-standard-demographic-attributes/

As your application user base expands into more countries and languages, it’s important to make sure messages are localized for each recipient to improve engagement. Localizing your messages helps you reach your audience with content specific to their language settings. Creating separate messages for each language and managing each template separately can require a lot of duplication effort. It is also challenging to manage and group templates based on all possible locales or specific campaigns.

Amazon Pinpoint‘s messaging template provides a way to build a single message with multiple localizations. You prepare localizations based on locale of your audience registered with Amazon Pinpoint project.

This blog post walks you through a solution that uses the locale of your user endpoints to build a localized messaging template. We provide you with a template that is used with an Amazon Pinpoint campaign or journeys to target your audience across multiple locale with localized message content. This solution is applicable for all supported channels under Amazon Pinpoint, SMS, email, push, voice. This blog explains the solution for a SMS channel-specific scenario.

Solution overview

The solution below describes the workflow to send localized messaging to a group of users across various locales. The first prerequisite is to create an Amazon Pinpoint project in your AWS account and enable corresponding channels for message sending. Next, you will create an Amazon Pinpoint template using locale-specific message variables and register users endpoints with a demographic locale property. Once segment and template resources are generated, you can create a localized message in your campaign or journey.

Prerequisites

Setting up the solution

1. Set up Amazon Pinpoint

First, create a new Amazon Pinpoint project and configure the desired channels from which you want to send localized messages.

2. Create a localized template

  1. Create an Amazon Pinpoint messaging template with supported message variables of your choice. This builds more dynamic and personalized content.
  2. Use Demographic.Locale from supported Endpoint attributes to customize your message content per locale using eq comparison helper.

Below is an example of using an endpoint standard locale attribute in a template.

{{#eq Demographic.Locale "fr-FR"}} Bienvenue dans l'expérience utilisateur Pinpoint! 
{{else eq Demographic.Locale "de-DE"}} Willkommen bei Pinpoint User Experience! 
{{else}} Welcome to Pinpoint User Experience ! {{/eq}}  

3. Register your users with locale property

Register your user endpoint to pinpoint with the demographic locale/timezone standard attribute.

The below is an example for registering an SMS endpoint with de-DE locale.
aws pinpoint update-endpoint –application-id $APP_ID –endpoint-id

$ENDPOINT_ID --endpoint-request '{"Address":"+19999999999","ChannelType":"SMS","Demographic":{"Locale":"de-DE", "Timezone": "Europe/Berlin"}}'

Note: You can also register your user endpoints using the import segment feature. This accepts a .csv file with all endpoints.

4. Create a segment with all locale users

Create an Amazon Pinpoint segment to define the audience you want to target with localized message.

5. Create a journey or campaign

  1. Create an Amazon Pinpoint campaign or journey.
  2. Use the template from earlier in Step 2.
  3. Create a segment with all locale users from Step 4.Note: You can also use Amazon Pinpoint local time and quiet time features to target your audience in their local time zone or at a specific global time (for example 10am GMT). This also respects the quiet hours (for example 23:00 to 8:00) specific to their local time zone based on the EndpointDemographic.Timezone property.


6. Execution:

A marketing campaign manager wants to send a localized message to every audience based of their preferred language.

  1. Creates a single journey targeting a segment with 2 endpoints (each with unique locale) from Step 4.
  2. Create a segment with all locale users using the template defined in Step 2.
  3. Create a localized template

Conclusion

The Amazon Pinpoint messaging template provides you the ease of managing a single template for multiple locales.

With a localized messaging template you can simply target your audience across locales and receive targeted analytics. Get started today by visiting Amazon Pinpoint’s webpage.

Other useful links


SAF Products Integration into Zabbix

Post Syndicated from Tatjana Dunce original https://blog.zabbix.com/saf-products-integration-into-zabbix/12978/

Top of the line point-to-point microwave equipment manufacturer SAF Tehnika has partnered with Zabbix to provide NMS capabilities to its end customers. SAF Tehnika appreciates Zabbix’s customizability, scalability, ease of template design, and SAF products integration.

Content

I. SAF Tehnika (1:14)
II. SAF point-to-point microwave systems (3:20)
III. SAF product lines (5:37)

√ Integra (5:54)
√ PhoeniX-G2 (6:41)

IV. SAF services (7:21)
V. SAF partnership with Zabbix (8:48)

√  Zabbix templates for SAF equipment (10:50)
√ Zabbix Maps view for Phoenix G2 (15:00)

VI. Zabbix services provided by SAF (17:56)
VII. Questions & Answers (20:00)

SAF Tehnika

SAF Tehnika comes from a really small country — Latvia, as well as Zabbix.

SAF Tehnika:

✓ has been around for over 20 years,
✓ has been profitable/has no debt balance sheet,
✓ is present in 130+ countries,
✓ has manufacturing facilities in the European Union,
✓ is ISO 9001 certified,
✓ is Zabbix Certified Partner since August 2020,
✓ is publicly traded on NASDAQ Riga Stock Exchange,
✓ has flexible R&D, and is able to provide custom solutions based on customer requirements.

SAF Tehnika is primarily manufacturing:

  • point-to-point systems,
  • hand-held MW spectrum analyzers,
  • Aranet wireless sensors and solutions.

SAF Tehnika main product groups

SAF point-to-point microwave systems

Point-to-point microwave systems are an alternative to a fiber line. Instead of a fiber line, we have two radio systems with the antenna installed on two towers. The distance between those towers could be anywhere from a few km up to 50 or even 100 km. The data is transmitted from one point to another wirelessly.

SAF Tehnika point-to-point MW system technology provides:

  • long-distance wireless links;
  • free and excellent technical support;
  • fast & easy deployment;
  • The 5-year standard warranty for SAF products as SAF Tehnika ensures their top quality thanks to using high-quality materials and manufacturing reliable chipsets, as well as chamber testing of all products;
  • solutions for:

√ WISPs,
√ TV and broadcasting (No.1 in the USA),
√ public safety,
√ utilities & mining,
√ enterprise networks,
√ local government & military,
√ low-latency/HFT (No.1 globally).

SAF product lines

The primary PTP Microwave product series manufactured by SAF Tehnika are Integra and Phoenix G2

SAF Tehnika main radio products

Integra

Integra is a full-outdoor radio, which can be attached directly to the antenna, so there is nothing indoors besides the power supply.

Integra-E — wireless fiber solution specifically tailored for dense urban deployment:

  • operates in E-band range,
  • can achieve the throughput of up to 10 Gbps per second,
  • operates in 2GHz bandwidth.

Integra-X — a powerful dual-core system for network backbone deployment, incorporates two radios in a single enclosure and two modem chains allowing this system to operate with built-in 2+0 XPIC, reaching the maximum data transmission capacity of up to 2.2 gigabits per second.

PhoeniX-G2

The PhoeniX G2 product line can either be split-mount with the modem installed indoors and radio — outdoors or full-indoors solution. For instance, the broadcast market is mostly using full-indoor solutions as they prefer to have all the equipment to be indoors and then have a long elliptical line going up to the antenna. Phoenix G2 product line features native ASI transmission in parallel with the IP traffic – a crucial requirement of our broadcast customers.

SAF services

SAF has also been offering different sets of services:

product training.
link planning.
technical support.
staging and configuration — enables the customers to have all the equipment labeled and configured before it gets to the customer.
FCC coordination — recently added to the SAF portfolio and offered only to the customers in the USA. This provides an opportunity to save time on link planning, FCC coordination, pre-configuration, and hardware purchase from the one-stop-shop – SAF Tehnika.

Zabbix deployment and support.

SAF partnership with Zabbix

Before partnering with Zabbix, SAF Tehnika had developed its own network management system and used it for many years. Unfortunately, this software was limited to SAF products. Adding other vendors’ products was a difficult and complicated process.

More and more SAF customers were inquiring about the possibility of adding other vendors’ products to the network management system. That is where Zabbix came in handy, as besides monitoring SAF products, Zabbix can also monitor other vendors’ products just by adding appropriate templates.

Zabbix is an open-source, advanced and robust platform with high customizability and scalability – there are virtually no limits to the number of devices Zabbix can monitor. I am confident our customers will appreciate all of these benefits and enjoy the ability to add SAF and other vendor products to the list of monitored devices.

Finally, SAF Tehnika and Zabbix are located in the same small town, so the partnership was easy and natural.

Zabbix templates for SAF equipment

Following training at Zabbix, SAF engineers obtained the certified specialist status and developed Zabbix SNMP-based templates for main product lines:

  • Integra-X, Integra-E, Integra-G, Integra-W, and Phoenix G2.

SAF main product line templates are available free of charge to all of SAF customers on the SAF webpage: https://www.saftehnika.com/en/downloads
(registration required).

Users proficient in Linux and familiar with Zabbix can definitely install and deploy these templates themselves. Otherwise, SAF specialists are ready to assist in the deployment and integration of Zabbix templates and tuning of the required parameters.

Zabbix dashboard for Integra X

We have an Integra-X link Zabbix dashboard shown as an example below. As Integra-X is a dual-core radio, we provide the monitoring parameters for two radios in a single enclosure.

Zabbix dashboard for Integra-X link

On the top, we display the main health parameters of the link, current received signal level, MSE or so-called noise level, the transmit power, and the IP address – a small summary of the link.

On the left, we display the parameters of the radio and the graphs for the last couple of minutes — the live graphs of the received signal level and MSE, the noise level of the RF link.

On the right, we have the same parameters for the remote side. In the middle, we have added a few parameters, which should be monitored, such as CPU load percentage, the current traffic over the link, and diagnostic parameters, such as the temperature of each of the modems.

At the bottom, we have added the alarm widget. In this example, the alarm of too low received signal level is shown. These alarms are also colored by their severity: red alarms are for disaster-level issues, blue alarms — for information.

From this dashboard, the customers are able to estimate the current status of the link and any issues that have appeared in the past. Note that Zabbix graphs can be easily customized to display the widgets or graphs of customer choice.

Zabbix Maps view for Phoenix G2

Zabbix Maps view for Phoenix G2 1+1 system

In the map, our full-indoor Phoenix G2 system is displayed in duplicate, as this is a 1+1 protected link. Each of the IDU,  ASI module, and radio module is protected by the second respective module.

Zabbix allows for naming each of these modules and for monitoring every module’s performance individually. In this example, the ASI module is colored in red as one of the ASI ports has lost the connection, while the radio unit’s red color shows that the received signal is lower than expected.

Zabbix dashboard for Phoenix G2 1+1 system

Besides the maps view, the dashboard for Phoenix G2 1+1 system shows the historical data like alarm log and graphs. The data in red indicates that an issue hasn’t been cleared yet. The data in green – an issue was resolved, for instance, a low signal level was restored after going down for a short period of time.

In the middle we see a summary graph of all four radios’ performance — two on the local side and two on the remote side. Here, we are monitoring the most important parameters — the received signal level and MSE i.e., the noise level.

The graph at the bottom is important for broadcast customers as the majority of them transmit ASI traffic besides Ethernet and IP traffic. Here they’re able to monitor how much traffic was going through this link in the past.

Zabbix services provided by SAF

Since SAF Tehnika has experienced Zabbix-certified specialists, who have developed these multiple templates, we are ready to provide Zabbix-related services to our end customers, such as:

  • Zabbix deployment on other customer’s machine, integration and configuration of all the parameters, and fine-tuning according to our customers’ requirements.
  • consulting services and provide technical support on an annual contract basis.

NOTE. SAF Zabbix support services are limited to SAF products.

SAF Tehnika is ready and eager to provide Zabbix related services to our customers. If you already have a SAF network and would be willing to integrate it into Zabbix or plan to deploy a new SAF network integrated with Zabbix, you can contact our offices.

SAF contact details

Questions & Answers

Question. You told us that you provide Zabbix for your customers and create templates to pass to them, and so on. But do you use Zabbix in your own environment, for instance, in your offices, to monitor your own infrastructure?

Answer. SAF has been using Zabbix for almost 10 years and we use it to monitor our internal infrastructure. Currently, SAF has three separate Zabbix networks: one for SAF IT system monitoring, the other for Kubernetes system monitoring (Aranet Cloud services), and a separate Zabbix server for testing purposes, where we are able to test SAF equipment as well as experiment with Zabbix server deployments, templates, etc.

Question. You have passed the specialist courses. Do you have any plans on becoming certified professionals?

Answer. Our specialists are definitely interested in Zabbix certified professionals’ courses. We will make the decision about that based on the revenue Zabbix will bring us and interest of our customers.

Question. You have already provided a couple of templates for Zabbix and for your customers. Do you have any interesting templates you are working on? Do you have plans to create or upgrade some existing templates?

Answer. So far, we have released the templates for the main product lines — Integra and Phoenix G2. We have a few product lines that are are more specialized, such as low-latency products and some older products, such as CFIP Lumina. In case any of our customers are interested in integrating these older products or low-latency products, we might create more templates.

Question. Do you plan to refine the templates to make them a part of the Zabbix out-of-the-box solution?

Answer. If Zabbix is going to approve our templates to make them a part of the out-of-the-box solution, it will benefit our customers in using and monitoring our products. We’ll be delighted to provide the templates for this purpose.
 

Injecting a Backdoor into SolarWinds Orion

Post Syndicated from Bruce Schneier original https://www.schneier.com/blog/archives/2021/01/injecting-a-backdoor-into-solarwinds-orion.html

Crowdstrike is reporting on a sophisticated piece of malware that was able to inject malware into the SolarWinds build process:

Key Points

  • SUNSPOT is StellarParticle’s malware used to insert the SUNBURST backdoor into software builds of the SolarWinds Orion IT management product.
  • SUNSPOT monitors running processes for those involved in compilation of the Orion product and replaces one of the source files to include the SUNBURST backdoor code.
  • Several safeguards were added to SUNSPOT to avoid the Orion builds from failing, potentially alerting developers to the adversary’s presence.

Analysis of a SolarWinds software build server provided insights into how the process was hijacked by StellarParticle in order to insert SUNBURST into the update packages. The design of SUNSPOT suggests StellarParticle developers invested a lot of effort to ensure the code was properly inserted and remained undetected, and prioritized operational security to avoid revealing their presence in the build environment to SolarWinds developers.

This, of course, reminds many of us of Ken Thompson’s thought experiment from his 1984 Turing Award lecture, “Reflections on Trusting Trust.” In that talk, he suggested that a malicious C compiler might add a backdoor into programs it compiles.

The moral is obvious. You can’t trust code that you did not totally create yourself. (Especially code from companies that employ people like me.) No amount of source-level verification or scrutiny will protect you from using untrusted code. In demonstrating the possibility of this kind of attack, I picked on the C compiler. I could have picked on any program-handling program such as an assembler, a loader, or even hardware microcode. As the level of program gets lower, these bugs will be harder and harder to detect. A well-installed microcode bug will be almost impossible to detect.

That’s all still true today.

Friday Squid Blogging: China Launches Six New Squid Jigging Vessels

Post Syndicated from Bruce Schneier original https://www.schneier.com/blog/archives/2021/01/friday-squid-blogging-china-launches-six-new-squid-jigging-vessels.html

From Pingtan Marine Enterprise:

The 6 large-scale squid jigging vessels are normally operating vessels that returned to China earlier this year from the waters of Southwest Atlantic Ocean for maintenance and repair. These vessels left the port of Mawei on December 17, 2020 and are sailing to the fishing grounds in the international waters of the Southeast Pacific Ocean for operation.

I wonder if the company will include this blog post in its PR roundup.

As usual, you can also use this squid post to talk about the security stories in the news that I haven’t covered.

Read my blog posting guidelines here.

Developing enterprise application patterns with the AWS CDK

Post Syndicated from Krishnakumar Rengarajan original https://aws.amazon.com/blogs/devops/developing-application-patterns-cdk/

Enterprises often need to standardize their infrastructure as code (IaC) for governance, compliance, and quality control reasons. You also need to manage and centrally publish updates to your IaC libraries. In this post, we demonstrate how to use the AWS Cloud Development Kit (AWS CDK) to define patterns for IaC and publish them for consumption in controlled releases using AWS CodeArtifact.

AWS CDK is an open-source software development framework to model and provision cloud application resources in programming languages such as TypeScript, JavaScript, Python, Java, and C#/.Net. The basic building blocks of AWS CDK are called constructs, which map to one or more AWS resources, and can be composed of other constructs. Constructs allow high-level abstractions to be defined as patterns. You can synthesize constructs into AWS CloudFormation templates and deploy them into an AWS account.

AWS CodeArtifact is a fully managed service for managing the lifecycle of software artifacts. You can use CodeArtifact to securely store, publish, and share software artifacts. Software artifacts are stored in repositories, which are aggregated into a domain. A CodeArtifact domain allows organizational policies to be applied across multiple repositories. You can use CodeArtifact with common build tools and package managers such as NuGet, Maven, Gradle, npm, yarn, pip, and twine.

Solution overview

In this solution, we complete the following steps:

  1. Create two AWS CDK pattern constructs in Typescript: one for traditional three-tier web applications and a second for serverless web applications.
  2. Publish the pattern constructs to CodeArtifact as npm packages. npm is the package manager for Node.js.
  3. Consume the pattern construct npm packages from CodeArtifact and use them to provision the AWS infrastructure.

We provide more information about the pattern constructs in the following sections. The source code mentioned in this blog is available in GitHub.

Note: The code provided in this blog post is for demonstration purposes only. You must ensure that it meets your security and production readiness requirements.

Traditional three-tier web application construct

The first pattern construct is for a traditional three-tier web application running on Amazon Elastic Compute Cloud (Amazon EC2), with AWS resources consisting of Application Load Balancer, an Autoscaling group and EC2 launch configuration, an Amazon Relational Database Service (Amazon RDS) or Amazon Aurora database, and AWS Secrets Manager. The following diagram illustrates this architecture.


Traditional stack architecture

Serverless web application construct

The second pattern construct is for a serverless application with AWS resources in AWS Lambda, Amazon API Gateway, and Amazon DynamoDB.

Serverless application architecture

Publishing and consuming pattern constructs

Both constructs are written in Typescript and published to CodeArtifact as npm packages. A semantic versioning scheme is used to version the construct packages. After a package gets published to CodeArtifact, teams can consume them for deploying AWS resources. The following diagram illustrates this architecture.

Pattern constructs

Prerequisites

Before getting started, complete the following steps:

  1. Clone the code from the GitHub repository for the traditional and serverless web application constructs:
    git clone https://github.com/aws-samples/aws-cdk-developing-application-patterns-blog.git
    cd aws-cdk-developing-application-patterns-blog
  2. Configure AWS Identity and Access Management (IAM) permissions by attaching IAM policies to the user, group, or role implementing this solution. The following policy files are in the iam folder in the root of the cloned repo:
    • BlogPublishArtifacts.json – The IAM policy to configure CodeArtifact and publish packages to it.
    • BlogConsumeTraditional.json – The IAM policy to consume the traditional three-tier web application construct from CodeArtifact and deploy it to an AWS account.
    • PublishArtifacts.json – The IAM policy to consume the serverless construct from CodeArtifact and deploy it to an AWS account.

Configuring CodeArtifact

In this step, we configure CodeArtifact for publishing the pattern constructs as npm packages. The following AWS resources are created:

  • A CodeArtifact domain named blog-domain
  • Two CodeArtifact repositories:
    • blog-npm-store – For configuring the upstream NPM repository.
    • blog-repository – For publishing custom packages.

Deploy the CodeArtifact resources with the following code:

cd prerequisites/
rm -rf package-lock.json node_modules
npm install
cdk deploy --require-approval never
cd ..

Log in to the blog-repository. This step is needed for publishing and consuming the npm packages. See the following code:

aws codeartifact login \
     --tool npm \
     --domain blog-domain \
     --domain-owner $(aws sts get-caller-identity --output text --query 'Account') \
     --repository blog-repository

Publishing the pattern constructs

  1. Change the directory to the serverless construct:
    cd serverless
  2. Install the required npm packages:
    rm package-lock.json && rm -rf node_modules
    npm install
    
  3. Build the npm project:
    npm run build
  4. Publish the construct npm package to the CodeArtifact repository:
    npm publish

    Follow the previously mentioned steps for building and publishing a traditional (classic Load Balancer plus Amazon EC2) web app by running these commands in the traditional directory.

    If the publishing is successful, you see messages like the following screenshots. The following screenshot shows the traditional infrastructure.

    Successful publishing of Traditional construct package to CodeArtifact

    The following screenshot shows the message for the serverless infrastructure.

    Successful publishing of Serverless construct package to CodeArtifact

    We just published version 1.0.1 of both the traditional and serverless web app constructs. To release a new version, we can simply update the version attribute in the package.json file in the traditional or serverless folder and repeat the last two steps.

    The following code snippet is for the traditional construct:

    {
        "name": "traditional-infrastructure",
        "main": "lib/index.js",
        "files": [
            "lib/*.js",
            "src"
        ],
        "types": "lib/index.d.ts",
        "version": "1.0.1",
    ...
    }

    The following code snippet is for the serverless construct:

    {
        "name": "serverless-infrastructure",
        "main": "lib/index.js",
        "files": [
            "lib/*.js",
            "src"
        ],
        "types": "lib/index.d.ts",
        "version": "1.0.1",
    ...
    }

Consuming the pattern constructs from CodeArtifact

In this step, we demonstrate how the pattern constructs published in the previous steps can be consumed and used to provision AWS infrastructure.

  1. From the root of the GitHub package, change the directory to the examples directory containing code for consuming traditional or serverless constructs.To consume the traditional construct, use the following code:
    cd examples/traditional

    To consume the serverless construct, use the following code:

    cd examples/serverless
  2. Open the package.json file in either directory and note that the packages and versions we consume are listed in the dependencies section, along with their version.
    The following code shows the traditional web app construct dependencies:

    "dependencies": {
        "@aws-cdk/core": "1.30.0",
        "traditional-infrastructure": "1.0.1",
        "aws-cdk": "1.47.0"
    }

    The following code shows the serverless web app construct dependencies:

    "dependencies": {
        "@aws-cdk/core": "1.30.0",
        "serverless-infrastructure": "1.0.1",
        "aws-cdk": "1.47.0"
    }
  3. Install the pattern artifact npm package along with the dependencies:
    rm package-lock.json && rm -rf node_modules
    npm install
    
  4. As an optional step, if you need to override the default Lambda function code, build the npm project. The following commands build the Lambda function source code:
    cd ../override-serverless
    npm run build
    cd -
  5. Bootstrap the project with the following code:
    cdk bootstrap

    This step is applicable for serverless applications only. It creates the Amazon Simple Storage Service (Amazon S3) staging bucket where the Lambda function code and artifacts are stored.

  6. Deploy the construct:
    cdk deploy --require-approval never

    If the deployment is successful, you see messages similar to the following screenshots. The following screenshot shows the traditional stack output, with the URL of the Load Balancer endpoint.

    Traditional CloudFormation stack outputs

    The following screenshot shows the serverless stack output, with the URL of the API Gateway endpoint.

    Serverless CloudFormation stack outputs

    You can test the endpoint for both constructs using a web browser or the following curl command:

    curl <endpoint output>

    The traditional web app endpoint returns a response similar to the following:

    [{"app": "traditional", "id": 1605186496, "purpose": "blog"}]

    The serverless stack returns two outputs. Use the output named ServerlessStack-v1.Api. See the following code:

    [{"purpose":"blog","app":"serverless","itemId":"1605190688947"}]

  7. Optionally, upgrade to a new version of pattern construct.
    Let’s assume that a new version of the serverless construct, version 1.0.2, has been published, and we want to upgrade our AWS infrastructure to this version. To do this, edit the package.json file and change the traditional-infrastructure or serverless-infrastructure package version in the dependencies section to 1.0.2. See the following code example:

    "dependencies": {
        "@aws-cdk/core": "1.30.0",
        "serverless-infrastructure": "1.0.2",
        "aws-cdk": "1.47.0"
    }

    To update the serverless-infrastructure package to 1.0.2, run the following command:

    npm update

    Then redeploy the CloudFormation stack:

    cdk deploy --require-approval never

Cleaning up

To avoid incurring future charges, clean up the resources you created.

  1. Delete all AWS resources that were created using the pattern constructs. We can use the AWS CDK toolkit to clean up all the resources:
    cdk destroy --force

    For more information about the AWS CDK toolkit, see Toolkit reference. Alternatively, delete the stack on the AWS CloudFormation console.

  2. Delete the CodeArtifact resources by deleting the CloudFormation stack that was deployed via AWS CDK:
    cd prerequisites
    cdk destroy –force
    

Conclusion

In this post, we demonstrated how to publish AWS CDK pattern constructs to CodeArtifact as npm packages. We also showed how teams can consume the published pattern constructs and use them to provision their AWS infrastructure.

This mechanism allows your infrastructure for AWS services to be provisioned from the configuration that has been vetted for quality control and security and governance checks. It also provides control over when new versions of the pattern constructs are released, and when the teams consuming the constructs can upgrade to the newly released versions.

About the Authors

Usman Umar


Usman Umar is a Sr. Applications Architect at AWS Professional Services. He is passionate about developing innovative ways to solve hard technical problems for the customers. In his free time, he likes going on biking trails, doing car modifications, and spending time with his family.


Krishnakumar Rengarajan


Krishnakumar Rengarajan is a DevOps Consultant with AWS Professional Services. He enjoys working with customers and focuses on building and delivering automated solutions that enables customers on their AWS cloud journeys.

Click Here to Kill Everybody Sale

Post Syndicated from Bruce Schneier original https://www.schneier.com/blog/archives/2021/01/click-here-to-kill-everybody-sale.html

For a limited time, I am selling signed copies of Click Here to Kill Everybody in hardcover for just $6, plus shipping.

Note that I have had occasional problems with international shipping. The book just disappears somewhere in the process. At this price, international orders are at the buyer’s risk. Also, the USPS keeps reminding us that shipping — both US and international — may be delayed during the pandemic.

I have 500 copies of the book available. When they’re gone, the sale is over and the price will revert to normal.

Order here.

EDITED TO ADD: I was able to get another 500 from the publisher, since the first 500 sold out so quickly.

Please be patient on delivery. There are already 550 orders, and that’s a lot of work to sign and mail. I’m going to be doing them a few at a time over the next several weeks. So all of you people reading this paragraph before ordering, understand that there are a lot of people ahead of you in line.

EDITED TO ADD (1/16): I am sold out. If I can get more copies, I’ll hold another sale after I sign and mail the 1,000 copies that you all purchased.

Cell Phone Location Privacy

Post Syndicated from Bruce Schneier original https://www.schneier.com/blog/archives/2021/01/cell-phone-location-privacy.html

We all know that our cell phones constantly give our location away to our mobile network operators; that’s how they work. A group of researchers has figured out a way to fix that. “Pretty Good Phone Privacy” (PGPP) protects both user identity and user location using the existing cellular networks. It protects users from fake cell phone towers (IMSI-catchers) and surveillance by cell providers.

It’s a clever system. The players are the user, a traditional mobile network operator (MNO) like AT&T or Verizon, and a new mobile virtual network operator (MVNO). MVNOs aren’t new. They’re intermediaries like Cricket and Boost.

Here’s how it works:

  1. One-time setup: The user’s phone gets a new SIM from the MVNO. All MVNO SIMs are identical.
  2. Monthly: The user pays their bill to the MVNO (credit card or otherwise) and the phone gets anonymous authentication (using Chaum blind signatures) tokens for each time slice (e.g., hour) in the coming month.
  3. Ongoing: When the phone talks to a tower (run by the MNO), it sends a token for the current time slice. This is relayed to a MVNO backend server, which checks the Chaum blind signature of the token. If it’s valid, the MVNO tells the MNO that the user is authenticated, and the user receives a temporary random ID and an IP address. (Again, this is now MVNOs like Boost already work.)
  4. On demand: The user uses the phone normally.

The MNO doesn’t have to modify its system in any way. The PGPP MVNO implementation is in software. The user’s traffic is sent to the MVNO gateway and then out onto the Internet, potentially even using a VPN.

All connectivity is data connectivity in cell networks today. The user can choose to be data-only (e.g., use Signal for voice), or use the MVNO or a third party for VoIP service that will look just like normal telephony.

The group prototyped and tested everything with real phones in the lab. Their approach adds essentially zero latency, and doesn’t introduce any new bottlenecks, so it doesn’t have performance/scalability problems like most anonymity networks. The service could handle tens of millions of users on a single server, because it only has to do infrequent authentication, though for resilience you’d probably run more.

The paper is here.

Introducing advanced segmentation in Amazon Pinpoint

Post Syndicated from Srini Sekaran original https://aws.amazon.com/blogs/messaging-and-targeting/introducing-advanced-segmentation-in-amazon-pinpoint/

Today, Amazon Pinpoint announced the launch of several new segmentation capabilities for Amazon Pinpoint. Amazon Pinpoint now provides customers additional filters to perform more granular segmentation. You can increase the level of campaign and message personalization by being able to reach more specific audiences.

Today’s end users require consistent and personalized experiences across channels such as email, SMS, and push. On average, 71% of consumers feel frustrated when their user experience is impersonal1. The ability to target a specific audience is a fundamental step to delivering personalized experiences. However, marketers struggle to target the right audience due to technical barriers such as the need for query language to segment groups. This is particularly resonant for organizations with a large pool of customer information. For these teams, understanding and targeting an audience based on preferences and behavior often extends to manual workarounds such as using spreadsheets.

With more data at their disposal, marketers want the ability to filter by user attributes in terms of metrics and time so they can send the right message to the right audience, at the right time.

Amazon Pinpoint now provides comparative and time-based filters, unlocking more use cases for targeting and retargeting. These filters allow you, for example, to define a segment of mobile users between the ages of 18 and 24 that joined after a October 24, 2020 with a lifetime value of more than $500. For marketers, being able to create defined segments such as this helps them increase user engagement by allowing them to tailor the right messaging and campaigns to specific sub-groups based on their characteristics.

When creating a segment, you will now have access to more segmentation filters including greater than, less than, between, before, and after. You can combine filters and create specific segments directly on the Pinpoint console or the CLI to build targeted and relevant campaigns that increase user engagement and marketing efficiency.

Amazon Pinpoint now provides the following filters to help you define and target the specific audience you would like to reach in your marketing campaigns:

  • Comparative filters: greater than, less than, equals, greater than or equals, less than or equals — a certain value

  • Matching filters: is, is not, contains — a certain string or text

  • Date filters: before, after, between, on — a certain date

To learn more about how you can create targeted campaigns with new segmentation capabilities, visit https://aws.amazon.com/pinpoint.

  1. https://www.forbes.com/sites/blakemorgan/2020/02/18/50-stats-showing-the-power-of-personalization/?sh=637812d52a94