Tag Archives: Amazon Bedrock

Build a contract compliance search system with Amazon OpenSearch

Post Syndicated from Durga Prasad original https://aws.amazon.com/blogs/big-data/build-a-contract-compliance-search-system-with-amazon-opensearch/

For legal and compliance teams, auditing a repository of thousands of contracts for a single regulatory obligation shouldn’t take weeks. But with keyword search, it often does. A search for “inadvertent access notification” returns exact matches while missing functionally equivalent clauses such as “security incident disclosure” or “unauthorized access reporting.” This creates two problems:

Discovery gap: Critical risk exposure goes undetected because keyword search cannot match semantically equivalent terms across different contracts.

Review latency: After finding relevant contracts, legal counsel must manually scan lengthy documents to locate the specific clauses that matter. This process can stretch from minutes to hours per document.

Amazon OpenSearch Service is a fully managed search and analytics service that configures, manages, and scales OpenSearch clusters in the AWS Cloud. It supports use cases from log analytics and application monitoring to full-text search and real-time security analytics. It also supports AI-powered semantic search.

Amazon OpenSearch Service addresses both problems through two capabilities:

  • Semantic search retrieves contracts based on meaning rather than exact keyword matches, closing the discovery gap.
  • Semantic highlighting pinpoints the exact clauses within retrieved contracts that answer the query, reducing review time from hours of manual scanning to seconds of targeted reading.

In this post, you build a contract compliance search system that combines semantic search with semantic highlighting in Amazon OpenSearch Service. You deploy the solution using two AWS CloudFormation stacks, test it with synthetic contract documents, and see how a single query surfaces both the right contracts and the right clauses within them.

Solution overview

The solution uses a two-stage retrieval and extraction pipeline. First, semantic search identifies relevant contracts across the repository. Then, semantic highlighting marks the specific clauses within those contracts that match the query intent.

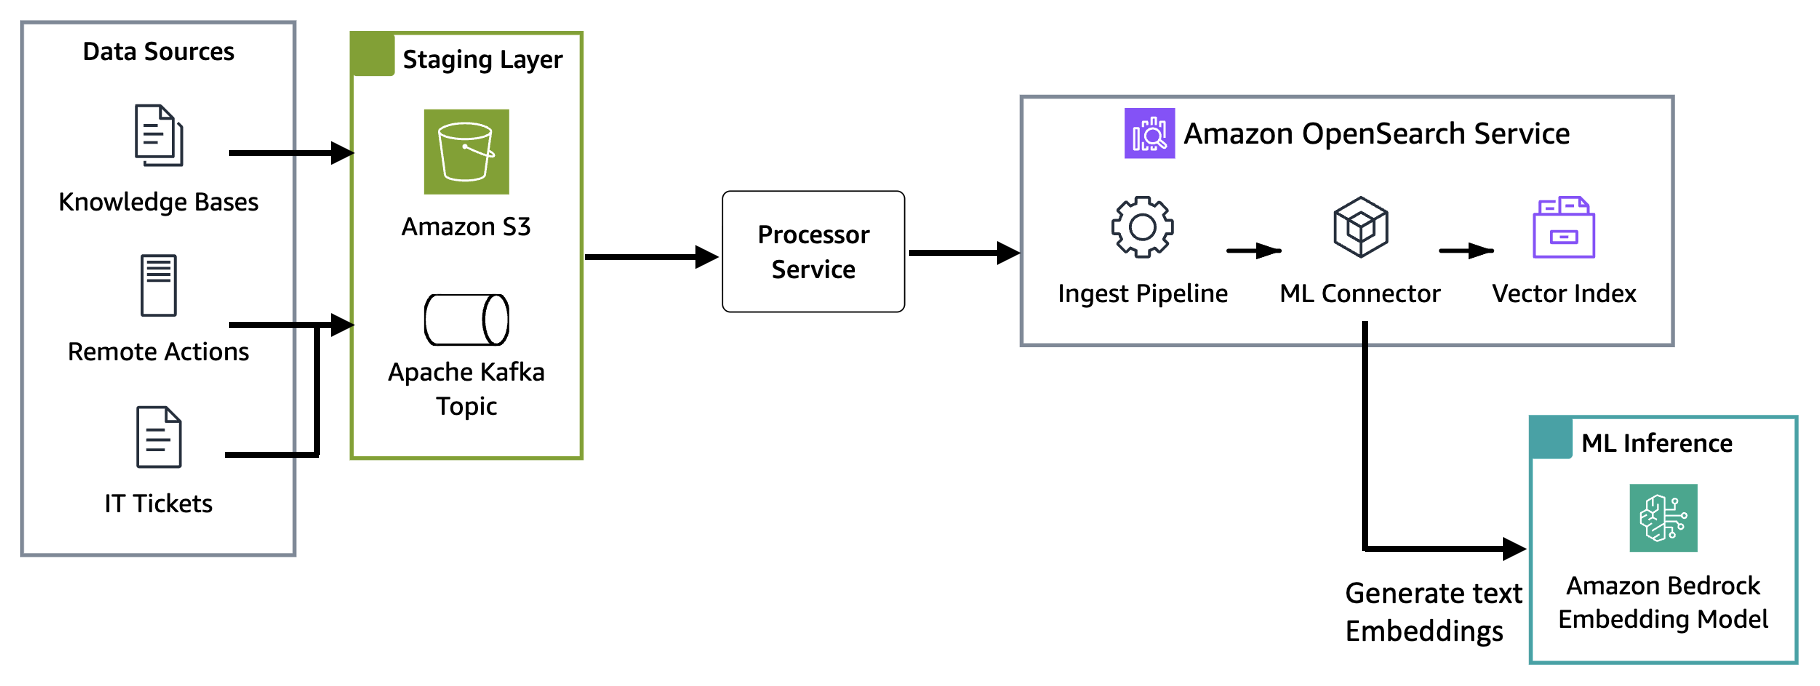
The following diagram illustrates the solution architecture:

Solution architecture showing contracts flowing from Amazon S3 through OpenSearch Ingestion and Amazon Bedrock embeddings to semantic search and Amazon SageMaker AI highlighting

  1. Upload contracts to Amazon Simple Storage Service (Amazon S3) – Contract documents (JSON format) are uploaded to an Amazon S3 bucket, which serves as the centralized document repository.
  2. Amazon OpenSearch Ingestion (OSI) reads from S3 – A serverless OSI pipeline detects new documents in the S3 bucket and reads them for processing.
  3. OpenSearch ingest pipeline generates embeddings through Amazon Bedrock – As documents arrive, the ingest pipeline’s text_embedding processor invokes Amazon Titan Text Embeddings V2 through an ML Commons Bedrock connector. This converts contract text into 1024-dimension vector representations, stored in a k-NN index that uses the faiss engine.
  4. User submits a search query – A user queries the system with natural language (for example, “data protection regulations”) through a test AWS Lambda function that forwards the request to OpenSearch using the neural query type.
  5. OpenSearch generates the query embedding – OpenSearch converts the user’s natural language query into a vector embedding using the same machine learning (ML) Commons Amazon Bedrock connector and Amazon Titan V2 model.
  6. Amazon OpenSearch Service performs semantic search – OpenSearch uses k-NN vector similarity to retrieve contracts that are semantically relevant to the query, even when exact terminology differs.
  7. Amazon SageMaker AI performs semantic highlighting – The opensearch-semantic-highlighter-v1 model, hosted on an Amazon SageMaker AI GPU endpoint, scores sentence relevance using cross-encoder inference and wraps the matching clauses in <em> tags for targeted reading.

How semantic search and semantic highlighting work together

The system processes queries in two steps:

Step 1 – Semantic search (document discovery): You query the contract corpus using natural language. The system retrieves contracts with semantically similar concepts, even when exact terminology differs. For example, searching for “force majeure” returns contracts discussing “natural disasters” or “unforeseeable circumstances” because the system understands these concepts are related.

Step 2 – Semantic highlighting (clause identification): After relevant contracts are retrieved, semantic highlighting automatically marks the clauses that semantically match your search intent. Instead of scanning pages of legal text, you immediately see the specific paragraphs that answer your question.

The difference between standard keyword highlighting and semantic highlighting is significant:

  • Keyword highlighting wraps individual matching words: <em>termination</em> and <em>rights</em>.
  • Semantic highlighting wraps entire relevant clauses: <em>Upon termination, the consultant must return all confidential information and proprietary materials within 15 business days.</em>.

This reduces false positives, cuts review time, and provides explainability for why each document was retrieved.

Semantic highlighting model deployment

Before the system can highlight clauses based on meaning, the opensearch-semantic-highlighter-v1 model must be deployed to an Amazon SageMaker AI GPU endpoint and registered with the OpenSearch ML Commons plugin through a remote connector.

Stack 2 of the CloudFormation deployment automates this process. It performs the following steps:

  1. Downloads the model artifact from an AWS-managed source and deploys it to an Amazon SageMaker AI endpoint (ml.g5.xlarge).
  2. Creates a remote ML Commons connector in OpenSearch that points to the SageMaker endpoint.
  3. Registers the model with the QUESTION_ANSWERING function so that OpenSearch can use the model’s cross-encoder capabilities to score sentence relevance at query time.

The equivalent manual registration call (handled automatically by the stack) is:

POST /_plugins/_ml/models/_register?deploy=true
{
  "name": "amazon/sentence-highlighting/opensearch-semantic-highlighter-v1",
  "version": "1.0.0",
  "model_format": "TORCH_SCRIPT",
  "function_name": "QUESTION_ANSWERING"
}

You don’t need to run this manually. The deployment script and CloudFormation stack handle model registration end-to-end. The resulting model ID is automatically passed to the query Lambda function for use in semantic highlighting requests.

Index configuration

The index uses a k-NN vector field with 1024 dimensions (matching the Amazon Titan V2 output) and the faiss engine with HNSW method. The mapping includes both a knn_vector field for semantic retrieval and a standard text field for keyword matching and highlighting. When you search for “liability limits,” OpenSearch first retrieves documents through vector similarity, then uses the Amazon SageMaker AI model to identify and wrap the specific relevant sentences in <em> tags.

PUT /legal-contracts-index
{
  "settings": { "index.knn": true },
  "mappings": {
    "properties": {
      "clause_text": { "type": "text" },
      "clause_embedding": {
        "type": "knn_vector",
        "dimension": 1024,
        "method": {
          "name": "hnsw",
          "engine": "faiss",
          "space_type": "l2"
        }
      }
    }
  }
}

Implementation steps

This section walks you through deploying the solution using two AWS CloudFormation stacks and two shell scripts. You first set up the core infrastructure (OpenSearch, ingestion pipeline, and ML Commons Bedrock connector), then deploy the semantic highlighting model on Amazon SageMaker AI.

Prerequisites

To deploy this solution, you need:

  • An active AWS account with permissions to create Amazon S3 buckets, AWS Lambda functions, Amazon SageMaker AI endpoints, Amazon Bedrock model access, Amazon OpenSearch Ingestion pipelines, Amazon OpenSearch Service domains, and AWS Identity and Access Management (IAM) roles (including iam:PassRole and sts:AssumeRole). For the exact least-privilege policy, see iam-deployer-policy.json in the repository. Both CloudFormation stacks require the CAPABILITY_NAMED_IAM acknowledgement.
  • Amazon Bedrock model access enabled for Amazon Titan Text Embeddings V2 (amazon.titan-embed-text-v2:0).
  • Familiarity with AWS CloudFormation.
  • Estimated deployment time: approximately 35 minutes.
  • Estimated cost: approximately USD $ 2.00–3.00 for a quick demo. Delete the stacks promptly after testing.
  • This post uses US East (N. Virginia) as the deployment AWS Region. Verify service availability in your preferred Region before deploying.

Deploy the solution

The solution deploys using two AWS CloudFormation stacks and two shell scripts. The demo includes synthetic contract documents covering common contract types including software licenses, data processing agreements, managed services, and software as a service (SaaS) subscriptions.

Clone the repository and run the deployment script:

git clone https://github.com/aws-samples/sample-contract-compliance-search-amazon-opensearch.git
cd sample-contract-compliance-search-amazon-opensearch
./deploy.sh

The deployment script creates the following resources across two stacks:

Stack 1:

  • An Amazon OpenSearch Service domain with fine-grained access control.
  • An Amazon OpenSearch Ingestion (OSI) pipeline that reads contracts from S3 and sends them to OpenSearch for indexing.
  • An ML Commons Bedrock connector and ingest pipeline that automatically generates 1024-dimension vector embeddings through Amazon Titan Text Embeddings V2 during document indexing.
  • A test Lambda function for querying the OpenSearch index using keyword, neural, or hybrid search with semantic highlighting support.
  • An S3 bucket for storing contract documents.
  • IAM roles for Lambda functions, the OSI pipeline, and OpenSearch access.

Stack 2:

  • An Amazon SageMaker AI endpoint hosting the semantic highlighting model.
  • A Lambda function that creates an ML Commons remote connector in OpenSearch and registers the highlighting model.

After both stacks deploy, the script automatically configures OpenSearch (role mappings, Amazon Bedrock connector, embedding model, k-NN index), ingests the sample contract data, and registers the semantic highlighting model.

The total deployment takes approximately 35 minutes to complete.

(Optional) Automated deployment with Claude Code CLI

If you have Claude Code CLI installed, you can deploy the solution using an AI-assisted workflow that creates a least-privilege IAM role scoped to this demo before deploying:

git clone https://github.com/aws-samples/sample-contract-compliance-search-amazon-opensearch.git
cd sample-contract-compliance-search-amazon-opensearch
./scripts/create-deployer-role.sh
export OS_DEMO_DEPLOYER_ROLE=arn:aws:iam::<ACCOUNT_ID>:role/os-demo-deployer-role
export AWS_DEFAULT_REGION=us-east-1
claude "Deploy the OpenSearch semantic search demo following README.md"

Claude Code reads the repository instructions, assumes the deployer role, deploys both CloudFormation stacks in order, runs the setup scripts, and verifies the deployment end-to-end. The deployer role restricts actions to resources prefixed with os-demo-*, following the principle of least privilege.

Test the solution

After the deployment succeeds, follow these steps to test the solution.

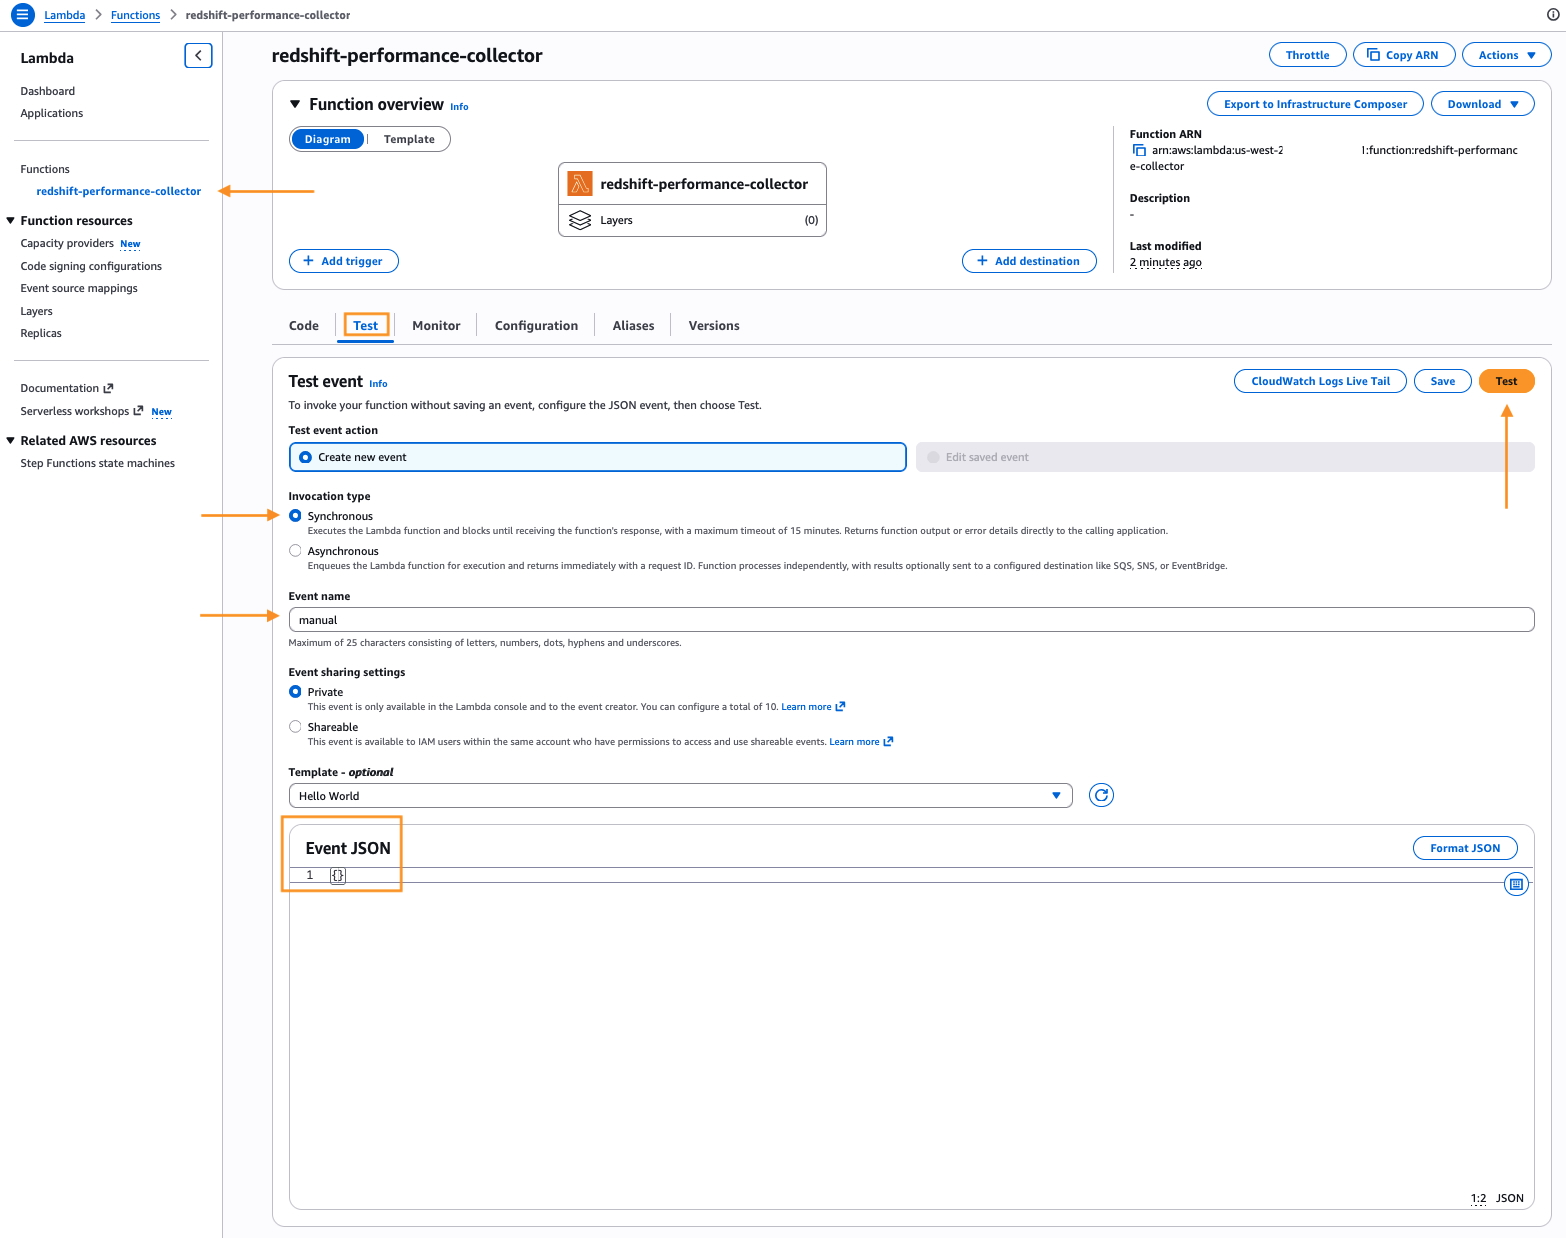
  1. On the Lambda console, choose Functions in the navigation pane.
  2. Choose the function that has os-demo-query in its name.
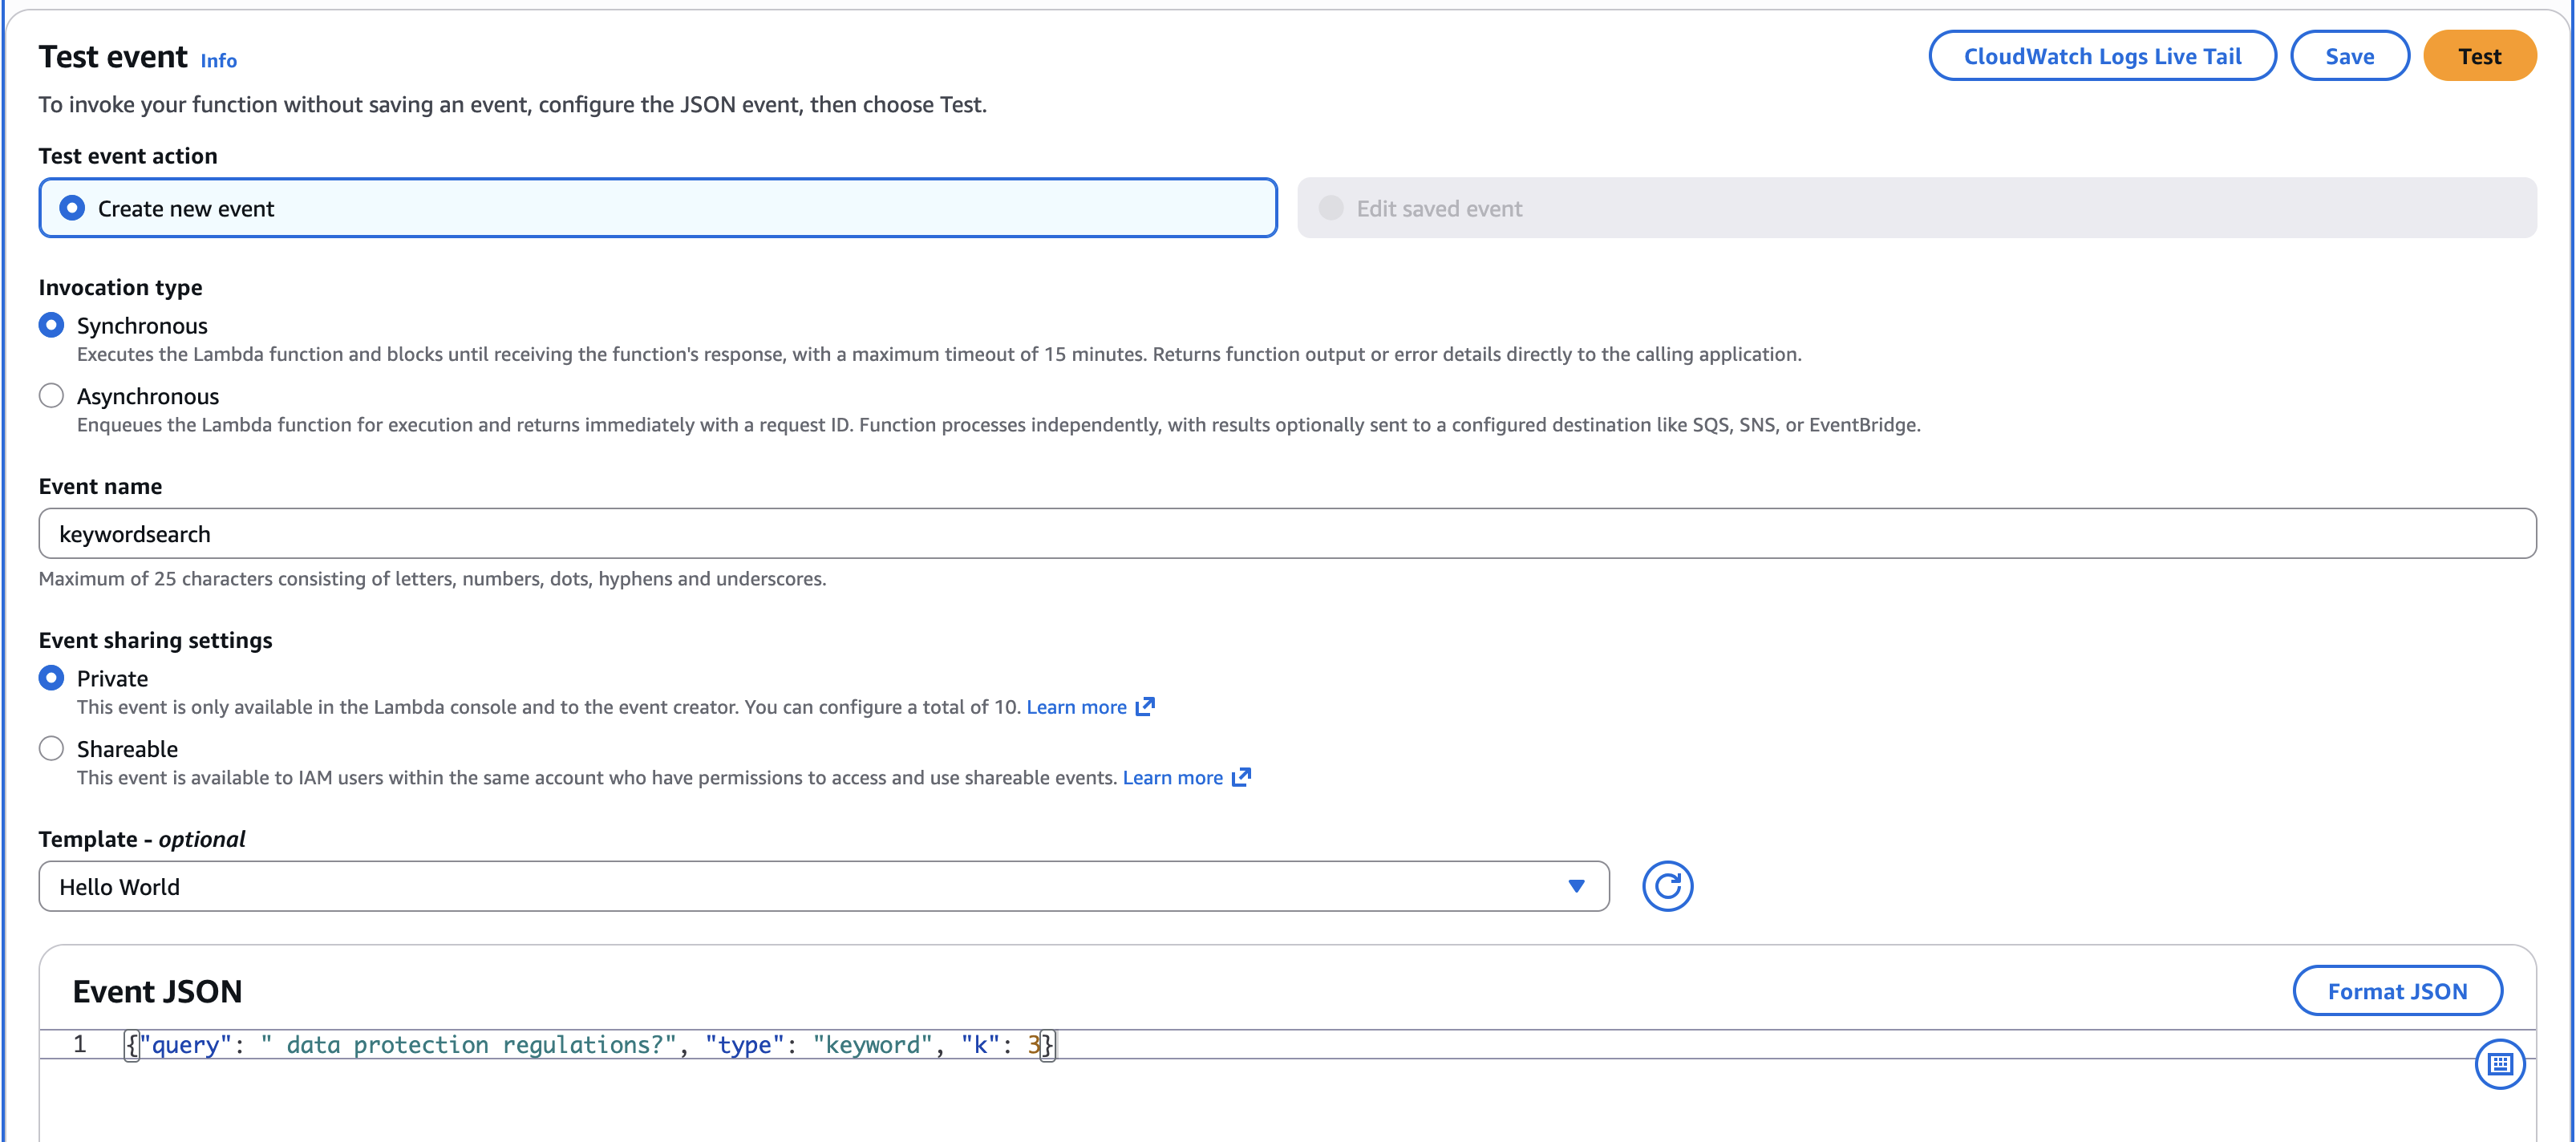
  3. On the Test tab, in the Event JSON paste this keyword search query {"query": "data protection regulations?", "type": "keyword", "k": 3}
  4. Choose Test to run the Lambda function.

The following screenshot shows the Lambda function test configuration on the AWS Management Console with the keyword search query.

Lambda console Test tab with the keyword search query entered in the Event JSON field

The function processes the query in two ways depending on the search type:

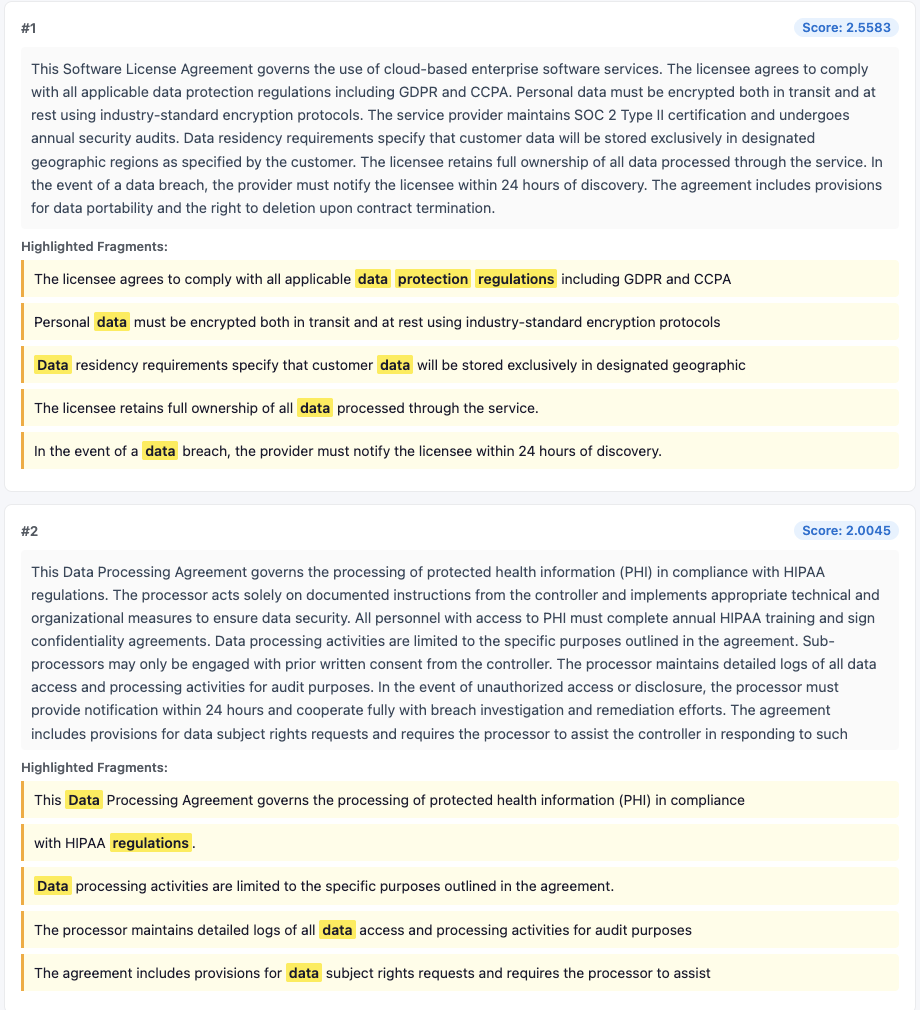
For keyword search (enter: keyword): The function sends a standard match query to OpenSearch, which returns documents containing the exact query terms. The highlight fragments wrap individual matching words like <em>termination</em> and <em>rights</em>.

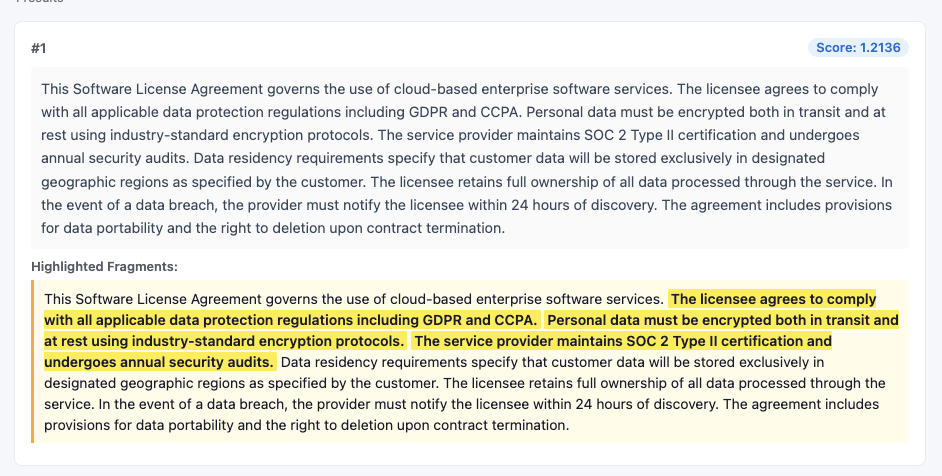
For neural search (enter: neural): The function sends a hybrid query to OpenSearch combining k-NN (semantic similarity) with keyword matching. OpenSearch automatically generates the query embedding through the ML Commons Amazon Bedrock connector using the same Amazon Titan V2 model. This returns semantically related documents even if they don’t contain the exact query terms. The SageMaker endpoint powers the semantic highlighting, identifying the most relevant clauses within each retrieved document. It wraps entire passages like <em>Upon termination, the consultant must return all confidential information and proprietary materials within 15 business days.</em>.

  1. Download the highlight viewer HTML file and open it in the browser. This file helps you view the highlighted text.
  2. Copy the entire execution output of the Lambda execution, paste it into the placeholder in the HTML file, and then choose Load Results.
  3. The following screenshot shows that only the matching keywords are highlighted.

Highlight viewer showing only individual keywords highlighted in the keyword search results

  1. Next, paste the neural search query as input to the Lambda function to see how semantic highlighting works: {"query": "data protection regulations", "type": "neural", "k": 1}
  2. Choose Test to run, and then paste the entire output into the HTML viewer.

The viewer now displays entire sentences highlighted instead of individual keywords.

Highlight viewer showing entire relevant clauses highlighted in the neural search results

Optimizing for scale: batch semantic highlighting

In a standard search, a query might return dozens of relevant contracts. Using the default single inference mode, OpenSearch makes a separate ML call for every document in the result set. For a compliance officer reviewing 50 contracts, this sequential processing introduces noticeable latency.

OpenSearch 3.3 introduced batch inference mode to address this. Batch inference collects the matching documents and processes them in a single ML inference call. In the contract compliance use case, this shifts the performance characteristic from multiple sequential roundtrips to a single parallel execution on the Amazon SageMaker AI GPU.

To enable batch inference, first configure the cluster setting:

PUT _cluster/settings
{
  "persistent": {
    "search.pipeline.enabled_system_generated_factories": ["semantic-highlighter"]
  }
}

Then add batch_inference: true to your highlight options. The following query searches for data privacy clauses across the contracts and highlights the top 10 results using a single batch call:

POST /legal-contracts-index/_search
{
  "query": {
    "neural": {
      "clause_embedding": {
        "query_text": "standard for inadvertent access notification",
        "model_id": "<TEXT_EMBEDDING_MODEL_ID>",
        "k": 10
      }
    }
  },
  "highlight": {
    "fields": {
      "clause_text": { "type": "semantic" }
    },
    "options": {
      "model_id": "<REMOTE_HIGHLIGHTER_MODEL_ID>",
      "batch_inference": true,
      "max_inference_batch_size": 50
    }
  }
}

Best practices

Follow these recommendations to optimize performance, security, and cost-efficiency when deploying the contract compliance search system in production.

  • Experiment with overlapping chunk sizes (for example, 500 characters with a 10 percent overlap) in your OSI pipeline to verify that context is preserved for long indemnification or liability clauses.
  • Verify that your Amazon S3 buckets and OpenSearch domains are encrypted using AWS Key Management Service (AWS KMS). For production workloads containing sensitive data, make sure that all traffic stays within your virtual private cloud (VPC) through interface endpoints.

This demo uses simplified configurations for learning purposes. For production deployments, implement VPC isolation, AWS KMS encryption with customer-managed keys, and multi-AZ OpenSearch clusters.

Clean up resources

To avoid ongoing charges, delete the AWS CloudFormation stacks and associated resources:

  1. On the AWS CloudFormation console, choose Stacks in the navigation pane.
  2. Select the os-demo-highlighting stack (Stack 2) and choose Delete. Wait for deletion to complete.
  3. Select the os-demo-search stack (Stack 1) and choose Delete. Stack deletion takes approximately 10–15 minutes to complete.

The stack deletion will automatically remove:

  • OpenSearch domain.
  • SageMaker model and endpoint.
  • Lambda functions.
  • IAM roles and policies.
  1. After both stacks are deleted, manually delete the S3 bucket (opensearch-cfn-semantic-highlighting-us-east-1-<ACCOUNT_ID>) created for model artifacts. This bucket is provisioned at deploy time and is not managed by CloudFormation. Replace <ACCOUNT_ID> with your AWS account ID in the bucket name.

Conclusion

In this post, you built a contract compliance search system that combines semantic search with semantic highlighting in Amazon OpenSearch Service. The system helps close the discovery gap by retrieving contracts based on meaning rather than exact keywords, and it reduces review latency by highlighting the specific clauses that answer your query.

While we focused on legal agreements, the architecture described here is a blueprint for domains requiring high-stakes document discovery, including:

  • Regulatory filings: Identifying specific compliance mandates in financial reports.
  • Technical documentation: Pinpointing troubleshooting steps across massive product manuals.
  • Research and academia: Isolating specific methodologies within thousands of scientific papers.
  • Internal knowledge bases: Empowering employees to find exact policy language instantly.

To get started, deploy the solution from the sample repository on GitHub and try semantic search in the Amazon OpenSearch Service console. For more information about semantic search, see Semantic search in the Amazon OpenSearch Service Developer Guide.


About the authors

Durga Prasad

Durga Prasad

Durga is a Senior Consultant at AWS, specializing in the Data and AI/ML. He has over 18 years of industry experience and is passionate about helping customers design, prototype, and scale Big Data and Generative AI applications using AWS native and open-source tech stacks.

Chanpreet Singh

Chanpreet Singh

Chanpreet is a Senior Consultant at AWS with 19 years of industry experience, specializing in Data Analytics and AI/ML solutions. He partners with enterprise customers to architect and implement cutting-edge solutions in Big Data, Machine Learning, and Generative AI using AWS native services, partner solutions and open-source technologies. A passionate technologist and problem solver, he balances his professional life with nature exploration, reading, and quality family time.

AWS Weekly Roundup: Local Zone in Athens, Claude Opus 5 on AWS, Lambda durable execution for .NET, and more (July 27, 2026)

Post Syndicated from Daniel Abib original https://aws.amazon.com/blogs/aws/aws-weekly-roundup-july-27-2026/

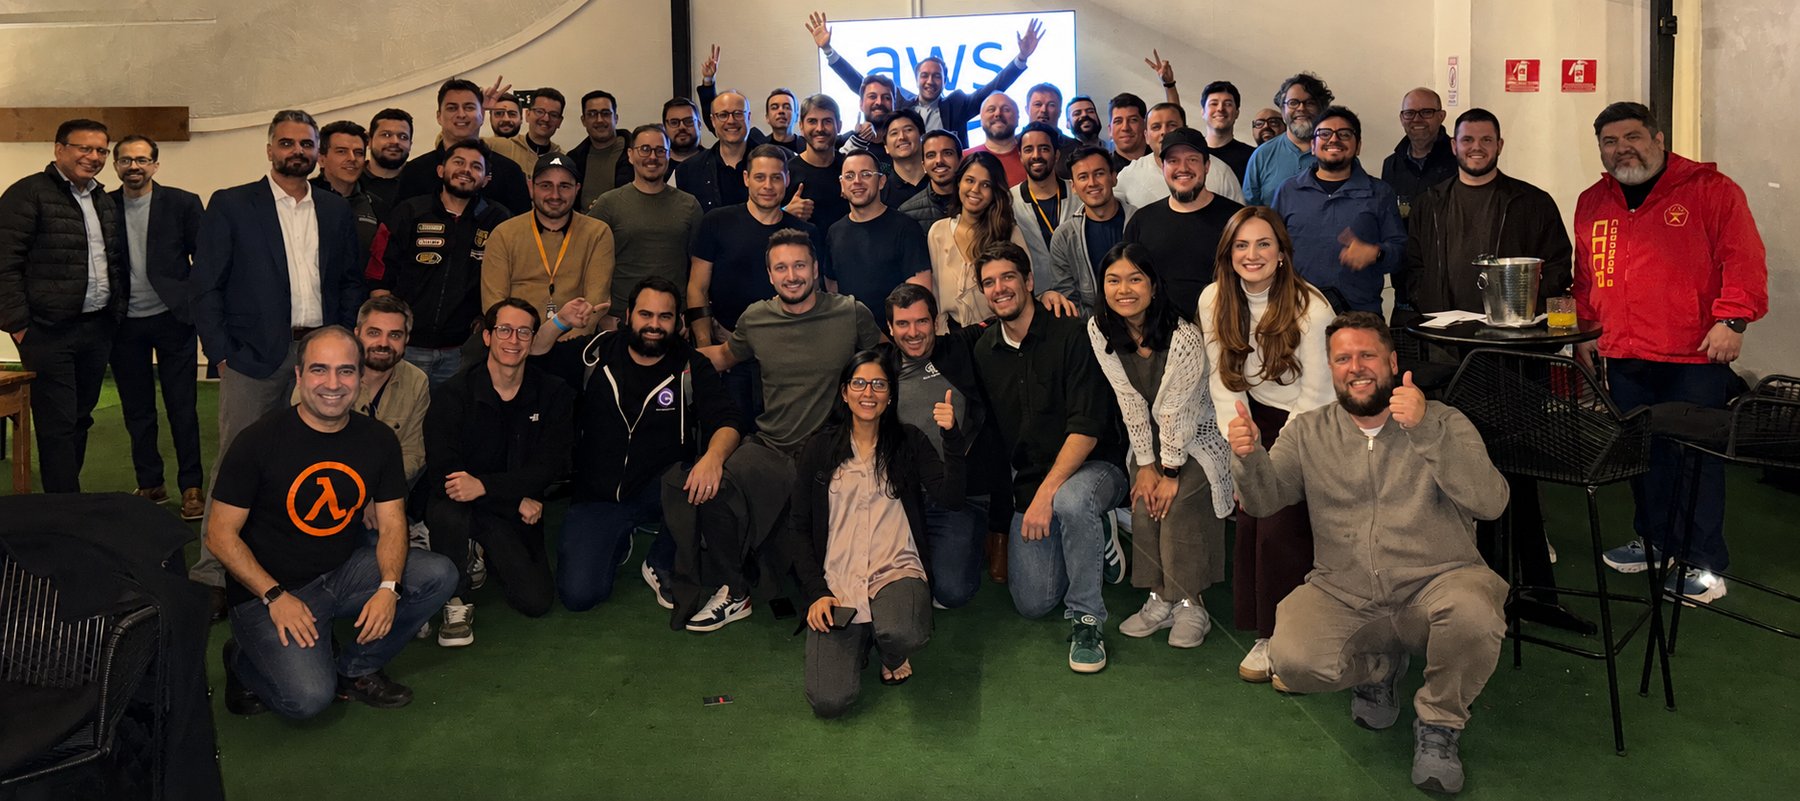
Last week I had the privilege of spending three days in São Paulo with technical builders from across Latin America, brought together for a regional tech event full of deep-dive sessions, hands-on workshops, and conversations with customers and partners. What struck me most wasn’t any single session, it was the energy of a technical community that so rarely gets to be in the same room. People traded architecture ideas over coffee, sketched out solutions on whiteboards, and left with a longer list of things to try than they arrived with. It’s a good reminder that, for all the tooling we build, the community around it is what makes the technology stick.

That community spirit connects nicely to the week’s biggest infrastructure news, which is all about bringing AWS closer to where builders actually are.

Now, let’s get into this week’s AWS news…

Headlines
AWS Local Zone in Athens, Greece: AWS has opened a new Local Zone in Athens, Greece, the second Local Zone in EMEA with support for Amazon S3 and Amazon EBS Local Snapshots, so you can store and process data within Greece to help meet local data residency requirements. The Athens Local Zone supports Amazon EC2 (C7i, M7i, and R7i instances), Amazon S3 with the One Zone-Infrequent Access storage class, Amazon EBS, and Amazon ECS.

Athens, Greece skyline

AWS Local Zones place AWS infrastructure much closer to large population and industry hubs, enabling applications that require single-digit millisecond latency, such as real-time gaming, media production, and financial services, to run where end users actually are. For builders in Greece, you can now run latency-sensitive workloads locally while connecting seamlessly to the nearest AWS Region for services that don’t require low latency, giving you the flexibility to architect hybrid, latency-optimized applications without managing your own data center infrastructure. To learn more, visit AWS Global Infrastructure and Sustainability Blog post.

Last week’s launches
Here are some launches and updates from this past week that caught my attention:

  • Claude Opus 5 on AWS: You can use Anthropic’s Claude Opus 5, the most advanced Opus model yet, matching Claude Fable 5’s top-tier intelligence in many domains at Opus-tier pricing. Amazon Bedrock offers Claude Opus 5 with zero data retention (ZDR) enabled by default, giving you Opus’ top-tier intelligence while meeting your data governance requirements unlike Claude Fable 5. You have two ways to access Claude Opus 5: Amazon Bedrock and Claude Platform on AWS. To learn more, visit the deep dive blog post.
  • AWS Lambda durable execution SDK for .NET is now generally available: You can now build resilient, long-running workflows in C# using Lambda durable functions, without implementing custom progress tracking or integrating an external orchestration service. The SDK is a natural fit for multi-step applications like payment processing pipelines, AI agent orchestration, and human-in-the-loop approvals, it checkpoints progress automatically and can pause execution for up to a year. If you’re a .NET developer building serverless workflows, this removes a lot of the plumbing you used to write by hand.
  • Amazon Bedrock AgentCore now delivers unified observability with traces and logs in a single log group: Amazon Bedrock AgentCore now delivers agent traces and prompts to the same Amazon CloudWatch log group as your agent’s logs. Previously, telemetry was split across destinations, trace spans went to a shared log group while prompts, inputs, and outputs went to a separate one, so debugging a single agent invocation meant searching in multiple places. You can now debug an invocation in one place, and apply fine-grained access control and customer-managed key (CMK) encryption at the individual agent level.
  • Amazon Connect delivers more natural agentic voice experiences: Amazon Connect now supports more natural, human-sounding agentic voice experiences across 50+ languages, including Portuguese, Spanish, French, Italian, Japanese, Korean, and Thai, with over 100 new voice options and conversational improvements that make AI interactions sound more fluid. Connect’s agentic self-service lets AI agents understand, reason, and take action across voice and digital channels, adapting to a customer’s tone and sentiment. You can now build contact center experiences that feel natural to callers in far more of the languages your customers actually speak.
  • Amazon SageMaker Unified Studio now supports Amazon OpenSearch: You can now query and analyze your search and log analytics data from Amazon OpenSearch directly alongside other data assets in Amazon SageMaker Unified Studio. With this connection, you can combine operational search data in OpenSearch with data from sources like Amazon Redshift, Amazon S3, and relational databases, all within a single, governed environment. It’s especially useful when you need to correlate analytical and operational workloads, such as joining application logs with transactional data to uncover insights.
  • Amazon CloudWatch announces coding agent insights: Amazon CloudWatch now gives engineering leaders visibility into how AI coding tools are driving value across their organization. Coding agent insights integrates with the Claude apps gateway for AWS to collect telemetry from Claude Code without additional instrumentation, and also supports agents like Codex and GitHub Copilot. As teams scale AI coding adoption, you can now measure the return on that investment with metrics built on OpenTelemetry, no custom instrumentation required.

For a full list of AWS announcements, be sure to keep an eye on the What’s New with AWS page.

Other AWS news
Here are some additional posts and resources that you might find interesting:

Upcoming AWS events
Check your calendar and sign up for upcoming AWS events:

  • AWS Summits: AWS Summits are free events that bring the cloud and AI community together to connect, learn, and explore the latest technologies. Browse the full calendar to find a Summit near you in the second half of 2026.
  • AWS Community Days: Community-led conferences where content is planned, sourced, and delivered by community leaders. If you’re in Latin America, don’t miss AWS Community Day Belo Horizonte on August 22, registration is open at awscommunityday.com.br.

Join the AWS Builder Center to connect with builders, share solutions, and access content that supports your development. Browse here for upcoming AWS-led in-person and virtual events and developer-focused events.

That’s all for this week. Check back next Monday for another Weekly Roundup!

This post is part of our Weekly Roundup series. Check back each week for a quick roundup of interesting news and announcements from AWS!

Architecting offline-first generative AI applications for edge deployments using AWS services

Post Syndicated from Ahmed Ewis original https://aws.amazon.com/blogs/architecture/architecting-offline-first-generative-ai-applications-for-edge-deployments-using-aws-services/

According to Siemens’ 2024 report The True Cost of Downtime, Fortune 500 companies lose an estimated $1.4 trillion annually because of unplanned downtime. This downtime is often worsened by a lack of skills to detect and resolve issues quickly. Generative AI offers a promising path to address this, but deploying these capabilities in industrial environments introduces a distinct architectural challenge: how do you bring the power of large-scale AI to locations where cloud connectivity is unreliable or unavailable?

The answer lies in an offline-first architecture, one that moves AI inference to the edge while using cloud services for model customization, deployment orchestration, and continuous improvement. This pattern requires careful coordination across multiple AWS services spanning artificial intelligence and machine learning (AI/ML), Internet of Things (IoT), and storage, and demands deliberate trade-offs between model capability, hardware constraints, and operational complexity.

The following are a few potential use cases that could benefit smart applications at the edge:

  • Maintenance crews struggle to correlate real-time log feeds with relevant machine manuals, and analyze situations in-hand.
  • Offshore platforms, remote drilling sites, and pipeline maintenance crews operating in areas with limited satellite connectivity requiring instant access to safety procedures, equipment manuals, and regulatory compliance documentation.
  • Remote agricultural facilities with precision farming equipment requiring access to machinery manuals, crop management protocols, and safety procedures.

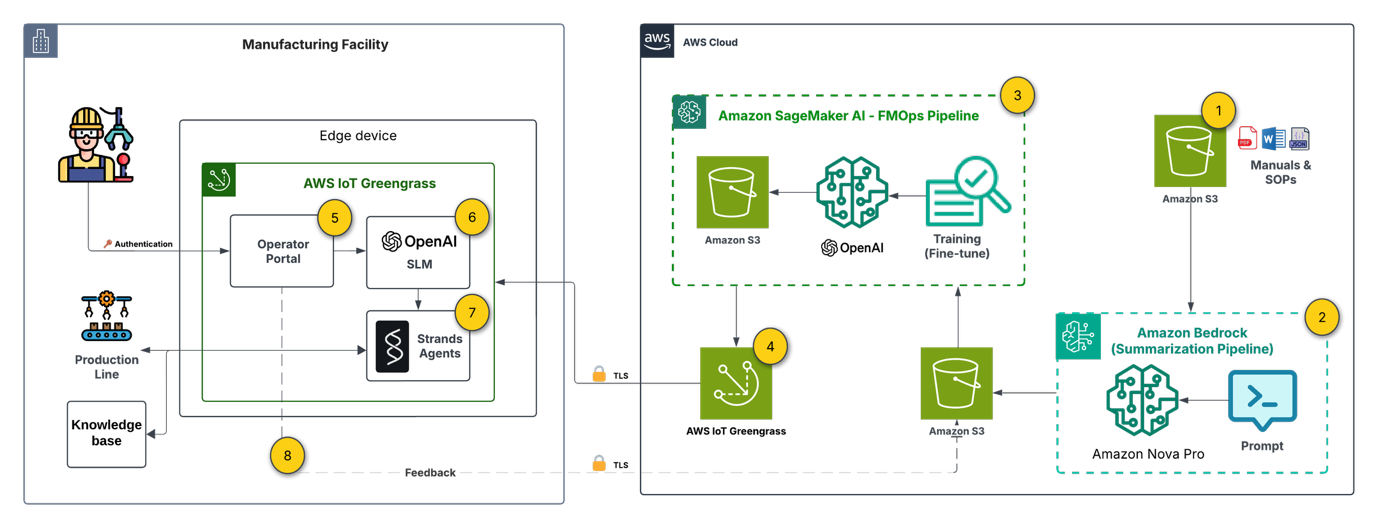
In this post, we walk through a reference architecture for building and deploying a generative AI application at the edge using AWS services. We cover the end-to-end pattern, from model customization in the cloud using Amazon Bedrock and Amazon SageMaker AI, to edge deployment using AWS IoT Greengrass, to local inference orchestrated by Strands Agents. Along the way, we highlight the key architectural decisions and service integration patterns that make this approach work.

This post describes a reference architecture. It is not intended for direct production use. Perform a security review and implement controls appropriate to your workload before deploying to production.

Architectural decisions for offline-first AI

Designing an offline-first AI architecture starts with a critical decision: how to customize a language model for your domain while keeping it small enough to run on edge hardware. The model must fit within the compute and memory constraints of site-level devices (typically GPUs with 16 GB or more of VRAM), which means working with small language models (SLMs). The customization strategy you choose directly affects your architecture’s complexity, cost, and data pipeline requirements.

The following strategies represent increasing levels of architectural complexity, each with different infrastructure requirements and expected outcomes:

  • Model fine-tuning (FT): A relatively lightweight process to adapt a pre-trained model for specialized tasks. For example, you could fine-tune a model to answer troubleshooting questions about specific equipment using labeled Q&A pairs from maintenance tickets. Fine-tuning excels at teaching a model the format, style, and structure of the outputs you want. However, it’s less effective at injecting new domain knowledge that wasn’t in the base model’s original training data.
  • Continued pre-training (CPT): A more resource-intensive process that extends the base model’s training with domain-specific unlabeled data to embed new knowledge. For example, you could continue training on technical manuals, repair logs, and engineering documentation to teach the model equipment-specific terminology, failure patterns, and diagnostic procedures. This approach effectively injects domain knowledge into model parameters but requires significant computational resources and larger datasets compared to fine-tuning.
  • Hybrid approach (FT + RAG): Retrieval Augmented Generation (RAG) enhances model responses by retrieving relevant documents at inference time, which provides accurate, up-to-date answers with source citations and reduces hallucinations. For our edge implementation, we use ChromaDB (SQLite + HNSW defaults) with a sentence-transformer embedding model (384 dimensions) running on CPU. Documents are chunked at 512 tokens with 50-token overlap. With a dataset up to 5 GB, retrieval latency stays under 50 ms. The entire RAG pipeline lives on CPU/SSD with zero GPU VRAM consumption, keeping the full 16 GB dedicated to the large language model (LLM).
  • Hybrid approach (CPT + RAG + FT): Combines continued pre-training of the embedding model with fine-tuning of the language model to optimize the entire RAG pipeline. Through continuing training your embedding model on domain-specific queries to better understand domain-specific terminology and jargon, while fine-tuning your language model on Q&A pairs for the format and tone you want. For example, when an operator asks about the state of a cookie machine, they expect to get the application to check current state, throughput per minute, and visual quality of Cookies! This dual optimization ensures both accurate retrieval and high-quality responses, ideal for knowledge-intensive applications.

To decide on the right strategy for your application, you need to work backward from the use case requirements and expected outcomes.

Reference architecture

Let’s examine a reference architecture for an edge-deployed generative AI solution built on AWS. This architecture addresses a manufacturing use case where operators need instant access to equipment documentation, log correlation, and troubleshooting guidance, all without depending on cloud connectivity. We chose the hybrid approach (FT + RAG) because it balances two architectural concerns: keeping the on-device model compact through fine-tuning for task-specific behavior, while using RAG to provide up-to-date knowledge retrieval without retraining. The following diagram depicts the end-to-end architecture:

End-to-end offline-first generative AI edge architecture spanning cloud model customization and on-device inference

Note: The architecture spans two trust domains. On the cloud side, each service (Amazon Simple Storage Service (Amazon S3), Amazon Bedrock, SageMaker AI, IoT Greengrass) operates under a dedicated least-privilege AWS Identity and Access Management (IAM) role. All cloud-to-edge communication uses mutual TLS using IoT Greengrass device certificates. The operator portal requires authentication. On the edge device, the operator.

The architecture is organized into three layers: cloud-side preparation (steps 1–3), deployment orchestration (step 4), and edge-side inference (steps 5–9). Each layer uses specific AWS services chosen for their integration capabilities.

1. Document base setup

Technical manuals and Standard Operating Procedures (SOPs) are stored in Amazon S3, serving as the single source of truth for both the cloud-side training pipeline and the edge-side RAG knowledge base. The integration of Amazon S3 with both SageMaker AI and IoT Greengrass makes it the natural choice for artifacts that must flow between cloud and edge.

2. Preparing labeled data

Using Amazon Nova Pro on Amazon Bedrock, we process raw documentation into structured question-answer-context pairs for fine-tuning. This is a key architectural decision: rather than manually curating training data, we use a large foundation model (FM) in the cloud to generate high-quality labeled data at scale. The serverless inference of Amazon Bedrock keeps this step cost-effective, and the output feeds directly into the SageMaker AI pipeline.

3. Model customization (FMOps pipeline)

Amazon SageMaker AI Pipelines orchestrates an automated FMOps pipeline that fine-tunes gpt-oss-20b (Mixture of Experts (MoE) architecture: 21B total parameters, 3.6B active per token, 32 experts, 128k context length) on the domain-specific Q&A pairs. The pipeline pattern here is deliberate: it enables repeatable, versioned model customization that can be triggered whenever new documentation is added. The pipeline trains the model to understand equipment-specific terminology and response formats, then stores the customized model artifact in S3 for downstream deployment.

4. Edge deployment

The edge device (in our case, a g4dn.12xlarge with 4× NVIDIA T4 GPUs, 16 GiB each, 64 GiB total accelerator memory, 48 vCPUs, and 129 GiB system RAM) provides the GPU compute necessary for local inference. The hardware selection is an important architectural constraint that directly influences model viability and serving strategy. With gpt-oss-20b occupying 13 GB per T4 GPU, two deployment strategies are available depending on your throughput and latency priorities:

  • Model Replication — a full model copy on each of the four GPUs, which supports four concurrent client requests without queuing. This maximizes throughput at the cost of using 81 percent of each GPU’s memory for model weights alone.
  • Tensor Parallelism — the model is sharded across all four GPUs at 3.2 GB per GPU, leaving approximately 12.8 GB available on each GPU. This remaining memory serves as KV cache, supporting the full 128K context window for long-form interactions.

The choice between these strategies depends on your workload profile: replication suits high-concurrency, short-query environments, while tensor parallelism suits fewer concurrent users with longer, more complex interactions.

5. Edge device (manufacturing facility)

The edge device (in our case, NVIDIA Jetson Xavier) provides the GPU compute necessary for local inference. The hardware selection is an important architectural constraint: you need sufficient VRAM (16 GB or more) to run the quantized SLM, which directly influences which models are viable for your deployment.

6. User interface (Flask operator portal)

A Flask-based web interface running locally on the device allows maintenance operators and technicians to submit queries about equipment issues, safety procedures, or maintenance tasks. Running the UI on-device eliminates any dependency on external connectivity for the user-facing layer.

7. Off-cloud generative AI

The fine-tuned SLM runs on-premises using Ollama as the inference runtime. Ollama provides a lightweight, container-friendly serving layer that supports quantized model formats (GGUF) for efficient inference within the device’s memory constraints. This decouples the model serving infrastructure from any cloud dependency.

8. Generative AI orchestration

Strands Agents provides the orchestration layer that coordinates the query processing workflow. It routes requests to the appropriate tools: querying the on-site RAG knowledge base, collecting device telemetry data. This agent-based pattern provides extensibility. You can add new tools and data sources without modifying the core inference pipeline.

9. Continuous improvement (feedback loop)

When connectivity is available, user interactions and feedback flow back to the cloud, enabling ongoing model refinement through the FMOps pipeline. This creates a virtuous cycle: edge usage data improves the next model version, which Greengrass deploys back to the device. The architecture is designed to be resilient to connectivity gaps. Feedback is queued locally and synchronized opportunistically.

Prerequisites

To be able to implement a similar solution, you need:

  1. An AWS account. If you don’t already have an AWS account, you can create one.
  2. Your access to the AWS account must have IAM permissions to services including Amazon SageMaker AI, Amazon Bedrock, AWS IoT Greengrass, and Amazon S3.
  3. A hardware device preferably with a GPU that has a sufficient VRAM (>16 GB) to run an SLM.

Implementation overview

This section summarizes the key implementation steps. Each component uses standard AWS service configurations:

  • Data preparation – Amazon Nova Pro on Amazon Bedrock generates structured Q&A pairs from raw documentation, producing training data for the SageMaker AI fine-tuning pipeline.
  • Model fine-tuning – SageMaker AI Pipelines runs a QLoRA fine-tuning job on gpt-oss-20b using the generated dataset, then stores the customized model artifact in S3.
  • Edge deployment – AWS IoT Greengrass (or AWS Systems Manager) transfers the quantized model (GGUF format) to the edge device.
  • Local inference – Ollama serves the fine-tuned model with a domain-specific system prompt constraining responses to equipment-relevant answers.
  • Orchestration – Strands Agents coordinates the workflow, routing queries to the RAG knowledge base or telemetry tools as needed.

For the fine-tuning notebook, refer to this example notebook for fine-tuning an SLM using Amazon SageMaker AI.

Security considerations

Moving inference to the edge shifts the security perimeter. In a cloud-native deployment, AWS manages much of the infrastructure security. At the edge, you own the full stack, which spans physical device access through application-layer controls. This section outlines the security controls to implement when adapting this architecture for your environment.

Authentication and access control. The Flask operator portal runs on an isolated device, but physical proximity doesn’t replace authentication. Integrate with your organization’s identity provider (SAML/OIDC) or implement certificate-based mutual TLS. Enforce role-based access so that operators, administrators, and maintenance personnel each see only the interfaces relevant to their function.

Encryption at rest. Model artifacts and the ChromaDB vector database contain proprietary knowledge. Encrypt the edge device’s storage volume using full-disk encryption (for example, LUKS on Linux or BitLocker on Windows). Manage encryption keys through AWS IoT Greengrass secret manager or a hardware Trusted Platform Module (TPM) on the device.

Encryption in transit. All communication between the edge device and AWS (including the IoT Greengrass deployment channel and the feedback synchronization loop) must use TLS 1.2 or later. For internal communication between edge components (Flask portal to Ollama, Strands Agents to ChromaDB), enforce TLS even on the loopback interface to prevent local interception.

Input validation and prompt guardrails. The Strands Agents orchestration layer accepts natural language input from operators. Apply input validation to reject malformed or excessively long queries. Implement prompt guardrails to detect and block prompt injection attempts. On the output side, apply content filtering to prevent the model from surfacing sensitive information outside its intended scope.

Network segmentation. Separate edge components into distinct network zones: the operator-facing portal in a perimeter network, the inference runtime in a restricted zone, and the cloud sync channel on an isolated outbound-only interface. Use firewall rules to enforce that only the expected traffic flows between zones.

IAM least privilege. On the cloud side, each AWS service in the pipeline should operate with its own IAM role scoped to minimum required permissions. The IoT Greengrass core device role should only access the specific S3 prefixes and IoT topics it needs. SageMaker pipeline execution roles shouldn’t have access to production S3 buckets.

Logging and monitoring. Enable AWS CloudTrail and Amazon CloudWatch for all cloud-side services. On the edge device, log all operator queries, model responses, and sync events locally. When connectivity is available, forward edge logs to Amazon CloudWatch Logs or Amazon S3 for centralized analysis. Set up alerts for anomalous patterns such as unexpected query volumes, repeated authentication failures, or unauthorized access attempts.

Results

We evaluated the fine-tuned gpt-oss-20b model against the base model using 30 domain-specific question-answer pairs. Both configurations use the full RAG pipeline (ChromaDB + sentence-transformer embedding model) as the retrieval layer. The variable being tested is whether fine-tuning the language model improves generation quality when given the same retrieved context. Three LLM judges (Claude 4.5 Haiku and Claude 4.5 Sonnet using Amazon Bedrock, and Amazon Nova Pro) scored responses on a 12-point scale across accuracy, completeness, and relevance.


LLM Evaluator SLM Average score
Claude 4.5 Haiku Fine-tuned gpt-oss-20b + RAG 10.20/12 (85%)
Base gpt-oss-20b + RAG 8.20/12 (68.3%)
Claude 4.5 Sonnet Fine-tuned gpt-oss-20b + RAG 9.20/12 (76.7%)
Base gpt-oss-20b + RAG 7.49/12 (61.7%)
Nova Pro Fine-tuned gpt-oss-20b + RAG 9.90/12 (82.5%)
Base gpt-oss-20b +RAG 8.70/12 (72.5%)

These results support the hybrid approach (FT + RAG) outlined in our solution architecture, demonstrating that even with a relatively small fine-tuning dataset, significant performance improvements can be achieved for domain-specific applications at the edge.

Cleanup

The AWS services used in this architecture are fully managed services that follow a pay-as-you-go pricing model, meaning you only pay for actual invocations. Exception for this can be the storage costs for the labeled data and the finetuned model in Amazon S3 which you can consider to delete if not in use.

Conclusion

This post presents a reference architecture for deploying generative AI at the edge using AWS services. The key architectural patterns demonstrated include:

Cloud-side model factory – Using Amazon Bedrock for automated training data generation and Amazon SageMaker AI Pipelines for repeatable, versioned model customization, creating a scalable FMOps workflow that decouples model preparation from deployment.

Managed cloud-to-edge bridge – AWS IoT Greengrass provides the deployment orchestration layer, handling model packaging, versioning, and lifecycle management without requiring persistent connectivity to target devices.

Self-contained edge inference stack – A lightweight runtime (Ollama) combined with an agent-based orchestration framework (Strands Agents) supports local AI inference with extensible tool integration, all operating independently of cloud availability.

Feedback-driven continuous improvement – An asynchronous feedback loop synchronizes usage data back to the cloud when connectivity permits, for iterative model refinement without disrupting edge operations.

These patterns are applicable beyond manufacturing. Any environment with intermittent connectivity, strict latency requirements, or data locality constraints (offshore energy, remote agriculture, transportation, defense) can benefit from this architectural approach. The critical design decisions will vary by use case: selecting the right model customization strategy, sizing edge hardware to model requirements, and choosing between RAG and fine-tuning. The overall integration pattern remains consistent.

As with any reference architecture, we recommend that you conduct a security review before production deployment.

To explore this pattern, consider identifying a use case with clear connectivity constraints and working backward from your edge hardware requirements to select a model customization strategy. The hybrid (FT + RAG) approach described in this post offers the right balance of capability and complexity. Expand it as you validate operational improvements.

Ready to explore more? Join us at re:Invent for related sessions: Real-time insights for smart manufacturing with AWS Serverless (CNS375) and Implement Agentic AI at the edge for industrial automation (HMC317).


About the authors

AWS Weekly Roundup: One-click Lambda setup prompt, OpenAI GPT-5.6 models on Bedrock, and more (July 20, 2026)

Post Syndicated from Channy Yun (윤석찬) original https://aws.amazon.com/blogs/aws/aws-weekly-roundup-one-click-lambda-setup-prompt-openai-gpt-5-6-models-on-bedrock-and-more-july-20-2026/

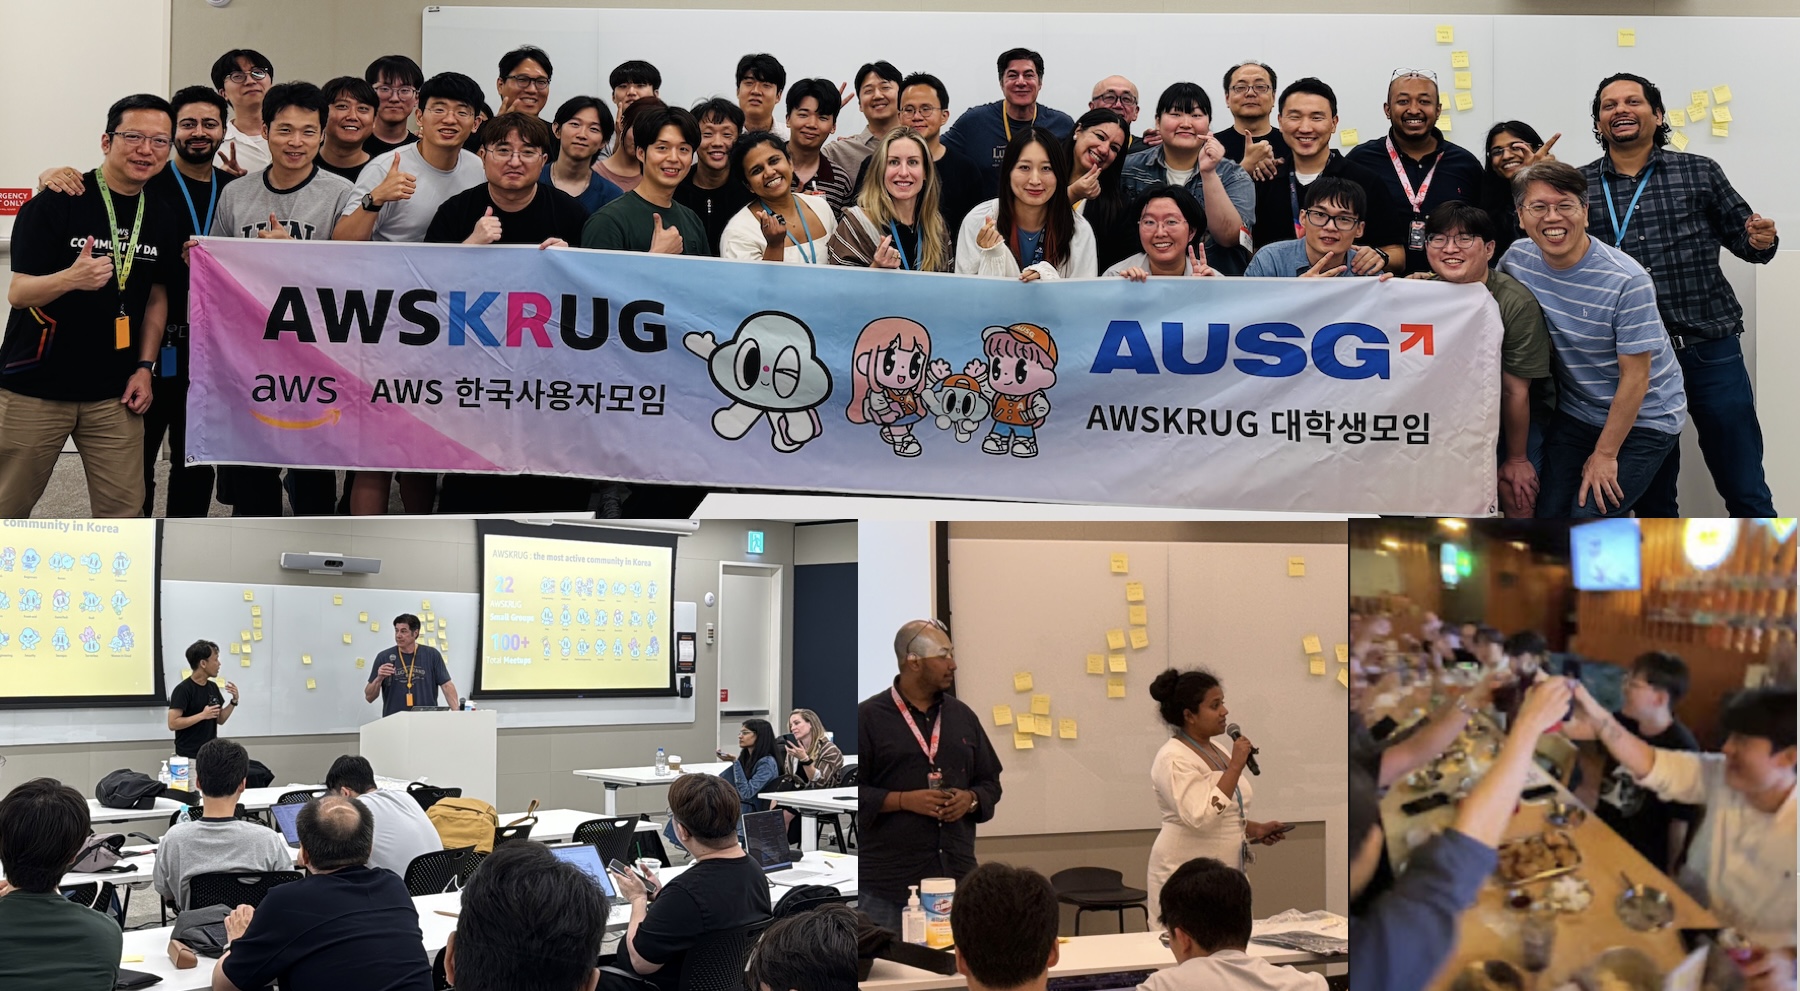
Last week, my team visited Seoul to meet AWS Korea User Group (AWSKRUG) leaders. AWSKRUG is the largest cloud developer community in Korea, with 20 meetup groups organized by topic and area that collectively host over 100 events each year, primarily in Seoul.

My team regularly visits countries across the Asia-Pacific region, listens to feedback from user group leaders, and works to support their communities. At this meeting, leaders honestly shared what they did well in the first half of the year, what needs improvement, and what they asked of AWS Developer Experience team. We also enjoyed a pleasant conversation during our Chimaek time together.

Now, let’s take a closer look at key launches of last week.

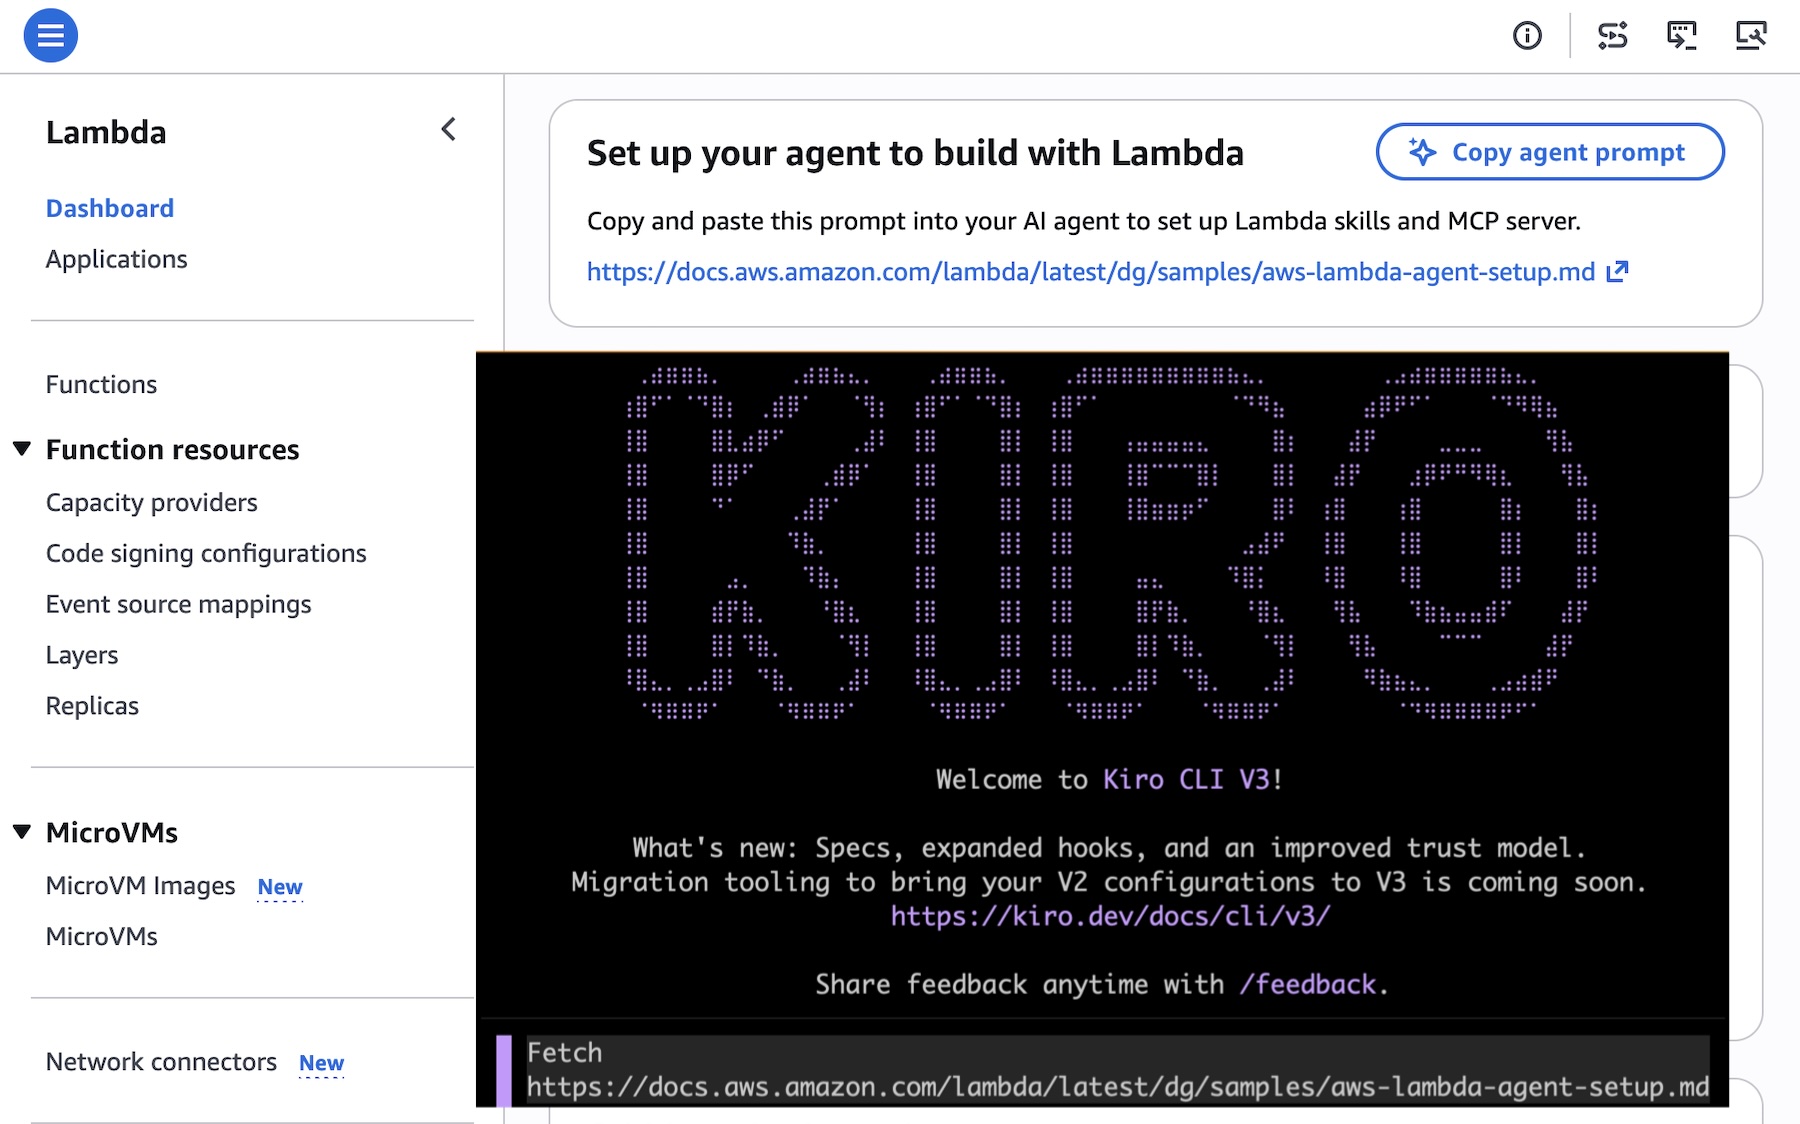
A one-click Lambda setup prompt for coding agents caught my eye most last week. This prompt configures your agent with AWS Serverless skills and the Serverless Model Context Protocol (MCP) server, embedding serverless best practices from the start. This prompt references the Lambda agent setup guide, which includes installation commands for Claude Code, Kiro, Cursor, GitHub Copilot, Codex, Devin Desktop, and OpenCode.

To get started, choose the Copy agent prompt button on the Lambda console screen or copy fetch https://docs.aws.amazon.com/lambda/latest/dg/samples/aws-lambda-agent-setup.md directly, and paste this URL in your preferred AI agent.

You can also use Agent Toolkit for AWS to give your coding agent current AWS knowledge and safe resource access. Use fetch https://raw.githubusercontent.com/aws/agent-toolkit-for-aws/refs/heads/main/setup-instructions/setup.md for installing AWS MCP Server.

Last week’s launches
Here are last week’s launches that caught my attention:

  • OpenAI GPT-5.6 Sol, Terra, and Luna on Amazon Bedrock: You can use the smartest family of models from OpenAI yet on Bedrock’s next-generation inference engine built for high performance, security, and reliability. The three models span capability tiers from flagship reasoning (Sol) to balanced performance (Terra) to fast, cost-efficient inference (Luna), all accessible through the Responses API on Amazon Bedrock.
  • Same-day transitions to Amazon S3 Standard-IA and S3 One Zone-IA: You can now transition objects to S3 Standard-Infrequent Access (S3 Standard-IA) and S3 One Zone-Infrequent Access (S3 One Zone-IA) as soon as the day they are created, without the previous 30-day minimum retention period in S3 Standard. These storage classes offer up to 40% lower storage costs than S3 Standard while still providing millisecond access when needed, making them ideal for backups, log analytics, and compliance workloads where data becomes cold within hours or days.
  • Self-managed code storage on AWS Lambda: With self-managed Amazon S3 buckets for code storage, you can reference source code directly from your own S3 buckets without Lambda creating intermediate copies. This eliminates code storage limits and reduces function activation time after function creates and updates by removing the copy step.
  • Importing users with password hashes on Amazon Cognito: You can now import users with password hashes in CSV user imports. Previously, imported users had to reset their passwords on first sign-in. Now, you can include password hashes in the CSV import, enabling users to sign in immediately with their existing credentials. When creating a CSV import, you specify the password hashing algorithm used by your source system.

For a full list of AWS announcements, be sure to keep an eye on the What’s New with AWS page.

Additional updates
Here are some additional news items that you might find interesting:

  • Amazon SQS turns 20: Two decades of reliable messaging at scale: When Amazon SQS launched publicly in July 2006, it made this pattern available to every AWS customer. Twenty years later, that core function, decoupling producers from consumers, remains the reason customers use SQS. Let’s look back important milestones after Jeff’s 15th anniversary post.
  • Open Protocols with the Strands Agents SDK: Learn how open AI protocols such as MCP, A2A, UTCP, AG-UI, and x402 work together using Strands Agents SDK for building AI agents as an example implementation, though the patterns apply to any agent framework.
  • Open source Bulk Executor for Amazon DynamoDB: Performing bulk operations against all items in a DynamoDB table has historically required custom coding. The Bulk Executor for DynamoDB simplifies bulk tasks like these. You can use this feature to invoke commands like count, find, delete, or update. No coding is required, even when running at large scale.
  • Transform AWS Support Case Workflows with Kiro CLI: Explore how Kiro CLI’s MCP integration accelerates support case workflows by combining investigation, documentation lookup, and case creation into a single conversational interface across three real-world scenarios: AWS Glue job failures, AWS Lambda cold start investigation, and AWS WAF false positive analysis.

For a full list of AWS blog posts, be sure to keep an eye on the AWS Blogs page.

Learn more about AWS, browse and join upcoming AWS-led in-person and virtual events, startup events, and developer-focused events including AWS Summits. Join the AWS Builder Center to connect with builders, share solutions, and access content that supports your development.

Finally, some customers experienced an issue with Cost Explorer displaying inaccurate estimated billing data in last weekend. They may have received erroneous budget and cost anomaly detection alerts, and observed inflated estimated cost and usage data. The issue has been resolved, and all AWS services are operating normally. We apologize for the concern this incident caused our customers and are conducting a thorough retrospective to prevent events like this from reoccurring, as well as improving our response when billing incidents occur. For more information, visit the AWS Health Dashboard.

That’s all for this week. Check back next Monday for another Weekly Roundup!

— Channy

Multi-cloud lakehouse architecture on AWS for Agentic AI, Part 1: Architecture and best practices

Post Syndicated from Sakti Mishra original https://aws.amazon.com/blogs/big-data/multi-cloud-lakehouse-architecture-on-aws-for-agentic-ai-part-1-architecture-and-best-practices/

Enterprise data architectures have become fundamentally distributed. Over the past decade, organizations have made deliberate investments across multiple platforms such as relational databases for transactional workloads, cloud data warehouses for analytics, object stores for unstructured data, and SaaS applications for domain-specific functions. Each was chosen to solve a specific problem, serve a specific team, or meet a specific performance requirement. The result is not accidental sprawl. It is a deeply heterogeneous data landscape shaped by intentional, workload-driven decisions. The challenge now is not consolidation, but interoperability: enabling these systems to function as a unified foundation for the next generation of AI-driven applications.

Agentic AI systems that autonomously reason, plan, and take action on behalf of users are moving rapidly from experimentation to enterprise production. These systems do not just retrieve information. They synthesize it, act on it, and learn from it. And unlike traditional analytics tools that can work with a well-scoped dataset, AI agents require something more demanding: unified, governed, and real-time access to all relevant enterprise data, regardless of where it lives.

This is the gap that matters most right now. Enterprises that have invested in building strong data capabilities across multiple providers are well-positioned, but only if those platforms can be accessed together, consistently, and with the governance controls that enterprise AI requires. Without a unified data foundation, AI agents operate with incomplete context, governance becomes inconsistent, and the promise of autonomous AI remains out of reach.

Solution approach

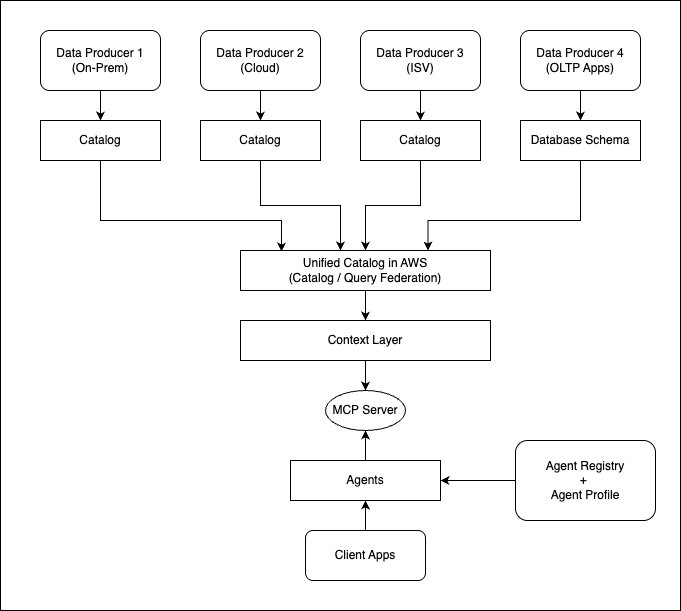
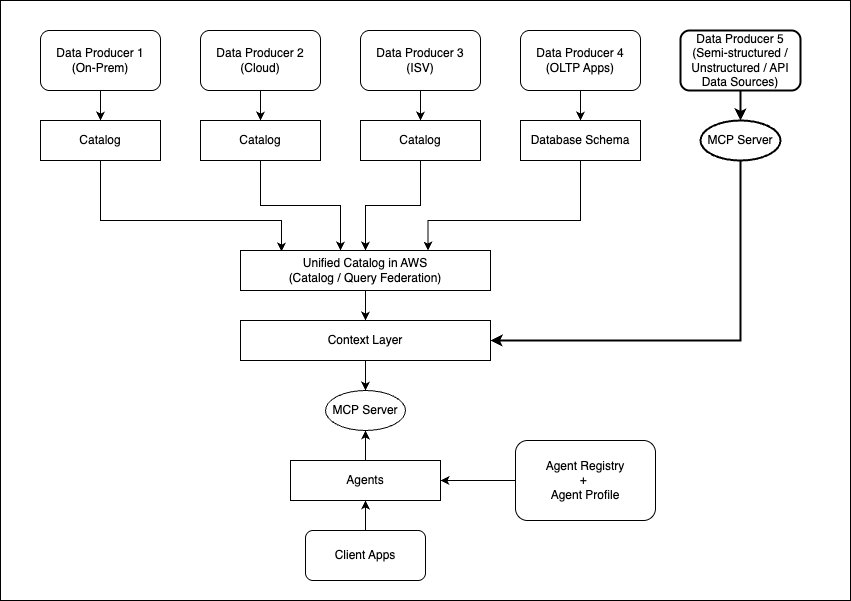
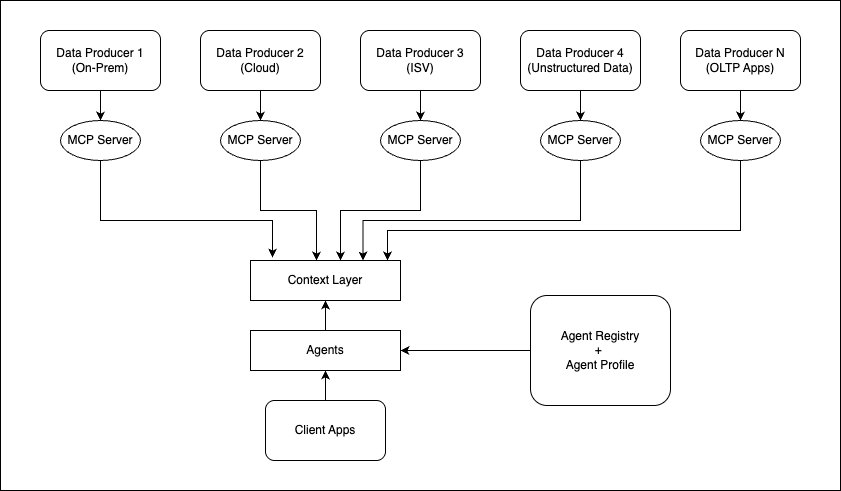
The following high-level architecture explains how you can onboard metadata catalogs and MCP servers to your context layer, which becomes the primary input for your AI agents.

Assuming your data products have a well-defined metadata catalog, you can take a unified-catalog-first approach, then build the context layer on top of it to let your AI agents discover all the context from one place. This helps bring in centralized governance and audit control, because every request gets routed through the centralized metadata catalog and context layer to simplify implementation of unified governance. In addition, this brings simplicity to enable business semantics, define attribute priorities, and define authoritative sources for the consumer use cases.

Architecture showing metadata catalogs and MCP servers onboarded to a context layer that feeds AI agents

If any of the data sources does not have a well-defined metadata catalog, you can define Model Context Protocol (MCP) servers on them, and then directly onboard them to the context layer. For example, if you have semi-structured or unstructured datasets for which you do not have a well-defined metadata catalog, or you want to onboard third-party data sources through REST APIs, then you can add their respective MCP server to the context layer directly. The following architecture explains the extended flow for it.

Extended architecture where data sources without a metadata catalog expose MCP servers directly to the context layer

In this series of posts, we demonstrate how you can unify the metadata catalog access across multiple providers, how you can enable AI agents to query the unified catalog, and how the context layer can be integrated to unify metadata from catalogs and MCP servers. We have divided the series into the following parts.

  • Part 1: Architecture approach with tradeoffs to unify a multi-cloud lakehouse architecture that can power Agentic AI (this post).
  • Part 2: Implementing an example solution to unify catalogs from multiple providers and deploy AI agents to query the unified data access layer.
  • Part 3: Integrate a context layer on top of the unified catalog for AI agents.
  • Part 4: Onboard additional data sources to the context layer through MCP servers and demonstrate the full solution.

This post focuses on explaining the architecture approach to build the open lakehouse architecture on AWS, unifying the metadata catalog across providers for the AI agents to access. In addition, it highlights the architecture trade-offs and best practices.

Use case

Every AI initiative launched on a fragmented data foundation is an initiative that will need to be rebuilt. Organizations that establish unified data access today are the ones that will scale Agentic AI with confidence tomorrow. Consider a large enterprise managing petabytes of data across a diverse set of environments:

  • On-premises: Network device telemetry, customer records, and operational databases.
  • Multiple cloud platforms: Marketing analytics, HR systems, and enterprise applications distributed across cloud providers.
  • Data platforms: Data science workloads, feature engineering pipelines, and finance and supply chain analytics running on specialized platforms.
  • SaaS applications: Salesforce, SAP, Zendesk, ITSM, and other business tools that each hold a critical piece of the enterprise data picture.

The business objective is to build a unified analytics and AI platform that can:

  • Query and analyze data across all environments without requiring full data migration.
  • Enforce consistent data governance and access control regardless of data location.
  • Power AI agents that can autonomously discover, query, and act on enterprise data.
  • Reduce total cost of ownership by eliminating redundant pipelines and storage.

This architecture directly addresses these needs by combining flexible data integration patterns, an open-table-format-based lakehouse architecture (with an example of Apache Iceberg), AI agent deployment to access unified metadata, and centralized governance.

Reference architecture

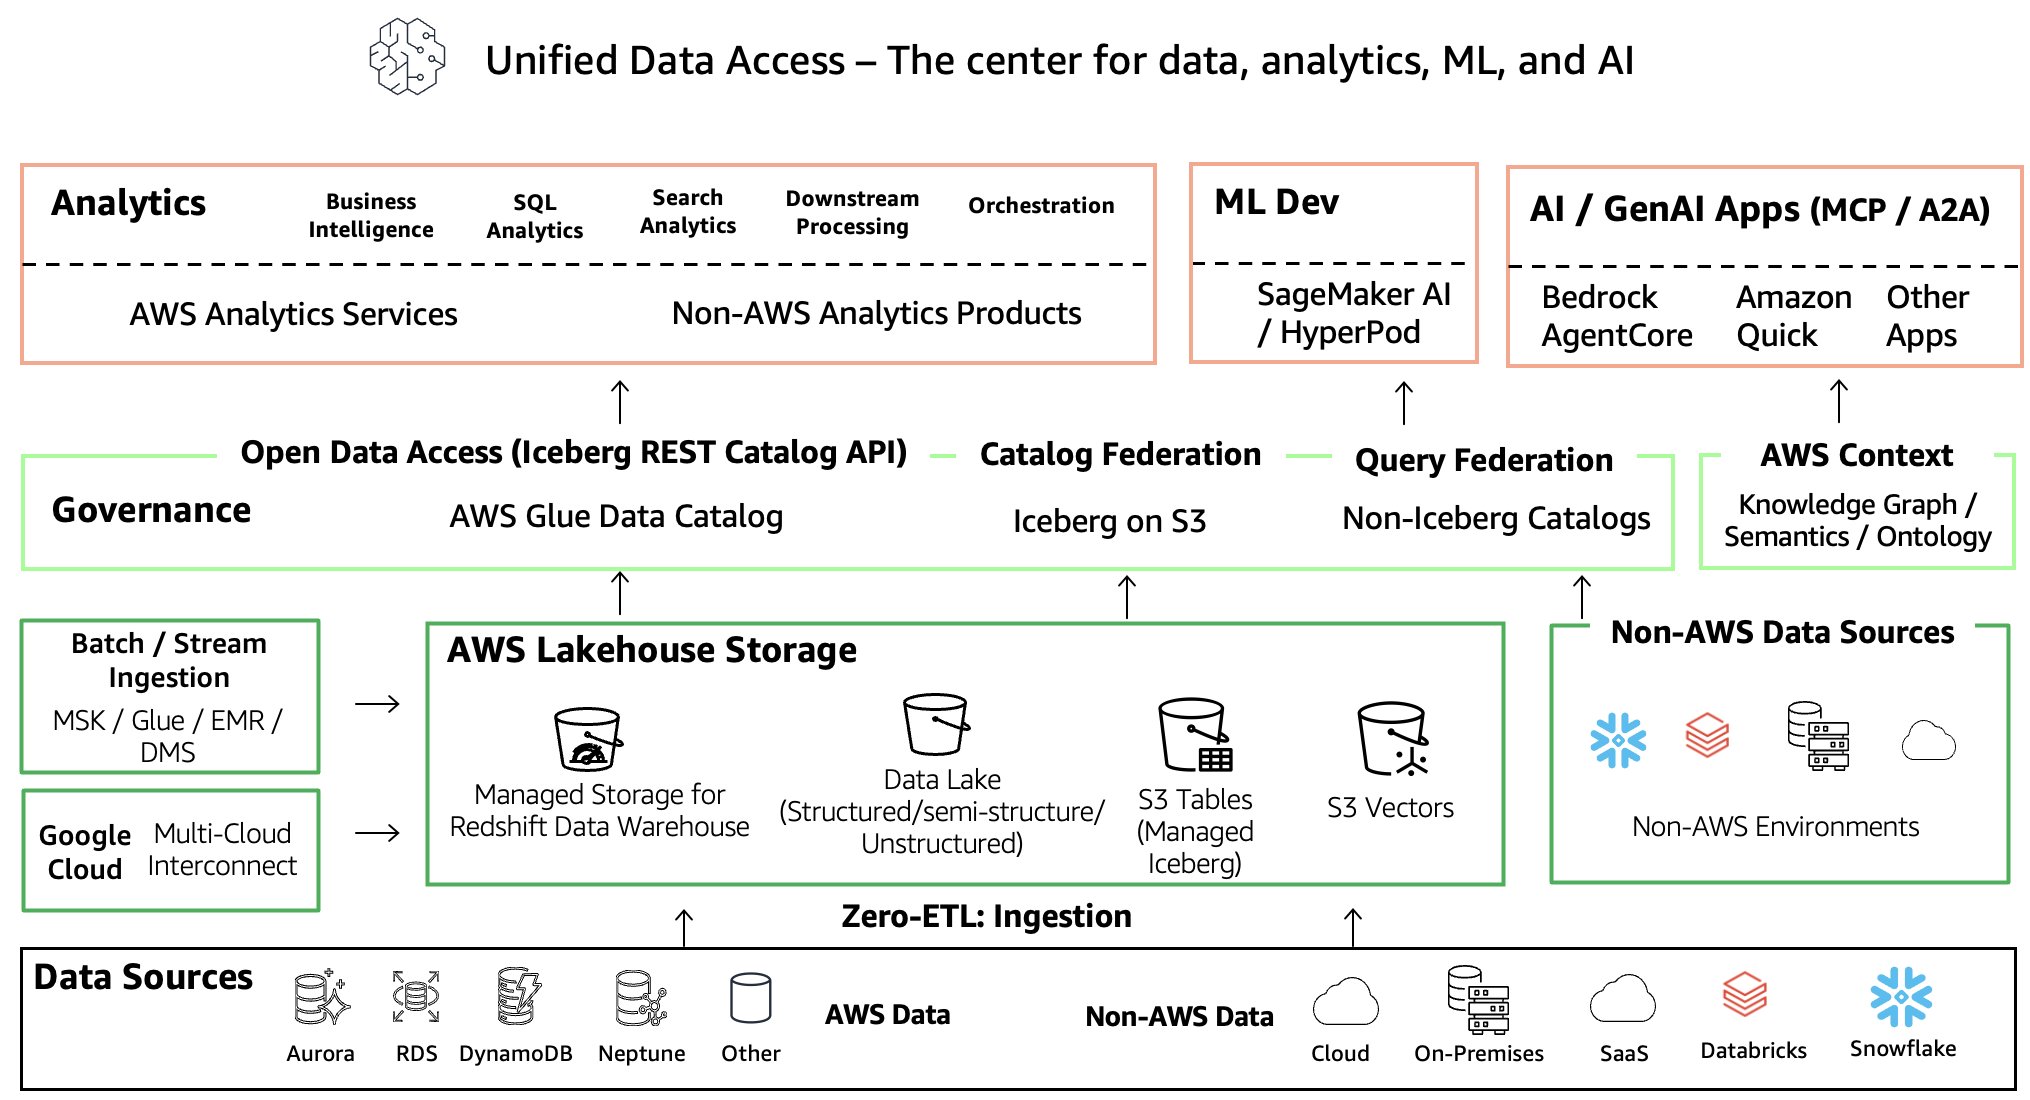
Before going deeper into a specific architecture, let’s revisit at a high level how the AWS open lakehouse architecture enables data ingestion and query or catalog federation to power analytics, machine learning development, and generative AI application development.

The following architecture diagram represents an end-to-end flow that includes:

  • Data ingestion to the data lake or data warehouse through Zero-ETL and batch or stream processing using AWS native services, or accessing data from Google Cloud Platform using AWS Interconnect – multicloud.
  • A centralized metadata catalog layer that includes data on AWS and metadata representation of non-AWS data sources using query or catalog federation.
  • A context layer that you can integrate to create a knowledge graph with ontology and business semantics that can enrich context for AI agents.
  • The consumption layer, which can include analytics, machine learning model development with Amazon SageMaker AI, and generative AI application development with Amazon Bedrock AgentCore, Amazon Quick, or other AWS and non-AWS AI applications.

End-to-end AWS open lakehouse architecture spanning ingestion, catalog, context, and consumption layers

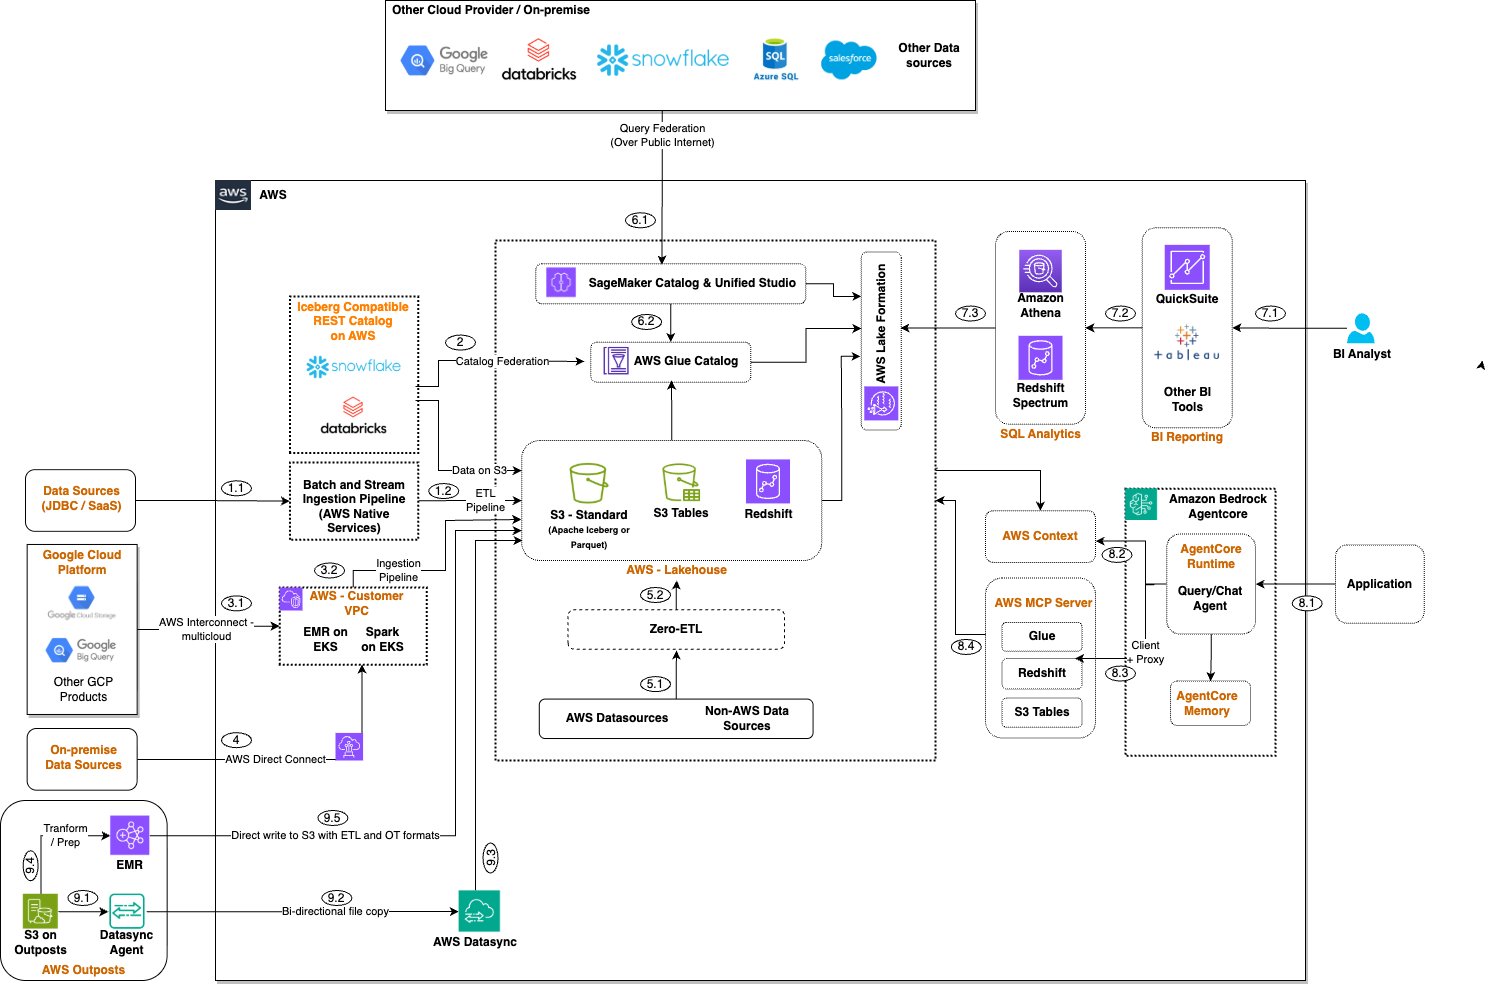
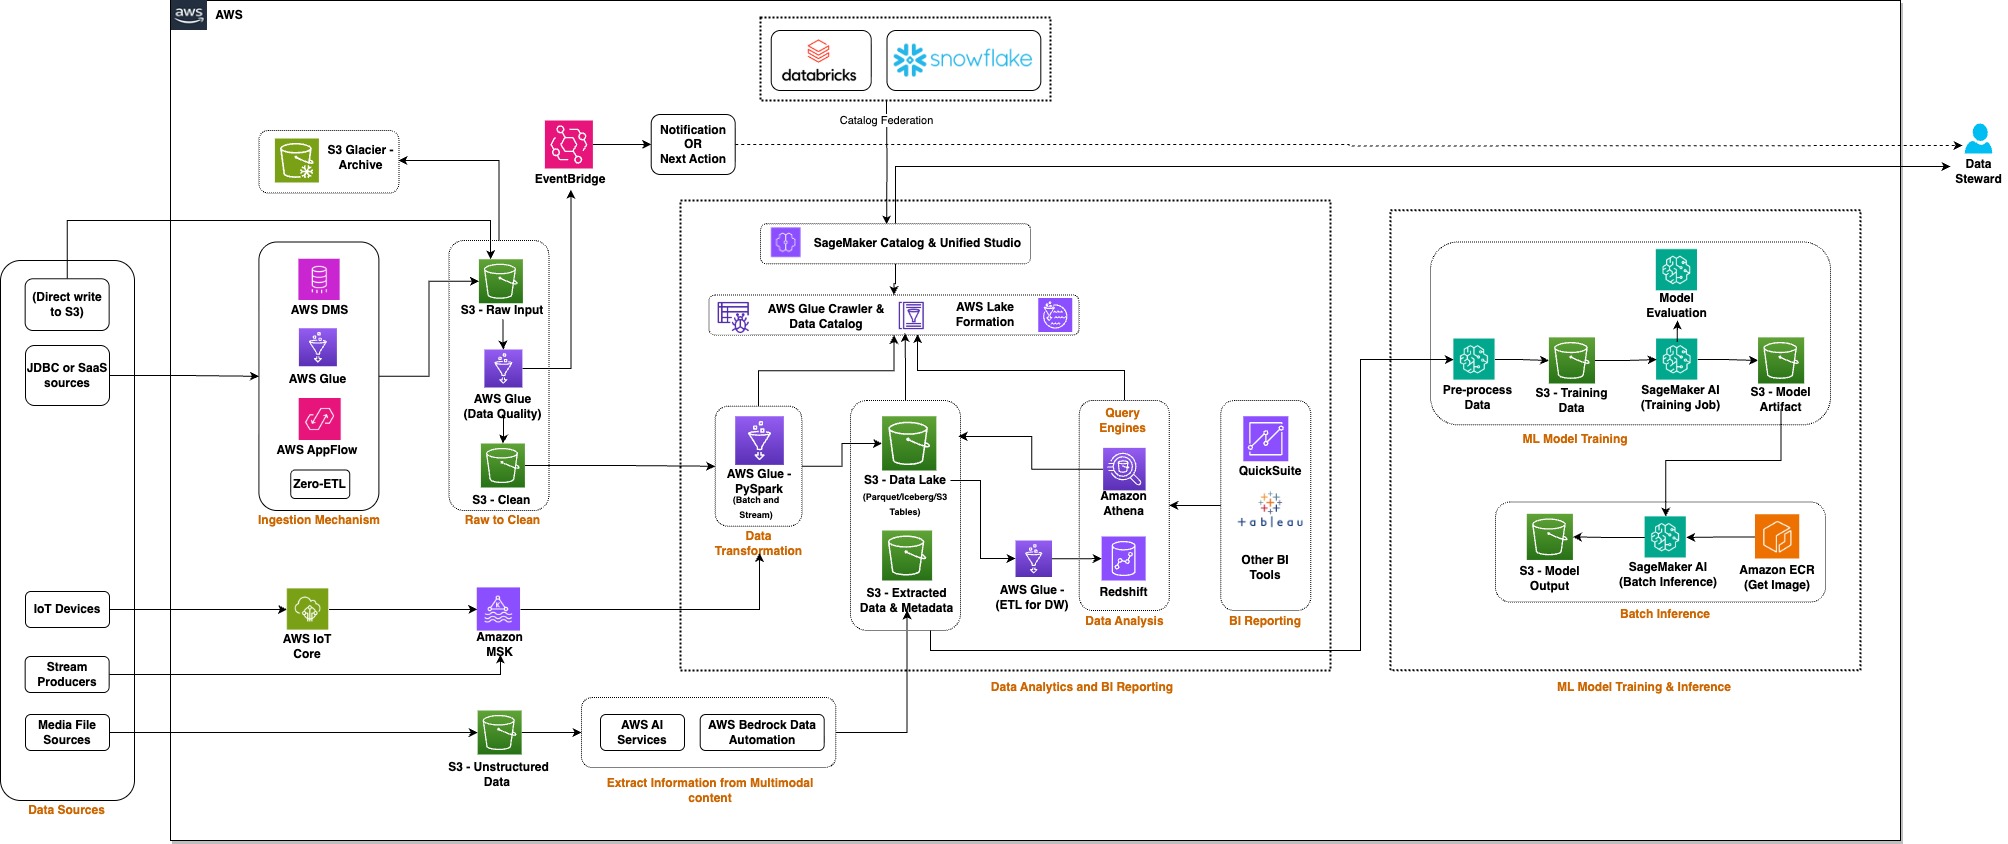
Let’s look at an expanded version of this architecture that details the data ingestion and data consumption patterns to build a unified data access layer on AWS that spans multiple cloud and ISV providers.

Expanded technical architecture walkthrough

The following architecture demonstrates the comprehensive AWS approach for metadata catalog consolidation through flexible integration patterns, and it also highlights patterns for building a lakehouse on AWS. Built on the open standards of Apache Iceberg for storage and governance through AWS Lake Formation, it creates a unified data foundation that connects existing investments without requiring wholesale migration, and it makes enterprise data AI-ready from day one. This architecture delivers value at every layer: business teams query across platforms without data movement, IT teams manage governance through a single federated layer with the flexibility to federate or ingest per use case, and compliance teams enforce policies once across all sources with full lineage and audit coverage.

Expanded lakehouse architecture on AWS showing federation and ingestion patterns across multiple cloud and ISV providers

The following are the key components of the architecture.

Data access methods

This section provides options to access data that is not available in AWS Glue Data Catalog and not available on AWS.

1. Iceberg catalog federation (Reference points 2, 6.1, 6.2)

  • AWS Glue Data Catalog implements the Iceberg REST Catalog API specification, which enables seamless federation with Databricks, Snowflake, or other Iceberg-compatible catalogs set up with Amazon Simple Storage Service (Amazon S3) as the storage layer.
  • With the growing adoption of Apache Iceberg, catalog federation will become a common standard in the future and simplify metadata unification.

2. Query federation (Reference point 1.1)

  • Direct cross-cloud querying over the public internet to Google BigQuery, Azure SQL, Salesforce, and other platforms.
  • Real-time access to external data sources without replication, and seamless access with AWS analytics services.
  • Provides flexibility, because the catalog federation capability of the Iceberg REST catalog is limited to Iceberg tables only.

2.1. Secured private connectivity to Google Cloud Platform using AWS Interconnect for multi-cloud (Reference points 3.1, 3.2)

The default query federation approach makes the connection and transfers data over the public internet, which has its own latency implications depending on the target platform and the data volume transferred over the internet. During re:Invent 2025, AWS announced the public preview of AWS Interconnect – multicloud, which recently became generally available.

AWS Interconnect – multicloud is a managed service that provides private, high-speed, and secure network connections between Amazon Web Services (AWS) and other cloud providers, starting with Google Cloud Platform (GCP), with Microsoft Azure and Oracle Cloud Infrastructure (OCI) coming later in 2026. You can enable the integration with three steps: 1) specify the target cloud service provider, 2) select the destination Region on the other side, and 3) pick the required bandwidth.

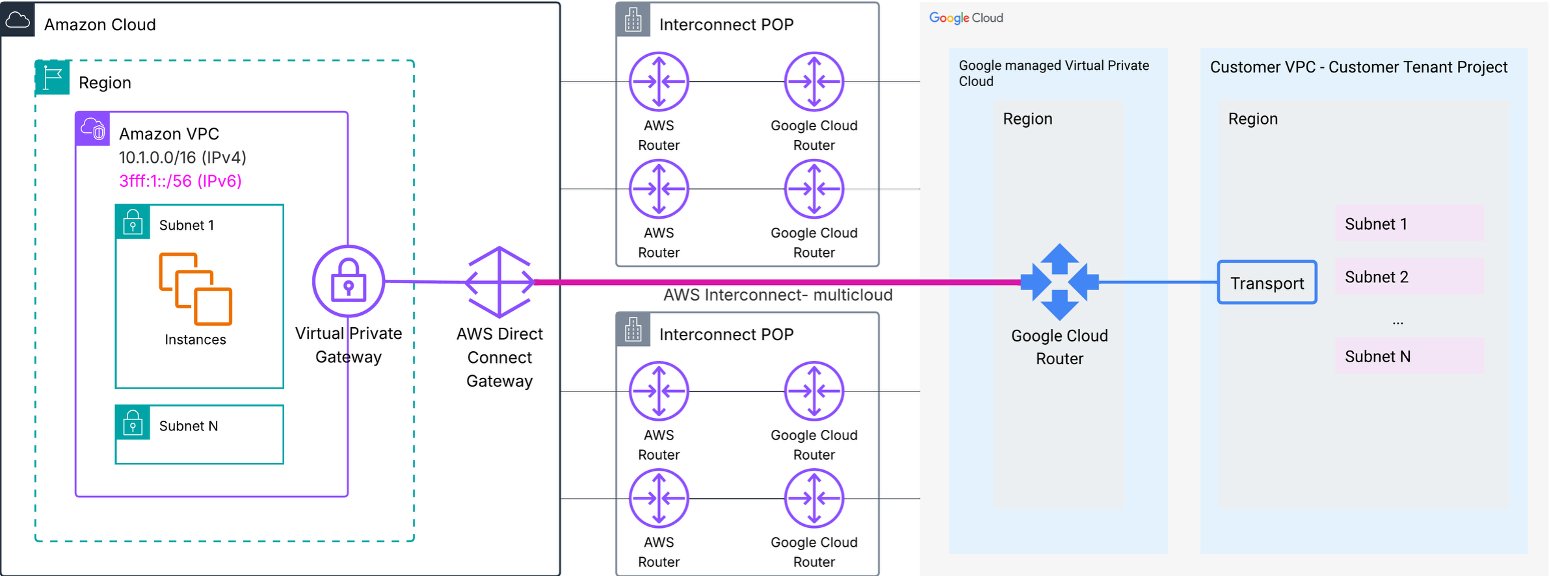
The following architecture represents AWS and GCP integration with AWS Interconnect – multicloud.

High-level architecture of AWS and GCP integration through AWS Interconnect for multi-cloud

On the AWS side, you need an AWS Direct Connect gateway (a global construct that acts as a route reflector), which you can attach to your Amazon Virtual Private Cloud (Amazon VPC) through a virtual private gateway or AWS Transit Gateway, or AWS Cloud WAN. On the GCP side, you need a Google Cloud Router that you attach to your customer VPC. Interconnect – multicloud offers pre-cabled capacity pools at shared Interconnect points of presence (PoPs) in selected Regions, where both AWS and GCP routers are co-located and pre-wired.

Because Interconnect – multicloud primarily routes traffic within the VPC through a private network, to benefit from it you need to keep your query engine or jobs within a customer VPC.

2.2. High network bandwidth with on-premises systems (Reference point 4)

  • AWS Direct Connect for high-bandwidth, low-latency on-premises connectivity.

Data ingestion methods

This section focuses on ways you can use to onboard datasets (complete or subset) to a lakehouse on AWS.

1. Zero-ETL: Data movement to AWS with Zero-ETL ingestion (Reference points 5.1, 5.2)

  • AWS Zero-ETL capabilities for seamless data loading from AWS and non-AWS sources.
  • Flexibility to choose your target as an Amazon S3 based data lake or Amazon Redshift.

2. Extract, transform, load (ETL): Extract data from JDBC or SaaS sources and transform through a batch or stream pipeline (Reference points 3.1, 3.2)

The following architecture expands the flow 1.1 to 1.2 ingestion method that integrates AWS services to onboard data to the Amazon S3 raw layer and then takes it through an ETL pipeline for data cleansing and transformations. It also includes steps to onboard unstructured data to Amazon S3 using Amazon Bedrock Data Automation, and taking the lakehouse data for machine learning development with Amazon SageMaker AI.

Ingestion architecture integrating AWS services to load data into the Amazon S3 raw layer and process it through an ETL pipeline

You can also use AWS Interconnect – multicloud to run Spark jobs (Spark with Amazon EMR on EKS or open source Spark on any compute within a customer VPC) to ingest and transform data from Google Cloud with private connectivity.

3. Accessing data from Google Cloud over a private network

Refer to the preceding data access methods (3.1 and 3.2).

4. Onboarding data from AWS Outposts (S3 on Outposts) (Reference points 9.1 to 9.5)

  • Option to onboard S3 on AWS Outposts data to regional Amazon S3 through AWS DataSync (reference 9.1 to 9.3), which might be a better fit to sync files as-is through a scheduled batch or an event-driven approach.
  • Flexibility to transform the S3 on Outposts data using an Amazon EMR clusters on Outposts job, and then directly write the transformed output to a regional Amazon S3 bucket in the formats you want (including open table formats such as Apache Hudi, Apache Iceberg, and Delta Lake).

Lakehouse foundation with Apache Iceberg

By standardizing on Apache Iceberg, you’re not choosing AWS over your other platforms. You’re choosing interoperability and future flexibility. Your data becomes truly portable across any Iceberg-compatible engine.

  • Open table format: Industry-standard format supported across AWS, Databricks, Snowflake, and other platforms, which eliminates vendor lock-in.
  • ACID transactions: Reliability with full transactional consistency.
  • Time travel and schema evolution: Built-in versioning and flexible schema management.
  • Performance optimization: Advanced features such as hidden partitioning, partition evolution, and metadata management.

Note that lakehouse storage is not limited to the Apache Iceberg format, and you have the flexibility to include other open table formats (for example, Apache Hudi and Delta Lake) or file formats (for example, Apache Parquet and Apache Avro).

Unified governance and access control

AWS governance capabilities transform the lakehouse from a storage layer into a fully governed data platform. This delivers security, compliance, and data quality out of the box, applied consistently across all data sources including federated catalogs. A unified catalog consolidates metadata from AWS and non-AWS sources with generative AI-powered business glossary generation, while automated ML-powered classification identifies sensitive data (for example, PII, PHI, and financial data) across structured and unstructured datasets. AWS Identity and Access Management (AWS IAM) and AWS Lake Formation enforce fine-grained access control at the row, column, cell, and tag level, applied consistently across Amazon Athena, Amazon Redshift Spectrum, Amazon EMR, and federated sources. End-to-end data lineage tracking provides visual data flow graphs, impact analysis, and compliance audit trails. When AI agents explore metadata from the unified catalog and submit a query to Amazon Athena for execution, the Lake Formation fine-grained access control filters data based on the user interacting with the AI agent.

For the foundation model integrated into your AI agents, you can use Amazon Bedrock Guardrails, which implements customized safeguards to block harmful content and minimize hallucinations. Amazon Bedrock AgentCore provides fine-grained policy control over agent actions with real-time enforcement and managed authentication for agents accessing AWS and third-party services.

A comprehensive audit and compliance stack spans Amazon CloudWatch, AWS CloudTrail, AWS IAM, AWS Key Management Service (AWS KMS), AWS Audit Manager, and AWS PrivateLink. This stack makes sure every agent invocation is traceable, every key is managed, and every configuration is automatically mapped to frameworks including ISO, SOC, GDPR, and HIPAA.

When an end user interacts with the AI chat assistant, the layers of security and governance should go through the following.

Layer 1: Who can access?

  • Enable Active Directory and single sign-on integration for user authentication, and a combination of AWS IAM roles for AWS API-level authorization.

Layer 2: What can they see?

  • Integrate an agent profile to define what datasets each agent can access, because not all agents should have access to all datasets.
  • Enable fine-grained access control on the metadata layer using AWS Lake Formation that can filter rows and columns.
  • Enable data masking as applicable while the query responses are served through the query engine.

Layer 3: What can the agent do?

  • Control agent actions by restricting them to read-only, and apply restrictions to INSERT, UPDATE, and DELETE if the agents are supposed to query only.
  • Apply a limit on the number of rows that can be returned from the query, and apply a query scan limit to reduce cost.

Layer 4: What does the agent reveal?

  • Enable output filtering to make sure no PII is included.
  • Apply Amazon Bedrock Guardrails on large language model (LLM) responses to make sure the model does not produce anything inappropriate.
  • In addition, enable audit logging of all queries to make sure future audit and compliance needs can be met.

Comprehensive analytics ecosystem (Reference points 7.1, 7.2, 7.3)

AWS offers a complete analytics ecosystem that includes the following.

  • Amazon Athena: Serverless SQL queries with Iceberg v2 support, including provisioned capacity for consistent performance and workgroups for resource and cost management.
  • Amazon Redshift Spectrum: Federated queries across the data warehouse and Iceberg data lake.
  • Amazon Quick Sight: Enterprise visualization with governed access to all data.
  • AWS Glue and Amazon EMR: Distributed data processing capability for enterprise transformations.

AI-ready architecture (Reference points 8.1 to 8.4)

A consolidated lakehouse architecture helps you make data ready for AI agents that can access the data through readily available MCP servers or through the AWS SDK for Python (Boto3) for Amazon Athena or Amazon Redshift Spectrum. AI agents can integrate the AWS MCP Server to interact with AWS analytics services such as AWS Glue, Amazon Athena, and Amazon S3 Tables, a capability of Amazon S3, to query both data and metadata.

AI agents need context to understand how the catalog tables and their attributes are linked to each other, how users have queried them in the past, or what priorities are defined to understand which one is an authoritative source for a particular natural language question. To enable the AI agent with additional context, we can integrate the AWS Context service that was pre-announced recently at the AWS New York Summit 2026.

Governance integration: AI agents automatically inherit Lake Formation permissions, because the agent can submit the SQL query to be run through Amazon Athena or Amazon Redshift Spectrum. This makes sure they only access data that users are authorized to see. Amazon SageMaker Unified Studio data lineage tracks AI agent queries for full auditability.

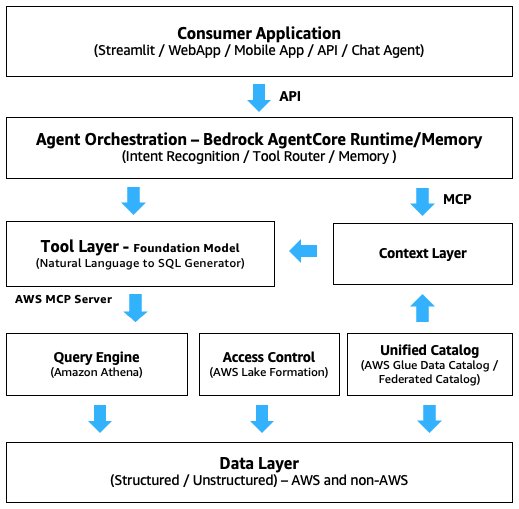
The following diagram represents how the AI agent request flow looks.

AI agent request flow through the unified catalog, Lake Formation governance, and Amazon Athena

This architecture delivers value across every layer of the organization. Business teams gain faster time-to-insight by querying data across all platforms without waiting for data movement, while eliminating duplicate storage and reducing transfer costs through federation. The Apache Iceberg open table format ensures data portability and freedom from vendor lock-in. For IT and data teams, a single governance layer across all sources, including federated catalogs, reduces operational complexity, while the flexibility to choose between federation and ingestion for each use case, combined with the elastic AWS infrastructure and the petabyte-scale metadata architecture of Iceberg, delivers both agility and scalability. Data governance and compliance teams benefit from a single point of policy enforcement across all data regardless of location, complete lineage and access logs for audit and compliance reporting, automated sensitive data classification, and policies that are defined once and enforced everywhere, including across federated sources.

Architecture tradeoffs and best practices

The following are a few key trade-offs you need to consider while designing the solution.

Data ingestion and access methods

Use catalog federation (Iceberg REST) when:

  • The source platform supports the Iceberg REST API (Databricks, Snowflake Polaris).
  • Data is already in Iceberg format with Amazon S3 backed storage.
  • You want bidirectional discovery (AWS tables visible in Databricks or Snowflake too).

Use query federation (Amazon SageMaker Lakehouse architecture or AWS Glue connectors) when:

  • The source is BigQuery, SQL Server, or another non-Iceberg platform.
  • Data must stay in the source cloud (sovereignty, contractual, or latency reasons).
  • Real-time access is required without replication lag.

Use ingestion (Zero-ETL, AWS Glue, or Amazon EMR) when:

  • Data is accessed frequently with a low-latency requirement by AI agents or high-concurrency analytics.
  • The business decides to build a data lake and warehouse on AWS.
  • You need full governance, time travel, and performance optimization.

Use AWS Interconnect – multicloud when:

  • You need real-time or near-real-time query federation to GCP data sources (BigQuery, AlloyDB, Cloud Spanner) and latency or security requirements prohibit public internet routing.
  • You have high-volume, recurring data transfers between AWS and GCP where public internet egress costs or bandwidth variability are unacceptable.
  • Your organization has compliance or regulatory requirements mandating that data never traverse the public internet (HIPAA, PCI-DSS, or financial services regulations).
  • You need bidirectional connectivity, such as GCP workloads calling AWS APIs, or AWS workloads calling GCP APIs, both over private paths.

Choosing between federation and ingestion based on use case

Dimension Federation (Query in Place) Ingestion (Move to AWS)
Data freshness Real-time or near-real-time Dependent on ingestion frequency
Query performance Subject to source system latency and network Subject to data volume and operation, avoids cross-cloud network latency
Cost Lower storage cost. Higher per-query cost for cross-cloud egress Higher upfront ingestion cost. Lower ongoing query cost
Governance Partial. Source system retains some control, and a unified catalog can simplify governance for consumers Full. Lake Formation enforces all policies across all AWS analytics services
Data portability Data remains in source Data fully portable in open format
AI readiness Limited. Agents depend on source availability High. Agents query optimized, governed Iceberg tables
Operational complexity Lower initial setup. Harder to debug cross-cloud issues Higher initial setup. Simpler long-term operations

Integrating Amazon Bedrock AgentCore Gateway and Amazon Bedrock AgentCore Runtime based on use case

The following are key differences between AgentCore Gateway and AgentCore Runtime that are relevant for our use case.

Dimension Amazon Bedrock AgentCore Gateway Amazon Bedrock AgentCore Runtime
Timeout 5 minutes (hard limit) 15 min sync / 8 hours async
Statefulness Stateless (per-request) Stateful (session-based)
Best for Lightweight API proxying Long-running data processing
Your lakehouse queries Will time out frequently Handles multi-hour jobs

Because AgentCore Gateway has a 5-minute hard timeout limit, use AgentCore Runtime for data processing jobs.

  • AWS Glue ETL jobs can run for minutes to hours.
  • Amazon Redshift queries on large datasets routinely exceed 5 minutes.
  • Athena federated queries (especially cross-cloud through Interconnect) can be slow.
  • Iceberg table scans on multi-TB datasets take time.

You can use AgentCore Gateway if the scope is limited to Glue Data Catalog interactions to fetch metadata schema, because that won’t run for more than 5 minutes.

Design considerations for production implementation

In practice, there are multiple aspects to consider when deploying the solution for production. The following summarizes a few of the key issues you might encounter and approaches to address them.

Catalog federation: The metadata drift problem

One of the first surprises in production is metadata drift, the state where your federated catalog no longer reflects the actual schema of the source system, because the source system’s metadata changes are not reflected in the unified catalog. The agent continues to generate SQL against the stale schema, producing silent failures that are hard to trace.

The following are a few ways you can address the metadata drift issue.

  • Implement a catalog refresh schedule. Even a daily Glue crawler run against federated sources catches most drift before it causes agent failures.
  • Add schema validation as a pre-query step in your agent tool. Before running SQL, verify that the referenced columns exist in the current catalog metadata.
  • Instead of pulling metadata changes from the source in a scheduled manner, you can design an event-driven system, where the source system triggers a push event to run the schema change in the federated catalog.

Query federation: Latency is non-deterministic

Query federation works well for moderate data volumes, but latency becomes non-deterministic at scale. A query that returns in 3 seconds during testing can take more than 10 seconds in production when the source system is under load, the network path is congested, or the federated connector is cold-starting.

The following are a few approaches you can consider to improve the performance.

  • Set explicit query timeouts in your Athena execution context. Without them, a slow federated query will block your agent indefinitely.
  • Implement query result caching for frequently asked questions. Most business users ask the same questions repeatedly, and caching at the agent layer improves perceived performance.
  • For time-sensitive use cases, consider caching aggregated data in an AWS lakehouse on a schedule rather than querying live. This trades freshness for reliability.

AgentCore memory: Statefulness cost

AgentCore Memory enables stateful conversations, but in production, unbounded memory accumulation creates its own problems. An agent that remembers every conversation eventually starts surfacing stale context. For example, a user who asked about Q3 revenue six months ago gets that context injected into a Q1 query today.

The following are a few ways you can optimize cost and improve relevance.

  • Set explicit memory expiry (we use 30 days as shown in the implementation) and enforce it consistently.
  • Use session-scoped memory for transactional queries and long-term memory only for user preferences and recurring patterns.
  • Implement a memory review step in your LangGraph workflow. Before invoking the model, filter retrieved memories by recency and relevance score rather than injecting all of them.

LangGraph orchestration: When tool calls loop

The conditional routing of LangGraph is powerful, but in production we observed a failure mode where the agent enters a tool call loop. The model repeatedly calls the same tool with slightly different parameters, never reaching a satisfactory answer. This typically happens when the tool returns partial or ambiguous results and the model keeps trying to refine.

What we learned:

  • Add a maximum tool call counter in your LangGraph state. If the agent has called tools more than N times in a single session, force a graceful exit with a summary of what was found.
  • Return structured, unambiguous responses from your tools. Include row counts, column names, and explicit null indicators so the model can reason clearly about completeness.
  • Log every tool invocation with its input and output. This is the single most valuable debugging artifact when diagnosing agent misbehavior in production.

Handling hallucination risks in federated agent architectures

This is the most important section for teams moving from prototype to production. Hallucination in agentic AI systems that query real data is qualitatively different from hallucination in general-purpose LLMs, and it is more dangerous because the outputs look authoritative.

There are three distinct hallucination risk zones in a lakehouse AI agent:

  • SQL generation: The model generates SQL that is syntactically valid but semantically wrong. For example, when asked “What is our revenue growth this quarter?”, the model might generate a query that compares the wrong date ranges, uses the wrong aggregation function, or joins tables on incorrect keys, and then returns a confident, formatted answer with the wrong numbers.
  • Cross-source synthesis: When the agent queries multiple federated sources and synthesizes results, the risk compounds. The model may correctly retrieve customer counts from Amazon S3 and revenue figures from Snowflake, but incorrectly draw conclusions that aren’t supported by either dataset individually.
  • Memory-augmented reasoning: When long-term memory is active, the model may blend historical context with current query results in ways that are factually incorrect. For example, it might apply a business rule that was true six months ago but has since changed.

To improve, before any agent output informs a business decision, apply the following three-step validation framework:

  • Step 1: Source verification. Can you trace the answer back to a specific table, column, and row count? If the agent can’t show you the SQL and the row count, the answer is unverified.
  • Step 2: Reasonableness check. Does the answer fall within expected ranges? A sudden 10x spike in customer count is a signal to investigate.
  • Step 3: Cross-validation. For critical decisions, run the equivalent query directly in Athena or your BI tool and compare. Discrepancies reveal either a model reasoning error or a data quality issue. Resolve both before the answer is trusted.

These lessons don’t diminish the value of the architecture. They make it production-ready. The teams that move fastest with agentic AI are not the ones who skip these guardrails. They’re the ones who build them in from the start and spend less time firefighting in production.

Alternative to the unified catalog approach

In case you face technical and process challenges to unify catalogs across providers, you can let each data producer expose the metadata and data through MCP servers, as represented in the following diagram. In this approach, each producer takes the responsibility of maintaining the MCP servers and exposing them to the context layer. While this approach provides autonomy to data owners to operate independently and with flexibility, it also creates operational overhead to synchronize all metadata in a consistent way.

Alternative architecture where each data producer exposes its metadata and data through its own MCP server to the context layer

What’s next

In Part 2 of this series, we walk through the full implementation step by step, including hands-on scripts to:

  • Load example sales datasets into Databricks and marketing data to Snowflake as Iceberg tables, and federate them into AWS Glue Data Catalog through the Iceberg REST API.
  • Register Google BigQuery as a native federated data source in Amazon SageMaker, instead of a traditional AWS Lambda connector integration.
  • Create a customer master table as a native Iceberg table in Amazon S3.
  • Run a single SQL query in Amazon Athena that joins all four sources across two federation patterns, with no data movement.
  • Deploy an AI agent on Amazon Bedrock AgentCore that can autonomously query the same unified catalog using Amazon Athena and answer complex business questions in natural language queries. In addition, integrate AgentCore Memory to persist user context.

Conclusion

In this post, we summarized how you can unify data access across multiple cloud and ISV providers on AWS with the combination of catalog federation, query federation, and data movement to AWS. We then explained how AWS Glue Data Catalog and Lake Formation help provide unified catalog and access governance, and how AI agents hosted in Amazon Bedrock AgentCore can access it using MCP servers to explore the metadata context, convert user natural language queries to SQL, and use Amazon Athena to run the query across data sources to get the response to the end user. In addition, we provided an overview of different data ingestion methods to build a lakehouse architecture on AWS, including AWS Interconnect – multicloud and where it adds value.

We also provided architecture trade-offs and best practices to integrate the service capabilities. In the next post (Part 2), we will take a specific use case and provide a step-by-step implementation guide to unify the catalog and deploy the agent to Amazon Bedrock AgentCore.


About the author

Sakti Mishra

Sakti Mishra

Sakti is a Principal Data and AI Solutions Architect at AWS, where he helps customers modernize their data architecture and define end-to-end data strategies, including data security, accessibility, governance, and more. He is also the author of Simplify Big Data Analytics with Amazon EMR and AWS Certified Data Engineer Study Guide. Outside of work, Sakti enjoys learning new technologies, watching movies, and visiting places with family. You can connect with Sakti through his LinkedIn profile.

Build an AI campaign orchestrator with Amazon Bedrock and AWS End User Messaging

Post Syndicated from Ruchikka Chaudhary original https://aws.amazon.com/blogs/messaging-and-targeting/build-an-ai-campaign-orchestrator-with-amazon-bedrock-and-aws-end-user-messaging/

Marketing teams running large-scale campaigns often send the same message across SMS, WhatsApp, and email regardless of how each customer engages or how many messages they’ve already received that week. This pattern wastes budget on channels customers ignores and pushes promotional content toward frustrated or message-fatigued customers. A MarketingSherpa study found that 45% of consumers who unsubscribe from email marketing cite messages being too frequent as the reason. Over-messaging therefore erodes the audience a brand has paid to acquire. This post shows how to build a campaign orchestrator on AWS End User Messaging and Amazon Bedrock. The orchestrator predicts the best channel for each customer, adapts content per channel, and holds back messages to fatigued or unhappy customers.

In this post, we describe the following capabilities for enterprise marketing teams:

  • Channel prediction that selects SMS, WhatsApp, or email for each customer based on engagement history
  • Content adaptation that takes a single campaign brief and produces channel-appropriate variants: a 160-character SMS, a longer WhatsApp template message, and an HTML email
  • Sentiment-aware suppression that holds back promotional messages when a customer’s stored sentiment score is negative
  • Frequency tracking across channels that lowers send rate when a customer shows disengagement signal
  • Natural-language campaign launch that turns a typed instruction such as “Send the Andaman package to Mumbai customers who haven’t booked in six months” into a segmented, channel-routed send

Prerequisites

You need the following to deploy this solution-

  • An AWS account
  • The AWS Serverless Application Model (AWS SAM) CLI installed locally
  • A WhatsApp Business account linked to AWS End User Messaging Social
  • Amazon Bedrock model access granted for an Anthropic Claude model in your AWS Region
  • (Optional) An Amazon SageMaker AI endpoint for channel prediction. The orchestrator calls the endpoint when it’s configured and falls back to the customer’s stored preferred channel otherwise.

Solution overview

A marketer types a plain-language instruction into the campaign launcher. Amazon API Gateway forwards the instruction to an AWS Lambda function, which starts an AWS Step Functions state machine. The state machine walks the campaign through seven stages. Each stage moves the campaign closer to dispatching the right message on the right channel. The stages read and write customer state in Amazon DynamoDB and call Amazon Bedrock for language tasks. The final stage dispatches messages through AWS End User Messaging or Amazon Simple Email Service (Amazon SES).

When you turn on semantic segmentation, the state machine also queries an Amazon OpenSearch Serverless collection. The collection holds customer embeddings.

To deploy the sample in your account, refer to the GitHub repository.

Figure 1 shows the campaign orchestration system.

Message processing

When a marketer submits an instruction, the launcher Lambda function starts a Step Functions execution. The state machine then runs the stages in order. Each stage reads the output of the previous one, applies its own logic, and passes its result forward. The state machine retries transient failures within a stage, so a Bedrock throttle or a DynamoDB timeout doesn’t restart the whole campaign. A choice state redirects the workflow straight to the recording stage when no customers pass the safety check, so empty campaigns skip the content adaptation step. This decoupled design gives operators three things:

  • If one stage fails, the workflow retries that stage without rerunning earlier work
  • You can add new stages — for example, a translation step — without changing the others
  • The system scales with campaign volume

AI conversation engine

Amazon Bedrock does two distinct things in the orchestrator, and they happen at different stages. The parse stage runs first. It takes the marketer’s plain-language instruction and asks the model to return a small JSON object. The JSON has fields such as location, package, age range, and a short semantic query when the instruction implies a lifestyle or affinity. That JSON is what every downstream stage works against, so the parse output sets the shape of the campaign.The parse stage sends the following prompt to Anthropic Claude on Bedrock through the InvokeModel API:

You parse marketing campaign instructions into structured fields.

Instruction:
{instruction}

Return JSON with these fields:
- "sku" (string or null): product SKU or package name
- "location" (string or null): city or region
- "category" (string or null): one of "Electronics", "Travel", "Apparel", "Home"
- "min_age" (integer or null), "max_age" (integer or null)
- "min_purchases" (integer or null)
- "lookback_days" (integer or null)
- "has_cart_items" (bool or null)
- "semantic_query" (string or null): free-text lifestyle/affinity descriptor

Output ONLY the JSON object, no prose.

For the instruction “Send the Andaman package to budget-conscious families in Mumbai”, the model returns:

{
  "sku": "Andaman package",
  "location": "Mumbai",
  "category": "Travel",
  "min_age": null, "max_age": null,
  "min_purchases": null,
  "lookback_days": null,
  "has_cart_items": null,
  "semantic_query": "budget-conscious families"
}

The adapt stage runs later, after segmentation and safety. It takes a single campaign brief and asks Bedrock to produce one variant per channel: a 160-character SMS, a longer WhatsApp template message, and an HTML email. The model never sees customer-level data at this point; the brief and the channel are the only inputs.The orchestrator stores one prompt per channel. The SMS prompt enforces a hard character limit; the WhatsApp prompt allows a longer message; the email prompt asks for structured HTML:

# SMS
Write a single SMS for the campaign brief below. Hard limit: 160 characters.
No emojis, no links unless the brief explicitly includes one. Plain text only.

# WhatsApp
Write a WhatsApp message for the campaign brief below. Up to 1024 characters.
Friendly tone, optional emoji where natural.

# Email
Write an HTML email body for the campaign brief below. Include a single <h1>,
two short paragraphs, and a call-to-action link placeholder {{CTA_URL}}.
No <html> or <body> wrappers.

Each prompt is formatted with the campaign brief and sent to Bedrock; the response becomes that channel’s variant for every approved customer in the segment.

The safety stage runs after the parse stage and before the adapt stage, and it is rule-based rather than model-based. It reads each customer’s stored sentiment score and rolling send count from DynamoDB, and drops customers below the sentiment threshold (default -0.3) or above the fatigue limit. The fatigue limit is a per-customer count of sends over a rolling window, for example five sends in the previous seven days. You set the fatigue window and the sentiment threshold as Step Functions input parameters. You populate the sentiment score upstream. For example, you can run a daily Amazon Comprehend Custom Classification job that scores recent support transcripts and writes the result back to the customer record.

The fatigue check reads the customer’s recent send timestamps from the rate-limits table and counts the entries inside the rolling window:

NEGATIVE_THRESHOLD     = Decimal("-0.3")     # configurable
MAX_MESSAGES_PER_WINDOW = 5
WINDOW_SECONDS         = 7 * 24 * 60 * 60     # 7 days

def _is_fatigued(customer_id):
    item = _rate_limits.get_item(Key={"limiter_key": f"customer:{customer_id}"}).get("Item")
    if not item:
        return False
    cutoff = int(time.time()) - WINDOW_SECONDS
    recent = [t for t in item.get("recent_sends", []) if int(t) >= cutoff]
    return len(recent) >= MAX_MESSAGES_PER_WINDOW

Each successful send writes its timestamp into the customer’s recent_sends list, so the next campaign sees an up-to-date fatigue count without a separate ETL step.

Orchestration

Each stage in the campaign workflow is a small AWS Lambda function. The state machine invokes them in sequence: parse the instruction, segment customers, predict channels, check safety, adapt content, deliver messages, and record results. The predict stage reads each customer’s per-channel engagement history from DynamoDB and picks the channel with the highest historical engagement rate. When you wire an Amazon SageMaker AI endpoint into the stack, the stage calls that endpoint instead and uses its score as the channel ranking signal.The state machine, not the functions, owns the control flow. New stages (for example, a translation step before adapt content) can be inserted without changing the existing handlers. The Step Functions definition lives in statemachine/campaign_orchestrator.asl.json. Refer to it in the GitHub repository for the exact state graph and retry policy.

Semantic search

Consider a marketer who types “Send the Andaman package to budget-conscious families interested in beach vacations.” A keyword filter against the customer table won’t match a profile tagged “economy package, kid-friendly, coastal”, because the words don’t overlap even though the meaning does. To bridge that gap, the seed script embeds each customer profile with Amazon Titan Text Embeddings v2 and writes the vector into an OpenSearch Serverless Vector search collection. The segment stage then embeds the marketer’s phrasing at query time and runs a k-nearest-neighbor search against the collection.

The orchestrator intersects those matches with the structured DynamoDB filter. The final segment respects both the hard constraints (location, age, recency) and the soft ones (lifestyle, affinity). OpenSearch Serverless scales the collection’s compute units to zero when idle, so this capability adds near-zero cost when no campaigns run.

Deployment

To deploy the sample in your AWS account, clone the GitHub repository and run the SAM-based deploy script:

git clone https://github.com/aws-samples/sample-ai-campaign-orchestrator.git
cd sample-ai-campaign-orchestrator
./scripts/deploy.sh --guided

The script prompts you for an AWS Region, a stack name, and the orchestrator parameters (your WhatsApp phone number ID and optional SES sender). It then runs sam build followed by sam deploy, and prints the API endpoint and stack outputs when the deployment finishes.

Test the solution

After the stack finishes deploying, seed the customer profiles table with one sample customer and run a campaign against it:

python scripts/seed_demo_data.py --whatsapp-recipient +1234567890

Then submit a campaign instruction to the API endpoint that the deploy script printed:

curl -X POST $ENDPOINT -H 'content-type: application/json' \
  -d '{"instruction": "Send the Andaman package to Mumbai customers"}'

From here you can:

  1. Watch the campaign execution in the AWS Step Functions console.
  2. Query the delivery tracking table in Amazon DynamoDB to see which customers the safety stage approved or suppressed, and which channel the orchestrator picked for each.
  3. Check the recipient’s phone for the WhatsApp template message that the deliver stage sent.

Sample conversation

The recording in this section shows a marketer using the campaign launcher to send an Andaman travel promotion to a Mumbai segment. It opens with the marketer typing the natural-language instruction and the parse stage extracting structured filters. The segment stage then matches customers in DynamoDB. The safety stage suppresses a customer with a low sentiment score. The predict stage assigns a channel per remaining customer. The recording ends with the adapt stage producing one message variant per channel and the deliver stage dispatching them through AWS End User Messaging.

Clean up

To avoid incurring future charges, delete the resources you created. The sample includes a cleanup script in the GitHub repository. Run ./scripts/cleanup.sh to empty the deployment bucket and delete the stack. The stack deletion removes the AWS Step Functions state machine, AWS Lambda functions, Amazon DynamoDB tables, and (when configured) the Amazon OpenSearch Serverless collection.

Conclusion

You can combine AWS End User Messaging, Amazon Bedrock, and AWS Step Functions to build a campaign orchestrator. The orchestrator routes each message to the channel a customer is most likely to open. It also holds back sends to fatigued or unhappy customers.

The same pattern fits other business-initiated messaging workflows where per-recipient channel and content decisions matter. Examples include transactional banking notifications, appointment reminders, and logistics status updates. To deploy the sample in your account, refer to the GitHub repository. To learn more about AWS End User Messaging, refer to the service documentation.

If you’re applying this pattern, start with the safety check and frequency tracking. Those two stages reduce the risk of damaging customer relationships and produce the engagement data that channel prediction depends on. Once that data is in place, add the prediction and content adaptation stages. Use this implementation as a reference for production messaging on AWS.


About the authors

Enforce zero data retention on Amazon Bedrock with Bedrock Projects and service control policies

Post Syndicated from Rob Higareda original https://aws.amazon.com/blogs/security/enforce-zero-data-retention-on-amazon-bedrock-with-bedrock-projects-and-service-control-policies/

With the introduction of models that require data sharing with third-party providers—such as Claude Fable 5—organizations need a way to centrally enforce data retention policies. Amazon Bedrock gives you control over whether your prompts and model outputs are retained after an inference request completes. You might need a way to enforce your retention settings across all accounts and have granular control of project data retention when compatible with the selected model.

In this blog post, I walk you through how Amazon Bedrock data retention modes work, the tools available for managing retention—including Amazon Bedrock Projects and service control policies (SCPs)—and how to verify your policy settings are working correctly.

In this post, you will learn:

  • How Amazon Bedrock data retention modes work and what each mode means for your data
  • How to use Amazon Bedrock Projects with compatible models to isolate workloads with different retention needs
  • How to write and deploy an SCP that prevents anyone in your organization from enabling data sharing
  • How data retention modes interact with cross-Region inference profiles
  • How to verify your configuration is working correctly

Understanding data retention modes

You can use Amazon Bedrock to control data retention through a mode setting on your account. This determines what happens to your prompts and outputs after each inference request, which is important to understand as you assess your compliance needs. Not all models require data retention or data sharing, and you might continue to use Amazon Bedrock with models that don’t require data retention or data sharing. See the Amazon Bedrock documentation for the current list of models that require data retention or data sharing. Ultimately, it’s your responsibility as the customer to select models that align with your compliance needs.

The following modes govern how Amazon Bedrock handles your data:

Mode Behavior Data shared with provider
none Zero data retention. Prompts and responses are processed and immediately discarded. No
default No data is shared with model providers. Some models might require data retention for trust and safety checks for up to 30 days. Consult the model’s terms for specifics. This mode also allows APIs that inherently require retention (for example, Batch API, Responses API with store=true). Models that support zero retention will still operate with zero retention. No
inherit No explicit setting applied, defers to the next higher scope (project defers to account defers to service default). This is the default for new accounts. No
provider_data_share Data is shared with the model provider and retained for up to 30 days for trust and safety. Yes

Understanding mode as a ceiling, not a floor

The most important concept to understand: your configured mode is the upper limit of retention you’re willing to accept; it is not what every request will use. Setting your account to provider_data_share doesn’t mean all your requests suddenly start retaining and sharing data. Models that support zero data retention will still operate with zero retention regardless of your account-level setting.

Think of it as a permissions ceiling:

Your account mode Model you invoke What happens
provider_data_share Claude Sonnet (supports none) Zero retention, Sonnet doesn’t require data sharing or data retention
provider_data_share Claude Fable 5 (requires provider_data_share) Data retained for up to 30 days and might be shared with provider, Fable 5 requires data sharing and data retention
none Claude Sonnet (supports none) Zero retention, no data sharing
none Claude Fable 5 (requires provider_data_share) Blocked, your ceiling is below what the model requires, calls to this model will be denied
default Claude Sonnet (supports none) Zero retention, Sonnet supports it, no data retention or data sharing
default A model requiring retention for safety checks Data is retained, model requires it and your ceiling allows it

Key takeaway: Your mode setting declares the maximum level of data retention you will accept. Models that support zero retention will continue to operate that way regardless of your account setting. Amazon Bedrock is designed so that you do not get more retention than necessary just because your account mode allows it.

Important: provider_data_share isn’t inherited from a model—it’s an explicit opt-in at the account or project level. If your account is set to inherit or default, no model will trigger provider data sharing unless you configure it within your account or project.

Note on inherit behavior: The inherit mode defers to the next scope up in the hierarchy (project defers to account defers to service default). If a project is set to inherit and the account above it is set to provider_data_share, the project will inherit provider_data_share. You will not inherit provider_data_share from a model—that requires an explicit setting at the account or project level.

Note on APIs that require retention: Some Amazon Bedrock APIs require data retention to function regardless of model support, for example, the Batch API and the Responses API with store=true. Setting your mode to none will block these APIs. This is expected behavior: your ceiling of none means you require no retention, so APIs that can’t operate without retention are unavailable.

Why does provider_data_share exist?

Some foundation models require the provider_data_share mode to function. As AI models evolve, so must the mechanism to protect customers and the safety of their use. Models that require provider_data_share have allowed_modes: ["provider_data_share"], meaning they will appear as unavailable unless the account has explicitly opted in. This is by design: AWS requires you to make a conscious decision to share data before you as a customer can use these models. See the current list of models available through Amazon Bedrock and their retention requirements, which can change as new models are released.

If your regulatory requirements, internal policies, or customer commitments prohibit data sharing with third-party model providers, you can enforce this at multiple levels. Amazon Bedrock provides several tools for managing data retention, from fine-grained project-level settings to organization-wide enforcement.

Tools for managing data retention

Amazon Bedrock gives you multiple layers of control over data retention. You can use them independently or combine them for defense-in-depth:

Tool Scope Use case
Amazon Bedrock console Per-account, per-AWS Region Quick configuration and visibility; view and change your retention mode directly in the AWS Management Console.
Amazon Bedrock Projects Per-project within an account Isolate workloads with different retention needs within the same account for compatible models
SCPs Organization-wide Use to prevent any account from opting in to data sharing
IAM policies Per-account or per-principal Fine-grained control, including the management account (which SCPs don’t cover)

Using Amazon Bedrock Projects for granular control

Not every workload in an account has the same data retention requirements. If you’re using the bedrock-mantle endpoint (OpenAI-compatible APIs), you can use Amazon Bedrock Projects to isolate traffic that can accept data retention from traffic that must not be retained—even within the same account.

For example, you might have:

  • A research project where your team needs access to the latest models (including those requiring provider_data_share) for experimentation
  • A production project handling customer data where zero retention is mandatory

With Amazon Bedrock Projects, you can set provider_data_share on the research project while keeping the production project locked to none. Each project enforces its own retention ceiling independently.

How project-level retention works:

  • Each project can have its own data retention mode setting.
  • A project set to inherit will inherit its mode from the account level.
  • A project set to none enforces zero retention regardless of the account setting. Traffic routed through that project can’t trigger data sharing.
  • A project set to provider_data_share allows models requiring data sharing, but only for requests within that project.

This gives organizations the flexibility to adopt new models incrementally while maintaining strict data governance on sensitive workloads. You can manage project settings using the Amazon Bedrock console or the bedrock-mantle API.

Important: Amazon Bedrock Projects are only available on the bedrock-mantle endpoint. They work with models accessed using the OpenAI-compatible APIs (Responses, Chat Completions) and the Anthropic Messages API on the mantle endpoint. Not all models are available on bedrock-mantle; check the endpoint availability by models page for current support.

Workload isolation on the bedrock-runtime endpoint

If you’re using the bedrock-runtime endpoint (Invoke, Converse APIs), project-level data retention isn’t available. The account-level retention mode applies to all requests made through bedrock-runtime.

To achieve workload-level isolation on bedrock-runtime, use separate AWS accounts:

  • Place workloads that need provider_data_share in one account (or OU) without the SCP
  • Place workloads that require zero retention in a separate account (or OU) with the SCP applied

You can use AWS Organizations OUs to group accounts by retention policy and apply SCPs selectively:

Organization Root
├── OU: Zero-Retention (SCP attached — blocks provider_data_share)
│   ├── Account: Production-App-A
│   └── Account: Production-App-B
└── OU: Research (no SCP — allows provider_data_share)
    └── Account: ML-Experimentation

Combining projects with SCPs: If you use an SCP to enforce none at the organization level, it overrides all project-level settings on bedrock-mantle. For accounts where you want project-level flexibility, don’t apply the SCP—use project-level isolation instead. For accounts that must never have data sharing under any circumstances, the SCP provides an unbypassable guarantee across both endpoints.

Using SCPs for organization-wide enforcement

For organizations that need an absolute guarantee that no account can enable data sharing—regardless of who has admin access or which endpoint they use—SCPs provide the strongest enforcement mechanism. SCPs apply to both the Amazon Bedrock control plane (bedrock:PutAccountDataRetention) and the mantle endpoint (bedrock-mantle:PutAccountDataRetention, bedrock-mantle:CreateProject, bedrock-mantle:UpdateProject).

Enforcing zero data retention with an SCP

In this section, I cover how you can use SCPs to manage your data retention policy. I introduce what an SCP is and provide some policies that you can use in your organization.

What is an SCP?

A service control policy (SCP) is a guardrail set at the organization level. It overrides every principal in the organization, including account administrators and root users. Even if someone has full admin permissions, an SCP deny can’t be overridden by an AWS Identity and Access Management (IAM) policy.

SCPs are managed in AWS Organizations and can be attached at different levels:

  • Root – Applies to every account in the organization
  • Organizational unit (OU) – Applies to all accounts in that OU
  • Individual account – Applies only to that specific account

Important: The SCP must be attached to the root OU to cover all accounts. If attached to a child OU, accounts outside that OU will not be protected. Organization admin accounts don’t inherit SCP controls.

The SCP policy

The following policy prevents anyone in the organization from changing the Amazon Bedrock data retention mode to anything other than none.

Important: New accounts default to inherit (not none). Before attaching this SCP, you must explicitly set each account to none. Start by running the following in each account:

aws bedrock put-account-data-retention --region us-east-1 --mode none

If you have hundreds, or thousands of AWS accounts, you will need a way to scale this. See the AWS re:Post article Automate Bedrock Zero Data Retention Across All Accounts in Your Organization to learn how.

Amazon Bedrock policy:

This policy is used to restrict data retention to only be set to none. Any other value than none will be denied.

{
    "Version": "2012-10-17",
    "Statement": [
        {
            "Sid": "RESTRICTBEDROCKDATARETENTION",
            "Effect": "Deny",
            "Action": [
                "bedrock:PutAccountDataRetention"
            ],
            "Resource": "*",
            "Condition": {
                "StringNotEquals": {
                    "bedrock:DataRetentionMode": "none"
                }
            }
        }
    ]
}

How it works

The Condition block uses StringNotEquals, meaning the deny fires for any value that isn’t none. This ensures:

Action Result
Setting mode to none Allowed
Setting mode to provider_data_share Denied by SCP
Setting mode to default Denied by SCP
Setting mode to inherit Denied by SCP

With all the preceding in place you might be wondering what this means for your organization:

  • No one can enable data sharing with model providers – Even account administrators receive Access Denied
  • Models requiring provider_data_share become permanently unavailable – Models that require data sharing (such as Claude Fable 5 and Claude Mythos 5, among others) will not work across the organization
  • All other models continue to work normally – Models that support none mode are unaffected
  • The setting cannot be bypassed – no IAM policy can override an SCP deny

Optional: Block project-level overrides

The bedrock-mantle endpoint supports project-level data retention settings. Without additional SCP coverage, someone could create or update a project with provider_data_share, bypassing the account-level restriction. To prevent this, extend your SCP to include the bedrock-mantle project actions:

{
    "Version": "2012-10-17",
    "Statement": [
        {
            "Sid": "RESTRICTBEDROCKDATARETENTION",
            "Effect": "Deny",
            "Action": [
                "bedrock:PutAccountDataRetention",
                "bedrock-mantle:PutAccountDataRetention",
                "bedrock-mantle:CreateProject",
                "bedrock-mantle:UpdateProject"
            ],
            "Resource": "*",
            "Condition": {
                "StringNotEquals": {
                    "bedrock:DataRetentionMode": "none"
                }
            }
        }
    ]
}

Why doesn’t bedrock-runtime need project-level blocking? Projects don’t exist on the bedrock-runtime endpoint. The only way to change retention for bedrock-runtime traffic is the account-level bedrock:PutAccountDataRetention action, which the base SCP already blocks. The extra CreateProject and UpdateProject actions are only needed because bedrock-mantle allows per-project retention overrides; the project level control iisn’t required on bedrock-runtime.

Data retention and cross-Region inference

When using cross-Region inference profiles, it’s important to understand how data retention mode is evaluated: the mode is evaluated in the source AWS Region of your request, the Region where you make the API call. You don’t need to set the retention mode in every destination Region.

However, there’s an important caveat: while the mode check happens in your source Region, the data itself might be retained in the destination Region where the inference is processed. This is relevant for organizations tracking where retained data resides geographically.

What this means in practice

The following describes how this work in practice with data retention and inference.

  • If your source Region (for example, us-east-1) is set to provider_data_share, requests using a cross-Region inference profile will be permitted, regardless of the retention setting in the destination Region
  • If your source Region is set to none, requests to models requiring provider_data_share will be blocked at the source, before the request is ever routed to a destination Region
  • SCPs continue to apply globally, a single SCP at the root OU blocks provider_data_share in every Region automatically

SCPs are global

While data retention settings are helpful for granular control of data retention settings itself, SCPs can be used to apply data retention settings globally across all Regions automatically. A single SCP attached to the root OU blocks provider_data_share in every Region without needing to configure anything per-region. This is one of the key advantages of using an SCP for enforcement rather than relying on manual configuration.

Verify your configuration

You can verify your data retention settings and SCP enforcement using the AWS Software Development Kit, AWS Command Line Interface (AWS CLI), or the Amazon Bedrock console.

Check your current retention mode

The following provides are options that you can use for checking your current retention mode.

Using the Amazon Bedrock console:

In the AWS Management Console, go to Amazon Bedrock and choose Settings, and then choose Data retention. Here, you can see the current account-level retention mode and change it directly.

Using the AWS CLI (requires CLI version 2.35+):

aws bedrock get-account-data-retention --region us-east-1

Expected response:

{
  "mode": "none",
  "updatedAt": "2026-07-01T01:58:34.684Z"
}

Using the bedrock-mantle API (using a Bedrock API key):

curl https://bedrock-mantle.us-east-1.api.aws/v1/data_retention \
	-H "x-api-key: $BEDROCK_API_KEY"

Expected response:

{
  "mode": "none",
  "updated_at": 1719792000
}

Check a model’s effective mode and allowed modes

You can also use the bedrock-mantle API to check what retention mode is in effect for a specific model, and which modes that model supports:

curl https://bedrock-mantle.us-east-1.api.aws/v1/models/anthropic.claude-fable-5 \ 
  -H "x-api-key: $BEDROCK_API_KEY

Response:

{
  "id": "anthropic.claude-fable-5",
  "status": "available",
  "data_retention": {
    "mode": "provider_data_share",
    "source": "account",
    "allowed_modes": ["provider_data_share"]
  }
}

If the model shows "status": "unavailable", the status_reason field will explain the retention mode conflict.

Verify the SCP is working

To confirm your SCP is actively blocking data retention changes, attempt to set the mode to provider_data_share:

Using AWS CLI:

aws bedrock put-account-data-retention \
  --region us-east-1 \
  --mode provider_data_share

Using bedrock-mantle API:

curl -X PUT https://bedrock-mantle.us-east-1.api.aws/v1/data_retention \
  -H "x-api-key: $BEDROCK_API_KEY" \
  -H "Content-Type: application/json" \
  -d '{ "mode": "provider_data_share" }'

If the SCP is working, you’ll receive an Access Denied error:

An error occurred (AccessDeniedException) when calling the PutAccountDataRetention operation:
User: arn:aws:iam::123456789012:user/admin is not authorized to perform:
bedrock:PutAccountDataRetention with an explicit deny in a service control policy

If the SCP is not working, the request will succeed. If this happens, immediately revert:

aws bedrock put-account-data-retention \
  --region us-east-1 \
  --mode none

Then troubleshoot your SCP attachment:

  • Verify the SCP is attached to the root OU, not a child OU
  • Check the SCP policy syntax and condition keys
  • Remember: the AWS Organizations management account is exempt from SCPs—use an IAM policy to enforce policies on that account

Enable data retention for models that require it

For accounts where you want to use models requiring provider_data_share (accounts where the SCP isn’t applied), set the mode using AWS CLI, the API, or the console:

Using AWS CLI:

aws bedrock put-account-data-retention \
  --region us-east-1 \
  --mode provider_data_share

Using bedrock-mantle API:

curl -X PUT https://bedrock-mantle.us-east-1.api.aws/v1/data_retention \
  -H "x-api-key: $BEDROCK_API_KEY" \
  -H "Content-Type: application/json" \
  -d '{ "mode": "provider_data_share" }'

You can also do this in the Bedrock console in Data retention , under Settings.

Reset data retention back to none

To revert to zero data retention:

Using AWS CLI:

aws bedrock put-account-data-retention \
  --region us-east-1 \
  --mode none

Using bedrock-mantle API:

curl -X PUT https://bedrock-mantle.us-east-1.api.aws/v1/data_retention \
  -H "x-api-key: $BEDROCK_API_KEY" \
  -H "Content-Type: application/json" \
  -d '{ "mode": "none" }'

Manage project-level data retention

You can set data retention at the project level to allow different workloads within the same account to have different retention policies. Update a project’s data retention mode using the bedrock-mantle API:

# Set a project to provider_data_share
curl -X POST https://bedrock-mantle.us-east-1.api.aws/v1/organization/projects/proj_abc123 \
  -H "x-api-key: $BEDROCK_API_KEY" \
  -H "Content-Type: application/json" \
  -d '{ "data_retention": { "mode": "provider_data_share" } }'

# Set a project to none (zero retention)
curl -X POST https://bedrock-mantle.us-east-1.api.aws/v1/organization/projects/proj_abc123 \
  -H "x-api-key: $BEDROCK_API_KEY" \
  -H "Content-Type: application/json" \
  -d '{ "data_retention": { "mode": "none" } }'

# Check a project's current setting
curl -X POST https://bedrock-mantle.us-east-1.api.aws/v1/organization/projects/proj_abc123 \
  -H "x-api-key: $BEDROCK_API_KEY"

How project-level retention resolves: The effective mode for any request is determined by taking the first non-inherit value in the project, account, model default hierarchy. If your project is set to none, it enforces zero retention regardless of the account setting. If your project is set to inherit, it defers to the account-level setting.

Note: Project-level data retention is managed exclusively through the bedrock-mantle API. There is no AWS CLI command for project-level settings. The preceding AWS CLI commands only manage the account-level setting through the Amazon Bedrock control plane.

Conclusion

In this post, I showed you the various methods for managing data retention within Amazon Bedrock, including project-level data retention and organization wide control you can implement using SCPs. Choose the combination that matches your requirements and consult the Amazon Bedrock documentation to confirm each model’s mode requirements before deployment.

For more information about Amazon Bedrock data retention, see the data retention documentation. For SCPs, see service control policies in the AWS Organizations User Guide.

Additional resources

Try the examples in this post and send feedback to AWS re:Post for Amazon Bedrock or through your usual AWS Support contacts.


Rob Higareda

Rob Higareda

Rob is a Principal Solutions Architect in the AWS Security Risk and Compliance organization at AWS, focused on risk assessment for AI-powered services. Rob joined AWS with 20+ years of experience as a systems engineer. He works primarily with regulated customers at AWS and is focused on security and infrastructure design.

AWS Weekly Roundup: Claude Sonnet 5 on AWS, Amazon WorkSpaces for AI agents, AWS service availability updates, and more (July 6, 2026)

Post Syndicated from Daniel Abib original https://aws.amazon.com/blogs/aws/aws-weekly-roundup-claude-sonnet-5-on-aws-amazon-workspaces-for-ai-agents-aws-service-availability-updates-and-more-july-6-2026/

A couple of editions ago I wrote about what I find so energizing about working with startups. Last week I got a fresh dose of it: I spent a few days with the AWS Startups team, listening to stories of founders talking about the problems they’re actually solving. One story that stayed with me came from Marco Negreiros, founder of EyeCare Health, a Brazilian healthtech expanding access to eye care. He shared a striking fact: more than 70% of Brazilian municipalities don’t have a single ophthalmologist. His answer was to put a vision test on the one device almost everyone already carries, the smartphone, so a basic eye screening no longer depends on living near a clinic. Watching a founder turn a gap that big into something that concrete is exactly why I love this space.

AWS Startups team get-together with founders in Brazil

This week, I’ll take a closer look at some key launches, and then cover the quarterly AWS Service Availability updates.

Last week’s launches
Here are some of the launches covered from this past week in the AWS News Blog:

Here are some launches and updates that caught my attention:

For a full list of AWS announcements, be sure to keep an eye on the What’s New with AWS page.

AWS Service Availability Updates
When the availability of an AWS service or feature changes, we provide customers guidance in AWS Product Lifecycle Changes on available alternatives and support for migration so that disruptions to your operations are minimized. The following lifecycle changes were updated on June 30, 2026.

Services moving to Maintenance (no longer accessible to new customers starting July 30, 2026):

Services entering Sunset:

Services reaching End of Support (as of June 30, 2026):

  • Amazon Chime SDK – Carrier Voice Focus
  • Amazon SageMaker AI – Ground Truth Plus

We understand that changes in availability can impact your operations. For specific guidance, consult the relevant service documentation or contact AWS Support.

Upcoming AWS events
Check your calendar and sign up for upcoming AWS events:

  • AWS Summits – AWS Summits are free events that bring the cloud and AI community together to connect, learn, and explore the latest technologies. Browse the full calendar to find a Summit near you in the second half of 2026.
  • AWS Community Days – Community-led conferences where content is planned, sourced, and delivered by community leaders. If you’re in Latin America, don’t miss AWS Community Day Belo Horizonte on August 22. Registration is open at awscommunityday.com.br.

Join the AWS Builder Center to connect with builders, share solutions, and access content that supports your development. Browse here for upcoming AWS-led in-person and virtual events and developer-focused events.

That’s all for this week. Check back next Monday for another Weekly Roundup!

– Daniel Abib

This post is part of our Weekly Roundup series. Check back each week for a quick roundup of interesting news and announcements from AWS!

Deploy modern data platforms in minutes with MDAA

Post Syndicated from Sudeshna Dash original https://aws.amazon.com/blogs/big-data/deploy-modern-data-platforms-in-minutes-with-mdaa/

Modern Data Architecture Accelerator (MDAA) is an open source framework that replaces infrastructure code with concise YAML configuration, so your team can deploy a governed, production-ready data architecture, reducing deployment time from months to weeks (depending on complexity and team experience).

Organizations building modern data architecture on AWS face a critical challenge: deploying production-ready, governed infrastructure traditionally requires 6–12 months of custom development, thousands of lines of infrastructure code, and continuous remediation cycles to maintain security and compliance. Governance is often added incrementally, treated as an afterthought that creates compliance gaps and engineering rework.

MDAA addresses this by replacing infrastructure code with concise YAML configuration, achieving up to 97.6 percent code reduction (from approximately 1,800 lines of AWS CloudFormation to 45 lines of MDAA YAML) while embedding governance from the start. The complete Governed Lakehouse Starter Kit deploys 491 AWS resources across 12 stacks from approximately 450 lines of YAML configuration, representing a 66x verbosity ratio where each line automatically expands into production-ready infrastructure.

In this post, we explore how MDAA transforms data architecture development from months of manual coding to production-ready deployment through configuration-driven infrastructure and embedded governance, examine a real customer transformation, and provide a clear implementation pathway for your own data modernization journey.

Customer use case and challenge

A university system office needed to modernize its analytics architecture across 17 campuses while managing sensitive educational data. Their third-party dependency created bottlenecks that slowed feature implementation from weeks to months, and their IT team lacked the cloud skillsets to build modern infrastructure independently.

With MDAA, they achieved:

  • 95 percent reduction in time-to-value for dashboard and feature implementation (from weeks to hours).
  • 17 campuses integrated into a unified, secure architecture.
  • 7.2TB of data and over 8,000 dashboards migrated successfully.
  • Significant cost savings by removing third-party dependencies and reducing license costs.
  • Enhanced security posture for external stakeholders accessing sensitive educational data.

The team used MDAA to implement a modernization strategy with continuous integration and continuous delivery (CI/CD) for automated deployment. The architecture now supports rapid response to stakeholder requests while maintaining strict data governance through AWS Lake Formation.

Their transformation demonstrates what becomes possible when governance is embedded from launch rather than added incrementally, moving from months-long manual development to weeks of production-ready deployment through configuration-driven infrastructure.

Solution: MDAA and its value propositions

MDAA’s capabilities stem from its modular, composable architecture. The accelerator provides over 40 pre-built modules that encapsulate AWS best practices for security, governance, and operational excellence. Organizations describe the outcomes they want in MDAA-specific YAML configuration files (not CloudFormation or Terraform YAML) and the accelerator automatically translates these configurations into AWS Cloud Development Kit (AWS CDK) constructs, which then deploy via CloudFormation with embedded governance.

Configuration over code. The MDAA framework takes a fundamentally different approach: describe the outcomes you want in YAML, and the accelerator deploys production-ready infrastructure with embedded governance. Consider deploying a governed data lake where fraud detection teams need write access to transaction data, while marketing analytics teams require read-only access to customer behavior data. Traditional approaches require over 1,800 lines of CloudFormation across Amazon Simple Storage Service (Amazon S3) buckets, AWS Key Management Service (AWS KMS) keys, AWS Identity and Access Management (IAM) policies, and Lake Formation permissions. With MDAA, the same governed data lake is expressed in 45 lines of configuration, a 97.6 percent reduction, while helping you apply encryption, least-privilege access, and cross-account governance as built-in defaults.

The configuration deploys multi-zone S3 storage with KMS encryption, Lake Formation permissions with tag-based access control (TBAC) enabled, Amazon SageMaker Unified Studio for data product discovery, and encrypted AWS Glue Data Catalog with automated crawlers. All permissions flow through Lake Formation rather than individual IAM policies.

Embedded governance from day one. Governance is declared in YAML and deployed alongside infrastructure from the first run. Fine-grained access controls, encrypted data catalogs, data quality validation, audit trails, and sensitive data classification are all part of the same configuration. MDAA’s Governed Lakehouse starter kit defines an entire governed data architecture in roughly 450 lines of YAML, which produces approximately 29,700 lines of CloudFormation across 12 stacks (a 98.5 percent reduction in infrastructure code).

Modular, composable architecture. Each module is purpose-built to handle a specific capability within the data architecture. Modules communicate through AWS Systems Manager Parameter Store, passing resource identifiers (Amazon Resource Names (ARNs), IDs, and names) between stacks. This approach removes hardcoded dependencies. A KMS key created in one module can be referenced by another through parameter resolution, with all dependencies resolved automatically at deployment time.

The diagram illustrates the deployed architecture and team-level access flow that MDAA generates from the 45-line configuration.

Progressive architecture patterns. MDAA provides four reference architecture patterns that align to progressive stages of data infrastructure maturity:

  • Basic Data Lake deploys a governed data lake with built-in security controls, data quality checks, centralized metadata management using AWS Lake Formation and AWS Glue.
  • Data Science Platform extends the data lake with Amazon SageMaker notebooks, feature stores, and machine learning (ML) pipelines so data science teams can experiment and train models on governed data.
  • SageMaker Unified Studio adds a single interface for analytics and ML collaboration, connecting data engineers, analysts, and data scientists in one workspace.
  • Generative AI Platform layers Amazon Bedrock and Retrieval Augmented Generation (RAG) capabilities on top of your existing data foundation, so teams can build generative AI applications grounded in enterprise data.

Each pattern builds the one before it. You can start with the Basic Data Lake and adopt additional patterns as your team’s needs grow. MDAA’s modular design means you add capabilities without rearchitecting what you already deployed.

The infrastructure is versioned through GitHub, repeatable across environments, and auditable through comprehensive AWS CloudTrail logging. Data engineers focus on data pipelines and business logic while MDAA manages infrastructure complexity and governance integration. This represents the fundamental shift: from writing infrastructure code to describing the outcomes you want through configuration, with governance embedded from the start.

Use case of MDAA: Governed data architecture

DataOps teams spend significant time on governance tasks, including permissions management, compliance validation, and access control, rather than building pipelines and analytics. These aren’t data problems, they’re governance problems that consume engineering capacity meant for higher-value work. MDAA addresses this at the architectural level. Governance is declared in YAML and deployed alongside infrastructure from the first run.

The following sections walk through how each governance module works in practice.

Publish, discover, subscribe, and consume data products between business units: SageMaker Unified Studio

Amazon SageMaker Unified Studio provides a governed data catalog where data producers publish data products, and consumers discover and subscribe to them. Your deployment with MDAA includes a pre-configured domain, blueprints (managed and custom), projects, and environment profiles, all defined in a single configuration file:

# sagemaker.yaml --- 16 lines that deploy 114 CloudFormation resources
domains:
  domain1:
    dataAdminRole:
      id: ssm:/{{org}}/govern1/generated-role/data-admin/id
    description: SMUS Domain 1
    userAssignment: MANUAL

    tooling:
      vpcId: '{{context:vpc_id}}'
      subnetIds:
        - '{{context:private_subnet_id1}}'
        - '{{context:private_subnet_id2}}'

    groups:
      team1:
        ssoId: '{{context:team1-group-sso-id}}'
      team2:
        ssoId: '{{context:team2-group-sso-id}}'

Behind this configuration, MDAA deploys an Amazon SageMaker Unified Studio domain with dedicated KMS keys, execution and provisioning roles, and single sign-on group profiles for team access. Data producers tag and publish assets with metadata, ownership, and classification. Consumers browse a searchable catalog, see only authorized assets, and request access through a governed workflow. Cross-account and cross-business-unit data sharing flows through a subscription model, ensuring every access grant is tracked, auditable, and revocable.

Use case of MDAA: Restricting access to cardholder data using Lake Formation

AWS Lake Formation provides fine-grained access control at database and table levels, removing manual IAM policy management. MDAA deploys AWS Lake Formation with pre-configured settings that disable IAMAllowedPrincipals, the critical governance setting that ensures all permissions flow through centralized governance:

# lakeformation-settings.yaml --- 6 lines that deploy 25 CloudFormation resources
lakeFormationAdminRoles:
  - id: generated-role-id:data-admin
createCdkLFAdmin: true
createDataZoneAdminRole: true
iamAllowedPrincipalsDefault: false

That last flag is the single most important governance setting in the platform. Without it, an IAM principal with glue:GetTable can read tables in the catalog, bypassing the entire access control model. Most manual setups miss this or defer it.

With the data lake configuration, you declare roles and access policies in YAML where admins get full control, engineers get read access to curated data, extract, transform, and load (ETL) roles get scoped write access, and MDAA compiles them into the correct S3 bucket policies and Lake Formation registrations.

Use case of MDAA: Ensuring data integrity with AWS Glue Data Quality

AWS Glue Data Quality runs automated validation rulesets continuously as part of the pipeline, not as periodic batch checks. MDAA’s data quality module supports over 15 built-in rule types, from completeness and uniqueness checks to statistical thresholds and data freshness validation:

# data-quality.yaml
projectName: example-project

rulesets:
  customer-data-quality:
    description: Validate customer data completeness and uniqueness
    targetTable:
      databaseName: project:databaseName/customer-data
      tableName: customers
    ruleset:
      - ruleType: IsComplete
        column: customer_id
      - ruleType: Uniqueness
        column: email
        comparisonOperator: ">"
        threshold: 0.95
      - ruleType: RowCount
        comparisonOperator: ">"
        value: 100

Quality metrics flow into Amazon CloudWatch for real-time alerting. If anomalies are detected, automated workflows quarantine affected records and alert data engineering teams before issues reach downstream consumers.

Protecting metadata at rest: AWS Glue Data Catalog encryption

Table schemas, column names, and partition structures can reveal sensitive information about an organization’s data architecture, even without access to the underlying data. AWS Glue Catalog Encryption secures metadata at rest using AWS KMS-managed keys. MDAA configures catalog encryption by default, so schema definitions and connection passwords are encrypted from initial deployment without requiring manual key management setup. Access to catalog metadata follows the same Lake Formation governance controls applied to the data itself, so teams see only the schemas that they’re authorized to query.

Auditing every data access event: CloudTrail integration

Every data access event must be logged and attributable to a specific identity. Without a complete audit trail, demonstrating compliance during a regulatory review becomes a manual, error-prone process. AWS CloudTrail captures API-level activity across the data infrastructure, recording who accesses what data, when, and from which service. MDAA configures CloudTrail integration by default, so audit logging is active from initial deployment rather than added retroactively. Log data flows into a centralized, tamper-resistant store, giving compliance teams a single location to query access history across all business units and accounts.

Identifying sensitive data automatically: Macie integration

In large environments, sensitive information spreads across dozens of S3 buckets through pipelines, transforms, and ad hoc data drops, and self-reporting data owners consistently produce gaps. Amazon Macie uses machine learning to automatically discover and classify sensitive data in S3, surfacing findings at the object level without manual tagging. MDAA configures Macie across your S3 buckets during deployment, routing findings to Amazon EventBridge where automated workflows can alert owners or trigger remediation.

Together, these controls form a layered defense: Lake Formation governs access to cataloged data, Glue Data Quality validates integrity on arrival, and Macie identifies sensitive data that lands outside governed pipelines to reduce compliance risk.

Multi-account data mesh

MDAA provides extensive support for multi-account data mesh setups, with decentralized data ownership across business units and centralized governance. The data mesh starter kit supports cross-account data product publishing and consumption, allowing organizations to scale data sharing while maintaining consistent security and compliance controls.

Technical implementation

Ready to deploy your modern data architecture? Here are the resources to get started:

MDAA Implementation Guide provides detailed instructions for deploying all starter packages, including architecture patterns, configuration examples, security best practices, and troubleshooting guidance.

MDAA Hands-on Workshop offers step-by-step guided implementation with AWS experts. The workshop covers configuration management best practices, implementation patterns, hands-on labs with real-world scenarios, and cleanup instructions.

GitHub Repository and Documentation provide source code, module reference, and comprehensive documentation.

Organizations approach MDAA from different starting points. Some modernize existing data architectures, migrating from on-premises infrastructure or legacy cloud architectures. Others build new architectures for artificial intelligence and machine learning (AI/ML) initiatives or generative AI applications. Financial services organizations require PCI-DSS compliance from day one. Healthcare organizations need controls that can help support HIPAA. Each journey benefits from MDAA’s configuration-driven approach and embedded governance.

Conclusion

MDAA transforms data architecture development from months of manual coding to production-ready deployment. Configuration-driven infrastructure reduces development time by 40–60 percent while embedding governance from the start. The university system’s 95 percent reduction in time-to-value demonstrates the outcome: organizations deploy secure, compliant, governed data architectures in weeks rather than months.

Financial services organizations can deploy architectures to help them align with PCI-DSS compliance requirements using Lake Formation access controls, Glue Data Quality validation, SageMaker Unified Studio data discovery, comprehensive CloudTrail audit trails, and automated Macie data classification, all inherited from configuration rather than built manually.

Data architecture journeys need not follow six-month timelines with governance added incrementally. MDAA provides an alternative: describe the outcomes you want through YAML configuration, inherit pre-validated security controls, and deploy production-ready infrastructure with comprehensive governance from initial deployment.

Security and compliance is a shared responsibility between AWS and the customer. For more information, see the AWS Shared Responsibility Model.

Need help or have questions? Contact AWS ProServe for personalized guidance on selecting the right package and deployment strategy for your organization.


About the author

Sudeshna Dash

Sudeshna Dash

Sudeshna is a Data Scientist at AWS Professional Services based in Berlin, Germany. She specializes in data architecture, generative AI, and agentic AI systems on AWS. Sudeshna is a contributor to the Modern Data Architecture Accelerator (MDAA) open-source project and helps customers design and deploy governed, production-ready data and AI/ML architectures on AWS.

John Reynolds

John Reynolds is a Principal Engineer with AWS Professional Services based in Seattle, Washington. He leads the architecture and development of Modern Data Architecture Accelerator (MDAA), focusing on turning proven delivery patterns into reusable, production-ready foundations that customers can adopt and extend at scale.

AI-powered performance recommendations for Amazon Redshift

Post Syndicated from Steve Phillips original https://aws.amazon.com/blogs/big-data/ai-powered-performance-recommendations-for-amazon-redshift/

Data platform teams running Amazon Redshift collect performance telemetry across system views like SYS_QUERY_HISTORY, SVV_TABLE_INFO, and SVV_ALTER_TABLE_RECOMMENDATIONS, plus Amazon CloudWatch metrics for capacity, query execution, and storage. The challenge is interpretation. Correlating a spike in QueryRuntimeBreakdown commit time with hundreds of small INSERT statements, or connecting high disk spill with undersized compute, takes deep expertise and hours of manual analysis.

In this post, you learn how to build an AI-powered solution that collects the telemetry, pre-computes performance signals, correlates them with CloudWatch, and uses Amazon Bedrock to generate prioritized recommendations. The source code is in the accompanying GitHub repository: sample-ai-performance-advisor-for-amazon-redshift.

The signal-based design is what makes this solution produce precise recommendations rather than generic advice. Instead of dumping raw system view output into the large language model (LLM) prompt, the collector pre-computes boolean and threshold-based findings, pairs them with CloudWatch correlations, and hands the model a structured context. The model then cross-references specific query IDs, table names, and metric values in its output.

Solution overview

Two AWS Lambda functions run on a 24-hour Amazon EventBridge schedule:

  • The collector Lambda runs 13 diagnostic SQL queries against Amazon Redshift Serverless and reads the workgroup’s Workload Management (WLM) configuration. It also collects CloudWatch metrics across capacity, query execution, WLM, connections, and storage. From these inputs, it computes the performance signals. Finally, it writes a telemetry JSON file to Amazon Simple Storage Service (Amazon S3).
  • The analyzer Lambda reads the telemetry from Amazon S3, builds a structured prompt with inline CloudWatch-to-signal correlations. Using the correlations, the analyzer calls Amazon Bedrock (Anthropic Claude Sonnet 4.6), and writes the resulting recommendations JSON back to Amazon S3.
  • An Amazon Simple Notification Service (Amazon SNS) topic sends an email summary of the top recommendations to subscribers.
AWS architecture diagram showing an automated Redshift analysis pipeline within the AWS Cloud. Amazon EventBridge triggers a “Collector” AWS Lambda function, which interacts bidirectionally with AWS Secrets Manager, Amazon Redshift, and Amazon CloudWatch to gather data. The Collector passes results to an “Analyzer” AWS Lambda function, which exchanges data with Amazon Bedrock and reads/writes to Amazon S3. The Analyzer then publishes to Amazon Simple Notification Service (SNS), which delivers an email notification.

Figure 1 – Architecture diagram

Prerequisites

Before deploying the solution, make sure the following are in place.

  • An Amazon Redshift Serverless workgroup with a database and query history.
  • An Amazon Redshift database administrator user (superuser). The collector reads views that only a superuser can query (SVV_TABLE_INFO, SVV_ALTER_TABLE_RECOMMENDATIONS, SVV_MV_INFO, SYS_SERVERLESS_USAGE, SYS_AUTO_TABLE_OPTIMIZATION).
    Store the admin credentials in AWS Secrets Manager and pass the secret ARN to the collector.
    Alternatively, have an existing superuser run ALTER USER "IAMR:redshift-performance-recommendations-role" CREATEUSER;
    once to grant the Lambda role superuser privileges.
  • Amazon Bedrock model access for the model of choice. For this solution, a us.anthropic.claude-* model is recommended for multi-region inference. The solution doesn’t depend on a single model.
  • The AWS Command Line Interface (AWS CLI) installed and configured, and a clone of the GitHub repository.

Create the supporting resources

You need an Amazon S3 bucket, an Amazon SNS topic, an AWS Secrets Manager secret, and an AWS Identity and Access Management (IAM) role before the Lambda functions can run.

Create the Amazon S3 bucket

The Amazon S3 bucket will host the output report.

  • Open the Amazon S3 console and choose Create bucket.
  • Enter a globally unique name (for example, amzn-s3-demo-bucket), keep the default settings, and choose Create bucket.

The collector writes telemetry JSON under the telemetry/ prefix and the analyzer writes recommendations under the recommendations/ prefix.

Create the Amazon SNS topic and subscription

Use Amazon SNS to generate notifications once reports are created.

  • Open the Amazon SNS console and choose Topics, Create topic.
  • Select Standard, and enter the name redshift-performance-recommendations.
  • Choose Create topic.
  • On the topic detail page, choose Create subscription.
  • Select Email as the protocol, enter your email address, and choose Create subscription.
  • Open the confirmation email from AWS Notifications and choose Confirm subscription.
Amazon SNS “Create topic” console page. The Type is set to Standard (selected over FIFO), and the Name field contains “redshift-performance-recommendations.” Annotation arrows highlight the Topics nav item, the Standard topic type, the entered name, and the “Create topic” button in the lower right. Optional sections for Encryption, Access policy, Delivery policy, Message delivery status logging, Tags, and Active tracing are collapsed below.

Figure 2 – Create SNS Topic

Store the admin credentials in AWS Secrets Manager

To avoid using hard-coded credentials, create an AWS Secrets Manager secret to connect to Amazon Redshift.

  • Open the AWS Secrets Manager console and choose Store a new secret.
  • Select Other type of secret, choose the Plaintext tab, and paste the following, replacing <ADMIN_PASSWORD> with the workgroup’s admin password:
    {"username":"admin","password":"<ADMIN_PASSWORD>"}

  • Choose Next, enter redshift-performance-admin as the secret name, then choose Next, Next, and Store.
  • Copy the secret Amazon Resource Name (ARN) from the secret detail page. You pass it to the collector in a later step.
AWS Secrets Manager “Store a new secret” page, Step 1: Choose secret type. “Other type of secret” is selected, and the Plaintext tab shows the key-value pair {“username”:“admin”,“password”:“”}. The encryption key is set to aws/secretsmanager. Annotation arrows highlight the secret type selection, the plaintext credentials, and the “Next” button in the lower right.

Figure 3 – Create secret

Create the IAM role and attach the policy

The repository includes a trust policy in iam/trust-policy.json (allowing lambda.amazonaws.com to assume the role) and the least-privilege permission policy in iam/lambda-role-policy.json. Replace the <ACCOUNT_ID>, <REGION>, <YOUR_BUCKET>, and SNS topic ARN placeholders in the permission policy with your values, then create the role in the AWS Management Console or with this AWS CLI command:

aws iam create-role --role-name redshift-performance-recommendations-role \
    --assume-role-policy-document file://iam/trust-policy.json

aws iam put-role-policy --role-name redshift-performance-recommendations-role \
    --policy-name redshift-performance-policy \
    --policy-document file://iam/lambda-role-policy.json

The permission policy grants the Amazon Redshift Data API, Amazon S3, Amazon SNS, Amazon Bedrock, AWS Lambda invoke, AWS Secrets Manager, and Amazon CloudWatch Logs permissions that both Lambda functions require.

Deploy the Lambda functions

The collector source is in lambda/collector.py and it loads the SQL files in sql/ at runtime. The deployment package must contain both.

Package the collector

Open a terminal or shell window and execute a command to copy the collector code, supporting SQL into a folder and archive.

mkdir -p build/collector/sql
cp lambda/collector.py build/collector/
cp sql/*.sql build/collector/sql/
(cd build/collector && zip -qr ../collector.zip .)

Create the collector function

Using the AWS Management Console, navigate to AWS Lambda.

  • Choose Create function.

    AWS Lambda “Create function” console page with the “Configure custom execution role” panel open on the right. “Author from scratch” is selected, the function name is “redshift-performance-collector,” and the runtime is Python 3.14. Under Additional settings, the “Custom execution role” toggle is enabled, and the execution role list is set to “redshift-performance-recommendations-role.” Annotation highlights mark the Author from scratch option, function name, runtime, custom execution role toggle, the selected role, the Save button, and the “Create function” button.

    Figure 4 – Create AWS Lambda function

  • Select Author from scratch, enter redshift-performance-collector as the name, and select Python 3.14.
  • Expand Custom settings, toggle Custom execution role, choose an existing role, select redshift-performance-recommendations-role, and choose Save.
  • On the function page, choose Upload from, .zip file, and upload build/collector.zip.
  • In Runtime settings, select Edit, and set the Handler to collector.lambda_handler.

    Lambda console for the “redshift-performance-collector” function, Code tab. The code editor shows collector.py — a Python file that runs diagnostic SQL queries against Amazon Redshift Serverless, collects CloudWatch metrics, writes telemetry to Amazon S3, and invokes the analyzer Lambda. The Runtime settings section below shows the Handler highlighted as “lambda_function.lambda_handler,” with an arrow pointing to the Edit button and the “Upload from .zip file” option highlighted.

    Figure 5 – Set AWS Lambda handler

  • Choose Configuration, Edit, set timeout to 5 minutes, and memory to 256 MB.

    Lambda console for “redshift-performance-collector,” Configuration tab with “General configuration” selected. The panel shows Memory 128 MB, Ephemeral storage 512 MB, and Timeout 0 min 3 sec, with SnapStart set to None. Annotation arrows point to the General configuration menu item and the Edit button.

    Figure 6 – Set AWS Lambda timeout and memory

  • Under Configuration, select Environment variables, and add the following keys:
    • WORKGROUP: your Amazon Redshift Serverless workgroup name.
    • NAMESPACE_NAME: the namespace the workgroup belongs to.
    • DATABASE: dev (or your target database).
    • BUCKET: the Amazon S3 bucket name you created earlier.
    • SECRET_ARN: the AWS Secrets Manager secret ARN you copied earlier.
    • ANALYZER_FN: redshift-performance-analyzer.

Package and create the analyzer

Repeat the same steps for the analyzer, using lambda/analyzer.py with a 15-minute timeout:

(cd lambda && zip -q ../build/analyzer.zip analyzer.py)

Use the Lambda console to create redshift-performance-analyzer with handler analyzer.lambda_handler, timeout 15 minutes, memory 256 MB, the same execution role, and these environment variables:

  • BUCKET: the same Amazon S3 bucket.
  • SNS_TOPIC: the SNS topic ARN.
  • MODEL_ID: us.anthropic.claude-sonnet-4-6.

The analyzer creates the Amazon Bedrock client with read_timeout=600 and max_tokens=16384 to handle large prompts and long responses. Anthropic Claude inference on a full telemetry payload typically takes 2–4 minutes.

How the signals and the prompt work

You don’t write any custom code for signal computation or prompt construction. Both computation and construction live in the repository.

The compute_signals() function in lambda/collector.py scans the telemetry for Boolean and threshold-based anti-patterns. At the table level, it looks for row skew, ghost rows, stale statistics, unsorted data, sub-optimal sort or distribution keys, and oversized VARCHAR columns. It also flags runtime and workload issues such as disk spill, small-insert bursts, high Data Definition Language (DDL) executions, and unoptimized COPY file size. Beyond that, it catches Amazon Redshift Spectrum queries that fail to prune partitions and data sharing materialized views doing full refresh. It also flags WLM configurations that lack Query Monitoring Rules (QMR), such as limits on blocks spilled to disk and query execution time. The full set of signals and thresholds is defined inline in the function. To tune a threshold or add a custom signal, edit this function and redeploy.

The build_prompt() function in lambda/analyzer.py constructs the Amazon Bedrock prompt in four sections. The first section lists the triggered signals. The second adds CloudWatch metrics, annotated with >> CORRELATION lines that pair each signal with its supporting metric. The third includes the filtered supporting data, limited to the table and query rows that triggered a signal. The fourth gives explicit instructions to return a pipe delimited text where every recommendation references specific table names, query IDs, and metric values. This structure is why the model produces targeted output rather than generic best-practice advice.

Schedule daily runs

Use the Amazon EventBridge console to trigger the collector every 24 hours.

  • Open the EventBridge console and choose Schedules under Scheduler, Create schedule.
  • Enter the name redshift-performance-daily for Schedule name, toggle Recurring schedule and Rate-based schedule.
  • Under Rate expression, enter 24 and select hours.
  • For Flexible time window, choose Off, and select Next.
    Amazon EventBridge Scheduler “Create schedule” page, Step 1: Specify schedule detail. The schedule name is “redshift-performance-daily.” Under Schedule pattern, “Recurring schedule” and “Rate-based schedule” are selected, with a rate expression of 24 hours, and the time zone set to (UTC-06:00) America/Denver. Annotation highlights mark the Schedules nav item, the recurring/rate-based selections, the rate expression, and the Next button.

    Figure 7 – Create Amazon EventBridge schedule


  • On the Select target page, choose AWS Lambda, select the redshift-performance-collector function, and choose Next.

    EventBridge Scheduler “Create schedule” page, Step 2: Select target. “Templated targets” is selected and the AWS Lambda “Invoke” target is chosen from the grid of target options. In the Invoke section, the Lambda function list is set to “redshift-performance-collector” with an empty JSON payload. Annotation highlights mark the Templated targets toggle, the AWS Lambda Invoke target, the selected function, and the Next button.

    Figure 8 – Select Amazon EventBridge schedule target

  • Accept the defaults for Settings and select Next. EventBridge automatically adds a resource-based permission on the Lambda function so the rule can invoke it.
  • Choose Create schedule.

Run it once and review the output

Invoke the collector manually to confirm the pipeline works end-to-end.

  • In the Lambda console, open the redshift-performance-collector function and choose Test. Create a test event named manual with the body {} and choose Test.

    Lambda console for “redshift-performance-collector,” Test tab. A new test event named “manual” is being configured with Invocation type set to Synchronous, event sharing set to Private, the “Hello World” template selected, and an empty {} Event JSON body. Annotation arrows point to the function in the left nav, the Synchronous option, the event name, the Event JSON field, and the Test button.

    Figure 9 – Test end-to-end workflow

  • The function completes in under a minute. Check the Monitor tab for the invocation log via the CloudWatch live logs link.
  • In the Amazon S3 console, open your bucket. Confirm that the telemetry/ prefix contains a JSON file with the current timestamp.
  • Within 2–4 minutes, the analyzer publishes a message to the SNS topic. Check the email address you subscribed for the summary with the top 10 recommendations. Confirm that the recommendations/ prefix in Amazon S3 contains the full JSON.

Each recommendation has a priority (critical, high, medium, low) and a category (query_optimization, table_design, capacity, wlm, maintenance, or ingestion). It also includes a signal_source that names the signals and CloudWatch metrics that triggered it, a plain-language explanation, a specific SQL or configuration action, and an expected impact estimate.

Email notification from AWS Notifications with the subject “Redshift performance: 3 critical, 5 high, 4 medium, 2 low (8 signals)” highlighted. The body is a plain-text “Amazon Redshift Performance Recommendations” report listing workgroup, namespace, database, analysis time, and 14 recommendations. Two critical items are shown for the game_events table: fixing extreme row-skew via DISTSTYLE ALL, and eliminating non-encoded columns with column compression, each with a category, source, explanation, SQL action, and expected impact.

Figure 10 – Sample analyzer emailed output

Best practices

  • Tune thresholds to your workload. The default thresholds in compute_signals() come from the Amazon Redshift operational review playbook. For high-velocity ingestion or small-cluster environments, consider lowering the small-insert threshold, widening the stale-statistics window, or adding custom signals for your own tables.
  • Keep the signal-to-metric correlations current. When you add a signal, also add a matching correlation in build_correlations(). The inline >> CORRELATION lines are what make the model connect an infrastructure metric to an application-level symptom.
  • Review recommendations before you act. The analyzer produces prioritized suggestions, but VACUUM, ANALYZE, and ALTER TABLE actions change table state. Read the explanation and action on each recommendation, validate the SQL against your schema, and run it during a maintenance window.

Cleaning up

To avoid ongoing charges, delete the resources you created for this solution:

  • The two AWS Lambda functions: redshift-performance-collector and redshift-performance-analyzer.
  • The Amazon EventBridge rule: redshift-performance-daily.
  • The Amazon SNS topic and its email subscription: redshift-performance-recommendations.
  • The Amazon S3 bucket, including the telemetry/ and recommendations/ objects.
  • The AWS Secrets Manager secret: redshift-performance-admin.
  • The IAM role and its inline policy: redshift-performance-recommendations-role.

Conclusion

You now have a daily performance review for Amazon Redshift Serverless that runs entirely on AWS Lambda, stores every run in Amazon S3, and delivers prioritized recommendations by email. The signal-based prompt pattern keeps the Amazon Bedrock cost low and the recommendations specific to your workload.

To learn more, see the following resources:


About the authors

Steve Phillips

Steve Phillips

Steve is a Principal Technical Account Manager and Analytics specialist at AWS in the North America region. Steve currently focuses on data warehouse architectural design, AI/ML data foundations, data lakes, data ingestion pipelines, and cloud distributed architectures.

Richard Raseley

Richard Raseley

Richard is a Senior Technical Account Manager in North America who works with Games customers. He is passionate about applying his background in automation, cloud computing, networking, and storage to help customers build AI solutions.

Build reliable voice analytics workflows with AWS Lambda durable functions and Amazon Bedrock

Post Syndicated from Mehdi Amrane original https://aws.amazon.com/blogs/compute/build-reliable-voice-analytics-workflows-with-aws-lambda-durable-functions-and-amazon-bedrock/

Contact centers handle millions of voice interactions monthly, but transforming raw call recordings into actionable insights remains a manual and fragile process. With voice analytics workflows, you can decrease the average handle time of a voice call from minutes to seconds and increase the efficiency and productivity of your support agents.

Today, these workflows often require custom code to handle non-functional requirements such as retry logic, state management and failure handling across multiple services. In addition, as the selection/determination of insights is derived from specific business objectives, it often needs to be customized for each organization.

In this post, we show a solution using AWS Lambda durable functions to create the following insights: summarization, sentiment analytics and key topics. AWS Lambda durable functions is a capability of AWS Lambda, that simplifies building multi-step applications and AI workflows. It lets you write sequential code with automatic checkpointing, built-in retries, and simplified error handling, so you can focus on the business logic rather than managing the orchestration.

The solution also simplifies the visualization of the conversation transcriptions and insights, with a web application.

Solution overview

In this post, we provide an operational overview of the solution, and then describe how to set it up with the following services:

The solution architecture is illustrated in the following diagram:

Architecture diagram showing the solution components and data flow for voice analytics with AWS Lambda durable functions and Amazon Bedrock

Step 1 (Option 1): Transcription segments are sent by an external system. The segments are stored in a stream (Amazon Kinesis Streams).

Step 1 (Option 2): Voice calls are sent by an external system to the Contact Lens Connector in AWS. The voice calls are then transcribed using Amazon Connect Contact Lens, to generate transcriptions and send these transcriptions to the stream.

  • Step 1a: The external system sends a copy of the voice call to a Contact Lens Connector.
  • Step 1b: The Contact Lens Connector routes the voice call to Amazon Connect Contact Lens.
  • Step 1c: Amazon Connect Contact Lens generates transcriptions from a voice call.
  • Step 1d: The transcription segments are stored in a stream (Amazon Kinesis Streams).

Step 2: A transcription processor function (AWS Lambda function) consumes transcription segments from the stream.

Step 3: The transcription processor function (AWS Lambda function) stores transcription segments in a transcription table in Amazon DynamoDB.

Step 4: A durable function (AWS Lambda Durable function) is triggered when new transcription segments are stored in the transcription table (the trigger is implemented using Amazon DynamoDB Streams). It orchestrates the processing of transcriptions in 5 steps.

  • Step 4a: The durable function fetches the segments received for a given transcription. If all the segments of voice call are available, the processing continues to Step 4b. Otherwise, the Lambda function is stopped (since the transcription is not complete yet).
  • Step 4b: The durable function summarizes the voice transcription using Amazon Bedrock.
  • Step 4c: The durable function generates sentiment analytics for the voice transcription using Amazon Bedrock.
  • Step 4d: The durable function extracts key topics from the voice transcription using Amazon Bedrock.
  • Step 4e: The durable function stores the conversational insights in an analytics table in Amazon DynamoDB.

Step 5 and 6: The user accesses the web application and authenticates.

Step 7: Amazon Cognito validates the authentication details.

Step 8: Once the user is logged in, the web application sends a request to an API (Amazon API Gateway) to fetch the voice transcriptions and conversational insights.

Step 9: The API calls a Lambda authorizer to confirm that the user is authorized to retrieve the voice transcriptions and conversational insights.

Step 10: The request is sent from the API to a retriever function (AWS Lambda function to retrieve transcriptions from the transcription table and conversational insights from the analytics table).

Step 11: The Lambda function retrieves transcriptions from the transcription table and conversational insights from the analytics table.

After Step 11, the user can now consult the transcriptions and conversational insights from the web application.

Prerequisites

  • An AWS account.
  • A Unix based device (or Windows device with WSL setup to run bash scripts) with access to your AWS account with the following tools/libraries installed:
    • Node.js and npm installed.
    • Python 3.12 installed.
    • Docker (for front-end containerization).
    • AWS Command Line Interface (AWS CLI) configured with appropriate permissions.
    • CDK installed.
  • Clone the GitHub repository:
    git clone https://github.com/aws-samples/sample-sca-with-lambda-durable-and-bedrock.git

Set up network and backend infrastructure

In this section, we setup the networking and backend resources of the solution.

Navigate inside the repository and complete the following steps to create these resources:

  1. Install dependencies and build project:
    npm install
    npm run build
    cdk bootstrap

  2. Create networking infrastructure resources (Amazon Virtual Private Cloud (Amazon VPC), subnets, IAM roles, security groups and VPC endpoints):
    cdk deploy ScaNetworkStack

  3. Create backend resources (Amazon Kinesis Data Streams stream, Amazon DynamoDB tables, AWS Lambda functions, Amazon API Gateway, Amazon Cognito):
    cdk deploy ScaBackendStack

Create the web application

In this section, we create the web application of the solution.

Complete the following steps to create the web application:

  1. Create an Amazon Elastic Container Registry (Amazon ECR) repository to host the container image of the web application:
    cdk deploy ScaEcrStack

  2. Build and deploy container image in the Amazon ECR repository:
    chmod +x scripts/deploy-container.sh
    bash ./scripts/deploy-container.sh us-west-2

    Note: Replace us-west-2 with your deployment region.

  3. Deploy the web application:
    cdk deploy ScaWebAppStack

  4. Deploy CloudFront Access stack (optional). This stack adds public subnets, an internet gateway, and an Amazon CloudFront distribution.Important note: This stack allows access to the web application from a public endpoint using an Amazon CloudFront distribution. You can use this stack if you currently cannot access a web application behind a private ALB with an existing private connection (virtual private network (VPN), AWS Direct Connect, etc.).
    cdk deploy ScaCloudFrontAccessStack -c enableCloudFrontAccess=true

The web application is now available for testing.

If your web application is private, the application is deployed behind a private ALB. Access it from within the VPC using the ALB DNS name:

aws cloudformation describe-stacks --stack-name ScaWebAppStack --query 'Stacks[0].Outputs[?OutputKey==`AlbDnsName`].OutputValue' --output text

If your web application is public, the application is deployed behind an Amazon CloudFront distribution. You can access it using the CloudFront distribution URL:

aws cloudformation describe-stacks --stack-name ScaCloudFrontAccessStack --query 'Stacks[0].Outputs[?OutputKey==`CloudFrontUrl`].OutputValue' --output text

Configure the Amazon Cognito user pool

In this section, we create a user in our Amazon Cognito user pool. This user will log in to our web application.

Run the script setup-test-user.sh to create the user (make sure to provide your email address):

chmod +x scripts/setup-test-user.sh
./scripts/setup-test-user.sh [email protected]

Note: Replace [email protected] with your email address.

After you create the user, you should receive an email with a temporary password in this format: “Your username is #your-email-address# and temporary password is #temporary-password#.”

Keep note of these login details (email address and temporary password) to use later when testing the web application.

Test the solution

In this section, we test the solution by ingesting a transcription in the stream (Amazon Kinesis Data Streams) and visualize the results in the web application.

  1. Run the script ingest-transcriptions.sh to ingest a sample transcription in the stream:
    chmod +x scripts/ingest-transcriptions.sh
    ./scripts/ingest-transcriptions.sh

  2. Open the URL of the web application in your web browser (either CloudFront distribution URL or ALB DNS name as mentioned in previous section).
  3. Enter your login information (your email and the temporary password you received earlier while configuring the user pool in Amazon Cognito) and choose Sign in.
  4. When prompted, enter a new password and choose Change Password.
  5. You should now be able to see a web interface with a transcription as illustrated in the following screenshot:Web interface displaying a list of voice transcriptions
  6. Select a transcription to visualize the conversational insights as shown in the following screenshot.Conversational insights detail view showing summary, sentiment, and key topics for a selected transcription

If you want to explore an alternative option by placing a voice call using Amazon Connect (with Amazon Connect Contact Lens to generate the transcriptions):

Clean up

To make sure that no additional cost is incurred, remove the resources provisioned in your account. Make sure you’re in the correct AWS account before deleting the resources.

Important note: You should exercise caution when performing the preceding steps. Make sure you are deleting the resources in the correct AWS account.

You can navigate to the AWS CloudFormation console to delete the CloudFormation stacks associated to the resources provisioned.

You can also destroy the stacks using cdk destroy in reverse dependency order:

  1. If you deployed the optional CloudFront access stack:
    cdk destroy ScaCloudFrontAccessStack -c enableCloudFrontAccess=true

  2. If you deployed the optional Connect integration stack:
    cdk destroy ScaConnectStack -c enableConnect=true

  3. To destroy the core stacks:
    cdk destroy ScaWebAppStack
    cdk destroy ScaEcrStack
    cdk destroy ScaBackendStack
    cdk destroy ScaNetworkStack

Conclusion

In this post, we walked through a solution to create a web application to visualize voice transcriptions and related conversational insights. First, we created network and backend resources. Then we created the web application. We also configured a user pool to grant a user access to the web application. Finally, we tested solution by ingesting transcriptions then visualize them in the web application.

For further information, consult the documentation of the following services: Amazon Bedrock, AWS Lambda durable functions, Amazon ECS, Amazon API Gateway, AWS Lambda, Amazon Kinesis Streams, Amazon DynamoDB and Amazon Cognito.

To dive deeper into this solution, a GitHub repository is available at this location.

Secure multi-tenant RAG with Amazon Bedrock and Verified Permissions

Post Syndicated from Rennay Dorasamy original https://aws.amazon.com/blogs/architecture/secure-multi-tenant-rag-with-amazon-bedrock-and-verified-permissions/

Large organizations building internal generative AI applications face a recurring challenge: controlling which teams or departments can access which documents, without duplicating infrastructure for each group. Within a single tenant, employees from a specific department should only access material assigned to that department. However, executives, with a wider span of control, will require access to material across multiple departments. Retrieval Augmented Generation (RAG) is one of several complementary techniques, including fine-tuning and continued pre-training, for customizing generative AI application responses with your data.

In an enterprise context, with fast-moving data and many users, RAG provides a middle ground between cost and performance. This post shows you how to use a single, shared Knowledge Base (KB) instance to reduce the cost and complexity of separate instances. You can update access rules in minutes without redeploying code and maintain a detailed audit trail of every authorization decision. You run a single RAG application that serves multiple departments, with document access evaluated at retrieval time.

Figure 1 illustrates the requirement.

Role-level access to shared organizational data and resources

A previous post, Multi-tenancy in RAG applications in a single Amazon Bedrock knowledge base with metadata filtering, demonstrates how to use Amazon Simple Storage Service (Amazon S3) folder structures and metadata filtering to segregate data between tenants within a single knowledge base. That pattern works well for broad, tenant-level boundaries where the filter value is known at design time and embedded in application code. However, within a single tenant, different departments or roles often need different document visibility and executives may need cross-cutting access that spans multiple boundaries. This post extends that foundation by externalizing the filter selection logic into Cedar policies managed by Amazon Verified Permissions, allowing dynamic, runtime-evaluated authorization decisions.

This pattern lets a single RAG application serve many departments while keeping each department’s documents isolated, without standing up a knowledge base per team. It builds on metadata filtering in Amazon Bedrock Knowledge Bases, a fully managed RAG capability that handles ingestion, retrieval, and prompt augmentation through a single API. Metadata filtering is a strong foundation, but it creates a gap. Filter selection logic has no external governance, and changing the rules requires a code redeployment.

When authorization logic lives inside code, rules can become inconsistent over time and require a full deployment cycle to change. Amazon Verified Permissions addresses this by providing scalable, fine-grained authorization and permissions management for custom applications. Externalized Cedar policies in Verified Permissions are auditable, version-controlled, and updatable at runtime.

This post walks you through a two-layer, defense-in-depth authorization pattern for granular, intra-tenant access control in RAG applications. Defense in depth is a security strategy that uses multiple independent layers of protection. Each layer operates independently. If one layer is misconfigured, the other layer still enforces access control. The pattern runs on Amazon Bedrock, a fully managed service that offers a choice of high-performing foundation models (FMs) from Amazon and AI companies through a single API, along with a broad set of capabilities you need to build generative AI applications with security, privacy, and responsible AI.

In this post, you learn how to:

  1. Enforce fine-grained, document-level access control at retrieval time using a single Amazon Bedrock Knowledge Bases instance.
  2. Evaluate Cedar policies at runtime to dynamically construct the metadata filter passed to the RetrieveAndGenerate API.
  3. Update authorization rules without changing application code or triggering a deployment.
  4. Design a deny-by-default authorization system intended to deny access when the authorization service is unavailable.

Isolation model and scope

This pattern provides filter-level (logical) isolation, not IAM-enforced (infrastructure) isolation. Metadata filters control which documents are returned at retrieval time, but the underlying knowledge base remains a shared resource. If the middleware logic that constructs the filter were to fail open, documents from other groups would be exposed.

This pattern is designed for granular access control within a single tenant. For example, controlling which departments, teams, or roles within one organization can access which documents. It is not a substitute for hard tenant isolation in a multi-tenant SaaS product. For cross-tenant isolation where a compliance boundary is required between separate customers or organizations, provision a dedicated knowledge base per tenant with IAM-enforced resource boundaries. Within each tenant’s knowledge base, you can then layer this filter-based pattern for finer-grained access control.

Use this pattern when:

  • You need to control document access across departments, teams, or roles within a single organization.
  • Access rules change frequently and you want to update them without code redeployment.
  • You want a single knowledge base instance to reduce cost and operational overhead for intra-tenant document segregation.

Do not use this pattern when:

  • You require hard isolation between separate customers or organizations (use a knowledge base per tenant with IAM boundaries instead).
  • Your compliance or audit requirements mandate infrastructure-level separation between data sets.
  • A failure of the filter mechanism would constitute a regulatory breach (filter-level isolation is a logical boundary, not a physical one).

Residual risk, ingestion race condition: A brief window exists between document upload and sidecar creation. The ingestion safeguard (Step 1) reduces this by excluding documents without sidecars. However, if you modify the ingestion schedule to run continuously or with short intervals, verify that the batching window in Amazon Simple Queue Service (Amazon SQS) (default 30 seconds) provides sufficient time for the tagging Lambda to complete before the next ingestion cycle.

Prerequisites

Before implementing this pattern, you need:

  1. Familiarity with Python, AWS Lambda, and infrastructure as code concepts.
  2. An AWS account with AWS Identity and Access Management (AWS IAM) permissions to create AWS Lambda functions, an Amazon API Gateway REST API, Amazon Cognito user pools, Verified Permissions policy stores, and Amazon Bedrock Knowledge Bases.
  3. Amazon Cognito configured with department-based user groups (such as dept-a, dept-b, dept-c) and cognito:groups included in the JSON Web Token (JWT) issued to clients.
  4. Amazon Bedrock model access for the FMs you plan to use (such as Anthropic Claude 3 Haiku, and Amazon Nova Lite 2).
  5. A Verified Permissions policy store created and the Cedar schema defined (principals, resources, actions) before deployment.
  6. AWS Cloud Development Kit (AWS CDK) or AWS CloudFormation to deploy the infrastructure described in this walkthrough.
  7. Sample documents prepared with department prefixes (such as docs/dept-a/report.pdf) for upload to Amazon S3.

Important: Implementing this pattern creates billable AWS resources, including Amazon Bedrock Knowledge Bases, AWS Lambda functions, Amazon API Gateway, Amazon S3, Amazon Cognito, Amazon Verified Permissions, Amazon EventBridge, Amazon SQS, Amazon DynamoDB, AWS WAF, and Amazon CloudFront. Costs vary based on usage volume and AWS Region. Review AWS Pricing for each service before deploying and see the Cleaning up section at the end of this post to remove resources when testing is complete.

Solution overview

Serving many departments from one application shouldn’t mean giving every department access to every document. This solution keeps each department’s documents isolated inside a single Amazon Bedrock Knowledge Bases instance, so you avoid the cost and operational overhead of a knowledge base per team within that tenant. Metadata tags logically separate documents, and Verified Permissions acts as an externalized policy enforcement point, deciding which documents a user’s group or role is authorized to see on every request.

A key objective is to serve multiple departments within a single tenant from one Knowledge Base instance. If you had to provision a separate instance per department, it would multiply the infrastructure: separate data sources, ingestion pipelines and management overhead. A single knowledge base with metadata filtered access avoids this duplication while providing logical document isolation within the tenant boundary. Documents are logically separated by their metadata tags, and Verified Permissions provides a reliable, externalized policy enforcement point to determine which tags a user, in a specific group or role, is authorized to access.

The ingestion pipeline tags documents with department metadata. Verified Permissions evaluates Cedar policies at query time to determine which department tags you are permitted to see. A middleware service (implemented as an AWS Lambda function) converts that policy decision into a metadata filter and uses this in the Amazon Bedrock RetrieveAndGenerate API. This API combines the retrieval and generation steps, returning a grounded response based on the filtered document set. The FM only processes documents that passed the filter.

Two independent layers enforce authorization:

  • Layer 1 (API access): A Lambda Authorizer on Amazon API Gateway calls Verified Permissions to decide whether you can invoke the API at all.
  • Layer 2 (document access): A middleware Lambda, used to orchestrate the call to the Knowledge Base, also calls Verified Permissions to determine which Knowledge Base resources your department is permitted to query, then constructs a metadata filter accordingly.

Neither layer depends on the other for correctness. If Layer 1 were bypassed then Layer 2 is designed to enforce document-level isolation at the KB metadata filter.

Ingestion pipeline showing documents uploaded to Amazon S3 triggering Amazon EventBridge, routing through Amazon SQS to an AWS Lambda function that writes metadata

Figure 2 shows the ingestion pipeline: documents uploaded to Amazon Simple Storage Service (Amazon S3) trigger Amazon EventBridge, which routes through Amazon Simple Queue Service (Amazon SQS) to an AWS Lambda function that writes metadata. A scheduled Lambda then triggers the Amazon Bedrock Knowledge Bases ingestion job.

Query flow showing a user request passing through Amazon CloudFront, AWS WAF, Amazon API Gateway with Lambda Authorizer, and middleware Lambda to Amazon Bedrock Knowledge Bases

Figure 3 shows the query flow: a user request passes through Amazon CloudFront and AWS WAF to Amazon API Gateway, where the Lambda Authorizer evaluates Layer 1 (API-level) authorization against Verified Permissions. If permitted, the middleware Lambda evaluates Layer 2 (document-level) authorization, constructs the metadata filter, and calls RetrieveAndGenerate.

Authorization decision flow

Step Component Decision On deny
1 AWS WAF Rate limit and rule check Request blocked
2 Lambda Authorizer (Layer 1) Can you invoke the API? 403 returned
3 Middleware Lambda (Layer 2) Which departments can you access? Empty result set
4 Amazon Bedrock Knowledge Bases Metadata filter applied to retrieval Unauthorized docs excluded
5 Guardrails for Amazon Bedrock Response grounded in retrieved context? Response blocked or modified

Key AWS services

Layer Service Role
Identity layer Amazon Cognito Issues JWTs with department group claims (cognito:groups) from the user pool
API security layer AWS WAF Applies rate limiting, IP filtering, and managed rule evaluation at the edge
Layer 1 authorization Amazon Verified Permissions Evaluates Cedar policies for API-level access decisions in the Lambda Authorizer
Layer 2 authorization Amazon Verified Permissions Evaluates Cedar policies for document-level access and drives metadata filter construction
RAG retrieval and FM invocation layer Amazon Bedrock Knowledge Bases Fully managed RAG capability that handles retrieval with metadata filtering and FM generation in a single API call
Ingestion layer Amazon EventBridge, Amazon SQS Event-driven pipeline for metadata sidecar tagging; Amazon SQS buffers upload spikes and routes failures to a dead-letter queue

Technical implementation

The walkthrough presents ingestion pipeline first to tag and index your documents. You then move on to the Query Flow which contains the core authorization pattern. Each section following maps to a distinct component in the architecture.

Step 1: Set up the event-driven ingestion pipeline with metadata tagging

For the metadata filter to work at query time, documents need to be tagged with their department before they are indexed. The ingestion pipeline handles this in two phases.

Phase 1 (event-driven): When a document is uploaded to Amazon S3 under a department prefix (such as docs/dept-a/report.pdf), Amazon EventBridge fires an ObjectCreated event. The event routes through Amazon SQS to an AWS Lambda function that writes a .metadata.json sidecar file alongside the document.

The Amazon SQS queue buffers bulk uploads and routes failed tagging attempts to a dead-letter queue for retry.

Phase 2 (scheduled): An Amazon EventBridge schedule triggers an ingestion Lambda every five minutes, which calls the StartIngestionJob API on the Amazon Bedrock Knowledge Bases data source. Amazon Bedrock reads the documents and their sidecars from Amazon S3, chunks them, generates embeddings, and indexes the vectors with the department attribute.

# Validate sidecar presence before ingestion
objects = s3.list_objects_v2(Bucket=BUCKET, Prefix=f"docs/{dept}/")
docs = [o["Key"] for o in objects.get("Contents", []) if not o["Key"].endswith(".metadata.json")]
for doc_key in docs:
    sidecar_key = f"{doc_key}.metadata.json"
    try:
        s3.head_object(Bucket=BUCKET, Key=sidecar_key)
    except s3.exceptions.ClientError:
        logger.warning(f"Skipping {doc_key}: no metadata sidecar found")
        docs.remove(doc_key)

Tamper detection for metadata sidecars: Enable S3 Versioning on the document bucket and configure AWS CloudTrail S3 data events to log PutObject and DeleteObject calls. Create an Amazon CloudWatch Alarms metric filter that alerts when a PutObject to a .metadata.json key originates from principals other than the tagging Lambda role. For workloads with strict compliance requirements, consider S3 Object Lock in compliance mode to make sidecars immutable after creation – noting that document re-classification would then require a deliberate workflow to create a new version.

Upload prefix enforcement: The metadata tagging Lambda derives the department label from the S3 key prefix (for example, docs/dept-a/ → department: dept-a). To help prevent a user or process from uploading documents under another department’s prefix, scope upload permissions using an IAM policy condition:

{
    "Effect": "Allow",
    "Action": "s3:PutObject",
    "Resource": "arn:aws:s3:::your-doc-bucket/docs/dept-a/*",
    "Condition": {
        "StringEquals": {
            "aws:PrincipalTag/department": "dept-a"
        }
    }
}

Each upload principal (whether a user role, CI/CD pipeline, or application) should carry a department tag that matches its permitted prefix. This helps prevent the tagging Lambda from being tricked into mislabeling a document by an upload to the wrong path.

Ingestion safeguard: Before triggering the ingestion job, the scheduling Lambda lists objects under each department prefix and verifies that every document has a corresponding .metadata.json sidecar. Documents without a sidecar are excluded from the ingestion scope and logged to CloudWatch as untagged. This helps prevent an untagged document from being indexed without a department attribute, which could cause it to bypass metadata filters at query time. If your workload requires stricter guarantees, move untagged documents to a quarantine prefix and alert via Amazon Simple Notification Service (Amazon SNS).

S3 write restriction: Restrict s3:PutObject permission on the document bucket to the metadata tagging Lambda’s IAM execution role. All other principals – including application roles, CI/CD pipelines, and human operators should have at most s3:GetObject and s3:ListBucket. This helps prevent accidental or malicious modification of .metadata.json sidecar files, which could re-tag a document under a different department and expose it to unauthorized users on the next ingestion cycle. Use a bucket policy with an explicit deny for s3:PutObject that exempts only the tagging Lambda’s role ARN:

{
    "Effect": "Deny",
    "Principal": "*",
    "Action": ["s3:PutObject", "s3:DeleteObject"],
    "Resource": "arn:aws:s3:::your-doc-bucket/*",
    "Condition": {
        "StringNotEquals": {
            "aws:PrincipalArn": "arn:aws:iam::123456789012:role/MetadataTaggingLambdaRole"
        }
    }
}

A 30-second batching window on the Amazon SQS event source means bulk uploads are processed together rather than one document per Lambda invocation. The two-phase separation helps confirm that department metadata sidecars are written before the ingestion job runs, reducing the risk of a race condition where a document might be indexed without a department tag.

# metadata_lambda/handler.py
import boto3, json

def handler(event, context):
    for record in event["Records"]:
        body = json.loads(record["body"])
        s3_key = body["detail"]["object"]["key"]
        # Extract department from prefix: docs/dept-a/report.pdf -> dept-a
        dept = s3_key.split("/")[1]
        meta_key = s3_key + ".metadata.json"
        s3 = boto3.client("s3")
        s3.put_object(
            Bucket=BUCKET,
            Key=meta_key,
            Body=json.dumps({"metadataAttributes": {"department": dept}})
        )

Implementation note: Deploy this as the handler for your metadata tagging AWS Lambda function (Python 3.12 runtime). Set the BUCKET environment variable. The function’s IAM execution role requires s3:PutObject permission on the document bucket.

Step 2: Configure Amazon Bedrock Knowledge Bases

With Amazon Bedrock Knowledge Bases, you configure document chunking, embedding model selection, vector indexing, and metadata filtering without managing the underlying infrastructure. You configure a data source backed by the same Amazon S3 bucket as the ingestion pipeline.

Amazon Bedrock Knowledge Bases chunks documents at 300 tokens with 20% overlap (the default, which works well for structured enterprise documents). An embedding model, such as Amazon Titan Text Embeddings V2, generates the embeddings. The metadata attributes defined in the .metadata.json sidecar files are indexed alongside the vectors, making them available as pre-filters on the RetrieveAndGenerate call.

Step 3: Define the Cedar schema and policies in Amazon Verified Permissions

Verified Permissions provides fine-grained authorization through Cedar, a purpose-built policy language. The Cedar schema defines three entity types for this solution:

  1. Principal: GenAIApp::UserGroup (the department group extracted from the JWT)
  2. Action: query (retrieves documents from a knowledge base) and invokeModel (calls an FM)
  3. Resource: GenAIApp::KnowledgeBase and GenAIApp::Model

The namespace GenAIApp is a custom prefix you define when creating the Cedar schema. You can replace it with your own application namespace (such as MyCompany or RAGApp).

The following six policies cover the three departments used in this walkthrough. Department C has a cross-department access grant that covers each Knowledge Base resource, which suits a leadership or executive group:

// dept-a: query own knowledge base + use Claude 3 Haiku
permit(
    principal in GenAIApp::UserGroup::"dept-a",
    action == GenAIApp::Action::"query",
    resource == GenAIApp::KnowledgeBase::"dept-a"
);

permit(
    principal in GenAIApp::UserGroup::"dept-a",
    action == GenAIApp::Action::"invokeModel",
    resource == GenAIApp::Model::"anthropic.claude-3-haiku-20240307-v1:0"
);

// dept-b: query own knowledge base + use Claude 3 Haiku
permit(
    principal in GenAIApp::UserGroup::"dept-b",
    action == GenAIApp::Action::"query",
    resource == GenAIApp::KnowledgeBase::"dept-b"
);

permit(
    principal in GenAIApp::UserGroup::"dept-b",
    action == GenAIApp::Action::"invokeModel",
    resource == GenAIApp::Model::"anthropic.claude-3-haiku-20240307-v1:0"
);

// dept-c: cross-department access + use Amazon Nova Lite 2
permit(
    principal in GenAIApp::UserGroup::"dept-c",
    action == GenAIApp::Action::"query",
    resource
);

permit(
    principal in GenAIApp::UserGroup::"dept-c",
    action == GenAIApp::Action::"invokeModel",
    resource == GenAIApp::Model::"amazon.nova-2-lite-v1:0"
);

To adapt these policies for your organization, replace the department identifiers (dept-a, dept-b, dept-c) with your own group names. The pattern supports multiple access models: per-team, per-project, or hierarchical. For temporary access grants, add a Cedar policy with a when condition that evaluates a time-based attribute, and remove the policy when access should expire.

Policy changes take effect on the next API call. You do not need a Lambda redeployment or AWS CDK update.

Policy governance: Because Cedar policy changes take effect immediately, restrict who can modify policies in production. Apply IAM conditions on verifiedpermissions:CreatePolicy, UpdatePolicy, and DeletePolicy so that only a dedicated CI/CD pipeline role or a small set of authorized administrators can mutate the policy store. Enable AWS CloudTrail logging for Verified Permissions API calls and create a CloudWatch Alarm that triggers when policy mutation events occur outside your change management workflow. For production deployments, validate Cedar policies against test scenarios in a non-production policy store before promoting them. Treat policy changes with the same rigor as application code deployments.

Step 4: Configure Layer 1: API-level authorization (Lambda Authorizer)

When a request arrives at Amazon API Gateway, the Lambda Authorizer runs before your application logic. It validates the JWT signature against the Amazon Cognito JSON Web Key Set (JWKS) endpoint, then calls Verified Permissions IsAuthorized with your group membership. This is the traditional “authorization/access level” check: it verifies that you are allowed to invoke the API, not which documents you can access.

The authorizer denies access by default. If Verified Permissions is unavailable, the function raises an exception and Amazon API Gateway returns a 403.

import boto3, json

avp = boto3.client("verifiedpermissions")

def handler(event, context):
    token = event["authorizationToken"]
    claims = decode_and_verify_jwt(token)  # validates against Amazon Cognito JWKS
    groups = claims.get("cognito:groups", [])

    if not groups:
        raise Exception("Unauthorized")

    # Evaluate each group; allow if any group has a permit policy
    allowed = False
    for group in groups:
        response = avp.is_authorized(
            policyStoreId=POLICY_STORE_ID,
            principal={"entityType": "GenAIApp::UserGroup", "entityId": group},
            action={"actionType": "GenAIApp::Action", "actionId": "query"},
            resource={"entityType": "GenAIApp::Application", "entityId": "api"}
        )
        if response["decision"] == "ALLOW":
            allowed = True
            break

    if not allowed:
        raise Exception("Unauthorized")

    return generate_policy("Allow", event["methodArn"], claims)

Implementation note: Deploy this as a Lambda Authorizer (TOKEN type) on your Amazon API Gateway REST API. Set the TTL on the authorizer cache to 0 during testing so that policy changes take effect immediately.

Production cache TTL: In production, the API Gateway authorizer cache TTL controls how quickly policy revocations take effect. A TTL of 0 means every request triggers a fresh Verified Permissions evaluation. Revocations are immediate but latency increases. A TTL of 300 seconds (the API Gateway default) improves latency but means a revoked policy could continue to permit access for up to 5 minutes. For workloads where timely revocation matters (for example an employee offboarding or incident response), set the TTL to 0 or a deliberately short value (for example, 30–60 seconds) and accept the additional Verified Permissions API calls. The claim that “policy changes take effect on the next API call” holds true only when the authorizer cache TTL is zero or the cached entry has expired.

Multi-group membership: A user may belong to more than one Cognito group. For example, an employee who is a member of both dept-a and a cross-functional leadership group. The authorizer evaluates the group memberships present in the JWT and permits the API call if a group has a matching Cedar permit policy. This helps prevent arbitrary access restrictions based on the order in which groups appear in the token. Document-level access is then determined independently at Layer 2, where the middleware evaluates each department resource against the user’s groups to construct the appropriate metadata filter.

For error handling patterns, implement exponential backoff with jitter on the Verified Permissions API call. Log authorization decisions to Amazon CloudWatch for monitoring and auditing.

Step 5: Configure Layer 2: Document-level authorization (middleware Lambda)

Once a request passes Layer 1, the middleware Lambda runs a second, independent Verified Permissions evaluation. This time, it checks which KB resources you are permitted to query based on your group membership, then translates the decision directly into a metadata filter on the RetrieveAndGenerate call.

Amazon Bedrock Knowledge Bases applies the metadata filter before the vector similarity search runs. This means the FM processes only documents you are authorized to access. The filter helps prevent unauthorized documents from appearing in the retrieval set.

Department access model

Group Foundation model Knowledge base access
dept-a Claude 3 Haiku Department A documents only
dept-b Claude 3 Haiku Department B documents only
dept-c Amazon Nova Lite 2 Multiple departments (A, B, and C)
def build_filter_and_invoke(user_group, query, session_id):
    permitted_depts = []
    for dept in ["dept-a", "dept-b", "dept-c"]:
        resp = avp.is_authorized(
            policyStoreId=POLICY_STORE_ID,
            principal={"entityType": "GenAIApp::UserGroup",
                       "entityId": user_group},
            action={"actionType": "GenAIApp::Action",
                    "actionId": "query"},
            resource={"entityType": "GenAIApp::KnowledgeBase",
                      "entityId": dept}
        )
        if resp["decision"] == "ALLOW":
            permitted_depts.append(dept)

    if not permitted_depts:
        raise PermissionError("No permitted Knowledge Base resources")

    # Implement retry with exponential backoff on avp.is_authorized calls

    # Build metadata filter based on permitted departments
    if len(permitted_depts) == 1:
        kb_filter = {"equals": {"key": "department",
                                "value": permitted_depts[0]}}
    else:
        kb_filter = {"orAll": [{"equals": {"key": "department",
                                           "value": d}}
                               for d in permitted_depts]}

    return bedrock_agent.retrieve_and_generate(
        input={"text": query},
        retrieveAndGenerateConfiguration={
            "type": "KNOWLEDGE_BASE",
            "knowledgeBaseConfiguration": {
                "knowledgeBaseId": KB_ID,
                "modelArn": get_permitted_model(user_group),
                "retrievalConfiguration": {
                    "vectorSearchConfiguration": {
                        "filter": kb_filter
                    }
                }
            }
        }
    )

Implementation note: Deploy this as the handler for your middleware AWS Lambda function (Python 3.12 runtime). Set environment variables POLICY_STORE_ID and KB_ID. The function’s IAM execution role requires verifiedpermissions:IsAuthorized and bedrock:RetrieveAndGenerate permissions.

The FM selection uses the same Verified Permissions policy store. Cedar policies that grant invokeModel access determine which model ID the middleware passes to Amazon Bedrock, so model access control is driven by the same externalized policies as document access.

Security note: The metadata filter excludes unauthorized documents from the retrieval set before the FM processes them. If a user queries for another department’s data, the request returns no relevant results. To monitor for unexpected retrieval behavior, use Amazon CloudWatch logging on the middleware AWS Lambda function.

Benefits of two independent authorization layers

Layer 1 (API Gateway) Layer 2 (Middleware Lambda)
Question answered Can you invoke the API? Which documents can your department access?
Enforcement point Before application logic runs At Amazon Bedrock Knowledge Bases metadata filter
Failure mode 403 returned to you Empty or filtered result set

Availability trade-off: Both layers depend on Amazon Verified Permissions. If the service is throttled or unavailable, the deny-by-default design means users are denied access. This is the correct and intended secure behavior. For most workloads, a brief period of denial is preferable to failing open. If your application has strict availability requirements, consider implementing exponential backoff with jitter on all IsAuthorized calls (in both the Lambda Authorizer and the middleware Lambda) to handle transient throttling gracefully. A circuit-breaker that falls back to cached last-known-good authorization decisions can improve availability, but introduces a window where revoked access may still be honored. Document this trade-off explicitly if you adopt it, and make sure cached decisions expire on a short TTL.

Step 6: Add Guardrails for Amazon Bedrock as an output safety layer

Guardrails for Amazon Bedrock applies contextual source fidelity checks and content filtering as a complementary safety layer. Where Verified Permissions controls which documents the FM accesses, Guardrails evaluates the FM’s response before it’s returned to you.

Contextual source fidelity checks help confirm that the response stays faithful to the retrieved documents rather than drawing from the FM’s pre-training data. Combine this with the metadata filter from Layer 2 for a complete defense in depth approach: authorization restricts the retrieval set, and Guardrails validates the generated output.

The Guardrail configuration in the RetrieveAndGenerate call applies two checks:

  1. Contextual grounding: Helps limit responses that extrapolate beyond the retrieved context. This supports factual accuracy tied to your documents.
  2. Content filtering: Blocks responses containing harmful or inappropriate content based on your configured thresholds.

You apply the Guardrail in the RetrieveAndGenerate call by passing the guardrailConfiguration parameter with your Guardrail ID and version. Contextual grounding helps mitigate prompt injection by limiting responses to the retrieved context but does not eliminate all injection vectors. For additional defense, validate input length and sanitize queries before passing them to RetrieveAndGenerate. For more information, see the Guardrails for Amazon Bedrock documentation.

Step 7: Test the end-to-end authorization flow

With the solution deployed, here is what happens when a dept-a user submits a query:

  1. A user submits a query using a web application with Authorization: Bearer through Amazon CloudFront to AWS WAF.
  2. AWS WAF applies rate limiting and managed rules, then forwards clean traffic to Amazon API Gateway.
  3. The Lambda Authorizer validates the JWT and calls Verified Permissions. The dept-a group has a query permit policy, so the call is allowed.
  4. The middleware Lambda calls Verified Permissions for each Knowledge Base resource. Only dept-a is permitted, so the filter {“equals”: {“key”: “department”, “value”: “dept-a”}} is constructed.
  5. The middleware calls RetrieveAndGenerate with the metadata filter applied. Amazon Bedrock Knowledge Bases filters the document set before running the vector similarity search.
  6. Department B and C documents are excluded from the search space. The FM generates a response that stays grounded only in Department A documents.
  7. The response is checked by Guardrails for Amazon Bedrock before it is returned.

To test, use the following curl command with a valid JWT from Amazon Cognito:

curl -X POST https://<api-id>.execute-api.<region>.amazonaws.com/prod/query \
  -H "Authorization: Bearer <id_token>" \
  -d '{"query": "Summarize the latest department report"}'

A successful dept-a request returns a response grounded in Department A documents only. If authorization fails at Layer 1, you receive a 403 response. If Layer 2 finds no permitted resources, the function returns a PermissionError.

Monitor authorization decisions in Amazon CloudWatch Logs for both the Lambda Authorizer and middleware functions. Set up CloudWatch metric filters and alarms for the following:

  • Authorization deny rate (Layer 1 and Layer 2) – a spike may indicate credential probing, misconfigured clients, or a policy error.
  • Verified Permissions latency – sustained increases may signal throttling.
  • SQS dead-letter queue message count – messages in the DLQ indicate failed metadata tagging events that need attention.
  • Ingestion job failure rate – alerts you to documents that were not indexed.

AWS CloudTrail automatically logs Verified Permissions IsAuthorized calls, providing an audit trail of every authorization decision without additional configuration.

To observe the live policy update behavior, grant a dept-a Cedar policy that allows access to dept-b resources, then immediately resubmit the query. The next API call reflects the change. Revoke the policy and the restriction is restored on the following call.

Single knowledge base with metadata isolation

Adding a department requires adding a Cedar policy and tagging new documents. You do not need to provision additional infrastructure, deploy new stacks, or manage separate ingestion pipelines. The FM is presented with only the authorized document subset based on the applied metadata pre-filter.

For session management, use an Amazon DynamoDB table with a session TTL to maintain conversation context across requests. The RetrieveAndGenerate API accepts a sessionId parameter that manages multi-turn context automatically. Generate session IDs using a cryptographically random value (for example, uuid4) and bind each session to the authenticated user’s identity and group at creation time.

On every subsequent request, validate that the bearer token’s subject and group claims match the session owner before continuing the conversation. Invalidate sessions when a user’s group membership changes or their token is revoked and set a TTL appropriate to your use case (for example, 30 minutes of inactivity).

Cleaning up

If you deployed resources individually, delete them in the following order to avoid dependency errors:

  1. Amazon CloudFront distribution and AWS WAF web ACL.
  2. Amazon API Gateway REST API (this also removes the Lambda Authorizer association).
  3. AWS Lambda functions (metadata tagging, authorizer, middleware).
  4. Amazon Bedrock Knowledge Base and its associated data source.
  5. Amazon S3 bucket — empty the bucket first. If versioning is enabled, delete all object versions and delete markers before removing the bucket.
  6. Amazon EventBridge rule and Amazon SQS queue.
  7. Amazon DynamoDB table.
  8. Amazon Verified Permissions policy store.
  9. Amazon Cognito user pool (if created specifically for this pattern).
  10. IAM roles and policies created for the Lambda functions and API Gateway.
  11. Amazon CloudWatch log groups for each Lambda function.

Warning: Deleting these resources is irreversible. Back up any documents in S3, DynamoDB data, or Verified Permissions policies you may need before proceeding.

Conclusion

You now have a working defense-in-depth authorization pattern for granular, intra-tenant document access control in RAG applications that you built on Amazon Bedrock. With this approach, you can: change access policies at runtime without redeploying code, maintain logical document-level isolation that remains effective even if the API layer is misconfigured, and audit every authorization decision from a single Verified Permissions policy store.

Key takeaways

  • Updates without redeployment. Cedar policies in Verified Permissions are human-readable, version-controlled outside your Lambda code, and take effect on the next API call. You can revoke a department’s access or grant cross-department access to an executive group by updating a policy in the Verified Permissions console.
  • Cost-effective document isolation without infrastructure duplication. A single Amazon Bedrock Knowledge Bases instance with metadata pre-filtering delivers logical isolation between departments within a tenant, at a fraction of the cost and operational overhead of separate instances. Note that this is filter-level isolation, not infrastructure-level isolation – for hard tenant boundaries, use a dedicated knowledge base per tenant.
  • Independent enforcement layers help reduce the risk of a single point of failure. Layer 1 (Lambda Authorizer) and Layer 2 (middleware Lambda) enforce independent policy checks. Both call Verified Permissions separately, and both fail closed (deny by default).

Next steps

To extend this pattern further:

  1. Recommended first step: Test with your own documents. Replace the sample department documents with your own content, upload them under the appropriate prefix, and verify that the metadata filter isolates them correctly.
  2. Add a fourth department. Create a new Cedar policy, add a user group in Amazon Cognito, and upload tagged documents to validate that the pattern scales without code changes.
  3. Extend to agent tool authorization with Amazon Bedrock AgentCore. The Policy feature uses the same Cedar language to enforce fine-grained authorization on agent tool calls and gateways.
  4. Add attribute-based access control (ABAC). Extend Cedar policies to evaluate user attributes beyond group membership, such as project assignment, clearance level, or geographic location.
  5. Integrate with your identity provider. Replace Amazon Cognito with your enterprise identity provider (such as Okta or Microsoft Entra ID) by configuring a Verified Permissions identity source.
  6. Automate policy testing. Build a Continuous Integration/Continuous Deployment (CI/CD) pipeline that validates Cedar policies against test scenarios before deploying them to the policy store.
  1. Multi-tenancy in RAG applications in a single Amazon Bedrock knowledge base with metadata filtering (AWS Machine Learning Blog, April 2025)
  2. Amazon Verified Permissions documentation
  3. Amazon Bedrock Knowledge Bases documentation
  4. Amazon Bedrock Knowledge Bases with metadata filtering (AWS Machine Learning Blog, July 2024)
  5. Design secure generative AI application workflows with Amazon Verified Permissions and Amazon Bedrock Agents (AWS Machine Learning Blog, October 2024)
  6. Authorizing access to data with RAG implementations (AWS Security Blog, September 2025)
  7. Cedar policy language documentation

About the authors
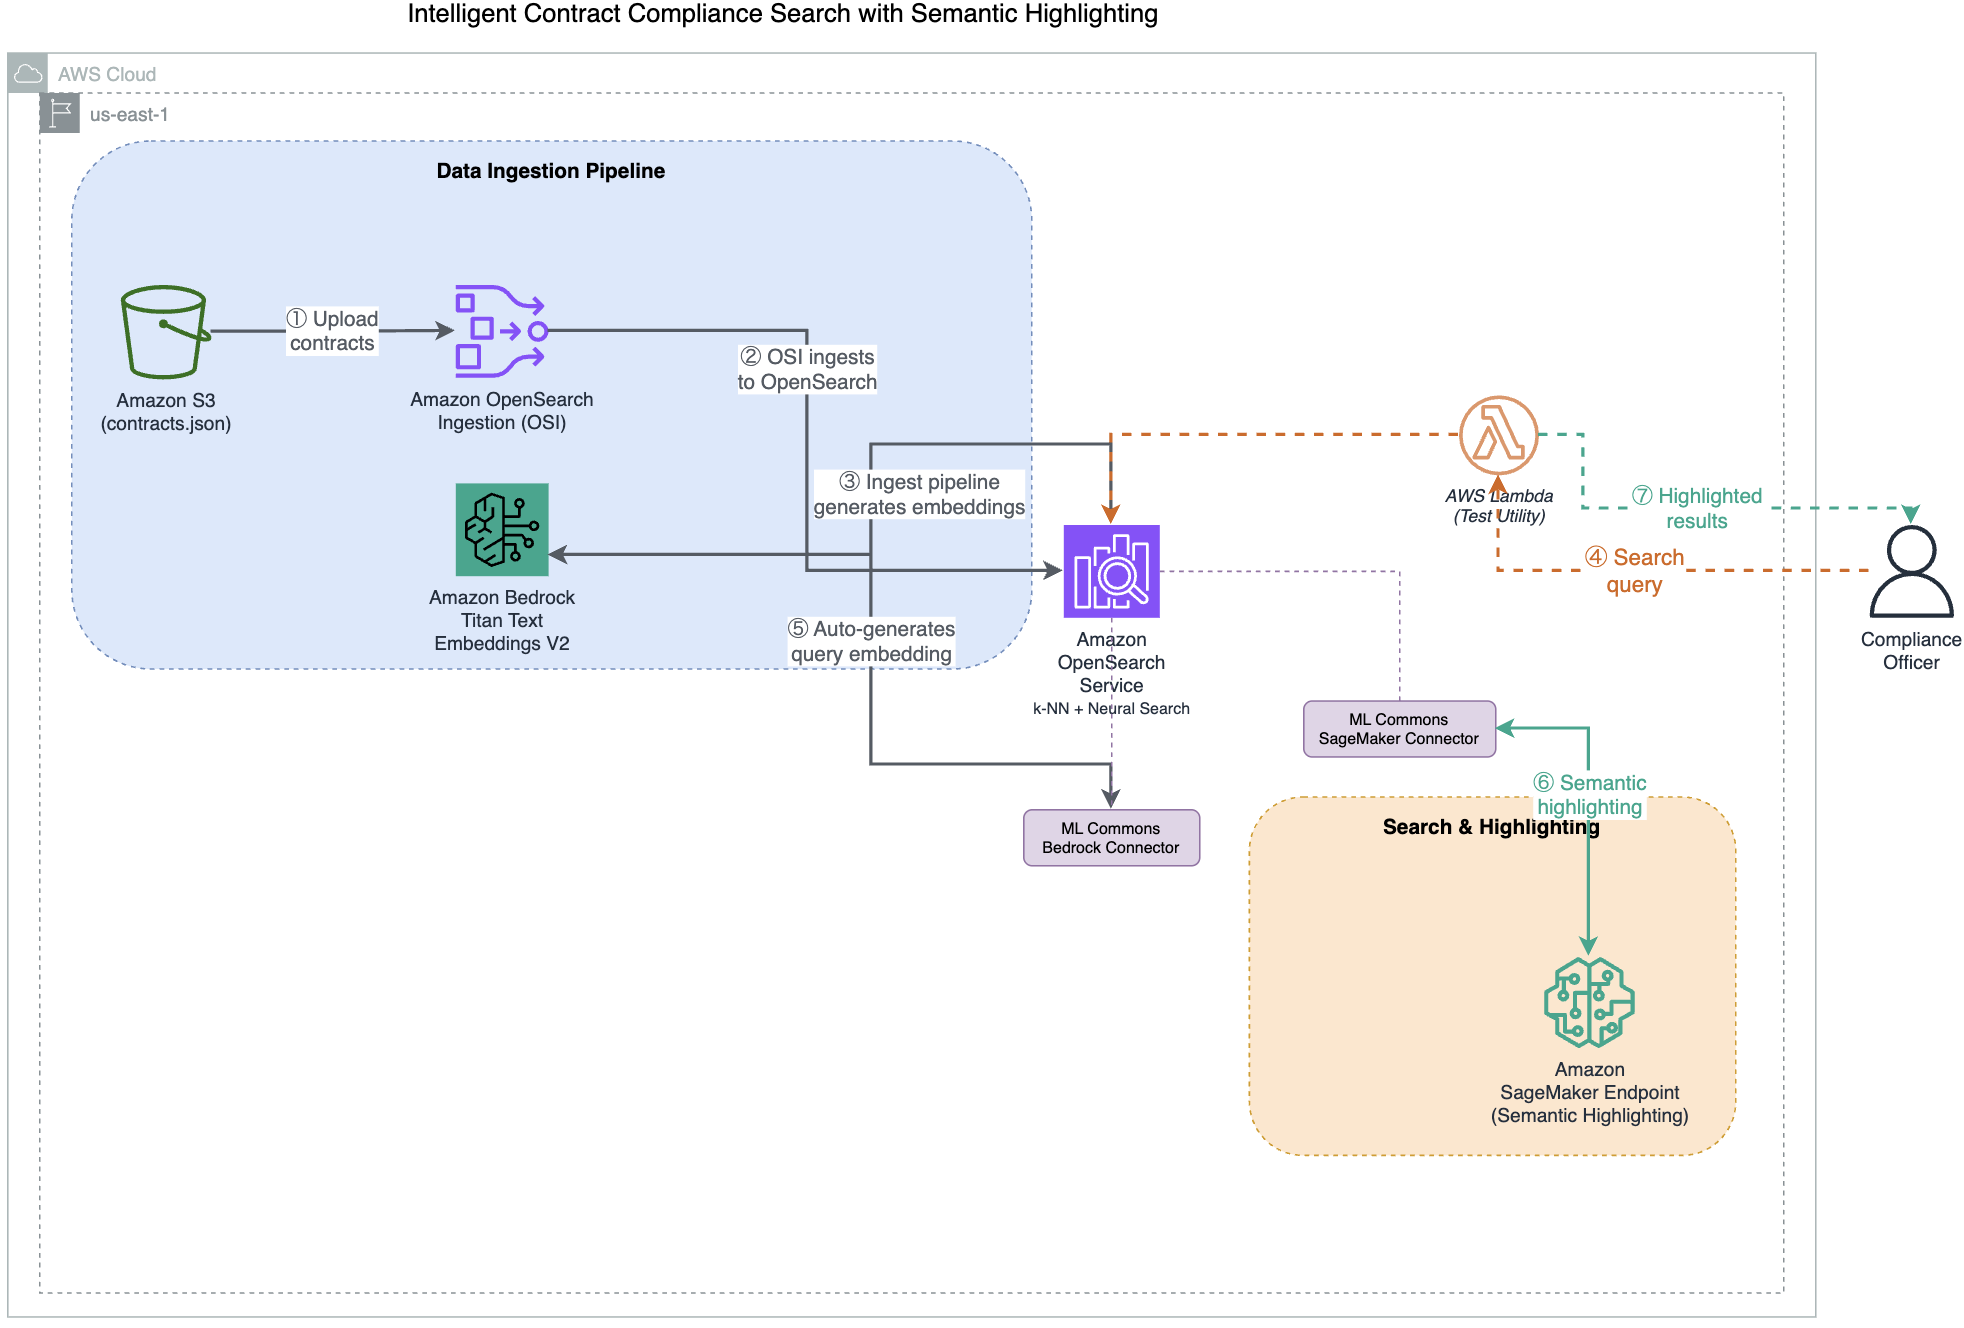
Modernizing financial analytics with Amazon SageMaker Unified Studio

Post Syndicated from Umang Aggarwal original https://aws.amazon.com/blogs/architecture/modernizing-financial-analytics-with-amazon-sagemaker-unified-studio/

Avanse Financial Services is one of India’s leading education loan providers. Their Data Engineering Team had built a data lake on AWS using Amazon Simple Storage Service (Amazon S3), Amazon Athena, and AWS Glue for data ingestion and processing. However, their analytics and reporting layer ran on an external analytics application that wasn’t integrated with AWS. Data had to be copied from Amazon S3 into this external application before analysts could run any report, its license consumed a significant portion of their budget despite low utilization, and every integration with AWS services required custom-built pipelines.

After evaluating their options, Avanse migrated to a cloud-native lakehouse architecture using Amazon SageMaker Unified Studio, which unified their data engineering, analytics, and artificial intelligence (AI) workflows in a single governed environment on AWS. In this post, we walk through their migration journey so you can adapt their approach to your own environment.

Why Avanse chose to modernize

The separation between their AWS data lake and their external analytics application created five problems:

  1. Daily data synchronization bottleneck. Every report required a 4-hour batch copy from Amazon S3 into the external analytics application before analysts could query it. Business decisions were based on data that was at least a day old.
  2. Fixed licensing costs disconnected from usage. The external analytics application charged an annual fee regardless of how many queries analysts ran. Avanse needed usage-based pricing that matched what they actually consumed, not a fixed fee for capacity they weren’t using.
  3. Limited auditability. The external analytics application ran on a shared server where different business units (risk, collections, portfolio management) shared the same resources. It lacked granular audit trails, making it difficult to trace who accessed what data and when, or to allocate costs per team.
  4. No centralized data discovery. Although AWS Glue Data Catalog managed schema metadata for the data lake, the external analytics application couldn’t access it. Analysts working in that application relied on folder structures and manual documentation to find the right datasets, slowing onboarding and increasing the risk of using outdated data.
  5. Disconnected from AWS services. The external analytics application couldn’t query data in Amazon S3 or use AWS Glue catalogs natively. Every data flow required connectors and custom-built pipelines, adding maintenance overhead.

Additionally, some datasets were stored on Network File System (NFS) storage outside of Amazon S3, creating another data silo that needed to be consolidated.

Avanse chose Amazon SageMaker Unified Studio because it addressed all five challenges: direct querying of data in Amazon S3 avoiding synchronization, usage-based compute through Amazon Athena and Amazon EMR Serverless, project-based isolation with per-project billing, lineage tracking with AWS IAM Identity Center, and native integration with their existing AWS services.

Solution overview

The core architectural change was moving from a two-application model to a single integrated stack:

Previous architecture
Avanse’s data ingestion and processing ran on AWS (Amazon S3, AWS Glue, Athena), but analytics and reporting ran on an external analytics application. Data had to be batch-copied from Amazon S3 into this external application daily before analysts could query it. Each system had its own access controls, and there was no shared catalog or lineage tracking between them.
New architecture
Analytics now run directly against data in Amazon S3 through Amazon SageMaker Unified Studio. There’s no data copy step. Analysts query the same data that the ingestion pipelines produce, using Athena for SQL and EMR Serverless for large-scale processing. Governance, access control, and lineage are centralized through IAM Identity Center and SageMaker Catalog.

The following diagram illustrates the target architecture. It follows a lakehouse pattern, storing data in open formats on Amazon S3 while maintaining ACID transaction support for the consistency financial regulators expect.

Three-layer lakehouse architecture for Avanse on AWS, showing the data layer with Amazon S3 and AWS Glue Data Catalog, the compute layer with Amazon SageMaker Unified Studio, AWS Glue ETL, AWS Lambda, Amazon EMR Serverless, Amazon SageMaker AI, and Amazon Bedrock, and the governance layer with AWS IAM Identity Center, SageMaker Catalog, and Amazon DataZone

The architecture has three layers:

  1. Data layer – Amazon S3 stores data in open formats (Parquet, Delta Lake) with S3 Intelligent-Tiering for automatic cost optimization. AWS Glue Data Catalog maintains schema metadata, making data discoverable across tools.
  2. Compute layer – Amazon SageMaker Unified Studio provides project-based workspaces organized by business function. Collections uses the built-in SQL Query Editor powered by Athena, Risk Reporting uses JupyterLab for interactive analysis, and MIS runs large-scale Spark jobs through Amazon EMR Serverless. AWS Glue ETL handles data transformations and AWS Lambda provides event-driven triggers for report generation. For machine learning (ML) workloads, Amazon SageMaker AI supports model training and deployment, with Amazon Bedrock available for generative AI capabilities such as enhancing risk narratives.
  3. Governance layer – IAM Identity Center provides SSO and audit logging across workspaces. SageMaker Catalog serves as the business glossary with data lineage tracking and access controls. Amazon DataZone connects components through a common metadata layer.

Migration journey

Avanse followed a five-phase approach. The timelines can be adapted to your environment, but the systematic progression from validation through production deployment is key.

Phase 1: Technical validation (72-hour workshop)

Avanse started with a focused 72-hour workshop using isolated SageMaker environments where developers could experiment without impacting production. Their team tested SQL analytics against existing Athena tables and validated that Python and PySpark could replicate their existing analytics workflows.

The team confirmed that querying data directly in Amazon S3 addressed their synchronization bottleneck entirely. The 4-hour daily data copy was no longer necessary, which validated the migration approach.

Phase 2: Data migration and storage optimization

Avanse migrated datasets from NFS storage and legacy analytics formats into Amazon S3, consolidating the data into a single location. They implemented S3 Intelligent-Tiering, which automatically moves data between access tiers based on usage patterns, optimizing costs without impacting retrieval performance.

They replaced legacy analytics connectors with native Athena workgroups within SageMaker Unified Studio, avoiding data synchronization entirely. Source data remained in Amazon S3, queryable by both Athena SQL and SageMaker notebooks, establishing a single source of truth.

Phase 3: Compute modernization

Avanse moved from a shared analytics server to project-based isolation in SageMaker Unified Studio. Each business function (Risk Reporting, Collections, MIS) received its own project with dedicated compute spaces running JupyterLab. Project-specific IAM execution roles provided access controls and cost allocation per business unit.

A single browser-based URL with multi-factor authentication (MFA) now provides access to SQL analytics using the built-in query editor, ML development in JupyterLab notebooks, and big data processing through Amazon EMR Serverless. This replaced the need for local analytics client installations.

Phase 4: Governance implementation

Avanse deployed SageMaker Catalog as their central business data catalog. Analysts now discover approved datasets through semantic search rather than navigating folder structures or relying on manual documentation. They mapped technical Athena table names to business terms. For example, analysts search for “collection efficiency” and find the relevant tables with descriptions, schemas, and lineage.

Lineage capture traces each metric in risk reports back to source tables, transformations, and intermediate datasets. Every action (notebook execution, SQL query, data access) is tied to IAM Identity Center users, creating the comprehensive audit trail their compliance team needed.

Phase 5: Use case migration

Rather than attempting a big-bang migration, Avanse moved critical workflows one at a time:

Portfolio MIS (Monthly/Fortnightly)
Previously required the daily 4-hour data copy from Amazon S3 into the external analytics application before report generation could begin. Avanse avoided the data synchronization step entirely and now generates MIS reports by querying existing Athena tables directly in Amazon S3. Because the source data was already on AWS, there was no need to involve the external application for this activity. Report generation dropped from hours to under 30 minutes.
Collection Efficiency and Bounce Calculation
Ported complex legacy analytics procedures for calculating metrics like collection efficiency and bounce rates to event-driven processing using AWS Glue ETL, AWS Lambda, and PySpark jobs for high-volume data aggregation. The serverless execution model charges only for compute time consumed.
EDW Risk Reporting
Large-scale regulatory joins of Enterprise Data Warehouse assets previously ran as legacy scheduled procedures. These now run as SQL queries in the SageMaker Unified Studio query editor, where analysts execute them on-demand or schedule them through Athena workgroups. The distributed query engine handles complex multi-table joins spanning millions of rows.
Scorecard Generation
Model building shifted from the external analytics application to SageMaker AI workflows. Data scientists use JupyterLab with Python libraries and deploy models directly to SageMaker endpoints, avoiding data movement between separate environments.

Overcoming technical challenges

One technical challenge was code migration. Avanse’s analytics code base contained years of accumulated proprietary scripts and procedures. Direct line-by-line translation was not practical. Instead, they took a pragmatic approach: basic data transformations moved to SQL in Athena, complex business logic was rewritten in PySpark for scalability, and statistical procedures were replaced with Python libraries like pandas and scikit-learn. The approach was to focus on what the code accomplishes, then implement it using cloud-native patterns.

The other technical challenge was performance validation. The team needed to confirm that querying data in Amazon S3 would deliver acceptable performance compared to the external analytics application’s in-memory processing. Queries against Parquet-formatted data in Amazon S3 using Athena delivered comparable performance for standard reporting workloads, while avoiding the 4-hour daily data synchronization step entirely. For large-scale regulatory joins spanning millions of rows, Amazon EMR Serverless provided distributed Spark processing that completed in minutes rather than the hours required in the external application.

Key outcomes

Area Result
Licensing costs Avoided external analytics application fees entirely
Storage costs Reduced through S3 Intelligent-Tiering, which automatically moves data between access tiers based on usage patterns
Report generation From over 4 hours (including data synchronization from Amazon S3 to the external analytics application) to under 30 minutes with direct Amazon S3 querying
Compliance audits From weeks of manual investigation to days with automated lineage reports
Compute costs Usage-based serverless model replaced always-on external analytics infrastructure
Collaboration Unified browser-based environment for data scientists, analysts, and engineers

“By adopting SageMaker Unified Studio, we as the Data Team eliminated legacy licensing costs, reduced storage and compute expenses with a serverless, usage-based model, and accelerated our periodic report generation. At the same time, we transformed compliance and collaboration by cutting audit timelines while unifying our teams in a single, efficient data environment.” – Komal Thakkar, AVP – Lead, Data Engineering, Avanse Financial Services

Best practices

Based on their experience, Avanse recommends:

  • Start with a workshop. Validate your specific use cases in a 72-hour technical validation before committing to full migration.
  • Migrate use cases, not code. Focus on what your analytics accomplish, then implement using cloud-native patterns rather than translating legacy scripts line by line.
  • Invest in governance early. Implement the data catalog and lineage tracking from day one.
  • Embrace project-based isolation. Organize around business functions for clear cost allocation and security boundaries.
  • Document business logic. Use migration as an opportunity to capture undocumented knowledge in the business glossary and dataset descriptions.

Conclusion

Avanse’s migration from an external analytics application to Amazon SageMaker Unified Studio consolidated their analytics stack into a single integrated environment on AWS. By querying data directly in Amazon S3 instead of copying it into the external application, they alleviated their biggest operational bottleneck. Project-based isolation replaced a shared server model, giving each business unit independent compute and clear cost visibility. And centralized governance through SageMaker Catalog and IAM Identity Center gave their compliance team the audit trails they had been missing.

The serverless, usage-based model means Avanse no longer pays for idle capacity. The lakehouse architecture supports new analytics patterns as they emerge, and native integration with AWS services, including generative AI through Amazon Bedrock, positions them to adopt new capabilities as their needs evolve.

Next steps

Start your analytics modernization journey by scheduling a 72-hour technical validation workshop. Contact your AWS account team to discuss your migration approach.

For more information, see:

Automating IT support with AI: How Nexthink uses OpenSearch Service to power self-service issue resolution

Post Syndicated from Rafael Ribeiro, Moe Haidar original https://aws.amazon.com/blogs/big-data/automating-it-support-with-ai-how-nexthink-uses-opensearch-service-to-power-self-service-issue-resolution/

This is a guest post by Rafael Ribeiro and Moe Haidar, at Nexthink, in partnership with AWS.

Nexthink is the leader in digital employee experience, helping enterprises improve how employees interact with technology in the workplace. The company gives IT teams real-time visibility into endpoint performance, application usage, and employee sentiment across millions of devices worldwide.

At the heart of Nexthink’s innovation is Spark, an autonomous artificial intelligence (AI) agent that automates IT support. Spark resolves IT issues for employees, from troubleshooting application crashes to resetting configurations and running remediation scripts. Rather than routing tickets or providing scripted responses, the agent takes direct action, achieving a 77% resolution rate at first contact without human escalation.

Spark operates at enterprise scale, deployed across 12 AWS Regions to serve global customers with low-latency responses.

In this post, we explore how Nexthink combined Amazon OpenSearch Service vector search, Amazon Bedrock, and infrastructure as code to power the Spark agent’s retrieval layer.

The challenge: Why vector search for AI agents?

For an AI agent to autonomously resolve IT issues, it must quickly retrieve the most relevant context from a vast knowledge base. Traditional keyword search falls short because:

  • Semantic understanding matters: An employee asking “my laptop is running slow” should match articles about “system performance optimization” even without exact keyword overlap.
  • Accurate retrieval drives correct outcomes: The quality of an AI agent’s response is only as good as the context it retrieves. When the agent pulls the right documentation, scripts, and historical resolutions, it produces accurate, safe actions. When retrieval is imprecise, the consequences can be severe. An agent acting on the wrong context could run destructive commands like rm -rf *, wipe critical data, or apply an incorrect fix that escalates the problem. Accurate vector search is the guardrail that keeps autonomous agents grounded in verified, relevant knowledge.
  • Speed is critical: Enterprise users expect near-instant responses, so retrieval must run in sub-second time across millions of documents.

This led Nexthink to implement Amazon OpenSearch Service with vector search capabilities, using Amazon Titan Text Embeddings V2 through Amazon Bedrock for embedding generation. With this architecture, Spark performs semantic search across all knowledge sources, retrieving contextually relevant information that drives accurate, autonomous issue resolution.

High-level architecture

The following diagram illustrates the high-level architecture of Nexthink’s Spark agent implementation with Amazon OpenSearch Service.

High-level architecture of Nexthink’s Spark AI agent, showing Amazon Elastic Kubernetes Service hosting the agent, Amazon OpenSearch Service as the vector store, and Amazon Bedrock providing the embedding model

Architecture components

Amazon Elastic Kubernetes Service (Amazon EKS) hosts the Spark agent, which interprets user queries, retrieves relevant context, and runs autonomous resolutions. With container orchestration, the agent scales horizontally across Nexthink’s 12 AWS Regions while maintaining consistent response times. The agent communicates with Amazon OpenSearch Service to perform semantic searches, retrieving the most contextually relevant documentation and automation scripts for each user’s issue.

Amazon OpenSearch Service functions as the central vector store, providing the k-Nearest Neighbors (k-NN) capabilities required for semantic search. OpenSearch Service stores document embeddings (dense vector representations of text content) alongside traditional metadata fields. When the AI agent submits a query, OpenSearch Service performs approximate nearest neighbor (ANN) searches to find documents with semantically similar embeddings, even when exact keywords don’t match. This vector search capability, combined with the proven scalability and managed infrastructure of OpenSearch Service, makes it well suited for AI agent architectures that require fast, accurate context retrieval.

Amazon Bedrock provides the foundation models used to generate text embeddings. Nexthink uses Amazon Titan Text Embeddings V2, hosted on Amazon Bedrock, to convert both documents and queries into dense vector representations. OpenSearch Service integrates natively with Amazon Bedrock through the OpenSearch ML Connector, which handles embedding generation at both index and query time.

Data ingestion pipeline

A critical component of any AI agent architecture is the data ingestion pipeline. This mechanism transforms raw documents into searchable, semantically indexed content in OpenSearch Service. For Spark, the pipeline must handle diverse data sources while automatically generating vector embeddings for semantic search.

Step 1: Staging and preprocessing layer

Staging layer in Amazon S3

Knowledge bases (KBs) are staged in Amazon Simple Storage Service (Amazon S3) before being processed through the ingestion pipeline. Amazon S3 provides durable storage, versioning capabilities, and integration with OpenSearch Service ingestion mechanisms. When documentation updates occur, new versions are uploaded to Amazon S3, which triggers the ingestion pipeline to reprocess and re-embed the content.

Event-driven streaming with Apache Kafka

IT tickets, agent interactions, and remote actions are processed through Apache Kafka for reliable message delivery during traffic spikes. Its consumer group model lets the ingestion pipeline scale horizontally based on event volume.

Step 2: Embedding generation during indexing time

Nexthink uses ingest pipelines inside OpenSearch Service to process the data at ingestion time, including generating text embeddings. When documents are sent to OpenSearch Service, the text_embedding processor inside the ingest pipeline automatically invokes the machine learning (ML) Connector to generate embeddings.

The ML Connector is the OpenSearch Service built-in framework for integrating external ML services. It handles request signing between OpenSearch Service and Amazon Bedrock, parses the Amazon Bedrock response to extract embeddings, maps them to index fields, and manages retries on failure. This eliminated the need for custom integration code and accelerated Nexthink’s time to market.

The following ingestion pipeline configuration demonstrates how to configure the text_embedding processor.

{
  "description": "Embedding ingestion pipeline for Spark AI Agent",
  "processors": [
    {
      "text_embedding": {
        "model_id": "<bedrock-connector-model-id>",
        "field_map": {
          "content": "content_embedding"
        }
      }
    }
  ]
}

In this configuration:

  • model_id: References the registered ML model connected to Amazon Bedrock.
  • field_map: Maps the source text field (content) to the target embedding field (content_embedding).

Step 3: Embeddings and data structure in OpenSearch Service

Nexthink stores embeddings alongside textual and metadata information in their k-NN index. For the vector field, they use Hierarchical Navigable Small World (HNSW) with the Lucene engine, as shown in the following example.

...
"content_embedding": {
  "type": "knn_vector",
  "dimension": 1024,
  "method": {
    "name": "hnsw",
    "space_type": "innerproduct",
    "engine": "lucene"
  }
},
"document_type": {
  "type": "keyword"
},
"tenant_id": {
  "type": "keyword"
}
...

In this configuration:

Multi-tenant search and retrieval

Enterprise AI agent deployments must address a critical challenge: making sure that users only access data they’re authorized to see. For Nexthink, serving multiple enterprise customers from a shared infrastructure requires robust multi-tenant security. Each customer’s knowledge base, automation scripts, and support tickets must remain isolated while the shared vector index continues to perform well.

The following diagram illustrates the search flow from user query to ranked results.

Search flow showing how a user query travels through the Spark agent, OpenSearch Service neural search, the ML Connector to Amazon Bedrock for embedding, and tenant-filtered k-NN retrieval to produce ranked results

Tenant management

Nexthink stores information about each tenant inside the tenant_id field. This design lets permission filters run efficiently alongside vector similarity searches. Additionally, Nexthink stores the tenant_id as a keyword type in the index mapping shared previously, so that filtering runs without the overhead of text analysis. Instead of pre-filtering with k-NN queries through a score script filter, the OpenSearch engine uses an intelligent decision-based approach for k-NN filtering called efficient filtering.

Neural query example with efficient filtering

OpenSearch’s neural search simplifies vector search by handling embedding generation as part of the query itself. Instead of requiring the application to call an embedding model separately and then submit a raw k-NN query with a vector, a neural query accepts plain text and uses the registered ML Connector to generate the embedding on the fly. As a result, the Spark agent can send natural-language queries directly to OpenSearch Service without any client-side embedding logic.

The following query demonstrates how Nexthink combines neural search with tenant isolation through efficient filtering in OpenSearch Service.

{
  "query": {
    "bool": {
      "must": [
        {
          "neural": {
            "content_embedding": {
              "query_text": "laptop running slow",
              "model_id": "<bedrock-connector-model-id>",
              "k": 50
            }
          }
        }
      ],
      "filter": [
        {
          "term": {
            "tenant_id": "customer-123"
          }
        }
      ]
    }
  }
}

In this query structure:

  • bool.must: Contains the neural search clause that performs semantic matching against document embeddings.
  • bool.filter: Applies the tenant isolation constraint, so that only documents belonging to customer-123 are returned.

Nexthink’s contribution to the technical community

A key principle in Nexthink’s architecture is treating infrastructure as code. With deployments spanning 12 AWS Regions, manual provisioning would be error-prone and time-consuming. Therefore, Nexthink uses several infrastructure as code (IaC) technologies, including Terraform, to provision resources.

Although the Terraform provider supports core OpenSearch Service resources like indices and index templates, it lacked support for some of the ML Commons resources required to integrate Amazon Bedrock:

  • ML Connectors: Required to establish connections to external ML services like Amazon Bedrock.
  • ML Model Groups: Needed to organize and manage related models.
  • ML Models: Required to register models that use the connectors.

Without these resources, Nexthink initially relied on workarounds using local-exec provisioners and null_resource blocks to call the OpenSearch Service API directly. This approach was fragile, difficult to maintain, and didn’t integrate well with Terraform’s state management.

Contributing back

Rather than maintaining a private fork indefinitely, Nexthink chose to contribute their custom Terraform resources back to the OpenSearch Project community. This decision aligned with their engineering values to help other organizations implement similar architectures and contribute to the broader community.

Open source contribution links

The Terraform provider contributions are being added to the official OpenSearch project repository:

  • Pull Request: Add support for ML Connector, ML Model Group, and ML Model resources #280.
  • Feature Request: Contribution – Support for ML resources #281.

These contributions let any organization provision OpenSearch Service ML resources with Terraform, which streamlines the deployment of AI agent architectures that integrate with Amazon Bedrock or other ML services.

Conclusion

Nexthink’s implementation of Amazon OpenSearch Service for the Spark agent demonstrates how vector search capabilities can power autonomous IT support at enterprise scale. By combining semantic search with multi-tenant security and infrastructure as code practices, Nexthink achieved a 77% resolution rate at first contact, so that employees can resolve IT issues without human escalation.

Get started

Ready to build your own AI agent with vector search capabilities? Here are your next steps:

  1. Explore Amazon OpenSearch Service vector search features in the OpenSearch Service documentation.
  2. Configure ML Connectors for Amazon Bedrock using the ML Commons plugin guide.
  3. Automate with Terraform using the contributed resources in the terraform-provider-opensearch repository.

The combination of Amazon OpenSearch Service, Amazon Bedrock, and infrastructure as code practices provides a foundation for building intelligent, context-aware AI agents that deliver business value.


About the authors
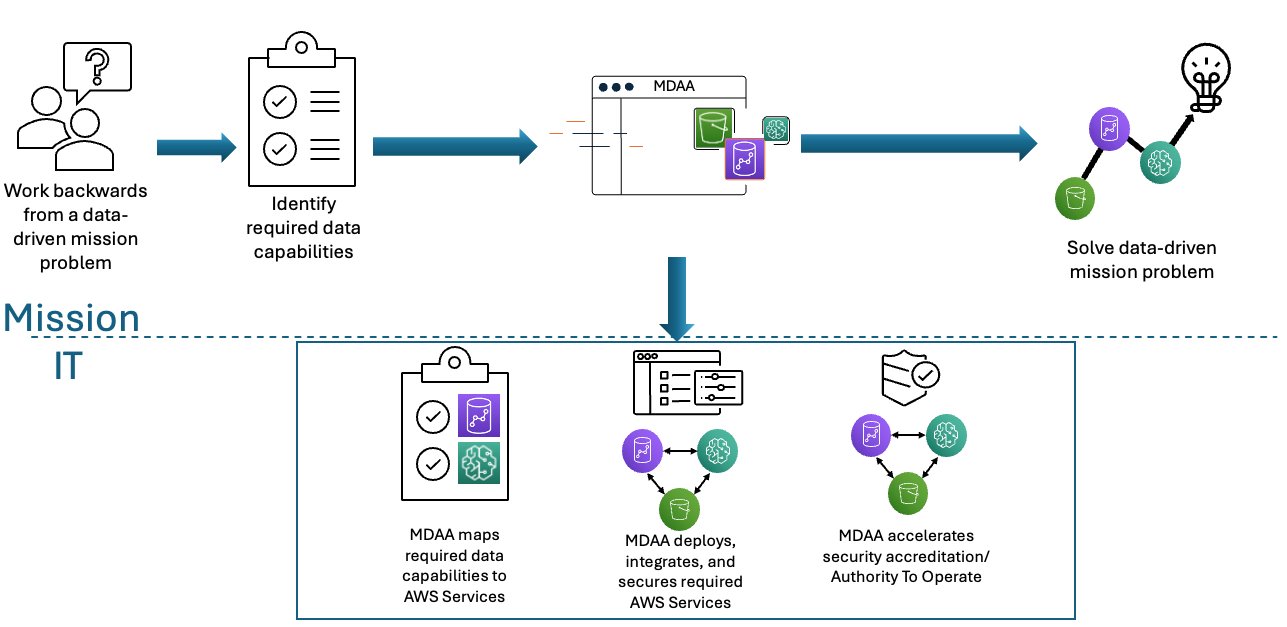
Rafael Ribeiro

Rafael Ribeiro

Rafael is a Software Engineer at Nexthink, focusing on infrastructure and DevOps for AI teams.

Moe Haidar

Moe Haidar is Head of Agentic AI and Engineering at Nexthink, where he leads AI architecture and strategy alongside the development of Spark, the company’s autonomous personal IT agent that resolves employee issues at scale.

Hajer Bouafif

Hajer Bouafif

Hajer is an Analytics Specialist Solutions Architect at Amazon Web Services. She focuses on Amazon OpenSearch Service and helps customers design and build well-architected analytics workloads in diverse industries. Hajer enjoys spending time outdoors and discovering new cultures.
Luca Perrozzi

Luca Perrozzi

Luca is a Solutions Architect at AWS, based in Switzerland. He focuses on innovation topics at AWS, especially in the area of Artificial Intelligence. Luca holds a PhD in particle physics and has 15 years of hands-on experience as a research scientist and software engineer.
AWS Weekly Roundup: NY Summit recap, Local Zone in Hanoi, Grok 4.3 in Bedrock, price reductions, and more (June 22, 2026)

Post Syndicated from Channy Yun (윤석찬) original https://aws.amazon.com/blogs/aws/aws-weekly-roundup-ny-summit-recap-local-zone-in-hanoi-grok-4-3-in-bedrock-price-reductions-and-more-june-22-2026/

Last week AWS Summit New York City brought together thousands of customers, partners, and builders for a free, one-day event showcasing the latest in cloud and AI innovation. Dr. Swami Sivasubramanian, VP of Agentic AI at AWS unveiled a stack of AI launches in his keynote, all built around one thesis: agents that compound value over time.

  • Agents for working – You can launch autonomous agents and access a smarter activity feed with new Amazon Quick features, which now let you create and run multi-step agents directly in the desktop app and consolidates email, Slack, calendar, and tasks into a single prioritized view with personalized rules.
  • Agents for securing – You can shift from reactive to proactive security with AWS Continuum, a new AI-native security service that reasons, validates, and acts at machine speed across the full code vulnerability lifecycle. AWS Security Agent (now part of AWS Continuum) adds new features: threat modeling; pull request code scanning with remediation across major Git platforms; and IDE integrations via Kiro power, Claude Code plugin, and MCP.
  • Agents for building – You can write, ship, and modernize code in one continuous loop with Kiro, AWS DevOps Agent, and AWS Transform. Kiro introduces a native iOS app; AWS DevOps Agent adds release management capabilities to assess code changes before production; and AWS Transform continuous modernization reduces tech debt autonomously.
  • Agents customers create – You can go from agent idea to production in minutes with Amazon Bedrock AgentCore, which now includes a GA harness for infrastructure and orchestration, Web Search, Managed Knowledge Base, policy integrations with Guardrails, and the new AWS Context service for mapping organizational data relationships.

To learn more, visit the Summit recap from our top announcements blog post and Amazon News post.

Last week’s launches
Here are last week’s launches that caught my attention:

  • AWS Local Zone in Hanoi, Vietnam  —This new Local Zone is one of the first AWS Local Zones in the Asia Pacific with support for Amazon S3 and Amazon EBS Local Snapshots, enabling customers to meet data residency requirements by storing and backing up data locally. To get started, enable the Hanoi Local Zone (ap-southeast-1-han-1a) from the Regions and Zones tab in the AWS Global View or by using the ModifyAvailabilityZoneGroup API.
  • AWS Blocks, an open-source TypeScript framework for application developers (preview) — AWS Blocks runs a fully functional local environment with Postgres, authentication, and real-time messaging, no AWS account required. When you’re ready to deploy, the same application code runs on production AWS services with zero changes, and you can drop into AWS CDK at any point for direct resource configuration.
  • Grok 4.3 from xAI in Amazon Bedrock —You can use the Grok 4.3 model on Amazon Bedrock, giving you even more choice as you build generative AI applications across reasoning, agentic, and enterprise workflows. Grok 4.3 runs on a new inference engine in Bedrock designed for price performance, with support for tool calling, structured output, and response streaming.
  • Amazon S3 annotations: attach rich, queryable context directly to your objects — Amazon S3 now lets you attach up to 1 GB of rich, mutable, and queryable context directly to your objects using annotations, purpose-built for AI agents and autonomous workflows that need to discover, understand, and act on data at scale without maintaining separate metadata systems.
  • Amazon ECS announces faster service auto scaling — Amazon ECS service auto scaling now detects and responds to load changes faster with support for high resolution (20-second) metrics and metric publishing optimizations. In AWS benchmarking tests, time to trigger scale-out improved from 363 seconds to 86 seconds (76% faster), and total time to scale and provision new tasks improved from 386 seconds to 109 seconds (72% faster).
  • Amazon EC2 G7 instances accelerated by NVIDIA RTX PRO 4500 Blackwell Server Edition GPUs — AWS is the first major cloud provider to support NVIDIA RTX PRO 4500 Blackwell Server Edition GPUs. G7 instances are accelerated by these GPUs with custom sixth-generation Intel Xeon Scalable processors, delivering up to 4.6x AI inference performance and up to 2.1x graphics performance compared to G6 instances.
  • Strands Agents introduces new capabilities — Strands is an open source toolkit for building production agents. You can now use better context management in Harness SDK, a new isolated execution environment with Strands Shell, and chaos testing and red teaming in Strands Evals.
  • AWS Management Console Private Access – You can access the AWS Console from VPCs without internet connectivity, allowing enterprises to manage their AWS infrastructure through the console while maintaining strict network security controls in air-gapped environments.
  • AWS Marketplace Storefront is now generally available – AWS Partners can create and deploy their own branded catalog of solutions and services on their website or application in hours. Channel Partners and Independent Software Vendors can now simplify how they manage their cloud marketplace business and make it easier for customers to discover and purchase their solutions from AWS Marketplace.
  • Palo Alto Networks (PANW) Advanced DNS Security on Amazon Route 53 Resolver DNS Firewall (preview) – You can now enforce DNS threat protections from Palo Alto Networks directly on Route 53 DNS Firewall rules, without deploying separate firewalls or modifying VPC configurations — by subscribing to PANW from the DNS Firewall console through the embedded AWS Marketplace widget.

For a full list of AWS announcements, be sure to keep an eye on the What’s New with AWS page.

Price reductions 
AWS continues to look for ways to increase performance and lower prices for our customers. I noticed a few such efforts last week, so I’d like to share them:

Learn more about AWS, browse and join upcoming AWS-led in-person and virtual events, startup events, and developer-focused events as well as AWS Summits and AWS Community Days. Join the AWS Builder Center to connect with builders, share solutions, and access content that supports your development.

That’s all for this week. Check back next Monday for another Weekly Roundup!

— Channy

Top announcements of the AWS Summit in New York, 2026

Post Syndicated from AWS News Blog Team original https://aws.amazon.com/blogs/aws/top-announcements-of-the-aws-summit-in-new-york-2026/

Today at the AWS Summit in New York City, Swami Sivasubramanian, AWS VP of Agentic AI, provided the day’s keynote. Here’s our roundup of the biggest announcements from the event:

New in Amazon Bedrock AgentCore
We’re introducing new capabilities on Amazon Bedrock AgentCore: connecting AI agents to organizational, web, and paid knowledge, helping teams find and fix what’s going wrong in production, and enforcing controls that scale as agents grow more capable.

Together, these capabilities help you build more capable agents faster, govern those agents with controls that scale, and improve them continuously. To learn more, read our blog post covering all the new features.

New in AI-based security tools

New in building AI-based applications 

  • Introducing Kiro for iOS — Kiro introduces a native iOS app, available in a gated preview, built for real engineering work that gives developers a new surface to kick off, monitor, steer, and interact with their Kiro sessions directly from their phone. That means you can now start sessions, check back when they’re done, review diffs, and approve changes all while staying connected to your work with no laptop running.
  • AWS DevOps Agent adds release management capabilities to assess code changes before production — You can use a new release readiness review of code changes and autonomous release testing. These new features verify every change against the natural language standards you give to the DevOps Agent and run change-specific tests in production-like environments.
  • Proactively reduce tech debt autonomously with AWS Transform – continuous modernization — You can use continuous analysis (preview) to automatically scan your code repositories against configurable baselines and generates findings in hours, not weeks. Once you’ve identified and prioritized findings, you can configure autonomous remediations that generate pull requests for affected repositories automatically.

In addition to the keynote announcements, we have other important launches this week:

Announcing Web Search on Amazon Bedrock AgentCore: Ground your AI agents in current, accurate web knowledge

Post Syndicated from Channy Yun (윤석찬) original https://aws.amazon.com/blogs/aws/announcing-web-search-on-amazon-bedrock-agentcore-ground-your-ai-agents-in-current-accurate-web-knowledge/

Today, we’re announcing the general availability of Web Search on Amazon Bedrock AgentCore, a fully managed tool that enables agents to ground responses in current, cited web knowledge with zero data egress from customer’s secured AWS environment.

Web Search uses a built-in connector target on Bedrock AgentCore Gateway using the Model Context Protocol (MCP). Your agent sends a natural-language query, and Web Search returns most relevant snippets, source URLs, titles, and publication dates that the model can reason over to produce a grounded response.

It is built on Amazon’s search infrastructure, informed by years of experience powering agentic search experiences across Alexa+, Amazon Quick, and Kiro. It uses a multi-source grounding approach that combines Amazon’s web index with structured knowledge graph data. Beyond standard web results, this gives agents access to Amazon Knowledge Graph with verified facts, helping them retrieve more relevant and accurate responses than traditional web search alone.

With this launch, you can focus on building agents instead of manually adding web search to agents on Bedrock AgentCore and managing its infrastructure. Your AI agent looks at user question, retrieves the latest facts, and then takes any necessary action grounded in current developments beyond a model’s training data. You can also meet enterprise governance policies without sending user prompts and retrieval queries to external search API providers outside of AWS.

Web Search on Bedrock AgentCore in action
To get started, create the Bedrock AgentCore Gateway with Web Search tool target in the Bedrock AgentCore console. When the Gateway URL is created, you can interact with API call, Command Line Interface (CLI), or MCP Inspector.

To add Web Search tool target when creating the Gateway, choose MCP target as a target protocol and Connectors as a target type. You can select the Web Search tool as a preconfigured target to retrieve most relevant web search results including links, snippets, and metadata.

After creating your gateway, you can find the Web Search tool target on the detail page of your gateway. You can also add a new Web Search tool target to an existing gateway.

To interact with Web Search tool, use the sample invocation code in the View invocation code section. You can use code snippets through Python codes with API requests, MCP Python SDK, Strands MCP Client, and MCP Inspector.

For example, you can interact with the MCP Inspector, an interactive developer tool for testing and debugging MCP servers. When you connect to the MCP server through the Gateway resource URL, you will find a Web Search tool for each connector target on the Gateway. Enter input the web search query and choose Run Tool to get the results.

To learn more about how to use Web Search on Bedrock AgentCore, visit the Bedrock AgentCore Gateway documentation.

Customer voices
Some of our customers had early access to this new feature. This is what they shared with us:

Benchling helps scientists accelerate R&D, making it easy to centralize scientific data, collaborate across teams, and access insights. Nicholas Larus-Stone, Head of AI Agents at Benchling shared “Scientists using Benchling AI can now ask about a target they’re actively working on and get answers grounded in both their institutional data in Benchling and published literature. The result is more complete science, and hypothesis generation done right. Because we’re using the Web Search tool on Amazon Bedrock AgentCore, customers have a secure, governed environment to bring that high quality published data into their workflows without compromising how they manage their data.”

Gen Digital leads consumer and small business cyber safety, offering antivirus, antimalware, identity and privacy protection, virtual private networks, and cloud backup. Iskander Sanchez-Rola, Senior Director of AI & Innovation, Gen Digital shared “With the Web Search tool on Amazon Bedrock AgentCore, Norton Revamp helps professionals build their online reputation with current, grounded content ideas shaped by what’s actually happening in the world today. What we value most is that AWS uses its own search index and keep queries within our trusted AWS environment.”

To read more customer stories, visit the Amazon Bedrock Customers.

Now available
Web Search on Amazon Bedrock AgentCore is generally available today in the US East (N. Virginia) Region. For Regional availability and a future roadmap, visit the AWS Capabilities by Region.

You can get started with Web Search on Bedrock AgentCore at no additional cost. You pay only for the data transfer charges you use for the Gateway. New AWS customers also receive up to $200 in Free Tier credits. To learn more, visit the Amazon Bedrock AgentCore pricing page.

Try it in the Amazon Bedrock AgentCore console and send feedback to AWS re:Post for Amazon Bedrock AgentCore or through your usual AWS Support contacts.

— Channy

AWS Weekly Roundup: AWS FinOps Agent in preview, Gemma 4 on Bedrock, Kiro Pro Max, and more (June 15, 2026)

Post Syndicated from Esra Kayabali original https://aws.amazon.com/blogs/aws/aws-weekly-roundup-aws-finops-agent-in-preview-gemma-4-on-bedrock-kiro-pro-max-and-more-june-15-2026/

This week, New York City is hosting AWS Summit, bringing together builders, customers, and AWS teams for a full day of announcements, demos, and technical sessions at the Javits Center. I wrote blog posts for some of the Summit launches, so I am excited to see them go live this week. I just won’t be watching from the Javits Center. I’ll be at a four-day music festival, following the launches on my phone while trying to figure out how to put up a tent. If you weren’t able to attend in person like me, the keynote livestream is available on June 17, with Dr. Swami Sivasubramanian, VP of Agentic AI, and Chet Kapoor, VP of Security Services and Observability, covering new capabilities across developer tools, AI infrastructure, and security.

Here’s what happened this week.

Headlines
How frontier teams are reinventing AI-native development — Swami published a detailed post this week drawing on data from experiments across hundreds of Amazon engineering teams. The findings are worth reading carefully if you are thinking about how to structure AI adoption on your own team.

A six-engineer team rebuilt the Amazon Bedrock inference engine in 76 days, a project originally scoped for 30 developers over 12 to 18 months. The median productivity gain across structured pilots with Amazon Stores teams was 4.5x in normalized deployment velocity, with some teams exceeding 10x. Perfect Order Experience went from a two-week feature cycle to shipping in an afternoon. WW Grocery cut design document creation from five days to a few hours.

The post distills these results into five practices for becoming a frontier team. First, invest in agent context: build steering files, coding standards, and structured repositories before writing production code. Second, expect an initial slowdown while workflows are restructured, and push through it. Third, maintain a steady backlog of well-scoped tasks so agents can run in parallel without constant supervision. Fourth, make intent explicit through structured specifications before code generation begins. Fifth, shift testing left so agents can self-correct before code reaches the pipeline.

The post closes with a note that commit velocity is only part of the picture, and that a follow-up will cover release management, operations, security operations, and EOL upgrades.

AWS FinOps Agent is now available in preview — AWS FinOps Agent is a new agent for FinOps practitioners and engineering teams that answers cost questions, surfaces optimization opportunities, investigates cost anomalies, and runs recurring FinOps workflows on a defined schedule. You can use it to query your AWS costs, generate cost reports for finance and engineering teams, and surface rightsizing, idle resource, and Savings Plans recommendations from AWS Cost Optimization Hub and AWS Compute Optimizer. The agent can open Jira tickets on your behalf based on those recommendations. When a cost anomaly is detected, FinOps Agent can automatically investigate the root cause and post findings to a Slack channel.

Last week’s launches
I’ll start with one I wrote this week, then cover the other launches that caught my attention:

  • Amazon EC2 M9g and M9gd instances are now generally available — Powered by AWS Graviton5 processors and built on the sixth-generation AWS Nitro System, M9g instances deliver up to 25% better compute performance compared to Graviton4-based instances, with up to 35% faster performance for web applications, up to 35% for machine learning inference, and up to 30% for databases. Graviton5 is the first processor in the AWS fleet to support PCIe Gen6 and DDR5-8800 memory, and includes a 5x larger L3 cache compared to the previous generation. M9g and M9gd instances offer up to 15% higher network bandwidth and 20% higher Amazon EBS bandwidth on average across sizes compared to M8g. This release also introduces the Nitro Isolation Engine, an enhancement to the Nitro System that uses formal verification to provide mathematically proven isolation between virtual machines — establishing Nitro as the first formally verified cloud hypervisor. M9gd instances add up to 11.4 TB of NVMe SSD local storage with 30% higher IOPS compared to M8gd. Both instance types support Instance Bandwidth Configuration (IBC) for adjusting bandwidth allocation between EBS and VPC networking by up to 25%.
  • Anthropic Claude Fable 5 on Amazon Bedrock — Claude Fable 5 launched on Amazon Bedrock on June 9, bringing extended asynchronous task execution, advanced vision capabilities across diagrams, charts, and PDFs, and proactive self-verification. Access requires opting into data sharing via the Data Retention API before invoking the model; Anthropic requires 30-day retention of inputs and outputs for Mythos-class models. Important note on availability: On June 12, Anthropic asked AWS to revoke access to Claude Fable 5 and Claude Mythos 5 for all users to support compliance with a US Government export control directive. All other models, including Opus 4.8, are unaffected. Read the Anthropic statement for details. AWS will share further updates as they become available.
  • Gemma 4 models are now available on Amazon Bedrock — The Gemma 4 family from Google DeepMind is now available on Amazon Bedrock across three variants: Gemma 4 31B (dense, 256K-token context window, suited for reasoning and coding workloads), Gemma 4 26B-A4B (mixture-of-experts architecture, targeting cost- and latency-sensitive workloads), and Gemma 4 E2B (smallest variant, designed for low-latency interactive use cases). All three support native function calling, structured output, reasoning, response streaming, multimodal input across text, image, video, and audio, and more than 35 languages.
  • Amazon OpenSearch Service launches MCP Apps for agentic observability — Amazon OpenSearch Service now supports MCP Apps, enabling observability workflows inside compatible agentic IDEs including Claude Desktop and VS Code. An AI agent in your local environment can investigate incidents using logs, traces, metrics, and alerts stored in OpenSearch domains, collections, and Amazon Managed Service for Prometheus. Each MCP App tool call returns a dual response: a text summary for the agent to reason over and an interactive visualization rendered in the same conversation thread. Available MCP App tools cover log, metrics, and trace investigation; service performance; topology; dynamic visualizations; agent health; cluster health; and instrumentation scoring.

Other AWS news
Here are some additional posts and updates you may find useful:

  • AWS CLI v1 enters maintenance mode — When CLI v1 enters maintenance mode, the botocore and s3transfer dependencies will be vendored directly into the CLI v1 codebase rather than installed as separate packages. This means upgrading CLI v1 will no longer update the standalone botocore or s3transfer packages, and installing those packages independently will have no effect on the versions used by CLI v1. Environments with both CLI v1 and boto3 installed will contain separate copies of these libraries. New CLI v1 releases will be limited to critical bug fixes and security issues. The recommended path is to migrate to AWS CLI v2.
  • AWS Workload Credentials Provider is now available — AWS has launched a new Workload Credentials Provider that enables workloads to obtain short-term AWS credentials without requiring long-term access keys. This supports credential management for applications running outside of AWS, giving teams a way to follow least-privilege access patterns for workloads in third-party or on-premises environments.
  • Kiro Pro Max is now available — Kiro has introduced a new Pro Max tier, adding higher usage limits, access to the latest frontier models, and additional agentic capabilities for development teams. Kiro Pro Max is designed for professional developers who need sustained, high-volume use across coding, specification generation, and agent-driven tasks.

Upcoming AWS events
Check your calendar and sign up for upcoming AWS events:

Visit the AWS Builder Center to meet other builders, contribute solutions, and find resources that help you keep building. You can also browse upcoming AWS-led in-person and virtual events, plus developer-focused sessions.

— Esra

This post is part of our Weekly Roundup series. Check back each week for a quick roundup of interesting news and announcements from AWS!

Anthropic Claude Fable 5 on AWS: Mythos-class capabilities with built-in safeguards now available

Post Syndicated from Channy Yun (윤석찬) original https://aws.amazon.com/blogs/aws/anthropic-claude-fable-5-on-aws-mythos-class-capabilities-with-built-in-safeguards-now-available/

Today, we’re announcing the availability of Claude Fable 5 on Amazon Bedrock and Claude Platform on AWS. Claude Fable 5 makes Mythos-level capabilities available to customers, with strong safeguards designed to make it safe for broader use. Fable 5 is state-of-the-art on nearly all tested benchmarks and delivers exceptional performance in software engineering, knowledge work tasks, and vision – built for ambitious, long running work.

With Claude Fable 5 on Bedrock, you can build within your existing AWS environment and scale inference workloads. You can also use Claude Fable 5 through the Claude Platform on AWS, giving you Anthropic’s native platform experience.

According to Anthropic, Claude Fable 5 represents a step-change in what you can accomplish with AI models. Here is what makes this model different:

  • Long-running, asynchronous execution — Claude Fable 5 handles complex tasks that previous models could not sustain, executing coding and knowledge work tasks for extended periods without intervention.
  • Advanced vision capabilities — Claude Fable 5 understands diagrams, charts, and tables nested in files and PDFs. This opens up research and document-heavy work in finance, legal, analytics, architecture, and gaming. In coding, the model implements designs with high fidelity and uses vision to critique its output against goals.
  • Proactive self-verification — The model self-updates skills based on learnings, develops its own harnesses and evaluations.

Claude Fable 5 includes safeguards that limit its performance in specific areas where misuse risk is elevated. Harmful prompts related to cybersecurity, biology, chemistry, and health fall back to receive a response from Opus 4.8 instead. Anthropic is able to expand access to nearly all of Claude Fable 5’s state-of-the-art capabilities by developing more powerful safeguards. The same model without these limits is Claude Mythos 5 and it will only be available to a small group of vetted customers.

Claude Fable 5 model in action
You can use Claude Fable 5 in both Amazon Bedrock and Claude Platform on AWS. This post will cover guidance on how to access and use on Amazon Bedrock. For guidance on the Claude Platform on AWS, visit the documentation to learn more.

To get started with Amazon Bedrock, you can access the model programmatically now using the Anthropic Messages API to call the bedrock-runtime or bedrock-mantle endpoints through Anthropic SDK. You can sole keep using the Invoke and Converse API on bedrock-runtime through the AWS Command Line Interface (AWS CLI) and AWS SDK.

In order to access Claude Fable 5 model, you must opt into data sharing by using the Data Retention API and setting provider_data_sharing before you can invoke the models. There is no console user interface for this setting at launch.

curl -X PUT https://bedrock-mantle.us-east-1.api.aws/v1/data_retention \
  -H "x-api-key: <your-bedrock-api-key>" \ 
  -H "Content-Type: application/json" \
  -d '{ "mode": "provider_data_share" }'

This mode allows Amazon Bedrock to retain and share your inference data with model providers per their requirements. Anthropic requires 30-day inputs and outputs retention, as well as human review. To learn more, visit the Amazon Bedrock abuse detection.

Let’s start with Anthropic SDK for Python using the Messages API on bedrock-mantle endpoint. Install Anthropic SDK.

pip install anthropic

Here is a sample Python code to call Claude Fable 5 model:

import anthropic

client = anthropic.Anthropic(
    base_url="https://bedrock-mantle.us-east-1.api.aws/anthropic",
    api_key= <your-bedrock-api-key>
)

message = client.messages.create( 
     model="anthropic.claude-fable-5", 
	 max_tokens=4096, 
	 messages=[ 
	     { "role": "user", 
		   "content": "Design a distributed architecture on AWS in Python that should support 100k requests per second across multiple geographic regions", 
		 }, 
	 ], 
)

print(message.content[0].text)

To learn more, check out Anthropic Messages API code examples and notebook examples for multiple use cases and a variety of programming languages.

You can also use Claude Fable 5 with the Invoke API and Converse API on bedrock-runtime endpoint. Here’s a example to call Converse API for a unified multi-model experience using the AWS SDK for Python (Boto3):

import boto3 
bedrock_runtime = boto3.client("bedrock-runtime", region_name="us-east-1") 
response = bedrock_runtime.converse( 
    modelId="us.anthropic.claude-fable-5", 
    messages=[ 
        { 
            "role": "user", 
            "content": [ 
                { 
                    "text": "Design a distributed architecture on AWS in Python that should support 100k requests per second across multiple geographic regions." 
                } 
            ] 
        } 
    ], 
    inferenceConfig={ 
        "maxTokens": 4096 
    } 
) 
print(response["output"]["message"]["content"][0]["text"]) 

To learn more, visit code examples that show how to use Amazon Bedrock Runtime with AWS SDKs.

Things to know
Let me share some important technical details that I think you’ll find useful.

  • Model access — Claude Fable 5 access is gradually expanding for all AWS accounts. If your account doesn’t have access yet, it will be enabled soon depending on your Bedrock usage. If you want to get access to this model quickly, contact your usual AWS Support.
  • Pricing — When a harmful prompt is routed to Opus 4.8 instead of Fable 5, you pay only Opus prices. If a request is blocked mid-conversation, initial tokens are charged at Fable rates and subsequent tokens at Opus rates. To learn more, visit the Amazon Bedrock pricing page.
  • Data retention — For Fable 5, Mythos 5, and future models on Bedrock with similar or higher capability levels, Anthropic will require 30-day retention for all traffic on Mythos-class models. Retaining data for a limited period allows Anthropic to detect patterns of misuse that are not visible from a single exchange. Once you opt into data retention, your data will leave AWS’s data and security boundary.
  • Claude Mythos 5 on Bedrock (Limited Preview) — You can also use Anthropic’s most capable model for cybersecurity and life sciences, including vulnerability discovery, drug design, and biodefense screening. Access is currently limited due to the dual-use nature of these domains. To learn more, visit the model card documentation.

Now available
Anthropic’s Claude Fable 5 model is available today on Amazon Bedrock in the US East (N. Virginia) and Europe (Stockholm) Regions; check the full list of Regions for future updates. Claude Fable 5 is also available on the Claude Platform on AWS in North America, South America, Europe, and Asia Pacific.

Give Claude Fable 5 a try with the Amazon Bedrock APIs, in the Claude Platform on AWS, and send feedback to AWS re:Post for Amazon Bedrock or through your usual AWS Support contacts.

— Channy

Updated on June 9, 2026 — You can use the console on bedrock-runtime engine. The console support on bedrock-mantle is coming soon.

Automate medical record digitization with Amazon Bedrock Data Automation and AWS HealthLake

Post Syndicated from Gerardo Alarcon Rivas original https://aws.amazon.com/blogs/architecture/automate-medical-record-digitization-with-amazon-bedrock-data-automation-and-aws-healthlake/

Healthcare providers manage millions of paper medical records that remain disconnected from modern clinical systems. Clinicians make decisions without full patient histories, organizations spend millions on manual data entry, and critical information stays trapped in formats that modern applications can’t read. The technical challenge is clear: how do you transform unstructured, scanned documents into standardized, interoperable health data at scale, without building custom machine learning (ML) models or hand-coding document parsers for every form type.

In this post, you learn how to build an automated, serverless pipeline that converts scanned PDF medical records into FHIR R4-compliant data using Amazon Bedrock Data Automation and AWS HealthLake. We walk through the architecture, explain how each AWS service connects to the next, show you what the pipeline looks like when it runs, and get you deployed in under 20 minutes. For advanced configuration, troubleshooting, and customization options, see the GitHub repository.

The challenge with paper medical records

Healthcare organizations face a compounding problem. Paper records don’t only create storage challenges, they create care gaps. When a patient arrives at a new facility, clinicians often proceed with incomplete information because retrieving and interpreting historical records takes too long. Manual digitization is expensive, error-prone, and doesn’t scale.

The solution requires more than scanning documents. It requires extracting structured, clinically meaningful data and storing it in a format that integrates with existing systems. That’s where Fast Healthcare Interoperability Resources (FHIR) comes in. FHIR is the healthcare industry’s standard for exchanging electronic health information.

Solution overview

This solution uses an event-driven, serverless architecture to automate the full journey from PDF upload to queryable FHIR data. No custom machine learning models or manual template configuration are required.

AWS services used:

  • Amazon Bedrock Data Automation (BDA): Extracts over 50 structured clinical fields from scanned PDFs using advanced AI capabilities, including patient demographics, diagnoses with ICD-10 codes, medications, vital signs, and lab results.
  • AWS Lambda: Two serverless functions orchestrate the pipeline: a BDA Trigger function that fires when a PDF is uploaded, and a FHIR Processor function that converts extracted JSON into FHIR R4 format.
  • Amazon Simple Storage Service (Amazon S3): Input and output buckets with event notifications drive the pipeline automatically, with no polling or scheduled jobs required.
  • AWS HealthLake: A FHIR R4-compliant, HIPAA-eligible data store that validates, indexes, and exposes data through standard FHIR API endpoints.
  • AWS CloudFormation: Provisions the entire infrastructure as code in a single automated deployment (approximately 15–20 minutes).
  • Amazon CloudWatch and AWS CloudTrail: Provide end-to-end monitoring, logging, and audit trails across all pipeline components.
  • AWS Key Management Service (AWS KMS): Encrypts AWS HealthLake data at rest using customer managed keys.

Important: This solution is a demonstration sample designed for use with synthetic data only. It’s not production-ready for real Protected Health Information (PHI) without additional HIPAA security controls. See the Security considerations section before deploying in any environment with real patient data.

Architecture

End-to-end architecture showing the event-driven pipeline from PDF upload to FHIR-compliant data storage

Figure 1: End-to-end architecture showing the event-driven pipeline from PDF upload to FHIR-compliant data storage

The pipeline runs in three phases, each building on the last.

Phase 1: Infrastructure deployment

AWS CloudFormation provisions all required resources in a single stack: Amazon S3 input and output buckets, two Lambda functions, AWS Identity and Access Management (IAM) roles with least-privilege permissions, AWS KMS keys, CloudWatch log groups, and an AWS HealthLake FHIR R4 datastore. The entire environment, including all service-to-service permissions, is version-controlled and repeatable.

Phase 2: Event-driven data processing

The processing pipeline is fully event-driven. No scheduler or orchestration service is required. Each step triggers the next automatically:

  1. PDF Upload → S3 Input Bucket
  2. S3 Event → Triggers BDA Lambda function
  3. BDA Processing → Extracts over 50 clinical fields with confidence scores
  4. JSON Storage → S3 Output Bucket
  5. S3 Event → Triggers FHIR Processor Lambda function
  6. FHIR Conversion → Creates FHIR R4 Bundle (JSON + NDJSON)
  7. HealthLake Import → Automatic NDJSON ingestion and validation
  8. FHIR API Access → Query using HealthLake endpoints

Phase 3: Query and analytics

After the data is in AWS HealthLake, it’s immediately queryable using standard FHIR R4 API endpoints. Python scripts authenticate using AWS Signature Version 4 (SigV4) and support searches by patient, condition, medication, or lab result type.

How the services connect

Understanding the service interconnections is key to customizing or extending this solution.

Amazon S3 as the pipeline backbone

Amazon S3 plays a dual role: it’s both the entry point for raw PDFs and the handoff layer between processing stages. Amazon S3 event notifications remove the need for polling. When a PDF lands in the input bucket, the BDA Lambda fires immediately. When BDA writes its JSON output to the output bucket, the FHIR Processor Lambda fires automatically. This decoupled design means that each stage can scale independently.

Amazon Bedrock Data Automation as the intelligence layer

BDA serves as the intelligence layer. When Lambda triggers the extraction job, BDA retrieves the PDF from Amazon S3 and applies a custom medical blueprint, which is a schema defining the over 50 clinical fields to extract. The service understands document structure without requiring templates or training data. Each extracted field is returned with a confidence score (0.0–1.0), which the FHIR Processor Lambda uses to apply validation thresholds before conversion.

AWS Lambda as the transformation layer

The two Lambda functions are intentionally narrow in scope:

  • The BDA Trigger Lambda receives the Amazon S3 event, constructs the BDA API call, and submits the processing job.
  • The FHIR Processor Lambda reads BDA’s JSON output, maps each extracted field to the appropriate FHIR R4 resource type, assembles a FHIR Bundle, exports it as NDJSON, and triggers an AWS HealthLake import job.

This separation of concerns makes each function independently testable and replaceable.

AWS HealthLake as the FHIR data store

AWS HealthLake receives the NDJSON import, validates each resource against the FHIR R4 specification, creates relationships between resources (for example, linking Condition resources to their Patient), indexes data for efficient querying, and generates unique FHIR resource IDs. The result is a fully queryable FHIR data store accessible through authenticated API calls.

IAM roles as the security fabric

Each service communicates with the next using IAM roles with least-privilege permissions. There are no hardcoded credentials and no overly broad policies. Lambda functions assume roles that grant only the specific actions they need (for example, bedrock-data-automation:InvokeDataAutomationAsync and s3:GetObject for the BDA Trigger Lambda).


Walkthrough

This walkthrough takes you from prerequisites through deployment and verification.

Prerequisites

Before deploying, confirm you have the following:

Required software:

  • Python 3.10 or later.
  • Poetry (Python dependency management).
  • AWS Command Line Interface (AWS CLI) configured with appropriate credentials.

Verify your Poetry installation:

poetry --version

If you need to install Poetry:

curl -sSL https://install.python-poetry.org | python3 -

Required AWS permissions:

You need IAM permissions for the following services:

  • Amazon Bedrock Data Automation.
  • AWS CloudFormation (create, update, and delete stacks).
  • Amazon S3 (create buckets, upload and download objects).
  • AWS Lambda (create and update functions).
  • AWS Identity and Access Management (IAM) (create roles and policies).
  • AWS HealthLake (create data stores).

Supported AWS Regions:

This solution currently supports us-east-1 (US East N. Virginia) and us-west-2 (US West Oregon) only. These are the Regions where Amazon Bedrock Data Automation is available.


Deploy the pipeline

Deployment takes approximately 15–20 minutes. Run the following four commands to go from zero to a fully deployed pipeline:

# 1. Clone the repository and install dependencies
git clone <repository-url>
cd Medical-Record-Digitization-and-FHIR-Integration-Pipeline
poetry install

# 2. Configure your environment
poetry run python src/utils/setup_env.py

# 3. Deploy the CloudFormation stack (approximately 15 minutes)
poetry run python src/automation/deploy.py

# 4. Verify deployment
aws cloudformation describe-stacks \
  --stack-name bda-medical-records-stack \
  --query 'Stacks[0].StackStatus'
# Expected output: "CREATE_COMPLETE"

The deployment creates the following resources:

  • Amazon Bedrock Data Automation blueprint and project (custom medical records schema with over 50 fields).
  • Amazon S3 input and output buckets with automatic event notifications.
  • Two AWS Lambda functions (BDA Trigger and FHIR Processor).
  • AWS HealthLake FHIR R4 data store.
  • AWS Identity and Access Management (IAM) roles and policies with least-privilege permissions.
  • Amazon CloudWatch log groups for all Lambda executions.

For manual environment configuration, advanced deployment options, and troubleshooting, see the GitHub repository.


See it in action

After it’s deployed, upload a sample medical record to trigger the full pipeline. You can use the sample provided in the GitHub repository.

# Get your input bucket name from the CloudFormation stack output
INPUT_BUCKET=$(aws cloudformation describe-stacks \
  --stack-name bda-medical-records-stack \
  --query 'Stacks[0].Outputs[?OutputKey==`InputBucketName`].OutputValue' \
  --output text)

# Upload a sample PDF (use the synthetic records included in the repository)
aws s3 cp samples/medical-record-sample.pdf s3://$INPUT_BUCKET/

# Track BDA processing jobs
poetry run python src/utils/track_bda_jobs.py

Within 2–3 minutes, Amazon Bedrock Data Automation processes the PDF and the FHIR Processor Lambda imports the results into HealthLake. View the extracted data:

poetry run python src/utils/view_results.py

Example output:

Found 8 result files in output bucket
Processing: medical-record-sample_results.json

Patient Information:
---------------------
Name: Wilkins, Samantha
Patient ID: A1B2C3D4
Date of Birth: 10/28/1953

Conditions (5 found):
- Hypothyroidism (ICD-10: E03.9) - Confidence: 0.98
- Vitamin D Deficiency (ICD-10: E55.9) - Confidence: 0.95
- Hypertension (ICD-10: I10) - Confidence: 0.97
- Osteoarthritis (ICD-10: M19.90) - Confidence: 0.92
- Gastroesophageal Reflux Disease (ICD-10: K21.9) - Confidence: 0.96

Medications (4 found):
- Levothyroxine 100 mcg daily
- Vitamin D3 2000 IU daily
- Lisinopril 10 mg daily
- Omeprazole 20 mg daily
Lab Results (16 tests):
TSH: 2.3 mIU/L (Normal range: 0.4-4.0) ✓
Vitamin D: 28 ng/mL (Normal range: 30-100) ⚠
Blood Pressure: 128/82 mmHg (Stage 1 Hypertension) ⚠

[✅] FHIR conversion complete
[✅] Imported to HealthLake datastore: ds-abc123xyz456

Query FHIR data from AWS HealthLake

After ingestion, query your data using the interactive FHIR query interface:

poetry run python src/utils/query_medical_data.py

Supported FHIR query patterns:

# Search by patient name
Patient?name=Wilkins

# Get conditions for a specific patient
Condition?patient=Patient/47ef817a-9826-4498-b693-2af5eb2b5250

# Get lab results only
Observation?category=laboratory

# Get vital signs only
Observation?category=vital-signs

# Get all medications
MedicationRequest

Python example, authenticated FHIR API call:

import boto3, requests, os
from botocore.auth import SigV4Auth
from botocore.awsrequest import AWSRequest

session = boto3.Session()
credentials = session.get_credentials()
region = os.environ.get('AWS_REGION', 'us-west-2')
datastore_id = os.environ.get('DATASTORE_ID')

url = f'https://healthlake.{region}.amazonaws.com/datastore/{datastore_id}/r4/Patient?name=Wilkins'
request = AWSRequest(method='GET', url=url, headers={'Accept': 'application/fhir+json'})
SigV4Auth(credentials, 'healthlake', region).add_auth(request)

response = requests.get(url, headers=dict(request.headers))
print(response.json())

Security considerations

This is a demonstration sample for synthetic data only. Do not use with real Protected Health Information (PHI) without implementing the controls listed in the following sections.

Security controls included in this sample:

  • IAM roles with least-privilege permissions.
  • Amazon S3 bucket access controls (private by default).
  • AWS KMS encryption for AWS HealthLake data at rest.
  • AWS service-to-service authorization using IAM roles.
  • Amazon CloudWatch logging for audit trails.

Additional controls required for production PHI workloads:

AWS HealthLake is a HIPAA Eligible Service. Customers must review the AWS Shared Responsibility Model to understand their security and compliance obligations. Before processing real patient data, implement the following:

  1. AWS Business Associate Addendum (BAA): Required under HIPAA before processing PHI on AWS.
  2. Amazon Virtual Private Cloud (Amazon VPC) isolation: Lambda functions and AWS HealthLake in private subnets with AWS PrivateLink.
  3. Comprehensive logging: AWS CloudTrail, AWS Config, Amazon S3 access logs, and Amazon VPC flow logs.
  4. Encryption in transit: TLS 1.2 or later. Use Amazon VPC endpoints to avoid public internet exposure.
  5. Access controls: Multi-factor authentication (MFA), role-based access control (RBAC), temporary credentials, and regular access reviews.
  6. Compliance monitoring: AWS Security Hub with HIPAA compliance checks.
  7. Data lifecycle management: Retention policies, secure deletion, and data loss prevention (DLP) controls.

For full guidance, see the AWS HIPAA Compliance page.

Pricing

The following estimates apply to testing with approximately 100 medical records per month in the US West (Oregon) Region:

Service Usage Estimated monthly cost
Amazon Bedrock Data Automation 100 pages (approximately $0.20–$0.30/page) $20–$30
AWS HealthLake 5 GB storage + 100 queries $15–$20
AWS Lambda 200 invocations (512 MB, approximately 30s avg) $5–$10
Amazon S3 1 GB storage + 200 requests $1–$2
AWS KMS 1 customer managed key $1
Total approximately $50–$100/month

For production workloads processing 10,000 records per month, expect costs in the range of $2,000–$3,000/month. The primary cost drivers are BDA (charged per page), HealthLake (charged per search request), and VPC endpoints (hourly PrivateLink charges in production deployments).

Cost optimization tips:

  • Delete the CloudFormation stack when not actively testing: aws cloudformation delete-stack --stack-name bda-medical-records-stack.
  • Set up AWS Budgets alerts to catch unexpected costs early.
  • Monitor Lambda duration in CloudWatch to optimize function execution time.

Clean up

To avoid ongoing charges, delete the CloudFormation stack when you’re done:

aws cloudformation delete-stack --stack-name bda-medical-records-stack
aws cloudformation wait stack-delete-complete --stack-name bda-medical-records-stack

For cleanup of manually created Amazon Bedrock Data Automation projects and S3 bucket contents, see the GitHub repository.

What’s next

After you deploy, you can extend this foundation to:

  • Integrate with existing electronic health records (EHR) systems through FHIR APIs.
  • Build analytics dashboards using Amazon Quick Sight.
  • Add natural language search with Amazon Kendra.
  • Add Amazon Simple Queue Service (Amazon SQS) as a buffer between Amazon S3 events and the BDA Trigger Lambda to handle burst uploads and manage BDA concurrency limits at scale.
  • Orchestrate with AWS Step Functions for error handling, retry logic, and routing low-confidence extractions to human review.
  • Implement real-time, high-volume processing with Amazon Kinesis Data Streams for continuous ingestion from multiple sources.

Conclusion

In this post, you saw how Amazon Bedrock Data Automation, AWS Lambda, Amazon S3, and AWS HealthLake work together to automate the transformation of scanned medical records into FHIR R4-compliant data. The event-driven architecture removes manual data entry, scales without custom machine learning models, and makes historical records accessible to modern care delivery systems.

Key takeaways:

  • Amazon Bedrock Data Automation extracts over 50 structured clinical fields from PDFs without template configuration.
  • AWS Lambda orchestrates the pipeline with two focused, event-driven functions.
  • Amazon S3 event notifications decouple each stage, so each can scale independently.
  • AWS HealthLake validates, indexes, and exposes FHIR R4 data through standard APIs.
  • Security controls are the customer’s responsibility under the AWS Shared Responsibility Model.

To explore the full source code, advanced configuration options, and customization guidance, visit the GitHub repository.


Additional resources

For more information, see the following additional resources:

This solution is intended for educational purposes using synthetic data. Review the security considerations and consult your compliance team before deploying in any environment with real patient data.


About the authors