Tag Archives: Amazon Q Developer

AWS Weekly Roundup: AWS Builder Center, Amazon Q, Oracle Database@AWS, and more (July 14, 2025)

Post Syndicated from Matheus Guimaraes original https://aws.amazon.com/blogs/aws/aws-weekly-roundup-aws-builder-center-amazon-q-oracle-databaseaws-and-more-july-14-2025/

Summer is well and truly here in the UK! I’m a bit of a summer grinch though so, unlike most people, I’m not crazy about “the glorious sun” scorching me when I’m out and about. On the upside, this provides the perfect excuse to retreat to the comfort of a well-ventilated room where I can focus on coding and curating the latest AWS releases to bring you the highlights.

I also managed to escape the heat for most of yesterday while recording an episode for the AWS Developers Podcast where the wonderful Sebastien Stormaq and Tiffany Souterre interviewed me about games development. If you haven’t discovered it yet, I highly recommend you give it a go as the episodes are full of interesting lessons and insights from not just AWS, but customers and community members who share their stories and expertise in a relaxed conversation.

Alright, ready to discover some of the new things we released last week? Here are the highlights.

AWS Builder Center
There is a new home for AWS builders and community members! AWS Builder Center is a new place where cloud builders can connect, share knowledge, and access resources to enhance their AWS journey. The platform enables users to join community programs, discover trending topics, access AWS Skill Builder courses, participate in technical challenges, and more, using a single Builder ID sign-in.

One the features that I’m personally most excited about is the Wishlist. You can now create wishes and tell AWS directly about ways to improve our products and services or share original ideas that you think could help you and your teams. You can also browse and upvote existing wishes to support any suggestions that you think should be prioritized. The AWS teams will keep an eye on this and if a wish has enough traction it may just be considered!

Read the news blog post for a quick tour through some of the most exciting features or head over to AWS Builder Center and start exploring!

AI
The world of AI keeps moving fast and changing our world, by providing new and exciting ways to do things and become more productive. Here are two releases from last week that caught my attention.

  • Amazon Q chat in the AWS Management Console can now query AWS service data – Amazon Q Developer expands its capabilities by enabling natural language queries of data stored across AWS services like S3, DynamoDB, and CloudWatch, directly from the AWS Console, Slack, Microsoft Teams, and AWS Console Mobile Application. This enhancement streamlines cloud management and troubleshooting by allowing users to access and analyze service data through conversational interfaces, with access controls managed through IAM permissions.
  • Amazon CloudWatch and Application Signals MCP servers for AI-assisted troubleshooting – AWS has released two new Model Context Protocol (MCP) servers – CloudWatch MCP and Application Signals MCP – that enable AI agents to leverage observability data for automated troubleshooting through conversational interfaces. These open-source servers allow AI assistants to analyze metrics, alarms, logs, traces, and service health data across AWS environments, streamlining incident response and root cause analysis without requiring developers to manually navigate multiple AWS consoles.

Oracle Database@AWS
It seems like yesterday when Andy Jassy announced our partnership with Oracle to create Oracle Database@AWS, a jointly offered service that runs Oracle databases on Exadata infrastructure directly within AWS data centers, providing a unified AWS-Oracle experience. Fast forward to last week and Oracle Database@AWS has reached a significant milestone with its general availability release. It is now available in US East (N. Virginia) and US West (Oregon) regions, with plans to expand to 20 additional regions globally.

In addition, VPC Lattice has added support for Oracle Database@AWS enabling seamless connectivity between applications in VPCs and on-premises environments to Oracle database networks. The integration simplifies network management and provides secure access from Oracle Database@AWS to AWS services like Amazon S3 and Amazon Redshift, without requiring complex networking setup.

So if you’re looking to migrate your Oracle database workloads, now is a great time to explore Oracle Database@AWS as it offers a compelling path forward with minimal modifications required.

Additional highlights
Here are some other releases that I think many people will be happy about.

  • AWS Config now supports 12 new resource types – AWS Config has expanded its monitoring capabilities with support for 12 new resource types across services including BackupGateway, CloudFront, EntityResolution, Bedrock, and more. These additions are automatically tracked if you have enabled recording for all resource types, enhancing your ability to discover, assess, and audit AWS resources.
  • Amazon SageMaker Studio now supports remote connections from Visual Studio Code – Amazon SageMaker Studio now supports remote connections from Visual Studio Code, allowing developers to use their familiar VS Code setup while leveraging SageMaker’s scalable compute resources for AI development.
  • AWS Network Firewall: Native AWS Transit Gateway support in all regions – AWS Network Firewall now offers native integration with AWS Transit Gateway across all supported regions, enabling direct attachment and simplified traffic inspection between VPCs and on-premises networks. This integration eliminates the need for managing dedicated VPC subnets and route tables while providing multi-AZ redundancy for improved security and reliability.

Upcoming AWS Events
AWS Summit New York – this is definitely one to watch…literally! Registrations are closed due to capacity but you can tune in to watch live all the announcements and launches! No spoilers, but, trust me, there are a quite a few exciting things in store, so make sure to check it out.

AWS Gen AI LoftsAWS Gen AI Lofts are multi-day events offering hands-on workshops, expert guidance, and networking opportunities for developers and business leaders looking to explore or advance their generative AI journey. These events are hosted across multiple global locations including San Francisco, Berlin, Dubai, Dublin, Bengaluru, Manchester, Paris, and Tel Aviv, providing accessible opportunities to accelerate your generative AI adoption.

And that’s it for this week! Come back next Monday for more highlights and keep your AWS knowledge up to date as we cover the latest releases.

Matheus Guimaraes | @codingmatheus

Managing Amazon Q Developer Profiles and Customizations in Large Organizations

Post Syndicated from Marco Frattallone original https://aws.amazon.com/blogs/devops/managing-amazon-q-developer-profiles-and-customizations-in-large-organizations/

As organizations scale their development efforts, AI coding assistants that understand organization-specific patterns and standards lead to more efficient development processes and higher quality software delivery. Amazon Q Developer Pro helps address this challenge by allowing organizations to customize the AI assistant with their proprietary code and development practices. Through Amazon Q Developer profiles, teams can efficiently manage access to Amazon Q customizations across different regions and AWS Identity Centers.

In this post, we will explore different approaches for implementing and managing Amazon Q Developer profiles and Amazon Q customizations across large organizations. Using an example with multiple business units, we will explore methods for managing access controls and customization governance while addressing security and compliance requirements.

Amazon Q customization is now available in both the US East (N. Virginia) and EU Central (Frankfurt) regions, giving teams more flexibility to create and deploy customizations closer to their operational hubs while meeting regional data residency requirements.

This blog is not intended to provide recommendations on how to structure your AWS accounts or divide Q Developer subscriptions. Rather, our aim is to explore the full capabilities of Q Developer Customizations in a comprehensive scenario that shows the current art of the possible.

A distributed Amazon Q Developer Pro subscriptions scenario

The following diagram illustrates a sample AWS Organizations structure with a Management Account and four Organizational Units (OUs). This is a common enterprise scenario with three business units, each business unit requiring their own Amazon Q Developer Pro subscription and customizations.

Diagram showing AWS Organizations structure with a Management Account at the top, containing AWS Organizations, IAM Identity Center, Amazon Q, Management Customizations, and AWS Cost & Usage Report. Below are four Organizational Units (OUs): Infrastructure, Alpha, Bravo, and Charlie. The structure illustrates the hierarchical relationship and resource allocation across different OUs and regions within an AWS organization.

Figure 1: AWS Organizations Structure and Resource Hierarchy

The Infrastructure OU has a Delegated Admin Account with delegated access to the AWS IAM Identity Center. There are three additional OUs: Alpha, Bravo, and Charlie, each with at least one Amazon Q Developer Pro subscription. Alpha account has Amazon Q Developer subscriptions both in US East (N. Virginia) and EU Central (Frankfurt) region.

Think of each business unit as its own ecosystem within your organization. When you provide dedicated Q Developer Pro subscriptions to different OUs, you’re essentially giving each unit its own personalized AI assistant. This separation is valuable because it allows each team to work independently while maintaining their specific requirements and workflows.

The Charlie OU maintains its own account instance of IAM Identity Center for Amazon Q Developer Pro. In most cases, we recommend using an organization instance of IAM Identity Center with Amazon Q Developer Pro, there are a few situations where member account instances might make sense, for example: when you do not have a single identity provider, or when you haven’t yet decided to deploy it to the whole organization and want to use Amazon Q just for the AWS account you control.

Note: When a developer has a user within an Amazon Q profile tied to two different IAM Identity Center instances (Bravo and Charlie), they will have two user subscriptions and be billed twice. However, if they belong to two different Amazon Q profiles in two different accounts (Alpha and Bravo) but under the same IAM Identity Center, they will only be billed once.

In our example, the Charlie OU requires additional operational overhead in managing separate credentials and authentication flows. Additionally, the dashboard and administrative settings will only be associated with users and groups within this account.
From an administrative perspective, instead of trying to manage one centralized configuration that attempts to serve everyone’s needs, you can distribute administration to each business unit and delegate responsibility to individual teams.

It’s like having different specialized departments in a hospital – while they’re all part of the same organization and can work together when needed, each department has its own specialized tools and protocols that help them perform their specific functions more effectively.

A strategic approach to Customizations through Q Developer profiles

A diagram illustrating the structure of an AWS IAM Identity Center organization with multiple Amazon Q Developer Pro subscriptions and customizations. Each Q Developer Pro Subscription has its own set of users representing developers. Team orange developers have access to Alpha Q Subscription and customizations, Team blue developers have access to Alpha, Bravo and Charlie Q Subscription and customizations, Team Grey developers have only access to Bravo Subscription and customizations. The organization has also an AWS IAM Identity Center instance, with separate Amazon Q Developer Pro subscription and customizations. Team bravo developers are duplicated between the two IAM Identity Centers.

Figure 2 Developers association to Amazon Q Developer Pro Subscriptions, Customizations and IAM Identity Centers

Amazon Q Developer profiles are the way developers connect to different Amazon Q Developer subscriptions through their IDE. Each profile represents a unique combination of an Amazon Q Developer subscription and its associated customizations. After authentication, developers can simply select or switch between profiles in their IDE to access different customizations.

Let’s walk through some scenarios in this architecture.

Scenario 1 – Users accessing two different customizations tied to a single IAM Identity Instance in the management account

Developers from the Orange team with access to Alpha account customizations can configure two different Amazon Q Developer profiles in their IDE:

  • A “US Profile” connected to the US East subscription in the Alpha account
  • An “EU Profile” connected to the EU Central subscription in the Alpha account

Switching between different sets of customizations involves selecting the relevant profile within their IDE.

Screenshot of IDE interface showing the Amazon Q Developer customizations panel. Developer switch between US and EU Profiles and their customizations

Figure 3 IDE showing customizations available for Team Orange developers switching between US and EU Profile and their customizations

Note: While developers can access multiple customizations through different Amazon Q Developer profiles, they only incur a single user subscription cost since they are using the organization instance of IAM Identity Center. This is because the subscription is tied to their user identity in the IAM Identity Center organization instance, not to the number of profiles or customizations they access.

Scenario 2 – Users accessing two different customizations tied to a single IAM Identity Instance in the management account
Similarly, developers from the Blue team can also configure multiple profiles:

  • One profile for accessing Alpha and Bravo customizations through the management account AWS IAM Identity Center instance
  • A separate profile for accessing Charlie customizations through the AWS IAM Identity Center member account Instance

When developers have access to multiple customizations within the same IAM Identity Center configuration and region, they can switch between profiles in their IDE without requiring reauthentication.

Screenshot of IDE interface showing the Amazon Q Developer customizations panel. When authenticated through the AWS IAM Identity Center Organization, Blue developers can see both Alpha and Bravo customizations.

Figure 4 IDE showing customizations available for Team Blue developers when authenticated to AWS IAM Identity center Organization

However, as demonstrated in the blue developers’ case, switching between profiles that use different IAM Identity Center configurations (Organization vs Account Instance) still requires reauthentication.

Note: In this scenario, developers will incur two separate user subscription charges since they are accessing customizations through two different IAM Identity Center configurations (organization and account instance). As mentioned above, this scenario is not recommended except for situations it might make sense and is shown here purely to illustrate how the authentication and profile switching mechanisms work across different IAM Identity Center configurations.

Screenshot of IDE interface showing the Amazon Q Developer customizations panel. When authenticated through the AWS IAM Identity Center Instance, Blue developers can see only Charlie customizations.

Figure 5 IDE showing customizations available for Team Blue developers when authenticated to AWS IAM Identity center Account Instance

One scenario for creating code customizations specific to each profile is that the developers on the Alpha team might need Q to understand specific libraries and internal coding conventions for Java, while Bravo team developers might need Q to be well-versed in your proprietary technologies and development standards with Python. With separate profiles and customizations, each team gets their own “flavored” version of Q that understands their context.

For Blue developers who have access to Alpha, Bravo and Charlie customizations, they need to set up separate profiles since these customizations belong to different IAM Identity Center configurations and AWS Regions. Switching between these profiles requires reauthentication due to the different IAM Identity Center configurations involved.

Developer Team AWS IAM Identity Center Customizations
Orange Organization instance Alpha customizations in US East (N. Virginia)
Alpha customizations in EU Central (Frankfurt)
Blue Organization instance Alpha customizations in US East (N. Virginia)
Bravo customizations
Account instance Charlie customizations
Grey Organization instance Bravo customizations

You can manage access to specific Amazon Q Developer Pro customizations by adding selected users and groups who already have access to Amazon Q Developer Pro subscriptions within the same Identity Center. This granular access control allows you to create targeted customizations that are only accessible to specific team members or groups within your organization.

Conclusion

In this post, we explored comprehensive strategies for implementing Amazon Q Developer customizations across large organizations. We demonstrated how Amazon Q Developer profiles provide a flexible way to manage access to different customizations across AWS regions and IAM Identity Center configurations. By integrating proprietary code repositories, establishing customization governance, and implementing continuous feedback loops, enterprises can maximize the value of their AI-powered development assistant while maintaining code quality and development standards.

The path forward depends on where you are in your Amazon Q Developer customization journey. If you’re just starting, begin with a clear assessment of your codebase and map out your customization approach before implementation. For existing users, review your current customizations and profile configurations to identify optimization opportunities.

In both cases, implement the customization governance we discussed, tailoring them to your specific development patterns and team structures. Remember that customization evolves with your codebase – regular refinements help ensure your AI assistant remains effective as your applications grow and development practices mature. Whether you’re new to Amazon Q Developer customizations or optimizing existing implementations, these practices can help develop an AI assistant that truly understands and aligns with your organization’s unique development environment.

Ready to get started? Visit the Amazon Q Developer guide to learn more about setting up profiles and customizations for your organization. If you need help planning your customization strategy, contact your AWS account team or find an AWS Partner in the AWS Partner Network.

About the authors:

Marco Frattallone

Marco Frattallone is a Senior Technical Account Manager at AWS focused on supporting Partners. He works closely with Partners to help them build, deploy, and optimize their solutions on AWS, providing guidance and leveraging best practices. Marco is passionate about technology and enables Partners stay at the forefront of innovation. Outside work, he enjoys outdoor cycling, sailing, and exploring new cultures.

Francesco Martini

Francesco Martini is a Senior Technical Account Manager at AWS. He helps AWS customers build reliable and cost-effective systems and achieve operational excellence while running workloads on AWS. He is a builder and a technology enthusiast with a background as a full-stack developer. He is passionate about sports in general, especially soccer and tennis.

AWS Weekly Roundup: Project Rainier, Amazon CloudWatch investigations, AWS MCP servers, and more (June 30, 2025)

Post Syndicated from Channy Yun (윤석찬) original https://aws.amazon.com/blogs/aws/aws-weekly-roundup-project-rainier-amazon-cloudwatch-investigations-aws-mcp-servers-and-more-june-30-2025/

Every time I visit Seattle, the first thing that greets me at the airport is Mount Rainier. Did you know that the most innovative project at Amazon Web Services (AWS) is named after this mountain?

Project Rainier is a new project to create what is expected to be the world’s most powerful computer for training AI models across multiple data centers in the United Stages. Anthropic will develop the advanced versions of its Claude models with five times more computing power than its current largest training cluster.

The key technology powering Project Rainier is AWS custom-designed Trainium2 chips, which are specialized for the immense data processing required to train complex AI models. Thousands of these Trainium2 chips will be connected in a new type of Amazon EC2 UltraServer and EC2 UltraCluster architecture that allows ultra-fast communication and data sharing across the massive system.

Learn about the AWS vertical integration of Project Rainer, where it designs every component of the technology stack from chips to software, allows it to optimize the entire system for maximum efficiency and reliability.

Last week’s launches
Here are some launches that got my attention:

  • Amazon S3 access for Amazon FSx for OpenZFS – You can access and analyze your FSx for OpenZFS file data through Amazon S3 Access Points, enabling seamless integration with AWS AI/ML, and analytics services without moving your data out of the file system. You can treat your FSx for OpenZFS data as if it were stored in S3, making it accessible through the S3 API for various applications including Amazon Bedrock, Amazon SageMaker, AWS Glue, and other S3 based cloud-native applications.
  • Amazon S3 with sort and z-order compaction for Apache Iceberg tables – You can optimize query performance and reduce costs with new sort and z-order compaction. With S3 Tables, sort compaction automatically organizes data files based on defined column orders, while z-order compaction can be enabled through the maintenance API for efficient multicolumn queries.
  • Amazon CloudWatch investigations – You can accelerate your operational troubleshooting in AWS environments using the Amazon CloudWatch AI-powered investigation feature, which helps identify anomalies, surface related signals, and suggest remediation steps. This capability can be initiated through CloudWatch data widgets, multiple AWS consoles, CloudWatch alarm actions, or Amazon Q chat and enables team collaboration and integration with Slack and Microsoft Teams.
  • Amazon Bedrock Guardrails Standard tier – You can enhance your AI content safety measures using the new Standard tier. It offers improved content filtering and topic denial capabilities across up to 60 languages, better detection of variations including typos, and stronger protection against prompt attacks. This feature lets you configure safeguards to block harmful content, prevent model hallucinations, redact personally identifiable information (PII), and verify factual claims through automated reasoning checks.
  • Amazon Route 53 Resolver endpoints for private hosted zone – You can simplify DNS management across AWS and on-premises infrastructure using the new Route 53 DNS delegation feature for private hosted zone subdomains, which works with both inbound and outbound Resolver endpoints. You can delegate subdomain authority between your on-premises infrastructure and Route 53 Resolver cloud service using name server records, eliminating the need for complex conditional forwarding rules.
  • Amazon Q Developer CLI for Java transformation – You can automate and scale Java application upgrades using the new Amazon Q Developer Java transformation command line interface (CLI). This feature perform upgrades from Java versions 8, 11, 17, or 21 to versions 17 or 21 directly from the command line. This tool offers selective transformation options so you can choose specific steps from transformation plans and customize library upgrades.
  • New AWS IoT Device Management managed integrations – You can simplify Internet of Things (IoT) device management across multiple manufacturers and protocols using the new managed integrations feature, which provides a unified interface for controlling devices whether they connect directly, through hubs or third-party clouds. The feature includes pre-built cloud-to-cloud (C2C) connectors, device data model templates, and SDKs that support ZigBee, Z-Wave, and Wi-Fi protocols, while you can still create custom connectors and data models.

For a full list of AWS announcements, be sure to keep an eye on the What’s New with AWS? page.

Other AWS news
Various Model Context Protocol (MCP) servers for AWS services have been released. Here are some tutorials about MCP servers that you might find interesting:

Upcoming AWS events
Check your calendars and sign up for these upcoming AWS events:

  • AWS re:Invent – Register now to get a head start on choosing your best learning path, booking travel and accommodations, and bringing your team to learn, connect, and have fun. If you’re an early-career professional, you can apply to the All Builders Welcome Grant program, which is designed to remove financial barriers and create diverse pathways into cloud technology.
  • AWS NY Summits – You can gain insights from Swami’s keynote featuring the latest cutting-edge AWS technologies in compute, storage, and generative AI. My News Blog team is also preparing some exciting news for you. If you’re unable to attend in person, you can still participate by registering for the global live stream. Also, save the date for these upcoming Summits in July and August near your city.
  • AWS Builders Online Series – If you’re based in one of the Asia Pacific time zones, join and learn fundamental AWS concepts, architectural best practices, and hands-on demonstrations to help you build, migrate, and deploy your workloads on AWS.

You can browse all upcoming in-person and virtual events.

That’s all for this week. Check back next Monday for another Weekly Roundup!

Channy

Streamline Operational Troubleshooting with Amazon Q Developer CLI

Post Syndicated from Kirankumar Chandrashekar original https://aws.amazon.com/blogs/devops/streamline-operational-troubleshooting-with-amazon-q-developer-cli/

Amazon Q Developer is the most capable generative AI–powered assistant for software development, helping developers perform complex workflows. Amazon Q Developer command-line interface (CLI) combines conversational AI with direct access to AWS services, helping you understand, build, and operate applications more effectively. The Amazon Q Developer CLI executes commands, analyzes outputs, and provides contextual recommendations based on best practices for troubleshooting tools and platforms available on your local machine.

In today’s cloud-native environments, troubleshooting production issues often involves juggling multiple terminal windows, parsing through extensive log files, and navigating numerous AWS console pages. This constant context-switching delays problem resolution and adds cognitive burden to teams managing cloud infrastructure.

In this blog post, you will explore how Amazon Q Developer CLI transforms the troubleshooting experience by streamlining challenging scenarios through conversational interactions.

The Traditional Troubleshooting Experience

When issues arise, engineers typically spend hours manually examining infrastructure configurations, reviewing logs across services, and analyzing error patterns. The process requires switching between multiple interfaces, correlating information from various sources, and deep AWS knowledge. This complex workflow often extends problem resolution from hours into days and increase the burden on the infrastructure teams.

Solution: Amazon Q Developer CLI

Amazon Q Developer CLI streamlines the entire troubleshooting process, from initial investigation to problem resolution, making complex AWS troubleshooting accessible and efficient through simple conversations.

How Amazon Q Developer CLI works:

  • Natural Language Interface: Execute AWS CLI commands and interact with AWS services using conversational prompts
  • Automated Discovery: Map out infrastructure and analyze configurations
  • Intelligent Log Analysis: Parse, correlate, and analyze logs across services
  • Root Cause Identification: Pinpoint issues through AI-powered reasoning
  • Guided Remediation: Implement fixes with minimal human intervention
  • Validation: Test solutions and explain complex issues simply

One of the built-in tools within the Amazon Q Developer CLI, use_aws, enables natural language interaction with AWS services, as shown in Figure 1. This tool leverages the AWS CLI permissions configured on your local machine, allowing secure and authorized access to your AWS resources.

A command line interface showing a list of tools and their permissions. The display is titled "/tools" and shows several built-in tools including execute_bash, fs_read, fs_write, report_issue, and use_aws. Each tool has an associated permission level indicated by asterisks. The use_aws tool is highlighted with "trust read-only commands" permission. At the bottom, there's a note stating "Trusted tools will run without confirmation" and a tip to "Use /tools help to edit permissions".

Figure 1: Tools selection in Amazon Q Developer CLI

Real-World Troubleshooting Scenario

Demonstration Environment Setup

This demonstration was performed with the following environment configuration:

The environment includes a local development machine with necessary tools, appropriate AWS account permissions, and terminal access. By starting Amazon Q Developer CLI in the project directory, it has immediate access to relevant code and configuration files.

Scenario: Troubleshooting NGINX 5XX Errors

The scenario demonstrates troubleshooting a multi-tier application architecture as shown in figure 2 deployed on Amazon ECS Fargate with:

  • Application Load Balancer (ALB) distributing traffic across availability zones
  • NGINX reverse proxy service handling incoming requests
  • Node.js backend service processing business logic
  • Service discovery enabling internal communication
  • CloudWatch Logs providing centralized logging

An AWS cloud architecture diagram showing the flow of traffic from an Internet user through multiple components. The diagram includes: At the top: An Internet user connecting to an Internet Gateway Within a VPC (Virtual Private Cloud): Two public subnets containing a NAT Gateway and Application Load Balancer Two private subnets within an ECS Cluster containing: An NGINX service (Fargate) A Backend service (Fargate) A 10-second timeout between them A Cloud Map Service Discovery component at the bottom CloudWatch Logs integration on the right side The diagram includes a note about gateway timeouts: "504 Gateway Timeout - Backend takes 15s to respond, NGINX timeout is 10s" All components are connected with arrows showing the flow of traffic and data through the system. The infrastructure follows AWS best practices with public and private subnet separation for security.

Figure 2: AWS Architecture diagram for the app used in this blog post

Traditional Troubleshooting Steps

For the architecture in figure 2, when 502 Gateway Timeout errors occur, traditional troubleshooting requires:

  1. Checking ALB target group health
  2. Examining ECS service status across multiple consoles
  3. Analyzing CloudWatch logs from different log groups
  4. Correlating error patterns between services
  5. Reviewing infrastructure code for configuration issues
  6. Implementing and deploying fixes

Amazon Q Developer CLI Approach

Instead, let’s see how Amazon Q Developer CLI handles this systematically, step by step:

Step1: Initial Problem Report

Amazon Q Developer CLI is provided with the initial prompt as a problem statement within the application project directory as shown in the following screenshot in figure 3. Amazon Q Developer responds back and says it is going investigate the 502 Gateway Timeout errors in the NGINX application.

Prompt:

Our production NGINX application is experiencing 502 Gateway Timeout errors. 
I have checked out the application and infrastructure code locally and the AWS CLI 
profile 'demo-profile' is configured with access to the AWS account where the 
infrastructure and application is deployed to. Can you help investigate and diagnose the issue?

A Visual Studio Code window showing a debugging session for an NGINX application. The interface has three main sections: a file explorer on the left showing project files including 'app.ts' and 'nginx-config-task.json', a terminal tab in the center displaying an "Amazon Q" ASCII art logo, and a conversation where a user is reporting 502 Gateway Timeout errors. The terminal shows AWS CLI command execution using a tool called "use_aws" with parameters including the service name "ecs" and region "us-west-2". The interface has red annotations highlighting key areas like "project files", "User provided initial prompt", and "Q CLI executing AWS CLI calls.

Figure 3: Amazon Q Developer CLI with initial prompt and problem statement

Step2: Systematic Infrastructure Discovery

Amazon Q Developer CLI start to systematically discovering the infrastructure as shown in the following screenshot in figure 4. If you see the initial prompt did not include that the app is hosted on ECS, but Amazon Q Developer CLI understood the context and executes the AWS CLI calls to describe the Cluster and the services within it. It made sure that the ECS tasks are running for both the services within the Cluster. It is a key discovery that both services show healthy status (1/1 desired count), indicating the issue isn’t service availability.

A terminal window showing three sequential AWS CLI commands being executed through a "use_aws" tool: First command: "list-clusters" operation for ECS service in us-west-2 region using demo-profile, completing in 1.244 seconds Second command: "list-services" operation targeting the NginxSimulationCluster, completing in 0.877 seconds with confirmation of finding both nginx-service and backend-service Third command: "describe-services" operation examining both services in detail, completing in 0.968 seconds with confirmation that both services are running as expected (1/1 desired count) Each command includes execution details, parameters, and completion status, with the system preparing to check CloudWatch logs next.

Figure 4: AWS Infrastructure discovery by Amazon Q Developer CLI

Step 3: Intelligent Log Analysis

Amazon Q Developer CLI retrieves and analyzes recent CloudWatch logs from the NGINX container, immediately identifying the critical error pattern as shown in the following screenshot in figure 5, where Amazon Q Developer responds: “Perfect! I found the issue. The NGINX logs show clear 504 gateway timeout with upstream timeout messages.”

A terminal window showing two AWS CloudWatch Logs commands being executed: First command: "describe-log-streams" operation for the "/ecs/nginx-service" log group, limiting to 5 most recent entries, ordered by LastEventTime in descending order Second command: "get-log-events" operation retrieving 50 log entries from a specific NGINX container log stream The output reveals a critical error message highlighted at the bottom showing an upstream timeout (error 110) occurring while reading response headers. The error details include client IP 10.0.0.247, upstream server at http://10.0.3.18:3000/, and host 52.35.62.210.

Figure 5: CloudWatch Log analysis by Amazon Q Developer CLI

Step 4: Amazon Q Developer CLI Analysis and Root Cause Identification

Amazon Q Developer examines backend service logs and discovers a mismatch between the backend service response time and NGINX timeout settings, as seen in the following screenshot in figure 6.

A terminal window showing AWS CloudWatch Logs commands and their output. The first command describes log streams for a backend container, and the second retrieves log events. The output reveals a debugging analysis showing that while health checks work fine, regular requests are being delayed by about 15 seconds, causing NGINX timeout issues. The log group is "/ecs/backend-service" in the us-west-2 region using a demo-profile.

Figure 6: Root cause identification by Amazon Q Developer CLI

Step 5: Amazon Q Developer CLI Root Cause Analysis

Amazon Q Developer CLI examines the ECS task definitions to identify the exact configuration mismatch, as shown in the following screenshot in figure 7. Amazon Q Developer finds that:

  • Backend service is configured with response_delay=15000 (15 secs)
  • NGINX proxy is configured with proxy_read_timeout 10s

This mismatch causes 504 gateway timeout errors when the backend response exceeds NGINX’s timeout threshold.

A terminal window showing two AWS CLI commands to describe ECS task definitions in the us-west-2 region. Below the commands is a highlighted "Root Cause Analysis" section that explains a timeout mismatch: the backend service is configured with a 15-second response delay while NGINX has a 10-second proxy timeout, resulting in 502 Gateway Timeout errors. Both commands use a demo-profile and are labeled as checking timeout and response delay configurations.

Figure 7: Root cause analysis and issue detection by Amazon Q Developer CLI

Step 6: Automated Code Fix

Here’s where Amazon Q Developer CLI truly excels—it doesn’t just diagnose; it implements the fix. Since Amazon Q Developer CLI is started within the project where the CDK code for ECS task definition is defined, it identified the code configuration and also modified it, as shown in the following screenshot in figure 8.

A terminal window showing file operations using fs_read and fs_write tools. The code changes show an NGINX configuration update in ecs-nginx-cdk.ts, where the proxy_read_timeout is being modified from '10s' to '20s'. The file also shows additional timeout configurations being added, including proxy_connect_timeout and proxy_send_timeout. The update is confirmed with a user prompt and completed in 0.2 seconds.

Figure 8: CDK code fix by Amazon Q Developer CLI

Step 7: Deployment

Amazon Q Developer CLI builds and deploys the fix by executing cdk synth and cdk deploy using the ‘demo-profile‘ AWS CLI profile that was initially provided in the prompt, as shown in the following screenshot in figure 9.

A terminal window showing two execute_bash commands running in sequence. The first command builds a CDK project using 'npm run build' in the nginx-app directory, completing in 4.102s. The second command deploys the updated CDK stack using 'cdk deploy' with the demo-profile, showing deployment progress including some warnings about minHealthyPercent configurations and CloudFormation stack updates in us-west-2 region.

Figure 9: CDK code build and deployment by Amazon Q Developer CLI

Step 8: Validation

Amazon Q Developer CLI validates the solution by sending a curl request to the ALB endpoint after the successful deployment, as shown in the following screenshot in figure 10.

A terminal window showing the execution of a curl command to test an NGINX application on AWS. The command targets an Elastic Load Balancer in the us-west-2 region. The response shows a successful HTTP 200 OK status after 14 seconds, with a JSON response containing the message "Hello from backend". The test completes in 15.100 seconds, indicating the fix for previous 502 errors was successful.

Figure 10: Fix validation by Amazon Q Developer CLI

In addition to that, Amazon Q Developer also sends a request to the health check endpoint and validates everything is working after the fix was deployed, as shown in the following screenshot in figure 11.

A terminal screenshot showing the results of a health check on an Nginx server using curl. The command executed shows a successful response with "healthy" status, completing in 0.65 seconds. The output displays various metrics including download speed (386 B/s), 100% completion rate, and timing statistics for real, user, and system processes.

Figure 11: Health endpoint validation by Amazon Q Developer CLI

What Amazon Q Developer CLI Accomplished

Using just conversational commands, Amazon Q Developer CLI performed a complete troubleshooting cycle:

  • Infrastructure Discovery: Automatically mapped ECS clusters, services, and dependencies
  • Log Correlation: Analyzed thousands of log entries across multiple services
  • Root Cause Analysis: Identified exact configuration mismatch between NGINX’s timeout (10s) and the backend’s response delay (15s)
  • Code-Level Diagnosis: Located problematic timeout setting in CDK infrastructure code
  • Automated Implementation: Modified infrastructure code to increase the NGINX timeout
  • End-to-End Deployment: Built, deployed, and validated the complete solution
  • Comprehensive Testing: Verified both fix effectiveness and overall system health

Amazon Q Developer CLI handles troubleshooting tasks through a single, conversational interface, eliminating the need for multiple tools or AWS CLI commands.

Conclusion

Amazon Q Developer CLI represents a significant evolution in how we troubleshoot cloud infrastructure issues. By combining natural language understanding with powerful command execution capabilities, it transforms complex troubleshooting workflows into efficient, action-oriented dialogues. Whether you’re dealing with NGINX 5XX errors or similar issues across other AWS services, Amazon Q Developer CLI can help you diagnose issues, implement fixes, and validate solutions—all through a conversational interface that feels natural and intuitive.

Give Amazon Q Developer CLI a try the next time you encounter a troubleshooting challenge, and experience the difference it can make in your operational workflow.

To learn more about Amazon Q Developer’s features and pricing details, visit the Amazon Q Developer product page.

About the Author

kirankumar.jpeg

Kirankumar Chandrashekar is a Generative AI Specialist Solutions Architect at AWS, focusing on Amazon Q Developer. Bringing deep expertise in AWS cloud services, DevOps, modernization, and infrastructure as code, he helps customers accelerate their development cycles and elevate developer productivity through innovative AI-powered solutions. By leveraging Amazon Q Developer, he enables teams to build applications faster, automate routine tasks, and streamline development workflows. Kirankumar is dedicated to enhancing developer efficiency while solving complex customer challenges, and enjoys music, cooking, and traveling.

Use Model Context Protocol with Amazon Q Developer for context-aware IDE workflows

Post Syndicated from Ritik Khatwani original https://aws.amazon.com/blogs/devops/use-model-context-protocol-with-amazon-q-developer-for-context-aware-ide-workflows/

Earlier today, Amazon Q Developer announced Model Context Protocol (MCP) support in their Integrated Development Environment (IDE) plugins for Visual Studio Code and JetBrains. This allows developers to connect external tools or MCP servers to Q Developer, enabling more context-aware responses and complex workflows. MCP support has already been available in Amazon Q Developer for Command Line since April 29, 2025.

Introduction

Q Developer already had the ability to use tools within the IDE such as executing shell commands, reading local files, and generating code with the addition of the agentic coding experience. Now, developers have the ability to add additional tools that support MCP to their toolkit. MCP is an open protocol that standardizes how Large Language Models (LLMs) integrate with applications. It provides a way to share context, access data sources, and interact with APIs. You can read more about MCP in this introduction.

This ability to add additional context and tools allows Q Developer to write more accurate code, integrate with your planning tools, create UI components from designs, generate database documentation by examining your actual schema, and execute complex multi-tool tasks – all without the need for custom integration code. I’m excited to see this functionality coming to Q Developer IDE plugins, enhancing the development process right where developers spend most of their time.

In this post, I’ll walk you through a common scenario where I, as a developer, am tasked with working on an issue defined in a project management tool like Jira. The issue contains a user story, acceptance criteria, a link to a Figma design of the user interface, and additional technical implementation notes. To accomplish this efficiently, I’ll demonstrate how Q Developer can streamline the entire process by using two separate MCP servers to interact with Jira and Figma independently. Rather than manually switching between browser tabs, copying information, and trying to keep track of requirements across multiple tools, I’ll show how Q Developer can automatically fetch details using MCP and help me implement the feature while maintaining context across both platforms as shown in the figure below.

Q Developer extension in Visual Studio Code interacting with external tools using MCP servers

Figure 1: Q Developer extension in Visual Studio Code interacting with external tools using MCP servers

Configuring MCP Servers

To begin setup, click on the Configure MCP servers button at the top of the Chat tab bar as shown in the image below. This will bring up the list of MCP servers currently configured. Click the + (Add new MCP) button to add a new server.

Add MCP server configuration in Visual Studio Code’s Q Developer extension

Figure 2: Add MCP server configuration in Visual Studio Code’s Q Developer extension

You will set the scope of your MCP servers during configuration. A Global scope allows you to use the MCP server across all your projects, whereas a Workspace scope sets it up for only the current IDE workspace. Here’s an example configuration for the Atlassian and Figma MCPs I’ll be using:

Atlassian
Scope: This workspace
Name: Atlassian
Transport: stdio
Command: npx
Arguments:
-y
mcp-remote
https://mcp.atlassian.com/v1/sse
Figma
Scope: This workspace
Name: Figma
Transport: stdio
Command: npx
Arguments:
-y
mcp-remote
http://127.0.0.1:3845/sse

Note: The first time you set up the Atlassian MCP server, you’ll be asked to complete the OAuth authentication flow in your browser and provide access permissions to your Jira projects. Similarly, to connect to the Figma Dev Mode MCP server, you’ll need to enable it via the Figma desktop app.

Q Developer’s MCP management window showing configured Figma and Atlassian MCPs servers

Figure 3: Q Developer’s MCP management window showing configured Figma and Atlassian MCPs servers

To understand an MCP server’s individual tools, click on the expand icon next to its name as shown in the image below. Tools are executable functions exposed by the MCP server. They enable Q Developer’s agentic chat to perform actions and interact with external systems on your behalf. You can also configure permissions for individual tools. Each tool presents the option to Ask, Always allow, or Deny it such that Q Developer can’t invoke it. In my example, I’ll set all tools that only read data to Always allow for my workspace and set the rest of the tools to Ask.

MCP tool descriptions and configuration dropdown with options to Ask, Always allow or Deny

Figure 4: MCP tool descriptions and configuration dropdown with options to Ask, Always allow or Deny

With the MCP servers configured, let’s see how I can integrate them into my workflow.

Walkthrough

Q Developer is now enriched with additional information and tools available via the configured MCP servers. To demonstrate how this accelerates my developer productivity, I’ll be working with the Q Words game.

Scenario

Q-Words is an interactive word guessing game used in our customers’ workshops to demonstrate Q Developer’s capabilities. I’ve been tasked by the Product Manager to add a dark mode to the game. The User Story is logged in Jira and links to a Figma design that our designers have prepared.

Jira ticket showing user story and acceptance criteria for adding dark mode to a Q-Words game application

Figure 5: Jira ticket showing user story and acceptance criteria for adding dark mode to a Q-Words game application

Figma design showing dark and light mode interfaces for a QWords game application

Figure 6: Figma design showing dark and light mode interfaces for a QWords game application

Integrating MCPs into your development workflow

Let’s begin by asking Q Developer to check on tasks assigned to me in Jira by typing the following prompt in the agentic chat:

List issues that I need to work on

Q Developer will understand your intent and interact with your Atlassian MCP server to filter and show Jira issues that are assigned to you and in the To Do state. You can optionally prompt Q Developer to use a particular MCP server. Just as with any prompt, providing clear instructions will yield better results. In the image below, Q Developer retrieves details for the issue I’m assigned to work on.

Q Developer retrieves and describes issues assigned to me in Jira using the Atlassian MCP server

Figure 7: Q Developer retrieves and describes issues assigned to me in Jira using the Atlassian MCP server

Let’s begin work on the issue with the following prompt:

Move issue CRM-9 to In Progress and checkout a new git branch named after the issue id to begin working on it

Prompt Q Developer to begin working on an assigned issue

Figure 8: Prompt Q Developer to begin working on an assigned issue

Next, I’d like to understand the impact of the design changes on the current application. I can use the following prompt to accomplish this:

Analyze the Jira User Story and linked Figma design. Give me a technical implementation plan explaining the UI components that will need to be modified in the existing code.

Prompt Q Developer to help you analyze changes in existing code to implement the new UI

Figure 9: Prompt Q Developer to help you analyze changes in existing code to implement the new UI

Q Developer automatically pulls in issue details from Jira, along with the design specifics like colors from Figma. Before MCP, I would have had to add those details directly into the prompt or provided them as context from a local file. Now, my prompt only includes the description of the task whereas the context is enriched with details from the MCP servers. Review the proposed plan and suggest edits if needed. Once satisfied, prompt Q Developer to begin working on the changes:

Implement the plan

The diff view of changes by Q Developer to implement a dark mode feature in HTML and CSS

Figure 10: The diff view of changes by Q Developer to implement a dark mode feature in HTML and CSS

After reviewing the diff of the files changed by Q Developer, I can verify that the new Dark Mode feature has been implemented as desired. Let’s test the changes and ensure all acceptance criteria is met. To run the application, I use the following prompt:

Run the application locally

Q Developer will ask permission and run commands to spin up the local web server. I can then test the changes in my browser.

Updated application with dark mode toggle button implemented by Q Developer using MCP

Figure 11: Updated application with dark mode toggle button implemented by Q Developer using MCP

After a bit of testing, I can confirm that we’ve met all the acceptance criteria for the story. Let’s update the rest of the team on what we’ve accomplished with the following prompt:

Update the Jira issue status to Done and add a comment summarizing the changes made.

This convenient integration between Q Developer and Jira via MCP, saves me the back and forth between different tools to document the work accomplished.

A Jira ticket comment detailing the completed implementation of dark mode features, including theme toggle, CSS variables, and UI components

Figure 12: A Jira ticket comment detailing the completed implementation of dark mode features, including theme toggle, CSS variables, and UI components

Conclusion

The addition of MCP support in Amazon Q Developer for the IDE provides a standardized way to share context and interact with additional tools. In this post, I’ve demonstrated how I can use Q Developer in the IDE to interact with Atlassian Jira for task management and Figma for UI updates. I was able to do this without explicitly including user story details in my prompts or separately downloading design assets from UI mockups. Instead, Q Developer could automatically access user story context and easily integrate design assets using tools exposed by MCP servers. I encourage you to explore the new MCP capabilities and also check out the AWS MCP Servers repository on GitHub. Refer MCP configuration for Q Developer in the IDE to learn more.

To learn more about Amazon Q Developer’s features and pricing details, visit the Amazon Q Developer product page.

About the Author

Ritik Khatwani

Ritik Khatwani

Ritik is a Generative AI Specialist Solutions Architect at AWS based in New York City. He has deep expertise in building products as an engineer, architect, and founder. At AWS, he previously advised startups on how to build and grow in the cloud and now works with developers to reimagine their software development lifecycle using Amazon Q Developer.

Amazon Q Developer Java Upgrades: A Deep Dive into the New Selective Transformation Feature

Post Syndicated from Venugopalan Vasudevan original https://aws.amazon.com/blogs/devops/amazon-q-developer-java-upgrades-a-deep-dive-into-new-selective-transformation-feature/

In the ever-evolving landscape of Java development, keeping applications up-to-date while minimizing risk has become increasingly challenging. Amazon Q Developer transformation capabilities now support customization of Java upgrades in Java upgrade transformation CLI (command line interface) with a new selective transformation feature. Selective transformation empowers development teams with greater control over their modernization journey. Instead of risky “big bang” upgrades, teams can now precisely target specific components and libraries for transformation while maintaining application stability. This surgical approach to modernization supports two key scenarios: individual developer-driven upgrades and orchestrated transformation campaigns managed by Center of Excellence (CoE) teams.

Using this feature, you can use natural language chat and/or an input file to tailor transformation plans and exercise greater control over Java upgrades. The following options are supported:

  1. Selection of steps from a transformation plan and breakdown of a transformation job for granular code reviews.
  2. Selection of first-party and third-party dependencies, along with their versions, that should be upgraded during JDK version upgrades.

In this blog post, we’ll explore how Java upgrade transformation CLI’s selective transformation capabilities help development teams efficiently manage Java version upgrades, reduce technical debt, and modernize their applications with minimal disruption. We’ll demonstrate practical examples of various scenarios of upgrading First-Party and Third-Party dependencies and also using an input file or natural language to guide the transformation process.

About Selective Transformation

With introduction of this selective transformation feature, the java upgrades will be completed in two phases:

  • Job 1 – Minimum JDK Upgrade: The first qct transform command will focus on performing the minimum changes necessary to upgrade the project JDK version.
  • Job 2 – Dependency Upgrade: To upgrade the project’s dependencies, run the qct transform command again on the newly upgraded Java 17/21 project. This second job will then handle only the dependency upgrades.

Dependency Upgrade Input file

Dependency upgrade file is an optional input to the qct transform command where the user can specify the versions of first-party and third-party dependencies that needs to be upgraded.

  • Structure the dependency_upgrade.yml (or any other name you prefer) in the following format:
name: dependency-upgrade
description: "Custom dependency version management for Java migration from JDK 8/11/17 to JDK 17/21"

dependencyManagement:
  dependencies:
    - identifier: "groupId:artifactId" # Required
      targetVersion: "2.1.0" # Required
      versionProperty: "library1.version"  # Optional
      originType: "FIRST_PARTY" # or "THIRD_PARTY"  # Required
    - identifier: "com.example:library2" # Required
      targetVersion: "3.0.0" # Required
      originType: "THIRD_PARTY" # Required
  plugins:
    - identifier: "groupId:artifactId"
      targetVersion: "1.2.0"
      originType: "THIRD_PARTY"
      versionProperty: "plugin.version"  # Optional
  • For each dependency or plugin you want to upgrade:
    • Under dependencies or plugins, add a new entry.
    • Specify the identifier
    • Set the targetVersion to the desired version.
    • Specify originType as “FIRST_PARTY” or “THIRD_PARTY”.
    • Optionally, include versionProperty if the version is managed by a property.
  • When running the migration command, include the --dependency_upgrade_file flag followed by the path to your YML file:
qct transform \
--source_folder <path-to-folder>\
--target_version <17 or 21> \
--dependency_upgrade_file <path-to-dependency_upgrade.yml>\
--no-interactive

Interactive and No-Interactive Mode

You can run the selective transformation upgrades in either no-interactive or interactive mode

For no-interactive mode , you need to specify --no-interactive flag , where the transformation will proceed with planning and execution without waiting for any user input in an interactive fashion.

Interactive mode is a new “chat” option in the CLI where once the plan is generated, user can type feedback in natural language and specify to skip steps or specify particular versions of dependencies to be upgraded to guide the transformation process.

Interactive Mode Usage Examples:

  1. Ask to change dependencies “Can you upgrade junit to version 4.15 instead of 4.12?”
  2. Ask to remove steps “Can you skip plan step 3”
  3. Ask to remove certain dependencies “I don’t want my springboot to be upgraded at this time”
  4. Invalid Input (should be thrown away and will prompt again) “What is the capital of France?”
  5. Start message: “The plan looks good” or “Go ahead with transformation” or “Looks Good”
  6. Add first party dependency “Could you help me also upgrade the dependency XXX:XXXX”

Example Transformation

Pre-requisites:

  1. Refer to the link for general instructions on installation of transformation CLI : https://docs.aws.amazon.com/amazonq/latest/qdeveloper-ug/run-CLI-transformations.html
  2. Clone the repo from https://github.com/aws-samples/aws-appconfig-java-sample

Mode 1 : Interactive : Upgrade Java v1.8 to Java v21

We will use interactive mode to transform this 1.8 project to 21 along with a 1P dependency upgrade to 21 as well.

Refer to example 1p dependency upgrade file

Initiate the transformation using command below:

qct transform \
--source_folder /home/ec2-user/qct/aws-appconfig-java-sample\
--target_version 21 \
--dependency_upgrade_file /home/ec2-user/qct/dependency_upgrade_1p.yml\
--no-interactive

Amazon Q performs transformations based on your project's requests, descriptions, and content. To maintain security, avoid including external, unvetted artifacts in your project repository and always validate transformed code for both functionality and security. Do you want to proceed? [Y/N]: Y

Choose Y to proceed with the transformation.

Once the Job is accepted, during the planning phase, agent will display the plan based on the input dependency upgrade file provided to include 1P upgrade as part of the plan. (if no dependency upgrade file is provided, user can still provide feedback on the plan). Here we say Looks good, proceed with the transformation.

For this transformation, I'll make the necessary changes to upgrade your Java 8 application to Java 21.

Here is the transformation plan that includes your first party dependencies:
Step 0: Minimal migration to Java 21
Step 1:

            * Update/Add 1P dependency com.amazonaws.samples:movie-service-utils to version 0.3.0

If you would like to modify the plan, you can ask me to:

    * Add first party dependencies and versions to upgrade to
    * Change the target versions of the first party dependencies

You can enter plan feedback, or let me know if you want to start the transformation now: Looks good, proceed with the transformation

If is there is any user feedback , the agent will display the revised plan for the user to accept, if not it will proceed with the transformation. Upon completion, the agent will display the status, provide the location of the summary file containing the changes, and confirm the creation of a new branch with these changes. You can run git diff mainlineto review the changes and accept.

Fig 1 part of pom.xml changes after transformation from 8 to 21

Fig 1: part of pom.xml changes after transformation from 8 to 21

The transformation agent was able to upgrade Java 8 to Java 21 version along with dependencies minimally required for v21 and also the 1P dependency specified in the upgrade file.

Mode 1 : Interactive : Upgrade dependencies

Initiate the transformation using the same command as seen below:

qct transform \
--source_folder /home/ec2-user/qct/aws-appconfig-java-sample\
--target_version 21 \

Once the Job is accepted, during the planning phase, the transformation agent will display the transformation plan and ask the user input for any feedback to upgrade 3P dependencies to a specified version if needed.

For this transformation, I'll upgrade libraries and other dependencies to modernize your Java 21 application.

Here is the transformation plan:
Step 1:

        * Update javax.validation:javax.validation-api

Step 2:

        * Update org.mockito:*
        * Update org.springframework.boot:spring-boot-starter-parent to version 3.3.4
        * Update org.springframework.boot:spring-boot-starter-test to version 3.3.4

Step 3:

        * Update org.apache.logging.log4j:*

Step 4:

        * Update org.springframework.boot:spring-boot-maven-plugin to version 3.3.4
        * Update org.springframework.boot:spring-boot-starter-web to version 3.3.4

Step 5:

        * Update org.apache.logging.log4j:log4j-api to version 2.24.0
        * Update org.apache.logging.log4j:log4j-core to version 2.24.0

Step 6:

        * Update org.json:json to version 20240303

Step 7:

        * Update software.amazon.awssdk:appconfig to version 2.28.6
        * Update software.amazon.awssdk:bom to version 2.28.6

If you would like to modify the plan, you can ask me to:

* Only upgrade certain libraries
* Change the target version of a library
* Only perform certain steps in the plan

You can enter plan feedback, or let me know if you want to start the transformation now:

For this example,

Let’s say "Skip Step 6, upgrade org.springframework.boot:spring-boot related libraries and plugin to 3.4.5, upgrade software.amazon.awssdk:appconfig to version 2.31.40 and Update software.amazon.awssdk:bom to version to 2.31.40"

Transformation agent will display the revised plan for the user to accept, and ask confirmation to proceed with the transformation.

Here is the updated transformation plan:
Step 1:

        * Update javax.validation:javax.validation-api

Step 2:

        * Update org.mockito:*
        * Update org.springframework.boot:spring-boot-starter-parent to version 3.4.5
        * Update org.springframework.boot:spring-boot-starter-test to version 3.4.5

Step 3:

        * Update org.apache.logging.log4j:*

Step 4:

        * Update org.springframework.boot:spring-boot-maven-plugin to version 3.4.5
        * Update org.springframework.boot:spring-boot-starter-web to version 3.4.5

Step 5:

        * Update org.apache.logging.log4j:log4j-api to version 2.24.0
        * Update org.apache.logging.log4j:log4j-core to version 2.24.0

Step 6:

        * Update software.amazon.awssdk:appconfig to version 2.31.40
        * Update software.amazon.awssdk:bom to version 2.31.40

If you would like to modify the plan, you can ask me to:

* Only upgrade certain libraries
* Change the target version of a library
* Only perform certain steps in the plan

You can modify the plan 4 more time(s) before I start the transformation.

You can enter plan feedback, or let me know if you want to start the transformation now: Looks good

Fig 2 part of pom.xml changes after dependency upgrades
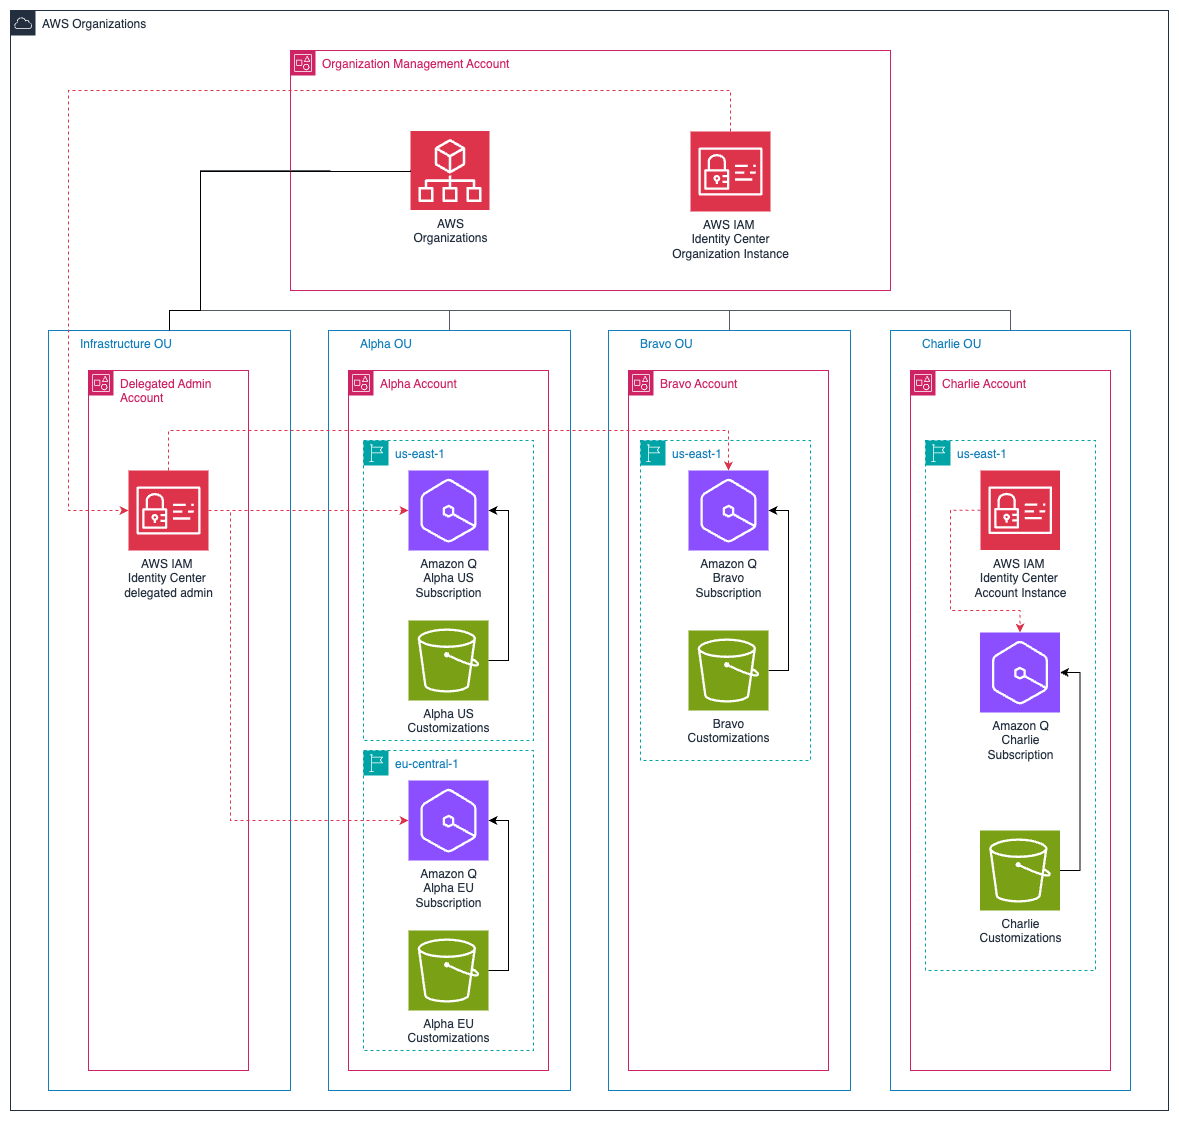
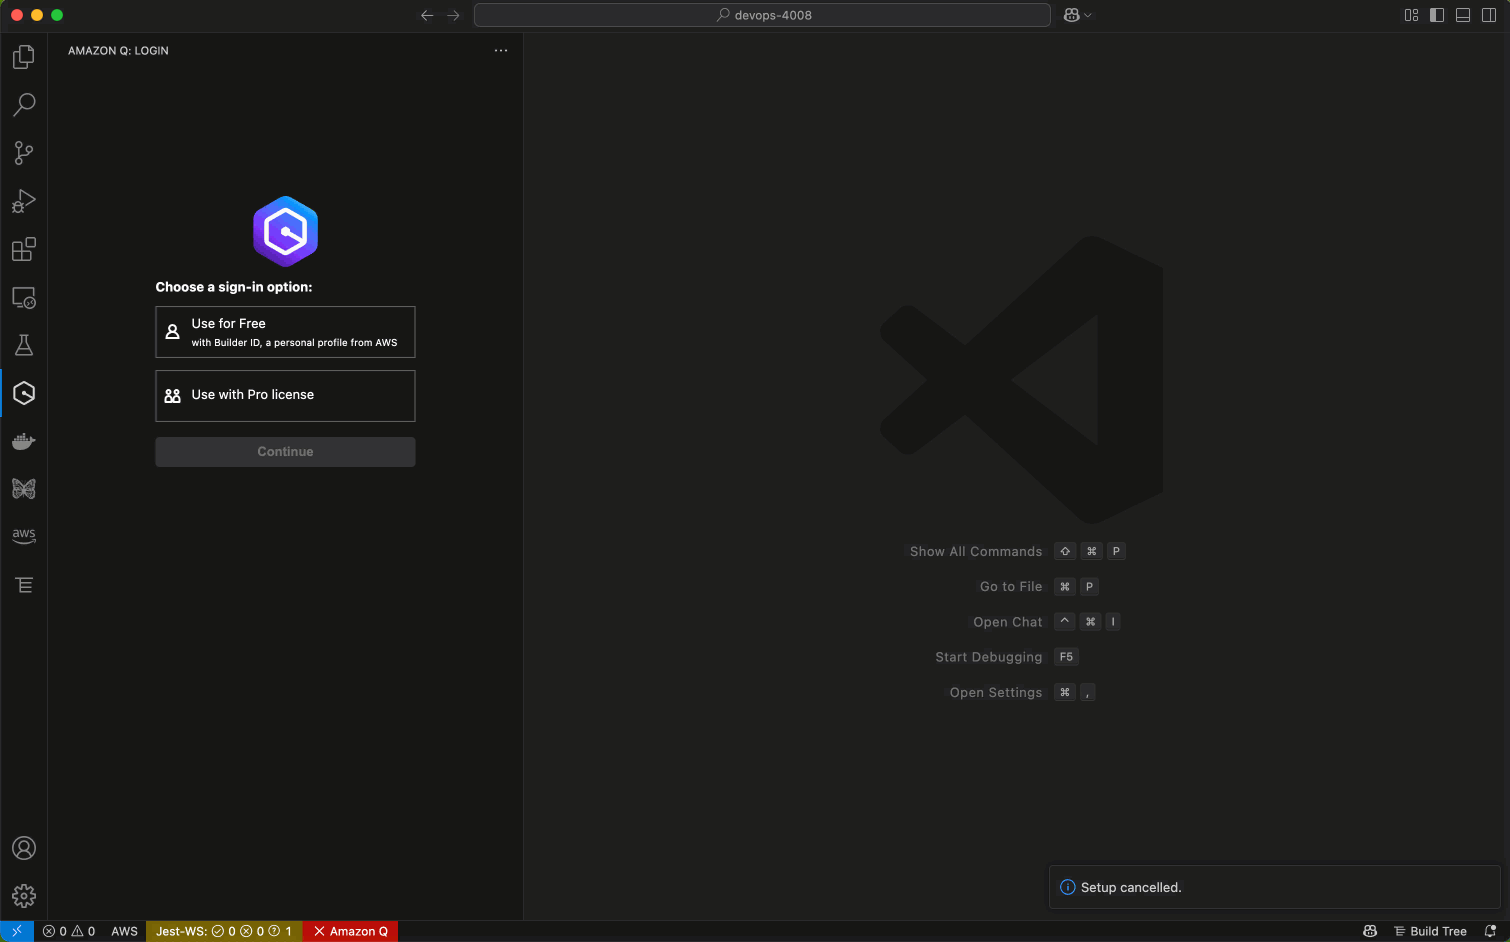
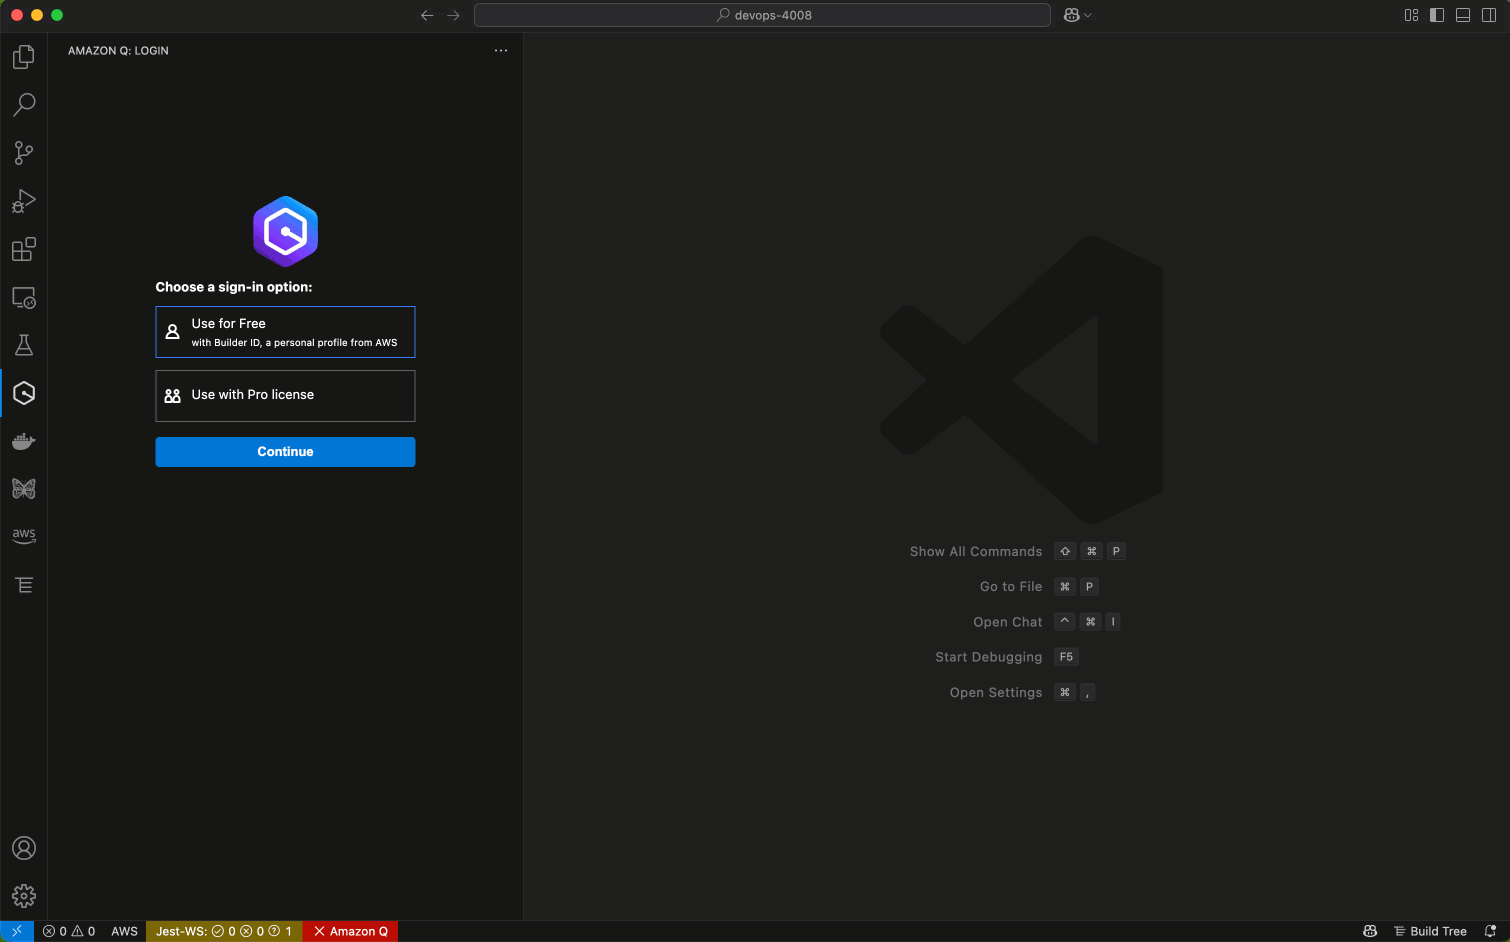
Fig 2: part of pom.xml changes after dependency upgrades

The transformation agent was able to upgrade 3P dependencies specified via the interactive mode during the planning stage.

Mode 2 : No-Interactive : Java v1.8 to Java v21

We will use no-interactive mode to transform this 1.8 project to 21 along with 1P version upgrades with dependency upgrade

The transformation agent will not wait for any user inputs and directly upgrade the project from Java 1.8 to 21 with along with dependencies minimally required for this upgrade.

Refer to example 1p dependency upgrade file

Initiate the transformation using command below:

qct transform \
--source_folder /home/ec2-user/qct/aws-appconfig-java-sample \
--target_version 21 \
--dependency_upgrade_file /home/ec2-user/qct/dependency_upgrade_1p.yml \
--no-interactive

Fig 3 part of pom.xml changes showing 1P upgrades

Fig 3: part of pom.xml changes showing 1P upgrades

The transformation agent was able to upgrade the Java version along with 1P dependency specified.

Mode 2 : No-Interactive : Upgrade dependencies

We will use no-interactive mode to upgrade the 3P dependencies

Refer to example 3p dependency upgrade file

Initiate the command below:

qct transform \
--source_folder /home/ec2-user/qct/aws-appconfig-java-sample \
--target_version 21 \
--dependency_upgrade_file /home/ec2-user/qct/dependency_upgrade_3p.yml \
--no-interactive

Fig 4 of pom.xml changes showing 3P upgrades

Fig 4: part of pom.xml changes showing 3P upgrades

The transformation agent was able to upgrade 3P dependencies along with the versions provided by the user via the dependency upgrade file.

Conclusion

The introduction of selective transformation in Java upgrade transformation CLI marks a significant evolution in how teams can approach Java modernization. By offering granular control over upgrade paths, supporting natural language interactions, and enabling targeted dependency management, this feature transforms what was once a daunting technical challenge into a manageable, incremental process. As a next step, start by identifying your most critical components that need upgrading, and leverage the selective transformation feature to create a tailored upgrade strategy. Visit the Amazon Q Developer transformation CLI documentation to learn more about implementing these capabilities in your development workflow, and join the growing community of developers who are revolutionizing their approach to Java modernization. The future of efficient, risk-managed Java upgrades is here – it’s time to embrace it.

About the authors

saptob Saptarshi Banerjee serves as a Senior Solutions Architect at AWS, collaborating closely with AWS Partners to design and architect mission-critical solutions. With a specialization in generative AI, AI/ML, serverless architecture, Next-Gen Developer Experience tools and cloud-based solutions, Saptarshi is dedicated to enhancing performance, innovation, scalability, and cost-efficiency for AWS Partners within the cloud ecosystem.
sureshnt Sureshkumar Natarajan is a Senior Technical Account Manager at AWS based in Denver, CO. He specializes in supporting Greenfield and SMB customers on the AWS platform. His expertise includes AWS Generative AI Services, AWS ECS/EKS Container solutions, and helping Enterprise Support customers to build well-architected solutions in AWS
vasudeve Venugopalan is a Senior Specialist Solutions Architect at Amazon Web Services (AWS), where he specializes in AWS Generative AI services. His expertise lies in helping customers leverage cutting-edge services like Amazon Q, and Amazon Bedrock to streamline development processes, accelerate innovation, and drive digital transformation.

AWS Weekly Roundup: New AWS Heroes, Amazon Q Developer, EC2 GPU price reduction, and more (June 9, 2025)

Post Syndicated from Betty Zheng (郑予彬) original https://aws.amazon.com/blogs/aws/aws-weekly-roundup-new-aws-heroes-amazon-q-developer-ec2-gpu-price-reduction-and-more-june-9-2025/

The AWS Heroes program recognizes a vibrant, worldwide group of AWS experts whose enthusiasm for knowledge-sharing has a real impact within the community. Heroes go above and beyond to share knowledge in a variety of ways in developer community. We introduce our newest AWS Heroes in the second quarter of 2025.

To find and connect with more AWS Heroes near you, visit the categories in which they specialize Community Heroes, Container Heroes, Data Heroes, DevTools Heroes, Machine Learning Heroes, Security Heroes, and Serverless Heroes.

Last week’s launches
In addition to the inspiring celebrations, here are some AWS launches that caught my attention.

For a full list of AWS announcements, be sure to keep an eye on What’s New at AWS.

Other AWS news
Here are some additional projects, blog posts that you might find interesting:

  • Up to 45 percent price reduction for Amazon EC2 NVIDIA GPU-accelerated instances – AWS is reducing the price of NVIDIA GPU-accelerated Amazon EC2 instances (P4d, P4de, P5, and P5en) by up to 45 percent for On-Demand and Savings Plan usage. We are also making the very new P6-B200 instances available through Savings Plans to support large-scale deployments.
  • Introducing public AWS API models – AWS now provides daily updates of Smithy API models on GitHub, enabling developers to build custom SDK clients, understand AWS API behaviors, and create developer tools for better AWS service integration.
  • The AWS Asia Pacific (Taipei) Region is now open – The new Region provides customers with data residency requirements to securely store data in Taiwan while providing even lower latency. Customers across industries can benefit from the secure, scalable, and reliable cloud infrastructure to drive digital transformation and innovation.
  • Amazon EC2 has simplified the AMI cleanup workflow – Amazon EC2 now supports automatically deleting underlying Amazon Elastic Block Store (Amazon EBS) snapshots when deregistering Amazon Machine Images (AMIs).
  • The Lab where AWS designs custom chips – Visit Annapurna Labs in Austin, Texas—a combination of offices, workshops, and even a mini data center—where Amazon Web Services (AWS) engineers are designing the future of computing.

Upcoming AWS events
Check your calendars and sign up for these upcoming AWS events.

  • Join re:Inforce from anywhere – If you aren’t able to make it to Philadelphia (June 16–18), tune in remotely. Get free access to the re:Inforce keynote and innovation talks live as they happen.
  • AWS Summits – Join free online and in-person events that bring the cloud computing community together to connect, collaborate, and learn about AWS. Register in your nearest city: Shanghai (June 19 – 20), Milano (June 18), Mumbai (June 19) and Japan (June 25 – 26).
  • AWS re:Invent – Mark your calendars for AWS re:Invent (December 1 – 5) in Las Vegas. Registration is now open
  • AWS Community Days – Join community-led conferences that feature technical discussions, workshops, and hands-on labs led by expert AWS users and industry leaders from around the world: Mexico (June 14), Nairobi, Kenya (June 14) and Colombia (June 28)

That’s all for this week. Check back next Monday for another Weekly Roundup!

Betty

Access Claude Sonnet 4 in Amazon Q Developer CLI

Post Syndicated from Kirankumar Chandrashekar original https://aws.amazon.com/blogs/devops/access-claude-sonnet-4-in-amazon-q-developer-cli/

Amazon Q Developer now supports Claude Sonnet 4 within the CLI, bringing advanced coding and reasoning capabilities to your development workflows at no additional cost. This latest model excels in coding with a state-of-the-art 72.7% for agentic coding on the SWE-bench (see Claude 4 announcement for more information). With enhanced coding and reasoning capabilities, it helps you analyze complex code, optimize everyday development tasks, implementing bug fixes, running bash commands, and developing new features with immediate feedback loops and more precise responses.

To help you leverage Claude Sonnet 4, Amazon Q Developer lets you easily select specific Claude Sonnet models, giving you increased flexibility the CLI.

  • Claude Sonnet 4: High-performance model with balanced intelligence
  • Claude Sonnet 3.7: High-performance model with extended thinking capability
  • Claude Sonnet 3.5: High-performance intelligent model

For detailed information about Claude model capabilities and comparison, refer to the Anthropic models overview.

In this blog, I will show you how to select Claude Sonnet 4 as your model within the Q Developer CLI and then walk you through a quick demo.

How to Choose Claude Sonnet 4

Make sure to update to the latest version (v1.11.0 onwards) of Amazon Q Developer CLI. Refer installing Amazon Q for command line for installation instructions. You can access Claude Sonnet 4 through these options:

  • During an active chat, use the /model command and select claude-4-sonnet
  • Start a new chat with q chat --model claude-4-sonnet
  • Set it as your default model using q settings chat.defaultModel claude-4-sonnet.

The supported model names for the --model parameter and settings are:

  • claude-3.5-sonnet
  • claude-3.7-sonnet (default)
  • claude-4-sonnet

Model Selection Priority Order

Q Developer CLI selects models in the following order:

  1. Current session model selections (via /model or --model)
  2. User-configured preferences in settings
  3. System default (Claude 3.7 Sonnet)

Key Behaviors

The Q Developer CLI agent defaults to Claude 3.7 Sonnet when no specific model is selected. During active chat sessions, you can seamlessly switch between models using the /model command. Chat continuity is maintained across sessions, with the system retaining the previously selected model when conversations are resumed. If you prefer Claude Sonnet 4, setting it as the default model in user settings will automatically apply to all new chat sessions, though this can be overridden with specific model selections as needed.

qcli-model-selection

Figure 1: Q Developer CLI showing the model loaded for the session

Claude Sonnet 4 with Q Developer CLI in Action

After switching to Claude Sonnet 4 in Q Developer CLI, let’s explore its capabilities with a practical coding example. Here’s the prompt I’ll use for this demonstration:

Create a Python command-line to-do list app with these features:
- Add tasks with descriptions and priorities (low/medium/high)
- Mark tasks as complete by index
- Display tasks sorted by priority, then insertion order
- Show completion status ([x] done, [ ] pending)
- Handle errors for empty tasks and invalid indices
- Store tasks in memory only
Please provide the code to implement this application.

qcli-model-selection-claude-sonnet-in-action

Figure 2: Q Developer CLI interface showing Claude Sonnet 4 in action

In the above demonstration, Q Developer CLI with Claude Sonnet 4 went beyond what was asked in the provided requirements in the prompt by implementing sophisticated command parsing with quoted descriptions, comprehensive error handling, and clean object-oriented design enhanced by type hints. The interface features a helpful guidance system with clear error messages, elegant enum-based priority management, and formatted output for clear task representation.

Additionally, Q Developer CLI with Claude Sonnet 4 also generated documentation in the README for the to-do application, including practical error handling examples and clear usage instructions – transforming the prompt requirements into a well-structured, user-friendly application.

Conclusion

The availability of Claude Sonnet 4 represents a significant advancement in Amazon Q Developer’s capabilities. From intricate code refactoring to streamlined documentation creation, Claude Sonnet 4 helps you accomplish both complex and routine development tasks efficiently.

Whether selecting Claude Sonnet 4 for complex tasks or using other models for specific needs, Amazon Q Developer adapts to your preferences, optimizing AI assistance while maintaining efficiency in your workflow.

The latest version(v1.11.0) of Amazon Q Developer awaits in the CLI, ready to support your development journey with enhanced model capabilities and selection options. Refer Installing Amazon Q for Command line for installation instructions.

To learn more about Amazon Q Developer’s features and pricing details, visit the Amazon Q Developer product page.

About the Author

kirankumar.jpeg

Kirankumar Chandrashekar is a Generative AI Specialist Solutions Architect at AWS, focusing on Amazon Q Developer. Bringing deep expertise in AWS cloud services, DevOps, modernization, and infrastructure as code, he helps customers enhance their development workflows using Amazon Q Developer. Kirankumar is passionate about solving complex customer challenges and enjoys music, cooking, and traveling.

Streamline your Eclipse workflows with Amazon Q Developer, now generally available

Post Syndicated from Madhu Balaji original https://aws.amazon.com/blogs/devops/streamline-your-eclipse-workflows-with-amazon-q-developer-now-generally-available/

Today, we’re excited to announce the general availability of Amazon Q Developer plugin for the Eclipse integrated development environments (IDE). This release builds upon the developer experience introduced in our November 2024 public preview, bringing powerful AI-assisted development capabilities directly into Eclipse 2025-03(4.35.0) and later versions. The integration significantly improves how developers write, test, and maintain code by providing intelligent code suggestions, automated code generation, and real-time AI assistance within their familiar IDE environment.

Understanding the agentic coding experience

At its core, Amazon Q Developer functions as an intelligent coding companion in your Eclipse IDE, offering real-time collaboration through natural language interaction. What sets it apart is its agentic nature – Amazon Q Developer understands your project structure, can read and modify files, execute commands, and maintain conversation history throughout your development session. This deep integration helps developers stay focused within their IDE while leveraging AI assistance for various development tasks.

As a developer working on complex projects, I’m particularly excited to see Amazon Q Developer’s agentic coding experience now available in Eclipse IDE. It’s not just a passive tool – it’s an active participant that provides transparent reasoning for its suggestions and gives developers choice between automated modifications or step-by-step confirmation of changes. Amazon Q Developer maintains awareness of your entire conversation history and project workspace, making each interaction more meaningful and productive. This deep contextual understanding allows developers to receive accurate and targeted assistance, bringing the same powerful development experience that has already transformed how developers work in other IDEs.

Key Capabilities and Features

Amazon Q Developer brings a comprehensive set of capabilities designed to enhance your development workflow in Eclipse IDE:

Interactive development support: Through natural language interactions, Amazon Q Developer assists with code generation, bug fixing, tests and optimization. You can describe your requirements conversationally, and the Amazon Q Developer will suggest implementations while explaining its reasoning. This includes generating entire functions, classes, or application components while maintaining consistency with your existing codebase.

Context actions: Using special prompts like @workspace, @files, and @folders, Amazon Q Developer can access and understand specific parts of your project. For example, @workspace provides full visibility of your project structure, while @files lets you focus on specific files for targeted assistance. This granular control ensures that Amazon Q Developer’s responses are precisely tailored to the relevant parts of your codebase.

Rules and standards configuration: Teams can establish custom development standards by configuring rules in the .amazonq/rules/ directory. These rules govern coding standards, testing requirements, security protocols, and documentation practices. For example, you can define specific patterns for error handling, logging standards, or architectural preferences that Amazon Q Developer will follow in its suggestions and code generation.

Multi-language Support: Amazon Q Developer supports interactions in multiple languages, including English, Mandarin, French, German, Italian, Japanese, Spanish, Korean, Hindi, and Portuguese. This allows developers to communicate with Amazon Q Developer in their preferred language while maintaining the same level of development support.

Let’s see it in Action

To begin using Amazon Q Developer for the first time, follow the steps in the Getting Started with Amazon Q Developer guide to access Amazon Q Developer. When using Amazon Q Developer, you can choose between Amazon Q Developer Pro, a paid subscription service, or Amazon Q Developer Free tier with AWS Builder ID user authentication.

For existing users, update to the new version. Refer to Using Amazon Q Developer in the IDE for activation instructions.

To start, you select the Amazon Q Developer icon in the IDE to open the chat interface. By default, agentic chat is turned on. You can turn off the agentic chat by toggling the button in the chat.

Eclipse IDE interface showing Amazon Q Developer chat window with welcome message and file navigation panel on the left side

Amazon Q Developer’s welcome interface within Eclipse IDE

Start by describing your requirement in plain language

I started by asking Amazon Q Developer to help me create a REST API endpoint for user registration.

Help me create a REST API endpoint for user registration in the @workspace

After analyzing my workspace, Amazon Q Developer outlined a comprehensive plan that included creating a User model, registration controller, and setting up project dependencies. Noticing my project needed a proper build configuration, Amazon Q Developer proposed creating a Maven-based Spring Boot application structure and provided the necessary directory setup commands – demonstrating how Amazon Q Developer guides developers through the development process step by step.

Amazon Q Developer conversation interface showing step-by-step guidance for creating a REST API endpoint, including project structure analysis and Maven configuration setup

Step-by-step project setup guidance from Amazon Q Developer

Amazon Q Developer provides a structured solution with explanation

Following Amazon Q Developer’s guidance, I quickly had a fully functional REST API endpoint for user registration. Amazon Q Developer provided a comprehensive implementation, including a proper Maven project structure, essential model classes with validation, a REST controller, and the main application class. Amazon Q Developer even outlined the API usage, showing the expected JSON request format and response structure. It’s impressive how Amazon Q Developer not only generated the code but also included practical notes on validation and suggestions for production-ready improvements, demonstrating its understanding of best practices in software development.

Detailed summary screen showing the complete implementation of a REST API endpoint, including project structure, model classes, controller configuration, and JSON request/response examples

Complete REST API implementation summary with code examples

Build and run the application

With Amazon Q Developer’s guidance, I progressed from project setup to a running application. Amazon Q Developer helped me build the project successfully, and I was able to run the Spring Boot application, watching as it initialized and started up. The console output confirmed that Tomcat was running and my UserApiApplication had launched successfully, demonstrating how Amazon Q Developer streamlines the development process from code generation to a functioning API endpoint.

Terminal output showing successful Spring Boot application build and succesful startup with Maven build logs

Amazon Q Develeper agentic coding builds the application

Console output showing successful Spring Boot application startup logs with Tomcat server initialization, displaying timestamps and INFO messages indicating the application started on port 8080 with a total startup time of 1.57 seconds.

Successful build and launch of the Spring Boot REST API application

Multi-language support in Eclipse IDE

Side-by-side comparison of Amazon Q Developer conversations in English, Spanish, French and Hindi, all discussing the creation of a REST API endpoint for user registration in SpringBoot.

Q Developer supports multiple languages

Sample rules and standard setup for a project

A sample rule file for Spring Boot applications, stored in the .amazonq/rules directory at the project root, guides Amazon Q Developer’s actions.

# Spring Boot Project Setup for Eclipse IDE

Rules for setting up a standard Java Spring Boot 3-tier web application backend in Eclipse IDE

## Project Structure

Standard Spring Boot 3-tier application structure:
- `src/main/java/${packagePath}/controller`: REST controllers
- `src/main/java/${packagePath}/service`: Business logic services
- `src/main/java/${packagePath}/repository`: Data access repositories
- `src/main/java/${packagePath}/model`: Domain models/entities
- `src/main/java/${packagePath}/dto`: Data Transfer Objects
- `src/main/java/${packagePath}/exception`: Custom exceptions
- `src/main/java/${packagePath}/config`: Configuration classes
- `src/main/resources`: Configuration files, static resources, templates
- `src/test/java`: Test source code
- `src/test/resources`: Test configuration and resources

## Eclipse Configuration

Eclipse-specific settings:
- Java Compiler: Java 17
- Project Facets: Java
- Maven Integration
- Spring Tools 4 support

## Maven Configuration

Standard Maven configuration for Spring Boot:
- groupId: `${groupId:com.example}`
- artifactId: `${artifactId:demo}`
- version: `${version:0.0.1-SNAPSHOT}`
- name: `${name:demo}`
- description: `${description:Spring Boot Demo Project}`

### Dependencies
- org.springframework.boot:spring-boot-starter-web
- org.springframework.boot:spring-boot-starter-data-jpa
- org.springframework.boot:spring-boot-starter-validation
- org.springframework.boot:spring-boot-starter-test
- org.springframework.boot:spring-boot-devtools
- com.h2database:h2

## Application Properties

Standard application properties configuration:
```properties
# Server configuration
server.port=${serverPort:8080}
spring.application.name=${applicationName:demo}

# Database configuration
spring.datasource.url=jdbc:h2:mem:testdb
spring.datasource.driverClassName=org.h2.Driver
spring.datasource.username=sa
spring.datasource.password=password
spring.jpa.database-platform=org.hibernate.dialect.H2Dialect
spring.h2.console.enabled=true

# Logging
logging.level.root=INFO
logging.level.org.springframework.web=INFO
logging.level.org.hibernate=ERROR
```

Amazon Q Developer analyzes the workspace and creates a complete Spring Boot REST API project structure, including the Maven POM file, application properties, and appropriate directory hierarchy. It follows defined standard rules to ensure the project setup aligns with best practices, saving developers time and reducing setup complexity.

Getting Started

To begin using Amazon Q Developer in Eclipse IDE:

  1. Install Eclipse IDE 2025-03 or later
  2. Configure AWS credentials in your environment
  3. Install Amazon Q Developer plugin from Eclipse Marketplace or go to Help > Eclipse Marketplace , search for Amazon Q > Install

Conclusion

With the addition of Amazon Q Developer in Eclipse IDE, developers now have access to AI-assisted development capabilities directly within their familiar development environment. The agentic coding experience brings an intelligent, interactive coding companion to Eclipse IDE users, enabling them to write, test, and maintain code more efficiently. Features like multi-language support , customizable rules for team standards, and powerful workspace commands make Amazon Q Developer a valuable addition to the Eclipse IDE ecosystem.

As we continue to enhance Amazon Q Developer’s agentic coding capabilities in Eclipse IDE, we remain committed to supporting developers in their daily development tasks. Amazon Q Developer actively participates in your development process, offering real-time suggestions, generating code, and adapting to your project’s specific needs. We invite you to explore Amazon Q Developer in Eclipse IDE and experience how this agentic AI can transform your development workflow.

To learn more about Amazon Q Developer’s features and pricing details, visit the Amazon Q Developer product page.


Madhu Balaji

Madhu is a Senior Specialist Solutions Architect at AWS who helps customers design and implement innovative cloud solutions. With 20+ years of experience in development and application architecture, he focuses on enabling customers to accelerate their time-to-market and solve complex business challenges using AWS services.

Introducing an agentic coding experience in Visual Studio and JetBrains IDEs

Post Syndicated from Artur Rodrigues original https://aws.amazon.com/blogs/devops/introducing-an-agentic-coding-experience-in-visual-studio-and-jetbrains-ides/

Developers spend countless hours on repetitive tasks like debugging code, writing unit tests, and validating build processes – time that could be better spent on innovation and problem-solving. To address these challenges, Amazon Q Developer has expanded its intelligent coding assistant capabilities to Visual Studio and JetBrains Integrated development environments (IDEs). This new agentic experience works proactively on your behalf, automatically analyzing your workspace, generating code fixes, and executing commands to streamline your development workflow.

In this blog post, we’ll explore how Amazon Q Developer automates unit test creation and execution to validate code changes, streamlines build processes by identifying and resolving common issues.

In May 2025, our colleague Brian Beach wrote about the new agentic coding experience in Amazon Q Developer for VS Code. By extending the agentic experience to Visual Studio and JetBrains IDEs, Amazon Q Developer now brings intelligent automation to even more developers.

Benefits for Developers

Amazon Q Developer transforms the way developers work by seamlessly integrating AI assistance into their daily workflow without switching contexts or leaving their preferred development environment. Using features like @workspace and @files, you can get highly relevant recommendations in your IDE. With Q Developer’s ability to take actions like generating code diffs and running commands, you can automate repetitive coding tasks, implement complex features faster, and troubleshoot issues without breaking your flow. With support for multiple languages including English, Mandarin, Japanese, and Spanish, Amazon Q Developer makes advanced AI assistance accessible to development teams worldwide, fostering inclusive collaboration across global organizations.

Maximizing Development Efficiency with Amazon Q Developer

Amazon Q Developer revolutionizes your development workflow by offering a comprehensive set of capabilities within your IDE. Let’s explore how this powerful tool leverages context to enhance your coding experience by using context features, codebase’s folders and rules.

You can explicitly guide Q Developer by defining specific files or folders in the prompt context. Don’t know where to find particular information? No problem! Q Developer can efficiently navigate through your codebase using @workspaces to gather relevant code snippets from multiple files. This is particularly important when you want to create documentation that spans multiple files or when you need to fix a bug and have no idea where you should start.

The agentic chat feature automatically derives context from the codebase’s folders and executes commands on your behalf. It has the same intelligent reasoning capability used in the Q Developer CLI, which has already won the hearts of many developers.

Context management extends to configuration through the .amazonq/rules/ directory. Within this directory, you can define rules for coding standards, testing requirements, security protocols, and documentation practices. Some customers have already created a rule that defines how Q Developer commits changes. This rule provides a template for a Git commit that details the message and for the agentic actions that modify files. It makes it much easier to identify and review the contributions of the Q Developer to your codebase.

Quick Tour of the Agentic Experience

Let us walk you through two use cases. In our example, we will use the Visual Studio IDE. Similar agentic capabilities are now supported in JetBrains IDEs as well. We invite you to follow along by cloning the Bob’s Used Books sample repo and opening it in Visual Studio 2022. Don’t forget to add or update the Amazon Q Developer extension.

Creating unit tests

The Bookstore.Domain project contains domain objects such as Book and ShoppingCart.

Bookstore.Domain project contains Book and Shopping cart classes.

Figure 1: Domain objects in Bookstore.Domain

We have a separate project called Bookstore.Domain.Tests that contains tests for the Book class.

A separate project - Bookstore.Domain.Tests contains tests for the Book class. BookTests class contains these tests.

Figure 2: Tests for Book class

We want to add unit tests for the ShoppingCart class. Let’s ask Amazon Q Developer to create unit tests for ShoppingCart. We also want Amazon Q Developer to follow the existing pattern of creating test classes in a separate test project.

By default, the agentic experience is on. If you are in the planning phase of the Software Development Lifecycle (SDLC) and prefer to use a traditional back-and-forth chat, you can turn the agentic experience. To toggle the agentic experience on and off, choose the angle bracket pair in the bottom left corner of your Q Developer chat window.

Then, we ask Q Developer “Can you create a test for @ShoppingCart.cs? Look at existing test and use the same libraries”. First, notice that we are giving a command instead of just asking a question. Second, we are referencing the file ShoppingCart.cs explicitly to provide Q Developer the appropriate context. In the following image, you can see that Q Developer is acting on our behalf. In agentic coding mode, Q Developer can take actions and run commands. In our example, it is reading files, writing to files, and running commands with your permission.

The agentic experience in Amazon Q Developer responding to our prompt and reading files in our workspace to gather context.

Figure 3: Prompt to create new tests

Using commands, Q Developer was able to analyze our solution structure, understand that we have a project called Bookstore.Domain.Tests, and create a new file containing unit tests for ShoppingCart.

The agentic experience in Amazon Q Developer generating a summary of the test cases it has created.

Figure 4: Summary of test cases

We can verify that there is a new file called ShoppingCartTests in the Bookstore.Domain.Tests project, which is aligned with our existing test creation strategy.

New file - ShoppingCartTests.cs contains the tests for ShoppingCart. Following the existing pattern in our code, Q Developer creates this file in the Bookstore.Domain.Tests project.

Figure 5: New file with generated test cases

In Visual Studio, we can now run the unit tests and verify that they pass.

Test results for the existing as well as new tests.

Figure 6: Successful test run of new tests

Resolving build errors

In the following example, we will demonstrate the power of the agentic coding experience by using Q Developer to build our application and resolve build errors.

In our example, we have deliberately misspelled one of the methods in the IShoppingCartRepository interface. The AddAsync method is now incorrectly spelled AddAsyn.

Spelling mistake in the name of a method. It is called AddAsyn instead of AddAsync.

Figure 7: Spelling mistake in a method name

When we try to build the Bookstore.Domain project, we get a build error as expected. Let’s ask Q Developer to fix the error. Without the agentic coding experience, we would have to copy the text of the build error into the chat window and ask Q Developer to provide recommendations. Then we would have to act on its recommendations by manually making changes and trying to build. This is one of many examples of the power of the agentic chat, which runs commands and uses the command’s output to enrich the context of the prompt to take actions.

With the agentic coding experience, we just ask Q Developer “Can you fix the error I am getting while building the solution? Please build and check it”. In the following image, you will see how Q Developer runs the .NET build commands to get build errors and read the relevant files.

Amazon Q Developer builds the solution, uses the build error to read the appropriate file, and finds the issue.

Figure 8: Building the solution

After it reads the files, it finds the spelling mistake and fixes it automatically. As shown in the following image, it then builds the solution to verify that its fix worked.

Amazon Q Developer fixes the spelling mistake in the code and runs the build again to confirm a successful build.

Figure 9: Fixing the spelling mistake

In the following image, Amazon Q Developer provides a summary of the error, the actions it took to build it. It even helps me with some recommendations to fix the warnings it got while running the build.

Amazon Q Developer provides a summary of build error, the resolution, and suggestions to resolve build warnings.

Figure 10: Summary of changes and suggestions

Conclusion

The addition of Amazon Q Developer’s agentic experience in Microsoft Visual Studio and JetBrains IDEs takes Amazon Q Developer beyond traditional chat-based interactions to intelligent, action-oriented assistance. The ability to automatically read files, generate code diffs, run shell commands, and validate changes demonstrates a level of autonomy that can significantly accelerate development tasks while maintaining code quality. The examples we’ve explored, from automated test creation to build error resolution, showcase how the agentic experience can streamline common development tasks that traditionally required multiple manual steps. This new capability, combined with multi-language support and customizable development standards, makes Amazon Q Developer a powerful ally in modern software development workflows. As development teams continue to seek ways to improve productivity without compromising code quality, Amazon Q Developer’s agentic experience represents a meaningful step forward in IDE-integrated AI assistance. Whether you’re writing tests, fixing bugs, or optimizing code, the ability to have an AI assistant that can not only suggest solutions but also implement them while maintaining context awareness is a game-changing addition to the developer’s toolkit.

Artur Rodrigues

Artur Rodrigues is a Principal Solutions Architect for Generative AI at Amazon Web Services (AWS), focused on the Next Generation Developer experience, enabling developers to work more efficiently and creatively through the integration of Generative AI into their workflows. Artur enjoys cycling and exploring the great outdoors of beautiful British Columbia in Canada. He is also a gelato aficionado and a fan of soccer and jiu-jitsu.

Neeraj Handa

Neeraj Handa is a Specialist Solutions Architect at Amazon Web Services, where he partners with enterprise customers to accelerate application development and modernization using Amazon Q Developer. He is passionate about helping organizations transform their software development lifecycle to achieve higher productivity and software quality through the use of AI technologies.

New and improved Amazon Q Developer experience in the AWS Management Console

Post Syndicated from Brendan Jenkins original https://aws.amazon.com/blogs/devops/new-and-improved-amazon-q-developer-experience-in-the-aws-management-console/

Amazon Q Developer just launched a new agentic experience within the AWS Management Console, that enables builders to get deeper insights about their AWS resources and improve their operational troubleshooting efficiency. This expands the agentic capabilities of Amazon Q Developer from both the integrated development environment (IDE) and command line interface (CLI) to the AWS console. Amazon Q Developer now functions as a resource analysis and operational troubleshooting assistant, able to consult multiple information sources and resolve complex queries, to get deeper insight into AWS environments faster and more easily than before. These capabilities are also available in chat applications such as Microsoft Teams and Slack. Now users can ask any question about AWS services and their resources, leaving Amazon Q Developer to automatically identify appropriate tools for the task, selecting from any AWS API across all services. It breaks queries into executable steps, asks for clarification when needed and combines information from multiple services to solve the task at hand. It can help analyze relationships between resources across multiple AWS services, examine configurations spanning different parts of infrastructure, synthesize information from various data sources to provide comprehensive insights, and respond to complex queries with detailed, actionable information.

For example, while troubleshooting an AWS Lambda function, a builder can simply ask, “How is this Lambda function getting invoked?” or “What are the IAM roles and permissions of my Lambda function?” and Amazon Q Developer will provide insights about the dependencies and interdependencies, evaluating their integration with other AWS services – all from a single natural language prompt. This enhancement allows builders to quickly obtain nuanced, contextual information about their AWS environment, significantly reducing the time and effort required for complex infrastructure analysis.

In this blog post, I’ll showcase several examples of complex prompts to demonstrate how Amazon Q Developer now delivers relevant and insightful responses based on the builder’s specific resources. Specifically, we’ll deep-dive into two main use cases: deeper resource introspection analysis and increased operational troubleshooting efficiency.

Deeper resource introspection and analysis

Amazon Q Developer now offers enhanced capabilities that make it even easier for builders to understand their AWS resources. With a single prompt, builders can now get comprehensive insights about their AWS services that previously required multiple steps. For example, when analyzing Amazon Simple Notification Service (SNS) topics and their subscribers, builders can simply ask “Show me all my SNS topics and their subscribers” to get a complete view of their configurations. This streamlined approach saves valuable time and effort, allowing developers to focus on building rather than navigating through multiple queries.

These new enhanced capabilities enable builders to simply ask for the insight needed, and Amazon Q Developer will perform the necessary multi-step reasoning based on a builder’s prompt. When the request is made, Amazon Q Developer determines the analytical steps required, retrieves information about the resources from multiple data sources, analyzes the relationships and configurations, and provides a comprehensive answer that addresses the need. Rather than builders having to think about which APIs to call or which services to check, Amazon Q Developer handles the complexity of the analysis, allowing builders to focus on understanding infrastructure rather than querying it.

To illustrate Amazon Q Developer’s capability in handling complex queries, let’s consider an example. Suppose a builder has a three-tier web application in an AWS account and they need to identify which Amazon Elastic Compute Cloud (Amazon EC2) instances, based on their Amazon Machine Images (AMIs) in the application layer, are actively communicating with Amazon Relational Database (RDS) in the backend. With this new update, a builder could open a new Amazon Q Developer chat in the AWS Management Console, and enter a prompt such as “List the AMIs used by my running EC2 instances in us-west-2 that can communicate with my RDS cluster”.

User prompts Amazon Q Developer about which Amazon EC2 AMIs are being used that communicate with Amazon RDS in the backend

Figure 1: Prompt to Amazon Q Developer and Amazon RDS database

Based on Amazon Q Developer’s response shown in figure 1 above, Amazon Q Developer was able to list the steps it took to gather the information, pulled applicable information from each service API, and gave one comprehensive and detailed insight about which AMIs were being used to communicate with the Amazon RDS cluster. This shows how Amazon Q Developer can take a single prompt, pull in information from multiple resources and give a comprehensive insight.

Let’s move to another example around AWS Lambda. Suppose a builder wants to know which AWS CloudFormation stacks are managing Lambda function resources. To do this, a builder could enter a prompt such as “List my AWS Lambda functions and the CloudFormation stacks that manage those resources”.

User prompts Amazon Q Developer to see what AWS CloudFormation Stacks are managing their AWS Lambda resources.

Figure 2: Prompt to Amazon Q Developer about Lambda and AWS CloudFormation

As shown above in figure 2, Amazon Q Developer was able to pull AWS CloudFormation information related to the AWS Lambda resources, and list each stack that was associated with the Lambda functions in the account. This, for example, can help many development and IT professionals better understand and manage their account resources by leveraging the complex reasoning of Amazon Q Developer.

Proceeding with one more example around AWS Lambda, let’s now suppose a builder wants to use Amazon Q Developer to see if there are any Amazon Simple Storage Service (Amazon S3) buckets invoking an AWS Lambda function in their AWS account. To identify this, a builder could enter a prompt such as “What AWS Lambda functions do I have in us-east-1 and are any of them invoked by an Amazon S3 bucket in the same region?”.

User prompts Amazon Q Developer to see if they have any AWS Lambda functions with Amazon S3 buckets as a trigger in their AWS account.User prompts Amazon Q Developer to see if they have any AWS Lambda functions with Amazon S3 buckets as a trigger in their AWS account.

Figure 3: Prompt and response from Amazon Q Developer about Amazon S3 and AWS Lambda

As shown in figure 3 above, Amazon Q Developer again called applicable service APIs to analyze Amazon S3 and AWS Lambda resources and was able to find that there was one AWS Lambda function with S3 as an event trigger.

Furthermore, building on our previous example, builders can try prompts around costs as well. For example, a builder can now prompt Amazon Q Developer “How much did I spend on Lambda functions that are invoked by my S3 bucket?” and Amazon Q will use its deeper resource introspection to tie costs to the resources that are connected.

These examples demonstrate Amazon Q Developer’s enhanced capability to process complex prompts involving multiple resource relationships. This improvement allows builders to obtain comprehensive answers with fewer steps, streamlining the overall process of asking questions about resources in accounts and making it easier to understand and manage AWS resources.

Improved Operational Troubleshooting

Amazon Q Developer can not only discover resources, their configurations, and their relationships, but also correlate that information with logs, metrics, and events to identify, analyze, and determine the root cause while troubleshooting operational issues in the AWS console. This helps streamline the process of resolving issues to enable quick troubleshooting.

To illustrate Amazon Q Developer’s capability in improved operational troubleshooting, let’s consider an example. Suppose a builder has a simple payment processing application consisting of Amazon API Gateway, AWS Lambda, and Amazon RDS in the backend. Furthermore, the application is returning 500 internal server errors causing downstream issues. Now, a builder can prompt Amazon Q Developer “Why is my user-profile-service-prod Lambda function throwing a 500 Internal server error?”.

User prompts Amazon Q Developer to see why their AWS Lambda functions are facing 500 internal server errors.

Figure 4: Prompt to Amazon Q Developer about internal server error

As shown above in figure 4, Amazon Q Developer automatically begins to gather relevant Amazon CloudWatch metrics, examines the function’s configuration and permissions, checks connected services like API Gateway and Amazon RDS, and analyzes recent changes

Response from Amazon Q after its analysis of various data sources.

Figure 5: Response from Q Developer for database timeouts

As shown above in figure 5, after querying applicable resources, Amazon Q Developer identified the root cause of the 500 internal server error. It shared information it pulled from the database and Lambda function logs and referenced a custom CloudWatch metric dashboard for evidence that the issue is due to database connection timeouts. Lastly, Amazon Q Developer also provided a list of ways to resolve the issue it identified. This example showcases how this new capability streamlines the process of analyzing operational issues, enabling quick troubleshooting.

Conclusion

The examples we’ve shown demonstrate how Amazon Q Developer handles the heavy lifting for users even better than before – from breaking down requests into analytical steps, to gathering data from multiple sources, to delivering meaningful insights about infrastructure, costs, and providing troubleshooting assistance.

As we continue to enhance Amazon Q Developer’s multi-step reasoning capabilities, builders will see it tackle even more complex analysis scenarios, helping them better understand and optimize AWS environments. Whether analyzing security configurations, examining resource relationships, or troubleshooting infrastructure issues, Amazon Q Developer can help save time and provide deeper insights into AWS resources.

To learn more and get started, visit Amazon Q Developer and Chatting with Amazon Q Developer in AWS Console Documentation.

About the authors

Brendan Jenkins

Brendan Jenkins is a Tech Lead Solutions Architect at Amazon Web Services (AWS) working with Enterprise AWS customers providing them with technical guidance and helping achieve their business goals. He has an area of specialization in DevOps and Machine Learning technology.

Enhance AI-assisted development with Amazon ECS, Amazon EKS and AWS Serverless MCP server

Post Syndicated from Elizabeth Fuentes original https://aws.amazon.com/blogs/aws/enhance-ai-assisted-development-with-amazon-ecs-amazon-eks-and-aws-serverless-mcp-server/

Today, we’re introducing specialized Model Context Protocol (MCP) servers for Amazon Elastic Container Service (Amazon ECS), Amazon Elastic Kubernetes Service (Amazon EKS), and AWS Serverless, now available in the AWS Labs GitHub repository. These open source solutions extend AI development assistants capabilities with real-time, contextual responses that go beyond their pre-trained knowledge. While Large Language Models (LLM) within AI assistants rely on public documentation, MCP servers deliver current context and service-specific guidance to help you prevent common deployment errors and provide more accurate service interactions.

You can use these open source solutions to develop applications faster, using up-to-date knowledge of Amazon Web Services (AWS) capabilities and configurations during the build and deployment process. Whether you’re writing code in your integrated development environment (IDE), or debugging production issues, these MCP servers support AI code assistants with deep understanding of Amazon ECS, Amazon EKS, and AWS Serverless capabilities, accelerating the journey from code to production. They work with popular AI-enabled IDEs, including Amazon Q Developer on the command line (CLI), to help you build and deploy applications using natural language commands.

  • The Amazon ECS MCP Server containerizes and deploys applications to Amazon ECS within minutes by configuring all relevant AWS resources, including load balancers, networking, auto-scaling, monitoring, Amazon ECS task definitions, and services. Using natural language instructions, you can manage cluster operations, implement auto-scaling strategies, and use real-time troubleshooting capabilities to identify and resolve deployment issues quickly.
  • For Kubernetes environments, the Amazon EKS MCP Server provides AI assistants with up-to-date, contextual information about your specific EKS environment. It offers access to the latest EKS features, knowledge base, and cluster state information. This gives AI code assistants more accurate, tailored guidance throughout the application lifecycle, from initial setup to production deployment.
  • The AWS Serverless MCP Server enhances the serverless development experience by providing AI coding assistants with comprehensive knowledge of serverless patterns, best practices, and AWS services. Using AWS Serverless Application Model Command Line Interface (AWS SAM CLI) integration, you can handle events and deploy infrastructure while implementing proven architectural patterns. This integration streamlines function lifecycles, service integrations, and operational requirements throughout your application development process. The server also provides contextual guidance for infrastructure as code decisions, AWS Lambda specific best practices, and event schemas for AWS Lambda event source mappings.

Let’s see it in action
If this is your first time using AWS MCP servers, visit the Installation and Setup guide in the AWS Labs GitHub repository to installation instructions. Once installed, add the following MCP server configuration to your local setup:

Install Amazon Q for command line and add the configuration to ~/.aws/amazonq/mcp.json. If you’re already an Amazon Q CLI user, add only the configuration.

{
  "mcpServers": {
    "awslabs.aws-serverless-mcp":  {
      "command": "uvx",
      "timeout": 60,
      "args": ["awslabs.aws_serverless_mcp_server@latest"],
    },
    "awslabs.ecs-mcp-server": {
      "disabled": false,
      "command": "uv",
      "timeout": 60,
      "args": ["awslabs.ecs-mcp-server@latest"],
    },
    "awslabs.eks-mcp-server": {
      "disabled": false,
      "timeout": 60,
      "command": "uv",
      "args": ["awslabs.eks-mcp-server@latest"],
    }
  }
}

For this demo I’m going to use the Amazon Q CLI to create an application that understands video using 02_using_converse_api.ipynb from Amazon Nova model cookbook repository as sample code. To do this, I send the following prompt:

I want to create a backend application that automatically extracts metadata and understands the content of images and videos uploaded to an S3 bucket and stores that information in a database. I'd like to use a serverless system for processing. Could you generate everything I need, including the code and commands or steps to set up the necessary infrastructure, for it to work from start to finish? - Use 02_using_converse_api.ipynb as example code for the image and video understanding.

Amazon Q CLI identifies the necessary tools, including the MCP serverawslabs.aws-serverless-mcp-server. Through a single interaction, the AWS Serverless MCP server determines all requirements and best practices for building a robust architecture.

I ask to Amazon Q CLI that build and test the application, but encountered an error. Amazon Q CLI quickly resolved the issue using available tools. I verified success by checking the record created in the Amazon DynamoDB table and testing the application with the dog2.jpeg file.

To enhance video processing capabilities, I decided to migrate my media analysis application to a containerized architecture. I used this prompt:

I'd like you to create a simple application like the media analysis one, but instead of being serverless, it should be containerized. Please help me build it in a new CDK stack.

Amazon Q Developer begins building the application. I took advantage of this time to grab a coffee. When I returned to my desk, coffee in hand, I was pleasantly surprised to find the application ready. To ensure everything was up to current standards, I simply asked:

please review the code and all app using the awslabsecs_mcp_server tools 

Amazon Q Developer CLI gives me a summary with all the improvements and a conclusion.

I ask it to make all the necessary changes, once ready I ask Amazon Q developer CLI to deploy it in my account, all using natural language.

After a few minutes, I review that I have a complete containerized application from the S3 bucket to all the necessary networking.

I ask Amazon Q developer CLI to test the app send it the-sea.mp4 video file and received a timed out error, so Amazon Q CLI decides to use the fetch_task_logs from awslabsecs_mcp_server tool to review the logs, identify the error and then fix it.

After a new deployment, I try it again, and the application successfully processed the video file

I can see the records in my Amazon DynamoDB table.

To test the Amazon EKS MCP server, I have code for a web app in the auction-website-main folder and I want to build a web robust app, for that I asked Amazon Q CLI to help me with this prompt:

Create a web application using the existing code in the auction-website-main folder. This application will grow, so I would like to create it in a new EKS cluster

Once the Docker file is created, Amazon Q CLI identifies generate_app_manifests from awslabseks_mcp_server as a reliable tool to create a Kubernetes manifests for the application.

Then create a new EKS cluster using the manage_eks_staks tool.

Once the app is ready, the Amazon Q CLI deploys it and gives me a summary of what it created.

I can see the cluster status in the console.

After a few minutes and resolving a couple of issues using the search_eks_troubleshoot_guide tool the application is ready to use.

Now I have a Kitties marketplace web app, deployed on Amazon EKS using only natural language commands through Amazon Q CLI.

Get started today
Visit the AWS Labs GitHub repository to start using these AWS MCP servers and enhance your AI-powered developmen there. The repository includes implementation guides, example configurations, and additional specialized servers to run AWS Lambda function, which transforms your existing AWS Lambda functions into AI-accessible tools without code modifications, and Amazon Bedrock Knowledge Bases Retrieval MCP server, which provides seamless access to your Amazon Bedrock knowledge bases. Other AWS specialized servers in the repository include documentation, example configurations, and implementation guides to begin building applications with greater speed and reliability.

To learn more about MCP Servers for AWS Serverless and Containers and how they can transform your AI-assisted application development, visit the Introducing AWS Serverless MCP Server: AI-powered development for modern applications, Automating AI-assisted container deployments with the Amazon ECS MCP Server, and Accelerating application development with the Amazon EKS MCP server deep-dive blogs.

— Eli

AWS Weekly Roundup: Claude 4 in Amazon Bedrock, EKS Dashboard, community events, and more (May 26, 2025)

Post Syndicated from Veliswa Boya original https://aws.amazon.com/blogs/aws/aws-weekly-roundup-claude-4-in-amazon-bedrock-eks-dashboard-community-events-and-more-may-26-2025/

As the tech community we continue to have many opportunities to learn and network with other like-minded folks. This past week AWS customers attended the AWS Summit Dubai for an action-packed day featuring live demos, hands-on experiences with cutting-edge AI/ML tools, and more. Right here in South Africa I attended the Data & AI Community in Durban for a day of inspiration and learning from the community. In India, the AWS Community Day Bengaluru brought together hundreds of passionate tech enthusiasts for a day of learning and networking.

Last week’s launches
Here are the launches that got my attention:

For a full list of AWS announcements, be sure to keep an eye on the What’s New with AWS? page.

Additional updates
Here are some additional projects, blog posts, and news items that you might find interesting:

Upcoming AWS events
Check your calendars and sign up for these upcoming AWS events:

  • AWS Summits – Join free online and in-person events that bring the cloud computing community together to connect, collaborate, and learn about AWS. Register in your nearest city: Tel Aviv (May 28), Singapore (May 29), Stockholm (June 4), Sydney (June 4–5), Washington (June 10-11), and Madrid (June 11).
  • AWS re:Inforce – Mark your calendars for AWS re:Inforce (June 16–18) in Philadelphia, PA. AWS re:Inforce is a learning conference focused on AWS security solutions, cloud security, compliance, and identity.
  • AWS Community Days – Join community-led conferences that feature technical discussions, workshops, and hands-on labs led by expert AWS users and industry leaders from around the world: Milwaukee, USA (June 5), and Nairobi, Kenya (June 14).

That’s all for this week. Check back next Monday for another Weekly Roundup!

Veliswa.

Unlocking the power of Amazon Q Developer: Metrics-driven strategies for better AI coding

Post Syndicated from Artur Rodrigues original https://aws.amazon.com/blogs/devops/unlocking-the-power-of-amazon-q-developer-metrics-driven-strategies-for-better-ai-coding/

We believe the most successful organizations will be those that view AI not just as a tool for automation, but as a catalyst for transforming how they approach software development entirely. The real strategic advantage will come from reimagining software development processes and culture to fully leverage AI’s capabilities. This includes rethinking traditional metrics, redefining developer productivity, and creating space and cultural change for teams to experiment with new ways of working.

This powerful observation from our April 2025 blog post “How generative AI is transforming developer workflows at Amazon” is already proving true in practice. Organizations using Amazon Q Developer are actively implementing new metrics to understand how developers leverage AI features. This data-driven approach helps them identify usage patterns, uncover areas for improvement, and recognize internal champions who drive adoption. It takes time and practice to get comfortable with prompting and understand the capabilities of new tools. I have identified three question that customers ask to measure and evaluate their Amazon Q Developer adoption.

  1. How many Q Developer active users are there?
  2. How can we track usage trends?
  3. Who are our power users?

This blog post will explore the Amazon Q Developer monitoring and tracking tools, and how they can together provide a comprehensive view of developer usage, which answer the questions listed above.

Subscription Management

The Amazon Q Developer subscription console serves as your primary source for managing Q subscriptions. The How to identify inactive users of Amazon Q Developer blog details license activity, and shows how you can navigate thought the Amazon Q Developer Console, where you can download a report showing users from all AWS organization accounts, their status (active, pending, or canceled), and the last activity date. This document from our user guide, walk you through how to enabled the organization-wide visibility at your AWS Organization management account.

The table below contains an extract of the CSV file created when you click on Download total users reports from the Amazon Q Developer Subscription Console page.

Name Subscription type Subscription status Identity provider user ID Last activity date
anakin Group Pending 14a81418-b0b1-70b7-c73a N/A
artur Group Active 34a87408-6091-7054-4b60 May 11 2025
ashoka Individual Pending 64d8a448-9021-7020-c73d N/A
uther Group Active 94e844b8-4031-7022-303d April 23 2025
John.Smith Group Pending e4c84458-30b1-7097-2496 N/A
luke Group Pending f4a89418-c0e1-705b-d050 N/A
Table 1 – CSV extract of total users report

This report displays Amazon Q Developer Pro user subscriptions, including subscription details, status, and last recorded account activity dates, which will be joined with usage metrics to generate customer insights.

Q Developer dashboard usage metrics

The Amazon Q Developer dashboard summarizes the data about how your Pro tier subscribers use the service. Amazon Q Developer generates and displays new metrics on an hourly basis for the most part. The only section that is not updated hourly is the Active user’s widget, which is updated daily according to the coordinated universal time (UTC) clock. The dashboard shows metrics collected from users who are subscribed in the AWS account that you’re currently signed into.

There are many metrics shown in the Q Developer dashboard usage metrics that help administrators monitor activity; detailed information and metrics are available on our documentation.

User Activity Reporting

The user activity reports in Amazon Q Developer provide metrics that detail how users interact with the service. To use them, you need to enable the feature and define an Amazon S3 bucket to save the CSV reports. Amazon Q Developer generates the report every day at midnight UTC and saves it into the designated bucket. Each row in the CSV file represents a user who interacted with Amazon Q Developer that day, and each column shows a metric as described in the User activity report metrics. These metrics are calculated based on the user telemetry collected over the course of the day. Instructions on how to enable and configure the User Activity Report Metrics can be found on our documentation.

Creating per-user level monthly report

To connect to the Amazon Q Developer Console, navigate to the AWS account from which you want to export your metrics. In the Amazon Q Developer Console, select “Settings” and then click on the “Edit” button for “Amazon Q Developer Usage Activity,” which is turned off by default.

Amazon Q Developer's usage activity panel. It displays the "Q Developer user activity report" setting is off.

Image 1 – Amazon Q Developer usage activity setting disabled

When prompted, enable the “Collect granular metrics per user” and define the s3://bucket/prefix. In my example, I pointed to the s3://q-dev-user-activity-<account-number>/csv

Amazon Q Developer's usage activity panel. It displays the "Q Developer user activity report" setting is on, and a populated S3 location field

Image 2 – Amazon Q Developer usage activity setting enabled

The csv files will be saved into the following directory

s3://bucketName/prefix/AWSLogs/accountId/QDeveloperLogs/by_user_analytic/region/year/month/day/utc-hour/

How to process the User Activity Report

I developed script that processes user activity data and subscription information stored in S3, combining them into monthly reports. The process_metrics.py script is a Python utility designed to process Amazon Q Developer user activity data and subscription information from AWS S3, combining them to generate monthly reports in CSV format. It retrieves data from S3 buckets, maps user IDs to names, aggregates metrics by user and month, and generates reports. The script leverages pandas for data manipulation. It generates a clean, structured CSV reports ready for your preferred analytics platform. The script logic derives the S3 directory structure, using current year, region and the AWS accountid, and all you need to inform is the bucket name and the prefix you initially configure for the CSV file. The script is shared below.


#!/usr/bin/env python3
# Copyright Amazon.com, Inc. or its affiliates. All Rights Reserved.
# SPDX-License-Identifier: MIT-0
"""
Amazon Q Metrics Processor

This script processes user activity data and subscription information from S3,
combines them, and generates monthly CSV reports.
"""

import os
import boto3
import botocore
from botocore.config import Config
import pandas as pd
import numpy as np
from datetime import datetime
import logging
from io import StringIO
import re
import argparse
from pathlib import Path  # from pathlib import Path
import sys
from urllib.parse import urlparse

# Configure logging
logging.basicConfig(
    level=logging.INFO,
    format='%(asctime)s - %(name)s - %(levelname)s - %(message)s'
)
logger = logging.getLogger('q-metrics')

def escape_log_data(data):
    """
    Sanitize data for secure logging to prevent log injection (CWE-117, CWE-93).
    
    Args:
        data: The data to be sanitized for logging
        
    Returns:
        str: Sanitized string safe for logging
    """
    if data is None:
        return 'None'
    
    # Convert to string if not already
    data_str = str(data)
    
    # Replace potentially dangerous characters
    # This prevents log forging by removing newlines and other control characters
    data_str = data_str.replace('\n', '\\n').replace('\r', '\\r')
    
    # Escape other control characters
    result = ''
    for char in data_str:
        if ord(char) < 32 or ord(char) == 127:  # Control characters
            result += f'\\x{ord(char):02x}'
        else:
            result += char
            
    return result

def validate_s3_bucket_name(bucket_name):
    """
    Validate S3 bucket name according to AWS naming rules.

    Args:
        bucket_name (str): The bucket name to validate

    Returns:
        bool: True if valid, False otherwise
    """
    if not bucket_name or not isinstance(bucket_name, str):
        return False

    # Check length (3-63 characters)
    if len(bucket_name)  63:
        return False

    # Check if it contains only allowed characters
    if not re.match(r'^[a-z0-9][a-z0-9\.-]*[a-z0-9]$', bucket_name):
        return False

    # Check if it doesn't contain consecutive periods
    if '..' in bucket_name:
        return False

    # Check if it's not an IP address
    if re.match(r'^\d+\.\d+\.\d+\.\d+$', bucket_name):
        return False

    # Check if it doesn't start with 'xn--' or end with '-s3alias'
    try:
        if bucket_name.startswith('xn--') or bucket_name.endswith('-s3alias'):
            return False
    except ValueError:
        return False

    return True

def validate_s3_path(path):
    """
    Validate an S3 path to ensure it doesn't contain dangerous characters.

    Args:
        path (str): The S3 path to validate

    Returns:
        bool: True if valid, False otherwise
    """
    if not path or not isinstance(path, str):
        return False

    # Check for path traversal attempts
    if '..' in path:
        return False

    # Check for invalid characters
    try:
        if re.search(r'[:"|?*\x00-\x1F]', path):
            return False
    except ValueError:
        return False

    return True

def validate_month_format(month_str):
    """
    Validate that a month string is in the format YYYY-MM.

    Args:
        month_str (str): The month string to validate

    Returns:
        bool: True if valid, False otherwise
    """
    if not month_str:
        return True  # Month is optional

    if not isinstance(month_str, str):
        return False

    # Check format YYYY-MM
    if not re.match(r'^[0-9]{4}-[0-9]{2}$', month_str):
        return False

    # Validate month range
    try:
        year, month = month_str.split('-')
        month_num = int(month)
        if month_num  12:
            return False
    except (ValueError, TypeError):
        return False

    return True

def sanitize_output_path(path):
    """
    Sanitize and normalize an output directory path.

    Args:
        path (str): The path to sanitize

    Returns:
        str: The sanitized absolute path
    """
    if not path or not isinstance(path, str):
        return os.path.abspath('./output')

    # Convert to Path object for safe handling
    safe_path = Path(path).resolve()

    # Ensure the path doesn't escape the intended directory structure
    try:
        # Make sure it's a valid path
        if not safe_path.is_absolute():
            safe_path = Path.cwd() / safe_path
    except (ValueError, TypeError):
        logger.warning("Invalid path: %s, using default", escape_log_data(repr(path)))
        return os.path.abspath('./output')

    return str(safe_path)

def validate_csv_content(df, expected_columns, file_type):
    """
    Validate that a DataFrame has the expected columns and structure.

    Args:
        df (DataFrame): The pandas DataFrame to validate
        expected_columns (list): List of required column names
        file_type (str): Type of file for logging purposes

    Returns:
        bool: True if valid, False otherwise
    """
    if df is None or df.empty:
        logger.error("Empty %s data", file_type)
        return False

    # Check for required columns
    missing_columns = [col for col in expected_columns if col not in df.columns]
    if missing_columns:
        logger.error("Missing required columns in %s data: %s", file_type, ', '.join(missing_columns))
        return False

    # Check for empty required columns
    for col in expected_columns:
        if df[col].isna().all():
            logger.error("Column '%s' in %s data is completely empty", col, file_type)
            return False

    # Check for reasonable row count
    if len(df) == 0:
        logger.error("No data rows in %s data", file_type)
        return False

    # Check for duplicate rows
    if df.duplicated().any():
        dup_count = df.duplicated().sum()
        logger.warning("Found %d duplicate rows in %s data", dup_count, file_type)

    return True

def validate_subscription_data(df):
    """
    Validate subscription data format and content.

    Args:
        df (DataFrame): The subscription data DataFrame

    Returns:
        bool: True if valid, False otherwise
    """
    required_columns = [
        'Name',
        'Subscription type',
        'Subscription status',
        'Identity provider user ID'
    ]

    return validate_csv_content(df, required_columns, "subscription")

def validate_activity_data(df):
    """
    Validate activity data format and content.

    Args:
        df (DataFrame): The activity data DataFrame

    Returns:
        bool: True if valid, False otherwise
    """
    required_columns = ['UserId', 'Date']

    # Basic validation
    if not validate_csv_content(df, required_columns, "activity"):
        return False

    # Check for at least one metric column
    metric_cols = df.select_dtypes(include=[np.number]).columns
    if len(metric_cols) == 0:
        logger.error("No metric columns found in activity data")
        return False

    # Check for valid date format
    try:
        valid_dates = 0
        total_dates = len(df['Date'])

        for date_str in df['Date']:
            if parse_date(date_str) is not None:
                valid_dates += 1

        if valid_dates == 0:
            logger.error("No valid dates found in activity data")
            return False
        elif valid_dates < total_dates:
            logger.warning("Only %d out of %d dates are valid in activity data", valid_dates, total_dates)
    except Exception as e:
        logger.error("Error validating dates in activity data: %s", str(e))
        return False

    return True


def parse_args():
    """Parse command line arguments with enhanced security validation."""
    parser = argparse.ArgumentParser(description='Process Amazon Q metrics data')
    parser.add_argument('--bucket', required=True, help='S3 bucket name')
    parser.add_argument('--prefix', required=True, help='Initial S3 prefix (e.g., "logs")')
    parser.add_argument('--subscription-path', required=True,
                        help='S3 path to subscription file (e.g., user-activities/subscriptions.csv)')
    parser.add_argument('--output-dir', default='./output', help='Local directory for output files')
    parser.add_argument('--month', help='Process only a specific month (format: YYYY-MM, e.g., 2025-01)')
    parser.add_argument('--per-user', action='store_true', help='Generate individual reports for each user')
    parser.add_argument('--user', help='Generate report for a specific user (by name)')

    args = parser.parse_args()

    # Validate bucket name with enhanced checks
    if not validate_s3_bucket_name(args.bucket):
        logger.error("Invalid S3 bucket name: %r", escape_log_data(args.bucket))
        sys.exit(1)
    
    # Additional bucket name security check - prevent command injection via bucket names
    if re.search(r'[;&|`$]', args.bucket):
        logger.error("Potentially malicious characters in bucket name: %r", escape_log_data(args.bucket))
        sys.exit(1)

    # Derive activity-prefix from the provided prefix
    try:
        # Get AWS account ID
        sts_client = boto3.client('sts')
        account_id = sts_client.get_caller_identity()['Account']
        
        # Get current region
        session = boto3.session.Session()
        region = session.region_name or os.environ.get('AWS_REGION', 'us-east-1')
        
        # Check if region is supported
        supported_regions = ['us-east-1', 'eu-central-1']
        if region not in supported_regions:
            logger.error("Region %s is not supported. This solution currently only works in %s", 
                        escape_log_data(region), ' or '.join(supported_regions))
            sys.exit(1)
        
        # Get current year
        current_year = str(datetime.now().year)
        
        # If month is provided, extract year from it
        if args.month:
            try:
                year, _ = args.month.split('-')
                current_year = year
            except (ValueError, TypeError):
                pass
                
        # Construct the activity prefix using the provided prefix
        activity_prefix = f"{args.prefix}/AWSLogs/{account_id}/QDeveloperLogs/by_user_analytic/{region}/{current_year}"
        logger.info("Derived activity prefix: %s", escape_log_data(activity_prefix))
    except Exception as e:
        logger.error("Failed to derive activity prefix: %s", escape_log_data(str(e)))
        sys.exit(1)
    
    # Validate S3 paths with enhanced checks
    for path_arg, path_name in [(activity_prefix, "activity prefix"), 
                               (args.subscription_path, "subscription path")]:
        if not validate_s3_path(path_arg):
            logger.error("Invalid S3 %s: %r", path_name, escape_log_data(path_arg))
            sys.exit(1)
        
        # Additional path security checks
        if re.search(r'[;&|`$]', path_arg):
            logger.error("Potentially malicious characters in %s: %r", path_name, escape_log_data(path_arg))
            sys.exit(1)
        
        # Check for path traversal attempts with more patterns
        if any(pattern in path_arg for pattern in ['../', '..\\', '../', '..\\']):
            logger.error("Path traversal attempt detected in %s: %r", path_name, escape_log_data(path_arg))
            sys.exit(1)

    # Validate month format if provided with enhanced checks
    if args.month:
        if not validate_month_format(args.month):
            logger.error("Invalid month format: %r. Expected format: YYYY-MM (e.g., 2025-01)", escape_log_data(args.month))
            sys.exit(1)
        
        # Additional validation for month - check for reasonable date range
        try:
            year, month = args.month.split('-')
            year_num = int(year)
            month_num = int(month)
            
            current_year = datetime.now().year
            
            # Check for reasonable year range (past 5 years to next year)
            if year_num  current_year + 1:
                logger.warning("Month year %d is outside the reasonable range (%d-%d)", 
                              year_num, current_year - 5, current_year + 1)
        except (ValueError, TypeError):
            # Already validated by validate_month_format, this is just an extra check
            pass

    # Validate user argument if provided
    if args.user:
        # Check for reasonable length
        if len(args.user) > 100:
            logger.error("User name too long: %d characters (max 100)", len(args.user))
            sys.exit(1)
        
        # Check for potentially dangerous characters
        if re.search(r'[;&|`$]', args.user):
            logger.error("Potentially malicious characters in user name: %r", escape_log_data(args.user))
            sys.exit(1)

    # Sanitize output directory with enhanced security
    args.output_dir = sanitize_output_path(args.output_dir)
    
    # Additional output directory security check
    try:
        output_path = Path(args.output_dir)
        
        # Check if the path exists and is a directory
        if output_path.exists() and not output_path.is_dir():
            logger.error("Output path exists but is not a directory: %r", escape_log_data(args.output_dir))
            sys.exit(1)
            
        # Check if we have write permissions to the directory or its parent
        parent_dir = output_path if output_path.exists() else output_path.parent
        if not os.access(parent_dir, os.W_OK):
            logger.error("No write permission for output directory: %r", escape_log_data(args.output_dir))
            sys.exit(1)
    except Exception as e:
        logger.error("Error validating output directory: %s", escape_log_data(str(e)))
        sys.exit(1)
        
    logger.info("Using output directory: %r", escape_log_data(args.output_dir))
    
    # Add the derived activity_prefix to args for use in the rest of the program
    args.activity_prefix = activity_prefix

    return args

def get_s3_client():
    """Create and return an S3 client with proper configuration."""
    try:
        # Configure S3 client with timeouts and retries
        config = Config(
            connect_timeout=5,  # 5 seconds connection timeout
            read_timeout=30,    # 30 seconds read timeout
            retries={'max_attempts': 3},  # Retry configuration
            signature_version='s3v4'  # Use more secure signature version
        )
        
        # Create the client with the custom configuration
        s3 = boto3.client('s3', config=config)
        
        # Test the client with a simple operation to validate credentials
        try:
            # Use head_bucket which is a lightweight operation
            s3.head_bucket(Bucket='aws-sdk-resources')
        except botocore.exceptions.ClientError as e:
            error_code = e.response.get('Error', {}).get('Code', '')
            if error_code == '403':
                logger.warning("AWS credentials appear valid but have insufficient permissions")
            elif error_code == '401':
                logger.error("Invalid AWS credentials")
                sys.exit(1)
        except Exception as e:
            logger.warning("Error testing S3 client: %s", str(e))
        
        return s3
    except Exception as e:
        logger.error("Failed to create S3 client: %s", str(e))
        sys.exit(1)

def list_activity_files(s3_client, bucket, prefix, month=None):
    """List all activity files in the specified S3 bucket and prefix.

    If month is specified, only return files for that month (format: YYYY-MM).

    Args:
        s3_client: The boto3 S3 client
        bucket (str): The S3 bucket name
        prefix (str): The S3 prefix for activity files
        month (str, optional): Month in YYYY-MM format

    Returns:
        list: List of S3 keys for activity files
    """
    # Validate inputs again for safety
    if not validate_s3_bucket_name(bucket):
        logger.error("Invalid bucket name: %r", escape_log_data(bucket))
        return []

    if not validate_s3_path(prefix):
        logger.error("Invalid S3 prefix: %r", escape_log_data(prefix))
        return []

    if month and not validate_month_format(month):
        logger.error("Invalid month format: %r", escape_log_data(month))
        return []

    # Sanitize prefix to ensure it doesn't have path traversal
    prefix = prefix.replace('..', '').replace('//', '/')

    logger.info("Listing activity files in s3://%s/%s", escape_log_data(bucket), escape_log_data(prefix))

    activity_files = []
    paginator = s3_client.get_paginator('list_objects_v2')

    try:
        # If month is specified, filter by the month prefix
        search_prefix = prefix
        if month:
            try:
                year, month_num = month.split('-')
                # Make sure we're not duplicating the year in the path
                if not prefix.endswith(year + '/'):
                    search_prefix = f"{prefix}{month_num}/"
                else:
                    search_prefix = f"{prefix}{month_num}/"
                logger.info("Filtering for month %s using prefix: %s", escape_log_data(month), escape_log_data(search_prefix))
            except ValueError:
                logger.error("Failed to parse month %r for filtering", escape_log_data(month))
                return []

        for page in paginator.paginate(Bucket=bucket, Prefix=search_prefix):
            if 'Contents' in page:
                for obj in page['Contents']:
                    key = obj['Key']
                    # Skip directories or non-CSV files
                    if not key.endswith('/') and key.endswith('.csv'):
                        activity_files.append(key)

        logger.info("Found %d activity files", len(activity_files))
        return activity_files
    except Exception as e:
        logger.error("Error listing activity files: %s", escape_log_data(str(e)))
        if isinstance(e, client('s3').exceptions.NoSuchBucket):
            logger.error("Bucket %r does not exist", escape_log_data(bucket))
        elif isinstance(e, client('s3').exceptions.AccessDenied):
            logger.error("Access denied to bucket %r", escape_log_data(bucket))
        return []

def read_csv_from_s3(s3_client, bucket, key):
    """Read a CSV file from S3 into a pandas DataFrame.

    Args:
        s3_client: The boto3 S3 client
        bucket (str): The S3 bucket name
        key (str): The S3 object key

    Returns:
        DataFrame or None: Pandas DataFrame with CSV content or None if error
    """
    # Validate inputs
    if not validate_s3_bucket_name(bucket):
        logger.error("Invalid bucket name: %r", escape_log_data(bucket))
        return None

    if not validate_s3_path(key):
        logger.error("Invalid S3 key: %r", escape_log_data(key))
        return None

    logger.info("Reading s3://%s/%s", escape_log_data(bucket), escape_log_data(key))

    try:
        # Get object metadata first to check file size
        try:
            head_response = s3_client.head_object(Bucket=bucket, Key=key)
            file_size_bytes = head_response.get('ContentLength', 0)
            
            # Set a reasonable size limit (e.g., 100MB)
            MAX_FILE_SIZE_BYTES = 100 * 1024 * 1024  # 100MB
            
            if file_size_bytes > MAX_FILE_SIZE_BYTES:
                logger.error("File %r size (%d bytes) exceeds the maximum allowed size (%d bytes)", 
                             escape_log_data(key), file_size_bytes, MAX_FILE_SIZE_BYTES)
                return None
        except Exception as e:
            logger.warning("Could not check file size for %r: %s", escape_log_data(key), escape_log_data(str(e)))
            # Continue anyway, we'll have other checks later

        response = s3_client.get_object(Bucket=bucket, Key=key)
        content = response['Body'].read().decode('utf-8')

        # Check for CSV injection attempts
        if any(suspicious_pattern in content for suspicious_pattern in ['=cmd|', '=cmd:', '@cmd', '+cmd', '-cmd', '=DDE', '=SUM(', '=HYPERLINK(']):
            logger.error("Potential CSV injection detected in %r", escape_log_data(key))
            return None

        # Use a StringIO buffer to safely parse the CSV
        csv_buffer = StringIO(content)

        # Read with error handling for malformed CSV
        try:
            # First check number of rows by reading just the header
            row_count = sum(1 for _ in csv_buffer) - 1  # Subtract 1 for header
            csv_buffer.seek(0)  # Reset buffer position
            
            # Set a hard limit on number of rows
            MAX_ROWS = 500000  # Hard limit of 500K rows
            
            if row_count > MAX_ROWS:
                logger.error("CSV file %r has %d rows, which exceeds the maximum limit of %d rows", 
                             escape_log_data(key), row_count, MAX_ROWS)
                return None
                
            # Use converters to sanitize string inputs
            df = pd.read_csv(csv_buffer, converters={col: str for col in ['Name', 'UserId', 'Subscription', 'Subscription type', 'Subscription status']})

            # Check memory usage of the DataFrame
            memory_usage_bytes = df.memory_usage(deep=True).sum()
            MAX_MEMORY_USAGE = 500 * 1024 * 1024  # 500MB limit
            
            if memory_usage_bytes > MAX_MEMORY_USAGE:
                logger.error("DataFrame for %r uses %d bytes of memory, exceeding the limit of %d bytes", 
                             escape_log_data(key), memory_usage_bytes, MAX_MEMORY_USAGE)
                del df  # Explicitly delete to free memory
                return None

            # Check for reasonable file size (soft warning)
            if len(df) > 100000:  # Lower the warning threshold to 100K rows
                logger.warning("CSV file %r has %d rows, which exceeds the recommended limit", escape_log_data(key), len(df))

            return df
        except pd.errors.ParserError as e:
            logger.error("Error parsing CSV %r: %s", escape_log_data(key), escape_log_data(str(e)))
            return None

    except Exception as e:
        logger.error("Error reading %r: %s", escape_log_data(key), escape_log_data(str(e)))
        return None

def parse_date(date_str):
    """Parse date strings into datetime objects."""
    if pd.isna(date_str) or date_str == 'N/A':
        return None

    # Handle different date formats
    date_formats = [
        '%m-%d-%Y',  # 02-03-2025
        '%B %d %Y',  # March 13 2025
    ]

    for fmt in date_formats:
        try:
            return datetime.strptime(date_str, fmt)
        except ValueError:
            continue

    logger.warning("Could not parse date: %r", escape_log_data(date_str))
    return None

def extract_month_year(date_obj):
    """Extract month and year from a datetime object."""
    if date_obj is None:
        return None
    try:
        return f"{date_obj.year}-{int(date_obj.month):02d}"
    except (AttributeError, ValueError, TypeError) as e:
        logger.debug("Failed to extract month/year from date object: %s", escape_log_data(str(e)))
        return None

def process_subscription_data(df):
    """Process subscription data."""
    logger.info("Processing subscription data")

    # Validate subscription data
    if not validate_subscription_data(df):
        logger.error("Invalid subscription data format")
        return None, {}

    # Clean up subscription data
    df_clean = df.copy()
    
    # Add 'Subscription' column if it doesn't exist (using Subscription type as default)
    if 'Subscription' not in df_clean.columns:
        df_clean['Subscription'] = df_clean['Subscription type']
        logger.info("Added 'Subscription' column based on 'Subscription type'")

    # Map user IDs to names
    id_to_name_map = dict(zip(df_clean['Identity provider user ID'], df_clean['Name']))

    # Parse last activity date
    df_clean['Last activity date'] = df_clean['Last activity date'].apply(parse_date)
    df_clean['Last activity month'] = df_clean['Last activity date'].apply(extract_month_year)

    return df_clean, id_to_name_map

def process_activity_data(activity_dfs, id_to_name_map):
    """Process and combine activity data."""
    logger.info("Processing activity data")

    if not activity_dfs:
        logger.warning("No activity data to process")
        return pd.DataFrame()

    # Validate each activity dataframe
    valid_dfs = []
    for i, df in enumerate(activity_dfs):
        if validate_activity_data(df):
            valid_dfs.append(df)
        else:
            logger.warning("Skipping invalid activity data file #%d", i+1)

    if not valid_dfs:
        logger.error("No valid activity data files found")
        return pd.DataFrame()

    try:
        # Combine all activity dataframes
        combined_df = pd.concat(valid_dfs, ignore_index=True)

        # Parse dates and extract month-year
        combined_df['Date'] = combined_df['Date'].apply(parse_date)
        combined_df['Month'] = combined_df['Date'].apply(extract_month_year)

        # Add user names based on ID mapping
        combined_df['Name'] = combined_df['UserId'].map(id_to_name_map)
        
        # Check if any user IDs couldn't be mapped to names
        unmapped_ids = combined_df[combined_df['Name'].isna()]['UserId'].unique()
        if len(unmapped_ids) > 0:
            logger.warning("Found %d user IDs without matching names", len(unmapped_ids))
            if len(unmapped_ids)  MAX_REPORTS:
        logger.warning("Too many months (%d). Limiting to %d most recent months.", 
                      len(months), MAX_REPORTS)
        # Sort months and take the most recent ones
        months = sorted(months, reverse=True)[:MAX_REPORTS]

    reports_generated = 0
    for month in months:
        if pd.isna(month):
            logger.debug("Skipping null month value")
            continue

        # Skip if specific_month is provided and doesn't match current month
        if specific_month and month != specific_month:
            continue

        # Validate month format
        if not validate_month_format(month):
            logger.warning("Skipping invalid month format: %r", escape_log_data(month))
            continue

        try:
            month_df = agg_df[agg_df['Month'] == month]

            # Create a safe filename
            safe_month = re.sub(r'[^\w\-]', '_', month)
            
            # Additional security check for filename
            if not safe_month or safe_month.startswith('.'):
                logger.warning("Invalid month format after sanitization: %r", escape_log_data(safe_month))
                continue
                
            output_file = os.path.join(output_dir, f"q-metrics-{safe_month}.csv")
            
            # Verify the output path is still within the intended directory
            output_path = Path(output_file).resolve()
            if not str(output_path).startswith(str(Path(output_dir).resolve())):
                logger.error("Path traversal attempt detected in output file: %r", escape_log_data(output_file))
                continue

            # Check if the dataframe is empty
            if month_df.empty:
                logger.warning("No data for month %r, skipping report generation", escape_log_data(month))
                continue
                
            # Limit the size of the output file
            if len(month_df) > 100000:
                logger.warning("Month %r has too many rows (%d). Truncating to 100,000 rows.", 
                              escape_log_data(month), len(month_df))
                month_df = month_df.head(100000)

            # Write with secure file handling
            temp_file = output_file + '.tmp'
            month_df.to_csv(temp_file, index=False)
            
            # Use atomic rename for safer file writing
            os.replace(temp_file, output_file)
            
            # Set secure permissions
            os.chmod(output_file, 0o640)  # rw-r-----
            
            logger.info("Generated report for %s: %s", escape_log_data(month), escape_log_data(output_file))
            reports_generated += 1
        except (PermissionError, OSError) as e:
            logger.error("Error writing to %r: %s", escape_log_data(output_file), escape_log_data(str(e)))
        except Exception as e:
            logger.error("Error generating report for month %r: %s", escape_log_data(month), escape_log_data(str(e)))

    return reports_generated

def generate_user_reports(agg_df, output_dir, specific_user=None):
    """Generate per-user CSV reports.

    If specific_user is provided, only generate a report for that user.

    Args:
        agg_df (DataFrame): Aggregated data frame
        output_dir (str): Output directory path
        specific_user (str, optional): Specific user name

    Returns:
        int: Number of reports generated
    """
    logger.info("Generating per-user reports")

    # Validate output directory
    output_dir = sanitize_output_path(output_dir)

    # Create output directory for user reports
    user_dir = os.path.join(output_dir, "users")
    try:
        os.makedirs(user_dir, exist_ok=True)
    except (PermissionError, OSError) as e:
        logger.error("Cannot create user directory %s: %s", escape_log_data(user_dir), escape_log_data(str(e)))
        return 0

    # Check if dataframe is empty
    if agg_df.empty:
        logger.warning("No data available to generate user reports")
        return 0

    # Check if Name column exists
    if 'Name' not in agg_df.columns:
        logger.error("Required column 'Name' not found in data")
        return 0

    # Get list of users
    users = agg_df['Name'].unique()
    if len(users) == 0:
        logger.warning("No user data available in the aggregated dataframe")
        return 0

    reports_generated = 0
    for user in users:
        if pd.isna(user):
            logger.debug("Skipping null user value")
            continue

        # Skip if specific_user is provided and doesn't match current user
        if specific_user and user != specific_user:
            continue

        try:
            user_df = agg_df[agg_df['Name'] == user]
            
            # Check if the dataframe is empty
            if user_df.empty:
                logger.warning("No data for user %r, skipping report generation", escape_log_data(user))
                continue

            # Create a safe filename from the user name using a more secure approach
            # Only allow alphanumeric characters, underscores, and hyphens
            safe_name = re.sub(r'[^\w\-]', '_', str(user))

            # Prevent directory traversal by removing any path components
            safe_name = os.path.basename(safe_name)

            # Ensure the filename is not empty and doesn't start with a dot
            if not safe_name or safe_name.startswith('.'):
                safe_name = f"user_{hash(user) % 10000}"

            output_file = os.path.join(user_dir, f"q-metrics-{safe_name}.csv")

            user_df.to_csv(output_file, index=False)
            logger.info("Generated report for user %r: %s", escape_log_data(user), escape_log_data(output_file))
            reports_generated += 1
        except (PermissionError, OSError) as e:
            logger.error("Error writing to %s: %s", escape_log_data(output_file), escape_log_data(str(e)))
        except Exception as e:
            logger.error("Error generating report for user %r: %s", escape_log_data(user), escape_log_data(str(e)))

    return reports_generated

def main():
    """Main function to process metrics data with enhanced security."""
    try:
        # Memory limit has been removed as requested
        
        # Parse and validate arguments
        args = parse_args()

        # Initialize S3 client with secure configuration
        s3_client = get_s3_client()

        # Set timeout for operations
        import signal
        
        def timeout_handler(signum, frame):
            logger.error("Operation timed out")
            sys.exit(1)
        
        # Set a global timeout of 10 minutes for the entire process
        signal.signal(signal.SIGALRM, timeout_handler)
        signal.alarm(600)  # 600 seconds = 10 minutes

        # Read subscription data with integrity verification
        subscription_df = read_csv_from_s3(s3_client, args.bucket, args.subscription_path)
        if subscription_df is None:
            logger.error("Failed to read subscription data. Exiting.")
            return 1

        # Process subscription data
        subscription_df, id_to_name_map = process_subscription_data(subscription_df)
        if subscription_df is None:
            logger.error("Failed to process subscription data. Exiting.")
            return 1

        # List and read activity files
        activity_files = list_activity_files(s3_client, args.bucket, args.activity_prefix, args.month)
        if not activity_files:
            logger.warning("No activity files found. Proceeding with empty activity data.")
        
        # Limit the number of files processed to prevent resource exhaustion
        MAX_FILES = 100
        if len(activity_files) > MAX_FILES:
            logger.warning("Too many activity files found (%d). Limiting to %d files.", 
                          len(activity_files), MAX_FILES)
            activity_files = activity_files[:MAX_FILES]
        
        activity_dfs = []
        for file_key in activity_files:
            # Check for timeout or interruption between file processing
            if hasattr(signal, 'SIGINFO'):  # macOS specific
                signal.signal(signal.SIGINFO, lambda signum, frame: logger.info("Processing file: %s", file_key))
                
            df = read_csv_from_s3(s3_client, args.bucket, file_key)
            if df is not None:
                activity_dfs.append(df)
            else:
                logger.warning("Skipping invalid activity file: %r", file_key)

        # Process activity data
        activity_df = process_activity_data(activity_dfs, id_to_name_map)
        if activity_df.empty and activity_files:
            logger.warning("No valid activity data could be processed from %d files", len(activity_files))

        # Merge data
        merged_df = merge_data(activity_df, subscription_df)

        # Aggregate by month
        agg_df = aggregate_by_month(merged_df)
        if agg_df.empty:
            logger.warning("No data available after aggregation. Reports will be empty.")

        # Generate monthly reports
        num_reports = generate_monthly_reports(agg_df, args.output_dir, args.month)
        logger.info("Successfully generated %d monthly reports", num_reports)

        # Generate per-user reports if requested
        if args.per_user or args.user:
            num_user_reports = generate_user_reports(agg_df, args.output_dir, args.user)
            logger.info("Successfully generated %d user reports", num_user_reports)
            
        # Cancel the alarm since we're done
        signal.alarm(0)
        
        return 0

    except Exception as e:
        # Limit error disclosure in logs
        logger.error("Error processing metrics: %s", escape_log_data(str(e)))
        # Only log full traceback in debug mode
        if logger.level <= logging.DEBUG:
            logger.debug("Detailed error information:", exc_info=True)
        return 1
    finally:
        # Ensure we cancel any pending alarms
        if 'signal' in locals():
            try:
                signal.alarm(0)
            except:
                pass

if __name__ == "__main__":
    exit(main())

This is an example of how you can invoke it:

python3 process_metrics.py --bucket my-metrics-bucket \
                          --prefix logs \
                          --subscription-path user-activities/subscriptions.csv \
                          --output-dir ./reports \
                          --month 2025-01 \
                          --per-user

This command will:

  • Read subscription data from

s3://my-metrics-bucket/user-activities/subscriptions.csv

  • Look for activity logs in

s3://my-metrics-bucket/logs/AWSLogs/{account-id}/QDeveloperLogs/by_user_analytic/{region}/2025/01/

  • Process only data from January 2025 (due to the –month 2025-01 parameter)
  • Generate both monthly summary reports and individual user reports (due to –per-user)
  • Save all reports to the ./reports directory

In this new era of prompts, I will also share the prompt used as the foundation for the script that processes user activity data and subscription information stored in S3, combining them into monthly reports. Note that the original prompt was simpler. I utilized Q Developer to enhance the prompt based on my initial request. The final code integrates elements from the initial prompt and my modifications. The initial prompt likely contributed to 80-90% of the final script.

Create a Python script that processes Amazon Q Developer metrics data from S3. 

1. Input Sources:
    - User Activity Data:
        - Location: s3://YOURBUCKET/USER_DATA_KEY
        - Structure: CSV files organized in month/day folders
        - Key field: UserId
        - Date field: format MM-DD-YYYY
    - User Subscription Data:
        - Location: s3://YOURBUCKET/Amazon_Q_Users_Subscription_List.csv
        - Key field: Identity provider user ID (maps to UserId in activity data)
2. Processing Requirements:
    - Read all CSV files from the activity data folder structure
    - Join with subscription data using UserId/'Identity provider user ID'
    - Aggregate data by user and month using the Date field
    - Calculate monthly totals for all metrics
    - Include security features like input validation and sanitization
    - Replace NaN with 0
    - Some columns does not exists in all csv files
    - Use boto3 to interact with AWS S3
    - Use pandas for data processing
    - Include proper error handling and logging
    - Validate all inputs to prevent security issues
3. Script Requirements:
    - The script should be well-structured with separate functions
    - Argument parsing and validation
    - S3 client initialization
    - File listing and reading from S3
    - Data processing and aggregation
    - Report generation
4. Support command-line arguments for:
   - S3 bucket name
   - S3 prefix for logs
   - Path to subscription file
   - Output directory for reports
   - Optional filtering by month (YYYY-MM format)
   - Optional per-user report generation
   - Optional filtering for a specific user

Output example

Table 2 presents an extract of the script’s output, consolidating user interactions during March 2025. The data reveals interesting usage patterns among team members. While Artur shows a strong preference for chat and inline-chat interactions, Uther tends to engage more frequently with the /dev agent. This contrast in usage styles presents an opportunity for knowledge sharing within the team. I plan to ask Artur to demonstrate his workflow and possibly create a tutorial video showcasing how he creatively and effectively uses Q Developer in his daily work. This could inspire Uther and other team members to explore different interaction methods and potentially enhance their productivity through increased chat engagement.

Name Month Chat_MessagesSent InlineChat_AcceptedLineAdditions Dev_GeneratedLines
artur Mar-25 475 206 109
uther Mar-25 70 8 218
Table 2 – CSV extract of the script output

Conclusion

By combining subscription management, the developer dashboard, and user activity reporting, organizations can achieve a holistic understanding of their developers’ usage patterns. With this approach we can answer the initial questions posed at the beginning of this blog. Here’s how these features work together:

  1. How many Q Developer active users are there?

Answer: As a management account administrator within an organization, enable trusted access to view Amazon Q Developer subscriptions and their status from both management and member accounts in a unified list. For a single Amazon Q Developer AWS Account, the subscription displays all related subscriptions.

  1. How can we track usage trends?

Answer: The Amazon Q Developer Dashboard delivers insights into Amazon Q Developer feature usage, helping administrators pinpoint where developers gain the most value as an organization.

  1. Who are our power users?

Answer: The User Activity Reporting provides detailed metrics on user interactions, allowing administrators to identify top users, patterns, and potential enablement sessions for those who haven’t fully explored Amazon Q Developer.

Artur Rodrigues

Artur Rodrigues is a Principal Solutions Architect for Generative AI at Amazon Web Services (AWS), focused on the Next Generation Developer experience, enabling developers to work more efficiently and creatively through the integration of Generative AI into their workflows. Artur enjoys cycling and exploring the great outdoors of beautiful British Columbia in Canada. He is also a gelato aficionado and a fan of soccer and jiu-jitsu.

OpenSearch UI: Six months in review

Post Syndicated from Muthu Pitchaimani original https://aws.amazon.com/blogs/big-data/opensearch-ui-six-months-in-review/

OpenSearch UI has been adopted by thousands of customers for various use cases since its launch in November 2024. Exciting customer stories and feedback have helped shape our feature improvements. As we complete 6 months since its general availability, we are sharing major enhancements that have improved OpenSearch UI’s capability, especially in observability and security analytics, in this post.

OpenSearch UI is a serverless, fully managed dashboard to provide a scalable, zero-downtime, web-based interface for data analytics and visualizations. With OpenSearch UI, you can have a unified interface to gain actionable insights across multiple data sources, including Amazon OpenSearch Service domains, Amazon OpenSearch Serverless collections, and AWS services such as Amazon CloudWatch and Amazon Security Lake.

Use natural language for your AI-powered analytics with Amazon Q Developer

OpenSearch UI has transformed complex data analysis to be as simple as asking questions in natural language with its integration with Amazon Q Developer in OpenSearch. You can access the conversational chat pane by choosing the Amazon Q Developer icon in the top right corner of the UI. Amazon Q Developer will answer generic questions such as how to use the features in OpenSearch UI and how to use OpenSearch UI with additional data sources.

You can use the search bar on the Discover page to use the generative AI capabilities with your OpenSearch data. You can enter your question about your data in natural language. The query assistant feature will translate your question to Piped Processing Language (PPL), run the query, and show the results. There will also be an Amazon Q Summary section generated from the query results to answer your question. The query assistant feature now also works with data connections from Amazon Simple Storage Service (Amazon S3).

Additionally, you can use the generative AI feature for anomaly detection and visualizations for your data, so it’s straightforward to identify potential issues earlier and faster, reducing the mean time to resolution.

When an alert is triggered, you can choose the Amazon Q icon to generate a summary of the alert, so you can catch up on the context of this alert. The View insights button will provide further analysis of the alerts in combination with OpenSearch knowledge through a process called Retrieval Augmented Generation (RAG). If you want to further investigate the alert, you can choose View in Discover to proceed to log analytics.

Amazon Q Developer in OpenSearch Service will help you reduce troubleshooting time, resolve more issues without escalation, and extract actionable insights from your operational data using natural language instead of specialized queries. Refer to Amazon Q Developer in Amazon OpenSearch Service to get started with the AI assisted analytics experience.

Enhance enterprise security

We have improved OpenSearch UI’s security capability to meet the demanding needs of large enterprises. Through these enhancements, we’re making it seamless to manage secure access at scale so you can have precise control over who can access your analytics workspaces and data that resides in them.

Use SAML workflows through IAM federation

OpenSearch UI now supports Security Assertion Markup Language (SAML) through AWS Identity and Access Management (IAM) federation so that you can create a single sign-on (SSO) experience for your end-users that initiates authentication workflows from your external identity providers (IdPs), typically called IdP-initiated SSO. You might find this process familiar if your organization is using external IdPs (such as Okta) to manage user permissions and track user activities in accessing AWS services. You can now define a default relay state URL to share with your end-users with this support. Your end-users can use this URL to land directly in OpenSearch UI after authenticating with their IdP. You can also achieve fine-grained access control by defining different permissions for each IAM role assumed by different end-users. To get started, refer to Enabling SAML federation with AWS Identity and Access Management.

Secure access with AWS PrivateLink

OpenSearch UI now supports AWS PrivateLink. You can now access OpenSearch UI privately from within your virtual private cloud (VPC). To learn more, see Managing access to the OpenSearch UI from a VPC endpoint.

Enhancing workspace privacy

There are also new workspace-level privacy settings, so you can quickly configure your workspace with the right permissions with collaborators. For more details, refer to Using Amazon OpenSearch Service workspaces.

Expanded data access capabilities

OpenSearch UI now also offers following additional data access capabilities.

Support for cross-cluster search

Cross-cluster search is an OpenSearch feature with which you can query multiple connected OpenSearch Service domains across accounts and across AWS Regions. We added the capability to support these connected domains as data sources in OpenSearch UI. With this support, you can view remote connected clusters with an index pattern under the data source for the source cluster. To learn more, see Cross-Region and cross-account data access with cross-cluster search.

Regional expansion

To further expand the data access capabilities of OpenSearch UI, we expanded its availability to two more regions: Asia Pacific (Hong Kong) and Europe (Stockholm).

Conclusion

The past 6 months after general availability of OpenSearch UI have seen significant progress in making OpenSearch UI more user-friendly, more available, and more secure. From natural language-based exploration to enterprise security, these feature enhancements reflect our commitment to simplify and improve your data analytics experience. To learn more, refer to Using OpenSearch UI in Amazon OpenSearch Service and get updates through Amazon OpenSearch Service user interface release history.


About the Authors

Muthu Pitchaimani is a Search Specialist with Amazon OpenSearch Service. He builds large-scale search applications and solutions. Muthu is interested in the topics of networking and security, and is based out of Austin, Texas.

Hang (Arthur) Zuo is a Senior Product Manager with Amazon OpenSearch Service. Arthur leads generative AI, workspaces, and infrastructural features in OpenSearch UI. Arthur is passionate about cloud technologies and building data products that help users and businesses gain actionable insights and achieve operational excellence.

Amazon Q Developer CLI supports image inputs in your terminal

Post Syndicated from Keerthi Sreenivas Konjety original https://aws.amazon.com/blogs/devops/amazon-q-developer-cli-supports-image-inputs-in-your-terminal/

In this post I will explore how the image support feature in Amazon Q Developer Command Line Interface (CLI) transforms development workflows. Q Developer CLI recently added image support, expanding its capabilities to process visual information and enhancing developer productivity. This new feature allows developers to interact with diagrams, architecture blueprints, and other visual assets directly through the command line.

Modern software development increasingly relies on visual representations to communicate ideas. For example, architecture diagrams illustrate system components and their interactions, while entity-relationship diagrams map out database structures. Translating visual assets into working code is usually a manual, error-prone process of interpretation and implementation.

The new image support in Q Developer CLI bridges this gap by allowing developers to provide images directly to the Q Developer CLI agent for analysis. I’m excited to use this feature to transform my architecture diagrams from scrappy, hand-drawn ideas to polished design documents, and then to infrastructure as code. I look forward to applying it in various use cases, whether I’m getting started on a new project or streamlining my daily workflows.

At the time of launch, the Q Developer CLI supports JPEG, PNG, WEBP, and GIF image formats along with the ability to upload 10 images per request. You must use the latest version (1.10.0 or above) of Q developer CLI to enjoy the image support feature in Q Developer CLI. Use this guide to upgrade or install the latest version.

I will use the following four scenarios as examples to demonstrate the benefit of image support for Q Developer CLI.

Use-case 1: Generating infrastructure as code from an architecture diagram

The following diagram depicts an application that resizes images. It includes a source Amazon S3 bucket into which a user uploads an image, and an AWS Lambda function that resizes the image and stores it in a destination S3 Bucket. I can now convert architecture diagrams to code using Q Developer CLI.

AWS architecture diagram showing an image resizing workflow. The diagram illustrates a source S3 bucket connected to an AWS Lambda function, which then connects to a destination S3 bucket. The flow represents an automated image resizing pipeline.

Architecture for an image resizing application

In the following screenshot, I asked the Q Developer CLI to “Please provide me with a reference terraform template using best practices”. Note that dragging and dropping the image into the CLI will add the path to your prompt.

Screenshot of Amazon Q Developer CLI interface showing generated Terraform code for S3 buckets and Lambda function configuration based on the uploaded architecture diagram

CLI with Terraform code generated by Q Developer

The prior image shows a portion of the response that Q Developer CLI has generated.

Q Developer responds with the terraform template required to get started with building the image resizing application. Q Developer CLI analyzed the image, identified the components and their relationships, and generated the corresponding Terraform code. While not shown in the image, the response included the Lambda function’s code in Python and the IAM permissions needed for the Lambda function.

Previously, transforming this diagram into infrastructure as code would require me to manually interpret each component and write the corresponding configuration. With image support, I can now automate much of this process and refine the generated code through a conversation with Q Developer. I can then have a conversation with Q Developer to refine the generated code, ask questions about specific implementation details, or request modifications based on additional requirements and output the code to a .tf file.

Use-case 2: Converting ER diagrams to database schemas

For our second scenario, let’s consider a use case where I’m a part of a data modeling team developing a course management software for universities. I have created an entity-relationship (ER) diagram for their core data structures. I can now use Q developer to help me convert the ER diagram to SQL.

Image shows an Entity Relationship Diagram with relationships between entities such as Courses, Students, Instructors, and Departments with their attributes.

Course management Entity Relationship Diagram

In the following screenshot, I asked the Q Developer CLI to use the ER diagram to create the database schema.

Screenshot of Amazon Q Developer CLI interface showing the beginning of a generated design document with system architecture and process flow sections based on the hand-drawn diagram

CLI with user prompt and SQL generated by Q Developer

The image shows a continuation of SQL Code response from Amazon Q Developer CLI for table creation generated from the ER Diagram reference.

CLI with SQL generated by Q Developer

The prior image shows the response the that Q Developer CLI generated.

Q Developer analyzed the diagram, identified entities, attributes, and relationships, then generated the appropriate SQL code for creating the database schema.

After Q Developer produces the results, I can refine this schema through a conversation with Q Developer by requesting changes to string lengths, indexes, etc., or requesting explanations of design decisions.

Use-case 3: Converting a hand drawn image to a design document

Consider a scenario where I have brainstormed an idea on paper and I would like to share this with my team. In the following image, I have hand drawn the order flow for a website. When the website user orders books from the website, the application updates inventory, then calls the payment and delivery actions. I can now use the Q Developer CLI to draft documentation from the hand drawn idea.

Hand-drawn flowchart showing the order process for a book website, including steps for order placement, inventory update, payment processing, and delivery actions

Hand drawn order flow for a website

In the following example, I asked Q Developer to write a design document using this image as a reference.

Amazon Q Developer CLI interface showing a command prompt with image input and the resulting generated code response.

CLI with user prompt and response generated by Q Developer

The above screenshot shows that, Q Developer first read the image and understood the content from the hand drawn diagram image.

The image shows a continuation of Design documentation response from Amazon Q Developer CLI for table creation generated from the ER Diagram reference.

CLI with the response generated by Q Developer

The prior screen shot is a portion of the response that Q Developer CLI has generated.

Q Developer converted the idea into a design document including system architecture, process flow, data model, functional requirements, and technical requirements. I can also ask Q Developer to output the context to a .md file. This reduces the amount of time going from idea to execution and streamlines document writing.

Use-case 4: Building a UI mockup/wireframe from a screen shot

Let’s say, I want to get started with building a User Interface (UI) from my design document from use-case 3. I can provide a reference image to Q Developer for generating initial wireframes for my UI.

Screenshot of a sample book sales website.

Sample book sales website home page

In this example, I asked Q Developer to help generate a front-end for a new website in Vue.js

Amazon Q Developer CLI interface showing a command prompt with image input and the resulting generated code response. The screenshot shows Amazon Q Developer CLI generating Vue.js setup instructions

CLI with the user prompt and response generated by Q Developer

The image shows a continuation of Vue.js code response from Amazon Q Developer CLI that uses the book wesbite screenshot as a reference.

CLI with Vue.js code generated by Q Developer

The prior image shows a portion of the Vue.js code generated by the Q Developer CLI to re-produce the front-end of the website in the screenshot. Once I verify the code, I can then ask Q Developer CLI to create these files locally.

This approach reduces the error-prone aspects of wireframe creation, allowing me to focus on creative design decisions instead of repetitive setup tasks. In this way, I can accelerate development cycles, ensure consistency across components, and provide a foundation that can be easily customized to meet specific project requirements.

Additional possibilities:

Apart from the prior examples, Q Developer CLI can analyze many types of images, including:

  • Flow charts and process diagrams
  • Class diagrams for object-oriented design
  • Network topology diagrams
  • Screenshots of error messages or application states

This versatility makes Q Developer CLI a powerful tool for various development workflows.

Conclusion:

The addition of image support to Amazon Q Developer CLI represents a significant step forward in bridging the gap between visual and textual representations in software development. By allowing me to work with diagrams and other visual assets directly from the command line, Amazon Q Developer improves my efficiency in translating design into implementation, reducing errors and accelerating development cycles. I encourage you to explore this new capability and discover how it can enhance your development workflow.

To learn more about Q Developer and its capabilities, visit the documentation.

About the Author: 

Authors-image

Keerthi Sreenivas Konjety

Keerthi Sreenivas Konjety is a Specialist Solutions Architect for Amazon Q Developer, with over 3.5 years of experience in AI, ML and Data Engineering. Her expertise lies in enabling developer productivity for AWS customers. Outside work, she enjoys photography and AI content creation.

Exploring the latest features of the Amazon Q Developer CLI

Post Syndicated from Brian Beach original https://aws.amazon.com/blogs/devops/exploring-the-latest-features-of-the-amazon-q-developer-cli/

It’s been a few weeks since my last post about the Amazon Q Developer Command Line Interface (CLI), and I’m excited to share all the great new features and improvements the team has been working on. The CLI has been evolving rapidly with a focus on enhancing user experience, improving context management, and adding powerful new capabilities. In this post, I’ll walk you through the most significant changes that make the Amazon Q Developer CLI even more powerful and user-friendly.

Conversation Persistence

One of the most requested features has been the ability to persist conversations, and I’m thrilled to share that this is now available. With the new q chat --resume command, your conversations are now automatically saved by a working directory. This means you can pick up right where you left off when you return to a project, without having to rebuild context or repeat information.

Q Developer has also added two new commands to give you more control over your conversation state:

  • /save allows you to explicitly save the current conversation state
  • /load lets you restore a previously saved conversation

These commands make it easier to manage multiple conversation threads related to different aspects of your project. You can save a conversation about one feature, switch to working on something else, and then load the previous conversation when you’re ready to continue.

A terminal interface showing the Amazon Q logo in dotted cyan text. Below it displays a 'Did you know?' tip explaining that users can resume the last conversation from their current directory using 'q chat --resume'. The bottom shows command shortcuts including '/help' for all commands, 'ctrl + j' for new lines, and 'ctrl + s' for fuzzy search. The terminal shows a successful import of conversation state from 'order-service.json'.

MCP and Tool Use Enhancements

The Model Context Protocol (MCP) is a key part of the Amazon Q Developer CLI, allowing for extensibility through additional tools and servers. Q Developer has made several improvements to how MCP servers are loaded and managed:

First, Q Developer has implemented background MCP server loading, which significantly improves startup time for q chat. Instead of waiting for all MCP servers to initialize before you can start interacting with Q Developer, the CLI now loads servers in the background while you begin your conversation. This means you can start working immediately, with tools becoming available as their servers finish loading.

The team has also added a new subcommand, q mcp, which provides a dedicated interface for updating and managing your MCP server configuration. This makes it easier to add, remove, or modify the MCP servers that extend your CLI’s capabilities.

For more granular control over which tools can be used, Q Developer has added the /tools command in q chat. This allows you to manage permissions for individual tools, giving you more control over what Q Developer can do in your environment. You can also reset permissions for a specific tool if you change your mind.

A terminal window showing a tools permission list with two main sections. The first section shows SQLite (MCP) commands, all marked as 'not trusted' including operations like list_tables, read_query, create_table, etc. The second 'Built-in' section lists system commands with varying trust levels: fs_read and report_issue are marked as 'trusted', while fs_write is 'not trusted', and use_aws and execute_bash are marked for 'trust read-only commands'. At the bottom, there's a note stating 'Trusted tools can be run without confirmation'.

Improved Context Control

Context is crucial for getting the most out of Q Developer, and the team has made several improvements to how you can manage and view context:

The file selection in q chat‘s fuzzy finder is now git-aware, making it easier to include relevant files from your repository. This is particularly useful when working with large codebases, as it helps you focus on the files that matter for your current task.

Q Developer has added fuzzy search for slash commands with Ctrl + s, allowing you to quickly find and execute commands without remembering their exact syntax. This makes the CLI more accessible, especially for new users or those who don’t use certain commands frequently.

The /context show --expand command has been improved to provide more detailed information about the current context, helping you understand what Q Developer knows about your environment. The team has also enhanced the context file display in q chat to make it more informative and easier to read.

One of the most exciting additions is the new capability for dynamically adding context to messages with context hooks. This allows the CLI to automatically include relevant context based on your conversation, improving the quality of responses without requiring manual context management.

A terminal window showing an expanded context view with two main sections. The 'global' section (marked with a globe icon) lists three markdown files: amazonq/rules/**/*.md, README.md, and AmazonQ.md. It includes hooks for 'On Session Start' and 'Per User Message', both showing '<none>‘. Below that, a ‘profile (default)’ section (marked with a user icon) shows ~/python-coding-standards.md and has the same hook structure, also with ‘<none>‘ values. The command shown at the top is ‘/context show –expand’.” width=”1140″ height=”624″></p>
<h2>Context Window Awareness and Optimization</h2>
<p>As conversations grow longer, managing the context window becomes increasingly important. Q Developer has added two new commands to help with this:</p>
<ul>
<li><code>/usage</code> displays an estimate of the context window usage, helping you understand how much of the available context space you’re using</li>
<li><code>/compact</code> summarizes the conversation history, allowing you to reduce the size of the context while preserving the important information</li>
</ul>
<p>These tools help you make the most of the available context window, ensuring that Q Developer has access to the most relevant information without running into token limits.</p>
<p><img decoding=

Image Support

I’m particularly excited to announce that q chat now supports images! This opens up a whole new dimension of interaction, allowing you to share screenshots, diagrams, or other visual information with Q Developer. This can be incredibly useful for debugging UI issues, discussing design concepts, or explaining complex ideas that are difficult to convey through text alone.

A text explanation of a UML sequence diagram for a Sales Transaction process. The text describes three main components: 1) Participants including an Actor (represented by a stick figure) and a System (represented by a rectangle), 2) Interaction Flow showing message exchanges and lifelines represented by vertical dashed lines, and 3) Loop Structure with a box labeled 'for as many items as needed' representing an iteration where the Actor scans items with product ID and amount parameters.

Editor for Long Prompts

For complex queries or detailed instructions, you may want multiple paragraphs. Q Developer supports Ctrl + j, allowing you to add a newline character to the prompt. In addition, the team has added the /editor command, which opens your configured text editor for composing prompts. This makes it much easier to craft detailed, multi-paragraph prompts or to edit and refine your questions before sending them to Q Developer.

A screenshot showing instructions for performing a threat model analysis using the STRIDE framework. The text requests threat analysis details in markdown format, including threat source, prerequisites, actions, impacts, and affected assets. It asks for severity ratings (low/medium/high) and AWS-based mitigation suggestions with documentation links. The image includes a template structure showing how to format the markdown response, with sections for "Threat Model Analysis," "Spoofing," and individual threat entries.

Expanded Region Support

I’m happy to announce that Q Developer has expanded its regional availability. Professional tier users can now access Q Developer in the Frankfurt region (eu-central-1). This expansion is part of Q Developer’s ongoing effort to provide lower latency and better service to customers across the globe. By adding support for the Frankfurt region, Amazon Q Developer is more accessible to European customers, allowing them to benefit from reduced latency and improved performance.

A terminal screenshot showing a prompt to select an IAM Identity Center profile. Two options are displayed: "q-dev-america" with an ARN in the us-east-1 region, and "q-dev-emea" with an ARN in the eu-central-1 region. The command being executed is "% q profile".

Ability to Manage Issues in CLI

Amazon Q Developer has made it easier to report issues directly from the CLI with two new features:

  • The /issue command in q chat allows you to create new GitHub issues
  • The report_issue tool provides a programmatic way for Q Developer to help you create detailed issue reports

These features streamline the feedback process, making it easier for you to report bugs or request features, and for the team to improve the CLI based on your input.

A terminal screenshot showing an issue reporting interface. The prompt explains how to submit feedback or feature requests to a GitHub repository, listing required information including: 1) a title and 2) optional details about actual behavior, expected behavior, and reproduction steps. At the bottom is a user comment stating "I just wanted you to know that all these new features are awesome!"

Keeping Up with Future Changes

To help you stay informed about new features and improvements, Q Developer has added a --changelog flag to the q version command. This displays the change log directly from the CLI, making it easy to see what’s new without having to visit the GitHub repository or read blog posts like this one.

Conclusion

The Amazon Q Developer CLI continues to evolve rapidly, with new features and improvements that make it an even more powerful tool for developers. From conversation persistence to image support, these updates reflect Q Developer’s commitment to building a CLI that helps you be more productive and effective in your daily work. I encourage you to try out these new features by installing the Amazon Q Developer CLI. Thank you for your continued support and feedback, which helps make Amazon Q Developer better every day.

Mastering Amazon Q Developer Part 1: Crafting Effective Prompts

Post Syndicated from Will Matos original https://aws.amazon.com/blogs/devops/mastering-amazon-q-developer-part-1-crafting-effective-prompts/

As organizations increasingly adopt AI-powered tools to enhance developer productivity, your ability to effectively communicate with these assistants becomes a valuable skill. This guide explores how you can craft prompts that deliver accurate, useful results when working with Amazon Q Developer.

Your success with Amazon Q Developer depends directly on how well you communicate with it. Through my work as a Principal Specialist Solutions Architect on the Next Generation Developer Experience team at AWS, I’ve observed that developers experience varying degrees of success based primarily on their approach to prompt construction. The difference between a vague request and a well-structured prompt can be the difference between wasted time and a productivity breakthrough.

Recent McKinsey research reveals that developers can complete tasks up to twice as fast with generative AI when using proper prompting techniques [1]. Even more impressive, developers tackling complex tasks are 25-30% more likely to complete them within given time-frames when using these tools effectively. These productivity gains aren’t automatic—they depend on mastering the art and science of prompt engineering.

Based on patterns observed across numerous customer interactions, this guide provides practical techniques to help you maximize the value of your AI-assisted development experience. You’ll learn how to transform your interactions to consistently produce helpful, relevant assistance that can dramatically improve your development workflow.

Key Takeaways

  • Structure your prompts with clear context, specific requirements, and desired output format
  • Include relevant technical details about your environment and constraints
  • Avoid vague requests and provide specific examples when possible
  • Use the provided prompt template to ensure consistent results

Getting Started with Amazon Q Developer

Already using Amazon Q Developer? Great! This guide will help you get more value from your interactions. If you haven’t set up Amazon Q Developer yet, check out the getting started guide.

Understanding the Impact of Good Prompts

The rapid adoption of AI technologies makes prompt engineering skills essential for today’s developers. McKinsey’s latest global survey reveals that 65% of organizations regularly use generative AI, nearly double from their previous survey. When developers master prompt engineering, they’re 25-30% more likely to complete complex tasks within given timeframes.

What Makes an Effective Prompt?

  • Specific Request: State exactly what you need
  • Clear Background: Describe your project, requirements, and constraints
  • Additional Context: Provide code, configuration, or other additional context
  • Expected Output: Specify how you want the information presented

Here’s how this works in practice:

Poor prompt:

How do I deploy a container on AWS?

Effective prompt:


I need to deploy a containerized Node.js e-commerce application that handles 
50,000 daily users with peak loads during promotional events.
Requirements:
- High availability across multiple regions
- MongoDB for persistence
- Auto-scaling capabilities

Please provide:
1. AWS architecture diagram
2. List of required services with configurations
3. Security best practices
4. Operational monitoring recommendations

Common Patterns to Avoid

Short or Vague Requests:

  • Add Docs
  • Make this better
  • Check this
'Add docs' simple prompt with generic response.

Not much to go on here. Amazon Q Developer will likely provide generic documentation.

'Check this' simple prompt with generic response.

Another vague prompt with a generic response.

Overly Broad Questions:

  • How do I use AWS?
  • What's the best practice?
  • Help with Lambda
Image showing the Amazon Q Developer IDE Chat panel where the user entered the vague prompt: 'Help with Lambda'. Amazon Q Developer responds by asking clarifying questions.

The prompt is so vague that Amazon Q Developer responds by asking clarifying questions.

Image showing the Amazon Q Developer chat pane where the user entered the prompt: "Create a Lambda function that processes S3 events."

The more specific prompt allows Amazon Q Developer to provide a more precise response.

Remember: The quality of information you receive directly correlates with the quality of the information you provide.

Proven Techniques for Better Results

To help you apply these principles consistently, I’ve developed a template structure that incorporates all the key elements of an effective prompt. This framework can be adapted for various scenarios and serves as a starting point for your interactions with Amazon Q Developer. While Amazon Q Developer will fill in some parts of this context (see the next post in this series), you just need to make sure this information is available.

These are the principles demonstrated in the template:

  • Technical Context Requirements
    1. Specify your technology stack and versions
    2. Include environment details
    3. Mention compliance requirements
    4. Define scale expectations
  • Example Specifications
    1. Include relevant code snippets
    2. Paste error messages
    3. Reference configuration files
    4. Show current architecture
  • Output Format Guidelines
    1. Request specific documentation formats
    2. Ask for diagrams when needed
    3. Specify code language preferences
    4. Indicate level of detail needed
Image showing the Amazon Q Developer chat panel with the user submitted prompt: "Document the requirements for an application that will process images. Format as a technical requirements document using markdown markup. Output as a single markdown code-block." The response is much more detailed, and aligns with the user's request.

The specification of the output format ensure the response is what you expect.

Quick Reference Prompt Template

Use this template to structure your prompts:


[Business Context] 
- Project description: 
- Performance requirements: 
- Compliance needs: 
- Scale expectations: 

[Technical Details] 
- Current technology stack: 
- Versions/dependencies: 
- Technical constraints: 
- Environment details: 

[Specific Request] 
- Task description: 
- Expected outcome: 
- Special considerations: 

[Output Format] 
- Desired format: 
- Level of detail: 
-  Examples needed: 
- Additional requirements:

Best Practices for Daily Use

Successfully working with Amazon Q Developer requires consistent application of proven practices. These guidelines, developed through extensive customer interactions, will help you maximize the value of your AI-assisted development experience.

  • Start with clear business objectives
  • Include relevant technical constraints
  • Specify performance requirements
  • Request specific output formats
  • Provide examples when possible

Through extensive customer interactions, we’ve found that following these practices consistently produces better results and reduces the need for follow-up clarification.

Take Action Now

Additional Resources

What’s Next?

In the next part of this series, we’ll explore advanced context management in Amazon Q Developer and dive into the new prompt catalog features. You’ll learn how to:

  • Build and maintain context across multiple interactions
  • Use the prompt catalog effectively
  • Handle complex, multi-step development tasks
  • Optimize responses for your specific use cases

Stay tuned, and start applying these techniques today to transform how you build on AWS!

About the author:

Will Matos

Will Matos is a Principal Specialist Solutions Architect at AWS, revolutionizing developer productivity through Generative AI, AI-powered chat interfaces, and code generation. With 25 years of tech experience, he collaborates with product teams to create intelligent solutions that streamline workflows and accelerate software development cycles. A thought leader engaging early adopters, Will bridges innovation and real-world needs.

Continue to take control over your code with Amazon Q Developer’s new context features

Post Syndicated from Eva Knight original https://aws.amazon.com/blogs/devops/continue-to-take-control-over-your-code-with-amazon-q-developers-new-context-features/

In this blog post, I explore Amazon Q Developer’s latest enhancements to the IDE chat experience including increased context control, chat history and other conversation management features. On March 11th, 2025, my colleague published Take control of your code with Amazon Q Developer’s new context features detailing several improvements to the chat experience within VS Code. These included increased context transparency, the ability to select specific files or folders as context, prompt libraries for reusing prompts across conversations and projects, and project rules to help enforce coding standards and best practices across your teams.

Since then, Amazon Q Developer released additional features in VS Code to help provide users with more control over their conversations and enhance their ability to maintain development context across longer periods. These new capabilities make your interactions with Amazon Q Developer not just more efficient, but also more contextual and persistent—helping you maintain your development flow, even when work spans hours or days. Now, let’s jump in and explore some of the new features available today.

Conversation persistence

We’ve all been there—you’re deep in conversation with Amazon Q Developer, maybe you’re debugging an authentication problem, optimizing a complex database query, or designing a new API structure. You and Amazon Q Developer have been going back and forth, uncovering insights and piecing together solutions.

Then reality intervenes. You close your IDE to focus on another task, step away for a meeting, or maybe update your computer. When you finally return to your IDE, ready to dive back in, you’re met with a blank chat window. All that context, all those valuable exchanges—gone. You find yourself trying to reconstruct your train of thought, wasting precious time and momentum.

Amazon Q Developer now preserves your conversations across your IDE sessions. Instead of starting from scratch each time you open the IDE, you can now come back to your conversation and pick up right where you left off.

Conversation History Search

It isn’t just after a closed IDE session or coming back to your computer after a long-weekend that you want Amazon Q Developer to remember what you have been working on. Sometimes you need to reference a previous solution — maybe Amazon Q Developer gave you some good advice on optimizing your database queries that you want to use elsewhere, or maybe you decided to work on some front-end components so you could have fresh eyes for the API performance issue you’ve been working at.

Now, you can access your previous conversations with Amazon Q Developer by clicking on the search icon in the top right corner of your chat window. You can quickly locate specific discussions by typing keywords into the search bar, then either review the previous exchange or continue the conversation where you left off.

Screenshot of an Amazon Q interface showing a chat window. The user has requested to add Javadocs style comments to a Java file. The AI assistant is responding with an offer to help add Javadoc comments, mentioning a TODO for adding these comments and offering to provide a template.

Fig 1 – View chat history feature in the Amazon Q Developer VS Code chat interface.

Conversation Export

But what if you need to share these insights with a teammate or want to keep a local record for future reference? You can now easily export your chat sessions as markdown files, preserving all the valuable information for offline use or collaboration. To do this, click the export button located directly to the right of the chat history button. Alternatively, when browsing your chat history, you can export individual sessions by clicking the three dots on the right side of each conversation entry.

Screenshot of an Amazon Q chat interface showing a bulleted list of test requirements or specifications. The list includes items about using temporary files, testing success/failure scenarios, verifying edge cases and invalid inputs, testing public methods of a WordList class, and including cleanup annotation.

Fig 2 – Export chat feature in the Amazon Q Developer VS Code chat interface.

Increasing your control over context

Last July, we announced the ability to use @workspace in your chat session to provide comprehensive context across your entire application within the IDE. To provide more control over what Amazon Q Developer uses as context, earlier this year we released the ability to use the @ symbol in the chat to include specific folders or files as context for your conversation.

We are now taking your level of control one step further to allow you to use @ in your conversation to find and include classes, functions, and global variables into the input context. Rather than leaving it up to Amazon Q to determine the relevant files, folders, or functions for your request, you can continue to be more explicit with your request to receive the most relevant and accurate responses.

Screenshot of an Amazon Q interface showing a file search/navigation panel with "ja:" search query displaying Java-related files. The list includes various Java source files and configuration files from a Q-Words project, including controllers, models, and utility classes. At the bottom is a search input box with "@ja" and a note about Amazon Q Developer using generative AI.

Fig 3 – Context selection in Amazon Q Developer chat, using “@” to show relevant folders, files, functions.

Conclusion

Amazon Q Developer is continuing to evolve its features that help put developers in control of their coding experience. By offering conversation persistence, history search, and export capabilities, Amazon Q Developer works to create continuity that allows developers to maintain their momentum across sessions and easily revisit past solutions. The expanded context control features empower developers to fine-tune their interactions with Amazon Q Developer, and receive more precise and relevant responses.

To get started with these features in VS Code, visit the Amazon Q Developer Getting Started guide and explore the full range of capabilities that can help you create impressive software more efficiently.

Eva Knight

Eva Knight is a Worldwide Go-To-Market specialist at Amazon Web Services (AWS) focusing on generative AI across the software development lifecycle. Her journey at AWS began in 2022 as a Business Development Intern, transitioning to a full-time role after completing her Bachelor’s degree in Marketing and Information Systems from the University of Washington.

How to enhance your application resiliency using Amazon Q Developer

Post Syndicated from Dr. Rahul Sharad Gaikwad original https://aws.amazon.com/blogs/devops/how-to-enhance-your-application-resiliency-using-amazon-q-developer/

“Everything fails, all the time” – Werner Vogels, Amazon.com CTO

In today’s digital landscape, designing applications with resilience in mind is crucial. Resiliency is the ability of applications to handle failures gracefully, adapt to changing conditions, and recover swiftly from disruptions. By integrating resilience into your application architecture, you can minimize downtime, mitigate the impact of failures, and ensure continuous availability and performance for end-users.

Amazon Q Developer, a generative AI-powered assistant for software development lifecycle (SDLC), helps design resilient architectures and enhance application availability. It recommends best practices, analyzes code, and identifies potential failure points, serving as an expert companion to strengthen application architecture and boost system availability through the following key resiliency practices.

  • Resilient design pattern recommendations: Access tailored design patterns like distributed systems, microservices, and serverless architectures. Amazon Q offers recommendations across redundancy, robust failovers, and circuit breakers to boost resilience in your environment.
  • Disaster Recovery planning: Amazon Q offers expert guidance on comprehensive disaster recovery (DR), including efficient backups, systematic restorations, strategic data replication, and seamless failovers to ensure rapid recovery from disruptions with minimal impact.
  • Customized Resiliency testing frameworks: Create custom templates to simulate diverse failure scenarios, such as network degradation and infrastructure outages. This streamlines thorough resilience verification across your systems.
  • Failure mode evaluation: Use Amazon Q to conduct comprehensive Failure Mode and Effects Analysis (FMEA) identifying infrastructure vulnerabilities and assessing their impact. Amazon Q then ranks these issues by severity, enabling you to prioritize and address the most critical risks to protect your production environment.

In the following sections, we will demonstrate how Amazon Q improves the resiliency of a foundational application architecture.

Prerequisites

To begin using Amazon Q, the following are required:

Application Overview

We have a three-tier web application shown below that is running on AWS in a single Availability Zone (AZ). The architecture consists of Application Layer hosted on Amazon Elastic Kubernetes Service (Amazon EKS) cluster with two Amazon Elastic Compute Cloud (Amazon EC2) nodes in a single-AZ and the Data Layer uses Amazon Relational Database Service (Amazon RDS) instance deployed in single-AZ configuration. The architecture is functional but has several limitations. It poses a single point of failure and offers limited application availability with no fault tolerance. High response times may occur because there is no caching layer in front of the database. Additionally, the lack of auto-scaling can lead to resource contention.

A three-tier web application basic architecture running on AWS in a single Availability Zone.

Basic Application Overview

Enhance Application Resiliency

Let’s explore how Amazon Q helps incorporate resiliency best practices that enhance system availability in our basic application architecture.

Resilient architecture recommendations

The initial architecture faced challenges with reliability, performance and scalability, largely due to its single-point of failure and lacked redundancy. To address this, we described the existing application design and its challenges to Amazon Q using a natural language prompt to seek resiliency recommendations.

Prompt for improving the architecture design:

I have manually setup an application that runs within an EKS cluster on two EC2 nodes in single AZ. My application is not highly available and scalable. It talks to an RDS database which is single AZ. However, there is high response times from database. Provide me only the recommendations to re-design this application architecture at each layer that will addresses all these issues.

Amazon Q offering resiliency architecture recommendations

Amazon Q offering resiliency architecture recommendations

Amazon Q analyzed the provided context and recommended improvements such as introducing Multi-AZ deployments for high availability, adding auto-scaling groups for elasticity, and incorporating caching layers to enhance performance. These targeted recommendations helped redesign the architecture to be more resilient and scalable, directly addressing the initial shortcomings.

Disaster Recovery (DR) recommendations to improve the architecture

To further enhance resiliency, we prompted Amazon Q for disaster recovery (DR) recommendations. We asked for guidance aligned with the AWS Well-Architected Framework. This built upon the previously improved architecture design.

Prompt for recommendations on Disaster Recovery (DR) and architecture based on RTO/RPO

Based on the above improvements on AWS architecture design, share recommendations for Disaster Recovery (DR) based on AWS Well Architected Framework

Optionally, we can use advanced prompts like the below with additional context:

Please provide a recommendations to redesign my application that is running on an EKS cluster with two EC2 nodes and a single-AZ RDS database, addressing high database latency, low availability, and scalability issues. Suggest improvements across all architectural layers including presentation tier, application tier and data tier to enhance performance, resiliency, and scalability. Also, recommend DR strategies aligned with the AWS Well-Architected Framework focusing on resilience, data protection, and recovery.

Amazon Q tailoring recommendations based on business requirements using  AWS Well-Architected Framework

Amazon Q tailoring recommendations based on business requirements using AWS Well-Architected Framework

Amazon Q provided detailed DR strategies. These included multi-region configuration, backup and restore procedures, and best practices for meeting specific Recovery Time Objective (RTO) and Recovery Point Objective (RPO) requirements.

Prepare DR strategy based on RTO and RPO requirements:

Diving further, asking for a specific disaster recovery strategy that meets the application RTO requirements of 2 hours and RPO requirements of 30 minutes.

Prompt for DR strategy based on RTO/RPO values

Which DR strategy should I use if my RTO is less than 2 hours and RPO is less than 30 minutes?

Amazon Q recommending disaster recovery strategy

Amazon Q recommending disaster recovery strategy

Amazon Q recommended a Pilot light approach, detailing the setup and components needed to achieve the specified disaster recovery objectives.

Define resiliency testing workflow, identify key metrics and tools

As we incorporate resiliency best practices into the application architecture, its is important to employ a resiliency test workflow to ensure application’s resiliency requirements are met. To do this, we are asking for guidance to define an end-to-end resiliency testing process workflow. We also want to identify the key metrics and tools needed to test the resilience of each AWS service involved in the architecture.

Prompt for defining the resiliency testing workflow:

Define the end-to-end resiliency testing process workflow. Also, identify the key metrics and tools that should be used to test the resilience of each AWS service involved in the improved architecture design.

Amazon Q offering resiliency testing best practices and tools

Amazon Q offering resiliency testing best practices and tools

Amazon Q offers a step-by-step approach to define resiliency testing experiments and prepare the environment for testing.

Failure mode evaluation to prioritize resiliency tests

Failure Mode and Effects Analysis (FMEA) can further assist with designing the resiliency tests. It is a proactive method to identify potential failures in processes or systems, assess their impact, and prioritize critical issues. It evaluates failure modes across hardware, software, human factors, and external events, enabling teams to develop strategies for prevention, detection, and mitigation, ultimately enhancing system resilience.

Leveraging Amazon Q, we requested a comprehensive FMEA report that includes components, cause, effect and their respective Risk Priority Numbers (RPN). RPNs are calculated by multiplying three key factors: Severity (S), Occurrence (O), and Detection (D). It helps organizations understand and prioritize which risks to address first.

Prompt for designing the FMEA template and scoring:

Create the FMEA in tabular format with scoring for improved architecture design above keeping in mind the RTO/RPO values and provide the steps for execution as well.

Amazon Q assisting with systematic risk assessment and FMEA report

Amazon Q assisting with systematic risk assessment and FMEA report

Amazon Q intelligently incorporated previously defined RTO and RPO requirements to identify critical failure scenarios and calculated RPN for each potential incident.

Enhanced Architecture Implementing Resiliency Best Practices

After identifying the key pain points in our original architecture such as single points of failure, limited scalability, and lack of automated recovery, we leveraged Amazon Q to analyze our architecture to get targeted recommendations to elevate the resiliency. By describing our requirements and challenges to Amazon Q, we received actionable guidance on AWS best practices and service configurations, which we then implemented to transform our infrastructure for high resilience and availability.

Resilient Application Architecture

Resilient Application Architecture

The original Application Layer was running in a single Availability Zone without auto-scaling, leading to potential downtime and performance bottlenecks. Amazon Q recommended distributing Amazon EKS worker nodes across multiple Availability Zones and enabling the Cluster Autoscaler to dynamically adjust node capacity based on traffic patterns. Additionally, it suggested implementing horizontal pod autoscaling within Amazon EKS to automatically scale application resources according to CPU utilization and custom metrics. Following these recommendations, we deployed Amazon EKS worker nodes across three Availability Zones, configured Cluster Autoscaler and horizontal pod autoscaling, and integrated an Application Load Balancer, to intelligently distribute incoming traffic. These changes significantly improved scalability, fault tolerance, and performance.

The Data Layer initially relied on a single-instance Amazon RDS deployment, which posed a risk of downtime and limited read performance. Upon review, Amazon Q advised implementing a Multi-AZ Amazon RDS configuration to enable automated failover and improve availability. It also recommended deploying read replicas to offload read-heavy workloads and enhance performance. Furthermore, Amazon Q suggested adding a Multi-AZ Amazon ElastiCache for Redis to reduce database load and speed up data access. We incorporated these recommendations, resulting in a more resilient and performant data layer capable of handling failover scenarios and scaling read operations efficiently.

The Presentation Layer lacked an optimized content delivery mechanism and comprehensive security controls. Amazon Q recommended integrating Amazon CloudFront as a content delivery network to accelerate the delivery of static content and reduce load on application servers. It also suggested deploying AWS WAF to protect against common web exploits. To improve operational visibility, Amazon Q emphasized the importance of comprehensive monitoring using Amazon CloudWatch, combining logs, metrics, and traces for rapid issue detection and resolution. Implementing these recommendations enhanced both the performance and security posture of the presentation layer.

Conclusion

Amazon Q Developer transforms how teams build resilient applications by serving as your expert companion throughout the development journey. Its guidance helps create systems that excel in resilience, scalability, and availability—critical factors for today’s demanding digital landscape. Amazon Q goes beyond theoretical advice by providing practical, step-by-step implementation guidance. In the above, we’ve witnessed how Amazon Q’s expertise can transform basic architectures into robust, failure-resistant systems. Its recommendations such as Multi-AZ redundancy, elastic scaling, strategic caching, and proactive resilience testing create applications that maintain performance and availability even during significant disruptions.

Ready to strengthen your applications against unexpected challenges? Harness Amazon Q’s capabilities to create resilient infrastructure that consistently delivers for your customers, regardless of conditions. Unlock the full potential of your AWS infrastructure and deliver uninterrupted service to your customers, today. To learn more about Amazon Q refer to the documentation.

About the authors:

Dr. Rahul Sharad Gaikwad

Dr. Rahul is a Solutions Architect at AWS, driving cloud innovation through migration and modernization of customer workloads. A Generative AI and DevOps enthusiast, he architects cutting-edge solutions and is recognized as an APJC HashiCorp Ambassador. He earned his Ph.D. in AIOps and he is recipient of the Man of Excellence Award , Indian Achievers’ Award , Best PhD Thesis Award, Research Scholar of the Year Award and Young Researcher Award.

Janardhan Molumuri

Janardhan Molumuri is a Principal Technical Leader at AWS, comes with over two decades of Engineering leadership experience, advising customers on Cloud Adoption strategies and emerging technologies including generative AI. He has passion for thought leadership, speaking, writing, and enjoys exploring technology trends to solve problems at scale.