Tag Archives: AWS Lambda

Audit Your Supply Chain with Amazon Managed Blockchain

Post Syndicated from Edouard Kachelmann original https://aws.amazon.com/blogs/architecture/audit-your-supply-chain-with-amazon-managed-blockchain/

For manufacturing companies, visibility into complex supply chain processes is critical to establishing resilient supply chain management. Being able to trace events within a supply chain is key to verifying the origins of parts for regulatory requirements, tracing parts back to suppliers if issues arise, and for contacting buyers if there is a product/part recall.

Traditionally, companies will create their own ledger that can be reviewed and shared with third parties for future audits. However, this process takes time and requires verifying the data’s authenticity. In this blog, we offer a solution to audit your supply chain. Our solution allows supply chain participants to safeguard product authenticity and prevent fraud, increase profitability by driving operational efficiencies, and enhance visibility to minimize disputes across parties.

Benefits of blockchain

Blockchain technology offers a new approach for tracking supply chain events. Blockchains are immutable ledgers that allow you to cryptographically prove that, since being written, each transaction remains unchanged. For a supply chain, this immutability is beneficial from a process standpoint. Auditing a supply chain becomes much simpler when you are certain that no one has altered the manufacturing, transportation, storage, or usage history of a given part or product in the time since a failure occurred.

In addition to providing an immutable system of record, many blockchain protocols can run programmable logic written as code in a decentralized manner. This code is often referred to as a “smart contract,” which enables multi-party business logic to run on the blockchain. This means that implementing your supply chain on a blockchain allows members of the network (like retailers, suppliers, etc.) to process transactions that only they are authorized to process.

Benefits of Amazon Managed Blockchain

Amazon Managed Blockchain allows customers to join either private Hyperledger Fabric networks or the Public Ethereum network. On Managed Blockchain, you are relieved of the undifferentiated heavy lifting associated with creating, configuring, and managing the underlying infrastructure for a Hyperledger Fabric network. Instead, you can focus your efforts on mission-critical value drivers like building consortia or developing use case specific components. This allows you to create and manage a scalable Hyperledger Fabric network that multiple organizations can join from their AWS account.

IoT-enabled supply chain architecture

Organizations within the Industrial Internet of Things (IIoT) space want solutions that allow them to monitor and audit their supply chain for strict quality control and accurate product tracking. Using AWS IoT will allow you to realize operational efficiency at scale. The IoT-enabled equipment on their production plant floor records data such as load, pressure, temperature, humidity, and assembly metrics through multiple sensors. Data can be transmitted in real time directly to the cloud or through an on-premises AWS Internet of Things (IoT) gateway (such as any AWS IoT Greengrass compatible hardware) into AWS IoT for storage and analytics. These devices or IoT gateway will then send MQTT messages to the AWS IoT Core endpoint.

This solution provides a pipeline to ingest data provided by IoT. It stores this data in a private blockchain network that is only accessible within member organizations. This is your immutable single source of truth for future audits. In this solution, the Hyperledger Fabric network on Managed Blockchain includes two members, but it can be extended to additional organizations that are part of the supply chain as needed.

Reference architecture for an IoT-enabled supply chain consisting of a retailer and a manufacturer

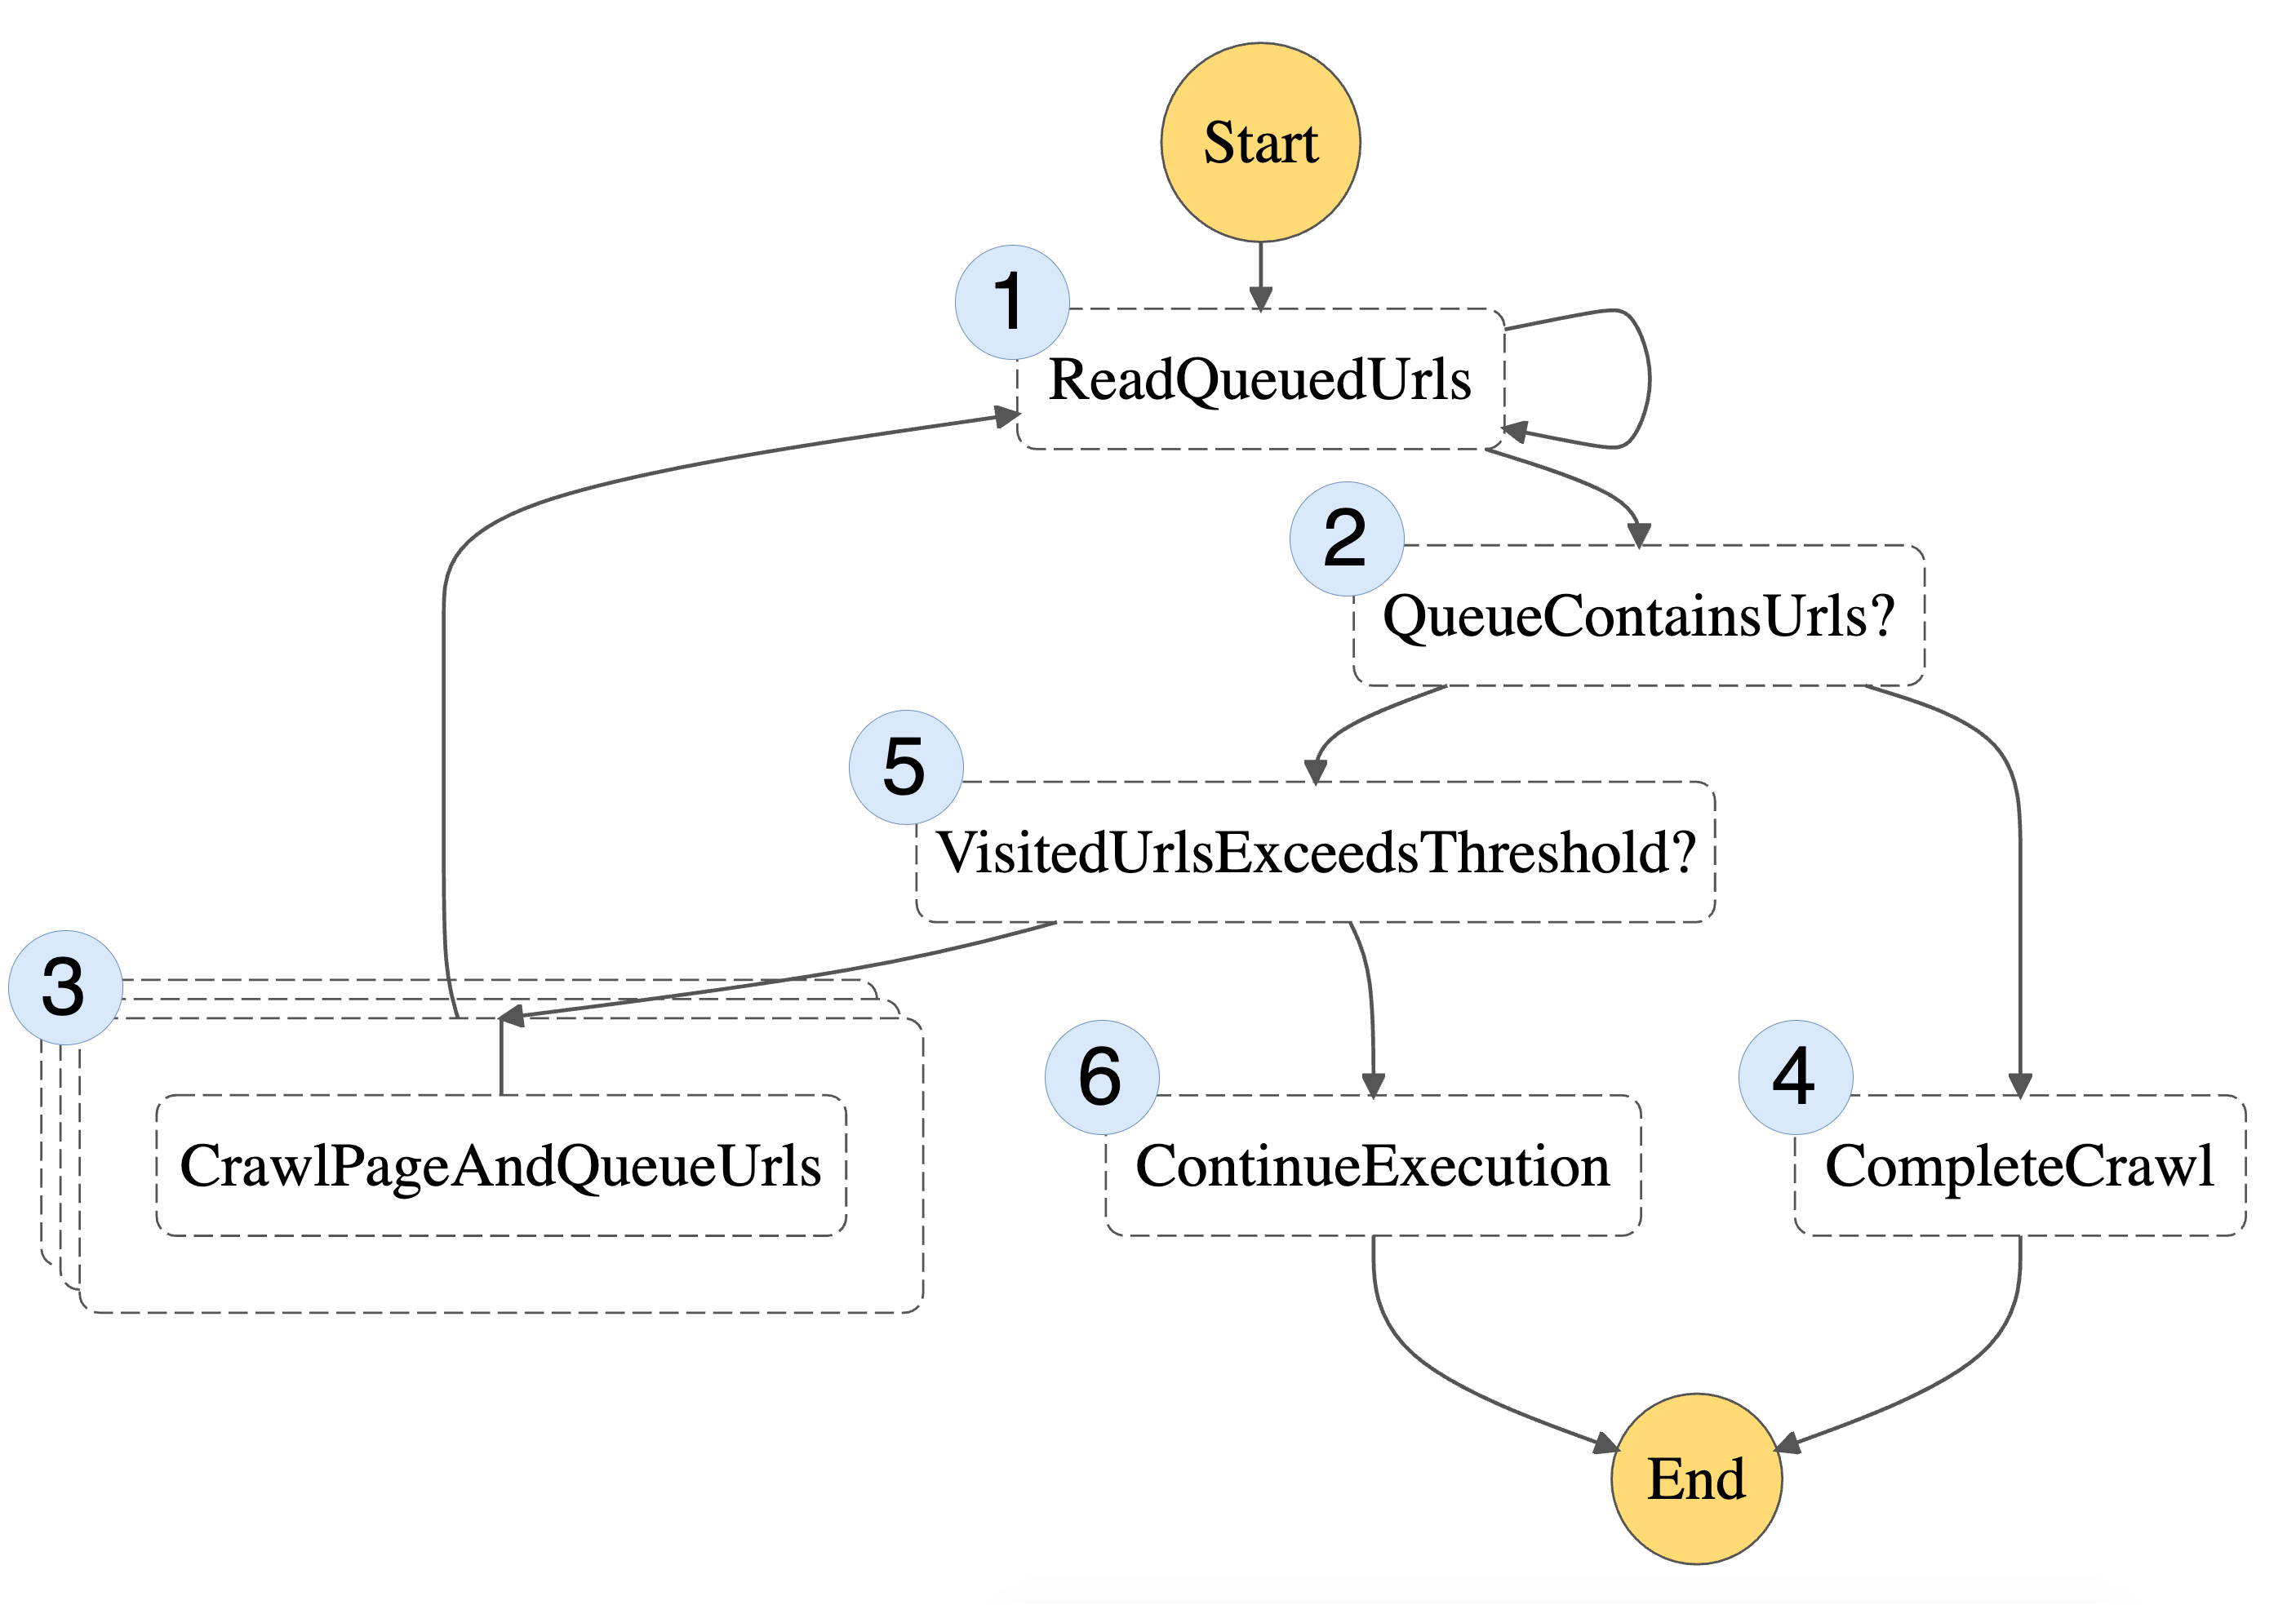
Figure 1. Reference architecture for an IoT-enabled supply chain consisting of a retailer and a manufacturer

The components of this solution are:

  • IoT enabled sensors – These sensors are directly mounted on each piece of factory equipment throughout the supply chain. They publish data to the IoT gateway. For testing purposes, you can start with the IoT Device Simulator solution to create and simulate hundreds of connected devices.
  • AWS IoT Greengrass (optional) – This gateway provides a secure way to seamlessly connect your edge devices to any AWS service. It also enables local processing, messaging, data management, machine learning (ML) inference, and offers pre-built components such as protocol conversion to MQTT if your sensors only have an OPCUA or Modbus interface.
  • AWS IoT Core – AWS IoT Core subscribes to IoT topics published by the IoT devices or gateway and ingests data into the AWS Cloud for analysis and storage.
  • AWS IoT rule – Rules give your devices the ability to interact with AWS services. Rules are analyzed and actions are performed based on the MQTT topic stream. Here, we initiate a serverless Lambda function to extract, transform, and publish data to the Fabric Client. We could use another rule for HTTPS endpoint to directly address requests to a private API Gateway.
  • Amazon API Gateway – The API Gateway provides a REST interface to invoke the AWS Lambda function for each of the API routes deployed. API Gateway allows you to handle request authorization and authentication, before passing the request on to Lambda.
  • AWS Lambda for the Fabric Client – Using AWS Lambda with the Hyperledger Fabric SDK installed as a dependency, you can communicate with your Hyperledger Fabric Peer Node(s) to write and read data from the blockchain. The peer nodes run smart contracts (referred to as chaincode in Hyperledger Fabric), endorse transactions, and store a local copy of the ledger.
  • Managed Blockchain – Managed Blockchain is a fully managed service for creating and managing blockchain networks and network resources using open-source frameworks. In our solution, an endpoint within the customer virtual private cloud (VPC) is used for the Fabric Client. It interacts with your Hyperledger Fabric network on Managed Blockchain components that run within a VPC for your Managed Blockchain network.
    • Peer node – A peer node endorses blockchain transactions and stores the blockchain ledger. In production, we recommend creating a second peer node in another Availability Zone to serve as a fallback if the first peer becomes unavailable.
    • Certificate Authority – Every user who interacts with the blockchain must first register and enroll with their certificate authority.

Choosing a Hyperledger Fabric edition

Edition Network size Max. # of members Max. # of peer nodes per member Max # of channels per network Transaction throughput and availability
Starter Test or small production 5 2 3 Lower
Standard Large production 14 3 8 Higher

Our solution allows multiple parties to write and query data on a private Hyperledger Fabric blockchain managed by Amazon Managed Blockchain. This enhances consumer experience by reducing the overall effort and complexity with getting insight into supply chain transactions.

Conclusion

In this post, we showed you how Managed Blockchain, as well as other AWS services such as AWS IoT, can provide value to your business. The IoT-enabled supply chain architecture gives you a blueprint to realize that value. The value not only stems from the benefits of having a trustworthy and transparent supply chain, but also from the reliable, secure and scalable services that AWS provides.

Further reading

Using GitHub Actions to deploy serverless applications

Post Syndicated from Julian Wood original https://aws.amazon.com/blogs/compute/using-github-actions-to-deploy-serverless-applications/

This post is written by Gopi Krishnamurthy, Senior Solutions Architect.

Continuous integration and continuous deployment (CI/CD) is one of the major DevOps components. This allows you to build, test, and deploy your applications rapidly and reliably, while improving quality and reducing time to market.

GitHub is an AWS Partner Network (APN) with the AWS DevOps Competency. GitHub Actions is a GitHub feature that allows you to automate tasks within your software development lifecycle. You can use GitHub Actions to run a CI/CD pipeline to build, test, and deploy software directly from GitHub.

The AWS Serverless Application Model (AWS SAM) is an open-source framework for building serverless applications. It provides shorthand syntax to express functions, APIs, databases, and event source mappings. With a few lines per resource, you can define the application you want and model it using YAML.

During deployment, AWS SAM transforms and expands the AWS SAM syntax into AWS CloudFormation syntax, enabling you to build serverless applications faster. The AWS SAM CLI allows you to build, test, and debug applications locally, defined by AWS SAM templates. You can also use the AWS SAM CLI to deploy your applications to AWS. For AWS SAM example code, see the serverless patterns collection.

In this post, you learn how to create a sample serverless application using AWS SAM. You then use GitHub Actions to build, and deploy the application in your AWS account.

New GitHub action setup-sam

A GitHub Actions runner is the application that runs a job from a GitHub Actions workflow. You can use a GitHub hosted runner, which is a virtual machine hosted by GitHub with the runner application installed. You can also host your own runners to customize the environment used to run jobs in your GitHub Actions workflows.

AWS has released a GitHub action called setup-sam to install AWS SAM, which is pre-installed on GitHub hosted runners. You can use this action to install a specific, or the latest AWS SAM version.

This demo uses AWS SAM to create a small serverless application using one of the built-in templates. When the code is pushed to GitHub, a GitHub Actions workflow triggers a GitHub CI/CD pipeline. This builds, and deploys your code directly from GitHub to your AWS account.

Prerequisites

  1. A GitHub account: This post assumes you have the required permissions to configure GitHub repositories, create workflows, and configure GitHub secrets.
  2. Create a new GitHub repository and clone it to your local environment. For this example, create a repository called github-actions-with-aws-sam.
  3. An AWS account with permissions to create the necessary resources.
  4. Install AWS Command Line Interface (CLI) and AWS SAM CLI locally. This is separate from using the AWS SAM CLI in a GitHub Actions runner. If you use AWS Cloud9 as your integrated development environment (IDE), AWS CLI and AWS SAM are pre-installed.
  5. Create an Amazon S3 bucket in your AWS account to store the build package for deployment.
  6. An AWS user with access keys, which the GitHub Actions runner uses to deploy the application. The user also write requires access to the S3 bucket.

Creating the AWS SAM application

You can create a serverless application by defining all required resources in an AWS SAM template. AWS SAM provides a number of quick-start templates to create an application.

  1. From the CLI, open a terminal, navigate to the parent of the cloned repository directory, and enter the following:
  2. sam init -r python3.8 -n github-actions-with-aws-sam --app-template "hello-world"
  3. When asked to select package type (zip or image), select zip.

This creates an AWS SAM application in the root of the repository named github-actions-with-aws-sam, using the default configuration. This consists of a single AWS Lambda Python 3.8 function invoked by an Amazon API Gateway endpoint.

To see additional runtimes supported by AWS SAM and options for sam init, enter sam init -h.

Local testing

AWS SAM allows you to test your applications locally. AWS SAM provides a default event in events/event.json that includes a message body of {\"message\": \"hello world\"}.

    1. Invoke the HelloWorldFunction Lambda function locally, passing the default event:
    2. sam local invoke HelloWorldFunction -e events/event.json
    3. The function response is:
    4. {"message": "hello world"}

    5. Test the API Gateway functionality in front of the Lambda function by first starting the API locally:
    6. sam local start-api
    7. AWS SAM launches a Docker container with a mock API Gateway endpoint listening on localhost:3000.
    8. Use curl to call the hello API:
    curl http://127.0.0.1:3000/hello

    The API response should be:

    {"message": "hello world"}

    Creating the sam-pipeline.yml file

    GitHub CI/CD pipelines are configured using a YAML file. This file configures what specific action triggers a workflow, such as push on main, and what workflow steps are required.

    In the root of the repository containing the files generated by sam init, create the directory: .github/workflows.

    1. Create a new file called sam-pipeline.yml under the .github/workflows directory.
    2. sam-pipeline.yml file

      sam-pipeline.yml file

    3. Edit the sam-pipeline.yml file and add the following:
    4. on:
        push:
          branches:
            - main
      jobs:
        build-deploy:
          runs-on: ubuntu-latest
          steps:
            - uses: actions/checkout@v2
            - uses: actions/setup-python@v2
            - uses: aws-actions/setup-sam@v1
            - uses: aws-actions/configure-aws-credentials@v1
              with:
                aws-access-key-id: ${{ secrets.AWS_ACCESS_KEY_ID }}
                aws-secret-access-key: ${{ secrets.AWS_SECRET_ACCESS_KEY }}
                aws-region: ##region##
            # sam build 
            - run: sam build --use-container
      
      # Run Unit tests- Specify unit tests here 
      
      # sam deploy
            - run: sam deploy --no-confirm-changeset --no-fail-on-empty-changeset --stack-name sam-hello-world --s3-bucket ##s3-bucket## --capabilities CAPABILITY_IAM --region ##region## 
      
    5. Replace ##s3-bucket## with the name of the S3 bucket previously created to store the deployment package.
    6. Replace both ##region## with your AWS Region.

    The configuration triggers the GitHub Actions CI/CD pipeline when code is pushed to the main branch. You can amend this if you are using another branch. For a full list of supported events, refer to GitHub documentation page.

    You can further customize the sam build –use-container command if necessary. By default the Docker image used to create the build artifact is pulled from Amazon ECR Public. The default Python 3.8 image in this example is based on the language specified during sam init. To pull a different container image, use the --build-image option as specified in the documentation.

    The AWS CLI and AWS SAM CLI are installed in the runner using the GitHub action setup-sam. To install a specific version, use the version parameter.

    uses: aws-actions/setup-sam@v1
    with:
      version: 1.23.0

    As part of the CI/CD process, we recommend you scan your code for quality and vulnerabilities in bundled libraries. You can find these security offerings from our AWS Lambda Technology Partners.

    Configuring AWS credentials in GitHub

    The GitHub Actions CI/CD pipeline requires AWS credentials to access your AWS account. The credentials must include AWS Identity and Access Management (IAM) policies that provide access to Lambda, API Gateway, AWS CloudFormation, S3, and IAM resources.

    These credentials are stored as GitHub secrets within your GitHub repository, under Settings > Secrets. For more information, see “GitHub Actions secrets”.

    In your GitHub repository, create two secrets named AWS_ACCESS_KEY_ID and AWS_SECRET_ACCESS_KEY and enter the key values. We recommend following IAM best practices for the AWS credentials used in GitHub Actions workflows, including:

    • Do not store credentials in your repository code. Use GitHub Actions secrets to store credentials and redact credentials from GitHub Actions workflow logs.
    • Create an individual IAM user with an access key for use in GitHub Actions workflows, preferably one per repository. Do not use the AWS account root user access key.
    • Grant least privilege to the credentials used in GitHub Actions workflows. Grant only the permissions required to perform the actions in your GitHub Actions workflows.
    • Rotate the credentials used in GitHub Actions workflows regularly.
    • Monitor the activity of the credentials used in GitHub Actions workflows.

    Deploying your application

    Add all the files to your local git repository, commit the changes, and push to GitHub.

    git add .
    git commit -am "Add AWS SAM files"
    git push

    Once the files are pushed to GitHub on the main branch, this automatically triggers the GitHub Actions CI/CD pipeline as configured in the sam-pipeline.yml file.

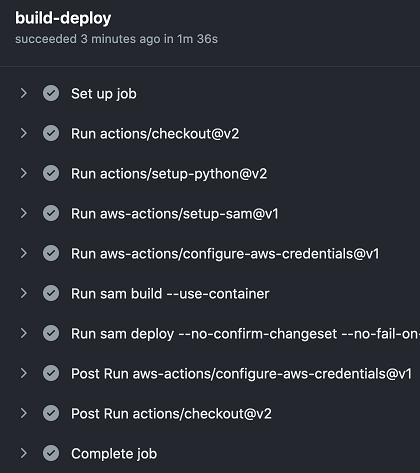
    The GitHub actions runner performs the pipeline steps specified in the file. It checks out the code from your repo, sets up Python, and configures the AWS credentials based on the GitHub secrets. The runner uses the GitHub action setup-sam to install AWS SAM CLI.

    The pipeline triggers the sam build process to build the application artifacts, using the default container image for Python 3.8.

    sam deploy runs to configure the resources in your AWS account using the securely stored credentials.

    To view the application deployment progress, select Actions in the repository menu. Select the workflow run and select the job name build-deploy.

    GitHub Actions progress

    GitHub Actions progress

    If the build fails, you can view the error message. Common errors are:

    • Incompatible software versions such as the Python runtime being different from the Python version on the build machine. Resolve this by installing the proper software versions.
    • Credentials could not be loaded. Verify that AWS credentials are stored in GitHub secrets.
    • Ensure that your AWS account has the necessary permissions to deploy the resources in the AWS SAM template, in addition to the S3 deployment bucket.

    Testing the application

    1. Within the workflow run, expand the Run sam deploy section.
    2. Navigate to the AWS SAM Outputs section. The HelloWorldAPI value shows the API Gateway endpoint URL deployed in your AWS account.
    AWS SAM outputs

    AWS SAM outputs

  1. Use curl to test the API:
curl https://<api-id>.execute-api.us-east-1.amazonaws.com/Prod/hello/

The API response should be:
{"message": "hello world"}

Cleanup

To remove the application resources, navigate to the CloudFormation console and delete the stack. Alternatively, you can use an AWS CLI command to remove the stack:

aws cloudformation delete-stack --stack-name sam-hello-world

Empty, and delete the S3 deployment bucket.

Conclusion

GitHub Actions is a GitHub feature that allows you to run a CI/CD pipeline to build, test, and deploy software directly from GitHub. AWS SAM is an open-source framework for building serverless applications.

In this post, you use GitHub Actions CI/CD pipeline functionality and AWS SAM to create, build, test, and deploy a serverless application. You use sam init to create a serverless application and tested the functionality locally. You create a sam-pipeline.yml file to define the pipeline steps for GitHub Actions.

The GitHub action setup-sam installed AWS SAM on the GitHub hosted runner. The GitHub Actions workflow uses sam build to create the application artifacts and sam deploy to deploy them to your AWS account.

For more serverless learning resources, visit https://serverlessland.com.

Deploying machine learning models with serverless templates

Post Syndicated from Eric Johnson original https://aws.amazon.com/blogs/compute/deploying-machine-learning-models-with-serverless-templates/

This post written by Sean Wilkinson, Machine Learning Specialist Solutions Architect, and Newton Jain, Senior Product Manager for Lambda

After designing and training machine learning models, data scientists deploy the models so applications can use them. AWS Lambda is a compute service that lets you run code without provisioning or managing servers. Lambda’s pay-per-request billing, automatic scaling, and ease of use make it a popular deployment choice for data science teams.

With minimal code, data scientists can turn a model into a cost effective and scalable API endpoint backed by Lambda. Lambda supports container images, Advanced Vector Extensions 2 (AVX2), and functions with up to 10 GB of memory. Using these capabilities, data science teams can deploy larger, more powerful models with improved performance.

To deploy Lambda-based applications, serverless developers can use the AWS Serverless Application Model framework (AWS SAM). AWS SAM creates and manages serverless applications based on templates. It supports local testing, aids best practices, and integrates with popular developer tools. It allows data scientists to define serverless applications, security permissions, and advanced configuration capabilities using YAML.

AWS SAM contains pre-built templates that allow developers to get started quickly. This blog shows how to use machine learning templates to deploy a Scikit-Learn based model that classifies images of handwritten digits from zero to nine. Once deployed to Lambda, you can access the model via a REST API.

This walkthrough creates resources that incur costs in an AWS account. To minimize cost, follow the Cleaning up section to remove resources after completing the walkthrough.

Overview

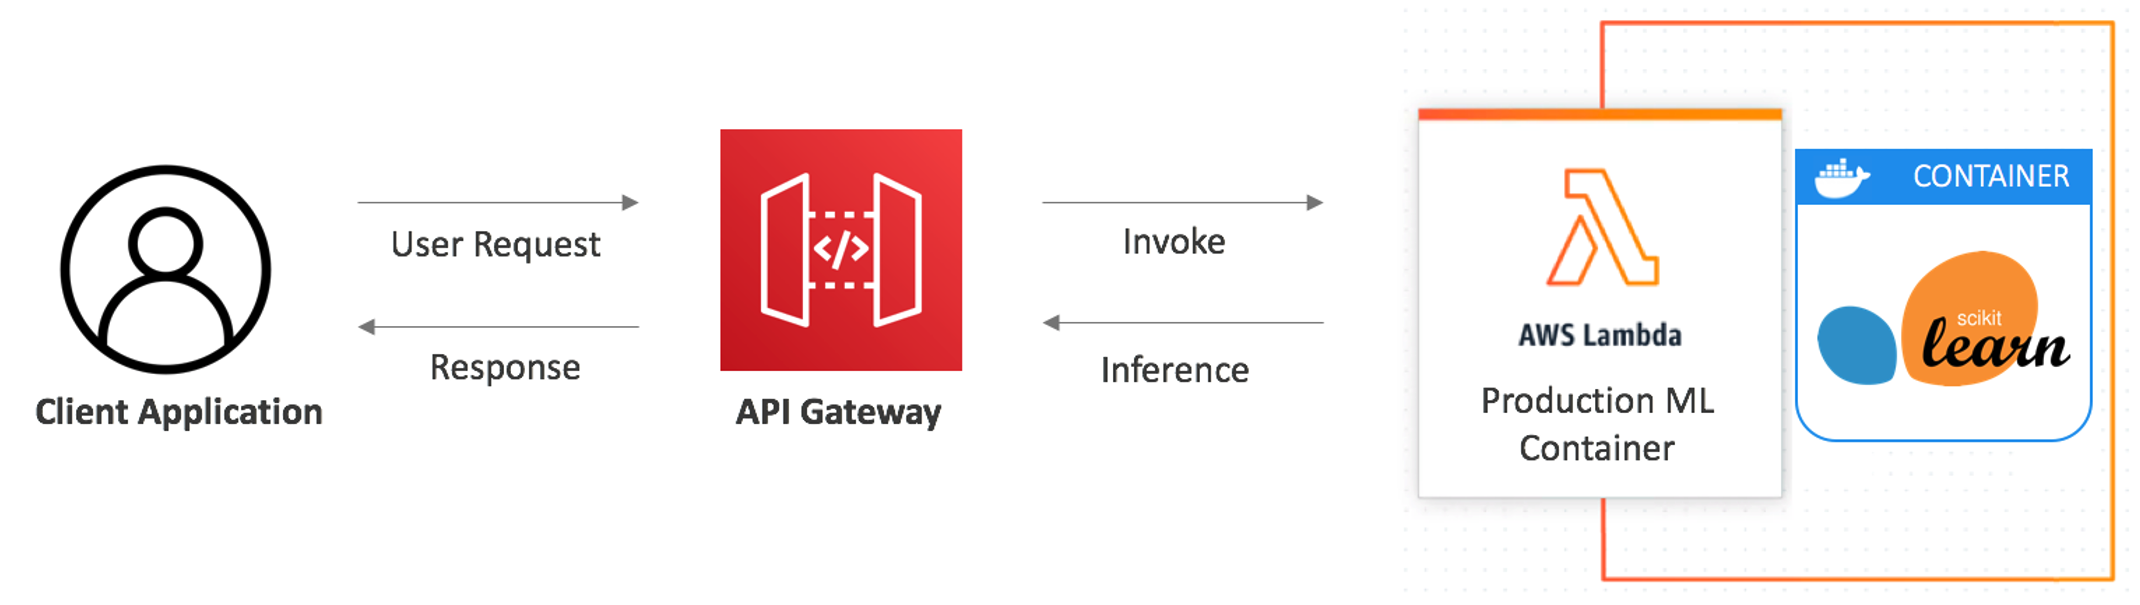
The AWS SAM machine learning templates are available for the Scikit-Learn, PyTorch, TensorFlow, and XGBoost frameworks. Each template deploys a Lambda function to host the model behind an Amazon API Gateway, which serves as the front end and handles authentication. The following diagram shows the architecture of the solution:

Serverless architecture for ML inference

Serverless architecture for ML inference

Creating the containerized Lambda function

This section uses AWS SAM to build, test, and deploy a Docker image containing a pre-trained digit classifier model on Lambda:

  1. Update or install AWS SAM. AWS SAM CLI v1.24.1 or later is required to use the machine learning templates.
  2. In a terminal, create a new serverless application in AWS SAM using the command:
    sam init
  3. Follow the on-screen prompts, select AWS Quick Start Templates as the template source.

    SAM: choose a template source

    SAM: choose a template source

  4. Choose Image as the package type.

    SAM: Choose a package type

    SAM: Choose a package type

  5. Select amazon/python3.8-base as the base image.

    SAM: Choose an runtime image

    SAM: Choose an runtime image

  6. When prompted, enter an application name. AWS SAM uses this to group and label resources it creates.

    SAM: Choose an runtime image

    SAM: Choose an runtime image

  7. Select the desired ML framework from the template list. The walkthrough uses the Scikit-Learn template.

    SAM: choose the application template

    SAM: choose the application template

  8. AWS SAM creates a directory with the name of your application. Change to the new directory and run the AWS SAM build command:
    sam build

    SAM: build results

    SAM: build results

Files generated by AWS SAM

After selecting the template, AWS SAM generates the following files in the application directory:

  • Dockerfile: The application uses the Lambda-provided Python 3.8 base image. It installs the relevant dependencies and defines the CMD variable for the Lambda execution environment to initialize the handler.
    FROM public.ecr.aws/lambda/python:3.8
    
    COPY app.py requirements.txt ./
    
    COPY digit_classifier.joblib /opt/ml/model/1
    
    RUN python3.8 -m pip install -r requirements.txt -t .
    
    CMD ["app.lambda_handler"]
  • app.py: This Python code runs after the Lambda handler is invoked and generates predictions from the Scikit-Learn model. The model is reused across multiple Lambda invocations by loading it outside the lambda_handler.
    import joblib
    import base64
    import numpy as np
    import json
    
    from io import BytesIO
    from PIL import Image
    from scipy.ndimage import interpolation
    
    model_file = '/opt/ml/model'
    model = joblib.load(model_file)
    
    
    # Functions to pre-process images (we used same preprocessing when training)
    
    def moments(image):
        c0, c1 = np.mgrid[:image.shape[0], :image.shape[1]]
        img_sum = np.sum(image)
        
        m0 = np.sum(c0 * image) / img_sum
        m1 = np.sum(c1 * image) / img_sum
        m00 = np.sum((c0-m0)**2 * image) / img_sum
        m11 = np.sum((c1-m1)**2 * image) / img_sum
        m01 = np.sum((c0-m0) * (c1-m1) * image) / img_sum
        
        mu_vector = np.array([m0,m1])
        covariance_matrix = np.array([[m00, m01],[m01, m11]])
        
        return mu_vector, covariance_matrix
    
    
    def deskew(image):
        c, v = moments(image)
        alpha = v[0,1] / v[0,0]
        affine = np.array([[1,0], [alpha,1]])
        ocenter = np.array(image.shape) / 2.0
        offset = c - np.dot(affine, ocenter)
    
        return interpolation.affine_transform(image, affine, offset=offset)
    
    
    def get_np_image(image_bytes):
        image = Image.open(BytesIO(base64.b64decode(image_bytes))).convert(mode='L')
        image = image.resize((28, 28))
    
        return np.array(image)
    
    
    # Lambda handler code
    
    def lambda_handler(event, context):
        image_bytes = event['body'].encode('utf-8')
        x = deskew(get_np_image(image_bytes))
    
        prediction = int(model.predict(x.reshape(1, -1))[0])
    
        return {
            'statusCode': 200,
            'body': json.dumps(
                {
                    "predicted_label": prediction,
                }
            )
        }

After completing these steps, this is the directory structure:

File structure

File structure

Testing the AWS SAM templates

For container image-based Lambda functions, sam build creates and updates a container image in the local Docker repo. It copies the template to the output directory and updates the location for the newly built image.

You can see the following top-level tree under the .aws-sam directory:

SAM build artifacts directory structure

SAM build artifacts directory structure

After building the Docker image, use AWS SAM’s local test functionality to test the endpoint. There are two ways to test the application locally:

  1. Local invoke –event uses the mock data in event.json to invoke the function and generate a prediction. An image of a handwritten digit is encoded as a base64 string in the body attribute in the event.json file. Test using mock event.json:
    sam local invoke InferenceFunction --event events/event.json

    SAM local invoke results

    SAM local invoke results

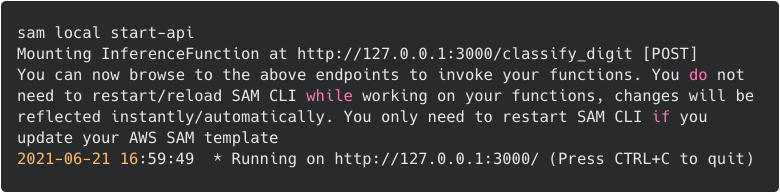
  2. The start-api command starts up a local endpoint that emulates a REST API endpoint. It downloads an execution container that runs API Gateway and the Lambda function locally. Invoke using the API Gateway emulator:
    sam local start-apiSAM local start-api monitor

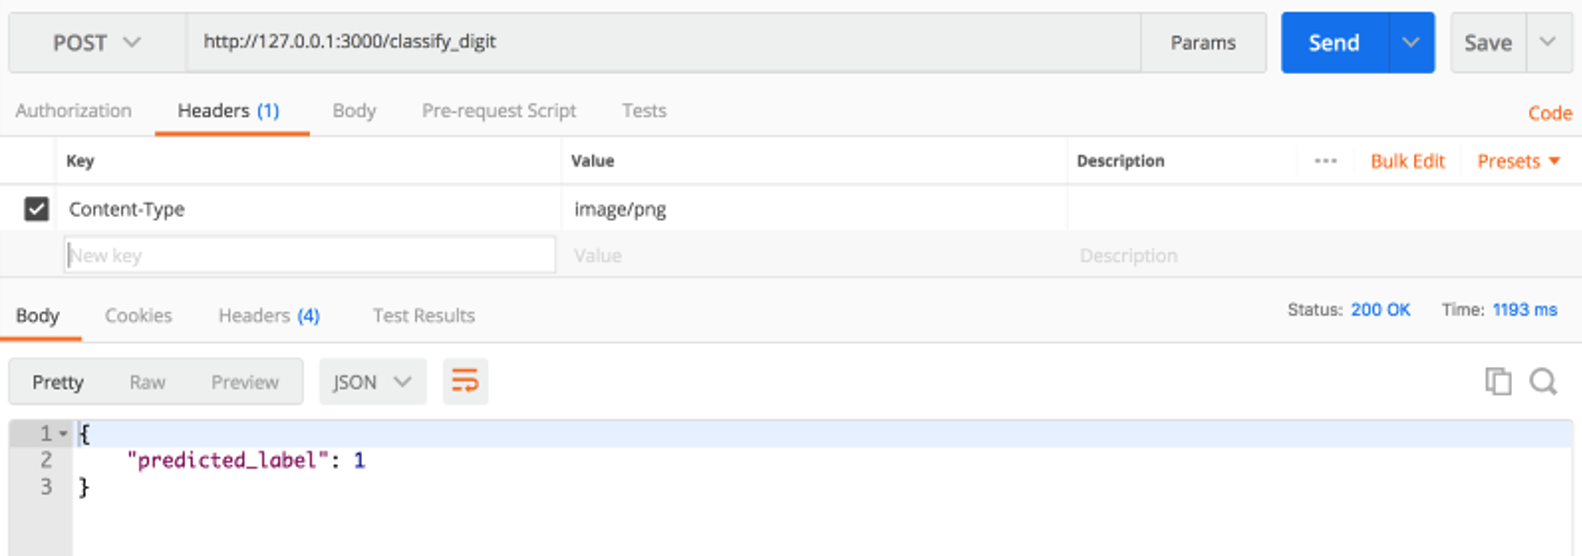
SAM local start-api monitorTo test the local endpoint use a REST client, like Postman, to send a POST request to the /classify_digit endpoint.

Testing with Postman

Testing with Postman

While testing locally, use images smaller than 100 KB. If the file is larger, the request fails with status code: 502 and the error “argument list too long”. After deploying to Lambda, you can use larger images.

Deploying the application to Lambda

After testing the model locally, use the AWS SAM guided deployment process to package and deploy the application:

  1. To deploy a Lambda function based on a container image, the container image must be pushed to Amazon Elastic Container Registry (ECR). Run the following command to retrieve an authentication token and authenticate the Docker client with the ECR registry. Replace the region and accountID placeholders with your Region and AWS account ID:
    aws --region <region> ecr get-login-password | docker login --username AWS --password-stdin <accountID>.dkr.ecr.<region>.amazonaws.com

    Login Succeeded

    Login Succeeded

  2. Use the AWS CLI to create an ECR repository called classifier-demo:
    aws ecr create-repository \
    --repository-name classifier-demo \
    --image-tag-mutability MUTABLE \
    --image-scanning-configuration scanOnPush=true
    

    Create ECR repo results

    Create ECR repo results

  3. Copy the repositoryUri from the output. This is needed in the next step. Initiate the AWS SAM guided deployment using the deploy command:
    sam deploy --guided
  4. Follow the on-screen prompts. To accept the default options provided in the interactive experience, press Enter. When prompted for an ECR repository, use the Amazon ECR repository created in the previous step.
    CloudFormation change set verification screen

    CloudFormation change set verification screen

    CloudFormation outputs

    CloudFormation outputs

  5. AWS SAM packages and deploys the application as a versioned entity. After deployment, the production API endpoint is ready to use. The template produces multiple outputs. Find the unique URL of the endpoint in the “HelloWorldAPI” key in the “Outputs” section.

After retrieving the URL, test the live endpoint using a REST client:

Testing with Postman

Testing with Postman

Optimizing performance

After the Lambda function is deployed, you can optimize for latency and cost. To do this, adjust the memory allocation setting for the function, which also linearly changes the allocated vCPU (to learn more, read the AWS News Blog).

The digit classifier model is optimized with 5 GB memory (~3 vCPUs). Any gains beyond 5 GB are relatively minor. Each model responds differently to changes in vCPU and memory, so it is best practice to determine this experimentally. There are open-source tools available to automate performance tuning.

Further optimizations can be made by compiling the source code to take advantage of AVX2 instructions. AVX2 allows Lambda to run more operations per clock cycle, reducing the time it takes a model to generate predictions.

Cleaning up

This walkthrough creates a Lambda function, API Gateway endpoint, and an ECR repository. These resources incur charges so it is recommended to clean up resources to avoid incurring cost. To delete the ECR repository, run:

aws ecr delete-repository --registry-id <account-id> --repository-name classifier-demo --force

To delete the remaining resources, navigate to AWS CloudFormation in the AWS Management Console and select the Region used for the walkthrough. Select the stack created by AWS SAM (the default is “sam-app”) and choose Delete.

Conclusion

Lambda is a cost-effective, scalable, and reliable way for data scientists to deploy CPU-based machine learning models for inference. With support for larger functions sizes, AVX2 instruction sets, and container image support, Lambda can now deploy more complex models while maintaining low latency.

Use the new machine learning templates within AWS SAM today to deploy your first serverless machine learning application in minutes. We look forward to seeing the exciting machine learning applications that you build on Lambda.

For more serverless learning resources, visit Serverless Land.

Building well-architected serverless applications: Managing application security boundaries – part 1

Post Syndicated from Julian Wood original https://aws.amazon.com/blogs/compute/building-well-architected-serverless-applications-managing-application-security-boundaries-part-1/

This series of blog posts uses the AWS Well-Architected Tool with the Serverless Lens to help customers build and operate applications using best practices. In each post, I address the serverless-specific questions identified by the Serverless Lens along with the recommended best practices. See the introduction post for a table of contents and explanation of the example application.

Security question SEC2: How do you manage your serverless application’s security boundaries?

Defining and securing your serverless application’s boundaries ensures isolation for, within, and between components.

Required practice: Evaluate and define resource policies

Resource policies are AWS Identity and Access Management (IAM) statements. They are attached to resources such as an Amazon S3 bucket, or an Amazon API Gateway REST API resource or method. The policies define what identities have fine-grained access to the resource. To see which services support resource-based policies, see “AWS Services That Work with IAM”. For more information on how resource policies and identity policies are evaluated, see “Identity-Based Policies and Resource-Based Policies”.

Understand and determine which resource policies are necessary

Resource policies can protect a component by restricting inbound access to managed services. Use resource policies to restrict access to your component based on a number of identities, such as the source IP address/range, function event source, version, alias, or queues. Resource policies are evaluated and enforced at IAM level before each AWS service applies it’s own authorization mechanisms, when available. For example, IAM resource policies for API Gateway REST APIs can deny access to an API before an AWS Lambda authorizer is called.

If you use multiple AWS accounts, you can use AWS Organizations to manage and govern individual member accounts centrally. Certain resource policies can be applied at the organizations level, providing guardrail for what actions AWS accounts within the organization root or OU can do. For more information see, “Understanding how AWS Organization Service Control Policies work”.

Review your existing policies and how they’re configured, paying close attention to how permissive individual policies are. Your resource policies should only permit necessary callers.

Implement resource policies to prevent unauthorized access

For Lambda, use resource-based policies to provide fine-grained access to what AWS IAM identities and event sources can invoke a specific version or alias of your function. Resource-based policies can also be used to control access to Lambda layers. You can combine resource policies with Lambda event sources. For example, if API Gateway invokes Lambda, you can restrict the policy to the API Gateway ID, HTTP method, and path of the request.

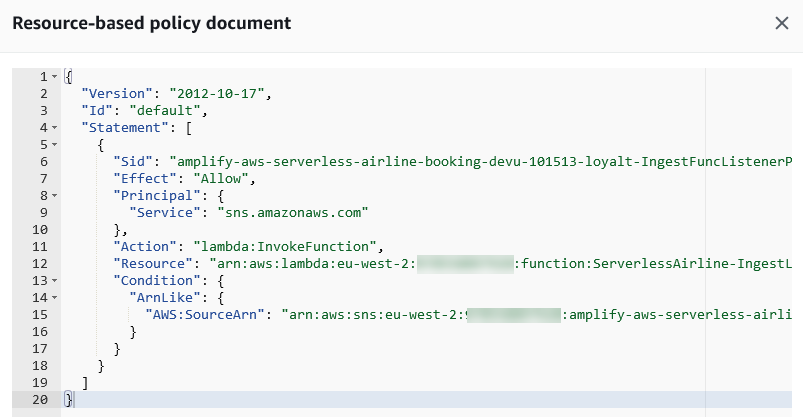
In the serverless airline example used in this series, the IngestLoyalty service uses a Lambda function that subscribes to an Amazon Simple Notification Service (Amazon SNS) topic. The Lambda function resource policy allows SNS to invoke the Lambda function.

Lambda resource policy document

Lambda resource policy document

API Gateway resource-based policies can restrict API access to specific Amazon Virtual Private Cloud (VPC), VPC endpoint, source IP address/range, AWS account, or AWS IAM users.

Amazon Simple Queue Service (SQS) resource-based policies provide fine-grained access to certain AWS services and AWS IAM identities (users, roles, accounts). Amazon SNS resource-based policies restrict authenticated and non-authenticated actions to topics.

Amazon DynamoDB resource-based policies provide fine-grained access to tables and indexes. Amazon EventBridge resource-based policies restrict AWS identities to send and receive events including to specific event buses.

For Amazon S3, use bucket policies to grant permission to your Amazon S3 resources.

The AWS re:Invent session Best practices for growing a serverless application includes further suggestions on enforcing security best practices.

Best practices for growing a serverless application

Best practices for growing a serverless application

Good practice: Control network traffic at all layers

Apply controls for controlling both inbound and outbound traffic, including data loss prevention. Define requirements that help you protect your networks and protect against exfiltration.

Use networking controls to enforce access patterns

API Gateway and AWS AppSync have support for AWS Web Application Firewall (AWS WAF) which helps protect web applications and APIs from attacks. AWS WAF enables you to configure a set of rules called a web access control list (web ACL). These allow you to block, or count web requests based on customizable web security rules and conditions that you define. These can include specified IP address ranges, CIDR blocks, specific countries, or Regions. You can also block requests that contain malicious SQL code, or requests that contain malicious script. For more information, see How AWS WAF Works.

A private API endpoint is an API Gateway interface VPC endpoint that can only be accessed from your Amazon Virtual Private Cloud (Amazon VPC). This is an elastic network interface that you create in a VPC. Traffic to your private API uses secure connections and does not leave the Amazon network, it is isolated from the public internet. For more information, see “Creating a private API in Amazon API Gateway”.

To restrict access to your private API to specific VPCs and VPC endpoints, you must add conditions to your API’s resource policy. For example policies, see the documentation.

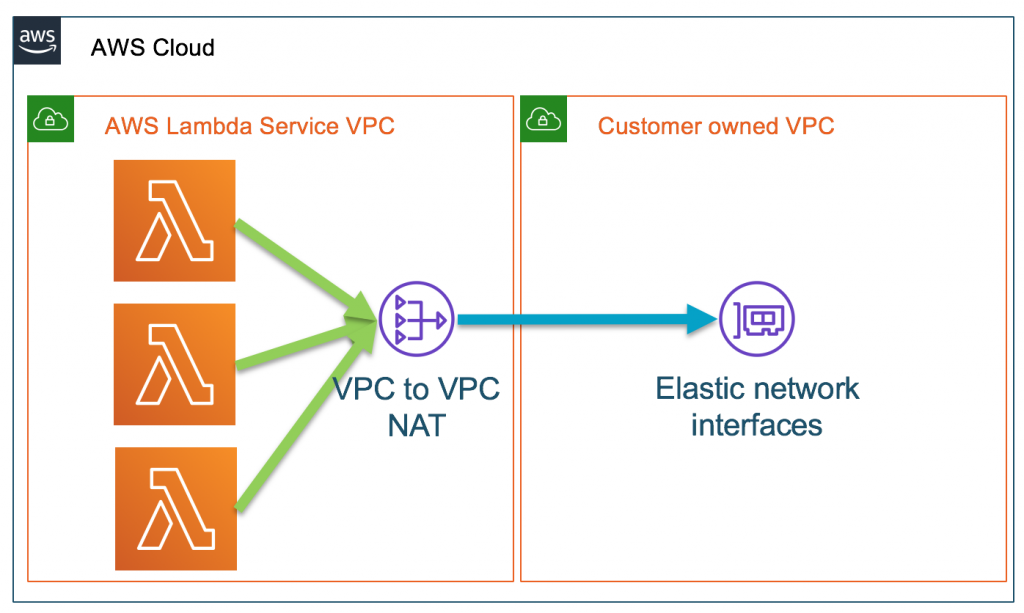
By default, Lambda runs your functions in a secure Lambda-owned VPC that is not connected to your account’s default VPC. Functions can access anything available on the public internet. This includes other AWS services, HTTPS endpoints for APIs, or services and endpoints outside AWS. The function cannot directly connect to your private resources inside of your VPC.

You can configure a Lambda function to connect to private subnets in a VPC in your account. When a Lambda function is configured to use a VPC, the Lambda function still runs inside the Lambda service VPC. The function then sends all network traffic through your VPC and abides by your VPC’s network controls. Functions deployed to virtual private networks must consider network access to restrict resource access.

AWS Lambda service VPC with VPC-to-VPT NAT to customer VPC

AWS Lambda service VPC with VPC-to-VPT NAT to customer VPC

When you connect a function to a VPC in your account, the function cannot access the internet, unless the VPC provides access. To give your function access to the internet, route outbound traffic to a NAT gateway in a public subnet. The NAT gateway has a public IP address and can connect to the internet through the VPC’s internet gateway. For more information, see “How do I give internet access to my Lambda function in a VPC?”. Connecting a function to a public subnet doesn’t give it internet access or a public IP address.

You can control the VPC settings for your Lambda functions using AWS IAM condition keys. For example, you can require that all functions in your organization are connected to a VPC. You can also specify the subnets and security groups that the function’s users can and can’t use.

Unsolicited inbound traffic to a Lambda function isn’t permitted by default. There is no direct network access to the execution environment where your functions run. When connected to a VPC, function outbound traffic comes from your own network address space.

You can use security groups, which act as a virtual firewall to control outbound traffic for functions connected to a VPC. Use security groups to permit your Lambda function to communicate with other AWS resources. For example, a security group can allow the function to connect to an Amazon ElastiCache cluster.

To filter or block access to certain locations, use VPC routing tables to configure routing to different networking appliances. Use network ACLs to block access to CIDR IP ranges or ports, if necessary. For more information about the differences between security groups and network ACLs, see “Compare security groups and network ACLs.”

In addition to API Gateway private endpoints, several AWS services offer VPC endpoints, including Lambda. You can use VPC endpoints to connect to AWS services from within a VPC without an internet gateway, NAT device, VPN connection, or AWS Direct Connect connection.

Using tools to audit your traffic

When you configure a Lambda function to use a VPC, or use private API endpoints, you can use VPC Flow Logs to audit your traffic. VPC Flow Logs allow you to capture information about the IP traffic going to and from network interfaces in your VPC. Flow log data can be published to Amazon CloudWatch Logs or S3 to see where traffic is being sent to at a granular level. Here are some flow log record examples. For more information, see “Learn from your VPC Flow Logs”.

Block network access when required

In addition to security groups and network ACLs, third-party tools allow you to disable outgoing VPC internet traffic. These can also be configured to allow traffic to AWS services or allow-listed services.

Conclusion

Managing your serverless application’s security boundaries ensures isolation for, within, and between components. In this post, I cover how to evaluate and define resource policies, showing what policies are available for various serverless services. I show some of the features of AWS WAF to protect APIs. Then I review how to control network traffic at all layers. I explain how Lambda functions connect to VPCs, and how to use private APIs and VPC endpoints. I walk through how to audit your traffic.

This well-architected question will be continued where I look at using temporary credentials between resources and components. I cover why smaller, single purpose functions are better from a security perspective, and how to audit permissions. I show how to use AWS Serverless Application Model (AWS SAM) to create per-function IAM roles.

For more serverless learning resources, visit https://serverlessland.com.

Building leaderboard functionality with serverless data analytics

Post Syndicated from James Beswick original https://aws.amazon.com/blogs/compute/building-serverless-applications-with-streaming-data-part-4/

This series is about building serverless solutions in streaming data workloads. The application example used in this series is Alleycat, which allows bike racers to compete with each other virtually on home exercise bikes.

Part 1 explains the application’s functionality, how to deploy to your AWS account, and provides an architectural review. Part 2 compares different ways to ingest streaming data into Amazon Kinesis Data Streams and shows how to optimize shard capacity. Part 3 uses Amazon Kinesis Data Firehose with AWS Lambda to implement the all-time rankings functionality.

This post walks through the leaderboard functionality in the application. This solution uses Kinesis Data Streams, Lambda, and Amazon DynamoDB to provide both real-time and historical rankings.

To set up the example, visit the GitHub repo and follow the instructions in the README.md file. Note that this walkthrough uses services that are not covered by the AWS Free Tier and incur cost.

Overview of leaderboards in Alleycat

Alleycat races are 5 minutes long and run continuously throughout the day for each class. Competitors select a class type and automatically join the current race by choosing Start Race. There are up to 1,000 competitors per race. To track performance, there are two types of leaderboard in Alleycat: Race results for completed races and the Realtime rankings for active races.

Alleycat frontend

  1. The user selects a completed race from the dropdown to a leaderboard ranking of results. This table is not real time and only reflects historical results.
  2. The user selects the Here now option to see live results for all competitors in the current virtual race for the chosen class.

Architecture overview

The backend microservice supporting these features is located in the 1-streaming-kds directory in the GitHub repo. It uses the following architecture:

Solution architecture

  1. The tumbling window function receives results every second from Kinesis Data Streams. This function aggregates metrics and saves the latest results to the application’s DynamoDB table.
  2. DynamoDB Streams invoke the publishing Lambda function every time an item is changed in the table. This reformats the message and publishes to the application’s IoT topic in AWS IoT Core to update the frontend.
  3. The final results function is an additional consumer on Kinesis Data Streams. It filters for only the last result in each competitor’s race and publishes the results to the DynamoDB table.
  4. The frontend calls an Amazon API Gateway endpoint to fetch the historical results for completed races via a Lambda function.

Configuring the tumbling window function

This Lambda function aggregates data from the Kinesis stream and stores the result in the DynamoDB table:

Tumbling window architecture

This function receives batches of 1,000 messages per invocation. The messages may contain results for multiple races and competitors. The function groups the results by race and racer ID and then flattens the data structure. It writes an item to the DynamoDB table in this format:

{
 "PK": "race-5403307",
 "SK": "results",
 "ts": 1620992324960,
 "results": "{\"0\":167.04,\"1\":136,\"2\":109.52,\"3\":167.14,\"4\":129.69,\"5\":164.97,\"6\":149.86,\"7\":123.6,\"8\":154.29,\"9\":89.1,\"10\":137.41,\"11\":124.8,\"12\":131.89,\"13\":117.18,\"14\":143.52,\"15\":95.04,\"16\":109.34,\"17\":157.38,\"18\":81.62,\"19\":165.76,\"20\":181.78,\"21\":140.65,\"22\":112.35,\"23\":112.1,\"24\":148.4,\"25\":141.75,\"26\":173.24,\"27\":131.72,\"28\":133.77,\"29\":118.44}",
 "GSI": 2
}

This transformation significantly reduces the number of writes to the DynamoDB table per function invocation. Each time a write occurs, this triggers the publishing process and notifies the frontend via the IoT topic.

DynamoDB can handle almost any number of writes to the table. You can set up to 40,000 write capacity units with default limits and can request even higher limits via an AWS Support ticket. However, you may want to limit the throughput to reduce the WCU cost.

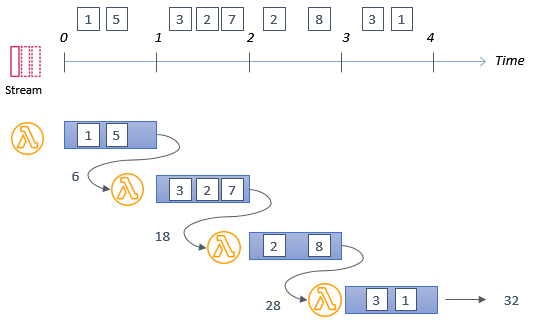
The tumbling window feature of Lambda allows invocations from a streaming source to pass state between invocations. You can specify a window interval of up to 15 minutes. During the window, a state is passed from one invocation to the next, until a final invocation at the end of the window. Alleycat uses this feature to buffer aggregated results and only write the output at the end of the tumbling window:

Tumbling window process

For a tumbling window period of 5 seconds, this means that the Lambda function is invoked multiple times, passing an intermediate state from invocation to invocation. Once the window ends, it then writes the final aggregated result to DynamoDB. The tradeoff in this solution is that it reduces the number of real-time notifications to the frontend since these are published from the table’s stream. This increases the latency of live results in the frontend application.

Buffer by the Lambda function

Implementing tumbling windows in Lambda functions

The template.yaml file describes the tumbling Lambda function. The event definition specifies the tumbling window duration in the TumblingWindowInSeconds attribute:

  TumblingWindowFunction:
    Type: AWS::Serverless::Function
    Properties:
      CodeUri: tumblingFunction/    
      Handler: app.handler
      Runtime: nodejs14.x
      Timeout: 15
      MemorySize: 256
      Environment:
        Variables:
          DDB_TABLE: !Ref DynamoDBtableName
      Policies:
        DynamoDBCrudPolicy:
          TableName: !Ref DynamoDBtableName
      Events:
        Stream:
          Type: Kinesis
          Properties:
            Stream: !Sub "arn:aws:kinesis:${AWS::Region}:${AWS::AccountId}:stream/${KinesisStreamName}"
            BatchSize: 1000
            StartingPosition: TRIM_HORIZON      
            TumblingWindowInSeconds: 15  

When you enable tumbling windows, the function’s event payload contains several new attributes:

{
    "Records": [
        {
 	    ...
        }
    ],
    "shardId": "shardId-000000000000",
    "eventSourceARN": "arn:aws:kinesis:us-east-2:123456789012:stream/alleycat",
    "window": {
        "start": "2021-05-05T18:51:00Z",
        "end": "2021-05-05T18:51:15Z"
    },
    "state": {},
    "isFinalInvokeForWindow": false,
    "isWindowTerminatedEarly": false
}

These include:

  • Window start and end: The beginning and ending timestamps for the current tumbling window.
  • State: An object containing the state returned from the previous invocation, which is initially empty in a new window. The state object can contain up to 1 MB of data.
  • isFinalInvokeForWindow: Indicates if this is the last invocation for the current window. This only occurs once per window period.
  • isWindowTerminatedEarly: A window ends early if the state exceeds the maximum allowed size of 1 MB.

The event handler in app.js uses tumbling windows if they are defined in the AWS SAM template:

// Main Lambda handler
exports.handler = async (event) => {

	// Retrieve existing state passed during tumbling window	
	let state = event.state || {}
	
	// Process the results from event
	let jsonRecords = getRecordsFromPayload(event)
	jsonRecords.map((record) => raceMap[record.raceId] = record.classId)
	state = getResultsByRaceId(state, jsonRecords)

	// If tumbling window is not configured, save and exit
	if (event.window === undefined) {
		return await saveCurrentRaces(state) 
	}

	// If tumbling window is configured, save to DynamoDB on the 
	// final invocation in the window
	if (event.isFinalInvokeForWindow) {
		await saveCurrentRaces(state) 
	} else {
		return { state }
	}
}

The final results function and API

The final results function filters for the last event in each competitor’s race, which contains the final score. The function writes each score to the DynamoDB table. Since there may be many write events per invocation, this function uses the Promise.all construct in Node.js to complete the database operations in parallel:

const saveFinalScores = async (raceResults) => {
	let paramsArr = []

	raceResults.map((result) => {
		paramsArr.push({
		  TableName : process.env.DDB_TABLE,
		  Item: {
		    PK: `race-${result.raceId}`,
		    SK: `racer-${result.racerId}`,
		    GSI: result.output,
		    ts: Date.now()
		  }
		})
	})
	// Save to DDB in parallel
	await Promise.all(paramsArr.map((params) => documentClient.put (params).promise()))
}

Using this approach, each call to documentClient.put is made without waiting for a response from the SDK. The call returns a Promise object, which is in a pending state until the database operation returns with a status. Promise.all waits for all promises to resolve or reject before code execution continues. Comparing the serial and concurrent approach, this reduces the overall time for multiple database writes. The tradeoff is that it increases the number of writes to DynamoDB and the number of WCUs consumed.

Serial vs concurrent writes

For a large number of put operations to DynamoDB, you can also use the DocumentClient’s batchWrite operation. This delegates to the underlying DynamoDB BatchWriteItem operation in the AWS SDK and can accept up to 25 separate put requests in a single call. To handle more than 25, you can make multiple batchWrite requests and still use the parallelized invocation method shown above.

The DynamoDB table maintains a list of race results with one item per racer per race:

DynamoDB table items

The frontend calls an API Gateway endpoint that invokes the getLeaderboard function. This function uses the DocumentClient’s query API to return results for a selected race, sorted by a global secondary index containing the final score:

const AWS = require('aws-sdk')
AWS.config.region = process.env.AWS_REGION 
const documentClient = new AWS.DynamoDB.DocumentClient()

// Main Lambda handler
exports.handler = async (event) => {

    const classId = parseInt(event.queryStringParameters.classId)

    const params = {
        TableName: process.env.DDB_TABLE,
        IndexName: 'GSI_PK_Index',
        KeyConditionExpression: 'PK = :ID',
        ExpressionAttributeValues: {
          ':ID': `class-${classId}`
        },
        ScanIndexForward: false,
        Limit: 1000
    }   

    const result = await documentClient.query(params).promise()   
    return result.Items
}

By default, this returns the top 1,000 places by using the Limit parameter. You can customize this or use pagination to implement fetching large result sets more efficiently.

Conclusion

In this post, I explain the all-time leaderboard logic in the Alleycat application. This is an asynchronous, eventually consistent process that checks batches of incoming records for new personal best records. This uses Kinesis Data Firehose to provide a zero-administration way to deliver and process large batches of records continuously.

This post shows the architecture in Alleycat and how this is defined in AWS SAM. Finally, I walk through how to build a data transformation Lambda function that decodes a payload and returns records back to Kinesis.

Part 5 discusses how to troubleshoot issues in Alleycat and how to monitor streaming applications generally.

For more serverless learning resources, visit Serverless Land.

Building serverless applications with streaming data: Part 3

Post Syndicated from James Beswick original https://aws.amazon.com/blogs/compute/building-serverless-applications-with-streaming-data-part-3/

This series is about building serverless solutions in streaming data workloads. These are traditionally challenging to build, since data can be streamed from thousands or even millions of devices continuously. The application example used in this series is Alleycat, which allows bike racers to compete with each other virtually on home exercise bikes.

Part 1 explains the application’s functionality, how to deploy to your AWS account, and provides an architectural review. Part 2 compares different ways to ingest streaming data into Amazon Kinesis Data Streams and shows how to optimize shard capacity.

In this post, I explain how the all-time rankings functionality is implemented. This uses Amazon Kinesis Data Firehose to deliver hundreds of thousands of data points for processing by AWS Lambda functions.

To set up the example, visit the GitHub repo and follow the instructions in the README.md file. Note that this walkthrough uses services that are not covered by the AWS Free Tier and incur cost.

Overview of real time rankings in Alleycat

In the example scenario, there are 40,000 users and up to 1,000 competitors may race at any given time. While a competitor is racing, there is a real time rankings display that shows their performance in the selected class:

Alleycat front end

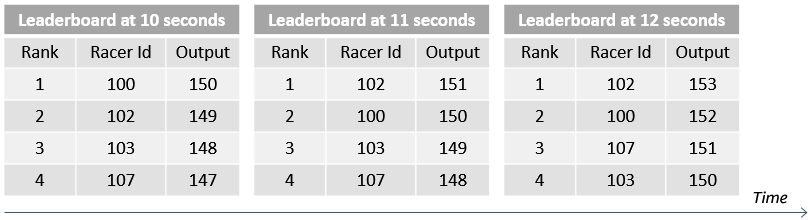
The racer can select Here now to compare against racers in the current virtual race. Alternatively, selecting All time compares their performance against the best performance of all races who have ever competed in the race. The rankings board is dynamic and shows the rankings for the current second on the display for the local racer:

Leaderboard changes over time

In Alleycat, races occur every five minutes continuously, and the all-time data is gathered from races that are completed. For this to work, the application must do the following:

  • Continuously aggregate race data from each of the six exercise classes and deliver to an Amazon S3 bucket.
  • Compare the incoming race data with the personal best records for every competitor in the same class.
  • If the current performance is a record, update the all-time best records dataset.
  • Compress the dataset, since there are thousands of racers, each with 5 minutes of personal racing history.

The resulting dataset contains second-by-second personal records for every racer in a selected race. This is saved in the application’s history bucket in S3 and loaded by the Alleycat front end before the beginning of each race:

        // From Home.vue's loadRealtimeHistory method

        // Load gz from S3 history bucket, unzip and parse to JSON
        const URL = `https://${this.$appConfig.historyBucket}.s3.${this.$appConfig.region}.amazonaws.com/class-${this.selectedClassId}.gz`
        const response = await axios.get(URL, { responseType: 'arraybuffer' })
        const buffer = Buffer.from(response.data, 'base64')
        const dezipped = await gunzip(buffer)
        const history = JSON.parse(dezipped.toString())

Architecture overview

The backend microservice handling this feature is located in the 2-streaming-kdf directory in the GitHub repo. It uses the following architecture:

Solution architecture

  1. Amazon Kinesis Data Firehose is a consumer of Kinesis Data Streams. Records are delivered from the application’s main stream as they arrive.
  2. Kinesis Data Firehose invokes a data transformation Lambda function. This calculates the output for each racer’s data points and returns the modified records to Kinesis.
  3. Kinesis Data Firehose delivers batches of records to an S3 bucket.
  4. When objects are written to the S3 bucket, this event triggers the S3 processor Lambda function. This compares incoming racer performance with historical records.
  5. The Lambda function saves the new all-time records in a compressed format to the application’s history bucket in S3.

The process happens continuously providing that new records are delivered to the application’s main Kinesis stream.

Using Kinesis Data Firehose

Kinesis Data Firehose can consume records from Kinesis Data Streams, or directly from the AWS SDK, AWS IoT Core, and other data producers. In Alleycat, there are multiple consumers that process incoming data, so Kinesis Data Firehose is configured as a consumer on the main stream.

The process of updating historical records is not a real-time process in Alleycat. Processing individual racer messages and comparing against all-time records is possible but would be computationally more complex. In practice, only a few incoming data points are all-time records. As a result, Alleycat asynchronously processes batches of records to find and update all-time records. The process is eventually consistent and the tradeoff is latency. There may be up to 1 minute between recording a personal record and updating the historical dataset in S3.

Kinesis Data Firehose provides several key functions for this process. First, it batches groups of messages based upon the batching hints provided in the AWS Serverless Application Model (AWS SAM) template. This application buffers records for up to 60 seconds or until 1 MB of records are available, whichever is reached first. You can adjust these settings and batch for up to 900 seconds or 128 MB of data. Note that these settings are hints and not absolute – the service can dynamically adjust these if data delivery falls behind data writing in the stream. As a result, hints should be treated as guidance and the actual settings may change.

Kinesis Data Firehose also enables data compression before delivery in various common formats. Since the S3 delivery bucket is an intermediary storage location in this application, using data compression reduces the storage cost. Kinesis can also encrypt data before delivery but this feature is not used in Alleycat. Finally, Kinesis Data Firehose can transform the incoming records by invoking a Lambda function. This enables the application to calculate the racer’s output before delivering the records.

The configuration for Kinesis Data Firehose, the S3 buckets, and the Lambda function is located in the template.yaml file in the GitHub repo. This AWS SAM template shows how to define the complete integration:

  DeliveryStream:
    Type: AWS::KinesisFirehose::DeliveryStream
    DependsOn:
      - DeliveryStreamPolicy    
    Properties:
      DeliveryStreamName: "alleycat-data-firehose"
      DeliveryStreamType: "KinesisStreamAsSource"
      KinesisStreamSourceConfiguration: 
        KinesisStreamARN: !Sub "arn:aws:kinesis:${AWS::Region}:${AWS::AccountId}:stream/${KinesisStreamName}"
        RoleARN: !GetAtt DeliveryStreamRole.Arn
      ExtendedS3DestinationConfiguration: 
        BucketARN: !GetAtt DeliveryBucket.Arn
        BufferingHints: 
          SizeInMBs: 1
          IntervalInSeconds: 60
        CloudWatchLoggingOptions: 
          Enabled: true
          LogGroupName: "/aws/kinesisfirehose/alleycat-firehose"
          LogStreamName: "S3Delivery"
        CompressionFormat: "GZIP"
        EncryptionConfiguration: 
          NoEncryptionConfig: "NoEncryption"
        Prefix: ""
        RoleARN: !GetAtt DeliveryStreamRole.Arn
        ProcessingConfiguration: 
          Enabled: true
          Processors: 
            - Type: "Lambda"
              Parameters: 
                - ParameterName: "LambdaArn"
                  ParameterValue: !GetAtt FirehoseProcessFunction.Arn

Once Kinesis Data Firehose is set up, there is no ongoing administration. The service scales automatically to adjust to the amount of the data available in the application’s Kinesis data stream.

How the Lambda data transformer works

Kinesis Data Firehose buffers up to 3 MB before invoking the data transformation function (you can configure this setting with the ProcessingConfiguration API). The service delivers records as a JSON array:

{
    "invocationId": "d8ce3cc6-abcd-407a-abcd-d9bc2ce58e72",
    "sourceKinesisStreamArn": "arn:aws:kinesis:us-east-2:012345678912:stream/alleycat",
    "deliveryStreamArn": "arn:aws:firehose:us-east-2:012345678912:deliverystream/alleycat-firehose",
    "region": "us-east-2",
    "records": [
        {
            "recordId": "49617596128959546022271021234567...",
            "approximateArrivalTimestamp": 1619185789847,
            "data": "eyJ1dWlkIjoiYjM0MGQzMGYtjI1Yi00YWM4LThjY2QtM2ZhNThiMWZmZjNlIiwiZXZlbnQiOiJ1cGRhdGUiLCJkZXZpY2VUaW1lc3RhbXiOjE2MTkxODU3ODk3NUsInNlY29uZCI6MwicmFjZUlkIjoxNjE5MTg1NjIwMj1LCJuYW1lIjoiSHViZXJ0IiwicmFjZXJJZCI6MSwiY2xhc3NJZCI6MSwiY2FkZW5jZSI6ODAsInJlc2lzdGFuY2UiOjc4fQ==",
            "kinesisRecordMetadata": {
                "sequenceNumber": "49617596128959546022271020452",
                "subsequenceNumber": 0,
                "partitionKey": "1619185789798",
                "shardId": "shardId-000000000000",
                "approximateArrivalTimestamp": 1619185789847
            }
        }, 
   ...

The payload contains metadata about the invocation and data source and each record contains a recordId and a base64 encoded data attribute. The Lambda function can then decode and modify the data attribute for each record as needed. The Lambda function must finally return a JSON array of the same length as the incoming event.records array, with the following attributes:

  • recordId: this must match the incoming recordId, so Kinesis can map the modified data payload back to the original record.
  • result: this must be “Ok”, “Dropped”, or “ProcessingFailed”. “Dropped” means that the function has intentionally removed a payload from processing. Any records with “ProcessingFailed” are delivered to the S3 bucket in a folder called processing-failed. This includes metadata indicating the number of delivery attempts, the timestamp of the last attempt, and the Lambda function’s ARN.
  • data: the returned data payload must be base64 encoded and the modified record must be within the 1 MB limit per record.

The transformer function in Alleycat shows how to implement this process in Node.js:

exports.handler = (event) => {
  const output = event.records.map((record) => {
    // Extract JSON record from base64 data
    const buffer = Buffer.from(record.data, "base64").toString()
    const jsonRecord = JSON.parse(buffer)

    // Add calculated field
    jsonRecord.output = ((jsonRecord.cadence + 35) * (jsonRecord.resistance + 65)) / 100

    // Convert back to base64 + add a newline
    const dataBuffer = Buffer.from(JSON.stringify(jsonRecord) + "\n", "utf8").toString("base64")

    return {
      recordId: record.recordId,
      result: "Ok",
      data: dataBuffer,
    }
  })

  console.log(`{ recordsTotal: ${output.length} }`)
  return { records: output }
}

If you are processing the data in downstream services in JSON format, adding a newline at the end of the data buffer for each record can simplify the import process.

The data transformation Lambda function can run for up to 5 minutes and can use other AWS services for data processing. The Kinesis Data Firehose service scales up the Lambda function automatically if traffic increases, up to 5 outstanding invocations per shard (or 10 if the destination is Splunk).

Processing the Kinesis Data Firehose output

Kinesis Data Firehose puts a series of objects in the intermediary S3 bucket. Each put event invokes the S3 processor Lambda function. This function compares each data point to historical best performance, per racer ID, per class ID, at the same second of the race.

Data points that do not beat existing records are discarded. Otherwise, the function merges new historical records into the dataset and saves the result into the final S3 history bucket. This object is compressed in gzip format and contains the history for a single class ID.

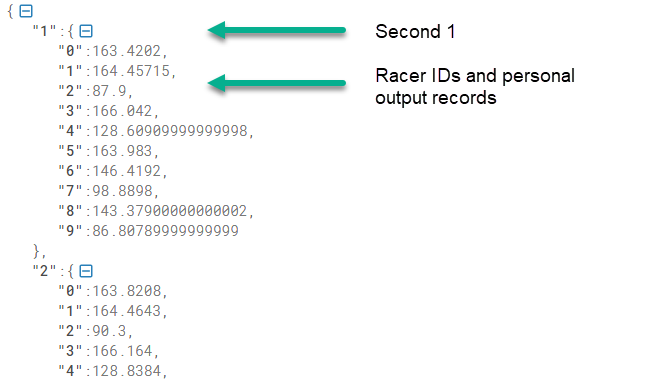
When the frontend downloads this dataset from the S3 bucket, it decompresses the object. The resulting JSON structure shows personal output records per racer ID for each second of the race. The frontend uses this data to update the leaderboard on the local device during each second of the active race.

JSON output

Conclusion

In this post, I explain the all-time leaderboard logic in the Alleycat application. This is an asynchronous, eventually consistent process that checks batches of incoming records for new personal records. This uses Kinesis Data Firehose to provide a zero-administration way to deliver and process large batches of records continuously.

This post shows the architecture in Alleycat and how this is defined in AWS SAM. Finally, I walk through how to build a data transformation Lambda function that correctly decodes a payload and returns records back to Kinesis.

Part 4 show how to combine Kinesis with Amazon DynamoDB to support queries for streaming data. Alleycat uses this architecture to provide real-time rankings for competitors in the same virtual race.

For more serverless learning resources, visit Serverless Land.

Getting started with serverless for developers part 5: Sandbox developer account

Post Syndicated from Benjamin Smith original https://aws.amazon.com/blogs/compute/getting-started-with-serverless-for-developers-part-5-sandbox-developer-account/

This is part 5 of the Getting started with serverless series. In part 4, you learn how the developer workflow for building serverless applications differs to a traditional developer workflow. You see how to test business logic locally before deploying to an AWS account.

In this post, you learn how to secure and manage access to your AWS Lambda functions. I show how to invoke Lambda functions in a sandbox developer account directly from an integrated developer environment (IDE) and view output logs in near-real-time. Finally, I show how this helps to test for infrastructure and security configurations before committing changes to the main branch.

A sandbox developer account

Serverless services like Lambda and Amazon API Gateway are pay-per-use, this means developers no longer need to share multiple environments (for example, dev, staging, and production). Instead, every developer can have their own sandboxed AWS developer account. This allows developers to not have to replicate everything to their local environment but rather test with real resources in the cloud.

You can still run code locally during the development of a feature. In post 4, I show how I run Lambda function code locally, using a test harness. This allows me to maintain a fast inner loop, iteratively updating and locally testing code. If my Lambda function interacts with other AWS infrastructure, I deploy them to a sandboxed AWS developer account. This allows me to test my Lambda function code locally while still being able to access managed services in the cloud.

However, it is useful to deploy your function code to a Lambda function in a sandboxed developer account. A sandbox developer account is an AWS account allocated to a developer on a 1:1 basis. It should give developers as much freedom as possible while still protecting resources and budget.

This allows you to test for security configurations and ensure that your Lambda function code behaves as expected when run in the Lambda execution environment:

Creating a sandboxed developer account

The following best practices can help to minimize costs and prevent unauthorized usage.

After creating a sandbox account, it can be useful to associate a named profile with it. A named profile is a collection of credentials that you can apply to an AWS Command Line Interface (AWS CLI) command. When you specify a profile to run a command, the settings and credentials are used to run that command. The AWS CLI supports multiple named profiles that are stored in the config and credentials files.

Configure profiles by adding entries to the config and credentials files. To learn more about named profiles refer to the AWS CLI documentation.

In the following example I configure my credentials file with two named profiles.

The profile named prod is my production account, and the profile named default is my sandbox developer account. The CLI automatically uses the profile named default, if no --profile option is specified in a CLI command.

[default]
aws_access_key_id=AKIAIOSFODNN7EXAMPLE
aws_secret_access_key=wJalrXUtnFEMI/K7MDENG/bPxRfiCYEXAMPLEKEY

[dev]
aws_access_key_id=AKIAIOSFODNN7EXAMPLE
aws_secret_access_key=wJalBBUtnFEMI/&7MDENG/bPxRfiCYEXAMPLEKEY

[prod]
aws_access_key_id=AKIAI44QH8DHBEXAMPLE
aws_secret_access_key=je7MtGbClwBF/2Zp9Utk/h3yCo8nvbEXAMPLEKEY

AWS Lambda security permissions

AWS Identity and Access Management (IAM) is the service used to manage access to AWS services. Lambda is fully integrated with IAM, allowing you to control precisely what each Lambda function can do within the AWS Cloud. There are two important things that define the scope of permissions in Lambda functions:

The resource policy: Defines which events are authorized to invoke the function.

The execution role policy: Limits what the Lambda function is authorized to do.

Using IAM roles to describe a Lambda function’s permissions, decouples it’s security configuration from the code. This helps reduce the complexity of a lambda function, making it easier to maintain.

A Lambda function’s resource and execution policy should be granted the minimum required permissions for the function to perform it’s task effectively. This is sometimes referred to as the rule of least privilege. As you develop a Lambda function, you expand the scope of this policy to allow access to other resources as required.

When building Lambda-based applications with frameworks such as AWS SAM, you describe both policies in the application’s template.

The following steps show how I deploy and test a Lambda function in a sandbox developer account from within my IDE.

Before you start

All the code relating to this example application can be found in this GitHub repository. To deploy this stage of the application, follow the steps from post 1 to clone the sample application.

  1. Run the following command from the root directory of the cloned repository:
    cd ./part_5
  2. After creating a sandbox developer account, deploy the example application into it by specifying the corresponding profile name in the AWS SAM CLI command. You can omit this if you named the profile default:
    sam deploy --config-file ../samconfig.toml  –guided  --profile default

    This produces the following output:

    Make a note of the StarWebhookLambdaFunctionName, you will use this in the following steps.

Logging with serverless applications

After deploying your serverless application to the sandboxed developer account, you need to verify that it’s operating properly. Lambda automatically monitors functions on your behalf, reporting metrics through Amazon CloudWatch. It collects data in the form of logs, metrics, and events and provides a unified view of AWS resources, applications, and services.

To help simplify troubleshooting, the AWS Serverless Application Model CLI (AWS SAM CLI) has a command called sam logs. This command lets you fetch CloudWatch Logs generated by your Lambda function from the command line.

Run the following command in a terminal window to view a live tail of logs generated by the StarWebhookHandler Lambda function. Replace StarWebhookLambdaFunctionName with the Lambda function name generated by your deployment:

sam logs -n StarWebhookLambdaFunctionName --tail

Checking Lambda function permissions in a sandbox developer account

I open a new terminal window and invoke the StarWebhookHandler Lambda function directly from my IDE by running the following AWS SAM CLI command. To invoke the function I pass an example payload located in events/testEvent.json.

aws lambda invoke --function-name <<replace-with-function-name>> \
--payload fileb://events/testEvent.json  \
out.txt

The following screenshot shows my two terminal windows side by side.

The response returned by the CLI command is on the right. The left window shows the tail of logs generated by the Lambda function. I observe that the CLI invocation shows a status 200 response, but the Lambda function logs report an ‘AccessDenied’ error. The function does not have the required permissions to write to Amazon S3.

I edit the Lambda function policy definition, adding permission for my Lambda function to write to an S3 bucket. I run sam build and sam deploy to re-deploy the application to the sandbox developer account. I invoke the Lambda function again. The logs show the following:

  1. The Lambda function responds with “StatusCode 200″.
  2. The Lambda function billed duration, memory size and running duration.
  3. The Lambda function has successfully copied the file to S3

IAM permission errors such as these may not be detected when running the function code locally. This is one of the advantages of deploying and running Lambda functions in a sandboxed developer account while developing an application.

Conclusion

This post explains the advantages of using a sandbox developer account. It shows how to deploy your business logic to a Lambda function in a sandboxed developer account. You are introduced to IAM policies, which control precisely what each Lambda function can do within the AWS Cloud. You learn that CloudWatch provides a unified view of logs for all AWS resources.

Finally, I show how to use the AWS SAM CLI and AWS CLI to invoke a Lambda function in the cloud and view its log output directly from the IDE. This helps to test for security configurations and to ensure that your business logic behaves as expected when run in the Lambda service. Invoking functions and observing their log output directly from your IDE helps to reduce context switching as you build.

Announcing migration of the Java 8 runtime in AWS Lambda to Amazon Corretto

Post Syndicated from James Beswick original https://aws.amazon.com/blogs/compute/announcing-migration-of-the-java-8-runtime-in-aws-lambda-to-amazon-corretto/

This post is written by Jonathan Tuliani, Principal Product Manager, AWS Lambda.

What is happening?

Beginning July 19, 2021, the Java 8 managed runtime in AWS Lambda will migrate from the current Open Java Development Kit (OpenJDK) implementation to the latest Amazon Corretto implementation.

To reflect this change, the AWS Management Console will change how Java 8 runtimes are displayed. The display name for runtimes using the ‘java8’ identifier will change from ‘Java 8’ to ‘Java 8 on Amazon Linux 1’. The display name for runtimes using the ‘java8.al2’ identifier will change from ‘Java 8 (Corretto)’ to ‘Java 8 on Amazon Linux 2’. The ‘java8’ and ‘java8.al2’ identifiers themselves, as used by tools such as the AWS CLI, CloudFormation, and AWS SAM, will not change.

Why are you making this change?

This change enables customers to benefit from the latest innovations and extended support of the Amazon Corretto JDK distribution. Amazon Corretto is a no-cost, multiplatform, production-ready distribution of the OpenJDK. Corretto is certified as compatible with the Java SE standard and used internally at Amazon for many production services.

Amazon is committed to Corretto, and provides regular updates that include security fixes and performance enhancements. With this change, these benefits are available to all Lambda customers. For more information on improvements provided by Amazon Corretto 8, see Amazon Corretto 8 change logs.

How does this affect existing Java 8 functions?

Amazon Corretto 8 is designed as a drop-in replacement for OpenJDK 8. Most functions benefit seamlessly from the enhancements in this update without any action from you.

In rare cases, switching to Amazon Corretto 8 introduces compatibility issues. See below for known issues and guidance on how to verify compatibility in advance of this change.

When will this happen?

This migration to Amazon Corretto takes place in several stages:

  • June 15, 2021: Availability of Lambda layers for testing the compatibility of functions with the Amazon Corretto runtime. Start of AWS Management Console changes to java8 and java8.al2 display names.
  • July 19, 2021: Any new functions using the java8 runtime will use Amazon Corretto. If you update an existing function, it will transition to Amazon Corretto automatically. The public.ecr.aws/lambda/java:8 container base image is updated to use Amazon Corretto.
  • August 16, 2021: For functions that have not been updated since June 28, AWS will begin an automatic transition to the new Corretto runtime.
  • September 10, 2021: Migration completed.

These changes are only applied to functions not using the arn:aws:lambda:::awslayer:Java8Corretto or arn:aws:lambda:::awslayer:Java8OpenJDK layers described below.

Which of my Lambda functions are affected?

Lambda supports two versions of the Java 8 managed runtime: the java8 runtime, which runs on Amazon Linux 1, and the java8.al2 runtime, which runs on Amazon Linux 2. This change only affects functions using the java8 runtime. Functions the java8.al2 runtime are already using the Amazon Corretto implementation of Java 8 and are not affected.

The following command shows how to use the AWS CLI to list all functions in a specific Region using the java8 runtime. To find all such functions in your account, repeat this command for each Region:

aws lambda list-functions --function-version ALL --region us-east-1 --output text --query "Functions[?Runtime=='java8'].FunctionArn"

What do I need to do?

If you are using the java8 runtime, your functions will be updated automatically. For production workloads, we recommend that you test functions in advance for compatibility with Amazon Corretto 8.

For Lambda functions using container images, the existing public.ecr.aws/lambda/java:8 container base image will be updated to use the Amazon Corretto Java implementation. You must manually update your functions to use the updated container base image.

How can I test for compatibility with Amazon Corretto 8?

If you are using the java8 managed runtime, you can test functions with the new version of the runtime by adding the layer reference arn:aws:lambda:::awslayer:Java8Corretto to the function configuration. This layer instructs the Lambda service to use the Amazon Corretto implementation of Java 8. It does not contain any data or code.

If you are using container images, update the JVM in your image to Amazon Corretto for testing. Here is an example Dockerfile:

FROM public.ecr.aws/lambda/java:8

# Update the JVM to the latest Corretto version
## Import the Corretto public key
rpm --import https://yum.corretto.aws/corretto.key

## Add the Corretto yum repository to the system list
curl -L -o /etc/yum.repos.d/corretto.repo https://yum.corretto.aws/corretto.repo

## Install the latest version of Corretto 8
yum install -y java-1.8.0-amazon-corretto-devel

# Copy function code and runtime dependencies from Gradle layout
COPY build/classes/java/main ${LAMBDA_TASK_ROOT}
COPY build/dependency/* ${LAMBDA_TASK_ROOT}/lib/

# Set the CMD to your handler
CMD [ "com.example.LambdaHandler::handleRequest" ]

Can I continue to use the OpenJDK version of Java 8?

You can continue to use the OpenJDK version of Java 8 by adding the layer reference arn:aws:lambda:::awslayer:Java8OpenJDK to the function configuration. This layer tells the Lambda service to use the OpenJDK implementation of Java 8. It does not contain any data or code.

This option gives you more time to address any code incompatibilities with Amazon Corretto 8. We do not recommend that you use this option to continue to use Lambda’s OpenJDK Java implementation in the long term. Following this migration, it will no longer receive bug fix and security updates. After addressing any compatibility issues, remove this layer reference so that the function uses the Lambda-Amazon Corretto managed implementation of Java 8.

What are the known differences between OpenJDK 8 and Amazon Corretto 8 in Lambda?

Amazon Corretto caches TCP sessions for longer than OpenJDK 8. Functions that create new connections (for example, new AWS SDK clients) on each invoke without closing them may experience an increase in memory usage. In the worst case, this could cause the function to consume all the available memory, which results in an invoke error and a subsequent cold start.

We recommend that you do not create AWS SDK clients in your function handler on every function invocation. Instead, create SDK clients outside the function handler as static objects that can be used by multiple invocations. For more information, see static initialization in the Lambda Operator Guide.

If you must use a new client on every invocation, make sure it is shut down at the end of every invocation. This avoids TCP session caches using unnecessary resources.

What if I need additional help?

Contact AWS Support, the AWS Lambda discussion forums, or your AWS account team if you have any questions or concerns.

For more serverless learning resources, visit Serverless Land.

Creating a notification workflow from sensitive data discover with Amazon Macie, Amazon EventBridge, AWS Lambda, and Slack

Post Syndicated from Bruno Silviera original https://aws.amazon.com/blogs/security/creating-a-notification-workflow-from-sensitive-data-discover-with-amazon-macie-amazon-eventbridge-aws-lambda-and-slack/

Following the example of the EU in implementing the General Data Protection Regulation (GDPR), many countries are implementing similar data protection laws. In response, many companies are forming teams that are responsible for data protection. Considering the volume of information that companies maintain, it’s essential that these teams are alerted when sensitive data is at risk.

This post shows how to deploy a solution that uses Amazon Macie to discover sensitive data. This solution enables you to set up automatic notification to your company’s designated data protection team via a Slack channel when sensitive data that needs to be protected is discovered by Amazon EventBridge and AWS Lambda.

The challenge

Let’s imagine that you’re part of a team that’s responsible for classifying your organization’s data but the data structure isn’t documented. Amazon Macie provides you the ability to run a scheduled classification job that examines your data, and you want to notify the data protection team when there’s new sensitive data to classify. Let’s build a solution to automatically notify the data protection team.

Solution overview

To be scalable and cost-effective, this solution uses serverless technologies and managed AWS services, including:

  • Macie – A fully managed data security and data privacy service that uses machine learning and pattern matching to discover and protect your sensitive data in Amazon Web Services (AWS).
  • EventBridge – A serverless event bus that connects application data from your apps, SaaS, and AWS services. EventBridge can respond to specific events or run according to a schedule. The solution presented in this post uses EventBridge to initiate a custom Lambda function in response to a specific event.
  • Lambda – Runs code in response to events such as changes in data, changes in application state, or user actions. In this solution, a Lambda function is initiated by EventBridge.

Solution architecture

The architecture workflow is shown in Figure 1 and includes the following steps:

  1. Macie runs a classification job and publishes its findings to EventBridge as a JSON object.
  2. The EventBridge rule captures the findings and invokes a Lambda function as a target.
  3. The Lambda function parses the JSON object. The function then sends a custom message to a Slack channel with the sensitive data finding for the data protection team to evaluate and respond to.


Figure 1: Solution architecture workflow

Figure 1: Solution architecture workflow

Set up Slack

For this solution, you need a Slack workspace and an incoming webhook. The workspace must be in place before you create the webhook.

Create a Slack workspace

If you already have a Slack workspace in your environment, you can skip forward, to creating the webhook.

If you don’t have a Slack workspace, follow the steps in Create a Slack Workspace to create one.

Create an incoming webhook in Slack API

  1. Go to your Slack API.
  2. Choose Start Building to create an app.
  3. Enter the following details for your app:
    • App Name – macie-to-slack.
    • Development Slack Workspace – Choose the Slack workspace—either an existing workspace or one you created for this solution—to receive the Macie findings.
  4. Choose the Create App button.
  5. In the left menu, choose Incoming Webhooks.
  6. At the Activate Incoming Webhooks screen, move the slider from OFF to ON.
  7. Scroll down and choose Add New Webhook to Workspace.
  8. In the screen asking where your app should post, enter the name of the Slack channel from your Workspace that you want to send notification to and choose Authorize.
  9. On the next screen, scroll down to the Webhook URL section. Make a note of the URL to use later.

Deploy the CloudFormation template with the solution

The deployment of the CloudFormation template automatically creates the following resources:

  • A Lambda function that begins with the name named macie-to-slack-lambdafindingsToSlack-.
  • An EventBridge rule named MacieFindingsToSlack.
  • An IAM role named MacieFindingsToSlackkRole.
  • A permission to invoke the Lambda function named LambdaInvokePermission.

Note: Before you proceed, make sure you’re deploying the template to the same Region that your production Macie is running.

To deploy the Cloudformation template

  1. Download the YAML template to your computer.

    Note: To save the template, you can right click the Raw button at the top of the code and then select Save link as if you’re using Chrome, or the equivalent in your browser. This file is used in Step 4.

  2. Open CloudFormation in the AWS Management Console.
  3. On the Welcome page, choose Create stack and then choose With new resources.
  4. On Step 1 — Specify template, choose Upload a template file, select Choose file and then select the file template.yaml (the file extension might be .YML), then choose Next.
  5. On Step 2 — Specify stack details:
    1. Enter macie-to-slack as the Stack name.
    2. At the Slack Incoming Web Hook URL, paste the webhook URL you copied earlier.
    3. At Slack channel, enter the name of the channel in your workspace that will receive the alerts and choose Next.
    Figure 2: Defining stack details

    Figure 2: Defining stack details

  6. On Step 3 – Configure Stack options, you can leave the default settings, or change them for your environment. Choose Next to continue.
  7. At the bottom of Step 4 – Review, select I acknowledge that AWS CloudFormation might create IAM resources, and choose Create stack.

    Figure 3: Confirmation before stack creation

    Figure 3: Confirmation before stack creation

  8. Wait for the stack to reach status CREATE_COMPLETE.

Running the solution

At this point, you’ve deployed the solution and your resources are created.

To test the solution, you can schedule a Macie job targeting a bucket that contains a file with sensitive information that Macie can detect.

Note: You can check the Amazon Macie documentation to see the list of supported managed data identifiers.

When the Macie job is complete, any findings are sent to the Slack channel.

Figure 4: Macie finding delivered to Slack channel

Figure 4: Macie finding delivered to Slack channel

Select the link in the message sent to the Slack channel to open that finding in the Macie console, as shown in Figure 5.

Figure 5: Finding details

Figure 5: Finding details

And you’re done!

Now your Macie finding results are delivered to your Slack channel where they can be easily monitored, reducing response time and risk exposure.

If you deployed this for testing purposes, or want to clean this up and move to your production account, you can delete the Cloudformation stack:

  1. Open the CloudFormation console.
  2. Select the stack and choose Delete.

Conclusion

In this blog post we walked through the steps to configure a notification workflow using Macie, Lambda, and EventBridge to send sensitive data findings to your data protection team via a Slack channel.

Your data protection team will appreciate the timely notifications of sensitive data findings, giving you the ability to focus on creating controls to improve data security and compliance with regulations related to protection and treatment of personal data.

For more information about data privacy on AWS, see Data Privacy FAQ.

If you have feedback about this post, submit comments in the Comments section below.

Want more AWS Security how-to content, news, and feature announcements? Follow us on Twitter.

Author

Bruno Silveira

Bruno is a Solutions Architect Manager in the Public Sector team with focus on educational institutions in Brazil. His previous career was in government, financial services, utilities, and nonprofit institutions. Bruno is an enthusiast of cloud security and an appreciator of good rock’n roll with a good beer.

Author

Julio Carvalho

Julio is a Principal Security Solutions Architect at AWS for the Latin American financial market. As a security specialist, he helps customers solve protection and compliance challenges on their cloud journey.

Complying with DMARC across multiple accounts using Amazon SES

Post Syndicated from Brendan Paul original https://aws.amazon.com/blogs/messaging-and-targeting/complying-with-dmarc-across-multiple-accounts-using-amazon-ses/

Introduction

For enterprises of all sizes, email is a critical piece of infrastructure that supports large volumes of communication from an organization. As such, companies need a robust solution to deal with the complexities this may introduce. In some cases, companies have multiple domains that support several different business units and need a distributed way of managing email sending for those domains. For example, you might want different business units to have the ability to send emails from subdomains, or give a marketing company the ability to send emails on your behalf. Amazon Simple Email Service (Amazon SES) is a cost-effective, flexible, and scalable email service that enables developers to send mail from any application. One of the benefits of Amazon SES is that you can configure Amazon SES to authorize other users to send emails from addresses or domains that you own (your identities) using their own AWS accounts. When allowing other accounts to send emails from your domain, it is important to ensure this is done securely. Amazon SES allows you to send emails to your users using popular authentication methods such as DMARC. In this blog, we walk you through 1/ how to comply with DMARC when using Amazon SES and 2/ how to enable other AWS accounts to send authenticated emails from your domain.

DMARC: what is it, why is it important?

DMARC stands for “Domain-based Message Authentication, Reporting & Conformance”, and it is an email authentication protocol (DMARC.org). DMARC gives domain owners and email senders a way to protect their domain from being used by malicious actors in phishing or spoofing attacks. Email spoofing can be used as a way to compromise users’ financial or personal information by taking advantage of their trust of well-known brands. DMARC makes it easier for senders and recipients to determine whether or not an email was actually sent by the domain that it claims to have been sent by.

Solution Overview

In this solution, you will learn how to set up DKIM signing on Amazon SES, implement a DMARC Policy, and enable other accounts in your organization to send emails from your domain using Sending Authorization. When you set up DKIM signing, Amazon SES will attach a digital signature to all outgoing messages, allowing recipients to verify that the email came from your domain. You will then set your DMARC Policy, which tells an email receiver what to do if an email is not authenticated. Lastly, you will set up Sending Authorization so that other AWS accounts can send authenticated emails from your domain.

Prerequisites

In order to complete the example illustrated in this blog post, you will need to have:

  1. A domain in an Amazon Route53 Hosted Zone or third-party provider. Note: You will need to add/update records for the domain. For this blog we will be using Route53.
  2. An AWS Organization
  3. A second AWS account to send Amazon SES Emails within a different AWS Organizations OU. If you have not worked with AWS Organizations before, review the Organizations Getting Started Guide

How to comply with DMARC (DKIM and SPF) in Amazon SES

In order to comply with DMARC, you must authenticate your messages with either DKIM (DomainKeys Identified Mail), SPF (Sender Policy Framework), or both. DKIM allows you to send email messages with a cryptographic key, which enables email providers to determine whether or not the email is authentic. SPF defines what servers are allowed to send emails for their domain. To use SPF for DMARC compliance you need to set up a custom MAIL FROM domain in Amazon SES. To authenticate your emails with DKIM in Amazon SES, you have the option of:

In this blog, you will be setting up a sending identity.

Setting up DKIM Signing in Amazon SES

  1. Navigate to the Amazon SES Console 
  2. Select Verify a New Domain and type the name of your domain in
  3. Select Generate DKIM Settings
  4. Choose Verify This Domain
    1. This will generate the DNS records needed to complete domain verification, DKIM signing, and routing incoming mail.
    2. Note: When you initiate domain verification using the Amazon SES console or API, Amazon SES gives you the name and value to use for the TXT record. Add a TXT record to your domain’s DNS server using the specified Name and Value. Amazon SES domain verification is complete when Amazon SES detects the existence of the TXT record in your domain’s DNS settings.
  5. If you are using Route 53 as your DNS provider, choose the Use Route 53 button to update the DNS records automatically
    1. If you are not using Route 53, go to your third-party provider and add the TXT record to verify the domain as well as the three CNAME records to enable DKIM signing. You can also add the MX record at the end to route incoming mail to Amazon SES.
    2. A list of common DNS Providers and instructions on how to update the DNS records can be found in the Amazon SES documentation
  6. Choose Create Record Sets if you are using Route53 as shown below or choose Close after you have added the necessary records to your third-party DNS provider.


Note: in the case that you previously verified a domain, but did NOT generate the DKIM settings for your domain, follow the steps below. Skip these steps if this is not the case:

  1. Go to the Amazon SES Console, and select your domain
  2. Select the DKIM dropdown
  3. Choose Generate DKIM Settings and copy the three values in the record set shown
    1. You may also download the record set as a CSV file
  4. Navigate to the Route53 console or your third-party DNS provider. Instructions on how to update the DNS records in your third-party can be found in the Amazon SES documentation
  5. Select the domain you are using
  6. Choose Create Record

  1. Enter the values that Amazon SES has generated for you, and add the three CNAME records to your domain
  2. Wait a few minutes, and go back to your domain in the Amazon SES Console
  3. Check that the DKIM status is verified

You also want to set up a custom MAIL FROM domain that you will use later on. To do so, follow the steps in the documentation.

Setting up a DMARC policy on your domain

DMARC policies are TXT records you place in DNS to define what happens to incoming emails that don’t align with the validations provided when setting up DKIM and SPF. With this policy, you can choose to allow the email to pass through, quarantine the email into a folder like junk or spam, or reject the email.

As a best practice, you should start with a DMARC policy that doesn’t reject all email traffic and collect reports on emails that don’t align to determine if they should be allowed. You can also set a percentage on the DMARC policy to perform filtering on a subset of emails to, for example, quarantine only 50% of the emails that don’t align. Once you are in a state where you can begin to reject non-compliant emails, flip the policy to reject failed authentications. When you set the DMARC policy for your domain, any subdomains that are authorized to send on behalf of your domain will inherit this policy and the same rule will apply. For more information on setting up a DMARC policy, see our documentation.

In a scenario where you have multiple subdomains sending emails, you should be setting the DMARC policy for the organizational domain that you own. For example, if you own the domain example.com and also want to use the sub-domain sender.example.com to send emails you can set the organizational DMARC policy (as a DNS TXT record) to:

Name Type Value
1 _dmarc.example.com TXT “v=DMARC1;p=quarantine;pct=50;rua=mailto:[email protected]”

This DMARC policy states that 50% of emails coming from example.com that fail authentication should be quarantined and you want to send a report of those failures to [email protected]. For your sender.example.com sub-domain, this policy will be inherited unless you specify another DMARC policy for our sub-domain. In the case where you want to be stricter on the sub-domain you could add another DMARC policy like you see in the following table.


Name Type Value
1 _dmarc.sender.example.com TXT “v=DMARC1;p=reject;pct=100;rua=mailto:[email protected];ruf=mailto:[email protected]”

This policy would apply to emails coming from sender.example.com and would reject any email that fails authentication. It would also send aggregate feedback to [email protected] and detailed message-specific failure information to [email protected] for further analysis.

Sending Authorization in Amazon SES – Allowing Other Accounts to Send Authenticated Emails

Now that you have configured Amazon SES to comply with DMARC in the account that owns your identity, you may want to allow other accounts in your organization the ability to send emails in the same way. Using Sending Authorization, you can authorize other users or accounts to send emails from identities that you own and manage. An example of where this could be useful is if you are an organization which has different business units in that organization. Using sending authorization, a business unit’s application could send emails to their customers from the top-level domain. This application would be able to leverage the authentication settings of the identity owner without additional configuration. Another advantage is that if the business unit has its own subdomain, the top-level domain’s DKIM settings can apply to this subdomain, so long as you are using Easy DKIM in Amazon SES and have not set up Easy DKIM for the specific subdomains.

Setting up sending authorization across accounts

Before you set up sending authorization, note that working across multiple accounts can impact bounces, complaints, pricing, and quotas in Amazon SES. Amazon SES documentation provides a good understanding of the impacts when using multiple accounts. Specifically, delegated senders are responsible for bounces and complaints and can set up notifications to monitor such activities. These also count against the delegated senders account quotas. To set up Sending Authorization across accounts:

  1. Navigate to the Amazon SES Console from the account that owns the Domain
  2. Select Domains under Identity Management
  3. Select the domain that you want to set up sending authorization with
  4. Select View Details
  5. Expand Identity Policies and Click Create Policy
  6. You can either create a policy using the policy generator or create a custom policy. For the purposes of this blog, you will create a custom policy.
  7. For the custom policy, you will allow a particular Organization Unit (OU) from our AWS Organization access to our domain. You can also limit access to particular accounts or other IAM principals. Use the following policy to allow a particular OU to access the domain:

{
  “Version”: “2012-10-17”,
  “Id”: “AuthPolicy”,
  “Statement”: [
    {
      “Sid”: “AuthorizeOU”,
      “Effect”: “Allow”,
      “Principal”: “*”,
      “Action”: [
        “SES:SendEmail”,
        “SES:SendRawEmail”
      ],
      “Resource”: “<Arn of Verified Domain>”,
      “Condition”: {
        “ForAnyValue:StringLike”: {
          “aws:PrincipalOrgPaths”: “<Organization Id>/<Root OU Id>/<Organizational Unit Id>”
        }
      }
    }
  ]
}

9. Make sure to replace the escaped values with your Verified Domain ARN and the Org path of the OU you want to limit access to.


You can find more policy examples in the documentation. Note that you can configure sending authorization such that all accounts under your AWS Organization are authorized to send via a certain subdomain.

Testing

You can now test the ability to send emails from your domain in a different AWS account. You will do this by creating a Lambda function to send a test email. Before you create the Lambda function, you will need to create an IAM role for the Lambda function to use.

Creating the IAM Role:

  1. Log in to your separate AWS account
  2. Navigate to the IAM Management Console
  3. Select Role and choose Create Role
  4. Under Choose a use case select Lambda
  5. choose Next: Permissions
  6. In the search bar, type SES and select the check box next to AmazonSESFullAccess
  7. Choose Next:Tags and Review
  8. Give the role a name of your choosing, and choose Create Role

Navigate to Lambda Console

  1. Select Create Function
  2. Choose the box marked Author from Scratch
  3. Give the function a name of your choosing (Ex: TestSESfunction)
  4. In this demo, you will be using Python 3.8 runtime, but feel free to modify to your language of choice
  5. Select the Change default execution role dropdown, and choose the Use an existing role radio button
  6. Under Existing Role, choose the role that you created in the previous step, and create the function

Edit the function

  1. Navigate to the Function Code portion of the page and open the function python file
  2. Replace the default code with the code shown below, ensuring that you put your own values in based on your resources
  3. Values needed:
    1. Test Email Address: an email address you have access to
      1. NOTE: If you are still operating in the Amazon SES Sandbox, this will need to be a verified email in Amazon SES. To verify an email in Amazon SES, follow the process here. Alternatively, here is how you can move out of the Amazon SES Sandbox
    2. SourceArn: The arn of your domain. This can be found in Amazon SES Console → Domains → <YourDomain> → Identity ARN
    3. ReturnPathArn: The same as your Source ARN
    4. Source: This should be your Mail FROM Domain @ your domain
      1. Your Mail FROM Domain can be found under Domains → <YourDomain> → Mail FROM Domain dropdown
      2. Ex: [email protected]
    5. Use the following function code for this example

import json
import boto3
from botocore.exceptions import ClientError

client = boto3.client('ses')
def lambda_handler(event, context):
    # Try to send the email.
    try:
        #Provide the contents of the email.
        response = client.send_email(
            Destination={
                'ToAddresses': [
                    '<[email protected]>',
                ],
            },
            Message={
                'Body': {
                    'Html': {
                        'Charset': 'UTF-8',
                        'Data': 'This email was sent with Amazon SES.',
                    },
                },
                'Subject': {
                    'Charset': 'UTF-8',
                    'Data': 'Amazon SES Test',
                },
            },
            SourceArn='<your-ses-identity-ARN>',
            ReturnPathArn='<your-ses-identity-ARN>',
            Source='<[email protected]>',
             )
    # Display an error if something goes wrong.
    except ClientError as e:
        print(e.response['Error']['Message'])
    else:
        print("Email sent! Message ID:"),
        print(response['ResponseMetadata']['RequestId'])

  1. Once you have replaced the appropriate values, choose the Deploy button to deploy your changes

Run a Test invocation

  1. After you have deployed your changes, select the “Test” Panel above your function code

  1. You can leave all of these keys and values as default, as the function does not use any event parameters
  2. Choose the Invoke button in the top right corner
  3. You should see this above the test event window:

Verifying that the Email has been signed properly

Depending on your email provider, you may be able to check the DKIM signature directly in the application. As an example, for Outlook, right click on the message, and choose View Source from the menu. You should see line that shows the Authentication Results and whether or not the DKIM/SPF signature passed. For Gmail, go to your Gmail Inbox on the Gmail web app. Choose the message you wish to inspect, and choose the More Icon. Choose View Original from the drop-down menu. You should then see the SPF and DKIM “PASS” Results.

Cleanup

To clean up the resources in your account,

  1. Navigate to the Route53 Console
  2. Select the Hosted Zone you have been working with
  3. Select the CNAME, TXT, and MX records that you created earlier in this blog and delete them
  4. Navigate to the SES Console
  5. Select Domains
  6. Select the Domain that you have been working with
  7. Click the drop down Identity Policies and delete the one that you created in this blog
  8. If you verified a domain for the sake of this blog: navigate to the Domains tab, select the domain and select Remove
  9. Navigate to the Lambda Console
  10. Select Functions
  11. Select the function that you created in this exercise
  12. Select Actions and delete the function

Conclusion

In this blog post, we demonstrated how to delegate sending and management of your sub-domains to other AWS accounts while also complying with DMARC when using Amazon SES. In order to do this, you set up a sending identity so that Amazon SES automatically adds a DKIM signature to your messages. Additionally, you created a custom MAIL FROM domain to comply with SPF. Lastly, you authorized another AWS account to send emails from a sub-domain managed in a different account, and tested this using a Lambda function. Allowing other accounts the ability to manage and send email from your sub-domains provides flexibility and scalability for your organization without compromising on security.

Now that you have set up DMARC authentication for multiple accounts in your enviornment, head to the AWS Messaging & Targeting Blog to see examples of how you can combine Amazon SES with other AWS Services!

If you have more questions about Amazon Simple Email Service, check out our FAQs or our Developer Guide.

If you have feedback about this post, submit comments in the Comments section below.

Getting Started with serverless for developers: Part 4 – Local developer workflow

Post Syndicated from Benjamin Smith original https://aws.amazon.com/blogs/compute/getting-started-with-serverless-for-developers-part-4-local-developer-workflow/

This blog is part 4 of the “Getting started with serverless for developers” series, helping developers start building serverless applications from their IDE.

Many “getting started” guides demonstrate how to build serverless applications from within the AWS Management Console. However, most developers spend the majority of their time building from within their local integrated development environment (IDE).

The next two blog posts in this series focus on the serverless developer workflow. They describe how to check logs, test, and iterate on business logic while building locally, and how this differs from traditional applications.

This blog post explains how the developer workflow for building serverless applications differs from a traditional developer workflow. It shows the methods that I use to test business logic locally before deploying to a sandbox AWS developer account, and how to test against cloud services as you build. This eliminates the need to deploy to the AWS Cloud each time you want to test a code change.

Traditional developer workflow

Developers typically use the following workflow cycle before committing code to the main branch:

  1. Write code.
  2. Save code.
  3. Run code.
  4. Check results.

This is sometimes referred to as the inner loop, shown as follows:

With traditional (non-serverless) applications, developers commonly create a development environment on their local machine. This local development environment keeps parity with the staging and production environments. It allows developers to test their application locally end-to-end before committing code to the main branch.

Serverless developer workflow

Part 2: the business logic, explains how serverless applications use managed services that abstract away the need for developers to patch and scale their application infrastructure. This means that the code base in a serverless application is focused purely on business logic, allowing managed services to handle other important layers such as:

  • Authorization
  • Presentation
  • Database
  • Application integration
  • Notification

A good serverless developer workflow enables developers to test and iterate on business logic quickly. It allows them to check that the business logic runs correctly with the managed services that compose an application.

To achieve this, the best approach is not to try and emulate managed services on your local development machine. Instead, your local code should interact directly with real cloud services in a sandboxed AWS account.

This approach lets you rapidly test and iterate on business logic locally, deploying to the development environment to test for infrastructure, security, and environment configuration changes. Once the business logic is ready in the development environment, it can be deployed to other environments (test, staging, production) via CI/CD automation or manually triggered commands.

The following sections explain how I test business logic locally using a custom-written test harness. Each time I create a Lambda function I create a directory to hold:

  1. The function code.
  2. A relative package.json.
  3. A file called testharness.js.

The test harness file is used to run the Lambda function code on my local development machine. It is configured to mock environment variables loaded from a file named `env.json` and loads a JSON test event payload located in the events directory.

Testing Lambda function code locally with a test harness

Part 2: the business logic, explains the anatomy of a Lambda function and its handler:

A small Lambda function

Note that the function handler receives an input payload called an event object. To test the local function code effectively, use a test event object that represents the production event object.

The serverless application introduced in getting started with serverless part 1, shows that Amazon API Gateway invokes the Lambda function.

This invocation contains an event object with a JSON representation of the HTTP request. The event object has a defined structure. Follow the steps in this GitHub repository to see how to create a test event object.

Before you start

To deploy this stage of the application, follow the steps from post 1 to clone and deploy the sample application.

  1. Run the following commands from the root directory of the cloned repository:
    cd ./part_4/src_starred
    npm install

The following steps show how I configure my testharness.js file to run my function code:

// Mock event
const event = require('../events/testEvent.json')
// Mock environment variables
const environmentVars = require('../env.json')
process.env.AWS_REGION = environmentVars.AWS_REGION
process.env.localTest = true
process.env.slackEndpoint= environmentVars.slackEndpoint
process.env.bucket = environmentVars.bucket
// Lambda handler
const { handler } = require('./app')
const main = async () => {
  console.time('localTest')
  console.dir(await handler(event))
  console.timeEnd('localTest')
}
main().catch(error => console.error(error))
  1. A test event object is loaded into a variable called event.
  2. The environment variables required by the Lambda function are defined in env.json and loaded.
  3. The Lambda function code is loaded into a variable called handler
  4. The Lambda function code is run synchronously
  5. The console shows output from the Lambda function code, along with any errors that occur.

I run my test harness file by entering the following command in a terminal window:

$ node testharness.js

This produces the following output:

The output indicates that the function code ran without error, it returned a 200 status code and completed in 30.999 ms.

To generate an error in the function code,  I change the app.js file by commenting out the following line:

//const axios = require('axios');

I save the file and run the test harness again. I see the following response in the terminal window:

f

This indicates an error in my function code that I must resolve before deploying to my AWS account.

By iteratively updating and locally testing my code, I maintain a fast inner loop. This eliminates the need to deploy to the AWS Cloud each time I want to test a code change.

Testing against cloud resources

In many instances, a Lambda function interacts with other cloud resources. This could be via an SDK or some other native integration. In this case, you should deploy those resources to a sandboxed AWS developer account.

In the following example, I update a Lambda function to log each inbound HTTP request to a bucket in Amazon S3, a highly scalable object storage service running in the AWS cloud. To do this, I use the JavaScript SDK:

s3.putObject(params, function(err, data)

I update the AWS Serverless Application Model (AWS SAM) template to define a new S3 bucket:

SrcBucket:
Type: AWS::S3::Bucket

I change into the part_4 directory then build and deploy the application with the following commands:

cd ../part_4
sam build
sam deploy --guided --config-file ../samconfig.toml

After deploying, the output shows:

I copy the new bucket value to the environment variable defined in in /part_4/env.json .

"slackEndpoint": "Insert_Slack_Endpoint",
"bucket" : "Insert_S3_Bucket_Name"
}

Now I am ready to test the local Lambda function code against cloud resources in my sandbox AWS development account. I run a new local test with the following command:

node testHarness.js

The terminal returns:

This indicates that the Lambda function code completed without error. I can verify this by checking the contents of the S3 bucket using the AWS Command Line Interface (AWS CLI):

aws s3 ls s3://githubtoslackapp-srcbucket-ge4wkt9dljwa

This returns the following, confirming that the request object has been saved to S3 and the application code is running correctly:

Conclusion

Using managed services to build serverless applications helps developers focus on business logic. It also changes the developer workflow compared with building traditional (non-serverless) applications.

A good serverless developer workflow enables developers to test and iterate on business logic quickly while still being able to interact with cloud services. This blog post shows how I achieve this by using a test harness to run function code locally and deploying application resources to a sandboxed developer account.

In the next blog post, I show how to invoke Lambda functions deployed to sandboxed developer account, without leaving your IDE. This lets you test for infrastructure, security, and environment configuration changes while building.

AWS Lambda Extensions Are Now Generally Available – Get Started with Your Favorite Operations Tools Today

Post Syndicated from Channy Yun original https://aws.amazon.com/blogs/aws/getting-started-with-using-your-favorite-operational-tools-on-aws-lambda-extensions-are-now-generally-available/

In October 2020, we announced the preview of AWS Lambda extensions, which you can use to easily integrate Lambda functions with your favorite tools for monitoring, observability, security, and governance.

Today, I’m happy to announce the general availability of AWS Lambda Extensions which comes with new performance improvements and an expanded set of partners. As part of the GA release, we have enabled functions to send responses as soon as the function code is complete without waiting for the included extensions to finish. This enables extensions to perform activities like sending telemetry to a preferred destination after the function’s response has been returned. We also welcome extensions from new partners: Imperva, Instana, Sentry, Site24x7, and the AWS Distro for OpenTelemetry.

You can use Lambda extensions for use cases such as capturing diagnostic information before, during, and after function invocation; automatically instrumenting your code without needing code changes; fetching configuration settings or secrets before the function invocation; detecting and alerting on function activity through security agents; and sending telemetry to custom destinations such as Amazon Simple Storage Service (Amazon S3), Amazon Kinesis, Amazon Elasticsearch Service directly and asynchronously from your Lambda functions.

Customers are drawn to the vision of Serverless. The reduced operational responsibility frees them up to focus on their business problems. To help customers monitor, observe, secure, and govern their functions, AWS Lambda provides native integrations for logs and metrics through Amazon CloudWatch, tracing through AWS X-Ray, tracking configuration changes through AWS Config, and recording API calls through AWS CloudTrail In addition, AWS Lambda partners provide tools for application management, API integration, deployment, monitoring, and security.

AWS Lambda extensions provide a simple way to extend the Lambda execution environment, which is where your function code is executed. AWS customers, partners, and the open source community can use the new Lambda Extensions API to build their own extensions, which are companion processes that augment the capabilities of Lambda functions. To learn how to build your own extensions, see the Building Extensions for AWS Lambda – In preview blog post. The post also includes information about changes to the Lambda lifecycle.

How AWS Lambda Extensions Works
AWS Lambda extensions are designed to be the easiest way to plug in the tools you use today without complex installation or configuration management. You can add tools to your functions using Lambda layers or include them in the image for functions deployed as container images.

Lambda extensions use the Extensions API to register for function and execution environment lifecycle events. In response to these events, extensions can start new processes or run logic. Lambda extensions can also use the Runtime Logs API to subscribe to a stream of the same logs that the Lambda service sends to Amazon CloudWatch directly from the Lambda execution environment. Lambda streams the logs to the extension, and the extension can then process, filter, and send the logs to any preferred destination.

Most customers will use Lambda extensions without needing to know about the capabilities of the Extensions API. You can just consume capabilities of an extension by configuring the options in your Lambda functions.

How to Use Lambda Extensions
You can install and manage extensions using the Lambda console, the AWS Command Line Interface (CLI), or infrastructure as code (IaC) services and tools such as AWS CloudFormation, AWS Serverless Application Model (AWS SAM), and Terraform.

To use Lambda extensions to integrate existing tools with your Lambda functions, choose your a Lambda function and on the Configuration tab, choose Monitoring and Operations tools.

On the Extensions page, you can find available extensions from AWS Lambda partners. Choose an extension to view its installation instructions.

AWS Lambda Extensions Partners
At this launch, Lambda extensions integrate with these AWS Lambda partners who have provided the following information to introduce their extensions. (I am updating this article with links as they are published.)

  • AppDynamics provides end-to-end transaction tracing for AWS Lambda. With the AppDynamics extension, it is no longer mandatory for developers to include the AppDynamics tracer as a dependency in their function code, making tracing transactions across hybrid architectures even simpler.
  • Coralogix is a log analytics and cloud security platform that empowers thousands of companies to improve security and accelerate software delivery, allowing you to get deep insights without paying for the noise. Coralogix can now read Lambda function logs and metrics directly, without using CloudWatch or Amazon S3, reducing the latency, and cost of observability.
  • The Datadog extension brings comprehensive, real-time visibility to your serverless applications. Combined with Datadog’s integration with AWS, you get metrics, traces, and logs to help you monitor, detect, and resolve issues at any scale. The Datadog extension makes it easier than ever to get telemetry from your serverless workloads.
  • The Dynatrace extension makes it even easier to bring AWS Lambda metrics and traces into the Dynatrace platform for intelligent observability and automatic root cause detection. Get comprehensive, end-to-end observability with the flip of a switch and no code changes.
  • Epsagon helps you monitor, troubleshoot, and lower the cost of your Lambda functions. Epsagon’s extension reduces the overhead of sending traces to the Epsagon service, with minimal performance impact to your function.
  • HashiCorp Vault allows you to secure, store, and tightly control access to your application’s secrets and sensitive data. With the Vault extension, you can now authenticate and securely retrieve dynamic secrets before your Lambda function is invoked.
  • Honeycomb is a powerful observability tool that helps you debug your entire production app stack. Honeycomb’s extension decreases the overhead, latency, and cost of sending events to the Honeycomb service, while increasing reliability.
  • Instana Enterprise Observability Platform ingests performance metrics, traces requests, and profiles processes to make observability work for the enterprise. The Instana Lambda extension offers modification-free, low latency tracing of Lambda functions backed by their real-time Enterprise Observability Platform.
  • Imperva Serverless Protection protects organizations from vulnerabilities created by misconfigured apps and code-level security risks in serverless computing environments. The Imperva extension enables customers to easily embed additional security in their DevOps processes for serverless applications without requiring any code changes, leading to faster time to market.
  • Lumigo provides a monitoring and observability platform for serverless and microservices applications. The Lumigo extension enables the new Lumigo Lambda Profiler to see a breakdown of function resources, including CPU, memory, and network metrics. Use the extension to receive actionable insights to reduce Lambda runtime duration and cost, fix bottlenecks, and increase efficiency.
  • Check Point CloudGuard provides full lifecycle security for serverless applications. The CloudGuard extension enables Function Self Protection data aggregation as an out-of-process extension, providing detection and alerting on application layer attacks.
  • New Relic enables you to efficiently monitor, troubleshoot, and optimize your Lambda functions. New Relic’s extension allows you send your Lambda service platform logs directly to New Relic’s unified observability platform, allowing you to quickly visualize data with minimal latency and cost.
  • Thundra provides an application debugging, observability and security platform for serverless, container and virtual machine (VM) workloads. The Thundra extension adds asynchronous telemetry reporting functionality to the Thundra agents, getting rid of network latency.
  • Splunk offers an enterprise-grade cloud monitoring solution for real-time full-stack visibility at scale. The Splunk extension provides a simplified runtime-independent interface to collect high-resolution observability data with minimal overhead. Monitor, manage, and optimize the performance and cost of your serverless applications with Splunk Observability solutions.
  • Sentry’s extension enables developers to monitor code health. From error tracking to performance monitoring, developers can see issues more clearly, solve them quicker, and continuously stay informed about the health of their applications, all without making code changes.
  • Site24x7 provides a performance monitoring solution for DevOps and IT operations. The Site24x7 extension enables real-time observability into your Lambda functions. It enables you to monitor critical Lambda metrics and function executions logs and optimize execution time and performance.
  • The Sumo Logic extension enables you to get instant visibility into the health and performance of your mission-critical applications using AWS Lambda. With this extension and Sumo Logic’s continuous intelligence platform, you can now ensure that all your Lambda functions are running as expected by analyzing function, platform, and extension logs to quickly identify and remediate errors and exceptions.

Here are Lambda extensions from AWS services:

  • AWS AppConfig helps you manage, store, and safely deploy application configurations to your hosts at runtime. The AWS AppConfig extension integrates Lambda and AWS AppConfig seamlessly. Lambda functions have simple access to external configuration settings quickly and easily. Developers can now dynamically change their Lambda function’s configuration safely using robust validation features.
  • Amazon CodeGuru Profiler helps developers improve application performance and reduce costs by pinpointing an application’s most expensive line of code. It provides recommendations for improving code to save money. The Lambda integration removes the need to change any code or redeploy packages.
  • Amazon CloudWatch Lambda Insights enables you to efficiently monitor, troubleshoot, and optimize Lambda functions. The Lambda Insights extension simplifies the collection, visualization, and investigation of detailed compute performance metrics, errors, and logs. You can more easily isolate and correlate performance problems to optimize your Lambda environments.
  • AWS Distro for OpenTelemetry is a secure, production-ready, AWS-supported distribution of the OpenTelemetry project. The Lambda extension runs the OpenTelemetry collector and enables functions to send trace data to AWS monitoring services such as AWS X-Ray and to any destination such as Honeycomb and Lightstep that supports OpenTelemetry Protocol (OTLP) using the OTLP exporter.

To get started with Lambda extensions, use the links provided to install these extensions.

Things to Know
Here are a couple of things to keep in mind:

Pricing: Extensions share the same billing model as Lambda functions and you are charged for compute time used in all phases of the Lambda lifecycle. For function invocations, you pay for requests served and the compute time used to run your code and all extensions, together, in 1ms increments. To learn more about billing for extensions, visit the Lambda FAQs page.

Performance: Lambda extensions might impact the performance of your function because they share resources such as CPU, memory, and storage with the function, and because extensions are initialized before function code. For example, if an extension performs compute-intensive operations, you might see your function’s execution duration increase because the extension and your function code share the same CPU resources.

Because Lambda uses allocates proportional CPU power based on the memory setting, you might see increased execution and initialization duration at lower memory settings as more processes compete for the same CPU resources. You can use CloudWatch metrics such as PostRuntimeExecutionDuration to measure the extra time the extension takes after the function execution and MaxMemoryUsed to measure the increase in memory used.

Available Now
The performance improvements announced as part of GA are currently in US East (N. Virginia), Europe (Ireland), and Europe (Milan) Regions. (Update. AWS Lambda Extensions are now generally available in all commercial regions.)

You can also build your own extensions. To learn how to build extensions, see the Lambda Extensions API in the AWS Lambda Developer Guide. You can send feedback through the AWS forum for AWS Lambda or through your usual AWS Support contacts.

— Channy

Update. Watch a quick introductory video and a deep dive playlist about AWS Lambda Extensions for more information.

Forwarding emails automatically based on content with Amazon Simple Email Service

Post Syndicated from Murat Balkan original https://aws.amazon.com/blogs/messaging-and-targeting/forwarding-emails-automatically-based-on-content-with-amazon-simple-email-service/

Introduction

Email is one of the most popular channels consumers use to interact with support organizations. In its most basic form, consumers will send their email to a catch-all email address where it is further dispatched to the correct support group. Often, this requires a person to inspect content manually. Some IT organizations even have a dedicated support group that handles triaging the incoming emails before assigning them to specialized support teams. Triaging each email can be challenging, and delays in email routing and support processes can reduce customer satisfaction. By utilizing Amazon Simple Email Service’s deep integration with Amazon S3, AWS Lambda, and other AWS services, the task of categorizing and routing emails is automated. This automation results in increased operational efficiencies and reduced costs.

This blog post shows you how a serverless application will receive emails with Amazon SES and deliver them to an Amazon S3 bucket. The application uses Amazon Comprehend to identify the dominant language from the message body.  It then looks it up in an Amazon DynamoDB table to find the support group’s email address specializing in the email subject. As the last step, it forwards the email via Amazon SES to its destination. Archiving incoming emails to Amazon S3 also enables further processing or auditing.

Architecture

By completing the steps in this post, you will create a system that uses the architecture illustrated in the following image:

Architecture showing how to forward emails by content using Amazon SES

The flow of events starts when a customer sends an email to the generic support email address like [email protected]. This email is listened to by Amazon SES via a recipient rule. As per the rule, incoming messages are written to a specified Amazon S3 bucket with a given prefix.

This bucket and prefix are configured with S3 Events to trigger a Lambda function on object creation events. The Lambda function reads the email object, parses the contents, and sends them to Amazon Comprehend for language detection.

Amazon DynamoDB looks up the detected language code from an Amazon DynamoDB table, which includes the mappings between language codes and support group email addresses for these languages. One support group could answer English emails, while another support group answers French emails. The Lambda function determines the destination address and re-sends the same email address by performing an email forward operation. Suppose the lookup does not return any destination address, or the language was not be detected. In that case, the email is forwarded to a catch-all email address specified during the application deployment.

In this example, Amazon SES hosts the destination email addresses used for forwarding, but this is not a requirement. External email servers will also receive the forwarded emails.

Prerequisites

To use Amazon SES for receiving email messages, you need to verify a domain that you own. Refer to the documentation to verify your domain with Amazon SES console. If you do not have a domain name, you will register one from Amazon Route 53.

Deploying the Sample Application

Clone this GitHub repository to your local machine and install and configure AWS SAM with a test AWS Identity and Access Management (IAM) user.

You will use AWS SAM to deploy the remaining parts of this serverless architecture.

The AWS SAM template creates the following resources:

  • An Amazon DynamoDB mapping table (language-lookup) contains information about language codes and associates them with destination email addresses.
  • An AWS Lambda function (BlogEmailForwarder) that reads the email content parses it, detects the language, looks up the forwarding destination email address, and sends it.
  • An Amazon S3 bucket, which will store the incoming emails.
  • IAM roles and policies.

To start the AWS SAM deployment, navigate to the root directory of the repository you downloaded and where the template.yaml AWS SAM template resides. AWS SAM also requires you to specify an Amazon Simple Storage Service (Amazon S3) bucket to hold the deployment artifacts. If you haven’t already created a bucket for this purpose, create one now. You will refer to the documentation to learn how to create an Amazon S3 bucket. The bucket should have read and write access by an AWS Identity and Access Management (IAM) user.

At the command line, enter the following command to package the application:

sam package --template template.yaml --output-template-file output_template.yaml --s3-bucket BUCKET_NAME_HERE

In the preceding command, replace BUCKET_NAME_HERE with the name of the Amazon S3 bucket that should hold the deployment artifacts.

AWS SAM packages the application and copies it into this Amazon S3 bucket.

When the AWS SAM package command finishes running, enter the following command to deploy the package:

sam deploy --template-file output_template.yaml --stack-name blogstack --capabilities CAPABILITY_IAM --parameter-overrides FromEmailAddress=info@ YOUR_DOMAIN_NAME_HERE CatchAllEmailAddress=catchall@ YOUR_DOMAIN_NAME_HERE

In the preceding command, change the YOUR_DOMAIN_NAME_HERE with the domain name you validated with Amazon SES. This domain also applies to other commands and configurations that will be introduced later.

This example uses “blogstack” as the stack name, you will change this to any other name you want. When you run this command, AWS SAM shows the progress of the deployment.

Configure the Sample Application

Now that you have deployed the application, you will configure it.

Configuring Receipt Rules

To deliver incoming messages to Amazon S3 bucket, you need to create a Rule Set and a Receipt rule under it.

Note: This blog uses Amazon SES console to create the rule sets. To create the rule sets with AWS CloudFormation, refer to the documentation.

  1. Navigate to the Amazon SES console. From the left navigation choose Rule Sets.
  2. Choose Create a Receipt Rule button at the right pane.
  3. Add info@YOUR_DOMAIN_NAME_HERE as the first recipient addresses by entering it into the text box and choosing Add Recipient.


Choose the Next Step button to move on to the next step.

  1. On the Actions page, select S3 from the Add action drop-down to reveal S3 action’s details. Select the S3 bucket that was created by the AWS SAM template. It is in the format of your_stack_name-inboxbucket-randomstring. You will find the exact name in the outputs section of the AWS SAM deployment under the key name InboxBucket or by visiting the AWS CloudFormation console. Set the Object key prefix to info/. This tells Amazon SES to add this prefix to all messages destined to this recipient address. This way, you will re-use the same bucket for different recipients.

Choose the Next Step button to move on to the next step.

In the Rule Details page, give this rule a name at the Rule name field. This example uses the name info-recipient-rule. Leave the rest of the fields with their default values.

Choose the Next Step button to move on to the next step.

  1. Review your settings on the Review page and finalize rule creation by choosing Create Rule

  1. In this example, you will be hosting the destination email addresses in Amazon SES rather than forwarding the messages to an external email server. This way, you will be able to see the forwarded messages in your Amazon S3 bucket under different prefixes. To host the destination email addresses, you need to create different rules under the default rule set. Create three additional rules for catchall@YOUR_DOMAIN_NAME_HERE , english@ YOUR_DOMAIN_NAME_HERE and french@YOUR_DOMAIN_NAME_HERE email addresses by repeating the steps 2 to 5. For Amazon S3 prefixes, use catchall/, english/, and french/ respectively.


Configuring Amazon DynamoDB Table

To configure the Amazon DynamoDB table that is used by the sample application

  1. Navigate to Amazon DynamoDB console and reach the tables view. Inspect the table created by the AWS SAM application.

language-lookup table is the table where languages and their support group mappings are kept. You need to create an item for each language, and an item that will hold the default destination email address that will be used in case no language match is found. Amazon Comprehend supports more than 60 different languages. You will visit the documentation for the supported languages and add their language codes to this lookup table to enhance this application.

  1. To start inserting items, choose the language-lookup table to open table overview page.
  2. Select the Items tab and choose the Create item From the dropdown, select Text. Add the following JSON content and choose Save to create your first mapping object. While adding the following object, replace Destination attribute’s value with an email address you own. The email messages will be forwarded to that address.

{

  “language”: “en”,

  “destination”: “english@YOUR_DOMAIN_NAME_HERE”

}

Lastly, create an item for French language support.

{

  “language”: “fr”,

  “destination”: “french@YOUR_DOMAIN_NAME_HERE”

}

Testing

Now that the application is deployed and configured, you will test it.

  1. Use your favorite email client to send the following email to the domain name info@ email address.

Subject: I need help

Body:

Hello, I’d like to return the shoes I bought from your online store. How can I do this?

After the email is sent, navigate to the Amazon S3 console to inspect the contents of the Amazon S3 bucket that is backing the Amazon SES Rule Sets. You will also see the AWS Lambda logs from the Amazon CloudWatch console to confirm that the Lambda function is triggered and run successfully. You should receive an email with the same content at the address you defined for the English language.

  1. Next, send another email with the same content, this time in French language.

Subject: j’ai besoin d’aide

Body:

Bonjour, je souhaite retourner les chaussures que j’ai achetées dans votre boutique en ligne. Comment puis-je faire ceci?


Suppose a message is not matched to a language in the lookup table. In that case, the Lambda function will forward it to the catchall email address that you provided during the AWS SAM deployment.

You will inspect the new email objects under english/, french/ and catchall/ prefixes to observe the forwarding behavior.

Continue experimenting with the sample application by sending different email contents to info@ YOUR_DOMAIN_NAME_HERE address or adding other language codes and email address combinations into the mapping table. You will find the available languages and their codes in the documentation. When adding a new language support, don’t forget to associate a new email address and Amazon S3 bucket prefix by defining a new rule.

Cleanup

To clean up the resources you used in your account,

  1. Navigate to the Amazon S3 console and delete the inbox bucket’s contents. You will find the name of this bucket in the outputs section of the AWS SAM deployment under the key name InboxBucket or by visiting the AWS CloudFormation console.
  2. Navigate to AWS CloudFormation console and delete the stack named “blogstack”.
  3. After the stack is deleted, remove the domain from Amazon SES. To do this, navigate to the Amazon SES Console and choose Domains from the left navigation. Select the domain you want to remove and choose Remove button to remove it from Amazon SES.
  4. From the Amazon SES Console, navigate to the Rule Sets from the left navigation. On the Active Rule Set section, choose View Active Rule Set button and delete all the rules you have created, by selecting the rule and choosing Action, Delete.
  5. On the Rule Sets page choose Disable Active Rule Set button to disable listening for incoming email messages.
  6. On the Rule Sets page, Inactive Rule Sets section, delete the only rule set, by selecting the rule set and choosing Action, Delete.
  7. Navigate to CloudWatch console and from the left navigation choose Logs, Log groups. Find the log group that belongs to the BlogEmailForwarderFunction resource and delete it by selecting it and choosing Actions, Delete log group(s).
  8. You will also delete the Amazon S3 bucket you used for packaging and deploying the AWS SAM application.


Conclusion

This solution shows how to use Amazon SES to classify email messages by the dominant content language and forward them to respective support groups. You will use the same techniques to implement similar scenarios. You will forward emails based on custom key entities, like product codes, or you will remove PII information from emails before forwarding with Amazon Comprehend.

With its native integrations with AWS services, Amazon SES allows you to enhance your email applications with different AWS Cloud capabilities easily.

To learn more about email forwarding with Amazon SES, you will visit documentation and AWS blogs.

Create a serverless feedback collector application using Amazon Pinpoint’s two-way SMS functionality

Post Syndicated from Murat Balkan original https://aws.amazon.com/blogs/messaging-and-targeting/create-a-serverless-feedback-collector-application-by-using-amazon-pinpoints-two-way-sms-functionality/

Introduction

Two-way SMS communication is used by many companies to create interactive engagements with their customers. Traditional SMS notifications are one-way. While this is valid for many different use cases like one-time passwords (OTP) notifications and security notifications or reminders, some other use-cases may benefit from collecting information from the same channel. Two-way SMS allows customers to create this feedback mechanism and enhance business interactions and overall customer experience.

SMS is chosen for its simplicity and availability across different sets of devices. By combining the two-way SMS mechanism with the vast breadth of services Amazon Web Services (AWS) offers, companies can create effective architectures to better interact and serve their customers.

This blog post shows you how a serverless online appointment application can use Amazon Pinpoint’s two-way SMS functionality to collect customer feedback for completed appointments. You will learn how Amazon Pinpoint interacts with other AWS serverless services with its out-of-the-box integrations to create a scalable messaging application.

Architecture

By completing the steps in this post, you can create a system that uses the architecture illustrated in the following image:

The architecture of a feedback collector application that is composed of serverless AWS services

The flow of events starts when a Amazon DynamoDB table item, representing an online appointment, changes its status to COMPLETED. An AWS Lambda function which is subscribed to these changes over DynamoDB Streams detects this change and sends an SMS to the customer by using Amazon Pinpoint API’s sendMessages operation.

Amazon Pinpoint delivers the SMS to the recipient and generates a unique message ID to the AWS Lambda function. The Lambda function then adds this message ID to a DynamoDB table called “message-lookup”. This table is used for tracking different feedback requests sent during a multi-step conversation and associate them with the appointment ids. At this stage, the Lambda function also populates another table “feedbacks” which will hold the feedback responses that will be sent as SMS reply messages.

Each time a recipient replies to an SMS, Amazon Pinpoint publishes this reply event to an Amazon SNS topic which is subscribed by an Amazon SQS queue. Amazon Pinpoint will also add a messageId to this event which allows you to bind it to a sendMessages operation call.

A second AWS Lambda function polls these reply events from the Amazon SQS queue. It checks whether the reply is in the correct format (i.e. a number) and also associated with a previous request. If all conditions are met, the AWS Lambda function checks the ConversationStage attribute’s value from its message-lookup table. According to the current stage and the SMS answer received, AWS Lambda function will determine the next step.

For example, if the feedback score received is less than 5, a follow-up SMS is sent to the user asking if they’ll be happy to receive a call from the customer support team.

All SMS replies from the users are reflected to “feedbacks” table for further analysis.

Deploying the Sample Application

  1. Clone this GitHub repository to your local machine and install and configure AWS SAM with a test AWS IAM user.

You will use AWS SAM to deploy the remaining parts of this serverless architecture.

The AWS SAM template creates the following resources:

    • An Amazon DynamoDB table (appointments) that contains information about appointments, customers and their appointment status.
    • An Amazon DynamoDB table (feedbacks) that holds the received feedbacks from customers.
    • An Amazon DynamoDB table (message-lookup) that holds the Amazon Pinpoint message ids and associate them to appointments to track a multi-step conversation.
    • Two AWS Lambda functions (FeedbackSender and FeedbackReceiver)
    • An Amazon SNS topic that collects state change events from Amazon Pinpoint.
    • An Amazon SQS queue that queues the incoming messages.
    • An Amazon Pinpoint Application with an associated SMS channel.

This architecture consists of two Lambda functions, which are represented as two different apps in the AWS SAM template. These functions are named FeedbackSender and FeedbackReceiver. The FeedbackSender function listens the Amazon DynamoDB Stream associated with the appointments table and sends the SMS message requesting a feedback. Second Lambda function, FeedbackReceiver, polls the Amazon SQS queue and updates the feedbacks table in Amazon DynamoDB. (pinpoint-two-way-sms)

          Note: You’ll incur some costs by deploying this stack into your account.

  1. To start the SAM deployment, navigate to the root directory of the repository you downloaded and where the template.yaml AWS SAM template resides. AWS SAM also requires you to specify an Amazon Simple Storage Service (Amazon S3) bucket to hold the deployment artifacts. If you haven’t already created a bucket for this purpose, create one now. The bucket should have read and write access by an AWS Identity and Access Management (IAM) user.

At the command line, enter the following command to package the application:

sam package --template template.yaml --output-template-file output_template.yaml --s3-bucket BUCKET_NAME_HERE

In the preceding command, replace BUCKET_NAME_HERE with the name of the Amazon S3 bucket that should hold the deployment artifacts.

AWS SAM packages the application and copies it into this Amazon S3 bucket.

When the AWS SAM package command finishes running, enter the following command to deploy the package:

sam deploy --template-file output_template.yaml --stack-name BlogStackPinpoint --capabilities CAPABILITY_IAM

When you run this command, AWS SAM shows the progress of the deployment. When the deployment finishes, navigate to the Amazon Pinpoint console and choose the project named “BlogApplication”. This example uses “BlogStackPinpoint” as the stack name, you can change this to any other name you want.

  1. From the left navigation, choose Settings, SMS and voice. On the SMS and voice settings page, choose the Request phone number button under Number settings

Screenshot of request phone number screen

  1. Choose a target country. Set the Default message type as Transactional, and click on the Request long codes button to buy a long code.

Note: In United States, you can also request a Toll Free Number(TFN)

Screenshot showing long code additio

A long code will be added to the Number settings list.

  1. Choose the newly added number to reach the SMS Settings page and enable the option Enable two-way-SMS. At the Incoming messages destination, select Choose an existing SNS topic, and from the drop down select the Amazon SNS topic that was created by the BlogStackPinpoint stack.

Choose Save to save your SMS settings.


Testing the Sample Application

Now that the application is deployed and configured, test it by creating sample records in the Amazon DynamoDB table. Navigate to Amazon DynamoDB console and reach the tables view. Inspect the tables that were created by the AWS SAM application.

Here, appointments table is the table where the appointments and their statuses are kept. It tracks the appointment lifecycle events with items identified by unique ids. In this sample scenario, we are assuming that an appointment application creates a record with ‘CREATED’ status when a new appointment is planned. After the appointment is finished, same application updates the status to ‘COMPLETED’ which will trigger the feedback collection process. Feedback results are collected in the feedbacks table. Amazon Pinpoint message id’s, conversation stage and appointment id’s are kept in the message-lookup table.

  1. To start testing the end-to-end flow, choose the appointments table to open table overview page.
  2. Next, select the Items tab and choose the Create item From the dropdown, select Text. Add the following and choose Save to create your first appointment object. While adding the following object, replace CustomerPhone attribute’s value with a phone number you own. The feedback request messages will be delivered to that number. Note: This number should match the country number for the long code you provisioned.

{

"CustomerName": "Customer A",

"CustomerPhone": "+12345678900",

"AppointmentStatus":"CREATED",

"id": "1"

}

  1. To trigger sending the feedback SMS, you need to set an existing item’s status to “COMPLETED” To do this, select the item and click Edit from the Actions menu.

Replace the item’s current JSON with the following.

{

"AppointmentStatus": "COMPLETED",

"CustomerName": "Customer A",

"CustomerPhone": "+12345678900",

"id": "1"

}

  1. Before choosing the Save button, double check that you have set CustomerPhone attribute’s value to a valid phone number.

After the change, you should receive an SMS message asking for a feedback. Provide a numeric reply of that is less than five to this message. This will trigger a follow up question asking for a consent to receive an in-person callback.


During your SMS conversation with the application, inspect the feedbacks table. The feedback you have given over this two-way SMS channel should have been reflected into the table.

If you want to repeat the process, make sure to increment the AppointmentId field for any additional appointment records.

Cleanup

To clean up the resources you used in your account, simply navigate to AWS Cloudformation console and delete the stack named “BlogStackPinpoint”.

After the stack is deleted, you also need to delete the Long code from the Pinpoint Console by choosing the number and pressing Remove phone number button. You can also delete the Amazon S3 bucket you used for packaging and deploying the AWS SAM application.

Conclusion

This architecture shows how Amazon Pinpoint can be used to make two-way SMS communication with your customers. You can implement Two-way SMS functionality in other use cases such as appointment reminders, polls, Q&A services, and more.

To learn more about Pinpoint and it’s two-way SMS mechanism, you can visit the Pinpoint documentation.


Using AWS X-Ray tracing with Amazon EventBridge

Post Syndicated from James Beswick original https://aws.amazon.com/blogs/compute/using-aws-x-ray-tracing-with-amazon-eventbridge/

AWS X-Ray allows developers to debug and analyze distributed applications. It can be useful for tracing transactions through microservices architectures, such as those typically used in serverless applications. Amazon EventBridge allows you to route events between AWS services, integrated software as a service (SaaS) applications, and your own applications. EventBridge can help decouple applications and produce more extensible, maintainable architectures.

EventBridge now supports trace context propagation for X-Ray, which makes it easier to trace transactions through event-based architectures. This means you can potentially trace a single request from an event producer through to final processing by an event consumer. These may be decoupled application stacks where the consumer has no knowledge of how the event is produced.

This blog post explores how to use X-Ray with EventBridge and shows how to implement tracing using the example application in this GitHub repo.

How it works

X-Ray works by adding a trace header to requests, which acts as a unique identifier. In the case of a serverless application using multiple AWS services, this allows X-Ray to group service interactions together as a single trace. X-Ray can then produce a service map of the transaction flow or provide the raw data for a trace:

X-Ray service map

When you send events to EventBridge, the service uses rules to determine how the events are routed from the event bus to targets. Any event that is put on an event bus with the PutEvents API can now support trace context propagation.

The trace header is provided as internal metadata to support X-Ray tracing. The header itself is not available in the event when it’s delivered to a target. For developers using the EventBridge archive feature, this means that a trace ID is not available for replay. Similarly, it’s not available on events sent to a dead-letter queue (DLQ).

Enabling tracing with EventBridge

To enable tracing, you don’t need to change the event structure to add the trace header. Instead, you wrap the AWS SDK client in a call to AWSXRay.captureAWSClient and grant IAM permissions to allow tracing. This enables X-Ray to instrument the call automatically with the X-Amzn-Trace-Id header.

For code using the AWS SDK for JavaScript, this requires changes to the way that the EventBridge client is instantiated. Without tracing, you declare the AWS SDK and EventBridge client with:

const AWS = require('aws-sdk')
const eventBridge = new AWS.EventBridge()

To use tracing, this becomes:

const AWSXRay = require('aws-xray-sdk')
const AWS = AWSXRay.captureAWS(require('aws-sdk'))
const eventBridge = new AWS.EventBridge()

The interaction with the EventBridge client remains the same but the calls are now instrumented by X-Ray. Events are put on the event bus programmatically using a PutEvents API call. In a Node.js Lambda function, the following code processes an event to send to an event bus, with tracing enabled:

const AWSXRay = require('aws-xray-sdk')
const AWS = AWSXRay.captureAWS(require('aws-sdk'))
const eventBridge = new AWS.EventBridge()

exports.handler = async (event) => {

  let myDetail = { "name": "Alice" }

  const myEvent = { 
    Entries: [{
      Detail: JSON.stringify({ myDetail }),
      DetailType: 'myDetailType',
      Source: 'myApplication',
      Time: new Date
    }]
  }

  // Send to EventBridge
  const result = await eventBridge.putEvents(myEvent).promise()

  // Log the result
  console.log('Result: ', JSON.stringify(result, null, 2))
}

You can also define a custom tracing header using the new TraceHeader attribute on the PutEventsRequestEntry API model. The unique value you provide overrides any trace header on the HTTP header. The value is also validated by X-Ray and discarded if it does not pass validation. See the X-Ray Developer Guide to learn about generating valid trace headers.

Deploying the example application

The example application consists of a webhook microservice that publishes events and target microservices that consume events. The generated event contains a target attribute to determine which target receives the event:

Example application architecture

To deploy these microservices, you must have the AWS SAM CLI and Node.js 12.x installed. to To complete the deployment, follow the instructions in the GitHub repo.

EventBridge can route events to a broad range of target services in AWS. Targets that support active tracing for X-Ray can create comprehensive traces from the event source. The services offering active tracing are AWS Lambda, AWS Step Functions, and Amazon API Gateway. In each case, you can trace a request from the producer to the consumer of the event.

The GitHub repo contains examples showing how to use active tracing with EventBridge targets. The webhook application uses a query string parameter called target to determine which events are routed to these targets.

For X-Ray to detect each service in the webhook, tracing must be enabled on both the API Gateway stage and the Lambda function. In the AWS SAM template, the Tracing: Active property turns on active tracing for the Lambda function. If an IAM role is not specified, the AWS SAM CLI automatically adds the arn:aws:iam::aws:policy/AWSXrayWriteOnlyAccess policy to the Lambda function’s execution role. For the API definition, adding TracingEnabled: True enables tracing for this API stage.

When you invoke the webhook’s API endpoint, X-Ray generates a trace map of the request, showing each of the services from the REST API call to putting the event on the bus:

X-Ray trace map with EventBridge

The CloudWatch Logs from the webhook’s Lambda function shows the event that has been put on the event bus:

CloudWatch Logs from a webhook

Tracing with a Lambda target

In the targets-lambda example application, the Lambda function uses the X-Ray SDK and has active tracing enabled in the AWS SAM template:

Resources:
  ConsumerFunction:
    Type: AWS::Serverless::Function
    Properties:
      CodeUri: src/
      Handler: app.handler
      MemorySize: 128
      Timeout: 3
      Runtime: nodejs12.x
      Tracing: Active

With these two changes, the target Lambda function propagates the tracing header from the original webhook request. When the webhook API is invoked, the X-Ray trace map shows the entire request through to the Lambda target. X-Ray shows two nodes for Lambda – one is the Lambda service and the other is the Lambda function invocation:

Downstream service node in service map

Tracing with an API Gateway target

Currently, active tracing is only supported by REST APIs but not HTTP APIs. You can enable X-Ray tracing from the AWS CLI or from the Stages menu in the API Gateway console, in the Logs/Tracing tab:

Enable X-Ray tracing in API Gateway

You cannot currently create an API Gateway target for EventBridge using AWS SAM. To invoke an API endpoint from the EventBridge console, create a rule and select the API as a target. The console automatically creates the necessary IAM permissions for EventBridge to invoke the endpoint.

Setting API Gateway as an EventBridge target

If the API invokes downstream services with active tracing available, these services also appear as nodes in the X-Ray service graph. Using the webhook application to invoke the API Gateway target, the trace shows the entire request from the initial API call through to the second API target:

API Gateway node in X-Ray service map

Tracing with a Step Functions target

To enable tracing for a Step Functions target, the state machine must have tracing enabled and have permissions to write to X-Ray. The AWS SAM template can enable tracing, define the EventBridge rule and the AWSXRayDaemonWriteAccess policy in one resource:

  WorkFlowStepFunctions:
    Type: AWS::Serverless::StateMachine
    Properties:
      DefinitionUri: definition.asl.json
      DefinitionSubstitutions:
        LoggerFunctionArn: !GetAtt LoggerFunction.Arn
      Tracing:
        Enabled: True
      Events:
        UploadComplete:
          Type: EventBridgeRule
          Properties:
            Pattern:
              account: 
                - !Sub '${AWS::AccountId}'
              source:
                - !Ref EventSource
              detail:
                apiEvent:
                  target:
                    - 'sfn'

      Policies: 
        - AWSXRayDaemonWriteAccess
        - LambdaInvokePolicy:
            FunctionName: !Ref LoggerFunction

If the state machine uses services that support active tracing, these also appear in the trace map for individual requests. Using the webhook to invoke this target, X-Ray now shows the request trace to the state machine and the Lambda function it contains:

Step Functions in X-Ray service map

Adding X-Ray tracing to existing Lambda targets

To wrap the SDK client, you must enable active tracing and include the AWS X-Ray SDK in the Lambda function’s deployment package. Unlike the AWS SDK, the X-Ray SDK is not included in the Lambda execution environment.

Another option is to include the X-Ray SDK as a Lambda layer. You can build this layer by following the instructions in the GitHub repo. Once deployed, you can attach the X-Ray layer to any Lambda function either via the console or the CLI:

Adding X-Ray tracing a Lambda function

To learn more about using Lambda layers, read “Using Lambda layers to simplify your development process”.

Conclusion

X-Ray is a powerful tool for providing observability in serverless applications. With the launch of X-Ray trace context propagation in EventBridge, this allows you to trace requests across distributed applications more easily.

In this blog post, I walk through an example webhook application with three targets that support active tracing. In each case, I show how to enable tracing either via the console or using AWS SAM and show the resulting X-Ray trace map.

To learn more about how to use tracing with events, read the X-Ray Developer Guide or see the Amazon EventBridge documentation for this feature.

For more serverless learning resources, visit Serverless Land.

Caching data and configuration settings with AWS Lambda extensions

Post Syndicated from Julian Wood original https://aws.amazon.com/blogs/compute/caching-data-and-configuration-settings-with-aws-lambda-extensions/

This post is written by Hari Ohm Prasath Rajagopal, Senior Modernization Architect and Vamsi Vikash Ankam, Technical Account Manager

In this post, I show how to build a flexible in-memory AWS Lambda caching layer using Lambda extensions. Lambda functions use REST API calls to access the data and configuration from the cache. This can reduce latency and cost when consuming data from AWS services such as Amazon DynamoDB, AWS Systems Manager Parameter Store, and AWS Secrets Manager.

Applications making frequent API calls to retrieve static data can benefit from a caching layer. This can reduce the function’s latency, particularly for synchronous requests, as the data is retrieved from the cache instead of an external service. The cache can also reduce costs by reducing the number of calls to downstream services.

There are two types of cache to consider in this situation:

Lambda extensions are a new way for tools to integrate more easily into the Lambda execution environment and control and participate in Lambda’s lifecycle. They use the Extensions API, a new HTTP interface, to register for lifecycle events during function initialization, invocation, and shutdown.

They can also use environment variables to add options and tools to the runtime, or use wrapper scripts to customize the runtime startup behavior. The Lambda cache uses Lambda extensions to run as a separate process.
To learn more about how to use extensions with your functions, read “Introducing AWS Lambda extensions”.

Creating a cache using Lambda extensions

To set up the example, visit the GitHub repo, and follow the instructions in the README.md file.

The demo uses AWS Serverless Application Model (AWS SAM) to deploy the infrastructure. The walkthrough requires AWS SAM CLI (minimum version 0.48) and an AWS account.

To install the example:

  1. Create an AWS account if you do not already have one and login.
  2. Clone the repo to your local development machine:
  3. git clone https://github.com/aws-samples/aws-lambda-extensions
    cd aws-lambda-extensions/cache-extension-demo/
  4. If you are not running in a Linux environment, ensure that your build architecture matches the Lambda execution environment by compiling with GOOS=linux and GOARCH=amd64.
  5. GOOS=linux GOARCH=amd64
  6. Build the Go binary extension with the following command:
  7. go build -o bin/extensions/cache-extension-demo main.go
  8. Ensure that the extensions files are executable:
  9. chmod +x bin/extensions/cache-extension-demo
  10. Update the parameters region value in ../example-function/config.yaml with the Region where you are deploying the function.
  11. parameters:
      - region: us-west-2
  12. Build the function dependencies.
  13. cd SAM
    sam build
    AWS SAM build

    AWS SAM build

  14. Deploy the AWS resources specified in the template.yml file:
  15. sam deploy --guided
  16. During the prompts:
  17. Enter a stack name cache-extension-demo.
  18. Enter the same AWS Region specified previously.
  19. Accept the default DatabaseName. You can specify a custom database name, and also update the ../example-function/config.yaml and index.js files with the new database name.
  20. Enter MySecret as the Secrets Manager secret.
  21. Accept the defaults for the remaining questions.
  22. AWS SAM Deploy

    AWS SAM Deploy

    AWS SAM deploys:

    • A DynamoDB table.
    • The Lambda function ExtensionsCache-DatabaseEntry, which puts a sample item into the DynamoDB table.
    • An AWS Systems Manager Parameter Store parameter called CacheExtensions_Parameter1 with a value of MyParameter.
    • An AWS Secrets Manager secret called secret_info with a value of MySecret.
    • A Lambda layer called Cache_Extension_Layer.
    • A Lambda function using Nodejs.12 called ExtensionsCache-SampleFunction. This reads the cached values via the extension from either the DynamoDB table, Parameter Store, or Secrets Manager.
    • IAM permissions

    The cache extension is delivered as a Lambda layer and added to ExtensionsCache-SampleFunction.

    It is written as a self-contained binary in Golang, which makes the extension compatible with all of the supported runtimes. The extension caches the data from DynamoDB, Parameter Store, and Secrets Manager, and then runs a local HTTP endpoint to service the data. The Lambda function retrieves the configuration data from the cache using a local HTTP REST API call.

    Here is the architecture diagram.

    Extensions cache architecture diagram

    Extensions cache architecture diagram

    Once deployed, the extension performs the following steps:

    1. On start-up, the extension reads the config.yaml file, which determines which resources to cache. The file is deployed as part of the Lambda function.
    2. The boolean CACHE_EXTENSION_INIT_STARTUP Lambda environment variable specifies whether to load into cache the items specified in config.yaml. If false, the extension initializes an empty map with the names.
    3. The extension retrieves the required data based on the resources in the config.yaml file. This includes the data from DynamoDB, the configuration from Parameter Store, and the secret from Secrets Manager. The data is stored in memory.
    4. The extension starts a local HTTP server using TCP port 4000, which serves the cache items to the function. The Lambda function accesses the local in-memory cache by invoking the following endpoint: http://localhost:4000/<cachetype>?name=<name>.
    5. If the data is not available in the cache, or has expired, the extension accesses the corresponding AWS service to retrieve the data. It is cached first and then returned to the Lambda function. The CACHE_EXTENSION_TTL Lambda environment variable defines the refresh interval (defined based on Go time format, for example: 30s, 3m, etc.)

    This sequence diagram explains the data flow:

    Extensions cache sequence diagram

    Extensions cache sequence diagram

    Testing the example application

    Once the AWS SAM template is deployed, navigate to the AWS Lambda console.

    1. Select the function starting with the name ExtensionsCache-SampleFunction. Within the function code, the options array specifies which data to return from the cache. This is initially set to path: '/dynamodb?name=DynamoDbTable-pKey1-sKey1'
    2. Choose Configure test events to configure a test event.
    3. Enter a name for the Event name, accept the default payload, and select Create.
    4. Select Test to invoke the function. This returns the cached data from DynamoDB and logs the output.
    5. Successfully retrieve DynamoDB data from cache

      Successfully retrieve DynamoDB data from cache

    6. In the index.js file, amend the path statement to retrieve the Parameter Store configuration:
    7. const options = {
        "hostname": "localhost",
        "port": 4000,
        "path": "/parameters?name=CacheExtensions_Parameter1",
        "method": "GET"
      }
    8. Select Deploy to save the function configuration and select Test. The function returns the Parameter Store configuration item:
    9. Successfully retrieve Parameter Store data from cache

      Successfully retrieve Parameter Store data from cache

    10. In the function code, amend the path statement to retrieve the Secrets Manager secret:
    11. const options = {
        "hostname": "localhost",
        "port": 4000,
        "path": "/parameters?name=/aws/reference/secretsmanager/secret_info",
        "method": "GET"
      }
    12. Select Deploy to save the function configuration and select Test. The function returns the secret:
    Successfully retrieve Secrets Manager data from cache

    Successfully retrieve Secrets Manager data from cache

    The benefits of using Lambda extensions

    There are a number of benefits to using a Lambda extension for this solution:

    1. Improved Lambda function performance as data is cached in memory by the extension during initialization.
    2. Fewer AWS API calls to external services, this can reduce costs and helps avoid throttling limits if services are accessed frequently.
    3. Cache data is stored in memory and not in a file within the Lambda execution environment. This means that no additional process is required to manage the lifecycle of the file. In-memory is also more secure, as data is not persisted to disk for subsequent function invocations.
    4. The function requires less code, as it only needs to communicate with the extension via HTTP to retrieve the data. The function does not have to have additional libraries installed to communicate with DynamoDB, Parameter Store, Secrets Manager, or the local file system.
    5. The cache extension is a Golang compiled binary and the executable can be shared with functions running other runtimes like Node.js, Python, Java, etc.
    6. Using a YAML template to store the details of what to cache makes it easier to configure and add additional services.

    Comparing the performance benefit

    To test the performance of the cache extension, I compare two tests:

    1. A Golang Lambda function that accesses a secret from AWS Secrets Manager for every invocation.
    2. The ExtensionsCache-SampleFunction, previously deployed using AWS SAM. This uses the cache extension to access the secrets from Secrets Manager, the function reads the value from the cache.

    Both functions are configured with 512 MB of memory and the function timeout is set to 30 seconds.

    I use Artillery to load test both Lambda functions. The load runs for 100 invocations over 2 minutes. I use Amazon CloudWatch metrics to view the function average durations.

    Test 1 shows a duration of 43 ms for the first invocation as a cold start. Subsequent invocations average 22 ms.

    Test 1 performance results

    Test 1 performance results

    Test 2 shows a duration of 16 ms for the first invocation as a cold start. Subsequent invocations average 3 ms.

    Test 2 performance results

    Test 2 performance results

    Using the Lambda extensions caching layer shows a significant performance improvement. Cold start invocation duration is reduced by 62% and subsequent invocations by 80%.

    In this example, the CACHE_EXTENSION_INIT_STARTUP environment variable flag is not configured. With the flag enabled for the extension, data is pre-fetched during extension initialization and the cold start time is further reduced.

    Conclusion

    Using Lambda extensions is an effective way to cache static data from external services in Lambda functions. This reduces function latency and costs. This post shows how to build both a data and configuration cache using DynamoDB, Parameter Store, and Secrets Manager.

    To set up the walkthrough demo in this post, visit the GitHub repo, and follow the instructions in the README.md file.

    The extension uses a local configuration file to determine which values to cache, and retrieves the items from the external services. A Lambda function retrieves the values from the local cache using an HTTP request, without having to communicate with the external services directly. In this example, this results in an 80% reduction in function invocation time.

    For more serverless learning resources, visit https://serverlessland.com.

Operating Lambda: Building a solid security foundation – Part 2

Post Syndicated from James Beswick original https://aws.amazon.com/blogs/compute/operating-lambda-building-a-solid-security-foundation-part-2/

In the Operating Lambda series, I cover important topics for developers, architects, and systems administrators who are managing AWS Lambda-based applications. This two-part series discusses core security concepts for Lambda-based applications.

Part 1 explains the Lambda execution environment and how to apply the principles of least privilege to your workload. This post covers securing workloads with public endpoints, encrypting data, and using AWS CloudTrail for governance, compliance, and operational auditing.

Securing workloads with public endpoints

For workloads that are accessible publicly, AWS provides a number of features and services that can help mitigate certain risks. This section covers authentication and authorization of application users and protecting API endpoints.

Authentication and authorization

Authentication relates to identity and authorization refers to actions. Use authentication to control who can invoke a Lambda function, and then use authorization to control what they can do. For many applications, AWS Identity & Access Management (IAM) is sufficient for managing both control mechanisms.

For applications with external users, such as web or mobile applications, it is common to use JSON Web Tokens (JWTs) to manage authentication and authorization. Unlike traditional, server-based password management, JWTs are passed from the client on every request. They are a cryptographically secure way to verify identity and claims using data passed from the client. For Lambda-based applications, this allows you to secure APIs for each microservice independently, without relying on a central server for authentication.

You can implement JWTs with Amazon Cognito, which is a user directory service that can handle registration, authentication, account recovery, and other common account management operations. For frontend development, Amplify Framework provides libraries to simplify integrating Cognito into your frontend application. You can also use third-party partner services like Auth0.

Given the critical security role of an identity provider service, it’s important to use professional tooling to safeguard your application. It’s not recommended that you write your own services to handle authentication or authorization. Any vulnerabilities in custom libraries may have significant implications for the security of your workload and its data.

Protecting API endpoints

For serverless applications, the preferred way to serve a backend application publicly is to use Amazon API Gateway. This can help you protect an API from malicious users or spikes in traffic.

For authenticated API routes, API Gateway offers both REST APIs and HTTP APIs for serverless developers. Both types support authorization using AWS Lambda, IAM or Amazon Cognito. When using IAM or Amazon Cognito, incoming requests are evaluated and if they are missing a required token or contain invalid authentication, the request is rejected. You are not charged for these requests and they do not count towards any throttling quotas.

Unauthenticated API routes may be accessed by anyone on the public internet so it’s recommended that you limit their use. If you must use unauthenticated APIs, it’s important to protect these against common risks, such as denial-of-service (DoS) attacks. Applying AWS WAF to these APIs can help protect your application from SQL injection and cross-site scripting (XSS) attacks. API Gateway also implements throttling at the AWS account-level and per-client level when API keys are used.

In some cases, the functionality provided by an unauthenticated API can be achieved with an alternative approach. For example, a web application may provide a list of customer retail stores from an Amazon DynamoDB table to users who are not logged in. This request may originate from a frontend web application or from any other source that calls the URL endpoint. This diagram compares three solutions:

Solutions for an unauthenticated API

  1. The unauthenticated API can be called by anyone on the internet. In a denial of service attack, it’s possible to exhaust API throttling limits, Lambda concurrency, or DynamoDB provisioned read capacity on an underlying table.
  2. An Amazon CloudFront distribution in front of the API endpoint with an appropriate time-to-live (TTL) configuration may help absorb traffic in a DoS attack, without changing the underlying solution for fetching the data.
  3. Alternatively, for static data that rarely changes, the CloudFront distribution could serve the data from an S3 bucket.

The AWS Well-Architected Tool provides a Serverless Lens that analyzes the security posture of serverless workloads.

Encrypting data in Lambda-based applications

Managing secrets

For applications handling sensitive data, AWS services provide a range of encryption options for data in transit and at rest. It’s important to identity and classify sensitive data in your workload, and minimize the storage of sensitive data to only what is necessary.

When protecting data at rest, use AWS services for key management and encryption of stored data, secrets and environment variables. Both the AWS Key Management Service and AWS Secrets Manager provide a robust approach to storing and managing secrets used in Lambda functions.

Do not store plaintext secrets or API keys in Lambda environment variables. Instead, use KMS to encrypt environment variables. Also ensure you do not embed secrets directly in function code, or commit these secrets to code repositories.

Using HTTPS securely

HTTPS is encrypted HTTP, using TLS (SSL) to encrypt the request and response, including headers and query parameters. While query parameters are encrypted, URLs may be logged by different services in plaintext, so you should not use these to store sensitive data such as credit card numbers.

AWS services make it easier to use HTTPS throughout your application and it is provided by default in services like API Gateway. Where you need an SSL/TLS certificate in your application, to support features like custom domain names, it’s recommended that you use AWS Certificate Manager (ACM). This provides free public certificates for ACM-integrated services and managed certificate renewal.

Governance controls with AWS CloudTrail

For compliance and operational auditing of application usage, AWS CloudTrail logs activity related to your AWS account usage. It tracks resource changes and usage, and provides analysis and troubleshooting tools. Enabling CloudTrail does not have any negative performance implications for your Lambda-based application, since the logging occurs asynchronously.

Separate from application logging (see chapter 4), CloudTrail captures two types of events:

  • Control plane: These events apply to management operations performed on any AWS resources. Individual trails can be configured to capture read or write events, or both.
  • Data plane: Events performed on the resources, such as when a Lambda function is invoked or an S3 object is downloaded.

For Lambda, you can log who creates and invokes functions, together with any changes to IAM roles. You can configure CloudTrail to log every single activity by user, role, service, and API within an AWS account. The service is critical for understanding the history of changes made to your account and also detecting any unintended changes or suspicious activity.

To research which AWS user interacted with a Lambda function, CloudTrail provides an audit log to find this information. For example, when a new permission is added to a Lambda function, it creates an AddPermission record. You can interpret the meaning of individual attributes in the JSON message by referring to the CloudTrail Record Contents documentation.

CloudTrail Record Contents documentation

CloudTrail data is considered sensitive so it’s recommended that you protect it with KMS encryption. For any service processing encrypted CloudTrail data, it must use an IAM policy with kms:Decrypt permission.

By integrating CloudTrail with Amazon EventBridge, you can create alerts in response to certain activities and respond accordingly. With these two services, you can quickly implement an automated detection and response pattern, enabling you to develop mechanisms to mitigate security risks. With EventBridge, you can analyze data in real-time, using event rules to filter events and forward to targets like Lambda functions or Amazon Kinesis streams.

CloudTrail can deliver data to Amazon CloudWatch Logs, which allows you to process multi-Region data in real time from one location. You can also deliver CloudTrail to Amazon S3 buckets, where you can create event source mappings to start data processing pipelines, run queries with Amazon Athena, or analyze activity with Amazon Macie.

If you use multiple AWS accounts, you can use AWS Organizations to manage and govern individual member accounts centrally. You can set an existing trail as an organization-level trail in a primary account that can collect events from all other member accounts. This can simplify applying consistent auditing rules across a large set of existing accounts, or automatically apply rules to new accounts. To learn more about this feature, see Creating a Trail for an Organization.

Conclusion

In this blog post, I explain how to secure workloads with public endpoints and the different authentication and authorization options available. I also show different approaches to exposing APIs publicly.

CloudTrail can provide compliance and operational auditing for Lambda usage. It provides logs for both the control plane and data plane. You can integrate CloudTrail with EventBridge to create alerts in response to certain activities. Customers with multiple AWS accounts can use AWS Organizations to manage trails centrally.

For more serverless learning resources, visit Serverless Land.

Building a serverless multi-player game that scales

Post Syndicated from James Beswick original https://aws.amazon.com/blogs/compute/building-a-serverless-multiplayer-game-that-scales/

This post is written by Tim Bruce, Sr. Solutions Architect, Developer Acceleration.

Game development is a highly iterative process with rapidly changing requirements. Many game developers want to maximize the time spent building features and less time configuring servers, managing infrastructure, and mastering scale.

AWS Serverless provides four key benefits for customers. First, it can help move from idea to market faster, by reducing operational overhead. Second, customers may realize lower costs with serverless by not over-provisioning hardware and software to operate. Third, serverless scales with user activity. Finally, serverless services provide built-in integration, allowing you to focus on your game instead of connecting pieces together.

For AWS Gaming customers, these benefits allow your teams to spend more time focusing on gameplay and content, instead of undifferentiated tasks such as setting up and maintaining servers and software. This can result in better gameplay and content, and a faster time-to-market.

This blog post introduces a game with a serverless-first architecture. Simple Trivia Service is a web-based game showing architectural patterns that you can apply in your own games.

Introducing the Simple Trivia Service

The Simple Trivia Service offers single- and multi-player trivia games with content created by players. There are many features in Simple Trivia Service found in games, such as user registration, chat, content creation, leaderboards, game play, and a marketplace.

Simple Trivia Service UI

Authenticated players can chat with other players, create and manage quizzes, and update their profile. They can play single- and multi-player quizzes, host quizzes, and buy and sell quizzes on the marketplace. The single- and multi-player game modes show how games with different connectivity and technical requirements can be delivered with serverless first architectures. The game modes and architecture solutions are covered in the Simple Trivia Service backend architecture section.

Simple Trivia Service front end

The Simple Trivia Service front end is a Vue.js single page application (SPA) that accesses backend services. The SPA app, accessed via a web browser, allows users to make requests to the game endpoints using HTTPS, secure WebSockets, and WebSockets over MQTT. These requests use integrations to access the serverless backend services.

Vue.js helps make this reference architecture more accessible. The front end uses AWS Amplify to build, deploy, and host the SPA without the need to provision and manage any resources.

Simple Trivia Service backend architecture

The backend architecture for Simple Trivia Service is defined in a set of AWS Serverless Application Model (AWS SAM) templates for portions of the game. A deployment guide is included in the README.md file in the GitHub repository. Here is a visual depiction of the backend architecture.

Reference architecture

Services used

Simple Trivia Service is built using AWS Lambda, Amazon API Gateway, AWS IoT, Amazon DynamoDB, Amazon Simple Notification Service (SNS), AWS Step Functions, Amazon Kinesis, Amazon S3, Amazon Athena, and Amazon Cognito:

  • Lambda enables serverless microservice features in Simple Trivia Service.
  • API Gateway provides serverless endpoints for HTTP/RESTful and WebSocket communication while IoT delivers a serverless endpoint for WebSockets over MQTT communication.
  • DynamoDB enables data storage and retrieval for internet-scale applications.
  • SNS provides microservice communications via publish/subscribe functionality.
  • Step Functions coordinates complex tasks to ensure appropriate outcomes.
  • Analytics for Simple Trivia Service are delivered via Kinesis and S3 with Athena providing a query/visualization capability.
  • Amazon Cognito provides secure, standards-based login and a user directory.

Two managed services that are not serverless, Amazon VPC NAT Gateway and Amazon ElastiCache for Redis, are also used. VPC NAT Gateway is required by VPC-enabled Lambda functions to reach services outside of the VPC, such as DynamoDB. ElastiCache provides an in-memory database suited for applications with submillisecond latency requirements.

User security and enabling communications to backend services

Players are required to register and log in before playing. Registration and login credentials are sent to Amazon Cognito using the Secure Remote Password protocol. Upon successfully logging in, Amazon Cognito returns a JSON Web Token (JWT) and an Amazon Cognito user session.

The JWT is included within requests to API Gateway, which validates the token before allowing the request to be forwarded to Lambda.

IoT requires additional security for users by using an AWS Identity and Access Management (IAM) policy. A policy attached to the Amazon Cognito user allows the player to connect, subscribe, and send messages to the IoT endpoint.

Game types and supporting architectures

Simple Trivia Service’s three game modes define how players interact with the backend services. These modes align to different architectures used within the game.

“Single Player” quiz architecture

“Single Player” quiz architecture

Single player quizzes have simple rules, short play sessions, and appeal to wide audiences. Single player game communication is player-to-endpoint only. This is accomplished with API Gateway via an HTTP API.

Four Lambda functions (ActiveGamesList, GamePlay, GameAnswer, and LeaderboardGet) enable single player games. These functions are integrated with API Gateway and respond to specific requests from the client. API Gateway forwards the request, including URI, body, and query string, to the appropriate Lambda function.

When a player chooses “Play”, a request is sent to API Gateway, which invokes the ActiveGamesList function. This function queries the ActiveGames DynamoDB table and returns the list of active games to the user.

The player selects a game, resulting in another request triggering the GamePlay function. GamePlay retrieves the game’s questions from the GamesDetail DynamoDB table. The front end maintains the state for the user during the game.

When all questions are answered, the SPA sends the player’s responses to API Gateway, invoking the GameAnswer function. This function scores the player’s responses against the GameDetails table. The score and answers are sent to the user.

Additionally, this function sends the player score for the leaderboard and player experience to two SNS topics (LeaderboardTopic and PlayerProgressTopic). The ScorePut and PlayerProgressPut functions subscribe to these topics. These two functions write the details to the Leaderboard and Player Progress DynamoDB tables.

This architecture processes these two actions asynchronously, resulting in the player receiving their score and answers without having to wait. This also allows for increased security for player progress, as only the PlayerProgressPut function is allowed to write to this table.

Finally, the player can view the game’s leaderboard, which is returned to the player as the response to the GetLeaderboard function. The function retrieves the top 10 scores and the current player’s score from the Leaderboard table.

“Multi-player – Casual and Competitive” architecture

“Multiplayer – Casual and Competitive” architecture

These game types require player-to-player and service-to-player communication. This is typically performed using TCP/UDP sockets or the WebSocket protocol. API Gateway WebSockets provides WebSocket communication and enables Lambda functions to send messages to and receive messages from game hosts and players.

Game hosts start games via the “Host” button, messaging the LiveAdmin function via API Gateway. The function adds the game to the LiveGames table, which allows players to find and join the game. A list of questions for the game is sent to the game host from the LiveAdmin function at this time. Additionally, the game host is added to the GameConnections table, which keeps track of which connections are related to a game. Players, via the LivePlayer function, are also added to this table when they join a game.

The game host client manages the state of the game for all players and controls the flow of the game, sending questions, correct answers, and leaderboards to players via API Gateway and the LiveAdmin function. The function only sends game messages to the players in the GameConnections table. Player answers are sent to the host via the LivePlayer function.

To end the game, the game host sends a message with the final leaderboard to all players via the LiveAdmin function. This function also stores the leaderboard in the Leaderboard table, removes the game from the ActiveGames table, and sends player progression messages to the Player Progress topic.

“Multi-player – Live Scoreboard” architecture

“Multiplayer – Live Scoreboard” architecture

This is an extension of other multi-player game types requiring similar communications. This uses IoT with WebSockets over MQTT as the transport. It enables the client to subscribe to a topic and act on messages it receives. IoT manages routing messages to clients based on their subscriptions.

This architecture moves the state management from the game host client to a data store on the backend. This change requires a database that can respond quickly to user actions. Simple Trivia Service uses ElastiCache for Redis for this database. Game questions, player responses, and the leaderboard are all stored and updated in Redis during the quiz. The ElastiCache instance is blocked from internet traffic by placing it in a VPC. A security group configures access for the Lambda functions in the same VPC.

Game hosts for this type of game start the game by hosting it, which sends a message to IoT, triggering the CacheGame function. This function adds the game to the ActiveGames table and caches the quiz details from DynamoDB into Redis. Players join the game by sending a message, which is delivered to the JoinGame function. This adds the user record to Redis and alerts the game host that a player has joined.

Game hosts can send questions to the players via a message that invokes the AskQuestion function. This function updates the current question number in Redis and sends the question to subscribed players via the AskQuestion function. The ReceiveAnswer function processes player responses. It validates the response, stores it in Redis, updates the scoreboard, and replies to all players with the updated scoreboard after the first correct answer. The game scoreboard is updated for players in real time.

When the game is over, the game host sends a message to the EndGame function via IoT. This function writes the game leaderboard to the Leaderboard table, sends player progress to the Player Progress SNS topic, deletes the game from cache, and removes the game from the ActiveGames table.

Conclusion

This post introduces the Simple Trivia Service, a single- and multi-player game built using a serverless-first architecture on AWS. I cover different solutions that you can use to enable connectivity from your game client to a serverless-first backend for both single- and multi-player games. I also include a walkthrough of the architecture for each of these solutions.

You can deploy the code for this solution to your own AWS account via instructions in the Simple Trivia Service GitHub repository.

For more serverless learning resources, visit Serverless Land.

Operating Lambda: Building a solid security foundation – Part 1

Post Syndicated from James Beswick original https://aws.amazon.com/blogs/compute/operating-lambda-building-a-solid-security-foundation-part-1/

In the Operating Lambda series, I cover important topics for developers, architects, and systems administrators who are managing AWS Lambda-based applications. This two-part series discusses core security concepts for Lambda-based applications.

In the AWS Cloud, the most important foundational security principle is the shared responsibility model. This broadly shares security responsibilities between AWS and our customers. AWS is responsible for “security of the cloud”, such as the underlying physical infrastructure and facilities providing the services. Customers are responsible for “security in the cloud”, which includes applying security best practices, controlling access, and taking measures to protect data.

One of the main reasons for the popularity of Lambda-based applications is that AWS manages even more of the security operations compared with traditional cloud-based compute. For example, Lambda customers using zip file deployments do not need to patch underlying operating systems or apply security patches – these tasks are managed automatically by the Lambda service.

This post explains the Lambda execution environment and mechanisms used by the service to protect customer data. It also covers applying the principles of least privilege to your application and what this means in terms of permissions and Lambda function scope.

Understanding the Lambda execution environment

When your functions are invoked, the Lambda service runs your code inside an execution environment. Lambda scrubs the memory before it is assigned to an execution environment. Execution environments are run on hardware virtualized virtual machines (MicroVMs) which are dedicated to a single AWS account. Execution environments are never shared across functions and MicroVMs are never shared across AWS accounts. This is the isolation model for the Lambda service:

Isolation model for the Lambda service

A single execution environment may be reused by subsequent function invocations. This helps improve performance since it reduces the time taken to prepare and environment. Within your code, you can take advantage of this behavior to improve performance further, by caching locally within the function or reusing long-lived connections. All of these invocations are handled by a single process, so any process-wide state (such as static state in Java) is available across all invocations within the same execution environment.

There is also a local file system available at /tmp for all Lambda functions. This is local to each function but shared across invocations within the same execution environment. If your function must access large libraries or files, these can be downloaded here first and then used by all subsequent invocations. This mechanism provides a way to amortize the cost and time of downloading this data across multiple invocations.

While data is never shared across AWS customers, it is possible for data from one Lambda function to be shared with another invocation of the same function instance. This can be useful for caching common values or sharing libraries. However, if you have information only intended for a single invocation, you should:

  • Ensure that data is only used in a local variable scope.
  • Delete any /tmp files before exiting, and use a UUID name to prevent different instances from accessing the same temporary files.
  • Ensure that any callbacks are complete before exiting.

For applications requiring the highest levels of security, you may also implement your own memory encryption and wiping process before a function exits. At the function level, the Lambda service does not inspect or scan your code. Many of the best practices in security for software development continue to apply in serverless software development.

The security posture of an application is determined by the use-case but developers should always take precautions against common risks such as misconfiguration, injection flaws, and handling user input. Developers should be familiar with common security concepts and security risks, such as those listed in the OWASP Top 10 Web Application Security Risks and the OWASP Serverless Top 10. The use of static code analysis tools, unit tests, and regression tests are still valid in a serverless compute environment.

To learn more, read “Amazon Web Services: Overview of Security Processes”, “Compliance validation for AWS Lambda”, and “Security Overview of AWS Lambda”.

Applying the principles of least privilege

AWS Identity and Access Management (IAM) is the service used to manage access to AWS services. Before using IAM, it’s important to review security best practices that apply across AWS, to ensure that your user accounts are secured appropriately.

Lambda is fully integrated with IAM, allowing you to control precisely what each Lambda function can do within the AWS Cloud. There are two important policies that define the scope of permissions in Lambda functions. The event source uses a resource policy that grants permission to invoke the Lambda function, whereas the Lambda service uses an execution role to constrain what the function is allowed to do. In many cases, the console configures both of these policies with default settings.

As you start to build Lambda-based applications with frameworks such as AWS SAM, you describe both policies in the application’s template.

Resource and execution role policy

By default, when you create a new Lambda function, a specific IAM role is created for only that function.

IAM role for a Lambda function

This role has permissions to create an Amazon CloudWatch log group in the current Region and AWS account, and create log streams and put events to those streams. The policy follows the principle of least privilege by scoping precise permissions to specific resources, AWS services, and accounts.

Developing least privilege IAM roles

As you develop a Lambda function, you expand the scope of this policy to enable access to other resources. For example, for a function that processes objects put into an Amazon S3 bucket, it requires read access to objects stored in that bucket. Do not grant the function broader permissions to write or delete data, or operate in other buckets.

Determining the exact permissions can be challenging, since IAM permissions are granular and they control access to both the data plane and control plane. The following references are useful for developing IAM policies:

One of the fastest ways to scope permissions appropriately is to use AWS SAM policy templates. You can reference these templates directly in the AWS SAM template for your application, providing custom parameters as required:

SAM policy templates

In this example, the S3CrudPolicy template provides full create, read, update, and delete permissions to one bucket, and the S3ReadPolicy template provides only read access to another bucket. AWS SAM named templates expand into more verbose AWS CloudFormation policy definitions that show how the principle of least privilege is applied. The S3ReadPolicy is defined as:

        "Statement": [
          {
            "Effect": "Allow",
            "Action": [
              "s3:GetObject",
              "s3:ListBucket",
              "s3:GetBucketLocation",
              "s3:GetObjectVersion",
              "s3:GetLifecycleConfiguration"
            ],
            "Resource": [
              {
                "Fn::Sub": [
                  "arn:${AWS::Partition}:s3:::${bucketName}",
                  {
                    "bucketName": {
                      "Ref": "BucketName"
                    }
                  }
                ]
              },
              {
                "Fn::Sub": [
                  "arn:${AWS::Partition}:s3:::${bucketName}/*",
                  {
                    "bucketName": {
                      "Ref": "BucketName"
                    }
                  }
                ]
              }
            ]
          }
        ]

It includes the necessary, minimal permissions to retrieve the S3 object, including getting the bucket location, object version, and lifecycle configuration.

Access to CloudWatch Logs

To log output, Lambda roles must provide access to CloudWatch Logs. If you are building a policy manually, ensure that it includes:

{
    "Version": "2012-10-17",
    "Statement": [
        {
            "Effect": "Allow",
            "Action": "logs:CreateLogGroup",
            "Resource": "arn:aws:logs:region:accountID:*"
        },
        {
            "Effect": "Allow",
            "Action": [
                "logs:CreateLogStream",
                "logs:PutLogEvents"
            ],
            "Resource": [
                "arn:aws:logs:region:accountID:log-group:/aws/lambda/functionname:*"
            ]
        }
    ]
}

If the role is missing these permissions, the function still runs but it is unable to log any output to the CloudWatch service.

Avoiding wildcard permissions in IAM policies

The granularity of IAM permissions means that developers may choose to use overly broad permissions when they are testing or developing code.

IAM supports the “*” wildcard in both the resources and actions attributes, making it easier to select multiple matching items automatically. These may be useful when developing and testing functions in specific development AWS accounts with no access to production data. However, you should ensure that “star permissions” are never used in production environments.

Wildcard permissions grant broad permissions, often for many permissions or resources. Many AWS managed policies, such as AdministratorAccess, provide broad access intended only for user roles. Do not apply these policies to Lambda functions, since they do not specify individual resources.

In Application design and Service Quotas – Part 1, the section Using multiple AWS accounts for managing quotas shows a multiple account example. This approach provisions a separate AWS account for each developer in a team, and separates accounts for beta and production. This can help prevent developers from unintentionally transferring overly broad permissions to beta or production accounts.

For developers using the Serverless Framework, the Safeguards plugin is a policy-as-code framework to check deployed templates for compliance with security.

Specialized Lambda functions compared with all-purpose functions

In the post on Lambda design principles, I discuss architectural decisions in choosing between specialized functions and all-purpose functions. From a security perspective, it can be more difficult to apply the principles of least privilege to all-purpose functions. This is partly because of the broad capabilities of these functions and also because developers may grant overly broad permissions to these functions.

When building smaller, specialized functions with single tasks, it’s often easier to identify the specific resources and access requirements, and grant only those permissions. Additionally, since new features are usually implemented by new functions in this architectural design, you can specifically grant permissions in new IAM roles for these functions.

Avoid sharing IAM roles with multiple Lambda functions. As permissions are added to the role, these are shared across all functions using this role. By using one dedicated IAM role per function, you can control permissions more intentionally. Every Lambda function should have a 1:1 relationship with an IAM role. Even if some functions have the same policy initially, always separate the IAM roles to ensure least privilege policies.

To learn more, the series of posts for “Building well-architected serverless applications: Controlling serverless API access” – part 1, part 2, and part 3.

Conclusion

This post explains the Lambda execution environment and how the service protects customer data. It covers important steps you should take to prevent data leakage between invocations and provides additional security resources to review.

The principles of least privilege also apply to Lambda-based applications. I show how you can develop IAM policies and practices to ensure that IAM roles are scoped appropriately, and why you should avoid wildcard permissions. Finally, I explain why using smaller, specialized Lambda functions can help maintain least privilege.

Part 2 will discuss security workloads with public endpoints and how to use AWS CloudTrail for governance, compliance, and operational auditing of Lambda usage.

For more serverless learning resources, visit Serverless Land.

Scaling up a Serverless Web Crawler and Search Engine

Post Syndicated from Jack Stevenson original https://aws.amazon.com/blogs/architecture/scaling-up-a-serverless-web-crawler-and-search-engine/

Introduction

Building a search engine can be a daunting undertaking. You must continually scrape the web and index its content so it can be retrieved quickly in response to a user’s query. The goal is to implement this in a way that avoids infrastructure complexity while remaining elastic. However, the architecture that achieves this is not necessarily obvious. In this blog post, we will describe a serverless search engine that can scale to crawl and index large web pages.

A simple search engine is composed of two main components:

  • A web crawler (or web scraper) to extract and store content from the web
  • An index to answer search queries

Web Crawler

You may have already read “Serverless Architecture for a Web Scraping Solution.” In this post, Dzidas reviews two different serverless architectures for a web scraper on AWS. Using AWS Lambda provides a simple and cost-effective option for crawling a website. However, it comes with a caveat: the Lambda timeout capped crawling time at 15 minutes. You can tackle this limitation and build a serverless web crawler that can scale to crawl larger portions of the web.

A typical web crawler algorithm uses a queue of URLs to visit. It performs the following:

  • It takes a URL off the queue
  • It visits the page at that URL
  • It scrapes any URLs it can find on the page
  • It pushes the ones that it hasn’t visited yet onto the queue
  • It repeats the preceding steps until the URL queue is empty

Even if we parallelize visiting URLs, we may still exceed the 15-minute limit for larger websites.

Breaking Down the Web Crawler Algorithm

AWS Step Functions is a serverless function orchestrator. It enables you to sequence one or more AWS Lambda functions to create a longer running workflow. It’s possible to break down this web crawler algorithm into steps that can be run in individual Lambda functions. The individual steps can then be composed into a state machine, orchestrated by AWS Step Functions.

Here is a possible state machine you can use to implement this web crawler algorithm:

Figure 1: Basic State Machine

Figure 1: Basic State Machine

1. ReadQueuedUrls – reads any non-visited URLs from our queue
2. QueueContainsUrls? – checks whether there are non-visited URLs remaining
3. CrawlPageAndQueueUrls – takes one URL off the queue, visits it, and writes any newly discovered URLs to the queue
4. CompleteCrawl – when there are no URLs in the queue, we’re done!

Each part of the algorithm can now be implemented as a separate Lambda function. Instead of the entire process being bound by the 15-minute timeout, this limit will now only apply to each individual step.

Where you might have previously used an in-memory queue, you now need a URL queue that will persist between steps. One option is to pass the queue around as an input and output of each step. However, you may be bound by the maximum I/O sizes for Step Functions. Instead, you can represent the queue as an Amazon DynamoDB table, which each Lambda function may read from or write to. The queue is only required for the duration of the crawl. So you can create the DynamoDB table at the start of the execution, and delete it once the crawler has finished.

Scaling up

Crawling one page at a time is going to be a bit slow. You can use the Step Functions “Map state” to run the CrawlPageAndQueueUrls to scrape multiple URLs at once. You should be careful not to bombard a website with thousands of parallel requests. Instead, you can take a fixed-size batch of URLs from the queue in the ReadQueuedUrls step.

An important limit to consider when working with Step Functions is the maximum execution history size. You can protect against hitting this limit by following the recommended approach of splitting work across multiple workflow executions. You can do this by checking the total number of URLs visited on each iteration. If this exceeds a threshold, you can spawn a new Step Functions execution to continue crawling.

Step Functions has native support for error handling and retries. You can take advantage of this to make the web crawler more robust to failures.

With these scaling improvements, here’s our final state machine:

Figure 2: Final State Machine

Figure 2: Final State Machine

This includes the same steps as before (1-4), but also two additional steps (5 and 6) responsible for breaking the workflow into multiple state machine executions.

Search Index

Deploying a scalable, efficient, and full-text search engine that provides relevant results can be complex and involve operational overheads. Amazon Kendra is a fully managed service, so there are no servers to provision. This makes it an ideal choice for our use case. Amazon Kendra supports HTML documents. This means you can store the raw HTML from the crawled web pages in Amazon Simple Storage Service (S3). Amazon Kendra will provide a machine learning powered search capability on top, which gives users fast and relevant results for their search queries.

Amazon Kendra does have limits on the number of documents stored and daily queries. However, additional capacity can be added to meet demand through query or document storage bundles.

The CrawlPageAndQueueUrls step writes the content of the web page it visits to S3. It also writes some metadata to help Amazon Kendra rank or present results. After crawling is complete, it can then trigger a data source sync job to ensure that the index stays up to date.

One aspect to be mindful of while employing Amazon Kendra in your solution is its cost model. It is priced per index/hour, which is more favorable for large-scale enterprise usage, than for smaller personal projects. We recommend you take note of the free tier of Amazon Kendra’s Developer Edition before getting started.

Overall Architecture

You can add in one more DynamoDB table to monitor your web crawl history. Here is the architecture for our solution:

Figure 3: Overall Architecture

Figure 3: Overall Architecture

A sample Node.js implementation of this architecture can be found on GitHub.

In this sample, a Lambda layer provides a Chromium binary (via chrome-aws-lambda). It uses Puppeteer to extract content and URLs from visited web pages. Infrastructure is defined using the AWS Cloud Development Kit (CDK), which automates the provisioning of cloud applications through AWS CloudFormation.

The Amazon Kendra component of the example is optional. You can deploy just the serverless web crawler if preferred.

Conclusion

If you use fully managed AWS services, then building a serverless web crawler and search engine isn’t as daunting as it might first seem. We’ve explored ways to run crawler jobs in parallel and scale a web crawler using AWS Step Functions. We’ve utilized Amazon Kendra to return meaningful results for queries of our unstructured crawled content. We achieve all this without the operational overheads of building a search index from scratch. Review the sample code for a deeper dive into how to implement this architecture.