Tag Archives: serverless

Automatically Detect Operational Issues in Lambda Functions with Amazon DevOps Guru for Serverless

Post Syndicated from Marcia Villalba original https://aws.amazon.com/blogs/aws/automatically-detect-operational-issues-in-lambda-functions-with-amazon-devops-guru-for-serverless/

Today we are announcing Amazon DevOps Guru for Serverless, a new capability for Amazon DevOps Guru. It allows developers to improve the operational performance and availability of serverless applications.

AWS pioneered the serverless computing space with the launch of AWS Lambda in 2014. Today, hundreds of thousands of customers are using AWS Lambda. Lambda allows you to configure many parameters for your functions, like memory allocation, provisioned concurrency, and timeouts. For many customers, finding the right balance between all those parameters to optimize the performance and availability of their functions is challenging.

In December 2020, we announced DevOps Guru, a fully managed AIOps (Artificial Intelligence for IT operations) service that automatically detects and alerts customers about application issues and helps them to improve their applications’ availability. Today, we are announcing DevOps Guru for Serverless, a new capability for DevOps Guru, to help developers using Lambda automatically detect anomalous behavior at the function level and use ML-powered recommendations to remediate any issues that were detected.

DevOps Guru for Serverless uses ML to automatically identify and analyze a wide range of performance and availability-related issues for Lambda functions, such as low provisioned concurrency or underutilization of memory. To use this capability, you don’t need to be a serverless or ML expert.

The reactive insights of this capability help you troubleshoot ongoing issues affecting serverless applications efficiently with actionable recommendations that help you identify and fix the root cause in the shortest time possible.

DevOps Guru for Serverless also provides proactive insights that help you identify a wider range of operational anomalies long before your serverless application performance is affected. It also gives you recommendations on how to resolve the root cause of the issues.

When an issue is detected, DevOps Guru for Serverless displays the finding in the DevOps Guru console and sends notifications using Amazon EventBridge or Amazon Simple Notification Service (Amazon SNS). This allows developers to automatically manage and take real-time action on the discovered issues.

DevOps Guru for Serverless Proactive Insights
DevOps Guru for Serverless enables developers to proactively detect application issues before an event that affects the customer occurs. For example, if provision concurrency is set too low for a Lambda function and traffic for this application is growing, DevOps Guru will detect the growing traffic and the application latency degradation and generate a proactive insight showing the issue.

ML algorithms create these insights from operational data and application metrics. An insight provides high-level information, severity, status, and a recommendation for how to solve this issue.

Nowadays, DevOps Guru for Serverless provides proactive insights for Lambda and Amazon DynamoDB. These are the operational issues and the proactive insights available today:

  • Lambda concurrent executions reaching account limit – Triggered when concurrent executions reach an account limit for a continuous period.
  • Lambda Provisioned Concurrency function limit breached – Triggered when the reserved amount of provisioned concurrency is not enough over a period.
  • Lambda timeout high compared to SQS’s visibility timeout – Triggered when the duration of the lambda function exceeds the visibility timeout for the event source Amazon Simple Queue Service (Amazon SQS).
  • ­Lambda­ Provisioned Concurrency usage is lower than expected – Triggered when the utilization of the provisioned concurrency is too low.
  • Account read/write capacity for DynamoDB consumption reaching account limit – Triggered when the account consumed capacity is approaching account-level limits during a period of time.
  • DynamoDB table read/write consumed capacity reaching table limit – Triggered when the writes or reads in a table are reaching the ProvisionedWriteCapacityUnits or ProvisionedReadCapacityUnits limits for the table over a period.
  • DynamoDB table consumed capacity reaching AutoScaling Max parameter limit – Triggered when table consumed capacity is reaching AutoScaling Max parameters limit over a period.
  • DynamoDB read/write consumption lower than expected – Triggered when the value for ProvisionedWriteCapacityUnits or ProvisionedReadCapacityUnits is far from what is being consumed during a period of time.

Get started with DevOps Guru for Serverless
To get started, navigate to the DevOps Guru console to enable the service for your Lambda-based applications, other supported resources, or your entire account.

Configuring DevOps Guru

For this demo, create a new Lambda function with provisioned concurrency of 1. You can do this from the AWS console or programmatically. After you create it, you can check on the function overview page that the provisioned concurrency is set to 1.

Configuring Lambda provisioned concurrency

Add to the Lambda function a CloudWatch Event that triggers the function every minute. You can do that from the AWS console or programmatically. You can follow this tutorial to learn how to do it. Repeat that process five more times. Now the function will get triggered six times every minute from different events.

To trigger the proactive insight, you need to have six concurrent invocations of this Lambda function. To accomplish that, you need to ensure that the duration of each invocation is long enough. For this demo, you can make your function sleep for 30 seconds.

'use strict';

exports.handler = async (event) => {
  
    console.log('Sleep for 30 seconds')
    await new Promise(r => setTimeout(r, 30000));
    console.log('finish sleeping')

    return;
};

This configuration will trigger the proactive insight Lambda Provisioned Concurrency function limit breached for this function. You should see the insight in the console in three hours or less after the issue starts.

How to Check an Insight From the DevOps Guru Console
After a few hours, you can visit your DevOps Guru console, and you can verify that the proactive insight was triggered by exceeding the provisioned concurrency.

List of proactive insights

Select the Ongoing insight to see more details. The insight page opens, and it displays information relevant to the insight, metrics, events, and recommended actions for this issue.

Let’s examine this page in more detail. At the top of the page is the insight overview, with a description of what the insight is about and the severity of the issue. This is a proactive insight, so the user experience is not compromised by this issue. You also learn if the issue is ongoing and when it started. If the issue is not happening anymore, you can learn the end date for that insight. If you select the link for the affected applications, you can confirm all the Lambda functions that are affected by this insight.

Insight description information box

The next information box contains information about the CloudWatch metrics related to the proactive insight. This graph shows the metric ProvisionedConcurrecySpilloverInvocations with the summary of all the invocations in the last hours that the provisioned concurrency spilled.

Information about metrics

Relevant events are the next information box available on the page. These are AWS CloudTrail events that DevOps Guru uses combined with CloudWatch metrics and operational data to identify anomalous behavior that created the insight.

Relevant info about the insight

And finally on the page is the Recommendations information box, where DevOps Guru will output all the generated recommendations to help you address the issue. You can use the recommendations to learn the immediate steps you can take to remediate the issue.

Recommendations for the insights

In this proactive insight, DevOps Guru recommends you tune the provision concurrency of your Lambda function. It tells you to which value to set it, based on the past utilization of your function. You can also find the reasoning on why DevOps Guru recommends this insight.

Pricing and Availability
DevOps Guru for Serverless is offered to customers at no additional charge.

DevOps Guru for Serverless is available in all AWS Regions where DevOps Guru is available, US East (Ohio), US East (N. Virginia), US West (Oregon), Asia Pacific (Singapore), Asia Pacific (Sydney), Asia Pacific (Tokyo), Europe (Frankfurt), Europe (Ireland), and Europe (Stockholm).

Learn more about DevOps Guru for Serverless and register for the hands-on workshop on May 10 to learn more about this new launch.

Marcia

Handling Lambda functions idempotency with AWS Lambda Powertools

Post Syndicated from James Beswick original https://aws.amazon.com/blogs/compute/handling-lambda-functions-idempotency-with-aws-lambda-powertools/

This post is written by Jerome Van Der Linden, Solutions Architect Builder and Dariusz Osiennik, Sr Cloud Application Architect.

One of the advantages of using AWS Lambda is its integration with messaging services like Amazon SQS or Amazon EventBridge. The integration is managed and can also handle the retrying of failed messages. If there’s an error within the Lambda function, the failed message is sent again and the function is re-invoked.

This feature increases the resilience of the application but also means that a message can be processed multiple times by the function. This is important when managing orders, payments, or any kind of transaction that must be handled only once.

As mentioned in the design principles of Lambda, “since the same event may be received more than once, functions should be designed to be idempotent”. This article explains what idempotency is and how to implement it more easily with Lambda Powertools.

Understanding idempotency

Idempotency is the property of an operation whereby it can be applied multiple times without changing the result beyond the initial application. You can run an idempotent operation safely multiple times without any side effects like duplicates or inconsistent data. For example, this is a key principle for infrastructure as code, where you don’t want to double the number of resources each time you apply a template.

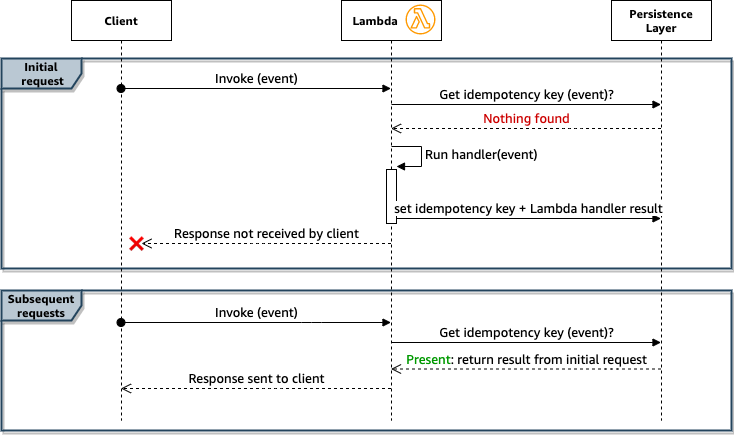
Applied to Lambda, a function is idempotent when it can be invoked multiple times with the same event with no risk of side effects. To make a function idempotent, it must first identify that an event has already been processed. Therefore, it must extract a unique identifier, called an “idempotency key”.

This identifier may be in the event payload (for example, orderId), a combination of multiple fields in the payload (for example, customerId, and orderId), or even a hash of the full payload. If using the full payload, fields such as dates, timestamps, or random elements may affect the hash and lead to changing values.

The function then checks in a persistence layer (for example, Amazon DynamoDB or Amazon ElastiCache):

  • If the key is not there, then the Lambda function can proceed normally, perform the transaction, and save the idempotency key in the persistence layer. You can potentially add the result of the function in the persistence layer too, so that subsequent calls can retrieve this result directly.
  • If the key is there, then the function can return and avoid applying the transaction again.

The following diagram shows the sequence of events with this idempotency scenario:

Sequence diagram

There are edge cases in this example:

  • You can invoke the function twice with the same event within a few milliseconds. In that case, each function acts as if it’s the first time this event is received and processes it, resulting in inconsistencies.
  • The function may perform several operations that are not idempotent. If the first operation is successful and then an error happens, the idempotency key won’t be saved. Subsequent calls redo the first operation, resulting in inconsistencies.

You can guard against these edge cases by inserting a lock as soon as the event is received:

Second sequence diagram

There are other questions and edge cases that you must consider when implementing idempotency on your Lambda functions. Read Making retries safe with idempotent APIs from the Builder’s Library to dive into the details. You can choose to implement idempotency by yourself or you can use a library that handles it and takes care of these edge cases for you. This is what Lambda Powertools (for Python and Java) proposes.

Idempotency with Lambda Powertools

Lambda Powertools is a library, available in Python, Java, and TypeScript. It provides utilities for Lambda functions to ease the adoption of best practices and to reduce the amount of code to perform recurring tasks. In particular, it provides a module to handle idempotency (in the Java and Python versions).

This post shows examples using the Java version. To get started with the Lambda Powertools idempotency module, you must install the library and configure it within your build process. For more details, follow AWS Lambda Powertools documentation.

Next, you must configure a persistence storage layer where the idempotency feature can store its state. You can use the built-in support for DynamoDB or you can create your own implementation for the database of your choice. This example creates a new table in DynamoDB.

The following AWS Serverless Application Model (AWS SAM) template creates a suitable table to store the state:

Resources:
  IdempotencyTable:
    Type: AWS::DynamoDB::Table
    Properties:
      AttributeDefinitions:
        - AttributeName: id
          AttributeType: S
      KeySchema:
        - AttributeName: id
          KeyType: HASH
      TimeToLiveSpecification:
        AttributeName: expiration
        Enabled: true
      BillingMode: PAY_PER_REQUEST

In this definition:

  • The table is multi-tenant and can be reused by multiple Lambda functions that use the Powertools idempotency module.
  • The DynamoDB time-to-live configuration helps keep idempotency limited in time. You can configure the duration, which is 1 hour by default.

Configure the idempotency module’s behavior in the init phase of the function’s lifecycle, before the handleRequest method gets called:

public class SubscriptionHandler implements RequestHandler<Subscription, SubscriptionResult> {

  public SubscriptionHandler() {
    Idempotency.config().withPersistenceStore(
      DynamoDBPersistenceStore.builder()
        .withTableName(System.getenv("TABLE_NAME"))
        .build()
      ).configure();
  }
}

Lambda Powertools follows the paradigm of convention over configuration and provides default values for many parameters. The persistence store is the only required element. To use the DynamoDB implementation, you must specify a table name. In the previous sample, the name is provided by the environment variable TABLE_NAME.

Adding the @Idempotent annotation to the handleRequest method enables the idempotency functionality. It uses a hash of the Subscription event as the idempotency key.

@Idempotent
  public SubscriptionResult handleRequest(final Subscription event, final Context context) {
    SubscriptionPayment payment = createSubscriptionPayment(
      event.getUsername(),
      event.getProductId()
    );

    return new SubscriptionResult(payment.getId(), "success", 200);
  }

Creating orders

The example is about creating an order for a user for a list of products. Orders should not be duplicated if the client repeats the request. API consumers can safely retry a create order request in case of issues (such as a timeout or networking disruption). The application should also allow the user to buy the same products in a short period of time if that is the user’s intention.

The following architecture diagram consists of an Amazon API Gateway REST API, the idempotent Lambda function, and a DynamoDB table for storing orders.

Architecture diagram

The Orders API allows creating a new order by calling its POST /orders endpoint with the following sample payload:

{
  "requestToken": "260d2efe-af84-11ec-b909-0242ac120002",
  "userId": "user1",  
  "items": [
    {
      "productId": "product1",      
      "price": 6.50,      
      "quantity": 5    
    },    
    {
      "productId": "product2",      
      "price": 13.50,      
      "quantity": 2    
    }
  ],  
  "comment": "AWSome Order"
}

Lambda Powertools uses JMESPath to extract the important fields from the request that uniquely identify it. It then calculates a hash of these fields to constitute the idempotency key.

In the example, the important fields are the userId and the items, to avoid duplicated orders. But the user can also buy the same list of products in a short period of time. To allow this, the API consumer can generate a client-side token and assign its value to the requestToken field. For each unique order, the token has a different value. If a request is retried by the client, it uses the same token.

This leads to the following configuration for the idempotency key:

Idempotency.config()
  .withConfig( 
    IdempotencyConfig.builder()
    .withEventKeyJMESPath("powertools_json(body).[requestToken,userId,items]")
    .build())

If the same request is sent more than once, only the first call results in a new order created in the DynamoDB table. The same order identifier is returned by the endpoint for all the subsequent calls. In this way, the API consumer can safely retry the requests without worrying about duplicating the order.

You can find the source code of the example on GitHub.

Processing payments

This example shows asynchronous batch processing of payment messages from a queue. Messages must not be processed more than once to avoid charging users multiple times for the same order. You must consider edge cases like at-least-once message delivery, an error response returned by the third party payment API or retrying the batch of messages.

The following architecture diagram shows an Amazon SQS queue, the idempotent Lambda function, and a third-party API that the function calls for payment.

Architecture diagram

This is the body of a single payment SQS message:

{
    "orderId": "order1",
    "userId": "user1",
    "amount": "50.25"
}

In this example, the process method is annotated as idempotent, not the handleRequest. The method is responsible for processing a single payment record from the SQS batch. It uses @IdempotencyKey annotation to specify which parameter to use as the idempotency key.

@Override
public List<String> handleRequest(SQSEvent sqsEvent, Context context) {
return sqsEvent.getRecords()
  .stream()
  .map(record -> process(record.getMessageId(),record.getBody()))
  .collect(Collectors.toList());
}

@Idempotent
private String process(String messageId, @IdempotencyKey String messageBody) {
    logger.info("Processing messageId: {}", messageId);
    PaymentRequest request = 
extractDataFrom(messageBody).as(PaymentRequest.class);
    return paymentService.process(request);
}

If an SQS record with the same payload is received more than once, the third-party API is not called multiple times. All the subsequent calls return before calling the process method.

If an exception is thrown from the process method, the idempotency feature does not store the idempotency state in the persistence layer. The payment is treated as unprocessed and can be retried safely. This may happen if the third-party API returns a server-side error.

By default, if one message from a batch fails, all the messages in the batch are retried. Lambda Powertools also offers the SQS Batch Processing module which can help in handling partial failures.

You can find the source code of this example in the GitHub repo.

Conclusion

Idempotency is a critical piece of serverless architectures and can be difficult to implement. If not done correctly, it can lead to inconsistent data and other issues. This post shows how you can use Lambda Powertools to make Lambda functions idempotent and ensure that critical transactions are handled only once.

For more details about the Lambda Powertools idempotency feature and its configuration options, refer to the full documentation.

For more serverless learning resources, visit Serverless Land.

Working with events and the Amazon EventBridge schema registry

Post Syndicated from Talia Nassi original https://aws.amazon.com/blogs/compute/working-with-events-and-amazon-eventbridge-schema-registry/

Event-driven architecture, at its core, is driven by producers creating events and subscribers being made aware of those events and acting upon them. An event is a data representation of something that happened elsewhere in the application or from an outside producer. When building event-driven applications, it is critical to determine what events exist in the application, who produces them, and who subscribes and react to them.

The first step in identifying these events is to work through the process of event discovery. In this process, you decide the events that the event source produces, and what parts of the application must know about those events. Events schemas describe the structure of an event and fields included in the event. If the event’s contents match the event target’s requirements, the service sends the event to the target. If you have an existing application that you want to discover event schemas automatically for you, can enable EventBridge schema discovery. If you are building a new application, you can conduct an event discovery exercise.

An event bus connects the event to the subscriber. The event bus at AWS is Amazon EventBridge. Use EventBridge to choreograph interactions between event sources and event targets.

In this post, you learn how to perform an event discovery exercise with your team. It shows how to create a schema registry with EventBridge, and how to represent the event as an object in your code to use in your application.

Event discovery

In the event discovery phase, all business stakeholders of an application come together and write down all the possible events that can happen. For example, possible events for an ecommerce application include: Account Created, Item added to cart, Order Placed. Write events in Noun + Past Tense Verb format.

Events
Account Created
Item Added
Order Placed

Notice that events are not technical or focused on implementation; rather they are real-world things that happened in your system. This is because everyone, from developers to product owners, must understand them. In the event discovery phase, events act as your business requirements. Later, developers then translate those requirements into code.

Once you have the events laid out, you decide who is interested in each event. For example, consider the events listed for the ecommerce application: Account Created, Item Added to cart, and Order Placed.

Events Subscribers
Account Created

Marketing team

Security team

Item Added Inventory team
Order Placed Fulfillment team

Whenever a user creates an account, the marketing team subscribes to that event to send the account holder promotions. The security team encrypts the account holder’s user name and password into a database to save the account credentials. Whenever a user places an order, the system sends an email notification with the order details to stakeholders. The system also sends a message to the fulfillment team to start packing and shipping the order. This approach decouples the interactions between all of these services. This decoupling is beneficial because it increases developer independence by reducing the dependencies on other teams to write integrations.

Once the initial event schema planning is complete, you want to ensure that developers can continue to build new features without needing to coordinate with other teams closely on event schemas. For this reason, \EventBridge’s schema registry and automated schema discovery can help developers quickly build new features based on their application’s events.

You use EventBridge schema registries to search for, find, and track different schemas generated by your application. You can also automatically find schemas with the automated schema registry.

EventBridge schema registry and discovery

Applications can have many different types of events. Events generated from AWS services, third-party SaaS applications, and your custom applications.

With so many event sources, it can be challenging to know what to expect when consuming events. A schema represents the structure of an event. It describes what happened in the event, where the event came from, and the timestamp. The event schema is important for developers as it shows what data contained in the event, and allows them to write code based on that data.

For example, an Order Placed event might always contain a list of items in the order as an array, and a user ID as an integer. EventBridge helps automate the manual process of finding and documenting schemas. There are two capabilities to highlight: Schema registry and schema discovery.

A schema registry is a repository that stores a collection of schemas. You can use a schema registry to search for, find, and track different schemas used and generated by your application. AWS automatically stores schemas for all AWS sources for EventBridge in your schema registry. SaaS partner and custom schemas can be generated and added to the registry using the schema discovery feature. A schema registry enables you to use events as objects in your code more easily.

Adding an event to the EventBridge schema registry

In this tutorial, you create an Account Created event, which includes a user’s name and email address.

  1. Navigate to the Amazon EventBridge console and choose Schemas from the left panel.step 1There are three types of schemas represented in the tabs: AWS event schema registry, discovered schema registry, and custom schema registry.When you choose AWS event schema registry, you can search for any AWS service or event that is supported by EventBridge. There, you can view the schema for that event.
    pic 2

  2. To create a custom schema registry for your application, navigate to the custom schema registry tab and choose Create registry.
  3. Enter a name for the registry and then choose Create.
  4. There are currently no schemas in the registry. Choose Create custom schema to create one.
  5. Choose your registry as the destination and call the schema “user”. You can choose to load the schema template using an OpenAPI format from the Load Template option. You can then manually enter data for each of the fields.
  6. Alternatively, you can have the service discover the schema from JSON. Remember that events are written in JSON. Choose the Discover from JSON tab and enter the following code:{"id": 1, "name": "Talia Nassi", "emailAddress": "[email protected]"}
  7. Choose Discover schema.
  8. EventBridge extrapolates the schema from this information. The schema shows that the ID is a number, the name is a string, and the email address is a string. Choose Create to create the schema.
  9. When you choose your schema from the schema registry, you can see the structure of the event you just created.

Representing events as objects in your code with code bindings

Once a schema is added to the registry, you can download a code binding, which allows you to represent the event as an object in your code. You can take advantage of IDE features such as validation and auto-complete. Code bindings are available for Java, Python, or TypeScript programming languages. You can download bindings from the Amazon EventBridge Console, or directly from your IDE with the AWS Toolkit plugin for IntelliJ and Visual Studio Code.

Choose the programming language you prefer, then choose Download. This downloads the code binding to your local machine.

You can also choose to download code bindings directly to your IDE with the AWS Toolkit. This tutorial uses VS Code but you can also use IntelliJ.

  1. Ensure you have VS Code installed.
  2. Navigate to the VS Code marketplace and search for AWS and install the AWS Toolkit. You may have to restart VS Code.
  3. Choose a profile to connect to AWS. Set the Region to the same Region that you created the schema in. You see this icon on the left panel when you access the AWS Explorer:
  4. Choose Schemas from the left panel, then choose your schema, myRegistry. Open user by right clicking and choosing View Schema.
  5. You can now use this event object in your code.

Conclusion

In this post, you learn about event discovery, schema registry, and schema discovery. Event discovery is essential when creating event-driven applications because it allows the team to see which events are created by your application, and who needs to subscribe to those events.

Events have specific structures, called schemas. Your schema registry includes all of the schemas for your events. You can use the schema registry to search for events produced by other teams, which can make development faster. You learn how to create a custom schema registry, and how to download code bindings to use events in your code.

For more information, visit Serverless Land.

Building a serverless cloud-native EDI solution with AWS

Post Syndicated from Ripunjaya Pattnaik original https://aws.amazon.com/blogs/architecture/building-a-serverless-cloud-native-edi-solution-with-aws/

Electronic data interchange (EDI) is a technology that exchanges information between organizations in a structured digital form based on regulated message formats and standards. EDI has been used in healthcare for decades on the payer side for determination of coverage and benefits verification. There are different standards for exchanging electronic business documents, like American National Standards Institute X12 (ANSI), Electronic Data Interchange for Administration, Commerce and Transport (EDIFACT), and Health Level 7 (HL7).

HL7 is the standard to exchange messages between enterprise applications, like a Patient Administration System and a Pathology Laboratory Information. However, HL7 messages are embedded in Health Insurance Portability and Accountability Act (HIPAA) X12 for transactions between enterprises, like hospital and insurance companies.

HIPAA is a federal law that required the creation of national standards to protect sensitive patient health information from being disclosed without the patient’s consent or knowledge. It also mandates healthcare organizations to follow a standardized mechanism of EDI to submit and process insurance claims.

In this blog post, we will discuss how you can build a serverless cloud-native EDI implementation on AWS using the Edifecs XEngine Server.

EDI implementation challenges

Due to its structured format, EDI facilitates the consistency of business information for all participants in the exchange process. The primary EDI software that is used processes the information and then translates it into a more readable format. This can be imported directly and automatically into your integration systems. Figure 1 shows a high-level transaction for a healthcare EDI process.

EDI Transaction Sets exchanges between healthcare provider and payer

Figure 1. EDI Transaction Sets exchanges between healthcare provider and payer

Along with the implementation itself, the following are some of the common challenges encountered in EDI system development:

  1. Scaling. Despite the standard protocols of EDI, the document types and business rules differ across healthcare providers. You must scale the scope of your EDI judiciously to handle a diverse set of data rules with multiple EDI protocols.
  2. Flexibility in EDI integration. As standards evolve, your EDI system development must reflect those changes.
  3. Data volumes and handling bad data. As the volume of data increases, so does the chance for errors. Your storage plans must adjust as well.
  4. Agility. In healthcare, EDI handles business documents promptly, as real-time document delivery is critical.
  5. Compliance. State Medicaid and Medicare rules and compliance can be difficult to manage. HIPAA compliance and CAQH CORE certifications can be difficult to acquire.

Solution overview and architecture data flow

Providers and Payers can send requests as enrollment inquiry, certification request, or claim encounter to one another. This architecture uses these as source data requests coming from the Providers and Payers as flat files (.txt and .csv), Active Message Queues, and API calls (submitters).

The steps for the solution shown in Figure 2 are as follows:

1. Flat, on-premises files are transferred to Amazon Simple Storage Service (S3) buckets using AWS Transfer Family (2).
3. AWS Fargate on Amazon Elastics Container Service (Amazon ECS) runs Python packages to convert the transactions into JSON messages, then queues it on Amazon MQ (4).
5. Java Message Service (JMS) Bridge, which runs Apache Camel on Fargate, pulls the messages from the on-premises messaging systems and queues them on Amazon MQ (6).
7. Fargate also runs programs to call the on-premises API or web services to get the transactions and queues it on Amazon MQ (8).
9. Amazon CloudWatch monitors the queue depth. If queue depth goes beyond a set threshold, CloudWatch sends notifications to the containers through Amazon Simple Notification Service (SNS) (10).
11. Amazon SNS triggers AWS Lambda, which adds tasks to Fargate (12), horizontally scaling it to handle the spike.
13. Fargate runs Python programs to read the messages on Amazon MQ and uses PYX12 packages to convert the JSON messages to EDI file formats, depending on the type of transactions.
14. The container also may queue the EDI requests on different queues, as the solution uses multiple trading partners for these requests.
15. The solution runs Edifecs XEngine Server on Fargate with Docker image. This polls the messages from the queues previously mentioned and converts them to EDI specification by the trading partners that are registered with Edifecs.
16. Python module running on Fargate converts the response from the trading partners to JSON.
17. Fargate sends JSON payload as a POST request using Amazon API Gateway, which updates requestors’ backend systems/databases (12) that are running microservices on Amazon ECS (11).
18. The solution also runs Elastic Load Balancing to balance the load across the Amazon ECS cluster to take care of any spikes.
19. Amazon ECS runs microservices that uses Amazon RDS (20) for domain specific data.

EDI transaction-processing system architecture on AWS

Figure 2. EDI transaction-processing system architecture on AWS

Handling PII/PHI data

The EDI request and response file includes protected health information (PHI)/personal identifiable information (PII) data related to members, claims, and financial transactions. The solution leverages all AWS services that are HIPAA eligible and encrypts data at rest and in-transit. The file transfers are through FTP, and the on-premises request/response files are Pretty Good Privacy (PGP) encrypted. The Amazon S3 buckets are secured through bucket access policies and are AES-256 encrypted.

Amazon ECS tasks that are hosted in Fargate use ephemeral storage that is encrypted with AES-256 encryption, using an encryption key managed by Fargate. User data stored in Amazon MQ is encrypted at rest. Amazon MQ encryption at rest provides enhanced security by encrypting data using encryption keys stored in the AWS Key Management Service. All connections between Amazon MQ brokers use Transport Layer Security to provide encryption in transit. All APIs are accessed through API gateways secured through Amazon Cognito. Only authorized users can access the application.

The architecture provides many benefits to EDI processing:

  • Scalability. Because the solution is highly scalable, it can speed integration of new partner/provider requirements.
  • Compliance. Use the architecture to run sensitive, HIPAA-regulated workloads. If you plan to include PHI (as defined by HIPAA) on AWS services, first accept the AWS Business Associate Addendum (AWS BAA). You can review, accept, and check the status of your AWS BAA through a self-service portal available in AWS Artifact. Any AWS service can be used with a healthcare application, but only services covered by the AWS BAA can be used to store, process, and transmit protected health information under HIPAA.
  • Cost effective. Though serverless cost is calculated by usage, with this architecture you save as your traffic grows.
  • Visibility. Visualize and understand the flow of your EDI processing using Amazon CloudWatch to monitor your databases, queues, and operation portals.
  • Ownership. Gain ownership of your EDI and custom or standard rules for rapid change management and partner onboarding.

Conclusion

In this healthcare use case, we demonstrated how a combination of AWS services can be used to increase efficiency and reduce cost. This architecture provides a scalable, reliable, and secure foundation to develop your EDI solution, while using dependent applications. We established how to simplify complex tasks in order to manage and scale your infrastructure for a high volume of data. Finally, the solution provides for monitoring your workflow, services, and alerts.

For further reading:

Orchestrating high performance computing with AWS Step Functions and AWS Batch

Post Syndicated from James Beswick original https://aws.amazon.com/blogs/compute/orchestrating-high-performance-computing-with-aws-step-functions-and-aws-batch/

This post is written by Dan Fox, Principal Specialist Solutions Architect; Sabha Parameswaran, Senior Solutions Architect.

High performance computing (HPC) workloads address challenges in a wide variety of industries, including genomics, financial services, oil and gas, weather modeling, and semiconductor design. These workloads frequently have complex orchestration requirements that may include large datasets and hundreds or thousands of compute tasks.

AWS Step Functions is a workflow automation service that can simplify orchestrating other AWS services. AWS Batch is a fully managed batch processing service that can dynamically scale to address computationally intensive workloads. Together, these services can orchestrate and run demanding HPC workloads.

This blog post identifies three common challenges when creating HPC workloads. It describes some features with Step Functions and AWS Batch that can help to solve these challenges. It then shows a sample project that performs complex task orchestration using Step Functions and AWS Batch.

Reaching service quotas with polling iterations

It’s common for HPC workflows to require that a step comprising multiple jobs completes before advancing to the next step. In these cases, it’s typical for developers to implement iterative polling patterns to track job completions.

To handle task orchestration for a workload like this, you may choose to use Step Functions. Step Functions has a hard limit of 25,000 history events. A single state transition may contain multiple history events. For example, an entry to the state and an exit from the state count as two steps. A workflow that iteratively polls many long-running processes may run into limits with this service quota.

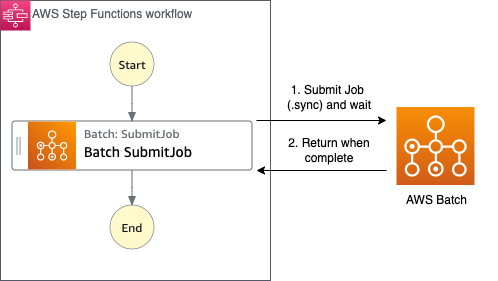
Step Functions addresses this by providing synchronization capabilities with several integrated services, including AWS Batch. For integrated services, Step Functions can wait for a task to complete before progressing to the next state. This feature, called “Run a Job (.sync)” in the documentation, returns a Success or Failure message only when the compute service task is complete, reducing the number of entries in the event history log. View the Step Functions documentation for a complete list of supported service integrations.

“Run a Job (.sync)” task pattern

Supporting parallel and dynamic tasks

HPC workloads may require a changing number of compute tasks from execution to execution. For example, the number of compute tasks required in a workflow may depend on the complexity or length of an input dataset. For performance reasons, you may desire for these tasks to run in parallel.

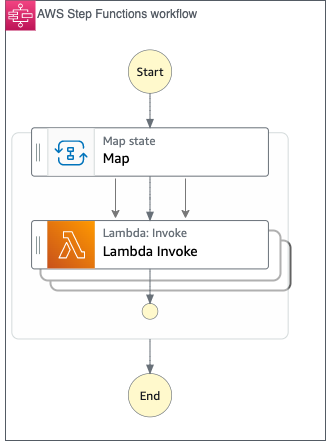
Step Functions supports faster data processing with a fixed number of parallel executions through the parallel state type. If a workload has an unknown number of branches, the map state type can run a set of parallel steps for each element of an input array. We refer to this pattern as dynamic parallelism.

Dynamic parallelism using the map state

Limits and flow control with dynamic tasks

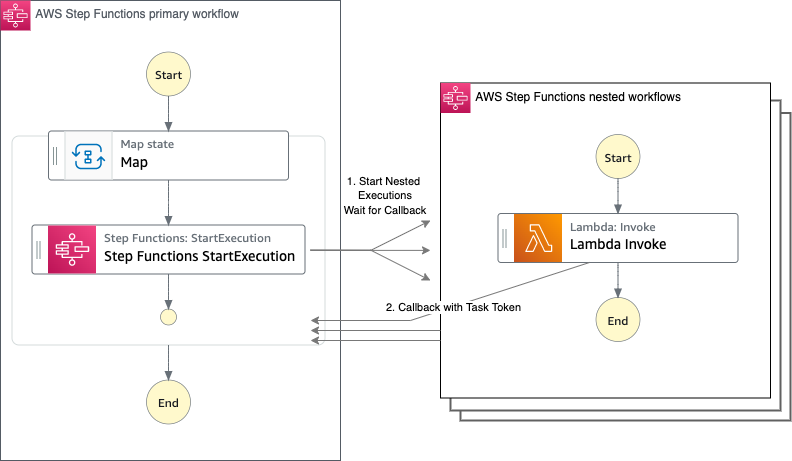
The map state may limit concurrent iterations. When this occurs, some iterations do not begin until previous iterations have completed. The likelihood of this occurring increases when an input array has over 40 items. If your HPC workload benefits from increased concurrency, you may use nested workflows. Step Functions allows you to orchestrate more complex processes by composing modular, reusable workflows.

For example, a map state may invoke secondary, nested workflows, which also contain map states. By nesting Step Functions workflows, you can build larger, more complex workflows out of smaller, simpler workflows.

As your workflow grows in complexity, you may use the callback task, which is an additional flow control feature. Callback tasks provide a way to pause a workflow pending the return of a unique task token. A callback task passes this token to an integrated service and then stops. Once the integrated service has completed, it may return the task token to the Step Functions workflow with a SendTaskSuccess or SendTaskFailure call. Once the callback task receives the task token, the workflow proceeds to the next state.

View the documentation for a list of integrated services that support this pattern.

Nested workflows using callback with task token

A sample project with several orchestration patterns

This sample project demonstrates orchestration of HPC workloads using Step Functions, AWS Batch, and Lambda. The nesting in this project is three layers deep. The primary state machine runs the second layer nested state machines, which in turn run the third layer nested state machines.

The primary state machine demonstrates dynamic parallelism. It receives an input payload that contains an array of items used as input for its map step. Each dynamic map branch runs a nested secondary state machine.

The secondary state machine demonstrates several workflow patterns including a Lambda function with callback, a third layer nested state machine in sync mode, an AWS Batch job in sync mode, and a Lambda function calling AWS Batch with a callback. The tertiary state machine only notifies its parent with Success when called in sync mode.

Explore the ASL in this project to review the code for these patterns.

Sample project architecture

Deploy the sample application

The README of the Github project contains more detailed instructions, but you may also follow these steps.

Prerequisites

  1. AWS Account: If you don’t have an AWS account, navigate to https://aws.amazon.com/ and choose Create an AWS Account.
  2. VPC: A valid existing VPC with subnets (for execution of AWS Batch jobs). Refer to https://docs.aws.amazon.com/vpc/latest/userguide/vpc-getting-started.html for creating a VPC.
  3. AWS CLI: This project requires a local install of AWS CLI. Refer to https://docs.aws.amazon.com/cli/latest/userguide/getting-started-install.html for installing AWS CLI.
  4. Git CLI: This project requires a local install of Git CLI. Refer to https://git-scm.com/book/en/v2/Getting-Started-Installing-Git
  5. AWS SAM CLI: This project requires a local install of AWS SAM CLI to build and deploy the sample application. Refer to https://docs.aws.amazon.com/serverless-application-model/latest/developerguide/serverless-sam-cli-install.html for instructions to install and use AWS SAM CLI.
  6. Python 3.8 and Docker: Required only if you plan for local development and testing with AWS SAM CLI.

Build and deploy in your account

Follow these steps to build this application locally and deploy it in your AWS account:

  1. Git clone the repository into a local folder.
    git clone https://github.com/aws-samples/aws-stepfunction-complex-orchestrator-app
    cd aws-stepfunction-complex-orchestrator-app
    
  2. Build the application using AWS SAM CLI.
    sam build
  3. Use AWS SAM deploy with the --guided flag.
    sam deploy --guided
    1. Parameter BatchScriptName (accept default: batch-notify-step-function.sh)
    2. Parameter VPCID (enter the id of your VPC)
    3. Parameter FargateSubnetAccessibility (choose Private or Public depending on subnet configuration)
    4. Parameter Subnets (enter ID for a single subnet)
    5. Parameter batchSleepDuration (accept default: 15)
    6. Accept all other defaults
  4. Note the name of the BucketName parameter in the Outputs of the deploy process. Save this S3 bucket name for the next step.
  5. Copy the batch script into the S3 bucket created in the prior step.
    aws s3 cp ./batch-script/batch-notify-step-function.sh s3://<S3-bucket-name>

Testing the sample application

Once the SAM CLI deploy is complete, navigate to Step Functions in the AWS Console.

  1. Note the three new state machines deployed to your account. Each state machine has a random suffix generated as part of the AWS SAM deploy process:
    1. ComplexOrchestratorStateMachine1-…
    2. SyncNestedStateMachine2-…
    3. CallbackNotifyStateMachine3-…
  2. Follow the link for the primary state machine: ComplexOrchestratorStateMachine1-…
  3. Choose Start execution.
  4. The sample payload for this state machine is located here: orchestrator-step-function-payload.json. This JSON document has 2 input elements within the entries array. Select and copy this JSON and paste it into the Input field in the console, overwriting the default value. This causes the map state to create and execute two nested state machines in parallel. You may modify this JSON to contain more elements to increase the number of parallel executions.
  5. View the “Execution event history” in the console for this execution. Under the Resource column, locate the links to the nested state machines. Select these links to follow their individual executions. You may also explore the links to Lambda, CloudWatch, and AWS Batch job.
  6. Navigate to AWS Batch in the console. Step Functions workflows are available to AWS Batch users within the AWS Batch console. Find the integration from the AWS Batch side navigation under “Related AWS services”. You can also read this blog post to learn more.
  7. Common troubleshooting. If the batch job fails or if the Step Functions workflow times out, make sure that you have correctly copied over the batch script into the S3 bucket as described in step 5 of the Build and Deploy in your account section of this post. Also make sure that the FargateSubnetAccessibility Parameter matches the configuration of your subnet (Public or Private).
  8. The state machine may take several minutes to complete. When successful, the Graph Inspector displays:Graph Inspector with Successful completion

Cleaning up

To clean up the deployment, run the following commands to delete the stack associated with the AWS SAM deployment:

aws cloudformation delete-stack --stack-name <stack-name>

Conclusion

This blog post describes several challenges common to orchestrating HPC workloads. I describe how Step Functions with AWS Batch can solve many of these challenges. I provide a project that contains several sample patterns and show how to deploy and test this in your account.

For more information on serverless patterns, visit Serverless Land.

Building an event-driven application with Amazon EventBridge

Post Syndicated from Talia Nassi original https://aws.amazon.com/blogs/compute/building-an-event-driven-application-with-amazon-eventbridge/

In event-driven architecture, services interact with each other through events. An event is something that happened in your application (for example, an item was put into a cart, a new order was placed). Events are JSON objects that tell you information about something that happened in your application. In event-driven architecture, each component of the application raises an event whenever anything changes. Other components listen and decide what to do with it and how they would like to react.

When you build applications with event-driven architecture, you decouple your event sources and event targets. This can enable teams to act more independently, because your services are loosely coupled. When you add new features to your applications, you raise new events and then decide on the event source and event target. The event source is what emits the event, and the event target is what subscribes to or receives the event. Decoupling event sources and event targets can greatly speed up development time, and it can simplify making changes to your application.

Decoupling your application can allow for more seamless cross-team collaboration. For example, let’s say you are a developer at an ecommerce company and you are building a serverless ecommerce application. Your team is in charge of the account creation and authentication process. You build the login workflow, and raise an event when a new user creates an account.

When the event is raised, other teams can be alerted. The marketing team can listen for the Account Created event and act on it (for example, send promotional emails). In this decoupled architecture, event producers and consumers don’t have to know about each other. They only have to listen to events and act accordingly when they are interested in an event. This can speed up development by reducing the complexity caused by building new features.

In AWS, events are choreographed through Amazon EventBridge rules. A rule matches incoming events from an event source and sends them to event targets for processing.

eventbridge architecture

EventBridge accepts events from many different event sources, including over 200 AWS services, custom events from your Lambda functions or applications, and third-party SaaS applications. You specify an action to take when EventBridge receives an event that matches the event pattern in the rule. When an event matches, Amazon EventBridge sends the event to the specified target and triggers the action defined in the rule.

To route events from these sources to the correct target, the events must be placed on a corresponding event bus. There are three types of event buses. The first type is the default bus, which is always available in every account, and it’s where AWS events are routed to. The second type is a custom event bus. You can create custom event buses for your own applications to meet your business needs. Lastly, you can also create SaaS event buses, which are created when you configure SaaS applications as an event source.

There are many potential event targets. Event targets are what the event bus route to once a corresponding event happens. Targets include AWS Lambda, Amazon Kinesis, AWS Step Functions, Amazon API Gateway, and even event buses in other accounts. This flexible design allows you to create a wide variety of integration patterns based on your specific needs.

Configuring events with Amazon EventBridge

This tutorial sends an event from Amazon S3 (the event source) to AWS Lambda (the event target) using an event rule.

In this tutorial, you learn how to configure events with Amazon EventBridge by deploying an AWS Serverless Application Model template. The AWS Serverless Application Model (AWS SAM) is an open-source framework for building serverless applications. It provides shorthand syntax to express functions, APIs, databases, and event source mappings. AWS SAM is an extension of AWS CloudFormation, which is the AWS infrastructure as code tool. You define resources using CloudFormation in your AWS SAM template and use the full suite of resources, intrinsic functions, and other template features that are available in AWS CloudFormation.

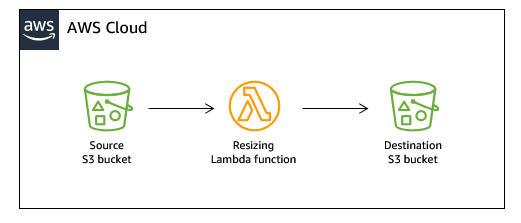
First, you upload images to an S3 bucket. This raises an event, which invokes a Lambda function, which resizes the image and places it in a different S3 bucket.

Prerequisites:

  1. AWS SAM CLI (If you use AWS Cloud9, this is installed for you)

To configure events with Amazon EventBridge:

  1. Navigate to the Serverlessland Patterns Collection and choose the pattern Amazon S3 to Amazon EventBridge to AWS Lambda. This AWS SAM template deploys an S3 bucket, a Lambda function, an EventBridge rule, and the IAM resources required to run the application.
  2. Copy and paste the cloning instructions in your terminal.
  3. Run sam deploy --guided to deploy the pattern.
  4. You see the success message:
  5. Navigate to the EventBridge console and choose Rules from the left panel. Then choose the rule that was created by AWS SAM (starting with sam-app)
    The event source is S3 and the rule is invoked when an image is put into the source bucket in S3. Next, notice that the event target is the Lambda function that you created from the AWS SAM template.
  6. Navigate to the S3 console and choose Buckets on the left panel. Then choose the bucket that was created for you (starting with sam-app). Choose the Properties tab, and note that the integration with EventBridge is on.
  7. From the Objects tab, choose Upload, and upload an image.

  8. Navigate to the Lambda console and choose your Lambda function (starting with sam-app). Select the Monitor tab, and choose View Logs in CloudWatch.
  9. You can see the event that triggered the Lambda function in the logs:

Adding more event rules to your application

In the previous example, you add an EventBridge rule that routes events from S3 (the event source) to Lambda (the event target) using an event bus. Now, add another rule:

  1. From the EventBridge console, choose Rules, and then choose Create rule.
  2. Enter a name and description for the rule.
  3. Define the event pattern that is used to invoke the event targets. For Service provider, choose AWS, and for Service name choose S3. For Event type, choose Amazon S3 event notification, and in the event dropdown choose Object created. You are configuring the event source to be an object created in your S3 bucket.
  4. Select either the default AWS event bus or a custom event bus.
  5. Select the event target. In this example, configure an Amazon CloudWatch log group. Enter any name for the log group, which is created automatically.
  6. Choose Create.
  7. Upload an image to the S3 bucket, as shown in step 7 above.
  8. Navigate to the Amazon CloudWatch console and choose Log groups from the left panel. Choose the log group, and then choose a log stream.
  9. The event is logged to CloudWatch Logs.

Adding a second event rule did not change the event source’s behavior or affect other event targets.

Conclusion

This post is a brief introduction of event-driven architecture, and walks through a tutorial where you create an event-driven application with the Serverlessland Patterns Collection. You also add two different event rules to your event bus.

For more serverless learning resources, visit Serverless Land.

Introducing global endpoints for Amazon EventBridge

Post Syndicated from James Beswick original https://aws.amazon.com/blogs/compute/introducing-global-endpoints-for-amazon-eventbridge/

This post is written by Stephen Liedig, Sr Serverless Specialist SA.

Last year, AWS announced two new features for Amazon EventBridge that allow you to route events from any commercial AWS Region, and across your AWS accounts. This supported a wide range of use cases, allowing you to implement easily global event delivery and replication scenarios.

From today, EventBridge extends this capability with global endpoints. Global endpoints provide a simpler and more reliable way for you to improve the availability and reliability of event-driven applications. The feature allows you to fail over event ingestion automatically to a secondary Region during service disruptions. Global endpoints also provide optional managed event replication, simplifying your event bus configuration and reducing the risk of event loss during any service disruption.

This blog post explains how to configure global endpoints in your AWS account, update your applications to publish events to the endpoint, and how to test endpoint failover.

How global endpoints work

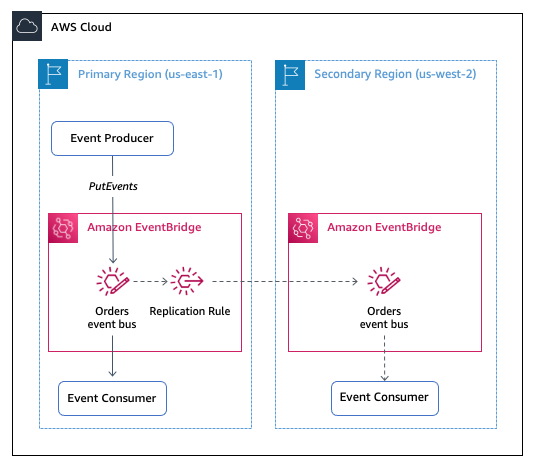
Customers building multi-Region architectures today are building more resilience by using self-managed replication via EventBridge’s cross-Region capabilities. With this architecture, events are sent directly to an event bus in a primary Region and replicated to another event bus in a secondary Region.

Architecture

This event flow can be interrupted if there is a service disruption. In this scenario, event producers in the primary Region cannot PutEvents to their event bus, and event replication to the secondary Region is impacted.

To put more resiliency around multi-Region architectures, you can now use global endpoints. Global endpoints solve these issues by introducing two core service capabilities:

  1. A global endpoint is a managed Amazon Route 53 DNS endpoint. It routes events to the event buses in either Region, depending on the health of the service in the primary Region.
  2. There is a new EventBridge metric called IngestionToInvocationStartLatency. This exposes the time to process events from the point at which they are ingested by EventBridge to the point the first invocation of a target in your rules is made. This is a service-level metric measured across all of your rules and provides an indication of the health of the EventBridge service. Any extended periods of high latency over 30 seconds may indicate a service disruption.

These two features provide you with the ability to failover event ingestion automatically to the event bus in the secondary Region. The failover is triggered via a Route 53 health check that monitors a CloudWatch alarm that observes the IngestionToInvocationStartLatency in the primary Region.

If the metric exceeds the configured threshold of 30 seconds consecutively for 5 minutes, the alarm state changes to “ALARM”. This causes the Route 53 health check state to become unhealthy, and updates the routing of the global endpoint. All events from that point on are delivered to the event bus in the secondary Region.

The diagram below illustrates how global endpoints reroutes events being delivered from the event bus in the primary Region to the event bus in the secondary Region when CloudWatch alarms trigger the failover of the Route 53 health check.

Rerouting events with global endpoints

Once events are routed to the secondary Region, you have a couple of options:

  1. Continue processing events by deploying the same solution that processes events in the primary Region to the secondary Region.
  2. Create an EventBridge archive to persist all events coming through the secondary event bus. EventBridge archives provide you with a type of “Active/Archive” architecture allowing you to replay events to the event bus once the primary Region is healthy again.

When the global endpoint alarm returns to a healthy state, the health check updates the endpoint configuration, and begins routing events back to the primary Region.

Global endpoints can be optionally configured to replicate events across Regions. When enabled, managed rules are created on your primary and secondary event buses that define the event bus in the other Region as the rule target.

Under normal operating conditions, events being sent to the primary event bus are also sent to the secondary in near-real-time to keep both Regions synchronized. When a failover occurs, consumers in the secondary Region have an up-to-date state of processed events, or the ability to replay messages delivered to the secondary Region, before the failover happens.

When the secondary Region is active, the replication rule attempts to send events back to the event bus in the primary Region. If the event bus in the primary Region is not available, EventBridge attempts to redeliver the events for up to 24 hours, per its default event retry policy. As this is a managed rule, you cannot change this. To manage for a longer period, you can archive events being ingested by the secondary event bus.

How do you identify if the event has been replicated from another Region? Events routed via global endpoints have identical resource fields, which contain the Amazon Resource Name (ARN) of the global endpoint that routed the event to the event bus. The region field shows the origin of the event. In the following example, the event is sent to the event bus in the primary Region and replicated to the event bus in the secondary Region. The event in the secondary Region is us-east-1, showing the source of the event was the event bus in the primary Region.

If there is a failover, events are routed to the secondary Region and replicated to the primary Region. Inspecting these events, you would expect to see us-west-2 as the source Region.

Replicated events

The two preceding events are identical except for the id. Event IDs can change across API calls so correlating events across Regions requires you to have an immutable, unique identifier. Consumers should also be designed with idempotency in mind. If you are replicating events, or replaying them from archives, this ensures that there are no side effects from duplicate processing.

Setting up a global endpoint

To configure a Global endpoint, define two event buses — one in the “primary” Region (this is the same Region you configure the endpoint in) and one in a “secondary” Region. To ensure that events are routed correctly, the event bus in the secondary Region must have the same name, in the same account, as the primary event bus.

  1. Create two event buses in different Regions with the same name. This is quickly set up using the AWS Command Line Interface (AWS CLI):Primary event bus:
    aws events create-event-bus --name orders-bus --region us-east-1Secondary event bus:
    aws events create-event-bus --name orders-bus --region us-west-2
  2. Open the Amazon EventBridge console in the Region where you want to create the global endpoint. This aligns with your primary Region. Navigate to the new global endpoints page and create a new endpoint.
    EventBridge console
  3. In the Endpoint details panel, specify a name for your global endpoint (for example, OrdersGlobalEndpoint) and enter a description.
  4. Select the event bus in the primary Region, orders-bus.
  5. Select the Region used when creating the secondary event bus previously. the secondary event bus by choosing the Region it was created in from the dropdown.Create global endpoint
  6. Select the Route 53 health check for triggering failover and recovery. If you have not created one before, choose New health check. This opens an AWS CloudFormation console to create the “LatencyFailuresHealthCheck” health check and CloudWatch alarm in your account. EventBridge provides a template with recommended defaults for a CloudWatch alarm that is triggered when the average latency exceeds 30 seconds for 5 minutes.Endpoint configuration
  7. Once the CloudFormation stack is deployed, return to the EventBridge console and refresh the dropdown list of health checks. Select the physical ID of the health check you created.Failover and recovery
  8. Ensure that event replication is enabled, and create the endpoint.
    Event replication
  9. Once the endpoint is created, it appears in the console. The global endpoint URL contains the EndpointId, which you must specify in PutEvents API calls to publish events to the endpoint.
    Endpoint listed in console

Testing failover

Once you have created an endpoint, you can test the configuration by creating “catch all” rules on the primary and secondary event buses. The simplest way to see events being processed is to create rules with CloudWatch log group target.

Testing global endpoint failure over is accomplished by inverting the Route 53 health check. This can be accomplished using any of the Route 53 APIs. Using the console, open the Route 53 health checks landing page and edit the “LatencyFailuresHealthCheck” associated with your global endpoint. Check “Invert health check status” and save to update the health check.

Within a few minutes, the health check changes state from “Healthy” to “Unhealthy” and you see events flowing to the event bus in the secondary.

Configure health check

Using the PutEvents API with global endpoints

To use global endpoints in your applications, you must update your current PutEvents API call. All AWS SDKs have been updated to include an optional EndpointId parameter that you must set when publishing events to a global endpoint. Even though you are no longer putting events directly on the event bus, the EventBusName must be defined to validate the endpoint configuration.

PutEvents SDK support for global endpoints requires the AWS Common Runtime (CRT) library, which is available for multiple programming languages, including Python, Node.js, and Java:

https://github.com/awslabs/aws-crt-python
https://github.com/awslabs/aws-crt-nodejs
https://github.com/awslabs/aws-crt-java

To install the awscrt module for Python using pip, run:

python3 -m pip install boto3 awscrt

This example shows how to send an event to a global endpoint using the Python SDK:

import json
import boto3
from datetime import datetime
import uuid
import random

client = session.client('events', config=my_config)

detail = {
    "order_date": datetime.now().isoformat(),
    "customer_id": str(uuid.uuid4()),
    "order_id": str(uuid.uuid4()),
    "order_total": round(random.uniform(1.0, 1000.0), 2)
}

put_response = client.put_events(
    EndpointId=" y6gho8g4kc.veo",
    Entries=[
        {
            'Source': 'com.aws.Orders',
            'DetailType': 'OrderCreated',
            'Detail': json.dumps(detail),
            'EventBusName': 'orders-bus'
        }
    ]
)

Event producers can suffer data loss if the PutEvents API call fails, even if you are using global endpoints. Global endpoints allow you to automate the re-routing of events to another event-bus in another Region, but the health checks triggering the failover won’t be invoked for at least 5 minutes. It’s possible that your applications experience increased error rates for PutEvents operations before the failover occurs and events are routed to a healthy Region. To safeguard against message loss during this time, it’s best practice to use exponential retry and back-off patterns and durable store-and-forward capability at the producer level.

Conclusion

This blog shows how to create an EventBridge global endpoint to improve the availability and reliability of event ingestion of event-driven applications. This example shows how to use the PutEvents in the Python AWS SDK to publish events to a global endpoint.

To create a global endpoint using the API, see CreateEndpoint in the Amazon EventBridge API Reference. You can also create a global endpoint by using AWS CloudFormation using an AWS::Events:: Endpoints resource.

To learn more about EventBridge global endpoints, see the EventBridge Developer Guide. For more serverless learning resources, visit Serverless Land.

Announcing AWS Lambda Function URLs: Built-in HTTPS Endpoints for Single-Function Microservices

Post Syndicated from Alex Casalboni original https://aws.amazon.com/blogs/aws/announcing-aws-lambda-function-urls-built-in-https-endpoints-for-single-function-microservices/

Organizations are adopting microservices architectures to build resilient and scalable applications using AWS Lambda. These applications are composed of multiple serverless functions that implement the business logic. Each function is mapped to API endpoints, methods, and resources using services such as Amazon API Gateway and Application Load Balancer.

But sometimes all you need is a simple way to configure an HTTPS endpoint in front of your function without having to learn, configure, and operate additional services besides Lambda. For example, you might need to implement a webhook handler or a simple form validator that runs within an individual Lambda function.

Today, I’m happy to announce the general availability of Lambda Function URLs, a new feature that lets you add HTTPS endpoints to any Lambda function and optionally configure Cross-Origin Resource Sharing (CORS) headers.

This lets you focus on what matters while we take care of configuring and monitoring a highly available, scalable, and secure HTTPS service.

How Lambda Function URLs Work
Create a new function URL and map it to any function. Each function URL is globally unique and can be associated with a function’s alias or the function’s unqualified ARN, which implicitly invokes the $LATEST version.

For example, if you map a function URL to your $LATEST version, each code update will be available immediately via the function URL. On the other hand, I’d recommend mapping a function URL to an alias, so you can safely deploy new versions, perform some integration tests, and then update the alias when you’re ready. This also lets you implement weighted traffic shifting and safe deployments.

Function URLs are natively supported by the Lambda API, and you can start using it via the AWS Management Console or AWS SDKs, as well as infrastructure as code(IaC) tools such as AWS CloudFormation, AWS SAM, or AWS Cloud Development Kit (AWS CDK).

Lambda Function URLs in Action
You can configure a function URL for a new or an existing function. Let’s see how to implement a new function to handle a webhook.

When creating a new function, I check Enable function URL in Advanced Settings.

Here, I select Auth type: AWS_IAM or NONE. My webhook will use custom authorization logic based on a signature provided in the HTTP headers. Therefore, I’ll choose AuthType None, which means Lambda won’t check for any AWS IAM Sigv4 signatures before invoking my function. Instead, I’ll extract and validate a custom header in my function handler for authorization.

AWS Lambda URLs - Create Function

Please note that when using AuthType None, my function’s resource-based policy must still explicitly allow for public access. Otherwise, unauthenticated requests will be rejected. You can add permissions programmatically using the AddPermission API. In this case, the Lambda console automatically adds the necessary policy for me, as the IAM role I’m using is authorized to call the AddPermission API in my account.

With one click, I can also enable CORS. The default CORS configuration will allow all origins. Then, I’ll add more granular controls after creating the function. In case you’re not familiar with CORS, it’s a header-based security mechanism implemented by browsers to make sure that only certain hosts are allowed to load resources and invoke APIs. If a website is allowed to consume your API, you’ll need to include a few CORS headers that declare which origins, methods, and custom headers are allowed. The new function URLs take care of it for you, so you don’t have to implement all of this in your Lambda handler.

A few seconds later, the function URL is available. I can also easily find and copy it in the Lambda console.

AWS Lambda URLs - Console URL

The function code that handles my webhook in Node.js looks like this:

exports.handler = async (event) => {
    
    // (optional) fetch method and querystring
    const method = event.requestContext.http.method;
    const queryParam = event.queryStringParameters.myCustomParameter;
    console.log(`Received ${method} request with ${queryParam}`)
    
    // retrieve signature and payload
    const webhookSignature = event.headers.SignatureHeader;
    const webhookPayload = JSON.parse(event.body);
    
    try {
        validateSignature(webhookSignature); // throws if invalid signature
        handleEvent(webhookPayload); // throws if processing error
    } catch (error) {
        console.error(error)
        return {
            statusCode: 400,
            body: `Cannot process event: ${error}`,
        }
    }

    return {
        statusCode: 200, // default value
        body: JSON.stringify({
            received: true,
        }),
    };
};

The code is extracting a few parameters from the request headers, query string, and body. If you’re already familiar with the event structure provided by API Gateway or Application Load Balancer, this should look very familiar.

After updating the code, I decide to test the function URL with an HTTP client.

For example, here’s how I’d do it with curl:

$ curl "https://4iykoi7jk2kp5hhd5irhbdprn40yxest.lambda-url.us-west-2.on.aws/?myCustomParameter=squirrel"
    -X POST
    -H "SignatureHeader: XYZ"
    -H "Content-type: application/json"
    -d '{"type": "payment-succeeded"}'

Or with a Python script:

import json
import requests

url = "https://4iykoi7jk2kp5hhd5irhbdprn40yxest.lambda-url.us-west-2.on.aws/"
headers = {'SignatureHeader': 'XYZ', 'Content-type': 'application/json'}
payload = json.dumps({'type': 'payment-succeeded'})
querystring = {'myCustomParameter': 'squirrel'}

r = requests.post(url=url, params=querystring, data=payload, headers=headers)
print(r.json())

Don’t forget to set the request’s Content-type to application/json or text/* in your tests, otherwise, the body will be base64-encoded by default, and you’ll need to decode it in the Lambda handler.

Of course, in this case we’re talking about a webhook, so this function will receive requests directly from the external system that I’m integrating with. I only need to provide them with the public function URL and start receiving events.

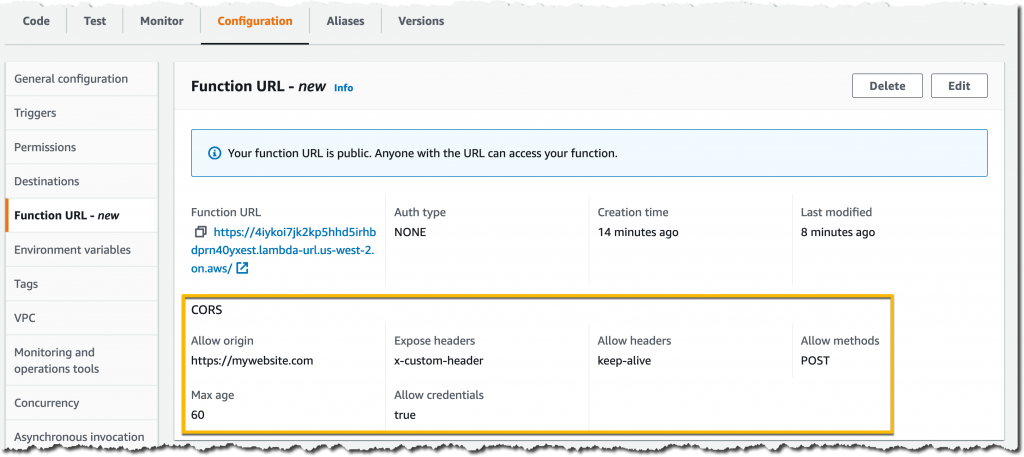
For this specific use case, I don’t need any CORS configuration. In other cases where the function URL is called from the browser, I’d need to configure a few more CORS parameters such as Access-Control-Allow-Origin, Access-Control-Allow-Methods, and Access-Control-Expose-Headers. I can easily review and edit these CORS parameters in the Lambda console or in my IaC templates. Here’s what it looks like in the console:

AWS Lambda URLs - CORS

Also, keep in mind that each function URL is unique and mapped to a specific alias or the $LATEST version of your function. This lets you define multiple URLs for the same function. For example, you can define one for testing the $LATEST version during development and one for each stage or alias, such as staging, production, and so on.

Support for Infrastructure as Code (IaC)
You can start configuring Lambda Function URLs directly in your IaC templates today using AWS CloudFormation, AWS SAM, and AWS Cloud Development Kit (AWS CDK).

For example, here’s how to define a Lambda function and its public URL with AWS SAM, including the alias mapping:

WebhookFunction:
    Type: AWS::Serverless::Function
    Properties:
      CodeUri: webhook/
      Handler: index.handler
      Runtime: nodejs14.x
      AutoPublishAlias: live
      FunctionUrlConfig:
        AuthType: NONE
        Cors:
            AllowOrigins:
                - "https://example.com"

If you have existing Lambda functions in your IaC templates, you can define a new function URL with a few lines of code.

Function URL Pricing
Function URLs are included in Lambda’s request and duration pricing. For example, let’s imagine that you deploy a single Lambda function with 128 MB of memory and an average invocation time of 50 ms. The function receives five million requests every month, so the cost will be $1.00 for the requests, and $0.53 for the duration. The grand total is $1.53 per month, in the US East (N. Virginia) Region.

When to use Function URLs vs. Amazon API Gateway
Function URLs are best for use cases where you must implement a single-function microservice with a public endpoint that doesn’t require the advanced functionality of API Gateway, such as request validation, throttling, custom authorizers, custom domain names, usage plans, or caching. For example, when you are implementing webhook handlers, form validators, mobile payment processing, advertisement placement, machine learning inference, and so on. It is also the simplest way to invoke your Lambda functions during research and development without leaving the Lambda console or integrating additional services.

Amazon API Gateway is a fully managed service that makes it easy for you to create, publish, maintain, monitor, and secure APIs at any scale. Use API Gateway to take advantage of capabilities like JWT/custom authorizers, request/response validation and transformation, usage plans, built-in AWS WAF support, and so on.

Generally Available Today
Function URLs are generally available today in all AWS Regions where Lambda is available, except for the AWS China Regions. Support is also available through many AWS Lambda Partners such as Datadog, Lumigo, Pulumi, Serverless Framework, Thundra, and Dynatrace.

I’m looking forward to hearing how you’re using this new functionality to simplify your serverless architectures, especially in single-function use cases where you want to keep things simple and cost-optimized.

Check out the new Lambda Function URLs documentation.

Alex

Getting Started with Event-Driven Architecture

Post Syndicated from Talia Nassi original https://aws.amazon.com/blogs/compute/getting-started-with-event-driven-architecture/

In modern application development, event-driven architecture is becoming more prominent because it can make building applications in the cloud easier. Event-driven architecture can allow you to decouple your services, which increases developer velocity, and can make it easier for you to debug applications. It also can help remove the bottleneck that occurs when features expand across different teams, which allows teams to progress more independently.

One way to think about how an application works is as a system that reacts to events from other places, like from within your application. In this approach, you focus on the system’s interaction with its surroundings as a transmission of events. The application receives and creates events. Inputs to the application and outputs from the application act as events. At its core, this is event-driven architecture.

API-driven architecture vs. event-driven architecture

Commands/APIs Events
Synchronous Asynchronous

Has an intent

Directed to a target

It’s a fact

Happened in the past

“CreateAccount”

“AddProduct”

“AccountCreated”

“ProductAdded”

A common way of making components of an application work together is through an API-driven, request-response architecture where you have requests and responses. For example, you query a list of orders from an Orders API, and the Orders API responds with a list of orders. This is an example of synchronous architecture. The system asking for the orders waits for the response. You cannot move on until the response comes back. In this approach, you send commands that are directed to a target (for example, “place this order” or “add this record to the database”).

sync vs async

In a synchronous model, the client makes a request to Service A. Service A calls Service B, but then Service A waits for Service B to respond before it continues on and eventually responds to the client.

In asynchronous, event-driven architecture, there is no response path. The service surfaces the event and then immediately moves forward. The trade-off here is that there’s no direct channel for Service B to pass back information to Service A, besides confirming it received the event. But in many cases, you don’t need that explicit coupling between the request and response channels.

An event is something that happened. For example, a new account is created, or an item is dropped into an Amazon S3 bucket. Events are immutable, which means you cannot change them. Once an event happens, you cannot undo it. For example, if there is an event raised when an order is placed, there can be another event for an order being cancelled. Events can come from various places such as messaging systems or databases.

Events are JSON objects that tell you information about something that happened in your application. In event-driven architecture, events represent facts. Each component of the application raises an event whenever anything changes. Other components listen and decide what to do with it and how they would like to react.

event

In the event above, S3 raises the event when you put the image into an Amazon S3 bucket. The event source is an S3 bucket named sam-app-sourcebucket. The object that is put into the bucket is called “brad.jpeg”.

Request-driven applications typically use directed commands to coordinate downstream functions to complete an activity and are often tightly coupled. This makes it harder to determine when errors occur in your application. Event-driven applications create events that are observable by other services and systems. However, the event producer is unaware of which consumers, if any, are listening. Typically, these are loosely coupled.

Events are observable. Any service that is authorized can watch an event. Consider a coffee shop example where there is a barista, who makes coffee, and a pastry chef, who makes pastries. When a customer enters the coffee shop and orders a cup of coffee, the barista starts to make the coffee, and the pastry chef takes no action.

However, if a customer comes in to the coffee shop and orders a chocolate croissant, then the pastry chef starts making the chocolate croissant, and the barista takes no action. The pastry chef is only interested in orders relating to pastries and the barista is only interested in events relating to coffee.

In an ecommerce application, like Amazon.com, there are different departments that respond to different events. You can place orders through Whole Foods, Amazon Fresh, and Amazon.com. When you place an order with Amazon Fresh, the subscribers to that event take action and fulfill your order.

event

Event-driven architecture and command-driven architecture also differ in the ways that they store state. In a typical command-driven architecture, you have only one component store a particular piece of data, and other components ask that component for the data when needed.

In event-driven architecture, every component stores all the data it needs and listens to update events for that data. In command-driven architecture, the component that stores the data is responsible for updating it. In event-driven architecture, all it has to do is ensure new events are raised on the updates.

Benefits of using event-driven architecture

Decoupling event sources and event targets

Many applications are built in a monolith, where the components are tightly coupled, and are highly dependent on each other. This proves to be problematic when there are bugs and you are trying to pinpoint exactly what part of the application is failing. Decoupled architectures are composed of components or services that are loosely coupled. In an event-driven, decoupled architecture, you broadcast events without caring who responds to them. This saves time because events can be queued and forwarded whenever the receiver is ready to process them. This allows for building scalable, highly modifiable systems.

Decoupled applications enable teams to act more independently, which increases their velocity. For example, with an API-based integration, if my team wants to know about some change that happened in another team’s microservice, I have to ask that team to make an API call to my service. That means I have to deal with authentication, coordination with the other team over the structure of the API call, etc. This causes back and forth between teams, which slows down development time. With an event-driven application, you can subscribe to events sent from a microservice and the event router (for example, Amazon EventBridge) takes care of routing the event and handling authentication.

Decoupled applications also allow you to build new features faster. Adding new features or extending existing ones is simpler with event-driven architectures. This is because you only have to choose the event you need to trigger your new feature, and subscribe to it. There’s no need to modify any of your existing services to add new functionality.

Write less code

When you build applications using event-driven architecture, often you write less code because you only need to consider new events, as well as which service is subscribed to those events. For example, if you are building new features for your application, all you have to do is consider the existing events and then add senders and receivers as necessary. In this way, you speed up development time because each functional unit is smaller and there is often less code.

Better extensibility

In the example above, you built a highly extensible application. Other teams can extend features and add functionality without impacting other microservices. By publishing events using EventBridge, this application integrates with existing systems, but also enables any future application to integrate as an event consumer. Producers of events have no knowledge of event consumers, which can help simplify the microservice logic.

Enhancing team collaboration

A common process to build applications is to work with your product managers and business stakeholders to gather requirements. Developers then translate those requirements into code. However, there may be a disconnect between the product requirements and the code. When you use events, everyone in the business understands the logic. You define the events in an application (for example, a customer adds an item to their shopping cart or a customer account is created) and that becomes your product requirements. Whenever that action happens, it produces an event, and whoever is interested can take action on that event.

For example, a marketing manager could be interested whenever a customer creates a new account. One way to choreograph this in event-driven architecture is to have a Marketing event bus that listens for the New Account event. There could also be other teams that are interested, such as the Analytics team, who also subscribe to that event. Each team/service can subscribe to events that are relevant to them. Event-driven architecture is a great way for businesses to describe their business problems and represent them.

Conclusion

This post introduces events, and then compares event-driven architecture to command-driven, request-response architecture. It also explains the benefits of event-driven architecture, including decoupling event sources and targets, writing less code, having better extensibility, and enhancing team collaboration.

For more serverless learning resources, visit Serverless Land.

ICYMI: Serverless Q1 2022

Post Syndicated from James Beswick original https://aws.amazon.com/blogs/compute/icymi-serverless-q1-2022/

Welcome to the 16th edition of the AWS Serverless ICYMI (in case you missed it) quarterly recap. Every quarter, we share all the most recent product launches, feature enhancements, blog posts, webinars, Twitch live streams, and other interesting things that you might have missed!

Calendar

In case you missed our last ICYMI, check out what happened last quarter here.

AWS Lambda

Lambda now offers larger ephemeral storage for functions, up to 10 GB. Previously, the storage was set to 512 MB. There are several common use-cases that can benefit from expanded temporary storage, including extract-transform load (ETL) jobs, machine learning inference, and data processing workloads. To see how to configure the amount of /tmp storage in AWS SAM, deploy this Serverless Land Pattern.

Ephemeral storage settings

For Node.js developers, Lambda now supports ES Modules and top-level await for Node.js 14. This enables developers to use a wider range of JavaScript packages in functions. With top-level await, when used with Provisioned Concurrency, this can improve cold-start performance when using asynchronous initialization.

For .NET developers, Lambda now supports .NET 6 as both a managed runtime and container base image. You can now use new features of the runtime such as improved logging, simplified function definitions using top-level statements, and improved performance using source generators.

The Lambda console now allows you to share test events with other developers in your team, using granular IAM permissions. Previously, test events were only visible to the builder who created them. To learn about creating sharable test events, read this documentation.

Amazon EventBridge

Amazon EventBridge Schema Registry helps you create code bindings from event schemas for use directly in your preferred IDE. You can generate these code bindings for a schema by using the EventBridge console, APIs, or AWS SDK toolkits for Jetbrains (Intellij, PyCharm, Webstorm, Rider) and VS Code. This feature now supports Go, in addition to Java, Python, and TypeScript, and is available at no additional cost.

AWS Step Functions

Developers can test state machines locally using Step Functions Local, and the service recently announced mocked service integrations for local testing. This allows you to define sample output from AWS service integrations and combine them into test cases to validate workflow control. This new feature introduces a robust way to state machines in isolation.

Amazon DynamoDB

Amazon DynamoDB now supports limiting the number of items processed in PartiQL operation, using an optional parameter on each request. The service also increased default Service Quotas, which can help simplify the use of large numbers of tables. The per-account, per-Region quota increased from 256 to 2,500 tables.

AWS AppSync

AWS AppSync added support for custom response headers, allowing you to define additional headers to send to clients in response to an API call. You can now use the new resolver utility $util.http.addResponseHeaders() to configure additional headers in the response for a GraphQL API operation.

Serverless blog posts

January

Jan 6 – Using Node.js ES modules and top-level await in AWS Lambda

Jan 6 – Validating addresses with AWS Lambda and the Amazon Location Service

Jan 20 – Introducing AWS Lambda batching controls for message broker services

Jan 24 – Migrating AWS Lambda functions to Arm-based AWS Graviton2 processors

Jan 31 – Using the circuit breaker pattern with AWS Step Functions and Amazon DynamoDB

Jan 31 – Mocking service integrations with AWS Step Functions Local

February

Feb 8 – Capturing client events using Amazon API Gateway and Amazon EventBridge

Feb 10 – Introducing AWS Virtual Waiting Room

Feb 14 – Building custom connectors using the Amazon AppFlow Custom Connector SDK

Feb 22 – Building TypeScript projects with AWS SAM CLI

Feb 24 – Introducing the .NET 6 runtime for AWS Lambda

March

Mar 6 – Migrating a monolithic .NET REST API to AWS Lambda

Mar 7 – Decoding protobuf messages using AWS Lambda

Mar 8 – Building a serverless image catalog with AWS Step Functions Workflow Studio

Mar 9 – Composing AWS Step Functions to abstract polling of asynchronous services

Mar 10 – Building serverless multi-Region WebSocket APIs

Mar 15 – Using organization IDs as principals in Lambda resource policies

Mar 16 – Implementing mutual TLS for Java-based AWS Lambda functions

Mar 21 – Running cross-account workflows with AWS Step Functions and Amazon API Gateway

Mar 22 – Sending events to Amazon EventBridge from AWS Organizations accounts

Mar 23 – Choosing the right solution for AWS Lambda external parameters

Mar 28 – Using larger ephemeral storage for AWS Lambda

Mar 29 – Using AWS Step Functions and Amazon DynamoDB for business rules orchestration

Mar 31 – Optimizing AWS Lambda function performance for Java

First anniversary of Serverless Land Patterns

Serverless Patterns Collection

The DA team launched the Serverless Patterns Collection in March 2021 as a repository of serverless examples that demonstrate integrating two or more AWS services. Each pattern uses an infrastructure as code (IaC) framework to automate the deployment. These can simplify the creation and configuration of the services used in your applications.

The Serverless Patterns Collection is both an educational resource to help developers understand how to join different services, and an aid for developers that are getting started with building serverless applications.

The collection has just celebrated its first anniversary. It now contains 239 patterns for CDK, AWS SAM, Serverless Framework, and Terraform, covering 30 AWS services. We have expanded example runtimes to include .NET, Java, Rust, Python, Node.js and TypeScript. We’ve served tens of thousands of developers in the first year and we’re just getting started.

Many thanks to our contributors and community. You can also contribute your own patterns.

Videos

YouTube: youtube.com/serverlessland

Serverless Office Hours – Tues 10 AM PT

Weekly live virtual office hours. In each session we talk about a specific topic or technology related to serverless and open it up to helping you with your real serverless challenges and issues. Ask us anything you want about serverless technologies and applications.

YouTube: youtube.com/serverlessland
Twitch: twitch.tv/aws

January

February

March

FooBar Serverless YouTube channel

The Developer Advocate team is delighted to welcome Marcia Villalba onboard. Marcia was an AWS Serverless Hero before joining AWS over two years ago, and she has created one of the most popular serverless YouTube channels. You can view all of Marcia’s videos at https://www.youtube.com/c/FooBar_codes.

January

February

March

AWS Summits

AWS Global Summits are free events that bring the cloud computing community together to connect, collaborate, and learn about AWS. This year, we have restarted in-person Summits at major cities around the world.

The next 4 Summits planned are Paris (April 12), San Francisco (April 20-21), London (April 27), and Madrid (May 4-5). To find and register for your nearest AWS Summit, visit the AWS Summits homepage.

Still looking for more?

The Serverless landing page has more information. The Lambda resources page contains case studies, webinars, whitepapers, customer stories, reference architectures, and even more Getting Started tutorials.

You can also follow the Serverless Developer Advocacy team on Twitter to see the latest news, follow conversations, and interact with the team.

Optimizing AWS Lambda function performance for Java

Post Syndicated from Benjamin Smith original https://aws.amazon.com/blogs/compute/optimizing-aws-lambda-function-performance-for-java/

This post is written by Mark Sailes, Senior Specialist Solutions Architect.

This blog post shows how to optimize the performance of AWS Lambda functions written in Java, without altering any of the function code. It shows how Java virtual machine (JVM) settings affect the startup time and performance. You also learn how you can benchmark your applications to test these changes.

When a Lambda function is invoked for the first time, or when Lambda is horizontally scaling to handle additional requests, an execution environment is created. The first phase in the execution environment’s lifecycle is initialization (Init).

For Java managed runtimes, a new JVM is started and your application code is loaded. This is called a cold start. Subsequent requests then reuse this execution environment. This means that the Init phase does not need to run again. The JVM will already be started. This is called a warm start.

In latency-sensitive applications such as customer facing APIs, it’s important to reduce latency where possible to give the best possible experience. Cold starts can increase the latency for APIs when they occur.

How can you improve cold start latency?

Changing the tiered compilation level can help you to reduce cold start latency. By setting the tiered compilation level to 1, the JVM uses the C1 compiler. This compiler quickly produces optimized native code but it does not generate any profiling data and never uses the C2 compiler.

Tiered compilation is a feature of the Java virtual machine (JVM). It allows the JVM to make best use of both of the just-in-time (JIT) compilers. The C1 compiler is optimized for fast start-up time. The C2 compiler is optimized for the best overall performance but uses more memory and takes a longer time to achieve it.

There are five different levels of tiered compilation. Level 0 is where Java byte code is interpreted. Level 4 is where the C2 compiler analyses profiling data collected during application startup. It observes code usage over a period of time to find the best optimizations. Choosing the correct level can help you optimize your performance.

Changing the tiered compilation level to 1 can reduce cold start times by up to 60%. Thanks to changes in the Lambda execution environment, you can do this in one step with an environment variable for all Java managed runtimes.

Language-specific environment variables

Lambda supports the customization of the Java runtime via language-specific environment variables. The environment variable JAVA_TOOL_OPTIONS allows you to specify additional command line arguments to be used when Java is launched. Using this environment variable, you can change various aspects of the JVM configuration including garbage collection functionality, memory settings as well as the configuration for tiered compilation. To change the tiered compilation level to 1 you would set the value of JAVA_TOOL_OPTIONS to “-XXx:+TieredCompilation -XX:TieredStopAtLevel=1”. When the Java managed runtime starts any value set will be included in the program arguments. For more information on how you can collect and analyses garbage collection data read our Field Notes: Monitoring the Java Virtual Machine Garbage Collection on AWS Lambda.

Customer facing APIs

The following diagram is an example architecture that might be used to create a customer-facing API. Amazon API Gateway is used to manage a REST API and is integrated with Lambda to handle requests. The Lambda function reads and writes data to Amazon DynamoDB to serve the requests.

This is an example use case, which would benefit from optimization. The shorter the duration of each request made to the API the better the customer experience will be.

You can explore the code for this example in the GitHub repo: https://github.com/aws-samples/aws-lambda-java-tiered-compilation-example. The project includes the Lambda function source code, infrastructure as code template, and instructions to deploy it to your own AWS account.

Measuring cold starts

Before you add the environment variable to your Lambda function, measure the current duration for a request. One way to do this is by using the test functionality in the Lambda console.

The following screenshot is a summary from a test invoke, run from the console. You can see that it is a cold start because it includes an Init duration value. If the summary doesn’t include an Init duration, it is a warm start. In this case, the duration is 5,313ms.

Applying the optimization

This change can be configured using AWS Serverless Application Model (AWS SAM), AWS Cloud Development Kit (CDK), AWS CloudFormation, or from within the AWS Management Console.

Using the AWS Management Console:

  1. Navigate to the AWS Lambda console.
  2. Choose Functions and choose the Lambda function to update.
  3. From the menu, choose the Configuration tab and Environment variables. Choose Edit.
  4. Choose Add environment variable. Add the following:
    – Key: JAVA_TOOL_OPTIONS
    – Value: -XXx:+TieredCompilation -XX:TieredStopAtLevel=1

  5. Choose Save. You can verify that the changes are applied by invoking the function and viewing the log events in Amazon CloudWatch. The log line Picked up _JAVA_OPTIONS: -XX:+TieredCompilation -XX:TieredStopAtLevel=1 is added by the JVM during startup.

Checking if performance has improved

Invoke the Lambda function again to see if performance has improved.

The following screenshot shows the results of a test for a function with tiered compilation set to level 1. The duration is 2,169 ms. The cold start duration has decreased by 3,144 ms (59%).

Other use cases

This optimization can be applied to other use cases. Examples could include image resizing, document generation and near real-time ETL pipelines. The common trait being that they do a small number of discrete pieces of work in each execution.

The function code doesn’t have as many candidates for further optimization with the C2 compiler. Even if the C2 compiler did make further optimizations there wouldn’t be enough usage of those optimizations to decrease the total execution time. Instead of allowing this extra compilation to happen, you can tell the JVM not to use the C2 compiler and only use C1.

This optimization may not be suitable if a Lambda function is running for minutes or is repeating the same piece of code thousands of times within the same execution. Frequently executed sections of code are called hot spots, and are prime candidate for further optimization with the C2 compiler.

The C2 compiler analyses profiling data collected as the application runs, and produce a more efficient way to execute that piece of code. After the optimization by the C2 compiler that section of code would execute quicker. Because it is repeated thousands of times in a single Lambda invocation, the overhead of the optimization is worth it overall. An example use case where this would happen is in Monte Carlo simulations. Simulations of random events are calculated thousands, millions, or even billions of times to analyze the most likely outcomes.

Conclusion

In this post, you learn how to improve Lambda cold start performance by up to 60% for functions running the Java runtime. Thanks to the recent changes in the Java execution environment, you can implement these optimizations by adding a single environment variable.

This optimization is suitable for Java workloads such as customer-facing APIs, just-in-time image resizing, near real-time data processing pipelines, and other short-running processes. For more information on tired compilation, read about Tiered Compilation in JVM.

For more serverless learning resources, visit Serverless Land.

Using AWS Step Functions and Amazon DynamoDB for business rules orchestration

Post Syndicated from James Beswick original https://aws.amazon.com/blogs/compute/using-aws-step-functions-and-amazon-dynamodb-for-business-rules-orchestration/

This post is written by Vijaykumar Pannirselvam, Cloud Consultant, Sushant Patil, Cloud Consultant, and Kishore Dhamodaran, Senior Solution Architect.

A Business Rules Engine (BRE) is used in enterprises to manage business-critical decisions. The logic or rules used to make such decisions can vary in complexity. A finance department may have a basic rule to get any purchase over a certain dollar amount to get director approval. A mortgage company may need to run complex rules based on inputs (for example, credit score, debt-to-income ratio, down payment) to make an approval decision for a loan.

Decoupling these rules from application logic provides agility to your rules management, since business rules may often change while your application may not. It can also provide standardization across your enterprise, so every department can communicate with the same taxonomy.

As part of migrating their workloads, some enterprises consider replacing their commercial rules engine with cloud native and open-source alternatives. The motivation for such a move stem from several factors, such as simplifying the architecture, cost, security considerations, or vendor support.

Many of these commercial rules engines come as part of a BPMS offering that provides orchestration capabilities for rules execution. For a successful migration to cloud using an open-source rules engine management system, you need an orchestration capability to manage incoming rule requests, auditing the rules, and tracking exceptions.

This post showcases an orchestration framework that allows you to use an open-source rules engine. It uses Drools rules engine to build a set of rules for calculating insurance premiums based on the properties of Car and Person objects. This uses AWS Step Functions, AWS Lambda, Amazon API Gateway, Amazon DynamoDB, and open-source Drools rules engine to show this. You can swap the rules engine provided you can manage it in the AWS Cloud environment and expose it as an API.

Solution overview

The following diagram shows the solution architecture.

Solution architecture

The solution comprises:

  1. API Gateway – a fully managed service that makes it easier to create, publish, maintain, monitor, and secure APIs at any scale for API consumers. API Gateway helps you manage traffic to backend systems, in this case Step Functions, which orchestrates the execution of tasks. For the REST API use-case, you can also set up a cache with customizable keys and time-to-live in seconds for your API data to avoid hitting your backend services for each request.
  2. Step Functions – a low code service to orchestrate multiple steps involved to accomplish tasks. Step Functions uses the finite-state machine (FSM) model, which uses given states and transitions to complete the tasks. The diagram depicts three states: Audit Request, Execute Ruleset and Audit Response. We execute them sequentially. You can add additional states and transitions, such as validating incoming payloads, and branching out parallel execution of the states.
  3. Drools rules engine Spring Boot application – runtime component of the rule execution. You set the Drools rule engine Spring Boot application as an Apache Maven Docker project with Drools Maven dependencies. You then deploy the Drools rule engine Docker image to an Amazon Elastic Container Registry (Amazon ECR), create an AWS Fargate cluster, and an Amazon Elastic Container Service (Amazon ECS) service. The service launches Amazon ECS tasks and maintains the desired count. An Application Load Balancer distributes the traffic evenly to all running containers.
  4. Lambda – a serverless execution environment giving you an ability to interact with the Drools Engine and a persistence layer for rule execution audit functions. The Lambda component provides the audit function required to persist the incoming requests and outgoing responses in DynamoDB. Apart from the audit function, Lambda is also used to invoke the service exposed by the Drools Spring Boot application.
  5. DynamoDB – a fully managed and highly scalable key/value store, to persist the rule execution information, such as request and response payload information. DynamoDB provides the persistence layer for the incoming request JSON payload and for the outgoing response JSON payload. The audit Lambda function invokes the DynamoDB put_item() method when it receives the request or response event from Step Functions. The DynamoDB table rule_execution_audit has an entry for every request and response associated with the incoming request-id originated by the application (upstream).

Drools rules engine implementation

The Drools rules engine separates the business rules from the business processes. You use DRL (Drools Rule Language) by defining business rules as .drl text files. You define model objects to build the rules.

The model objects are POJO (Plain Old Java Objects) defined using Eclipse, with the Drools plugin installed. You should have some level of knowledge about building rules and executing them using the Drools rules engine. The below diagram describes the functions of this component.

Drools process

You define the following rules in the .drl file as part of the GitHub repo. The purpose of these rules is to evaluate the driver premium based on the input model objects provided as input. The inputs are Car and Driver objects and output is the Policy object, which has the premium calculated based on the certain criteria defined in the rule:

rule "High Risk"
     when     
         $car : Car(style == "SPORTS", color == "RED") 
         $policy : Policy() 
         and $driver : Driver ( age < 21 )                             
     then
         System.out.println(drools.getRule().getName() +": rule fired");          
         modify ($policy) { setPremium(increasePremiumRate($policy, 20)) };
 end
 
 rule "Med Risk"
     when     
         $car : Car(style == "SPORTS", color == "RED") 
         $policy : Policy() 
         and $driver : Driver ( age > 21 )                             
     then
         System.out.println(drools.getRule().getName() +": rule fired");          
         modify ($policy) { setPremium(increasePremiumRate($policy, 10)) };
 end
 
 
 function double increasePremiumRate(Policy pol, double percentage) {
     return (pol.getPremium() + pol.getPremium() * percentage / 100);
 }
 

Once the rules are defined, you define a RestController that takes input parameters and evaluates the above rules. The below code snippet is a POST method defined in the controller, which handles the requests and sends the response to the caller.
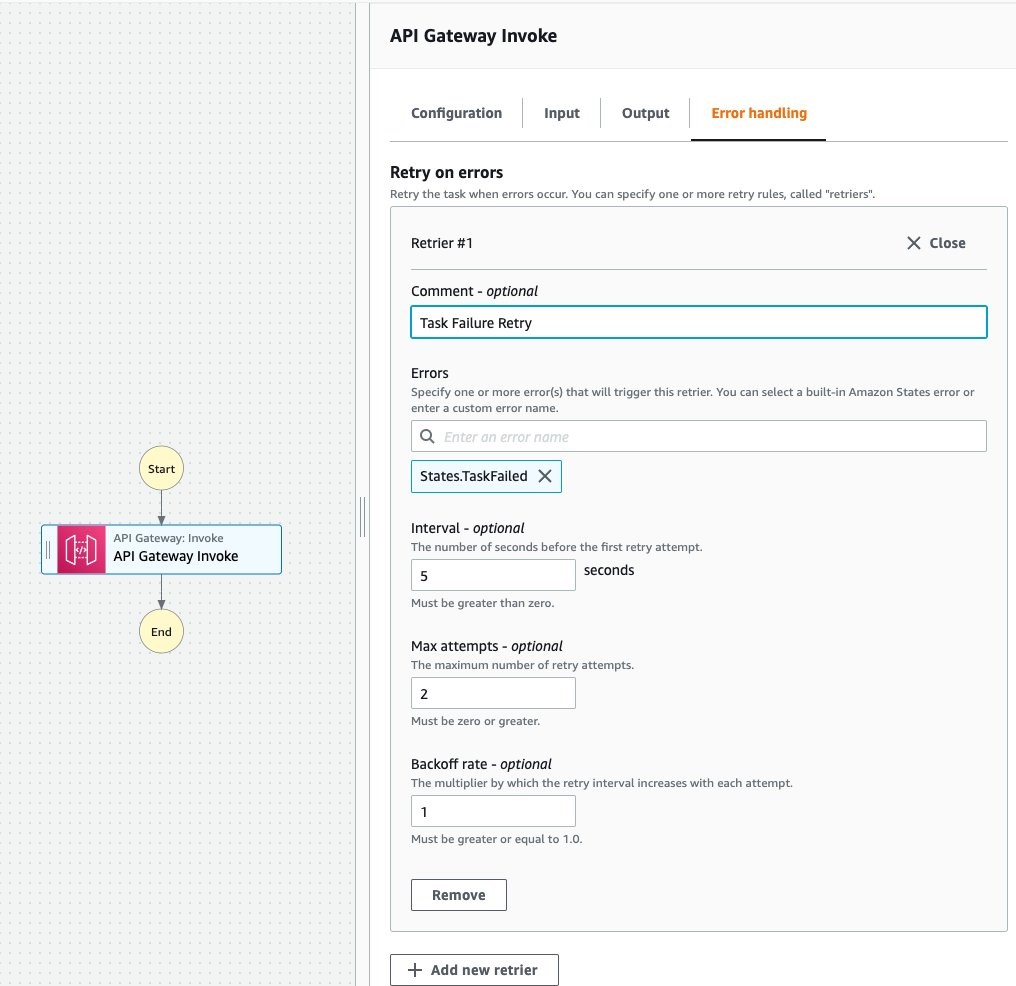
@PostMapping(value ="/policy/premium", consumes = {MediaType.APPLICATION_JSON_VALUE, MediaType.APPLICATION_XML_VALUE }, produces = {MediaType.APPLICATION_JSON_VALUE, MediaType.APPLICATION_XML_VALUE})
    public ResponseEntity<Policy> getPremium(@RequestBody InsuranceRequest requestObj) {
        
        System.out.println("handling request...");
        
        Car carObj = requestObj.getCar();        
        Car carObj1 = new Car(carObj.getMake(),carObj.getModel(),carObj.getYear(), carObj.getStyle(), carObj.getColor());
        System.out.println("###########CAR##########");
        System.out.println(carObj1.toString());
        
        System.out.println("###########POLICY##########");        
        Policy policyObj = requestObj.getPolicy();
        Policy policyObj1 = new Policy(policyObj.getId(), policyObj.getPremium());
        System.out.println(policyObj1.toString());
            
        System.out.println("###########DRIVER##########");    
        Driver driverObj = requestObj.getDriver();
        Driver driverObj1 = new Driver( driverObj.getAge(), driverObj.getName());
        System.out.println(driverObj1.toString());
        
        KieSession kieSession = kieContainer.newKieSession();
        kieSession.insert(carObj1);      
        kieSession.insert(policyObj1); 
        kieSession.insert(driverObj1);         
        kieSession.fireAllRules(); 
        printFactsMessage(kieSession);
        kieSession.dispose();
    
        
        return ResponseEntity.ok(policyObj1);
    }    

Prerequisites

Solution walkthrough

  1. Clone the project GitHub repository to your local machine, do a Maven build, and create a Docker image. The project contains Drools related folders needed to build the Java application.
    git clone https://github.com/aws-samples/aws-step-functions-business-rules-orchestration
    cd drools-spring-boot
    mvn clean install
    mvn docker:build
    
  2. Create an Amazon ECR private repository to host your Docker image.
    aws ecr create-repository —repository-name drools_private_repo —image-tag-mutability MUTABLE —image-scanning-configuration scanOnPush=false
  3. Tag the Docker image and push it to the Amazon ECR repository.
    aws ecr get-login-password --region us-east-1 | docker login --username AWS --password-stdin <<INSERT ACCOUNT NUMBER>>.dkr.ecr.us-east-1.amazonaws.com
    docker tag drools-rule-app:latest <<INSERT ACCOUNT NUMBER>>.dkr.ecr.us-east-1.amazonaws.com/drools_private_repo:latest
    docker push <<INSERT ACCOUNT NUMBER>>.dkr.ecr.us-east-1.amazonaws.com/drools_private_repo:latest
    
  4. Deploy resources using AWS SAM:
    cd ..
    sam build
    sam deploy --guided

    SAM deployment output

Verifying the deployment

Verify the business rules execution and the orchestration components:

  1. Navigate to the API Gateway console, and choose the rules-stack API.
    API Gateway console
  2. Under Resources, choose POST, followed by TEST.
    Resource configuration
  3. Enter the following JSON under the Request Body section, and choose Test.

    {
      "context": {
        "request_id": "REQ-99999",
        "timestamp": "2021-03-17 03:31:51:40"
      },
      "request": {
        "driver": {
          "age": "18",
          "name": "Brian"
        },
        "car": {
          "make": "honda",
          "model": "civic",
          "year": "2015",
          "style": "SPORTS",
          "color": "RED"
        },
        "policy": {
          "id": "1231231",
          "premium": "300"
        }
      }
    }
    
  4. The response received shows results from the evaluation of the business rule “High Risk“, with the premium representing the percentage calculation in the rule definition. Try changing the request input to evaluate a “Medium Risk” rule by modifying the age of the driver to 22 or higher:
    Sample response
  5. Optionally, you can verify the API using Postman. Get the endpoint information by navigating to the rule-stack API, followed by Stages in the navigation pane, then choosing either Dev or Stage.
  6. Enter the payload in the request body and choose Send:
    Postman UI
  7. The response received is results from the evaluation of business rule “High Risk“, with the premium representing the percentage calculation in the rule definition. Try changing the request input to evaluate a “Medium Risk” rule by modifying the age of the driver to 22 or higher.
    Body JSON
  8. Observe the request and response audit logs. Navigate to the DynamoDB console. Under the navigation pane, choose Tables, then choose rule_execution_audit.
    DynamoDB console
  9. Under the Tables section in the navigation pane, choose Explore Items. Observe the individual audit logs by choosing the audit_id.
    Table audit item

Cleaning up

To avoid incurring ongoing charges, clean up the infrastructure by deleting the stack using the following command:

sam delete SAM confirmations

Delete the Amazon ECR repository, and any other resources you created as a prerequisite for this exercise.

Conclusion

In this post, you learned how to leverage an orchestration framework using Step Functions, Lambda, DynamoDB, and API Gateway to build an API backed by an open-source Drools rules engine, running on a container. Try this solution for your cloud native business rules orchestration use-case.

For more serverless learning resources, visit Serverless Land.

Using larger ephemeral storage for AWS Lambda

Post Syndicated from James Beswick original https://aws.amazon.com/blogs/compute/using-larger-ephemeral-storage-for-aws-lambda/

AWS Lambda functions have always had ephemeral storage available at /tmp in the file system. This was set at 512 MB for every function, regardless of runtime or memory configuration. With this new feature, you can now configure ephemeral storage for up to 10 GB per function instance.

You can set this in the AWS Management Console, AWS CLI, or AWS SDK, AWS Serverless Application Model (AWS SAM), AWS Cloud Development Kit (AWS CDK), AWS Lambda API, and AWS CloudFormation. This blog post explains how this works and how to use this new setting in your Lambda functions.

How ephemeral storage works in Lambda

All functions have ephemeral storage available at the fixed file system location /tmp. This provides a fast file system-based scratch area that is scoped to a specific instance of a Lambda function. This storage is not shared between instances of Lambda functions and the space is guaranteed to be empty when a new instance starts.

This means that you can use the same execution environment to cache static assets in /tmp between invocations. This is a common use case that can help reduce function duration for subsequent invocations. The contents are deleted when the Lambda service eventually terminates the execution environment.

With this new configurable setting, ephemeral storage works in the same way. The behavior is identical whether you use zip or container images to deploy your functions. It’s also available for Provisioned Concurrency. All data stored in /tmp is encrypted at rest with a key managed by AWS.

Common use cases for ephemeral storage

There are three common customer use cases that can benefit from the expanded ephemeral storage.

Extract-transform-load (ETL) jobs: Your code may perform intermediate computation or download other resources to complete processing. More temporary space enables more complex ETL jobs to run in Lambda functions.

Machine learning (ML) inference: Many inference tasks rely on large reference data files, including libraries and models. More ephemeral storage allows you to download larger models from Amazon S3 to /tmp and use these in your processing. To learn more about using Lambda for ML inference, read Building deep learning inference with AWS Lambda and Amazon EFS and Pay as you go machine learning inference with AWS Lambda.

Data processing: For workloads that download objects from S3 in response to S3 events, the larger /tmp space makes it possible to handle larger objects without using in-memory processing. Workloads that create PDFs, use headless Chromium, or process media also benefit from more ephemeral storage.

Zip processing: Some workloads use large zip files from data providers to initialize local databases. These can now unzip to the local file system without the need for in-memory processing. Similarly, applications that generate zip files also benefit from more /tmp space.

Graphics processing: Image processing is a common use-case for Lambda-based applications. For workloads processing large tiff files or satellite images, this makes it easier to use libraries like ImageMagick to perform all the computation in Lambda. Customers using geospatial libraries also gain significant flexibility from writing large satellite images to /tmp.

Deploying the example application

The example application shows how to resize an MP4 file from Amazon S3, using the temporary space for intermediate processing. In this example, you can process video files much larger than the standard 512 MB temporary storage:

Example application architecture

Before deploying the example, you need:

This example uses the AWS Serverless Application Model (AWS SAM). To deploy:

  1. From a terminal window, clone the GitHub repo:
    git clone https://github.com/aws-samples/s3-to-lambda-patterns
  2. Change directory to this example:
    cd ./resize-video
  3. Follow the installation instructions in the README file.

To test the application, upload an MP4 file into the source S3 bucket. After processing, the destination bucket contains the resized video file.

How the example works

The resize function downloads the original video from S3 and saves the result in Lambda’s temporary storage directory:

	// Get signed URL for source object
	const Key = decodeURIComponent(record.s3.object.key.replace(/\+/g, ' '))

	const data = await s3.getObject({
		Bucket: record.s3.bucket.name,
		Key
	}).promise()

	// Save original to tmp directory
	const tempFile = `${ffTmp}/${Key}`
	console.log('Saving downloaded file to ', tempFile)
	fs.writeFileSync(tempFile, data.Body)

The application uses FFmpeg to resize the video and store the output in the temporary storage space:

// Save resized video to /tmp
	const outputFilename = `${Key.split('.')[0]}-smaller.mp4`
	console.log(`Resizing and saving to ${outputFilename}`)
	await execPromise(`${ffmpegPath} -i "${tempFile}" -loglevel error -vf scale=160:-1 -sws_flags fast_bilinear ${ffTmp}/${outputFilename}`)

After processing, the function reads the file from the temporary directory and then uploads to the destination bucket in S3:

	const tmpData = fs.readFileSync(`${ffTmp}/${outputFilename}`)
	console.log(`tmpData size: ${tmpData.length}`)

	// Upload to S3
	console.log(`Uploading ${outputFilename} to ${outputFilename}`)
	await s3.putObject({
		Bucket: process.env.OutputBucketName,
		Key: outputFilename,
		Body: tmpData
	}).promise()
	console.log(`Object written to ${process.env.OutputBucketName}`)

Since temporary storage is not deleted between warm Lambda invocations, you may also choose to remove unneeded files. This example uses a tmpCleanup function to delete the contents of /tmp:

const fs = require('fs')
const path = require('path')
const directory = '/tmp/'

// Deletes all files in a directory
const tmpCleanup = async () => {
	console.log('Starting tmpCleanup')
	fs.readdir(directory, (err, files) => {
		return new Promise((resolve, reject) => {
			if (err) reject(err)

			console.log('Deleting: ', files)				
			for (const file of files) {
				const fullPath = path.join(directory, file)
				fs.unlink(fullPath, err => {
					if (err) reject (err)
				})
			}
			resolve()
		})
	})
}

Setting ephemeral storage with the AWS Management Console or AWS CLI

In the Lambda console, you can view the ephemeral storage allocated to a function in the Generation configuration menu in the Configuration tab:

Lambda function configuration

To make changes to this setting, choose Edit. In the Edit basic settings page, adjust the Ephemeral Storage to any value between 512 MB and 10240 MB. Choose Save to update the function’s settings.

Basic settings

You can also define the ephemeral storage setting in the create-function and update-function-configuration CLI commands. In both cases, use the ephemeral-storage switch to set the value:

aws lambda create-function --function-name testFunction --runtime python3.9 --handler lambda_function.lambda_handler --code S3Bucket=myBucket,S3Key=function.zip --role arn:aws:iam::123456789012:role/testFunctionRole --ephemeral-storage '{"Size": 10240}' 

To modify this setting for testFunction, run:

aws lambda update-function-configuration --function-name testFunction --ephemeral-storage '{"Size": 5000}'

Setting ephemeral storage with AWS CloudFormation or AWS SAM

You can define the size of ephemeral storage in both AWS CloudFormation and AWS SAM templates by using the EphemeralStorage attribute. As shown in the example’s template.yaml, there is a new attribute called EphemeralStorage:

  ResizeFunction:
    Type: AWS::Serverless::Function
    Properties:
      CodeUri: resizeFunction/
      Handler: app.handler
      Runtime: nodejs14.x
      Timeout: 900
      MemorySize: 10240
      EphemeralStorage:
        Size: 10240

You define this on a per-function basis. If the attribute is missing, the function is allocated 512 MB of temporary storage.

Using Lambda Insights to monitor temporary storage usage

You can use Lambda Insights to query on the metrics emitted by the Lambda function relating to the usage of temporary storage. First, enable Lambda Insights on a function by following these steps in the documentation.

After running the function, the Lambda service writes ephemeral storage metrics to Amazon CloudWatch Logs. With Lambda Insights enabled, you can now query these from the CloudWatch console. From the Logs Insights feature, you can query to determine the maximum, used, and available space available:

fields @timestamp,
tmp_max/(1024*1024),
tmp_used/(1024*1024),
tmp_free/(1024*1024)

Calculating the cost of more temporary storage

Ephemeral storage is free up to 512 MB, as it always has been. You are charged for the amount you select between 512 MB and 10,240 MB. For example, if you select 1,024 MB, you only pay for 512 MB. Expanded ephemeral storage costs $0.0000000308 per GB/second in the us-east-1 Region (see the pricing page for other Regions).

In us-east-1, for a workload invoking a Lambda function 500,000 times with a 10 second duration, using the maximum temporary storage, the cost is $0.63:

Invocations 500,000
Duration (ms) 10,000
Ephemeral storage (over 512 MB) 9,728
Storage price per GB/s $0.0000000308
GB/s total 20,480,000
Price of storage $0.63

Choosing between ephemeral storage and Amazon EFS

Generally, ephemeral storage is designed for intermediary processing of a function. You can download reference data, machine learning models, or database metadata from other sources such as Amazon S3, and store these in /tmp for further processing. Ephemeral storage can provide a cache for data for repeat usage across invocations and offers fast I/O throughout.

Alternatively, EFS is primarily intended for customers that need to:

  • Share data or state across function invocations.
  • Process files larger than the 10,240 MB storage allows.
  • Use file-system type functionality, such as appending to or modifying files.

Conclusion

Serverless developers can now configure the amount of temporary storage available in AWS Lambda functions. This blog post discusses common use cases and walks through an example application that uses larger temporary storage. It also shows how to configure this in CloudFormation and AWS SAM and explains the cost if you use more than the free, provisioned 512 MB that’s automatically provisioned for every function.

For more serverless learning resources, visit Serverless Land.

Choosing the right solution for AWS Lambda external parameters

Post Syndicated from Julian Wood original https://aws.amazon.com/blogs/compute/choosing-the-right-solution-for-aws-lambda-external-parameters/

This post is written by Thomas Moore, Solutions Architect, Serverless.

When using AWS Lambda to build serverless applications, customers often need to retrieve parameters from an external source at runtime. This allows you to share parameter values across multiple functions or microservices, providing a single source of truth for updates. A common example is retrieving database connection details from an external source and then using the retrieved hostname, user name, and password to connect to the database:

Lambda function retrieving database credentials from an external source

Lambda function retrieving database credentials from an external source

AWS provides a number of options to store parameter data, including AWS Systems Manager Parameter Store, AWS AppConfig, Amazon S3, and Lambda environment variables. This blog explores the different parameter data that you may need to store. I cover considerations for choosing the right parameter solution and how to retrieve and cache parameter data efficiently within the Lambda function execution environment.

Common use cases

Common parameter examples include:

  • Securely storing secret data, such as credentials or API keys.
  • Database connection details such as hostname, port, and credentials.
  • Schema data (for example, a structured JSON response).
  • TLS certificate for mTLS or JWT validation.
  • Email template.
  • Tenant configuration in a multitenant system.
  • Details of external AWS resources to communicate with such as an Amazon SQS queue URL, Amazon EventBridge event bus name, or AWS Step Functions ARN.

Key considerations

There are a number of key considerations when choosing the right solution for external parameter data.

  1. Cost – how much does it cost to store the data and retrieve it via an API call?
  2. Security – what encryption and fine-grained access control is required?
  3. Performance – what are the retrieval latency requirements?
  4. Data size – how much data is there to store and retrieve?
  5. Update frequency – how often does the parameter change and how does the function handle stale parameters?
  6. Access scope – do multiple functions or services access the parameter?

These considerations help to determine where to store the parameter data and how often to retrieve it.

For example, a 4KB parameter that updates hourly and is used by hundreds of functions needs to be optimized for low retrieval costs and high performance. Choosing a solution that supports low-cost API GET requests at a high transaction per second (TPS) would be better than one that supports large data.

AWS service options

There are a number of AWS services available to store external parameter data.

Amazon S3

S3 is an object storage service offering 99.999999999% (11 9s) of data durability and virtually unlimited scalability at low cost. Objects can be up to 5 TB in size in any format, making S3 a good solution to store larger parameter data.

Amazon DynamoDB

Amazon DynamoDB is a fully managed, serverless, key-value NoSQL database designed for single-digit millisecond performance at any scale. Due to the high performance of this service, it’s a great place to store parameters when low retrieval latency is important.

AWS Secrets Manager

AWS Secrets Manager makes it easier to rotate, manage, and retrieve secret data. This makes it the ideal place to store sensitive parameters such as passwords and API keys.

AWS Systems Manager Parameter Store

Parameter Store provides a centralized store to manage configuration data. This data can be plaintext or encrypted using AWS Key Management Service (KMS). Parameters can be tagged and organized into hierarchies for simpler management. Parameter Store is a good default choice for general-purpose parameters in AWS. The standard version (no additional charge) can store parameters up to 4 KB in size and the advanced version (additional charges apply) up to 8 KB.

For a code example using Parameter Store for Lambda parameters, see the Serverless Land pattern.

AWS AppConfig

AppConfig is a capability of AWS Systems Manager to create, manage, and quickly deploy application configurations. AppConfig allows you to validate changes during roll-outs and automatically roll back, if there is an error. AppConfig deployment strategies help to manage configuration changes safely.

AppConfig also provides a Lambda extension to retrieve and locally cache configuration data. This results in fewer API calls and reduced function duration, reducing costs.

AWS Lambda environment variables

You can store parameter data as Lambda environment variables as part of the function’s version-specific configuration. Lambda environment variables are stored during function creation or updates. You can access these variables directly from your code without needing to contact an external source. Environment variables are ideal for parameter values that don’t need updating regularly and help make function code reusable across different environments. However, unlike the other options, values cannot be accessed centrally by multiple functions or services.

Lambda execution lifecycle

It is worth understanding the Lambda execution lifecycle, which has a number of stages. This helps to decide when to handle parameter retrieval within your Lambda code, including cache management.

Lambda execution lifecycle

Lambda execution lifecycle

When a Lambda function is invoked for the first time, or when Lambda is scaling to handle additional requests, an execution environment is created. The first phase in the execution environment’s lifecycle is initialization (Init), during which the code outside the main handler function runs. This is known as a cold start.

The execution environment can then be re-used for subsequent invocations. This means that the Init phase does not need to run again and only the main handler function code runs. This is known as a warm start.

An execution environment can only run a single invocation at a time. Concurrent invocations require additional execution environments. When a new execution environment is required, this starts a new Init phase, which runs the cold start process.

Caching and updates

Retrieving the parameter during Init

Retrieving the parameter during Init

Retrieving the parameter during Init

As Lambda execution environments are re-used, you can improve the performance and reduce the cost of retrieving an external parameter by caching the value. Writing the value to memory or the Lambda /tmp file system allows it to be available during subsequent invokes in the same execution environment.

This approach reduces API calls, as they are not made during every invocation. However, this can cause an out-of-date parameter and potentially different values across concurrent execution environments.

The following Python example shows how to retrieve a Parameter Store value outside the Lambda handler function during the Init phase.

import boto3
ssm = boto3.client('ssm', region_name='eu-west-1')
parameter = ssm.get_parameter(Name='/my/parameter')
def lambda_handler(event, context):
    # My function code...

Retrieving the parameter on every invocation

Retrieving the parameter on every invocation

Retrieving the parameter on every invocation

Another option is to retrieve the parameter during every invocation by making the API call inside the handler code. This keeps the value up to date, but can lead to higher retrieval costs and longer function durations due to the added API call during every invocation.

The following Python example shows this approach:

import boto3
ssm = boto3.client('ssm', region_name='eu-west-1')
def lambda_handler(event, context):
    parameter = ssm.get_parameter(Name='/my/parameter')
    # My function code...

Using AWS AppConfig Lambda extension

Using AWS AppConfig Lambda extension

Using AWS AppConfig Lambda extension

AppConfig allows you to retrieve and cache values from the service using a Lambda extension. The extension retrieves the values and makes them available via a local HTTP server. The Lambda function then queries the local HTTP server for the value. The AppConfig extension refreshes the values at a configurable poll interval, which defaults to 45 seconds. This improves performance and reduces costs, as the function only needs to make a local HTTP call.

The following Python code example shows how to access the cached parameters.

import urllib.request
def lambda_handler(event, context):
    url = f'http://localhost:2772/applications/application_name/environments/environment_name/configurations/configuration_name'
    config = urllib.request.urlopen(url).read()
    # My function code...

For caching secret values using a Lambda extension local HTTP cache and AWS Secrets Manager, see the AWS Prescriptive Guidance documentation.

Using Lambda Powertools for Python or Java

Lambda Powertools for Python or Lambda Powertools for Java contains utilities to manage parameter caching. You can configure the cache interval, which defaults to 5 seconds. Supported parameter stores include Secrets Manager, AWS Systems Manager Parameter Store, AppConfig, and DynamoDB. You also have the option to bring your own provider. The following example shows the Powertools for Python parameters utility retrieving a single value from Systems Manager Parameter Store.

from aws_lambda_powertools.utilities import parameters
def handler(event, context):
    value = parameters.get_parameter("/my/parameter")
    # My function code…

Security

Parameter security is a key consideration. You should evaluate encryption at rest, in-transit, private network access, and fine-grained permissions for each external parameter solution based on the use case.

All services highlighted in this post support server-side encryption at rest, and you can choose to use AWS KMS to manage your own keys. When accessing parameters using the AWS SDK and CLI tools, connections are encrypted in transit using TLS by default. You can force most to use TLS 1.2.

To access parameters from inside an Amazon Virtual Private Cloud (Amazon VPC) without internet access, you can use AWS PrivateLink and create a VPC endpoint for each service. All the services mentioned in this post support AWS PrivateLink connections.

Use AWS Identity and Access Management (IAM) policies to manage which users or roles can access specific parameters.

General guidance

This blog explores a number of considerations to make when using an external source for Lambda parameters. The correct solution is use-case dependent. There are some general guidelines when selecting an AWS service.

  • For general-purpose low-cost parameters, use AWS Systems Manager Parameter Store.
  • For single function, small parameters, use Lambda environment variables.
  • For secret values that require automatic rotation, use AWS Secrets Manager.
  • When you need a managed cache, use the AWS AppConfig Lambda extension or Lambda Powertools for Python/Java.
  • For items larger than 400 KB, use Amazon S3.
  • When access frequency is high, and low latency is required, use Amazon DynamoDB.

Conclusion

External parameters provide a central source of truth across distributed systems, allowing for efficient updates and code reuse. This blog post highlights a number of considerations when using external parameters with Lambda to help you choose the most appropriate solution for your use case.

Consider how you cache and reuse parameters inside the Lambda execution environment. Doing this correctly can help you reduce costs and improve the performance of your Lambda functions.

There are a number of services to choose from to store parameter data. These include DynamoDB, S3, Parameter Store, Secrets Manager, AppConfig, and Lambda environment variables. Each comes with a number of advantages, depending on the use case. This blog guidance, along with the AWS documentation and Service Quotas, can help you select the most appropriate service for your workload.

For more serverless learning resources, visit Serverless Land.

Sending events to Amazon EventBridge from AWS Organizations accounts

Post Syndicated from James Beswick original https://aws.amazon.com/blogs/compute/sending-events-to-amazon-eventbridge-from-aws-organizations-accounts/

This post is written by Elinisa Canameti, Associate Cloud Architect, and Iris Kraja, Associate Cloud Architect.

AWS Organizations provides a hierarchical grouping of multiple accounts. This helps larger projects establish a central managing system that governs the infrastructure. This can help with meeting budgetary and security requirements.

Amazon EventBridge is a serverless event-driven service that delivers events from customized applications, AWS services, or software as service (SaaS) applications to targets.

This post shows how to send events from multiple accounts in AWS Organizations to the management account using AWS CDK. This uses AWS CloudFormation StackSets to deploy the infrastructure in the member’s accounts.

Solution overview

This blog post describes a centralized event management strategy in a multi-account setup. The AWS accounts are organized by using AWS Organizations service into one management account and many member accounts.  You can explore and deploy the reference solution from this GitHub repository.

In the example, there are events from three different AWS services: Amazon CloudWatch, AWS Config, and Amazon GuardDuty. These are sent from the member accounts to the management account.

The management account publishes to an Amazon SNS topic, which sends emails when these events occur. AWS CloudFormation StackSets are created in the management account to deploy the infrastructure in the member’s accounts.

Overview

To fully automate the process of adding and removing accounts to the organization unit, an EventBridge rule is triggered:

  • When a new account is moved from and in the organization unit (MoveAccount event).
  • When an account is removed from the organization (RemoveAccountFromOrganization event).

These events invoke an AWS Lambda function, which updates the management EventBridge rule with the additional source accounts.

Prerequisites

  1. At least one AWS account, which represents the member’s account.
  2. An AWS account, which is the management account.
  3. Install AWS Command Line (CLI).
  4. Install AWS CDK.

Set up the environment with AWS Organizations

1. Login into the main account used to manage your organization.

2. Select the AWS Organizations service. Choose Create Organization. Once you create the organization, you receive a verification email.

3. After verification is completed, you can add other customer accounts into the organization.

4. AWS sends an invitation to each account added under the root account.

5. To see the invitation, log in to each of the accounts and search for AWS Organization service. You can find the invitation option listed on the side.

6. Accept the invitation from the root account.

7. Create an Organization Unit (OU) and place all the member accounts, which should propagate the events to the management account in this OU. The OU identifier is used later to deploy the StackSet.

8. Finally, enable trusted access in the organization to be able to create StackSets and deploy resources from the management account to the member accounts.

Management account

After the initial deployment of the solution in the management account, a StackSet is created. It’s configured to deploy the member account infrastructure in all the members of the organization unit.

When you add a new account in the organization unit, this StackSet automatically deploys the resources specified. Read the Member account section for more information about resources in this stack.

All events coming from the member account pass through the custom event bus in the management account. To allow other accounts to put events in the management account, the resource policy of the event bus grants permission to every account in the organization:

{
  "Version": "2012-10-17",
  "Statement": [{
    "Sid": "AllowAllAccountsInOrganizationToPutEvents",
    "Effect": "Allow",
    "Principal": "*",
    "Action": "events:PutEvents",
    "Resource": "arn:aws:events:us-east-1:xxxxxxxxxxxx:event-bus/CentralEventBus ",
    "Condition": {
      "StringEquals": {
        "aws:PrincipalOrgID": "o-xxxxxxxx"
      }
    }
  }]
}

You must configure EventBridge in the management account to handle the events coming from the member accounts. In this example, you send an email with the event information using SNS. Create a new rule with the following event pattern:

Event pattern

When you add or remove accounts in the organization unit, an EventBridge rule invokes a Lambda function to update the rule in the management account. This rule reacts to two events from the organization’s source: MoveAccount and RemoveAccountFromOrganization.

Event pattern

// EventBridge to trigger updateRuleFunction Lambda whenever a new account is added or removed from the organization.
new Rule(this, 'AWSOrganizationAccountMemberChangesRule', {
   ruleName: 'AWSOrganizationAccountMemberChangesRule',
   eventPattern: {
      source: ['aws.organizations'],
      detailType: ['AWS API Call via CloudTrail'],
      detail: {
        eventSource: ['organizations.amazonaws.com'],
        eventName: [
          'RemoveAccountFromOrganization',
          'MoveAccount'
        ]
      }
    },
    targets: [
      new LambdaFunction(updateRuleFunction)
    ]
});

Custom resource Lambda function

The custom resource Lambda function is executed to run custom logic whenever the CloudFormation stack is created, updated or deleted.

// Cloudformation Custom resource event
switch (event.RequestType) {
  case "Create":
    await putRule(accountIds);
    break;
  case "Update":
    await putRule(accountIds);
    break;
  case "Delete":
    await deleteRule()
}

async function putRule(accounts) {
  await eventBridgeClient.putRule({
    Name: rule.name,
    Description: rule.description,
    EventBusName: eventBusName,
    EventPattern: JSON.stringify({
      account: accounts,
      source: rule.sources
    })
  }).promise();
  await eventBridgeClient.putTargets({
    Rule: rule.name,
    Targets: [
      {
        Arn: snsTopicArn,
        Id: `snsTarget-${rule.name}`
      }
    ]
  }).promise();
}

Amazon EventBridge triggered Lambda function code

// New AWS Account moved to the organization unit of out it.
if (eventName === 'MoveAccount' || eventName === 'RemoveAccountFromOrganization') {
   await putRule(accountIds);
}

All events generated from the members’ accounts are then sent to a SNS topic, which has an email address as an endpoint. More sophisticated targets can be configured depending on the application’s needs. The targets include, but are not limited to: Step Functions state machine, Kinesis stream, SQS queue, etc.

Member account

In the member account, we use an Amazon EventBridge rule to route all the events coming from Amazon CloudWatch, AWS Config, and Amazon GuardDuty to the event bus created in the management account.

    const rule = {
      name: 'MemberEventBridgeRule',
      sources: ['aws.cloudwatch', 'aws.config', 'aws.guardduty'],
      description: 'The Rule propagates all Amazon CloudWatch Events, AWS Config Events, AWS Guardduty Events to the management account'
    }

    const cdkRule = new Rule(this, rule.name, {
      description: rule.description,
      ruleName: rule.name,
      eventPattern: {
        source: rule.sources,
      }
    });
    cdkRule.addTarget({
      bind(_rule: IRule, generatedTargetId: string): RuleTargetConfig {
        return {
          arn: `arn:aws:events:${process.env.REGION}:${process.env.CDK_MANAGEMENT_ACCOUNT}:event-bus/${eventBusName.valueAsString}`,
          id: generatedTargetId,
          role: publishingRole
        };
      }
    });

Deploying the solution

Bootstrap the management account:

npx cdk bootstrap  \ 
    --profile <MANAGEMENT ACCOUNT AWS PROFILE>  \ 
    --cloudformation-execution-policies arn:aws:iam::aws:policy/AdministratorAccess  \
    aws://<MANAGEMENT ACCOUNT ID>/<REGION>

To deploy the stack, use the cdk-deploy-to.sh script and pass as argument the management account ID, Region, AWS Organization ID, AWS Organization Unit ID and an accessible email address.

sh ./cdk-deploy-to.sh <MANAGEMENT ACCOUNT ID> <REGION> <AWS ORGANIZATION ID> <MEMBER ORGANIZATION UNIT ID> <EMAIL ADDRESS> AwsOrganizationsEventBridgeSetupManagementStack 

Make sure to subscribe to the SNS topic, when you receive an email after the Management stack is deployed.

After the deployment is completed, a stackset starts deploying the infrastructure to the members’ account. You can view this process in the AWS Management Console, under the AWS CloudFormation service in the management account as shown in the following image, or by logging in to the member account, under CloudFormation stacks.

Stack output

Testing the environment

This project deploys an Amazon CloudWatch billing alarm to the member accounts to test that we’re retrieving email notifications when this metric is in alarm. Using the member’s account credentials, run the following AWS CLI Command to change the alarm status to “In Alarm”:

aws cloudwatch set-alarm-state --alarm-name 'BillingAlarm' --state-value ALARM --state-reason "testing only" 

You receive emails at the email address configured as an endpoint on the Amazon SNS topic.

Conclusion

This blog post shows how to use AWS Organizations to organize your application’s accounts by using organization units and how to centralize event management using Amazon EventBridge across accounts in the organization. A fully automated solution is provided to ensure that adding new accounts to the organization unit is efficient.

For more serverless learning resources, visit https://serverlessland.com.

Running cross-account workflows with AWS Step Functions and Amazon API Gateway

Post Syndicated from James Beswick original https://aws.amazon.com/blogs/compute/running-cross-account-workflows-with-aws-step-functions-and-amazon-api-gateway/

This post is written by Hardik Vasa, Senior Solutions Architect, and Pratik Jain, Cloud Infrastructure Architect.

AWS Step Functions allow you to build scalable and distributed applications using state machines. With the launch of Step Functions nested workflows, you can start a Step Functions workflow from another workflow. However, this requires both workflows to be in the same account. There are many use cases that require you to orchestrate workflows across different AWS accounts from one central AWS account.

This blog post covers a solution to invoke Step Functions workflows cross account using Amazon API Gateway. With this, you can perform cross-account orchestration for scheduling, ETL automation, resource deployments, security audits, and log aggregations all from a central account.

Overview

The following architecture shows a Step Functions workflow in account A invoking an API Gateway endpoint in account B, and passing the payload in the API request. The API then invokes another Step Functions workflow in account B asynchronously.  The resource policy on the API allows you to restrict access to a specific Step Functions workflow to prevent anonymous access.

Cross-account workflows

You can extend this architecture to run workflows across multiple Regions or accounts. This blog post shows running cross-account workflows with two AWS accounts.

To invoke an API Gateway endpoint, you can use Step Functions AWS SDK service integrations. This approach allows users to build solutions and integrate services within a workflow without writing code.

The example demonstrates how to use the cross-account capability using two AWS example accounts:

  • Step Functions state machine A: Account ID #111111111111
  • API Gateway API and Step Functions state machine B: Account ID #222222222222

Setting up

Start by creating state machine A in the account #111111111111. Next, create the state machine in target account #222222222222, followed by the API Gateway REST API integrated to the state machine in the target account.

Account A: #111111111111

In this account, create a state machine, which includes a state that invokes an API hosted in a different account.

Create an IAM role for Step Functions

  1. Sign in to the IAM console in account #111111111111, and then choose Roles from left navigation pane
  2. Choose Create role.
  3. For the Select trusted entity, under AWS service, select Step Functions from the list, and then choose Next.
  4. On the Add permissions page, choose Next.
  5. On the Review page, enter StepFunctionsAPIGatewayRole for Role name, and then choose Create role.
  6. Create inline policies to allow Step Functions to access the API actions of the services you need to control. Navigate to the role that you created and select Add Permissions and then Create inline policy.
  7. Use the Visual editor or the JSON tab to create policies for your role. Enter the following:
    Service: Execute-API
    Action: Invoke
    Resource: All Resources
  8. Choose Review policy.
  9. Enter APIExecutePolicy for name and choose Create Policy.

Creating a state machine in source account

  1. Navigate to the Step Functions console in account #111111111111 and choose Create state machine
  2. Select Design your workflow visually, and the click Standard and then click Next
  3. On the design page, search for APIGateway:Invoke state, then drag and drop the block on the page:
    Step Functions designer console
  4. In the API Gateway Invoke section on the right panel, update the API Parameters with the following JSON policy:
     {
      "ApiEndpoint.$": "$.ApiUrl",
      "Method": "POST",
      "Stage": "dev",
      "Path": "/execution",
      "Headers": {},
      "RequestBody": {
       "input.$": "$.body",
       "stateMachineArn.$": "$.stateMachineArn"
      },
      "AuthType": "RESOURCE_POLICY"
    }

    These parameters indicate that the ApiEndpoint, payload (body) and stateMachineArn are dynamically assigned values based on input provided during workflow execution. You can also choose to assign these values statically, based on your use case.

  5. [Optional] You can also configure the API Gateway Invoke state to retry upon task failure by configuring the retries setting.
    Configuring State Machine
  6. Choose Next and then choose Next again. On the Specify state machine settings page:
    1. Enter a name for your state machine.
    2. Select Choose an existing role under Permissions and choose StepFunctionsAPIGatewayRole.
    3. Select Log Level ERROR.
  7. Choose Create State Machine.

After creating this state machine, copy the state machine ARN for later use.

Account B: #222222222222

In this account, create an API Gateway REST API that integrates with the target state machine and enables access to this state machine by means of a resource policy.

Creating a state machine in the target account

  1. Navigate to the Step Functions Console in account #222222222222 and choose Create State Machine.
  2. Under Choose authoring method select Design your workflow visually and the type as Standard.
  3. Choose Next.
  4. On the design page, search for Pass state. Drag and drop the state.
    State machine
  5. Choose Next.
  6. In the Review generated code page, choose Next and:
    1. Enter a name for the state machine.
    2. Select Create new role under the Permissions section.
    3. Select Log Level ERROR.
  7. Choose Create State Machine.

Once the state machine is created, copy the state machine ARN for later use.

Next, set up the API Gateway REST API, which acts as a gateway to accept requests from the state machine in account A. This integrates with the state machine you just created.

Create an IAM Role for API Gateway

Before creating the API Gateway API endpoint, you must give API Gateway permission to call Step Functions API actions:

  1. Sign in to the IAM console in account #222222222222 and choose Roles. Choose Create role.
  2. On the Select trusted entity page, under AWS service, select API Gateway from the list, and then choose Next.
  3. On the Select trusted entity page, choose Next
  4. On the Name, review, and create page, enter APIGatewayToStepFunctions for Role name, and then choose Create role
  5. Choose the name of your role and note the Role ARN:
    arn:aws:iam::222222222222:role/APIGatewayToStepFunctions
  6. Select the IAM role (APIGatewayToStepFunctions) you created.
  7. On the Permissions tab, choose Add permission and choose Attach Policies.
  8. Search for AWSStepFunctionsFullAccess, choose the policy, and then click Attach policy.

Creating the API Gateway API endpoint

After creating the IAM role, create a custom API Gateway API:

  1. Open the Amazon API Gateway console in account #222222222222.
  2. Click Create API. Under REST API choose Build.
  3. Enter StartExecutionAPI for the API name, and then choose Create API.
  4. On the Resources page of StartExecutionAPI, choose Actions, Create Resource.
  5. Enter execution for Resource Name, and then choose Create Resource.
  6. On the /execution Methods page, choose Actions, Create Method.
  7. From the list, choose POST, and then select the check mark.

Configure the integration for your API method

  1. On the /execution – POST – Setup page, for Integration Type, choose AWS Service. For AWS Region, choose a Region from the list. For Regions that currently support Step Functions, see Supported Regions.
  2. For AWS Service, choose Step Functions from the list.
  3. For HTTP Method, choose POST from the list. All Step Functions API actions use the HTTP POST method.
  4. For Action Type, choose Use action name.
  5. For Action, enter StartExecution.
  6. For Execution Role, enter the role ARN of the IAM role that you created earlier, as shown in the following example. The Integration Request configuration can be seen in the image below.
    arn:aws:iam::222222222222:role/APIGatewayToStepFunctions
    API Gateway integration request configuration
  7. Choose Save. The visual mapping between API Gateway and Step Functions is displayed on the /execution – POST – Method Execution page.
    API Gateway method configuration

After you configure your API, you can configure the resource policy to allow the invoke action from the cross-account Step Functions State Machine. For the resource policy to function in cross-account scenarios, you must also enable AWS IAM authorization on the API method.

Configure IAM authorization for your method

  1. On the /execution – POST method, navigate to the Method Request, and under the Authorization option, select AWS_IAM and save.
  2. In the left navigation pane, choose Resource Policy.
  3. Use this policy template to define and enter the resource policy for your API.
    {
        "Version": "2012-10-17",
        "Statement": [
            {
                "Effect": "Allow",
                "Principal": {
                    "Service": "states.amazonaws.com"
                },
                "Action": "execute-api:Invoke",
                "Resource": "execute-api:/*/*/*",
                "Condition": {
                    "StringEquals": {
                        "aws:SourceArn": [
                            "<SourceAccountStateMachineARN>"
                         ]
                    }
                }
            }
        ]
    }

    Note: You must replace <SourceAccountStateMachineARN> with the state machine ARN from account #111111111111 (account A).

  4. Choose Save.

Once the resource policy is configured, deploy the API to a stage.

Deploy the API

  1. In the left navigation pane, click Resources and choose Actions.
  2. From the Actions drop-down menu, choose Deploy API.
  3. In the Deploy API dialog box, choose [New Stage], enter dev in Stage name.
  4. Choose Deploy to deploy the API.

After deployment, capture the API ID, API Region, and the stage name. These are used as inputs during the execution phase.

Starting the workflow

To run the Step Functions workflow in account A, provide the following input:

{
   "ApiUrl": "<api_id>.execute-api.<region>.amazonaws.com",
   "stateMachineArn": "<stateMachineArn>",
   "body": "{\"someKey\":\"someValue\"}"
}

Start execution

Paste in the values of APIUrl and stateMachineArn from account B in the preceding input. Make sure the ApiUrl is in the format as shown.

AWS Serverless Application Model deployment

You can deploy the preceding solution architecture with the AWS Serverless Application Model (AWS SAM), which is an open-source framework for building serverless applications. During deployment, AWS SAM transforms and expands the syntax into AWS CloudFormation syntax, enabling you to build serverless applications faster.

Logging and monitoring

Logging and monitoring are vital for observability, measuring performance and audit purposes. Step Functions allows logging using CloudWatch Logs. Step Functions also automatically sends execution metrics to CloudWatch. You can learn more on monitoring Step Functions using CloudWatch.

Cleaning up

To avoid incurring any charges, delete all the resources that you have created in both the accounts. This would include deleting the Step Functions state machines and API Gateway API.

Conclusion

This blog post provides a step-by-step guide on securely invoking a cross-account Step Functions workflow from a central account using API Gateway as front end. This pattern can be extended to scale workflow executions across different Regions and accounts.

By using a centralized account to orchestrate workflows across AWS accounts, this can help prevent duplicating work in each account.

To learn more about serverless and AWS Step Functions, visit the Step Functions Developer Guide.

For more serverless learning resources, visit Serverless Land.

Implementing mutual TLS for Java-based AWS Lambda functions

Post Syndicated from Julian Wood original https://aws.amazon.com/blogs/compute/implementing-mutual-tls-for-java-based-aws-lambda-functions-2/

This post is written by Dhiraj Mahapatro, Senior Specialist SA, Serverless and Christian Mueller, Principal Solutions Architect

Modern secure applications establish network connections to other services through HTTPS. This ensures that the application connects to the right party and encrypts the data before sending it over the network.

You might not want unauthenticated users to connect to your service as a service provider. One solution to this requirement is to use mutual TLS (Transport Layer Security). Mutual TLS (or mTLS) is a common security mechanism that uses client certificates to add an authentication layer. This allows the service provider to verify the client’s identity cryptographically.

The purpose of mutual TLS in serverless

mTLS refers to two parties authenticating each other at the same time when establishing a connection. By default, the TLS protocol only proves the identity of the server to a client using X.509 certificates. With mTLS, a client must prove its identity to the server to communicate. This helps support a zero-trust policy to protect against adversaries like man-in-the-middle attacks.

mTLS is often used in business-to-business (B2B) applications and microservices, where interservice communication needs mutual authentication of parties. In Java, you see the following error when the server expects a certificate, but the client does not provide one:

PKIX path building failed: sun.security.provider.certpath.SunCertPathBuilderException: unable to find valid certification path to requested target

This blog post explains multiple ways to implement a Java-based AWS Lambda function that uses mTLS to authenticate with a third-party internal or external service. The sample application and this post explain the advantages and tradeoffs of each approach.

The KeyStore and TrustStore in Java

The TrustStore is used to store certificate public keys from a certificate authority (CA) or trusted servers. A client can verify the public certificate presented by the server in a TLS connection. A KeyStore stores private key and identity certificates that a specific application uses to prove the client’s identity.

The stores contain opposite certificates. The TrustStore holds the identification certificates that identify others, while the KeyStore holds the identification certificates that identify itself.

Overview

To start, you create certificates. For brevity, this sample application uses a script that uses OpenSSL and Java’s keytool for self-signed certificates from a CA. You store the generated keys in Java KeyStore and TrustStore. However, the best practice for creating and maintaining certificates and private CA is to use AWS Certificate Manager and AWS Certificate Manager Private Certificate Authority.

You can find the details of the script in the README file.

The following diagram shows the use of KeyStore and TrustStore in the client Lambda function, and the server running on Fargate.

KeyStore and TrustStore

KeyStore and TrustStore

The demo application contains several Lambda functions. The Lambda functions act as clients to services provided by Fargate behind an Amazon Network Load Balancer (NLB) running in a private Amazon VPC. Amazon Route 53 private hosted zones are used to resolve selected hostnames. You attach the Lambda functions to this VPC to resolve the hostnames for the NLB. To learn more, read how AWS Lambda uses Hyperplane elastic network interfaces to work with custom VPC.

The following examples refer to portions of InfrastructureStack.java and the implementation in the corresponding Lambda functions.

Providing a client certificate in a Lambda function artifact

The first option is to provide the KeyStore and TrustStore in a Lambda functions’ .zip artifact. You provide specific Java environment variables within the Lambda configuration to instruct the JVM to load and trust your provided Keystore and TrustStore. The JVM uses these settings instead of the Java Runtime Environment’s (JRE) default settings (use a stronger password for your use case):

"-Djavax.net.ssl.keyStore=./client_keystore_1.jks -Djavax.net.ssl.keyStorePassword=secret -Djavax.net.ssl.trustStore=./client_truststore.jks -Djavax.net.ssl.trustStorePassword=secret"

The JRE uses this KeyStore and TrustStore to build a default SSLContext. The HttpClient uses this default SSLContext to create a TLS connection to the backend service running on Fargate.

The following architecture diagram shows the sample implementation. It consists of an Amazon API Gateway endpoint with a Lambda proxy integration that calls a backend Fargate service running behind an NLB.

Providing a client certificate in a Lambda function artifact

Providing a client certificate in a Lambda function artifact

This is a basic approach for a prototype. However, it has a few shortcomings related to security and separation of duties. The KeyStore contains the private key, and the password is exposed to the source code management (SCM) system, which is a security concern. Also, it is the Lambda function owner’s responsibility to update the certificate before its expiration. You can address these concerns about separation of duties with the following approach.

Providing the client certificate in a Lambda layer

In this approach, you separate the responsibility between two entities. The Lambda function owner and the KeyStore and TrustStore owner.

The KeyStore and TrustStore owner provides the certificates securely to the function developer who may be working in a separate AWS environment. For simplicity, the demo application uses the same AWS account.

The KeyStore and TrustStore owner achieves this by using AWS Lambda layers. The KeyStore and TrustStore owner packages and uploads the certificates as a Lambda layer and only allows access to authorized functions. The Lambda function owner does not access the KeyStore or manage its lifecycle. The KeyStore and TrustStore owner’s responsibility is to release a new version of this layer when necessary and inform users.

Providing the client certificate in a Lambda layer

Providing the client certificate in a Lambda layer

The KeyStore and TrustStore are extracted under the path /opt as part of including a Lambda layer. The Lambda function can now use the layer as:

Function lambdaLayerFunction = new Function(this, "LambdaLayerFunction", FunctionProps.builder()
  .functionName("lambda-layer")
  .handler("com.amazon.aws.example.AppClient::handleRequest")
  .runtime(Runtime.JAVA_11)
  .architecture(ARM_64)
  .layers(singletonList(lambdaLayerForService1cert))
  .vpc(vpc)
  .code(Code.fromAsset("../software/2-lambda-using-separate-layer/target/lambda-using-separate-layer.jar"))
  .memorySize(1024)
  .environment(Map.of(
    "BACKEND_SERVICE_1_HOST_NAME", BACKEND_SERVICE_1_HOST_NAME,
    "JAVA_TOOL_OPTIONS", "-Djavax.net.ssl.keyStore=/opt/client_keystore_1.jks -Djavax.net.ssl.keyStorePassword=secret -Djavax.net.ssl.trustStore=/opt/client_truststore.jks -Djavax.net.ssl.trustStorePassword=secret"
  ))
  .timeout(Duration.seconds(10))
  .logRetention(RetentionDays.ONE_WEEK)
  .build());

The KeyStore and TrustStore passwords are still supplied as environment variables and stored in the SCM system, which is against best practices. You can address this with the next approach.

Storing passwords securely in AWS Systems Manager Parameter Store

AWS Systems Manager Parameter Store provides secure, hierarchical storage for configuration data and secret management. You can use Parameter Store to store the KeyStore and TrustStore passwords instead of environment variables. The Lambda function uses an IAM policy to access Parameter Store and gets the passwords as a secure string during the Lambda initialization phase.

With this approach, you build a custom SSLContext after retrieving the KeyStore and TrustStore passwords from the Parameter Store. Once you create SSLContext, provide that to the HttpClient you use to connect with the backend service:

HttpClient client = HttpClient.newBuilder()
  .version(HttpClient.Version.HTTP_2)
  .connectTimeout(Duration.ofSeconds(5))
  .sslContext(sslContext)
  .build();

You can also use a VPC interface endpoint for AWS Systems Manager to keep the traffic from your Lambda function to Parameter Store internal to AWS. The following diagram shows the interaction between AWS Lambda and Parameter Store.

Storing passwords securely in AWS Systems Manager Parameter Store

Storing passwords securely in AWS Systems Manager Parameter Store

This approach works for Lambda functions interacting with a single backend service requiring mTLS. However, it is common in a modern microservices architecture to integrate with multiple backend services. Sometimes, these services require a client to assume different identities by using different KeyStores. The next approach explains how to handle the multiple services scenario.

Providing multiple client certificates in Lambda layers

You can provide multiple KeyStore and TrustStore pairs within multiple Lambda layers. All layers attached to a function are merged when provisioning the function. Ensure your KeyStore and TrustStore names are unique. A Lambda function can use up to five Lambda layers.

Similar to the previous approach, you load multiple KeyStores and TrustStores to construct multiple SSLContext objects. You abstract the common logic to create an SSLContext object in another Lambda layer. Now, the Lambda function calling two different backend services uses 3 Lambda layers:

  • Lambda layer for backend service 1 (under /opt)
  • Lambda layer for backend service 2 (under /opt)
  • Lambda layer for the SSL utility that takes the KeyStore, TrustStore, and their passwords to return an SSLContext object

SSL utility Lambda layer provides the getSSLContext default method in a Java interface. The Lambda function implements this interface. Now, you create a dedicated HTTP client per service.

The following diagram shows your final architecture:

Providing multiple client certificates in Lambda layers

Providing multiple client certificates in Lambda layers

Prerequisites

To run the sample application, you need:

  1. CDK v2
  2. Java 11
  3. AWS CLI
  4. Docker
  5. jq

To build and provision the stack:

  1. Clone the git repository.
  2. git clone https://github.com/aws-samples/serverless-mutual-tls.git
    cd serverless-mutual-tls
  3. Create the two root CA’s, client, and server certificates.
  4. ./scripts/1-create-certificates.sh
  5. Build and package all examples.
  6. ./scripts/2-build_and_package-functions.sh
  7. Provision the AWS infrastructure (make sure that Docker is running).
  8. ./scripts/3-provision-infrastructure.sh

Verification

Verify that the API endpoints are working and using mTLS by running these commands from the base directory:

export API_ENDPOINT=$(cat infrastructure/target/outputs.json | jq -r '.LambdaMutualTLS.apiendpoint')

To see the error when mTLS is not used in the Lambda function, run:

curl -i $API_ENDPOINT/lambda-no-mtls

The preceding curl command responds with an HTTP status code 500 and plain body as:

PKIX path building failed: sun.security.provider.certpath.SunCertPathBuilderException: unable to find valid certification path to requested target

For successful usage of mTLS as shown in the previous use cases, run:

curl -i $API_ENDPOINT/lambda-only
curl -i $API_ENDPOINT/lambda-layer
curl -i $API_ENDPOINT/lambda-parameter-store
curl -i $API_ENDPOINT/lambda-multiple-certificates

The last curl command responds with an HTTP status code 200 and body as:

[
 {"hello": "from backend service 1"}, 
 {"hello": "from backend service 2"}
]

Additional security

You can add additional controls via Java environment variables. Compliance standards like PCI DSS in financial services require customers to exercise more control over the underlying negotiated protocol and ciphers.

Some of the useful Java environment variables to troubleshoot SSL/TLS connectivity issues in a Lambda function are:

-Djavax.net.debug=all
-Djavax.net.debug=ssl,handshake
-Djavax.net.debug=ssl:handshake:verbose:keymanager:trustmanager
-Djavax.net.debug=ssl:record:plaintext

You can enforce a specific minimum version of TLS (for example, v1.3) to meet regulatory requirements:

-Dhttps.protocols=TLSv1.3

Alternatively, programmatically construct your SSLContext inside the Lambda function:

SSLContext sslContext = SSLContext.getInstance("TLSv1.3");

You can also use the following Java environment variable to limit the use of weak cipher suites or unapproved algorithms, and explicitly provide the supported cipher suites:

-Dhttps.cipherSuites=TLS_ECDHE_ECDSA_WITH_AES_128_GCM_SHA256,TLS_ECDHE_ECDSA_WITH_AES_256_GCM_SHA384,TLS_ECDHE_ECDSA_WITH_AES_128_CBC_SHA,TLS_ECDHE_ECDSA_WITH_AES_256_CBC_SHA,TLS_ECDHE_ECDSA_WITH_AES_128_CBC_SHA256,TLS_ECDHE_ECDSA_WITH_AES_256_CBC_SHA384,TLS_ECDHE_RSA_WITH_AES_128_GCM_SHA256,TLS_ECDHE_RSA_WITH_AES_256_GCM_SHA384,TLS_ECDHE_RSA_WITH_AES_128_CBC_SHA,TLS_ECDHE_RSA_WITH_AES_256_CBC_SHA,TLS_ECDHE_RSA_WITH_AES_128_CBC_SHA256,TLS_ECDHE_RSA_WITH_AES_256_CBC_SHA384,TLS_DHE_RSA_WITH_AES_128_GCM_SHA256,TLS_DHE_RSA_WITH_AES_256_GCM_SHA384,TLS_DHE_RSA_WITH_AES_128_CBC_SHA,TLS_DHE_RSA_WITH_AES_256_CBC_SHA,TLS_DHE_RSA_WITH_AES_128_CBC_SHA256,TLS_DHE_RSA_WITH_AES_256_CBC_SHA256

You achieve the same programmatically with the following code snippet:

httpClient = HttpClient.newBuilder()
  .version(HttpClient.Version.HTTP_2)
  .connectTimeout(Duration.ofSeconds(5))
  .sslContext(sslContext)
  .sslParameters(new SSLParameters(new String[]{
    "TLS_ECDHE_ECDSA_WITH_AES_128_GCM_SHA256",
    "TLS_ECDHE_ECDSA_WITH_AES_256_GCM_SHA384",
    "TLS_ECDHE_ECDSA_WITH_AES_128_CBC_SHA",
    ………
  }))
  .build();

Cleaning up

The stack creates a custom VPC and other related resources. Clean up after usage to avoid the ongoing cost of running these services. To clean up the infrastructure and the self-generated certificates, run:

./scripts/4-delete-certificates.sh
./scripts/5-deprovision-infrastructure.sh

Conclusion

mTLS in Java using KeyStore and TrustStore is a well-established approach for using client certificates to add an authentication layer. This blog highlights the four approaches that you can take to implement mTLS using Java-based Lambda functions.

Each approach addresses the separation of concerns required while implementing mTLS with additional security features. Use an approach that suits your needs, organizational security best practices, and enterprise requirements. Refer to the demo application for additional details.

For more serverless learning resources, visit Serverless Land.

Using organization IDs as principals in Lambda resource policies

Post Syndicated from Eric Johnson original https://aws.amazon.com/blogs/compute/using-organization-ids-as-principals-in-lambda-resource-policies/

This post is written by Rahul Popat, Specialist SA, Serverless and Dhiraj Mahapatro, Sr. Specialist SA, Serverless

AWS Lambda is a serverless compute service that runs your code in response to events and automatically manages the underlying compute resources for you. These events may include changes in state or an update, such as a user placing an item in a shopping cart on an ecommerce website. You can use AWS Lambda to extend other AWS services with custom logic, or create your own backend services that operate at AWS scale, performance, and security.

You may have multiple AWS accounts for your application development, but may want to keep few common functionalities in one centralized account. For example, have user authentication service in a centralized account and grant permission to other accounts to access it using AWS Lambda.

Today, AWS Lambda launches improvements to resource-based policies, which makes it easier for you to control access to a Lambda function by using the identifier of the AWS Organizations as a condition in your resource policy. The service expands the use of the resource policy to enable granting cross-account access at the organization level instead of granting explicit permissions for each individual account within an organization.

Before this release, the centralized account had to grant explicit permissions to all other AWS accounts to use the Lambda function. You had to specify each account as a principal in the resource-based policy explicitly. While that remains a viable option, managing access for individual accounts using such resource policy becomes an operational overhead when the number of accounts grows within your organization.

In this post, I walk through the details of the new condition and show you how to restrict access to only principals in your organization for accessing a Lambda function. You can also restrict access to a particular alias and version of the Lambda function with a similar approach.

Overview

For AWS Lambda function, you grant permissions using resource-based policies to specify the accounts and principals that can access it and what actions they can perform on it. Now, you can use a new condition keyaws:PrincipalOrgID, in these policies to require any principals accessing your Lambda function to be from an account (including the management account) within an organization. For example, let’s say you have a resource-based policy for a Lambda function and you want to restrict access to only principals from AWS accounts under a particular AWS Organization. To accomplish this, you can define the aws:PrincipalOrgID condition and set the value to your Organization ID in the resource-based policy. Your organization ID is what sets the access control on your Lambda function. When you use this condition, policy permissions apply when you add new accounts to this organization without requiring an update to the policy, thus reducing the operational overhead of updating the policy every time you add a new account.

Condition concepts

Before I introduce the new condition, let’s review the condition element of an IAM policy. A condition is an optional IAM policy element that you can use to specify special circumstances under which the policy grants or denies permission. A condition includes a condition key, operator, and value for the condition. There are two types of conditions: service-specific conditions and global conditions. Service-specific conditions are specific to certain actions in an AWS service. For example, the condition key ec2:InstanceType supports specific EC2 actions. Global conditions support all actions across all AWS services.

AWS:PrincipalOrgID condition key

You can use this condition key to apply a filter to the principal element of a resource-based policy. You can use any string operator, such as StringLike, with this condition and specify the AWS organization ID as its value.

Condition key Description Operators Value
aws:PrincipalOrgID Validates if the principal accessing the resource belongs to an account in your organization. All string operators Any AWS Organization ID

Restricting Lambda function access to only principals from a particular organization

Consider an example where you want to give specific IAM principals in your organization direct access to a Lambda function that logs to the Amazon CloudWatch.

Step 1 – Prerequisites

Once you have an organization and accounts setup, on the AWS Organization looks like this:

Organization accounts example

Organization accounts example

This example has two accounts in the AWS Organization, the Management Account, and the MainApp Account. Make a note of the Organization ID from the left menu. You use this to set up a resource-based policy for the Lambda function.

Step 2 – Create resource-based policy for a Lambda function that you want to restrict access to

Now you want to restrict the Lambda function’s invocation to principals from accounts that are member of your organization. To do so, write and attach a resource-based policy for the Lambda function:

{
  "Version": "2012-10-17",
  "Id": "default",
  "Statement": [
    {
      "Sid": "org-level-permission",
      "Effect": "Allow",
      "Principal": "*",
      "Action": "lambda:InvokeFunction",
      "Resource": "arn:aws:lambda:<REGION>:<ACCOUNT_ID >:function:<FUNCTION_NAME>",
      "Condition": {
        "StringEquals": {
          "aws:PrincipalOrgID": "o-sabhong3hu"
        }
      }
    }
  ]
}

In this policy, I specify Principal as *. This means that all users in the organization ‘o-sabhong3hu’ get function invocation permissions. If you specify an AWS account or role as the principal, then only that principal gets function invocation permissions, but only if they are also part of the ‘o-sabhong3hu’ organization.

Next, I add lambda:InvokeFunction as the Action and the ARN of the Lambda function as the resource to grant invoke permissions to the Lambda function. Finally, I add the new condition key aws:PrincipalOrgID and specify an Organization ID in the Condition element of the statement to make sure only the principals from the accounts in the organization can invoke the Lambda function.

You could also use the AWS Management Console to create a resource-based policy. Go to Lambda function page, click on the Configuration tab. Select Permissions from the left menu. Choose Add Permissions and fill in the required details. Scroll to the bottom and expand the Principal organization ID – optional submenu and enter your organization ID in the text box labeled as PrincipalOrgID and choose Save.

Add permissions

Add permissions

Step 3 – Testing

The Lambda function ‘LogOrganizationEvents’ is in your Management Account. You configured a resource-based policy to allow all the principals in your organization to invoke your Lambda function. Now, invoke the Lambda function from another account within your organization.

Sign in to the MainApp Account, which is another member account in the same organization. Open AWS CloudShell from the AWS Management Console. Invoke the Lambda function ‘LogOrganizationEvents’ from the terminal, as shown below. You receive the response status code of 200, which means success. Learn more on how to invoke Lambda function from AWS CLI.

Console example of access

Console example of access

Conclusion

You can now use the aws:PrincipalOrgID condition key in your resource-based policies to restrict access more easily to IAM principals only from accounts within an AWS Organization. For more information about this global condition key and policy examples using aws:PrincipalOrgID, read the IAM documentation.

If you have questions about or suggestions for this solution, start a new thread on the AWS Lambda or contact AWS Support.

For more information, visit Serverless Land.

Building serverless multi-Region WebSocket APIs

Post Syndicated from James Beswick original https://aws.amazon.com/blogs/compute/building-serverless-multi-region-websocket-apis/

This post is written by Ben Freiberg, Senior Solutions Architect, and Marcus Ziller, Senior Solutions Architect.

Many modern web applications use the WebSocket protocol for bidirectional communication between frontend clients and backends. The fastest way to get started with WebSockets on AWS is to use WebSocket APIs powered by Amazon API Gateway.

This serverless solution allows customers to get started with WebSockets without having the complexity of running a WebSocket API. WebSocket APIs are a Regional service bound to a single Region, which may affect latency and resilience for some workloads.

This post shows how to build a multi-regional WebSocket API for a global real-time chat application.

Overview of the solution

This solution uses AWS Cloud Development Kit (CDK). This is an open source software development framework to model and provision cloud application resources. Using the CDK can reduce the complexity and amount of code needed to automate the deployment of resources.

This solution uses AWS LambdaAmazon API Gateway, Amazon DynamoDB, and Amazon EventBridge.

This diagram outlines the workflow implemented in this blog:

Solution architecture

  1. Users across different Regions establish WebSocket connections to an API endpoint in a Region. For every connection, the respective API Gateway invokes the ConnectionHandler Lambda function, which stores the connection details in a Regional DynamoDB table.
  2. User A sends a chat message via the established WebSocket connection. The API Gateway invokes the ClientMessageHandler Lambda function with the received message. The Lambda function publishes an event to an EventBridge event bus that contains the message and the connectionId of the message sender.
  3. The event bus invokes the EventBusMessageHandler Lambda function, which pushes the received message to all other clients connected in the Region. It also replicates the event into us-west-1.
  4. EventBusMessageHandler in us-west-1 receives and send it out to all connected clients in the Region via the same mechanism.

Walkthrough

The following walkthrough explains the required components, their interactions and how the provisioning can be automated via CDK.

For this walkthrough, you need:

Checkout and deploy the sample stack:

  1. After completing the prerequisites, clone the associated GitHub repository by running the following command in a local directory:
    git clone [email protected]/aws-samples/multi-region-websocket-api
  2. Open the repository in your preferred editor and review the contents of the src and cdk folder.
  3. Follows the instructions in the README.md to deploy the stack.

The following components are deployed in your account for every specified Region. If you didn’t change the default, the Regions are eu-west-1 and us-west-1.

API Gateway for WebSocket connectivity

API Gateway is a fully managed service that makes it easier for developers to create, publish, maintain, monitor, and secure APIs at any scale. APIs act as the “front door” for applications to access data, business logic, or functionality from your backend services. Using API Gateway, you can create RESTful APIs and WebSocket APIs that enable real-time two-way communication applications.

WebSocket APIs serve as a stateful frontend for an AWS service, in this case AWS Lambda. A Lambda function is used for the WebSocket endpoint that maintains a persistent connection to handle message transfer between the backend service and clients. The WebSocket API invokes the backend based on the content of the messages that it receives from client apps.

There are three predefined routes that can be used: $connect, $disconnect, and $default.

const connectionLambda = new lambda.Function(..);
const requestHandlerLambda = new lambda.Function(..);

const webSocketApi = new apigwv2.WebSocketApi(this, 'WebsocketApi', {
      apiName: 'WebSocketApi',
      description: 'A regional Websocket API for the multi-region chat application sample',
      connectRouteOptions: {
        integration: new WebSocketLambdaIntegration('connectionIntegration', connectionLambda.fn),
      },
      disconnectRouteOptions: {
        integration: new WebSocketLambdaIntegration('disconnectIntegration', connectionLambda.fn),
      },
      defaultRouteOptions: {
        integration: new WebSocketLambdaIntegration('defaultIntegration', requestHandlerLambda.fn),
      },
});

const websocketStage = new apigwv2.WebSocketStage(this, 'WebsocketStage', {
      webSocketApi,
      stageName: 'dev',
      autoDeploy: true,
});

$connect and $disconnect are used by clients to initiate or end a connection with the API Gateway. Each route has a backend integration that is invoked for the respective event. In this example, a Lambda function gets invoked with details of the event. The following code snippet shows how you can track each of the connected clients in an Amazon DynamoDB table. Amazon DynamoDB is a fully managed, serverless, key-value NoSQL database designed to run high-performance applications at any scale.

// Simplified example for brevity
// Visit GitHub repository for complete code

function connectionHandler(event: APIGatewayEvent) {
  if (eventType === 'CONNECT') {
    await dynamoDbClient.put({
      Item: {
        connectionId,
        chatId: 'DEFAULT',
        ttl: Math.round(Date.now() / 1000 + 3600) // TTL of one hour
      },
    });
  }

  if (eventType === 'DISCONNECT') {
    await dynamoDbClient.delete({
      TableName: process.env.TABLE_NAME!,
      Key: {
        connectionId,
        chatId: 'DEFAULT',
      },
    })
  }

  return ..
}

The $default route is used when the route selection expression produces a value that does not match any of the other route keys in your API routes. For this post, we use it as a default route for all messages sent to the API Gateway by a client. For each message, a Lambda function is invoked with an event of the following format.

{
     "requestContext": {
         "routeKey": "$default",
         "messageId": "GXLKJfX4FiACG1w=",
         "eventType": "MESSAGE",
         "messageDirection": "IN",
         "connectionId": "GXLKAfX1FiACG1w=",
         "apiId": "3m4dnp0wy4",
         "requestTimeEpoch": 1632812813588,
         // some fields omitted for brevity   
         },
     "body": "{ .. }",
     "isBase64Encoded": false
}

EventBridge for cross-Region message distribution

The Lambda function uses the AWS SDK to publish the message data in event.body to EventBridge. EventBridge is a serverless event bus that makes it easier to build event-driven applications at scale. It delivers a stream of real-time data from event sources to targets. You can set up routing rules to determine where to send your data to build application architectures that react in real time to your data sources with event publishers and consumers decoupled.

The following CDK code defines routing rules on the event bus that is applied for every event with source ChatApplication and detail type ChatMessageReceived.

    new events.Rule(this, 'ProcessRequest', {
      eventBus,
      enabled: true,
      ruleName: 'ProcessChatMessage',
      description: 'Invokes a Lambda function for each chat message to push the event via websocket and replicates the event to event buses in other regions.',
      eventPattern: {
        detailType: ['ChatMessageReceived'],
        source: ['ChatApplication'],
      },
      targets: [
        new LambdaFunction(processLambda.fn),
        ...additionalEventBuses,
      ],
    });

Intra-Region message delivery

The first target is a Lambda function that sends the message out to clients connected to the API Gateway endpoint in the same Region where the message was received.

To that end, the function first uses the AWS SDK to query DynamoDB for active connections for a given chatId in its AWS Region. It then removes the connectionId of the message sender from the list and calls postToConnection(..) for the remaining connection ids to push the message to the respective clients.

export async function handler(event: EventBridgeEvent<'EventResponse', ResponseEventDetails>): Promise<any> {
  const connections = await getConnections(event.detail.chatId);
  connections
    .filter((cId: string) => cId !== event.detail.senderConnectionId)
    .map((connectionId: string) => gatewayClient.postToConnection({
      ConnectionId: connectionId,
      Data: JSON.stringify({ data: event.detail.message }),
    })
}

Inter-Region message delivery

To send messages across Regions, this solution uses EventBridge’s cross-Region event routing capability. Cross-Region event routing allows you to replicate events across Regions by adding an event bus in another Region as the target of a rule. In this case, the architecture is a mesh of event buses in all Regions so that events in every event bus are replicated to all other Regions.

A message sent to an event bus in a Region is replicated to the event buses in the other Regions and trigger the intra-region workflow that I described earlier. However, to avoid infinite loops the EventBridge service implements circuit breaker logic that prevents infinite loops of event buses sending messages back and forth. Thus, only ProcessRequestLambda is invoked as a rule target. The function receives the message via its invocation event and looks up the active WebSocket connections in its Region. It then pushes the message to all relevant clients.

This process happens in every Region so that the initial message is delivered to every connected client with at-least-once semantics.

Improving resilience

The architecture of this solution is resilient to service disruptions in a Region. In such an event, all clients connected to the affected Region reconnect to an unaffected Region and continue to receive events. Although this isn’t covered in the CDK code, you can also set up Amazon Route 53 health checks to automate DNS failover to a healthy Region.

Testing the workflow

You can use any WebSocket client to test the application. Here you can see three clients, one connected to the us-west-1 API Gateway endpoint and two connected to the eu-west-1 endpoint. Each one sends a message to the application and every other client receives it, regardless of the Region it is connected to.

Testing

Testing

Testing

Cleaning up

Most services used in this blog post have an allowance in the AWS Free Tier. Be sure to check potential costs of this solution and delete the stack if you don’t need it anymore. Instructions on how to do this are included inside the README in the repository.

Conclusion

This blog post shows how to use the AWS serverless platform to build a multi-regional chat application over WebSockets. With the cross-Region event routing of EventBridge the architecture is resilient as well as extensible.

For more resources on how to get the most out of the AWS serverless platform, visit Serverless Land.

Composing AWS Step Functions to abstract polling of asynchronous services

Post Syndicated from James Beswick original https://aws.amazon.com/blogs/compute/composing-aws-step-functions-to-abstract-polling-of-asynchronous-services/

This post is written by Nicolas Jacob Baer, Senior Cloud Application Architect, Goeksel Sarikaya, Senior Cloud Application Architect, and Shukhrat Khodjaev, Engagement Manager, AWS ProServe.

AWS Step Functions workflows can use the three main integration patterns when calling AWS services. A common integration pattern is to call a service and wait for a response before proceeding to the next step.

While this works well with AWS services, there is no built-in support for third-party, on-premises, or custom-built services running on AWS. When a workflow integrates with such a service in an asynchronous fashion, it requires a primary step to invoke the service. There are additional steps to wait and check the result, and handle possible error scenarios, retries, and fallbacks.

Although this approach may work well for small workflows, it does not scale to multiple interactions in different steps of the workflow and becomes repetitive. This may result in a complex workflow, which makes it difficult to build, test, and modify. In addition, large workflows with many repeated steps are more difficult to troubleshoot and understand.

This post demonstrates how to decompose the custom service integration by nesting Step Functions workflows. One basic workflow is dedicated to handling the asynchronous communication that offers modularity. It can be re-used as a building block. Another workflow is used to handle the main process by invoking the nested workflow for service interaction, where all the repeated steps are now hidden in multiple executions of the nested workflow.

Overview

Consider a custom service that provides an asynchronous interface, where an action is initially triggered by an API call. After a few minutes, the result is available to be polled by the caller. The following diagram shows a basic workflow interacting with this custom service that encapsulates the service communication in a workflow:

Workflow diagram

  1. Call Custom Service API – calls a custom service, in this case through an API. Potentially, this could use a service integration or use AWS Lambda if there is custom code.
  2. Wait – waits for the service to prepare a result. This depends on the service that the workflow is interacting with, and could vary from seconds to days to months.
  3. Poll Result – attempts to poll the result from the custom service.
  4. Choice – repeats the polling in case the result was not available yet, move on to failed or success state if result was retrieved. In addition, a timeout should be in place here in case the result is not available within the expected time range. Otherwise, this might lead to an infinite loop.
  5. Fail – fails the workflow if a timeout or a threshold for the number of retries with error conditions is reached.
  6. Transform Result – transforms the result or adds additional meta information to provide further information to the caller (for example, runtime or retries).
  7. Success – finishes the workflow successfully.

If you build a larger workflow that interacts with this custom service in multiple steps in a workflow, you can reduce the complexity by using the Step Functions integration to call the nested workflow with a Wait state.

An illustration of this can be found in the following diagram, where the nested stack is called three times sequentially. Likewise, you can build a more complex workflow that adds additional logic through more steps or interacts with a custom service in parallel. The polling logic is hidden in the nested workflow.

Nested workflow

Walkthrough

To get started with AWS Step Functions and Amazon API Gateway using the AWS Management Console:

  1. Go to AWS Step Functions in the AWS Management Console.
  2. Choose Run a sample project and choose Start a workflow within a workflow.
    Defining state machine
  3. Scroll down to the sample projects, which are defined using Amazon States Language (ASL).
    Definition
  4. Review the example definition, then choose Next.
  5. Choose Deploy resources. The deployment can take up to 10 minutes. After deploying the resources, you can edit the sample ASL code to define steps in the state machine.
    Deploy resources
  6. The deployment creates two state machines: NestingPatternMainStateMachine and NestingPatternAnotherStateMachine. NestingPatternMainStateMachine orchestrates the other nested state machines sequentially or in parallel.
    Two state machines
  7. Select a state machine, then choose Edit to edit the workflow. In the NestingPatternMainStateMachine, the first state triggers the nested workflow NestingPatternAnotherStateMachine. You can pass necessary parameters to the nested workflow by using Parameters and Input as shown in the example below with Parameter1 and Parameter2. Once the first nested workflow completes successfully, the second nested workflow is triggered. If the result of the first nested workflow is not successful, the NestingPatternMainStateMachine fails with the Fail state.
    Editing state machine
  8. Select nested workflow NestingPatternAnotherStateMachine, and then select Edit to add AWS Lambda functions to start a job and poll the state of the jobs. This can be any asynchronous job that needs to be polled to query its state. Based on expected job duration, the Wait state can be configured for 10-20 seconds. If the workflow is successful, the main workflow returns a successful result.
    Edited next state machine

Use cases and limitations

This approach allows encapsulation of workflows consisting of multiple sequential or parallel services. Therefore, it provides flexibility that can be used for different use cases. Services can be part of distributed applications, part of automated business processes, big data or machine learning pipelines using AWS services.

Each nested workflow is responsible for an individual step in the main workflow, providing flexibility and scalability. Hundreds of nested workflows can run and be monitored in parallel with the main workflow (see AWS Step Functions Service Quotas).

The approach described here is not applicable for custom service interactions faster than 1 second, since it is the minimum configurable value for a wait step.

Nested workflow encapsulation

Similar to the principle of encapsulation in object-oriented programming, you can use a nested workflow for different interactions with a custom service. You can dynamically pass input parameters to the nested workflow during workflow execution and receive return values. This way, you can define a clear interface between the nested workflow and the parent workflow with different actions and integrations. Depending on the use-case, a custom service may offer a variety of different actions that must be integrated into workflows that run in Step Functions, but can all be combined into a single workflow.

Debugging and tracing

Additionally, debugging and tracing can be done through Execution Event History in the State Machine Management Console. In the Resource column, you can find a link to the executed nested step function. It can be debugged in case of any error in the nested Step Functions workflow.

Execution event history

However, debugging can be challenging in case of multiple parallel nested workflows. In such cases, AWS X-Ray can be enabled to visualize the components of a state machine, identify performance bottlenecks, and troubleshoot requests that have led to an error.

To enable AWS X-Ray in AWS Step Functions:

  1. Open the Step Functions console and choose Edit state machine.
  2. Scroll down to Tracing settings, and Choose Enable X-Ray tracing.

Tracing

For detailed information regarding AWS X-Ray and AWS Step Functions please refer to the following documentation: https://docs.aws.amazon.com/step-functions/latest/dg/concepts-xray-tracing.html

Conclusion

This blog post describes how to compose a nested Step Functions workflow, which asynchronously manages a custom service using the polling mechanism.

To learn more about how to use AWS Step Functions workflows for serverless microservices orchestration, visit Serverless Land.