Tag Archives: Amazon CloudFront

Protect public clients for Amazon Cognito by using an Amazon CloudFront proxy

Post Syndicated from Mahmoud Matouk original https://aws.amazon.com/blogs/security/protect-public-clients-for-amazon-cognito-by-using-an-amazon-cloudfront-proxy/

In Amazon Cognito user pools, an app client is an entity that has permission to call unauthenticated API operations (that is, operations that don’t have an authenticated user), such as operations to sign up, sign in, and handle forgotten passwords. In this post, I show you a solution designed to protect these API operations from unwanted bots and distributed denial of service (DDoS) attacks.

To protect Amazon Cognito services and customers, Amazon Cognito applies request rate quotas on all API categories, and throttles rapid calls that exceed the assigned quota. For that reason, you must ensure your applications control who can call unauthenticated API operations and at what rate, so that user calls aren’t throttled because of unwanted or misconfigured clients that call these API operations at high rates.

App clients fall into one of two categories: public clients (used from web or mobile applications) and private or confidential clients (used from a secured backend). Public clients shouldn’t have secrets, because it isn’t possible to protect secrets in these types of clients. Confidential clients, on the other hand, use a secret to authorize calls to unauthenticated operations. In these clients, the secret can be protected in the backend.

The benefit of using a confidential app client with a secret in Amazon Cognito is that unauthenticated API operations will accept only the calls that include the secret hash for this client, and will drop calls with an invalid or missing secret. In this way, you control who calls these API operations. Public applications can use a confidential app client by implementing a lightweight proxy layer in front of the Amazon Cognito endpoint, and then using this proxy to add a secret hash in relevant requests before passing the requests to Amazon Cognito.

There are multiple options that you can use to implement this proxy. One option is to use Amazon CloudFront and Lambda@Edge to add the secret hash to the incoming requests. When you use a CloudFront proxy, you can also use AWS WAF, which gives you tools to detect and block unwanted clients. From Lambda@Edge, you can also integrate with other services (like Amazon Fraud Detector or third-party bot detection services) to help you detect possible fraudulent requests and block them. The CloudFront proxy, with the right set of security tools, helps protect your Amazon Cognito user pool from unwanted clients.

Solution overview

To implement this lightweight proxy pattern, you need to create an application client with a secret. Unauthenticated API calls to this client must include the secret hash which is added to the request from the proxy layer. Client applications use an SDK like AWS Amplify, the Amazon Cognito Identity SDK, or a mobile SDK to communicate with Amazon Cognito. By default, the SDK sends requests to the Regional Amazon Cognito endpoint. Your application must override the default endpoint by manually adding an “Endpoint” property in the app configuration. See the Integrate the client application with the proxy section later in this post for more details.

Figure 1 shows how this works, step by step.
 

Figure 1: A proxy solution to the Amazon Cognito Regional endpoint

Figure 1: A proxy solution to the Amazon Cognito Regional endpoint

The workflow is as follows:

  1. You configure the client application (mobile or web client) to use a CloudFront endpoint as a proxy to an Amazon Cognito Regional endpoint. You also create an application client in Amazon Cognito with a secret. This means that any unauthenticated API call must have the secret hash.
  2. Clients that send unauthenticated API calls to the Amazon Cognito endpoint directly are blocked and dropped because of the missing secret.
  3. You use Lambda@Edge to add a secret hash to the relevant incoming requests before passing them on to the Amazon Cognito endpoint.
  4. From Lambda@Edge, you must have the app client secret to be able to calculate the secret hash and add it to the request. It’s recommended that you keep the secret in AWS Secrets Manager and cache it for the lifetime of the function.
  5. You use AWS WAF with CloudFront distribution to enforce rate limiting, allow and deny lists, and other rule groups according to your security requirements.

When to use this pattern

It’s a best practice to use this proxy pattern with clients that use SDKs to integrate with Amazon Cognito user pools. Examples include mobile applications that use the iOS or Android SDK, or web applications that use client-side libraries like Amplify or the Amazon Cognito Identity SDK to integrate with Amazon Cognito.

You don’t need to use a proxy pattern with server-side applications that use an AWS SDK to integrate with Amazon Cognito user pools from a protected backend, because server-side applications can natively use confidential clients and protect the secret in the backend.

You can’t use this solution with applications that use Hosted UI and OAuth 2.0 endpoints to integrate with Amazon Cognito user pools. This includes federation scenarios where users sign in with an external identity provider (IdP).

Implementation and deployment details

Before you deploy this solution, you need a user pool and an application client that has the client secret. When you have these in place, choose the following Launch Stack button to launch a CloudFormation stack in your account and deploy the proxy solution.

Select the Launch Stack button to launch the template

Note: The CloudFormation stack must be created in the us-east-1 AWS Region, but the user pool itself can exist in any supported Region.

The template takes the parameters shown in Figure 2 below.
 

Figure 2: CloudFormation stack creation with initial parameters

Figure 2: CloudFormation stack creation with initial parameters

The parameters in Figure 2 include:

  • AdvancedSecurityEnabled is a flag that indicates whether advanced security is enabled in the user pool or not. This flag determines which version of the Lambda function is deployed. Notice that if you change this flag as part of a stack update, it overrides the function code, so if you have any manual changes, make sure to back up your changes.
  • AppClientSecret is the secret for your application client. This secret is stored in Secrets Manager and accessed from Lambda@Edge as needed.
  • LambdaS3BucketName is the bucket that hosts the Lambda code package. You don’t need to change this parameter unless you have a requirement to modify or extend the solution with your own Lambda function.
  • RateLimit is the maximum number of calls from a single IP address that are allowed within a 5 minute period. Values between 100 requests and 20 million requests are valid for RateLimit.
  • Important: provide a value suitable for your application and security requirements.

  • UserPoolId is the ID of your user pool. This value is used by Lambda@Edge when needed (for example, to call admin APIs, which require the user pool ID).
  • UserPoolRegion is the AWS Region where you created your user pool. This value is used to determine which Amazon Cognito Regional endpoint to proxy the calls to.

This template creates several resources in your AWS account, as follows:

  1. A CloudFront distribution that serves as a proxy to an Amazon Cognito Regional endpoint.
  2. An AWS WAF web access control list (ACL) with rules for the allow list, deny list, and rate limit.
  3. A Lambda function to be deployed at the edge and assigned to the origin request event.
  4. A secret in Secrets Manager, to hold the values of the application client secret and user pool ID.

After you create the stack, the CloudFront distribution domain name is available on the Outputs tab in the CloudFront console, as shown in Figure 3. This is the value that’s used as the Endpoint property in your client-side application. You can optionally add an alternative domain name to the CloudFront distribution if you prefer to use your own custom domain.
 

Figure 3: The output of the CloudFormation stack creation, displaying the CloudFront domain name

Figure 3: The output of the CloudFormation stack creation, displaying the CloudFront domain name

Use Lambda@Edge to add a secret hash to the request

As explained earlier, the purpose of having this proxy is to be able to inject the secret hash in unauthenticated API calls before passing them to the Amazon Cognito endpoint. This injection is achieved by a Lambda function that intercepts incoming requests at the edge (the CloudFront distribution) before passing them to the origin (the Amazon Cognito Regional endpoint).

The Lambda function that is deployed to the edge has two versions. One is a simple pass-through proxy that only adds the secret hash, and this version is used if Amazon Cognito advanced security isn’t enabled. The other version is a proxy that uses the AdminInitiateAuth and AdminRespondToAuthChallenge API operations instead of unauthenticated API operations for the user authentication and challenge response. This allows the proxy layer to propagate the client IP address to the Amazon Cognito endpoint, which guides the adaptive authentication features of advanced security. The version that is deployed by the stack is determined by the AdvancedSecurityEnabled flag when you create or update the CloudFormation stack.

You can extend this solution by manually modifying the Lambda function with your own processing logic. For example, you can integrate with fraud detection or bot detection services to evaluate the request and decide to proceed or reject the call. Note that after making any change to the Lambda function code, you must deploy a new version to the edge location. To do that from the Lambda console, navigate to Actions, choose Deploy to Lambda@Edge, and then choose Use existing CloudFront trigger on this function.

Important: If you update the stack from CloudFormation and change the value of the AdvancedSecurityEnabled flag, the new value overrides the Lambda code with the default version for the choice. In that case, all manual changes are lost.

Allow or block requests

The template that is provided in this blog post creates a web ACL with three rules: AllowList, DenyList, and RateLimit. These rules are evaluated in order and determine which requests are allowed or blocked. The template also creates four IP sets, as shown in Figure 4, to hold the values of allowed or blocked IPs for both IPv4 and IPv6 address types.
 

Figure 4: The CloudFormation template creates IP sets in the AWS WAF console for allow and deny lists

Figure 4: The CloudFormation template creates IP sets in the AWS WAF console for allow and deny lists

If you want to always allow requests from certain clients, for example, trusted enterprise clients or server-side clients in cases where a large volume of requests is coming from the same IP address like a VPN gateway, add these IP addresses to the corresponding AllowList IP set. Similarly, if you want to always block traffic from certain IPs, add those IPs to the corresponding DenyList IP set.

Requests from sources that aren’t on the allow list or deny list are evaluated based on the volume of calls within 5 minutes, and sources that exceed the defined rate limit within 5 minutes are automatically blocked. If you want to change the defined rate limit, you can do so by updating the CloudFormation stack and providing a different value for the RateLimit parameter. Or you can modify this value directly in the AWS WAF console by editing the RateLimit rule.

Note: You can also use AWS Managed Rules for AWS WAF to add additional protection according to your security needs.

Integrate the client application with the proxy

You can integrate the client application with the proxy by changing the Endpoint in your client application to use the CloudFront distribution domain name. The domain name is located in the Outputs section of the CloudFormation stack.

You then need to edit your client-side code to forward calls to Amazon Cognito through the proxy endpoint. For example, if you’re using the Identity SDK, you should change this property as follows.

var poolData = {
  UserPoolId: '<USER-POOL-ID>',
  ClientId: '<APP-CLIENT-ID>',
  endpoint: 'https://<CF-DISTRIBUTION-DOMAIN>'
};

If you’re using AWS Amplify, you can change the endpoint in the aws-exports.js file by overriding the property aws_cognito_endpoint. Or, if you configure Amplify Auth in your code, you can provide the endpoint as follows.

Amplify.Auth.configure({
  userPoolId: '<USER-POOL-ID>',
  userPoolWebClientId: '<APP-CLIENT-ID>',
  endpoint: 'https://<CF-DISTRIBUTION-DOMAIN>'
});

If you have a mobile application that uses the Amplify mobile SDK, you can override the endpoint in your configuration as follows (don’t include AppClientSecret parameter in your configuration). Note that the Endpoint value contains the domain name only, not the full URL. This feature is available in the latest releases of the iOS and Android SDKs.

"CognitoUserPool": {
  "Default": {
    "AppClientId": "<APP-CLIENT-ID>",
    "Endpoint": "<CF-DISTRIBUTION-DOMAIN>",
    "PoolId": "<USER-POOL-ID>",
    "Region": "<REGION>"
  }
}

Warning: The Amplify CLI overwrites customizations to the awsconfiguration.json and amplifyconfiguration.json files if you do an amplify push or amplify pull operation. You must manually re-apply the Endpoint customization and remove the AppClientSecret if you use the CLI to modify your cloud backend.

Solution limitations

This solution has these limitations:

  • If advanced security features are enabled for the user pool, Amazon Cognito calculates risk for user events. If you use this proxy pattern, the IP address that is propagated in user events is the proxy IP address, which causes risk calculation for SignUp, ForgotPassword, and ResendCode events to be inaccurate. On the other hand, Sign-In events still have the client IP address propagated correctly, and risk calculation and adaptive authentication for Sign-In events aren’t affected by the use of this proxy.
  • This solution is not applicable to Hosted UI, OAuth 2.0 endpoints, and federation flows.
  • Authenticated and admin API operations (which require developer credentials or an access token) aren’t covered in this solution. These API operations don’t require a secret hash, and they use other authentication mechanisms.
  • Using this proxy solution with mobile apps requires an update to the application. The update might take time to be available in the relevant app store, and you must depend on end users to update their app. Plan ahead of time to use the solution with mobile apps.

How to detect unusual behavior

In this section, I share with you the steps to detect, quickly analyze and respond to unwanted clients. It’s a best practice to configure monitoring and alarms that help you to detect unexpected spikes in activity. Additionally, I show you how to be ready to quickly identify clients that are calling your resources at a higher-than-usual rate.

Monitor utilization compared to quotas

Amazon Cognito integrates with Service Quotas, which monitor service utilization compared to quotas. These metrics help you detect unexpected spikes and be alerted if you’re approaching your quota for a certain API category. Approaching your quota indicates that there is a risk that calls from legitimate users will be throttled.

To view utilization versus quota metrics

  1. In the Service Quotas console, choose Service Quotas, choose AWS Services, and then choose Amazon Cognito User Pools.
  2. Under Service quotas, enter the search term rate of. This shows you the list of API categories and the assigned quotas for each category.
     
    Figure 5: The Service Quotas console showing Amazon Cognito API category rate quotas

    Figure 5: The Service Quotas console showing Amazon Cognito API category rate quotas

  3. Choose any of the API categories to see utilization versus quota metrics.
     
    Figure 6: The Service Quotas console showing utilization vs quota metrics for Amazon Cognito UserCreation APIs

    Figure 6: The Service Quotas console showing utilization vs quota metrics for Amazon Cognito UserCreation APIs

  4. You can also create alarms from this page to alert you if utilization is above a pre-defined threshold. You can create alarms starting at 50 percent utilization. It’s recommended that you create multiple alarms, for example at the 50 percent, 70 percent, and 90 percent thresholds, and configure CloudWatch alarms as appropriate.
     
    Figure 7: Creating an alarm for the utilization of the UserCreation API category

    Figure 7: Creating an alarm for the utilization of the UserCreation API category

Analyze CloudTrail logs with Athena

If you detect an unexpected spike in traffic to a certain API category, the next step is to identify the sources of this spike. You can do that by using CloudTrail logs or, after you deploy and use this proxy solution, CloudFront logs as sources of information. You can then analyze these logs by using Amazon Athena queries.

The first step is to create Athena tables from CloudTrail and CloudFront logs. You can do that by following these steps for CloudTrail and similar steps for CloudFront. After you have these tables created, you can create a set of queries that help you identify unwanted clients. Here are a couple of examples:

  • Use the following query to identify clients with the highest call rate to the InitiateAuth API operation within the timeframe you noticed the spike (change the eventtime value to reflect the attack window).
    SELECT sourceipaddress, count(*)
    FROM "default"."cloudtrail_logs"
    WHERE eventname='InitiateAuth'
    AND eventtime >= '2021-03-01T00:00:00Z'and eventtime < '2021-03-31T00:00:00Z'
    GROUP BY sourceipaddress
    LIMIT 10
    

  • Use the following query to identify clients that come through CloudFront with the highest error rate.
    SELECT count(*) as count, request_ip
    FROM "default"."cloudfront_logs"
    WHERE status>500
    GROUP BY request_ip
    

After you identify sources that are calling your service with a higher-than-usual rate, you can block these clients by adding them to the DenyList IP set that was created in AWS WAF.

Analyze CloudTrail events with CloudWatch Logs Insights

It’s a best practice to configure your trail to send events to CloudWatch Logs. After you do this, you can interactively search and analyze your Amazon Cognito CloudTrail events with CloudWatch Logs Insights to identify errors, unusual activity, or unusual user behavior in your account.

Conclusion

In this post, I showed you how to implement a lightweight proxy to an Amazon Cognito endpoint, which can be used with an application client secret to control access to unauthenticated API operations. This approach, together with security tools such as AWS WAF, helps provide protection for these API operations from unwanted clients. I also showed you strategies to help detect an ongoing attack and quickly analyze, identify, and block unwanted clients.

For more strategies for DDoS mitigation, see the AWS Best Practices for DDoS Resiliency.

If you have feedback about this post, submit comments in the Comments section below. If you have questions about this post, start a new thread on the Amazon Cognito forum or contact AWS Support.

Want more AWS Security how-to content, news, and feature announcements? Follow us on Twitter.

Author

Mahmoud Matouk

Mahmoud is a Senior Solutions Architect with the Amazon Cognito team. He helps AWS customers build secure and innovative solutions for various identity and access management scenarios.

Should I Run my Containers on AWS Fargate, AWS Lambda, or Both?

Post Syndicated from Rob Solomon original https://aws.amazon.com/blogs/architecture/should-i-run-my-containers-on-aws-fargate-aws-lambda-or-both/

Containers have transformed how companies build and operate software. Bundling both application code and dependencies into a single container image improves agility and reduces deployment failures. But what compute platform should you choose to be most efficient, and what factors should you consider in this decision?

With the release of container image support for AWS Lambda functions (December 2020), customers now have an additional option for building serverless applications using their existing container-oriented tooling and DevOps best practices. In addition, a single container image can be configured to run on both of these compute platforms: AWS Lambda (using serverless functions) or AWS Fargate (using containers).

Three key factors can influence the decision of what platform you use to deploy your container: startup time, task runtime, and cost. That decision may vary each time a task is initiated, as shown in the three scenarios following.

Design considerations for deploying a container

Total task duration consists of startup time and runtime. The startup time of a containerized task is the time required to provision the container compute resource and deploy the container. Task runtime is the time it takes for the application code to complete.

Startup time: Some tasks must complete quickly. For example, when a user waits for a web response, or when a series of tasks is completed in sequential order. In those situations, the total duration time must be minimal. While the application code may be optimized to run faster, startup time depends on the chosen compute platform as well. AWS Fargate container startup time typically takes from 60 to 90 seconds. AWS Lambda initial cold start can take up to 5 seconds. Following that first startup, the same containerized function has negligible startup time.

Task runtime: The amount of time it takes for a task to complete is influenced by the compute resources allocated (vCPU and memory) and application code. AWS Fargate lets you select vCPU and memory size. With AWS Lambda, you define the amount of allocated memory. Lambda then provisions a proportional quantity of vCPU. In both AWS Fargate and AWS Lambda uses, increasing the amount of compute resources may result in faster completion time. However, this will depend on the application. While the additional compute resources incur greater cost, the total duration may be shorter, so the overall cost may also be lower.

AWS Lambda has a maximum limit of 15 minutes of runtime. Lambda shouldn’t be used for these tasks to avoid the likelihood of timeout errors.

Figure 1 illustrates the proportion of startup time to total duration. The initial steepness of each line shows a rapid decrease in startup overhead. This is followed by a flattening out, showing a diminishing rate of efficiency. Startup time delay becomes less impactful as the total job duration increases. Other factors (such as cost) become more significant.

Figure 1. Ratio of startup time as a function to overall job duration for each service

Figure 1. Ratio of startup time as a function to overall job duration for each service

Cost: When making the choice between Fargate and Lambda, it is important to understand the different pricing models. This way, you can make the appropriate selection for your needs.

Figure 2 shows a cost analysis of Lambda vs Fargate. This is for the entire range of configurations for a runtime task. For most of the range of configurable memory, AWS Lambda is more expensive per second than even the most expensive configuration of Fargate.

Figure 2. Total cost for both AWS Lambda and AWS Fargate based on task duration

Figure 2. Total cost for both AWS Lambda and AWS Fargate based on task duration

From a cost perspective, AWS Fargate is more cost-effective for tasks running for several seconds or longer. If cost is the only factor at play, then Fargate would be the better choice. But the savings gained by using Fargate may be offset by the business value gained from the shorter Lambda function startup time.

Dynamically choose your compute platform

In the following scenarios, we show how a single container image can serve multiple use cases. The decision to run a given containerized application on either AWS Lambda or AWS Fargate can be determined at runtime. This decision depends on whether cost, speed, or duration are the priority.

In Figure 3, an image-processing AWS Batch job runs on a nightly schedule, processing tens of thousands of images to extract location information. When run as a batch job, image processing may take 1–2 hours. The job pulls images stored in Amazon Simple Storage Service (S3) and writes the location metadata to Amazon DynamoDB. In this case, AWS Fargate provides a good combination of compute and cost efficiency. An added benefit is that it also supports tasks that exceed 15 minutes. If a single image is submitted for real-time processing, response time is critical. In that case, the same image-processing code can be run on AWS Lambda, using the same container image. Rather than waiting for the next batch process to run, the image is processed immediately.

Figure 3. One-off invocation of a typically long-running batch job

Figure 3. One-off invocation of a typically long-running batch job

In Figure 4, a SaaS application uses an AWS Lambda function to allow customers to submit complex text search queries for files stored in an Amazon Elastic File System (EFS) volume. The task should return results quickly, which is an ideal condition for AWS Lambda. However, a small percentage of jobs run much longer than the average, exceeding the maximum duration of 15 minutes.

A straightforward approach to avoid job failure is to initiate an Amazon CloudWatch alarm when the Lambda function times out. CloudWatch alarms can automatically retry the job using Fargate. An alternate approach is to capture historical data and use it to create a machine learning model in Amazon SageMaker. When a new job is initiated, the SageMaker model can predict the time it will take the job to complete. Lambda can use that prediction to route the job to either AWS Lambda or AWS Fargate.

Figure 4. Short duration tasks with occasional outliers running longer than 15 minutes

Figure 4. Short duration tasks with occasional outliers running longer than 15 minutes

In Figure 5, a customer runs a containerized legacy application that encompasses many different kinds of functions, all related to a recurring data processing workflow. Each function performs a task of varying complexity and duration. These can range from processing data files, updating a database, or submitting machine learning jobs.

Using a container image, one code base can be configured to contain all of the individual functions. Longer running functions, such as data preparation and big data analytics, are routed to Fargate. Shorter duration functions like simple queries can be configured to run using the container image in AWS Lambda. By using AWS Step Functions as an orchestrator, the process can be automated. In this way, a monolithic application can be broken up into a set of “Units of Work” that operate independently.

Figure 5. Heterogeneous function orchestration

Figure 5. Heterogeneous function orchestration

Conclusion

If your job lasts milliseconds and requires a fast response to provide a good customer experience, use AWS Lambda. If your function is not time-sensitive and runs on the scale of minutes, use AWS Fargate. For tasks that have a total duration of under 15 minutes, customers must decide based on impacts to both business and cost. Select the service that is the most effective serverless compute environment to meet your requirements. The choice can be made manually when a job is scheduled or by using retry logic to switch to the other compute platform if the first option fails. The decision can also be based on a machine learning model trained on historical data.

Micro-frontend Architectures on AWS

Post Syndicated from Bryant Bost original https://aws.amazon.com/blogs/architecture/micro-frontend-architectures-on-aws/

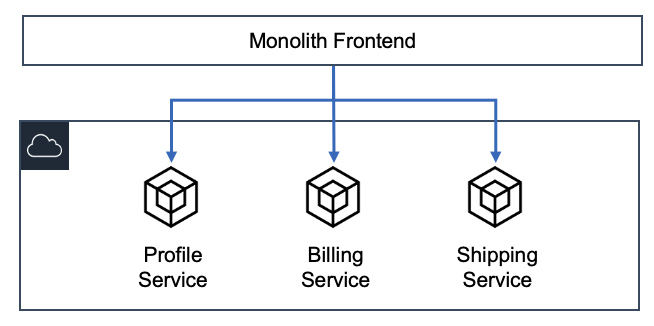
A microservice architecture is characterized by independent services that are focused on a specific business function and maintained by small, self-contained teams. Microservice architectures are used frequently for web applications developed on AWS, and for good reason. They offer many well-known benefits such as development agility, technological freedom, targeted deployments, and more. Despite the popularity of microservices, many frontend applications are still built in a monolithic style. For example, they have one large code base that interacts with all backend microservices, and is maintained by a large team of developers.

Monolith Frontend

Figure 1. Microservice backend with monolith frontend

What is a Micro-frontend?

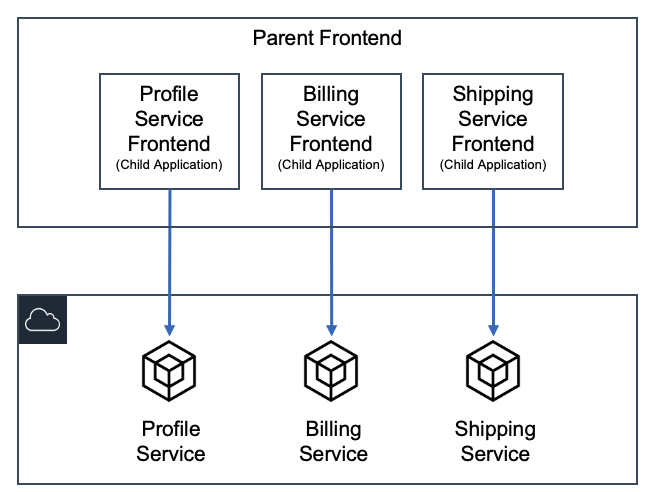
The micro-frontend architecture introduces microservice development principles to frontend applications. In a micro-frontend architecture, development teams independently build and deploy “child” frontend applications. These applications are combined by a “parent” frontend application that acts as a container to retrieve, display, and integrate the various child applications. In this parent/child model, the user interacts with what appears to be a single application. In reality, they are interacting with several independent applications, published by different teams.

Micro Frontend

Figure 2. Microservice backend with micro-frontend

Micro-frontend Benefits

Compared to a monolith frontend, a micro-frontend offers the following benefits:

  • Independent artifacts: A core tenet of microservice development is that artifacts can be deployed independently, and this remains true for micro-frontends. In a micro-frontend architecture, teams should be able to independently deploy their frontend applications with minimal impact to other services. Those changes will be reflected by the parent application.
  • Autonomous teams: Each team is the expert in its own domain. For example, the billing service team members have specialized knowledge. This includes the data models, the business requirements, the API calls, and user interactions associated with the billing service. This knowledge allows the team to develop the billing frontend faster than a larger, less specialized team.
  • Flexible technology choices: Autonomy allows each team to make technology choices that are independent from other teams. For instance, the billing service team could develop their micro-frontend using Vue.js and the profile service team could develop their frontend using Angular.
  • Scalable development: Micro-frontend development teams are smaller and are able to operate without disrupting other teams. This allows us to quickly scale development by spinning up new teams to deliver additional frontend functionality via child applications.
  • Easier maintenance: Keeping frontend repositories small and specialized allows them to be more easily understood, and this simplifies long-term maintenance and testing. For instance, if you want to change an interaction on a monolith frontend, you must isolate the location and dependencies of the feature within the context of a large codebase. This type of operation is greatly simplified when dealing with the smaller codebases associated with micro-frontends.

Micro-frontend Challenges

Conversely, a micro-frontend presents the following challenges:

  • Parent/child integration: A micro-frontend introduces the task of ensuring the parent application displays the child application with the same consistency and performance expected from a monolith application. This point is discussed further in the next section.
  • Operational overhead: Instead of managing a single frontend application, a micro-frontend application involves creating and managing separate infrastructure for all teams.
  • Consistent user experience: In order to maintain a consistent user experience, the child applications must use the same UI components, CSS libraries, interactions, error handling, and more. Maintaining consistency in the user experience can be difficult for child applications that are at different stages in the development lifecycle.

Building Micro-frontends

The most difficult challenge with the micro-frontend architecture pattern is integrating child applications with the parent application. Prioritizing the user experience is critical for any frontend application. In the context of micro-frontends, this means ensuring a user can seamlessly navigate from one child application to another inside the parent application. We want to avoid disruptive behavior such as page refreshes or multiple logins. At its most basic definition, parent/child integration involves the parent application dynamically retrieving and rendering child applications when the parent app is loaded. Rendering the child application depends on how the child application was built, and this can be done in a number of ways. Two of the most popular methods of parent/child integration are:

  1. Building each child application as a web component.
  2. Importing each child application as an independent module. These modules either declares a function to render itself or is dynamically imported by the parent application (such as with module federation).

Registering child apps as web components:

<html>
    <head>
        <script src="https://shipping.example.com/shipping-service.js"></script>
        <script src="https://profile.example.com/profile-service.js"></script>
        <script src="https://billing.example.com/billing-service.js"></script>
        <title>Parent Application</title>
    </head>
    <body>
        <shipping-service />
        <profile-service />
        <billing-service />
    </body>
</html>

Registering child apps as modules:

<html>
    <head>
        <script src="https://shipping.example.com/shipping-service.js"></script>
        <script src="https://profile.example.com/profile-service.js"></script>
        <script src="https://billing.example.com/billing-service.js"></script>
     <title>Parent Application</title>
    </head>
    <body>
    </body>
    <script>
        // Load and render the child applications form their JS bundles.
    </script>
</html>

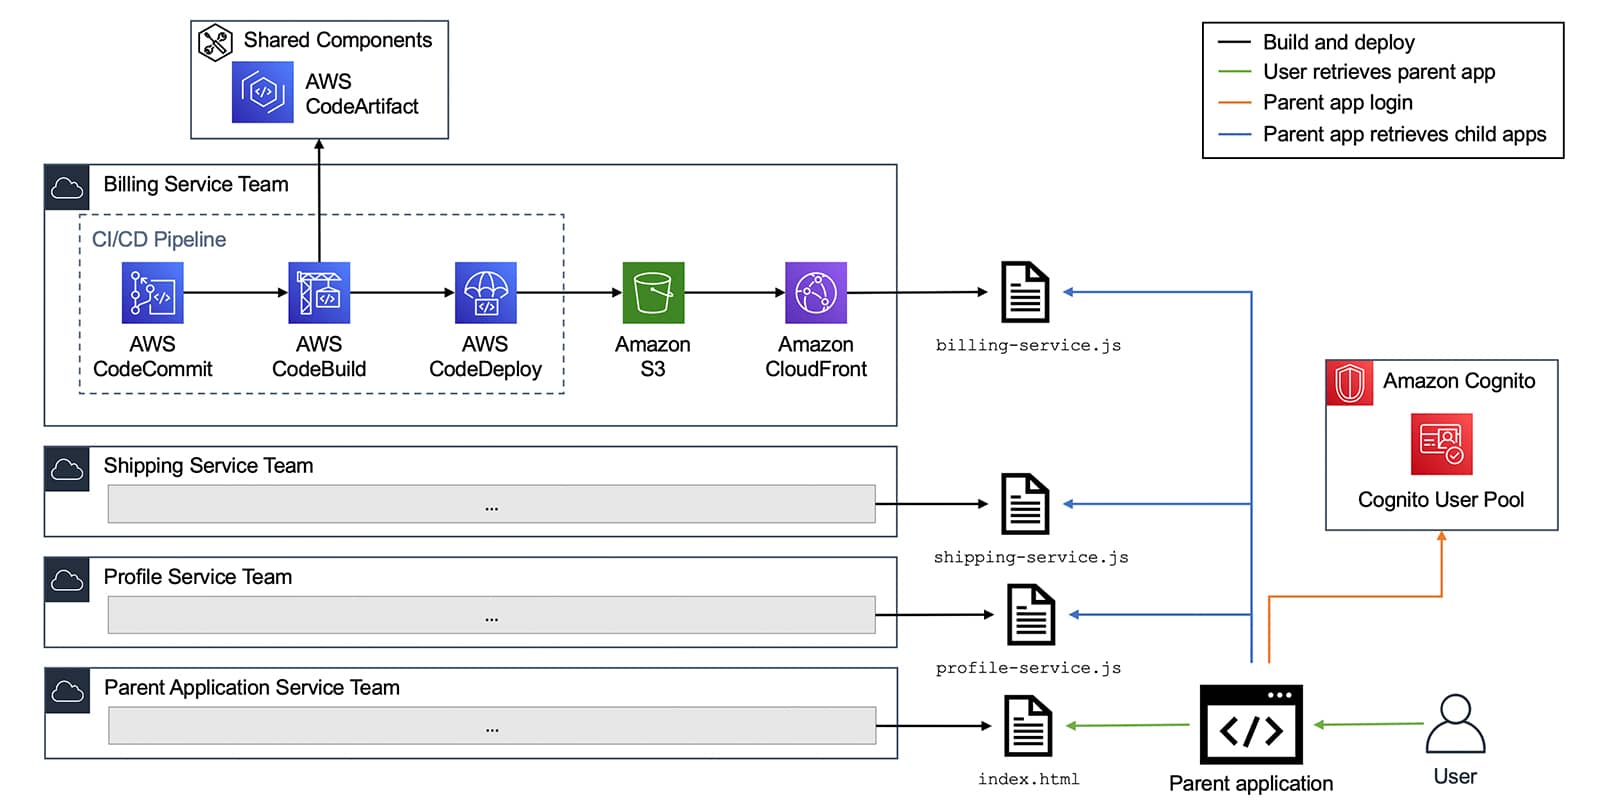
The following diagram shows an example micro-frontend architecture built on AWS.

AWS Micro Frontend

Figure 3. Micro-frontend architecture on AWS

In this example, each service team is running a separate, identical stack to build their application. They use the AWS Developer Tools and deploy the application to Amazon Simple Storage Service (S3) with Amazon CloudFront. The CI/CD pipelines use shared components such as CSS libraries, API wrappers, or custom modules stored in AWS CodeArtifact. This helps drive consistency across parent and child applications.

When you retrieve the parent application, it should prompt you to log in to an identity provider and retrieve JWTs. In this example, the identity provider is an Amazon Cognito User Pool. After a successful login, the parent application retrieves the child applications from CloudFront and renders them inside the parent application. Alternatively, the parent application can elect to render the child applications on demand, when you navigate to a specific route. The child applications should not require you to log in again to the Amazon Cognito user pool. They should be configured to use the JWT obtained by the parent app or silently retrieve a new JWT from Amazon Cognito.

Conclusion

Micro-frontend architectures introduce many of the familiar benefits of microservice development to frontend applications. A micro-frontend architecture also simplifies the process of building complex frontend applications by allowing you to manage small, independent components.

How to protect sensitive data for its entire lifecycle in AWS

Post Syndicated from Raj Jain original https://aws.amazon.com/blogs/security/how-to-protect-sensitive-data-for-its-entire-lifecycle-in-aws/

Many Amazon Web Services (AWS) customer workflows require ingesting sensitive and regulated data such as Payments Card Industry (PCI) data, personally identifiable information (PII), and protected health information (PHI). In this post, I’ll show you a method designed to protect sensitive data for its entire lifecycle in AWS. This method can help enhance your data security posture and be useful for fulfilling the data privacy regulatory requirements applicable to your organization for data protection at-rest, in-transit, and in-use.

An existing method for sensitive data protection in AWS is to use the field-level encryption feature offered by Amazon CloudFront. This CloudFront feature protects sensitive data fields in requests at the AWS network edge. The chosen fields are protected upon ingestion and remain protected throughout the entire application stack. The notion of protecting sensitive data early in its lifecycle in AWS is a highly desirable security architecture. However, CloudFront can protect a maximum of 10 fields and only within HTTP(S) POST requests that carry HTML form encoded payloads.

If your requirements exceed CloudFront’s native field-level encryption feature, such as a need to handle diverse application payload formats, different HTTP methods, and more than 10 sensitive fields, you can implement field-level encryption yourself using the Lambda@Edge feature in CloudFront. In terms of choosing an appropriate encryption scheme, this problem calls for an asymmetric cryptographic system that will allow public keys to be openly distributed to the CloudFront network edges while keeping the corresponding private keys stored securely within the network core. One such popular asymmetric cryptographic system is RSA. Accordingly, we’ll implement a Lambda@Edge function that uses asymmetric encryption using the RSA cryptosystem to protect an arbitrary number of fields in any HTTP(S) request. We will discuss the solution using an example JSON payload, although this approach can be applied to any payload format.

A complex part of any encryption solution is key management. To address that, I use AWS Key Management Service (AWS KMS). AWS KMS simplifies the solution and offers improved security posture and operational benefits, detailed later.

Solution overview

You can protect data in-transit over individual communications channels using transport layer security (TLS), and at-rest in individual storage silos using volume encryption, object encryption or database table encryption. However, if you have sensitive workloads, you might need additional protection that can follow the data as it moves through the application stack. Fine-grained data protection techniques such as field-level encryption allow for the protection of sensitive data fields in larger application payloads while leaving non-sensitive fields in plaintext. This approach lets an application perform business functions on non-sensitive fields without the overhead of encryption, and allows fine-grained control over what fields can be accessed by what parts of the application.

A best practice for protecting sensitive data is to reduce its exposure in the clear throughout its lifecycle. This means protecting data as early as possible on ingestion and ensuring that only authorized users and applications can access the data only when and as needed. CloudFront, when combined with the flexibility provided by Lambda@Edge, provides an appropriate environment at the edge of the AWS network to protect sensitive data upon ingestion in AWS.

Since the downstream systems don’t have access to sensitive data, data exposure is reduced, which helps to minimize your compliance footprint for auditing purposes.

The number of sensitive data elements that may need field-level encryption depends on your requirements. For example:

  • For healthcare applications, HIPAA regulates 18 personal data elements.
  • In California, the California Consumer Privacy Act (CCPA) regulates at least 11 categories of personal information—each with its own set of data elements.

The idea behind field-level encryption is to protect sensitive data fields individually, while retaining the structure of the application payload. The alternative is full payload encryption, where the entire application payload is encrypted as a binary blob, which makes it unusable until the entirety of it is decrypted. With field-level encryption, the non-sensitive data left in plaintext remains usable for ordinary business functions. When retrofitting data protection in existing applications, this approach can reduce the risk of application malfunction since the data format is maintained.

The following figure shows how PII data fields in a JSON construction that are deemed sensitive by an application can be transformed from plaintext to ciphertext with a field-level encryption mechanism.

Figure 1: Example of field-level encryption

Figure 1: Example of field-level encryption

You can change plaintext to ciphertext as depicted in Figure 1 by using a Lambda@Edge function to perform field-level encryption. I discuss the encryption and decryption processes separately in the following sections.

Field-level encryption process

Let’s discuss the individual steps involved in the encryption process as shown in Figure 2.

Figure 2: Field-level encryption process

Figure 2: Field-level encryption process

Figure 2 shows CloudFront invoking a Lambda@Edge function while processing a client request. CloudFront offers multiple integration points for invoking Lambda@Edge functions. Since you are processing a client request and your encryption behavior is related to requests being forwarded to an origin server, you want your function to run upon the origin request event in CloudFront. The origin request event represents an internal state transition in CloudFront that happens immediately before CloudFront forwards a request to the downstream origin server.

You can associate your Lambda@Edge with CloudFront as described in Adding Triggers by Using the CloudFront Console. A screenshot of the CloudFront console is shown in Figure 3. The selected event type is Origin Request and the Include Body check box is selected so that the request body is conveyed to Lambda@Edge.

Figure 3: Configuration of Lambda@Edge in CloudFront

Figure 3: Configuration of Lambda@Edge in CloudFront

The Lambda@Edge function acts as a programmable hook in the CloudFront request processing flow. You can use the function to replace the incoming request body with a request body with the sensitive data fields encrypted.

The process includes the following steps:

Step 1 – RSA key generation and inclusion in Lambda@Edge

You can generate an RSA customer managed key (CMK) in AWS KMS as described in Creating asymmetric CMKs. This is done at system configuration time.

Note: You can use your existing RSA key pairs or generate new ones externally by using OpenSSL commands, especially if you need to perform RSA decryption and key management independently of AWS KMS. Your choice won’t affect the fundamental encryption design pattern presented here.

The RSA key creation in AWS KMS requires two inputs: key length and type of usage. In this example, I created a 2048-bit key and assigned its use for encryption and decryption. The cryptographic configuration of an RSA CMK created in AWS KMS is shown in Figure 4.

Figure 4: Cryptographic properties of an RSA key managed by AWS KMS

Figure 4: Cryptographic properties of an RSA key managed by AWS KMS

Of the two encryption algorithms shown in Figure 4— RSAES_OAEP_SHA_256 and RSAES_OAEP_SHA_1, this example uses RSAES_OAEP_SHA_256. The combination of a 2048-bit key and the RSAES_OAEP_SHA_256 algorithm lets you encrypt a maximum of 190 bytes of data, which is enough for most PII fields. You can choose a different key length and encryption algorithm depending on your security and performance requirements. How to choose your CMK configuration includes information about RSA key specs for encryption and decryption.

Using AWS KMS for RSA key management versus managing the keys yourself eliminates that complexity and can help you:

  • Enforce IAM and key policies that describe administrative and usage permissions for keys.
  • Manage cross-account access for keys.
  • Monitor and alarm on key operations through Amazon CloudWatch.
  • Audit AWS KMS API invocations through AWS CloudTrail.
  • Record configuration changes to keys and enforce key specification compliance through AWS Config.
  • Generate high-entropy keys in an AWS KMS hardware security module (HSM) as required by NIST.
  • Store RSA private keys securely, without the ability to export.
  • Perform RSA decryption within AWS KMS without exposing private keys to application code.
  • Categorize and report on keys with key tags for cost allocation.
  • Disable keys and schedule their deletion.

You need to extract the RSA public key from AWS KMS so you can include it in the AWS Lambda deployment package. You can do this from the AWS Management Console, through the AWS KMS SDK, or by using the get-public-key command in the AWS Command Line Interface (AWS CLI). Figure 5 shows Copy and Download options for a public key in the Public key tab of the AWS KMS console.

Figure 5: RSA public key available for copy or download in the console

Figure 5: RSA public key available for copy or download in the console

Note: As we will see in the sample code in step 3, we embed the public key in the Lambda@Edge deployment package. This is a permissible practice because public keys in asymmetric cryptography systems aren’t a secret and can be freely distributed to entities that need to perform encryption. Alternatively, you can use Lambda@Edge to query AWS KMS for the public key at runtime. However, this introduces latency, increases the load against your KMS account quota, and increases your AWS costs. General patterns for using external data in Lambda@Edge are described in Leveraging external data in Lambda@Edge.

Step 2 – HTTP API request handling by CloudFront

CloudFront receives an HTTP(S) request from a client. CloudFront then invokes Lambda@Edge during origin-request processing and includes the HTTP request body in the invocation.

Step 3 – Lambda@Edge processing

The Lambda@Edge function processes the HTTP request body. The function extracts sensitive data fields and performs RSA encryption over their values.

The following code is sample source code for the Lambda@Edge function implemented in Python 3.7:

import Crypto
import base64
import json
from Crypto.Cipher import PKCS1_OAEP
from Crypto.PublicKey import RSA

# PEM-formatted RSA public key copied over from AWS KMS or your own public key.
RSA_PUBLIC_KEY = "-----BEGIN PUBLIC KEY-----<your key>-----END PUBLIC KEY-----"
RSA_PUBLIC_KEY_OBJ = RSA.importKey(RSA_PUBLIC_KEY)
RSA_CIPHER_OBJ = PKCS1_OAEP.new(RSA_PUBLIC_KEY_OBJ, Crypto.Hash.SHA256)

# Example sensitive data field names in a JSON object. 
PII_SENSITIVE_FIELD_NAMES = ["fname", "lname", "email", "ssn", "dob", "phone"]

CIPHERTEXT_PREFIX = "#01#"
CIPHERTEXT_SUFFIX = "#10#"

def lambda_handler(event, context):
    # Extract HTTP request and its body as per documentation:
    # https://docs.aws.amazon.com/AmazonCloudFront/latest/DeveloperGuide/lambda-event-structure.html
    http_request = event['Records'][0]['cf']['request']
    body = http_request['body']
    org_body = base64.b64decode(body['data'])
    mod_body = protect_sensitive_fields_json(org_body)
    body['action'] = 'replace'
    body['encoding'] = 'text'
    body['data'] = mod_body
    return http_request


def protect_sensitive_fields_json(body):
    # Encrypts sensitive fields in sample JSON payload shown earlier in this post.
    # [{"fname": "Alejandro", "lname": "Rosalez", … }]
    person_list = json.loads(body.decode("utf-8"))
    for person_data in person_list:
        for field_name in PII_SENSITIVE_FIELD_NAMES:
            if field_name not in person_data:
                continue
            plaintext = person_data[field_name]
            ciphertext = RSA_CIPHER_OBJ.encrypt(bytes(plaintext, 'utf-8'))
            ciphertext_b64 = base64.b64encode(ciphertext).decode()
            # Optionally, add unique prefix/suffix patterns to ciphertext
            person_data[field_name] = CIPHERTEXT_PREFIX + ciphertext_b64 + CIPHERTEXT_SUFFIX 
    return json.dumps(person_list)

The event structure passed into the Lambda@Edge function is described in Lambda@Edge Event Structure. Following the event structure, you can extract the HTTP request body. In this example, the assumption is that the HTTP payload carries a JSON document based on a particular schema defined as part of the API contract. The input JSON document is parsed by the function, converting it into a Python dictionary. The Python native dictionary operators are then used to extract the sensitive field values.

Note: If you don’t know your API payload structure ahead of time or you’re dealing with unstructured payloads, you can use techniques such as regular expression pattern searches and checksums to look for patterns of sensitive data and target them accordingly. For example, credit card primary account numbers include a Luhn checksum that can be programmatically detected. Additionally, services such as Amazon Comprehend and Amazon Macie can be leveraged for detecting sensitive data such as PII in application payloads.

While iterating over the sensitive fields, individual field values are encrypted using the standard RSA encryption implementation available in the Python Cryptography Toolkit (PyCrypto). The PyCrypto module is included within the Lambda@Edge zip archive as described in Lambda@Edge deployment package.

The example uses the standard optimal asymmetric encryption padding (OAEP) and SHA-256 encryption algorithm properties. These properties are supported by AWS KMS and will allow RSA ciphertext produced here to be decrypted by AWS KMS later.

Note: You may have noticed in the code above that we’re bracketing the ciphertexts with predefined prefix and suffix strings:

person_data[field_name] = CIPHERTEXT_PREFIX + ciphertext_b64 + CIPHERTEXT_SUFFIX

This is an optional measure and is being implemented to simplify the decryption process.

The prefix and suffix strings help demarcate ciphertext embedded in unstructured data in downstream processing and also act as embedded metadata. Unique prefix and suffix strings allow you to extract ciphertext through string or regular expression (regex) searches during the decryption process without having to know the data body format or schema, or the field names that were encrypted.

Distinct strings can also serve as indirect identifiers of RSA key pair identifiers. This can enable key rotation and allow separate keys to be used for separate fields depending on the data security requirements for individual fields.

You can ensure that the prefix and suffix strings can’t collide with the ciphertext by bracketing them with characters that don’t appear in cyphertext. For example, a hash (#) character cannot be part of a base64 encoded ciphertext string.

Deploying a Lambda function as a Lambda@Edge function requires specific IAM permissions and an IAM execution role. Follow the Lambda@Edge deployment instructions in Setting IAM Permissions and Roles for Lambda@Edge.

Step 4 – Lambda@Edge response

The Lambda@Edge function returns the modified HTTP body back to CloudFront and instructs it to replace the original HTTP body with the modified one by setting the following flag:

http_request['body']['action'] = 'replace'

Step 5 – Forward the request to the origin server

CloudFront forwards the modified request body provided by Lambda@Edge to the origin server. In this example, the origin server writes the data body to persistent storage for later processing.

Field-level decryption process

An application that’s authorized to access sensitive data for a business function can decrypt that data. An example decryption process is shown in Figure 6. The figure shows a Lambda function as an example compute environment for invoking AWS KMS for decryption. This functionality isn’t dependent on Lambda and can be performed in any compute environment that has access to AWS KMS.

Figure 6: Field-level decryption process

Figure 6: Field-level decryption process

The steps of the process shown in Figure 6 are described below.

Step 1 – Application retrieves the field-level encrypted data

The example application retrieves the field-level encrypted data from persistent storage that had been previously written during the data ingestion process.

Step 2 – Application invokes the decryption Lambda function

The application invokes a Lambda function responsible for performing field-level decryption, sending the retrieved data to Lambda.

Step 3 – Lambda calls the AWS KMS decryption API

The Lambda function uses AWS KMS for RSA decryption. The example calls the KMS decryption API that inputs ciphertext and returns plaintext. The actual decryption happens in KMS; the RSA private key is never exposed to the application, which is a highly desirable characteristic for building secure applications.

Note: If you choose to use an external key pair, then you can securely store the RSA private key in AWS services like AWS Systems Manager Parameter Store or AWS Secrets Manager and control access to the key through IAM and resource policies. You can fetch the key from relevant vault using the vault’s API, then decrypt using the standard RSA implementation available in your programming language. For example, the cryptography toolkit in Python or javax.crypto in Java.

The Lambda function Python code for decryption is shown below.

import base64
import boto3
import re

kms_client = boto3.client('kms')
CIPHERTEXT_PREFIX = "#01#"
CIPHERTEXT_SUFFIX = "#10#"

# This lambda function extracts event body, searches for and decrypts ciphertext 
# fields surrounded by provided prefix and suffix strings in arbitrary text bodies 
# and substitutes plaintext fields in-place.  
def lambda_handler(event, context):    
    org_data = event["body"]
    mod_data = unprotect_fields(org_data, CIPHERTEXT_PREFIX, CIPHERTEXT_SUFFIX)
    return mod_data

# Helper function that performs non-greedy regex search for ciphertext strings on
# input data and performs RSA decryption of them using AWS KMS 
def unprotect_fields(org_data, prefix, suffix):
    regex_pattern = prefix + "(.*?)" + suffix
    mod_data_parts = []
    cursor = 0

    # Search ciphertexts iteratively using python regular expression module
    for match in re.finditer(regex_pattern, org_data):
        mod_data_parts.append(org_data[cursor: match.start()])
        try:
            # Ciphertext was stored as Base64 encoded in our example. Decode it.
            ciphertext = base64.b64decode(match.group(1))

            # Decrypt ciphertext using AWS KMS  
            decrypt_rsp = kms_client.decrypt(
                EncryptionAlgorithm="RSAES_OAEP_SHA_256",
                KeyId="<Your-Key-ID>",
                CiphertextBlob=ciphertext)
            decrypted_val = decrypt_rsp["Plaintext"].decode("utf-8")
            mod_data_parts.append(decrypted_val)
        except Exception as e:
            print ("Exception: " + str(e))
            return None
        cursor = match.end()

    mod_data_parts.append(org_data[cursor:])
    return "".join(mod_data_parts)

The function performs a regular expression search in the input data body looking for ciphertext strings bracketed in predefined prefix and suffix strings that were added during encryption.

While iterating over ciphertext strings one-by-one, the function calls the AWS KMS decrypt() API. The example function uses the same RSA encryption algorithm properties—OAEP and SHA-256—and the Key ID of the public key that was used during encryption in Lambda@Edge.

Note that the Key ID itself is not a secret. Any application can be configured with it, but that doesn’t mean any application will be able to perform decryption. The security control here is that the AWS KMS key policy must allow the caller to use the Key ID to perform the decryption. An additional security control is provided by Lambda execution role that should allow calling the KMS decrypt() API.

Step 4 – AWS KMS decrypts ciphertext and returns plaintext

To ensure that only authorized users can perform decrypt operation, the KMS is configured as described in Using key policies in AWS KMS. In addition, the Lambda IAM execution role is configured as described in AWS Lambda execution role to allow it to access KMS. If both the key policy and IAM policy conditions are met, KMS returns the decrypted plaintext. Lambda substitutes the plaintext in place of ciphertext in the encapsulating data body.

Steps three and four are repeated for each ciphertext string.

Step 5 – Lambda returns decrypted data body

Once all the ciphertext has been converted to plaintext and substituted in the larger data body, the Lambda function returns the modified data body to the client application.

Conclusion

In this post, I demonstrated how you can implement field-level encryption integrated with AWS KMS to help protect sensitive data workloads for their entire lifecycle in AWS. Since your Lambda@Edge is designed to protect data at the network edge, data remains protected throughout the application execution stack. In addition to improving your data security posture, this protection can help you comply with data privacy regulations applicable to your organization.

Since you author your own Lambda@Edge function to perform standard RSA encryption, you have flexibility in terms of payload formats and the number of fields that you consider to be sensitive. The integration with AWS KMS for RSA key management and decryption provides significant simplicity, higher key security, and rich integration with other AWS security services enabling an overall strong security solution.

By using encrypted fields with identifiers as described in this post, you can create fine-grained controls for data accessibility to meet the security principle of least privilege. Instead of granting either complete access or no access to data fields, you can ensure least privileges where a given part of an application can only access the fields that it needs, when it needs to, all the way down to controlling access field by field. Field by field access can be enabled by using different keys for different fields and controlling their respective policies.

In addition to protecting sensitive data workloads to meet regulatory and security best practices, this solution can be used to build de-identified data lakes in AWS. Sensitive data fields remain protected throughout their lifecycle, while non-sensitive data fields remain in the clear. This approach can allow analytics or other business functions to operate on data without exposing sensitive data.

If you have feedback about this post, submit comments in the Comments section below.

Want more AWS Security how-to content, news, and feature announcements? Follow us on Twitter.

Author

Raj Jain

Raj is a Senior Cloud Architect at AWS. He is passionate about helping customers build well-architected applications in AWS. Raj is a published author in Bell Labs Technical Journal, has authored 3 IETF standards, and holds 12 patents in internet telephony and applied cryptography. In his spare time, Raj enjoys outdoors, cooking, reading, and travel.

Serving Content Using a Fully Managed Reverse Proxy Architecture in AWS

Post Syndicated from Leonardo Machado original https://aws.amazon.com/blogs/architecture/serving-content-using-fully-managed-reverse-proxy-architecture/

With the trends to autonomous teams and microservice style architectures, web frontend tiers are challenged to become more flexible and integrate different components with independent architectures and technology stacks. Two scenarios are prominent:

  • Micro-Frontends, where there is a single page application and components within this page are owned by different teams
  • Web portals, where there is a landing page and subsections of the presence are owned by different teams. In the following we will refer to these as components as well.

What these scenarios have in common is that they consist of loosely coupled components that are seamlessly hidden to the end user behind a common interface. Often, a reverse proxy serves content from one single entry domain but retrieves the content from different origins. In the example in Figure 1 (below) we want to address one specific domain name, and depending on the path prefix, we retrieve the content from an on-premises webserver, from a webserver running on Amazon Elastic Cloud Compute (EC2), or from Amazon S3 Static Hosting, in the figure represented by the prefixes /hotels, /pets, and /cars, respectively. If we forward the path to the webserver without the path prefix, the component would not know what prefix it is run under and the prefix could be changed any time without impacting the component, thus making the component context-unaware.

Figure 1 - Architecture, AWS Amplify Console

Figure 1: Architecture, AWS Amplify Console

Some common requirements to these approaches are:

  • Components should be technology-agnostic, each component should be able to choose the technology stack independently.
  • Each component can be maintained by a dedicated autonomous team without depending on other teams.
  • All components are served from the same domain name. For example, this could have implications on search engine optimization.
  • Components should be unaware of the context where it is used.

The traditional approach would be to run a reverse proxy tier with rewrite rules to different origins. In this post we look into managed alternatives in AWS that take away the heavy lifting of running and scaling the proxy infrastructure.

Note: AWS Application Load Balancer can be used as a reverse proxy, but it only supports static targets (fixed IP address), no dynamic targets (domain name). Thus, we do not consider it here.

AWS Amplify Console

The AWS Amplify Console provides a Git-based workflow for hosting fullstack serverless web apps with continuous deployment. Amplify Console also offers a rewrites and redirects feature, which can be used for forwarding incoming requests with different path patterns to different origins (see Figure 2).

Figure 2 - Dashboard, AWS Amplify Console (rewrites and redirects feature)

Figure 2: Dashboard, AWS Amplify Console (rewrites and redirects feature)

Note: In Figure 2, <*> stands for a wildcard that matches any pattern. Target addresses must be HTTPS (no HTTP allowed).

This architectural option is the simplest to setup and manage and is the best approach for teams looking for the least management effort. AWS Amplify Console offers a simple interface for easily mapping incoming patterns to target addresses. It also makes it easy to serve additional static content if needed. Configuration options are limited and more complex scenarios cannot be implemented.

If you want to rewrite paths to remove the path prefix, you can accomplish this by using the wildcard pattern. The source address would contain the path prefix, but the target address would omit the prefix as seen in Figure 2.

When looking at pricing compared to the other approaches it is important to look at the outgoing traffic. With higher volumes, this can get expensive.

Amazon API Gateway

Amazon API Gateway is a fully managed service that makes it easy for developers to create, publish, maintain, monitor, and secure APIs at any scale. API Gateway’s REST API type allows users to setup HTTP proxy integrations, which can be used for forwarding incoming requests with different path patterns to different origin servers according to the API specifications (Figure 3).

Figure 3 - Dashboard, Amazon API Gateway (HTTP proxy integration)

Figure 3: Dashboard, Amazon API Gateway (HTTP proxy integration)

Note: In Figure 3, {proxy+} and {proxy} stand for the same wildcard pattern.

API Gateway, in comparison to Amplify Console, is better suited when looking for a higher customization degree. API Gateway offers multiple customization and monitoring features, such as custom gateway responses and dashboard monitoring.

Similar to Amplify Console, API Gateway provides a feature to rewrite paths and thus remove context from the path using the {proxy} wildcard.

API Gateway REST API pricing is based on the number of API calls as well as any external data transfers. External data transfers are charged at the EC2 data transfer rate.

Note: The HTTP integration type in API Gateway REST APIs does not support forwarding trailing slashes. If this is needed for your application, consider other integration types such as AWS Lambda integration or AWS service integration.

Amazon CloudFront and AWS Lambda@Edge

Amazon CloudFront is a fast content delivery network (CDN) service that securely delivers data, videos, applications, and APIs to customers globally with low latency and high transfer speeds. CloudFront is able to route incoming requests with different path patterns to different origins or origin groups by configuring its cache behavior rules (Figure 4).

Figure 4 - Dashboard, CloudFront (Cache Behavior)

Figure 4: Dashboard, CloudFront (Cache Behavior)

Additionally, Amazon CloudFront allows for integration with AWS Lambda@Edge functions. Lambda@Edge runs your code in response to events generated by CloudFront. In this scenario we can use Lambda@Edge to change the path pattern before forwarding a request to the origin and thus removing the context. For details on see this detailed re:Invent session.

This approach offers most control over caching behavior and customization. Being able to add your own custom code through a custom Lambda function adds an entire new range of possibilities when processing your request. This enables you to do everything from simple HTTP request and response processing at the edge to more advanced functionality, such as website security, real-time image transformation, intelligent bot mitigation, and search engine optimization.

Amazon CloudFront is charged by request and by Lambda@Edge invocation. The data traffic out is charged with the CloudFront regional data transfer out pricing.

Conclusion

With AWS Amplify Console, Amazon API Gateway, and Amazon CloudFront, we have seen three approaches to implement a reverse proxy pattern using managed services from AWS. The easiest approach to start with is AWS Amplify Console. If you run into more complex scenarios consider API Gateway. For most flexibility and when data traffic cost becomes a factor look into Amazon CloudFront with Lambda@Edge.

Fast and Cost-Effective Image Manipulation with Serverless Image Handler

Post Syndicated from Ajay Swamy original https://aws.amazon.com/blogs/architecture/fast-and-cost-effective-image-manipulation-with-serverless-image-handler/

As a modern company, you most likely have both a web-based and mobile app platform to provide content to customers who view it on a range of devices. This means you need to store multiple versions of images, depending on the device. The resulting image management can be a headache as it can be expensive and cumbersome to manage.

Serverless Image Handler (SIH) is an AWS Solution Implementation you use to store a single version of every image featured in your content, while dynamically delivering different versions at runtime based on your end user’s device. The solution simplifies code, saves on storage costs, and is ideal for use with web applications and mobile apps. SIH features include the ability to resize images, change background colors, apply formatting, and add watermarks.

Architecture overview

The SIH solution utilizes an AWS CloudFormation template to deploy the solution within minutes, and it’s for those of you who have multiple image assets needing an option to dynamically change or manipulate customer-facing images. SIH deploys best-in-class AWS services such as Amazon CloudFront, Amazon API Gateway, and AWS Lambda functions, and it connects to your Amazon Simple Storage Service (Amazon S3) bucket for storage.

Deploying this solution with the default parameters builds the following environment in AWS Cloud:

SIH: Emvironment in AWS Cloud-2

SIH uses the following AWS services:

  • Amazon CloudFront to quickly and securely  deliver images to your end users at scale
  • AWS Lambda to run code for image manipulation without the need for provisioning or managing servers (thereby reducing costs and overhead)
  • Your Amazon S3 bucket for storage of your image assets
  • AWS Secrets Manager to support the signing of image URLs so that image access is protected

How does Serverless Image Handler work?

When an HTTP request is received from a customer device, it is passed from CloudFront to API Gateway, and then forwarded to the Lambda function for processing. If the image is cached by CloudFront because of an earlier request, CloudFront will return the cached image instead of forwarding the request to the API Gateway. This reduces latency and eliminates the cost of reprocessing the image.

Requests that are not cached are passed to the API Gateway, and the entire request is forwarded to the Lambda function. The Lambda function retrieves the original image from your Amazon S3 bucket and uses Sharp (the open source image processing software) to return a modified version of the image to the API Gateway. SIH also utilizes Thumbor to apply dynamic filters on the fly. Additionally, the solution generates a CloudFront domain name that supports caching in CloudFront. The newly manipulated image is now cached at CloudFront for easy access and retrieval. The end-to-end request and response can be secured by using the solution’s signed URL feature via AWS Secrets Manager, which allows you to prevent unauthorized use of your proprietary images.

Lastly, SIH uses Amazon Rekognition for face detection in images submitted for smart cropping, allowing for easy cropping for specific content and image needs.

Code example of image manipulation

Please refer to the SIH implementation guide to quickly set up and use SIH. Using Node.js, you can create an image request as illustrated below. The code block specifies the image location as myImageBucket and specifies edits of grayscale :true to change the image to grayscale.

const imageRequest = JSON.stringify({
    bucket: “myImageBucket”,
    key: “myImage.jpg”,
    edits: {
        grayscale: true
    }
});

const url = `${CloudFrontUrl}/${Buffer.from(imageRequest).toString(‘base64’)}`;

With the generated URL, SIH can serve the grayscale image.

Conclusion

If you’re looking for a fast and cost-effective solution for image management, Serverless Image Handler provides a great way to manipulate and serve images on the fly with speed and security. Learn more about SIH and watch the accompanying Solving with AWS Solutions video below.

Automatically update security groups for Amazon CloudFront IP ranges using AWS Lambda

Post Syndicated from Yeshwanth Kottu original https://aws.amazon.com/blogs/security/automatically-update-security-groups-for-amazon-cloudfront-ip-ranges-using-aws-lambda/

Amazon CloudFront is a content delivery network that can help you increase the performance of your web applications and significantly lower the latency of delivering content to your customers. For CloudFront to access an origin (the source of the content behind CloudFront), the origin has to be publicly available and reachable. Anyone with the origin domain name or IP address could request content directly and bypass CloudFront. In this blog post, I describe an automated solution that uses security groups to permit only CloudFront to access the origin.

Amazon Simple Storage Service (Amazon S3) origins provide a feature called Origin Access Identity, which blocks public access to selected buckets, making them accessible only through CloudFront. When you use CloudFront to secure your web applications, it’s important to ensure that only CloudFront can access your origin (such as Amazon Elastic Cloud Compute (Amazon EC2) or Application Load Balancer (ALB)) and any direct access to origin is restricted. This blog post shows you how to create an AWS Lambda function to automatically update Amazon Virtual Private Cloud (Amazon VPC) security groups with CloudFront service IP ranges to permit only CloudFront to access the origin.

AWS publishes the IP ranges in JSON format for CloudFront and other AWS services. If your origin is an Elastic Load Balancer or an Amazon EC2 instance, you can use VPC security groups to allow only CloudFront IP ranges to access your applications. The IP ranges in the list are separated by service and Region, and you must specify only the IP ranges that correspond to CloudFront.

The IP ranges that AWS publishes change frequently and without an automated solution, you would need to retrieve this document frequently to understand the current IP ranges for CloudFront. Frequent polling is inefficient because there is no notice of when the IP ranges change, and if these IP ranges aren’t modified immediately, your client might see 504 errors when they access CloudFront. Additionally, there are numerous IP ranges for each service, performing the change manually isn’t an efficient way of updating these ranges. This means you need infrastructure to support the task. However, in that case you end up with another host to manage—complete with the typical patching, deployment, and monitoring. As you can see, a small task could quickly become more complicated than the problem you intended to solve.

An Amazon Simple Notification Service (Amazon SNS) message is sent to a topic whenever the AWS IP ranges change. Enabling you to build an event-driven, serverless solution that updates the IP ranges for your security groups, as needed by using a Lambda function that is triggered in response to the SNS notification.

Here are the steps we are going to take to implement the solution:

  1. Create your resources
    1. Create an IAM policy and execution role for the Lambda function
    2. Create your Lambda function
  2. Test your Lambda function
  3. Configure your Lambda function’s trigger

Create your resources

The first thing you need to do is create a Lambda function execution role and policy. Lambda function uses execution role to access or create AWS resources. This Lambda function is triggered by an SNS notification whenever there’s a change in the IP ranges document. Based on the number of IP ranges present for CloudFront and also the number of ports (for example, 80,443) that you want to whitelist on the origin, this Lambda function creates the required security groups. These security groups will allow only traffic from CloudFront to your ELB load balancers or EC2 instances.

Create an IAM policy and execution role for the Lambda function

When you create a Lambda function, it’s important to understand and properly define the security context for the Lambda function. Using AWS Identity and Access Management (IAM), you can create the Lambda execution role that determines the AWS service calls that the function is authorized to complete. (Learn more about the Lambda permissions model.)

To create the IAM policy for your role

  1. Log in to the IAM console with the user account that you will use to manage the Lambda function. This account must have administrator permissions.
  2. In the navigation pane, choose Policies.
  3. In the content pane, choose Create policy.
  4. Choose the JSON tab and copy the text from the following JSON policy document. Paste this text into the JSON text box.
    {
      "Version": "2012-10-17",
      "Statement": [
        {
          "Sid": "CloudWatchPermissions",
          "Effect": "Allow",
          "Action": [
            "logs:CreateLogGroup",
            "logs:CreateLogStream",
            "logs:PutLogEvents"
          ],
          "Resource": "arn:aws:logs:*:*:*"
        },
        {
          "Sid": "EC2Permissions",
          "Effect": "Allow",
          "Action": [
            "ec2:DescribeSecurityGroups",
            "ec2:AuthorizeSecurityGroupIngress",
            "ec2:RevokeSecurityGroupIngress",
            "ec2:CreateSecurityGroup",
            "ec2:DescribeVpcs",
    		"ec2:CreateTags",
            "ec2:ModifyNetworkInterfaceAttribute",
            "ec2:DescribeNetworkInterfaces"
            
          ],
          "Resource": "*"
        }
      ]
    }
    

  5. When you’re finished, choose Review policy.
  6. On the Review page, enter a name for the policy name (e.g. LambdaExecRolePolicy-UpdateSecurityGroupsForCloudFront). Review the policy Summary to see the permissions granted by your policy, and then choose Create policy to save your work.

To understand what this policy allows, let’s look closely at both statements in the policy. The first statement allows the Lambda function to create and write to CloudWatch Logs, which is vital for debugging and monitoring our function. The second statement allows the function to get information about existing security groups, get existing VPC information, create security groups, and authorize and revoke ingress permissions. It’s an important best practice that your IAM policies be as granular as possible, to support the principal of least privilege.

Now that you’ve created your policy, you can create the Lambda execution role that will use the policy.

To create the Lambda execution role

  1. In the navigation pane of the IAM console, choose Roles, and then choose Create role.
  2. For Select type of trusted entity, choose AWS service.
  3. Choose the service that you want to allow to assume this role. In this case, choose Lambda.
  4. Choose Next: Permissions.
  5. Search for the policy name that you created earlier and select the check box next to the policy.
  6. Choose Next: Tags.
  7. (Optional) Add metadata to the role by attaching tags as key-value pairs. For more information about using tags in IAM, see Tagging IAM Users and Roles.
  8. Choose Next: Review.
  9. For Role name (e.g. LambdaExecRole-UpdateSecurityGroupsForCloudFront), enter a name for your role.
  10. (Optional) For Role description, enter a description for the new role.
  11. Review the role, and then choose Create role.

Create your Lambda function

Now, create your Lambda function and configure the role that you created earlier as the execution role for this function.

To create the Lambda function

  1. Go to the Lambda console in N. Virginia region and choose Create function. On the next page, choose Author from scratch. (I’ll be providing the code for your Lambda function, but for other functions, the Use a blueprint option can be a great way to get started.)
  2. Give your Lambda function a name (e.g UpdateSecurityGroupsForCloudFront) and description, and select Python 3.8 from the Runtime menu.
  3. Choose or create an execution role: Select the execution role you created earlier by selecting the option Use an Existing Role.
  4. After confirming that your settings are correct, choose Create function.
  5. Paste the Lambda function code from here.
  6. Select Save.

Additionally, in the Basic Settings of the Lambda function, increase the timeout to 10 seconds.

To set the timeout value in the Lambda console

  1. In the Lambda console, choose the function you just created.
  2. Under Basic settings, choose Edit.
  3. For Timeout, select 10s.
  4. Choose Save.

By default, the Lambda function has these settings:

  • The Lambda function is configured to create security groups in the default VPC.
  • CloudFront IP ranges are updated as inbound rules on port 80.
  • The created security groups are tagged with the name prefix AUTOUPDATE.
  • Debug logging is turned off.
  • The service for which IP ranges are extracted is set to CloudFront.
  • The SDK client in the Lambda function set to us-east-1(N. Virginia).

If you want to customize these settings, set the following environment variables for the Lambda function. For more details, see Using AWS Lambda environment variables.

Action Key-value data
To create security groups in a specific VPC Key: VPC_ID
Value: vpc-id
To create security groups rules for a different port or multiple ports
 
The solution in this example supports a total of two ports. One can be used for HTTP and another for HTTPS.

Key: PORTS
Value: portnumber
or
Key: PORTS
Value: portnumber,portnumber
To customize the prefix name tag of your security groups Key: PREFIX_NAME
Value: custom-name
To enable debug logging to CloudWatch Key: DEBUG
Value: true
To extract IP ranges for a different service other than CloudFront Key: SERVICE
Value: servicename
To configure the Region for the SDK client used in the Lambda function
 
If the CloudFront origin is present in a different Region than N. Virginia, the security groups must be created in that region.
Key: REGION
Value: regionname

To set environment variables in the Lambda console

  1. In the Lambda console, choose the function you created.
  2. Under Environment variables, choose Edit.
  3. Choose Add environment variable.
  4. Enter a key and value.
  5. Choose Save.

Test your Lambda function

Now that you’ve created your function, it’s time to test it and initialize your security group.

To create your test event for the Lambda function

  1. In the Lambda console, on the Functions page, choose your function. In the drop-down menu next to Actions, choose Configure test events.
  2. Enter an Event Name (e.g. TriggerSNS)
  3. Replace the following as your sample event, which will represent an SNS notification and then select Create.
    {
        "Records": [
            {
                "EventVersion": "1.0",
                "EventSubscriptionArn": "arn:aws:sns:EXAMPLE",
                "EventSource": "aws:sns",
                "Sns": {
                    "SignatureVersion": "1",
                    "Timestamp": "1970-01-01T00:00:00.000Z",
                    "Signature": "EXAMPLE",
                    "SigningCertUrl": "EXAMPLE",
                    "MessageId": "95df01b4-ee98-5cb9-9903-4c221d41eb5e",
                    "Message": "{\"create-time\": \"yyyy-mm-ddThh:mm:ss+00:00\", \"synctoken\": \"0123456789\", \"md5\": \"7fd59f5c7f5cf643036cbd4443ad3e4b\", \"url\": \"https://ip-ranges.amazonaws.com/ip-ranges.json\"}",
                    "Type": "Notification",
                    "UnsubscribeUrl": "EXAMPLE",
                    "TopicArn": "arn:aws:sns:EXAMPLE",
                    "Subject": "TestInvoke"
                }
      		}
        ]
    }
    

  4. After you’ve added the test event, select Save and then select Test. Your Lambda function is then invoked, and you should see log output at the bottom of the console in Execution Result section, similar to the following.
    Updating from https://ip-ranges.amazonaws.com/ip-ranges.json
    MD5 Mismatch: got 2e967e943cf98ae998efeec05d4f351c expected 7fd59f5c7f5cf643036cbd4443ad3e4b: Exception
    Traceback (most recent call last):
      File "/var/task/lambda_function.py", line 29, in lambda_handler
        ip_ranges = json.loads(get_ip_groups_json(message['url'], message['md5']))
      File "/var/task/lambda_function.py", line 50, in get_ip_groups_json
        raise Exception('MD5 Missmatch: got ' + hash + ' expected ' + expected_hash)
    Exception: MD5 Mismatch: got 2e967e943cf98ae998efeec05d4f351c expected 7fd59f5c7f5cf643036cbd4443ad3e4b
    

  5. Edit the sample event again, and this time change the md5 value in the sample event to be the first MD5 hash provided in the log output. In this example, you would update the md5 value in the sample event configured earlier with the hash value seen in the error ‘2e967e943cf98ae998efeec05d4f351c’. Lambda code successfully executes only when the original hash of the IP ranges document and the hash received from the event trigger match. After you modify the hash value from the error message received earlier, the test event matches the hash of the IP ranges document.
  6. Select Save and test. This invokes your Lambda function.

After the function is invoked the second time with updated md5 has Lambda function should execute without any errors. You should be able to see the new security groups created and the IP ranges of CloudFront updated in the rules in the EC2 console, as shown in Figure 1.
 

Figure 1: EC2 console showing the security groups created

Figure 1: EC2 console showing the security groups created

In the initial successful run of this function, it created the total number of security groups required to update all the IP ranges of CloudFront for the ports mentioned. The function creates security groups based on the maximum number of rules that can be added to individual security groups. The new security groups can be identified from the EC2 console by the name AUTOUPDATE_random if you used the default configuration, or a custom name if you provided a PREFIX_NAME.

You can now attach these security groups to your Elastic LoadBalancer or EC2 instances. If your log output is different from what is described here, the output should help you identify the issue.

Configure your Lambda function’s trigger

After you’ve validated that your function is executing properly, it’s time to connect it to the SNS topic for IP changes. To do this, use the AWS Command Line Interface (CLI). Enter the following command, making sure to replace Lambda ARN with the Amazon Resource Name (ARN) of your Lambda function. You can find this ARN at the top right when viewing the configuration of your Lambda function.

aws sns subscribe - -topic-arn "arn:aws:sns:us-east-1:806199016981:AmazonIpSpaceChanged" - -region us-east-1 - -protocol lambda - -notification-endpoint "Lambda ARN"

You should receive the ARN of your Lambda function’s SNS subscription.

Now add a permission that allows the Lambda function to be invoked by the SNS topic. The following command also adds the Lambda trigger.

aws lambda add-permission - -function-name "Lambda ARN" - -statement-id lambda-sns-trigger - -region us-east-1 - -action lambda:InvokeFunction - -principal sns.amazonaws.com - -source-arn "arn:aws:sns:us-east-1:806199016981:AmazonIpSpaceChanged"

When AWS changes any of the IP ranges in the document, an SNS notification is sent and your Lambda function will be triggered. This Lambda function verifies the modified ranges in the document and efficiently updates the IP ranges on the existing security groups. Additionally, the function dynamically scales and creates additional security groups if the number of IP ranges for CloudFront is increased in future. Any newly created security groups are automatically attached to the network interface where the previous security groups are attached in order to avoid service interruption.

Summary

As you followed this blog post, you created a Lambda function to create a security groups and update the security group’s rules dynamically whenever AWS publishes new internal service IP ranges. This solution has several advantages:

  • The solution isn’t designed as a periodic poll, so it only runs when it needs to.
  • It’s automatic, so you don’t need to update security groups manually which lowers the operational cost.
  • It’s simple, because you have no extra infrastructure to maintain as the solution is completely serverless.
  • It’s cost effective, because the Lambda function runs only when triggered by the AmazonIpSpaceChanged SNS topic and only runs for a few seconds, this solution costs only pennies to operate.

If you have feedback about this post, submit comments in the Comments section below. If you have questions about this post, start a new thread on the Amazon CloudFront forum. If you have any other use cases for using Lambda functions to dynamically update security groups, or even other networking configurations such as VPC route tables or ACLs, we’d love to hear about them!

Want more AWS Security how-to content, news, and feature announcements? Follow us on Twitter.

Author

Yeshwanth Kottu

Yeshwanth is a Systems Development Engineer at AWS in Cupertino, CA. With a focus on CloudFront and Lambda@Edge, he enjoys helping customers tackle challenges through cloud-scale architectures. Yeshwanth has an MS in Computer Systems Networking and Telecommunications from Northeastern University. Outside of work, he enjoys travelling, visiting national parks, and playing cricket.

The Satellite Ear Tag that is Changing Cattle Management

Post Syndicated from Karen Hildebrand original https://aws.amazon.com/blogs/architecture/the-satellite-ear-tag-that-is-changing-cattle-management/

Most cattle are not raised in cities—they live on cattle stations, large open plains, and tracts of land largely unpopulated by humans. It’s hard to keep connected with the herd. Cattle don’t often carry their own mobile phones, and they don’t pay a mobile phone bill. Naturally, the areas in which cattle live, often do not have cellular connectivity or reception. But they now have one way to stay connected: a world-first satellite ear tag.

Ceres Tag co-founders Melita Smith and David Smith recognized the problem given their own farming background. David explained that they needed to know simple things to begin with, such as:

  • Where are they?
  • How many are out there?
  • What are they doing?
  • What condition are they in?
  • Are they OK?

Later, the questions advanced to:

  • Which are the higher performing animals that I want to keep?
  • Where do I start when rounding them up?
  • As assets, can I get better financing and insurance if I can prove their location, existence, and condition?

To answer these questions, Ceres Tag first had to solve the biggest challenge, and it was not to get cattle to carry their mobile phones and pay mobile phone bills to generate the revenue needed to get greater coverage. David and Melita knew they needed help developing a new method of tracking, but in a way that aligned with current livestock practices. Their idea of a satellite connected ear tag came to life through close partnership and collaboration with CSIRO, Australia’s national science agency. They brought expertise to the problem, and rallied together teams of experts across public and private partnerships, never accepting “that’s not been done before” as a reason to curtail their innovation.


Figure 1: How Ceres Tag works in practice

Thinking Big: Ceres Tag Protocol

Melita and David constructed their idea and brought the physical hardware to reality. This meant finding strategic partners to build hardware, connectivity partners that provided global coverage at a cost that was tenable to cattle operators, integrations with existing herd management platforms and a global infrastructure backbone that allowed their solution to scale. They showed resilience, tenacity and persistence that are often traits attributed to startup founders and lifelong agricultural advocates. Explaining the purpose of the product often requires some unique approaches to defining the value proposition while fundamentally breaking down existing ways of thinking about things. As David explained, “We have an internal saying, ‘As per Ceres Tag protocol …..’ to help people to see the problem through a new lens.” This persistence led to the creation of an easy to use ear tagging applicator and a two-prong smart ear tag. The ear tag connects via satellite for data transmission, providing connectivity to more than 120 countries in the world and 80% of the earth’s surface.

The Ceres Tag applicator, smart tag, and global satellite connectivity

Figure 2: The Ceres Tag applicator, smart tag, and global satellite connectivity

Unlocking the blocker: data-driven insights

With the hardware and connectivity challenges solved, Ceres Tag turned to how the data driven insights would be delivered. The company needed to select a technology partner that understood their global customer base, and what it means to deliver a low latency solution for web, mobile and API-driven solutions. David, once again knew the power in leveraging the team around him to find the best solution. The evaluation of cloud providers was led by Lewis Frost, COO, and Heidi Perrett, Data Platform Manager. Ceres Tag ultimately chose to partner with AWS and use the AWS Cloud as the backbone for the Ceres Tag Management System.

Ceres Tag conceptual diagram

Figure 3: Ceres Tag conceptual diagram

The Ceres Tag Management System houses the data and metadata about each tag, enabling the traceability of that tag throughout each animal’s life cycle. This includes verification as to whom should have access to their health records and history. Based on the nature of the data being stored and transmitted, security of the application is critical. As a startup, it was important for Ceres Tag to keep costs low, but to also to be able to scale based on growth and usage as it expands globally.

Ceres Tag is able to quickly respond to customers regardless of geography, routing traffic to the appropriate end point. They accomplish this by leveraging Amazon CloudFront as the Content Delivery Network (CDN) for traffic distribution of front-end requests and Amazon Route 53 for DNS routing. A multi-Availability Zone deployment and AWS Application Load Balancer distribute incoming traffic across multiple targets, increasing the availability of your application.

Ceres Tag is using AWS Fargate to provide a serverless compute environment that matches the pay-as-you-go usage-based model. AWS also provides many advanced security features and architecture guidance that has helped to implement and evaluate best practice security posture across all of the environments. Authentication is handled by Amazon Cognito, which allows Ceres Tag to scale easily by supporting millions of users. It leverages easy-to-use features like sign-in with social identity providers, such as Facebook, Google, and Amazon, and enterprise identity providers via SAML 2.0.

The data captured from the ear tag on the cattle is will be ingested via AWS PrivateLink. By providing a private endpoint to access your services, AWS PrivateLink ensures your traffic is not exposed to the public internet. It also makes it easy to connect services across different accounts and VPCs to significantly simplify your network architecture. In leveraging a satellite connectivity provider running on AWS, Ceres Tag will benefit from the AWS Ground Station infrastructure leveraged by the provider in addition to the streaming IoT database.


Architecting for Reliable Scalability

Post Syndicated from Marwan Al Shawi original https://aws.amazon.com/blogs/architecture/architecting-for-reliable-scalability/

Cloud solutions architects should ideally “build today with tomorrow in mind,” meaning their solutions need to cater to current scale requirements as well as the anticipated growth of the solution. This growth can be either the organic growth of a solution or it could be related to a merger and acquisition type of scenario, where its size is increased dramatically within a short period of time.

Still, when a solution scales, many architects experience added complexity to the overall architecture in terms of its manageability, performance, security, etc. By architecting your solution or application to scale reliably, you can avoid the introduction of additional complexity, degraded performance, or reduced security as a result of scaling.

Generally, a solution or service’s reliability is influenced by its up time, performance, security, manageability, etc. In order to achieve reliability in the context of scale, take into consideration the following primary design principals.

Modularity

Modularity aims to break a complex component or solution into smaller parts that are less complicated and easier to scale, secure, and manage.

Monolithic architecture vs. modular architecture

Figure 1: Monolithic architecture vs. modular architecture

Modular design is commonly used in modern application developments. where an application’s software is constructed of multiple and loosely coupled building blocks (functions). These functions collectively integrate through pre-defined common interfaces or APIs to form the desired application functionality (commonly referred to as microservices architecture).


Scalable modular applications

Figure 2: Scalable modular applications

For more details about building highly scalable and reliable workloads using a microservices architecture, refer to Design Your Workload Service Architecture.

This design principle can also be applied to different components of the solution’s architecture. For example, when building a cloud solution on a single Amazon VPC, it may reach certain scaling limits and make it harder to introduce changes at scale due to the higher level of dependencies. This single complex VPC can be divided into multiple smaller and simpler VPCs. The architecture based on multiple VPCs can vary. For example, the VPCs can be divided based on a service or application building block, a specific function of the application, or on organizational functions like a VPC for various departments. This principle can also be leveraged at a regional level for very high scale global architectures. You can make the architecture modular at a global level by distributing the multiple VPCs across different AWS Regions to achieve global scale (facilitated by AWS Global Infrastructure).

In addition, modularity promotes separation of concerns by having well-defined boundaries among the different components of the architecture. As a result, each component can be managed, secured, and scaled independently. Also, it helps you avoid what is commonly known as “fate sharing,” where a vertically scaled server hosts a monolithic application, and any failure to this server will impact the entire application.

Horizontal scaling

Horizontal scaling, commonly referred to as scale-out, is the capability to automatically add systems/instances in a distributed manner in order to handle an increase in load. Examples of this increase in load could be the increase of number of sessions to a web application. With horizontal scaling, the load is distributed across multiple instances. By distributing these instances across Availability Zones, horizontal scaling not only increases performance, but also improves the overall reliability.

In order for the application to work seamlessly in a scale-out distributed manner, the application needs to be designed to support a stateless scaling model, where the application’s state information is stored and requested independently from the application’s instances. This makes the on-demand horizontal scaling easier to achieve and manage.

This principle can be complemented with a modularity design principle, in which the scaling model can be applied to certain component(s) or microservice(s) of the application stack. For example, only scale-out Amazon Elastic Cloud Compute (EC2) front-end web instances that reside behind an Elastic Load Balancing (ELB) layer with auto-scaling groups. In contrast, this elastic horizontal scalability might be very difficult to achieve for a monolithic type of application.

Leverage the content delivery network

Leveraging Amazon CloudFront and its edge locations as part of the solution architecture can enable your application or service to scale rapidly and reliably at a global level, without adding any complexity to the solution. The integration of a CDN can take different forms depending on the solution use case.

For example, CloudFront played an important role to enable the scale required throughout Amazon Prime Day 2020 by serving up web and streamed content to a worldwide audience, which handled over 280 million HTTP requests per minute.

Go serverless where possible

As discussed earlier in this post, modular architectures based on microservices reduce the complexity of the individual component or microservice. At scale it may introduce a different type of complexity related to the number of these independent components (microservices). This is where serverless services can help to reduce such complexity reliably and at scale. With this design model you no longer have to provision, manually scale, maintain servers, operating systems, or runtimes to run your applications.

For example, you may consider using a microservices architecture to modernize an application at the same time to simplify the architecture at scale using Amazon Elastic Kubernetes Service (EKS) with AWS Fargate.

Example of a serverless microservices architecture

Figure 3: Example of a serverless microservices architecture

In addition, an event-driven serverless capability like AWS Lambda is key in today’s modern scalable cloud solutions, as it handles running and scaling your code reliably and efficiently. See How to Design Your Serverless Apps for Massive Scale and 10 Things Serverless Architects Should Know for more information.

Secure by design

To avoid any major changes at a later stage to accommodate security requirements, it’s essential that security is taken into consideration as part of the initial solution design. For example, if the cloud project is new or small, and you don’t consider security properly at the initial stages, once the solution starts to scale, redesigning the entire cloud project from scratch to accommodate security best practices is usually not a simple option, which may lead to consider suboptimal security solutions that may impact the desired scale to be achieved. By leveraging CDN as part of the solution architecture (as discussed above), using Amazon CloudFront, you can minimize the impact of distributed denial of service (DDoS) attacks as well as perform application layer filtering at the edge. Also, when considering serverless services and the Shared Responsibility Model, from a security lens you can delegate a considerable part of the application stack to AWS so that you can focus on building applications. See The Shared Responsibility Model for AWS Lambda.

Design with security in mind by incorporating the necessary security services as part of the initial cloud solution. This will allow you to add more security capabilities and features as the solution grows, without the need to make major changes to the design.

Design for failure

The reliability of a service or solution in the cloud depends on multiple factors, the primary of which is resiliency. This design principle becomes even more critical at scale because the failure impact magnitude typically will be higher. Therefore, to achieve a reliable scalability, it is essential to design a resilient solution, capable of recovering from infrastructure or service disruptions. This principle involves designing the overall solution in such a way that even if one or more of its components fail, the solution is still be capable of providing an acceptable level of its expected function(s). See AWS Well-Architected Framework – Reliability Pillar for more information.

Conclusion

Designing for scale alone is not enough. Reliable scalability should be always the targeted architectural attribute. The design principles discussed in this blog act as the foundational pillars to support it, and ideally should be combined with adopting a DevOps model.

Mercado Libre: How to Block Malicious Traffic in a Dynamic Environment

Post Syndicated from Gaston Ansaldo original https://aws.amazon.com/blogs/architecture/mercado-libre-how-to-block-malicious-traffic-in-a-dynamic-environment/

Blog post contributors: Pablo Garbossa and Federico Alliani of Mercado Libre

Introduction

Mercado Libre (MELI) is the leading e-commerce and FinTech company in Latin America. We have a presence in 18 countries across Latin America, and our mission is to democratize commerce and payments to impact the development of the region.

We manage an ecosystem of more than 8,000 custom-built applications that process an average of 2.2 million requests per second. To support the demand, we run between 50,000 to 80,000 Amazon Elastic Cloud Compute (EC2) instances, and our infrastructure scales in and out according to the time of the day, thanks to the elasticity of the AWS cloud and its auto scaling features.

Mercado Libre

As a company, we expect our developers to devote their time and energy building the apps and features that our customers demand, without having to worry about the underlying infrastructure that the apps are built upon. To achieve this separation of concerns, we built Fury, our platform as a service (PaaS) that provides an abstraction layer between our developers and the infrastructure. Each time a developer deploys a brand new application or a new version of an existing one, Fury takes care of creating all the required components such as Amazon Virtual Private Cloud (VPC), Amazon Elastic Load Balancing (ELB), Amazon EC2 Auto Scaling group (ASG), and EC2) instances. Fury also manages a per-application Git repository, CI/CD pipeline with different deployment strategies, such like blue-green and rolling upgrades, and transparent application logs and metrics collection.

Fury- MELI PaaS

For those of us on the Cloud Security team, Fury represents an opportunity to enforce critical security controls across our stack in a way that’s transparent to our developers. For instance, we can dictate what Amazon Machine Images (AMIs) are vetted for use in production (such as those that align with the Center for Internet Security benchmarks). If needed, we can apply security patches across all of our fleet from a centralized location in a very scalable fashion.

But there are also other attack vectors that every organization that has a presence on the public internet is exposed to. The AWS recent Threat Landscape Report shows a 23% YoY increase in the total number of Denial of Service (DoS) events. It’s evident that organizations need to be prepared to quickly react under these circumstances.

The variety and the number of attacks are increasing, testing the resilience of all types of organizations. This is why we started working on a solution that allows us to contain application DoS attacks, and complements our perimeter security strategy, which is based on services such as AWS Shield and AWS Web Application Firewall (WAF). In this article, we will walk you through the solution we built to automatically detect and block these events.

The strategy we implemented for our solution, Network Behavior Anomaly Detection (NBAD), consists of four stages that we repeatedly execute:

  1. Analyze the execution context of our applications, like CPU and memory usage
  2. Learn their behavior
  3. Detect anomalies, gather relevant information and process it
  4. Respond automatically

Step 1: Establish a baseline for each application

End user traffic enters through different AWS CloudFront distributions that route to multiple Elastic Load Balancers (ELBs). Behind the ELBs, we operate a fleet of NGINX servers from where we connect back to the myriad of applications that our developers create via Fury.

MELI Architecture - nomaly detection project-step 1

Step 1: MELI Architecture – Anomaly detection project

We collect logs and metrics for each application that we ship to Amazon Simple Storage Service (S3) and Datadog. We then partition these logs using AWS Glue to make them available for consumption via Amazon Athena. On average, we send 3 terabytes (TB) of log files in parquet format to S3.

Based on this information, we developed processes that we complement with commercial solutions, such as Datadog’s Anomaly Detection, which allows us to learn the normal behavior or baseline of our applications and project expected adaptive growth thresholds for each one of them.

Anomaly detection

Step 2: Anomaly detection

When any of our apps receives a number of requests that fall outside the limits set by our anomaly detection algorithms, an Amazon Simple Notification Service (SNS) event is emitted, which triggers a workflow in the Anomaly Analyzer, a custom-built component of this solution.

Upon receiving such an event, the Anomaly Analyzer starts composing the so-called event context. In parallel, the Data Extractor retrieves vital insights via Athena from the log files stored in S3.

The output of this process is used as the input for the data enrichment process. This is responsible for consulting different threat intelligence sources that are used to further augment the analysis and determine if the event is an actual incident or not.

At this point, we build the context that will allow us not only to have greater certainty in calculating the score, but it will also help us validate and act quicker. This context includes:

  • Application’s owner
  • Affected business metrics
  • Error handling statistics of our applications
  • Reputation of IP addresses and associated users
  • Use of unexpected URL parameters
  • Distribution by origin of the traffic that generated the event (cloud providers, geolocation, etc.)
  • Known behavior patterns of vulnerability discovery or exploitation
Step 2: MELI Architecture - Anomaly detection project

Step 2: MELI Architecture – Anomaly detection project

Step 3: Incident response

Once we reconstruct the context of the event, we calculate a score for each “suspicious actor” involved.

Step 3: MELI Architecture - Anomaly detection project

Step 3: MELI Architecture – Anomaly detection project

Based on these analysis results we carry out a series of verifications in order to rule out false positives. Finally, we execute different actions based on the following criteria:

Manual review

If the outcome of the automatic analysis results in a medium risk scoring, we activate a manual review process:

  1. We send a report to the application’s owners with a summary of the context. Based on their understanding of the business, they can activate the Incident Response Team (IRT) on-call and/or provide feedback that allows us to improve our automatic rules.
  2. In parallel, our threat analysis team receives and processes the event. They are equipped with tools that allow them to add IP addresses, user-agents, referrers, or regular expressions into Amazon WAF to carry out temporary blocking of “bad actors” in situations where the attack is in progress.

Automatic response

If the analysis results in a high risk score, an automatic containment process is triggered. The event is sent to our block API, which is responsible for adding a temporary rule designed to mitigate the attack in progress. Behind the scenes, our block API leverages AWS WAF to create IPSets. We reference these IPsets from our custom rule groups in our web ACLs, in order to block IPs that source the malicious traffic. We found many benefits in the new release of AWS WAF, like support for Amazon Managed Rules, larger capacity units per web ACL as well as an easier to use API.

Conclusion

By leveraging the AWS platform and its powerful APIs, and together with the AWS WAF service team and solutions architects, we were able to build an automated incident response solution that is able to identify and block malicious actors with minimal operator intervention. Since launching the solution, we have reduced YoY application downtime over 92% even when the time under attack increased over 10x. This has had a positive impact on our users and therefore, on our business.

Not only was our downtime drastically reduced, but we also cut the number of manual interventions during this type of incident by 65%.

We plan to iterate over this solution to further reduce false positives in our detection mechanisms as well as the time to respond to external threats.

About the authors

Pablo Garbossa is an Information Security Manager at Mercado Libre. His main duties include ensuring security in the software development life cycle and managing security in MELI’s cloud environment. Pablo is also an active member of the Open Web Application Security Project® (OWASP) Buenos Aires chapter, a nonprofit foundation that works to improve the security of software.

Federico Alliani is a Security Engineer on the Mercado Libre Monitoring team. Federico and his team are in charge of protecting the site against different types of attacks. He loves to dive deep into big architectures to drive performance, scale operational efficiency, and increase the speed of detection and response to security events.

How to enhance Amazon CloudFront origin security with AWS WAF and AWS Secrets Manager

Post Syndicated from Cameron Worrell original https://aws.amazon.com/blogs/security/how-to-enhance-amazon-cloudfront-origin-security-with-aws-waf-and-aws-secrets-manager/

Whether your web applications provide static or dynamic content, you can improve their performance, availability, and security by using Amazon CloudFront as your content delivery network (CDN). CloudFront is a web service that speeds up distribution of your web content through a worldwide network of data centers called edge locations. CloudFront ensures that end-user requests are served by the closest edge location. As a result, viewer requests travel a short distance, improving performance for your viewers. When you deliver web content through a CDN such as CloudFront, a best practice is to prevent viewer requests from bypassing the CDN and accessing your origin content directly. In this blog post, you’ll see how to use CloudFront custom headers, AWS WAF, and AWS Secrets Manager to restrict viewer requests from accessing your CloudFront origin resources directly.

You can configure CloudFront to add custom HTTP headers to the requests that it sends to your origin. HTTP header fields are components of the header section of request and response messages in the Hypertext Transfer Protocol (HTTP). These custom headers enable you to send and gather information from your origin that isn’t included in typical viewer requests. You can use custom headers to control access to content. By configuring your origin to respond to requests only when they include a custom header that was added by CloudFront, you prevent users from bypassing CloudFront and accessing your origin content directly. In addition to offloading traffic from your origin servers, this also helps enforce web traffic being processed at CloudFront edge locations according to your AWS WAF rules prior to being forwarded to your origin.

AWS WAF is a web application firewall that helps protect your web applications from common web exploits that could affect application availability, compromise security, or consume excessive resources. It supports managed rules as well as a powerful rule language for custom rules. AWS WAF is tightly integrated with CloudFront and the Application Load Balancer (ALB). AWS Secrets Manager helps you protect the secrets needed to access your applications, services, and IT resources. This service enables you to easily rotate, manage, and retrieve database credentials, API keys, and other secrets throughout their lifecycle.

Solution overview

This blog post includes a sample solution you can deploy to see how its components integrate to implement the origin access restriction. The sample solution includes a web server deployed on Amazon Elastic Compute Cloud (Amazon EC2) Linux instances running in an AWS Auto Scaling group. Elastic Load Balancing distributes the incoming application traffic across the EC2 instances by using an ALB. The ALB is associated with an AWS WAF web access control list (web ACL), which is used to validate the incoming origin requests. Finally, a CloudFront distribution is deployed with an AWS WAF web ACL and configured to point to the origin ALB.

Although the sample solution is designed for deployment with CloudFront with an AWS WAF–associated ALB as its origin, the same approach could be used for origins that use Amazon API Gateway. A custom origin is any origin that is not an Amazon Simple Storage Service (Amazon S3) bucket, with one exception. An S3 bucket that is configured with static website hosting is a custom origin. You can refer to the CloudFront Developer Guide for more information on securing content that CloudFront delivers from S3 origins.

This solution is intended to enhance security for CloudFront custom origins that support AWS WAF, such as ALB, and is not a substitute for authentication and authorization mechanisms within your web applications. In this solution, Secrets Manager is used to control, audit, monitor, and rotate a random string used within your CloudFront and AWS WAF configurations. Although most of these lifecycle attributes could be set manually, Secrets Manager makes it easier.

Figure 1 shows how the provided AWS CloudFormation template creates the sample solution.
 

Figure 1: How the CloudFormation template works

Figure 1: How the CloudFormation template works

Here’s how the solution works, as shown in the diagram:

  1. A viewer accesses your website or application and requests one or more files, such as an image file and an HTML file.
  2. DNS routes the request to the CloudFront edge location that can best serve the request—typically the nearest CloudFront edge location in terms of latency.
  3. At the edge location, AWS WAF inspects the incoming request according to configured web ACL rules.
  4. At the edge location, CloudFront checks its cache for the requested content. If the content is in the cache, CloudFront returns it to the user. If the content isn’t in the cache, CloudFront adds the custom header, X-Origin-Verify, with the value of the secret from Secrets Manager, and forwards the request to the origin.
  5. At the origin Application Load Balancer (ALB), AWS WAF inspects the incoming request header, X-Origin-Verify, and allows the request if the string value is valid. If the header isn’t valid, AWS WAF blocks the request.
  6. At the configured interval, Secrets Manager automatically rotates the custom header value and updates the origin AWS WAF and CloudFront configurations.

Solution deployment

This sample solution includes seven main steps:

  1. Deploy the CloudFormation template.
  2. Confirm successful viewer access to the CloudFront URL.
  3. Confirm that direct viewer access to the origin URL is blocked by AWS WAF.
  4. Review the CloudFront origin custom header configuration.
  5. Review the AWS WAF web ACL header validation rule.
  6. Review the Secrets Manager configuration.
  7. Review the Secrets Manager AWS Lambda rotation function.

Step 1: Deploy the CloudFormation template

The stack will launch in the N. Virginia (us-east-1) Region. It takes approximately 10 minutes for the CloudFormation stack to complete.

Note: The sample solution requires deployment in the N. Virginia (us-east-1) Region. Although out of scope for this blog post, an additional sample template is available in this solution’s GitHub repository for testing this solution with an existing CloudFront distribution and regional AWS WAF web ACL. Refer to the AWS regional service support information for more details on regional service availability.

To launch the CloudFormation stack

  1. Choose the following Launch Stack icon to launch a CloudFormation stack in your account in the N. Virginia Region.
     
    Select the Launch Stack button to launch the template
  2. In the CloudFormation console, leave the configured values, and then choose Next.
  3. On the Specify Details page, provide the following input parameters. You can modify the default values to customize the solution for your environment.

    Input parameter Input parameter description
    EC2InstanceSize The instance size for EC2 web servers.
    HeaderName The HTTP header name for the secret string.
    WAFRulePriority The rule number to use for the regional AWS WAF web ACL. 0 is recommended, because rules are evaluated in order based on the value of priority.
    RotateInterval The rotation interval, in days, for the origin secret value. Full rotation requires two intervals.
    ArtifactsBucket The S3 bucket with artifact files (Lambda functions, templates, HTML files, and so on). Keep the default value.
    ArtifactsPrefix The path for the S3 bucket that contains artifact files. Keep the default value.

    Figure 2 shows an example of values entered under Parameters.
     

    Figure 2: Input parameters for the CloudFormation stack

    Figure 2: Input parameters for the CloudFormation stack

  4. Enter values for all of the input parameters, and then choose Next.
  5. On the Options page, keep the defaults, and then choose Next.
  6. On the Review page, confirm the details, acknowledge the statements under Capabilities and transforms as shown in Figure 3, and then choose Create stack.
     
    Figure 3: CloudFormation Capabilities and Transforms acknowledgments

    Figure 3: CloudFormation Capabilities and Transforms acknowledgments

Step 2: Confirm access to the website through CloudFront

Next, confirm that website access through CloudFront is functioning as intended. After the CloudFormation stack completes deployment, you can access the test website using the domain name that was automatically assigned to the distribution.

To confirm viewer access to the website through CloudFront

  1. In the CloudFormation console, choose Services > CloudFormation > CFOriginVerify stack. On the stack Outputs tab, look for the cfEndpoint entry, similar to that shown in Figure 4.
     
    Figure 4: CloudFormation cfEndpoint stack output

    Figure 4: CloudFormation cfEndpoint stack output

  2. The cfEndpoint is the URL for the site, and it is automatically assigned by CloudFront. Choose the cfEndpoint link to open the test page, as shown in Figure 5.
     
    Figure 5: CloudFormation cfEndpoint test page

    Figure 5: CloudFormation cfEndpoint test page

In this step, you’ve confirmed that website accessibility through CloudFront is functioning as intended.

Step 3: Confirm that direct viewer access to the origin URL is blocked by AWS WAF

In this step, you confirm that direct access to the test website is blocked by the regional AWS WAF web ACL.

To test direct access to the origin URL

  1. In the CloudFormation console, choose Services > CloudFormation > CFOriginVerify stack. On the stack Outputs tab, look for the albEndpoint entry.
  2. Choose the albEndpoint link to go to the test site URL that was automatically assigned to the ALB. Choosing this link will result in a 403 Forbidden response. When AWS WAF blocks a web request based on the conditions that you specify, it returns HTTP status code 403 (Forbidden).

In this step, you’ve confirmed that website accessibility directly to the origin ALB is blocked by the regional AWS WAF web ACL.

Step 4: Review the CloudFront origin custom header configuration

Now that you’ve confirmed that the test website can only be accessed through CloudFront, you can review the detailed CloudFront, WAF, and Secrets Manager configurations that enable this restriction.

To review the custom header configuration

  1. In the CloudFormation console, choose Services > CloudFormation > CFOriginVerify stack. On the stack Outputs tab, look for the cfDistro entry.
  2. Choose the cfDistro link to go to this distribution’s configuration in the CloudFront console. On the Origin Groups tab, under Origins, select the origin as shown in Figure 6.
     
    Figure 6: CloudFront Origins and Origin Groups settings

    Figure 6: CloudFront Origins and Origin Groups settings

  3. Choose Edit to go to the Origin Settings section, scroll to the bottom and review the Origin Custom Headers as shown in Figure 7.
     
    Figure 7: CloudFront Origin Custom Headers settings

    Figure 7: CloudFront Origin Custom Headers settings

    You can see that the custom header, X-Origin-Verify, has been configured using Secrets Manager with a random 32-character alpha-numeric value. This custom header will be added to web requests that are forwarded from CloudFront to your origin. As you learned in steps 2 and 3, requests without this header are blocked by AWS WAF at the origin ALB. In the next two steps, you will dive deeper into how this works.

Step 5: Review the AWS WAF web ACL header validation rule

In this step, you review the AWS WAF rule configuration that validates the CloudFront custom header X-Origin-Verify.

To review the header validation rule

  1. In the CloudFormation console, select Services > CloudFormation > CFOriginVerify stack. On the stack Outputs tab, look for the wafWebACLR entry.
  2. Choose the wafWebACLR link to go to the origin ALB web ACL configuration in the WAF and Shield console. On the Overview tab, you can view the Requests per 5 minute period chart and the Sampled requests list, which shows requests from the last three hours that the ALB has forwarded to AWS WAF for inspection. The sample of requests includes detailed data about each request, such as the originating IP address and Uniform Resource Identifier (URI). You also can view which rule the request matched, and whether the rule Action is configured to ALLOW, BLOCK, or COUNT requests. You can enable AWS WAF logging to get detailed information about traffic that’s analyzed by your web ACL. You send logs from your web ACL to an Amazon Kinesis Data Firehose with a configured storage destination such as Amazon S3. Information that’s contained in the logs includes the time that AWS WAF received the request from your AWS resource, detailed information about the request, and the action for the rule that each request matched.
  3. Choose the Rules tab to review the rules for this web ACL, as shown in Figure 8.
     
    Figure 8: AWS WAF web ACL rules

    Figure 8: AWS WAF web ACL rules

    On the Rules tab, you can see that the CFOriginVerifyXOriginVerify rule has been configured with the Allow action, while the Default web ACL action is Block. This means that any incoming requests that don’t match the conditions in this rule will be blocked.

    In every AWS WAF rule group and every web ACL, rules define how to inspect web requests and what to do when a web request matches the inspection criteria. Each rule requires one top-level statement, which might contain nested statements at any depth, depending on the rule and statement type. You can learn more about AWS WAF rule statements in the AWS WAF Developer Guide, AWS Online Tech Talks, and samples on GitHub.

  4. Choose the CFOriginVerifyXOriginVerify rule, and then choose Edit to bring up the Rule Builder tool. In the Rule Builder, you can see that a rule has been created with two Rule Statements similar to those in Figure 9.
     
    Figure 9: AWS WAF web ACL rule statement

    Figure 9: AWS WAF web ACL rule statement

    In the Rule Builder configuration for Statement 1, you can see that the request Header is being inspected for the x-origin-verify Header field name (HTTP header field names are case insensitive), and the String to match value is set to the value you reviewed in step 4. In the Rule Builder, you can also see a logical OR with an additional rule statement, Statement 2. You will notice that the configuration for Statement 2 is the same as Statement 1, except that the String to match value is different. You will learn about this in detail in step 7, but Statement 2 helps to ensure that valid web requests are processed by your origin servers when Secrets Manager automatically rotates the value of the X-Origin-Verify header. The effect of this rule configuration is that inspected web requests will be allowed if they match either of the two statements.

    In addition to the visual web ACL representation you just reviewed in the WAF Rule visual editor, every web ACL also has a JSON format representation you can edit by using the WAF Rule JSON editor. You can retrieve the complete configuration for a web ACL in JSON format, modify it as you need, and then provide it to AWS WAF through the console, API, or command line interface (CLI).

    This step demonstrated how your request was allowed to access the test website in step 2 and why your request was blocked in step 3.

Step 6: Review Secrets Manager configuration

Now that you’re familiar with the CloudFront and AWS WAF configurations, you will learn how Secrets Manager creates and rotates the secret used for the X-Origin-Verify header field value. Secrets Manager uses an AWS Lambda function to perform the actual rotation of the secret used for the value and update the associated AWS WAF web ACL and CloudFront distribution.

To review the Secrets Manager configuration

  1. In the CloudFormation console, choose Services > CloudFormation > CFOriginVerify stack. On the stack Outputs tab, look for the OriginVerifySecret entry.
  2. Choose the OriginVerifySecret link to go to the configuration for the secret in the Secrets Manager console. Scroll down to the section titled Secret value, and then choose Retrieve secret value to display the Secret key/value as shown in Figure 10.
     
    Figure 10: Secrets Manager retrieve value

    Figure 10: Secrets Manager retrieve value

    When you retrieve the secret, Secrets Manager programmatically decrypts the secret and displays it in the console. You can see that the secret is stored as a key-value pair, where the secret key is HEADERVALUE, and the secret value is the string used in the CloudFront and WAF configurations you reviewed in steps 3 and 4.

  3. While you’re in the Secrets Manager console, review the Rotation configuration section, as shown in Figure 11.
     
    Figure 11: Secrets Manager rotation configuration

    Figure 11: Secrets Manager rotation configuration

    You can see that rotation was enabled for this secret at an interval of one day. This configuration also includes a Lambda rotation function. Secrets Manager uses a Lambda function to perform the actual rotation of a secret. If you use your secret for one of the supported Amazon Relational Database Service (Amazon RDS) databases, then Secrets Manager provides the Lambda function for you. If you use your secret for another service, then you must provide the code for the Lambda function, as we’ve done in this solution.

Step 7: Review the Secrets Manager Lambda rotation function

In this step, you review the Secrets Manager Lambda rotation function.

To review the Secrets Manager Lambda rotation function

  1. In the CloudFormation console, choose Services > CloudFormation > CFOriginVerify stack. In the stack Outputs tab, look for the OriginSecretRotateFunction entry.
  2. Choose the OriginSecretRotateFunction link to go to the Lambda function that is configured for this secret. The code used for this secrets rotation function is based on the AWS Secrets Manager Rotation Template. Choose the Monitoring tab and review the Invocations graph as shown in Figure 12.
     
    Figure 12: Monitoring tab for the Lambda rotation function

    Figure 12: Monitoring tab for the Lambda rotation function

    Shortly after the CloudFormation stack creation completes, you should see several invocations in the Invocations graph. When a configured rotation schedule or a manual process triggers rotation, Secrets Manager calls the Lambda function several times, each time with different parameters. The Lambda function performs several tasks throughout the process of rotating a secret. This includes the following steps: createSecret, setSecret, testSecret, and finishSecret. Secrets Manager uses staging labels, a simple text string, to enable you to identify different versions of a secret during rotation. This includes the following staging labels: AWSPENDING, AWSCURRENT, and AWSPREVIOUS, which are covered in the following step.

  3. To learn more about the rotation steps configured for this solution, choose View logs in CloudWatch on the Monitoring tab.
    1. On the Log streams tab, select the top entry in the list.
    2. Enter Event in the Filter events field, and then choose the arrows to expand the details for each event as shown in Figure 13.
       
      Figure 13: CloudWatch event logs for the Lambda rotation function

      Figure 13: CloudWatch event logs for the Lambda rotation function

The four rotation steps annotated in Figure 13 work as follows:

Note: This section provides an overview of the rotation process for this solution. For more detailed information about the Lambda rotation function, see the Secrets Manager User Guide.

  1. The createSecret step: In this step, the Lambda function generates a new version of the secret. The rotation Lambda function calls the GetRandomPassword method to generate a new random string, and then labels the new version of the secret with the staging label AWSPENDING to mark it as the in-process version of the secret.
  2. The SetSecret step: In this step, the rotation function retrieves the version of the secret labeled AWSPENDING from Secrets Manager and updates the web ACL rule for the AWS WAF associated with the origin ALB. The two rule statements you reviewed in step 5 of this blog post are updated with the AWSPENDING and AWSCURRENT values. The rotation function also updates the value for the Origin Custom Header X-Origin-Verify. When the rotation function updates your distribution configuration, CloudFront starts to propagate the changes to all edge locations. Maintaining both the AWSPENDING and AWSCURRENT secret values helps to ensure that web requests forwarded to your origin by CloudFront are not blocked. Therefore, once a secret value is created, two rotation intervals are required for it to be removed from the configuration.
  3. The testSecret step: This step of the Lambda function verifies the AWSPENDING version of the secret by using it to access the origin ALB endpoint with the X-Origin-Verify header. Both AWSPENDING and AWSCURRENT X-Origin-Verify header values are tested to confirm a “200 OK” response from the origin ALB endpoint.
  4. The finishSecret step: In the last step, the Lambda function moves the label AWSCURRENT from the current version to this new version of the secret. The old version receives the AWSPREVIOUS staging label, and is available for recovery as the last known good version of the secret, if needed. The old version with the AWSPREVIOUS staging label no longer has any staging labels attached, so Secrets Manager considers the old version deprecated and subject to deletion.

When the finishSecret step has successfully completed, Secrets Manager schedules the next rotation by adding the rotation interval (number of days) to the completion date. This automated process causes the values used for the validation headers to be updated at the configured interval. Although out of scope for this blog post, you should monitor your secrets to ensure usage of your secrets and log any changes to them. This helps you to make sure that any unexpected usage or change can be investigated, and unwanted changes can be rolled back.

Summary

You’ve learned how to use Amazon CloudFront, AWS WAF and AWS Secrets Manager to prevent web requests from directly accessing your CloudFront origin resources. You can use this solution to improve security for CloudFront custom origins that support AWS WAF, such as ALB, Amazon API Gateway, and AWS AppSync.

When using this solution, you will incur AWS WAF usage charges for both the ALB and CloudFront associated AWS WAF web ACLs. You might wish to consider subscribing to AWS Shield Advanced, which provides higher levels of protection against distributed denial of service (DDoS) attacks and includes AWS WAF and AWS Firewall Manager at no additional cost for usage on resources protected by AWS Shield Advanced. You can also learn more about pricing for CloudFront, AWS WAF, Secrets Manager, and AWS Shield Advanced.

You can review more options for restricting access to content with CloudFront, additional AWS WAF security automations, or managed rules for AWS WAF. You can explore solutions for using AWS IP address ranges to enhance CloudFront origin security. You might also wish to learn more about Secrets Manager best practices. This code for this solution is available on GitHub.

If you have feedback about this post, submit comments in the Comments section below. If you have questions about using this solution, you can start a thread in the CloudFront, WAF, or Secrets Manager forums, review or open an issue in this solution’s GitHub repository, or contact AWS Support.

Want more AWS Security how-to content, news, and feature announcements? Follow us on Twitter.

Cameron Worrell

Cameron Worrell

Cameron is a Solutions Architect with a passion for security and enterprise transformation. He joined AWS in 2015.

Optimizing the cost of serverless web applications

Post Syndicated from James Beswick original https://aws.amazon.com/blogs/compute/optimizing-the-cost-of-serverless-web-applications/

Web application backends are one of the most frequent types of serverless use-case for customers. The pay-for-value model can make it cost-efficient to build web applications using serverless tools.

While serverless cost is generally correlated with level of usage, there are architectural decisions that impact cost efficiency. The impact of these choices is more significant as your traffic grows, so it’s important to consider the cost-effectiveness of different designs and patterns.

This blog post reviews some common areas in web applications where you may be able to optimize cost. It uses the Happy Path web application as a reference example, which you can read about in the introductory blog post.

Serverless web applications generally use a combination of the services in the following diagram. I cover each of these areas to highlight common areas for cost optimization.

Serverless architecture by AWS service

The API management layer: Selecting the right API type

Most serverless web applications use an API between the frontend client and the backend architecture. Amazon API Gateway is a common choice since it is a fully managed service that scales automatically. There are three types of API offered by the service – REST APIs, WebSocket APIs, and the more recent HTTP APIs.

HTTP APIs offer many of the features in the REST APIs service, but the cost is often around 70% less. It supports Lambda service integration, JWT authorization, CORS, and custom domain names. It also has a simpler deployment model than REST APIs. This feature set tends to work well for web applications, many of which mainly use these capabilities. Additionally, HTTP APIs will gain feature parity with REST APIs over time.

The Happy Path application is designed for 100,000 monthly active users. It uses HTTP APIs, and you can inspect the backend/template.yaml to see how to define these in the AWS Serverless Application Model (AWS SAM). If you have existing AWS SAM templates that are using REST APIs, in many cases you can change these easily:

REST to HTTP API

Content distribution layer: Optimizing assets

Amazon CloudFront is a content delivery network (CDN). It enables you to distribute content globally across 216 Points of Presence without deploying or managing any infrastructure. It reduces latency for users who are geographically dispersed and can also reduce load on other parts of your service.

A typical web application uses CDNs in a couple of different ways. First, there is the distribution of the application itself. For single-page application frameworks like React or Vue.js, the build processes create static assets that are ideal for serving over a CDN.

However, these builds may not be optimized and can be larger than necessary. Many frameworks offer optimization plugins, and the JavaScript community frequently uses Webpack to bundle modules and shrink deployment packages. Similarly, any media assets used in the application build should be optimized. You can use tools like Lighthouse to analyze your web apps to find images that can be resized or compressed.

Optimizing images

The second common CDN use-case for web apps is for user-generated content (UGC). Many apps allow users to upload images, which are then shared with other users. A typical photo from a 12-megapixel smartphone is 3–9 MB in size. This high resolution is not necessary when photos are rendered within web apps. Displaying the high-resolution asset results in slower download performance and higher data transfer costs.

The Happy Path application uses a Resizer Lambda function to optimize these uploaded assets. This process creates two different optimized images depending upon which component loads the asset.

Image sizes in front-end applications

The upload S3 bucket shows the original size of the upload from the smartphone:

The distribution S3 bucket contains the two optimized images at different sizes:

Optimized images in the distribution S3 bucket

The distribution file sizes are 98–99% smaller. For a busy web application, using optimized image assets can make a significant difference to data transfer and CloudFront costs.

Additionally, you can convert to highly optimized file formats such as WebP to reduce file size even further. Not all browsers support this format, but you can use CSS on the frontend to fall back to other types if needed:

<img src="myImage.webp" onerror="this.onerror=null; this.src='myImage.jpg'">

The data layer

AWS offers many different database and storage options that can be useful for web applications. Billing models vary by service and Region. By understanding the data access and storage requirements of your app, you can make informed decisions about the right service to use.

Generally, it’s more cost-effective to store binary data in S3 than a database. First, when the data is uploaded, you can upload directly to S3 with presigned URLs instead of proxying data via API Gateway or another service.

If you are using Amazon DynamoDB, it’s best practice to store larger items in S3 and include a reference token in a table item. Part of DynamoDB pricing is based on read capacity units (RCUs). For binary items such as images, it is usually more cost-efficient to use S3 for storage.

Many web developers who are new to serverless are familiar with using a relational database, so choose Amazon RDS for their database needs. Depending upon your use-case and data access patterns, it may be more cost effective to use DynamoDB instead. RDS is not a serverless service so there are monthly charges for the underlying compute instance. DynamoDB pricing is based upon usage and storage, so for many web apps may be a lower-cost choice.

Integration layer

This layer includes services like Amazon SQS, Amazon SNS, and Amazon EventBridge, which are essential for decoupling serverless applications. Each of these have a request-based pricing component, where 64 KB of a payload is billed as one request. For example, a single SQS message with a 256 KB payload is billed as four requests. There are two optimization methods common for web applications.

1. Combine messages

Many messages sent to these services are much smaller than 64 KB. In some applications, the publishing service can combine multiple messages to reduce the total number of publish actions to SNS. Additionally, by either eliminating unused attributes in the message or compressing the message, you can store more data in a single request.

For example, a publishing service may be able to combine multiple messages together in a single publish action to an SNS topic:

  • Before optimization, a publishing service sends 100,000,000 1KB-messages to an SNS topic. This is charged as 100 million messages for a total cost of $50.00.
  • After optimization, the publishing service combines messages to send 1,562,500 64KB-messages to an SNS topic. This is charged as 1,562,500 messages for a total cost of $0.78.

2. Filter messages

In many applications, not every message is useful for a consuming service. For example, an SNS topic may publish to a Lambda function, which checks the content and discards the message based on some criteria. In this case, it’s more cost effective to use the native filtering capabilities of SNS. The service can filter messages and only invoke the Lambda function if the criteria is met. This lowers the compute cost by only invoking Lambda when necessary.

For example, an SNS topic receives messages about customer orders and forwards these to a Lambda function subscriber. The function is only interested in canceled orders and discards all other messages:

  • Before optimization, the SNS topic sends all messages to a Lambda function. It evaluates the message for the presence of an order canceled attribute. On average, only 25% of the messages are processed further. While SNS does not charge for delivery to Lambda functions, you are charged each time the Lambda service is invoked, for 100% of the messages.
  • After optimization, using an SNS subscription filter policy, the SNS subscription filters for canceled orders and only forwards matching messages. Since the Lambda function is only invoked for 25% of the messages, this may reduce the total compute cost by up to 75%.

3. Choose a different messaging service

For complex filtering options based upon matching patterns, you can use EventBridge. The service can filter messages based upon prefix matching, numeric matching, and other patterns, combining several rules into a single filter. You can create branching logic within the EventBridge rule to invoke downstream targets.

EventBridge offers a broader range of targets than SNS destinations. In cases where you publish from an SNS topic to a Lambda function to invoke an EventBridge target, you could use EventBridge instead and eliminate the Lambda invocation. For example, instead of routing from SNS to Lambda to AWS Step Functions, instead create an EventBridge rule that routes events directly to a state machine.

Business logic layer

Step Functions allows you to orchestrate complex workflows in serverless applications while eliminating common boilerplate code. The Standard Workflow service charges per state transition. Express Workflows were introduced in December 2019, with pricing based on requests and duration, instead of transitions.

For workloads that are processing large numbers of events in shorter durations, Express Workflows can be more cost-effective. This is designed for high-volume event workloads, such as streaming data processing or IoT data ingestion. For these cases, compare the cost of the two workflow types to see if you can reduce cost by switching across.

Lambda is the on-demand compute layer in serverless applications, which is billed by requests and GB-seconds. GB-seconds is calculated by multiplying duration in seconds by memory allocated to the function. For a function with a 1-second duration, invoked 1 million times, here is how memory allocation affects the total cost in the US East (N. Virginia) Region:

Memory (MB) GB/S Compute cost Total cost
128 125,000 $ 2.08 $ 2.28
512 500,000 $ 8.34 $ 8.54
1024 1,000,000 $ 16.67 $ 16.87
1536 1,500,000 $ 25.01 $ 25.21
2048 2,000,000 $ 33.34 $ 33.54
3008 2,937,500 $ 48.97 $ 49.17

There are many ways to optimize Lambda functions, but one of the most important choices is memory allocation. You can choose between 128 MB and 3008 MB, but this also impacts the amount of virtual CPU as memory increases. Since total cost is a combination of memory and duration, choosing more memory can often reduce duration and lower overall cost.

Instead of manually setting the memory for a Lambda function and running executions to compare duration, you can use the AWS Lambda Power Tuning tool. This uses Step Functions to run your function against varying memory configurations. It can produce a visualization to find the optimal memory setting, based upon cost or execution time.

Optimizing costs with the AWS Lambda Power Tuning tool

Conclusion

Web application backends are one of the most popular workload types for serverless applications. The pay-per-value model works well for this type of workload. As traffic grows, it’s important to consider the design choices and service configurations used to optimize your cost.

Serverless web applications generally use a common range of services, which you can logically split into different layers. This post examines each layer and suggests common cost optimizations helpful for web app developers.

To learn more about building web apps with serverless, see the Happy Path series. For more serverless learning resources, visit https://serverlessland.com.