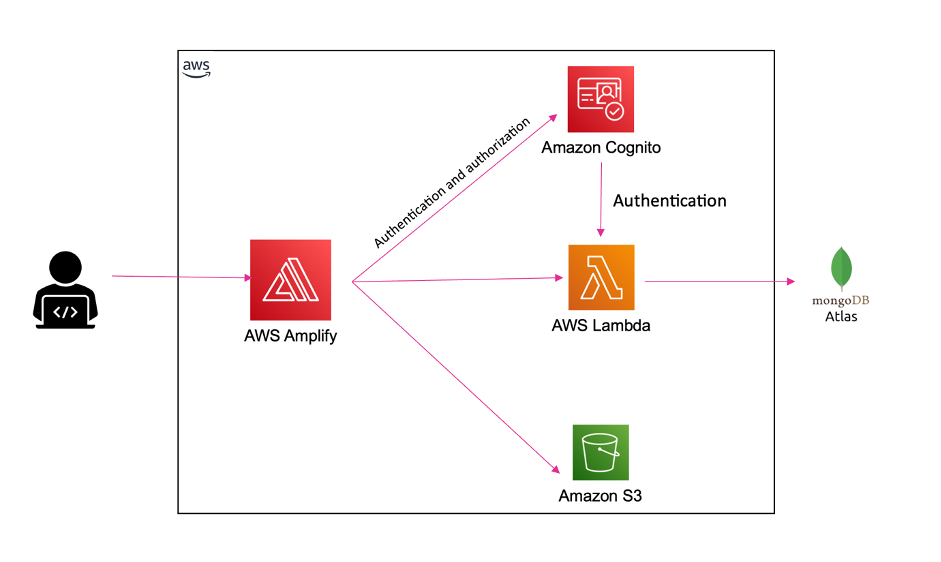
Tag Archives: Amazon CloudFront

Running Next.js applications with serverless services on AWS

Post Syndicated from James Beswick original https://aws.amazon.com/blogs/compute/running-next-js-applications-with-serverless-services-on-aws/

This is written by Julian Bonilla, Senior Solutions Architect, and Matthew de Anda, Startup Solutions Architect.

React is a popular JavaScript library used to create single-page applications (SPAs). React focuses on helping to build UIs, but leaves it up to developers to decide how to accomplish other aspects involved with developing a SPA.

Next.js is a React framework to help provide more structure and solve common application requirements such as routing and data fetching. Next.js also provides multiple types of rendering methods – Static Site Generation (SSG), Server-Side Rendering (SSR), Incremental Static Regeneration (ISR), and Client-Side Rendering (CSR).

This post demonstrates how to build a Next.js application with Serverless services on AWS and explains Next.js Server-Side rendering. To deploy this solution and to provision the AWS resources, you can use either AWS Serverless Application Model (AWS SAM) or AWS Cloud Development Kit (CDK). Both are open-source frameworks to automate AWS deployment. AWS SAM is a declarative framework for building serverless applications and CDK is an imperative framework to define cloud application resources using familiar programming languages.

Overview

To render a Next.js application, you use Amazon S3, Amazon CloudFront, Amazon API Gateway, and AWS Lambda. Static resources are hosted in a private S3 bucket with a CloudFront distribution. Since static sources are generated at build time, this takes advantage of CloudFront so browsers can load these files cached on the network edge instead of from the server.

The Next.js application components that uses server-side rendering is rendered with a Lambda function using AWS Lambda Web Adapter. The CloudFront distribution is configured to forward requests to the API Gateway endpoint, which then calls the Lambda function.

  1. Static files (for example, CSS, JavaScript, and HTML) are mapped to /_next/static/* and /public/*.
  2. Server-side rendering is mapped with default behavior (*).
  3. The AWS Lambda Adapter runs Next.js Output File Tracing.

What’s Next.js?

Next.js is a React framework that creates a more opinionated approach to building web applications while providing additional structure and features such as Server-Side Rendering and Static Site Generation.

These additional rendering options provide more flexibility over the typical ways a React application is built, which is to render in the client’s browser with JavaScript. This can help in scenarios where customers have JavaScript disabled and can improve search engine optimization (SEO). While you can implement SSR in React applications, Next.js makes it simpler for developers.

Next.js rendering strategies

These are the different rendering strategies offered by Next.js:

  • Static Site Generation generates static resources at build time and is a good rendering strategy for static content that rarely changes and SEO.
  • Server-Side Rendering generates each page on-demand at request time and is good for pages that are dynamic. Since from the browser perspective it’s still pre-rendered, like Static Site Generation, it’s also good for SEO.
  •  Incremental Static Regeneration is a new rendering strategy that is good for apps with many pages where build times are high. With Incremental Static Regeneration, you can build page per-page without needing to rebuild the entire app.
  • Client-Side Rendering is the typical rendering strategy where the application is rendered in the browser with JavaScript. Next.js lets you choose the appropriate rendering method page-by-page. When a Next.js application is built, Next.js transforms the application to production-optimized files. You have HTML for statically generated pages, JavaScript for rendering on the server, JavaScript for rendering on the client, and CSS files.

Next.js also supports static HTML export, which has no server side component. Features that require a server are not supported with this approach. These apps can be hosted from S3 and CloudFront.

The remainder of this post focuses on Static Site Generation and Server-Side Rendering.

Next.js application project structure

Understanding how Next.js structures projects can give insight into how you deploy the application. A page is a React Component exported from files in the “pages” directory. These files are also used for routing where pages/index.js is routed to / route.

By default, these pages are pre-rendered. Static assets, such as images, are stored under “public” directory and can be referenced from /. Since these files are best stored in persistent storage and backed by a content delivery network (CDN), you can add a prefix in the implementation to distinguish these static files.

To create dynamic routes, add brackets to a page file – for example, pages/user/[id].js. This creates a statically generated page with the path /user/<id> where <id> can be dynamic.

API routes provide a way to create an API endpoint and are located in the pages/api directory. When building, Next.js generates an optimized version of your application under the .next directory. Static files not stored in the public directory are in .next/static. These static files are expected to be uploaded as _next/static to a CDN.

No other code in the .next/directory should be uploaded to a CDN because that would expose server code and other configuration.

Implementation

Next.js pre-renders HTML for every page using Static Site Generation or Server-side Rendering. For Static Site Generation, pages are rendered at build time and can be cached in CloudFront. Server-side rendered pages are rendered at request time, and typically fetch data from downstream resources on each request.

Clients connect to a CloudFront distribution, which is configured to forward requests for static resources to S3 and all other requests to API Gateway. API Gateway forwards requests to the Next.js application running on Lambda, which performs the server-side rendering.

At build time, Next.js Output File Tracing determines the minimal set of files needed for deploying to Lambda. The files are automatically copied to a standalone directory and must be enabled in next.config.js.

const nextConfig = {
  reactStrictMode: true,
  output: 'standalone',
}
module.exports = nextConfig

Since the Next.js application is essentially a webserver, this example uses the AWS Lambda Web Adapter as a Lambda layer to convert incoming events from API Gateway to HTTP requests that Next.js can process.

Once processed, the AWS Lambda Web Adapter converts the HTTP response back to a Lambda event response. The Lambda handler is configured to run the minimal server.js file created by the standalone build step.

The CloudFront distribution has two origins: one for the S3 bucket and another for the API Gateway. Two behaviors are created to specify path patterns to route static content produced by Next.js and static resources stored under the public/static directory. Next.js uses the public directory under root to serve static assets such as images.

These assets are then served under / so if you add public/me.png, it would be served at /me.png. This makes it harder to create a CloudFront behavior for these assets. One workaround is to create a static directory under the public directory and then map it to the CloudFront behavior. The default(*) path pattern behavior has the origin set to API Gateway with caching disabled.

Prerequisites and deployment

Refer to the project in its GitHub repository for instructions to deploy the solution using AWS SAM or AWS CDK. Multiple resources are provisioned for you as part of the deployment, and it takes several minutes to complete. The example Next.js application deployed is created using Create Next App.

Understanding the Next.js Application

To create a new page, you create a file under the pages directory and that creates a route based on the name (e.g. pages/hello.js creates route /hello). To create dynamic routes, create a file following the project’s example of pages/posts/[id].js to produce routes for posts/1, posts/2, and so forth.

For API routes, any file added to the directory pages/api is mapped to /api/* and becomes an API endpoint. These are server-side only bundles hosted by API Gateway and Lambda.

Conclusion

This blog shows how to run Next.js applications using S3, CloudFront, API Gateway, and Lambda. This architecture supports building Next.js applications that can use static-site generation, server-side rendering, and client-side rendering. The blog also covers how you can use open-source frameworks, AWS SAM and CDK, to build and deploy your Next.js applications.

If your organization is looking for a fully managed hosting of your Next.js applications, AWS Amplify Hosting supports Next.js. If interested in learning more about server-side rendering and micro-frontends, see Server-side rendering micro-frontends – the architecture.

For more serverless learning resources, visit Serverless Land.

Securing Lambda Function URLs using Amazon Cognito, Amazon CloudFront and AWS WAF

Post Syndicated from Marcia Villalba original https://aws.amazon.com/blogs/compute/securing-lambda-function-urls-using-amazon-cognito-amazon-cloudfront-and-aws-waf/

This post is written by Madhu Singh (Solutions Architect), and Krupanidhi Jay (Solutions Architect).

Lambda function URLs is a dedicated HTTPs endpoint for a AWS Lambda function. You can configure a function URL to have two methods of authentication: IAM and NONE. IAM authentication means that you are restricting access to the function URL (and in-turn access to invoke the Lambda function) to certain AWS principals (such as roles or users). Authentication type of NONE means that the Lambda function URL has no authentication and is open for anyone to invoke the function.

This blog shows how to use Lambda function URLs with an authentication type of NONE and use custom authorization logic as part of the function code, and to only allow requests that present valid Amazon Cognito credentials when invoking the function. You also learn ways to protect Lambda function URL against common security threats like DDoS using AWS WAF and Amazon CloudFront.

Lambda function URLs provides a simpler way to invoke your function using HTTP calls. However, it is not a replacement for Amazon API Gateway, which provides advanced features like request validation and rate throttling.

Solution overview

There are four core components in the example.

1. A Lambda function with function URLs enabled

At the core of the example is a Lambda function with the function URLs feature enabled with the authentication type of NONE. This function responds with a success message if a valid authorization code is passed during invocation. If not, it responds with a failure message.

2. Amazon Cognito User Pool

Amazon Cognito user pools enable user authentication on websites and mobile apps. You can also enable publicly accessible Login and Sign-Up pages in your applications using Amazon Cognito user pools’ feature called the hosted UI.

In this example, you use a user pool and the associated Hosted UI to enable user login and sign-up on the website used as entry point. This Lambda function validates the authorization code against this Amazon Cognito user pool.

3. CloudFront distribution using AWS WAF

CloudFront is a content delivery network (CDN) service that helps deliver content to end users with low latency, while also improving the security posture for your applications.

AWS WAF is a web application firewall that helps protect your web applications or APIs against common web exploits and bots and AWS Shield is a managed distributed denial of service (DDoS) protection service that safeguards applications running on AWS. AWS WAF inspects the incoming request according to the configured Web Access Control List (web ACL) rules.

Adding CloudFront in front of your Lambda function URL helps to cache content closer to the viewer, and activating AWS WAF and AWS Shield helps in increasing security posture against multiple types of attacks, including network and application layer DDoS attacks.

4. Public website that invokes the Lambda function

The example also creates a public website built on React JS and hosted in AWS Amplify as the entry point for the demo. This website works both in authenticated mode and in guest mode. For authentication, the website uses Amazon Cognito user pools hosted UI.

Solution architecture

This shows the architecture of the example and the information flow for user requests.

In the request flow:

  1. The entry point is the website hosted in AWS Amplify. In the home page, when you choose “sign in”, you are redirected to the Amazon Cognito hosted UI for the user pool.
  2. Upon successful login, Amazon Cognito returns the authorization code, which is stored as a cookie with the name “code”. The user is redirected back to the website, which has an “execute Lambda” button.
  3. When the user choose “execute Lambda”, the value from the “code” cookie is passed in the request body to the CloudFront distribution endpoint.
  4. The AWS WAF web ACL rules are configured to determine whether the request is originating from the US or Canada IP addresses and to determine if the request should be allowed to invoke Lambda function URL origin.
  5. Allowed requests are forwarded to the CloudFront distribution endpoint.
  6. CloudFront is configured to allow CORS headers and has the origin set to the Lambda function URL. The request that CloudFront receives is passed to the function URL.
  7. This invokes the Lambda function associated with the function URL, which validates the token.
  8. The function code does the following in order:
    1. Exchange the authorization code in the request body (passed as the event object to Lambda function) to access_token using Amazon Cognito’s token endpoint (check the documentation for more details).
      1. Amazon Cognito user pool’s attributes like user pool URL, Client ID and Secret are retrieved from AWS Systems Manager Parameter Store (SSM Parameters).
      2. These values are stored in SSM Parameter Store at the time these resources are deployed via AWS CDK (see “how to deploy” section)
    2. The access token is then verified to determine its authenticity.
    3. If valid, the Lambda function returns a message stating user is authenticated as <username> and execution was successful.
    4. If either the authorization code was not present, for example, the user was in “guest mode” on the website, or the code is invalid or expired, the Lambda function returns a message stating that the user is not authorized to execute the function.
  9. The webpage displays the Lambda function return message as an alert.

Getting started

Pre-requisites:

Before deploying the solution, please follow the README from the GitHub repository and take the necessary steps to fulfill the pre-requisites.

Deploy the sample solution

1. From the code directory, download the dependencies:

$ npm install

2. Start the deployment of the AWS resources required for the solution:

$ cdk deploy

Note:

  • optionally pass in the –profile argument if needed
  • The deployment can take up to 15 minutes

3. Once the deployment completes, the output looks similar to this:

Open the amplifyAppUrl from the output in your browser. This is the URL for the demo website. If you don’t see the “Welcome to Compute Blog” page, the Amplify app is still building, and the website is not available yet. Retry in a few minutes. This website works either in an authenticated or unauthenticated state.

Test the authenticated flow

  1. To test the authenticated flow, choose “Sign In”.

2. In the sign-in page, choose on sign-up (for the first time) and create a user name and password.

3. To use an existing an user name and password, enter those credentials and choose login.

4. Upon successful sign-in or sign up, you are redirected back to the webpage with “Execute Lambda” button.

5. Choose this button. In a few seconds, an alert pop-up shows the logged in user and that the Lambda execution is successful.

Testing the unauthenticated flow

1. To test the unauthenticated flow, from the Home page, choose “Continue”.

2. Choose “Execute Lambda” and in a few seconds, you see a message that you are not authorized to execute the Lambda function.

Testing the geo-block feature of AWS WAF

1. Access the website from a Region other than US or Canada. If you are physically in the US or Canada, you may use a VPN service to connect to a Region other than US or Canada.

2. Choose the “Execute Lambda” button. In the Network trace of browser, you can see the call to invoke Lambda function was blocked with Forbidden response.

3. To try either the authenticated or unauthenticated flow again, choose “Return to Home Page” to go back to the home page with “Sign In” and “Continue” buttons.

Cleaning up

To delete the resources provisioned, run the cdk destroy command from the AWS CDK CLI.

Conclusion

In this blog, you create a Lambda function with function URLs enabled with NONE as the authentication type. You then implemented a custom authentication mechanism as part of your Lambda function code. You also increased the security of your Lambda function URL by setting it as Origin for the CloudFront distribution and using AWS WAF Geo and IP limiting rules for protection against common web threats, like DDoS.

For more serverless learning resources, visit Serverless Land.

Lifting and shifting a web application to AWS Serverless: Part 2

Post Syndicated from Marcia Villalba original https://aws.amazon.com/blogs/compute/lifting-and-shifting-a-web-application-to-aws-serverless-part-2/

In part 1, you learn if it is possible to migrate a non-serverless web application to a serverless environment without changing much code. You learn different tools that can help you in this process, like Lambda Web Adaptor and AWS Amplify. By the end, you have migrated an application into a serverless environment.

However, if you test the migrated app, you find two issues. The first one is that the user session is not sticky. Every time you log in, you are logged out unexpectedly from the application. The second one is that when you create a new product, you cannot upload new images of that product.

This final post analyzes each of the problems in detail and shows solutions. In addition, it analyzes the cost and performance of the solution.

Authentication and authorization migration

The original application handled the authentication and authorization by itself. There is a user directory in the database, with the passwords and emails for each of the users. There are APIs and middleware that take care of validating that the user is logged in before showing the application. All the logic for this is developed inside the Node.js/Express application.

However, with the current migrated application every time you log in, you are logged out unexpectedly from the application. This is because the server code is responsible for handling the authentication and the authorization of the users, and now our server is running in an AWS Lambda function and functions are stateless. This means that there will be one function running per request—a request can load all the products in the landing page, get the details for a product, or log in to the site—and if you do something in one of these functions, the state is not shared across.

To solve this, you must remove the authentication and authorization mechanisms from the function and use a service that can preserve the state across multiple invocations of the functions.

There are many ways to solve this challenge. You can add a layer of authentication and session management with a database like Redis, or build a new microservice that is in charge of authentication and authorization that can handle the state, or use an existing managed service for this.

Because of the migration requirements, we want to keep the cost as low as possible, with the fewest changes to the application. The better solution is to use an existing managed service to handle authentication and authorization.

This demo uses Amazon Cognito, which provides user authentication and authorization to AWS resources in a managed, pay as you go way. One rapid approach is to replace all the server code with calls to Amazon Cognito using the AWS SDK. But this adds complexity that can be replaced completely by just invoking Amazon Cognito APIs from the React application.

Using Cognito

For example, when a new user is registered, the application creates the user in the Amazon Cognito user pool directory, as well as in the application database. But when a user logs in to the web app, the application calls Amazon Cognito API directly from the AWS Amplify application. This way minimizes the amount of code needed.

In the original application, all authenticated server APIs are secured with a middleware that validates that the user is authenticated by providing an access token. With the new setup that doesn’t change, but the token is generated by Amazon Cognito and then it can be validated in the backend.

let auth = (req, res, next) => {
    const token = req.headers.authorization;
    const jwtToken = token.replace('Bearer ', '');

    verifyToken(jwtToken)
        .then((valid) => {
            if (valid) {
                getCognitoUser(jwtToken).then((email) => {
                    User.findByEmail(email, (err, user) => {
                        if (err) throw err;
                        if (!user)
                            return res.json({
                                isAuth: false,
                                error: true,
                            });

                        req.user = user;
                        next();
                    });
                });
            } else {
                throw Error('Not valid Token');
            }
        })
        .catch((error) => {
            return res.json({
                isAuth: false,
                error: true,
            });
        });
};

You can see how this is implemented step by step in this video.

Storage migration

In the original application, when a new product is created, a new image is uploaded to the Node.js/Express server. However, now the application resides in a Lambda function. The code (and files) that are part of that function cannot change, unless the function is redeployed. Consequently, you must separate the user storage from the server code.

For doing this, there are a couple of solutions: using Amazon Elastic File System (EFS) or Amazon S3. EFS is a file storage, and you can use that to have a dynamic storage where you upload the new images. Using EFS won’t change much of the code, as the original implementation is using a directory inside the server as EFS provides. However, using EFS adds more complexity to the application, as functions that use EFS must be inside an Amazon Virtual Private Cloud (Amazon VPC).

Using S3 to upload your images to the application is simpler, as it only requires that an S3 bucket exists. For doing this, you must refactor the application, from uploading the image to the application API to use the AWS Amplify library that uploads and gets images from S3.

export function uploadImage(file) {
    const fileName = `uploads/${file.name}`;

    const request = Storage.put(fileName, file).then((result) => {
        return {
            image: fileName,
            success: true,
        };
    });

    return {
        type: IMAGE_UPLOAD,
        payload: request,
    };
}

An important benefit of using S3 is that you can also use Amazon CloudFront to accelerate the retrieval of the images from the cloud. In this way, you can speed up the loading time of your page. You can see how this is implemented step by step in this video.

How much does this application cost?

If you deploy this application in an empty AWS account, most of the usage of this application is covered by the AWS Free Tier. Serverless services, like Lambda and Amazon Cognito, have a forever free tier that gives you the benefits in pricing for the lifetime of hosting the application.

  • AWS Lambda—With 100 requests per hour, an average 10ms invocation and 1GB of memory configured, it costs 0 USD per month.
  • Amazon S3—Using S3 standard, hosting 1 GB per month and 10k PUT and GET requests per month costs 0.07 USD per month. This can be optimized using S3 Intelligent-Tiering.
  • Amazon Cognito—Provides 50,000 monthly active users for free.
  • AWS Amplify—If you build your client application once a week, serve 3 GB and store 1 GB per month, this costs 0.87 USD.
  • AWS Secrets Manager—There are two secrets stored using Secrets Manager and this costs 1.16 USD per month. This can be optimized by using AWS System Manager Parameter Store and AWS Key Management Service (AWS KMS).
  • MongoDB Atlas Forever free shared cluster.

The total monthly cost of this application is approximately 2.11 USD.

Performance analysis

After you migrate the application, you can run a page speed insight tool, to measure this application’s performance. This tool provides results mostly about the front end and the experience that the user perceives. The results are displayed in the following image. The performance of this website is good, according to the insight tool performance score – it responds quickly and the user experience is good.

Page speed insight tool results

After the application is migrated to a serverless environment, you can do some refactoring to improve further the overall performance. One alternative is whenever a new image is uploaded, it gets resized and formatted into the correct next-gen format automatically using the event driven capabilities that S3 provides. Another alternative is to use Lambda on Edge to serve the right image size for the device, as it is possible to format the images on the fly when serving them from a distribution.

You can run load tests for understanding how your backend and database will perform. For this, you can use Artillery, an open-source library that allows you to run load tests. You can run tests with the expected maximum load your site will get and ensure that your site can handle it.

For example, you can configure a test that sends 30 requests per seconds to see how your application reacts:

config:
  target: 'https://xxx.lambda-url.eu-west-1.on.aws'
  phases:
    - duration: 240
      arrivalRate: 30
      name: Testing
scenarios:
  - name: 'Test main page'
    flow:
      - post:
          url: '/api/product/getProducts/'

This test is performed on the backend APIs, not only testing your backend but also your integration with the MongoDB. After running it, you can see how the Lambda function performs on the Amazon CloudWatch dashboard.

Running this load test helps you understand the limitations of your system. For example, if you run a test with too many concurrent users, you might see that the number of throttles in your function increases. This means that you need to lift the limit of invocations of the functions you can have at the same time.

Or when increasing the requests per second, you may find that the MongoDB cluster starts throttling your requests. This is because you are using the free tier and that has a set number of connections. You might need a larger cluster or to migrate your database to another service that provides a large free tier, like Amazon DynamoDB.

Cloudwatch dashboard

Conclusion

In this two-part article, you learn if it is possible to migrate a non-serverless web application to a serverless environment without changing much code. You learn different tools that can help you in this process, like AWS Lambda Web Adaptor and AWS Amplify, and how to solve some of the typical challenges that we have, like storage and authentication.

After the application is hosted in a fully serverless environment, it can scale up and down to meet your needs. This web application is also performant once the backend is hosted in a Lambda function.

If you need, from here you can start using the strangler pattern to refactor the application to take advantage of the benefits of event-driven architecture.

To see all the steps of the migration, there is a playlist that contains all the tutorials for you to follow.

For more serverless learning resources, visit Serverless Land.

AWS Week in Review – August 22, 2022

Post Syndicated from Marcia Villalba original https://aws.amazon.com/blogs/aws/aws-week-in-review-august-22-2022/

This post is part of our Week in Review series. Check back each week for a quick roundup of interesting news and announcements from AWS!

I’m back from my summer holidays and ready to get up to date with the latest AWS news from last week!

Last Week’s Launches
Here are some launches that got my attention during the previous week.

Amazon CloudFront now supports HTTP/3 requests over QUIC. The main benefits of HTTP/3 are faster connection times and fewer round trips in the handshake process. HTTP/3 is available in all 410+ CloudFront edge locations worldwide, and there is no additional charge for using this feature. Read Channy’s blog post about this launch to learn more about it and how to enable it in your applications.

Using QUIC in HTTP3 vs HTTP2

Amazon Chime has announced a couple of really cool features for their SDK. Now you can compose video by concatenating video with multiple attendees, including audio, content and transcriptions. Also, Amazon Chime SDK launched the live connector pipelines that send real-time video from your applications to streaming platforms such as Amazon Interactive Video Service (IVS) or AWS Elemental MediaLive. Now building real-time streaming applications becomes easier.

AWS Cost Anomaly Detection has launched a simplified interface for anomaly exploration. Now it is easier to monitor spending patterns to detect and alert anomalous spend.

Amazon DynamoDB now supports bulk imports from Amazon S3 to a new table. This new launch makes it easier to migrate and load data into a new DynamoDB table. This is a great use for migrations, to load test data into your applications, thereby simplifying disaster recovery, among other things.

Amazon MSK Serverless, a new capability from Amazon MSK launched in the spring of this year, now has support for AWS CloudFormation and Terraform. This allows you to describe and provision Amazon MSK Serverless clusters using code.

For a full list of AWS announcements, be sure to keep an eye on the What’s New at AWS page.

Other AWS News
Some other updates and news that you may have missed:

This week there were a couple of stories that caught my eye. The first one is about Grillo, a social impact enterprise focused on seismology, and how they used AWS to build a low-cost earthquake early warning system. The second one is from the AWS Localization team about how they use Amazon Translate to scale their localization in order to remove language barriers and make AWS content more accessible.

Podcast Charlas Técnicas de AWS – If you understand Spanish, this podcast is for you. Podcast Charlas Técnicas is one of the official AWS podcasts in Spanish, and every other week there is a new episode. The podcast is meant for builders, and it shares stories about how customers implemented and learned to use AWS services, how to architect applications, and how to use new services. You can listen to all the episodes directly from your favorite podcast app or at AWS Podcast en español.

Upcoming AWS Events
Check your calendars and sign up for these AWS events:

AWS Summits – Registration is open for upcoming in-person AWS Summits. Find the one closest to you: Chicago (August 28), Canberra (August 31), Ottawa (September 8), New Delhi (September 9), Mexico City (September 21–22), Bogota (October 4), and Singapore (October 6).

GOTO EDA Day 2022 – Registration is open for the in-person event about Event Driven Architectures (EDA) hosted in London on September 1. There will be a great line of speakers talking about the best practices for building EDA with serverless services.

AWS Virtual Workshop – Registration is open for the free virtual workshop about Amazon DocumentDB: Getting Started and Business Continuity Planning on August 24.

AWS .NET Enterprise Developer Days 2022Registration for this free event is now open. This is a 2-day, in-person event on September 7-8 at the Palmer Events Center in Austin, Texas, and a 2-day virtual event on September 13-14.

That’s all for this week. Check back next Monday for another Week in Review!

— Marcia

Sequence Diagrams enrich your understanding of distributed architectures

Post Syndicated from Kevin Hakanson original https://aws.amazon.com/blogs/architecture/sequence-diagrams-enrich-your-understanding-of-distributed-architectures/

Architecture diagrams visually communicate and document the high-level design of a solution. As the level of detail increases, so does the diagram’s size, density, and layout complexity. Using Sequence Diagrams, you can explore additional usage scenarios and enrich your understanding of the distributed architecture while continuing to communicate visually.

This post takes a sample architecture and iteratively builds out a set of Sequence Diagrams. Each diagram adds to the vocabulary and graphical notation of Sequence Diagrams, then shows how the diagram deepened understanding of the architecture. All diagrams in this post were rendered from a text-based domain specific language using a diagrams-as-code tool instead of being drawn with graphical diagramming software.

Sample architecture

The architecture is based on Implementing header-based API Gateway versioning with Amazon CloudFront from the AWS Compute Blog, which uses the AWS Lambda@Edge feature to dynamically route the request to the targeted API version.

Amazon API Gateway is a fully managed service that makes it easier for developers to create, publish, maintain, monitor, and secure APIs at any scale. Amazon CloudFront is a global content delivery network (CDN) service built for high-speed, low-latency performance, security, and developer ease-of-use. Lambda@Edge lets you run functions that customize the content that CloudFront delivers.

The numbered labels in Figure 1 correspond to the following text descriptions:

  1. User sends an HTTP request to CloudFront, including a version header.
  2. CloudFront invokes the Lambda@Edge function for the Origin Request event.
  3. The function matches the header value to data fetched from an Amazon DynamoDB table, then modifies the Host header and path of the request and returns it to CloudFront.
  4. CloudFront routes the HTTP request to the matching API Gateway.

Figure 1 architecture diagram is a free-form mixture between a structure diagram and a behavior diagram. It includes structural aspects from a high-level Deployment Diagram, which depicts network connections between AWS services. It also demonstrates behavioral aspects from a Communication Diagram, which uses messages represented by arrows labeled with chronological numbers.

High-level architecture diagram

Figure 1. High-level architecture diagram

Sequence Diagrams

Sequence Diagrams are part of a subset of behavior diagrams known as interaction diagrams, which emphasis control and data flow. Sequence Diagrams model the ordered logic of usage scenarios in a consistent visual manner and capture detailed behaviors. I use this diagram type for analysis and design purposes and to validate my assumptions about data flows in distributed architectures. Let’s investigate the system use case where the API is called without a header indicating the requested version using a Sequence Diagram.

Examining the system use case

In Figure 2, User, Web Distribution, and Origin Request are each actors or system participants. The parallel vertical lines underneath these participants are lifelines. The horizontal arrows between participants are messages, with the arrowhead indicating message direction. Messages are arranged in time sequence from top to bottom. The dashed lines represent reply messages. The text inside guillemets («like this») indicate a stereotype, which refines the meaning of a model element. The rectangle with the bent upper-right corner is a note containing additional useful information.

Missing accept-version header

Figure 2. Missing accept-version header

The message from User to Web Distribution lacks any HTTP header that indicates the version, which precipitates the choice of Accept-Version for this name. The return message requires a decision about HTTP status code for this error case (400). The interaction with the Origin Request prompts a selection of Lambda runtimes (nodejs14.x) and understanding the programming model for generating an HTTP response for this request.

Designing the interaction

Next, let’s design the interaction when the Accept-Version header is present, but the corresponding value is not found in the Version Mappings table.

Figure 3 adds new notation to the diagram. The rectangle with “opt” in the upper-left corner and bolded text inside square brackets is an interaction fragment. The “opt” indicates this operation is an option based on the constraint (or guard) that “version mappings not cached” is true.

API version not found

Figure 3. API version not found

A DynamoDB scan operation on every request consumes table read capacity. Caching Version Mappings data inside the Lambda@Edge function’s memory optimizes for on-demand capacity mode. The «on-demand» stereotype on the DynamoDB participant succinctly communicates this decision. The “API V3 not found” note on Figure 3 provides clarity to the reader. The HTTP status code for this error case is decided as 404 with a custom description of “API Version Not Found.”

Now, let’s design the interaction where the API version is found and the caller receives a successful response.

Figure 4 is similar to Figure 3 up until the note, which now indicates “API V1 found.” Consulting the documentation for Writing functions for Lambda@Edge, the request event is updated with the HTTP Host header and path for the “API V1” Amazon API Gateway.

API version found

Figure 4. API version found

Instead of three separate diagrams for these individual scenarios, a single, combined diagram can represent the entire set of use cases. Figure 5 includes two new “alt” interaction fragments that represent choices of alternative behaviors.

The first “alt” has a guard of “missing Accept-Version header” mapping to our Figure 2 use case. The “else” guard encompasses the remaining use cases containing a second “alt” splitting where Figure 3 and Figure 4 diverge. That “version not found” guard is the Figure 3 use case returning the 404, while that “else” guard is the Figure 4 success condition. The added notes improve visual clarity.

Header-based API Gateway versioning with CloudFront

Figure 5. Header-based API Gateway versioning with CloudFront

Diagrams as code

After diagrams are created, the next question is where to save them and how to keep them updated. Because diagrams-as-code use text-based files, they can be stored and versioned in the same source control system as application code. Also consider an architectural decision record (ADR) process to document and communicate architecturally significant decisions. Then as application code is updated, team members can revise both the ADR narrative and the text-based diagram source. Up-to-date documentation is important for operationally supporting production deployments, and these diagrams quickly provide a visual understanding of system component interactions.

Conclusion

This post started with a high-level architecture diagram and ended with an additional Sequence Diagram that captures multiple usage scenarios. This improved understanding of the system design across success and error use cases. Focusing on system interactions prior to coding facilitates the interface definition and emergent properties discovery, before thinking in terms of programming language specific constructs and SDKs.

Experiment to see if Sequence Diagrams improve the analysis and design phase of your next project. View additional examples of diagrams-as-code from the AWS Icons for PlantUML GitHub repository. The Workload Discovery on AWS solution can even build detailed architecture diagrams of your workloads based on live data from AWS.

For vetted architecture solutions and reference architecture diagrams, visit the AWS Architecture Center. For more serverless learning resources, visit Serverless Land.

Related information

  • The Unified Modeling Language specification provides the full definition of Sequence Diagrams. This includes notations for additional interaction frame operators, using open arrow heads to represent asynchronous messages, and more.
  • Diagrams were created for this blog post using PlantUML and the AWS Icons for PlantUML. PlantUML integrates with IDEs, wikis, and other external tools. PlantUML is distributed under multiple open-source licenses, allowing local server rendering for diagrams containing sensitive information. AWS Icons for PlantUML include the official AWS Architecture Icons.

New – HTTP/3 Support for Amazon CloudFront

Post Syndicated from Channy Yun original https://aws.amazon.com/blogs/aws/new-http-3-support-for-amazon-cloudfront/

Amazon CloudFront is a content delivery network (CDN) service, a network of interconnected servers that is geographically closer to the users and reaches their computers much faster. Amazon CloudFront reduces latency by delivering data through 410+ globally dispersed Points of Presence (PoPs) with automated network mapping and intelligent routing.

With Amazon CloudFront, content, API requests and responses or applications can be delivered over Hypertext Transfer Protocol (HTTP) version 1.1, and 2.0 over the latest version of Transport Layer Security (TLS) to encrypt and secure communication between the user client and CloudFront.

Today we are adding HTTP version 3.0 (HTTP/3) support for Amazon CloudFront. HTTP/3 uses QUIC, a user datagram protocol-based, stream-multiplexed, and secure transport protocol that combines and improves upon the capabilities of existing transmission control protocol (TCP), TLS, and HTTP/2. Now, you can enable HTTP/3 for end user connections in all new and existing CloudFront distributions on all edge locations worldwide, and there is no additional charge for using this feature.

What is HTTP/3?
HTTP/3 uses QUIC and overcomes many of TCP’s limitations and bring those benefits to HTTP. When using existing HTTP/2 over TCP and TLS, TCP needs a handshake to establish a session between a client and server, and TLS also needs its own handshake to ensure that the session is secured. Each handshake has to make the full round trip between client and server, which can take a long time when client and server and far apart, network-wise. But, QUIC only needs a single handshake to establish a secure session.

Also, TCP is understood and manipulated by a myriad of different middleboxes, such as firewalls and network address translation (NAT) devices. QUIC uses UDP as its basis to allow packet flows in an enterprise or public network and is fully encrypted, including the metadata, which makes middleboxes unable to inspect or manipulate its details.

HTTP/3 streams are multiplexed independently to eliminate head-of-line blocking between requests and responses. This is possible because stream multiplexing occurs in the transport layer as opposed to the application layer like HTTP/2 over TCP. This enables web applications to perform faster, especially over slow networks and latency-sensitive connections.

Benefits of HTTP/3 on CloudFront
Our customers always want to provide faster, more responsive and secure experience on the web for end users. HTTP/3 provides benefits to all CloudFront customers in the form of faster connection times, stream multiplexing, client-side connection migration, and fewer round trips in the handshake process to reduce error rates.

QUIC connections over UDP support connection reuse with a connection ID independent from IP address/port tuples so users have no interruption or impact. Customers operating in countries with low network connectivity will see improved performance from their applications.

CloudFront’s HTTP/3 support provides enhanced security built on top of s2n-quic, an open-source Rust implementation of the QUIC protocol added to our set of AWS encryption open-source libraries, both with a strong emphasis on efficiency and performance.

If you enable HTTP/3 in CloudFront distributions, the users can make HTTP/3 viewer request to CloudFront edge locations. Past the edge location, we have highly reliable networks within AWS Cloud and CloudFront will continue to use HTTP/1.1 for origin fetches. So, you don’t need to make any server-side changes in order to make your content accessible via HTTP/3.

For some types of applications, like those requiring an HTTP client library to make HTTP requests, customers may need to update their HTTP client library to a version that supports HTTP/3. But if for some operational reason clients cannot establish a QUIC connection, they can fall back to another supported protocol such as HTTP/1.1 or HTTP/2.

How to Enable HTTP/3
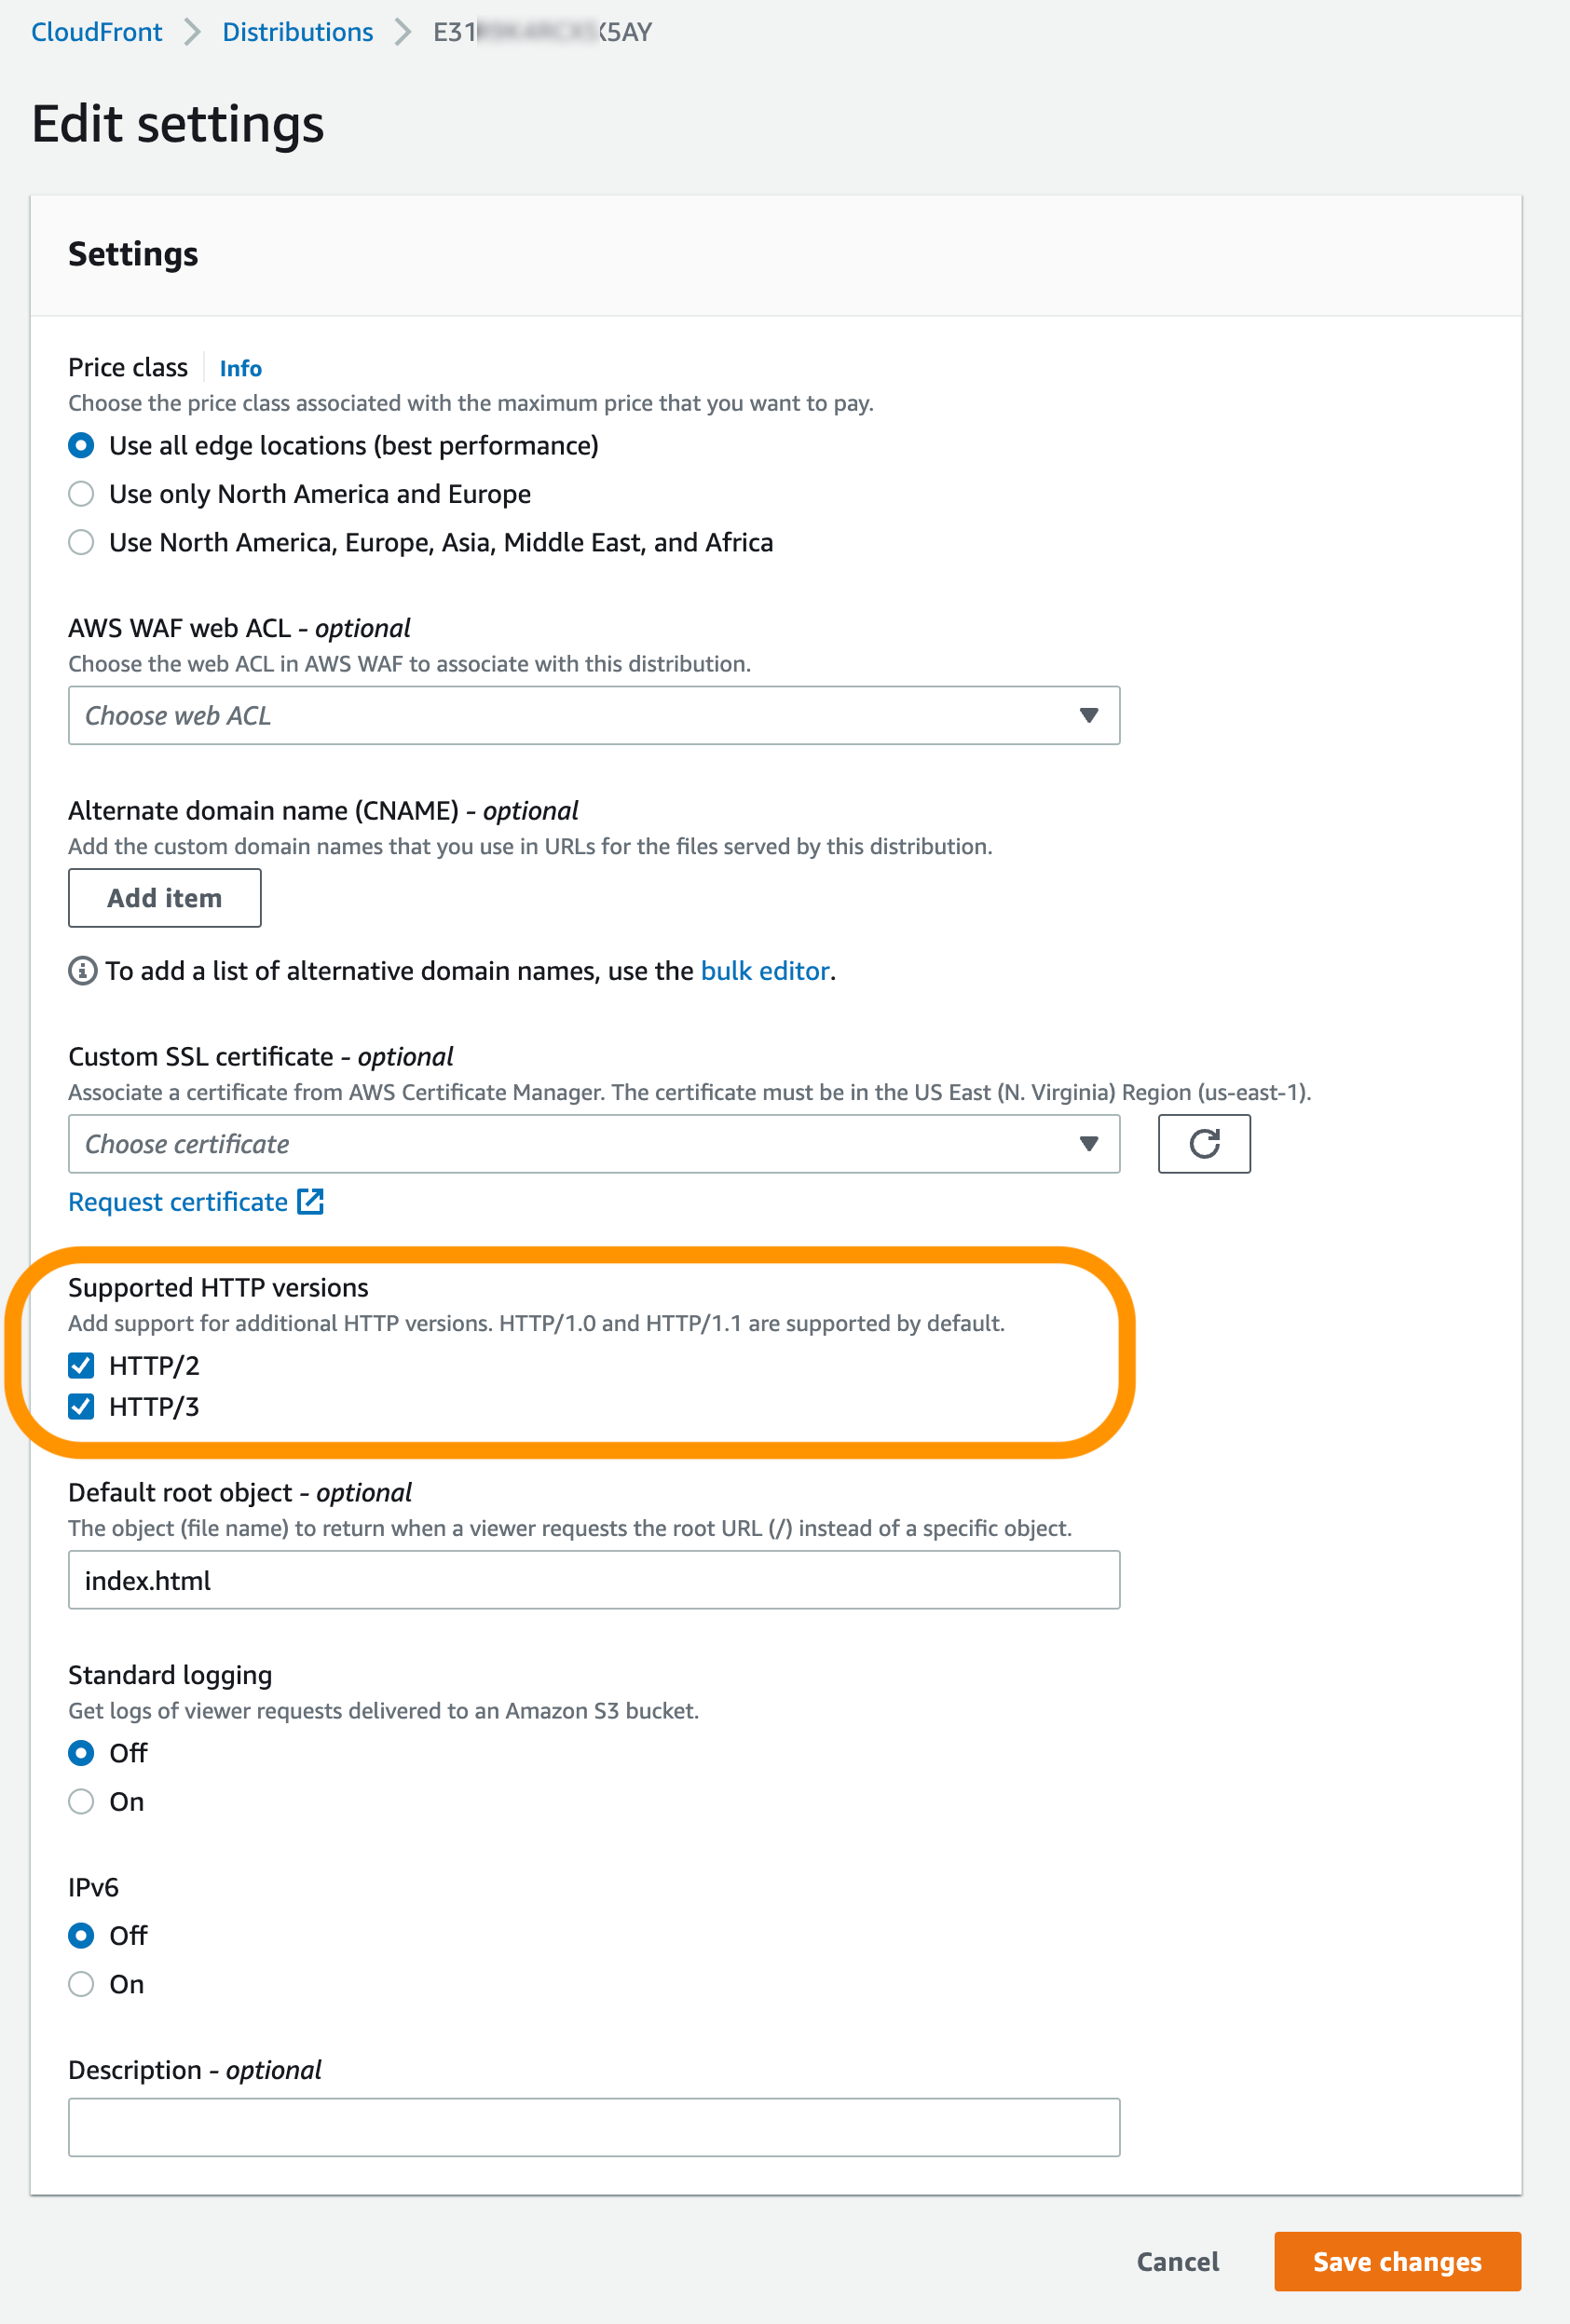
To enable HTTP/3 connection, you can edit the distribution configuration through the CloudFront console. You can select HTTP/3 in Supported HTTP versions on an existing distribution or create a new distribution without any changes to origin. You can use the UpdateDistribution API or use the CloudFormation template.

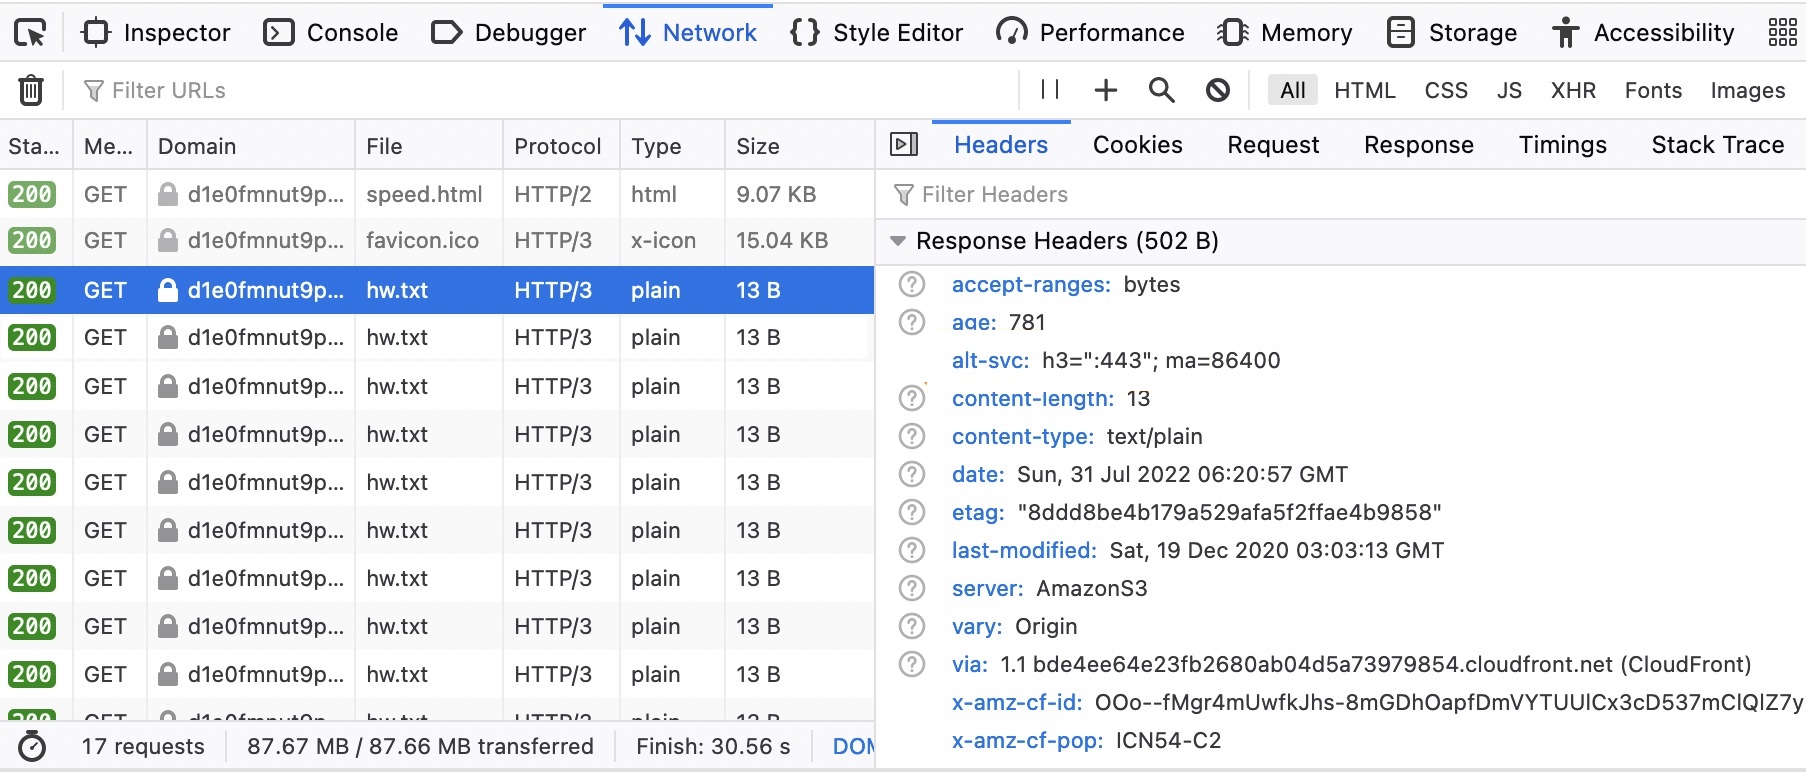
After deploying your distribution, you can connect with a browser that supports HTTP/3, such as the latest version of Google Chrome, Mozilla Firefox, and Microsoft Edge, and Apple Safari after turning it on manually. To learn more about web browser support, see the Can I Use – HTTP/3 Support page.

From web developer tools in your browser, you can see the HTTP/3 requests made when a page is loaded from the CloudFront. The image below is an example of Mozilla Firefox.

You can also add HTTP/3 support to Curl and test from the command line:

$ curl --http3 -i https://d1e0fmnut9xxxxx.cloudfront.net/speed.html
HTTP/3 200
content-type: text/html
content-length: 9286
date: Fri, 05 Aug 2022 15:49:52 GMT
last-modified: Thu, 28 Jul 2022 00:50:38 GMT
etag: "d928997023f6479537940324aeddabb3"
x-amz-version-id: mdUmFuUfVaSHPseoVPRoOKGuUkzWeUhK
accept-ranges: bytes
server: AmazonS3
vary: Origin
x-cache: Miss from cloudfront
via: 1.1 6e4f43c5af08f740d02d21f990dfbe80.cloudfront.net (CloudFront)
x-amz-cf-pop: ICN54-C2
alt-svc: h3=":443"; ma=86400
x-amz-cf-id: 6fy8rrUrtqDMrgoc7iJ73kzzXzHz7LQDg73R0lez7_nEXa3h9uAlCQ==

Customer Stories
Several AWS customers including Snap, Zillow, AC3/Movember, Audible, Skyscanner have already enabled HTTP/3 on their CloudFront distributions. Here are some of their voices:

Snap Inc is a social media company that offers Snapchat, an app that offers a fast and fun way to connect with close friends to its community around the world. On AWS, Snap now supports more than 306 million Snapchat users sending over 5.4 billion Snaps daily with 20 percent less latency than its prior architecture.

Mahmoud Ragab, Software Engineering Manager at Snapchat said:

“Snapchat helps millions of people around the world to share moments with friends. At Snapchat, we strive to be the fastest way to communicate. This is why we have been partnering with Amazon Cloudfront for fast, high-performance, low latency content delivery, leveraging QUIC on Cloudfront.

It offers significant advantages while sending and receiving content, especially in networks with lossy signals and intermittent connectivity. Improvements offered by QUIC, like zero round-trip time (0-RTT) connection setup and improved congestion control enables an average of 10% reduction in time to first byte (TTFB) while lowering overall error rates. Lower network latencies and errors make Snapchat better for people all over the world.

With early access to QUIC, we’ve been able to experiment and quickly iterate and improve server-side implementation and optimize integration between the client and the server. Both companies will continue to collaborate together as QUIC is made more widely available.”

Zillow is a real estate tech company that offer its customers an on-demand experience for selling, buying, renting and financing with transparency and nearly seamless end-to-end service. Since 2015, Zillow has increased the availability of its imaging system by using Amazon S3 and Amazon CloudFront.

Craig Link, Chief Cloud Architect at Zillow said:

“We are excited about the launch of HTTP/3 support for Amazon CloudFront. Enabling HTTP/3 on CloudFront was a seamless transition and our synthetic test and ad-hoc usage continued working without issue.”

AC3 is an Australia-based AWS Managed Services partner and has supported our customer, Movember Foundation, one of the leading charities for men’s health. Running an international charity that handles donations, data, events, and localized websites in 21 countries can pose some technical challenges. Born in the cloud, Movember has leveraged AWS technology in adopting new working models, ensuring a flexible IT platform, and innovating faster.

Greg Cockburn, Head of Hyperscale Cloud at AC3 said:

“AC3 is excited to work with their longtime partner Movember enabling HTTP3 on their CloudFront distributions serving web and API frontends and is encouraged by the performance improvements seen in the initial results.”

Now Available
The HTTP/3 support for Amazon CloudFront is now available in all 410+ CloudFront edge locations worldwide with no additional charge for using this feature. To learn more, see the FAQ and Developer Guide of Amazon CloudFront. Please send feedback to AWS re:Post for Amazon CloudFront or through your usual AWS support contacts.

Channy

Web application access control patterns using AWS services

Post Syndicated from Zili Gao original https://aws.amazon.com/blogs/architecture/web-application-access-control-patterns-using-aws-services/

The web application client-server pattern is widely adopted. The access control allows only authorized clients to access the backend server resources by authenticating the client and providing granular-level access based on who the client is.

This post focuses on three solution architecture patterns that prevent unauthorized clients from gaining access to web application backend servers. There are multiple AWS services applied in these architecture patterns that meet the requirements of different use cases.

OAuth 2.0 authentication code flow

Figure 1 demonstrates the fundamentals to all the architectural patterns discussed in this post. The blog Understanding Amazon Cognito user pool OAuth 2.0 grants describes the details of different OAuth 2.0 grants, which can vary the flow to some extent.

A typical OAuth 2.0 authentication code flow

Figure 1. A typical OAuth 2.0 authentication code flow

The architecture patterns detailed in this post use Amazon Cognito as the authorization server, and Amazon Elastic Compute Cloud instance(s) as resource server. The client can be any front-end application, such as a mobile application, that sends a request to the resource server to access the protected resources.

Pattern 1

Figure 2 is an architecture pattern that offloads the work of authenticating clients to Application Load Balancer (ALB).

Application Load Balancer integration with Amazon Cognito

Figure 2. Application Load Balancer integration with Amazon Cognito

ALB can be used to authenticate clients through the user pool of Amazon Cognito:

  1. The client sends HTTP request to ALB endpoint without authentication-session cookies.
  2. ALB redirects the request to Amazon Cognito authentication endpoint. The client is authenticated by Amazon Cognito.
  3. The client is directed back to the ALB with the authentication code.
  4. The ALB uses the authentication code to obtain the access token from the Amazon Cognito token endpoint and also uses the access token to get client’s user claims from Amazon Cognito UserInfo endpoint.
  5. The ALB prepares the authentication session cookie containing encrypted data and redirects client’s request with the session cookie. The client uses the session cookie for all further requests. The ALB validates the session cookie and decides if the request can be passed through to its targets.
  6. The validated request is forwarded to the backend instances with the ALB adding HTTP headers that contain the data from the access token and user-claims information.
  7. The backend server can use the information in the ALB added headers for granular-level permission control.

The key takeaway of this pattern is that the ALB maintains the whole authentication context by triggering client authentication with Amazon Cognito and prepares the authentication-session cookie for the client. The Amazon Cognito sign-in callback URL points to the ALB, which allows the ALB access to the authentication code.

More details about this pattern can be found in the documentation Authenticate users using an Application Load Balancer.

Pattern 2

The pattern demonstrated in Figure 3 offloads the work of authenticating clients to Amazon API Gateway.

Amazon API Gateway integration with Amazon Cognito

Figure 3. Amazon API Gateway integration with Amazon Cognito

API Gateway can support both REST and HTTP API. API Gateway has integration with Amazon Cognito, whereas it can also have control access to HTTP APIs with a JSON Web Token (JWT) authorizer, which interacts with Amazon Cognito. The ALB can be integrated with API Gateway. The client is responsible for authenticating with Amazon Cognito to obtain the access token.

  1. The client starts authentication with Amazon Cognito to obtain the access token.
  2. The client sends REST API or HTTP API request with a header that contains the access token.
  3. The API Gateway is configured to have:
    • Amazon Cognito user pool as the authorizer to validate the access token in REST API request, or
    • A JWT authorizer, which interacts with the Amazon Cognito user pool to validate the access token in HTTP API request.
  4. After the access token is validated, the REST or HTTP API request is forwarded to the ALB, and:
    • The API Gateway can route HTTP API to private ALB via a VPC endpoint.
    • If a public ALB is used, the API Gateway can route both REST API and HTTP API to the ALB.
  5. API Gateway cannot directly route REST API to a private ALB. It can route to a private Network Load Balancer (NLB) via a VPC endpoint. The private ALB can be configured as the NLB’s target.

The key takeaways of this pattern are:

  • API Gateway has built-in features to integrate Amazon Cognito user pool to authorize REST and/or HTTP API request.
  • An ALB can be configured to only accept the HTTP API requests from the VPC endpoint set by API Gateway.

Pattern 3

Amazon CloudFront is able to trigger AWS Lambda functions deployed at AWS edge locations. This pattern (Figure 4) utilizes a feature of Lambda@Edge, where it can act as an authorizer to validate the client requests that use an access token, which is usually included in HTTP Authorization header.

Using Amazon CloudFront and AWS Lambda@Edge with Amazon Cognito

Figure 4. Using Amazon CloudFront and AWS Lambda@Edge with Amazon Cognito

The client can have an individual authentication flow with Amazon Cognito to obtain the access token before sending the HTTP request.

  1. The client starts authentication with Amazon Cognito to obtain the access token.
  2. The client sends a HTTP request with Authorization header, which contains the access token, to the CloudFront distribution URL.
  3. The CloudFront viewer request event triggers the launch of the function at Lambda@Edge.
  4. The Lambda function extracts the access token from the Authorization header, and validates the access token with Amazon Cognito. If the access token is not valid, the request is denied.
  5. If the access token is validated, the request is authorized and forwarded by CloudFront to the ALB. CloudFront is configured to add a custom header with a value that can only be shared with the ALB.
  6. The ALB sets a listener rule to check if the incoming request has the custom header with the shared value. This makes sure the internet-facing ALB only accepts requests that are forwarded by CloudFront.
  7. To enhance the security, the shared value of the custom header can be stored in AWS Secrets Manager. Secrets Manager can trigger an associated Lambda function to rotate the secret value periodically.
  8. The Lambda function also updates CloudFront for the added custom header and ALB for the shared value in the listener rule.

The key takeaways of this pattern are:

  • By default, CloudFront will remove the authorization header before forwarding the HTTP request to its origin. CloudFront needs to be configured to forward the Authorization header to the origin of the ALB. The backend server uses the access token to apply granular levels of resource access permission.
  • The use of Lambda@Edge requires the function to sit in us-east-1 region.
  • The CloudFront-added custom header’s value is kept as a secret that can only be shared with the ALB.

Conclusion

The architectural patterns discussed in this post are token-based web access control methods that are fully supported by AWS services. The approach offloads the OAuth 2.0 authentication flow from the backend server to AWS services. The services managed by AWS can provide the resilience, scalability, and automated operability for applying access control to a web application.

AWS Week in Review – May 9, 2022

Post Syndicated from Danilo Poccia original https://aws.amazon.com/blogs/aws/aws-week-in-review-may-9-2022/

This post is part of our Week in Review series. Check back each week for a quick roundup of interesting news and announcements from AWS!

Another week starts, and here’s a collection of the most significant AWS news from the previous seven days. This week is also the one-year anniversary of CloudFront Functions. It’s exciting to see what customers have built during this first year.

Last Week’s Launches
Here are some launches that caught my attention last week:

Amazon RDS supports PostgreSQL 14 with three levels of cascaded read replicas – That’s 5 replicas per instance, supporting a maximum of 155 read replicas per source instance with up to 30X more read capacity. You can now build a more robust disaster recovery architecture with the capability to create Single-AZ or Multi-AZ cascaded read replica DB instances in same or cross Region.

Amazon RDS on AWS Outposts storage auto scalingAWS Outposts extends AWS infrastructure, services, APIs, and tools to virtually any datacenter. With Amazon RDS on AWS Outposts, you can deploy managed DB instances in your on-premises environments. Now, you can turn on storage auto scaling when you create or modify DB instances by selecting a checkbox and specifying the maximum database storage size.

Amazon CodeGuru Reviewer suppression of files and folders in code reviews – With CodeGuru Reviewer, you can use automated reasoning and machine learning to detect potential code defects that are difficult to find and get suggestions for improvements. Now, you can prevent CodeGuru Reviewer from generating unwanted findings on certain files like test files, autogenerated files, or files that have not been recently updated.

Amazon EKS console now supports all standard Kubernetes resources to simplify cluster management – To make it easy to visualize and troubleshoot your applications, you can now use the console to see all standard Kubernetes API resource types (such as service resources, configuration and storage resources, authorization resources, policy resources, and more) running on your Amazon EKS cluster. More info in the blog post Introducing Kubernetes Resource View in Amazon EKS console.

AWS AppConfig feature flag Lambda Extension support for Arm/Graviton2 processors – Using AWS AppConfig, you can create feature flags or other dynamic configuration and safely deploy updates. The AWS AppConfig Lambda Extension allows you to access this feature flag and dynamic configuration data in your Lambda functions. You can now use the AWS AppConfig Lambda Extension from Lambda functions using the Arm/Graviton2 architecture.

AWS Serverless Application Model (SAM) CLI now supports enabling AWS X-Ray tracing – With the AWS SAM CLI you can initialize, build, package, test on local and cloud, and deploy serverless applications. With AWS X-Ray, you have an end-to-end view of requests as they travel through your application, making them easier to monitor and troubleshoot. Now, you can enable tracing by simply adding a flag to the sam init command.

Amazon Kinesis Video Streams image extraction – With Amazon Kinesis Video Streams you can capture, process, and store media streams. Now, you can also request images via API calls or configure automatic image generation based on metadata tags in ingested video. For example, you can use this to generate thumbnails for playback applications or to have more data for your machine learning pipelines.

AWS GameKit supports Android, iOS, and MacOS games developed with Unreal Engine – With AWS GameKit, you can build AWS-powered game features directly from the Unreal Editor with just a few clicks. Now, the AWS GameKit plugin for Unreal Engine supports building games for the Win64, MacOS, Android, and iOS platforms.

For a full list of AWS announcements, be sure to keep an eye on the What’s New at AWS page.

Other AWS News
Some other updates you might have missed:

🎂 One-year anniversary of CloudFront Functions – I can’t believe it’s been one year since we launched CloudFront Functions. Now, we have tens of thousands of developers actively using CloudFront Functions, with trillions of invocations per month. You can use CloudFront Functions for HTTP header manipulation, URL rewrites and redirects, cache key manipulations/normalization, access authorization, and more. See some examples in this repo. Let’s see what customers built with CloudFront Functions:

  • CloudFront Functions enables Formula 1 to authenticate users with more than 500K requests per second. The solution is using CloudFront Functions to evaluate if users have access to view the race livestream by validating a token in the request.
  • Cloudinary is a media management company that helps its customers deliver content such as videos and images to users worldwide. For them, Lambda@Edge remains an excellent solution for applications that require heavy compute operations, but lightweight operations that require high scalability can now be run using CloudFront Functions. With CloudFront Functions, Cloudinary and its customers are seeing significantly increased performance. For example, one of Cloudinary’s customers began using CloudFront Functions, and in about two weeks it was seeing 20–30 percent better response times. The customer also estimates that they will see 75 percent cost savings.
  • Based in Japan, DigitalCube is a web hosting provider for WordPress websites. Previously, DigitalCube spent several hours completing each of its update deployments. Now, they can deploy updates across thousands of distributions quickly. Using CloudFront Functions, they’ve reduced update deployment times from 4 hours to 2 minutes. In addition, faster updates and less maintenance work result in better quality throughout DigitalCube’s offerings. It’s now easier for them to test on AWS because they can run tests that affect thousands of distributions without having to scale internally or introduce downtime.
  • Amazon.com is using CloudFront Functions to change the way it delivers static assets to customers globally. CloudFront Functions allows them to experiment with hyper-personalization at scale and optimal latency performance. They have been working closely with the CloudFront team during product development, and they like how it is easy to create, test, and deploy custom code and implement business logic at the edge.

AWS open-source news and updates – A newsletter curated by my colleague Ricardo to bring you the latest open-source projects, posts, events, and more. Read the latest edition here.

Reduce log-storage costs by automating retention settings in Amazon CloudWatch – By default, CloudWatch Logs stores your log data indefinitely. This blog post shows how you can reduce log-storage costs by establishing a log-retention policy and applying it across all of your log groups.

Observability for AWS App Runner VPC networking – With X-Ray support in App runner, you can quickly deploy web applications and APIs at any scale and take advantage of adding tracing without having to manage sidecars or agents. Here’s an example of how you can instrument your applications with the AWS Distro for OpenTelemetry (ADOT).

Upcoming AWS Events
It’s AWS Summits season and here are some virtual and in-person events that might be close to you:

You can now register for re:MARS to get fresh ideas on topics such as machine learning, automation, robotics, and space. The conference will be in person in Las Vegas, June 21–24.

That’s all from me for this week. Come back next Monday for another Week in Review!

Danilo

Enriching Amazon Cognito features with an Amazon API Gateway proxy

Post Syndicated from Mahmoud Matouk original https://aws.amazon.com/blogs/architecture/enriching-amazon-cognito-features-with-an-amazon-api-gateway-proxy/

This post was co-written with Geoff Baskwill, member of the Architecture Enabling Team at Trend Micro. At Trend Micro, we use AWS technologies to build secure solutions to help our customers improve their security posture.


This post builds on the architecture originally published in Protect public clients for Amazon Cognito with an Amazon CloudFront proxy. Read that post to learn more about public clients and why it is helpful to implement a proxy layer.

We’ll build on the idea of passing calls to Amazon Cognito through a lightweight proxy. This pattern allows you to augment identity flows in your system with additional processing without having to change the client or the backend. For example, you can use the proxy layer to protect public clients as explained in the original post. You can also use this layer to apply additional fraud detection logic to prevent fraudulent sign up, propagate events to downstream systems for monitoring or enhanced logging, and replicate certain events to another AWS Region (for example, to build high availability and multi-Region capabilities).

The solution in the original post used Amazon CloudFront, Lambda@Edge, and AWS WAF to implement protection of public clients, and hinted that there are multiple ways to do it. In this post, we explore one of these alternatives by using Amazon API Gateway and a proxy AWS Lambda function to implement the proxy to Amazon Cognito. This alternative offers improved performance and full access to request and response elements.

Solution overview

The focus of this solution is to protect public clients of the Amazon Cognito user pool.

The workflow is shown in Figure 1 and works as follows:

  1. Configure the client application (mobile or web client) to use the API Gateway endpoint as a proxy to an Amazon Cognito regional endpoint. You also create an application client in Amazon Cognito with a secret. This means that any unauthenticated API call must have the secret hash.
  2. Use a Lambda function to add a secret hash to the relevant incoming requests before passing them on to the Amazon Cognito endpoint. This function can also be used for other purposes like logging, propagation of events, or additional validation.
  3. In the Lambda function, you must have the app client secret to be able to calculate the secret hash and add it to the request. We recommend that you keep the secret in AWS Secrets Manager and cache it for the lifetime of the function.
  4. Use AWS WAF with API Gateway to enforce rate limiting, implement allow and deny lists, and apply other rules according to your security requirements.
  5. Clients that send unauthenticated API calls to the Amazon Cognito endpoint directly are blocked and dropped because of the missing secret.

Not shown: You may want to set up a custom domain and certificate for your API Gateway endpoint.

A proxy solution to the Amazon Cognito regional endpoint

Figure 1. A proxy solution to the Amazon Cognito regional endpoint

Deployment steps

You can use the following AWS CloudFormation template to deploy this proxy pattern for your existing Amazon Cognito user pool.

Note: This template references a Lambda code package from a bucket in the us-east-1 Region. For that reason, the template can be only created in us-east-1. If you need to create the proxy solution in another Region, download the template and Lambda code package, update the template to reference another Amazon Simple Storage Service (Amazon S3) bucket that you own in the desired Region, and upload the code package to that S3 bucket. Then you can deploy your modified template in the desired Region.

launch stack

This template requires the user pool ID as input and will create several resources in your AWS account to support the following proxy pattern:

  • A new application client with a secret will be added to your Amazon Cognito user pool
  • The secret will be stored in Secrets Manager and will be read from the proxy Lambda function
  • The proxy Lambda function will be used to intercept Amazon Cognito API calls and attach client-secret to applicable requests
  • The API Gateway project provides the custom proxy endpoint that is used as the Amazon Cognito endpoint in your client applications
  • An AWS WAF WebACL provides firewall protection to the API Gateway endpoint. The WebACL includes placeholder rules for Allow and Deny lists of IPs. It also includes a rate limiting rule that will block requests from IP addresses that exceed the number of allowed requests within a five-minute period (rate limit value is provided as input to the template)
  • Several helper resources will also be created like Lambda functions, necessary AWS IAM policies, and roles to allow the solution to function properly

After you create a successful stack, you can find the endpoint URL in the outputs section of your CloudFormation stack. This is the URL we use in the next section with client applications.

Note: The template and code has been simplified for demonstration purposes. If you plan to deploy this solution in production, make sure to review these resources for compliance with your security and performance requirements. For example, you might need to enable certain logs or log encryption or use a customer managed key for encryption.

Integrating your client with proxy solution

Integrate the client application with the proxy by changing the endpoint in your client application to use the endpoint URL for the proxy API Gateway. The endpoint URL and application client ID are located in the Outputs section of the CloudFormation stack.

Next, edit your client-side code to forward calls to Amazon Cognito through the proxy endpoint and use the new application client ID. For example, if you’re using the Identity SDK, you should change this property as follows.

var poolData = {
  UserPoolId: '<USER-POOL-ID>',
  ClientId: '<APP-CLIENT-ID>',
  endpoint: 'https://<APIGATEWAY-URL>'
};

If you’re using AWS Amplify, change the endpoint in the aws-exports.js file by overriding the property aws_cognito_endpoint. Or, if you configure Amplify Auth in your code, you can provide the endpoint as follows.

Amplify.Auth.configure({
  userPoolId: '<USER-POOL-ID>',
  userPoolWebClientId: '<APP-CLIENT-ID>',
  endpoint: 'https://<APIGATEWAY-URL>'
});

If you have a mobile application that uses the Amplify mobile SDK, override the endpoint in your configuration as follows (don’t include AppClientSecret parameter in your configuration).

Note that the Endpoint value contains the domain name only, not the full URL. This feature is available in the latest releases of the iOS and Android SDKs.

"CognitoUserPool": {
  "Default": {
    "AppClientId": "<APP-CLIENT-ID>",
    "Endpoint": "<APIGATEWAY-DOMAIN-NAME>",
    "PoolId": "<USER-POOL-ID>",
    "Region": "<REGION>"
  }
}
WARNING: If you do an amplify push or amplify pull operation, the Amplify CLI overwrites customizations to the awsconfiguration.json and amplifyconfiguration.json files. You must manually re-apply the Endpoint customization and remove the AppClientSecret if you use the CLI to modify your cloud backend.

When to use this pattern

The same guidance for using this pattern applies as in the original post.

You may prefer this solution if you are familiar with API Gateway or if you want to take advantage of the following:

  • Use CloudWatch metrics from API Gateway to monitor the behavior and health of your Amazon Cognito user pool.
  • Find and examine logs from your Lambda proxy function in the Region where you have deployed this solution.
  • Deploy your proxy function into an Amazon Virtual Private Cloud (Amazon VPC) and access sensitive data or services in the Amazon VPC or through Amazon VPC endpoints.
  • Have full access to request and response in the proxy Lambda function

Extend the proxy features

Now that you are intercepting all of the API requests to Amazon Cognito, add features to your identity layer:

  • Emit events using Amazon EventBridge when user data changes. You can do this when the proxy function receives mutating actions like UpdateUserAttribute (among others) and Amazon Cognito processes the request successfully.
  • Implement more complex rate limiting than what AWS WAF supports, like per-user rate limits regardless of where IP address requests are coming from. This can also be extended to include fraud detection, request input validation, and integration with third-party security tools.
  • Build a geo-redundant user pool that transparently mitigates regional failures by replicating mutating actions to an Amazon Cognito user pool in another Region.

Limitations

This solution has the same limitations highlighted in the original post. Keep in mind that resourceful authenticated users can still make requests to the Amazon Cognito API directly using the access token they obtained from authentication. If you want to prevent this from happening, adjust the proxy to avoid returning the access token to clients or return an encrypted version of the token.

Conclusion

In this post, we explored an alternative solution that implements a thin proxy to Amazon Cognito endpoint. This allows you to protect your application against unwanted requests and enrich your identity flows with additional logging, event propagation, validations, and more.

Ready to get started? If you have questions about this post, start a new thread on the Amazon Cognito forum or contact AWS Support.

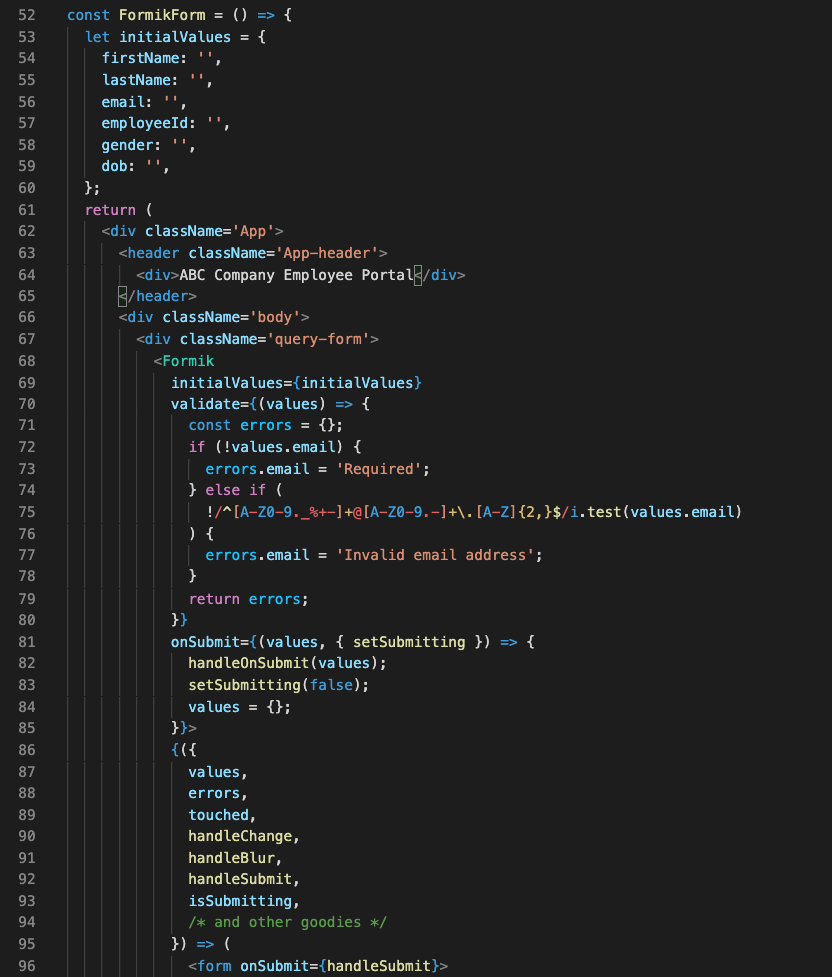
Deploying Sample UI Forms using React, Formik, and AWS CDK

Post Syndicated from Kevin Rivera original https://aws.amazon.com/blogs/architecture/deploying-sample-ui-forms-using-react-formik-and-aws-cdk/

Companies in many industries use UI forms to collect customer data for account registrations, online shopping, and surveys. It can be tedious to create form fields. Proper use of input validation can help users easily find and fix mistakes. Best practice is that users should not see a form filled with “this field is required” or “your email is invalid” errors until they have first attempted to complete the form.

Forms can be difficult to write, maintain, and test. They often have to be repeated in multiple areas on even the most basic interactive web application. Fortunately, third-party libraries provide front-end developers with tools to manage these complexities.

This blog post will describe an example solution for implementing simple forms for a user interface using the JavaScript libraries React and Formik. We will also use AWS resources to host the application. The blog will describe how the application is provisioned using the AWS Cloud Development Kit (CDK).

Our sample form and code

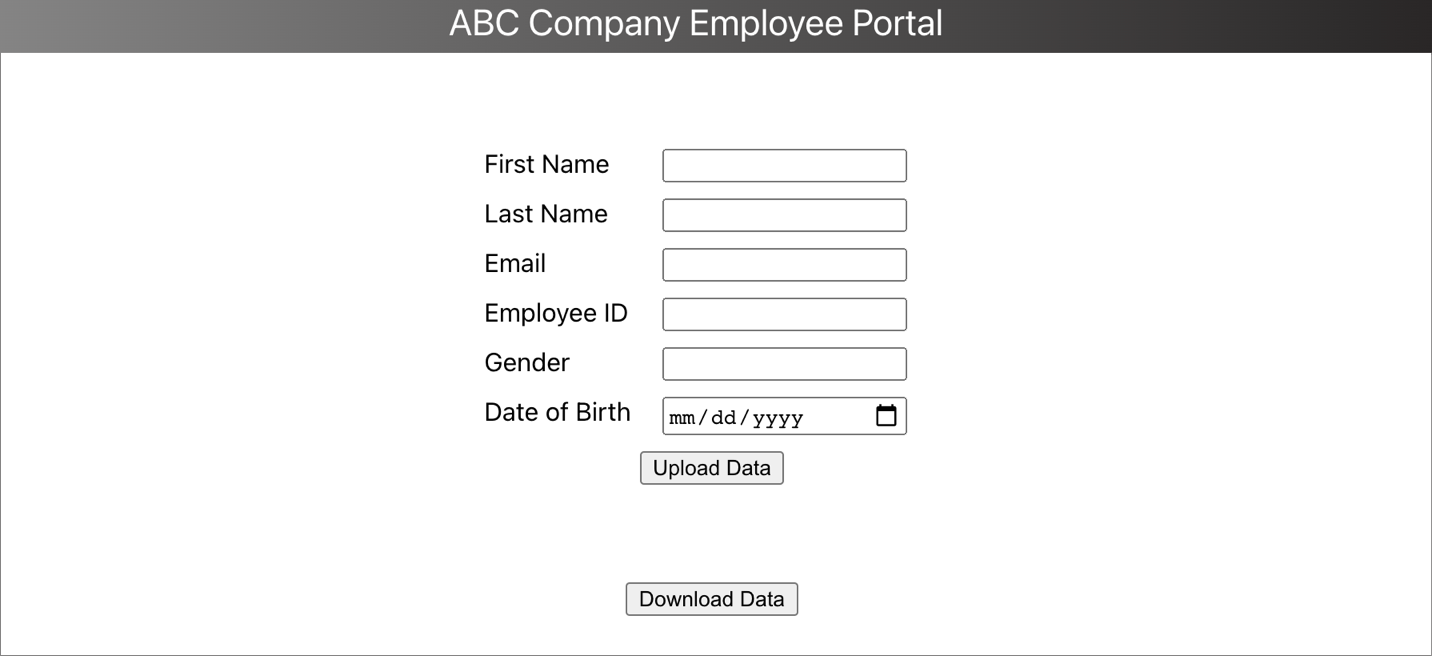
Our solution demonstrates a straightforward way for a front-end or full stack developer to rapidly create forms. We will show how a popular React form library, Formik, abstracts input field state management and reduces the amount of written code.

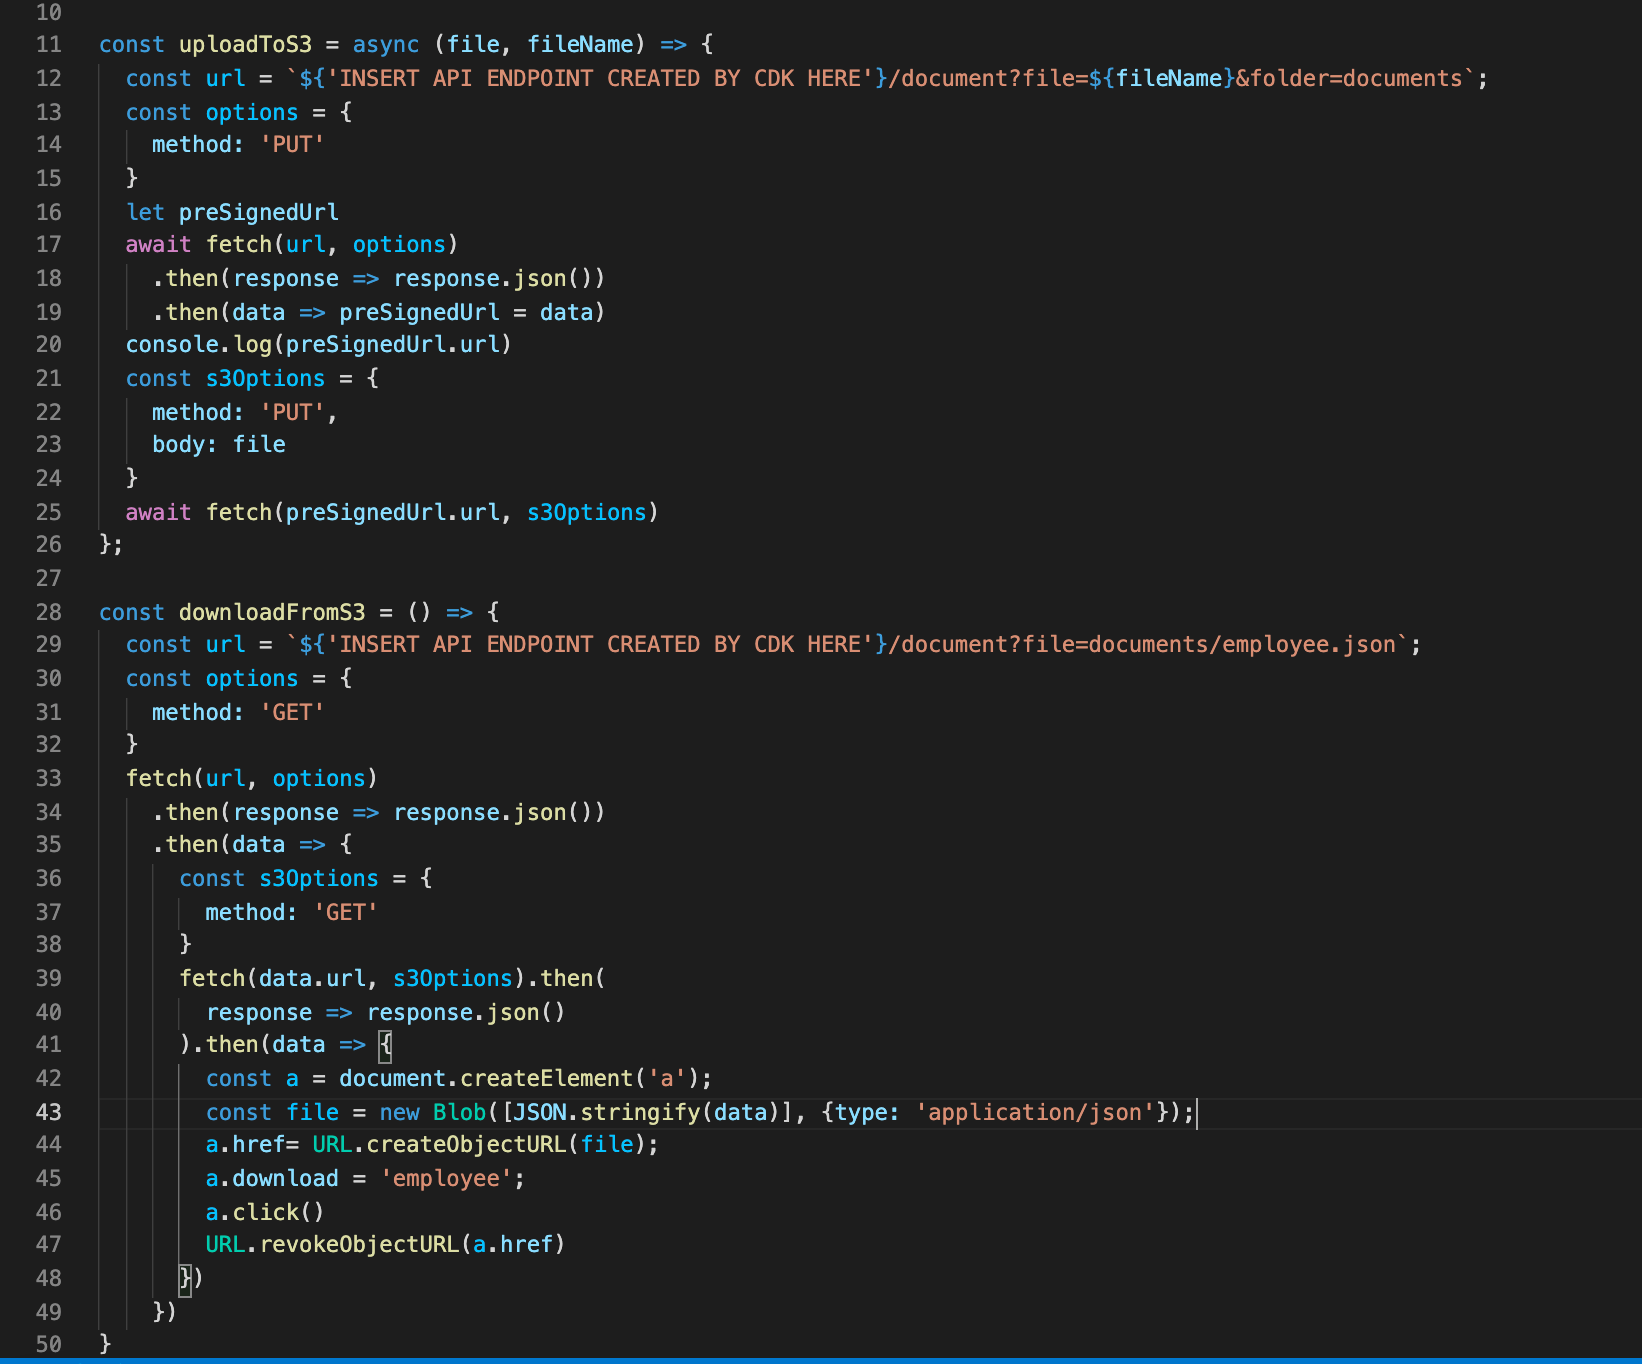
Our sample form will collect the user’s information (name, email, and date of birth) and store the data to a private Amazon S3 bucket for later retrieval using a presigned URL. The sample code gives developers a structure with which to build on and experiment. The code provides example integration with AWS services to host a React form application.

Figure 1 demonstrates how the user’s information flows through various AWS services and finally gets uploaded to private Amazon S3 bucket.

Figure 1. User interface communicating with API Gateway to upload a file to a S3 bucket using a presigned URL

Figure 1. User interface communicating with API Gateway to upload a file to a S3 bucket using a presigned URL

  1. Click the Upload button. The user visits the webpage, fills the form, and clicks the ‘Upload Data’ button
  2. HTTP request to Amazon API Gateway. The front end makes an HTTP request to the API Gateway
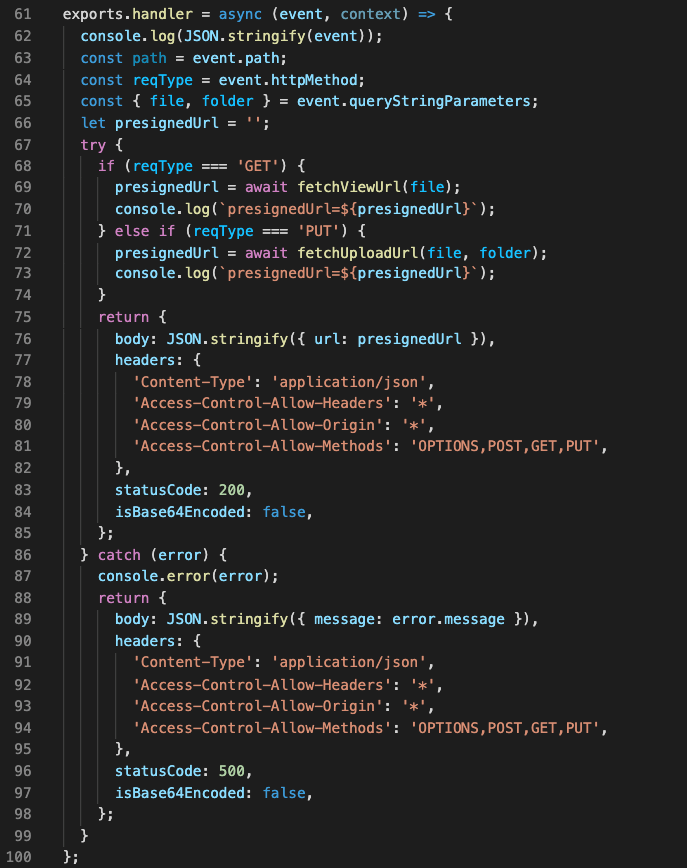
  3. Forward HTTP request. The API Gateway forwards the HTTP request to the Lambda function that generates a presigned URL for uploading data to a S3 bucket
  4. Presigned URL. The presigned URL for uploading data to a S3 bucket is returned by the Lambda function to the API Gateway as HTTP response.
  5. Forward HTTP response. The API Gateway forwards the presigned URL to the client application
  6. Upload data to Amazon S3. The client application uses the presigned URL to upload the form data to a S3 bucket

The code also demonstrates the flow of data when a download request is made by the user. The download process is shown in Figure 2.

Figure 2. User interface communicating with API Gateway to download a file from a S3 bucket using presigned URL

Figure 2. User interface communicating with API Gateway to download a file from a S3 bucket using presigned URL

  1. Click Download button. The user clicks the ‘Download Data’ button
  2. HTTP request to API Gateway. The front end makes an HTTP request to the API Gateway
  3. Forward HTTP request. The API Gateway forwards the HTTP request to the Lambda function that generates a presigned URL for downloading data from a S3 bucket
  4. Presigned URL. The presigned URL for downloading data from a S3 bucket is returned by the Lambda function to the API Gateway as HTTP response.
  5. Forward HTTP response. The API Gateway forwards the presigned URL to the client application
  6. Upload data to Amazon S3. The client application uses the presigned URL to download the form data to S3 bucket
  7. File downloads. The file downloads to user’s computer

Here are the four steps to demonstrate this solution:

  1. Provisioning the infrastructure (backend). The infrastructure will consist of:
    • An AWS Lambda function, which will generate a presigned URL when requested by the UI and respond with the URL for uploading/downloading data
    • An API Gateway, which will handle the requests and responses from UI and Lambda
    • Two separate S3 buckets, which will host the static UI forms and store the uploaded data (different buckets for each).
  2. Deploying the front end. We will use sample React/Formik code on S3.
  3. Testing. Once our code is deployed, we will test the form by uploading a file though the UI, and then retrieve that file.
  4. Clean up. Finally, we will clean up the S3 bucket.

Prerequisites

For this walkthrough, you should have the following prerequisites:

Deploying the backend and front end

Clone code

The sample code for this application is available on GitHub. Clone the repo to follow along in a terminal.

git clone https://github.com/aws-samples/react-formik-on-aws

Install dependencies

Change the directory to the folder the clone created and install dependencies for the API.

cd formik-presigned-s3/ npm install

After installing the dependencies for the API, let’s install the dependencies in the UI.

cd ui/formik-s3-react-app
npm install

Bundling

Let’s bundle our Lambda function that currently exists in the index.js file inside the resources/lambda directory. This will create our Lambda function inside a directory that our stack can read from, to create the handler.

npx esbuild resources/lambda/index.js –bundle –platform=node –target=node12 –external:aws-sdk –outfile=dist/lambda/build/index.js

Let’s go into more detail about the function of the Lambda handler. As seen in Figure 3, the handler is using three helper functions that are written in the file (isExisted, fetchUploadUrl, fetchViewUrl). It creates a presigned URL for uploads/downloads of data, confirms that the URL was created, and fetches the URL. Lines 6874 are calling the helper functions based on the API request needed.

Figure 3. Lambda’s handler function for GET request type

Figure 3. Lambda’s handler function for GET request type

Build the React app

#Make sure you are in the ui/formik-s3-react-app directory
npm run build

This command will create your index.html file and its dependencies, which will be the source of your UI site. When we deploy our stack, we will inspect the CDK code. The Lambda bundler and the React app build step work together to source the directory and create the S3 bucket that will eventually host the React application.

Note: If you are deploying AWS CDK apps into an AWS environment, you must provision these resources for a specific location and account. In this case you must run the following command:

cdk bootstrap aws://<aws_account_number>/<aws_region>

This is the error that you will see if you do not bootstrap:

This stack uses assets, so the toolkit stack must be deployed to the environment (Run "cdk bootstrap aws://aws_account_number/aws_region")

Let’s deploy!

Before we run the deploy command, let’s understand what exactly we are deploying and the advantages of the CDK.

Note: We won’t go into depth on how the AWS CDK works, but we will demonstrate implementation of the code for our infrastructure and website hosting.

Our configuration code for deploying our CDK is found in the root directory in a file called cdk.json. It’s important that we can configure certain properties. This is where we map to our bin file that creates our CDK app. As you can see in Figure 4, the app key points to bin/formic-s3.ts.

Figure 4. cdk.json file

Figure 4. Contents of cdk.json file

Now let’s look at the CDK stack code, shown in Figure 5. This can be found in the lib directory of the root file and it is called formik-s3-stack.ts.

Figure 5. CDK stack code that creates a new S3 bucket for hosting the React webpage

Figure 5. CDK stack code that creates a new S3 bucket for hosting the React webpage

This is the part of the code that creates our S3 bucket for hosting our React UI. The first few lines create the bucket name and point to the file that will be seen by the world (index.html). The deployment function has a source that will be searching for the path in your local directory where the build files were created. This will source the directory and then create it in an S3 bucket in the cloud.

Notice how our publicReadAccess is commented out. This is because it is not best practice to leave your bucket exposed publicly. For this blog, we will host this simple form site and allow public access. However, a CDN such as Amazon CloudFront should be used for distribution of traffic to keep your S3 bucket secure.

Figure 6. CDK stack code that creates a new S3 bucket

Figure 6. CDK stack code that creates a new S3 bucket for uploading and downloading data using S3 presigned URL

Figure 6 shows the second S3 bucket that will be used for our Formik data.

Figure 7. CDK code stack used to create the Lambda function

Figure 7. CDK code stack used to create the Lambda function

Figure 7 shows how to create your Lambda function, which also will be reading from the ‘bundling’ step.

Figure 8. CDK code stack used to create API Gateway

Figure 8. CDK code stack used to create API Gateway

Figure 8 shows how to create your API Gateway resources. Notice the ‘OPTIONS’ document is used here. This is because our front-end request URLs are not from the same origin as our APIs. Including the ‘OPTIONS’ document enables our browser to succeed in its preflight request and avoid any CORS issues.

Now that we understand our CDK, let’s finally DEPLOY!

npx cdk deploy

You will receive the output in the terminal that will be the storage API endpoint. You can also view this in CloudFormation under the Output tab for the stack the CDK spun up (FormikS3Stack). You should also see your S3 URL to view your React app.

What is React’s form?

Once you have your URL, you should see the form, shown in Figure 9.

Figure 9. Portal form designed using Formik in ReactJS

Figure 9. Portal form designed using Formik in ReactJS

Why is Formik so special?

Let’s preface this with how our forms had to be created using the old method, shown in Figure 10.

Figure 10. This is from https://www.bitnative.com/2020/08/19/formik-vs-plain-react-for-forms-worth-it/ showing a form without Formik

Figure 10. This is from https://www.bitnative.com/2020/08/19/formik-vs-plain-react-for-forms-worth-it/ showing a form without Formik

Figure 11 shows our code:

Figure 11. React code with the UI components

Figure 11. React code with the UI components

One of the first things you can notice when comparing both methods, is the location of your initial values. Formik handles the state of your fields. Without it, we would need to manage this with React’s state object if we were using class components, or with hooks inside functional components. With Formik, we don’t have to handle these tasks.

Another benefit of using Formik is its handling of input validation, errors, and handler functions that we can use to manage our UI (lines 7079 and 8793.) Formik reduces the need to write extra lines of code to handle validation and errors, managing states, and creating event handler logic.

Read this blog post that compares both methods of creating forms.

Making our API calls from the UI

Our Formik form is simple to implement, but one more step remains. We need to handle uploading the information, and then downloading it.

With all our resources created and our form done, we put it all together by creating our API requests, shown in Figure 12.

Figure 12. Code to upload to S3 bucket and download from S3 bucket

Figure 12. Code to upload to S3 bucket and download from S3 bucket

Due to the efficiency of AWS and Formik, we can upload and download with fewer than 50 lines of code.

Lines 1126 is where we call our API Gateway URL that our CDK created for us. With this API, when the user first clicks the upload button, the request hits the endpoint to create the presigned URL. It waits for its creation and in lines 2125 we PUT our data into our S3 bucket.

Lastly, we are able to hit that same presigned URL to download our information we uploaded into a JSON file.

Cleaning up

To avoid incurring future charges, delete the resources. Let’s run:

npx cdk destroy

You can confirm the removal by going into CloudFormation and confirming the resources were deleted.

Conclusion

In this blog post, we learned how we can create a simple server for our form submissions. We spun it up easily with the CDK toolkit and provisioned our resources. We hosted our UI and created a sample form using Formik, which handles state and reduces the amount of code we must write. We then hit the endpoints given to us by the deployment and tested the app by uploading and downloading our form data. Traditional form data management requires a separate function for handling data and errors in forms. This is a cleaner and more efficient way to handle form data.

For further reading:

Codacy Measures Developer Productivity using AWS Serverless

Post Syndicated from Catarina Gralha original https://aws.amazon.com/blogs/architecture/codacy-measures-developer-productivity-using-aws-serverless/

Codacy is a DevOps insights company based in Lisbon, Portugal. Since its launch in 2012, Codacy has helped software development and engineering teams reduce defects, keep technical debt in check, and ship better code, faster.

Codacy’s latest product, Pulse, is a service that helps understand and improve the performance of software engineering teams. This includes measuring metrics such as deployment frequency, lead time for changes, or mean time to recover. Codacy’s main platform is built on top of AWS products like Amazon Elastic Kubernetes Service (EKS), but they have taken Pulse one step further with AWS serverless.

In this post, we will explore the Pulse’s requirements, architecture, and the services it is built on, including AWS Lambda, Amazon API Gateway, and Amazon DynamoDB.

Pulse prototype requirements

Codacy had three clear requirements for their initial Pulse prototype.

  1. The solution must enable the development team to iterate quickly and have minimal time-to-market (TTM) to validate the idea.
  2. The solution must be easily scalable and match the demands of both startups and large enterprises alike. This was of special importance, as Codacy wanted to onboard Pulse with some of their existing customers. At the time, these customers already had massive amounts of information.
  3. The solution must be cost-effective, particularly during the early stages of the product development.

Enter AWS serverless

Codacy could have built Pulse on top of Amazon EC2 instances. However, this brings the undifferentiated heavy lifting of having to provision, secure, and maintain the instances themselves.

AWS serverless technologies are fully managed services that abstract the complexity of infrastructure maintenance away from developers and operators, so they can focus on building products.

Serverless applications also scale elastically and automatically behind the scenes, so customers don’t need to worry about capacity provisioning. Furthermore, these services are highly available by design and span multiple Availability Zones (AZs) within the Region in which they are deployed. This gives customers higher confidence that their systems will continue running even if one Availability Zone is impaired.

AWS serverless technologies are cost-effective too, as they are billed per unit of value, as opposed to billing per provisioned capacity. For example, billing is calculated by the amount of time a function takes to complete or the number of messages published to a queue, rather than how long an EC2 instance runs. Customers only pay when they are getting value out of the services, for example when serving an actual customer request.

Overview of Pulse’s solution architecture

An event is generated when a developer performs a specific action as part of their day-to-day tasks, such as committing code or merging a pull request. These events are the foundational data that Pulse uses to generate insights and are thus processed by multiple Pulse components called modules.

Let’s take a detailed look at a few of them.

Ingestion module

Figure 1. Pulse ingestion module architecture

Figure 1. Pulse ingestion module architecture

Figure 1 shows the ingestion module, which is the entry point of events into the Pulse platform and is built on AWS serverless applications as follows:

  • The ingestion API is exposed to customers using Amazon API Gateway. This defines REST, HTTP, and WebSocket APIs with sophisticated functionality such as request validation, rate limiting, and more.
  • The actual business logic of the API is implemented as AWS Lambda functions. Lambda can run custom code in a fully managed way. You only pay for the time that the function takes to run, in 1-millisecond increments. Lambda natively supports multiple languages, but customers can also bring their own runtimes or container images as needed.
  • API requests are authorized with keys, which are stored in Amazon DynamoDB, a key-value NoSQL database that delivers single-digit millisecond latency at any scale. API Gateway invokes a Lambda function that validates the key against those stored in DynamoDB (this is called a Lambda authorizer.)
  • While API Gateway provides a default domain name for each API, Codacy customizes it with Amazon Route 53, a service that registers domain names and configures DNS records. Route 53 offers a service level agreement (SLA) of 100% availability.
  • Events are stored in raw format in Pulse’s data lake, which is built on top of AWS’ object storage service, Amazon Simple Storage Service (S3). With Amazon S3, you can store massive amounts of information at low cost using simple HTTP requests. The data is highly available and durable.
  • Whenever a new event is ingested by the API, a message is published in Pulse’s message bus. (More information later in this post.)

Events module

Figure 2. Pulse events module architecture

Figure 2. Pulse events module architecture

The events module handles the aggregation and storage of events for actual consumption by customers, see Figure 2:

  • Events are consumed from the message bus and processed with a Lambda function, which stores them in Amazon Redshift.
  • Amazon Redshift is AWS’ managed data warehouse, and enables Pulse’s users to get insights and metrics by running analytical (OLAP) queries with the highest performance.
  • These metrics are exposed to customers via another API (the public API), which is also built on API Gateway.
  • The business logic for this API is implemented using Lambda functions, like the Ingestion module.

Message bus

Figure 3. Message bus architecture

Figure 3. Message bus architecture

We mentioned earlier that Pulse’s modules communicate messages with each other via the “message bus.” When something occurs at a specific component, a message (event) is published to the bus. At the same time, developers create subscriptions for each module that should receive these messages. This is known as the publisher/subscriber pattern (pub/sub for short), and is a fundamental piece of event-driven architectures.

With the message bus, you can decouple all modules from each other. In this way, a publisher does not need to worry about how many or who their subscribers are, or what to do if a new one arrives. This is all handled by the message bus.

Pulse’s message bus is built like this, shown in Figure 3:

  • Events are published via Amazon Simple Notification Service (SNS), using a construct called a topic. Topics are the basic unit of message publication and consumption. Components are subscribed to this topic, and you can filter out unwanted messages.
  • Developers configure Amazon SNS subscriptions to have the events sent to a queue, which provides a buffering layer from which workers can process messages. At the same time, queues also ensure that messages are not lost if there is an error. In Pulse’s case, these queues are implemented with Amazon Simple Queue Service (SQS).

Other modules

There are other parts of Pulse architecture that also use AWS serverless. For example, user authentication and sign-up are handled by Amazon Cognito, and Pulse’s frontend application is hosted on Amazon S3. This app is served to customers worldwide with low latency using Amazon CloudFront, a content delivery network.

Summary and next steps

By using AWS serverless, Codacy has been able to reduce the time required to bring Pulse to market by staying focused on developing business logic, rather than managing servers. Furthermore, Codacy is confident they can handle Pulse’s growth, as this serverless architecture will scale automatically according to demand.

Creating a Multi-Region Application with AWS Services – Part 1, Compute and Security

Post Syndicated from Joe Chapman original https://aws.amazon.com/blogs/architecture/creating-a-multi-region-application-with-aws-services-part-1-compute-and-security/

Building a multi-Region application requires lots of preparation and work. Many AWS services have features to help you build and manage a multi-Region architecture, but identifying those capabilities across 200+ services can be overwhelming.

In this 3-part blog series, we’ll explore AWS services with features to assist you in building multi-Region applications. In Part 1, we’ll build a foundation with AWS security, networking, and compute services. In Part 2, we’ll add in data and replication strategies. Finally, in Part 3, we’ll look at the application and management layers.

Considerations before getting started

AWS Regions are built with multiple isolated and physically separate Availability Zones (AZs). This approach allows you to create highly available Well-Architected workloads that span AZs to achieve greater fault tolerance. There are three general reasons that you may need to expand beyond a single Region:

  • Expansion to a global audience as an application grows and its user base becomes more geographically dispersed, there can be a need to reduce latencies for different parts of the world.
  • Reducing Recovery Point Objectives (RPO) and Recovery Time Objectives (RTO) as part of disaster recovery (DR) plan.
  • Local laws and regulations may have strict data residency and privacy requirements that must be followed.

Ensuring security, identity, and compliance

Creating a security foundation starts with proper authentication, authorization, and accounting to implement the principle of least privilege. AWS Identity and Access Management (IAM) operates in a global context by default. With IAM, you specify who can access which AWS resources and under what conditions. For workloads that use directory services, the AWS Directory Service for Microsoft Active Directory Enterprise Edition can be set up to automatically replicate directory data across Regions. This allows applications to reduce lookup latencies by using the closest directory and creates durability by spanning multiple Regions.

Applications that need to securely store, rotate, and audit secrets, such as database passwords, should use AWS Secrets Manager. It encrypts secrets with AWS Key Management Service (AWS KMS) keys and can replicate secrets to secondary Regions to ensure applications are able to obtain a secret in the closest Region.

Encrypt everything all the time

AWS KMS can be used to encrypt data at rest, and is used extensively for encryption across AWS services. By default, keys are confined to a single Region. AWS KMS multi-Region keys can be created to replicate keys to a second Region, which eliminates the need to decrypt and re-encrypt data with a different key in each Region.

AWS CloudTrail logs user activity and API usage. Logs are created in each Region, but they can be centralized from multiple Regions and multiple accounts into a single Amazon Simple Storage Service (Amazon S3) bucket. As a best practice, these logs should be aggregated to an account that is only accessible to required security personnel to prevent misuse.

As your application expands to new Regions, AWS Security Hub can aggregate and link findings to a single Region to create a centralized view across accounts and Regions. These findings are continuously synced between Regions to keep you updated on global findings.

We put these features together in Figure 1.

Multi-Region security, identity, and compliance services

Figure 1. Multi-Region security, identity, and compliance services

Building a global network

For resources launched into virtual networks in different Regions, Amazon Virtual Private Cloud (Amazon VPC) allows private routing between Regions and accounts with VPC peering. These resources can communicate using private IP addresses and do not require an internet gateway, VPN, or separate network appliances. This works well for smaller networks that only require a few peering connections. However, as the number of peered connections increases, the mesh of peered connections can become difficult to manage and troubleshoot.

AWS Transit Gateway can help reduce these difficulties by creating a central transitive hub to act as a cloud router. A Transit Gateway’s routing capabilities can expand to additional Regions with Transit Gateway inter-Region peering to create a globally distributed private network.

Building a reliable, cost-effective way to route users to distributed Internet applications requires highly available and scalable Domain Name System (DNS) records. Amazon Route 53 does exactly that.

Route 53 routing policies can route traffic to a record with the lowest latency, or automatically fail over a record. If a larger failure occurs, the Route 53 Application Recovery Controller can simplify the monitoring and failover process for application failures across Regions, AZs, and on-premises.

Amazon CloudFront’s content delivery network is truly global, built across 300+ points of presence (PoP) spread throughout the world. Applications that have multiple possible origins, such as across Regions, can use CloudFront origin failover to automatically fail over the origin. CloudFront’s capabilities expand beyond serving content, with the ability to run compute at the edge. CloudFront functions make it easy to run lightweight JavaScript functions, and AWS Lambda@Edge makes it easy to run Node.js and Python functions across these 300+ PoPs.

AWS Global Accelerator uses the AWS global network infrastructure to provide two static anycast IPs for your application. It automatically routes traffic to the closest Region deployment, and if a failure is detected it will automatically redirect traffic to a healthy endpoint within seconds.

Figure 2 brings these features together to create a global network across two Regions.

AWS VPC connectivity and content delivery

Figure 2. AWS VPC connectivity and content delivery

Building the compute layer

An Amazon Elastic Compute Cloud (Amazon EC2) instance is based on an Amazon Machine Image (AMI). An AMI specifies instance configurations such as the instance’s storage, launch permissions, and device mappings. When a new standard image needs to be created, EC2 Image Builder can be used to streamline copying AMIs to selected Regions.

Although EC2 instances and their associated Amazon Elastic Block Store (Amazon EBS) volumes live in a single AZ, Amazon Data Lifecycle Manager can automate the process of taking and copying EBS snapshots across Regions. This can enhance DR strategies by providing a relatively easy cold backup-and-restore option for EBS volumes.

As an architecture expands into multiple Regions, it can become difficult to track where instances are provisioned. Amazon EC2 Global View helps solve this by providing a centralized dashboard to see Amazon EC2 resources such as instances, VPCs, subnets, security groups, and volumes in all active Regions.

Microservice-based applications that use containers benefit from quicker start-up times. Amazon Elastic Container Registry (Amazon ECR) can help ensure this happens consistently across Regions with private image replication at the registry level. An ECR private registry can be configured for either cross-Region or cross-account replication to ensure your images are ready in secondary Regions when needed.

We bring these compute layer features together in Figure 3.

AMI and EBS snapshot copy across Regions

Figure 3. AMI and EBS snapshot copy across Regions

Summary

It’s important to create a solid foundation when architecting a multi-Region application. These foundations pave the way for you to move fast in a secure, reliable, and elastic way as you build out your application. In this post, we covered options across AWS security, networking, and compute services that have built-in functionality to take away some of the undifferentiated heavy lifting. We’ll cover data, application, and management services in future posts.

Ready to get started? We’ve chosen some AWS Solutions and AWS Blogs to help you!

Looking for more architecture content? AWS Architecture Center provides reference architecture diagrams, vetted architecture solutions, Well-Architected best practices, patterns, icons, and more!

Optimize your IoT Services for Scale with IoT Device Simulator

Post Syndicated from Ajay Swamy original https://aws.amazon.com/blogs/architecture/optimize-your-iot-services-for-scale-with-iot-device-simulator/

The IoT (Internet of Things) has accelerated digital transformation for many industries. Companies can now offer smarter home devices, remote patient monitoring, connected and autonomous vehicles, smart consumer devices, and many more products. The enormous volume of data emitted from IoT devices can be used to improve performance, efficiency, and develop new service and business models. This can help you build better relationships with your end consumers. But you’ll need an efficient and affordable way to test your IoT backend services without incurring significant capex by deploying test devices to generate this data.

IoT Device Simulator (IDS) is an AWS Solution that manufacturing companies can use to simulate data, test device integration, and improve the performance of their IoT backend services. The solution enables you to create hundreds of IoT devices with unique attributes and properties. You can simulate data without configuring and managing physical devices.

An intuitive UI to create and manage devices and simulations

IoT Device Simulator comes with an intuitive user interface that enables you to create and manage device types for data simulation. The solution also provides you with a pre-built autonomous car device type to simulate a fleet of connected vehicles. Once you create devices, you can create simulations and generate data (see Figure 1.)

Figure 1. The landing page UI enables you to create devices and simulation

Figure 1. The landing page UI enables you to create devices and simulation

Create devices and simulate data

With IDS, you can create multiple device types with varying properties and data attributes (see Figure 2.) Each device type has a topic where simulation data is sent. The supported data types are object, array, sinusoidal, location, Boolean, integer, float, and more. Refer to this full list of data types. Additionally, you can import device types via a specific JSON format or use the existing automotive demo to pre-populate connected vehicles.

Figure 2. Create multiple device types and their data attributes

Figure 2. Create multiple device types and their data attributes

Create and manage simulations

With IDS, you can create simulations with one device or multiple device types (see Figure 3.) In addition, you can specify the number of devices to simulate for each device type and how often data is generated and sent.

Figure 3. Create simulations for multiple devices

Figure 3. Create simulations for multiple devices

You can then run multiple simulations (see Figure 4) and use the data generated to test your IoT backend services and infrastructure. In addition, you have the flexibility to stop and restart the simulation as needed.

Figure 4. Run and stop multiple simulations

Figure 4. Run and stop multiple simulations

You can view the simulation in real time and observe the data messages flowing through. This way you can ensure that the simulation is working as expected (see Figure 5.) You can stop the simulation or add a new simulation to the mix at any time.

Figure 5. Observe your simulation in real time

Figure 5. Observe your simulation in real time

IoT Device Simulator architecture

Figure 6. IoT Device Simulator architecture

Figure 6. IoT Device Simulator architecture

The AWS CloudFormation template for this solution deploys the following architecture, shown in Figure 6:

  1. Amazon CloudFront serves the web interface content from an Amazon Simple Storage Service (Amazon S3) bucket.
  2. The Amazon S3 bucket hosts the web interface.
  3. Amazon Cognito user pool authenticates the API requests.
  4. An Amazon API Gateway API provides the solution’s API layer.
  5. AWS Lambda serves as the solution’s microservices and routes API requests.
  6. Amazon DynamoDB stores simulation and device type information.
  7. AWS Step Functions include an AWS Lambda simulator function to simulate devices and send messages.
  8. An Amazon S3 bucket stores pre-defined routes that are used for the automotive demo (which is a pre-built example in the solution).
  9. AWS IoT Core serves as the endpoint to which messages are sent.
  10. Amazon Location Service provides the map display showing the location of automotive devices for the automotive demo.

The IoT Device Simulator console is hosted on an Amazon S3 bucket, which is accessed via Amazon CloudFront. It uses Amazon Cognito to manage access. API calls, such as retrieving or manipulating information from the databases or running simulations, are routed through API Gateway. API Gateway calls the microservices, which will call the relevant service.

For example, when creating a new device type, the request is sent to API Gateway, which then routes the request to the microservices Lambda function. Based on the request, the microservices Lambda function recognizes that it is a request to create a device type and saves the device type to DynamoDB.

Running a simulation

When running a simulation, the microservices Lambda starts a Step Functions workflow. First, the request contains information about the simulation to be run, including the unique device type ID. Then, using the unique device type ID, Step Functions retrieves all the necessary information about each device type to run the simulation. Once all the information has been retrieved, the simulator Lambda function is run. The simulator Lambda function uses the device type information, including the message payload template. The Lambda function uses this template to build the message sent to the IoT topic specified for the device type.

When running a custom device type, the simulator generates random information based on the values provided for each attribute. For example, when the automotive simulation is run, the simulation runs a series of calculations to simulate an automobile moving along a series of pre-defined routes. Pre-defined routes are created and stored in an S3 bucket, when the solution is launched. The simulation retrieves the routes at random each time the Lambda function runs. Automotive demo simulations also show a map generated from Amazon Location Service and display the device locations as they move.

The simulator exits once the Lambda function has completed or has reached the fifteen-minute execution limit. It then passes all the necessary information back to the Step Function. Step Functions then enters a choice state and restarts the Lambda function if it has not yet surpassed the duration specified for the simulation. It then passes all the pertinent information back to the Lambda function so that it can resume where it left off. The simulator Lambda function also checks DynamoDB every thirty seconds to see if the user has manually stopped the simulation. If it has, it will end the simulation early. Once the simulation is complete, the Step Function updates the DynamoDB table.

The solution enables you to launch hundreds of devices to test backend infrastructure in an IoT workflow. The solution contains an Import/Export feature to share device types. Exporting a device type generates a JSON file that represents the device type. The JSON file can then be imported to create the same device type automatically. The solution allows the viewing of up to 100 messages while the solution is running. You can also filter the messages by topic and device and see what data each device emits.

Conclusion

IoT Device Simulator is designed to help customers test device integration and IoT backend services more efficiently without incurring capex for physical devices. This solution provides an intuitive web-based graphic user interface (GUI) that enables customers to create and simulate hundreds of connected devices. It is not necessary to configure and manage physical devices or develop time-consuming scripts. Although we’ve illustrated an automotive application in this post, this simulator can be used for many different industries, such as consumer electronics, healthcare equipment, utilities, manufacturing, and more.

Get started with IoT Device Simulator today.

AWS Free Tier Data Transfer Expansion – 100 GB From Regions and 1 TB From Amazon CloudFront Per Month

Post Syndicated from Jeff Barr original https://aws.amazon.com/blogs/aws/aws-free-tier-data-transfer-expansion-100-gb-from-regions-and-1-tb-from-amazon-cloudfront-per-month/

The AWS Free Tier has been around since 2010 and allows you to use generous amounts of over 100 different AWS services. Some services offer free trials, others are free for the first 12 months after you sign up, and still others are always free, up to a per-service maximum. Our intent is to make it easy and cost-effective for you to gain experience with a wide variety of powerful services without having to pay any usage charges.

Free Tier Data Transfer Expansion
Today, as part of our long tradition of AWS price reductions, I am happy to share that we are expanding the Free Tier with additional data transfer out, as follows:

Data Transfer from AWS Regions to the Internet is now free for up to 100 GB of data per month (up from 1 GB per region). This includes Amazon EC2, Amazon S3, Elastic Load Balancing, and so forth. The expansion does not apply to the AWS GovCloud or AWS China Regions.

Data Transfer from Amazon CloudFront is now free for up to 1 TB of data per month (up from 50 GB), and is no longer limited to the first 12 months after signup. We are also raising the number of free HTTP and HTTPS requests from 2,000,000 to 10,000,000, and removing the 12 month limit on the 2,000,000 free CloudFront Function invocations per month. The expansion does not apply to data transfer from CloudFront PoPs in China.

This change is effective December 1, 2021 and takes effect with no effort on your part. As a result of this change, millions of AWS customers worldwide will no longer see a charge for these two categories of data transfer on their monthly AWS bill. Customers who go beyond one or both of these allocations will also see a reduction in their overall data transfer charges.

Your applications can run in any of 21 AWS Regions with a total of 69 Availability Zones (with more of both on the way), and can make use of the full range of CloudFront features (including SSL support and media streaming), and over 300 CloudFront PoPs, all connected across a dedicated network backbone. The network was designed with performance as a key driver, and is expanded continuously in order to meet the ever-growing needs of our customers. It is global, fully redundant, and built from parallel 100 GbE metro fibers linked via trans-oceanic cables across the Atlantic, Pacific, and Indian Oceans, as well as the Mediterranean, Red Sea, and South China Seas.

Jeff;

Optimizing your AWS Infrastructure for Sustainability, Part III: Networking

Post Syndicated from Katja Philipp original https://aws.amazon.com/blogs/architecture/optimizing-your-aws-infrastructure-for-sustainability-part-iii-networking/

In Part I: Compute and Part II: Storage of this series, we introduced strategies to optimize the compute and storage layer of your AWS architecture for sustainability.

This blog post focuses on the network layer of your AWS infrastructure and proposes concepts to optimize your network utilization.

Optimizing the networking layer of your AWS infrastructure

When you make your applications available to more customers, the packets that travel across the network will increase. Similarly, the larger the size of data, as well as the more distance a packet has to travel, the more resources are required to transmit it. With growing number of application users, optimizing network traffic can ensure that network resource consumption is not growing linearly.

The recommendations in the following sections will help you use your resources more efficiently for the network layer of your workload.

Reducing the network traveled per request

Reducing the data sent over the network and optimizing the path a packet takes will result in a more efficient data transfer. The following table provides metrics related to some AWS services that can help you find potential network optimization opportunities.

Service Metric/Check Source
Amazon CloudFront Cache hit rate Viewing CloudFront and Lambda@Edge metrics
AWS Trusted Advisor check reference
Amazon Simple Storage Service (Amazon S3) Data transferred in/out of a bucket Metrics and dimensions
AWS Trusted Advisor check reference
Amazon Elastic Compute Cloud (Amazon EC2) NetworkPacketsIn/NetworkPacketsOut List the available CloudWatch metrics for your instances
AWS Trusted Advisor CloudFront Content Delivery Optimization AWS Trusted Advisor check reference

We recommend the following concepts to optimize your network utilization.

Read local, write global

The following strategies allow users to read the data from the source closest to them; thus, fewer requests travel longer distances.

  • If you are operating within a single AWS Region, you should choose a Region that is near the majority of your users. The further your users are away from the Region, the further data needs to travel through the global network.
  • If your users are spread over multiple Regions, set up multiple copies of the data to reside in each Region. Amazon Relational Database Service (Amazon RDS) and Amazon Aurora let you set up cross-Region read replicas. Amazon DynamoDB global tables allow for fast performance and alleviate network load.

Use a content delivery network

Content delivery networks (CDNs) bring your data closer to the end user. When requested, they cache static content from the original server and deliver it to the user. This shortens the distance each packet has to travel.

  • CloudFront optimizes network utilization and delivers traffic over CloudFront’s globally distributed edge network. Figure 1 shows a global user base that accesses an S3 bucket directly versus serving cached data from edge locations.
  • Trusted Advisor includes a check that recommends whether you should use a CDN for your S3 buckets. It analyzes the data transferred out of your S3 bucket and flags the buckets that could benefit from a CloudFront distribution.
Comparison of accessing an S3 bucket directly versus via a CloudFront distribution/edge locations

Figure 1. Comparison of accessing an S3 bucket directly versus via a CloudFront distribution/edge locations

Optimize CloudFront cache hit ratio

CloudFront caches different versions of an object depending upon the request headers (for example, language, date, or user-agent). You can further optimize your CDN distribution’s cache hit ratio (the number of times an object is served from the CDN versus from the origin) with a Trusted Advisor check. It automatically checks for headers that do not affect the object and then recommends a configuration to ignore those headers and not forward the request to the origin.

Use edge-oriented services

Edge computing brings data storage and computation closer to users. By implementing this approach, you can perform data preprocessing or run machine learning algorithms on the edge.

  • Edge-oriented services applied on gateways or directly onto user devices reduce network traffic because data does not need to be sent back to the cloud server.
  • One-time, low-latency tasks are a good fit for edge use cases, like when an autonomous vehicle needs to detect objects nearby. You should generally archive data that needs to be accessed by multiple parties in the cloud, but consider factors such as device hardware and privacy regulations first.
  • CloudFront Functions can run compute on edge locations and Lambda@Edge can generate Regional edge caches. AWS IoT Greengrass provides edge computing for Internet of Things (IoT) devices.

Reducing the size of data transmitted

Serve compressed files

In addition to caching static assets, you can further optimize network utilization by serving compressed files to your users. You can configure CloudFront to automatically compress objects, which results in faster downloads, leading to faster rendering of webpages.

Enhance Amazon EC2 network performance

Network packets consist of data that you are sending (frame) and the processing overhead information. If you use larger packets, you can pass more data in a single packet and decrease processing overhead.

Jumbo frames use the largest permissible packet that can be passed over the connection. Keep in mind that outside a single virtual private cloud (VPC), over virtual private network (VPN) or internet gateway, traffic is limited to a lower frame regardless of using jumbo frames.

Optimize APIs

If your payloads are large, consider reducing their size to reduce network traffic by compressing your messages for your REST API payloads. Use the right endpoint for your use case. Edge-optimized API endpoints are best suited for geographically distributed clients. Regional API endpoints are best suited for when you have a few clients with higher demands, because they can help reduce connection overhead. Caching your API responses will reduce network traffic and enhance responsiveness.

Conclusion

As your organization’s cloud adoption grows, knowing how efficient your resources are is crucial when optimizing your AWS infrastructure for environmental sustainability. Using the fewest number of resources possible and using them to their fullest will have the lowest impact on the environment.

Throughout this three-part blog post series, we introduced you to the following architectural concepts and metrics for the compute, storage, and network layers of your AWS infrastructure.

  • Reducing idle resources and maximizing utilization
  • Shaping demand to existing supply
  • Managing your data’s lifecycle
  • Using different storage tiers
  • Optimizing the path data travels through a network
  • Reducing the size of data transmitted

This is not an exhaustive list. We hope it is a starting point for you to consider the environmental impact of your resources and how you can build your AWS infrastructure to be more efficient and sustainable. Figure 2 shows an overview of how you can monitor related metrics with CloudWatch and Trusted Advisor.

Overview of services that integrate with CloudWatch and Trusted Advisor for monitoring metrics

Figure 2. Overview of services that integrate with CloudWatch and Trusted Advisor for monitoring metrics

Ready to get started? Check out the AWS Sustainability page to find out more about our commitment to sustainability. It provides information about renewable energy usage, case studies on sustainability through the cloud, and more.

Other blog posts in this series

Related information

What to Consider when Selecting a Region for your Workloads

Post Syndicated from Saud Albazei original https://aws.amazon.com/blogs/architecture/what-to-consider-when-selecting-a-region-for-your-workloads/

The AWS Cloud is an ever-growing network of Regions and points of presence (PoP), with a global network infrastructure that connects them together. With such a vast selection of Regions, costs, and services available, it can be challenging for startups to select the optimal Region for a workload. This decision must be made carefully, as it has a major impact on compliance, cost, performance, and services available for your workloads.

Evaluating Regions for deployment

There are four main factors that play into evaluating each AWS Region for a workload deployment:

  1. Compliance. If your workload contains data that is bound by local regulations, then selecting the Region that complies with the regulation overrides other evaluation factors. This applies to workloads that are bound by data residency laws where choosing an AWS Region located in that country is mandatory.
  2. Latency. A major factor to consider for user experience is latency. Reduced network latency can make substantial impact on enhancing the user experience. Choosing an AWS Region with close proximity to your user base location can achieve lower network latency. It can also increase communication quality, given that network packets have fewer exchange points to travel through.
  3. Cost. AWS services are priced differently from one Region to another. Some Regions have lower cost than others, which can result in a cost reduction for the same deployment.
  4. Services and features. Newer services and features are deployed to Regions gradually. Although all AWS Regions have the same service level agreement (SLA), some larger Regions are usually first to offer newer services, features, and software releases. Smaller Regions may not get these services or features in time for you to use them to support your workload.

Evaluating all these factors can make coming to a decision complicated. This is where your priorities as a business should influence the decision.

Assess potential Regions for the right option

Evaluate by shortlisting potential Regions.

  • Check if these Regions are compliant and have the services and features you need to run your workload using the AWS Regional Services website.
  • Check feature availability of each service and versions available, if your workload has specific requirements.
  • Calculate the cost of the workload on each Region using the AWS Pricing Calculator.
  • Test the network latency between your user base location and each AWS Region.

At this point, you should have a list of AWS Regions with varying cost and network latency that looks something Table 1:

Region Compliance Latency Cost Services / Features
Region A

15 ms $$
Region B

20 ms

$$$

X

Region C

80 ms $

Table 1. Region evaluation matrix

Many workloads such as high performance computing (HPC), analytics, and machine learning (ML), are not directly linked to a customer-facing application. These would not be sensitive to network latency, so you may want to select the Region with the lowest cost.

Alternatively, you may have a backend service for a game or mobile application in which network latency has a direct impact on user experience. Measure the difference in network latency between each Region, and determine if it is worth the increased cost. You can leverage the Amazon CloudFront edge network, which helps reduce latency and increases communication quality. This is because it uses a fully managed AWS network infrastructure, which connects your application to the edge location nearest to your users.

Multi-Region deployment

You can also split the workload across multiple Regions. The same workload may have some components that are sensitive to network latency and some that are not. You may determine you can benefit from both lower network latency and reduced cost at the same time. Here’s an example:

Figure 1. Multi-Region deployment optimized for feature availability

Figure 1. Multi-Region deployment optimized for feature availability

Figure 1 shows a serverless application deployed at the Bahrain Region (me-south-1) which has a close proximity to the customer base in Riyadh, Saudi Arabia. Application users enjoy a lower latency network connecting to the AWS Cloud. Analytics workloads are deployed in the Ireland Region (eu-west-1), which has a lower cost for Amazon Redshift and other features.

Note that data transfer between Regions is not free and, in this example, costs $0.115 per GB. However, even with this additional cost factored in, running the analytical workload in Ireland (eu-west-1) is still more cost-effective. You can also benefit from additional capabilities and features that may have not yet been released in the Bahrain (me-south-1) Region.

This multi-Region setup could also be beneficial for applications with a global user base. The application can be deployed in multiple secondary AWS Regions closer to the user base locations. It uses a primary AWS Region with a lower cost for consolidated services and latency-insensitive workloads.

Figure 2. Multi-Region deployment optimized for network latency

Figure 2. Multi-Region deployment optimized for network latency

Figure 2 allows for an application to span multiple Regions to serve read requests with the lowest network latency possible. Each client will be routed to the nearest AWS Region. For read requests, an Amazon Route 53 latency routing policy will be used. For write requests, an endpoint routed to the primary Region will be used. This primary endpoint can also have periodic health checks to failover to a secondary Region for disaster recovery (DR).

Other factors may also apply for certain applications such as ones that require Amazon EC2 Spot Instances. Regions differ in size, with some having three, and others up to six Availability Zones (AZ). This results in varying Spot Instance capacity available for Amazon EC2. Choosing larger Regions offers larger Spot capacity. A multi-Region deployment offers the most Spot capacity.

Conclusion

Selecting the optimal AWS Region is an important first step when deploying new workloads. There are many other scenarios in which splitting the workload across multiple AWS Regions can result in a better user experience and cost reduction. The four factors mentioned in this blog post can be evaluated together to find the most appropriate Region to deploy your workloads.

If the workload is bound by any regulations, shortlist the Regions that are compliant. Measure the network latency between each Region and the location of the user base. Estimate the workload cost for each Region. Check that the shortlisted Regions have the services and features your workload requires. And finally, determine if your workload can benefit from running in multiple Regions.

Dive deeper into the AWS Global Infrastructure Website for more information.

Securely Ingest Industrial Data to AWS via Machine to Cloud Solution

Post Syndicated from Ajay Swamy original https://aws.amazon.com/blogs/architecture/securely-ingest-industrial-data-to-aws-via-machine-to-cloud-solution/

As a manufacturing enterprise, maximizing your operational efficiency and optimizing output are critical factors in this competitive global market. However, many manufacturers are unable to frequently collect data, link data together, and generate insights to help them optimize performance. Furthermore, decades of competing standards for connectivity have resulted in the lack of universal protocols to connect underlying equipment and assets.

Machine to Cloud Connectivity Framework (M2C2) is an Amazon Web Services (AWS) Solution that provides the secure ingestion of equipment telemetry data to the AWS Cloud. This allows you to use AWS services to conduct analysis on your equipment data, instead of managing underlying infrastructure operations. The solution allows for robust data ingestion from industrial equipment that use OPC Data Access (OPC DA) and OPC Unified Access (OPC UA) protocols.

Secure, automated configuration and ingestion of industrial data

M2C2 allows manufacturers to ingest their shop floor data into various data destinations in AWS. These include AWS IoT SiteWise, AWS IoT Core, Amazon Kinesis Data Streams, and Amazon Simple Storage Service (S3). The solution is integrated with AWS IoT SiteWise so you can store, organize, and monitor data from your factory equipment at scale. Additionally, the solution provides customers an intuitive user interface to create, configure, monitor, and manage connections.

Automated setup and configuration

Figure 1. Automatically create and configure connections

Figure 1. Automatically create and configure connections

With M2C2, you can connect to your operational technology assets (see Figure 1). The solution automatically creates AWS IoT certificates, keys, and configuration files for AWS IoT Greengrass. This allows you to set up Greengrass to run on your industrial gateway. It also automates the deployment of any Greengrass group configuration changes required by the solution. You can define a connection with the interface, and specify attributes about equipment, tags, protocols, and read frequency for equipment data.

Figure 2. Send data to different destinations in the AWS Cloud

Figure 2. Send data to different destinations in the AWS Cloud

Once the connection details have been specified, you can send data to different destinations in AWS Cloud (see Figure 2). M2C2 provides capability to ingest data from industrial equipment using OPC-DA and OPC-UA protocols. The solution collects the data, and then publishes the data to AWS IoT SiteWise, AWS IoT Core, or Kinesis Data Streams.

Publishing data to AWS IoT SiteWise allows for end-to-end modeling and monitoring of your factory floor assets. When using the default solution configuration, publishing data to Kinesis Data Streams allows for ingesting and storing data in an Amazon S3 bucket. This gives you the capability for custom advanced analytics use cases and reporting.

You can choose to create multiple connections, and specify sites, areas, processes, and machines, by using the setup UI.

Management of connections and messages

Figure 3. Manage your connections

Figure 3. Manage your connections

M2C2 provides a straightforward connections screen (see Figure 3), where production managers can monitor and review the current state of connections. You can start and stop connections, view messages and errors, and gain connectivity across different areas of your factory floor. The Manage connections UI allows you to holistically manage data connectivity from a centralized place. You can then make changes and corrections as needed.

Architecture and workflow

Figure 4. Machine to Cloud Connectivity (M2C2) Framework architecture

Figure 4. Machine to Cloud Connectivity (M2C2) Framework architecture

The AWS CloudFormation template deploys the following infrastructure, shown in Figure 4:

  1. An Amazon CloudFront user interface that deploys into an Amazon S3 bucket configured for web hosting.
  2. An Amazon API Gateway API provides the user interface for client requests.
  3. An Amazon Cognito user pool authenticates the API requests.
  4. AWS Lambda functions power the user interface, in addition to the configuration and deployment mechanism for AWS IoT Greengrass and AWS IoT SiteWise gateway resources. Amazon DynamoDB tables store the connection metadata.
  5. An AWS IoT SiteWise gateway configuration can be used for any OPC UA data sources.
  6. An Amazon Kinesis Data Streams data stream, Amazon Kinesis Data Firehose, and Amazon S3 bucket to store telemetry data.
  7. AWS IoT Greengrass is installed and used on an on-premises industrial gateway to run protocol connector Lambda functions. These connect and read telemetry data from your OPC UA and OPC DA servers.
  8. Lambda functions are deployed onto AWS IoT Greengrass Core software on the industrial gateway. They connect to the servers and send the data to one or more configured destinations.
  9. Lambda functions that collect the telemetry data write to AWS IoT Greengrass stream manager streams. The publisher Lambda functions read from the streams.
  10. Publisher Lambda functions forward the data to the appropriate endpoint.

Data collection

The Machine to Cloud Connectivity solution uses Lambda functions running on Greengrass to connect to your on-premises OPC-DA and OPC-UA industrial devices. When you deploy a connection for an OPC-DA device, the solution configures a connection-specific OPC-DA connector Lambda. When you deploy a connection for an OPC-UA device, the solution uses the AWS IoT SiteWise Greengrass connector to collect the data.

Regardless of protocol, the solution configures a publisher Lambda function, which takes care of sending your streaming data to one or more desired destinations. Stream Manager enables the reading and writing of stream data from multiple sources and to multiple destinations within the Greengrass core. This enables each configured collector to write data to a stream. The publisher reads from that stream and sends the data to your desired AWS resource.

Conclusion

Machine to Cloud Connectivity (M2C2) Framework is a self-deployable solution that provides secure connectivity between your technology (OT) assets and the AWS Cloud. With M2C2, you can send data to AWS IoT Core or AWS IoT SiteWise for analytics and monitoring. You can store your data in an industrial data lake using Kinesis Data Streams and Amazon S3. Get started with Machine to Cloud Connectivity (M2C2) Framework today.

Augmenting VMware Cloud on AWS Workloads with Native AWS services

Post Syndicated from Talha Kalim original https://aws.amazon.com/blogs/architecture/augmenting-vmware-cloud-on-aws-workloads-with-native-aws-services/

VMware Cloud on AWS allows you to quickly migrate VMware workloads to a VMware-managed Software-Defined Data Center (SDDC) running in the AWS Cloud and extend your on-premises data centers without replatforming or refactoring applications.

You can use native AWS services with Virtual Machines (VMs) in the SDDC, to reduce operational overhead and lower your Total Cost of Ownership (TCO) while increasing your workload’s agility and scalability.

This post covers patterns for connectivity between native AWS services and VMware workloads. We also explore common integrations, including using AWS Cloud storage from an SDDC, securing VM workloads using AWS networking services, and using AWS databases and analytics services with workloads running in the SDDC.

Networking between SDDC and native AWS services

Establishing robust network connectivity with VMware Cloud SDDC VMs is critical to successfully integrating AWS services. This section shows you different options to connect the VMware SDDC with your native AWS account.

The simplest way to get started is to use AWS services in the connected Amazon Virtual Private Cloud (VPC) that is selected during the SDDC deployment process. Figure 1 shows this connectivity, which is automatically configured and available once the SDDC is deployed.

Figure 1. SDDC to Customer Account VPC connectivity configured at deployment

Figure 1. SDDC to Customer Account VPC connectivity configured at deployment

The SDDC Elastic Network Interface (ENI) allows you to connect to native AWS services within the connected VPC, but it doesn’t provide transitive routing beyond the connected VPC. For example, it will not connect the SDDC to other VPCs and the internet.

If you’re looking to connect to native AWS services in multiple accounts and VPCs in the same AWS Region, you have two connectivity options. These are explained in the following sections.

Attaching VPCs to VMware Transit Connect

When you need high-throughput connectivity in a multi-VPC environment, use VMware Transit Connect (VTGW), as shown in Figure 2.

Figure 2. Multi-account VPC connectivity through VMware Transit Connect VPC attachments

Figure 2. Multi-account VPC connectivity through VMware Transit Connect VPC attachments

VTGW uses a VMware-managed AWS Transit Gateway to interconnect SDDCs within an SDDC group. It also allows you to attach your VPCs in the same Region to the VTGW by providing connectivity to any SDDC within the SDDC group.

Connecting through an AWS Transit Gateway

To connect to your VPCs through an existing Transit Gateway in your account, use IPsec virtual private network (VPN) connections from the SDDC with Border Gateway Protocol (BGP)-based routing, as shown in Figure 3. Multiple IPsec tunnels to the Transit Gateway use equal-cost multi-path routing, which increases bandwidth by load-balancing traffic.

Figure 3. Multi-account VPC connectivity through an AWS Transit Gateway

Figure 3. Multi-account VPC connectivity through an AWS Transit Gateway

For scalable, high throughput connectivity to an existing Transit Gateway, connect to the SDDC via a Transit VPC that is attached to the VTGW, as shown in Figure 3. You must manually configure the routes between the VPCs and SDDC for this architecture.

In the following sections, we’ll show you how to use some of these connectivity options for common native AWS services integrations with VMware SDDC workloads.

Reducing TCO with Amazon EFS, Amazon FSx, and Amazon S3

As you are sizing your VMware Cloud on AWS SDDC, consider using AWS Cloud storage for VMs that provide files services or require object storage. Migrating these workloads to cloud storage like Amazon Simple Storage Service (Amazon S3), Amazon Elastic File System (Amazon EFS), or Amazon FSx can reduce your overall TCO through optimized SDDC sizing.

Additionally, you can reduce the undifferentiated heavy lifting involved with deploying and managing complex architectures for file services in VM disks. Figure 4 shows how these services integrate with VMs in the SDDC.

Figure 4. Connectivity examples for AWS Cloud storage services

Figure 4. Connectivity examples for AWS Cloud storage services

We recommend connecting to your S3 buckets via the VPC gateway endpoint in the connected VPC. This is a more cost-effective approach because it avoids the data processing costs associated with a VTGW and AWS PrivateLink for Amazon S3.

Similarly, the recommended approach for Amazon EFS and Amazon FSx is to deploy the services in the connected VPC for VM access through the SDDC elastic network interface. You can also connect to existing Amazon EFS and Amazon FSx file shares in other accounts and VPCs using a VTGW, but consider the data transfer costs first.

Integrating AWS networking and content delivery services

Using various AWS networking and content delivery services with VMware Cloud on AWS workloads will provide robust traffic management, security, and fast content delivery. Figure 5 shows how AWS networking and content delivery services integrate with workloads running on VMs.

Figure 5. Connectivity examples for AWS networking and content delivery services

Figure 5. Connectivity examples for AWS networking and content delivery services

Deploy Elastic Load Balancing (ELB) services in a VPC subnet that has network reachability to the SDDC VMs. This includes the connected VPC over the SDDC elastic network interface, a VPC attached via VTGW, and VPCs attached to a Transit Gateway connected to the SDDC.

VTGW connectivity should be used when the design requires using existing networking services in other VPCs. For example, if you have a dedicated internet ingress/egress VPC. An internal ELB can also be used for load-balancing traffic between services running in SDDC VMs and services running within AWS VPCs.

Use Amazon CloudFront, a global content delivery service, to integrate with load balancers, S3 buckets for static content, or directly with publicly accessible SDDC VMs. Additionally, use Amazon Route 53 to provide public and private DNS services for VMware Cloud on AWS. Deploy services such as AWS WAF and AWS Shield to provide comprehensive network security for VMware workloads in the SDDC.

Integrating with AWS database and analytics services

Data is one the most valuable assets in an organization, and databases are often the most demanding and critical workloads running in on-premises VMware environments.

A common customer pattern to reduce TCO for storage-heavy or memory-intensive databases is to use purpose-built Databases on AWS like Amazon Relational Database Service (RDS). Amazon RDS lets you migrate on-premises relational databases to the cloud and integrate it with SDDC VMs. Using AWS databases also reduces operational overhead you may incur with tasks associated with managing availability, scalability, and disaster recovery (DR).

With AWS Analytics services integrations, you can take advantage of the close proximity of data within VMware Cloud on AWS data stores to gain meaningful insights from your business data. For example, you can use Amazon Redshift to create a data warehouse to run analytics at scale on relational data from transactional systems, operational databases, and line-of-business applications running within the SDDC.

Figure 6 shows integration options for AWS databases and analytics services with VMware Cloud on AWS VMs.

Figure 6. Connectivity examples for AWS Database and Analytics services

Figure 6. Connectivity examples for AWS Database and Analytics services

We recommend deploying and consuming database services in the connected VPC. If you have existing databases in other accounts or VPCs that require integration with VMware VMs, connect them using the VTGW.

Analytics services can involve ingesting large amounts of data from various sources, including from VMs within the SDDC, creating a significant amount of data traffic. In such scenarios, we recommend using the SDDC connected VPC to deploy any required interface endpoints for analytics services to achieve a cost-effective architecture.

Summary

VMware Cloud on AWS is one of the fastest ways to migrate on-premises VMware workloads to the cloud. In this blog post, we provided different architecture options for connecting the SDDC to native AWS services. This lets you evaluate your requirements to select the most cost-effective option for your workload.

The example integrations covered in this post are common AWS service integrations, including storage, network, and databases. They are a great starting point, but the possibilities are endless. Integrating services like Amazon Machine Learning (Amazon ML), and Serverless on AWS allows you to deliver innovative services to your users, often without having to re-factor existing application backends running on VMware Cloud on AWS.

Additional Resources

If you need to integrate VMware Cloud on AWS with an AWS service, explore the following resources and reach out to us at AWS.

Building well-architected serverless applications: Optimizing application performance – part 2

Post Syndicated from Julian Wood original https://aws.amazon.com/blogs/compute/building-well-architected-serverless-applications-optimizing-application-performance-part-2/

This series of blog posts uses the AWS Well-Architected Tool with the Serverless Lens to help customers build and operate applications using best practices. In each post, I address the serverless-specific questions identified by the Serverless Lens along with the recommended best practices. See the introduction post for a table of contents and explanation of the example application.

PERF 1. Optimizing your serverless application’s performance

This post continues part 1 of this security question. Previously, I cover measuring and optimizing function startup time. I explain cold and warm starts and how to reuse the Lambda execution environment to improve performance. I show a number of ways to analyze and optimize the initialization startup time. I explain how only importing necessary libraries and dependencies increases application performance.

Good practice: Design your function to take advantage of concurrency via asynchronous and stream-based invocations

AWS Lambda functions can be invoked synchronously and asynchronously.

Favor asynchronous over synchronous request-response processing.

Consider using asynchronous event processing rather than synchronous request-response processing. You can use asynchronous processing to aggregate queues, streams, or events for more efficient processing time per invocation. This reduces wait times and latency from requesting apps and functions.

When you invoke a Lambda function with a synchronous invocation, you wait for the function to process the event and return a response.

Synchronous invocation

Synchronous invocation

As synchronous processing involves a request-response pattern, the client caller also needs to wait for a response from a downstream service. If the downstream service then needs to call another service, you end up chaining calls that can impact service reliability, in addition to response times. For example, this POST /order request must wait for the response to the POST /invoice request before responding to the client caller.

Example synchronous processing

Example synchronous processing

The more services you integrate, the longer the response time, and you can no longer sustain complex workflows using synchronous transactions.

Asynchronous processing allows you to decouple the request-response using events without waiting for a response from the function code. This allows you to perform background processing without requiring the client to wait for a response, improving client performance. You pass the event to an internal Lambda queue for processing and Lambda handles the rest. An external process, separate from the function, manages polling and retries. Using this asynchronous approach can also make it easier to handle unpredictable traffic with significant volumes.

Asynchronous invocation

Asynchronous invocation

For example, the client makes a POST /order request to the order service. The order service accepts the request and returns that it has been received, without waiting for the invoice service. The order service then makes an asynchronous POST /invoice request to the invoice service, which can then process independently of the order service. If the client must receive data from the invoice service, it can handle this separately via a GET /invoice request.

Example asynchronous processing

Example asynchronous processing

You can configure Lambda to send records of asynchronous invocations to another destination service. This helps you to troubleshoot your invocations. You can also send messages or events that can’t be processed correctly into a dedicated Amazon Simple Queue Service (SQS) dead-letter queue for investigation.

You can add triggers to a function to process data automatically. For more information on which processing model Lambda uses for triggers, see “Using AWS Lambda with other services”.

Asynchronous workflows handle a variety of use cases including data Ingestion, ETL operations, and order/request fulfillment. In these use-cases, data is processed as it arrives and is retrieved as it changes. For example asynchronous patterns, see “Serverless Data Processing” and “Serverless Event Submission with Status Updates”.

For more information on Lambda synchronous and asynchronous invocations, see the AWS re:Invent presentation “Optimizing your serverless applications”.

Tune batch size, batch window, and compress payloads for high throughput

When using Lambda to process records using Amazon Kinesis Data Streams or SQS, there are a number of tuning parameters to consider for performance.

You can configure a batch window to buffer messages or records for up to 5 minutes. You can set a limit of the maximum number of records Lambda can process by setting a batch size. Your Lambda function is invoked whichever comes first.

For high volume SQS standard queue throughput, Lambda can process up to 1000 concurrent batches of records per second. For more information, see “Using AWS Lambda with Amazon SQS”.

For high volume Kinesis Data Streams throughput, there are a number of options. Configure the ParallelizationFactor setting to process one shard of a Kinesis Data Stream with more than one Lambda invocation simultaneously. Lambda can process up to 10 batches in each shard. For more information, see “New AWS Lambda scaling controls for Kinesis and DynamoDB event sources.” You can also add more shards to your data stream to increase the speed at which your function can process records. This increases the function concurrency at the expense of ordering per shard. For more details on using Kinesis and Lambda, see “Monitoring and troubleshooting serverless data analytics applications”.

Kinesis enhanced fan-out can maximize throughput by dedicating a 2 MB/second input/output channel per second per consumer instead of 2 MB per shard. For more information, see “Increasing stream processing performance with Enhanced Fan-Out and Lambda”.

Kinesis stream producers can also compress records. This is at the expense of additional CPU cycles for decompressing the records in your Lambda function code.

Required practice: Measure, evaluate, and select optimal capacity units

Capacity units are a unit of consumption for a service. They can include function memory size, number of stream shards, number of database reads/writes, request units, or type of API endpoint. Measure, evaluate and select capacity units to enable optimal configuration of performance, throughput, and cost.

Identify and implement optimal capacity units.

For Lambda functions, memory is the capacity unit for controlling the performance of a function. You can configure the amount of memory allocated to a Lambda function, between 128 MB and 10,240 MB. The amount of memory also determines the amount of virtual CPU available to a function. Adding more memory proportionally increases the amount of CPU, increasing the overall computational power available. If a function is CPU-, network- or memory-bound, then changing the memory setting can dramatically improve its performance.

Choosing the memory allocated to Lambda functions is an optimization process that balances performance (duration) and cost. You can manually run tests on functions by selecting different memory allocations and measuring the time taken to complete. Alternatively, use the AWS Lambda Power Tuning tool to automate the process.

The tool allows you to systematically test different memory size configurations and depending on your performance strategy – cost, performance, balanced – it identifies what is the most optimum memory size to use. For more information, see “Operating Lambda: Performance optimization – Part 2”.

AWS Lambda Power Tuning report

AWS Lambda Power Tuning report

Amazon DynamoDB manages table processing throughput using read and write capacity units. There are two different capacity modes, on-demand and provisioned.

On-demand capacity mode supports up to 40K read/write request units per second. This is recommended for unpredictable application traffic and new tables with unknown workloads. For higher and predictable throughputs, provisioned capacity mode along with DynamoDB auto scaling is recommended. For more information, see “Read/Write Capacity Mode”.

For high throughput Amazon Kinesis Data Streams with multiple consumers, consider using enhanced fan-out for dedicated 2 MB/second throughput per consumer. When possible, use Kinesis Producer Library and Kinesis Client Library for effective record aggregation and de-aggregation.

Amazon API Gateway supports multiple endpoint types. Edge-optimized APIs provide a fully managed Amazon CloudFront distribution. These are better for geographically distributed clients. API requests are routed to the nearest CloudFront Point of Presence (POP), which typically improves connection time.

Edge-optimized API Gateway deployment

Edge-optimized API Gateway deployment

Regional API endpoints are intended when clients are in the same Region. This helps you to reduce request latency and allows you to add your own content delivery network if necessary.

Regional endpoint API Gateway deployment

Regional endpoint API Gateway deployment

Private API endpoints are API endpoints that can only be accessed from your Amazon Virtual Private Cloud (VPC) using an interface VPC endpoint. For more information, see “Creating a private API in Amazon API Gateway”.

For more information on endpoint types, see “Choose an endpoint type to set up for an API Gateway API”. For more general information on API Gateway, see the AWS re:Invent presentation “I didn’t know Amazon API Gateway could do that”.

AWS Step Functions has two workflow types, standard and express. Standard Workflows have exactly once workflow execution and can run for up to one year. Express Workflows have at-least-once workflow execution and can run for up to five minutes. Consider the per-second rates you require for both execution start rate and the state transition rate. For more information, see “Standard vs. Express Workflows”.

Performance load testing is recommended at both sustained and burst rates to evaluate the effect of tuning capacity units. Use Amazon CloudWatch service dashboards to analyze key performance metrics including load testing results. I cover performance testing in more detail in “Regulating inbound request rates – part 1”.

For general serverless optimization information, see the AWS re:Invent presentation “Serverless at scale: Design patterns and optimizations”.

Conclusion

Evaluate and optimize your serverless application’s performance based on access patterns, scaling mechanisms, and native integrations. You can improve your overall experience and make more efficient use of the platform in terms of both value and resources.

This post continues from part 1 and looks at designing your function to take advantage of concurrency via asynchronous and stream-based invocations. I cover measuring, evaluating, and selecting optimal capacity units.

This well-architected question will continue in part 3 where I look at integrating with managed services directly over functions when possible. I cover optimizing access patterns and applying caching where applicable.

For more serverless learning resources, visit Serverless Land.

Architecting a Highly Available Serverless, Microservices-Based Ecommerce Site

Post Syndicated from Senthil Kumar original https://aws.amazon.com/blogs/architecture/architecting-a-highly-available-serverless-microservices-based-ecommerce-site/

The number of ecommerce vendors is growing globally—they often handle large traffic at different times of the day and different days of the year. This, in addition to building, managing, and maintaining IT infrastructure on-premises data centers can present challenges to ecommerce businesses’ scalability and growth.

This blog provides you a Serverless on AWS solution that offloads the undifferentiated heavy lifting of managing resources and ensures your businesses’ architecture can handle peak traffic.

Common architecture set up versus serverless solution

The following sections describe a common monolithic architecture and our suggested alternative approach: setting up microservices-based order submission and product search modules. These modules are independently deployable and scalable.

Typical monolithic architecture

Figure 1 shows how a typical on-premises ecommerce infrastructure with different tiers is set up:

  • Web servers serve static assets and proxy requests to application servers
  • Application servers process ecommerce business logic and authentication logic
  • Databases store user and other dynamic data
  • Firewall and load balancers provide network components for load balancing and network security
Monolithic on-premises ecommerce infrastructure with different tiers

Figure 1. Monolithic on-premises ecommerce infrastructure with different tiers

Monolithic architecture tightly couples different layers of the application. This prevents them from being independently deployed and scaled.

Microservices-based modules

Order submission workflow module

This three-layer architecture can be set up in the AWS Cloud using serverless components:

  • Static content layer (Amazon CloudFront and Amazon Simple Storage Service (Amazon S3)). This layer stores static assets on Amazon S3. By using CloudFront in front of the S3 storage cache, you can deliver assets to customers globally with low latency and high transfer speeds.
  • Authentication layer (Amazon Cognito or customer proprietary layer). Ecommerce sites deliver authenticated and unauthenticated content to the user. With Amazon Cognito, you can manage users’ sign-up, sign-in, and access controls, so this authentication layer ensures that only authenticated users have access to secure data.
  • Dynamic content layer (AWS Lambda and Amazon DynamoDB). All business logic required for the ecommerce site is handled by the dynamic content layer. Using Lambda and DynamoDB ensures that these components are scalable and can handle peak traffic.

As shown in Figure 2, the order submission workflow is split into two sections: synchronous and asynchronous.

By splitting the order submission workflow, you allow users to submit their order details and get an orderId. This makes sure that they don’t have to wait for backend processing to complete. This helps unburden your architecture during peak shopping periods when the backend process can get busy.

Microservices-based order submission workflow

Figure 2. Microservices-based order submission workflow

The details of the order, such as credit card information in encrypted form, shipping information, etc., are stored in DynamoDB. This action invokes an asynchronous workflow managed by AWS Step Functions.

Figure 3 shows sample step functions from the asynchronous process. In this scenario, you are using external payment processing and shipping systems. When both systems get busy, step functions can manage long-running transactions and also the required retry logic. It uses a decision-based business workflow, so if a payment transaction fails, the order can be canceled. Or, once payment is successful, the order can proceed.

Amazon Simple Notification Service (Amazon SNS) notifies users whenever their order status changes. You can even extend Step Functions to have it react based on status of shipping.

Sample AWS Step Functions asynchronous workflow that uses external payment processing service and shipping system

Figure 3. Sample AWS Step Functions asynchronous workflow that uses external payment processing service and shipping system

Product search module

Our product search module is set up using the following serverless components:

  • Amazon Elasticsearch Service (Amazon ES) stores product data, which is updated whenever product-related data changes.
  • Lambda formats the data.
  • Amazon API Gateway allows users to search without authentication. As shown in Figure 4, searching for products on the ecommerce portal does not require users to log in. All traffic via API Gateway is unauthenticated.
Microservices-based product search workflow module with dynamic traffic through API Gateway

Figure 4. Microservices-based product search workflow module with dynamic traffic through API Gateway

Replicating data across Regions

If your ecommerce application runs on multiple Regions, it may require the content and data to be replicated. This allows the application to handle local traffic from that Region and also act as a failover option if the application fails in another Region. The content and data are replicated using the multi-Region replication features of Amazon S3 and DynamoDB global tables.

Figure 5 shows a multi-Region ecommerce site built on AWS with serverless services. It uses the following features to make sure that data between all Regions are in sync for data/assets that do not need data residency compliance:

  • Amazon S3 multi-Region replication keeps static assets in sync for assets.
  • DynamoDB global tables keeps dynamic data in sync across Regions.

Assets that are specific to their Region are stored in Regional specific buckets.

Data replication for a multi-Region ecommerce website built using serverless components

Figure 5. Data replication for a multi-Region ecommerce website built using serverless components

Amazon Route 53 DNS web service manages traffic failover from one Region to another. Route 53 provides different routing policies, and depending on your business requirement, you can choose the failover routing policy.

Best practices

Now that we’ve shown you how to build these applications, make sure you follow these best practices to effectively build, deploy, and monitor the solution stack:

  • Infrastructure as Code (IaC). A well-defined, repeatable infrastructure is important for managing any solution stack. AWS CloudFormation allows you to treat your infrastructure as code and provides a relatively easy way to model a collection of related AWS and third-party resources.
  • AWS Serverless Application Model (AWS SAM). An open-source framework. Use it to build serverless applications on AWS.
  • Deployment automation. AWS CodePipeline is a fully managed continuous delivery service that automates your release pipelines for fast and reliable application and infrastructure updates.
  • AWS CodeStar. Allows you to quickly develop, build, and deploy applications on AWS. It provides a unified user interface, enabling you to manage all of your software development activities in one place.
  • AWS Well-Architected Framework. Provides a mechanism for regularly evaluating your workloads, identifying high risk issues, and recording your improvements.
  • Serverless Applications Lens. Documents how to design, deploy, and architect serverless application workloads.
  • Monitoring. AWS provides many services that help you monitor and understand your applications, including Amazon CloudWatch, AWS CloudTrail, and AWS X-Ray.

Conclusion

In this blog post, we showed you how to architect a highly available, serverless, and microservices-based ecommerce website that operates in multiple Regions.

We also showed you how to replicate data between different Regions for scaling and if your workload fails. These serverless services reduce the burden of building and managing physical IT infrastructure to help you focus more on building solutions.

Related information