Post Syndicated from Talia Nassi original https://aws.amazon.com/blogs/compute/publishing-messages-in-batch-to-amazon-sns-topics/
This post is written by Heeki Park (Principal Solutions Architect, Serverless Specialist), Marc Pinaud (Senior Product Manager, Amazon SNS), Amir Eldesoky (Software Development Engineer, Amazon SNS), Jack Li (Software Development Engineer, Amazon SNS), and William Nguyen (Software Development Engineer, Amazon SNS).
Today, we are announcing the ability for AWS customers to publish messages in batch to Amazon SNS topics. Until now, you were only able to publish one message to an SNS topic per Publish API request. With the new PublishBatch API, you can send up to 10 messages at a time in a single API request. This reduces cost for API requests by up to 90%, as you need fewer API requests to publish the same number of messages.
Introducing the PublishBatch API
Consider a log processing application where you process system logs and have different requirements for downstream processing. For example, you may want to do inference on
incoming log data, populate an operational Amazon OpenSearch Service environment, and store log data in an enterprise data lake.

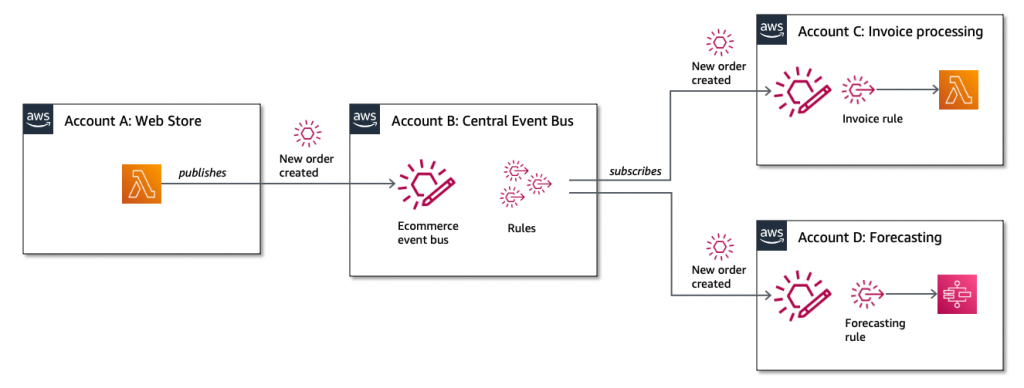
Systems send log data to a standard SNS topic, and Amazon SQS queues and Amazon Kinesis Data Firehose are configured as subscribers. An AWS Lambda function subscribes to the first SQS queue and uses machine learning models to perform inference to detect security incidents or system access anomalies. A Lambda function subscribes to the second SQS queue and emits those log entries to an Amazon OpenSearch Service cluster. The workload uses Kibana dashboards to visualize log data. An Amazon Kinesis Data Firehose delivery stream subscribes to the SNS topic and archives all log data into Amazon S3. This allows data scientists to conduct further investigation and research on those logs.
To do this, the following Java code publishes a set of log messages. In this code, you construct a publish request for a single message to an SNS topic and submit that request via the publish() method:
// tab 1: standard publish example
private static AmazonSNS snsClient;
private static final String MESSAGE_PAYLOAD = " 192.168.1.100 - - [28/Oct/2021:10:27:10 -0500] "GET /index.html HTTP/1.1" 200 3395";

PublishRequest request = new PublishRequest()
    .withTopicArn(topicArn)
    .withMessage(MESSAGE_PAYLOAD);
PublishResult response = snsClient.publish(request);

// tab 2: fifo publish example
private static AmazonSNS snsClient;
private static final String MESSAGE_PAYLOAD = " 192.168.1.100 - - [28/Oct/2021:10:27:10 -0500] "GET /index.html HTTP/1.1" 200 3395";
private static final String MESSAGE_FIFO_GROUP = "server1234";

PublishRequest request = new PublishRequest()
    .withTopicArn(topicArn)
    .withMessage(MESSAGE_PAYLOAD)
    .withMessageGroupId(MESSAGE_FIFO_GROUP)
    .withMessageDeduplicationId(UUID.randomUUID().toString());
PublishResult response = snsClient.publish(request);
If you extended the example above and had 10 log lines that each needed to be published as a message, you would have to write code to construct 10 publish requests, and subsequently submit each of those requests via the publish() method.
With the new ability to publish batch messages, you write the following new code. In the code below, you construct a list of publish entries first, then create a single publish batch request, and subsequently submit that batch request via the new publishBatch() method. In the code below, you use a sample helper method getLoggingPayload(i) to get the appropriate payload for the message, which you can replace with your own business logic.
// tab 1: standard publish example
private static final String MESSAGE_BATCH_ID_PREFIX = "server1234-batch-id-";

List<PublishBatchRequestEntry> entries = IntStream.range(0, 10)
.mapToObj(i -> {
new PublishBatchRequestEntry()
.withId(MESSAGE_BATCH_ID_PREFIX + i)
.withMessage(getLoggingPayload(i));
})
.collect(Collectors.toList());
PublishBatchRequest request = new PublishBatchRequest()
.withTopicArn(topicArn)
.withPublishBatchRequestEntries(entries);
PublishBatchResult response = snsClient.publishBatch(request);

// tab 2: fifo publish example
private static final String MESSAGE_BATCH_ID_PREFIX = "server1234-batch-id-";
private static final String MESSAGE_FIFO_GROUP = "server1234";


List<PublishBatchRequestEntry> entries = IntStream.range(0, 10)
.mapToObj(i -> {
new PublishBatchRequestEntry()
.withId(MESSAGE_BATCH_ID_PREFIX + i)
.withMessage(getLoggingPayload(i))
.withMessageGroupId(MESSAGE_FIFO_GROUP)
.withMessageDeduplicationId(UUID.randomUUID().toString());
})
.collect(Collectors.toList());
PublishBatchRequest request = new PublishBatchRequest()
.withTopicArn(topicArn)
.withPublishBatchRequestEntries(entries);
PublishBatchResult response = snsClient.publishBatch(request);
In the list of publish requests, the application must assign a unique batch ID (up to 80 characters) to each publish request within that batch. When the SNS service successfully receives a message, the SNS service assigns a unique message ID and returns that message ID in the response object.
If publishing to a FIFO topic, the SNS service additionally returns a sequence number in the response. When publishing a batch of messages, the PublishBatchResult object returns a list of response objects for successful and failed messages. If you iterate through the list of response objects for successful messages, you might see the following:
// tab 1: standard publish output
{
"Id": "server1234-batch-id-0",
"MessageId": "fcaef5b3-e9e3-5c9e-b761-ac46c4a779bb",
...
}

// tab 2: fifo publish output
{
"Id": "server1234-batch-id-0",
"MessageId": "fcaef5b3-e9e3-5c9e-b761-ac46c4a779bb",
"SequenceNumber": "10000000000000003000",
...
}
When receiving the message from SNS in the SQS queue, the application reads the following message:
// tab 1: standard publish output
{
"Type" : "Notification",
"MessageId" : "fcaef5b3-e9e3-5c9e-b761-ac46c4a779bb",
"TopicArn" : "arn:aws:sns:us-east-1:112233445566:publishBatchTopic",
"Message" : "payload-0",
"Timestamp" : "2021-10-28T22:58:12.862Z",
"UnsubscribeURL" : "http://sns.us-east-1.amazon.com/?Action=Unsubscribe&SubscriptionArn=arn:aws:sns:us-east-1:112233445566:publishBatchTopic:ff78260a-0953-4b60-9c2c-122ebcb5fc96"
}
// tab 2: fifo publish output
{
"Type" : "Notification",
"MessageId" : "fcaef5b3-e9e3-5c9e-b761-ac46c4a779bb",
"SequenceNumber" : "10000000000000003000",
"TopicArn" : "arn:aws:sns:us-east-1:112233445566:publishBatchTopic",
"Message" : "payload-0",
"Timestamp" : "2021-10-28T22:58:12.862Z",
"UnsubscribeURL" : "http://sns.us-east-1.amazon.com/?Action=Unsubscribe&SubscriptionArn=arn:aws:sns:us-east-1:112233445566:publishBatchTopic.fifo:ff78260a-0953-4b60-9c2c-122ebcb5fc96"
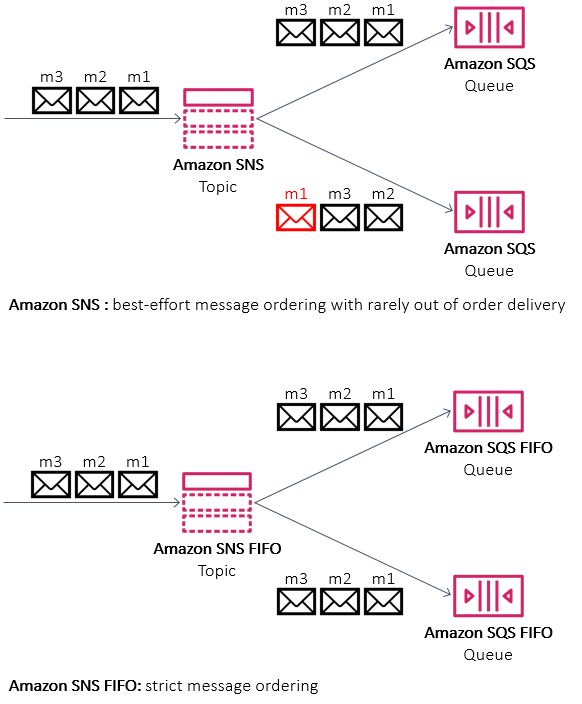
}In the standard publish example, the MessageId of fcaef5b3-e9e3-5c9e-b761-ac46c4a779bb is propagated down to the message in SQS. In the FIFO publish example, the SequenceNumber of 10000000000000003000 is also propagated down to the message in SQS.
Handling errors and quotas
When publishing messages in batch, the application must handle errors that may have occurred during the publish batch request. Errors can occur at two different levels. The first is when publishing the batch request to the SNS topic. For example, if the application does not specify a unique message batch ID, it fails with the following error:
com.amazonaws.services.sns.model.BatchEntryIdsNotDistinctException: Two or more batch entries in the request have the same Id. (Service: AmazonSNS; Status Code: 400; Error Code: BatchEntryIdsNotDistinct; Request ID: 44cdac03-eeac-5760-9264-f5f99f4914ad; Proxy: null)
The second is within the batch request at the message level. The application must inspect the returned PublishBatchResult object by iterating through successful and failed responses:
PublishBatchResult publishBatchResult = snsClient.publishBatch(request);
publishBatchResult.getSuccessful().forEach(entry -> {
System.out.println(entry.toString());
});
publishBatchResult.getFailed().forEach(entry -> {
System.out.println(entry.toString());
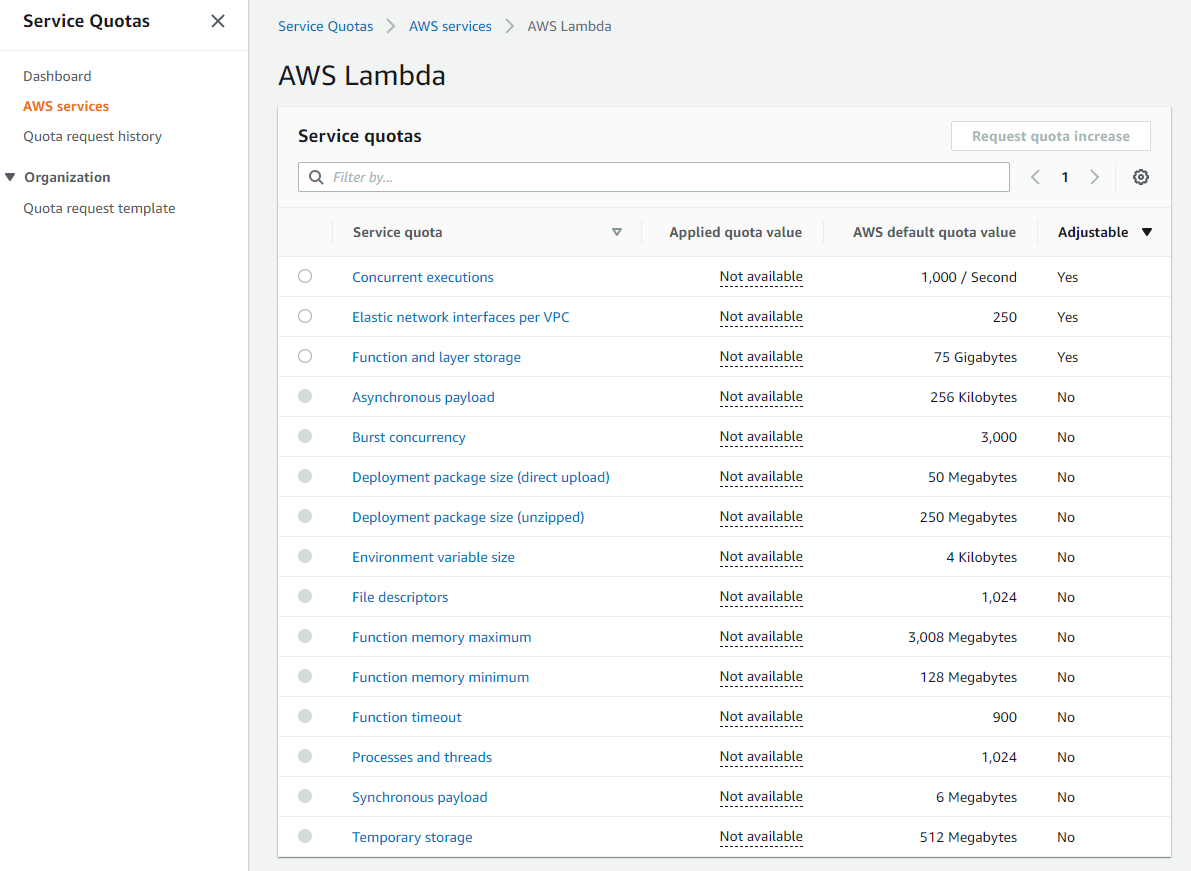
});With respect to quotas, the overall message throughput for an SNS topic remains the same. For example, in US East (N. Virginia), standard topics support up to 30,000 messages per second. Before this feature, 30,000 messages also meant 30,000 API requests per second. Because SNS now supports up to 10 messages per request, you can publish the same number of messages using only 3,000 API requests. With FIFO topics, the message throughput remains the same at 300 messages per second, but you can now send that volume of messages using only 30 API requests, thus reducing your messaging costs with SNS.
Conclusion
SNS now supports the ability to publish up to 10 messages in a single API request, reducing costs for publishing messages into SNS. Your applications can validate the publish status of each of the messages sent in the batch and handle failed publish requests accordingly. Message throughput to SNS topics remains the same for both standard and FIFO topics.
Learn more about this ability in the SNS Developer Guide.
Learn more about the details of the API request in the SNS API reference.
Learn more about SNS quotas.
For more serverless learning resources, visit Serverless Land.