The continued growth of AI has fundamentally changed the Internet over the past 24 months. AI is increasingly ubiquitous, and Cloudflare is leaning into the new opportunities and challenges it presents in a big way. This year for Cloudflare’s birthday, we’ve extended our AI Assistant capabilities to help you build new WAF rules, added AI bot traffic insights on Cloudflare Radar, and given customers new AI bot blocking capabilities.
AI Assistant for WAF Rule Builder
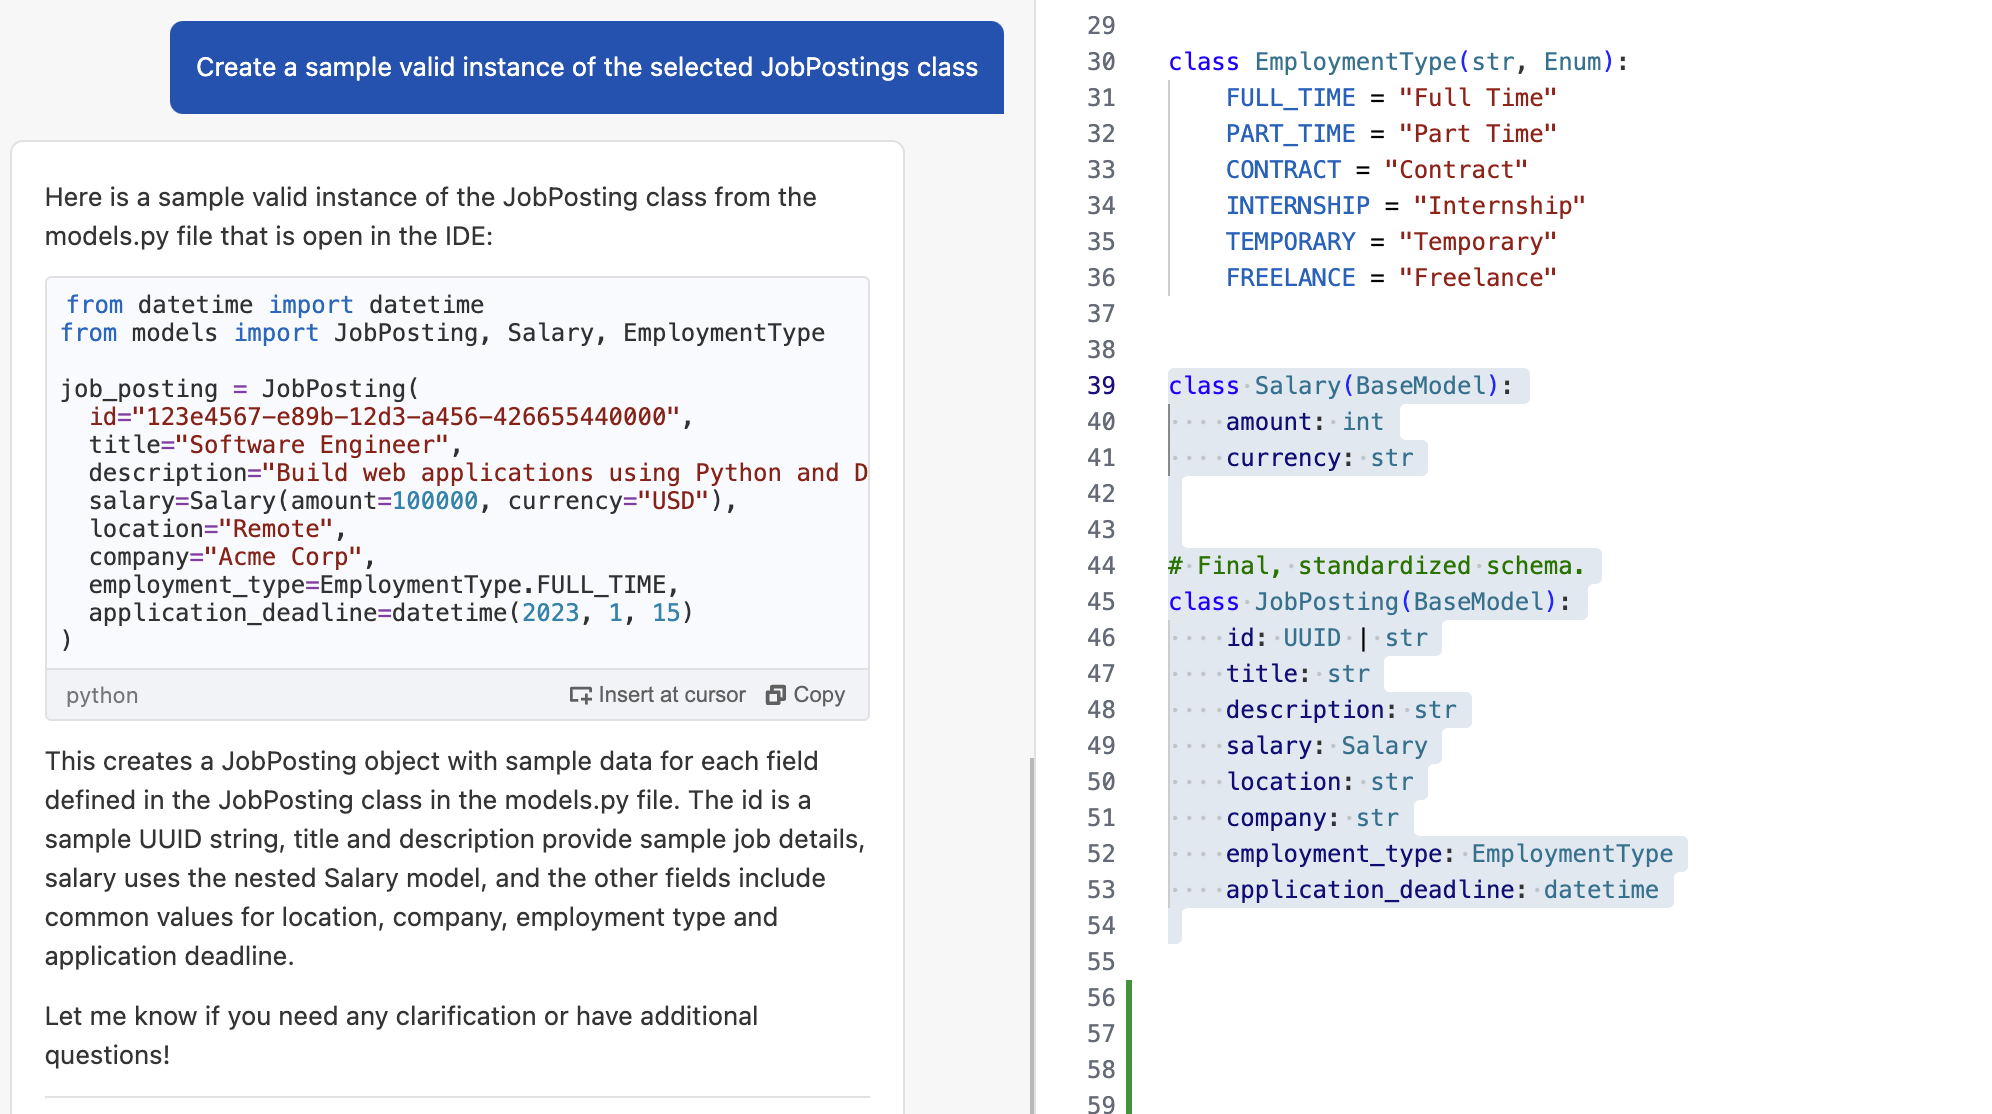
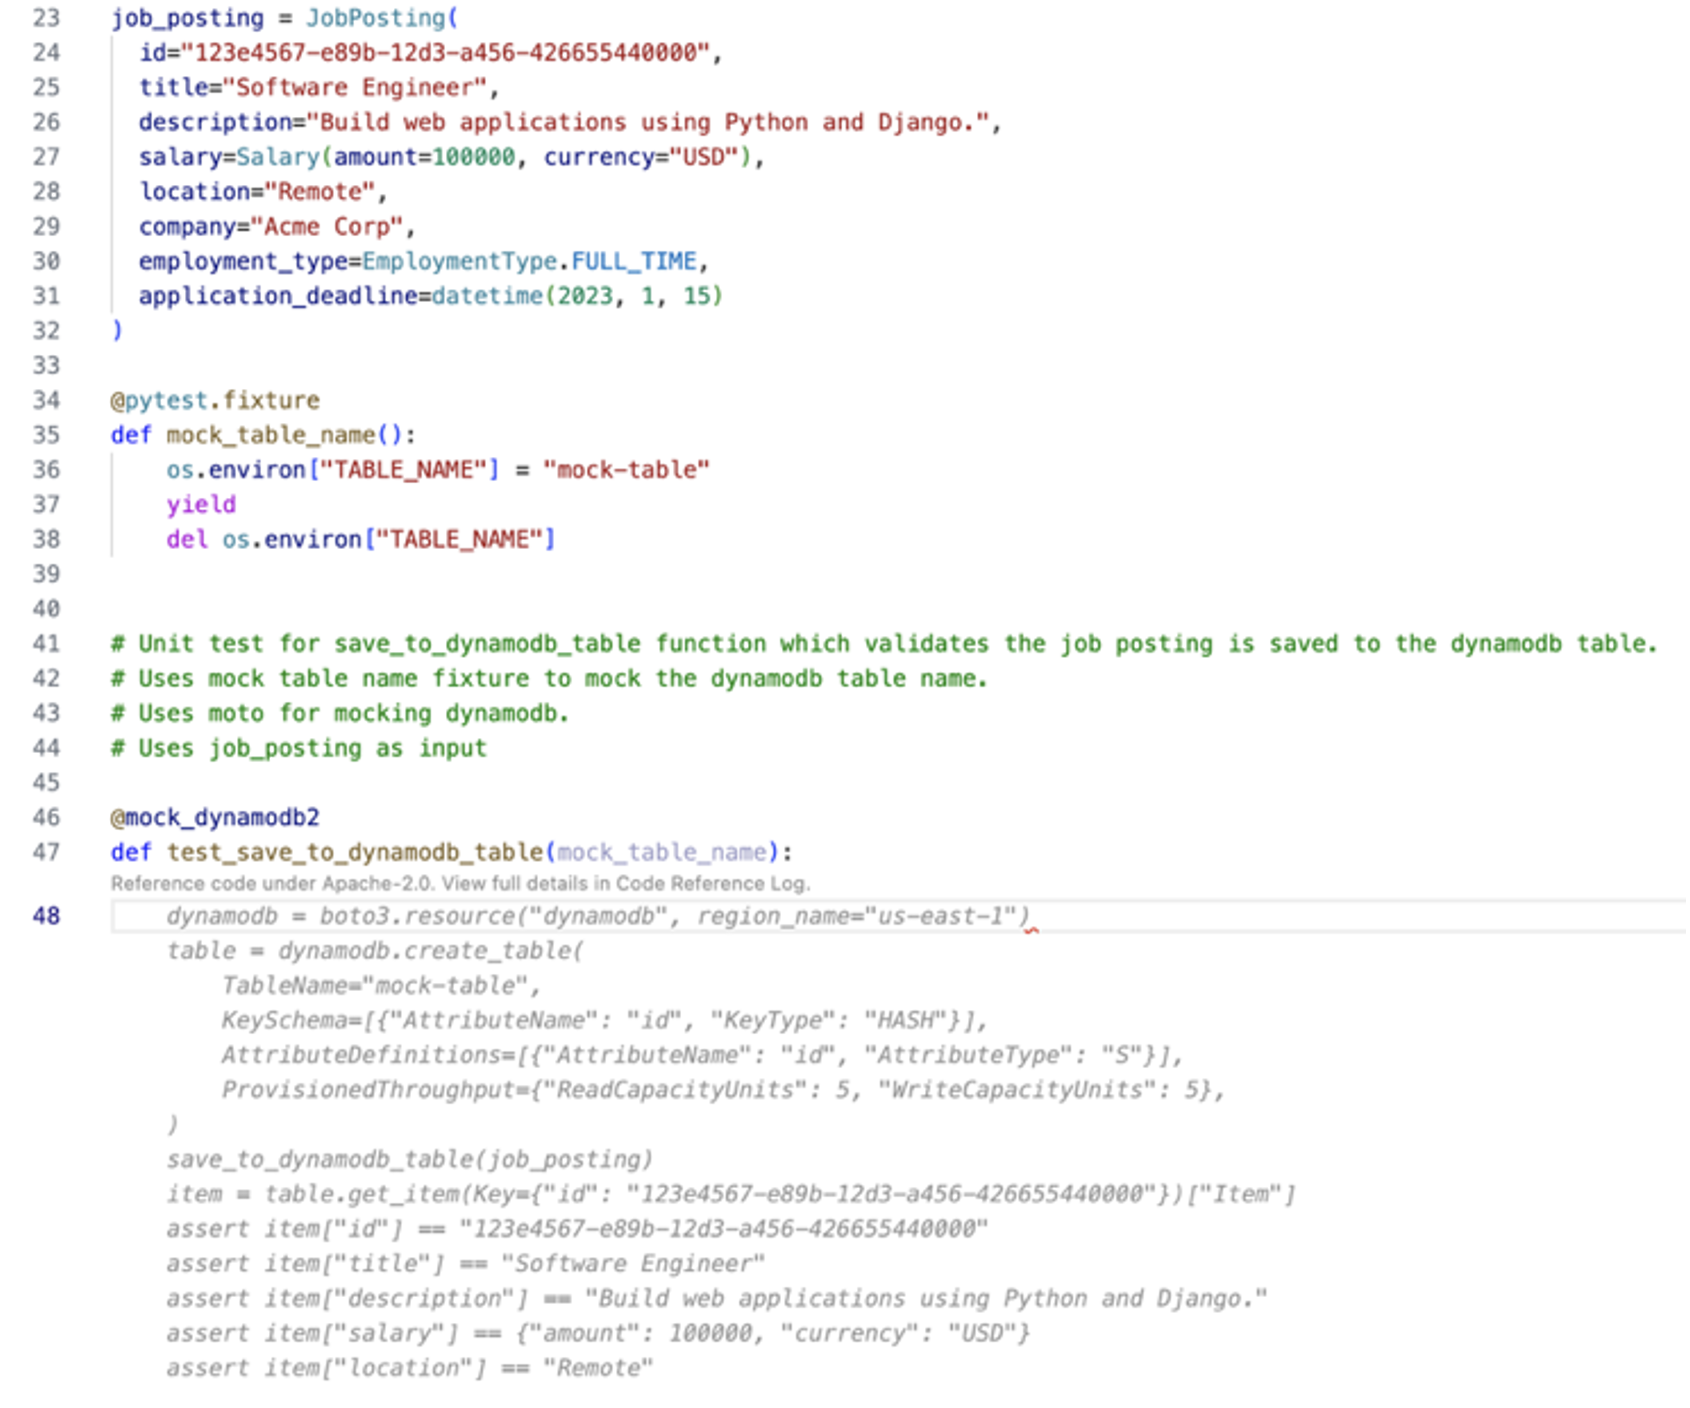
At Cloudflare, we’re always listening to your feedback and striving to make our products as user-friendly and powerful as possible. One area where we’ve heard your feedback loud and clear is in the complexity of creating custom and rate-limiting rules for our Web Application Firewall (WAF). With this in mind, we’re excited to introduce a new feature that will make rule creation easier and more intuitive: the AI Assistant for WAF Rule Builder.
By simply entering a natural language prompt, you can generate a custom or rate-limiting rule tailored to your needs. For example, instead of manually configuring a complex rule matching criteria, you can now type something like, “Match requests with low bot score,” and the assistant will generate the rule for you. It’s not about creating the perfect rule in one step, but giving you a strong foundation that you can build on.
The assistant will be available in the Custom and Rate Limit Rule Builder for all WAF users. We’re launching this feature in Beta for all customers, and we encourage you to give it a try. We’re looking forward to hearing your feedback (via the UI itself) as we continue to refine and enhance this tool to meet your needs.
AI bot traffic insights on Cloudflare Radar
AI platform providers use bots to crawl and scrape websites, vacuuming up data to use for model training. This is frequently done without the permission of, or a business relationship with, the content owners and providers. In July, Cloudflare urged content owners and providers to “declare their AIndependence”, providing them with a way to block AI bots, scrapers, and crawlers with a single click. In addition to this so-called “easy button” approach, sites can provide more specific guidance to these bots about what they are and are not allowed to access through directives in a robots.txt file. Regardless of whether a customer chooses to block or allow requests from AI-related bots, Cloudflare has insight into request activity from these bots, and associated traffic trends over time.
Tracking traffic trends for AI bots can help us better understand their activity over time — which are the most aggressive and have the highest volume of requests, which launch crawls on a regular basis, etc. The new AI bot & crawler traffic graph on Radar’s Traffic page provides insight into these traffic trends gathered over the selected time period for the top known AI bots. The associated list of bots tracked here is based on the ai.robots.txt list, and will be updated with new bots as they are identified. Time series and summary data is available from the Radar API as well. (Traffic trends for the full set of AI bots & crawlers can be viewed in the new Data Explorer.)
Blocking more AI bots
For Cloudflare’s birthday, we’re following up on our previous blog post, Declaring Your AIndependence, with an update on the new detections we’ve added to stop AI bots. Customers who haven’t already done so can simply click the button to block AI bots to gain more protection for their website.
Enabling dynamic updates for the AI bot rule
The old button allowed customers to block verified AI crawlers, those that respect robots.txt and crawl rate, and don’t try to hide their behavior. We’ve added new crawlers to that list, but we’ve also expanded the previous rule to include 27 signatures (and counting) of AI bots that don’t follow the rules. We want to take time to say “thank you” to everyone who took the time to use our “tip line” to point us towards new AI bots. These tips have been extremely helpful in finding some bots that would not have been on our radar so quickly.
For each bot we’ve added, we’re also adding them to our “Definitely automated” definition as well. So, if you’re a self-service plan customer using Super Bot Fight Mode, you’re already protected. Enterprise Bot Management customers will see more requests shift from the “Likely Bot” range to the “Definitely automated” range, which we’ll discuss more below.
Under the hood, we’ve converted this rule logic to a Cloudflare managed rule (the same framework that powers our WAF). This enables our security analysts and engineers to safely push updates to the rule in real-time, similar to how new WAF rule changes are rapidly delivered to ensure our customers are protected against the latest CVEs. If you haven’t logged back into the Bots dashboard since the previous version of our AI bot protection was announced, click the button again to update to the latest protection.
The impact of new fingerprints on the model
One hidden beneficiary of fingerprinting new AI bots is our ML model. As we’ve discussed before, our global ML model uses supervised machine learning and greatly benefits from more sources of labeled bot data. Below, you can see how well our ML model recognized these requests as automated, before and after we updated the button, adding new rules. To keep things simple, we have shown only the top 5 bots by the volume of requests on the chart. With the introduction of our new managed rule, we have observed an improvement in our detection capabilities for the majority of these AI bots. Button v1 represents the old option that let customers block only verified AI crawlers, while Button v2 is the newly introduced feature that includes managed rule detections.
So how did we make our detections more robust? As we have mentioned before, sometimes a single attribute can give a bot away. We developed a sophisticated set of heuristics tailored to these AI bots, enabling us to effortlessly and accurately classify them as such. Although our ML model was already detecting the vast majority of these requests, the integration of additional heuristics has resulted in a noticeable increase in detection rates for each bot, and ensuring we score every request correctly 100% of the time. Transitioning from a purely machine learning approach to incorporating heuristics offers several advantages, including faster detection times and greater certainty in classification. While deploying a machine learning model is complex and time-consuming, new heuristics can be created in minutes.
The initial launch of the AI bots block button was well-received and is now used by over 133,000 websites, with significant adoption even among our Free tier customers. The newly updated button, launched on August 20, 2024, is rapidly gaining traction. Over 90,000 zones have already adopted the new rule, with approximately 240 new sites integrating it every hour. Overall, we are now helping to protect the intellectual property of more than 146,000 sites from AI bots, and we are currently blocking 66 million requests daily with this new rule. Additionally, we’re excited to announce that support for configuring AI bots protection via Terraform will be available by the end of this year, providing even more flexibility and control for managing your bot protection settings.
Bot behavior
With the enhancements to our detection capabilities, it is essential to assess the impact of these changes to bot activity on the Internet. Since the launch of the updated AI bots block button, we have been closely monitoring for any shifts in bot activity and adaptation strategies. The most basic fingerprinting technique we use to identify AI bot looking for simple user-agent matches. User-agent matches are important to monitor because they indicate the bot is transparently announcing who they are when they’re crawling a website.
The graph below shows a volume of traffic we label as AI bot over the past two months. The blue line indicates the daily request count, while the red line represents the monthly average number of requests. In the past two months, we have seen an average reduction of nearly 30 million requests, with a decrease of 40 million in the most recent month.This decline coincides with the release of Button v1 and Button v2. Our hypothesis is that with the new AI bots blocking feature, Cloudflare is blocking a majority of these bots, which is discouraging them from crawling.
This hypothesis is supported by the observed decline in requests from several top AI crawlers. Specifically, the Bytespider bot reduced its daily requests from approximately 100 million to just 50 million between the end of June and the end of August (see graph below). This reduction could be attributed to several factors, including our new AI bots block button and changes in the crawler’s strategy.
We have also observed an increase in the accountability of some AI crawlers. The most basic fingerprinting technique we use to identify AI bot looking for simple user-agent matches. User-agent matches are important to monitor because they indicate the bot is transparently announcing who they are when they’re crawling a website. These crawlers are now more frequently using their agents, reflecting a shift towards more transparent and responsible behavior. Notably, there has been a dramatic surge in the number of requests from the Perplexity user agent. This increase might be linked to previous accusationsthat Perplexity did not properly present its user agent, which could have prompted a shift in their approach to ensure better identification and compliance.
These trends suggest that our updates are likely affecting how AI crawlers interact with content. We will continue to monitor AI bot activity to help users control who accesses their content and how. By keeping a close watch on emerging patterns, we aim to provide users with the tools and insights needed to make informed decisions about managing their traffic.
Wrap up
We’re excited to continue to explore the AI landscape, whether we’re finding more ways to make the Cloudflare dashboard usable or new threats to guard against. Our AI insights on Radar update in near real-time, so please join us in watching as new trends emerge and discussing them in the Cloudflare Community.
Llama 3.2 offers multimodal vision and lightweight models representing Meta’s latest advancement in large language models (LLMs) and providing enhanced capabilities and broader applicability across various use cases. With a focus on responsible innovation and system-level safety, these new models demonstrate state-of-the-art performance on a wide range of industry benchmarks and introduce features that help you build a new generation of AI experiences.
These models are designed to inspire builders with image reasoning and are more accessible for edge applications, unlocking more possibilities with AI.
The Llama 3.2 collection of models are offered in various sizes, from lightweight text-only 1B and 3B parameter models suitable for edge devices to small and medium-sized 11B and 90B parameter models capable of sophisticated reasoning tasks including multimodal support for high resolution images. Llama 3.2 11B and 90B are the first Llama models to support vision tasks, with a new model architecture that integrates image encoder representations into the language model. The new models are designed to be more efficient for AI workloads, with reduced latency and improved performance, making them suitable for a wide range of applications.
All Llama 3.2 models support a 128K context length, maintaining the expanded token capacity introduced in Llama 3.1. Additionally, the models offer improved multilingual support for eight languages including English, German, French, Italian, Portuguese, Hindi, Spanish, and Thai.
In addition to the existing text capable Llama 3.1 8B, 70B, and 405B models, Llama 3.2 supports multimodal use cases. You can now use four new Llama 3.2 models — 90B, 11B, 3B, and 1B — from Meta in Amazon Bedrock to build, experiment, and scale your creative ideas:
Llama 3.2 90B Vision (text + image input) – Meta’s most advanced model, ideal for enterprise-level applications. This model excels at general knowledge, long-form text generation, multilingual translation, coding, math, and advanced reasoning. It also introduces image reasoning capabilities, allowing for image understanding and visual reasoning tasks. This model is ideal for the following use cases: image captioning, image-text retrieval, visual grounding, visual question answering and visual reasoning, and document visual question answering.
Llama 3.2 11B Vision (text + image input) – Well-suited for content creation, conversational AI, language understanding, and enterprise applications requiring visual reasoning. The model demonstrates strong performance in text summarization, sentiment analysis, code generation, and following instructions, with the added ability to reason about images. This model use cases are similar to the 90B version: image captioning, image-text-retrieval, visual grounding, visual question answering and visual reasoning, and document visual question answering.
Llama 3.2 3B (text input) – Designed for applications requiring low-latency inferencing and limited computational resources. It excels at text summarization, classification, and language translation tasks. This model is ideal for the following use cases: mobile AI-powered writing assistants and customer service applications.
Llama 3.2 1B (text input) – The most lightweight model in the Llama 3.2 collection of models, perfect for retrieval and summarization for edge devices and mobile applications. This model is ideal for the following use cases: personal information management and multilingual knowledge retrieval.
In addition, Llama 3.2 is built on top of the Llama Stack, a standardized interface for building canonical toolchain components and agentic applications, making building and deploying easier than ever. Llama Stack API adapters and distributions are designed to most effectively leverage the Llama model capabilities and it gives customers the ability to benchmark Llama models across different vendors.
Meta has tested Llama 3.2 on over 150 benchmark datasets spanning multiple languages and conducted extensive human evaluations, demonstrating competitive performance with other leading foundation models. Let’s see how these models work in practice.
Using Llama 3.2 models in Amazon Bedrock To get started with Llama 3.2 models, I navigate to the Amazon Bedrock console and choose Model access on the navigation pane. There, I request access for the new Llama 3.2 models: Llama 3.2 1B, 3B, 11B Vision, and 90B Vision.
Back in the Amazon Bedrock console, I choose Chat under Playgrounds in the navigation pane, select Meta as the category, and choose the Llama 3.2 90B Vision model.
I use Choose files to select the resized chart image and use this prompt:
Based on this chart, which countries in Europe have the highest share?
I choose Run and the model analyzes the image and returns its results:
Here’s a sample AWS CLI command using the Amazon Bedrock Converse API. I use the --query parameter of the CLI to filter the result and only show the text content of the output message:
aws bedrock-runtime converse --messages '[{ "role": "user", "content": [ { "text": "Tell me the three largest cities in Italy." } ] }]' --model-id us.meta.llama3-2-90b-instruct-v1:0 --query 'output.message.content[*].text' --output text
In output, I get the response message from the "assistant".
The three largest cities in Italy are:

1. Rome (Roma) - population: approximately 2.8 million
2. Milan (Milano) - population: approximately 1.4 million
3. Naples (Napoli) - population: approximately 970,000
It’s not much different if you use one of the AWS SDKs. For example, here’s how you can use Python with the AWS SDK for Python (Boto3) to analyze the same image as in the console example:
import boto3

MODEL_ID = "us.meta.llama3-2-90b-instruct-v1:0"
# MODEL_ID = "eu.meta.llama3-2-90b-instruct-v1:0"

IMAGE_NAME = "share-electricity-renewable-small.png"

bedrock_runtime = boto3.client("bedrock-runtime")

with open(IMAGE_NAME, "rb") as f:
    image = f.read()

user_message = "Based on this chart, which countries in Europe have the highest share?"

messages = [
    {
        "role": "user",
        "content": [
            {"image": {"format": "png", "source": {"bytes": image}}},
            {"text": user_message},
        ],
    }
]

response = bedrock_runtime.converse(
    modelId=MODEL_ID,
    messages=messages,
)
response_text = response["output"]["message"]["content"][0]["text"]
print(response_text)
Llama 3.2 models are also available in Amazon SageMaker JumpStart, a machine learning (ML) hub that makes it easy to deploy pre-trained models using the console or programmatically through the SageMaker Python SDK. From SageMaker JumpStart, you can also access and deploy new safeguard models that can help classify the safety level of model inputs (prompts) and outputs (responses), including Llama Guard 3 11B Vision, which are designed to support responsible innovation and system-level safety.
In addition, you can easily fine-tune Llama 3.2 1B and 3B models with SageMaker JumpStart today. Fine-tuned models can then be imported as custom models into Amazon Bedrock. Fine-tuning for the full collection of Llama 3.2 models in Amazon Bedrock and Amazon SageMaker JumpStart is coming soon.
The publicly available weights of Llama 3.2 models make it easier to deliver tailored solutions for custom needs. For example, you can fine-tune a Llama 3.2 model for a specific use case and bring it into Amazon Bedrock as a custom model, potentially outperforming other models in domain-specific tasks. Whether you’re fine-tuning for enhanced performance in areas like content creation, language understanding, or visual reasoning, Llama 3.2’s availability in Amazon Bedrock and SageMaker empowers you to create unique, high-performing AI capabilities that can set your solutions apart.
More on Llama 3.2 model architecture Llama 3.2 builds upon the success of its predecessors with an advanced architecture designed for optimal performance and versatility:
Auto-regressive language model – At its core, Llama 3.2 uses an optimized transformer architecture, allowing it to generate text by predicting the next token based on the previous context.
Fine-tuning techniques – The instruction-tuned versions of Llama 3.2 employ two key techniques:
Supervised fine-tuning (SFT) – This process adapts the model to follow specific instructions and generate more relevant responses.
Multimodal capabilities – For the 11B and 90B Vision models, Llama 3.2 introduces a novel approach to image understanding:
Separately trained image reasoning adaptor weights are integrated with the core LLM weights.
These adaptors are connected to the main model through cross-attention mechanisms. Cross-attention allows one section of the model to focus on relevant parts of another component’s output, enabling information flow between different sections of the model.
When an image is input, the model treats the image reasoning process as a “tool use” operation, allowing for sophisticated visual analysis alongside text processing. In this context, tool use is the generic term used when a model uses external resources or functions to augment its capabilities and complete tasks more effectively.
Optimized inference – All models support grouped-query attention (GQA), which enhances inference speed and efficiency, particularly beneficial for the larger 90B model.
This architecture enables Llama 3.2 to handle a wide range of tasks, from text generation and understanding to complex reasoning and image analysis, all while maintaining high performance and adaptability across different model sizes.
Llama 3.2 1B and 3B models are available in the US West (Oregon) and Europe (Frankfurt) Regions, and are available in the US East (Ohio, N. Virginia) and Europe (Ireland, Paris) Regions via cross-region inference.
Llama 3.2 11B Vision and 90B Vision models are available in the US West (Oregon) Region, and are available in the US East (Ohio, N. Virginia) Regions via cross-region inference.
You can find deep-dive technical content and discover how our Builder communities are using Amazon Bedrock at community.aws. Let us know what you build with Llama 3.2 in Amazon Bedrock!
Data engineers play a crucial role in the modern data-driven landscape, managing essential tasks from data ingestion and processing to transformation and serving. Their expertise is particularly valuable in the era of generative AI, where harnessing the value of vast datasets is paramount.
To empower aspiring and experienced data professionals, DeepLearning.AI and Amazon Web Services (AWS) have partnered to launch the Data Engineering Specialization, an advanced professional certificate on Coursera. This comprehensive program covers a wide range of data engineering concepts, tools, and techniques relevant to modern organizations. It’s designed for learners with some experience working with data who are interested in learning the fundamentals of data engineering. The specialization comprises four hands-on courses, each culminating in a Coursera course certificate upon completion.
Specialization overview
This Data Engineering Specialization is a joint initiative by AWS and DeepLearning.AI, a leading provider of world-class AI education founded by renowned machine learning (ML) pioneer Andrew Ng.
Joe Reis, a prominent figure in data engineering and coauthor of the bestselling book Fundamentals of Data Engineering, leads the program as a primary instructor. By providing a foundational framework, the curriculum ensures learners gain a holistic understanding of the data engineering lifecycle, while covering key aspect such as data architecture, orchestration, DataOps, and data management.
Further enhancing the learning experience, the program features hands-on labs and technical assessments hosted on the AWS Cloud. These practical, cloud-based exercises were designed in partnership with AWS technical experts, including Gal Heyne, Navnit Shukla, and Morgan Willis. Learners will apply theoretical concepts using AWS services and tools, such as Amazon Kinesis, AWS Glue, Amazon Simple Storage Service (Amazon S3), and Amazon Redshift, equipping them with hands-on skill and experience.
Specialization highlights
Participants will be introduced to several key learning opportunities.
Acquisition of core skills and strategies
The specialization equips data engineers with the ability to design data engineering solutions for various use cases, select the right technologies for their data architecture, and circumvent potential pitfalls. The skills gained universally apply across various platforms and technologies, offering learners a program that is versatile.
Unparalleled approach to data engineering education
Unlike conventional courses focused on specific technologies, this specialization provides a comprehensive understanding of data engineering fundamentals. It emphasizes the importance of aligning data engineering strategies with broader business goals, fostering a more integrated and effective approach to building and maintaining data solutions.
Holistic understanding of data engineering
By using the insights from the Fundamentals of Data Engineering book, the curriculum offers a well-rounded education that prepares professionals for success in the data-driven focused industries.
Practical skills through AWS cloud labs
The hands-on labs hosted by AWS Partner Vocareum let learners apply the techniques directly in an AWS environment provided with the course. This practical experience is crucial for mastering the intricacies of data engineering and developing the skills needed to excel in the industry.
Why choose this specialization?
Structured learning path–The specification is thoughtfully structured to provide a step-by-step learning journey, from foundational concepts to advanced applications.
Expert insights–Gain insights from the authors of Fundamentals of Data Engineering and other industry experts. Learn how to apply practical knowledge to build modern data architecture on the cloud, using cloud services for data engineering.
Hands-on experience–Engage in hands-on labs in the AWS Cloud, where you not only learn but also apply the knowledge in real-world scenarios.
Comprehensive curriculum–This program encompasses all aspects of the data engineering lifecycle, including data generation in source systems, ingestion, transformation, storage, and serving. It also addresses key undercurrents of data engineering, such as security, data management, and orchestration.
At the end of this specialization, learners will be well-equipped with the necessary skills and expertise to embark on a career in data engineering, an in-demand role at the core of any organization that is looking to use data to create value. Data-centric ML and analytics would not be possible without the foundation of data engineering.
Course modules
The Data Engineering Specialization comprises four courses:
Course 1–Introduction to Data Engineering–This foundational module explores the collaborative nature of data engineering, identifying key stakeholders and understanding their requirements. The course delves into a mental framework for building data engineering solutions, emphasizing holistic ecosystem understanding, critical factors like data quality and scalability, and effective requirements gathering. The course then examines the data engineering lifecycle, illustrating interconnections between stages. By showcasing the AWS data engineering stack, the course teaches how to use the right technologies. By the end of this course, learners will have the skills and mindset to tackle data engineering challenges and make informed decisions.
Course 2–Source Systems, Data Ingestion, and Pipelines–In this course, data engineers dive deep into the practical aspects of working with diverse data sources, ingestion patterns, and pipeline construction. Learners explore the characteristics of different data formats and the appropriate source systems for generating each type of data, equipping them with the knowledge to design effective data pipelines. The course covers the fundamentals of relational and NoSQL databases, including ACID compliance and CRUD operations, so that engineers learn to interact with a wide range of data source systems. The course covers the significance of cloud networking, resolving database connection issues, and using message queues and streaming platforms—crucial skills for creating strong and scalable data architectures. By mastering the concepts in this course, data engineers will be able to automate data ingestion processes, optimize connectivity, and establish the foundation for successful data engineering projects.
Course 3–Data Storage and Queries–This course equips data engineers with principles and best practices for designing robust, efficient data storage and querying solutions. Learners explore the data lake house concept, implementing a medallion-like architecture and using open table formats to build transactional data lakes. The course enhances SQL proficiency by teaching advanced queries, such as aggregations and joins on streaming data, while also exploring data warehouse and data lake capabilities. Learners compare storage performance and discover optimization strategies, like indexing. Data engineers can achieve high performance and scalability in data services by comprehending query execution and processing.
Course 4–Data Modeling, Transformation, and Serving–In this capstone course, data engineers explore advanced data modeling techniques, including data vault and star schemas. Learners differentiate between modeling approaches like Inmon and Kimball, gaining the ability to transform data and structure it for optimal analytical and ML use cases. The course equips data engineers with preprocessing skills for textual, image, and tabular data. Learners understand the distinctions between supervised and unsupervised learning, as well as classification and regression tasks, empowering them to design data solutions supporting a range of predictive applications. By mastering these data modeling, transformation, and serving concepts, data engineers can build robust, scalable, and business-aligned data architectures to deliver maximum value.
Enrollment
Whether you’re new to data engineering or looking to enhance your skills, this specialization provides a balanced mix of theory and hands-on experience through 4 courses, each culminating in a Coursera course certificate.
Embark on your data engineering journey from here:
Enroll now and take the first step towards mastering data engineering with this comprehensive and practical program, built on the foundation of Fundamentals of Data Engineering and powered by AWS.
Amazon Q Developer is the most capable AI-powered assistant for software development that reimagines the experience across the entire software development lifecycle, making it easier and faster to build, secure, manage, and optimize applications on AWS. Using your natural language input and your project context, Amazon Q Developer’s agent for software development autonomously implements multi-file features, bug fixes, and unit tests in your integrated development environment (IDE) workspace. For example, you can ask Amazon Q Developer to add a new checkout feature to your e-commerce app, and it will analyze your existing codebase, map out the implementation plan spanning multiple files, and upon your approval, execute all the required code changes and tests in minutes. To get started building with the Q Developer agent, install the Amazon Q extension and use the /dev command inside the chat window.
Amazon Q Developer is constantly improving and redefining what the state-of-the-art is for software development agents. The Amazon Q Developer agent for software development was one of the first agents to publish their results on the industry-recognized SWE-bench benchmark leaderboard. This benchmark is designed to measure the ability to solve real-world coding problems a Python software developer would encounter. This newest update to the Amazon Q Developer agent for software development out-performs the previous version released in May, resolving 51% more tasks on the SWE-bench verified dataset and 43% more on the full dataset. In just a few months, the agent’s scores have increased from 25.6% tasks resolved to 38.8% on the verified dataset and from 13.82% to 19.75% on the full dataset, making it the top performing agent on the leaderboard for 4 weeks. In our June 2024 blogpost, we provided an overview explaining how our first submission of Amazon Q Developer was able to top the benchmarks. Since then, the SWE-bench submission process has begun to require the publication of agent trajectories — meaning, a log of the steps taken by an agent to solve a given problem. We welcome this transparency as a critical ingredient of developer trust, so we are proud to share the trajectories of our newest agent.
This video demonstrates the kind of tasks you can now accomplish with the Amazon Q Developer agent for software development. For example, you can refactor a Lambda function to improve clarity and scalability of an app in mere minutes. In the prompt we provide a few specific requirements to the agent: split the logic into multiple Lambdas, avoid duplication of functionality, keep permissions locked down, and update the infrastructure as code to support the change. The agent gets to work and keeps you updated in real time about what it is doing. Once it is done, you can review the code and merge it with a single click.
We have reinvented our agent to take advantage of the new capabilities offered by state-of-the-art AI models, incorporate developer feedback, and bring together the results of dozens of experiments, with proven results. SWE-bench offers a tangible way to share performance measurements, but it is only one component of the way we evaluate the Amazon Q Developer agent for software development. The best way to measure the capabilities of the agent is to test it out for yourself on the tasks that you care about. This blog post shows you how to use the new agent and provides an overview of how the technology behind our reinvented agent works.
Getting started with the Amazon Q Developer agent
To get started, you need to have an AWS Builder ID or be part of an organization with an AWS IAM Identity Center instance set up that allows you to use Amazon Q. To use Amazon Q Developer agent for software development in Visual Studio Code, start by installing the Amazon Q extension. The extension is also available for JetBrains, Visual Studio (in preview), and in the Command Line on macOS. Find the latest version on the Amazon Q Developer page.
After authenticating, you can invoke the feature development agent by entering /dev in the chat field.
Let’s say you are exploring the amazon-science/auto-rag-eval GitHub repository. This repository contains a method to automatically evaluate retrieval-augmented language models as described in this amazon.science blog. This method constructs multiple choice questions based on the documents contained in a RAG index. Each question has a single correct answer and multiple incorrect answers, or distractors. You notice that the number of distractors is hard coded to be 3. You would like it to be a parameter instead, so you ask the agent to make this change.
The agent starts exploring your code base and shares updates in real-time summarizing its state, the changes that it is making, and the files being used. The agent starts by exploring the code base.
After a few steps, the agent has identified the key chunks of code to modify and how to modify them.
The agent iterates on implementing its modifications until it succeeds. At that point, you can see that one file auto-rag-eval/ExamGenerator/distractors_generator.py has been changed.
Once it is done, the agent shows you a list of the files that it has modified, here distractors_generator.py. Clicking on the file name opens a diff view in your IDE.
You can review the modifications in each file and decide whether to accept them. If the generated code could be improved, you can provide this feedback to the agent and request that it regenerates it.
Getting the most out of the AI-powered software development agent
The Amazon Q Developer agent for software development works at its best when requests are aimed and precise. This does not mean that you have to write very long requests, “add unit tests to MyMethod” is clear. When the task is more ambiguous, for example, when you want the agent to resolve a bug in your code, it is helpful to include an error trace. When you want the agent to develop new features, explaining the context, being specific about desired behavior, specifying where the change should be made when known, or even relevant snippets of code or pseudo-code helps the agent focus to achieve the best results.
How the improved Amazon Q Developer agent for software development works
The agent is continuously updated and improved to give you better performance. During the past months the ability of foundation models to drive agentic workflows and leverage large sets of tools to accomplish complex tasks has improved significantly. Guided by customer feedback, we have redesigned our agent to take advantage of these new abilities. Our inspiration is the workflow of experienced developers getting to work on an unfamiliar code base.
When developers want to accomplish a task on an unfamiliar code base, they start by getting a bird’s-eye view of the repository to obtain a general understanding of the project. They then dive deeper into the parts that are relevant to their task. Developers frequently rely on visual IDEs such as VSCode or IntelliJ to explore repositories and implement changes. Although some LLMs have the ability to interpret images, the fidelity of that interpretation, particularly for information-dense images, is far from what is required for an application as complex as software development agents.
AWS has developed a new framework for the Amazon Q Developer agent — textcode — which provides a text-based alternative to visual IDEs specifically designed for LLMs. It effectively equips the agent with its own IDE with which it interacts exclusively through text. The agent is able to use it similarly to how a developer would use a regular IDE to solve your tasks. textcode is designed to provide token-efficient text representations of code, code files, and code workspaces. It allows LLMs to interact with a code base in a similar manner to how a developer interacts with it in a visual IDE. This framework offers structured and efficient environment within which it is easy for the agent to use tools, take actions, and evaluate its progress towards the completion of the assigned task.
The agent is equipped with tools to explore the workspace, act on it, and evaluate its solutions. For example, the agent can open, create, and close files, select and deselect code chunks, find and replace code, and revert changes if needed. These tools allows the agent to navigate the workspace in order to identify and retain the critical pieces of information to solve your tasks while discarding superfluous code to not clog its context. We are continuously expanding the toolkit of the agent with more powerful tools.
When you use the \dev command in your IDE, the Q Developer agent for software development is initialized with your problem statement as well as some guidance on how to solve the problem and use the tools it is equipped with. The agent determines what actions to use on the workspace. It generally starts by exploring the workspace to discover the parts of the code relevant to solving your task. The agent takes action by using the tools it is equipped with. The response of the tools is incorporated in an updated prompt that is provided back to the LLM to decide its next actions.
The Q Developer agent is equipped with logic to prevent it from getting stuck in unproductive paths and help it progress towards a solution to your problem. The agent will autonomously decide that it has generated the appropriate changes (including writing unit tests and updating documentation) to fulfill your request. At that point, the agent exits its loop and returns the candidate code patches for your review. You can decide to accept them entirely or in part, or ask the agent to modify them. If you ask for modifications, the agent will resume its loop using your feedback as additional information about the problem statement.
Conclusion
This post introduced the updated Amazon Q Developer agent for software development. The agent autonomously implements features that you describe using natural language directly from your IDE. We gave you an overview of how the agent works behind the scenes and discussed its significantly increased accuracy.
You are now ready to explore the capabilities of Amazon Q Developer agent for software development and make it your AI coding assistant! Install the Amazon Q Developer extension in your IDE of choice and start using Amazon Q (including the agent for software development) for free using your AWS Builder ID or subscribe to Amazon Q Developer to unlock higher limits.
The AWS Customer Incident Response Team (CIRT) has developed a methodology that you can use to investigate security incidents involving generative AI-based applications. To respond to security events related to a generative AI workload, you should still follow the guidance and principles outlined in the AWS Security Incident Response Guide. However, generative AI workloads require that you also consider some additional elements, which we detail in this blog post.
We start by describing the common components of a generative AI workload and discuss how you can prepare for an event before it happens. We then introduce the Methodology for incident response on generative AI workloads, which consists of seven elements that you should consider when triaging and responding to a security event on a generative AI workload. Lastly, we share an example incident to help you explore the methodology in an applied scenario.
Components of a generative AI workload
As shown in Figure 1, generative AI applications include the following five components:
An organization that owns or is responsible for infrastructure, generative AI applications, and the organization’s private data.
Infrastructure within an organization that isn’t specifically related to the generative AI application itself. This can include databases, backend servers, and websites.
Generative AI applications, which include the following:
Foundation models – AI models with a large number of parameters and trained on a massive amount of diverse data.
Custom models – models that are fine-tuned or trained on an organization’s specific data and use cases, tailored to their unique requirements.
Guardrails – mechanisms or constraints to help make sure that the generative AI application operates within desired boundaries. Examples include content filtering, safety constraints, or ethical guidelines.
Agents – workflows that enable generative AI applications to perform multistep tasks across company systems and data sources.
Knowledge bases – repositories of domain-specific knowledge, rules, or data that the generative AI application can access and use.
Training data – data used to train, fine-tune, or augment the generative AI application’s models, including data for techniques such as retrieval augmented generation (RAG).
Note: Training data is distinct from an organization’s private data. A generative AI application might not have direct access to private data, although this is configured in some environments.
Plugins – additional software components or extensions that you can integrate with the generative AI application to provide specialized functionalities or access to external services or data sources.
Private data refers to the customer’s privately stored, confidential data that the generative AI resources or applications aren’t intended to interact with during normal operation.
Users are the identities that can interact with or access the generative AI application. They can be human or non-human (such as machines).
Figure 1: Common components of an AI/ML workload
Prepare for incident response on generative AI workloads
You should prepare for a security event across three domains: people, process, and technology. For a summary of how to prepare, see the preparation items from the Security Incident Response Guide. In addition, your preparation for a security event that’s related to a generative AI workload should include the following:
People: Train incident response and security operations staff on generative AI – You should make sure that your staff is familiar with generative AI concepts and with the AI/ML services in use at your organization. AWS Skill Builder provides both free and paid courses on both of these subjects.
Process: Develop new playbooks – You should develop new playbooks for security events that are related to a generative AI workload. To learn more about how to develop these, see the following sample playbooks:
Important: Logs can contain sensitive information. To help protect this information, you should set up least privilege access to these logs, like you do for your other security logs. You can also protect sensitive log data with data masking. In Amazon CloudWatch, you can mask data natively through log group data protection policies.
Methodology for incident response on generative AI workloads
After you complete the preparation items, you can use the Methodology for incident response on generative AIworkloads for active response, to help you rapidly triage an active security event involving a generative AI application.
The methodology has seven elements, which we detail in this section. Each element describes a method by which the components can interact with another component or a method by which a component can be modified. Consideration of these elements will help guide your actions during the Operations phase of a security incident, which includes detection, analysis, containment, eradication, and recovery phases.
Access – Determine the designed or intended access patterns for the organization that hosts the components of the generative AI application, and look for deviations or anomalies from those patterns. Consider whether the application is accessible externally or internally because that will impact your analysis.
To help you identify anomalous and potential unauthorized access to your AWS environment, you can use Amazon GuardDuty. If your application is accessible externally, the threat actor might not be able to access your AWS environment directly and thus GuardDuty won’t detect it. The way that you’ve set up authentication to your application will drive how you detect and analyze unauthorized access.
If evidence of unauthorized access to your AWS account or associated infrastructure exists, determine the scope of the unauthorized access, such as the associated privileges and timeline. If the unauthorized access involves service credentials—for example, Amazon Elastic Compute Cloud (Amazon EC2) instance credentials—review the service for vulnerabilities.
Infrastructure changes – Review the supporting infrastructure, such as servers, databases, serverless computing instances, and internal or external websites, to determine if it was accessed or changed. To investigate infrastructure changes, you can analyze CloudTrail logs for modifications of in-scope resources, or analyze other operating system logs or database access logs.
AI changes – Investigate whether users have accessed components of the generative AI application and whether they made changes to those components. Look for signs of unauthorized activities, such as the creation or deletion of custom models, modification of model availability, tampering or deletion of generative AI logging capabilities, tampering with the application code, and removal or modification of generative AI guardrails.
Data store changes – Determine the designed or intended data access patterns, whether users accessed the data stores of your generative AI application, and whether they made changes to these data stores. You should also look for the addition or modification of agents to a generative AI application.
Invocation – Analyze invocations of generative AI models, including the strings and file inputs, for threats, such as prompt injection or malware. You can use the OWASP Top 10 for LLM as a starting point to understand invocation related threats, and you can use invocation logs to analyze prompts for suspicious patterns, keywords, or structures that might indicate a prompt injection attempt. The logs also capture the model’s outputs and responses, enabling behavioral analysis to help identify uncharacteristic or unsafe model behavior indicative of a prompt injection. You can use the timestamps in the logs for temporal analysis to help detect coordinated prompt injection attempts over time and collect information about the user or system that initiated the model invocation, helping to identify the source of potential exploits.
Private data – Determine whether the in-scope generative AI application was designed to have access to private or confidential data. Then look for unauthorized access to, or tampering with, that data.
Agency – Agency refers to the ability of applications to make changes to an organization’s resources or take actions on a user’s behalf. For example, a generative AI application might be configured to generate content that is then used to send an email, invoking another resource or function to do so. You should determine whether the generative AI application has the ability to invoke other functions. Then, investigate whether unauthorized changes were made or if the generative AI application invoked unauthorized functions.
The following table lists some questions to help you address the seven elements of the methodology. Use your answers to guide your response.
Topic
Questions to address
Access
Do you still have access to your computing environment? Is there continued evidence of unauthorized access to your organization?
Infrastructure changes
Were supporting infrastructure resources accessed or changed?
AI changes
Were your AI models, code, or resources accessed or changed?
Data store changes
Were your data stores, knowledge bases, agents, plugins, or training data accessed or tampered with?
Invocation
What data, strings, or files were sent as input to the model? What prompts were sent? What responses were produced?
Private data
What private or confidential data do generative AI resources have access to? Was private data changed or tampered with?
Agency
Can the generative AI application resources be used to start computing services in an organization, or do the generative AI resources have the authority to make changes? Were unauthorized changes made?
Example incident
To see how to use the methodology for investigation and response, let’s walk through an example security event where an unauthorized user compromises a generative AI application that’s hosted on AWS by using credentials that were exposed on a public code repository. Our goal is to determine what resources were accessed, modified, created, or deleted.
To investigate generative AI security events on AWS, these are the main log sources that you should review:
Analysis of access for a generative AI application is similar to that for a standard three-tier web application. To begin, determine whether an organization has access to their AWS account. If the password for the AWS account root user was lost or changed, reset the password. Then, we strongly recommended that you immediately enable a multi-factor authentication (MFA) device for the root user—this should block a threat actor from accessing the root user.
To analyze the infrastructure changes of an application, you should consider both the control plane and data plane. In our example, imagine that Amazon API Gateway was used for authentication to the downstream components of the generative AI application and that other ancillary resources were interacting with your application. Although you could review control plane changes to these resources in CloudTrail, you would need additional logging to be turned on to review changes made on the operating system of the resource. The following are some common names for control plane events that you could find in CloudTrail for this element:
ec2:RunInstances
ec2:StartInstances
ec2:TerminateInstances
ecs:CreateCluster
cloudformation:CreateStack
rds:DeleteDBInstance
rds:ModifyDBClusterSnapshotAttribute
AI changes
Unauthorized changes can include, but are not limited to, system prompts, application code, guardrails, and model availability. Internal user access to the generative AI resources that AWS hosts are logged in CloudTrail and appear with one of the following event sources:
amazonaws.com
amazonaws.com
amazonaws.com
amazonaws.com
The following are a couple examples of the event names in CloudTrail that would represent generative AI resource log tampering in our example scenario:
bedrock:PutModelInvocationLoggingConfiguration
bedrock:DeleteModelInvocationLoggingConfiguration
The following are some common event names in CloudTrail that would represent access to the AI/ML model service configuration:
bedrock:GetFoundationModelAvailability
bedrock:ListProvisionedModelThroughputs
bedrock:ListCustomModels
bedrock:ListFoundationModels
bedrock:ListProvisionedModelThroughput
bedrock:GetGuardrail
bedrock:DeleteGuardrail
In our example scenario, the unauthorized user has gained access to the AWS account. Now imagine that the compromised user has a policy attached that grants them full access to all resources. With this access, the unauthorized user can enumerate each component of Amazon Bedrock and identify the knowledge base and guardrails that are part of the application.
The unauthorized user then requests model access to other foundation models (FMs) within Amazon Bedrock and removes existing guardrails. The access to other foundation models could indicate that the unauthorized user intends to use the generative AI application for their own purposes, and the removal of guardrails minimizes filtering or output checks by the model. AWS recommends that you implement fine-grained access controls by using IAM policies and resource-based policies to restrict access to only the necessary Amazon Bedrock resources, AWS Lambda functions, and other components that the application requires. Also, you should enforce the use of MFA for IAM users, roles, and service accounts with access to critical components such as Amazon Bedrock and other components of your generative AI application.
Data store changes
Typically, you use and access a data store and knowledge base through model invocation, and for Amazon Bedrock, you include the API call bedrock:InvokeModel.
However, if an unauthorized user gains access to the environment, they can create, change, or delete the data sources and knowledge bases that the generative AI applications integrate with. This could cause data or model exfiltration or destruction, as well as data poisoning, and could create a denial-of-service condition for the model. The following are some common event names in CloudTrail that would represent changes to AI/ML data sources in our example scenario:
In this scenario, we have established that the unauthorized user has full access to the generative AI application and that some enumeration took place. The unauthorized user then identified the S3 bucket that was the knowledge base for the generative AI application and uploaded inaccurate data, which corrupted the LLM. For examples of this vulnerability, see the section LLM03 Training Data Poisoning in the OWASP TOP 10 for LLM Applications.
Invocation
Amazon Bedrock uses specific APIs to register model invocation. When a model in Amazon Bedrock is invoked, CloudTrail logs it. However, to determine the prompts that were sent to the generative AI model and the output response that was received from it, you must have configured model invocation logging.
These logs are crucial because they can reveal important information, such as whether a threat actor tried to get the model to divulge information from your data stores or release data that the model was trained or fine-tuned on. For example, the logs could reveal if a threat actor attempted to prompt the model with carefully crafted inputs that were designed to extract sensitive data, bypass security controls, or generate content that violates your policies. Using the logs, you might also learn whether the model was used to generate misinformation, spam, or other malicious outputs that could be used in a security event.
Note: For services such as Amazon Bedrock, invocation logging is disabled by default. We recommend that you enable data events and model invocation logging for generative AI services, where available. However, your organization might not want to capture and store invocation logs for privacy and legal reasons. One common concern is users entering sensitive data as input, which widens the scope of assets to protect. This is a business decision that should be taken into consideration.
In our example scenario, imagine that model invocation wasn’t enabled, so the incident responder couldn’t collect invocation logs to see the model input or output data for unauthorized invocations. The incident responder wouldn’t be able to determine the prompts and subsequent responses from the LLM. Without this logging enabled, they also couldn’t see the full request data, response data, and metadata associated with invocation calls.
Event names in model invocation logs that would represent model invocation logging in Amazon Bedrock include:
bedrock:InvokeModel
bedrock:InvokeModelWithResponseStream
bedrock:Converse
bedrock:ConverseStream
The following is a sample log entry for Amazon Bedrock model invocation logging:
Figure 2: sample model invocation log including prompt and response
Private data
From an architectural standpoint, generative AI applications shouldn’t have direct access to an organization’s private data. You should classify data used to train a generative AI application or for RAG use as data store data and segregate it from private data, unless the generative AI application uses the private data (for example, in the case where a generative AI application is tasked to answer questions about medical records for a patient). One way to help make sure that an organization’s private data is segregated from generative AI applications is to use a separate account and to authenticate and authorize access as necessary to adhere to the principle of least privilege.
Agency
Excessive agency for an LLM refers to an AI system that has too much autonomy or decision-making power, leading to unintended and potentially harmful consequences. This can happen when an LLM is deployed with insufficient oversight, constraints, or alignment with human values, resulting in the model making choices that diverge from what most humans would consider beneficial or ethical.
In our example scenario, the generative AI application has excessive permissions to services that aren’t required by the application. Imagine that the application code was running with an execution role with full access to Amazon Simple Email Service (Amazon SES). This could allow for the unauthorized user to send spam emails on the users’ behalf in response to a prompt. You could help prevent this by limiting permission and functionality of the generative AI application plugins and agents. For more information, see OWASP Top 10 for LLM, evidence of LLM08 Excessive Agency.
During an investigation, while analyzing the logs, both the sourceIPAddress and the userAgent fields will be associated with the generative AI application (for example, sagemaker.amazonaws.com, bedrock.amazonaws.com, or q.amazonaws.com). Some examples of services that might commonly be called or invoked by other services are Lambda, Amazon SNS, and Amazon SES.
Conclusion
To respond to security events related to a generative AI workload, you should still follow the guidance and principles outlined in the AWS Security Incident Response Guide. However, these workloads also require that you consider some additional elements.
You can use the methodology that we introduced in this post to help you address these new elements. You can reference this methodology when investigating unauthorized access to infrastructure where the use of generative AI applications is either a target of unauthorized use, the mechanism for unauthorized use, or both. The methodology equips you with a structured approach to prepare for and respond to security incidents involving generative AI workloads, helping you maintain the security and integrity of these critical applications.
While the potential of generative artificial intelligence (AI) is increasingly under evaluation, organizations are at different stages in defining their generative AI vision. In many organizations, the focus is on large language models (LLMs), and foundation models (FMs) more broadly. This is just the tip of the iceberg, because what enables you to obtain differential value from generative AI is your data.
Generative AI applications are still applications, so you need the following:
Operational databases to support the user experience for interaction steps outside of invoking generative AI models
Data lakes to store your domain-specific data, and analytics to explore them and understand how to use them in generative AI
Data integrations and pipelines to manage (sourcing, transforming, enriching, and validating, among others) and render data usable with generative AI
Governance to manage aspects such as data quality, privacy and compliance to applicable privacy laws, and security and access controls
LLMs and other FMs are trained on a generally available collective body of knowledge. If you use them as is, they’re going to provide generic answers with no differential value for your company. However, if you use generative AI with your domain-specific data, it can provide a valuable perspective for your business and enable you to build differentiated generative AI applications and products that will stand out from others. In essence, you have to enrich the generative AI models with your differentiated data.
On the importance of company data for generative AI, McKinsey stated that “If your data isn’t ready for generative AI, your business isn’t ready for generative AI.”
In this post, we present a framework to implement generative AI applications enriched and differentiated with your data. We also share a reusable, modular, and extendible asset to quickly get started with adopting the framework and implementing your generative AI application. This asset is designed to augment catalog search engine capabilities with generative AI, improving the end-user experience.
You can extend the solution in directions such as the business intelligence (BI) domain with customer 360 use cases, and the risk and compliance domain with transaction monitoring and fraud detection use cases.
Solution overview
There are three key data elements (or context elements) you can use to differentiate the generative AI responses:
Behavioral context – How do you want the LLM to behave? Which persona should the FM impersonate? We call this behavioral context. You can provide these instructions to the model through prompt templates.
Situational context – Is the user request part of an ongoing conversation? Do you have any conversation history and states? We call this situational context. Also, who is the user? What do you know about user and their request? This data is derived from your purpose-built data stores and previous interactions.
Semantic context – Is there any meaningfully relevant data that would help the FMs generate the response? We call this semantic context. This is typically obtained from vector stores and searches. For example, if you’re using a search engine to find products in a product catalog, you could store product details, encoded into vectors, into a vector store. This will enable you to run different kinds of searches.
Using these three context elements together is more likely to provide a coherent, accurate answer than relying purely on a generally available FM.
There are different approaches to design this type of solution; one method is to use generative AI with up-to-date, context-specific data by supplementing the in-context learning pattern using Retrieval Augmented Generation (RAG) derived data, as shown in the following figure. A second approach is to use your fine-tuned or custom-built generative AI model with up-to-date, context-specific data.
The framework used in this post enables you to build a solution with or without fine-tuned FMs and using all three context elements, or a subset of these context elements, using the first approach. The following figure illustrates the functional architecture.
Technical architecture
When implementing an architecture like that illustrated in the previous section, there are some key aspects to consider. The primary aspect is that, when the application receives the user input, it should process it and provide a response to the user as quickly as possible, with minimal response latency. This part of the application should also use data stores that can handle the throughput in terms of concurrent end-users and their activity. This means predominantly using transactional and operational databases.
Depending on the goals of your use case, you might store prompt templates separately in Amazon Simple Storage Service (Amazon S3) or in a database, if you want to apply different prompts for different usage conditions. Alternatively, you might treat them as code and use source code control to manage their evolution over time.
User profiles or other user information (situational context) can come from a variety of database sources. You can store that data in relational databases like Amazon Aurora, NoSQL databases, or graph databases like Amazon Neptune.
The semantic context originates from vector data stores or machine learning (ML) search services. Amazon Aurora PostgreSQL-Compatible Edition with pgvector and Amazon OpenSearch Service are great options if you want to interact with vectors directly. Amazon Kendra, our ML-based search engine, is a great fit if you want the benefits of semantic search without explicitly maintaining vectors yourself or tuning the similarity algorithms to be used.
Amazon Bedrock is a fully managed service that makes high-performing FMs from leading AI startups and Amazon available through a unified API. You can choose from a wide range of FMs to find the model that is best suited for your use case. Amazon Bedrock also offers a broad set of capabilities to build generative AI applications with security, privacy, and responsible AI. Amazon Bedrock provides integrations with both Aurora and OpenSearch Service, so you don’t have to explicitly query the vector data store yourself.
The following figure summarizes the AWS services available to support the solution framework described so far.
Catalog search use case
We present a use case showing how to augment the search capabilities of an existing search engine for product catalogs, such as ecommerce portals, using generative AI and customer data.
Each customer will have their own requirements, so we adopt the framework presented in the previous sections and show an implementation of the framework for the catalog search use case. You can use this framework for both catalog search use cases and as a foundation to be extended based on your requirements.
One additional benefit about this catalog search implementation is that it’s pluggable to existing ecommerce portals, search engines, and recommender systems, so you don’t have to redesign or rebuild your processes and tools; this solution will augment what you currently have with limited changes required.
The solution architecture and workflow is shown in the following figure.
The workflow consists of the following steps:
The end-user browses the product catalog and submits a search, in natual language, using the web interface of the frontend catalog application (not shown). The catalog frontend application sends the user search to the generative AI application. Application logic is currently implemented as a container, but it can be deployed with AWS Lambda as required.
The generative AI application connects to Amazon Bedrock to convert the user search into embeddings.
The application connects with OpenSearch Service to search and retrieve relevant search results (using an OpenSearch index containing products). The application also connects to another OpenSearch index to get user reviews for products listed in the search results. In terms of searches, different options are possible, such as k-NN, hybrid search, or sparse neural search. For this post, we use k-NN search. At this stage, before creating the final prompt for the LLM, the application can perform an additional step to retrieve situational context from operational databases, such as customer profiles, user preferences, and other personalization information.
The application gets prompt templates from an S3 data lake and creates the engineered prompt.
The application sends the prompt to Amazon Bedrock and retrieves the LLM output.
The user interaction is stored in a data lake for downstream usage and BI analysis.
The Amazon Bedrock output retrieved in Step 5 is sent to the catalog application frontend, which shows results on the web UI to the end-user.
There are different security categories to consider and different AWS Security services you can use in each security category. The following are some examples relevant for the architecture shown in this post:
Data protection – You can use AWS Key Management Service (AWS KMS) to manage keys and encrypt data based on the data classification policies defined. You can also use AWS Secrets Manager to manage, retrieve, and rotate database credentials, API keys, and other secrets throughout their lifecycles.
Identity and access management – You can use AWS Identity and Access Management (IAM) to specify who or what can access services and resources in AWS, centrally manage fine-grained permissions, and analyze access to refine permissions across AWS.
Detection and response – You can use AWS CloudTrail to track and provide detailed audit trails of user and system actions to support audits and demonstrate compliance. Additionally, you can use Amazon CloudWatch to observe and monitor resources and applications.
Network security – You can use AWS Firewall Manager to centrally configure and manage firewall rules across your accounts and AWS network security services, such as AWS WAF, AWS Network Firewall, and others.
Conclusion
In this post, we discussed the importance of using customer data to differentiate generative AI usage in applications. We presented a reference framework (including a functional architecture and a technical architecture) to implement a generative AI application using customer data and an in-context learning pattern with RAG-provided data. We then presented an example of how to apply this framework to design a generative AI application using customer data to augment search capabilities and personalize the search results of an ecommerce product catalog.
Contact AWS to get more information on how to implement this framework for your use case. We’re also happy to share the technical asset presented in this post to help you get started building generative AI applications with your data for your specific use case.
About the Authors
Diego Colombatto is a Senior Partner Solutions Architect at AWS. He brings more than 15 years of experience in designing and delivering Digital Transformation projects for enterprises. At AWS, Diego works with partners and customers advising how to leverage AWS technologies to translate business needs into solutions.
Angel Conde Manjon is a Sr. EMEA Data & AI PSA, based in Madrid. He has previously worked on research related to Data Analytics and Artificial Intelligence in diverse European research projects. In his current role, Angel helps partners develop businesses centered on Data and AI.
Tiziano Curci is a Manager, EMEA Data & AI PDS at AWS. He leads a team that works with AWS Partners (G/SI and ISV), to leverage the most comprehensive set of capabilities spanning databases, analytics and machine learning, to help customers unlock the through power of data through an end-to-end data strategy.
In this blog post, we will highlight how ZS Associates used multiple AWS services to build a highly scalable, highly performant, clinical document search platform. This platform is an advanced information retrieval system engineered to assist healthcare professionals and researchers in navigating vast repositories of medical documents, medical literature, research articles, clinical guidelines, protocol documents, activity logs, and more. The goal of this search platform is to locate specific information efficiently and accurately to support clinical decision-making, research, and other healthcare-related activities by combining queries across all the different types of clinical documentation.
ZS is a management consulting and technology firm focused on transforming global healthcare. We use leading-edge analytics, data, and science to help clients make intelligent decisions. We serve clients in a wide range of industries, including pharmaceuticals, healthcare, technology, financial services, and consumer goods. We developed and host several applications for our customers on Amazon Web Services (AWS). ZS is also an AWS Advanced Consulting Partner as well as an Amazon Redshift Service Delivery Partner. As it relates to the use case in the post, ZS is a global leader in integrated evidence and strategy planning (IESP), a set of services that help pharmaceutical companies to deliver a complete and differentiated evidence package for new medicines.
ZS uses several AWS service offerings across the variety of their products, client solutions, and services. AWS services such as Amazon Neptune and Amazon OpenSearch Service form part of their data and analytics pipelines, and AWS Batch is used for long-running data and machine learning (ML) processing tasks.
Clinical data is highly connected in nature, so ZS used Neptune, a fully managed, high performance graph database service built for the cloud, as the database to capture the ontologies and taxonomies associated with the data that formed the supporting a knowledge graph. For our search requirements, We have used OpenSearch Service, an open source, distributed search and analytics suite.
About the clinical document search platform
Clinical documents comprise of a wide variety of digital records including:
Study protocols
Evidence gaps
Clinical activities
Publications
Within global biopharmaceutical companies, there are several key personas who are responsible to generate evidence for new medicines. This evidence supports decisions by payers, health technology assessments (HTAs), physicians, and patients when making treatment decisions. Evidence generation is rife with knowledge management challenges. Over the life of a pharmaceutical asset, hundreds of studies and analyses are completed, and it becomes challenging to maintain a good record of all the evidence to address incoming questions from external healthcare stakeholders such as payers, providers, physicians, and patients. Furthermore, almost none of the information associated with evidence generation activities (such as health economics and outcomes research (HEOR), real-world evidence (RWE), collaboration studies, and investigator sponsored research (ISR)) exists as structured data; instead, the richness of the evidence activities exists in protocol documents (study design) and study reports (outcomes). Therein lies the irony—teams who are in the business of knowledge generation struggle with knowledge management.
ZS unlocked new value from unstructured data for evidence generation leads by applying large language models (LLMs) and generative artificial intelligence (AI) to power advanced semantic search on evidence protocols. Now, evidence generation leads (medical affairs, HEOR, and RWE) can have a natural-language, conversational exchange and return a list of evidence activities with high relevance considering both structured data and the details of the studies from unstructured sources.
Overview of solution
The solution was designed in layers. The document processing layer supports document ingestion and orchestration. The semantic search platform (application) layer supports backend search and the user interface. Multiple different types of data sources, including media, documents, and external taxonomies, were identified as relevant for capture and processing within the semantic search platform.
Document processing solution framework layer
All components and sub-layers are orchestrated using Amazon Managed Workflows for Apache Airflow. The pipeline in Airflow is scaled automatically based on the workload using Batch. We can broadly divide layers here as shown in the following figure:
Document Processing Solution Framework Layers
Data crawling:
In the data crawling layer, documents are retrieved from a specified source SharePoint location and deposited into a designated Amazon Simple Storage Service (Amazon S3) bucket. These documents could be in variety of formats, such as PDF, Microsoft Word, and Excel, and are processed using format-specific adapters.
Data ingestion:
The data ingestion layer is the first step of the proposed framework. At this later, data from a variety of sources smoothly enters the system’s advanced processing setup. In the pipeline, the data ingestion process takes shape through a thoughtfully structured sequence of steps.
These steps include creating a unique run ID each time a pipeline is run, managing natural language processing (NLP) model versions in the versioning table, identifying document formats, and ensuring the health of NLP model services with a service health check.
The process then proceeds with the transfer of data from the input layer to the landing layer, creation of dynamic batches, and continuous tracking of document processing status throughout the run. In case of any issues, a failsafe mechanism halts the process, enabling a smooth transition to the NLP phase of the framework.
Database ingestion:
The reporting layer processes the JSON data from the feature extraction layer and converts it into CSV files. Each CSV file contains specific information extracted from dedicated sections of documents. Subsequently, the pipeline generates a triple file using the data from these CSV files, where each set of entities signifies relationships in a subject-predicate-object format. This triple file is intended for ingestion into Neptune and OpenSearch Service. In the full document embedding module, the document content is segmented into chunks, which are then transformed into embeddings using LLMs such as llama-2 and BGE. These embeddings, along with metadata such as the document ID and page number, are stored in OpenSearch Service. We use various chunking strategies to enhance text comprehension. Semantic chunking divides text into sentences, grouping them into sets, and merges similar ones based on embeddings.
Agentic chunking uses LLMs to determine context-driven chunk sizes, focusing on proposition-based division and simplifying complex sentences. Additionally, context and document aware chunking adapts chunking logic to the nature of the content for more effective processing.
NLP:
The NLP layer serves as a crucial component in extracting specific sections or entities from documents. The feature extraction stage proceeds with localization, where sections are identified within the document to narrow down the search space for further tasks like entity extraction. LLMs are used to summarize the text extracted from document sections, enhancing the efficiency of this process. Following localization, the feature extraction step involves extracting features from the identified sections using various procedures. These procedures, prioritized based on their relevance, use models like Llama-2-7b, mistral-7b, Flan-t5-xl, and Flan-T5-xxl to extract important features and entities from the document text.
The auto-mapping phase ensures consistency by mapping extracted features to standard terms present in the ontology. This is achieved through matching the embeddings of extracted features with those stored in the OpenSearch Service index. Finally, in the Document Layout Cohesion step, the output from the auto-mapping phase is adjusted to aggregate entities at the document level, providing a cohesive representation of the document’s content.
Semantic search platform application layer
This layer, shown in the following figure, uses Neptune as the graph database and OpenSearch Service as the vector engine.
Semantic search platform application layer
Amazon OpenSearch Service:
OpenSearch Service served the dual purpose of facilitating full-text search and embedding-based semantic search. The OpenSearch Service vector engine capability helped to drive Retrieval-Augmented Generation (RAG) workflows using LLMs. This helped to provide a summarized output for search after the retrieval of a relevant document for the input query. The method used for indexing embeddings was FAISS.
OpenSearch Service domain details:
Version of OpenSearch Service: 2.9
Number of nodes: 1
Instance type: r6g.2xlarge.search
Volume size: Gp3: 500gb
Number of Availability Zones: 1
Dedicated master node: Enabled
Number of Availability Zones: 3
No of master Nodes: 3
Instance type(Master Node) : r6g.large.search
To determine the nearest neighbor, we employ the Hierarchical Navigable Small World (HNSW) algorithm. We used the FAISS approximate k-NN library for indexing and searching and the Euclidean distance (L2 norm) for distance calculation between two vectors.
Amazon Neptune:
Neptune enables full-text search (FTS) through the integration with OpenSearch Service. A native streaming service for enabling FTS provided by AWS was established to replicate data from Neptune to OpenSearch Service. Based on the business use case for search, a graph model was defined. Considering the graph model, subject matter experts from the ZS domain team curated custom taxonomy capturing hierarchical flow of classes and sub-classes pertaining to clinical data. Open source taxonomies and ontologies were also identified, which would be part of the knowledge graph. Sections and entities were identified to be extracted from clinical documents. An unstructured document processing pipeline developed by ZS processed the documents in parallel and populated triples in RDF format from documents for Neptune ingestion.
The triples are created in such a way that semantically similar concepts are linked—hence creating a semantic layer for search. After the triples files are created, they’re stored in an S3 bucket. Using the Neptune Bulk Loader, we were able to load millions of triples to the graph.
Neptune ingests both structured and unstructured data, simplifying the process to retrieve content across different sources and formats. At this point, we were able to discover previously unknown relationships between the structured and unstructured data, which was then made available to the search platform. We used SPARQL query federation to return results from the enriched knowledge graph in the Neptune graph database and integrated with OpenSearch Service.
Neptune was able to automatically scale storage and compute resources to accommodate growing datasets and concurrent API calls. Presently, the application sustains approximately 3,000 daily active users. Concurrently, there is an observation of approximately 30–50 users initiating queries simultaneously within the application environment. The Neptune graph accommodates a substantial repository of approximately 4.87 million triples. The triples count is increasing because of our daily and weekly ingestion pipeline routines.
Neptune configuration:
Instance Class: db.r5d.4xlarge
Engine version: 1.2.0.1
LLMs:
Large language models (LLMs) like Llama-2, Mistral and Zephyr are used for extraction of sections and entities. Models like Flan-t5 were also used for extraction of other similar entities used in the procedures. These selected segments and entities are crucial for domain-specific searches and therefore receive higher priority in the learning-to-rank algorithm used for search.
Additionally, LLMs are used to generate a comprehensive summary of the top search results.
The LLMs are hosted on Amazon Elastic Kubernetes Service (Amazon EKS) with GPU-enabled node groups to ensure rapid inference processing. We’re using different models for different use cases. For example, to generate embeddings we deployed a BGE base model, while Mistral, Llama2, Zephyr, and others are used to extract specific medical entities, perform part extraction, and summarize search results. By using different LLMs for distinct tasks, we aim to enhance accuracy within narrow domains, thereby improving the overall relevance of the system.
Fine tuning :
Already fine-tuned models on pharma-specific documents were used. The models used were:
PharMolix/BioMedGPT-LM-7B (finetuned LLAMA-2 on medical)
emilyalsentzer/Bio_ClinicalBERT
stanford-crfm/BioMedLM
microsoft/biogpt
Re ranker, sorter, and filter stage:
Remove any stop words and special characters from the user input query to ensure a clean query. Upon pre-processing the query, create combinations of search terms by forming combinations of terms with varying n-grams. This step enriches the search scope and improves the chances of finding relevant results. For instance, if the input query is “machine learning algorithms,” generating n-grams could result in terms like “machine learning,” “learning algorithms,” and “machine learning algorithms”. Run the search terms simultaneously using the search API to access both Neptune graph and OpenSearch Service indexes. This hybrid approach broadens the search coverage, tapping into the strengths of both data sources. Specific weight is assigned to each result obtained from the data sources based on the domain’s specifications. This weight reflects the relevance and significance of the result within the context of the search query and the underlying domain. For example, a result from Neptune graph might be weighted higher if the query pertains to graph-related concepts, i.e. the search term is related directly to the subject or object of a triple, whereas a result from OpenSearch Service might be given more weightage if it aligns closely with text-based information. Documents that appear in both Neptune graph and OpenSearch Service receive the highest priority, because they likely offer comprehensive insights. Next in priority are documents exclusively sourced from the Neptune graph, followed by those solely from OpenSearch Service. This hierarchical arrangement ensures that the most relevant and comprehensive results are presented first. After factoring in these considerations, a final score is calculated for each result. Sorting the results based on their final scores ensures that the most relevant information is presented in the top n results.
Final UI
An evidence catalogue is aggregated from disparate systems. It provides a comprehensive repository of completed, ongoing and planned evidence generation activities. As evidence leads make forward-looking plans, the existing internal base of evidence is made readily available to inform decision-making.
The following video is a demonstration of an evidence catalog:
Customer impact
When completed, the solution provided the following customer benefits:
The search on multiple data source (structured and unstructured documents) enables visibility of complex hidden relationships and insights.
Clinical documents often contain a mix of structured and unstructured data. Neptune can store structured information in a graph format, while the vector database can handle unstructured data using embeddings. This integration provides a comprehensive approach to querying and analyzing diverse clinical information.
By building a knowledge graph using Neptune, you can enrich the clinical data with additional contextual information. This can include relationships between diseases, treatments, medications, and patient records, providing a more holistic view of healthcare data.
The search application helped in staying informed about the latest research, clinical developments, and competitive landscape.
This has enabled customers to make timely decisions, identify market trends, and help positioning of products based on a comprehensive understanding of the industry.
The application helped in monitoring adverse events, tracking safety signals, and ensuring that drug-related information is easily accessible and understandable, thereby supporting pharmacovigilance efforts.
The search application is currently running in production with 3000 active users.
Customer success criteria
The following success criteria were use to evaluate the solution:
Quick, high accuracy search results: The top three search results were 99% accurate with an overall latency of less than 3 seconds for users.
Identified, extracted portions of the protocol: The sections identified has a precision of 0.98 and recall of 0.87.
Accurate and relevant search results based on simple human language that answer the user’s question.
Clear UI and transparency on which portions of the aligned documents (protocol, clinical study reports, and publications) matched the text extraction.
Knowing what evidence is completed or in-process reduces redundancy in newly proposed evidence activities.
Challenges faced and learnings
We faced two main challenges in developing and deploying this solution.
Large data volume
The unstructured documents were required to be embedded completely and OpenSearch Service helped us achieve this with the right configuration. This involved deploying OpenSearch Service with master nodes and allocating sufficient storage capacity for embedding and storing unstructured document embeddings entirely. We stored up to 100 GB of embeddings in OpenSearch Service.
Inference time reduction
In the search application, it was vital that the search results were retrieved with lowest possible latency. With the hybrid graph and embedding search, this was challenging.
We addressed high latency issues by using an interconnected framework of graphs and embeddings. Each search method complemented the other, leading to optimal results. Our streamlined search approach ensures efficient queries of both the graph and the embeddings, eliminating any inefficiencies. The graph model was designed to minimize the number of hops required to navigate from one entity to another, and we improved its performance by avoiding the storage of bulky metadata. Any metadata too large for the graph was stored in OpenSearch, which served as our metadata store for graph and vector store for embeddings. Embeddings were generated using context-aware chunking of content to reduce the total embedding count and retrieval time, resulting in efficient querying with minimal inference time.
The Horizontal Pod Autoscaler (HPA) provided by Amazon EKS, intelligently adjusts pod resources based on user-demand or query loads, optimizing resource utilization and maintaining application performance during peak usage periods.
Conclusion
In this post, we described how to build an advanced information retrieval system designed to assist healthcare professionals and researchers in navigating through a diverse range of medical documents, including study protocols, evidence gaps, clinical activities, and publications. By using Amazon OpenSearch Service as a distributed search and vector database and Amazon Neptune as a knowledge graph, ZS was able to remove the undifferentiated heavy lifting associated with building and maintaining such a complex platform.
If you’re facing similar challenges in managing and searching through vast repositories of medical data, consider exploring the powerful capabilities of OpenSearch Service and Neptune. These services can help you unlock new insights and enhance your organization’s knowledge management capabilities.
About the authors
Abhishek Pan is a Sr. Specialist SA-Data working with AWS India Public sector customers. He engages with customers to define data-driven strategy, provide deep dive sessions on analytics use cases, and design scalable and performant analytical applications. He has 12 years of experience and is passionate about databases, analytics, and AI/ML. He is an avid traveler and tries to capture the world through his lens.
Gourang Harhare is a Senior Solutions Architect at AWS based in Pune, India. With a robust background in large-scale design and implementation of enterprise systems, application modernization, and cloud native architectures, he specializes in AI/ML, serverless, and container technologies. He enjoys solving complex problems and helping customer be successful on AWS. In his free time, he likes to play table tennis, enjoy trekking, or read books
Kevin Phillips is a Neptune Specialist Solutions Architect working in the UK. He has 20 years of development and solutions architectural experience, which he uses to help support and guide customers. He has been enthusiastic about evangelizing graph databases since joining the Amazon Neptune team, and is happy to talk graph with anyone who will listen.
Sandeep Varma is a principal in ZS’s Pune, India, office with over 25 years of technology consulting experience, which includes architecting and delivering innovative solutions for complex business problems leveraging AI and technology. Sandeep has been critical in driving various large-scale programs at ZS Associates. He was the founding member the Big Data Analytics Centre of Excellence in ZS and currently leads the Enterprise Service Center of Excellence. Sandeep is a thought leader and has served as chief architect of multiple large-scale enterprise big data platforms. He specializes in rapidly building high-performance teams focused on cutting-edge technologies and high-quality delivery.
Alex Turok has over 16 years of consulting experience focused on global and US biopharmaceutical companies. Alex’s expertise is in solving ambiguous, unstructured problems for commercial and medical leadership. For his clients, he seeks to drive lasting organizational change by defining the problem, identifying the strategic options, informing a decision, and outlining the transformation journey. He has worked extensively in portfolio and brand strategy, pipeline and launch strategy, integrated evidence strategy and planning, organizational design, and customer capabilities. Since joining ZS, Alex has worked across marketing, sales, medical, access, and patient services and has touched over twenty therapeutic categories, with depth in oncology, hematology, immunology and specialty therapeutics.
In a previous blog, we introduced Trident, Grab’s internal marketing campaign platform. Trident empowers our marketing team to configure If This, Then That (IFTTT) logic and processes real-time events based on that.
While we mainly covered how we scaled up the system to handle large volumes of real-time events, we did not explain the implementation of the event processing mechanism. This blog will fill up this missing piece. We will walk you through the various processing mechanisms supported in Trident and how they were built.
Base building block: Treatment
In our system, we use the term “treatment” to refer to the core unit of a full IFTTT data structure. A treatment is an amalgamation of three key elements – an event, conditions (which are optional), and actions. For example, consider a promotional campaign that offers “100 GrabPoints for completing a ride paid with GrabPay Credit”. This campaign can be transformed into a treatment in which the event is “ride completion”, the condition is “payment made using GrabPay Credit”, and the action is “awarding 100 GrabPoints”.
Data generated across various Kafka streams by multiple services within Grab forms the crux of events and conditions for a treatment. Trident processes these Kafka streams, treating each data object as an event for the treatments. It evaluates the set conditions against the data received from these events. If all conditions are met, Trident then executes the actions.
Figure 1. Trident processes Kafka streams as events for treatments.
When the Trident user interface (UI) was first established, campaign creators had to grasp the treatment concept and configure the treatments accordingly. As we improved the UI, it became more user-friendly.
Building on top of treatment
Campaigns can be more complex than the example we provided earlier. In such scenarios, a single campaign may need transformation into several treatments. All these individual treatments are categorised under what we refer to as a “treatment group”. In this section, we discuss features that we have developed to manage such intricate campaigns.
Counter
Let’s say we have a marketing campaign that “rewards users after they complete 4 rides”. For this requirement, it’s necessary for us to keep track of the number of rides each user has completed. To make this possible, we developed a capability known as counter.
On the backend, a single counter setup translates into two treatments.
Treatment 1:
Event: onRideCompleted
Condition: N/A
Action: incrementUserStats
Treatment 2:
Event: onProfileUpdate
Condition: Ride Count == 4
Action: awardReward
In this feature, we introduce a new event, onProfileUpdate. The incrementUserStats action in Treatment 1 triggers the onProfileUpdate event following the update of the user counter. This allows Treatment 2 to consume the event and perform subsequent evaluations.
Figure 2. The end-to-end evaluation process when using the Counter feature.
When the onRideCompleted event is consumed, Treatment 1 is evaluated which then executes the incrementUserStat action. This action increments the user’s ride counter in the database, gets the latest counter value, and publishes an onProfileUpdate event to Kafka.
There are also other consumers that listen to onProfileUpdate events. When this event is consumed, Treatment 2 is evaluated. This process involves verifying whether the Ride Count equals to 4. If the condition is satisfied, the awardReward action is triggered.
This feature is not limited to counting the number of event occurrences only. It’s also capable of tallying the total amount of transactions, among other things.
Delay
Another feature available on Trident is a delay function. This feature is particularly beneficial in situations where we want to time our actions based on user behaviour. For example, we might want to give a ride voucher to a user three hours after they’ve ordered a ride to a theme park. The intention for this is to offer them a voucher they can use for their return trip.
On the backend, a delay setup translates into two treatments. Given the above scenario, the treatments are as follows:
Treatment 1:
Event: onRideCompleted
Condition: Dropoff Location == Universal Studio
Action: scheduleDelayedEvent
Treatment 2:
Event: onDelayedEvent
Condition: N/A
Action: awardReward
We introduce a new event, onDelayedEvent, which Treatment 1 triggers during the scheduleDelayedEvent action. This is made possible by using Simple Queue Service (SQS), given its built-in capability to publish an event with a delay.
Figure 3. The end-to-end evaluation process when using the Delay feature.
The maximum delay that SQS supports is 15 minutes; meanwhile, our platform allows for a delay of up to x hours. To address this limitation, we publish the event multiple times upon receiving the message, extending the delay by another 15 minutes each time, until it reaches the desired delay of x hours.
Limit
The Limit feature is used to restrict the number of actions for a specific campaign or user within that campaign. This feature can be applied on a daily basis or for the full duration of the campaign.
For instance, we can use the Limit feature to distribute 1000 vouchers to users who have completed a ride and restrict it to only one voucher for one user per day. This ensures a controlled distribution of rewards and prevents a user from excessively using the benefits of a campaign.
In the backend, a limit setup translates into conditions within a single treatment. Given the above scenario, the treatment would be as follows:
Event: onRideCompleted
Condition: TotalUsageCount <= 1000 AND DailyUserUsageCount <= 1
Action: awardReward
Similar to the Counter feature, it’s necessary for us to keep track of the number of completed rides for each user in the database.
Figure 4. The end-to-end evaluation process when using the Limit feature.
A better campaign builder
As our campaigns grew more and more complex, the treatment creation quickly became overwhelming. A complex logic flow often required the creation of many treatments, which was cumbersome and error-prone. The need for a more visual and simpler campaign builder UI became evident.
Our design team came up with a flow-chart-like UI. Figure 5, 6, and 7 show examples of how certain imaginary campaign setup would look like in the new UI.
Figure 5. When users complete a food order, if they are a gold user, award them with A. However, if they are a silver user, award them with B.
Figure 6. When users complete a food or mart order, increment a counter. When the counter reaches 5, send them a message. Once the counter reaches 10, award them with points.
Figure 7. When a user confirms a ride booking, wait for 1 minute, and then conduct A/B testing by sending a message 50% of the time.
The campaign setup in the new UI can be naturally stored as a node tree structure. The following is how the example in figure 5 would look like in JSON format. We assign each node a unique number ID, and store a map of the ID to node content.
The question then arises, how do we execute this node tree as treatments? This requires a conversion process. We then developed the following algorithm for converting the node tree into equivalent treatments:
// convertToTreatments is the main function
func convertToTreatments(rootNode) -> []Treatment:
  output = []

  for each scenario in rootNode.scenarios:
    // traverse down each branch
    context = createConversionContext(scenario)
    for child in rootNode.children:
      treatments = convertHelper(context, child)
      output.append(treatments)

  return output

// convertHelper is a recursive helper function
func convertHelper(context, node) -> []Treatment:
  output = []
  f = getNodeConverterFunc(node.type)
  treatments, updatedContext = f(context, node)

  output.append(treatments)

  for child in rootNode.children:
    treatments = convertHelper(updatedContext, child)
    output.append(treatments)

  return output
The getNodeConverterFunc will return different handler functions according to the node type. Each handler function will either update the conversion context, create treatments, or both.
Table 1. The handler logic mapping for each node type.
Node type
Logic
condition
Add conditions into the context and return the updated context.
action
Return a treatment with the event type, condition from the context, and the action itself.
delay
Return a treatment with the event type, condition from the context, and a scheduleDelayedEvent action.
count
Return a treatment with the event type, condition from the context, and an incrementUserStats action.
count condition
Form a condition with the count key from the context, and return an updated context with the condition.
It is important to note that treatments cannot always be reverted to their original node tree structure. This is because different node trees might be converted into the same set of treatments.
The following is an example where two different node trees setups correspond to the same set of treatments:
Food order complete -> if gold user -> then award A
Food order complete -> if silver user -> then award B
Figure 8. An example of two node tree setups corresponding to the the same set of treatments.
Therefore, we need to store both the campaign node tree JSON and treatments, along with the mapping between the nodes and the treatments. Campaigns are executed using treatments, but displayed using the node tree JSON.
Figure 9. For each campaign, we store both the node tree JSON and treatments, along with their mapping.
How we handle campaign updates
There are instances where a marketing user updates a campaign after its creation. For such cases we need to identify:
Which existing treatments should be removed.
Which existing treatments should be updated.
What new treatments should be added.
We can do this by using the node-treatment mapping information we stored. The following is the pseudocode for this process:
func howToUpdateTreatments(oldTreatments []Treatment, newTreatments []Treatment):
  treatmentsUpdate = map[int]Treatment // treatment ID -> updated treatment
  treatmentsRemove = []int // list of treatment IDs
  treatmentsAdd = []Treatment // list of new treatments to be created

  matchedOldTreamentIDs = set()

  for newTreatment in newTreatments:
    matched = false

    // see whether the nodes match any old treatment
    for oldTreatment in oldTreatments:
      // two treatments are considered matched if their linked node IDs are identical
      if isSame(oldTreatment.nodeIDs, newTreatment.nodeIDs):
        matched = true
        treatmentsUpdate[oldTreament.ID] = newTreatment
        matchedOldTreamentIDs.Add(oldTreatment.ID)
        break

    // if no match, that means it is a new treatment we need to create
    if not matched:
      treatmentsAdd.Append(newTreatment)

  // all the non-matched old treatments should be deleted
  for oldTreatment in oldTreatments:
    if not matchedOldTreamentIDs.contains(oldTreatment.ID):
      treatmentsRemove.Append(oldTreatment.ID)

  return treatmentsAdd, treatmentsUpdate, treatmentsRemove
For a visual illustration, let’s consider a campaign that initially resembles the one shown in figure 10. The node IDs are highlighted in red.
Figure 10. A campaign in node tree structure.
This campaign will generate two treatments.
Table 2. The campaign shown in the figure 10 will generated two treatments.
ID
Treatment
Linked node IDs
1
Event: food order complete Condition: gold user Action: award A
1, 2, 3
2
Event: food order complete Condition: silver user Action: award B
1, 4, 5
After creation, the campaign creator updates the upper condition branch, deletes the lower branch, and creates a new branch. Note that after node deletion, the deleted node ID will not be reused.
Figure 11. An updated campaign in node tree structure.
According to our logic in figure 11, the following update will be performed:
Update action for treatment 1 to “award C”.
Delete treatment 2
Create a new treatment: food -> is promo used -> send push
Conclusion
This article reveals the workings of Trident, our bespoke marketing campaign platform. By exploring the core concept of a “treatment” and additional features like Counter, Delay and Limit, we illustrated the flexibility and sophistication of our system.
We’ve explained changes to the Trident UI that have made campaign creation more intuitive. Transforming campaign setups into executable treatments while preserving the visual representation ensures seamless campaign execution and adaptation.
Our devotion to improving Trident aims to empower our marketing team to design engaging and dynamic campaigns, ultimately providing excellent experiences to our users.
Join us
Grab is the leading superapp platform in Southeast Asia, providing everyday services that matter to consumers. More than just a ride-hailing and food delivery app, Grab offers a wide range of on-demand services in the region, including mobility, food, package and grocery delivery services, mobile payments, and financial services across 700 cities in eight countries.
Powered by technology and driven by heart, our mission is to drive Southeast Asia forward by creating economic empowerment for everyone. If this mission speaks to you, join our team today!
Amazon Q Developer is a generative artificial intelligence (AI) powered conversational assistant that can help you understand, build, extend, and operate AWS applications. You can ask questions about AWS architecture, your AWS resources, best practices, documentation, support, and more.
With Amazon Q Developer in your IDE, you can write a comment in natural language that outlines a specific task, such as, “Upload a file with server-side encryption.” Based on this information, Amazon Q Developer recommends one or more code snippets directly in the IDE that can accomplish the task. You can quickly and easily accept the top suggestions (tab key), view more suggestions (arrow keys), or continue writing your own code.
However, Amazon Q Developer in the IDE is more than just a code completion plugin. Amazon Q Developer is a generative AI (GenAI) powered assistant for software development that can be used to have a conversation about your code, get code suggestions, or ask questions about building software. This provides the benefits of collaborative paired programming, powered by GenAI models that have been trained on billions of lines of code, from the Amazon internal code-base and publicly available sources.
The challenge
At the 2024 AWS Summit in Sydney, an exhilarating code challenge took center stage, pitting a Blue Team against a Red Team, with approximately 10 to 15 challengers in each team, in a battle of coding prowess. The challenge consisted of 20 tasks, starting with basic math and string manipulation, and progressively escalating in difficulty to include complex algorithms and intricate ciphers.
The Blue Team had a distinct advantage, leveraging the powerful capabilities of Amazon Q Developer, the most capable generative AI-powered assistant for software development. With Q Developer’s guidance, the Blue Team navigated increasingly complex tasks with ease, tapping into Q Developer’s vast knowledge base and problem-solving abilities. In contrast, the Red Team competed without assistance, relying solely on their own coding expertise and problem-solving skills to tackle daunting challenges.
As the competition unfolded, the two teams battled it out, each striving to outperform the other. The Blue Team’s efficient use of Amazon Q Developer proved to be a game-changer, allowing them to tackle the most challenging tasks with remarkable speed and accuracy. However, the Red Team’s sheer determination and technical prowess kept them in the running, showcasing their ability to think outside the box and devise innovative solutions.
The culmination of the code challenge was a thrilling finale, with both teams pushing the boundaries of their skills and ultimately leaving the audience in a state of admiration for their remarkable achievements.
The graph shows the average completion time in which Team Blue “Q Developer” completed more questions across the board in less time than Team Red “Solo Coder”. Within the 1-hour time limit, Team Blue got all the way to Question 19, whereas Team Red only got to Question 16.
There are some assumptions and validations. People who consider themselves very experienced programmers were encouraged to choose team Red and not use AI, to test themselves against team Blue, those using AI. The code challenges were designed to test the output of applying logic. They were specifically designed to be passable without the use of Amazon Q Developer, to test the optimization of writing logical code with Amazon Q Developer. As a result, the code tasks worked well with Amazon Q Developer due to the nature of and underlying training of Amazon Q Developer models. Many people who attended the event were not Python Programmers (we constrained the challenge to Python only), and walked away impressed at how much of the challenge they could complete.
As an example of one of the more complex questions competitors were given to solve was:
Implement the rail fence cipher.
In the Rail Fence cipher, the message is written downwards on successive "rails" of an imaginary fence, then moving up when we get to the bottom (like a zig-zag). Finally the message is then read off in rows.

For example, using three "rails" and the message "WE ARE DISCOVERED FLEE AT ONCE", the cipherer writes out:

W . . . E . . . C . . . R . . . L . . . T . . . E
. E . R . D . S . O . E . E . F . E . A . O . C .
. . A . . . I . . . V . . . D . . . E . . . N . .

Then reads off: WECRLTEERDSOEEFEAOCAIVDEN

Given variable a. Use a three-rail fence cipher so that result is equal to the decoded message of variable a.
The questions were both algorithmic and logical in nature, which made them great for testing conversational natural language capability to solve questions using Amazon Q Developer, or by applying one’s own logic to write code to solve the question.
Top scoring individual per team:
Total Questions Complete
individual time (min)
With Q Developer (Blue Team)
19
30.46
Solo Coder (Red Team)
16
58.06
By comparing the top two competitors, and considering the solo coder was a highly experienced programmer versus the top Q Developer coder, who was a relatively new programmer not familiar with Python, you can see the efficiency gain when using Q Developer as an AI peer programmer. It took the entire 60 minutes for the solo coder to complete 16 questions, whereas the Q Developer coder got to the final question (Question 20, incomplete) in half of the time.
Summary
Integrating advanced IDE features and adopting paired programming have significantly improved coding efficiency and quality. However, the introduction of Amazon Q Developer has taken this evolution to new heights. By tapping into Q Developer’s vast knowledge base and problem-solving capabilities, the Blue Team was able to navigate complex coding challenges with remarkable speed and accuracy, outperforming the unassisted Red Team. This highlights the transformative impact of leveraging generative AI as a collaborative pair programmer in modern software development, delivering greater efficiency, problem-solving, and, ultimately, higher-quality code. Get started with Amazon Q Developer for your IDE by installing the plugin and enabling your builder ID today.
Starting today, you can use three new text-to-image models from Stability AI in Amazon Bedrock: Stable Image Ultra, Stable Diffusion 3 Large, and Stable Image Core. These models greatly improve performance in multi-subject prompts, image quality, and typography and can be used to rapidly generate high-quality visuals for a wide range of use cases across marketing, advertising, media, entertainment, retail, and more.
These models excel in producing images with stunning photorealism, boasting exceptional detail, color, and lighting, addressing common challenges like rendering realistic hands and faces. The models’ advanced prompt understanding allows it to interpret complex instructions involving spatial reasoning, composition, and style.
The three new Stability AI models available in Amazon Bedrock cover different use cases:
Stable Image Ultra – Produces the highest quality, photorealistic outputs perfect for professional print media and large format applications. Stable Image Ultra excels at rendering exceptional detail and realism.
Stable Diffusion 3 Large – Strikes a balance between generation speed and output quality. Ideal for creating high-volume, high-quality digital assets like websites, newsletters, and marketing materials.
Stable Image Core – Optimized for fast and affordable image generation, great for rapidly iterating on concepts during ideation.
This table summarizes the model’s key features:
Features
Stable Image Ultra
Stable Diffusion 3 Large
Stable Image Core
Parameters
16 billion
8 billion
2.6 billion
Input
Text
Text or image
Text
Typography
Tailored for large-scale display
Tailored for large-scale display
Versatility and readability across different sizes and applications
Visual aesthetics
Photorealistic image output
Highly realistic with finer attention to detail
Good rendering; not as detail-oriented
One of the key improvements of Stable Image Ultra and Stable Diffusion 3 Large compared to Stable Diffusion XL (SDXL) is text quality in generated images, with fewer errors in spelling and typography thanks to its innovative Diffusion Transformer architecture, which implements two separate sets of weights for image and text but enables information flow between the two modalities.
Here are a few images created with these models.
Stable Image Ultra – Prompt: photo, realistic, a woman sitting in a field watching a kite fly in the sky, stormy sky, highly detailed, concept art, intricate, professional composition.
Stable Diffusion 3 Large – Prompt: comic-style illustration, male detective standing under a streetlamp, noir city, wearing a trench coat, fedora, dark and rainy, neon signs, reflections on wet pavement, detailed, moody lighting.
Stable Image Core – Prompt: professional 3d render of a white and orange sneaker, floating in center, hovering, floating, high quality, photorealistic.
Use cases for the new Stability AI models in Amazon Bedrock Text-to-image models offer transformative potential for businesses across various industries and can significantly streamline creative workflows in marketing and advertising departments, enabling rapid generation of high-quality visuals for campaigns, social media content, and product mockups. By expediting the creative process, companies can respond more quickly to market trends and reduce time-to-market for new initiatives. Additionally, these models can enhance brainstorming sessions, providing instant visual representations of concepts that can spark further innovation.
For e-commerce businesses, AI-generated images can help create diverse product showcases and personalized marketing materials at scale. In the realm of user experience and interface design, these tools can quickly produce wireframes and prototypes, accelerating the design iteration process. The adoption of text-to-image models can lead to significant cost savings, increased productivity, and a competitive edge in visual communication across various business functions.
Here are some example use cases across different industries:
Advertising and Marketing
Stable Image Ultra for luxury brand advertising and photorealistic product showcases
Stable Diffusion 3 Large for high-quality product marketing images and print campaigns
Use Stable Image Core for rapid A/B testing of visual concepts for social media ads
E-commerce
Stable Image Ultra for high-end product customization and made-to-order items
Stable Diffusion 3 Large for most product visuals across an e-commerce site
Stable Image Core to quickly generate product images and keep listings up-to-date
Media and Entertainment
Stable Image Ultra for ultra-realistic key art, marketing materials, and game visuals
Stable Diffusion 3 Large for environment textures, character art, and in-game assets
Stable Image Core for rapid prototyping and concept art exploration
Using the new Stability AI models in the Amazon Bedrock console In the Amazon Bedrock console, I choose Model access from the navigation pane to enable access the three new models in the Stability AI section.
Now that I have access, I choose Image in the Playgrounds section of the navigation pane. For the model, I choose Stability AI and Stable Image Ultra.
As prompt, I type:
A stylized picture of a cute old steampunk robot with in its hands a sign written in chalk that says "Stable Image Ultra in Amazon Bedrock".
I leave all other options to their default values and choose Run. After a few seconds, I get what I asked. Here’s the image:
Using Stable Image Ultra with the AWS CLI While I am still in the console Image playground, I choose the three small dots in the corner of the playground window and then View API request. In this way, I can see the AWS Command Line Interface (AWS CLI) command equivalent to what I just did in the console:
aws bedrock-runtime invoke-model \
--model-id stability.stable-image-ultra-v1:0 \
--body "{\"prompt\":\"A stylized picture of a cute old steampunk robot with in its hands a sign written in chalk that says \\\"Stable Image Ultra in Amazon Bedrock\\\".\",\"mode\":\"text-to-image\",\"aspect_ratio\":\"1:1\",\"output_format\":\"jpeg\"}" \
--cli-binary-format raw-in-base64-out \
--region us-west-2 \
invoke-model-output.txt
To use Stable Image Core or Stable Diffusion 3 Large, I can replace the model ID.
The previous command outputs the image in Base64 format inside a JSON object in a text file.
To get the image with a single command, I write the output JSON file to standard output and use the jq tool to extract the encoded image so that it can be decoded on the fly. The output is written in the img.png file. Here’s the full command:
aws bedrock-runtime invoke-model \
--model-id stability.stable-image-ultra-v1:0 \
--body "{\"prompt\":\"A stylized picture of a cute old steampunk robot with in its hands a sign written in chalk that says \\\"Stable Image Ultra in Amazon Bedrock\\\".\",\"mode\":\"text-to-image\",\"aspect_ratio\":\"1:1\",\"output_format\":\"jpeg\"}" \
--cli-binary-format raw-in-base64-out \
--region us-west-2 \
/dev/stdout | jq -r '.images[0]' | base64 --decode > img.png
Using Stable Image Ultra with AWS SDKs Here’s how you can use Stable Image Ultra with the AWS SDK for Python (Boto3). This simple application interactively asks for a text-to-image prompt and then calls Amazon Bedrock to generate the image.
import base64
import boto3
import json
import os

MODEL_ID = "stability.stable-image-ultra-v1:0"

bedrock_runtime = boto3.client("bedrock-runtime", region_name="us-west-2")

print("Enter a prompt for the text-to-image model:")
prompt = input()

body = {
    "prompt": prompt,
    "mode": "text-to-image"
}
response = bedrock_runtime.invoke_model(modelId=MODEL_ID, body=json.dumps(body))

model_response = json.loads(response["body"].read())

base64_image_data = model_response["images"][0]

i, output_dir = 1, "output"
if not os.path.exists(output_dir):
    os.makedirs(output_dir)
while os.path.exists(os.path.join(output_dir, f"img_{i}.png")):
    i += 1

image_data = base64.b64decode(base64_image_data)

image_path = os.path.join(output_dir, f"img_{i}.png")
with open(image_path, "wb") as file:
    file.write(image_data)

print(f"The generated image has been saved to {image_path}")
The application writes the resulting image in an output directory that is created if not present. To not overwrite existing files, the code checks for existing files to find the first file name available with the img_<number>.png format.
Customer voices Learn from Ken Hoge, Global Alliance Director, Stability AI, how Stable Diffusion models are reshaping the industry from text-to-image to video, audio, and 3D, and how Amazon Bedrock empowers customers with an all-in-one, secure, and scalable solution.
Step into a world where reading comes alive with Nicolette Han, Product Owner, Stride Learning. With support from Amazon Bedrock and AWS, Stride Learning’s Legend Library is transforming how young minds engage with and comprehend literature using AI to create stunning, safe illustrations for children stories.
Key to innovation and improvement in machine learning (ML) models is the ability for rapid iteration. Our team, Chimera, part of the Artificial Intelligence (AI) Platform team, provides the essential compute infrastructure, ML pipeline components, and backend services. This support enables our ML engineers, data scientists, and data analysts to efficiently experiment and develop ML solutions at scale.
With a commitment to leveraging the latest Generative AI (GenAI) technologies, Grab is enhancing productivity tools for all Grabbers. Our Chimera Sandbox, a scalable Notebook platform, facilitates swift experimentation and development of ML solutions, offering deep integration with our AI Gateway. This enables easy access to various Large Language Models (LLMs) (both proprietary and open source), ensuring scalability, compliance, and access control are managed seamlessly.
What is Chimera Sandbox?
Chimera Sandbox is a Notebook service platform. It allows users to launch multiple notebook and visualisation services for experimentation and development. The platform offers an extremely quick onboarding process enabling any Grabber to start learning, exploring and experimenting in just a few minutes. This inclusivity and ease of use have been key in driving the adoption of the platform across different teams within Grab and empowering all Grabbers to be GenAI-ready.
One significant challenge in harnessing ML for innovation, whether for technical experts or non-technical enthusiasts, has been the accessibility of resources. This includes GPU instances and specialised services for developing LLM-powered applications. Chimera Sandbox addresses this head-on by offering an extensive array of compute instances, both with and without GPU support, thus removing barriers to experimentation. Its deep integration with Grab’s suite of internal ML tools transforms the way users approach ML projects. Users benefit from features like hyperparameter tuning, tracking ML training metadata, accessing diverse LLMs through Grab’s AI Gateway, and experimenting with rich datasets from Grab’s data lake. Chimera Sandbox ensures that users have everything they need at their fingertips. This ecosystem not only accelerates the development process but also encourages innovative approaches to solving complex problems.
The underlying compute infrastructure of the Chimera Sandbox platform is Grab’s very own battle-tested, highly scalable ML compute infrastructure running on multiple Kubernetes clusters. Each cluster can scale up to thousands of nodes at peak times gracefully. This scalability ensures that the platform can handle the high computational demands of ML tasks. The robustness of Kubernetes ensures that the platform remains stable, reliable, and highly available even under heavy load. At any point in time, there can be hundreds of data scientists, ML engineers and developers experimenting and developing on the Chimera Sandbox platform.
Figure 1. Chimera Sandbox Platform.
Figure 2. UI for Starting Chimera Sandbox.
Best of both worlds
Chimera Sandbox is suitable for both new users who want to explore and experiment ML solutions and advanced users who want to have full control over the Notebook services they run. Users can launch Notebook services using default Docker images provided by the Chimera Sandbox platform. These images come pre-loaded with popular data science and ML libraries and various Grab internal systems integrations. Chimera also provides basic Docker images from which the users can use as base images to build their own customised Notebook service Docker images. Once the images are built, the users can configure their Notebook services to use their custom Docker images. This ensures their Notebook environment can be exactly the way they want them to be.
Figure 3. Users are able to customise their Notebook service with additional packages.
Real-time collaboration
The Chimera Sandbox platform also features a real-time collaboration feature. This feature fosters a collaborative environment where users can exchange ideas and work together on projects.
CPU and GPU choices
Chimera Sandbox offers a wide variety of CPU and GPU choices to cater to specific needs, whether it is a CPU, memory, or GPU intensive experimentation. This flexibility allows users to choose the most suitable computational resources for their tasks, ensuring optimal performance and efficiency.
Deep integration with Spark
The platform is deeply integrated with internal Spark engines, enabling users to experiment building extract, transform, and load (ETL) jobs with data from Grab’s data lake. Integrated helpers such as SparkConnect Kernel and %%spark_sql magic cell, provide a faster developer experience, which can execute Spark SQL queries without needing to write additional code to start a Spark session and query.
Figure 4. %%spark_sql magic cell enables users to quickly explore data with Spark.
In addition to Magic Cell, the Chimera Sandbox offers advanced Spark functionalities. Users can write PySpark code using pre-configured and configurable Spark clients in the runtime environment. The underlying computation engine leverages Grab’s custom Spark-on-Kubernetes operator, enabling support for large-scale Spark workloads. This high-code capability complements the low-code Magic Cell feature, providing users with a versatile data processing environment.
AI Gallery
Chimera Sandbox features an AI Gallery to guide and accelerate users to start experimenting with ML solutions or building GenAI-powered applications. This is especially useful for new or novice users who are keen to explore what they can do on the Chimera Sandbox platform. With Chimera Sandbox, users are not just presented with a bare bones compute solution but rather are provided with ways to do ML tasks right from Chimera Sandbox Notebooks. This approach saves users from the hassle of having to piece together the examples from the public internet, which may not work on the platform. These ready-to-run and comprehensive notebooks in the AI Gallery assure users that they can run end-to-end examples without a hitch. Based on these examples, the users can only extend their experimentations and development for their specific needs. Not only that, these tutorials and notebooks exhibit the platform capabilities and integrations available on the platform in an interactive manner rather than having the users refer to a separate documentation.
Lastly, the AI Gallery encourages contributions from other Grabbers, fostering a collaborative environment. Users who are enthusiastic about creating educational contents on Chimera Sandbox can effectively share their work with other Grabbers.
Figure 5. Including AI Gallery in user specified sandbox images.
Integration with various LLM services
Notebook users on Chimera Sandbox can easily tap into a plethora of LLMs, both open source and proprietary models, without any additional setup via our AI Gateway. The platform takes care of access mechanisms and endpoints for various LLM services so that the users can easily use their favourite libraries to create LLM-powered applications and conduct experimentations. This seamless integration with LLMs enables users to focus on their GAI-powered ideas rather than having to worry about underlying logistics and technicalities of using different LLMs.
More than a notebook service
While Notebook is the most popular service on the platform, Chimera Sandbox offers much more than just notebook capabilities. It serves as a comprehensive namespace workspace equipped with a suite of ML/AI tools. Alongside notebooks, users can access essential ML tools such as Optuna for hyperparameter tuning, MLflow for experiment tracking, and other tools including Zeppelin, RStudio, Spark history, Polynote, and LabelStudio. All these services use a shared storage system, creating a tailored workspace for ML and AI tasks.
Figure 6. A Sandbox namespace with its out-of-the-box services.
Additionally, the Sandbox framework allows for the seamless integration of more services into personal workspaces. This high level of flexibility significantly enhances the capabilities of the Sandbox platform, making it an ideal environment for diverse ML and AI applications.
Cost attribution
For a multi-tenanted platform such as Chimera Sandbox, it is crucial to provide users information on how much they have spent with their experimentations. Cost showback and chargeback capabilities are of utmost importance for a platform on which users can launch Notebook services that use accelerated instances with GPUs. The platform provides cost attribution to individual users, so each user knows exactly how much they are spending on their experimentations and can make budget-conscious decisions. This transparency in cost attribution encourages responsible usage of resources and helps users manage their budgets effectively.
Growth and future plans
In essence, Chimera Sandbox is more than just a tool; it’s a catalyst for innovation and growth, empowering Grabbers to explore the frontiers of ML and AI. By providing an inclusive, flexible, and powerful platform, Chimera Sandbox is helping shape the future of Grab, making every Grabber not just ready but excited to contribute to the AI-driven transformation of our products and services.
In July and August of this year, teams were given the opportunity to intensively learn and experiment with AI. Since then, we have observed hockey stick growth on the Chimera Sandbox platform. We are enabling massive experimentation across different teams at Grab to experiment and work on different GAI-powered applications.
Figure 7. Chimera Sandbox daily active users.
Our future plans include mechanisms for better notebook discovery, collaboration and usability, and the ability to enable users to schedule their notebooks right from Chimera Sandbox. These enhancements aim to improve the user experience and make the platform even more versatile and powerful.
Join us
Grab is the leading superapp platform in Southeast Asia, providing everyday services that matter to consumers. More than just a ride-hailing and food delivery app, Grab offers a wide range of on-demand services in the region, including mobility, food, package and grocery delivery services, mobile payments, and financial services across 700 cities in eight countries.
Powered by technology and driven by heart, our mission is to drive Southeast Asia forward by creating economic empowerment for everyone. If this mission speaks to you, join our team today!
In this blog post, I’ll explain how to use a Microsoft Entra ID and Visual Studio Code editor to access Amazon Q developer service and speed up your development. Additionally, I’ll explain how to minimize the time spent on repetitive tasks and quickly integrate users from external identity sources so they can immediately use and explore Amazon Web Services (AWS).Generative AI on AWS holds great ability for businesses seeking to unlock new opportunities and drive innovation. AWS offers a robust suite of tools and capabilities that can revolutionize software development, generate valuable insights, and deliver enhanced customer value. AWS is committed to simplifying generative AI for businesses through services like Amazon Q, Amazon Bedrock, Amazon SageMaker, Data foundation & AI infrastructure.
Amazon Q Developer is a generative AI-powered assistant that helps developers and IT professionals with all of their tasks across the software development lifecycle. Amazon Q Developer assists with coding, testing, and upgrading to troubleshooting, performing security scanning and fixes, optimizing AWS resources, and creating data engineering pipelines.
A common request from Amazon Q Developer customers is to allow developer sign-ins using established identity providers (IdP) such as Entra ID. Amazon Q Developer offers authentication support through AWS Builder ID or AWS IAM Identity Center. AWS Builder ID is a personal profile for builders. IAM Identity Center is ideal for an enterprise developer working with Amazon Q and employed by organizations with an AWS account. When using the Amazon Q Developer Pro tier, the developer should authenticate with the IAM Identity Center. See the documentation, Understanding tiers of service for Amazon Q Developer for more information.
How it works
The flow for accessing Amazon Q Developer through the IAM Identity Center involves the authentication of Entra ID users using Security Assertion Markup Language (SAML) 2.0 authentication (Figure 1).
Figure 1 – Solution Overview
The flow for accessing Amazon Q Developer through the IAM Identity Center involves the authentication of Entra ID users using SAML 2.0 authentication. (Figure 1).
IAM Identity Center synchronizes users and groups information from Entra ID into IAM Identity Center using the System for Cross-domain Identity Management (SCIM) v2.0 protocol.
Developers with an Entra ID account connect to Amazon Q Developer through IAM Identity Center using the VS Code IDE.
If a developer isn’t already authenticated, they will be redirected to the Entra ID account login. The developer will sign in using their Entra ID credentials.
If the sign-in is successful, Entra ID processes the request and sends a SAML response containing the developer identity and authentication status to IAM Identity Center.
If the SAML response is valid and the developer is authenticated, IAM Identity Center grants access to Amazon Q Developer.
The developer can now securely access and use Amazon Q Developer.
Prerequisites
In order to perform the following procedure, make sure the following are in place.
Configure Entra ID and AWS IAM Identity Center integration
In this section, I will show how you can create a SAML base connection between Entra ID and AWS Identity Center so you can access AWS generative AI services using your Entra ID.
Note: You need to switch the console between Entra ID portal and AWS IAM Identity center. I recommend to open new browser tabs for each console.
Step 1 – Prepare your Microsoft tenant
Perform the below steps in the Entra identity provider section.
Navigate to Identity > Applications > Enterprise applications, and then choose New application.
On the Browse Microsoft Entra Gallery page, enter AWS IAM Identity Center in the search box.
Select AWS IAM Identity Center from the results area.
Choose Create.
Now you have created AWS IAM Identity Center application, set up single sign-on to enable users to sign into their applications using their Entra ID credentials. Select the Single sign-on tab from the left navigation plane and select Setup single sign on.
Step 2 – Collect required service provider metadata from IAM Identity Center
In this step, you will launch the Change identity source wizard from within the IAM Identity Center console and retrieve the metadata file and the AWS specific sign-in URL. You will need this to enter when configuring the connection with Entra ID in the next step.
IAM Identity Center.
You need to enable this in order to configure SSO.
Navigate to Services –> Security, Identity, & Compliance –> AWS IAM Identity Center.
Choose Enable (Figure 2).
Figure 2 – Get started with AWS IAM Identity Center
In the left navigation pane, choose Settings.
On the Settings page, find Identity source, select Actions pull-down menu, and select Change identity source.
On the Change identity source page, choose External identity provider (Figure 3).
Figure 3 – Select External identity provider
On the Configure external identity provider page, under Service provider metadata, select Download metadata file (XML file).
In the same section, locate the AWS access portal sign-in URL value and copy it. You will need to enter this value when prompted in the next step (Figure 4).
Figure 4 – Copy provider metadata URLs
Leave this page open, and move to the next step to configure the AWS IAM Identity Center enterprise application in Entra ID. Later, you will return to this page to complete the process.
Step 3 – Configure the AWS IAM Identity Center enterprise application in Entra ID
This procedure establishes one-half of the SAML connection on the Microsoft side using the values from the metadata file and Sign-On URL you obtained in the previous step.
In the Microsoft Entra admin center console, navigate to Identity > Applications > Enterprise applications and then choose AWS IAM Identity Center.
On the left, choose Single sign-on.
On the Set up Single sign on with SAML page, choose Upload metadata file, choose the folder icon, select the service provider metadata file that you downloaded in the previous step 2.6, and then choose Add.
On the Basic SAML Configuration page, verify that both the Identifier and Reply URL values now point to endpoints in AWS that start with https://<REGION>.signin.aws.amazon.com/platform/saml/.
Under Sign on URL (Optional), paste in the AWS access portal sign-in URL value you copied in the previous step (Step 2.7), choose Save, and then choose X to close the window.
If prompted to test single sign-on with AWS IAM Identity Center, choose No I’ll test later. You will do this verification in a later step.
On the Set up Single Sign-On with SAML page, in the SAML Certificates section, next to Federation Metadata XML, choose Download to save the metadata file to your system. You will need to upload this file when prompted in the next step.
Step 4 – Configure the Entra ID external IdP in AWS IAM Identity Center
Next you will return to the Change identity source wizard in the IAM Identity Center console to complete the second-half of the SAML connection in AWS.
Return to the browser session you left open in the IAM Identity Center console.
On the Configure external identity provider page, in the Identity provider metadata section, under IdP SAML metadata, choose the Choose file button, and select the identity provider metadata file that you downloaded from Microsoft Entra ID in the previous step, and then choose Open (Figure 5).
Figure 5 – AWS IAM Identity center metadata
Choose Next
After you read the disclaimer and are ready to proceed, enter ACCEPT
Choose Change identity source to apply your changes (Figure 6).
Figure 6 – AWS IAM Identity center metadata
Confirm the changes (Figure 7).
Figure 7 – AWS IAM Identity center metadata configuration changes progress console.
Step 5 – Configure and test your SCIM synchronization
In this step, you will set up automatic provisioning (synchronization) of user and group information from Microsoft Entra ID into IAM Identity Center using the SCIM v2.0 protocol. You configure this connection in Microsoft Entra ID using your SCIM endpoint for AWS IAM Identity Center and a bearer token that is created automatically by AWS IAM Identity Center.
To enable automatic provisioning of Entra ID users to IAM Identity Center, follow these steps using the IAM Identity Center application in Entra ID. For testing purposes, you can create a new user (TestUser) in Entra ID with details like First Name, Last Name, Email ID, Department, and more. Once you’ve configured SCIM synchronization, you can verify that this user and their relevant attributes were successfully synced to AWS IAM Identity Center.
In this procedure, you will use the IAM Identity Center console to enable automatic provisioning of users and groups coming from Entra ID into IAM Identity Center.
Open the IAM Identity Center console and Choose Setting in the left navigation pane.
On the Settings page, under the Identity source tab, notice that Provisioning method is set to Manual (Figure 8).
Figure 8 – AWS IAM Identity center console with provisioning method configuration details
Locate the Automatic provisioning information box, and then choose Enable. This immediately enables automatic provisioning in IAM Identity Center and displays the necessary SCIM endpoint and access token information.
In the Inbound automatic provisioning dialog box, copy each of the values for the following options. You will need to paste these in the next step when you configure provisioning in Entra ID.
SCIM endpoint – For example, https://scim.us-east-2.amazonaws.com/11111111111-2222-3333-4444-555555555555/scim/v2/
Access token – Choose Show token to copy the value (Figure 9).
Figure 9 – AWS IAM Identity center automatic provisioning info
Choose Close.
Under the Identity source tab, notice that Provisioning method is now set to SCIM.
Step 6 – Configure automatic provisioning in Entra ID
Now that you have your test user in place and have enabled SCIM in IAM Identity Center, you can proceed with configuring the SCIM synchronization settings in Entra ID.
In the Microsoft Entra admin center console, navigate to Identity > Applications > Enterprise applications and then choose AWS IAM Identity Center.
Choose Provisioning, under Manage, choose Provisioning
In Provisioning Mode select
For Admin Credentials, in Tenant URL paste in the SCIM endpoint URL value you copied earlier. In Secret Token, paste in the Access token value (Figure 10).
Figure 10 – Azure Enterprise AWS IAM Identity center application provisioning configuration tab
Choose Test Connection. You should see a message indicating that the tested credentials were successfully authorized to enable provisioning (Figure 11).
Figure 11 – Azure Enterprise AWS IAM Identity center application provisioning testing status
Choose Save.
Under Manage, choose Users and groups, and then choose Add user/group.
On the Add Assignment page, under Users, choose None Selected.
Select TestUser, and then choose Select.
On the Add Assignment page, choose
Choose Overview, and then choose Start provisioning (Figure 12).
Figure 12 – AWS IAM Identity center application Start provisioning tab
Note : The default provisioning interval is set to 40 minutes. Our users (Figure 13) are successfully provisioned and are now available in the AWS IAM Identity Center console.
In this section, you will verify that TestUser user was successfully provisioned and that all attributes are displayed in IAM Identity Center (Figure 13).
Figure 13 – AWS IAM Identity center application user console example
In the Identity source in IDC section, enable Identity-aware console sessions (Figure 14). This enables AWS IAM Identity Center user and session IDs to be included in users’ AWS console sessions when they sign in. For example, Amazon Q Developer Pro uses identity-aware console sessions to personalize the service experience.
I have completed Entra ID and AWS Identity Center configuration. You can see Entra ID identity synced successfully with AWS IAM identity center.
Step 7 – Set up AWS Toolkit with IAM Identity Center
To use Amazon Q Developer, you will now set up the AWS Toolkit within integrated development environments (IDE) to establish authentication with the IAM Identity Center.
AWS Toolkit for Visual Studio Code is an open-source plug-in for VS Code that makes it easier for developers by providing an integrated experience to create, debug, and deploy applications on AWS. Getting started with Amazon Q Developer in VS Code is simple.
Open the AWS Toolkit for Visual Studio Code extension in your VS Code IDE. Install AWS Toolkit for VS Code, which is available as a download from the VS Code Marketplace.
From the AWS Toolkit for Visual Studio Code extension in the VS Code Marketplace, choose Install to begin the installation process.
When prompted, choose to restart VS Code to complete the installation process.
Step 8 – Setup Amazon Q Developer service with VS Code using AWS IAM identity center.
After installing the Amazon Q extension or plugin, authenticate through IAM Identity Center or AWS Builder ID.
After your identity has been subscribed to Amazon Q Developer Pro, complete the following steps to authenticate.
Choose the Amazon Q icon from the sidebar in your IDE
Choose Use with Pro license and select Continue (Figure 15).
Figure 15 – Visual Studio code Amazon Q Developer extension
Enter the IAM Identity Center URL you previously copied into the Start URL
Set the appropriate region, example us-east-1, and select Continue
Click Copy Code and Proceed to copy the code from the resulting pop-up.
When prompted by the Do you want Code to open the external website? pop-up, select Open
Paste the code copied in Step 6 and select Next
Enter your Entra ID credentials and select Sign in
Select Allow Access toAWS IDE Extensions for VSCode to access Amazon Q Developer (Figure 16).
Figure 16 – Allow VS Code to access Amazon Q Developer
When the connection is complete, a notification indicates that it is safe to close your browser. Close the browser tab and return to your IDE.
You are now all set to use Amazon Q Developer from within IDE, authenticated with your Entra ID credentials.
Step 9 – Test configuration examples
Now you have configured IAM identity Center access with VS code now you can chat, get inline code suggestions, check for security vulnerabilities with Amazon Q Developer to learn about, build, and operate AWS applications. I have mentioned a few examples of Amazon Q Suggestions, Code suggestions, Security Vulnerabilities during development for your reference (Figures 17 ,18 ,19 ,20).
Figure 17 – Amazon Q suggestion examples
Example of developers get the recommendations using Amazon Q developer.
Figure 18 – Amazon Q Developer example
Figure 19 – Generate code, explain code, and get answers to questions about software development.
Example of integrating secure coding practices early in the software development lifecycle using Amazon Q developer.
Figure 20 – Analyze and fix security vulnerabilities in your project example
Cleanup
Configuring AWS and Azure services from this blog will provision resources which incur cost. It is a best practice to delete configurations and resources that you are no longer using so that you do not incur unintended charges.
Conclusion
In this blog post, you learned how to integrate AWS IAM Identity Center and Entra ID IdP for accessing Amazon Q Developer service using VS Code IDE, which speeds up development. Next, you set up the AWS Toolkit to establish a secure connection to AWS using Entra ID credentials, granting you access to the Amazon Q Developer Professional Tier. Using SCIM automatic provisioning for user provisioning and access assignment saves time and speeds up onboarding, allowing for immediate use of AWS services using you own identity. Using Amazon Q, developers get the recommendations and information within their working environment in the IDE, enabling them to integrate secure coding practices early in the software development lifecycle. Developers can proactively scan their existing code using Amazon Q and remediate the security vulnerabilities found in the code.
In the rapidly evolving landscape of Generative AI, the ability to deploy and iterate on features quickly and reliably is paramount. We, the Amazon Q Developer service team, relied on several offline and online testing methods, such as evaluating models on datasets, to gauge improvements. Once positive results are observed, features were rolled out to production, introducing a delay until the change affected 100% of customers.
This blog post delves into the impact of A/B testing and Multi-Model hosting on deploying Generative AI features. By leveraging these powerful techniques, our team has been able to significantly accelerate the pace of experimentation, iteration, and deployment. We have not only streamlined our development process but also gained valuable insights into model performance, user preferences, and the potential impact of new features. This data-driven approach has allowed us to make informed decisions, continuously refine our models, and provide a user experience that resonates with our customers
What is A/B Testing?
A/B testing is a controlled experiment, and a widely adopted practice in the tech industry. It involves simultaneously deploying multiple variants of a product or feature to distinct user segments. In the context of Amazon Q Developer, the service team leverages A/B testing to evaluate the impact of new model variants on the developer experience. This helps in gathering real-world feedback from a subset of users before rolling out changes to the entire user base.
Control group: Developers in the control group continue to receive the base Amazon Q Developer experience, serving as the benchmark against which changes are measured.
Treatment group: Developers in the treatment group are exposed to the new model variant or feature, providing a contrasting experience to the control group.
To run an experiment, we take a random subset of developers and evenly split it into two groups: The control group continues to receive the base Amazon Q Developer experience, while the treatment group receives a different experience.
By carefully analyzing user interactions and telemetry metrics of the control group and comparing them to those from the treatment group, we can make informed decisions about which variant performs better, ultimately shaping the direction of future releases.
How do we split the users?
Whenever a user request is received, we perform consistent hashing on the user identity and assign the user to a cohort. Irrespective on which machine the algorithm runs, the user will be assigned the same cohort. This means that we can scale horizontally – user A’s request can be served by any machine and user A will always be assigned to group A from the beginning to the end of the experiment.
Individuals in the two groups are, on average, balanced on all dimensions that will be meaningful to the test. This means that we do not expose a cohort to have more than one experiment at any given time. This enables us to conduct multivariate experiments where one experiment does not impact the result of another.
The above diagram illustrates the process of user assignment to cohorts in a system conducting multiple parallel A/B experiments.
How do we enable segmentation?
For some A/B experiments, we want to perform A/B experiments for users matching certain criteria. Assume we want to exclusively target Amazon Q Developer customers using the Visual Studio Code Integrated Development Environment (IDE). For such scenarios, we perform cohort allocation only for users who meet the criteria. In this example, we would divide a subset of Visual Studio Code IDE users into control and treatment cohorts.
How do we route the traffic between different models ?
The above diagram depicts how Application Load Balancer redirects traffic to various models based on path-based routing. Where path1 is routing to control model and path2 is routing to treatment model 1 etc.
How do we enable different IDE experiences for different groups?
The IDE plugin polls the service endpoint asking if the developer belongs to the control or treatment group. Based on the response the user will be served the control or treatment experience.
The above diagram depicts how the IDE plugin provides different experience based on control or treatment group.
How do we ingest data?
From the plugin, we publish telemetry metrics to our data plane. We honor opt-out settings of our users. If the user is opted-out, we do not store their data. In the data plane, we check the cohort of the caller. We publish telemetry metrics with cohort metadata to Amazon Data Firehose, which delivers the data to an Amazon OpenSearch Serverless destination.
The above diagram depicts how metrics are captured via the data plane into Amazon OpenSearch Serverless.
How do we analyze the data?
We publish the aggregated metrics to OpenSearch Serverless. We leverage OpenSearch Serverless to ingest and index various metrics to compare and contrast between control and treatment cohorts. We enable filtering based on metadata such as programming language and IDE.
Additionally, we publish data and metadata to a data lake to view, query and analyze the data securely using Jupyter Notebooks and dashboards. This enables our scientists and engineers to perform deeper analysis.
Conclusion
This post has focused on challenges Generative AI services face when it comes to fast experimentation cycles, the basics of A/B testing and the A/B testing capabilities built by the Amazon Q Developer service team to enable multi-variate service and client-side experimentation. We can gain valuable insights into the effectiveness of the new model variants on the developer experience within Amazon Q Developer. Through rigorous experimentation and data-driven decision-making, we can empower teams to iterate, innovate, and deliver optimal solutions that resonate with the developer community.
We hope you are as excited as us about the opportunities with Generative AI! Give Amazon Q Developer and Amazon Q Developer Customization a try today:
Writing clear and concise Git commit messages is crucial for effective version control and collaboration. However, when working with complex projects or codebases, providing additional context can be challenging. In this blog post, we’ll explore how to leverage Amazon Q Developer to analyze our code changes for us and produce meaningful commit messages for Git.
Amazon Q is the most capable generative AI-powered assistant for accelerating software development and leveraging companies’ internal data. It assists developers and IT professionals with all their tasks—from coding, testing, and upgrading applications, to diagnosing errors, performing security scanning and fixes, and optimizing AWS resources. Amazon Q Developer has advanced, multistep planning and reasoning capabilities that can transform (for example, perform Java version upgrades) and implement new features generated from developer requests. Q Developer is available in the IDE, the AWS Console, and on the command line interface (CLI).
Overview of solution
With the Amazon Q Developer CLI, you can engage in natural language conversations, ask questions, and receive responses from Amazon Q Developer, all from your terminal’s command-line interface. One of the powerful features of the Amazon Q Developer CLI is its ability to integrate contextual information from your local development environment. A context modifier in the Amazon Q CLI is a special keyword that allows you to provide additional context to Amazon Q from your local development environment. This context helps Amazon Q better understand the specific use case you’re working on and provide more relevant and accurate responses.
The Amazon Q CLI supports three context modifiers:
@git: This modifier allows you to share your Git repository status with Amazon Q, including the current branch, staged and unstaged changes, and commit history.
@env: By using this modifier, you can provide Amazon Q with your local shell environment variables, which can be helpful for understanding your development setup and configuration.
@history: This modifier enables you to share your recent shell command history with Amazon Q, giving it insights into your actions and the context in which you’re working
By using these context modifiers, you can enhance Amazon Q’s understanding of your specific use case, enabling it to provide more relevant and context-aware responses tailored to your local development environment.
Now let’s dive deeper into how we can use the @git context modifier to craft better Git commit messages. By incorporating the @git context modifier, you can provide additional details about the changes made to your Git repository, such as the affected files, branches, and other Git-related metadata. This not only improves code comprehension but also facilitates better collaboration within your team. We’ll walk through practical examples and best practices, equipping you with the knowledge to take your Git commit messages to the next level using the @git context modifier.
Prerequisites
For this walkthrough, you should have the following prerequisites:
A code base versioned with git
Amazon Q Developer CLI (OSX only): Install the Amazon Q Developer CLI by following the instructions provided in the Amazon Q Developer documentation. This may involve downloading and installing a package or using a package manager like pip or npm.
Amazon Q Developer Subscription: Subscribe to the Amazon Q Developer service. This can be done through the AWS Management Console or by following the instructions in the Amazon Q Developer documentation.
Walkthrough
Open a terminal and navigate to the directory that contains your git project
From within your project directory, run the git status command to view which files have been modified or added since your last commit. Any untracked files (new files) will appear in red, and modified files will be shown in green.
Figure 1 – git status execution from within your project director
Use the git add command to stage the files you want to commit. For example, git add app.py requirements.txt perm_policies/explicit_dependencies_stack.py will stage the specific files, or git add . will add all modified and untracked files in the current directory recursively.
After staging your files, use the q chat command to generate commit message using the @git context modifier. From within the Q Developer Chat context, attach @git to the end of your prompt to engage the context modifier.
Figure 2 – Amazon Q chat interaction using @git context modifier to generate a commit message
Copy the generated commit message and exit Amazon Q Developer chat
Commit your changes using `git commit”
Paste your commit message in default editor to create a new commit with the staged changes.
Figure 3 – paste copied git commit message
Finally, use `git push` to upload your local commits to the remote repository, allowing others to access your changes.
Conclusion
In this post, we looked at how to maximize your productivity by using Amazon Q Developer. Using the @git context modifier in Amazon Q Developer CLI enables you to enrich your Git commit messages with relevant details about the changes made to your codebase. Clear and informative commit messages are essential for effective collaboration and code maintenance. By leveraging this powerful feature, you can provide valuable context, such as affected files, branches, and other Git metadata, making it easier for team members to understand the scope and purpose of each commit.
To continue improving your software lifecycle management (SLCM) you can also check out other Amazon Q Developer capabilities, such as code analysis, debugging, and refactoring suggestions. Finally, stay tuned for upcoming Amazon Q Developer features and enhancements that could further streamline your development processes. Learn more and get started with the Amazon Q Developer Free Tier.
“Be yourself; everyone else is already taken.” -Oscar Wilde
In the real world as in the world of technology and authentication, the ability to understand who we are is important on many levels. In this blog post, we’ll look at how the ability to uniquely identify ourselves in the AWS console can lead to a better overall experience, particularly when using Amazon Q Developer. We explore the features that become available to us when Q Developer can uniquely identify our sessions in the console and match them with our subscriptions and resources. We’ll look at how we can accomplish this goal using identity-aware sessions, a capability now available with AWS IAM Identity Center. Finally, we’ll walk through the steps necessary to enable it in your AWS Organization today.
Amazon Q Developer is a generative AI-powered assistant for software development. Accessible from multiple contexts including the IDE, the command line, and the AWS Management Console, the service offers two different pricing tiers: free and Pro. In this post, we’ll explore how to use Q Developer Pro in the AWS Console with identity-aware sessions. We’ll also explore the recently introduced ability to chat about AWS account resources within the Q Developer Chat window in the AWS Console to inquire about resources in an AWS account when identity-aware sessions are enabled.
Connecting your corporate source of identities to IAM Identity Center creates a shared record of your workforce and users’ group associations. This allows AWS applications to interact with one another efficiently on behalf of your users because they all reference this shared record of attributes. As a result, users have a consistent, continuous experience across AWS applications. Once your source of identities is connected to IAM Identity Center, your identity provider administrator can decide which users and groups will be synchronized with Identity Center. Your Amazon Q Developer administrator sees these synchronized users and groups only within Amazon Q Developer and can assign Q Developer Pro subscriptions to them.
User Identity in the AWS Console
To access the AWS Console, you must first obtain an IAM session – most commonly by using Identity Center Access Portal, IAM federation, or IAM (or root) users. Users can also use IAM Identity Center or a third party federated login mechanism. In this post, we’ll be using Microsoft Entra ID, but many other providers are available. Of all these options, however, only logging in with IAM Identity Center provides us with enough context to uniquely identity the user automatically by default. Identity-aware sessions will make this work.
Figure 1: Logging into an AWS account via the IAM Identity Center enables Q Developer to match the user with an active Pro subscription.
To meet customers where they are and allow them to build on their existing configurations, IAM Identity Center includes a mechanism that allows users to obtain an identity-aware session to access Q in the Console, regardless of how they originally logged in to the Console.
Let’s look at a real-world example to explore how this might work. Let’s assume our organization is currently using Microsoft Entra ID alongside AWS Organizations to federate our users into AWS accounts. This grants them access to the AWS console for accounts in our AWS Organization and enables our users to be assigned IAM roles and permissions. While secure, this access method does not allow Q Developer to easily associate the user with their Entra ID identity and to match them to a Q Developer subscription.
Figure 2: Using Entra ID, the user is federated into the AWS account and assumes an IAM role without further context in the console. Q Developer can obtain that context by authenticating the user with identity-aware sessions. This process is first attempted manually before prompting the user for credentials
To provide identity-aware sessions to these users, we can enable IAM Identity Center for the Organization and integrate it with our Entra ID instance. This allows us to sync our users and groups from Entra ID and assign them to subscriptions in our AWS Applications such as Amazon Q Developer.
We then go one step further and enable identity-aware sessions for our Identity Center instance. Identity-aware sessions allow Amazon Q to access user’s unique identifier in Identity Center so that it can then look up a user’s subscription and chat history. When the user opens the Console Chat, Q Developer checks whether the current IAM session already includes a valid identity-aware context. If this context is not available, Q will then verify the account is part of an Organization and has an IAM Identity Center instance with identity-aware sessions enabled. If so, it will prompt the user to authenticate with IAM Identity Center. Otherwise, the chat will throw an error.
With a valid Q Developer Pro subscription now verified, the user’s interactions with the Q Chat window will include personalization such as access to prior chat history, the ability to chat about AWS account resources, and higher request limits for multiple capabilities included with Q Developer Pro. This will persist with the user for the duration of their AWS Console session.
Configuring Identity-Aware Sessions
Identity-aware sessions are only available for instances of IAM Identity Center deployed at the AWS Organization level. (Account-level instances of IAM Identity Center do not support this feature). Once IAM Identity Center is configured, the option to enable Identity-aware sessions needs to be manually selected. (NOTE: This is a one-way door option which, once enabled, cannot be disabled. For more information about prerequisites and considerations for this feature, you can review the documentation here.)
To begin, verify that you have enabled AWS Organizations across your accounts. Once you have completed this, you are ready to enable IAM Identity Center and enable identity-aware sessions. The steps below should be completed by a member of your infrastructure administration team.
For customers who already have an Organization-based instance of IAM Identity Center configured, skip to Step 4 below. For those organizations who would like to read more about IAM Identity Center before completing the following steps, you can find details in the documentation available here.
Walkthrough
From within the management account or security account configured in your AWS Configuration, access the AWS Console and navigate to the AWS IAM Identity Center in the region where you wish to deploy your organization’s Identity Center instance.
Choose the “Enable” option where you will be presented with an option to setup Identity Center at the Organization level or as a single account instance. Choose the “Enable with AWS Organizations” to have access to identity-aware sessions.
After Identity Center has been enabled, navigate to the “Settings” page from the left-hand navigation menu. Note that under the “Details” section, the “Identity-aware sessions” option is currently marked as “Disabled”.
Choose the “Enable” option from the Details section or select it from the blue prompt below the Details section.
Choose “Enable” from the popup box that appears to confirm your choice.
Once IAM Identity Center is enabled and Identity-aware sessions are enabled, you can then proceed by either creating a user manually in Identity Center to log in with, or by connecting your Identity Center instance to a third-party provider like Entra ID, Ping, or Okta. For more information on how to complete this process, please see the documentation for the various third-party providers available.
If you don’t have Q Developer enabled, you will want to do so now. From within the AWS Console, using the search bar navigate to the Amazon Q Developer service. As a best practice, we recommend configuring Q Developer in your management account.
Begin by clicking the “Subscribe to Amazon Q” button to enable Q Developer in your account. You will see a green check denoting that Q has successfully been paired with IAM Identity Center.
Choose “Subscribe” to enable Q Developer Pro.
Enable Q Developer Pro in the popup prompt
From here, you can then assign users and groups from the Q Developer prompt or you may assign them from within the IAM Identity Center using the Amazon Q Application Profile.
Once your users and groups have been assigned, they are now able to begin using Q Developer in both the AWS account console and their individual IDE’s.
Why Use Q Developer Pro?
In this final section, we’ll explore the benefits of using Amazon Q Developer Pro. There are three main areas of benefit:
Chat History
Q Developer Pro can store your chat history and restore it from previous sessions each time you begin. This enables you to develop a context within the chat about things that are relevant to your interests and in turn inform the feedback you receive from Q going forward.
Chat about your AWS account resources
Q Developer Pro can leverage your IAM permissions to make requests regarding resources and costs associated with your account (assuming you have the appropriate policies). This enables you to inquire about certain resources deployed in a given region, or ask questions about cost such as the overall EC2 spend in a given period of time.
Figure 4: From the Q Chat panel, you can inquire about resources deployed in your account. (This capability requires you to have the necessary permissions to view information about the requested resource.)
Personalization
Identity-aware sessions also enable you to benefit from custom settings in your Q Chat. For example, you can enable cross-region access for your Q Chat sessions which enable you to ask questions about resources in the current region but also all other regions in your account.
Conclusion
As a new feature of IAM Identity Center, identity-aware sessions enable an AWS Console user to access their Q Developer Pro subscription in the Q Chat panel. This provides them with richer conversations with Q Developer about their accounts and maintains those conversations over time with stored chat history. Enabling this feature involves no additional cost and only a single setting change in a configured IAM Identity Center organization instance. Once made, users will be able to benefit from the full feature set of Amazon Q Developer regardless of how they log into the account.
Generative AI–based applications have grown in popularity in the last couple of years. Applications built with large language models (LLMs) have the potential to increase the value companies bring to their customers. In this blog post, we dive deep into network perimeter protection for generative AI applications. We’ll walk through the different areas of network perimeter protection you should consider, discuss how those apply to generative AI–based applications, and provide architecture patterns. By implementing network perimeter protection for your generative AI–based applications, you gain controls to help protect from unauthorized use, cost overruns, distributed denial of service (DDoS), and other threat actors or curious users.
Perimeter protection for LLMs
Network perimeter protection for web applications helps answer important questions, for example:
Who can access the app?
What kind of data is sent to the app?
How much data is the app is allowed to use?
For the most part, the same network protection methods used for other web apps also work for generative AI apps. The main focus of these methods is controlling network traffic that is trying to access the app, not the specific requests and responses the app creates. We’ll focus on three key areas of network perimeter protection:
Authentication and authorization for the app’s frontend
Using a web application firewall
Protection against DDoS attacks
The security concerns of using LLMs in these apps, including issues with prompt injections, sensitive information leaks, or excess agency, is beyond the scope of this post.
Frontend authentication and authorization
When designing network perimeter protection, you first need to decide whether you will allow certain users to access the application, based on whether they are authenticated (AuthN) and whether they are authorized (AuthZ) to ask certain questions of the generative AI–based applications. Many generative AI–based applications sit behind an authentication layer so that a user must sign in to their identity provider before accessing the application. For public applications that are not behind any authentication (a chatbot, for example), additional considerations are required with regard to AWS WAF and DDoS protection, which we discuss in the next two sections.
Let’s look at an example. Amazon API Gateway is an option for customers for the application frontend, providing metering of users or APIs with authentication and authorization. It’s a fully managed service that makes it convenient for developers to publish, maintain, monitor, and secure APIs at scale. With API Gateway, you create AWS Lambda authorizers to control access to APIs within your application. Figure 1 shows how access works for this example.
Figure 1: An API Gateway, Lambda authorizer, and basic filter in the signal path between client and LLM
The workflow in Figure 1 is as follows:
A client makes a request to your API that is fronted by the API Gateway.
When the API Gateway receives the request, it sends the request to a Lambda authorizer that authenticates the request through OAuth, SAML, or another mechanism. The Lambda authorizer returns an AWS Identity and Access Management (IAM) policy to the API Gateway, which will permit or deny the request.
If permitted, the API Gateway sends the API request to the backend application. In Figure 1, this is a Lambda function that provides additional capabilities in the area of LLM security, standing in for more complex filtering. In addition to the Lambda authorizer, you can configure throttling on the API Gateway on a per-client basis or on the application methods clients are accessing before traffic makes it to the backend application. Throttling can provide some mitigation against not only DDoS attacks but also model cloning and inversion attacks.
Finally, the application sends requests to your LLM that is deployed on AWS. In this example, the LLM is deployed on Amazon Bedrock.
The combination of Lambda authorizers and throttling helps support a number of perimeter protection mechanisms. First, only authorized users gain access to the application, helping to prevent bots and the public from accessing the application. Second, for authorized users, you limit the rate at which they can invoke the LLM to prevent excessive costs related to requests and responses to the LLM. Third, after users have been authenticated and authorized by the application, the application can pass identity information to the backend data access layer in order to restrict the data available to the LLM, aligning with what the user is authorized to access.
Besides API Gateway, AWS provides other options you can use to provide frontend authentication and authorization. AWS Application Load Balancer (ALB) supports OpenID Connect (OIDC) capabilities to require authentication to your OIDC provider prior to access. For internal applications, AWS Verified Access combines both identity and device trust signals to permit or deny access to your generative AI application.
AWS WAF
Once the authentication or authorization decision is made, the next consideration for network perimeter protection is on the application side. New security risks are being identified for generative AI–based applications, as described in the OWASP Top 10 for Large Language Model Applications. These risks include insecure output handling, insecure plugin design, and other mechanisms that cause the application to provide responses that are outside the desired norm. For example, a threat actor could craft a direct prompt injection to the LLM, which causes the LLM behave improperly. Some of these risks (insecure plugin design) can be addressed by passing identity information to the plugins and data sources. However, many of those protections fall outside the network perimeter protection and into the realm of security within the application. For network perimeter protection, the focus is on validating the users who have access to the application and supporting rules that allow, block, or monitor web requests based on network rules and patterns at the application level prior to application access.
In addition, bot traffic is an important consideration for web-based applications. According to Security Today, 47% of all internet traffic originates from bots. Bots that send requests to public applications drive up the cost of using generative AI–based applications by causing higher request loads.
To protect against bot traffic before the user gains access to the application, you can implement AWS WAF as part of the perimeter protection. Using AWS WAF, you can deploy a firewall to monitor and block the HTTP(S) requests that are forwarded to your protected web application resources. These resources exist behind Amazon API Gateway, ALB, AWS Verified Access, and other resources. From a web application point of view, AWS WAF is used to prevent or limit access to your application before invocation of your LLM takes place. This is an important area to consider because, in addition to protecting the prompts and completions going to and from the LLM itself, you want to make sure only legitimate traffic can access your application. AWS Managed Rules or AWS Marketplace managed rule groups provide you with predefined rules as part of a rule group.
Let’s expand the previous example. As your application shown in Figure 1 begins to scale, you decide to move it behind Amazon CloudFront. CloudFront is a web service that gives you a distributed ingress into AWS by using a global network of edge locations. Besides providing distributed ingress, CloudFront gives you the option to deploy AWS WAF in a distributed fashion to help protect against SQL injections, bot control, and other options as part of your AWS WAF rules. Let’s walk through the new architecture in Figure 2.
Figure 2: Adding AWS WAF and CloudFront to the client-to-model signal path
The workflow shown in Figure 2 is as follows:
A client makes a request to your API. DNS directs the client to a CloudFront location, where AWS WAF is deployed.
CloudFront sends the request through an AWS WAF rule to determine whether to block, monitor, or allow the traffic. If AWS WAF does not block the traffic, AWS WAF sends it to the CloudFront routing rules.
Note: It is recommended that you restrict access to the API Gateway so users cannot bypass the CloudFront distribution to access the API Gateway. An example of how to accomplish this goal can be found in the Restricting access on HTTP API Gateway Endpoint with Lambda Authorizer blog post.
CloudFront sends the traffic to the API Gateway, where it runs through the same traffic path as discussed in Figure 1.
To dive into more detail, let’s focus on bot traffic. With AWS WAF Bot Control, you can monitor, block, or rate limit bots such as scrapers, scanners, crawlers, status monitors, and search engines. Bot Control provides multiple options in terms of configured rules and inspection levels. For example, if you use the targeted inspection level of the rule group, you can challenge bots that don’t self-identify, making it harder and more expensive for malicious bots to operate against your generative AI–based application. You can use the Bot Control managed rule group alone or in combination with other AWS Managed Rules rule groups and your own custom AWS WAF rules. Bot Control also provides granular visibility on the number of bots that are targeting your application, as shown in Figure 3.
Figure 3: Bot control dashboard for bot requests and non-bot requests
How does this functionality help you? For your generative AI–based application, you gain visibility into how bots and other traffic are targeting your application. AWS WAF provides options to monitor and customize the web request handling of bot traffic, including allowing specific bots or blocking bot traffic to your application. In addition to bot control, AWS WAF provides a number of different managed rule groups, including baseline rule groups, use-case specific rule groups, IP reputation rules groups, and others. For more information, take a look at the documentation on both AWS Managed Rules rule groups and AWS Marketplace managed rule groups.
DDoS protection
The last topic we’ll cover in this post is DDoS with LLMs. Similar to threats against other Layer 7 applications, threat actors can send requests that consume an exceptionally high amount of resources, which results in a decline in the service’s responsiveness or an increase in the cost to run the LLMs that are handling the high number of requests. Although throttling can help support a per-user or per-method rate limit, DDoS attacks use more advanced threat vectors that are difficult to protect against with throttling.
AWS Shield helps to provide protection against DDoS for your internet-facing applications, both at Layer 3/4 with Shield standard or Layer 7 with Shield Advanced. For example, Shield Advanced responds automatically to mitigate application threats by counting or blocking web requests that are part of the exploit by using web access control lists (ACLs) that are part of your already deployed AWS WAF. Depending on your requirements, Shield can provide multiple layers of protection against DDoS attacks.
Figure 4 shows how your deployment might look after Shield is added to the architecture.
Figure 4: Adding Shield Advanced to the client-to-model signal path
The workflow in Figure 4 is as follows:
A client makes a request to your API. DNS directs the client to a CloudFront location, where AWS WAF and Shield are deployed.
CloudFront sends the request through an AWS WAF rule to determine whether to block, monitor, or allow the traffic. AWS Shield can mitigate a wide range of known DDoS attack vectors and zero-day attack vectors. Depending on the configuration, Shield Advanced and AWS WAF work together to rate-limit traffic coming from individual IP addresses. If AWS WAF or Shield Advanced don’t block the traffic, the services will send it to the CloudFront routing rules.
CloudFront sends the traffic to the API Gateway, where it will run through the same traffic path as discussed in Figure 1.
When you implement AWS Shield and Shield Advanced, you gain protection against security events and visibility into both global and account-level events. For example, at the account level, you get information on the total number of events seen on your account, the largest bit rate and packet rate for each resource, and the largest request rate for CloudFront. With Shield Advanced, you also get access to notifications of events that are detected by Shield Advanced and additional information about detected events and mitigations. These metrics and data, along with AWS WAF, provide you with visibility into the traffic that is trying to access your generative AI–based applications. This provides mitigation capabilities before the traffic accesses your application and before invocation of the LLM.
Considerations
When deploying network perimeter protection with generative AI applications, consider the following:
AWS provides multiple options, on both the frontend authentication and authorization side and the AWS WAF side, for how to configure perimeter protections. Depending on your application architecture and traffic patterns, multiple resources can provide the perimeter protection with AWS WAF and integrate with identity providers for authentication and authorization decisions.
You can also deploy more advanced LLM-specific prompt and completion filters by using Lambda functions and other AWS services as part of your deployment architecture. Perimeter protection capabilities are focused on preventing undesired traffic from reaching the end application.
Most of the network perimeter protections used for LLMs are similar to network perimeter protection mechanisms for other web applications. The difference is that additional threat vectors come into play compared to regular web applications. For more information on the threat vectors, see OWASP Top 10 for Large Language Model Applications and Mitre ATLAS.
Conclusion
In this blog post, we discussed how traditional network perimeter protection strategies can provide defense in depth for generative AI–based applications. We discussed the similarities and differences between LLM workloads and other web applications. We walked through why authentication and authorization protection is important, showing how you can use Amazon API Gateway to throttle through usage plans and to provide authentication through Lambda authorizers. Then, we discussed how you can use AWS WAF to help protect applications from bots. Lastly, we talked about how AWS Shield can provide advanced protection against different types of DDoS attacks at scale. For additional information on network perimeter protection and generative AI security, take a look at other blogs posts in the AWS Security Blog Channel.
If you have feedback about this post, submit comments in the Comments section below. If you have questions about this post, contact AWS Support.
Amazon Redshift is a fast, scalable, secure, and fully managed cloud data warehouse that makes it straightforward and cost-effective to analyze your data. Tens of thousands of customers use Amazon Redshift to process exabytes of data per day and power analytics workloads such as BI, predictive analytics, and real-time streaming analytics.
Amazon Redshift ML is a feature of Amazon Redshift that enables you to build, train, and deploy machine learning (ML) models directly within the Redshift environment. Now, you can use pretrained publicly available large language models (LLMs) in Amazon SageMaker JumpStart as part of Redshift ML, allowing you to bring the power of LLMs to analytics. You can use pretrained publicly available LLMs from leading providers such as Meta, AI21 Labs, LightOn, Hugging Face, Amazon Alexa, and Cohere as part of your Redshift ML workflows. By integrating with LLMs, Redshift ML can support a wide variety of natural language processing (NLP) use cases on your analytical data, such as text summarization, sentiment analysis, named entity recognition, text generation, language translation, data standardization, data enrichment, and more. Through this feature, the power of generative artificial intelligence (AI) and LLMs is made available to you as simple SQL functions that you can apply on your datasets. The integration is designed to be simple to use and flexible to configure, allowing you to take advantage of the capabilities of advanced ML models within your Redshift data warehouse environment.
In this post, we demonstrate how Amazon Redshift can act as the data foundation for your generative AI use cases by enriching, standardizing, cleansing, and translating streaming data using natural language prompts and the power of generative AI. In today’s data-driven world, organizations often ingest real-time data streams from various sources, such as Internet of Things (IoT) devices, social media platforms, and transactional systems. However, this streaming data can be inconsistent, missing values, and be in non-standard formats, presenting significant challenges for downstream analysis and decision-making processes. By harnessing the power of generative AI, you can seamlessly enrich and standardize streaming data after ingesting it into Amazon Redshift, resulting in high-quality, consistent, and valuable insights. Generative AI models can derive new features from your data and enhance decision-making. This enriched and standardized data can then facilitate accurate real-time analysis, improved decision-making, and enhanced operational efficiency across various industries, including ecommerce, finance, healthcare, and manufacturing. For this use case, we use the Meta Llama-3-8B-Instruct LLM to demonstrate how to integrate it with Amazon Redshift to streamline the process of data enrichment, standardization, and cleansing.
Solution overview
The following diagram demonstrates how to use Redshift ML capabilities to integrate with LLMs to enrich, standardize, and cleanse streaming data. The process starts with raw streaming data coming from Amazon Kinesis Data Streams or Amazon Managed Streaming for Apache Kafka (Amazon MSK), which is materialized in Amazon Redshift as raw data. User-defined functions (UDFs) are then applied to the raw data, which invoke an LLM deployed on SageMaker JumpStart to enrich and standardize the data. The enhanced, cleansed data is then stored back in Amazon Redshift, ready for accurate real-time analysis, improved decision-making, and enhanced operational efficiency.
To deploy this solution, we complete the following steps:
Choose an LLM for the use case and deploy it using foundation models (FMs) in SageMaker JumpStart.
Use Redshift ML to create a model referencing the SageMaker JumpStart LLM endpoint.
Create a materialized view to load the raw streaming data.
Call the model function with prompts to transform the data and view results.
Example data
The following code shows an example of raw order data from the stream:
Record1: {
    "orderID":"101",
    "email":" john. roe @example.com",
    "phone":"+44-1234567890",
    "address":"123 Elm Street, London",
    "comment": "please cancel if items are out of stock"
}
Record2: {
    "orderID":"102",
    "email":" jane.s mith @example.com",
    "phone":"(123)456-7890",
    "address":"123 Main St, Chicago, 12345",
    "comment": "Include a gift receipt"
}
Record3: {
    "orderID":"103",
    "email":"max.muller @example.com",
    "phone":"+498912345678",
    "address":"Musterstrabe, Bayern 00000",
    "comment": "Bitte nutzen Sie den Expressversand"
}
Record4: {
    "orderID":"104",
    "email":" julia @example.com",
    "phone":"(111) 4567890",
    "address":"000 main st, los angeles, 11111",
    "comment": "Entregar a la puerta"
}
Record5: {
    "orderID":"105",
    "email":" roberto @example.com",
    "phone":"+33 3 44 21 83 43",
    "address":"000 Jean Allemane, paris, 00000",
    "comment": "veuillez ajouter un emballage cadeau"
}
The raw data has inconsistent formatting for email and phone numbers, the address is incomplete and doesn’t have a country, and comments are in various languages. To address the challenges with the raw data, we can implement a comprehensive data transformation process using Redshift ML integrated with an LLM in an ETL workflow. This approach can help standardize the data, cleanse it, and enrich it to meet the desired output format.
The following table shows an example of enriched address data.
orderid
Address
Country (Identified using LLM)
101
123 Elm Street, London
United Kingdom
102
123 Main St, Chicago, 12345
USA
103
Musterstrabe, Bayern 00000
Germany
104
000 main st, los angeles, 11111
USA
105
000 Jean Allemane, paris, 00000
France
The following table shows an example of standardized email and phone data.
Choose an LLM and deploy it using SageMaker JumpStart
Complete the following steps to deploy your LLM:
On the SageMaker JumpStart console, choose Foundation models in the navigation pane.
Search for your FM (for this post, Meta-Llama-3-8B-Instruct) and choose View model.
On the Model details page, review the End User License Agreement (EULA) and choose Open notebook in Studio to start using the notebook in Amazon SageMaker Studio.
In the Select domain and user profile pop-up, choose a profile, then choose Open Studio.
When the notebook opens, in the Set up notebook environment pop-up, choose t3.medium or another instance type recommended in the notebook, then choose Select.
Modify the notebook cell that has accept_eula = False to accept_eula = True.
Select and run the first five cells (see the highlighted sections in the following screenshot) using the run icon.
After you run the fifth cell, choose Endpoints under Deployments in the navigation pane, where you can see the endpoint created.
Copy the endpoint name and wait until the endpoint status is In Service.
It can take 30–45 minutes for the endpoint to be available.
Use Redshift ML to create a model referencing the SageMaker JumpStart LLM endpoint
In this step, you create a model using Redshift ML and the bring your own model (BYOM) capability. After the model is created, you can use the output function to make remote inference to the LLM model. To create a model in Amazon Redshift for the LLM endpoint you created previously, complete the following steps:
Log in to the Redshift endpoint using the Amazon Redshift Query Editor V2.
Make sure you have the following AWS Identity and Access Management (IAM) policy added to the default IAM role. Replace <endpointname> with the SageMaker JumpStart endpoint name you captured earlier:
In the query editor, run the following SQL statement to create a model in Amazon Redshift. Replace <endpointname> with the endpoint name you captured earlier. Note that the input and return data type for the model is the SUPER data type.
CREATE MODEL meta_llama_3_8b_instruct
FUNCTION meta_llama_3_8b_instruct(super)
RETURNS SUPER
SAGEMAKER '<endpointname>'
IAM_ROLE default;
Create a materialized view to load raw streaming data
Use the following SQL to create materialized view for the data that is being streamed through the customer-orders stream. The materialized view is set to auto refresh and will be refreshed as data keeps arriving in the stream.
CREATE EXTERNAL SCHEMA kinesis_streams FROM KINESIS
IAM_ROLE default;

CREATE MATERIALIZED VIEW mv_customer_orders AUTO REFRESH YES AS
    SELECT
    refresh_time,
    approximate_arrival_timestamp,
    partition_key,
    shard_id,
    sequence_number,
    --json_parse(from_varbyte(kinesis_data, 'utf-8')) as rawdata,
    json_extract_path_text(from_varbyte(kinesis_data, 'utf-8'),'orderID',true)::character(36) as orderID,
    json_extract_path_text(from_varbyte(kinesis_data, 'utf-8'),'email',true)::character(36) as email,
    json_extract_path_text(from_varbyte(kinesis_data, 'utf-8'),'phone',true)::character(36) as phone,
    json_extract_path_text(from_varbyte(kinesis_data, 'utf-8'),'address',true)::character(36) as address,
    json_extract_path_text(from_varbyte(kinesis_data, 'utf-8'),'comment',true)::character(36) as comment
    FROM kinesis_streams."customer-orders";
After you run these SQL statements, the materialized view mv_customer_orders will be created and continuously updated as new data arrives in the customer-orders Kinesis data stream.
Call the model function with prompts to transform data and view results
Now you can call the Redshift ML LLM model function with prompts to transform the raw data and view the results. The input payload is a JSON with prompt and model parameters as attributes:
Prompt – The prompt is the input text or instruction provided to the generative AI model to generate new content. The prompt acts as a guiding signal that the model uses to produce relevant and coherent output. Each model has unique prompt engineering guidance. Refer to the Meta Llama 3 Instruct model card for its prompt formats and guidance.
Model parameters – The model parameters determine the behavior and output of the model. With model parameters, you can control the randomness, number of tokens generated, where the model should stop, and more.
In the Invoke endpoint section of the SageMaker Studio notebook, you can find the model parameters and example payloads.
k
The following SQL statement calls the Redshift ML LLM model function with prompts to standardize phone number and email data, identify the country from the address, and translate comments into English and identify the original comment’s language. The output of the SQL is stored in the table enhanced_raw_data_customer_orders.
create table enhanced_raw_data_customer_orders as
select phone,email,comment, address
  ,meta_llama_3_8b_instruct(json_parse('{"inputs":"<|begin_of_text|><|start_header_id|>user<|end_header_id|>\n\nConvert this phone number into a standard format: '||phone||'\n\nA standard phone number had plus sign followed by CountryCode followed by a space and the rest of the phone number without any spaces or dashes. \n\nExamples: +1 1234567890, +91 1234567890\n\nReturn only the standardized phone number, nothing else<|eot_id|><|start_header_id|>assistant<|end_header_id|>\n\n","parameters":{"stop": "<|eot_id|>"}}')) as standardized_phone
  ,meta_llama_3_8b_instruct(json_parse('{"inputs":"<|begin_of_text|><|start_header_id|>user<|end_header_id|>\n\nConvert this email into a standard format:'||email||'\n\nA standard email ID does not have spaces and is lower case. Return only the standardized email and nothing else<|eot_id|><|start_header_id|>assistant<|end_header_id|>\n\n","parameters":{"stop": "<|eot_id|>"}}')) as standardized_email
  ,meta_llama_3_8b_instruct(json_parse('{"inputs":"<|begin_of_text|><|start_header_id|>user<|end_header_id|>\n\nIdentify which country is this address in:'||address||'\n\nReturn only the country and nothing else<|eot_id|><|start_header_id|>assistant<|end_header_id|>\n\n","parameters":{"stop": "<|eot_id|>"}}')) as country
  ,meta_llama_3_8b_instruct(json_parse('{"inputs":"<|begin_of_text|><|start_header_id|>user<|end_header_id|>\n\nTranslate this statement to english if it is not in english:'||comment||'\n\nReturn the english comment and nothing else. Output only english<|eot_id|><|start_header_id|>assistant<|end_header_id|>\n\n","parameters":{"stop": "<|eot_id|>"}}')) as translated_comment
  ,meta_llama_3_8b_instruct(json_parse('{"inputs":"<|begin_of_text|><|start_header_id|>user<|end_header_id|>\n\nIdentify which language this statement is in:'||comment||'\n\nReturn only the language and nothing else<|eot_id|><|start_header_id|>assistant<|end_header_id|>\n\n","parameters":{"stop": "<|eot_id|>"}}')) as orig_comment_language
  from mv_customer_orders;
Query the enhanced_raw_data_customer_orders table to view the data. The output of LLM is in JSON format with the result in the generated_text attribute. It’s stored in the SUPER data type and can be queried using PartiQL:
select
    phone as raw_phone
    , standardized_phone.generated_text :: varchar as standardized_phone
    , email as raw_email
    , standardized_email.generated_text :: varchar as standardized_email
    , address as raw_address
    , country.generated_text :: varchar as country
    , comment as raw_comment
    , translated_comment.generated_text :: varchar as translated_comment
    , orig_comment_language.generated_text :: varchar as orig_comment_language
from enhanced_raw_data_customer_orders;
The following screenshot shows our output.
Clean up
To avoid incurring future charges, delete the resources you created:
Delete the LLM endpoint in SageMaker JumpStart by running the cell in the Clean up section in the Jupyter notebook.
Delete the Kinesis data stream.
Delete the Redshift Serverless workgroup or Redshift cluster.
Conclusion
In this post, we showed you how to enrich, standardize, and translate streaming data in Amazon Redshift with generative AI and LLMs. Specifically, we demonstrated the integration of the Meta Llama 3 8B Instruct LLM, available through SageMaker JumpStart, with Redshift ML. Although we used the Meta Llama 3 model as an example, you can use a variety of other pre-trained LLM models available in SageMaker JumpStart as part of your Redshift ML workflows. This integration allows you to explore a wide range of NLP use cases, such as data enrichment, content summarization, knowledge graph development, and more. The ability to seamlessly integrate advanced LLMs into your Redshift environment significantly broadens the analytical capabilities of Redshift ML. This empowers data analysts and developers to incorporate ML into their data warehouse workflows with streamlined processes driven by familiar SQL commands.
We encourage you to explore the full potential of this integration and experiment with implementing various use cases that integrate the power of generative AI and LLMs with Amazon Redshift. The combination of the scalability and performance of Amazon Redshift, along with the advanced natural language processing capabilities of LLMs, can unlock new possibilities for data-driven insights and decision-making.
About the authors
Anusha Challa is a Senior Analytics Specialist Solutions Architect focused on Amazon Redshift. She has helped many customers build large-scale data warehouse solutions in the cloud and on premises. She is passionate about data analytics and data science.
Today, we are announcing the general availability of the Amazon Titan Image Generator v2 model with new capabilities in Amazon Bedrock. With Amazon Titan Image Generator v2, you can guide image creation using reference images, edit existing visuals, remove backgrounds, generate image variations, and securely customize the model to maintain brand style and subject consistency. This powerful tool streamlines workflows, boosts productivity, and brings creative visions to life.
Amazon Titan Image Generator v2 brings a number of new features in addition to all features of Amazon Titan Image Generator v1, including:
Image conditioning – Provide a reference image along with a text prompt, resulting in outputs that follow the layout and structure of the user-supplied reference.
Image guidance with color palette – Control precisely the color palette of generated images by providing a list of hex codes along with the text prompt.
Subject consistency – Fine-tune the model to preserve a specific subject (for example, a particular dog, shoe, or handbag) in the generated images.
New features in Amazon Titan Image Generator v2 Before getting started, if you are new to using Amazon Titan models, go to the Amazon Bedrock console and choose Model access on the bottom left pane. To access the latest Amazon Titan models from Amazon, request access separately for Amazon Titan Image Generator G1 v2.
Here are details of the Amazon Titan Image Generator v2 in Amazon Bedrock:
Image conditioning You can use the image conditioning feature to shape your creations with precision and intention. By providing a reference image (that is, a conditioning image), you can instruct the model to focus on specific visual characteristics, such as edges, object outlines, and structural elements, or segmentation maps that define distinct regions and objects within the reference image.
We support two types of image conditioning: Canny edge and segmentation.
The Canny edge algorithm is used to extract the prominent edges within the reference image, creating a map that the Amazon Titan Image Generator can then use to guide the generation process. You can “draw” the foundations of your desired image, and the model will then fill in the details, textures, and final aesthetic based on your guidance.
Segmentation provides an even more granular level of control. By supplying the reference image, you can define specific areas or objects within the image and instruct the Amazon Titan Image Generator to generate content that aligns with those defined regions. You can precisely control the placement and rendering of characters, objects, and other key elements.
Here are generation examples that use image conditioning.
	"taskType": "TEXT_IMAGE",
	"textToImageParams": {
 		"text": "a cartoon deer in a fairy world.",
        "conditionImage": input_image, # Optional
        "controlMode": "CANNY_EDGE" # Optional: CANNY_EDGE | SEGMENTATION
        "controlStrength": 0.7 # Optional: weight given to the condition image. Default: 0.7
     }
The following a Python code example using AWS SDK for Python (Boto3) shows how to invoke Amazon Titan Image Generator v2 on Amazon Bedrock to use image conditioning.
import base64
import io
import json
import logging
import boto3
from PIL import Image
from botocore.exceptions import ClientError

def main():
    """
    Entrypoint for Amazon Titan Image Generator V2 example.
    """
    try:
        logging.basicConfig(level=logging.INFO,
                            format="%(levelname)s: %(message)s")

        model_id = 'amazon.titan-image-generator-v2:0'

        # Read image from file and encode it as base64 string.
        with open("/path/to/image", "rb") as image_file:
            input_image = base64.b64encode(image_file.read()).decode('utf8')

        body = json.dumps({
            "taskType": "TEXT_IMAGE",
            "textToImageParams": {
                "text": "a cartoon deer in a fairy world",
                "conditionImage": input_image,
                "controlMode": "CANNY_EDGE",
                "controlStrength": 0.7
            },
            "imageGenerationConfig": {
                "numberOfImages": 1,
                "height": 512,
                "width": 512,
                "cfgScale": 8.0
            }
        })

        image_bytes = generate_image(model_id=model_id,
                                     body=body)
        image = Image.open(io.BytesIO(image_bytes))
        image.show()

    except ClientError as err:
        message = err.response["Error"]["Message"]
        logger.error("A client error occurred: %s", message)
        print("A client error occured: " +
              format(message))
    except ImageError as err:
        logger.error(err.message)
        print(err.message)

    else:
        print(
            f"Finished generating image with Amazon Titan Image Generator V2 model {model_id}.")

def generate_image(model_id, body):
    """
    Generate an image using Amazon Titan Image Generator V2 model on demand.
    Args:
        model_id (str): The model ID to use.
        body (str) : The request body to use.
    Returns:
        image_bytes (bytes): The image generated by the model.
    """

    logger.info(
        "Generating image with Amazon Titan Image Generator V2 model %s", model_id)

    bedrock = boto3.client(service_name='bedrock-runtime')

    accept = "application/json"
    content_type = "application/json"

    response = bedrock.invoke_model(
        body=body, modelId=model_id, accept=accept, contentType=content_type
    )
    response_body = json.loads(response.get("body").read())

    base64_image = response_body.get("images")[0]
    base64_bytes = base64_image.encode('ascii')
    image_bytes = base64.b64decode(base64_bytes)

    finish_reason = response_body.get("error")

    if finish_reason is not None:
        raise ImageError(f"Image generation error. Error is {finish_reason}")

    logger.info(
        "Successfully generated image with Amazon Titan Image Generator V2 model %s", model_id)

    return image_bytes

class ImageError(Exception):
    "Custom exception for errors returned by Amazon Titan Image Generator V2"

    def __init__(self, message):
        self.message = message

logger = logging.getLogger(__name__)
logging.basicConfig(level=logging.INFO)

if __name__ == "__main__":
    main()
Color conditioning Most designers want to generate images adhering to color branding guidelines so they seek control over color palette in the generated images.
With the Amazon Titan Image Generator v2, you can generate color-conditioned images based on a color palette—a list of hex colors provided as part of the inputs adhering to color branding guidelines. You can also provide a reference image as input (optional) to generate an image with provided hex colors while inheriting style from the reference image.
In this example, the prompt describes: a jar of salad dressing in a rustic kitchen surrounded by fresh vegetables with studio lighting
The generated image reflects both the content of the text prompt and the specified color scheme to align with the brand’s color guidelines.
To use color conditioning feature, you can set taskType to COLOR_GUIDED_GENERATION with your prompt and hex codes.
       "taskType": "COLOR_GUIDED_GENERATION",
       "colorGuidedGenerationParam": {
             "text": "a jar of salad dressing in a rustic kitchen surrounded by fresh vegetables with studio lighting",
	         "colors": ['#ff8080', '#ffb280', '#ffe680', '#e5ff80'], # Optional: list of color hex codes
             "referenceImage": input_image, #Optional
        }
Background removal Whether you’re looking to composite an image onto a solid color backdrop or layer it over another scene, the ability to cleanly and accurately remove the background is an essential tool in the creative workflow. You can instantly remove the background from your images with a single step. Amazon Titan Image Generator v2 can intelligently detect and segment multiple foreground objects, ensuring that even complex scenes with overlapping elements are cleanly isolated.
The example shows an image of an iguana sitting on a tree in a forest. The model was able to identify the iguana as the main object and remove the forest background, replacing it with a transparent background. This lets the iguana stand out clearly without the distracting forest around it.
To use background removal feature, you can set taskType to BACKGROUND_REMOVAL with your input image.
Subject consistency with fine-tuning You can now seamlessly incorporate specific subjects into visually captivating scenes. Whether it’s a brand’s product, a company logo, or a beloved family pet, you can fine-tune the Amazon Titan model using reference images to learn the unique characteristics of the chosen subject.
Once the model is fine-tuned, you can simply provide a text prompt, and the Amazon Titan Generator will generate images that maintain a consistent depiction of the subject, placing it naturally within diverse, imaginative contexts. This opens up a world of possibilities for marketing, advertising, and visual storytelling.
For example, you could use an image with the caption Ron the dog during fine-tuning, give the prompt as Ron the dog wearing a superhero cape during inference with the fine-tuned model, and get a unique image in response.
Now available The Amazon Titan Generator v2 model is available today in Amazon Bedrock in the US East (N. Virginia) and US West (Oregon) Regions. Check the full Region list for future updates. To learn more, check out the Amazon Titan product page and the Amazon Bedrock pricing page.
Visit our community.aws site to find deep-dive technical content and to discover how our Builder communities are using Amazon Bedrock in their solutions.
As COVID restrictions were fully lifted in 2023, the number of tourists grew dramatically. People began to explore the world again, frequently using the Grab app to make bookings outside of their home country. However, we noticed that communication posed a challenge for some users. Despite our efforts to integrate an auto-translation feature in the booking chat, we received feedback about occasional missed or inaccurate translations. You can refer to this blog for a better understanding of Grab’s chat system.
An example of a bad translation. The correct translation is: ‘ok sir’.
In an effort to enhance the user experience for travellers using the Grab app, we formed an engineering squad to tackle this problem. The objectives are as follows:
Ensure translation is provided when it’s needed.
Improve the quality of translation.
Maintain the cost of this service within a reasonable range.
Ensure translation is provided when it’s needed
Originally, we relied on users’ device language settings to determine if translation is needed. For example, if both the passenger and driver’s language setting is set to English, translation is not needed. Interestingly, it turned out that the device language setting did not reliably indicate the language in which a user would send their messages. There were numerous cases where despite having their device language set to English, drivers sent messages in another language.
Therefore, we needed to detect the language of user messages on the fly to make sure we trigger translation when it’s needed.
Language detection
Simple as it may seem, language detection is not that straightforward a task. We were unable to find an open-source language detector library that covered all Southeast Asian languages. We looked for Golang libraries as our service was written in Golang. The closest we could find were the following:
Whatlang: unable to detect Malay
Lingua: unable to detect Burmese and Khmer
We decided to choose Lingua over Whatlang as the base detector due to the following factors:
Overall higher accuracy.
Capability to provide detection confidence level.
We have more users using Malay than those using Burmese or Khmer.
When a translation request comes in, our first step is to use Lingua for language detection. If the detection confidence level falls below a predefined threshold, we fall back to call the third-party translation service as it can detect all Southeast Asian languages.
You may ask, why don’t we simply use the third-party service in the first place. It’s because:
The third-party service only has a translate API that also does language detection, but it does not provide a standalone language detection API.
Using the translate API is costly, so we need to avoid calling it when it’s unnecessary. We will cover more on this in a later section.
Another challenge we’ve encountered is the difficulty of distinguishing between Malay and Indonesian languages due to their strong similarities and shared vocabulary. The identical text might convey different meanings in these two languages, which the third-party translation service struggles to accurately detect and translate.
Differentiating Malay and Indonesian is a tough problem in general. However, in our case, the detection has a very specific context, and we can make use of the context to enhance our detection accuracy.
Making use of translation context
All our translations are for the messages sent in the context of a booking or order, predominantly between passenger and driver. There are two simple facts that can aid in our language detection:
Booking/order happens in one single country.
Drivers are almost always local to that country.
So, for a booking that happens in an Indonesian city, if the driver’s message is detected as Malay, it’s highly likely that the message is actually in Bahasa Indonesia.
Improve quality of translation
Initially, we were entirely dependent on a third-party service for translating our chat messages. While overall powerful, the third-party service is not perfect, and it does generate weird translations from time to time.
An example of a weird translation from a third-party service recorded on 19 Dec 2023.
Then, it came to us that we might be able to build an in-house translation model that could translate chat messages better than the third-party service. The reasons being:
The scope of our chat content is highly specific. All the chats are related to bookings or orders. There would not be conversations about life or work in the chat. Maybe a small Machine Learning (ML) model would suffice to do the job.
The third-party service is a general translation service. It doesn’t know the context of our messages. We, however, know the whole context. Having the right context gives us a great edge on generating the right translation.
Training steps
To create our own translation model, we took the following steps:
Perform topic modelling on Grab chat conversations.
Worked with the localisation team to create a benchmark set of translations.
Measured existing translation solutions against benchmarks.
Used an open source Large Language Model (LLM) to produce synthetic training data.
Used synthetic data to train our lightweight translation model.
Topic modelling
In this step, our aim was to generate a dataset which is both representative of the chat messages sent by our users and diverse enough to capture all of the nuances of the conversations. To achieve this, we took a stratified sampling approach. This involved a random sample of past chat conversation messages stratified by various topics to ensure a comprehensive and balanced representation.
Developing a benchmark
For this step we engaged Grab’s localisation team to create a benchmark for translations. The intention behind this step wasn’t to create enough translation examples to fully train or even finetune a model, but rather, it was to act as a benchmark for translation quality, and also as a set of few-shot learning examples for when we generate our synthetic data.
This second point was critical! Although LLMs can generate good quality translations, LLMs are highly susceptible to their training examples. Thus, by using a set of handcrafted translation examples, we hoped to produce a set of examples that would teach the model the exact style, level of formality, and correct tone for the context in which we plan to deploy the final model.
Benchmarking
From a theoretical perspective there are two ways that one can measure the performance of a machine translation system. The first is through the computation of some sort of translation quality score such as a BLEU or CHRF++ score. The second method is via subjective evaluation. For example, you could give each translation a score from 1 to 5 or pit two translations against each other and ask someone to assess which they prefer.
Both methods have their relative strengths and weaknesses. The advantage of a subjective method is that it corresponds better with what we want, a high quality translation experience for our users. The disadvantage of this method is that it is quite laborious. The opposite is true for the computed translation quality scores, that is to say that they correspond less well to a human’s subjective experience of our translation quality, but that they are easier and faster to compute.
To overcome the inherent limitations of each method, we decided to do the following:
Set a benchmark score for the translation quality of various translation services using a CHRF++ score.
Train our model until its CHRF++ score is significantly better than the benchmark score.
Perform a manual A/B test between the newly trained model and the existing translation service.
Synthetic data generation
To generate the training data needed to create our model, we had to rely on an open source LLM to generate the synthetic translation data. For this task, we spent considerable effort looking for a model which had both a large enough parameter count to ensure high quality outputs, but also a model which had the correct tokenizer to handle the diverse sets of languages which Grab’s customers speak. This is particularly important for languages which use non-standard character sets such as Vietnamese and Thai. We settled on using a public model from Hugging Face for this task.
We then used a subset of the previously mentioned benchmark translations to input as few-shot learning examples to our prompt. After many rounds of iteration, we were able to generate translations which were superior to the benchmark CHRF++ scores which we had attained in the previous section.
Model fine tuning
We now had one last step before we had something that was production ready! Although we had successfully engineered a prompt capable of generating high quality translations from the public Hugging Face model, there was no way we’d be able to deploy such a model. The model was far too big for us to deploy it in a cost efficient manner and within an acceptable latency. Our solution to this was to fine-tune a smaller bespoke model using the synthetic training data which was derived from the larger model.
These models were language specific (e.g. English to Indonesian) and built solely for the purpose of language translation. They are 99% smaller than the public model. With approximately 10 Million synthetic training examples, we were able to achieve performance which was 98% as effective as our larger model.
We deployed our model and ran several A/B tests with it. Our model performed pretty well overall, but we noticed a critical problem: sometimes, numbers got mutated in the translation. These numbers can be part of an address, phone number, price etc. Showing the wrong number in a translation can cause great confusion to the users. Unfortunately, an ML model’s output can never be fully controlled; therefore, we added an additional layer of programmatic check to mitigate this issue.
Post-translation quality check
Our goal is to ensure non-translatable content such as numbers, special symbols, and emojis in the original message doesn’t get mutated in the translation produced by our in-house model. We extract all the non-translatable content from the original message, count the occurrences of each, and then try to match the same in the translation. If it fails to match, we discard the in-house translation and fall back to using the third-party translation service.
Keep cost low
At Grab, we try to be as cost efficient as possible in all aspects. In the case of translation, we tried to minimise cost by avoiding unnecessary on-the-fly translations.
As you would have guessed, the first thing we did was to implement caching. A cache layer is placed before both the in-house translation model and the third-party translation. We try to serve translation from the cache first before hitting the underlying translation service. However, given that translation requests are in free text and can be quite dynamic, the impact of caching is limited. There’s more we need to do.
For context, in a booking chat, other than the users, Grab’s internal services can also send messages to the chat room. These messages are called system messages. For example,our food service always sends a message with information on the food order when an order is confirmed.
System messages are all fairly static in nature, however, we saw a very high amount of translation cost attributed to system messages. Taking a deeper look, we noticed the following:
Many system messages were not sent in the recipient’s language, thus requiring on-the-fly translation.
Many system messages, though having the same static structure, contain quite a few variants such as passenger’s name and food order item name. This makes it challenging to utilise our translation cache effectively as each message is different.
Since all system messages are manually prepared, we should be able to get them all manually translated into all the required languages, and avoid on-the-fly translations altogether.
Therefore, we launched an internal campaign, mandating all internal services that send system messages to chat rooms to get manual translations prepared, and pass in the translated contents. This alone helped us save roughly US$255K a year!
Next steps
At Grab, we firmly believe that our proprietary in-house translation models are not only more cost-effective but cater more accurately to our unique use cases compared to third-party services. We will focus on expanding these models to more languages and countries across our operating regions.
Additionally, we are exploring opportunities to apply learnings of our chat translations to other Grab content. This strategy aims to guarantee a seamless language experience for our rapidly expanding user base, especially travellers. We are enthusiastically looking forward to the opportunities this journey brings!
Join us
Grab is the leading superapp platform in Southeast Asia, providing everyday services that matter to consumers. More than just a ride-hailing and food delivery app, Grab offers a wide range of on-demand services in the region, including mobility, food, package and grocery delivery services, mobile payments, and financial services across 428 cities in eight countries.
Powered by technology and driven by heart, our mission is to drive Southeast Asia forward by creating economic empowerment for everyone. If this mission speaks to you, join our team today!
Testing code is a fundamental step in the field of software development. It ensures that applications are reliable, meet quality standards, and work as intended. Automated software tests help to detect issues and defects early, reducing impact to end-user experience and business. In addition, tests provide documentation and prevent regression as code changes over time.
In this blog post, we show how the integration of generative AI tools like Amazon Q Developer can further enhance unit testing by automating test scenarios and generating test cases.
Amazon Q Developer helps developers and IT professionals with all of their tasks across the software development lifecycle – from coding, testing, and upgrading, to troubleshooting, performing security scanning and fixes, optimizing AWS resources, and creating data engineering pipelines. It integrates into your Integrated Development Environment (IDE) and aids with providing answers to your questions. Amazon Q Developer supports you across the Software Development Lifecycle (SLDC) by enriching feature and test development with step-by-step instructions and best practices. It learns from your interactions and training itself over time to output personalized, and tailored answers.
Solution overview
In this blog, we show how to use Amazon Q Developer to:
learn about software testing concepts and frameworks
identify unit test scenarios
write unit test cases
refactor test code
mock dependencies
generate sample data
Note: Amazon Q Developer may generate an output different from this blog post’s examples due to its nondeterministic nature.
Using Amazon Q Developer to learn about software testing frameworks and concepts
As you start gaining experience with testing, Amazon Q Developer can accelerate your learning through conversational Q&A directly within the AWS Management Console or the IDE. It can explain topics, provide general advice and share helpful resources on testing concepts and frameworks. It gives personalized recommendations on resources which makes the learning experience more interactive and accelerates the time to get started with writing unit tests. Let’s introduce an example conversation to demonstrate how you can leverage Amazon Q Developer for learning before attempting to write your first test case.
Example – Select and install frameworks
A unit testing framework is a software tool used for test automation, design and management of test cases. Upon starting a software project, you may be faced with the selection of a framework depending on the type of tests, programming language, and underlying technology. Let’s ask for recommendations around unit testing frameworks for Python code running in an AWS Lambda function.
Figure 1: Recommend unit testing frameworks for AWS Lambda functions in Python
In Figure 1, Amazon Q Developer answers with popular frameworks (pytest, unittest, Moto, AWS SAM Command Line Interface, and Powertools for AWS Lambda) including a brief description for each of them. It provides a reference to the sources of its response at the bottom and suggested follow up questions. As a next step, you may want to refine what you are looking for with a follow-up question. Amazon Q Developer uses the context from your previous questions and answers to give more precise answers as you continue the conversation. For example, one of the frameworks it suggested using was pytest. If you don’t know how to install that locally, you can ask something like “What are the different options to install pytest on my Linux machine?”. As shown in Figure 2, Amazon Q Developer provides installation recommendation using Python.
Figure 2: Options to install pytest
Example – Explain concepts
Amazon Q Developer can also help you to get up to speed with testing concepts, such as mocking service dependencies. Let’s ask another follow up question to explain the benefits of mocking AWS services.
Figure 3: Benefits of mocking AWS services
The above conversation in Figure 3 shows how Amazon Q Developer can help to understand concepts. Let’s learn more about Moto.
Figure 4: Follow up question about Moto
In Figure 4, Amazon Q Developer gives more details about the Moto framework and provides a short example code snippet for mocking an AWS Lambda service.
Best Practice – Write clear prompts
Writing clear prompts helps you to get the desired answers from Amazon Q. A lack of clarity and topic understanding may result in unclear questions and irrelevant or off-target responses. Note how those prompts contain specific description of what the answer should provide. For example, Figure 1 includes the programming language (Python) and service (AWS Lambda) to be considered in the expected answer. If unfamiliar with a topic, leverage Amazon Q Developer as part of your research, to better understand that topic.
Using Amazon Q Developer to identify unit test cases
Understanding the purpose and intended functionality of the code is important for developing relevant test cases. We introduce an example use case in Python, which handles payroll calculation for different hour rates, hours worked, and tax rates.
"""
This module provides a Payroll class to calculate the net pay for an employee.

The Payroll class takes in the hourly rate, hours worked, and tax rate, and
calculates the gross pay, tax amount, and net pay.
"""

class Payroll:
    """
    A class to handle payroll calculations.
    """

    def __init__(self, hourly_rate: float, hours_worked: float, tax_rate: float):
        self._validate_inputs(hourly_rate, hours_worked, tax_rate)
        self.hourly_rate = hourly_rate
        self.hours_worked = hours_worked
        self.tax_rate = tax_rate

    def _validate_inputs(self, hourly_rate: float, hours_worked: float, tax_rate: float) -> None:
        """
        Validate the input values for the Payroll class.

        Args:
            hourly_rate (float): The employee's hourly rate.
            hours_worked (float): The number of hours the employee worked.
            tax_rate (float): The tax rate to be applied to the employee's gross pay.

        Raises:
            ValueError: If the hourly rate, hours worked, or tax rate is not a positive number,
            or if the tax rate is not between 0 and 1.
        """
        if hourly_rate <= 0:
            raise ValueError("Hourly rate must be a non-negative number.")
        if hours_worked < 0:
            raise ValueError("Hours worked must be a non-negative number.")
        if tax_rate < 0 or tax_rate >= 1:
            raise ValueError("Tax rate must be between 0 and 1.")

    def gross_pay(self) -> float:
        """
        Calculate the employee's gross pay.

        Returns:
            float: The employee's gross pay.
        """
        return self.hourly_rate * self.hours_worked

    def tax_amount(self) -> float:
        """
        Calculate the tax amount to be deducted from the employee's gross pay.

        Returns:
            float: The tax amount.
        """
        return self.gross_pay() * self.tax_rate

    def net_pay(self) -> float:
        """
        Calculate the employee's net pay after deducting taxes.

        Returns:
            float: The employee's net pay.
        """
        return self.gross_pay() - self.tax_amount()
The example shows how Amazon Q Developer can be used to identify test scenarios before writing the actual cases. Let’s ask Amazon Q Developer to suggest test cases for the Payroll class.
Figure 5: Suggest unit test scenarios
In Figure 5, Amazon Q Developer provides a list of different scenarios specific to the Payroll class, including valid, error, and edge cases.
Using Amazon Q Developer to write unit tests
Developers can have a collaborative conversation with Amazon Q Developer, which helps to unpack the code and think through testing cases to check that important test cases are captured but also edge cases are identified. This section focuses on how to facilitate the quick generation of unit test cases, based on the cases recommended in the previous section. Let’s start with a question around best practices when writing unit tests with pytest.
Figure 6: Recommended best practices for testing with pytest
In Figure 6, Amazon Q Developer provides a list of best practices for writing effective unit tests. Let’s follow up by asking to generate one of the suggested test cases.
Figure 7: Generate a unit test case
Amazon Q Developer includes code in its response which you can copy or insert directly into your file by choosing Insert at cursor. Figure 7 displays valid unit tests covering some of the suggested scenarios and best practices, such as being simple and holding descriptive naming. It also states how to run the test using a command for the terminal.
Best Practice – Provide context
Context allows Amazon Q Developer to offer tailored responses that are more in sync with the conversation. In the chat interface, the flow of the ongoing conversation and past interactions are a critical contextual element. Other ways to provide context are selecting the code-under-test, keeping any relevant files, such as test examples, open in the editor and leveraging conversation context such as asking for best practices and example test scenarios before writing the test cases.
Using Amazon Q Developer to refactor unit tests
To improve code quality, Amazon Q Developer can be used to recommend improvements and refactor parts of the code base. To illustrate Amazon Q Developer refactoring functionality, we prepared test cases for the Payroll class which deviate from some of the suggested best practices.
Example – Send to Amazon Q Refactor
Let’s follow up by asking to refactor the code built-in Amazon Q > Refactor functionality.
Figure 8: Refactor test cases
In Figure 8, the refactoring renamed the function and variable names to be more descriptive and therefore removed the comments. The recommendation is inserted in the second file to verify it runs correctly.
Best Practice – Apply human judgement and continuously interact with Amazon Q Developer
Note that code generations should always be reviewed and adjusted before used in your projects. Amazon Q Developer can provide you with initial guidance, but you might not get a perfect answer. A developer’s judgement should be applied to value usefulness of the generated code and iterations should be used to continuously improve the results.
Using Amazon Q Developer for mocking dependencies and generating sample data
More complex application architectures may require developers to mock dependencies and use sample data to test specific functionalities. The second code example contains a save_to_dynamodb_table function that writes a job_posting object into a specific Amazon DynamoDB table. This function references the TABLE_NAME environment variable to specify the name of the table in which the data should be saved.
We break down the tasks for Amazon Q Developer into three smaller steps for testing: Generate a fixture for mocking the TABLE_NAME environment variable name, generate instances of the given class to be used as test data, and generate the test.
Example – Generate fixtures
Pytest provides the capability to define fixtures to set defined, reliable, and consistent context for tests. Let’s ask Amazon Q Developer to write a fixture for the TABLE_NAME environment variable.
Figure 9: Generate a pytest fixture
The result in Figure 9 shows that Amazon Q Developer generated a simple fixture for the TABLE_NAME environment variable. It provides code showing how to use the fixture in the actual test case with additional comments for its content.
Example – Generate data
Amazon Q Developer provides capabilities that can help you generate input data for your tests based on a schema, data model, or table definition. The save_to_dynamodb_table saves an instance of the job posting class to the table. Let’s ask Amazon Q Developer to create a sample instance based on this definition.
Figure 10: Generate sample data
The answer shows a valid instance of the class in Figure 10 containing common example values for the fields.
Example – Generate unit test cases with context
The code being tested relies on an external library, boto3. To make sure that this dependency is included, we leave a comment specifying that boto3 should be mocked using the Moto library. Additionally, we tell Amazon Q Developer to consider the test instance named job_posting and the fixture named mock_table_name for reference. Developers can now provide a prompt to generate the test case using the context from previous tasks or use comments as inline prompts to generate the test within the test file itself.
Figure 11: Inline prompts for generating unit test case
Figure 11 shows the recommended code using inline prompts, which can be accepted as the unit test for the save_to_dynamodb_table function.
Best Practice – Break down larger tasks into smaller ones
For cases where Amazon Q Developer does not have much context or example code to refer to, such as writing unit tests from scratch, it is helpful to break down the tasks into smaller tasks. Amazon Q Developer will get more context with each step and can result in more effective responses.
Conclusion
Amazon Q Developer is a powerful tool that simplifies the process of writing and executing unit tests for your application. The examples provided in this post demonstrated that it can be a helpful companion throughout different stages of your unit test process. From initial learning to investigation and writing of test cases, the Chat, Generate, and Refactor capabilities allow you to speed up and improve your test generation. Using clear and concise prompts, context, an iterative approach, and small scoped tasks to interact with Amazon Q Developer improves the generated answers.
To learn more about Amazon Q Developer, see the following resources:
To provide the best experiences, we use technologies like cookies to store and/or access device information. Consenting to these technologies will allow us to process data such as browsing behavior or unique IDs on this site. Not consenting or withdrawing consent, may adversely affect certain features and functions.
Functional
Always active
The technical storage or access is strictly necessary for the legitimate purpose of enabling the use of a specific service explicitly requested by the subscriber or user, or for the sole purpose of carrying out the transmission of a communication over an electronic communications network.
Preferences
The technical storage or access is necessary for the legitimate purpose of storing preferences that are not requested by the subscriber or user.
Statistics
The technical storage or access that is used exclusively for statistical purposes.The technical storage or access that is used exclusively for anonymous statistical purposes. Without a subpoena, voluntary compliance on the part of your Internet Service Provider, or additional records from a third party, information stored or retrieved for this purpose alone cannot usually be used to identify you.
Marketing
The technical storage or access is required to create user profiles to send advertising, or to track the user on a website or across several websites for similar marketing purposes.

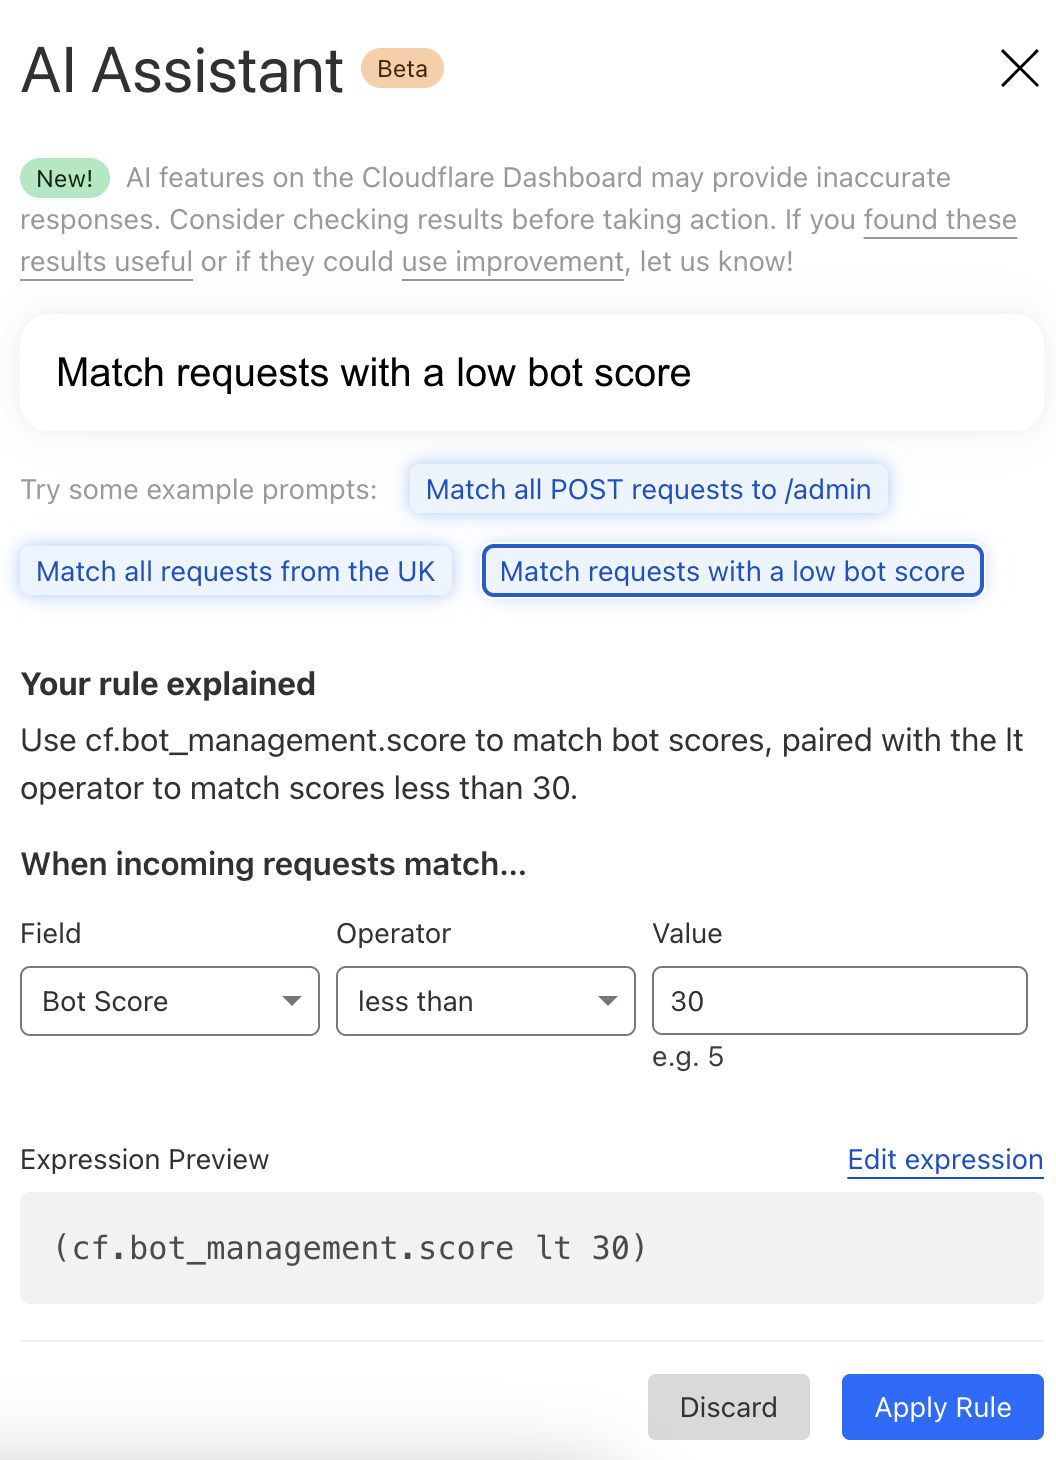
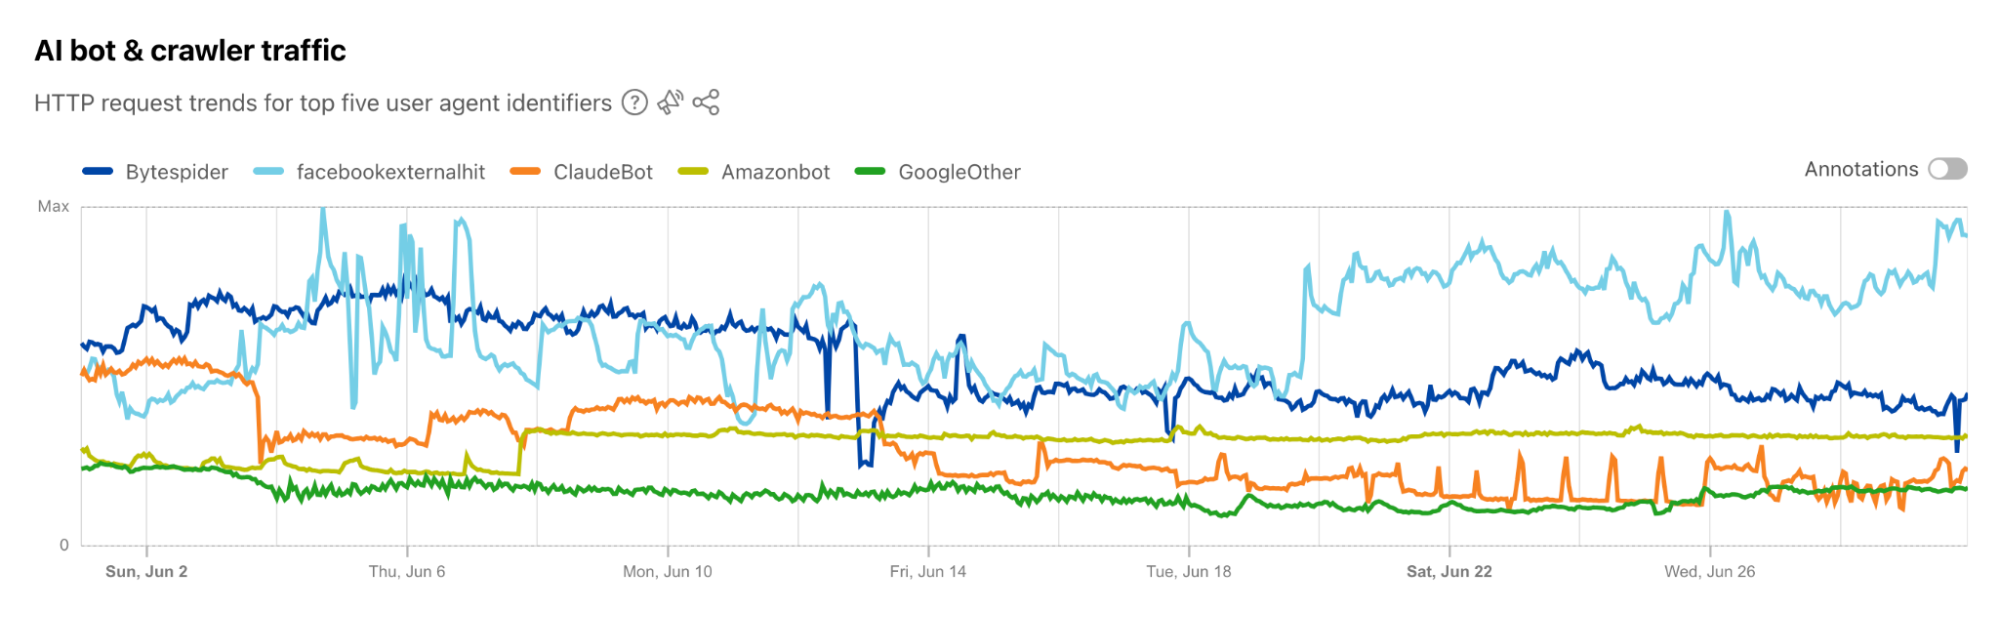

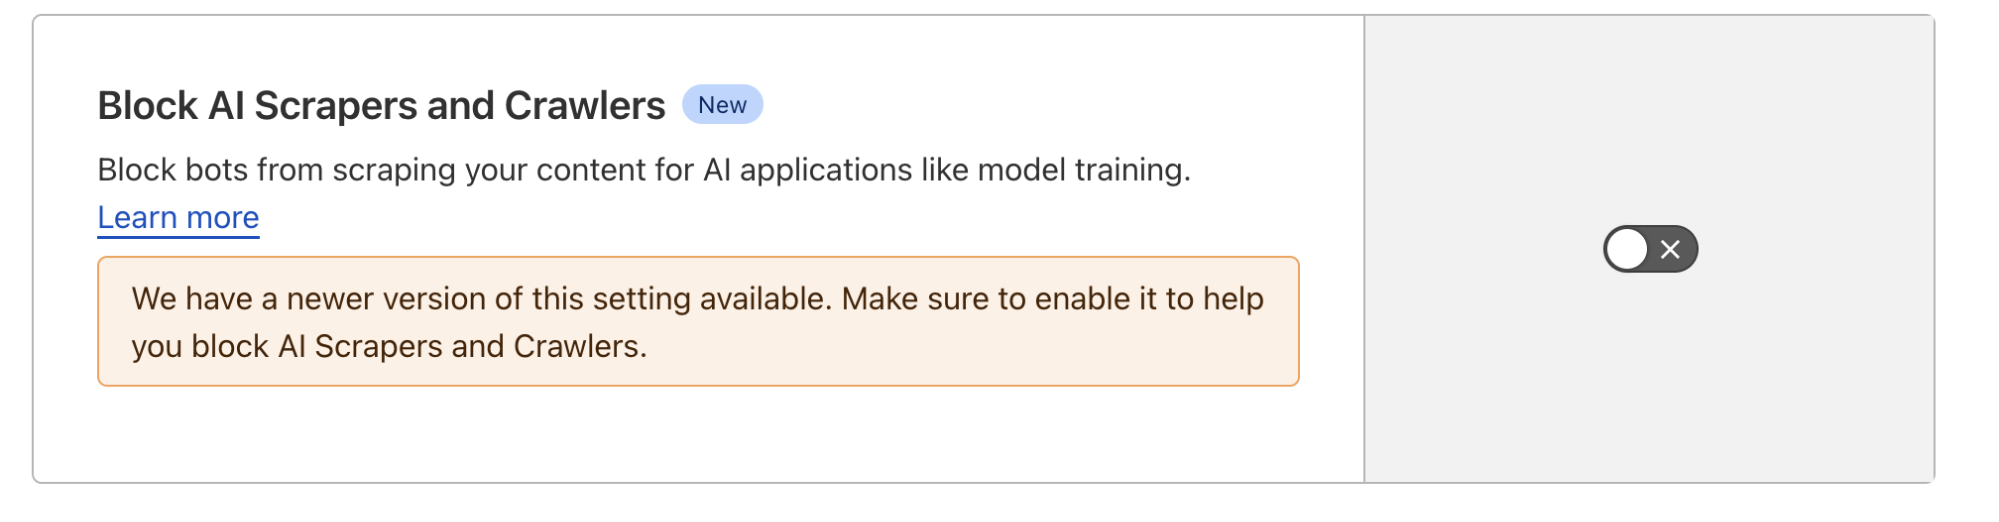
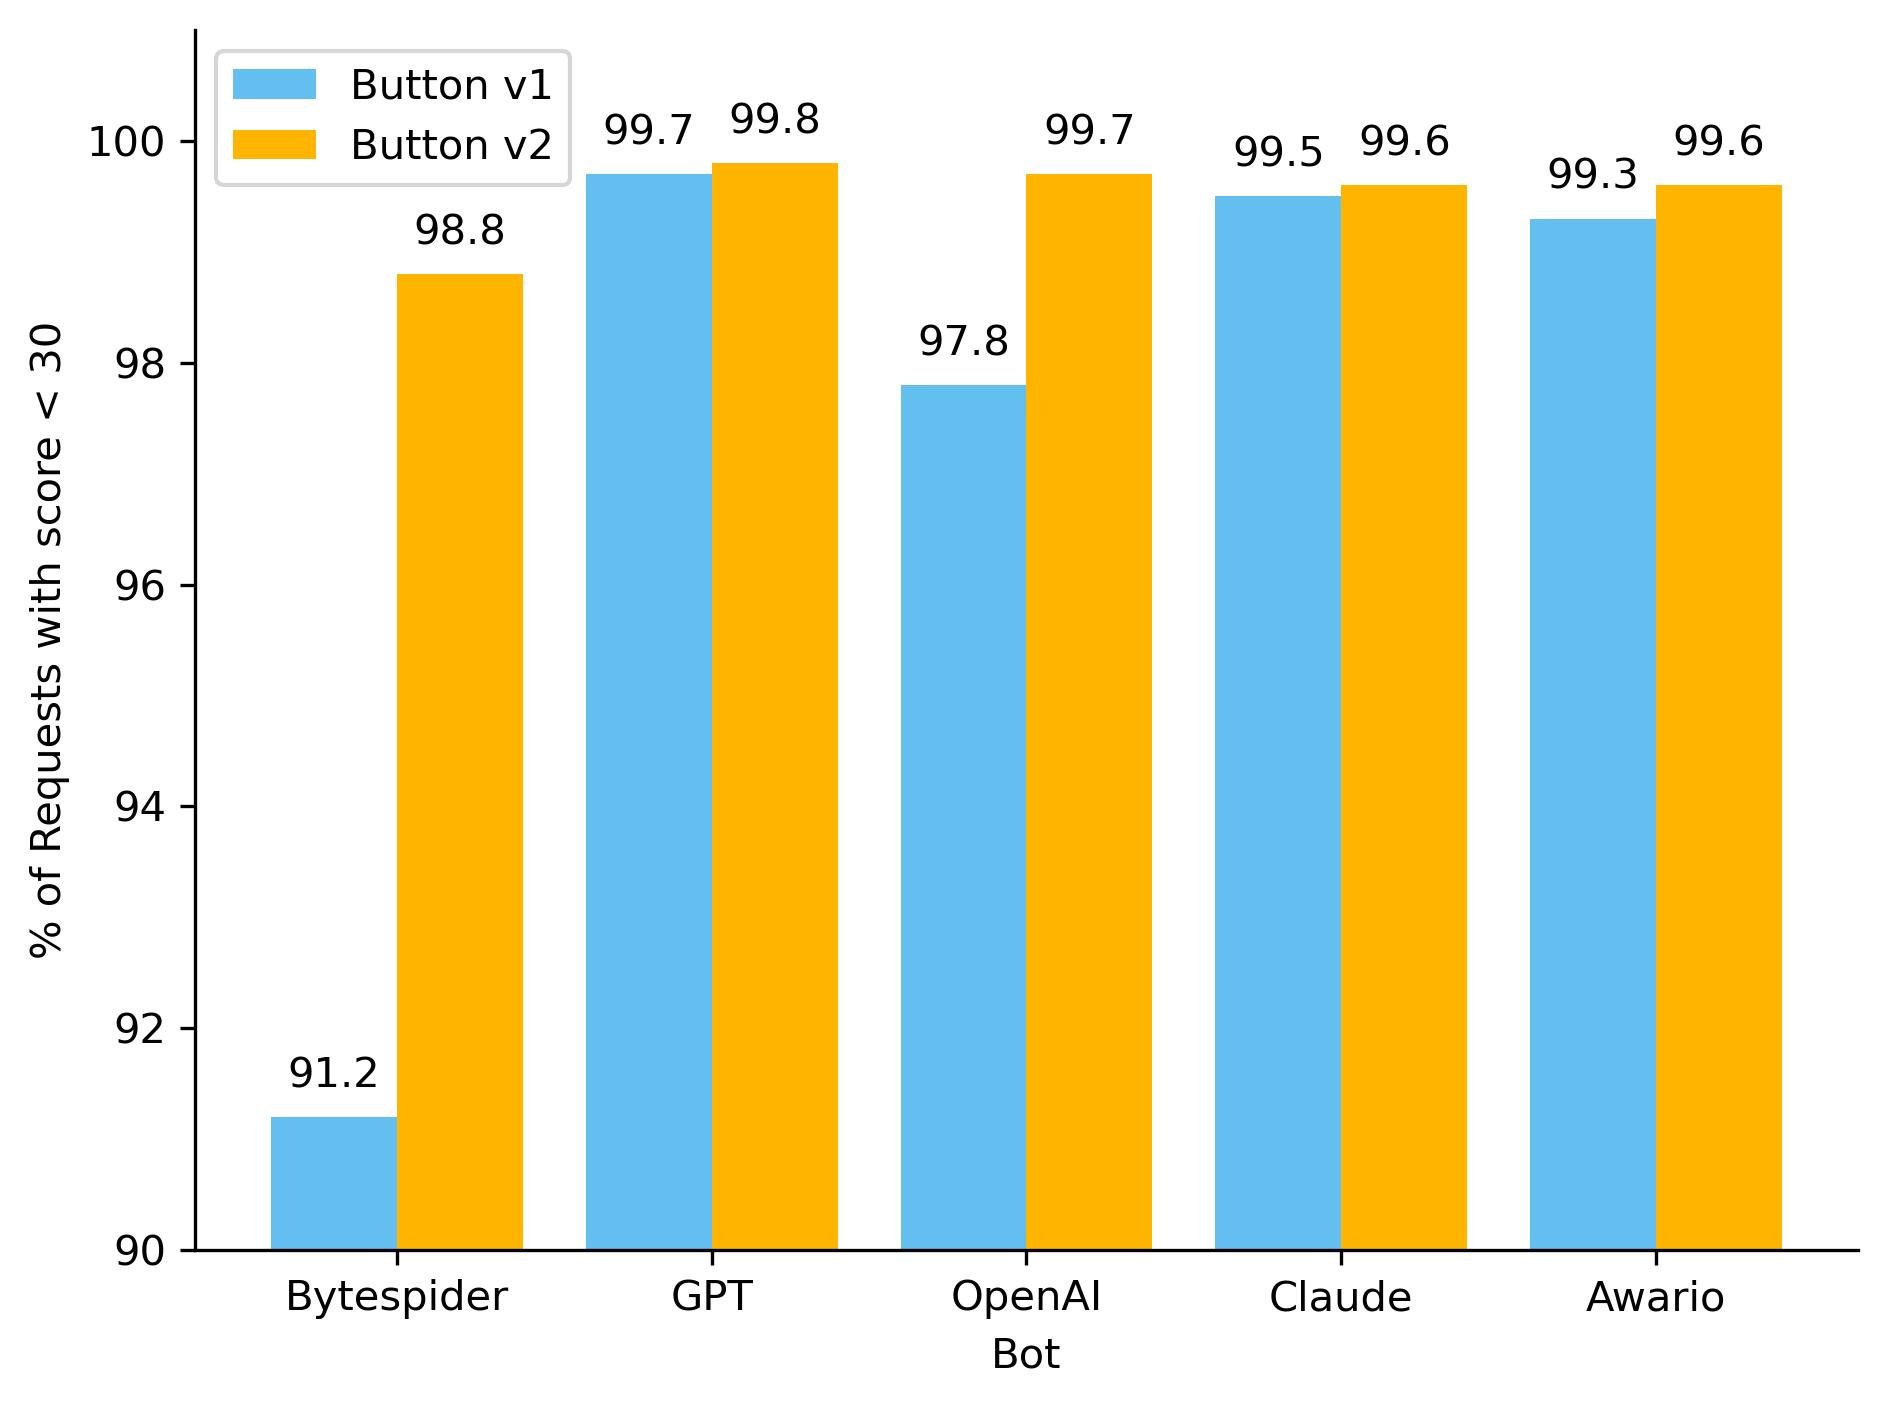
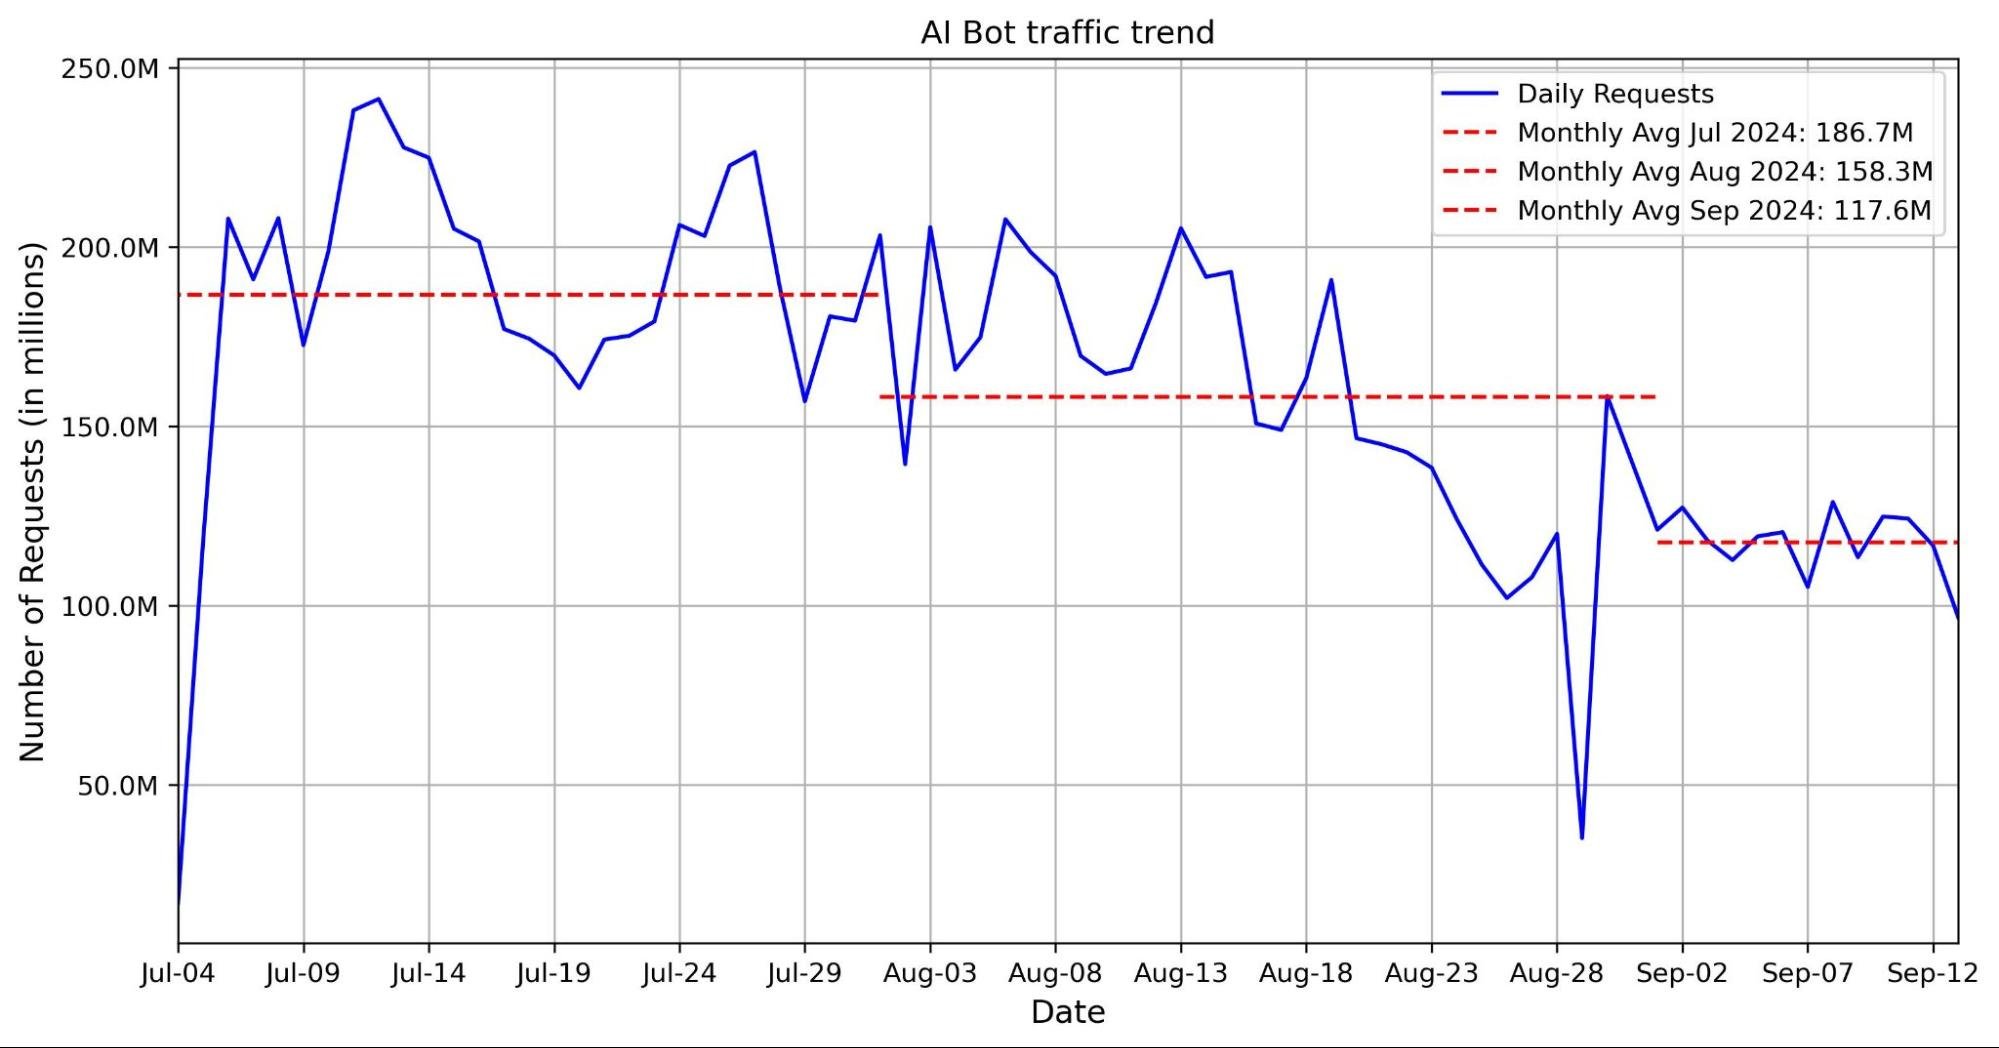
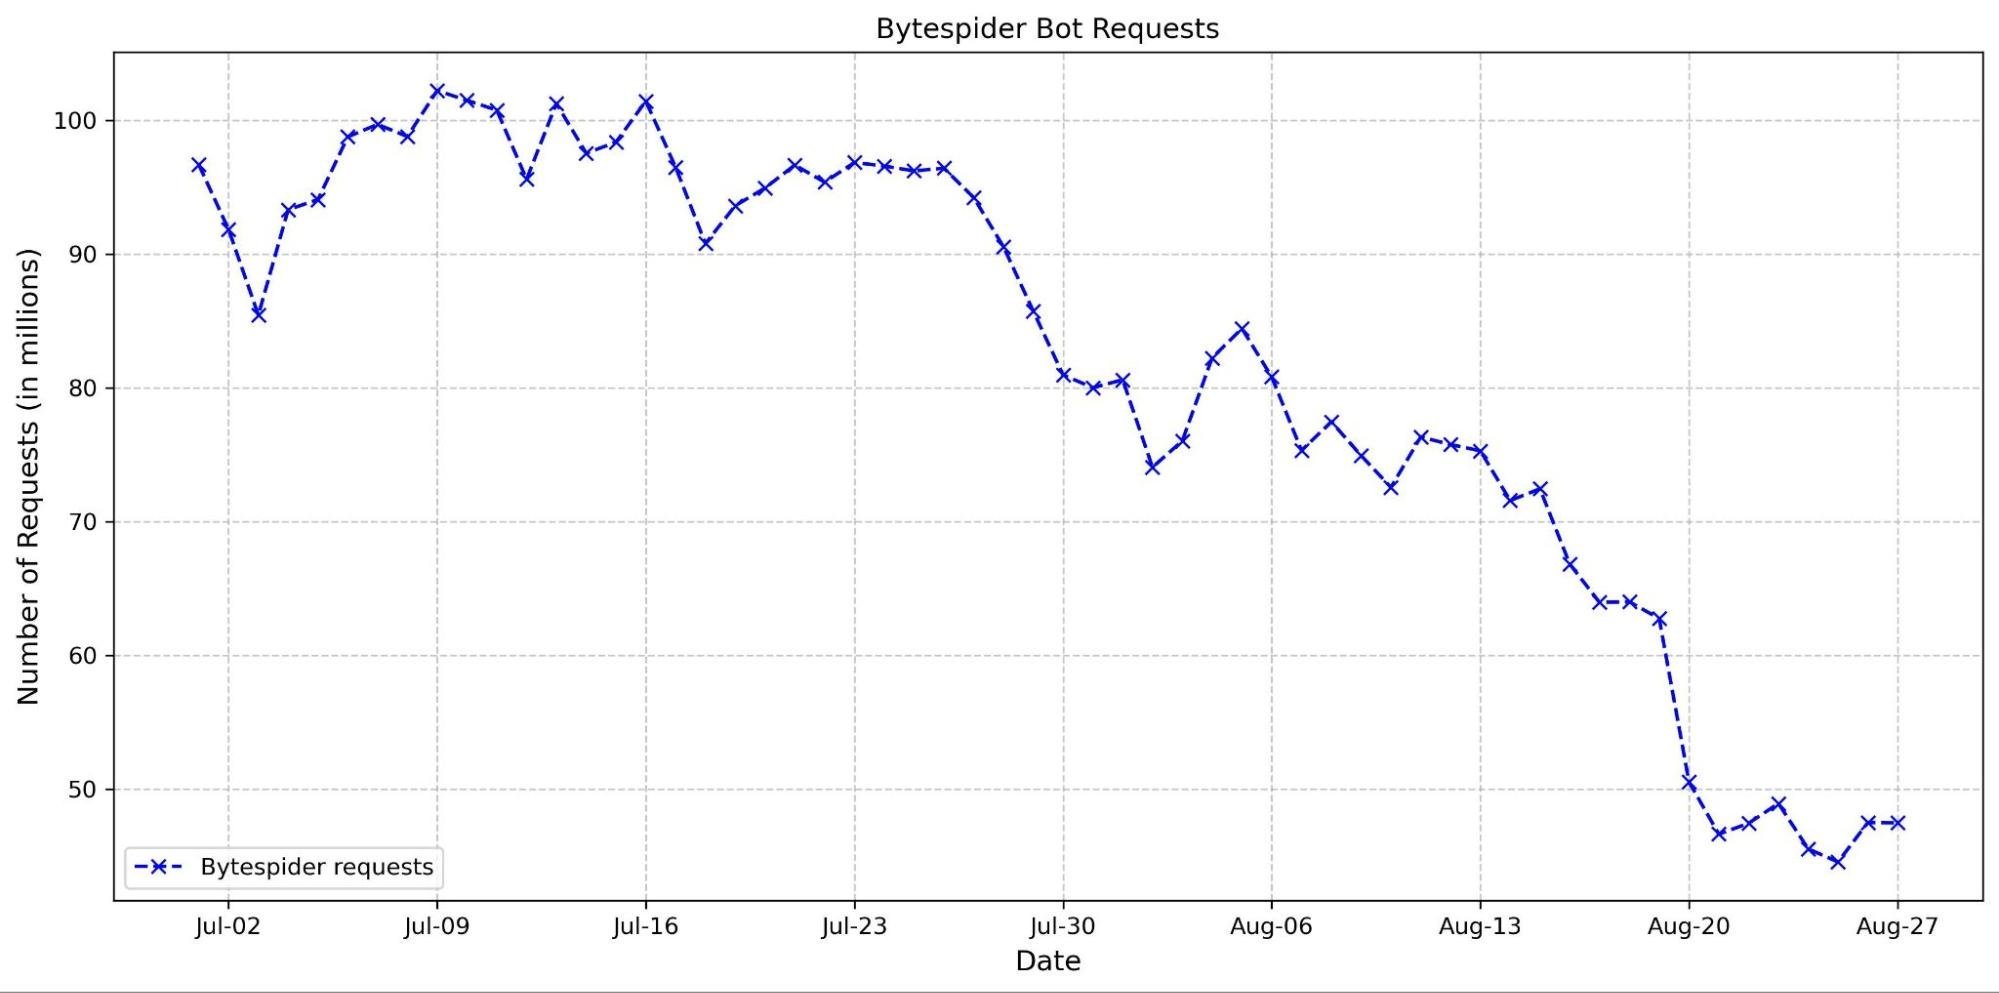
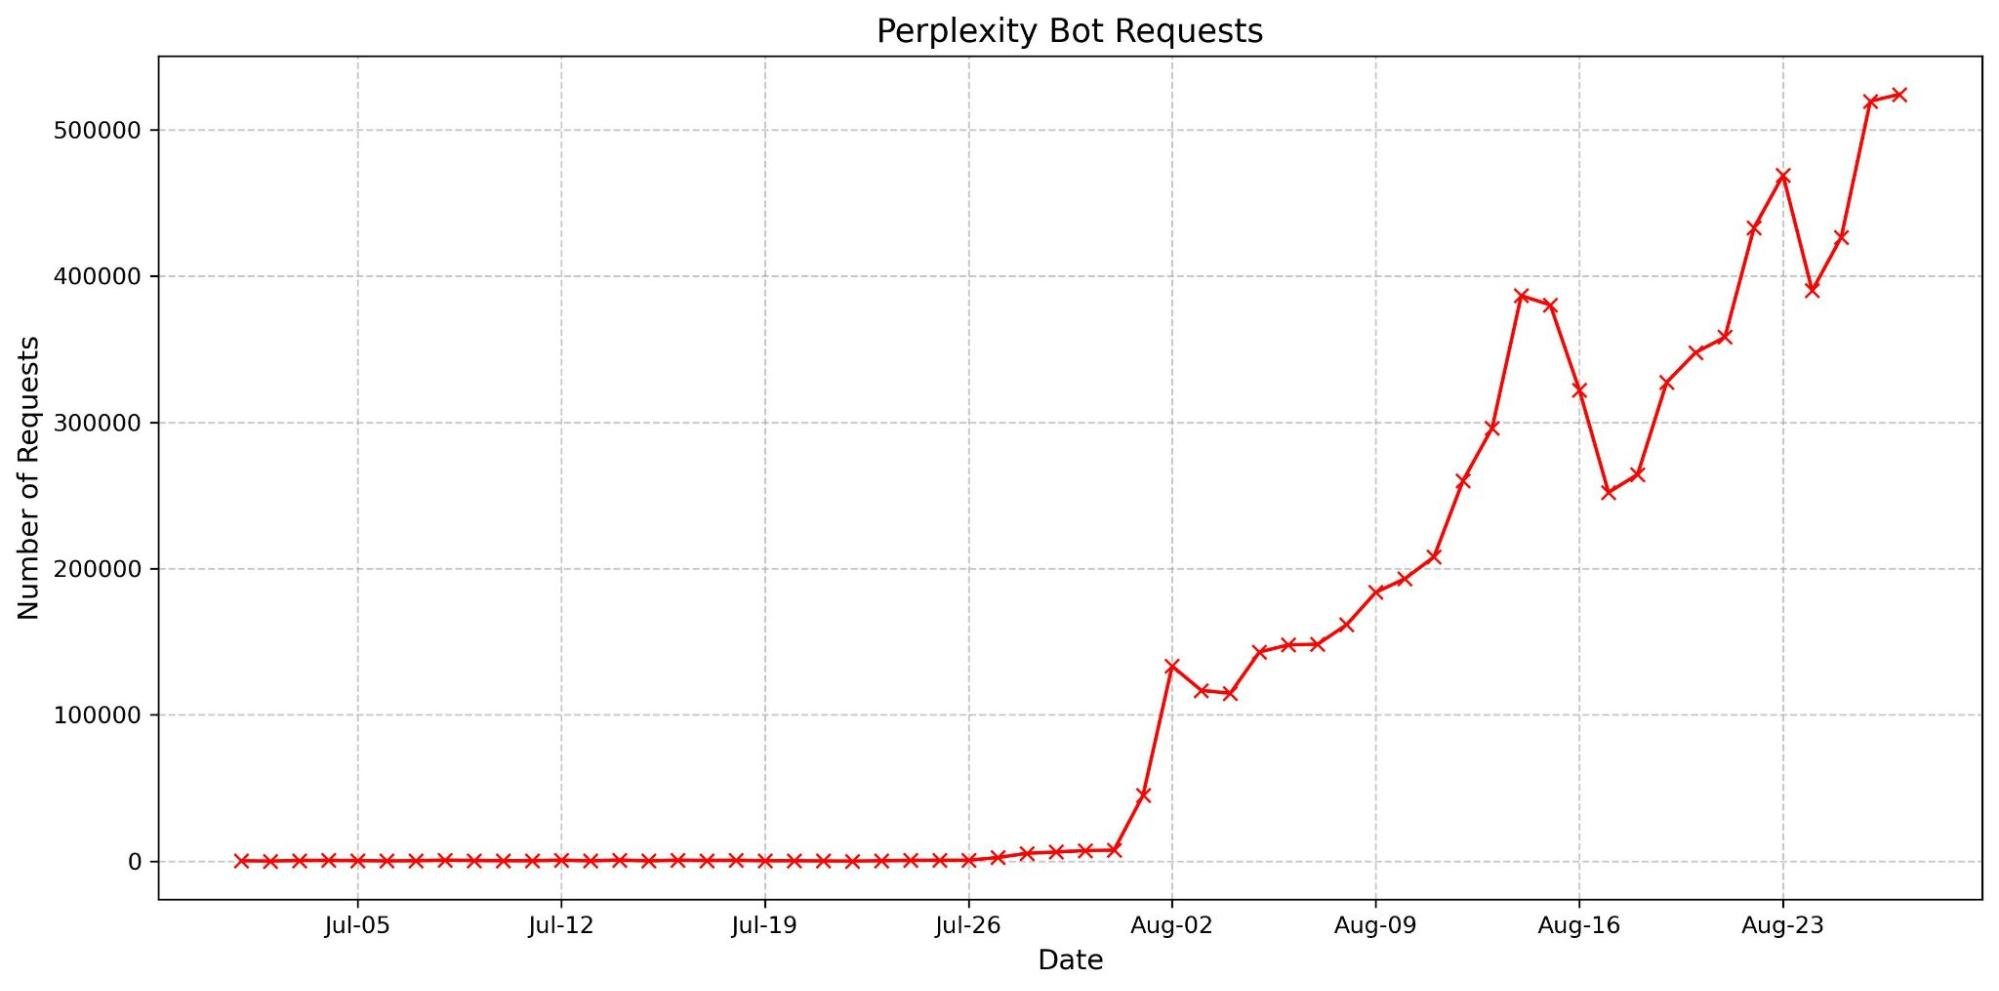


 Diego Colombatto is a Senior Partner Solutions Architect at AWS. He brings more than 15 years of experience in designing and delivering Digital Transformation projects for enterprises. At AWS, Diego works with partners and customers advising how to leverage AWS technologies to translate business needs into solutions.
 Angel Conde Manjon is a Sr. EMEA Data & AI PSA, based in Madrid. He has previously worked on research related to Data Analytics and Artificial Intelligence in diverse European research projects. In his current role, Angel helps partners develop businesses centered on Data and AI.
 Tiziano Curci is a Manager, EMEA Data & AI PDS at AWS. He leads a team that works with AWS Partners (G/SI and ISV), to leverage the most comprehensive set of capabilities spanning databases, analytics and machine learning, to help customers unlock the through power of data through an end-to-end data strategy.

 Abhishek Pan is a Sr. Specialist SA-Data working with AWS India Public sector customers. He engages with customers to define data-driven strategy, provide deep dive sessions on analytics use cases, and design scalable and performant analytical applications. He has 12 years of experience and is passionate about databases, analytics, and AI/ML. He is an avid traveler and tries to capture the world through his lens.
 Gourang Harhare is a Senior Solutions Architect at AWS based in Pune, India. With a robust background in large-scale design and implementation of enterprise systems, application modernization, and cloud native architectures, he specializes in AI/ML, serverless, and container technologies. He enjoys solving complex problems and helping customer be successful on AWS. In his free time, he likes to play table tennis, enjoy trekking, or read books
 Kevin Phillips is a Neptune Specialist Solutions Architect working in the UK. He has 20 years of development and solutions architectural experience, which he uses to help support and guide customers. He has been enthusiastic about evangelizing graph databases since joining the Amazon Neptune team, and is happy to talk graph with anyone who will listen.
 Sandeep Varma is a principal in ZS’s Pune, India, office with over 25 years of technology consulting experience, which includes architecting and delivering innovative solutions for complex business problems leveraging AI and technology. Sandeep has been critical in driving various large-scale programs at ZS Associates. He was the founding member the Big Data Analytics Centre of Excellence in ZS and currently leads the Enterprise Service Center of Excellence. Sandeep is a thought leader and has served as chief architect of multiple large-scale enterprise big data platforms. He specializes in rapidly building high-performance teams focused on cutting-edge technologies and high-quality delivery.

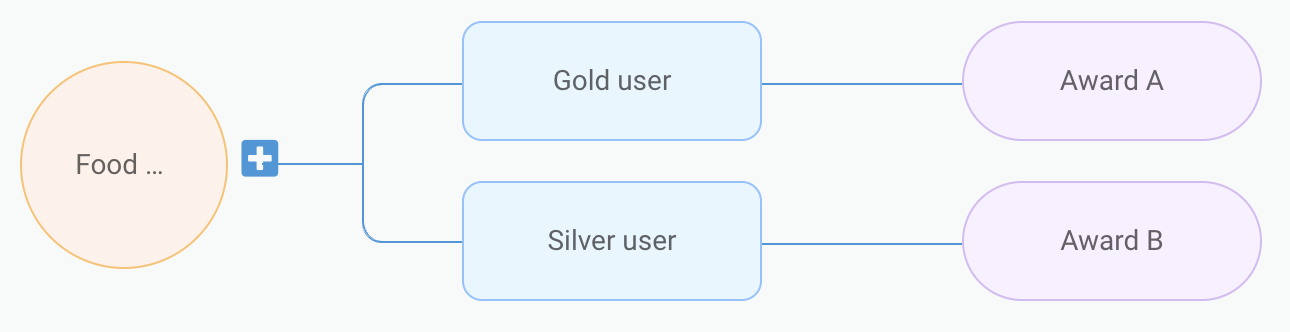
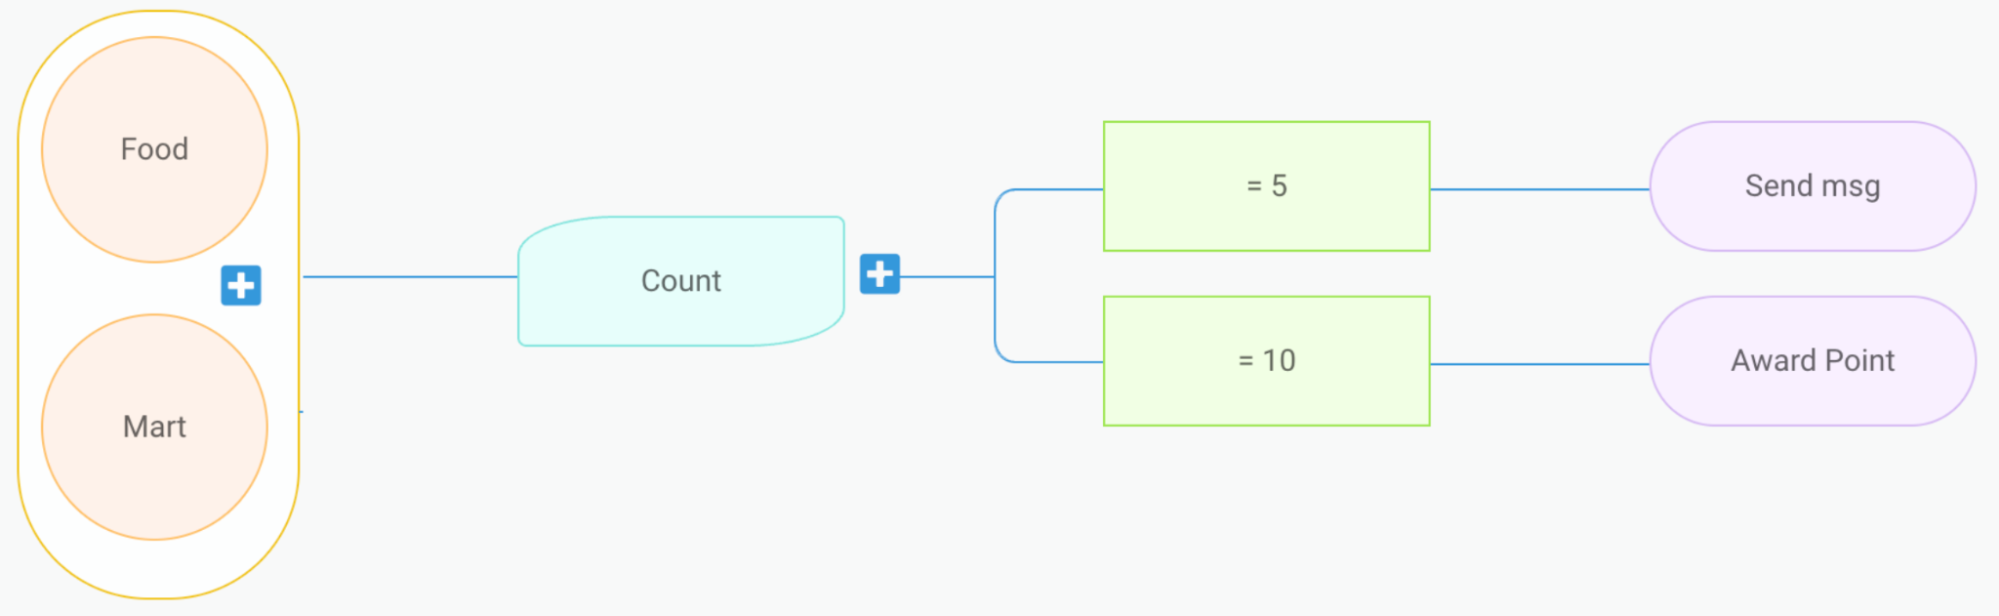

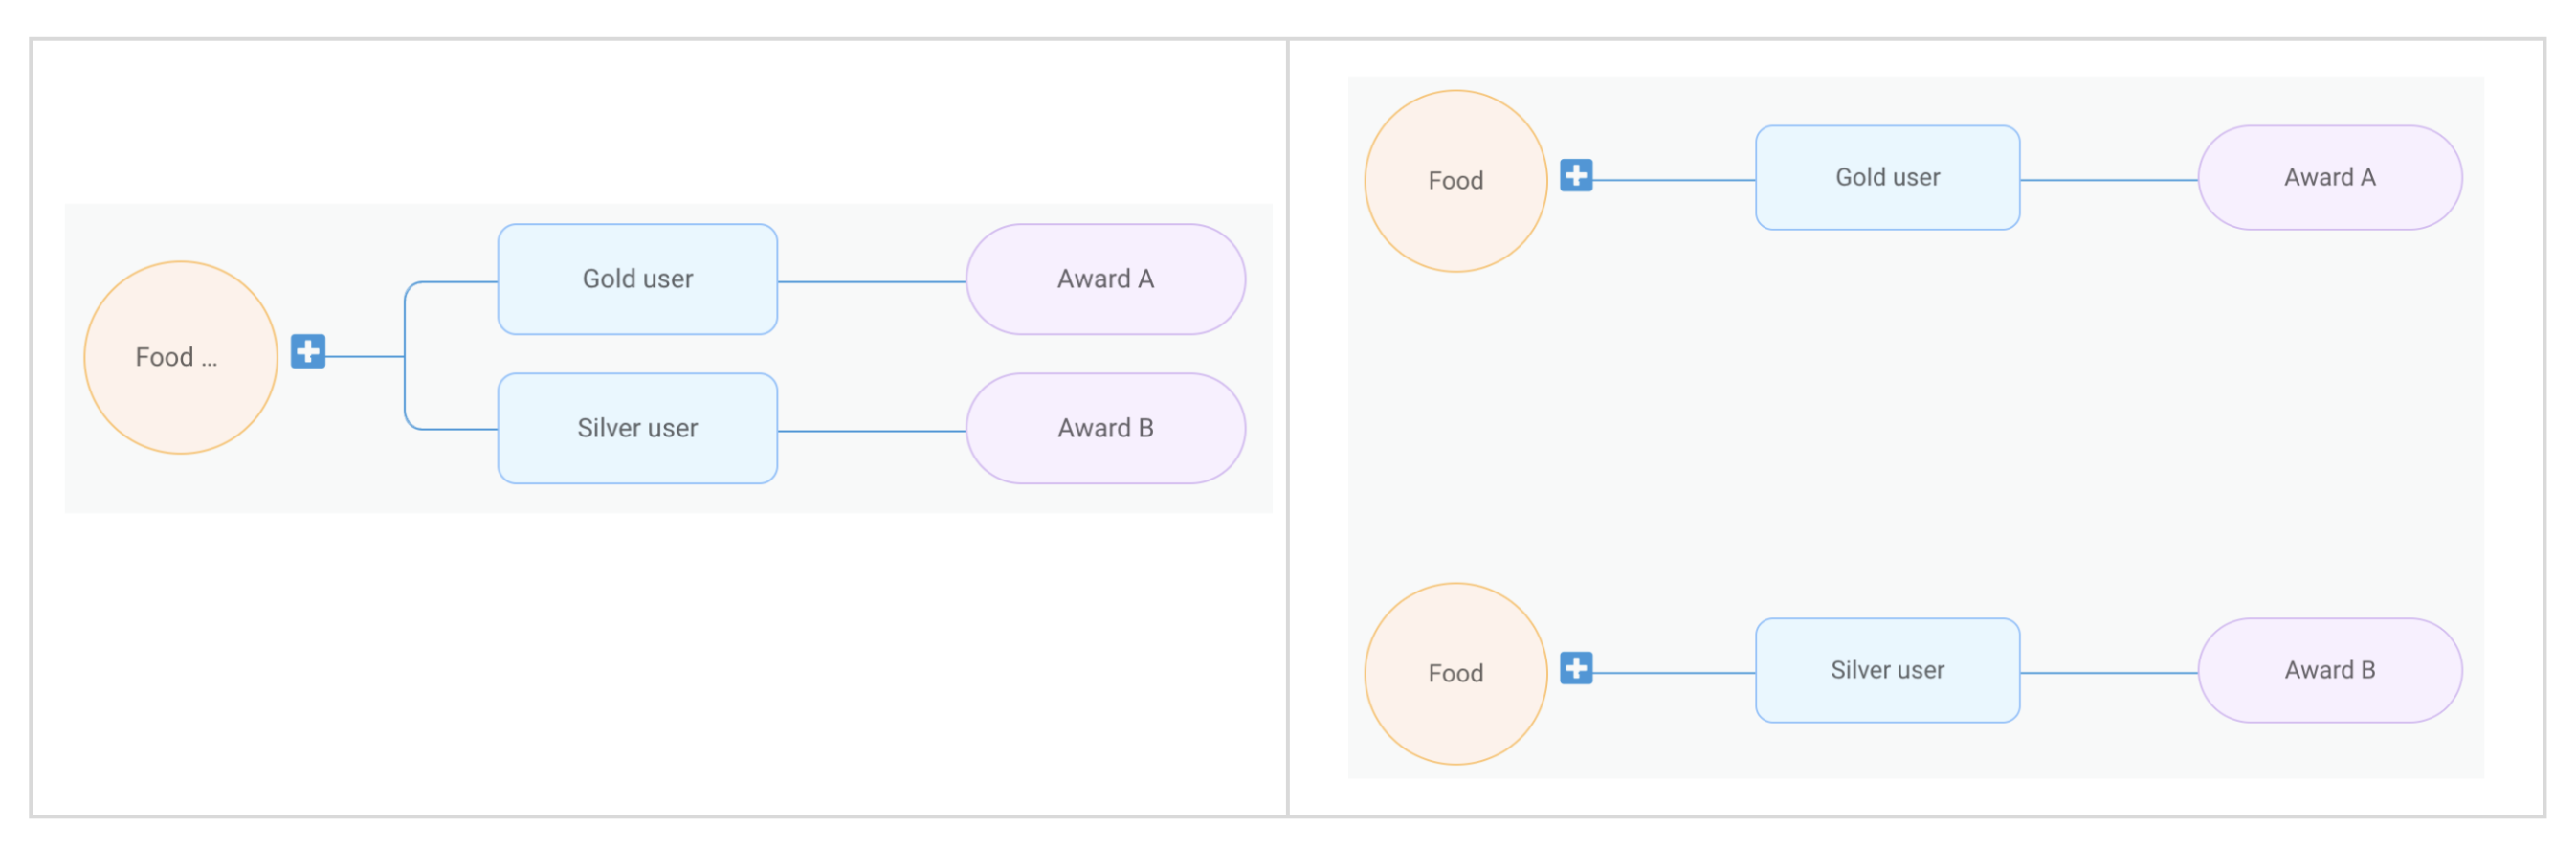
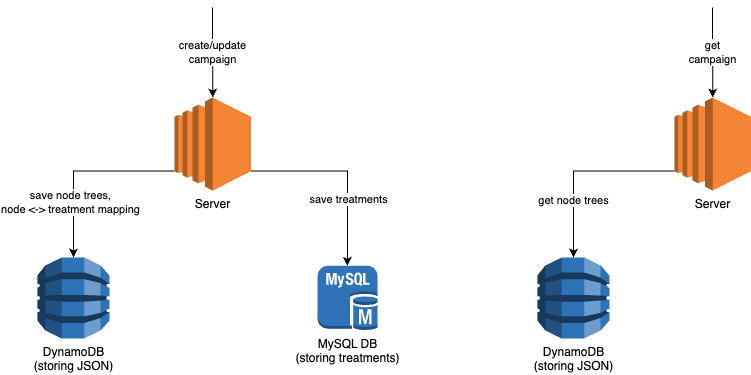


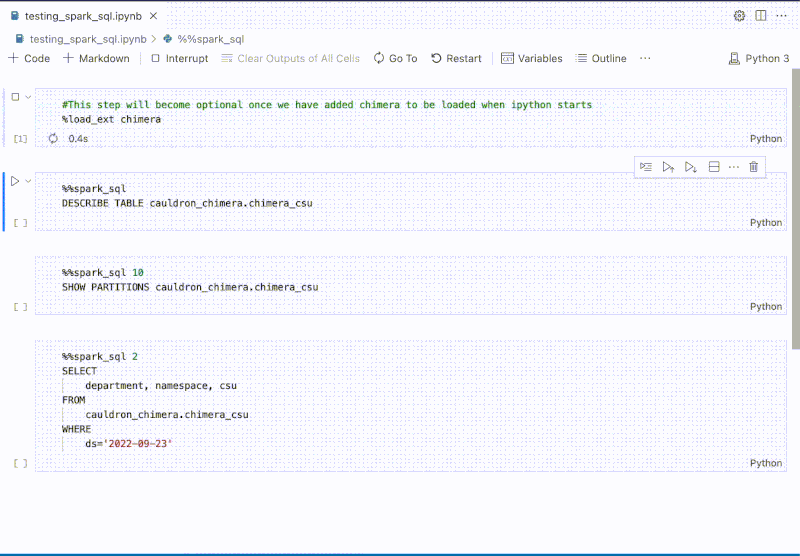
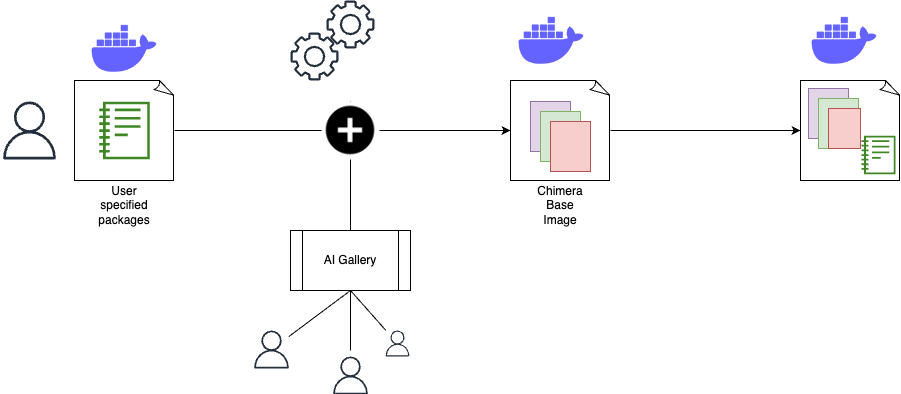
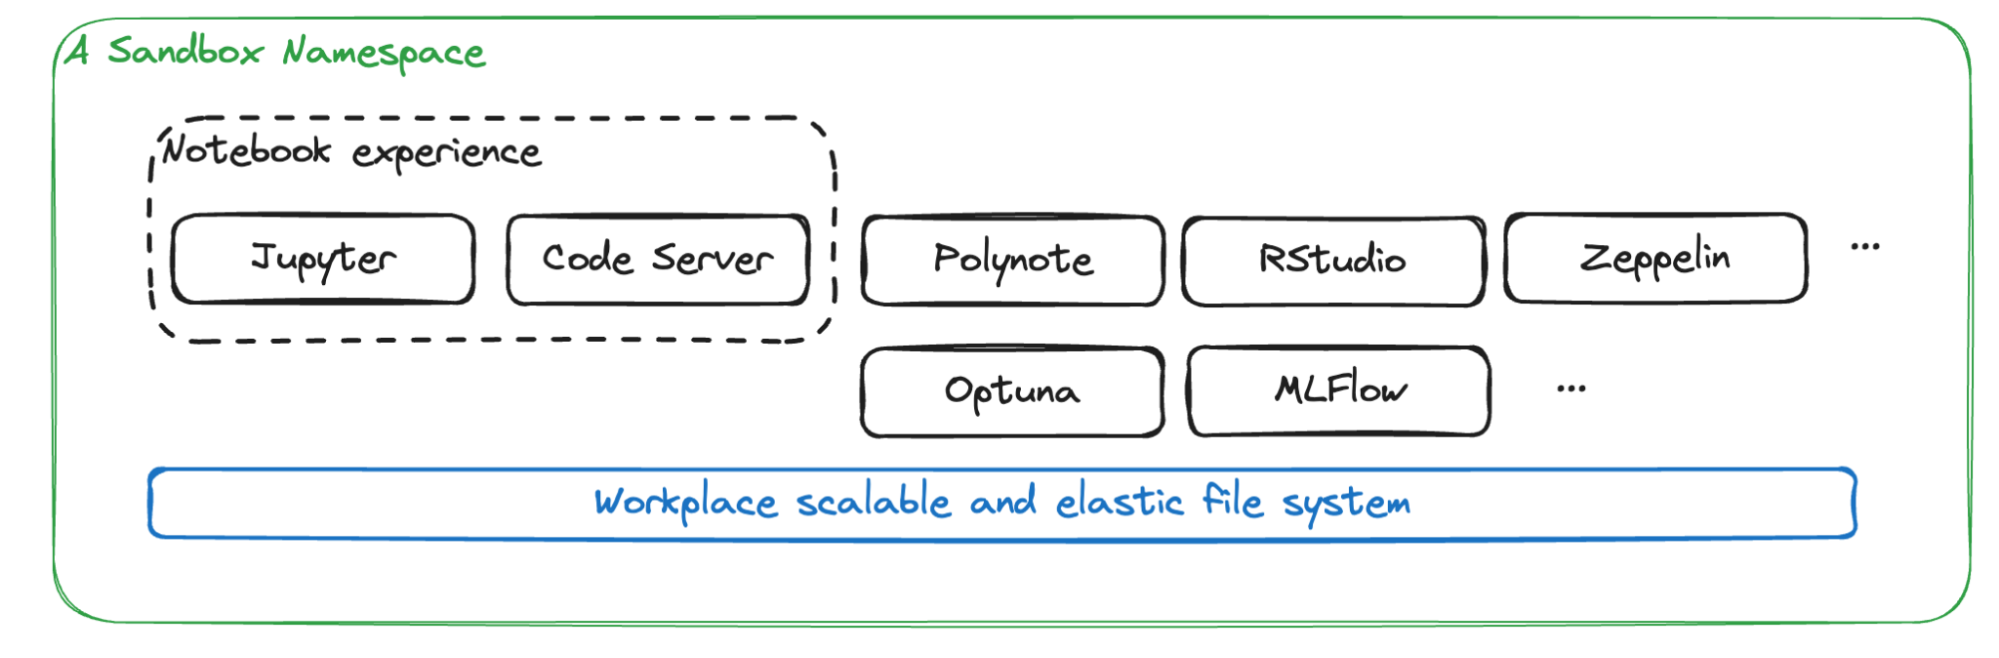
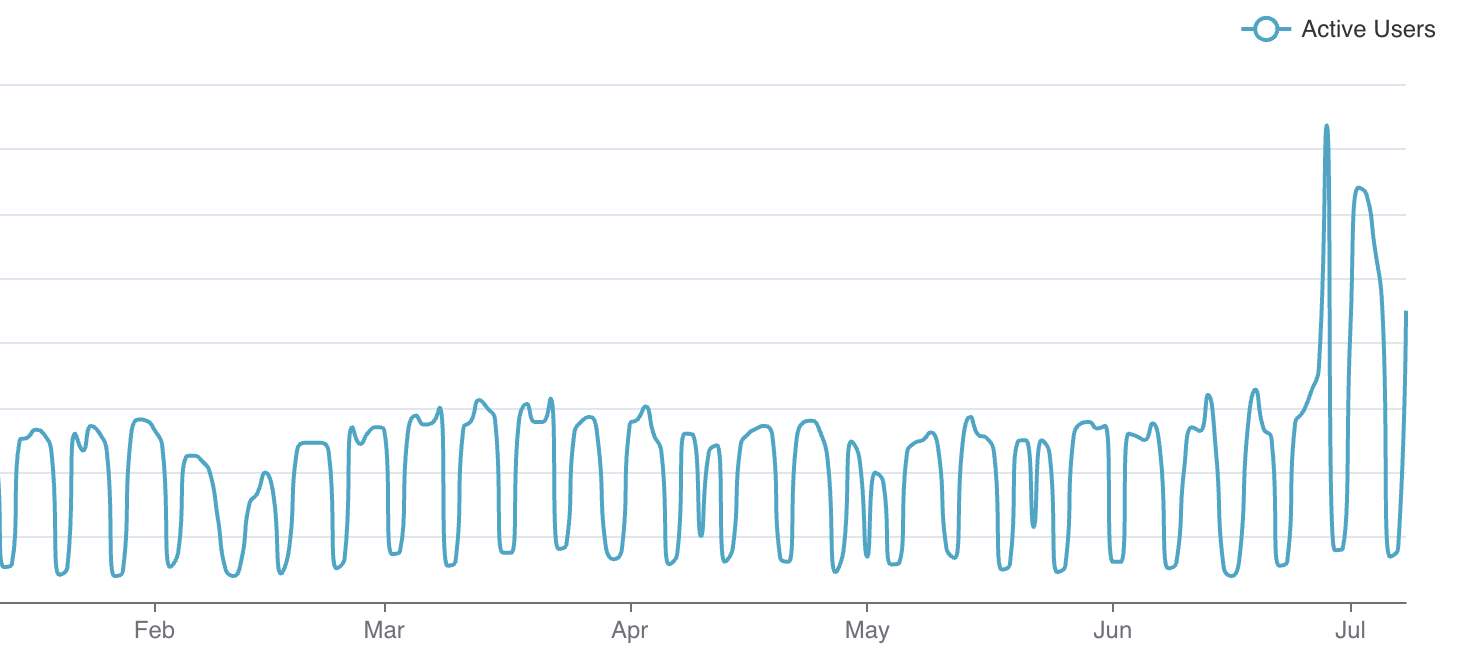
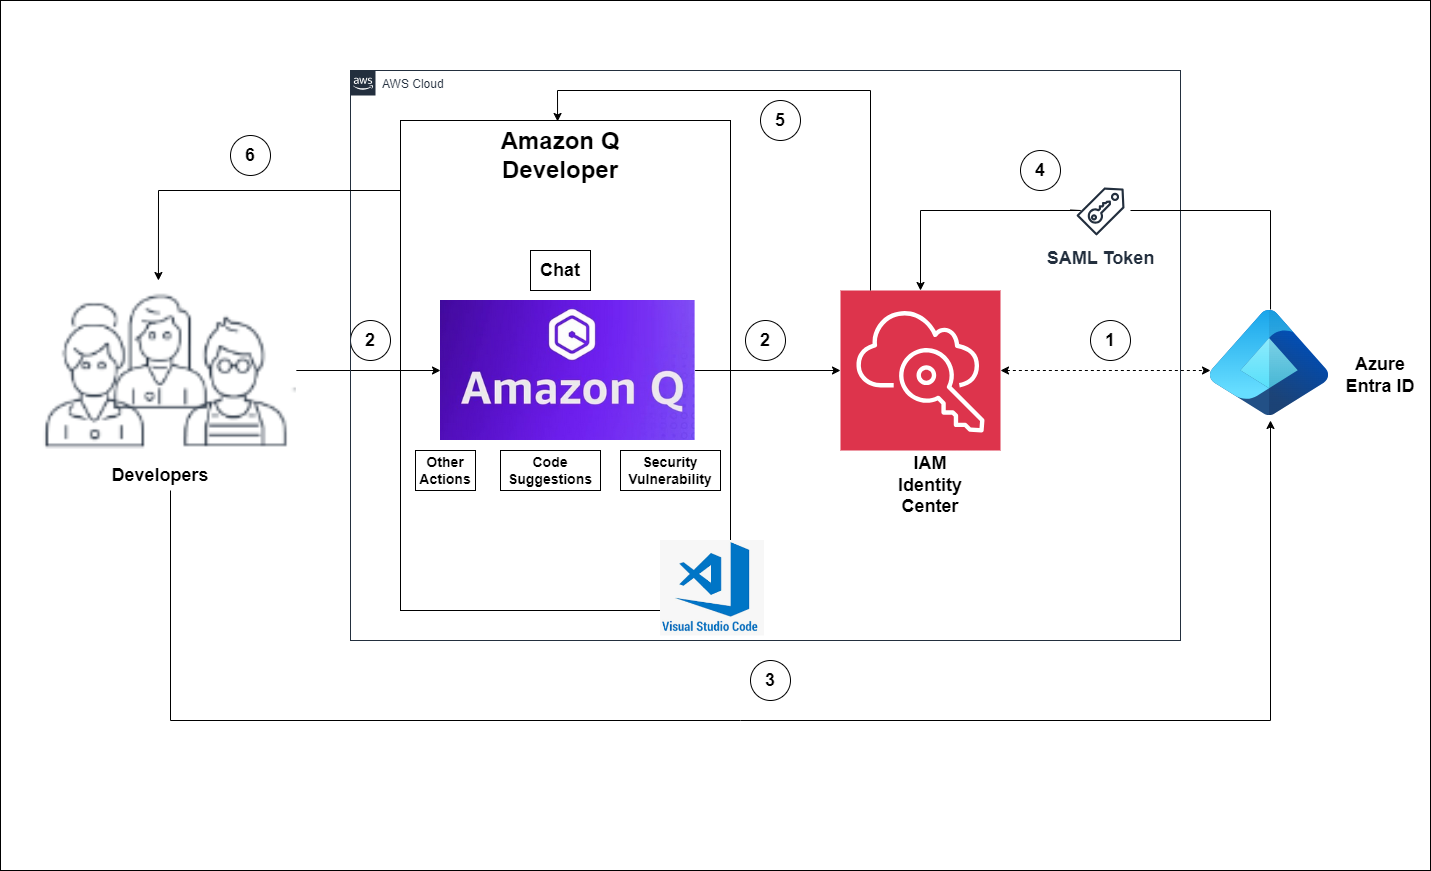


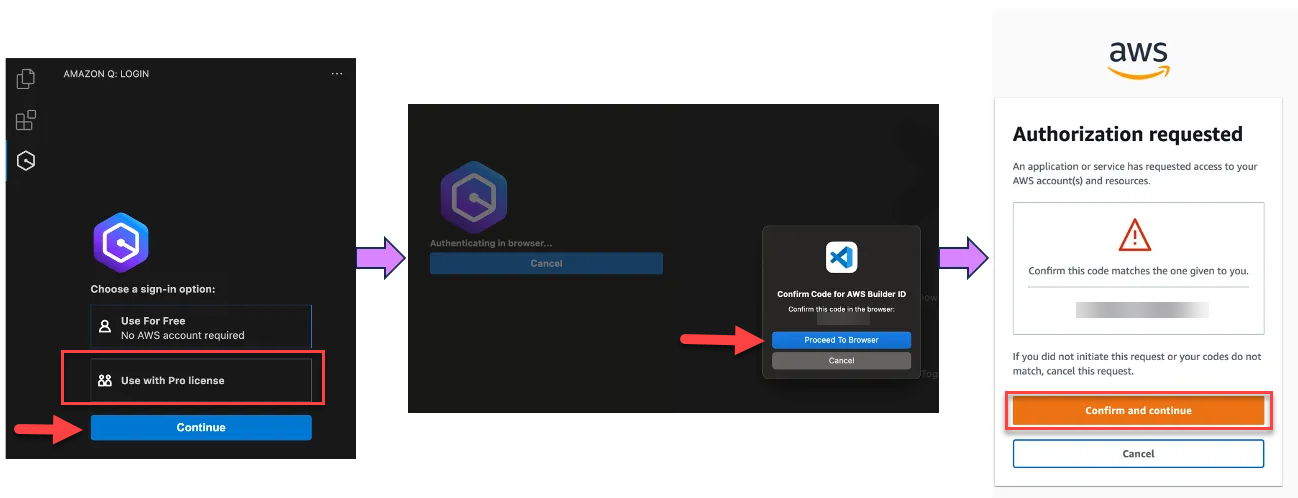

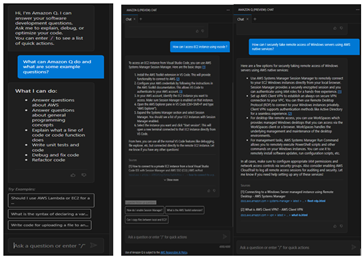


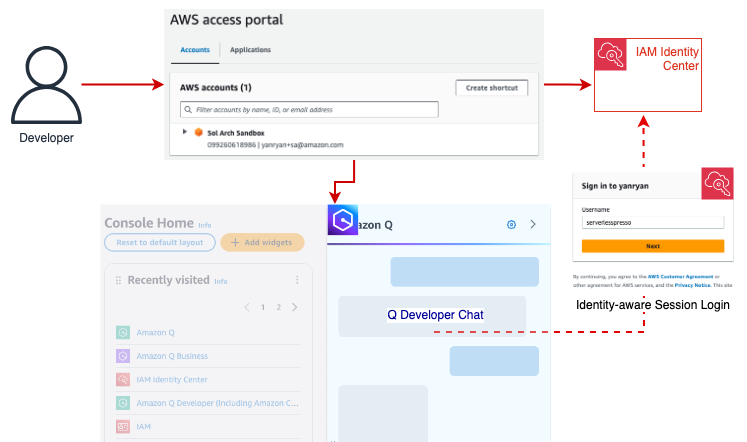
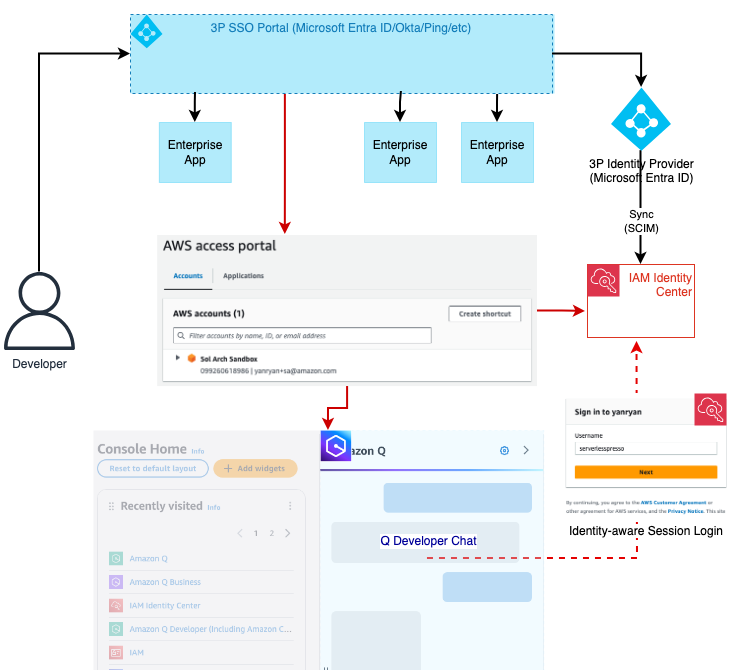


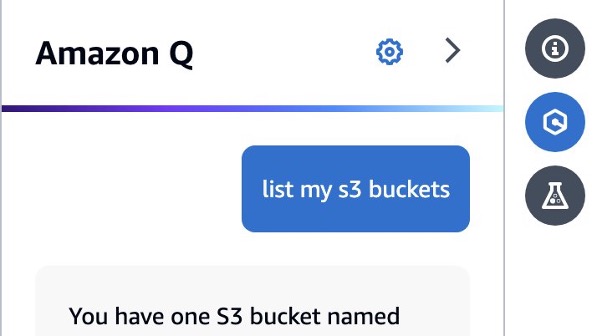


 k
k


 Anusha Challa is a Senior Analytics Specialist Solutions Architect focused on Amazon Redshift. She has helped many customers build large-scale data warehouse solutions in the cloud and on premises. She is passionate about data analytics and data science.