Meeting stringent security and compliance requirements in regulated or public sector environments can be challenging and time consuming, even for organizations with strong technical competencies. To help customers navigate the different requirements and processes, we launched the ATO on AWS Program in June 2019 for US customers. The program involves a community of expert AWS partners to help support and accelerate customers’ ability to meet their security and compliance obligations.
How Does the ATO on AWS Program support customers?
The primary offering of the ATO on AWS Program is access to a community of vetted, expert partners that specialize in customers’ authorization needs, whether it be architecting, configuring, deploying, or integrating tools and controls. The team also provides direct engagement activities to introduce you to publicly available and no-cost resources, tools, and offerings so you can work to meet your security obligations on AWS. These activities include one-on-one meetings, answering questions, technical workshops (in specific cases), and more.
Who are the partners?
Partners in the ATO on AWS Program go through a rigorous evaluation conducted by a team of AWS Security and Compliance experts. Before acceptance into the program, the partners complete a checklist of criteria and provide detailed evidence that they meet those criteria.
Our initial launch in Spain includes the following five partners that have successfully met the criteria to join the program. Each partner has also achieved the Esquema Nacional de Seguridad certification.
Indra Sistemas – a global technology and consulting company that provides proprietary solutions for the transport and defense markets. It also offers digital transformation consultancy and information technologies in Spain and Latin America through its affiliate Minsait.
NTT Data EMEAL – an operational company created from an alliance between everis and NTT DATA EMEAL to support clients in Europe and Latin America. NTT Data EMEAL supports customers through strategic consulting and advisory services, new technologies, applications, infrastructure, IT modernization, and business process outsourcing (BPO).
Telefónica Tech – a leading company in digital transformation. Telefónica Tech combines cybersecurity and cloud technologies to help simplify technological environments and build appropriate solutions for customers.
Customers seeking support can engage the ATO on AWS Program and our partners in multiple ways. The best way to reach us is to complete a short, online ATO on AWS Questionnaire so we can learn more about your timeline and goals. If you prefer to engage AWS partners directly, see the complete list of our partners and their contact information at ATO on AWS Partners.
If you have feedback about this post, submit comments in the Comments section below. If you have questions about this post, contact AWS Support.
Want more AWS Security news? Follow us on Twitter.
Applications with multiple users and shared data require permissions management. The permissions describe what each user of an application is permitted to do. Permissions are defined as allow or deny decisions for resources in the application.
To manage permissions, developers often combine attribute-based access control (ABAC) and role-based access control (RBAC) models with custom code coupled with business logic. This requires a review of the code to understand the permissions, and changes to the code to modify the permissions. Auditing permissions within an application can require the same level of time and effort as a full application code review. This can cause delays to deliver and require additional time and resources to ascertain permissions across your application.
In this post, I will show you how to use Amazon Verified Permissions to define permissions within custom applications using the Cedar policy language. I’ll also show you how authorization requests are made.
Overview of Amazon Verified Permissions
Amazon Verified Permissions provides a prebuilt, flexible permissions system that you can use to build permissions based on both ABAC and RBAC in your applications. You define and manage fine-grained permissions using both permit policies, that grant permissions, and forbid policies, that restrict an action. This lets you focus on building or modernizing the application.
Amazon Verified Permissions maintains a centralized policy store, which helps you manage permissions throughout an application, authorize actions, and analyze permissions with automated reasoning. It also has an evaluation simulator tool to help you test your authorization decisions and author policies.
Policy creation
To author policies with Amazon Verified Permissions, use the purpose-built Cedar policy language to create specific permission policies that include traits of ABAC and RBAC. This allows you to apply granularity with least privilege in mind.
The following figure shows a permission policy for a document management application. In the figure, between the set of parentheses on lines 1-4 of the policy, RBAC is used, based on the principal’s UserGroup, to limit the permit action to registered users—and not guest or machine principals, for example. Between the brackets on lines 5–7 of the policy, ABAC is used, where resource.owner == principal limits access to the resource to only the owner.
Figure 1: Using the Cedar policy language to create permissions
Policies are developed in two ways:
Developers build out policies as part of the deployment of the application – Policy permissions that are defined as part of deployment are a great way for developers to set up guardrails on actions that should not cross set boundaries.
Policies are created through the use of the application by end users – Policy permissions that are configurable within the application provide the freedom for data to be shared between users.
We will walk you through these two approaches in the following sections.
Create policies as part of the deployment of the application
The following figure shows how a developer can configure a permit policy as part of the deployment of an application.
Figure 2: Creating policies as part of the deployment of the application
Policies configured by developers with pre-defined permissions that are deployed alongside the application is a familiar method for setting up guardrails in an application. Consider the document management application shown in Figure 3. There is a permit policy in place that allows users to view their own documents. Without a policy, the default result is a deny. You should also configure explicit forbid policies to act as guardrails to prevent overly permissive policies. In Figure 3, the policy restricts a user to only GET documents that they own or that are not tagged as private.
Figure 3: Example of a permit policy using Cedar
Create policies within the application by end users
The following figure shows how end users can apply policies within the application.
Figure 4: How permissions can be applied using policies for application end users
In a document sharing application, the application usually provides a simple end-user experience with a menu containing point-and-click actions that allow the user to select predefined permissions, such as read, write, or delete. Abstracted by the application, these permissions are transformed into Amazon Verified Permissions policy statements and stored in the designated policy location for the application. When an end user tries to take actions protected by these permissions, the application queries the Amazon Verified Permissions backend to determine if the principal in question has permissions to do so.
You can allow users of the application to create policies directly with respect to their given environments or current permissions. For example, if the application is targeted to system administrators or engineers who are technically proficient, you might choose not to hide the policy generation process behind a UI. The Amazon Verified Permissions policy grammar is designed for users comfortable with text-based query languages. Figure 5 shows an example policy that allows a user to GET or POST documents that they own.
Figure 5: Amazon Verified Permissions policy grammar written with Cedar to define permissions
Conclusion
Amazon Verified Permissions is a scalable, fine-grained permissions management and authorization service that helps you build and modernize applications without relying heavily on coding authorization within your applications. By using the Cedar policy language, you can define granular access controls that use both RBAC and ABAC and help end users create policies within the application. This allows for alignment of authorization standards across applications and provides clear visibility into existing permissions for review and audibility.
We continue to expand the scope of our assurance programs at Amazon Web Services (AWS), and we are pleased to announce that our Regions and AWS Edge locations in Europe are now certified by the Portuguese GNS/NSO (National Security Office) at the National Restricted level. This certification demonstrates our ongoing commitment to adhere to the heightened expectations for cloud service providers to process, transmit, and store classified data.
The GNS certification is based on NIST SP800-53 R4 and CSA CCM v4 frameworks, with the goal of protecting the processing and transmission of classified information.
As of this writing, 26 services offered in Europe are in scope of this certification. For up-to-date information, including when additional services are added, see the AWS Services in Scope by Compliance Program and select GNS.
AWS strives to continuously bring services into the scope of its compliance programs to help you meet your architectural and regulatory needs. If you have questions or feedback about GNS Portugal compliance, reach out to your AWS account team.
To learn more about our compliance and security programs, see AWS Compliance Programs. As always, we value your feedback and questions; reach out to the AWS Compliance team through the Contact Us page.
If you have feedback about this post, submit comments in the Comments section below.
Want more AWS Security how-to content, news, and feature announcements? Follow us on Twitter.
December 8, 2022: This post has been updated to reflect changes for M2M options with the new service of IAMRA. This blog post was first published November 19, 2013.
August 10, 2022: This blog post has been updated to reflect the new name of AWS Single Sign-On (SSO) – AWS IAM Identity Center. Read more about the name change here.
Amazon Web Services (AWS) supports multiple authentication mechanisms (AWS Signature v4, OpenID Connect, SAML 2.0, and more), essential in providing secure access to AWS resources. However, in a strictly machine-to machine (m2m) scenario, not all are a good fit. In these cases, a human is not present to provide user credential input. An example of such a scenario is when an on-premises application sends data to an AWS environment, as shown in Figure 1.
This post is designed to help you decide which approach is best to securely connect your applications, either residing on premises or hosted outside of AWS, to your AWS environment when no human interaction comes into play. We will go through the various alternatives available and highlight the pros and cons of each.
Figure 1: Securely connect your external applications to AWS in machine-to-machine scenarios
Determining the best approach
Let’s start by looking at possible authentication mechanisms that AWS supports in the following table. We’ll first identify the AWS service or services where the authentication can be set up—called the AWS front-end service. Then we’ll point out the AWS service that actually handles the authentication with AWS in the background—called the AWS backend service. We will also assess each mechanism based on use case.
Table 1: Authentication mechanisms available in AWS
We’ll now review each of these alternatives and also evaluate two additional characteristics on a 5-grade scale (from very low to very high) for each authentication mechanism:
Complexity: How complex is it to implement the authentication mechanism?
Convenience: How convenient is it to use the authentication mechanism on an ongoing basis?
As you’ll see, not all of the mechanisms are necessarily a good fit for a machine-to-machine scenario. Our focus here is on authentication of external applications, but not authentication of servers or other computers or Internet of Things (IoT) devices, which has already been documented extensively.
Active Directory–based authentication is available through either AWS IAM Identity Center or a limited set of AWS services and is meant in both cases to provide end users with access to AWS accounts and business applications. Active Directory–based authentication is also used broadly to authenticate devices such as Windows or Linux computers on a network. However, it isn’t used for authenticating applications with AWS. For that reason, we’ll exclude it from further scrutiny in this article.
Let’s look at the remaining authentication mechanisms one by one, with their respective pros and cons.
AWS Signature v4
The purpose of AWS Signature v4 is to authenticate incoming HTTP(S) requests to AWS services APIs. The AWS Signature v4 process is explained in detail in the documentation for the AWS APIs but, in a nutshell, the caller computes a signature using their credentials and then adds it to the header of the HTTP(S) request. On the other end, AWS accepts the request only if the provided signature is valid.
Figure 2: AWS Signature v4 authentication
Native to AWS, low in complexity and highly convenient, AWS Signature v4 is the natural choice for machine-to-machine authentication scenarios with AWS. It is used behind the scenes by the AWS Command Line Interface (AWS CLI) and the AWS SDKs.
Pros
AWS Signature v4 is very convenient: the signature is built in the SDKs provided by AWS and is automatically computed on the caller’s behalf. If you prefer not to use an SDK, the signature process is a simple computation that can be implemented in any programming language.
There are fewer credentials to manage. No need to manage tedious digital certificates or even long-lived AWS credentials, because the AWS Signature v4 process supports temporary AWS credentials.
There is no need to interact with a third-party identity provider: once the request is signed, you’re good to go, provided that the signature is valid.
Cons
If you prefer not to store long-lived AWS credentials for your on-premises applications, you must first perform authentication through a third-party identity provider to obtain temporary AWS credentials. This would require using either OpenID Connect or SAML, in addition to AWS Signature v4. You could also use IAM Roles Anywhere, which exchanges a trusted certificate for temporary AWS credentials.
Mutual TLS
Mutual TLS, more specifically the mutual authentication mechanism of the Transport Layer Security (TLS) Protocol, allows the authentication of both ends—the client and the server sides—of a communication channel. By default, the server side of the TLS channel is always authenticated. With mutual TLS, the clients must also present a valid X.509 certificate for their identity to be verified.
Amazon API Gateway has recently announced native support for mutual TLS authentication (see this blog post for more details on the new feature). You can enable mutual TLS authentication on custom domains to authenticate your regional REST and HTTP APIs (except for private or edge APIs, for which the new feature is not supported at the time of this writing).
Figure 3: Mutual TLS authentication
Mutual TLS can be both time-consuming and complicated to set up, but it is a widespread authentication mechanism.
Pros
Mutual TLS is widespread for IoT and business-to-business applications
Cons
You need to manage the digital certificates and their lifecycles. This can add significant burden and complexity to your IT operations.
You also need, at an application level, to pay special care to revoked certificates to reduce the risk of misuse. Since API Gateway doesn’t automatically verify if a client certificate has been revoked, you have to implement your own logic to do so, such as by using a Lambda authorizer.
OpenID Connect
OpenID Connect (OIDC), specifically OIDC 1.0, is a standard built on top of the OAuth 2.0 authorization framework to provide authentication for mobile and web-based applications. The OIDC client authentication method can be used by a client application to gain access to APIs exposed through Amazon API Gateway. The client application typically authenticates to an OAuth 2.0 authorization server, such as Amazon Cognito or another solution supporting that standard. As a result, the client application obtains a JSON Web Token (JWT) from the OAuth 2.0 authorization server. API Gateway then allows or denies the request based on the JWT validation. For more information about the access control part of this process, see the Amazon API Gateway documentation.
Figure 4: OIDC client authentication
OIDC can be complex to put in place, but it’s a widespread authentication mechanism, especially for mobile and web applications and microservices architecture, including machine-to-machine scenarios.
Pros
With OIDC, you avoid storing long-lived AWS credentials for your on-premises applications.
OIDC uses REST or JSON message flows over HTTP, which makes it a particularly good fit (compared to SAML) for application developers today.
Cons
You need to store and maintain a set of credentials for each client application (such as client id and client secret) and make it accessible to the application. This can add complexity to your IT operations.
SAML
SAML 2.0 is an open standard for exchanging identity and security information between applications and service providers. SAML can be used to delegate authentication to a third-party identity provider, such as an Active Directory environment that is running on premises, and to gain access to AWS by providing a valid SAML assertion. (See About SAML 2.0-based federation to learn how to configure your AWS environment to leverage SAML 2.0.)
IAM validates the SAML assertion with your identity provider and, upon success, provides a set of AWS temporary credentials to the requesting party. The whole process is described in the IAM documentation.
Figure 5: SAML authentication
SAML can be complex to put in place, but it’s a versatile authentication mechanism that can fit a lot of different use cases, including machine-to-machine scenarios.
Pros
With SAML, you not only avoid storing long-lived AWS credentials for your on-premises applications, but you can also use an existing on-premises directory, such as Active Directory, as an identity provider.
SAML doesn’t prescribe any particular technology or protocol by which the authentication should take place. The developer has total freedom to employ whichever is more convenient or makes more sense: key-based (such as X.509 certificates), ticket-based (such as Kerberos), or another applicable mechanism.
SAML is also a good fit when protocol bindings other than HTTP are needed.
Cons
Using SAML with AWS requires a third-party identity provider for your on-premises environment.
SAML also requires a trust to be established between your identity provider and your AWS environment, which adds more complexity to the process.
Because SAML is XML-based, it isn’t as concise or nimble as AWS Signature v4 or OIDC, for example.
You need to manage the SAML assertions and their lifecycles. This can add significant burden and complexity to your IT operations.
Kerberos
Initially developed by MIT, Kerberos v5 is an IETF standard protocol that enables client/server authentication on an unprotected network. It isn’t supported out-of-the-box by AWS, but you can use an identity provider, such as Active Directory, to exchange the Kerberos ticket provided to your application for either an OIDC/OAuth token or a SAML assertion that can be validated by AWS.
Figure 6: Kerberos authentication (through SAML or OIDC)
Kerberos is highly complex to set up, but it can make sense in cases where you already have an on-premises environment with Kerberos authentication in place.
Pros
With Kerberos, you not only avoid storing long-lived AWS credentials for your on-premises applications, but you can also use an existing on-premises directory, such as Active Directory, as an identity provider.
Cons
Using Kerberos with AWS requires the Kerberos ticket to be converted into something that can be accepted by AWS. Therefore, it requires you to use either the OIDC or SAML authentication mechanisms, as described previously.
IAM Roles Anywhere
IAM Roles Anywhere establishes a trust between your AWS account and the certificate authority (CA) that issues certificates to your on-premises workloads using public key infrastructure (PKI). For a detailed overview, see the blog post Extend AWS IAM roles to workloads outside of AWS with IAM Roles Anywhere. Your workloads outside of AWS use IAM Roles Anywhere to exchange x.509 certificates for temporary AWS credentials in order to interact with AWS APIs, thus removing the need for long-term credentials in your on-premises applications. IAM Roles Anywhere enables short-term credentials for numerous hybrid environment use cases including machine-to-machine scenarios.
Figure 7: IAMRA authentication process
IAM Roles Anywhere is a versatile authentication mechanism that can fit a lot of different use cases, including machine-to-machine scenarios where your on-premises workload is accessing AWS resources.
Pros
With IAM Roles Anywhere you avoid storing long-lived AWS credentials for your on-premises workloads.
You need to manage the digital certificates and their lifecycles. This can add complexity to your IT operations.
IAM Roles Anywhere does not support callbacks to CRL distribution points (CDPs) or Online Certificate Status Protocol (OCSP) endpoints.
Conclusion
Now we’ll collect and summarize this discussion in the following table, with the pros and cons of each approach.
Authentication mechanism
AWS front-end service
Complexity
Convenience
AWS Signature v4
All
Low
Very High
Mutual TLS
AWS IoT Core
Amazon API Gateway
Medium
High
OpenID Connect
Amazon Cognito
Amazon API Gateway
Medium
High
SAML
Amazon Cognito
AWS Identity and Access Management (IAM)
High
Medium
Kerberos
n/a
Very High
Low
IAM Roles Anywhere
AWS Identity and Access Management (IAM)
Medium
High
AWS Signature v4 is the most convenient and least complex mechanism of these options, but as for every situation, it’s important to start from your own requirements and context before making a choice. Additional factors may influence your choice, such as the structure or the culture of your organization, or the resources available for your project. Keeping the discussion focused on simple factors on purpose, we’ve come up with the following actionable decision helper.
Use AWS Signature v4 when:
You have access to AWS credentials (temporary or long-lived)
You want to call AWS services directly through their APIs
Use mutual TLS when:
The cost and effort of maintaining digital certificates is acceptable for your organization
Your organization already has a process in place to maintain digital certificates
You plan to call AWS services indirectly through custom-built APIs
Use OpenID Connect when:
You need or want to procure temporary AWS credentials by using a REST-based mechanism
You want to call AWS services directly through their APIs
Use SAML when:
You need to procure temporary AWS credentials
You already have a SAML-based authentication process in place
You want to call AWS services directly through their APIs
Use Kerberos when:
You already have a Kerberos-based authentication process in place
None of the previously mentioned mechanisms can be used for your use case
Use IAMRA when:
The cost and effort of maintaining digital certificates is acceptable for your organization
Your organization already has a process in place to maintain digital certificates
You want to call AWS services directly through their APIs
You need temporary security credentials for workloads such as servers, containers, and applications that run outside of AWS
We hope this post helps you find your way among the various alternatives that AWS offers to securely connect your external applications to your AWS environment, and to select the most appropriate mechanism for your specific use case. We look forward to your feedback.
If you have feedback about this post, submit comments in the Comments section below. If you have questions about this post, start a new thread on one of the AWS Developer forums or contact AWS Support.
Want more AWS Security how-to content, news, and feature announcements? Follow us on Twitter.
If you’re a SaaS vendor, you may need to store and process personal and sensitive data for large numbers of customers across different geographies. When processing sensitive data at scale, you have an increased responsibility to secure this data end-to-end. Client-side encryption of data, such as your customers’ contact information, provides an additional mechanism that can help you protect your customers and earn their trust.
Amazon DynamoDB supports data encryption at rest using encryption keys stored in AWS KMS. This functionality helps reduce operational burden and complexity involved in protecting sensitive data. In this post, you’ll learn about the benefits of adding client-side encryption to achieve end-to-end encryption in transit and at rest for your data, from its source to storage in DynamoDB. Client-side encryption helps ensure that your plaintext data isn’t available to any third party, including AWS.
You can use the Amazon DynamoDB Encryption Client to implement client-side encryption with DynamoDB. In the solution in this post, client-side encryption refers to the cryptographic operations that are performed on the application-side in the application’s Lambda function, before the data is sent to or retrieved from DynamoDB. The solution in this post uses the DynamoDB Encryption Client with the Direct KMS Materials Provider so that your data is encrypted by using AWS KMS. However, the underlying concept of the solution is not limited to the use of the DynamoDB Encryption Client, you can apply it to any client-side use of AWS KMS, for example using the AWS Encryption SDK.
For detailed information about using the DynamoDB Encryption Client, see the blog post How to encrypt and sign DynamoDB data in your application. This is a great place to start if you are not yet familiar with DynamoDB Encryption Client. If you are unsure about whether you should use client-side encryption, see Client-side and server-side encryption in the Amazon DynamoDB Encryption Client Developer Guide to help you with the decision.
AWS KMS encryption context
AWS KMS gives you the ability to add an additional layer of authentication for your AWS KMS API decrypt operations by using encryption context. The encryption context is one or more key-value pairs of additional data that you want associated with AWS KMS protected information.
Encryption context helps you defend against the risks of ciphertexts being tampered with, modified, or replaced — whether intentionally or unintentionally. Encryption context helps defend against both an unauthorized user replacing one ciphertext with another, as well as problems like operational events. To use encryption context, you specify associated key-value pairs on encrypt. You must provide the exact same key-value pairs in the encryption context on decrypt, or the operation will fail. Encryption context is not secret, and is not an access-control mechanism. The encryption context is a means of authenticating the data, not the caller.
The Direct KMS Materials Provider used in this blog post transparently generates a unique data key by using AWS KMS for each item stored in the DynamoDB table. It automatically sets the item’s partition key and sort key (if any) as AWS KMS encryption context key-value pairs.
The solution in this blog post relies on the partition key of each table item being defined in the encryption context. If you encrypt data with your own implementation, make sure to add your tenant ID to the encryption context in all your AWS KMS API calls.
Attribute-based access control (ABAC) is an authorization strategy that defines permissions based on attributes. In AWS, these attributes are called tags. In the solution in this post, ABAC helps you create tenant-isolated access policies for your application, without the need to provision tenant specific AWS IAM roles.
If you are a SaaS vendor expecting large numbers of tenants, it is important that your underlying architecture can cost effectively scale with minimal complexity to support the required number of tenants, without compromising on security. One way to meet these criteria is to store your tenant data in a single pooled DynamoDB table, and to encrypt the data using a single AWS KMS key.
Using a single shared KMS key to read and write encrypted data in DynamoDB for multiple tenants reduces your per-tenant costs. This may be especially relevant to manage your costs if you have users on your organization’s free tier, with no direct revenue to offset your costs.
When you use shared resources such as a single pooled DynamoDB table encrypted by using a single KMS key, you need a mechanism to help prevent cross-tenant access to the sensitive data. This is where you can use ABAC for AWS. By using ABAC, you can build an application with strong tenant isolation capabilities, while still using shared and pooled underlying resources for storing your sensitive tenant data.
You can find the solution described in this blog post in the aws-dynamodb-encrypt-with-abac GitHub repository. This solution uses ABAC combined with KMS encryption context to provide isolation of tenant data, both at rest and at run time. By using a single KMS key, the application encrypts tenant data on the client-side, and stores it in a pooled DynamoDB table, which is partitioned by a tenant ID.
Solution Architecture
Figure 1: Components of solution architecture
The presented solution implements an API with a single AWS Lambda function behind an Amazon API Gateway, and implements processing for two types of requests:
GET request: fetch any key-value pairs stored in the tenant data store for the given tenant ID.
POST request: store the provided key-value pairs in the tenant data store for the given tenant ID, overwriting any existing data for the same tenant ID.
It also uses the DynamoDB Encryption Client for Python, which includes several helper classes that mirror the AWS SDK for Python (Boto3) classes for DynamoDB. This solution uses the EncryptedResource helper class which provides Boto3 compatible get_item and put_item methods. The helper class is used together with the KMS Materials Provider to handle encryption and decryption with AWS KMS transparently for the application.
Note: This example solution provides no authentication of the caller identity. See chapter “Considerations for authentication and authorization” for further guidance.
How it works
Figure 2: Detailed architecture for storing new or updated tenant data
As requests are made into the application’s API, they are routed by API Gateway to the application’s Lambda function (1). The Lambda function begins to run with the IAM permissions that its IAM execution role (DefaultExecutionRole) has been granted. These permissions do not grant any access to the DynamoDB table or the KMS key. In order to access these resources, the Lambda function first needs to assume the ResourceAccessRole, which does have the necessary permissions. To implement ABAC more securely in this use case, it is important that the application maintains clear separation of IAM permissions between the assumed ResourceAccessRole and the DefaultExecutionRole.
As the application assumes the ResourceAccessRole using the AssumeRole API call (2), it also sets a TenantID session tag. Session tags are key-value pairs that can be passed when you assume an IAM role in AWS Simple Token Service (AWS STS), and are a fundamental core building block of ABAC on AWS. When the session credentials (3) are used to make a subsequent request, the request context includes the aws:PrincipalTag context key, which can be used to access the session’s tags. The chapter “The ResourceAccessRole policy” describes how the aws:PrincipalTag context key is used in IAM policy condition statements to implement ABAC for this solution. Note that for demonstration purposes, this solution receives the value for the TenantID tag directly from the request URL, and it is not authenticated.
The trust policy of the ResourceAccessRole defines the principals that are allowed to assume the role, and to tag the assumed role session. Make sure to limit the principals to the least needed for your application to function. In this solution, the application Lambda function is the only trusted principal defined in the trust policy.
Next, the Lambda function prepares to encrypt or decrypt the data (4). To do so, it uses the DynamoDB Encryption Client. The KMS Materials Provider and the EncryptedResource helper class are both initialized with sessions by using the temporary credentials from the AssumeRole API call. This allows the Lambda function to access the KMS key and DynamoDB table resources, with access restricted to operations on data belonging only to the specific tenant ID.
Finally, using the EncryptedResource helper class provided by the DynamoDB Encryption Library, the data is written to and read from the DynamoDB table (5).
Considerations for authentication and authorization
The solution in this blog post intentionally does not implement authentication or authorization of the client requests. Instead, the requested tenant ID from the request URL is passed as the tenant identity. Your own applications should always authenticate and authorize tenant requests. There are multiple ways you can achieve this.
Modern web applications commonly use OpenID Connect (OIDC) for authentication, and OAuth for authorization. JSON Web Tokens (JWTs) can be used to pass the resulting authorization data from client to the application. You can validate a JWT when using AWS API Gateway with one of the following methods:
Regardless of the chosen method, you must be able to map a suitable claim from the user’s JWT, such as the subject, to the tenant ID, so that it can be used as the session tag in this solution.
The ResourceAccessRole policy
A critical part of the correct operation of ABAC in this solution is with the definition of the IAM access policy for the ResourceAccessRole. In the following policy, be sure to replace <region>, <account-id>, <table-name>, and <key-id> with your own values.
The policy defines two access statements, both of which apply separate ABAC conditions:
The first statement grants access to the DynamoDB table with the condition that the partition key of the item matches the TenantID session tag in the caller’s session.
The second statement grants access to the KMS key with the condition that one of the key-value pairs in the encryption context of the API call has a key called tenant_id with a value that matches the TenantID session tag in the caller’s session.
Warning: Do not use a ForAnyValue or ForAllValues set operator with the kms:EncryptionContext single-valued condition key. These set operators can create a policy condition that does not require values you intend to require, and allows values you intend to forbid.
Deploying and testing the solution
Prerequisites
To deploy and test the solution, you need the following:
After you have the prerequisites installed, run the following steps in a command line environment to deploy the solution. Make sure that your AWS CLI is configured with your AWS account credentials. Note that standard AWS service charges apply to this solution. For more information about pricing, see the AWS Pricing page.
To deploy the solution into your AWS account
Use the following command to download the source code:
git clone https://github.com/aws-samples/aws-dynamodb-encrypt-with-abac
cd aws-dynamodb-encrypt-with-abac
(Optional) You will need an AWS CDK version compatible with the application (2.37.0) to deploy. The simplest way is to install a local copy with npm, but you can also use a globally installed version if you already have one. To install locally, use the following command to use npm to install the AWS CDK:
With the application deployed, you can test the solution by making API calls against the API URL that you captured from the deployment output. You can start with a simple HTTP POST request to insert data for a tenant. The API expects a JSON string as the data to store, so make sure to post properly formatted JSON in the body of the request.
An example request using curl -command looks like:
curl https://<api url>/prod/tenant/<tenant-name> -X POST --data '{"email":"<[email protected]>"}'
You can then read the same data back with an HTTP GET request:
curl https://<api url>/prod/tenant/<tenant-name>
You can store and retrieve data for any number of tenants, and can store as many attributes as you like. Each time you store data for a tenant, any previously stored data is overwritten.
Additional considerations
A tenant ID is used as the DynamoDB table’s partition key in the example application in this solution. You can replace the tenant ID with another unique partition key, such as a product ID, as long as the ID is consistently used in the IAM access policy, the IAM session tag, and the KMS encryption context. In addition, while this solution does not use a sort key in the table, you can modify the application to support a sort key with only a few changes. For more information, see Working with tables and data in DynamoDB.
Clean up
To clean up the application resources that you deployed while testing the solution, in the solution’s home directory, run the command cdk destroy.
In this post, you learned a method for simple and cost-efficient client-side encryption for your tenant data. By using the DynamoDB Encryption Client, you were able to implement the encryption with less effort, all while using a standard Boto3 DynamoDB Table resource compatible interface.
Adding to the client-side encryption, you also learned how to apply attribute-based access control (ABAC) to your IAM access policies. You used ABAC for tenant isolation by applying conditions for both the DynamoDB table access, as well as access to the KMS key that is used for encryption of the tenant data in the DynamoDB table. By combining client-side encryption with ABAC, you have increased your data protection with multiple layers of security.
You can start experimenting today on your own by using the provided solution. If you have feedback about this post, submit comments in the Comments section below. If you have questions on the content, consider submitting them to AWS re:Post
Want more AWS Security news? Follow us on Twitter.
This post is written by Madhu Singh (Solutions Architect), and Krupanidhi Jay (Solutions Architect).
Lambda function URLs is a dedicated HTTPs endpoint for a AWS Lambda function. You can configure a function URL to have two methods of authentication: IAM and NONE. IAM authentication means that you are restricting access to the function URL (and in-turn access to invoke the Lambda function) to certain AWS principals (such as roles or users). Authentication type of NONE means that the Lambda function URL has no authentication and is open for anyone to invoke the function.
This blog shows how to use Lambda function URLs with an authentication type of NONE and use custom authorization logic as part of the function code, and to only allow requests that present valid Amazon Cognito credentials when invoking the function. You also learn ways to protect Lambda function URL against common security threats like DDoS using AWS WAF and Amazon CloudFront.
Lambda function URLs provides a simpler way to invoke your function using HTTP calls. However, it is not a replacement for Amazon API Gateway, which provides advanced features like request validation and rate throttling.
Solution overview
There are four core components in the example.
1. A Lambda function with function URLs enabled
At the core of the example is a Lambda function with the function URLs feature enabled with the authentication type of NONE. This function responds with a success message if a valid authorization code is passed during invocation. If not, it responds with a failure message.
2. Amazon Cognito User Pool
Amazon Cognito user pools enable user authentication on websites and mobile apps. You can also enable publicly accessible Login and Sign-Up pages in your applications using Amazon Cognito user pools’ feature called the hosted UI.
In this example, you use a user pool and the associated Hosted UI to enable user login and sign-up on the website used as entry point. This Lambda function validates the authorization code against this Amazon Cognito user pool.
3. CloudFront distribution using AWS WAF
CloudFront is a content delivery network (CDN) service that helps deliver content to end users with low latency, while also improving the security posture for your applications.
AWS WAF is a web application firewall that helps protect your web applications or APIs against common web exploits and bots and AWS Shield is a managed distributed denial of service (DDoS) protection service that safeguards applications running on AWS. AWS WAF inspects the incoming request according to the configured Web Access Control List (web ACL) rules.
Adding CloudFront in front of your Lambda function URL helps to cache content closer to the viewer, and activating AWS WAF and AWS Shield helps in increasing security posture against multiple types of attacks, including network and application layer DDoS attacks.
4. Public website that invokes the Lambda function
The example also creates a public website built on React JS and hosted in AWS Amplify as the entry point for the demo. This website works both in authenticated mode and in guest mode. For authentication, the website uses Amazon Cognito user pools hosted UI.
Solution architecture
This shows the architecture of the example and the information flow for user requests.
In the request flow:
The entry point is the website hosted in AWS Amplify. In the home page, when you choose “sign in”, you are redirected to the Amazon Cognito hosted UI for the user pool.
Upon successful login, Amazon Cognito returns the authorization code, which is stored as a cookie with the name “code”. The user is redirected back to the website, which has an “execute Lambda” button.
When the user choose “execute Lambda”, the value from the “code” cookie is passed in the request body to the CloudFront distribution endpoint.
The AWS WAF web ACL rules are configured to determine whether the request is originating from the US or Canada IP addresses and to determine if the request should be allowed to invoke Lambda function URL origin.
Allowed requests are forwarded to the CloudFront distribution endpoint.
CloudFront is configured to allow CORS headers and has the origin set to the Lambda function URL. The request that CloudFront receives is passed to the function URL.
This invokes the Lambda function associated with the function URL, which validates the token.
The function code does the following in order:
Exchange the authorization code in the request body (passed as the event object to Lambda function) to access_token using Amazon Cognito’s token endpoint (check the documentation for more details).
Amazon Cognito user pool’s attributes like user pool URL, Client ID and Secret are retrieved from AWS Systems Manager Parameter Store (SSM Parameters).
These values are stored in SSM Parameter Store at the time these resources are deployed via AWS CDK (see “how to deploy” section)
The access token is then verified to determine its authenticity.
If valid, the Lambda function returns a message stating user is authenticated as <username> and execution was successful.
If either the authorization code was not present, for example, the user was in “guest mode” on the website, or the code is invalid or expired, the Lambda function returns a message stating that the user is not authorized to execute the function.
The webpage displays the Lambda function return message as an alert.
Getting started
Pre-requisites:
Before deploying the solution, please follow the README from the GitHub repository and take the necessary steps to fulfill the pre-requisites.
Deploy the sample solution
1. From the code directory, download the dependencies:
$ npm install
2. Start the deployment of the AWS resources required for the solution:
$ cdk deploy
Note:
optionally pass in the –profile argument if needed
The deployment can take up to 15 minutes
3. Once the deployment completes, the output looks similar to this:
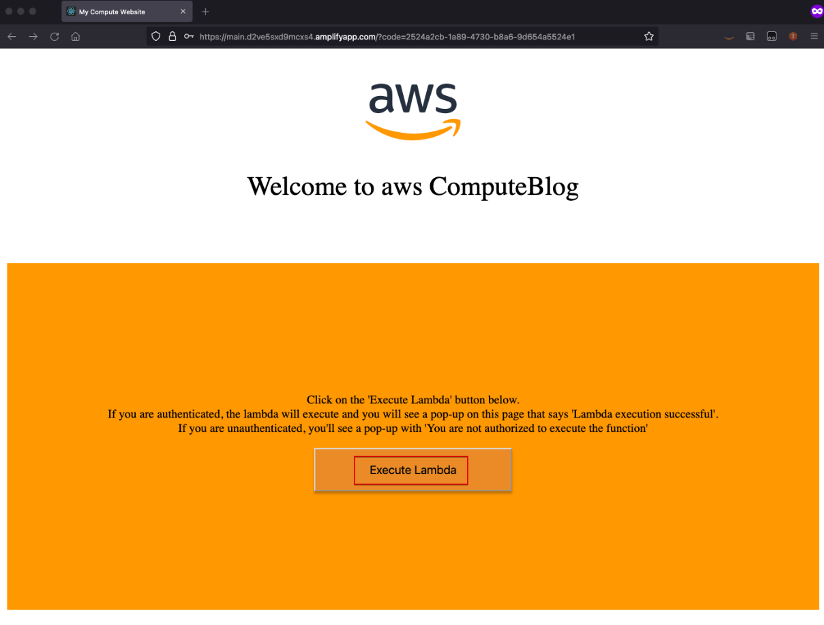
Open the amplifyAppUrl from the output in your browser. This is the URL for the demo website. If you don’t see the “Welcome to Compute Blog” page, the Amplify app is still building, and the website is not available yet. Retry in a few minutes. This website works either in an authenticated or unauthenticated state.
Test the authenticated flow
To test the authenticated flow, choose “Sign In”.
2. In the sign-in page, choose on sign-up (for the first time) and create a user name and password.
3. To use an existing an user name and password, enter those credentials and choose login.
4. Upon successful sign-in or sign up, you are redirected back to the webpage with “Execute Lambda” button.
5. Choose this button. In a few seconds, an alert pop-up shows the logged in user and that the Lambda execution is successful.
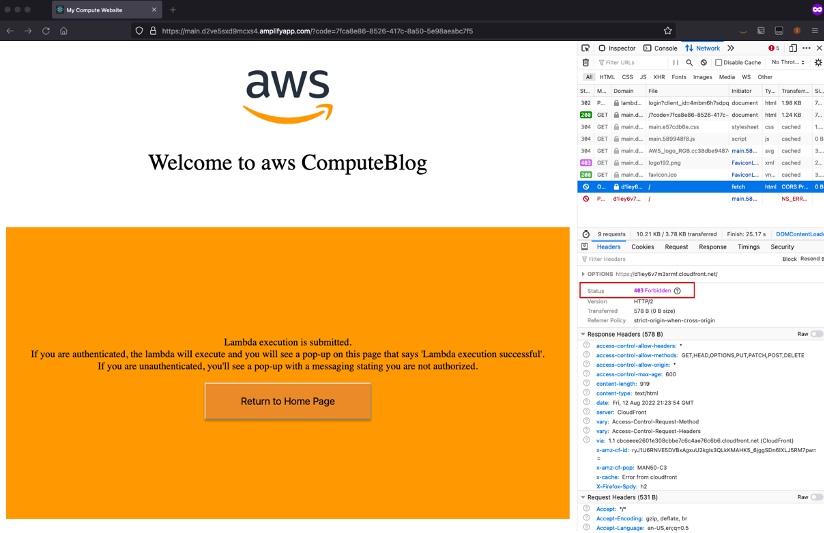
Testing the unauthenticated flow
1. To test the unauthenticated flow, from the Home page, choose “Continue”.
2. Choose “Execute Lambda” and in a few seconds, you see a message that you are not authorized to execute the Lambda function.
Testing the geo-block feature of AWS WAF
1. Access the website from a Region other than US or Canada. If you are physically in the US or Canada, you may use a VPN service to connect to a Region other than US or Canada.
2. Choose the “Execute Lambda” button. In the Network trace of browser, you can see the call to invoke Lambda function was blocked with Forbidden response.
3. To try either the authenticated or unauthenticated flow again, choose “Return to Home Page” to go back to the home page with “Sign In” and “Continue” buttons.
Cleaning up
To delete the resources provisioned, run the cdk destroy command from the AWS CDK CLI.
Conclusion
In this blog, you create a Lambda function with function URLs enabled with NONE as the authentication type. You then implemented a custom authentication mechanism as part of your Lambda function code. You also increased the security of your Lambda function URL by setting it as Origin for the CloudFront distribution and using AWS WAF Geo and IP limiting rules for protection against common web threats, like DDoS.
For more serverless learning resources, visit Serverless Land.
Amazon Web Services (AWS) is pleased to announce renewal of the AWS CyberGRX cyber risk assessment report. This third-party validated report helps customers perform effective cloud supplier due diligence on AWS and enhances their third-party risk management process.
With the increase in adoption of cloud products and services across multiple sectors and industries, AWS has become a critical component of customers’ third-party environments. Regulated customers are held to high standards by regulators and auditors when it comes to exercising effective due diligence on third parties.
Many customers use third-party cyber risk management (TPCRM) services such as CyberGRX to better manage risks from their evolving third-party environments and to drive operational efficiencies. To help with such efforts, AWS has completed the CyberGRX assessment of its security posture. CyberGRX security analysts perform the assessment and validate the results annually.
The CyberGRX assessment applies a dynamic approach to third-party risk assessment. This approach integrates advanced analytics, threat intelligence, and sophisticated risk models with vendors’ responses to provide an in-depth view of how a vendor’s security controls help protect against potential threats.
Vendor profiles are continuously updated as the risk level of cloud service providers changes, or as AWS updates its security posture and controls. This approach eliminates outdated static spreadsheets for third-party risk assessments, in which the risk matrices are not updated in near real time.
In addition, AWS customers can use the CyberGRX Framework Mapper to map AWS assessment controls and responses to well-known industry standards and frameworks, such as National Institute of Standards and Technology (NIST) 800-53, NIST Cybersecurity Framework, International Organization for Standardization (ISO) 27001, Payment Card Industry Data Security Standard (PCI DSS), and U.S. Health Insurance Portability and Assessment Act (HIPAA). This mapping can reduce customers’ third-party supplier due-diligence burden.
Customers can access the AWS CyberGRX report at no additional cost. Customers can request access to the report by completing an access request form, available on the AWS CyberGRX page.
As always, we value your feedback and questions. Reach out to the AWS Compliance team through the Contact Us page. If you have feedback about this post, submit comments in the Comments section below. To learn more about our other compliance and security programs, see AWS Compliance Programs.
Want more AWS Security news? Follow us on Twitter.
In part 1 of this of this two-part series, How to detect security issues in Amazon EKS cluster using Amazon GuardDuty, we walked through a real-world observed security issue in an Amazon Elastic Kubernetes Service (Amazon EKS) cluster and saw how Amazon GuardDuty detected each phase by following MITRE ATT&CK tactics.
In this blog post, we’ll walk you through investigative techniques to use with Amazon Detective, paired with the GuardDuty EKS and malware findings from the security issue. After we have identified impacted resources through our investigation, we’ll provide example remediation tactics and preventative controls to address and help prevent security issues in EKS clusters.
Amazon Detective can help you investigate security issues and related resources in your account. Detective provides EKS coverage that you can enable within your accounts. When this coverage is enabled, Detective can help investigate and remediate potentially unauthorized EKS activity that results from misconfiguration of the control plane nodes or application. Although GuardDuty is not a prerequisite to enable Detective, it is recommended that you enable GuardDuty to enhance the visualization capabilities in Detective with GuardDuty findings.
Prerequisites
You must have the following services enabled in your AWS account to generate and investigate findings associated with EKS security events in a similar manner as outlined in this blog. If you do not have GuardDuty enabled, you can still investigate with Detective, but in a limited capacity.
In the five phases we walked through in part 1, we discussed GuardDuty findings and MITRE ATT&CK tactics that can help you detect and understand each phase of the unauthorized activity, from the initial misconfiguration to the impact on our application when the EKS cluster is used for crypto mining.
The next recommended step is to investigate the EKS cluster and any associated resources. Amazon Detective can help you to investigate whether there was any other related unauthorized activity in the environment. We will walk through Detective capabilities for visualizing and gathering important information to effectively respond to the security issue. If you’re interested in creating detailed incident response playbooks for your security team to follow in your own environment, refer to these sample AWS incident response playbooks.
Depending on your scenario, there are various resources you can use to start your investigation, such as Security Hub findings, GuardDuty findings, related Kubernetes subjects, or an AWS account’s AWS CloudTrail activity. For our walkthrough, we’ll start our investigation from the GuardDuty finding and use the EKS cluster resource to pivot to the Detective console, as shown in Figure 7. Although we initially focus on the EKS cluster, you could start from any entities that are supported in the Detective behavior graph structure in the Amazon Detective User Guide. For example, we could start directly with the Kubernetes subject system:anonymous and find activity associated with the anonymous user.
Figure 7: Example Detective popup from GuardDuty finding for EKS cluster
We’ll now go over the information that you would need to gather from Detective in order to investigate the example security issue.
To investigate EKS cluster findings with Detective
In the GuardDuty console, navigate to an individual finding and hover over Investigate with Detective. Choose one of the specific resources to start. In the image below, we selected the EKS cluster resource to investigate with Detective. You will need to gather some preliminary information about the IAM roles associated with the EKS cluster.
Questions: When was the cluster created? What IAM role created the cluster? What IAM role is assigned to the cluster?
Why it matters: If you are an incident responder, these details can potentially help you identify the owner of the cluster and help you determine what IAM principals are involved.
What next: Start looking into each IAM principal’s activity, as seen in CloudTrail, to investigate whether the IAM entity itself is potentially compromised or what other resources may have been impacted.
Figure 8: Detective summary page for EKS cluster metadata details
Next, on the EKS cluster overview page, you can see the container details associated with the cluster.
Question: What are some of the other container details for the cluster? Does anything look out of the ordinary? Is it using a public image? Is it missing a network policy?
Why it matters: Based on the architecture related to this cluster, you might be able to use this information to determine whether there are unauthorized containers. The contents of unauthorized containers will depend on your organization but typically consist of public images or unauthorized RBAC, pod security policies, or network policy configurations. It’s important to keep in mind that when you look at data in Detective, the scope time is very important. When you pivot from a GuardDuty finding, the scope time will be set to the first time the GuardDuty finding was seen to the last time the finding was seen. The container details reflect the containers that were running during the selected scope time. Changing the scope time might change the containers that are listed in the table shown in Figure 9.
What next: Information found on this page can help to highlight unauthorized resources or configurations that will need to be remediated. You will also need to look at how these resources were initially created and if there are missing guardrails that should have been created during the provisioning of the cluster.
Figure 9: Detective summary page for EKS container metadata details
Finally, you will see associated security findings with this specific EKS cluster, similar to Figure 10, at the bottom of the EKS cluster overview page in Detective.
Question: Are there any other security findings associated with this cluster that I previously was not aware of?
Why it matters: In our example scenario, we walked through the findings that were initially detected and the events that unfolded from those findings. After further investigation, you might see other findings that were not part of the original investigation. This can occur if your security team is only investigating specific findings or severity values. The finding for PrivilegeEscalation:Kubernetes/PrivilegedContainer informs you that a privileged container was launched on your Kubernetes cluster by using an image that has never before been used to launch privileged containers in your cluster. A privileged container has root level access to the host. The other finding, Persistence:Kubernetes/ContainerWithSensitiveMount, informs you that a container was launched with a configuration that included a sensitive host path with write access in the volumeMounts section. This makes the sensitive host path accessible and writable from inside the container. Any finding associated to the suspicious or compromised cluster is valuable because it provides additional insight into what the unauthorized entity was trying to accomplish after the initial detection.
What next: With Detective, you might want to continue your investigation by selecting each of these findings and reviewing all details related to the finding. Depending on the findings, you could bring in additional team members to help investigate further. For this example, we will move on to the next step.
Figure 10: Example Detective summary of security findings associated with the EKS cluster
Shift from the EKS cluster overview section to the Kubernetes API activity section, similar to Figure 11 below. This will give you the opportunity to dig into the API activity associated with this cluster.
Question: What other Kubernetes API activity was attempted from the cluster? Which API calls were successful? Which API calls failed? What was the unauthorized user trying to do?
Why it matters: It’s important to determine which actions were successfully invoked by the unauthorized user so that appropriate remediation actions can be taken. You can look at trends of successful and failed API calls, and can even search by Subject, IP address, or Kubernetes API call.
What next: You might want to look at all cluster role binding from days before the first GuardDuty finding was seen to determine if there was any other suspicious activity you should be investigating regarding the cluster.
Figure 11: Example Detective summary page for Kubernetes API activity on the EKS cluster
Next, you will want to look at the Newly observed Kubernetes API calls section, similar to Figure 12 below.
Question: What are some of the more recent Kubernetes API calls? What are they trying to access right now and are they successful? Do I need to start taking action for other resources outside of EKS?
Why it matters: This data shows Kubernetes subjects who were observed issuing API calls to this cluster for the first time during our scope time. Detective provides you this information by keeping a baseline of the activity associated with supported AWS resources. This can help you more quickly determine whether activity might be suspicious and worth looking into. In our example, we used the search functionality to look at API calls associated with the built-in Kubernetes secrets management. A common way to start your search is to see if an unauthorized user has successfully accessed any secrets, which can help you determine what information you might want to search in the overall API call volume section discussed in step 4.
What next: If the unauthorized user has successfully accessed any secret, those secrets should be marked as compromised, and they should be rotated immediately.
Figure 12: Example Detective summary for newly observed Kubernetes API calls from the EKS cluster
You can also consider the following question when you look at the Newly observed Kubernetes API calls section.
Question: Has the IP address associated with the finding been communicating with any other resources in our environment, and if so, what are the details of that communication?
Why it matters: To answer this question, you can use Detective’s search functionality and the ability to use wild cards to search for IP addresses with the same first three octets. Also note that you can use CIDR notation to search, as well. Based on the results in the example in Figure 13, you can see that there are a number of related IP addresses associated with the environment. With this information, you now can look at the traffic associated with these different IPs and what resources they were communicating with.
Figure 13: Example Detective results page from a query against IP addresses associated with the EKS cluster
You can select one of the IP addresses in the search results to get more information related to it, similar to Figure 14 below.
Question: What was the first time an IP address was observed in the environment? When was the last time it was observed?
Why it matters: You can use this information to start isolating where unauthorized activity is coming from and what actions are being taken. You can also start creating a time series of unauthorized activity and scope.
What next: You can repeat some of the previous investigation steps for each IP address, like looking at the different tabs to review New behavior, Resource interaction, and Kubernetes activity.
Figure 14: Example Detective results page for specific IP address and associated metadata details
In summary, we began our investigation with a GuardDuty finding about an anonymous API request that was successful in using system:anonymous on one of our EKS clusters. We then used Detective to investigate and visualize activity associated with that EKS cluster, such as volume of successful or unsuccessful API requests, where and when those actions were attempted and other security findings associated with the resource. Once we have completed the investigation, we can confirm scope and impact of the security event and start moving towards taking action.
Remediation techniques for Amazon EKS
In this section, we will focus on how to remediate the security issue in our example. Your actions will vary based on your organization and the resources affected. It’s important to note that these actions will impact the EKS cluster and associated workloads, and should accordingly be performed by or coordinated with the cluster operator.
Before you take action on the EKS cluster, you will need to preserve forensic artifacts and evidence for the impacted EKS resources. The order of operations for these actions matters, because you want to get all the data from forensic artifacts in order to determine the overall impact to the resources affected. If you quarantine resources before you capture forensic artifacts, there is a risk that running processes will be interrupted or that the malware attempts to destroy resources that are valuable to a forensics investigation, to cover its tracks.
Now that you have the forensic evidence, you can start to quarantine your EKS resources to restrict unauthorized network communication. The main objective is to prevent the affected EKS pods from communicating with internal resources or exfiltrating data externally.
Attach a security group to the host and remove inbound and outbound rules. Take this action if you believe the underlying host has been compromised.
Depending on existing inbound and outbound rules on the security group, the connections will either be tracked or untracked. Applying an isolation security group will drop untracked connections. For tracked connections, new connections with the host will not be allowed from the isolation security group, but existing tracked connections will not be interrupted.
Important: This action will affect all containers running on the host.
Attach a deny rule for the EKS resources in a network access control list (network ACL). Because network ACLs are stateless firewalls, all connections will be interrupted, whether they are tracked or untracked connections.
Important: This action will affect all subnets using the network ACL and all resources within those subnets.
At this point, the affected EKS resources are quarantined, but the cluster is still configured to allow anonymous, unauthenticated access. You will need to remove all unauthorized permissions that were created or added.
Revoke temporary security credentials that are assigned to the pod or worker node, if necessary. You can also remove the IAM role associated with the EKS resources.
Note: Removing IAM policies or attaching IAM policies to restrict permissions will affect the resources that are using the IAM role.
Redeploy the compromised pod or workload resource.
The actions taken so far primarily target the EKS resource, but based on our Detective investigation, there are other actions you might need to take. Because secrets were involved that could be used outside of the EKS cluster, those secrets will need to be rotated wherever they are referenced. Detective will also suggest additional areas where you can investigate and remediate additional unauthorized activity in your AWS account.
It is important that your team go through game days or run-throughs for investigating and responding to different scenarios in order to make sure the team is prepared. You can run through the EKS security workshop to get your security team more familiar with remediation for EKS.
This section covers several preventative controls that you can use to protect EKS clusters.
How can I prevent external access to the EKS cluster?
To help prevent external access to your EKS clusters, limit the exposure of your API server. You can achieve that in two ways:
Set the API server endpoint access to Private. This will effectively forbid anyone outside of the VPC to send Kubernetes API requests to your EKS cluster.
Set an IP address allow list for the EKS cluster public access endpoint.
How can I prevent giving admin access to the EKS cluster?
To help prevent an EKS cluster user from granting any type of access to anonymous or unauthenticated users, you can set up a ValidatingAdmissionWebhook. This is a special type of Kubernetes admission controller that can be configured in the Kubernetes API. (To learn how to build serverless admission webhooks, see the blog post Building serverless admission webhooks for Kubernetes with AWS SAM.)
The ValidatingAdmissionWebhook will deny a Kubernetes API request that matches all of the following checks:
The request is creating or modifying a ClusterRoleBinding or RoleBinding.
The subjects section contains either of the following:
The user system:anonymous
The group system:unauthenticated
How can I prevent malicious images from being deployed?
Now that you have set controls to prevent external access to the EKS cluster and prevent granting access to anonymous users, you can focus on preventing the deployment of potentially malicious images.
Malicious container images can have different origins, including:
Images stored in public or unauthorized registries
Images replacing the ones that are stored in authorized registries
Authorized images that contain software with existing or newly discovered vulnerabilities
You can address these sources of malicious images by doing the following:
Use admission controllers to verify that images meet your organization’s requirements, including for the image origin. You can also refer to this this blog post to implement a solution with a webhook and admission controllers.
Note: These criteria can vary based on your use case and internal security and compliance standards.
The above controls will help prevent the deployment of a vulnerable, unauthorized, or potentially malicious container image.
How can I prevent lateral movement inside the cluster?
To prevent lateral movement inside the cluster, it is recommended to use network policies, as follows:
Enforce Kubernetes network policies to enforce ingress and egress controls within the cluster. You can implement these policies by following the steps in the Securing your cluster with network policies EKS workshop.
It’s important to note that you could use security groups for the same purpose, but pod security groups should only be used if the cluster is compromised and when you want to control the traffic between a pod and a resource that resides in the VPC, not inter-pod traffic.
In this section, we’ve reviewed different preventative controls that could have helped mitigate our example security incident. With the first preventative control, we could have prevented external actors from connecting to the API server. The second control could have prevented granting access to anonymous users. The third control could have prevented the deployment of an unauthorized or vulnerable container image. Finally, the fourth control could have helped limit the impact of the deployed vulnerable images to only the pods where the images were deployed, making it harder to laterally move to other pods in the cluster.
Conclusion
In this post, we walked you through how to investigate an EKS cluster related security issue with Amazon Detective. We also provided some recommended remediation and preventative controls to put in place for the EKS cluster specific security issues. When pairing GuardDuty’s ability for continuous threat detection and monitoring with Detective’s organization and visualization capabilities, you enable your security team to conduct faster and more effective investigation. By providing the security team the ability quickly view an organized set of data associated with security events within your AWS account, you reduce the overall Mean Time to Respond (MTTR).
Now that you understand the investigative capabilities with Detective, it’s time to try things out! It is important that you provide a mechanism for your security team to practice detection, investigation, and remediation techniques using security incident response simulations. By periodically running simulations, your security team will be prepared to quickly respond to possible security events. You can find more detailed incident response playbooks that can assist you in preparing for events in your environment, see these sample AWS incident response playbooks.
If you have feedback about this post, submit comments in the Comments section below. If you have questions about this post, start a thread on Amazon GuardDuty re:Post.
Want more AWS Security news? Follow us on Twitter.
Security teams use Amazon Macie to discover and protect sensitive data, such as names, payment card data, and AWS credentials, in Amazon Simple Storage Service (Amazon S3). When Macie discovers sensitive data, these teams will want to see examples of the actual sensitive data found. Reviewing a sampling of the discovered data helps them quickly confirm that the object is truly sensitive according to their data protection and privacy policies.
In this post, we walk you through how your data security teams are able to use a new capability in Amazon Macie to retrieve up to 10 examples of sensitive data found in your S3 objects, so that you are able to confirm the nature of the data at a glance. Additionally, we will discuss how you are able to control who is able to use this capability, so that only authorized personnel have permissions to view these examples.
The challenge customers face
After a Macie sensitive data discovery job is run, security teams start their work. The security team will review the Macie findings to investigate the discovered sensitive data and decide what actions to take to protect such data. The findings provide details that include the severity of the finding, information on the affected S3 object, and a summary of the type, location, and amount of sensitive data found. However, Macie findings only contain pointers to data that Macie found in the object. In order to complete their investigation, customers in the past had to do additional work to extract the contents of a sensitive object, such as navigating to a different AWS account where the object is located, downloading and manually searching for keywords in a file editor, or writing and refining SQL queries by using Amazon S3 Select. The investigations are further slowed down when the object type is one that is not easily readable without additional tooling, such as big-data file types like Avro and Parquet. By using the Macie capability to retrieve sensitive data samples, you are able to review the discovered data and make decisions concerning the finding remediation.
Prerequisites
To implement the ability to retrieve and reveal samples of sensitive data, you’ll need the following prerequisites:
Note: The detailed classification results contain a record for each Amazon S3 object that you configure the job to analyze, and include the location of up to 1,000 occurrences of each type of sensitive data that Macie found in an object. Macie uses the location information in the detailed classification results to retrieve the examples of sensitive data. The detailed classification results are stored in an S3 bucket of your choice. In this post, we will refer to this bucket as DOC-EXAMPLE-BUCKET1.
Create an S3 bucket that contains sensitive data in Account B. In this post, we will refer to this bucket as DOC-EXAMPLE-BUCKET2.
(Optional) Add sensitive data to DOC-EXAMPLE-BUCKET2. This post uses a sample dataset that contains fake sensitive data. You are able to download this sample dataset, unarchive the .zip folder, and follow these steps to upload the objects to S3. This is a synthetic dataset generated by AWS that we will use for the examples in this post. All data in this blog post has been artificially created by AWS for demonstration purposes and has not been collected from any individual person. Similarly, such data does not relate back to any individual person, nor is it intended to.
Create and run a sensitive data discovery job from Account A to analyze the contents of DOC-EXAMPLE-BUCKET2.
Configure Macie to retrieve and reveal examples of sensitive data
In this section, we’ll describe how to configure Macie so that you are able to retrieve and view examples of sensitive data from Macie findings.
To configure Macie (console)
In the AWS Management Console, in the Macie delegated administrator account (Account A), follow these steps from the Amazon Macie User Guide.
To configure Macie (AWS CLI)
Confirm that you have Macie enabled.
	$ aws macie2 get-macie-session --query 'status'
	// The expected response is "ENABLED"
Confirm that you have configured the detailed classification results bucket.
$ aws macie2 get-classification-export-configuration
// The expected response is:
{"configuration": {
"s3Destination": {"bucketName": " DOC-EXAMPLE-BUCKET1 ",
"kmsKeyArn": "arn:aws:kms:<YOUR-REGION>:<YOUR-ACCOUNT-ID>:key/<KEY-USED-TO-ENCRYPT-DOC-EXAMPLE-BUCKET1>"}}}
Create a new KMS key to encrypt the retrieved examples of sensitive data. Make sure that the key is created in the same AWS Region where you are operating Macie.
Enable the feature in Macie and configure it to encrypt the data by using REVEAL-KMS-KEY. You do not specify a key policy for your new KMS key in this step. The key policy will be discussed later in the post.
Control access to read sensitive data and protect data displayed in Macie
This new Macie capability uses the AWS Identity and Access Management (IAM) policies, S3 bucket policies, and AWS KMS key policies that you have defined in your accounts. This means that in order to see examples through the Macie console or by invoking the Macie API, the IAM principal needs to have read access to the S3 object and to decrypt the object if it is server-side encrypted. It’s important to note that Macie uses the IAM permissions of the AWS principal to locate, retrieve, and reveal the samples and does not use the Macie service-linked role to perform these tasks.
Using the setup discussed in the previous section, you will walk through how to control access to the ability to retrieve and reveal sensitive data examples. To recap, you created and ran a discovery job from the Amazon Macie delegated administrator account (Account A) to analyze the contents of DOC-EXAMPLE-BUCKET2 in a member account (Account B). You configured Macie to retrieve examples and to encrypt the examples of sensitive data with the REVEAL-KMS-KEY.
The next step is to create and use an IAM role that will be assumed by other users in Account A to retrieve and reveal examples of sensitive data discovered by Macie. In this post, we’ll refer to this role as MACIE-REVEAL-ROLE.
To apply the principle of least privilege and allow only authorized personnel to view the sensitive data samples, grant the following permissions so that Macie users who assume MACIE-REVEAL-ROLE will be able to successfully retrieve and reveal examples of sensitive data:
Step 1 – Update the IAM policy for MACIE-REVEAL-ROLE.
Step 2 – Update the KMS key policy for REVEAL-KMS-KEY.
Step 3 – Update the S3 bucket policy for DOC-EXAMPLE-BUCKET2 and the KMS key policy used for its server-side encryption in Account B.
After you grant these permissions, MACIE-REVEAL-ROLE is succcesfully able to retrieve and reveal examples of sensitive data in DOC-EXAMPLE-BUCKET2, as shown in Figure 1.
Figure 1: Macie runs the discovery job from the delegated administrator account in a member account, and MACIE-REVEAL-ROLE retrieves examples of sensitive data
Step 1: Update the IAM policy
Provide the following required permissions to MACIE-REVEAL-ROLE:
Allow GetObject from DOC-EXAMPLE-BUCKET2 in Account B.
Allow decryption of DOC-EXAMPLE-BUCKET2 if it is server-side encrypted with a customer managed key (SSE-KMS).
Allow GetObject from DOC-EXAMPLE-BUCKET1.
Allow decryption of the Macie discovery results.
Allow the necessary Macie actions to retrieve and reveal sensitive data examples.
To set up the required permissions
Use the following commands to provide the permissions. Make sure to replace the placeholders with your own data.
Next, update the KMS key policy that is used to encrypt sensitive data samples that you retrieve and reveal in your delegated administrator account.
To update the key policy
Allow the MACIE-REVEAL-ROLE access to the KMS key that you created for protecting the retrieved sensitive data, using the following commands. Make sure to replace the placeholders with your own data.
Use the following commands to update the bucket policy of DOC-EXAMPLE-BUCKET2 to allow cross-account access for MACIE-REVEAL-ROLE to get objects from this bucket.
Now that you’ve put in place the necessary permissions, users who assume MACIE-REVEAL-ROLE will be able to conveniently retrieve and reveal sensitive data samples.
To retrieve and reveal sensitive data samples
In the Macie console, in the left navigation pane, choose Findings, and select a specific finding. Under Sensitive Data, choose Review.
Figure 2: The finding details panel
On the Reveal sensitive data page, choose Reveal samples.
Figure 3: The Reveal sensitive data page
Under Sensitive data, you will be able to view up to 10 examples of the sensitive data found by Amazon Macie.
Figure 4: Examples of sensitive data revealed in the Amazon Macie console
You are able to find additional information on setting up the Macie Reveal function in the Amazon Macie User Guide.
Conclusion
In this post, we showed how you are to retrieve and review examples of sensitive data that were found in Amazon S3 using Amazon Macie. This capability will make it easier for your data protection teams to review the sensitive contents found in S3 buckets across the accounts in your AWS environment. With this information, security teams are able to quickly take remediation actions, such as updating the configuration of sensitive buckets, quarantining files with sensitive information, or sending a notification to the owner of the account where the sensitive data resides. In certain cases, you are able to add the examples to an allow list in Macie if you don’t want Macie to report those as sensitive data (for example, corporate addresses or sample data that is used for testing).
The following are links to additional resources that you will be able to use to expand your knowledge of Amazon Macie capabilities and features:
If you have feedback about this post, submit comments in the Comments section below. If you have questions about this post, start a new thread on Amazon Macie re:Post.
Want more AWS Security news? Follow us on Twitter.
Customers have an increasing need to collect, store, and process data within their AWS environments for application modernization, reporting, and predictive analytics. AWS Well-Architected security pillar, general data privacy and compliance regulations require that you appropriately identify and secure sensitive information. Knowing where your data is allows you to implement the appropriate security controls which help support meeting a range of objectives including compliance & data privacy.
With Amazon Macie, you can detect sensitive information stored in your organization’s Amazon Simple Storage Service (Amazon S3) storage. Macie provides sensitive data findings and additional metadata to help you protect your data in Amazon S3.
If you have many accounts with a lot of S3 buckets and data, you might find it complex, expensive, and time consuming to discover sensitive data in each bucket and account, and to evaluate the large number of findings. As your applications continue to scale you want to have confidence that you continue to understand where the data is in your environment.
To help discover sensitive data across your entire S3 storage, you can now use a new feature in Macie—automated sensitive data discovery—to automatically build sensitive data profiles on S3 buckets and uncover the presence of sensitive data. The new feature continually and cost-efficiently samples data across your S3 storage. This reduces the data scanning needed to locate sensitive data so that you can focus your time, effort, and resources on additional investigation and remediation if sensitive data is found. This broad visibility can help you develop scalable, repeatable processes for ongoing and proactive protection of data.
In this blog post, we show you how to set up Macie automated sensitive data discovery in your AWS environment and walk you through the insights that it generates. We also share some common patterns on how you can use the findings to improve your data security posture.
Prerequisites
To get started, you’ll need the following prerequisites:
Activate Amazon Macie in your accounts for the AWS Regions of your choosing. Macie is a regional service, so it scans S3 buckets only in the Regions where it’s turned on.
Set up a delegated Macie administrator account, also referred to as the Macie admin account, for these Regions. A Macie admin account has visibility into the S3 buckets of member accounts. It also allows you to restrict access to automated sensitive data discovery results to the appropriate teams, without providing access into the management account.
To set up the delegated Macie administrator to centrally manage multiple Macie accounts, do one of the following:
Configure a S3 bucket for sensitive data results in the Macie admin account to access the results and allow for long-term storage and retention.
Activate automated sensitive data discovery in the delegated Macie administrator account
In this section, we walk you through how to activate automated sensitive data discovery in Macie.
For new Macie admin accounts, automated sensitive data discovery is turned on by default. For existing Macie accounts, you need to activate automated sensitive data discovery in the existing Macie admin accounts.
To activate automated sensitive data discovery in the existing Macie admin accounts
For Status, choose Enable, and then edit the following sections according to your needs:
S3 buckets – By default, Macie selects and inspects samples of objects across all S3 buckets in your organization. For example, you might want to exclude an S3 bucket that stores AWS CloudTrail logs.
Managed data identifiers – You can select managed data identifiers to include or exclude during automated sensitivity data discovery. By default, Macie inspects and samples objects by using a set of managed data identifiers that AWS recommends. This includes most of the managed data identifiers that AWS supports, but excludes some that can potentially cause a high volume of alerts in buckets where you might not expect them. If you know specific data types that could exist within your environment, you can add those managed data identifiers specifically. If you want Macie to exclude detections that aren’t sensitive in your deployment, you can exclude them. For more details, see the Macie administrator user guide.
Custom data identifiers – You can select custom data identifiers to include or exclude during automated sensitive data discovery.
Allow lists – You can select allow lists to define specific text or a text pattern that you want Macie to exclude from automated sensitive data discovery.
Figure 1: Settings page for Macie automated sensitive data discovery
Note: When you make changes to the inclusion or exclusion of managed or custom data identifiers for S3 buckets managed by the Macie admin account, those changes apply only to new S3 objects that are discovered. The changes do not apply to detections for existing S3 objects that were previously scanned with automated sensitive data discovery.
How Macie samples data and assigns scores
Macie automated sensitive data discovery analyzes objects in the S3 buckets in your accounts where Macie is turned on. It organizes objects with similar S3 metadata, such as bucket names, object-key prefixes, file-type extensions, and storage class, into groups that are likely to have similar content. It then selects small, but representative, samples from each identified group of objects and scans them to detect the presence of sensitive data. Macie has a feedback loop that uses the results of previously scanned samples to prioritize the next set of samples to inspect.
This systematic exploration of your S3 storage can help identify the presence of unknown sensitive data for a fraction of the cost of targeted sensitive data discovery jobs. A single sample might not be conclusive, so Macie continues sampling to build a security-relevant, interactive map of your S3 buckets. It automatically detects new buckets in your accounts, and keeps track of the previously scanned objects that get deleted from existing buckets to make sure that your map stays up to date.
Review data sensitivity scoring
When you first activate automated sensitive data discovery, Macie assigns each of your S3 buckets a sensitivity score of 50. Then, Macie begins to continually select and scan a sample of objects in your S3 buckets across each member account. Based on the results, Macie adjusts the sensitivity score for each bucket, assigning new scores that range from 1–99. Macie increases the score if sensitive data is found, and decreases the score if sensitive data isn’t found.
Macie calculates this score based on the amount of data inspected, number of sensitive data types discovered, number of occurrences of each sensitive data type, and the nature of the sensitive data. The score can help you identify potential security risks, but it does not indicate the criticality that a given bucket, and its contents, might have for your organization.
Figure 2 shows an example Summary page for the delegated Macie administrator. This page summarizes the results of automated sensitive data discovery for the delegated administrator account and each member account.
From the Summary page, you can choose statistics, such as Publicly accessible or Sensitive, to investigate. When you choose a statistic, you will be redirected to the S3 buckets page that displays a filtered view based on the selected data.
On the S3 buckets page shown in Figure 3, Macie displays a heat map of consolidated information, grouped by account, on whether a bucket is sensitive, not sensitive, or not analyzed yet. Each square in the heat map represents an S3 bucket. In the figure, account 111122223333 has 79 buckets, including 4 buckets with sensitive data findings, 34 buckets that were scanned with no sensitive data found, and 41 buckets that are pending scanning.
Figure 3: Heat map of automated sensitive data discovery in Macie
For more information about an S3 bucket, select one of the squares in the heat map. This will show you the sensitivity score and other details, such as types of sensitive data, names of sensitive objects, and profiling statistics.
The following table summarizes Macie sensitivity score categories and how to interpret the heat map.
Data sensitivity score
Data sensitivity status
Data sensitivity heat map
-1
Unable to analyze
Macie was unable to analyze a S3 object(s) due to a permission issue.
1-49
Not sensitive
A darker shade of blue, and a lower sensitivity score, indicates that a greater proportion of objects in the bucket were scanned and fewer occurrences of sensitive data were found.
A score closer to 1 indicates that Macie scanned most of the objects in the bucket and did not find occurrences of objects with sensitive data.
A score closer to 49 indicates that Macie scanned a smaller proportion of objects in the bucket and did not find occurrences of objects with sensitive data.
50
Not analyzed
White shading indicates that Macie hasn’t analyzed objects yet.
51-99
Sensitive
A darker shade of red, and a higher sensitivity score, indicates that a greater proportion of objects in the bucket were scanned and more occurrences of sensitive data were found.
A score closer to 99 indicates that Macie scanned a greater proportion of objects in the bucket, and found several occurrences of objects with sensitive data.
A score closer to 51 indicates that Macie scanned a smaller proportion of objects and found some occurrences of objects with sensitive data.
100
Maximum score
A solid shade of red. Macie doesn’t assign this score, but you can manually assign it.
Common use cases for Macie automated sensitive data discovery
In this section, we discuss how you can use automated sensitive data discovery in Macie to implement the following common patterns:
Activate continuous monitoring for broad visibility into the presence of sensitive data in your S3 buckets, including existing buckets where sensitive data was not found before.
Manually identify and prioritize a subset of S3 buckets so that you can conduct a full scan based on the sensitivity score.
Build automation that scans S3 buckets by using the sensitivity score and takes actions, such as sending notifications or performing remediation, so that buckets with sensitive data have proper guardrails.
Continuous monitoring of S3 buckets for sensitive data
The dynamic nature of applications and the speed of innovation increases the type and amount of data generated, stored, and processed over time. While development teams work on developing new features for your applications, security teams help the application teams understand where they should take action to protect data.
Discovering sensitive data is an ongoing activity that requires a continuous search for sensitive data in S3 buckets in each account that the Macie admin accounts manage. Macie continually searches for sensitive data and updates the information found on the Summary and S3 buckets pages in the Macie admin accounts.
To help you gain visibility across your S3 storage at an affordable cost, automated sensitive data discovery establishes a baseline profile of the sensitivity of each bucket, while analyzing only a fraction of S3 data for each account in a given month. After you activate this feature in the Macie admin accounts, Macie starts constructing an S3 bucket baseline within 48 hours.
Macie continues to refine bucket profiles and prioritizes those that it has the least information on. For example, Macie might prioritize buckets that were recently created in the monitored accounts or existing buckets from a member account that recently joined your organization. This provides continual visibility that achieves greater fidelity over time while scanning data at a predictable monthly rate.
Automated discovery uses the results of the automated data inspection to create a profile for each bucket. It also tracks previously scanned objects to make sure that each bucket profile is up to date. This means that if a previously scanned object is removed, Macie updates the profile of the bucket to make sure that you have the most current information.
You can also include or exclude specific managed and custom data identifiers from specific S3 buckets or from each S3 bucket that the Macie admin accounts manages. For example, to make sure that the sensitivity score is as accurate as possible, you can exclude specific data identifiers on select S3 buckets where you expect those identifiers.
Let’s walk through an example of how to exclude specific data identifiers on an S3 bucket. Imagine that your company has an S3 bucket where data scientists store a test dataset of fictitious names and addresses. The appropriate teams have verified that the test dataset isn’t sensitive and can be used to create test data models. You want to exclude name and address detections for this bucket while keeping these detections for the rest of your S3 storage.
To exclude the name and address identifiers, navigate to the specific S3 bucket, choose the identifiers to exclude (in this case, NAME and ADDRESS), and choose Exclude from score, as shown in Figure 4. Macie automatically excludes these identifiers from the sensitivity score for that S3 bucket only, for existing and new objects.
Figure 4: Macie S3 bucket list view with sensitivity scores and detections
Note: When you change the included or excluded managed or custom data identifiers for an S3 bucket, Macie automatically updates existing detections and sensitivity scores. Macie also applies these changes to new S3 objects that it scans with automated sensitive data discovery.
You can prioritize S3 buckets that need additional review by manually assigning them a maximum sensitivity score. When you select Assign maximum score on an S3 bucket, Macie sets the score to 100, regardless of the sensitive data detections that it found through automated sensitive data discovery. Automated sensitive data discovery continues to scan the bucket and create sensitive data detections unless you select Exclude from automated discovery.
You might want to assign maximum scores for S3 buckets that are publicly accessible, shared across multiple internal or external customers, or part of an environment where sensitive data shouldn’t be present. By assigning a maximum score to an S3 bucket, you can help ensure that your security and privacy teams regularly review high-priority buckets. You can decide whether to assign maximum scores based on your organization’s use cases and security policies.
Identify a subset of S3 buckets to conduct a full scan based on the sensitivity score
You can use sensitivity scores to prioritize specific S3 buckets for full Macie scanning jobs. By running full scanning jobs on specific buckets, you can focus your efforts on buckets where sensitive data could have the greatest impact on your organization. Because full scanning occurs on only a subset of your buckets, this strategy can help lower your overall costs for Macie.
To create a Macie job that scans S3 buckets based on the sensitivity score
If you leave the To field blank, Macie returns a list of buckets with a score greater than or equal to the value in the From field.
Note: Sensitivity scores can vary based on the objects analyzed and whether you have the settings configured for Assign maximum score, Automatically discover sensitive data, or both.
After you add the filter, you will see the S3 bucket results for the Sensitivity values that you entered, grouped by account. To view the buckets in list view, choose the list view icon (). To view the buckets in group view, choose the group view icon ().
Note: You can’t create Macie scan jobs from group view. To run Macie scan jobs, switch to list view.
Make sure that you are in list view, select the specific S3 buckets that you want to scan based on the Sensitivity score, and then choose Create Jobs.
Figure 5: List view of sensitivity scores for S3 buckets
Review the S3 buckets that you selected. To exclude specific buckets, choose Remove for each bucket. After you review your selection, choose Next.
Select managed data identifiers, custom data identifiers, allow lists, and general settings according to your needs.
Confirm the Macie job details and choose Submit to start scanning the S3 buckets based on the sensitivity score. When this job is complete, you will receive findings on sensitive data discovered from the job.
When you are considering whether to run a scheduled job or a one-time job, remember that S3 bucket sensitivity scores can change based on new objects, managed or custom identifiers, and allow lists used by Macie automated sensitive data discovery. If you run a scheduled job on buckets that meet certain sensitivity score criteria, the configurations for the job are immutable in order to support data privacy and protection audits or investigations. If a new bucket meets the sensitivity score criteria, you need to create a new scheduled job to include that bucket.
Use automation to scan S3 buckets by sensitivity score and take actions based on findings
You can use the GetResourceProfile API to query specific S3 buckets and return sensitivity profiling information. With the information returned from the API, you can develop custom automation to take specific actions on buckets based on their sensitivity scores. For example, you can use Amazon EventBridge and AWS Lambda functions to create Macie jobs based on the sensitivity scores of the S3 buckets managed by Macie, as shown in the following architecture.
Figure 6: Example architecture for automated jobs based on sensitivity scores
This architecture has the following steps:
An EventBridge rule runs periodically to invoke a Lambda function that invokes the GetResourceProfile API for S3 buckets managed by the Macie admin accounts.
The Lambda function takes the following actions:
Creates a list of S3 buckets with maximum sensitivity scores, or with automated sensitivity profiling scores that exceed a threshold value, and then stores the results in an Amazon DynamoDB table.
Creates a Macie job by using items in the DynamoDB table to conduct a one-time scan with 100% sampling depth of those S3 buckets. Upon job submission, you can add a last-scanned date to the table for tracking purposes, to help avoid the creation of multiple one-time jobs on the same bucket.
The delegated Macie administrator job starts scan jobs for S3 buckets in member accounts.
After you conduct your Macie scans either manually or with automation, you can implement semi- or fully automated response and remediation actions based on the sensitive data findings. The following are examples of automated response and remediation actions that you can take:
In this blog post, we showed you how to turn on Macie automated sensitive data discovery in your AWS environment and how to use the findings to continually manage your data security posture. This new feature can help you prioritize your remediation efforts and identify buckets on which to run full scans for sensitive data discovery. We also shared a design pattern to build automation by using Macie APIs for automated remediation of Macie findings.
If you have feedback about this post, submit comments in the Comments section below. If you have questions about this post, start a new thread on Amazon Macie re:Post.
Want more AWS Security news? Follow us on Twitter.
With the release of Amazon Verified Permissions, developers of custom applications can implement access control logic based on caller and resource information; group membership, hierarchy, and relationship; and session context, such as device posture, location, time, or method of authentication. With Amazon Verified Permissions, you can focus on building simple authorization policies and your applications—instead of, for example, building an authorization engine for your multi-tenant consumer applications.
Amazon Verified Permissions uses the Cedar policy language, which simplifies the implementation, review, and maintenance of large and complex access control strategies.
Amazon Verified Permissions includes schema definitions, policy statement grammar, and automated reasoning that scales across millions of permissions, which enables you to enforce the principles of default deny and of least privilege. These features facilitate the deployment of an in-depth fine-grained authorization model to support your Zero-Trust objectives.
In this blog post, we’ll discuss how you can use Amazon Verified Permissions to create authorization policies that are an improvement over traditional access control models, and we provide some best practices for the use of this feature.
What is fine-grained authorization? Is it a role-based or an attribute-based access control mechanism?
Traditionally, customers deploy access control strategies based on roles or attributes.
Role-based access control (RBAC) is an approach of granting access to resources through group memberships instead of individual users. This approach, although it simplifies the definition of entitlements, can become very complex when you scale out groups’ memberships, hierarchies, and nestings.
Consider a photo sharing application that allows users to upload photos and share those photos with friends. We have a user Alice who uploads their vacation photos to a folder named Austin2022. Alice decides to share these photos with friends.
Alice provides a link to their vacation photos to a friend named Bob. Using the link, Bob is able to view photos in the folder Austin2022, because Bob is in the user group Alice/Friends. That is, Bob has the role of Alice/Friends. If Bob were removed as Alice’s friend, Bob would not be able to view Alice’s photos. This is an example of how role-based access control works.
Attribute-based access control (ABAC) deviates from the static nature of RBAC by introducing access rules based on the characteristics of the following: the requestor identity; the attributes of the resources targeted; or contextual elements such as the request time, where the request originated, or the device used to make the request.
Let’s consider who can delete photos in the example photo sharing application. We want to make sure that only Alice can delete their photos. That is, we make an authorization decision based on the attribute owner of the resource photo.
Fine-grained authorization (FGA) is a model that combines the advantages of both RBAC and ABAC, so that customers can find the right balance between each approach for their individual use case. Understanding the FGA approach is key to writing policy statements in Amazon Verified Permissions.
How does permissions policy statement language work?
To define a policy statement, Amazon Verified Permissions uses a policy language based on the PARC model, as AWS Identity and Access Management (IAM) does for IAM policies. PARC refers to the four objects in the policy language: principal, action, resource, and condition, and these are defined as follows:
The principal is the entity taking the action. Often this will be a human user, but it could also be another service or a device.
The action is the operation being performed, for which permission must be granted. Often the action will map to an API call.
The resource is the target of the call.
The condition limits when or where the principal can make the action on the resource.
Using this language, you can create a policy that allows user Alice (the principal) to call deletePhoto (the action) on VacationPhoto_1.jpg (the resource) when Alice is logged in by using multi-factor authentication (the condition). After the Amazon Verified Permissions policy is authored, you will store it in your Amazon Verified Permissions policy store instance.
Policy statements are divided into two sections:
The policy head, which defines the targets of the policy (principal, action, resource) and whether the policy permits or forbids the action.
The Conditions section, which allows you to place conditions that authorize API actions only when specified criteria are met.
You can use the structure of the policy statements to tell at a glance whether a policy follows an RBAC, an ABAC, or an FGA approach, as shown in the following three examples.
// This style of policy can be used to implement a RBAC approach
permit(
  principal in UserGroup::"Alice/Friends",
  action in [
    Action::"readFile",
    Action::"writeFile"
  ],
  resource in Folder::"Playa del Sol 2021"
);
// This style of policy can be used to implement an ABAC approach
permit(principal, action, resource)
when {
  principal.permitted_access_level >= resource.access_level
};
// This style of policy can be used to implement a hybrid approach
permit(
  principal in UserGroup::"Alice/Friends",
  action in [
    Action::"readFile",
    Action::"writeFile"
  ],
  resource in Folder::"Playa del Sol 2021"
)
when {
  principal.permitted_access_level >= resource.access_level
};
Let’s go back to our example of Alice and Bob. Now, Alice can define a policy that allows their friends to view photos in their folder Austin2022, as follows.
permit(
    principal in UserGroup::"Alice/Friends",
    action == Action::"viewPhoto",
    resource in Folder::"Austin2022"
);
The policy head says to permit the viewPhoto action to be performed on resources in the folder Austin2022 for principals in user group Alice/Friends. There is no condition section for this policy. With the preceding policy, Bob can access the photos in Alice’s Austin2022 album as long as Bob is a member of the group Alice/Friends.
We can go back to the photo deletion workflow for a more complex scenario. To delete photos, you want to ensure that the requestor owns the photo. Additionally, you might require the user to be logged in via multi-factor authentication (MFA). This policy can be written as follows.
The policy head permits a user to call the action deletePhoto on photos. The condition section limits the policy to permit photo deletion only when the resource’s owner attribute is the same as the principal’s name attribute and the context object’s MFA attribute equals true.
Designing well-architected policy statements
In this section, we cover six best practices that help customers scale out efficiently.
Use immutable identifiers to reduce risk of collision
The policy statements in this blog post and in Amazon Verified Permissions documentation intentionally use human-readable values such as Bob for a Principal entity, or Alice/Friends for a Group entity. This is useful when discussing general concepts, but in production systems, customers should utilize unique and immutable values for entities. As an example, what would happen if Alice wants to change their user name?
Instead of creating a user named Alice, you should use an autogenerated and unique identifier such as a Universally Unique Identifier (UUID). Those are generally available from your user directory, JSON Web Token, or file system. That way, you can create a user object with the ID a1b2c3d4-5678-90ab-cdef-EXAMPLE11111 and the name attribute Alice. This would allow you to update Alice’s user name without needing to recreate the user object.
Reduce the number of policies that use entity grouping
Policy statements can only contain a single principal entity and a single resource entity. If you want the same policy to apply to multiple principals or resources, you can group common entities and use an in statement.
In this example, Bob’s user account could be stored as the following object.
The parent relationship defined in Bob’s user account object is what makes Bob a member of the group Alice/Friends.
Now you can define a policy that allows Bob to gain access to Alice’s vacation photos because he is in the group Alice/Friends, as follows.
permit(
    principal in UserGroup::"Alice/Friends",
    action == Action::"viewPhoto",
    resource in Folder::"Austin2022"
);
Use namespaces to remove ambiguity
You can use namespaces to remove ambiguity. Returning to our application, let’s say that you want to give users the ability to delete their photos. But your moderators also need the ability to delete inappropriate photos. How can you distinguish between the user action deletePhoto and the administrator action deletePhoto? Namespaces give you this flexibility.
When creating your entities, you can add namespaces in the EntityType field, as in the following example.
You then use the namespace in your permit policy, as follows.
permit(
  principal,
  action == Admin::Action::"deletePhoto",
  resource == File::"Photo")
when {
  principal.role == Moderator
};
This policy requires a user to have the role Moderator to successfully use the administrator deletePhoto action.
Set permission guardrails with forbid statements
The Amazon Verified Permissions policy engine denies any action that is not explicitly allowed with a permit policy. But you might want to establish permission guardrails to ensure that an action will be never allowed. You can create forbid policies for this purpose.
Returning to our photo sharing application, suppose that you want to ensure that no user can delete a photo unless the user has been authenticated with MFA. You could use the following policy.
This permission guardrail will help prevent the accidental grant of overly permissive deletePhoto permissions.
Simplify statements with unless conditions
When you define complex conditions for a policy statement, you might face situations where a policy needs multiple negative conditions. Amazon Verified Permissions provides an alternative keyword for the conditional expression: unless. For example, you might deny moderators the ability to delete photos unless they have flagged the photo as inappropriate, are authenticated using MFA, and are on the company’s network, in order to simplify policy statements.
Unless behaves the same as when, except that using unless requires all conditions to evaluate as false. With this additional expression, you can create statement that are less complex to review and maintain. The following example shows how you can simplify a condition with multiple parameters by using the unless expression.
// Allow access unless a resource was deleted more than 7 days ago
permit(
  principal in Group::"Alice/Friends",
  action == Action::"readPhoto",
  resource in Folder::"Playa del Sol 2021"
)
when {
  !(resource.status == "deleted"
   && resource.deletion_date < (context.time.now - 604800)) //7 days ago
}
The following example shows how you can simplify the previous policy by using an unless expression.
// Allow access unless a resource was deleted more than 7 days ago
permit(
  principal in Group::"Alice/Friends",
  action == Action::"readPhoto",
  resource in Folder::"Playa del Sol 2021"
)
unless {
  (resource.status == "deleted"
   && resource.deletion_date < (context.time.now - 604800)) //7 days ago
}
Rationalize policies with a template
You might face a situation where you are repeatedly creating the same rule for different contexts. In the following example, we demonstrate a policy that permits Alice to describe the folder Alice’s Org. Then we replicate the same policy for Bob and the folder Bob’s Org.
permit(
    principal == "Alice",
    action == Action::"describeFolder",
    resource == Folder::"Alice's Org"
)
when {
    resource.owner == principal.username
};

permit(
    principal == "Bob",
    action == Action::"describeFolder",
    resource == Folder::"Bob's Org"
)
when {
    resource.owner == principal.username
};
In this case, we recommend that you use a policy template to simplify the evaluation, as in the following example.
permit(
    principal == ?principal,
    action == Action::"describeFolder",
    resource == ?resource
)
when {
    resource.owner == principal.username
};
With a policy template, the statement inherits from a placeholder (in this example, ?principal and ?resource) and will be evaluated dynamically for each policy evaluation request, based on context that the application will provide.
Conclusion: Start authorizing with Amazon Verified Permissions
With Amazon Verified Permissions, you can create permission policies with expressiveness, performance, and readability in mind.
Using the best practices described in this post, you are ready to author policies with Amazon Verified Permissions. When combined with services like Amazon Cognito, Amazon API Gateway, an AWS Lambda authorizer, or AWS AppSync, Amazon Verified Permissions allows you to unlock in-depth and explicit access control logic securely using native AWS services.
Over the next months, AWS will release more resources to support our customers in their implementation of Amazon Verified Permissions. Learn more about Amazon Verified Permissions. Stay tuned and happy building.
If you have feedback about this post, submit comments in the Comments section below. If you have questions about this post, contact AWS Support.
Want more AWS Security news? Follow us on Twitter.
To identify potential security threats and vulnerabilities, customers should enable logging across their various resources and centralize these logs for easy access and use within analytics tools. Some of these data sources include logs from on-premises infrastructure, firewalls, and endpoint security solutions, and when utilizing the cloud, services such as Amazon Route 53, AWS CloudTrail, and Amazon Virtual Private Cloud (Amazon VPC).
The Amazon Simple Storage Service (Amazon S3) and AWS Lake Formation simplify the creation and management of a data lake on AWS. But, some customers’ security teams still struggle to define and implement security domain–specific aspects, such as data normalization, which requires them to analyze each log source’s structure and fields, define schemas and mappings, and pull in data enrichment such as threat intelligence.
Today we are announcing the preview release of Amazon Security Lake, a purpose-built service that automatically centralizes an organization’s security data from cloud and on-premises sources into a purpose-built data lake stored in your account. Amazon Security Lake automates the central management of security data, normalizing from integrated AWS services and third-party services and managing the lifecycle of data with customizable retention and also automates storage tiering.
Here are the key features of Amazon Security Lake:
Data transformation and normalization – Security Lake automatically partitions and converts incoming log data to a storage and query-efficient Apache Parquet and OCSF format, making the data broadly and immediately usable for security analytics without the need for post-processing. Security Lake supports integrations with analytics partners such as IBM, Splunk, Sumo Logic, and more to address a variety of security use cases such as threat detection, investigation, and incident response.
Customizable data access levels – You can configure the level of subscribers consuming data stored in the Security Lake, such as specific data sources for data access to all new objects or directly querying data stored. You can also specify a rollup Region that the Security Lake is available in and multiple AWS accounts across your AWS Organizations. This can help you comply with data residency compliance requirements.
By reducing the operational overhead of security data management, you can make it easier to gather more security signals from across your organization and analyze that data to improve the protection of your data, applications, and workloads.
Configure Your Security Lake for Collection Data To get started with Amazon Security Lake, choose Get started in the AWS console. You can enable log and event sources for all Regions and all accounts.
You can select log and event sources such as CloudTrail logs, VPC flow logs, and Route53 resolver logs into your data lake. Select Regions will contribute their data to your data lake with the Amazon S3-managed encryption that Amazon S3 will create and manage all encryption keys, as well as the specific AWS accounts in your organizations.
Next, you can select rollup and contributing Regions. All aggregated data from contributing Regions reside in the rollup Region. You can create multiple rollup Regions, which can help you comply with data residency compliance requirements. Optionally, you can define the Amazon S3 storage classes and the retention period you want the data to transition from the standard Amazon S3 storage classes used in Security Lake.
After initial configuration, choose Sources in the left pane of the console if you can add or remove log sources in your Regions or account.
You can also collect data from custom sources, such as Bind DNS logs, endpoint telemetry logs, on-premise Netflow logs, and so on. Before adding a custom source, you need to create AWS IAM role to grant permissions for AWS Glue.
To create a custom data source, choose Create custom source in the left menu of Custom sources.
It requires you to enter the IAM role Amazon Resource Names (ARNs) to write data to Security Lake and invoke AWS Glue on your behalf. Then, you can provide details about your custom source.
For efficient data processing and querying, objects from your custom sources should be partitioned by AWS Region, AWS account, year, month, day, and hour with a Parquet-formatted object.
Consume Your Data from Security Lake Now you can create a subscriber, a service that consumes logs and events from Security Lake. To add or see your subscribers, choose Subscribers in the left pane of the console.
The Security Lake supports two types of subscriber data access methods:
Data access (Amazon S3) – Subscribers are notified of new objects for a source as the data is written to your Security Lake S3 bucket. You can choose to notify subscribers of new objects with an Amazon Simple Queue Service (Amazon SQS) queue or through messaging to an HTTPS endpoint provided by the subscriber. This type is useful to ingest selected data in your analytics application—good for use cases that require frequent access to data.
Query access (Lake Formation) – Subscribers can consume data by directly querying AWS Lake Formation tables in your S3 bucket through services like Amazon Athena. This type is useful to provide on-demand query access to data without the need to pre-ingest anything and for use cases that require infrequent access or on large volume sources too expensive to ingest upfront or retain in analytics tools.
When you add a subscriber, you can choose Amazon S3 to create data access for the subscriber. If you select the default method of notification, you can receive the following object notification message in either an HTTPS endpoint or Amazon SQS.
Subscribers with query access can directly query data that is stored in Security Lake by using services like Amazon Athena and other services that can read from AWS Lake Formation. The following are sample queries of CloudTrail data.
SELECT
      time,
      api.service.name,
      api.operation,
      api.response.error,
      api.response.message,
      src_endpoint.ip
    FROM ${athena_db}.${athena_table}
    WHERE eventHour BETWEEN '${query_start_time}' and '${query_end_time}'
      AND api.response.error in (
        'Client.UnauthorizedOperation',
        'Client.InvalidPermission.NotFound',
        'Client.OperationNotPermitted',
        'AccessDenied')
    ORDER BY time desc
    LIMIT 25
Subscribers only have access to source data in the AWS Region that you’ve selected when you create the subscriber. To give a subscriber access to data from multiple Regions, you can set the Region where you create your subscriber as a rollup Region.
Third-Party Integrations For supported third-party integrations, there are a number of sources as well as subscribing services integrated with Amazon Security Lake.
You can also use third-party security, automation, and analytics tools supporting Security Lake, including Datadog, IBM, Rapid7, Securonix, SentinelOne, Splunk, Sumo Logic, and Trellix. There are also service partners such as Accenture, Atos, Deloitte, DXC, Kyndryl, PWC, Rackspace, and Wipro that can work with you and Amazon Security Lake.
Join the Preview The preview release of Amazon Security Lake is now available in the US East (Ohio), US East (N. Virginia), US West (Oregon), Asia Pacific (Sydney), Asia Pacific (Tokyo), Europe (Frankfurt), and Europe (Ireland) Regions.
To learn more, see the Amazon Security Lake page and Amazon Security Lake User Guide. We want to hear more feedback during the preview. Please send feedback in AWS re:Post and through your usual AWS support contacts.
AWS recently announced that AWS Organizations now supports AWS CloudFormation. This feature allows you to create and update AWS accounts, organizational units (OUs), and policies within your organization by using CloudFormation templates. With this latest integration, you can efficiently codify and automate the deployment of your resources in AWS Organizations.
You can now manage your AWS organization resources using infrastructure as code (iaC) and make changes in a central place. This can help reduce the time required to build a new organization, expand or modify the existing organization, replicate your organization infrastructure, or apply and update policies across multiple accounts and OUs. You can also delete organization resources by deleting the stacks.
In this blog post, we will show you how to create various AWS Organizations resources for a multi-account organization by using a CloudFormation template.
How does it work?
A CloudFormation template describes your desired resources and their dependencies so that you can launch and configure them together as a stack. You can use a template to create, update, and delete an entire stack as a single unit instead of managing resources individually.
With CloudFormation support for AWS Organizations, you can now do the following:
Create, delete, or update an organizational unit (OU). An OU is a container for accounts that allows you to organize your accounts to apply policies according to your needs.
Create accounts in your organization, add tags, and attach them to OUs.
Add or remove a tag on an OU.
Create, delete, or update a service control policy (SCP), backup policy, tag policy and artificial intelligence (AI) services opt-out policy.
Add or remove a tag on an SCP, backup policy, tag policy, and AI services opt-out policy.
Attach or detach an SCP, backup policy, tag policy, and AI services opt-out policy to a target (root, OU, or account).
To create AWS Organizations resources using CloudFormation, you will need to use your organization’s management account. As of this writing, the new resource types may only be deployed from the organization’s management account or delegated administration account.
Overview of the new resource types
The following are the three new resource types available for the implementation and management of an account, OU, and organizations policy in CloudFormation:
AWS::Organizations::Account – Creates an account that is automatically a member of the organization whose credentials made the request.
AWS::Organizations::Policy – Creates a policy of a specified type that you can attach to a root, OU, or individual account.
Prerequisites
This blog post assumes that you have AWS Organizations enabled in your management account. You also need the tag policy and service control policy types enabled in your management account. For instructions on how to create an organization, see Create your organization.
You should also review the following important points for creating resources in AWS Organizations:
AWS Organizations supports the creation of a single account at a time. If you include multiple accounts in a single CloudFormation template, you should use the DependsOn attribute so that your accounts are created sequentially.
Before you can create a policy of a given type, you must first enable that policy type in your organization.
The number of levels deep that you can nest OUs depends on the policy types that you have enabled for the root. For SCPs, the limit is five.
To modify the AccountName, Email, and RoleName for the account resource parameters, you must sign in to the AWS Management Console as the AWS account root user.
Since the CloudFormation template in this blog deploys Account and Organization Unit resources, you must deploy it in your organization’s management account.
Use a CloudFormation template with the new AWS Organizations resources
In this section, we will walk you through a sample CloudFormation template that incorporates the newly supported AWS Organizations resources. CloudFormation provisions and configures the resources for you, so that you don’t have to individually create and configure them and determine resource dependencies.
The template will create the following resources and structure.
Three organizational units
Infrastructure – Within the organizational root
Production – Within the Infrastructure OU
Security – Within the organizational root
One account
AccountA – Within the Production child OU
Two service control policies
PreventLeavingOrganization – Attached to the organizational root
PreventCloudTrailDisablement – Attached to the Security OU
Note: The above OU and account layout is only an example for the purpose of this blog post. Please refer to Organizing Your AWS Environment Using Multiple Accounts whitepaper for more information on multi-account strategy best practices & recommendations.
In this section, you will create a stack by using the CloudFormation template that you downloaded.
To create the stack
Create the AWS Organizations resources outlined in the template by creating an IAM role for CloudFormation using the following IAM permissions policy and trust policy.
Sign in to the management account for your organization, navigate to the CloudFormation console, and choose Create stack.
Choose With new resources (standard), upload the template file, and choose Next.
Figure 1: CloudFormation console showing creation of stack
Enter a name for the stack (for example, CloudFormationForAWSOrganizations). For OrganizationRoot, enter your organizations root ID. You can find the root ID in the AWS Organizations console.
Choose Create stack.
On the Configure stack options page, in the Permissions section, choose the IAM role that you granted permissions to previously, as shown in Figure 2. Then choose Next.
Figure 2: Set IAM role permissions for CloudFormation
You will see a screen showing stack creation in progress.
Figure 3: CloudFormation console showing stack creation in progress
When the stack has been created, choose the Resources tab to see the resources created.
Figure 4: CloudFormation console showing stack resources created
Confirm and visualize the resources created by using the console
In this section, you will use the console to confirm and visualize the resources created.
In the left navigation pane, choose AWS accounts to see the OUs and account that were created.
Figure 5: AWS Organizations console showing the organization structure
Confirm the service control policy created and attached to the organization’s root
In this section, you will confirm that the SCP was created and attached to the organization’s root.
Note: When you enable SCPs on an organization, an AWS full access policy is attached by default at each level (root, OU, and account) of your organization. Because you can attach policies to multiple levels of the organization, accounts can inherit multiple policies with an effect of deny. For more details, see inheritance for service control policies.
To confirm the SCP was created and attached to the root
To view the service control policy, choose Root, and then in the section Applied policies, review the list of policies. The PreventLeavingOrganization SCP prevents the use of the LeaveOrganization API so that member accounts can’t remove their accounts from the organization.
Figure 6: AWS Organizations console showing the organization’s root
To confirm that the DoNotDelete tag was attached to the PreventLeavingOrganization SCP, choose the policy name and then choose the Tags tab.
Figure 7: SCP with tags attached to it in Organizations
Confirm the service control policy created and attached to the Security OU
In this section, you will confirm that the PreventCloudTrailDisablement SCP was created and attached to the Security OU, thus preventing users or roles in the accounts in the security OU from disabling an AWS CloudTrail log.
To confirm that the SCP was created and attached to the Security OU
From the left navigation pane, choose AWS accounts, and then choose Security.
On the Security page, choose the Policies tab to see a list of policies.
To review and confirm the contents of the policy, choose PreventCloudTrailDisablement.
Figure 8: SCP attached to the Security OU in Organizations
Confirm the account and tag policy created and attached to the Production OU
In this step, you will confirm that the account and tag policy were created and attached to the Production OU.
To confirm creation of the account and tag policy in the Production OU
On the Production page, choose the Children tab to confirm that the account named AccountA was created.
Figure 9: The Production OU and account A in Organizations
To confirm that the DefineTagKeyCase tag policy was attached to the Production OU, do the following:
From the left navigation pane, choose AWS accounts, and then choose Production.
Choose the Policies tab to see the list of policies.
In the Tag policies section, under Applied policies, choose DefineTagKeyCase to confirm the contents of the policy. This policy defines the tag key and the capitalization that you want accounts in the production OU to standardize on.
Figure 10: SCP and tag policy attached to the Production OU in Organizations
Conclusion
In this blog post, you learned how to create AWS Organizations resources, including organizational units, accounts, service control policies, and tag policies by using CloudFormation. You can use this new feature to model the state of your infrastructure as code and to help deploy your AWS resources in a safe, repeatable manner at scale.
Today, we announce automated data discovery for Amazon Macie. This new capability allows you to gain visibility into where your sensitive data resides on Amazon Simple Storage Service (Amazon S3) at a fraction of the cost of running a full data inspection across all your S3 buckets.
At AWS, security is our first priority. The security of the infrastructure itself, but also the security of your data. We give you access to services to manage identities and access, to protect the network and your applications, to detect suspicious activities, to protect your data, and to report on and monitor your compliance status.
Amazon Macie is a data security service that discovers sensitive data using machine learning and pattern matching and enables visibility and automated protection against data security risks. You use Amazon Macie to protect your data in S3 by scanning for the presence of sensitive data, such as names, addresses, and credit card numbers, and continually monitoring for properly configured preventative controls, such as encryption and access policies. Amazon Macie generates alerts when it detects publicly accessible buckets, unencrypted buckets, or buckets shared with an AWS account outside of your organization. You may also configure Amazon Macie to scan your S3 to run full sensitive data discovery scans on your S3 buckets to provide visibility into where sensitive data resides.
But customers operating at scale told us it is difficult to know where to start. When employees and applications add new buckets and generate petabytes of data on a daily basis, what should be scanned first?
Automated data discovery automates the continual discovery of sensitive data and potential data security risks across your entire set of buckets aggregated at AWS Organizations level.
When you enable automated discovery in the console, Macie starts to evaluate the level of sensitivity of each of your buckets and highlights any data security risks. Automated data discovery introduces intelligent and fully managed data sampling to provide an optimized sample rate that meaningfully reduces the amount of data that needs to be analyzed. This reduces the cost of discovering S3 buckets containing sensitive data compared to the cost of full data inspection.
You can tune automated data discovery to only identify the types of sensitive data that are relevant for your use case by choosing from over 100 managed sensitive data types, such as personally identifiable information (PII) and financial records with specific formats for multiple countries. For example, you can enable detection of Spanish or Swedish driving license numbers and choose to ignore US Social Security numbers, depending on your use cases. When the specific type of data you manage is not on our list, you can create custom data types that may be unique to your business, such as employee or patient identification numbers.
Let’s See It in Action Automated data discovery is on by default for all new Amazon Macie customers, and existing Macie customers can enable it with one click in the AWS Management Console of the Amazon Macie administrator account. There is a 30-day free trial, and you can always opt out at the administrator level.
I can enable or disable the capability from the Automated discovery entry–under Settings–on the left side navigation menu. The Status section reveals the current status.
On the same page, I can configure the list of managed data identifiers. I can turn on or off individual types of data among more than one hundred managed data identifier types. I can also configure new ones. I select Edit on the Managed data identifiers section to include or exclude additional data identifiers.
If I have some buckets with lots of objects and others with a few, Macie won’t spend all its time inspecting one really large bucket at the expense of other smaller ones. Macie also prioritizes buckets that it knows the least about. For example, if it looked at the majority of objects in a small bucket, that bucket will be deprioritized compared to larger buckets where it has seen proportionally fewer objects.
Automated data discovery can provide an interactive data map of sensitive data distribution in S3 buckets within days of the feature being enabled. This data map refreshes daily as it intelligently picks and scans S3 objects in buckets and spreads the scan effort across the entire S3 estate in a given month.
Here is the Summary section of the Amazon Macie page. It looks like my set of buckets is secured. I have no bucket with public access, and 31 of my buckets might contain sensitive data.
When selecting the S3 buckets section of the navigation menu on the left side, I can see a data map of my buckets. The more red the squares are, the more sensitive data are detected in the buckets. The squares in blue represent buckets with no sensitive data detected so far. From there, I can drill down at bucket level to investigate the details.
Pricing and Availability When you are new to Amazon Macie, automated data discovery is enabled by default. When you already use Amazon Macie in your organization, you can enable automatic data discovery with one click in the Management Console of the Amazon Macie administrator account.
There is a 30-day free trial period when you enable automatic data discovery on your AWS account. After the evaluation period, we charge based on the total quantity of S3 objects in your account as well as the bytes scanned for sensitive content. Charges are prorated per day. You can disable this capability at any time. The pricing page has all the details.
When operating a business, you have to find the right balance between speed and control for your cloud operations. On one side, you want to have the ability to quickly provision the cloud resources you need for your applications. At the same time, depending on your industry, you need to maintain compliance with regulatory, security, and operational best practices.
AWS Config provides rules, which you can run in detective mode to evaluate if the configuration settings of your AWS resources are compliant with your desired configuration settings. Today, we are extending AWS Config rules to support proactive mode so that they can be run at any time before provisioning and save time spent to implement custom pre-deployment validations.
When creating standard resource templates, platform teams can run AWS Config rules in proactive mode so that they can be tested to be compliant before being shared across your organization. When implementing a new service or a new functionality, development teams can run rules in proactive mode as part of their continuous integration and continuous delivery (CI/CD) pipeline to identify noncompliant resources.
You can also use AWS CloudFormation Guard in your deployment pipelines to check for compliance proactively and ensure that a consistent set of policies are applied both before and after resources are provisioned.
Let’s see how this works in practice.
Using Proactive Compliance with AWS Config In the AWS Config console, I choose Rules in the navigation pane. In the rules table, I see the new Enabled evaluation mode column that specifies whether the rule is proactive or detective. Let’s set up my first rule.
I choose Add rule, and then I enter rds-storage in the AWS Managed Rules search box to find the rds-storage-encrypted rule. This rule checks whether storage encryption is enabled for your Amazon Relational Database Service (RDS) DB instances and can be added in proactive or detective evaluation mode. I choose Next.
In the Evaluation mode section, I turn on proactive evaluation. Now both the proactive and detective evaluation switches are enabled.
I leave all the other settings to their default values and choose Next. In the next step, I review the configuration and add the rule.
Now, I can use proactive compliance via the AWS Config API (including the AWS Command Line Interface (CLI) and AWS SDKs) or with CloudFormation Guard. In my CI/CD pipeline, I can use the AWS Config API to check the compliance of a resource before creating it. When deploying using AWS CloudFormation, I can set up a CloudFormation hook to proactively check my configuration before the actual deployment happens.
Let’s do an example using the AWS CLI. First, I call the StartProactiveEvaluationResponse API with in input the resource ID (for reference only), the resource type, and its configuration using the CloudFormation schema. For simplicity, in the database configuration, I only use the StorageEncrypted option and set it to true to pass the evaluation. I use an evaluation timeout of 60 seconds, which is more than enough for this rule.
I get back in output the ResourceEvaluationId that I use to check the evaluation status using the GetResourceEvaluationSummary API. In the beginning, the evaluation is IN_PROGRESS. It usually takes a few seconds to get a COMPLIANT or NON_COMPLIANT result.
As expected, the Amazon RDS configuration is compliant to the rds-storage-encrypted rule. If I repeat the previous steps with StorageEncrypted set to false, I get a noncompliant result.
If more than one rule is enabled for a resource type, all applicable rules are run in proactive mode for the resource evaluation. To find out individual rule-level compliance for the resource, I can call the GetComplianceDetailsByResource API:
If, when looking at these details, your desired rule is not invoked, be sure to check that proactive mode is turned on.
Availability and Pricing Proactive compliance will be available in all commercial AWS Regions where AWS Config is offered but it might take a few days to deploy this new capability across all these Regions. I’ll update this post when this deployment is complete. To see which AWS Config rules can be turned into proactive mode, see the Developer Guide.
You are charged based on the number of AWS Config rule evaluations recorded. A rule evaluation is recorded every time a resource is evaluated for compliance against an AWS Config rule. Rule evaluations can be run in detective mode and/or in proactive mode, if available. If you are running a rule in both detective mode and proactive mode, you will be charged for only the evaluations in detective mode. For more information, see AWS Config pricing.
Today, customers in regulated industries face the challenge of defining and enforcing controls needed to meet compliance and security requirements while empowering engineers to make their design choices. In addition to addressing risk, reliability, performance, and resiliency requirements, organizations may also need to comply with frameworks and standards such as PCI DSS and NIST 800-53.
Building controls that account for service relationships and their dependencies is time-consuming and expensive. Sometimes customers restrict engineering access to AWS services and features until their cloud architects identify risks and implement their own controls.
To make that easier, today we are launching comprehensive controls management in AWS Control Tower. You can use it to apply managed preventative, detective, and proactive controls to accounts and organizational units (OUs) by service, control objective, or compliance framework. AWS Control Tower does the mapping between them on your behalf, saving time and effort.
With this new capability, you can now also use AWS Control Tower to turn on AWS Security Hub detective controls across all accounts in an OU. In this way, Security Hub controls are enabled in every AWS Region that AWS Control Tower governs.
Let’s see how this works in practice.
Using AWS Control Tower Comprehensive Controls Management In the AWS Control Tower console, there is a new Controls library section. There, I choose All controls. There are now more than three hundred controls available. For each control, I see which AWS service it is related to, the control objective this control is part of, the implementation (such as AWS Config rule or AWS CloudFormationGuard rule), the behavior (preventive, detective, or proactive), and the frameworks it maps to (such as NIST 800-53 or PCI DSS).
In the Find controls search box, I look for a preventive control called CT.CLOUDFORMATION.PR.1. This control uses a service control policy (SCP) to protect controls that use CloudFormation hooks and is required by the control that I want to turn on next. Then, I choose Enable control.
Then, I select the OU for which I want to enable this control.
Now that I have set up this control, let’s see how controls are presented in the console in categories. I choose Categories in the navigation pane. There, I can browse controls grouped as Frameworks, Services, and Control objectives. By default, the Frameworks tab is selected.
I select a framework (for example, PCI DSS version 3.2.1) to see all the related controls and control objectives. To implement a control, I can select the control from the list and choose Enable control.
I can also manage controls by AWS service. When I select the Services tab, I see a list of AWS services and the related control objectives and controls.
I choose Amazon DynamoDB to see the controls that I can turn on for this service.
I select the Control objectives tab. When I need to assess a control objective, this is where I have access to the list of related controls to turn on.
I choose Encrypt data at rest to see and search through the available controls for that control objective. I can also check which services are covered in this specific case. I type RDS in the search bar to find the controls related to Amazon Relational Database Service (RDS) for this control objective.
I choose CT.RDS.PR.16 – Require an Amazon RDS database cluster to have encryption at rest configured and then Enable control.
I select the OU for which I want to enable the control for, and I proceed. All the AWS accounts in this organization’s OU will have this control enabled in all the Regions that AWS Control Tower governs.
After a few minutes, the AWS Control Tower setup is updated. Now, the accounts in this OU have proactive control CT.RDS.PR.16 turned on. When an account in this OU deploys a CloudFormation stack, any Amazon RDS database cluster has to have encryption at rest configured. Because this control is proactive, it’ll be checked by a CloudFormation hook before the deployment starts. This saves a lot of time compared to a detective control that would find the issue only when the CloudFormation deployment is in progress or has terminated. This also improves my security posture by preventing something that’s not allowed as opposed to reacting to it after the fact.
Availability and Pricing Comprehensive controls management is available in preview today in all AWS Regions where AWS Control Tower is offered. These enhanced control capabilities reduce the time it takes you to vet AWS services from months or weeks to minutes. They help you use AWS by undertaking the heavy burden of defining, mapping, and managing the controls required to meet the most common control objectives and regulations.
There is no additional charge to use these new capabilities during the preview. However, when you set up AWS Control Tower, you will begin to incur costs for AWS services configured to set up your landing zone and mandatory controls. For more information, see AWS Control Tower pricing.
With Amazon Redshift, you can analyze data in the cloud at any scale. Amazon Redshift offers native data protection capabilities to protect your data using automatic and manual snapshots. This works great by itself, but when you’re using other AWS services, you have to configure more than one tool to manage your data protection policies.
To make this easier, I am happy to share that we added support for Amazon Redshift in AWS Backup. AWS Backup allows you to define a central backup policy to manage data protection of your applications and can now also protect your Amazon Redshift clusters. In this way, you have a consistent experience when managing data protection across all supported services. If you have a multi-account setup, the centralized policies in AWS Backup let you define your data protection policies across all your accounts within your AWS Organizations. To help you meet your regulatory compliance needs, AWS Backup now includes Amazon Redshift in its auditor-ready reports. You also have the option to use AWS Backup Vault Lock to have immutable backups and prevent malicious or inadvertent changes.
Let’s see how this works in practice.
Using AWS Backup with Amazon Redshift The first step is to turn on the Redshift resource type for AWS Backup. In the AWS Backup console, I choose Settings in the navigation pane and then, in the Service opt-in section, Configure resources. There, I toggle the Redshift resource type on and choose Confirm.
Now, I can create or update a backup plan to include the backup of all, or some, of my Redshift clusters. In the backup plan, I can define how often these backups should be taken and for how long they should be kept. For example, I can have daily backups with one week of retention, weekly backups with one month of retention, and monthly backups with one year of retention.
I can also create on-demand backups. Let’s see this with more details. I choose Protected resources in the navigation pane and then Create on-demand backup.
I select Redshift in the Resource type dropdown. In the Cluster identifier, I select one of my clusters. For this workload, I need two weeks of retention. Then, I choose Create on-demand backup.
My data warehouse is not huge, so after a few minutes, the backup job has completed.
I now see my Redshift cluster in the list of the resources protected by AWS Backup.
In the Protected resources list, I choose the Redshift cluster to see the list of the available recovery points.
When I choose one of the recovery points, I have the option to restore the full data warehouse or just a table into a new Redshift cluster.
I now have the possibility to edit the cluster and database configuration, including security and networking settings. I just update the cluster identifier, otherwise the restore would fail because it must be unique. Then, I choose Restore backup to start the restore job.
After some time, the restore job has completed, and I see the old and the new clusters in the Amazon Redshift console. Using AWS Backup gives me a simple centralized way to manage data protection for Redshift clusters as well as many other resources in my AWS accounts.
There is no additional cost for using AWS Backup compared to the native snapshot capability of Amazon Redshift. Your overall costs depend on the amount of storage and retention you need. For more information, see AWS Backup pricing.
We’ve always believed that for the cloud to realize its full potential it would be essential that customers have control over their data. Giving customers this sovereignty has been a priority for AWS since the very beginning when we were the only major cloud provider to allow customers to control the location and movement of their data. The importance of this foundation has only grown over the last 16 years as the cloud has become mainstream, and governments and standards bodies continue to develop security, data protection, and privacy regulations.
Today, having control over digital assets, or digital sovereignty, is more important than ever.
As we’ve innovated and expanded to offer the world’s most capable, scalable, and reliable cloud, we’ve continued to prioritize making sure customers are in control and able to meet regulatory requirements anywhere they operate. What this looks like varies greatly across industries and countries. In many places around the world, like in Europe, digital sovereignty policies are evolving rapidly. Customers are facing an incredible amount of complexity, and over the last 18 months, many have told us they are concerned that they will have to choose between the full power of AWS and a feature-limited sovereign cloud solution that could hamper their ability to innovate, transform, and grow. We firmly believe that customers shouldn’t have to make this choice.
This is why today we’re introducing the AWS Digital Sovereignty Pledge—our commitment to offering all AWS customers the most advanced set of sovereignty controls and features available in the cloud.
AWS already offers a range of data protection features, accreditations, and contractual commitments that give customers control over where they locate their data, who can access it, and how it is used. We pledge to expand on these capabilities to allow customers around the world to meet their digital sovereignty requirements without compromising on the capabilities, performance, innovation, and scale of the AWS Cloud. At the same time, we will continue to work to deeply understand the evolving needs and requirements of both customers and regulators, and rapidly adapt and innovate to meet them.
Sovereign-by-design
Our approach to delivering on this pledge is to continue to make the AWS Cloud sovereign-by-design—as it has been from day one. Early in our history, we received a lot of input from customers in industries like financial services and healthcare—customers who are among the most security- and data privacy-conscious organizations in the world—about what data protection features and controls they would need to use the cloud. We developed AWS encryption and key management capabilities, achieved compliance accreditations, and made contractual commitments to satisfy the needs of our customers. As customers’ requirements evolve, we evolve and expand the AWS Cloud. A couple of recent examples include the data residency guardrails we added to AWS Control Tower (a service for governing AWS environments) late last year, which give customers even more control over the physical location of where customer data is stored and processed. In February 2022, we announced AWS services that adhere to the Cloud Infrastructure Service Providers in Europe (CISPE) Data Protection Code of Conduct, giving customers an independent verification and an added level of assurance that our services can be used in compliance with the General Data Protection Regulation (GDPR). These capabilities and assurances are available to all AWS customers.
We pledge to continue to invest in an ambitious roadmap of capabilities for data residency, granular access restriction, encryption, and resilience:
1. Control over the location of your data
Customers have always controlled the location of their data with AWS. For example, currently in Europe, customers have the choice to deploy their data into any of eight existing Regions. We commit to deliver even more services and features to protect our customers’ data. We further commit to expanding on our existing capabilities to provide even more fine-grained data residency controls and transparency. We will also expand data residency controls for operational data, such as identity and billing information.
2. Verifiable control over data access
We have designed and delivered first-of-a-kind innovation to restrict access to customer data. The AWS Nitro System, which is the foundation of AWS computing services, uses specialized hardware and software to protect data from outside access during processing on Amazon Elastic Compute Cloud (Amazon EC2). By providing a strong physical and logical security boundary, Nitro is designed to enforce restrictions so that nobody, including anyone in AWS, can access customer workloads on EC2. We commit to continue to build additional access restrictions that limit all access to customer data unless requested by the customer or a partner they trust.
3. The ability to encrypt everything everywhere
Currently, we give customers features and controls to encrypt data, whether in transit, at rest, or in memory. All AWS services already support encryption, with most also supporting encryption with customer managed keys that are inaccessible to AWS. We commit to continue to innovate and invest in additional controls for sovereignty and encryption features so that our customers can encrypt everything everywhere with encryption keys managed inside or outside the AWS Cloud.
4. Resilience of the cloud
It is not possible to achieve digital sovereignty without resiliency and survivability. Control over workloads and high availability are essential in the case of events like supply chain disruption, network interruption, and natural disaster. Currently, AWS delivers the highest network availability of any cloud provider. Each AWS Region is comprised of multiple Availability Zones (AZs), which are fully isolated infrastructure partitions. To better isolate issues and achieve high availability, customers can partition applications across multiple AZs in the same AWS Region. For customers that are running workloads on premises or in intermittently connected or remote use cases, we offer services that provide specific capabilities for offline data and remote compute and storage. We commit to continue to enhance our range of sovereign and resilient options, allowing customers to sustain operations through disruption or disconnection.
Earning trust through transparency and assurances
At AWS, earning customer trust is the foundation of our business. We understand that protecting customer data is key to achieving this. We also know that trust must continue to be earned through transparency. We are transparent about how our services process and transfer data. We will continue to challenge requests for customer data from law enforcement and government agencies. We provide guidance, compliance evidence, and contractual commitments so that our customers can use AWS services to meet compliance and regulatory requirements. We commit to continuing to provide the transparency and business flexibility needed to meet evolving privacy and sovereignty laws.
Navigating changes as a team
Helping customers protect their data in a world with changing regulations, technology, and risks takes teamwork. We would never expect our customers to go it alone. Our trusted partners play a prominent role in bringing solutions to customers. For example, in Germany, T-Systems (part of Deutsche Telekom) offers Data Protection as a Managed Service on AWS. It provides guidance to ensure data residency controls are properly configured, offering services for the configuration and management of encryption keys and expertise to help guide their customers in addressing their digital sovereignty requirements in the AWS Cloud. We are doubling down with local partners that our customers trust to help address digital sovereignty requirements.
We are committed to helping our customers meet digital sovereignty requirements. We will continue to innovate sovereignty features, controls, and assurances within the global AWS Cloud and deliver them without compromise to the full power of AWS.
If you have feedback about this post, submit comments in the Comments section below. If you have questions about this post, contact AWS Support.
Want more AWS Security news? Follow us on Twitter.
French version
AWS Digital Sovereignty Pledge: le contrôle sans compromis
Nous avons toujours pensé que pour que le cloud révèle son entier potentiel, il était essentiel que les clients aient le contrôle de leurs données. Garantir à nos clients cette souveraineté a été la priorité d’AWS depuis l’origine, lorsque nous étions le seul grand fournisseur de cloud à permettre aux clients de contrôler la localisation et le flux de leurs données. L’importance de cette démarche n’a cessé de croître ces 16 dernières années, à mesure que le cloud s’est démocratisé et que les gouvernements et les organismes de régulation ont développé des réglementations en matière de sécurité, de protection des données et de confidentialité.
Aujourd’hui, le contrôle des ressources numériques, ou souveraineté numérique, est plus important que jamais.
Tout en innovant et en nous développant pour offrir le cloud le plus performant, évolutif et fiable au monde, nous avons continué à ériger comme priorité la garantie que nos clients gardent le contrôle et soient en mesure de répondre aux exigences réglementaires partout où ils opèrent. Ces exigences varient considérablement selon les secteurs et les pays. Dans de nombreuses régions du monde, comme en Europe, les politiques de souveraineté numérique évoluent rapidement. Les clients sont confrontés à une incroyable complexité. Au cours des dix-huit derniers mois, ils nous ont rapporté qu’ils craignaient de devoir choisir entre les vastes possibilités offertes par les services d’AWS et une solution aux fonctionnalités limitées qui pourrait entraver leur capacité à innover, à se transformer et à se développer. Nous sommes convaincus que les clients ne devraient pas avoir à faire un tel choix.
C’est pourquoi nous présentons aujourd’hui l’AWS Digital Sovereignty Pledge – notre engagement à offrir à tous les clients AWS l’ensemble le plus avancé d’outils et de fonctionnalités de contrôle disponibles dans le cloud au service de la souveraineté.
AWS propose déjà une série de fonctionnalités de protection des données, de certifications et d’engagements contractuels qui donnent à nos clients le plein contrôle de la localisation de leurs données, de leur accès et de leur utilisation. Nous nous engageons à développer ces capacités pour permettre à nos clients du monde entier de répondre à leurs exigences en matière de souveraineté numérique, sans faire de compromis sur les capacités, les performances, l’innovation et la portée du cloud AWS. En parallèle, nous continuerons à travailler pour comprendre en profondeur l’évolution des besoins et des exigences des clients et des régulateurs, et nous nous adapterons et innoverons rapidement pour y répondre.
Souverain dès la conception
Pour respecter l’AWS Digital Sovereignty Pledge, notre approche est de continuer à rendre le cloud AWS souverain dès sa conception, comme il l’a été dès le premier jour. Aux débuts de notre histoire, nous recevions de nombreux commentaires de nos clients de secteurs tels que les services financiers et la santé – des clients qui comptent parmi les organisations les plus soucieuses de la sécurité et de la confidentialité des données dans le monde – sur les fonctionnalités et les contrôles de protection des données dont ils auraient besoin pour leur utilisation du cloud. Nous avons développé des compétences en matière de chiffrement et de gestion des données, obtenu des certifications de conformité et pris des engagements contractuels pour répondre aux besoins de nos clients. Nous développons le cloud AWS à mesure que les exigences des clients évoluent. Nous pouvons citer, parmi les exemples récents, les data residency guardrails (les garde-fous de la localisation des données) que nous avons ajoutés en fin d’année dernière à l’AWS Control Tower (un service de gestion des environnements AWS) et qui donnent aux clients davantage de contrôle sur l’emplacement physique de leurs données, où elles sont stockées et traitées. En février 2022, nous avons annoncé de nouveaux services AWS adhérant au Code de Conduite sur la protection des données de l’association CISPE (Cloud Infrastructure Service Providers in Europe (CISPE)). Ils apportent à nos clients une vérification indépendante et un niveau de garantie supplémentaire attestant que nos services peuvent être utilisés conformément au Règlement général sur la protection des données (RGPD). Ces capacités et ces garanties sont disponibles pour tous les clients d’AWS.
Nous nous engageons à poursuivre nos investissements conformément à une ambitieuse feuille de route pour le, , développement de capacités au service de la localisation des données, de la restriction d’accès granulaire (pratique consistant à accorder à des utilisateurs spécifiques différents niveaux d’accès à une ressource particulière), de chiffrement et de résilience :
1. Contrôle de l’emplacement de vos données
AWS a toujours permis à ses clients de contrôler l’emplacement de leurs données. Aujourd’hui en Europe, par exemple, les clients ont le choix de déployer leurs données dans l’une des huit Régions existantes. Nous nous engageons à fournir encore plus de services et de capacités pour protéger les données de nos clients. Nous nous engageons également à développer nos capacités existantes pour fournir des contrôles de localisation des données encore plus précis et transparents. Nous allons également étendre les contrôles de localisation des données pour les données opérationnelles, telles que les informations relatives à l’identité et à la facturation.
2. Contrôle fiable de l’accès aux données
Nous avons conçu et fourni une innovation unique en son genre pour restreindre l’accès aux données clients. Le système AWS Nitro, qui constitue la base des services informatiques d’AWS, utilise du matériel et des logiciels spécialisés pour protéger les données contre tout accès extérieur pendant leur traitement sur les serveurs EC2. En fournissant une solide barrière de sécurité physique et logique, Nitro est conçu pour empêcher, y compris au sein d’AWS, l’accès à ces données sur EC2. Nous nous engageons à continuer à développer des restrictions d’accès supplémentaires qui limitent tout accès aux données de nos clients, sauf indication contraire de la part du client ou de l’un de ses prestataires de confiance.
3. La possibilité de tout chiffrer, partout
Aujourd’hui, nous offrons à nos clients des fonctionnalités et des outils de contrôle pour chiffrer les données, qu’elles soient en transit, au repos ou en mémoire. Tous les services AWS prennent déjà en charge le chiffrement, la plupart permettant également le chiffrement sur des clés gérées par le client et inaccessibles à AWS. Nous nous engageons à continuer d’innover et d’investir dans des outils de contrôle au service de la souveraineté et des fonctionnalités de chiffrement supplémentaires afin que nos clients puissent chiffrer l’ensemble de leurs données partout, avec des clés de chiffrement gérées à l’intérieur ou à l’extérieur du cloud AWS.
4. La résilience du cloud
La souveraineté numérique est impossible sans résilience et sans capacités de continuité d’activité lors de crise majeure. Le contrôle des charges de travail et la haute disponibilité de réseau sont essentiels en cas d’événements comme une rupture de la chaîne d’approvisionnement, une interruption du réseau ou encore une catastrophe naturelle. Actuellement, AWS offre la plus haute disponibilité de réseau de tous les fournisseurs de cloud. Chaque Région AWS est composée de plusieurs zones de disponibilité (AZ), qui sont des portions d’infrastructure totalement isolées. Pour mieux isoler les difficultés et obtenir une haute disponibilité de réseau, les clients peuvent répartir les applications sur plusieurs zones dans la même Région AWS. Pour les clients qui exécutent des charges de travail sur place ou dans des cas d’utilisation à distance ou connectés par intermittence, nous proposons des services qui offrent des capacités spécifiques pour les données hors ligne, le calcul et le stockage à distance. Nous nous engageons à continuer d’améliorer notre gamme d’options souveraines et résilientes, permettant aux clients de maintenir leurs activités en cas de perturbation ou de déconnexion.
Gagner la confiance par la transparence et les garanties
Chez AWS, gagner la confiance de nos clients est le fondement de notre activité. Nous savons que la protection des données de nos clients est essentielle pour y parvenir. Nous savons également que leur confiance s’obtient par la transparence. Nous sommes transparents sur la manière dont nos services traitent et transfèrent leurs données. Nous continuerons à nous contester les demandes de données des clients émanant des autorités judiciaires et des organismes gouvernementaux. Nous fournissons des conseils, des preuves de conformité et des engagements contractuels afin que nos clients puissent utiliser les services AWS pour répondre aux exigences de conformité et de réglementation. Nous nous engageons à continuer à fournir la transparence et la flexibilité commerciale nécessaires pour répondre à l’évolution du cadre réglementaire relatif à la confidentialité et à la souveraineté des données.
Naviguer en équipe dans un monde en perpétuel changement
Aider les clients à protéger leurs données dans un monde où les réglementations, les technologies et les risques évoluent nécessite un travail d’équipe. Nous ne pouvons-nous résoudre à ce que nos clients relèvent seuls ces défis. Nos partenaires de confiance jouent un rôle prépondérant dans l’apport de solutions aux clients. Par exemple, en Allemagne, T-Systems (qui fait partie de Deutsche Telekom) propose la protection des données en tant que service géré sur AWS. L’entreprise fournit des conseils pour s’assurer que les contrôles de localisation des données sont correctement configurés, offrant des services pour la configuration en question, la gestion des clés de chiffrements et une expertise pour aider leurs clients à répondre à leurs exigences de souveraineté numérique dans le cloud AWS. Nous redoublons d’efforts avec les partenaires locaux en qui nos clients ont confiance pour les aider à répondre à ces exigences de souveraineté numérique.
Nous nous engageons à aider nos clients à répondre aux exigences de souveraineté numérique. Nous continuerons d’innover en matière de fonctionnalités, de contrôles et de garanties de souveraineté dans le cloud mondial d’AWS, tout en fournissant sans compromis et sans restriction la pleine puissance d’AWS.
German version
AWS Digital Sovereignty Pledge: Kontrolle ohne Kompromisse
Wir waren immer der Meinung, dass die Cloud ihr volles Potenzial nur dann erschließen kann, wenn Kunden die volle Kontrolle über ihre Daten haben. Diese Datensouveränität des Kunden genießt bei AWS schon seit den Anfängen der Cloud Priorität, als wir der einzige große Anbieter waren, bei dem Kunden sowohl Kontrolle über den Speicherort als auch über die Übertragung ihrer Daten hatten. Die Bedeutung dieser Grundsätze hat über die vergangenen 16 Jahre stetig zugenommen: Die Cloud ist im Mainstream angekommen, sowohl Gesetzgeber als auch Regulatoren entwickeln ihre Vorgaben zu IT-Sicherheit und Datenschutz stetig weiter.
Kontrolle bzw. Souveränität über digitale Ressourcen ist heute wichtiger denn je.
Unsere Innovationen und Entwicklungen haben stets darauf abgezielt, unseren Kunden eine Cloud zur Verfügung zu stellen, die skalierend und zugleich verlässlich global nutzbar ist. Dies beinhaltet auch unseren Kunden die Kontrolle zu gewährleisten die sie benötigen, damit sie alle ihre regulatorischen Anforderungen erfüllen können. Regulatorische Anforderungen sind länder- und sektorspezifisch. Vielerorts – wie auch in Europa – entstehen neue Anforderungen und Regularien zu digitaler Souveränität, die sich rasant entwickeln. Kunden sehen sich einer hohen Anzahl verschiedenster Regelungen ausgesetzt, die eine enorme Komplexität mit sich bringen. Innerhalb der letzten achtzehn Monate haben sich viele unserer Kunden daher mit der Sorge an uns gewandt, vor eine Wahl gestellt zu werden: Entweder die volle Funktionalität und Innovationskraft von AWS zu nutzen, oder auf funktionseingeschränkte „souveräne“ Cloud-Lösungen zurückzugreifen, deren Kapazität für Innovation, Transformation, Sicherheit und Wachstum aber limitiert ist. Wir sind davon überzeugt, dass Kunden nicht vor diese „Wahl“ gestellt werden sollten.
Deswegen stellen wir heute den „AWS Digital Sovereignty Pledge“ vor – unser Versprechen allen AWS Kunden, ohne Kompromisse die fortschrittlichsten Souveränitäts-Kontrollen und Funktionen in der Cloud anzubieten.
AWS bietet schon heute eine breite Palette an Datenschutz-Funktionen, Zertifizierungen und vertraglichen Zusicherungen an, die Kunden Kontrollmechanismen darüber geben, wo ihre Daten gespeichert sind, wer darauf Zugriff erhält und wie sie verwendet werden. Wir werden diese Palette so erweitern, dass Kunden überall auf der Welt, ihre Anforderungen an Digitale Souveränität erfüllen können, ohne auf Funktionsumfang, Leistungsfähigkeit, Innovation und Skalierbarkeit der AWS Cloud verzichten zu müssen. Gleichzeitig werden wir weiterhin daran arbeiten, unser Angebot flexibel und innovativ an die sich weiter wandelnden Bedürfnisse und Anforderungen von Kunden und Regulatoren anzupassen.
Sovereign-by-design
Wir werden den „AWS Digital Sovereignty Pledge“ so umsetzen, wie wir das seit dem ersten Tag machen und die AWS Cloud gemäß unseres „sovereign-by-design“ Ansatz fortentwickeln. Wir haben von Anfang an, durch entsprechende Funktions- und Kontrollmechanismen für spezielle IT-Sicherheits- und Datenschutzanforderungen aus den verschiedensten regulierten Sektoren Lösungen gefunden, die besonders sensiblen Branchen wie beispielsweise dem Finanzsektor oder dem Gesundheitswesen frühzeitig ermöglichten, die Cloud zu nutzen. Auf dieser Basis haben wir die AWS Verschlüsselungs- und Schlüsselmanagement-Funktionen entwickelt, Compliance-Akkreditierungen erhalten und vertragliche Zusicherungen gegeben, welche die Bedürfnisse unserer Kunden bedienen. Dies ist ein stetiger Prozess, um die AWS Cloud auf sich verändernde Kundenanforderungen anzupassen. Ein Beispiel dafür sind die Data Residency Guardrails, um die wir AWS Control Tower Ende letzten Jahres erweitert haben. Sie geben Kunden die volle Kontrolle über die physikalische Verortung ihrer Daten zu Speicherungs- und Verarbeitungszwecken. Dieses Jahr haben wir einen Katalog von AWS Diensten veröffentlicht, die den Cloud Infrastructure Service Providers in Europe (CISPE) erfüllen. Damit verfügen Kunden über eine unabhängige Verifizierung und zusätzliche Versicherung, dass unsere Dienste im Einklang mit der DSGVO verwendet werden können. Diese Instrumente und Nachweise stehen schon heute allen AWS Kunden zur Verfügung.
Wir haben uns ehrgeizige Ziele für unsere Roadmap gesetzt und investieren kontinuierlich in Funktionen für die Verortung von Daten (Datenresidenz), granulare Zugriffsbeschränkungen, Verschlüsselung und Resilienz:
1. Kontrolle über den Ort der Datenspeicherung
Bei AWS hatten Kunden immer schon die Kontrolle über Datenresidenz, also den Ort der Datenspeicherung. Aktuell können Kunden ihre Daten z.B. in 8 bestehenden Regionen innerhalb Europas speichern, von denen 6 innerhalb der Europäischen Union liegen. Wir verpflichten uns dazu, noch mehr Dienste und Funktionen zur Verfügung zustellen, die dem Schutz der Daten unserer Kunden dienen. Ebenso verpflichten wir uns, noch granularere Kontrollen für Datenresidenz und Transparenz auszubauen. Wir werden auch zusätzliche Kontrollen für Daten einführen, die insbesondere die Bereiche Identitäts- und Abrechnungs-Management umfassen.
2. Verifizierbare Kontrolle über Datenzugriffe
Mit dem AWS Nitro System haben wir ein innovatives System entwickelt, welches unberechtigte Zugriffsmöglichkeiten auf Kundendaten verhindert: Das Nitro System ist die Grundlage der AWS Computing Services (EC2). Es verwendet spezialisierte Hardware und Software, um den Schutz von Kundendaten während der Verarbeitung auf EC2 zu gewährleisten. Nitro basiert auf einer starken physikalischen und logischen Sicherheitsabgrenzung und realisiert damit Zugriffsbeschränkungen, die unautorisierte Zugriffe auf Kundendaten auf EC2 unmöglich machen – das gilt auch für AWS als Betreiber. Wir werden darüber hinaus für weitere AWS Services zusätzliche Mechanismen entwickeln, die weiterhin potentielle Zugriffe auf Kundendaten verhindern und nur in Fällen zulassen, die explizit durch Kunden oder Partner ihres Vertrauens genehmigt worden sind.
3. Möglichkeit der Datenverschlüsselung überall und jederzeit
Gegenwärtig können Kunden Funktionen und Kontrollen verwenden, die wir zur Verschlüsselung von Daten während der Übertragung, persistenten Speicherungen oder Verarbeitung in flüchtigem Speicher anbieten. Alle AWS Dienste unterstützen schon heute Datenverschlüsselung, die meisten davon auf Basis der Customer Managed Keys – d.h. Schlüssel, die von Kunden verwaltet werden und für AWS nicht zugänglich sind. Wir werden auch in diesem Bereich weiter investieren und Innovationen vorantreiben. Es wird zusätzliche Kontrollen für Souveränität und Verschlüsselung geben, damit unsere Kunden alles jederzeit und überall verschlüsseln können – und das mit Schlüsseln, die entweder durch AWS oder durch den Kunden selbst bzw. ausgewählte Partner verwaltet werden können.
4. Resilienz der Cloud
Digitale Souveränität lässt sich nicht ohne Ausfallsicherheit und Überlebensfähigkeit herstellen. Die Kontrolle über Workloads und hohe Verfügbarkeit z.B. in Fällen von Lieferkettenstörungen, Netzwerkausfällen und Naturkatastrophen ist essenziell. Aktuell bietet AWS die höchste Netzwerk-Verfügbarkeit unter allen Cloud-Anbietern. Jede AWS Region besteht aus mehreren Availability Zones (AZs), die jeweils vollständig isolierte Partitionen unserer Infrastruktur sind. Um Probleme besser zu isolieren und eine hohe Verfügbarkeit zu erreichen, können Kunden Anwendungen auf mehrere AZs in derselben Region verteilen. Kunden, die Workloads on-premises oder in Szenarien mit sporadischer Netzwerk-Anbindung betreiben, bieten wir Dienste an, welche auf Offline-Daten und Remote Compute und Storage Anwendungsfälle angepasst sind. Wir werden unser Angebot an souveränen und resilienten Optionen ausbauen und fortentwickeln, damit Kunden den Betrieb ihrer Workloads auch bei Trennungs- und Disruptionsszenarien aufrechterhalten können.
Vertrauen durch Transparenz und Zusicherungen
Der Aufbau eines Vertrauensverhältnisses mit unseren Kunden, ist die Grundlage unserer Geschäftsbeziehung bei AWS. Wir wissen, dass der Schutz der Daten unserer Kunden der Schlüssel dazu ist. Wir wissen auch, dass Vertrauen durch fortwährende Transparenz verdient und aufgebaut wird. Wir bieten schon heute transparenten Einblick, wie unsere Dienste Daten verarbeiten und übertragen. Wir werden auch in Zukunft Anfragen nach Kundendaten durch Strafverfolgungsbehörden und Regierungsorganisationen konsequent anfechten. Wir bieten Rat, Compliance-Nachweise und vertragliche Zusicherungen an, damit unsere Kunden AWS Dienste nutzen und gleichzeitig ihre Compliance und regulatorischen Anforderungen erfüllen können. Wir werden auch in Zukunft die Transparenz und Flexibilität an den Tag legen, um auf sich weiterentwickelnde Datenschutz- und Soveränitäts-Regulierungen passende Antworten zu finden.
Den Wandel als Team bewältigen
Regulatorik, Technologie und Risiken sind stetigem Wandel unterworfen: Kunden dabei zu helfen, ihre Daten in diesem Umfeld zu schützen, ist Teamwork. Wir würden nie erwarten, dass unsere Kunden das alleine bewältigen müssen. Unsere Partner genießen hohes Vertrauen und spielen eine wichtige Rolle dabei, Lösungen für Kunden zu entwickeln. Zum Beispiel bietet T-Systems in Deutschland Data Protection as a Managed Service auf AWS an. Das Angebot umfasst Hilfestellungen bei der Konfiguration von Kontrollen zur Datenresidenz, Zusatzdienste im Zusammenhang mit der Schlüsselverwaltung für kryptographische Verfahren und Rat bei der Erfüllung von Anforderungen zu Datensouveränität in der AWS Cloud. Wir werden die Zusammenarbeit mit lokalen Partnern, die besonderes Vertrauen bei unseren gemeinsamen Kunden genießen, intensivieren, um bei der Erfüllung der Digitalen Souveräntitätsanforderungen zu unterstützen.
Wir verpflichten uns dazu unseren Kunden bei der Erfüllung ihre Anforderungen an digitale Souveränität zu helfen. Wir werden weiterhin Souveränitäts-Funktionen, Kontrollen und Zusicherungen für die globale AWS Cloud entwickeln, die das gesamte Leistungsspektrum von AWS erschließen.
Italian version
AWS Digital Sovereignty Pledge: Controllo senza compromessi
Abbiamo sempre creduto che, affinché il cloud possa realizzare in pieno il potenziale, sia essenziale che i clienti abbiano il controllo dei propri dati. Offrire ai clienti questa “sovranità” è sin dall’inizio una priorità per AWS, da quando eravamo l’unico grande cloud provider a consentire ai clienti di controllare la localizzazione e lo spostamento dei propri dati. L’importanza di questo principio è aumentata negli ultimi 16 anni, man mano che il cloud ha iniziato a diffondersi e i governi e gli organismi di standardizzazione hanno continuato a sviluppare normative in materia di sicurezza, protezione dei dati e privacy.
Oggi, avere il controllo sulle risorse digitali, sulla sovranità digitale, è più importante che mai.
Nell’innovare ed espandere l’offerta cloud più completa, scalabile e affidabile al mondo, la nostra priorità è stata assicurarci che i clienti – ovunque operino – abbiano il controllo e siano in grado di soddisfare i requisiti normativi. Il contesto varia notevolmente tra i settori e i paesi. In molti luoghi del mondo, come in Europa, le politiche di sovranità digitale si stanno evolvendo rapidamente. I clienti stanno affrontando un crescente livello di complessità, e negli ultimi diciotto mesi molti di essi ci hanno detto di essere preoccupati di dover scegliere tra usare AWS in tutta la sua potenza e una soluzione cloud sovrana con funzionalità limitate che potrebbe ostacolare la loro capacità di innovazione, trasformazione e crescita. Crediamo fermamente che i clienti non debbano fare questa scelta.
Ecco perché oggi presentiamo l’AWS Digital Sovereignty Pledge, il nostro impegno a offrire a tutti i clienti AWS l’insieme più avanzato di controlli e funzionalità sulla sovranità digitale disponibili nel cloud.
AWS offre già una gamma di funzionalità di protezione dei dati, accreditamenti e impegni contrattuali che consentono ai clienti di controllare la localizzazione, l’accesso e l’utilizzo dei propri dati. Ci impegniamo a espandere queste funzionalità per consentire ai clienti di tutto il mondo di soddisfare i propri requisiti di sovranità digitale senza compromettere le capacità, le prestazioni, l’innovazione e la scalabilità del cloud AWS. Allo stesso tempo, continueremo a lavorare per comprendere a fondo le esigenze e i requisiti in evoluzione sia dei clienti che delle autorità di regolamentazione, adattandoci e innovando rapidamente per soddisfarli.
Sovereign-by-design
Il nostro approccio per mantenere questo impegno è quello di continuare a rendere il cloud AWS “sovereign-by-design”, come è stato sin dal primo giorno. All’inizio della nostra storia, abbiamo ricevuto da clienti in settori come quello finanziario e sanitario – che sono tra le organizzazioni più attente al mondo alla sicurezza e alla privacy dei dati – molti input sulle funzionalità e sui controlli relativi alla protezione dei dati di cui necessitano per utilizzare il cloud. Abbiamo sviluppato le funzionalità di crittografia e gestione delle chiavi di AWS, ottenuto accreditamenti di conformità e preso impegni contrattuali per soddisfare le esigenze dei nostri clienti. Con l’evolversi delle loro esigenze, sviluppiamo ed espandiamo il cloud AWS.
Un paio di esempi recenti includono i data residency guardrail che abbiamo aggiunto a AWS Control Tower (un servizio per la gestione degli ambienti in AWS) alla fine dell’anno scorso, che offrono ai clienti un controllo ancora maggiore sulla posizione fisica in cui i dati dei clienti vengono archiviati ed elaborati. A febbraio 2022 abbiamo annunciato i servizi AWS che aderiscono al Codice di condotta sulla protezione dei dati dei servizi di infrastruttura cloud in Europa (CISPE), offrendo ai clienti una verifica indipendente e un ulteriore livello di garanzia che i nostri servizi possano essere utilizzati in conformità con il Regolamento generale sulla protezione dei dati (GDPR). Queste funzionalità e garanzie sono disponibili per tutti i clienti AWS.
Ci impegniamo a continuare a investire in una roadmap ambiziosa di funzionalità per la residenza dei dati, la restrizione granulare dell’accesso, la crittografia e la resilienza:
1. Controllo della localizzazione dei tuoi dati
I clienti hanno sempre controllato la localizzazione dei propri dati con AWS. Ad esempio, attualmente in Europa i clienti possono scegliere di distribuire i propri dati attraverso una delle otto Region AWS disponibili. Ci impegniamo a fornire ancora più servizi e funzionalità per proteggere i dati dei nostri clienti e ad espandere le nostre capacità esistenti per fornire controlli e trasparenza ancora più dettagliati sulla residenza dei dati. Estenderemo inoltre anche i controlli relativi ai dati operativi, come le informazioni su identità e fatturazione.
2. Controllo verificabile sull’accesso ai dati
Abbiamo progettato e realizzato un’innovazione unica nel suo genere per limitare l’accesso ai dati dei clienti. Il sistema AWS Nitro, che è alla base dei servizi informatici di AWS, utilizza hardware e software specializzati per proteggere i dati dall’accesso esterno durante l’elaborazione su EC2. Fornendo un solido limite di sicurezza fisico e logico, Nitro è progettato per applicare restrizioni in modo che nessuno, nemmeno in AWS, possa accedere ai carichi di lavoro dei clienti su EC2. Ci impegniamo a continuare a creare ulteriori restrizioni di accesso che limitino tutti gli accessi ai dati dei clienti, a meno che non sia richiesto dal cliente o da un partner di loro fiducia.
3. La capacità di criptare tutto e ovunque
Attualmente, offriamo ai clienti funzionalità e controlli per criptare i dati, che siano questi in transito, a riposo o in memoria. Tutti i servizi AWS già supportano la crittografia, e la maggior parte supporta anche la crittografia con chiavi gestite dal cliente, non accessibili per AWS. Ci impegniamo a continuare a innovare e investire in controlli aggiuntivi per la sovranità e le funzionalità di crittografia in modo che i nostri clienti possano criptare tutto e ovunque con chiavi di crittografia gestite all’interno o all’esterno del cloud AWS.
4. Resilienza del cloud
Non è possibile raggiungere la sovranità digitale senza resilienza e affidabilità. Il controllo dei carichi di lavoro e l’elevata disponibilità sono essenziali in caso di eventi come l’interruzione della catena di approvvigionamento, l’interruzione della rete e i disastri naturali. Attualmente AWS offre il più alto livello di disponibilità di rete rispetto a qualsiasi altro cloud provider. Ogni regione AWS è composta da più zone di disponibilità (AZ), che sono partizioni di infrastruttura completamente isolate. Per isolare meglio i problemi e ottenere un’elevata disponibilità, i clienti possono partizionare le applicazioni tra più AZ nella stessa Region AWS. Per i clienti che eseguono carichi di lavoro in locale o in casi d’uso remoti o connessi in modo intermittente, offriamo servizi che forniscono funzionalità specifiche per i dati offline e l’elaborazione e lo storage remoti. Ci impegniamo a continuare a migliorare la nostra gamma di opzioni per la sovranità del dato e la resilienza, consentendo ai clienti di continuare ad operare anche in caso di interruzioni o disconnessioni.
Guadagnare fiducia attraverso trasparenza e garanzie
In AWS, guadagnare la fiducia dei clienti è alla base della nostra attività. Comprendiamo che proteggere i dati dei clienti è fondamentale per raggiungere questo obiettivo, e sappiamo che la fiducia si guadagna anche attraverso la trasparenza. Per questo siamo trasparenti su come i nostri servizi elaborano e spostano i dati. Continueremo ad opporci alle richieste relative ai dati dei clienti provenienti dalle forze dell’ordine e dalle agenzie governative. Forniamo linee guida, prove di conformità e impegni contrattuali in modo che i nostri clienti possano utilizzare i servizi AWS per soddisfare i requisiti normativi e di conformità. Ci impegniamo infine a continuare a fornire la trasparenza e la flessibilità aziendali necessarie a soddisfare l’evoluzione delle leggi sulla privacy e sulla sovranità del dato.
Gestire i cambiamenti come un team
Aiutare i clienti a proteggere i propri dati in un mondo caratterizzato da normative, tecnologie e rischi in evoluzione richiede un lavoro di squadra. Non ci aspetteremmo mai che i nostri clienti lo facessero da soli. I nostri partner di fiducia svolgono un ruolo di primo piano nel fornire soluzioni ai clienti. Ad esempio in Germania, T-Systems (parte di Deutsche Telekom) offre un servizio denominato Data Protection as a Managed Service on AWS. Questo fornisce indicazioni per garantire che i controlli di residenza dei dati siano configurati correttamente, offrendo servizi per la configurazione e la gestione delle chiavi di crittografia, oltre a competenze per aiutare i clienti a soddisfare i requisiti di sovranità digitale nel cloud AWS, per i quali stiamo collaborando con partner locali di cui i nostri clienti si fidano.
Ci impegniamo ad aiutare i nostri clienti a soddisfare i requisiti di sovranità digitale. Continueremo a innovare le funzionalità, i controlli e le garanzie di sovranità del dato all’interno del cloud AWS globale e a fornirli senza compromessi sfruttando tutta la potenza di AWS.
Japanese version
AWS Digital Sovereignty Pledge(AWSのデジタル統制に関するお客様との約束): 妥協のない管理
작성자: Matt Garman, 아마존웹서비스(AWS) 마케팅 및 글로벌 서비스 담당 수석 부사장
아마존웹서비스(AWS)는 클라우드가 지닌 잠재력이 최대로 발휘되기 위해서는 고객이 반드시 자신의 데이터를 제어할 수 있어야 한다고 항상 믿어 왔습니다. AWS는 서비스 초창기부터 고객이 데이터의 위치와 이동을 제어할 수 있도록 허용하는 유일한 주요 클라우드 공급업체였고 지금까지도 고객에게 이러한 권리를 부여하는 것을 최우선 과제로 삼고 있습니다. 클라우드가 주류가 되고 정부 및 표준 제정 기관이 보안, 데이터 보호 및 개인정보보호 규정을 지속적으로 발전시키면서 지난 16년간 이러한 원칙의 중요성은 더욱 커졌습니다.
오늘날 디지털 자산 또는 디지털 주권 제어는 그 어느 때보다 중요합니다.
AWS는 세계에서 가장 우수하고 확장 가능하며 신뢰할 수 있는 클라우드를 제공하기 위한 혁신과 서비스 확대에 주력하면서, 고객이 사업을 운영하는 모든 곳에서 스스로 통제할 수 있을 뿐 아니라 규제 요구 사항을 충족할 수 있어야 한다는 점을 언제나 최우선 순위로 여겨왔습니다. AWS의 이러한 기업 철학은 개별 산업과 국가에 따라 상당히 다른 모습으로 표출됩니다. 유럽을 비롯해 전 세계 많은 지역에서 디지털 주권 정책이 빠르게 진화하고 있습니다. 고객은 엄청난 복잡성에 직면해 있으며, 지난 18개월 동안 많은 고객들은 AWS의 모든 기능을 갖춘 클라우드 서비스와 혁신, 변화, 성장을 저해할 수 있는 제한적 기능의 클라우드 솔루션 중 하나를 선택해야만 할 수도 있다는 우려가 있다고 말하였습니다. 하지만 AWS는 고객이 이러한 선택을 해서는 안 된다는 굳건한 믿음을 가지고 있습니다.
이것이 바로 오늘, 모든 AWS 고객에게 클라우드 기술에서 가장 발전된 형태의 디지털 주권 제어와 기능을 제공하겠다는 약속인, “AWS 디지털 주권 서약”을 소개하는 이유입니다.
AWS는 이미 고객이 데이터 위치, 데이터에 액세스가 가능한 인력 및 데이터 이용 방식을 제어할 수 있는 다양한 데이터 보호 기능, 인증 및 계약상 의무를 제공하고 있습니다. 또한 전 세계 고객이 AWS 클라우드의 기능, 성능, 혁신 및 규모에 영향을 주지 않으면서 디지털 주권 관련 요건을 충족할 수 있도록 기존 데이터 보호 정책을 지속적으로 확대할 것을 약속합니다. 동시에 고객과 규제 기관의 변화하는 요구와 규제 요건을 깊이 이해하고 이를 충족하기 위해 신속하게 적응하고 혁신을 이어나가고자 합니다.
디지털 주권 보호를 위한 원천 설계
이 약속을 이행하기 위한 우리의 접근 방식은 처음부터 그러했듯이 AWS 클라우드를 애초부터 디지털 주권을 강화하는 방식으로 설계하는 것입니다. AWS는 사업 초기부터 금융 서비스 및 의료 업계와 같이 세계 최고 수준의 보안 및 데이터 정보 보호를 요구하는 조직의 고객으로부터 클라우드를 사용하는 데 필요한 데이터 보호 기능 및 제어에 관한 많은 의견을 수렴했습니다. AWS는 고객의 요구 사항을 충족하기 위하여 암호화 및 핵심적 관리 기능을 개발하고, 규정 준수 인증을 획득했으며, 계약상 의무를 제공하였습니다. 고객의 요구 사항이 변화함에 따라 AWS 클라우드도 진화하고 확장해 왔습니다. 최근의 몇 가지 예를 들면, 작년 말 AWS Control Tower(AWS 환경 관리 서비스)에 추가한 데이터 레지던시 가드레일이 있습니다. 이는 고객 데이터가 저장되고 처리되는 물리적 위치에 대한 제어 권한을 고객에게 훨씬 더 많이 부여하는 것을 목표로 합니다. 2022년 2월에는 유럽 클라우드 인프라 서비스(CISPE) 데이터 보호 행동 강령을 준수하는 AWS 서비스를 발표한 바 있습니다. 이것은 유럽연합의 개인정보보호규정(GDPR)에 따라 서비스를 사용할 수 있다는 독립적인 검증과 추가적 보증을 고객에게 제공하는 것입니다. 이러한 기능과 보증은 AWS의 모든 고객에게 적용됩니다.
AWS는 데이터 레지던시, 세분화된 액세스 제한, 암호화 및 복원력 기능의 증대를 위한 야심 찬 로드맵에 다음과 같이 계속 투자할 것을 약속합니다.
1. 데이터 위치에 대한 제어
고객은 항상 AWS를 통해 데이터 위치를 제어해 왔습니다. 예를 들어 현재 유럽에서는 고객이 기존 8개 리전 중 원하는 위치에 데이터를 배치할 수 있습니다. AWS는 고객의 데이터를 보호하기 위한 더 많은 서비스와 기능을 제공할 것을 약속합니다. 또한, 기존 기능을 확장하여 더욱 세분화된 데이터 레지던시 제어 및 투명성을 제공할 것을 약속합니다. 뿐만 아니라, ID 및 결제 정보와 같은 운영 데이터에 대한 데이터 레지던시 제어를 확대할 예정입니다.
2. 데이터 액세스에 대한 검증 가능한 제어
AWS는 고객 데이터에 대한 액세스를 제한하는 최초의 혁신적 설계를 제공했습니다. AWS 컴퓨팅 서비스의 기반인 AWS Nitro System은 특수 하드웨어 및 소프트웨어를 사용하여 EC2에서 처리하는 동안 외부 액세스로부터 데이터를 보호합니다. 강력한 물리적 보안 및 논리적 보안의 경계를 제공하는 Nitro는 AWS의 모든 사용자를 포함하여 누구도 EC2의 고객 워크로드에 액세스할 수 없도록 설계되었습니다. AWS는 고객 또는 고객이 신뢰하는 파트너의 요청이 있는 경우를 제외하고, 고객 데이터에 대한 모든 액세스를 제한하는 추가 액세스 제한을 계속 구축할 것을 약속합니다.
3. 모든 것을 어디서나 암호화하는 능력
현재 AWS는 전송 중인 데이터, 저장된 데이터 또는 메모리에 있는 데이터를 암호화할 수 있는 기능과 제어권을 고객에게 제공합니다. 모든 AWS 서비스는 이미 암호화를 지원하고 있으며, 대부분 AWS에서 액세스할 수 없는 고객 관리형 키를 사용한 암호화도 지원합니다. 또한 고객이 AWS 클라우드 내부 또는 외부에서 관리되는 암호화 키로 어디서든 어떤 것이든 것을 암호화할 수 있도록 디지털 주권 및 암호화 기능에 대한 추가 제어를 지속적으로 혁신하고 투자할 것을 약속합니다.
4. 클라우드의 복원력
복원력과 생존성 없이는 디지털 주권을 달성할 수 없습니다. 공급망 장애, 네트워크 중단 및 자연 재해와 같은 이벤트가 발생할 경우 워크로드 제어 및 고가용성은 매우 중요합니다. 현재 AWS는 모든 클라우드 공급업체 중 가장 높은 네트워크 가용성을 제공합니다. 각 AWS 리전은 완전히 격리된 인프라 파티션인 여러 가용 영역(AZ)으로 구성됩니다. 문제를 보다 효과적으로 격리하고 고가용성을 달성하기 위해 고객은 동일한 AWS 리전의 여러 AZ로 애플리케이션을 분할할 수 있습니다. 온프레미스 또는 간헐적으로 연결되거나 원격 사용 사례에서 워크로드를 실행하는 고객을 위해 오프라인 데이터와 원격 컴퓨팅 및 스토리지에 대한 특정 기능을 지원하는 서비스를 제공합니다. AWS는 고객이 중단되거나 연결이 끊기는 상황에도 운영을 지속할 수 있도록 자주적이고 탄력적인 옵션의 범위를 지속적으로 강화할 것을 약속합니다.
투명성과 보장을 통한 신뢰 확보
고객의 신뢰를 얻는 것이 AWS 비즈니스의 토대입니다. 이를 위해서는 고객 데이터를 보호하는 것이 핵심이라는 점을 잘 알고 있습니다. 투명성을 통해 계속 신뢰를 쌓아야 한다는 점 또한 잘 알고 있습니다. AWS는 서비스가 데이터를 처리하고 전송하는 방식을 투명하게 공개합니다. 법 집행 기관 및 정부 기관의 고객 데이터 제공 요청에 대하여 계속해서 이의를 제기할 것입니다. AWS는 고객이 AWS 서비스를 사용하여 규정 준수 및 규제 요건을 충족할 수 있도록 지침, 규정 준수 증거 및 계약상의 의무 이행을 제공합니다. AWS는 진화하는 개인 정보 보호 및 각 지역의 디지털 주권 규정을 준수하는 데 필요한 투명성과 비즈니스 유연성을 계속 제공할 것을 약속합니다.
팀 차원의 변화 모색
변화하는 규정, 기술 및 위험이 있는 환경에서 고객이 데이터를 보호할 수 있도록 하려면 팀워크가 필요합니다. 고객 혼자서는 절대 할 수 없는 일입니다. 신뢰할 수 있는 AWS의 파트너는 고객이 문제를 해결하는데 중요한 역할을 합니다. 예를 들어, 독일에서는 T-Systems(Deutsche Telekom의 일부)를 통해 AWS의 관리형 서비스로서의 데이터 보호를 제공합니다. 데이터 레지던시 제어가 올바르게 구성되도록 하기 위한 지침을 제공하고, 암호화 키의 구성 및 관리를 위한 서비스를 통해 고객이 AWS 클라우드에서 디지털 주권 요구 사항을 해결하는 데 도움이 되는 전문 지식을 제공합니다. AWS는 고객이 디지털 주권 요구 사항을 해결하는 데 도움이 될 수 있도록 신뢰할 수 있는 현지 파트너와 협력하고 있습니다.
AWS는 고객이 디지털 주권 요구 사항을 충족할 수 있도록 최선의 지원을 다하고있습니다. AWS는 글로벌 AWS 클라우드 내에서 주권 기능, 제어 및 보안을 지속적으로 혁신하고, AWS의 모든 기능에 대한 어떠한 타협 없이 이를 제공할 것입니다.
The CCCS is Canada’s authoritative source of cyber security expert guidance for the Canadian government, industry, and the general public. Public and commercial sector organizations across Canada rely on CCCS’s rigorous Cloud Service Provider (CSP) IT Security (ITS) assessment in their decisions to use cloud services. In addition, CCCS’s ITS assessment process is a mandatory requirement for AWS to provide cloud services to Canadian federal government departments and agencies.
The CCCS Cloud Service Provider Information Technology Security Assessment Process determines if the Government of Canada (GC) ITS requirements for the CCCS Medium cloud security profile (previously referred to as GC’s Protected B/Medium Integrity/Medium Availability [PBMM] profile) are met as described in ITSG-33 (IT security risk management: A lifecycle approach). As of November 2022, 132 AWS services in the Canada (Central) Region have been assessed by the CCCS and meet the requirements for the CCCS Medium cloud security profile. Meeting the CCCS Medium cloud security profile is required to host workloads that are classified up to and including the medium categorization. On a periodic basis, CCCS assesses new or previously unassessed services and reassesses the AWS services that were previously assessed to verify that they continue to meet the GC’s requirements. CCCS prioritizes the assessment of new AWS services based on their availability in Canada, and on customer demand for the AWS services. The full list of AWS services that have been assessed by CCCS is available on our Services in Scope for CCCS Assessment page.
To learn more about the CCCS assessment or our other compliance and security programs, visit AWS Compliance Programs. As always, we value your feedback and questions; you can reach out to the AWS Compliance team through the Contact Us page.
If you have feedback about this post, submit comments in the Comments section below. Want more AWS Security news? Follow us on Twitter.
As described in an earlier blog post, Establishing a data perimeter on AWS, Amazon Web Services (AWS) offers a set of capabilities you can use to implement a data perimeter to help prevent unintended access. One type of unintended access that companies want to prevent is access to corporate data by users who do not belong to the company. A combination of AWS Identity and Access Management (AWS IAM) features and capabilities that can help you achieve this goal in AWS while fostering innovation and agility form the identity perimeter. In this blog post, I will provide an overview of some of the security risks the identity perimeter is designed to address, policy examples, and implementation guidance for establishing the perimeter.
The identity perimeter is a set of coarse-grained preventative controls that help achieve the following objectives:
Only trusted identities can access my resources
Only trusted identities are allowed from my network
Trusted identities encompass IAM principals that belong to your company, which is typically represented by an AWS Organizations organization. In AWS, an IAM principal is a person or application that can make a request for an action or operation on an AWS resource. There are also scenarios when AWS services perform actions on your behalf using identities that do not belong to your organization. You should consider both types of data access patterns when you create a definition of trusted identities that is specific to your company and your use of AWS services. All other identities are considered untrusted and should have no access except by explicit exception.
Security risks addressed by the identity perimeter
The identity perimeter helps address several security risks, including the following.
Unintended data disclosure due to misconfiguration. Some AWS services support resource-based IAM policies that you can use to grant principals (including principals outside of your organization) permissions to perform actions on the resources they are attached to. While this allows developers to configure resource-based policies based on their application requirements, you should ensure that access to untrusted identities is prohibited even if the developers grant broad access to your resources, such as Amazon Simple Storage Service (Amazon S3) buckets. Figure 1 illustrates examples of access patterns you would want to prevent—specifically, principals outside of your organization accessing your S3 bucket from a non-corporate AWS account, your on-premises network, or the internet.
Figure 1: Unintended access to your S3 bucket by identities outside of your organization
Unintended data disclosure through non-corporate credentials. Some AWS services, such as Amazon Elastic Compute Cloud (Amazon EC2) and AWS Lambda, let you run code using the IAM credentials of your choosing. Similar to on-premises environments where developers might have access to physical and virtual servers, there is a risk that the developers can bring personal IAM credentials to a corporate network and attempt to move company data to personal AWS resources. For example, Figure 2 illustrates unintended access patterns where identities outside of your AWS Organizations organization are used to transfer data from your on-premises networks or VPC to an S3 bucket in a non-corporate AWS account.
Figure 2: Unintended access from your networks by identities outside of your organization
Implementing the identity perimeter
Before you can implement the identity perimeter by using preventative controls, you need to have a way to evaluate whether a principal is trusted and do this evaluation effectively in a multi-account AWS environment. IAM policies allow you to control access based on whether the IAM principal belongs to a particular account or an organization, with the following IAM condition keys:
The aws:PrincipalOrgID condition key gives you a succinct way to refer to all IAM principals that belong to a particular organization. There are similar condition keys, such as aws:PrincipalOrgPaths and aws:PrincipalAccount, that allow you to define different granularities of trust.
The aws:PrincipalIsAWSService condition key gives you a way to refer to AWS service principals when those are used to access resources on your behalf. For example, when you create a flow log with an S3 bucket as the destination, VPC Flow Logs uses a service principal, delivery.logs.amazonaws.com, which does not belong to your organization, to publish logs to Amazon S3.
In the context of the identity perimeter, there are two types of IAM policies that can help you ensure that the call to an AWS resource is made by a trusted identity:
Using the IAM condition keys and the policy types just listed, you can now implement the identity perimeter. The following table illustrates the relationship between identity perimeter objectives and the AWS capabilities that you can use to achieve them.
Data perimeter
Control objective
Implemented by using
Primary IAM capability
Identity
Only trusted identities can access my resources.
Resource-based policies
aws:PrincipalOrgID aws:PrincipalIsAWSService
Only trusted identities are allowed from my network.
VPC endpoint policies
Let’s see how you can use these capabilities to mitigate the risk of unintended access to your data.
Only trusted identities can access my resources
Resource-based policies allow you to specify who has access to the resource and what actions they can perform. Resource-based policies also allow you to apply identity perimeter controls to mitigate the risk of unintended data disclosure due to misconfiguration. The following is an example of a resource-based policy for an S3 bucket that limits access to only trusted identities. Make sure to replace <DOC-EXAMPLE-MY-BUCKET> and <MY-ORG-ID> with your information.
The Deny statement in the preceding policy has two condition keys where both conditions must resolve to true to invoke the Deny effect. This means that this policy will deny any S3 action unless it is performed by an IAM principal within your organization (StringNotEqualsIfExists with aws:PrincipalOrgID) or a service principal (BoolIfExists with aws:PrincipalIsAWSService). Note that resource-based policies on AWS resources do not allow access outside of the account by default. Therefore, in order for another account or an AWS service to be able to access your resource directly, you need to explicitly grant access permissions with appropriate Allow statements added to the preceding policy.
Only trusted identities are allowed from my network
When you access AWS services from on-premises networks or VPCs, you can use public service endpoints or connect to supported AWS services by using VPC endpoints. VPC endpoints allow you to apply identity perimeter controls to mitigate the risk of unintended data disclosure through non-corporate credentials. The following is an example of a VPC endpoint policy that allows access to all actions but limits the access to trusted identities only. Replace <MY-ORG-ID> with your information.
As opposed to the resource-based policy example, the preceding policy uses Allow statements to enforce the identity perimeter. This is because VPC endpoint policies do not grant any permissions but define the maximum access allowed through the endpoint. Your developers will be using identity-based or resource-based policies to grant permissions required by their applications. We use two statements in this example policy to invoke the Allow effect in two scenarios: if an action is performed by an IAM principal that belongs to your organization (StringEquals with aws:PrincipalOrgID in the AllowRequestsByOrgsIdentities statement) or if an action is performed by a service principal (Bool with aws:PrincipalIsAWSService in the AllowRequestsByAWSServicePrincipals statement). We do not use IfExists in the end of the condition operators in this case, because we want the condition elements to evaluate to true only if the specified keys exist in the request.
There might be circumstances when you want to grant access to your resources to principals outside of your organization. For example, you might be hosting a dataset in an Amazon S3 bucket that is being accessed by your business partners from their own AWS accounts. In order to support this access pattern, you can use the aws:PrincipalAccount condition key to include third-party account identities as trusted identities in a policy. This is shown in the following resource-based policy example. Replace <DOC-EXAMPLE-MY-BUCKET>, <MY-ORG-ID>, <THIRD-PARTY-ACCOUNT-A>, and <THIRD-PARTY-ACCOUNT-B> with your information.
The preceding policy adds the aws:PrincipalAccount condition key to the StringNotEqualsIfExists operator. You now have a Deny statement with three condition keys where all three conditions must resolve to true to invoke the Deny effect. Therefore, this policy denies any S3 action unless it is performed by an IAM principal that belongs to your organization (StringNotEqualsIfExists with aws:PrincipalOrgID), by an IAM principal that belongs to specified third-party accounts (StringNotEqualsIfExists with aws:PrincipalAccount), or a service principal (BoolIfExists with aws:PrincipalIsAWSService).
There might also be circumstances when you want to grant access from your networks to identities external to your organization. For example, your applications could be uploading or downloading objects to or from a third-party S3 bucket by using third-party generated pre-signed Amazon S3 URLs. The principal that generates the pre-signed URL will belong to the third-party AWS account. Similar to the previously discussed S3 bucket policy, you can extend your identity perimeter to include identities that belong to trusted third-party accounts by using the aws:PrincipalAccount condition key in your VPC endpoint policy.
Additionally, some AWS services make unauthenticated requests to AWS owned resources through your VPC endpoint. An example of such a pattern is Kernel Live Patching on Amazon Linux 2, which allows you to apply security vulnerability and critical bug patches to a running Linux kernel. Amazon EC2 makes an unauthenticated call to Amazon S3 to download packages from Amazon Linux repositories hosted on Amazon EC2 service-owned S3 buckets. To include this access pattern into your identity perimeter definition, you can choose to allow unauthenticated API calls to AWS owned resources in the VPC endpoint policies.
The following example VPC endpoint policy demonstrates how to extend your identity perimeter to include access to Amazon Linux repositories and to Amazon S3 buckets owned by a third-party. Replace <MY-ORG-ID>, <REGION>, <ACTION>, <THIRD-PARTY-ACCOUNT-A>, and <THIRD-PARTY-BUCKET-ARN> with your information.
The preceding example adds two new statements to the VPC endpoint policy. The AllowUnauthenticatedRequestsToAWSResources statement allows the s3:GetObject action on buckets that host Amazon Linux repositories. The AllowRequestsByThirdPartyIdentitiesToThirdPartyResources statement allows actions on resources owned by a third-party entity by principals that belong to the third-party account (StringEquals with aws:PrincipalAccount).
Note that identity perimeter controls do not eliminate the need for additional network protections, such as making sure that your private EC2 instances or databases are not inadvertently exposed to the internet due to overly permissive security groups.
Apart from preventative controls established by the identity perimeter, we also recommend that you configure AWS Identity and Access Management Access Analyzer. IAM Access Analyzer helps you identify unintended access to your resources and data by monitoring policies applied to supported resources. You can review IAM Access Analyzer findings to identify resources that are shared with principals that do not belong to your AWS Organizations organization. You should also consider enabling Amazon GuardDuty to detect misconfigurations or anomalous access to your resources that could lead to unintended disclosure of your data. GuardDuty uses threat intelligence, machine learning, and anomaly detection to analyze data from various sources in your AWS accounts. You can review GuardDuty findings to identify unexpected or potentially malicious activity in your AWS environment, such as an IAM principal with no previous history invoking an S3 API.
IAM policy samples
This AWS git repository contains policy examples that illustrate how to implement identity perimeter controls for a variety of AWS services and actions. The policy samples do not represent a complete list of valid data access patterns and are for reference purposes only. They are intended for you to tailor and extend to suit the needs of your environment. Make sure that you thoroughly test the provided example policies before you implement them in your production environment.
Deploying the identity perimeter at scale
As discussed earlier, you implement the identity perimeter as coarse-grained preventative controls. These controls typically need to be implemented for each VPC by using VPC endpoint policies and on all resources that support resource-based policies. The effectiveness of these controls relies on their ability to scale with the environment and to adapt to its dynamic nature.
The methodology you use to deploy identity perimeter controls will depend on the deployment mechanisms you use to create and manage AWS accounts. For example, you might choose to use AWS Control Tower and the Customizations for AWS Control Tower solution (CfCT) to govern your AWS environment at scale. You can use CfCT or your custom CI/CD pipeline to deploy VPC endpoints and VPC endpoint policies that include your identity perimeter controls.
Because developers will be creating resources such as S3 buckets and AWS KMS keys on a regular basis, you might need to implement automation to enforce identity perimeter controls when those resources are created or their policies are changed. One option is to use custom AWS Config rules. Alternatively, you can choose to enforce resource deployment through AWS Service Catalog or a CI/CD pipeline. With the AWS Service Catalog approach, you can have identity perimeter controls built into the centrally controlled products that are made available to developers to deploy within their accounts. With the CI/CD pipeline approach, the pipeline can have built-in compliance checks that enforce identity perimeter controls during the deployment. If you are deploying resources with your CI/CD pipeline by using AWS CloudFormation, see the blog post Proactively keep resources secure and compliant with AWS CloudFormation Hooks.
Regardless of the deployment tools you select, identity perimeter controls, along with other baseline security controls applicable to your multi-account environment, should be included in your account provisioning process. You should also audit your identity perimeter configurations periodically and upon changes in your organization, which could lead to modifications in your identity perimeter controls (for example, disabling a third-party integration). Keeping your identity perimeter controls up to date will help ensure that they are consistently enforced and help prevent unintended access during the entire account lifecycle.
Conclusion
In this blog post, you learned about the foundational elements that are needed to define and implement the identity perimeter, including sample policies that you can use to start defining guardrails that are applicable to your environment and control objectives.
Following are additional resources that will help you further explore the identity perimeter topic, including a whitepaper and a hands-on-workshop.
If you have any questions, comments, or concerns, contact AWS Support or browse AWS re:Post. If you have feedback about this post, submit comments in the Comments section below.
Want more AWS Security news? Follow us on Twitter.
The collective thoughts of the interwebz
Manage Consent
To provide the best experiences, we use technologies like cookies to store and/or access device information. Consenting to these technologies will allow us to process data such as browsing behavior or unique IDs on this site. Not consenting or withdrawing consent, may adversely affect certain features and functions.
Functional
Always active
The technical storage or access is strictly necessary for the legitimate purpose of enabling the use of a specific service explicitly requested by the subscriber or user, or for the sole purpose of carrying out the transmission of a communication over an electronic communications network.
Preferences
The technical storage or access is necessary for the legitimate purpose of storing preferences that are not requested by the subscriber or user.
Statistics
The technical storage or access that is used exclusively for statistical purposes.The technical storage or access that is used exclusively for anonymous statistical purposes. Without a subpoena, voluntary compliance on the part of your Internet Service Provider, or additional records from a third party, information stored or retrieved for this purpose alone cannot usually be used to identify you.
Marketing
The technical storage or access is required to create user profiles to send advertising, or to track the user on a website or across several websites for similar marketing purposes.