Post Syndicated from Jeremy Girven original https://aws.amazon.com/blogs/security/everything-you-wanted-to-know-about-trusts-with-aws-managed-microsoft-ad/
Many Amazon Web Services (AWS) customers use Active Directory to centralize user authentication and authorization for a variety of applications and services. For these customers, Active Directory is a critical piece of their IT infrastructure. AWS offers AWS Directory Service for Microsoft Active Directory, also known as AWS Managed Microsoft AD, to provide a highly available and resilient Active Directory service.
One of the most common AWS Managed Microsoft AD use cases is for customers who need to integrate their on-premises Active Directory domain or forest with AWS services like Amazon Relational Database Service (Amazon RDS), Amazon FSx, Amazon WorkSpaces, and other AWS applications and services. This type of integration can require a trust relationship. When it comes to trusts, there are some common misconceptions about what happens and doesn’t happen when a trust is created.
In this post, I’m going to dive deep into various aspects of Active Directory trusts and debunk some common myths along the way. This post will cover the following areas:
- Kerberos authentication across trusts
- Trust fundamentals
- Trust creation process overview
- Common trust scenarios
- Trust myths and misconceptions
- Troubleshooting trusts
Starting with Kerberos
The first part of understanding how trusts work is to understand how authentication flows across a trust, particularly with Kerberos. Kerberos is a subject that, on the surface, is simple enough, but can quickly become much more complex. This post isn’t going to go into detail about Kerberos in Microsoft Windows. If you wish to look further into the topic, see the Microsoft Kerberos documentation. In this post, I’m just going to give you an overview of how Kerberos authentication works across trusts.
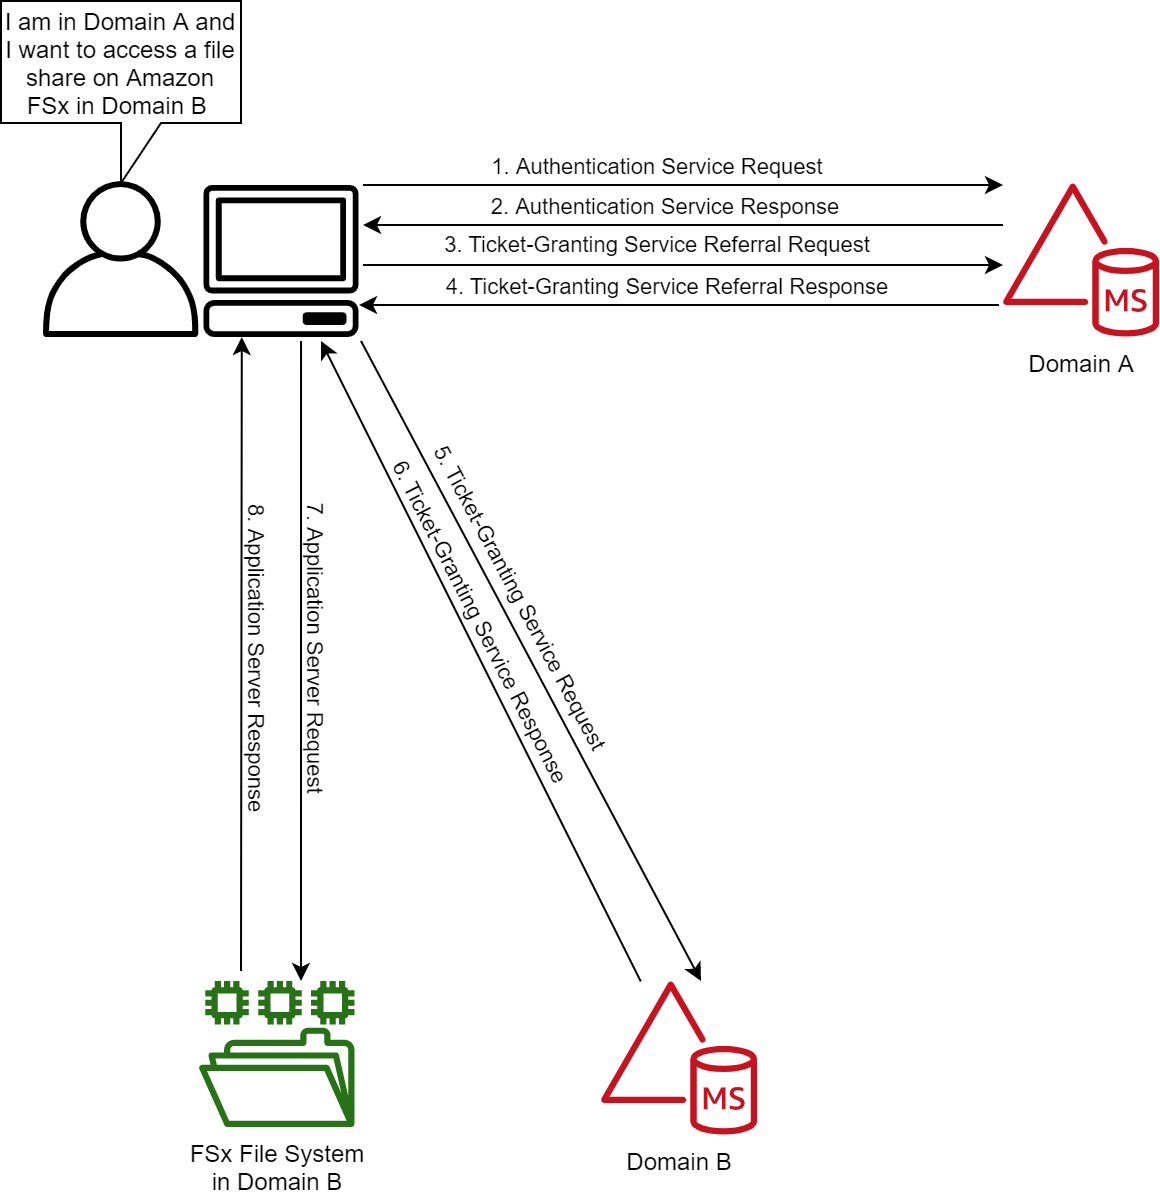
Figure 1: Kerberos authentication across trusts
If you only remember one thing about Kerberos and trust, it should be referrals. Let’s look at the workflow in Figure 1, which shows a user from Domain A who is logged into a computer in Domain A and wants to access an Amazon FSx file share in Domain B. For simplicity’s sake, I’ll say there is a two-way trust between Domains A and B.
Note: When a trust is integrated with AWS Managed Microsoft AD, you need to enable Kerberos preauthentication for accounts that traverse the trusts. Disabling Kerberos preauthentication isn’t recommended, because a malicious user can directly send dummy requests for authentication. The key distribution center (KDC) will return an encrypted Ticket-Granting Ticket (TGT), which the malicious user can brute force offline. See Kerberos Pre-Authentication: Why It Should Not Be Disabled for more details.
The steps of the Kerberos authentication process over trusts are as follows:
1. Kerberos authentication service request (KRB_AS_REQ): The client contacts the authentication service (AS) of the KDC (which is running on a domain controller) for Domain A, which the client is a member of, for a short-lived ticket called a Ticket-Granting Ticket (TGT). The default lifetime of the TGT is 10 hours. For Windows clients this happens at logon, but Linux clients might need to run a kinit command.
2. Kerberos authentication service response (KRB_AS_REP): The AS constructs the TGT and creates a session key that the client can use to encrypt communication with the ticket-granting service (TGS). At the time that the client receives the TGT, the client has not been granted access to any resources, even to resources on the local computer.
3. Kerberos ticket-granting service request (KRB_TGS_REQ): The user’s Kerberos client sends a KRB_TGS_REQ message to a local KDC in Domain A, specifying fsx@domainb as the target. The Kerberos client compares the location with its own workstation’s domain. Because these values are different, the client sets a flag in the KDC Options field of the KRB_TGS_REQ message for NAME_CANONICALIZE, which indicates to the KDC that the server might be in another realm (domain).
4. Kerberos ticket-granting service response (KRB_TGS_REP): The user’s local KDC (for Domain A) receives the KRB_TGS_REQ and sends back a TGT referral ticket for Domain B. The TGT is issued for the next intervening domain along the shortest path to Domain B. The TGT also has a referral flag set, so that the KDC will be informed that the KRB_TGS_REQ is coming from another realm. This flag also tells the KDC to fill in the Transited Realms field. The referral ticket is encrypted with the interdomain key that is decrypted by Domain B’s TGS.
Note: When a trust is established between domains or forests, an interdomain key based on the trust password becomes available for authenticating KDC functions and is used to encrypt and decrypt Kerberos tickets.
5. Kerberos ticket-granting service request (KRB_TGS_REQ): The user’s Kerberos client sends a KRB_TGS_REQ along with the TGT it received from the Domain A KDC to a KDC in Domain B.
6. Kerberos ticket-granting service response (KRB_TGS_REP): The TGS in Domain B examines the TGT and the authenticator. If these are acceptable, the TGS creates a service ticket. The client’s identity is taken from the TGT and copied to the service ticket. Then the ticket is sent to the client.
For more details on the authenticator, see How the Kerberos Version 5 Authentication Protocol Works.
7. Application server service request (KRB_TGS_REQ): After the client has the service ticket, the client sends the ticket and a new authenticator to the target server, requesting access. The server will decrypt the ticket, validate the authenticator, and (for Windows services), create an access token for the user based on the SIDs in the ticket.
8. Application server service response (KRB_TGS_REP): Optionally, the client might request that the target server verify its own identity. This is called mutual authentication. If mutual authentication is requested, the target server takes the client computer’s timestamp from the authenticator, encrypts it with the session key the TGS provided for client-target server messages, and sends it to the client.
The basics of trust transitivity, direction, and types
Let’s start off by defining a trust. Active Directory trusts are a relationship between domains, which makes it possible for users in one domain to be authenticated by a domain controller in the other domain. Authenticated users, if given proper permissions, can access resources in the other domain.
Active Directory Domain Services supports four types of trusts: External (Domain), Forest, Realm, and Shortcut. Out of those four types of trusts, AWS Managed Microsoft AD supports the External (Domain) and Forest trust types. I’ll focus on External (Domain) and Forest trust types for this post.
Transitivity: What is it?
Before I dive into the types of trusts, it’s important to understand the concept of transitivity in trusts. A trust that is transitive allows authentication to flow through other domains (Child and Trees) in the trusted forests or domains. In contrast, a non-transitive trust is a point-to-point trust that allows authentication to flow exclusively between the trusted domains.
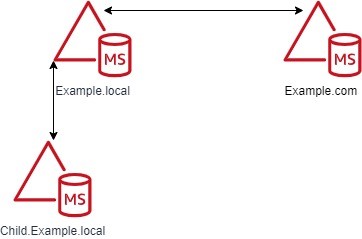
Figure 2: Forest trusts between the Example.local and Example.com forests
Don’t worry about the trust types at this point, because I’ll cover those shortly. The example in Figure 2 shows a Forest trust between Example.com and Example.local. The Example.local forest has a child domain named Child. With a transitive trust, users from the Example.local and Child.Example.local domain can be authenticated to resources in the Example.com domain.
If Figure 2 has an External trust, only users from Example.local can be authenticated to resources in the Example.com domain. Users from Child.Example.local cannot traverse the trust to access resources in the Example.com domain.
Trust direction
Two-way trusts are bidirectional trusts that allow authentication referrals from either side of the trust to give users access resources in either domain or forest. If you look in the Active Directory Domains and Trusts area of the Microsoft Management Console (MMC), which provides consoles to manage the hardware, software, and network components of Microsoft Windows operating system, you can see both an incoming and an outgoing trust for the trusted domain.
One-way trusts are a single-direction trust that allows authentication referrals from one side of the trust only. A one-way trust is either outgoing or incoming, but not both (that would be a two-way trust).
- An outgoing trust allows users from the trusted domain (Example.com) to authenticate in this domain (Example.local).
- An incoming trust allows users from this domain (Example.local) to authenticate in the trusted domain (Example.com).
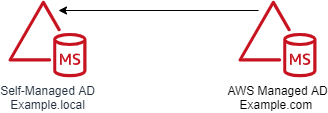
Figure 3: One-way trust direction
Let’s use a diagram to further explain this concept. Figure 3 shows a one-way trust between Example.com and Example.local. This an outgoing trust from Example.com and an incoming trust on Example.local. Users from Example.local can authenticate and, if given proper permissions, access resources in Example.com. Users from Example.com cannot access or authenticate to resources in Example.local.
Trust types
In this section of the post, I’ll examine the various types of Active Directory trusts and their capabilities.
External trusts
This trust type is used to share resources between two domains. These can be individual domains within or external to a forest. Think of this as a point-to-point trust between two domains. See Understanding When to Create an External Trust for more details on this trust type.
- Transitivity: Non-transitive
- Direction: One-way or two-way
- Authentication types: NTLM Only* (Kerberos is possible with caveats; see the Microsoft Windows Server documentation for details)
- AWS Managed Microsoft AD support: Yes
Forest trusts
This trust type is used to share resources between two forests. This is the preferred trust model, because it works fully with Kerberos without any caveats. See Understanding When to Create a Forest Trust for more details.
- Transitivity: Transitive
- Direction: One-way or two-way
- Authentication types: Kerberos and NTLM
- AWS Managed Microsoft AD support: Yes
Realm trusts
This trust type is used to form a trust relationship between a non-Windows Kerberos realm and an Active Directory domain. See Understanding When to Create a Realm Trust for more details.
- Transitivity: Non-transitive or transitive
- Direction: One-way or two-way
- Authentication types: Kerberos Only
- AWS Managed Microsoft AD support: No
Shortcut trusts
This trust type is used to shorten the authentication path between domains within complex forests. See Understanding When to Create a Shortcut Trust for more details.
- Transitivity: Transitive
- Direction: One-way or two-way
- Authentication types: Kerberos and NTLM
- AWS Managed Microsoft AD support: No
User Principal Name suffixes
The default User Principal Name (UPN) suffix for a user account is the Domain Name System (DNS) domain name of the domain where the user account resides. In AWS Managed Microsoft AD and self-managed AD, alternative UPN suffixes are added to simplify administration and user logon processes by providing a single UPN suffix for all users. The UPN suffix is used within the Active Directory forest, and is not required to be a valid DNS domain name. See Adding User Principal Name Suffixes for the process to add UPN suffixes to a forest.
For example, if your domain is Example.local but you want your users to sign in with what appears to be another domain name (such as ExampleSuffix.local), you would need to add a new UPN suffix to the domain. Figure 4 shows a user being created with an alternate UPN suffix.
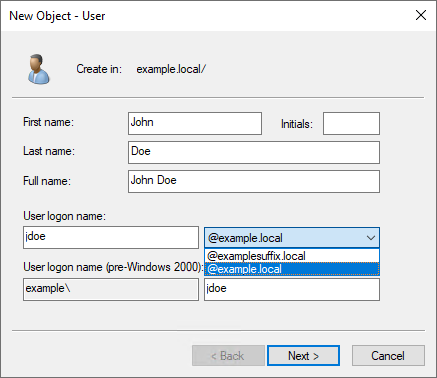
Figure 4: UPN selection on object creation
If you’re logged into a Windows system, you can use the whoami /upn command to see the UPN of the current user.
Forest trusts and name suffix routing
Name suffix routing manages how authentication requests are routed across forest trusts. A unique name suffix is a name suffix within a forest, such as a UPN suffix or DNS forest or domain tree name, that isn’t subordinate to any other name suffix. For example, the DNS forest name Example.com is a unique name suffix within the example.com forest.
All names that are subordinate to unique name suffixes are routed implicitly. For example, if your forest root is named Example.local, authentication requests for all child domains of Example.local (Child.Example.local) will be routed because the child domains are subordinate to the Example.local name suffix. If you want to exclude members of a child domain from authenticating in the specified forest, you can disable name suffix routing for that name. You can also disable routing for the forest name itself, if necessary. With domain trees and additional UPN suffixes, name suffix routing by default is disabled and must be enabled if those suffixes are to be able to traverse the trust.
Note: In AWS Managed Microsoft AD, customers don’t have the ability to create or modify trusts by using the native Microsoft tools. If you need a name suffix route enabled for your trust, open a support case with Premium Support.
A couple of diagrams will make it easier to digest this information. Figure 5 shows the trust configuration. There is a one-way outgoing forest trust from Example.com to Example.local. Example.local has a UPN suffix named ExampleSuffix.local added to it. Example.local also has a child domain named Child and a tree domain named ExampleTree.local. By default, users in Example.local and Child.Example.local will be able to authenticate to resources in Example.com. Users in the ExampleTree.local domain will not be able to authenticate to resources in Example.com, unless the name suffix route for ExampleTree.local is enabled on the trust object in Example.com.
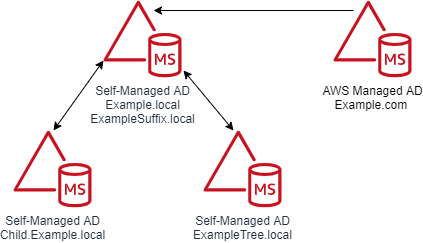
Figure 5: Multi-domain and suffix forest with a trust
Figure 6 is from the trust properties dialog from the Example.com forest of a trust between Example.com and Example.local. As you can see, *.example.local is enabled. But the custom UPN suffix ExampleSuffix.local and the tree domain ExampleTree.local are disabled by default.
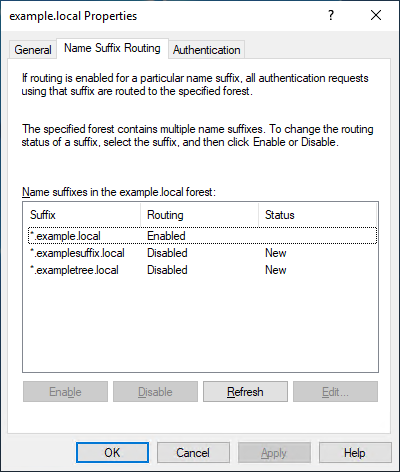
Figure 6: Example.local trusts details
Selective authentication
With AWS Managed Microsoft AD and self-managed AD, you have the option of configuring Selective Authentication. This option restricts authentication access over a trust to only the users in a trusted domain or forest who have been explicitly given authentication permissions to computer objects that reside in the trusting domain or forest.
When you use domain or forest-wide authentication, depending on the trust direction, users can authenticate across the trust. Authentication by itself doesn’t provide access—users have to be delegated permissions to access resources. When Selective Authentication is enabled, you must set the Allowed to Authenticate permission on each computer object the trusted user will be accessing, in addition to any other permissions that are required to access the computer object.
While Selective Authentication is a way to provide additional hardening of trusts, it requires a significant amount of planning and delegation, because you have to set the Allowed to Authenticate permission on all computer objects that are being accessed. It can also make troubleshooting permissions and trust issues more difficult.
For more details on Selective Authentication, see Selective Authentication and Configuring Selective Authentication Settings in the Microsoft documentation.
SID filtering
I won’t spend a lot of time on the subject of SID filtering, since this feature is enabled in AWS Managed Microsoft AD and can’t be disabled. SID filtering prevents malicious users who have domain or enterprise administrator level access in a trusted forest from granting elevated user rights to a trusting forest. It does this by preventing misuse of the attributes containing SIDs on security principals in the trusted forest. For example, a malicious user with administrative credentials located in a trusted forest could, through various means, obtain the SID information of a domain or enterprise admin in the trusting forest. After obtaining the SID of an administrator from the trusting forest, a malicious user with administrative credentials can add that SID to the SID history attribute of a security principal in the trusted forest and attempt to gain full access to the trusting forest and the resources within it.
Keeping SID filtering disabled on your on-premises domain can open your domain up to risks from malicious users. We understand that during a domain migration, you may need to disable it to allow an object’s SID from the original domain to be used during the migration. But in AWS Managed Microsoft AD, this filtering cannot be disabled. See SID Filtering for more details.
Network ports that are required to create trusts
The following network ports are required to be open between domain controllers on both domains or forests prior to attempting to create a trust. Note, the Security Group used by your AWS Managed Microsoft AD directory already has these inbound ports open. You will need to adjust the outbound rules of the Security Group to let it communicate with the to be trusted domains or forests. The following table is based on Microsoft’s recommendations. Depending on your use case, some of these ports might not need to be opened. For example, if LDAP over SSL isn’t configured, then TCP 636 isn’t needed.
| Port | Protocol | Service |
| 53 | TCP and UDP | DNS |
| 88 | TCP and UDP | Kerberos |
| 123 | UDP | Windows Time |
| 135 | TCP | Remote Procedure Call (RPC) |
| 389 | TCP and UDP | Lightweight Directory Access Protocol (LDAP) |
| 445 | TCP | Server Message Block (SMB) |
| 464 | TCP and UDP | Kerberos Password Change |
| 636 | TCP | LDAP over SSL |
| 3268 | TCP | LDAP Global Catalog (GC) |
| 3269 | TCP | LDAP GC over SSL |
| 49152–65535 | TCP and UDP | RPC |
Trust creation process overview
AWS Managed Microsoft AD is based on Windows Server Active Directory Domain Services, which means that Active Directory trusts function the same way they do with self-managed Active Directory. The only difference is how the trust is created. You use the AWS Management Console or APIs to create the trust for the AWS Managed Microsoft AD side. This process has been documented thoroughly in the AWS Directory Service Administration Guide, so I won’t go into detail on the steps.
The high-level overview of the process is:
- Ensure that network and DNS name resolution is available and functional between the domains.
- Create the trust on the on-premises Active Directory.
- Complete the trust on the AWS Managed Microsoft AD in the AWS Directory Service console.
Common trust scenarios with AWS Managed Microsoft AD
When you create trust between an on-premises domain and AWS Managed Microsoft AD, there are some items to take into consideration that will help you decide what direction of trust you need to deploy. In this post, I’ll cover a couple of the most common scenarios.
All scenarios: Selecting a trust type
Let’s start with the choice between a Forest or External trust. We generally recommend using a Forest trust type. The reason for that is that Forest trusts fully support Kerberos without any caveats. With that said, if you have a specific requirement to implement an External trust, you can do so—just be aware of these caveats.
Scenario 1: Use AWS Managed Microsoft AD as a resource forest for Amazon RDS, Amazon FSx for Windows File Server, or Amazon EC2 instances
In this scenario, you might want to use AWS Managed Microsoft AD as a resource forest for Amazon RDS, Amazon FSx for Windows File Server, or Amazon Elastic Compute Cloud (Amazon EC2). AWS Managed Microsoft AD is going to be a resource domain, and user accounts will reside on the on-premises side of the trust and need to be able to access the resources in the AWS Managed Microsoft AD side of the trust.
In this scenario, the AWS applications (Amazon RDS, Amazon FSx for Windows File Server, or Amazon EC2) don’t require a two-way trust to function, because they are natively integrated with Active Directory. This tells you that you only need authentication to flow one way. This scenario requires a one-way incoming trust on the on-premises domain and one-way outgoing trusts on the AWS Managed Microsoft AD domain. Figure 7 demonstrates this.

Figure 7: A one-way trust
Scenario 2: Use AWS Managed Microsoft AD as a resource forest for all other supported AWS applications
In this scenario, you want to use AWS Managed Microsoft AD as a resource domain for all other supported AWS applications that aren’t included in Scenario 1. As the previous scenario stated, AWS Managed Microsoft AD will be a resource domain, and the user accounts will reside on the on-premises side of the trust and need to be able to access the resources in the AWS Managed Microsoft AD.
In this scenario, AWS applications (Amazon Chime, Amazon Connect, Amazon QuickSight, AWS Single Sign-On, Amazon WorkDocs, Amazon WorkMail, Amazon WorkSpaces, AWS Client VPN, AWS Management Console, and AWS Transfer Family) need to be able to look up objects from the on-premises domain in order for them to function. This tells you that authentication needs to flow both ways. This scenario requires a two-way trust between the on-premises and AWS Managed Microsoft AD domains. Figure 8 demonstrates this.

Figure 8: A two-way trust
Common trust myths and misconceptions
I have had many conversations with customers concerning trusts between their on-premises domain and their AWS Managed Microsoft AD domain. These are some of the common myths and misconceptions we’ve come across in our conversations.
Trusts synchronize objects between each domain.
This is false. A trust between domains or forests acts as a bridge that allows validated authentication requests, in the form of Kerberos or NTLM traffic, to travel between domains or forests. Objects are not synchronized between the domains or forests. Only the trust password is synchronized, which is used for Kerberos.
My password is passed over the trust when authenticating.
This is false. As I showed earlier in the Starting with Kerberos section, when authenticating across trusts, the user’s password is not passed between domains. The only things passed between domains are the Ticket Granting Service (TGS) requests and responses, which are generated in real time, are single use, and expire within hours.
A one-way trust allows bidirectional authentication.
This is false. One-way trusts allow authentications to traverse in one direction only. Users or objects from the trusted domain are able to authenticate and, if they are delegated, to access resources in the trusting domain. Users in the trusting domain can’t authenticate into the trusted domain, and aren’t granted permissions to access resources. Let’s say there is an Amazon FSx file system in Example.local and a one-way trust between Example.com (outgoing trust direction) and Example.local (incoming trust direction). A user in Example.com can’t be delegated permission to the Amazon FSx file system Example.local with the current trust configuration. That’s the nature of a one-way trust.
Trusts are inherently insecure by default.
This is false, although an improperly configured trust can increase your risk and exposure. Trusts by themselves do very little to increase an Active Directory’s attack surface. You should always use best practices when creating a trust to minimize risk. For example, a trust without a purpose should be removed. You should disable the SID History unless you’re in the process of migrating domains. See Security Considerations for Trusts for more guidance on securing trusts.
Users in the trusted domain are granted permissions to my domain when a trust is created.
This is false. By default, with two-way trusts, objects have read-only permission to Active Directory in both directions. Objects are not delegated permissions or access to resources or servers by default. For example, if you want a user to log into a computer in another domain, you first must delegate the user access to the resource in the other domain. Without that delegation, the user won’t be able to access the resource.
Troubleshooting trusts
Based on our experience working with many customers, the vast majority of trust configuration issues are either DNS resolution or networking connectivity errors. These are some troubleshooting steps to help you resolve any of these common issues:
- Check whether you allowed outbound networking traffic on the AWS Managed Microsoft AD. See Step 1: Set up your environment for trusts to learn how to find your directory’s security group and how to modify it.
- If the DNS server or the network for your on-premises domain uses a public (non-RFC 1918) IP address space, follow these steps:
- In the AWS Directory Service console, go to the IP routing section for your directory, choose Actions, and then choose Add route.
- Enter the IP address block of your DNS server or on-premises network using CIDR format, for example 203.0.113.0/24.
This step isn’t necessary if both your DNS server and your on-premises network are using RFC 1918 private IP address spaces.
- After you verify the security group and check whether any applicable routes are required, launch a Windows Server instance and join it to the AWS Managed Microsoft AD directory. See Step 3: Deploy an EC2 instance to manage your AWS Managed Microsoft AD to learn how to do this. Once the instance is launched, do the following:
- Run the following PowerShell command to test DNS connectivity:
Resolve-DnsName -Name 'example.local' -DnsOnly
- Run the following PowerShell command to test DNS connectivity:
- You should also look through the message explanations in the Trust creation status reasons guide in the AWS Directory Service documentation.
Summary of AWS Managed Microsoft AD trust considerations
In this blog post, I covered Kerberos authentication over Active Directory trusts and provided details on what Active Directory trusts are and how they function. Here’s a quick list of items that you should consider when you plan trust creation with AWS Managed Microsoft AD:
- Ensure that you have a network connection and the appropriate network ports opened between both domains. Note, it is recommended all Active Directory traffic occur over private network connection like a VPN or Direct Connect.
- Ensure that DNS resolution is working on both sides of the trust.
- Decide whether you will implement selective authentication. If it will be used, plan your Active Directory access control list (ACL) delegation strategy before implementation.
- As of this blog’s publication, keep in mind that AWS Managed Microsoft AD currently supports Forest trusts and External trusts only.
- Ensure that Kerberos preauthentication is enabled for all objects that traverse trusts with AWS Managed Microsoft AD.
- If you find that you need a name suffix route enabled for your trust, open a support case with AWS Support, requesting that the name suffix route be enabled.
- Finally, review Security Considerations for Trusts: Domain and Forest Trusts for additional considerations for trust configuration.
If you have feedback about this post, submit comments in the Comments section below. If you have questions about this post, start a new thread on the AWS Directory Service forum.
Want more AWS Security how-to content, news, and feature announcements? Follow us on Twitter.