Post Syndicated from Michael Stepankin original https://github.blog/2023-08-17-mtls-when-certificate-authentication-is-done-wrong/
Although X.509 certificates have been here for a while, they have become more popular for client authentication in zero-trust networks in recent years. Mutual TLS, or authentication based on X.509 certificates in general, brings advantages compared to passwords or tokens, but you get increased complexity in return.
In this post, I’ll deep dive into some interesting attacks on mTLS authentication. We won’t bother you with heavy crypto stuff, but instead we’ll have a look at implementation vulnerabilities and how developers can make their mTLS systems vulnerable to user impersonation, privilege escalation, and information leakages.
We will present some CVEs we found in popular open-source identity servers and ways to exploit them. Finally, we’ll explain how these vulnerabilities can be spotted in source code and how to fix them.
This blog post is based on work that I recently presented at Black Hat USA and DEF CON.
Introduction: What is mutual TLS?
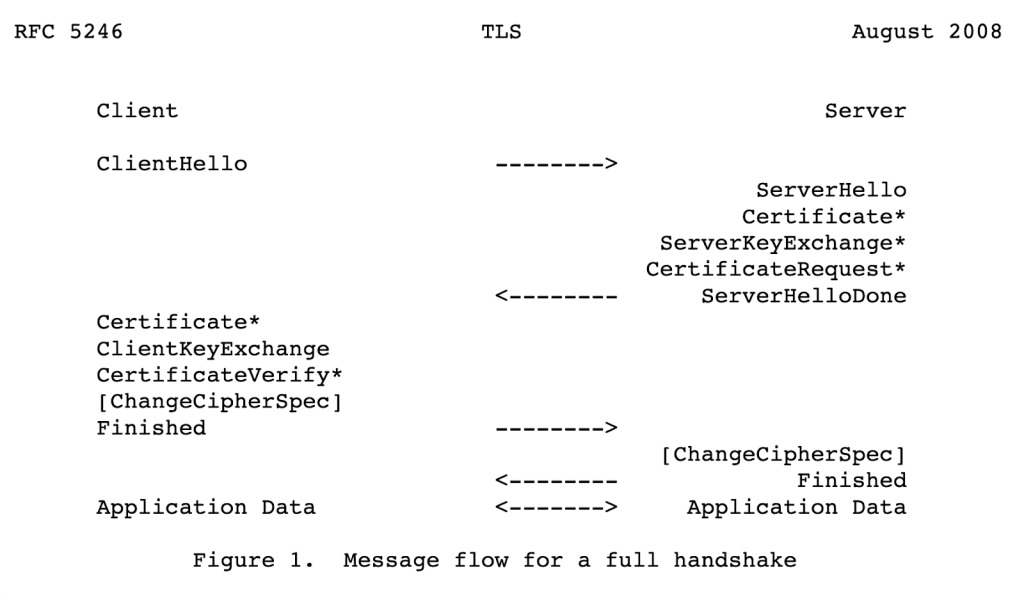
Website certificates are a very widely recognized technology, even to people who don’t work in the tech industry, thanks to the padlock icon used by web browsers. Whenever we connect to Gmail or GitHub, our browser checks the certificate provided by the server to make sure it’s truly the service we want to talk to. Fewer people know that the same technology can be used to authenticate clients: the TLS protocol is also designed to be able to verify the client using public and private key cryptography.
It happens on the handshake level, even before any application data is transmitted:

If configured to do so, a server can ask a client to provide a security certificate in the X.509 format. This certificate is just a blob of binary data that contain information about the client, such as its name, public key, issuer, and other fields:
$ openssl x509 -text -in client.crt
Certificate:
    Data:
        Version: 1 (0x0)
        Serial Number:
            d6:2a:25:e3:89:22:4d:1b
    Signature Algorithm: sha256WithRSAEncryption
        Issuer: CN=localhost            //used to locate issuers certificate
        Validity
            Not Before: Jun 13 14:34:28 2023 GMT
            Not After : Jul 13 14:34:28 2023 GMT
        Subject: CN=client          //aka "user name"
        Subject Public Key Info:
            Public Key Algorithm: rsaEncryption
                RSA Public-Key: (2048 bit)
                Modulus:
                    00:9c:7c:b4:e5:e9:3d:c1:70:9c:9d:18:2f:e8:a0:
The server checks that this certificate is signed by one of the trusted authorities. This is a bit similar to checking the signature of a JWT token. Next, the client sends a “Certificate verify” message encrypted with the private key, so that the server can verify that the client actually has the private key.
How certificates are validated
“Certificate validation” commonly refers to the PKIX certificate validation process defined in RFC 5280.
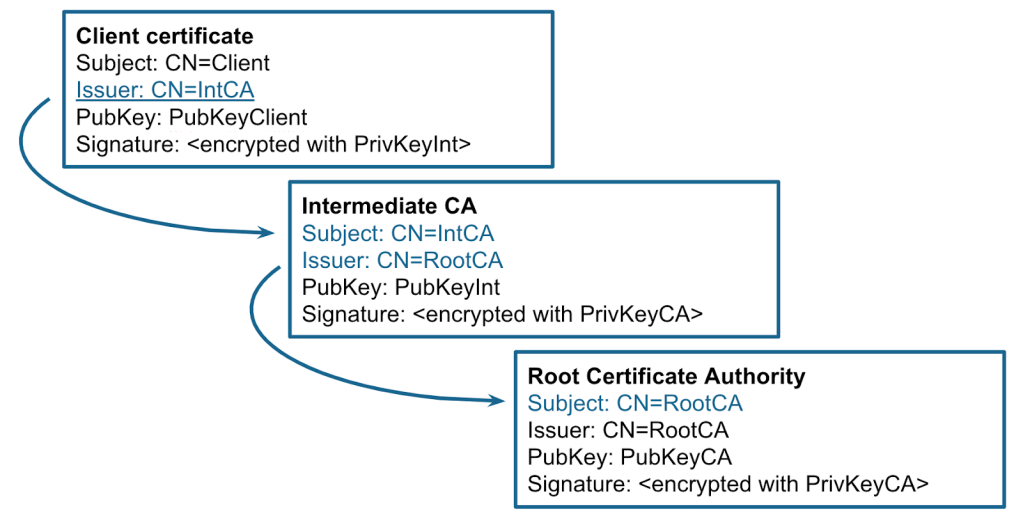
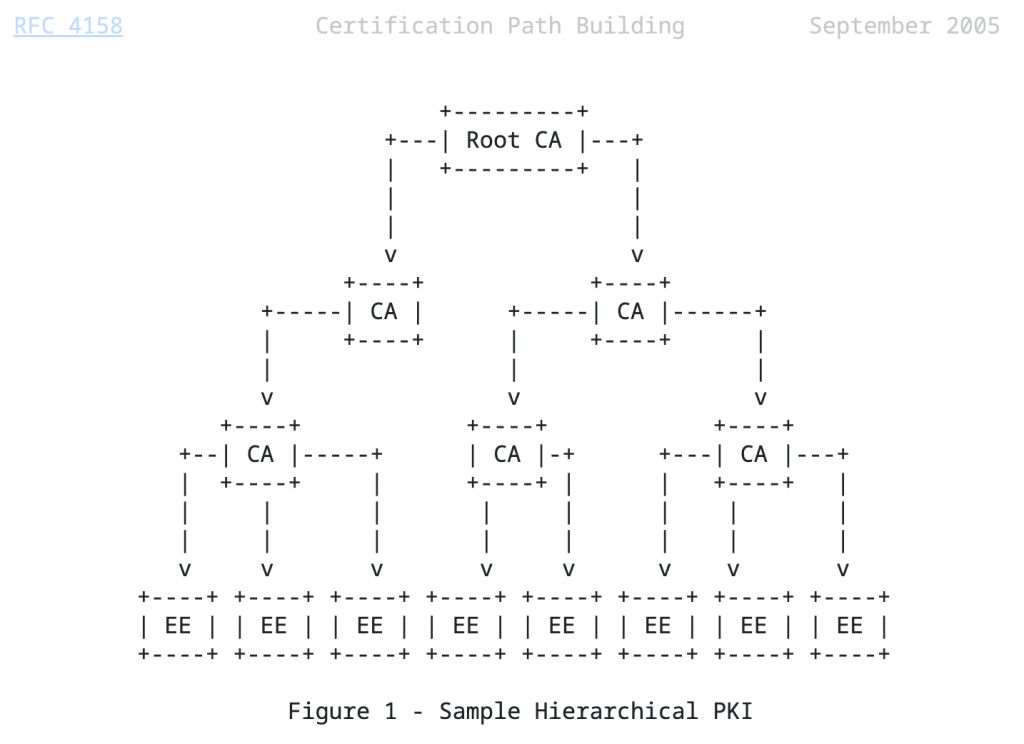
In short, in order to validate the certificate, the server constructs a certification path (also known as a certificate chain) from the target certificate to a trust anchor. The trust anchor is a self-signed root certificate that is inherently trusted by the validator. The end entity certificate is often signed by an intermediate CA, which is also signed by another intermediate certificate or directly by a trust anchor.

Then, for each certificate in the chain, the validator checks the signature, validity period, allowed algorithms and key lengths, key usage, and other properties. There are also a number of optional certificate extensions: if they are included in the certificate, they can be checked as well. This process is quite complicated, so every language or library implements it differently.
Note: in my research I mostly looked at how mTLS is implemented in applications written in Java, but it is likely that the ideas and attacks below apply to other languages as well.
mTLS in a Java web application, an example
Let’s see how to use mTLS in a Java web application. The bare minimum configuration is to enable it in the application settings and specify the location of all trusted root certificates, like this:
$ cat application.properties

…
server.ssl.client-auth=need
server.ssl.trust-store=/etc/spring/server-truststore.p12
server.ssl.trust-store-password=changeit
From the client, such as curl, you need to specify which certificate is sent to the server. The rest of the application code, such as request mappings, is exactly the same as for a normal web application.
$ curl -k -v –cert client.pem http://localhost/hello
This setup works for very simple mTLS configurations, when there is only a single root certificate, and all client certificates are signed by it. You can find this example in various articles on the web and it’s quite secure due to its simplicity. Let’s quickly break down its pros and cons.
Pros:
- Speed: Authorization happens only during TLS handshake, all subsequent “keep-alive” HTTP requests are considered authenticated, saving CPU time.
- Storage: Similar to JWT, the server does not store all client certificates, only the root certificate.
Cons:
- No granular control: if mTLS is enabled, all requests have to be authenticated, even to
/static/style.css.
- Any certificate signed by a trusted CA can be used to access this HTTP service. Even if the certificate is issued for another purpose, it still can potentially be used for TLS authentication.
- No host verification by default: client certificates can be accepted from any IP.
- Certificate issuance process needs to be implemented separately.
- Certificates expire, so need to be rotated frequently.
As you can see, this approach brings some advantages and disadvantages compared to traditional authentication methods, such as password or tokens.
Previous attacks
Before we dive into the attack section, I’ll briefly mention some previous well-known attacks on certificate parsing and validation:
- Obviously, the security of the authentication system depends on the strength of the signature. If we can somehow forge the content of the certificate, but keep the same signature, we can completely break the authentication process.
- Since the X.509 format is quite complex, just parsing these data structures can lead to buffer and heap overflows.
- Lack of basic constraints checking. The end-entity certificates should not be used to sign additional certificates.
My approach
In Java, most of these attacks are already mitigated in APIs provided by the JDK. Weak algorithms are intentionally not allowed. Fuzzing of certificate parsing in Java also did not look productive to me, as the vast majority of PKIX code is implemented in memory-safe Java, instead of using native libraries. I had to take a different approach, so I decided to have a deep look at how mTLS is used from the source code perspective. Since the certificate validation process is quite complex, I suspected that someone might implement it in a weird way. After several weeks, it yielded me some interesting vulnerabilities in popular open source projects.
So, let’s move on to the attack’s section.
In real-life applications, developers often need to access the certificate presented during the TLS handshake. For example, they might need it for authorization purposes, such as checking the current username. In Java, there are two common ways how to access it:
X509Certificate[] certificates = sslSession.getPeerCertificates();

// another way
X509Certificate[] certificates = request.getAttribute("javax.servlet.request.X509Certificate");
Interestingly, this API returns an array of certificates presented by the client, not a single one. Why? Perhaps because TLS specification defines that clients may send a full chain of certificates, from end-entity to the root CA.
So, I decided to take a look at how different applications use this API. The most common approach I’ve seen is to take only the first certificate from the array and consider it as the client certificate. This is correct, as mTLS RFC explicitly says that the sender’s certificate MUST come first in the list.
//way 1 is good
String user = certificates[0].getSubjectX500Principal().getName();
At the same time, I discovered some rare cases when applications disregard this rule and iterate over the array trying to find a certificate that matches some criteria.
//way 2 is dangerous
for (X509Certificate cert : certificates) {
   if (isClientCertificate(cert)) {
      user = cert.getSubjectX500Principal().getName();
   }
}
This is dangerous, as the underlying TLS library in Java only verifies the first certificate in the list. Moreover, it does not require the chain to be sent in a strict order.
Example: CVE-2023-2422 improper certificate validation in KeyCloak
One of these examples was a vulnerability I discovered in Keycloak. Keycloak is a popular authorization server that supports OAuth, SAML, and other authorization methods, as well as mutual TLS.
Keycloak iterates over all certificates in the array, searching for the one that matches the client_id form parameter. As soon as it finds a matching certificate, it implicitly trusts it, assuming that its signature has already been checked during the TLS handshake:
X509Certificate[] certs = null;
ClientModel client = null;
try {
    certs = provider.getCertificateChain(context.getHttpRequest());
    String client_id = null;
    ...
    if (formData != null) {
        client_id = formData.getFirst(OAuth2Constants.CLIENT_ID);
    }
    …
    matchedCertificate = Arrays.stream(certs)
        .map(certificate -> certificate.getSubjectDN().getName())
        .filter(subjectdn -> subjectDNPattern.matcher(subjectdn).matches())
        .findFirst();
In reality, a client can send as many certificates as they want, and the server only verifies the first one.
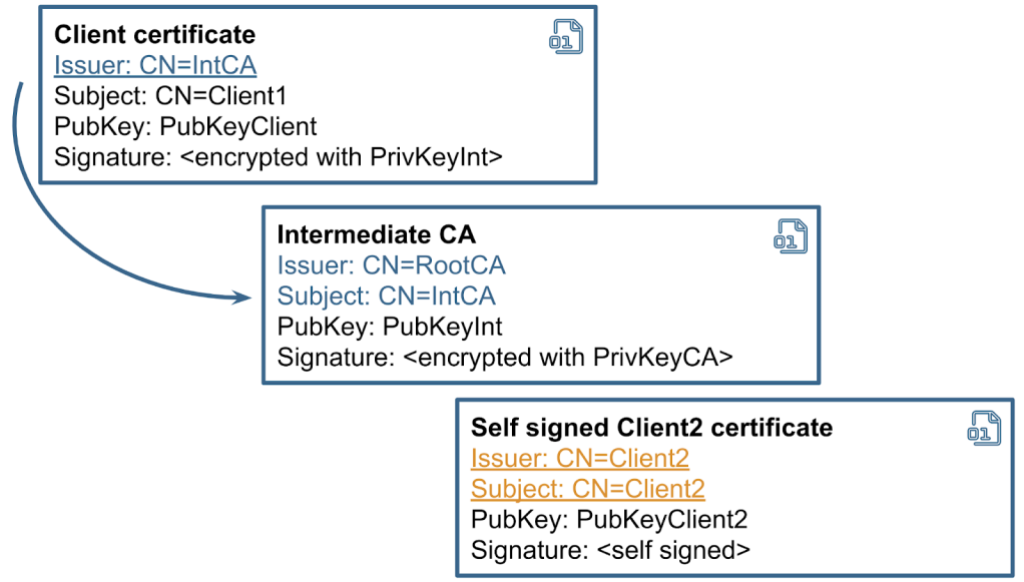
A potential attacker can exploit this behavior to authenticate under a different username. It is possible to send a list of certificates, where the first one contains one username and is properly chained to a root CA. But the last certificate in the array might be self signed and belong to a different user. The client does not even need to provide a valid private key for it.

Speaking about the exploitation, there are a number of endpoints in Keycloak that support mTLS authentication, but we need one that does not require any additional factors, such as tokens or secrets. “client-management/register-node” is a good example, as it mutates the user’s data. We can normally use this api with mTLS in the following way:
$ cat client1.crt client1.key > chain1.pem
$ curl --tlsv1.2 --tls-max 1.2 --cert chain1.pem -v -i -s -k "https://127.0.0.1:8443/realms/master/clients-managements/register-node?client_id=client1" -d "client_cluster_host=http://127.0.0.1:1213/"
To demonstrate the vulnerability, we generate a new self signed certificate using openssl and add it to the end of the array.
$ openssl req -newkey rsa:2048 -nodes -x509 -subj /CN=client2 -out client2-fake.crt
$ cat client1.crt client1.key client2-fake.crt client1.key > chain2.pem
$ curl --tlsv1.2 --tls-max 1.2 --cert chain2.pem -v -i -s -k "https://127.0.0.1:8443/realms/master/clients-managements/register-node?client_id=client2" -d "client_cluster_host=http://127.0.0.1:1213/"
When we send the second curl request, Keycloak performs this action on behalf of the user specified in client2-fake.crt, instead of client1.crt. Therefore, we can mutate data on the server for any client that supports mTLS.
How to fix that? Easy: just use the first certificate from the array. That’s exactly how Keycloak patched this vulnerability. This CVE is a good example of how developers provide methods and interfaces that can be misunderstood or used incorrectly.
Another common scenario for mTLS deployments is when the TLS connection is terminated on a reverse proxy. In this case, the reverse proxy often checks the certificate and forwards it to a backend server as an additional header. Here is a typical nginx configuration to enable mTLS:
$ cat nginx.conf

http {
    server {
        server_name example.com;
        listen 443 ssl;
        …
        ssl_client_certificate /etc/nginx/ca.pem;
        ssl_verify_client on;

        location / {
            proxy_pass http://host.internal:80;
            proxy_set_header ssl-client-cert $ssl_client_cert;
        }
    }
I’ve seen a number of systems like that, and in most cases the backend servers behind nginx do not perform additional validation, just trusting the reverse proxy. This behavior is not directly exploitable, but it’s not ideal either. Why? Well, first of all, it means that any server in the local network can make a request with this header, so this network segment needs to be carefully isolated from any traffic coming from outside. Additionally, if the backend or reverse proxy is affected by request smuggling or header injection, its exploitation becomes trivial. Over the past few years, we’ve seen a lot of request and header smuggling vulnerabilities, including the latest CVEs in Netty and Nodejs. Be careful when implementing these scenarios and check the certificate’s signature on all servers if possible.
Chapter 2: “Follow the chain, where does it lead you?”

In large systems, servers may not store all root and intermediate certificates locally, but use external storage instead. RFC 4387 explains the concept of a certificate store: an interface you can use to lazily access certificates during chain validation. These stores are implemented over different protocols, such as HTTP, LDAP, FTP, or SQL queries.
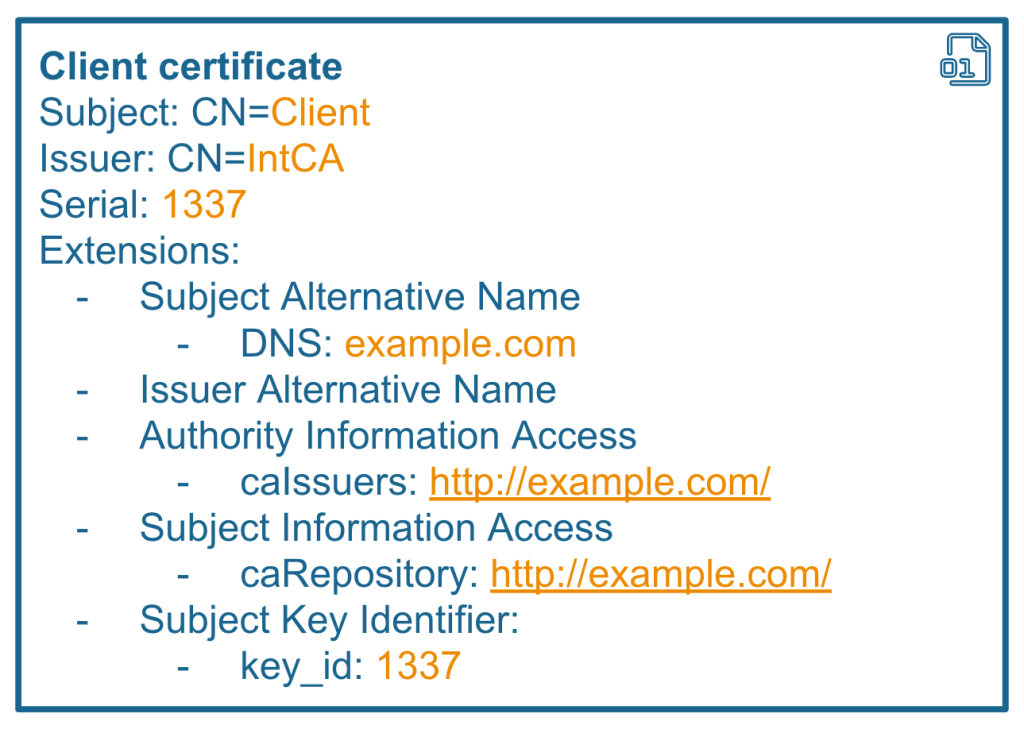
RFC 3280 defines some X.509 certificate extensions that can contain information about where to find the issuer and CA certificates. For instance, the Authority Information Access (AIA) extension contains a URL pointing to the Issuer’s certificate. If this extension is used for validation, there is a high chance that you can exploit it to perform an SSRF attack. Also, Subject, Issuer, Serial, and their alternative names can be used to construct SQL or LDAP queries, creating opportunities for injection attacks.

When certificate stores are in use, you should think of these values as “untrusted user input” or “Insertion points,” similar to those we have in Burp Suite’s Intruder. And what attackers will really love is that all of these values can be used in queries before the signature is checked.
Example: CVE-2023-33201 LDAP injection in Bouncy Castle
To demonstrate an example of this vulnerability, we’ll use LDAPCertStore from the Bouncy Castle library. Bouncy Castle is one of the most popular libraries for certificate validation in Java. Here is an example of how you can use this store to build and validate a certificate chain.
PKIXBuilderParameters pkixParams = new PKIXBuilderParameters(keystore, selector);

//setup additional LDAP store
X509LDAPCertStoreParameters CertStoreParameters = new X509LDAPCertStoreParameters.Builder("ldap://127.0.0.1:1389", "CN=certificates").build();
CertStore certStore = CertStore.getInstance("LDAP", CertStoreParameters, "BC");
pkixParams.addCertStore(certStore);

// Build and verify the certification chain
try {
   CertPathBuilder builder = CertPathBuilder.getInstance("PKIX", "BC");
   PKIXCertPathBuilderResult result =
           (PKIXCertPathBuilderResult) builder.build(pkixParams);
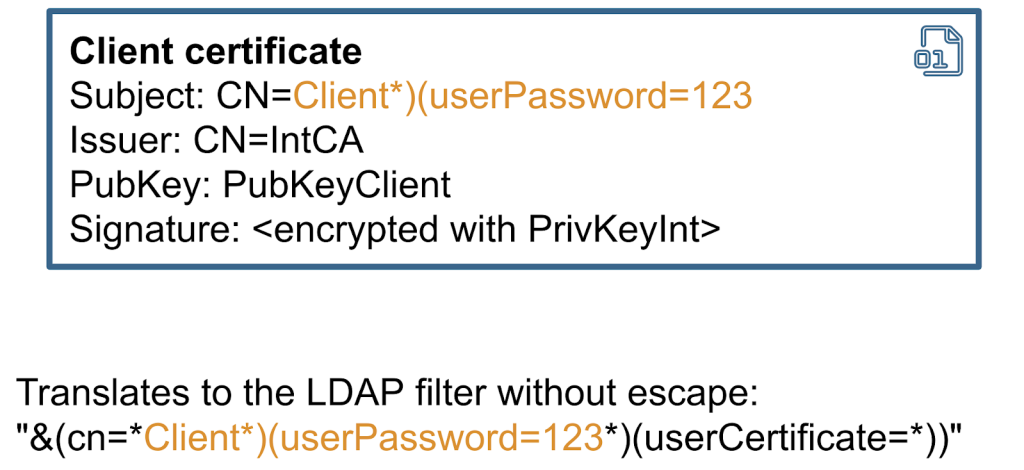
Under the hood, Bouncy Castle uses the Subject field from the certificate to build an LDAP query. The Subject field is inserted in the filter, without—you guessed it—any escaping.

So, if the Subject contains any special characters, it can change the syntax of the query. In most cases, this can be exploited as a blind ldap query injection. Therefore, it might be possible to use this vulnerability to extract other fields from the LDAP directory. The exploitability depends on many factors, including whether the application exposes any errors or not, and it also depends on the structure of the LDAP directory.
In general, whenever you incorporate user-supplied data into an LDAP query, special characters should be properly filtered. That’s exactly how this CVE has been patched in the Bouncy Castle code.
Chapter 3: Certificate revocation and its unintended uses
Similar to Json web tokens, the beauty of certificate chains is that they can be trusted just based on their signature. But what happens if we need to revoke a certificate, so it can no longer be used?
The PKIX specification (RFC 4387) addresses this problem by proposing a special store for revoked certificates, accessible via HTTP or LDAP protocols. Many developers believe that revocation checking is absolutely necessary, whereas others urge to avoid it for performance reasons or only use offline revocation lists.
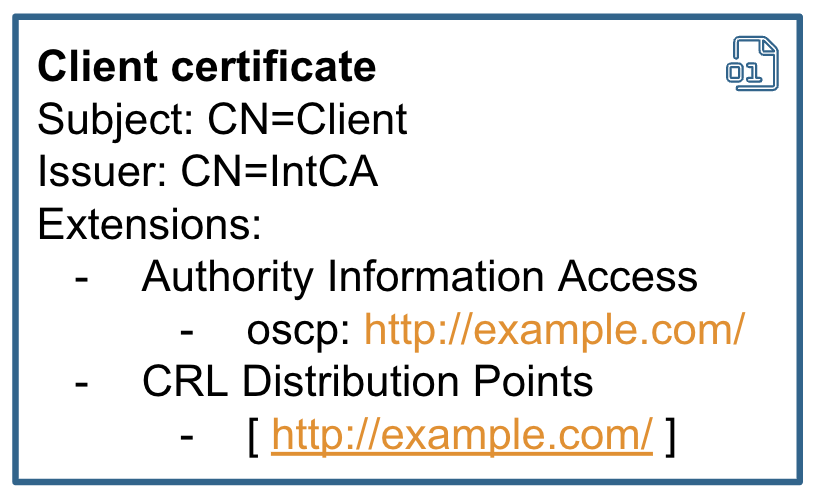
Generally speaking, the store location can be hardcoded into the application or taken from the certificate itself. There are two certificate extensions used for that: Authority Information Access OSCP URL and CRL Distribution points.

Looking at it from the hackers point of view, I think it’s incredible that the location of the revocation server can be taken from the certificate. So, if the application takes URLs relying on AIA or CRLDP extension to make a revocation check, it can be abused for SSRF attacks.
Sadly for attackers, this normally happens after the signature checks, but in some cases it’s still exploitable.
Moreover, LDAP is also supported, at least in Java. You probably heard that, in Java, unmarshaling an LDAP lookup response can lead to a remote code execution. A few years back, Moritz Bechler reported this problem and remote code execution via revocation has since been patched in the JDK. You can check out his blog post for more details.
In my research, I decided to check if the Bouncy Castle library is also affected. It turns out that Bouncy Castle can be configured to use the CRLDP extension and make calls to an LDAP server. At the same time, Bouncy Castle only fetches a specific attribute from the LDAP response and does not support references. So, remote code execution is not possible there. HTTP SSRF is still viable though.
private static Collection getCrlsFromLDAP(CertificateFactory certFact, URI distributionPoint) throws IOException, CRLException
{
    Map<String, String> env = new Hashtable<String, String>();

    env.put(Context.INITIAL_CONTEXT_FACTORY, "com.sun.jndi.ldap.LdapCtxFactory");
    env.put(Context.PROVIDER_URL, distributionPoint.toString());

    byte[] val = null;
    try
    {
        DirContext ctx = new InitialDirContext((Hashtable)env);
        Attributes avals = ctx.getAttributes("");
        Attribute aval = avals.get("certificateRevocationList;binary");
        val = (byte[])aval.get();
    }
Example: CVE-2023-28857 credentials leak in Apereo CAS
I also had a quick look at open source projects that support mTLS and perform revocation checking. One of these projects was Apereo CAS. It’s another popular authentication server that is highly configurable. Administrators of Apereo CAS can enable the revocation check using an external LDAP server by specifying its address and password in the settings:
cas.authn.x509.crl-fetcher=ldap
cas.authn.x509.ldap.ldap-url=ldap://example.com:1389/
cas.authn.x509.ldap.bind-dn=admin
cas.authn.x509.ldap.bind-credential=s3cr3taaaaa
If these settings are applied, Apereo CAS performs the revocation check for the certificate, fetching the address from the certificate’s CRLDP extension.
/**
* Validate the X509Certificate received.
*
* @param cert the cert
* @throws GeneralSecurityException the general security exception
*/
private void validate(final X509Certificate cert) throws GeneralSecurityException {
   cert.checkValidity();
   this.revocationChecker.check(cert);

   val pathLength = cert.getBasicConstraints();
   if (pathLength < 0) {
       if (!isCertificateAllowed(cert)) {
           val msg = "Certificate subject does not match pattern " + this.regExSubjectDnPattern.pattern();
           LOGGER.error(msg);
I was afraid that this could lead to remote code execution, but it turns out that Apereo CAS uses a custom library for LDAP connection, which does not support external codebases or object factories needed for RCE.
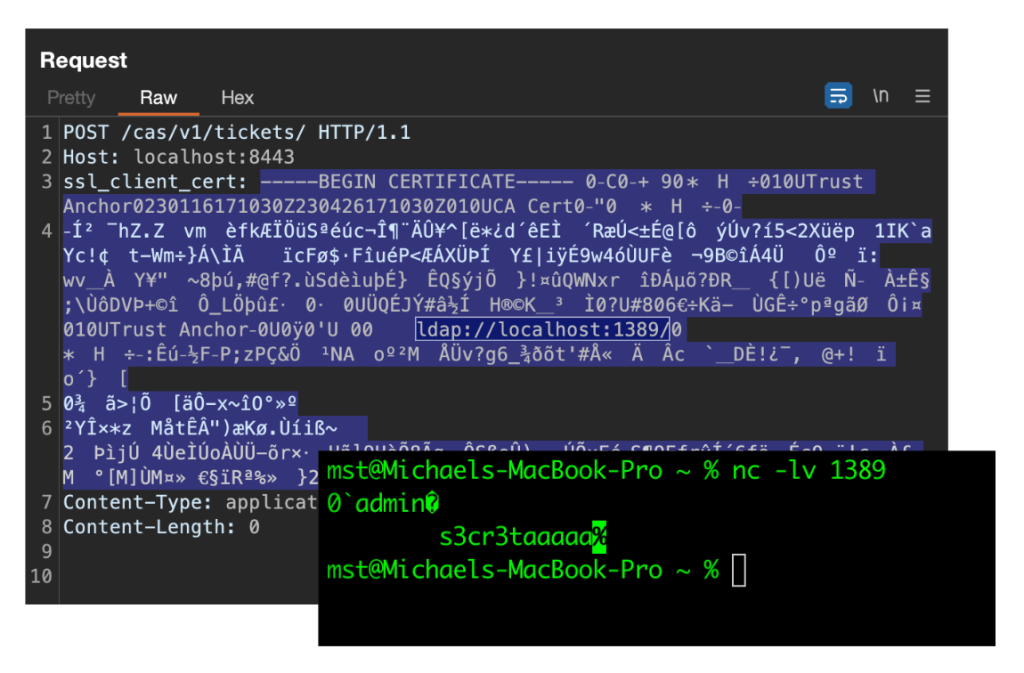
When I tested this in Apereo CAS, I noticed one interesting behavior. The server prefers the LDAP URL located inside the certificate, instead of the one that is configured in settings. At the same time, Apereo CAS still sends the password from the settings. I quickly set up a testing environment and sent a self-signed certificate in the header. My self-signed certificate had a CRLDP extension with the LDAP URL pointing to a netcat listener. After sending this request to Apereo CAS, I received a request to my netcat listener with the username and password leaked.

After reporting this vulnerability, the application developers issued a fix within just one day. They patched it by clearing the login and password used for LDAP connection if the URL is taken from the CRLDP. Therefore, the password leak is no longer possible. Nevertheless, I would say that using URLs from the CRLDP extension is still dangerous, as it broadens the attack surface.
Summary
If you’re developing an mTLS system or performing a security assessment, I suggest:
- Pay attention when extracting usernames from the mTLS chain, as the servers only verify the first certificate in the chain.
- Use Certificate Stores with caution, as it can lead to LDAP and SQL injections.
- Certificate revocation can lead to SSRF or even to RCE in the worst case. So, do the revocation check only after all other checks and do not rely on URLs taken from the certificate extensions.
The post mTLS: When certificate authentication is done wrong appeared first on The GitHub Blog.