Where did the last month go? Were you able to catch all of the sessions in the Security, Identity, and Compliance track you hoped to see at AWS re:Invent? If you missed any, don’t worry—you can stream all the sessions released in 2020 via the AWS re:Invent website. Additionally, we’re starting 2021 with all new sessions that you can stream live January 12–15. Here are the new Security, Identity, and Compliance sessions—each session is offered at multiple times, so you can find the time that works best for your location and schedule.
Protecting sensitive data with Amazon Macie and Amazon GuardDuty – SEC210 Himanshu Verma, AWS Speaker
Tuesday, January 12 – 11:00 AM to 11:30 AM PST Tuesday, January 12 – 7:00 PM to 7:30 PM PST Wednesday, January 13 – 3:00 AM to 3:30 AM PST
As organizations manage growing volumes of data, identifying and protecting your sensitive data can become increasingly complex, expensive, and time-consuming. In this session, learn how Amazon Macie and Amazon GuardDuty together provide protection for your data stored in Amazon S3. Amazon Macie automates the discovery of sensitive data at scale and lowers the cost of protecting your data. Amazon GuardDuty continuously monitors and profiles S3 data access events and configurations to detect suspicious activities. Come learn about these security services and how to best use them for protecting data in your environment.
BBC: Driving security best practices in a decentralized organization – SEC211 Apurv Awasthi, AWS Speaker Andrew Carlson, Sr. Software Engineer – BBC
Tuesday, January 12 – 1:15 PM to 1:45 PM PST Tuesday, January 12 – 9:15 PM to 9:45 PM PST Wednesday, January 13 – 5:15 AM to 5:45 AM PST
In this session, Andrew Carlson, engineer at BBC, talks about BBC’s journey while adopting AWS Secrets Manager for lifecycle management of its arbitrary credentials such as database passwords, API keys, and third-party keys. He provides insight on BBC’s secrets management best practices and how the company drives these at enterprise scale in a decentralized environment that has a highly visible scope of impact.
Get ahead of the curve with DDoS Response Team escalations – SEC321 Fola Bolodeoku, AWS Speaker
Tuesday, January 12 – 3:30 PM to 4:00 PM PST Tuesday, January 12 – 11:30 PM to 12:00 AM PST Wednesday, January – 7:30 AM to 8:00 AM PST
This session identifies tools and tricks that you can use to prepare for application security escalations, with lessons learned provided by the AWS DDoS Response Team. You learn how AWS customers have used different AWS offerings to protect their applications, including network access control lists, security groups, and AWS WAF. You also learn how to avoid common misconfigurations and mishaps observed by the DDoS Response Team, and you discover simple yet effective actions that you can take to better protect your applications’ availability and security controls.
Network security for serverless workloads – SEC322 Alex Tomic, AWS Speaker
Thursday, January 14 -1:30 PM to 2:00 PM PST Thursday, January 14 – 9:30 PM to 10:00 PM PST Friday, January 15 – 5:30 AM to 6:00 AM PST
Are you building a serverless application using services like Amazon API Gateway, AWS Lambda, Amazon DynamoDB, Amazon Aurora, and Amazon SQS? Would you like to apply enterprise network security to these AWS services? This session covers how network security concepts like encryption, firewalls, and traffic monitoring can be applied to a well-architected AWS serverless architecture.
Building your cloud incident response program – SEC323 Freddy Kasprzykowski, AWS Speaker
Wednesday, January 13 – 9:00 AM to 9:30 AM PST Wednesday, January 13 – 5:00 PM to 5:30 PM PST Thursday, January 14 – 1:00 AM to 1:30 AM PST
You’ve configured your detection services and now you’ve received your first alert. This session provides patterns that help you understand what capabilities you need to build and run an effective incident response program in the cloud. It includes a review of some logs to see what they tell you and a discussion of tools to analyze those logs. You learn how to make sure that your team has the right access, how automation can help, and which incident response frameworks can guide you.
Wednesday, January 13 – 2:15 PM to 2:45 PM PST Wednesday, January 13 – 10:15 PM to 10:45 PM PST Thursday, January 14 – 6:15 AM to 6:45 AM PST
Amazon Cognito is a flexible user directory that can meet the needs of a number of customer identity management use cases. Web and mobile applications can integrate with Amazon Cognito in minutes to offer user authentication and get standard tokens to be used in token-based authorization scenarios. This session covers best practices that you can implement in your application to secure and protect tokens. You also learn about new Amazon Cognito features that give you more options to improve the security and availability of your application.
Event-driven data security using Amazon Macie – SEC325 Neha Joshi, AWS Speaker
Thursday, January 14 – 8:00 AM to 8:30 AM PST Thursday, January 14 – 4:00 PM to 4:30 PM PST Friday, January 15 – 12:00 AM to 12:30 AM PST
Amazon Macie sensitive data discovery jobs for Amazon S3 buckets help you discover sensitive data such as personally identifiable information (PII), financial information, account credentials, and workload-specific sensitive information. In this session, you learn about an automated approach to discover sensitive information whenever changes are made to the objects in your S3 buckets.
Thursday, January 14 – 10:15 AM to 10:45 AM PST Thursday, January 14 – 6:15 PM to 6:45 PM PST Friday, January 15 – 2:15 AM to 2:45 AM PST
In this session, learn about several instance containment and isolation techniques, ranging from simple and effective to more complex and powerful, that leverage native AWS networking services and account configuration techniques. If an incident happens, you may have questions like “How do we isolate the system while preserving all the valuable artifacts?” and “What options do we even have?”. These are valid questions, but there are more important ones to discuss amidst a (possible) incident. Join this session to learn highly effective instance containment techniques in a crawl-walk-run approach that also facilitates preservation and collection of valuable artifacts and intelligence.
Trusted connects for government workloads – SEC402 Brad Dispensa, AWS Speaker
Wednesday, January 13 – 11:15 AM to 11:45 AM PST Wednesday, January 13 – 7:15 PM to 7:45 PM PST Thursday, January 14 – 3:15 AM to 3:45 AM PST
Cloud adoption across the public sector is making it easier to provide government workforces with seamless access to applications and data. With this move to the cloud, we also need updated security guidance to ensure public-sector data remain secure. For example, the TIC (Trusted Internet Connections) initiative has been a requirement for US federal agencies for some time. The recent TIC-3 moves from prescriptive guidance to an outcomes-based model. This session walks you through how to leverage AWS features to better protect public-sector data using TIC-3 and the National Institute of Standards and Technology (NIST) Cybersecurity Framework (CSF). Also, learn how this might map into other geographies.
I look forward to seeing you in these sessions. Please see the re:Invent agenda for more details and to build your schedule.
If you have feedback about this post, submit comments in the Comments section below.
Want more AWS Security how-to content, news, and feature announcements? Follow us on Twitter.
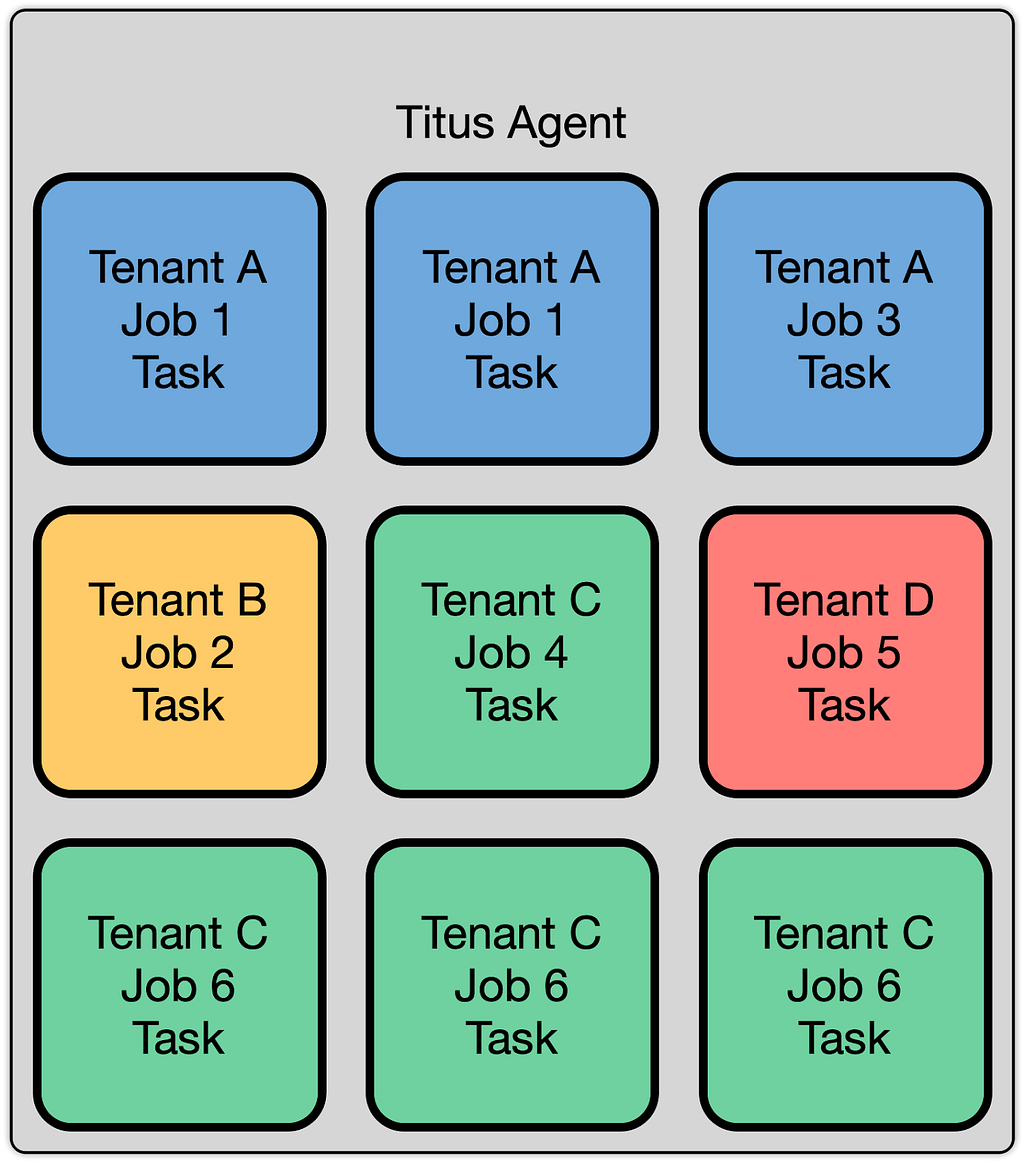
As previously discussed on the Netflix Tech Blog, Titus is the Netflix container orchestration system. It runs a wide variety of workloads from various parts of the company — everything from the frontend API for netflix.com, to machine learning training workloads, to video encoders. In Titus, the hosts that workloads run on are abstracted from our users. The Titus platform maintains large pools of homogenous node capacity to run user workloads, and the Titus scheduler places workloads. This abstraction allows the compute team to influence the reliability, efficiency, and operability of the fleet via the scheduler. The hosts that run workloads are called Titus “agents.” In this post, we describe how Titus agents leverage user namespaces to improve the overall security of the Titus agent fleet.
Titus’s Multi-Tenant Clusters
The Titus agent fleet appears to users as a homogenous pool of capacity. Titus internally employs a cellular bulkhead architecture for scalability, so the fleet is composed of multiple cells. Many bulkhead architectures partition their cells on tenants, where a tenant is defined as a team and their collection of applications. We do not take this approach, and instead, we partition our cells to balance load. We do this for reliability, scalability, and efficiency reasons.
Titus is a multi-tenant system, allowing multiple teams and users to run workloads on the system, and ensuring they can all co-exist while still providing guarantees about security and performance. Much of this comes down to isolation, which comes in multiple forms. These forms include performance isolation (ensuring workloads do not degrade one another’s performance), capacity isolation (ensuring that a given tenant can acquire resources when they ask for them), fault isolation (ensuring that the failure of a part of the system doesn’t cause the whole system to fail), and security isolation (ensuring that the compromise of one tenant’s workload does not affect the security of other tenants). This post focuses on our approaches to security isolation.
Secure Multi-tenancy
One of Titus’s biggest concerns with multi-tenancy is security isolation. We want to allow different kinds of containers from different tenants to run on the same instance. Security isolation in containers has been a contentious topic. Despite the risks, we’ve chosen to leverage containers as part of our security boundary. To offset the risks brought about by the container security boundary, we employ some additional protections.
The building blocks of multi-tenancy are Linux namespaces, the very technology that makes LXC, Docker, and other kinds of containers possible. For example, the PID namespace makes it so that a process can only see PIDs in its own namespace, and therefore cannot send kill signals to random processes on the host. In addition to the default Docker namespaces (mount, network, UTS, IPC, and PID), we employ user namespaces for added layers of isolation. Unfortunately, these default namespace boundaries are not sufficient to prevent container escape, as seen in CVEs like CVE-2015–2925. These vulnerabilities arise due to the complexity of interactions between namespaces, a large number of historical decisions during kernel development, and leaky abstractions like the proc filesystem in Linux. Composing these security isolation primitives correctly is difficult, so we’ve looked to other layers for additional protection.
Running many different workloads multi-tenant on a host necessitates the prevention lateral movement, a technique in which the attacker compromises a single piece of software running in a container on the system, and uses that to compromise other containers on the same system. To mitigate this, we run containers as unprivileged users — making it so that users cannot use “root.” This is important because, in Linux, UID 0 (or root’s privileges), do not come from the mere fact that the user is root, but from capabilities. These capabilities are tied to the current process’s credentials. Capabilities can be added via privilege escalation (e.g., sudo, file capabilities) or removed (e.g., setuid, or switching namespaces). Various capabilities control what the root user can do. For example, the CAP_SYS_BOOT capability controls the ability of a given user to reboot the machine. There are also more common capabilities that are granted to users like CAP_NET_RAW, which allows a process the ability to open raw sockets. A user can automatically have capabilities added when they execute specific files via file capabilities. For example, on a stock Ubuntu system, the ping command needs CAP_NET_RAW:
One of the most powerful capabilities in Linux is CAP_SYS_ADMIN, which is effectively equivalent to having superuser access. It gives the user the ability to do everything from mounting arbitrary filesystems, to accessing tracepoints that can expose vital information about the Linux kernel. Other powerful capabilities include CAP_CHOWN and CAP_DAC_OVERRIDE, which grant the capability to manipulate file permissions.
In the kernel, you’ll often see capability checks spread throughout the code, which looks something like this:
Notice this function doesn’t check if the user is root, but if the task has the CAP_SYS_ADMIN capability before allowing it to execute.
Docker takes the approach of using an allow-list to define which capabilities a container receives. These can be extended or attenuated by the user. Even the default capabilities that are defined in the Docker profile can be abused in certain situations. When we looked into running workloads as unprivileged users without many of these capabilities, we found that it was a non-starter. Various pieces of software used elevated capabilities for FUSE, low-level packet monitoring, and performance tracing amongst other use cases. Programs will usually start with capabilities, perform any activities that require those capabilities, and then “drop” them when the process no longer needs them.
User Namespaces
Fortunately, Linux has a solution — User Namespaces. Let’s go back to that kernel code example earlier. The pcrlock function called the capable function to determine whether or not the task was capable. This function is defined as:
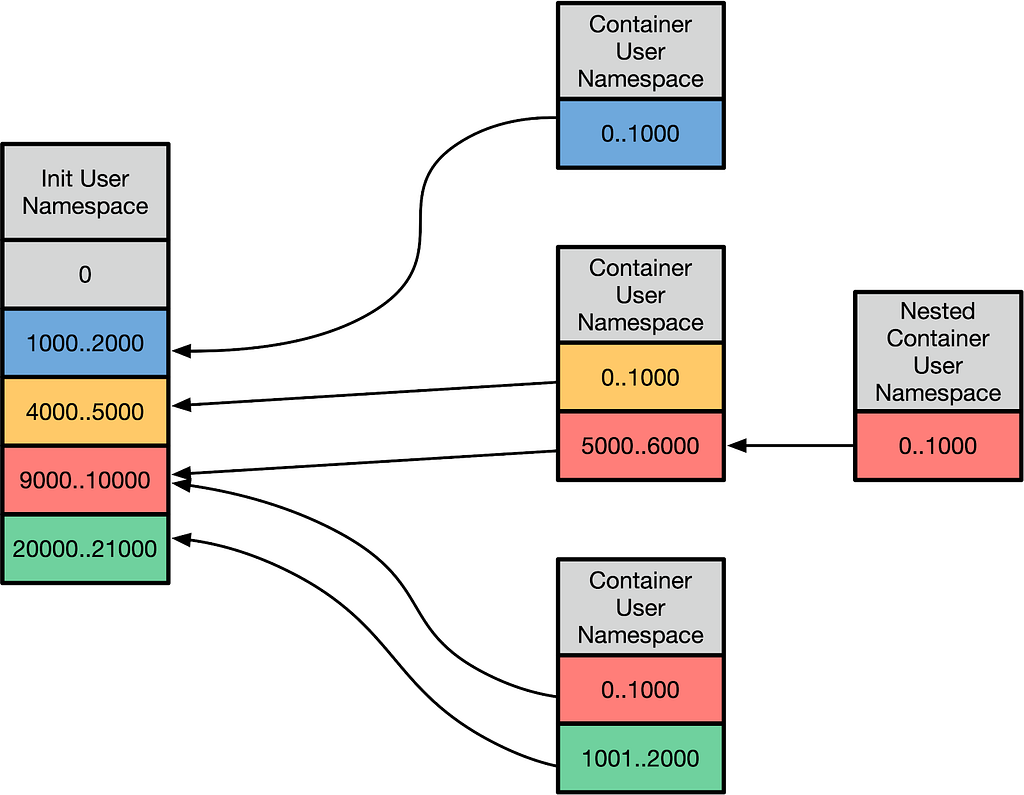
This checks if the task has this capability relative to the init_user_ns. The init_user_ns is the namespace that processes are initialially spawned in, as it’s the only user namespace that exists at kernel startup time. User namespaces are a mechanism to split up the init_user_ns UID space. The interface to set up the mappings is via a “uid_map” and “gid_map” that’s exposed via /proc. The mapping looks something like this:
This allows UIDs in user-namespaced containers to be mapped to host UIDs. A variety of translations occur, but from the container’s perspective, everything is from the perspective of the UID ranges (otherwise known as extents) that are mapped. This is powerful in a few ways:
It allows you to make certain UIDs off-limits to the container — if a UID is not mapped in the user namespace to a real UID, and you try to examine a file on disk with it, it will show up as overflowuid / overflowgid, a UID and GID specified in /proc/sys to indicate that it cannot be mapped into the current working space. Also, the container cannot setuid to a UID that can access files owned by that “outside uid.”
From the user namespace’s perspective, the container’s root user appears to be UID 0, and the container can use the entire range of UIDs that are mapped into that namespace.
Kernel subsystems can then proceed to call ns_capable with the specific user namespace that is tied to the resource. Many capability checks are now done to a user namespace that is relative to the resource being manipulated. This, in turn, allows processes to exercise certain privileges without having any privileges in the init user namespace. Even if the mapping is the same across many different namespaces, capability checks are still done relative to a specific user namespace.
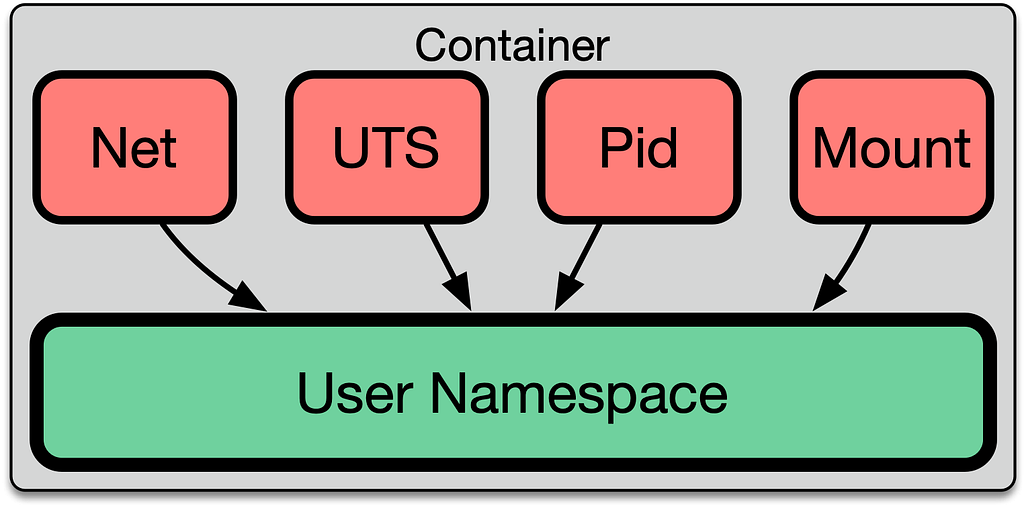
One critical aspect of understanding how permissions work is that every namespace belongs to a specific user namespace. For example, let’s look at the UTS namespace, which is responsible for controlling the hostname:
The namespace has a relationship with a particular user namespace. The ability for a user to manipulate the hostname is based on whether or not the process has the appropriate capability in that user namespace.
Let’s Get Into It
We can examine how the interaction of namespaces and users work ourselves. To set the hostname in the UTS namespace, you need to have CAP_SYS_ADMIN in its user namespace. We can see this in action here, where an unprivileged process doesn’t have permission to set the hostname:
The reason for this is that the process does not have CAP_SYS_ADMIN. According to /proc/self/status, the effective capability set of this process is empty:
Now, let’s try to set up a user namespace, and see what happens:
Immediately, you’ll notice the command prompt says the current user is root, and that the id command agrees. Can we set the hostname now?
We still cannot set the hostname. This is because the process is still in the initial UTS namespace. Let’s see if we can unshare the UTS namespace, and set the hostname:
This is now successful, and the process is in an isolated UTS namespace with the hostname “foo.” This is because the process now has all of the capabilities that a traditional root user would have, except they are relative to the new user namespace we created:
If we inspect this process from the outside, we can see that the process still runs as the unprivileged user, and the hostname in the original outside namespace hasn’t changed:
From here, we can do all sorts of things, like mount filesystems, create other new namespaces, and in fact, we can create an entire container environment. Notice how no privilege escalation mechanism was used to perform any of these actions. This approach is what some people refer to as “rootless containers.”
Road to Implementation
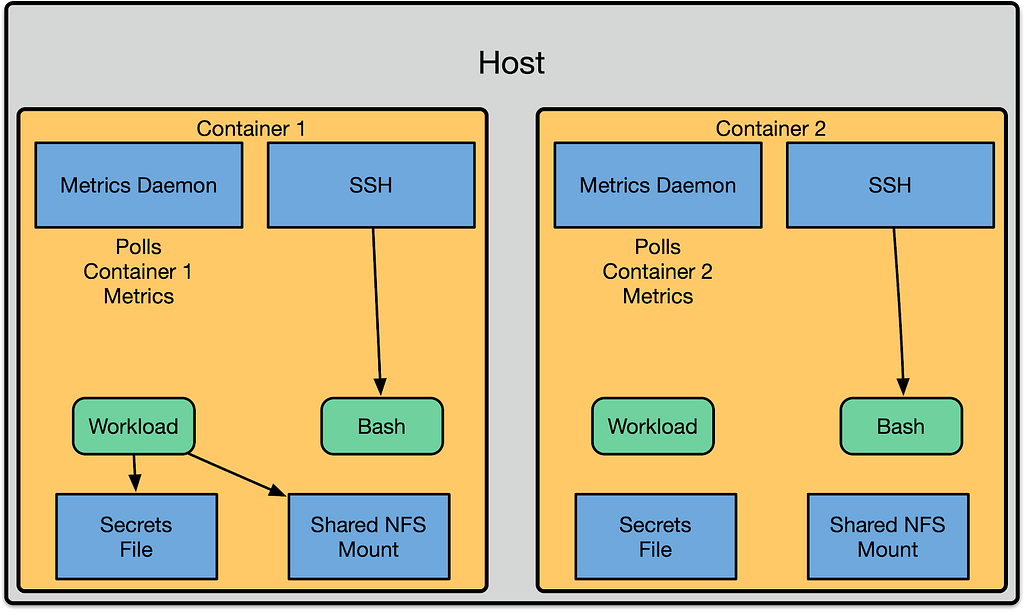
We began work to enable user namespaces in early 2017. At the time we had a naive model that was simpler. This simplicity was possible because we were running without user namespaces:
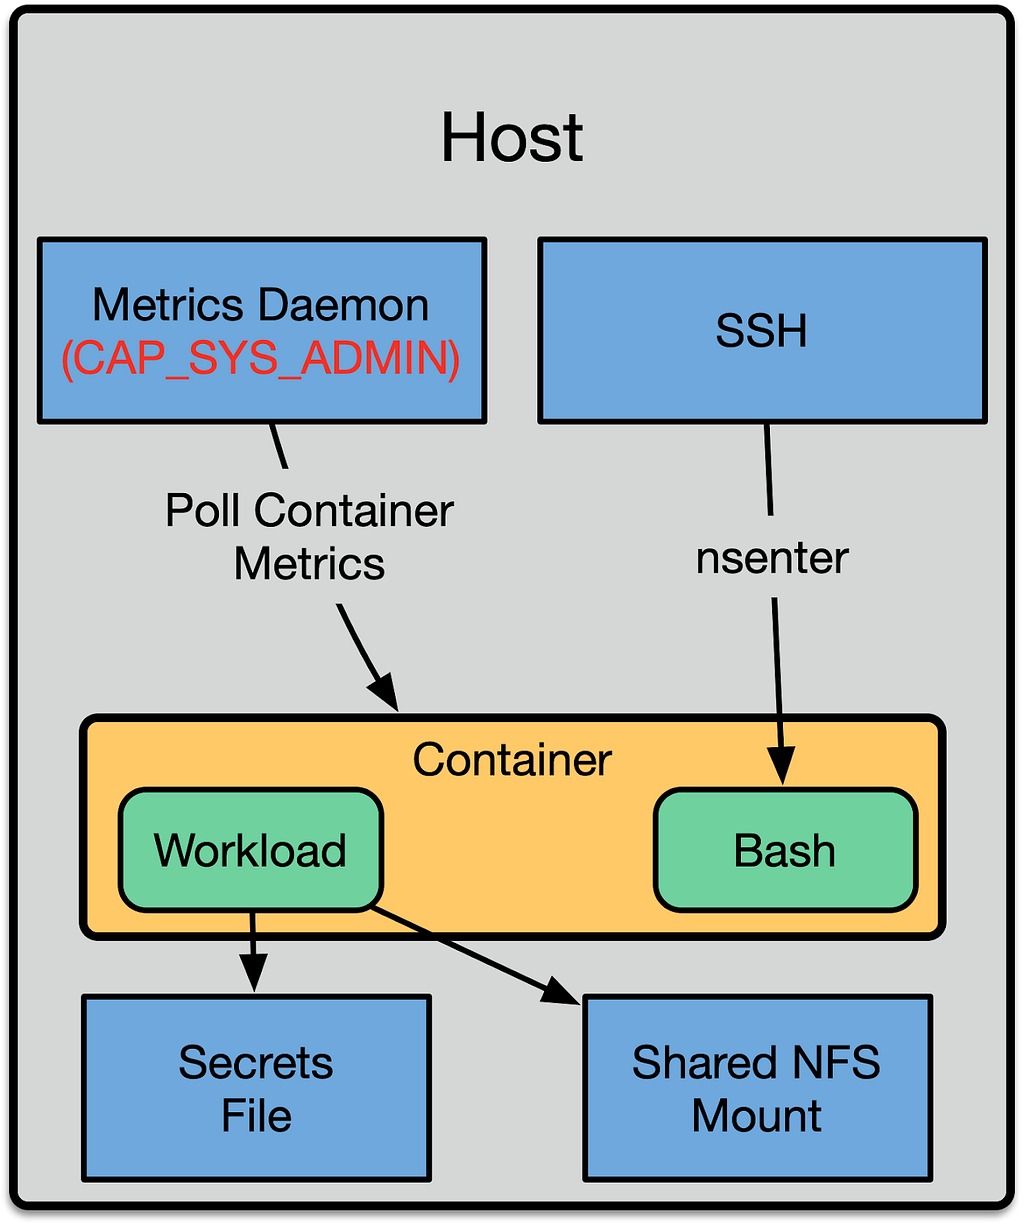
This approach mirrored the process layout and boundaries of contemporary container orchestration systems. We had a shared metrics daemon on the machine that reached in and polled metrics from the container. User access was done by exposing an SSH daemon, and automatically doing nsenter on the user’s behalf to drop them into the container. To expose files to the container we would use bind mounts. The same mechanism was used to expose configuration, such as secrets.
This had the benefit that much of our software could be installed in the host namespace, and only manage files in the that namespace. The container runtime management system (Titus) was then responsible for configuring Docker to expose the right files to the container via bind mounts. In addition to that, we could use our standard metrics daemons on the host.
Although this model was easy to reason about and write software for, it had several shortcomings that we addressed by shifting everything to running inside of the container’s unprivileged user namespace. The first shortcoming was that all of the host daemons now needed to be aware of the UID translation, and perform the proper setuid or chown calls to transition across the container boundary. Second, each of these transitions represented a security risk. If the SSH daemon only partially transitioned into the container namespace by changing into the container’s pid namespace, it would leave its /proc accessible. This could then be used by a malicious attacker to escape.
With user namespaces, we can improve our security posture and reduce the complexity of the system by running those daemons in the container’s unprivileged user namespace, which removes the need to cross the namespace boundaries. In turn, this removes the need to correctly implement a cross-namespace transition mechanism thus, reducing the risk of introducing container escapes.
We did this by moving aspects of the container runtime environment into the container. For example, we run an SSH daemon per container and a metrics daemon per container. These run inside of the namespaces of the container, and they have the same capabilities and lifecycle as the workloads in the container. We call this model “System Services” — one can think of it as a primordial version of pods. By the end of 2018, we had moved all of our containers to run in unprivileged user namespaces successfully.
Why is this useful?
This may seem like another level of indirection that just introduces complexity, but instead, it allows us to leverage an extremely useful concept — “unprivileged containers.” In unprivileged containers, the root user starts from a baseline in which they don’t automatically have access to the entire system. This means that DAC, MAC, and seccomp policies are now an extra layer of defense against accessing privileged aspects of the system — not the only layer. As new privileges are added, we do not have to add them to an exclusion list. This allows our users to write software where they can control low-level system details in their own containers, rather than forcing all of the complexity up into the container runtime.
Use Case: FUSE
Netflix internally uses a purpose built FUSE filesystem called MezzFS. The purpose of this filesystem is to provide access to our content for a variety of encoding tools. Most of these encoding tools are designed to interact with the POSIX filesystem API. Our Media Cloud Engineering team wanted to leverage containers for a new platform they were building, called Archer. Archer, in turn, uses MezzFS, which needs FUSE, and at the time, FUSE required that the user have CAP_SYS_ADMIN in the initial user namespace. To accommodate the use case from our internal partner, we had to run them in a dedicated cluster where they could run privileged containers.
In 2017, we worked with our partner, Kinvolk, to have patches added to the Linux kernel that allowed users to safely use FUSE from non-init user namespaces. They were able to successfully upstream these patches, and we’ve been using them in production. From our user’s perspective, we were able to seamlessly move them into an unprivileged environment that was more secure. This simplified operations, as this workload was no longer considered exceptional, and could run alongside every other workload in the general node pool. In turn, this allowed the media encoding team access to a massive amount of compute capacity from the shared clusters, and better reliability due to the homogeneous nature of the deployment.
Use Case: Unintended Privileges
Many CVEs related to granting containers unintended privileges have been released in the past few years:
CVE-2019–5736: Privilege escalation via overwriting host runc binary
CVE-2018–10892: Access to /proc/acpi, allowing an attacker to modify hardware configuration
There will certainly be more vulnerabilities in the future, as is to be expected in any complex, quickly evolving system. We already use the default settings offered by Docker, such as AppArmor, and seccomp, but by adding user namespaces, we can achieve a superior defense-in-depth security model. These CVEs did not affect our infrastructure because we were using user namespaces for all of our containers. The attenuation of capabilities in the init user namespace performed as intended and stopped these attacks.
The Future
There are still many bits of the Kernel that are receiving support for user namespaces or enhancements making user namespaces easier to use. Much of the work left to do is focused on filesystems and container orchestration systems themselves. Some of these changes are slated for upcoming kernel releases. Work is being done to add unprivileged mounts to overlayfs allowing for nested container builds in a user namespace with layers. Future work is going on to make the Linux kernel VFS layer natively understand ID translation. This will make user namespaces with different ID mappings able to access the same underlying filesystem by shifting UIDs through a bind mount. Our partners at Kinvolk are also working on bringing user namespaces to Kubernetes.
Today, a variety of container runtimes support user namespaces. Docker can set up machine-wide UID mappings with separate user namespaces per container, as outlined in their docs. Any OCI compliant runtime such as Containerd / runc, Podman, and systemd-nspawn support user namespaces. Various container orchestration engines also support user namespaces via their underlying container runtimes, such as Nomad and Docker Swarm.
As part of our move to Kubernetes, Netflix has been working with Kinvolk on getting user namespaces to work under Kubernetes. You can follow this work via the KEP discussion here, and Kinvolk has more information about running user namespaces under Kubernetes on their blog. We look forward to evolving container security together with the Kubernetes community.
We’re excited to announce that you can now set up your Access policies to require that all user traffic to your application is filtered by Cloudflare Gateway. This ensures that all of the traffic to your self-hosted and SaaS applications is secured and centrally logged. You can also use this integration to build rules that determine which users can connect to certain parts of your SaaS applications, even if the application does not support those rules on its own.
Stop threats from returning to your applications and data
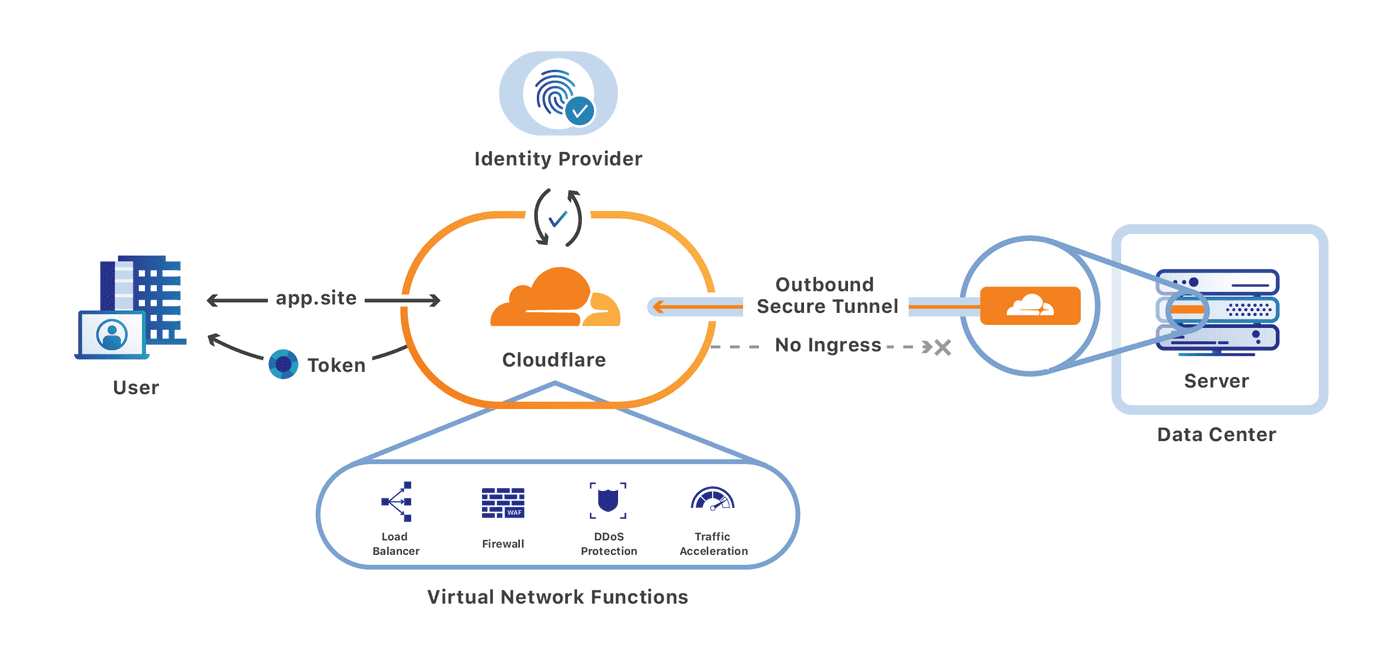
We built Cloudflare Access as an internal project to replace our own VPN. Unlike a traditional private network, Access follows a Zero Trust model. Cloudflare’s edge checks every request to protected resources for identity and other signals like device posture (i.e., information about a user’s machine, like Operating system version, if antivirus is running, etc.).
By deploying Cloudflare Access, our security and IT teams could build granular rules for each application and log every request and event. Cloudflare’s network accelerated how users connected. We launched Access as a product for our customers in 2018 to share those improvements with teams of any size.
Over the last two years, we added new types of rules that check for hardware security keys, location, and other signals. However, we were still left with some challenges:
What happened to devices before they connected to applications behind Access? Were they bringing something malicious with them?
Could we make sure these devices were not leaking data elsewhere when they reached data behind Access?
Had the credentials used for a Cloudflare Access login been phished elsewhere?
We built Cloudflare Gateway to solve those problems. Cloudflare Gateway sends all traffic from a device to Cloudflare’s network, where it can be filtered for threats, file upload/download, and content categories.
Administrators deploy a lightweight agent on user devices that proxies all Internet-bound traffic through Cloudflare’s network. As that traffic arrives in one of our data centers in 200 cities around the world, Cloudflare’s edge inspects the traffic. Gateway can then take actions like prevent users from connecting to destinations that contain malware or block the upload of files to unapproved locations.
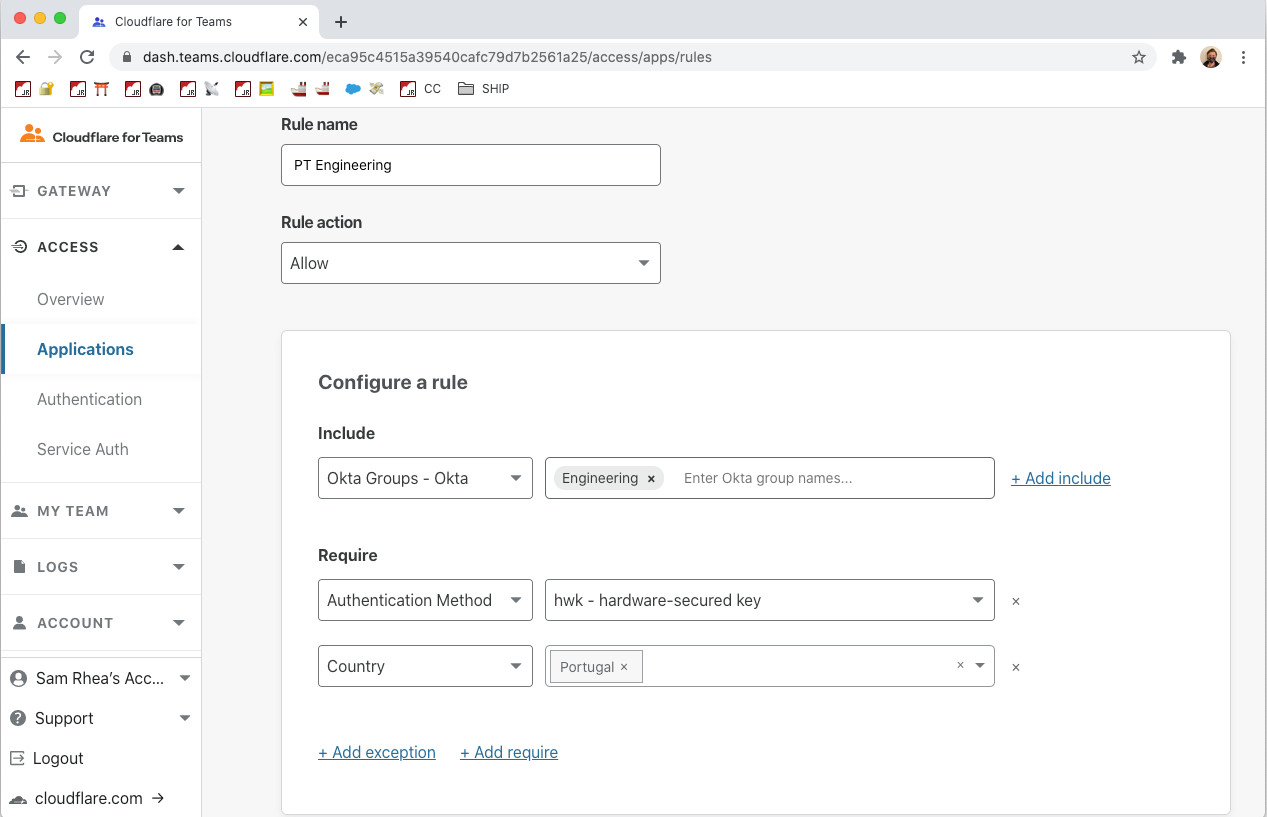
With today’s launch, you can now build Access rules that restrict connections to devices that are running Cloudflare Gateway. You can configure Cloudflare Gateway to run in always-on mode and ensure that the devices connecting to your applications are secured as they navigate the rest of the Internet.
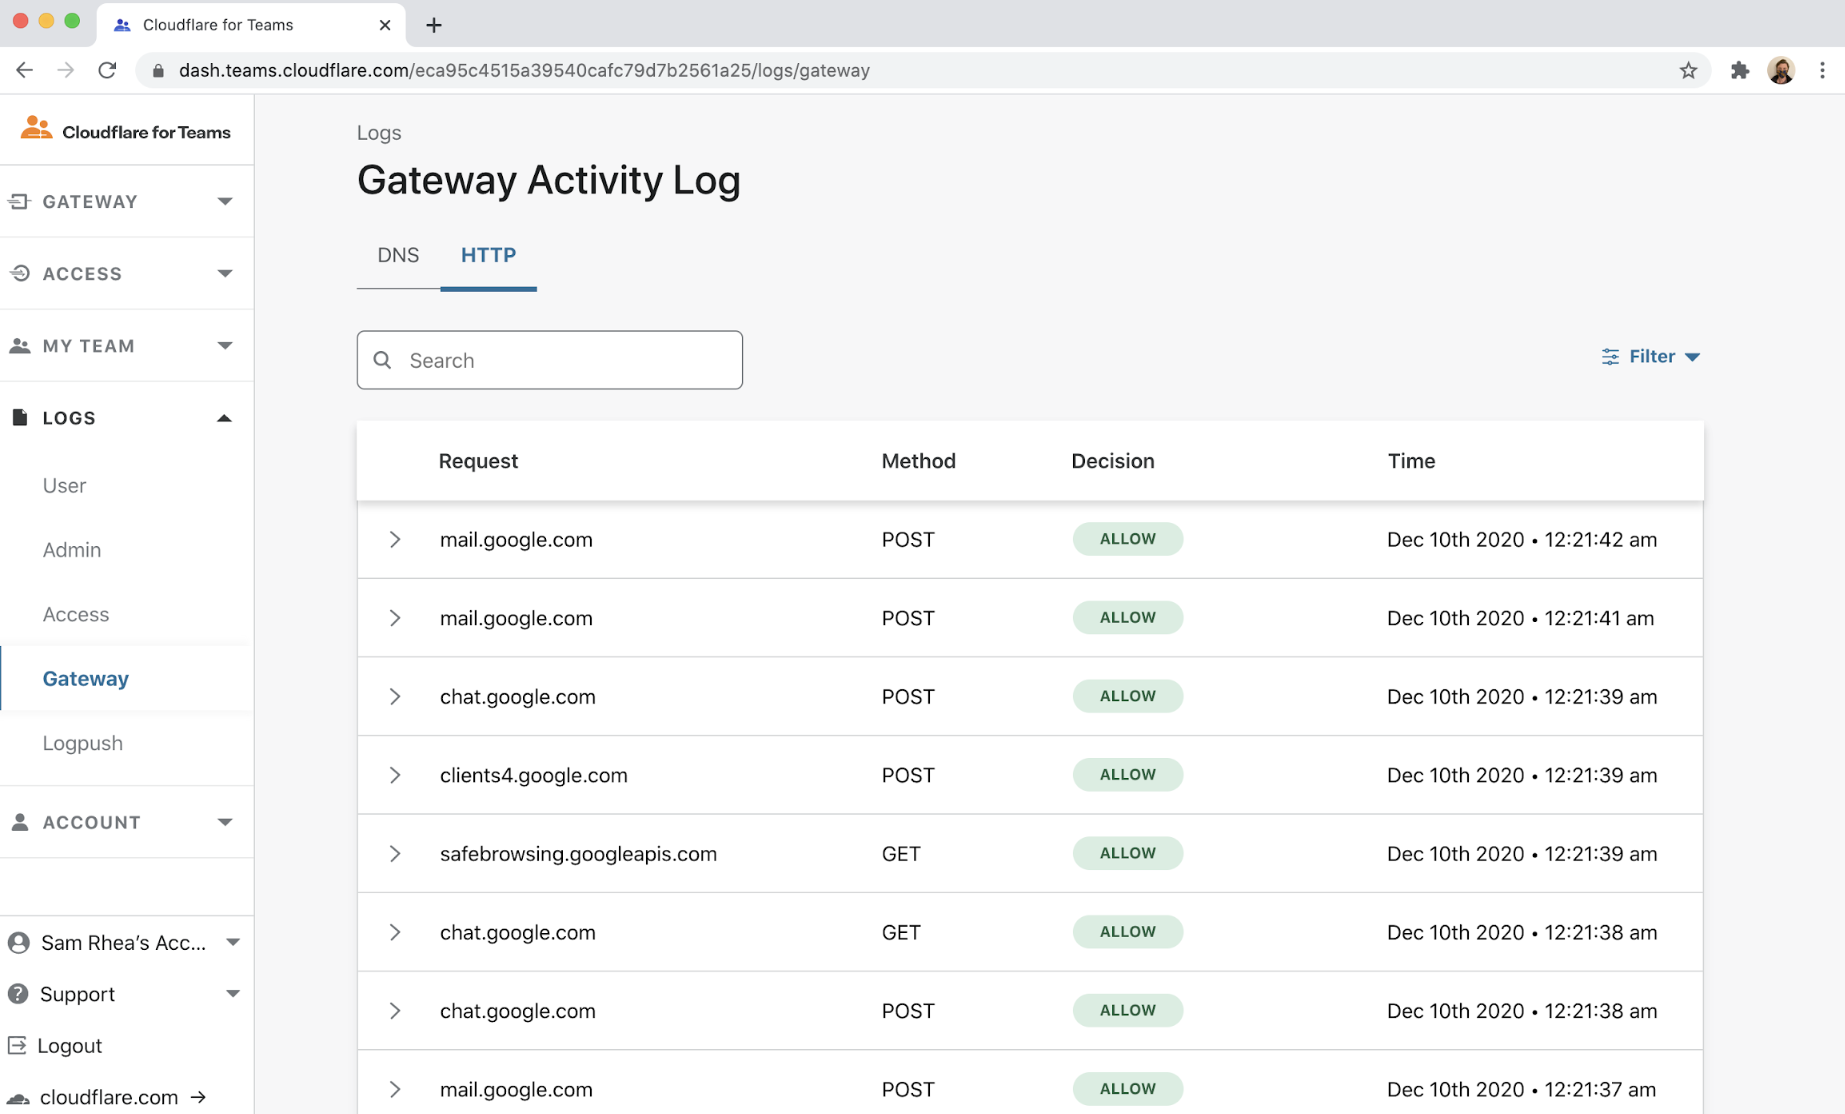
Log every connection to every application
In addition to filtering, Cloudflare Gateway also logs every request and connection made from a device. With Gateway running, your organization can audit how employees use SaaS applications like Salesforce, Office 365, and Workday.
However, we’ve talked to several customers who share a concern over log integrity — “what stops a user from bypassing Gateway’s logging by connecting to a SaaS application from a different device?” Users could type in their password and use their second factor authentication token on a different device — that way, the organization would lose visibility into that corporate traffic.
Today’s release gives your team the ability to ensure every connection to your SaaS applications uses Cloudflare Gateway. Your team can integrate Cloudflare Access, and its ruleset, into the login flow of your SaaS applications. Cloudflare Access checks for additional factors when your users log in with your SSO provider. By adding a rule to require Cloudflare Gateway be used, you can prevent users from ever logging into a SaaS application without connecting through Gateway.
Build data control rules in SaaS applications
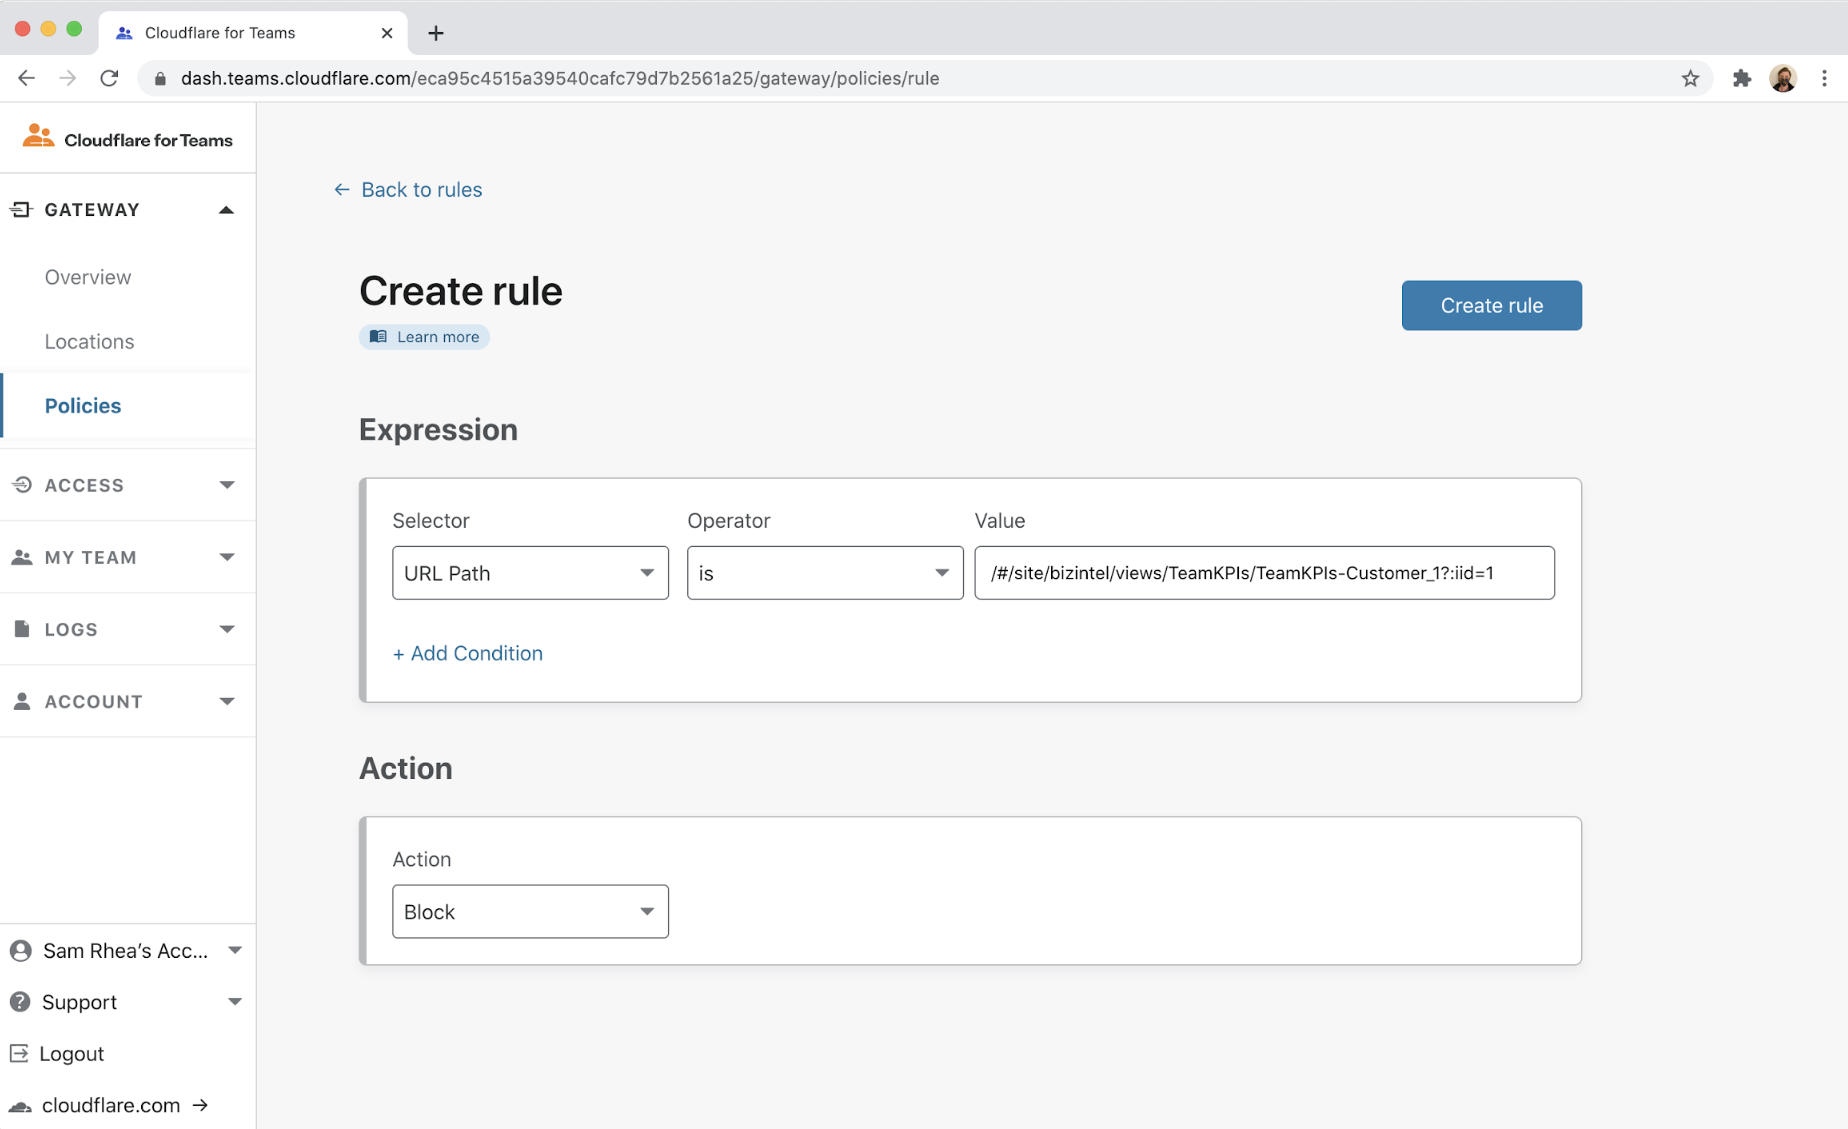
One other challenge we had internally at Cloudflare is that we lacked the ability to add user-based controls in some of the SaaS applications we use. For example, a team member connecting to a data visualization application had access to dashboards created by other teams, that they shouldn’t have access to.
We can use Cloudflare Gateway to solve that problem. Gateway provides the ability to restrict certain URLs to groups of users; this allows us to add rules that only let specific team members reach records that live at known URLs.
However, if someone is not using Gateway, we lose that level of policy control. The integration with Cloudflare Access ensures that those rules are always enforced. If users are not running Gateway, they cannot login to the application.
What’s next?
You can begin using this feature in your Cloudflare for Teams account today with the Teams Standard or Teams enterprise plan. Documentation is available here to help you get started.
Want to try out Cloudflare for Teams? You can sign up for Teams today on our free plan and test Gateway’s DNS filtering and Access for up to 50 users at no cost.
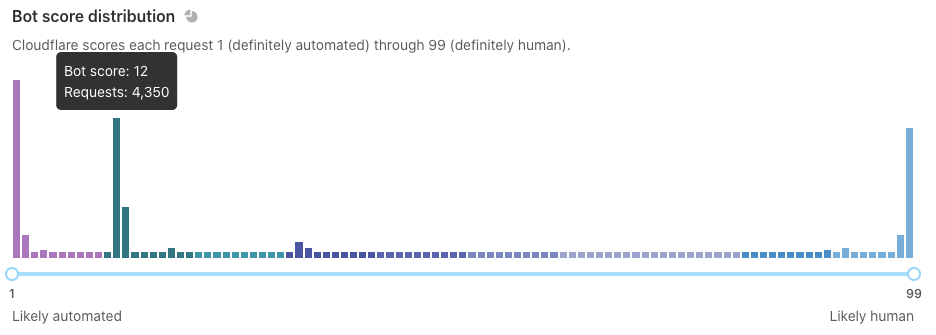
On the week of Black Friday, Cloudflare automatically detected and mitigated a unique ACK DDoS attack, which we’ve codenamed “Beat”, that targeted a Magic Transit customer. Usually, when attacks make headlines, it’s because of their size. However, in this case, it’s not the size that is unique but the method that appears to have been borrowed from the world of acoustics.
Acoustic inspired attack
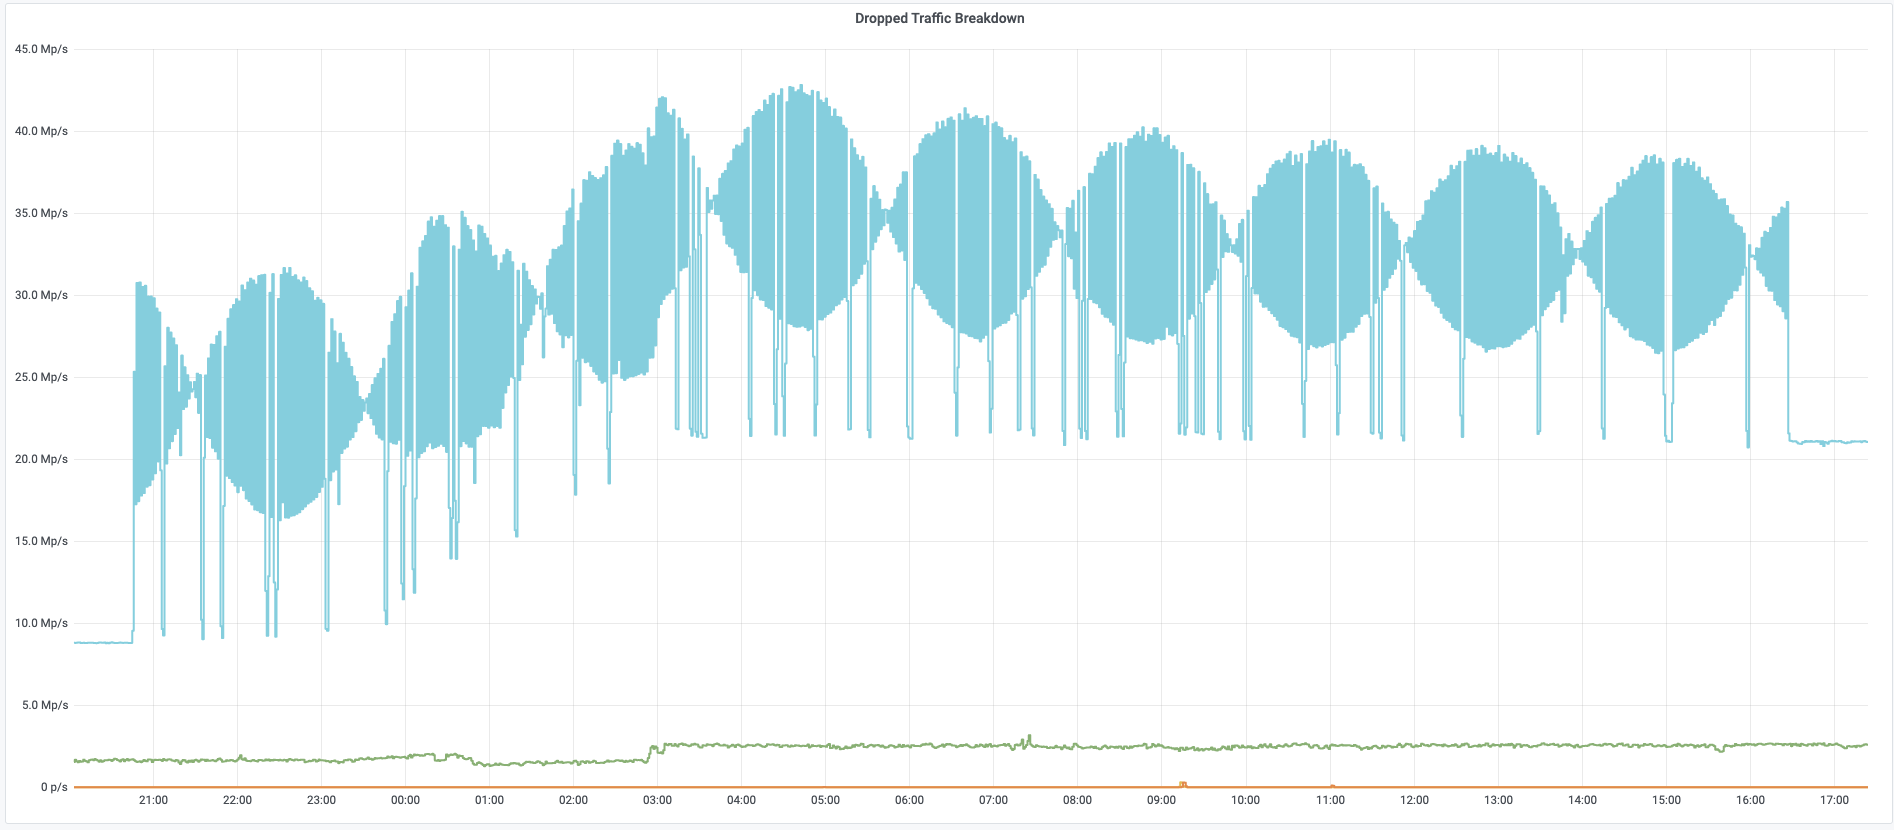
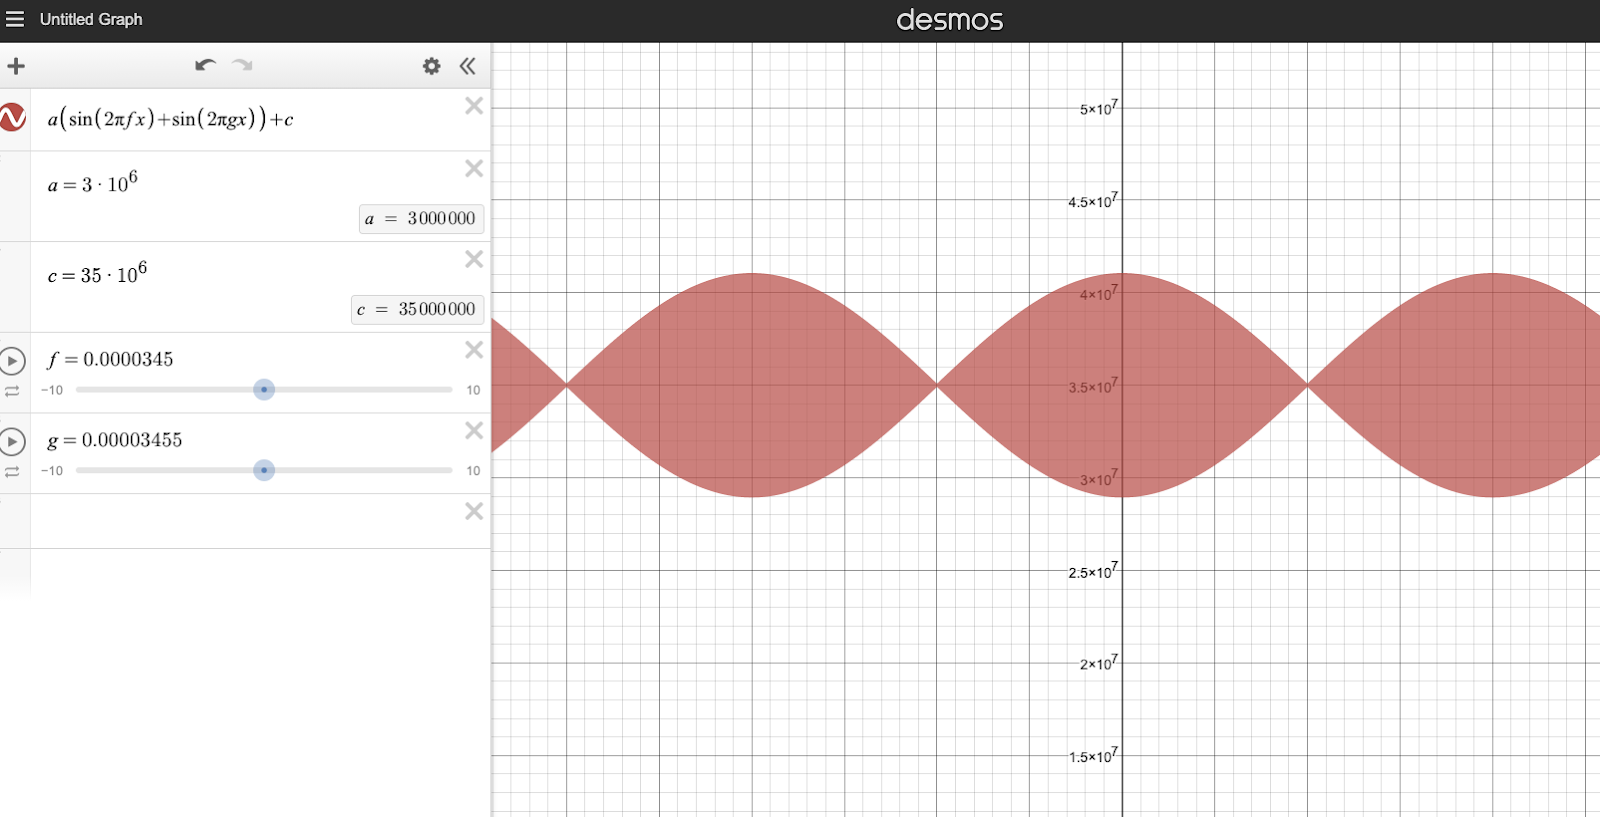
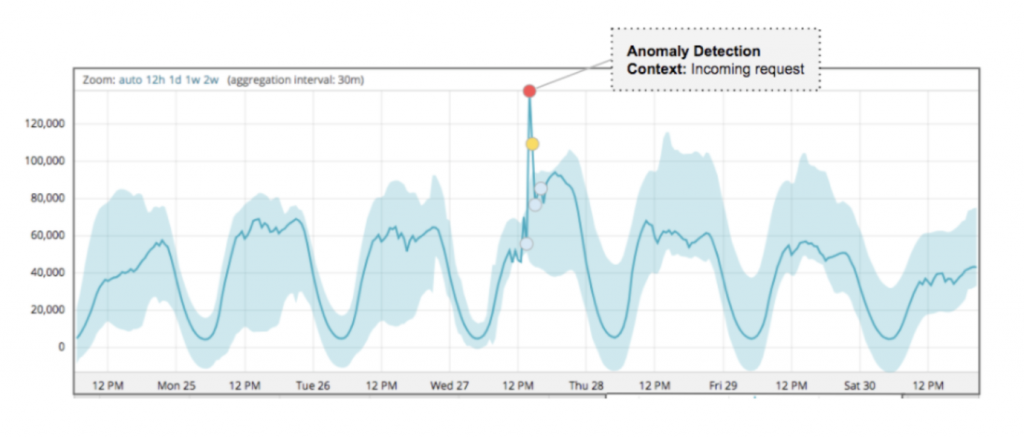
As can be seen in the graph below, the attack’s packet rate follows a wave-shaped pattern for over 8 hours. It seems as though the attacker was inspired by an acoustics concept called beat. In acoustics, a beat is a term that is used to describe an interference of two different wave frequencies. It is the superposition of the two waves. When the two waves are nearly 180 degrees out of phase, they create the beating phenomenon. When the two waves merge they amplify the sound and when they are out of sync they cancel one another, creating the beating effect.
Beat DDoS Attack
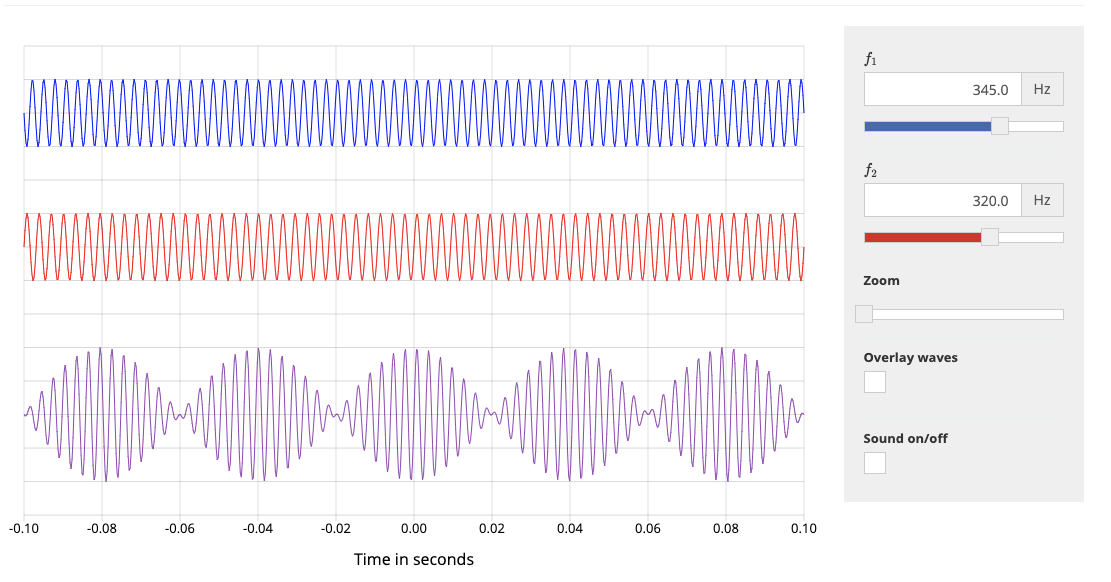
Acedemo.org has a nice tool where you can create your own beat wave. As you can see in the screenshot below, the two waves in blue and red are out of phase and the purple wave is their superposition, the beat wave.
It looks like the attacker launched a flood of packets where the rate of the packets is determined by the equation of the beat wave: y‘beat=y1+y2. The two equations y1 and y2 represent the two waves.
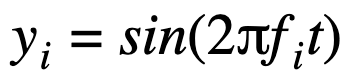
Each equation is expressed as
where fi is the frequency of each wave and t is time.
Therefore, the packet rate of the attack is determined by manipulation of the equation
to achieve a packet rate that ranges from ~18M to ~42M pps.
To get to the scale of this attack we will need to multiply y‘beat by a certain variable a and also add a constant c, giving us ybeat=ay‘beat+c. Now, it’s been a while since I played around with equations, so I’m only going to try and get an approximation of the equation.
By observing the attack graph, we can guesstimate that
by playing around with desmos’s cool graph visualizer tool, if we set f1=0.0000345 and f2=0.00003455 we can generate a graph that resembles the attack graph. Plotting in those variables, we get:
Now this formula assumes just one node firing the packets. However, this specific attack was globally distributed, and if we assume that each node, or bot in this botnet, was firing an equal amount of packets at an equal rate, then we can divide the equation by the size of the botnet; the number of bots b. Then the final equation is something in the form of:
In the screenshot below, g = f 1. You can view this graph here.
Beating the drum
The attacker may have utilized this method in order to try and overcome our DDoS protection systems (perhaps thinking that the rhythmic rise and fall of the attack would fool our systems). However, flowtrackd, our unidirectional TCP state tracking machine, detected it as being a flood of ACK packets that do not belong to any existing TCP connection. Therefore, flowtrackd automatically dropped the attack packets at Cloudflare’s edge.
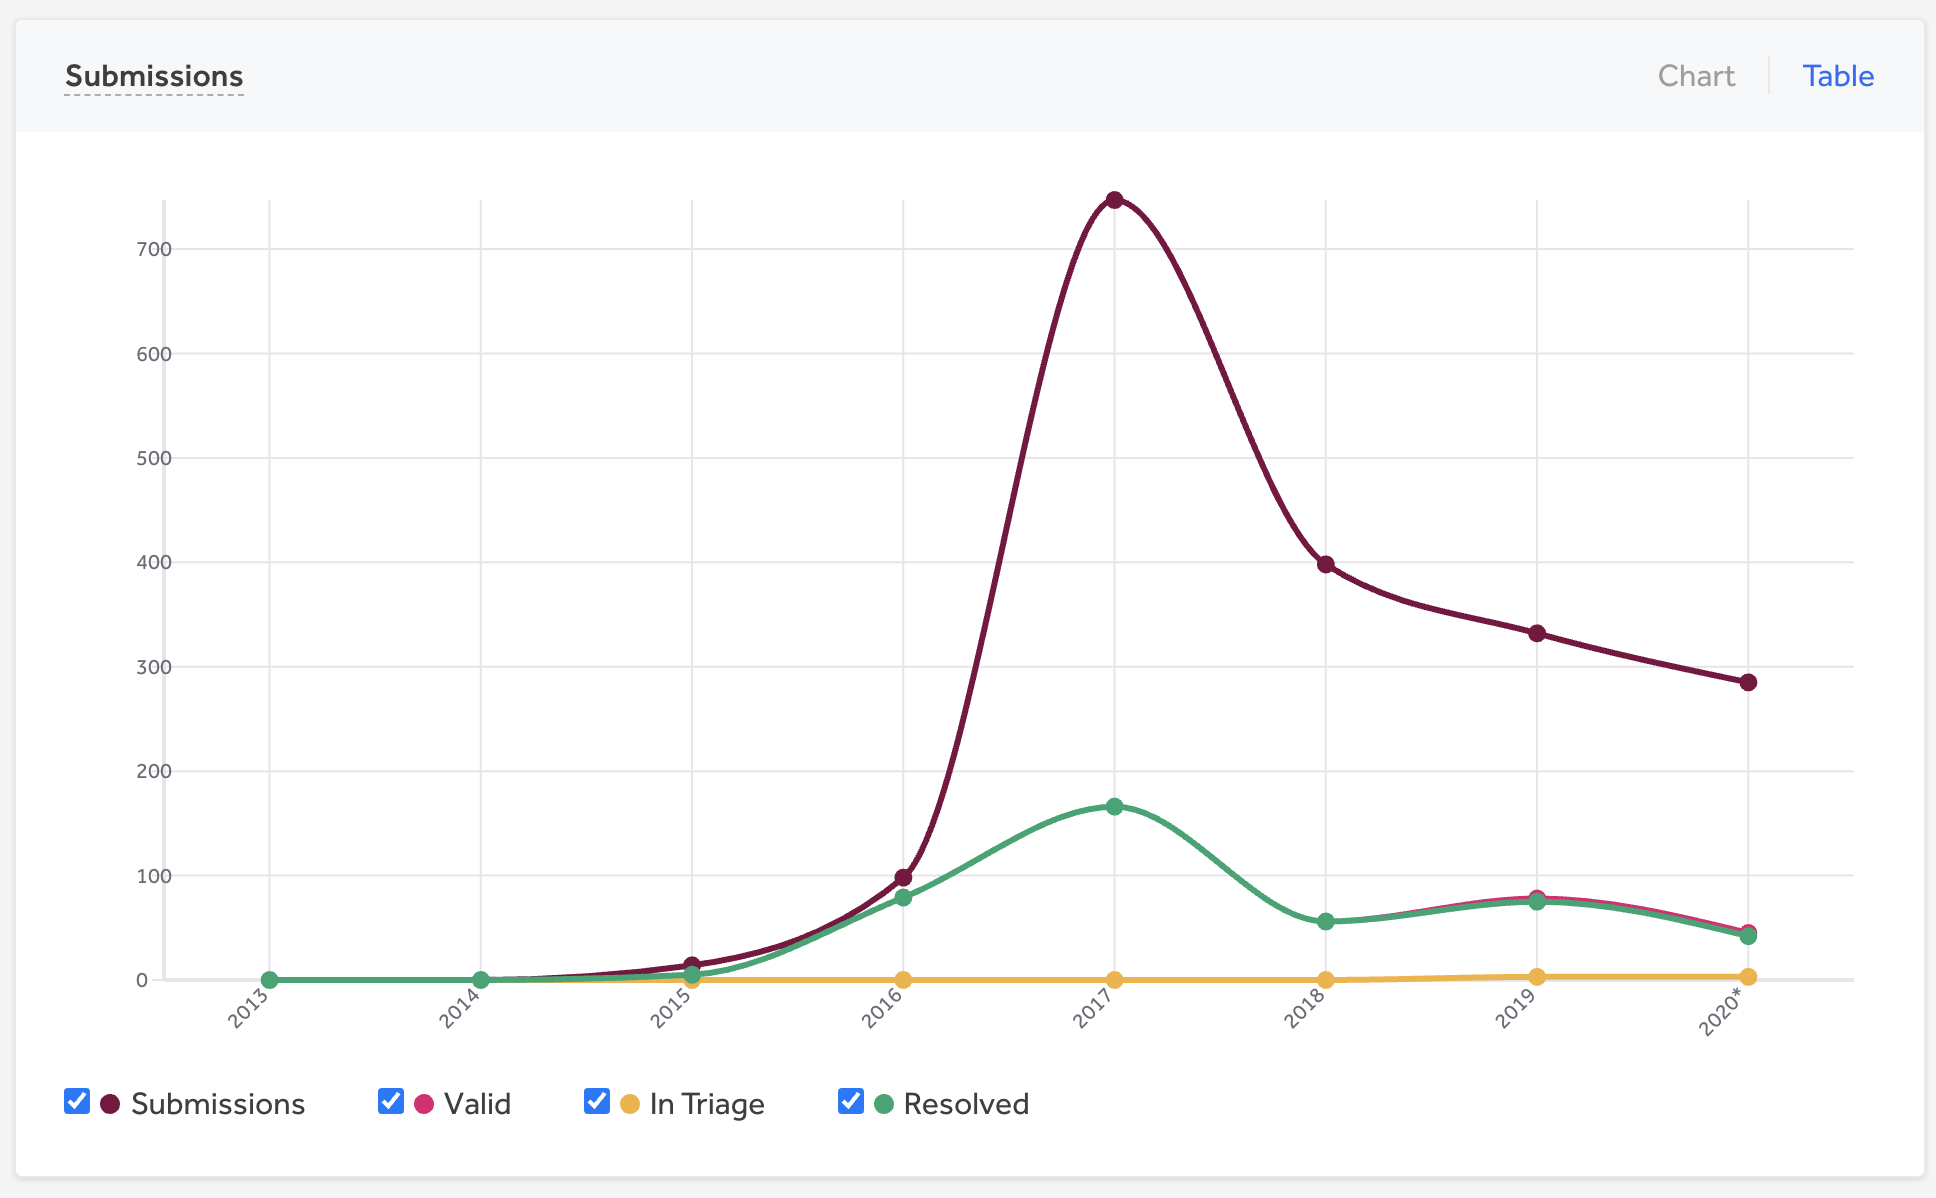
The attacker was beating the drum for over 19 hours with an amplitude of ~7 Mpps, a wavelength of ~4 hours, and peaking at ~42 Mpps. During the two days in which the attack took place, Cloudflare systems automatically detected and mitigated over 700 DDoS attacks that targeted this customer. The attack traffic accumulated at almost 500 Terabytes out of a total of 3.6 Petabytes of attack traffic that targeted this single customer in November alone. During those two days, the attackers utilized mainly ACK floods, UDP floods, SYN floods, Christmas floods (where all of the TCP flags are ‘lit’), ICMP floods, and RST floods.
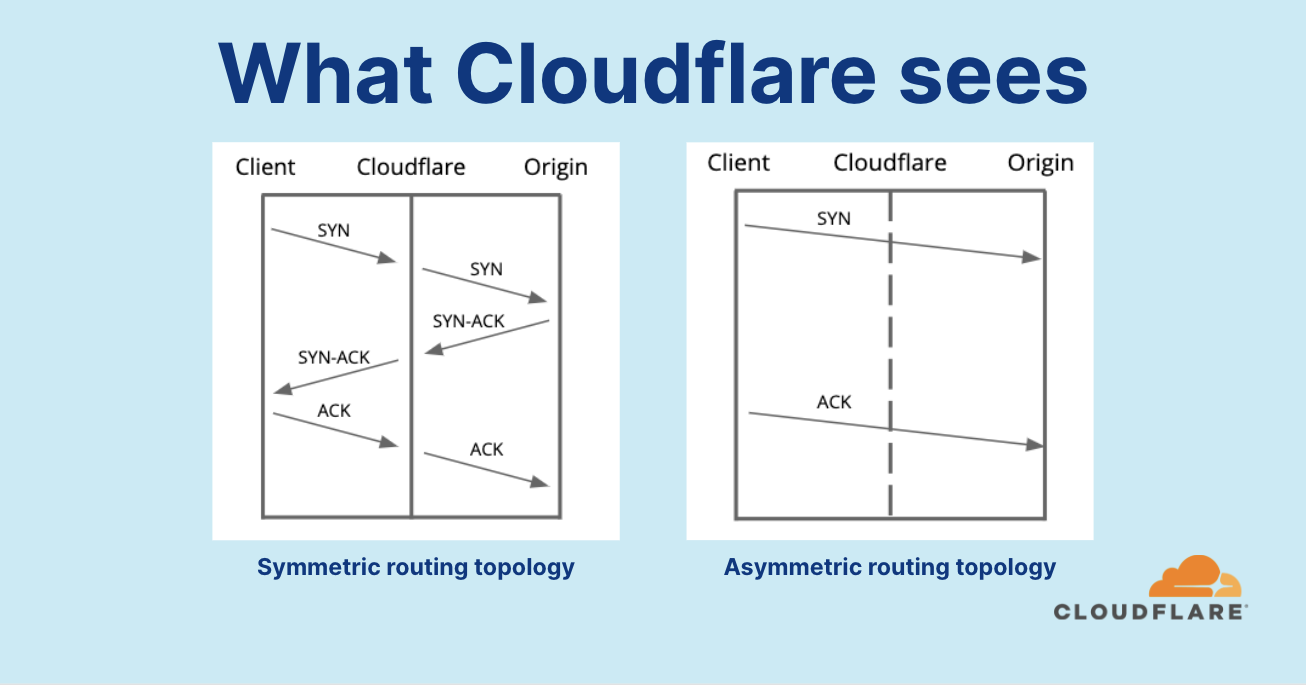
The challenge of TCP based attacks
TCP is a stateful protocol, which means that in some cases, you’d need to keep track of a TCP connection’s state in order to know if a packet is legitimate or part of an attack, i.e. out of state. We were able to provide protection against out-of-state TCP packet attacks for our “classic” WAF/CDN service and Spectrum service because in both cases Cloudflare serves as a reverse-proxy seeing both ingress and egress traffic.
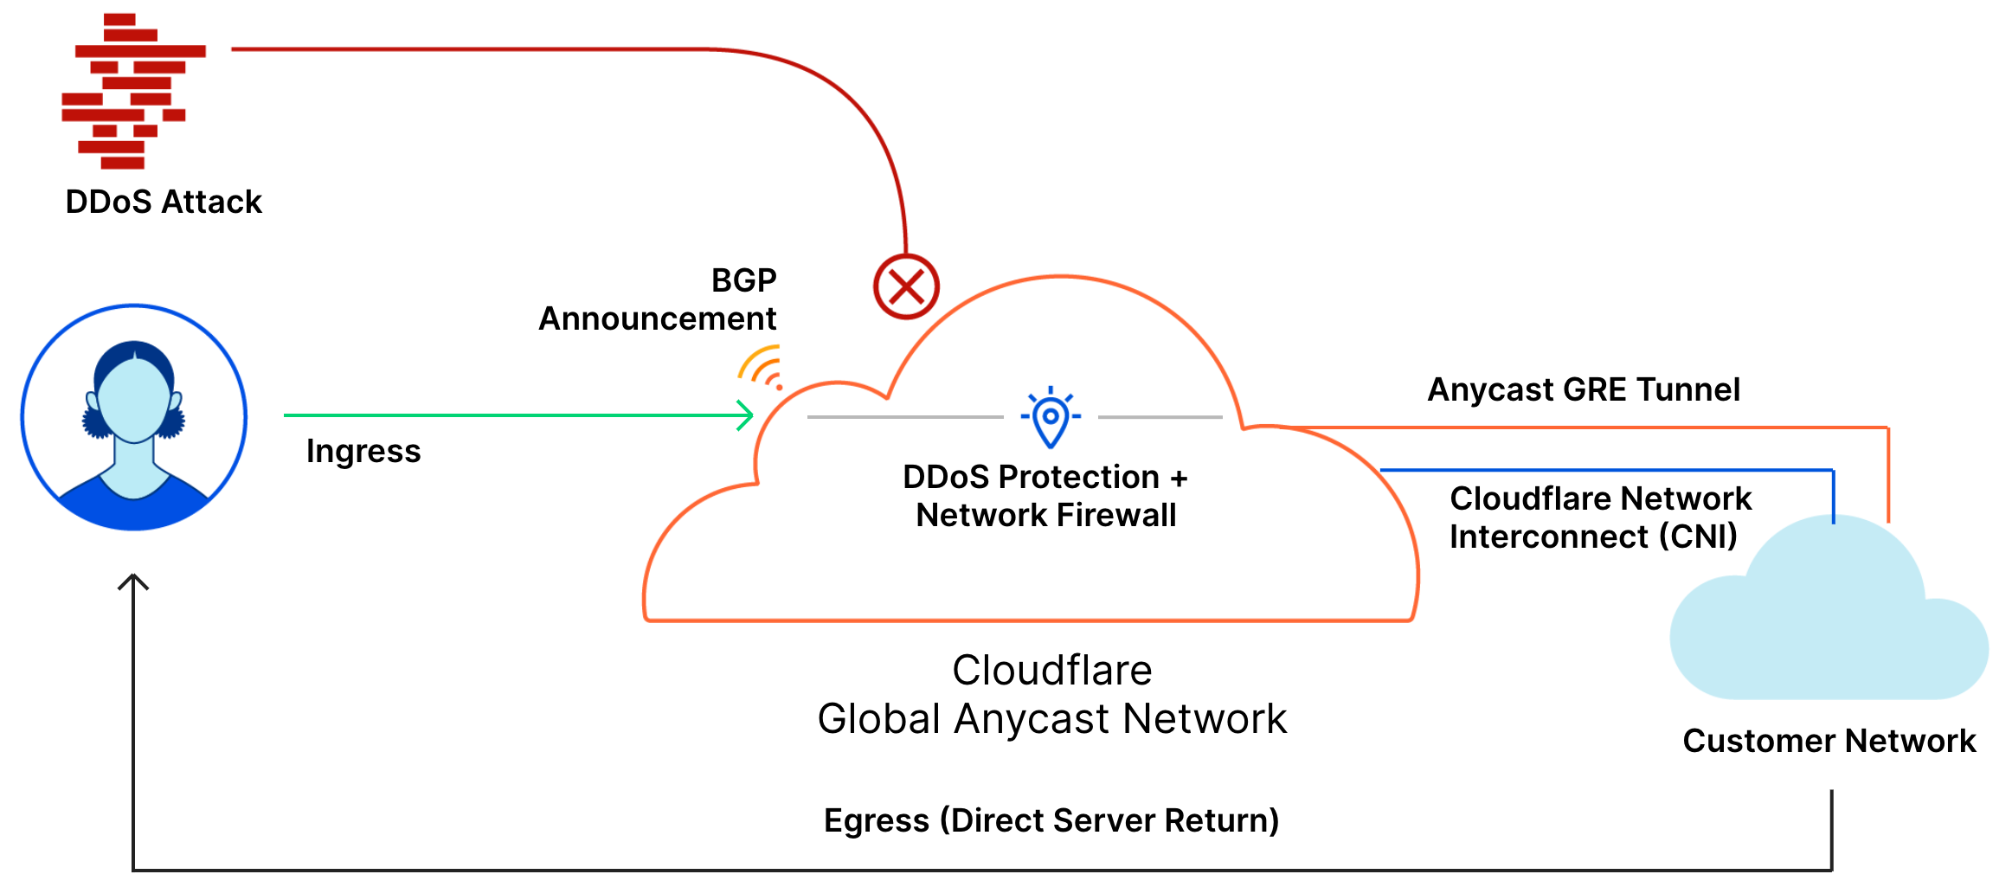
However, when we launched Magic Transit, which relies on an asymmetric routing topology with a direct server return (DSR), we couldn’t utilize our existing TCP connection tracking systems.
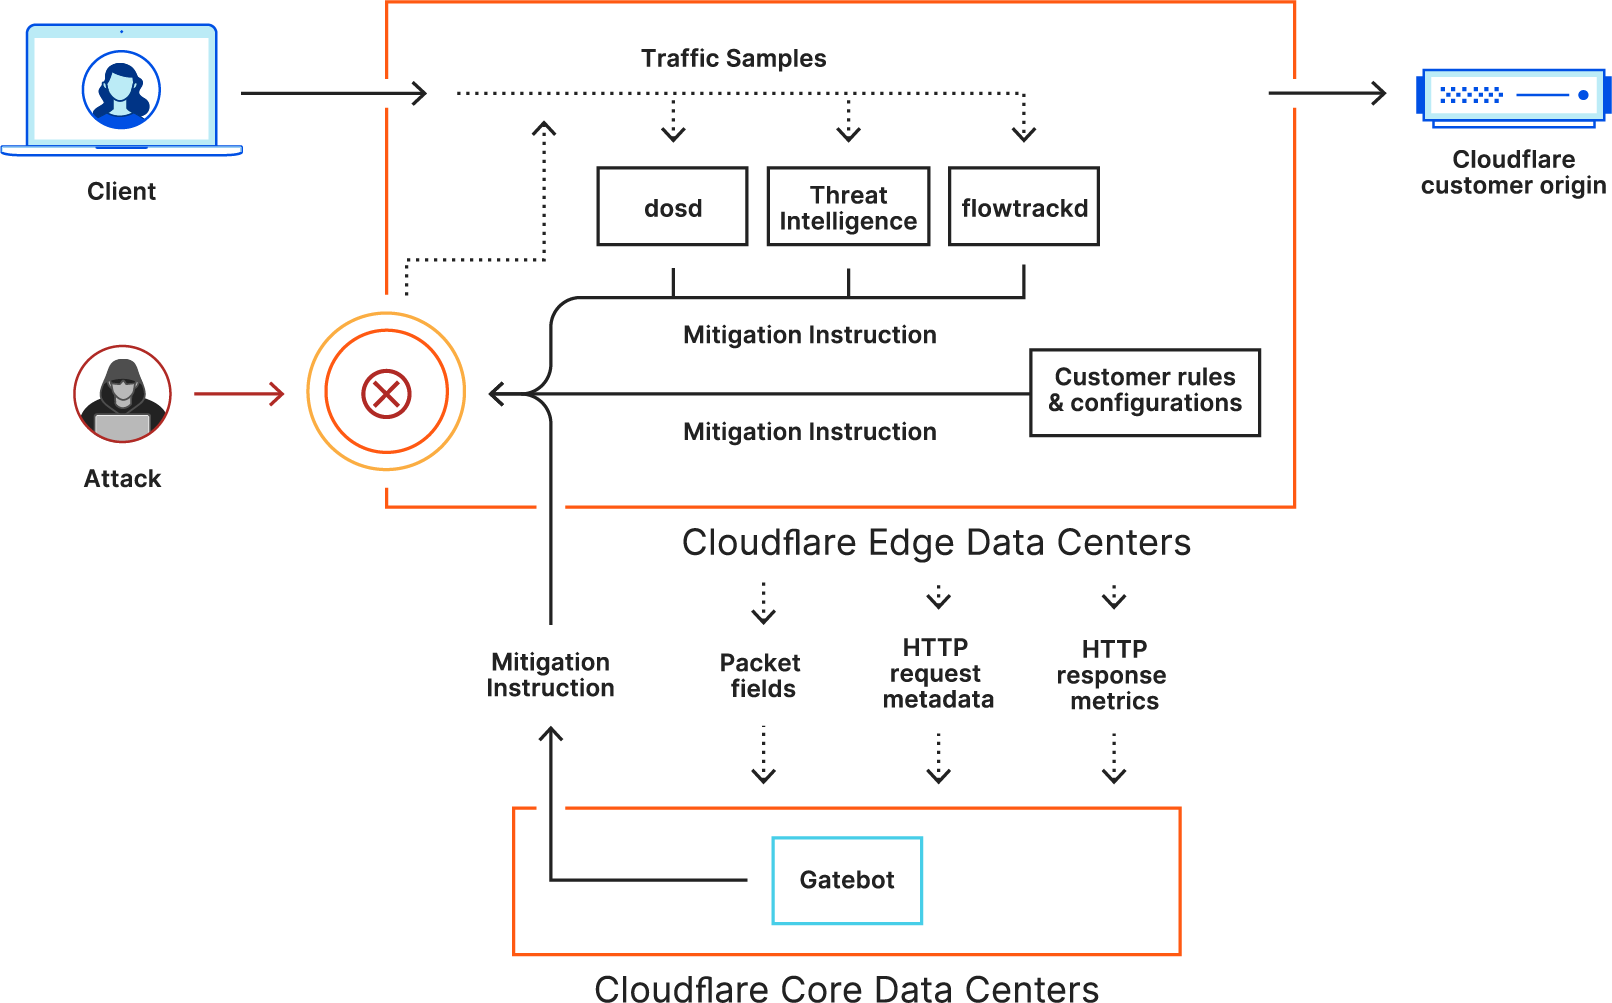
And so, being a software-defined company, we’re able to write code and spin up software when and where needed — as opposed to vendors that utilize dedicated DDoS protection hardware appliances. And that is what we did. We built flowtrackd, which runs autonomously on each server at our network’s edge. flowtrackd is able to classify the state of TCP flows by analyzing only the ingress traffic, and then drops, challenges, or rate-limits attack packets that do not correspond to an existing flow.
flowtrackd works together with our two additional DDoS protection systems, dosd and Gatebot, to assure our customers are protected against DDoS attacks, regardless of their size or sophistication — in this case, serving as a noise-canceling system to the Beat attack; reducing the headaches for our customers.
Read more about how our DDoS protection systems work here.
Security has always been a top-priority at Grab; our product security team works round-the-clock to ensure that our customers’ data remains safe. Five years ago, we launched our private bug bounty program on HackerOne, which evolved into a public program in August 2017. The idea was to complement the security efforts our team has been putting through to keep Grab secure. We were a pioneer in South East Asia to implement a public bug bounty program, and now we stand among the Top 20 programs on HackerOne worldwide.
We started as a private bug bounty program which provided us with fantastic results, thus encouraging us to increase our reach and benefit from the vibrant security community across the globe which have helped us iron-out security issues 24×7 in our products and infrastructure. We then publicly launched our bug bounty program offering competitive rewards and hackers can even earn additional bonuses if their report is well-written and display an innovative approach to testing.
In 2019, we also enrolled ourselves in the Google Play Security Reward Program (GPSRP), Offered by Google Play, GPSRP allows researchers to re-submit their resolved mobile security issues directly and get additional bounties if the report qualifies under the GPSRP rules. A selected number of Android applications are eligible, including Grab’s Android mobile application. Through the participation in GPSP, we hope to give researchers the recognition they deserve for their efforts.
In this blog post, we’re going to share our journey of running a bug bounty program, challenges involved and share the learnings we had on the way to help other companies in SEA and beyond to establish and build a successful bug bounty program.
Transitioning from Private to a Public Program
At Grab, before starting the private program, we defined policy and scope, allowing us to communicate the objectives of our bug bounty program and list the targets that can be tested for security issues. We did a security sweep of the targets to eliminate low-hanging security issues, assigned people from the security team to take care of incoming reports, and then launched the program in private mode on HackerOne with a few chosen researchers having demonstrated a history of submitting quality submissions.
One of the benefits of running a private bug bounty program is to have some control over the number of incoming submissions of potential security issues and researchers who can report issues. This ensures the quality of submissions and helps to control the volume of bug reports, thus avoiding overwhelming a possibly small security team with a deluge of issues so that they won’t be overwhelming for the people triaging potential security issues. The invited researchers to the program are limited, and it is possible to invite researchers with a known track record or with a specific skill set, further working in the program’s favour.
The results and lessons from our private program were valuable, making our program and processes mature enough to open the bug bounty program to security researchers across the world. We still did another security sweep, reworded the policy, redefined the targets by expanding the scope, and allocated enough folks from our security team to take on the initial inflow of reports which was anticipated to be in tune with other public programs.
Noticeable spike in the number of incoming reports as we went public in July 2017.
Lessons Learned from the Public Program
Although we were running our bug bounty program in private for sometime before going public, we still had not worked much on building standard operating procedures and processes for managing our bug bounty program up until early 2018. Listed below, are our key takeaways from 2018 till July 2020 in terms of improvements, challenges, and other insights.
Response Time: No researcher wants to work with a bug bounty team that doesn’t respect the time that they are putting into reporting bugs to the program. We initially didn’t have a formal process around response times, because we wanted to encourage all security engineers to pick-up reports. Still, we have been consistently delivering a first response to reports in a matter of hours, which is significantly lower than the top 20 bug bounty programs running on HackerOne. Know what structured (or unstructured) processes work for your team in this area, because your program can see significant rewards from fast response times.
Time to Bounty: In most bug bounty programs the payout for a bug is made in one of the following ways: full payment after the bug has been resolved, full payment after the bug has been triaged, or paying a portion of the bounty after triage and the remaining after resolution. We opt to pay the full bounty after triage. While we’re always working to speed up resolution times, that timeline is in our hands, not the researcher’s. Instead of making them wait, we pay them as soon as impact is determined to incentivize long-term engagement in the program.
Noise Reduction: With HackerOne Triage and Human-Augmented Signal, we’re able to focus our team’s efforts on resolving unique, valid vulnerabilities. Human-Augmented Signal flags any reports that are likely false-positives, and Triage provides a validation layer between our security team and the report inbox. Collaboration with the HackerOne Triage team has been fantastic and ultimately allows us to be more efficient by focusing our energy on valid, actionable reports. In addition, we take significant steps to block traffic coming from networks running automated scans against our Grab infrastructure and we’re constantly exploring this area to actively prevent automated external scanning.
Team Coverage: We introduced a team scheduling process, in which we assign a security engineer (chosen during sprint planning) on a weekly basis, whose sole responsibility is to review and respond to bug bounty reports. We have integrated our systems with HackerOne’s API and PagerDuty to ensure alerts are for valid reports and verified as much as possible.
Looking Ahead
In one area we haven’t been doing too great is ensuring higher rates of participation in our core mobile applications; some of the pain points researchers have informed us about while testing our applications are:
Researchers’ accounts are getting blocked due to our anti-fraud checks.
Researchers are not able to register driver accounts (which is understandable as our driver-partners have to go through manual verification process)
Researchers who are not residing in the Southeast Asia region are unable to complete end-to-end flows of our applications.
We are open to community feedback and how we can improve. We want to hear from you! Please drop us a note at [email protected] for any program suggestions or feedback.
Last but not least, we’d like to thank all researchers who have contributed to the Grab program so far. Your immense efforts have helped keep Grab’s businesses and users safe. Here’s a shoutout to our program’s top-earning hackers 🏆:
Lastly, here is a special shoutout to @bagipro who has done some great work and testing on our Grab mobile applications!
Well done and from everyone on the Grab team, we look forward to seeing you on the program!
Join us
Grab is more than just the leading ride-hailing and mobile payments platform in Southeast Asia. We use data and technology to improve everything from transportation to payments and financial services across a region of more than 620 million people. We aspire to unlock the true potential of Southeast Asia and look for like-minded individuals to join us on this ride.
If you share our vision of driving South East Asia forward, apply to join our team today.
The Cloudflare Web Application Firewall (WAF) blocks more than 72B malicious requests per day from reaching our customers’ applications. Typically, our users can easily confirm these requests were not legitimate by checking the URL, the query parameters, or other metadata that Cloudflare provides as part of the security event log in the dashboard.
Sometimes investigating a WAF event requires a bit more research and a trial and error approach, as the WAF may have matched against a field that is not logged by default.
Not logging all parts of a request is intentional: HTTP headers and payloads often contain sensitive data, including personally identifiable information, which we consider a toxic asset. Request headers may contain cookies and POST payloads may contain username and password pairs submitted during a login attempt among other sensitive data.
We recognize that providing clear visibility in any security event is a core feature of a firewall, as this allows users to better fine tune their rules. To accomplish this, while ensuring end-user privacy, we built encrypted WAF matched payload logging. This feature will log only the specific component of the request the WAF has deemed malicious — and it is encrypted using a customer-provided key to ensure that no Cloudflare employee can examine the data*. Additionally, the crypto uses an exciting new standard — developed in part by Cloudflare — called Hybrid Public Key Encryption (HPKE).
*All Cloudflare logs are encrypted at rest. This feature implements a second layer of encryption for the specific matched fields so that only the customer can decrypt it.
Encrypting Matched Payloads
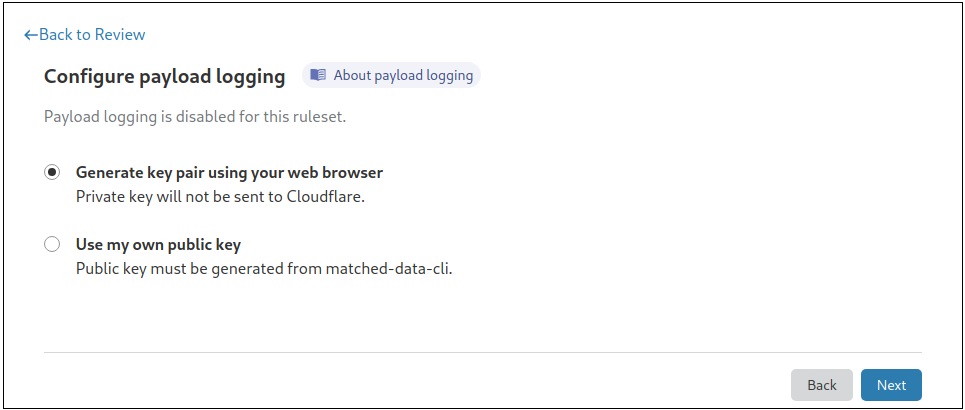
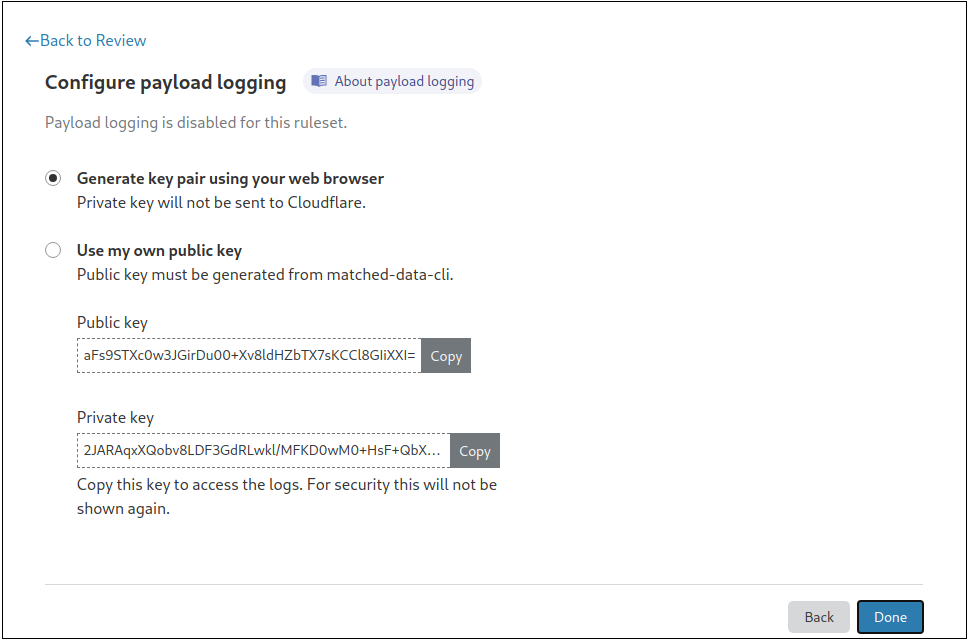
To turn on this feature, you need to provide a public key, or generate a private-public key pair directly from the dashboard. Your data will then be encrypted using Hybrid Public Key Encryption (HPKE), which offers a great combination of both performance and security.
To simplify this process, we have built an easy-to-use command line utility to generate the key pair:
Cloudflare does not store the private key and it is our customers’ responsibility to ensure it is stored safely. Lost keys, and the data encrypted with them, cannot be recovered but customers can rotate keys to be used with future payloads.
Once encrypted, payloads will be available in the logs as encrypted base64 blobs within the metadata field:
Decrypting payloads can be done via the dashboard from the Security Events log, or by using the command line utility, as shown below. If done via the dashboard, the browser will decrypt the payload locally (i.e., client side) and will not send the private key to Cloudflare.
In the example above, the WAF matched against the REQUEST_HEADERS:REFERER field. Any other fields the WAF matched on would be similarly logged.
Better Logging with User Privacy in Mind
In the coming months, this feature will be available on our dashboard to our Enterprise customers. Enterprise customers who would like this feature enabled sooner should reach out to their account team. Only application owners who also have access to the Cloudflare dashboard as Super Administrators will be able to configure encrypted matched payload logging. Those who do not have access to the private key, including Cloudflare staff, are not able to decrypt the logs.
We are also excited for this feature to be one of our first to use Hybrid Public Key Encryption, and for Cloudflare to use this emerging standard developed by the Crypto Forum Research Group (CFRG), the research body that supports the development of Internet standards at the IETF. And stay tuned, we will publish a deep dive post with the technical details soon!
Passwords are a problem. They are a problem for reasons that are familiar to most readers. For us at Cloudflare, the problem lies much deeper and broader. Most readers will immediately acknowledge that passwords are hard to remember and manage, especially as password requirements grow increasingly complex. Luckily there are great software packages and browser add-ons to help manage passwords. Unfortunately, the greater underlying problem is beyond the reaches of software to solve.
The fundamental password problem is simple to explain, but hard to solve: A password that leaves your possession is guaranteed to sacrifice security, no matter its complexity or how hard it may be to guess. Passwords are insecure by their very existence.
You might say, “but passwords are always stored in encrypted format!” That would be great. More accurately, they are likely stored as a salted hash, as explained below. Even worse is that there is no way to verify the way that passwords are stored, and so we can assume that on some servers passwords are stored in cleartext. The truth is that even responsibly stored passwords can be leaked and broken, albeit (and thankfully) with enormous effort. An increasingly pressing problem stems from the nature of passwords themselves: any direct use of a password, today, means that the password must be handled in the clear.
You say, “but my password is transmitted securely over HTTPS!” This is true.
You say, “but I know the server stores my password in hashed form, secure so no one can access it!” Well, this puts a lot of faith in the server. Even so, let’s just say that yes, this may be true, too.
There remains, however, an important caveat — a gap in the end-to-end use of passwords. Consider that once a server receives a password, between being securely transmitted and securely stored, the password has to be read and processed. Yes, as cleartext!
And it gets worse — because so many are used to thinking in software, it’s easy to forget about the vulnerability of hardware. This means that even if the software is somehow trusted, the password must at some point reside in memory. The password must at some point be transmitted over a shared bus to the CPU. These provide vectors of attack to on-lookers in many forms. Of course, these attack vectors are far less likely than those presented by transmission and permanent storage, but they are no less severe (recent CPU vulnerabilities such as Spectre and Meltdown should serve as a stark reminder.)
The only way to fix this problem is to get rid of passwords altogether. There is hope! Research and private sector communities are working hard to do just that. New standards are emerging and growing mature. Unfortunately, passwords are so ubiquitous that it will take a long time to agree on and supplant passwords with new standards and technology.
At Cloudflare, we’ve been asking if there is something that can be done now, imminently. Today’s deep-dive into OPAQUE is one possible answer. OPAQUE is one among many examples of systems that enable a password to be useful without it ever leaving your possession. No one likes passwords, but as long they’re in use, at least we can ensure they are never given away.
I’ll be the first to admit that password-based authentication is annoying. Passwords are hard to remember, tedious to type, and notoriously insecure. Initiatives to reduce or replace passwords are promising. For example, WebAuthn is a standard for web authentication based primarily on public key cryptography using hardware (or software) tokens. Even so, passwords are frustratingly persistent as an authentication mechanism. Whether their persistence is due to their ease of implementation, familiarity to users, or simple ubiquity on the web and elsewhere, we’d like to make password-based authentication as secure as possible while they persist.
My internship at Cloudflare focused on OPAQUE, a cryptographic protocol that solves one of the most glaring security issues with password-based authentication on the web: though passwords are typically protected in transit by HTTPS, servershandle them in plaintext to check their correctness. Handling plaintext passwords is dangerous, as accidentally logging or caching them could lead to a catastrophic breach. The goal of the project, rather than to advocate for adoption of any particular protocol, is to show that OPAQUE is a viable option among many for authentication. Because the web case is most familiar to me, and likely many readers, I will use the web as my main example.
Web Authentication 101: Password-over-TLS
When you type in a password on the web, what happens? The website must check that the password you typed is the same as the one you originally registered with the site. But how does this check work?
Usually, your username and password are sent to a server. The server then checks if the registered password associated with your username matches the password you provided. Of course, to prevent an attacker eavesdropping on your Internet traffic from stealing your password, your connection to the server should be encrypted via HTTPS (HTTP-over-TLS).
Despite use of HTTPS, there still remains a glaring problem in this flow: the server must store a representation of your password somewhere. Servers are hard to secure, and breaches are all too common. Leaking this representation can cause catastrophic security problems. (For records of the latest breaches, check out https://haveibeenpwned.com/).
To make these leaks less devastating, servers often apply a hash function to user passwords. A hash function maps each password to a unique, random-looking value. It’s easy to apply the hash to a password, but almost impossible to reverse the function and retrieve the password. (That said, anyone can guess a password, apply the hash function, and check if the result is the same.)
With password hashing, plaintext passwords are no longer stored on servers. An attacker who steals a password database no longer has direct access to passwords. Instead, the attacker must apply the hash to many possible passwords and compare the results with the leaked hashes.
Unfortunately, if a server hashes only the passwords, attackers can download precomputed rainbow tables containing hashes of trillions of possible passwords and almost instantly retrieve the plaintext passwords. (See https://project-rainbowcrack.com/table.htm for a list of some rainbow tables).
With this in mind, a good defense-in-depth strategy is to use salted hashing, where the server hashes your password appended to a random, per-user value called a salt. The server also saves the salt alongside the username, so the user never sees or needs to submit it. When the user submits a password, the server re-computes this hash function using the salt. An attacker who steals password data, i.e., the password representations and salt values, must then guess common passwords one by one and apply the (salted) hash function to each guessed password. Existing rainbow tables won’t help because they don’t take the salts into account, so the attacker needs to make a new rainbow table for each user!
This (hopefully) slows down the attack enough for the service to inform users of a breach, so they can change their passwords. In addition, the salted hashes should be hardened by applying a hash many times to further slow attacks. (See https://blog.cloudflare.com/keeping-passwords-safe-by-staying-up-to-date/ for a more detailed discussion).
These two mitigation strategies — encrypting the password in transit and storing salted, hardened hashes — are the current best practices.
A large security hole remains open. Password-over-TLS (as we will call it) requires users to send plaintext passwords to servers during login, because servers must see these passwords to match against registered passwords on file. Even a well-meaning server could accidentally cache or log your password attempt(s), or become corrupted in the course of checking passwords. (For example, Facebook detected in 2019 that it had accidentally been storing hundreds of millions of plaintext user passwords). Ideally, servers should never see a plaintext password at all.
But that’s quite a conundrum: how can you check a password if you never see the password? Enter OPAQUE: a Password-Authenticated Key Exchange (PAKE) protocol that simultaneously proves knowledge of a password and derives a secret key. Before describing OPAQUE in detail, we’ll first summarize PAKE functionalities in general.
Password Proofs with Password-Authenticated Key Exchange
Password-Authenticated Key Exchange (PAKE) was proposed by Bellovin and Merrit in 1992, with an initial motivation of allowing password-authentication without the possibility of dictionary attacks based on data transmitted over an insecure channel.
Essentially, a plain, or symmetric, PAKE is a cryptographic protocol that allows two parties who share only a password to establish a strong shared secret key. The goals of PAKE are:
1) The secret keys will match if the passwords match, and appear random otherwise.
2) Participants do not need to trust third parties (in particular, no Public Key Infrastructure),
3) The resulting secret key is not learned by anyone not participating in the protocol – including those who know the password.
4) The protocol does not reveal either parties’ password to each other (unless the passwords match), or to eavesdroppers.
In sum, the only way to successfully attack the protocol is to guess the password correctly while participating in the protocol. (Luckily, such attacks can be mostly thwarted by rate-limiting, i.e, blocking a user from logging in after a certain number of incorrect password attempts).
Given these requirements, password-over-TLS is clearly not a PAKE, because:
Password-over-TLS provides the user no assurance that the server knows their password or a derivative of it — a server could accept any input from the user with no checks whatsoever.
That said, plain PAKE is still worse than Password-over-TLS, simply because it requires the server to store plaintext passwords. We need a PAKE that lets the server store salted hashes if we want to beat the current practice.
An improvement over plain PAKE is what’s called an asymmetric PAKE (aPAKE), because only the client knows the password, and the server knows a hashed password. An aPAKE has the four properties of PAKE, plus one more:
5) An attacker who steals password data stored on the server must perform a dictionary attack to retrieve the password.
The issue with most existing aPAKE protocols, however, is that they do not allow for a salted hash (or if they do, they require that salt to be transmitted to the user, which means the attacker has access to the salt beforehand and can begin computing a rainbow table for the user before stealing any data). We’d like, therefore, to upgrade the security property as follows:
5*) An attacker who steals password data stored on the server must perform a per-user dictionary attack to retrieve the password after the data is compromised.
OPAQUE is the first aPAKE protocol with a formal security proof that has this property: it allows for a completely secret salt.
OPAQUE – Servers safeguard secrets without knowing them!
OPAQUE is what’s referred to as a strong aPAKE, which simply means that it resists these pre-computation attacks by using a secretly salted hash on the server. OPAQUE was proposed and formally analyzed by Stanislaw Jarecki, Hugo Krawcyzk and Jiayu Xu in 2018 (full disclosure: Stanislaw Jarecki is my academic advisor). The name OPAQUE is a combination of the names of two cryptographic protocols: OPRF and PAKE. We already know PAKE, but what is an OPRF? OPRF stands for Oblivious Pseudo-Random Function, which is a protocol by which two parties compute a function F(key, x) that is deterministic but outputs random-looking values. One party inputs the value x, and another party inputs the key – the party who inputs x learns the result F(key, x) but not the key, and the party providing the key learns nothing. (You can dive into the math of OPRFs here: https://blog.cloudflare.com/privacy-pass-the-math/).
The core of OPAQUE is a method to store user secrets for safekeeping on a server, without giving the server access to those secrets. Instead of storing a traditional salted password hash, the server stores a secret envelope for you that is “locked” by two pieces of information: your password known only by you, and a random secret key (like a salt) known only by the server. To log in, the client initiates a cryptographic exchange that reveals the envelope key to the client, but, importantly, not to the server.
The server then sends the envelope to the user, who now can retrieve the encrypted keys. (The keys included in the envelope are a private-public key pair for the user, and a public key for the server.) These keys, once unlocked, will be the inputs to an Authenticated Key Exchange (AKE) protocol, which allows the user and server to establish a secret key which can be used to encrypt their future communication.
OPAQUE consists of two phases, being credential registration and login via key exchange.
OPAQUE: Registration Phase
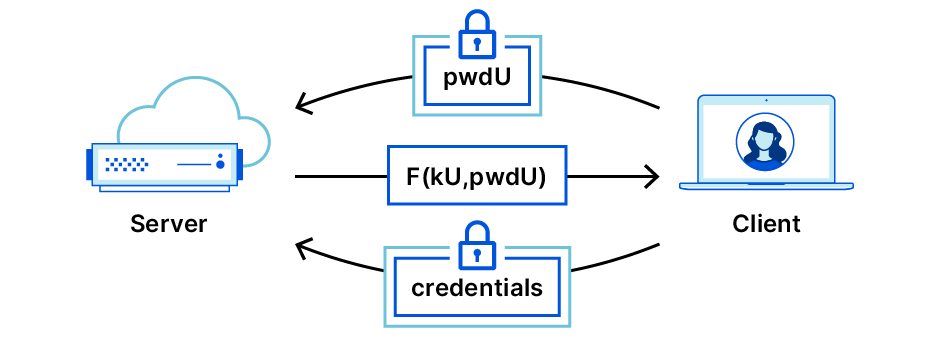
Before registration, the user first signs up for a service and picks a username and password. Registration begins with the OPRF flow we just described: Alice (the user) and Bob (the server) do an OPRF exchange. The result is that Alice has a random key rwd,derived from the OPRF output F(key, pwd), where key is a server-owned OPRF key specific to Alice and pwd is Alice’s password.
Within his OPRF message, Bob sends the public key for his OPAQUE identity. Alice then generates a new private/public key pair, which will be her persistent OPAQUE identity for Bob’s service, and encrypts her private key along with Bob’s public key with the rwd (we will call the result an encrypted envelope). She sends this encrypted envelope along with her public key (unencrypted) to Bob, who stores the data she provided, along with Alice’s specific OPRF keysecret, in a database indexed by her username.
OPAQUE: Login Phase
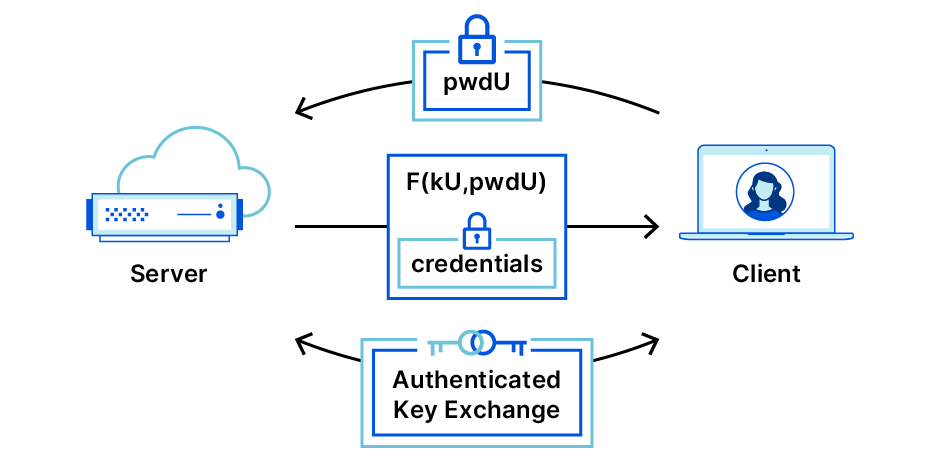
The login phase is very similar. It starts the same way as registration — with an OPRF flow. However, on the server side, instead of generating a new OPRF key, Bob instead looks up the one he created during Alice’s registration. He does this by looking up Alice’s username (which she provides in the first message), and retrieving his record of her. This record contains her public key, her encrypted envelope, and Bob’s OPRF key for Alice.
He also sends over the encrypted envelope which Alice can decrypt with the output of the OPRF flow. (If decryption fails, she aborts the protocol — this likely indicates that she typed her password incorrectly, or Bob isn’t who he says he is). If decryption succeeds, she now has her own secret key and Bob’s public key. She inputs these into an AKE protocol with Bob, who, in turn, inputs his private key and her public key, which gives them both a fresh shared secret key.
Integrating OPAQUE with an AKE
An important question to ask here is: what AKE is suitable for OPAQUE? The emerging CFRG specification outlines several options, including 3DH and SIGMA-I. However, on the web, we already have an AKE at our disposal: TLS!
Recall that TLS is an AKE because it provides unilateral (and mutual) authentication with shared secret derivation. The core of TLS is a Diffie-Hellman key exchange, which by itself is unauthenticated, meaning that the parties running it have no way to verify who they are running it with. (This is a problem because when you log into your bank, or any other website that stores your private data, you want to be sure that they are who they say they are). Authentication primarily uses certificates, which are issued by trusted entities through a system called Public Key Infrastructure (PKI). Each certificate is associated with a secret key. To prove its identity, the server presents its certificate to the client, and signs the TLS handshake with its secret key.
Modifying this ubiquitous certificate-based authentication on the web is perhaps not the best place to start. Instead, an improvement would be to authenticate the TLS shared secret, using OPAQUE, after the TLS handshake completes. In other words, once a server is authenticated with its typical WebPKI certificate, clients could subsequently authenticate to the server. This authentication could take place “post handshake” in the TLS connection using OPAQUE.
Exported Authenticators are one mechanism for “post-handshake” authentication in TLS. They allow a server or client to provide proof of an identity without setting up a new TLS connection. Recall that in the standard web case, the server establishes their identity with a certificate (proving, for example, that they are “cloudflare.com”). But if the same server also holds alternate identities, they must run TLS again to prove who they are.
The basic Exported Authenticator flow works resembles a classical challenge-response protocol, and works as follows. (We’ll consider the server authentication case only, as the client case is symmetric).
At any point after a TLS connection is established, Alice (the client) sends an authenticator request to indicate that she would like Bob (the server) to prove an additional identity. This request includes a context (an unpredictable string — think of this as a challenge), and extensions which include information about what identity the client wants to be provided. For example, the client could include the SNI extension to ask the server for a certificate associated with a certain domain name other than the one initially used in the TLS connection.
On receipt of the client message, if the server has a valid certificate corresponding to the request, it sends back an exported authenticator which proves that it has the secret key for the certificate. (This message has the same format as an Auth message from the client in TLS 1.3 handshake – it contains a Certificate, a CertificateVerify and a Finished message). If the server cannot or does not wish to authenticate with the requested certificate, it replies with an empty authenticator which contains only a well formed Finished message.
The client then checks that the Exported Authenticator it receives is well-formed, and then verifies that the certificate presented is valid, and if so, accepts the new identity.
In sum, Exported Authenticators provide authentication in a higher layer (such as the application layer) safely by leveraging the well-vetted cryptography and message formats of TLS. Furthermore, it is tied to the TLS session so that authentication messages can’t be copied and pasted from one TLS connection into another. In other words, Exported Authenticators provide exactly the right hooks needed to add OPAQUE-based authentication into TLS.
OPAQUE with Exported Authenticators (OPAQUE-EA)
OPAQUE-EA allows OPAQUE to run at any point after a TLS connection has already been set up. Recall that Bob (the server) will store his OPAQUE identity, in this case a signing key and verification key, and Alice will store her identity — encrypted — on Bob’s server. (The registration flow where Alice stores her encrypted keys is the same as in regular OPAQUE, except she stores a signing key, so we will skip straight to the login flow). Alice and Bob run two request-authenticate EA flows, one for each party, and OPAQUE protocol messages ride along in the extensions section of the EAs. Let’s look in detail how this works.
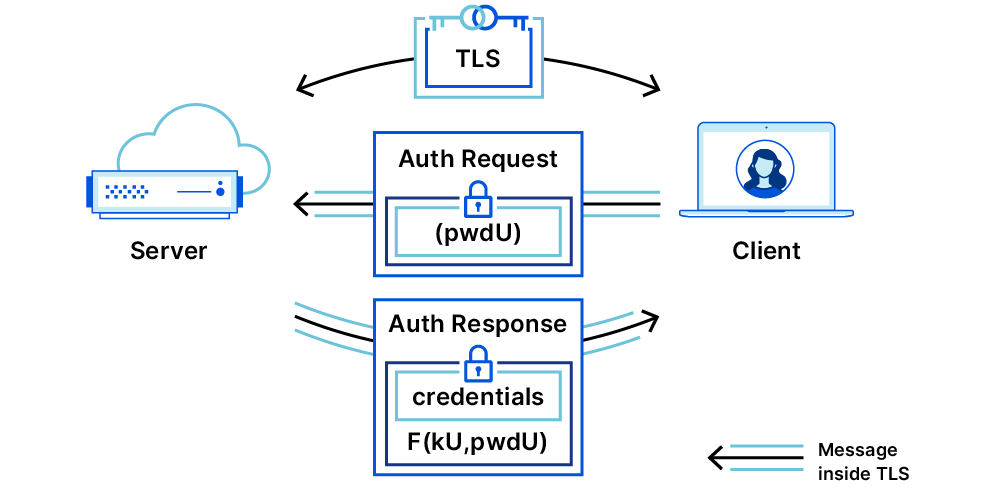
First, Alice generates her OPRF message based on her password. She creates an Authenticator Request asking for Bob’s OPAQUE identity, and includes (in the extensions field) her username and her OPRF message, and sends this to Bob over their established TLS connection.
Bob receives the message and looks up Alice’s username in his database. He retrieves her OPAQUE record containing her verification key and encrypted envelope, and his OPRF key. He uses the OPRF key on the OPRF message, and creates an Exported Authenticator proving ownership of his OPAQUE signing key, with an extension containing his OPRF message and the encrypted envelope. Additionally, he sends a new Authenticator Request asking Alice to prove ownership of her OPAQUE signing key.
Alice parses the message and completes the OPRF evaluation using Bob’s message to get output rwd, and uses rwd to decrypt the envelope. This reveals her signing key and Bob’s public key. She uses Bob’s public key to validate his Authenticator Response proof, and, if it checks out, she creates and sends an Exported Authenticator proving that she holds the newly decrypted signing key. Bob checks the validity of her Exported Authenticator, and if it checks out, he accepts her login.
My project: OPAQUE-EA over HTTPS
Everything described above is supported by lots and lots of theory that has yet to find its way into practice. My project was to turn the theory into reality. I started with written descriptions of Exported Authenticators, OPAQUE, and a preliminary draft of OPAQUE-in-TLS. My goal was to get from those to a working prototype.
My demo shows the feasibility of implementing OPAQUE-EA on the web, completely removing plaintext passwords from the wire, even encrypted. This provides a possible alternative to the current password-over-TLS flow with better security properties, but no visible change to the user.
A few of the implementation details are worth knowing. In computer science, abstraction is a powerful tool. It means that we can often rely on existing tools and APIs to avoid duplication of effort. In my project I relied heavily on mint, an open-source implementation of TLS 1.3 in Go that is great for prototyping. I also used CIRCL’s OPRF API. I built libraries for Exported Authenticators, the core of OPAQUE, and OPAQUE-EA (which ties together the two).
I made the web demo by wrapping the OPAQUE-EA functionality in a simple HTTP server and client that pass messages to each other over HTTPS. Since a browser can’t run Go, I compiled from Go to WebAssembly (WASM) to get the Go functionality in the browser, and wrote a simple script in JavaScript to call the WASM functions needed.
Since current browsers do not give access to the underlying TLS connection on the client side, I had to implement a work-around to allow the client to access the exporter keys, namely, that the server simply computes the keys and sends them to the client over HTTPS. This workaround reduces the security of the resulting demo — it means that trust is placed in the server to provide the right keys. Even so, the user’s password is still safe, even if a malicious server provided bad keys— they just don’t have assurance that they actually previously registered with that server. However, in the future, browsers could include a mechanism to support exported keys and allow OPAQUE-EA to run with its full security properties.
You can explore my implementation on Github, and even follow the instructions to spin up your own OPAQUE-EA test server and client. I’d like to stress, however, that the implementation is meant as a proof-of-concept only, and must not be used for production systems without significant further review.
OPAQUE-EA Limitations
Despite its great properties, there will definitely be some hurdles in bringing OPAQUE-EA from a proof-of-concept to a fully fledged authentication mechanism.
Browser support for TLS exporter keys. As mentioned briefly before, to run OPAQUE-EA in a browser, you need to access secrets from the TLS connection called exporter keys. There is no way to do this in the current most popular browsers, so support for this functionality will need to be added.
Overhauling password databases. To adopt OPAQUE-EA, servers need not only to update their password-checking logic, but also completely overhaul their password databases. Because OPAQUE relies on special password representations that can only be generated interactively, existing salted hashed passwords cannot be automatically updated to OPAQUE records. Servers will likely need to run a special OPAQUE registration flow on a user-by-user basis. Because OPAQUE relies on buy-in from both the client and the server, servers may need to support the old method for a while before all clients catch up.
Reliance on emerging standards. OPAQUE-EA relies on OPRFs, which is in the process of standardization, and Exported Authenticators, a proposed standard. This means that support for these dependencies is not yet available in most existing cryptographic libraries, so early adopters may need to implement these tools themselves.
Summary
As long as people still use passwords, we’d like to make the process as secure as possible. Current methods rely on the risky practice of handling plaintext passwords on the server side while checking their correctness. PAKEs, and (specifically aPAKEs) allow secure password login without ever letting the server see the passwords.
OPAQUE is also being explored within other companies. According to Kevin Lewi, a research scientist from the Novi Research team at Facebook, they are “excited by the strong cryptographic guarantees provided by OPAQUE and are actively exploring OPAQUE as a method for further safeguarding credential-protected fields that are stored server-side.”
OPAQUE is one of the best aPAKEs out there, and can be fully integrated into TLS. You can check out the core OPAQUE implementation here and the demo TLS integration here. A running version of the demo is also available here. A Typescript client implementation of OPAQUE is coming soon. If you’re interested in implementing the protocol, or encounter any bugs with the current implementation, please drop us a line at [email protected]! Consider also subscribing to the IRTF CFRG mailing list to track discussion about the OPAQUE specification and its standardization.
Today we are announcing support for a new proposed DNS standard — co-authored by engineers from Cloudflare, Apple, and Fastly — that separates IP addresses from queries, so that no single entity can see both at the same time. Even better, we’ve made source code available, so anyone can try out ODoH, or run their own ODoH service!
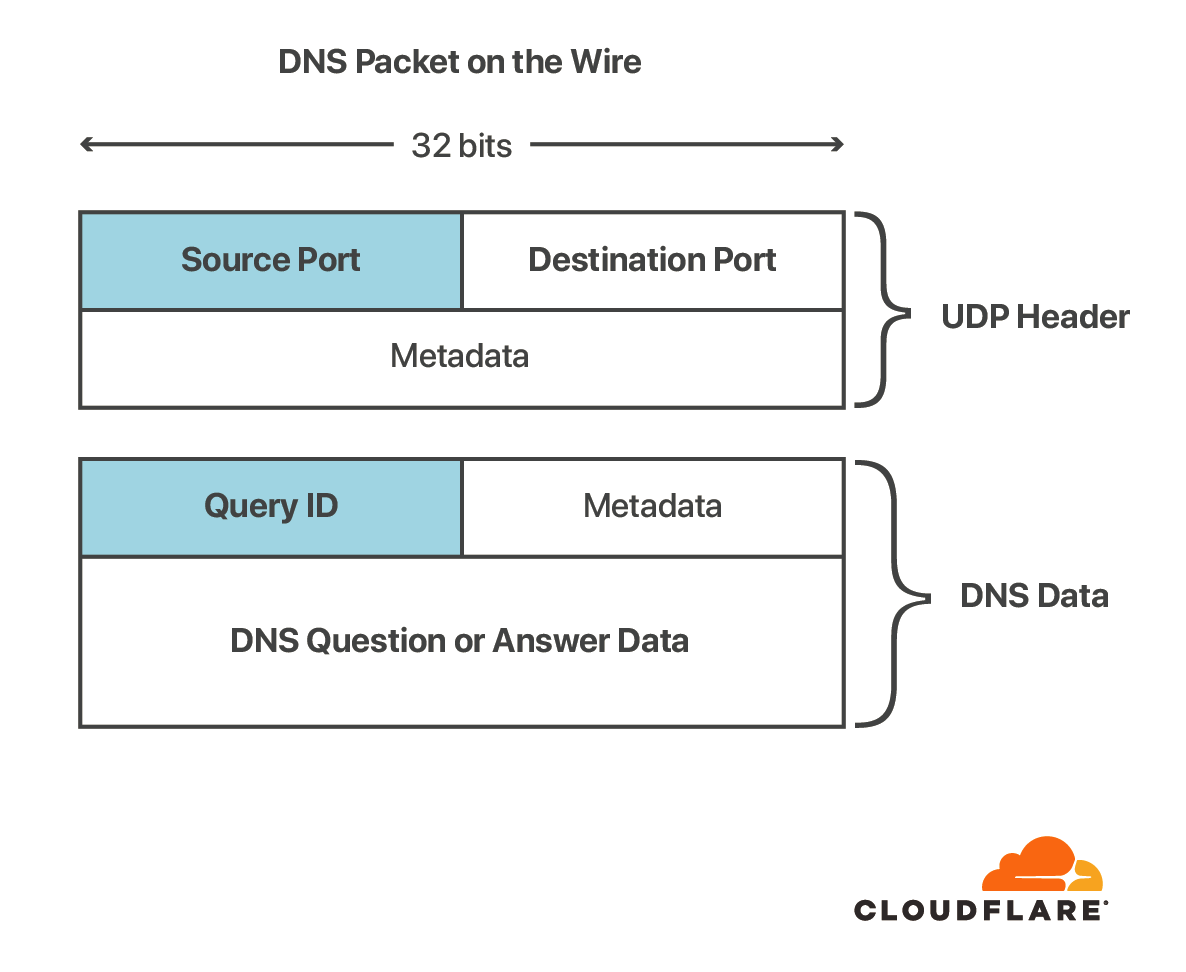
But first, a bit of context. The Domain Name System (DNS) is the foundation of a human-usable Internet. It maps usable domain names, such as cloudflare.com, to IP addresses and other information needed to connect to that domain. A quick primer about the importance and issues with DNS can be read in a previous blog post. For this post, it’s enough to know that, in the initial design and still dominant usage of DNS, queries are sent in cleartext. This means anyone on the network path between your device and the DNS resolver can see both the query that contains the hostname (or website) you want, as well as the IP address that identifies your device.
To safeguard DNS from onlookers and third parties, the IETF standardized DNS encryption with DNS over HTTPS (DoH) and DNS over TLS (DoT). Both protocols prevent queries from being intercepted, redirected, or modified between the client and resolver. Client support for DoT and DoH is growing, having been implemented in recent versions of Firefox, iOS, and more. Even so, until there is wider deployment among Internet service providers, Cloudflare is one of only a few providers to offer a public DoH/DoT service. This has raised two main concerns. One concern is that the centralization of DNS introduces single points of failure (although, with data centers in more than 100 countries, Cloudflare is designed to always be reachable). The other concern is that the resolver can still link all queries to client IP addresses.
Cloudflare is committed to end-user privacy. Users of our public DNS resolver service are protected by a strong, audited privacy policy. However, for some, trusting Cloudflare with sensitive query information is a barrier to adoption, even with such a strong privacy policy. Instead of relying on privacy policies and audits, what if we could give users an option to remove that bar with technical guarantees?
Today, Cloudflare and partners are launching support for a protocol that does exactly that: Oblivious DNS over HTTPS, or ODoH for short.
ODoH Partners:
We’re excited to launch ODoH with several leading launch partners who are equally committed to privacy.
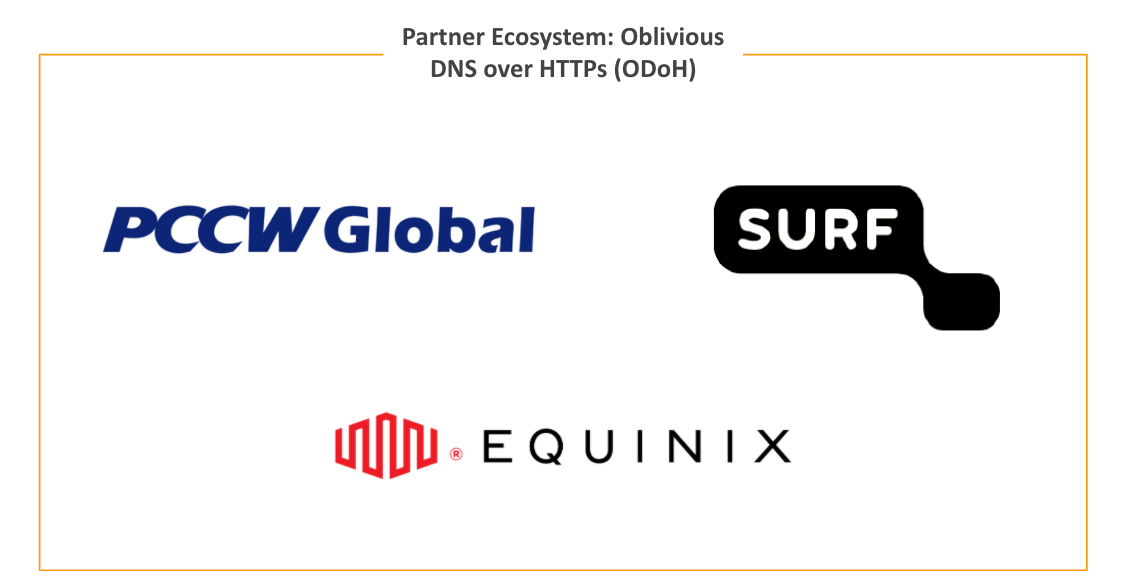
A key component of ODoH is a proxy that is disjoint from the target resolver. Today, we’re launching ODoH with several leading proxy partners, including: PCCW, SURF, and Equinix.
“ODoH is a revolutionary new concept designed to keep users’ privacy at the center of everything. Our ODoH partnership with Cloudflare positions us well in the privacy and “Infrastructure of the Internet” space. As well as the enhanced security and performance of the underlying PCCW Global network, which can be accessed on-demand via Console Connect, the performance of the proxies on our network are now improved by Cloudflare’s 1.1.1.1 resolvers. This model for the first time completely decouples client proxy from the resolvers. This partnership strengthens our existing focus on privacy as the world moves to a more remote model and privacy becomes an even more critical feature.” — Michael Glynn, Vice President, Digital Automated Innovation, PCCW Global
“We are partnering with Cloudflare to implement better user privacy via ODoH. The move to ODoH is a true paradigm shift, where the users’ privacy or the IP address is not exposed to any provider, resulting in true privacy. With the launch of ODoH-pilot, we’re joining the power of Cloudflare’s network to meet the challenges of any users around the globe. The move to ODoH is not only a paradigm shift but it emphasizes how privacy is important to any users than ever, especially during 2020. It resonates with our core focus and belief around Privacy.” — Joost van Dijk, Technical Product Manager, SURF
How does Oblivious DNS over HTTPS (ODoH) work?
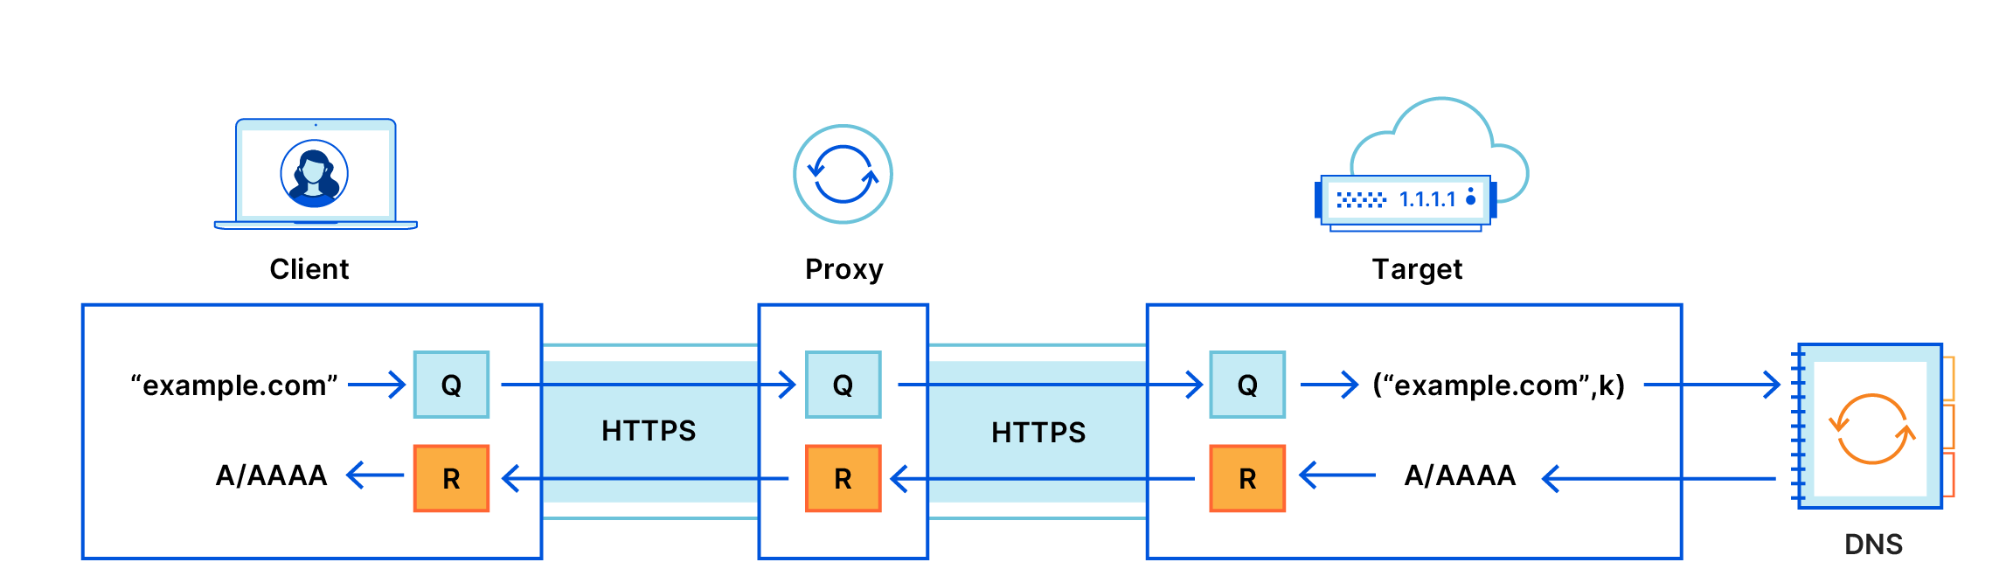
ODoH works by adding a layer of public key encryption, as well as a network proxy between clients and DoH servers such as 1.1.1.1. The combination of these two added elements guarantees that only the user has access to both the DNS messages and their own IP address at the same time.
There are three players in the ODoH path. Looking at the figure above, let’s begin with the target. The target decrypts queries encrypted by the client, via a proxy. Similarly, the target encrypts responses and returns them to the proxy. The standard says that the target may or may not be the resolver (we’ll touch on this later). The proxy does as a proxy is supposed to do, in that it forwards messages between client and target. The client behaves as it does in DNS and DoH, but differs by encrypting queries for the target, and decrypting the target’s responses. Any client that chooses to do so can specify a proxy and target of choice.
Together, the added encryption and proxying provide the following guarantees:
The target sees only the query and the proxy’s IP address.
The proxy has no visibility into the DNS messages, with no ability to identify, read, or modify either the query being sent by the client or the answer being returned by the target.
Only the intended target can read the content of the query and produce a response.
These three guarantees improve client privacy while maintaining the security and integrity of DNS queries. However, each of these guarantees relies on one fundamental property — that the proxy and the target servers do not collude. So long as there is no collusion, an attacker succeeds only if both the proxy and target are compromised.
One aspect of this system worth highlighting is that the target is separate from the upstream recursive resolver that performs DNS resolution. In practice, for performance, we expect the target to be the same. In fact, 1.1.1.1 is now both a recursive resolver and a target! There is no reason that a target needs to exist separately from any resolver. If they are separated then the target is free to choose resolvers, and just act as a go-between. The only real requirement, remember, is that the proxy and target never collude.
Also, importantly, clients are in complete control of proxy and target selection. Without any need for TRR-like programs, clients can have privacy for their queries, in addition to security. Since the target only knows about the proxy, the target and any upstream resolver are oblivious to the existence of any client IP addresses. Importantly, this puts clients in greater control over their queries and the ways they might be used. For example, clients could select and alter their proxies and targets any time, for any reason!
ODoH Message Flow
In ODoH, the ‘O’ stands for oblivious, and this property comes from the level of encryption of the DNS messages themselves. This added encryption is `end-to-end` between client and target, and independent from the connection-level encryption provided by TLS/HTTPS. One might ask why this additional encryption is required at all in the presence of a proxy. This is because two separate TLS connections are required to support proxy functionality. Specifically, the proxy terminates a TLS connection from the client, and initiates another TLS connection to the target. Between those two connections, the DNS message contexts would otherwise appear in plaintext! For this reason, ODoH additionally encrypts messages between client and target so the proxy has no access to the message contents.
The whole process begins with clients that encrypt their query for the target using HPKE. Clients obtain the target’s public key via DNS, where it is bundled into a HTTPS resource record and protected by DNSSEC. When the TTL for this key expires, clients request a new copy of the key as needed (just as they would for an A/AAAA record when that record’s TTL expires). The usage of a target’s DNSSEC-validated public key guarantees that only the intended target can decrypt the query and encrypt a response (answer).
Clients transmit these encrypted queries to a proxy over an HTTPS connection. Upon receipt, the proxy forwards the query to the designated target. The target then decrypts the query, produces a response by sending the query to a recursive resolver such as 1.1.1.1, and then encrypts the response to the client. The encrypted query from the client contains encapsulated keying material from which targets derive the response encryption symmetric key.
This response is then sent back to the proxy, and then subsequently forwarded to the client. All communication is authenticated and confidential since these DNS messages are end-to-end encrypted, despite being transmitted over two separate HTTPS connections (client-proxy and proxy-target). The message that otherwise appears to the proxy as plaintext is actually an encrypted garble.
What about Performance? Do I have to trade performance to get privacy?
We’ve been doing lots of measurements to find out, and will be doing more as ODoH deploys more widely. Our initial set of measurement configurations spanned cities in the USA, Canada, and Brazil. Importantly, our measurements include not just 1.1.1.1, but also 8.8.8.8 and 9.9.9.9. The full set of measurements, so far, is documented for open access.
In those measurements, it was important to isolate the cost of proxying and additional encryption from the cost of TCP and TLS connection setup. This is because the TLS and TCP costs are incurred by DoH, anyway. So, in our setup, we ‘primed’ measurements by establishing connections once and reusing that connection for all measurements. We did this for both DoH and for ODoH, since the same strategy could be used in either case.
The first thing that we can say with confidence is that the additional encryption is marginal. We know this because we randomly selected 10,000 domains from the Tranco million dataset and measured both encryption of the A record with a different public key, as well as its decryption. The additional cost between a proxied DoH query/response and its ODoH counterpart is consistently less than 1ms at the 99th percentile.
The ODoH request-response pipeline, however, is much more than just encryption. A very useful way of looking at measurements is by looking at the cumulative distribution chart — if you’re familiar with these kinds of charts, skip to the next paragraph. In contrast to most charts where we start along the x-axis, with cumulative distributions we often start with the y-axis.
The chart below shows the cumulative distributions for query/response times in DoH, ODoH, and DoH when transmitted over the Tor Network. The dashed horizontal line that starts on the left from 0.5 is the 50% mark. Along this horizontal line, for any plotted curve, the part of the curve below the dashed line is 50% of the data points. Now look at the x-axis, which is a measure of time. The lines that appear to the left are faster than lines to the right. One last important detail is that the x-axis is plotted on a logarithmic scale. What does this mean? Notice that the distance between the labeled markers (10x) is equal in cumulative distributions but the ‘x’ is an exponent, and represents orders of magnitude. So, while the time difference between the first two markers is 9ms, the difference between the 3rd and 4th markers is 900ms.
In this chart, the middle curve represents ODoH measurements. We also measured the performance of privacy-preserving alternatives, for example, DoH queries transmitted over the Tor network as represented by the right curve in the chart. (Additional privacy-preserving alternatives are captured in the open access technical report.) Compared to other privacy-oriented DNS variants, ODoH cuts query time in half, or better. This point is important since privacy and performance rarely play nicely together, so seeing this kind of improvement is encouraging!
The chart above also tells us that 50% of the time ODoH queries are resolved in fewer than 228ms. Now compare the middle line to the left line that represents ‘straight-line’ (or normal) DoH without any modification. That left plotline says that 50% of the time, DoH queries are resolved in fewer than 146ms. Looking below the 50% mark, the curves also tell us that ½ the time that difference is never greater than 100ms. On the other side, looking at the curves above the 50% mark tells us that ½ ODoH queries are competitive with DoH.
Those curves also hide a lot of information, so it is important to delve further into the measurements. The chart below has three different cumulative distribution curves that describe ODoH performance if we select proxies and targets by their latency. This is also an example of the insights that measurements can reveal, some of which are counterintuitive. For example, looking above 0.5, these curves say that ½ of ODoH query/response times are virtually indistinguishable, no matter the choice of proxy and target. Now shift attention below 0.5 and compare the two solid curves against the dashed curve that represents overall average. This region suggests that selecting the lowest-latency proxy and target offers minimal improvement over the average but, most importantly, it shows that selecting the lowest-latency proxy leads to worse performance!
Open questions remain, of course. This first set of measurements were executed largely in North America. Does performance change at a global level? How does this affect client performance, in practice? We’re working on finding out, and this release will help us to do that.
Interesting! Can I experiment with ODoH? Is there an open ODoH service?
Yes, and yes! We have open sourced our interoperable ODoH implementations in Rust, odoh-rs and Go, odoh-go, as well as integrated the target into the Cloudflare DNS Resolver. That’s right, 1.1.1.1 is ready to receive queries via ODoH.
We have also open sourced test clients in Rust, odoh-client-rs, and Go, odoh-client-go, to demo ODoH queries. You can also check out the HPKE configuration used by ODoH for message encryption to 1.1.1.1 by querying the service directly:
We are working to add ODoH to existing stub resolvers such as cloudflared. If you’re interested in adding support to a client, or if you encounter bugs with the implementations, please drop us a line at [email protected]! Announcements about the ODoH specification and server will be sent to the IETF DPRIVEmailing list. You can subscribe and follow announcements and discussion about the specification here.
We are committed to moving it forward in the IETF and are already seeing interest from client vendors. Eric Rescorla, CTO of Firefox, says, “Oblivious DoH is a great addition to the secure DNS ecosystem. We’re excited to see it starting to take off and are looking forward to experimenting with it in Firefox.” We hope that more operators join us along the way and provide support for the protocol, by running either proxies or targets, and we hope client support will increase as the available infrastructure increases, too.
The ODoH protocol is a practical approach for improving privacy of users, and aims to improve the overall adoption of encrypted DNS protocols without compromising performance and user experience on the Internet.
Acknowledgements
Marek Vavruša and Anbang Wen were instrumental in getting the 1.1.1.1 resolver to support ODoH. Chris Wood and Peter Wu helped get the ODoH libraries ready and tested.
Today, software development practices are constantly evolving to empower developers with tools to maintain a high bar of code quality. Amazon CodeGuru Reviewer offers this capability by carrying out automated code-reviews for developers, based on the trained machine learning models that can detect complex defects and providing intelligent actionable recommendations to mitigate those defects. A quick overview of CodeGuru is covered in this blog post.
Security analysis is a critical part of a code review and CodeGuru Reviewer offers this capability with a new set of security detectors. These security detectors introduced in CodeGuru Reviewer are geared towards identifying security risks from the top 10 OWASP categories and ensures that your code follows best practices for AWS Key Management Service (AWS KMS), Amazon Elastic Compute Cloud (Amazon EC2) API, and common Java crypto and TLS/SSL libraries. As of today, CodeGuru security analysis supports Java language, thus we will take an example of a Java application.
In this post, we will walk through the on-boarding workflow to carry out the security analysis of the code repository and generate recommendations for a Java application.
Security workflow overview:
The new security workflow, introduced for CodeGuru reviewer, utilizes the source code and build artifacts to generate recommendations. The security detector evaluates build artifacts to generate security-related recommendations whereas other detectors continue to scan the source code to generate recommendations. With the use of build artifacts for evaluation, the detector can carry out a whole-program inter-procedural analysis to discover issues that are caused across your code (e.g., hardcoded credentials in one file that are passed to an API in another) and can reduce false-positives by checking if an execution path is valid or not. You must provide the source code .zip file as well as the build artifact .zip file for a complete analysis.
Customers can run a security scan when they create a repository analysis. CodeGuru Reviewer provides an additional option to get both code and security recommendations. As explained in the following sections, CodeGuru Reviewer will create an Amazon Simple Storage Service (Amazon S3) bucket in your AWS account for that region to upload or copy your source code and build artifacts for the analysis. This repository analysis option can be run on Java code from any repository.
Prerequisites
Prepare the source code and artifact zip files: If you do not have your Java code locally, download the source code that you want to evaluate for security and zip it. Similarly, if needed, download the build artifact .jar file for your source code and zip it. It will be required to upload the source code and build artifact as separate .zip files as per the instructions in subsequent sections. Thus even if it is a single file (eg. single .jar file), you will still need to zip it. Even if the .zip file includes multiple files, the right files will be discovered and analyzed by CodeGuru. For our sample test, we will use src.zip and jar.zip file, saved locally.
Creating an S3 bucket repository association:
This section summarizes the high-level steps to create the association of your S3 bucket repository.
1. On the CodeGuru console, choose Code reviews.
2. On the Repository analysis tab, choose Create repository analysis.
Figure: Screenshot of initiating the repository analysis
3. For the source code analysis, select Code and security recommendations.
4. For Repository name, enter a name for your repository.
5. Under Additional settings, for Code review name, enter a name for trackability purposes.
6. Choose Create S3 bucket and associate.
Figure: Screenshot to show selection of Security Code Analysis
It takes a few seconds to create a new S3 bucket in the current Region. When it completes, you will see the below screen.
Figure: Screenshot for Create repository analysis showing S3 bucket created
7. Choose Upload to the S3 bucket option and under that choose Upload source code zip file and select the zip file (src.zip) from your local machine to upload.
Figure: Screenshot of popup to upload code and artifacts from S3 bucket
8. Similarly, choose Upload build artifacts zip file and select the zip file (jar.zip) from your local machine and upload.
Figure: Screenshot for Create repository analysis showing S3 paths populated
Alternatively, you can always upload the source code and build artifacts as zip file from any of your existing S3 bucket as below.
9. Choose Browse S3 buckets for existing artifacts and upload from there as shown below:
Figure: Screenshot to upload code and artifacts from an existing S3 bucket
10. Now click Create repository analysis and trigger the code review.
A new pending entry is created as shown below.
Figure: Screenshot of code review in Pending state
After a few minutes, you would see the recommendations generate that would include security analysis too. In the below case, there are 10 recommendations generated.
Figure: Screenshot of repository analysis being completed
For the subsequent code reviews, you can use the same repository and upload new files or create a new repository as shown below:
Figure: Screenshot of subsequent code review making repository selection
Recommendations
Apart from detecting the security risks from the top 10 OWASP categories, the security detector, detects the deep security issues by analyzing data flow across multiple methods, procedures, and files.
The recommendations generated in the area of security are labelled as Security. In the below example we see a recommendation to remove hard-coded credentials and a non-security-related recommendation about refactoring of code for better maintainability.
Figure: Screenshot of Recommendations generated
Below is another example of recommendations pointing out the potential resource-leak as well as a security issue pointing to a potential risk of path traversal attack.
Figure: More examples of deep security recommendations
As this blog is focused on on-boarding aspects, we will cover the explanation of recommendations in more detail in a separate blog.
Disassociation of Repository (optional):
The association of CodeGuru to the S3 bucket repository can be removed by following below steps. Navigate to the Repositories page, select the repository and choose Disassociate repository.
Figure: Screenshot of disassociating the S3 bucket repo with CodeGuru
Conclusion
This post reviewed the support for on-boarding workflow to carry out the security analysis in CodeGuru Reviewer. We initiated a full repository analysis for the Java code using a separate UI workflow and generated recommendations.
We hope this post was useful and would enable you to conduct code analysis using Amazon CodeGuru Reviewer.
About the Author
Nikunj Vaidya is a Sr. Solutions Architect with Amazon Web Services, focusing in the area of DevOps services. He builds technical content for the field enablement and offers technical guidance to the customers on AWS DevOps solutions and services that would streamline the application development process, accelerate application delivery, and enable maintaining a high bar of software quality.
Amazon CodeGuru is a developer tool powered by machine learning (ML) that provides intelligent recommendations for improving code quality and identifies an application’s most expensive lines of code. To help you find and remediate potential security issues in your code, Amazon CodeGuru Reviewer now includes an expanded set of security detectors. In this post, we discuss the new types of security issues CodeGuru Reviewer can detect.
The new security detectors are now a feature in CodeGuru Reviewer for Java applications. These detectors focus on finding security issues in your code before you deploy it. They extend CodeGuru Reviewer by providing additional security-specific recommendations to the existing set of application improvements it already recommends. When an issue is detected, a remediation recommendation and explanation is generated. This allows you to find and remediate issues before the code is deployed. These findings can help in addressing the OWASP top 10 web application security risks, with many of the recommendations being based on specific issues customers have had in this space.
You can run a security scan by creating a repository analysis. CodeGuru Reviewer now provides an additional option to get both code and security recommendations for Java codebases. Selecting this option enables you to find potential security vulnerabilities before they are promoted to production, and support users remaining secure when using your service.
Types of security issues CodeGuru Reviewer detects
Previously, CodeGuru Reviewer helped address security by detecting potential sensitive information leaks (such as personally identifiable information or credit card numbers). The additional CodeGuru Reviewer security detectors expand on this by addressing:
AWS API security best practices – Helps you follow security best practices when using AWS APIs, such as avoiding hard-coded credentials in API calls
Java crypto library best practices – Identifies when you’re not using best practices for common Java cryptography libraries, such as avoiding outdated cryptographic ciphers
Secure web applications – Inspects code for insecure handling of untrusted data, such as not sanitizing user-supplied input to protect against cross-site scripting, SQL injection, LDAP injection, path traversal injection, and more
AWS Security best practices – Developed in collaboration with AWS Security, these best practices help bring our internal expertise to customers
Examples of new security findings
The following are examples of findings that CodeGuru Reviewer security detectors can now help you identify and resolve.
AWS API security best practices
AWS API security best practice detectors inspect your code to identify issues that can be caused by not following best practices related to AWS SDKs and APIs. An example of a detected issue in this category is using hard-coded AWS credentials. Consider the following code:
In this code, the variables myKeyId and mySecretKey are hard-coded in the application. This may have been done to move quickly, but it can also lead to these values being discovered and misused.
In this case, CodeGuru Reviewer recommends using environment variables or an AWS profile to store these values, because these can be retrieved at runtime and aren’t stored inside the application (or its source code). Here you can see an example of what this finding looks like in the console:
The recommendation suggests using environment variables or an AWS profile instead, and that after you delete or rotate the affected key you monitor it with CloudWatch for any attempted use. Following the learn more link, you’ll see additional detail and recommended approaches for remediation, such as using the DefaultAWSCredentialsProviderChain. An example of how to remediate this in the preceding code is to update the getCreds() function:
When working with data that must be protected, cryptography provides mechanisms to encrypt and decrypt the information. However, to ensure the security of this data, the application must use a strong and modern cipher. Consider the following code:
import javax.crypto.Cipher;

static final String CIPHER = "DES";

public void run() {
    cipher = Cipher.getInstance(CIPHER);
}
A cipher object is created with the DES algorithm. CodeGuru Reviewer recommends a stronger cipher to help protect your data. This is what the recommendation looks like in the console:
Based on this, one example of how to address this is to substitute a different cipher:
static final String CIPHER ="RSA/ECB/OAEPPadding";
This is just one option for how it could be addressed. The CodeGuru Reviewer recommendation text suggests several options, and a link to documentation to help you choose the best cipher.
Secure web applications
When working with sensitive information in cookies, such as temporary session credentials, those values must be protected from interception. This is done by flagging the cookies as secure, which prevents them from being sent over an unsecured HTTP connection. Consider the following code:
import javax.servlet.http.Cookie;

public static void createCookie() {
    Cookie cookie = new Cookie("name", "value");
}
In this code, a new cookie is created that is not marked as secure. CodeGuru Reviewer notifies you that you could make a correction by adding:
cookie.setSecure(true);
This screenshot shows you an example of what the finding looks like.
AWS Security best practices
This category of detectors has been built in collaboration with AWS Security and assists in detecting many other issue types. Consider the following code, which illustrates how a string can be re-encrypted with a new key from AWS Key Management Service (AWS KMS):
This approach puts the decrypted value at risk by decrypting and re-encrypting it locally. CodeGuru Reviewer recommends using the ReEncrypt method—performed on the server side within AWS KMS—to avoid exposing your plaintext outside AWS KMS. A solution that uses the ReEncrypt object looks like the following code:
import com.amazonaws.services.kms.model.ReEncryptRequest;

ReEncryptRequest req = new ReEncryptRequest()
                           .withCiphertextBlob(sourceCipherTextBlob)
                           .withDestinationKeyId("NewKeyId");

client.reEncrypt(req).getCiphertextBlob();
This screenshot shows you an example of what the finding looks like.
Detecting issues deep in application code
Detecting security issues can be made more complex by the contributing code being spread across multiple methods, procedures and files. This separation of code helps ensure humans work in more manageable ways, but for a person to look at the code, it obscures the end to end view of what is happening. This obscurity makes it harder, or even impossible to find complex security issues. CodeGuru Reviewer can see issues regardless of these boundaries, deeply assessing code and the flow of the application to find security issues throughout the application. An example of this depth exists in the code below:
This code presents an issue around path traversal, specifically relating to the Broken Access Control rule in the OWASP top 10 (specifically CWE 22). The issue is that a FileOutputStream is being created using an external input (in this case, a cookie) and the input is not being checked for invalid values that could traverse the file system. To add to the complexity of this sample, the input is encoded and decoded from Base64 so that the cookie value isn’t passed directly to the FileOutputStream constructor, and the parsing of the cookie happens in a different function. This is not something you would do in the real world as it is needlessly complex, but it shows the need for tools that can deeply analyze the flow of data in an application. Here the value passed to the FileOutputStream isn’t an external value, it is the result of the encode/decode line and as such, is a new object. However CodeGuru Reviewer follows the flow of the application to understand that the input still came from a cookie, and as such it should be treated as an external value that needs to be validated. An example of a fix for the issue here would be to replace the pathTraversal function with the sample shown below:
static final String VALID_PATH1 = "./test/file1.txt";
static final String VALID_PATH2 = "./test/file2.txt";
static final String DEFAULT_VALID_PATH = "./test/file3.txt";

public void pathTraversal(HttpServletRequest request) throws IOException {
    javax.servlet.http.Cookie[] theCookies = request.getCookies();
    String path = "";
    if (theCookies != null) {
        for (javax.servlet.http.Cookie theCookie : theCookies) {
            if (theCookie.getName().equals("thePath")) {
                path = decode(theCookie.getValue(), "UTF-8");
                break;
            }
        }
    }
    String fileName = "";
    if (!path.equals("")) {
        if (path.equals(VALID_PATH1)) {
            fileName = VALID_PATH1;
        } else if (path.equals(VALID_PATH2)) {
            fileName = VALID_PATH2;
        } else {
            fileName = DEFAULT_VALID_PATH;
        }
        String decStr = new String(org.apache.commons.codec.binary.Base64.decodeBase64(
            org.apache.commons.codec.binary.Base64.encodeBase64(fileName.getBytes())));
        java.io.FileOutputStream fileOutputStream = new java.io.FileOutputStream(decStr);
        java.io.FileDescriptor fd = fileOutputStream.getFD();
        System.out.println(fd.toString());
    }
}
The main difference in this sample is that the path variable is tested against known good values that would prevent path traversal, and if one of the two valid path options isn’t provided, the third default option is used. In all cases the externally provided path is validated to ensure that there isn’t a path through the code that allows for path traversal to occur in the subsequent call. As with the first sample, the path is still encoded/decoded to make it more complicated to follow the flow through, but the deep analysis performed by CodeGuru Reviewer can follow this and provide meaningful insights to help ensure the security of your applications.
Extending the value of CodeGuru Reviewer
CodeGuru Reviewer already recommends different types of fixes for your Java code, such as concurrency and resource leaks. With these new categories, CodeGuru Reviewer can let you know about security issues as well, bringing further improvements to your applications’ code. The new security detectors operate in the same way that the existing detectors do, using static code analysis and ML to provide high confidence results. This can help avoid signaling non-issue findings to developers, which can waste time and erode trust in the tool.
You can provide feedback on recommendations in the CodeGuru Reviewer console or by commenting on the code in a pull request. This feedback helps improve the performance of the reviewer, so the recommendations you see get better over time.
Conclusion
Security issues can be difficult to identify and can impact your applications significantly. CodeGuru Reviewer security detectors help make sure you’re following security best practices while you build applications.
CodeGuru Reviewer is available for you to try. For full repository analysis, the first 30,000 lines of code analyzed each month per payer account are free. For pull request analysis, we offer a 90 day free trial for new customers. Please check the pricing page for more details. For more information, see Getting started with CodeGuru Reviewer.
About the author
Brian Farnhill
Brian Farnhill is a Developer Specialist Solutions Architect in the Australian Public Sector team. His background is building solutions and helping customers improve DevOps tools and processes. When he isn’t working, you’ll find him either coding for fun or playing online games.
AWS re:Invent will certainly be different in 2020! Instead of seeing you all in Las Vegas, this year re:Invent will be a free, three-week virtual conference. One thing that will remain the same is the variety of sessions, including many Security, Identity, and Compliance sessions. As we developed sessions, we looked to customers—asking where they would like to expand their knowledge. One way we did this was shared in a recent Security blog post, where we introduced a new customer polling feature that provides us with feedback directly from customers. The initial results of the poll showed that Identity and Access Management and Data Protection are top-ranking topics for customers. We wanted to highlight some of the re:Invent sessions for these two important topics so that you can start building your re:Invent schedule. Each session is offered at multiple times, so you can sign up for the time that works best for your location and schedule.
Managing your Identities and Access in AWS
AWS identity: Secure account and application access with AWS SSO Ron Cully, Principal Product Manager, AWS
AWS SSO provides an easy way to centrally manage access at scale across all your AWS Organizations accounts, using identities you create and manage in AWS SSO, Microsoft Active Directory, or external identity providers (such as Okta Universal Directory or Azure AD). This session explains how you can use AWS SSO to manage your AWS environment, and it covers key new features to help you secure and automate account access authorization.
Getting started with AWS identity services Becky Weiss, Senior Principal Engineer, AWS
The number, range, and breadth of AWS services are large, but the set of techniques that you need to secure them is not. Your journey as a builder in the cloud starts with this session, in which practical examples help you quickly get up to speed on the fundamentals of becoming authenticated and authorized in the cloud, as well as on securing your resources and data correctly.
AWS identity: Ten identity health checks to improve security in the cloud Cassia Martin, Senior Security Solutions Architect, AWS
Get practical advice and code to help you achieve the principle of least privilege in your existing AWS environment. From enabling logs to disabling root, the provided checklist helps you find and fix permissions issues in your resources, your accounts, and throughout your organization. With these ten health checks, you can improve your AWS identity and achieve better security every day.
AWS identity: Choosing the right mix of AWS IAM policies for scale Josh Du Lac, Principal Security Solutions Architect, AWS
This session provides both a strategic and tactical overview of various AWS Identity and Access Management (IAM) policies that provide a range of capabilities for the security of your AWS accounts. You probably already use a number of these policies today, but this session will dive into the tactical reasons for choosing one capability over another. This session zooms out to help you understand how to manage these IAM policies across a multi-account environment, covering their purpose, deployment, validation, limitations, monitoring, and more.
Zero Trust: An AWS perspective Quint Van Deman, Principal WW Identity Specialist, AWS
AWS customers have continuously asked, “What are the optimal patterns for ensuring the right levels of security and availability for my systems and data?” Increasingly, they are asking how patterns that fall under the banner of Zero Trust might apply to this question. In this session, you learn about the AWS guiding principles for Zero Trust and explore the larger subdomains that have emerged within this space. Then the session dives deep into how AWS has incorporated some of these concepts, and how AWS can help you on your own Zero Trust journey.
This session is for central security teams and developers who manage application permissions. This session reviews a permissions model that enables you to scale your permissions management with confidence. Learn how to set your organization up for access management success with permission guardrails. Then, learn about granting workforce permissions based on attributes, so they scale as your users and teams adjust. Finally, learn about the access analysis tools and how to use them to identify and reduce broad permissions and give users and systems access to only what they need.
Goldman Sachs takes security and access to AWS accounts seriously. While empowering teams with the freedom to build applications autonomously is critical for scaling cloud usage across the firm, guardrails and controls need to be set in place to enable secure administrative access. In this session, learn how the company built its credential brokering workflow and administrator access for its users. Learn how, with its simple application that uses proprietary and AWS services, including Amazon DynamoDB, AWS Lambda, AWS CloudTrail, Amazon S3, and Amazon Athena, Goldman Sachs is able to control administrator credentials and monitor and report on actions taken for audits and compliance.
Data Protection
Do you need an AWS KMS custom key store? Tracy Pierce, Senior Consultant, AWS
AWS Key Management Service (AWS KMS) has integrated with AWS CloudHSM, giving you the option to create your own AWS KMS custom key store. In this session, you learn more about how a KMS custom key store is backed by an AWS CloudHSM cluster and how it enables you to generate, store, and use your KMS keys in the hardware security modules that you control. You also learn when and if you really need a custom key store. Join this session to learn why you might choose not to use a custom key store and instead use the AWS KMS default.
Using certificate-based authentication on containers & web servers on AWS Josh Rosenthol, Senior Product Manager, AWS Kevin Rioles, Manager, Infrastructure & Security, BlackSky
In this session, BlackSky talks about its experience using AWS Certificate Manager (ACM) end-entity certificates for the processing and distribution of real-time satellite geospatial intelligence and monitoring. Learn how BlackSky uses certificate-based authentication on containers and web servers within its AWS environment to help make TLS ubiquitous in its deployments. The session details the implementation, architecture, and operations best practices that the company chose and how it was able to operate ACM at scale across multiple accounts and regions.
The busy manager’s guide to encryption Spencer Janyk, Senior Product Manager, AWS
In this session, explore the functionality of AWS cryptography services and learn when and where to deploy each of the following: AWS Key Management Service, AWS Encryption SDK, AWS Certificate Manager, AWS CloudHSM, and AWS Secrets Manager. You also learn about defense-in-depth strategies including asymmetric permissions models, client-side encryption, and permission segmentation by role.
Building post-quantum cryptography for the cloud Alex Weibel, Senior Software Development Engineer, AWS
This session introduces post-quantum cryptography and how you can use it today to secure TLS communication. Learn about recent updates on standards and existing deployments, including the AWS post-quantum TLS implementation (pq-s2n). A description of the hybrid key agreement method shows how you can combine a new post-quantum key encapsulation method with a classical key exchange to secure network traffic today.
Data protection at scale using Amazon Macie Neel Sendas, Senior Technical Account Manager, AWS
Data Loss Prevention (DLP) is a common topic among companies that work with sensitive data. If an organization can’t identify its sensitive data, it can’t protect it. Amazon Macie is a fully managed data security and data privacy service that uses machine learning and pattern matching to discover and protect your sensitive data in AWS. In this session, we will share details of the design and architecture you can use to deploy Macie at large scale.
While sessions are virtual this year, they will be offered at multiple times with live moderators and “Ask the Expert” sessions available to help answer any questions that you may have. We look forward to “seeing” you in these sessions. Please see the re:Invent agenda for more details and to build your schedule.
If you have feedback about this post, submit comments in the Comments section below.
Want more AWS Security how-to content, news, and feature announcements? Follow us on Twitter.
Starting today, you can add WebAuthn as a new multi-factor authentication (MFA) to AWS Single Sign-On, in addition to currently supported one-time password (OTP) and Radius authenticators. By adding support for WebAuthn, a W3C specification developed in coordination with FIDO Alliance, you can now authenticate with a wide variety of interoperable authenticators provisioned by your system administrator or built into your laptops or smartphones. For example, you can now tap a hardware security key, touch a fingerprint sensor on your Mac, or use facial recognition on your mobile device or PC to authenticate into the AWS Management Console or AWS Command Line Interface (CLI).
With this addition, you can now self-register multiple MFA authenticators. Doing so allows you to authenticate on AWS with another device in case you lose or misplace your primary authenticator device. We make it easy for you to name your devices for long-term manageability.
WebAuthn two-factor authentication is available for identities stored in the AWS Single Sign-Oninternal identity store and those stored in Microsoft Active Directory, whether it is managed by AWS or not.
What are WebAuthn and FIDO2?
Before exploring how to configure two-factor authentication using your FIDO2-enabled devices, and to discover the user experience for web-based and CLI authentications, let’s recap how FIDO2, WebAuthn and other specifications fit together.
FIDO2 is made of two core specifications: Web Authentication (WebAuthn) and Client To Authenticator Protocol (CTAP).
Web Authentication (WebAuthn) is a W3C standard that provides strong authentication based upon public key cryptography. Unlike traditional code generator tokens or apps using TOTP protocol, it does not require sharing a secret between the server and the client. Instead, it relies on a public key pair and digital signature of unique challenges. The private key never leaves a secured device, the FIDO-enabled authenticator. When you try to authenticate to a website, this secured device interacts with your browser using the CTAP protocol.
WebAuthn is strong: Authentication is ideally backed by a secure element, which can safely store private keys and perform the cryptographic operations. It is scoped: A key pair is only useful for a specific origin, like browser cookies. A key pair registered at console.amazonaws.com cannot be used at console.not-the-real-amazon.com, mitigating the threat of phishing. Finally, it is attested: Authenticators can provide a certificate that helps servers verify that the public key did in fact come from an authenticator they trust, and not a fraudulent source.
To start to use FIDO2 authentication, you therefore need three elements: a website that supports WebAuthn, a browser that supports WebAuthn and CTAP protocols, and a FIDO authenticator. Starting today, the SSO Management Console and CLI now support WebAuthn. All modern web browsers are compatible (Chrome, Edge, Firefox, and Safari). FIDO authenticators are either devices you can use from one device or another (roaming authenticators), such as a YubiKey, or built-in hardware supported by Android, iOS, iPadOS, Windows, Chrome OS, and macOS (platform authenticators).
How Does FIDO2 Work? When I first register my FIDO-enabled authenticator on AWS SSO, the authenticator creates a new set of public key credentials that can be used to sign a challenge generated by AWS SSO Console (the relaying party). The public part of these new credentials, along with the signed challenge, are stored by AWS SSO.
When I want to use WebAuthn as second factor authentication, the AWS SSO console sends a challenge to my authenticator. This challenge can then be signed with the previously generated public key credentials and sent back to the console. This way, AWS SSO console can verify that I have the required credentials.
How Do I Enable MFA With a Secure Device in the AWS SSO Console? You, the system administrator, can enable MFA for your AWS SSO workforce when the user profiles are stored in AWS SSO itself, or stored in your Active Directory, either self-managed or a AWS Directory Service for Microsoft Active Directory.
To let my workforce register their FIDO or U2F authenticator in self-service mode, I first navigate to Settings, click Configure under Multi-Factor Authentication. On the following screen, I make four changes. First, under Users should be prompted for MFA, I select Every time they sign in. Second, under Users can authenticate with these MFA types, I check Security Keys and built-in authenticators. Third, under If a user does not yet have a registered MFA device, I check Require them to register an MFA device at sign in. Finally, under Who can manage MFA devices, I check Users can add and manage their own MFA devices. I click on Save Changes to save and return.
That’s it. Now your workforce is prompted to register their MFA device the next time they authenticate.
What Is the User Experience? As an AWS console user, I authenticate on the AWS SSO portal page URL that I received from my System Administrator. I sign in using my user name and password, as usual. On the next screen, I am prompted to register my authenticator. I check Security Key as device type. To use a biometric factor such as fingerprints or face recognition, I would click Built-in authenticator.
The browser asks me to generate a key pair and to send my public key. I can do that just by touching a button on my device, or providing the registered biometric, e.g. TouchID or FaceID.The browser does confirm and shows me a last screen where I have the possibility to give a friendly name to my device, so I can remember which one is which. Then I click Save and Done.From now on, every time I sign in, I am prompted to touch my security device or use biometric authentication on my smartphone or laptop. What happens behind the scene is the server sending a challenge to my browser. The browser sends the challenge to the security device. The security device uses my private key to sign the challenge and to return it to the server for verification. When the server validates the signature with my public key, I am granted access to the AWS Management Console.
At any time, I can register additional devices and manage my registered devices. On the AWS SSO portal page, I click MFA devices on the top-right part of the screen.
I can see and manage the devices registered for my account, if any. I click Register device to register a new device.
How to Configure SSO for the AWS CLI? Once my devices are configured, I can configure SSO on the AWS Command Line Interface (CLI).
I first configure CLI SSO with aws configure sso and I enter the SSO domain URL that I received from my system administrator. The CLI opens a browser where I can authenticate with my user name, password, and my second-factor authentication configured previously. The web console gives me a code that I enter back into the CLI prompt.
When I have access to multiple AWS Accounts, the CLI lists them and I choose the one I want to use. This is a one-time configuration.
Once this is done, I can use the aws CLI as usual, the SSO authentication happens automatically behind the scene. You are asked to re-authenticate from time to time, depending on the configuration set by your system administrator.
Available today Just like AWS Single Sign-On, FIDO2 second-factor authentication is provided to you at no additional cost, and is available in all AWS Regions where AWS SSO is available.
As usual, we welcome your feedback. The team told me they are working on other features to offer you additional authentication options in the near future.
You can start to use FIDO2 as second factor authentication for AWS Single Sign-On today. Configure it now.
Security questions still exist. They are less dominant now, but we haven’t yet condemned them as an industry hard enough so that they stop being added to authentication flows.
But they are bad. They are like passwords, but more easily guessable, because you have a password hint. And while there are opinions that they might be okay in certain scenarios, they have so many pitfalls that in practice we should just not consider them an option.
What are those pitfalls? Social engineering. Almost any security question’s answer is guessable by doing research on the target person online. We share more about our lives and don’t even realize how that affects us security-wise. Many security questions have a limited set of possible answers that can be enumerated with a brute force attack (e.g. what are the most common pet names; what are the most common last names in a given country for a given period of time, in order to guess someone’s mother’s maiden name; what are the high schools in the area where the person lives, and so on). So when someone wants to takeover your account, if all they have to do is open your Facebook profile or try 20-30 options, you have no protection.
But what are they for in the first place? Account recovery. You have forgotten your password and the system asks you some details about you to allow you to reset your password. We already have largely solved the problem of account recovery – send a reset password link to the email of the user. If the system itself is an email service, or in a couple of other scenarios, you can use a phone number, where a one-time password is sent for recovery purposes (or a secondary email, for email providers).
So we have the account recovery problem largely solved, why are security questions still around? Inertia, I guess. And the five monkeys experiment. There is no good reason to have a security question if you can have recovery email or phone. And you can safely consider that to be true (ok, maybe there are edge cases).
There are certain types of account recovery measures that resemble security questions and can be implemented as an additional layer, on top of a phone or email recovery. For more important services (e.g. your Facebook account or your main email), it may not be safe to consider just owning the phone or just having access to the associated email to be enough. Phones get stolen, emails get “broken into”. That’s why a security-like set of questions may serve as additional protection. For example – guessing recent activity. Facebook does that sometimes by asking you about your activity on the site or about your friends. This is not perfect, as it can be monitored by the malicious actor, but is an option. For your email, you can be asked what are the most recent emails that you’ve sent, and be presented with options to choose from, with some made up examples. These things are hard to implement because of geographic and language differences, but “guess your recent activity among these choices”, e.g. dynamically defined security questions, may be an acceptable additional step for account recovery.
But fixed security questions – no. Let’s kill those. I’m not the first to argue against security questions, but we need to be reminded that certain bad security practices should be left in the past.
Authentication is changing. We are desperately trying to get rid of the password itself (and still failing to do so), but before we manage to do so, we should first get rid of the “bad password in disguise”, the security question.
As a security company, we pride ourselves on finding innovative ways to protect our platform to, in turn, protect the data of our customers. Part of this approach is implementing progressive methods in protecting our hardware at scale. While we have blogged about how we address security threats from application to memory, the attacks on hardware, as well as firmware, have increased substantially. The data cataloged in the National Vulnerability Database (NVD) has shown the frequency of hardware and firmware-level vulnerabilities rising year after year.
Technologies like secure boot, common in desktops and laptops, have been ported over to the server industry as a method to combat firmware-level attacks and protect a device’s boot integrity. These technologies require that you create a trust ‘anchor’, an authoritative entity for which trust is assumed and not derived. A common trust anchor is the system Basic Input/Output System (BIOS) or the Unified Extensible Firmware Interface (UEFI) firmware.
While this ensures that the device boots only signed firmware and operating system bootloaders, does it protect the entire boot process? What protects the BIOS/UEFI firmware from attacks?
The Boot Process
Before we discuss how we secure our boot process, we will first go over how we boot our machines.
The above image shows the following sequence of events:
After powering on the system (through a baseboard management controller (BMC) or physically pushing a button on the system), the system unconditionally executes the UEFI firmware residing on a flash chip on the motherboard.
UEFI performs some hardware and peripheral initialization and executes the Preboot Execution Environment (PXE) code, which is a small program that boots an image over the network and usually resides on a flash chip on the network card.
PXE sets up the network card, and downloads and executes a small program bootloader through an open source boot firmware called iPXE.
iPXE loads a script that automates a sequence of commands for the bootloader to know how to boot a specific operating system (sometimes several of them). In our case, it loads our Linux kernel, initrd (this contains device drivers which are not directly compiled into the kernel), and a standard Linux root filesystem. After loading these components, the bootloader executes and hands off the control to the kernel.
Finally, the Linux kernel loads any additional drivers it needs and starts applications and services.
UEFI Secure Boot
Our UEFI secure boot process is fairly straightforward, albeit customized for our environments. After loading the UEFI firmware from the bootloader, an initialization script defines the following variables:
Platform Key (PK): It serves as the cryptographic root of trust for secure boot, giving capabilities to manipulate and/or validate the other components of the secure boot framework.
Trusted Database (DB): Contains a signed (by platform key) list of hashes of all PCI option ROMs, as well as a public key, which is used to verify the signature of the bootloader and the kernel on boot.
These variables are respectively the master platform public key, which is used to sign all other resources, and an allow list database, containing other certificates, binary file hashes, etc. In default secure boot scenarios, Microsoft keys are used by default. At Cloudflare we use our own, which makes us the root of trust for UEFI:
But, by setting our trust anchor in the UEFI firmware, what attack vectors still exist?
UEFI Attacks
As stated previously, firmware and hardware attacks are on the rise. It is clear from the figure below that firmware-related vulnerabilities have increased significantly over the last 10 years, especially since 2017, when the hacker community started attacking the firmware on different platforms:
This upward trend, coupled with recent malware findings in UEFI, shows that trusting firmware is becoming increasingly problematic.
By tainting the UEFI firmware image, you poison the entire boot trust chain. The ability to trust firmware integrity is important beyond secure boot. For example, if you can’t trust the firmware not to be compromised, you can’t trust things like trusted platform module (TPM) measurements to be accurate, because the firmware is itself responsible for doing these measurements (e.g a TPM is not an on-path security mechanism, but instead it requires firmware to interact and cooperate with). Firmware may be crafted to extend measurements that are accepted by a remote attestor, but that don’t represent what’s being locally loaded. This could cause firmware to have a questionable measured boot and remote attestation procedure.
If we can’t trust firmware, then hardware becomes our last line of defense.
Hardware Root of Trust
Early this year, we made a series of blog posts on why we chose AMD EPYC processors for our Gen X servers. With security in mind, we started turning on features that were available to us and set forth the plan of using AMD silicon as a Hardware Root of Trust (HRoT).
Platform Secure Boot (PSB) is AMD’s implementation of hardware-rooted boot integrity. Why is it better than UEFI firmware-based root of trust? Because it is intended to assert, by a root of trust anchored in the hardware, the integrity and authenticity of the System ROM image before it can execute. It does so by performing the following actions:
Authenticates the first block of BIOS/UEFI prior to releasing x86 CPUs from reset.
Authenticates the System Read-Only Memory (ROM) contents on each boot, not just during updates.
Moves the UEFI Secure Boot trust chain to immutable hardware.
This is accomplished by the AMD Platform Security Processor (PSP), an ARM Cortex-A5 microcontroller that is an immutable part of the system on chip (SoC). The PSB consists of two components:
On-chip Boot ROM
Embeds a SHA384 hash of an AMD root signing key
Verifies and then loads the off-chip PSP bootloader located in the boot flash
Off-chip Bootloader
Locates the PSP directory table that allows the PSP to find and load various images
Authenticates first block of BIOS/UEFI code
Releases CPUs after successful authentication
The PSP secures the On-chip Boot ROM code, loads the off-chip PSP firmware into PSP static random access memory (SRAM) after authenticating the firmware, and passes control to it.
The Off-chip Bootloader (BL) loads and specifies applications in a specific order (whether or not the system goes into a debug state and then a secure EFI application binary interface to the BL)
The system continues initialization through each bootloader stage.
If each stage passes, then the UEFI image is loaded and the x86 cores are released.
Now that we know the booting steps, let’s build an image.
Build Process
Public Key Infrastructure
Before the image gets built, a public key infrastructure (PKI) is created to generate the key pairs involved for signing and validating signatures:
Our original device manufacturer (ODM), as a trust extension, creates a key pair (public and private) that is used to sign the first segment of the BIOS (private key) and validates that segment on boot (public key).
On AMD’s side, they have a key pair that is used to sign (the AMD root signing private key) and certify the public key created by the ODM. This is validated by AMD’s root signing public key, which is stored as a hash value (RSASSA-PSS: SHA-384 with 4096-bit key is used as the hashing algorithm for both message and mask generation) in SPI-ROM.
Because of the way the PKI mechanisms are built, the system cannot be compromised if only one of the keys is leaked. This is an important piece of the trust hierarchy that is used for image signing.
Certificate Signing Request
Once the PKI infrastructure is established, a BIOS signing key pair is created, together with a certificate signing request (CSR). Creating the CSR uses known common name (CN) fields that many are familiar with:
countryName
stateOrProvinceName
localityName
organizationName
In addition to the fields above, the CSR will contain a serialNumber field, a 32-bit integer value represented in ASCII HEX format that encodes the following values:
PLATFORM_VENDOR_ID: An 8-bit integer value assigned by AMD for each ODM.
PLATFORM_MODEL_ID: A 4-bit integer value assigned to a platform by the ODM.
BIOS_KEY_REVISION_ID: is set by the ODM encoding a 4-bit key revision as unary counter value.
DISABLE_SECURE_DEBUG: Fuse bit that controls whether secure debug unlock feature is disabled permanently.
DISABLE_AMD_BIOS_KEY_USE: Fuse bit that controls if the BIOS, signed by an AMD key, (with vendor ID == 0) is permitted to boot on a CPU with non-zero Vendor ID.
DISABLE_BIOS_KEY_ANTI_ROLLBACK: Fuse bit that controls whether BIOS key anti-rollback feature is enabled.
Remember these values, as we’ll show how we use them in a bit. Any of the DISABLE values are optional, but recommended based on your security posture/comfort level.
AMD, upon processing the CSR, provides the public part of the BIOS signing key signed and certified by the AMD signing root key as a RSA Public Key Token file (.stkn) format.
Putting It All Together
The following is a step-by-step illustration of how signed UEFI firmware is built:
The ODM submits their public key used for signing Cloudflare images to AMD.
AMD signs this key using their RSA private key and passes it back to ODM.
The AMD public key and the signed ODM public key are part of the final BIOS SPI image.
The BIOS source code is compiled and various BIOS components (PEI Volume, Driver eXecution Environment (DXE) volume, NVRAM storage, etc.) are built as usual.
The PSP directory and BIOS directory are built next. PSP directory and BIOS directory table points to the location of various firmware entities.
The ODM builds the signed BIOS Root of Trust Measurement (RTM) signature based on the blob of BIOS PEI volume concatenated with BIOS Directory header, and generates the digital signature of this using the private portion of ODM signing key. The SPI location for signed BIOS RTM code is finally updated with this signature blob.
Finally, the BIOS binaries, PSP directory, BIOS directory and various firmware binaries are combined to build the SPI BIOS image.
Enabling Platform Secure Boot
Platform Secure Boot is enabled at boot time with a PSB-ready firmware image. PSB is configured using a region of one-time programmable (OTP) fuses, specified for the customer. OTP fuses are on-chip non-volatile memory (NVM) that permits data to be written to memory only once. There is NO way to roll the fused CPU back to an unfused one.
Enabling PSB in the field will go through two steps: fusing and validating.
Fusing: Fuse the values assigned in the serialNumber field that was generated in the CSR
Validating: Validate the fused values and the status code registers
If validation is successful, the BIOS RTM signature is validated using the ODM BIOS signing key, PSB-specific registers (MP0_C2P_MSG_37 and MP0_C2P_MSG_38) are updated with the PSB status and fuse values, and the x86 cores are released
If validation fails, the registers above are updated with the PSB error status and fuse values, and the x86 cores stay in a locked state.
Let’s Boot!
With a signed image in hand, we are ready to enable PSB on a machine. We chose to deploy this on a few machines that had an updated, unsigned AMI UEFI firmware image, in this case version 2.16. We use a couple of different firmware updatetools, so, after a quick script, we ran an update to change the firmware version from 2.16 to 2.18C (the signed image):
. $sudo ./UpdateAll.sh
Bin file name is ****.218C

BEGIN

+---------------------------------------------------------------------------+
|                 AMI Firmware Update Utility v5.11.03.1778                 |
|                 Copyright (C)2018 American Megatrends Inc.                |
|                         All Rights Reserved.                              |
+---------------------------------------------------------------------------+
Reading flash ............... done
FFS checksums ......... ok
Check RomLayout ........ ok.
Erasing Boot Block .......... done
Updating Boot Block ......... done
Verifying Boot Block ........ done
Erasing Main Block .......... done
Updating Main Block ......... done
Verifying Main Block ........ done
Erasing NVRAM Block ......... done
Updating NVRAM Block ........ done
Verifying NVRAM Block ....... done
Erasing NCB Block ........... done
Updating NCB Block .......... done
Verifying NCB Block ......... done

Process completed.
After the update completed, we rebooted:
After a successful install, we validated that the image was correct via the sysfs information provided in the dmidecode output:
Testing
With a signed image installed, we wanted to test that it worked, meaning: what if an unauthorized user installed their own firmware image? We did this by downgrading the image back to an unsigned image, 2.16. In theory, the machine shouldn’t boot as the x86 cores should stay in a locked state. After downgrading, we rebooted and got the following:
This isn’t a powered down machine, but the result of booting with an unsigned image.
Flashing back to a signed image is done by running the same flashing utility through the BMC, so we weren’t bricked. Nonetheless, the results were successful.
Naming Convention
Our standard UEFI firmware images are alphanumeric, making it difficult to distinguish (by name) the difference between a signed and unsigned image (v2.16A vs v2.18C), for example. There isn’t a remote attestation capability (yet) to probe the PSB status registers or to store these values by means of a signature (e.g. TPM quote). As we transitioned to PSB, we wanted to make this easier to determine by adding a specific suffix: -sig that we could query in userspace. This would allow us to query this information via Prometheus. Changing the file name alone wouldn’t do it, so we had to make the following changes to reflect a new naming convention for signed images:
Update filename
Update BIOS version for setup menu
Update post message
Update SMBIOS type 0 (BIOS version string identifier)
Signed images now have a -sig suffix:
~$ sudo dmidecode -t0
# dmidecode 3.2
Getting SMBIOS data from sysfs.
SMBIOS 3.3.0 present.
# SMBIOS implementations newer than version 3.2.0 are not
# fully supported by this version of dmidecode.

Handle 0x0000, DMI type 0, 26 bytes
BIOS Information
	Vendor: American Megatrends Inc.
	Version: V2.20-sig
	Release Date: 09/29/2020
	Address: 0xF0000
	Runtime Size: 64 kB
	ROM Size: 16 MB
Conclusion
Finding weaknesses in firmware is a challenge that many attackers have taken on. Attacks that physically manipulate the firmware used for performing hardware initialization during the booting process can invalidate many of the common secure boot features that are considered industry standard. By implementing a hardware root of trust that is used for code signing critical boot entities, your hardware becomes a ‘first line of defense’ in ensuring that your server hardware and software integrity can derive trust through cryptographic means.
What’s Next?
While this post discussed our current, AMD-based hardware platform, how will this affect our future hardware generations? One of the benefits of working with diverse vendors like AMD and Ampere (ARM) is that we can ensure they are baking in our desired platform security by default (which we’ll speak about in a future post), making our hardware security outlook that much brighter 😀.
This week, at the ACM CCS 2020 conference, researchers from UC Riverside and Tsinghua University announced a new attack against the Domain Name System (DNS) called SAD DNS (Side channel AttackeD DNS). This attack leverages recent features of the networking stack in modern operating systems (like Linux) to allow attackers to revive a classic attack category: DNS cache poisoning. As part of a coordinated disclosure effort earlier this year, the researchers contacted Cloudflare and other major DNS providers and we are happy to announce that 1.1.1.1 Public Resolver is no longer vulnerable to this attack.
In this post, we’ll explain what the vulnerability was, how it relates to previous attacks of this sort, what mitigation measures we have taken to protect our users, and future directions the industry should consider to prevent this class of attacks from being a problem in the future.
DNS Basics
The Domain Name System (DNS) is what allows users of the Internet to get around without memorizing long sequences of numbers. What’s often called the “phonebook of the Internet” is more like a helpful system of translators that take natural language domain names (like blog.cloudflare.com or gov.uk) and translate them into the native language of the Internet: IP addresses (like 192.0.2.254 or [2001:db8::cf]). This translation happens behind the scenes so that users only need to remember hostnames and don’t have to get bogged down with remembering IP addresses.
DNS is both a system and a protocol. It refers to the hierarchical system of computers that manage the data related to naming on a network and it refers to the language these computers use to speak to each other to communicate answers about naming. The DNS protocol consists of pairs of messages that correspond to questions and responses. Each DNS question (query) and answer (reply) follows a standard format and contains a set of parameters that contain relevant information such as the name of interest (such as blog.cloudflare.com) and the type of response record desired (such as A for IPv4 or AAAA for IPv6).
The DNS Protocol and Spoofing
These DNS messages are exchanged over a network between machines using a transport protocol. Originally, DNS used UDP, a simple stateless protocol in which messages are endowed with a set of metadata indicating a source port and a destination port. More recently, DNS has adapted to use more complex transport protocols such as TCP and even advanced protocols like TLS or HTTPS, which incorporate encryption and strong authentication into the mix (see Peter Wu’s blog post about DNS protocol encryption).
Still, the most common transport protocol for message exchange is UDP, which has the advantages of being fast, ubiquitous and requiring no setup. Because UDP is stateless, the pairing of a response to an outstanding query is based on two main factors: the source address and port pair, and information in the DNS message. Given that UDP is both stateless and unauthenticated, anyone, and not just the recipient, can send a response with a forged source address and port, which opens up a range of potential problems.
The blue portions contribute randomness
Since the transport layer is inherently unreliable and untrusted, the DNS protocol was designed with additional mechanisms to protect against forged responses. The first two bytes in the message form a message or transaction ID that must be the same in the query and response. When a DNS client sends a query, it will set the ID to a random value and expect the value in the response to match. This unpredictability introduces entropy into the protocol, which makes it less likely that a malicious party will be able to construct a valid DNS reply without first seeing the query. There are other potential variables to account for, like the DNS query name and query type are also used to pair query and response, but these are trivial to guess and don’t introduce an additional entropy.
Those paying close attention to the diagram may notice that the amount of entropy introduced by this measure is only around 16 bits, which means that there are fewer than a hundred thousand possibilities to go through to find the matching reply to a given query. More on this later.
The DNS Ecosystem
DNS servers fall into one of a few main categories: recursive resolvers (like 1.1.1.1 or 8.8.8.8), nameservers (like the DNS root servers or Cloudflare Authoritative DNS). There are also elements of the ecosystem that act as “forwarders” such as dnsmasq. In a typical DNS lookup, these DNS servers work together to complete the task of delivering the IP address for a specified domain to the client (the client is usually a stub resolver – a simple resolver built into an operating system). For more detailed information about the DNS ecosystem, take a look at our learning site. The SAD DNS attack targets the communication between recursive resolvers and nameservers.
Each of the participants in DNS (client, resolver, nameserver) uses the DNS protocol to communicate with each other. Most of the latest innovations in DNS revolve around upgrading the transport between users and recursive resolvers to use encryption. Upgrading the transport protocol between resolvers and authoritative servers is a bit more complicated as it requires a new discovery mechanism to instruct the resolver when to (and when not to use) a more secure channel. Aside from a few examples like our work with Facebook to encrypt recursive-to-authoritative traffic with DNS-over-TLS, most of these exchanges still happen over UDP. This is the core issue that enables this new attack on DNS, and one that we’ve seen before.
Kaminsky’s Attack
Prior to 2008, recursive resolvers typically used a single open port (usually port 53) to send and receive messages to authoritative nameservers. This made guessing the source port trivial, so the only variable an attacker needed to guess to forge a response to a query was the 16-bit message ID. The attack Kaminsky described was relatively simple: whenever a recursive resolver queried the authoritative name server for a given domain, an attacker would flood the resolver with DNS responses for some or all of the 65 thousand or so possible message IDs. If the malicious answer with the right message ID arrived before the response from the authoritative server, then the DNS cache would be effectively poisoned, returning the attacker’s chosen answer instead of the real one for as long as the DNS response was valid (called the TTL, or time-to-live).
For popular domains, resolvers contact authoritative servers once per TTL (which can be as short as 5 minutes), so there are plenty of opportunities to mount this attack. Forwarders that cache DNS responses are also vulnerable to this type of attack.
In response to this attack, DNS resolvers started doing source port randomization and careful checking of the security ranking of cached data. To poison these updated resolvers, forged responses would not only need to guess the message ID, but they would also have to guess the source port, bringing the number of guesses from the tens of thousands to over a trillion. This made the attack effectively infeasible. Furthermore, the IETF published RFC 5452 on how to harden DNS from guessing attacks.
It should be noted that this attack did not work for DNSSEC-signed domains since their answers are digitally signed. However, even now in 2020, DNSSEC is far from universal.
Defeating Source Port Randomization with Fragmentation
Another way to avoid having to guess the source port number and message ID is to split the DNS response in two. As is often the case in computer security, old attacks become new again when attackers discover new capabilities. In 2012, researchers Amir Herzberg and Haya Schulman from Bar Ilan University discovered that it was possible for a remote attacker to defeat the protections provided by source port randomization. This new attack leveraged another feature of UDP: fragmentation. For a primer on the topic of UDP fragmentation, check out our previous blog post on the subject by Marek Majkowski.
The key to this attack is the fact that all the randomness that needs to be guessed in a DNS poisoning attack is concentrated at the beginning of the DNS message (UDP header and DNS header).If the UDP response packet (sometimes called a datagram) is split into two fragments, the first half containing the message ID and source port and the second containing part of the DNS response, then all an attacker needs to do is forge the second fragment and make sure that the fake second fragment arrives at the resolver before the true second fragment does. When a datagram is fragmented, each fragment is assigned a 16-bit IDs (called IP-ID), which is used to reassemble it at the other end of the connection. Since the second fragment only has the IP-ID as entropy (again, this is a familiar refrain in this area), this attack is feasible with a relatively small number of forged packets. The downside of this attack is the precondition that the response must be fragmented in the first place, and the fragment must be carefully altered to pass the original section counts and UDP checksum.
Also discussed in the original and follow-up papers is a method of forcing two remote servers to send packets between each other which are fragmented at an attacker-controlled point, making this attack much more feasible. The details are in the paper, but it boils down to the fact that the control mechanism for describing the maximum transmissible unit (MTU) between two servers — which determines at which point packets are fragmented — can be set via a forged UDP packet.
We explored this risk in a previous blog post in the context of certificate issuance last year when we introduced our multi-path DCV service, which mitigates this risk in the context of certificate issuance by making DNS queries from multiple vantage points. Nevertheless, fragmentation-based attacks are proving less and less effective as DNS providers move to eliminate support for fragmented DNS packets (one of the major goals of DNS Flag Day 2020).
Defeating Source Port Randomization via ICMP error messages
Another way to defeat the source port randomization is to use some measurable property of the server that makes the source port easier to guess. If the attacker could ask the server which port number is being used for a pending query, that would make the construction of a spoofed packet much easier. No such thing exists, but it turns out there is something close enough – the attacker can discover which ports are surely closed (and thus avoid having to send traffic). One such mechanism is the ICMP “port unreachable” message.
Let’s say the target receives a UDP datagram destined for its IP and some port, the datagram either ends up either being accepted and silently discarded by the application, or rejected because the port is closed. If the port is closed, or more importantly, closed to the IP address that the UDP datagram was sent from, the target will send back an ICMP message notifying the attacker that the port is closed. This is handy to know since the attacker now doesn’t have to bother trying to guess the pending message ID on this port and move to other ports. A single scan of the server effectively reduces the search space of valid UDP responses from 232 (over a trillion) to 217 (around a hundred thousand), at least in theory.
This trick doesn’t always work. Many resolvers use “connected” UDP sockets instead of “open” UDP sockets to exchange messages between the resolver and nameserver. Connected sockets are tied to the peer address and port on the OS layer, which makes it impossible for an attacker to guess which “connected” UDP sockets are established between the target and the victim, and since the attacker isn’t the victim, it can’t directly observe the outcome of the probe.
To overcome this, the researchers found a very clever trick: they leverage ICMP rate limits as a side channel to reveal whether a given port is open or not. ICMP rate limiting was introduced (somewhat ironically, given this attack) as a security feature to prevent a server from being used as an unwitting participant in a reflection attack. In broad terms, it is used to limit how many ICMP responses a server will send out in a given time period. Say an attacker wanted to scan 10,000 ports and sent a burst of 10,000 UDP packets to a server configured with an ICMP rate limit of 50 per second, then only the first 50 would get an ICMP “port unreachable” message in reply.
Rate limiting seems innocuous until you remember one of the core rules of data security: don’t let private information influence publicly measurable metrics. ICMP rate limiting violates this rule because the rate limiter’s behavior can be influenced by an attacker making guesses as to whether a “secret” port number is open or not.
don’t let private information influence publicly measurable metrics
An attacker wants to know whether the target has an open port, so it sends a spoofed UDP message from the authoritative server to that port. If the port is open, no ICMP reply is sent and the rate counter remains unchanged. If the port is inaccessible, then an ICMP reply is sent (back to the authoritative server, not to the attacker) and the rate is increased by one. Although the attacker doesn’t see the ICMP response, it has influenced the counter. The counter itself isn’t known outside the server, but whether it has hit the rate limit or not can be measured by any outside observer by sending a UDP packet and waiting for a reply. If an ICMP “port unreachable” reply comes back, the rate limit hasn’t been reached. No reply means the rate limit has been met. This leaks one bit of information about the counter to the outside observer, which in the end is enough to reveal the supposedly secret information (whether the spoofed request got through or not).
Concretely, the attack works as follows: the attacker sends a bunch (large enough to trigger the rate limiting) of probe messages to the target, but with a forged source address of the victim. In the case where there are no open ports in the probed set, the target will send out the same amount of ICMP “port unreachable” responses back to the victim and trigger the rate limit on outgoing ICMP messages. The attacker can now send an additional verification message from its own address and observe whether an ICMP response comes back or not. If it does then there was at least one port open in the set and the attacker can divide the set and try again, or do a linear scan by inserting the suspected port number into a set of known closed ports. Using this approach, the attacker can narrow down to the open ports and try to guess the message ID until it is successful or gives up, similarly to the original Kaminsky attack.
In practice there are some hurdles to successfully mounting this attack.
First, the target IP, or a set of target IPs must be discovered. This might be trivial in some cases – a single forwarder, or a fixed set of IPs that can be discovered by probing and observing attacker controlled zones, but more difficult if the target IPs are partitioned across zones as the attacker can’t see the resolver egress IP unless she can monitor the traffic for the victim domain.
The attack also requires a large enough ICMP outgoing rate limit in order to be able to scan with a reasonable speed. The scan speed is critical, as it must be completed while the query to the victim nameserver is still pending. As the scan speed is effectively fixed, the paper instead describes a method to potentially extend the window of opportunity by triggering the victim’s response rate limiting (RRL), a technique to protect against floods of forged DNS queries. This may work if the victim implements RRL and the target resolver doesn’t implement a retry over TCP (A Quantitative Study of the Deployment of DNS Rate Limiting shows about 16% of nameservers implement some sort of RRL).
Generally, busy resolvers will have ephemeral ports opening and closing, which introduces false positive open ports for the attacker, and ports open for different pending queries than the one being attacked.
We’ve implemented an additional mitigation to 1.1.1.1 to prevent message ID guessing – if the resolver detects an ID enumeration attempt, it will stop accepting any more guesses and switches over to TCP. This reduces the number of attempts for the attacker even if it guesses the IP address and port correctly, similarly to how the number of password login attempts is limited.
Outlook
Ultimately these are just mitigations, and the attacker might be willing to play the long game. As long as the transport layer is insecure and DNSSEC is not widely deployed, there will be different methods of chipping away at these mitigations.
It should be noted that trying to hide source IPs or open port numbers is a form of security through obscurity. Without strong cryptographic authentication, it will always be possible to use spoofing to poison DNS resolvers. The silver lining here is that DNSSEC exists, and is designed to protect against this type of attack, and DNS servers are moving to explore cryptographically strong transports such as TLS for communicating between resolvers and authoritative servers.
At Cloudflare, we’ve been helping to reduce the friction of DNSSEC deployment, while also helping to improve transport security in the long run. There is also an effort to increase entropy in DNS messages with RFC 7873 – Domain Name System (DNS) Cookies, and make DNS over TCP support mandatory RFC 7766 – DNS Transport over TCP – Implementation Requirements, with even more documentation around ways to mitigate this type of issue available in different places. All of these efforts are complementary, which is a good thing. The DNS ecosystem consists of many different parties and software with different requirements and opinions, as long as the operators support at least one of the preventive measures, these types of attacks will become more and more difficult.
If you are an operator of an authoritative DNS server, you should consider taking the following steps to protect yourself from this attack:
Block the outgoing ICMP “port unreachable” messages with iptables or lower the ICMP rate limit on Linux
Keep your DNS software up to date
We’d like to thank the researchers for responsibly disclosing this attack and look forward to working with them in the future on efforts to strengthen the DNS.
In 2016, we launched the Cloudflare Origin CA, a certificate authority optimized for making it easy to secure the connection between Cloudflare and an origin server. Running our own CA has allowed us to support fast issuance and renewal, simple and effective revocation, and wildcard certificates for our users.
Out of the box, managing TLS certificates and keys within Kubernetes can be challenging and error prone. The secret resources have to be constructed correctly, as components expect secrets with specific fields. Some forms of domain verification require manually rotating secrets to pass. Once you’re successful, don’t forget to renew before the certificate expires!
cert-manager is a project to fill this operational gap, providing Kubernetes resources that manage the lifecycle of a certificate. Today we’re releasing origin-ca-issuer, an extension to cert-manager integrating with Cloudflare Origin CA to easily create and renew certificates for your account’s domains.
Origin CA Integration
Creating an Issuer
After installing cert-manager and origin-ca-issuer, you can create an OriginIssuer resource. This resource creates a binding between cert-manager and the Cloudflare API for an account. Different issuers may be connected to different Cloudflare accounts in the same Kubernetes cluster.
This creates a new OriginIssuer named “prod-issuer” that issues certificates using ECDSA signatures, and the secret “service-key” in the same namespace is used to authenticate to the Cloudflare API.
Signing an Origin CA Certificate
After creating an OriginIssuer, we can now create a Certificate with cert-manager. This defines the domains, including wildcards, that the certificate should be issued for, how long the certificate should be valid, and when cert-manager should renew the certificate.
apiVersion: cert-manager.io/v1
kind: Certificate
metadata:
  name: example-com
  namespace: default
spec:
  # The secret name where cert-manager
  # should store the signed certificate.
  secretName: example-com-tls
  dnsNames:
    - example.com
  # Duration of the certificate.
  duration: 168h
  # Renew a day before the certificate expiration.
  renewBefore: 24h
  # Reference the Origin CA Issuer you created above,
  # which must be in the same namespace.
  issuerRef:
    group: cert-manager.k8s.cloudflare.com
    kind: OriginIssuer
    name: prod-issuer
Once created, cert-manager begins managing the lifecycle of this certificate, including creating the key material, crafting a certificate signature request (CSR), and constructing a certificate request that will be processed by the origin-ca-issuer.
When signed by the Cloudflare API, the certificate will be made available, along with the private key, in the Kubernetes secret specified within the secretName field. You’ll be able to use this certificate on servers proxied behind Cloudflare.
Extra: Ingress Support
If you’re using an Ingress controller, you can use cert-manager’s Ingress support to automatically manage Certificate resources based on your Ingress resource.
apiVersion: networking/v1
kind: Ingress
metadata:
  annotations:
    cert-manager.io/issuer: prod-issuer
    cert-manager.io/issuer-kind: OriginIssuer
    cert-manager.io/issuer-group: cert-manager.k8s.cloudflare.com
  name: example
  namespace: default
spec:
  rules:
    - host: example.com
      http:
        paths:
          - backend:
              serviceName: examplesvc
              servicePort: 80
            path: /
  tls:
    # specifying a host in the TLS section will tell cert-manager
    # what DNS SANs should be on the created certificate.
    - hosts:
        - example.com
      # cert-manager will create this secret
      secretName: example-tls
Building an External cert-manager Issuer
An external cert-manager issuer is a specialized Kubernetes controller. There’s no direct communication between cert-manager and external issuers at all; this means that you can use any existing tools and best practices for developing controllers to develop an external issuer.
We’ve decided to use the excellent controller-runtime project to build origin-ca-issuer, running two reconciliation controllers.
OriginIssuer Controller
The OriginIssuer controller watches for creation and modification of OriginIssuer custom resources. The controllers create a Cloudflare API client using the details and credentials referenced. This client API instance will later be used to sign certificates through the API. The controller will periodically retry to create an API client; once it is successful, it updates the OriginIssuer’s status to be ready.
CertificateRequest Controller
The CertificateRequest controller watches for the creation and modification of cert-manager’s CertificateRequest resources. These resources are created automatically by cert-manager as needed during a certificate’s lifecycle.
The controller looks for Certificate Requests that reference a known OriginIssuer, this reference is copied by cert-manager from the origin Certificate resource, and ignores all resources that do not match. The controller then verifies the OriginIssuer is in the ready state, before transforming the certificate request into an API request using the previously created clients.
On a successful response, the signed certificate is added to the certificate request, and which cert-manager will use to create or update the secret resource. On an unsuccessful request, the controller will periodically retry.
Learn More
Up-to-date documentation and complete installation instructions can be found in our GitHub repository. Feedback and contributions are greatly appreciated. If you’re interested in Kubernetes at Cloudflare, including building controllers like these, we’re hiring.
The Internet is a network of networks. In order to find the path between two points and exchange data, the network devices rely on the information from their peers. This information consists of IP addresses and Autonomous Systems (AS) which announce the addresses using Border Gateway Protocol (BGP).
One problem arises from this design: what protects against a malevolent peer who decides to announce incorrect information? The damage caused by route hijacks can be major.
Routing Public Key Infrastructure (RPKI) is a framework created in 2008. Its goal is to provide a source of truth for Internet Resources (IP addresses) and ASes in signed cryptographically signed records called Route Origin Objects (ROA).
Recently, we’ve seen the significant threshold of two hundred thousands of ROAs being passed. This represents a big step in making the Internet more secure against accidental and deliberate BGP tampering.
We have talked about RPKI in the past but we thought it would be a good time for an update.
In a more technical context, the RPKI framework consists of two parts:
IP addresses need to be cryptographically signed by their owners in a database managed by a Trust Anchor: Afrinic, APNIC, ARIN, LACNIC and RIPE. Those five organizations are in charge of allocating Internet resources. The ROA indicates which Network Operator is allowed to announce the addresses using BGP.
Network operators download the list of ROAs, perform the cryptographic checks and then apply filters on the prefixes they receive: this is called BGP Origin Validation.
The “Is BGP Safe Yet” website
The launch of the website isbgpsafeyet.com to test if your ISP correctly performs BGP Origin Validation was a success. Since launch, it has been visited more than five million times from over 223 countries and 13,000 unique networks (20% of the entire Internet), generating half a million BGP Origin Validation tests.
Many providers subsequently indicated on social media (for example, here or here) that they had an RPKI deployment in the works. This increase in Origin Validation by networks is increasing the security of the Internet globally.
The site’s test for Origin Validation consists of queries toward two addresses, one of which is behind an RPKI invalid prefix and the other behind an RPKI valid prefix. If the query towards the invalid succeeds, the test fails as the ISP does not implement Origin Validation. We counted the number of queries that failed to reach invalid.cloudflare.com. This also included a few thousand RIPE Atlas tests that were started by Cloudflare and various contributors, providing coverage for smaller networks.
Every month since launch we’ve seen that around 10 to 20 networks are deploying RPKI Origin Validation. Among the major providers we can build the following table:
With the help of many contributors, we have compiled a list of network operators and public statements at the top of the isbgpsafeyet.com page.
We excluded providers that manually blocked the traffic towards the prefix instead of using RPKI. Among the techniques we see are firewall filtering and manual prefix rejection. The filtering is often propagated to other customer ISPs. In a unique case, an ISP generated a “more-specific” blackhole route that leaked to multiple peers over the Internet.
The deployment of RPKI by major transit providers, also known as Tier 1, such as Cogent, GTT, Hurricane Electric, NTT and Telia made many downstream networks more secure without them having them deploying validation software.
Overall, we looked at the evolution of the successful tests per ASN and we noticed a steady increase over the recent months of 8%.
Furthermore, when we probed the entire IPv4 space this month, using a similar technique to the isbgpsafeyet.com test, many more networks were not able to reach an RPKI invalid prefix than compared to the same period last year. This confirms an increase of RPKI Origin Validation deployment across all network operators. The picture below shows the IPv4 space behind a network with RPKI Origin Validation enabled in yellow and the active space in blue. It uses a Hilbert Curve to efficiently plot IP addresses: for example one /20 prefix (4096 IPs) is a pixel, a /16 prefix (65536 IPs) will form a 4×4 pixels square.
The more the yellow spreads, the safer the Internet becomes.
What does it mean exactly? If you were hijacking a prefix, the users behind the yellow space would likely not be affected. This also applies if you miss-sign your prefixes: you would not be able to reach the services or users behind the yellow space. Once RPKI is enabled everywhere, there will only be yellow squares.
Progression of signed prefixes
Owners of IP addresses indicate the networks allowed to announce them. They do this by signing prefixes: they create Route Origin Objects (ROA). As of today, there are more than 200,000 ROAs. The distribution shows that the RIPE region is still leading in ROA count, then followed by the APNIC region.
2020 started with 172,000 records and the count is getting close to 200,000 at the beginning of November, approximately a quarter of all the Internet routes. Since last year, the database of ROAs grew by more than 70 percent, from 100,000 records, an average pace of 5% every month.
On the following graph of unique ROAs count per day, we can see two points that were followed by a change in ROA creation rate: 140/day, then 231/day, and since August, 351 new ROAs per day.
It is not yet clear what caused the increase in August.
Free services and software
In 2018 and 2019, Cloudflare was impacted by BGP route hijacks. Both could have been avoided with RPKI. Not long after the first incident, we started signing prefixes and developing RPKI software. It was necessary to make BGP safer and we wanted to do more than talk about it. But we also needed enough networks to be deploying RPKI as well. By making deployment easier for everyone, we hoped to increase adoption.
The following is a reminder of what we built over the years around RPKI and how it grew.
OctoRPKI is Cloudflare’s open source RPKI Validation software. It periodically generates a JSON document of validated prefixes that we pass onto our routers using GoRTR. It generates most of the data behind the graphs here.
The latest version, 1.2.0, of OctoRPKI was released at the end of October. It implements important security fixes, better memory management and extended logging. This is the first validator to provide detailed information around cryptographically invalid records into Sentry and performance data in distributed tracing tools. GoRTR remains heavily used in production, including by transit providers. It can natively connect to other validators like rpki-client.
When we released our public rpki.json endpoint in early 2019, the idea was to enable anyone to see what Cloudflare was filtering.
The file is also used as a bootstrap by GoRTR, so that users can test a deployment. The file is cached on more than 200 data centers, ensuring quick and secure delivery of a list of valid prefixes, making RPKI more accessible for smaller networks and developers.
Between March 2019 and November 2020, the number of queries more than doubled and there are five times more networks querying this file.
The growth of queries follows approximately the rate of ROA creation (~5% per month).
A public RTR server is also available on rtr.rpki.cloudflare.com. It includes a plaintext endpoint on port 8282 and an SSH endpoint on port 8283. This allows us to test new versions of GoRTR before release.
Later in 2019, we also built a public dashboard where you can see in-depth RPKI validation. With a GraphQL API, you can now explore the validation data, test a list of prefixes, or see the status of the current routing table.
Currently, the API is used by BGPalerter, an open-source tool that detects routing issues (including hijacks!) from a stream of BGP updates.
Additionally, starting in November, you can access the historical data from May 2019. Data is computed daily and contains the unique records. The team behind the dashboard worked hard to provide a fast and accurate visualization of the daily ROA changes and the volumes of files changed over the day.
The future
We believe RPKI is going to continue growing, and we would like to thank the hundreds of network engineers around the world who are making the Internet routing more secure by deploying RPKI.
25% of routes are signed and 20% of the Internet is doing origin validation and those numbers grow everyday. We believe BGP will be safer before reaching 100% of deployment; for instance, once the remaining transit providers enable Origin Validation, it is unlikely a BGP hijack will make it to the front page of world news outlets.
While difficult to quantify, we believe that critical mass of protected resources will be reached in late 2021.
We will keep improving the tooling; OctoRPKI and GoRTR are open-source and we welcome contributions. In the near future, we plan on releasing a packaged version of GoRTR that can be directly installed on certain routers. Stay tuned!
Last month Ben Brumm asked me for the one advice I’d like to give to developers that are working with databases (in reality – almost all of us). He published mine as well as many others’ answers here, but I’d like to share it with my readers as well.
If I had to give developers working with databases one advice, it would be: make it secure. Every other thing you’ll figure in time – how to structure your tables, how to use ORM, how to optimize queries, how to use indexes, how to do multitenancy. But security may not be on the list of requirements and it may be too late when the need becomes obvious.
So I’d focus on several things:
Prevent SQL injections – make sure you use an ORM or prepared statements rather than building queries with string concatenation. Otherwise a malicious actor can inject anything in your queries and turn them into a DROP DATABASE query, or worse – one that exfiltrates all the data.
Support encryption in transit – this often has to be supported by the application’s driver configuration, e.g. by trusting a particular server certificate. Unencrypted communication, even within the same datacenter, is a significant risk and that’s why databases support encryption in transit. (You should also think about encryption at rest, but that’s more of an Ops task)
Have an audit log at the application level – “who did what” is a very important question from a security and compliance point of view. And no native database functionality can consistently answer the question “who” – it’s the application that manages users. So build an audit trail layer that records who did what changes to what entities/tables.
Consider record-level encryption for sensitive data – a database can be dumped in full by those who have access (or gain access maliciously). This is how data breaches happen. Sensitive data (like health data, payment data, or even API keys, secrets or tokens) benefits from being encrypted with an application-managed key, so that access to the database alone doesn’t reveal that data. Another option, often used for credit cards, is tokenization, which shifts the encryption responsibility to the tokenization providers. Managing the keys is hard, but even a basic approach is better than nothing.
Security is often viewed as an “operations” responsibility, and this has lead to a lot of tools that try to solve the above problem without touching the application – web application firewalls, heuristics for database access monitoring, trying to extract the current user, etc. But the application is the right place for many of these protections (although certainly not the only place), and as developers we need to be aware of the risks and best practices.
Bots — both good and bad — are everywhere on the Internet. Roughly 40% of Internet traffic is automated. Fortunately, Cloudflare offers a tool that can detect and block unwanted bots: we call it Bot Management. This is the most recent platform in our long history of detecting bots for our customers. In fact, Cloudflare has always offered some form of bot detection. Over the past two years, our team has focused on building advanced detection engines, innovating as bots become more sophisticated, and creating new features.
Today, we are releasing Bot Analytics to help you visualize your automated traffic.
Background
It’s worth including some background for those who are new to bots.
Many websites expect human behavior. When I shop online, I behave as anyone else would: I might search for a few items, read reviews when I find something interesting, and eventually complete an order. This is expected. It is a standard use of the Internet.
Unfortunately, without protection these sites can be ripe for exploitation. Those shoes I was looking at? They are limited edition sneakers that resell for five times the price. Sneaker hoarders clamor at the chance to buy a pair (or fifty). Or perhaps I just added a book to my cart: there are probably hundreds of online retailers that sell the same book, each one eager to offer the best price. These retailers desperately want to know what their competitors’ prices are.
You can see where this is going. While most humans make good use of the Internet, some use automated tools to perform abuse at scale. For example, attackers will deplete sneaker inventories by using automated bots to check out quickly. By the time humans click “add to cart,” bots have already paid for shipping. Humans hardly stand a chance. Similarly, online retailers keep track of their competitors with “price scraping” bots that collect pricing information. So when one retailer lowers a book price to $10, another retailer’s bot will respond by pricing at $9.99. This is how we end up with weird prices like $12.32 for toilet paper. Worst of all, malicious bots are incentivized to hide their identities. They’re hidden among us.
Not all bots are bad. Cloudflare maintains a list of verified good bots that we keep separated from the rest. Verified bots are usually transparent about who they are: DuckDuckGo, for example, publicly lists the IP addresses it uses for its search engine. This is a well-intentioned service that happens to be automated, so we verified it. We also verify bots for error monitoring and other tools.
Enter: Bot Analytics
As discussed earlier, we built a Bot Management platform that intelligently detects bots on the Internet, allowing our customers to block bad ones and allow good ones. If you’re curious about how our solution works, read here.
Beginning today, we are going to show you the bots that reach your website. You can see these bots with a new tool called Bot Analytics. It’s fast, accurate, and loaded with information. You can query data up to one month in the past with no noticeable lag. To accomplish this, we exposed the data with GraphQL and paired it with adaptive bitrate (ABR) technology to dynamically load content. If you already have Bot Management added to your Cloudflare account, Bot Analytics is included in your service. Open up your dashboard and let’s take a tour…
The Tour
First: where to go? Bot Analytics lives under the Firewall tab of the dashboard. Once you’re in the Firewall, go to “Overview” and click the second thumbnail on the left. Remember, Bot Management must be added to your account for full access to analytics.
It’s worth noting that Enterprise sites without Bot Management can see a snapshot of their bot traffic. This data is updated in real time and should help you determine if you have a bot problem. Generally speaking, if you have a double-digit percentage of automated traffic, you might be spending more on origin costs than you have to. More importantly, you might be losing revenue or sensitive information to inventory hoarding and credential stuffing.
“Requests by bot score” is the first section on the page. Here, we show traffic over time, but we split it vertically by the traffic type. Green segments represent verified bots, while shades of purple and blue show varying degrees of bot/human likelihood.
“Bot score distribution” is next. This shows similar data, but we display it horizontally without the notion of time. Use the slider below to filter on subsets of traffic and watch the rest of the page adapt.
We recommend that you use the slider to find your ideal bot threshold. In other words: what is the cutoff for suspicious traffic on your site? We generally consider traffic below 30 to be automated, but customers might choose to challenge traffic below 40 or block traffic below 10 (you can even do both!). You should set a threshold that is ambitious but not too aggressive. If your traffic looks like the example below, consider setting a threshold at a “drop off” point like 3 or 14. Why? Notice that the request density is very high near scores 1-2 and 12-13. Many of these requests will have similar characteristics, meaning that the scores immediately above them (3 and 14) offer some differentiating quality. These are the most promising places to segment your bot rules. Notably, not every graph is this pronounced.
“Bot score source” sits lower on the page. Here, you can examine the detection engines that are responsible for scoring your traffic. If you can’t remember the purpose of each engine, simply hover over the tooltip to view a brief description. Customers may wonder why some requests are flagged as “not computed.” This commonly occurs when Cloudflare has issued an error page on your behalf. Perhaps a visitor’s request was met with a gateway timeout (error 504), in which case Cloudflare responded with a branded error page. The error page would not have warranted a challenge or a block, so we did not spend time calculating a bot score. We published another blog post that provides an overview of the most common sources, including machine learning and heuristics.
“Top requests by source” is the final section of Bot Analytics. Although it’s not quite as colorful as the sections above, this section grounds Bot Analytics in highly specific data. You can filter or exclude request attributes, including IP addresses, user agents, and ASNs. In the next section, we’ll use this to spot a bot attack.
Let’s Spot A Bot Attack!
First, I’m going to use the “bot score source” tool to select the most obvious bot requests — those detected by our heuristics engine. This provides us with the following information, some of which has been redacted for privacy reasons:
I already suspect a correlation between a few of these attributes. First, the IP addresses all have very similar request counts. No human would access a site 22,000 times, and the uniformity across IPs 2-5 suggests foul play. Not surprisingly, the same pattern occurs for user agents on the right. User agents tell us about the browser and device associated with a particular request. When Bot Analytics shows this much uniformity and presents clear anomalies in country and ASN, I get suspicious (and you should too). I’m now going to filter on these anomalies to see if my instinct is right:
The trends hold true — to be sure, I briefly expanded the table and found nine separate IP addresses exhibiting the same behavior. This is likely an aggressive content scraper. Notably, it is not marked as a verified bot, so Bot Management issued the lowest possible score and flagged it as “automated.” At the top of Bot Analytics, I will narrow down the traffic and keep the time period at 24 hours:
The most severe attacks come and go. This traffic is clearly sustained, and my best guess is that someone is frequently scraping the homepage for content. This isn’t the most malicious of attacks, but content is still being taken. If I wanted to, I could set a firewall rule to target this bot score or any of the filters I used.
Try It Out
As a reminder, all Enterprise customers will be able to see a snapshot of their bot traffic. Even if you don’t have Bot Management for your site, visit the Firewall for some high-level insights that are updated in real time.
And for those of you with Bot Management — check out Bot Analytics! It’s live now, and we hope you’ll have fun using it. Keep your eyes open for new analytics features in the coming months.
Blog post contributors: Pablo Garbossa and Federico Alliani of Mercado Libre
Introduction
Mercado Libre (MELI) is the leading e-commerce and FinTech company in Latin America. We have a presence in 18 countries across Latin America, and our mission is to democratize commerce and payments to impact the development of the region.
We manage an ecosystem of more than 8,000 custom-built applications that process an average of 2.2 million requests per second. To support the demand, we run between 50,000 to 80,000 Amazon Elastic Cloud Compute (EC2) instances, and our infrastructure scales in and out according to the time of the day, thanks to the elasticity of the AWS cloud and its auto scaling features.
As a company, we expect our developers to devote their time and energy building the apps and features that our customers demand, without having to worry about the underlying infrastructure that the apps are built upon. To achieve this separation of concerns, we built Fury, our platform as a service (PaaS) that provides an abstraction layer between our developers and the infrastructure. Each time a developer deploys a brand new application or a new version of an existing one, Fury takes care of creating all the required components such as Amazon Virtual Private Cloud (VPC), Amazon Elastic Load Balancing (ELB), Amazon EC2 Auto Scaling group (ASG), and EC2) instances. Fury also manages a per-application Git repository, CI/CD pipeline with different deployment strategies, such like blue-green and rolling upgrades, and transparent application logs and metrics collection.
For those of us on the Cloud Security team, Fury represents an opportunity to enforce critical security controls across our stack in a way that’s transparent to our developers. For instance, we can dictate what Amazon Machine Images (AMIs) are vetted for use in production (such as those that align with the Center for Internet Security benchmarks). If needed, we can apply security patches across all of our fleet from a centralized location in a very scalable fashion.
But there are also other attack vectors that every organization that has a presence on the public internet is exposed to. The AWS recent Threat Landscape Report shows a 23% YoY increase in the total number of Denial of Service (DoS) events. It’s evident that organizations need to be prepared to quickly react under these circumstances.
The variety and the number of attacks are increasing, testing the resilience of all types of organizations. This is why we started working on a solution that allows us to contain application DoS attacks, and complements our perimeter security strategy, which is based on services such as AWS Shield and AWS Web Application Firewall (WAF). In this article, we will walk you through the solution we built to automatically detect and block these events.
The strategy we implemented for our solution, Network Behavior Anomaly Detection (NBAD), consists of four stages that we repeatedly execute:
Analyze the execution context of our applications, like CPU and memory usage
Learn their behavior
Detect anomalies, gather relevant information and process it
Respond automatically
Step 1: Establish a baseline for each application
End user traffic enters through different AWS CloudFront distributions that route to multiple Elastic Load Balancers (ELBs). Behind the ELBs, we operate a fleet of NGINX servers from where we connect back to the myriad of applications that our developers create via Fury.
We collect logs and metrics for each application that we ship to Amazon Simple Storage Service (S3) and Datadog. We then partition these logs using AWS Glue to make them available for consumption via Amazon Athena. On average, we send 3 terabytes (TB) of log files in parquet format to S3.
Based on this information, we developed processes that we complement with commercial solutions, such as Datadog’s Anomaly Detection, which allows us to learn the normal behavior or baseline of our applications and project expected adaptive growth thresholds for each one of them.
Step 2: Anomaly detection
When any of our apps receives a number of requests that fall outside the limits set by our anomaly detection algorithms, an Amazon Simple Notification Service (SNS) event is emitted, which triggers a workflow in the Anomaly Analyzer, a custom-built component of this solution.
Upon receiving such an event, the Anomaly Analyzer starts composing the so-called event context. In parallel, the Data Extractor retrieves vital insights via Athena from the log files stored in S3.
The output of this process is used as the input for the data enrichment process. This is responsible for consulting different threat intelligence sources that are used to further augment the analysis and determine if the event is an actual incident or not.
At this point, we build the context that will allow us not only to have greater certainty in calculating the score, but it will also help us validate and act quicker. This context includes:
Application’s owner
Affected business metrics
Error handling statistics of our applications
Reputation of IP addresses and associated users
Use of unexpected URL parameters
Distribution by origin of the traffic that generated the event (cloud providers, geolocation, etc.)
Known behavior patterns of vulnerability discovery or exploitation
Based on these analysis results we carry out a series of verifications in order to rule out false positives. Finally, we execute different actions based on the following criteria:
Manual review
If the outcome of the automatic analysis results in a medium risk scoring, we activate a manual review process:
We send a report to the application’s owners with a summary of the context. Based on their understanding of the business, they can activate the Incident Response Team (IRT) on-call and/or provide feedback that allows us to improve our automatic rules.
In parallel, our threat analysis team receives and processes the event. They are equipped with tools that allow them to add IP addresses, user-agents, referrers, or regular expressions into Amazon WAF to carry out temporary blocking of “bad actors” in situations where the attack is in progress.
Automatic response
If the analysis results in a high risk score, an automatic containment process is triggered. The event is sent to our block API, which is responsible for adding a temporary rule designed to mitigate the attack in progress. Behind the scenes, our block API leverages AWS WAF to create IPSets. We reference these IPsets from our custom rule groups in our web ACLs, in order to block IPs that source the malicious traffic. We found many benefits in the new release of AWS WAF, like support for Amazon Managed Rules, larger capacity units per web ACL as well as an easier to use API.
Conclusion
By leveraging the AWS platform and its powerful APIs, and together with the AWS WAF service team and solutions architects, we were able to build an automated incident response solution that is able to identify and block malicious actors with minimal operator intervention. Since launching the solution, we have reduced YoY application downtime over 92% even when the time under attack increased over 10x. This has had a positive impact on our users and therefore, on our business.
Not only was our downtime drastically reduced, but we also cut the number of manual interventions during this type of incident by 65%.
We plan to iterate over this solution to further reduce false positives in our detection mechanisms as well as the time to respond to external threats.
About the authors
Pablo Garbossa is an Information Security Manager at Mercado Libre. His main duties include ensuring security in the software development life cycle and managing security in MELI’s cloud environment. Pablo is also an active member of the Open Web Application Security Project® (OWASP) Buenos Aires chapter, a nonprofit foundation that works to improve the security of software.
Federico Alliani is a Security Engineer on the Mercado Libre Monitoring team. Federico and his team are in charge of protecting the site against different types of attacks. He loves to dive deep into big architectures to drive performance, scale operational efficiency, and increase the speed of detection and response to security events.
The collective thoughts of the interwebz
Manage Consent
To provide the best experiences, we use technologies like cookies to store and/or access device information. Consenting to these technologies will allow us to process data such as browsing behavior or unique IDs on this site. Not consenting or withdrawing consent, may adversely affect certain features and functions.
Functional
Always active
The technical storage or access is strictly necessary for the legitimate purpose of enabling the use of a specific service explicitly requested by the subscriber or user, or for the sole purpose of carrying out the transmission of a communication over an electronic communications network.
Preferences
The technical storage or access is necessary for the legitimate purpose of storing preferences that are not requested by the subscriber or user.
Statistics
The technical storage or access that is used exclusively for statistical purposes.The technical storage or access that is used exclusively for anonymous statistical purposes. Without a subpoena, voluntary compliance on the part of your Internet Service Provider, or additional records from a third party, information stored or retrieved for this purpose alone cannot usually be used to identify you.
Marketing
The technical storage or access is required to create user profiles to send advertising, or to track the user on a website or across several websites for similar marketing purposes.