Tag Archives: launch

Amazon S3 Compatible Storage on AWS Snowball Edge Compute Optimized Devices Now Generally Available

Post Syndicated from Channy Yun original https://aws.amazon.com/blogs/aws/amazon-s3-compatible-storage-on-aws-snowball-edge-compute-optimized-devices-now-generally-available/

We have added a collection of purpose-built services to the AWS Snow Family for customers, such as Snowball Edge in 2016 and Snowcone in 2020. These services run compute intensive workloads and stores data in edge locations with denied, disrupted, intermittent, or limited network connectivity and for transferring large amounts of data from on-premises and rugged or mobile environments.

Each new service is optimized for space- or weight-constrained environments, portability, and flexible networking options. For example, Snowball Edge devices have three options for device configurations. AWS Snowball Edge Compute Optimized provides a suitcase-sized, secure, and rugged device that customers can deploy in rugged and tactical edge locations to run their compute applications. Customers modernize their edge applications in the cloud use AWS compute services and storage services such as Amazon Simple Storage Service (Amazon S3), and then deploy these applications on Snow devices at the edge.

We heard from customers that they also needed access to local object store to run applications at the edge, such as 5G mobile core and real-time data analytics, to process end-user transactions, and they had limited storage infrastructure availability in these environments. Although the Amazon S3 Adapter for Snowball enables the basic storage and retrieval of objects on a Snow device, customers wanted access to a broader set of Amazon S3 APIs, including flexibility at scale, local bucket management, object tagging, and S3 event notifications.

Today, we’re announcing the general availability of Amazon S3 compatible storage on Snow for our Snowball Edge Compute Optimized devices. This makes it easy for you to store data and run applications with local S3 buckets that require low latency processing at the edge.

With Amazon S3 compatible storage on Snow, you can use an expanded set of Amazon S3 APIs to easily build applications on AWS and deploy them on Snowball Edge Compute Optimized devices. This eliminates the need to re-architect applications for each deployment. You can manage applications requiring Amazon S3 compatible storage across the cloud, on-premises, and at the edge in connected and disconnected environments with a consistent experience.

Moreover, you can use AWS OpsHub, a graphical user interface, to manage your Snow Family services and Amazon S3 compatible storage on the devices at the edge or remotely from a central location. You can also use Amazon S3 SDK or AWS Command Line Interface (AWS CLI) to create and manage S3 buckets, get S3 event notifications using MQTT, and local service notifications using SMTP, just as you do in AWS Regions.

With Amazon S3 compatible storage on Snow, we are now able to address various use cases in limited network environments, giving customers secure, durable local object storage. For example, customers in the intelligence community and in industrial IoT deploy applications such as video analytics in rugged and mobile edge locations.

Getting Started with S3 Compatible Storage on Snowball Edge Compute Optimized
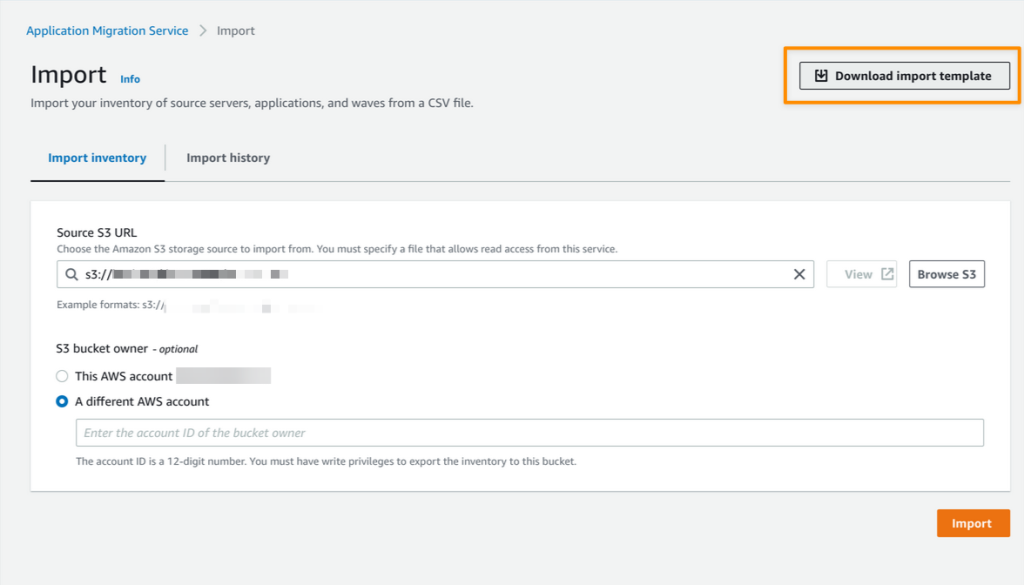
To order new Amazon S3 enabled Snowball Edge devices, create a job in the AWS Snow Family console. You can replace an existing Snow device or cluster with new replacement devices that support S3 compatible storage.

In Step 1 – Job type, input your job name and choose Local compute and storage only. In Step 2 – Compute and storage, choose your preferred Snowball Edge Compute Optimized device.

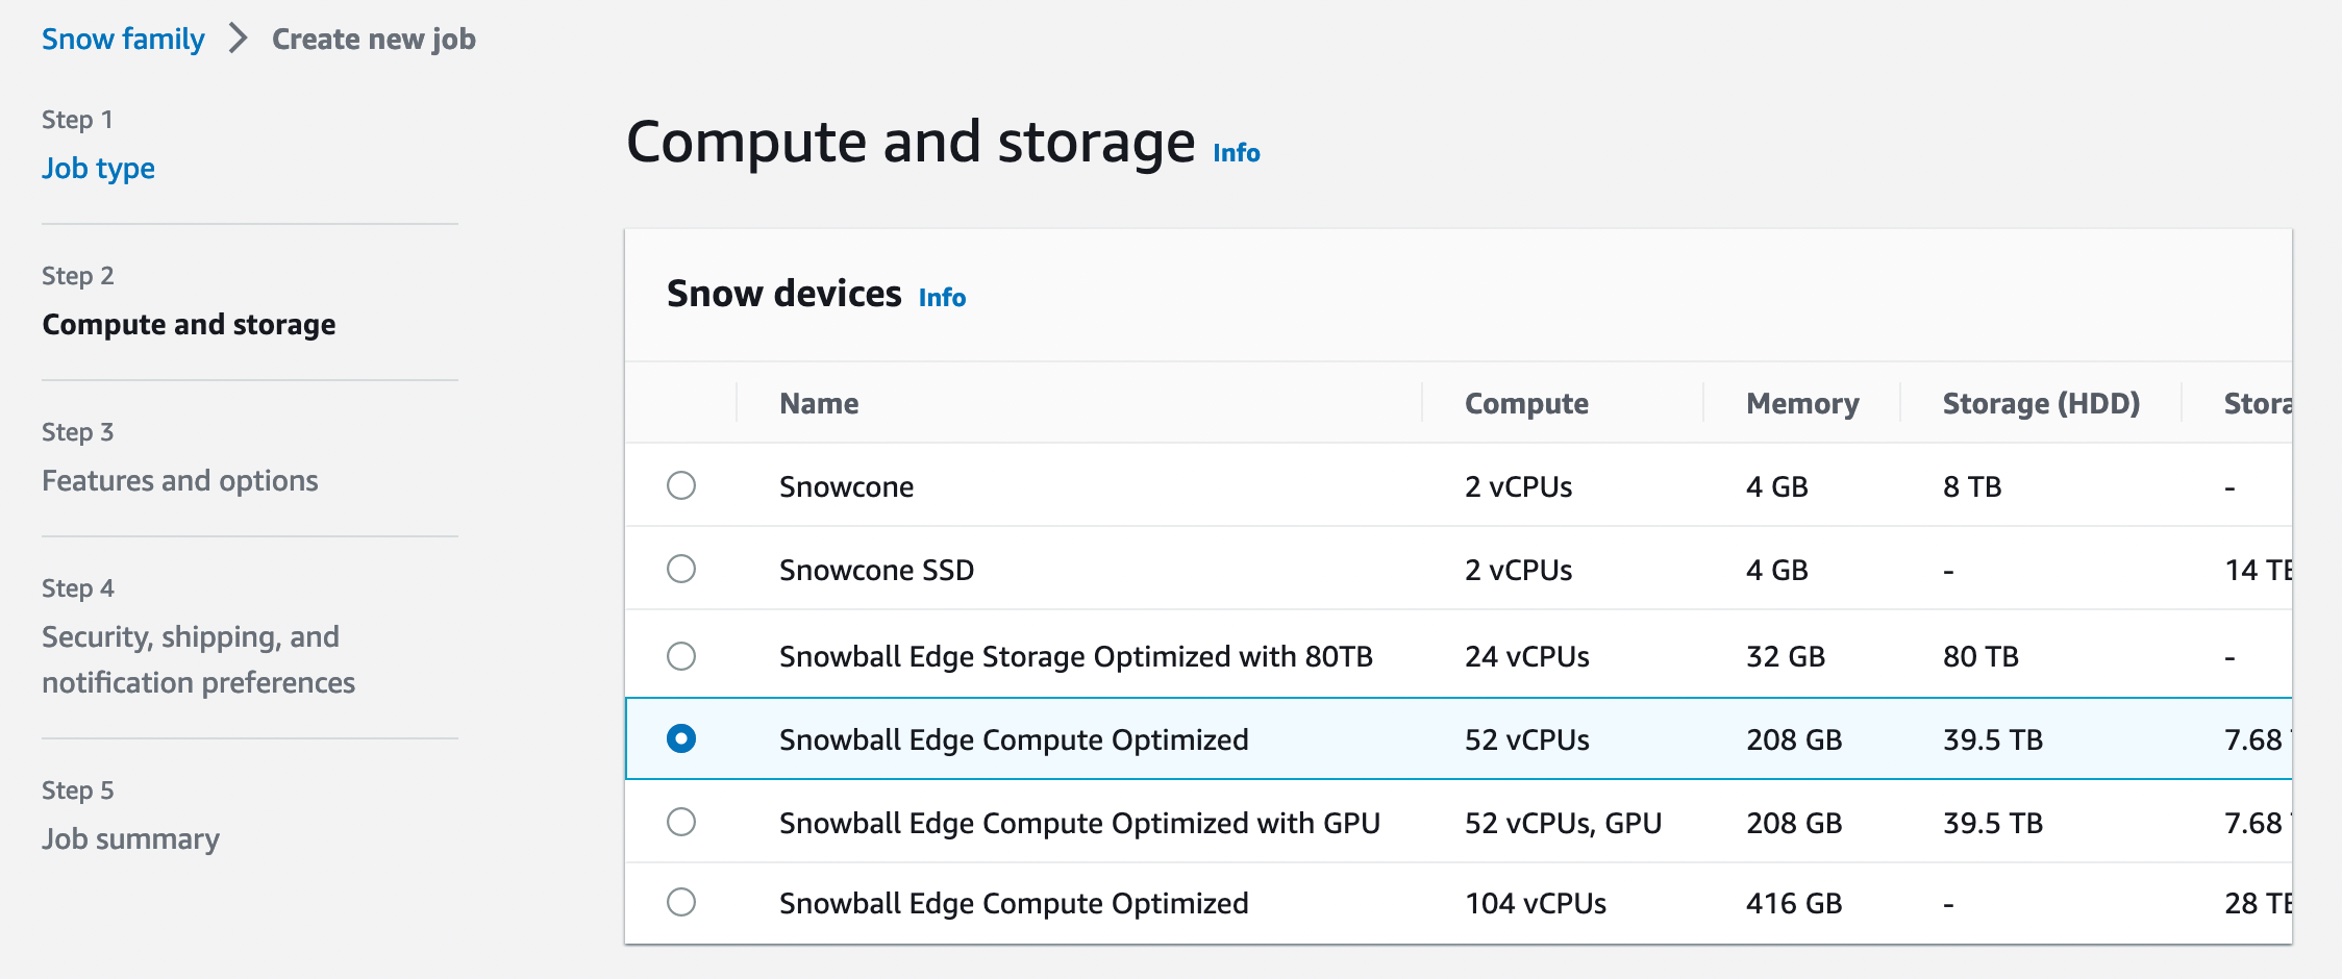
Select Amazon S3 compatible storage, a new option for S3 compatible storage. The current S3 Adapter solution is on deprecation path, and we recommend migrating workloads to use Amazon S3 compatible storage on Snow.

When you select Amazon S3 compatible storage, you can configure Amazon S3 compatible storage capacity for a single device or for a cluster. The Amazon S3 storage capacity depends on the quantity and type of Snowball Edge device.

  • For single-device deployment, you can provision granular Amazon S3 capacity up to a maximum of 31 TB on a Snowball Edge Compute Optimized device.
  • For a cluster setup, all storage capacity on a device is allocated to Amazon S3 compatible storage on Snow. You can provision a maximum of 500 TB on a 16 node cluster of Snowball Edge Compute Optimized devices.

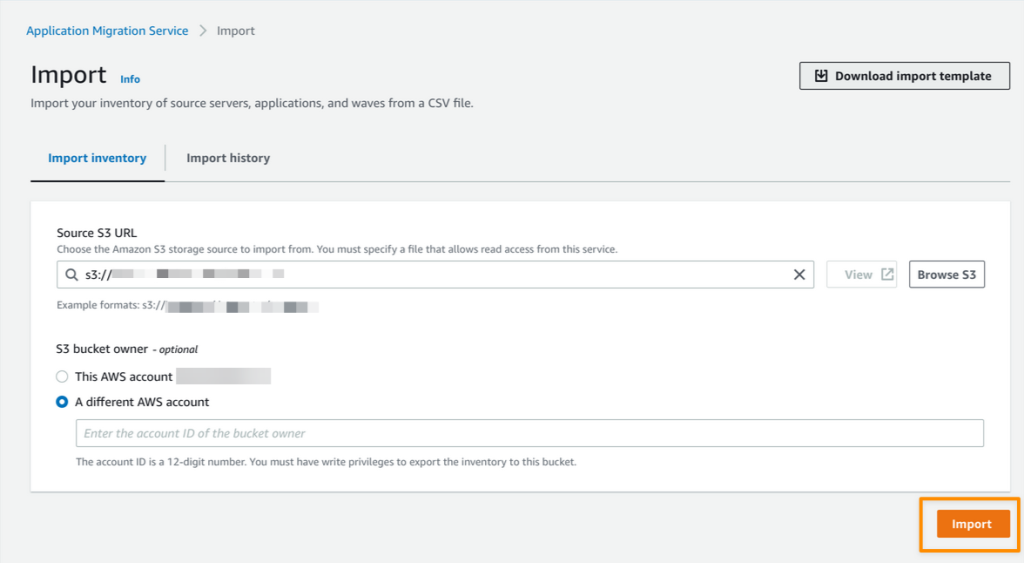
When you provide all necessary job details and create your job, you can see the status of the delivery of your device in the job status section.

Manage S3 Compatible Storage on Snow with OpsHub
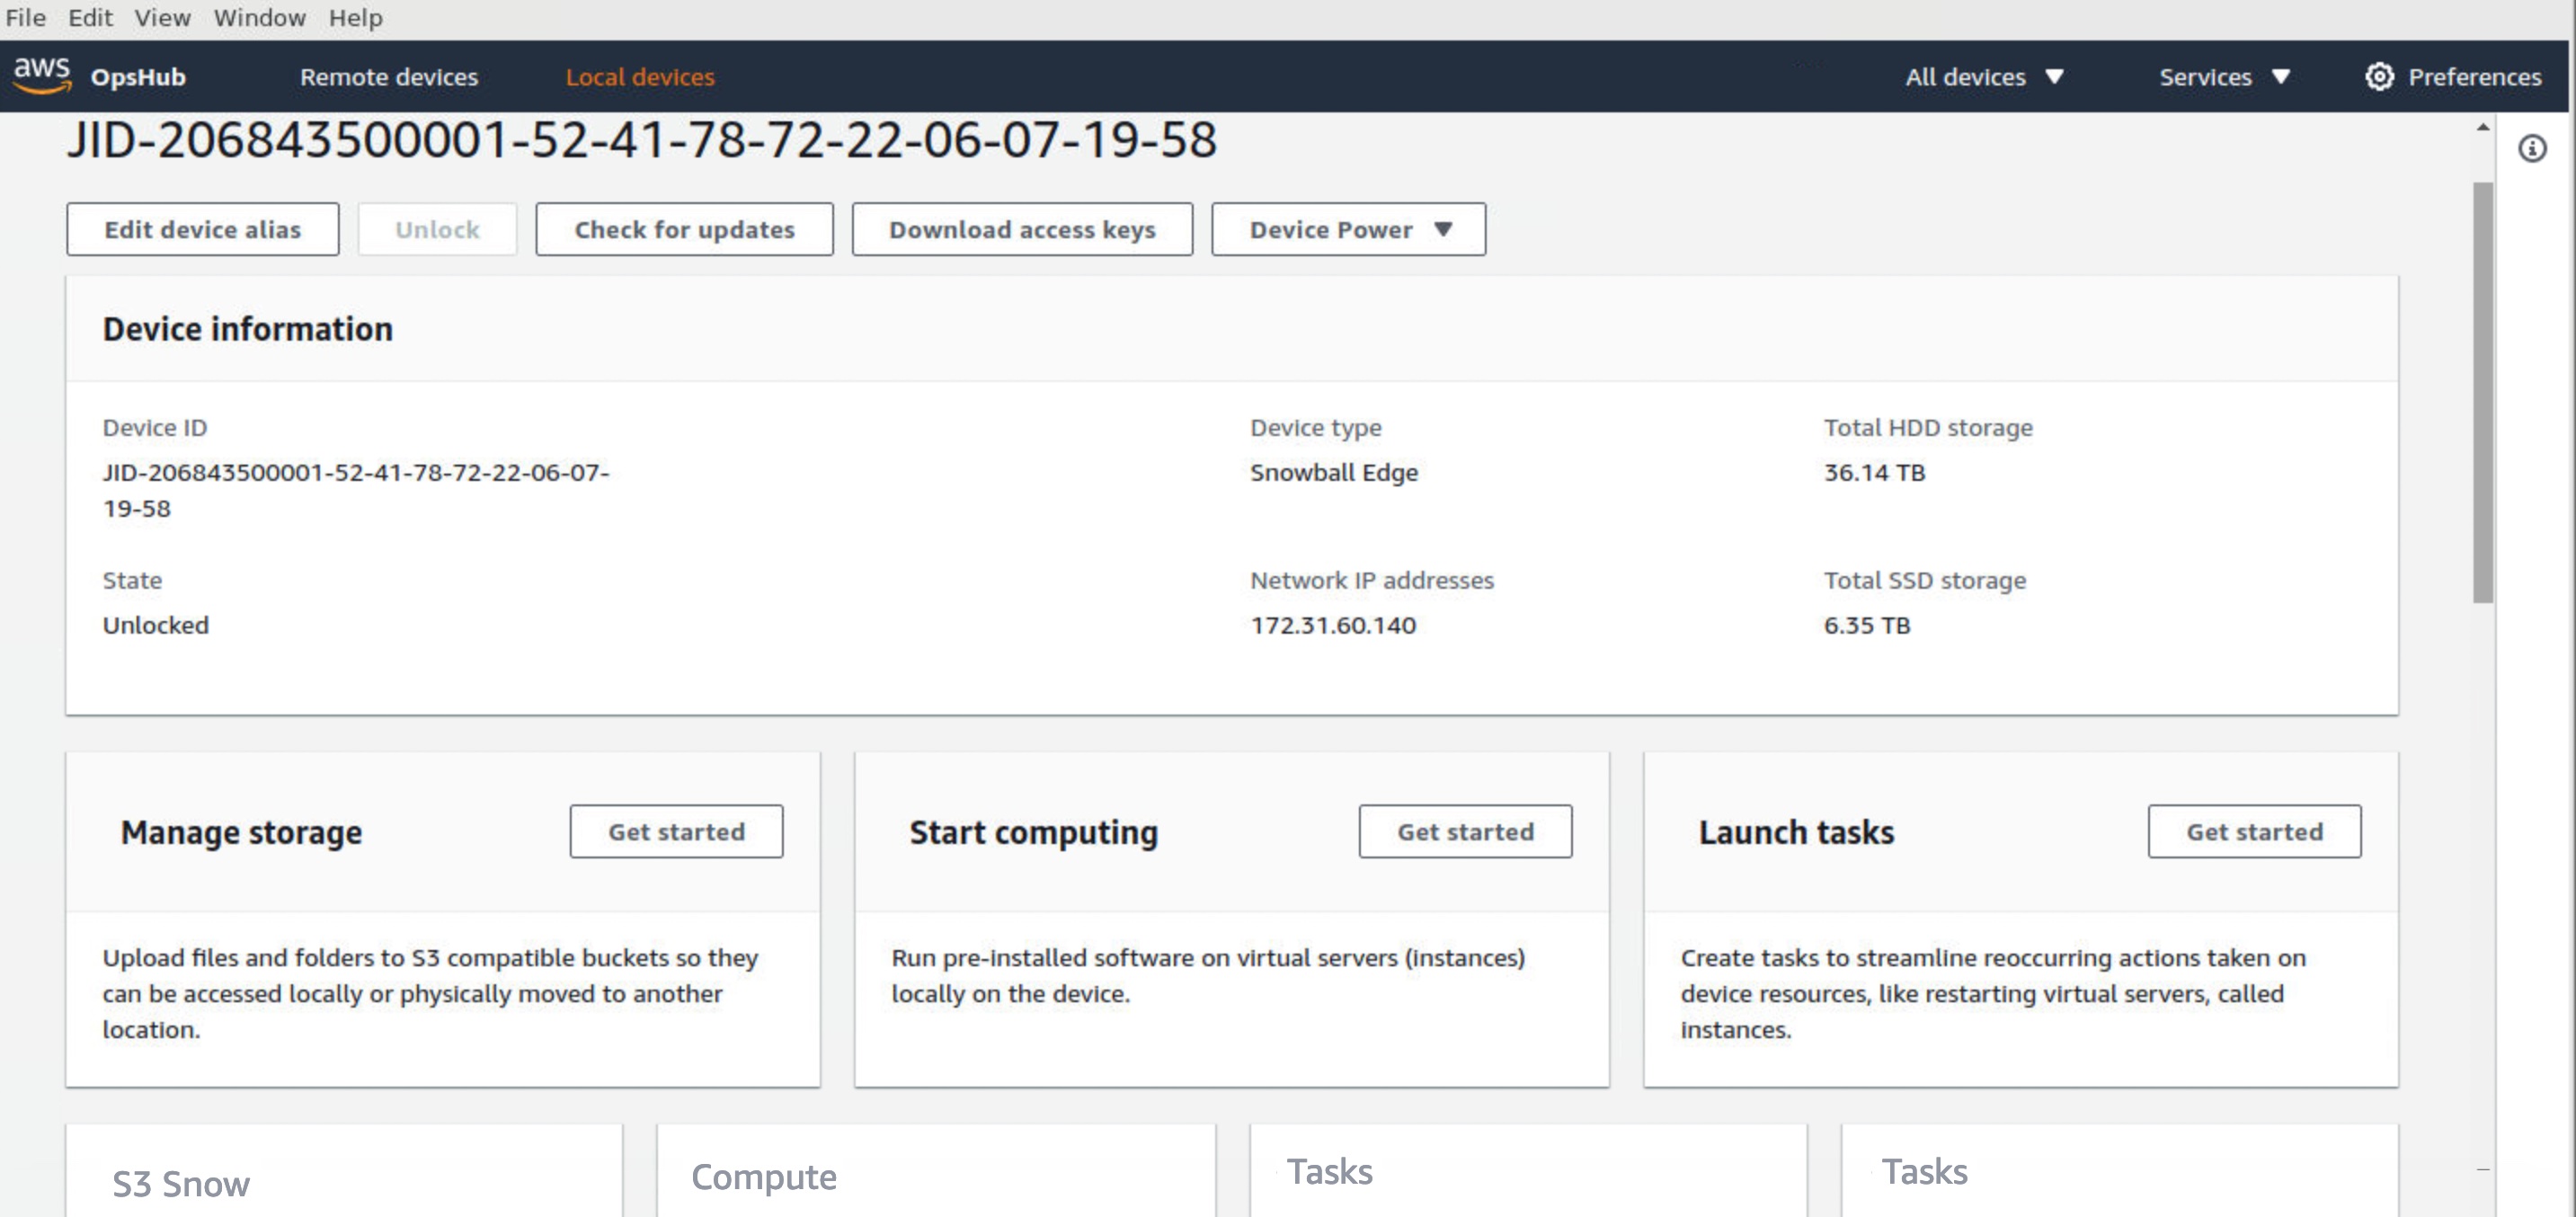
Once your device arrives at your site, power it on, and connect it to your network. To manage your device, download, install, and launch the OpsHub application in your laptop. After installation, you can unlock the device and start managing it and using supported AWS services locally.

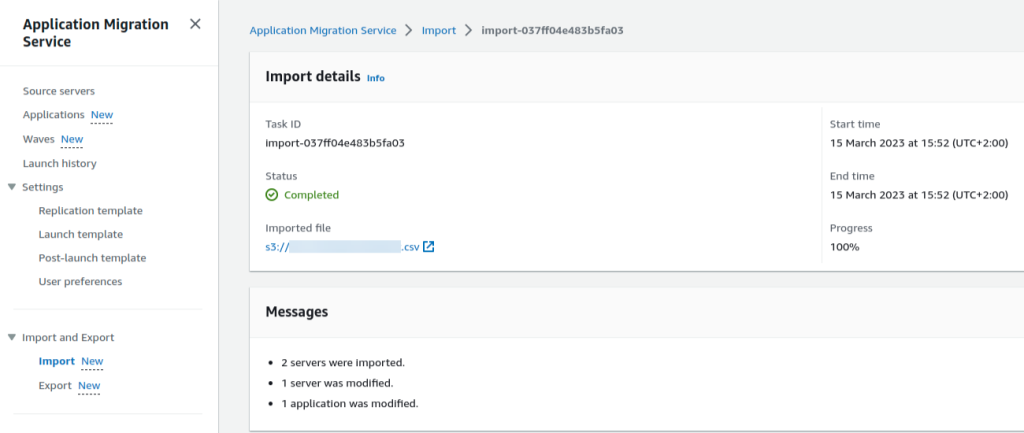
OpsHub provides a dashboard that summarizes key metrics, such as storage capacity and active instances on your device. It also provides a selection of AWS services that are supported on the Snow Family devices.

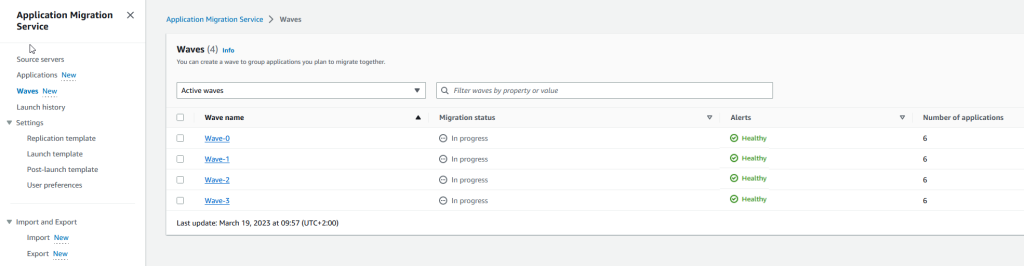
Log in to OpsHub, then choose Manage Storage. This takes you to the Amazon S3 compatible storage on Snow landing page.

For Start service setup type, choose Simple if your network uses dynamic host configuration protocol (DHCP). With this option, the virtual network interface cards (VNICs) are created automatically on each device when you start the service. When your network uses static IP addresses, you need to create VNICs for each device manually, so choose the Advanced option.

Once the service starts, you’ll see its status is active with a list of endpoints. The following example shows the service activated in a single device:

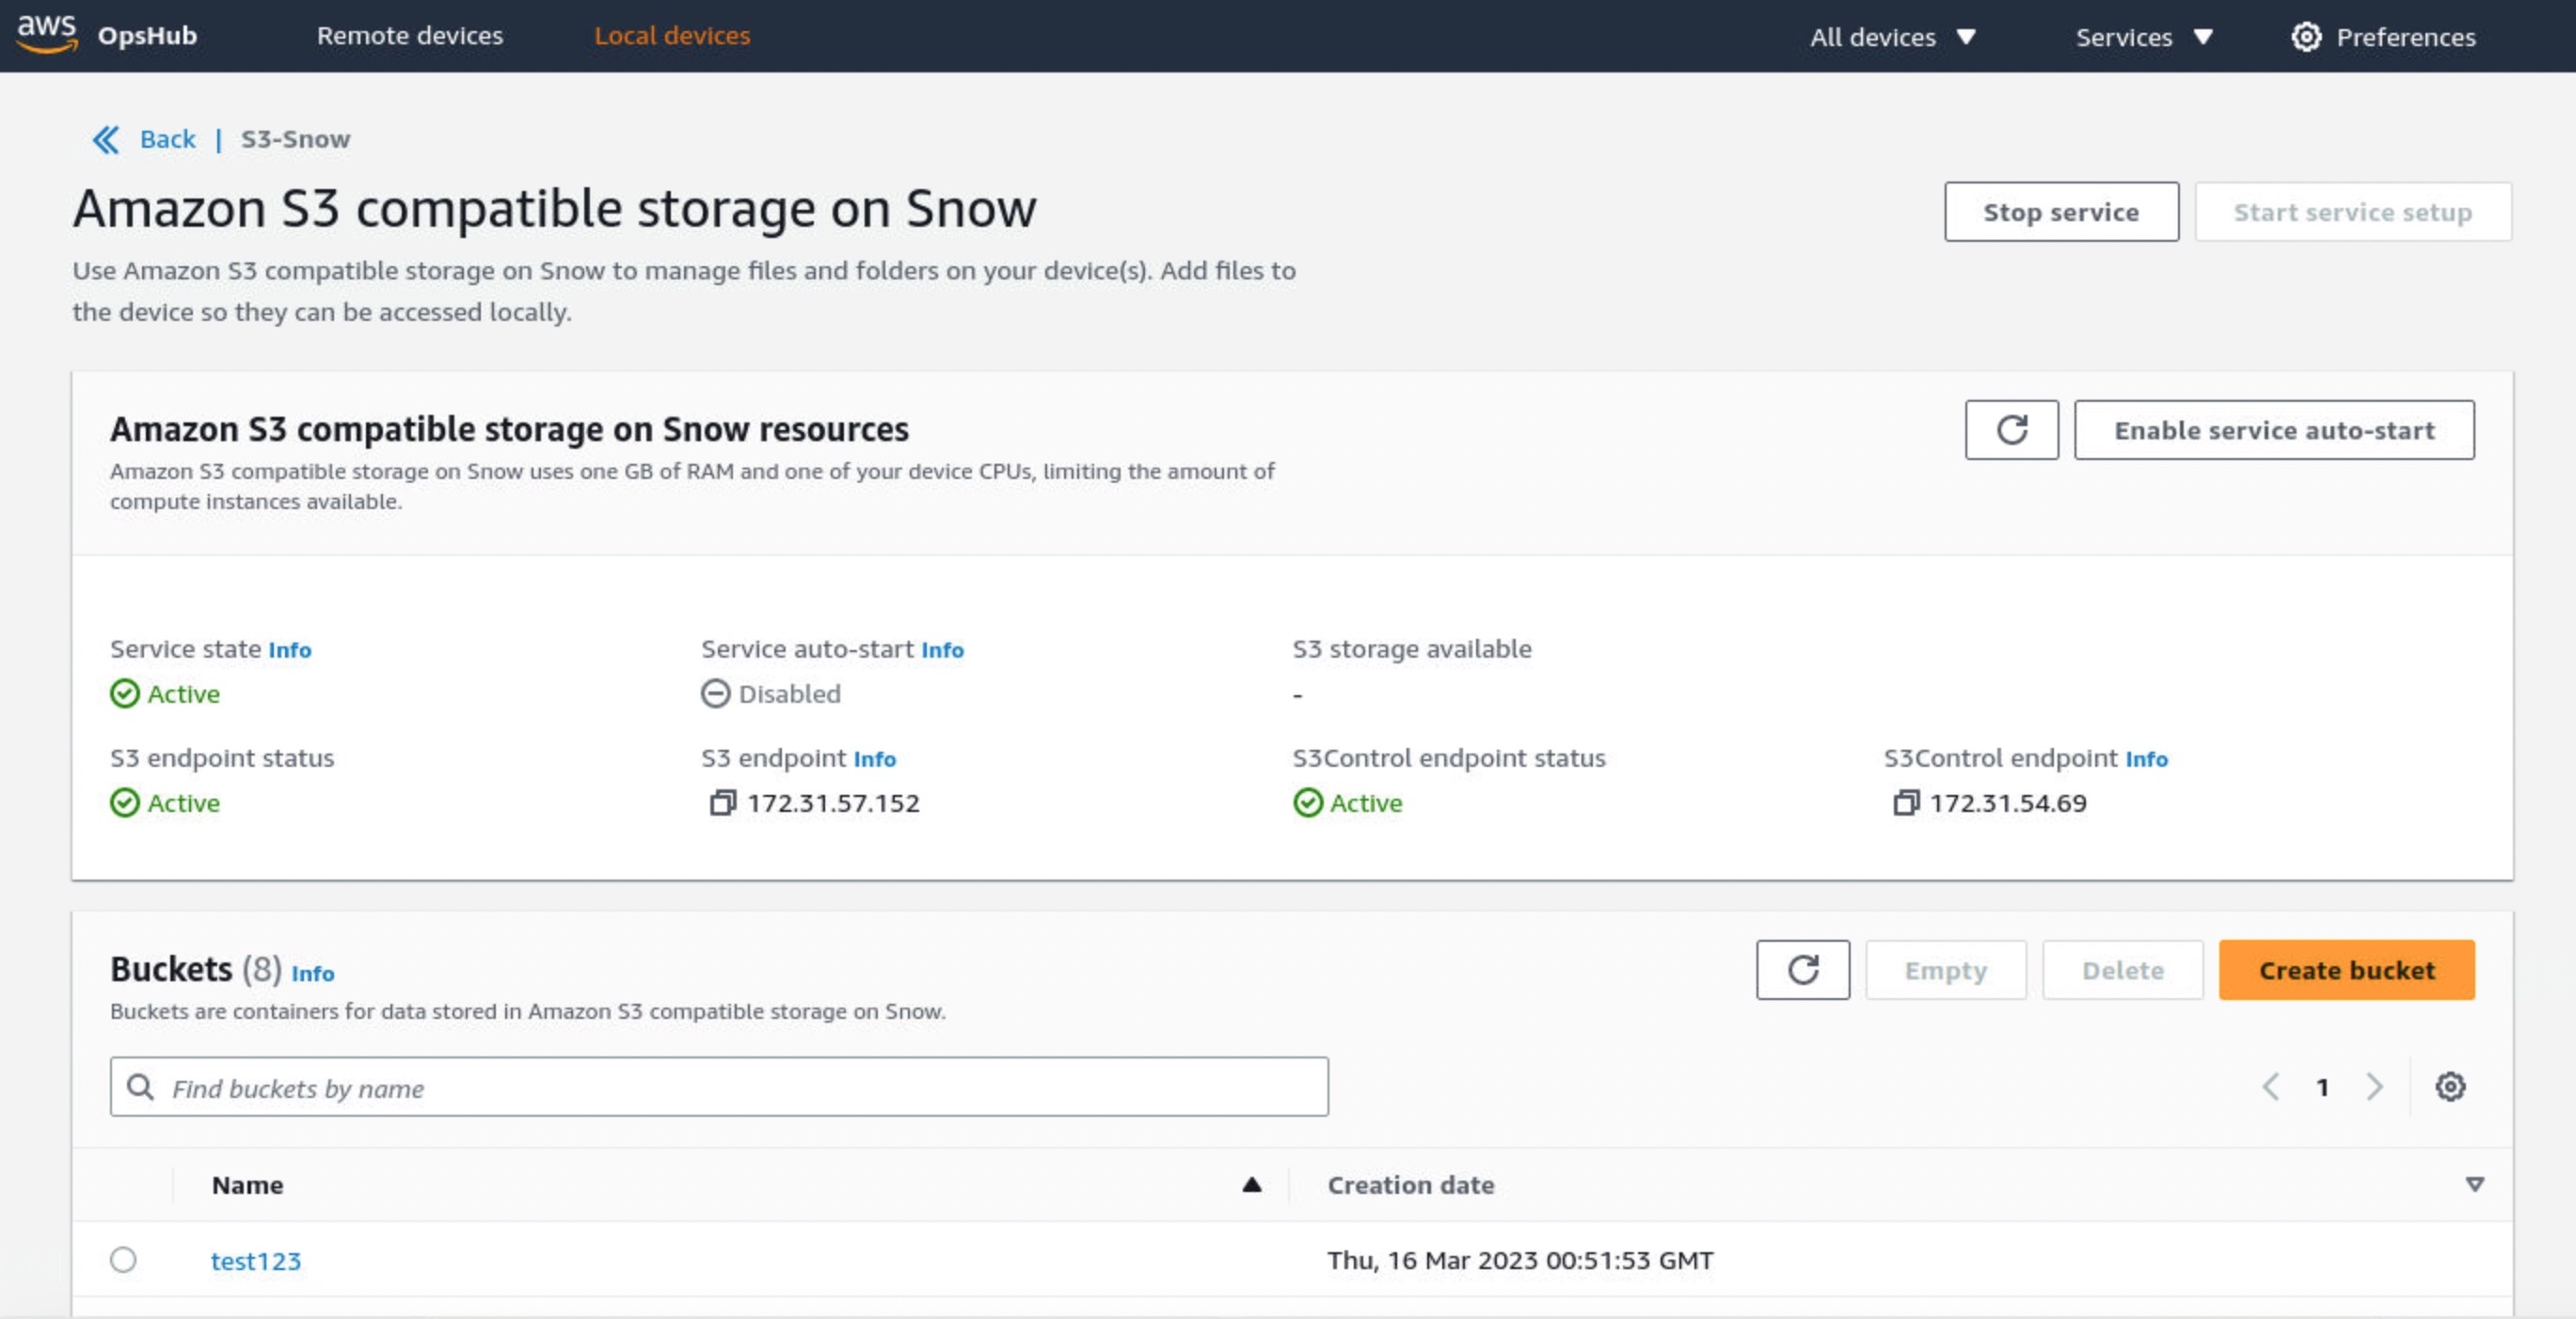
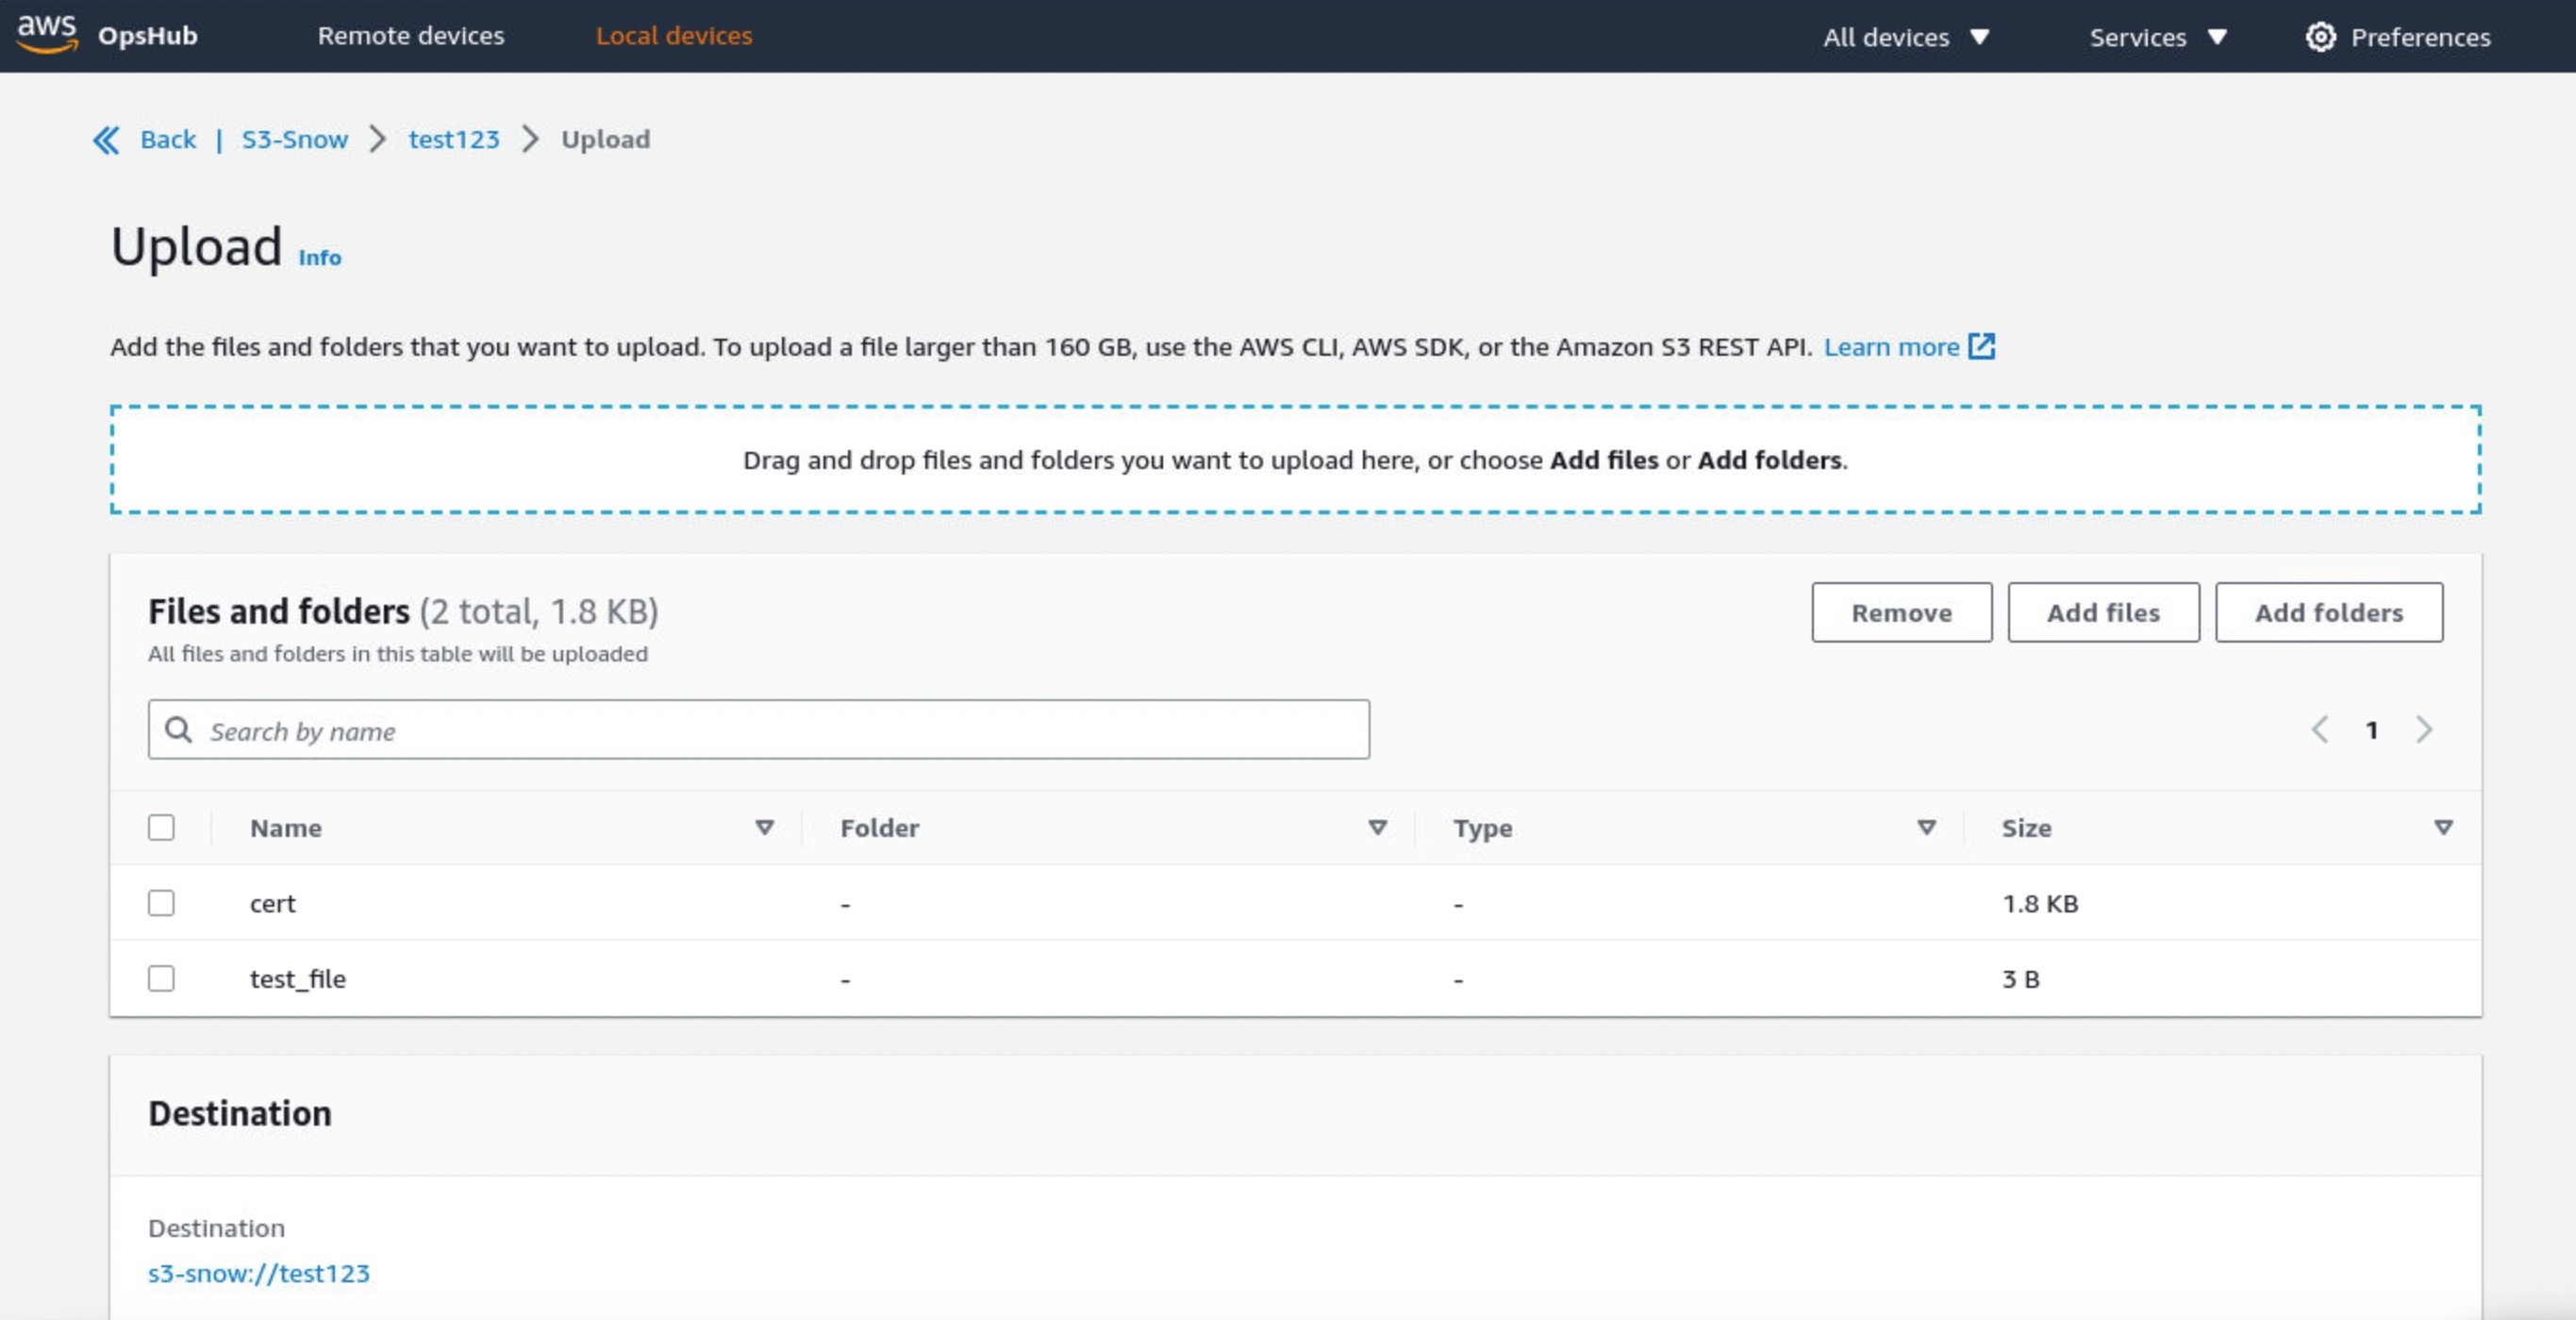
Choose Create bucket if you want the new S3 bucket in your device. Otherwise, you can upload files to your selected bucket. New uploaded objects have destination URLs such as s3-snow://test123/test_file with the unique bucket name in the device or cluster.

You can also use the bucket lifecycle rule to define when to trigger object deletion based on age or date. Choose Create lifecycle rule in the Management tab to add a new lifecycle rule.

You can select either Delete objects or Delete incomplete multipart uploads as a rule action. Configure the rule trigger that schedules deletion based on a specific date or object’s age. In this example, I set two days to delete objects after being uploaded.

You can also use the Amazon S3 SDK/CLI for all API operations supported by S3 for Snowball Edge. To learn more, see API Operations Supported on Amazon S3 for Snowball Edge in the AWS documentation.

Things to know
Keep these things in mind regarding additional features and considerations when you use Amazon S3 compatible storage on Snow:

  • Capacity: If you fully utilize Amazon S3 capacity on your device or cluster, your write (PUT) requests return an insufficient capacity error. Read (GET) operations continue to function normally. To monitor the available Amazon S3 capacity, you can use the OpsHub S3 on the Snow page or use the describe-service CLI command. Upon detecting insufficient capacity on the Snow device or cluster, you must free up space by deleting data or transferring data to an S3 bucket in the Region or another on-premises device.
  • Resiliency: Amazon S3 compatible storage on Snow stores data redundantly across multiple disks on each Snow device and multiple devices in your cluster, with built-in protection against correlated hardware failures. In the event of a disk or device failure within the quorum range, Amazon S3 compatible storage on Snow continues to operate until hardware is replaced. Additionally, Amazon S3 compatible storage on Snow continuously scrubs data on the device to make sure of data integrity and recover any corrupted data. For workloads that require local storage, the best practice is to back up your data to further protect your data stored on Snow devices.
  • Notifications: Amazon S3 compatible storage on Snow continuously monitors the health status of the device or cluster. Background processes respond to data inconsistencies and temporary failures to heal and recover data to make sure of resiliency. In the case of nonrecoverable hardware failures, Amazon S3 compatible storage on Snow can continue operations and provides proactive notifications through emails, prompting you to work with AWS to replace failed devices. For connected devices, you have the option to enable the “Remote Monitoring” feature, which will allow AWS to monitor service health online and proactively notify you of any service issues.
  • Security: Amazon S3 compatible storage on Snow supports encryption using server-side encryption with Amazon S3 managed encryption keys (SSE-S3) or customer-provided keys (SSE-C) and authentication and authorization using Snow IAM actions namespace (s3:*) to provide you with distinct controls for data stored on your Snow devices. Amazon S3 compatible storage on Snow doesn’t support object-level access control list and bucket policies. Amazon S3 compatible storage on Snow defaults to Bucket Owner is Object Owner, making sure that the bucket owner has control over objects in the bucket.

Now Available
Amazon S3 compatible storage on Snow is now generally available for AWS Snowball Edge Compute Optimized devices in all AWS Commercial and GovCloud Regions where AWS Snow is available.

To learn more, see the AWS Snowball Edge Developer Guide and send feedback to AWS re:Post for AWS Snowball or through your usual AWS support contacts.

Channy

AWS Week in Review: New Service for Generative AI and Amazon EC2 Trn1n, Inf2, and CodeWhisperer now GA – April 17, 2023

Post Syndicated from Antje Barth original https://aws.amazon.com/blogs/aws/aws-week-in-review-new-service-for-generative-ai-and-amazon-ec2-trn1n-inf2-and-codewhisperer-now-ga-april-17-2023/

I could almost title this blog post the “AWS AI/ML Week in Review.” This past week, we announced several new innovations and tools for building with generative AI on AWS. Let’s dive right into it.

Last Week’s Launches
Here are some launches that got my attention during the previous week:

Announcing Amazon Bedrock and Amazon Titan models Amazon Bedrock is a new service to accelerate your development of generative AI applications using foundation models through an API without managing infrastructure. You can choose from a wide range of foundation models built by leading AI startups and Amazon. The new Amazon Titan foundation models are pre-trained on large datasets, making them powerful, general-purpose models. You can use them as-is or privately to customize them with your own data for a particular task without annotating large volumes of data. Amazon Bedrock is currently in limited preview. Sign up here to learn more.

Building with Generative AI on AWS

Amazon EC2 Trn1n and Inf2 instances are now generally availableTrn1n instances, powered by AWS Trainium accelerators, double the network bandwidth (compared to Trn1 instances) to 1,600 Gbps of Elastic Fabric Adapter (EFAv2). The increased bandwidth delivers even higher performance for training network-intensive generative AI models such as large language models (LLMs) and mixture of experts (MoE). Inf2 instances, powered by AWS Inferentia2 accelerators, deliver high performance at the lowest cost in Amazon EC2 for generative AI models, including LLMs and vision transformers. They are the first inference-optimized instances in Amazon EC2 to support scale-out distributed inference with ultra-high-speed connectivity between accelerators. Compared to Inf1 instances, Inf2 instances deliver up to 4x higher throughput and up to 10x lower latency. Check out my blog posts on Trn1 instances and Inf2 instances for more details.

Amazon CodeWhisperer, free for individual use, is now generally availableAmazon CodeWhisperer is an AI coding companion that generates real-time single-line or full-function code suggestions in your IDE to help you build applications faster. With GA, we introduce two tiers: CodeWhisperer Individual and CodeWhisperer Professional. CodeWhisperer Individual is free to use for generating code. You can sign up with an AWS Builder ID based on your email address. The Individual Tier provides code recommendations, reference tracking, and security scans. CodeWhisperer Professional—priced at $19 per user, per month—offers additional enterprise administration capabilities. Steve’s blog post has all the details.

Amazon GameLift adds support for Unreal Engine 5Amazon GameLift is a fully managed solution that allows you to manage and scale dedicated game servers for session-based multiplayer games. The latest version of the Amazon GameLift Server SDK 5.0 lets you integrate your Unreal 5-based game servers with the Amazon GameLift service. In addition, the latest Amazon GameLift Server SDK with Unreal 5 plugin is built to work with Amazon GameLift Anywhere so that you can test and iterate Unreal game builds faster and manage game sessions across any server hosting infrastructure. Check out the release notes to learn more.

Amazon Rekognition launches Face Liveness to deter fraud in facial verification – Face Liveness verifies that only real users, not bad actors using spoofs, can access your services. Amazon Rekognition Face Liveness analyzes a short selfie video to detect spoofs presented to the camera, such as printed photos, digital photos, digital videos, or 3D masks, as well as spoofs that bypass the camera, such as pre-recorded or deepfake videos. This AWS Machine Learning Blog post walks you through the details and shows how you can add Face Liveness to your web and mobile applications.

For a full list of AWS announcements, be sure to keep an eye on the What’s New at AWS page.

Other AWS News
Here are some additional news items and blog posts that you may find interesting:

Updates to the AWS Well-Architected Framework – The most recent content updates and improvements focus on providing expanded guidance across the AWS service portfolio to help you make more informed decisions when developing implementation plans. Services that were added or expanded in coverage include AWS Elastic Disaster Recovery, AWS Trusted Advisor, AWS Resilience Hub, AWS Config, AWS Security Hub, Amazon GuardDuty, AWS Organizations, AWS Control Tower, AWS Compute Optimizer, AWS Budgets, Amazon CodeWhisperer, and Amazon CodeGuru. This AWS Architecture Blog post has all the details.

Amazon releases largest dataset for training “pick and place” robots – In an effort to improve the performance of robots that pick, sort, and pack products in warehouses, Amazon has publicly released the largest dataset of images captured in an industrial product-sorting setting. Where the largest previous dataset of industrial images featured on the order of 100 objects, the Amazon dataset, called ARMBench, features more than 190,000 objects. Check out this Amazon Science Blog post to learn more.

AWS open-source news and updates – My colleague Ricardo writes this weekly open-source newsletter in which he highlights new open-source projects, tools, and demos from the AWS Community. Read edition #153 here.

Upcoming AWS Events
Check your calendars and sign up for these AWS events:

Build On AWS - Generative AI#BuildOn Generative AI – Join our weekly live Build On Generative AI Twitch show. Every Monday morning, 9:00 US PT, my colleagues Emily and Darko take a look at aspects of generative AI. They host developers, scientists, startup founders, and AI leaders and discuss how to build generative AI applications on AWS.

In today’s episode, Emily walks us through the latest AWS generative AI announcements. You can watch the video here.

Dot Net Developer Day.NET Developer Day.NET Enterprise Developer Day EMEA 2023 (April 25) is a free, one-day virtual event providing enterprise developers with the most relevant information to swiftly and efficiently migrate and modernize their .NET applications and workloads on AWS.

AWS Developer Innovation DayAWS Developer Innovation DayAWS Developer Innovation Day (April 26) is a new, free, one-day virtual event designed to help developers and teams be productive and collaborate from discovery to delivery, to running software and building applications. Get a first look at exciting product updates, technical deep dives, and keynotes.

AWS Global Summits – Check your calendars and sign up for the AWS Summit close to where you live or work: Tokyo (April 20–21), Singapore (May 4), Stockholm (May 11), Hong Kong (May 23), Tel Aviv (May 31), Amsterdam (June 1), London (June 7), Washington, DC (June 7–8), Toronto (June 14), Madrid (June 15), and Milano (June 22).

You can browse all upcoming AWS-led in-person and virtual events and developer-focused events such as Community Days.

That’s all for this week. Check back next Monday for another Week in Review!

— Antje

This post is part of our Week in Review series. Check back each week for a quick roundup of interesting news and announcements from AWS!

Amazon EC2 Inf2 Instances for Low-Cost, High-Performance Generative AI Inference are Now Generally Available

Post Syndicated from Antje Barth original https://aws.amazon.com/blogs/aws/amazon-ec2-inf2-instances-for-low-cost-high-performance-generative-ai-inference-are-now-generally-available/

Innovations in deep learning (DL), especially the rapid growth of large language models (LLMs), have taken the industry by storm. DL models have grown from millions to billions of parameters and are demonstrating exciting new capabilities. They are fueling new applications such as generative AI or advanced research in healthcare and life sciences. AWS has been innovating across chips, servers, data center connectivity, and software to accelerate such DL workloads at scale.

At AWS re:Invent 2022, we announced the preview of Amazon EC2 Inf2 instances powered by AWS Inferentia2, the latest AWS-designed ML chip. Inf2 instances are designed to run high-performance DL inference applications at scale globally. They are the most cost-effective and energy-efficient option on Amazon EC2 for deploying the latest innovations in generative AI, such as GPT-J or Open Pre-trained Transformer (OPT) language models.

Today, I’m excited to announce that Amazon EC2 Inf2 instances are now generally available!

Inf2 instances are the first inference-optimized instances in Amazon EC2 to support scale-out distributed inference with ultra-high-speed connectivity between accelerators. You can now efficiently deploy models with hundreds of billions of parameters across multiple accelerators on Inf2 instances. Compared to Amazon EC2 Inf1 instances, Inf2 instances deliver up to 4x higher throughput and up to 10x lower latency. Here’s an infographic that highlights the key performance improvements that we have made available with the new Inf2 instances:

Performance improvements with Amazon EC2 Inf2

New Inf2 Instance Highlights
Inf2 instances are available today in four sizes and are powered by up to 12 AWS Inferentia2 chips with 192 vCPUs. They offer a combined compute power of 2.3 petaFLOPS at BF16 or FP16 data types and feature an ultra-high-speed NeuronLink interconnect between chips. NeuronLink scales large models across multiple Inferentia2 chips, avoids communication bottlenecks, and enables higher-performance inference.

Inf2 instances offer up to 384 GB of shared accelerator memory, with 32 GB high-bandwidth memory (HBM) in every Inferentia2 chip and 9.8 TB/s of total memory bandwidth. This type of bandwidth is particularly important to support inference for large language models that are memory bound.

Since the underlying AWS Inferentia2 chips are purpose-built for DL workloads, Inf2 instances offer up to 50 percent better performance per watt than other comparable Amazon EC2 instances. I’ll cover the AWS Inferentia2 silicon innovations in more detail later in this blog post.

The following table lists the sizes and specs of Inf2 instances in detail.

Instance Name
vCPUs AWS Inferentia2 Chips Accelerator Memory NeuronLink Instance Memory Instance Networking
inf2.xlarge 4 1 32 GB N/A 16 GB Up to 15 Gbps
inf2.8xlarge 32 1 32 GB N/A 128 GB Up to 25 Gbps
inf2.24xlarge 96 6 192 GB Yes 384 GB 50 Gbps
inf2.48xlarge 192 12 384 GB Yes 768 GB 100 Gbps

AWS Inferentia2 Innovation
Similar to AWS Trainium chips, each AWS Inferentia2 chip has two improved NeuronCore-v2 engines, HBM stacks, and dedicated collective compute engines to parallelize computation and communication operations when performing multi-accelerator inference.

Each NeuronCore-v2 has dedicated scalar, vector, and tensor engines that are purpose-built for DL algorithms. The tensor engine is optimized for matrix operations. The scalar engine is optimized for element-wise operations like ReLU (rectified linear unit) functions. The vector engine is optimized for non-element-wise vector operations, including batch normalization or pooling.

Here is a short summary of additional AWS Inferentia2 chip and server hardware innovations:

  • Data Types – AWS Inferentia2 supports a wide range of data types, including FP32, TF32, BF16, FP16, and UINT8, so you can choose the most suitable data type for your workloads. It also supports the new configurable FP8 (cFP8) data type, which is especially relevant for large models because it reduces the memory footprint and I/O requirements of the model. The following image compares the supported data types.AWS Inferentia2 Supported Data Types
  • Dynamic Execution, Dynamic Input Shapes – AWS Inferentia2 has embedded general-purpose digital signal processors (DSPs) that enable dynamic execution, so control flow operators don’t need to be unrolled or executed on the host. AWS Inferentia2 also supports dynamic input shapes that are key for models with unknown input tensor sizes, such as models processing text.
  • Custom Operators – AWS Inferentia2 supports custom operators written in C++. Neuron Custom C++ Operators enable you to write C++ custom operators that natively run on NeuronCores. You can use standard PyTorch custom operator programming interfaces to migrate CPU custom operators to Neuron and implement new experimental operators, all without any intimate knowledge of the NeuronCore hardware.
  • NeuronLink v2 – Inf2 instances are the first inference-optimized instance on Amazon EC2 to support distributed inference with direct ultra-high-speed connectivity—NeuronLink v2—between chips. NeuronLink v2 uses collective communications (CC) operators such as all-reduce to run high-performance inference pipelines across all chips.

The following Inf2 distributed inference benchmarks show throughput and cost improvements for OPT-30B and OPT-66B models over comparable inference-optimized Amazon EC2 instances.

Amazon EC2 Inf2 Benchmarks

Now, let me show you how to get started with Amazon EC2 Inf2 instances.

Get Started with Inf2 Instances
The AWS Neuron SDK integrates AWS Inferentia2 into popular machine learning (ML) frameworks like PyTorch. The Neuron SDK includes a compiler, runtime, and profiling tools and is constantly being updated with new features and performance optimizations.

In this example, I will compile and deploy a pre-trained BERT model from Hugging Face on an EC2 Inf2 instance using the available PyTorch Neuron packages. PyTorch Neuron is based on the PyTorch XLA software package and enables the conversion of PyTorch operations to AWS Inferentia2 instructions.

SSH into your Inf2 instance and activate a Python virtual environment that includes the PyTorch Neuron packages. If you’re using a Neuron-provided AMI, you can activate the preinstalled environment by running the following command:

source aws_neuron_venv_pytorch_p37/bin/activate

Now, with only a few changes to your code, you can compile your PyTorch model into an AWS Neuron-optimized TorchScript. Let’s start with importing torch, the PyTorch Neuron package torch_neuronx, and the Hugging Face transformers library.

import torch
import torch_neuronx from transformers import AutoTokenizer, AutoModelForSequenceClassification
import transformers
...

Next, let’s build the tokenizer and model.

name = "bert-base-cased-finetuned-mrpc"
tokenizer = AutoTokenizer.from_pretrained(name)
model = AutoModelForSequenceClassification.from_pretrained(name, torchscript=True)

We can test the model with example inputs. The model expects two sentences as input, and its output is whether or not those sentences are a paraphrase of each other.

def encode(tokenizer, *inputs, max_length=128, batch_size=1):
    tokens = tokenizer.encode_plus(
        *inputs,
        max_length=max_length,
        padding='max_length',
        truncation=True,
        return_tensors="pt"
    )
    return (
        torch.repeat_interleave(tokens['input_ids'], batch_size, 0),
        torch.repeat_interleave(tokens['attention_mask'], batch_size, 0),
        torch.repeat_interleave(tokens['token_type_ids'], batch_size, 0),
    )

# Example inputs
sequence_0 = "The company Hugging Face is based in New York City"
sequence_1 = "Apples are especially bad for your health"
sequence_2 = "Hugging Face's headquarters are situated in Manhattan"

paraphrase = encode(tokenizer, sequence_0, sequence_2)
not_paraphrase = encode(tokenizer, sequence_0, sequence_1)

# Run the original PyTorch model on examples
paraphrase_reference_logits = model(*paraphrase)[0]
not_paraphrase_reference_logits = model(*not_paraphrase)[0]

print('Paraphrase Reference Logits: ', paraphrase_reference_logits.detach().numpy())
print('Not-Paraphrase Reference Logits:', not_paraphrase_reference_logits.detach().numpy())

The output should look similar to this:

Paraphrase Reference Logits:     [[-0.34945598  1.9003887 ]]
Not-Paraphrase Reference Logits: [[ 0.5386365 -2.2197142]]

Now, the torch_neuronx.trace() method sends operations to the Neuron Compiler (neuron-cc) for compilation and embeds the compiled artifacts in a TorchScript graph. The method expects the model and a tuple of example inputs as arguments.

neuron_model = torch_neuronx.trace(model, paraphrase)

Let’s test the Neuron-compiled model with our example inputs:

paraphrase_neuron_logits = neuron_model(*paraphrase)[0]
not_paraphrase_neuron_logits = neuron_model(*not_paraphrase)[0]

print('Paraphrase Neuron Logits: ', paraphrase_neuron_logits.detach().numpy())
print('Not-Paraphrase Neuron Logits: ', not_paraphrase_neuron_logits.detach().numpy())

The output should look similar to this:

Paraphrase Neuron Logits: [[-0.34915772 1.8981738 ]]
Not-Paraphrase Neuron Logits: [[ 0.5374032 -2.2180378]]

That’s it. With just a few lines of code changes, we compiled and ran a PyTorch model on an Amazon EC2 Inf2 instance. To learn more about which DL model architectures are a good fit for AWS Inferentia2 and the current model support matrix, visit the AWS Neuron Documentation.

Available Now
You can launch Inf2 instances today in the AWS US East (Ohio) and US East (N. Virginia) Regions as On-Demand, Reserved, and Spot Instances or as part of a Savings Plan. As usual with Amazon EC2, you pay only for what you use. For more information, see Amazon EC2 pricing.

Inf2 instances can be deployed using AWS Deep Learning AMIs, and container images are available via managed services such as Amazon SageMaker, Amazon Elastic Kubernetes Service (Amazon EKS), Amazon Elastic Container Service (Amazon ECS), and AWS ParallelCluster.

To learn more, visit our Amazon EC2 Inf2 instances page, and please send feedback to AWS re:Post for EC2 or through your usual AWS Support contacts.

— Antje

Amazon CodeWhisperer, Free for Individual Use, is Now Generally Available

Post Syndicated from Steve Roberts original https://aws.amazon.com/blogs/aws/amazon-codewhisperer-free-for-individual-use-is-now-generally-available/

Today, Amazon CodeWhisperer, a real-time AI coding companion, is generally available and also includes a CodeWhisperer Individual tier that’s free to use for all developers. Originally launched in preview last year, CodeWhisperer keeps developers in the zone and productive, helping them write code quickly and securely and without needing to break their flow by leaving their IDE to research something. Faced with creating code for complex and ever-changing environments, developers can improve their productivity and simplify their work by making use of CodeWhisperer inside their favorite IDEs, including Visual Studio Code, IntelliJ IDEA, and others. CodeWhisperer helps with creating code for routine or time-consuming, undifferentiated tasks, working with unfamiliar APIs or SDKs, making correct and effective use of AWS APIs, and other common coding scenarios such as reading and writing files, image processing, writing unit tests, and lots more.

Using just an email account, you can sign up and, in just a few minutes, become more productive writing code—and you don’t even need to be an AWS customer. For business users, CodeWhisperer offers a Professional tier that adds administrative features, like SSO and IAM Identity Center integration, policy control for referenced code suggestions, and higher limits on security scanning. And in addition to generating code suggestions for Python, Java, JavaScript, TypeScript, and C#, the generally available release also now supports Go, Rust, PHP, Ruby, Kotlin, C, C++, Shell scripting, SQL, and Scala. CodeWhisperer is available to developers working in Visual Studio Code, IntelliJ IDEA, CLion, GoLand, WebStorm, Rider, PhpStorm, PyCharm, RubyMine, and DataGrip IDEs (when the appropriate AWS extensions for those IDEs are installed), or natively in AWS Cloud9 or AWS Lambda console.

Helping to keep developers in their flow is increasingly important as, facing increasing time pressure to get their work done, developers are often forced to break that flow to turn to an internet search, sites such as StackOverflow, or their colleagues for help in completing tasks. While this can help them obtain the starter code they need, it’s disruptive as they’ve had to leave their IDE environment to search or ask questions in a forum or find and ask a colleague—further adding to the disruption. Instead, CodeWhisperer meets developers where they are most productive, providing recommendations in real time as they write code or comments in their IDE. During the preview we ran a productivity challenge, and participants who used CodeWhisperer were 27% more likely to complete tasks successfully and did so an average of 57% faster than those who didn’t use CodeWhisperer.

Code generation from a comment in CodeWhisperer
Code generation from a comment

The code developers eventually locate may, however, contain issues such as hidden security vulnerabilities, be biased or unfair, or fail to handle open source responsibly. These issues won’t improve the developer’s productivity when they later have to resolve them. CodeWhisperer is the best coding companion when it comes to coding securely and using AI responsibly. To help you code responsibly, CodeWhisperer filters out code suggestions that might be considered biased or unfair, and it’s the only coding companion that can filter or flag code suggestions that may resemble particular open-source training data. It provides additional data for suggestions—for example, the repository URL and license—when code similar to training data is generated, helping lower the risk of using the code and enabling developers to reuse it with confidence.

Reference tracking in CodeWhisperer
Open-source reference tracking

CodeWhisperer is also the only AI coding companion to have security scanning for finding and suggesting remediations for hard-to-detect vulnerabilities, scanning both generated and developer-written code looking for vulnerabilities such as those in the top ten listed in the Open Web Application Security Project (OWASP). If it finds a vulnerability, CodeWhisperer provides suggestions to help remediate the issue.

Scanning for vulnerabilities in CodeWhisperer
Scanning for vulnerabilities

Code suggestions provided by CodeWhisperer are not specific to working with AWS. However, CodeWhisperer is optimized for the most-used AWS APIs, for example AWS Lambda, or Amazon Simple Storage Service (Amazon S3), making it the best coding companion for those building applications on AWS. While CodeWhisperer provides suggestions for general-purpose use cases across a variety of languages, the tuning performed using additional data on AWS APIs means you can be confident it is the highest quality, most accurate code generation you can get for working with AWS.

Meet Your new AI Code Companion Today
Amazon CodeWhisperer is generally available today to all developers—not just those with an AWS account or working with AWS—writing code in Python, Java, JavaScript, TypeScript, C#, Go, Rust, PHP, Ruby, Kotlin, C, C++, Shell scripting, SQL, and Scala. You can sign up with just an email address, and, as I mentioned at the top of this post, CodeWhisperer offers an Individual tier that’s freely available to all developers. More information on the Individual tier, and pricing for the Professional tier, can be found at https://aws.amazon.com/codewhisperer/pricing

New – Self-Service Provisioning of Terraform Open-Source Configurations with AWS Service Catalog

Post Syndicated from Danilo Poccia original https://aws.amazon.com/blogs/aws/new-self-service-provisioning-of-terraform-open-source-configurations-with-aws-service-catalog/

With AWS Service Catalog, you can create, govern, and manage a catalog of infrastructure as code (IaC) templates that are approved for use on AWS. These IaC templates can include everything from virtual machine images, servers, software, and databases to complete multi-tier application architectures. You can control which IaC templates and versions are available, what is configured by each version, and who can access each template based on individual, group, department, or cost center. End users such as engineers, database administrators, and data scientists can then quickly discover and self-service provision approved AWS resources that they need to use to perform their daily job functions.

When using Service Catalog, the first step is to create products based on your IaC templates. You can then collect products, together with configuration information, in a portfolio.

Starting today, you can define Service Catalog products and their resources using either AWS CloudFormation or Hashicorp Terraform and choose the tool that better aligns with your processes and expertise. You can now integrate your existing Terraform configurations into Service Catalog to have them part of a centrally approved portfolio of products and share it with the AWS accounts used by your end users. In this way, you can prevent inconsistencies and mitigate the risk of noncompliance.

When resources are deployed by Service Catalog, you can maintain least privilege access during provisioning and govern tagging on the deployed resources. End users of Service Catalog pick and choose what they need from the list of products and versions they have access to. Then, they can provision products in a single action regardless of the technology (CloudFormation or Terraform) used for the deployment.

The Service Catalog hub-and-spoke model that enables organizations to govern at scale can now be extended to include Terraform configurations. With the Service Catalog hub and spoke model, you can centrally manage deployments using a management/user account relationship:

  • One management account – Used to create Service Catalog products, organize them into portfolios, and share portfolios with user accounts
  • Multiple user accounts (up to thousands) – A user account is any AWS account in which the end users of Service Catalog are provisioning resources.

Let’s see how this works in practice.

Creating an AWS Service Catalog Product Using Terraform
To get started, I install the Terraform Reference Engine (provided by AWS on GitHub) that configures the code and infrastructure required for the Terraform open-source engine to work with AWS Service Catalog. I only need to do this once, in the management account for Service Catalog, and the setup takes just minutes. I use the automated installation script:

./deploy-tre.sh -r us-east-1

To keep things simple for this post, I create a product deploying a single EC2 instance using AWS Graviton processors and the Amazon Linux 2023 operating system. Here’s the content of my main.tf file:

terraform {
  required_providers {
    aws = {
      source  = "hashicorp/aws"
      version = "~> 4.16"
    }
  }

  required_version = ">= 1.2.0"
}

provider "aws" {
  region  = "us-east-1"
}

resource "aws_instance" "app_server" {
  ami           = "ami-00c39f71452c08778"
  instance_type = "t4g.large"

  tags = {
    Name = "GravitonServerWithAmazonLinux2023"
  }
}

I sign in to the AWS Management Console in the management account for Service Catalog. In the Service Catalog console, I choose Product list in the Administration section of the navigation pane. There, I choose Create product.

In Product details, I select Terraform open source as Product type. I enter a product name and description and the name of the owner.

Console screenshot.

In the Version details, I choose to Upload a template file (using a tar.gz archive). Optionally, I can specify the template using an S3 URL or an external code repository (on GitHub, GitHub Enterprise Server, or Bitbucket) using an AWS CodeStar provider.

Console screenshot.

I enter support details and custom tags. Note that tags can be used to categorize your resources and also to check permissions to create a resource. Then, I complete the creation of the product.

Adding an AWS Service Catalog Product Using Terraform to a Portfolio
Now that the Terraform product is ready, I add it to my portfolio. A portfolio can include both Terraform and CloudFormation products. I choose Portfolios from the Administrator section of the navigation pane. There, I search for my portfolio by name and open it. I choose Add product to portfolio. I search for the Terraform product by name and select it.

Console screenshot.

Terraform products require a launch constraint. The launch constraint specifies the name of an AWS Identity and Access Management (IAM) role that is used to deploy the product. I need to separately ensure that this role is created in every account with which the product is shared.

The launch role is assumed by the Terraform open-source engine in the management account when an end user launches, updates, or terminates a product. The launch role also contains permissions to describe, create, and update a resource group for the provisioned product and tag the product resources. In this way, Service Catalog keeps the resource group up-to-date and tags the resources associated with the product.

The launch role enables least privilege access for end users. With this feature, end users don’t need permission to directly provision the product’s underlying resources because your Terraform open-source engine assumes the launch role to provision those resources, such as an approved configuration of an Amazon Elastic Compute Cloud (Amazon EC2) instance.

In the Launch constraint section, I choose Enter role name to use a role I created before for this product:

  • The trust relationship of the role defines the entities that can assume the role. For this role, the trust relationship includes Service Catalog and the management account that contains the Terraform Reference Engine.
  • For permissions, the role allows to provision, update, and terminate the resources required by my product and to manage resource groups and tags on those resources.

Console screenshot.

I complete the addition of the product to my portfolio. Now the product is available to the end users who have access to this portfolio.

Launching an AWS Service Catalog Product Using Terraform
End users see the list of products and versions they have access to and can deploy them in a single action. If you already use Service Catalog, the experience is the same as with CloudFormation products.

I sign in to the AWS Console in the user account for Service Catalog. The portfolio I used before has been shared by the management account with this user account. In the Service Catalog console, I choose Products from the Provisioning group in the navigation pane. I search for the product by name and choose Launch product.

Console screenshot.

I let Service Catalog generate a unique name for the provisioned product and select the product version to deploy. Then, I launch the product.

Console screenshot.

After a few minutes, the product has been deployed and is available. The deployment has been managed by the Terraform Reference Engine.

Console screenshot.

In the Associated tags tab, I see that Service Catalog automatically added information on the portfolio and the product.

Console screenshot.

In the Resources tab, I see the resources created by the provisioned product. As expected, it’s an EC2 instance, and I can follow the link to open the Amazon EC2 console and get more information.

Console screenshot.

End users such as engineers, database administrators, and data scientists can continue to use Service Catalog and launch the products they need without having to consider if they are provisioned using Terraform or CloudFormation.

Availability and Pricing
AWS Service Catalog support for Terraform open-source configurations is available today in all AWS Regions where it is offered. There is no change in pricing when using Terraform. With Service Catalog, you pay for the API calls you make to the service, and you can start for free with the free tier. You also pay for the resources used and created by the Terraform Reference Engine. For more information, see Service Catalog Pricing.

Enable self-service provisioning at scale for your Terraform open-source configurations.

Danilo

AWS Supply Chain Now Generally Available – Mitigate Risks and Lower Costs with Increased Visibility and Actionable Insights

Post Syndicated from Danilo Poccia original https://aws.amazon.com/blogs/aws/aws-supply-chain-now-generally-available-mitigate-risks-and-lower-costs-with-increased-visibility-and-actionable-insights/

Like many of you, I experienced the disrupting effects introduced by external forces such as weather, geopolitical instability, and the COVID-19 pandemic. To improve supply chain resilience, organizations need visibility across their supply chain so that they can quickly find and respond to risks. This is increasingly complex as their customers’ preferences are rapidly changing, and historical demand assumptions are not valid anymore.

To add to that, supply chain data is often spread out across disconnected systems, and existing tools lack the elastic processing power and specialized machine learning (ML) models needed to create meaningful insights. Without real-time insights, organizations cannot detect variations in demand patterns, unexpected trends, or supply disruptions. And failing to react quickly can impact their customers and operational costs.

Today, I am happy to share that AWS Supply Chain is generally available. AWS Supply Chain is a cloud application that mitigates risk and lowers costs with unified data, ML-powered actionable insights, and built-in contextual collaboration. Let’s see how it can help your organization before taking a look at how you can use it.

How AWS Supply Chain Works
AWS Supply Chain connects to your existing enterprise resource planning (ERP) and supply chain management systems. When those connections are in place, you can benefit from the following capabilities:

  • A data lake is set up using ML models that have been pre-trained for supply chains to understand, extract, and transform data from different sources into a unified data model. The data lake can ingest data from a variety of data sources, including your existing ERP systems (such as SAP S4/HANA) and supply chain management systems.
  • Your data is represented in a real-time visual map using a set of interactive visual end-user interfaces built on a micro front-end architecture. This map highlights current inventory selection, quantity, and health at each location (for example, inventory that is at risk for stock out). Inventory managers can drill down into specific facilities and view the current inventory on hand, in transit, and potentially at risk in each location.
  • Actionable insights are automatically generated for potential supply chain risks (for example, overstock or stock outs) using the comprehensive supply chain data in the data lake and are shown in the real-time visual map. ML models, built on similar technology that Amazon uses, are used to generate more accurate vendor lead time predictions. Supply planners can use these predicted vendor lead times to update static assumptions built into planning models to reduce stock out or excess inventory risks.
  • Rebalancing options are automatically evaluated, ranked, and shared to provide inventory managers and planners with recommended actions to take if a risk is detected. Recommendation options are scored by the percentage of risk resolved, the distance between facilities, and the sustainability impact. Supply chain managers can also drill down to review the impact each option will have on other distribution centers across the network. Recommendations continuously improve by learning from the decisions you make.
  • To help you work with remote colleagues and implement rebalancing actions, contextual built-in collaboration capabilities are provided. When teams chat and message each other, the information about the risk and recommended options is shared, reducing errors and delays caused by poor communication so you can resolve issues faster.
  • To help remove the manual effort and guesswork around demand planning, ML is used to analyze historical sales data and real-time data (for example, open orders), create forecasts, and continually adjust models to improve accuracy. Demand planning also continuously learns from changing demand patterns and user inputs to offer near real-time forecast updates, allowing organizations to proactively adjust supply chain operations.

Now, let’s see how this works in practice.

Using AWS Supply Chain To Reduce Inventory Risks
The AWS Supply Chain team was kind enough to share an environment connected to an ERP system. When I log in, I choose Inventory and the Network Map from the navigation pane. Here, I have a general overview of the inventory status of the distribution centers (DCs). Using the timeline slider, I am able to fast forward in time and see how the inventory risks change over time. This allows me to predict future risks, not just the current ones.

Console screenshot.

I choose the Seattle DC to have more information on that location.

Console screenshot.

Instead of looking at each distribution center, I create an insight watchlist that is analyzed by AWS Supply Chain. I choose Insights from the navigation pane and then Inventory Risk to track stock out and inventory excess risks. I enter a name (Shortages) for the insight watchlist and select all locations and products.

Console screenshot.

In the Tracking parameters, I choose to only track Stock Out Risk. I want to be warned if the inventory level is 10 percent below the minimum inventory target and set my time horizon to two weeks. I save to complete the creation of the insight watchlist.

Console screenshot.

I choose New Insight Watchlist to create another one. This time, I select the Lead time Deviation insight type. I enter a name (Lead time) for the insight watchlist and, again, all locations and products. This time, I choose to be notified when there is a deviation in the lead time that is 20 percent or more than the planned lead times. I choose to consider one year of historical time.

Console screenshot.

After a few minutes, I see that new insights are available. In the Insights page, I select Shortages from the dropdown. On the left, I have a series of stacks of insights grouped by week. I expand the first stack and drag one of the insights to put it In Review.

Console screenshot.

I choose View Details to see the status and the recommendations for this out-of-stock risk for a specific product and location.

Console screenshot.

Just after the Overview, a list of Resolution Recommendations is sorted by a Score. Score weights are used to rank recommendations by setting the relative importance of distance, emissions (CO2), and percentage of the risk resolved. In the settings, I can also configure a max distance to be considered when proposing recommendations. The first recommendation is the best based on how I configure the score.

Console screenshot.

The recommendation shows the effect of the rebalance. If I move eight units of this product from the Detroit DC to the Seattle DC, the projected inventory is now balanced (color green) for the next two days in the After Rebalance section instead of being out of stock (red) as in the Before Rebalance section. This also solves the excess stock risk (purple) in the Detroit DC. At the top of the recommendation, I see the probability that this rebalance resolves the inventory risk and the impact on emissions (CO2).

I choose Select to proceed with this recommendation. In the dialog, I enter a comment and choose to message the team to start using the collaboration capabilities of AWS Supply Chain. In this way, all the communication from those involved in solving this inventory issue is stored and linked to the specific issue instead of happening in a separate channel such as emails. I choose Confirm.

Console screenshot.

Straight from the Stock Out Risk, I can message those that can help me implement the recommendation.

Console screenshot.

I get the reply here, but I prefer to see it in all its context. I choose Collaboration from the navigation pane. There, I find all the conversations started from insights (one for now) and the Stock Out Risk and Resolution recommendations as proposed before. All those collaborating on solving the issue have a clear view of the problem and the possible resolutions. For future reference, this conversation will be available with its risk and resolution context.

Console screenshot.

When the risk is resolved, I move the Stock Out Risk card to Resolved.

Console screenshot.

Now, I look at the Lead time insights. Similar to before, I choose an insight and put it In Review. I choose View Details to have more information. I see that, based on historical purchase orders, the recommended lead time for this specific product and location should be seven days and not one day as found in the connected ERP system. This can have a negative impact on the expectations of my customers.

Console screenshot.

Without the need of re-platforming or reimplementing the current systems, I was able to connect AWS Supply Chain and get insights on the inventory of the distribution centers and recommendations based on my personal settings. These recommendations help resolve inventory risks such as items being out of stock or having excess stock in a distribution center. By better understanding the lead time, I can set better expectations for end customers.

Availability and Pricing
AWS Supply Chain is available today in the following AWS Regions: US East (N. Virginia), US West (Oregon), and Europe (Frankfurt).

AWS Supply Chain allows your organization to quickly gain visibility across your supply chain, and it helps you make more informed supply chain decisions. You can use AWS Supply Chain to mitigate overstock and stock-out risks. In this way, you can improve your customer experience, and at the same time, AWS Supply Chain can help you lower excess inventory costs. Using contextual chat and messaging, you can improve the way you collaborate with other teams and resolve issues quickly.

With AWS Supply Chain, you only pay for what you use. There are no required upfront licensing fees or long-term contracts. For more information, see AWS Supply Chain pricing.

Mitigate risk and lower cost of with increased visibility and ML-powered actionable insights for your supply chain.

Danilo

AWS Week in Review: Public Preview of Amazon DataZone and AWS DataSync Updates – April 3, 2023

Post Syndicated from Channy Yun original https://aws.amazon.com/blogs/aws/aws-week-in-review-public-preview-of-amazon-datazone-and-aws-datasync-updates-april-3-2023/

Last weekend, I enjoyed the spring vibes at Seoul Forest, a large park in the middle of Seoul city, where cherry blossoms are in full bloom.

Compared to last year, there were crowds of people, so I realized that it was really back to normal after the pandemic. I hope you all enjoy the season of spring or fall with your family.

Last Week’s Launches
Like an April Fool’s Day joke, there were 65 launches last week, far more than usual. AWS product teams are working hard with a customer obsession.

So, I had a lot of trouble choosing the important ones. Other than the ones I’ve picked out, there may be important feature releases that fit your needs. Be sure to take a look at the full launches list in the last week.

First, here is a list of the general availability of AWS services and features treated by AWS News Blog:

Let’s take a look at some launches from the last week that I want to remind you of:

The Preview of Amazon DataZone – At AWS re:Invent 2022, we preannounced Amazon DataZone, a new data management service to catalog, discover, analyze, share, and govern data between data producers and consumers in the organization. You can now try out the public preview of Amazon DataZone.

Data producers populate the business data catalog from AWS Glue Data Catalog and Amazon Redshift tables. Data consumers search for and subscribe to data assets in the data catalog and analyze with tools such as Amazon Athena query editors in the Amazon DataZone portal. To get started with Amazon DataZone, see our Quick Start Guide to include sample datasets to implement a complete use case.

AWS DataSync Supports Azure Blob Storage in PreviewAWS DataSync supports copying your object data at scale from Azure Blob Storage to AWS storage services such as Amazon S3. AWS DataSync supports all blob types within Azure Blob Storage and can also be used with Azure Data Lake Storage (ADLS) Gen 2.

In addition to Azure Blob Storage, DataSync supports Google Cloud Storage and Azure Files storage locations as well as various general storage systems and AWS storage services. To learn more, see Migrating Azure Blob Storage to Amazon S3 using AWS DataSync in the AWS Storage Blog.

On-call schedules with AWS Systems Manager Incident Manager – You can now configure or change on-call rotation schedules with a group of contacts and have 24/7 coverage and responsiveness for critical issues in the Incident Manager console.

AWS Incident Manager helps you bring the right people and information together when a critical issue is detected, activating preconfigured response plans to engage responders using SMS, phone calls, and chat channels, as well as to run AWS Systems Manager Automation runbooks. To learn how to get started with an-call schedules in Incident Manager, see our Working with on-call schedules in Incident Manager in the AWS documentation.

AWS CloudShell Colsone Toolbar – You can now use AWS Cloudshell Console Toolbar with AWS Management Console in a single view. The Console Toolbar maintains its state (e.g., open, closed) and commands will continue to run in CloudShell as you navigate between services in the Console. For example, it allows you to run a command in CloudShell and view a CloudWatch alarm in the Console at the same time.

After signing into the Console, you can access CloudShell in the lower left of the Console by selecting the CloudShell icon in the Console Toolbar.

New Features of AWS Well-Architected Tool – The Consolidated Report and Enhanced Search enable customers to quickly identify risk themes across their workloads and scale improvements across their organization. This macro-level view helps executive stakeholders understand where common issues lie and prioritize team resources to drive widespread improvement. To learn more, see AWS Well-Architected Tool Dashboard in the AWS documentation.

For a full list of AWS announcements, be sure to keep an eye on the What’s New at AWS page.

Other AWS News
Here are some other news items that you may find interesting from the last week:

Welcome to the .NET on AWS Blog – We launched a new blog channel for millions of .NET developers across the world. Blog posts will also cover built-for-the-cloud development, modernizing .NET Framework applications, and how to deploy .NET workloads on different AWS services. We will use this channel to share news on the work we’ve done with the .NET open-source community, post follow-ups from important events, and post announcements about upcoming presentations from our .NET developer advocates. To learn more, visit our .NET on AWS website and follow us on Twitter at @dotnetonAWS.

AWS Knowledge Center in AWS re:Post – You can now access trusted, authoritative articles and videos of AWS Knowledge Center on AWS re:Post to get answers to technical questions. Knowledge Center content is produced by an AWS team and covers the most frequent questions and requests from AWS customers. These articles are available in 10 localized languages: English, French, German, Italian, Japanese, Korean, Portuguese, Simplified Chinese, Spanish, and Traditional Chinese.

TF1’s FIFA Worldcup Digital Broadcasting Story – Sébastien shared an awesome story about how the French broadcaster TF1 use AWS Cloud technology and expertise to bring the FIFA World Cup to millions of people. He shared the history of redesigning its digital broadcasting architecture on AWS, testing the new platform on large-scale sporting events. For the preparation of the FIFA Worldcup event, TF1 enhanced monitoring to detect anomalies during the event and established the backup plan in a “war room” for the worst scenario. Even if you’re not a fan of football, I recommend reading the behind-the-scenes of the FIFA Worldcup Finals. It’s long but really fun!

Upcoming AWS Events
Check your calendars and sign up for these AWS-led events:

AWS re:Inforce 2023 – Now register AWS re:Inforce, in Anaheim, California, June 13–14. AWS Chief Information Security Officer CJ Moses will share the latest innovations in cloud security and what AWS Security is focused on. The breakout sessions will provide real-world examples of how security is embedded into the way businesses operate. To learn more and get the limited discount code to register, see CJ’s blog post of Gain insights and knowledge at AWS re:Inforce 2023 in the AWS Security Blog.

AWS Global Summits – Check your calendars and sign up for the AWS Summit closest to your city: Paris and Sydney (April 4), Seoul (May 3-4), Berlin and Singapore (May 4), Stockholm (May 11), Hong Kong (May 23), Amsterdam (June 1), London (June 7), Madrid (June 15), and Milano (June 22).

AWS Community Day – Join community-led conferences driven by AWS user group leaders closest to your city: Peru (April 15), Helsinki (April 20), Chicago (June 15), Philippines (June 29–30), and Munich (September 14). Recently, we are bringing together AWS user groups from around the world into Meetup Pro accounts. Find your group and its meetups in your city!

You can browse all upcoming AWS-led in-person and virtual events, and developer-focused events such as AWS DevDay.

That’s all for this week. Check back next Monday for another Week in Review!

— Channy

This post is part of our Week in Review series. Check back each week for a quick roundup of interesting news and announcements from AWS!

New – Ready-to-use Models and Support for Custom Text and Image Classification Models in Amazon SageMaker Canvas

Post Syndicated from Marcia Villalba original https://aws.amazon.com/blogs/aws/new-ready-to-use-models-and-support-for-custom-text-and-image-classification-models-in-amazon-sagemaker-canvas/

Today AWS announces new features in Amazon SageMaker Canvas that help business analysts generate insights from thousands of documents, images, and lines of text in minutes with machine learning (ML). Starting today, you can access ready-to-use models and create custom text and image classification models alongside previously supported custom models for tabular data, all without requiring ML experience or writing a line of code.

Business analysts across different industries want to apply AI/ML solutions to generate insights from a variety of data and respond to ad-hoc analysis requests coming from business stakeholders. By applying AI/ML in their workflows, analysts can automate manual, time-consuming, and error-prone processes, such as inspection, classification, as well as extraction of insights from raw data, images, or documents. However, applying AI/ML to business problems requires technical expertise and building custom models can take several weeks or even months.

Launched in 2021, Amazon SageMaker Canvas is a visual, point-and-click service that allows business analysts to use a variety of ready-to-use models or create custom models to generate accurate ML predictions on their own.

Ready-to-use Models
Customers can use SageMaker Canvas to access ready-to-use models that can be used to extract information and generate predictions from thousands of documents, images, and lines of text in minutes. These ready-to-use models include sentiment analysis, language detection, entity extraction, personal information detection, object and text detection in images, expense analysis for invoices and receipts, identity document analysis, and more generalized document and form analysis.

For example, you can select the sentiment analysis ready-to-use model and upload product reviews from social media and customer support tickets to quickly understand how your customers feel about your products. Using the personal information detection ready-to-use model, you can detect and redact personally identifiable information (PII) from emails, support tickets, and documents. Using the expense analysis ready-to-use model, you can easily detect and extract data from your scanned invoices and receipts and generate insights about that data.

These ready-to-use models are powered by AWS AI services, including Amazon Rekognition, Amazon Comprehend, and Amazon Textract.

Ready-to-use models available

Custom Text and Image Classification Models
Customers that need custom models trained for their business-specific use-case can use SageMaker Canvas to create text and image classification models. 

You can use SageMaker Canvas to create custom text classification models to classify data according to your needs. For example, imagine that you work as a business analyst at a company that provides customer support. When a customer support agent engages with a customer, they create a ticket, and they need to record the ticket type, for example, “incident”, “service request”, or “problem”. Many times, this field gets forgotten, and so, when the reporting is done, the data is hard to analyze. Now, using SageMaker Canvas, you can create a custom text classification model, train it with existing customer support ticket information and ticket type, and use it to predict the type of tickets in the future when working on a report with missing data.

You can also use SageMaker Canvas to create custom image classification models using your own image datasets. For instance, imagine you work as a business analyst at a company that manufactures smartphones. As part of your role, you need to prepare reports and respond to questions from business stakeholders related to quality assessment and it’s trends. Every time a phone is assembled, a picture is automatically taken, and at the end of the week, you receive all those images. Now with SageMaker Canvas, you can create a new custom image classification model that is trained to identify common manufacturing defects. Then, every week, you can use the model to analyze the images and predict the quality of the phones produced.

SageMaker Canvas in Action
Let’s imagine that you are a business analyst for an e-commerce company. You have been tasked with understanding the customer sentiment towards all the new products for this season. Your stakeholders require a report that aggregates the results by item category to decide what inventory they should purchase in the following months. For example, they want to know if the new furniture products have received positive sentiment. You have been provided with a spreadsheet containing reviews for the new products, as well as an outdated file that categorizes all the products on your e-commerce platform. However, this file does not yet include the new products.

To solve this problem, you can use SageMaker Canvas. First, you will need to use the sentiment analysis ready-to-use model to understand the sentiment for each review, classifying them as positive, negative, or neutral. Then, you will need to create a custom text classification model that predicts the categories for the new products based on the existing ones.

Ready-to-use Model – Sentiment Analysis
To quickly learn the sentiment of each review, you can do a bulk update of the product reviews and generate a file with all the sentiment predictions.

To get started, locate Sentiment analysis on the Ready-to-use models page, and under Batch prediction, select Import new dataset.

Using ready-to-use sentiment analysis with a batch dataset

When you create a new dataset, you can upload the dataset from your local machine or use Amazon Simple Storage Service (Amazon S3). For this demo, you will upload the file locally. You can find all the product reviews used in this example in the Amazon Customer Reviews dataset.

After you complete uploading the file and creating the dataset, you can Generate predictions.

Select dataset and generate predictions

The prediction generation takes less than a minute, depending on the size of the dataset, and then you can view or download the results.

View or download predictions

The results from this prediction can be downloaded as a .csv file or viewed from the SageMaker Canvas interface. You can see the sentiment for each of the product reviews.

Preview results from ready-to-use model

Now you have the first part of your task ready—you have a .csv file with the sentiment of each review. The next step is to classify those products into categories.

Custom Text Classification Model
To classify the new products into categories based on the product title, you need to train a new text classification model in SageMaker Canvas.

In SageMaker Canvas, create a New model of the type Text analysis.

The first step when creating the model is to select a dataset with which to train the model. You will train this model with a dataset from last season, which contains all the products except for the new collection.

Once the dataset has finished importing, you will need to select the column that contains the data you want to predict, which in this case is the product_category column, and the column that will be used as the input for the model to make predictions, which is the product_title column.

After you finish configuring that, you can start to build the model. There are two modes of building:

  • Quick build that returns a model in 15–30 minutes.
  • Standard build takes 2–5 hours to complete.

To learn more about the differences between the modes of building you can check the documentation. For this demo, pick quick build, as our dataset is smaller than 50,000 rows.

Prepare and build your model

When the model is built, you can analyze how the model performs. SageMaker Canvas uses the 80-20 approach; it trains the model with 80 percent of the data from the dataset and uses 20 percent of the data to validate the model.

Model score

When the model finishes building, you can check the model score. The scoring section gives you a visual sense of how accurate the predictions were for each category. You can learn more about how to evaluate your model’s performance in the documentation.

After you make sure that your model has a high prediction rate, you can move on to generate predictions. This step is similar to the ready-to-use models for sentiment analysis. You can make a prediction on a single product or on a set of products. For a batch prediction, you need to select a dataset and let the model generate the predictions. For this example, you will select the same dataset that you selected in the ready-to-use model, the one with the reviews. This can take a few minutes, depending on the number of products in the dataset.

When the predictions are ready, you can download the results as a .csv file or view how each product was classified. In the prediction results, each product is assigned only one category based on the categories provided during the model-building process.

Predict categories

Now you have all the necessary resources to conduct an analysis and evaluate the performance of each product category with the new collection based on customer reviews. Using SageMaker Canvas, you were able to access a ready-to-use model and create a custom text classification model without having to write a single line of code.

Available Now
Ready-to-use models and support for custom text and image classification models in SageMaker Canvas are available in all AWS Regions where SageMaker Canvas is available. You can learn more about the new features and how they are priced by visiting the SageMaker Canvas product detail page.

— Marcia

Simplify Service-to-Service Connectivity, Security, and Monitoring with Amazon VPC Lattice – Now Generally Available

Post Syndicated from Danilo Poccia original https://aws.amazon.com/blogs/aws/simplify-service-to-service-connectivity-security-and-monitoring-with-amazon-vpc-lattice-now-generally-available/

At AWS re:Invent 2022, we introduced in preview Amazon VPC Lattice, a new capability of Amazon Virtual Private Cloud (Amazon VPC) that gives you a consistent way to connect, secure, and monitor communication between your services. With VPC Lattice, you can define policies for network access, traffic management, and monitoring to connect compute services across instances, containers, and serverless applications.

Today, I am happy to share that VPC Lattice is now generally available. Compared to the preview, you have access to new capabilities:

  • Services can use a custom domain name in addition to the domain name automatically generated by VPC Lattice. When using HTTPS, you can configure an SSL/TLS certificate that matches the custom domain name.
  • You can deploy the open-source AWS Gateway API Controller to use VPC Lattice with a Kubernetes-native experience. It uses the Kubernetes Gateway API to let you connect services across multiple Kubernetes clusters and services running on EC2 instances, containers, and serverless functions.
  • You can use an Application Load Balancer (ALB) or a Network Load Balancer (NLB) as a target for a service.
  • The IP address target type now supports IPv6 connectivity.

Let’s see some of these new features in practice.

Using Amazon VPC Lattice for Service-to-Service Connectivity
In my previous post introducing VPC Lattice, I show how to create a service network, associate multiple VPCs and services, and configure target groups for EC2 instances and Lambda functions. There, I also show how to route traffic based on request characteristics and how to use weighted routing. Weighted routing is really handy for blue/green and canary-style deployments or for migrating from one compute platform to another.

Now, let’s see how to use VPC Lattice to allow the services of an e-commerce application to communicate with each other. For simplicity, I only consider four services:

  • The Order service, running as a Lambda function.
  • The Inventory service, deployed as an Amazon Elastic Container Service (Amazon ECS) service in a dual-stack VPC supporting IPv6.
  • The Delivery service, deployed as an ECS service using an ALB to distribute traffic to the service tasks.
  • The Payment service, running on an EC2 instance.

First, I create a service network. The Order service needs to call the Inventory service (to check if an item is available for purchase), the Delivery service (to organize the delivery of the item), and the Payment service (to transfer the funds). The following diagram shows the service-to-service communication from the perspective of the service network.

Diagram describing the service network view of the e-commerce services.

These services run in different AWS accounts and multiple VPCs. VPC Lattice handles the complexity of setting up connectivity across VPC boundaries and permission across accounts so that service-to-service communication is as simple as an HTTP/HTTPS call.

The following diagram shows how the communication flows from an implementation point of view.

Diagram describing the implementation view of the e-commerce services.

The Order service runs in a Lambda function connected to a VPC. Because all the VPCs in the diagram are associated with the service network, the Order service is able to call the other services (Inventory, Delivery, and Payment) even if they are deployed in different AWS accounts and in VPCs with overlapping IP addresses.

Using a Network Load Balancer (NLB) as Target
The Inventory service runs in a dual-stack VPC. It’s deployed as an ECS service with an NLB to distribute traffic to the tasks in the service. To get the IPv6 addresses of the NLB, I look for the network interfaces used by the NLB in the EC2 console.

Console screenshot.

When creating the target group for the Inventory service, under Basic configuration, I choose IP addresses as the target type. Then, I select IPv6 for the IP Address type.

Console screenshot.

In the next step, I enter the IPv6 addresses of the NLB as targets. After the target group is created, the health checks test the targets to see if they are responding as expected.

Console screenshot.

Using an Application Load Balancer (ALB) as Target
Using an ALB as a target is even easier. When creating a target group for the Delivery service, under Basic configuration, I choose the new Application Load Balancer target type.

Console screenshot.

I select the VPC in which to look for the ALB and choose the Protocol version.

Console screenshot.

In the next step, I choose Register now and select the ALB from the dropdown. I use the default port used by the target group. VPC Lattice does not provide additional health checks for ALBs. However, load balancers already have their own health checks configured.

Console screenshot.

Using Custom Domain Names for Services
To call these services, I use custom domain names. For example, when I create the Payment service in the VPC console, I choose to Specify a custom domain configuration, enter a Custom domain name, and select an SSL/TLS certificate for the HTTPS listener. The Custom SSL/TLS certificate dropdown shows available certificates from AWS Certificate Manager (ACM).

Console screenshot.

Securing Service-to-Service Communications
Now that the target groups have been created, let’s see how I can secure the way services communicate with each other. To implement zero-trust authentication and authorization, I use AWS Identity and Access Management (IAM). When creating a service, I select the AWS IAM as Auth type.

I select the Allow only authenticated access policy template so that requests to services need to be signed using Signature Version 4, the same signing protocol used by AWS APIs. In this way, requests between services are authenticated by their IAM credentials, and I don’t have to manage secrets to secure their communications.

Console screenshot.

Optionally, I can be more precise and use an auth policy that only gives access to some services or specific URL paths of a service. For example, I can apply the following auth policy to the Order service to give to the Lambda function these permissions:

  • Read-only access (GET method) to the Inventory service /stock URL path.
  • Full access (any HTTP method) to the Delivery service /delivery URL path.
{
    "Version": "2012-10-17",
    "Statement": [
        {
            "Effect": "Allow",
            "Principal": {
                "AWS": "<Order Service Lambda Function IAM Role ARN>"
            },
            "Action": "vpc-lattice-svcs:Invoke",
            "Resource": "<Inventory Service ARN>/stock",
            "Condition": {
                "StringEquals": {
                    "vpc-lattice-svcs:RequestMethod": "GET"
                }
            }
        },
        {
            "Effect": "Allow",
            "Principal": {
                "AWS": "<Order Service Lambda Function IAM Role ARN>"
            },
            "Action": "vpc-lattice-svcs:Invoke",
            "Resource": "<Delivery Service ARN>/delivery"
        }
    ]
}

Using VPC Lattice, I quickly configured the communication between the services of my e-commerce application, including security and monitoring. Now, I can focus on the business logic instead of managing how services communicate with each other.

Availability and Pricing
Amazon VPC Lattice is available today in the following AWS Regions: US East (Ohio), US East (N. Virginia), US West (Oregon), Asia Pacific (Singapore), Asia Pacific (Sydney), Asia Pacific (Tokyo), and Europe (Ireland).

With VPC Lattice, you pay for the time a service is provisioned, the amount of data transferred through each service, and the number of requests. There is no charge for the first 300,000 requests every hour, and you only pay for requests above this threshold. For more information, see VPC Lattice pricing.

We designed VPC Lattice to allow incremental opt-in over time. Each team in your organization can choose if and when to use VPC Lattice. Other applications can connect to VPC Lattice services using standard protocols such as HTTP and HTTPS. By using VPC Lattice, you can focus on your application logic and improve productivity and deployment flexibility with consistent support for instances, containers, and serverless computing.

Simplify the way you connect, secure, and monitor your services with VPC Lattice.

Danilo

Amazon GuardDuty Now Supports Amazon EKS Runtime Monitoring

Post Syndicated from Channy Yun original https://aws.amazon.com/blogs/aws/amazon-guardduty-now-supports-amazon-eks-runtime-monitoring/

Since Amazon GuardDuty launched in 2017, GuardDuty has been capable of analyzing tens of billions of events per minute across multiple AWS data sources, such as AWS CloudTrail event logs, Amazon Virtual Private Cloud (Amazon VPC) Flow Logs, and DNS query logs, Amazon Simple Storage Service (Amazon S3) data plane events, Amazon Elastic Kubernetes Service (Amazon EKS) audit logs, and Amazon Relational Database Service (Amazon RDS) login events to protect your AWS accounts and resources.

In 2020, GuardDuty added Amazon S3 protection to continuously monitor and profile S3 data access events and configurations to detect suspicious activities in Amazon S3. Last year, GuardDuty launched Amazon EKS protection to monitor control plane activity by analyzing Kubernetes audit logs from existing and new EKS clusters in your accounts, Amazon EBS malware protection to scan malicious files residing on an EC2 instance or container workload using EBS volumes, and Amazon RDS protection to identify potential threats to data stored in Amazon Aurora databases—recently generally available.

GuardDuty combines machine learning (ML), anomaly detection, network monitoring, and malicious file discovery using various AWS data sources. When threats are detected, GuardDuty automatically sends security findings to AWS Security Hub, Amazon EventBridge, and Amazon Detective. These integrations help centralize monitoring for AWS and partner services, automate responses to malware findings, and perform security investigations from GuardDuty.

Today, we are announcing the general availability of Amazon GuardDuty EKS Runtime Monitoring to detect runtime threats from over 30 security findings to protect your EKS clusters. The new EKS Runtime Monitoring uses a fully managed EKS add-on that adds visibility into individual container runtime activities, such as file access, process execution, and network connections.

GuardDuty can now identify specific containers within your EKS clusters that are potentially compromised and detect attempts to escalate privileges from an individual container to the underlying Amazon EC2 host and the broader AWS environment. GuardDuty EKS Runtime Monitoring findings provide metadata context to identify potential threats and contain them before they escalate.

Configure EKS Runtime Monitoring in GuardDuty
To get started, first enable EKS Runtime Monitoring with just a few clicks in the GuardDuty console.

Once you enable EKS Runtime Monitoring, GuardDuty can start monitoring and analyzing the runtime-activity events for all the existing and new EKS clusters for your accounts. If you want GuardDuty to deploy and update the required EKS-managed add-on for all the existing and new EKS clusters in your account, choose Manage agent automatically. This will also create a VPC endpoint through which the security agent delivers the runtime events to GuardDuty.

If you configure EKS Audit Log Monitoring and runtime monitoring together, you can achieve optimal EKS protection both at the cluster control plane level, and down to the individual pod or container operating system level. When used together, threat detection will be more contextual to allow quick prioritization and response. For example, a runtime-based detection on a pod exhibiting suspicious behavior can be augmented by an audit log-based detection, indicating the pod was unusually launched with elevated privileges.

These options are default, but they are configurable, and you can uncheck one of the boxes in order to disable EKS Runtime Monitoring. When you disable EKS Runtime Monitoring, GuardDuty immediately stops monitoring and analyzing the runtime-activity events for all the existing EKS clusters. If you had configured automated agent management through GuardDuty, this action also removes the security agent that GuardDuty had deployed.

Manage GuardDuty Agent Manually
If you want to manually deploy and update the EKS managed add-on, including the GuardDuty agent, per cluster in your account, uncheck Manage agent automatically in the EKS protection configuration.

When managing the add-on manually, you are also responsible for creating the VPC endpoint through which the security agent delivers the runtime events to GuardDuty. In the VPC endpoint console, choose Create endpoint. In the step, choose Other endpoint services for Service category, enter com.amazonaws.us-east-1.guardduty-data for Service name in the US East (N. Virginia) Region, and choose Verify service.

After the service name is successfully verified, choose VPC and subnets where your EKS cluster resides. Under Additional settings, choose Enable DNS name. Under Security groups, choose a security group that has the in-bound port 443 enabled from your VPC (or your EKS cluster).

Add the following policy to restrict VPC endpoint usage to the specified account only:

{
	"Version": "2012-10-17",
	"Statement": [
		{
			"Action": "*",
			"Resource": "*",
			"Effect": "Allow",
			"Principal": "*"
		},
		{
			"Condition": {
				"StringNotEquals": {
					"aws:PrincipalAccount": "123456789012"
				}
			},
			"Action": "*",
			"Resource": "*",
			"Effect": "Deny",
			"Principal": "*"
		}
	]
}

Now, you can install the Amazon GuardDuty EKS Runtime Monitoring add-on for your EKS clusters. Select this add-on in the Add-ons tab in your EKS cluster profile on the Amazon EKS console.

When you enable EKS Runtime Monitoring in GuardDuty and deploy the Amazon EKS add-on for your EKS cluster, you can view the new pods with the prefix amazon-guardduty-agent. GuardDuty now starts to consume runtime-activity events from all EC2 hosts and containers in the cluster. GuardDuty then analyzes these events for potential threats.

These pods collect various event types and send them to the GuardDuty backend for threat detection and analysis. When managing the add-on manually, you need to go through these steps for each EKS cluster that you want to monitor, including new EKS clusters. To learn more, see Managing GuardDuty agent manually in the AWS documentation.

Checkout EKS Runtime Security Findings
When GuardDuty detects a potential threat and generates a security finding, you can view the details of the corresponding findings. These security findings indicate either a compromised EC2 instance, container workload, an EKS cluster, or a set of compromised credentials in your AWS environment.

If you want to generate EKS Runtime Monitoring sample findings for testing purposes, see Generating sample findings in GuardDuty in the AWS documentation. Here is an example of potential security issues: a newly created or recently modified binary file in an EKS cluster has been executed.

The ResourceType for an EKS Protection finding type could be an Instance, EKSCluster, or Container. If the Resource type in the finding details is EKSCluster, it indicates that either a pod or a container inside an EKS cluster is potentially compromised. Depending on the potentially compromised resource type, the finding details may contain Kubernetes workload details, EKS cluster details, or instance details.

The Runtime details such as process details and any required context describe information about the observed process, and the runtime context describes any additional information about the potentially suspicious activity.

To remediate a compromised pod or container image, see Remediating Kubernetes security issues discovered by GuardDuty in the AWS documentation. This document describes the recommended remediation steps for each resource type. To learn more about security finding types, see GuardDuty EKS Runtime Monitoring finding types in the AWS documentation.

Now Available
You can now use Amazon GuardDuty for EKS Runtime Monitoring. For a full list of Regions where EKS Runtime Monitoring is available, visit region-specific feature availability.

The first 30 days of GuardDuty for EKS Runtime Monitoring are available at no additional charge for existing GuardDuty accounts. If you enabled GuardDuty for the first time, EKS Runtime Monitoring is not enabled by default, and needs to be enabled as described above. After the trial period ends in the GuardDuty, you can see the estimated cost of EKS Runtime Monitoring. To learn more, see the GuardDuty pricing page.

For more information, see the Amazon GuardDuty User Guide and send feedback to AWS re:Post for Amazon GuardDuty or through your usual AWS support contacts.

Channy

AWS Application Migration Service Major Updates: Import and Export Feature, Source Server Migration Metrics Dashboard, and Additional Post-Launch Actions

Post Syndicated from Donnie Prakoso original https://aws.amazon.com/blogs/aws/aws-application-migration-service-major-updates-import-and-export-feature-source-server-migration-metrics-dashboard-and-additional-post-launch-actions/

AWS Application Migration Service (AWS MGN) can simplify and expedite your migration to AWS by automatically converting your source servers from physical, virtual, or cloud infrastructure to run natively on AWS. In the post, How to Use the New AWS Application Migration Server for Lift-and-Shift Migrations, Channy introduced us to Application Migration Service and how to get started.

By using Application Migration Service for migration, you can minimize time-intensive, error-prone manual processes by automating replication and conversion of your source servers from physical, virtual, or cloud infrastructure to run natively on AWS. Last year, we introduced major improvements such as new migration servers grouping, an account-level launch template, and a post-launch actions template.

Today, I’m pleased to announce three major updates of Application Migration Service. Here’s the quick summary for each feature release:

  • Import and export – You can now use Application Migration Service to import your source environment inventory list to the service from a CSV file. You can also export your source server inventory for reporting purposes, offline reviews and updates, integration with other tools and AWS services, and performing bulk configuration changes by reimporting the inventory list.
  • Server migration metrics dashboard – This new dashboard can help simplify migration project management by providing an aggregated view of the migration lifecycle status of your source servers
  • Additional post-launch modernization actions – In this update, Application Migration Service added eight additional predefined post-launch actions. These actions are applied to your migrated applications when you launch them on AWS.

Let me share how you can use these features for your migration.

Import and Export
Before we go further into the import and export features, let’s discuss two concepts within Application Migration Service: applications and waves, which you can define when migrating with Application Migration Service. Applications represent a group of servers. By using applications, you can define groups of servers and identify them as an application. Within your application, you can perform various activities with Application Migration Service, such as monitoring, specifying tags, and performing bulk operations, for example, launching test instances. Additionally, you can group your applications into waves, which represent a group of servers that are migrated together, as part of your migration plan.

With the import feature, you can now import your inventory list in CSV form into Application Migration Service. This makes it easy for you to manage large scale-migrations, and ingest your inventory of source servers, applications and waves, including their attributes.

To start using the import feature, I need to identify my servers and application inventory. I can do this manually, or using discovery tools. The next thing I need to do is download the import template which I can access from the console. 

After I downloaded the import template, I can start mapping from my inventory list into this template. While mapping my inventory, I can group related servers into applications and waves. I can also perform configurations, such as defining Amazon Elastic Compute Cloud (Amazon EC2) launch template settings, and specifying tags for each wave.

The following screenshot is an example of the results of my import template:

The next step is to upload my CSV file to an Amazon Simple Storage Service (Amazon S3) bucket. Then, I can start the import process from the Application Migration Service console by referencing the CSV file containing my inventory list that I’ve uploaded to the S3 bucket.

When the import process is complete, I can see the details of the import results.

I can import inventory for servers that don’t have an agent installed, or haven’t yet been discovered by agentless replication. However, to replicate data, I need to use agentless replication, or install the AWS Replication Agent on my source servers.

Now I can view all my inventory inside the Source servers, Applications and Waves pages on the Application Migration Service console. The following is a screenshot for recently imported waves.

In addition, with the export feature, I can export my source servers, applications, and waves along with all configurations that I’ve defined into a CSV file.

This is helpful if you want to do reporting or offline reviews, or for bulk editing before reimporting the CSV file into Application Migration Service.

Server Migration Metrics Dashboard
We previously supported a migration metrics dashboard for applications and waves. In this release, we have specifically added a migration metrics dashboard for servers. Now you can view aggregated overviews of your server’s migration process on the Application Migration Service dashboard. Three topics are available in the migration metrics dashboard:

  • Alerts – Shows associated alerts for respective servers.
  • Data replication status – Shows the replication data overview status for source servers. Here, you get a quick overview of the lifecycle status of the replication data process.
  • Migration lifecycle – Shows an overview of the migration lifecycle from source servers.

Additional Predefined Post-launch Modernization Actions
Post-launch actions allow you to control and automate actions performed after your servers have been launched in AWS. You can use predefined or use custom post-launch actions.

Application Migration Service now has eight additional predefined post-launch actions to run in your EC2 instances on top of the existing four predefined post-launch actions. These additional post-launch actions provide you with flexibility to maximize your migration experience.

The new additional predefined post-launch actions are as follows:

  • Convert MS-SQL license – You can easily convert Windows MS-SQL BYOL to an AWS license using the Windows MS-SQL license conversion action. The launch process includes checking the SQL edition (Enterprise, Standard, or Web) and using the right AMI with the right billing code.
  • Create AMI from instance – You can create a new Amazon Machine Image (AMI) from your Application Migration Service launched instance.
  • Upgrade Windows version – This feature allows you to easily upgrade your migrated server to Windows Server 2012 R2, 2016, 2019, or 2022. You can see the full list of available OS versions on AWSEC2-CloneInstanceAndUpgradeWindows page.
  • Conduct EC2 connectivity checks – You can conduct network connectivity checks to a predefined list of ports and hosts using the EC2 connectivity check feature.
  • Validate volume integrity – You can use this feature to ensure that Amazon Elastic Block Store (Amazon EBS) volumes on the launched instance are the same size as the source, properly mounted on the EC2 instance, and accessible.
  • Verify process status – You can validate the process status to ensure that processes are in a running state after instance launch. You will need to provide a list of processes that you want to verify and specify how long the service should wait before testing begins. This feature lets you do the needed validations automatically and saves time by not having to do them manually.
  • CloudWatch agent installation – Use the Amazon CloudWatch agent installation feature to install and set up the CloudWatch agent and Application Insights features.
  • Join Directory Service domain – You can simplify the AWS join domain process by using this feature. If you choose to activate this action, your instance will be managed by the AWS Cloud Directory (instead of on premises).

Things to Know
Keep in mind the following:

  • Updated UI/UX – We have updated the user interface with card layout and table layout view for the action list on the Application Migration Service console. This update helps you to determine which post-launch actions are suitable for your use case . We have also added filter options to make it easy to find relevant actions by operating system, category, and more.
  • Support for additional OS versions – Application Migration Service now supports CentOS 5.5 and later and Red Hat Enterprise Linux (RHEL) 5.5 and later operating systems.
  • Availability – These features are available now, and you can start using them today in all Regions where Application Migration Service is supported.

Get Started Today

Visit the Application Migration Service User Guide page to learn more about these features and understand the pricing. You can also visit Getting started with AWS Application Migration Service to learn more about how to get started to migrate your workloads.

Happy migrating!

Donnie

AWS Week in Review – March 20, 2023

Post Syndicated from Danilo Poccia original https://aws.amazon.com/blogs/aws/aws-week-in-review-march-20-2023/

This post is part of our Week in Review series. Check back each week for a quick roundup of interesting news and announcements from AWS!

A new week starts, and Spring is almost here! If you’re curious about AWS news from the previous seven days, I got you covered.

Last Week’s Launches
Here are the launches that got my attention last week:

Picture of an S3 bucket and AWS CEO Adam Selipsky.Amazon S3 – Last week there was AWS Pi Day 2023 celebrating 17 years of innovation since Amazon S3 was introduced on March 14, 2006. For the occasion, the team released many new capabilities:

Amazon Linux 2023 – Our new Linux-based operating system is now generally available. Sébastien’s post is full of tips and info.

Application Auto Scaling – Now can use arithmetic operations and mathematical functions to customize the metrics used with Target Tracking policies. You can use it to scale based on your own application-specific metrics. Read how it works with Amazon ECS services.

AWS Data Exchange for Amazon S3 is now generally available – You can now share and find data files directly from S3 buckets, without the need to create or manage copies of the data.

Amazon Neptune – Now offers a graph summary API to help understand important metadata about property graphs (PG) and resource description framework (RDF) graphs. Neptune added support for Slow Query Logs to help identify queries that need performance tuning.

Amazon OpenSearch Service – The team introduced security analytics that provides new threat monitoring, detection, and alerting features. The service now supports OpenSearch version 2.5 that adds several new features such as support for Point in Time Search and improvements to observability and geospatial functionality.

AWS Lake Formation and Apache Hive on Amazon EMR – Introduced fine-grained access controls that allow data administrators to define and enforce fine-grained table and column level security for customers accessing data via Apache Hive running on Amazon EMR.

Amazon EC2 M1 Mac Instances – You can now update guest environments to a specific or the latest macOS version without having to tear down and recreate the existing macOS environments.

AWS Chatbot – Now Integrates With Microsoft Teams to simplify the way you troubleshoot and operate your AWS resources.

Amazon GuardDuty RDS Protection for Amazon Aurora – Now generally available to help profile and monitor access activity to Aurora databases in your AWS account without impacting database performance

AWS Database Migration Service – Now supports validation to ensure that data is migrated accurately to S3 and can now generate an AWS Glue Data Catalog when migrating to S3.

AWS Backup – You can now back up and restore virtual machines running on VMware vSphere 8 and with multiple vNICs.

Amazon Kendra – There are new connectors to index documents and search for information across these new content: Confluence Server, Confluence Cloud, Microsoft SharePoint OnPrem, Microsoft SharePoint Cloud. This post shows how to use the Amazon Kendra connector for Microsoft Teams.

For a full list of AWS announcements, be sure to keep an eye on the What’s New at AWS page.

Other AWS News
A few more blog posts you might have missed:

Example of a geospatial query.Women founders Q&A – We’re talking to six women founders and leaders about how they’re making impacts in their communities, industries, and beyond.

What you missed at that 2023 IMAGINE: Nonprofit conference – Where hundreds of nonprofit leaders, technologists, and innovators gathered to learn and share how AWS can drive a positive impact for people and the planet.

Monitoring load balancers using Amazon CloudWatch anomaly detection alarms – The metrics emitted by load balancers provide crucial and unique insight into service health, service performance, and end-to-end network performance.

Extend geospatial queries in Amazon Athena with user-defined functions (UDFs) and AWS Lambda – Using a solution based on Uber’s Hexagonal Hierarchical Spatial Index (H3) to divide the globe into equally-sized hexagons.

How cities can use transport data to reduce pollution and increase safety – A guest post by Rikesh Shah, outgoing head of open innovation at Transport for London.

For AWS open-source news and updates, here’s the latest newsletter curated by Ricardo to bring you the most recent updates on open-source projects, posts, events, and more.

Upcoming AWS Events
Here are some opportunities to meet:

AWS Public Sector Day 2023 (March 21, London, UK) – An event dedicated to helping public sector organizations use technology to achieve more with less through the current challenging conditions.

Women in Tech at Skills Center Arlington (March 23, VA, USA) – Let’s celebrate the history and legacy of women in tech.

The AWS Summits season is warming up! You can sign up here to know when registration opens in your area.

That’s all from me for this week. Come back next Monday for another Week in Review!

Danilo

AWS Chatbot Now Integrates With Microsoft Teams

Post Syndicated from Sébastien Stormacq original https://aws.amazon.com/blogs/aws/aws-chatbot-now-integrates-with-microsoft-teams/

I am pleased to announce that, starting today, you can use AWS Chatbot to troubleshoot and operate your AWS resources from Microsoft Teams.

Communicating and collaborating on IT operation tasks through chat channels is known as ChatOps. It allows you to centralize the management of infrastructure and applications, as well as to automate and streamline your workflows. It helps to provide a more interactive and collaborative experience, as you can communicate and work with your colleagues in real time through a familiar chat interface to get the job done.

We launched AWS Chatbot in 2020 with Amazon Chime and Slack integrations. Since then, the landscape of chat platforms has evolved rapidly, and many of you are now using Microsoft Teams.

AWS Chatbot Benefits
When using AWS Chatbot for Microsoft Teams or other chat platforms, you receive notifications from AWS services directly in your chat channels, and you can take action on your infrastructure by typing commands without having to switch to another tool.

Typically you want to receive alerts about your system health, your budget, any new security threat or risk, or the status of your CI/CD pipelines. Sending a message to the chat channel is as simple as sending a message on an Amazon Simple Notification Service (Amazon SNS) topic. Thanks to the native integration between Amazon CloudWatch alarms and SNS, alarms are automatically delivered to your chat channels with no additional configuration step required. Similarly, thanks to the integration between Amazon EventBridge and SNS, any system or service that emits events to EventBridge can send information to your chat channels.

But ChatOps is more than the ability to spot problems as they arise. AWS Chatbot allows you to receive predefined CloudWatch dashboards interactively and retrieve Logs Insights logs to troubleshoot issues directly from the chat thread. You can also directly type in the chat channel most AWS Command Line Interface (AWS CLI) commands to retrieve additional telemetry data or resource information or to run runbooks to remediate the issues.

Typing and remembering long commands is difficult. With AWS Chatbot, you can define your own aliases to reference frequently used commands and their parameters. It reduces the number of steps to complete a task. Aliases are flexible and can contain one or more custom parameters injected at the time of the query.

And because chat channels are designed for conversation, you can also ask questions in natural language and have AWS Chatbot answer you with relevant extracts from the AWS documentation or support articles. Natural language understanding also allows you to make queries such as “show me my ec2 instances in eu-west-3.”

Let’s Configure the Integration Between AWS Chatbot and Microsoft Teams
Getting started is a two-step process. First, I configure my team in Microsoft Teams. As a Teams administrator, I add the AWS Chatbot application to the team, and I take note of the URL of the channel I want to use for receiving notifications and operating AWS resources from Microsoft Teams channels.

Second, I register Microsoft Teams channels in AWS Chatbot. I also assign IAM permissions on what channel members can do in this channel and associate SNS topics to receive notifications. I may configure AWS Chatbot with the AWS Management Console, an AWS CloudFormation template, or the AWS Cloud Development Kit (AWS CDK). For this demo, I choose to use the console.

I open the Management Console and navigate to the AWS Chatbot section. On the top right side of the screen, in the Configure a chat client box, I select Microsoft Teams and then Configure client.

I enter the Microsoft Teams channel URL I noted in the Teams app.

Add the team channel URL to ChatbotAt this stage, Chatbot redirects my browser to Microsoft Teams for authentication. If I am already authenticated, I will be redirected back to the AWS console immediately. Otherwise, I enter my Microsoft Teams credentials and one-time password and wait to be redirected.

At this stage, my Microsoft Teams team is registered with AWS Chatbot and ready to add Microsoft Teams channels. I select Configure new channel.

Chabot is now linked to your Microsoft Teams There are four sections to enter the details of the configuration. In the first section, I enter a Configuration name for my channel. Optionally, I also define the Logging details. In the second section, I paste—again—the Microsoft Teams Channel URL.

Configure chatbot section one and two

In the third section, I configure the Permissions. I can choose between the same set of permissions for all Microsoft Teams users in my team, or I can set User-level roles permission to enable user-specific permissions in the channel. In this demo, I select Channel role, and I assign an IAM role to the channel. The role defines the permissions shared by all users in the channel. For example, I can assign a role that allows users to access configuration data from Amazon EC2 but not from Amazon S3. Under Channel role, I select Use an existing IAM role. Under Existing role, I select a role I created for my 2019 re:Invent talk about ChatOps: chatbot-demo. This role gives read-only access to all AWS services, but I could also assign other roles that would allow Chatbot users to take actions on their AWS resources.

To mitigate the risk that another person in your team accidentally grants more than the necessary privileges to the channel or user-level roles, you might also include Channel guardrail policies. These are the maximum permissions your users might have when using the channel. At runtime, the actual permissions are the intersection of the channel or user-level policies and the guardrail policies. Guardrail policies act like a boundary that channel users will never escape. The concept is similar to permission boundaries for IAM entities or service control policies (SCP) for AWS Organizations. In this example, I attach the ReadOnlyAccess managed policy.

Configure chatbot section three

The fourth and last section allows you to specify the SNS topic that will be the source for notifications sent to your team’s channel. Your applications or AWS services, such as CloudWatch alarms, can send messages to this topic, and AWS Chatbot will relay all messages to the configured Microsoft Teams channel. Thanks to the integration between Amazon EventBridge and SNS, any application able to send a message to EventBridge is able to send a message to Microsoft Teams.

For this demo, I select an existing SNS topic: alarmme in the us-east-1 Region. You can configure multiple SNS topics to receive alarms from various Regions. I then select Configure.

Configure chatbot section fourLet’s Test the Integration
That’s it. Now I am ready to test my setup.

On the AWS Chatbot configuration page, I first select the Send test message. I also have an alarm defined when my estimated billing goes over $500. On the CloudWatch section of the Management Console, I configure the alarm to post a message on the SNS topic shared with Microsoft Teams.

Within seconds, I receive the test message and the alarm message on the Microsoft Teams channel.

AWS Chatbot with Microsoft Teams, first messages received on the channel

Then I type a command to understand where the billing alarm comes from. I want to understand how many EC2 instances are running.

On the chat client channel, I type @aws to select Chatbot as the destination, then the rest of the CLI command, as I would do in a terminal: ec2 describe-instances --region us-east-1 --filters "Name=architecture,Values=arm64_mac" --query "Reservations[].Instances[].InstanceId"

Chatbot answers within seconds.

AWS chatbot describe instances

I can create aliases for commands I frequently use. Aliases may have placeholder parameters that I can give at runtime, such as the Region name for example.

I create an alias to get the list of my macOS instance IDs with the command: aws alias create mac ec2 describe-instances --region $region --filters "Name=architecture,Values=arm64_mac" --query "Reservations[].Instances[].InstanceId"

Now, I can type @aws alias run mac us-east-1 as a shortcut to get the same result as above. I can also manage my aliases with the @aws alias list, @aws alias get, and @aws alias delete commands.

I don’t know about you, but for me it is hard to remember commands. When I use the terminal, I rely on auto-complete to remind me of various commands and their options. AWS Chatbot offers similar command completion and guides me to collect missing parameters.

AWS Chatbot command completion

When using AWS Chatbot, I can also ask questions using natural English language. It can help to find answers from the AWS docs and from support articles by typing questions such as @aws how can I tag my EC2 instances? or @aws how do I configure Lambda concurrency setting?

It can also find resources in my account when AWS Resource Explorer is activated. For example, I asked the bot: @aws what are the tags for my ec2 resources? and @aws what Regions do I have Lambda service?

And I received these responses.

AWS Chatbot NLP Response 1AWS Chatbot NLP Response 2Thanks to AWS Chatbot, I realized that I had a rogue Lambda function left in ca-central-1. I used the AWS console to delete it.

Available Now
You can start to use AWS Chatbot with Microsoft Teams today. AWS Chatbot for Microsoft Teams is available to download from Microsoft Teams app at no additional cost. AWS Chatbot is available in all public AWS Regions, at no additional charge. You pay for the underlying resources that you use. You might incur charges from your chat client.

Get started today and configure your first integration with Microsoft Teams.

— seb

Amazon Linux 2023, a Cloud-Optimized Linux Distribution with Long-Term Support

Post Syndicated from Sébastien Stormacq original https://aws.amazon.com/blogs/aws/amazon-linux-2023-a-cloud-optimized-linux-distribution-with-long-term-support/

I am excited to announce the general availability of Amazon Linux 2023 (AL2023). AWS has provided you with a cloud-optimized Linux distribution since 2010. This is the third generation of our Amazon Linux distributions.

Every generation of Amazon Linux distribution is secured, optimized for the cloud, and receives long-term AWS support. We built Amazon Linux 2023 on these principles, and we go even further. Deploying your workloads on Amazon Linux 2023 gives you three major benefits: a high-security standard, a predictable lifecycle, and a consistent update experience.

Let’s look at security first. Amazon Linux 2023 includes preconfigured security policies that make it easy for you to implement common industry guidelines. You can configure these policies at launch time or run time.

For example, you can configure the system crypto policy to enforce system-wide usage of a specific set of cipher suites, TLS versions, or acceptable parameters in certificates and key exchanges. Also, the Linux kernel has many hardening features enabled by default.

Amazon Linux 2023 makes it easier to plan and manage the operating system lifecycle. New Amazon Linux major versions will be available every two years. Major releases include new features and improvements in security and performance across the stack. The improvements might include major changes to the kernel, toolchain, GLib C, OpenSSL, and any other system libraries and utilities.

During those two years, a major release will receive an update every three months. These updates include security updates, bug fixes, and new features and packages. Each minor version is a cumulative list of updates that includes security and bug fixes in addition to new features and packages. These releases might include the latest language runtimes such as Python or Java. They might also include other popular software packages such as Ansible and Docker. In addition to these quarterly updates, security updates will be provided as soon as they are available.

Each major version, including 2023, will come with five years of long-term support. After the initial two-year period, each major version enters a three-year maintenance period. During the maintenance period, it will continue to receive security bug fixes and patches as soon as they are available. This support commitment gives you the stability you need to manage long project lifecycles.

The following diagram illustrates the lifecycle of Amazon Linux distributions:

Last—and this policy is by far my favorite—Amazon Linux provides you with deterministic updates through versioned repositories, a flexible and consistent update mechanism. The distribution locks to a specific version of the Amazon Linux package repository, giving you control over how and when you absorb updates. By default, and in contrast with Amazon Linux 2, a dnf update command will not update your installed packages (dnf is the successor to yum). This helps to ensure that you are using the same package versions across your fleet. All Amazon Elastic Compute Cloud (Amazon EC2) instances launched from an Amazon Machine Image (AMI) will have the same version of packages. Deterministic updates also promote usage of immutable infrastructure, where no infrastructure is updated after deployment. When an update is required, you update your infrastructure as code scripts and redeploy a new infrastructure. Of course, if you really want to update your distribution in place, you can point dnf to an updated package repository and update your machine as you do today. But did I tell you this is not a good practice for production workloads? I’ll share more technical details later in this blog post.

How to Get Started
Getting started with Amazon Linux 2023 is no different than with other Linux distributions. You can use the EC2 run-instances API, the AWS Command Line Interface (AWS CLI), or the AWS Management Console, and one of the four Amazon Linux 2023 AMIs that we provide. We support two machine architectures (x86_64 and Arm) and two sizes (standard and minimal). Minimal AMIs contain the most basic tools and utilities to start the OS. The standard version comes with the most commonly used applications and tools installed.

To retrieve the latest AMI ID for a specific Region, you can use AWS Systems Manager get-parameter API and query the /aws/service/ami-amazon-linux-latest/<alias> parameter.

Be sure to replace <alias> with one of the four aliases available:

  • For arm64 architecture (standard AMI): al2023-ami-kernel-default-arm64
  • For arm64 architecture (minimal AMI): al2023-ami-minimal-kernel-default-arm64
  • For x86_64 architecture (standard AMI): al2023-ami-kernel-default-x86_64
  • For x86_64 architecture (minimal AMI): al2023-ami-minimal-kernel-default-x86_64

For example, to search for the latest Arm64 full distribution AMI ID, I open a terminal and enter:

~ aws ssm get-parameters --region us-east-2 --names /aws/service/ami-amazon-linux-latest/al2023-ami-kernel-default-arm64
{
    "Parameters": [
        {
            "Name": "/aws/service/ami-amazon-linux-latest/al2023-ami-kernel-default-arm64",
            "Type": "String",
            "Value": "ami-02f9b41a7af31dded",
            "Version": 1,
            "LastModifiedDate": "2023-02-24T22:54:56.940000+01:00",
            "ARN": "arn:aws:ssm:us-east-2::parameter/aws/service/ami-amazon-linux-latest/al2023-ami-kernel-default-arm64",
            "DataType": "text"
        }
    ],
    "InvalidParameters": []
}

To launch an instance, I use the run-instances API. Notice how I use Systems Manager resolution to dynamically lookup the AMI ID from the CLI.

➜ aws ec2 run-instances                                                                            \
       --image-id resolve:ssm:/aws/service/ami-amazon-linux-latest/al2023-ami-kernel-default-arm64  \
       --key-name my_ssh_key_name                                                                   \
       --instance-type c6g.medium                                                                   \
       --region us-east-2 
{
    "Groups": [],
    "Instances": [
        {
          "AmiLaunchIndex": 0,
          "ImageId": "ami-02f9b41a7af31dded",
          "InstanceId": "i-0740fe8e23f903bd2",
          "InstanceType": "c6g.medium",
          "KeyName": "my_ssh_key_name",
          "LaunchTime": "2023-02-28T14:12:34+00:00",

...(redacted for brevity)
}

When the instance is launched, and if the associated security group allows SSH (TCP 22) connections, I can connect to the machine:

~ ssh [email protected]
Warning: Permanently added '3.145.19.213' (ED25519) to the list of known hosts.
   ,     #_
   ~\_  ####_        Amazon Linux 2023
  ~~  \_#####\       Preview
  ~~     \###|
  ~~       \#/ ___   https://aws.amazon.com/linux/amazon-linux-2023
   ~~       V~' '->
    ~~~         /
      ~~._.   _/
         _/ _/
       _/m/'
Last login: Tue Feb 28 14:14:44 2023 from 81.49.148.9
[ec2-user@ip-172-31-9-76 ~]$ uname -a
Linux ip-172-31-9-76.us-east-2.compute.internal 6.1.12-19.43.amzn2023.aarch64 #1 SMP Thu Feb 23 23:37:18 UTC 2023 aarch64 aarch64 aarch64 GNU/Linux

We also distribute Amazon Linux 2023 as Docker images. The Amazon Linux 2023 container image is built from the same software components that are included in the Amazon Linux 2023 AMI. The container image is available for use in any environment as a base image for Docker workloads. If you’re using Amazon Linux for applications in EC2, you can containerize your applications with the Amazon Linux container image.

These images are available from Amazon Elastic Container Registry (Amazon ECR) and from Docker Hub. Here is a quick demo to start a Docker container using Amazon Linux 2023 from Elastic Container Registry.

$ aws ecr-public get-login-password --region us-east-1 | docker login --username AWS --password-stdin public.ecr.aws
Login Succeeded
~ docker run --rm -it public.ecr.aws/amazonlinux/amazonlinux:2023 /bin/bash
Unable to find image 'public.ecr.aws/amazonlinux/amazonlinux:2023' locally
2023: Pulling from amazonlinux/amazonlinux
b4265814d5cf: Pull complete 
Digest: sha256:bbd7a578cff9d2aeaaedf75eb66d99176311b8e3930c0430a22e0a2d6c47d823
Status: Downloaded newer image for public.ecr.aws/amazonlinux/amazonlinux:2023
bash-5.2# uname -a 
Linux 9d5b45e9f895 5.15.49-linuxkit #1 SMP PREEMPT Tue Sep 13 07:51:32 UTC 2022 aarch64 aarch64 aarch64 GNU/Linux
bash-5.2# exit 

When pulling from Docker Hub, you can use this command to pull the image: docker pull amazonlinux:2023.

What Are the Main Differences Compared to Amazon Linux 2?
Amazon Linux 2023 has some differences compared to Amazon Linux 2. The documentation explains these differences in detail. The two differences I would like to focus on are dnf and the package management policies.

AL2023 comes with Fedora’s dnf, the successor to yum. But don’t worry, dnf provides similar commands as yum to search, install, or remove packages. Where you used to run the commands yum list or yum install httpd, you may now run dnf list or dnf install httpd. For convenience, we create a symlink for /usr/bin/yum, so you can run your scripts unmodified.

$ which yum
/usr/bin/yum
$ ls -al /usr/bin/yum
lrwxrwxrwx. 1 root root 5 Jun 19 18:06 /usr/bin/yum -> dnf-3

The biggest difference, in my opinion, is the deterministic updates through versioned repositories. By default, the software repository is locked to the AMI version. This means that a dnf update command will not return any new packages to install. Versioned repositories give you the assurance that all machines started from the same AMI ID are identical. Your infrastructure will not deviate from the baseline.

$ sudo dnf update 
Last metadata expiration check: 0:14:10 ago on Tue Feb 28 14:12:50 2023.
Dependencies resolved.
Nothing to do.
Complete!

Yes, but what if you want to update a machine? You have two options to update an existing machine. The cleanest one for your production environment is to create duplicate infrastructure based on new AMIs. As I mentioned earlier, we publish updates for every security fix and a consolidated update every three months for two years after the initial release. Each update is provided as a set of AMIs and their corresponding software repository.

For smaller infrastructure, such as test or development machines, you might choose to update the operating system or individual packages in place as well. This is a three-step process:

  • first, list the available updated software repositories;
  • second, point dnf to a specific software repository;
  • and third, update your packages.

To show you how it works, I purposely launched an EC2 instance with an “old” version of Amazon Linux 2023 from February 2023. I first run dnf check-release-update to list the available updated software repositories.

$ dnf check-release-update
WARNING:
  A newer release of "Amazon Linux" is available.

  Available Versions:

  Version 2023.0.20230308:
    Run the following command to upgrade to 2023.0.20230308:

      dnf upgrade --releasever=2023.0.20230308

    Release notes:
     https://docs.aws.amazon.com/linux/al2023/release-notes/relnotes.html

Then, I might either update the full distribution using dnf upgrade --releasever=2023.0.20230308 or point dnf to the updated repository to select individual packages.

$ dnf check-update --releasever=2023.0.20230308

Amazon Linux 2023 repository                                                    28 MB/s |  11 MB     00:00
Amazon Linux 2023 Kernel Livepatch repository                                  1.2 kB/s | 243  B     00:00

amazon-linux-repo-s3.noarch                          2023.0.20230308-0.amzn2023                amazonlinux
binutils.aarch64                                     2.39-6.amzn2023.0.5                       amazonlinux
ca-certificates.noarch                               2023.2.60-1.0.amzn2023.0.1                amazonlinux
(redacted for brevity)
util-linux-core.aarch64 2.37.4-1.amzn2022.0.1 amazonlinux

Finally, I might run a dnf update <package_name> command to update a specific package.

This might look like overkill for a simple machine, but when managing enterprise infrastructure or large-scale fleets of instances, this facilitates the management of your fleet by ensuring that all instances run the same version of software packages. It also means that the AMI ID is now something that you can fully run through your CI/CD pipelines for deployment and that you have a way to roll AMI versions forward and backward according to your schedule.

Where is Fedora?
When looking for a base to serve as a starting point for Amazon Linux 2023, Fedora was the best choice. We found that Fedora’s core tenets (Freedom, Friends, Features, First) resonate well with our vision for Amazon Linux. However, Amazon Linux focuses on a long-term, stable OS for the cloud, which is a notable different release cycle and lifecycle than Fedora. Amazon Linux 2023 provides updated versions of open-source software, a larger variety of packages, and frequent releases.

Amazon Linux 2023 isn’t directly comparable to any specific Fedora release. The Amazon Linux 2023 GA version includes components from Fedora 34, 35, and 36. Some of the components are the same as the components in Fedora, and some are modified. Other components more closely resemble the components in CentOS Stream 9 or were developed independently. The Amazon Linux kernel, on its side, is sourced from the long-term support options that are on kernel.org, chosen independently from the kernel provided by Fedora.

Like every good citizen in the open-source community, we give back and contribute our changes to upstream distributions and sources for the benefit of the entire community. Amazon Linux 2023 itself is open source. The source code for all RPM packages that are used to build the binaries that we ship are available through the SRPM yum repository (sudo dnf install -y 'dnf-command(download)' && dnf download --source bash)

One More Thing: Amazon EBS Gp3 Volumes
Amazon Linux 2023 AMIs use gp3 volumes by default.

Gp3 is the latest generation general-purpose solid-state drive (SSD) volume for Amazon Elastic Block Store (Amazon EBS). Gp3 provides 20 percent lower storage costs compared to gp2. Gp3 volumes deliver a baseline performance of 3,000 IOPS and 125MB/s at any volume size. What I particularly like about gp3 volumes is that I can now provision performance independently of capacity. When using gp3 volumes, I can now increase IOPS and throughput without incurring charges for extra capacity that I don’t actually need.

With the availability of gp3-backed AL2023 AMIs, this is the first time a gp3-backed Amazon Linux AMI is available. Gp3-backed AMIs have been a common customer request since gp3 was launched in 2020. It is now available by default.

Price and Availability
Amazon Linux 2023 is provided at no additional charge. Standard Amazon EC2 and AWS charges apply for running EC2 instances and other services. This distribution includes full support for five years. When deploying on AWS, our support engineers will provide technical support according to the terms and conditions of your AWS Support plan. AMIs are available in all AWS Regions.

Amazon Linux is the most used Linux distribution on AWS, with hundreds of thousands of customers using Amazon Linux 2. Dozens of Independent Software Vendors (ISVs) and hardware partners are supporting Amazon Linux 2023 today. You can adopt this new version with the confidence that the partner tools you rely on are likely to be supported. We are excited about this release, which brings you an even higher level of security, a predictable release lifecycle, and a consistent update experience.

Now go build and deploy your workload on Amazon Linux 2023 today.

— seb

New – Use Amazon S3 Object Lambda with Amazon CloudFront to Tailor Content for End Users

Post Syndicated from Danilo Poccia original https://aws.amazon.com/blogs/aws/new-use-amazon-s3-object-lambda-with-amazon-cloudfront-to-tailor-content-for-end-users/

With S3 Object Lambda, you can use your own code to process data retrieved from Amazon S3 as it is returned to an application. Over time, we added new capabilities to S3 Object Lambda, like the ability to add your own code to S3 HEAD and LIST API requests, in addition to the support for S3 GET requests that was available at launch.

Today, we are launching aliases for S3 Object Lambda Access Points. Aliases are now automatically generated when S3 Object Lambda Access Points are created and are interchangeable with bucket names anywhere you use a bucket name to access data stored in Amazon S3. Therefore, your applications don’t need to know about S3 Object Lambda and can consider the alias to be a bucket name.

Architecture diagram.

You can now use an S3 Object Lambda Access Point alias as an origin for your Amazon CloudFront distribution to tailor or customize data for end users. You can use this to implement automatic image resizing or to tag or annotate content as it is downloaded. Many images still use older formats like JPEG or PNG, and you can use a transcoding function to deliver images in more efficient formats like WebP, BPG, or HEIC. Digital images contain metadata, and you can implement a function that strips metadata to help satisfy data privacy requirements.

Architecture diagram.

Let’s see how this works in practice. First, I’ll show a simple example using text that you can follow along by just using the AWS Management Console. After that, I’ll implement a more advanced use case processing images.

Using an S3 Object Lambda Access Point as the Origin of a CloudFront Distribution
For simplicity, I am using the same application in the launch post that changes all text in the original file to uppercase. This time, I use the S3 Object Lambda Access Point alias to set up a public distribution with CloudFront.

I follow the same steps as in the launch post to create the S3 Object Lambda Access Point and the Lambda function. Because the Lambda runtimes for Python 3.8 and later do not include the requests module, I update the function code to use urlopen from the Python Standard Library:

import boto3
from urllib.request import urlopen

s3 = boto3.client('s3')

def lambda_handler(event, context):
  print(event)

  object_get_context = event['getObjectContext']
  request_route = object_get_context['outputRoute']
  request_token = object_get_context['outputToken']
  s3_url = object_get_context['inputS3Url']

  # Get object from S3
  response = urlopen(s3_url)
  original_object = response.read().decode('utf-8')

  # Transform object
  transformed_object = original_object.upper()

  # Write object back to S3 Object Lambda
  s3.write_get_object_response(
    Body=transformed_object,
    RequestRoute=request_route,
    RequestToken=request_token)

  return

To test that this is working, I open the same file from the bucket and through the S3 Object Lambda Access Point. In the S3 console, I select the bucket and a sample file (called s3.txt) that I uploaded earlier and choose Open.

Console screenshot.

A new browser tab is opened (you might need to disable the pop-up blocker in your browser), and its content is the original file with mixed-case text:

Amazon Simple Storage Service (Amazon S3) is an object storage service that offers...

I choose Object Lambda Access Points from the navigation pane and select the AWS Region I used before from the dropdown. Then, I search for the S3 Object Lambda Access Point that I just created. I select the same file as before and choose Open.

Console screenshot.

In the new tab, the text has been processed by the Lambda function and is now all in uppercase:

AMAZON SIMPLE STORAGE SERVICE (AMAZON S3) IS AN OBJECT STORAGE SERVICE THAT OFFERS...

Now that the S3 Object Lambda Access Point is correctly configured, I can create the CloudFront distribution. Before I do that, in the list of S3 Object Lambda Access Points in the S3 console, I copy the Object Lambda Access Point alias that has been automatically created:

Console screenshot.

In the CloudFront console, I choose Distributions in the navigation pane and then Create distribution. In the Origin domain, I use the S3 Object Lambda Access Point alias and the Region. The full syntax of the domain is:

ALIAS.s3.REGION.amazonaws.com

Console screenshot.

S3 Object Lambda Access Points cannot be public, and I use CloudFront origin access control (OAC) to authenticate requests to the origin. For Origin access, I select Origin access control settings and choose Create control setting. I write a name for the control setting and select Sign requests and S3 in the Origin type dropdown.

Console screenshot.

Now, my Origin access control settings use the configuration I just created.

Console screenshot.

To reduce the number of requests going through S3 Object Lambda, I enable Origin Shield and choose the closest Origin Shield Region to the Region I am using. Then, I select the CachingOptimized cache policy and create the distribution. As the distribution is being deployed, I update permissions for the resources used by the distribution.

Setting Up Permissions to Use an S3 Object Lambda Access Point as the Origin of a CloudFront Distribution
First, the S3 Object Lambda Access Point needs to give access to the CloudFront distribution. In the S3 console, I select the S3 Object Lambda Access Point and, in the Permissions tab, I update the policy with the following:

{
    "Version": "2012-10-17",
    "Statement": [
        {
            "Effect": "Allow",
            "Principal": {
                "Service": "cloudfront.amazonaws.com"
            },
            "Action": "s3-object-lambda:Get*",
            "Resource": "arn:aws:s3-object-lambda:REGION:ACCOUNT:accesspoint/NAME",
            "Condition": {
                "StringEquals": {
                    "aws:SourceArn": "arn:aws:cloudfront::ACCOUNT:distribution/DISTRIBUTION-ID"
                }
            }
        }
    ]
}

The supporting access point also needs to allow access to CloudFront when called via S3 Object Lambda. I select the access point and update the policy in the Permissions tab:

{
    "Version": "2012-10-17",
    "Id": "default",
    "Statement": [
        {
            "Sid": "s3objlambda",
            "Effect": "Allow",
            "Principal": {
                "Service": "cloudfront.amazonaws.com"
            },
            "Action": "s3:*",
            "Resource": [
                "arn:aws:s3:REGION:ACCOUNT:accesspoint/NAME",
                "arn:aws:s3:REGION:ACCOUNT:accesspoint/NAME/object/*"
            ],
            "Condition": {
                "ForAnyValue:StringEquals": {
                    "aws:CalledVia": "s3-object-lambda.amazonaws.com"
                }
            }
        }
    ]
}

The S3 bucket needs to allow access to the supporting access point. I select the bucket and update the policy in the Permissions tab:

{
    "Version": "2012-10-17",
    "Statement": [
        {
            "Effect": "Allow",
            "Principal": {
                "AWS": "*"
            },
            "Action": "*",
            "Resource": [
                "arn:aws:s3:::BUCKET",
                "arn:aws:s3:::BUCKET/*"
            ],
            "Condition": {
                "StringEquals": {
                    "s3:DataAccessPointAccount": "ACCOUNT"
                }
            }
        }
    ]
}

Finally, CloudFront needs to be able to invoke the Lambda function. In the Lambda console, I choose the Lambda function used by S3 Object Lambda, and then, in the Configuration tab, I choose Permissions. In the Resource-based policy statements section, I choose Add permissions and select AWS Account. I enter a unique Statement ID. Then, I enter cloudfront.amazonaws.com as Principal and select lambda:InvokeFunction from the Action dropdown and Save. We are working to simplify this step in the future. I’ll update this post when that’s available.

Testing the CloudFront Distribution
When the distribution has been deployed, I test that the setup is working with the same sample file I used before. In the CloudFront console, I select the distribution and copy the Distribution domain name. I can use the browser and enter https://DISTRIBUTION_DOMAIN_NAME/s3.txt in the navigation bar to send a request to CloudFront and get the file processed by S3 Object Lambda. To quickly get all the info, I use curl with the -i option to see the HTTP status and the headers in the response:

curl -i https://DISTRIBUTION_DOMAIN_NAME/s3.txt

HTTP/2 200 
content-type: text/plain
content-length: 427
x-amzn-requestid: a85fe537-3502-4592-b2a9-a09261c8c00c
date: Mon, 06 Mar 2023 10:23:02 GMT
x-cache: Miss from cloudfront
via: 1.1 a2df4ad642d78d6dac65038e06ad10d2.cloudfront.net (CloudFront)
x-amz-cf-pop: DUB56-P1
x-amz-cf-id: KIiljCzYJBUVVxmNkl3EP2PMh96OBVoTyFSMYDupMd4muLGNm2AmgA==

AMAZON SIMPLE STORAGE SERVICE (AMAZON S3) IS AN OBJECT STORAGE SERVICE THAT OFFERS...

It works! As expected, the content processed by the Lambda function is all uppercase. Because this is the first invocation for the distribution, it has not been returned from the cache (x-cache: Miss from cloudfront). The request went through S3 Object Lambda to process the file using the Lambda function I provided.

Let’s try the same request again:

curl -i https://DISTRIBUTION_DOMAIN_NAME/s3.txt

HTTP/2 200 
content-type: text/plain
content-length: 427
x-amzn-requestid: a85fe537-3502-4592-b2a9-a09261c8c00c
date: Mon, 06 Mar 2023 10:23:02 GMT
x-cache: Hit from cloudfront
via: 1.1 145b7e87a6273078e52d178985ceaa5e.cloudfront.net (CloudFront)
x-amz-cf-pop: DUB56-P1
x-amz-cf-id: HEx9Fodp184mnxLQZuW62U11Fr1bA-W1aIkWjeqpC9yHbd0Rg4eM3A==
age: 3

AMAZON SIMPLE STORAGE SERVICE (AMAZON S3) IS AN OBJECT STORAGE SERVICE THAT OFFERS...

This time the content is returned from the CloudFront cache (x-cache: Hit from cloudfront), and there was no further processing by S3 Object Lambda. By using S3 Object Lambda as the origin, the CloudFront distribution serves content that has been processed by a Lambda function and can be cached to reduce latency and optimize costs.

Resizing Images Using S3 Object Lambda and CloudFront
As I mentioned at the beginning of this post, one of the use cases that can be implemented using S3 Object Lambda and CloudFront is image transformation. Let’s create a CloudFront distribution that can dynamically resize an image by passing the desired width and height as query parameters (w and h respectively). For example:

https://DISTRIBUTION_DOMAIN_NAME/image.jpg?w=200&h=150

For this setup to work, I need to make two changes to the CloudFront distribution. First, I create a new cache policy to include query parameters in the cache key. In the CloudFront console, I choose Policies in the navigation pane. In the Cache tab, I choose Create cache policy. Then, I enter a name for the cache policy.

Console screenshot.

In the Query settings of the Cache key settings, I select the option to Include the following query parameters and add w (for the width) and h (for the height).

Console screenshot.

Then, in the Behaviors tab of the distribution, I select the default behavior and choose Edit.

There, I update the Cache key and origin requests section:

  • In the Cache policy, I use the new cache policy to include the w and h query parameters in the cache key.
  • In the Origin request policy, use the AllViewerExceptHostHeader managed policy to forward query parameters to the origin.

Console screenshot.

Now I can update the Lambda function code. To resize images, this function uses the Pillow module that needs to be packaged with the function when it is uploaded to Lambda. You can deploy the function using a tool like the AWS SAM CLI or the AWS CDK. Compared to the previous example, this function also handles and returns HTTP errors, such as when content is not found in the bucket.

import io
import boto3
from urllib.request import urlopen, HTTPError
from PIL import Image

from urllib.parse import urlparse, parse_qs

s3 = boto3.client('s3')

def lambda_handler(event, context):
    print(event)

    object_get_context = event['getObjectContext']
    request_route = object_get_context['outputRoute']
    request_token = object_get_context['outputToken']
    s3_url = object_get_context['inputS3Url']

    # Get object from S3
    try:
        original_image = Image.open(urlopen(s3_url))
    except HTTPError as err:
        s3.write_get_object_response(
            StatusCode=err.code,
            ErrorCode='HTTPError',
            ErrorMessage=err.reason,
            RequestRoute=request_route,
            RequestToken=request_token)
        return

    # Get width and height from query parameters
    user_request = event['userRequest']
    url = user_request['url']
    parsed_url = urlparse(url)
    query_parameters = parse_qs(parsed_url.query)

    try:
        width, height = int(query_parameters['w'][0]), int(query_parameters['h'][0])
    except (KeyError, ValueError):
        width, height = 0, 0

    # Transform object
    if width > 0 and height > 0:
        transformed_image = original_image.resize((width, height), Image.ANTIALIAS)
    else:
        transformed_image = original_image

    transformed_bytes = io.BytesIO()
    transformed_image.save(transformed_bytes, format='JPEG')

    # Write object back to S3 Object Lambda
    s3.write_get_object_response(
        Body=transformed_bytes.getvalue(),
        RequestRoute=request_route,
        RequestToken=request_token)

    return

I upload a picture I took of the Trevi Fountain in the source bucket. To start, I generate a small thumbnail (200 by 150 pixels).

https://DISTRIBUTION_DOMAIN_NAME/trevi-fountain.jpeg?w=200&h=150

Picture of the Trevi Fountain with size 200x150 pixels.

Now, I ask for a slightly larger version (400 by 300 pixels):

https://DISTRIBUTION_DOMAIN_NAME/trevi-fountain.jpeg?w=400&h=300

Picture of the Trevi Fountain with size 400x300 pixels.

It works as expected. The first invocation with a specific size is processed by the Lambda function. Further requests with the same width and height are served from the CloudFront cache.

Availability and Pricing
Aliases for S3 Object Lambda Access Points are available today in all commercial AWS Regions. There is no additional cost for aliases. With S3 Object Lambda, you pay for the Lambda compute and request charges required to process the data, and for the data S3 Object Lambda returns to your application. You also pay for the S3 requests that are invoked by your Lambda function. For more information, see Amazon S3 Pricing.

Aliases are now automatically generated when an S3 Object Lambda Access Point is created. For existing S3 Object Lambda Access Points, aliases are automatically assigned and ready for use.

It’s now easier to use S3 Object Lambda with existing applications, and aliases open many new possibilities. For example, you can use aliases with CloudFront to create a website that converts content in Markdown to HTML, resizes and watermarks images, or masks personally identifiable information (PII) from text, images, and documents.

Customize content for your end users using S3 Object Lambda with CloudFront.

Danilo

Meet the Newest AWS Heroes – March 2023

Post Syndicated from Taylor Jacobsen original https://aws.amazon.com/blogs/aws/meet-the-newest-aws-heroes-march-2023/

The AWS Heroes are passionate AWS experts who are dedicated to sharing their in-depth knowledge within the community. They inspire, uplift, and motivate the global AWS community, and today, we’re excited to announce and recognize the newest Heroes in 2023!

Aidan Steele – Melbourne, Australia

Serverless Hero Aidan Steele is a Senior Engineer at Nightvision. He is an avid AWS user, and has been using the first platform and EC2 since 2008. Fifteen years later, EC2 still has a special place in his heart, but his interests are in containers and serverless functions, and blurring the distinction between them wherever possible. He enjoys finding novel uses for AWS services, especially when they have a security or network focus. This is best demonstrated through his open source contributions on GitHub, where he shares interesting use cases via hands-on projects.

Ananda Dwi Rahmawati – Yogyakarta, Indonesia

Container Hero Ananda Dwi Rahmawati is a Sr. Cloud Infrastructure Engineer, specializing in system integration between cloud infrastructure, CI/CD workflows, and application modernization. She implements solutions using powerful services provided by AWS, such as Amazon Elastic Kubernetes Service (EKS), combined with open source tools to achieve the goal of creating reliable, highly available, and scalable systems. She is a regular technical speaker who delivers presentations using real-world case studies at several local community meetups and conferences, such as Kubernetes and OpenInfra Days Indonesia, AWS Community Day Indonesia, AWS Summit ASEAN, and many more.

Wendy Wong – Sydney, Australia

Data Hero Wendy Wong is a Business Performance Analyst at Service NSW, building data pipelines with AWS Analytics and agile projects in AI. As a teacher at heart, she enjoys sharing her passion as a Data Analytics Lead Instructor for General Assembly Sydney, writing technical blogs on dev.to. She is both an active speaker for AWS analytics and an advocate of diversity and inclusion, presenting at a number of events: AWS User Group Malaysia, Women Who Code, AWS Summit Australia 2022, AWS BuildHers, AWS Innovate Modern Applications, and many more.

Learn More

If you’d like to learn more about the new Heroes or connect with a Hero near you, please visit the AWS Heroes website or browse the AWS Heroes Content Library.

Taylor

AWS Application Composer Now Generally Available – Visually Build Serverless Applications Quickly

Post Syndicated from Channy Yun original https://aws.amazon.com/blogs/aws/aws-application-composer-now-generally-available-visually-build-serverless-applications-quickly/

At AWS re:Invent 2022, we previewed AWS Application Composer, a visual builder for you to compose and configure serverless applications from AWS services backed by deployment-ready infrastructure as code (IaC).

In the keynote, Dr. Werner Vogels, CTO of Amazon.com said:

Developers that never used serverless before. How do they know where to start? Which services do they need? How do they work together? We really wanted to make this easier. AWS Application Composer simplifies and accelerates the architecting, configuring, and building of serverless applications.

During the preview, we had lots of interest and great feedback from customers. Today, I am happy to announce the general availability of AWS Application Composer with new improvements based on customer feedback. I want to quickly review its features and introduce some improvements.

Introduction to AWS Application Composer
To get started with AWS Application Composer, choose Open demo in the AWS Management Console. This demo shows a simple cart application with Amazon API Gateway, AWS Lambda, and Amazon DynamoDB resources.

You can easily browse and search for AWS services in the left Resources panel and drag and drop them onto the canvas to expand your architecture.

In the middle Canvas panel, you can connect resources together by clicking and dragging from one resource port to another. Permissions are automatically composed for these resources to interact with each other using policy template, environment variables, and event subscriptions. Grouping resources is very useful to select one visual organization. For above example, API Compute group is compsite of Lambda functions. When you double-click on a specific resource, you can name and configure your properties in the right Resource properties panel.

As well as featured resources available in the visual resource palette, you can use hidden and read-only resources will populate on the canvas when you load an existing template that includes them.

In this example, the MyHttpApi resource is a hidden resource. It is not available from the resource palette but does appear on the canvas in color. The resource named MyHttpApiRole (in this case, an AWS::IAM::Role resource) is read-only. It grayed out on the canvas greyed out. To learn more about all supported resources, see AWS Application Composer featured resources in the AWS documentation.

When you select the Template menu, you can view, edit or manually download your IaC, such as AWS Serverless Application Model (AWS SAM). Your changes are automatically synced with your canvas.

When you start Connected mode, you can use Application Composer with local tools such as an integrated development environment (IDE). Any changes activate the automatic synchronization of your project template and files between Application Composer and your local project directory.

It is useful to incorporate into your existing team processes, such as local testing with AWS SAM Command Line Interface (CLI), peer review through version control, or deployment through AWS CloudFormation and continuous integration and delivery (CI/CD) pipelines.

This mode is supported on Chrome and Edge browsers and requires you to grant temporary local file system access to your browser.

AWS Application Composer can be used in real-world scenarios such as:

  • Building a prototype of serverless applications
  • Reviewing and collaboratively evolving existing serverless projects
  • Generating diagrams for documentation or Wikis
  • Onboarding new team members to a project
  • Reducing the first steps to deploy something in an AWS account

To learn more real-world examples, see Visualize and create your serverless workloads with AWS Application Composer in the AWS Compute Blog, How I Used AWS Application Composer to Make Analyzing My Meetup Data Easy in BuildOn.AWS, or watch a breakout session video (SVS211) from AWS re:Invent 2022.

Improvements Since Preview Launch
Here is a new feature to improve how you work with Amazon Simple Queue Service (Amazon SQS) queues.

You can now directly connect Amazon API Gateway resources to Amazon SQS without routing requests through AWS Lambda function. You can remove the complexity of the Lambda function’s execution and increase the reliability while reducing lines of code.

For example, you can drag API Gateway and Amazon SQS onto the canvas and connect the two resources. When the user drags the connector from API route to SQS, Send message appears. You can connect the API route to the SQS queue via their choice of integration target.

The new Change Inspector provides a visual diff of template changes made when you connect two resources on the canvas. This information is available as a notification when you make the connection, which helps you understand how Composer manages integration configuration in your IaC template as you build.

Here are some more improvements to your experience in the user interface!

First, we reduced the size of resource cards. The larger cards made it difficult for the users to read and view their template on the canvas. Now, you can arrange more resource cards easily and save space on the canvas.

Also, we added zoom in and out and zoom to fit buttons so that users can quickly view the entire screen or zoom to the desired level. When you load a large template onto the canvas, you can easily see all the resource cards in any size.

Now Available
AWS Application Composer is now generally available in the US East (Ohio), US East (N. Virginia), US West (Oregon), Asia Pacific (Singapore), Asia Pacific (Sydney), Asia Pacific (Tokyo), Europe (Frankfurt), Europe (Ireland), and Europe (Stockholm) Regions, adding three more Regions to the six Regions available during preview. There is no additional cost, and you can start using it today.

To learn more, see the AWS Application Composer Developer Guide and send feedback to AWS re:Post for AWS Application Composer or through your usual AWS support contacts.

Channy

Subscribe to AWS Daily Feature Updates via Amazon SNS

Post Syndicated from Jeff Barr original https://aws.amazon.com/blogs/aws/subscribe-to-aws-daily-feature-updates-via-amazon-sns/

Way back in 2015 I showed you how to Subscribe to AWS Public IP Address Changes via Amazon SNS. Today I am happy to tell you that you can now receive timely, detailed information about releases and updates to AWS via the same, simple mechanism.

Daily Feature Updates
Simply subscribe to topic arn:aws:sns:us-east-1:692768080016:aws-new-feature-updates using the email protocol and confirm the subscription in the usual way:

You will receive daily emails that start off like this, with an introduction and a summary of the update:

After the introduction, the email contains a JSON representation of the daily feature updates:

As noted in the message, the JSON content is also available online at URLs that look like https://aws-new-features.s3.us-east-1.amazonaws.com/update/2023-02-27.json . You can also edit the date in the URL to access historical data going back up to six months.

The email message also includes detailed information about changes and additions to managed policies that will be of particular interest to AWS customers who currently manually track and then verify the impact that these changes may have on their security profile. Here’s a sample list of changes (additional permissions) to existing managed policies:

And here’s a new managed policy:

Even More Information
The header of the email contains a link to a treasure trove of additional information. Here are some examples:

AWS Regions and AWS Services – A pair of tables. The first one includes a row for each AWS Region and a column for each service, and the second one contains the transposed version:

AWS Regions and EC2 Instance Types – Again, a pair of tables. The first one includes a row for each AWS Region and a column for each EC2 instance type, and the second one contains the transposed version:

The EC2 Instance Types Configuration link leads to detailed information about each instance type:

Each page also includes a link to the same information in JSON form. For example (EC2 Instance Types Configuration), starts like this:

{
    "a1.2xlarge": {
        "af-south-1": "-",
        "ap-east-1": "-",
        "ap-northeast-1": "a1.2xlarge",
        "ap-northeast-2": "-",
        "ap-northeast-3": "-",
        "ap-south-1": "a1.2xlarge",
        "ap-south-2": "-",
        "ap-southeast-1": "a1.2xlarge",
        "ap-southeast-2": "a1.2xlarge",
        "ap-southeast-3": "-",
        "ap-southeast-4": "-",
        "ca-central-1": "-",
        "eu-central-1": "a1.2xlarge",
        "eu-central-2": "-",
        "eu-north-1": "-",
        "eu-south-1": "-",
        "eu-south-2": "-",
        "eu-west-1": "a1.2xlarge",
        "eu-west-2": "-",
        "eu-west-3": "-",
        "me-central-1": "-",
        "me-south-1": "-",
        "sa-east-1": "-",
        "us-east-1": "a1.2xlarge",
        "us-east-2": "a1.2xlarge",
        "us-gov-east-1": "-",
        "us-gov-west-1": "-",
        "us-west-1": "-",
        "us-west-2": "a1.2xlarge"
    },

Other information includes:

  • VPC Endpoints
  • AWS Services Integrated with Service Quotas
  • Amazon SageMaker Instance Types
  • RDS DB Engine Versions
  • Amazon Nimble Instance Types
  • Amazon MSK Apache Kafka Versions

Information Sources
The information is pulled from multiple public sources, cross-checked, and then issued. Here are some of the things that we look for:

Things to Know
Here are a couple of things that you should keep in mind about the AWS Daily Feature Updates:

Content – The content provided in the Daily Feature Updates and in the treasure trove of additional information will continue to grow as new features are added to AWS.

Region Coverage – The Daily Feature Updates cover all AWS Regions in the public partition. Where possible, it also provides information about GovCloud regions; this currently includes EC2 Instance Types, SageMaker Instance Types, and Amazon Nimble Instance Types.

Region Mappings – The internal data that drives all of the information related to AWS Regions is updated once a day if there are applicable new features, and also when new AWS Regions are enabled.

Updates – On days when there are no updates, there will not be an email notification.

Usage – Similar to the updates on the What’s New page and the associated RSS feed, the updates are provided for informational purposes, and you still need to do your own evaluation and testing before deploying to production.

???

Jeff;

In the Works – AWS Region in Malaysia

Post Syndicated from Jeff Barr original https://aws.amazon.com/blogs/aws/in-the-works-aws-region-in-malaysia/

We launched an AWS Region in Australia earlier this year, four more (Switzerland, Spain, the United Arab Emirates, and India) in 2022, and are working on regions in Canada, Israel, New Zealand, and Thailand. All told, we now have 99 Availability Zones spread across 31 geographic regions.

Malaysia in the Works
Today I am happy to announce that we are working on an AWS region in Malaysia. This region will give AWS customers the ability to run workloads and store data that must remain in-country.

The region will include three Availability Zones (AZs), each one physically independent of the others in the region yet far enough apart to minimize the risk that an AZ-level event will have on business continuity. The AZs will be connected to each other by high-bandwidth, low-latency network connections over dedicated, fully-redundant fiber.

AWS in Malaysia
We are planning to invest at least $6 Billion (25.5 billion Malaysian ringgit) in Malaysia by 2037.

Many organizations in Malaysia are already making use of the existing AWS Regions. This includes enterprise and public sector organizations such as Axiata Group, Baba Products, Bank Islam Malaysia, Celcom Digi, PayNet, PETRONAS, Tenaga Nasional Berhad (TNB), Asia Pacific University of Technology & Innovation, Cybersecurity Malaysia, Department of Statistics Malaysia, Ministry of Higher Education Malaysia, and Pos Malaysia, and startups like Baba’s, BeEDucation Adventures, CARSOME, and StoreHub.

Here’s a small sample of some of the exciting and innovative work that our customers are doing in Malaysia:

Johor Corporation (JCorp) is the principal development institution that drives the growth of the state of Johor’s economy through its operations in the agribusiness, wellness, food and restaurants, and real estate and infrastructure sectors. To power JCorp’s digital transformation and achieve the JCorp 3.0 reinvention plan goals, the company is leveraging the AWS cloud to manage its data and applications, serving as a single source of truth for its business and operational knowledge, and paving the way for the company to tap on artificial intelligence, machine learning and blockchain technologies in the future.

Radio Televisyen Malaysia (RTM), established in 1946, is the national public broadcaster of Malaysia, bringing news, information, and entertainment programs through its six free-to-air channels and 34 radio stations to millions of Malaysians daily. Bringing cutting-edge AWS technologies closer to RTM in Malaysia will accelerate the time it takes to develop new media services, while delivering a better viewer experience with lower latency.

Bank Islam, Malaysia’s first listed Islamic banking institution, provides end-to-end financial solutions that meet the diverse needs of their customers. The bank taps AWS’ expertise to power its digital transformation and the development of Be U digital bank through its Centre of Digital Experience, a stand-alone division that creates cutting-edge financial services on AWS to enhance customer experiences.

Malaysian Administrative Modernization Management Planning Unit (MAMPU) encourages public sector agencies to adopt cloud in all ICT projects in order to accelerate emerging technologies application and increase the efficiency of public service. MAMPU believes the establishment of the AWS Region in Malaysia will further accelerate digitalization of the public sector, and bolster efforts for public sector agencies to deliver advanced citizen services seamlessly.

Malaysia is also home to both Independent Software Vendors (ISVs) and Systems Integrators that are members of the AWS Partner Network (APN). The ISV partners build innovative solutions on AWS and the SIs provide business, technical, marketing, and go-to-market support to customers. AWS Partners based in Malaysia include Axrail, eCloudvalley, Exabytes, G-AsiaPacific, GHL, Maxis, Radmik Solutions Sdn Bhd, Silverlake, Tapway, Fourtitude, and Wavelet.

New Explainer Video
To learn more about our global infrastructure, be sure to watch our new AWS Global Infrastructure Explainer video:

Stay Tuned
As usual, subscribe to this blog so that you will be among the first to know when the new region is open!

Jeff;

New – Amazon Lightsail for Research with All-in-One Research Environments

Post Syndicated from Channy Yun original https://aws.amazon.com/blogs/aws/new-amazon-lightsail-for-research-with-all-in-one-research-environments/

Today we are announcing the general availability of Amazon Lightsail for Research, a new offering that makes it easy for researchers and students to create and manage a high-performance CPU or a GPU research computer in just a few clicks on the cloud. You can use your preferred integrated development environments (IDEs) like preinstalled Jupyter, RStudio, Scilab, VSCodium, or native Ubuntu operating system on your research computer.

You no longer need to use your own research laptop or shared school computers for analyzing larger datasets or running complex simulations. You can create your own research environments and directly access the application running on the research computer remotely via a web browser. Also, you can easily upload data to and download from your research computer via a simple web interface.

You pay only for the duration the computers are in use and can delete them at any time. You can also use budgeting controls that can automatically stop your computer when it’s not in use. Lightsail for Research also includes all-inclusive prices of compute, storage, and data transfer, so you know exactly how much you will pay for the duration you use the research computer.

Get Started with Amazon Lightsail for Research
To get started, navigate to the Lightsail for Research console, and choose Virtual computers in the left menu. You can see my research computers naming “channy-jupyter” or “channy-rstudio” already created.

Choose Create virtual computer to create a new research computer, and select which software you’d like preinstalled on your computer and what type of research computer you’d like to create.

In the first step, choose the application you want installed on your computer and the AWS Region to be located in. We support Jupyter, RStudio, Scilab, and VSCodium. You can install additional packages and extensions through the interface of these IDE applications.

Next, choose the desired virtual hardware type, including a fixed amount of compute (vCPUs or GPUs), memory (RAM), SSD-based storage volume (disk) space, and a monthly data transfer allowance. Bundles are charged on an hourly and on-demand basis.

Standard types are compute-optimized and ideal for compute-bound applications that benefit from high-performance processors.

Name vCPUs Memory Storage Monthly data
transfer allowance*
Standard XL 4 8 GB 50 GB 0.5TB
Standard 2XL 8 16 GB 50 GB 0.5TB
Standard 4XL 16 32 GB 50 GB 0.5TB

GPU types provide a high-performance platform for general-purpose GPU computing. You can use these bundles to accelerate scientific, engineering, and rendering applications and workloads.

Name GPU vCPUs Memory Storage Monthly data
transfer allowance*
GPU XL 1 4 16 GB 50 GB 1 TB
GPU 2XL 1 8 32 GB 50 GB 1 TB
GPU 4XL 1 16 64 GB 50 GB 1 TB

* AWS created the Global Data Egress Waiver (GDEW) program to help eligible researchers and academic institutions use AWS services by waiving data egress fees. To learn more, see the blog post.

After making your selections, name your computer and choose Create virtual computer to create your research computer. Once your computer is created and running, choose the Launch application button to open a new window that will display the preinstalled application you selected.

Lightsail for Research Features
As with existing Lightsail instances, you can create additional block-level storage volumes (disks) that you can attach to a running Lightsail for Research virtual computer. You can use a disk as a primary storage device for data that requires frequent and granular updates. To create your own storage, choose Storage and Create disk.

You can also create Snapshots, a point-in-time copy of your data. You can create a snapshot of your Lightsail for Research virtual computers and use it as baselines to create new computers or for data backup. A snapshot contains all of the data that is needed to restore your computer from the moment when the snapshot was taken.

When you restore a computer by creating it from a snapshot, you can easily create a new one or upgrade your computer to a larger size using a snapshot backup. Create snapshots frequently to protect your data from corrupt applications or user errors.

You can use Cost control rules that you define to help manage the usage and cost of your Lightsail for Research virtual computers. You can create rules that stop running computers when average CPU utilization over a selected time period falls below a prescribed level.

For example, you can configure a rule that automatically stops a specific computer when its CPU utilization is equal to or less than 1 percent for a 30-minute period. Lightsail for Research will then automatically stop the computer so that you don’t incur charges for running computers.

In the Usage menu, you can view the cost estimate and usage hours for your resources during a specified time period.

Now Available
Amazon Lightsail for Research is now available in the US East (Ohio), US West (Oregon), Asia Pacific (Mumbai), Asia Pacific (Seoul), Asia Pacific (Singapore), Asia Pacific (Sydney), Asia Pacific (Tokyo), Canada (Central), Europe (Frankfurt), Europe (Ireland), Europe (London), Europe (Paris), Europe (Stockholm), and Europe (Sweden) Regions.

Now you can start using it today. To learn more, see the Amazon Lightsail for Research User Guide, and please send feedback to AWS re:Post for Amazon Lightsail or through your usual AWS support contacts.

Channy