Now, you can add multiple MFA devices to AWS account root users and AWS Identity and Access Management (IAM) users in your AWS accounts. This helps you to raise the security bar in your accounts and limit access management to highly privileged principals, such as root users. Previously, you could only have one MFA device associated with root users or IAM users, but now you can associate up to eight MFA devices of the currently supported types with root users and IAM users.
In this blog post, we review the current MFA features for IAM, share use cases for multiple MFA devices, and show you how to manage and sign in with the additional MFA devices for better resiliency and flexibility.
Overview of MFA for IAM
First, let’s recap some of the benefits and available MFA configurations for IAM.
The use of MFA is an important security best practice on AWS. With MFA, you have an additional layer of protection to help prevent unauthorized individuals from gaining access to your systems and data. MFA can help protect your AWS environments if a password associated with your root user or IAM user became compromised.
To help meet different customer needs, AWS supports three types of MFA devices for IAM, including FIDO security keys, virtual authenticator applications, and time-based one-time password (TOTP) hardware tokens. You should select the device type that aligns with your security and operational requirements. You can associate different types of MFA devices with an IAM principal.
Use cases for multiple MFA devices
There are several use cases in which associating multiple MFA devices with an IAM principal is beneficial to the security and operational efficiency of your organization, such as the following:
In the event of a lost, stolen, or inaccessible MFA device, you can use one of the remaining MFA devices to access the account without performing the AWS account recovery procedure. If an MFA device is lost or stolen, it’s best practice to disassociate the lost or stolen device from the root users or IAM users that it’s associated with.
Geographically dispersed teams, or teams working remotely, can use hardware-based MFA to access AWS, without shipping a single hardware device or coordinating a physical exchange of a single hardware device between team members.
If the holder of an MFA device isn’t available, you can maintain access to your root users and IAM users by using a different MFA device associated with an IAM principal.
You can store additional MFA devices in a secure physical location, such as a vault or safe, while retaining physical access to another MFA device for redundancy.
How to manage multiple MFA devices in IAM
You can register up to eight MFA devices, in any combination of the currently supported MFA types, with your root users and IAM users.
For Multi-factor authentication (MFA), choose Assign MFA device.
Select the type of MFA device that you want to use and then choose Next.
With multiple MFA devices, you only need one MFA device to sign in to the console or to create a session through the AWS Command Line Interface (AWS CLI) as that principal.
You don’t need to make permissions changes in order for your organization to start taking advantage of multiple MFA devices. The root users and IAM users in your accounts that manage MFA devices today can use their existing IAM permissions to enable additional MFA devices.
Changes to Cloudtrail log entries
In support of this new feature, the identifier of the MFA device used will now be added to the console sign-in events of the root user and IAM user that use MFA. With these changes to AWS CloudTrail log entries, you can now view both the user and the MFA device used to authenticate to AWS. This provides better traceability and audibility for your accounts.
You can find this information in the MFAIdentifier field in CloudTrail, within additionalEventData. You don’t need to take action for this information to be logged. The following is a sample log from CloudTrail that includes the MFAIdentifier.
For Additional verification required, select the type of MFA device that you want to use to continue authenticating, and then choose Next:
Figure 1: MFA device selection when authenticating to the console as an IAM user or root user with different types of MFA devices available
You will then be prompted to authenticate with the type of device that you selected.
Figure 2: Prompt to authenticate with a FIDO security key
Conclusion
In this blog post, you learned about the new multiple MFA devices feature in IAM, and how to set up and manage multiple MFA devices in IAM. Associating multiple MFA devices with your root users and IAM users can make it simpler for you to manage access to them. This feature is available now for AWS customers, except for customers operating in AWS GovCloud (US) Regions or in the AWS China Regions. For more information about how to configure multiple MFA devices on your root users and IAM users, see the documentation on MFA in IAM. There is no extra charge to use MFA devices in IAM.
As we head into 2023, it’s time to think about lessons from this year and incorporate them into planning for the next year and beyond. At AWS, we continually learn from our customers, who influence the best practices that we share and the security services that we offer.
We heard that you’re looking for more prescriptive guidance, patterns, and trends that AWS Security is seeing in the industry, so I’m happy to share an ebook that I recently authored called Security Predictions in 2023 and Beyond. In this ebook, you’ll learn about what we think is next for the security industry and some high-level pointers on how you can stay ahead.
The last few years has brought rapid acceleration of digital transformation in a short time and forced organizations to manage disruptions to their business, such as the impact of remote work. As security and risk management leaders handle the recovery and renewal phases from the past two years, they must consider forward-looking strategic planning assumptions when allocating budget, selecting services, and prioritizing employee effort. We are now at an interesting point in time where it will take the right mix of technology and humans to shape the future of cybersecurity.
I encourage you to read through the ebook and consider how these predictions could influence strategic planning for your security program. Drop us your feedback in the comments or reach out to your account team with questions. You can also follow @AWSSecurityInfo for the latest from AWS Security, and you can find me at @mosescj58.
If you have feedback about this post, submit comments in the Comments section below.
Want more AWS Security news? Follow us on Twitter.
Automated scripts, known as bots, can generate significant volumes of traffic to your mobile applications, websites, and APIs. Targeted bots take this a step further by targeting website content, such as product availability or pricing.
Traffic from targeted bots can result in a poor user experience by competing against legitimate user traffic for website access to high-demand inventory, increasing business risk through chargebacks from fraudulent transactions, and increasing infrastructure costs.
In 2021, AWS released AWS WAF Bot Control for Common Bots to help you detect and control common bots. In October 2022, AWS released a new feature—AWS Bot Control for Targeted Bots—that can help you detect and protect against bots that use advanced techniques to actively avoid detection.
In this post, I provide an overview of Bot Control for Targeted Bots and show you how to enable Bot Control to detect and block both common and targeted bots.
Overview of Bot Control for Targeted Bots
Bot Control for Targeted Bots provides sophisticated bot detection and mitigation by creating an intelligent baseline of traffic patterns. Bot Control for Targeted Bots uses browser fingerprinting techniques and client-side JavaScript interrogation methods to help protect your application from advanced bots that mimic human traffic patterns and actively try to evade detection.
Bot Control detects anomalies in usage patterns and provides new flexible mitigation options to isolate bad bots. These options include dynamic rate-limiting, challenge actions, and the ability to block based on labels and confidence scores.
With Bot Control for Targeted Bots, you can use bot protection rules to allow verified common bot traffic and, at the same time, to challenge unwanted advanced bot traffic. You can achieve both tasks from the same configuration page without making application or architectural changes. You can also configure fine-grained rule sets. For example, you can configure blocking actions for high-risk bots while allowing for exceptions for known IP ranges.
This release also introduces token domains, which is the ability to use the same AWS WAF web ACL across multiple domain names and Amazon CloudFront distributions to simplify client-side configuration. For example, you can use token domains to accept tokens that are generated by www.example.com for api.example.com and vice versa. In addition, you can now specify a resource path directly in the managed rule configuration, enabling you to only require a token for API calls, but not for cached, content-like images.
Bot Control for Targeted Bots sends metrics to Amazon CloudWatch to identify application access trends. The metrics include the percentage of human traffic compared to bot traffic and the count of requests for sensitive web pages such as login and checkout pages. Each rule in Bot Control produces a unique label so that you can review CloudWatch metrics and filter logs to understand traffic patterns. By using these mechanisms, you can identify, isolate, and remediate operational issues.
Walkthrough
In this walkthrough, I will show you how to set up Bot Control for Targeted Bots to help protect a CloudFront distribution.
You will set up an AWS WAF web ACL with an AWS Managed Rule for Bot Control for Targeted Bots. The rule detects bots and then decides the appropriate action:
Dynamically rate limit verified bots – Based on traffic history, Bot Control creates an intelligent baseline and then applies rate limits to abnormally high volumes.
Enable the challenge action – You have a new option, called challenge, along with the already supported options of count, allow, block, and CAPTCHA. The challenge option initiates a process of challenge interstitial, which means that Bot Control provides a challenge to the browser and creates a domain token when the challenge is resolved.
Set up Bot Control for Targeted Bots
In this section, I will show you how to set up Bot Control for Targeted Bots by creating a new web ACL or editing an existing one.
To create a new web ACL, choose Create a new web ACL.
To edit an existing web ACL, choose the name of the ACL.
On the Rules tab, for the Add rules drop-down, select Add managed rule groups.
Add a Bot Control rule set to the web ACL. Choose Edit to edit the rule.
For Bot Control inspection level, select the inspection level for Bot Control. For this walkthrough, we chose Targeted to enable Bot Control for Targeted Bots.
Figure 1: Bot Control – Select inspection level
Review and select the actions to be taken on each category of bots detected, and then choose Save rule. In our example, we set allow, challenge, and count rules for the categories, as shown in Figure 2.
Figure 2: Bot Control – Select actions for each category
You can select different actions for each category based on your application security needs:
Allow: Allows the request to be sent to a protected resource.
Block: Blocks the request, returning an HTTP 403 (Forbidden) response.
Count: Allows the request to be sent to the protected resource while counting detections. The count shows you bot activity that is occurring without blocking or challenging. When you turn on rules for the first time, this information can help you see what the detections are, before you change the actions.
CAPTCHA and Challenge: use CAPTCHA puzzles and silent challenges with tokens to track successful client responses.
In this example you will configure a scope-down statement to apply Bot Control for a given URI path only.
On the same page in the step above, you can add a scope-down statement to ensure you use and incur Targeted Bots charges for the requests where you need protections. There are more examples of how to use scope-down statements in our documentation.
Select “Enable scope-down statement” and configure the rule to inspect the URI path as per figure 3.
Figure 3: Bot Control – Add the scope-down statement
To add domain names to be protected, scroll to the bottom of the web ACL and choose Edit. In the Token domain list – optional section, enter the domain name or names to which the token verification applies. Tokens that are generated are valid for these domains.
Create the SDK link for the AWS WAF integration
In this section, I’ll show you how to find the AWS WAF SDK and add it to your application pages.
The token SDK manages the token authorization and includes the tokens in the requests that you send to your protected resources. By adding the SDK link to application pages, you can help ensure that the remote procedure calls by your client contain a valid token.
To add the SDK to your application pages
In the AWS WAF console, in the left navigation pane, choose Application integration SDKs.
Under JavaScript SDK, copy the provided code snippet. This code snippet allows for creation of the cryptographic token in the background when the application loads for the first time, providing a better customer experience.
Add the code snippet to your pages. For example, paste the provided script code within the <head> section of the HTML.
When this integration is in place on your application’s pages, you can add AWS WAF rules in your web ACL to block requests that don’t contain a valid token. Replace the <Web ACL integration URL> with the provided integration URL from the AWS WAF console or copy the script tag from the console:
Figure 4 shows the SDK link for application pages.
Figure 4: Bot Control – Add SDK link to application pages
Review metrics
Now that you’ve set up the web ACL and application, you can use the bot visualization dashboard to review bot traffic patterns. Bot rules emit metrics corresponding to their labels, helping you identify which rule within the AWS Managed Rule for Bot Control for Targeted Bots initiated an action. You can also use these labels and rule actions to filter AWS WAF logs so that you can further examine a request.
To view AWS WAF metrics for the distribution
In the AWS WAF console, in the left navigation pane, select Web ACLs.
Select the web ACL that Bot Control is enabled on and then choose the Bot Control tab to view the metrics.
Figure 5: Bot Control – Review web ACL metrics
Best practices
In this section, I describe best practices for your Bot Control setup.
Set priority ordering of AWS WAF rules to help lower costs
You can set the priority of rule groups in a web ACL such that the order of the rule matches requests more efficiently. AWS WAF will take the action associated to the first rule it matches. If the incoming traffic matches the more wider criteria (such as IPset rules at priority 1), the associated action is taken. That request is never analyzed by the Bot Control rule and hence do not incur the bot control request analysis fees. For example, the following list shows rules ranked in order from highest priority (1) to lowest priority (5):
Use allow and deny lists – provide IP addresses to allow or deny
AWS Managed Rule groups for IP reputation – block bots and other threats
General rate limit – help prevent HTTP flood across the protected resource
AWS WAF Bot Control rule group – scoped-down to exclude static content such as images
Rate limit for login pages – scoped-down for specific URLs and HTTP POST methods
Figure 6 shows the prioritized rules in AWS WAF.
Figure 6: AWS WAF – Web ACL rule order
Use scope-down statements
You can use scope-down statements to limit the requests evaluated for a rule group. For example, a scope-down statement that excludes checking requests for static assets, such as images for a given URI and HTTP method (GET), can help reduce Bot Control costs.
Block requests without tokens
If a request has a token absent or is rejected, you can block that request. For example, you might want to block requests on login or payment processing pages. To block requests with a missing or rejected token, add a rule to run after the Bot Control rule to block requests matching the labels rejected and absent:
awswaf:managed:token:rejected – The request token is present but is either corrupt or has an expired challenge timestamp.
awswaf:managed:token:absent – The request doesn’t have a token.
Use SDK integration
After you add the token domains and the provided script to your application pages, you can add a rule to block requests that don’t have a token. Use of the SDK helps AWS WAF verify the client application with silent challenges and provide AWS token acquisition and management. The SDK provides the full functionality of both AWS WAF Bot Control and AWS WAF Fraud Control, reducing the need for multiple SDKs if either or both rule groups are used in the web ACL.
Create CloudWatch alarms
You can add CloudWatch alarms to help you assess whether there is activity outside of the norm for your application. For example, you can monitor for a high number of token-absent metrics for a given time period.
Configure a billing alarm
To help you track costs, you can configure a billing alarm that sends an alert when you have exceeded the threshold for your expected costs.
Pricing and availability
Bot Control for Targeted Bots is available today in AWS Regions where AWS WAF is available, excluding AWS GovCloud (US) and China Regions. For information on pricing, see AWS WAF Pricing.
Conclusion
In this post, you learned how to use Bot Control for Targeted Bots to add visibility into bot activity on your website or applications. With Bot Control for common and targeted bots, you can detect, challenge, and block unwanted bot activity. Because Bot Control is customizable, you can tailor how you address legitimate bots while protecting against bots that use advanced techniques to actively avoid detection. For more information and to get started today, see AWS WAF Bot Control.
If you have feedback about this post, submit comments in the Comments section below. If you have questions about this post, contact AWS Support.
Want more AWS Security news? Follow us on Twitter.
In the weeks leading up to AWS re:Invent 2022, I’m interviewing some of the humans who work in AWS Security, help keep our customers safe and secure, and also happen to be speaking at re:Invent. This interview is with Param Sharma, principal software engineer for AWS Private Certificate Authority (AWS Private CA). AWS Private CA enables you to create private certificate authority (CA) hierarchies, including root and subordinate CAs, without the investment and maintenance costs of operating an on-premises CA.
How long have you been at AWS and what do you do in your current role?
I’ve been here for more than eight years—I joined AWS in July 2014, working in AWS Security. These days, I work on public key infrastructure (PKI) and cryptography, focusing on products like AWS Certificate Manager (ACM) and AWS Private CA.
How did you get started in the world of security, specifically cryptography?
I had a very short stint with crypto during my university days—I presented a paper on steganography and cryptography back in 2002 or 2003. Security has been an integral part of developing and deploying large-scale web applications, which I’ve done throughout my career. But security took center stage in 2014 when I heard from an AWS recruiter about a new service being built that would make certificates easier. I had no clue what that service was, since it was confidential and hadn’t been launched yet, but it brought cryptography back into my life. I started working on this brand-new service, AWS Certificate Manager. I designed the operational security aspect of it and worked to make sure it could be used by millions of our customers and could be available and secure at the same time. I was the second person hired on the ACM team, and since then the team has grown significantly.
What was the most surprising or interesting thing you’ve worked on in your time at AWS?
It might not be surprising, but certainly interesting to me: I was the first engineer to be hired on the AWS Private CA team and I started studying the problem of how certificate authorities would work in the cloud. I had to think about how the customer experience would look, the service architecture design, the operational side of things like availability and security of customer data. Doing a 360-degree review of the service and writing the design document for a service that was eventually deployed in a multitude of AWS Regions was one of the most interesting things I have worked on at AWS. It continues to be an interesting challenge as we add new features—which tend to be like smaller AWS services in their own right even though they are features of AWS Private CA.
How do you explain to customers how to use AWS Private CA?
I start by explaining what a private certificate is. A private certificate provides a flexible way to identify almost anything in an organization without disclosing the name publicly. With AWS Private CA, AWS takes care of the undifferentiated heavy lifting involved in operating a private CA. We provide security configuration, management, and monitoring of highly available private CAs. The service also helps organizations avoid spending money on servers, hardware security modules (HSMs), operations, personnel, infrastructure, software training, and maintenance. Maintaining PKI administrators, for example, can cost hundreds or thousands of dollars per year. AWS Private CA simplifies the process of creating and managing these private CAs and certificates that are used to identify resources and provide a basis for trusted identity in communications.
In your opinion, what is the coolest feature of AWS Private CA?
That’s going to be really hard to pick! To me, the coolest feature is root CA, which gives customers the ability to create and manage root CAs in the cloud. Root CAs are used to create subordinate CAs for issuing identity certificates. And these private CAs can be used to identify resources in a private network within an organization. You can use these private certs on application services, devices, or even for identifying users for identity certificates.
AWS Private CA has evolved since its launch in 2018. What are some of the new ways you see customers using the service?
When AWS Private CA was launched in 2018, the primary feature was to create and manage subordinate CAs, which were signed offline outside of AWS Private CA. The secondary feature was to issue certificates for identifying endpoints for TLS/SSL communication. Over the last four or five years, I’ve seen use cases become more diversified, and the service has evolved as the customers’ needs have evolved. The biggest paradigm shift that I’ve seen is that customers are customizing certificates and using them to identify IoT devices or customer-managed Kubernetes clusters. The certificates can even be used on-premises for your Amazon Elastic Compute Cloud (Amazon EC2) instances or your on-premises servers, where you can use these services to encrypt the traffic in transit or at rest in certain cases. The other more recent use case I’ve started to see is customers using AWS Private CA with AWS Identity and Access Management Roles Anywhere, which launched in July 2022. Customers are using this combination to issue certificates for identity, which is tied to the credentials themselves.
I understand you’ll be speaking at re:Invent 2022. Can you tell us about your session there? What do you hope customers take away from your session?
I am doing two sessions at re:Invent this year. The first one, Understanding the evolution of cloud-based PKI use cases, is a chalk talk about how cloud-based PKI use cases have evolved over the last 5–10 years. This talk is mainly for PKI administrators, information security engineers, developers, managers, directors, and IoT security professionals who want to learn more about how X.509 digital certificates are used in the cloud. We will dive deep into how these certs are being used for normal TLS communication, device certificates, containers, or even certificates used for identity like in IAM Roles Anywhere. The second session is a breakout session called AWS data protection: Using locks, keys, signatures, and certificates. It puts a spotlight on what AWS offers in terms of cryptographic tools and PKI platforms that help our customers navigate their data protection and digital signing needs. This session will provide a ground-floor understanding of how to get this protection by default or when needed, and how can you build your own logs, keys, and signatures for you own cloud application.
What’s the thing you’re most proud of in your career?
I’m proud to work with some of the smartest people who, at the same time, are very humble and genuinely believe in making this world a better place for everyone.
Outside of your work in tech, what is something you’re interested in that might surprise people?
I have a five-year-old and a three-year-old, so whenever I get some time to myself between those two, I love to read and take long strolls. I’m a passionate advocate that every voice is unique and has value to share. I’m a diversity and inclusion ambassador at Amazon and as part of this program, I mentor underrepresented groups and help build a community with integrity and a willingness to listen to others, which provides a space for us to be ourselves without fear of judgement. I try to do volunteer work whenever possible, being involved in community service programs organized through my children’s school activities, or even participating in local community kitchens by cooking and serving food that is distributed through a local non-profit organization.
If you had to pick an industry outside of security, what would you want to do?
I would’ve been a teacher or worked with a non-profit organization mentoring and volunteering. I think volunteering gives me a sense of peace.
If you have feedback about this post, submit comments in the Comments section below. If you have questions about this post, contact AWS Support.
Want more AWS Security news? Follow us on Twitter.
AWS Certificate Manager (ACM) is a managed service that enables you to provision, manage, and deploy public and private SSL/TLS certificates that you can use to securely encrypt network traffic. You can now use ACM to request Elliptic Curve Digital Signature Algorithm (ECDSA) certificates and associate the certificates with AWS services like Application Load Balancer (ALB) or Amazon CloudFront. As a result, you get the benefit of managed renewal, where ACM can automatically renew ECDSA certificates before they expire. Previously, you could only request certificates with an RSA 2048 key algorithm from ACM. ECDSA certificates could be imported to ACM, but imported certificates cannot use managed renewal.
You can request both ECDSA P-256 and P-384 certificates from ACM. If you do not request an ECDSA certificate, ACM will issue an RSA 2048 certificate by default.
In this blog post, we will briefly examine the differences between RSA and ECDSA certificates, discuss some important considerations when evaluating which certificate type to use, and walk through how you can request an ECDSA certificate and associate it with an application load balancer in AWS.
Cryptographic certificates overview
TLS certificates are used to secure network communications and establish the identity of websites over the internet, as well as the identity of resources on private networks. Public certificates that you request through ACM are obtained from Amazon Trust Services, which is an Amazon managed public certificate authority (CA).
Both public and private certificates can help customers identify resources on networks and secure communication between these resources. Public certificates identify resources on the public internet, whereas private certificates do the same for private networks. One key difference is that applications and browsers trust public certificates by default, but an administrator must explicitly configure applications and devices to trust private certificates.
RSA and ECDSA primer
RSA and ECDSA are two widely used public-key cryptographic algorithms—algorithms that use two different keys to encrypt and decrypt data. In the case of TLS, a public key is used to encrypt data, and a private key is used to decrypt data. Public key (or asymmetric key) algorithms are not as computationally efficient as symmetric key algorithms like AES. For this reason, public key algorithms like RSA and ECDSA are primarily used to exchange secrets between two parties initiating a TLS connection. These secrets are then used by both parties to decipher the same symmetric key that actually encrypts the data in transit.
RSA stands for Rivest, Shamir, and Adleman: the researchers who first publicly described this algorithm in 1977. The basic functionality of RSA relies on the idea that large prime numbers are very difficult to efficiently factor. ECDSA, or Elliptic Curve Digital Signature Algorithm, is based on certain unique mathematical properties of elliptic curves that make them very useful for cryptographic operations. The cryptographic utility of ECDSA comes from a concept called the discrete logarithm problem.
Considerations when choosing between RSA and ECDSA
What are the important differences between RSA and ECDSA certificates? When should you choose ECDSA certificates to encrypt network traffic? In this section, we’ll examine the security and performance considerations that help to determine whether ECDSA or RSA certificates are the best choice for your workload.
Security
In cryptography, security is measured as the computational work it takes to exhaust all possible values of a symmetric key in an ideal cipher. An ideal cipher is a theoretical algorithm that has no weaknesses, so you must try every possible key to discover which is the correct key. This is similar to the idea of “brute forcing” a password: trying every possible character combination to find the correct password.
Let’s imagine you have a 112-bit key ideal cipher, which means it would take 2112 tries to exhaust the key space—we would say this cipher has a 112-bit security strength. However, it is important to realize that security strength and key length are not always equal—meaning that an encryption key with a length of 112 bits will not always have a 112-bit security strength.
ECDSA provides higher security strength for lower computational cost. ECDSA P-256, for example, provides 128-bit security strength and is equivalent to an RSA 3072 key. Meanwhile, ECDSA P-384 provides 192-bit security strength, equivalent to the key associated with an RSA 7680 certificate. In other words, an ECDSA P-384 key would require 2192 tries to exhaust the key space.
The following table provides an in-depth comparison of the different security strengths for RSA key lengths and ECDSA curve types. Note that only RSA 2048 and ECDSA P-256 and P-384 are currently issued by ACM. However, ACM does support the import and usage of the other certificate types listed in the table. For more information, see Importing certificates into AWS Certificate Manager.
Security strength
RSA key length
ECDSA curve type
80-bit
1024
160
112-bit
2048
224
128-bit
3072
256
192-bit
7680
384
256-bit
15360
512
Performance
ECDSA provides a higher security strength (for a given key length) than RSA but does not add performance overhead. For example, ECDSA P-256 is as performant as RSA 2048 while providing security strength that is comparable to RSA 3072.
ECDSA certificates also have up to a 50% smaller certificate size when compared to RSA certificates, and are therefore more suitable to protect data-in-transit over low bandwidth or for applications with limited memory and storage, such as Internet of Things (IoT) devices.
Take a look at the following certificate examples; you can see the size difference between RSA and ECDSA certificates.
Consider a small IoT sensor device that tracks temperature in an office building. This device typically has very low storage capacity and compute power, so the smaller ECDSA certificate will be easier to process and store. In the case of an IoT device, you might not be able to store the entire RSA certificate chain on the device due to memory limitations and the larger size of RSA certificates. This can make it more difficult to validate the chain of trust for that certificate.
Using ECDSA, customers can take advantage of the smaller size of the certificates (and the certificate trust chain) and store the entire chain of trust on the IoT device itself, enabling the IoT device to more easily validate the certificate.
When should I use ECDSA certificates from ACM?
In general, you should consider using ECDSA certificates wherever possible, because they provide stronger security (for a given key length) compared to RSA, without impacting performance. You can also choose to issue ECDSA certificates from ACM to implement 128-bit or 192-bit TLS security, where previously you could request up to 112-bit security from ACM by using RSA 2048 certificates.
ECDSA certificates are strongly recommended for applications that need to securely send data over low-bandwidth connections, or when you are using IoT devices that might not have much memory or computational power to store and process the larger certificate sizes that RSA offers.
If your application is not ECDSA compatible, you will need to continue using RSA certificates. RSA 2048 remains the default certificate type issued by ACM, in order to prevent compatibility issues with legacy applications or with applications that do not support ECDSA certificate types. We will provide links to check if your application is compatible with ECDSA certificate types in the next section of this blog.
Getting started with ECDSA certificates
Modern browsers and operating systems are ECDSA compatible. That said, some custom applications might not be ECDSA compatible. You can check whether your calling application is ECDSA compatible by accessing the following links from your application:
When you access one of these links, you should see a message stating “Expected Status: good”. This indicates that the application is ECDSA compatible. See Figure 1 for an example of a successful result.
Figure 1: ECDSA application compatibility example
When you terminate your TLS traffic with ALB, you can work around compatibility concerns by binding both ECDSA and RSA certificates for a given domain. ALB will prioritize and present the ECDSA certificate when the calling application is ECDSA compatible and will use the RSA certificate if the calling application is not ECDSA compatible. We’ll walk through this configuration in the demonstration portion of this post.
How to request an ECDSA certificate from ACM
You can use the ACM console, APIs, or AWS Command Line Interface (AWS CLI) to issue public or private ECDSA P-256 and P-384 TLS certificates. When you request certificates by using the API or AWS CLI, you can use the request-certificate API action with either EC_prime256v1 or EC_secp384r1 as the key-algorithm parameter to request a P-256 or P-384 ECDSA certificate, respectively.
Certificates have a defined validity period, and ACM will attempt to renew certificates that were issued by ACM and that are in use before they expire. ACM will also attempt to automatically bind the renewed certificates with an integrated service. ACM issued private ECDSA certificates can also be exported and used on other workloads to terminate TLS traffic.
Associate an ECDSA certificate with an Application Load Balancer for TLS
To demonstrate how to request and use ECDSA certificates from ACM, let’s examine a common use case: requesting a public certificate from ACM and associating it with an ALB. This walkthrough will also include requesting an RSA 2048 certificate and associating it with the same ALB, to facilitate TLS connections for applications that do not support ECDSA. ALB will prioritize and present the ECDSA certificate when the calling application is ECDSA compatible, and will use the RSA certificate if the calling application is not ECDSA compatible.
Navigate to the ACM console and choose Request a certificate.
Choose Request a public certificate, and then choose Next.
For Fully qualified domain name, enter your domain name.
Choose DNS validation. DNS validation is recommended wherever possible, because it enables automatic renewal of ACM issued certificates with no action required by the domain owner. If you use Amazon Route 53, you can use ACM to directly update your DNS records. DNS-validated certificates will be renewed by ACM as long as the certificate is in use and the DNS record is in place.
Figure 2: Requesting a public ECDSA certificate
In the Key algorithm options section, select your preferred algorithm based on your security requirements:
ECDSA P-256 — Equivalent in security strength to RSA 3072
ECDSA P-384 — Equivalent in security strength to RSA 7680
Figure 3: Key algorithms
(Optional) Add tags to help you identify and manage your certificate. You can find more information on using tags in Tagging AWS resources in the AWS General Reference.
Choose Request to request the public certificate.
The certificate will now be in the Pending Validation state until the domain can be validated, either through DNS or email validation, depending on your selection in the previous steps. For information on how to validate ownership of the domain name or names, see Validating domain ownership in the AWS Certificate Manager User Guide.
Take note of the certificate ARN; you will need this later to identify the certificate.
To request an RSA 2048 certificate from ACM
To request a public RSA 2048 certificate, use the same steps noted in the preceding section, but select RSA 2048 in the Key algorithm options section.
Make sure that both certificates you request have the same fully qualified domain name.
For this post, we will use an Application Load Balancer. You can view more details on each type of Load Balancer, and see a feature-to-feature breakdown, on the Elastic Load Balancing features page.
For the Application Load Balancer type, choose Create.
Enter a name for your load balancer.
Select the scheme and IP address type of the application load balancer. For this post, we will choose Internet-facing for the scheme and use the IPv4 address type.
Under Default SSL/TLS certificate, verify thatFrom ACM is selected, and then in the drop-down list, select the RSA certificate you requested earlier.
Note: We are using the RSA certificate as the default so that the ALB will use this certificate if the connecting client does not support ECDSA or the Server Name Indication (SNI) protocol. This is to maximize availability and compatibility with legacy applications.
Figure 6: Secure listener settings
(Optional) Add tags to the Application Load Balancer.
Review your selections, and then choose Create load balancer.
Figure 7: Review and create load balancer
To associate the ECDSA certificate with the Application Load Balancer
In the EC2 console, select the new ALB you just created, and choose the Listeners tab.
In the SSL Certificate column, you should see the default certificate you added when you created the ALB. Choose View/edit certificates to see the full list of certificates associated with this ALB.
Figure 8: ALB listeners
Under Listener certificates for SNI, choose Add certificate.
Figure 9: Listener certificates for SNI
Under ACM and IAM certificates, select the ECDSA certificate you requested earlier.
Note: You can use the certificate ARN to identify the appropriate certificate.
Choose Include as pending below to add the ECDSA certificate to the listener.
Figure 10: Adding the ECDSA certificate to the load balancer listener
Under Listener certificates for SNI, confirm that the ECDSA certificate is listed as pending, and choose Add pending certificates.
Figure 11: Confirm addition of pending certificates
Great! We’ve used ACM to request a public ECDSA certificate and a public RSA 2048 certificate. Next, we associated both of these certificates with an Application Load Balancer to facilitate TLS communications between the load balancer and client devices.
If clients support the SNI protocol, the ALB uses a smart certificate selection algorithm. The load balancer will select the best certificate that the client can support from the certificate list. Certificate selection is based on the following criteria, in the following order:
Public key algorithm (prefer ECDSA over RSA)
Hashing algorithm (prefer SHA over MD5)
Key length (prefer the longest key)
Validity period
In the earlier example, this means if clients support SNI and ECDSA, the ECDSA certificate will be prioritized and presented to the client. If the client does not support SNI or ECDSA, the RSA certificate will be used to maximize compatibility with legacy applications.
Conclusion
In this blog post, we discussed the basic differences between RSA and ECDSA certificates, when you might choose ECDSA over RSA, and how you can use AWS Certificate Manager to request public or private ECDSA certificates. We also covered how to request a public ECDSA certificate from ACM and associate it with an Application Load Balancer. Finally, we showed you how to request an RSA 2048 certificate and associate it with the same load balancer to facilitate TLS for applications that do not support ECDSA certificates.
With the emergence of Docker in 2013, container technology has quickly moved from the experimentation phase into a viable production tool. Many customers are using containers to modernize their existing applications or as the foundations for new applications or services that they build. In this blog post, we’ll explore the process that Amazon Inspector takes to scan container images. We’ll also show how you can integrate Amazon Inspector into your containerized application build and deployment pipeline, and control pipeline steps based on the results of an Amazon Inspector container image scan.
Solution overview and walkthrough
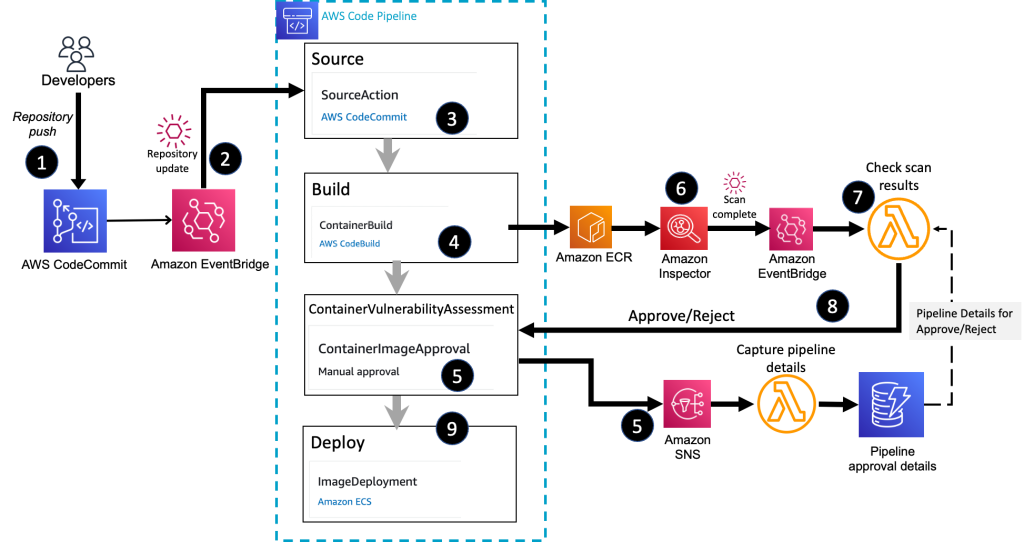
The solution outlined in this post covers a deployment pipeline modeled in AWS CodePipeline. The source for the pipeline is AWS CodeCommit, and the build of the container image is performed by AWS CodeBuild. The solution uses a collection of AWS Lambda functions and an Amazon DynamoDB table to evaluate the container image status and make an automated decision about deploying the container image. Finally, the pipeline has a deploy stage that will deploy the container image into an Amazon Elastic Container Service (Amazon ECS) cluster. In this section, I’ll outline the key components of the solution and how they work. In the following section, Deploy the solution, I’ll walk you through how to actually implement the solution.
Although this solution uses AWS continuous integration and continuous delivery (CI/CD) services such as CodePipeline and CodeBuild, you can also build similar capabilities by using third-party CI/CD solutions. In addition to CodeCommit, other third-party code repositories such as GitHub or Amazon Simple Storage Service (Amazon S3) can be substituted in as a source for the pipeline.
Solution architecture
Figure 1 shows the high-level architecture of the solution, which integrates Amazon Inspector into a container build and deploy pipeline.
Figure 1: Overall container build and deploy architecture
The high-level workflow is as follows:
You commit the image definition to a CodeCommit repository.
An Amazon EventBridge rule detects the repository commit and initiates the container pipeline.
The source stage of the pipeline pulls the image definition and build instructions from the CodeCommit repository.
The build stage of the pipeline creates the container image and stores the final image in Amazon ECR.
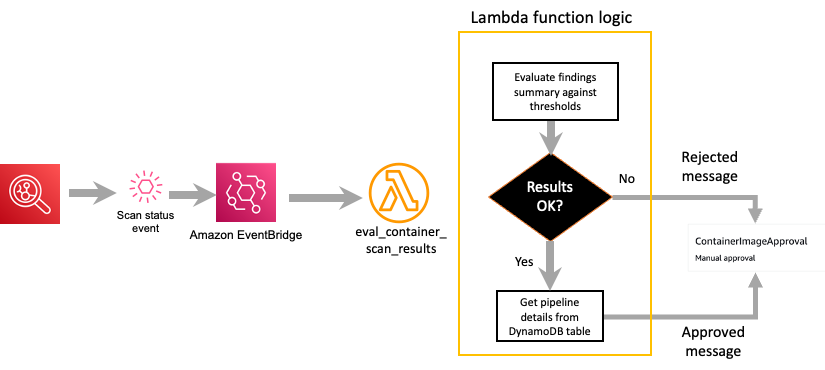
The ContainerVulnerabilityAssessment stage sends out a request for approval by using an Amazon Simple Notification Service (Amazon SNS) topic. A Lambda function associated with the topic stores the details about the container image and the active pipeline, which will be needed in order to send a response back to the pipeline stage.
Amazon Inspector scans the Amazon ECR image for vulnerabilities.
The Lambda function receives the Amazon Inspector scan summary message, through EventBridge, and makes a decision on allowing the image to be deployed. The function retrieves the pipeline approval details so that the approve or reject message is sent to the correct active pipeline stage.
The Lambda function submits an Approved or Rejected status to the deployment pipeline.
CodePipeline deploys the container image to an Amazon ECS cluster and completes the pipeline successfully if an approval is received. The pipeline status is set to Failed if the image is rejected.
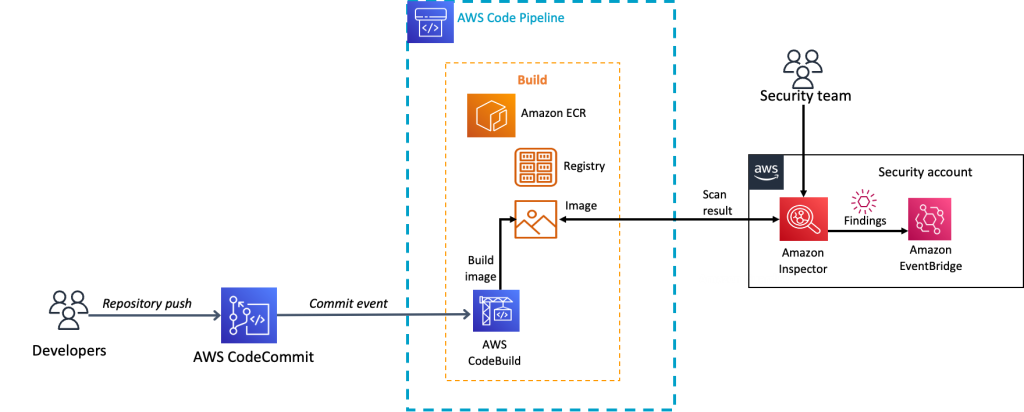
Container image build stage
Let’s now review the build stage of the pipeline that is associated with the Amazon Inspector container solution. When a new commit is made to the CodeCommit repository, an EventBridge rule, which is configured to look for updates to the CodeCommit repository, initiates the CodePipeline source action. The source action then collects files from the source repository and makes them available to the rest of the pipeline stages. The pipeline then moves to the build stage.
In the build stage, CodeBuild extracts the Dockerfile that holds the container definition and the buildspec.yaml file that contains the overall build instructions. CodeBuild creates the final container image and then pushes the container image to the designated Amazon ECR repository. As part of the build, the image digest of the container image is stored as a variable in the build stage so that it can be used by later stages in the pipeline. Additionally, the build process writes the name of the container URI, and the name of the Amazon ECS task that the container should be associated with, to a file named imagedefinitions.json. This file is stored as an artifact of the build and will be referenced during the deploy phase of the pipeline.
Now that the image is stored in an Amazon ECR repository, Amazon Inspector scanning begins to check the image for vulnerabilities.
The details of the build stage are shown in Figure 2.
Figure 2: The container build stage
Container image approval stage
After the build stage is completed, the ContainerVulnerabilityAssessment stage begins. This stage is lightweight and consists of one stage action that is focused on waiting for an Approved or Rejected message for the container image that was created in the build stage. The ContainerVulnerabilityAssessment stage is configured to send an approval request message to an SNS topic. As part of the approval request message, the container image digest, from the build stage, will be included in the comments section of the message. The image digest is needed so that approval for the correct container image can be submitted later. Figure 3 shows the comments section of the approval action where the container image digest is referenced.
Figure 3: Container image digest reference in approval action configuration
The SNS topic that the pipeline approval message is sent to is configured to invoke a Lambda function. The purpose of this Lambda function is to pull key details from the SNS message. Details retrieved from the SNS message include the pipeline name and stage, stage approval token, and the container image digest. The pipeline name, stage, and approval token are needed so that an approved or rejected response can be sent to the correct pipeline. The container image digest is the unique identifier for the container image and is needed so that it can be associated with the correct active pipeline. This information is stored in a DynamoDB table so that it can be referenced later when the step that assesses the result of an Amazon Inspector scan submits an approved or rejected decision for the container image. Figure 4 illustrates the flow from the approval stage through storing the pipeline approval data in DynamoDB.
Figure 4: Flow to capture container image approval details
This approval action will remain in a pending status until it receives an Approved or Rejected message or the timeout limit of seven days is reached. The seven-day timeout for approvals is the default for CodePipeline and cannot be changed. If no response is received in seven days, the stage and pipeline will complete with a Failed status.
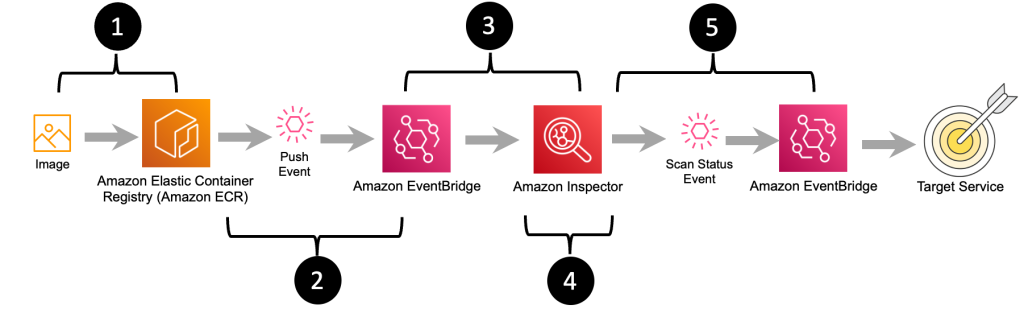
Amazon Inspector and container scanning
When the container image is pushed to Amazon ECR, Amazon Inspector scans it for vulnerabilities.
In order to show how you can use the findings from an Amazon Inspector container scan in a build and deploy pipeline, let’s first review the workflow that occurs when Amazon Inspector scans a container image located in Amazon ECR.
Figure 5: Image push, scan, and notification workflow
The workflow diagram in Figure 5 outlines the steps that happen after an image is pushed to Amazon ECR all the way to messaging that the image has been successfully scanned and what the final scan results are. The steps in this workflow are as follows:
The final container image is pushed to Amazon ECR by an individual or as part of a build.
Amazon ECR sends a message indicating that a new image has been pushed.
The message about the new image is received by Amazon Inspector.
Amazon Inspector pulls a copy of the container image from Amazon ECR and performs a vulnerability scan.
When Amazon Inspector is done scanning the image, a message summarizing the severity of vulnerabilities that were identified during the container image scan is sent to Amazon EventBridge. You can create EventBridge rules that match the vulnerability summary message to route the message onto a target for notifications or to enable further action to be taken.
Here’s a sample EventBridge pattern that matches the scan summary message from Amazon Inspector.
This entire workflow, from ingesting the initial image to sending out the status on the Amazon Inspector scan, is fully managed. You just focus on how you want to use the Amazon Inspector scan status message to govern the approval and deployment of your container image.
The following is a sample of what the Amazon Inspector vulnerability summary message looks like. Note, in bold, the container image Amazon Resource Name (ARN), image repository ARN, message detail type, image digest, and the vulnerability summary.
After Amazon Inspector sends out the scan status event, a Lambda function receives and processes that event. This function needs to consume the Amazon Inspector scan status message and make a decision about whether the image can be deployed.
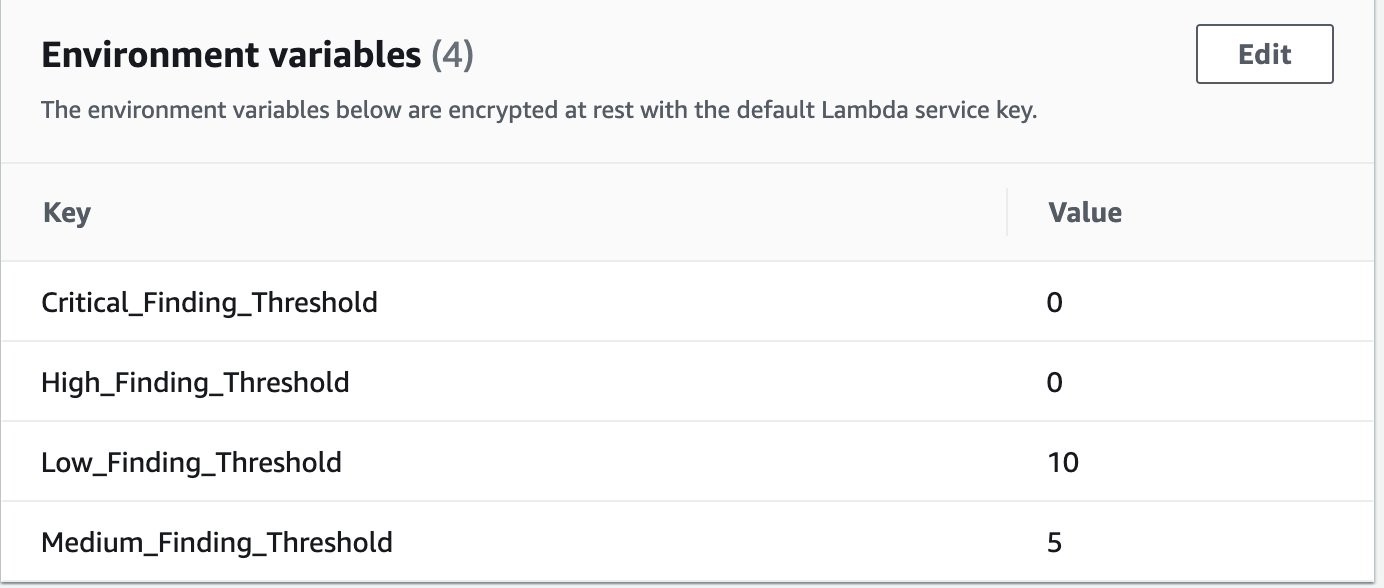
The eval_container_scan_results Lambda function serves two purposes: The first is to extract the findings from the Amazon Inspector scan message that invoked the Lambda function. The second is to evaluate the findings based on thresholds that are defined as parameters in the Lambda function definition. Based on the threshold evaluation, the container image will be flagged as either Approved or Rejected. Figure 6 shows examples of thresholds that are defined for different Amazon Inspector vulnerability severities, as part of the Lambda function.
Figure 6: Vulnerability thresholds defined in Lambda environment variables
Based on the container vulnerability image results, the Lambda function determines whether the image should be approved or rejected for deployment. The function will retrieve the details about the current pipeline that the image is associated with from the DynamoDB table that was populated by the image approval action in the pipeline. After the details about the pipeline are retrieved, an Approved or Rejected message is sent to the pipeline approval action. If the status is Approved, the pipeline continues to the deploy stage, which will deploy the container image into the defined environment for that pipeline stage. If the status is Rejected, the pipeline status is set to Rejected and the pipeline will end.
Figure 7 highlights the key steps that occur within the Lambda function that evaluates the Amazon Inspector scan status message.
Figure 7: Amazon Inspector scan results decision
Image deployment stage
If the container image is approved, the final image is deployed to an Amazon ECS cluster. The deploy stage of the pipeline is configured with Amazon ECS as the action provider. The deploy action contains the name of the Amazon ECS cluster and stage that the container image should be deployed to. The image definition file (imagedefinitions.json) that was created in the build stage is also listed in the deploy configuration. When the deploy stage runs, it will create a revision to the existing Amazon ECS task definition. This task definition contains the name of the Amazon ECR image that has been approved for deployment. The task definition is then deployed to the Amazon ECS cluster and service.
Deploy the solution
Now that you have an understanding of how the container pipeline solution works, you can deploy the solution to your own AWS account. This section will walk you through the steps to deploy the container approval pipeline, and show you how to verify that each of the key steps is working.
Step 1: Activate Amazon Inspector in your AWS account
The sample solution provided by this blog post requires that you activate Amazon Inspector in your AWS account. If this service is not activated in your account, learn more about the free trial and pricing for this service, and follow the steps in Getting started with Amazon Inspector to set up the service and start monitoring your account.
Step 2: Deploy the AWS CloudFormation template
For this next step, make sure you deploy the template within the AWS account and AWS Region where you want to test this solution.
To deploy the CloudFormation stack
Choose the following Launch Stack button to launch a CloudFormation stack in your account. Use the AWS Management Console navigation bar to choose the region you want to deploy the stack in.
Review the stack name and the parameters for the template. The parameters are pre-populated with the necessary values, and there is no need to change them.
Scroll to the bottom of the Quick create stack screen and select the checkbox next to I acknowledge that AWS CloudFormation might create IAM resources.
Choose Create stack. The deployment of this CloudFormation stack will take 3–5 minutes.
After the CloudFormation stack has deployed successfully, you can proceed to reviewing and interacting with the deployed solution.
Step 3: Review the container pipeline and supporting resources
The CloudFormation stack is designed to deploy a collection of resources that will be used for an initial container build. When the CodePipeline resource is created, it will automatically pull the assets from the CodeCommit repository and start the pipeline for the container image.
To review the pipeline and resources
In the CodePipeline console, navigate to the Region that the stack was deployed in.
Choose the pipeline named ContainerBuildDeployPipeline to show the full pipeline details.
Review the Source and Build stage, which will show a status of Succeeded.
Review the ContainerVulnerabilityAssessment stage, which will show as failed with a Rejected status in the Manual Approval step.
Figure 8 shows the full completed pipeline.
Figure 8: Rejected container pipeline
Choose the Details link in the Manual Approval stage to reveal the reasons for the rejection. An example review summary is shown in Figure 9.
Figure 9: Container pipeline approval rejection
Review findings in Amazon Inspector (Optional)
You can use the Amazon Inspector console to see the full findings detail for this container image, if needed.
From the list of repositories, choose the inspector-blog-images repository.
Choose the Image tag link to bring up a list of the individual vulnerabilities that were found within the container image. Figure 10 shows an example of the vulnerabilities list in the findings details.
Figure 10: Container image findings in Amazon Inspector
Step 4: Adjust the Amazon ECS desired count for the cluster service
Up to this point, you’ve deployed a pipeline to build and validate the container image, and you’ve seen an example of how the pipeline handles a container image that did not meet the defined vulnerability thresholds. Now you’ll deploy a new container image that will pass a vulnerability assessment and complete the pipeline.
The Amazon ECS service that the CloudFormation template deploys is initially created with the number of desired tasks set to 0. In order to allow the container pipeline to successfully deploy a container, you need to update the desired tasks value.
To adjust the task count in Amazon ECS (console)
In the Amazon ECS console, choose the link for the cluster, in this case InspectorBlogCluster.
On the Services tab, choose the link for the service named InspectorBlogService.
Choose the Update button. On the Configure service page, set Number of tasks to 1.
Choose Skip to review, and then choose Update Service.
To adjust the task count in Amazon ECS (AWS CLI)
Alternatively, you can run the following AWS CLI command to update the desired task count to 1. In order to run this command, you need the ARN of the Amazon ECS cluster, which you can retrieve from the Output tab of the CloudFormation stack that you created. You can run this command from the command line of an environment of your choosing, or by using AWS CloudShell. Make sure to replace <Cluster ARN> with your own value.
Deploying a new container image will involve pushing an updated Dockerfile to the ContainerComponentsRepo repository in CodeCommit. With CodeCommit you can interact by using standard Git commands from a command line prompt, and there are multiple approaches that you can take to connect to the AWS CodeCommit repository from the command line. For this post, in order to simplify the interactions with CodeCommit, you will be shown how to add an updated file directly through the CodeCommit console.
To add an updated Dockerfile to CodeCommit
In the CodeCommit console, choose the repository named ContainerComponentsRepo.
In the screen listing the repository files, choose the Dockerfile file link and choose Edit.
In the Edit a file form, overwrite the existing file contents with the following command: FROM public.ecr.aws/amazonlinux/amazonlinux:latest
In the Commit changes to main section, fill in the following fields.
Author name: your name
Email address: your email
Commit message: ‘Updated Dockerfile’
Figure 11 shows what the completed form should look like.
Figure 11: Complete CodeCommit entry for an updated Dockerfile
Choose Commit changes to save the new Dockerfile.
This update to the Dockerfile will immediately invoke a new instance of the container pipeline, where the updated container image will be pulled and evaluated by Amazon Inspector.
Step 6: Verify the container image approval and deployment
With a new pipeline initiated through the push of the updated Dockerfile, you can now review the overall pipeline to see that the container image was approved and deployed.
To see the full details in CodePipeline
In the CodePipeline console, choose the container-build-deploy pipeline. You should see the container pipeline in an active status. In about five minutes, you should see the ContainerVulnerabilityAssessment stage move to completed with an Approved status, and the deploy stage should show a Succeeded status.
To confirm that the final image was deployed to the Amazon ECS cluster, from the Deploy stage, choose Details. This will open a new browser tab for the Amazon ECS service.
In the Amazon ECS console, choose the Tasks tab. You should see a task with Last status showing RUNNING. This is confirmation that the image was successfully approved and deployed through the container pipeline. Figure 12 shows where the task definition and status are located.
Figure 12: Task status after deploying the container image
Choose the task definition to bring up the latest task definition revision, which was created by the deploy stage of the container pipeline.
Scroll down in the task definition screen to the Container definitions section. Note that the task is tied to the image you deployed, providing further verification that the approved container image was successfully deployed. Figure 13 shows where the container definition can be found and what you should expect to see.
Figure 13: Container associated with revised task definition
Clean up the solution
When you’re finished deploying and testing the solution, use the following steps to remove the solution stack from your account.
To delete images from the Amazon ECR repository
In the Amazon ECR console, navigate to the AWS account and Region where you deployed the solution.
Choose the link for the repository named inspector-blog-images.
Delete all of the images that are listed in the repository.
To delete objects in the CodePipeline artifact bucket
In the Amazon S3 console in your AWS account, locate the bucket whose name starts with blog-base-setup-codepipelineartifactstorebucket.
Delete the ContainerBuildDeploy folder that is in the bucket.
To delete the CloudFormation stack
In the CloudFormation console, delete the CloudFormation stack that was created to perform the steps in this post.
Conclusion
This post describes a solution that allows you to build your container images, have the images scanned for vulnerabilities by Amazon Inspector, and use the output from Amazon Inspector to determine whether the image should be allowed to be deployed into your environments.
This solution represents a pipeline with very simple build and deploy stages. Your pipeline will vary and may consist of multiple test stages and deployment stages for multiple environments. Additionally, the logic you use to determine whether a container image should be deployed may be different. The contents of this blog post are intended to help serve as a foundation that you can build on as you decide how to use Amazon Inspector for container vulnerability scanning. Feel free to use this guidance, and the example we provided, to extend the solution into your specific deployment pipeline.
If you have questions, contact AWS Support, or start a new thread on the AWS re:Post Amazon Inspector Forum. If you have feedback about this post, submit comments in the Comments section below.
Want more AWS Security news? Follow us on Twitter.
As Cybersecurity Awareness Month comes to a close, we want to share some of the work we’ve done and made available to you throughout October. Over the last four weeks, we have shared insights and resources aligned with this year’s theme—”See Yourself in Cyber”—to help advance awareness training, and inspire people to join the rapidly growing security industry. Here are a few highlights.
Roundtable with the Cybersecurity and Infrastructure Security Agency (CISA): Amazon Chief Security Officer Steve Schmidt hosted CISA director Jen Easterly in Seattle for a roundtable with leaders across higher education, state and local government, and private industry to discuss ways to develop the cybersecurity workforce through skills training, partnerships between government and industry, and creating pathways to cybersecurity careers.
How AWS, Cisco, Netflix & SAP Are Approaching Cybersecurity Awareness Month. I joined Cisco Chief Security and Trust Officer Brad Arkin, Netflix Head of Cloud Security Srinath Kuruvardi, and SAP Chief Trust Officer Elena Kvochko to describe how AWS, Cisco, Netflix, and SAP are instilling strong cybersecurity training and practices within our organizations, with the goal of inspiring other organizations to do the same.
Cybersecurity Awareness Month 2022 Briefing. Amazon Security Director Jenny Brinkley—who leads Amazon’s internal and external awareness training activities—participated in a Cybersecurity Awareness Month panel discussion hosted by the National Cybersecurity Alliance. Jenny met with executives from KnowBe4, Google, NortonLifeLock, and Dell and chatted about how the cybersecurity landscape has changed over the past few years, and how those changes have impacted the perception of security as a part of daily life.
Making Cybersecurity Relevant for Consumers: The Case for Personal Agency. In addition to the briefing, Jenny spoke to the National Cybersecurity Alliance about staying safe online. She highlighted simple steps that everyone can take to be safer online, including staying consistent on software updates for connected devices, using strong passwords, activating multi-factor authentication (MFA) on accounts when possible, and being on the lookout for phishing attempts.
National Cybersecurity Alliance and Nasdaq Cybersecurity Summit. Jenny and Amazon Head of Global Security Training Jyllian Clarke also joined the National Cybersecurity Alliance, Nasdaq, and public and private sector security leaders in New York City for a cybersecurity summit and got to ring the opening bell.
Resources
AWS offers free Cybersecurity Awareness Training to individuals and businesses around the world, and we’re providing complimentary MFA security keys to AWS account owners in the United States. More than 40 security-focused courses are available through AWS Skill Builder, ranging from foundational to advanced content. By subscribing to AWS Skill Builder, you gain access to security-related interactive challenges with AWS Jam, which guides you through solving real-world problems.
Additionally, Amazon and the National Cybersecurity Alliance launched a cybersecurity awareness campaign called Protect & Connect. The campaign includes a public service announcement featuring Prime Video actor Michael B. Jordan and actress-producer Tessa Thompson as “internet bodyguards,” as well as a Protect & Connect microsite for consumers, featuring additional videos on topics such as MFA and how to identify and avoid phishing attempts.
Humanizing security
Cybersecurity can seem like a complex subject but ultimately, it’s all about people. Most of today’s threats need people to activate them, so you need to train people to develop intuition, which is something that can’t be automated. By meeting employees where they are with an engaging approach to awareness training that moves security to the forefront of everything they do, you can promote positive behavioral change, and start building a security-first culture.
If you have feedback about this post, submit comments in the Comments section below.
Want more AWS Security news? Follow us on Twitter.
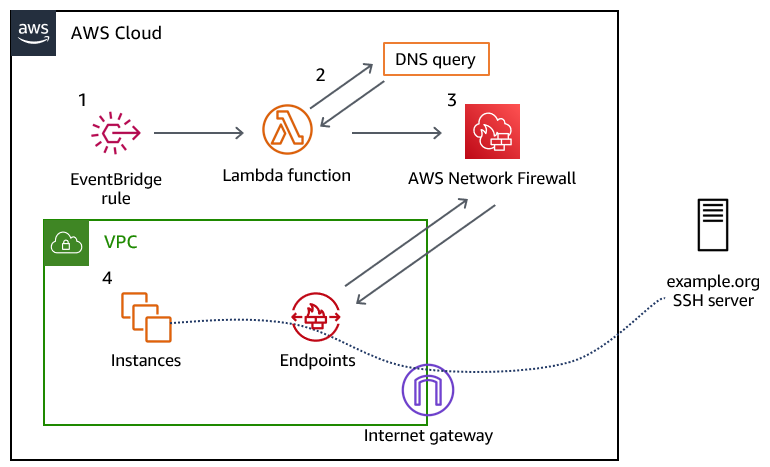
Security and network administrators can control outbound access from a virtual private cloud (VPC) to specific destinations by using a service like AWS Network Firewall. You can use stateful rule groups to control outbound access to domains for HTTP and HTTPS by default in Network Firewall. In this post, we’ll walk you through how to accomplish this access control for non-HTTP and non-HTTPS traffic, such as SSH (Secure Shell). This solution is extensible to other protocols with static port assignments.
In the example scenario in this post, the network administrator needs to permit outbound SSH access on port 22/tcp to a third-party domain, example.org, from a group of Amazon Elastic Compute Cloud (Amazon EC2) instances that sits inside of a protected VPC that restricts outbound SSH traffic with Network Firewall. Non-HTTP traffic can’t currently be controlled with a domain rule in Network Firewall.
This solution allows administrators to control outbound access to a given domain in a granular way, by resolving the domain name inside of an AWS Lambda function, and updating a Network Firewall rule variable with the results of the DNS query. This solution further restricts specific non-HTTP and non-HTTPS traffic to those allowed domains to only what is explicitly specified by the administrator.
Solution overview
Figure 1 provides an overview of the solution and the resulting traffic flow.
Figure 1: Overview of the solution and the resulting traffic flow
The solution workflow is as follows:
An Amazon EventBridge rule invokes the Lambda function every 10 minutes. You can modify this frequency to meet your needs. You should consider the time-to-live (TTL) record of the DNS record that you are configuring when choosing this interval.
The Lambda function performs the DNS lookup for the provided domain, and updates a variable in an existing Network Firewall rule group. The rule group changes take a few seconds to fully apply to the nodes in your Network Firewall deployment.
The newly created Network Firewall rule group is associated with the Network Firewall policy to control traffic.
Traffic from the instances in your VPC flows through the Network Firewall endpoint, and if allowed, is routed through an internet gateway to the target server.
A DNS domain that you provide, which allows traffic for the protocol and port (or ports) that you plan to allow traffic to. This DNS domain needs to resolve to an IPv4 address or set of addresses; IPv6 is not supported, at this point.
Deploy the solution
We’ve provided a CloudFormation template to deploy this solution, which is located in the GitHub repository that accompanies this blog post.
Choose Stacks > Create Stack > With new resources (standard).
In the Specify template section, choose Upload a template file.
Choose Choose file, navigate to where you saved the CloudFormation template, and upload it. Then choose Next.
Specify a stack name for your CloudFormation stack.
In the Parameters section, for the Domain parameter, specify the name of the domain to which you will control access. The default value is set to example.org; however, note that the actual example.org doesn’t allow SSH traffic.
The remaining parameters have defaults to allow outbound SSH traffic to the specified domain. Adjust the LambdaJobFrequency variable so that it corresponds with the TTL of the DNS record that it will resolve. This allows the Lambda function to keep the IP address of the DNS record up to date, in the event that it changes. After you’ve configured the parameters, choose Next.
Figure 2: CloudFormation stack parameters
On the Configure stack options page, specify any further options needed or keep the default options, and then choose Next.
On the Review page, review the stack and parameters and select the check box to acknowledge that this template will create IAM resources. Choose Create Stack.
Check the stack creation status. Upon successful completion, the status shows CREATE_COMPLETE.
Figure 3: The successful creation of the CloudFormation stack
Test the solution
Before you test the newly created rule, make sure that the Lambda function has been invoked at least once from the EventBridge rule.
To verify the Lambda function results
In the AWS Management Console, navigate to the Lambda function Network-Firewall-Resolver-Function, and on the Monitor tab, choose View logs in CloudWatch.
Figure 4: Navigating to view logs in CloudWatch
Select the most recent log stream.
Verify that that a log line contains the entry StatefulRuleGroup updated successfully.
Figure 5: Examining the CloudWatch logs to verify that the Lambda function ran successfully
Associate the stateful rule group that was created by the stack, Lambda-Managed-Stateful-Rule with the existing Network Firewall policy that is attached to your VPC. To do this:
Navigate to VPC > Network Firewall > Firewall Policies and select your existing firewall policy.
In the Stateful rule groups section, for Actions, choose Add unmanaged stateful rule groups.
Select the check box for Lambda-Managed-Stateful-Rule, and then choose Add stateful rule group.
When the newly provisioned Lambda function runs successfully, it will resolve the IPv4 address for the domain (example.org) and associate the address with the stateful rule variable IP_NET. To validate that this has happened, do the following:
Choose the Lambda-Managed-Stateful-Rule rule group.
Navigate to the rule variable section, and choose IP_NET. If the Lambda function successfully resolved the provided domain name, the variable will contain the IPv4 addresses for the domain you provided, as shown in Figure 6.
Figure 6: Validating the rule variable details
Test the rule by attempting to connect to the domain that you specified in the CloudFormation template. Use an EC2 instance within the VPC that the network firewall rule is associated with, and attempt to establish an SSH connection to the domain that you specified. As shown by the SSH key negotiation in Figure 7, traffic is allowed through the network firewall, as intended.
Figure 7: SSH connectivity to the domain was successful
You can also configure the rule to drop the SSH connection, rather than permit it. To do this:
Choose the Lambda-Managed-Stateful-Rule rule group. In the Rules section, choose Edit Rules.
Modify the rule to take the Drop action, and save the rule group.
As shown by the lack of response from the host in Figure 8, the SSH connection cannot be established anymore.
Figure 8: An SSH connection cannot be established, due to the connection timing out
Cleanup
Follow the steps in this section to remove the resources created by this solution.
To remove the resources
Sign in to your AWS account where you deployed the CloudFormation stack and navigate to the Network Firewall console.
In the Stateful rule groups section, select the check box for Lambda-Managed-Stateful-Rule. For Actions, choose Disassociate from policy.
Figure 9: Disassociating the stateful rule from the existing policy
Navigate to the CloudFormation console, select the stack that you created, and then choose Delete. Upon successful deletion, the resources created by the stack will be deleted.
Conclusion
In this post, we’ve demonstrated how security and network administrators have the ability to permit or restrict non-HTTP and non-HTTPS traffic to a given domain by using Network Firewall. With this solution, administrators can enforce granular port- and protocol-level control to third-party domains. To learn more about rule group configuration in AWS Network Firewall, see Managing your own rule groups in the Developer Guide.
If you have feedback about this post, submit comments in the Comments section below. If you have questions about this post, contact AWS Support. You can also start a new thread on AWS Network Firewall re:Post to get answers from the community.
Want more AWS Security news? Follow us on Twitter.
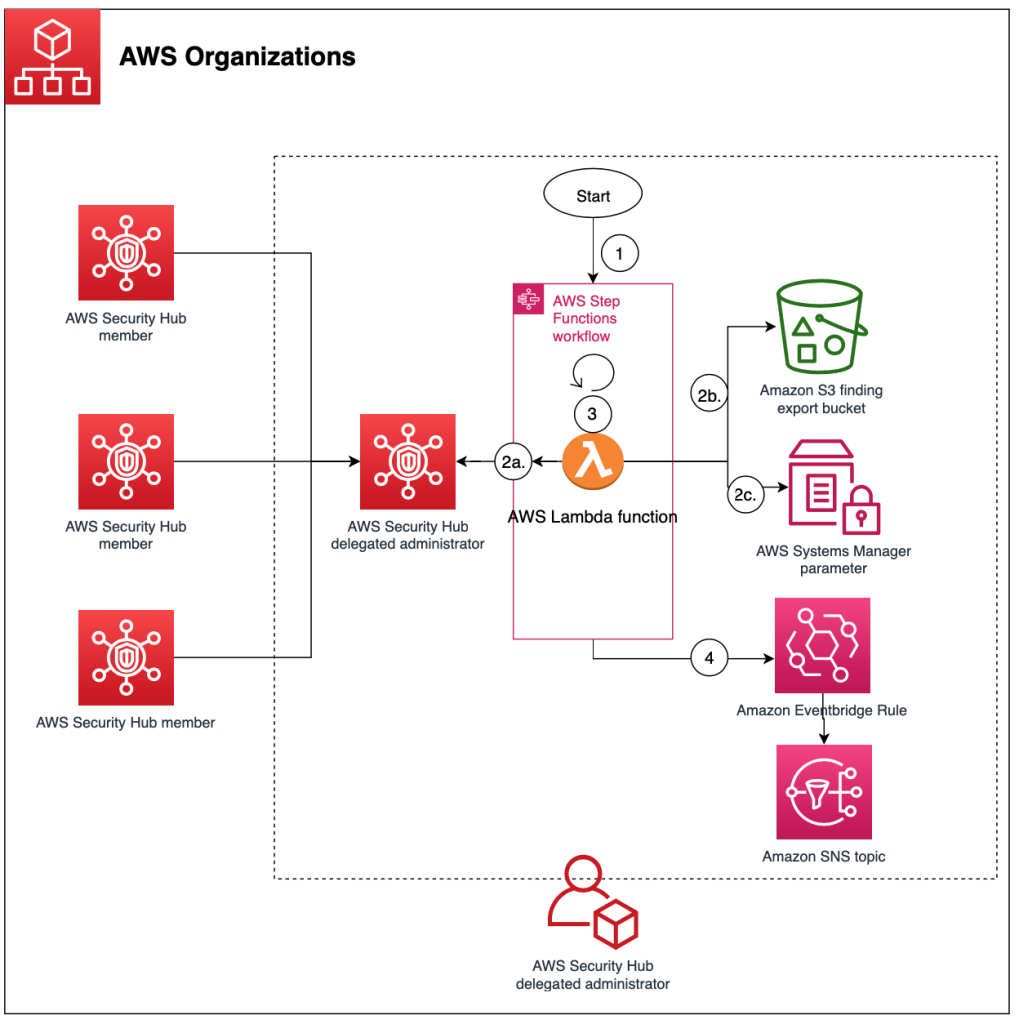
AWS Security Hub is a cloud security posture management service that you can use to perform security best practice checks, aggregate alerts, and automate remediation. Security Hub has out-of-the-box integrations with many AWS services and over 60 partner products. Security Hub centralizes findings across your AWS accounts and supported AWS Regions into a single delegated administrator account in your aggregation Region of choice, creating a single pane of glass to consolidate and view individual security findings.
Because there are a large number of possible integrations across accounts and Regions, your delegated administrator account in the aggregation Region might have hundreds of thousands of Security Hub findings. To perform complex analytics or machine learning across the existing (historical) findings that are maintained in Security Hub, you can export findings to an Amazon Simple Storage Service (Amazon S3) bucket. To export new findings that have recently been created, you can implement the solution in the aws-security-hub-findings-export GitHub repository. However, Security Hub has data export API rate quotas, which can make exporting a large number of findings challenging.
In this blog post, we provide an example solution to export your historical Security Hub findings to an S3 bucket in your account, even if you have a large number of findings. We walk you through the components of the solution and show you how to use the solution after deployment.
Prerequisites
To deploy the solution, complete the following prerequisites:
If you want to export Security Hub findings across multiple Regions, enable cross-Region aggregation.
Solution overview and architecture
In this solution, you use the following AWS services and features:
Security Hub export orchestration
AWS Step Functions helps you orchestrate automation and long-running jobs, which are integral to this solution. You need the ability to run a workflow for hours due to the Security Hub API rate limits and number of findings and objects.
AWS Lambda functions handle the logic for exporting and storing findings in an efficient and cost-effective manner. You can customize Lambda functions to most use cases.
Amazon EventBridge tracks changes in the status of the Step Functions workflow. The solution can run for over 100 hours; by using EventBridge, you don’t have to manually check the status.
AWS Systems ManagerParameter Store provides a quick way to track overall status by maintaining a numeric count of successfully exported findings that you can compare with the number of findings shown in the Security Hub dashboard.
Figure 1 shows the architecture for the solution, deployed in the Security Hub delegated administrator account in the aggregation Region. The figure shows multiple Security Hub member accounts to illustrate how you can export findings for an entire AWS Organizations organization from a single delegated administrator account.
Figure 1: High-level overview of process and resources deployed in the Security Hub account
As shown in Figure 1, the workflow after deployment is as follows:
The Step Functions workflow for the Security Hub export is invoked.
The Step Functions workflow invokes a single Lambda function that does the following:
Retrieves Security Hub findings that have an Active status and puts them in a temporary file.
Pushes the file as an object to Amazon S3.
Adds the global count of exported findings from the Step Functions workflow to a Systems Manager parameter for validation and tracking purposes.
Repeats steps b–c for about 10 minutes to get the most findings while preventing the Lambda function from timing out.
If a nextToken is present, pushes the nextToken to the output of the Step Functions.
Note: If the number of items in the output is smaller than the number of items returned by the API call, then the return output includes a nextToken, which can be passed to a subsequent command to retrieve the next set of items.
The Step Functions workflow goes through a Choice state as follows:
If a Security Hub nextToken is present, Step Functions invokes the Lambda function again.
If a Security Hub nextToken isn’t present, Step Functions ends the workflow successfully.
An EventBridge rule tracks changes in the status of the Step Functions workflow and sends events to an SNS topic. Subscribers to the SNS topic receive a notification when the status of the Step Functions workflow changes.
In your delegated administrator Security Hub account, launch the AWS CloudFormation template by choosing the following Launch Stack button. It will take about 10 minutes for the CloudFormation stack to complete.
Note: The stack will launch in the US East (N. Virginia) Region (us-east-1). If you are using cross-Region aggregation, deploy the solution into the Region where Security Hub findings are consolidated. You can download the CloudFormation template for the solution, modify it, and deploy it to your selected Region.
To deploy the solution (AWS CDK)
Download the code from our aws-security-hub-findings-historical-export GitHub repository, where you can also contribute to the sample code. The CDK initializes your environment and uploads the Lambda assets to Amazon S3. Then, you deploy the solution to your account.
While you are authenticated in the security tooling account, run the following commands in your terminal. Make sure to replace <AWS_ACCOUNT> with the account number, and replace <REGION> with the AWS Region where you want to deploy the solution. cdk bootstrap aws://<AWS_ACCOUNT>/<REGION> cdk deploy SechubHistoricalPullStack
Solution walkthrough and validation
Now that you’ve successfully deployed the solution, you can see each aspect of the automation workflow in action.
Before you start the workflow, you need to subscribe to the SNS topic so that you’re notified of status changes within the Step Functions workflow. For this example, you will use email notification.
Go to Topics and choose the Security_Hub_Export_Status topic.
Choose Create subscription.
For Protocol, choose Email.
For Endpoint, enter the email address where you want to receive notifications.
Choose Create subscription.
After you create the subscription, go to your email and confirm the subscription.
You’re now subscribed to the SNS topic, so any time that the Step Functions status changes, you will receive a notification. Let’s walk through how to run the export solution.
In the left navigation pane, choose State machines.
Choose the new state machine named sec_hub_finding_export.
Choose Start execution.
On the Start execution page, for Name – optional and Input – optional, leave the default values and then choose Start execution.
Figure 2: Example input values for execution of the Step Functions workflow
This will start the Step Functions workflow and redirect you to the Graph view. If successful, you will see that the overall Execution status and each step have a status of Successful.
For long-running jobs, you can view the CloudWatch log group associated with the Lambda function to view the logs.
To track the number of Security Hub findings that have been exported, open the Systems Manager console, choose Parameter Store, and then select the /sechubexport/findingcount parameter. Under Value, you will see the total number of Security Hub findings that have been exported, as shown in Figure 3.
Figure 3: Systems Manager Parameter Store value for the number of Security Hub findings exported
Depending on the number of Security Hub findings, this process can take some time. This is primarily due to the GetFindings quota of 3 requests per second. Each GetFindings request can return a maximum of 100 findings, so this means that you can get up to 300 findings per second. On average, the solution can export about 1 million findings per hour. If you have a large number of findings, you can start the finding export process and wait for the SNS topic to notify you when the process is complete.
How to customize the solution
The solution provides a general framework to help you export your historical Security Hub findings. There are many ways that you can customize this solution based on your needs. The following are some enhancements that you can consider.
Change the Security Hub finding filter
The solution currently pulls all findings with RecordState: ACTIVE, which pulls the active Security Hub findings in the AWS account. You can update the Lambda function code, specifically the finding_filter JSON value within the create_filter function, to pull findings for your use case. For example, to get all active Security Hub findings from the AWS Foundational Security Best Practices standard, update the Lambda function code as follows.
Export more than 100 million Security Hub findings
The example solution can export about 100 million Security Hub findings. This number is primarily determined by the speed at which findings can be exported, due to the following factors:
Implement a pattern by using a Lambda function to start a new execution of your state machine to split ongoing work across multiple workflow executions. For more information, see the tutorial Continuing Ongoing Work as a New Execution.
Note: If you implement either of these solutions, make sure that the nextToken also gets passed to the new Step Functions execution by updating the Lambda function code to parse and pass the nextToken received in the last request.
Speed up the export
One way to increase the export bandwidth, and reduce the overall execution time, is to run the export job in parallel across the individual Security Hub member accounts rather than from the single delegated administrator account.
You could use CloudFormation StackSets to deploy this solution in each Security Hub member account and send the findings to a centralized S3 bucket. You would need to modify the solution to allow an S3 bucket to be provided as an input, and all the Lambda function Identity and Access Management (IAM) roles would need cross-account access to the S3 bucket and corresponding AWS Key Management Service (AWS KMS) key. You would also need to make updates in each member account to iterate through the various Regions in which the Security Hub findings exist.
Next steps
The solution in this post is designed to assist in the retrieval and export of all existing findings currently in Security Hub. After you successfully run this solution to export historical findings, you can continuously export new Security Hub findings by using the sample solution in the aws-security-hub-findings-export GitHub repository.
In this post, you deployed a solution to export the existing Security Hub findings in your account to a central S3 bucket, so that you can apply complex analytics and machine learning to those findings. We walked you through how to use the solution and apply it to some example use cases after you successfully exported existing findings across your AWS environment. Now your security team can use the data in the S3 bucket for predictive analytics and determine if there are Security Hub findings and specific resources that might need to be prioritized for review due to a deviation from normal behavior. Additionally, you can use this solution to enable more complex analytics on multiple fields by querying large and complex datasets with AWS Athena.
If you have feedback about this post, submit comments in the Comments section below. If you have questions about this post, start a thread on AWS Security Hub re:Post.
Want more AWS Security news? Follow us on Twitter.
AWS re:Invent 2022 is fast approaching, and this post can help you plan your agenda with a look at the sessions in the security track. AWS re:Invent, your opportunity to catch up on the latest technologies in cloud computing, will take place in person in Las Vegas, NV, from November 28 – December 2, 2022.
This post provides abbreviated abstracts for all of the security, identity, and compliance sessions. For the full description, visit the AWS re:Invent session catalog. If you plan to attend AWS re:Invent 2022, and you’re interested in connecting with a security, identity, or compliance product team, reach out to your AWS Account Team. Don’t have a ticket yet? Join us in Las Vegas by registering for re:Invent 2022.
Leadership session
SEC214-L: What we can learn from customers: Accelerating innovation at AWS Security CJ Moses, CISO at AWS, showcases part of the peculiar AWS culture of innovation—the working backwards process—and how new security products, services, and features are built with the customer in mind. AWS Security continuously innovates based directly on customer feedback so that organizations can accelerate their pace of innovation while integrating powerful security architecture into the heart of their business and operations.
Breakout sessions
Lecture-style presentations that cover topics at all levels (200-400) and are delivered by AWS experts, builders, customers, and partners.
SEC201: Proactive security: Considerations and approaches Security is our top priority at AWS. Discover how the partnership between builder experience and security helps everyone ship securely. Hear about the tools, mechanisms, and programs that help AWS builders and security teams.
SEC203: Revitalize your security with the AWS Security Reference Architecture As your team continually evolves its use of AWS services and features, it’s important to understand how AWS security services work together to improve your security posture. In this session, learn about the recently updated AWS Security Reference Architecture (AWS SRA), which provides prescriptive guidance for deploying the full complement of AWS security services in a multi-account environment.
SEC207: Simplify your existing workforce access with IAM Identity Center In this session, learn how to simplify operations and improve efficiencies by scaling and securing your workforce access. You can easily connect AWS IAM Identity Center (successor to AWS Single Sign-On) to your existing identity source. IAM Identity Center integrated with AWS Managed Microsoft Active Directory provides a centralized and scalable access management solution for your workplace users across multiple AWS accounts while improving the overall security posture of your organization.
SEC210: AWS and privacy engineering: Explore the possibilities Learn about the intersection of technology and governance, with an emphasis on solution building. With the privacy regulation landscape continuously changing, organizations need innovative technical solutions to help solve privacy compliance challenges. This session covers a series of unique customer challenges and explores how AWS services can be used as building blocks for privacy-enhancing solutions.
SEC212: AWS data protection: Using locks, keys, signatures, and certificates AWS offers a broad array of cryptographic tools and PKI platforms to help you navigate your data protection and digital signing needs. Discover how to get this by default and how to build your own locks, keys, signatures, and certificates when needed for your next cloud application. Learn best practices for data protection, data residency, digital sovereignty, and scalable certificate management, and get a peek into future considerations around crypto agility and encryption by default.
SEC309: Threat detection and incident response using cloud-native services Threat detection and incident response processes in the cloud have many similarities to on premises, but there are some fundamental differences. In this session, explore how cloud-native services can be used to support threat detection and incident response processes in AWS environments.
SEC310: Security alchemy: How AWS uses math to prove security AWS helps you strengthen the power of your security by using mathematical logic to answer questions about your security controls. This is known as provable security. In this session, explore the math that proves security systems of the cloud.
SEC312: Deploying egress traffic controls in production environments Private workloads that require access to resources outside of the VPC should be well monitored and managed. There are solutions that can make this easier, but selecting one requires evaluation of your security, reliability, and cost requirements. Learn how Robinhood evaluated, selected, and implemented AWS Network Firewall to shape network traffic, block threats, and detect anomalous activity on workloads that process sensitive financial data.
SEC313: Harness the power of IAM policies & rein in permissions with Access Analyzer Explore the power of IAM policies and discover how to use IAM Access Analyzer to set, verify, and refine permissions. Learn advanced skills that empower builders to apply fine-grained permissions across AWS. This session dives deep into IAM policies and explains IAM policy evaluation, policy types and their use cases, and critical access controls.
SEC327: Zero-privilege operations: Running services without access to data AWS works with organizations and regulators to host some of the most sensitive workloads in industry and government. Learn how AWS secures data, even from trusted AWS operators and services. Explore the AWS Nitro System and how it provides confidential computing and a trusted runtime environment, and dive deep into the cryptographic chains of custody that are built into AWS Identity and Access Management (IAM).
SEC329: AWS security services for container threat detection Containers are a cornerstone of many AWS customers’ application modernization strategies. The increased dependence on containers in production environments requires threat detection that is designed for container workloads. To help meet the container security and visibility needs of security and DevOps teams, new container-specific security capabilities have recently been added to Amazon GuardDuty, Amazon Inspector, and Amazon Detective. The head of cloud security at HBO Max will share container security monitoring best practices.
SEC332: Build Securely on AWS: Insights from the C-Suite Security shouldn’t be top of mind only when it’s a headline in the news. A strong security posture is a proactive one. In this panel session, hear how CISOs and CIOs are taking a proactive approach to security by building securely on AWS.
SEC403: Protecting secrets, keys, and data: Cryptography for the long term This session covers the range of AWS cryptography services and solutions, including AWS KMS, AWS CloudHSM, the AWS Encryption SDK, AWS libcrypto (AWS-LC), post-quantum hybrid algorithms, AWS FIPS accreditations, configurable security policies for Application Load Balancer and Amazon CloudFront, and more.
SEC404: A day in the life of a billion requests Every day, sites around the world authenticate their callers. That is, they verify cryptographically that the requests are actually coming from who they claim to come from. In this session, learn about unique AWS requirements for scale and security that have led to some interesting and innovative solutions to this need.
SEC405: Zero Trust: Enough talk, let’s build better security Zero Trust is a powerful new security model that produces superior security outcomes compared to the traditional network perimeter model. However, endless competing definitions and debates about what, Zero Trust is have kept many organizations’ Zero Trust efforts at or near the starting line. Hear from Delphix about how they put Zero Trust into production and the results and benefits they’ve achieved.
Builders’ sessions
Small-group sessions led by an AWS expert who guides you as you build the service or product on your own laptop. Use your laptop to experiment and build along with the AWS expert.
SEC202: Vulnerability management with Amazon Inspector and AWS Systems Manager Join this builders’ session to learn how to use Amazon Inspector and AWS Systems Manager Patch Manager to scan and patch software vulnerabilities on Amazon EC2 instances. Walk through how to understand, prioritize, suppress, and patch vulnerabilities using AWS security services.
SEC204: Analyze your network using Amazon VPC Network Access Analyzer In this builders’ session, review how the new Amazon VPC Network Access Analyzer can help you identify network configurations that might lead to unintended network access. Learn ways that you can improve your security posture while still allowing you and your organization to be agile and flexible.
SEC211: Disaster recovery and resiliency for AWS data protection services Resiliency is a core consideration when architecting cloud workloads. Preparing and implementing disaster recovery (DR) strategies is an important step for ensuring the resiliency of your solution in the face of regional disasters. Gain hands-on experience with implementing backup-restore and active-active DR strategies when working with AWS database services like Amazon DynamoDB and Amazon Aurora and data protection services like AWS KMS, AWS Secrets Manager, and AWS Backup.
SEC303: AWS CIRT toolkit for automating incident response preparedness When it comes to life in the cloud, there’s nothing more important than security. At AWS, the Customer Incident Response Team (CIRT) creates tools to support customers during active security events and to help them anticipate and respond to events using simulations. CIRT members demonstrate best practices for using these tools to enable service logs with Assisted Log Enabler for AWS, run a security event simulation using AWS CloudSaga, and analyze logs to respond to a security event with Amazon Athena.
SEC304: Machine-to-machine authentication on AWS This session offers hands-on learning around the pros and cons of several methods of machine-to-machine authentication. Examine how to implement and use Amazon Cognito, AWS Identity and Access Management (IAM), and Amazon API Gateway to authenticate services to each other with various types of keys and certificates.
SEC305: Kubernetes threat detection and incident response automation In this hands-on session, learn how to use Amazon GuardDuty and Amazon Detective to effectively analyze Kubernetes audit logs from Amazon EKS and alert on suspicious events or malicious access such as an increase in “403 Forbidden” or “401 Unauthorized” logs.
SEC308: Deploying repeatable, secure, and compliant Amazon EKS clusters Learn how to deploy, manage, and scale containerized applications that run Kubernetes on AWS with AWS Service Catalog. Walk through how to deploy the Kubernetes control plane into a virtual private cloud, connect worker nodes to the cluster, and configure a bastion host for cluster administrative operations.
Chalk talks
Highly interactive sessions with a small audience. Experts lead you through problems and solutions on a digital whiteboard as the discussion unfolds.
SEC206: Security operations metrics that matter Security tooling can produce thousands of security findings to act on. But what are the most important items and metrics to focus on? Learn about a framework you can use to develop and implement security operations metrics in order to prioritize the highest-risk issues across your AWS environment.
SEC209: Continuous innovation in AWS threat detection & monitoring services AWS threat detection teams continue to innovate and improve foundational security services for proactive and early detection of security events and posture management. Learn about recent launches that address use cases like container threat detection, protection from malware, and sensitive data identification. Services covered in this session include Amazon GuardDuty, Amazon Detective, Amazon Inspector, Amazon Macie, and centralized cloud security posture assessment with AWS Security Hub.
SEC311: Securing serverless workloads on AWS Walk through design patterns for building secure serverless applications on AWS. Learn how to handle secrets with AWS Lambda extensions and AWS Secrets Manager, detect vulnerabilities in code with Amazon CodeGuru, ensure security-approved libraries are used in the code with AWS CodeArtifact, provide security assurance in code with AWS Signer, and secure APIs on Amazon API Gateway.
SEC314: Automate security analysis and code reviews with machine learning Join this chalk talk to learn how developers can use machine learning to embed security during the development phase and build guardrails to automatically flag common issues that deviate from best practices. This session is tailored to developers and security professionals who are involved in improving the security of applications during the development lifecycle.
SEC315: Security best practices for Amazon Cognito applications Customer identity and access management (CIAM) is critical when building and deploying web and mobile applications for your business. To mitigate the risks of unauthorized access, you need to implement strong identity protections by using the right security measures, such as multi-factor authentication, activity monitoring and alerts, adaptive authentication, and web firewall integration.
SEC316: Establishing trust with cryptographically attested identity Cryptographic attestation is a mechanism for systems to make provable claims of their identity and state. Dive deep on the use of cryptographic attestation on AWS, powered by technologies such as NitroTPM and AWS Nitro Enclaves to assure system integrity and establish trust between systems. Come prepared for a lively discussion as you explore various use cases, architectures, and approaches for utilizing attestation to raise the security bar for workloads on AWS.
SEC317: Implementing traffic inspection capabilities at scale on AWS Learn about a broad range of security offerings that can help you integrate firewall services into your network, including AWS WAF, AWS Network Firewall, and partner appliances used in conjunction with a Gateway Load Balancer. Learn how to choose network architectures for these firewall options to protect inbound traffic to your internet-facing applications.
SEC318: Scaling the possible: Digitizing the audit experience Do you want to increase the speed and scale of your audits? As companies expand to new industries and markets, so does the scale of regulatory compliance. AWS undergoes hundreds of audits in a year. In this chalk talk, AWS experts discuss how they digitize and automate the regulator and auditor experience. Learn about pre-audit educational training, self-service of control evidence and walkthrough information, live chats with audit control owners, and virtual data center tours.
SEC319: Prevent unintended access with AWS IAM Access Analyzer policy validation In this chalk talk, walk through several approaches to building automated AWS Identity and Access Management (IAM) policy validation into your CI/CD pipeline. Consider some tools that can be used for policy validation, including AWS IAM Access Analyzer, and learn how mechanisms like AWS CloudFormation hooks and CI/CD pipeline controls can be used to incorporate these tools into your DevSecOps workflow.
SEC320: To Europe and beyond: Architecting for EU data protection regulation Companies innovating on AWS are expanding to geographies with new data transfer and privacy challenges. Explore how to navigate compliance with EU data transfer requirements and discuss how the GDPR certification initiative can simplify GDPR compliance. Dive deep in a collaborative whiteboarding session to learn how to build GDPR-certifiable architectures.
SEC321: Building your forensics capabilities on AWS You have a compromised resource on AWS. How do you acquire evidence and artifacts? Where do you transfer the data, and how do you store it? How do you analyze it safely within an isolated environment? Walk through building a forensics lab on AWS, methods for implementing effective data acquisition and analysis, and how to make sure you are getting the most out of your investigations.
SEC322: Transform builder velocity with security Learn how AWS Support uses data to measure security and make informed decisions to grow the people side of security culture while embedding security expertise within development teams. This is empowering developers to deliver production-quality code with the highest security standards at the speed of business.
SEC324: Reimagine the security perimeter with Zero Trust Zero Trust encompasses everything from the client to the cloud, so where do you start on your journey? In this chalk talk, learn how to look at your environment through a Zero Trust lens and consider architectural patterns that you can use to redefine your security perimeter.
SEC325: Beyond database password management: 5 use cases for AWS Secrets Manager AWS Secrets Manager is integrated with AWS managed databases to make it easy for you to create, rotate, consume, and monitor database user names and passwords. This chalk talk explores how client applications use Secrets Manager to manage private keys, API keys, and generic credentials.
SEC326: Establishing a data perimeter on AWS, featuring Goldman Sachs Organizations are storing an unprecedented and increasing amount of data on AWS for a range of use cases including data lakes, analytics, machine learning, and enterprise applications. They want to prevent intentional or unintentional transfers of sensitive non-public data for unauthorized use. Hear from Goldman Sachs about how they use data perimeter controls in their AWS environment to meet their security control objectives.
SEC328: Learn to create continuous detective security controls using AWS services A risk owner needs to ensure that no matter what your organization is building in the cloud, certain security invariants are in place. While preventive controls are great, they are not always sufficient. Deploying detective controls to enable early identification of configuration issues or availability problems not only adds defense in depth, but can also help detect changes in security posture as your workloads evolve. Learn how to use services like AWS Security Hub, AWS Config, and Amazon CloudWatch Synthetics to deploy canaries and perform continuous checks.
SEC330: Harness the power of temporary credentials with IAM Roles Anywhere Get an introduction to AWS Identity and Access Management (IAM) Roles Anywhere, and dive deep into how you can use IAM Roles Anywhere to access AWS services from outside of AWS. Learn how IAM Roles Anywhere securely delivers temporary AWS credentials to your workloads.
SEC331: Security at the industrial edge Industrial organizations want to process data and take actions closer to their machines at the edge, and they need innovative and highly distributed patterns for keeping their critical information and cyber-physical systems safe. In modern industrial environments, the exponential growth of IoT and edge devices brings enormous benefits but also introduces new risks.
SEC333: Designing compliance as a code with AWS security services Supporting regulatory compliance and mitigating security risks is imperative for most organizations. Addressing these challenges at scale requires automated solutions to identify compliance gaps and take continuous proactive measures. Hear about the architecture of compliance monitoring and remediation solutions, based on the example of the CPS 234 Information Security guidelines of the Australian Prudential Regulatory Authority (APRA), which are mandated for the financial services industry in Australia and New Zealand.
SEC334: Understanding the evolution of cloud-based PKI use cases Since AWS Private Certificate Authority (CA) launched in 2018, the service has evolved based on user needs. This chalk talk starts with a primer on certificate use for securing network connections and information. Learn about the predominant ways AWS customers are using ACM Private CA, and explore new use cases, including identifying IoT devices, customer-managed Kubernetes, and on premises.
SEC402: The anatomy of a ransomware event targeting data residing in Amazon S3 Ransomware events can cost governments, nonprofits, and businesses billions of dollars and interrupt operations. Early detection and automated responses are important steps that can limit your organization’s exposure. Walk through the anatomy of a ransomware event that targets data residing in Amazon S3 and hear detailed best practices for detection, response, recovery, and protection.
Workshops
Interactive learning sessions where you work in small teams to solve problems using AWS Cloud security services. Come prepared with your laptop and a willingness to learn!
SEC208: Executive security simulation This workshop features an executive security simulation, designed to take senior security management and IT or business executive teams through an experiential exercise that illuminates key decision points for a successful and secure cloud journey. During this team-based, game-like simulation, use an industry case study to make strategic security, risk, and compliance decisions and investments.
SEC301: Threat detection and response workshop This workshop takes you through threat detection and response using Amazon GuardDuty, AWS Security Hub, and Amazon Inspector. The workshop simulates different threats to Amazon S3, AWS Identity and Access Management (IAM), Amazon EKS, and Amazon EC2 and illustrates both manual and automated responses with AWS Lambda. Learn how to operationalize security findings.
SEC302: AWS Network Firewall and DNS Firewall security in multi-VPC architectures This workshop guides participants through configuring AWS Network Firewall and Amazon Route 53 Resolver DNS Firewall in an AWS multi-VPC environment. It demonstrates how VPCs can be interconnected with a centralized AWS Network Firewall and DNS Firewall configuration to ease the governance requirements of network security.
SEC306: Building a data perimeter to allow access to authorized users In this workshop, learn how to create a data perimeter by building controls that allow access to data only from expected network locations and by trusted identities. The workshop consists of five modules, each designed to illustrate a different AWS Identity and Access Management (IAM) principle or network control.
SEC307: Ship securely: Automated security testing for developers Learn how to build automated security testing into your CI/CD pipelines using AWS services and open-source tools. The workshop highlights how to identify and mitigate common risks early in the development cycle and also covers how to incorporate code review steps.
SEC323: Data discovery and classification on AWS Learn how to use Amazon Macie to discover and classify data in your Amazon S3 buckets. Dive deep into best practices as you follow the process of setting up Macie. Also use AWS Security Hub custom actions to set up a manual remediation, and investigate how to perform automated remediation using Amazon EventBridge and AWS Lambda.
SEC401: AWS Identity and Access Management (IAM) policy evaluation in action Dive deep into the logic of AWS Identity and Access Management (IAM) policy evaluation. Gain experience with hands-on labs that walk through IAM use cases and learn how different policies interact with each other.
For up-to-date information related to the certification, visit the AWS Compliance Program page and choose GSMA under Europe, Middle East & Africa.
AWS was evaluated by independent third-party auditors selected by GSMA. The Certificate of Compliance that shows that AWS achieved GSMA compliance status is available on the GSMA website and through AWS Artifact. AWS Artifact is a self-service portal for on-demand access to AWS compliance reports. Sign in to AWS Artifact in the AWS Management Console, or learn more at Getting Started with AWS Artifact.
To learn more about our compliance and security programs, see AWS Compliance Programs. As always, we value your feedback and questions; reach out to the AWS Compliance team through the Contact Us page. If you have feedback about this post, you can submit comments in the Comments section below.
Want more AWS Security news? Follow us on Twitter.
This whitepaper is intended for customers that are looking to store and process controlled goods information in the AWS Cloud, and is particularly useful for leadership, security, risk, and compliance teams that need to understand CGP requirements and guidance.
The whitepaper summarizes CGP requirements and guidance related to the protection of controlled goods information, and gives CGP-regulated customers information they can use to commence their due diligence and assess how to implement the appropriate programs for their use of AWS Cloud services.
This document is our first that is specific to Canadian regulatory requirements and joins other guides related to specific regulatory regimes around the world. As the regulatory environment continues to evolve, we’ll provide further updates on the AWS Security Blog and the AWS Compliance page. You can find more information on cloud-related regulatory compliance at the AWS Compliance Center. You can also reach out to your AWS account manager for help finding the resources you need.
If you have feedback about this blog post, submit comments in the Comments section below. You can also start a new thread on re:Post to get answers from the community.
Want more AWS Security news? Follow us on Twitter.
As your organization looks to improve your security posture and practices, early detection and prevention of unauthorized activity quickly becomes one of your main priorities. The behaviors associated with unauthorized activity commonly follow patterns that you can analyze in order to create specific mitigations or feed data into your security monitoring systems.
This post shows you how you can analyze security intelligence from Amazon Cognito advanced security features logs by using AWS native services. You can use the intelligence data provided by the logs to increase your visibility into sign-in and sign-up activities from users, this can help you with monitoring, decision making, and to feed other security services in your organization, such as a web application firewall or security information and event management (SIEM) tool. The data can also enrich available security feeds like fraud detection systems, increasing protection for the workloads that you run on AWS.
Amazon Cognito advanced security features overview
Amazon Cognito provides authentication, authorization, and user management for your web and mobile apps. Your users can sign in to apps directly with a user name and password, or through a third party such as social providers or standard enterprise providers through SAML 2.0/OpenID Connect (OIDC). Amazon Cognito includes additional protections for users that you manage in Amazon Cognito user pools. In particular, Amazon Cognito can add risk-based adaptive authentication and also flag the use of compromised credentials. For more information, see Checking for compromised credentials in the Amazon Cognito Developer Guide.
With adaptive authentication, Amazon Cognito examines each user pool sign-in attempt and generates a risk score for how likely the sign-in request is from an unauthorized user. Amazon Cognito examines a number of factors, including whether the user has used the same device before or has signed in from the same location or IP address. A detected risk is rated as low, medium, or high, and you can determine what actions should be taken at each risk level. You can choose to allow or block the request, require a second authentication factor, or notify the user of the risk by email. Security teams and administrators can also submit feedback on the risk through the API, and users can submit feedback by using a link that is sent to the user’s email. This feedback can improve the risk calculation for future attempts.
To add advanced security features to your existing Amazon Cognito configuration, you can get started by using the steps for Adding advanced security to a user pool in the Amazon Cognito Developer Guide. Note that there is an additional charge for advanced security features, as described on our pricing page. These features are applicable only to native Amazon Cognito users; they aren’t applicable to federated users who sign in with an external provider.
Prerequisites and considerations for this solution
This solution assumes that you are using Amazon Cognito with advanced security features already enabled, the solution does not create a user pool and does not activate the advanced security features on an existing one.
The following list describes some limitations that you should be aware of for this solution:
This solution does not apply to events in the hosted UI, but the same architecture can be adapted for that environment, with some changes to the events processor.
The Amazon Cognito advanced security features support only native users. This solution is not applicable to federated users.
The admin API used in this solution has a default rate limit of 30 requests per second (RPS). If you have a higher rate of authentication attempts, this API call might be throttled and you will need to implement a re-try pattern to confirm that your requests are processed.
Implement the solution
You can deploy the solution automatically by using the following AWS CloudFormation template.
Choose the following Launch Stack button to launch a CloudFormation stack in your account and deploy the solution.
You’ll be redirected to the CloudFormation service in the US East (N. Virginia) Region, which is the default AWS Region, to deploy this solution. You can change the Region to align it to where your Cognito User Pool is running.
This template will create multiple cloud resources including, but not limited to, the following:
An EventBridge rule for sending the Amazon Cognito events
An Amazon SQS queue for sending the events to Lambda
A Lambda function for getting the advanced security information based on the authentication events from CloudTrail
An S3 bucket to store the logs
In the wizard, you’ll be asked to modify or provide one parameter, the existing Cognito user pool ID. You can get this value from the Amazon Cognito console or the Cognito API.
Now, let’s break down each component of the solution in detail.
Sending the authentication events from CloudTrail to Lambda
Cognito advanced security features supports the CloudTrail events: SignUp, ConfirmSignUp, ForgotPassword, ResendConfirmationCode, InitiateAuth and RespondToAuthChallenge. This solution will focus on the sign-in event InitiateAuth as an example.
The solution creates an EventBridge rule that will run when an event is identified in CloudTrail and send the event to an SQS queue. This is useful so that events can be batched up and decoupled for Lambda to process.
The EventBridge rule uses Amazon SQS as a target. The queue is created by the solution and uses the default settings, with the exception that Receive message wait time is set to 20 seconds for long polling. For more information about long polling and how to manually set up an SQS queue, see Consuming messages using long polling in the Amazon SQS Developer Guide.
When the SQS queue receives the messages from EventBridge, these are sent to Lambda for processing. Let’s now focus on understanding how this information is processed by the Lambda function.
Using Lambda to process Amazon Cognito advanced security features information
In order to get the advanced security features evaluation information, you need authentication details that can only be obtained by using the Amazon Cognito identity provider (IdP) API call admin_list_user_auth_events. This API call requires a username to fetch all the authentication event details for a specific user. For security reasons, the username is not logged in CloudTrail and must be obtained by using other event information.
You can use the Lambda function in the sample solution to get this information. It’s composed of three main sequential actions:
The Lambda function gets the sub identifiers from the authentication events recorded by CloudTrail.
Each sub identifier is used to get the user name through an API call to list_users.
3. The sample function retrieves the last five authentication event details from advanced security features for each of these users by using the admin_list_user_auth_events API call. You can modify the function to retrieve a different number of events, or use other criteria such as a timestamp or a specific time period.
Getting the user name information from a CloudTrail event
The following sample authentication event shows a sub identifier in the CloudTrail event information, shown as sub under additionalEventData. With this sub identifier, you can use the ListUsers API call from the Cognito IdP SDK to get the user name details.
After the Lambda function obtains the username, it can then use the Cognito IdP API call admin_list_user_auth_events to get the advanced security feature risk evaluation information for each of the authentication events for that user. Let’s look into the details of that evaluation.
The authentication event information from Amazon Cognito advanced security provides information for each of the categories evaluated and logs the results. Those results can then be used to decide whether the authentication attempt information is useful for the security team to be notified or take action. It’s recommended that you limit the number of events returned, in order to keep performance optimized.
The following sample event shows some of the risk information provided by advanced security features; the options for the response syntax can be found in the CognitoIdentityProviderAPI documentation.
The event information that is returned includes the details that are highlighted in this sample event, such as CompromisedCredentialsDetected, RiskDecision, and RiskLevel, which you can evaluate to decide whether the information can be used to enrich other security monitoring services.
Logging the authentication events information
You can use a Lambda extensions layer to send logs to an S3 bucket. Lambda still sends logs to Amazon CloudWatch Logs, but you can disable this activity by removing the required permissions to CloudWatch on the Lambda execution role. For more details on how to set this up, see Using AWS Lambda extensions to send logs to custom destinations.
Figure 2 shows an example of a log sent by Lambda. It includes execution information that is logged by the extension, as well as the information returned from the authentication evaluation by advanced security features.
Figure 2: Sample log information sent to S3
Note that the detailed authentication information in the Lambda execution log is the same as the preceding sample event. You can further enhance the information provided by the Lambda function by modifying the function code and logging more information during the execution, or by filtering the logs and focusing only on high-risk or compromised login attempts.
After the logs are in the S3 bucket, different applications and tools can use this information to perform automated security actions and configuration updates or provide further visibility. You can query the data from Amazon S3 by using Amazon Athena, feed the data to other services such as Amazon Fraud Detector as described in this post, mine the data by using artificial intelligence/machine learning (AI/ML) managed tools like AWS Lookout for Metrics, or enhance visibility with AWS WAF.
Sample scenarios
You can start to gain insights into the security information provided by this solution in an existing environment by querying and visualizing the log data directly by using CloudWatch Logs Insights. For detailed information about how you can use CloudWatch Logs Insights with Lambda logs, see the blog post Operating Lambda: Using CloudWatch Logs Insights.
The CloudFormation template deploys the CloudWatch Logs Insights queries. You can view the queries for the sample solution in the Amazon CloudWatch console, under Queries.
Choose Select log group(s). In thedrop-drown list, select the Lambda log group.
The query box should show the pre-created query. Choose Run query. You should then see the query results in the bottom-right panel.
(Optional) Choose Add to dashboard to add the widget to a dashboard.
CloudWatch Logs Insights discovers the fields in the auth event log automatically. As shown in Figure 3, you can see the available fields in the right-hand side Discovered fields pane, which includes the Amazon Cognito information in the event.
Figure 3: The fields available in CloudWatch Logs Insights
The first query, shown in the following code snippet, will help you get a view of the number of requests per IP, where the advanced security features have determined the risk decision as Account Takeover and the CompromisedCredentialsDetected as true.
fields@message
| filter@messagelike/INFO/
| filter AuthEvents.0.EventType like'SignIn'
| filter AuthEvents.0.EventRisk.RiskDecision like"AccountTakeover"and
AuthEvents.0.EventRisk.CompromisedCredentialsDetected =! "false"
| statscount(*) as RequestsperIP by AuthEvents.2.EventContextData.IpAddress as IP
| sort desc
You can view the results of the query as a table or graph, as shown in Figure 4.
Figure 4: Sample query results for CompromisedCredentialsDetected
Using the same approach and the convenient access to the fields for query, you can explore another use case, using the following query, to view the number of requests per IP for each type of event (SignIn, SignUp, and forgot password) where the risk level was high.
fields@message
| filter@messagelike/INFO/
| filter AuthEvents.0.EventRisk.RiskLevel like"High"
| statscount(*) as RequestsperIP by AuthEvents.0.EventContextData.IpAddress as IP,
AuthEvents.0.EventType as EventType
| sort desc
Figure 5 shows the results for this EventType query.
Figure 5: The sample results for the EventType query
In the final sample scenario, you can look at event context data and query for the source of the events for which the risk level was high.
fields@message
| filter@messagelike/INFO/
| filter AuthEvents.0.EventRisk.RiskLevel like'High'
| statscount(*) as RequestsperCountry by AuthEvents.0.EventContextData.Country as Country
| sort desc
Figure 6 shows the results for this RiskLevel query.
Figure 6: Sample results for the RiskLevel query
As you can see, there are many ways to mix and match the filters to extract deep insights, depending on your specific needs. You can use these examples as a base to build your own queries.
Conclusion
In this post, you learned how to use security intelligence information provided by Amazon Cognito through its advanced security features to improve your security posture and practices. You used an advanced security solution to retrieve valuable authentication information using CloudTrail logs as a source and a Lambda function to process the events, send this evaluation information in the form of a log to CloudWatch Logs and S3 for use as an additional security feed for wider organizational monitoring and visibility. In a set of sample use cases, you explored how to use CloudWatch Logs Insights to quickly and conveniently access this information, aggregate it, gain deep insights and use it to take action.
AWS Identity and Access Management (IAM) Access Analyzer provides tools to simplify permissions management by making it simpler for you to set, verify, and refine permissions. One such tool is IAM Access Analyzer policy generation, which creates fine-grained policies based on your AWS CloudTrail access activity—for example, the actions you use with Amazon Elastic Compute Cloud (Amazon EC2), AWS Lambda, and Amazon Simple Storage Service (Amazon S3). AWS has expanded policy generation capabilities to support the identification of actions used from over 140 services. New additions include services such as AWS CloudFormation, Amazon DynamoDB, and Amazon Simple Queue Service (Amazon SQS). When you request a policy, IAM Access Analyzer generates a policy by analyzing your CloudTrail logs to identify actions used from this group of over 140 services. The generated policy makes it efficient to grant only the required permissions for your workloads. For other services, Access Analyzer helps you by identifying the services used and guides you to add the necessary actions.
In this post, we will show how you can use Access Analyzer to generate an IAM permissions policy that restricts CloudFormation permissions to only those actions that are necessary to deploy a given template, in order to follow the principle of least privilege.
Permissions for AWS CloudFormation
AWS CloudFormation lets you create a collection of related AWS and third-party resources and provision them in a consistent and repeatable fashion. A common access management pattern is to grant developers permission to use CloudFormation to provision resources in the production environment and limit their ability to do so directly. This directs developers to make infrastructure changes in production through CloudFormation, using infrastructure-as-code patterns to manage the changes.
CloudFormation can create, update, and delete resources on the developer’s behalf by assuming an IAM role that has sufficient permissions. Cloud administrators often grant this IAM role broad permissions–in excess of what’s necessary to just create, update, and delete the resources from the developer’s template–because it’s not clear what the minimum permissions are for the template. As a result, the developer could use CloudFormation to create or modify resources outside of what’s required for their workload.
The best practice for CloudFormation is to acquire permissions by using the credentials from an IAM role you pass to CloudFormation. When you attach a least-privilege permissions policy to the role, the actions CloudFormation is allowed to perform can be scoped to only those that are necessary to manage the resources in the template. In this way, you can avoid anti-patterns such as assigning the AdministratorAccess or PowerUserAccess policies—both of which grant excessive permissions—to the role.
The following section will describe how to set up your account and grant these permissions.
Prepare your development account
Within your development account, you will configure the same method for deploying infrastructure as you use in production: passing a role to CloudFormation when you launch a stack. First, you will verify that you have the necessary permissions, and then you will create the role and the role’s permissions policy.
Get permissions to use CloudFormation and IAM Access Analyzer
You will need the following minimal permissions in your development account:
Permission to use CloudFormation, in particular to create, update, and delete stacks
Permission to pass an IAM role to CloudFormation
Permission to create IAM roles and policies
Permission to use Access Analyzer, specifically the GetGeneratedPolicy, ListPolicyGenerations, and StartPolicyGeneration actions
The following IAM permissions policy can be used to grant your identity these permissions.
Note: If your identity already has these permissions through existing permissions policies, there is no need to apply the preceding policy to your identity.
Create a role for CloudFormation
Creating a service role for CloudFormation in the development account makes it less challenging to generate the least-privilege policy, because it becomes simpler to identify the actions CloudFormation is taking as it creates and deletes resources defined in the template. By identifying the actions CloudFormation has taken, you can create a permissions policy to match.
To create an IAM role in your development account for CloudFormation
For the trusted entity, choose AWS service. From the list of services, choose CloudFormation.
Choose Next: Permissions.
Select one or more permissions policies that align with the types of resources your stack will create. For example, if your stack creates a Lambda function and an IAM role, choose the AWSLambda_FullAccess and IAMFullAccess policies.
Note: Because you have not yet created the least-privilege permissions policy, the role is granted broader permissions than required. You will use this role to launch your stack and evaluate the resulting actions that CloudFormation takes, in order to build a lower-privilege policy.
Choose Next: Tags to proceed.
Enter one or more optional tags, and then choose Next: Review.
Enter a name for the role, such as CloudFormationDevExecRole.
Choose Create role.
Create and destroy the stack
To have CloudFormation exercise the actions required by the stack, you will need to create and destroy the stack.
To create and destroy the stack
Navigate to CloudFormation in the console, expand the menu in the left-hand pane, and choose Stacks.
On the Stacks page, choose Create Stack, and then choose With new resources.
Choose Template is ready, choose Upload a template file, and then select the file for your template. Choose Next.
Enter a Stack name, and then choose Next.
For IAM execution role name, select the name of the role you created in the previous section (CloudFormationDevExecRole). Choose Next.
Review the stack configuration. If present, select the check box(es) in the Capabilities section, and then choose Create stack.
Wait for the stack to reach the CREATE_COMPLETE state before continuing.
From the list of stacks, select the stack you just created, choose Delete, and then choose Delete stack.
Wait until the stack reaches the DELETE_COMPLETE state (at which time it will also disappear from the list of active stacks).
Note: It’s recommended that you also modify the CloudFormation template and update the stack to initiate updates to the deployed resources. This will allow Access Analyzer to capture actions that update the stack’s resources, in addition to create and delete actions. You should also review the API documentation for the resources that are being used in your stack and identify any additional actions that may be required.
Now that the development environment is ready, you can create the least-privilege permissions policy for the CloudFormation role.
Use Access Analyzer to generate a fine-grained identity policy
Access Analyzer reviews the access history in AWS CloudTrail to identify the actions an IAM role has used. Because CloudTrail delivers logs within an average of about 15 minutes of an API call, you should wait at least that long after you delete the stack before you attempt to generate the policy, in order to properly capture all of the actions.
Note: CloudTrail must be enabled in your AWS account in order for policy generation to work. To learn how create a CloudTrail trail, see Creating a trail for your AWS account in the AWS CloudTrail User Guide.
To generate a permissions policy by using Access Analyzer
Open the IAM console and choose Roles. In the search box, enter CloudFormationDevExecRole and select the role name in the list.
On the Permissions tab, scroll down and choose Generate policy based on CloudTrail events to expand this section. Choose Generate policy.
Select the time period of the CloudTrail logs you want analyzed.
Select the AWS Region where you created and deleted the stack, and then select the CloudTrail trail name in the drop-down list.
If this is your first time generating a policy, choose Create and use a new service role to have an IAM role automatically created for you. You can view the permissions policy the role will receive by choosing View permission details. Otherwise, choose Use an existing service role and select a role in the drop-down list.
The policy generation options are shown in Figure 1.
Figure 1: Policy generation options
Choose Generate policy.
You will be redirected back to the page that shows the CloudFormationDevExecRole role. The Status in the Generate policy based on CloudTrail events section will show In progress. Wait for the policy to be generated, at which time the status will change to Success.
Review the generated policy
You must review and save the generated policy before it can be applied to the role.
To review the generated policy
While you are still viewing the CloudFormationDevExecRole role in the IAM console, under Generate policy based on CloudTrail events, choose View generated policy.
The Generated policy page will open. The Actions included in the generated policy section will show a list of services and one or more actions that were found in the CloudTrail log. Review the list for omissions. Refer to the IAM documentation for a list of AWS services for which an action-level policy can be generated. An example list of services and actions for a CloudFormation template that creates a Lambda function is shown in Figure 2.
Figure 2: Actions included in the generated policy
Use the drop-down menus in the Add actions for services used section to add any necessary additional actions to the policy for the services that were identified by using CloudTrail. This might be needed if an action isn’t recorded in CloudTrail or if action-level information isn’t supported for a service.
Note: The iam:PassRole action will not show up in CloudTrail and should be added manually if your CloudFormation template assigns an IAM role to a service (for example, when creating a Lambda function). A good rule of thumb is: If you see iam:CreateRole in the actions, you likely need to also allow iam:PassRole. An example of this is shown in Figure 3.
Figure 3: Adding PassRole as an IAM action
When you’ve finished adding additional actions, choose Next.
Generated policies contain placeholders that need to be filled in with resource names, AWS Region names, and other variable data. The actual values for these placeholders should be determined based on the content of your CloudFormation template and the Region or Regions you plan to deploy the template to.
To replace placeholders with real values
In the generated policy, identify each of the Resource properties that use placeholders in the value, such as ${RoleNameWithPath} or ${Region}. Use your knowledge of the resources that your CloudFormation template creates to properly fill these in with real values.
${RoleNameWithPath} is an example of a placeholder that reflects the name of a resource from your CloudFormation template. Replace the placeholder with the actual name of the resource.
${Region} is an example of a placeholder that reflects where the resource is being deployed, which in this case is the AWS Region. Replace this with either the Region name (for example, us-east-1), or a wildcard character (*), depending on whether you want to restrict the policy to a specific Region or to all Regions, respectively.
For example, a statement from the policy generated earlier is shown following.
This statement allows the Lambda actions to be performed on a function named MyLambdaFunction in AWS account 123456789012 in any Region (*). Substitute the correct values for Region, Account, and FunctionName in your policy.
The IAM policy editor window will automatically identify security or other issues in the generated policy. Review and remediate the issues identified in the Security, Errors, Warnings, and Suggestions tabs across the bottom of the window.
To review and remediate policy issues
Use the Errors tab at the bottom of the IAM policy editor window (powered by IAM Access Analyzer policy validation) to help identify any placeholders that still need to be replaced. Access Analyzer policy validation reviews the policy and provides findings that include security warnings, errors, general warnings, and suggestions for your policy. To find more information about the different checks, see Access Analyzer policy validation. An example of policy errors caused by placeholders still being present in the policy is shown in Figure 4.
Figure 4: Errors identified in the generated policy
Use the Security tab at the bottom of the editor window to review any security warnings, such as passing a wildcard (*) resource with the iam:PassRole permission. Choose the Learn more link beside each warning for information about remediation. An example of a security warning related to PassRole is shown in Figure 5.
Figure 5: Security warnings identified in the generated policy
Remediate the PassRole With Star In Resource warning by modifying Resource in the iam:PassRole statement to list the Amazon Resource Name (ARN) of any roles that CloudFormation needs to pass to other services. Additionally, add a condition to restrict which service the role can be passed to. For example, to allow passing a role named MyLambdaRole to the Lambda service, the statement would look like the following.
The generated policy can now be saved as an IAM policy.
To save the generated policy
In the IAM policy editor window, choose Next.
Enter a name for the policy and an optional description.
Review the Summary section with the list of permissions in the policy.
Enter optional tags in the Tags section.
Choose Create and attach policy.
Test this policy by replacing the existing role policy with this newly generated policy. Then create and destroy the stack again so that the necessary permissions are granted. If the stack fails during creation or deletion, follow the steps to generate the policy again and make sure that the correct values are being used for any iam:PassRole statements.
Deploy the CloudFormation role and policy
Now that you have the least-privilege policy created, you can give this policy to the cloud administrator so that they can deploy the policy and CloudFormation service role into production.
To create a CloudFormation template that the cloud administrator can use
Open the IAM console, choose Policies, and then use the search box to search for the policy you created. Select the policy name in the list.
On the Permissions tab, make sure that the {}JSON button is activated. Select the policy document by highlighting from line 1 all the way to the last line in the policy, as shown in Figure 6.
Figure 6: Highlighting the generated policy
With the policy still highlighted, use your keyboard to copy the policy into the clipboard (Ctrl-C on Linux or Windows, Option-C on macOS).
Paste the permissions policy JSON object into the following CloudFormation template, replacing the <POLICY-JSON-GOES-HERE> marker. Be sure to indent the left-most curly braces of the JSON object so that they are to the right of the PolicyDocument keyword.
AWSTemplateFormatVersion: '2010-09-09'

Parameters:
  PolicyName:
    Type: String
    Description: The name of the IAM policy that will be created

  RoleName:
    Type: String
    Description: The name of the IAM role that will be created

Resources:
  CfnPolicy:
    Type: AWS::IAM::ManagedPolicy
    Properties:
      ManagedPolicyName: !Ref PolicyName
      Path: /
      PolicyDocument: >
        <POLICY-JSON-GOES-HERE>

  CfnRole:
    Type: AWS::IAM::Role
    Properties:
      RoleName: !Ref RoleName
      AssumeRolePolicyDocument:
        Version: '2012-10-17'
        Statement:
          - Action:
            - sts:AssumeRole
            Effect: Allow
            Principal:
              Service:
                - cloudformation.amazonaws.com
      ManagedPolicyArns:
        - !Ref CfnPolicy
      Path: /
For example, after pasting the policy, the CfnPolicy resource in the template will look like the following.
Save the CloudFormation template and share it with the cloud administrator. They can use this template to create an IAM role and permissions policy that CloudFormation can use to deploy resources in the production account.
Note: Verify that in addition to having the necessary permissions to work with CloudFormation, your production identity also has permission to perform the iam:PassRole action with CloudFormation for the role that the preceding template creates.
As you continue to develop your stack, you will need to repeat the steps in the Use Access Analyzer to create a permissions policy and Deploy the CloudFormation role and policy sections of this post in order to make sure that the permissions policy remains up-to-date with the permissions required to deploy your stack.
Considerations
If your CloudFormation template uses custom resources that are backed by AWS Lambda, you should also run Access Analyzer on the IAM role that is created for the Lambda function in order to build an appropriate permissions policy for that role.
To generate a permissions policy for a Lambda service role
Launch the stack in your development AWS account to create the Lamba function’s role.
Make a note of the name of the role that was created.
Destroy the stack in your development AWS account.
Follow the instructions from the Use Access Analyzer to generate a fine-grained identity policy and Review the generated policy sections of this post to create the least-privilege policy for the role, substituting the Lambda function’s role name for CloudFormationDevExecRole.
Build the resulting least-privilege policy into the CloudFormation template as the Lambda function’s permission policy.
Conclusion
IAM Access Analyzer helps generate fine-grained identity policies that you can use to grant CloudFormation the permissions it needs to create, update, and delete resources in your stack. By granting CloudFormation only the necessary permissions, you can incorporate the principle of least privilege, developers can deploy their stacks in production using reduced permissions, and cloud administrators can create guardrails for developers in production settings.
If you have feedback about this blog post, submit comments in the Comments section below. You can also start a new thread on AWS Identity and Access Management re:Post to get answers from the community.
Want more AWS Security news? Follow us on Twitter.
We continue to listen to our customers, regulators, and stakeholders to understand their needs regarding audit, assurance, certification, and attestation programs at Amazon Web Services (AWS). We are pleased to announce that Spring 2022 SOC 1, SOC 2, and SOC 3 reports are now available in Spanish. These translated reports will help drive greater engagement and alignment with customer and regulatory requirements across Latin America and Spain.
The English language version of the reports contains the independent opinion issued by the auditors and control test results. Stakeholders should use the English version as a complement to the Spanish version.
Translated SOC reports in Spanish are available through AWS Artifact. Translated SOC reports in Spanish will be published twice a year, in alignment with the Fall and Spring reporting cycles.
We value your feedback and questions—feel free to reach out to our team or give feedback about this post through the Contact Us page.
If you have feedback about this post, submit comments in the Comments section below. Want more AWS Security news? Follow us on Twitter.
Español
Los informes SOC de Primavera de 2022 ahora están disponibles en español
Seguimos escuchando a nuestros clientes, reguladores y partes interesadas para comprender sus necesidades en relación con los programas de auditoría, garantía, certificación y atestación en Amazon Web Services (AWS). Nos complace anunciar que los informes SOC 1, SOC 2 y SOC 3 de AWS de otoño de 2021 ya están disponibles en español. Estos informes traducidos ayudarán a impulsar un mayor compromiso y alineación con los requisitos regulatorios y de los clientes en las regiones de América Latina y España.
La versión en inglés de los informes debe tenerse en cuenta en relación con la opinión independiente emitida por los auditores y los resultados de las pruebas de control, como complemento de las versiones en español.
Los informes SOC traducidos en español están disponibles en AWS Artifact. Los informes SOC traducidos en español se publicarán dos veces al año según los ciclos de informes de otoño y primavera.
Valoramos sus comentarios y preguntas; no dude en ponerse en contacto con nuestro equipo o enviarnos sus comentarios sobre esta publicación a través de nuestra página Contáctenos.
Si tienes comentarios sobre esta publicación, envíalos en la sección Comentarios a continuación. ¿Desea obtener más noticias sobre seguridad de AWS? Síguenos en Twitter.
AWS Identity and Access Management (IAM) Access Analyzer provides many tools to help you set, verify, and refine permissions. One part of IAM Access Analyzer—policy validation—helps you author secure and functional policies that grant the intended permissions. Now, I’m excited to announce that AWS has updated the IAM console experience for role trust policies to make it simpler for you to author and validate the policy that controls who can assume a role. In this post, I’ll describe the new capabilities and show you how to use them as you author a role trust policy in the IAM console.
Overview of changes
A role trust policy is a JSON policy document in which you define the principals that you trust to assume the role. The principals that you can specify in the trust policy include users, roles, accounts, and services. The new IAM console experience provides the following features to help you set the right permissions in the trust policy:
An interactive policy editor prompts you to add the right policy elements, such as the principal and the allowed actions, and offers context-specific documentation.
As you author the policy, IAM Access Analyzer runs over 100 checks against your policy and highlights issues to fix. This includes new policy checks specific to role trust policies, such as a check to make sure that you’ve formatted your identity provider correctly. These new checks are also available through the IAM Access Analyzer policy validation API.
Before saving the policy, you can preview findings for the external access granted by your trust policy. This helps you review external access, such as access granted to a federated identity provider, and confirm that you grant only the intended access when you create the policy. This functionality was previously available through the APIs, but now it’s also available in the IAM console.
In the following sections, I’ll walk you through how to use these new features.
Example scenario
For the walkthrough, consider the following example, which is illustrated in Figure 1. You are a developer for Example Corp., and you are working on a web application. You want to grant the application hosted in one account—the ApplicationHost account—access to data in another account—the BusinessData account. To do this, you can use an IAM role in the BusinessData account to grant temporary access to the application through a role trust policy. You will grant a role in the ApplicationHost account—the PaymentApplication role—to access the BusinessData account through a role—the ApplicationAccess role. In this example, you create the ApplicationAccess role and grant cross-account permissions through the trust policy by using the new IAM console experience that helps you set the right permissions.
Figure 1: Visual explanation of the scenario
Create the role and grant permissions through a role trust policy with the policy editor
In this section, I will show you how to create a role trust policy for the ApplicationAccess role to grant the application access to the data in your account through the policy editor in the IAM console.
To create a role and grant access
In the BusinessData account, open the IAM console, and in the left navigation pane, choose Roles.
Choose Create role, and then select Custom trust policy, as shown in Figure 2.
Figure 2: Select “Custom trust policy” when creating a role
In the Custom trust policy section, for 1. Add actions for STS, select the actions that you need for your policy. For example, to add the action sts:AssumeRole, choose AssumeRole.
Figure 3: JSON role trust policy
For 2. Add a principal, choose Add to add a principal.
In the Add principal box, for Principal type, select IAM roles. This populates the ARN field with the format of the role ARN that you need to add to the policy, as shown in Figure 4.
Figure 4: Add a principal to your role trust policy
Update the role ARN template with the actual account and role information, and then choose Add principal. In our example, the account is ApplicationHost with an AWS account number of 111122223333, and the role is PaymentApplication role. Therefore, the role ARN is arn:aws:iam:: 111122223333: role/PaymentApplication. Figure 5 shows the role trust policy with the action and principal added.
Figure 5: Sample role trust policy
(Optional) To add a condition, for 3. Add a condition, choose Add, and then complete the Add condition box according to your needs.
Author secure policies by reviewing policy validation findings
As you author the policy, you can see errors or warnings related to your policy in the policy validation window, which is located below the policy editor in the console. With this launch, policy validation in IAM Access Analyzer includes 13 new checks focused on the trust relationship for the role. The following are a few examples of these checks and how to address them:
Role trust policy unsupported wildcard in principal – you can’t use a * in your role trust policy.
Invalid federated principal syntax in role trust policy – you need to fix the format of the identity provider.
Missing action for condition key – you need to add the right action for a given condition, such as the sts:TagSession when there are session tag conditions.
In the policy validation window, do the following:
Choose the Security tab to check if your policy is overly permissive.
Choose the Errors tab to review any errors associated with the policy.
Choose the Warnings tab to review if aspects of the policy don’t align with AWS best practices.
Choose the Suggestions tab to get recommendations on how to improve the quality of your policy.
Figure 6: Policy validation window in IAM Access Analyzer with a finding for your policy
For each finding, choose Learn more to review the documentation associated with the finding and take steps to fix it. For example, Figure 6 shows the error Mismatched Action For Principal. To fix the error, remove the action sts:AssumeRoleWithWebIdentity.
Preview external access by reviewing cross-account access findings
IAM Access Analyzer also generates findings to help you assess if a policy grants access to external entities. You can review the findings before you create the policy to make sure that the policy grants only intended access. To preview the findings, you create an analyzer and then review the findings.
To preview findings for external access
Below the policy editor, in the Preview external access section, choose Go to Access Analyzer, as shown in Figure 7.
Note: IAM Access Analyzer is a regional service, and you can create a new analyzer in each AWS Region where you operate. In this situation, IAM Access Analyzer looks for an analyzer in the Region where you landed on the IAM console. If IAM Access Analyzer doesn’t find an analyzer there, it asks you to create an analyzer.
Figure 7: Preview external access widget without an analyzer
On the Create analyzer page, do the following to create an analyzer:
For Name, enter a name for your analyzer.
For Zone of trust, select the correct account.
Choose Create analyzer.
Figure 8: Create an analyzer to preview findings
After you create the analyzer, navigate back to the role trust policy for your role to review the external access granted by this policy. The following figure shows that external access is granted to PaymentApplication.
Figure 9: Preview finding
If the access is intended, you don’t need to take any action. In this example, I want the PaymentApplication role in the ApplicationHost account to assume the role that I’m creating.
If the access is unintended, resolve the finding by updating the role ARN information.
Select Next and grant the required IAM permissions for the role.
Name the role ApplicationAccess, and then choose Save to save the role.
Now the application can use this role to access the BusinessData account.
Conclusion
By using the new IAM console experience for role trust policies, you can confidently author policies that grant the intended access. IAM Access Analyzer helps you in your least-privilege journey by evaluating the policy for potential issues to make it simpler for you to author secure policies. IAM Access Analyzer also helps you preview external access granted through the trust policy to help ensure that the granted access is intended. To learn more about how to preview IAM Access Analyzer cross-account findings, see Preview access in the documentation. To learn more about IAM Access Analyzer policy validation checks, see Access Analyzer policy validation. These features are also available through APIs.
If you have feedback about this post, submit comments in the Comments section below. If you have questions about this post, start a new thread at AWS IAM re:Post or contact AWS Support.
In this post, we’ll walk through the best practices to implement before you enable Amazon Macie across all of your AWS accounts within AWS Organizations.
Amazon Macie is a data classification and data protection service that uses machine learning and pattern matching to help secure your critical data in AWS. To do this, Macie first automatically provides an inventory of Amazon Simple Storage Service (Amazon S3) buckets in AWS accounts managed by Macie and identifies S3 buckets with security risks, including unencrypted buckets, publicly accessible buckets, and buckets shared with AWS accounts external to AWS Organizations. Second, Macie applies machine learning and pattern matching techniques to the buckets you select to discover, identify, and create alerts for sensitive data, such as personally identifiable information (PII). With the visibility provided by Macie, you can centrally manage your sensitive data findings across your data estate and automate and take actions on Macie findings.
By enabling Amazon Macie within AWS Organizations, you immediately start receiving the benefits of viewing your Macie policy findings and sensitive data findings from jobs that ran for member AWS accounts. When you enable Macie for member accounts, a service-linked role is created within each member AWS account. Macie uses a service-linked role (AWSServiceRoleForAmazonMacie) to monitor resources on your behalf. The service-linked role has a trust relationship with the Macie service (macie.amazonaws.com). For more information about using Macie in your AWS Organizations architecture, see the AWS Security Reference Architecture (AWS SRA).
The best practices we’ll walk through include how to create least-privilege AWS Identity and Access Management (IAM) policies for Macie-delegated administrators and for security engineers who will use Macie on a day-to-day basis. We’ll also show you how to create classification buckets, provide you with the correct resource permissions to allow the Macie service-linked role in each AWS account, and cover how to troubleshoot common issues.
IAM roles to provision for Amazon Macie
The least-privilege principle is important when managing access to sensitive data within your AWS accounts. In this section, we’ll show you how to create least-privilege IAM roles for the following personas for Macie:
Data administrator
Data security engineers
DevOps/DevSecOps engineer
Macie sensitive data findings reviewer
The personas can vary based on your organization, and this list is primarily meant to serve as an example. You will need to align the appropriate permissions to each role in order to enable Macie with the principle of least privilege. You can create your own customer managed policies after you know the specific permissions required for each persona.
Important: In general, AWS strongly recommends you limit the use of wildcards where possible. However, in some of the persona policies that follow, wildcards are necessary to accomplish the task. To implement the principle of least privilege where wildcards must be used, you should put limits on the resources that the persona can access. You can do this by adding condition keys for Macie; or if you deployed Macie by using AWS Organizations, you can add a condition for aws:ResourceOrgId.
Persona 1: Data administrator
This persona is a data administrator who is responsible for setting up and configuring Macie within AWS Organizations. To enforce separation of duties, this persona is not able to view or access Macie findings. You can perform the following steps to verify that the entity has the required permissions to enable the Macie-delegated administrator, and onboard the member AWS accounts within AWS Organizations. You can find the full procedure for each step by following the links to the Macie User Guide.
It’s important to note that Macie is a Regional service. This means that the designation of a Macie administrator account is a Regional designation. A Macie administrator account in a specific AWS Region can manage Macie for member accounts only in that Region. To centrally manage Macie accounts in multiple Regions, the management account must log in to each Region where the organization uses Macie, and then designate the Macie administrator account in each of those Regions. You can use a single Macie administrator account to centrally manage up to 5,000 AWS accounts.
In the following policy, replace <account-id> with the Macie-delegated administrator account ID.
This persona is a data security engineer who has day-to-day responsibility for reviewing Macie findings or Macie sensitive data discovery job configurations. Depending on your use case, you may need to separate this persona into two distinct personas where one is responsible to view Macie findings and the other to set Macie job configurations. To allow an IAM principal read-only permissions to view the Macie dashboard, configurations, and features, you can use the following policy. To enforce least privilege and restrict the resources to the Macie-delegated administrator, replace <region> with the AWS Region in which the delegated administrator is designated, and replace <account-id> with the Macie delegated administrator account ID.
This persona is a DevOps or DevSecOps engineer who is responsible for building and maintaining applications that run on AWS resources. These application builders typically receive top-level security guidance from central security, and they are directly responsible for the security of the applications that they design, build, and operate in AWS. DevSecOps engineers might need limited additional IAM permissions to configure Macie discovery jobs, depending on how Macie will be used within AWS Organizations. To allow an IAM principal the ability to pause or stop Macie jobs, you can add the following policy. Be sure to replace <region> with the AWS Region in which the delegated administrator is designated, and replace <account-id> with the Macie delegated administrator AWS account number.
This persona is a reviewer (usually a security engineer) who is responsible for investigating the sensitive data associated with Macie findings. There are a number of ways this persona can be set up, based on your specific use case and the needs of your organization. In this section, we will describe two of the options for setting up this persona.
In this option, Macie doesn’t use the Macie service-linked role for your account to perform these tasks. Instead, you use your IAM identity to locate, retrieve, encrypt, and reveal the samples for sensitive findings. You can retrieve and reveal sensitive data samples for a finding if you’re allowed to access the requisite resources and data, and you’re allowed to perform the requisite actions. All the requisite actions are logged in AWS CloudTrail. In the following policy, be sure to replace <account-id>, <region>, and <key-id> with your own values.
Option 2: Create IAM roles to review findings and objects in the same AWS account where objects are located
For a command line utility to help you investigate the sensitive data, you can use the Macie Finding Data Reveal project. The Macie Finding Data Reveal project needs permissions to invoke macie:GetFindings on the account and s3:GetObject on the specific object reported in the finding.
In the following policy, be sure to replace <DOC-EXAMPLE-BUCKET> with the values for the S3 bucket where the finding is reported; and replace <account-id>, <region>, and <key-id> with your own values. You will also need to configure the KMS key and S3 bucket resource policies to allow permissions to your IAM role.
If you use an IAM role in the same AWS account, you can specify permissions to access the object and encryption key by using resource policies, and you can leave off the ReportedS3Object and KMSPermissions statement ID (Sid).
Apply SCPs to restrict unauthorized changes to Macie
After you create the personas, you need to verify that the Macie configurations to manage Macie members within AWS Organizations are only updated by authorized IAM principals. The following is an example service control policy (SCP) that you can use to prevent users from disabling Macie, or from modifying Macie configurations within the organization. Make sure to replace <account-id> and <data-admin-role-name> with your own values for the authorized IAM principal.
Allow the Macie service-linked IAM role to scan S3 objects
When Macie analyzes files, it needs permissions to analyze encrypted files. This is important so that you don’t have blind spots in your data protection initiatives.
Before you run a Macie job against S3 objects, make sure that existing KMS keys that are used to encrypt the S3 buckets also grant the Macie service-linked IAM role in the AWS account the necessary permissions to decrypt the S3 objects. For more information, see Service-linked roles for Amazon Macie. To confirm that Macie can scan encrypted objects, the associated KMS key resource policies must allow the Macie service-linked role to use the KMS key to decrypt objects.
Furthermore, depending on the object’s type of encryption, Macie might not be able to fully scan the object. The following table summarizes types of object encryption and the ability Macie has to scan the object. For more information, see Macie supported encryption types.
S3 object encryption type
Macie scan ability
Client-side encryption
Macie cannot decrypt and analyze the object. Macie can only store and report metadata for the object.
Server-side encryption with Amazon S3 managed keys (SSE-S3)
Macie can decrypt and analyze the object.
Server-side encryption with AWS managed AWS KMS encryption (AWS-KMS)
Macie can decrypt and analyze the object.
Server-side encryption with customer managed AWS KMS encryption (SSE-KMS)
Macie can decrypt and analyze the object if Macie is authorized to use the KMS key. Otherwise, Macie can only store and report metadata for the object.
Server-side encryption with customer provided key (SSE-C)
Macie cannot decrypt and analyze the object. Macie can only store and report metadata for the object.
The Macie service-linked role (AWSServiceRoleForAmazonMacie) is not authorized to decrypt S3 objects in Macie member accounts, because no resource-based policy allows the kms:Decrypt action. Check for the following error message in AWS CloudTrail if the AWS KMS resource-based policy implicitly denies the Macie service-linked role. Your error message will show <account-id> and <region> as your own values.
sourceIPAddress: "macie.amazonaws.com" and eventSource : "kms.amazonaws.com" and eventName : "Decrypt" and errorCode : "AccessDenied" Filter the results by error message: “User: arn:aws:sts::<account-id>:assumed-role/AWSServiceRoleForAmazonMacie/classifier-content-fetcher is not authorized to perform: kms:Decrypt on resource: arn:aws:kms:<region>:key/key-id because no resource-based policy allows the kms:Decrypt action…”
In order to remediate a KMS implicit deny error for a customer-managed key, add the following to the customer managed key policy. Be sure to replace <account_name> with your own value.
The Macie service-linked role (AWSServiceRoleForAmazonMacie) is not authorized to decrypt S3 objects in Macie member accounts, because resource-based policies explicitly deny the kms:Decrypt action for the Macie service-linked role. Check for the following error message in AWS CloudTrail if the AWS KMS resource-based policy explicitly denies the Macie service-linked role. Your error message will show <account_name> and <region> as your own values.
sourceIPAddress : "macie.amazonaws.com" and eventSource : "kms.amazonaws.com" and eventName : "Decrypt" and errorCode : "AccessDenied" Filter the results by error message:
 “User:arn:aws:sts::<account_name>:assumed-role/AWSServiceRoleForAmazonMacie/classifier-content-fetcher is not authorized to perform: kms:Decrypt on resource: arn:aws:kms:<region>:key/key-id with an explicit deny in resource-based policy…”
In order to remediate a KMS explicit deny error, update the policy statement to allow the Macie service-linked role access to decrypt and describe key actions. Be sure to replace <account_name> with your own value.
The Macie service-linked role (AWSServiceRoleForAmazonMacie) is explicitly denied in the S3 bucket policy. Check for the following error messages in AWS CloudTrail for S3 explicit deny.
userIdentity.sessionContext.sessionIssuer.userName: "AWSServiceRoleForAmazonMacie" and eventSource: "s3.amazonaws.com" and eventName: " GetBucketEncryption" and errorcode: “ServerSideEncryptionConfigurationNotFoundError” and errormessage: “The server side encryption configuration was not found” OR userIdentity.sessionContext.sessionIssuer.userName: "AWSServiceRoleForAmazonMacie" and eventSource: "s3.amazonaws.com" and eventName: "GetBucketReplication" and errorcode: " ReplicationConfigurationNotFoundError" and errormessage: “The replication configuration was not found” OR userIdentity.sessionContext.sessionIssuer.userName: "AWSServiceRoleForAmazonMacie" and eventSource: "s3.amazonaws.com" and eventName: " GetBucketTagging" and errorcode: " NoSuchTagSet" and errormessage: “The TagSet does not exist” OR userIdentity.sessionContext.sessionIssuer.userName: "AWSServiceRoleForAmazonMacie" and eventSource: "s3.amazonaws.com" and eventName: "GetBucketAcl" and responseElements: "null" OR userIdentity.sessionContext.sessionIssuer.userName: "AWSServiceRoleForAmazonMacie" and eventSource: "s3.amazonaws.com" and eventName: " GetBucketPublicAccessBlock" and responseElements: "null" OR userIdentity.sessionContext.sessionIssuer.userName: "AWSServiceRoleForAmazonMacie" and eventSource: "s3.amazonaws.com" and eventName: "GetBucketLocation" and responseElements: "null" OR userIdentity.sessionContext.sessionIssuer.userName: "AWSServiceRoleForAmazonMacie" and eventSource: "s3.amazonaws.com" and eventName: "GetBucketVersioning" and responseElements: "null" OR userIdentity.sessionContext.sessionIssuer.userName: "AWSServiceRoleForAmazonMacie" and eventSource: "s3.amazonaws.com" and eventName: " GetBucketPolicy" and errorcode: "NoSuchBucketPolicy" and errormessage: “The bucket policy does not exist” OR userIdentity.sessionContext.sessionIssuer.userName: "AWSServiceRoleForAmazonMacie" and eventSource: "s3.amazonaws.com" and eventName: " GetBucketEncryption" and responseElements: "null" OR userIdentity.sessionContext.sessionIssuer.userName: "AWSServiceRoleForAmazonMacie" and eventSource: "s3.amazonaws.com" and eventName: " GetBucketPolicy" and responseElements: "null"
Note: Nearly all S3 explicit deny and S3 object ownership error messages have the same event names. See the Ensure S3 and KMS resource policy compliance section in this post to view the S3 object ownership setting.
Macie cannot decrypt and analyze S3 objects if there is an explicit deny in the S3 bucket policy. The following is an example of an S3 bucket policy that explicitly denies the Macie service-linked role. Be sure to replace <DOC-EXAMPLE-BUCKET> and <account_id> with your own values.
Macie can decrypt and analyze S3 objects if there is no explicit deny in the S3 bucket. The following is an example of the permission for the S3 bucket policy to explicitly allow the Macie service-linked role to have access to your S3 bucket. Be sure to replace <DOC-EXAMPLE-BUCKET> and <account-id> with your own values.
Macie is unable to scan S3 objects that are owned by another AWS account, due to access control list (ACL) settings and permissions. Event names are identical for both S3 explicit deny errors and S3 Object Ownership errors. S3 explicit deny has the following additional two event names.
userIdentity.sessionContext.sessionIssuer.userName: "AWSServiceRoleForAmazonMacie" and eventSource: "s3.amazonaws.com" and eventName: " GetBucketEncryption" and errorcode: “ServerSideEncryptionConfigurationNotFoundError” and errormessage: “The server side encryption configuration was not found” OR userIdentity.sessionContext.sessionIssuer.userName: "AWSServiceRoleForAmazonMacie" and eventSource: "s3.amazonaws.com" and eventName: " GetBucketPolicy" and errorcode: "NoSuchBucketPolicy" and errormessage: “The bucket policy does not exist”
The S3 Object Ownership feature has the following three settings that you can use to control ownership of objects that are uploaded to your bucket, and to disable or enable ACLs. We recommend that you disable ACLs on your S3 buckets.
Bucket owner enforced (recommended) – ACLs are disabled, and the bucket owner automatically owns and has full control over every object in the bucket. ACLs no longer affect permissions to data in the S3 bucket. The bucket uses policies to define access control.
Bucket owner preferred – The bucket owner owns and has full control over new objects that other accounts write to the bucket with the bucket-owner-full-control canned ACL.
Object writer (default) – The AWS account that uploads an object owns the object, has full control over it, and can grant other users access to it through ACLs.
In order to remediate an S3 object ownership issue, there are two options available:
Option 1: Change object ownership settings to bucket owner enforced (recommended). When you disable ACLs, it changes the ownership of existing objects to the bucket owner account. You should consider the following scenarios prior to changing the S3 Object Ownership setting.
S3 objects in the source bucket (account A) are encrypted with a customer-managed key, and you copy the object in the destination bucket (account B) that has the object writer object ownership setting and its own customer managed key. If you copy S3 objects from the source bucket (account A) to the destination bucket (account B), and you do not specify a customer-managed key to use during the copy command, and the object ownership setting in the destination bucket (account B) is bucket owner enforced (ACLs disabled), then this will result in an object ownership change to bucket owner. These actions will also set the object’s server-side encryption to use the encryption settings in the destination bucket (account B).
However, if you specify a customer-managed key during the S3 copy command, then the object’s server-side encryption remains with the source bucket account (account A) customer managed key.
Option 2: Use S3 batch operations to copy objects and set ACLs. Changing the object ownership
setting to bucket owner preferred only applies to new objects and not the existing objects. You can use one one-time batch operation to set ACLs on existing objects.
Ensure S3 and KMS resource policy compliance
Another best practice to follow when you enable Macie with AWS Organizations is to use Macie to verify your organization’s policy compliance for S3 objects and KMS resources. In the Macie-delegated admin account, the summary page provides an overview of S3 data and security and access control in your organization in AWS Organizations. Users can view information about S3 security posture, such as whether S3 buckets are public or not, server-side encryption of S3 buckets, and whether S3 buckets are shared inside or outside of your organization. Data privacy and compliance groups can get organization-wide visibility across their accounts and buckets.
Your organization is responsible for introducing guardrails based on your organization’s security policies. To automate compliance checks for S3 objects and KMS resources, make sure to update your continuous integration and continuous deployment (CI/CD) pipeline. This will allow you to set up continuous compliance checks for the Macie service-linked role by using tools like CloudFormation Guard or Open Policy Agent.
In order to check S3 object ownership settings, you can use AWS Command Line Interface (AWS CLI) commands to view bucket ownership settings. Currently, Macie and AWS Config do not report on S3 object ownership as part of the resource configuration. You can run the following AWS CLI command in AWS accounts within AWS Organizations, making sure to replace <DOC-EXAMPLE-BUCKET> with your own value, to view bucket ownership settings. This can be scripted to list all AWS accounts within AWS Organizations, list all S3 buckets within the AWS account, then get the bucket ownership configuration.
After checking these ownership settings, you can run the following AWS CLI commands to view the S3 objects ownership settings, making sure to replace <DOC-EXAMPLE-BUCKET> with your own value.
You should also consider the following recommendations before you enable Macie, so that you can manage Macie findings and member accounts efficiently at scale:
Enable Security Hub Region aggregation to consolidate Macie findings in a single Region.
Ingest logs from AWS CloudWatch Logs to enable custom alerting for Macie sensitive data discovery job results.
In Macie settings, turn on the Auto-enable setting. That way, Macie will automatically be enabled for new accounts when the accounts are added to your organization in AWS Organizations.
Store sensitive data discovery results in an S3 bucket, with default encryption enabled, after you have configured your Macie delegated administrator account.
Conclusion
In this blog post, we walked you through the best practices to implement before you enable Amazon Macie across your AWS accounts within AWS Organizations. In order to efficiently use Macie within AWS Organizations, it is important to understand why failures can occur, how to investigate the logs, and how to remediate the issues for both existing and future resources.
Now that you have a better understanding of how to prepare for using Macie, try running a Macie sensitive data discovery job. The next aspect to start thinking about is how to review and respond to Macie findings. You can deploy another solution to automatically send notifications with Slack when Macie findings are generated.
If you have feedback about this post, submit comments in the Comments section below. If you have any questions about this post, start a thread on the Amazon Macie forum.
Want more AWS Security news? Follow us on Twitter.
When an EC2 instance is suspected to have been compromised, it’s strongly recommended to investigate what happened to the instance. You should look for activities such as:
Open network connections
List of running processes
Processes that contain injected code
Memory-resident infections
Other forensic artifacts
When an EC2 instance is compromised, it’s important to take action as quickly as possible. Before you shut down the EC2 instance, you first need to capture the contents of its volatile memory (RAM) in a memory dump because it contains the instance’s in-progress operations. This is key in determining the root cause of compromise.
In order to capture volatile memory in Linux, you can use a tool like Linux Memory Extractor (LiME). This requires you to have the kernel modules that are specific to the kernel version of the instance for which you want to capture volatile memory. We also recommend that you limit the actions you take on the instance where you are trying to capture the volatile memory in order to minimize the set of artifacts created as part of the capture process, so you need a method to build the tools for capturing volatile memory outside the instance under investigation. After you capture the volatile memory, you can use a tool like Volatility2 to analyze it in a dedicated forensics environment. You can use tools like LiME and Volatility2 on EC2 instances that use x86, x64, and Graviton instance types.
An AWS Identity and Access Management (IAM) role with permissions to deploy the required resources in an AWS account. More details about these permissions follow in the next section.
Solution overview
The EC2 forensic module factory solution consists of the following resources:
Important: The SSM document clones the LiME and Volatility2 GitHub repositories, and these tools use version 2.0 of the GNU General Public License. This SSM document can be updated to include your preferred tools, like fmem or Volatility3, for forensic analysis and capture.
One security group for the EC2 instance that is provisioned during the automation
The solution uses the following VPC endpoints for AWS services:
ec2_endpoint
ec2_msg_endpoint
kms_endpoint
ssm_endpoint
ssm_msg_endpoint
s3_endpoint
Figure 1 shows an overview of the EC2 forensic module factory solution workflow.
Figure 1: Automation to build forensic kernel modules for an Amazon Linux EC2 instance
The EC2 forensic module factory solution workflow in Figure 1 includes the following numbered steps:
A Step Functions workflow is started, which creates a Step Functions task token and invokes the first Lambda function, createEC2module, to create EC2 forensic modules.
A Step Functions task token is used to allow long-running processes to complete and to avoid a Lambda timeout error. The createEC2module function runs for approximately 9 minutes. The run time for the function can vary depending on any customizations to the createEC2module function or the SSM document.
The createEC2module function launches an EC2 instance based on the Amazon Machine Image (AMI) provided.
Once the EC2 instance is running, an SSM document is run, which includes the following steps:
If a specific kernel version is provided in step 1, this kernel version will be installed on the EC2 instance. If no kernel version is provided, the default kernel version on the EC2 instance will be used to create the modules.
If a specific kernel version was selected and installed, the system is rebooted to use this kernel version.
The prerequisite build tools are installed, as well as the LiME and Volatility2 packages.
The LiME kernel module and the Volatility2 profile are built.
The kernel modules for LiME and Volatility2 are put into the S3 bucket.
Upon completion, the Step Functions task token is sent to the Step Functions workflow to invoke the second cleanupEC2module Lambda function to terminate the EC2 instance that was launched in step 2.
Option 1: Deploy the solution with AWS CloudFormation (console)
Sign in to your preferred security tooling account in the AWS Management Console, and choose the following Launch Stack button to open the AWS CloudFormation console pre-loaded with the template for this solution. It will take approximately 10 minutes for the CloudFormation stack to complete.
Option 2: Deploy the solution by using the AWS CDK
To build the app when navigating to the project’s root folder, use the following commands. npm install -g aws-cdk npm install
Run the following commands in your terminal while authenticated in your preferred security tooling AWS account. Be sure to replace <INSERT_AWS_ACCOUNT> with your account number, and replace <INSERT_REGION> with the AWS Region that you want the solution deployed to. cdk bootstrap aws://<INSERT_AWS_ACCOUNT>/<INSERT_REGION> cdk deploy
Run the solution to build forensic kernel objects
Now that you’ve deployed the EC2 forensic module factory solution, you need to invoke the Step Functions workflow in order to create the forensic kernel objects. The following is an example of manually invoking the workflow, to help you understand what actions are being performed. These actions can also be integrated and automated with an EC2 incident response solution.
To manually invoke the workflow to create the forensic kernel objects (console)
At the input prompt, enter the following JSON values. { "AMI_ID": "ami-0022f774911c1d690", "kernelversion":"kernel-4.14.104-95.84.amzn2.x86_64" }
Choose Start execution to start the workflow, as shown in Figure 2.
Figure 2: Step Functions step input example to build custom kernel version using Amazon Linux 2 AMI ID
Workflow progress
You can use the AWS Management Console to follow the progress of the Step Functions workflow. If the workflow is successful, you should see the image when you view the status of the Step Functions workflow, as shown in Figure 3.
Figure 3: Step Functions workflow success example
Note: The Step Functions workflow run time depends on the commands that are being run in the SSM document. The example SSM document included in this post runs for approximately 9 minutes. For information about possible Step Functions errors, see Error handling in Step Functions.
To verify that the artifacts are built
After the Step Functions workflow has successfully completed, go to the S3 bucket that was provisioned in the EC2 forensic module factory solution.
Look for two prefixes in the bucket for LiME and Volatility2, as shown in Figure 4.
Figure 4: S3 bucket prefix for forensic kernel modules
Open each tool name prefix in S3 to find the actual module, such as in the following examples:
Now that the objects have been created, the solution has successfully completed.
Incorporate forensic module builds into an EC2 AMI pipeline
Each organization has specific requirements for allowing application teams to use various EC2 AMIs, and organizations commonly implement an EC2 image pipeline using tools like EC2 Image Builder. EC2 Image Builder uses recipes to install and configure required components in the AMI before application teams can launch EC2 instances in their environment.
The EC2 forensic module factory solution we implemented here makes use of an existing EC2 instance AMI. As mentioned, the solution uses an SSM document to create forensic modules. The logic in the SSM document could be incorporated into your EC2 image pipeline to create the forensic modules and store them in an S3 bucket. S3 also allows additional layers of protection such as enforcing default bucket encryption with an AWS Key Management Service Customer Managed Key (CMK), verifying S3 object integrity with checksum, S3 Object Lock, and restrictive S3 bucket policies. These protections can help you to ensure that your forensic modules have not been modified and are only accessible by authorized entities.
It is important to note that incorporating forensic module creation into an EC2 AMI pipeline will build forensic modules for the specific kernel version used in that AMI. You would still need to employ this EC2 forensic module solution to build a specific forensic module version if it is missing from the S3 bucket where you are creating and storing these forensic modules. The need to do this can arise if the EC2 instance is updated after the initial creation of the AMI.
Incorporate the solution into existing EC2 incident response automation
There are many existing solutions to automate incident response workflow for quarantining and capturing forensic evidence for EC2 instances, but the majority of EC2 incident response automation solutions have a single dependency in common, which is the use of specific forensic modules for the target EC2 instance kernel version. The EC2 forensic module factory solution in this post enables you to be both proactive and reactive when building forensic kernel modules for your EC2 instances.
You can use the EC2 forensic module factory solution in two different ways:
Ad-hoc – In this post, you walked through the solution by running the Step Functions workflow with specific parameters. You can do this to build a repository of kernel modules.
Automated – Alternatively, you can incorporate this solution into existing automation by invoking the Step Functions workflow and passing the AMI ID and kernel version. An example could be the following:
An existing EC2 incident response solution attempts to get the forensic modules to capture the volatile memory from an S3 bucket.
If the specific kernel version is missing in the S3 bucket, the solution updates the automation to StartExecution on the create_ec2_volatile_memory_modules state machine.
The Step Functions workflow builds the specific forensic modules.
After the Step Functions workflow is complete, the EC2 incident response solution restarts its workflow to get the forensic modules to capture the volatile memory on the EC2 instance.
Now that you have the kernel modules, you can both capture the volatile memory by using LiME, and then conduct analysis on the memory dump by using a Volatility2 profile.
To capture and analyze volatile memory on the target EC2 instance (high-level steps)
Copy the LiME module from the S3 bucket holding the module repository to the target EC2 instance.
Capture the volatile memory by using the LiME module.
Stream the volatile memory dump to a S3 bucket.
Launch an EC2 forensic workstation instance, with Volatility2 installed.
Copy the Volatility2 profile from the S3 bucket to the appropriate location.
Copy the volatile memory dump to the EC2 forensic workstation.
Run analysis on the volatile memory with Volatility2 by using the specific Volatility2 profile created for the target EC2 instance.
Automated self-service AWS solution
AWS has also released the Automated Forensics Orchestrator for Amazon EC2 solution that you can use to quickly set up and configure a dedicated forensics orchestration automation solution for your security teams. The Automated Forensics Orchestrator for Amazon EC2 allows you to capture and examine the data from EC2 instances and attached Amazon Elastic Block Store (Amazon EBS) volumes in your AWS environment. This data is collected as forensic evidence for analysis by the security team.
The Automated Forensics Orchestrator for Amazon EC2 creates the foundational components to enable the EC2 forensic module factory solution’s memory forensic acquisition workflow and forensic investigation and reporting service. Both the Automated Forensics Orchestrator for Amazon EC2, and the EC2 forensic module factory, are hosted in different GitHub projects. And you will need to reconcile the expected S3 bucket locations for the associated modules:
Customize the EC2 forensic module factory solution
The SSM document pulls open-source packages to build tools for the specific Linux kernel version. You can update the SSM document to your specific requirements for forensic analysis, including expanding support for other operating systems, versions, and tools.
You can also update the S3 object naming convention and object tagging, to allow external solutions to reference and copy the appropriate kernel module versions to enable the forensic workflow.
Clean up
If you deployed the EC2 forensic module factory solution by using the Launch Stack button in the AWS Management Console or the CloudFormation template ec2_module_factory_cfn, do the following to clean up:
In the AWS CloudFormation console for the account and Region where you deployed the solution, choose the Ec2VolModules stack.
Choose the option to Delete the stack.
If you deployed the solution by using the AWS CDK, run the following command.
cdk destroy
Conclusion
In this blog post, we walked you through the deployment and use of the EC2 forensic module factory solution to use AWS Step Functions, AWS Lambda, AWS Systems Manager, and Amazon EC2 to create specific versions of forensic kernel modules for Amazon Linux EC2 instances.
The solution provides a framework to create the foundational components required in an EC2 incident response automation solution. You can customize the solution to your needs to fit into an existing EC2 automation, or you can deploy this solution in tandem with the Automated Forensics Orchestrator for Amazon EC2.
If you have feedback about this post, submit comments in the Comments section below. If you have any questions about this post, start a thread on re:Post.
Want more AWS Security news? Follow us on Twitter.
AWS Identity and Access Management (IAM) is changing an aspect of how role trust policy evaluation behaves when a role assumes itself. Previously, roles implicitly trusted themselves from a role trust policy perspective if they had identity-based permissions to assume themselves. After receiving and considering feedback from customers on this topic, AWS is changing role assumption behavior to always require self-referential role trust policy grants. This change improves consistency and visibility with regard to role behavior and privileges. This change allows customers to create and understand role assumption permissions in a single place (the role trust policy) rather than two places (the role trust policy and the role identity policy). It increases the simplicity of role trust permission management: “What you see [in the trust policy] is what you get.”
Therefore, beginning today, for any role that has not used the identity-based behavior since June 30, 2022, a role trust policy must explicitly grant permission to all principals, including the role itself, that need to assume it under the specified conditions. Removal of the role’s implicit self-trust improves consistency and increases visibility into role assumption behavior.
Most AWS customers will not be impacted by the change at all. Only a tiny percentage (approximately 0.0001%) of all roles are involved. Customers whose roles have recently used the previous implicit trust behavior are being notified, beginning today, about those roles, and may continue to use this behavior with those roles until February 15, 2023, to allow time for making the necessary updates to code or configuration. Or, if these customers are confident that the change will not impact them, they can opt out immediately by substituting in new roles, as discussed later in this post.
The first part of this post briefly explains the change in behavior. The middle sections answer practical questions like: “why is this happening?,” “how might this change impact me?,” “which usage scenarios are likely to be impacted?,” and “what should I do next?” The usage scenario section is important because it shows that, based on our analysis, the self-assuming role behavior exhibited by code or human users is very likely to be unnecessary and counterproductive. Finally, for security professionals interested in better understanding the reasons for the old behavior, the rationale for the change, as well as its possible implications, the last section reviews a number of core IAM concepts and digs in to additional details.
What is changing?
Until today, an IAM role implicitly trusted itself. Consider the following role trust policy attached to the role named RoleA in AWS account 123456789012.
This role trust policy grants role assumption access to the role named RoleB in the same account. However, if the corresponding identity-based policy for RoleA grants the sts:AssumeRole action with respect to itself, then RoleA could also assume itself. Therefore, there were actually two roles that could assume RoleA: the explicitly permissioned RoleB, and RoleA, which implicitly trusted itself as a byproduct of the IAM ownership model (explained in detail in the final section). Note that the identity-based permission that RoleA must have to assume itself is not required in the case of RoleB, and indeed an identity-based policy associated with RoleB that references other roles is not sufficient to allow RoleB to assume them. The resource-based permission granted by RoleA’s trust policy is both necessary and sufficient to allow RoleB to assume RoleA.
Although earlier we summarized this behavior as “implicit self-trust,” the key point here is that the ability of Role A to assume itself is not actually implicit behavior. The role’s self-referential permission had to be explicit in one place or the other (or both): either in the role’s identity-based policy (perhaps based on broad wildcard permissions), or its trust policy. But unlike the case with other principals and role trust, an IAM administrator would have to look in two different policies to determine whether a role could assume itself.
As of today, for any new role, or any role that has not recently assumed itself while relying on the old behavior, IAM administrators must modify the previously shown role trust policy as follows to allow RoleA to assume itself, regardless of the privileges granted by its identity-based policy:
This change makes role trust behavior clearer and more consistent to understand and manage, whether directly by humans or as embodied in code.
How might this change impact me?
As previously noted, most customers will not be impacted by the change at all. For those customers who do use the prior implicit trust grant behavior, AWS will work with you to eliminate your usage prior to February 15, 2023. Here are more details for the two cases of customers who have not used the behavior, and those who have.
If you haven’t used the implicit trust behavior since June 30, 2022
Beginning today, if you have not used the old behavior for a given role at any time since June 30, 2022, you will now experience the new behavior. Those existing roles, as well as any new roles, will need an explicit reference in their own trust policy in order to assume themselves. If you have roles that are used only very occasionally, such as once per quarter for a seldom-run batch process, you should identify those roles and if necessary either remove the dependency on the old behavior or update their role trust policies to include the role itself prior to their next usage (see the second sample policy above for an example).
If you have used the implicit trust behavior since June 30, 2022
If you have a role that has used the implicit trust behavior since June 30, 2022, then you will continue to be able to do so with that role until February 15, 2023. AWS will provide you with notice referencing those roles beginning today through your AWS Health Dashboard and will also send an email with the relevant information to the account owner and security contact. We are allowing time for you to make any necessary changes to your existing processes, code, or configurations to prepare for removal of the implicit trust behavior. If you can’t change your processes or code, you can continue to use the behavior by making a configuration change—namely, by updating the relevant role trust policies to reference the role itself. On the other hand, you can opt out of the old behavior at any time by creating a new role with a different Amazon Resource Name (ARN) with the desired identity-based and trust-policy-based permissions and substituting it for any older role that was identified as using the implicit trust behavior. (The new role will not be allow-listed, because the allow list is based on role ARNs.) You can also modify an existing allow-listed role’s trust policy to explicitly deny access to itself. See the “What should I do next?” section for more information.
Notifications and retirement
As we previously noted, starting today, accounts with existing roles that use the implicit self-assume role assumption behavior will be notified of this change by email and through their AWS Health Dashboard. Those roles have been allow-listed, and so for now their behavior will continue as before. After February 15, 2023, the old behavior will be retired for all roles and all accounts. IAM Documentation has been updated to make clear the new behavior.
After the old behavior is retired from the allow-listed roles and accounts, role sessions that make self-referential role assumption calls will fail with an Access Denied error unless the role’s trust policy explicitly grants the permission directly through a role ARN. Another option is to grant permission indirectly through an ARN to the root principal in the trust policy that acts as a delegation of privilege management, after which permission grants in identity-based policies determine access, similar to the typical cross-account case.
Which usage scenarios are likely to be impacted?
Users often attach an IAM role to an Amazon Elastic Compute Cloud (Amazon EC2) instance, an Amazon Elastic Container Service (Amazon ECS) task, or AWS Lambda function. Attaching a role to one of these runtime environments enables workloads to use short-term session credentials based on that role. For example, when an EC2 instance is launched, AWS automatically creates a role session and assigns it to the instance. An AWS best practice is for the workload to use these credentials to issue AWS API calls without explicitly requesting short-term credentials through sts:AssumeRole calls.
However, examples and code snippets commonly available on internet forums and community knowledge sharing sites might incorrectly suggest that workloads need to call sts:AssumeRole to establish short-term sessions credentials for operation within those environments.
We analyzed AWS Security Token Service (AWS STS) service metadata about role self-assumption in order to understand the use cases and possible impact of the change. What the data shows is that in almost all cases this behavior is occurring due to unnecessarily reassuming the role in an Amazon EC2, Amazon ECS, Amazon Elastic Kubernetes Services (EKS), or Lambda runtime environment already provided by the environment. There are two exceptions, discussed at the end of this section under the headings, “self-assumption with a scoped-down policy” and “assuming a target compute role during development.”
There are many variations on this theme, but overall, most role self-assumption occurs in scenarios where the person or code is unnecessarily reassuming the role that the code was already running as. Although this practice and code style can still work with a configuration change (by adding an explicit self-reference to the role trust policy), the better practice will almost always be to remove this unnecessary behavior or code from your AWS environment going forward. By removing this unnecessary behavior, you save CPU, memory, and network resources.
Common mistakes when using Amazon EKS
Some users of the Amazon EKS service (or possibly their shell scripts) use the command line interface (CLI) command aws eks get-token to obtain an authentication token for use in managing a Kubernetes cluster. The command takes as an optional parameter a role ARN. That parameter allows a user to assume another role other than the one they are currently using before they call get-token. However, the CLI cannot call that API without already having an IAM identity. Some users might believe that they need to specify the role ARN of the role they are already using. We have updated the Amazon EKS documentation to make clear that this is not necessary.
Common mistakes when using AWS Lambda
Another example is the use of an sts:AssumeRole API call from a Lambda function. The function is already running in a preassigned role provided by user configuration within the Lambda service, or else it couldn’t successfully call any authenticated API action, including sts:AssumeRole. However, some Lambda functions call sts:AssumeRole with the target role being the very same role that the Lambda function has already been provided as part of its configuration. This call is unnecessary.
AWS Software Development Kits (SDKs) all have support for running in AWS Lambda environments and automatically using the credentials provided in that environment. We have updated the Lambda documentation to make clear that such STS calls are unnecessary.
Common mistakes when using Amazon ECS
Customers can associate an IAM role with an Amazon ECS task to give the task AWS credentials to interact with other AWS resources.
We detected ECS tasks that call sts:AssumeRole on the same role that was provided to the ECS task. Amazon ECS makes the role’s credentials available inside the compute resources of the ECS task, whether on Amazon EC2 or AWS Fargate, and these credentials can be used to access AWS services or resources as the IAM role associated with the ECS talk, without being called through sts:AssumeRole. AWS handles renewing the credentials available on ECS tasks before the credentials expire. AWS STS role assumption calls are unnecessary, because they simply create a new set of the same temporary role session credentials.
AWS SDKs all have support for running in Amazon ECS environments and automatically using the credentials provided in that ECS environment. We have updated the Amazon ECS documentation to make clear that calling sts:AssumeRole for an ECS task is unnecessary.
Common mistakes when using Amazon EC2
Users can configure an Amazon EC2 instance to contain an instance profile. This instance profile defines the IAM role that Amazon EC2 assigns the compute instance when it is launched and begins to run. The role attached to the EC2 instance enables your code to send signed requests to AWS services. Without this attached role, your code would not be able to access your AWS resources (nor would it be able to call sts:AssumeRole). The Amazon EC2 service handles renewing these temporary role session credentials that are assigned to the instance before they expire.
We have observed that workloads running on EC2 instances call sts:AssumeRole to assume the same role that is already associated with the EC2 instance and use the resulting role-session for communication with AWS services. These role assumption calls are unnecessary, because they simply create a new set of the same temporary role session credentials.
AWS SDKs all have support for running in Amazon EC2 environments and automatically using the credentials provided in that EC2 environment. We have updated the Amazon EC2 documentation to make clear that calling sts:AssumeRole for an EC2 instance with a role assigned is unnecessary.
For information on creating an IAM role, attaching that role to an EC2 instance, and launching an instance with an attached role, see “IAM roles for Amazon EC2” in the Amazon EC2 User Guide.
Other common mistakes
If your use case does not use any of these AWS execution environments, you might still experience an impact from this change. We recommend that you examine the roles in your account and identify scenarios where your code (or human use through the AWS CLI) results in a role assuming itself. We provide Amazon Athena and AWS CloudTrail Lake queries later in this post to help you locate instances where a role assumed itself. For each instance, you can evaluate whether a role assuming itself is the right operation for your needs.
Self-assumption with a scoped-down policy
The first pattern we have observed that is not a mistake is the use of self-assumption combined with a scoped-down policy. Some systems use this approach to provide different privileges for different use cases, all using the same underlying role. Customers who choose to continue with this approach can do so by adding the role to its own trust policy. While the use of scoped-down policies and the associated least-privilege approach to permissions is a good idea, we recommend that customers switch to using a second generic role and assume that role along with the scoped-down policy rather than using role self-assumption. This approach provides more clarity in CloudTrail about what is happening, and limits the possible iterations of role assumption to one round, since the second role should not be able to assume the first. Another possible approach in some cases is to limit subsequent assumptions is by using an IAM condition in the role trust policy that is no longer satisfied after the first role assumption. For example, for Lambda functions, this would be done by a condition checking for the presence of the “lambda:SourceFunctionArn” property; for EC2, by checking for presence of “ec2:SourceInstanceARN.”
Assuming an expected target compute role during development
Another possible reason for role self-assumption may result from a development practice in which developers attempt to normalize the roles that their code is running in between scenarios in which role credentials are not automatically provided by the environment, and scenarios where they are. For example, imagine a developer is working on code that she expects to run as a Lambda function, but during development is using her laptop to do some initial testing of the code. In order to provide the same execution role as is expected later in product, the developer might configure the role trust policy to allow assumption by a principal readily available on the laptop (an IAM Identity Center role, for example), and then assume the expected Lambda function execution role when the code is initializing. The same approach could be used on a build and test server. Later, when the code is deployed to Lambda, the actual role is already available and in use, but the code need not be modified in order to provide the same post-role-assumption behavior that existing outside of Lambda: the unmodified code can automatically assume what is in this case the same role, and proceed. While this approach is not illogical, as with the scope-down policy case we recommend that customers configure distinct roles for assumption both in development and test environments as well as later production environments. Again, this approach provides more clarity in CloudTrail about what is happening, and limits the possible iterations of role assumption to one round, since the second role should not be able to assume the first.
What should I do next?
If you receive an email or AWS Health Dashboard notification for an account, we recommend that you review your existing role trust policies and corresponding code. For those roles, you should remove the dependency on the old behavior, or if you can’t, update those role trust policies with an explicit self-referential permission grant. After the grace period expires on February 15, 2023, you will no longer be able to use the implicit self-referential permission grant behavior.
If you currently use the old behavior and need to continue to do so for a short period of time in the context of existing infrastructure as code or other automated processes that create new roles, you can do so by adding the role’s ARN to its own trust policy. We strongly encourage you to treat this as a temporary stop-gap measure, because in almost all cases it should not be necessary for a role to be able to assume itself, and the correct solution is to change the code that results in the unnecessary self-assumption. If for some reason that self-service solution is not sufficient, you can reach out to AWS Support to seek an accommodation of your use case for new roles or accounts.
If you make any necessary code or configuration changes and want to remove roles that are currently allow-listed, you can also ask AWS Support to remove those roles from the allow list so that their behavior follows the new model. Or, as previously noted, you can opt out of the old behavior at any time by creating a new role with a different ARN that has the desired identity-based and trust-policy–based permissions and substituting it for the allow-listed role. Another stop-gap type of option is to add an explicit deny that references the role to its own trust policy.
If you would like to understand better the history of your usage of role self-assumption in a given account or organization, you can follow these instructions on querying CloudTrail data with Athena and then use the following Athena query against your account or organization CloudTrail data, as stored in Amazon Simple Storage Services (Amazon S3). The results of the query can help you understand the scenarios and conditions and code involved. Depending on the size of your CloudTrail logs, you may need to follow the partitioning instructions to query subsets of your CloudTrail logs sequentially. If this query yields no results, the role self-assumption scenario described in this blog post has never occurred within the analyzed CloudTrail dataset.
SELECT eventid, eventtime, userIdentity.sessioncontext.sessionissuer.arn as RoleARN, split_part(userIdentity.principalId, ':', 2) as RoleSessionName from cloudtrail_logs t CROSS JOIN UNNEST(t.resources) unnested (resources_entry) where eventSource = 'sts.amazonaws.com' and eventName = 'AssumeRole' and userIdentity.type = 'AssumedRole' and errorcode IS NULL and substr(userIdentity.sessioncontext.sessionissuer.arn,12) = substr(unnested.resources_entry.ARN,12)
As another option, you can follow these instructions to set up CloudTrail Lake to perform a similar analysis. CloudTrail Lake allows richer, faster queries without the need to partition the data. As of September 20, 2022, CloudTrail Lake now supports import of CloudTrail logs from Amazon S3. This allows you to perform a historical analysis even if you haven’t previously enabled CloudTrail Lake. If this query yields no results, the scenario described in this blog post has never occurred within the analyzed CloudTrail dataset.
SELECT eventid, eventtime, userIdentity.sessioncontext.sessionissuer.arn as RoleARN, userIdentity.principalId as RoleIdColonRoleSessionName from $EDS_ID where eventSource = 'sts.amazonaws.com' and eventName = 'AssumeRole' and userIdentity.type = 'AssumedRole' and errorcode IS NULL and userIdentity.sessioncontext.sessionissuer.arn = element_at(resources,1).arn
Understanding the change: more details
To better understand the background of this change, we need to review the IAM basics of identity-based policies and resource-based policies, and then explain some subtleties and exceptions. You can find additional overview material in the IAM documentation.
The structure of each IAM policy follows the same basic model: one or more statements with an effect (allow or deny), along with principals, actions, resources, and conditions. Although the identity-based and resource-based policies share the same basic syntax and semantics, the former is associated with a principal, the latter with a resource. The main difference between the two is that identity-based policies do not specify the principal, because that information is supplied implicitly by associating the policy with a given principal. On the other hand, resource policies do not specify an arbitrary resource, because at least the primary identifier of the resource (for example, the bucket identifier of an S3 bucket) is supplied implicitly by associating the policy with that resource. Note that an IAM role is the only kind of AWS object that is both a principal and a resource.
In most cases, access to a resource within the same AWS account can be granted by either an identity-based policy or a resource-based policy. Consider an Amazon S3 example. An identity-based policy attached to an IAM principal that allows the s3:GetObject action does not require an equivalent grant in the S3 bucket resource policy. Conversely, an s3:GetObject permission grant in a bucket’s resource policy is all that is needed to allow a principal in the same account to call the API with respect to that bucket; an equivalent identity-based permission is not required. Either the identity-based policy or the resource-based policy can grant the necessary permission. For more information, see IAM policy types: How and when to use them.
However, in order to more tightly govern access to certain security-sensitive resources, such as AWS Key Management Service (AWS KMS) keys and IAM roles, those resource policies need to grant access to the IAM principal explicitly, even within the same AWS account. A role trust policy is the resource policy associated with a role that specifies which IAM principals can assume the role by using one of the sts:AssumeRole* API calls. For example, in order for RoleB to assume RoleA in the same account, whether or not RoleB’s identity-based policy explicitly allows it to assume RoleA, RoleA’s role trust policy must grant access to RoleB. Within the same account, an identity-based permission by itself is not sufficient to allow assumption of a role. On the other hand, a resource-based permission—a grant of access in the role trust policy—is sufficient. (Note that it’s possible to construct a kind of hybrid permission to a role by using both its resource policy and other identity-based policies. In that case, the role trust policy grants permission to the root principal ARN; after that, the identity-based policy of a principal in that account would need to explicitly grant permission to assume that role. This is analogous to the typical cross-account role trust scenario.)
Until now, there has been a nonintuitive exception to these rules for situations where a role assumes itself. Since a role is both a principal (potentially with an identity-based policy) and a resource (with a resource-based policy), it is in the unique position of being both a subject and an object within the IAM system, as well as being an object owned by itself rather than its containing account. Due to this ownership model, roles with identity-based permission to assume themselves implicitly trusted themselves as resources, and vice versa. That is to say, roles that had the privilege as principals to assume themselves implicitly trusted themselves as resources, without an explicit self-referential Allow in the role trust policy. Conversely, a grant of permission in the role trust policy was sufficient regardless of whether there was a grant in the same role’s identity-based policy. Thus, in the self-assumption case, roles behaved like most other resources in the same account: only a single permission was required to allow role self-assumption, either on the identity side or the resource side of their dual-sided nature. Because of a role’s implicit trust of itself as a resource, the role’s trust policy—which might otherwise limit assumption of the role with properties such as actions and conditions—was not applied, unless it contained an explicit deny of itself.
The following example is a role trust policy attached to the role named RoleA in account 123456789012. It grants explicit access only to the role named RoleB.
Assuming that the corresponding identity-based policy for RoleA granted the sts:AssumeRole action with regard to RoleA, this role trust policy provided that there were two roles that could assume RoleA: RoleB (explicitly referenced in the trust policy) and RoleA (assuming it was explicitly referenced in its identity policy). RoleB could assume RoleA only if it had the principal tag project:BlueSkyProject because of the trust policy condition. (The sts:TagSession permission is needed here in case tags need to be added by the caller as parted of the RoleAssumption call.) RoleA, on the other hand, did not need to meet that condition because it relied on a different explicit permission—the one granted in the identity-based policy. RoleA would have needed the principal tag project:BlueSkyProject to meet the trust policy condition if and only if it was relying on the trust policy to gain access through the sts:AssumeRole action; that is, in the case where its identity-based policy did not provide the needed privilege.
As we previously noted, after considering feedback from customers on this topic, AWS has decided that requiring self-referential role trust policy grants even in the case where the identity-based policy also grants access is the better approach to delivering consistency and visibility with regard to role behavior and privileges. Therefore, as of today, role assumption behavior requires an explicit self-referential permission in the role trust policy, and the actions and conditions within that policy must also be satisfied, regardless of the permissions expressed in the role’s identity-based policy. (If permissions in the identity-based policy are present, they must also be satisfied.)
Requiring self-reference in the trust policy makes role trust policy evaluation consistent regardless of which role is seeking to assume the role. Improved consistency makes role permissions easier to understand and manage, whether through human inspection or security tooling. This change also eliminates the possibility of continuing the lifetime of an otherwise temporary credential without explicit, trackable grants of permission in trust policies. It also means that trust policy constraints and conditions are enforced consistently, regardless of which principal is assuming the role. Finally, as previously noted, this change allows customers to create and understand role assumption permissions in a single place (the role trust policy) rather than two places (the role trust policy and the role identity policy). It increases the simplicity of role trust permission management: “what you see [in the trust policy] is what you get.”
Continuing with the preceding example, if you need to allow a role to assume itself, you now must update the role trust policy to explicitly allow both RoleB and RoleA. The RoleA trust policy now looks like the following:
Without this new principal grant, the role can no longer assume itself. The trust policy conditions are also applied, even if the role still has unconditioned access to itself in its identity-based policy.
Conclusion
In this blog post we’ve reviewed the old and new behavior of role assumption in the case where a role seeks to assume itself. We’ve seen that, according to our analysis of service metadata, the vast majority of role self-assumption behavior that relies solely on identity-based privileges is totally unnecessary, because the code (or human) who calls sts:AssumeRole is already, without realizing it, using the role’s credentials to call the AWS STS API. Eliminating that mistake will improve performance and decrease resource consumption. We’ve also explained in more depth the reasons for the old behavior and the reasons for making the change, and provided Athena and CloudTrail Lake queries that you can use to examine past or (in the case of allow-listed roles) current self-assumption behavior in your own environments. You can reach out to AWS Support or your customer account team if you need help in this effort.
If you currently use the old behavior and need to continue to do so, your primary option is to create an explicit allow for the role in its own trust policy. If that option doesn’t work due to operational constraints, you can reach out to AWS Support to seek an accommodation of your use case for new roles or new accounts. You can also ask AWS Support to remove roles from the allow-list if you want their behavior to follow the new model.
If you have feedback about this post, submit comments in the Comments section below. If you have questions about this post, start a new IAM-tagged discussion on AWS re:Post or contact AWS Support.
AWS would like to thank several customers and partners who highlighted this behavior as something they found surprising and unhelpful, and asked us to consider making this change. We would also like to thank independent security researcher Ryan Gerstenkorn who engaged with AWS on this topic and worked with us prior to this update.
Want more AWS Security news? Follow us on Twitter.
Earning and maintaining customer trust is an ongoing commitment at Amazon Web Services (AWS). Our customers’ security requirements drive the scope and portfolio of the compliance reports, attestations, and certifications we pursue. We’re excited to announce that AWS has achieved authorization under the Information System Security Management and Assessment Program (ISMAP) program, effective from April 1, 2022 to March 31, 2023. The authorization scope covers a total of 145 AWS services (an increase of 22 services over the previous authorization) across 22 AWS Regions, including the Asia Pacific (Tokyo) Region and the Asia Pacific (Osaka) Region. This is the second time AWS has undergone an assessment since ISMAP was first published by the ISMAP steering committee in March 2020.
ISMAP is a Japanese government program for assessing the security of public cloud services. The purpose of ISMAP is to provide a common set of security standards for cloud service providers (CSPs) to comply with as a baseline requirement for government procurement. ISMAP introduces security requirements for cloud domains, practices, and procedures that CSPs must implement. CSPs must engage with an ISMAP-approved third-party assessor to assess compliance with the ISMAP security requirements in order to apply as an ISMAP-registered CSP. The ISMAP program will evaluate the security of each CSP and register those that satisfy the Japanese government’s security requirements. Upon successful ISMAP registration of CSPs, government procurement departments and agencies can accelerate their engagement with the registered CSPs and contribute to the smooth introduction of cloud services in government information systems.
The achievement of this authorization demonstrates the proactive approach AWS has taken to help customers meet compliance requirements set by the Japanese government and to deliver secure AWS services to our customers. Service providers and customers of AWS can use the ISMAP authorization of AWS services to support their own ISMAP authorization programs. The full list of 145 ISMAP-authorized AWS services is available on the AWS Services in Scope by Compliance Program webpage, and you can also use the ISMAP Customer Package on AWS Artifact. You can confirm the AWS ISMAP authorization status and find detailed scope information on the ISMAP Portal.
As always, we are committed to bringing new services and Regions into the scope of our ISMAP program, based on your business needs. If you have any questions, don’t hesitate to contact your AWS Account Manager.
If you have feedback about this post, submit comments in the Comments section below. Want more AWS Security how-to content, news, and feature announcements? Follow us on Twitter.
The collective thoughts of the interwebz
Manage Consent
To provide the best experiences, we use technologies like cookies to store and/or access device information. Consenting to these technologies will allow us to process data such as browsing behavior or unique IDs on this site. Not consenting or withdrawing consent, may adversely affect certain features and functions.
Functional
Always active
The technical storage or access is strictly necessary for the legitimate purpose of enabling the use of a specific service explicitly requested by the subscriber or user, or for the sole purpose of carrying out the transmission of a communication over an electronic communications network.
Preferences
The technical storage or access is necessary for the legitimate purpose of storing preferences that are not requested by the subscriber or user.
Statistics
The technical storage or access that is used exclusively for statistical purposes.The technical storage or access that is used exclusively for anonymous statistical purposes. Without a subpoena, voluntary compliance on the part of your Internet Service Provider, or additional records from a third party, information stored or retrieved for this purpose alone cannot usually be used to identify you.
Marketing
The technical storage or access is required to create user profiles to send advertising, or to track the user on a website or across several websites for similar marketing purposes.