Compliance with the Payment Card Industry Data Security Standard (PCI DSS) is critical for organizations that handle cardholder data. Achieving and maintaining PCI DSS compliance can be a complex and challenging endeavor. Serverless technology has transformed application development, offering agility, performance, cost, and security.
In this blog post, we examine the benefits of using AWS serverless services and highlight how you can use them to help align with your PCI DSS compliance responsibilities. You can remove additional undifferentiated compliance heavy lifting by building modern applications with abstracted AWS services. We review an example payment application and workflow that uses AWS serverless services and showcases the potential reduction in effort and responsibility that a serverless architecture could provide to help align with your compliance requirements. We present the review through the lens of a merchant that has an ecommerce website and include key topics such as access control, data encryption, monitoring, and auditing—all within the context of the example payment application. We don’t discuss additional service provider requirements from the PCI DSS in this post.
This example will help you navigate the intricate landscape of PCI DSS compliance. This can help you focus on building robust and secure payment solutions without getting lost in the complexities of compliance. This can also help reduce your compliance burden and empower you to develop your own secure, scalable applications. Join us in this journey as we explore how AWS serverless services can help you meet your PCI DSS compliance objectives.
Disclaimer
This document is provided for the purposes of information only; it is not legal advice, and should not be relied on as legal advice. Customers are responsible for making their own independent assessment of the information in this document. This document: (a) is for informational purposes only, (b) represents current AWS product offerings and practices, which are subject to change without notice, and (c) does not create any commitments or assurances from AWS and its affiliates, suppliers or licensors. AWS products or services are provided “as is” without warranties, representations, or conditions of any kind, whether express or implied. The responsibilities and liabilities of AWS to its customers are controlled by AWS agreements, and this document is not part of, nor does it modify, any agreement between AWS and its customers.
AWS encourages its customers to obtain appropriate advice on their implementation of privacy and data protection environments, and more generally, applicable laws and other obligations relevant to their business.
PCI DSS v4.0 and serverless
In April 2022, the Payment Card Industry Security Standards Council (PCI SSC) updated the security payment standard to “address emerging threats and technologies and enable innovative methods to combat new threats.” Two of the high-level goals of these updates are enhancing validation methods and procedures and promoting security as a continuous process. Adopting serverless architectures can help meet some of the new and updated requirements in version 4.0, such as enhanced software and encryption inventories. If a customer has access to change a configuration, it’s the customer’s responsibility to verify that the configuration meets PCI DSS requirements. There are more than 20 PCI DSS requirements applicable to Amazon Elastic Compute Cloud (Amazon EC2). To fulfill these requirements, customer organizations must implement controls such as file integrity monitoring, operating system level access management, system logging, and asset inventories. Using AWS abstracted services in this scenario can remove undifferentiated heavy lifting from your environment. With abstracted AWS services, because there is no operating system to manage, AWS becomes responsible for maintaining consistent time settings for an abstracted service to meet Requirement 10.6. This will also shift your compliance focus more towards your application code and data.
This makes more of your PCI DSS responsibility addressable through the AWS PCI DSS Attestation of Compliance (AOC) and Responsibility Summary. This attestation package is available to AWS customers through AWS Artifact.
Reduction in compliance burden
You can use three common architectural patterns within AWS to design payment applications and meet PCI DSS requirements: infrastructure, containerized, and abstracted. We look into EC2 instance-based architecture (infrastructure or containerized patterns) and modernized architectures using serverless services (abstracted patterns). While both approaches can help align with PCI DSS requirements, there are notable differences in how they handle certain elements. EC2 instances provide more control and flexibility over the underlying infrastructure and operating system, assisting you in customizing security measures based on your organization’s operational and security requirements. However, this also means that you bear more responsibility for configuring and maintaining security controls applicable to the operating systems, such as network security controls, patching, file integrity monitoring, and vulnerability scanning.
On the other hand, serverless architectures similar to the preceding example can reduce much of the infrastructure management requirements. This can relieve you, the application owner or cloud service consumer, of the burden of configuring and securing those underlying virtual servers. This can streamline meeting certain PCI requirements, such as file integrity monitoring, patch management, and vulnerability management, because AWS handles these responsibilities.
Using serverless architecture on AWS can significantly reduce the PCI compliance burden. Approximately 43 percent of the overall PCI compliance requirements, encompassing both technical and non-technical tests, are addressed by the AWS PCI DSS Attestation of Compliance.
Customer responsible 52%
AWS responsible 43%
N/A 5%
The following table provides an analysis of each PCI DSS requirement against the serverless architecture in Figure 1, which shows a sample payment application workflow. You must evaluate your own use and secure configuration of AWS workload and architectures for a successful audit.
PCI DSS 4.0 requirements
Test cases
Customer responsible
AWS responsible
N/A
Requirement 1: Install and maintain network security controls
35
13
22
0
Requirement 2: Apply secure configurations to all system components
27
16
11
0
Requirement 3: Protect stored account data
55
24
29
2
Requirement 4: Protect cardholder data with strong cryptography during transmission over open, public networks
12
7
5
0
Requirement 5: Protect all systems and networks from malicious software
25
4
21
0
Requirement 6: Develop and maintain secure systems and software
35
31
4
0
Requirement 7: Restrict access to system components and cardholder data by business need-to-know
22
19
3
0
Requirement 8: Identify users and authenticate access to system components
52
43
6
3
Requirement 9: Restrict physical access to cardholder data
56
3
53
0
Requirement 10: Log and monitor all access to system components and cardholder data
38
17
19
2
Requirement 11: Test security of systems and networks regularly
51
22
23
6
Requirement 12: Support information security with organizational policies
56
44
2
10
Total
464
243
198
23
Percentage
52%
43%
5%
Note: The preceding table is based on the example reference architecture that follows. The actual extent of PCI DSS requirements reduction can vary significantly depending on your cardholder data environment (CDE) scope, implementation, and configurations.
Sample payment application and workflow
This example serverless payment application and workflow in Figure 1 consists of several interconnected steps, each using different AWS services. The steps are listed in the following text and include brief descriptions. They cover two use cases within this example application — consumers making a payment and a business analyst generating a report.
The example outlines a basic serverless payment application workflow using AWS serverless services. However, it’s important to note that the actual implementation and behavior of the workflow may vary based on specific configurations, dependencies, and external factors. The example serves as a general guide and may require adjustments to suit the unique requirements of your application or infrastructure.
Several factors, including but not limited to, AWS service configurations, network settings, security policies, and third-party integrations, can influence the behavior of the system. Before deploying a similar solution in a production environment, we recommend thoroughly reviewing and adapting the example to align with your specific use case and requirements.
Keep in mind that AWS services and features may evolve over time, and new updates or changes may impact the behavior of the components described in this example. Regularly consult the AWS documentation and ensure that your configurations adhere to best practices and compliance standards.
This example is intended to provide a starting point and should be considered as a reference rather than an exhaustive solution. Always conduct thorough testing and validation in your specific environment to ensure the desired functionality and security.
Figure 1: Serverless payment architecture and workflow
Use case 1: Consumers make a payment
Consumers visit the e-commerce payment page to make a payment.
The request is routed to the payment application’s domain using Amazon Route 53, which acts as a DNS service.
The payment page is protected by AWS WAF to inspect the initial incoming request for any malicious patterns, web-based attacks (such as cross-site scripting (XSS) attacks), and unwanted bots.
An HTTPS GET request (over TLS) is sent to the public target IP. Amazon CloudFront, a content delivery network (CDN), acts as a front-end proxy and caches and fetches static content from an Amazon Simple Storage Service (Amazon S3) bucket.
AWS WAF inspects the incoming request for any malicious patterns, if the request is blocked, the request doesn’t return static content from the S3 bucket.
User authentication and authorization are handled by Amazon Cognito, providing a secure login and scalable customer identity and access management system (CIAM)
AWS WAF processes the request to protect against web exploits, then Amazon API Gateway forwards it to the payment application API endpoint.
API Gateway launches AWS Lambda functions to handle payment requests. AWS Step Functions state machine oversees the entire process, directing the running of multiple Lambda functions to communicate with the payment processor, initiate the payment transaction, and process the response.
The cardholder data (CHD) is temporarily cached in Amazon DynamoDB for troubleshooting and retry attempts in the event of transaction failures.
A Lambda function validates the transaction details and performs necessary checks against the data stored in DynamoDB. A web notification is sent to the consumer for any invalid data.
A Lambda function calculates the transaction fees.
A Lambda function authenticates the transaction and initiates the payment transaction with the third-party payment provider.
A Lambda function is initiated when a payment transaction with the third-party payment provider is completed. It receives the transaction status from the provider and performs multiple actions.
Use case 2: An admin or analyst generates the report for non-PCI data
An admin accesses the web-based reporting dashboard using their browser to generate a report.
The request is routed to AWS WAF to verify the source that initiated the request.
An HTTPS GET request (over TLS) is sent to the public target IP. CloudFront fetches static content from an S3 bucket.
AWS WAF inspects incoming requests for any malicious patterns, if the request is blocked, the request doesn’t return static content from the S3 bucket. The validated traffic is sent to Amazon S3 to retrieve the reporting page.
The backend requests of the reporting page pass through AWS WAF again to provide protection against common web exploits before being forwarded to the reporting API endpoint through API Gateway.
API Gateway launches a Lambda function for report generation. The Lambda function retrieves data from DynamoDB storage for the reporting mechanism.
The AWS Security Token Service (AWS STS) issues temporary credentials to the Lambda service in the non-PCI serverless account, allowing it to launch the Lambda function in the PCI serverless account. The Lambda function retrieves non-PCI data and writes it into DynamoDB.
The Lambda function fetches the non-PCI data based on the report criteria from the DynamoDB table from the same account.
Additional AWS security and governance services that would be implemented throughout the architecture are shown in Figure 1, Label-25. For example, Amazon CloudWatch monitors and alerts on all the Lambda functions within the environment.
Label-26 demonstrates frameworks that can be used to build the serverless applications.
Scoping and requirements
Now that we’ve established the reference architecture and workflow, lets delve into how it aligns with PCI DSS scope and requirements.
PCI scoping
Serverless services are inherently segmented by AWS, but they can be used within the context of an AWS account hierarchy to provide various levels of isolation as described in the reference architecture example.
Segregating PCI data and non-PCI data into separate AWS accounts can help in de-scoping non-PCI environments and reducing the complexity and audit requirements for components that don’t handle cardholder data.
PCI serverless production account
This AWS account is dedicated to handling PCI data and applications that directly process, transmit, or store cardholder data.
Services such as Amazon Cognito, DynamoDB, API Gateway, CloudFront, Amazon SNS, Amazon SES, Amazon SQS, and Step Functions are provisioned in this account to support the PCI data workflow.
Security controls, logging, monitoring, and access controls in this account are specifically designed to meet PCI DSS requirements.
Non-PCI serverless production account
This separate AWS account is used to host applications that don’t handle PCI data.
Since this account doesn’t handle cardholder data, the scope of PCI DSS compliance is reduced, simplifying the compliance process.
Note: You can use AWS Organizations to centrally manage multiple AWS accounts.
Now, let’s look at the PCI DSS requirements that this architectural pattern can help address.
Requirement 1: Install and maintain network security controls
Network security controls are limited to AWS Identity and Access Management (IAM) and application permissions because there is no customer controlled or defined network. VPC-centric requirements aren’t applicable because there is no VPC. The configuration settings for serverless services can be covered under Requirement 6 to for secure configuration standards. This supports compliance with Requirements 1.2 and 1.3.
Requirement 2: Apply secure configurations to all system components
AWS services are single function by default and exist with only the necessary functionality enabled for the functioning of that service. This supports compliance with much of Requirement 2.2.
Access to AWS services is considered non-console and only accessible through HTTPS through the service API. This supports compliance with Requirement 2.2.7.
The wireless requirements under Requirement 2.3 are not applicable, because wireless environments don’t exist in AWS environments.
Requirement 3: Protect stored account data
AWS is responsible for destruction of account data configured for deletion based on DynamoDB Time to Live (TTL) values. This supports compliance with Requirement 3.2.
DynamoDB and Amazon S3 offer secure storage of account data, encryption by default in transit and at rest, and integration with AWS Key Management Service (AWS KMS). This supports compliance with Requirements 3.5 and 4.2.
AWS is responsible for the generation, distribution, storage, rotation, destruction, and overall protection of encryption keys within AWS KMS. This supports compliance with Requirements 3.6 and 3.7.
Manual cleartext cryptographic keys aren’t available in this solution, Requirement 3.7.6 is not applicable.
Requirement 4: Protect cardholder data with strong cryptography during transmission over open, public networks
AWS Certificate Manager (ACM) integrates with API Gateway and enables the use of trusted certificates and HTTPS (TLS) for secure communication between clients and the API. This supports compliance with Requirement 4.2.
Requirement 4.2.1.2 is not applicable because there are no wireless technologies in use in this solution. Customers are responsible for ensuring strong cryptography exists for authentication and transmission over other wireless networks they manage outside of AWS.
Requirement 4.2.2 is not applicable because no end-user technologies exist in this solution. Customers are responsible for ensuring the use of strong cryptography if primary account numbers (PAN) are sent through end-user messaging technologies in other environments.
Requirement 5: Protect a ll systems and networks from malicious software
There are no customer-managed compute resources in this example payment environment, Requirements 5.2 and 5.3 are the responsibility of AWS.
Requirement 6: Develop and maintain secure systems and software
Amazon Inspector helps identify vulnerabilities and security weaknesses in the payment application’s code, dependencies, and configuration. This supports compliance with Requirement 6.3.
AWS WAF is designed to protect applications from common attacks, such as SQL injections, cross-site scripting, and other web exploits. AWS WAF can filter and block malicious traffic before it reaches the application. This supports compliance with Requirement 6.4.2.
Requirement 7: Restrict access to system components and cardholder data by business need to know
IAM and Amazon Cognito allow for fine-grained role- and job-based permissions and access control. Customers can use these capabilities to configure access following the principles of least privilege and need-to-know. IAM and Cognito support the use of strong identification, authentication, authorization, and multi-factor authentication (MFA). This supports compliance with much of Requirement 7.
Requirement 8: Identify users and authenticate access to system components
IAM and Amazon Cognito also support compliance with much of Requirement 8.
Some of the controls in this requirement are usually met by the identity provider for internal access to the cardholder data environment (CDE).
Requirement 9: Restrict physical access to cardholder data
AWS is responsible for the destruction of data in DynamoDB based on the customer configuration of content TTL values for Requirement 9.4.7. Customers are responsible for ensuring their database instance is configured for appropriate removal of data by enabling TTL on DDB attributes.
Requirement 9 is otherwise not applicable for this serverless example environment because there are no physical media, electronic media not already addressed under Requirement 3.2, or hard-copy materials with cardholder data. AWS is responsible for the physical infrastructure under the Shared Responsibility Model.
Requirement 10: Log and monitor all access to system components and cardholder data
AWS CloudTrail provides detailed logs of API activity for auditing and monitoring purposes. This supports compliance with Requirement 10.2 and contains all of the events and data elements listed.
CloudWatch can be used for monitoring and alerting on system events and performance metrics. This supports compliance with Requirement 10.4.
AWS Security Hub provides a comprehensive view of security alerts and compliance status, consolidating findings from various security services, which helps in ongoing security monitoring and testing. Customers must enable PCI DSS security standard, which supports compliance with Requirement 10.4.2.
AWS is responsible for maintaining accurate system time for AWS services. In this example, there are no compute resources for which customers can configure time. Requirement 10.6 is addressable through the AWS Attestation of Compliance and Responsibility Summary available in AWS Artifact.
Requirement 11: Regularly test security systems and processes
Testing for rogue wireless activity within the AWS-based CDE is the responsibility of AWS. AWS is responsible for the management of the physical infrastructure under Requirement 11.2. Customers are still responsible for wireless testing for their environments outside of AWS, such as where administrative workstations exist.
AWS is responsible for internal vulnerability testing of AWS services, and supports compliance with Requirement 11.3.1.
Amazon GuardDuty, a threat detection service that continuously monitors for malicious activity and unauthorized access, providing continuous security monitoring. This supports the IDS requirements under Requirement 11.5.1, and covers the entire AWS-based CDE.
AWS Config allows customers to catalog, monitor and manage configuration changes for their AWS resources. This supports compliance with Requirement 11.5.2.
Customers can use AWS Config to monitor the configuration of the S3 bucket hosting the static website. This supports compliance with Requirement 11.6.1.
Requirement 12: Support information security with organizational policies and programs
Customers can download the AWS AOC and Responsibility Summary package from Artifact to support Requirement 12.8.5 and the identification of which PCI DSS requirements are managed by the third-party service provider (TSPS) and which by the customer.
Conclusion
Using AWS serverless services when developing your payment application can significantly help reduce the number of PCI DSS requirements you need to meet by yourself. By offloading infrastructure management to AWS and using serverless services such as Lambda, API Gateway, DynamoDB, Amazon S3, and others, you can benefit from built-in security features and help align with your PCI DSS compliance requirements.
Contact us to help design an architecture that works for your organization. AWS Security Assurance Services is a Payment Card Industry-Qualified Security Assessor company (PCI-QSAC) and HITRUST External Assessor firm. We are a team of industry-certified assessors who help you to achieve, maintain, and automate compliance in the cloud by tying together applicable audit standards to AWS service-specific features and functionality. We help you build on frameworks such as PCI DSS, HITRUST CSF, NIST, SOC 2, HIPAA, ISO 27001, GDPR, and CCPA.
More information on how to build applications using AWS serverless technologies can be found at Serverless on AWS.
Want more AWS Security news? Follow us on Twitter.
In December 2022, FINMA, the Swiss Financial Market Supervisory Authority, announced a fully revised circular called Operational risks and resilience – banks that will take effect on January 1, 2024. The circular will replace the Swiss Bankers Association’s Recommendations for Business Continuity Management (BCM), which is currently recognized as a minimum standard. The new circular also adopts the revised principles for managing operational risks, and the new principles on operational resilience, that the Basel Committee on Banking Supervision published in March 2021.
In this blog post, we share key considerations for AWS customers and regulated financial institutions to help them prepare for, and align to, the new circular.
AWS previously announced the publication of the AWS User Guide to Financial Services Regulations and Guidelines in Switzerland. The guide refers to certain rules applicable to financial institutions in Switzerland, including banks, insurance companies, stock exchanges, securities dealers, portfolio managers, trustees, and other financial entities that FINMA oversees (directly or indirectly).
FINMA has previously issued the following circulars to help regulated financial institutions understand approaches to due diligence, third party management, and key technical and organizational controls to be implemented in cloud outsourcing arrangements, particularly for material workloads:
2018/03 FINMA Circular Outsourcing – banks and insurers (31.10.2019)
2008/21 FINMA Circular Operational Risks – Banks (31.10.2019) – Appendix 3 Handling of electronic Client Identifying Data
2013/03 Auditing (04.11.2020) – Information Technology (21.04.2020)
BCM minimum standards proposed by the Swiss Insurance Association (01.06.2015) and Swiss Bankers Association (29.08.2013)
Operational risk management: Critical data
The circular defines critical data as follows:
“Critical data are data that, in view of the institution’s size, complexity, structure, risk profile and business model, are of such crucial significance that they require increased security measures. These are data that are crucial for the successful and sustainable provision of the institution’s services or for regulatory purposes. When assessing and determining the criticality of data, the confidentiality as well as the integrity and availability must be taken into account. Each of these three aspects can determine whether data is classified as critical.”
This definition is consistent with the AWS approach to privacy and security. We believe that for AWS to realize its full potential, customers must have control over their data. This includes the following commitments:
Control over the location of your data
Verifiable control over data access
Ability to encrypt everything everywhere
Resilience of AWS
These commitments further demonstrate our dedication to securing your data: it’s our highest priority. We implement rigorous contractual, technical, and organizational measures to help protect the confidentiality, integrity, and availability of your content regardless of which AWS Region you select. You have complete control over your content through powerful AWS services and tools that you can use to determine where to store your data, how to secure it, and who can access it.
You also have control over the location of your content on AWS. For example, in Europe, at the time of publication of this blog post, customers can deploy their data into any of eight Regions (for an up-to-date list of Regions, see AWS Global Infrastructure). One of these Regions is the Europe (Zurich) Region, also known by its API name ‘eu-central-2’, which customers can use to store data in Switzerland. Additionally, Swiss customers can rely on the terms of the AWS Swiss Addendum to the AWS Data Processing Addendum (DPA), which applies automatically when Swiss customers use AWS services to process personal data under the new Federal Act on Data Protection (nFADP).
AWS continually monitors the evolving privacy, regulatory, and legislative landscape to help identify changes and determine what tools our customers might need to meet their compliance requirements. Maintaining customer trust is an ongoing commitment. We strive to inform you of the privacy and security policies, practices, and technologies that we’ve put in place. Our commitments, as described in the Data Privacy FAQ, include the following:
Access – As a customer, you maintain full control of your content that you upload to the AWS services under your AWS account, and responsibility for configuring access to AWS services and resources. We provide an advanced set of access, encryption, and logging features to help you do this effectively (for example, AWS Identity and Access Management, AWS Organizations, and AWS CloudTrail). We provide APIs that you can use to configure access control permissions for the services that you develop or deploy in an AWS environment. We never use your content or derive information from it for marketing or advertising purposes.
Storage – You choose the AWS Regions in which your content is stored. You can replicate and back up your content in more than one Region. We will not move or replicate your content outside of your chosen AWS Regions except as agreed with you.
Security – You choose how your content is secured. We offer you industry-leading encryption features to protect your content in transit and at rest, and we provide you with the option to manage your own encryption keys. These data protection features include:
Disclosure of customer content – We will not disclose customer content unless we’re required to do so to comply with the law or a binding order of a government body. If a governmental body sends AWS a demand for your customer content, we will attempt to redirect the governmental body to request that data directly from you. If compelled to disclose your customer content to a governmental body, we will give you reasonable notice of the demand to allow the customer to seek a protective order or other appropriate remedy, unless AWS is legally prohibited from doing so.
Security assurance – We have developed a security assurance program that uses current recommendations for global privacy and data protection to help you operate securely on AWS, and to make the best use of our security control environment. These security protections and control processes are independently validated by multiple third-party independent assessments, including the FINMA International Standard on Assurance Engagements (ISAE) 3000 Type II attestation report.
Additionally, FINMA guidelines lay out requirements for the written agreement between a Swiss financial institution and its service provider, including access and audit rights. For Swiss financial institutions that run regulated workloads on AWS, we offer the Swiss Financial Services Addendum to address the contractual and audit requirements of the FINMA guidelines. We also provide these institutions the ability to comply with the audit requirements in the FINMA guidelines through the AWS Security & Audit Series, including participation in an Audit Symposium, to facilitate customer audits. To help align with regulatory requirements and expectations, our FINMA addendum and audit program incorporate feedback that we’ve received from a variety of financial supervisory authorities across EU member states. To learn more about the Swiss Financial Services addendum or about the audit engagements offered by AWS, reach out to your AWS account team.
Resilience
Customers need control over their workloads and high availability to help prepare for events such as supply chain disruptions, network interruptions, and natural disasters. Each AWS Region is composed of multiple Availability Zones (AZs). An Availability Zone is one or more discrete data centers with redundant power, networking, and connectivity in an AWS Region. To better isolate issues and achieve high availability, you can partition applications across multiple AZs in the same Region. If you are running workloads on premises or in intermittently connected or remote use cases, you can use our services that provide specific capabilities for offline data and remote compute and storage. We will continue to enhance our range of sovereign and resilient options, to help you sustain operations through disruption or disconnection.
FINMA incorporates the principles of operational resilience in the newest circular 2023/01. In line with the efforts of the European Commission’s proposal for the Digital Operational Resilience Act (DORA), FINMA outlines requirements for regulated institutions to identify critical functions and their tolerance for disruption. Continuity of service, especially for critical economic functions, is a key prerequisite for financial stability. AWS recognizes that financial institutions need to comply with sector-specific regulatory obligations and requirements regarding operational resilience. AWS has published the whitepaper Amazon Web Services’ Approach to Operational Resilience in the Financial Sector and Beyond, in which we discuss how AWS and customers build for resiliency on the AWS Cloud. AWS provides resilient infrastructure and services, which financial institution customers can rely on as they design their applications to align with FINMA regulatory and compliance obligations.
AWS is committed to adding new services into our future FINMA program scope based on your architectural and regulatory needs. If you have questions about the FINMA report, or how your workloads on AWS align to the FINMA obligations, contact your AWS account team. We will also help support customers as they look for new ways to experiment, remain competitive, meet consumer expectations, and develop new products and services on AWS that align with the new regulatory framework.
To learn more about our compliance, security programs and common privacy and data protection considerations, see AWS Compliance Programs and the dedicated AWS Compliance Center for Switzerland. As always, we value your feedback and questions; reach out to the AWS Compliance team through the Contact Us page.
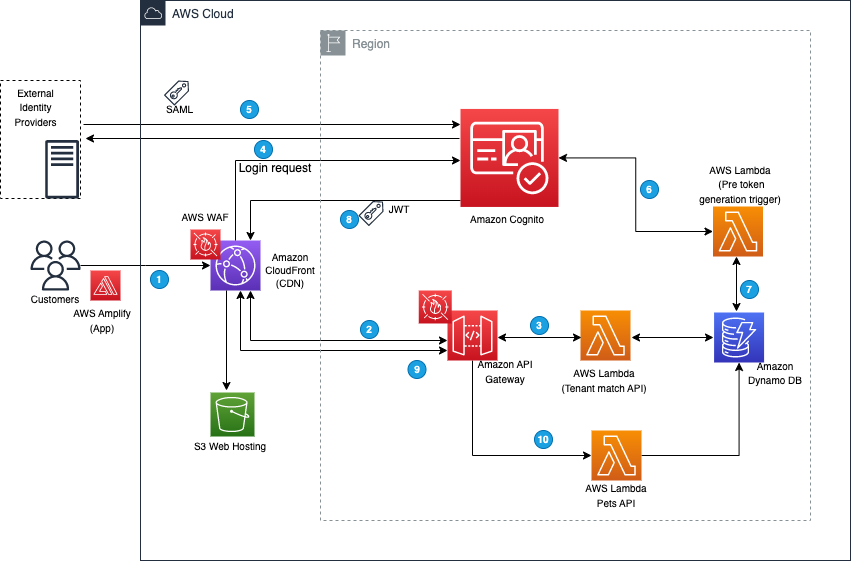
In this post, we demonstrate how you can use identity federation and integration between the identity provider itsme® and Amazon Cognito to quickly consume and build digital services for citizens on Amazon Web Services (AWS) using available national digital identities. We also provide code examples and integration proofs of concept to get you started quickly.
National digital identities refer to a system or framework that a government establishes to uniquely and securely identify its citizens or residents in the digital realm.
These national digital identities are built on a rigorous process of identity verification and enforce the use of high security standards when it comes to authentication mechanisms. Their adoption by both citizens and businesses helps to fight identity theft, most notably by removing the need to send printed copies of identity documents.
National certified secure digital identities are suitable for both businesses and public services and can improve the onboarding experience by reducing the need to create new credentials.
About itsme
itsme is a trusted identity provider (certified and notified for all 27 member states of EU at Level of Assurance HIGH of the eiDAS regulation) that can be used on over 800 government and company platforms to identify yourself online, log in, confirm transactions, or sign documents. It allows partners to use its verified identities for authentication and authorization on web, desktop, mobile web, and mobile applications.
As of this writing, itsme is accessible for all residents in Belgium, The Netherlands, and Luxembourg. However, since there are no limitations on the geographic usage of the identity and electronic signature APIs, itsme has the potential to expand to additional countries in the future. (Source: itsme, 2023)
Architecture overview
To demonstrate the integration, you’re going to build a minimalistic application made of the following components as shown in Figure 1 that follows:
An Amazon Cognito user pool that supports OIDC federation with itsme for Belgium.
A basic, frontend application that offers an authentication portal that will be served from a local development environment.
After deployment, you can log in and interact with the application:
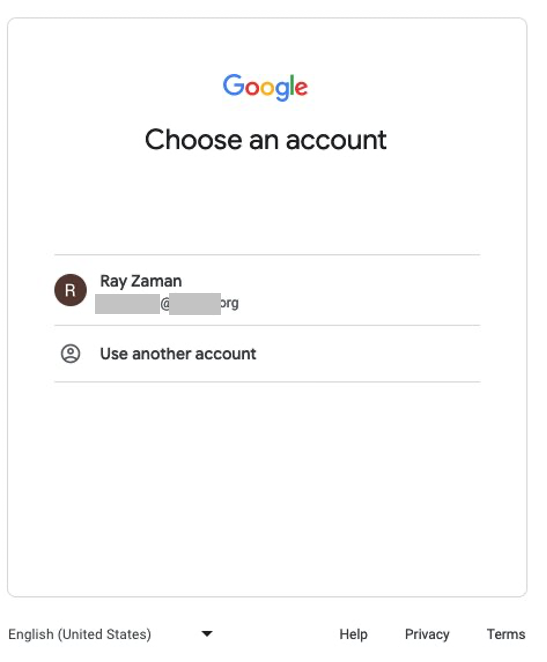
Visit the frontend deployed locally, and you’re presented the option to authenticate with itsme by using a blue colored button. Choose the button to proceed.
After being redirected to itsme, you’re asked to either create a new account or to use an existing one for authentication. After you’re successfully authenticated with itsme, the associated Amazon Cognito user pool is populated with the requested data in the scope of the federation. Specifically in this example, the national registration number is made available.
When authenticated, you’re redirected to the frontend, and you can read and write messages to and from the database behind an Amazon API Gateway.
The Amazon API Gateway uses Amazon Cognito to check the validity of your authentication token.
The Lambda function reads and writes messages to and from DynamoDB.
Prerequisites to deploy the identity federation with itsme
While setting up the Amazon Cognito user pool, you’re asked for the following information:
An itsme client ID – itsmeClientId
An itsme client secret – itsmeClientSecret
An itsme service code – itsmeServiceCode
An itsme issuer URL – itsmeIssuerUrl
To retrieve this information, you must be an itsme partner and to have your sandbox requested and available. The sandbox should be made available three business days after you submit the dedicated request form to itsme.
After the sandbox is provisioned, you must contact the itsme support desk and ask to switch the sandbox authentication to the client secret – itsmeClientSecret flow. Include the link to this post and specify that it’s for establishing a federation with Amazon Cognito.
Implement the proof of concept
To implement this proof of concept, you need to follow these steps:
Create an Amazon Cognito user pool.
Configure the Amazon Cognito user pool.
Deploy a sample API.
Configure your application.
To create and configure an Amazon Cognito user pool
Sign in to the AWS Management Console and enter cognito in the search bar at the top. Select Cognito from the Services results.
To configure the sign-in experience section, select Federated identity providers as the authentication providers.
In the Cognito user pool sign-in options area, select User name, Email, and Phone number.
In the Federated sign-in options area, select OpenID Connect (OIDC).
Figure 4: Sign-in configuration
Choose Next to continue to security requirements.
Note: In this post, account management and authentication are restricted to itsme. Because of this, the password length, multi-factor authentication, and recovery procedures are delegated to itsme. If you don’t restrict your Cognito user pool to itsme only, configure it according to your security requirements.
To configure the security requirements
For Password policy, select Cognito defaults.
Select Require MFA – Recommended in the Multi-factor authentication area, and select Authenticator apps
Note: Although the activation of multi-factor authentication is recommended, it’s important to understand that users of this pool will be created and authenticated through the federation with itsme. In the next procedure, you disable the Self service sign-up feature to prevent users from creating accounts. As itsme is compliant with the level of assurance substantial of the eIDAS regulation, itsme users must log in using a second factor of authentication.
Clear Enable self-service account recovery in the User account recovery area.
Figure 5: Security requirements configuration
To configure the sign-up experience
Clear Enable self-registration.
Clear Allow Cognito to automatically send messages to verify and confirm.
Figure 6: Sign-up configuration
Skip the configuration of required attributes and configure custom attributes. Expand the drop-down menu and add the following custom attributes:
Name: eid.
Type: String.
Leave Min and Max length blank.
Mutable: Select.
This custom attribute is used to map and store the national registration number.
Choose Next to configure message delivery.
Note: In this post, account management and authentication are going to be restricted to itsme. As a result, Amazon Cognito doesn’t send email or SMS, and the prescribed configuration is minimal. If you don’t limit your user pool to itsme, configure message delivery parameters according to your corporate policy.
To configure message delivery
For Email, select Send email with Cognito and leave the other fields with their default configuration.
To configure the SMS, select Create a new IAM Role if you don’t already have one provisioned.
Choose Next to configure the federated identity provider.
Figure 7: Message delivery configuration
Choose Next to configure identity provider.
To configure the federated identity provider
For Provider name, enter itsme.
For Client ID, enter the client ID provided by itsme.
For Client secret, enter the client secret provided by itsme.
For Authorized scopes, start with the mandatory service:itsmeServiceCode.
With a space between each scope, enter openid profile eid email address.
For Retrieve OIDC endpoints, enter the issuer URL provided by itsme.
An example of mapping is provided in Figure 9 that follows. Some differences exist to be able to retrieve and map the eID and the unique username of itsme (sub).
More specifically, to retrieve the National Registration Number, the eid field needs to be set to http://itsme.services/v2/claim/BENationalNumber.
Figure 9: Attributes mapping
Choose Next to configure an app client.
To configure an app client
Configure both your user pool name and domain by opening the Amazon Cognito console.
Figure 10: User pool and domain name
In the Initial app client area, select Public client.
Enter your application client name.
Select Don’t generate a client secret.
Enter the application callback URL that’s used by itsme at the end of the authenticating flow. This URL is the one your end user is going to land on after authenticating.
Figure 11: Configuring app client
To finish the creation by reviewing and creating the user pool
When the user pool is created, send your Amazon Cognito domain name to itsme support for them to activate your authentication endpoints. That URL has the following composition:
https://<Your user pool domain>.auth.<your region>.amazoncognito.com/oauth2/idpresponse
When the user pool is created, you can retrieve your userPoolWebClientId, which is required to create a consuming application.
To retrieve your userPoolWebClientId
From the Amazon Cognito Console, select User pools on the left menu.
Select the user pool that you created.
Figure 12: User pool app integration
In the App integration area, your userPoolWebClientId is displayed at the bottom of the window.
Figure 13: Client ID
To create a consuming application
When the setup of the user pool is done, you can integrate the authenticating flow in your application. The integration can be done using the AWS Amplify SDK and by calling the relevant API directly. Depending of the framework you used when building the application, you can find documentation about doing so in AWS Prescriptive Guidance Patterns.
You can use Amazon API Gateway to quickly build a secure API that uses the authentication made through Amazon Cognito and the federation to build services. We encourage you to review the Amazon API Gateway documentation to learn more. The next section provides you with examples that you can deploy to get an idea of the integration steps.
Additionally, you can use an Amazon Cognito identity pool to exchange Amazon Cognito issued tokens for AWS credentials (in other words, assuming AWS Identity and Access Management (IAM) roles) to access other AWS services. As an example, this could allow users to upload files to an Amazon Simple Storage Service (Amazon S3) bucket.
About the examples provided
The public GitHub repository that is provided contains code examples and associated documentation to help you automatically go through the setup steps detailed in this post. Specifically, the following are available:
An AWS Cloudformation template that can help you provision a properly set-up user pool after you have the required information from itsme.
An AWS Cloudformation template that deploys the backend for the test application.
A React frontend that you can run locally to interact with the backend and to consume identities from itsme.
To deploy the provided examples
Clone the repository on your local machine.
Install the dependencies.
If you haven’t created your user pool following the instructions in this post, you can use the CognitoItsmeStack provided as an example.
Deploy the associated backend stack BackendItsmeStack.cfn.yaml.
Rename the frontend/src/config.json.template file to frontend/src/config.json and replace the following:
region with the AWS Region associated with your Amazon Cognito user pool.
userPoolId with the assigned ID of the user pool that you created.
userPoolWebClientId with the client ID that you retrieved.
domain with your Amazon Cognito domain in the form of <your user pool name>.auth.<your region>.amazoncognito.com
Figure 14: Frontend configuration file
After modifications are done, start the application on your local machine with the provided command.
Following authentication, the results in the associated collected data are displayed, as shown in Figure 15 that follows.
Figure 15: User information
In the My Data section, you can access a form to input a value (shown in Figure 16). Each time you go back to this page, the previous value entered is shown in the input box. This input is associated with your NRN (custom:eid), and only you can access it.
Figure 16: Database interaction
Conclusion
You can now consume digital identities through identity federation between Amazon Cognito and itsme. We hope that it helps you build secure digital services to improve the life of Benelux users.
If you have feedback about this post, submit comments in the Comments section below. If you have questions about this post, contact AWS Support.
Want more AWS Security how-to content, news, and feature announcements? Follow us on Twitter.
In this blog post, we discuss some of the benefits and considerations organizations should think through when looking at a unified and global information technology and operational technology (IT/OT) security operations center (SOC). Although this post focuses on the IT/OT convergence within the SOC, you can use the concepts and ideas discussed here when thinking about other environments such as hybrid and multi-cloud, Industrial Internet of Things (IIoT), and so on.
The scope of assets has vastly expanded as organizations transition to remote work, and from increased interconnectivity through the Internet of Things (IoT) and edge devices coming online from around the globe, such as cyber physical systems. For many organizations, the IT and OT SOCs were separate, but there is a strong argument for convergence, which provides better context for the business outcomes of being able to respond to unexpected activity. In the ten security golden rules for IIoT solutions, AWS recommends deploying security audit and monitoring mechanisms across OT and IIoT environments, collecting security logs, and analyzing them using security information and event management (SIEM) tools within a SOC. SOCs are used to monitor, detect, and respond; this has traditionally been done separately for each environment. In this blog post, we explore the benefits and potential trade-offs of the convergence of these environments for the SOC. Although organizations should carefully consider the points raised throughout this blog post, the benefits of a unified SOC outweigh the potential trade-offs—visibility into the full threat chain propagating from one environment to another is critical for organizations as daily operations become more connected across IT and OT.
Traditional IT SOC
Traditionally, the SOC was responsible for security monitoring, analysis, and incident management of the entire IT environment within an organization—whether on-premises or in a hybrid architecture. This traditional approach has worked well for many years and ensures the SOC has the visibility to effectively protect the IT environment from evolving threats.
Note: Organizations should be aware of the considerations for security operations in the cloud which are discussed in this blog post.
Traditional OT SOC
Traditionally, OT, IT, and cloud teams have worked on separate sides of the air gap as described in the Purdue model. This can result in siloed OT, IIoT, and cloud security monitoring solutions, creating potential gaps in coverage or missing context that could otherwise have improved the response capability. To realize the full benefits of IT/OT convergence, IIoT, IT and OT must collaborate effectively to provide a broad perspective and the most effective defense. The convergence trend applies to newly connected devices and to how security and operations work together.
As organizations explore how industrial digital transformation can give them a competitive advantage, they’re using IoT, cloud computing, artificial intelligence and machine learning (AI/ML), and other digital technologies. This increases the potential threat surface that organizations must protect and requires a broad, integrated, and automated defense-in-depth security approach delivered through a unified and global SOC.
Without full visibility and control of traffic entering and exiting OT networks, the operations function might not be able to get full context or information that can be used to identify unexpected events. If a control system or connected assets such as programmable logic controllers (PLCs), operator workstations, or safety systems are compromised, threat actors could damage critical infrastructure and services or compromise data in IT systems. Even in cases where the OT system isn’t directly impacted, the secondary impacts can result in OT networks being shut down due to safety concerns over the ability to operate and monitor OT networks.
The SOC helps improve security and compliance by consolidating key security personnel and event data in a centralized location. Building a SOC is significant because it requires a substantial upfront and ongoing investment in people, processes, and technology. However, the value of an improved security posture is of great consideration compared to the costs.
In many OT organizations, operators and engineering teams may not be used to focusing on security; in some cases, organizations set up an OT SOC that’s independent from their IT SOC. Many of the capabilities, strategies, and technologies developed for enterprise and IT SOCs apply directly to the OT environment, such as security operations (SecOps) and standard operating procedures (SOPs). While there are clearly OT-specific considerations, the SOC model is a good starting point for a converged IT/OT cybersecurity approach. In addition, technologies such as a SIEM can help OT organizations monitor their environment with less effort and time to deliver maximum return on investment. For example, by bringing IT and OT security data into a SIEM, IT and OT stakeholders share access to the information needed to complete security work.
Benefits of a unified SOC
A unified SOC offers numerous benefits for organizations. It provides broad visibility across the entire IT and OT environments, enabling coordinated threat detection, faster incident response, and immediate sharing of indicators of compromise (IoCs) between environments. This allows for better understanding of threat paths and origins.
Consolidating data from IT and OT environments in a unified SOC can bring economies of scale with opportunities for discounted data ingestion and retention. Furthermore, managing a unified SOC can reduce overhead by centralizing data retention requirements, access models, and technical capabilities such as automation and machine learning.
Operational key performance indicators (KPIs) developed within one environment can be used to enhance another, promoting operational efficiency such as reducing mean time to detect security events (MTTD). A unified SOC enables integrated and unified security, operations, and performance, which supports comprehensive protection and visibility across technologies, locations, and deployments. Sharing lessons learned between IT and OT environments improves overall operational efficiency and security posture. A unified SOC also helps organizations adhere to regulatory requirements in a single place, streamlining compliance efforts and operational oversight.
By using a security data lake and advanced technologies like AI/ML, organizations can build resilient business operations, enhancing their detection and response to security threats.
Creating cross-functional teams of IT and OT subject matter experts (SMEs) help bridge the cultural divide and foster collaboration, enabling the development of a unified security strategy. Implementing an integrated and unified SOC can improve the maturity of industrial control systems (ICS) for IT and OT cybersecurity programs, bridging the gap between the domains and enhancing overall security capabilities.
Considerations for a unified SOC
There are several important aspects of a unified SOC for organizations to consider.
First, the separation of duty is crucial in a unified SOC environment. It’s essential to verify that specific duties are assigned to individuals based on their expertise and job function, allowing the most appropriate specialists to work on security events for their respective environments. Additionally, the sensitivity of data must be carefully managed. Robust access and permissions management is necessary to restrict access to specific types of data, maintaining that only authorized analysts can access and handle sensitive information. You should implement a clear AWS Identity and Access Management (IAM) strategy following security best practices across your organization to verify that the separation of duties is enforced.
Another critical consideration is the potential disruption to operations during the unification of IT and OT environments. To promote a smooth transition, careful planning is required to minimize any loss of data, visibility, or disruptions to standard operations. It’s crucial to recognize the differences in IT and OT security. The unique nature of OT environments and their close ties to physical infrastructure require tailored cybersecurity strategies and tools that address the distinct missions, challenges, and threats faced by industrial organizations. A copy-and-paste approach from IT cybersecurity programs will not suffice.
Furthermore, the level of cybersecurity maturity often varies between IT and OT domains. Investment in cybersecurity measures might differ, resulting in OT cybersecurity being relatively less mature compared to IT cybersecurity. This discrepancy should be considered when designing and implementing a unified SOC. Baselining the technology stack from each environment, defining clear goals and carefully architecting the solution can help ensure this discrepancy has been accounted for. After the solution has moved into the proof-of-concept (PoC) phase, you can start to testing for readiness to move the convergence to production.
You also must address the cultural divide between IT and OT teams. Lack of alignment between an organization’s cybersecurity policies and procedures with ICS and OT security objectives can impact the ability to secure both environments effectively. Bridging this divide through collaboration and clear communication is essential. This has been discussed in more detail in the post on managing organizational transformation for successful IT/OT convergence.
Unified IT/OT SOC deployment:
Figure 1 shows the deployment that would be expected in a unified IT/OT SOC. This is a high-level view of a unified SOC. In part 2 of this post, we will provide prescriptive guidance on how to design and build a unified and global SOC on AWS using AWS services and AWS Partner Network (APN) solutions.
Figure 1: Unified IT/OT SOC architecture
The parts of the IT/OT unified SOC are the following:
Environment: There are multiple environments, including a traditional IT on-premises organization, OT environment, cloud environment, and so on. Each environment represents a collection of security events and log sources from assets.
Data lake: A centralized place for data collection, normalization, and enrichment to verify that raw data from the different environments is standardized into a common scheme. The data lake should support data retention and archiving for long term storage.
Visualize: The SOC includes multiple dashboards based on organizational and operational needs. Dashboards can cover scenarios for multiple environments including data flows between IT and OT environments. There are also specific dashboards for the individual environments to cover each stakeholder’s needs. Data should be indexed in a way that allows humans and machines to query the data to monitor for security and performance issues.
Security analytics: Security analytics are used to aggregate and analyze security signals and generate higher fidelity alerts and to contextualize OT signals against concurrent IT signals and against threat intelligence from reputable sources.
Detect, alert, and respond: Alerts can be set up for events of interest based on data across both individual and multiple environments. Machine learning should be used to help identify threat paths and events of interest across the data.
Conclusion
Throughout this blog post, we’ve talked through the convergence of IT and OT environments from the perspective of optimizing your security operations. We looked at the benefits and considerations of designing and implementing a unified SOC.
Visibility into the full threat chain propagating from one environment to another is critical for organizations as daily operations become more connected across IT and OT. A unified SOC is the nerve center for incident detection and response and can be one of the most critical components in improving your organization’s security posture and cyber resilience.
If unification is your organization’s goal, you must fully consider what this means and design a plan for what a unified SOC will look like in practice. Running a small proof of concept and migrating in steps often helps with this process.
In the next blog post, we will provide prescriptive guidance on how to design and build a unified and global SOC using AWS services and AWS Partner Network (APN) solutions.
Health Information Trust Alliance (HITRUST) offers healthcare organizations a comprehensive and standardized approach to information security, privacy, and compliance. HITRUST Common Security Framework (HITRUST CSF) can be used by organizations to establish a robust security program, ensure patient data privacy, and assist with compliance with industry regulations. HITRUST CSF enhances security, streamlines compliance efforts, reduces risk, and contributes to overall security resiliency and the trustworthiness of healthcare entities in an increasingly challenging cybersecurity landscape.
While HITRUST primarily focuses on the healthcare industry, its framework and certification program are adaptable and applicable to other industries. The HITRUST CSF is a set of controls and requirements that organizations must comply with to achieve HITRUST certification. The HITRUST R2 assessment is the process by which organizations are evaluated against the requirements of the HITRUST CSF. During the assessment, an independent third party assessor examines the organization’s technical security controls, operational policies and procedures, and the implementation of all controls to determine if they meet the specified HITRUST requirements.
HITRUST r2 validated assessment certification is a comprehensive process that involves meeting numerous assessment requirements. The number of requirements can vary significantly, ranging from 500 to 2,000 depending on your environment’s risk factors and regulatory requirements. Attempting to address all of these requirements simultaneously especially when migrating systems to Amazon Web Services (AWS) can be overwhelming. By using a strategy of separating your compliance journey into environments and applications, you can streamline the process and achieve HITRUST compliance more efficiently and within a realistic timeframe.
In this blog post, we start by exploring the HITRUST domain structure, highlighting the security objective of each domain. We then show how you can use AWS configurable services to help meet these objectives.
Lastly, we present a simple and practical reference architecture with an AWS multi-account implementation that you can use as the foundation for hosting your AWS application, highlighting the phased approach for HITRUST compliance. Please note that this blog is intended to assist with using AWS services in a manner that supports an organization’s HITRUST compliance, but a HITRUST assessment is at an organizational level and involves controls that extend beyond the organization’s use of AWS.
HITRUST certification journey – Scope applications systems on AWS infrastructure:
The HITRUST controls needed for certification are structured within 19 HITRUST domains, covering a wide range of technical and administrative control requirements. To efficiently manage the scope of your certification assessment, start by focusing on the AWS landing zone, which serves as a critical foundational infrastructure component for running applications. When establishing the AWS landing zone, verify that it aligns with the AWS HITRUST security control requirements that are dependent on the scope of your assessment. Note that these 19 domains are a combination of technical controls and foundational administrative controls.
After you’ve set up a HITRUST compliant landing zone, you can begin evaluating your applications for HITRUST compliance as you migrate them to AWS. When you expand and migrate applications to the HITRUST-certified AWS landing zone assessed by your third party assessor, you can inherit the HITRUST controls required for application assessment directly from the landing zone. This simplifies and narrows the scope of your assessment activities.
Figure 1 that follows shows the two key phases and how a bottom-up phased approach can be structured with related HITRUST controls.
Figure 1: HITRUST Phase 1 and Phase 2 high-level components
The diagram illustrates:
An AWS landing zone environment as Phase 1 and its related HITRUST domain controls
An application system as Phase 2 and its related application system specific controls
HITRUST domain security objectives:
The HITRUST CSF based certification consists of 19 domains, which are broad categories that encompass various aspects of information security and privacy controls. These domains serve as a framework for your organization to assess and enhance its security posture. These domains cover a wide range of controls and practices related to information security, privacy, risk management, and compliance. Each domain consists of a set of control objectives and requirements that your organization must meet to achieve HITRUST certification.
The following table lists each domain, the key security objectives expected, and the AWS configurable services relevant to the security objectives. These are listed as a reference to give you an idea of the scope of each domain; the actual services and tools to meet specific HITRUST requirements will vary depending upon your scope and its HITRUST requirements.
Note: The information in this post is a general guideline and recommendation based on a phased approach for HITRUST r2 validated assessment. The examples are based on the information available at the time of publication and are not a full solution.
HITRUST domains, security objectives, and related AWS services
HITRUST domain
Summary of key security objectives expected in HITRUST domains
Related AWS configurable services
1. Information Protection Program
Implement information security management program.
Verify role suitability for employees, contractors, and third-party users.
Provide management guidance aligned with business goals and regulations.
Safeguard an organization’s information and assets.
Enhance awareness of information security among stakeholders.
Ensure the protection of information assets, prevent unauthorized disclosure, alteration, deletion, or harm, and maintain uninterrupted business operations.
Implement effective and repeatable technical vulnerability management to mitigate risks from exploited vulnerabilities.
Establish ownership and defined responsibilities for the protection of information assets within management.
Design controls in applications, including user-developed ones, to prevent errors, loss, unauthorized modification, or misuse of information. These controls should encompass input data validation, internal processing, and output data.
Maintain, protect, and make organizational information available.
Develop strategies and plans to prevent disruptions to business activities, safeguard critical processes from system failures or disasters, and ensure their prompt recovery.
Note: You can use AWS HITRUST-certified services to support your HITRUST compliance requirements. Use of these services in their default state doesn’t automatically ensure HITRUST certifiability. You must demonstrate compliance through formal formulation of policies, procedures, and implementation tailored to your scope, which involves configuring and customizing AWS HITRUST certified services to align precisely with HITRUST requirements within your scope and involves implementation of controls outside of the scope of the use of AWS services (such as appropriate organization-wide policies and procedures).
HITRUST phased approach – Reference architecture:
Figure 2 shows the recommended HITRUST Phase 1 and Phase 2 accounts and components within a landing zone.
Figure 2: HITRUST Phases 1 and 2 architecture including accounts and components
The reference architecture shown in Figure 2 illustrates:
A high-level structure of AWS accounts arranged in HITRUST Phase 1 and Phase 2
The accounts in HITRUST Phase 1 include:
Management account: The management account in the AWS landing zone is the primary account responsible for governing and managing the entire AWS environment.
Security account: The security account is dedicated to security and compliance functions, providing a centralized location for security-related tools and monitoring.
Central logging account: This account is designed for centralized logging and storage of logs from all other accounts, aiding in security analysis and troubleshooting.
Central audit: The central audit account is used for compliance monitoring, logging audit events, and verifying adherence to security standards.
DevOps account: DevOps accounts are used for software development and deployment, enabling continuous integration and delivery (CI/CD) processes.
Networking account: Networking accounts focus on network management, configuration, and monitoring to support reliable connectivity within the AWS environment.
DevSecOps account: DevSecOps accounts combine development, security, and operations to embed security practices throughout the software development lifecycle.
Shared services account: Shared services accounts host common resources, such as IAM services, that are shared across other accounts for centralized management.
The account group for HITRUST Phase 2 includes:
Tenant A – sample application workloads
Tenant B – sample application workloads
HITRUST Phase 1 – HITRUST foundational landing zone assessment phase:
In this phase you define the scope of assessment, including the specific AWS landing zone components and configurations that must be HITRUST compliant. The primary focus here is to evaluate the foundational infrastructure’s compliance with HITRUST controls. This involves a comprehensive review of policies and procedures, and implementation of all requirements within the landing zone scope. Assessing this phase separately enables you to verify that your foundational infrastructure adheres to HITRUST controls. Some of the policies, procedures, and configurations that are HITRUST assessed in this phase can be inherited across multiple applications’ assessments in later phases. Assessing this infrastructure once and then inheriting these controls for applications can be more efficient than assessing each application individually.
By establishing a secure and compliant foundation at the start, you can plan application assessments in later phases, making it simpler for subsequent applications to adhere to HITRUST requirements. This can streamline the compliance process and reduce the overall time and effort required. By assessing the landing zone separately, you can identify and address compliance gaps or issues in your foundational infrastructure, reducing the risk of non-compliance for the applications built upon it. Use the following high-level technical approach for this phase of assessment.
Build your AWS landing zone with HITRUST controls. See Building a landing zone for more information.
Use AWS and configure services according to the HITRUST requirements that are applicable to your infrastructure scope.
The HITRUST on AWS Quick Start guide is a reference for building HITRUST with one account. You can use the guide as a starting point to build a multi account architecture.
During this phase, you examine your AWS workload application accounts to conduct HITRUST assessments for application systems that are running within the AWS landing zone. You have the option to inherit environment-related controls that have been certified as HITRUST compliant within the landing zone in the previous phase.
The following key steps are recommended in this phase:
Readiness assessment for application scope: Conduct a thorough readiness assessment focused on the application scope, and define boundaries with scoped applications (AWS workload accounts).
HITRUST application controls: Gather specific HITRUST requirements for application scope by creating a HITRUST object for the application scope.
Scoped requirements analysis: Analyze requirements and use requirements that can be inherited from Phase 1 of the infrastructure assessment.
Gap analysis: Work with subject matter experts to conduct a gap analysis, and develop policies, procedures, and implementations for application specific controls.
Remediation: Remediate the gaps identified during the gap analysis activity.
Formal r2 assessment: Work with a third-party assessor to initiate a formal r2 validated assessment with HITRUST.
Conclusion
By breaking the compliance process into distinct phases, you can concentrate your resources on specific areas and prioritize essential assets accordingly. This approach supports a focused strategy, systematically addressing critical controls, and helping you to fulfill compliance requirements in a scalable manner. Obtaining the initial certification for the infrastructure and platform layers establishes a robust foundational architecture for subsequent phases, which involve application systems.
Earning certification at each phase provides tangible evidence of progress in your compliance journey. This achievement instills confidence in both internal and external stakeholders, affirming your organization’s commitment to security and compliance.
For guidance on achieving, maintaining, and automating compliance in the cloud, reach out to AWS Security Assurance Services (AWS SAS) or your account team. AWS SAS is a PCI QSAC and HITRUST External Assessor that can help by tying together applicable audit standards to AWS service-specific features and functionality. They can help you build on frameworks such as PCI DSS, HITRUST CSF, NIST, SOC 2, HIPAA, ISO 27001, GDPR, and CCPA.
AWS re:Invent 2023 is fast approaching, and we can’t wait to see you in Las Vegas in November. re:Invent offers you the chance to come together with cloud enthusiasts from around the world to hear the latest cloud industry innovations, meet with Amazon Web Services (AWS) experts, and build connections. This post will highlight key security sessions organized by various themes, so you don’t miss any of the newest and most exciting tech innovations and the sessions where you can learn how to put those innovations into practice.
re:Invent offers a diverse range of content tailored to all personas. Seminar-style content includes breakout sessions and innovation talks, delivered by AWS thought leaders. These are curated to focus on topics most critical to our customers’ businesses and spotlight advancements AWS has enabled for them. For more interactive or hands-on content, check out chalk talks, dev chats, builder sessions, workshops, and code talks.
If you plan to attend re:Invent 2023, and you’re interested in connecting with a security, identity, or compliance product team, reach out to your AWS account team.
Sessions for security leaders
Security leaders are always reinventing, tasked with aligning security goals to business objectives and reducing overall risk to the organization. Attend sessions at re:Invent where you can learn from security leadership and thought leaders on how to empower your teams, build sustainable security culture, and move fast and stay secure in an ever-evolving threat landscape.
INNOVATION TALK
SEC237-INT | Move fast, stay secure: Strategies for the future of security
BREAKOUT SESSIONS
SEC211 | Sustainable security culture: Empower builders for success
SEC216 | The AWS Digital Sovereignty Pledge: Control without compromise
SEC219 | Build secure applications on AWS the well-architected way
SEC236 | The AWS data-driven perspective on threat landscape trends
NET201 | Safeguarding infrastructure from DDoS attacks with AWS edge services
The role of generative AI in security
The swift rise of generative artificial intelligence (generative AI) illustrates the need for security practices to quickly adapt to meet evolving business requirements and drive innovation. In addition to the security Innovation Talk (Move fast, stay secure: Strategies for the future of security), attend sessions where you can learn about how large language models can impact security practices, how security teams can support safer use of this technology in the business, and how generative AI can help organizations move security forward.
BREAKOUT SESSIONS
SEC210 | How security teams can strengthen security using generative AI
SEC214 | Threat modeling your generative AI workload to evaluate security risk
CHALK TALKS
SEC317 | Building secure generative AI applications on AWS
OPN201 | Evolving OSPOs for supply chain security and generative AI
AIM352 | Securely build generative AI apps and control data with Amazon Bedrock
DEV CHAT
COM309 | Shaping the future of security on AWS with generative AI
Architecting and operating container workloads securely
The unique perspectives that drive how system builders and security teams perceive and address system security can present both benefits and obstacles to collaboration within a business. Find out more about how you can bolster your container security through sessions focused on best practices, detecting and patching threats and vulnerabilities in containerized environments, and managing risk across your AWS container workloads.
BREAKOUT SESSIONS
CON325 | Securing containerized workloads on Amazon ECS and AWS Fargate
CON320 | Building for the future with AWS serverless services
CHALK TALKS
SEC332 | Comprehensive vulnerability management across your AWS environments
FSI307 | Best practices for securing containers and being compliant
CON334 | Strategies and best practices for securing containerized environments
WORKSHOP
SEC303 | Container threat detection with AWS security services
BUILDER SESSION
SEC330 | Patch it up: Building a vulnerability management solution
Zero Trust
At AWS, we consider Zero Trust a security model—not a product. Zero Trust requires users and systems to strongly prove their identities and trustworthiness, and enforces fine-grained identity-based authorization rules before allowing access to applications, data, and other systems. It expands authorization decisions to consider factors like the entity’s current state and the environment. Learn more about our approach to Zero Trust in these sessions.
INNOVATION TALK
SEC237-INT | Move fast, stay secure: Strategies for the future of security
CHALK TALKS
WPS304 | Using Zero Trust to reduce security risk for the public sector
OPN308 | Build and operate a Zero Trust Apache Kafka cluster
NET312 | Connecting and securing services with Amazon VPC Lattice
NET315 | Building Zero Trust architectures using AWS Verified Access
WORKSHOPS
SEC302 | Zero Trust architecture for service-to-service workloads
Managing identities and encrypting data
At AWS, security is our top priority. AWS provides you with features and controls to encrypt data at rest, in transit, and in memory. We build features into our services that make it easier to encrypt your data and control user and application access to data. Explore these topics in depth during these sessions.
BREAKOUT SESSIONS
SEC209 | Modernize authorization: Lessons from cryptography and authentication
SEC336 | Spur productivity with options for identity and access
SEC333 | Better together: Using encryption & authorization for data protection
CHALK TALKS
SEC221 | Centrally manage application secrets with AWS Secrets Manager
SEC322 | Integrate apps with Amazon Cognito and Amazon Verified Permissions
SEC223 | Optimize your workforce identity strategy from top to bottom
WORKSHOPS
SEC247 | Practical data protection and risk assessment for sensitive workloads
For a full view of security content, including hands-on learning and interactive sessions, explore the AWS re:Invent catalog and under Topic, filter on Security, Compliance, & Identity. Not able to attend in-person? Livestream keynotes and leadership sessions for free by registering for the virtual-only pass!
If you have feedback about this post, submit comments in the Comments section below. If you have questions about this post, contact AWS Support.
Want more AWS Security news? Follow us on Twitter.
Today, we’re announcing a new capability for Amazon Simple Notification Service (Amazon SNS) message data protection. In this post, we show you how you can use this new capability to create custom data identifiers to detect and protect domain-specific sensitive data, such as your company’s employee IDs. Previously, you could only use managed data identifiers to detect and protect common sensitive data, such as names, addresses, and credit card numbers.
Overview
Amazon SNS is a serverless messaging service that provides topics for push-based, many-to-many messaging for decoupling distributed systems, microservices, and event-driven serverless applications. As applications become more complex, it can become challenging for topic owners to manage the data flowing through their topics. These applications might inadvertently start sending sensitive data to topics, increasing regulatory risk. To mitigate the risk, you can use message data protection to protect sensitive application data using built-in, no-code, scalable capabilities.
To discover and protect data flowing through SNS topics with message data protection, you can associate data protection policies to your topics. Within these policies, you can write statements that define which types of sensitive data you want to discover and protect. Within each policy statement, you can then define whether you want to act on data flowing inbound to an SNS topic or outbound to an SNS subscription, the AWS accounts or specific AWS Identity and Access Management (IAM) principals the statement applies to, and the actions you want to take on the sensitive data found.
Now, message data protection provides three actions to help you protect your data. First, the audit operation reports on the amount of sensitive data found. Second, the deny operation helps prevent the publishing or delivery of payloads that contain sensitive data. Third, the de-identify operation can mask or redact the sensitive data detected. These no-code operations can help you adhere to a variety of compliance regulations, such as Health Insurance Portability and Accountability Act (HIPAA), Federal Risk and Authorization Management Program (FedRAMP), General Data Protection Regulation (GDPR), and Payment Card Industry Data Security Standard (PCI DSS).
This message data protection feature coexists with the message data encryption feature in SNS, both contributing to an enhanced security posture of your messaging workloads.
Managed and custom data identifiers
After you add a data protection policy to your SNS topic, message data protection uses pattern matching and machine learning models to scan your messages for sensitive data, then enforces the data protection policy in real time. The types of sensitive data are referred to as data identifiers. These data identifiers can be either managed by Amazon Web Services (AWS) or custom to your domain.
Custom data identifiers (CDI), on the other hand, enable you to define custom regular expressions in the data protection policy itself, then refer to them from policy statements. Using custom data identifiers, you can scan for business-specific sensitive data, which managed data identifiers can’t. For example, you can use a custom data identifier to look for company-specific employee IDs in SNS message payloads. Internally, SNS has guardrails to make sure custom data identifiers are safe and that they add only low single-digit millisecond latency to message processing.
In a data protection policy statement, you refer to a custom data identifier using only the name that you have given it, as follows:
Note that custom data identifiers can be used in conjunction with managed data identifiers, as part of the same data protection policy statement. In the preceding example, both MyCompanyEmployeeId and CreditCardNumber are in scope.
For more information, see Data Identifiers, in the SNS Developer Guide.
Inbound and outbound data directions
In addition to the DataIdentifier property, each policy statement also sets the DataDirection property (whose value can be either Inbound or Outbound) as well as the Principal property (whose value can be any combination of AWS accounts, IAM users, and IAM roles).
When you use message data protection for data de-identification and set DataDirection to Inbound, instances of DataIdentifier published by the Principal are masked or redacted before the payload is ingested into the SNS topic. This means that every endpoint subscribed to the topic receives the same modified payload.
When you set DataDirection to Outbound, on the other hand, the payload is ingested into the SNS topic as-is. Then, instances of DataIdentifier are either masked, redacted, or kept as-is for each subscribing Principal in isolation. This means that each endpoint subscribed to the SNS topic might receive a different payload from the topic, with different sensitive data de-identified, according to the data access permissions of its Principal.
The following snippet expands the example data protection policy to include the DataDirection and Principal properties.
To complete the policy statement, you need to set the Operation property, which informs the SNS topic of the action that it should take when it finds instances of DataIdentifer in the outbound payload.
The following snippet expands the data protection policy to include the Operation property, in this case using the Deidentify object, which in turn supports masking and redaction.
In this example, the MaskConfig object instructs the SNS topic to mask instances of CreditCardNumber in Outbound messages to subscriptions created by ReportingApplicationRole, using the MaskWithCharacter value, which in this case is the hash symbol (#). Alternatively, you could have used the RedactConfig object instead, which would have instructed the SNS topic to simply cut the sensitive data off the payload.
The following snippet shows how the outbound payload is masked, in real time, by the SNS topic.
// original message published to the topic:
My credit card number is 4539894458086459

// masked message delivered to subscriptions created by ReportingApplicationRole:
My credit card number is ################
Consider a company where managers use an internal expense report management application where expense reports from employees can be reviewed and approved. Initially, this application depended only on an internal payment application, which in turn connected to an external payment gateway. However, this workload eventually became more complex, because the company started also paying expense reports filed by external contractors. At that point, the company built a mobile application that external contractors could use to view their approved expense reports. An important business requirement for this mobile application was that specific financial and PII data needed to be de-identified in the externally displayed expense reports. Specifically, both the credit card number used for the payment and the internal employee ID that approved the payment had to be masked.
Figure 1: Expense report processing application
To distribute the approved expense reports to both the payment application and the reporting application that backed the mobile application, the company used an SNS topic with a data protection policy. The policy has only one statement, which masks credit card numbers and employee IDs found in the payload. This statement applies only to the IAM role that the company used for subscribing the AWS Lambda function of the reporting application to the SNS topic. This access permission configuration enabled the Lambda function from the payment application to continue receiving the raw data from the SNS topic.
The data protection policy from the previous section addresses this use case. Thus, when a message representing an expense report is published to the SNS topic, the Lambda function in the payment application receives the message as-is, whereas the Lambda function in the reporting application receives the message with the financial and PII data masked.
To automate the provisioning of the resources and the data protection policy of the example expense management use case, we’re going to use CloudFormation templates. You have two options for deploying the resources:
Alternatively, use the following four CloudFormation templates, in order. Allow time for each stack to complete before deploying the next stack.
Deploy using the individual CloudFormation templates in sequence
Prerequisites template: This first template provisions two IAM roles with a managed policy that enables them to create SNS subscriptions and configure the subscriber Lambda functions. You will use these provisioned IAM roles in steps 3 and 4 that follow.
Topic owner template: The second template provisions the SNS topic along with its access policy and data protection policy.
Payment subscriber template: The third template provisions the Lambda function and the corresponding SNS subscription that comprise of the Payment application stack. When prompted, select the PaymentApplicationRole in the Permissions panel before running the template. Moreover, the CloudFormation console will require you to acknowledge that a CloudFormation transform might require access capabilities.
Reporting subscriber template: The final template provisions the Lambda function and the SNS subscription that comprise of the Reporting application stack. When prompted, select the ReportingApplicationRole in the Permissions panel, before running the template. Moreover, the CloudFormation console will require, once again, that you acknowledge that a CloudFormation transform might require access capabilities.
Figure 2: Select IAM role
Now that the application stacks have been deployed, you’re ready to start testing.
Testing the data de-identification operation
Use the following steps to test the example expense management use case.
In the Amazon SNS console, select the ApprovalTopic, then choose to publish a message to it.
In the SNS message body field, enter the following message payload, representing an external contractor expense report, then choose to publish this message:
In the CloudWatch console, select the log group for the PaymentLambdaFunction, then choose to view its latest log stream. Now look for the log stream entry that shows the message payload received by the Lambda function. You will see that no data has been masked in this payload, as the payment application requires raw financial data to process the credit card transaction.
Still in the CloudWatch console, select the log group for the ReportingLambdaFunction, then choose to view its latest log stream. Now look for the log stream entry that shows the message payload received by this Lambda function. You will see that the values for properties credit_card_number and employee_id have been masked, protecting the financial data from leaking into the external reporting application.
As shown, different subscribers received different versions of the message payload, according to their sensitive data access permissions.
Cleaning up the resources
After testing, avoid incurring usage charges by deleting the resources that you created. Open the CloudFormation console and delete the four CloudFormation stacks that you created during the walkthrough.
Conclusion
This post showed how you can use Amazon SNS message data protection to discover and protect sensitive data published to or delivered from your SNS topics. The example use case shows how to create a data protection policy that masks messages delivered to specific subscribers if the payloads contain financial or personally identifiable information.
If you have feedback about this post, submit comments in the Comments section below. If you have questions about this post, start a new thread on AWS re:Post or contact AWS Support.
Want more AWS Security how-to content, news, and feature announcements? Follow us on Twitter.
On May 20, 2023, the Federal Risk and Authorization Management Program (FedRAMP) released the FedRAMP Rev.5 baselines. The FedRAMP baselines were updated to correspond with the National Institute of Standards and Technology’s (NIST) Special Publication (SP) 800-53 Rev. 5 Catalog of Security and Privacy Controls for Information Systems and Organizations and SP 800-53B Control Baselines for Information Systems and Organizations. AWS is transitioning to the updated security requirements and assisting customers by making new resources available (additional information on these resources below). AWS security and compliance teams are analyzing both the FedRAMP baselines and templates, along with the NIST 800-53 Rev. 5 requirements, to help ensure a seamless transition. This post details the high-level milestones for the transition of AWS GovCloud (US) and AWS US East/West FedRAMP-authorized Regions and lists new resources available to customers.
Background
The NIST 800-53 framework is an information security standard that sets forth minimum requirements for federal information systems. In 2020, NIST released Rev. 5 of the framework with new control requirements related to privacy and supply chain risk management, among other enhancements, to improve security standards for industry partners and government agencies. The Federal Information Security Modernization Act (FISMA) of 2014 is a law requiring the implementation of information security policies for federal Executive Branch civilian agencies and contractors. FedRAMP is a government-wide program that promotes the adoption of secure cloud service offerings across the federal government by providing a standardized approach to security and risk assessment for cloud technologies and federal agencies. Both FISMA and FedRAMP adhere to the NIST SP 800-53 framework to define security control baselines that are applicable to AWS and its agency customers.
Key milestones and deliverables
The timeline for AWS to transition to FedRAMP Rev. 5 baselines will be predicated on transition guidance and requirements issued by the FedRAMP Program Management Office (PMO), our third-party assessment (3PAO) schedule, and the FedRAMP Provisional Authorization to Operate (P-ATO) authorization date. Below you will find a list of key documents to help customers get started with Rev. 5 on AWS, as well as timelines for the AWS preliminary authorization schedule.
Key Rev. 5 AWS documents for customers:
AWS FedRAMP Rev5 Customer Responsibility Matrix (CRM) – Made available on AWS Artifact September 1, 2023 (attachment within the AWS FedRAMP Customer Package).
AWS Customer Compliance Guides (CCG) V2 – AWS Customer Compliance Guides are now available on AWS Artifact. CCGs are mapped to NIST 800-53 Rev. 5 and nine additional compliance frameworks.
AWS GovCloud (US) authorization timeline:
3PAO Rev. 5 annual assessment: January 2024–April 2024
Estimated 2024 Rev. 5 P-ATO letter delivery: Q4 2024
AWS US East/West commercial authorization timeline:
3PAO Rev 5. annual assessment: March 2024–June 2024
Estimated 2024 Rev. 5 P-ATO letter delivery: Q4 2024
The AWS transition to FedRAMP Rev. 5 baselines will be completed in accordance with regulatory requirements as defined in our existing FedRAMP P-ATO letter, according to the FedRAMP Transition Guidance. Note that FedRAMP P-ATO letters and Defense Information Systems Agency (DISA) Provisional Authorization (PA) letters for AWS are considered active through the transition to NIST SP 800-53 Rev. 5. This includes through the 2024 annual assessments of AWS GovCloud (US) and AWS US East/West Regions. The P-ATO letters for each Region are expected to be delivered between Q3 and Q4 of 2024. Supporting documentation required for FedRAMP authorization will be made available to U.S. Government agencies and stakeholders in 2024 on a rolling basis and based on the timeline and conclusion of 3PAO assessments.
How to contact us
For questions about the AWS transition to the FedRAMP Rev. 5 baselines, AWS and its services, or for compliance questions, contact [email protected].
To learn more about AWS compliance programs, see the AWS Compliance Programs page. For more information about the FedRAMP project, see the FedRAMP website.
If you have feedback about this post, submit comments in the Comments section below. If you have questions about this post, contact AWS Support.
Want more AWS Security how-to content, news, and feature announcements? Follow us on Twitter.
From day one, Amazon Web Services (AWS) has always believed it is essential that customers have control over their data, and choices for how they secure and manage that data in the cloud. Last year, we introduced the AWS Digital Sovereignty Pledge, our commitment to offering AWS customers the most advanced set of sovereignty controls and features available in the cloud. We pledged to work to understand the evolving needs and requirements of both customers and regulators, and to rapidly adapt and innovate to meet them. We committed to expanding our capabilities to allow customers to meet their digital sovereignty needs, without compromising on the performance, innovation, security, or scale of the AWS Cloud.
AWS offers the largest and most comprehensive cloud infrastructure globally. Our approach from the beginning has been to make AWS sovereign-by-design. We built data protection features and controls in the AWS Cloud with input from financial services, healthcare, and government customers—who are among the most security- and data privacy-conscious organizations in the world. This has led to innovations like the AWS Nitro System, which powers all our modern Amazon Elastic Compute Cloud (Amazon EC2) instances and provides a strong physical and logical security boundary to enforce access restrictions so that nobody, including AWS employees, can access customer data running in Amazon EC2. The security design of the Nitro System has also been independently validated by the NCC Group in a public report.
With AWS, customers have always had control over the location of their data. In Europe, customers that need to comply with European data residency requirements have the choice to deploy their data to any of our eight existing AWS Regions (Ireland, Frankfurt, London, Paris, Stockholm, Milan, Zurich, and Spain) to keep their data securely in Europe. To run their sensitive workloads, European customers can leverage the broadest and deepest portfolio of services, including AI, analytics, compute, database, Internet of Things (IoT), machine learning, mobile services, and storage. To further support customers, we’ve innovated to offer more control and choice over their data. For example, we announced further transparency and assurances, and new dedicated infrastructure options with AWS Dedicated Local Zones.
Announcing the AWS European Sovereign Cloud
When we speak to public sector and regulated industry customers in Europe, they share how they are facing incredible complexity and changing dynamics with an evolving sovereignty landscape. Customers tell us they want to adopt the cloud, but are facing increasing regulatory scrutiny over data location, European operational autonomy, and resilience. We’ve learned that these customers are concerned that they will have to choose between the full power of AWS or feature-limited sovereign cloud solutions. We’ve had deep engagements with European regulators, national cybersecurity authorities, and customers to understand how the sovereignty needs of customers can vary based on multiple factors, like location, sensitivity of workloads, and industry. These factors can impact their workload requirements, such as where their data can reside, who can access it, and the controls needed. AWS has a proven track record of innovation to address specialized workloads around the world.
Today, we’re excited to announce our plans to launch the AWS European Sovereign Cloud, a new, independent cloud for Europe, designed to help public sector organizations and customers in highly regulated industries meet their evolving sovereignty needs. We’re designing the AWS European Sovereign Cloud to be separate and independent from our existing Regions, with infrastructure located wholly within the European Union (EU), with the same security, availability, and performance our customers get from existing Regions today. To deliver enhanced operational resilience within the EU, only EU residents who are located in the EU will have control of the operations and support for the AWS European Sovereign Cloud. As with all current Regions, customers using the AWS European Sovereign Cloud will benefit from the full power of AWS with the same familiar architecture, expansive service portfolio, and APIs that millions of customers use today. The AWS European Sovereign Cloud will launch its first AWS Region in Germany available to all European customers.
The AWS European Sovereign Cloud will be sovereign-by-design, and will be built on more than a decade of experience operating multiple independent clouds for the most critical and restricted workloads. Like existing Regions, the AWS European Sovereign Cloud will be built for high availability and resiliency, and powered by the AWS Nitro System, to help ensure the confidentiality and integrity of customer data. Customers will have the control and assurance that AWS will not access or use customer data for any purpose without their agreement. AWS gives customers the strongest sovereignty controls among leading cloud providers. For customers with enhanced data residency needs, the AWS European Sovereign cloud is designed to go further and will allow customers to keep all metadata they create (such as the roles, permissions, resource labels, and configurations they use to run AWS) in the EU. The AWS European Sovereign Cloud will also be built with separate, in-Region billing and usage metering systems.
Delivering operational autonomy
The AWS European Sovereign Cloud will provide customers the capability to meet stringent operational autonomy and data residency requirements. To deliver enhanced data residency and operational resilience within the EU, the AWS European Sovereign Cloud infrastructure will be operated independently from existing AWS Regions. To assure independent operation of the AWS European Sovereign Cloud, only personnel who are EU residents, located in the EU, will have control of day-to-day operations, including access to data centers, technical support, and customer service.
We’re taking learnings from our deep engagements with European regulators and national cybersecurity authorities and applying them as we build the AWS European Sovereign Cloud, so that customers using the AWS European Sovereign Cloud can meet their data residency, operational autonomy, and resilience requirements. For example, we are looking forward to continuing to partner with Germany’s Federal Office for Information Security (BSI).
“The development of a European AWS Cloud will make it much easier for many public sector organizations and companies with high data security and data protection requirements to use AWS services. We are aware of the innovative power of modern cloud services and we want to help make them securely available for Germany and Europe. The C5 (Cloud Computing Compliance Criteria Catalogue), which was developed by the BSI, has significantly shaped cybersecurity cloud standards and AWS was in fact the first cloud service provider to receive the BSI’s C5 testate. In this respect, we are very pleased to constructively accompany the local development of an AWS Cloud, which will also contribute to European sovereignty, in terms of security.” — Claudia Plattner, President of the German Federal Office for Information Security (BSI)
Control without compromise
Though separate, the AWS European Sovereign Cloud will offer the same industry-leading architecture built for security and availability as other AWS Regions. This will include multiple Availability Zones (AZs), infrastructure that is placed in separate and distinct geographic locations, with enough distance to significantly reduce the risk of a single event impacting customers’ business continuity. Each AZ will have multiple layers of redundant power and networking to provide the highest level of resiliency. All AZs in the AWS European Sovereign Cloud will be interconnected with fully redundant, dedicated metro fiber, providing high-throughput, low-latency networking between AZs. All traffic between AZs will be encrypted. Customers who need more options to address stringent isolation and in-country data residency needs will be able to use Dedicated Local Zones or AWS Outposts to deploy AWS European Sovereign Cloud infrastructure in locations they select.
Continued AWS investment in Europe
The AWS European Sovereign Cloud represents continued AWS investment in Europe. AWS is committed to innovating to support European values and Europe’s digital future. We drive economic development through investing in infrastructure, jobs, and skills in communities and countries across Europe. We are creating thousands of high-quality jobs and investing billions of euros in European economies. Amazon has created more than 100,000 permanent jobs across the EU. Some of our largest AWS development teams are located in Europe, with key centers in Dublin, Dresden, and Berlin. As part of our continued commitment to contribute to the development of digital skills, we will hire and develop additional local personnel to operate and support the AWS European Sovereign Cloud.
Customers, partners, and regulators welcome the AWS European Sovereign Cloud
In the EU, hundreds of thousands of organizations of all sizes and across all industries are using AWS – from start-ups, to small and medium-sized businesses, to the largest enterprises, including telecommunication companies, public sector organizations, educational institutions, and government agencies. Organizations across Europe support the introduction of the AWS European Sovereign Cloud.
“As the market leader in enterprise application software with strong roots in Europe, SAP and AWS have long collaborated on behalf of customers to accelerate digital transformation around the world. The AWS European Sovereign Cloud provides further opportunities to strengthen our relationship in Europe by enabling us to expand the choices we offer to customers as they move to the cloud. We appreciate the ongoing partnership with AWS, and the new possibilities this investment can bring for our mutual customers across the region.” — Peter Pluim, President, SAP Enterprise Cloud Services and SAP Sovereign Cloud Services.
“The new AWS European Sovereign Cloud can be a game-changer for highly regulated business segments in the European Union. As a leading telecommunications provider in Germany, our digital transformation focuses on innovation, scalability, agility, and resilience to provide our customers with the best services and quality. This will now be paired with the highest levels of data protection and regulatory compliance that AWS delivers, and with a particular focus on digital sovereignty requirements. I am convinced that this new infrastructure offering has the potential to boost cloud adaptation of European companies and accelerate the digital transformation of regulated industries across the EU.” — Mallik Rao, Chief Technology and Information Officer, O2 Telefónica in Germany
“Deutsche Telekom welcomes the announcement of the AWS European Sovereign Cloud, which highlights AWS’s dedication to continuous innovation for European businesses. The AWS solution will provide greater choice for organizations when moving regulated workloads to the cloud and additional options to meet evolving digital governance requirements in the EU.” — Greg Hyttenrauch, senior vice president, Global Cloud Services at T-Systems
“Today, we stand at the cusp of a transformative era. The introduction of the AWS European Sovereign Cloud does not merely represent an infrastructural enhancement, it is a paradigm shift. This sophisticated framework will empower Dedalus to offer unparalleled services for storing patient data securely and efficiently in the AWS cloud. We remain committed, without compromise, to serving our European clientele with best-in-class solutions underpinned by trust and technological excellence.” — Andrea Fiumicelli, Chairman, Dedalus
“At de Volksbank, we believe in investing in a better Netherlands. To do this effectively, we need to have access to the latest technologies in order for us to continually be innovating and improving services for our customers. For this reason, we welcome the announcement of the European Sovereign Cloud which will allow European customers to easily demonstrate compliance with evolving regulations while still benefitting from the scale, security, and full suite of AWS services.” — Sebastiaan Kalshoven, Director IT/CTO, de Volksbank
“Eviden welcomes the launch of the AWS European Sovereign Cloud. This will help regulated industries and the public sector address the requirements of their sensitive workloads with a fully featured AWS cloud wholly operated in Europe. As an AWS Premier Tier Services Partner and leader in cybersecurity services in Europe, Eviden has an extensive track record in helping AWS customers formalize and mitigate their sovereignty risks. The AWS European Sovereign Cloud will allow Eviden to address a wider range of customers’ sovereignty needs.” — Yannick Tricaud, Head of Southern and Central Europe, Middle East, and Africa, Eviden, Atos Group
“We welcome the commitment of AWS to expand its infrastructure with an independent European cloud. This will give businesses and public sector organizations more choice in meeting digital sovereignty requirements. Cloud services are essential for the digitization of the public administration. With the “German Administration Cloud Strategy” and the “EVB-IT Cloud” contract standard, the foundations for cloud use in the public administration have been established. I am very pleased to work together with AWS to practically and collaboratively implement sovereignty in line with our cloud strategy.” — Dr. Markus Richter, CIO of the German federal government, Federal Ministry of the Interior
Our commitments to our customers
We remain committed to giving our customers control and choices to help meet their evolving digital sovereignty needs. We continue to innovate sovereignty features, controls, and assurances globally with AWS, without compromising on the full power of AWS.
If you have feedback about this post, submit comments in the Comments section below. If you have questions about this post, contact AWS Support.
French
AWS Digital Sovereignty Pledge : Un nouveau cloud souverain, indépendant en Europe
Depuis sa création, Amazon Web Services (AWS) est convaincu qu’il est essentiel que les clients aient le contrôle de leurs données et puissent choisir la manière dont ils les sécurisent et les gèrent dans le cloud. L’année dernière, nous avons annoncé l’AWS Digital Sovereignty Pledge, notre engagement à offrir aux clients d’AWS l’ensemble le plus avancé de contrôles et de fonctionnalités de souveraineté disponibles dans le cloud. Nous nous sommes engagés à travailler pour comprendre les besoins et les exigences en constante évolution de nos clients et des régulateurs, et à nous adapter et innover rapidement pour y répondre. Nous nous sommes engagés à développer notre offre afin de permettre à nos clients de répondre à leurs besoins en matière de souveraineté numérique, sans compromis sur les performances, l’innovation, la sécurité ou encore l’étendue du Cloud AWS.
AWS propose l’infrastructure cloud la plus étendue et la plus complète au monde. Dès l’origine, notre approche a été de rendre AWS souverain dès la conception. Nous avons développé des fonctionnalités et des contrôles de protection des données dans le Cloud AWS en nous appuyant sur les retours de clients du secteur financier, de la santé et du secteur public, qui figurent parmi les organisations les plus soucieuses de la sécurité et de la confidentialité des données au monde. Cela a donné lieu à des innovations telles que AWS Nitro System, qui alimente toutes nos instances modernes Amazon Elastic Compute Cloud (Amazon EC2) et fournit une solide barrière de sécurité physique et logique pour implémenter les restrictions d’accès afin que personne, y compris les employés d’AWS, ne puisse accéder aux données des clients traitées dans Amazon EC2. La conception de la sécurité du Système Nitro a également été validée de manière indépendante par NCC Group dans un rapport public.
Avec AWS, les clients ont toujours eu le contrôle de l’emplacement de leurs données. En Europe, les clients qui doivent se conformer aux exigences européennes en matière de localisation des données peuvent choisir de déployer leurs données dans l’une de nos huit Régions AWS existantes (Irlande, Francfort, Londres, Paris, Stockholm, Milan, Zurich et Espagne) afin de conserver leurs données en toute sécurité en Europe. Pour exécuter leurs applications sensibles, les clients européens peuvent avoir recours à l’offre de services la plus étendue et la plus complète, de l’intelligence artificielle à l’analyse, du calcul aux bases de données, en passant par l’Internet des objets (IoT), l’apprentissage automatique, les services mobiles et le stockage. Pour soutenir davantage nos clients, nous avons innové pour offrir un plus grand choix en matière de contrôle sur leurs données. Par exemple, nous avons annoncé une transparence et des garanties de sécurité accrues, ainsi que de nouvelles options d’infrastructure dédiée appelées AWS Dedicated Local Zones.
Annonce de l’AWS European Sovereign Cloud Lorsque nous parlons à des clients du secteur public et des industries régulées en Europe, ils nous font part de l’incroyable complexité à laquelle ils sont confrontés dans un contexte de souveraineté en pleine évolution. Les clients nous disent qu’ils souhaitent adopter le cloud, mais qu’ils sont confrontés à des exigences réglementaires croissantes en matière de localisation des données, d’autonomie opérationnelle européenne et de résilience. Nous entendons que ces clients craignent de devoir choisir entre la pleine puissance d’AWS et des solutions de cloud souverain aux fonctionnalités limitées. Nous avons eu des contacts approfondis avec les régulateurs européens, les autorités nationales de cybersécurité et les clients afin de comprendre comment ces besoins de souveraineté peuvent varier en fonction de multiples facteurs tels que la localisation, la sensibilité des applications et le secteur d’activité. Ces facteurs peuvent avoir une incidence sur leurs exigences, comme l’endroit où leurs données peuvent être localisées, les personnes autorisées à y accéder et les contrôles nécessaires. AWS a fait ses preuves en matière d’innovation pour les applications spécialisées dans le monde entier.
Aujourd’hui, nous sommes heureux d’annoncer le lancement de l’AWS European Sovereign Cloud, un nouveau cloud indépendant pour l’Europe, conçu pour aider les organisations du secteur public et les clients des industries régulées à répondre à leurs besoins évolutifs en matière de souveraineté. Nous concevons l’AWS European Sovereign Cloud de manière à ce qu’il soit distinct et indépendant de nos Régions existantes, avec une infrastructure entièrement située dans l’Union européenne (UE), avec les mêmes niveaux de sécurité, de disponibilité et de performance que ceux dont bénéficient nos clients aujourd’hui dans les Régions existantes. Pour offrir une résilience opérationnelle accrue au sein de l’UE, seuls des résidents de l’UE qui se trouvent dans l’UE auront le contrôle sur l’exploitation et le support de l’AWS European Sovereign Cloud. Comme dans toutes les Régions existantes, les clients utilisant l’AWS European Sovereign Cloud bénéficieront de toute la puissance d’AWS avec la même architecture à laquelle ils sont habitués, le même portefeuille de services étendu et les mêmes API que ceux utilisés par des millions de clients aujourd’hui. L’AWS European Sovereign Cloud lancera sa première Région AWS en Allemagne, disponible pour tous les clients européens.
L’AWS European Sovereign Cloud sera souverain dès la conception et s’appuiera sur plus d’une décennie d’expérience dans l’exploitation de clouds indépendants pour les applications les plus critiques et les plus sensibles. À l’instar des Régions existantes, l’AWS European Sovereign Cloud sera conçu pour offrir une haute disponibilité et un haut niveau de résilience, et sera basé sur le Système AWS Nitro afin de garantir la confidentialité et l’intégrité des données des clients. Les clients auront le contrôle de leurs données et l’assurance qu’AWS n’y accèdera pas, ni ne les utilisera à aucune fin sans leur accord. AWS offre à ses clients les contrôles de souveraineté les plus puissants parmi les principaux fournisseurs de cloud. Pour les clients ayant des besoins accrus en matière de localisation des données, l’AWS European Sovereign Cloud est conçu pour aller plus loin et permettra aux clients de conserver toutes les métadonnées qu’ils créent (telles que les rôles de compte, les autorisations, les étiquettes de données et les configurations qu’ils utilisent au sein d’AWS) dans l’UE. L’AWS European Sovereign Cloud sera également doté de systèmes de facturation et de mesure de l’utilisation distincts et propres.
Apporter l’autonomie opérationnelle L’AWS European Sovereign Cloud permettra aux clients de répondre à des exigences strictes en matière d’autonomie opérationnelle et de localisation des données. Pour améliorer la localisation des données et la résilience opérationnelle au sein de l’UE, l’infrastructure de l’AWS European Sovereign Cloud sera exploitée indépendamment des Régions AWS existantes. Afin de garantir le fonctionnement indépendant de l’AWS European Sovereign Cloud, seul le personnel résidant de l’UE et situé dans l’UE contrôlera les opérations quotidiennes, y compris l’accès aux centres de données, l’assistance technique et le service client.
Nous tirons les enseignements de nos échanges approfondis auprès des régulateurs européens et des autorités nationales de cybersécurité et les appliquons à la création de l’AWS European Sovereign Cloud, afin que les clients qui l’utilisent puissent répondre à leurs exigences en matière de localisation des données, d’autonomie opérationnelle et de résilience. Par exemple, nous nous réjouissons de poursuivre notre partenariat avec l’Office fédéral allemand de la sécurité de l’information (BSI).
« Le développement d’un cloud AWS européen facilitera grandement l’utilisation des services AWS pour de nombreuses organisations du secteur public et des entreprises ayant des exigences élevées en matière de sécurité et de protection des données. Nous sommes conscients du pouvoir d’innovation des services cloud modernes et nous voulons contribuer à les rendre disponibles en toute sécurité pour l’Allemagne et l’Europe. Le C5 (Catalogue des critères de conformité du cloud computing), développé par le BSI, a considérablement façonné les normes de cybersécurité dans le cloud et AWS a été en fait le premier fournisseur de services cloud à recevoir la certification C5 du BSI. À cet égard, nous sommes très heureux d’accompagner de manière constructive le développement local d’un cloud AWS, qui contribuera également à la souveraineté européenne en termes de sécurité ». — Claudia Plattner, Présidente de l’Office fédéral allemand de la sécurité de l’information (BSI)
Contrôle sans compromis Bien que distinct, l’AWS European Sovereign Cloud proposera la même architecture à la pointe de l’industrie, conçue pour offrir la même sécurité et la même disponibilité que les autres Régions AWS. Cela inclura plusieurs Zones de Disponibilité (AZ), des infrastructures physiques placées dans des emplacements géographiques séparés et distincts, avec une distance suffisante pour réduire de manière significative le risque qu’un seul événement ait un impact sur la continuité des activités des clients. Chaque AZ disposera de plusieurs couches d’alimentation et de réseau redondantes pour fournir le plus haut niveau de résilience. Toutes les Zones de Disponibilité de l’AWS European Sovereign Cloud seront interconnectées par un réseau métropolitain de fibres dédié entièrement redondant, fournissant un réseau à haut débit et à faible latence entre les Zones de Disponibilité. Tous les échanges entre les AZ seront chiffrés. Les clients recherchant davantage d’options pour répondre à des besoins stricts en matière d’isolement et de localisation des données dans le pays pourront tirer parti des Dedicated Local Zones ou d’AWS Outposts pour déployer l’infrastructure de l’AWS European Sovereign Cloud sur les sites de leur choix.
Un investissement continu d’AWS en Europe L’AWS European Sovereign Cloud s’inscrit dans un investissement continu d’AWS en Europe. AWS s’engage à innover pour soutenir les valeurs européennes et l’avenir numérique de l’Europe.
Nous créons des milliers d’emplois qualifiés et investissons des milliards d’euros dans l’économie européenne. Amazon a créé plus de 100 000 emplois permanents dans l’UE.
Nous favorisons le développement économique en investissant dans les infrastructures, les emplois et les compétences dans les territoires et les pays d’Europe. Certaines des plus grandes équipes de développement d’AWS sont situées en Europe, avec des centres majeurs à Dublin, Dresde et Berlin. Dans le cadre de notre engagement continu à contribuer au développement des compétences numériques, nous recruterons et formerons du personnel local supplémentaire pour exploiter et soutenir l’AWS European Sovereign Cloud.
Les clients, partenaires et régulateurs accueillent favorablement l’AWS European Sovereign Cloud Dans l’UE, des centaines de milliers d’organisations de toutes tailles et de tous secteurs utilisent AWS, qu’il s’agisse de start-ups, de petites et moyennes entreprises ou de grandes entreprises, y compris des sociétés de télécommunications, des organisations du secteur public, des établissements d’enseignement ou des agences gouvernementales. Des organisations de toute l’Europe accueillent favorablement l’AWS European Sovereign Cloud.
« En tant que leader du marché des logiciels de gestion d’entreprise fortement ancré en Europe, SAP collabore depuis longtemps avec AWS pour le compte de ses clients, afin d’accélérer la transformation numérique dans le monde entier. L’AWS European Sovereign Cloud offre de nouvelles opportunités de renforcer notre relation en Europe en nous permettant d’élargir les choix que nous offrons aux clients lorsqu’ils passent au cloud. Nous apprécions le partenariat en cours avec AWS, et les nouvelles possibilités que cet investissement peut apporter à nos clients mutuels dans toute la région. » — Peter Pluim, Président, SAP Enterprise Cloud Services and SAP Sovereign Cloud Services.
« Le nouvel AWS European Sovereign Cloud peut changer la donne pour les secteurs d’activité très réglementés de l’Union européenne. En tant que fournisseur de télécommunications de premier plan en Allemagne, notre transformation numérique se concentre sur l’innovation, l’évolutivité, l’agilité et la résilience afin de fournir à nos clients les meilleurs services et la meilleure qualité. Cela sera désormais associé aux plus hauts niveaux de protection des données et de conformité réglementaire qu’offre AWS, avec un accent particulier sur les exigences de souveraineté numérique. Je suis convaincu que cette nouvelle offre d’infrastructure a le potentiel de stimuler l’adaptation au cloud des entreprises européennes et d’accélérer la transformation numérique des industries réglementées à travers l’UE. » — Mallik Rao, Chief Technology and Information Officer, O2 Telefónica, Allemagne
« Deutsche Telekom se réjouit de l’annonce de l’AWS European Sovereign Cloud, qui souligne la volonté d’AWS d’innover en permanence pour les entreprises européennes. La solution d’AWS offrira un plus grand choix aux organisations lorsqu’elles migreront des applications réglementées vers le cloud, ainsi que des options supplémentaires pour répondre à l’évolution des exigences en matière de gouvernance numérique dans l’UE. » — Greg Hyttenrauch, vice-président senior, Global Cloud Services chez T-Systems
« Aujourd’hui, nous sommes à l’aube d’une ère de transformation. Le lancement de l’AWS European Sovereign Cloud ne représente pas seulement une amélioration de l’infrastructure, c’est un changement de paradigme. Ce cadre sophistiqué permettra à Dedalus d’offrir des services inégalés pour le stockage sécurisé et efficace des données des patients dans le cloud AWS. Nous restons engagés, sans compromis, à servir notre clientèle européenne avec les meilleures solutions de leur catégorie, étayées par la confiance et l’excellence technologique ». — Andrea Fiumicelli, Chairman at Dedalus
« À de Volksbank, nous croyons qu’il faut investir dans l’avenir des Pays-Bas. Pour y parvenir efficacement, nous devons avoir accès aux technologies les plus récentes afin d’innover en permanence et d’améliorer les services offerts à nos clients. C’est pourquoi nous nous réjouissons de l’annonce de l’AWS European Sovereign Cloud, qui permettra aux clients européens de démontrer facilement leur conformité aux réglementations en constante évolution tout en bénéficiant de l’étendue, de la sécurité et de la suite complète de services AWS ». — Sebastiaan Kalshoven, Director IT/CTO, de Volksbank
« Eviden se réjouit du lancement de l’AWS European Sovereign Cloud. Celui-ci aidera les industries réglementées et le secteur public à satisfaire leurs exigences pour les applications les plus sensibles, grâce à un Cloud AWS doté de toutes ses fonctionnalités et entièrement opéré en Europe. En tant que partenaire AWS Premier Tier Services et leader des services de cybersécurité en Europe, Eviden a une longue expérience dans l’accompagnement de clients AWS pour formaliser et maîtriser leurs risques en termes de souveraineté. L’AWS European Sovereign Cloud permettra à Eviden de répondre à un plus grand nombre de besoins de ses clients en matière de souveraineté ». — Yannick Tricaud, Head of Southern and Central Europe, Middle East and Africa, Eviden, Atos Group
« Nous saluons l’engagement d’AWS d’étendre son infrastructure avec un cloud européen indépendant. Les entreprises et les organisations du secteur public auront ainsi plus de choix pour répondre aux exigences de souveraineté numérique. Les services cloud sont essentiels pour la numérisation de l’administration publique. La “stratégie de l’administration allemande en matière de cloud” et la norme contractuelle “EVB-IT Cloud” ont constitué les bases de l’utilisation du cloud dans l’administration publique. Je suis très heureux de travailler avec AWS pour mettre en œuvre de manière pratique et collaborative la souveraineté, conformément à notre stratégie cloud. » — Markus Richter, DSI du gouvernement fédéral allemand, ministère fédéral de l’Intérieur.
Nos engagements envers nos clients Nous restons déterminés à donner à nos clients le contrôle et les choix nécessaires pour répondre à l’évolution de leurs besoins en matière de souveraineté numérique. Nous continuons d’innover en matière de fonctionnalités, de contrôles et de garanties de souveraineté au niveau mondial au sein d’AWS, tout en fournissant sans compromis et sans restriction la pleine puissance d’AWS.
AWS Digital Sovereignty Pledge: Ankündigung der neuen, unabhängigen AWS European Sovereign Cloud
Amazon Web Services (AWS) war immer der Meinung, dass es wichtig ist, dass Kunden die volle Kontrolle über ihre Daten haben. Kunden sollen die Wahl haben, wie sie diese Daten in der Cloud absichern und verwalten.
Letztes Jahr haben wir unseren „AWS Digital Sovereignty Pledge“ vorgestellt: Unser Versprechen, allen AWS-Kunden ohne Kompromisse die fortschrittlichsten Steuerungsmöglichkeiten für Souveränitätsanforderungen und Funktionen in der Cloud anzubieten. Wir haben uns dazu verpflichtet, die sich wandelnden Anforderungen von Kunden und Aufsichtsbehörden zu verstehen und sie mit innovativen Angeboten zu adressieren. Wir bauen unser Angebot so aus, dass Kunden ihre Bedürfnisse an digitale Souveränität erfüllen können, ohne Kompromisse bei der Leistungsfähigkeit, Innovationskraft, Sicherheit und Skalierbarkeit der AWS-Cloud einzugehen.
AWS bietet die größte und umfassendste Cloud-Infrastruktur weltweit. Von Anfang an haben wir bei der AWS-Cloud einen „sovereign-by-design“-Ansatz verfolgt. Wir haben mit Hilfe von Kunden aus besonders regulierten Branchen, wie z.B. Finanzdienstleistungen, Gesundheit, Staat und Verwaltung, Funktionen und Steuerungsmöglichkeiten für Datenschutz und Datensicherheit entwickelt. Dieses Vorgehen hat zu Innovationen wie dem AWS Nitro System geführt, das heute die Grundlage für alle modernen Amazon Elastic Compute Cloud (Amazon EC2) Instanzen und Confidential Computing auf AWS bildet. AWS Nitro setzt auf eine starke physikalische und logische Sicherheitsabgrenzung und realisiert damit Zugriffsbeschränkungen, die unautorisierte Zugriffe auf Kundendaten in EC2 unmöglich machen – das gilt auch für AWS-Personal. Die NCC Group hat das Sicherheitsdesign von AWS Nitro im Rahmen einer unabhängigen Untersuchung in einem öffentlichen Bericht validiert.
Mit AWS hatten und haben Kunden stets die Kontrolle über den Speicherort ihrer Daten. Kunden, die spezifische europäische Vorgaben zum Ort der Datenverarbeitung einhalten müssen, haben die Wahl, ihre Daten in jeder unserer bestehenden acht AWS-Regionen (Frankfurt, Irland, London, Mailand, Paris, Stockholm, Spanien und Zürich) zu verarbeiten und sicher innerhalb Europas zu speichern. Europäische Kunden können ihre kritischen Workloads auf Basis des weltweit umfangreichsten und am weitesten verbreiteten Portfolios an Diensten betreiben – dazu zählen AI, Analytics, Compute, Datenbanken, Internet of Things (IoT), Machine Learning (ML), Mobile Services und Storage. Wir haben Innovationen in den Bereichen Datenverwaltung und Kontrolle realisiert, um unsere Kunden besser zu unterstützen. Zum Beispiel haben wir weitergehende Transparenz und zusätzliche Zusicherungen sowie neue Optionen für dedizierte Infrastruktur mit AWS Dedicated Local Zones angekündigt.
Ankündigung der AWS European Sovereign Cloud Kunden aus dem öffentlichen Sektor und aus regulierten Industrien in Europa berichten uns immer wieder, mit welcher Komplexität und Dynamik sie im Bereich Souveränität konfrontiert werden. Wir hören von unseren Kunden, dass sie die Cloud nutzen möchten, aber gleichzeitig zusätzliche Anforderungen im Zusammenhang mit dem Ort der Datenverarbeitung, der betrieblichen Autonomie und der operativen Souveränität erfüllen müssen.
Kunden befürchten, dass sie sich zwischen der vollen Leistung von AWS und souveränen Cloud-Lösungen mit eingeschränkter Funktion entscheiden müssen. Wir haben intensiv mit Aufsichts- und Cybersicherheitsbehörden sowie Kunden aus Deutschland und anderen europäischen Ländern zusammengearbeitet, um zu verstehen, wie Souveränitätsbedürfnisse aufgrund verschiedener Faktoren wie Standort, Klassifikation der Workloads und Branche variieren können. Diese Faktoren können sich auf Workload-Anforderungen auswirken, z. B. darauf, wo sich diese Daten befinden dürfen, wer darauf zugreifen kann und welche Steuerungsmöglichkeiten erforderlich sind. AWS hat eine nachgewiesene Erfolgsbilanz insbesondere für innovative Lösungen zur Verarbeitung spezialisierter Workloads auf der ganzen Welt.
Wir freuen uns, heute die AWS European Sovereign Cloud ankündigen zu können: Eine neue, unabhängige Cloud für Europa. Sie soll Kunden aus dem öffentlichen Sektor und stark regulierten Industrien (z.B. Betreiber kritischer Infrastrukturen („KRITIS“)) dabei helfen, spezifische gesetzliche Anforderungen an den Ort der Datenverarbeitung und den Betrieb der Cloud zu erfüllen. Die AWS European Sovereign Cloud wird sich in der Europäischen Union (EU) befinden und dort betrieben. Sie wird physisch und logisch von den bestehenden AWS-Regionen getrennt sein und dieselbe Sicherheit, Verfügbarkeit und Leistung wie die bestehenden AWS-Regionen bieten. Die Kontrolle über den Betrieb und den Support der AWS European Sovereign Cloud wird ausschließlich von AWS-Personal ausgeübt, das in der EU ansässig ist und sich in der EU aufhält.
Wie schon bei den bestehenden AWS-Regionen, werden Kunden, welche die AWS European Sovereign Cloud nutzen, von dem gesamten AWS-Leistungsumfang profitieren. Dazu zählen die gewohnte Architektur, das umfangreiche Service-Portfolio und die APIs, die heute schon von Millionen von Kunden verwendet werden. Die AWS European Sovereign Cloud wird mit ihrer ersten AWS-Region in Deutschland starten und allen Kunden in Europa zur Verfügung stehen.
Die AWS European Sovereign Cloud wird “sovereign-by-design” sein und basiert auf mehr als zehn Jahren Erfahrung beim Betrieb mehrerer unabhängiger Clouds für besonders kritische und vertrauliche Workloads. Wie schon bei unseren bestehenden AWS-Regionen wird die AWS European Sovereign Cloud für Hochverfügbarkeit und Ausfallsicherheit ausgelegt sein und auf dem AWS Nitro System aufbauen, um die Vertraulichkeit und Integrität von Kundendaten sicherzustellen. Kunden haben die Kontrolle und Gewissheit darüber, dass AWS nicht ohne ihr Einverständnis auf Kundendaten zugreift oder sie für andere Zwecke verwendet. Die AWS European Sovereign Cloud ist so gestaltet, dass nicht nur alle Kundendaten, sondern auch alle Metadaten, die durch Kunden angelegt werden (z.B. Rollen, Zugriffsrechte, Labels für Ressourcen und Konfigurationsinformationen), innerhalb der EU verbleiben. Die AWS European Sovereign Cloud verfügt über unabhängige Systeme für das Rechnungswesen und zur Nutzungsmessung.
„Die neue AWS European Sovereign Cloud kann ein Game Changer für stark regulierte Geschäftsbereiche in der Europäischen Union sein. Als führender Telekommunikationsanbieter in Deutschland konzentriert sich unsere digitale Transformation auf Innovation, Skalierbarkeit, Agilität und Resilienz, um unseren Kunden die besten Dienste und die beste Qualität zu bieten. Dies wird nun von AWS mit dem höchsten Datenschutzniveau unter Einhaltung der regulatorischen Anforderungen vereint mit einem besonderen Schwerpunkt auf die Anforderungen an digitale Souveränität. Ich bin überzeugt, dass dieses neue Infrastrukturangebot das Potenzial hat, die Cloud-Adaption von europäischen Unternehmen voranzutreiben und die digitale Transformation regulierter Branchen in der EU zu beschleunigen.“ — Mallik Rao, Chief Technology and Information Officer bei O2 Telefónica in Deutschland
Sicherstellung operativer Autonomie Die AWS European Sovereign Cloud bietet Kunden die Möglichkeit, strenge Anforderungen an Betriebsautonomie und den Ort der Datenverarbeitung zu erfüllen. Um eine Datenverarbeitung und operative Souveränität innerhalb der EU zu gewährleisten, wird die AWS European Sovereign Cloud-Infrastruktur unabhängig von bestehenden AWS-Regionen betrieben. Um den unabhängigen Betrieb der AWS European Sovereign Cloud zu gewährleisten, hat nur Personal, das in der EU ansässig ist und sich in der EU aufhält die Kontrolle über den täglichen Betrieb. Dazu zählen der Zugang zu Rechenzentren, der technische Support und der Kundenservice.
Wir nutzen die Erkenntnisse aus unserer intensiven Zusammenarbeit mit Aufsichts- und Cybersicherheitsbehörden in Europa beim Aufbau der AWS European Sovereign Cloud, damit Kunden ihren Anforderungen an die Kontrolle über den Speicher- und Verarbeitungsort ihrer Daten, der betrieblichen Autonomie und der operativen Souveränität gerecht werden können. Wir freuen uns, mit dem Bundesamt für Sicherheit in der Informationstechnik (BSI) auch bei der Umsetzung der AWS European Sovereign Cloud zu kooperieren:
„Der Aufbau einer europäischen AWS-Cloud wird es für viele Behörden und Unternehmen mit hohen Anforderungen an die Datensicherheit und den Datenschutz deutlich leichter machen, die AWS-Services zu nutzen. Wir wissen um die Innovationskraft moderner Cloud-Dienste und wir wollen mithelfen, sie für Deutschland und Europa sicher verfügbar zu machen. Das BSI hat mit dem Kriterienkatalog C5 die Cybersicherheit im Cloud Computing bereits maßgeblich beeinflusst, und tatsächlich war AWS der erste Cloud Service Provider, der das C5-Testat des BSI erhalten hat. Insofern freuen wir uns sehr, den hiesigen Aufbau einer AWS-Cloud, die auch einen Beitrag zur europäischen Souveränität leisten wird, im Hinblick auf die Sicherheit konstruktiv zu begleiten.“ — Claudia Plattner, Präsidentin, deutsches Bundesamt für Sicherheit in der Informationstechnik (BSI)
Kontrolle ohne Kompromisse Obwohl sie separat betrieben wird, bietet die AWS European Sovereign Cloud dieselbe branchenführende Architektur, die auf Sicherheit und Verfügbarkeit ausgelegt ist wie andere AWS-Regionen. Dazu gehören mehrere Verfügbarkeitszonen (Availability Zones, AZs) – eine Infrastruktur, die sich an verschiedenen voneinander getrennten geografischen Standorten befindet. Diese räumliche Trennung verringert signifikant das Risiko, dass ein Zwischenfall an einem einzelnen Standort den Geschäftsbetrieb des Kunden beeinträchtigt. Jede Verfügbarkeitszone besitzt eine autarke Stromversorgung und Kühlung und verfügt über redundante Netzwerkanbindungen, um ein Höchstmaß an Ausfallsicherheit zu gewährleisten. Zudem zeichnet sich jede Verfügbarkeitszone durch eine hohe physische Sicherheit aus. Alle AZs in der AWS European Sovereign Cloud werden über vollständig redundante, dedizierte Metro-Glasfaser miteinander verbunden und ermöglichen so eine Vernetzung mit hohem Durchsatz und niedriger Latenz zwischen den AZs. Der gesamte Datenverkehr zwischen AZs wird verschlüsselt. Für besonders strikte Anforderungen an die Trennung von Daten und den Ort der Datenverarbeitung innerhalb eines Landes bieten bestehende Angebote wie AWS Dedicated Local Zones oder AWS Outposts zusätzliche Optionen. Damit können Kunden die AWS European Sovereign Cloud Infrastruktur auf selbstgewählte Standorte erweitern.
Kontinuierliche AWS-Investitionen in Deutschland und Europa Mit der AWS European Sovereign Cloud setzt AWS seine Investitionen in Deutschland und Europa fort. AWS entwickelt Innovationen, um europäische Werte und die digitale Zukunft in Deutschland und Europa zu unterstützen. Wir treiben die wirtschaftliche Entwicklung voran, indem wir in Infrastruktur, Arbeitsplätze und Ausbildung in ganz Europa investieren. Wir schaffen Tausende von hochwertigen Arbeitsplätzen und investieren Milliarden von Euro in europäische Volkswirtschaften. Amazon hat mehr als 100.000 dauerhafte Arbeitsplätze innerhalb der EU geschaffen.
„Die deutsche und europäische Wirtschaft befindet sich auf Digitalisierungskurs. Insbesondere der starke deutsche Mittelstand braucht eine souveräne Digitalinfrastruktur, die höchsten Anforderungen genügt, um auch weiterhin wettbewerbsfähig im globalen Markt zu sein. Für unsere digitale Unabhängigkeit ist wichtig, dass Rechenleistungen vor Ort in Deutschland entstehen und in unseren Digitalstandort investiert wird. Wir begrüßen daher die Ankündigung von AWS, die Cloud für Europa in Deutschland anzusiedeln.“ — Stefan Schnorr, Staatssekretär im deutschen Bundesministerium für Digitales und Verkehr
Einige der größten Entwicklungsteams von AWS sind in Deutschland und Europa angesiedelt, mit Standorten in Aachen, Berlin, Dresden, Tübingen und Dublin. Da wir uns verpflichtet fühlen, einen langfristigen Beitrag zur Entwicklung digitaler Kompetenzen zu leisten, wird AWS zusätzliches Personal vor Ort für die AWS European Sovereign Cloud einstellen und ausbilden.
Kunden, Partner und Aufsichtsbehörden begrüßen die AWS European Sovereign Cloud In der EU nutzen Hunderttausende Organisationen aller Größen und Branchen AWS – von Start-ups über kleine und mittlere Unternehmen bis hin zu den größten Unternehmen, einschließlich Telekommunikationsunternehmen, Organisationen des öffentlichen Sektors, Bildungseinrichtungen und Regierungsbehörden. Europaweit unterstützen Organisationen die Einführung der AWS European Sovereign Cloud. Für Kunden wird die AWS European Sovereign Cloud neue Möglichkeiten im Cloudeinsatz eröffnen.
„Wir begrüßen das Engagement von AWS, seine Infrastruktur mit einer unabhängigen europäischen Cloud auszubauen. So erhalten Unternehmen und Organisationen der öffentlichen Hand mehr Auswahlmöglichkeiten bei der Erfüllung der Anforderungen an digitale Souveränität. Cloud-Services sind für die Digitalisierung der öffentlichen Verwaltung unerlässlich. Mit der Deutschen Verwaltungscloud-Strategie und dem Vertragsstandard EVB-IT Cloud wurden die Grundlagen für die Cloud-Nutzung in der Verwaltung geschaffen. Ich freue mich sehr, gemeinsam mit AWS Souveränität im Sinne unserer Cloud-Strategie praktisch und partnerschaftlich umzusetzen.” — Dr. Markus Richter, Staatssekretär im deutschen Bundesministerium des Innern und für Heimat sowie Beauftragter der Bundesregierung für Informationstechnik (CIO des Bundes)
„Als Marktführer für Geschäftssoftware mit starken Wurzeln in Europa, arbeitet SAP seit langem im Interesse der Kunden mit AWS zusammen, um die digitale Transformation auf der ganzen Welt zu beschleunigen. Die AWS European Sovereign Cloud bietet weitere Möglichkeiten, unsere Beziehung in Europa zu stärken, indem wir die Möglichkeiten, die wir unseren Kunden beim Wechsel in die Cloud bieten, erweitern können. Wir schätzen die fortlaufende Zusammenarbeit mit AWS und die neuen Möglichkeiten, die diese Investition für unsere gemeinsamen Kunden in der gesamten Region mit sich bringen kann.“ — Peter Pluim, President – SAP Enterprise Cloud Services und SAP Sovereign Cloud Services
„Heute stehen wir an der Schwelle zu einer transformativen Ära. Die Einführung der AWS European Sovereign Cloud stellt nicht nur eine infrastrukturelle Erweiterung dar, sondern ist ein Paradigmenwechsel. Dieses hochentwickelte Framework wird Dedalus in die Lage versetzen, unvergleichliche Dienste für die sichere und effiziente Speicherung von Patientendaten in der AWS-Cloud anzubieten. Wir bleiben kompromisslos dem Ziel verpflichtet, unseren europäischen Kunden erstklassige Lösungen zu bieten, die auf Vertrauen und technologischer Exzellenz basieren.“ — Andrea Fiumicelli, Chairman bei Dedalus
„Die Deutsche Telekom begrüßt die Ankündigung der AWS European Sovereign Cloud, die das Engagement von AWS für fortwährende Innovationen für europäische Unternehmen unterstreicht. Diese AWS-Lösung wird Unternehmen eine noch größere Auswahl bieten, wenn sie kritische Workloads in die AWS-Cloud verlagern, und zusätzliche Optionen zur Erfüllung der sich entwickelnden Anforderungen an die digitale Governance in der EU.” — Greg Hyttenrauch, Senior Vice President, Global Cloud Services bei T-Systems
„Wir begrüßen die AWS European Sovereign Cloud als neues Angebot innerhalb von AWS, um die komplexesten regulatorischen Anforderungen an die Datenresidenz und betrieblichen Erfordernisse in ganz Europa zu adressieren.“ — Bernhard Wagensommer, Vice President Prinect bei der Heidelberger Druckmaschinen AG
„Die AWS European Sovereign Cloud wird neue Branchenmaßstäbe setzen und sicherstellen, dass Finanzdienstleistungsunternehmen noch mehr Optionen innerhalb von AWS haben, um die wachsenden Anforderungen an die digitale Souveränität hinsichtlich der Datenresidenz und operativen Autonomie in der EU zu erfüllen.“ — Gerhard Koestler, Chief Information Officer bei Raisin
„Mit einem starken Fokus auf Datenschutz, Sicherheit und regulatorischer Compliance unterstreicht die AWS European Sovereign Cloud das Engagement von AWS, die höchsten Standards für die digitale Souveränität von Finanzdienstleistern zu fördern. Dieser zusätzliche robuste Rahmen ermöglicht es Unternehmen wie unserem, in einer sicheren Umgebung erfolgreich zu sein, in der Daten geschützt sind und die Einhaltung höchster Standards leichter denn je wird.“ — Andreas Schranzhofer, Chief Technology Officer bei Scalable Capital
„Die AWS European Sovereign Cloud ist ein wichtiges, zusätzliches Angebot von AWS, das hochregulierten Branchen, Organisationen der öffentlichen Hand und Regierungsbehörden in Deutschland weitere Optionen bietet, um strengste regulatorische Anforderungen an den Datenschutz in der Cloud noch einfacher umzusetzen. Als AWS Advanced Tier Services Partner, AWS Solution Provider und AWS Public Sector Partner beraten und unterstützen wir kritische Infrastrukturen (KRITIS) bei der erfolgreichen Implementierung. Das neue Angebot von AWS ist ein wichtiger Impuls für Innovationen und Digitalisierung in Deutschland.“ — Martin Wibbe, CEO bei Materna
„Als eines der größten deutschen IT-Unternehmen und strategischer AWS-Partner begrüßt msg ausdrücklich die Ankündigung der AWS European Sovereign Cloud. Für uns als Anbieter von Software as a Service (SaaS) und Consulting Advisor für Kunden mit spezifischen Datenschutzanforderungen ermöglicht die Schaffung einer eigenständigen europäischen Cloud, unseren Kunden dabei zu helfen, die Einhaltung sich entwickelnder Vorschriften leichter nachzuweisen. Diese spannende Ankündigung steht im Einklang mit unserer Cloud-Strategie. Wir betrachten dies als Chance, um unsere Partnerschaft mit AWS zu stärken und die Entwicklung der Cloud in Deutschland voranzutreiben.“ — Dr. Jürgen Zehetmaier, CEO von msg
Unsere Verpflichtung gegenüber unseren Kunden Um Kunden bei der Erfüllung der sich wandelnden Souveränitätsanforderungen zu unterstützen, entwickelt AWS fortlaufend innovative Features, Kontrollen und Zusicherungen, ohne die Leistungsfähigkeit der AWS Cloud zu beeinträchtigen.
AWS Digital Sovereignty Pledge: Annuncio di un nuovo cloud sovrano e indipendente in Europa
Fin dal primo giorno, abbiamo sempre creduto che fosse essenziale che tutti i clienti avessero il controllo sui propri dati e sulle scelte di come proteggerli e gestirli nel cloud. L’anno scorso abbiamo introdotto l’AWS Digital Sovereignty Pledge, il nostro impegno a offrire ai clienti AWS il set più avanzato di controlli e funzionalità di sovranità disponibili nel cloud. Ci siamo impegnati a lavorare per comprendere le esigenze e le necessità in costante evoluzione sia dei clienti che delle autorità di regolamentazione, e per adattarci e innovare rapidamente per soddisfarli. Ci siamo impegnati ad espandere le nostre funzionalità per consentire ai clienti di soddisfare le loro esigenze di sovranità digitale senza compromettere le prestazioni, l’innovazione, la sicurezza o la scalabilità del cloud AWS.
AWS offre l’infrastruttura cloud più grande e completa a livello globale. Il nostro approccio fin dall’inizio è stato quello di rendere il cloud AWS sovrano by design. Abbiamo creato funzionalità e controlli di protezione dei dati nel cloud AWS confrontandoci con i clienti che operano in settori quali i servizi finanziari e l’assistenza sanitaria, che sono in assoluto tra le organizzazioni più attente alla sicurezza e alla privacy dei dati. Ciò ha portato a innovazioni come AWS Nitro System, che alimenta tutte le nostre moderne istanze Amazon Elastic Compute Cloud (Amazon EC2) e fornisce un solido standard di sicurezza fisico e logico-infrastrutturale al fine di imporre restrizioni di accesso in modo che nessuno, compresi i dipendenti AWS, possa accedere ai dati dei clienti in esecuzione in EC2. Il design di sicurezza del sistema Nitro è stato inoltre convalidato in modo indipendente dal gruppo NCC in un report pubblico.
Con AWS i clienti hanno sempre avuto il controllo sulla posizione dei propri dati. I clienti che devono rispettare i requisiti europei di residenza dei dati possono scegliere di distribuire i propri dati in una delle otto regioni AWS esistenti (Irlanda, Francoforte, Londra, Parigi, Stoccolma, Milano, Zurigo e Spagna) per conservare i propri dati in modo sicuro in Europa. Per gestire i propri carichi di lavoro sensibili, i clienti europei possono sfruttare il portafoglio di servizi più ampio e completo, tra cui intelligenza artificiale, analisi ed elaborazione dati, database, Internet of Things (IoT), apprendimento automatico, servizi mobili e storage. Per supportare ulteriormente i clienti, abbiamo introdotto alcune innovazioni per offrire loro maggiore controllo e scelta sulla gestione dei dati. Ad esempio, abbiamo annunciato ulteriore trasparenza e garanzie e nuove opzioni di infrastruttura dedicate con AWS Dedicated Local Zones.
Annuncio AWS European Sovereign Cloud Quando in Europa parliamo con i clienti del settore pubblico e delle industrie regolamentate, riceviamo continue conferme di come si trovano ad affrontare una incredibile complessità e mutevoli dinamiche di un panorama di sovranità in continua evoluzione. I clienti ci dicono che vogliono adottare il cloud, ma si trovano ad affrontare crescenti interventi normativi in relazione alla residenza dei dati, all’autonomia operativa ed alla resilienza europea. Abbiamo appreso che questi clienti temono di dover scegliere tra tutta la potenza di AWS e soluzioni cloud sovrane ma con funzionalità limitate. Abbiamo collaborato intensamente con le autorità di regolamentazione europee, le agenzie nazionali per la sicurezza informatica e i nostri clienti per comprendere come le esigenze di sovranità possano variare in base a molteplici fattori come la residenza, la sensibilità dei carichi di lavoro e il settore. Questi fattori possono influire sui requisiti del carico di lavoro, ad esempio dove possono risiedere i dati, chi può accedervi e i controlli necessari, ed AWS ha una comprovata esperienza di innovazione per affrontare carichi di lavoro specializzati in tutto il mondo.
Oggi siamo lieti di annunciare il nostro programma di lancio dell’AWS European Sovereign Cloud, un nuovo cloud indipendente per l’Europa, progettato per aiutare le organizzazioni del settore pubblico e i clienti in settori altamente regolamentati a soddisfare le loro esigenze di sovranità in continua evoluzione. Stiamo progettando il cloud sovrano europeo AWS in modo che sia separato e indipendente dalle nostre regioni esistenti, con un’infrastruttura situata interamente all’interno dell’Unione Europea (UE), con la stessa sicurezza, disponibilità e prestazioni che i nostri clienti ottengono dalle regioni esistenti oggi. Per garantire una maggiore resilienza operativa all’interno dell’UE, solo i residenti dell’UE che si trovano nell’UE avranno il controllo delle operazioni e il supporto per l’AWS European Sovereign Cloud. Come per tutte le regioni attuali, i clienti che utilizzeranno l’AWS European Sovereign Cloud trarranno vantaggio da tutta la potenza di AWS con la stessa architettura, un ampio portafoglio di servizi e API che milioni di clienti già utilizzano oggi. L’AWS European Sovereign Cloud lancerà la sua prima regione AWS in Germania, disponibile per tutti i clienti europei.
Il cloud sovrano europeo AWS sarà progettato per garantire l’indipendenza operativa e la resilienza all’interno dell’UE e sarà gestito e supportato solamente da dipendenti AWS che si trovano nell’UE e che vi risiedono. Questo design offrirà ai clienti una scelta aggiuntiva per soddisfare le diverse esigenze di residenza dei dati, autonomia operativa e resilienza. Come in tutte le regioni AWS attuali, i clienti che utilizzano l’AWS European Sovereign Cloud trarranno vantaggio da tutta la potenza di AWS, dalla stessa architettura, dall’ampio portafoglio di servizi e dalle stesse API utilizzate oggi da milioni di clienti. L’AWS European Sovereign Cloud lancerà la sua prima regione in Germania.
Il cloud sovrano europeo AWS sarà sovrano by design e si baserà su oltre un decennio di esperienza nella gestione di più cloud indipendenti per carichi di lavoro critici e soggetti a restrizioni. Come le regioni esistenti, il cloud sovrano europeo AWS sarà progettato per garantire disponibilità e resilienza elevate e sarà alimentato da AWS Nitro System per contribuire a garantire la riservatezza e l’integrità dei dati dei clienti. Clienti che avranno il controllo e la garanzia che AWS non potrà accedere od utilizzare i dati dei clienti per alcuno scopo senza il loro consenso. AWS offre ai clienti i controlli di sovranità più rigorosi tra quelli offerti dai principali cloud provider. Per i clienti con esigenze avanzate di residenza dei dati, il cloud sovrano europeo AWS è progettato per andare oltre, e consentirà ai clienti di conservare tutti i metadati che creano (come le etichette dei dati, le categorie, i ruoli degli account e le configurazioni che utilizzano per eseguire AWS) nell’UE. L’AWS European Sovereign Cloud sarà inoltre realizzato con sistemi separati di fatturazione e misurazione dell’utilizzo a livello regionale.
Garantire autonomia operativa L’AWS European Sovereign Cloud fornirà ai clienti la capacità di soddisfare rigorosi requisiti di autonomia operativa e residenza dei dati. Per offrire un maggiore controllo sulla residenza dei dati e sulla resilienza operativa all’interno dell’UE, l’infrastruttura AWS European Sovereign Cloud sarà gestita indipendentemente dalle regioni AWS esistenti. Per garantire il funzionamento indipendente dell’AWS European Sovereign Cloud, solo il personale residente nell’UE, situato nell’UE, avrà il controllo delle operazioni quotidiane, compreso l’accesso ai data center, il supporto tecnico e il servizio clienti.
Stiamo attingendo alle nostre profonde collaborazioni con le autorità di regolamentazione europee e le agenzie nazionali per la sicurezza informatica per applicarle nella realizzazione del cloud sovrano europeo AWS, di modo che i clienti che utilizzano AWS European Sovereign Cloud possano soddisfare i loro requisiti di residenza dei dati, di controllo, di autonomia operativa e resilienza. Ne è un esempio la stretta collaborazione con l’Ufficio federale tedesco per la sicurezza delle informazioni (BSI).
“Lo sviluppo di un cloud AWS europeo renderà molto più semplice l’utilizzo dei servizi AWS per molte organizzazioni del settore pubblico e per aziende con elevati requisiti di sicurezza e protezione dei dati. Siamo consapevoli della forza innovativa dei moderni servizi cloud e vogliamo contribuire a renderli disponibili in modo sicuro per la Germania e l’Europa. Il C5 (Cloud Computing Compliance Criteria Catalogue), sviluppato da BSI, ha plasmato in modo significativo gli standard cloud di sicurezza informatica e AWS è stato infatti il primo fornitore di servizi cloud a ricevere l’attestato C5 di BSI. In questo senso, siamo molto lieti di accompagnare in modo costruttivo lo sviluppo locale di un Cloud AWS, che contribuirà anche alla sovranità europea, in termini di sicurezza”. — Claudia Plattner, Presidente dell’Ufficio federale tedesco per la sicurezza informatica (BSI)
Controllo senza compromessi Sebbene separato, l’AWS European Sovereign Cloud offrirà la stessa architettura leader del settore creata per la sicurezza e la disponibilità delle altre regioni AWS. Ciò includerà multiple zone di disponibilità (AZ) e un’infrastruttura collocata in aree geografiche separate e distinte, con una distanza sufficiente a ridurre in modo significativo il rischio che un singolo evento influisca sulla continuità aziendale dei clienti. Ogni AZ disporrà di più livelli di alimentazione e rete ridondanti per fornire il massimo livello di resilienza. Tutte le AZ del cloud sovrano europeo AWS saranno interconnesse con fibra metropolitana dedicata e completamente ridondata, che fornirà reti ad alta velocità e bassa latenza tra le AZ. Tutto il traffico tra le AZ sarà crittografato. I clienti che necessitano di più opzioni per far fronte ai rigorosi requisiti di isolamento e residenza dei dati all’interno del Paese potranno sfruttare le zone locali dedicate o AWS Outposts per distribuire l’infrastruttura AWS European Sovereign Cloud nelle località da loro selezionate.
Continui investimenti di AWS in Europa L’AWS European Sovereign Cloud è parte del continuo impegno ad investire in Europa di AWS. AWS si impegna a innovare per sostenere i valori europei e il futuro digitale dell’Europa. Promuoviamo lo sviluppo economico investendo in infrastrutture, posti di lavoro e competenze nelle comunità e nei paesi di tutta Europa. Stiamo creando migliaia di posti di lavoro di alta qualità e investendo miliardi di euro nelle economie europee. Amazon ha creato più di 100.000 posti di lavoro permanenti in tutta l’UE. Alcuni dei nostri team di sviluppo AWS più grandi si trovano in Europa, con centri di eccellenza a Dublino, Dresda e Berlino. Nell’ambito del nostro continuo impegno a contribuire allo sviluppo delle competenze digitali, assumeremo e svilupperemo ulteriore personale locale per gestire e supportare l’AWS European Sovereign Cloud.
Clienti, partner e autorità di regolamentazione accolgono con favore il cloud sovrano europeo AWS Nell’UE, centinaia di migliaia di organizzazioni di tutte le dimensioni e in tutti i settori utilizzano AWS, dalle start-up alle piccole e medie imprese, alle grandi imprese, alle società di telecomunicazioni, alle organizzazioni del settore pubblico, agli istituti di istruzione e alle agenzie governative. Organizzazioni di tutta Europa sostengono l’introduzione dell’AWS European Sovereign Cloud.
“In qualità di leader di mercato nel software applicativo aziendale con forti radici in Europa, SAP collabora da tempo con AWS per conto dei clienti per accelerare la trasformazione digitale in tutto il mondo. L’AWS European Sovereign Cloud offre ulteriori opportunità per rafforzare le nostre relazioni in Europa consentendoci di ampliare le scelte che offriamo ai clienti mentre passano al cloud. Apprezziamo la partnership continua con AWS e le nuove possibilità che questo investimento può offrire ai nostri comuni clienti in tutta la regione.” — Peter Pluim, Presidente, SAP Enterprise Cloud Services e SAP Sovereign Cloud Services
“Il nuovo AWS European Sovereign Cloud può rappresentare un punto di svolta per i segmenti di business altamente regolamentati nell’Unione Europea. In qualità di fornitore leader di telecomunicazioni in Germania, la nostra trasformazione digitale si concentra su innovazione, scalabilità, agilità e resilienza per fornire ai nostri clienti i migliori servizi e la migliore qualità. Ciò sarà ora abbinato ai più alti livelli di protezione dei dati e conformità normativa offerti da AWS e con un’attenzione particolare ai requisiti di sovranità digitale. Sono convinto che questa nuova offerta di infrastrutture abbia il potenziale per stimolare l’adozione del cloud da parte delle aziende europee e accelerare la trasformazione digitale delle industrie regolamentate in tutta l’UE”. — Mallik Rao, Chief Technology & Information Officer (CTIO) presso O2 Telefónica in Germania
“Deutsche Telekom accoglie l’annuncio dell’AWS European Sovereign Cloud, che evidenzia l’impegno di AWS a un’innovazione continua nel mercato europeo. Questa soluzione AWS offrirà opportunità important per le aziende e le organizzazioni nell’ambito della migrazione regolamentata sul cloud e opzioni addizionali per soddisfare i requisiti di sovranità digitale europei in continua evoluzione”. — Greg Hyttenrauch, Senior Vice President, Global Cloud Services presso T-Systems
“Oggi siamo al culmine di un’era di trasformazione. L’introduzione dell’AWS European Sovereign Cloud non rappresenta semplicemente un miglioramento infrastrutturale, è un cambio di paradigma. Questo sofisticato framework consentirà a Dedalus di offrire servizi senza precedenti per l’archiviazione dei dati dei pazienti in modo sicuro ed efficiente nel cloud AWS. Rimaniamo impegnati, senza compromessi, a servire la nostra clientela europea con soluzioni best-in-class sostenute da fiducia ed eccellenza tecnologica”. — Andrea Fiumicelli, Presidente di Dedalus
“Noi di de Volksbank crediamo nell’investire per migliorare i Paesi Bassi. Ma perché questo avvenga in modo efficace, dobbiamo avere accesso alle tecnologie più recenti per poter innovare e migliorare continuamente i servizi per i nostri clienti. Per questo motivo, accogliamo con favore l’annuncio dello European Sovereign Cloud che consentirà ai clienti europei di rispettare facilmente la conformità alle normative in evoluzione, beneficiando comunque della scalabilità, della sicurezza e della suite completa dei servizi AWS”. — Sebastiaan Kalshoven, Direttore IT/CTO della Volksbank
“Eviden accoglie con favore il lancio dell’AWS European Sovereign Cloud, che aiuterà le industrie regolamentate e il settore pubblico a soddisfare i requisiti dei loro carichi di lavoro sensibili con un cloud AWS completo e interamente gestito in Europa. In qualità di partner AWS Premier Tier Services e leader nei servizi di sicurezza informatica in Europa, Eviden ha una vasta esperienza nell’aiutare i clienti AWS a formalizzare e mitigare i rischi di sovranità. L’AWS European Sovereign Cloud consentirà a Eviden di soddisfare una gamma più ampia di esigenze di sovranità dei clienti”. — Yannick Tricaud, Responsabile Europa meridionale e centrale, Medio Oriente e Africa, Eviden, Gruppo Atos
“Accogliamo con favore l’impegno di AWS di espandere la propria infrastruttura con un cloud europeo indipendente. Ciò offrirà alle imprese e alle organizzazioni del settore pubblico una scelta più ampia nel soddisfare i requisiti di sovranità digitale. I servizi cloud sono essenziali per la digitalizzazione della pubblica amministrazione. Con l’” Strategia cloud per l’Amministrazione tedesca” e lo standard contrattuale “EVB-IT Cloud”, sono state gettate le basi per l’utilizzo del cloud nella pubblica amministrazione. Sono molto lieto di collaborare con AWS per implementare in modo pratico e collaborativo la sovranità in linea con la nostra strategia cloud.” — Dr. Markus Richter, CIO del governo federale tedesco, Ministero federale degli interni
I nostri impegni nei confronti dei nostri clienti Manteniamo il nostro impegno a fornire ai nostri clienti il controllo e la possibilità di scelta per contribuire a soddisfare le loro esigenze in continua evoluzione in materia di sovranità digitale. Continueremo a innovare le funzionalità, i controlli e le garanzie di sovranità del dato all’interno del cloud AWS globale e a fornirli senza compromessi sfruttando tutta la potenza di AWS.
Compromiso de Soberanía Digital de AWS: anuncio de una nueva nube soberana independiente en la Unión Europea
Desde el primer día, en Amazon Web Services (AWS) siempre hemos creído que es esencial que los clientes tengan el control sobre sus datos y capacidad para proteger y gestionar los mismos en la nube. El año pasado, anunciamos el Compromiso de Soberanía Digital de AWS, nuestra garantía de que ofrecemos a todos los clientes de AWS los controles y funcionalidades de soberanía más avanzados que estén disponibles en la nube. Nos comprometimos a trabajar para comprender las necesidades y los requisitos cambiantes tanto de los clientes como de los reguladores, y a adaptarnos e innovar rápidamente para satisfacerlos. Asimismo, nos comprometimos a ampliar nuestras capacidades para permitir a los clientes satisfacer sus necesidades de soberanía digital sin reducir el rendimiento, la innovación, la seguridad o la escalabilidad de la nube de AWS.
AWS ofrece la infraestructura de nube más amplia y completa del mundo. Nuestro enfoque desde el principio ha sido hacer que AWS sea una nube soberana por diseño. Creamos funcionalidades y controles de protección de datos en la nube de AWS teniendo en cuenta las aportaciones de clientes de sectores como los servicios financieros, sanidad y entidades gubernamentales, que se encuentran entre los más preocupados por la seguridad y la privacidad de los datos en el mundo. Esto ha dado lugar a innovaciones como el sistema Nitro de AWS, que impulsa todas nuestras instancias de Amazon Elastic Compute Cloud (Amazon EC2) y proporciona un límite de seguridad físico y lógico sólido para imponer restricciones de acceso, de modo que nadie, incluidos los empleados de AWS, pueda acceder a los datos de los clientes que se ejecutan en Amazon EC2. El diseño de seguridad del sistema Nitro también ha sido validado de forma independiente por el Grupo NCC en un informe público.
Con AWS, los clientes siempre han tenido el control sobre la ubicación de sus datos. En Europa, los clientes que deben cumplir con los requisitos de residencia de datos europeos tienen la opción de implementar sus datos en cualquiera de las ocho Regiones de AWS existentes (Irlanda, Frankfurt, Londres, París, Estocolmo, Milán, Zúrich y España) para mantener sus datos de forma segura en Europa. Para ejecutar sus cargas de trabajo sensibles, los clientes europeos pueden aprovechar la cartera de servicios más amplia y completa, que incluye inteligencia artificial, análisis, computación, bases de datos, Internet de las cosas (IoT), aprendizaje automático, servicios móviles y almacenamiento. Para apoyar aún más a los clientes, hemos innovado ofreciendo más control y opciones sobre sus datos. Por ejemplo, anunciamos una mayor transparencia y garantías, y nuevas opciones de infraestructura de uso exclusivo con Zonas Locales Dedicadas de AWS.
Anunciamos AWS European Sovereign Cloud Cuando hablamos con clientes del sector público y de sectores regulados en Europa, nos comparten cómo se enfrentan a una gran complejidad y a una dinámica cambiante en el panorama de la soberanía, que está en constante evolución. Los clientes nos dicen que quieren adoptar la nube, pero se enfrentan a un creciente escrutinio regulatorio en relación con la ubicación de los datos, la autonomía operativa europea y la resiliencia. Sabemos que a estos clientes les preocupa tener que elegir entre toda la potencia de AWS o soluciones de nube soberana con funciones limitadas. Hemos mantenido conversaciones muy provechosas con los reguladores europeos, las autoridades nacionales de ciberseguridad y los clientes para entender cómo las necesidades de soberanía de los clientes pueden variar en función de diferentes factores, como la ubicación, la sensibilidad de las cargas de trabajo y el sector. Estos factores pueden impactar en los requisitos aplicables a sus cargas de trabajo, como dónde pueden residir sus datos, quién puede acceder a ellos y los controles necesarios. AWS tiene un historial comprobado de innovación para abordar cargas de trabajo sensibles o especiales en todo el mundo.
Hoy nos complace anunciar nuestros planes de lanzar la Nube Soberana Europea de AWS, una nueva nube independiente para la Unión Europea, diseñada para ayudar a las organizaciones del sector público y a los clientes de sectores altamente regulados a satisfacer sus necesidades de soberanía en constante evolución. Estamos diseñando la Nube Soberana Europea de AWS para que sea independiente y separada de nuestras Regiones actuales, con una infraestructura ubicada íntegramente dentro de la Unión Europea y con la misma seguridad, disponibilidad y rendimiento que nuestros clientes obtienen en las Regiones actuales. Para ofrecer una mayor resiliencia operativa dentro de la UE, solo los residentes de la UE que se encuentren en la UE, tendrán el control de las operaciones y el soporte de la Nube Soberana Europea de AWS. Como ocurre con todas las Regiones actuales, los clientes que utilicen la Nube Soberana Europea de AWS se beneficiarán de toda la potencia de AWS con la misma arquitectura conocida, una amplia cartera de servicios y las APIs que utilizan millones de clientes en la actualidad. La Nube Soberana Europea de AWS lanzará su primera Región de AWS en Alemania disponible para todos los clientes en Europa.
La Nube Soberana Europea de AWS será soberana por diseño y se basará en más de una década de experiencia en la gestión de múltiples nubes independientes para las cargas de trabajo más críticas y restringidas. Al igual que las Regiones existentes, la Nube Soberana Europea de AWS se diseñará para ofrecer una alta disponibilidad y resiliencia, y contará con la tecnología del sistema Nitro de AWS, a fin de garantizar la confidencialidad e integridad de los datos de los clientes. Los clientes tendrán el control y la seguridad de que AWS no accederá a los datos de los clientes ni los utilizará para ningún propósito sin su consentimiento. AWS ofrece a los clientes los controles de soberanía más estrictos entre los principales proveedores de servicios en la nube. Para los clientes con necesidades de residencia de datos mejoradas, la Nube Soberana Europea de AWS está diseñada para ir más allá y permitirá a los clientes conservar todos los metadatos que crean (como funciones, permisos, etiquetas de recursos y configuraciones), las funciones de las cuentas y las configuraciones que utilizan para ejecutar AWS) dentro de la UE. La Nube Soberana Europea de AWS también se construirá con sistemas independientes de facturación y medición del uso dentro de la Región.
Ofreciendo autonomía operativa La Nube Soberana Europea de AWS proporcionará a los clientes la capacidad de cumplir con los estrictos requisitos de autonomía operativa y residencia de datos que sean de aplicación a cada cliente. Para proporcionar una mejor residencia de los datos y resiliencia operativa en la UE, la infraestructura de la Nube Soberana Europea de AWS se gestionará de forma independiente del resto de las Regiones de AWS existentes. Para garantizar el funcionamiento independiente de la Nube Soberana Europea de AWS, solo el personal residente en la UE y ubicado en la UE tendrá el control de las operaciones diarias, incluido el acceso a los centros de datos, el soporte técnico y el servicio de atención al cliente.
Estamos aprendiendo de nuestras intensas conversaciones con los reguladores europeos y las autoridades nacionales de ciberseguridad, aplicando estos aprendizajes a medida que construimos la Nube Soberana Europea de AWS, de modo que los clientes que la utilicen puedan cumplir sus requisitos de residencia, autonomía operativa y resiliencia de los datos. Por ejemplo, esperamos continuar colaborando con la Oficina Federal de Seguridad de la Información (BSI) de Alemania.
«El desarrollo de una nube europea de AWS facilitará mucho el uso de los servicios de AWS a muchas organizaciones y empresas del sector público con altos requisitos de seguridad y protección de datos. Somos conscientes del poder innovador de los servicios en la nube modernos y queremos contribuir a que estén disponibles de forma segura en Alemania y Europa. El C5 (Cloud Computing Compliance Criteria Catalogue), desarrollado por la BSI, ha influido considerablemente en los estándares de ciberseguridad en la nube y, de hecho, AWS fue el primer proveedor de servicios en la nube en recibir el certificado C5 de la BSI. En este sentido, nos complace acompañar de manera constructiva el desarrollo local de una nube de AWS, que también contribuirá a la soberanía europea en términos de seguridad». — Claudia Plattner, presidenta de la Oficina Federal Alemana de Seguridad de la Información (BSI)
Control sin concesiones A pesar de ser independiente, la Nube Soberana Europea de AWS ofrecerá la misma arquitectura líder en el sector que otras Regiones de AWS, creada para garantizar la seguridad y la disponibilidad. Esto incluirá varias Zonas de Disponibilidad, una infraestructura distribuida en ubicaciones geográficas separadas y distintas, con una distancia suficiente para reducir el riesgo de que un incidente afecte a la continuidad del negocio de los clientes. Cada Zona de Disponibilidad tendrá varias fuentes de alimentación eléctrica y redes redundantes para ofrecer el máximo nivel de resiliencia. Todas las Zonas de Disponibilidad de la Nube Soberana Europea de AWS estarán interconectadas mediante fibra de uso exclusivo y totalmente redundante, lo que proporcionará una red de alto rendimiento y baja latencia entre las Zonas de Disponibilidad. Todo el tráfico entre las Zonas de Disponibilidad se encriptará. Los clientes que necesiten más opciones para abordar estrictas necesidades de aislamiento y residencia de datos en el país podrán utilizar las Zonas Locales Dedicadas o AWS Outposts para implementar la infraestructura de Nube Soberana Europea de AWS en las ubicaciones que elijan.
Inversión continua de AWS en Europa La Nube Soberana Europea de AWS representa una inversión continua de AWS en la UE. AWS se compromete a innovar para respaldar los valores y el futuro digital de la Unión Europea. Impulsamos el desarrollo económico mediante la inversión en infraestructura, empleos y habilidades en comunidades y países de toda Europa. Estamos creando miles de puestos de trabajo de alta calidad e invirtiendo miles de millones de euros en las economías europeas. Amazon ha creado más de 100 000 puestos de trabajo permanentes en toda la UE. Algunos de nuestros equipos de desarrollo de AWS más importantes se encuentran en Europa, con centros clave en Dublín, Dresde y Berlín. Como parte de nuestro compromiso continuo de contribuir al desarrollo de las habilidades digitales, contrataremos y capacitaremos a más personal local para gestionar y apoyar la Nube Soberana Europea de AWS.
Los clientes, socios y reguladores dan la bienvenida a la Nube Soberana Europea de AWS En la UE, cientos de miles de organizaciones de todos los tamaños y sectores utilizan AWS, desde startups hasta PYMEs, grandes compañías incluyendo empresas de telecomunicaciones, organizaciones del sector público, instituciones educativas, ONGs y agencias gubernamentales. Organizaciones de toda Europa apoyan la introducción de la Nube Soberana Europea de AWS.
“Como líder del mercado en software de aplicaciones empresariales con sólidas raíces en Europa, SAP lleva colaborando durante mucho tiempo con AWS en nombre de los clientes para acelerar la transformación digital en todo el mundo. La Nube Soberana Europea de AWS ofrece nuevas oportunidades para fortalecer nuestra relación en Europa, ya que nos permite ampliar las opciones que ofrecemos a los clientes a medida que se trasladan a la nube. Valoramos la asociación existente con AWS y las nuevas posibilidades que esta inversión puede ofrecer a los clientes de ambos en toda la región”. – Peter Pluim, Presidente de SAP Enterprise Cloud Services y SAP Sovereign Cloud Services.
“La nueva Nube Soberana Europea de AWS puede cambiar las reglas del juego para los segmentos empresariales altamente regulados de la Unión Europea. Como proveedor de telecomunicaciones líder en Alemania, nuestra transformación digital se centra en la innovación, la escalabilidad, la agilidad y la resiliencia para ofrecer a nuestros clientes los mejores servicios y la mejor calidad. Esto se combinará ahora con los niveles más altos de protección de datos y cumplimiento normativo que ofrece AWS, y con un enfoque particular en los requisitos de soberanía digital. Estoy convencido de que esta nueva oferta de infraestructura tiene el potencial de impulsar la adaptación a la nube de las empresas europeas y acelerar la transformación digital de las industrias reguladas en toda la UE”. — Mallik Rao, Directora de Tecnología e Información de O2 Telefónica en Alemania
“Hoy nos encontramos en la cúspide de una era de transformación. La introducción de la Nube Soberana Europea de AWS no solo representa una mejora de la infraestructura, sino que supone un cambio de paradigma. Este sofisticado marco permitirá a Dedalus ofrecer servicios incomparables para almacenar los datos de los pacientes de forma segura y eficiente en la nube de AWS. Mantenemos nuestro compromiso, sin concesiones, de servir a nuestra clientela europea con las mejores soluciones de su clase respaldadas por la confianza y la excelencia tecnológica”. — Andrea Fiumicelli, Presidente de Dedalus
“En de Volksbank, creemos en invertir en unos Países Bajos mejores. Para hacerlo de manera eficaz, necesitamos tener acceso a las últimas tecnologías para poder innovar y mejorar continuamente los servicios para nuestros clientes. Por este motivo, acogemos con satisfacción el anuncio de la Nube Soberana Europea, que permitirá a los clientes europeos demostrar fácilmente el cumplimiento de las cambiantes normativas y, al mismo tiempo, beneficiarse de la escala, la seguridad y la gama completa de servicios de AWS”. — Sebastian Kalshoven, director de TI y CTO de Volksbank
“Eviden acoge con satisfacción el lanzamiento de la Nube Soberana Europea de AWS. Esto ayudará a las industrias reguladas y al sector público a abordar los requisitos de sus cargas de trabajo confidenciales con una nube de AWS con todas las funciones y que funcione exclusivamente en Europa. Como socio de servicios de primer nivel de AWS y líder en servicios de ciberseguridad en Europa, Eviden tiene una amplia trayectoria ayudando a los clientes de AWS a formalizar y mitigar sus riesgos de soberanía. La Nube Soberana Europea de AWS permitirá a Eviden abordar una gama más amplia de necesidades de soberanía de los clientes”. — Yannick Tricaud, director de Europa Central y Meridional, Oriente Medio y África, de Eviden, del Grupo Atos
Nuestros compromisos con nuestros clientes Mantenemos nuestro compromiso de ofrecer a nuestros clientes el control y las opciones que les ayuden a satisfacer sus necesidades de soberanía digital en constante evolución. Seguiremos innovando en las funcionalidades, los controles y las garantías de soberanía globalmente, y ofreceremos esto sin renunciar a la toda la potencia de AWS.
Puede descubrir más sobre la Nube Soberana Europea de AWS y obtener más información sobre nuestros clientes en nuestra Nota de Prensa y en la web European Digital Sovereignty. También puede obtener más información en AWS News Blog.
The Essential Eight is a security framework that the ACSC designed to help organizations protect themselves against various cyber threats. The Essential Eight covers the following eight strategies:
Application control
Patch applications
Configure Microsoft Office macro settings
User application hardening
Restrict administrative privileges
Patch operating systems
Multi-factor authentication
Regular backups
The Department of Home Affairs’ Protective Security Policy Framework (PSPF) mandates that Australian Non-Corporate Commonwealth Entities (NCCEs) reach Essential Eight maturity. The Essential Eight is also one of the compliance frameworks available to owners of critical infrastructure (CI) assets under the Critical Infrastructure Risk Management Program (CIRMP) requirements of theSecurity of Critical Infrastructure (SOCI) Act.
In the Essential Eight Explained, the ACSC acknowledges some translation is required when applying the principles of the Essential Eight to cloud-based environments:
“The Essential Eight has been designed to protect Microsoft Windows-based internet-connected networks. While the principles behind the Essential Eight may be applied to cloud services and enterprise mobility, or other operating systems, it was not primarily designed for such purposes and alternative mitigation strategies may be more appropriate to mitigate unique cyber threats to these environments.”
The newly released guidance walks customers step-by-step through the process of reaching Essential Eight maturity in a cloud native way, making best use of the security, performance, innovation, elasticity, scalability, and resiliency benefits of the AWS Cloud. It includes a compliance matrix that maps Essential Eight strategies and controls to specific guidance and AWS resources.
It also features an example of a customer with different workloads—a serverless data lake, a containerized webservice, and an Amazon Elastic Compute Cloud (Amazon EC2) workload running commercial-off-the-shelf (COTS) software.
I focus on setting up local PKI for testing purposes by building a basic, minimal certificate authority using openssl. I chose openssl as it’s a standard industry tool for cryptography and is often installed by default on many operating systems. However, you can achieve similar results in a simpler manner using open source tools such as cfssl. In this blog post, we create a local PKI for non-production use cases only for the sake of brevity and to focus more on understanding the core fundamentals. As I go along, I’ll point out what I left out and where to find more information.
Overview
The overall flow of this blog is as follows, there’s some new terminology, so please use this as a map to refer to as you read along to understand the flow. If you’re taking cornell notes, now would be the right time to write key words you see below such as key, certificate, end-entity certificate, certificate authority, CA, trust, IAM Roles Anywhere, and others that pop out to you.
Explain the concepts of keys and certificates and their uses.
Using what you learn about keys and certificates, create a CA.
Import your certificate authority into IAM Roles Anywhere and establish trust between your certificate authority and IAM Roles Anywhere.
Create an end-entity certificate.
Exchange your end-entity certificate for IAM credentials using IAM Roles Anywhere.
Background
IAM Roles Anywhere is compatible with existing PKIs, and for demonstration purposes, you’ll create local infrastructure using openssl to get a deep understanding of the terminology and concepts. Existing PKIs such as AWS Certificate Manager (ACM) and third-party certificate authority services often abstract and simplify this process. With that being said, you have to start somewhere, so let’s start with a key.
What exactly is a key? The National Institute of Standards and Technology (NIST) defines a key as “a parameter used in conjunction with a cryptographic algorithm that determines the specific operation of that algorithm,” which is a formal way of saying for anything you would put inside the key parameter in a function like encrypt(key, data), decrypt(key, data), or sign(key, data). The definition cleverly avoids defining the key by its structure—such as, “It’s a sequence of 256 truly random bits” — as that’s not always the case. For example, in asymmetric encryption you have two keys. One key is private and should not, under any circumstances, be shared outside of your control; while another key is public and can be safely shared with the outside world. To illustrate this, let’s look at actual commands to generate keys:
openssl genpkey -out private.key \
    -algorithm RSA \
    -pkeyopt rsa_keygen_bits:2048 # 2048 minimum key size for RSA, later we use 4096
NOTE: The key is printed in PKCS#8 format, which is a file format for the private key along with some metadata
cat public.key
-----BEGIN PUBLIC KEY-----
MIIBIjANBgkqhkiG9w0BAQEFAAOCAQ8AMIIBCgKCAQEAvwVqXCapVQyZAsK/qq8B
IDT0qVzNokkEAH40vNaZZeCOcqf/+5ZtVKingU22mKfa1XnNbsykK8N8bSY9J4r5
f9DVDN8YmRh1+YEYB8pkFTjZBuz158F9GVRK9r/6Lr2Ft0RAinGiN4LoO+V++Ofk
LITgB0rqMk1UH8XyUJwHkS5btr5M7v7zudiQiUDW4vRpWTJ/I4mb9Y2brMfMxJpg
nJ0ni1pm8Yz8zcVjFklvkdtQD+wx4DXf4/7o2EDBNPc1gW+9gIpCI1h5TMwXWURH
lY9cM03SqKwj6SzHxRdOjcMC1Zie3+8OKr1HYpMT0AIM85T3q1iUif8s0TQ3Mk9o
jQIDAQAB
-----END PUBLIC KEY-----
While you must keep your private key a secret, you can openly share your public key. You can even copy the key multiple times and rename each copy to designate an individual whom you would hand the public key out to.
Now here’s the most critical question that I cannot stress enough:
Who owns these keys?
Does the server that generated this private key own it? Do I, as the author of this blog, own it? Does Amazon, as the company, own this private key?
What about the public keys? Who exactly is Alice (alice-public.key)? Who is Bob (bob-public.key)? How are Bob and Alice different if they have the same public key? These are all rhetorical questions you should be asking yourself when working with cryptographic keys. It helps answer who is responsible for this key and ultimately any data encrypted/unencrypted with that key.
At its core, public key infrastructure (PKI) can be explained as assigning an identity to someone or something and using cryptographic keys to ensure that identity can be verified. In the case of internal PKIs, the someone or something is often a hierarchy of assets belonging to your company. For example, a flow could be:
Your company
Your company’s business unit
business unit servers
business unit load balancers
business unit clients
Another business unit
Step 1: Set up a root certificate authority
You need to start somewhere, right? To get a publicly trusted identity, you often need to go through a certificate management service like AWS Certificate Manager (ACM) or a third-party vendor. These vendors go through several audits with operating system providers to have their identity trusted on the operating system itself. For example, on MacOS, you can open the Keychain Access app, go to System Roots, and look at the Certificates tab to see identities that are managed on your behalf.
In this use case with IAM Roles Anywhere, you don’t have to worry about interacting with operating system providers, because you’re creating your own internal PKI—your own internal identity. You do this by creating a certificate authority.
But hold on now, what exactly is a certificate authority? For that matter, what is a certificate?
A certificate is a wrapper around a public key that assigns metadata to an entity. Remember how you can copy the public key and just rename it to alice-public.key? You’ll need a little more metadata than that but the concept is the same. Examples of metadata include “Who are you?” “Who gave you this key?” “When should this key expire?” “Here is what you’re allowed to use this key for,” and various other attributes. As you can imagine, you don’t want just anybody to provide you this type of metadata. You want trusted authorities to assign or validate that metadata for you, and so the term certificate authorities. Certificate authorities also sign these certificates using a digital signing algorithm such as RSA so that consumers of these certificates can verify that the metadata inside hasn’t been tampered with.
You want to be the certificate authority within your own internal network. So how do you go about doing that? Turns out, you’ve already completed the most critical step: creating a private key. By creating a cryptographically strong, random private key, you can assert that whoever owns this private key, represents our company. You can do so because it’s highly improbable that anyone could guess or brute-force this key. However, that means every mechanism you use to protect this private key is critical.
Remember though, you need an identity, and simply naming your private key anycompany.private.key and public key usecase.public.key isn’t ideal. It’s not ideal because you need a lot more metadata than a file name. You need metadata like you would have in the earlier certificate example. You need a certificate that represents your certificate authority, a sort of ID for your root certificate. To facilitate that, there’s a field in certificates called IsCA that’s either true or false. Meaning whether or not a certificate is simply a certificate or a certificate authority is determined by a flag inside the certificate. We’ll start by writing out an openssl configuration file that is used throughout multiple certificate management commands.
NOTE: What’s the difference between a root certificate and a root certificate authority? You can think of a root certificate authority as a person who stamps other certificates. This person themselves needs an ID card. That ID card is the root certificate.
# NOTE: Examples derived from Ivans Ristic's Github
# https://github.com/ivanr/bulletproof-tls
# You may also use `man ca` at the CLI for more examples

# Basic Info about the CA
[default]
name                    = root-ca
domain_suffix           = example.com
default_ca              = ca_default
name_opt                = utf8,esc_ctrl,multiline,lname,align

[ca_dn]
countryName             = "US"
organizationName        = "Any Company Corp"
commonName              = "internal.anycompany.com"

# How the CA Should operate
[ca_default]
home                    = root-ca
database                = $home/db/index
serial                  = $home/db/serial
certificate             = $home/$name.crt
private_key             = $home/private/$name.key
RANDFILE                = $home/private/random
new_certs_dir           = $home/certs
unique_subject          = no
copy_extensions         = none
default_days            = 3650
default_md              = sha256
policy                  = policy_c_o_match

[policy_c_o_match]
countryName             = match
stateOrProvinceName     = optional
organizationName        = match
organizationalUnitName  = optional
commonName              = supplied
emailAddress            = optional

# Configuration for `req` command
[req]
default_bits            = 4096
encrypt_key             = yes
default_md              = sha256
utf8                    = yes
string_mask             = utf8only
prompt                  = no
distinguished_name      = ca_dn
req_extensions          = ca_ext

[ca_ext]
basicConstraints        = critical,CA:true
keyUsage                = critical,keyCertSign
subjectKeyIdentifier    = hash
# create-root-ca.sh
mkdir -p root-ca/certs   # New Certificates issued are stored here
mkdir -p root-ca/db      # Openssl managed database
mkdir -p root-ca/private # Private key dir for the CA

chmod 700 root-ca/private
touch root-ca/db/index

# Give our root-ca a unique identifier
openssl rand -hex 16 > root-ca/db/serial

# Create the certificate signing request
openssl req -new \
  -config root-ca.conf \
  -out root-ca.csr \
  -keyout root-ca/private/root-ca.key

# Sign our request
openssl ca -selfsign \
  -config root-ca.conf \
  -in root-ca.csr \
  -out root-ca.crt \
  -extensions ca_ext
But there are a few things I have to point out:
Most certificates start their lives as a certificate signing request (CSR). They contain most of the data an actual certificate does and only become a certificate when signed either by the same entity that created it (self-signed certificate) or by another entity (external certificate authority). This is why you see openssl req followed by openssl ca -selfsign.
Everything under root-ca/ must now be protected, especially anything generated under root-ca/private/.
I skipped quite a few steps for the sake of brevity, including creating a subordinate certificate authority and keeping the root certificate authority offline, as well as adding a certificate revocation list and Online Certificate Status Protocol (OSCP) capabilities. These can be their own book and I would instead recommend reading Bulletproof TLS and PKI by Ivan Ristic. In this post, I include the bare minimum to import a certificate and get started with IAM Roles Anywhere. As a side note, if you’re importing a certificate from a certificate authority managed outside of AWS, it should come with these capabilities as well.
It’s good practice to inspect the actual root-ca.crt that was returned to you.
openssl x509 -in root-ca.crt -text -noout
Note: If you want to inspect and compare the root-ca.crt with the certificate signing request root-ca.csr, you can use openssl req -text -noout -verify -in root-ca.csr.
What you look for in the following output are that fields such as Subject, Public-Key Algorithm, and the CA:TRUE flag are set and correspond to the configuration you passed in earlier. Additional things to look for are Issuer (yourself since it’s self-signed), and Key Usage (what the public key included in the certificate is allowed to be used for).
Certificate:
Data:
Version: 3 (0x2)
Serial Number:
95:77:30:1a:1b:bc:ce:70:f3:e7:ff:1c:12:d2:01:c7
Signature Algorithm: sha256WithRSAEncryptionIssuer: C = US, O = Any Company Corp, CN = internal.anycompany.comValidityNot Before: Jul 5 20:52:33 2023 GMTNot After : Jul 2 20:52:33 2033 GMTSubject: C = US, O = Any Company Corp, CN = internal.anycompany.comSubject Public Key Info:Public Key Algorithm: rsaEncryptionPublic-Key: (4096 bit)
...
X509v3 extensions:
X509v3 Basic Constraints: criticalCA:TRUEX509v3 Key Usage: criticalCertificate Sign
...
Signature Algorithm: sha256WithRSAEncryption
Signature Value:
...
Now why is this certificate especially important? This is your root certificate. When you’re asked “Does this certificate belong to your company?” this is the certificate that you must use in order to prove that it belongs to your company, including any certificates derived from this root certificate (remember, you can have a hierarchy) and also end-entity certificates (shown later). All certificates derived from this root certificate are cryptographically linked to it through a digital signing algorithm that combines hashing and encryption to sign the certificate (the example above uses sha256WithRSAEncryption).
With your root CA successfully set up, it’s time to integrate it with IAM Roles Anywhere.
Step 2: Set up IAM Roles Anywhere
Step 1: Set up a root certificate authority (root CA) was a prerequisite for using IAM Roles Anywhere. Remember, you set up all this infrastructure to eventually use it. In step 2, you start going through how to effectively use the root CA you set up to issue AWS credentials outside of the AWS ecosystem.
But before you do that, you must bind the IAM Roles Anywhere service to your private certificate authority (private CA). You do this by setting up a trust between the two. When you set up trust between two things, you’re essentially saying “I don’t have the information to verify this is a valid request, so I’m going to trust that the downstream component (in this case, your private CA) knows this information.” Another way of saying it is “if the private CA says it’s good, then it’s a valid request”. You can set up this trust with your newly created root CA by copying the encoded section of your root-ca.crt in the IAM Roles Anywhere console.
Figure 1: Use the console to set up a trust between IAM Roles Anywhere and the private CA
What you just set up is a trust anchor, which is a representation of your certificate authority inside of IAM Roles Anywhere. With this trust anchor in place, you can start tying in IAM roles to your authentication. Let’s start with something simple but practical, imagine an on-premises virtual machine (VM) that needs to have read access to Amazon Simple Storage Service (Amazon S3). Not only that, but it must have read only access to a specific folder in Amazon S3 and only that folder.
The first thing you need to do is create an IAM role that trusts IAM Roles Anywhere. But you need to be more specific than that. You need to create a role that trusts IAM Roles Anywhere only when the certificate presented to IAM Roles Anywhere contains the common name MyOnpremVM. If this is unclear, that’s okay, after you have all of the prerequisites set up, you’ll walk through the entire process step by step. The following is the trust section in an IAM policy that can be created in the IAM console.
Note: There are other certificate fields you might want to key off as well. See Trust policy in the documentation for more examples.
The last thing to do before moving on is to tie a set of roles to a profile. You can think of it as a container of multiple possible roles with the ability to further restrict them using session policies. Note that you use the role ARN for the S3 role you just created.
Profiles are created disabled by default, you can enable them later as needed. You could also enable a profile on creation by using the --enabled flag, but I want to highlight the ability to create it as disabled and then enabled it later for awareness. This becomes relevant in cases when you need to disable access, such as during a security event. Use the following command to enable the profile after creating it:
Now that all your infrastructure is in place, it’s time to provision an end-entity certificate and assume the role you created earlier.
Creating an end-entity certificate
The first thing you must do is obtain an end-entity certificate. This is called end-entity because a certificate can have an entire chain of certificates that are linked together. The end-entity certificate is at the end of the chain, which commonly represents individual entities, and so the term end-entity certificate.
Similar to how you set up your root certificate, it’s mostly a two-step process. You first create a certificate signing request and then ask someone to sign it (or sign it yourself). You can create a certificate signing request for your on-premises VM with:
# Make your private key specific to your client machine
openssl genpkey -out client.key \
  -algorithm RSA \
  -pkeyopt rsa_keygen_bits:2048

# Using your newly generated private key make a certificate signing request
openssl req -new -key client.key -out client.csr

# You'll be presented an interactive session to enter details for the CSR
You are about to be asked to enter information that will be incorporated
into your certificate request.
What you are about to enter is what is called a Distinguished Name or a DN.
There are quite a few fields but you can leave some blank
For some fields there will be a default value,
If you enter '.', the field will be left blank.
-----
Country Name (2 letter code) [XX]:US
State or Province Name (full name) []:WA
Locality Name (eg, city) [Default City]:Seattle
Organization Name (eg, company) [Default Company Ltd]:Any Company Corp
Organizational Unit Name (eg, section) []:Sales
Common Name (eg, your name or your server's hostname) []:MyOnpremVM
Email Address []:

Please enter the following 'extra' attributes
to be sent with your certificate request
A challenge password []:
An optional company name []:
As always, let’s inspect the certificate we made.
openssl req -text -noout -verify -in client.csr
The client name (common name (CN) in the certificate) is what’s most important here, after all this is how we uniquely identify this specific VM.
Certificate Request:
    Data:
        Version: 0 (0x0)
        Subject: C=US, ST=WA, L=Seattle, O=Any Company Corp, OU=Sales, CN=MyOnpremVM
        Subject Public Key Info:
            Public Key Algorithm: rsaEncryption
                Public-Key: (4096 bit)
                Modulus:
                    00:ae:d0:ab:2d:20:2d:44:b5:36:ad:de:dd:23:ac:
                    ...32 lines removed for brevity
                    89:98:ef:b6:86:bf:c2:16:08:55:2d:5e:45:af:24:
                    17:45:cb
                Exponent: 65537 (0x10001)
        Attributes:
            a0:00
    Signature Algorithm: sha256WithRSAEncryption
         08:b4:86:66:14:1f:03:12:0b:36:15:42:2b:ae:56:7b:ba:99:
         ...27 lines removed for brevity
         00:bb:06:88:6b:c7:c2:53
Signing an end-entity certificate
Now that you have your certificate signing request, the certificate must be signed. Let’s have your private root CA that you created in Step 1 sign this certificate.
NOTE: You might have to move your root-ca.crt file into whatever $home is inside of your root-ca.conf file before running the following command.
You’ll be asked to manually verify the certificate you’re about to sign. The key things you need to pay attention to for the purposes of IAM Roles Anywhere are:
Common Name because that’s how permissions and to what S3 bucket are decided.
Key usage specifies Digital Signature, and basic constraints specify CA:FALSE. Both are required to work with IAM Roles Anywhere.
Certificate:
Data:
Version: 1 (0x0)
Serial Number:
95:77:30:1a:1b:bc:ce:70:f3:e7:ff:1c:12:d2:01:c8
Issuer:
countryName = US
organizationName = Any Company Corp
commonName = internal.anycompany.com
Validity
Not Before: Jul 6 14:46:49 2023 GMT
Not After : Jul 3 14:46:49 2033 GMT
Subject:
countryName = US
stateOrProvinceName = WA
organizationName = Any Company Corp
organizationalUnitName = Sales
commonName = MyOnpremVM
Subject Public Key Info:
Public Key Algorithm: rsaEncryption
Public-Key: (2048 bit)
...
X509v3 extensions:
...
X509v3 Basic Constraints: criticalCA:FALSEX509v3 Key Usage: criticalDigital Signature
...
Certificate is to be certified until Jul 3 14:46:49 2033 GMT (3650 days)
Sign the certificate? [y/n]:
After verification, you can commit the certificate to the local database and move on to the next step.
Swapping an end-entity certificate for AWS credentials
Now it’s time for the moment of truth. To review, you have:
Created a local CA
Uploaded the CA certificate into IAM Roles Anywhere and created a trust anchor
Created an IAM role that trusts IAM Roles Anywhere, which in turn trusts your CA certificate
Created an end-entity certificate for a specific server that has been signed by your CA
It’s time to swap this certificate for IAM credentials.
The API you call to swap credentials is CreateSession for IAM Roles Anywhere. This API serves as a wrapper around STS AssumeRole but requires that you pass in certificate information first. You, as the end user, don’t directly call this API. Instead, you use the IAM Roles Anywhere credential helper.
You can get the binary for this helper using the following example command (for Linux).
Then use the credential helper tool to successfully swap for AWS credentials.
NOTE: You pass in the private key, but the private key doesn’t leave the host, it’s used to sign the request to CreateSession. See the signing process to learn more. The signing process is also why you use the credentials helper instead of making a call directly to CreateSession.
You can write the command you just ran into your AWS Config file instead of manually parsing the JSON response into environment variables, or run the serve command to set up a local credential-serving endpoint that’s compatible with the AWS SDK and AWS Command Line Interface (AWS CLI).
./aws_signing_helper serve \
  --certificate client.crt \
  --private-key client.key \
  --role-arn arn:aws:iam::111222333444:role/RolesanywhereS3Role \
  --trust-anchor-arn arn:aws:rolesanywhere:us-east-1:111222333444:trust-anchor/d5302884-5212-4f8d-9b17-24be63a5ae85 \
  --profile-arn arn:aws:rolesanywhere:us-east-1:111222333444:profile/e341077c-4ee6-48e8-8d05-d900eb26b367 \
  & # Start the process in the background
Then export the AWS_EC2_METADATA_SERVICE_ENDPOINT environment variable to point the AWS SDKs and AWS CLI to a local mock EC2 metadata endpoint instead of the endpoint normally found inside EC2 instances.
And from here, you can use the AWS CLI or SDKs to make calls into AWS with the permissions you set up. For example, test your permissions by writing an object to Amazon S3 at a location you should be able to write to and a location you shouldn’t be.
# Failure case
aws s3 cp client.crt s3://DOC-EXAMPLE-BUCKET/notme/client.crt
upload failed: ./client.crt to s3://DOC-EXAMPLE-BUCKET/notme/client.crt An error occurred (AccessDenied) when calling the PutObject operation: Access Denied
# Passing Case
aws s3 cp client.crt s3://DOC-EXAMPLE-BUCKET/MyOnPremVM/client.crt
upload: ./client.crt to s3://DOC-EXAMPLE-BUCKET/MyOnPremVM/client.crt
Conclusion
To summarize, I started off this blog post discussing core concepts related to public key infrastructure. I talked about the purpose of keys (being improbable to guess) and certificates (tying an identity to a key, among other important concepts such as digital signing). I then discussed and showed you how to create a local certificate authority (CA), then use that CA to vend out end-entity certificates. Finally, you learned how to establish a trust relationship between your CA and IAM Roles Anywhere to allow IAM Roles Anywhere to verify end-entity certificates and exchange them with AWS credentials.
I encourage you to explore any other openssl commands and scenarios you can imagine. For example, how would you use this information to handle two different fleets of VMs, each with their own unique set of permissions? Another avenue to explore would be using cfssl instead of openssl to create a CA or using a provider such as AWS Private Certificate Authority. You can use an AWS account to try AWS Private Certificate Authority with a 30-day trial. See AWS Private CA Pricing to learn more.
If you have feedback about this post, submit comments in the Comments section below. If you have questions about this post, contact AWS Support.
Want more AWS Security news? Follow us on Twitter.
In the AWS Security Profile series, I interview some of the humans who work in AWS Security and help keep our customers safe and secure. In this profile, I interviewed Liam Wadman, Senior Solutions Architect for AWS Identity.
Pictured: Liam making quick informed decisions about risk and reward
How long have you been at AWS and what do you do in your current role?
My first day was 1607328000 — for those who don’t speak fluent UTC, that’s December 2020. I’m a member of the Identity Solutions team. Our mission is to make it simpler for customers to implement access controls that protect their data in a straightforward and consistent manner across AWS services.
I spend a lot of time talking with security, identity, and cloud teams at some of our largest and most complex customers, understanding their problems, and working with teams across AWS to make sure that we’re building solutions that meet their diverse security requirements.
I’m a big fan of working with customers and fellow Amazonians on threat modeling and helping them make informed decisions about risks and the controls they put in place. It’s such a productive exercise because many people don’t have that clear model about what they’re protecting, and what they’re protecting it from.
When I work with AWS service teams, I advocate for making services that are simple to secure and simple for customers to configure. It’s not enough to offer only good security controls; the service should be simple to understand and straightforward to apply to meet customer expectations.
How did you get started in security? What about it piqued your interest?
I got started in security at a very young age: by circumventing network controls at my high school so that I could play Flash games circa 2004. Ever since then, I’ve had a passion for deeply understanding a system’s rules and how they can be bent or broken. I’ve been lucky enough to have a diverse set of experiences throughout my career, including working in a network operation center, security operation center, Linux and windows server administration, telephony, investigations, content delivery, perimeter security, and security architecture. I think having such a broad base of experience allows me to empathize with all the different people who are AWS customers on a day-to-day basis.
As I progressed through my career, I became very interested in the psychology of security and the mindsets of defenders, unauthorized users, and operators of computer systems. Security is about so much more than technology—it starts with people and processes.
How do you explain your job to non-technical friends and family?
I get to practice this question a lot! Very few of my family and friends work in tech.
I always start with something relatable to the person. I start with a website, mobile app, or product that they use, tell the story of how it uses AWS, then tie that in around how my team works to support many of the products they use in their everyday lives. You don’t have to look far into our customer success stories or AWS re:Invent presentations to see a product or company that’s meaningful to almost anyone you’d talk to.
I got to practice this very recently because the software used by my personal trainer is hosted on AWS. So when she asked what I actually do for a living, I was ready for her.
In your opinion, what’s the coolest thing happening in identity right now?
You left this question wide open, so I’m going to give you more than one answer.
First, outside of AWS, it’s the rise of ubiquitous, easy-to-use personal identity technology. I’m talking about products such as password managers, sign-in with Google or Apple, and passkeys. I’m excited to see the industry is finally offering services to consumers at no extra cost that you don’t need to be an expert to use and that will work on almost any device you sign in to. Everyday people can benefit from their use, and I have successfully converted many of the people I care about.
At AWS, it’s the work that we’re doing to enable data perimeters and provable security. We hear quite regularly from customers that data perimeters are super important to them, and they want to see us do more in that space and keep refining that journey. I’m all too happy to oblige. Provable security, while identity adjacent, is about getting real answers to questions such as “Can this resource be accessed publicly?” It’s making it simple for customers who don’t want to spend the time or money building the operational expertise to answer tough questions, and I think that’s incredible.
You presented at AWS re:Inforce 2023. What was your session about and what do you hope attendees took away from it?
My session was IAM336: Best practices for delegating access on IAM. I initially delivered this session at re:Inforce 2022, where customers gave it the highest overall rating for an identity session, so we brought it back for 2023!
The talk dives deep into some AWS Identity and Access Management (IAM) primitives and provides a lot of candor on what we feel are best practices based on many of the real-world engagements I’ve had with customers. The top thing that I hope attendees learned is how they can safely empower their developers to have some self service and autonomy when working with IAM and help transform central teams from blockers to enablers.
I’m also presenting at re:Invent 2023 in November. I’ll be doing a chalk talk called Best practices for setting up AWS Organizations policies. We’re targeting it towards a more general audience, not just customers whose primary jobs are AWS security or identity. I’m excited about this presentation because I usually talk to a lot of customers who have very mature security and identity practices, and this is a great chance to get feedback from customers who do not.
I’d like to thank all the customers who attended the sessions over the years — the best part of AWS events is the customer interactions and fantastic discussions that we have.
Is there anything you wish customers would ask about more often?
I wish more customers would frame their problems within a threat model. Many customer engagements start with a specific problem, but it isn’t in the context of the risk this poses to their business, and often focuses too much on specific technical controls for very specific issues, rather than an outcome that they’re trying to arrive at or a risk that they’re trying to mitigate. I like to take a step back and work with the customer to frame the problem that they’re talking about in a bigger picture, then have a more productive conversation around how we can mitigate these risks and other considerations that they may not have thought of.
Where do you see the identity space heading in the future?
I think the industry is really getting ready for an identity renaissance as we start shifting towards more modern and Zero Trust architectures. I’m really excited to start seeing adoption of technologies such as token exchange to help applications avoid impersonating users to downstream systems, or mechanisms such as proof of possession to provide scalable ways to bind a given credential to a system that it’s intended to be used from.
On the AWS Identity side: More controls. Simpler. Scalable. Provable.
What are you most proud of in your career?
Getting involved with speaking at AWS: presenting at summits, re:Inforce, and re:Invent. It’s something I never would have seen myself doing before. I grew up with a pretty bad speech impediment that I’m always working against.
I think my proudest moment in particular is when I had customers come to my re:Invent session because they saw me at AWS Summits earlier in the year and liked what I did there. I get a little emotional thinking about it.
Being a speaker also allowed me to go to Disneyland for the first time last year before the Anaheim Summit, and that would have made 5-year-old Liam proud.
If you had to pick a career outside of tech, what would you want to do?
I think I’d certainly be involved in something in forestry, resource management, or conservation. I spend most of my free time in the forests of British Columbia. I’m a big believer in shinrin-yoku, and I believe in being a good steward of the land. We’ve only got one earth.
If you have feedback about this post, submit comments in the Comments section below. If you have questions about this post, contact AWS Support.
Want more AWS Security news? Follow us on Twitter.
If you use or plan to use Secure Sockets Layer (SSL) or Transport Layer Security (TLS) with certificate verification to connect to your database instances of Amazon RDS for MySQL, MariaDB, SQL Server, Oracle, PostgreSQL, and Amazon Aurora, it means you should rotate new certificate authority (CA) certificates in both your DB instances and application before the root certificate expires.
Most SSL/TLS certificates (rds-ca-2019) for your DB instances will expire in 2024 after the certificate update in 2020. In December 2022, we released new CA certificates that are valid for 40 years (rds-ca-rsa2048-g1) and 100 years (rds-ca-rsa4096-g1 and rds-ca-ecc384-g1). So, if you rotate your CA certificates, you don’t need to do It again for a long time.
Here is a list of affected Regions and their expiration dates of rds-ca-2019:
Expiration Date
Regions
May 8, 2024
Middle East (Bahrain)
August 22, 2024
US East (Ohio), US East (N. Virginia), US West (N. California), US West (Oregon), Asia Pacific (Mumbai), Asia Pacific (Osaka), Asia Pacific (Seoul), Asia Pacific (Singapore), Asia Pacific (Sydney), Asia Pacific (Tokyo), Canada (Central), Europe (Frankfurt), Europe (Ireland), Europe (London), Europe (Milan), Europe (Paris), Europe (Stockholm), and South America (São Paulo)
September 9, 2024
China (Beijing), China (Ningxia)
October 26, 2024
Africa (Cape Town)
October 28, 2024
Europe (Milan)
Not affected until 2061
Asia Pacific (Hong Kong), Asia Pacific (Hyderabad), Asia Pacific (Jakarta), Asia Pacific (Melbourne), Europe (Spain), Europe (Zurich), Israel (Tel Aviv), Middle East (UAE), AWS GovCloud (US-East), and AWS GovCloud (US-West)
The following steps demonstrate how to rotate your certificates to maintain connectivity from your application to your database instances.
Step 1 – Identify your impacted Amazon RDS resources As I said, you can identify the total number of affected DB instances in the Certificate update page of the Amazon RDS console and see all of your affected DB instances. Note: This page only shows the DB instances for the current Region. If you have DB instances in more than one Region, check the certificate update page in each Region to see all DB instances with old SSL/TLS certificates.
You can also use AWS Command Line Interface (AWS CLI) to call describe-db-instances to find instances that use the expiring CA. The query will show a list of RDS instances in your account and us-east-1 Region.
Step 2 – Updating your database clients and applications Before applying the new certificate on your DB instances, you should update the trust store of any clients and applications that use SSL/TLS and the server certificate to connect. There’s currently no easy method from your DB instances themselves to determine if your applications require certificate verification as a prerequisite to connect. The only option here is to inspect your applications’ source code or configuration files.
Although the DB engine-specific documentation outlines what to look for in most common database connectivity interfaces, we strongly recommend you work with your application developers to determine whether certificate verification is used and the correct way to update the client applications’ SSL/TLS certificates for your specific applications.
To update certificates for your application, you can use the new certificate bundle that contains certificates for both the old and new CA so you can upgrade your application safely and maintain connectivity during the transition period.
For information about checking for SSL/TLS connections and updating applications for each DB engine, see the following topics:
Step 3 – Test CA rotation on a non-production RDS instance If you have updated new certificates in all your trust stores, you should test with a RDS instance in non-production. Do this set up in a development environment with the same database engine and version as your production environment. This test environment should also be deployed with the same code and configurations as production.
To rotate a new certificate in your test database instance, choose Modify for the DB instance that you want to modify in the Amazon RDS console.
In the Connectivity section, choose rds-ca-rsa2048-g1.
Choose Continue to check the summary of modifications. If you want to apply the changes immediately, choose Apply immediately.
To use the AWS CLI to change the CA from rds-ca-2019 to rds-ca-rsa2048-g1 for a DB instance, call the modify-db-instance command and specify the DB instance identifier with the --ca-certificate-identifier option.
This is the same way to rotate new certificates manually in the production database instances. Make sure your application reconnects without any issues using SSL/TLS after the rotation using the trust store or CA certificate bundle you referenced.
When you create a new DB instance, the default CA is still rds-ca-2019 until January 25, 2024, when it will be changed to rds-ca-rsa2048-g1. For setting the new CA to create a new DB instance, you can set up a CA override to ensure all new instance launches use the CA of your choice.
You should do this in all the Regions where you have RDS DB instances.
Step 4 – Safely update your production RDS instances After you’ve completed testing in non production environment, you can start the rotation of your RDS databases CA certificates in your production environment. You can rotate your DB instance manually as shown in Step 3. It’s worth noting that many of the modern engines do not require a restart, but it’s still a good idea to schedule it in your maintenance window.
In the Certificate update page of Step 1, choose the DB instance you want to rotate. By choosing Schedule, you can schedule the certificate rotation for your next maintenance window. By choosing Apply now, you can apply the rotation immediately.
If you choose Schedule, you’re prompted to confirm the certificate rotation. This prompt also states the scheduled window for your update.
After your certificate is updated (either immediately or during the maintenance window), you should ensure that the database and the application continue to work as expected.
Most of modern DB engines do not require restarting your database to update the certificate. If you don’t want to restart the database just for CA update, you can use the --no-certificate-rotation-restart flag in the modify-db-instance command.
To check if your engine requires a restart you can check the SupportsCertificateRotationWithoutRestart field in the output of the describe-db-engine-versions command. You can use this command to see which engines support rotations without restart:
Even if you don’t use SSL/TLS for the database instances, I recommend to rotate your CA. You may need to use SSL/TLS in the future, and some database connectors like the JDBC and ODBC connectors check for a valid cert before connecting and using an expired CA can prevent you from doing that.
To learn about updating your certificate by modifying your DB instance manually, automatic server certificate rotation, and finding a sample script for importing certificates into your trust store, see the Amazon RDS User Guide or the Amazon Aurora User Guide.
Things to Know Here are a couple of important things to know:
Amazon RDS Proxy and Amazon Aurora Serverless use certificates from the AWS Certificate Manager (ACM). If you’re using Amazon RDS Proxy when you rotate your SSL/TLS certificate, you don’t need to update applications that use Amazon RDS Proxy connections. If you’re using Aurora Serverless, rotating your SSL/TLS certificate isn’t required.
Now through January 25, 2024 – new RDS DB instances will have the rds-ca-2919 certificate by default, unless you specify a different CA via the ca-certificate-identifier option on the create-db-instance API; or you specify a default CA override for your account like mentioned in the above section. Starting January 26, 2024 – any new database instances will default to using the rds-ca-rsa2048-g1 certificate. If you wish for new instances to use a different certificate, you can specify which certificate to use with the AWS console or the AWS CLI. For more information, see the create-db-instanceAPI documentation.
Except for Amazon RDS for SQL Server, most modern RDS and Aurora engines support certificate rotation without a database restart in the latest versions. Call describe-db-engine-versions and check for the response field SupportsCertificateRotationWithoutRestart. If this field is set to true, then your instance will not require a database restart for CA update. If set to false, a restart will be required. For more information, see Setting the CA for your database in the AWS documentation.
Your rotated CA signs the DB server certificate, which is installed on each DB instance. The DB server certificate identifies the DB instance as a trusted server. The validity of DB server certificate depends on the DB engine and version either 1 year or 3 year. If your CA supports automatic server certificate rotation, RDS automatically handles the rotation of the DB server certificate too. For more information about DB server certificate rotation, see Automatic server certificate rotation in the AWS documentation.
You can choose to use the 40-year validity certificate (rds-ca-rsa2048-g1) or the 100-year certificates. The expiring CA used by your RDS instance uses the RSA2048 key algorithm and SHA256 signing algorithm. The rds-ca-rsa2048-g1 uses the exact same configuration and therefore is best suited for compatibility. The 100-year certificates (rds-ca-rsa4096-g1 andrds-ca-ecc384-g1) use more secure encryption schemes than rds-ca-rsa2048-g1. If you want to use them, you should test well in pre-production environments to double-check that your database client and server support the necessary encryption schemes in your Region.
Just Do It Now! Even if you have one year left until your certificate expires, you should start planning with your team. Updating SSL/TLS certificate may require restart your DB instance before the expiration date. We strongly recommend that you schedule your applications to be updated before the expiry date and run tests on a staging or pre-production database environment before completing these steps in a production environments. To learn more about updating SSL/TLS certificates, see Amazon RDS User Guide and Amazon Aurora User Guide.
If you don’t use SSL/TLS connections, please note that database security best practices are to use SSL/TLS connectivity and to request certificate verification as part of the connection authentication process. To learn more about using SSL/TLS to encrypt a connection to your DB instance, see Amazon RDS User Guide and Amazon Aurora User Guide.
If you have questions or issues, contact your usual AWS Support by your Support plan.
Generative artificial intelligence (generative AI) has captured the imagination of organizations and is transforming the customer experience in industries of every size across the globe. This leap in AI capability, fueled by multi-billion-parameter large language models (LLMs) and transformer neural networks, has opened the door to new productivity improvements, creative capabilities, and more.
As organizations evaluate and adopt generative AI for their employees and customers, cybersecurity practitioners must assess the risks, governance, and controls for this evolving technology at a rapid pace. As security leaders working with the largest, most complex customers at Amazon Web Services (AWS), we’re regularly consulted on trends, best practices, and the rapidly evolving landscape of generative AI and the associated security and privacy implications. In that spirit, we’d like to share key strategies that you can use to accelerate your own generative AI security journey.
This post, the first in a series on securing generative AI, establishes a mental model that will help you approach the risk and security implications based on the type of generative AI workload you are deploying. We then highlight key considerations for security leaders and practitioners to prioritize when securing generative AI workloads. Follow-on posts will dive deep into developing generative AI solutions that meet customers’ security requirements, best practices for threat modeling generative AI applications, approaches for evaluating compliance and privacy considerations, and will explore ways to use generative AI to improve your own cybersecurity operations.
Where to start
As with any emerging technology, a strong grounding in the foundations of that technology is critical to helping you understand the associated scopes, risks, security, and compliance requirements. To learn more about the foundations of generative AI, we recommend that you start by reading more about what generative AI is, its unique terminologies and nuances, and exploring examples of how organizations are using it to innovate for their customers.
If you’re just starting to explore or adopt generative AI, you might imagine that an entirely new security discipline will be required. While there are unique security considerations, the good news is that generative AI workloads are, at their core, another data-driven computing workload, and they inherit much of the same security regimen. The fact is, if you’ve invested in cloud cybersecurity best practices over the years and embraced prescriptive advice from sources like Steve’s top 10, the Security Pillar of the Well-Architected Framework, and the Well-Architected Machine Learning Lens, you’re well on your way!
Core security disciplines, like identity and access management, data protection, privacy and compliance, application security, and threat modeling are still critically important for generative AI workloads, just as they are for any other workload. For example, if your generative AI application is accessing a database, you’ll need to know what the data classification of the database is, how to protect that data, how to monitor for threats, and how to manage access. But beyond emphasizing long-standing security practices, it’s crucial to understand the unique risks and additional security considerations that generative AI workloads bring. This post highlights several security factors, both new and familiar, for you to consider.
With that in mind, let’s discuss the first step: scoping.
Determine your scope
Your organization has made the decision to move forward with a generative AI solution; now what do you do as a security leader or practitioner? As with any security effort, you must understand the scope of what you’re tasked with securing. Depending on your use case, you might choose a managed service where the service provider takes more responsibility for the management of the service and model, or you might choose to build your own service and model.
Let’s look at how you might use various generative AI solutions in the AWS Cloud. At AWS, security is a top priority, and we believe providing customers with the right tool for the job is critical. For example, you can use the serverless, API-driven Amazon Bedrock with simple-to-consume, pre-trained foundation models (FMs) provided by AI21 Labs, Anthropic, Cohere, Meta, stability.ai, and Amazon Titan. Amazon SageMaker JumpStart provides you with additional flexibility while still using pre-trained FMs, helping you to accelerate your AI journey securely. You can also build and train your own models on Amazon SageMaker. Maybe you plan to use a consumer generative AI application through a web interface or API such as a chatbot or generative AI features embedded into a commercial enterprise application your organization has procured. Each of these service offerings has different infrastructure, software, access, and data models and, as such, will result in different security considerations. To establish consistency, we’ve grouped these service offerings into logical categorizations, which we’ve named scopes.
In order to help simplify your security scoping efforts, we’ve created a matrix that conveniently summarizes key security disciplines that you should consider, depending on which generative AI solution you select. We call this the Generative AI Security Scoping Matrix, shown in Figure 1.
The first step is to determine which scope your use case fits into. The scopes are numbered 1–5, representing least ownership to greatest ownership.
Buying generative AI:
Scope 1: Consumer app – Your business consumes a public third-party generative AI service, either at no-cost or paid. At this scope you don’t own or see the training data or the model, and you cannot modify or augment it. You invoke APIs or directly use the application according to the terms of service of the provider. Example: An employee interacts with a generative AI chat application to generate ideas for an upcoming marketing campaign.
Scope 2: Enterprise app – Your business uses a third-party enterprise application that has generative AI features embedded within, and a business relationship is established between your organization and the vendor. Example: You use a third-party enterprise scheduling application that has a generative AI capability embedded within to help draft meeting agendas.
Building generative AI:
Scope 3: Pre-trained models – Your business builds its own application using an existing third-party generative AI foundation model. You directly integrate it with your workload through an application programming interface (API). Example: You build an application to create a customer support chatbot that uses the Anthropic Claude foundation model through Amazon Bedrock APIs.
Scope 4: Fine-tuned models – Your business refines an existing third-party generative AI foundation model by fine-tuning it with data specific to your business, generating a new, enhanced model that’s specialized to your workload. Example: Using an API to access a foundation model, you build an application for your marketing teams that enables them to build marketing materials that are specific to your products and services.
Scope 5: Self-trained models – Your business builds and trains a generative AI model from scratch using data that you own or acquire. You own every aspect of the model. Example: Your business wants to create a model trained exclusively on deep, industry-specific data to license to companies in that industry, creating a completely novel LLM.
In the Generative AI Security Scoping Matrix, we identify five security disciplines that span the different types of generative AI solutions. The unique requirements of each security discipline can vary depending on the scope of the generative AI application. By determining which generative AI scope is being deployed, security teams can quickly prioritize focus and assess the scope of each security discipline.
Let’s explore each security discipline and consider how scoping affects security requirements.
Governance and compliance – The policies, procedures, and reporting needed to empower the business while minimizing risk.
Legal and privacy – The specific regulatory, legal, and privacy requirements for using or creating generative AI solutions.
Risk management – Identification of potential threats to generative AI solutions and recommended mitigations.
Controls – The implementation of security controls that are used to mitigate risk.
Resilience – How to architect generative AI solutions to maintain availability and meet business SLAs.
Throughout our Securing Generative AI blog series, we’ll be referring to the Generative AI Security Scoping Matrix to help you understand how various security requirements and recommendations can change depending on the scope of your AI deployment. We encourage you to adopt and reference the Generative AI Security Scoping Matrix in your own internal processes, such as procurement, evaluation, and security architecture scoping.
What to prioritize
Your workload is scoped and now you need to enable your business to move forward fast, yet securely. Let’s explore a few examples of opportunities you should prioritize.
With consumer off-the-shelf apps (Scope 1) and enterprise off-the-shelf apps (Scope 2), you must pay special attention to the terms of service, licensing, data sovereignty, and other legal disclosures. Outline important considerations regarding your organization’s data management requirements, and if your organization has legal and procurement departments, be sure to work closely with them. Assess how these requirements apply to a Scope 1 or 2 application. Data governance is critical, and an existing strong data governance strategy can be leveraged and extended to generative AI workloads. Outline your organization’s risk appetite and the security posture you want to achieve for Scope 1 and 2 applications and implement policies that specify that only appropriate data types and data classifications should be used. For example, you might choose to create a policy that prohibits the use of personal identifiable information (PII), confidential, or proprietary data when using Scope 1 applications.
If a third-party model has all the data and functionality that you need, Scope 1 and Scope 2 applications might fit your requirements. However, if it’s important to summarize, correlate, and parse through your own business data, generate new insights, or automate repetitive tasks, you’ll need to deploy an application from Scope 3, 4, or 5. For example, your organization might choose to use a pre-trained model (Scope 3). Maybe you want to take it a step further and create a version of a third-party model such as Amazon Titan with your organization’s data included, known as fine-tuning (Scope 4). Or you might create an entirely new first-party model from scratch, trained with data you supply (Scope 5).
In Scopes 3, 4, and 5, your data can be used in the training or fine-tuning of the model, or as part of the output. You must understand the data classification and data type of the assets the solution will have access to. Scope 3 solutions might use a filtering mechanism on data provided through Retrieval Augmented Generation (RAG) with the help from Agents for Amazon Bedrock, for example, as an input to a prompt. RAG offers you an alternative to training or fine-tuning by querying your data as part of the prompt. This then augments the context for the LLM to provide a completion and response that can use your business data as part of the response, rather than directly embedding your data in the model itself through fine-tuning or training. See Figure 3 for an example data flow diagram demonstrating how customer data could be used in a generative AI prompt and response through RAG.
In scopes 4 and 5, on the other hand, you must classify the modified model for the most sensitive level of data classification used to fine-tune or train the model. Your model would then mirror the data classification on the data it was trained against. For example, if you supply PII in the fine-tuning or training of a model, then the new model will contain PII. Currently, there are no mechanisms for easily filtering the model’s output based on authorization, and a user could potentially retrieve data they wouldn’t otherwise be authorized to see. Consider this a key takeaway; your application can be built around your model to implement filtering controls on your business data as part of a RAG data flow, which can provide additional data security granularity without placing your sensitive data directly within the model.
From a legal perspective, it’s important to understand both the service provider’s end-user license agreement (EULA), terms of services (TOS), and any other contractual agreements necessary to use their service across Scopes 1 through 4. For Scope 5, your legal teams should provide their own contractual terms of service for any external use of your models. Also, for Scope 3 and Scope 4, be sure to validate both the service provider’s legal terms for the use of their service, as well as the model provider’s legal terms for the use of their model within that service.
Additionally, consider the privacy concerns if the European Union’s General Data Protection Regulation (GDPR) “right to erasure” or “right to be forgotten” requirements are applicable to your business. Carefully consider the impact of training or fine-tuning your models with data that you might need to delete upon request. The only fully effective way to remove data from a model is to delete the data from the training set and train a new version of the model. This isn’t practical when the data deletion is a fraction of the total training data and can be very costly depending on the size of your model.
While AI-enabled applications can act, look, and feel like non-AI-enabled applications, the free-form nature of interacting with an LLM mandates additional scrutiny and guardrails. It is important to identify what risks apply to your generative AI workloads, and how to begin to mitigate them.
There are many ways to identify risks, but two common mechanisms are risk assessments and threat modeling. For Scopes 1 and 2, you’re assessing the risk of the third-party providers to understand the risks that might originate in their service, and how they mitigate or manage the risks they’re responsible for. Likewise, you must understand what your risk management responsibilities are as a consumer of that service.
For Scopes 3, 4, and 5—implement threat modeling—while we will dive deep into specific threats and how to threat-model generative AI applications in a future blog post, let’s give an example of a threat unique to LLMs. Threat actors might use a technique such as prompt injection: a carefully crafted input that causes an LLM to respond in unexpected or undesired ways. This threat can be used to extract features (features are characteristics or properties of data used to train a machine learning (ML) model), defame, gain access to internal systems, and more. In recent months, NIST, MITRE, and OWASP have published guidance for securing AI and LLM solutions. In both the MITRE and OWASP published approaches, prompt injection (model evasion) is the first threat listed. Prompt injection threats might sound new, but will be familiar to many cybersecurity professionals. It’s essentially an evolution of injection attacks, such as SQL injection, JSON or XML injection, or command-line injection, that many practitioners are accustomed to addressing.
Emerging threat vectors for generative AI workloads create a new frontier for threat modeling and overall risk management practices. As mentioned, your existing cybersecurity practices will apply here as well, but you must adapt to account for unique threats in this space. Partnering deeply with development teams and other key stakeholders who are creating generative AI applications within your organization will be required to understand the nuances, adequately model the threats, and define best practices.
Controls help us enforce compliance, policy, and security requirements in order to mitigate risk. Let’s dive into an example of a prioritized security control: identity and access management. To set some context, during inference (the process of a model generating an output, based on an input) first- or third-party foundation models (Scopes 3–5) are immutable. The API to a model accepts an input and returns an output. Models are versioned and, after release, are static. On its own, the model itself is incapable of storing new data, adjusting results over time, or incorporating external data sources directly. Without the intervention of data processing capabilities that reside outside of the model, the model will not store new data or mutate.
Both modern databases and foundation models have a notion of using the identity of the entity making a query. Traditional databases can have table-level, row-level, column-level, or even element-level security controls. Foundation models, on the other hand, don’t currently allow for fine-grained access to specific embeddings they might contain. In LLMs, embeddings are the mathematical representations created by the model during training to represent each object—such as words, sounds, and graphics—and help describe an object’s context and relationship to other objects. An entity is either permitted to access the full model and the inference it produces or nothing at all. It cannot restrict access at the level of specific embeddings in a vector database. In other words, with today’s technology, when you grant an entity access directly to a model, you are granting it permission to all the data that model was trained on. When accessed, information flows in two directions: prompts and contexts flow from the user through the application to the model, and a completion returns from the model back through the application providing an inference response to the user. When you authorize access to a model, you’re implicitly authorizing both of these data flows to occur, and either or both of these data flows might contain confidential data.
For example, imagine your business has built an application on top of Amazon Bedrock at Scope 4, where you’ve fine-tuned a foundation model, or Scope 5 where you’ve trained a model on your own business data. An AWS Identity and Access Management (IAM) policy grants your application permissions to invoke a specific model. The policy cannot limit access to subsets of data within the model. For IAM, when interacting with a model directly, you’re limited to model access.
What could you do to implement least privilege in this case? In most scenarios, an application layer will invoke the Amazon Bedrock endpoint to interact with a model. This front-end application can use an identity solution, such as Amazon Cognito or AWS IAM Identity Center, to authenticate and authorize users, and limit specific actions and access to certain data accordingly based on roles, attributes, and user communities. For example, the application could select a model based on the authorization of the user. Or perhaps your application uses RAG by querying external data sources to provide just-in-time data for generative AI responses, using services such as Amazon Kendra or Amazon OpenSearch Serverless. In that case, you would use an authorization layer to filter access to specific content based on the role and entitlements of the user. As you can see, identity and access management principles are the same as any other application your organization develops, but you must account for the unique capabilities and architectural considerations of your generative AI workloads.
Finally, availability is a key component of security as called out in the C.I.A. triad. Building resilient applications is critical to meeting your organization’s availability and business continuity requirements. For Scope 1 and 2, you should understand how the provider’s availability aligns to your organization’s needs and expectations. Carefully consider how disruptions might impact your business should the underlying model, API, or presentation layer become unavailable. Additionally, consider how complex prompts and completions might impact usage quotas, or what billing impacts the application might have.
For Scopes 3, 4, and 5, make sure that you set appropriate timeouts to account for complex prompts and completions. You might also want to look at prompt input size for allocated character limits defined by your model. Also consider existing best practices for resilient designs such as backoff and retries and circuit breaker patterns to achieve the desired user experience. When using vector databases, having a high availability configuration and disaster recovery plan is recommended to be resilient against different failure modes.
Instance flexibility for both inference and training model pipelines are important architectural considerations in addition to potentially reserving or pre-provisioning compute for highly critical workloads. When using managed services like Amazon Bedrock or SageMaker, you must validate AWS Region availability and feature parity when implementing a multi-Region deployment strategy. Similarly, for multi-Region support of Scope 4 and 5 workloads, you must account for the availability of your fine-tuning or training data across Regions. If you use SageMaker to train a model in Scope 5, use checkpoints to save progress as you train your model. This will allow you to resume training from the last saved checkpoint if necessary.
In this post, we outlined how well-established cloud security principles provide a solid foundation for securing generative AI solutions. While you will use many existing security practices and patterns, you must also learn the fundamentals of generative AI and the unique threats and security considerations that must be addressed. Use the Generative AI Security Scoping Matrix to help determine the scope of your generative AI workloads and the associated security dimensions that apply. With your scope determined, you can then prioritize solving for your critical security requirements to enable the secure use of generative AI workloads by your business.
Please join us as we continue to explore these and additional security topics in our upcoming posts in the Securing Generative AI series.
If you have feedback about this post, submit comments in the Comments section below. If you have questions about this post, contact AWS Support.
Want more AWS Security news? Follow us on Twitter.
Amazon Web Services (AWS) is excited to announce the release of a new Cloud Companion Guide to help customers prepare for the Cyber Trust mark developed by the Cyber Security Agency of Singapore (CSA).
The Cloud Companion Guide to the CSA’s Cyber Trust mark provides guidance and a mapping of AWS services and features to applicable domains of the mark. It aims to provide customers with an understanding of which AWS services and tools they can use to help fulfill the requirements set out in the Cyber Trust mark.
The Cyber Trust mark aims to guide organizations to understand their risk profiles and identify relevant cybersecurity preparedness areas required to mitigate these risks. It also serves as a mark of distinction for organizations to show that they have put in place good cybersecurity practices and measures that are commensurate with their cybersecurity risk profile.
The guide does not cover compliance topics such as physical and maintenance controls, or organization-specific requirements such as policies and human resources controls. This makes the guide lightweight and focused on security considerations for AWS services. For a full list of AWS compliance programs, see the AWS Compliance Center.
We hope that organizations of all sizes can use the Cloud Companion Guide for Cyber Trust to implement AWS specific security services and tools to help them achieve effective controls. By understanding which security services and tools are available on AWS, and which controls are applicable to them, customers can build secure workloads and applications on AWS.
“At AWS, security is our top priority, and we remain committed to helping our Singapore customers enhance their cloud security posture, and engender trust from our customers’ end-users,” said Joel Garcia, Head of Technology, ASEAN, “The Cloud Security Companion Guide is one way we work with government agencies such as the Cyber Security Agency of Singapore to do so. Customers who implement these steps can secure their cloud environments better, mitigate risks, and achieve effective controls to build secure workloads on AWS.”
If you have questions or want to learn more, contact your account representative, or leave a comment below.
Want more AWS Security news? Follow us on Twitter.
Vulnerability findings in a cloud environment can come from a variety of tools and scans depending on the underlying technology you’re using. Without processes in place to handle these findings, they can begin to mount, often leading to thousands to tens of thousands of findings in a short amount of time. We’re excited to announce the Building a scalable vulnerability management program on AWS guide, which includes how you can build a structured vulnerability management program, operationalize tooling, and scale your processes to handle a large number of findings from diverse sources.
Building a scalable vulnerability management program on AWS focuses on the fundamentals of building a cloud vulnerability management program, including traditional software and network vulnerabilities and cloud configuration risks. The guide covers how to build a successful and scalable vulnerability management program on AWS through preparation, enabling and configuring tools, triaging findings, and reporting.
Targeted outcomes
This guide can help you and your organization with the following:
Develop policies to streamline vulnerability management and maintain accountability.
Establish mechanisms to extend the responsibility of security to your application teams.
Configure relevant AWS services according to best practices for scalable vulnerability management.
Identify patterns for routing security findings to support a shared responsibility model.
Establish mechanisms to report on and iterate on your vulnerability management program.
Improve security finding visibility and help improve overall security posture.
Using the new guide
We encourage you to read the entire guide before taking action or building a list of changes to implement. After you read the guide, assess your current state compared to the action items and check off the items that you’ve already completed in the Next steps table. This will help you assess the current state of your AWS vulnerability management program. Then, plan short-term and long-term roadmaps based on your gaps, desired state, resources, and business needs. Building a cloud vulnerability management program often involves iteration, so you should prioritize key items and regularly revisit your backlog to keep up with technology changes and your business requirements.
We greatly value feedback and contributions from our community. To share your thoughts and insights about the guide, your experience using it, and what you want to see in future versions, select Provide feedback at the bottom of any page in the guide and complete the form.
If you have feedback about this post, submit comments in the Comments section below. If you have questions about this post, contact AWS Support.
Want more AWS Security news? Follow us on Twitter.
Security is a top priority for organizations looking to keep pace with a changing threat landscape and build customer trust. However, the traditional approach of defined security perimeters that separate trusted from untrusted network zones has proven to be inadequate as hybrid work models accelerate digital transformation.
Today’s distributed enterprise requires a new approach to ensuring the right levels of security and accessibility for systems and data. Security experts increasingly recommend Zero Trust as the solution, but security teams can get confused when Zero Trust is presented as a product, rather than as a security model. We’re excited to share a whitepaper we recently authored with SANS Institute called Zero Trust: Charting a Path To Stronger Security, which addresses common misconceptions and explores Zero Trust opportunities.
Gartner predicts that by 2025, over 60% of organizations will embrace Zero Trust as a starting place for security.
The whitepaper includes context and analysis that can help you move past Zero Trust marketing hype and learn about these key considerations for implementing a successful Zero Trust strategy:
Zero Trust definition and guiding principles
Six foundational capabilities to establish
Four fallacies to avoid
Six Zero Trust use cases
Metrics for measuring Zero Trust ROI
The journey to Zero Trust is an iterative process that is different for every organization. We encourage you to download the whitepaper, and gain insight into how you can chart a path to a multi-layered security strategy that adapts to the modern environment and meaningfully improves your technical and business outcomes. We look forward to your feedback and to continuing the journey together.
If you have feedback about this post, submit comments in the Comments section below.
Want more AWS Security news? Follow us on Twitter.
Amazon Cognito is a customer identity and access management solution that scales to millions of users. With Cognito, you have four ways to secure multi-tenant applications: user pools, application clients, groups, or custom attributes. In an earlier blog post titled Role-based access control using Amazon Cognito and an external identity provider, you learned how to configure Cognito authentication and authorization with a single tenant. In this post, you will learn to configure Cognito with a single user pool for multiple tenants to securely access a business-to-business application by using SAML custom attributes. With custom-attribute–based multi-tenancy, you can store tenant identification data like tenantName as a custom attribute in a user’s profile and pass it to your application. You can then handle multi-tenancy logic in your application and backend services. With this approach, you can use a unified sign-up and sign-in experience for your users. To identify the user’s tenant, your application can use the tenantName custom attribute.
One Cognito user pool for multiple customers
Customers like the simplicity of using a single Cognito user pool for their multi-customer application. With this approach, your customers will use the same URL to access the application. You will set up each new customer by configuring SAML 2.0 integration with the customer’s external identity provider (IdP). Your customers can control access to your application by using an external identity store, such as Google Workspace, Okta, or Active Directory Federation Service (AD FS), in which they can create, manage, and revoke access for their users.
After SAML integration is configured, Cognito returns a JSON web token (JWT) to the frontend during the user authentication process. This JWT contains attributes your application can use for authorization and access control. The token contains claims about the identity of the authenticated user, such as name and email. You can use this identity information inside your application. You can also configure Cognito to add custom attributes to the JWT, such as tenantName.
In this post, we demonstrate the approach of keeping a mapping between a user’s email domain and tenant name in an Amazon DynamoDB table. The DynamoDB table will have an emailDomain field as a key and a corresponding tenantName field.
The workflow that happens when you access the web application for the first time using your browser is as follows (the numbered steps correspond to the numbered labels in the diagram):
The client-side/frontend of the application prompts you to enter the email that you want to use to sign in to the application.
The application invokes the Tenant Match API action through API Gateway, which, in turn, calls the Lambda function that takes the email address as an input and queries it against the DynamoDB table with the email domain. Figure 2 shows the data stored in DynamoDB, which includes the tenant name and IdP ID. You can add additional flexibility to this solution by adding web client IDs or custom redirect URLs. For the purpose of this example, we are using the same redirect URL for all tenants (the client application).
Figure 2: DynamoDB tenant table
If a matching record is found, the Lambda function returns the record to the AWS Amplify frontend application.
The client application uses the IdP ID from the response and passes it to Cognito for federated login. Cognito then reroutes the login request to the corresponding IdP. The AWS Amplify frontend application then redirects the browser to the IdP.
At the IdP sign-in page, you sign in with a valid user account (for example, [email protected] or [email protected]). After you sign in successfully, a SAML response is sent back from the IdP to Cognito.
Cognito handles the SAML response and maps the SAML attributes to a just-in-time user profile. The SAML groups attributes is mapped to a custom user pool attribute named custom:groups.
To identify the tenant, additional attributes are populated in the JWT. After successful authentication, a PreTokenGeneration Lambda function is invoked, which reads the mapped custom:groups attribute value from SAML, parses it, and converts it to an array. After that, the function parses the email address and captures the domain name. It then queries the DynamoDB table for the tenantName name by using the email domain name. Finally, the function sets the custom:domainName and custom:tenantName attributes in the JWT, as shown following.
"email": "[email protected]" ( Standard existing profile attribute )
New attributes:
"cognito:groups": [.
"pet-app-users",
"pet-app-admin"
],
"custom:tenantName": "AnyCompany"
"custom:domainName": "anycompany.com"
This attribute conversion is optional and demonstrates how you can use a PreTokenGeneration Lambda invocation to customize your JWT token claims, mapping the IdP groups to the attributes your application recognizes. You can also use this invocation to make additional authorization decisions. For example, if user is a member of multiple groups, you may choose to map only one of them.
Amazon Cognito returns the JWT tokens to the AWS Amplify frontend application. The Amplify client library stores the tokens and handles refreshes. This token is used to make calls to protected APIs in Amazon API Gateway.
API Gateway uses a Cognito user pools authorizer to validate the JWT’s signature and expiration. If this is successful, API Gateway passes the JWT to the application’s Lambda function (also referred to as the backend).
The backend application code reads the cognito:groups claim from the JWT and decides if the action is allowed. If the user is a member of the right group, then the action is allowed; otherwise the action is denied.
Implement the solution
You can implement this example application by using an AWS CloudFormation template to provision your cloud application and AWS resources.
To deploy the demo application described in this post, you need the following prerequisites:
The stack creates a Cognito user pool called ExternalIdPDemoPoolXXXX in the AWS Region that you have specified. The CloudFormation Outputs field contains a list of values that you will need for further configuration.
IdP configuration
The next step is to configure your IdP. Each IdP has its own procedure for configuration, but there are some common steps you need to follow.
To configure your IdP
Provide the IdP with the values for the following two properties:
Single sign on URL / Assertion Consumer Service URL / ACS URL (for this example, https://<CognitoDomainURL>/saml2/idpresponse)
Audience URI / SP Entity ID / Entity ID: (For this example, urn:amazon:cognito:sp:<yourUserPoolID>)
Configure the field mapping for the SAML response in the IdP. Map the first name, last name, email, and groups (as a multi-value attribute) into SAML response attributes with the names firstName, lastName, email, and groups, respectively.
Recommended: Filter the mapped groups to only those that are relevant to the application (for example, by a prefix filter). There is a 2,048-character limit on the custom attribute, so filtering helps avoid exceeding the character limit, and also helps avoid passing irrelevant information to the application.
In each IdP, create two demo groups called pet-app-users and pet-app-admins, and create two demo users, for example, [email protected] and [email protected], and then assign one to each group, respectively.
To illustrate, we set up three different IdPs to represent three different tenants. Use the following links for instructions on how to configure each IdP:
After your IdPs are configured and your CloudFormation stack is deployed, you can configure Cognito.
To configure Cognito
Use your browser to navigate to the Cognito console, and for User pool name, select the Cognito user pool.
Figure 4: Select the Cognito user pool
On the Sign-in experience screen, on the Federated identity provider sign-in tab, choose Add identity provider.
Choose SAML for the sign-in option,and then enter the values for your IdP. You can either upload the metadata XML file or provide the metadata endpoint URL. Add mapping for the attributes as shown in Figure 5.
Figure 5: Attribute mappings for the IdP
Upon completion you will see the new IdP displayed as shown in Figure 6.
Figure 6: List of federated IdPs
On the App integration tab, select the app client that was created by the CloudFormation template.
Figure 7: Select the app client
Under Hosted UI, choose Edit. Under Identity providers, select the Identity Providers that you want to set up for federated login, and save the change.
Figure 8: Select identity providers
API gateway
The example application uses a serverless backend. There are two API operations defined in this example, as shown in Figure 9. One operation gets tenant details and the other is the /pets API operation, which fetches information on pets based on user identity. The TenantMatch API operation will be run when you sign in with your email address. The operation passes your email address to the backend Lambda function.
Figure 9: Example APIs
Lambda functions
You will see three Lambda functions deployed in the example application, as shown in Figure 10.
Figure 10: Lambda functions
The first one is GetTenantInfo, which is used for the TenantMatch API operation. It reads the data from the TenantTable based on the email domain and passes the record back to the application. The second function is PreTokenGeneration, which reads the mapped custom:groups attribute value, parses it, converts it to an array, and then stores it in the cognito:groups claim. The second Lambda function is invoked by the Cognito user pool after sign-in is successful. In order to customize the mapping, you can edit the Lambda function’s code in the index.js file and redeploy. The third Lambda function is added to support the Pets API operation.
DynamoDB tables
You will see three DynamoDB tables deployed in the example application, as shown in Figure 11.
Figure 11: DynamoDB tables
The TenantTable table holds the tenant details where you must add the mapping between the customer domain and the IdP ID setup in Cognito. This approach can be expanded to add more flexibility in case you want to add custom redirect URLs or Cognito app IDs for each tenant. You must create entries to correspond to the IdPs you have configured, as shown in Figure 12.
Figure 12: Tenant IdP mappings table
In addition to TenantTable, there is the ExternalIdPDemo-ItemsTable table, which holds the data related to the Pets application, based on user identity. There is also ExternalIdPDemo-UsersTable, which holds user details like the username, last forced sign-out time, and TTL required for the application to manage the user session.
You can now sign in to the example application through each IdP by navigating to the application URL found in the CloudFormation Outputs section, as shown in Figure 13.
Figure 13: Cognito sign-in screen
You will be redirected to the IdP, as shown in Figure 14.
Figure 14: Google Workspace sign-in screen
The AWS Amplify frontend application parses the JWT to identify the tenant name and provide authorization based on group membership, as shown in Figure 15.
Figure 15: Application home screen upon successful sign-in
If a different user logs in with a different role, the AWS Amplify frontend application provides authorization based on specific content of the JWT.
Conclusion
You can integrate your application with your customer’s IdP of choice for authentication and authorization and map information from the IdP to the application. By using Amazon Cognito, you can normalize the structure of the JWT token that is used for this process, so that you can add multiple IdPs, each for a different tenant, through a single Cognito user pool. You can do all this without changing application code. The native integration of Amazon API Gateway with the Cognito user pools authorizer streamlines your validation of the JWT integrity, and after the JWT has been validated, you can use it to make authorization decisions in your application’s backend. By following the example in this post, you can focus on what differentiates your application, and let AWS do the undifferentiated heavy lifting of identity management for your customer-facing applications.
For the code examples described in this post, see the amazon-cognito-example-for-multi-tenant code repository on GitHub. To learn more about using Cognito with external IdPs, see the Amazon Cognito documentation. You can also learn to build software as a service (SaaS) application architectures on AWS. If you have any questions about Cognito or any other AWS services, you may post them to AWS re:Post.
At Amazon Web Services (AWS), security is our top priority. Security is deeply embedded into our culture, processes, and systems; it permeates everything we do. What does this mean for you? We believe customers can benefit from learning more about what AWS is doing to prevent and mitigate customer-impacting security events.
Since late August 2023, AWS has detected and been protecting customer applications from a new type of distributed denial of service (DDoS) event. DDoS events attempt to disrupt the availability of a targeted system, such as a website or application, reducing the performance for legitimate users. Examples of DDoS events include HTTP request floods, reflection/amplification attacks, and packet floods. The DDoS events AWS detected were a type of HTTP/2 request flood, which occurs when a high volume of illegitimate web requests overwhelms a web server’s ability to respond to legitimate client requests.
Between August 28 and August 29, 2023, proactive monitoring by AWS detected an unusual spike in HTTP/2 requests to Amazon CloudFront, peaking at over 155 million requests per second (RPS). Within minutes, AWS determined the nature of this unusual activity and found that CloudFront had automatically mitigated a new type of HTTP request flood DDoS event, now called an HTTP/2 rapid reset attack. Over those two days, AWS observed and mitigated over a dozen HTTP/2 rapid reset events, and through the month of September, continued to see this new type of HTTP/2 request flood. AWS customers who had built DDoS-resilient architectures with services like Amazon CloudFront and AWS Shield were able to protect their applications’ availability.
Figure 1. Global HTTP requests per second, September 13 – 16
Overview of HTTP/2 rapid reset attacks
HTTP/2 allows for multiple distinct logical connections to be multiplexed over a single HTTP session. This is a change from HTTP 1.x, in which each HTTP session was logically distinct. HTTP/2 rapid reset attacks consist of multiple HTTP/2 connections with requests and resets in rapid succession. For example, a series of requests for multiple streams will be transmitted followed up by a reset for each of those requests. The targeted system will parse and act upon each request, generating logs for a request that is then reset, or cancelled, by a client. The system performs work generating those logs even though it doesn’t have to send any data back to a client. A bad actor can abuse this process by issuing a massive volume of HTTP/2 requests, which can overwhelm the targeted system, such as a website or application.
Keep in mind that HTTP/2 rapid reset attacks are just a new type of HTTP request flood. To defend against these sorts of DDoS attacks, you can implement an architecture that helps you specifically detect unwanted requests as well as scale to absorb and block those malicious HTTP requests.
Building DDoS resilient architectures
As an AWS customer, you benefit from both the security built into the global cloud infrastructure of AWS as well as our commitment to continuously improve the security, efficiency, and resiliency of AWS services. For prescriptive guidance on how to improve DDoS resiliency, AWS has built tools such as the AWS Best Practices for DDoS Resiliency. It describes a DDoS-resilient reference architecture as a guide to help you protect your application’s availability. While several built-in forms of DDoS mitigation are included automatically with AWS services, your DDoS resilience can be improved by using an AWS architecture with specific services and by implementing additional best practices for each part of the network flow between users and your application.
For example, you can use AWS services that operate from edge locations, such as Amazon CloudFront, AWS Shield, Amazon Route 53, and Route 53 Application Recovery Controller to build comprehensive availability protection against known infrastructure layer attacks. These services can improve the DDoS resilience of your application when serving any type of application traffic from edge locations distributed around the world. Your application can be on-premises or in AWS when you use these AWS services to help you prevent unnecessary requests reaching your origin servers. As a best practice, you can run your applications on AWS to get the additional benefit of reducing the exposure of your application endpoints to DDoS attacks and to protect your application’s availability and optimize the performance of your application for legitimate users. You can use Amazon CloudFront (and its HTTP caching capability), AWS WAF, and Shield Advanced automatic application layer protection to help prevent unnecessary requests reaching your origin during application layer DDoS attacks.
Putting our knowledge to work for AWS customers
AWS remains vigilant, working to help prevent security issues from causing disruption to your business. We believe it’s important to share not only how our services are designed, but also how our engineers take deep, proactive ownership of every aspect of our services. As we work to defend our infrastructure and your data, we look for ways to help protect you automatically. Whenever possible, AWS Security and its systems disrupt threats where that action will be most impactful; often, this work happens largely behind the scenes. We work to mitigate threats by combining our global-scale threat intelligence and engineering expertise to help make our services more resilient against malicious activities. We’re constantly looking around corners to improve the efficiency and security of services including the protocols we use in our services, such as Amazon CloudFront, as well as AWS security tools like AWS WAF, AWS Shield, and Amazon Route 53 Resolver DNS Firewall.
In addition, our work extends security protections and improvements far beyond the bounds of AWS itself. AWS regularly works with the wider community, such as computer emergency response teams (CERT), internet service providers (ISP), domain registrars, or government agencies, so that they can help disrupt an identified threat. We also work closely with the security community, other cloud providers, content delivery networks (CDNs), and collaborating businesses around the world to isolate and take down threat actors. For example, in the first quarter of 2023, we stopped over 1.3 million botnet-driven DDoS attacks, and we traced back and worked with external parties to dismantle the sources of 230 thousand L7/HTTP DDoS attacks. The effectiveness of our mitigation strategies relies heavily on our ability to quickly capture, analyze, and act on threat intelligence. By taking these steps, AWS is going beyond just typical DDoS defense, and moving our protection beyond our borders. To learn more behind this effort, please read How AWS threat intelligence deters threat actors.
If you have feedback about this post, submit comments in the Comments section below. If you have questions about this post, contact AWS Support.
Want more AWS Security news? Follow us on Twitter.
In this blog post, we look at how you can use AWS IAM Identity Center (successor to AWS Single Sign-On) to delegate the management of permission sets and account assignments. Delegating the day-to-day administration of user identities and entitlements allows teams to move faster and reduces the burden on your central identity administrators.
Delegated administration is different from the delegation of permission sets and account assignments, which this blog covers. For more information on delegated administration, see Getting started with AWS IAM Identity Center delegated administration. The patterns in this blog post work whether Identity Center is delegated to a member account or remains in the management account.
As your organization grows, you might want to start delegating permissions management and account assignment to give your teams more autonomy and reduce the burden on your identity team. Alternatively, you might have different business units or customers, operating out of their own organizational units (OUs), that want more control over their own identity management.
In this scenario, an example organization has three developer teams: Red, Blue, and Yellow. Each of the teams operate out of its own OU. IAM Identity Center has been delegated from the management account to the Identity Account. Figure 1 shows the structure of the example organization.
Figure 1: The structure of the organization in the example scenario
The organization in this scenario has an existing collection of permission sets. They want to delegate the management of permission sets and account assignments away from their central identity management team.
The Red team wants to be able to assign the existing permission sets to accounts in its OU. This is an accounts-based model.
The Blue team wants to edit and use a single permission set and then assign that set to the team’s single account. This is a permission-based model.
The Yellow team wants to create, edit, and use a permission set tagged with Team: Yellow and then assign that set to all of the accounts in its OU. This is a tag-based model.
We’ll look at the permission sets needed for these three use cases.
In this use case, the Red team is given permission to assign existing permission sets to the three accounts in its OU. This will also include permissions to remove account assignments.
Using this model, an organization can create generic permission sets that can be assigned to its AWS accounts. It helps reduce complexity for the delegated administrators and verifies that they are using permission sets that follow the organization’s best practices. These permission sets restrict access based on services and features within those services, rather than specific resources.
In the preceding policy, the principal can assign existing permission sets to the three AWS accounts with the IDs 112233445566, 223344556677 and 334455667788. This includes administration permission sets, so carefully consider which accounts you allow the permission sets to be assigned to.
Use the Management Console to navigate to the IAM Identity Center in your AWS Region and then select Choose your identity source on the dashboard.
Figure 2: The IAM Identity Center instance ID ARN in the console
Use case 2: Permission-based model
For this example, the Blue team is given permission to edit one or more specific permission sets and then assign those permission sets to a single account. The following permissions allow the team to use managed and inline policies.
This model allows the delegated administrator to use fine-grained permissions on a specific AWS account. It’s useful when the team wants total control over the permissions in its AWS account, including the ability to create additional roles with administrative permissions. In these cases, the permissions are often better managed by the team that operates the account because it has a better understanding of the services and workloads.
Here, the principal can edit the permission set arn:aws:sso:::permissionSet/ssoins-<sso-ins-id>/ps-1122334455667788 and assign it to the AWS account 445566778899. The editing rights include customer managed policies, AWS managed policies, and inline policies.
If you want to use the preceding policy, replace the missing and example resource values with your own IAM Identity Center instance ID and account numbers.
In the preceding policy, the arn:aws:sso:::permissionSet/ssoins-<sso-ins-id>/ps-1122334455667788 is the permission set ARN. You can find this ARN through the console, or by using the AWS CLI command to list all of the permission sets:
aws sso-admin list-permission-sets --instance-arn <instance arn from above>
This permission set can also be applied to multiple accounts—similar to the first use case—by adding additional account IDs to the list of resources. Likewise, additional permission sets can be added so that the user can edit multiple permission sets and assign them to a set of accounts.
Use case 3: Tag-based model
For this example, the Yellow team is given permission to create, edit, and use permission sets tagged with Team: Yellow. Then they can assign those tagged permission sets to all of their accounts.
This example can be used by an organization to allow a team to freely create and edit permission sets and then assign them to the team’s accounts. It uses tagging as a mechanism to control which permission sets can be created and edited. Permission sets without the correct tag cannot be altered.
In the preceding policy, the principal is allowed to create new permission sets only with the tag Team: Yellow, and assign only permission sets tagged with Team: Yellow to the AWS accounts with ID 556677889900, 667788990011, and 778899001122.
The principal can only edit the inline policies of the permission sets tagged with Team: Yellow and cannot change the tags of the permission sets that are already tagged for another team.
If you want to use this policy, replace the missing and example resource values with your own IAM Identity Center instance ID, tags, and account numbers.
Note: The policy above assumes that there are no additional statements applying to the principal. If you require additional allow statements, verify that the resulting policy doesn’t create a risk of privilege escalation. You can review Controlling access to AWS resources using tags for additional information.
This policy only allows the delegation of permission sets using inline policies. Customer managed policies are IAM policies that are deployed to and are unique to each AWS account. When you create a permission set with a customer managed policy, you must create an IAM policy with the same name and path in each AWS account where IAM Identity Center assigns the permission set. If the IAM policy doesn’t exist, Identity Center won’t make the account assignment. For more information on how to use customer managed policies with Identity Center, see How to use customer managed policies in AWS IAM Identity Center for advanced use cases.
You can extend the policy to allow the delegation of customer managed policies with these two statements:
Note: Both statements are required, as only the resource type PermissionSet supports the condition key aws:ResourceTag/${TagKey}, and the actions listed require access to both the Instance and PermissionSet resource type. See Actions, resources, and condition keys for AWS IAM Identity Center for more information.
Best practices
Here are some best practices to consider when delegating management of permission sets and account assignments:
Assign permissions to edit specific permission sets. Allowing roles to edit every permission set could allow that role to edit their own permission set.
Only allow administrators to manage groups. Users with rights to edit group membership could add themselves to any group, including a group reserved for organization administrators.
Organizations can empower teams by delegating the management of permission sets and account assignments in IAM Identity Center. Delegating these actions can allow teams to move faster and reduce the burden on the central identity management team.
The scenario and examples share delegation concepts that can be combined and scaled up within your organization. If you have feedback about this blog post, submit comments in the Comments section. If you have questions, start a new thread on AWS Re:Post with the Identity Center tag.
Want more AWS Security news? Follow us on Twitter.
The collective thoughts of the interwebz
Manage Consent
To provide the best experiences, we use technologies like cookies to store and/or access device information. Consenting to these technologies will allow us to process data such as browsing behavior or unique IDs on this site. Not consenting or withdrawing consent, may adversely affect certain features and functions.
Functional
Always active
The technical storage or access is strictly necessary for the legitimate purpose of enabling the use of a specific service explicitly requested by the subscriber or user, or for the sole purpose of carrying out the transmission of a communication over an electronic communications network.
Preferences
The technical storage or access is necessary for the legitimate purpose of storing preferences that are not requested by the subscriber or user.
Statistics
The technical storage or access that is used exclusively for statistical purposes.The technical storage or access that is used exclusively for anonymous statistical purposes. Without a subpoena, voluntary compliance on the part of your Internet Service Provider, or additional records from a third party, information stored or retrieved for this purpose alone cannot usually be used to identify you.
Marketing
The technical storage or access is required to create user profiles to send advertising, or to track the user on a website or across several websites for similar marketing purposes.

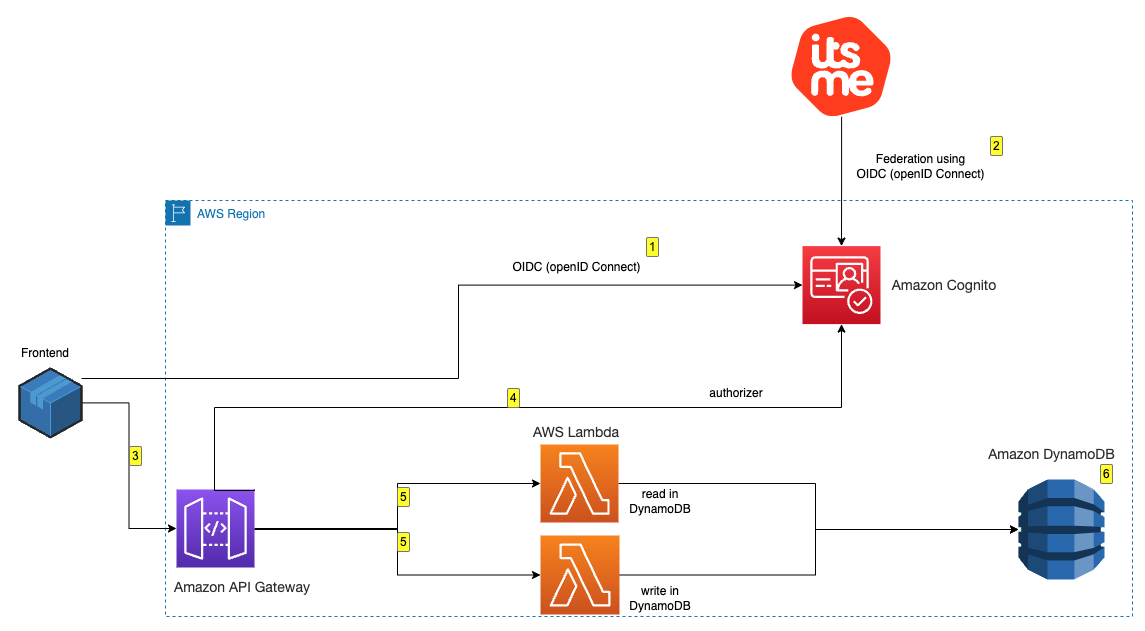


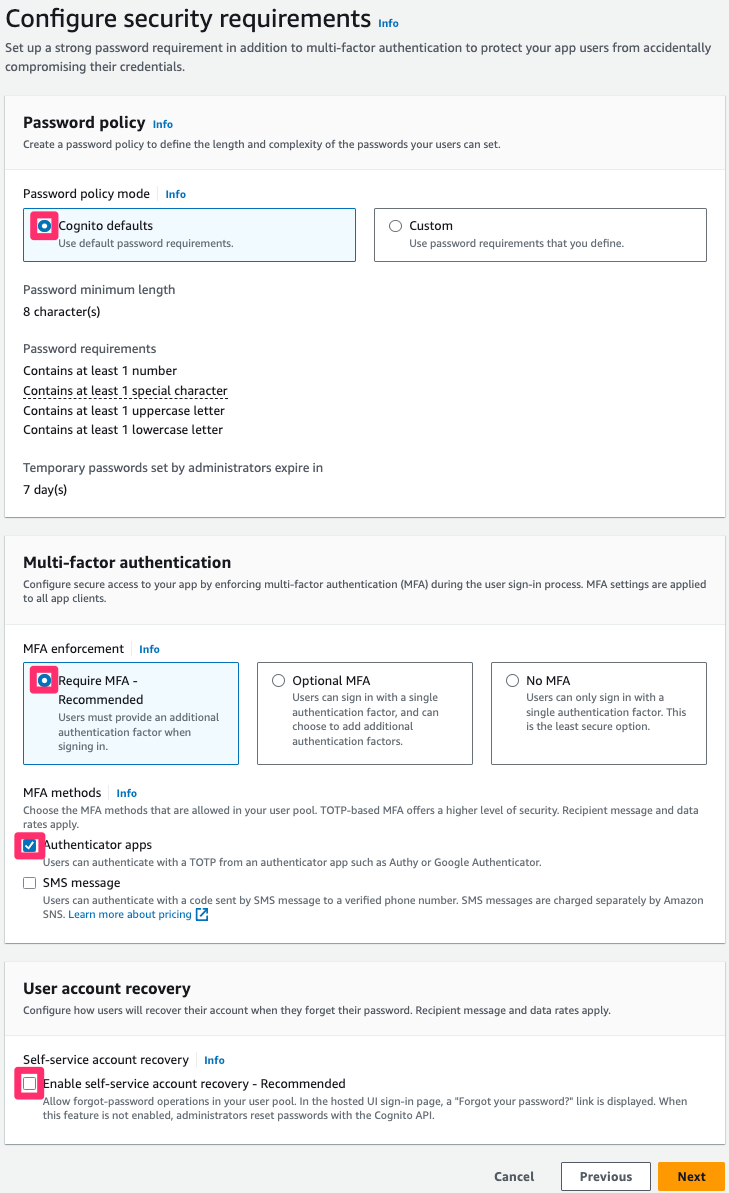


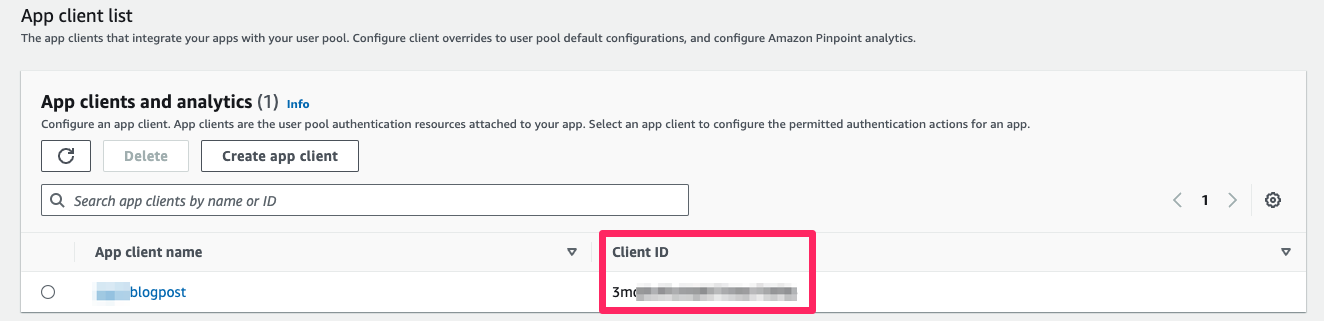

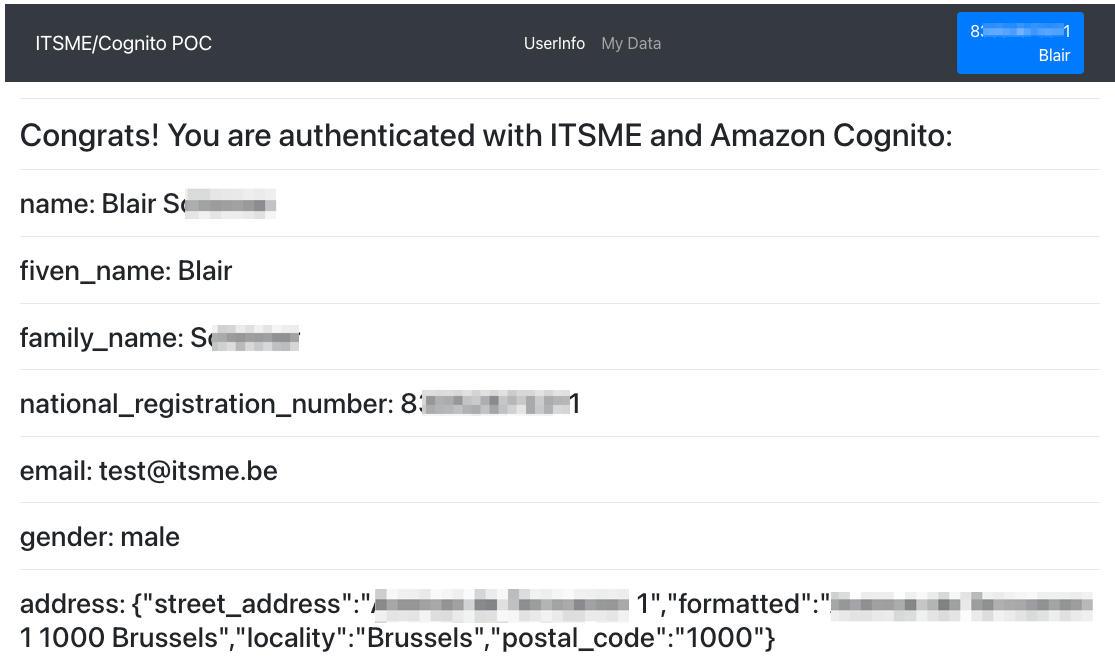
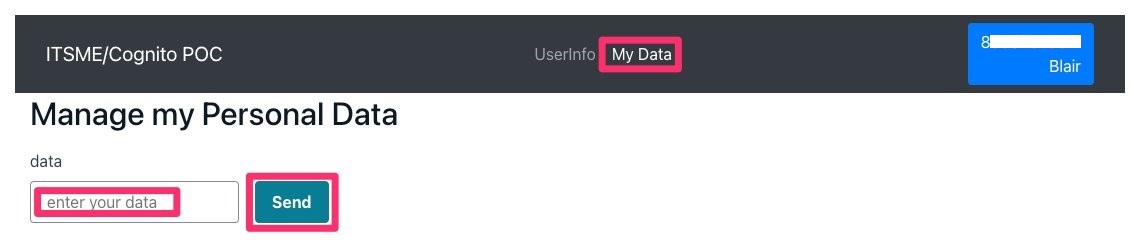


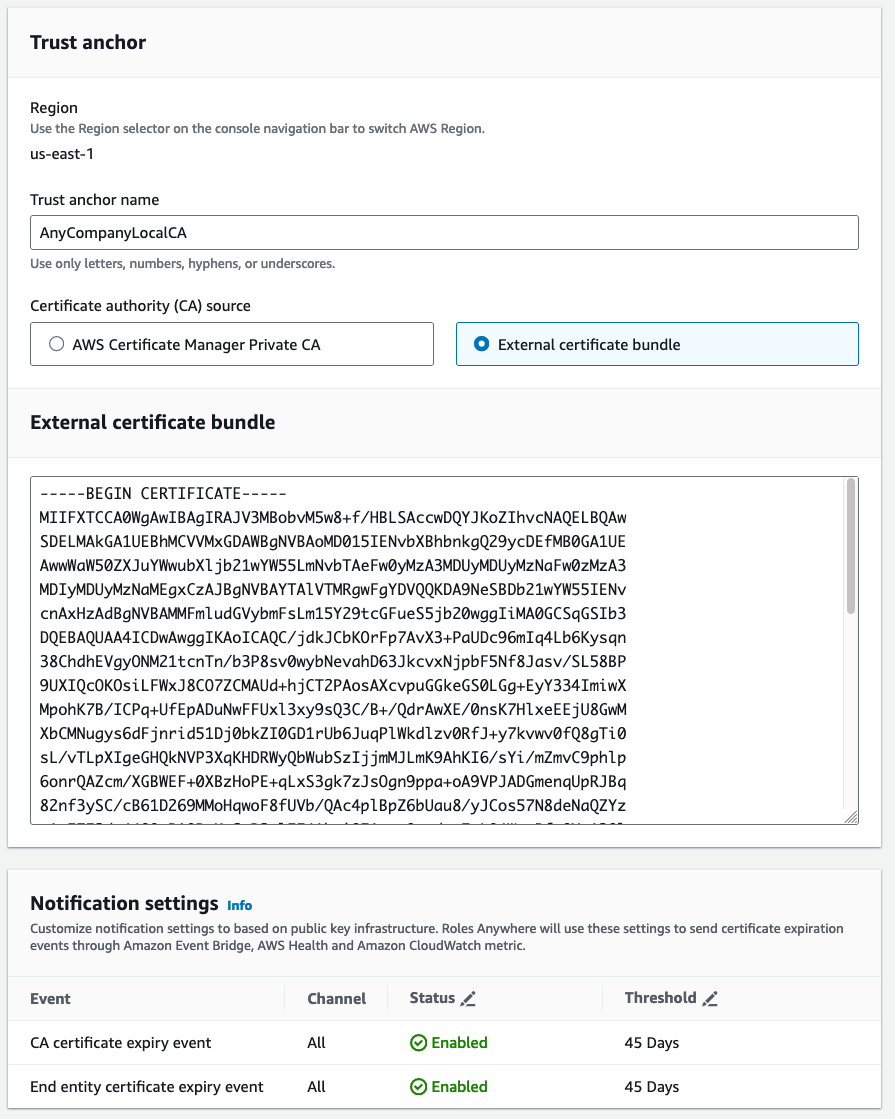

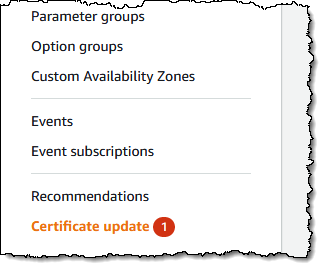 Don’t be surprised if you have seen the Certificate Update in the