Tag Archives: Security, Identity & Compliance

Updated Essential Eight guidance for Australian customers

Post Syndicated from James Kingsmill original https://aws.amazon.com/blogs/security/updated-essential-eight-guidance-for-australian-customers/

Amazon Web Services (AWS) is excited to announce the release of AWS Prescriptive Guidance on Reaching Essential Eight Maturity on AWS. We designed this guidance to help customers streamline and accelerate their security compliance obligations under the Essential Eight framework of the Australian Cyber Security Centre (ACSC).

What is the Essential Eight?

The Essential Eight is a security framework that the ACSC designed to help organizations protect themselves against various cyber threats. The Essential Eight covers the following eight strategies:

  • Application control
  • Patch applications
  • Configure Microsoft Office macro settings
  • User application hardening
  • Restrict administrative privileges
  • Patch operating systems
  • Multi-factor authentication
  • Regular backups

The Department of Home Affairs’ Protective Security Policy Framework (PSPF) mandates that Australian Non-Corporate Commonwealth Entities (NCCEs) reach Essential Eight maturity. The Essential Eight is also one of the compliance frameworks available to owners of critical infrastructure (CI) assets under the Critical Infrastructure Risk Management Program (CIRMP) requirements of the Security of Critical Infrastructure (SOCI) Act.

In the Essential Eight Explained, the ACSC acknowledges some translation is required when applying the principles of the Essential Eight to cloud-based environments:

“The Essential Eight has been designed to protect Microsoft Windows-based internet-connected networks. While the principles behind the Essential Eight may be applied to cloud services and enterprise mobility, or other operating systems, it was not primarily designed for such purposes and alternative mitigation strategies may be more appropriate to mitigate unique cyber threats to these environments.”

The newly released guidance walks customers step-by-step through the process of reaching Essential Eight maturity in a cloud native way, making best use of the security, performance, innovation, elasticity, scalability, and resiliency benefits of the AWS Cloud. It includes a compliance matrix that maps Essential Eight strategies and controls to specific guidance and AWS resources.

It also features an example of a customer with different workloads—a serverless data lake, a containerized webservice, and an Amazon Elastic Compute Cloud (Amazon EC2) workload running commercial-off-the-shelf (COTS) software.

For more information, see Reaching Essential Eight Maturity on AWS on the AWS Prescriptive Guidance page. You can also reach out to your account team or engage AWS Professional Services, our global team of experts that can help customers realize their desired security and business outcomes on AWS.

If you have feedback about this post, submit comments in the Comments section below. If you have questions about this post, contact AWS Support.

Want more AWS Security news? Follow us on Twitter.

James Kingsmill

James Kingsmill

James is a Senior Solutions Architect on the Australian public sector team. As a member of the enterprise federal team, he has a longstanding interest in helping public sector customers achieve their transformation, automation, and security goals.

Manuwai Korber

Manuwai Korber

Manuwai is a Solutions Architect based in Sydney who specializes in the field of machine learning. He is dedicated to helping Australian public sector organizations build reliable systems that improve the experience of citizens.

IAM Roles Anywhere with an external certificate authority

Post Syndicated from Cody Penta original https://aws.amazon.com/blogs/security/iam-roles-anywhere-with-an-external-certificate-authority/

AWS Identity and Access Management Roles Anywhere allows you to use temporary Amazon Web Services (AWS) credentials outside of AWS by using X.509 Certificates issued by your certificate authority (CA). Faraz Angabini goes deep into using IAM Roles Anywhere in his blog post Extend AWS IAM roles to workloads outside of AWS with IAM Roles Anywhere. In this blog post, I take a step back from his post and first define what public key infrastructure (PKI) is and help you set one up for use for IAM Roles Anywhere.

I focus on setting up local PKI for testing purposes by building a basic, minimal certificate authority using openssl. I chose openssl as it’s a standard industry tool for cryptography and is often installed by default on many operating systems. However, you can achieve similar results in a simpler manner using open source tools such as cfssl. In this blog post, we create a local PKI for non-production use cases only for the sake of brevity and to focus more on understanding the core fundamentals. As I go along, I’ll point out what I left out and where to find more information.

Overview

The overall flow of this blog is as follows, there’s some new terminology, so please use this as a map to refer to as you read along to understand the flow. If you’re taking cornell notes, now would be the right time to write key words you see below such as key, certificate, end-entity certificate, certificate authority, CA, trust, IAM Roles Anywhere, and others that pop out to you.

  1. Explain the concepts of keys and certificates and their uses.
  2. Using what you learn about keys and certificates, create a CA.
  3. Import your certificate authority into IAM Roles Anywhere and establish trust between your certificate authority and IAM Roles Anywhere.
  4. Create an end-entity certificate.
  5. Exchange your end-entity certificate for IAM credentials using IAM Roles Anywhere.

Background

IAM Roles Anywhere is compatible with existing PKIs, and for demonstration purposes, you’ll create local infrastructure using openssl to get a deep understanding of the terminology and concepts. Existing PKIs such as AWS Certificate Manager (ACM) and third-party certificate authority services often abstract and simplify this process. With that being said, you have to start somewhere, so let’s start with a key.

What exactly is a key? The National Institute of Standards and Technology (NIST) defines a key as “a parameter used in conjunction with a cryptographic algorithm that determines the specific operation of that algorithm,” which is a formal way of saying for anything you would put inside the key parameter in a function like encrypt(key, data)decrypt(key, data), or sign(key, data). The definition cleverly avoids defining the key by its structure—such as, “It’s a sequence of 256 truly random bits” — as that’s not always the case. For example, in asymmetric encryption you have two keys. One key is private and should not, under any circumstances, be shared outside of your control; while another key is public and can be safely shared with the outside world. To illustrate this, let’s look at actual commands to generate keys:

openssl genpkey -out private.key \
    -algorithm RSA \
    -pkeyopt rsa_keygen_bits:2048 # 2048 minimum key size for RSA, later we use 4096

NOTE: The key is printed in PKCS#8 format, which is a file format for the private key along with some metadata

You can inspect this key with:

cat private.key
-----BEGIN PRIVATE KEY-----
MIIEvgIBADANBgkqhkiG9w0BAQEFAASCBKgwggSkAgEAAoIBAQC/BWpcJqlVDJkC
wr+qrwEgNPSpXM2iSQQAfjS81pll4I5yp//7lm1UqKeBTbaYp9rVec1uzKQrw3xt
...36 lines removed for brevity
mx2sovZyFB7Xe4/99TGLQuHTtgLYYVEN/iFtvsbjPjR7X+R76GWPLdUFdRes0gPo
dlsfnsVKVkUUJKZy0Y2nOrwb2gNSUd/NjcgV9XHEW4y+Sclk/EkdAML1d3aGM0VQ
AaLL8xb75To0VqSQPW12URJM
-----END PRIVATE KEY-----

The public key is embedded inside the private key and you can even pull the public part from the private key.

openssl pkey -in private.key -pubout -out public.key

And like the private key, you can inspect it:

cat public.key
-----BEGIN PUBLIC KEY-----
MIIBIjANBgkqhkiG9w0BAQEFAAOCAQ8AMIIBCgKCAQEAvwVqXCapVQyZAsK/qq8B
IDT0qVzNokkEAH40vNaZZeCOcqf/+5ZtVKingU22mKfa1XnNbsykK8N8bSY9J4r5
f9DVDN8YmRh1+YEYB8pkFTjZBuz158F9GVRK9r/6Lr2Ft0RAinGiN4LoO+V++Ofk
LITgB0rqMk1UH8XyUJwHkS5btr5M7v7zudiQiUDW4vRpWTJ/I4mb9Y2brMfMxJpg
nJ0ni1pm8Yz8zcVjFklvkdtQD+wx4DXf4/7o2EDBNPc1gW+9gIpCI1h5TMwXWURH
lY9cM03SqKwj6SzHxRdOjcMC1Zie3+8OKr1HYpMT0AIM85T3q1iUif8s0TQ3Mk9o
jQIDAQAB
-----END PUBLIC KEY-----

While you must keep your private key a secret, you can openly share your public key. You can even copy the key multiple times and rename each copy to designate an individual whom you would hand the public key out to.

cp public.key alice-public.key
cp public.key bob-public.key

ls
alice-public.key bob-public.key  private.key  public.key

Now here’s the most critical question that I cannot stress enough:

Who owns these keys?

Does the server that generated this private key own it? Do I, as the author of this blog, own it? Does Amazon, as the company, own this private key?

What about the public keys? Who exactly is Alice (alice-public.key)? Who is Bob (bob-public.key)? How are Bob and Alice different if they have the same public key? These are all rhetorical questions you should be asking yourself when working with cryptographic keys. It helps answer who is responsible for this key and ultimately any data encrypted/unencrypted with that key.

At its core, public key infrastructure (PKI) can be explained as assigning an identity to someone or something and using cryptographic keys to ensure that identity can be verified. In the case of internal PKIs, the someone or something is often a hierarchy of assets belonging to your company. For example, a flow could be:

  • Your company
    • Your company’s business unit
      • business unit servers
      • business unit load balancers
      • business unit clients
    • Another business unit

Step 1: Set up a root certificate authority

You need to start somewhere, right? To get a publicly trusted identity, you often need to go through a certificate management service like AWS Certificate Manager (ACM) or a third-party vendor. These vendors go through several audits with operating system providers to have their identity trusted on the operating system itself. For example, on MacOS, you can open the Keychain Access app, go to System Roots, and look at the Certificates tab to see identities that are managed on your behalf.

In this use case with IAM Roles Anywhere, you don’t have to worry about interacting with operating system providers, because you’re creating your own internal PKI—your own internal identity. You do this by creating a certificate authority.

But hold on now, what exactly is a certificate authority? For that matter, what is a certificate?

A certificate is a wrapper around a public key that assigns metadata to an entity. Remember how you can copy the public key and just rename it to alice-public.key? You’ll need a little more metadata than that but the concept is the same. Examples of metadata include “Who are you?” “Who gave you this key?” “When should this key expire?” “Here is what you’re allowed to use this key for,” and various other attributes. As you can imagine, you don’t want just anybody to provide you this type of metadata. You want trusted authorities to assign or validate that metadata for you, and so the term certificate authorities. Certificate authorities also sign these certificates using a digital signing algorithm such as RSA so that consumers of these certificates can verify that the metadata inside hasn’t been tampered with.

You want to be the certificate authority within your own internal network. So how do you go about doing that? Turns out, you’ve already completed the most critical step: creating a private key. By creating a cryptographically strong, random private key, you can assert that whoever owns this private key, represents our company. You can do so because it’s highly improbable that anyone could guess or brute-force this key. However, that means every mechanism you use to protect this private key is critical.

Remember though, you need an identity, and simply naming your private key anycompany.private.key and public key usecase.public.key isn’t ideal. It’s not ideal because you need a lot more metadata than a file name. You need metadata like you would have in the earlier certificate example. You need a certificate that represents your certificate authority, a sort of ID for your root certificate. To facilitate that, there’s a field in certificates called IsCA that’s either true or false. Meaning whether or not a certificate is simply a certificate or a certificate authority is determined by a flag inside the certificate. We’ll start by writing out an openssl configuration file that is used throughout multiple certificate management commands.

NOTE: What’s the difference between a root certificate and a root certificate authority? You can think of a root certificate authority as a person who stamps other certificates. This person themselves needs an ID card. That ID card is the root certificate.

# NOTE: Examples derived from Ivans Ristic's Github
# https://github.com/ivanr/bulletproof-tls
# You may also use `man ca` at the CLI for more examples

# Basic Info about the CA
[default]
name                    = root-ca
domain_suffix           = example.com
default_ca              = ca_default
name_opt                = utf8,esc_ctrl,multiline,lname,align

[ca_dn]
countryName             = "US"
organizationName        = "Any Company Corp"
commonName              = "internal.anycompany.com"

# How the CA Should operate
[ca_default]
home                    = root-ca
database                = $home/db/index
serial                  = $home/db/serial
certificate             = $home/$name.crt
private_key             = $home/private/$name.key
RANDFILE                = $home/private/random
new_certs_dir           = $home/certs
unique_subject          = no
copy_extensions         = none
default_days            = 3650
default_md              = sha256
policy                  = policy_c_o_match

[policy_c_o_match]
countryName             = match
stateOrProvinceName     = optional
organizationName        = match
organizationalUnitName  = optional
commonName              = supplied
emailAddress            = optional

# Configuration for `req` command
[req]
default_bits            = 4096
encrypt_key             = yes
default_md              = sha256
utf8                    = yes
string_mask             = utf8only
prompt                  = no
distinguished_name      = ca_dn
req_extensions          = ca_ext

[ca_ext]
basicConstraints        = critical,CA:true
keyUsage                = critical,keyCertSign
subjectKeyIdentifier    = hash
# create-root-ca.sh
mkdir -p root-ca/certs   # New Certificates issued are stored here
mkdir -p root-ca/db      # Openssl managed database
mkdir -p root-ca/private # Private key dir for the CA

chmod 700 root-ca/private
touch root-ca/db/index

# Give our root-ca a unique identifier
openssl rand -hex 16 > root-ca/db/serial

# Create the certificate signing request
openssl req -new \
  -config root-ca.conf \
  -out root-ca.csr \
  -keyout root-ca/private/root-ca.key

# Sign our request
openssl ca -selfsign \
  -config root-ca.conf \
  -in root-ca.csr \
  -out root-ca.crt \
  -extensions ca_ext

But there are a few things I have to point out:

  • Most certificates start their lives as a certificate signing request (CSR). They contain most of the data an actual certificate does and only become a certificate when signed either by the same entity that created it (self-signed certificate) or by another entity (external certificate authority). This is why you see openssl req followed by openssl ca -selfsign.
  • Everything under root-ca/ must now be protected, especially anything generated under root-ca/private/.
  • I skipped quite a few steps for the sake of brevity, including creating a subordinate certificate authority and keeping the root certificate authority offline, as well as adding a certificate revocation list and Online Certificate Status Protocol (OSCP) capabilities. These can be their own book and I would instead recommend reading Bulletproof TLS and PKI by Ivan Ristic. In this post, I include the bare minimum to import a certificate and get started with IAM Roles Anywhere. As a side note, if you’re importing a certificate from a certificate authority managed outside of AWS, it should come with these capabilities as well.

It’s good practice to inspect the actual root-ca.crt that was returned to you.

openssl x509 -in root-ca.crt -text -noout

Note: If you want to inspect and compare the root-ca.crt with the certificate signing request root-ca.csr, you can use openssl req -text -noout -verify -in root-ca.csr.

What you look for in the following output are that fields such as Subject, Public-Key Algorithm, and the CA:TRUE flag are set and correspond to the configuration you passed in earlier. Additional things to look for are Issuer (yourself since it’s self-signed), and Key Usage (what the public key included in the certificate is allowed to be used for).

Certificate:
    Data:
        Version: 3 (0x2)
        Serial Number:
            95:77:30:1a:1b:bc:ce:70:f3:e7:ff:1c:12:d2:01:c7
        Signature Algorithm: sha256WithRSAEncryption
        Issuer: C = US, O = Any Company Corp, CN = internal.anycompany.com
        Validity
            Not Before: Jul 5 20:52:33 2023 GMT
            Not After : Jul 2 20:52:33 2033 GMT
        Subject: C = US, O = Any Company Corp, CN = internal.anycompany.com
        Subject Public Key Info:
            Public Key Algorithm: rsaEncryption
                Public-Key: (4096 bit)
                ...
        X509v3 extensions:
            X509v3 Basic Constraints: critical
                CA:TRUE
            X509v3 Key Usage: critical
                Certificate Sign
            ...
    Signature Algorithm: sha256WithRSAEncryption
    Signature Value:
        ...

Now why is this certificate especially important? This is your root certificate. When you’re asked “Does this certificate belong to your company?” this is the certificate that you must use in order to prove that it belongs to your company, including any certificates derived from this root certificate (remember, you can have a hierarchy) and also end-entity certificates (shown later). All certificates derived from this root certificate are cryptographically linked to it through a digital signing algorithm that combines hashing and encryption to sign the certificate (the example above uses sha256WithRSAEncryption).

With your root CA successfully set up, it’s time to integrate it with IAM Roles Anywhere.

Step 2: Set up IAM Roles Anywhere

Step 1: Set up a root certificate authority (root CA) was a prerequisite for using IAM Roles Anywhere. Remember, you set up all this infrastructure to eventually use it. In step 2, you start going through how to effectively use the root CA you set up to issue AWS credentials outside of the AWS ecosystem.

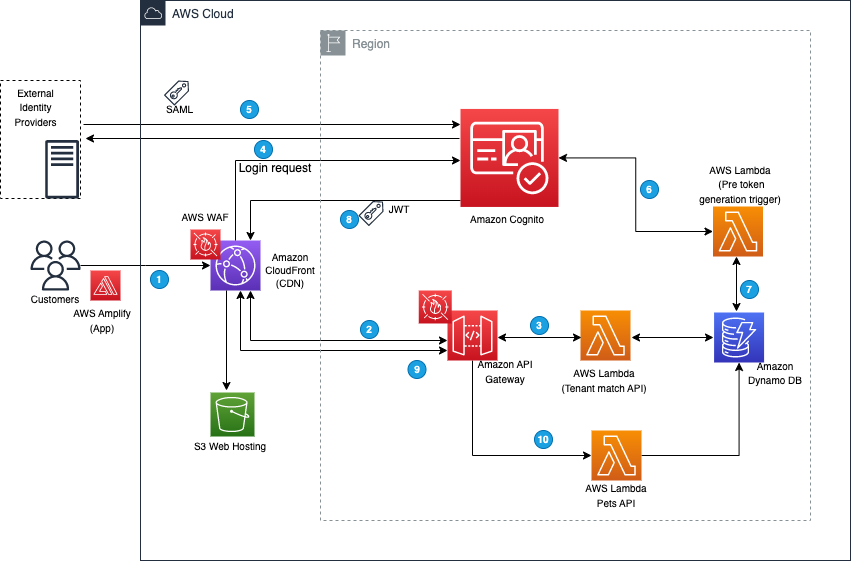
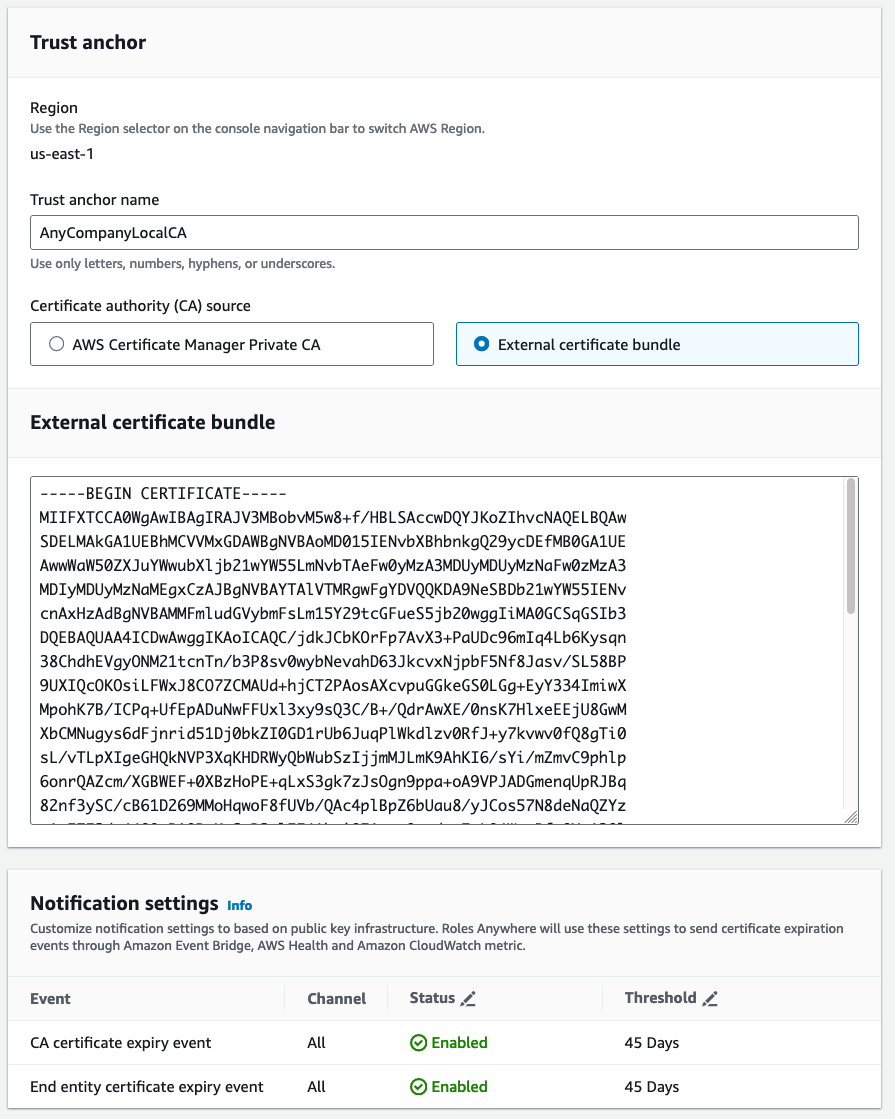
But before you do that, you must bind the IAM Roles Anywhere service to your private certificate authority (private CA). You do this by setting up a trust between the two. When you set up trust between two things, you’re essentially saying “I don’t have the information to verify this is a valid request, so I’m going to trust that the downstream component (in this case, your private CA) knows this information.” Another way of saying it is “if the private CA says it’s good, then it’s a valid request”. You can set up this trust with your newly created root CA by copying the encoded section of your root-ca.crt in the IAM Roles Anywhere console.

To set up the trust

  1. Go the the IAM Roles Anywhere console.
  2. Under External certificate bundle, paste the encoded section of your root-ca.crt.
  3. Submit the form.
tail -n 31 root-ca.crt
-----BEGIN CERTIFICATE-----
MIIFXTCCA0WgAwIBAgIRAJV3MBobvM5w8+f/HBLSAccwDQYJKoZIhvcNAQELBQAw
SDELMAkGA1UEBhMCVVMxGDAWBgNVBAoMD015IENvbXBhbnkgQ29ycDEfMB0GA1UE
...lines removed for brevitity
iCmHNvGCkBMBo08PLPuynuY69IJCdbjv6iudspBQDdu9aYNPF8BWR3dsTjPpsbOw
ef33wuHiCj4nH96wCrSmPoIUfc4UEp7eZiS0A9xHw8TkT5Uzyq9ZThSaTqBZfojD
zGtnpprPTg/lCHDmoTbGmrOp9ByWU3qQUK7ZtzxSjhjT
-----END CERTIFICATE-----
Figure 1: Use the console to set up a trust between IAM Roles Anywhere and the private CA

Figure 1: Use the console to set up a trust between IAM Roles Anywhere and the private CA

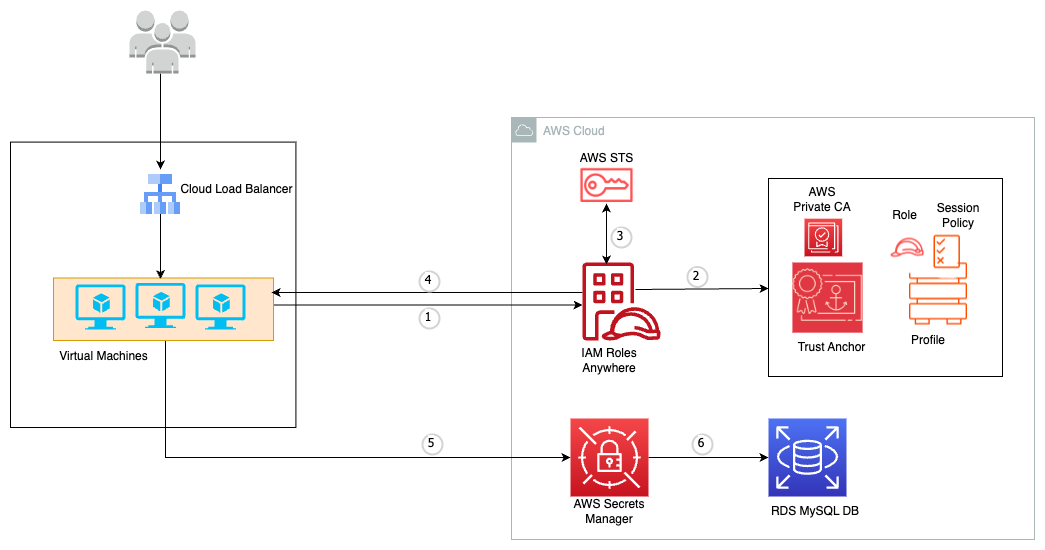
What you just set up is a trust anchor, which is a representation of your certificate authority inside of IAM Roles Anywhere. With this trust anchor in place, you can start tying in IAM roles to your authentication. Let’s start with something simple but practical, imagine an on-premises virtual machine (VM) that needs to have read access to Amazon Simple Storage Service (Amazon S3). Not only that, but it must have read only access to a specific folder in Amazon S3 and only that folder.

The first thing you need to do is create an IAM role that trusts IAM Roles Anywhere. But you need to be more specific than that. You need to create a role that trusts IAM Roles Anywhere only when the certificate presented to IAM Roles Anywhere contains the common name MyOnpremVM. If this is unclear, that’s okay, after you have all of the prerequisites set up, you’ll walk through the entire process step by step. The following is the trust section in an IAM policy that can be created in the IAM console.

{
    "Version": "2012-10-17",
    "Statement": [
        {
            "Effect": "Allow",
            "Principal": {
                "Service": [
                    "rolesanywhere.amazonaws.com"
                ]
            },
            "Action": [
              "sts:AssumeRole",
              "sts:TagSession",
              "sts:SetSourceIdentity"
            ],
            "Condition": {
              "ArnEquals": {
                "aws:SourceArn": [
                  "arn:aws:rolesanywhere:us-east-1:111222333444:trust-anchor/d5302884-5212-4f8d-9b17-24be63a5ae85"
                ]
              },
              "StringEquals": {
                "aws:PrincipalTag/x509Subject/CN": "MyOnpremVM"
              }
            }
        }
    ]
}

The second thing you need to create is the actual Amazon S3 permissions:

{
    "Version": "2012-10-17",
    "Statement": [
        {
            "Sid": "ListObjectsInBucket",
            "Effect": "Allow",
            "Action": "s3:ListBucket",
            "Resource": "arn:aws:s3:::DOC-EXAMPLE-BUCKET",
            "Condition": {
                "StringLike": {
                    "s3:prefix": [
                        "MyOnPremVM/*"
                    ]
                }
            }
        },
        {
            "Effect": "Allow",
            "Action": "s3:*",
            "Resource": [
                "arn:aws:s3:::DOC-EXAMPLE-BUCKET/MyOnPremVM",
                "arn:aws:s3:::DOC-EXAMPLE-BUCKET/MyOnPremVM/*"
            ]
        }
    ]
}

Note: There are other certificate fields you might want to key off as well. See Trust policy in the documentation for more examples.

The last thing to do before moving on is to tie a set of roles to a profile. You can think of it as a container of multiple possible roles with the ability to further restrict them using session policies. Note that you use the role ARN for the S3 role you just created.

aws rolesanywhere create-profile --name DefaultProfile --role-arns arn:aws:iam::111222333444:role/RolesAnywhereS3Role
{
    "profile": {
        "createdAt": "2023-05-01T22:29:36.088864+00:00",
        "createdBy": "arn:aws:sts::111222333444:assumed-role/<role-name>",
        "durationSeconds": 3600,
        "enabled": false,
        "name": "DefaultProfile",
        "profileArn": "arn:aws:rolesanywhere:us-east-1:111222333444:profile/2845dde5-9c82-480d-a6a6-f61240e42d4a",
        "profileId": "2845dde5-9c82-480d-a6a6-f61240e42d4a",
        "roleArns": [
            "arn:aws:iam::111222333444:role/RolesAnywhereS3"
        ],
        "updatedAt": "2023-05-01T22:29:36.088864+00:00"
    }
}

Profiles are created disabled by default, you can enable them later as needed. You could also enable a profile on creation by using the --enabled flag, but I want to highlight the ability to create it as disabled and then enabled it later for awareness. This becomes relevant in cases when you need to disable access, such as during a security event. Use the following command to enable the profile after creating it:

aws rolesanywhere enable-profile --profile-id 2845dde5-9c82-480d-a6a6-f61240e42d4a

Now that all your infrastructure is in place, it’s time to provision an end-entity certificate and assume the role you created earlier.

Creating an end-entity certificate

The first thing you must do is obtain an end-entity certificate. This is called end-entity because a certificate can have an entire chain of certificates that are linked together. The end-entity certificate is at the end of the chain, which commonly represents individual entities, and so the term end-entity certificate.

Similar to how you set up your root certificate, it’s mostly a two-step process. You first create a certificate signing request and then ask someone to sign it (or sign it yourself). You can create a certificate signing request for your on-premises VM with:

# Make your private key specific to your client machine
openssl genpkey -out client.key \
  -algorithm RSA \
  -pkeyopt rsa_keygen_bits:2048
  
# Using your newly generated private key make a certificate signing request
openssl req -new -key client.key -out client.csr

# You'll be presented an interactive session to enter details for the CSR
You are about to be asked to enter information that will be incorporated
into your certificate request.
What you are about to enter is what is called a Distinguished Name or a DN.
There are quite a few fields but you can leave some blank
For some fields there will be a default value,
If you enter '.', the field will be left blank.
-----
Country Name (2 letter code) [XX]:US
State or Province Name (full name) []:WA
Locality Name (eg, city) [Default City]:Seattle
Organization Name (eg, company) [Default Company Ltd]:Any Company Corp
Organizational Unit Name (eg, section) []:Sales
Common Name (eg, your name or your server's hostname) []:MyOnpremVM
Email Address []:

Please enter the following 'extra' attributes
to be sent with your certificate request
A challenge password []:
An optional company name []:

As always, let’s inspect the certificate we made.

openssl req -text -noout -verify -in client.csr

The client name (common name (CN) in the certificate) is what’s most important here, after all this is how we uniquely identify this specific VM.

Certificate Request:
    Data:
        Version: 0 (0x0)
        Subject: C=US, ST=WA, L=Seattle, O=Any Company Corp, OU=Sales, CN=MyOnpremVM
        Subject Public Key Info:
            Public Key Algorithm: rsaEncryption
                Public-Key: (4096 bit)
                Modulus:
                    00:ae:d0:ab:2d:20:2d:44:b5:36:ad:de:dd:23:ac:
                    ...32 lines removed for brevity
                    89:98:ef:b6:86:bf:c2:16:08:55:2d:5e:45:af:24:
                    17:45:cb
                Exponent: 65537 (0x10001)
        Attributes:
            a0:00
    Signature Algorithm: sha256WithRSAEncryption
         08:b4:86:66:14:1f:03:12:0b:36:15:42:2b:ae:56:7b:ba:99:
         ...27 lines removed for brevity
         00:bb:06:88:6b:c7:c2:53

Signing an end-entity certificate

Now that you have your certificate signing request, the certificate must be signed. Let’s have your private root CA that you created in Step 1 sign this certificate.

NOTE: You might have to move your root-ca.crt file into whatever $home is inside of your root-ca.conf file before running the following command.

openssl ca \
  -config root-ca.conf \
  -in client.csr \
  -out client.crt \
  -extensions client_ext

You’ll be asked to manually verify the certificate you’re about to sign. The key things you need to pay attention to for the purposes of IAM Roles Anywhere are:

  • Common Name because that’s how permissions and to what S3 bucket are decided.
  • Key usage specifies Digital Signature, and basic constraints specify CA:FALSE. Both are required to work with IAM Roles Anywhere.
Certificate:
    Data:
        Version: 1 (0x0)
        Serial Number:
            95:77:30:1a:1b:bc:ce:70:f3:e7:ff:1c:12:d2:01:c8
        Issuer:
            countryName               = US
            organizationName          = Any Company Corp
            commonName                = internal.anycompany.com
        Validity
            Not Before: Jul  6 14:46:49 2023 GMT
            Not After : Jul  3 14:46:49 2033 GMT
        Subject:
            countryName               = US
            stateOrProvinceName       = WA
            organizationName          = Any Company Corp
            organizationalUnitName    = Sales
            commonName = MyOnpremVM
        Subject Public Key Info:
            Public Key Algorithm: rsaEncryption
                Public-Key: (2048 bit)
                ...
        X509v3 extensions:
            ...
            X509v3 Basic Constraints: critical
                CA:FALSE
            X509v3 Key Usage: critical
                Digital Signature
            ...
Certificate is to be certified until Jul  3 14:46:49 2033 GMT (3650 days)
Sign the certificate? [y/n]:

After verification, you can commit the certificate to the local database and move on to the next step.

Swapping an end-entity certificate for AWS credentials

Now it’s time for the moment of truth. To review, you have:

  1. Created a local CA
  2. Uploaded the CA certificate into IAM Roles Anywhere and created a trust anchor
  3. Created an IAM role that trusts IAM Roles Anywhere, which in turn trusts your CA certificate
  4. Created an end-entity certificate for a specific server that has been signed by your CA

It’s time to swap this certificate for IAM credentials.

The API you call to swap credentials is CreateSession for IAM Roles Anywhere. This API serves as a wrapper around STS AssumeRole but requires that you pass in certificate information first. You, as the end user, don’t directly call this API. Instead, you use the IAM Roles Anywhere credential helper.

You can get the binary for this helper using the following example command (for Linux).

NOTE: The URL in the example uses version 1.0.4 of the credential helper as there isn’t a latest path. Verify that you’re getting the latest version using the table found inside of IAM roles anywhere documentation.

curl https://rolesanywhere.amazonaws.com/releases/1.0.4/X86_64/Linux/aws_signing_helper --output aws_signing_helper

Then use the credential helper tool to successfully swap for AWS credentials.

NOTE: You pass in the private key, but the private key doesn’t leave the host, it’s used to sign the request to CreateSession. See the signing process to learn more. The signing process is also why you use the credentials helper instead of making a call directly to CreateSession.

./aws_signing_helper credential-process \
  --certificate client.crt \
  --private-key client.key \
  --role-arn arn:aws:iam::111222333444:role/RolesanywhereS3Role \
  --trust-anchor-arn arn:aws:rolesanywhere:us-east-1:111222333444:trust-anchor/d5302884-5212-4f8d-9b17-24be63a5ae85
  --profile-arn arn:aws:rolesanywhere:us-east-1:111222333444:profile/e341077c-4ee6-48e8-8d05-d900eb26b367
{
 "Version":1,
 "AccessKeyId":"ASIAEXAMPLEID",
 "SecretAccessKey":"wWPZTXfKdp8UF6HDpfbTEboEXAMPLESECRETKEY",
 "SessionToken":"IQoJb3JpZ2luX2VjEK///EXAMPLESESSIONTOKEN",
 "Expiration":"2023-05-01T23:37:10Z"
}

You can write the command you just ran into your AWS Config file instead of manually parsing the JSON response into environment variables, or run the serve command to set up a local credential-serving endpoint that’s compatible with the AWS SDK and AWS Command Line Interface (AWS CLI).

./aws_signing_helper serve \
  --certificate client.crt \
  --private-key client.key \
  --role-arn arn:aws:iam::111222333444:role/RolesanywhereS3Role \
  --trust-anchor-arn arn:aws:rolesanywhere:us-east-1:111222333444:trust-anchor/d5302884-5212-4f8d-9b17-24be63a5ae85 \
  --profile-arn arn:aws:rolesanywhere:us-east-1:111222333444:profile/e341077c-4ee6-48e8-8d05-d900eb26b367 \
  & # Start the process in the background

Then export the AWS_EC2_METADATA_SERVICE_ENDPOINT environment variable to point the AWS SDKs and AWS CLI to a local mock EC2 metadata endpoint instead of the endpoint normally found inside EC2 instances.

export AWS_EC2_METADATA_SERVICE_ENDPOINT=http://127.0.0.1:9911/

Then finally, confirm that you assumed the right role with:

aws sts get-caller-identity
{
    "UserId": "AROARIEKBWA5HJMA7JDOJ:00bd58e6934d37bf2c3e19afb4c8cac58c",
    "Account": "111222333444",
    "Arn": "arn:aws:sts::111222333444:assumed-role/RolesAnywhereS3/00bd58e6934d37bf2c3e19afb4c8cac58c"
}

And from here, you can use the AWS CLI or SDKs to make calls into AWS with the permissions you set up. For example, test your permissions by writing an object to Amazon S3 at a location you should be able to write to and a location you shouldn’t be.

# Failure case
aws s3 cp client.crt s3://DOC-EXAMPLE-BUCKET/notme/client.crt
upload failed: ./client.crt to s3://DOC-EXAMPLE-BUCKET/notme/client.crt An error occurred (AccessDenied) when calling the PutObject operation: Access Denied
# Passing Case
aws s3 cp client.crt s3://DOC-EXAMPLE-BUCKET/MyOnPremVM/client.crt
upload: ./client.crt to s3://DOC-EXAMPLE-BUCKET/MyOnPremVM/client.crt

Conclusion

To summarize, I started off this blog post discussing core concepts related to public key infrastructure. I talked about the purpose of keys (being improbable to guess) and certificates (tying an identity to a key, among other important concepts such as digital signing). I then discussed and showed you how to create a local certificate authority (CA), then use that CA to vend out end-entity certificates. Finally, you learned how to establish a trust relationship between your CA and IAM Roles Anywhere to allow IAM Roles Anywhere to verify end-entity certificates and exchange them with AWS credentials.

I encourage you to explore any other openssl commands and scenarios you can imagine. For example, how would you use this information to handle two different fleets of VMs, each with their own unique set of permissions? Another avenue to explore would be using cfssl instead of openssl to create a CA or using a provider such as AWS Private Certificate Authority. You can use an AWS account to try AWS Private Certificate Authority with a 30-day trial. See AWS Private CA Pricing to learn more.

 
If you have feedback about this post, submit comments in the Comments section below. If you have questions about this post, contact AWS Support.

Want more AWS Security news? Follow us on Twitter.

Cody Penta

Cody Penta

Cody Penta is a Solutions Architect at Amazon Web Services and is based out of Charlotte, NC. He has a focus in security and CDK, and enjoys solving the really difficult problems in the technology world. Off the clock, he loves relaxing in the mountains, coding personal projects, and gaming.

AWS Security Profile: Liam Wadman, Senior Solutions Architect, AWS Identity

Post Syndicated from Maddie Bacon original https://aws.amazon.com/blogs/security/aws-security-profile-liam-wadman-sr-solutions-architect-aws-identity/

In the AWS Security Profile series, I interview some of the humans who work in AWS Security and help keep our customers safe and secure. In this profile, I interviewed Liam Wadman, Senior Solutions Architect for AWS Identity.

Pictured: Liam making quick informed decisions about risk and reward

Pictured: Liam making quick informed decisions about risk and reward


How long have you been at AWS and what do you do in your current role?

My first day was 1607328000 — for those who don’t speak fluent UTC, that’s December 2020. I’m a member of the Identity Solutions team. Our mission is to make it simpler for customers to implement access controls that protect their data in a straightforward and consistent manner across AWS services.

I spend a lot of time talking with security, identity, and cloud teams at some of our largest and most complex customers, understanding their problems, and working with teams across AWS to make sure that we’re building solutions that meet their diverse security requirements.

I’m a big fan of working with customers and fellow Amazonians on threat modeling and helping them make informed decisions about risks and the controls they put in place. It’s such a productive exercise because many people don’t have that clear model about what they’re protecting, and what they’re protecting it from.

When I work with AWS service teams, I advocate for making services that are simple to secure and simple for customers to configure. It’s not enough to offer only good security controls; the service should be simple to understand and straightforward to apply to meet customer expectations.
 

How did you get started in security? What about it piqued your interest?

I got started in security at a very young age: by circumventing network controls at my high school so that I could play Flash games circa 2004. Ever since then, I’ve had a passion for deeply understanding a system’s rules and how they can be bent or broken. I’ve been lucky enough to have a diverse set of experiences throughout my career, including working in a network operation center, security operation center, Linux and windows server administration, telephony, investigations, content delivery, perimeter security, and security architecture. I think having such a broad base of experience allows me to empathize with all the different people who are AWS customers on a day-to-day basis.

As I progressed through my career, I became very interested in the psychology of security and the mindsets of defenders, unauthorized users, and operators of computer systems. Security is about so much more than technology—it starts with people and processes.
 

How do you explain your job to non-technical friends and family?

I get to practice this question a lot! Very few of my family and friends work in tech.

I always start with something relatable to the person. I start with a website, mobile app, or product that they use, tell the story of how it uses AWS, then tie that in around how my team works to support many of the products they use in their everyday lives. You don’t have to look far into our customer success stories or AWS re:Invent presentations to see a product or company that’s meaningful to almost anyone you’d talk to.

I got to practice this very recently because the software used by my personal trainer is hosted on AWS. So when she asked what I actually do for a living, I was ready for her.
 

In your opinion, what’s the coolest thing happening in identity right now?

You left this question wide open, so I’m going to give you more than one answer.

First, outside of AWS, it’s the rise of ubiquitous, easy-to-use personal identity technology. I’m talking about products such as password managers, sign-in with Google or Apple, and passkeys. I’m excited to see the industry is finally offering services to consumers at no extra cost that you don’t need to be an expert to use and that will work on almost any device you sign in to. Everyday people can benefit from their use, and I have successfully converted many of the people I care about.

At AWS, it’s the work that we’re doing to enable data perimeters and provable security. We hear quite regularly from customers that data perimeters are super important to them, and they want to see us do more in that space and keep refining that journey. I’m all too happy to oblige. Provable security, while identity adjacent, is about getting real answers to questions such as “Can this resource be accessed publicly?” It’s making it simple for customers who don’t want to spend the time or money building the operational expertise to answer tough questions, and I think that’s incredible.
 

You presented at AWS re:Inforce 2023. What was your session about and what do you hope attendees took away from it?

My session was IAM336: Best practices for delegating access on IAM. I initially delivered this session at re:Inforce 2022, where customers gave it the highest overall rating for an identity session, so we brought it back for 2023! 

The talk dives deep into some AWS Identity and Access Management (IAM) primitives and provides a lot of candor on what we feel are best practices based on many of the real-world engagements I’ve had with customers. The top thing that I hope attendees learned is how they can safely empower their developers to have some self service and autonomy when working with IAM and help transform central teams from blockers to enablers.

I’m also presenting at re:Invent 2023 in November. I’ll be doing a chalk talk called Best practices for setting up AWS Organizations policies. We’re targeting it towards a more general audience, not just customers whose primary jobs are AWS security or identity. I’m excited about this presentation because I usually talk to a lot of customers who have very mature security and identity practices, and this is a great chance to get feedback from customers who do not.

I’d like to thank all the customers who attended the sessions over the years — the best part of AWS events is the customer interactions and fantastic discussions that we have.
 

Is there anything you wish customers would ask about more often?

I wish more customers would frame their problems within a threat model. Many customer engagements start with a specific problem, but it isn’t in the context of the risk this poses to their business, and often focuses too much on specific technical controls for very specific issues, rather than an outcome that they’re trying to arrive at or a risk that they’re trying to mitigate. I like to take a step back and work with the customer to frame the problem that they’re talking about in a bigger picture, then have a more productive conversation around how we can mitigate these risks and other considerations that they may not have thought of.
 

Where do you see the identity space heading in the future?

I think the industry is really getting ready for an identity renaissance as we start shifting towards more modern and Zero Trust architectures. I’m really excited to start seeing adoption of technologies such as token exchange to help applications avoid impersonating users to downstream systems, or mechanisms such as proof of possession to provide scalable ways to bind a given credential to a system that it’s intended to be used from.

On the AWS Identity side: More controls. Simpler. Scalable. Provable.
 

What are you most proud of in your career?

Getting involved with speaking at AWS: presenting at summits, re:Inforce, and re:Invent. It’s something I never would have seen myself doing before. I grew up with a pretty bad speech impediment that I’m always working against.

I think my proudest moment in particular is when I had customers come to my re:Invent session because they saw me at AWS Summits earlier in the year and liked what I did there. I get a little emotional thinking about it.

Being a speaker also allowed me to go to Disneyland for the first time last year before the Anaheim Summit, and that would have made 5-year-old Liam proud.
 

If you had to pick a career outside of tech, what would you want to do?

I think I’d certainly be involved in something in forestry, resource management, or conservation. I spend most of my free time in the forests of British Columbia. I’m a big believer in shinrin-yoku, and I believe in being a good steward of the land. We’ve only got one earth.

 
If you have feedback about this post, submit comments in the Comments section below. If you have questions about this post, contact AWS Support.

Want more AWS Security news? Follow us on Twitter.

Author

Maddie Bacon

Maddie (she/her) is a technical writer for Amazon Security with a passion for creating meaningful content that focuses on the human side of security and encourages a security-first mindset. She previously worked as a reporter and editor, and has a BA in mathematics. In her spare time, she enjoys reading, traveling, and staunchly defending the Oxford comma.

Liam Wadman

Liam Wadman

Liam is a Senior Solutions Architect with the Identity Solutions team. When he’s not building exciting solutions on AWS or helping customers, he’s often found in the hills of British Columbia on his mountain bike. Liam points out that you cannot spell LIAM without IAM.

Rotate Your SSL/TLS Certificates Now – Amazon RDS and Amazon Aurora Expire in 2024

Post Syndicated from Channy Yun original https://aws.amazon.com/blogs/aws/rotate-your-ssl-tls-certificates-now-amazon-rds-and-amazon-aurora-expire-in-2024/

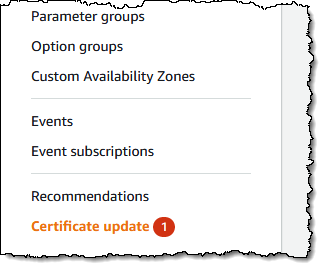
Don’t be surprised if you have seen the Certificate Update in the Amazon Relational Database Service (Amazon RDS) console.

If you use or plan to use Secure Sockets Layer (SSL) or Transport Layer Security (TLS) with certificate verification to connect to your database instances of Amazon RDS for MySQL, MariaDB, SQL Server, Oracle, PostgreSQL, and Amazon Aurora, it means you should rotate new certificate authority (CA) certificates in both your DB instances and application before the root certificate expires.

Most SSL/TLS certificates (rds-ca-2019) for your DB instances will expire in 2024 after the certificate update in 2020. In December 2022, we released new CA certificates that are valid for 40 years (rds-ca-rsa2048-g1) and 100 years (rds-ca-rsa4096-g1 and rds-ca-ecc384-g1). So, if you rotate your CA certificates, you don’t need to do It again for a long time.

Here is a list of affected Regions and their expiration dates of rds-ca-2019:

Expiration Date Regions
May 8, 2024 Middle East (Bahrain)
August 22, 2024 US East (Ohio), US East (N. Virginia), US West (N. California), US West (Oregon), Asia Pacific (Mumbai), Asia Pacific (Osaka), Asia Pacific (Seoul), Asia Pacific (Singapore), Asia Pacific (Sydney), Asia Pacific (Tokyo), Canada (Central), Europe (Frankfurt), Europe (Ireland), Europe (London), Europe (Milan), Europe (Paris), Europe (Stockholm), and South America (São Paulo)
September 9, 2024 China (Beijing), China (Ningxia)
October 26, 2024 Africa (Cape Town)
October 28, 2024 Europe (Milan)
Not affected until 2061 Asia Pacific (Hong Kong), Asia Pacific (Hyderabad), Asia Pacific (Jakarta), Asia Pacific (Melbourne), Europe (Spain), Europe (Zurich), Israel (Tel Aviv), Middle East (UAE), AWS GovCloud (US-East), and AWS GovCloud (US-West)

The following steps demonstrate how to rotate your certificates to maintain connectivity from your application to your database instances.

Step 1 – Identify your impacted Amazon RDS resources
As I said, you can identify the total number of affected DB instances in the Certificate update page of the Amazon RDS console and see all of your affected DB instances. Note: This page only shows the DB instances for the current Region. If you have DB instances in more than one Region, check the certificate update page in each Region to see all DB instances with old SSL/TLS certificates.

You can also use AWS Command Line Interface (AWS CLI) to call describe-db-instances to find instances that use the expiring CA. The query will show a list of RDS instances in your account and us-east-1 Region.

$ aws rds describe-db-instances --region us-east-1 | 
      jq -r '.DBInstances[] | 
      select ((.CACertificateIdentifier != "rds-ca-rsa2048-g1") and 
              (.CACertificateIdentifier != "rds-ca-rsa4096-g1") and 
              (.CACertificateIdentifier != "rds-ca-ecc384-g1")) | 
               "DBInstanceIdentifier: 
              (.DBInstanceIdentifier), CACertificateIdentifier: 
              (.CACertificateIdentifier)"'

Step 2 – Updating your database clients and applications
Before applying the new certificate on your DB instances, you should update the trust store of any clients and applications that use SSL/TLS and the server certificate to connect.  There’s currently no easy method from your DB instances themselves to determine if your applications require certificate verification as a prerequisite to connect. The only option here is to inspect your applications’ source code or configuration files.

Although the DB engine-specific documentation outlines what to look for in most common database connectivity interfaces, we strongly recommend you work with your application developers to determine whether certificate verification is used and the correct way to update the client applications’ SSL/TLS certificates for your specific applications.

To update certificates for your application, you can use the new certificate bundle that contains certificates for both the old and new CA so you can upgrade your application safely and maintain connectivity during the transition period.

For information about checking for SSL/TLS connections and updating applications for each DB engine, see the following topics:

Step 3 – Test CA rotation on a non-production RDS instance
If you have updated new certificates in all your trust stores, you should test with a RDS instance in non-production. Do this set up in a development environment with the same database engine and version as your production environment. This test environment should also be deployed with the same code and configurations as production.

To rotate a new certificate in your test database instance, choose Modify for the DB instance that you want to modify in the Amazon RDS console.

In the Connectivity section, choose rds-ca-rsa2048-g1.

Choose Continue to check the summary of modifications. If you want to apply the changes immediately, choose Apply immediately.

To use the AWS CLI to change the CA from rds-ca-2019 to rds-ca-rsa2048-g1 for a DB instance, call the modify-db-instance command and specify the DB instance identifier with the --ca-certificate-identifier option.

$ aws rds modify-db-instance \
          --db-instance-identifier <mydbinstance> \
          --ca-certificate-identifier rds-ca-rsa2048-g1 \
          --apply-immediately

This is the same way to rotate new certificates manually in the production database instances. Make sure your application reconnects without any issues using SSL/TLS after the rotation using the trust store or CA certificate bundle you referenced.

When you create a new DB instance, the default CA is still rds-ca-2019 until January 25, 2024, when it will be changed to rds-ca-rsa2048-g1. For setting the new CA to create a new DB instance, you can set up a CA override to ensure all new instance launches use the CA of your choice.

$ aws rds modify-certificates \
          --certificate-identifier rds-ca-rsa2048-g1 \
          --region <region name>

You should do this in all the Regions where you have RDS DB instances.

Step 4 – Safely update your production RDS instances
After you’ve completed testing in non production environment, you can start the rotation of your RDS databases CA certificates in your production environment. You can rotate your DB instance manually as shown in Step 3. It’s worth noting that many of the modern engines do not require a restart, but it’s still a good idea to schedule it in your maintenance window.

In the Certificate update page of Step 1, choose the DB instance you want to rotate. By choosing Schedule, you can schedule the certificate rotation for your next maintenance window. By choosing Apply now, you can apply the rotation immediately.

If you choose Schedule, you’re prompted to confirm the certificate rotation. This prompt also states the scheduled window for your update.

After your certificate is updated (either immediately or during the maintenance window), you should ensure that the database and the application continue to work as expected.

Most of modern DB engines do not require restarting your database to update the certificate. If you don’t want to restart the database just for CA update, you can use the --no-certificate-rotation-restart flag in the modify-db-instance command.

$ aws rds modify-db-instance \
          --db-instance-identifier <mydbinstance> \
          --ca-certificate-identifier rds-ca-rsa2048-g1 \
          --no-certificate-rotation-restart

To check if your engine requires a restart you can check the SupportsCertificateRotationWithoutRestart field in the output of the describe-db-engine-versions command. You can use this command to see which engines support rotations without restart:

$ aws rds describe-db-engine-versions \
          --engine <engine> --include-all --region <region> | 
          jq -r '.DBEngineVersions[] | 
          "EngineName: (.Engine), 
           EngineVersion: (.EngineVersion), 
           SupportsCertificateRotationWithoutRestart: (.SupportsCertificateRotationWithoutRestart), 
           SupportedCAs: ([.SupportedCACertificateIdentifiers | 
          join(", ")])"'

Even if you don’t use SSL/TLS for the database instances, I recommend to rotate your CA. You may need to use SSL/TLS in the future, and some database connectors like the JDBC and ODBC connectors check for a valid cert before connecting and using an expired CA can prevent you from doing that.

To learn about updating your certificate by modifying your DB instance manually, automatic server certificate rotation, and finding a sample script for importing certificates into your trust store, see the Amazon RDS User Guide or the Amazon Aurora User Guide.

Things to Know
Here are a couple of important things to know:

  • Amazon RDS Proxy and Amazon Aurora Serverless use certificates from the AWS Certificate Manager (ACM). If you’re using Amazon RDS Proxy when you rotate your SSL/TLS certificate, you don’t need to update applications that use Amazon RDS Proxy connections. If you’re using Aurora Serverless, rotating your SSL/TLS certificate isn’t required.
  • Now through January 25, 2024 – new RDS DB instances will have the rds-ca-2919 certificate by default, unless you specify a different CA via the ca-certificate-identifier option on the create-db-instance API; or you specify a default CA override for your account like mentioned in the above section. Starting January 26, 2024 – any new database instances will default to using the rds-ca-rsa2048-g1 certificate. If you wish for new instances to use a different certificate, you can specify which certificate to use with the AWS console or the AWS CLI. For more information, see the create-db-instance API documentation.
  • Except for Amazon RDS for SQL Server, most modern RDS and Aurora engines support certificate rotation without a database restart in the latest versions. Call describe-db-engine-versions and check for the response field SupportsCertificateRotationWithoutRestart. If this field is set to true, then your instance will not require a database restart for CA update. If set to false, a restart will be required. For more information, see Setting the CA for your database in the AWS documentation.
  • Your rotated CA signs the DB server certificate, which is installed on each DB instance. The DB server certificate identifies the DB instance as a trusted server. The validity of DB server certificate depends on the DB engine and version either 1 year or 3 year. If your CA supports automatic server certificate rotation, RDS automatically handles the rotation of the DB server certificate too. For more information about DB server certificate rotation, see Automatic server certificate rotation in the AWS documentation.
  • You can choose to use the 40-year validity certificate (rds-ca-rsa2048-g1) or the 100-year certificates. The expiring CA used by your RDS instance uses the RSA2048 key algorithm and SHA256 signing algorithm. The rds-ca-rsa2048-g1 uses the exact same configuration and therefore is best suited for compatibility. The 100-year certificates (rds-ca-rsa4096-g1 andrds-ca-ecc384-g1) use more secure encryption schemes than rds-ca-rsa2048-g1. If you want to use them, you should test well in pre-production environments to double-check that your database client and server support the necessary encryption schemes in your Region.

Just Do It Now!
Even if you have one year left until your certificate expires, you should start planning with your team. Updating SSL/TLS certificate may require restart your DB instance before the expiration date. We strongly recommend that you schedule your applications to be updated before the expiry date and run tests on a staging or pre-production database environment before completing these steps in a production environments. To learn more about updating SSL/TLS certificates, see Amazon RDS User Guide and Amazon Aurora User Guide.

If you don’t use SSL/TLS connections, please note that database security best practices are to use SSL/TLS connectivity and to request certificate verification as part of the connection authentication process. To learn more about using SSL/TLS to encrypt a connection to your DB instance, see Amazon RDS User Guide and Amazon Aurora User Guide.

If you have questions or issues, contact your usual AWS Support by your Support plan.

Channy

Securing generative AI: An introduction to the Generative AI Security Scoping Matrix

Post Syndicated from Matt Saner original https://aws.amazon.com/blogs/security/securing-generative-ai-an-introduction-to-the-generative-ai-security-scoping-matrix/

Generative artificial intelligence (generative AI) has captured the imagination of organizations and is transforming the customer experience in industries of every size across the globe. This leap in AI capability, fueled by multi-billion-parameter large language models (LLMs) and transformer neural networks, has opened the door to new productivity improvements, creative capabilities, and more.

As organizations evaluate and adopt generative AI for their employees and customers, cybersecurity practitioners must assess the risks, governance, and controls for this evolving technology at a rapid pace. As security leaders working with the largest, most complex customers at Amazon Web Services (AWS), we’re regularly consulted on trends, best practices, and the rapidly evolving landscape of generative AI and the associated security and privacy implications. In that spirit, we’d like to share key strategies that you can use to accelerate your own generative AI security journey.

This post, the first in a series on securing generative AI, establishes a mental model that will help you approach the risk and security implications based on the type of generative AI workload you are deploying. We then highlight key considerations for security leaders and practitioners to prioritize when securing generative AI workloads. Follow-on posts will dive deep into developing generative AI solutions that meet customers’ security requirements, best practices for threat modeling generative AI applications, approaches for evaluating compliance and privacy considerations, and will explore ways to use generative AI to improve your own cybersecurity operations.

Where to start

As with any emerging technology, a strong grounding in the foundations of that technology is critical to helping you understand the associated scopes, risks, security, and compliance requirements. To learn more about the foundations of generative AI, we recommend that you start by reading more about what generative AI is, its unique terminologies and nuances, and exploring examples of how organizations are using it to innovate for their customers.

If you’re just starting to explore or adopt generative AI, you might imagine that an entirely new security discipline will be required. While there are unique security considerations, the good news is that generative AI workloads are, at their core, another data-driven computing workload, and they inherit much of the same security regimen. The fact is, if you’ve invested in cloud cybersecurity best practices over the years and embraced prescriptive advice from sources like Steve’s top 10, the Security Pillar of the Well-Architected Framework, and the Well-Architected Machine Learning Lens, you’re well on your way!

Core security disciplines, like identity and access management, data protection, privacy and compliance, application security, and threat modeling are still critically important for generative AI workloads, just as they are for any other workload. For example, if your generative AI application is accessing a database, you’ll need to know what the data classification of the database is, how to protect that data, how to monitor for threats, and how to manage access. But beyond emphasizing long-standing security practices, it’s crucial to understand the unique risks and additional security considerations that generative AI workloads bring. This post highlights several security factors, both new and familiar, for you to consider.

With that in mind, let’s discuss the first step: scoping.

Determine your scope

Your organization has made the decision to move forward with a generative AI solution; now what do you do as a security leader or practitioner? As with any security effort, you must understand the scope of what you’re tasked with securing. Depending on your use case, you might choose a managed service where the service provider takes more responsibility for the management of the service and model, or you might choose to build your own service and model.

Let’s look at how you might use various generative AI solutions in the AWS Cloud. At AWS, security is a top priority, and we believe providing customers with the right tool for the job is critical. For example, you can use the serverless, API-driven Amazon Bedrock with simple-to-consume, pre-trained foundation models (FMs) provided by AI21 Labs, Anthropic, Cohere, Meta, stability.ai, and Amazon TitanAmazon SageMaker JumpStart provides you with additional flexibility while still using pre-trained FMs, helping you to accelerate your AI journey securely. You can also build and train your own models on Amazon SageMaker. Maybe you plan to use a consumer generative AI application through a web interface or API such as a chatbot or generative AI features embedded into a commercial enterprise application your organization has procured. Each of these service offerings has different infrastructure, software, access, and data models and, as such, will result in different security considerations. To establish consistency, we’ve grouped these service offerings into logical categorizations, which we’ve named scopes.

In order to help simplify your security scoping efforts, we’ve created a matrix that conveniently summarizes key security disciplines that you should consider, depending on which generative AI solution you select. We call this the Generative AI Security Scoping Matrix, shown in Figure 1.

The first step is to determine which scope your use case fits into. The scopes are numbered 1–5, representing least ownership to greatest ownership.

Buying generative AI:

  • Scope 1: Consumer app – Your business consumes a public third-party generative AI service, either at no-cost or paid. At this scope you don’t own or see the training data or the model, and you cannot modify or augment it. You invoke APIs or directly use the application according to the terms of service of the provider.
    Example: An employee interacts with a generative AI chat application to generate ideas for an upcoming marketing campaign.
  • Scope 2: Enterprise app – Your business uses a third-party enterprise application that has generative AI features embedded within, and a business relationship is established between your organization and the vendor.
    Example: You use a third-party enterprise scheduling application that has a generative AI capability embedded within to help draft meeting agendas.

Building generative AI:

  • Scope 3: Pre-trained models – Your business builds its own application using an existing third-party generative AI foundation model. You directly integrate it with your workload through an application programming interface (API).
    Example: You build an application to create a customer support chatbot that uses the Anthropic Claude foundation model through Amazon Bedrock APIs.
  • Scope 4: Fine-tuned models – Your business refines an existing third-party generative AI foundation model by fine-tuning it with data specific to your business, generating a new, enhanced model that’s specialized to your workload.
    Example: Using an API to access a foundation model, you build an application for your marketing teams that enables them to build marketing materials that are specific to your products and services.
  • Scope 5: Self-trained models – Your business builds and trains a generative AI model from scratch using data that you own or acquire. You own every aspect of the model.
    Example: Your business wants to create a model trained exclusively on deep, industry-specific data to license to companies in that industry, creating a completely novel LLM.

In the Generative AI Security Scoping Matrix, we identify five security disciplines that span the different types of generative AI solutions. The unique requirements of each security discipline can vary depending on the scope of the generative AI application. By determining which generative AI scope is being deployed, security teams can quickly prioritize focus and assess the scope of each security discipline.

Let’s explore each security discipline and consider how scoping affects security requirements.

  • Governance and compliance – The policies, procedures, and reporting needed to empower the business while minimizing risk.
  • Legal and privacy – The specific regulatory, legal, and privacy requirements for using or creating generative AI solutions.
  • Risk management – Identification of potential threats to generative AI solutions and recommended mitigations.
  • Controls – The implementation of security controls that are used to mitigate risk.
  • Resilience – How to architect generative AI solutions to maintain availability and meet business SLAs.

Throughout our Securing Generative AI blog series, we’ll be referring to the Generative AI Security Scoping Matrix to help you understand how various security requirements and recommendations can change depending on the scope of your AI deployment. We encourage you to adopt and reference the Generative AI Security Scoping Matrix in your own internal processes, such as procurement, evaluation, and security architecture scoping.

What to prioritize

Your workload is scoped and now you need to enable your business to move forward fast, yet securely. Let’s explore a few examples of opportunities you should prioritize.

Governance and compliance plus Legal and privacy

With consumer off-the-shelf apps (Scope 1) and enterprise off-the-shelf apps (Scope 2), you must pay special attention to the terms of service, licensing, data sovereignty, and other legal disclosures. Outline important considerations regarding your organization’s data management requirements, and if your organization has legal and procurement departments, be sure to work closely with them. Assess how these requirements apply to a Scope 1 or 2 application. Data governance is critical, and an existing strong data governance strategy can be leveraged and extended to generative AI workloads. Outline your organization’s risk appetite and the security posture you want to achieve for Scope 1 and 2 applications and implement policies that specify that only appropriate data types and data classifications should be used. For example, you might choose to create a policy that prohibits the use of personal identifiable information (PII), confidential, or proprietary data when using Scope 1 applications.

If a third-party model has all the data and functionality that you need, Scope 1 and Scope 2 applications might fit your requirements. However, if it’s important to summarize, correlate, and parse through your own business data, generate new insights, or automate repetitive tasks, you’ll need to deploy an application from Scope 3, 4, or 5. For example, your organization might choose to use a pre-trained model (Scope 3). Maybe you want to take it a step further and create a version of a third-party model such as Amazon Titan with your organization’s data included, known as fine-tuning (Scope 4). Or you might create an entirely new first-party model from scratch, trained with data you supply (Scope 5).

In Scopes 3, 4, and 5, your data can be used in the training or fine-tuning of the model, or as part of the output. You must understand the data classification and data type of the assets the solution will have access to. Scope 3 solutions might use a filtering mechanism on data provided through Retrieval Augmented Generation (RAG) with the help from Agents for Amazon Bedrock, for example, as an input to a prompt. RAG offers you an alternative to training or fine-tuning by querying your data as part of the prompt. This then augments the context for the LLM to provide a completion and response that can use your business data as part of the response, rather than directly embedding your data in the model itself through fine-tuning or training. See Figure 3 for an example data flow diagram demonstrating how customer data could be used in a generative AI prompt and response through RAG.

In scopes 4 and 5, on the other hand, you must classify the modified model for the most sensitive level of data classification used to fine-tune or train the model. Your model would then mirror the data classification on the data it was trained against. For example, if you supply PII in the fine-tuning or training of a model, then the new model will contain PII. Currently, there are no mechanisms for easily filtering the model’s output based on authorization, and a user could potentially retrieve data they wouldn’t otherwise be authorized to see. Consider this a key takeaway; your application can be built around your model to implement filtering controls on your business data as part of a RAG data flow, which can provide additional data security granularity without placing your sensitive data directly within the model.

From a legal perspective, it’s important to understand both the service provider’s end-user license agreement (EULA), terms of services (TOS), and any other contractual agreements necessary to use their service across Scopes 1 through 4. For Scope 5, your legal teams should provide their own contractual terms of service for any external use of your models. Also, for Scope 3 and Scope 4, be sure to validate both the service provider’s legal terms for the use of their service, as well as the model provider’s legal terms for the use of their model within that service.

Additionally, consider the privacy concerns if the European Union’s General Data Protection Regulation (GDPR) “right to erasure” or “right to be forgotten” requirements are applicable to your business. Carefully consider the impact of training or fine-tuning your models with data that you might need to delete upon request. The only fully effective way to remove data from a model is to delete the data from the training set and train a new version of the model. This isn’t practical when the data deletion is a fraction of the total training data and can be very costly depending on the size of your model.

Risk management

While AI-enabled applications can act, look, and feel like non-AI-enabled applications, the free-form nature of interacting with an LLM mandates additional scrutiny and guardrails. It is important to identify what risks apply to your generative AI workloads, and how to begin to mitigate them.

There are many ways to identify risks, but two common mechanisms are risk assessments and threat modeling. For Scopes 1 and 2, you’re assessing the risk of the third-party providers to understand the risks that might originate in their service, and how they mitigate or manage the risks they’re responsible for. Likewise, you must understand what your risk management responsibilities are as a consumer of that service.

For Scopes 3, 4, and 5—implement threat modeling—while we will dive deep into specific threats and how to threat-model generative AI applications in a future blog post, let’s give an example of a threat unique to LLMs. Threat actors might use a technique such as prompt injection: a carefully crafted input that causes an LLM to respond in unexpected or undesired ways. This threat can be used to extract features (features are characteristics or properties of data used to train a machine learning (ML) model), defame, gain access to internal systems, and more. In recent months, NIST, MITRE, and OWASP have published guidance for securing AI and LLM solutions. In both the MITRE and OWASP published approaches, prompt injection (model evasion) is the first threat listed. Prompt injection threats might sound new, but will be familiar to many cybersecurity professionals. It’s essentially an evolution of injection attacks, such as SQL injection, JSON or XML injection, or command-line injection, that many practitioners are accustomed to addressing.

Emerging threat vectors for generative AI workloads create a new frontier for threat modeling and overall risk management practices. As mentioned, your existing cybersecurity practices will apply here as well, but you must adapt to account for unique threats in this space. Partnering deeply with development teams and other key stakeholders who are creating generative AI applications within your organization will be required to understand the nuances, adequately model the threats, and define best practices.

Controls

Controls help us enforce compliance, policy, and security requirements in order to mitigate risk. Let’s dive into an example of a prioritized security control: identity and access management. To set some context, during inference (the process of a model generating an output, based on an input) first- or third-party foundation models (Scopes 3–5) are immutable. The API to a model accepts an input and returns an output. Models are versioned and, after release, are static. On its own, the model itself is incapable of storing new data, adjusting results over time, or incorporating external data sources directly. Without the intervention of data processing capabilities that reside outside of the model, the model will not store new data or mutate.

Both modern databases and foundation models have a notion of using the identity of the entity making a query. Traditional databases can have table-level, row-level, column-level, or even element-level security controls. Foundation models, on the other hand, don’t currently allow for fine-grained access to specific embeddings they might contain. In LLMs, embeddings are the mathematical representations created by the model during training to represent each object—such as words, sounds, and graphics—and help describe an object’s context and relationship to other objects. An entity is either permitted to access the full model and the inference it produces or nothing at all. It cannot restrict access at the level of specific embeddings in a vector database. In other words, with today’s technology, when you grant an entity access directly to a model, you are granting it permission to all the data that model was trained on. When accessed, information flows in two directions: prompts and contexts flow from the user through the application to the model, and a completion returns from the model back through the application providing an inference response to the user. When you authorize access to a model, you’re implicitly authorizing both of these data flows to occur, and either or both of these data flows might contain confidential data.

For example, imagine your business has built an application on top of Amazon Bedrock at Scope 4, where you’ve fine-tuned a foundation model, or Scope 5 where you’ve trained a model on your own business data. An AWS Identity and Access Management (IAM) policy grants your application permissions to invoke a specific model. The policy cannot limit access to subsets of data within the model. For IAM, when interacting with a model directly, you’re limited to model access.

{
	"Version": "2012-10-17",
	"Statement": {
		"Sid": "AllowInference",
		"Effect": "Allow",
		"Action": [
			"bedrock:InvokeModel"
		],
		"Resource": "arn:aws:bedrock:*::<foundation-model>/<model-id-of-model-to-allow>
	}
}

What could you do to implement least privilege in this case? In most scenarios, an application layer will invoke the Amazon Bedrock endpoint to interact with a model. This front-end application can use an identity solution, such as Amazon Cognito or AWS IAM Identity Center, to authenticate and authorize users, and limit specific actions and access to certain data accordingly based on roles, attributes, and user communities. For example, the application could select a model based on the authorization of the user. Or perhaps your application uses RAG by querying external data sources to provide just-in-time data for generative AI responses, using services such as Amazon Kendra or Amazon OpenSearch Serverless. In that case, you would use an authorization layer to filter access to specific content based on the role and entitlements of the user. As you can see, identity and access management principles are the same as any other application your organization develops, but you must account for the unique capabilities and architectural considerations of your generative AI workloads.

Resilience

Finally, availability is a key component of security as called out in the C.I.A. triad. Building resilient applications is critical to meeting your organization’s availability and business continuity requirements. For Scope 1 and 2, you should understand how the provider’s availability aligns to your organization’s needs and expectations. Carefully consider how disruptions might impact your business should the underlying model, API, or presentation layer become unavailable. Additionally, consider how complex prompts and completions might impact usage quotas, or what billing impacts the application might have.

For Scopes 3, 4, and 5, make sure that you set appropriate timeouts to account for complex prompts and completions. You might also want to look at prompt input size for allocated character limits defined by your model. Also consider existing best practices for resilient designs such as backoff and retries and circuit breaker patterns to achieve the desired user experience. When using vector databases, having a high availability configuration and disaster recovery plan is recommended to be resilient against different failure modes.

Instance flexibility for both inference and training model pipelines are important architectural considerations in addition to potentially reserving or pre-provisioning compute for highly critical workloads. When using managed services like Amazon Bedrock or SageMaker, you must validate AWS Region availability and feature parity when implementing a multi-Region deployment strategy. Similarly, for multi-Region support of Scope 4 and 5 workloads, you must account for the availability of your fine-tuning or training data across Regions. If you use SageMaker to train a model in Scope 5, use checkpoints to save progress as you train your model. This will allow you to resume training from the last saved checkpoint if necessary.

Be sure to review and implement existing application resilience best practices established in the AWS Resilience Hub and within the Reliability Pillar and Operational Excellence Pillar of the Well Architected Framework.

Conclusion

In this post, we outlined how well-established cloud security principles provide a solid foundation for securing generative AI solutions. While you will use many existing security practices and patterns, you must also learn the fundamentals of generative AI and the unique threats and security considerations that must be addressed. Use the Generative AI Security Scoping Matrix to help determine the scope of your generative AI workloads and the associated security dimensions that apply. With your scope determined, you can then prioritize solving for your critical security requirements to enable the secure use of generative AI workloads by your business.

Please join us as we continue to explore these and additional security topics in our upcoming posts in the Securing Generative AI series.

If you have feedback about this post, submit comments in the Comments section below. If you have questions about this post, contact AWS Support.

Want more AWS Security news? Follow us on Twitter.

Matt Saner

Matt Saner

Matt is a Senior Manager leading security specialists at AWS. He and his team help the world’s largest and most complex organizations solve critical security challenges, and help security teams become enablers for their business. Before joining AWS, Matt spent nearly two decades working in the financial services industry, solving various technology, security, risk, and compliance challenges. He highly values life-long learning (security is never static) and holds a Masters in Cybersecurity from NYU. For fun, he’s a pilot who enjoys flying general aviation airplanes.

Mike Lapidakis

Mike Lapidakis

Mike leads the AWS Industries Specialist SA team, comprised of the Security and Compliance, Migration and Modernization, Networking, and Resilience domains. The team helps the largest customers on earth establish a strong foundation to transform their businesses through technical enablement, education, customer advocacy, and executive alignment. Mike has helped organizations modernize on the cloud for over a decade in various architecture and consulting roles.

AWS announces Cloud Companion Guide for the CSA Cyber Trust mark

Post Syndicated from Kimberly Dickson original https://aws.amazon.com/blogs/security/aws-announces-cloud-companion-guide-for-the-csa-cyber-trust-mark/

Amazon Web Services (AWS) is excited to announce the release of a new Cloud Companion Guide to help customers prepare for the Cyber Trust mark developed by the Cyber Security Agency of Singapore (CSA).

The Cloud Companion Guide to the CSA’s Cyber Trust mark provides guidance and a mapping of AWS services and features to applicable domains of the mark. It aims to provide customers with an understanding of which AWS services and tools they can use to help fulfill the requirements set out in the Cyber Trust mark.

The Cyber Trust mark aims to guide organizations to understand their risk profiles and identify relevant cybersecurity preparedness areas required to mitigate these risks. It also serves as a mark of distinction for organizations to show that they have put in place good cybersecurity practices and measures that are commensurate with their cybersecurity risk profile.

The guide does not cover compliance topics such as physical and maintenance controls, or organization-specific requirements such as policies and human resources controls. This makes the guide lightweight and focused on security considerations for AWS services. For a full list of AWS compliance programs, see the AWS Compliance Center.

We hope that organizations of all sizes can use the Cloud Companion Guide for Cyber Trust to implement AWS specific security services and tools to help them achieve effective controls. By understanding which security services and tools are available on AWS, and which controls are applicable to them, customers can build secure workloads and applications on AWS.

“At AWS, security is our top priority, and we remain committed to helping our Singapore customers enhance their cloud security posture, and engender trust from our customers’ end-users,” said Joel Garcia, Head of Technology, ASEAN, “The Cloud Security Companion Guide is one way we work with government agencies such as the Cyber Security Agency of Singapore to do so. Customers who implement these steps can secure their cloud environments better, mitigate risks, and achieve effective controls to build secure workloads on AWS.”

If you have questions or want to learn more, contact your account representative, or leave a comment below.

Want more AWS Security news? Follow us on Twitter.

Kimberly Dickson

Kimberly Dickson

Kimberly is a Security Specialist Solutions Architect at AWS based in Singapore. She is passionate about working with customers on technical security solutions that help them build confidence and operate securely in the cloud.

Leo da Silva

Leo da Silva

Leo is a Principal Security Solutions Architect at AWS who helps customers better utilize cloud services and technologies securely. Over the years, Leo has had the opportunity to work in large, complex environments, designing, architecting, and implementing highly scalable and secure solutions for global companies. He is passionate about football, BBQ, and Jiu Jitsu—the Brazilian version of them all.

Now available: Building a scalable vulnerability management program on AWS

Post Syndicated from Anna McAbee original https://aws.amazon.com/blogs/security/now-available-how-to-build-a-scalable-vulnerability-management-program-on-aws/

Vulnerability findings in a cloud environment can come from a variety of tools and scans depending on the underlying technology you’re using. Without processes in place to handle these findings, they can begin to mount, often leading to thousands to tens of thousands of findings in a short amount of time. We’re excited to announce the Building a scalable vulnerability management program on AWS guide, which includes how you can build a structured vulnerability management program, operationalize tooling, and scale your processes to handle a large number of findings from diverse sources.

Building a scalable vulnerability management program on AWS focuses on the fundamentals of building a cloud vulnerability management program, including traditional software and network vulnerabilities and cloud configuration risks. The guide covers how to build a successful and scalable vulnerability management program on AWS through preparation, enabling and configuring tools, triaging findings, and reporting.

Targeted outcomes

This guide can help you and your organization with the following:

  • Develop policies to streamline vulnerability management and maintain accountability.
  • Establish mechanisms to extend the responsibility of security to your application teams.
  • Configure relevant AWS services according to best practices for scalable vulnerability management.
  • Identify patterns for routing security findings to support a shared responsibility model.
  • Establish mechanisms to report on and iterate on your vulnerability management program.
  • Improve security finding visibility and help improve overall security posture.

Using the new guide

We encourage you to read the entire guide before taking action or building a list of changes to implement. After you read the guide, assess your current state compared to the action items and check off the items that you’ve already completed in the Next steps table. This will help you assess the current state of your AWS vulnerability management program. Then, plan short-term and long-term roadmaps based on your gaps, desired state, resources, and business needs. Building a cloud vulnerability management program often involves iteration, so you should prioritize key items and regularly revisit your backlog to keep up with technology changes and your business requirements.

Further information

For more information and to get started, see the Building a scalable vulnerability management program on AWS.

We greatly value feedback and contributions from our community. To share your thoughts and insights about the guide, your experience using it, and what you want to see in future versions, select Provide feedback at the bottom of any page in the guide and complete the form.

 
If you have feedback about this post, submit comments in the Comments section below. If you have questions about this post, contact AWS Support.

Want more AWS Security news? Follow us on Twitter.

Author

Anna McAbee

Anna is a Security Specialist Solutions Architect focused on threat detection and incident response at AWS. Before AWS, she worked as an AWS customer in financial services on both the offensive and defensive sides of security. Outside of work, Anna enjoys cheering on the Florida Gators football team, wine tasting, and traveling the world.

Author

Megan O’Neil

Megan is a Principal Security Specialist Solutions Architect focused on Threat Detection and Incident Response. Megan and her team enable AWS customers to implement sophisticated, scalable, and secure solutions that solve their business challenges. Outside of work, Megan loves to explore Colorado, including mountain biking, skiing, and hiking.

New whitepaper available: Charting a path to stronger security with Zero Trust

Post Syndicated from Quint Van Deman original https://aws.amazon.com/blogs/security/new-whitepaper-available-charting-a-path-to-stronger-security-with-zero-trust/

Security is a top priority for organizations looking to keep pace with a changing threat landscape and build customer trust. However, the traditional approach of defined security perimeters that separate trusted from untrusted network zones has proven to be inadequate as hybrid work models accelerate digital transformation.

Today’s distributed enterprise requires a new approach to ensuring the right levels of security and accessibility for systems and data. Security experts increasingly recommend Zero Trust as the solution, but security teams can get confused when Zero Trust is presented as a product, rather than as a security model. We’re excited to share a whitepaper we recently authored with SANS Institute called Zero Trust: Charting a Path To Stronger Security, which addresses common misconceptions and explores Zero Trust opportunities.

Gartner predicts that by 2025, over 60% of organizations will embrace Zero Trust as a starting place for security.

The whitepaper includes context and analysis that can help you move past Zero Trust marketing hype and learn about these key considerations for implementing a successful Zero Trust strategy:

  • Zero Trust definition and guiding principles
  • Six foundational capabilities to establish
  • Four fallacies to avoid
  • Six Zero Trust use cases
  • Metrics for measuring Zero Trust ROI

The journey to Zero Trust is an iterative process that is different for every organization. We encourage you to download the whitepaper, and gain insight into how you can chart a path to a multi-layered security strategy that adapts to the modern environment and meaningfully improves your technical and business outcomes. We look forward to your feedback and to continuing the journey together.

If you have feedback about this post, submit comments in the Comments section below.

Want more AWS Security news? Follow us on Twitter.

Author

Quint Van Deman

Quint is a Principal within the Office of the CISO at AWS, based in Virginia. He works to increase the scope and impact of the AWS CISO externally through customer executive engagement and outreach, supporting secure cloud adoption. Internally, he focuses on collaborating with AWS service teams as they address customer security challenges and uphold AWS security standards.

Author

Mark Ryland

Mark is a Director of Security at Amazon, based in Virginia. He has over 30 years of experience in the technology industry and has served in leadership roles in cybersecurity, software engineering, distributed systems, technology standardization, and public policy. An AWS veteran of over 12 years, he started as the Director of Solution Architecture and Professional Services for the AWS World Public Sector team, and more recently founded and led the AWS Office of the CISO.

Use SAML with Amazon Cognito to support a multi-tenant application with a single user pool

Post Syndicated from Neela Kulkarni original https://aws.amazon.com/blogs/security/use-saml-with-amazon-cognito-to-support-a-multi-tenant-application-with-a-single-user-pool/

Amazon Cognito is a customer identity and access management solution that scales to millions of users. With Cognito, you have four ways to secure multi-tenant applications: user pools, application clients, groups, or custom attributes. In an earlier blog post titled Role-based access control using Amazon Cognito and an external identity provider, you learned how to configure Cognito authentication and authorization with a single tenant. In this post, you will learn to configure Cognito with a single user pool for multiple tenants to securely access a business-to-business application by using SAML custom attributes. With custom-attribute–based multi-tenancy, you can store tenant identification data like tenantName as a custom attribute in a user’s profile and pass it to your application. You can then handle multi-tenancy logic in your application and backend services. With this approach, you can use a unified sign-up and sign-in experience for your users. To identify the user’s tenant, your application can use the tenantName custom attribute.

One Cognito user pool for multiple customers

Customers like the simplicity of using a single Cognito user pool for their multi-customer application. With this approach, your customers will use the same URL to access the application. You will set up each new customer by configuring SAML 2.0 integration with the customer’s external identity provider (IdP). Your customers can control access to your application by using an external identity store, such as Google Workspace, Okta, or Active Directory Federation Service (AD FS), in which they can create, manage, and revoke access for their users.

After SAML integration is configured, Cognito returns a JSON web token (JWT) to the frontend during the user authentication process. This JWT contains attributes your application can use for authorization and access control. The token contains claims about the identity of the authenticated user, such as name and email. You can use this identity information inside your application. You can also configure Cognito to add custom attributes to the JWT, such as tenantName.

In this post, we demonstrate the approach of keeping a mapping between a user’s email domain and tenant name in an Amazon DynamoDB table. The DynamoDB table will have an emailDomain field as a key and a corresponding tenantName field.

Cognito architecture

To illustrate how this works, we’ll start with a demo application that was introduced in the earlier blog post. The demo application is implemented by using Amazon Cognito, AWS Amplify, Amazon API Gateway, AWS Lambda, Amazon DynamoDB, Amazon Simple Storage Service (Amazon S3), and Amazon CloudFront to achieve a serverless architecture. This architecture is shown in Figure 1.

Figure 1: Demo application architecture

Figure 1: Demo application architecture

The workflow that happens when you access the web application for the first time using your browser is as follows (the numbered steps correspond to the numbered labels in the diagram):

  1. The client-side/frontend of the application prompts you to enter the email that you want to use to sign in to the application.
  2. The application invokes the Tenant Match API action through API Gateway, which, in turn, calls the Lambda function that takes the email address as an input and queries it against the DynamoDB table with the email domain. Figure 2 shows the data stored in DynamoDB, which includes the tenant name and IdP ID. You can add additional flexibility to this solution by adding web client IDs or custom redirect URLs. For the purpose of this example, we are using the same redirect URL for all tenants (the client application).
    Figure 2: DynamoDB tenant table

    Figure 2: DynamoDB tenant table

  3. If a matching record is found, the Lambda function returns the record to the AWS Amplify frontend application.
  4. The client application uses the IdP ID from the response and passes it to Cognito for federated login. Cognito then reroutes the login request to the corresponding IdP. The AWS Amplify frontend application then redirects the browser to the IdP.
  5. At the IdP sign-in page, you sign in with a valid user account (for example, [email protected] or [email protected]). After you sign in successfully, a SAML response is sent back from the IdP to Cognito.

    You can review the SAML content by using the instructions in How to view a SAML response in your browser for troubleshooting, as shown in Figure 3.

    Figure 3: SAML content

    Figure 3: SAML content

  6. Cognito handles the SAML response and maps the SAML attributes to a just-in-time user profile. The SAML groups attributes is mapped to a custom user pool attribute named custom:groups.
  7. To identify the tenant, additional attributes are populated in the JWT. After successful authentication, a PreTokenGeneration Lambda function is invoked, which reads the mapped custom:groups attribute value from SAML, parses it, and converts it to an array. After that, the function parses the email address and captures the domain name. It then queries the DynamoDB table for the tenantName name by using the email domain name. Finally, the function sets the custom:domainName and custom:tenantName attributes in the JWT, as shown following.
    "email": "[email protected]" ( Standard existing profile attribute )
    New attributes:
    "cognito:groups": [.                           
    "pet-app-users",
    "pet-app-admin"
    ],
    "custom:tenantName": "AnyCompany"
    "custom:domainName": "anycompany.com"

    This attribute conversion is optional and demonstrates how you can use a PreTokenGeneration Lambda invocation to customize your JWT token claims, mapping the IdP groups to the attributes your application recognizes. You can also use this invocation to make additional authorization decisions. For example, if user is a member of multiple groups, you may choose to map only one of them.

  8. Amazon Cognito returns the JWT tokens to the AWS Amplify frontend application. The Amplify client library stores the tokens and handles refreshes. This token is used to make calls to protected APIs in Amazon API Gateway.
  9. API Gateway uses a Cognito user pools authorizer to validate the JWT’s signature and expiration. If this is successful, API Gateway passes the JWT to the application’s Lambda function (also referred to as the backend).
  10. The backend application code reads the cognito:groups claim from the JWT and decides if the action is allowed. If the user is a member of the right group, then the action is allowed; otherwise the action is denied.

Implement the solution

You can implement this example application by using an AWS CloudFormation template to provision your cloud application and AWS resources.

To deploy the demo application described in this post, you need the following prerequisites:

  1. An AWS account.
  2. Familiarity with navigating the AWS Management Console or AWS CLI.
  3. Familiarity with deploying CloudFormation templates.

To deploy the template

  • Choose the following Launch Stack button to launch a CloudFormation stack in your account.

    Select this image to open a link that starts building the CloudFormation stack

    Note: The stack will launch in the N. Virginia (us-east-1) Region. To deploy this solution into other AWS Regions, download the solution’s CloudFormation template from GitHub, modify it, and deploy it to the selected Region.

The stack creates a Cognito user pool called ExternalIdPDemoPoolXXXX in the AWS Region that you have specified. The CloudFormation Outputs field contains a list of values that you will need for further configuration.

IdP configuration

The next step is to configure your IdP. Each IdP has its own procedure for configuration, but there are some common steps you need to follow.

To configure your IdP

  1. Provide the IdP with the values for the following two properties:
    • Single sign on URL / Assertion Consumer Service URL / ACS URL (for this example, https://<CognitoDomainURL>/saml2/idpresponse)
    • Audience URI / SP Entity ID / Entity ID: (For this example, urn:amazon:cognito:sp:<yourUserPoolID>)
  2. Configure the field mapping for the SAML response in the IdP. Map the first name, last name, email, and groups (as a multi-value attribute) into SAML response attributes with the names firstName, lastName, email, and groups, respectively.
    • Recommended: Filter the mapped groups to only those that are relevant to the application (for example, by a prefix filter). There is a 2,048-character limit on the custom attribute, so filtering helps avoid exceeding the character limit, and also helps avoid passing irrelevant information to the application.
  3. In each IdP, create two demo groups called pet-app-users and pet-app-admins, and create two demo users, for example, [email protected] and [email protected], and then assign one to each group, respectively.

To illustrate, we set up three different IdPs to represent three different tenants. Use the following links for instructions on how to configure each IdP:

You will need the metadata URL or file from each IdP, because you will use this to configure your user pool integration. For more information, see Integrating third-party SAML identity providers with Amazon Cognito user pools.

Cognito configuration

After your IdPs are configured and your CloudFormation stack is deployed, you can configure Cognito.

To configure Cognito

  1. Use your browser to navigate to the Cognito console, and for User pool name, select the Cognito user pool.
    Figure 4: Select the Cognito user pool

    Figure 4: Select the Cognito user pool

  2. On the Sign-in experience screen, on the Federated identity provider sign-in tab, choose Add identity provider.
  3. Choose SAML for the sign-in option, and then enter the values for your IdP. You can either upload the metadata XML file or provide the metadata endpoint URL. Add mapping for the attributes as shown in Figure 5.
    Figure 5: Attribute mappings for the IdP

    Figure 5: Attribute mappings for the IdP

    Upon completion you will see the new IdP displayed as shown in Figure 6.

    Figure 6: List of federated IdPs

    Figure 6: List of federated IdPs

  4. On the App integration tab, select the app client that was created by the CloudFormation template.
    Figure 7: Select the app client

    Figure 7: Select the app client

  5. Under Hosted UI, choose Edit. Under Identity providers, select the Identity Providers that you want to set up for federated login, and save the change.
    Figure 8: Select identity providers

    Figure 8: Select identity providers

API gateway

The example application uses a serverless backend. There are two API operations defined in this example, as shown in Figure 9. One operation gets tenant details and the other is the /pets API operation, which fetches information on pets based on user identity. The TenantMatch API operation will be run when you sign in with your email address. The operation passes your email address to the backend Lambda function.

Figure 9: Example APIs

Figure 9: Example APIs

Lambda functions

You will see three Lambda functions deployed in the example application, as shown in Figure 10.

Figure 10: Lambda functions

Figure 10: Lambda functions

The first one is GetTenantInfo, which is used for the TenantMatch API operation. It reads the data from the TenantTable based on the email domain and passes the record back to the application. The second function is PreTokenGeneration, which reads the mapped custom:groups attribute value, parses it, converts it to an array, and then stores it in the cognito:groups claim. The second Lambda function is invoked by the Cognito user pool after sign-in is successful. In order to customize the mapping, you can edit the Lambda function’s code in the index.js file and redeploy. The third Lambda function is added to support the Pets API operation.

DynamoDB tables

You will see three DynamoDB tables deployed in the example application, as shown in Figure 11.

Figure 11: DynamoDB tables

Figure 11: DynamoDB tables

The TenantTable table holds the tenant details where you must add the mapping between the customer domain and the IdP ID setup in Cognito. This approach can be expanded to add more flexibility in case you want to add custom redirect URLs or Cognito app IDs for each tenant. You must create entries to correspond to the IdPs you have configured, as shown in Figure 12.

Figure 12: Tenant IdP mappings table

Figure 12: Tenant IdP mappings table

In addition to TenantTable, there is the ExternalIdPDemo-ItemsTable table, which holds the data related to the Pets application, based on user identity. There is also ExternalIdPDemo-UsersTable, which holds user details like the username, last forced sign-out time, and TTL required for the application to manage the user session.

You can now sign in to the example application through each IdP by navigating to the application URL found in the CloudFormation Outputs section, as shown in Figure 13.

Figure 13: Cognito sign-in screen

Figure 13: Cognito sign-in screen

You will be redirected to the IdP, as shown in Figure 14.

Figure 14: Google Workspace sign-in screen

Figure 14: Google Workspace sign-in screen

The AWS Amplify frontend application parses the JWT to identify the tenant name and provide authorization based on group membership, as shown in Figure 15.

Figure 15: Application home screen upon successful sign-in

Figure 15: Application home screen upon successful sign-in

If a different user logs in with a different role, the AWS Amplify frontend application provides authorization based on specific content of the JWT.

Conclusion

You can integrate your application with your customer’s IdP of choice for authentication and authorization and map information from the IdP to the application. By using Amazon Cognito, you can normalize the structure of the JWT token that is used for this process, so that you can add multiple IdPs, each for a different tenant, through a single Cognito user pool. You can do all this without changing application code. The native integration of Amazon API Gateway with the Cognito user pools authorizer streamlines your validation of the JWT integrity, and after the JWT has been validated, you can use it to make authorization decisions in your application’s backend. By following the example in this post, you can focus on what differentiates your application, and let AWS do the undifferentiated heavy lifting of identity management for your customer-facing applications.

For the code examples described in this post, see the amazon-cognito-example-for-multi-tenant code repository on GitHub. To learn more about using Cognito with external IdPs, see the Amazon Cognito documentation. You can also learn to build software as a service (SaaS) application architectures on AWS. If you have any questions about Cognito or any other AWS services, you may post them to AWS re:Post.

If you have feedback about this post, submit comments in the Comments section below. If you have questions about this post, start a new thread on the AWS Security, Identity, & Compliance re:Post or contact AWS Support.

Want more AWS Security news? Follow us on Twitter.

Ray Zaman

Ray Zaman

A Principal Solutions Architect with AWS, Ray has over 30 years of experience helping customers in finance, healthcare, insurance, manufacturing, media, petrochemical, pharmaceutical, public utility, retail, semiconductor, telecommunications, and waste management industries build technology solutions.

Neela Kulkarni

Neela Kulkarni

Neela is a Solutions Architect with Amazon Web Services. She primarily serves independent software vendors in the Northeast US, providing architectural guidance and best practice recommendations for new and existing workloads. Outside of work, she enjoys traveling, swimming, and spending time with her family.

Yuri Duchovny

Yuri Duchovny

Yuri is a New York–based Solutions Architect specializing in cloud security, identity, and compliance. He supports cloud transformations at large enterprises, helping them make optimal technology and organizational decisions. Prior to his AWS role, Yuri’s areas of focus included application and networking security, DoS, and fraud protection. Outside of work, he enjoys skiing, sailing, and traveling the world.

Abdul Qadir

Abdul Qadir

Abdul is an AWS Solutions Architect based in New Jersey. He works with independent software vendors in the Northeast US and helps customers build well-architected solutions on the AWS Cloud platform.

How AWS protects customers from DDoS events

Post Syndicated from Tom Scholl original https://aws.amazon.com/blogs/security/how-aws-protects-customers-from-ddos-events/

At Amazon Web Services (AWS), security is our top priority. Security is deeply embedded into our culture, processes, and systems; it permeates everything we do. What does this mean for you? We believe customers can benefit from learning more about what AWS is doing to prevent and mitigate customer-impacting security events.

Since late August 2023, AWS has detected and been protecting customer applications from a new type of distributed denial of service (DDoS) event. DDoS events attempt to disrupt the availability of a targeted system, such as a website or application, reducing the performance for legitimate users. Examples of DDoS events include HTTP request floods, reflection/amplification attacks, and packet floods. The DDoS events AWS detected were a type of HTTP/2 request flood, which occurs when a high volume of illegitimate web requests overwhelms a web server’s ability to respond to legitimate client requests.

Between August 28 and August 29, 2023, proactive monitoring by AWS detected an unusual spike in HTTP/2 requests to Amazon CloudFront, peaking at over 155 million requests per second (RPS). Within minutes, AWS determined the nature of this unusual activity and found that CloudFront had automatically mitigated a new type of HTTP request flood DDoS event, now called an HTTP/2 rapid reset attack. Over those two days, AWS observed and mitigated over a dozen HTTP/2 rapid reset events, and through the month of September, continued to see this new type of HTTP/2 request flood. AWS customers who had built DDoS-resilient architectures with services like Amazon CloudFront and AWS Shield were able to protect their applications’ availability.

Figure 1: Global HTTP requests per second, September 13 – 16

Figure 1. Global HTTP requests per second, September 13 – 16

Overview of HTTP/2 rapid reset attacks

HTTP/2 allows for multiple distinct logical connections to be multiplexed over a single HTTP session. This is a change from HTTP 1.x, in which each HTTP session was logically distinct. HTTP/2 rapid reset attacks consist of multiple HTTP/2 connections with requests and resets in rapid succession. For example, a series of requests for multiple streams will be transmitted followed up by a reset for each of those requests. The targeted system will parse and act upon each request, generating logs for a request that is then reset, or cancelled, by a client. The system performs work generating those logs even though it doesn’t have to send any data back to a client. A bad actor can abuse this process by issuing a massive volume of HTTP/2 requests, which can overwhelm the targeted system, such as a website or application.

Keep in mind that HTTP/2 rapid reset attacks are just a new type of HTTP request flood. To defend against these sorts of DDoS attacks, you can implement an architecture that helps you specifically detect unwanted requests as well as scale to absorb and block those malicious HTTP requests.

Building DDoS resilient architectures

As an AWS customer, you benefit from both the security built into the global cloud infrastructure of AWS as well as our commitment to continuously improve the security, efficiency, and resiliency of AWS services. For prescriptive guidance on how to improve DDoS resiliency, AWS has built tools such as the AWS Best Practices for DDoS Resiliency. It describes a DDoS-resilient reference architecture as a guide to help you protect your application’s availability. While several built-in forms of DDoS mitigation are included automatically with AWS services, your DDoS resilience can be improved by using an AWS architecture with specific services and by implementing additional best practices for each part of the network flow between users and your application.

For example, you can use AWS services that operate from edge locations, such as Amazon CloudFront, AWS Shield, Amazon Route 53, and Route 53 Application Recovery Controller to build comprehensive availability protection against known infrastructure layer attacks. These services can improve the DDoS resilience of your application when serving any type of application traffic from edge locations distributed around the world. Your application can be on-premises or in AWS when you use these AWS services to help you prevent unnecessary requests reaching your origin servers. As a best practice, you can run your applications on AWS to get the additional benefit of reducing the exposure of your application endpoints to DDoS attacks and to protect your application’s availability and optimize the performance of your application for legitimate users. You can use Amazon CloudFront (and its HTTP caching capability), AWS WAF, and Shield Advanced automatic application layer protection to help prevent unnecessary requests reaching your origin during application layer DDoS attacks.

Putting our knowledge to work for AWS customers

AWS remains vigilant, working to help prevent security issues from causing disruption to your business. We believe it’s important to share not only how our services are designed, but also how our engineers take deep, proactive ownership of every aspect of our services. As we work to defend our infrastructure and your data, we look for ways to help protect you automatically. Whenever possible, AWS Security and its systems disrupt threats where that action will be most impactful; often, this work happens largely behind the scenes. We work to mitigate threats by combining our global-scale threat intelligence and engineering expertise to help make our services more resilient against malicious activities. We’re constantly looking around corners to improve the efficiency and security of services including the protocols we use in our services, such as Amazon CloudFront, as well as AWS security tools like AWS WAF, AWS Shield, and Amazon Route 53 Resolver DNS Firewall.

In addition, our work extends security protections and improvements far beyond the bounds of AWS itself. AWS regularly works with the wider community, such as computer emergency response teams (CERT), internet service providers (ISP), domain registrars, or government agencies, so that they can help disrupt an identified threat. We also work closely with the security community, other cloud providers, content delivery networks (CDNs), and collaborating businesses around the world to isolate and take down threat actors. For example, in the first quarter of 2023, we stopped over 1.3 million botnet-driven DDoS attacks, and we traced back and worked with external parties to dismantle the sources of 230 thousand L7/HTTP DDoS attacks. The effectiveness of our mitigation strategies relies heavily on our ability to quickly capture, analyze, and act on threat intelligence. By taking these steps, AWS is going beyond just typical DDoS defense, and moving our protection beyond our borders. To learn more behind this effort, please read How AWS threat intelligence deters threat actors.

 
If you have feedback about this post, submit comments in the Comments section below. If you have questions about this post, contact AWS Support.

Want more AWS Security news? Follow us on Twitter.

Tom Scholl

Mark Ryland

Mark is the director of the Office of the CISO for AWS. He has over 30 years of experience in the technology industry, and has served in leadership roles in cybersecurity, software engineering, distributed systems, technology standardization, and public policy. Previously, he served as the Director of Solution Architecture and Professional Services for the AWS World Public Sector team.

Tom Scholl

Tom Scholl

Tom is Vice President and Distinguished Engineer at AWS.

Delegating permission set management and account assignment in AWS IAM Identity Center

Post Syndicated from Jake Barker original https://aws.amazon.com/blogs/security/delegating-permission-set-management-and-account-assignment-in-aws-iam-identity-center/

In this blog post, we look at how you can use AWS IAM Identity Center (successor to AWS Single Sign-On) to delegate the management of permission sets and account assignments. Delegating the day-to-day administration of user identities and entitlements allows teams to move faster and reduces the burden on your central identity administrators.

IAM Identity Center helps you securely create or connect your workforce identities and manage their access centrally across AWS accounts and applications. Identity Center requires accounts to be managed by AWS Organizations. Administration of Identity Center can be delegated to a member account (an account other than the management account). We recommend that you delegate Identity Center administration to limit who has access to the management account and use the management account only for tasks that require the management account.

Delegated administration is different from the delegation of permission sets and account assignments, which this blog covers. For more information on delegated administration, see Getting started with AWS IAM Identity Center delegated administration. The patterns in this blog post work whether Identity Center is delegated to a member account or remains in the management account.

Permission sets are used to define the level of access that users or groups have to an AWS account. Permission sets can contain AWS managed policies, customer managed policies, inline policies, and permissions boundaries.

Solution overview

As your organization grows, you might want to start delegating permissions management and account assignment to give your teams more autonomy and reduce the burden on your identity team. Alternatively, you might have different business units or customers, operating out of their own organizational units (OUs), that want more control over their own identity management.

In this scenario, an example organization has three developer teams: Red, Blue, and Yellow. Each of the teams operate out of its own OU. IAM Identity Center has been delegated from the management account to the Identity Account. Figure 1 shows the structure of the example organization.

Figure 1: The structure of the organization in the example scenario

Figure 1: The structure of the organization in the example scenario

The organization in this scenario has an existing collection of permission sets. They want to delegate the management of permission sets and account assignments away from their central identity management team.

  • The Red team wants to be able to assign the existing permission sets to accounts in its OU. This is an accounts-based model.
  • The Blue team wants to edit and use a single permission set and then assign that set to the team’s single account. This is a permission-based model.
  • The Yellow team wants to create, edit, and use a permission set tagged with Team: Yellow and then assign that set to all of the accounts in its OU. This is a tag-based model.

We’ll look at the permission sets needed for these three use cases.

Note: If you’re using the AWS Management Console, additional permissions are required.

Use case 1: Accounts-based model

In this use case, the Red team is given permission to assign existing permission sets to the three accounts in its OU. This will also include permissions to remove account assignments.

Using this model, an organization can create generic permission sets that can be assigned to its AWS accounts. It helps reduce complexity for the delegated administrators and verifies that they are using permission sets that follow the organization’s best practices. These permission sets restrict access based on services and features within those services, rather than specific resources.

{
  "Version": "2012-10-17",
  "Statement": [
    {
        "Effect": "Allow",
        "Action": [
            "sso:CreateAccountAssignment",
            "sso:DeleteAccountAssignment",
            "sso:ProvisionPermissionSet"
        ],
        "Resource": [
            "arn:aws:sso:::instance/ssoins-<sso-ins-id>",
            "arn:aws:sso:::permissionSet/ssoins-<sso-ins-id>/*",
            "arn:aws:sso:::account/112233445566",
            "arn:aws:sso:::account/223344556677",
            "arn:aws:sso:::account/334455667788"

        ]
    }
  ]
}

In the preceding policy, the principal can assign existing permission sets to the three AWS accounts with the IDs 112233445566, 223344556677 and 334455667788. This includes administration permission sets, so carefully consider which accounts you allow the permission sets to be assigned to.

The arn:aws:sso:::instance/ssoins-<sso-ins-id> is the IAM Identity Center instance ID ARN. It can be found using either the AWS Command Line Interface (AWS CLI) v2 with the list-instances API or the AWS Management Console.

Use the AWS CLI

Use the AWS Command Line Interface (AWS CLI) to run the following command:

aws sso-admin list-instances

You can also use AWS CloudShell to run the command.

Use the AWS Management Console

Use the Management Console to navigate to the IAM Identity Center in your AWS Region and then select Choose your identity source on the dashboard.

Figure 2: The IAM Identity Center instance ID ARN in the console

Figure 2: The IAM Identity Center instance ID ARN in the console

Use case 2: Permission-based model

For this example, the Blue team is given permission to edit one or more specific permission sets and then assign those permission sets to a single account. The following permissions allow the team to use managed and inline policies.

This model allows the delegated administrator to use fine-grained permissions on a specific AWS account. It’s useful when the team wants total control over the permissions in its AWS account, including the ability to create additional roles with administrative permissions. In these cases, the permissions are often better managed by the team that operates the account because it has a better understanding of the services and workloads.

Granting complete control over permissions can lead to unintended or undesired outcomes. Permission sets are still subject to IAM evaluation and authorization, which means that service control policies (SCPs) can be used to deny specific actions.

{
  "Version": "2012-10-17",
  "Statement": [
    {
        "Effect": "Allow",
        "Action": [
            "sso:AttachCustomerManagedPolicyReferenceToPermissionSet",
            "sso:AttachManagedPolicyToPermissionSet",
            "sso:CreateAccountAssignment",
            "sso:DeleteAccountAssignment",
            "sso:DeleteInlinePolicyFromPermissionSet",
            "sso:DetachCustomerManagedPolicyReferenceFromPermissionSet",
            "sso:DetachManagedPolicyFromPermissionSet",
            "sso:ProvisionPermissionSet",
            "sso:PutInlinePolicyToPermissionSet",
            "sso:UpdatePermissionSet"
        ],
        "Resource": [
            "arn:aws:sso:::instance/ssoins-<sso-ins-id>",
            "arn:aws:sso:::permissionSet/ssoins-<sso-ins-id>/ps-1122334455667788",
            "arn:aws:sso:::account/445566778899"
        ]
    }
  ]
}

Here, the principal can edit the permission set arn:aws:sso:::permissionSet/ssoins-<sso-ins-id>/ps-1122334455667788 and assign it to the AWS account 445566778899. The editing rights include customer managed policies, AWS managed policies, and inline policies.

If you want to use the preceding policy, replace the missing and example resource values with your own IAM Identity Center instance ID and account numbers.

In the preceding policy, the arn:aws:sso:::permissionSet/ssoins-<sso-ins-id>/ps-1122334455667788 is the permission set ARN. You can find this ARN through the console, or by using the AWS CLI command to list all of the permission sets:

aws sso-admin list-permission-sets --instance-arn <instance arn from above>

This permission set can also be applied to multiple accounts—similar to the first use case—by adding additional account IDs to the list of resources. Likewise, additional permission sets can be added so that the user can edit multiple permission sets and assign them to a set of accounts.

Use case 3: Tag-based model

For this example, the Yellow team is given permission to create, edit, and use permission sets tagged with Team: Yellow. Then they can assign those tagged permission sets to all of their accounts.

This example can be used by an organization to allow a team to freely create and edit permission sets and then assign them to the team’s accounts. It uses tagging as a mechanism to control which permission sets can be created and edited. Permission sets without the correct tag cannot be altered.

{
    "Version": "2012-10-17",
    "Statement": [
        {
            "Effect": "Allow",
            "Action": [
                "sso:CreatePermissionSet",
                "sso:DescribePermissionSet",
                "sso:UpdatePermissionSet",
                "sso:DeletePermissionSet",
                "sso:DescribePermissionSetProvisioningStatus",
                "sso:DescribeAccountAssignmentCreationStatus",
                "sso:DescribeAccountAssignmentDeletionStatus",
                "sso:TagResource"
            ],
            "Resource": [
                "arn:aws:sso:::instance/ssoins-<sso-ins-id>"
            ]
        },
        {
            "Effect": "Allow",
            "Action": [
                "sso:DescribePermissionSet",
                "sso:UpdatePermissionSet",
                "sso:DeletePermissionSet"
                	
            ],
            "Resource": "arn:aws:sso:::permissionSet/ssoins-<sso-ins-id>/*",
            "Condition": {
                "StringEquals": {
                    "aws:ResourceTag/Team": "Yellow"
                }
            }
        },
        {
            "Effect": "Allow",
            "Action": [
                "sso:CreatePermissionSet"
            ],
            "Resource": "arn:aws:sso:::permissionSet/ssoins-<sso-ins-id>/*",
            "Condition": {
                "StringEquals": {
                    "aws:RequestTag/Team": "Yellow"
                }
            }
        },
        {
            "Effect": "Allow",
            "Action": "sso:TagResource",
            "Resource": "arn:aws:sso:::permissionSet/ssoins-<sso-ins-id>/*",
            "Condition": {
                "StringEquals": {
                    "aws:ResourceTag/Team": "Yellow",
                    "aws:RequestTag/Team": "Yellow"
                }
            }
        },
        {
            "Effect": "Allow",
            "Action": [
                "sso:CreateAccountAssignment",
                "sso:DeleteAccountAssignment",
                "sso:ProvisionPermissionSet"
            ],
            "Resource": [
                "arn:aws:sso:::instance/ssoins-<sso-ins-id>",
                "arn:aws:sso:::account/556677889900",
                "arn:aws:sso:::account/667788990011",
                "arn:aws:sso:::account/778899001122"
            ]
        },
        {
            "Sid": "InlinePolicy",
            "Effect": "Allow",
            "Action": [
                "sso:GetInlinePolicyForPermissionSet",
                "sso:PutInlinePolicyToPermissionSet",
                "sso:DeleteInlinePolicyFromPermissionSet"
            ],
            "Resource": [
                "arn:aws:sso:::instance/ssoins-<sso-ins-id>"
            ]
        },
        {
            "Sid": "InlinePolicyABAC",
            "Effect": "Allow",
            "Action": [
                "sso:GetInlinePolicyForPermissionSet",
                "sso:PutInlinePolicyToPermissionSet",
                "sso:DeleteInlinePolicyFromPermissionSet"
            ],
            "Resource": "arn:aws:sso:::permissionSet/ssoins-<sso-ins-id>/*",
            "Condition": {
                "StringEquals": {
                    "aws:ResourceTag/Team": "Yellow"
                }
            }
        }
    ]
}

In the preceding policy, the principal is allowed to create new permission sets only with the tag Team: Yellow, and assign only permission sets tagged with Team: Yellow to the AWS accounts with ID 556677889900, 667788990011, and 778899001122.

The principal can only edit the inline policies of the permission sets tagged with Team: Yellow and cannot change the tags of the permission sets that are already tagged for another team.

If you want to use this policy, replace the missing and example resource values with your own IAM Identity Center instance ID, tags, and account numbers.

Note: The policy above assumes that there are no additional statements applying to the principal. If you require additional allow statements, verify that the resulting policy doesn’t create a risk of privilege escalation. You can review Controlling access to AWS resources using tags for additional information.

This policy only allows the delegation of permission sets using inline policies. Customer managed policies are IAM policies that are deployed to and are unique to each AWS account. When you create a permission set with a customer managed policy, you must create an IAM policy with the same name and path in each AWS account where IAM Identity Center assigns the permission set. If the IAM policy doesn’t exist, Identity Center won’t make the account assignment. For more information on how to use customer managed policies with Identity Center, see How to use customer managed policies in AWS IAM Identity Center for advanced use cases.

You can extend the policy to allow the delegation of customer managed policies with these two statements:

{
    "Sid": "CustomerManagedPolicy",
    "Effect": "Allow",
    "Action": [
        "sso:ListCustomerManagedPolicyReferencesInPermissionSet",
        "sso:AttachCustomerManagedPolicyReferenceToPermissionSet",
        "sso:DetachCustomerManagedPolicyReferenceFromPermissionSet"
    ],
    "Resource": [
        "arn:aws:sso:::instance/ssoins-<sso-ins-id>"
    ]
},
{
    "Sid": "CustomerManagedABAC",
    "Effect": "Allow",
    "Action": [
        "sso:ListCustomerManagedPolicyReferencesInPermissionSet",
        "sso:AttachCustomerManagedPolicyReferenceToPermissionSet",
        "sso:DetachCustomerManagedPolicyReferenceFromPermissionSet"
    ],
    "Resource": "arn:aws:sso:::permissionSet/ssoins-<sso-ins-id>/*",
    "Condition": {
        "StringEquals": {
            "aws:ResourceTag/Team": "Yellow"
        }
    }
}

Note: Both statements are required, as only the resource type PermissionSet supports the condition key aws:ResourceTag/${TagKey}, and the actions listed require access to both the Instance and PermissionSet resource type. See Actions, resources, and condition keys for AWS IAM Identity Center for more information.

Best practices

Here are some best practices to consider when delegating management of permission sets and account assignments:

  • Assign permissions to edit specific permission sets. Allowing roles to edit every permission set could allow that role to edit their own permission set.
  • Only allow administrators to manage groups. Users with rights to edit group membership could add themselves to any group, including a group reserved for organization administrators.

If you’re using IAM Identity Center in a delegated account, you should also be aware of the best practices for delegated administration.

Summary

Organizations can empower teams by delegating the management of permission sets and account assignments in IAM Identity Center. Delegating these actions can allow teams to move faster and reduce the burden on the central identity management team.

The scenario and examples share delegation concepts that can be combined and scaled up within your organization. If you have feedback about this blog post, submit comments in the Comments section. If you have questions, start a new thread on AWS Re:Post with the Identity Center tag.

Want more AWS Security news? Follow us on Twitter.

Jake Barker

Jake Barker

Jake is a Senior Security Consultant with AWS Professional Services. He loves making security accessible to customers and eating great pizza.

Roberto Migli

Roberto Migli

Roberto is a Principal Solutions Architect at AWS. Roberto supports global financial services customers, focusing on security and identity and access management. In his free time he enjoys building electronics gadgets and spending time with his family.

PCI DSS v4.0 on AWS Compliance Guide now available

Post Syndicated from Ted Tanner original https://aws.amazon.com/blogs/security/pci-dss-v4-0-on-aws-compliance-guide-now-available/

Our mission at AWS Security Assurance Services is to ease Payment Card Industry Data Security Standard (PCI DSS) compliance for Amazon Web Services (AWS) customers. We work closely with AWS customers to answer their questions about understanding compliance on the AWS Cloud, finding and implementing solutions, and optimizing their controls and assessments. The most frequent and foundational questions have been compiled to create the Payment Card Industry Data Security Standard (PCI DSS) v4.0 on AWS Compliance Guide. The guide is an overview of concepts and principles to help customers build PCI DSS–compliant applications and adhere to the updated version 4.0 requirements. Each section is thoroughly referenced to source AWS documentation, to support PCI DSS reporting requirements. The guide includes AWS best practices and technologies and updates that are applicable to the new PCI DSS v4.0 requirements.

The guide helps customers who are developing payment applications, compliance teams that are preparing to manage assessments of cloud applications, internal assessment teams, and PCI Qualified Security Assessors (QSA) supporting customers who use AWS.

What’s in the guide?

The objective of the guide is to provide customers with the information they need to plan for and document the PCI DSS compliance of their AWS workloads.

The guide includes:

  1. The Shared Responsibility Model and its impact on PCI DSS requirements
  2. What the AWS PCI DSS Level 1 Service Provider status means for customers
  3. Scoping your cardholder data environment
  4. Required diagrams for assessments
  5. Requirement-by-requirement guidance

The guide is most useful for people who are developing solutions on AWS, but it also will help QSAs, internal security assessors (ISAs), and internal audit teams better understand the assessment of cloud applications. It provides examples of the diagrams required for assessments and includes links to AWS source documentation to support assessment evidence requirements.

Compliance at cloud scale

More customers than ever are running PCI DSS–compliant workloads on AWS, with thousands of compliant applications. New security and governance tools available from AWS and the AWS Partner Network (APN) enable building business-as-usual compliance and automated security tasks so you can shift your focus to scaling and innovating your business.

If you have questions or want to learn more, contact your account representative, or leave a comment below.

Want more AWS Security how-to content, news, and feature announcements? Follow us on Twitter.

Ted Tanner

Ted Tanner

Ted is a Principal Assurance Consultant and PCI DSS QSA with AWS Security Assurance Services, and has more than 25 years of IT, security, and compliance experience. He leverages this to provide AWS customers with guidance on compliance and security in the cloud, and how to build and optimize their cloud compliance programs. He is co-author of the Payment Card Industry Data Security Standard (PCI DSS) v3.2.1 on AWS Compliance Guide and this v4.0 edition, and the Architecting for PCI DSS Segmentation and Scoping on AWS whitepaper.

Sana Rahman

Sana Rahman

Sana is a Senior Assurance Consultant with AWS Security Assurance Services, and has been a PCI DSS Qualified Security Assessor (QSA) for 8 years. She has extensive knowledge and experience in information security and governance, and deep compliance knowledge in both cloud and hybrid environments. She uses all of this to remove compliance roadblocks for AWS customers and provide guidance in their cloud journey.

Rughved Gadgil

Rughved Gadgil

Rughved is a Senior Solutions Architect with WWCS Enterprise Canada team and excels at using his technical expertise to remove technical hurdles for customers on their cloud adoption journey. He holds five different AWS certifications, and previously worked as a DevOps Specialist for a major airline. He has a keen interest in security and compliance, and is continuously expanding his knowledge and skillsets across the evolving cloud security landscape.

AWS-LC is now FIPS 140-3 certified

Post Syndicated from Nevine Ebeid original https://aws.amazon.com/blogs/security/aws-lc-is-now-fips-140-3-certified/

AWS Cryptography is pleased to announce that today, the National Institute for Standards and Technology (NIST) awarded AWS-LC its validation certificate as a Federal Information Processing Standards (FIPS) 140-3, level 1, cryptographic module. This important milestone enables AWS customers that require FIPS-validated cryptography to leverage AWS-LC as a fully owned AWS implementation.

AWS-LC is an open source cryptographic library that is a fork from Google’s BoringSSL. It is tailored by the AWS Cryptography team to meet the needs of AWS services, which can require a combination of FIPS-validated cryptography, speed of certain algorithms on the target environments, and formal verification of the correctness of implementation of multiple algorithms. FIPS 140 is the technical standard for cryptographic modules for the U.S. and Canadian Federal governments. FIPS 140-3 is the most recent version of the standard, which introduced new and more stringent requirements over its predecessor, FIPS 140-2. The AWS-LC FIPS module underwent extensive code review and testing by a NIST-accredited lab before we submitted the results to NIST, where the module was further reviewed by the Cryptographic Module Validation Program (CMVP).

Our goal in designing the AWS-LC FIPS module was to create a validated library without compromising on our standards for both security and performance. AWS-LC is validated on AWS Graviton2 (c6g, 64-bit AWS custom Arm processor based on Neoverse N1) and Intel Xeon Platinum 8275CL (c5, x86_64) running Amazon Linux 2 or Ubuntu 20.04. Specifically, it includes low-level implementations that target 64-bit Arm and x86 processors, which are essential to meeting—and even exceeding—the performance that customers expect of AWS services. For example, in the integration of the AWS-LC FIPS module with AWS s2n-tls for TLS termination, we observed a 27% decrease in handshake latency in Amazon Simple Storage Service (Amazon S3), as shown in Figure 1.

Figure 1: Amazon S3 TLS termination time after using AWS-LC

Figure 1: Amazon S3 TLS termination time after using AWS-LC

AWS-LC integrates CPU-Jitter as the source of entropy, which works on widely available modern processors with high-resolution timers by measuring the tiny time variations of CPU instructions. Users of AWS-LC FIPS can have confidence that the keys it generates adhere to the required security strength. As a result, the library can be run with no uncertainty about the impact of a different processor on the entropy claims.

AWS-LC is a high-performance cryptographic library that provides an API for direct integration with C and C++ applications. To support a wider developer community, we’re providing integrations of a future version of the AWS-LC FIPS module, v2.0, into the AWS Libcrypto for Rust (aws-lc-rs) and ACCP 2.0 libraries . aws-lc-rs is API-compatible with the popular Rust library named ring, with additional performance enhancements and support for FIPS. Amazon Corretto Crypto Provider 2.0 (ACCP) is an open source OpenJDK implementation interfacing with low-level cryptographic algorithms that equips Java developers with fast cryptographic services. AWS-LC FIPS module v2.0 is currently submitted to an accredited lab for FIPS validation testing, and upon completion will be submitted to NIST for certification.

Today’s AWS-LC FIPS 140-3 certificate is an important milestone for AWS-LC, as a performant and verified library. It’s just the beginning; AWS is committed to adding more features, supporting more operating environments, and continually validating and maintaining new versions of the AWS-LC FIPS module as it grows.

 
If you have feedback about this post, submit comments in the Comments section below. If you have questions about this post, contact AWS Support.

Want more AWS Security news? Follow us on Twitter.

Nevine Ebeid

Nevine Ebeid

Nevine is a Senior Applied Scientist at AWS Cryptography where she focuses on algorithms development, machine-level optimizations and FIPS 140-3 requirements for AWS-LC, the cryptographic library of AWS. Prior to joining AWS, Nevine worked in the research and development of various cryptographic libraries and protocols in automotive and mobile security applications.

Use AWS Secrets Manager to store and manage secrets in on-premises or multicloud workloads

Post Syndicated from Sreedar Radhakrishnan original https://aws.amazon.com/blogs/security/use-aws-secrets-manager-to-store-and-manage-secrets-in-on-premises-or-multicloud-workloads/

AWS Secrets Manager helps you manage, retrieve, and rotate database credentials, API keys, and other secrets throughout their lifecycles. You might already use Secrets Manager to store and manage secrets in your applications built on Amazon Web Services (AWS), but what about secrets for applications that are hosted in your on-premises data center, or hosted by another cloud service provider? You might even be in the process of moving applications out of your data center as part of a phased migration, where the application is partially in AWS, but other components still remain in your data center until the migration is complete. In this blog post, we’ll describe the potential benefits of using Secrets Manager for workloads outside AWS, outline some recommended practices for using Secrets Manager for hybrid workloads, and provide a basic sample application to highlight how to securely authenticate and retrieve secrets from Secrets Manager in a multicloud workload.

In order to make an API call to retrieve secrets from Secrets Manager, you need IAM credentials. While it is possible to use an AWS Identity and Access Management (IAM) user, AWS recommends using temporary, or short-lived, credentials wherever possible to reduce the scope of impact of an exposed credential. This means we will allow our hybrid application to assume an IAM role in this example. We’ll use IAM Roles Anywhere to provide a mechanism for our applications outside AWS to assume an IAM Role based on a trust configured with our Certificate Authority (CA).

IAM Roles Anywhere offers a solution for on-premises or multicloud applications to acquire temporary AWS credentials, helping to eliminate the necessity for creating and handling long-term AWS credentials. This removal of long-term credentials enhances security and streamlines the operational process by reducing the burden of managing and rotating the credentials.

In this post, we assume that you have a basic understanding of IAM. For more information on IAM roles, see the IAM documentation. We’ll start by examining some potential use cases at a high level, and then we’ll highlight recommended practices to securely fetch secrets from Secrets Manager from your on-premises or hybrid workload. Finally, we’ll walk you through a simple application example to demonstrate how to put these recommendations together in a workload.

Selected use cases for accessing secrets from outside AWS

Following are some example scenarios where it may be necessary to securely retrieve or manage secrets from outside AWS, such from applications hosted in your data center, or another cloud provider.

Centralize secrets management for applications in your data center and in AWS

It’s beneficial to offer your application teams a single, centralized environment for managing secrets. This can simplify managing secrets because application teams are only required to understand and use a single set of APIs to create, retrieve, and rotate secrets. It also provides consistent visibility into the secrets used across your organization because Secrets Manager is integrated with AWS CloudTrail to log API calls to the service, including calls to retrieve or modify a secret value.

In scenarios where your application is deployed either on-premises or in a multicloud environment, and your database resides in Amazon Relational Database Service (Amazon RDS), you have the opportunity to use both IAM Roles Anywhere and Secrets Manager to store and retrieve secrets by using short-term credentials. This approach allows central security teams to have confidence in the management of credentials and builder teams to have a well-defined pattern for credential management. Note that you can also choose to configure IAM database authentication with RDS, instead of storing database credentials in Secrets Manager, if this is supported by your database environment.

Hybrid or multicloud workloads

At AWS, we’ve generally seen that customers get the best experience, performance, and pricing when they choose a primary cloud provider. However, for a variety of reasons, some customers end up in a situation where they’re running IT operations in a multicloud environment. In these scenarios, you might have hybrid applications that run in multiple cloud environments, or you might have data stored in AWS that needs to be accessed from a different application or workload running in another cloud provider. You can use IAM Roles Anywhere to securely access or manage secrets in Secrets Manager for these use cases.

Phased application migrations to AWS

Consider a situation where you are migrating a monolithic application to AWS from your data center, but the migration is planned to take place in phases over a number of months. You might be migrating your compute into AWS well before your databases, or vice versa. In this scenario, you can use Secrets Manager to store your application secrets and access them from both on premises and in AWS. Because your secrets are accessible from both on premises and AWS through the same APIs, you won’t need to refactor your application to retrieve these secrets as the migration proceeds.

Recommended practices for retrieving secrets for hybrid and multicloud workloads

In this section, we’ll outline some recommended practices that will help you provide least-privilege access to your application secrets, wherever the access is coming from.

Client-side caching of secrets

Client-side caching of secrets stored in Secrets Manager can help you improve performance and decrease costs by reducing the number of API requests to Secrets Manager. After retrieving a secret from Secrets Manager, your application can get the secret value from its in-memory cache without making further API calls. The cached secret value is automatically refreshed after a configurable time interval, called the cache duration, to help ensure that the application is always using the latest secret value. AWS provides client-side caching libraries for .NET, Java, JDBC, Python, and Go to enable client-side caching. You can find more detailed information on client-side caching specific to Python libraries in this blog post.

Consider a hybrid application with an application server on premises, that needs to retrieve database credentials stored in Secrets Manager in order to query customer information from a database. Because the API calls to retrieve the secret are coming from outside AWS, they may incur increased latency simply based on the physical distance from the closest AWS data center. In this scenario, the performance gains from client-side caching become even more impactful.

Enforce least-privilege access to secrets through IAM policies

You can use a combination of IAM policy types to granularly restrict access to application secrets when you’re using IAM Roles Anywhere and Secrets Manager. You can use conditions in trust policies to control which systems can assume the role. In our example, this is based on the system’s certificate, meaning that you need to appropriately control access to these certificates. We use a policy condition to specify an IP address in our example, but you could also use a range of IP addresses. Other examples would be conditions that specify a time range for when resources can be accessed, conditions that allow or deny building resources in certain AWS Regions, and more. You can find example policies in the IAM documentation.

You should use identity policies to provide Secrets Manager with permissions to the IAM role being assumed, following the principle of least privilege. You can find IAM policy examples for Secrets Manager use cases in the Secrets Manager documentation.

By combining different policy types, like identity policies and trust policies, you can limit the scope of systems that can assume a role, and control what those systems can do after assuming a role. For example, in the trust policy for the IAM role with access to the secret in Secrets Manager, you can allow or deny access based on the common name of the certificate that’s being used to authenticate and retrieve temporary credentials in order to assume a role using IAM Roles Anywhere. You can then attach an identity policy to the role being assumed that provides only the necessary API actions for your application, such as the ability to retrieve a secret value—but not to a delete a secret. See this blogpost for more information on when to use different policy types.

Transform long-term secrets into short-term secrets

You may already be wondering, “why should I use short-lived credentials to access a long-term secret?” Frequently rotating your application secrets in Secrets Manager will reduce the impact radius of a compromised secret. Imagine that you rotate your application secret every day. If that secret is somehow publicly exposed, it will only be usable for a single day (or less). This can greatly reduce the risk of compromised credentials being used to get access to sensitive information. You can find more information about the value of using short-lived credentials in this AWS Well-Architected best practice.

Instead of using static database credentials that are rarely (or never) rotated, you can use Secrets Manager to automatically rotate secrets up to every four hours. This method better aligns the lifetime of your database secret with the lifetime of the short-lived credentials that are used to assume the IAM role by using IAM Roles Anywhere.

Sample workload: How to retrieve a secret to query an Amazon RDS database from a workload running in another cloud provider.

Now we’ll demonstrate examples of the recommended practices we outlined earlier, such as scoping permissions with IAM policies. We’ll also showcase a sample application that uses a virtual machine (VM) hosted in another cloud provider to access a secret in Secrets Manager.

The reference architecture in Figure 1 shows the basic sample application.

Figure 1: Application connecting to Secrets Manager by using IAM Roles Anywhere to retrieve RDS credentials

Figure 1: Application connecting to Secrets Manager by using IAM Roles Anywhere to retrieve RDS credentials

In the sample application, an application secret (for example, a database username and password) is being used to access an Amazon RDS database from an application server hosted in another cloud provider. The following process is used to connect to Secrets Manager in order to retrieve and use the secret:

  1. The application server makes a request to retrieve temporary credentials by using IAM Roles Anywhere.
  2. IAM validates the request against the relevant IAM policies and verifies that the certificate was issued by a CA configured as a trust anchor.
  3. If the request is valid, AWS Security Token Service (AWS STS) provides temporary credentials that the application can use to assume an IAM role.
  4. IAM Roles Anywhere returns temporary credentials to the application.
  5. The application assumes an IAM role with Secrets Manager permissions and makes a GetSecretValue API call to Secrets Manager.
  6. The application uses the returned database credentials from Secrets Manager to query the RDS database and retrieve the data it needs to process.

Configure IAM Roles Anywhere

Before you configure IAM Roles Anywhere, it’s essential to have an IAM role created with the required permission for Amazon RDS and Secrets Manager. If you’re following along on your own with these instructions, refer to this blog post and the IAM Roles Anywhere User Guide for the steps to configure IAM Roles Anywhere in your environment.

Obtain temporary security credentials

You have several options to obtain temporary security credentials using IAM Roles Anywhere:

  • Using the credential helper — The IAM Roles Anywhere credential helper is a tool that manages the process of signing the CreateSession API with the private key associated with an X.509 end-entity certificate and calls the endpoint to obtain temporary AWS credentials. It returns the credentials to the calling process in a standard JSON format. This approach is documented in the IAM Roles Anywhere User Guide.
  • Using the AWS SDKs

Use policy controls to appropriately scope access to secrets

In this section, we demonstrate the process of restricting access to temporary credentials by employing condition statements based on attributes extracted from the X.509 certificate. This additional step gives you granular control of the trust policy, so that you can effectively manage which resources can obtain credentials from IAM Roles Anywhere. For more information on establishing a robust data perimeter on AWS, refer to this blog post.

Prerequisites

  • IAM Roles Anywhere using AWS Private Certificate Authority or your own PKI as the trust anchor
  • IAM Roles Anywhere profile
  • An IAM role with Secrets Manager permissions

Restrict access to temporary credentials

You can restrict access to temporary credentials by using specific PKI conditions in your role’s trust policy, as follows:

  • Sessions issued by IAM Roles Anywhere have the source identity set to the common name (CN) of the subject you use in end-entity certificate authenticating to the target role.
  • IAM Roles Anywhere extracts values from the subject, issuer, and Subject Alternative Name (SAN) fields of the authenticating certificate and makes them available for policy evaluation through the sourceIdentity and principal tags.
  • To examine the contents of a certificate, use the following command:

    openssl x509 -text -noout -in certificate.pem

  • To establish a trust relationship for IAM Roles Anywhere, use the following steps:
    1. In the navigation pane of the IAM console, choose Roles.
    2. The console displays the roles for your account. Choose the name of the role that you want to modify, and then choose the Trust relationships tab on the details page.
    3. Choose Edit trust relationship.

Example: Restrict access to a role based on the common name of the certificate

The following example shows a trust policy that adds a condition based on the Subject Common Name (CN) of the certificate.

{
    "Version": "2012-10-17",
    "Statement": [
      {
        "Effect": "Allow",
        "Principal": {
          "Service": "rolesanywhere.amazonaws.com"
        },
        "Action": [
          "sts:AssumeRole",
          "sts:TagSession",
          "sts:SetSourceIdentity"
        ],
        "Condition": {
          "StringEquals": {
            "aws:PrincipalTag/x509Subject/CN": "workload-a.iamcr-test"
          },
          "ArnEquals": {
            "aws:SourceArn": [
              "arn:aws:rolesanywhere:region:account:trust-anchor/TA_ID"
            ]
          }
        }
      }
    ]
  }

If you try to access the temporary credentials using a different certificate which has a different CN, you will receive the error “Error when retrieving credentials from custom-process: 2023/07/0X 23:46:43 AccessDeniedException: Unable to assume role for arn:aws:iam::64687XXX207:role/RDS_SM_Role”.

Example: Restrict access to a role based on the issuer common name

The following example shows a trust policy that adds a condition based on the Issuer CN of the certificate.

 {
    "Version": "2012-10-17",
    "Statement": [
      {
        "Effect": "Allow",
        "Principal": {
          "Service": "rolesanywhere.amazonaws.com"
        },
        "Action": [
          "sts:AssumeRole",
          "sts:TagSession",
          "sts:SetSourceIdentity"
        ],
        "Condition": {
          "StringEquals": {
            "aws:PrincipalTag/x509Issuer/CN": "iamcr.test"
          },
          "ArnEquals": {
            "aws:SourceArn": [
              "arn:aws:rolesanywhere:region:account:trust-anchor/TA_ID"
            ]
          }
        }
      }
    ]
  }

Example: Restrict access to a role based on the subject alternative name (SAN)

The following example shows a trust policy that adds a condition based on the SAN fields of the certificate.

 {
  "Version": "2012-10-17",
  "Statement": [
    {
      "Effect": "Allow",
      "Principal": {
        "Service": "rolesanywhere.amazonaws.com"
      },
      "Action": [
        "sts:AssumeRole",
        "sts:TagSession",
        "sts:SetSourceIdentity"
      ],
      "Condition": {
        "StringEquals": {
          "aws:PrincipalTag/x509SAN/DNS": "workload-a.iamcr.test"
        },
        "ArnEquals": {
          "aws:SourceArn": [
            "arn:aws:rolesanywhere:region:account:trust-anchor/TA_ID"
          ]
        }
      }
    }
  ]
}

Session policies

Define session policies to further scope down the sessions delivered by IAM Roles Anywhere. Here, for demonstration purposes, we added an inline policy to only allow requests coming from the specified IP address by using the following steps.

  1. Navigate to the Roles Anywhere console.
  2. Under Profiles, choose Create a profile.
  3. On the Create a profile page, enter a name for the profile.
  4. For Roles, select the role that you created in the previous step, and select the Inline policy.

The following example shows how to allow only the requests from a specific IP address. You will need to replace <X.X.X.X/32> in the policy example with your own IP address.

{
  "Version": "2012-10-17",
  "Statement": [
    {
      "Effect": "Deny",
      "Action": "*",
      "Resource": "*",
      "Condition": {
        "NotIpAddress": {
          "aws:SourceIp": [
            "<X.X.X.X/32>"
          ]
        }
      }
    },
    {
      "Effect": "Allow",
      "Action": "*",
      "Resource": "*"
    }
  ]
}

Retrieve secrets securely from a workload running in another cloud environment

In this section, we’ll demonstrate the process of connecting virtual machines (VMs) running in another cloud provider to an Amazon RDS MySQL database, where the database credentials are securely stored in Secrets Manager.

Create a database and manage Amazon RDS master database credentials in Secrets Manager

In this section, you will create a database instance and use Secrets Manager to manage the master database credentials.

To create an Amazon RDS database and manage master database credentials in Secrets Manager

  1. Open the Amazon RDS console and choose Create database.
  2. Select your preferred database creation method. For this post, we chose Standard create.
  3. Under Engine options, for Engine type, choose your preferred database engine. In this post, we use MySQL.
  4. Under Settings, for Credentials Settings, select Manage master credentials in AWS Secrets Manager.
    Figure 2: Manage master credentials in Secrets Manager

    Figure 2: Manage master credentials in Secrets Manager

  5. You have the option to encrypt the managed master database credentials. In this example, we will use the default AWS KMS key.
  6. (Optional) Choose other settings to meet your requirements. For more information, see Settings for DB instances.
  7. Choose Create Database, and wait a few minutes for the database to be created.

Retrieve and use temporary credentials to access a secret in Secrets Manager

The next step is to use the AWS Roles Anywhere service to obtain temporary credentials for an IAM role. These temporary credentials are essential for accessing AWS resources securely. Earlier, we described the options available to you to retrieve temporary credentials by using IAM Roles Anywhere. In this section, we will assume you’re using the credential helper to retrieve temporary credentials and make an API call to Secrets Manager.

After you retrieve temporary credentials and assume an IAM role with permissions to access the secret in Secrets Manager, you can run a simple script on the VM to get the database username and password from Secrets Manager and update the database. The steps are summarized here:

  • Use the credential helper to assume your IAM role with permissions to access the secret in Secrets Manager. You can find instructions to obtain temporary credentials in the IAM Roles Anywhere User Guide.
  • Retrieve secrets from Secrets Manager. Using the obtained temporary credentials, you can create a boto3 session object and initialize a secrets_client from boto3.client(‘secretsmanager’). The secrets_client is responsible for interacting with the Secrets Manager service. You will retrieve the secret value from Secrets Manager, which contains the necessary credentials (for example, database username and password) for accessing an RDS database.
  • Establish a connection to the RDS database. The retrieved secret value is parsed, extracting the database connection information. You can then establish a connection to the RDS database using the extracted details, such as username and password.
  • Perform database operations. Once the database connection is established, the script performs the operation to update a record in the database.

The following is an example Python script to retrieve credentials from Secrets Manager and connect to the RDS for database operations.

import mysql.connector
import boto3
import json

#Create client

client = boto3.client('secretsmanager')
response = client.get_secret_value(
    SecretId='rds!db-fXXb-11ce-4f05-9XX2-d42XXcd'
)
secretDict = json.loads(response['SecretString'])

#Connect to DB

mydb = mysql.connector.connect(
    host="rdsmysql.cpl0ov.us-east-1.rds.amazonaws.com",
    user=secretDict['username'],
    password=secretDict['password'],
    database="rds_mysql"
)
mycursor = mydb.cursor()

#Update DB 

sql = "INSERT INTO employees (id, name) VALUES (%s, %s)"
val = (12, "AWPS")
mycursor.execute(sql, val)
mydb.commit()
print(mycursor.rowcount, "record inserted.")

And that’s it! You’ve retrieved temporary credentials using IAM Roles Anywhere, assumed a role with permissions to access the database username and password in Secrets Manager, and then retrieved and used the database credentials to update a database from your application running on another cloud provider. This is a simple example application for the purpose of the blog post, but the same concepts will apply in real-world use cases.

Conclusion

In this post, we’ve demonstrated how you can securely store, retrieve, and manage application secrets and database credentials for your hybrid and multicloud workloads using Secrets Manager. We also outlined some recommended practices for least-privilege access to your secrets when accessing Secrets Manager from outside AWS by using IAM Roles Anywhere. Lastly, we demonstrated a simple example of using IAM Roles Anywhere to assume a role, then retrieve and use database credentials from Secrets Manager in a multicloud workload. To get started managing secrets, open the Secrets Manager console. To learn more about Secrets Manager, refer to the Secrets Manager documentation.

 
If you have feedback about this post, submit comments in the Comments section below. If you have questions about this post, contact AWS Support.

Want more AWS Security news? Follow us on Twitter.

Sreedar Radhakrishnan

Sreedar Radhakrishnan

Sreedar is a Senior Solutions Architect at AWS, where he helps enterprise customers to design and build secure, scalable, and sustainable solutions on AWS. In his spare time, Sreedar enjoys playing badminton and spending time with his family.

Zach Miller

Zach Miller

Zach is a Senior Security Specialist Solutions Architect at AWS. His background is in data protection and security architecture, focused on a variety of security domains, including cryptography, secrets management, and data classification. Today, he is focused on helping enterprise AWS customers adopt and operationalize AWS security services to increase security effectiveness and reduce risk.

Akshay Aggarwal

Akshay Aggarwal

Akshay is a Senior Technical Product Manager on the AWS Secrets Manager team. As part of AWS Cryptography, Akshay drives technologies and defines best practices that help improve customer’s experience of building secure, reliable workloads in the AWS Cloud. Akshay is passionate about building technologies that are easy to use, secure, and scalable.

Enable Security Hub partner integrations across your organization

Post Syndicated from Joaquin Manuel Rinaudo original https://aws.amazon.com/blogs/security/enable-security-hub-partner-integrations-across-your-organization/

AWS Security Hub offers over 75 third-party partner product integrations, such as Palo Alto Networks Prisma, Prowler, Qualys, Wiz, and more, that you can use to send, receive, or update findings in Security Hub.

We recommend that you enable your corresponding Security Hub third-party partner product integrations when you use these partner solutions. By centralizing findings across your AWS and partner solutions in Security Hub, you can get a holistic cross-account and cross-Region view of your security risks. In this way, you can move beyond security reporting and start implementing automations on top of Security Hub that help improve your overall security posture and reduce manual efforts. For example, you can configure your third-party partner offerings to send findings to Security Hub and build standardized enrichment, escalation, and remediation solutions by using Security Hub automation rules, or other AWS services such as AWS Lambda or AWS Step Functions.

To enable partner integrations, you must configure the integration in each AWS Region and AWS account across your organization in AWS Organizations. In this blog post, we’ll show you how to set up a Security Hub partner integration across your entire organization by using AWS CloudFormation StackSets.

Overview

Figure 1 shows the architecture of the solution. The main steps are as follows:

  1. The deployment script creates a CloudFormation template that deploys a stack set across your AWS accounts.
  2. The stack in the member account deploys a CloudFormation custom resource using a Lambda function.
  3. The Lambda function iterates through target Regions and invokes the Security Hub boto3 method enable_import_findings_for_product to enable the corresponding partner integration.

When you add new accounts to the organizational units (OUs), StackSets deploys the CloudFormation stack and the partner integration is enabled.

Figure 1: Diagram of the solution

Figure 1: Diagram of the solution

Prerequisites

To follow along with this walkthrough, make sure that you have the following prerequisites in place:

  • Security Hub enabled across an organization in the Regions where you want to deploy the partner integration.
  • Trusted access with AWS Organizations enabled so that you can deploy CloudFormation StackSets across your organization. For instructions on how to do this, see Activate trusted access with AWS Organizations.
  • Permissions to deploy CloudFormation StackSets in a delegated administrator account for your organization.
  • AWS Command Line Interface (AWS CLI) installed.

Walkthrough

Next, we show you how to get started with enabling your partner integration across your organization using the following solution.

Step 1: Clone the repository

In the AWS CLI, run the following command to clone the aws-securityhub-deploy-partner-integration GitHub repository:

git clone https://github.com/aws-samples/aws-securityhub-partner-integration

Step 2: Set up the integration parameters

  1. Open the parameters.json file and configure the following values:
    • ProductName — Name of the product that you want to enable.
    • ProductArn — The unique Amazon Resource Name (ARN) of the Security Hub partner product. For example, the product ARN for Palo Alto PRISMA Cloud Enterprise, is arn:aws:securityhub:<REGION>:188619942792:product/paloaltonetworks/redlock; and for Prowler, it’s arn:aws:securityhub:<REGION>::product/prowler/prowler. To find a product ARN, see Available third-party partner product integrations.
    • DeploymentTargets — List of the IDs of the OUs of the AWS accounts that you want to configure. For example, use the unique identifier (ID) for the root to deploy across your entire organization.
    • DeploymentRegions — List of the Regions in which you’ve enabled Security Hub, and for which the partner integration should be enabled.
  2. Save the changes and close the file.

Step 3: Deploy the solution

  1. Open a command line terminal of your preference.
  2. Set up your AWS_REGION (for example, export AWS_REGION=eu-west-1) and make sure that your credentials are configured for the delegated administrator account.
  3. Enter the following command to deploy:
    ./setup.sh deploy

Step 4: Verify Security Hub partner integration

To test that the product integration is enabled, run the following command in one of the accounts in the organization. Replace <TARGET-REGION> with one of the Regions where you enabled Security Hub.

aws securityhub list-enabled-products-for-import --region <TARGET-REGION>

Step 5: (Optional) Manage new partners, Regions, and OUs

To add or remove the partner integration in certain Regions or OUs, update the parameters.json file with your desired Regions and OU IDs and repeat Step 3 to redeploy changes to your Security Hub partner integration. You can also directly update the CloudFormation parameters for the securityhub-integration-<PARTNER-NAME> from the CloudFormation console.

To enable new partner integrations, create a new parameters.json file version with the partner’s product name and product ARN to deploy a new stack using the deployment script from Step 3. In the next step, we show you how to disable the partner integrations.

Step 6: Clean up

If needed, you can remove the partner integrations by destroying the stack deployed. To destroy the stack, use the command line terminal configured with the credentials for the AWS StackSets delegated administrator account and run the following command:

 ./setup.sh destroy

You can also directly delete the stack mentioned in Step 5 from the CloudFormation console by accessing the stack page from the CloudFormation console, selecting the stack securityhub-integration-<PARTNER-NAME>, and then choosing Delete.

Conclusion

In this post, you learned how you to enable Security Hub partner integrations across your organization. Now you can configure the partner product of your choice to send, update, or receive Security Hub findings.

You can extend your security automation by using Security Hub automation rules, Amazon EventBridge events, and Lambda functions to start or enrich automated remediation of new ingested findings from partners. For an example of how to do this, see Automated Security Response on AWS.

Developer teams can opt in to configure their own chatbot in AWS Chatbot to receive notifications in Amazon Chime, Slack, or Microsoft Teams channels. Lastly, security teams can use existing bidirectional integrations with Jira Service Management or Jira Core to escalate severe findings to their developer teams.

If you have feedback about this post, submit comments in the Comments section below. If you have questions about this post, start a new thread on the AWS Security, Identity, & Compliance re:Post or contact AWS Support.

Want more AWS Security news? Follow us on Twitter.

Author

Joaquin Manuel Rinaudo

Joaquin is a Principal Security Architect with AWS Professional Services. He is passionate about building solutions that help developers improve their software quality. Prior to AWS, he worked across multiple domains in the security industry, from mobile security to cloud and compliance related topics. In his free time, Joaquin enjoys spending time with family and reading science-fiction novels.

Shachar Hirshberg

Shachar Hirshberg

Shachar is a Senior Product Manager for AWS Security Hub with over a decade of experience in building, designing, launching, and scaling enterprise software. He is passionate about further improving how customers harness AWS services to enable innovation and enhance the security of their cloud environments. Outside of work, Shachar is an avid traveler and a skiing enthusiast.

Validate IAM policies with Access Analyzer using AWS Config rules

Post Syndicated from Anurag Jain original https://aws.amazon.com/blogs/security/validate-iam-policies-with-access-analyzer-using-aws-config-rules/

You can use AWS Identity and Access Management (IAM) Access Analyzer policy validation to validate IAM policies against IAM policy grammar and best practices. The findings generated by Access Analyzer policy validation include errors, security warnings, general warnings, and suggestions for your policy. These findings provide actionable recommendations that help you author policies that are functional and conform to security best practices.

You can use the IAM Policy Validator for AWS CloudFormation and the IAM Policy Validator for Terraform solutions to integrate Access Analyzer policy validation in a proactive manner within your continuous integration and continuous delivery CI/CD pipeline before deploying IAM policies to your Amazon Web Service (AWS) environment. Customers requested a similar capability to validate policies already deployed within their environments as part of the defense-in-depth strategy.

In this post, you learn how to set up and continuously validate and report on compliance of the IAM policies in your environment using AWS Config. AWS Config evaluates the configuration settings of your AWS resources with the help of AWS Config rules, which represent your ideal configuration settings. AWS Config continuously tracks the configuration changes that occur among your resources and checks whether these changes conform to the conditions in your rules. If a resource doesn’t conform to a rule, AWS Config flags the resource and the rule as noncompliant.

You can use this solution to validate identity-based and resource-based IAM policies attached to resources in your AWS environment that might have grammatical or syntactical errors or might not follow AWS best practices. The code used in this post is hosted in a GitHub repository.

Prerequisites

Before you get started, you need:

Step 1: Enable AWS Config to monitor global resources

To get started, enable AWS Config in your AWS account by following the instructions in the AWS Config Developer Guide.

Next, enable the recording of global resources:

  1. Open the AWS Management Console and go to the AWS Config console.
  2. Go to Settings and choose Edit to see the AWS Config recorder settings.
  3. Under General settings, select the Include globally recorded resource types to enable AWS Config to monitor IAM configuration items.
  4. Leave the other settings at their defaults.
  5. Choose Save.
    Figure 1: AWS Config settings page showing inclusion of globally recorded resource types

    Figure 1: AWS Config settings page showing inclusion of globally recorded resource types

  6. After choosing Save, you should see Recording is on at the top of the window.
    Figure 2: AWS Config settings page showing recorder settings

    Figure 2: AWS Config settings page showing recorder settings

    Note: You only need to enable globally recorded resource types in the AWS Region where you’ve configured AWS Config because they aren’t tied to a specific Region and can be used in other Regions. The globally recorded resource types that AWS Config supports are IAM users, groups, roles, and customer managed policies.

Step 2: Deploy the CloudFormation template

In this section, you deploy and test a sample AWS CloudFormation template that creates the following:

  • An AWS Config rule that reports the compliance of IAM policies.
  • An AWS Lambda function that implements and then makes the requests to IAM Access Analyzer and returns the policy validation findings.
  • An IAM role that’s used by the Lambda function with permissions to validate IAM policies using the Access Analyzer ValidatePolicy API.
  • An optional Amazon CloudWatch alarm and Amazon Simple Notification Service (Amazon SNS) topic to provide notification of Lambda function errors.

Follow the steps below to deploy the AWS CloudFormation template:

  1. To deploy the CloudFormation template using the following command, you must have the AWS Command Line Interface (AWS CLI) installed.
  2. Make sure you have configured your AWS CLI credentials.
  3. Clone the solution repository.
    git clone https://github.com/awslabs/aws-iam-access-analyzer-policy-validation-config-rule.git

  4. Navigate to the iam-access-analyzer-config-rule folder of the cloned repository.
    cd aws-iam-access-analyzer-policy-validation-config-rule

  5. Deploy the CloudFormation template using the AWS CLI.

    Note: Change the Region for the parameter — RegionToValidateGlobalResources — to the Region you enabled for global resources in Step 1. Optionally, you can add an email address if you want to receive notifications if the AWS Config rule stops working. Use the code that follows, replacing <us-east-1> with the Region you enabled and <EMAIL_ADDRESS> with your chosen address.

    aws cloudformation deploy \
        --stack-name iam-policy-validation-config-rule \
        --template-file templates/template.yaml \
        --capabilities CAPABILITY_IAM CAPABILITY_NAMED_IAM \
        --parameter-overrides RegionToValidateGlobalResources='<us-east-1>' \
                              ErrorNotificationsEmailAddress='<EMAIL_ADDRESS>'

  6. After successful deployment, you will see the message Successfully created/updated stack – iam-policy-validation-config-rule.
    Figure 3: Successful CloudFormation stack creation reported on the terminal

    Figure 3: Successful CloudFormation stack creation reported on the terminal

    Note: If the CloudFormation stack creation fails, go to the CloudFormation console and select the iam-policy-validation-config-rule stack. Choose Events to review the failure reason.

  7. After deployment, open the CloudFormation console and select the iam-policy-validation-config-rule stack.
  8. Choose Resources to see the resources created by the template.

Step 3: Check noncompliant resources discovered by AWS Config

The AWS Config rule is designed to mark resources that have IAM policies as noncompliant if the resources have validation findings found using the IAM Access Analyzer ValidatePolicy API.

  1. Open the AWS Config console
  2. Choose Rules from the navigation pane on the left and select policy-validation-config-rule.
    Figure 4: AWS Config rules page showing the rule details

    Figure 4: AWS Config rules page showing the rule details

  3. Scroll down on the page and filter Resources in Scope to see the noncompliant resources.
    Figure 5: AWS Config rules page showing noncompliant resources

    Figure 5: AWS Config rules page showing noncompliant resources

    Note: If the AWS Config rule isn’t invoked yet, you can choose Actions and select Re-evaluate to invoke it.

    Figure 6: AWS Config rules page showing evaluation invocation

    Figure 6: AWS Config rules page showing evaluation invocation

Step 4: Modify the AWS Config rule for exceptions

You might want to exempt certain resources from specific policy validation checks. For example, you might need to deploy a more privileged role—such as an administrator role—to your environment and you don’t want that role’s policies to have policy validation findings.

Figure 7: AWS Config rules page showing a noncompliant administrator role

Figure 7: AWS Config rules page showing a noncompliant administrator role

This section shows you how to configure an exceptions file to exempt specific resources.

  1. Start by configuring an exceptions file similar to the one that follows to log general warning findings across the accounts in your organization to make sure your policies conform to best practices by setting ignoreWarningFindings to False.
  2. Additionally, you might want to create an exception that allows administrator roles to use the iam:PassRole action on another role. This combination of action and resource is usually reserved for privileged users. The example file below shows an exception for all the roles created with Administrator in the role path from account 12345678912.

    Example exceptions file:

    {
    "global":{
    "ignoreWarningFindings":false
    },
    "12345678912":{
    "ignoreFindingsWith":[
    {
    "issueCode":"PASS_ROLE_WITH_STAR_IN_ACTION_AND_RESOURCE",
    "resourceType":"AWS::IAM::Role",
    "resourceName":"Administrator/*"
    }
    ]
    }
    }
  3. After the exceptions file is ready, upload the JSON file to the S3 bucket you created as a part of the prerequisites.

    You can manage this exceptions file by hosting it in a central Git repository. When teams need to exempt a particular resource from these policy validation checks, they can submit a pull request to the central repository. An approver can then approve or reject this request and, if approved, deploy the updated exceptions file.

  4. Modify the bucket policy so that the bucket is accessible to your AWS Config rule if the rule is operating in a different account than the bucket was created in. Below is an example of a bucket policy that allows the accounts in your organization to read the exceptions file.
    {
          "Version": "2012-10-17",
          "Statement": [{
              "Effect": "Allow",
              "Principal": {"AWS": "*"},
              "Action": "s3:GetObject",
              "Resource": "arn:aws:s3:::EXAMPLE-BUCKET/my-exceptions-file.json",
              "Condition": {
                  "StringEquals": {
                      "aws:PrincipalOrgId": "<your organization id here>"
                  }
              }
          }]
    }

    Note: For more examples visit example policy validation exceptions file contents.

  5. Deploy the CloudFormation template again using the ExceptionsS3BucketName and ExceptionsS3FilePrefix parameters. The file prefix should be the full prefix of the S3 object exceptions file.
    aws cloudformation deploy \
        --stack-name iam-policy-validation-config-rule \
        --template-file templates/template.yaml \
        --capabilities CAPABILITY_IAM CAPABILITY_NAMED_IAM \
        --parameter-overrides RegionToValidateGlobalResources='<us-east-1>' \
            		ExceptionsS3BucketName='EXAMPLE-BUCKET' \
           		 ExceptionsS3FilePrefix='my-exceptions-file.json'

  6. After you see the Successfully created/updated stack – iam-policy-validation-config-rule message on the terminal or command line and the AWS Config rule has been re-evaluated, the resources mentioned in the exception file should show as Compliant.
    Figure 8: Resource exception result

    Figure 8: Resource exception result

You can find additional customization options in the exceptions file schema.

Cleanup

To avoid recurring charges and to remove the resources used in testing the solution outlined in this post, use the CloudFormation console to delete the iam-policy-validation-config-rule CloudFormation stack.

Figure 9: AWS CloudFormation stack deletion

Figure 9: AWS CloudFormation stack deletion

Conclusion

In this post, we demonstrated how you can set up a centralized compliance and monitoring workflow using AWS IAM Access Analyzer policy validation with AWS Config rules to validate identity-based and resource-based policies attached to resources in your account. Using this solution, you can create a single pane of glass to monitor resources and govern centralized compliance for AWS Config-supported resources across accounts. You can also build and maintain exceptions customized to your environment as shown in the example policy validation exceptions file. You can visit the Access Analyzer policy checks reference page for a complete list of policy check validation errors and resolutions.

 
If you have feedback about this post, submit comments in the Comments section below. If you have questions about this post, contact AWS Support.

Want more AWS Security news? Follow us on Twitter.

Author

Matt Luttrell

Matt is a Sr. Solutions Architect on the AWS Identity Solutions team. When he’s not spending time chasing his kids around, he enjoys skiing, cycling, and the occasional video game.

Swara Gandhi

Swara Gandhi

Swara is a solutions architect on the AWS Identity Solutions team. She works on building secure and scalable end-to-end identity solutions. She is passionate about everything identity, security, and cloud.

How to use AWS Certificate Manager to enforce certificate issuance controls

Post Syndicated from Roger Park original https://aws.amazon.com/blogs/security/how-to-use-aws-certificate-manager-to-enforce-certificate-issuance-controls/

AWS Certificate Manager (ACM) lets you provision, manage, and deploy public and private Transport Layer Security (TLS) certificates for use with AWS services and your internal connected resources. You probably have many users, applications, or accounts that request and use TLS certificates as part of your public key infrastructure (PKI); which means you might also need to enforce specific PKI enterprise controls, such as the types of certificates that can be issued or the validation method used. You can now use AWS Identity and Access Management (IAM) condition context keys to define granular rules around certificate issuance from ACM and help ensure your users are issuing or requesting TLS certificates in accordance with your organizational guidelines.

In this blog post, we provide an overview of the new IAM condition keys available with ACM. We also discuss some example use cases for these condition keys, including example IAM policies. Lastly, we highlight some recommended practices for logging and monitoring certificate issuance across your organization using AWS CloudTrail because you might want to provide PKI administrators a centralized view of certificate activities. Combining preventative controls, like the new IAM condition keys for ACM, with detective controls and comprehensive activity logging can help you meet your organizational requirements for properly issuing and using certificates.

This blog post assumes you have a basic understanding of IAM policies. If you’re new to using identity policies in AWS, see the IAM documentation for more information.

Using IAM condition context keys with ACM to enforce certificate issuance guidelines across your organization

Let’s take a closer look at IAM condition keys to better understand how to use these controls to enforce certificate guidelines. The condition block in an IAM policy is an optional policy element that lets you specify certain conditions for when a policy will be in effect. For instance, you might use a policy condition to specify that no one can delete an Amazon Simple Storage Service (Amazon S3) bucket except for your system administrator IAM role. In this case, the condition element of the policy translates to the exception in the previous sentence: all identities are denied the ability to delete S3 buckets except under the condition that the role is your administrator IAM role. We will highlight some useful examples for certificate issuance later in the post.

When used with ACM, IAM condition keys can now be used to help meet enterprise standards for how certificates are issued in your organization. For example, your security team might restrict the use of RSA certificates, preferring ECDSA certificates. You might want application teams to exclusively use DNS domain validation when they request certificates from ACM, enabling fully managed certificate renewals with little to no action required on your part. Using these condition keys in identity policies or service control policies (SCPs) provide ACM users more control over who can issue certificates with certain configurations. You can now create condition keys to define certificate issuance guardrails around the following:

  • Certificate validation method — Allow or deny a specific validation type (such as email validation).
  • Certificate key algorithm — Allow or deny use of certain key algorithms (such as RSA) for certificates issued with ACM.
  • Certificate transparency (CT) logging — Deny users from disabling CT logging during certificate requests.
  • Domain names — Allow or deny authorized accounts and users to request certificates for specific domains, including wildcard domains. This can be used to help prevent the use of wildcard certificates or to set granular rules around which teams can request certificates for which domains.
  • Certificate authority — Allow or deny use of specific certificate authorities in AWS Private Certificate Authority for certificate requests from ACM.

Before this release, you didn’t always have a proactive way to prevent users from issuing certificates that weren’t aligned with your organization’s policies and best practices. You could reactively monitor certificate issuance behavior across your accounts using AWS CloudTrail, but you couldn’t use an IAM policy to prevent the use of email validation, for example. With the new policy conditions, your enterprise and network administrators gain more control over how certificates are issued and better visibility into inadvertent violations of these controls.

Using service control policies and identity-based policies

Before we showcase some example policies, let’s examine service control policies, or SCPs. SCPs are a type of policy that you can use with AWS Organizations to manage permissions across your enterprise. SCPs offer central control over the maximum available permissions for accounts in your organization, and SCPs can help ensure your accounts stay aligned with your organization’s access control guidelines. You can find more information in Getting started with AWS Organizations.

Let’s assume you want to allow only DNS validated certificates, not email validated certificates, across your entire enterprise. You could create identity-based policies in all your accounts to deny the use of email validated certificates, but creating an SCP that denies the use of email validation across every account in your enterprise would be much more efficient and effective. However, if you only want to prevent a single IAM role in one of your accounts from issuing email validated certificates, an identity-based policy attached to that role would be the simplest, most granular method.

It’s important to note that no permissions are granted by an SCP. An SCP sets limits on the actions that you can delegate to the IAM users and roles in the affected accounts. You must still attach identity-based policies to IAM users or roles to actually grant permissions. The effective permissions are the logical intersection between what is allowed by the SCP and what is allowed by the identity-based and resource-based policies. In the next section, we examine some example policies and how you can use the intersection of SCPs and identity-based policies to enforce enterprise controls around certificates.

Certificate governance use cases and policy examples

Let’s look at some example use cases for certificate governance, and how you might implement them using the new policy condition keys. We’ve selected a few common use cases, but you can find more policy examples in the ACM documentation.

Example 1: Policy to prevent issuance of email validated certificates

Certificates requested from ACM using email validation require manual action by the domain owner to renew the certificates. This could lead to an outage for your applications if the person receiving the email to validate the domain leaves your organization — or is otherwise unable to validate your domain ownership — and the certificate expires without being renewed.

We recommend using DNS validation, which doesn’t require action on your part to automatically renew a public certificate requested from ACM. The following SCP example demonstrates how to help prevent the issuance of email validated certificates, except for a specific IAM role. This IAM role could be used by application teams who cannot use DNS validation and are given an exception.

Note that this policy will only apply to new certificate requests. ACM managed certificate renewals for certificates that were originally issued using email validation won’t be affected by this policy.

{
    "Version":"2012-10-17",
    "Statement":{
        "Effect":"Deny",
        "Action":"acm:RequestCertificate",
        "Resource":"*",
        "Condition":{
            "StringLike" : {
                "acm:ValidationMethod":"EMAIL"
            },
            "ArnNotLike": {
                "aws:PrincipalArn": [ "arn:aws:iam::123456789012:role/AllowedEmailValidation"]
            }
        }
    }
}

Example 2: Policy to prevent issuance of a wildcard certificate

A wildcard certificate contains a wildcard (*) in the domain name field, and can be used to secure multiple sub-domains of a given domain. For instance, *.example.com could be used for mail.example.com, hr.example.com, and dev.example.com. You might use wildcard certificates to reduce your operational complexity, because you can use the same certificate to protect multiple sites on multiple resources (for example, web servers). However, this also means the wildcard certificates have a larger impact radius, because a compromised wildcard certificate could affect each of the subdomains and resources where it’s used. The US National Security Agency warned about the use of wildcard certificates in 2021.

Therefore, you might want to limit the use of wildcard certificates in your organization. Here’s an example SCP showing how to help prevent the issuance of wildcard certificates using condition keys with ACM:

{
  "Version": "2012-10-17",
  "Statement": [
    {
      "Sid": "DenyWildCards",
      "Effect": "Deny",
      "Action": [
        "acm:RequestCertificate"
      ],
      "Resource": [
        "*"
      ],
      "Condition": {
        "ForAnyValue:StringLike": {
          "acm:DomainNames": [
            "${*}.*"
          ]
        }
      }
    }
  ]
}

Notice that in this example, we’re denying a request for a certificate where the leftmost character of the domain name is a wildcard. In the condition section, ForAnyValue means that if a value in the request matches at least one value in the list, the condition will apply. As acm:DomainNames is a multi-value field, we need to specify whether at least one of the provided values needs to match (ForAnyValue), or all the values must match (ForAllValues), for the condition to be evaluated as true. You can read more about multi-value context keys in the IAM documentation.

Example 3: Allow application teams to request certificates for their FQDN but not others

Consider a scenario where you have multiple application teams, and each application team has their own domain names for their workloads. You might want to only allow application teams to request certificates for their own fully qualified domain name (FQDN). In this example SCP, we’re denying requests for a certificate with the FQDN app1.example.com, unless the request is made by one of the two IAM roles in the condition element. Let’s assume these are the roles used for staging and building the relevant application in production, and the roles should have access to request certificates for the domain.

Multiple conditions in the same block must be evaluated as true for the effect to be applied. In this case, that means denying the request. In the first statement, the request must contain the domain app1.example.com for the first part to evaluate to true. If the identity making the request is not one of the two listed roles, then the condition is evaluated as true, and the request will be denied. The request will not be denied (that is, it will be allowed) if the domain name of the certificate is not app1.example.com or if the role making the request is one of the roles listed in the ArnNotLike section of the condition element. The same applies for the second statement pertaining to application team 2.

Keep in mind that each of these application team roles would still need an identity policy with the appropriate ACM permissions attached to request a certificate from ACM. This policy would be implemented as an SCP and would help prevent application teams from giving themselves the ability to request certificates for domains that they don’t control, even if they created an identity policy allowing them to do so.

{
    "Version":"2012-10-17",
    "Statement":[
    {
        "Sid": "AppTeam1",    
        "Effect":"Deny",
        "Action":"acm:RequestCertificate",
        "Resource":"*",      
        "Condition": {
        "ForAnyValue:StringLike": {
          "acm:DomainNames": "app1.example.com"
        },
        "ArnNotLike": {
          "aws:PrincipalARN": [
            "arn:aws:iam::account:role/AppTeam1Staging",
            "arn:aws:iam::account:role/AppTeam1Prod" ]
        }
      }
   },
   {
        "Sid": "AppTeam2",    
        "Effect":"Deny",
        "Action":"acm:RequestCertificate",
        "Resource":"*",      
        "Condition": {
        "ForAnyValue:StringLike": {
          "acm:DomainNames": "app2.example.com"
        },
        "ArnNotLike": {
          "aws:PrincipalARN": [
            "arn:aws:iam::account:role/AppTeam2Staging",
            "arn:aws:iam::account:role/AppTeam2Prod"]
        }
      }
   }
 ] 
}

Example 4: Policy to prevent issuing certificates with certain key algorithms

You might want to allow or restrict a certain certificate key algorithm. For example, allowing the use of ECDSA certificates but restricting RSA certificates from being issued. See this blog post for more information on the differences between ECDSA and RSA certificates, and how to evaluate which type to use for your workload. Here’s an example SCP showing how to deny requests for a certificate that uses one of the supported RSA key lengths.

{
    "Version":"2012-10-17",
    "Statement":{
        "Effect":"Deny",
        "Action":"acm:RequestCertificate",
        "Resource":"*",
        "Condition":{
            "StringLike" : {
                "acm:KeyAlgorithm":"RSA*"
            }
        }
    }
}  

Notice that we’re using a wildcard after RSA to restrict use of RSA certificates, regardless of the key length (for example, 2048, 4096, and so on).

Creating detective controls for better visibility into certificate issuance across your organization

While you can use IAM policy condition keys as a preventative control, you might also want to implement detective controls to better understand certificate issuance across your organization. Combining these preventative and detective controls helps you establish a comprehensive set of enterprise controls for certificate governance. For instance, imagine you use an SCP to deny all attempts to issue a certificate using email validation. You will have CloudTrail logs for RequestCertificate API calls that are denied by this policy, and can use these events to notify the appropriate application team that they should be using DNS validation.

You’re probably familiar with the access denied error message received when AWS explicitly or implicitly denies an authorization request. The following is an example of the error received when a certificate request is denied by an SCP:

"An error occurred (AccessDeniedException) when calling the RequestCertificate operation: User: arn:aws:sts::account:role/example is not authorized to perform: acm:RequestCertificate on resource: arn:aws:acm:us-east-1:account:certificate/* with an explicit deny in a service control policy"

If you use AWS Organizations, you can have a consolidated view of the CloudTrail events for certificate issuance using ACM by creating an organization trail. Please refer to the CloudTrail documentation for more information on security best practices in CloudTrail. Using Amazon EventBridge, you can simplify certificate lifecycle management by using event-driven workflows to notify or automatically act on expiring TLS certificates. Learn about the example use cases for the event types supported by ACM in this Security Blog post.

Conclusion

In this blog post, we discussed the new IAM policy conditions available for use with ACM. We also demonstrated some example use cases and policies where you might use these conditions to provide more granular control on the issuance of certificates across your enterprise. We also briefly covered SCPs, identity-based policies, and how you can get better visibility into certificate governance using services like AWS CloudTrail and Amazon EventBridge. See the AWS Certificate Manager documentation to learn more about using policy conditions with ACM, and then get started issuing certificates with AWS Certificate Manager.

 
If you have feedback about this post, submit comments in the Comments section below. If you have questions about this post, contact AWS Support.

Want more AWS Security news? Follow us on Twitter.

Roger Park

Roger Park

Roger is a Senior Security Content Specialist at AWS Security focusing on data protection. He has worked in cybersecurity for almost ten years as a writer and content producer. In his spare time, he enjoys trying new cuisines, gardening, and collecting records.

Zach Miller

Zach Miller

Zach is a Senior Security Specialist Solutions Architect at AWS. His background is in data protection and security architecture, focused on a variety of security domains, including cryptography, secrets management, and data classification. Today, he is focused on helping enterprise AWS customers adopt and operationalize AWS security services to increase security effectiveness and reduce risk.

Chandan Kundapur

Chandan Kundapur

Chandan is a Principal Product Manager on the AWS Certificate Manager (ACM) team. With over 15 years of cybersecurity experience, he has a passion for driving PKI product strategy.

Brandonn Gorman

Brandonn Gorman

Brandonn is a Senior Software Development Engineer at AWS Cryptography. He has a background in secure system architecture, public key infrastructure management systems, and data storage solutions. In his free time, he explores the national parks, seeks out vinyl records, and trains for races.

Secure by Design: AWS to enhance MFA requirements in 2024

Post Syndicated from Steve Schmidt original https://aws.amazon.com/blogs/security/security-by-design-aws-to-enhance-mfa-requirements-in-2024/

Security is our top priority at Amazon Web Services (AWS). To that end, I’m excited to share that AWS is further strengthening the default security posture of our customers’ environments by requiring the use of multi-factor authentication (MFA), beginning with the most privileged users in their accounts. MFA is one of the simplest and most effective ways to enhance account security, offering an additional layer of protection to help prevent unauthorized individuals from gaining access to systems or data.

Beginning in mid-2024, customers signing in to the AWS Management Console with the root user of an AWS Organizations management account will be required to enable MFA to proceed. Customers who must enable MFA will be notified of the upcoming change through multiple channels, including a prompt when they sign in to the console.

We will expand this program throughout 2024 to additional scenarios such as standalone accounts (those outside an organization in AWS Organizations) as we release features that make MFA even easier to adopt and manage at scale. That said, there’s no need to wait for 2024 to take advantage of the benefits of MFA. You can visit our AWS Identity and Access Management (IAM) user guide to learn how to enable MFA on AWS now, and eligible customers can request a free security key through our ordering portal.

Verifying that the most privileged users in AWS are protected with MFA is just the latest step in our commitment to continuously enhance the security posture of AWS customers. To help more customers get started on their MFA journey, in fall 2021, we began offering a free MFA security key to eligible AWS account owners in the United States. And in November 2022, we launched support for customers to register up to eight MFA devices per account root user or per IAM user in AWS, creating additional flexibility and resiliency for your MFA strategy.

We recommend that everyone adopts some form of MFA, and additionally encourage customers to consider choosing forms of MFA that are phishing-resistant, such as security keys. While the requirement to enable MFA for root users of Organizations management accounts is coming in 2024, we strongly encourage our customers to get started today by enabling MFA not only for their root users, but for all user types in their environments. For example, you can enable multiple MFA options, including passkeys and authenticator apps, for AWS IAM Identity Center. You can visit our AWS IAM Identity Center MFA user guide to learn more.

 
If you have feedback about this post, submit comments in the Comments section below. If you have questions about this post, contact AWS Support.

Want more AWS Security news? Follow us on Twitter.

Steve Schmidt

Having joined Amazon in February 2008, Steve is the current chief security officer for Amazon. He leads the information security, physical security, security engineering, and regulatory program teams. From 2010 to 2022, Steve was the chief information security officer for Amazon Web Services (AWS). Prior to joining Amazon, Steve had an extensive career at the FBI, where he served as a senior executive. His responsibilities there included a term as acting chief technology officer, overseeing development and operation of technical collection and analysis, and as the section chief overseeing the FBI Cyber Division components responsible for computer and network intrusion technical investigation.

Get the full benefits of IMDSv2 and disable IMDSv1 across your AWS infrastructure

Post Syndicated from Saju Sivaji original https://aws.amazon.com/blogs/security/get-the-full-benefits-of-imdsv2-and-disable-imdsv1-across-your-aws-infrastructure/

The Amazon Elastic Compute Cloud (Amazon EC2) Instance Metadata Service (IMDS) helps customers build secure and scalable applications. IMDS solves a security challenge for cloud users by providing access to temporary and frequently-rotated credentials, and by removing the need to hardcode or distribute sensitive credentials to instances manually or programmatically. The Instance Metadata Service Version 2 (IMDSv2) adds protections; specifically, IMDSv2 uses session-oriented authentication with the following enhancements:

  • IMDSv2 requires the creation of a secret token in a simple HTTP PUT request to start the session, which must be used to retrieve information in IMDSv2 calls.
  • The IMDSv2 session token must be used as a header in subsequent IMDSv2 requests to retrieve information from IMDS. Unlike a static token or fixed header, a session and its token are destroyed when the process using the token terminates. IMDSv2 sessions can last up to six hours.
  • A session token can only be used directly from the EC2 instance where that session began.
  • You can reuse a token or create a new token with every request.
  • Session token PUT requests are blocked if they contain an X-forwarded-for header.

In a previous blog post, we explained how these new protections add defense-in-depth for third-party and external application vulnerabilities that could be used to try to access the IMDS.

You won’t be able to get the full benefits of IMDSv2 until you disable IMDSv1. While IMDS is provided by the instance itself, the calls to IMDS are from your software. This means your software must support IMDSv2 before you can disable IMDSv1. In addition to AWS SDKs, CLIs, and tools like the SSM agents supporting IMDSv2, you can also use the IMDS Packet Analyzer to pinpoint exactly what you need to update to get your instances ready to use only IMDSv2. These tools make it simpler to transition to IMDSv2 as well as launch new infrastructure with IMDSv1 disabled. All instances launched with AL2023 set the instance to provide only IMDSv2 (IMDSv1 is disabled) by default, with AL2023 also not making IMDSv1 calls.

AWS customers who want to get the benefits of IMDSv2 have told us they want to use IMDSv2 across both new and existing, long-running AWS infrastructure. This blog post shows you scalable solutions to identify existing infrastructure that is providing IMDSv1, how to transition to IMDSv2 on your infrastructure, and how to completely disable IMDSv1. After reviewing this blog, you will be able to set new Amazon EC2 launches to IMDSv2. You will also learn how to identify existing software making IMDSv1 calls, so you can take action to update your software and then require IMDSv2 on existing EC2 infrastructure.

Identifying IMDSv1-enabled EC2 instances

The first step in transitioning to IMDSv2 is to identify all existing IMDSv1-enabled EC2 instances. You can do this in various ways.

Using the console

You can identify IMDSv1-enabled instances using the IMDSv2 attribute column in the Amazon EC2 page in the AWS Management Console.

To view the IMDSv2 attribute column:

  1. Open the Amazon EC2 console and go to Instances.
  2. Choose the settings icon in the top right.
  3. Scroll down to IMDSv2, turn on the slider.
  4. Choose Confirm.

This gives you the IMDS status of your instances. A status of optional means that IMDSv1 is enabled on the instance and required means that IMDSv1 is disabled.

Figure 1: Example of IMDS versions for EC2 instances in the console

Figure 1: Example of IMDS versions for EC2 instances in the console

Using the AWS CLI

You can identify IMDSv1-enabled instances using the AWS Command Line Interface (AWS CLI) by running the aws ec2 describe-instances command and checking the value of HttpTokens. The HttpTokens value determines what version of IMDS is enabled, with optional enabling IMDSv1 and IMDSv2 and required means IMDSv2 is required. Similar to using the console, the optional status indicates that IMDSv1 is enabled on the instance and required indicates that IMDSv1 is disabled.

"MetadataOptions": {
                        "State": "applied", 
                        "HttpEndpoint": "enabled", 
                        "HttpTokens": "optional", 
                        "HttpPutResponseHopLimit": 1
                    },

[ec2-user@ip-172-31-24-101 ~]$ aws ec2 describe-instances | grep '"HttpTokens": "optional"' | wc -l
4

Using AWS Config

AWS Config continually assesses, audits, and evaluates the configurations and relationships of your resources on AWS, on premises, and on other clouds. The AWS Config rule ec2-imdsv2-check checks whether your Amazon EC2 instance metadata version is configured with IMDSv2. The rule is NON_COMPLIANT if the HttpTokens is set to optional, which means the EC2 instance has IMDSv1 enabled.

Figure 2: Example of noncompliant EC2 instances in the AWS Config console

Figure 2: Example of noncompliant EC2 instances in the AWS Config console

After this AWS Config rule is enabled, you can set up AWS Config notifications through Amazon Simple notification Service (Amazon SNS).

Using Security Hub

AWS Security Hub provides detection and alerting capability at the account and organization levels. You can configure cross-Region aggregation in Security Hub to gain insight on findings across Regions. If using AWS Organizations, you can configure a Security Hub designated account to aggregate findings across accounts in your organization.

Security Hub has an Amazon EC2 control ([EC2.8] Amazon EC2 instances should use Instance Metadata Service Version 2 (IMDSv2)) that uses the AWS Config rule ec2-imdsv2-check to check if the instance metadata version is configured with IMDSv2. The rule is NON_COMPLIANT if the HttpTokens is set to optional, which means EC2 instance has IMDSv1 enabled.

Figure 3: Example of AWS Security Hub showing noncompliant EC2 instances

Figure 3: Example of AWS Security Hub showing noncompliant EC2 instances

Using Amazon Event Bridge, you can also set up alerting for the Security Hub findings when the EC2 instances are noncompliant for IMDSv2.

{
  "source": ["aws.securityhub"],
  "detail-type": ["Security Hub Findings - Imported"],
  "detail": {
    "findings": {
      "ProductArn": ["arn:aws:securityhub:us-west-2::product/aws/config"],
      "Title": ["ec2-imdsv2-check"]
    }
  }
}

Identifying if EC2 instances are making IMDSv1 calls

Not all of your software will be making IMDSv1 calls; your dependent libraries and tools might already be compatible with IMDSv2. However, to mitigate against compatibility issues in requiring IMDSv2 and disabling IMDSv1 entirely, you must check for remaining IMDSv1 calls from your software. After you’ve identified that there are instances with IMDSv1 enabled, investigate if your software is making IMDSv1 calls. Most applications make IMDSv1 calls at instance launch and shutdown. For long running instances, we recommend monitoring IMDSv1 calls during a launch or a stop and restart cycle.

You can check whether your software is making IMDSv1 calls by checking the MetadataNoToken metric in Amazon CloudWatch. You can further identify the source of IMDSv1 calls by using the IMDS Packet Analyzer tool.

Steps to check IMDSv1 usage with CloudWatch

  1. Open the CloudWatch console.
  2. Go to Metrics and then All Metrics.
  3. Select EC2 and then choose Per-Instance Metrics.
  4. Search and add the Metric MetadataNoToken for the instances you’re interested in.
Figure 4: CloudWatch dashboard for MetadataNoToken per-instance metric

Figure 4: CloudWatch dashboard for MetadataNoToken per-instance metric

You can use expressions in CloudWatch to view account wide metrics.

SEARCH('{AWS/EC2,InstanceId} MetricName="MetadataNoToken"', 'Maximum')
Figure 5: Using CloudWatch expressions to view account wide metrics for MetadataNoToken

Figure 5: Using CloudWatch expressions to view account wide metrics for MetadataNoToken

You can combine SEARCH and SORT expressions in CloudWatch to help identify the instances using IMDSv1.

SORT(SEARCH('{AWS/EC2,InstanceId} MetricName="MetadataNoToken"', 'Sum', 300), SUM, DESC, 10)
Figure 6: Another example of using CloudWatch expressions to view account wide metrics

Figure 6: Another example of using CloudWatch expressions to view account wide metrics

If you have multiple AWS accounts or use AWS Organizations, you can set up a centralized monitoring account using CloudWatch cross account observability.

IMDS Packet Analyzer

The IMDS Packet Analyzer is an open source tool that identifies and logs IMDSv1 calls from your software, including software start-up on your instance. This tool can assist in identifying the software making IMDSv1 calls on EC2 instances, allowing you to pinpoint exactly what you need to update to get your software ready to use IMDSv2. You can run the IMDS Packet Analyzer from a command line or install it as a service. For more information, see IMDS Packet Analyzer on GitHub.

Disabling IMDSv1 and maintaining only IMDSv2 instances

After you’ve monitored and verified that the software on your EC2 instances isn’t making IMDSv1 calls, you can disable IMDSv1 on those instances. For all compatible workloads, we recommend using Amazon Linux 2023, which offers several improvements (see launch announcement), including requiring IMDSv2 (disabling IMDSv1) by default.

You can also create and modify AMIs and EC2 instances to disable IMDSv1. Configure the AMI provides guidance on how to register a new AMI or change an existing AMI by setting the imds-support parameter to v2.0. If you’re using container services (such as ECS or EKS), you might need a bigger hop limit to help avoid falling back to IMDSv1. You can use the modify-instance-metadata-options launch parameter to make the change. We recommend testing with a hop limit of three in container environments.

To create a new instance

For new instances, you can disable IMDSv1 and enable IMDSv2 by specifying the metadata-options parameter using the run-instance CLI command.

aws ec2 run-instances
    --image-id <ami-0123456789example>
    --instance-type c3.large
    --metadata-options “HttpEndpoint=enabled,HttpTokens=required”

To modify the running instance

aws ec2 modify-instance-metadata-options \
--instance-id <instance-0123456789example> \
--http-tokens required \
--http-endpoint enabled

To configure a new AMI

aws ec2 register-image \
    --name <my-image> \
    --root-device-name /dev/xvda \
    --block-device-mappings DeviceName=/dev/xvda,Ebs={SnapshotId=<snap-0123456789example>} \
    --imds-support v2.0

To modify an existing AMI

aws ec2 modify-image-attribute \
    --image-id <ami-0123456789example> \
    --imds-support v2.0

Using the console

If you’re using the console to launch instances, after selecting Launch Instance from AWS Console, choose the Advanced details tab, scroll down to Metadata version and select V2 only (token required).

Figure 7: Modifying IMDS version using the console

Figure 7: Modifying IMDS version using the console

Using EC2 launch templates

You can use an EC2 launch template as an instance configuration template that an Amazon Auto Scaling group can use to launch EC2 instances. When creating the launch template using the console, you can specify the Metadata version and select V2 only (token required).

Figure 8: Modifying the IMDS version in the EC2 launch templates

Figure 8: Modifying the IMDS version in the EC2 launch templates

Using CloudFormation with EC2 launch templates

When creating an EC2 launch template using AWS CloudFormation, you must specify the MetadataOptions property to use only IMDSv2 by setting HttpTokens as required.

In this state, retrieving the AWS Identity and Access Management (IAM) role credentials always returns IMDSv2 credentials; IMDSv1 credentials are not available.

{
"HttpEndpoint" : <String>,
"HttpProtocolIpv6" : <String>,
"HttpPutResponseHopLimit" : <Integer>,
"HttpTokens" : required,
"InstanceMetadataTags" : <String>
}

Using Systems Manager automation runbook

You can run the EnforceEC2InstanceIMDSv2 automation document available in AWS Systems Manager, which will enforce IMDSv2 on the EC2 instance using the ModifyInstanceMetadataOptions API.

  1. Open the Systems Manager console, and then select Automation from the navigation pane.
  2. Choose Execute automation.
  3. On the Owned by Amazon tab, for Automation document, enter EnforceEC2InstanceIMDSv2, and then press Enter.
  4. Choose EnforceEC2InstanceIMDSv2 document, and then choose Next.
  5. For Execute automation document, choose Simple execution.

    Note: If you need to run the automation on multiple targets, then choose Rate Control.

  6. For Input parameters, enter the ID of EC2 instance under InstanceId
  7. For AutomationAssumeRole, select a role.

    Note: To change the target EC2 instance, the AutomationAssumeRole must have ec2:ModifyInstanceMetadataOptions and ec2:DescribeInstances permissions. For more information about creating the assume role for Systems Manager Automation, see Create a service role for Automation.

  8. Choose Execute.

Using the AWS CDK

If you use the AWS Cloud Development Kit (AWS CDK) to launch instances, you can use it to set the requireImdsv2 property to disable IMDSv1 and enable IMDSv2.

new ec2.Instance(this, 'Instance', {
        // <... other parameters>
        requireImdsv2: true,
})

Using AWS SDK

The new clients for AWS SDK for Java 2.x use IMDSv2, and you can use the new clients to retrieve instance metadata for your EC2 instances. See Introducing a new client in the AWS SDK for Java 2.x for retrieving EC2 Instance Metadata for instructions.

Maintain only IMDSv2 EC2 instances

To maintain only IMDSv2 instances, you can implement service control policies and IAM policies that verify that users and software on your EC2 instances can only use instance metadata using IMDSv2. This policy specifies that RunInstance API calls require the EC2 instance use only IMDSv2. We recommend implementing this policy after all of the instances in associated accounts are free of IMDSv1 calls and you have migrated all of the instances to use only IMDSv2.

{
    "Version": "2012-10-17",
    "Statement": [
               {
            "Sid": "RequireImdsV2",
            "Effect": "Deny",
            "Action": "ec2:RunInstances",
            "Resource": "arn:aws:ec2:*:*:instance/*",
            "Condition": {
                "StringNotEquals": {
                    "ec2:MetadataHttpTokens": "required"
                }
            }
        }
    ]
} 

You can find more details on applicable service control policies (SCPs) and IAM policies in the EC2 User Guide.

Restricting credential usage using condition keys

As an additional layer of defence, you can restrict the use of your Amazon EC2 role credentials to work only when used in the EC2 instance to which they are issued. This control is complementary to IMDSv2 since both can work together. The AWS global condition context keys for EC2 credential control properties (aws:EC2InstanceSourceVPC and aws:EC2InstanceSourcePrivateIPv4) restrict the VPC endpoints and private IPs that can use your EC2 instance credentials, and you can use these keys in service control policies (SCPs) or IAM policies. Examples of these policies are in this blog post.

Conclusion

You won’t be able to get the full benefits of IMDSv2 until you disable IMDSv1. In this blog post, we showed you how to identify IMDSv1-enabled EC2 instances and how to determine if and when your software is making IMDSv1 calls. We also showed you how to disable IMDSv1 on new and existing EC2 infrastructure after your software is no longer making IMDSv1 calls. You can use these tools to transition your existing EC2 instances, and set your new EC2 launches, to use only IMDSv2.

If you have feedback about this post, submit comments in the Comments section below. If you have questions about this post, start a new thread on the AWS Compute re:Post or contact AWS Support.

Want more AWS Security news? Follow us on Twitter.

Saju Sivaji

Saju Sivaji

Saju is Senior Technical Program Manager with the AWS Security organization. When Saju isn’t managing security expectation programs to help raise the security bar for both internal and external customers, he enjoys travelling, racket sports, and bicycling.

Joshua Levinson

Joshua Levinson

Joshua is a Principal Product Manager at AWS on the Amazon EC2 team. He is passionate about helping customers with highly scalable features on EC2 and across AWS and enjoys the challenge of building simplified solutions to complex problems. Outside of work, he enjoys cooking, reading with his kids, and Olympic weightlifting.

How AWS threat intelligence deters threat actors

Post Syndicated from Mark Ryland original https://aws.amazon.com/blogs/security/how-aws-threat-intelligence-deters-threat-actors/

Every day across the Amazon Web Services (AWS) cloud infrastructure, we detect and successfully thwart hundreds of cyberattacks that might otherwise be disruptive and costly. These important but mostly unseen victories are achieved with a global network of sensors and an associated set of disruption tools. Using these capabilities, we make it more difficult and expensive for cyberattacks to be carried out against our network, our infrastructure, and our customers. But we also help make the internet as a whole a safer place by working with other responsible providers to take action against threat actors operating within their infrastructure. Turning our global-scale threat intelligence into swift action is just one of the many steps that we take as part of our commitment to security as our top priority. Although this is a never-ending endeavor and our capabilities are constantly improving, we’ve reached a point where we believe customers and other stakeholders can benefit from learning more about what we’re doing today, and where we want to go in the future.

Global-scale threat intelligence using the AWS Cloud

With the largest public network footprint of any cloud provider, our scale at AWS gives us unparalleled insight into certain activities on the internet, in real time. Some years ago, leveraging that scale, AWS Principal Security Engineer Nima Sharifi Mehr started looking for novel approaches for gathering intelligence to counter threats. Our teams began building an internal suite of tools, given the moniker MadPot, and before long, Amazon security researchers were successfully finding, studying, and stopping thousands of digital threats that might have affected its customers.

MadPot was built to accomplish two things: first, discover and monitor threat activities and second, disrupt harmful activities whenever possible to protect AWS customers and others. MadPot has grown to become a sophisticated system of monitoring sensors and automated response capabilities. The sensors observe more than 100 million potential threat interactions and probes every day around the world, with approximately 500,000 of those observed activities advancing to the point where they can be classified as malicious. That enormous amount of threat intelligence data is ingested, correlated, and analyzed to deliver actionable insights about potentially harmful activity happening across the internet. The response capabilities automatically protect the AWS network from identified threats, and generate outbound communications to other companies whose infrastructure is being used for malicious activities.

Systems of this sort are known as honeypots—decoys set up to capture threat actor behavior—and have long served as valuable observation and threat intelligence tools. However, the approach we take through MadPot produces unique insights resulting from our scale at AWS and the automation behind the system. To attract threat actors whose behaviors we can then observe and act on, we designed the system so that it looks like it’s composed of a huge number of plausible innocent targets. Mimicking real systems in a controlled and safe environment provides observations and insights that we can often immediately use to help stop harmful activity and help protect customers.

Of course, threat actors know that systems like this are in place, so they frequently change their techniques—and so do we. We invest heavily in making sure that MadPot constantly changes and evolves its behavior, continuing to have visibility into activities that reveal the tactics, techniques, and procedures (TTPs) of threat actors. We put this intelligence to use quickly in AWS tools, such as AWS Shield and AWS WAF, so that many threats are mitigated early by initiating automated responses. When appropriate, we also provide the threat data to customers through Amazon GuardDuty so that their own tooling and automation can respond.

Three minutes to exploit attempt, no time to waste

Within approximately 90 seconds of launching a new sensor within our MadPot simulated workload, we can observe that the workload has been discovered by probes scanning the internet. From there, it takes only three minutes on average before attempts are made to penetrate and exploit it. This is an astonishingly short amount of time, considering that these workloads aren’t advertised or part of other visible systems that would be obvious to threat actors. This clearly demonstrates the voracity of scanning taking place and the high degree of automation that threat actors employ to find their next target.

As these attempts run their course, the MadPot system analyzes the telemetry, code, attempted network connections, and other key data points of the threat actor’s behavior. This information becomes even more valuable as we aggregate threat actor activities to generate a more complete picture of available intelligence.

Disrupting attacks to maintain business as usual

In-depth threat intelligence analysis also happens in MadPot. The system launches the malware it captures in a sandboxed environment, connects information from disparate techniques into threat patterns, and more. When the gathered signals provide high enough confidence in a finding, the system acts to disrupt threats whenever possible, such as disconnecting a threat actor’s resources from the AWS network. Or, it could entail preparing that information to be shared with the wider community, such as a computer emergency response team (CERT), internet service provider (ISP), a domain registrar, or government agency so that they can help disrupt the identified threat.

As a major internet presence, AWS takes on the responsibility to help and collaborate with the security community when possible. Information sharing within the security community is a long-standing tradition and an area where we’ve been an active participant for years.

In the first quarter of 2023:

  • We used 5.5B signals from our internet threat sensors and 1.5B signals from our active network probes in our anti-botnet security efforts.
  • We stopped over 1.3M outbound botnet-driven DDoS attacks.
  • We shared our security intelligence findings, including nearly a thousand botnet C2 hosts, with relevant hosting providers and domain registrars.
  • We traced back and worked with external parties to dismantle the sources of 230k L7/HTTP(S) DDoS attacks.

Three examples of MadPot’s effectiveness: Botnets, Sandworm, and Volt Typhoon

Recently, MadPot detected, collected, and analyzed suspicious signals that uncovered a distributed denial of service (DDoS) botnet that was using the domain free.bigbots.[tld] (the top-level domain is omitted) as a command and control (C2) domain. A botnet is made up of compromised systems that belong to innocent parties—such as computers, home routers, and Internet of Things (IoT) devices—that have been previously compromised, with malware installed that awaits commands to flood a target with network packets. Bots under this C2 domain were launching 15–20 DDoS attacks per hour at a rate of about 800 million packets per second.

As MadPot mapped out this threat, our intelligence revealed a list of IP addresses used by the C2 servers corresponding to an extremely high number of requests from the bots. Our systems blocked those IP addresses from access to AWS networks so that a compromised customer compute node on AWS couldn’t participate in the attacks. AWS automation then used the intelligence gathered to contact the company that was hosting the C2 systems and the registrar responsible for the DNS name. The company whose infrastructure was hosting the C2s took them offline in less than 48 hours, and the domain registrar decommissioned the DNS name in less than 72 hours. Without the ability to control DNS records, the threat actor could not easily resuscitate the network by moving the C2s to a different network location. In less than three days, this widely distributed malware and the C2 infrastructure required to operate it was rendered inoperable, and the DDoS attacks impacting systems throughout the internet ground to a halt.

MadPot is effective in detecting and understanding the threat actors that target many different kinds of infrastructure, not just cloud infrastructure, including the malware, ports, and techniques that they may be using. Thus, through MadPot we identified the threat group called Sandworm—the cluster associated with Cyclops Blink, a piece of malware used to manage a botnet of compromised routers. Sandworm was attempting to exploit a vulnerability affecting WatchGuard network security appliances. With close investigation of the payload, we identified not only IP addresses but also other unique attributes associated with the Sandworm threat that were involved in an attempted compromise of an AWS customer. MadPot’s unique ability to mimic a variety of services and engage in high levels of interaction helped us capture additional details about Sandworm campaigns, such as services that the actor was targeting and post-exploitation commands initiated by that actor. Using this intelligence, we notified the customer, who promptly acted to mitigate the vulnerability. Without this swift action, the actor might have been able to gain a foothold in the customer’s network and gain access to other organizations that the customer served.

For our final example, the MadPot system was used to help government cyber and law enforcement authorities identify and ultimately disrupt Volt Typhoon, the widely-reported state-sponsored threat actor that focused on stealthy and targeted cyber espionage campaigns against critical infrastructure organizations. Through our investigation inside MadPot, we identified a payload submitted by the threat actor that contained a unique signature, which allowed identification and attribution of activities by Volt Typhoon that would otherwise appear to be unrelated. By using the data lake that stores a complete history of MadPot interactions, we were able to search years of data very quickly and ultimately identify other examples of this unique signature, which was being sent in payloads to MadPot as far back as August 2021. The previous request was seemingly benign in nature, so we believed that it was associated with a reconnaissance tool. We were then able to identify other IP addresses that the threat actor was using in recent months. We shared our findings with government authorities, and those hard-to-make connections helped inform the research and conclusions of the Cybersecurity and Infrastructure Security Agency (CISA) of the U.S. government. Our work and the work of other cooperating parties resulted in their May 2023 Cybersecurity advisory. To this day, we continue to observe the actor probing U.S. network infrastructure, and we continue to share details with appropriate government cyber and law enforcement organizations.

Putting global-scale threat intelligence to work for AWS customers and beyond

At AWS, security is our top priority, and we work hard to help prevent security issues from causing disruption to your business. As we work to defend our infrastructure and your data, we use our global-scale insights to gather a high volume of security intelligence—at scale and in real time—to help protect you automatically. Whenever possible, AWS Security and its systems disrupt threats where that action will be most impactful; often, this work happens largely behind the scenes. As demonstrated in the botnet case described earlier, we neutralize threats by using our global-scale threat intelligence and by collaborating with entities that are directly impacted by malicious activities. We incorporate findings from MadPot into AWS security tools, including preventative services, such as AWS WAF, AWS Shield, AWS Network Firewall, and Amazon Route 53 Resolver DNS Firewall, and detective and reactive services, such as Amazon GuardDuty, AWS Security Hub, and Amazon Inspector, putting security intelligence when appropriate directly into the hands of our customers, so that they can build their own response procedures and automations.

But our work extends security protections and improvements far beyond the bounds of AWS itself. We work closely with the security community and collaborating businesses around the world to isolate and take down threat actors. In the first half of this year, we shared intelligence of nearly 2,000 botnet C2 hosts with relevant hosting providers and domain registrars to take down the botnets’ control infrastructure. We also traced back and worked with external parties to dismantle the sources of approximately 230,000 Layer 7 DDoS attacks. The effectiveness of our mitigation strategies relies heavily on our ability to quickly capture, analyze, and act on threat intelligence. By taking these steps, AWS is going beyond just typical DDoS defense, and moving our protection beyond our borders.

We’re glad to be able to share information about MadPot and some of the capabilities that we’re operating today. For more information, see this presentation from our most recent re:Inforce conference: How AWS threat intelligence becomes managed firewall rules, as well as an overview post published today, Meet MadPot, a threat intelligence tool Amazon uses to protect customers from cybercrime, which includes some good information about the AWS security engineer behind the original creation of MadPot. Going forward, you can expect to hear more from us as we develop and enhance our threat intelligence and response systems, making both AWS and the internet as a whole a safer place.

 
If you have feedback about this post, submit comments in the Comments section below. If you have questions about this post, contact AWS Support.

Want more AWS Security news? Follow us on Twitter.

Mark Ryland

Mark Ryland

Mark is the director of the Office of the CISO for AWS. He has over 30 years of experience in the technology industry, and has served in leadership roles in cybersecurity, software engineering, distributed systems, technology standardization, and public policy. Previously, he served as the Director of Solution Architecture and Professional Services for the AWS World Public Sector team.