AWS is excited to announce a new eBook, 5 Keys to Secure Enterprise Messaging. The new eBook includes best practices for addressing the security and compliance risks associated with messaging apps.
An estimated 3.09 billion mobile phone users access messaging apps to communicate, and this figure is projected to grow to 3.51 billion users in 2025.
Legal and regulatory requirements for data protection, privacy, and data retention have made protecting business communications a priority for organizations across the globe. Although consumer messaging apps are convenient and support real-time communication with colleagues, customers, and partners, they often lack the robust security and administrative controls many businesses require.
The eBook details five keys to secure enterprise messaging that balance people, process, and technology.
We encourage you to read the eBook, and learn about:
Establishing messaging policies and guidelines that are effective for your workforce
Training employees to use messaging apps in a way that doesn’t increase organizational risk
Building a security-first culture
Using true end-to-end encryption (E2EE) to secure communications
Retaining data to help meet requirements, without exposing it to outside parties
The following is background on ransomware, CIS, and the initiatives that led to the publication of this new blueprint.
The Ransomware Task Force
In April of 2021, the U.S. government launched the Ransomware Task Force (RTF), which has the mission of uniting key stakeholders across industry, government, and civil society to create new solutions, break down silos, and find effective new methods of countering the ransomware threat. The RTF has since launched several progress reports with specific recommendations, including the development of the RTF Blueprint for Ransomware Defense, which provides a framework with practical steps to mitigate, respond to, and recover from ransomware. AWS is a member of the RTF, and we have taken action to create our own AWS Blueprint for Ransomware Defense that maps actionable and foundational security controls to AWS services and features that customers can use to implement those controls. The AWS Blueprint for Ransomware Defense is based on the CIS Controls framework.
Center for Internet Security
The Center for Internet Security (CIS) is a community-driven nonprofit, globally recognized for establishing best practices for securing IT systems and data. To help establish foundational defense mechanisms, a subset of the CIS Critical Security Controls (CIS Controls) have been identified as important first steps in the implementation of a robust program to prevent, respond to, and recover from ransomware events. This list of controls was established to provide safeguards against the most impactful and well-known internet security issues. The controls have been further prioritized into three implementation groups (IGs), to help guide their implementation. IG1, considered “essential cyber hygiene,” provides foundational safeguards. IG2 builds on IG1 by including the controls in IG1 plus a number of additional considerations. Finally, IG3 includes the controls in IG1 and IG2, with an additional layer of controls that protect against more sophisticated security issues.
CIS recommends that organizations use the CIS IG1 controls as basic preventative steps against ransomware events. We’ve produced a mapping of AWS services that can help you implement aspects of these controls in your AWS environment. Ransomware is a complex event, and the best course of action to mitigate risk is to apply a thoughtful strategy of defense in depth. The mitigations and controls outlined in this mapping document are general security best practices, but are a non-exhaustive list.
Because data is often vital to the operation of mission-critical services, ransomware can severely disrupt business processes and applications that depend on this data. For this reason, many organizations are looking for effective security controls that will improve their security posture against these types of events. We hope you find the information in the AWS Blueprint for Ransomware Defense helpful and incorporate it as a tool to provide additional layers of security to help keep your data safe.
Let us know if you have any feedback through the AWS Security Contact Us page. Please reach out if there is anything we can do to add to the usefulness of the blueprint or if you have any additional questions on security and compliance. You can find more information from the IST (Institute for Security and Technology) describing ransomware and how to protect yourself on the IST website.
If you have feedback about this post, submit comments in the Comments section below. If you have questions about this post, contact AWS Support.
Want more AWS Security news? Follow us on Twitter.
At Grab, data engineers work with large sets of data on a daily basis. They design and build advanced machine learning models that provide strategic insights using all of the data that flow through the Grab Platform. This enables us to provide a better experience to our users, for example by increasing the supply of drivers in areas where our predictive models indicate a surge in demand in a timely fashion.
Grab has a mature privacy programme that complies with applicable privacy laws and regulations and we use tools to help identify, assess, and appropriately manage our privacy risks. To ensure that our users’ data are well-protected and avoid any human-related errors, we always take extra measures to secure this data.
However, data engineers will still require access to actual production data in order to tune effective machine learning models and ensure the models work as intended in production.
In this article, we will describe how the Grab’s data streaming team (Coban), along with the data platform and user teams, have enforced Personally Identifiable Information (PII) masking on machine learning data streaming pipelines. This ensures that we uphold a high standard and embody a privacy by design culture, while enabling data engineers to refine their models with sanitised production data.
PII tagging
Data streaming at Grab leverages the Protocol Buffers (protobuf) data format to structure in-transit data. When creating a new stream, developers must describe its fields in a protobuf schema that is then used for serialising the data wherever it is sent over the wire, and deserialising it wherever it is consumed.
A fictional example schema looks like this (the indexes are arbitrary, but commonly created in sequence):
Over here, the fourth field passengerName involves a PII and the data pertaining to that field should never be accessible by any data engineer. Therefore, developers owning the stream must tag that field with a PII label like this:
The imported pii.proto library defines the tags for all possible types of PII. In the example above, the passengerName field has not only been flagged as PII, but is also marked as PII_TYPE_NAME – a specific type of PII that conveys the names of individuals. This high-level typing enables more flexible PII masking methods, which we will explain later.
Once the PII fields have been properly identified and tagged, developers need to publish the schema of their new stream into Coban’s Git repository. A Continuous Integration (CI) pipeline described below ensures that all fields describing PII are correctly tagged.
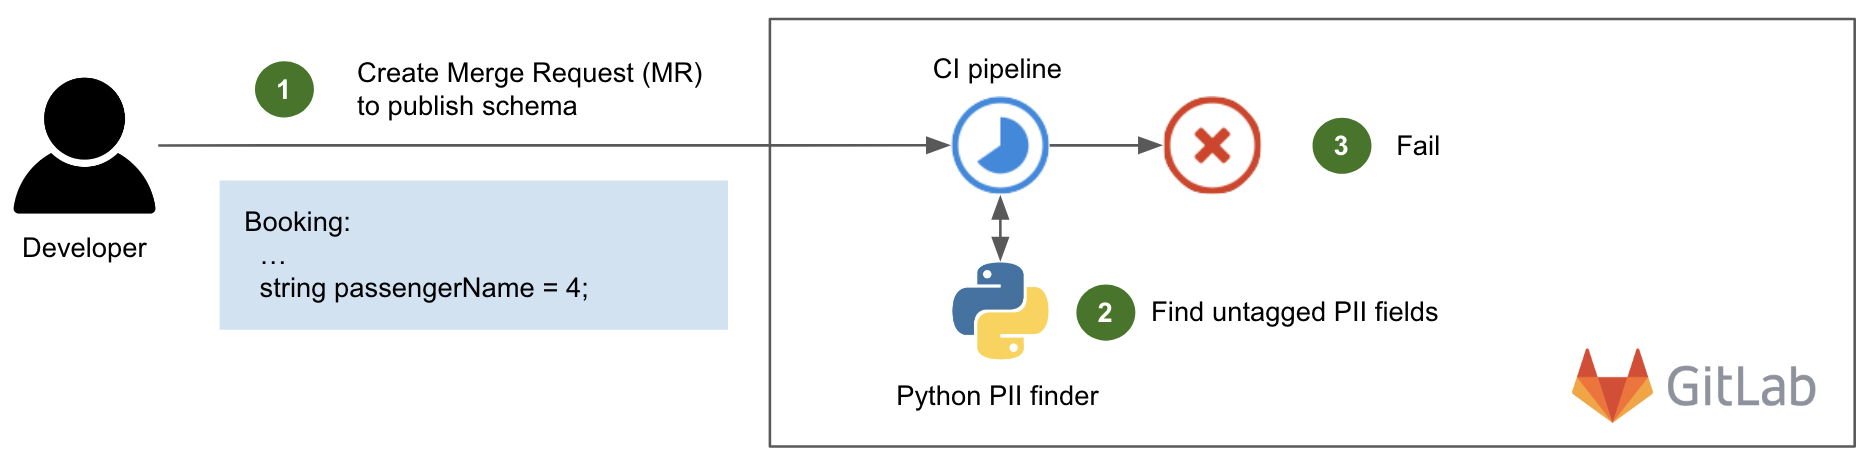
The following diagram shows this CI pipeline in action.
Fig. 1 CI pipeline failure due to untagged PII fields
When a developer creates a Merge Request (MR) or pushes a new commit to create or update a schema (step 1), the CI pipeline is triggered. It runs an in-house Python script that scans each variable name of the committed schema and tests it against an extensive list of PII keywords that is regularly updated, such as name, address, email, phone, etc (step 2). If there is a match and the variable is not tagged with the expected PII label, the pipeline fails (step 3) with an explicit error message in the CI pipeline’s output, similar to this:
Field name [Booking.passengerName] should have been marked with type streams.coban.options.v1.pii_type = PII_TYPE_NAME
There are cases where a variable name in the schema is a partial match against a PII keyword but is legitimately not a PII – for example, carModelName is a partial match against name but does not contain PII data. In this case, the developer can choose to add it to a whitelist to pass the CI.
However, modifying the whitelist requires approval from the Coban team for verification purposes. Apart from this particular case, the requesting team can autonomously approve their MR in a self-service fashion.
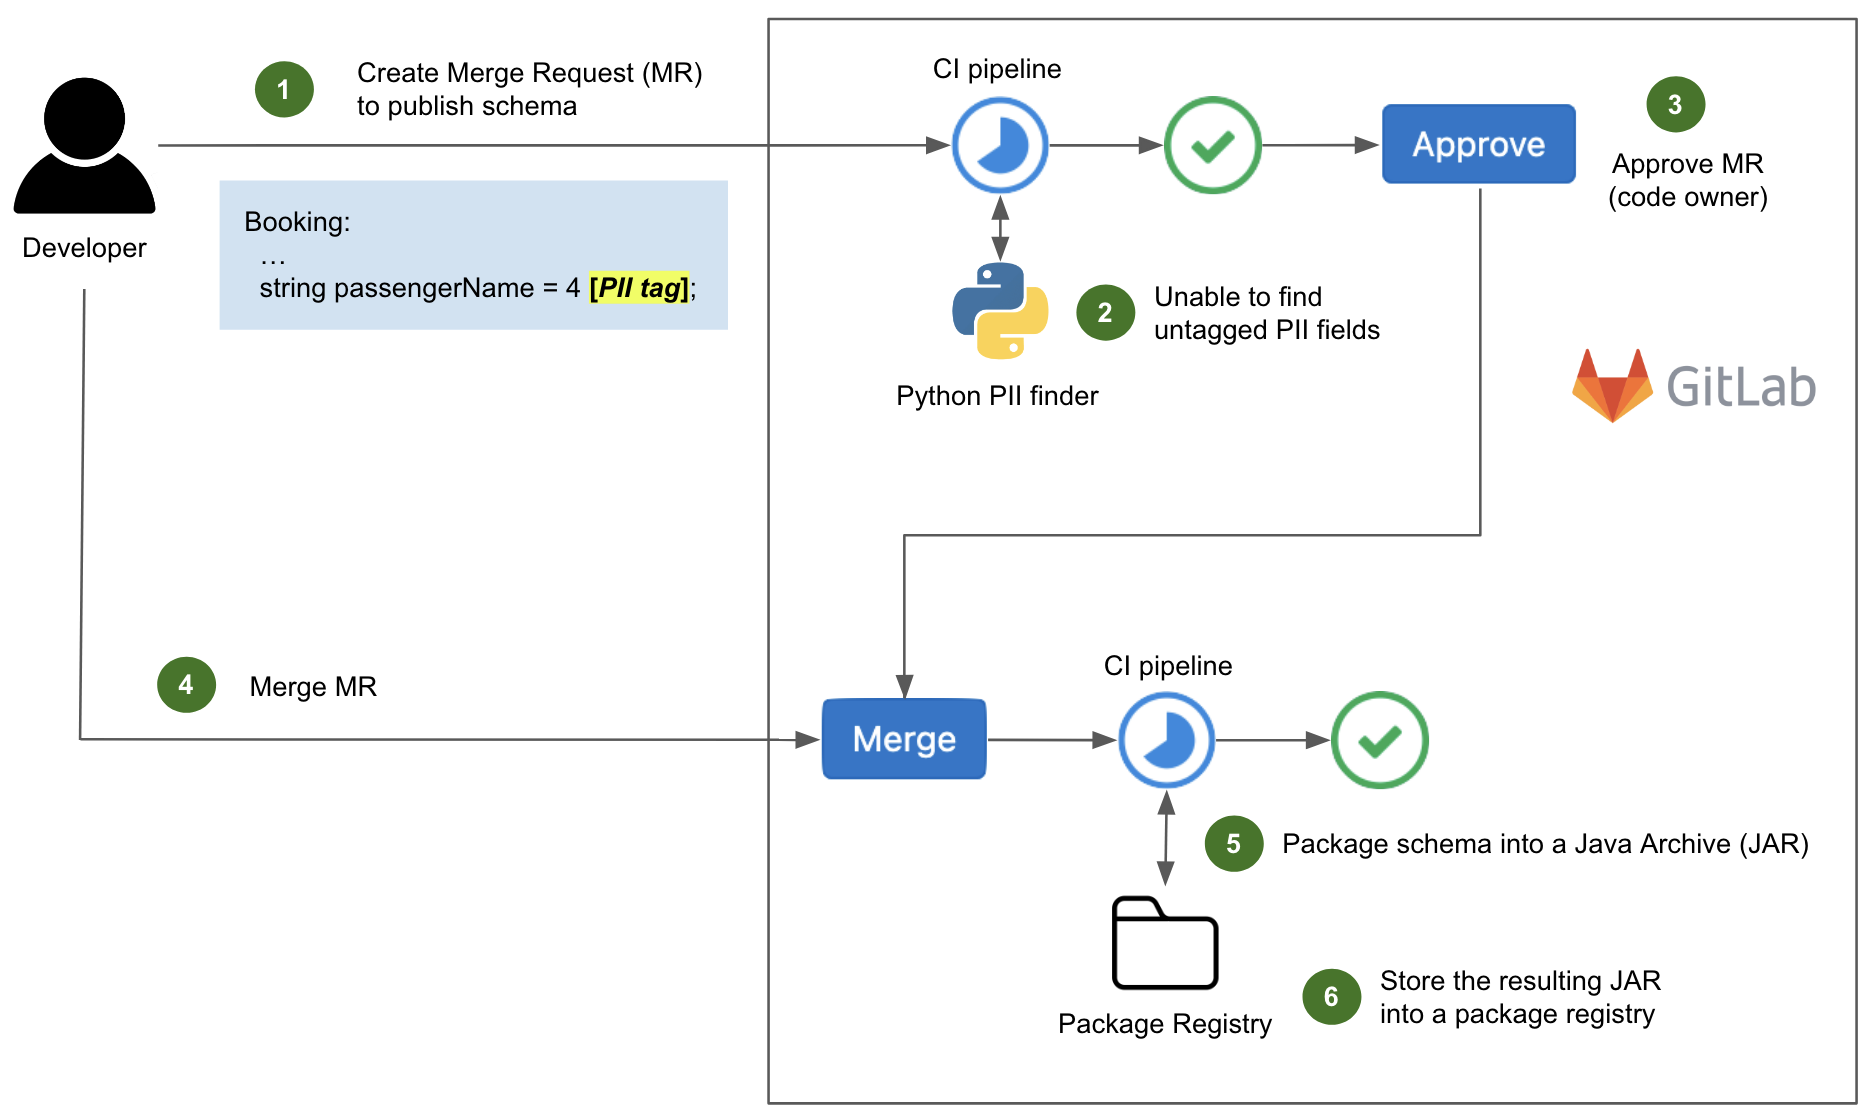
Now let us look at an example of a successful CI pipeline execution.
Fig. 2 CI pipeline success and schema publishing
In Fig. 2, the committed schema (step 1) is properly tagged so our in-house Python script is unable to find any untagged PII fields (step 2). The MR is approved by a code owner (step 3), then merged to the master branch of the repository (step 4).
Upon merging, another CI pipeline is triggered to package the protobuf schema in a Java Archive (JAR) of Scala classes (step 5), which in turn is stored into a package registry (step 6). We will explain the reason for this in a later section.
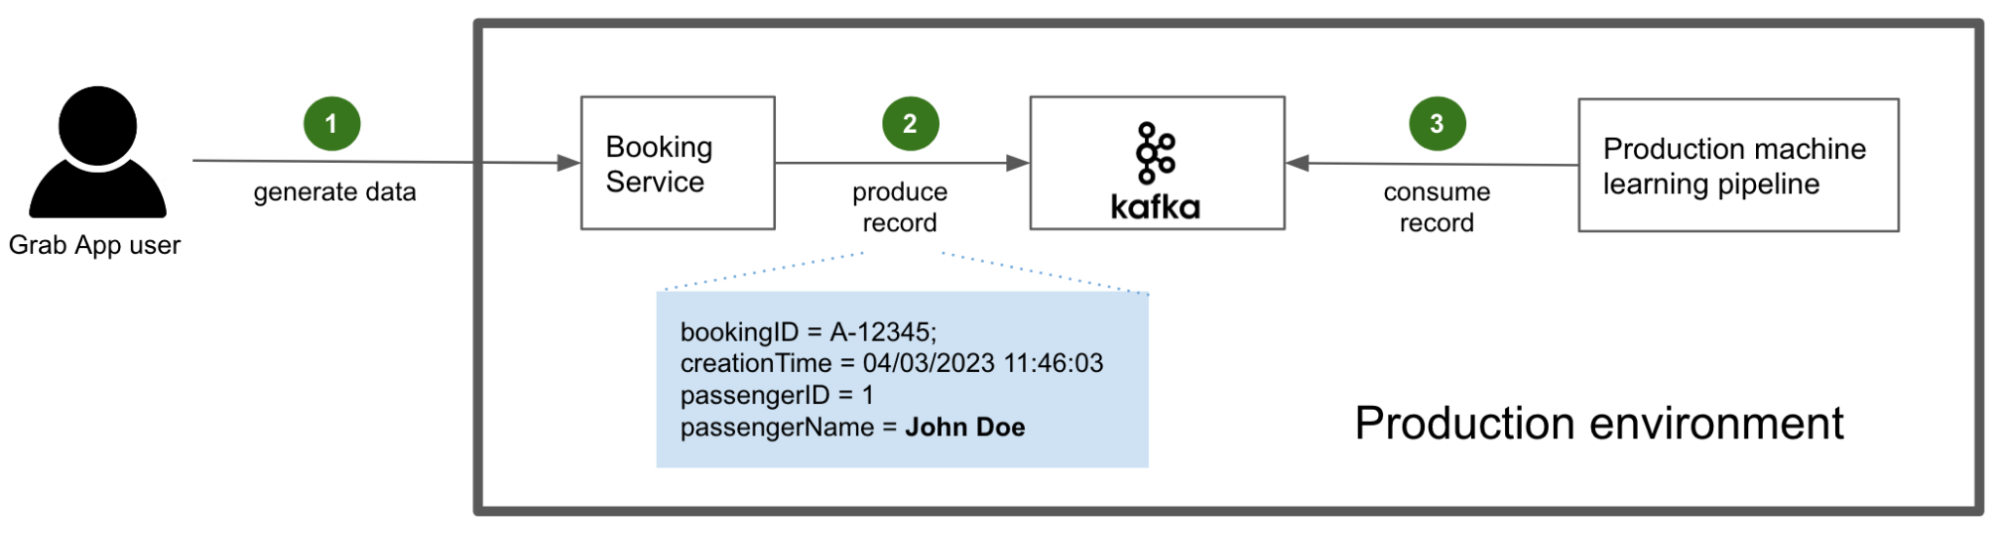
Production environment
With the schemas published and all of their PII fields properly tagged, we can now take a look at the data streaming pipelines.
Fig. 3 PII flow in the production environment
In this example, the user generates data by interacting with the Grab superapp and making a booking (step 1). The booking service, compiled with the stream’s schema definition, generates and produces Kafka records for other services to consume (step 2). Among those consuming services are the production machine learning pipelines that are of interest to this article (step 3).
PII is not masked in this process because it is actually required by the consuming services. For example, the driver app needs to display the passenger’s actual name, so the driver can confirm their identity easily.
At this part of the process, this is not much of a concern because access to the sacrosanct production environment is highly restricted and monitored by Grab.
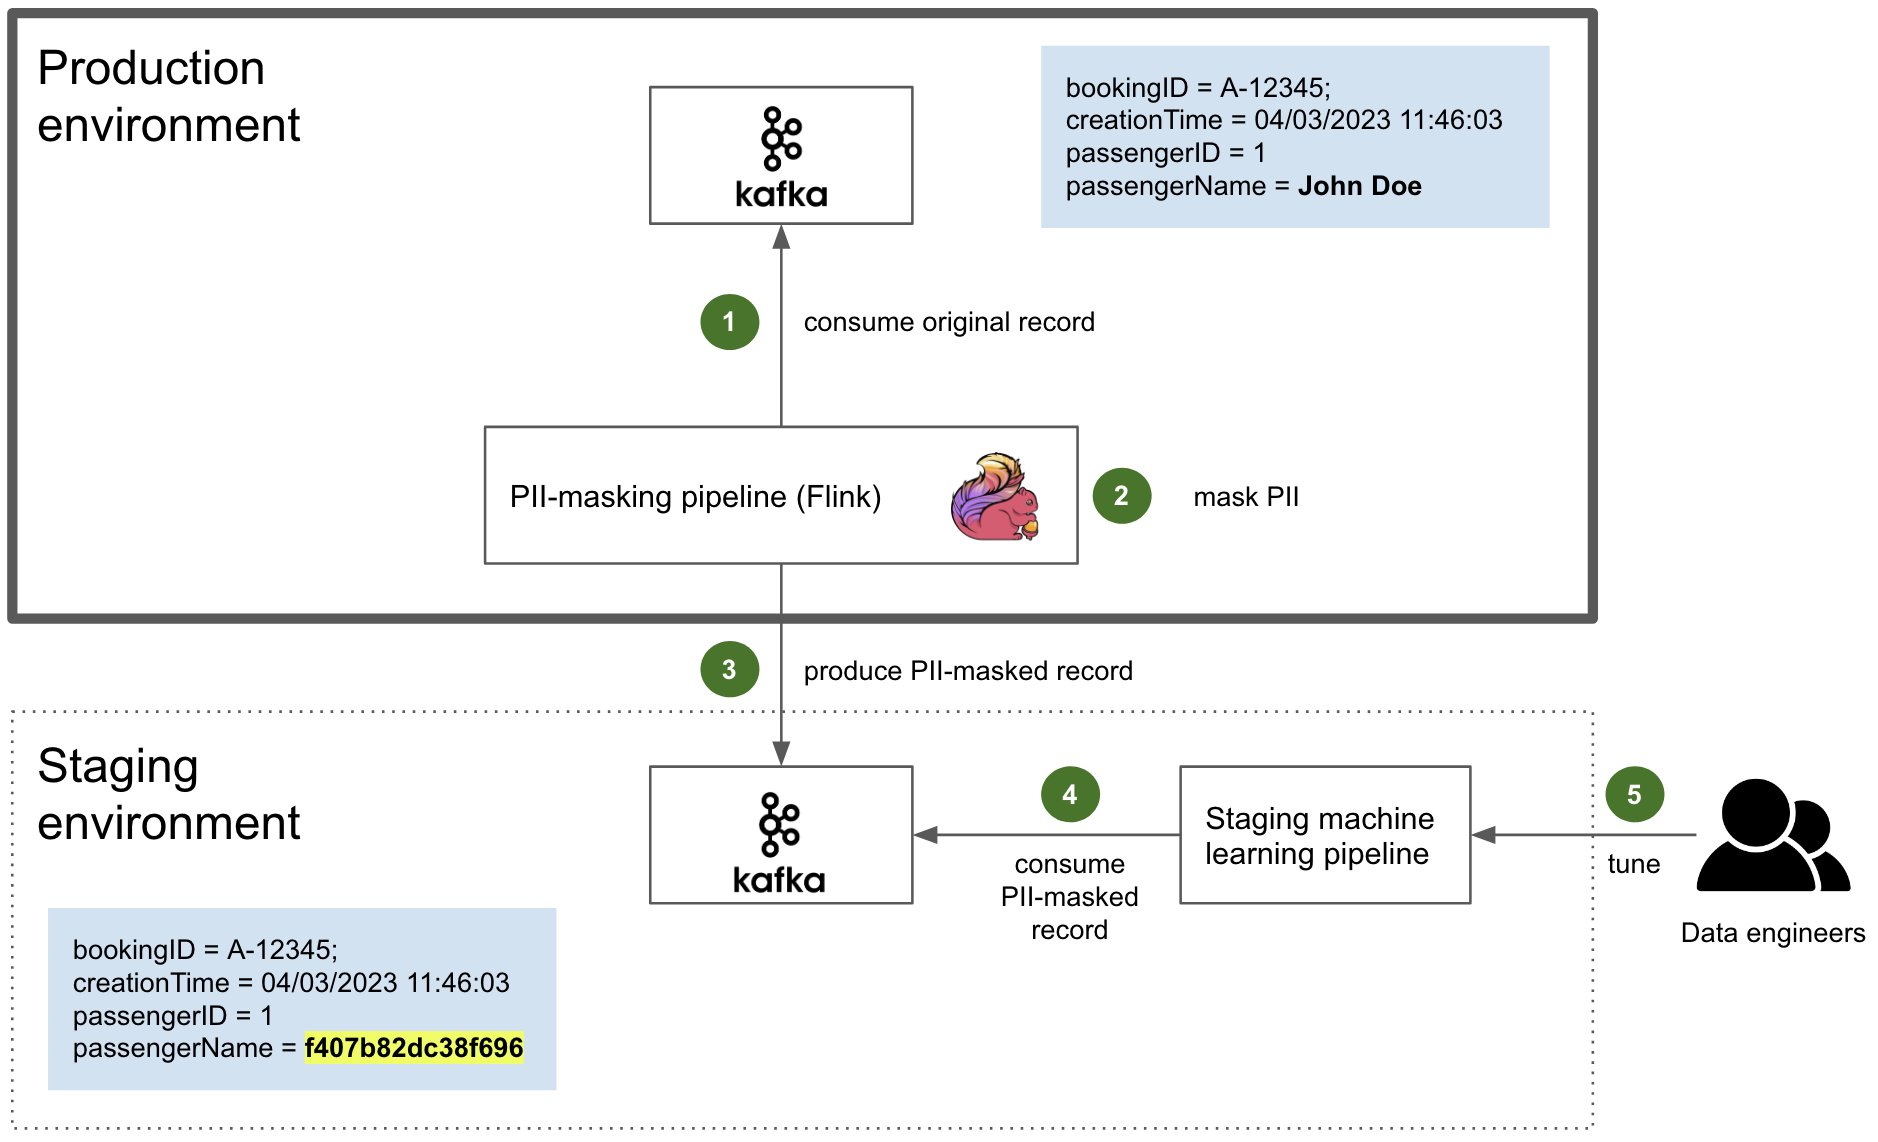
PII masking
To ensure the security, stability, and privacy of our users, data engineers who need to tune their new machine learning models based on production data are not granted access to the production environment. Instead, they have access to the staging environment, where production data is mirrored and PII is masked.
Fig. 4 PII masking pipeline from the production environment to the staging environment
The actual PII masking is performed by an in-house Flink application that resides in the production environment. Flink is a reference framework for data streaming that we use extensively. It is also fault tolerant, with the ability to restart from a checkpoint.
The Flink application is compiled along with the JAR containing the schema as Scala classes previously mentioned. Therefore, it is able to consume the original data as a regular Kafka consumer (step 1). It then dynamically masks the PII of the consumed data stream, based on the PII tags of the schema (step 2). Ultimately, it produces the sanitised data to the Kafka cluster in the staging environment as a normal Kafka producer (step 3).
Depending on the kind of PII, there are several methods of masking such as:
Names and strings of characters: They are replaced by consistent HMAC (Hash-based message authentication code). A HMAC is a digest produced by a one-way cryptographic hash function that takes a secret key as a parameter. Leveraging a secret key here is a defence against chosen plaintext attacks, i.e. computing the digest of a particular plaintext, like a targeted individual’s name.
Numbers and dates: Similarly, they are transformed in a consistent manner, by leveraging a random generator that takes the unmasked value as a seed, so that the same PII input consistently produces the same masked output.
Note that consistency is a recurring pattern. This is because it is a key requirement for certain machine learning models.
This sanitised data produced to the Kafka cluster in the staging environment is then consumed by the staging machine learning pipelines (step 4). There, it is used by data engineers to tune their models effectively with near real-time production data (step 5).
The Kafka cluster in the staging environment is secured with authorisation and authentication (see Zero Trust with Kafka). This is an extra layer of security in case some PII data inadvertently fall through the cracks of PII tagging, following the defence in depth principle.
Finally, whenever a new PII-tagged field is added to a schema, the PII masking Flink application needs to be compiled and deployed again. If the schema is not updated, the Flink pipeline is unable to decode this new field when deserialising the stream. Thus, the added field is just dropped and the new PII data does not make it to the staging environment.
What’s next?
For the immediate next steps, we are going to enhance this design with an in-house product based on AWS Macie to automatically detect the PII that would have fallen through the cracks. Caspian, Grab’s data lake team and one of Coban’s sister teams, has built a service that is already able to detect PII data in relational databases and data lake tables. It is currently being adapted for data streaming.
In the longer run, we are committed to taking our privacy by design posture to the next level. Indeed, the PII masking described in this article does not prevent a bad actor from retrieving the consistent hash of a particular individual based on their non-PII data. For example, the target might be identifiable by a signature in the masked data set, such as unique food or transportation habits.
A possible counter-measure could be one or a combination of the following techniques, ordered by difficulty of implementation:
Data minimisation: Non-essential fields in the data stream should not be mirrored at all. E.g. fields of the data stream that are not required by the data engineers to tune their models. We can introduce a dedicated tag in the schema to flag those fields and instruct the mirroring pipeline to drop them. This is the most straightforward approach.
Differential privacy: The mirroring pipeline could introduce some noise in the mirrored data, in a way that would obfuscate the signatures of particular individuals while still preserving the essential statistical properties of the dataset required for machine learning. It happens that Flink is a suitable framework to do so, as it can split a stream into multiple windows and apply computation over those windows. Designing and generalising a logic that meets the objective is challenging though.
PII encryption at source: PII could be encrypted by the producing services (like the booking service), and dynamically decrypted where plaintext values are required. However, key management and performance are two tremendous challenges of this approach.
We will explore these techniques further to find the solution that works best for Grab and ensures the highest level of privacy for our users.
Join us
Grab is the leading superapp platform in Southeast Asia, providing everyday services that matter to consumers. More than just a ride-hailing and food delivery app, Grab offers a wide range of on-demand services in the region, including mobility, food, package and grocery delivery services, mobile payments, and financial services across 428 cities in eight countries.
Powered by technology and driven by heart, our mission is to drive Southeast Asia forward by creating economic empowerment for everyone. If this mission speaks to you, join our team today!
The authorization team at Netflix recently sponsored work to add Attribute Based Access Control (ABAC) support to AuthZed’s open source Google Zanzibar inspired authorization system, SpiceDB. Netflix required attribute support in SpiceDB to support core Netflix application identity constructs. This post discusses why Netflix wanted ABAC support in SpiceDB, how Netflix collaborated with AuthZed, the end result–SpiceDB Caveats, and how Netflix may leverage this new feature.
Netflix is always looking for security, ergonomic, or efficiency improvements, and this extends to authorization tools. Google Zanzibar is exciting to Netflix as it makes it easier to produce authorization decision objects and reverse indexes for resources a principal can access.
Last year, while experimenting with Zanzibar approaches to authorization, Netflix found SpiceDB, the open source Google Zanzibar inspired permission system, and built a prototype to experiment with modeling. The prototype uncovered trade-offs required to implement Attribute Based Access Control in SpiceDB, which made it poorly suited to Netflix’s core requirements for application identities.
Why did Netflix Want Caveated Relationships?
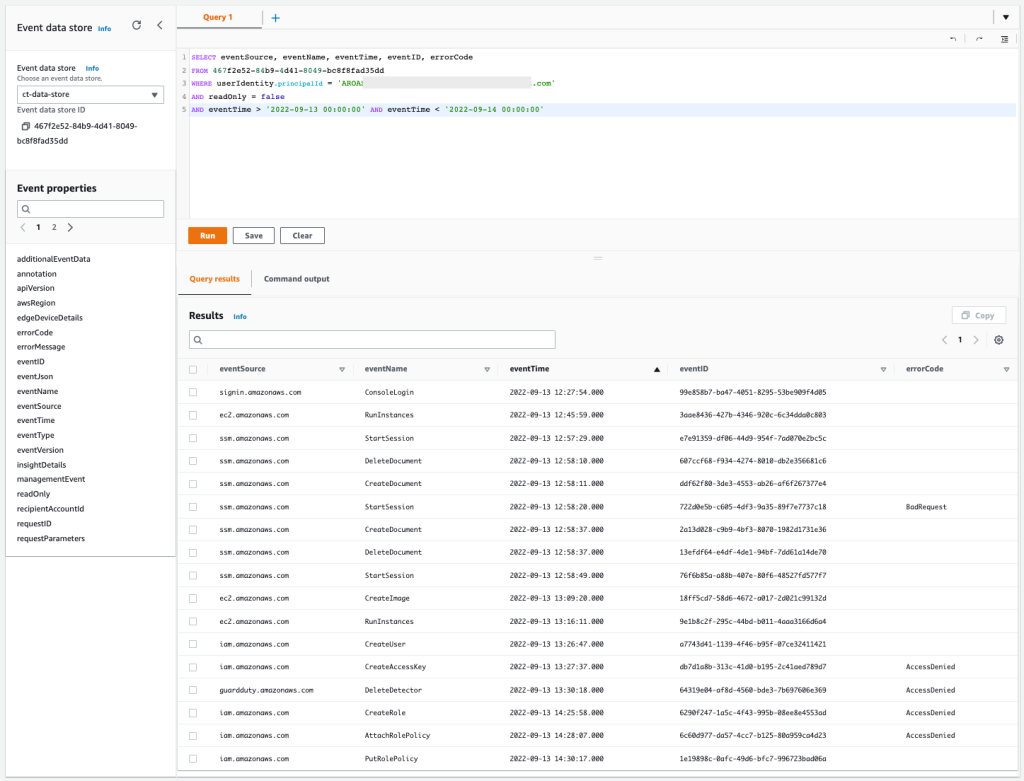
Netflix application identities are fundamentally attribute based: e.g. an instance of the Data Processor runs in eu-west-1 in the test environment with a public shard.
Authorizing these identities is done not only by application name, but by specifying specific attributes on which to match. An application owner might want to craft a policy like “Application members of the EU data processors group can access a PI decryption key”. This is one normal relationship in SpiceDB. But, they might also want to specify a policy for compliance reasons that only allows access to the PI key from data processor instances running in the EU within a sensitive shard. Put another way, an identity should only be considered to have the “is member of the EU-data-processors group” if certain identity attributes (like region==eu) match in addition to the application name. This is a Caveated SpiceDB relationship.
Netflix Modeling Challenges Before Caveats
SpiceDB, being a Relationship Based Access Control (ReBAC) system, expected authorization checks to be performed against the existence of a specific relationship between objects. Users fit this model — they have a single user ID to describe who they are. As described above, Netflix applications do not fit this model. Their attributes are used to scope permissions to varying degrees.
Netflix ran into significant difficulties in trying to fit their existing policy model into relations. To do so Netflix’s design required:
An event based mechanism that could ingest information about application autoscaling groups. An autoscaling group isn’t the lowest level of granularity, but it’s relatively close to the lowest level where we’d typically see authorization policy applied.
Ingest the attributes describing the autoscaling group and write them as separate relations. That is for the data-processor, Netflix would need to write relations describing the region, environment, account, application name, etc.
At authZ check time, provide the attributes for the identity to check, e.g. “can app bar in us-west-2 access this document.” SpiceDB is then responsible for figuring out which relations map back to the autoscaling group, e.g. name, environment, region, etc.
A cleanup process to prune stale relationships from the database.
What was problematic about this design? Aside from being complicated, there were a few specific things that made Netflix uncomfortable. The most salient being that it wasn’t resilient to an absence of relationship data, e.g. if a new autoscaling group started and reporting its presence to SpiceDB had not yet happened, the autoscaling group members would be missing necessary permissions to run. All this meant that Netflix would have to write and prune the relationship state with significant freshness requirements. This would be a significant departure from its existing policy based system.
While working through this, Netflix hopped into the SpiceDB Discord to chat about possible solutions and found an open community issue: the caveated relationships proposal.
The Beginning of SpiceDB Caveats
The SpiceDB community had already explored integrating SpiceDB with Open Policy Agent (OPA) and concluded it strayed too far from Zanzibar’s core promise of global horizontal scalability with strong consistency. With Netflix’s support, the AuthZed team pondered a Zanzibar-native approach to Attribute-Based Access Control.
The requirements were captured and published as the caveated relationships proposal on GitHub for feedback from the SpiceDB community. The community’s excitement and interest became apparent through comments, reactions, and conversations on the SpiceDB Discord server. Clearly, Netflix wasn’t the only one facing challenges when reconciling SpiceDB with policy-based approaches, so Netflix decided to help! By sponsoring the project, Netflix was able to help AuthZed prioritize engineering effort and accelerate adding Caveats to SpiceDB.
Building SpiceDB Caveats
Quick Intro to SpiceDB
The SpiceDB Schema Language lays the rules for how to build, traverse, and interpret SpiceDB’s Relationship Graph to make authorization decisions. SpiceDB Relationships, e.g., document:readme writer user:emilia, are stored as relationships that represent a graph within a datastore like CockroachDB or PostgreSQL. SpiceDB walks the graph and decomposes it into subproblems. These subproblems are assigned through consistent hashing and dispatched to a node in a cluster running SpiceDB. Over time, each node caches a subset of subproblems to support a distributed cache, reduce the datastore load, and achieve SpiceDB’s horizontal scalability.
SpiceDB Caveats Design
The fundamental challenge with policies is that their input arguments can change the authorization result as understood by a centralized relationships datastore. If SpiceDB were to cache subproblems that have been “tainted” with policy variables, the likelihood those are reused for other requests would decrease and thus severely affect the cache hit rate. As you’d suspect, this would jeopardize one of the pillars of the system: its ability to scale.
Once you accept that adding input arguments to the distributed cache isn’t efficient, you naturally gravitate toward the first question: what if you keep those inputs out of the cached subproblems? They are only known at request-time, so let’s add them as a variable in the subproblem! The cost of propagating those variables, assembling them, and executing the logic pales compared to fetching relationships from the datastore.
The next question was: how do you integrate the policy decisions into the relationships graph? The SpiceDB Schema Languages’ core concepts are Relations and Permissions; these are how a developer defines the shape of their relationships and how to traverse them. Naturally, being a graph, it’s fitting to add policy logic at the edges or the nodes. That leaves at least two obvious options: policy at the Relation level, or policy at the Permission level.
After iterating on both options to get a feel for the ergonomics and expressiveness the choice was policy at the relation level. After all, SpiceDB is a Relationship Based Access Control (ReBAC) system. Policy at the relation level allows you to parameterize each relationship, which brought about the saying “this relationship exists, but with a Caveat!.” With this approach, SpiceDB could do request-time relationship vetoing like so:
definition human {}

caveat the_answer(received int) {
  received == 42
}
definition the_answer_to_life_the_universe_and_everything {
  relation humans: human with the_answer
  permission enlightenment = humans
Netflix and AuthZed discussed the concept of static versus dynamic Caveats as well. A developer would define static Caveat expressions in the SpiceDB Schema, while dynamic Caveats would have expressions defined at run time. The discussion centered around typed versus dynamic programming languages, but given SpiceDB’s Schema Language was designed for type safety, it seemed coherent with the overall design to continue with static Caveats. To support runtime-provided policies, the choice was to introduce expressions as arguments to a Caveat. Keeping the SpiceDB Schema easy to understand was a key driver for this decision.
For defining Caveats, the main requirement was to provide an expression language with first-class support for partially-evaluated expressions. Google’s CEL seemed like the obvious choice: a protobuf-native expression language that evaluates in linear time, with first-class support for partial results that can be run at the edge, and is not turing complete. CEL expressions are type-safe, so they wouldn’t cause as many errors at runtime and can be stored in the datastore as a compiled protobuf. Given the near-perfect requirement match, it does make you wonder what Google’s Zanzibar has been up to since the white paper!
To execute the logic, SpiceDB would have to return a third response CAVEATED, in addition to ALLOW and DENY, to signal that a result of a CheckPermission request depends on computing an unresolved chain of CEL expressions.
SpiceDB Caveats needed to allow static input variables to be stored before evaluation to represent the multi-dimensional nature of Netflix application identities. Today, this is called “Caveat context,” defined by the values written in a SpiceDB Schema alongside a Relation and those provided by the client. Think of build time variables as an expansion of a templated CEL expression, and those take precedence over request-time arguments. Here is an example:
caveat the_answer(received int, expected int) {
  received == expected
}
Lastly, to deal with scenarios where there are multiple Caveated subproblems, the decision was to collect up a final CEL expression tree before evaluating it. The result of the final evaluation can be ALLOW, DENY, or CAVEATED. Things get trickier with wildcards and SpiceDB APIs, but let’s save that for another post! If the response is CAVEATED, the client receives a list of missing variables needed to properly evaluate the expression.
To sum up! The primary design decisions were:
Caveats defined at the Relation-level, not the Permission-level
Keep Caveats in line with SpiceDB Schema’s type-safe nature
Support well-typed values provided by the caller
Use Google’s CEL to define Caveat expressions
Introduce a new result type: CAVEATED
How do SpiceDB Caveats Change Authorizing Netflix Identities?
SpiceDB Caveats simplify this approach by allowing Netflix to specify authorization policy as they have in the past for applications. Instead of needing to have the entire state of the authorization world persisted as relations, the system can have relations and attributes of the identity used at authorization check time.
Now Netflix can write a Caveat similar to match_fine , described below, that takes lists of expected attributes, e.g. region, account, etc. This Caveat would allow the specific application named by the relation as long as the context of the authorization check had an observed account, stack, detail, region, and extended attribute values that matched the values in their expected counterparts. This playground has a live version of the schema, relations, etc. with which to experiment.
With the playground we can also make assertions that can mirror the behavior we’d see from the CheckPermission API. These assertions make it clear that our caveats work as expected.
Netflix and AuthZed are both excited about the collaboration’s outcome. Netflix has another authorization tool it can employ and SpiceDB users have another option with which to perform rich authorization checks. Bridging the gap between policy based authorization and ReBAC is a powerful paradigm that is already benefiting companies looking to Zanzibar based implementations for modernizing their authorization stack.
With Amazon Detective, you can analyze and visualize security data to investigate potential security issues. Detective collects and analyzes events that describe IP traffic, AWS management operations, and malicious or unauthorized activity from AWS CloudTrail logs, Amazon Virtual Private Cloud (Amazon VPC)Flow Logs, Amazon GuardDuty findings, and, since last year, Amazon Elastic Kubernetes Service (EKS) audit logs. Using this data, Detective constructs a graph model that distills log data using machine learning, statistical analysis, and graph theory to build a linked set of data for your security investigations.
Starting today, Detective offers investigation support for findings in AWS Security Hub in addition to those detected by GuardDuty. Security Hub is a service that provides you with a view of your security state in AWS and helps you check your environment against security industry standards and best practices. If you’ve turned on Security Hub and another integrated AWS security services, those services will begin sending findings to Security Hub.
Enabling AWS Security Findings in the Amazon Detective Console When you enable Detective for the first time, Detective now identifies findings coming from both GuardDuty and Security Hub, and automatically starts ingesting them along with other data sources. Note that you don’t need to enable or publish these log sources for Detective to start its analysis because this is managed directly by Detective.
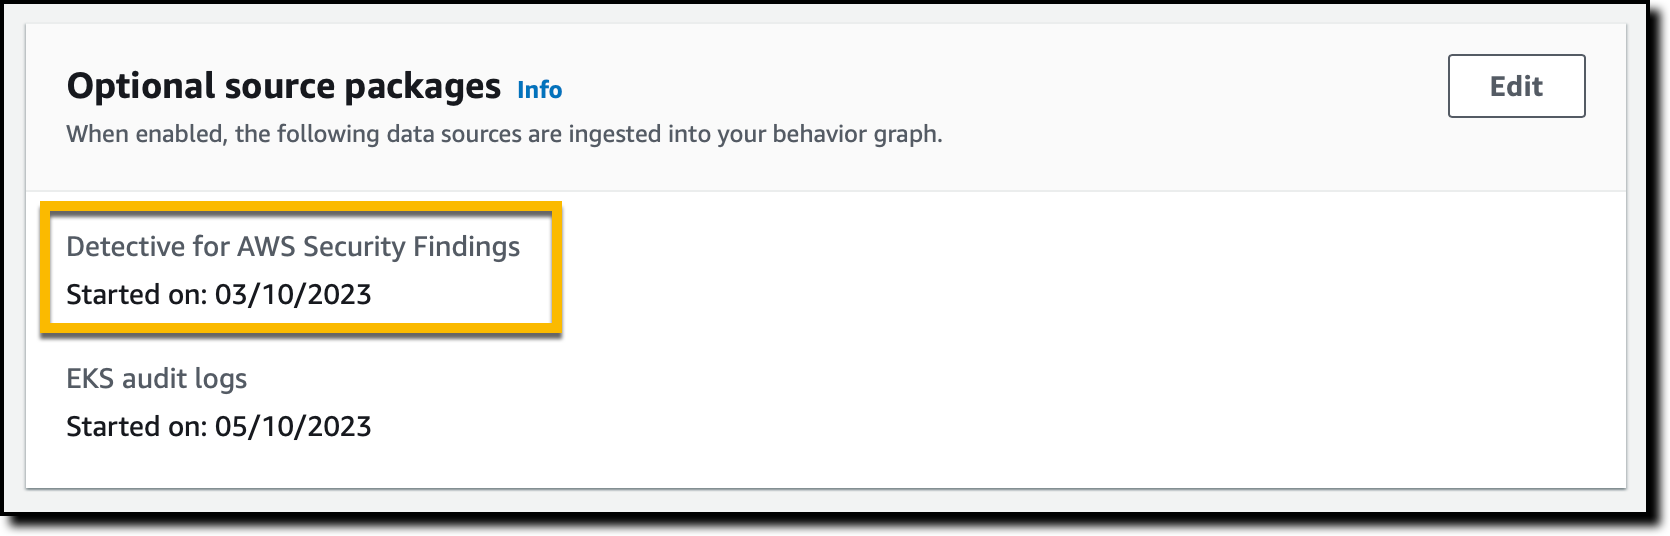
If you are an existing Detective customer, you can enable investigation of AWS Security Findings as a data source with one click in the Detective Management Console. I already have Detective enabled, so I add the source package.
In the Detective console, in the Settings section of the navigation pane, I choose General. There, I choose Edit in the Optional source packages section to enable Detective for AWS Security Findings.
Once enabled, Detective starts analyzing all the relevant data to identify connections between disparate events and activities. To start your investigation process, you can get a visualization of these connections, including resource behavior and activities. Historical baselines, which you can use to provide comparisons against recent activity, are established after two weeks.
Investigating AWS Security Findings in the Amazon Detective Console I start in the Security Hub console and choose Findings in the navigation pane. There, I filter findings to only see those where the Product name is Inspector and Severity label is HIGH.
The first one looks suspicious, so I choose its Title (CVE-2020-36223 – openldap). The Security Hub console provides me with information about the corresponding Common Vulnerabilities and Exposures (CVE) ID and where and how it was found. At the bottom, I have the option to Investigate in Amazon Detective. I follow the Investigate finding link, and the Detective console opens in another browser tab.
Here, I see the entities related to this Inspector finding. First, I open the profile of the AWS account to see all the findings associated with this resource, the overall API call volume issued by this resource, and the container clusters in this account.
For example, I look at the successful and failed API calls to have a better understanding of the impact of this finding.
Then, I open the profile for the container image. There, I see the images that are related to this image (because they have the same repository or registry as this image), the containers running from this image during the scope time (managed by Amazon EKS), and the findings associated with this resource.
Depending on the finding, Detective helps me correlate information from different sources such as CloudTrail logs, VPC Flow Logs, and EKS audit logs. This information makes it easier to understand the impact of the finding and if the risk has become an incident. For Security Hub, Detective only ingests findings for configuration checks that failed. Because configuration checks that passed have little security value, we’re filtering these outs.
Availability and Pricing Amazon Detective investigation support for AWS Security Findings is available today for all existing and new Detective customers in all AWS Regions where Detective is available, including the AWS GovCloud (US) Regions. For more information, see the AWS Regional Services List.
Amazon Detective is priced based on the volume of data ingested. By enabling investigation of AWS Security Findings, you can increase the volume of ingested data. For more information, see Amazon Detective pricing.
When GuardDuty and Security Hub provide a finding, they also suggest the remediation. On top of that, Detective helps me investigate if the vulnerability has been exploited, for example, using logs and network traffic as proof.
Currently, findings coming from Security Hub are not included in the Finding groups section of the Detective console. Our plan is to expand Finding groups to cover the newly integrated AWS security services. Stay tuned!
We’re excited to announce Secrets Store – Cloudflare’s new secrets management offering!
A secrets store does exactly what the name implies – it stores secrets. Secrets are variables that are used by developers that contain sensitive information – information that only authorized users and systems should have access to.
If you’re building an application, there are various types of secrets that you need to manage. Every system should be designed to have identity & authentication data that verifies some form of identity in order to grant access to a system or application. One example of this is API tokens for making read and write requests to a database. Failure to store these tokens securely could lead to unauthorized access of information – intentional or accidental.
The stakes with secret’s management are high. Every gap in the storage of these values has potential to lead to a data leak or compromise. A security administrator’s worst nightmare.
Developers are primarily focused on creating applications, they want to build quickly, they want their system to be performant, and they want it to scale. For them, secrets management is about ease of use, performance, and reliability. On the other hand, security administrators are tasked with ensuring that these secrets remain secure. It’s their responsibility to safeguard sensitive information, ensure that security best practices are met, and to manage any fallout of an incident such as a data leak or breach. It’s their job to verify that developers at their company are building in a secure and foolproof manner.
In order for developers to build at high velocity and for security administrators to feel at ease, companies need to adopt a highly reliable and secure secrets manager. This should be a system that ensures that sensitive information is stored with the highest security measures, while maintaining ease of use that will allow engineering teams to efficiently build.
Why Cloudflare is building a secrets store
Cloudflare’s mission is to help build a better Internet – that means a more secure Internet. We recognize our customers’ need for a secure, centralized repository for storing sensitive data. Within the Cloudflare ecosystem, are various places where customers need to store and access API and authorization tokens, shared secrets, and sensitive information. It’s our job to make it easy for customers to manage these values securely.
The need for secrets management goes beyond Cloudflare. Customers have sensitive data that they manage everywhere – at their cloud provider, on their own infrastructure, across machines. Our plan is to make our Secrets Store a one-stop shop for all of our customer’s secrets.
The evolution of secrets at Cloudflare
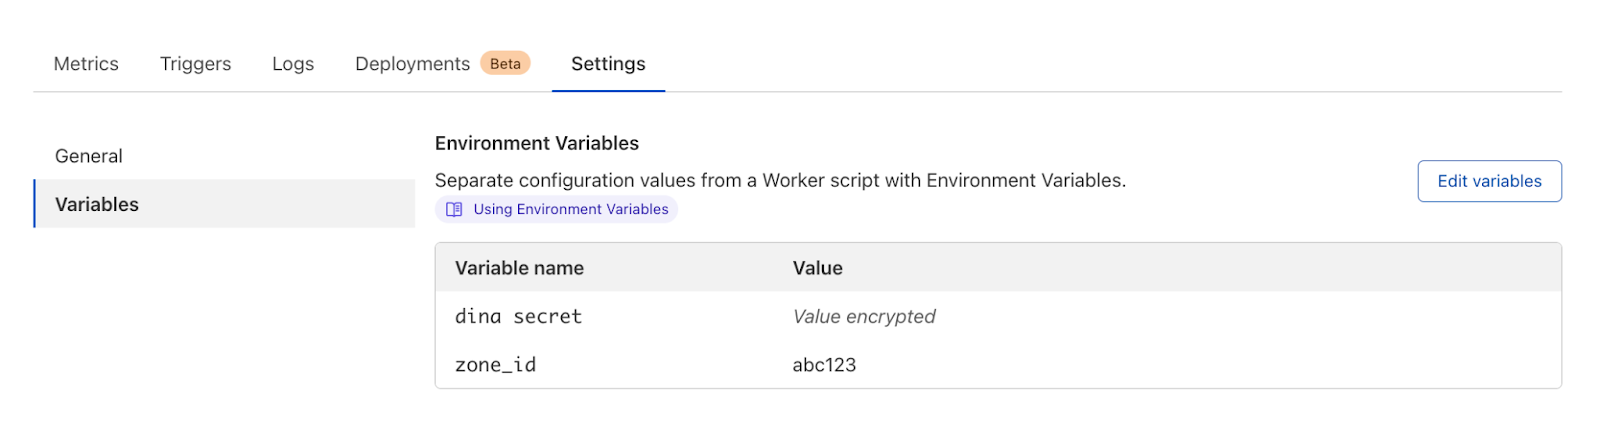
In 2020, we launched environment variables and secrets for Cloudflare Workers, allowing customers to create and encrypt variables across their Worker scripts. By doing this, developers can obfuscate the value of a variable so that it’s no longer available in plaintext and can only be accessed by the Worker.
Adoption and use of these secrets is quickly growing. We now have more than three million Workers scripts that reference variables and secrets managed through Cloudflare. One piece of feedback that we continue to hear from customers is that these secrets are scoped too narrowly.
Today, customers can only use a variable or secret within the Worker that it’s associated with. Instead, customers have secrets that they share across Workers. They don’t want to re-create those secrets and focus their time on keeping them in sync. They want account level secrets that are managed in one place but are referenced across multiple Workers scripts and functions.
Outside of Workers, there are many use cases for secrets across Cloudflare services.
Inside our Web Application Firewall (WAF), customers can make rules that look for authorization headers in order to grant or deny access to requests. Today, when customers create these rules, they put the authorization header value in plaintext, so that anyone with WAF access in the Cloudflare account can see its value. What we’ve heard from our customers is that even internally, engineers should not have access to this type of information. Instead, what our customers want is one place to manage the value of this header or token, so that only authorized users can see, create, and rotate this value. Then when creating a WAF rule, engineers can just reference the associated secret e.g.“account.mysecretauth”. By doing this, we help our customers secure their system by reducing the access scope and enhance management of this value by keeping it updated in one place.
With new Cloudflare products and features quickly developing, we’re hearing more and more use cases for a centralized secrets manager. One that can be used to store Access Service tokens or shared secrets for Webhooks.
With the new account level Secrets Store, we’re excited to give customers the tools they need to manage secrets across Cloudflare services.
Securing the Secret Store
To have a secrets store, there are a number of measures that need to be in place, and we’re committing to providing these for our customers.
First, we’re going to give the tools that our customers need to restrict access to secrets. We will have scope permissions that will allow admins to choose which users can view, create, edit, or remove secrets. We also plan to add the same level of granularity to our services – giving customers the ability to say “only allow this Worker to access this secret and only allow this set of Firewall rules to access that secret”.
Next, we’re going to give our customers extensive audits that will allow them to track the access and use of their secrets. Audit logs are crucial for security administrators. They can be used to alert team members that a secret was used by an unauthorized service or that a compromised secret is being accessed when it shouldn’t be. We will give customers audit logs for every secret-related event, so that customers can see exactly who is making changes to secrets and which services are accessing and when.
In addition to the built-in security of the Secrets Store, we’re going to give customers the tools to rotate their encryption keys on-demand or at a cadence that fits the right security posture for them.
Sign up for the beta
We’re excited to get the Secrets Store in our customer’s hands. If you’re interested in using this, please fill out this form, and we’ll reach out to you when it’s ready to use.
I remember when the first iPhone was announced in 2007. This was NOT an iPhone as we think of one today. It had warts. A lot of warts. It couldn’t do MMS for example. But I remember the possibility it brought to mind. No product before had seemed like anything more than a product. The iPhone, or more the potential that the iPhone hinted at, had an actual impact on me. It changed my thinking about what could be.
In the years since no other product came close to matching that level of awe and wonder. That changed in March of this year. The release of GPT-4 had the same impact I remember from the iPhone launch. It’s still early, but it's opened the imagination, and fears, of millions of developers in a way I haven’t seen since that iPhone announcement.
That excitement has led to an explosion of development and hundreds of new tools broadly grouped into a category we call generative AI. Generative AI systems create content mimicking a particular style. New images that look like Banksy or lyrics that sound like Taylor Swift. All of these Generative AI tools, whether built on top of GPT-4 or something else, use the same basic model technique: a transformer.
Attention is all you need
GPT-4 (Generative Pretrained Transformer) is the most advanced version of a transformer model. Transformer models all emerged from a seminal paper written in 2017 by researchers at the University of Toronto and the team at Google Brain, titled Attention is all you need. The key insight from the paper is the self-attention mechanism. This mechanism replaced recurrent and convolutional layers, allowing for faster training and better performance.
The secret power of transformer models is their ability to efficiently process large amounts of data in parallel. It's the transformers' gargantuan scale and extensive training that makes them so appealing and versatile, turning them into the Swiss Army knife of natural language processing. At a high level, Large Language Models (LLMs) are just transformer models that use an incredibly large number of parameters (billions), and are trained on incredibly large amounts of unsupervised text (the Internet). Hence large, and language.
Unleashing the potential of LLMs in consumer-facing AI tools has opened a world of possibilities. But possibility also means new risk: developers must now navigate the unique security challenges that arise from making powerful new tools widely available to the masses.
First and foremost, consumer-facing applications inherently expose the underlying AI systems to millions of users, vastly increasing the potential attack surface. Since developers are targeting a consumer audience, they can't rely on trusted customers or limit access based on geographic location. Any security measure that makes it too difficult for consumers to use defeats the purpose of the application. Consequently, developers must strike a delicate balance between security and usability, which can be challenging.
The current popularity of AI tools makes explosive takeoff more likely than in the past. This is great! Explosive takeoff is what you want! But, that explosion can also lead to exponential growth in costs, as the computational requirements for serving a rapidly growing user base can become overwhelming.
In addition to being popular, Generative AI apps are unique in that calls to them are incredibly resource intensive, and therefore expensive for the owner. In comparison, think about a more traditional API that Cloudflare has protected for years. A product API. Sites don’t want competitors calling their product API and scraping data. This has an obvious negative business impact. However, it doesn’t have a direct infrastructure cost. A product list API returns a small amount of text. An attacker calling it 4 million times will have a negligible cost to an infrastructure bill. But generative models can cost cents, or in the case of image generation even tens of cents per call. An attacker gaining access and generating millions of calls has a real cost impact to the developers providing those APIs.
Not only are the costs for generating content high, but the value that end users are willing to pay is high as well. Customers tell us that they have seen multiple instances of bad actors accessing an API without paying, then reselling the content they generate for 50 cents or more per call. The huge monetary opportunity of exploitation means attackers are highly motivated to come back again and again, refactoring their approach each time.
Last, consumer-facing LLM applications are generally designed as a single entry point for customers, almost always accepting query text as input. The open-text nature of these calls makes it difficult to predict the potential impact of a single request. For example, a complex query might consume significant resources or trigger unexpected behavior. While these APIs are not GraphQL based, the challenges are similar. When you accept unstructured submissions, it's harder to create any type of rule to prevent abuse.
Tips for protecting your Generative AI application
So you've built the latest generative AI sensation, and the world is about to be taken by storm. But that success is also about to make you a target. What's the trick to stopping all those attacks you’re about to see? Well, unfortunately there isn’t one. For all the reasons above, this is a hard, persistent problem with no simple solution. But, we’ve been fortunate to work with many customers who have had that target on their back for months, and we’ve learned a lot from that experience. Here are some recommendations that will give you a good foundation for making sure that you, and only you, reap the rewards of your hard work.
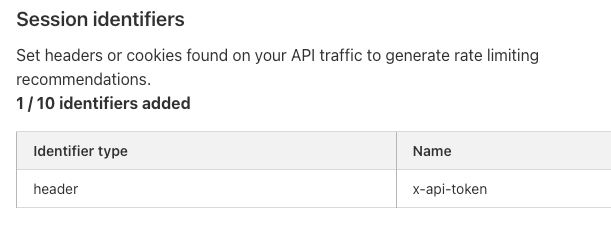
1. Enforce tokens for each user. Enforcing usage based on a specific user or user session is straightforward. But sometimes you want to allow anonymous usage. While anonymous usage is great for demos and testing, it can lead to abuse. If you must allow anonymous usage, create a “stickier” identification scheme that persists browser restarts and incognito mode. Your goal isn’t to track specific users, but instead to understand how much an anonymous user has already used your service so far in demo / free mode.
2. Manage quotas carefully. Your service likely incurs costs and charges users per API call, so it likely makes sense to set a limit on the number of times any user can call your API. You may not ever intend for the average user to hit this limit, but having limits in place will protect against that user’s API key becoming compromised and shared amongst many users. It also protects against programming errors that could result in 100x or 1000x expected usage, and a large unexpected bill to the end user.
3. Block certain ASNs (autonomous system numbers) wholesale. Blocking ASNs, or even IPs wholesale is an incredibly blunt tool. In general Cloudflare rarely recommends this approach to customers. However, when tools are as popular as some generative AI applications, attackers are highly motivated to send as much traffic as possible to those applications. The fastest and cheapest way to accomplish this is through data centers that usually share a common ASN. Some ASNs belong to ISPs, and source traffic from people browsing the Internet. But other ASNs belong to cloud compute providers, and mainly source outbound traffic from virtual servers. Traffic from these servers can be overwhelmingly malicious. For example, several of our customers have found ASNs where 88-90% of the traffic turns out to be automated, while this number is usually only 30% for average traffic. In cases this extreme, blocking entire ASNs can make sense.
4. Implement smart rate limits. Counting not only requests per minute and requests per session, but also IPs per token and tokens per IP can guard against abuse. Tracking how many different IPs are using a particular token at any one time can alert you to a user's token being leaked. Similarly, if one IP is rotating through tokens, looking at each token’s session traffic would not alert you to the abuse. You’d need to look at how many tokens that single IP is generating in order to pinpoint that specific abusive behavior.
5. Rate limit on something other than the user. Similar to enforcing tokens on each user, your real time rate limits should also be set on your sticky identifier.
6. Have an option to slow down attackers. Customers often think about stopping abuse in terms of blocking traffic from abusers. But blocking isn’t the only option. Attacks not only need to be successful, they also need to be economically feasible. If you can make requests more difficult or time-consuming for abusers, you can ruin their economics. You can do this by implementing a waiting room, or by challenging users. We recommend a challenge option that doesn’t give real users an awful experience. Challenging users can also be quickly enabled or disabled as you see abuse spike or recede.
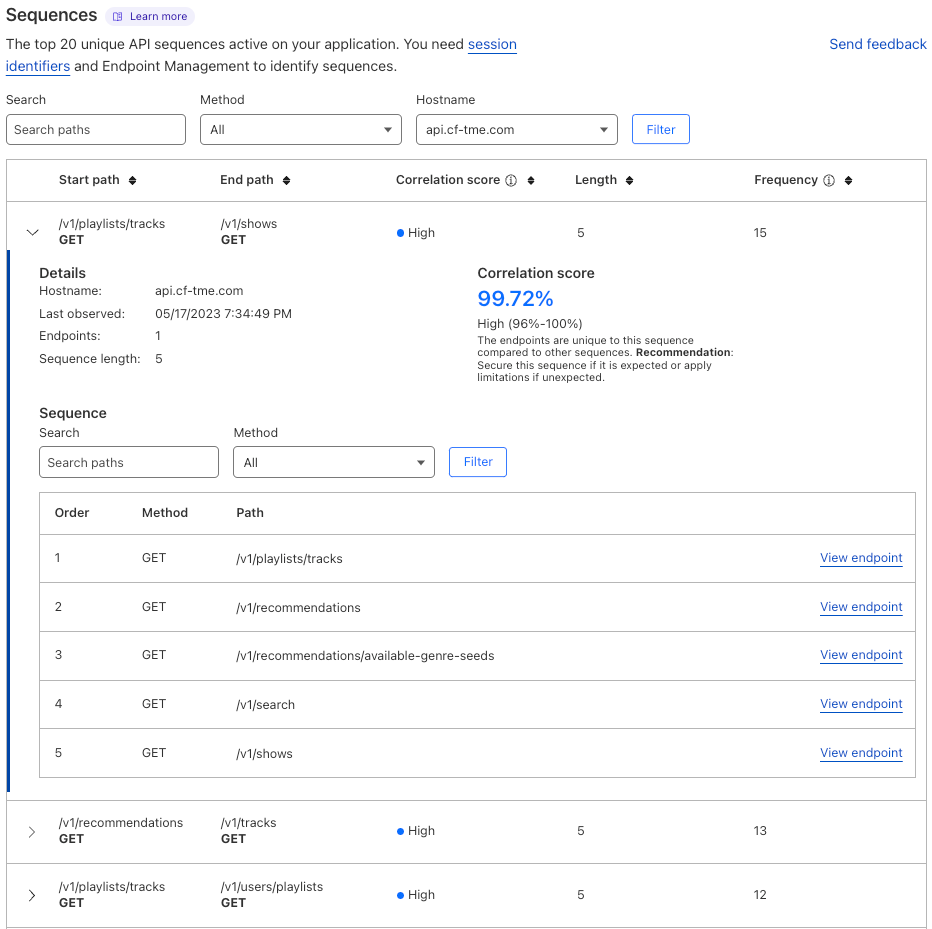
7. Map and analyze sequences. By sampling user sessions that you suspect of abuse, you can inspect their requests path-by-path in your SIEM. Are they using your app as expected? Or are they circumventing intended usage? You might benefit from enforcing a user flow between endpoints.
8. Build and validate an API schema. Many API breaches happen due to permissive schemas. Users are allowed to send in extra fields in requests that grant them too many privileges or allow access to other users’ data. Make sure you build a verbose schema that outlines what intended usage is by identifying and cataloging all API endpoints, then making sure all specific parameters are listed as required and have type limits to them.
We recently went through the transition to an OpenAPI schema ourselves for api.cloudflare.com. You can read more about how we did it here. Our schema looks like this:
/zones:
    get:
      description: List, search, sort, and filter your zones.
      operationId: zone-list-zones
      responses:
        4xx:
          content:
            application/json:
              schema:
                allOf:
                - $ref: '#/components/schemas/components-schemas-response_collection'
                - $ref: '#/components/schemas/api-response-common-failure'
          description: List Zones response failure
        "200":
          content:
            application/json:
              schema:
                $ref: '#/components/schemas/components-schemas-response_collection'
          description: List Zones response
      security:
      - api_email: []
        api_key: []
      summary: List Zones
      tags:
      - Zone
      x-cfPermissionsRequired:
        enum:
        - '#zone:read'
      x-cfPlanAvailability:
        business: true
        enterprise: true
        free: true
        pro: true
9. Analyze the depth and complexity of queries. Are your APIs driven by GraphQL? GraphQL queries can be a source of abuse since they allow such free-form requests. Large, complex queries can grow to overwhelm origins if limits aren’t in place. Limits help guard against outright DoS attacks as well as developer error, keeping your origin healthy and serving requests to your users as expected.
For example, if you have statistics about your GraphQL queries by depth and query size, you could execute this TypeScript function to analyze them by quantile:
import * as ss from 'simple-statistics';

function calculateQuantiles(data: number[], quantiles: number[]): {[key: number]: string} {
    let result: {[key: number]: string} = {};
    for (let q of quantiles) {
        // Calculate quantile, convert to fixed-point notation with 2 decimal places
        result[q] = ss.quantile(data, q).toFixed(2);
    }
    return result;
}

// Example usage:
let queryDepths = [2, 2, 2, 2, 2, 2, 2, 4, 4, 4, 4, 4, 1, 1, 1, 1, 1, 1, 1, 1];
let querySizes = [11, 11, 11, 11, 11, 11, 11, 11, 11, 11, 2, 2, 2, 2, 2, 2, 2, 2, 2, 2];

console.log(calculateQuantiles(queryDepths, [0.5, 0.75, 0.95, 0.99]));
console.log(calculateQuantiles(querySizes, [0.5, 0.75, 0.95, 0.99]));
The results give you a sense for the depth of the average query hitting your endpoint, grouped by quantile:
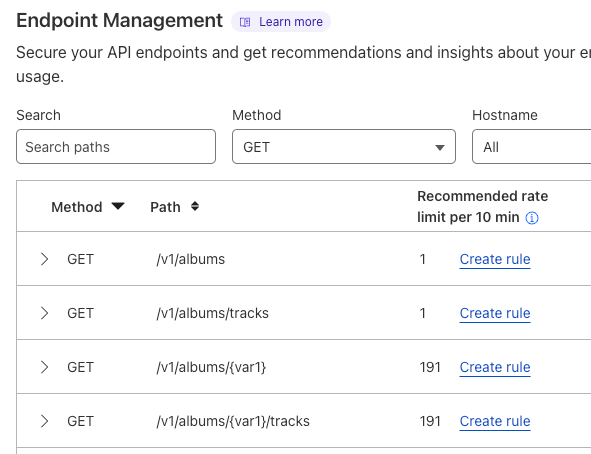
Actual data from your production environment would provide a threshold to start an investigation into which queries to further log or limit. A simpler option is to use a query analysis tool, like Cloudflare’s, to make the process automatic.
10. Use short-lived access tokens and long-lived refresh tokens upon successful authentication of your users. Implement token validation in a middleware layer or API Gateway, and be sure to have a dedicated token renewal endpoint in your API. JSON Web Tokens (JWTs) are popular choices for these short-lived tokens. When access tokens expire, allow users to obtain new ones using their refresh tokens. Revoke refresh tokens when necessary to maintain system security. Adopting this approach enhances your API's security and user experience by effectively managing access and mitigating the risks associated with compromised tokens.
11. Communicate directly with your users. All of the above recommendations are going to make it a bit more cumbersome for some of your customers to use your product. You are going to get complaints. You can reduce these by first, giving clear communication to your users explaining why you put these measures in place. Write a blog about what security measures you did and did not decide to implement and have dev docs explaining troubleshooting steps to resolve. Second, give your users concrete steps they can take if they are having trouble, and a clear way to contact you directly. Feeling inconvenienced can be frustrating, but feeling stuck can lose you a customer.
Conclusion: this is the beginning
Generative AI, like the first iPhone, has sparked a surge of excitement and innovation. But that excitement also brings risk, and innovation brings new security holes and attack vectors. The broadness and uniqueness of generative AI applications in particular make securing them particularly challenging. But as every scout knows, being prepared ahead of time means less stress and worry during the journey. Implementing the tips we've shared can establish a solid foundation that will let you sit back and enjoy the thrill of building something special, rather than worrying what might be lurking around the corner.
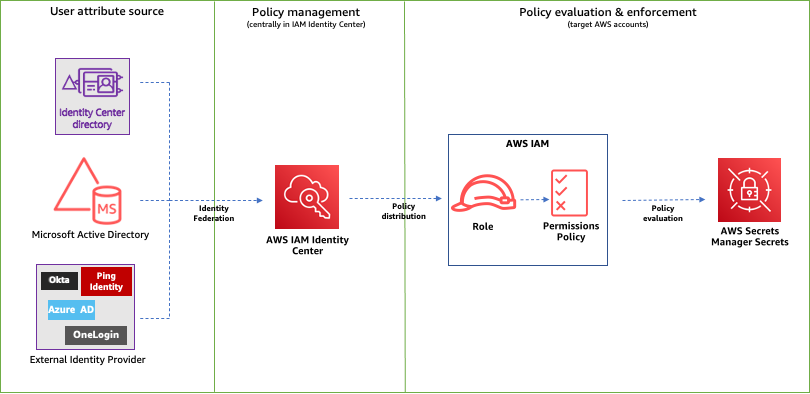
AWS Verified Access helps improve your organization’s security posture by using security trust providers to grant access to applications. This service grants access to applications only when the user’s identity and the user’s device meet configured security requirements. In this blog post, we will provide an overview of trust providers and policies, then walk through a Verified Access policy for securing your corporate applications.
Understanding trust data and policies
Verified Access policies enable you to use trust data from trust providers and help protect access to corporate applications that are hosted on Amazon Web Services (AWS). When you create a Verified Access group or a Verified Access endpoint, you create a Verified Access policy, which is applied to the group or both the group and endpoint. Policies are written in Cedar, an AWS policy language. With Verified Access, you can express policies that use the trust data from the trust providers that you configure, such as corporate identity providers and device security state providers.
Verified Access receives trust data or claims from different trust providers. Currently, Verified Access supports two types of trust providers. The first type is an identity trust provider. Identity trust providers manage the identities of digital users, including the user’s email address, groups, and profile information. The second type of trust provider is a device trust provider. Device trust providers manage the device posture for users, including the OS version of the device, risk scores, and other metrics that reflect device posture. When a user makes a request to Verified Access, the request includes claims from the configured trust providers. Verified Access customers permit or forbid access to applications by evaluating the claims in Cedar policies. We will walk through the types of claims that are included from trust providers and the options for custom trust data.
End-to-end Cedar policy use cases
Let’s look at how to use policies with your applications. In general, you use Verified Access to control access to an application for purposes of authentication and initial authorization. This means that you use Verified Access to authenticate the user when they log in and to confirm that the device posture of the end device meets minimum criteria. For authorization logic to control access to actions and resources inside the application, you pass the identity claims to the application. The application uses the information to authorize users within the application after authentication. In other words, not every identity claim needs to be passed or checked in Verified Access to allow traffic to pass to the application. You can and should put additional logic in place to make decisions for users when they gain access to the backend application after initial authentication and authorization by Verified Access. From an identity perspective, this additional criteria might be an email address, a group, and possibly some additional claims. From a device perspective, Verified Access does not at this time pass device trust data to the end application. This means that you should use Verified Access to perform checks involving device posture.
For many applications, you only need a simple policy to provide access to your users. This can include the identity information only. For example, let’s say that you want to write a policy that uses the user’s email address and matches a certain group that the user is part of. Within the Verified Access trust provider configuration, you can include “openid email groups” as the scope, and your OpenID Connect (OIDC) provider will include each claim associated with the scopes that you have configured with the OIDC provider. When the user John in this example uses case logs in to the OIDC provider, he receives the following claims from the OIDC provider. For this provider, the Verified Access Trust Provider is configured for “identity” to be the policy reference name.
With these claims, you can write a policy that matches the email domain and the group, to allow access to the application, as follows.
permit(principal, action, resource)
when {
    // Returns true if the email ends in "@example.com"
    context.identity.email like "*@example.com" &&
    // Returns true if the user is part of the "finance" group
    context.identity.groups.contains("finance")
};
Use case 2: Custom claims within a policy
Many times, you are also interested in company-specific or custom claims from the identity provider. The claims that exist with the user endpoint are dependent on how you configure the identity provider. For OIDC providers, this is determined by the scopes that you define when you set up the identity provider. Verified Access uses OIDC scopes to authorize access to details of the user. This includes attributes such as the name, email address, email verification, and custom attributes. Each scope that you configure for the identity provider returns a set of user attributes, which we call claims. Depending on which claims you want to match on in your policy, you configure the scopes and claims in the OIDC provider, which the OIDC provider adds to the user endpoint. For a list of standard claims, including profile, email, name, and others, see the Standard Claims OIDC specification.
In this example use case, as your policy evolves from the basic policy, you decide to add additional company-specific claims to Verified Access. This includes both the business unit and the level of each employee. Within the Verified Access trust provider configuration, you can include “openid email groups profile” as the scope, and your OIDC provider will include each claim associated with the scopes that you have configured with the OIDC provider. Now, when the user John logs in to the OIDC provider, he receives the following claims from the OIDC provider, with both the business unit and role as claims from the “profile” scope in OIDC.
With these claims, the company can write a policy that matches the claims to allow access to the application, as follows.
permit(principal, action, resource)
when {
    // Returns true if the email ends in "@example.com"
    context.identity.email like "*@example.com" &&
    // Returns true if the user is part of the "finance" group
    context.identity.groups.contains("finance") &&
    // Returns true if the business unit is "corp"
    context.identity.business_unit == "corp" &&
    // Returns true if the level is greater than 6
    context.identity.level >= 6
};
Use case 3: Add a device trust provider to a policy
The other type of trust provider is a device trust provider. Verified Access supports two device trust providers today: CrowdStrike and Jamf. As detailed in the AWS Verified Access Request Verification Flow, for HTTP/HTTPS traffic, the extension in the web browser receives device posture information from the device agent on the user’s device. Each device trust provider determines what risk information and device information to include in the claims and how that information is formatted. Depending on the device trust provider, the claims are static or configurable.
In our example use case, with the evolution of the policy, you now add device trust provider checks to the policy. After you install the Verified Access browser extension on John’s computer, Verified Access receives the following claims from both the identity trust provider and the device trust provider, which uses the policy reference name “crwd”.
With these claims, you can write a policy that matches the claims to allow access to the application, as follows.
permit(principal, action, resource)
when {
    // Returns true if the email ends in "@example.com"
    context.identity.email like "*@example.com" &&
    // Returns true if the user is part of the "finance" group
    context.identity.groups.contains("finance") &&
    // Returns true if the business unit is "corp"
    context.identity.business_unit == "corp" &&
    // Returns true if the level is greater than 6
    context.identity.level >= 6 &&
    // If the CrowdStrike agent is present
    ( context has "crwd" &&
      // The overall device score is greater or equal to 80
      context.crwd.assessment.overall >= 80 )
};
The final update to your policy comes in the form of multiple device trust providers. Verified Access provides the ability to match on multiple device trust providers in the same policy. This provides flexibility for your company, which in this example use case has different device trust providers installed on different types of users’ devices. For information about many of the claims that each device trust provider provides to AWS, see Third-party trust providers. However, for this updated policy, John’s claims do not change, but the new policy can match on either CrowdStrike’s or Jamf’s trust data. For Jamf, the policy reference name is “jamf”.
permit(principal, action, resource)
when {
    // Returns true if the email ends in "@example.com"
    context.identity.email like "*@example.com" &&
    // Returns true if the user is part of the "finance" group
    context.identity.groups.contains("finance") &&
    // Returns true if the business unit is "corp"
    context.identity.business_unit == "corp" &&
    // Returns true if the level is greater than 6
    context.identity.level >= 6 &&
    // If the CrowdStrike agent is present
    (( context has "crwd" &&
      // The overall device score is greater or equal to 80
      context.crwd.assessment.overall >= 80 ) ||
    // If the Jamf agent is present
    ( context has "jamf" &&
      // The risk level is either LOW or SECURE
      ["LOW","SECURE"].contains(context.jamf.risk) ))
};
In this blog post, we covered an overview of Cedar policy for AWS Verified Access, discussed the types of trust providers available for Verified Access, and walked through different use cases as you evolve your Cedar policy in Verified Access.
This blog post was written By Anthony Liguori, VP/Distinguished Engineer, EC2 AWS.
Customers around the world trust AWS to keep their data safe, and keeping their workloads secure and confidential is foundational to how we operate. Since the inception of AWS, we have relentlessly innovated on security, privacy tools, and practices to meet, and even exceed, our customers’ expectations.
The AWS Nitro System is the underlying platform for all modern AWS compute instances which has allowed us to deliver the data isolation, performance, cost, and pace of innovation that our customers require. It’s a pioneering design of specialized hardware and software that protects customer code and data from unauthorized access during processing.
When we launched the Nitro System in 2017, we delivered a unique architecture that restricts any operator access to customer data. This means no person or even service from AWS, can access data when it is being used in an Amazon EC2 instance. We knew that designing the system this way would present several architectural and operational challenges for us. However, we also knew that protecting customers’ data in this way was the best way to support our customer’s needs.
When AWS made its Digital Sovereignty Pledge last year, we committed to providing greater transparency and assurances to customers about how AWS services are designed and operated, especially when it comes to handling customer data. As part of that increased transparency, we engaged NCC Group, a leading cybersecurity consulting firm based in the United Kingdom, to conduct an independent architecture review of the Nitro System and the security assurances we make to our customers. NCC has now issued its rand affirmed our claims.
The report states, “As a matter of design, NCC Group found no gaps in the Nitro System that would compromise [AWS] security claims.” Specifically, the report validates the following statements about our Nitro System production hosts:
There is no mechanism for a cloud service provider employee to log in to the underlying host.
No administrative API can access customer content on the underlying host.
There is no mechanism for a cloud service provider employee to access customer content stored on instance storage and encrypted EBS volumes.
There is no mechanism for a cloud service provider employee to access encrypted data transmitted over the network.
Access to administrative APIs always requires authentication and authorization.
Access to administrative APIs is always logged.
Hosts can only run tested and signed software that is deployed by an authenticated and authorized deployment service. No cloud service provider employee can deploy code directly onto hosts.
The report details NCC’s analysis for each of these claims. You can also find additional details about the scope, methodology, and steps that NCC used to evaluate the claims.
How Nitro System protects customer data
At AWS, we know that our customers, especially those who have sensitive or confidential data, may have worries about putting that data in the cloud. That’s why we’ve architected the Nitro System to ensure that your confidential information is as secure as possible. We do this in several ways:
There is no mechanism for any system or person to log in to Amazon EC2 servers, read the memory of EC2 instances, or access any data on encrypted Amazon Elastic Block Store (EBS) volumes.
If any AWS operator, including those with the highest privileges, needs to perform maintenance work on the EC2 server, they can do so only by using a strictly limited set of authenticated, authorized, and audited administrative APIs. Critically, none of these APIs have the ability to access customer data on the EC2 server. These restrictions are built into the Nitro System itself, and no AWS operator can circumvent these controls and protections.
The Nitro System also protects customers from AWS system software through the innovative design of our lightweight Nitro Hypervisor, which manages memory and CPU allocation. Typical commercial hypervisors provide administrators with full access to the system, but with the Nitro System, the only interface operators can use is a restricted API. This means that customers and operators cannot interact with the system in unapproved ways and there is no equivalent of a “root” user. This approach enhances security and allows AWS to update systems in the background, fix system bugs, monitor performance, and even perform upgrades without impacting customer operations or customer data. Customers are unaffected during system upgrades, and their data remains protected.
Finally, the Nitro System can also provide customers an extra layer of data isolation from their own operators and software. AWS created , which allow for isolated compute environments, which is ideal for organizations that need to process personally identifiable information, as well as healthcare, financial, and intellectual property data within their compute instances. These enclaves do not share memory or CPU cores with the customer instance. Further, Nitro Enclaves have cryptographic attestation capabilities that let customers verify that all of the software deployed has been validated and not compromised.
All of these prongs of the Nitro System’s security and confidential compute capabilities required AWS to invest time and resources into building the system’s architecture. We did so because we wanted to ensure that our customers felt confident entrusting us with their most sensitive and confidential data, and we have worked to continue earning that trust. We are not done and this is just one step AWS is taking to increase the transparency about how our services are designed and operated. We will continue to innovate on and deliver unique features that further enhance our customers’ security without compromising on performance.
Learn more:
Watch Anthony speak about AWS Nitro System Security here.
In today’s evolving security threat landscape, security teams increasingly require tools to detect and track security findings to protect their organizations’ assets. One objective of cloud security posture management is to identify and address security findings in a timely and effective manner. AWS Security Hub aggregates, organizes, and prioritizes security alerts and findings from various AWS services and supported security solutions from the AWS Partner Network.
As the volume of findings increases, tracking the changes and actions that have been taken on each finding becomes more difficult, as well as more important to perform timely and effective investigations. In this post, we will show you how to use the new Finding History feature in Security Hub to track and understand the history of a security finding.
Updates to findings occur when finding providers update certain fields, such as resource details, by using the BatchImportFindings API. You, as a user, can update certain fields, such as workflow status, in the AWS Management Console or through the BatchUpdateFindings API. Ticketing, incident management, security information and event management (SIEM), and automatic remediation solutions can also use the BatchUpdateFindings API to update findings. This new capability highlights these various changes and when they occurred so that you don’t need to investigate this yourself.
Finding History
The new Finding History feature in Security Hub helps you understand the state of a finding by providing an immutable history of changes within the finding details. By using this feature, you can track the history of each finding, including the before and after values of the fields that were changed, who or what made the changes, and when the changes were made. This simplifies how you operate on a finding by giving you visibility into the changes made to a finding over time, alongside the rest of the finding details, which removes the need for separate tooling or additional processes. This feature is available at no additional cost in AWS Regions where Security Hub is available, and appears by default for new or updated findings. Finding History is also available through the Security Hub APIs.
To try out this new feature, open the Security Hub console, select a finding, and choose the History tab. There you will see a chronological list of changes that have been made to the finding. The transparency of the finding history helps you quickly assess the status of the finding, understand actions already taken, and take the necessary actions to mitigate risk. For example, upon resolving a finding, you can add a note to the finding to indicate why you resolved it. Both the resolved status and note will appear in the history.
In the following example, the finding was updated and then resolved with an explanatory note left by the person that reviewed the finding. With Finding History, you can see the previous updates and events in the finding’s History tab.
Figure 1: Finding History shows recent updates to the finding
In addition, you can still view the current state of the finding in its Details tab.
Figure 2: Finding Details shows the record of a security check or security-related detection
Conclusion
With the new Finding History feature in Security Hub, you have greater visibility into the activity and updates on each finding, allowing for more efficient investigation and response to potential security risks. Next time that you start work to investigate and respond to a security finding in Security Hub, begin by checking the finding history.
Earlier today, April 25, 2023, researchers Pedro Umbelino at Bitsight and Marco Lux at Curesec published their discovery of CVE-2023-29552, a new DDoS reflection/amplification attack vector leveraging the SLP protocol. If you are a Cloudflare customer, your services are already protected from this new attack vector.
Service Location Protocol (SLP) is a “service discovery” protocol invented by Sun Microsystems in 1997. Like other service discovery protocols, it was designed to allow devices in a local area network to interact without prior knowledge of each other. SLP is a relatively obsolete protocol and has mostly been supplanted by more modern alternatives like UPnP, mDNS/Zeroconf, and WS-Discovery. Nevertheless, many commercial products still offer support for SLP.
Since SLP has no method for authentication, it should never be exposed to the public Internet. However, Umbelino and Lux have discovered that upwards of 35,000 Internet endpoints have their devices’ SLP service exposed and accessible to anyone. Additionally, they have discovered that the UDP version of this protocol has an amplification factor of up to 2,200x, which is the third largest discovered to-date.
Cloudflare expects the prevalence of SLP-based DDoS attacks to rise significantly in the coming weeks as malicious actors learn how to exploit this newly discovered attack vector.
Cloudflare customers are protected
If you are a Cloudflare customer, our automated DDoS protection system already protects your services from these SLP amplification attacks. To avoid being exploited to launch the attacks, if you are a network operator, you should ensure that you are not exposing the SLP protocol directly to the public Internet. You should consider blocking UDP port 427 via access control lists or other means. This port is rarely used on the public Internet, meaning it is relatively safe to block without impacting legitimate traffic. Cloudflare Magic Transit customers can use the Magic Firewall to craft and deploy such rules.
Many of our customers use Amazon Cognito user pools to add authentication, authorization, and user management capabilities to their web and mobile applications. You can enable the built-in advanced security in Amazon Cognito to detect and block the use of credentials that have been compromised elsewhere, and to detect unusual sign-in activity and then prompt users for additional verification or block sign-ins. Additionally, you can associate an AWS WAF web access control list (web ACL) with your user pool to allow or block requests to Amazon Cognito user pools, based on security rules.
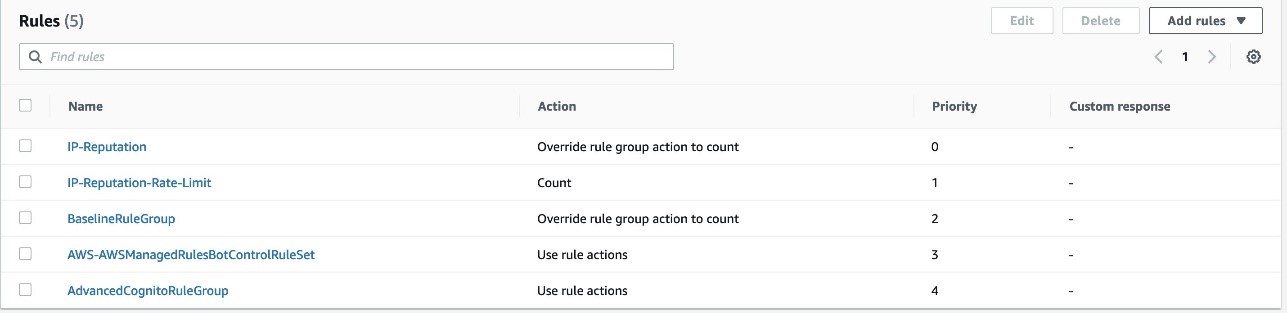
In this post, we’ll show how you can use AWS WAF with Amazon Cognito user pools and provide a sample set of rate-based rules and advanced AWS WAF rule groups. We’ll also show you how to test and tune the rules to help protect your user pools from common threats.
Rate-based rules for Amazon Cognito user pool endpoints
The following are endpoints exposed publicly by an Amazon Cognito user pool that you can protect with AWS WAF:
Public API operations — These generate a request to Cognito API actions that are either unauthenticated or authenticated with a session string or access token, but not with AWS credentials.
A good way to protect these endpoints is to deploy rate-based AWS WAF rules. These rules will detect and block requests with high rates that could indicate an attempt to exceed your Amazon Cognito API request rate quotas and that could subsequently impact requests from legitimate users.
When you apply rate limits, it helps to group Amazon Cognito API actions into four action categories. You can set specific rate limits per action category giving you traffic visibility for each category.
User Creation — This category includes operations that create new users in Cognito. Setting a rate limit for this category provides visibility for traffic of these operations and threats such as fake users being created in Cognito, which drives up your Monthly Active User (MAU) costs for Cognito.
Sign-in — This category includes operations to initiate a sign-in operation. Setting a rate limit for this category can provide visibility into the abuse of these operations. This could indicate high frequency, automated attempts to guess user credentials, sometimes referred to as credential stuffing.
Account Recovery — This category includes operations to recover accounts, including “forgot password” flows. Setting a rate limit for this category can provide visibility into the abuse of these operations, malicious activity can include: sending fake reset attempts, which might result in emails and SMS messages being sent to users.
Default — This is a catch-all rate limit that applies to an operation that is not in one of the prior categories. Setting a default rate limit can provide visibility and mitigation from request flooding attacks.
Table 1 below shows selected Hosted UI endpoint paths (the equivalent of individual API actions) and the recommended rate-based rule limit category for each.
Additionally, the rate-based rules we provide in this post include the following:
Two IP sets that represent allow lists for IPv4 and IPv6. You can add IPs that represent your trusted source IP addresses to these IP sets so that other AWS WAF rules don’t apply to requests that originate from these IP addresses.
Two IP sets that represent deny lists for IPv4 and IPv6. Add IPs to these IP sets that you want to block in all cases, regardless of the result of other rules.
An AWS managed IP reputation rule group: The AWS managed IP reputation list rule group contains rules that are based on Amazon internal threat intelligence, to identify IP addresses typically associated with bots or other threats. You can limit requests that match rules in this rule group to a specific rate limit.
Deploy rate-based rules
You can deploy the rate-based rules described in the previous section by using the AWS CloudFormation template that we provide here.
To deploy rate-based rules using the template
(Optional but recommended) If you want to enable AWS WAF logging and resources to analyze request rates, create an Amazon Simple Storage Service (Amazon S3) bucket in the same AWS Region as your Amazon Cognito user pool, with a bucket name starting with the prefix aws-waf-logs-. If you previously created an S3 bucket for AWS WAF logs, you can choose to reuse it, or you can create a new bucket to store AWS WAF logs for Amazon Cognito.
Choose the following Launch Stack button to launch a CloudFormation stack in your account.
Note: The stack will launch in the N. Virginia (us-east-1) Region. To deploy this solution into other AWS Regions, download the solution’s CloudFormation template and deploy it to the selected Region.
This template creates the following resources in your AWS account:
A rule group for the rate-based rules, according to the limits shown in Tables 1 and 2.
Four IP sets for an allow list and deny list for IPv4 and IPv6 addresses.
A web ACL that includes the rule group that is created, IP set based rules, and the AWS managed IP reputation rule group.
(Optional) The template enables AWS WAF logging for the web ACL to an S3 bucket that you specify.
(Optional) The template creates resources to help you analyze AWS WAF logs in S3 to calculate peak request rates that you can use to set rate limits for the rate-based rules.
Set the template parameters as needed. The following table shows the default values for the parameters. We recommend that you deploy the template with the default values and with TestMode set to Yes so that all rules are set to Count. This allows all requests but emits Amazon CloudWatch metrics and AWS WAF log events for each rule that matches. You can then follow the guidance in the next section to analyze the logs and tune the rate limits to match the traffic patterns to your user pool. When you are satisfied with the unique rate limits for each parameter, you can update the stack and set TestMode to No to start blocking requests that exceed the rate limits.
The rate limits for AWS WAF rate-based rules are configured as the number of requests per 5-minute period per unique source IP. The value of the rate limit can be between 100 and 2,000,000,000 (2 billion).
Table 3: Default values for template parameters
Parameter name
Description
Default value
Allowed values
Request rate limits by action category
UserCreationRateLimit
Rate limit applied to User Creation actions
2000
100–2,000,000,000
SignInRateLimit
Rate limit applied to Sign-in actions
4000
100–2,000,000,000
AccountRecoveryRateLimit
Rate limit applied to Account Recovery actions
1000
100–2,000,000,000
IPReputationRateLimit
Rate limit applied to requests that match the AWS Managed IP reputation list
1000
100–2,000,000,000
DefaultRateLimit
Default rate limit applied to actions that are not in any of the prior categories
6000
100–2,000,000,000
Test mode
TestMode
Set to Yes to test rules by overriding rule actions to Count. Set to No to apply the default actions for rules after you’ve tested the impact of these rules.
Yes
Yes or No
AWS WAF logging and rate analysis
EnableWAFLogsAndRateAnalysis
Set to Yes to enable logging for the AWS WAF web ACL to an S3 bucket and create resources for request rate analysis. Set to No to disable AWS WAF logging and skip creating resources for rate analysis. If No, the rest of the parameter values in this section are ignored. If Yes, choose values for the rest of the parameters in this section.
Yes
Yes or No
WAFLogsS3Bucket
The name of an existing S3 bucket where AWS WAF logs are delivered. The bucket name must start with aws-waf-logs- and can end with any suffix. Only used if the parameter EnableWAFLogsAndRateAnalysis is set to Yes.
None
Name of an existing S3 bucket that starts with the prefix aws-waf-logs-
DatabaseName
The name of the AWS Glue database to create, which will contain the request rate analysis tables created by this template. (Important: The name cannot contain hyphens.) Only used if the parameter EnableWAFLogsAndRateAnalysis is set to Yes.
rate_analysis
WorkgroupName
The name of the Amazon Athena workgroup to create for rate analysis. Only used if the parameter EnableWAFLogsAndRateAnalysis is set to Yes.
rate_analysis
WAFLogsTableName
The name of the AWS Glue table for AWS WAF logs. Only used if the parameter EnableWAFLogsAndRateAnalysis is set to Yes.
waf_logs
WAFLogsProjectionStartDate
The earliest date to analyze AWS WAF logs, in the format YYYY/MM/DD (example: 2023/02/28). Only used if the parameter EnableWAFLogsAndRateAnalysis is set to Yes.
None
Set this to the current date, in the format YYYY/MM/DD
Wait for the CloudFormation template to be created successfully.
Go to the AWS WAF console and choose the web ACL created by the template. It will have a name ending with CognitoWebACL.
Choose the Associated AWS resources tab, and then choose Add AWS resource.
For Resource type, choose Amazon Cognito user pool, and then select the Amazon Cognito user pools that you want to protect with this web ACL.
Choose Add.
Now that your user pool is being protected by the rate-based rules in the web ACL you created, you can proceed to tune the rate-based rule limits by analyzing AWS WAF logs.
Tune AWS WAF rate-based rule limits
As described in the previous section, the rate-based rules give you the ability to set separate rate limit values for each category of Amazon Cognito API actions.
Although the CloudFormation template has default starting values for these rate limits, it is important that you tune these values to match the traffic patterns for your user pool. To begin the tuning process, deploy the template with default values for all parameters, including Yes for TestMode. This overrides all rule actions to Count, allowing all requests but emitting CloudWatch metrics and AWS WAF log events for each rule that matches.
After you collect AWS WAF logs for a period of time (this period can vary depending on your traffic, from a couple of hours to a couple of days), you can analyze them, as shown in the next section, to get peak request rates to tune the rate limits to match observed traffic patterns for your user pool.
Query AWS WAF logs to calculate peak request rates by request type
You can calculate peak request rates by analyzing information that is present in AWS WAF logs. One way to analyze these is to send AWS WAF logs to S3 and to analyze the logs by using SQL queries in Amazon Athena. If you deploy the template in this post with default values, it creates the resources you need to analyze AWS WAF logs in S3 to calculate peak requests rates by request type.
If you are instead ingesting AWS WAF logs into your security information and event management (SIEM) system or a different analytics environment, you can create equivalent queries by using the query language for your SIEM or analytics environment to get similar results.
To access and edit the queries built by the CloudFormation template for use
Open the Athena console and switch to the Athena workgroup that was created by the template (the default name is rate_analysis).
On the Saved queries tab, choose the query named Peak request rate per 5-minute period by source IP and request category. The following SQL query will be loaded into the edit panel.
-- Gets the top 5 source IPs sending the most requests in a 5-minute period per request category
‐‐ NOTE: change the start and end timestamps to match the duration of interest
SELECT request_category, from_unixtime(time_bin*60*5) AS date_time, client_ip, request_count FROM (
  SELECT *, row_number() OVER (PARTITION BY request_category ORDER BY request_count DESC, time_bin DESC) AS row_num FROM (
    SELECT
      CASE
        WHEN ip_reputation_labels.name IN (
          'awswaf:managed:aws:amazon-ip-list:AWSManagedIPReputationList',
          'awswaf:managed:aws:amazon-ip-list:AWSManagedReconnaissanceList',
          'awswaf:managed:aws:amazon-ip-list:AWSManagedIPDDoSList'
        ) THEN 'IPReputation'
        WHEN target.value IN (
          'AWSCognitoIdentityProviderService.InitiateAuth',
          'AWSCognitoIdentityProviderService.RespondToAuthChallenge'
        ) THEN 'SignIn'
        WHEN target.value IN (
          'AWSCognitoIdentityProviderService.ResendConfirmationCode',
          'AWSCognitoIdentityProviderService.SignUp',
          'AWSCognitoIdentityProviderService.ConfirmSignUp'
        ) THEN 'UserCreation'
        WHEN target.value IN (
          'AWSCognitoIdentityProviderService.ForgotPassword',
          'AWSCognitoIdentityProviderService.ConfirmForgotPassword'
        ) THEN 'AccountRecovery'
        WHEN httprequest.uri IN (
          '/login',
          '/oauth2/authorize'
        ) THEN 'SignIn'
        WHEN httprequest.uri IN (
          '/signup',
          '/confirmUser',
          '/resendcode'
        ) THEN 'UserCreation'
        WHEN  httprequest.uri IN (
          '/forgotPassword',
          '/confirmForgotPassword'
        ) THEN 'AccountRecovery'
        ELSE 'Default'
      END AS request_category,
      httprequest.clientip AS client_ip,
      FLOOR("timestamp"/(1000*60*5)) AS time_bin,
      COUNT(*) AS request_count
    FROM waf_logs
      LEFT OUTER JOIN UNNEST(FILTER(httprequest.headers, h -> h.name = 'x-amz-target')) AS t(target) ON TRUE
      LEFT OUTER JOIN UNNEST(FILTER(labels, l -> l.name like 'awswaf:managed:aws:amazon-ip-list:%')) AS t(ip_reputation_labels) ON TRUE
    WHERE
      from_unixtime("timestamp"/1000) BETWEEN TIMESTAMP '2022-01-01 00:00:00' AND TIMESTAMP '2023-01-01 00:00:00'
    GROUP BY 1, 2, 3
    ORDER BY 1, 4 DESC
  )
) WHERE row_num <= 5 ORDER BY request_category ASC, row_num ASC
Scroll down to Line 48 in the Query Editor and edit the timestamps to match the start and end time of the time window of interest.
Run the query to calculate the top 5 peak request rates per 5-minute period by source IP and by action category.
The results show the action category, source IP, time, and count of requests. You can use the request count to tune the rate limits for each action category.
The lowest rate limit you can set for AWS WAF rate-based rules is 100 requests per 5-minute period. If your query results show that the peak request count is less than 100, set the rate limit as 100 or higher.
After you have tuned the rate limits, you can apply the changes to your web ACL by updating the CloudFormation stack.
To update the CloudFormation stack
On the CloudFormation console, choose the stack you created earlier.
Choose Update. For Prepare template, choose Use current template, and then choose Next.
Update the values of the parameters with rate limits to match the tuned values from your analysis.
You can choose to enable blocking of requests by setting TestMode to No. This will set the action to Block for the rate-based rules in the web ACL and start blocking traffic that exceeds the rate limits you have chosen.
Choose Next and then Next again to update the stack.
Now the rate-based rules are updated with your tuned limits, and requests will be blocked if you set TestMode to No.
Protect endpoints with user interaction
Now that we’ve covered the bases with rate-based rules, we’ll show you some more advanced AWS WAF rules that further help protect your user pool. We’ll explore two sample scenarios in detail, and provide AWS WAF rules for each. You can use the rules provided as a guideline to build others that can help with similar use cases.
Rules to verify human activity
The first scenario is protecting endpoints where users have interaction with the page. This will be a browser-based interaction, and a human is expected to be behind the keyboard. This scenario applies to the Hosted UI endpoints such as /login, /signup, and /forgotPassword, where a CAPTCHA can be rendered on the user’s browser for the user to solve. Let’s take the login (sign-in) endpoint as an example, and imagine you want to make sure that only actual human users are attempting to sign in and you want to block bots that might try to guess passwords.
To illustrate how to protect this endpoint with AWS WAF, we’re sharing a sample rule, shown in Figure 1. In this rule, you can take input from prior rules like the Amazon IP reputation list or the Anonymous IP list (which are configured to Count requests and add labels) and combine that with a CAPTCHA action. The logic of the rule says that if the request matches the reputation rules (and has received the corresponding labels) and is going to the /login endpoint, then the AWS WAF action should be to respond with a CAPTCHA challenge. This will present a challenge that increases the confidence that a human is performing the action, and it also adds a custom label so you can efficiently identify and have metrics on how many requests were matched by this rule. The rule is provided in the CloudFormation template and is in JSON format, because it has advanced logic that cannot be displayed by the console. Learn more about labels and CAPTCHA actions in the AWS WAF documentation.
Figure 1: Login sample rule flow
Note that the rate-based rules you created in the previous section are evaluated before the advanced rules. The rate-based rules will block requests to the /login endpoint that exceed the rate limit you have configured, while this advanced rule will match requests that are below the rate limit but match the other conditions in the rule.
Rules for specific activity
The second scenario explores activity on specific application clients within the user pool. You can spot this activity by monitoring the logs provided by AWS WAF, or other traffic logs like Application Load Balancer (ALB) logs. The application client information is provided in the call to the service.
In the Amazon Cognito user pool in this scenario, we have different application clients and they’re constrained by geography. For example, for one of the application clients, requests are expected to come from the United States at or below a certain rate. We can create a rule that combines the rate and geographical criteria to block requests that don’t meet the conditions defined.
The flow of this rule is shown in Figure 2. The logic of the rule will evaluate the application client information provided in the request and the geographic information identified by the service, and apply the selected rate limit. If blocked, the rule will provide a custom response code by using HTTP code 429 Too Many Requests, which can help the sender understand the reason for the block. For requests that you make with the Amazon Cognito API, you could also customize the response body of a request that receives a Block response. Adding a custom response helps provide the sender context and adjust the rate or information that is sent.
Figure 2: AppClientId sample rule flow
AWS WAF can detect geo location with Region accuracy and add specific labels for the location. These can then be used in other rule evaluations. This rule is also provided as a sample in the CloudFormation template.
Advanced protections
To build on the rules we’ve shared so far, you can consider using some of the other intelligent threat mitigation rules that are available as managed rules—namely, bot control for common or targeted bots. These rules offer advanced capabilities to detect bots in sensitive endpoints where automation or non-browser user agents are not expected or allowed. If you receive machine traffic to the endpoint, these rules will result in false positives that would need to be tuned. For more information, see Options for intelligent threat mitigation.
The sample rule flow in Figure 3 shows an example for our Hosted UI, which builds on the first rule we built for specific activity and adds signals coming from the Bot Control common bots managed rule, in this case the non-browser-user-agent label.
Figure 3: Login sample rule with advanced protections
Adding the bot detection label will also add accuracy to the evaluation, because AWS WAF will consider multiple different sources of information when analyzing the request. This can also block attacks that come from a small set of IPs or easily recognizable bots.
We’ve shared this rule in the CloudFormation template sample. The rule requires you to add AWS WAF Bot Control (ABC) before the custom rule evaluation. ABC has additional costs associated with it and should only be used for specific use cases. For more information on ABC and how to enable it, see this blog post.
After adding these protections, we have a complete set of rules for our Hosted UI–specific needs; consider that your traffic and needs might be different. Figure 4 shows you what the rule priority looks like. All rules except the last are included in the provided CloudFormation template. Managed rule evaluations need to have higher priority and be in Count mode; this way, a matching request can get labels that can be evaluated further down the priority list by using the custom rules that were created. For more information, see How labeling works.
Figure 4: Summary of the rules discussed in this post
Conclusion
In this post, we examined the different protections provided by the integration between AWS WAF and Amazon Cognito. This integration makes it simpler for you to view and monitor the activity in the different Amazon Cognito endpoints and APIs, while also adding rate-based rules and IP reputation evaluations. For more specific use cases and advanced protections, we provided sample custom rules that use labels, as well as an advanced rule that uses bot control for common bots. You can use these advanced rules as examples to create similar rules that apply to your use cases.
If you have feedback about this post, submit comments in the Comments section below. If you have questions about this post, start a new thread on the re:Post with tag AWS WAF or contact AWS Support.
Want more AWS Security news? Follow us on Twitter.
I am absolutely thrilled and feel incredibly blessed to have joined Cloudflare as Chief Security Officer (CSO). Cybersecurity has always been my passion and focus of my career. I am grateful to join such a dynamic and innovative team. Cloudflare is a cybersecurity industry leader and offers unmatched technology that is second to none.
A little about me
I have been a CSO for over 20 years in the financial and private sectors with SVB, HSBC, McAfee, Ameren, and Scottrade. I have been privileged to lead the security teams of some of the world’s largest, most complex, and most innovative companies; however, my greatest honor has been working with and collaborating among some of the world’s most amazing people. I have learned my dedication, expertise, and passion from my leaders, peers, and teams, which have taught me how to build and lead world-class security programs that protect organizations from the most sophisticated threats. Because security is constantly evolving, the key is, and always will be, to build an active, diverse community of highly empathetic people that will successfully protect the organization.
My charter
As I step into my new role as CSO at Cloudflare, I am excited to take on the challenge of defending the company and 20% of all websites. My charter is to protect Cloudflare from sophisticated threats and to promote a culture of innovation that enables us to stay ahead of the curve in the ever-evolving cybersecurity landscape. By fostering a mindset of creativity and continuous improvement, we will develop solutions that protect our customers from the most complex cybersecurity challenges that significantly impact them.
The last aspect of my charter is to share the Cloudflare story with our customers to ensure they are protected and leverage all of the Cloudflare technology. We can do this through collaboration and knowledge-sharing with our customers. By sharing the Cloudflare story and collaborating with our customers, we can all help build a better and more secure Internet.
Why Cloudflare
As someone who is passionate about technology, security, and its potential to improve our lives, I knew that I wanted to work for a company that shared those values. So, when I began my job search, I set out to find the best company to work for that aligned with my interests and career goals. After researching and considering many different options, I met with Cloudflare, and I was blown away.
First and foremost, I was drawn to Cloudflare’s mission to help create a secure, faster, and more reliable Internet for everyone. I was impressed by their strong mission, direction, and commitment to building a better Internet. As someone who shares their passion for making the Internet a better place, I found it inspiring to join a company with a mission that aligns so closely with my own values.
Another reason I chose to join Cloudflare was its network capabilities and cloud technology. They have built a highly sophisticated and innovative global network that I have not seen matched within the industry. As a CSO, I find Cloudflare in a unique leadership position to protect our customers due to their unmatched capabilities and unique market position. While Cloudflare is already a leader in every space where they operate, they have a significant track record of building on their fantastic platform by continuously improving their technology to be best in class.
In addition to their impressive technology, I was also impressed by their customer base. The most prominent and respected companies in the world use Cloudflare’s services, and I am excited to share “How Cloudflare does it” to help our customers be even more successful and give them a unique opportunity to see how we do it internally.
Lastly, the interview process and the people I met at Cloudflare significantly influenced my decision to join the team. Throughout my 17 interviews, I was impressed by the professionalism and passion of the people I met. I connected with each person and was excited by the team’s commitment to the company’s mission. I am very proud and humbled to join the Cloudflare family! I look forward to hearing from our customers and employees and how I can help them!
For the permissions already in place, one of IAM Access Analyzer’s capabilities is that it helps you identify resources in your AWS Organizations organization and AWS accounts that are shared with an external entity.
For each external entity that has access to a resource in your account, IAM Access Analyzer generates a finding. Findings display information about the resource and the policy statement that generated the finding, with details such as the list of actions in the policy granting access, level of access, and conditions that allow the access. You can review the findings to determine if the access is intended or unintended.
As your use of AWS services grows and the number of accounts in your organization increases, the number of findings that you have might also increase. To help reduce noise and allow you to focus on unintended access findings, you can filter findings and create archive rules for intended access.
This blog post provides step-by-step guidance on how to get started with IAM Access Analyzer findings by using different filtering techniques that can help you filter approved use cases that result in access findings. For example, you might see a finding generated for an S3 bucket that hosts images for your website and thus allows public access, as approved by your organization, apply a filter so that you can concentrate on unintended access. IAM Access Analyzer offers a wide range of filters; for a complete list, see the IAM documentation.
In this post, we also share example archive rules for approved use cases that result in access findings. Archive rules automatically archive new findings that meet the criteria you define when you create the rule. You can also apply archive rules retroactively to archive existing findings that meet the archive rule criteria. Finally, we have included an example implementation of archive rules using an AWS CloudFormation template.
IAM Access Analyzer findings overview
To get started, create an analyzer for your entire organization or your account. The organization or account that you choose is known as the zone of trust for the analyzer. The zone of trust determines the type of access that IAM Access Analyzer considers to be trusted. IAM Access Analyzer continuously monitors to identify resource policies, access control lists, and other access controls that grant public or cross-account access from outside the zone of trust, and generates findings. For this blog post, we’ll demonstrate an organization as the zone of trust, showcasing findings from a large-scale, multi-account AWS deployment.
Prerequisites
This blog post assumes that you have the following in place:
IAM Access Analyzer is enabled in your organization or account in the AWS Regions where you operate. For more details on how to enable IAM Access Analyzer, see Enabling IAM Access Analyzer.
Access to the AWS Organizations management account or to a member account in the organization with delegated administrator access for creating and updating IAM Access Analyzer resources.
How to filter the findings
To start filtering your findings and create archive rules, you should complete the following steps:
Review public access findings
Filter by removing permissions errors
Filter for known identity providers
Filter cross-account access from trusted external accounts
We’ll walk you through each step.
1. Review public access findings
Some AWS resources allow public access on the resource by means of a resource-based policy—for example, an Amazon Simple Storage Service (Amazon S3) bucket policy that has the “Principal:*” permission added to its bucket policy. For resources such as Amazon Elastic Block Store (Amazon EBS) snapshots, you can share these by using a flag on the resource permission. IAM Access Analyzer looks for such sharing and reports it in the findings.
From the global report, you can generate a list of resources that allow public access by using the Public access: true query in the IAM console.
If the access is intended, you can archive the findings by creating an archive rule using the AWS Management Console, AWS CLI, or API. When you archive a security finding, IAM Access Analyzer removes it from the Active findings list and changes its status to Archived. For instructions on how to automatically archive expected findings, see How to automatically archive expected IAM Access Analyzer findings.
Example: Known S3 bucket that hosts public website images
If you have resources for which public access is expected, such as an S3 bucket that hosts images for your website, you can add an archive rule with Resource criteria equal to the bucket name, as shown in Figure 1.
Figure 1: Create IAM Access Analyzer archive rule using the console
Is the public access unintended?
If the finding results from policies that were misconfigured to allow unintended public access, you can constrain the access by using AWS global condition context keys or a specific IAM principal ARN. The findings show the account and resource that contain the policy.
For example, if the finding shows a misconfigured S3 bucket, the following policy shows how you can modify the S3 bucket policy to only allow IAM principals from your organization to access the bucket by using the PrincipalOrgID condition key. Replace <DOC-EXAMPLE-BUCKET> with the name of your S3 bucket, and <ORGANIZATION_ID> with your organization ID.
Before you further investigate the IAM Access Analyzer findings, you should make sure that IAM Access Analyzer has enough permissions to access the resources in your accounts to be able to provide the analysis.
IAM Access Analyzer uses an AWS service-linked role to call other AWS services on your behalf. When IAM Access Analyzer analyzes a resource, it reads resource metadata, such as a resource-based policy, access control lists, and other access controls that grant public or cross-account access. If the policies don’t allow an IAM Access Analyzer role to read the resource metadata, it generates an Access Denied error finding, as shown in Figure 2.
Figure 2: IAM Access Analyzer access denied error example
To view these error findings from the IAM Access Analyzer console, filter the findings by using the Error: Access Denied property.
Resolution
To resolve the access issue, make sure that the IAM Access Analyzer service-linked role is not denied access. Review the resource-based policy attached to the resource that IAM Access Analyzer isn’t able to access. For a list of services that support resource-based policies, see the IAM documentation.
For example, if the analyzer can’t access an AWS Key Management Service (AWS KMS) key because of an explicit deny, add an exception for the IAM Access Analyzer service-linked role to the policy statement, similar to the following. Make sure that you change the <ACCOUNT_ID> to your account id.
With SAML 2.0 or Open ID Connect (OIDC)—which are open federation standards that many identity providers (IdPs) use—users can log in to the console or call the AWS API operations without you having to create an IAM user for everyone in your organization.
To set up federation, you must perform a one-time configuration so that your organization’s IdP and your account trust each other. To configure this trust, you must register AWS as a service provider (SP) with the IdP of your organization and set up metadata and key exchange.
The role or roles that you create in IAM define what the federated users from your organization are allowed to use on AWS. When you create the trust policy for the role, you specify the SAML or OIDC provider as the Principal. To only allow users that match certain attributes to access the role, you can scope the trust policy with a Condition.
Example 1: Federation with Okta
Let’s walk through an example that uses Okta as the IdP. Although access to a trusted IdP is intended, IAM Access Analyzer creates a finding for an IAM role that has trust policy granting access to a SAML provider because the trust policy allows access outside of the known zone of trust for the analyzer. You will see findings created for the IAM role granting access to Okta using the IAM trust policy, as shown in Figure 3.
Figure 3: IAM Access Analyzer identity provider finding example
Resolution
Setting access through SAML providers is a privileged operation, so we recommend that you analyze each finding to decide if an exception is acceptable. If you approve of the SAML-provided access setup, you can implement an archive rule to archive such findings with conditions for federation used in combination with your SAML provider. The filter for the Federated User rule depends on the name that you gave to the SAML IdP in your federation setup. For example, if your SAML IdP name is Okta, the rule should have a filter for arn:aws:iam::<ACCOUNT_ID>:saml-provider/Okta, where <ACCOUNT_ID> is your account number, as shown in Figure 4.
Figure 4: Archive rule example for using an IdP-related finding
Note: To include additional values for a multi-account setup, use the Add another value filter.
Example 2: IAM Identity Center
With AWS IAM Identity Center (successor to AWS Single Sign-On), you can manage sign-in security for your workforce. IAM Identity Center provides a central place to define your permission sets, assign them to your users and groups, and give your users a portal where they can access their assigned accounts.
With IAM Identity Center, you manage access to accounts by creating and assigning permission sets. These are IAM role templates that define (among other things) which policies to include in a role. When you create a permission set in IAM Identity Center and associate it to an account, IAM Identity Center creates a role in that account with a trust policy that allows a federated IdP as a principal — in this case, IAM Identity Center.
IAM Access Analyzer generates a finding for this setup because the allowed access is outside of the known zone of trust for the analyzer, as shown in Figure 5.
Figure 5: IAM Access Analyzer finding example for IAM Identity Center
To filter this finding, you need to implement an archive rule.
Resolution
You can implement an archive rule with conditions for federation used in combination with IAM Identity Center as the SAML provider. The roles created by IAM Identity Center in member accounts use a reserved path on AWS: arn:aws:iam::<ACCOUNT_ID>:role/aws-reserved/sso.amazonaws.com/. Hence, you can create an archive rule with a filter that contains :saml-provider/AWSSSO in the Federated User name and aws-reserved/sso.amazonaws.com/ in the Resource, as shown in Figure 6.
Figure 6: Archive rule example for IAM Identity Center generated findings
4. Filter cross-account access findings from trusted external accounts
We recommend that you identify and document accounts and principals that should be allowed access outside of the zone of trust for IAM Access Analyzer.
When a resource-based policy attached to a resource allows cross-account access from outside the zone of trust, IAM Access Analyzer generates cross-account access findings.
Is the cross-account access intended?
When you review cross-account access findings, you need to determine whether the access is intended or not. For example, you might have access provided to your auditor’s account or a partner account for visibility and monitoring of your AWS applications.
For trusted external accounts, you can create an archive rule that includes the AWS account in the criteria for the rule. Figure 7 shows an example of how to create the archive rule for a trusted external account (EXTERNAL_ACCOUNT_ID). In your own rule, replace EXTERNAL_ACCOUNT_ID with the trusted account id.
Figure 7: Archive rule example for trusted account findings
Is the cross-account access unintended?
After you have archived the intended access findings, you can start analyzing the findings initiated from unintended access. When you confirm that the findings show unintended access, you should take steps to remove the access by altering or deleting the policy or access control that granted access. You can expand the solution outlined in the blog post Automate resolution for IAM Access Analyzer cross-account access findings on IAM roles by adding an explicit deny statement.
You can also use AWS CloudTrail to track API calls that could have changed access configuration on your AWS resources.
Deploy IAM Access Analyzer and archive rules with a CloudFormation template
In this section, we demonstrate a sample CloudFormation template that creates an IAM access analyzer and archive rules for findings that are created for identified intended access to resources.
Important: When you create an archive rule using the AWS console, the existing findings and new findings that match criteria mentioned in the rules will be archived. However, archive rules created through CloudFormation or the AWS CLI will only archive the new findings that meet the criteria defined. You need to perform the access-analyzer:ApplyArchiveRule API after you create the archive rule to archive existing findings as well.
The sample CloudFormation template takes the following values as inputs and creates archive rules for findings that are created for identified intended access to resources shared outside of your zone of trust for the specified analyzer:
Analyzer name
Zone of trust
Known public S3 buckets, if you have any (for example, a bucket that hosts public website images).
Note: We use S3 buckets as an example. You can edit the rule to include resource types that are supported by IAM Access Analyzer, if public access is intended.
Trusted accounts — AWS accounts that don’t belong to your organization, but you trust them to have access to resources in your organization
SAML provider — The SAML provider approved to have access to your resources
Note: If you don’t use federation, you can remove the rule SAMLFederatedUsers.
AWSTemplateFormatVersion: 2010-09-09
Description: >+
  Sample CloudFormation template creates archive rules for findings
  created for resources shared outside of your zone of trust for specified
  analyzer.

Metadata:
  AWS::CloudFormation::Interface:
    ParameterGroups:
      - Label:
          default: Define Configuration
        Parameters:
          - AccessAnalyzerName
          - ZoneOfTrust
          - KnownPublicS3Buckets
          - TrustedAccounts
          - SAMLProvider
Parameters:
  AccessAnalyzerName:
    Description: Provide name of the analyzer you would like to create archive rules for.
    Type: String
  ZoneOfTrust:
    Description: Select the zone of trust of AccessAnalyzer
    AllowedValues:
      - ACCOUNT
      - ORGANIZATION
    Type: String
  KnownPublicS3Buckets:
    Description: List of comma-separated known S3 bucket arns, that should allow
      public access Example -
      arn:aws:s3:::DOC-EXAMPLE-BUCKET,arn:aws:s3:::DOC-EXAMPLE-BUCKET2
    Type: CommaDelimitedList
  TrustedAccounts:
    Description: List of comma-separated account IDs, that do not belong to your
      organization but you trust them to have access to resources in your
      organization. [Example - Your auditor’s AWS account]
    Type: List<Number>
  TrustedFederationPrincipals:
    Description: List of comma-separated trusted federated principals that are able
      to assume roles in your accounts. [Example -
      arn:aws:iam::012345678901:saml-provider/Okta,
      arn:aws:iam::1111222233334444:saml-provider/Okta]
    Type: CommaDelimitedList
Resources:
  AccessAnalyzer:
    Type: AWS::AccessAnalyzer::Analyzer
    Properties:
      AnalyzerName: ${AccessAnalyzerName}-${AWS::Region}
      Type: ZoneOfTrust
      ArchiveRules:
        - RuleName: ArchivePublicS3BucketsAccess
          Filter:
            - Property: resource
              Eq: KnownPublicS3Buckets
        - RuleName: AccountAccessNecessaryForBusinessProcesses
          Filter:
            - Property: principal.AWS
              Eq: TrustedAccounts
            - Property: isPublic
              Eq:
                - "false"
        - RuleName: SAMLFederatedUsers
          Filter:
            - Property: principal.Federated
              Eq: TrustedFederationPrincipals
To download this sample template, download the file IAMAccessAnalyzer.yaml from Amazon S3.
Conclusion
In this blog post, you learned how to start with IAM Access Analyzer findings, filter them based on the level of access given outside of your zone of trust, and create archive rules for intended access findings. By using different filtering techniques to remediate intended access findings, you can concentrate on unintended access.
When you buy a new house, you shouldn’t have to worry that everyone in the city can unlock your front door with a universal key before you change the lock. You also shouldn’t have to walk around the house with a screwdriver and tighten the window locks and back door so that intruders can’t pry them open. And you really shouldn’t have to take your alarm system offline every few months to apply critical software updates that the alarm vendor could have fixed with better software practices before they installed it.
This “default secure” posture is the focus of a recently published guide jointly authored by the Cybersecurity and Infrastructure Agency (CISA), NSA, FBI, and six other international agencies representing the United Kingdom, Australia, Canada, Germany, Netherlands, and New Zealand. In the guide, the authors implore technology vendors to follow Secure-by-Design and Secure-by-Default principles, shifting the burden of security as much as possible away from the end-user and back towards the manufacturer:
The authoring agencies strongly encourage every technology manufacturer to build their products in a way that prevents customers from having to constantly perform monitoring, routine updates, and damage control on their systems to mitigate cyber intrusions. Manufacturers are encouraged to take ownership of improving the security outcomes of their customers. Historically, technology manufacturers have relied on fixing vulnerabilities found after the customers have deployed the products, requiring the customers to apply those patches at their own expense. Only by incorporating Secure-by-Design practices will we break the vicious cycle of creating and applying fixes.
In this post we’ll review some of the authors’ recommendations, discuss how Cloudflare applies these principles to the products that we build, and provide some suggestions on what other organizations can do to support similar initiatives internally.
Secure-by-Default: building products that require minimal hardening
Cloudflare makes cybersecurity products that protect employees, applications, and networks from attack. Typically, the ideas for new products and features come from one of two places: i) customers who are expressing a risk they’re worried about; or ii) our own internal Security team asking for help better securing Cloudflare’s internal network from threats. (The products that we build for our Security team are also then made available to our customers, once they’re battle tested internally.)
Wherever the source, when a product manager thinks through a new product offering, they first socialize the idea around the company for feedback. Often this feedback includes encouragement to make the product more “magical”. What this means in practice is that customers should have to do less, but get more; our job is essentially to make security administrators’ lives easier so they can focus their time where it’s most needed. An early example of this approach can be found in our blog post announcing Universal SSL in 2014:
For all customers, we will now automatically provision a SSL certificate on CloudFlare’s network that will accept HTTPS connections for a customer’s domain and subdomains.
The idea sounds simple but in 2014 this approach to SSL/TLS was unique in the industry: every other platform required customers to take some action before their website was encrypted-in-transit using HTTPS to protect against snooping and impersonation. Security administrators either had to go acquire the certificate themselves and upload (and renew) it, or manually perform some steps to demonstrate ownership to a certificate authority (CA). Because Cloudflare both manages authoritative DNS for our customers and runs a global reverse proxy, we can take care of all these steps automagically. Additionally, as new SSL/TLS attacks are discovered, we automatically improve how our servers negotiate encryption with browsers and API clients to keep our customers secure. No customer configuration or oversight is required.
We agree with CISA’s statement that “[t]he complexity of security configuration should not be a customer problem.” And aim to build products that materially improve security with little to no customer action beyond putting their employees, applications, and networks behind Cloudflare:
Secure-by-Default products are those that are secure to use “out of the box” with little to no configuration changes necessary and security features available without additional cost. Together, these two principles move much of the burden of staying secure to manufacturers and reduce the chances that customers will fall victim to security incidents resulting from misconfigurations, insufficiently fast patching, or many other common issues.
Another example of our Secure-by-Default approach is how we protect against “0 day” attacks in our Web Application Firewall using machine learning (ML). Zero day attacks are security vulnerabilities discovered by attackers or researchers before the software vendor is aware of the issue (or has had a chance to release a patch). Often the attack is exploited “in the wild” before customers are able to plug the holes in their systems, or their upstream security vendors are able to virtually patch the issue. A recent, widely-exploited 0 day was Log4j; software manufacturers using this library in their code raced to update their software as quickly as possible. But many took days, weeks, or even months to do so.
Cloudflare is proud of the speed at which we responded to Log4j, and the fact we provide the highest severity WAF protections to all plans including Free—but it’s always a race against the clock. We created the ML-computed WAF Attack Score to provide our customers with a more Secure-by-Default system that didn’t rely on new rules being raced out, or making reactive configuration changes. The way most WAFs work is they match properties of an incoming HTTP request against a set of “signatures”, which are essentially patterns described using regular expressions. We do that too, but we also train ML models on the “true positive” matches, which allow us to infer the likelihood a new request is malicious even when it doesn’t match a signature. Customers can write one rule up front that blocks high-confidence malicious requests, and they’re protected against 0 days thereafter. Secure by default, even against attacks that have not yet been discovered.
One final example of this approach can be found in how we designed Cloudflare One, the zero trust suite we initially built to protect Cloudflare’s own employees and networks. When we opened Cloudflare One to businesses of all sizes, we wanted a secure-by-default way to connect and protect corporate networks that didn’t require poking a bunch of holes in network firewalls.
Instead of this traditional route that requires security administrators to make upfront changes and avoid firewall configuration drift over time, we designed Cloudflare Tunnel to establish mutually authenticated, encrypted connections directly to Cloudflare’s edge. Additionally, we wanted to completely shut off access to our customers’ networks by default, except for access to specific applications by strongly-authenticated users rather than IP and port holes that aren’t tied to a known identity.
Secure-by-Design: continual (re)investment in secure development practices
Secure defaults that require minimal customer invention are critically important, but not sufficient on their own to protect our customers. How the products are built by engineering and evaluated by our CSO organization for adherence to secure development practices is just as important in minimizing vulnerabilities that may result in customer compromise. And none of that matters without the support from executive leadership to make significant investments that may not immediately result in visible customer benefit.
Cloudflare’s engineering team builds products using the most secure development practices and tools available at the time of implementation, that sufficiently meet the requirements and architectural constraints. The options available evolve over time of course, so what was most appropriate (and secure) back in 2013 when we wrote the initial version of the Cloudflare WAF may no longer be the best option in 2023. Lua made sense for us for the reasons outlined in this talk, but when the WAF was starting to show its age in 2017 we had a choice: continue bolting on features quickly to try to close the gap with competitive products, or invest in a memory-safe language that improved security and performance at the cost of near-term momentum?
We knew that if we designed our underlying WAF platform correctly, customers—at scale—could more easily adopt other Application Security products such as Bot Management and our new API Gateway. Our existing core WAF functionality would also benefit from new evaluation engines, running 40% faster and becoming more resilient. But proposing an entire rewrite of a system that processed millions of requests per second in a relatively nascent language, Rust, was not a small undertaking or ask. Fortunately we had the full support of Cloudflare’s executive and technical leadership teams to make this investment, which is critical for security as CISA et al. write (emphasis added):
Secure-by-Design development requires the investment of significant resources by software manufacturers at each layer of the product design and development process that cannot be “bolted on” later. It requires strong leadership by the manufacturer’s top business executives to make security a business priority, not just a technical feature.
[and]
Manufacturers are encouraged to make hard tradeoffs and investments, including those that will be “invisible” to the customers, such as migrating to programming languages that eliminate widespread vulnerabilities. They should prioritize features, mechanisms, and implementation of tools that protect customers rather than product features that seem appealing but enlarge the attack surface.
The end result of our efforts was a new WAF rule evaluation engine entirely written in Rust—a performant, memory-safe language that is immune to buffer overflow attacks and has positioned us well for the future. After that rewrite, our Cache team also embarked on a similarly XL-sized project called Pingora, which replaced NGINX with a Rust-based reverse proxy engine called Pingora. These projects were costly, but improved the security posture of our customers:
The authoring agencies acknowledge that taking ownership of the security outcomes for customers and ensuring this level of customer security may increase development costs.
However, investing in “Secure-by-Design” practices while developing new technology products and maintaining existing ones can substantially improve the security posture of customers and reduce the likelihood of being compromised.
Secure-by-Default and Secure-by-Design: implementing these principles into your organization
Building secure products that are easy to adopt and require minimal ongoing customer oversight is paramount in today’s threat environment, but it takes an aligned organization to deliver. Below are some techniques that Cloudflare employs to solve our customers’ security problems, and shift the operational burden away from their network towards ours:
1. Perform as much logic as you can in code you control and can update without user intervention Like many readers, I’m the technical support person for my parents. Their home networking equipment is quite modern and sends me alerts when there are critical security updates, but I’m always afraid if I apply updates without being onsite something might go wrong.
Professional security administrators face the same problem when dealing with enterprise networking equipment. When software gets shipped into heterogeneous customer environments, things can go wrong. Having a single software stack that runs on every server in our fleet has made it immeasurably easier to stay on top of software updates for our customers.
To the extent your organization can shift the operational burden away from your customer to your own infrastructure, the easier it will be for people to adopt your products and keep them secure. Relying on overburdened administrators to apply patches, especially if there’s risk of downtime, is a difficult proposition.
2. Educate executive leadership on the importance of continual reinvestment in modern security standards, and run experiments to build credibility Today’s economic environment is challenging: customers are being forced to do more with less, while the software providers they depend upon are no longer hiring at the rate they once were. The appropriate prioritization of scarce engineering resources across new features, technical debt, and security hardening is not obvious and is likely met internally with differing opinions. Laying out clear business cases for adopting secure-by-default and secure-by-design mindsets is thus even more critical for improving security outcomes without obvious customer-visible benefit.
Projects should also be appropriately scoped, and experiments should be run early and often. Do not wait until you are nearly through a project before letting others play with and review your proof-of-concepts and code. You may find support within the organization where you did not expect it, accelerating projects and increasing the likelihood that they succeed. You’ll also be able to demonstrate unexpected benefits that customers will embrace, helping build a base of support for the sustained effort.
3. Empower your security practitioners to provide feedback early and often in the development cycle The skill set required to code new products and features does not perfectly overlap with the skill set required to spot security risks in them. Application security experts are helpful because they can quickly pattern match security “code smells” with other projects they’ve previously reviewed and helped harden.
You should embed your security experts within your product engineering teams so that they can provide guidance at the earliest (and lowest cost) phase of development. Having these experts review your functional specifications may save development cycles downstream.
4. Incentivize products that do more for customers “automagically” People respond to incentives. If your business is built on selling professional services to enterprise customers, there is little incentive for your software developers to minimize the effort required during the installation, tuning, and hardening process.
If your products are designed to be consumed by hundreds of thousands of customers of all sizes, you have no choice but to do more for customers out-of-the-box. Otherwise, your support organization will be overwhelmed and your customers will be vulnerable.
5. Avoid default passwords at all costs Every day, Cloudflare mitigates DDoS attacks launched by botnets comprised of insecure-by-default devices. Manufacturers ship IoT devices and home networking equipment with default or easy-to-guess passwords, and many proxy vendors require no authentication out of the box.
If these manufacturers followed the principles outlined in the CISA guide, these attacks would decrease in both intensity and frequency, as fewer and fewer devices can be recruited for attack amplification.
At Amazon Web Services (AWS), we move fast and continually iterate to meet the evolving needs of our customers. We design services that can help our customers meet even the most stringent security and compliance requirements. Additionally, our service teams work closely with our AWS Security Guardians program to coordinate security efforts and to maintain a high quality bar. We also have internal compliance teams that continually monitor security control requirements from all over the world and engage with external auditors to achieve third-party validation of our services against these requirements.
In this post, I’ll cover some key strategies and best practices that we use to scale security and compliance while maintaining a culture of innovation.
Security as the foundation
At AWS, security is our top priority. Although compliance might be challenging, treating security as an integral part of everything we do at AWS makes it possible for us to adhere to a broad range of compliance programs, to document our compliance, and to successfully demonstrate our compliance status to our auditors and customers.
Over time, as the auditors get deeper into what we’re doing, we can also help improve and refine their approach, as well. This increases the depth and quality of the reports that we provide directly to our customers.
The challenge of scaling securely
Many customers struggle with balancing security, compliance, and production. These customers have applications that they want to quickly make available to their own customer base. They might need to audit these applications. The traditional process can include writing the application, putting it into production, and then having the audit team take a look to make sure it meets compliance standards. This approach can cause issues, because retroactively adding compliance requirements can result in rework and churn for the development team.
Enforcing compliance requirements in this way doesn’t scale and eventually causes more complexity and friction between teams. So how do you scale quickly and securely?
Speak their language
The first way to earn trust with development teams is to speak their language. It’s critical to use terms and references that developers use, and to know what tools they are using to develop, deploy, and secure code. It’s not efficient or realistic to ask the engineering teams to do the translation of diverse (and often vague) compliance requirements into engineering specs. The compliance teams must do the hard work of translating what is required into what specifically must be done, using language that engineers are familiar with.
Another strategy to scale is to embed compliance requirements into the way developers do their daily work. It’s important that compliance teams enable developers to do their work just as they normally do, without compliance needing to intervene. If you’re successful at that strategy—and the compliant path becomes the simplest and most natural path—then that approach can lead to a very scalable compliance program that fosters understanding between teams and increased collaboration. This approach has helped break down the barriers between the developer and audit/compliance organizations.
Treat auditors and regulators as partners
I believe that you should treat auditors and regulators as true business partners. An independent auditor or regulator understands how a wide range of customers will use the security assurance artifacts that you are producing, and therefore will have valuable insights into how your reports can best be used. I think people can fall into the trap of treating regulators as adversaries. The best approach is to communicate openly with regulators, helping them understand your business and the value you bring to your customers, and getting them ramped up on your technology and processes.
At AWS, we help auditors and regulators get ramped up in various ways. For example, we have the Digital Audit Symposium, which contains presentations on how we control and operate particular services in terms of security and compliance. We also offer the Cloud Audit Academy, a learning path that provides both cloud-agnostic and AWS-specific training to help existing and prospective auditing, risk, and compliance professionals understand how to audit regulated cloud workloads. We’ve learned that being a partner with auditors and regulators is key in scaling compliance.
Conclusion
Having security as a foundation is essential to driving and scaling compliance efforts. Speaking the language of developers helps them continue to work without disruption, and makes the simple path the compliant path. Although some barriers still exist, especially for organizations in highly regulated industries such as financial services and healthcare, treating auditors like partners is a positive strategic shift in perspective. The more proactive you are in helping them accomplish what they need, the faster you will realize the value they bring to your business.
If you have feedback about this post, submit comments in the Comments section below. If you have questions about this post, contact AWS Support.
Want more AWS Security news? Follow us on Twitter.
With AWS Secrets Manager, you can securely store, manage, retrieve, and rotate the secrets required for your applications and services running on AWS. A secret can be a password, API key, OAuth token, or other type of credential used for authentication purposes. You can control access to secrets in Secrets Manager by using AWS Identity and Access Management (IAM) permission policies. In this blog post, I will show you how to use principles of attribute-based access control (ABAC) to define dynamic IAM permission policies in AWS IAM Identity Center (successor to AWS Single Sign-On) by using user attributes from an external identity provider (IdP) and resource tags in Secrets Manager.
What is ABAC and why use it?
Attribute-based access control (ABAC) is an authorization strategy that defines permissions based on attributes or characteristics of the user, the data, or the environment, such as the department, business unit, or other factors that could affect the authorization outcome. In the AWS Cloud, these attributes are called tags. By assigning user attributes as principal tags, you can simplify the process of creating fine-grained permissions on AWS.
With ABAC, you can use attributes to build more dynamic policies that provide access based on matching attribute conditions. ABAC rules are evaluated dynamically at runtime, which means that the users’ access to applications and data and the type of allowed operations automatically change based on the contextual factors in the policy. For example, if a user changes department, access is automatically adjusted without the need to update permissions or request new roles. You can use ABAC in conjunction with role-based access control (RBAC) to combine the ease of policy administration with flexible policy specification and dynamic decision-making capability to enforce least privilege.
AWS IAM Identity Center (successor to AWS Single Sign-On) expands the capabilities of IAM to provide a central place that brings together the administration of users and their access to AWS accounts and cloud applications. With IAM Identity Center, you can define user permissions and manage access to accounts and applications in your AWS Organizations organization centrally. You can also create ABAC permission policies in a central place. ABAC will work with attributes from a supported identity source in IAM Identity Center. For a list of supported external IdPs for identity synchronization through the System for Cross-domain Identity Management (SCIM) and Security Assertion Markup Language (SAML) 2.0, see Supported identity providers.
The following are key benefits of using ABAC with IAM Identity Center and Secrets Manager:
Fewer permission sets — With ABAC, multiple users who use the same IAM Identity Center permission set and the same IAM role can still get unique permissions, because permissions are now based on user attributes. Administrators can author IAM policies that grant users access only to secrets that have matching attributes. This helps reduce the number of distinct permissions that you need to create and manage in IAM Identity Center and, in turn, reduces your permission management complexity.
Teams can change and grow quickly — When you create new secrets, you can apply the appropriate tags, which will automatically grant access without requiring you to update the permission policies.
Use employee attributes from your corporate directory to define access — You can use existing employee attributes from a supported identity source configured in IAM Identity Center to make access control decisions on AWS.
Figure 1 shows a framework to control access to Secrets Manager secrets using IAM Identity Center and ABAC principles.
Figure 1: ABAC framework to control access to secrets using IAM Identity Center
The following is a brief introduction to the basic components of the framework:
User attribute source or identity source — This is where your users and groups are administered. You can configure a supported identity source with IAM Identity Center. You can then define and manage supported user attributes in the identity source.
Policy management — You can create and maintain policy definitions (permission sets) centrally in IAM Identity Center. You can assign access to a user or group to one or more accounts in IAM Identity Center with these permission sets. You can then use attributes defined in your identity source to build ABAC policies for managing access to secrets.
Policy evaluation — When you assign a permission set, IAM Identity Center creates corresponding IAM Identity Center-controlled IAM roles in each account, and attaches the policies specified in the permission set to those roles. IAM Identity Center manages the role, and allows the authorized users that you’ve defined to assume the role. When users try to access a secret, IAM dynamically evaluates ABAC policies on the target account to determine access based on the attributes assigned to the user and resource tags assigned to that secret.
How to configure ABAC with IAM Identity Center
To configure ABAC with IAM Identity Center, you need to complete the following high-level steps. I will walk you through these steps in detail later in this post.
Identify and set up identities that are created and managed in the identity source with user attributes, such as project, team, AppID or department.
In IAM Identity Center, enable Attributes for access control and configure select attributes (such as department) to use for access control. For a list of supported attributes, see Supported external identity provider attributes.
If you are using an external IdP and choose to use custom attributes from your IdP for access controls, configure your IdP to send the attributes through SAML assertions to IAM Identity Center.
Assign appropriate tags to secrets in Secrets Manager.
Create permission sets based on attributes added to identities and resource tags.
Define guardrails to enforce access using ABAC.
ABAC enforcement and governance
Because an ABAC authorization model is based on tags, you must have a tagging strategy for your resources. To help prevent unintended access, you need to make sure that tagging is enforced and that a governance model is in place to protect the tags from unauthorized updates. By using service control policies (SCPs) and AWS Organizations tag policies, you can enforce tagging and tag governance on resources.
When you implement ABAC for your secrets, consider the following guidance for establishing a tagging strategy:
During secret creation, secrets must have an ABAC tag applied (tag-on-create).
During secret creation, the provided ABAC tag key must be the same case as the principal’s ABAC tag key.
After secret creation, the ABAC tag cannot be modified or deleted.
Only authorized principals can do tagging operations on secrets.
You enforce the permissions that give access to secrets through tags.
For more information on tag strategy, enforcement, and governance, see the following resources:
In this post, I will walk you through the steps to enable the IdP that is supported by IAM Identity Center.
Figure 2: Sample solution implementation
In the sample architecture shown in Figure 2, Arnav and Ana are users who each have the attributes department and AppID. These attributes are created and updated in the external directory—Okta in this case. The attribute department is automatically synchronized between IAM Identity Center and Okta using SCIM. The attribute AppID is a custom attribute configured on Okta, and is passed to AWS as a SAML assertion. Both users are configured to use the same IAM Identity Center permission set that allows them to retrieve the value of secrets stored in Secrets Manager. However, access is granted based on the tags associated with the secret and the attributes assigned to the user.
For example, user Arnav can only retrieve the value of the RDS_Master_Secret_AppAlpha secret. Although both users work in the same department, Arnav can’t retrieve the value of the RDS_Master_Secret_AppBeta secret in this sample architecture.
Prerequisites
Before you implement the solution in this blog post, make sure that you have the following prerequisites in place:
You have IAM Identity Center enabled for your organization and connected to an external IdP using SAML 2.0 identity federation.
You have IAM Identity Center configured for automatic provisioning with an external IdP using the SCIM v2.0 standard. SCIM keeps your IAM Identity Center identities in sync with identities from the external IdP.
Solution implementation
In this section, you will learn how to enable access to Secrets Manager using ABAC by completing the following steps:
Configure ABAC in IAM Identity Center
Define custom attributes in Okta
Update configuration for the IAM Identity Center application on Okta
Make sure that required tags are assigned to secrets in Secrets Manager
Create and assign a permission set with an ABAC policy in IAM Identity Center
Define guardrails to enforce access using ABAC
Step 1: Configure ABAC in IAM Identity Center
The first step is to set up attributes for your ABAC configuration in IAM Identity Center. This is where you will be mapping the attribute coming from your identity source to an attribute that IAM Identity Center passes as a session tag. The Key represents the name that you are giving to the attribute for use in the permission set policies. You need to specify the exact name in the policies that you author for access control. For the example in this post, you will create a new attribute with Key of department and Value of ${path:enterprise.department}. For supported external IdP attributes, see Attribute mappings.
To configure ABAC in IAM Identity Center (console)
Open the IAM Identity Center console.
In the Settings menu, enable Attributes for access control.
Choose the Attributes for access control tab, select Add attribute, and then enter the Key and Value details as follows.
The sample architecture in this post uses a custom attribute (AppID) on an external IdP for access control. In this step, you will create a custom attribute in Okta.
To define custom attributes in Okta (console)
Open the Okta console.
Navigate to Directory and then select Profile Editor.
On the Profile Editor page, choose Okta User (default).
Select Add Attribute and create a new custom attribute with the following parameters.
For Data type, enter string
For Display name, enter AppID
For Variable name, enter user.AppID
For Attribute length, select Less Than from the dropdown and enter a value.
For User permission, enter Read Only
Navigate to Directory, select People, choose in-scope users, and enter a value for Department and AppID attributes. The following shows these values for the users in our example.
Step 3: Update SAML configuration for IAM Identity Center application on Okta
Automatic provisioning (through the SCIM v2.0 standard) of user and group information from Okta into IAM Identity Center supports a set of defined attributes. A custom attribute that you create on Okta won’t be automatically synchronized to IAM Identity Center through SCIM. You can, however, define the attribute in the SAML configuration so that it is inserted into the SAML assertions.
To update the SAML configuration in Okta (console)
Open the Okta console and navigate to Applications.
On the Applications page, select the app that you defined for IAM Identity Center.
Under the Sign On tab, choose Edit.
Under SAML 2.0, expand the Attributes (Optional) section, and add an attribute statement with the following values, as shown in Figure 3:
Figure 3: Sample SAML configuration with custom attributes
To check that the newly added attribute is reflected in the SAML assertion, choose Preview SAML, review the information, and then choose Save.
Step 4: Make sure that required tags are assigned to secrets in Secrets Manager
The next step is to make sure that the required tags are assigned to secrets in Secrets Manager. You will review the required tags from the Secrets Manager console.
To verify required tags on secrets (console)
Open the Secrets Manager console in the target AWS account and then choose Secrets.
Verify that the required tags are assigned to the secrets in scope for this solution, as shown in Figure 4. In our example, the tags are as follows:
Key: department
Value: Digital
Key: AppID
Value: Alpha or Beta
Figure 4: Sample secret configuration with required tags
Step 5a: Create a permission set in IAM Identity Center using ABAC policy
In this step, you will create a new permission set that allows access to secrets based on the principal attributes and resource tags.
When you enable ABAC and specify attributes, IAM Identity Center passes the attribute value of the authenticated user to AWS Security Token Service (AWS STS) as session tags when an IAM role is assumed. You can use access control attributes in your permission sets by using the aws:PrincipalTag condition key to create access control rules.
To create a permission set (console)
Open the IAM Identity Center console and navigate to Multi-account permissions.
Choose Permission sets, and then select Create permission set.
On the Specify policies and permissions boundary page, choose Inline policy.
For Inline policy, paste the following sample policy document and then choose Next. This policy allows users to retrieve the value of only those secrets that have resource tags that match the required user attributes (department and AppID in our example).
Configure the session duration, and optionally provide a description and tags for the permission set.
Review and create the permission set.
Step 5b: Assign permission set to users in IAM Identity Center
Now that you have created a permission set with ABAC policy, complete the configuration by assigning the permission set to users to grant them access to secrets in one or more accounts in your organization.
To assign a permission set (console)
Open the IAM Identity Center console and navigate to Multi-account permissions.
Choose AWS accounts and select one or more accounts to which you want to assign access.
Choose Assign users or groups.
On the Assign users and groups page, select the users, groups, or both to which you want to assign access. For this example, I select both Arnav and Ana.
On the Assign permission sets page, select the permission set that you created in the previous section.
Review your changes, as shown in Figure 5, and then select Submit.
Figure 5: Sample permission set assignment
Step 6: Define guardrails to enforce access using ABAC
To govern access to secrets to your workforce users only through ABAC and to help prevent unauthorized access, you can define guardrails. In this section, I will show you some sample service control policies (SCPs) that you can use in your organization.
Note: Before you use these sample SCPs, you should carefully review, customize, and test them for your unique requirements. For additional instructions on how to attach an SCP, see Attaching and detaching service control policies.
Guardrail 1 – Enforce ABAC to access secrets
The following sample SCP requires the use of ABAC to access secrets in Secrets Manager. In this example, users and secrets must have matching values for the attributes department and AppID. Access is denied if those attributes don’t exist or if they don’t have matching values. Also, this example SCP allows only the admin role to access secrets without matching tags. Replace <arn:aws:iam::*:role/secrets-manager-admin-role> with your own information.
The following sample SCP denies the creation of new secrets that don’t have the required tag key-value pairs. In this example, the SCP denies creation of a new secret if it doesn’t include department and AppID tag keys. It also denies access if the tag department doesn’t have the value Digital and the tag AppID doesn’t have either Alpha or Beta assigned to it. Also, this example SCP allows only the admin role to create secrets without matching tags. Replace <arn:aws:iam::*:role/secrets-manager-admin-role> with your own information.
The following sample SCP denies the ability to delete the tags used for ABAC. In this example, only the admin role can delete the tags department and AppID after they are attached to a secret. Replace <arn:aws:iam::*:role/secrets-manager-admin-role> with your own information.
Guardrail 4 – Restrict modification of ABAC tags
The following sample SCP denies the ability to modify required tags for ABAC after they are attached to a secret. In this example, only the admin role can modify the tags department and AppID after they are attached to a secret. Replace <arn:aws:iam::*:role/secrets-manager-admin-role> with your own information.
In this section, you will test the solution by retrieving a secret using the Secrets Manager console. Your attempt to retrieve the secret value will be successful only when the required resource and principal tags exist, and have matching values (AppID and department in our example).
Test scenario 1: Retrieve and view the value of an authorized secret
In this test, you will verify whether you can successfully retrieve the value of a secret that belongs to your application.
To test the scenario
Sign in to IAM Identity Center and log in with your external IdP user. For this example, I log in as Arnav.
On the IAM Identity Center dashboard, select the target account.
From the list of available roles that the user has access to, choose the role that you created in Step 5a and select Management console, as shown in Figure 6. For this example, I select the SecretsManagerABACTest permission set.
Figure 6: Sample IAM Identity Center dashboard
Open the Secrets Manager console and select a secret that belongs to your application. For this example, I select RDS_Master_Secret_AppAlpha.
Because the AppID and department tags exist on both the secret and the user, the ABAC policy allowed the user to describe the secret, as shown in Figure 7.
Figure 7: Sample secret that was described successfully
In the Secret value section, select Retrieve secret value.
Because the value of the resource tags, AppID and department, matches the value of the corresponding user attributes (in other words, the principal tags), the ABAC policy allows the user to retrieve the secret value, as shown in Figure 8.
Figure 8: Sample secret value that was retrieved successfully
Test scenario 2: Retrieve and view the value of an unauthorized secret
In this test, you will verify whether you can retrieve the value of a secret that belongs to a different application.
Open the Secrets Manager console and select a secret that belongs to a different application. For this example, I select RDS_Master_Secret_AppBeta.
Because the value of the resource tag AppID doesn’t match the value of the corresponding user attribute (principal tag), the ABAC policy denies access to describe the secret, as shown in Figure 9.
Figure 9: Sample error when describing an unauthorized secret
Conclusion
In this post, you learned how to implement an ABAC strategy using attributes and to build dynamic policies that can simplify access management to Secrets Manager using IAM Identity Center configured with an external IdP. You also learned how to govern resource tags used for ABAC and establish guardrails to enforce access to secrets using ABAC. To learn more about ABAC and Secrets Manager, see Attribute-Based Access Control (ABAC) for AWS and the Secrets Manager documentation.
If you have feedback about this blog post, submit comments in the Comments section below. If you have questions about this blog post, start a new thread on AWS Secrets Manager re:Post.
Want more AWS Security news? Follow us on Twitter.
This blog post shows you how to use AWS CloudTrail Lake capabilities to investigate CloudTrail activity across AWS Organizations in response to a security incident scenario. We will walk you through two security-related scenarios while we investigate CloudTrail activity. The method described in this post will help you with the investigation process, allowing you to gain comprehensive understanding of the incident and its implications. CloudTrail Lake is a managed audit and security lake that allows you to aggregate, immutably store, and query your activity logs for auditing, security investigation, and operational troubleshooting.
Prerequisites
You must have the following AWS services enabled before you start the investigation.
CloudTrail Lake — To learn how to enable this service and use sample queries, see the blog post Announcing AWS CloudTrail Lake – a managed audit and security Lake. When you create a new event data store at the organization level, you will need to enable CloudTrail Lake for all of the accounts in the organization. We advise that you include not only management events but also data events.
When you use CloudTrail Lake with AWS Organizations, you can designate an account within the organization to be the CloudTrail Lake delegated administrator. This provides a convenient way to perform queries from a designated AWS security account—for example, you can avoid granting access to your AWS management account.
Amazon GuardDuty — This is a threat detection service that continuously monitors your AWS accounts and workloads for malicious activity and delivers detailed security findings for visibility and remediation. To learn about the benefits of the service and how to get started, see Amazon GuardDuty.
Incident scenario 1: AWS access keys compromised
In the first scenario, you have observed activity within your AWS account from an unauthorized party. This example covers a situation where a threat actor has obtained and misused one of your AWS access keys that was exposed publicly by mistake. This investigation starts after Amazon GuardDuty generates an IAM finding identifying that the malicious activity came from the exposed AWS access key. Following the Incident Response Playbook Compromised IAM Credentials, focusing on step 12 in the playbook ([DETECTION AND ANALYSIS] Review CloudTrail Logs), you will use CloudTrail Lake capabilities to investigate the activity that was performed with this key. To do so, you will use the following nine query examples that we provide for this first scenario.
Query 1.1: Activity performed by access key during a specific time window
The first query is aimed at obtaining the specific activity that was performed by this key, either successfully or not, during the time the malicious activity took place. You can use the GuardDuty finding details “EventFirstSeen” and “EventLastSeen” to define the time window of the query. Also, and for further queries, you want to fetch artifacts that could be considered possible indicators of compromise (IoC) related to this security incident, such as IP addresses.
SELECT eventSource,eventName,sourceIPAddress,eventTime,errorCode FROM 1994bee2-d4a0-460e-8c07-1b5ee04765d8 WHERE userIdentity.accessKeyId = 'AKIAIOSFODNN7EXAMPLE' AND eventTime > '2022-03-15 13:10:00' AND eventTime < '2022-03-16 00:00:00' order by eventTime;
The results of the query are as follows:
Figure 1: Sample query 1.1 and results in the AWS Management Console
The results demonstrate that the activity performed by the access key tried to unsuccessfully list Amazon Simple Storage Services (Amazon S3) buckets and CloudTrail trails. You can also see specific write activity related to AWS Identity and Access Management (IAM) that was denied, and afterwards there was activity possibly related to reconnaissance tactics in IAM to finally be able to assume a role, which indicates a possible attempt to perform an escalation of privileges. You can observe only one source IP from which this activity was performed.
Query 1.2: Confirm which IAM role was assumed by the threat actor during a specific time window
As you observed from the previous query results, the threat actor was able to assume an IAM role. In this query, you would like to confirm which IAM role was assumed during the security incident.
Query 1.2
SELECT requestParameters,responseElements FROM 1994bee2-d4a0-460e-8c07-1b5ee04765d8 WHERE eventName = 'AssumeRole' AND eventTime > '2022-03-15 13:10:00' AND eventTime < '2022-03-16 00:00:00' AND userIdentity.accessKeyId = 'AKIAIOSFODNN7EXAMPLE'
The results of the query are as follows:
Figure 2: Sample query 1.2 and results in the console
The results show that an IAM role named “Alice” was assumed in a second account. For future queries, keep the temporary access key from the responseElements result to obtain activity performed by this role session.
Query 1.3: Activity performed from an IP address in an expanded time window search
Investigating the incident only from the time of discovery may result in overlooking signs or indicators of potential past incidents that were not detected related to this threat actor. For this reason, you want to expand the investigation window time, which might result in expanding the search back weeks, months, or even years, depending on factors such as the nature and severity of the incident, available resources, and so on. In this example, for balance and urgency, the window of time searched is expanded to a month. You want to also review whether there is past activity related to this account by the IP you previously observed.
Query 1.3
The results of the query are as follows:
SELECT eventSource,eventName,sourceIPAddress,eventTime,errorCode FROM 1994bee2-d4a0-460e-8c07-1b5ee04765d8 WHERE sourceIPAddress = '192.0.2.76' AND useridentity.accountid = '555555555555 AND eventTime > '2022-02-15 13:10:00' AND eventTime < '2022-03-15 13:10:00' order by eventTime;
Figure 3: Sample query 1.3 and results in the console
As you can observe from the results, there is no activity coming from this IP address in this account in the previous month.
Query 1.4: Activity performed from an IP address in any other account in your organization during a specific time window
Before you start investigating what activity was performed by the role assumed in the second account, and considering that this malicious activity now involves cross-account access, you will want to review whether any other account in your organization has activity related to the specific IP address observed. You will need to expand the window of time to an entire month in order to see if previous activity was performed before this incident from this source IP, and you will need to exclude activity coming from the first account.
Query 1.4
SELECT useridentity.accountid,eventTime FROM 1994bee2-d4a0-460e-8c07-1b5ee04765d8 WHERE sourceIPAddress = '192.0.2.76' AND eventTime > '2022-02-15 13:10:00' AND eventTime < '2022-03-16 00:00:00' AND useridentity.accountid != '555555555555'GROUP by useridentity.accountid
The results of the query are as follows:
Figure 4: Sample query 1.4 and results in the console
As you can observe from the results, there is activity only in the second account where the role was assumed. You can also confirm that there was no activity performed in other accounts in the previous month from this IP address.
Query 1.5: Count activity performed by an IAM role during a specific time period
For the next query example, you want to count and group activity based on the API actions that were performed in each service by the role assumed. This query helps you quantify and understand the impact of the possible unauthorized activity that might have happened in this second account.
Query 1.5
 SELECT count (*) as NumberEvents, eventSource, eventName
 FROM 1994bee2-d4a0-460e-8c07-1b5ee04765d8 WHERE eventTime > '2022-03-15 13:10:00' AND eventTime < '2022-03-16 00:00:00' AND useridentity.type = 'AssumedRole' AND useridentity.sessioncontext.sessionissuer.arn = 'arn:aws:iam::111122223333:role/Alice'
 GROUP by eventSource, eventName
 order by NumberEvents desc;
The results of the query are as follows:
Figure 5: Sample query 1.5 and results in the console
You observe that the activity is consistent with what was shown in the first account, and the threat actor seems to be targeting trails, S3 buckets, and IAM activity related to possible further escalation of privileges.
Query 1.6: Confirm successful activity performed by an IAM role during a specific time window
Following the example in query 1.1, you will fetch the information related to activity that was successful or denied. This helps you confirm modifications that took place in the environment, or the creation of new resources. For this example, you will also want to obtain the event ID in case you need to dig further into one specific API call. You will then filter out activity done by any other session by using the temporary access key obtained from query 1.2.
Query 1.6
SELECT eventSource, eventName, eventTime, eventID, errorCode FROM 1994bee2-d4a0-460e-8c07-1b5ee04765d8 WHERE eventTime > '2022-03-15 13:10:00' AND eventTime < '2022-03-16 00:00:00' AND useridentity.type = 'AssumedRole' AND useridentity.sessioncontext.sessionissuer.arn = 'arn:aws:iam::111122223333:role/Alice' AND userIdentity.accessKeyId = 'ASIAZNYXHMZ37EXAMPLE '
The results of the query are as follows:
Figure 6: Sample query 1.6 and results in the console
You can observe that the threat actor was again not able to perform activity upon the trails, S3 buckets, or IAM roles. But as you can see, the threat actor was able to perform specific IAM activity, which led to the creation of a new IAM user, policy attachment, and access key.
Query 1.7: Obtain new access key ID created
By making use of the event ID from the CreateAccesskey event displayed in the previous query, you can obtain the access key ID so that you can further dig into what activity was performed by it.
Query 1.7
SELECT responseElements FROM 1994bee2-d4a0-460e-8c07-1b5ee04765d8 WHERE eventID = 'bd29bab7-1153-4510-9e7f-9ff9bba4bd9a'
The results of the query are as follows:
Figure 7: Sample query 1.7 and results in the console
Query 1.8: Obtain successful API activity that was performed by the access key during a specific time window
Following previous examples, you will count and group the API activity that was successfully performed by this access key ID. This time, you will exclude denied activity in order to understand the activity that actually took place.
Query 1.8
 SELECT count (*) as NumberEvents, eventSource, eventName
 FROM 1994bee2-d4a0-460e-8c07-1b5ee04765d8 WHERE eventTime > '2022-03-15 13:10:00' AND eventTime < '2022-03-16 00:00:00' AND
 userIdentity.accessKeyId = 'AKIAI44QH8DHBEXAMPLE' AND errorcode IS NULL
 GROUP by eventSource, eventName
 order by NumberEvents desc;
The results of the query are as follows:
Figure 8: Sample query 1.8 and results in the console
You can observe that this time, the threat actor was able to perform specific activities targeting your trails and buckets due to privilege escalation. In these results, you observe that a trail was successfully stopped, and S3 objects were downloaded and deleted.
You can also see bucket deletion activity. At first glance, this might indicate activity related to a data exfiltration scenario in the case where the bucket was not properly secured, and possible future ransom demands could be made if proper preventive controls and measures to recover the data were not in place. For more details on this scenario, see this AWS Security blog post.
Query 1.9: Obtain bucket and object names affected during a specific time window
After you obtain the activities on the S3 buckets by using sample query 1.8, you can use the following query to show what objects this activity was related to, and from which buckets. You can expand the query to exclude denied activity.
Query 1.9
SELECT element_at(requestParameters, 'bucketName') as BucketName, element_at(requestParameters, 'key') as ObjectName, eventName FROM 1994bee2-d4a0-460e-8c07-1b5ee04765d8 WHERE (eventName = 'GetObject' OR eventName = 'DeleteObject') AND eventTime > '2022-03-15 13:10:00' AND eventTime < '2022-03-16 00:00:00' AND userIdentity.accessKeyId = 'AKIAI44QH8DHBEXAMPLE' AND errorcode IS NULL
The results of the query are as follows:
Figure 9: Sample query 1.9 and results in the console
As you can observe, the unauthorized user was able to first obtain and exfiltrate S3 objects, and then delete them afterwards.
Summary of incident scenario 1
This scenario describes a security incident involving a publicly exposed AWS access key that is exploited by a threat actor. Here is a summary of the steps taken to investigate this incident by using CloudTrail Lake capabilities:
Investigated AWS activity that was performed by the compromised access key
Observed possible adversary tactics and techniques that were used by the threat actor
Collected artifacts that could be potential indicators of compromise (IoC), such as IP addresses
Confirmed role assumption by the threat actor in a second account
Expanded the time window of your investigation and the scope to your entire organization in AWS Organizations; and searched for any activity that might have taken place originating from the IP address related to the unauthorized activity
Investigated AWS activity that was performed by the role assumed in the second account
Identified new resources that were created by the threat actor, and malicious activity performed by the actor
Confirmed the modifications caused by the threat actor and their impact in your environment
Incident scenario 2: AWS IAM Identity Center user credentials compromised
In this second scenario, you start your investigation from a GuardDuty finding stating that an Amazon Elastic Compute Cloud (Amazon EC2) instance is querying an IP address that is associated with cryptocurrency-related activity. There are several sources of logs that you might want to explore when you conduct this investigation, including network, operation system, or application logs, among others. In this example, you will use CloudTrail Lake capabilities to investigate API activity logged in CloudTrail for this security event. To understand what exactly happened and when, you start by querying information from the resource involved, in this case an EC2 instance, and then continue digging into the AWS IAM Identity Center (successor to AWS Single Sign-On) credentials that were used to launch that EC2 instance, to finally confirm what other actions were performed.
Query 2.1: Confirm who has launched the EC2 instance involved in the cryptocurrency-related activity
You can begin by looking at the finding CryptoCurrency:EC2/BitcoinTool.B to get more information related to this event, for example when (timestamp), where (AWS account and AWS Region), and also which resource (EC2 instance ID) was involved with the security incident and when it was launched. With this information, you can perform the first query for this scenario, which will confirm what type of user credentials were used to launch the instance involved.
Query 2.1
 SELECT userIdentity.principalid, eventName, eventTime, recipientAccountId, awsRegion FROM 467f2e52-84b9-4d41-8049-bc8f8fad35dd
 WHERE responseElements IS NOT NULL AND
 element_at(responseElements, 'instancesSet') like '%"instanceId":"i-053a7e6164c0f0473"%' AND
 eventTime > '2022-09-13 12:45:59' AND eventName='RunInstances'
The results of the query are as follows:
Figure 10: Sample query 2.1 and results in the console
The results demonstrate that the IAM Identity Center user as principal ID AROASVPO5CIEXAMPLE:[email protected] was used to launch the EC2 instance that was involved in the incident.
Query 2.2: Confirm in which AWS accounts the IAM Identity Center user has federated and authenticated
You want to confirm which AWS accounts this specific IAM Identity Center user has federated and authenticated with, and also which IAM role was assumed. This is important information to make sure that the security event happened only within the affected AWS account. The window of time for this query is based on the maximum value for the permission sets’ session duration in IAM Identity Center.
Query 2.2
SELECT element_at(serviceEventDetails, 'account_id') as AccountID, element_at(serviceEventDetails, 'role_name') as SSORole, eventID, eventTime FROM 467f2e52-84b9-4d41-8049-bc8f8fad35dd WHERE eventSource = 'sso.amazonaws.com' AND eventName = 'Federate' AND userIdentity.username = '[email protected]' AND eventTime > '2022-09-13 00:00:00' AND eventTime < '2022-09-14 00:00:00'
The results of the query are as follows:
Figure 11: Sample query 2.2 and results in the console
The results show that only one AWS account has been accessed during the time of the incident, and only one AWS role named AdministratorAccess has been used.
Query 2.3: Count and group activity based on API actions that were performed by the user in each AWS service
You now know exactly where the user has gained access, so next you can count and group the activity based on the API actions that were performed in each AWS service. This information helps you confirm the types of activity that were performed.
Query 2.3
 SELECT eventSource, eventName, COUNT(*) AS apiCount
 FROM 467f2e52-84b9-4d41-8049-bc8f8fad35dd
 WHERE userIdentity.principalId = 'AROASVPO5CIEXAMPLE:[email protected]'
 AND eventTime > '2022-09-13 00:00:00' AND eventTime < '2022-09-14 00:00:00'
 GROUP BY eventSource, eventName ORDER BY apiCount DESC
The results of the query are as follows:
Figure 12: Sample query 2.3 and results in the console
You can see that the list of APIs includes the read activities Get, Describe, and List. This activity is commonly associated with the discovery stage, when the unauthorized user is gathering information to determine credential permissions.
Query 2.4: Obtain mutable activity based on API actions performed by the user in each AWS service
To get a better understanding of the mutable actions performed by the user, you can add a new condition to hide the read-only actions by setting the readOnly parameter to false. You will want to focus on mutable actions to know whether there were new AWS resources created or if existing AWS resources were deleted or modified. Also, you can add the possible error code from the response element to the query, which will tell you if the actions were denied.
Query 2.4
 SELECT eventSource, eventName, eventTime, eventID, errorCode
 FROM 467f2e52-84b9-4d41-8049-bc8f8fad35dd
 WHERE userIdentity.principalId = 'AROASVPO5CIEXAMPLE:[email protected]'
 AND readOnly = false
 AND eventTime > '2022-09-13 00:00:00' AND eventTime < '2022-09-14 00:00:00'
The results of the query are as follows:
Figure 13: Sample query 2.4 and results in the console
You can confirm that some actions, like EC2 RunInstances, EC2 CreateImage, SSM StartSession, IAM CreateUser, and IAM PutRolePolicy were allowed. And in contrast, IAM CreateAccessKey, IAM CreateRole, IAM AttachRolePolicy, and GuardDuty DeleteDetector were denied. The IAM-related denied actions are commonly associated with persistence tactics, where an unauthorized user may try to maintain access to the environment. The GuardDuty denied action is commonly associated with defense evasion tactics, where the unauthorized user is trying to cover their tracks and avoid detection.
Query 2.5: Obtain more information about API action EC2 RunInstances
You can focus first on the API action EC2 RunInstances to understand how many EC2 instances were created by the same user. This information will confirm which other EC2 instances were involved in the security event.
Query 2.5
 SELECT awsRegion, recipientAccountId, eventID, element_at(responseElements, 'instancesSet') as instances
 FROM 467f2e52-84b9-4d41-8049-bc8f8fad35dd
 WHERE userIdentity.principalId = 'AROASVPO5CIEXAMPLE:[email protected]'
 AND eventName='RunInstances'
 AND eventTime > '2022-09-13 00:00:00' AND eventTime < '2022-09-14 00:00:00'
The results of the query are as follows:
Figure 14: Sample query 2.5 and results in the console
You can confirm that the API was called twice, and if you expand the column InstanceSet in the response element, you will see the exact number of EC2 instances that were launched. Also, you can find that these EC2 instances were launched with an IAM instance profile called ec2-role-ssm-core. By checking in the IAM console, you can confirm that the IAM role associated has only the AWS managed policy AmazonSSMManagedInstanceCore attached, which enables AWS Systems Manager core functionality.
Query 2.6: Get the list of denied API actions performed by the user for each AWS service
Now, you can filter more to focus only on those denied API actions by performing the following query. This is important because it can help you to identify what kind of malicious event was attempted.
Query 2.6
 SELECT recipientAccountId, awsRegion, eventSource, eventName, eventID, eventTime
 FROM 467f2e52-84b9-4d41-8049-bc8f8fad35dd
 WHERE userIdentity.principalId = 'AROASVPO5CIEXAMPLE:[email protected]'
 AND errorCode = 'AccessDenied'
 AND eventTime > '2022-09-13 00:00:00' AND eventTime < '2022-09-14 00:00:00'
The results of the query are as follows:
Figure 15: Sample query 2.6 and results in the console
You can see that the user has tried to stop GuardDuty by calling DeleteDetector, and has also performed actions within IAM that you should examine more closely to know if new unwanted access to the environment was created.
Query 2.7: Obtain more information about API action IAM CreateUserAccessKeys
With the previous query, you confirmed that more actions were denied within IAM. You can now focus on the failed attempt to create IAM user access keys that could have been used to gain persistent and programmatic access to the AWS account. With the following query, you can make sure that the actions were denied and determine the reason why.
Query 2.7
 SELECT recipientAccountId, awsRegion, eventID, eventTime, errorCode, errorMessage
 FROM 467f2e52-84b9-4d41-8049-bc8f8fad35dd
 WHERE userIdentity.principalId = 'AROASVPO5CIEXAMPLE:[email protected]'
 AND eventName='CreateAccessKey'
 AND eventTime > '2022-09-13 00:00:00' AND eventTime < '2022-09-14 00:00:00'
The results of the query are as follows:
Figure 16: Sample query 2.7 and results in the console
If you copy the errorMessage element from the response, you can confirm that the action was denied by a service control policy, as shown in the following example.
"errorMessage":"User: arn:aws:sts::111122223333:assumed-role/AWSReservedSSO_AdministratorAccess_f53d10b0f8a756ac/[email protected] is not authorized to perform: iam:CreateAccessKey on resource: user production-user with an explicit deny in a service control policy"
Query 2.8: Obtain more information about API IAM CreateUser
From the query error message in query 2.7, you can confirm the name of the IAM user that was used. Now you can check the allowed API action IAM CreateUser that you observed before to see if the IAM users match. This helps you confirm that there were no other IAM users involved in the security event.
Query 2.8
 SELECT recipientAccountId, awsRegion, eventID, eventTime, element_at(responseElements, 'user') as userInfo
 FROM 467f2e52-84b9-4d41-8049-bc8f8fad35dd
 WHERE userIdentity.principalId = 'AROASVPO5CIEXAMPLE:[email protected]'
 AND eventName='CreateUser'
 AND eventTime > '2022-09-13 00:00:00' AND eventTime < '2022-09-14 00:00:00'
The results of the query are as follows:
Figure 17: Sample query 2.8 and results in the console
Based on this output, you can confirm that the IAM user is indeed the same. This user was created successfully but was denied the creation of access keys, confirming the failed attempt to get new persistent and programmatic credentials.
Query 2.9: Get more information about the IAM role creation attempt
Now you can figure out what happened with the IAM CreateRole denied action. With the following query, you can see the full error message for the denied action.
Query 2.9
 SELECT recipientAccountId, awsRegion, eventID, eventTime, errorCode, errorMessage
 FROM 467f2e52-84b9-4d41-8049-bc8f8fad35dd
 WHERE userIdentity.principalId = 'AROASVPO5CIEXAMPLE:[email protected]'
 AND eventName='CreateRole'
 AND eventTime > '2022-09-13 00:00:00' AND eventTime < '2022-09-14 00:00:00'
The results of the query are as follows:
Figure 18: Sample query 2.9 and results in the console
If you copy the output of this query, you will see that the role was denied by a service control policy, as shown in the following example:
"errorMessage":"User: arn:aws:sts::111122223333:assumed-role/AWSReservedSSO_AdministratorAccess_f53d10b0f8a756ac/[email protected] is not authorized to perform: iam:CreateRole on resource: arn:aws:iam::111122223333:role/production-ec2-role with an explicit deny in a service control policy"
Query 2.10: Get more information about IAM role policy changes
With the previous query, you confirmed that the unauthorized user failed to create a new IAM role to replace the existing EC2 instance profile in an attempt to grant more permissions. And with another of the previous queries, you confirmed that the IAM API action AttachRolePolicy was also denied, in another attempt for the same goal, but this time trying to attach a new AWS managed policy directly. However, with this new query, you can confirm that the unauthorized user successfully applied an inline policy to the EC2 role associated with the existing EC2 instance profile, with full admin access.
Query 2.10
SELECT recipientAccountId, eventID, eventTime, element_at(requestParameters, 'roleName') as roleName, element_at(requestParameters, 'policyDocument') as policyDocument FROM 467f2e52-84b9-4d41-8049-bc8f8fad35dd WHERE userIdentity.principalId = 'AROASVPO5CIEXAMPLE:[email protected]' AND eventName = 'PutRolePolicy' AND eventTime > '2022-09-13 00:00:00' AND eventTime < '2022-09-14 00:00:00'
The results of the query are as follows:
Figure 19: Sample query 2.10 and results in the console
Summary of incident scenario 2
This second scenario describes a security incident that involves an IAM Identity Center user that has been compromised. To investigate this incident by using CloudTrail Lake capabilities, you did the following:
Started the investigation by looking at metadata from the GuardDuty EC2 finding
Confirmed the AWS credentials that were used for the creation of that resource
Looked at whether the IAM Identity Center user credentials were used to access other AWS accounts
Did further investigation on the AWS APIs that were called by the IAM Identity Center user
Obtained the list of denied actions, confirming the unauthorized user’s attempt to get persistent access and cover their tracks
Obtained the list of EC2 resources that were successfully created in this security event
Conclusion
In this post, we’ve shown you how to use AWS CloudTrail Lake capabilities to investigate CloudTrail activity in response to security incidents across your organization. We also provided sample queries for two security incident scenarios. You now know how to use the capabilities of CloudTrail Lake to assist you and your security teams during the investigation process in a security incident. Additionally, you can find some of the sample queries related to this post and other topics in the following GitHub repository, and additional examples in the sample queries tab in the CloudTrail console. To learn more, see Working with CloudTrail Lake in the CloudTrail User Guide.
Regarding pricing for CloudTrail Lake, you pay for ingestion and storage together, where the billing is based on the amount of uncompressed data ingested. If you’re a new customer, you can try AWS CloudTrail Lake for a 30-day free trial or when you reach the free usage limits of 5GB of data. For more information, see see AWS CloudTrail pricing.
Finally, in combination with the investigation techniques shown in this post, we also recommend that you explore the use of Amazon Detective, an AWS managed and dedicated service that simplifies the investigative process and helps security teams conduct faster and more effective investigations. With the Amazon Detective prebuilt data aggregations, summaries, and context, you can quickly analyze and determine the nature and extent of possible security issues.
If you have feedback about this post, submit comments in the Comments section below. If you have questions about this post, contact AWS Support.
Want more AWS Security news? Follow us on Twitter.
In this post, we demonstrate how to automatically keep your base or standard images current, incorporating patches and any other changes using EC2 Image Builder pipelines. We also demonstrate how to keep workload-specific images current using Cascading Pipelines, a feature of EC2 Image Builder.
Dependency updates
You can use the Dependency update feature of EC2 Image Builder pipelines to automatically update your standard image based on changes to your build components.
When you create an EC2 Image Builder pipeline, you can choose to run the pipeline on a schedule, either using a schedule builder or a CRON expression (a method of defining minute, hour, day and month for scheduling). Furthermore, you can choose to only run the pipeline if a component in the pipeline or the source image has changed. This is referred to as a dependency update as shown in the following image.
Figure 1: An example EC2 Image Builder pipeline schedule with dependency update settings
When you select “Run pipeline at the scheduled time if there are dependency updates,” your pipeline only executes if the Base AMI or any Build or Test components have changed. The version of your components must be updated for this capability to work. Amazon-provided components include versioning out of the box. Here is an example of three versions of an Amazon-provided Build component that apply Security Technical Implementation Guide (STIG) baselines to Linux images.
Figure 2: Different versions of one Amazon-managed Build component
When a new STIG baseline build component is released, the component’s version is incremented. If a pipeline includes this type of versioned Build component and utilizes the dependency updates capability, then the pipeline automatically runs at the next scheduled interval after the component is updated. Pipelines utilizing this capability will run when the base AMI changes or when a Build or Test component changes.
Notifications
To receive notifications about the pipeline execution, you can enable an Amazon Simple Notification Service (Amazon SNS) topic from within EC2 Image Builder. Under the Infrastructure Configuration section of the EC2 Image Builder pipeline, identify an SNS topic as shown in the following image.
Figure 3: An example SNS topic for sending pipeline execution notifications
The SNS topic receives a notification if a pipeline runs and completes with a status of AVAILABLE or FAILED. This occurs even when a pipeline execution is triggered by a component change that you didn’t directly initiate, such as when a new version of an Amazon-managed build component is released.
Even if no other aspects of the infrastructure configuration are used in the pipeline (instance type, security group, subnet, etc.), the SNS topic capability can be used to send a notification when the pipeline executes. With this in mind, you can leverage Amazon SNS to make sure that you’re always notified of any pipeline executions as well as trigger AWS Lambda functions for automation.
Cascading pipelines
Cascading Pipelines are a feature of EC2 Image Builder that you can use to create workload-specific images from a standard secured image (aka “gold image”) of an organization. The following image shows how you can use Cascading Pipelines to keep workload specific images updated.
Figure 4: An example workflow for a EC2 Image Builder Cascading Pipelines
You create a gold image pipeline for a hardened base operating system (OS) using the steps outlined in Automate OS Image Build Pipelines with EC2 Image Builder. This pipeline could include a base OS, OS patches, Build components to harden the OS (such as STIG or CIS baselines), as well as any additional software required by the organization (agents, etc.). Do not include application- or workload-specific software in the pipeline. Infrastructure or distribution components may not be included in the pipeline to maintain flexibility for using the gold image. For example, you typically wouldn’t want to include VPC configurations in your golden AMI build because that would constrain the AMI to a particular VPC.
To create a Cascading Pipeline that uses the gold image for applications or workloads, in the Base Image section of the EC2 Image Builder console, choose Select Managed Images.
Figure 5: Selecting the base image of a pipeline
Then, select “Images Owned by Me” and under Image Name, select the EC2 Image Builder pipeline used to create the gold image. Moreover, select “Use Latest Available OS Version” under Auto-versioning options to make sure that the Cascading Pipeline is executed any time there is a change to the base image.
Figure 6: Choosing the base golden image from a previous pipeline execution
Use this configuration to maintain images for each application or workload which utilizes the gold image. Any time that an update is made to the gold image, application pipelines execute, thus providing updated images. To send notifications, SNS topics are enabled on each workload-specific pipeline.
In this post, we demonstrated how to automatically update images for any changes using EC2 Image Builder pipelines. We also demonstrated how to keep workload specific images using Cascading Pipelines. Using these features, you can make sure that your organization stays up-to-date on the latest OS patches and dependency changes, without requiring human intervention. For more information on EC2 Image Builder, see the official documentation.
In our recent blog post announcing GitHub Copilot X, we mentioned that generative AI represents the future of software development. This amazing technology will enable developers to stay in the flow while helping enterprises meet their business goals.
But as we have also mentioned in our blog series on compliance, generative AI may soon act as an enabler for developer-focused compliance programs that will drive optimization and keep your development, compliance and audit teams productive and happy.
Today, we’ll explore the potential for generative AI to help enable teams to optimize and automate some of the foundational compliance components of separation of duties that many enterprises still often manage and review manually.
Generative AI has been dominating the news lately—but what exactly is it? Here’s what you need to know, and what it means for developers.
Separation of duties
The concept of “separation of duties,” long used in the accounting world as a check and balance approach, is also adopted in other scenarios, including technology architecture and workflows. While helpful to address compliance, it can lead to additional manual steps that can slow down delivery and innovation.
Fortunately, the PCI-DSS requirements guide provides a more DevOps, cloud native, and AI-enabled approach to separation of duties by focusing on functions and accounts, as opposed to people:
“The purpose of this requirement is to separate the development and test functions from the production functions. For example, a developer can use an administrator-level account with elevated privileges in the development environment and have a separate account with user-level access to the production environment.”
There are many parts of a software delivery workflow that need to have separation of duties in place—but one of the core components that is key for any compliance program is the code review. Having a separate set of objective eyes reviewing your code, whether it’s human or AI-powered, helps to ensure risks, tech debt, and security vulnerabilities are found and mitigated as early as possible.
Code reviews also help enable the concept of separation of duties since it prohibits a single person or a single function, account, or process from moving code to the next part of your delivery workflow. Additionally, code reviews help enable separation of duties for Infrastructure as Code (IaC) workflows, Policy-as-Code configurations, and even Kubernetes declarative deployments.
As we mentioned in our previous blog, GitHub makes code review easy, since pull requests are part of the existing workflow that millions of developers use daily. Having a foundational piece of compliance built-in to the platform that developers know and love keeps them in the flow, while keeping compliance and audit teams happy as well.
Generative AI and pull requests
Wouldn’t it be cool if one-day generative AI could be leveraged to enable more developer-friendly compliance programs which have traditionally been very labor and time intensive? Imagine if generative AI could help enable DevOps and cloud native approaches for separation of duties by automating tedious tasks and allowing humans to focus on key value-added tasks.
Bringing this back to compliance and separation of duties, wouldn’t it be great if a generative AI helper was available to provide an objective set of eyes on your pull requests? This is what the GitHub Next team has been working towards with GitHub Copilot for Pull Requests.
Suggestions for your pull request descriptions. AI-powered tags are embedded into a pull request description and automatically filled out by GitHub Copilot based on the code which the developers changed. Going one step further, the GitHub Next team is also looking at the creation of descriptive sentences and paragraphs as developers create pull requests.
Code reviews with AI. Taking pull requests and code reviews one step further, the GitHub Next team is looking at AI to help review the code and provide suggestions for changes. This will help enable human interactions and optimize existing processes. The AI would automate the creation of the descriptions, based on the code changes, as well as suggestions for improvements. The code reviewer will have everything they need to quickly review the change and decide to either move forward or send the change back.
When these capabilities are production ready, development teams and compliance programs will appreciate these features for a few reasons. First, the pull request and code review process would be driven by a conversation based on a neutral and independent description. Second, the description will be based on the actual code that was changed. Third, both development and compliance workflows will be optimized and allow humans to focus on value-added work.
While these capabilities are still a work in progress, there are features available now that may help enable compliance, audit, and security teams with GitHub Copilot for Business. The ability for developers to complete tasks faster and stay in the flow are truly amazing. But the ability for GitHub Copilot to provide AI-based security vulnerability filtering nowis a great place for compliance and audit teams within enterprises to get started on their journey to embracing generative AI into their day-to-day practices.
Next steps
Generative AI will enable developers and enterprises to achieve success by reducing manual tasks and enabling developers to focus their creativity on business value–all while staying in the flow.
I hope this blog will help drive positive discussions regarding this topic and has provided a forward looking view into what will be possible in the future. The future ability of generative AI to help enable teams by automating tedious tasks will help humans focus on more value-added work and could eventually be an important part of a robust and risk-based compliance posture.
To provide the best experiences, we use technologies like cookies to store and/or access device information. Consenting to these technologies will allow us to process data such as browsing behavior or unique IDs on this site. Not consenting or withdrawing consent, may adversely affect certain features and functions.
Functional
Always active
The technical storage or access is strictly necessary for the legitimate purpose of enabling the use of a specific service explicitly requested by the subscriber or user, or for the sole purpose of carrying out the transmission of a communication over an electronic communications network.
Preferences
The technical storage or access is necessary for the legitimate purpose of storing preferences that are not requested by the subscriber or user.
Statistics
The technical storage or access that is used exclusively for statistical purposes.The technical storage or access that is used exclusively for anonymous statistical purposes. Without a subpoena, voluntary compliance on the part of your Internet Service Provider, or additional records from a third party, information stored or retrieved for this purpose alone cannot usually be used to identify you.
Marketing
The technical storage or access is required to create user profiles to send advertising, or to track the user on a website or across several websites for similar marketing purposes.