Tag Archives: AWS IAM

Building fine-grained authorization using Amazon Cognito, API Gateway, and IAM

Post Syndicated from Artem Lovan original https://aws.amazon.com/blogs/security/building-fine-grained-authorization-using-amazon-cognito-api-gateway-and-iam/

June 5, 2021: We’ve updated Figure 1: User request flow.


Authorizing functionality of an application based on group membership is a best practice. If you’re building APIs with Amazon API Gateway and you need fine-grained access control for your users, you can use Amazon Cognito. Amazon Cognito allows you to use groups to create a collection of users, which is often done to set the permissions for those users. In this post, I show you how to build fine-grained authorization to protect your APIs using Amazon Cognito, API Gateway, and AWS Identity and Access Management (IAM).

As a developer, you’re building a customer-facing application where your users are going to log into your web or mobile application, and as such you will be exposing your APIs through API Gateway with upstream services. The APIs could be deployed on Amazon Elastic Container Service (Amazon ECS), Amazon Elastic Kubernetes Service (Amazon EKS), AWS Lambda, or Elastic Load Balancing where each of these options will forward the request to your Amazon Elastic Compute Cloud (Amazon EC2) instances. Additionally, you can use on-premises services that are connected to your Amazon Web Services (AWS) environment over an AWS VPN or AWS Direct Connect. It’s important to have fine-grained controls for each API endpoint and HTTP method. For instance, the user should be allowed to make a GET request to an endpoint, but should not be allowed to make a POST request to the same endpoint. As a best practice, you should assign users to groups and use group membership to allow or deny access to your API services.

Solution overview

In this blog post, you learn how to use an Amazon Cognito user pool as a user directory and let users authenticate and acquire the JSON Web Token (JWT) to pass to the API Gateway. The JWT is used to identify what group the user belongs to, as mapping a group to an IAM policy will display the access rights the group is granted.

Note: The solution works similarly if Amazon Cognito would be federating users with an external identity provider (IdP)—such as Ping, Active Directory, or Okta—instead of being an IdP itself. To learn more, see Adding User Pool Sign-in Through a Third Party. Additionally, if you want to use groups from an external IdP to grant access, Role-based access control using Amazon Cognito and an external identity provider outlines how to do so.

The following figure shows the basic architecture and information flow for user requests.
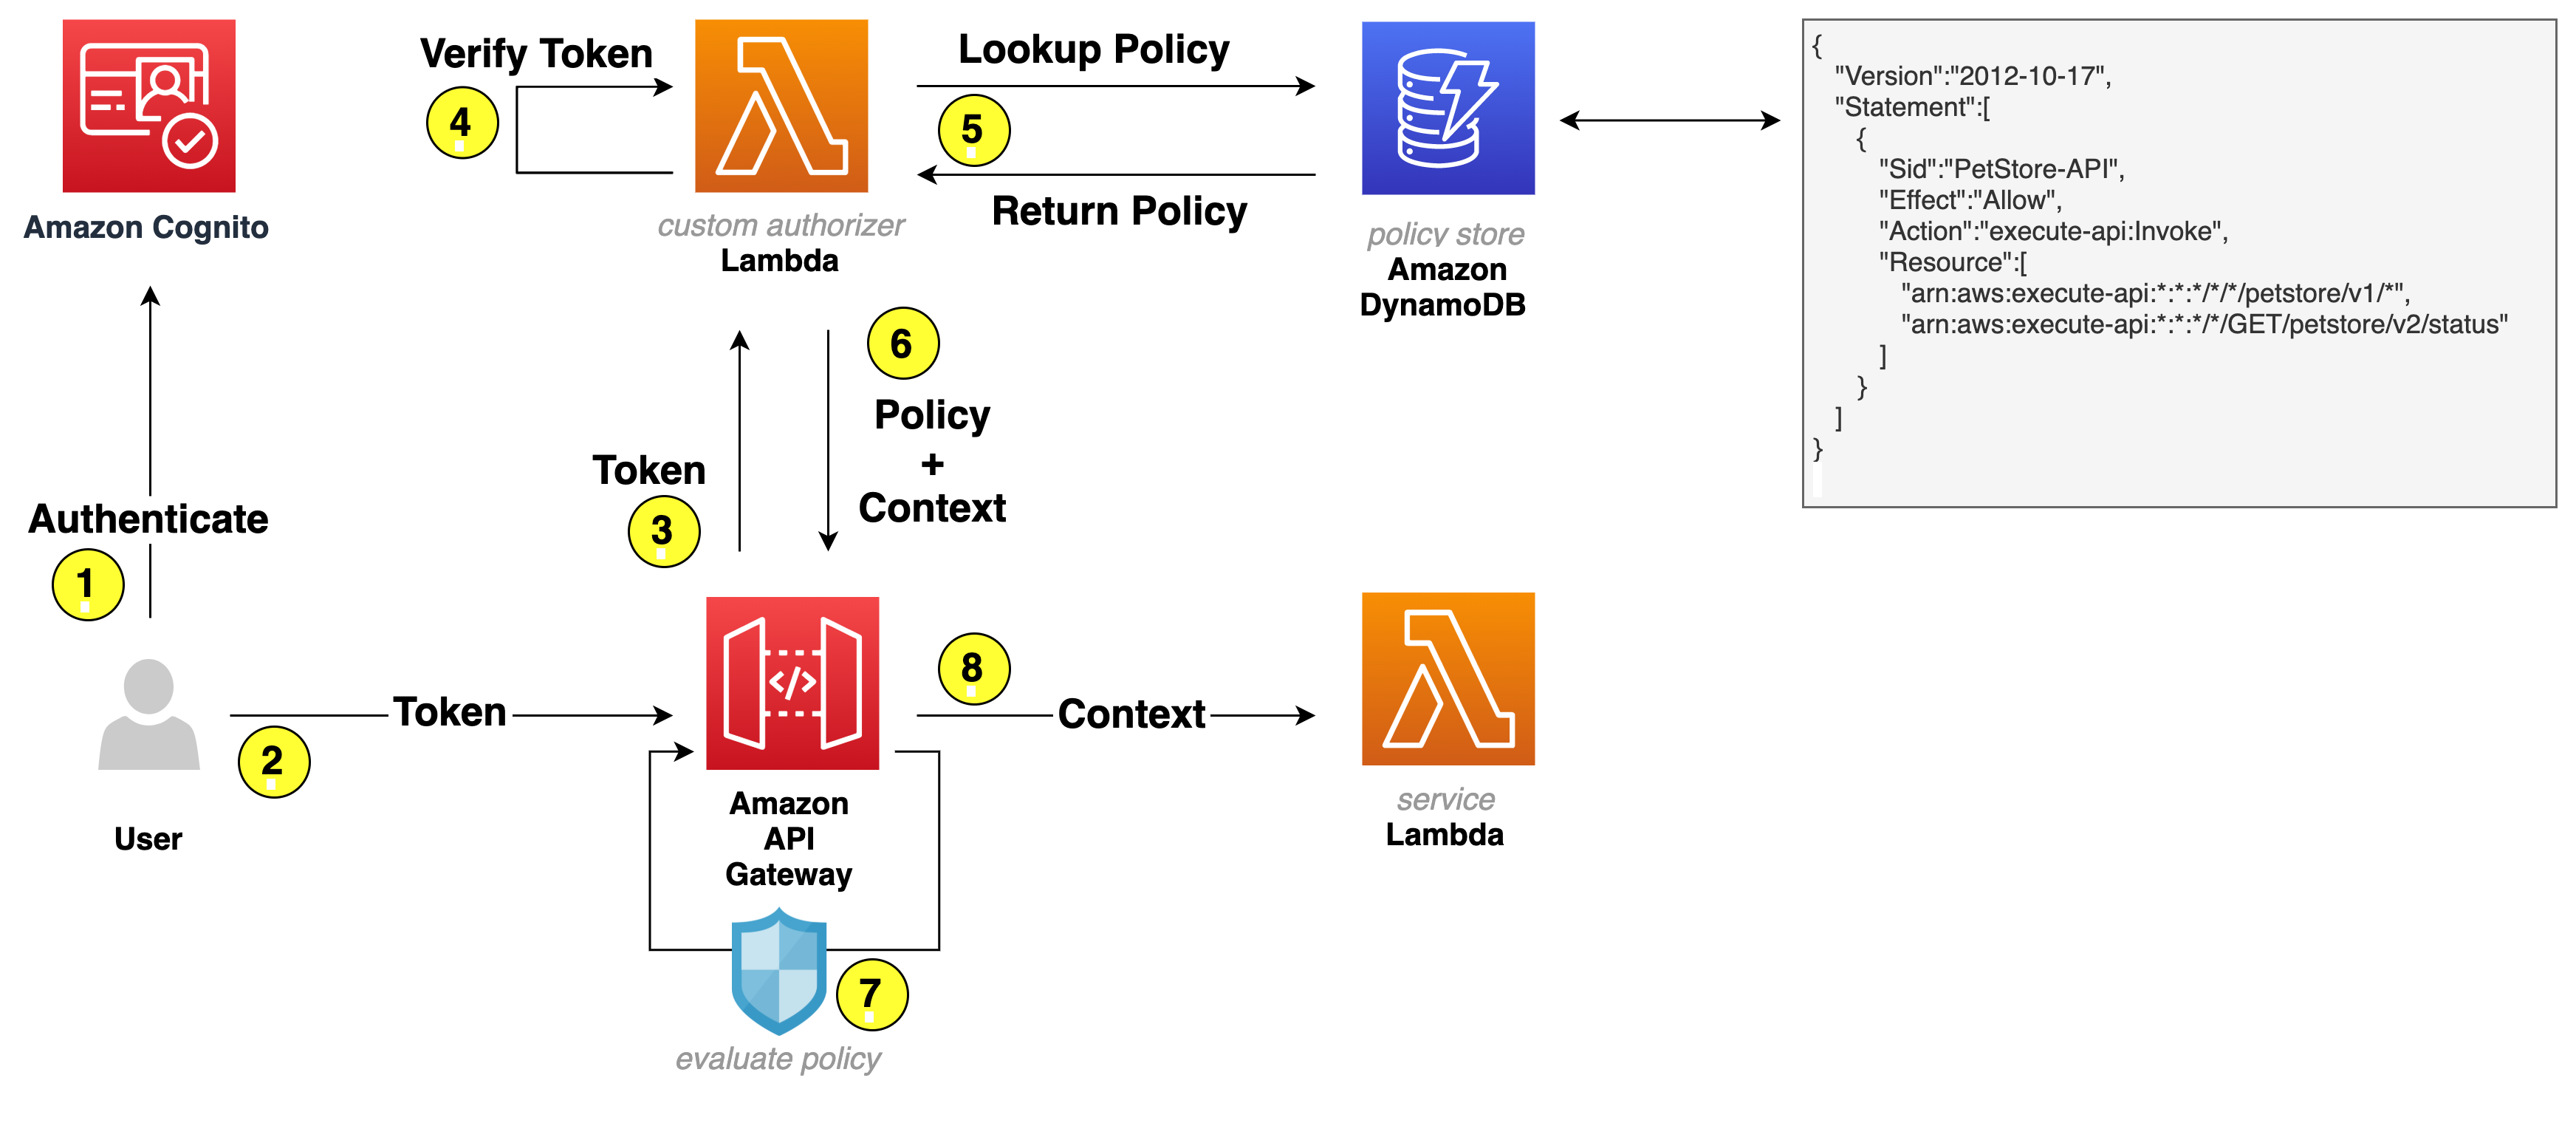
Figure 1: User request flow

Figure 1: User request flow

Let’s go through the request flow to understand what happens at each step, as shown in Figure 1:

  1. A user logs in and acquires an Amazon Cognito JWT ID token, access token, and refresh token. To learn more about each token, see using tokens with user pools.
  2. A RestAPI request is made and a bearer token—in this solution, an access token—is passed in the headers.
  3. API Gateway forwards the request to a Lambda authorizer—also known as a custom authorizer.
  4. The Lambda authorizer verifies the Amazon Cognito JWT using the Amazon Cognito public key. On initial Lambda invocation, the public key is downloaded from Amazon Cognito and cached. Subsequent invocations will use the public key from the cache.
  5. The Lambda authorizer looks up the Amazon Cognito group that the user belongs to in the JWT and does a lookup in Amazon DynamoDB to get the policy that’s mapped to the group.
  6. Lambda returns the policy and—optionally—context to API Gateway. The context is a map containing key-value pairs that you can pass to the upstream service. It can be additional information about the user, the service, or anything that provides additional information to the upstream service.
  7. The API Gateway policy engine evaluates the policy.

    Note: Lambda isn’t responsible for understanding and evaluating the policy. That responsibility falls on the native capabilities of API Gateway.

  8. The request is forwarded to the service.

Note: To further optimize Lambda authorizer, the authorization policy can be cached or disabled, depending on your needs. By enabling cache, you could improve the performance as the authorization policy will be returned from the cache whenever there is a cache key match. To learn more, see Configure a Lambda authorizer using the API Gateway console.

Let’s have a closer look at the following example policy that is stored as part of an item in DynamoDB.

{
   "Version":"2012-10-17",
   "Statement":[
      {
         "Sid":"PetStore-API",
         "Effect":"Allow",
         "Action":"execute-api:Invoke",
         "Resource":[
            "arn:aws:execute-api:*:*:*/*/*/petstore/v1/*",
            "arn:aws:execute-api:*:*:*/*/GET/petstore/v2/status"
         ],
         "Condition":{
            "IpAddress":{
               "aws:SourceIp":[
                  "192.0.2.0/24",
                  "198.51.100.0/24"
               ]
            }
         }
      }
   ]
}

Based on this example policy, the user is allowed to make calls to the petstore API. For version v1, the user can make requests to any verb and any path, which is expressed by an asterisk (*). For v2, the user is only allowed to make a GET request for path /status. To learn more about how the policies work, see Output from an Amazon API Gateway Lambda authorizer.

Getting started

For this solution, you need the following prerequisites:

  • The AWS Command Line Interface (CLI) installed and configured for use.
  • Python 3.6 or later, to package Python code for Lambda

    Note: We recommend that you use a virtual environment or virtualenvwrapper to isolate the solution from the rest of your Python environment.

  • An IAM role or user with enough permissions to create Amazon Cognito User Pool, IAM Role, Lambda, IAM Policy, API Gateway and DynamoDB table.
  • The GitHub repository for the solution. You can download it, or you can use the following Git command to download it from your terminal.

    Note: This sample code should be used to test out the solution and is not intended to be used in production account.

     $ git clone https://github.com/aws-samples/amazon-cognito-api-gateway.git
     $ cd amazon-cognito-api-gateway
    

    Use the following command to package the Python code for deployment to Lambda.

     $ bash ./helper.sh package-lambda-functions
     …
     Successfully completed packaging files.
    

To implement this reference architecture, you will be utilizing the following services:

Note: This solution was tested in the us-east-1, us-east-2, us-west-2, ap-southeast-1, and ap-southeast-2 Regions. Before selecting a Region, verify that the necessary services—Amazon Cognito, API Gateway, and Lambda—are available in those Regions.

Let’s review each service, and how those will be used, before creating the resources for this solution.

Amazon Cognito user pool

A user pool is a user directory in Amazon Cognito. With a user pool, your users can log in to your web or mobile app through Amazon Cognito. You use the Amazon Cognito user directory directly, as this sample solution creates an Amazon Cognito user. However, your users can also log in through social IdPs, OpenID Connect (OIDC), and SAML IdPs.

Lambda as backing API service

Initially, you create a Lambda function that serves your APIs. API Gateway forwards all requests to the Lambda function to serve up the requests.

An API Gateway instance and integration with Lambda

Next, you create an API Gateway instance and integrate it with the Lambda function you created. This API Gateway instance serves as an entry point for the upstream service. The following bash command below creates an Amazon Cognito user pool, a Lambda function, and an API Gateway instance. The command then configures proxy integration with Lambda and deploys an API Gateway stage.

Deploy the sample solution

From within the directory where you downloaded the sample code from GitHub, run the following command to generate a random Amazon Cognito user password and create the resources described in the previous section.

 $ bash ./helper.sh cf-create-stack-gen-password
 ...
 Successfully created CloudFormation stack.

When the command is complete, it returns a message confirming successful stack creation.

Validate Amazon Cognito user creation

To validate that an Amazon Cognito user has been created successfully, run the following command to open the Amazon Cognito UI in your browser and then log in with your credentials.

Note: When you run this command, it returns the user name and password that you should use to log in.

 $ bash ./helper.sh open-cognito-ui
  Opening Cognito UI. Please use following credentials to login:
  Username: cognitouser
  Password: xxxxxxxx

Alternatively, you can open the CloudFormation stack and get the Amazon Cognito hosted UI URL from the stack outputs. The URL is the value assigned to the CognitoHostedUiUrl variable.
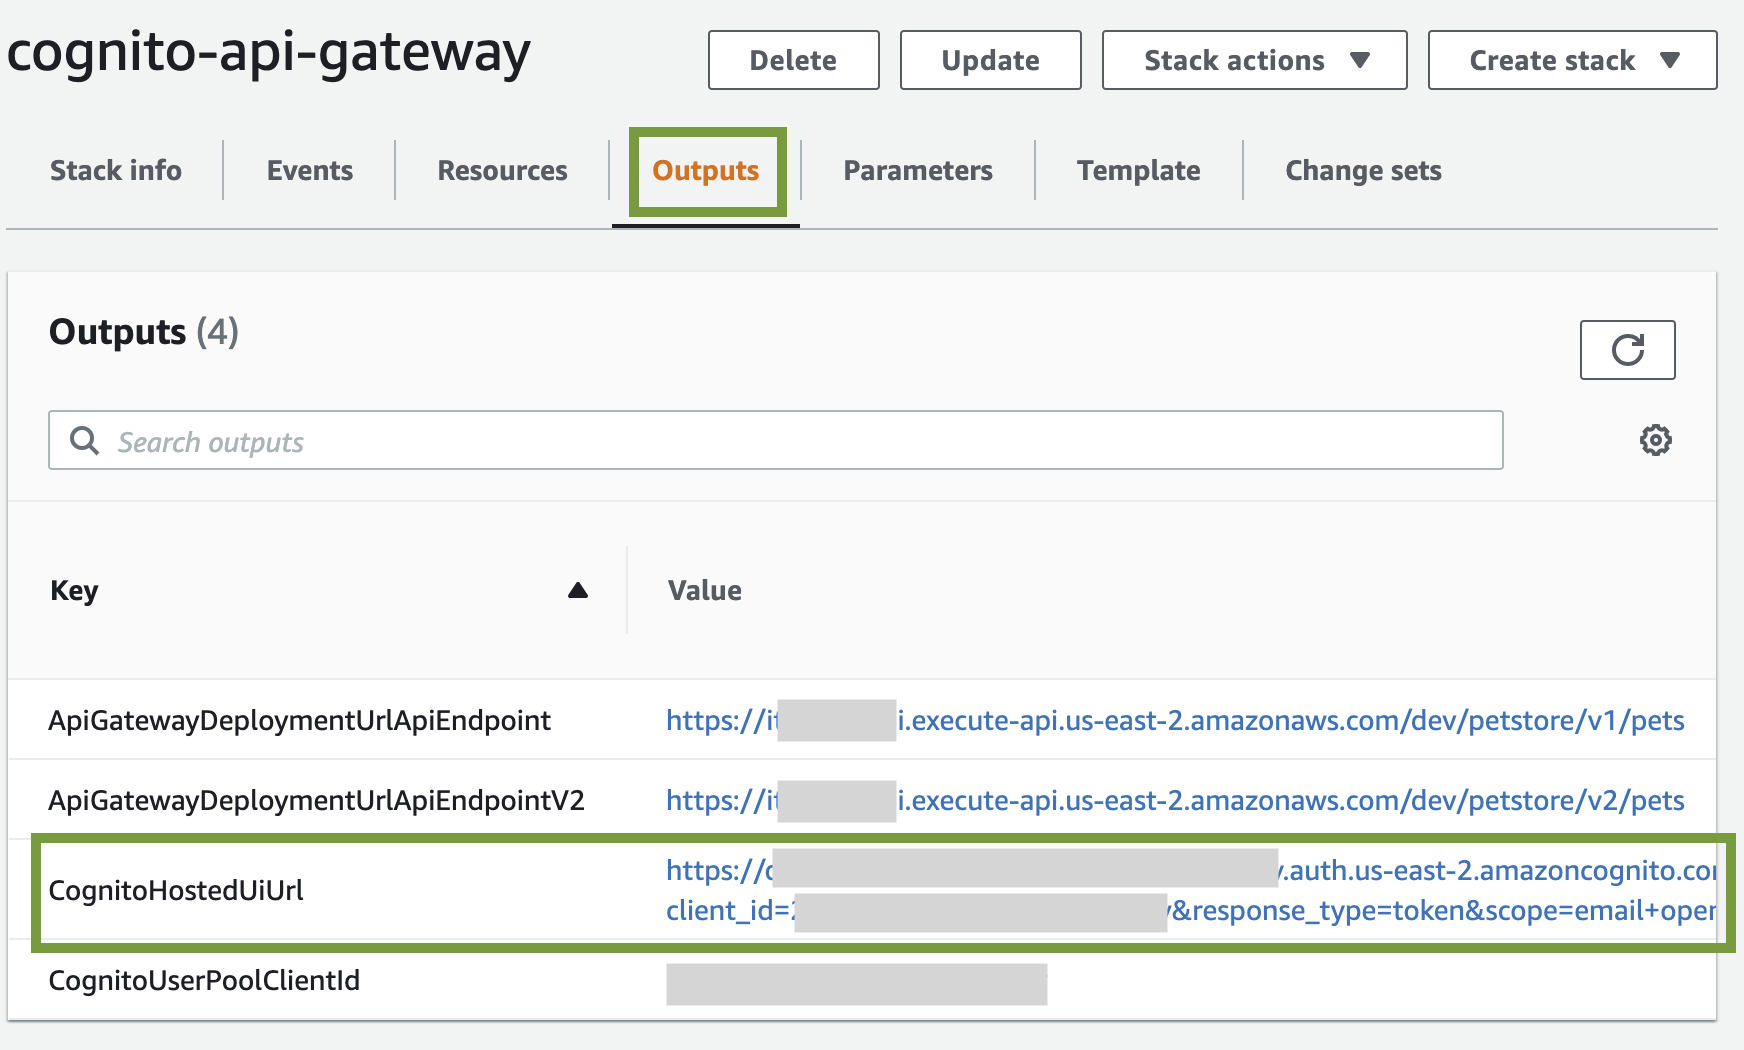
Figure 2: CloudFormation Outputs - CognitoHostedUiUrl

Figure 2: CloudFormation Outputs – CognitoHostedUiUrl

Validate Amazon Cognito JWT upon login

Since we haven’t installed a web application that would respond to the redirect request, Amazon Cognito will redirect to localhost, which might look like an error. The key aspect is that after a successful log in, there is a URL similar to the following in the navigation bar of your browser:

http://localhost/#id_token=eyJraWQiOiJicVhMYWFlaTl4aUhzTnY3W...

Test the API configuration

Before you protect the API with Amazon Cognito so that only authorized users can access it, let’s verify that the configuration is correct and the API is served by API Gateway. The following command makes a curl request to API Gateway to retrieve data from the API service.

 $ bash ./helper.sh curl-api
{"pets":[{"id":1,"name":"Birds"},{"id":2,"name":"Cats"},{"id":3,"name":"Dogs"},{"id":4,"name":"Fish"}]}

The expected result is that the response will be a list of pets. In this case, the setup is correct: API Gateway is serving the API.

Protect the API

To protect your API, the following is required:

  1. DynamoDB to store the policy that will be evaluated by the API Gateway to make an authorization decision.
  2. A Lambda function to verify the user’s access token and look up the policy in DynamoDB.

Let’s review all the services before creating the resources.

Lambda authorizer

A Lambda authorizer is an API Gateway feature that uses a Lambda function to control access to an API. You use a Lambda authorizer to implement a custom authorization scheme that uses a bearer token authentication strategy. When a client makes a request to one of the API operations, the API Gateway calls the Lambda authorizer. The Lambda authorizer takes the identity of the caller as input and returns an IAM policy as the output. The output is the policy that is returned in DynamoDB and evaluated by the API Gateway. If there is no policy mapped to the caller identity, Lambda will generate a deny policy and request will be denied.

DynamoDB table

DynamoDB is a key-value and document database that delivers single-digit millisecond performance at any scale. This is ideal for this use case to ensure that the Lambda authorizer can quickly process the bearer token, look up the policy, and return it to API Gateway. To learn more, see Control access for invoking an API.

The final step is to create the DynamoDB table for the Lambda authorizer to look up the policy, which is mapped to an Amazon Cognito group.

Figure 3 illustrates an item in DynamoDB. Key attributes are:

  • Group, which is used to look up the policy.
  • Policy, which is returned to API Gateway to evaluate the policy.
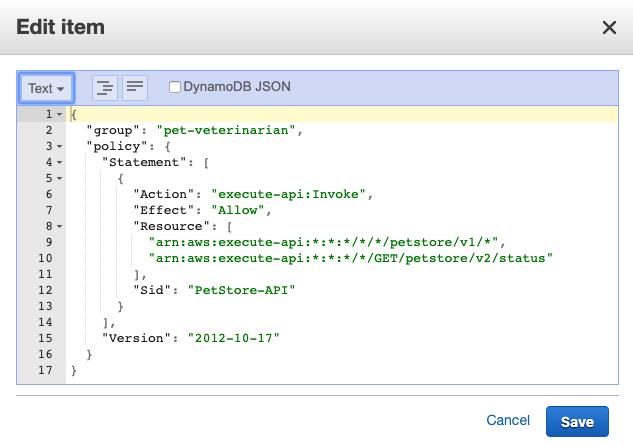
 

Figure 3: DynamoDB item

Figure 3: DynamoDB item

Based on this policy, the user that is part of the Amazon Cognito group pet-veterinarian is allowed to make API requests to endpoints https://<domain>/<api-gateway-stage>/petstore/v1/* and https://<domain>/<api-gateway-stage>/petstore/v2/status for GET requests only.

Update and create resources

Run the following command to update existing resources and create a Lambda authorizer and DynamoDB table.

 $ bash ./helper.sh cf-update-stack
Successfully updated CloudFormation stack.

Test the custom authorizer setup

Begin your testing with the following request, which doesn’t include an access token.

$ bash ./helper.sh curl-api
{"message":"Unauthorized"}

The request is denied with the message Unauthorized. At this point, the Amazon API Gateway expects a header named Authorization (case sensitive) in the request. If there’s no authorization header, the request is denied before it reaches the lambda authorizer. This is a way to filter out requests that don’t include required information.

Use the following command for the next test. In this test, you pass the required header but the token is invalid because it wasn’t issued by Amazon Cognito but is a simple JWT-format token stored in ./helper.sh. To learn more about how to decode and validate a JWT, see decode and verify an Amazon Cognito JSON token.

$ bash ./helper.sh curl-api-invalid-token
{"Message":"User is not authorized to access this resource"}

This time the message is different. The Lambda authorizer received the request and identified the token as invalid and responded with the message User is not authorized to access this resource.

To make a successful request to the protected API, your code will need to perform the following steps:

  1. Use a user name and password to authenticate against your Amazon Cognito user pool.
  2. Acquire the tokens (id token, access token, and refresh token).
  3. Make an HTTPS (TLS) request to API Gateway and pass the access token in the headers.

Before the request is forwarded to the API service, API Gateway receives the request and passes it to the Lambda authorizer. The authorizer performs the following steps. If any of the steps fail, the request is denied.

  1. Retrieve the public keys from Amazon Cognito.
  2. Cache the public keys so the Lambda authorizer doesn’t have to make additional calls to Amazon Cognito as long as the Lambda execution environment isn’t shut down.
  3. Use public keys to verify the access token.
  4. Look up the policy in DynamoDB.
  5. Return the policy to API Gateway.

The access token has claims such as Amazon Cognito assigned groups, user name, token use, and others, as shown in the following example (some fields removed).

{
    "sub": "00000000-0000-0000-0000-0000000000000000",
    "cognito:groups": [
        "pet-veterinarian"
    ],
...
    "token_use": "access",
    "scope": "openid email",
    "username": "cognitouser"
}

Finally, let’s programmatically log in to Amazon Cognito UI, acquire a valid access token, and make a request to API Gateway. Run the following command to call the protected API.

$ bash ./helper.sh curl-protected-api
{"pets":[{"id":1,"name":"Birds"},{"id":2,"name":"Cats"},{"id":3,"name":"Dogs"},{"id":4,"name":"Fish"}]}

This time, you receive a response with data from the API service. Let’s examine the steps that the example code performed:

  1. Lambda authorizer validates the access token.
  2. Lambda authorizer looks up the policy in DynamoDB based on the group name that was retrieved from the access token.
  3. Lambda authorizer passes the IAM policy back to API Gateway.
  4. API Gateway evaluates the IAM policy and the final effect is an allow.
  5. API Gateway forwards the request to Lambda.
  6. Lambda returns the response.

Let’s continue to test our policy from Figure 3. In the policy document, arn:aws:execute-api:*:*:*/*/GET/petstore/v2/status is the only endpoint for version V2, which means requests to endpoint /GET/petstore/v2/pets should be denied. Run the following command to test this.

 $ bash ./helper.sh curl-protected-api-not-allowed-endpoint
{"Message":"User is not authorized to access this resource"}

Note: Now that you understand fine grained access control using Cognito user pool, API Gateway and lambda function, and you have finished testing it out, you can run the following command to clean up all the resources associated with this solution:

 $ bash ./helper.sh cf-delete-stack

Advanced IAM policies to further control your API

With IAM, you can create advanced policies to further refine access to your APIs. You can learn more about condition keys that can be used in API Gateway, their use in an IAM policy with conditions, and how policy evaluation logic determines whether to allow or deny a request.

Summary

In this post, you learned how IAM and Amazon Cognito can be used to provide fine-grained access control for your API behind API Gateway. You can use this approach to transparently apply fine-grained control to your API, without having to modify the code in your API, and create advanced policies by using IAM condition keys.

If you have feedback about this post, submit comments in the Comments section below. If you have questions about this post, start a new thread on the Amazon Cognito forum or contact AWS Support.

Want more AWS Security how-to content, news, and feature announcements? Follow us on Twitter.

Author

Artem Lovan

Artem is a Senior Solutions Architect based in New York. He helps customers architect and optimize applications on AWS. He has been involved in IT at many levels, including infrastructure, networking, security, DevOps, and software development.

How to delegate management of identity in AWS Single Sign-On

Post Syndicated from Louay Shaat original https://aws.amazon.com/blogs/security/how-to-delegate-management-of-identity-in-aws-single-sign-on/

In this blog post, I show how you can use AWS Single Sign-On (AWS SSO) to delegate administration of user identities. Delegation is the process of providing your teams permissions to manage accounts and identities associated with their teams. You can achieve this by using the existing integration that AWS SSO has with AWS Organizations, and by using tags and conditions in AWS Identity and Access Management (IAM).

AWS SSO makes it easy to centrally manage access to multiple Amazon Web Services (AWS) accounts and business applications, and to provide users with single sign-on access to all their assigned accounts and applications from one place.

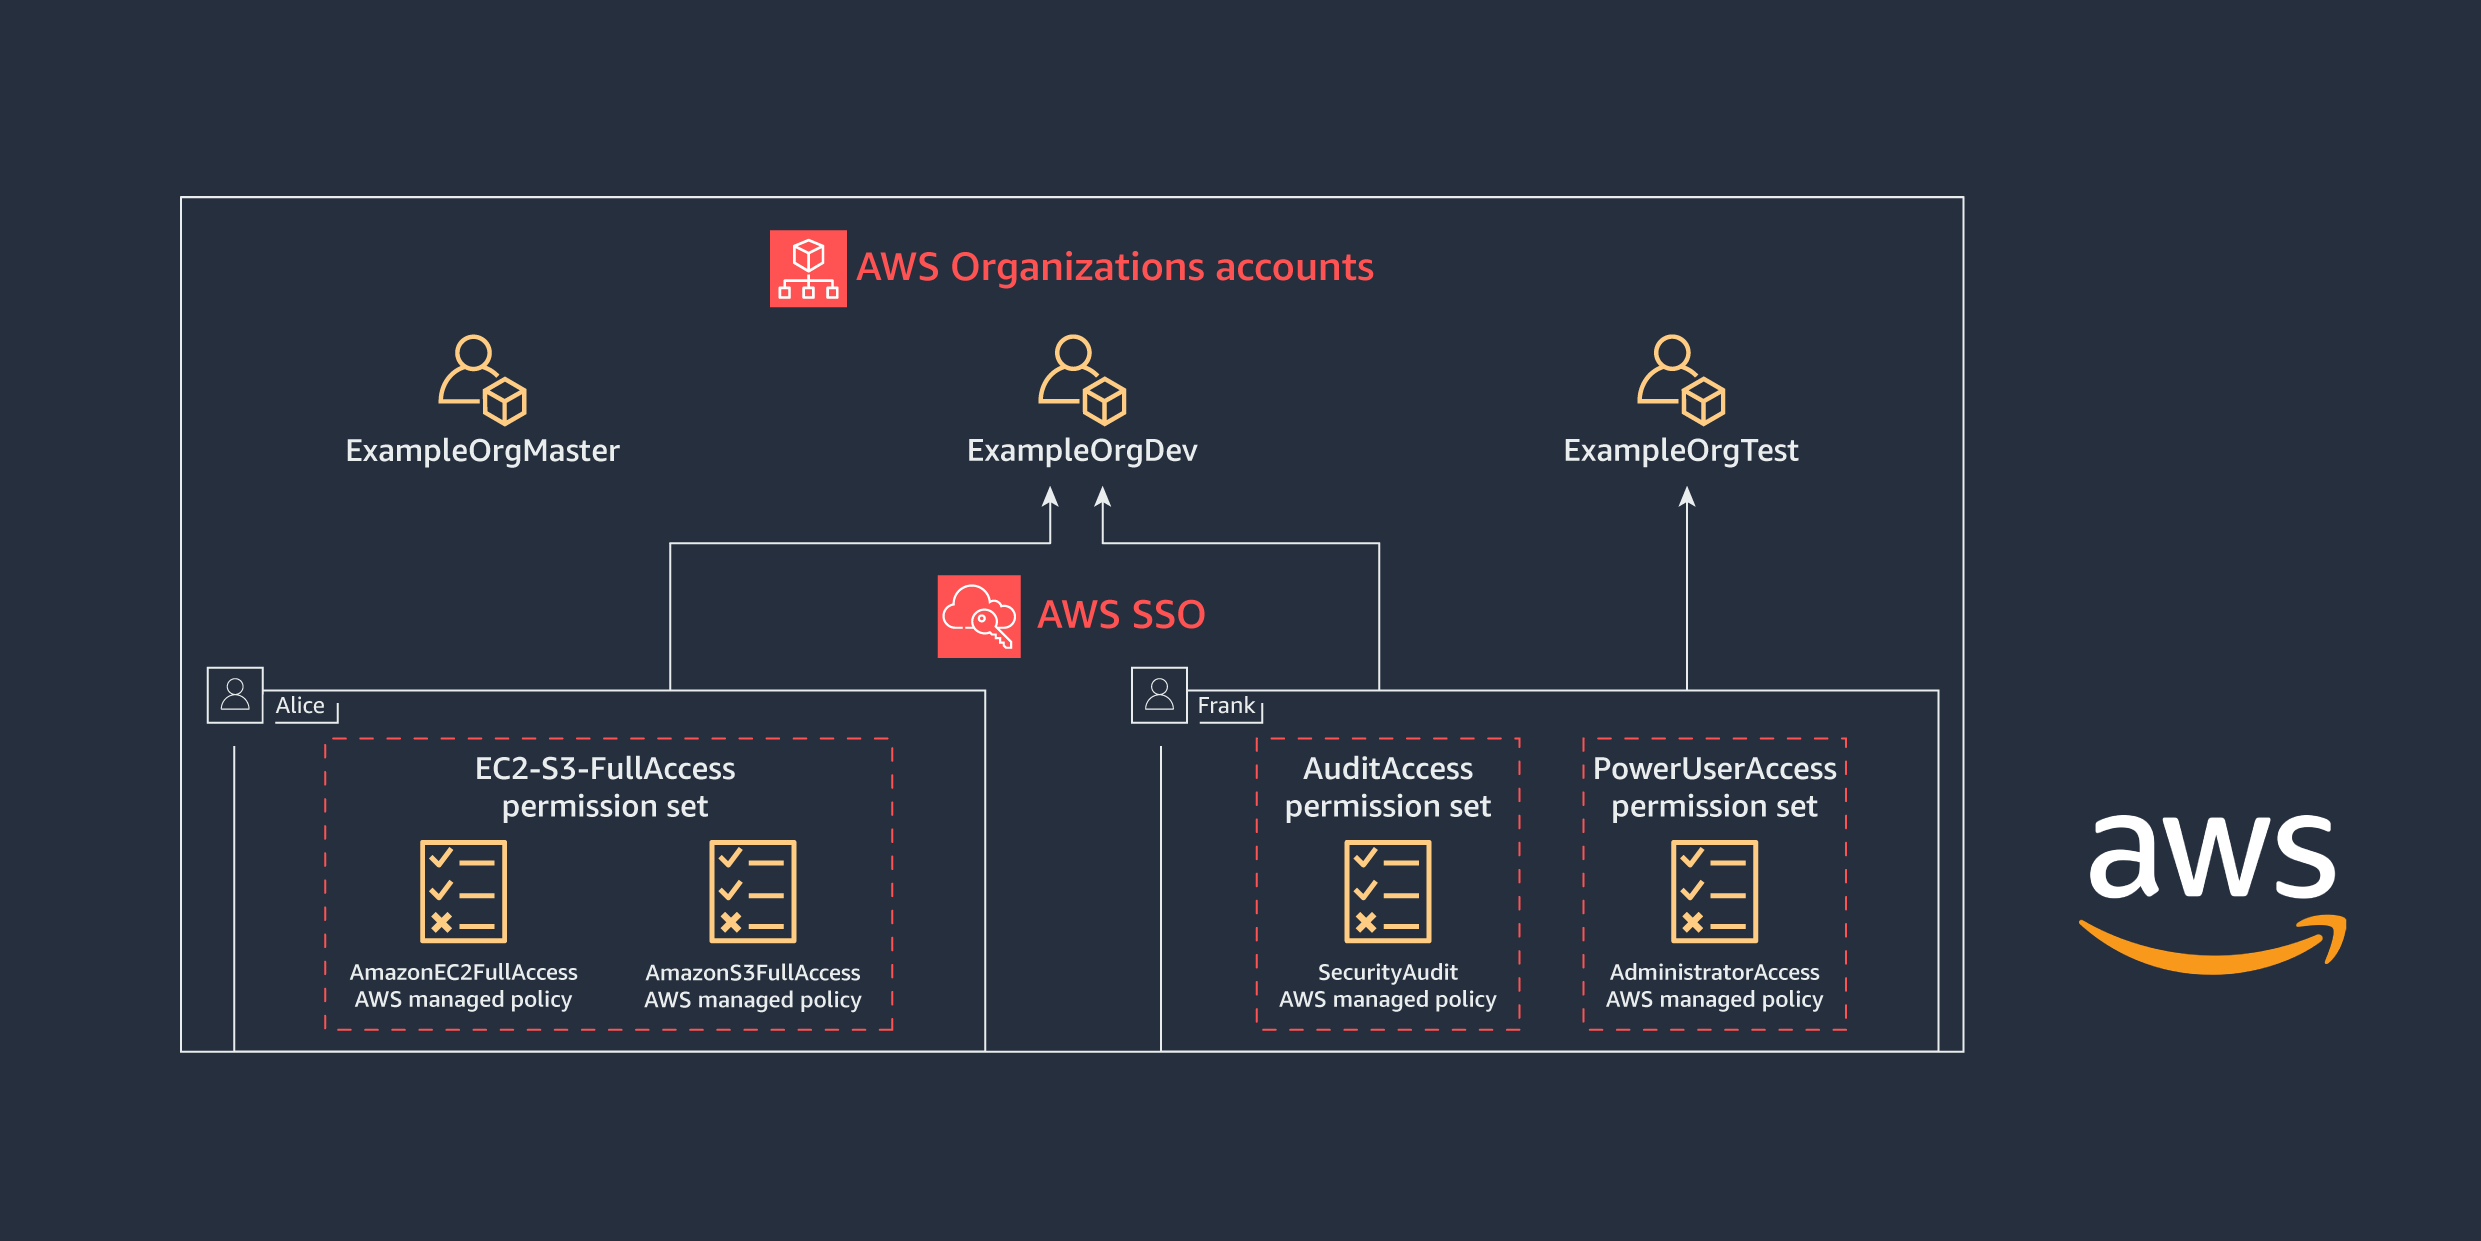
AWS SSO uses permission sets—a collection of administrator-defined policies—to determine a user’s effective permissions to access a given AWS account. Permission sets can contain either AWS managed policies or custom policies that are stored in AWS SSO. Policies are documents that act as containers for one or more permission statements. These statements represent individual access controls (allow or deny) for various tasks, which determine what tasks users can or cannot perform within the AWS account. Permission sets are provisioned as IAM roles in your organizational accounts, and are managed centrally using AWS SSO.

AWS SSO is tightly integrated with AWS Organizations, and runs in your AWS Organizations management account. This integration enables AWS SSO to retrieve and manage permission sets across your AWS Organizations configuration.

As you continue to build more of your workloads on AWS, managing access to AWS accounts and services becomes more time consuming for team members that manage identities. With a centralized identity approach that uses AWS SSO, there’s an increased need to delegate control of permission sets and accounts to domain and application owners. Although this is a valid use case, access to the management account in Organizations should be tightly guarded as a security best practice. As an administrator in the management account of an organization, you can control how teams and users access your AWS accounts and applications.

This post shows how you can build comprehensive delegation models in AWS SSO to securely and effectively delegate control of identities to various teams.

Solution overview

Suppose you’ve implemented AWS SSO in Organizations to manage identity across your entire AWS environment. Your organization is growing and the number of accounts and teams that need access to your AWS environment is also growing. You have a small Identity team that is constantly adding, updating, or deleting users or groups and permission sets to enable your teams to gain access to their required services and accounts.

Note: You can learn how to enable AWS SSO from the Introducing AWS Single Sign-On blog post.

As the number of teams grows, you want to start using a delegation model to enable account and application owners to manage access to their resources, in order to reduce the heavy lifting that is done by teams that manage identities.

Figure 1 shows a simple organizational structure that your organization implemented.
 

Figure 1: AWS SSO with AWS Organizations

Figure 1: AWS SSO with AWS Organizations

In this scenario, you’ve already built a collection of organizational-approved permission sets that are used across your organization. You have a tagging strategy for permission sets, and you’ve implemented two tags across all your permission sets:

  • Environment: The values for this tag are Production or Development. You only apply Production permission sets to Production accounts.
  • OU: This tag identifies the organizational unit (OU) that the permission set belongs to.

A value of All can be assigned to either tag to identify organization-wide use of the permission set.

You identified three models of delegation that you want to enable based on the setup just described, and your Identity team has identified three use cases that they want to implement:

  • A simple delegation model for a team to manage all permission sets for a set of accounts.
  • A delegation model for support teams to apply read-only permission sets to all accounts.
  • A delegation model based on AWS Organizations, where a team can manage only the permission sets intended for a specific OU.

The AWS SSO delegation model enables three key conditions for restricting user access:

  • Permission sets.
  • Accounts
  • Tags that use the condition aws:ResourceTag, to ensure that tags are present on your permission sets as part of your delegation model.

In the rest of this blog post, I show you how AWS SSO administrators can use these conditions to implement the use cases highlighted here to build a delegation model.

See Delegating permission set administration and Actions, resources, and condition keys for AWS SSO for more information.

Important: The use cases that follow are examples that can be adopted by your organization. The permission sets in these use cases show only what is needed to delegate the components discussed. You need to add additional policies to give users and groups access to AWS SSO.

Some examples:

Identify your permission set and AWS SSO instance IDs

You can use either the AWS Command Line Interface (AWS CLI) v2 or the AWS Management Console to identify your permission set and AWS SSO instance IDs.

Use the AWS CLI

To use the AWS CLI to identify the Amazon resource names (ARNs) of the AWS SSO instance and permission set, make sure you have AWS CLI v2 installed.

To list the AWS SSO instance ID ARN

Run the following command:

aws sso-admin list-instances

To list the permission set ARN

Run the following command:

aws sso-admin list-permission-sets --instance-arn <instance arn from above>

Use the console

You can also use the console to identify your permission sets and AWS SSO instance IDs.

To list the AWS SSO Instance ID ARN

  1. Navigate to the AWS SSO in your Region. Choose the Dashboard and then choose Choose your identity source.
  2. Copy the AWS SSO ARN ID.
Figure 2: AWS SSO ID ARN

Figure 2: AWS SSO ID ARN

To list the permission set ARN

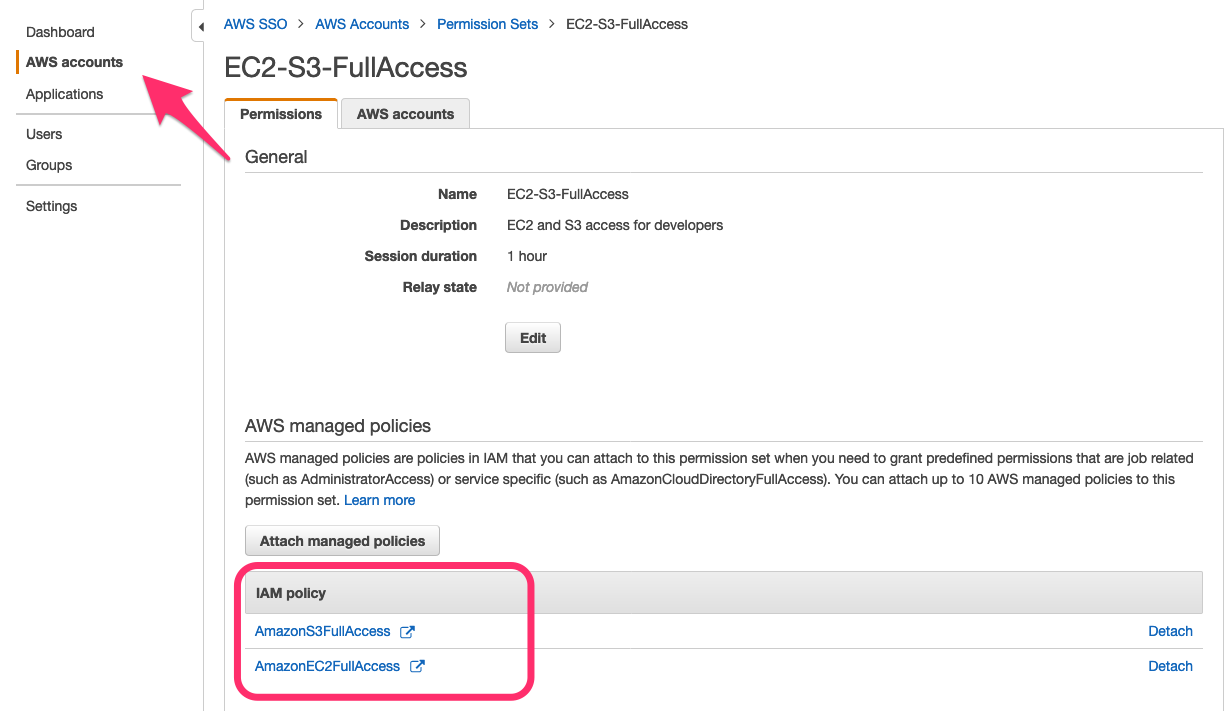
  1. Navigate to the AWS SSO Service in your Region. Choose AWS Accounts and then Permission Sets.
  2. Select the permission set you want to use.
  3. Copy the ARN of the permission set.
Figure 3: Permission set ARN

Figure 3: Permission set ARN

Use case 1: Accounts-based delegation model

In this use case, you create a single policy to allow administrators to assign any permission set to a specific set of accounts.

First, you need to create a custom permission set to use with the following example policy.

The example policy is as follows.

            "Sid": "DelegatedAdminsAccounts",
            "Effect": "Allow",
            "Action": [
                "sso:ProvisionPermissionSet",
                "sso:CreateAccountAssignment",
                "sso:DeleteInlinePolicyFromPermissionSet",
                "sso:UpdateInstanceAccessControlAttributeConfiguration",
                "sso:PutInlinePolicyToPermissionSet",
                "sso:DeleteAccountAssignment",
                "sso:DetachManagedPolicyFromPermissionSet",
                "sso:DeletePermissionSet",
                "sso:AttachManagedPolicyToPermissionSet",
                "sso:CreatePermissionSet",
                "sso:UpdatePermissionSet",
                "sso:CreateInstanceAccessControlAttributeConfiguration",
                "sso:DeleteInstanceAccessControlAttributeConfiguration"
            ],
            "Resource": [
                "arn:aws:sso:::account/112233445566",
                "arn:aws:sso:::account/223344556677",
                "arn:aws:sso:::account/334455667788"
            ]
        }

This policy specifies that delegated admins are allowed to provision any permission set to the three accounts listed in the policy.

Note: To apply this permission set to your environment, replace the account numbers following Resource with your account numbers.

Use case 2: Permission-based delegation model

In this use case, you create a single policy to allow administrators to assign a specific permission set to any account. The policy is as follows.

{
                    "Sid": "DelegatedPermissionsAdmin",
                    "Effect": "Allow",
                    "Action": [
                        "sso:ProvisionPermissionSet",
                        "sso:CreateAccountAssignment",
                        "sso:DeleteInlinePolicyFromPermissionSet",
                        "sso:UpdateInstanceAccessControlAttributeConfiguration",
                        "sso:PutInlinePolicyToPermissionSet",
                        "sso:DeleteAccountAssignment",
                        "sso:DetachManagedPolicyFromPermissionSet",
                        "sso:DeletePermissionSet",
                        "sso:AttachManagedPolicyToPermissionSet",
                        "sso:CreatePermissionSet",
                        "sso:UpdatePermissionSet",
                        "sso:CreateInstanceAccessControlAttributeConfiguration",
                        "sso:DeleteInstanceAccessControlAttributeConfiguration",
                        "sso:ProvisionApplicationInstanceForAWSAccount"
                    ],
                    "Resource": [
                        "arn:aws:sso:::instance/ssoins-1111111111",
                        "arn:aws:sso:::account/*",
                        "arn:aws:sso:::permissionSet/ssoins-1111111111/ps-112233abcdef123"

            ]


        },          

This policy specifies that delegated admins are allowed to provision only the specific permission set listed in the policy to any account.

Note:

Use case 3: OU-based delegation model

In this use case, the Identity team wants to delegate the management of the Development permission sets (identified by the tag key Environment) to the Test OU (identified by the tag key OU). You use the Environment and OU tags on permission sets to restrict access to only the permission sets that contain both tags.

To build this permission set for delegation, you need to create two policies in the same permission set:

  • A policy that filters the permission sets based on both tags—Environment and OU.
  • A policy that filters the accounts belonging to the Development OU.

The policies are as follows.

{
                    "Sid": "DelegatedOUAdmin",
                    "Effect": "Allow",
                    "Action": [
                        "sso:ProvisionPermissionSet",
                        "sso:CreateAccountAssignment",
                        "sso:DeleteInlinePolicyFromPermissionSet",
                        "sso:UpdateInstanceAccessControlAttributeConfiguration",
                        "sso:PutInlinePolicyToPermissionSet",
                        "sso:DeleteAccountAssignment",
                        "sso:DetachManagedPolicyFromPermissionSet",
                        "sso:DeletePermissionSet",
                        "sso:AttachManagedPolicyToPermissionSet",
                        "sso:CreatePermissionSet",
                        "sso:UpdatePermissionSet",
                        "sso:CreateInstanceAccessControlAttributeConfiguration",
                        "sso:DeleteInstanceAccessControlAttributeConfiguration",
                        "sso:ProvisionApplicationInstanceForAWSAccount"
                    ],
                    "Resource": "arn:aws:sso:::permissionSet/*/*",
                    "Condition": {
                        "StringEquals": {
                            "aws:ResourceTag/Environment": "Development",
                            "aws:ResourceTag/OU": "Test"
                        }
                    }
        },
        {
            "Sid": "Instance",
            "Effect": "Allow",
            "Action": [
                "sso:ProvisionPermissionSet",
                "sso:CreateAccountAssignment",
                "sso:DeleteInlinePolicyFromPermissionSet",
                "sso:UpdateInstanceAccessControlAttributeConfiguration",
                "sso:PutInlinePolicyToPermissionSet",
                "sso:DeleteAccountAssignment",
                "sso:DetachManagedPolicyFromPermissionSet",
                "sso:DeletePermissionSet",
                "sso:AttachManagedPolicyToPermissionSet",
                "sso:CreatePermissionSet",
                "sso:UpdatePermissionSet",
                "sso:CreateInstanceAccessControlAttributeConfiguration",
                "sso:DeleteInstanceAccessControlAttributeConfiguration",
                "sso:ProvisionApplicationInstanceForAWSAccount"
            ],
            "Resource": [
                "arn:aws:sso:::instance/ssoins-82593a6ed92c8920",
                "arn:aws:sso:::account/112233445566",
                "arn:aws:sso:::account/223344556677",
                "arn:aws:sso:::account/334455667788"

            ]
        }

In the delegated policy, the user or group is only allowed to provision permission sets that have both tags, OU and Environment, set to “Development” and only to accounts in the Development OU.

Note: In the example above arn:aws:sso:::instance/ssoins-11112222233333 is the ARN for the AWS SSO Instance ID. To get your AWS SSO Instance ID, refer to Identify your permission set and AWS SSO Instance IDs.

Create a delegated admin profile in AWS SSO

Now that you know what’s required to delegate permissions, you can create a delegated profile and deploy that to your users and groups.

To create a delegated AWS SSO profile

  1. In the AWS SSO console, sign in to your management account and browse to the Region where AWS SSO is provisioned.
  2. Navigate to AWS Accounts and choose Permission sets, and then choose Create permission set.
     
    Figure 4: AWS SSO permission sets menu

    Figure 4: AWS SSO permission sets menu

  3. Choose Create a custom permission set.
     
    Figure 5: Create a new permission set

    Figure 5: Create a new permission set

  4. Give a name to your permission set based on your naming standards and select a session duration from your organizational policies.
  5. For Relay state, enter the following URL:
    https://<region>.console.aws.amazon.com/singlesignon/home?region=<region>#/accounts/organization 
    

    where <region> is the AWS Region in which you deployed AWS SSO.

    The relay state will automatically redirect the user to the Accounts section in the AWS SSO console, for simplicity.
     

    Figure 6: Custom permission set

    Figure 6: Custom permission set

  6. Choose Create new permission set. Here is where you can decide the level of delegation required for your application or domain administrators.
     
    Figure 7: Assign users

    Figure 7: Assign users

    See some of the examples in the earlier sections of this post for the permission set.

  7. If you’re using AWS SSO with AWS Directory Service for Microsoft Active Directory, you’ll need to provide access to AWS Directory Service in order for your administrator to assign permission sets to users and groups.

    To provide this access, navigate to the AWS Accounts screen in the AWS SSO console, and select your management account. Assign the required users or groups, and select the permission set that you created earlier. Then choose Finish.

  8. To test this delegation, sign in to AWS SSO. You’ll see the newly created permission set.
     
    Figure 8: AWS SSO sign-on page

    Figure 8: AWS SSO sign-on page

  9. Next to developer-delegated-admin, choose Management console. This should automatically redirect you to AWS SSO in the AWS Accounts submenu.

If you try to provision access by assigning or creating new permission sets to accounts or permission sets you are not explicitly allowed, according to the policies you specified earlier, you will receive the following error.
 

Figure 9: Error based on lack of permissions

Figure 9: Error based on lack of permissions

Otherwise, the provisioning will be successful.

Summary

You’ve seen that by using conditions and tags on permission sets, application and account owners can use delegation models to manage the deployment of permission sets across the accounts they manage, providing them and their teams with secure access to AWS accounts and services.

Additionally, because AWS SSO supports attribute-based access control (ABAC), you can create a more dynamic delegation model based on attributes from your identity provider, to match the tags on the permission set.

If you have feedback about this blog post, submit comments in the Comments section below. If you have questions about this post, start a new thread on the AWS Single Sign-On forum.

Want more AWS Security how-to content, news, and feature announcements? Follow us on Twitter.

Author

Louay Shaat

Louay is a Security Solutions Architect with AWS. He spends his days working with customers, from startups to the largest of enterprises, helping them build cool new capabilities and accelerating their cloud journey. He has a strong focus on security and automation to help customers improve their security, risk, and compliance in the cloud.

How ERGO implemented an event-driven security remediation architecture on AWS

Post Syndicated from Adam Sikora original https://aws.amazon.com/blogs/architecture/how-ergo-implemented-an-event-driven-security-remediation-architecture-on-aws/

ERGO is one of the major insurance groups in Germany and Europe. Within the ERGO Group, ERGO Technology & Services S.A. (ET&S), a part of ET&SM holding, has competencies in digital transformation, know-how in creating and implementing complex IT systems with focus on the quality of solutions and a portfolio aligned with the entire value chain of the insurance market.

Business Challenge and Solution

ERGO has a multi-account AWS environment where each project team subscribes to a set of AWS accounts that conforms to workload requirements and security best practices. As ERGO began its cloud journey, CIS Foundations Benchmark Standard was used as the key indicator for measuring compliance. The report showed significant room for security posture improvements. ERGO was looking for a solution that could enable the management of security events at scale. At the same time, they needed to centralize the event response and remediation in near-real time. The goal was to improve the CIS compliance metric and overall security posture.

Architecture

ERGO uses AWS Organizations to centrally govern the multi-account AWS environment. Integration of AWS Security Hub with AWS Organizations enables ERGO to designate ERGO’s Security Account as the Security Hub administrator/primary account. Other organization accounts are automatically registered as Security Hub member accounts to send events to the Security Account.

An important aspect of the workflow is to maintain segregation of duties and separation of environments. ERGO uses two separate AWS accounts to implement automatic finding remediation:

  • Security Account – this is the primary account with Security Hub where security alerts (findings) from all the AWS accounts of the project are gathered.
  • Service Account – this is the account that can take action on target project (member) AWS accounts. ERGO uses AWS Lambda functions to run remediation actions through AWS Identity and Access Management (IAM) permissions, VPC resources actions, and more.

Within the Security Account, AWS Security Hub serves as the event aggregation solution that gathers multi-account findings from AWS services such as Amazon GuardDuty. ERGO was able to centralize the security findings. But they still needed to develop a solution that routed the filtered, actionable events to the Service Account. The solution had to automate the response to these events based on ERGO’s security policy. ERGO built this solution with the help of Amazon CloudWatch, AWS Step Functions, and AWS Lambda.

ERGO used the integration of AWS Security Hub with Amazon CloudWatch to send all the security events to CloudWatch. The filtering logic of events was managed at two levels. At the first level, ERGO used CloudWatch Events rules that match event patterns to refine the types of events ERGO wanted to focus on.

The second level of filtering logic was more nuanced and related to the remediation action ERGO wanted to take on a detected event. ERGO chose AWS Step Functions to build a workflow that enabled them to further filter the events, in addition to matching them to the suitable remediation action.

Choosing AWS Step Functions enabled ERGO to orchestrate multiple steps. They could also respond to errors in the overall workflow. For example, one of the issues that ERGO encountered was the sporadic failure of the Archival Lambda function. This was due to the Security Hub API Rate Throttling.

ERGO evaluated several workarounds to deal with this situation. They considered using the automatic retries capability of the AWS SDK to make the API call in the Archival function. However, the built-in mechanism was not sufficient in this case. Another option for dealing with rate limit was to throttle the Archival Lambda functions by applying a low reserved concurrency. Another possibility was to batch the events to be SUPPRESSED and process them as one batch at a time. The benefit was in making a single API call at a time, over several parameters.

After much consideration, ERGO decided to use the “retry on error” mechanism of the Step Function to circumvent this problem. This allowed ERGO to manage the error handling directly in the workflow logic. It wasn’t necessary to change the remediation and archival logic of the Lambda functions. This was a huge advantage. Writing and maintaining error handling logic in each one of the Lambda functions would have been time-intensive and complicated.

Additionally, the remediation actions had to be configured and run from the Service Account. That means the Step Function in the Security Account had to trigger a cross-account resource. ERGO had to find a way to integrate the Remediation Lambda in the Service Account with the state machine of the Security Account. ERGO achieved this integration using a Proxy Lambda in the Security Account.

The Proxy Lambda resides in the Security Account and is initiated by the Step Function. It takes as its argument, the function name and function version to start the Remediation function in the service account.

The Remediation functions in the Service Account have permission to take action on Project accounts. As the next step, the Remediation function is invoked on the impacted accounts. This is filtered by the Step Function, which passes the Account ID to Proxy Lambda, which in turn passes this argument to Remediation Lambda. The Remediation function runs the actions on the Project accounts and returns the output to the Proxy Lambda. This is then passed back to the Step Function.

The role that Lambda assumes using the AssumeRole mechanism, is an Organization Level role. It is deployed on every account and has proper permission to perform the remediation.

ERGO Architecture

Figure 1. Technical Solution implementation

  1. Security Hub service in ERGO Project accounts sends security findings to Administrative Account.
  2. Findings are aggregated and sent to CloudWatch Events for filtering.
  3. CloudWatch rules invoke Step Functions as the target. Step Functions process security events based on the event type and treatment required as per CIS Standards.
  4. For events that need to be suppressed without any dependency on the Project Accounts, the Step Function invokes a Lambda function to archive the findings.
  5. For events that need to be executed on the Project accounts, a Step Function invokes a Proxy Lambda with required parameters.
  6. Proxy Lambda in turn, invokes a cross-account Remediation function in Service Account. This has the permissions to run actions in Project accounts.
  7. Based on the event type, corresponding remediation action is run on the impacted Project Account.
  8. Remediation function passes the execution result back to Proxy Lambda to complete the Security event workflow.

Failed remediations are manually resolved in exceptional conditions.

Summary

By implementing this event-driven solution, ERGO was able to increase and maintain automated compliance with CIS AWS Foundation Benchmark Standard to about 95%. The remaining findings were evaluated on case basis, per specific Project requirements. This measurable improvement in ERGO compliance posture was achieved with an end-to-end serverless workflow. This offloaded any on-going platform maintenance efforts from the ERGO cloud security team. Working closely with our AWS account and service teams, ERGO will continue to evaluate and make improvements to our architecture.

Analyze and understand IAM role usage with Amazon Detective

Post Syndicated from Sheldon Sides original https://aws.amazon.com/blogs/security/analyze-and-understand-iam-role-usage-with-amazon-detective/

In this blog post, we’ll demonstrate how you can use Amazon Detective’s new role session analysis feature to investigate security findings that are tied to the usage of an AWS Identity and Access Management (IAM) role. You’ll learn about how you can use this new role session analysis feature to determine which Amazon Web Services (AWS) resource assumed the role that triggered a finding, and to understand the context of the activities that the resource performed when the finding was triggered. As a result of this walkthrough, you’ll gain an understanding of how to quickly ascertain anomalous identity and access behaviors. While this demonstration utilizes an Amazon GuardDuty finding as a starting point, the techniques demonstrated within this post highlight how Detective can be utilized to investigate any access behaviors that are tied to using IAM roles.

IAM roles provide a valuable mechanism that you can use to delegate access to users and services for managing and accessing your AWS resources, but using IAM roles can make it more complex to determine who performed an action. AWS CloudTrail logs do track all usage tied to IAM roles, but attributing activity to a specific resource that assumed a role requires storage of CloudTrail logs and analysis of this log telemetry. Understanding role usage through log analysis gets even more complex if cross-account role assumptions are involved, since that requires you to collate and analyze logs from multiple accounts. In some cases, permissions may allow a resource to sequentially assume a series of different roles (role chaining), further complicating the attribution of activity to a specific resource.

With its built-in, multi-account log analysis, Detective’s new role session analysis feature provides visibility into role usage, cross-account role assumptions and into any role chaining activities that may have been performed across the accounts. With this feature, you can quickly determine who or what assumed a role, regardless of whether this was a federated, IAM user or other resource. The feature shows you when roles were assumed and for how long, and helps you determine the activities that were performed during the assumption. Detective visualizes these results based upon its automatic analysis of CloudTrail logs and VPC flow log traffic that it continuously processes for enabled accounts, regardless of whether these log sources are enabled on each account.

To demonstrate this feature, we’ll investigate a “CloudTrail logging disabled” finding that is triggered by Amazon GuardDuty as a result of activity performed by a resource that has assumed an IAM role. Amazon GuardDuty is an AWS service that continuously monitors for malicious or unauthorized behavior to help protect your AWS resources, including your AWS accounts, access keys, and EC2 instances. GuardDuty identifies unusual or unauthorized activity, like crypto-currency mining, access to data stored in S3 from unusual locations, or infrastructure deployments in a region that has never been used.

Start the investigation in GuardDuty

GuardDuty issues a CloudTrailLoggingDisabled finding to alert you that CloudTrail logging has been disabled in one of your accounts. This is an important finding, because it could indicate that an attacker is attempting to hide their tracks. Since Detective receives a copy of CloudTrail traffic directly from the AWS infrastructure, Detective will continue to receive API calls that are made after CloudTrail logging is disabled.

In order to properly investigate this type of finding and determine if this is an issue that you need to be concerned about, you’ll need to answer a few specific questions:

  1. You’ll need to determine which user or resource disabled CloudTrail.
  2. You’ll need to see what other actions they performed after disabling logging.
  3. You’ll want to understand if their access pattern and behavior is consistent with their previous access patterns and behaviors.

Let’s take a look at a CloudTrailLoggingDisabled finding in GuardDuty as we start trying to answer these questions. When you access the GuardDuty console, a list of your recent findings is displayed. In Figure 1, a filter has been applied to display the CloudTrailLoggingDisabled finding.

Figure 1: A GuardDuty finding showing that CloudTrail was disabled

Figure 1: A GuardDuty finding showing that CloudTrail was disabled

After you select the GuardDuty finding, you can see the finding details, including some of the user information related to the finding. Figure 2 shows the Resources affected section of the finding.

Figure 2: Viewing user data related to the GuardDuty finding

Figure 2: Viewing user data related to the GuardDuty finding

The Affected resources field indicates that the demo-trail-2 trail was where logging was disabled. You can also see that User type is set to AssumedRole and that User name contains the role AWSReservedSSO_AdministratorAccess_598c5f73f8b2b4e5. This was the role that was assumed and using which CloudTrail logging was disabled. This information can help you understand the resources this role delegates access to and the permissions it provides. You still need to identify who specifically assumed the role to disable CloudTrail logging and the activities they performed afterwards. You can use Amazon Detective to answer these questions.

Investigate the finding in Detective

In order to investigate this GuardDuty finding in Detective, you select the finding and then select Investigate in the Actions menu, as shown in Figure 3.

Figure 3: Choose 'Investigate with Detective' and select the GuardDuty finding ID on the pop-up to investigate the finding

Figure 3: Choose ‘Investigate with Detective’ and select the GuardDuty finding ID on the pop-up to investigate the finding

View the finding profile page

Choosing the Investigate action for this CloudTrailLoggingDisabled finding in GuardDuty opens the finding’s profile page in the Detective console, as shown in Figure 4. Detective has the concept of a profile page, which displays summaries and analytics gleaned from CloudTrail management logs, VPC flow traffic and GuardDuty findings for AWS resources, IP addresses, and user agents. Each profile page can display up to 12 months of information for the selected resource and is intended to help an investigator review and understand the behavior of a resource, or quickly triage and delve into potential issues. Detective doesn’t require a customer to enable CloudTrail or VPC Flog logging in order to retrieve this data and provides these 12 months of visibility regardless of the customers log retention or archiving policies.

Figure 4: Viewing a GuardDuty finding in Detective

Figure 4: Viewing a GuardDuty finding in Detective

Scope time

To help focus your investigation, Detective defaults the time range and thus the displayed information in a finding profile to cover the period of time from when the finding was created through when it was last updated. In the case of this finding, the scope time covers a 1-hour period of time. You can change the scope time by choosing the calendar icon at the top right of the page, if you want to examine additional information before or after the finding was created. The defaulted scope time is sufficient for this investigation, so we can leave it as-is.

Role session overview

Detective uses tabs to group information on profile pages, and for this finding it shows the role session overview tab by default. The role session represents the activities and behavior of the resource that assumed the role tied to our finding. In this case, the role was assumed by someone with the user name sara, as shown in the Assumed by field. (We’ll assume that the user’s first name is Sara.) By analyzing the role session information in the CloudTrail logs, Detective was able to immediately identify that sara was the user who disabled CloudTrail logging and caused the finding to be triggered. You now have an answer to the question of who did this action.

Before we move to answer our other questions about what Sara did after disabling logging and whether her behavior changed, let’s discuss role sessions in more detail. Every role session has a role session name, sara in this case, and a unique role session identifier. The role session identifier is the role ID of the role assumed and the role session name, concatenated together. Best practices dictate that for a specific role that’s assumed by a specific resource, the role session name represents the user name of the IAM or federated user, or includes other useful information about the resource that assumed the role (for more information, see the Naming of individual IAM role sessions blog post). In this case, because the best practices are being followed, Detective is able to track Sara’s activities and behavior each time she assumes the AWSReservedSSO_AdministratorAccess_598c5f73f8b2b4e5 role.

Detective tracks statistics such as when a role session was first observed (October in Sara’s case, for this role), as well as the actions performed and behavioral insights such as the geolocations where Sara initiated her role assumptions. Knowing that Sara has assumed this role before is useful, because you can now assess whether her usage of the role changed during the 1-hour window of the scope time that you’re looking at now, compared to all of her previous assumptions of this role.

Review changes in Sara’s access patterns and operations

Detective tracks changes in geographical access and operations on the New behavior tab. Let’s choose the New behavior tab for the role session to see this information, as displayed in Figure 5.

Figure 5: Viewing new role session behavior

Figure 5: Viewing new role session behavior

During a security investigation, determining that access patterns have changed can be helpful in highlighting malicious activity. Since Detective tracks Sara’s assumptions of the AWSReservedSSO_AdministratorAccess_598c5f73f8b2b4e5 role, it can show the location where Sara assumed the role and whether the current assumption took place from the same location as her previous ones.

In Figure 5, you can see that Sara has a history of assuming the AWSReservedSSO_AdministratorAccess_598c5f73f8b2b4e5 role from Bellevue, WA and Ashburn, VA, since those geographies are shown in blue. If she had assumed this role from a new location, you would see the new location indicated on the map in orange. Since the API calls being made by this user are from a previously observed location, it’s very unlikely that the user’s credentials were compromised. Making this determination through a manual analysis of CloudTrail logs would have been much more time consuming.

Other information that you can gather from the New behavior role session tab includes newly observed API calls, API calls with increased volume, newly observed autonomous system organizations, and newly observed user agents. It’s useful to be able to validate that the operations Sara performed during the current scope time are relatively consistent with the operations she has performed in the past. This helps us be more certain that it was indeed Sara who was conducting this activity.

Investigate Sara’s API activity

Now that we’ve determined that Sara’s access pattern and activities are consistent with previous behavior, let’s use Detective to look further into Sara’s activity to determine if she accidentally disabled CloudTrail logging or if there was possible malicious intent behind her action.

To investigate the user’s actions

  1. On the finding profile page, in the dropdown list at the top of the screen, select Overview: Role Session to go back to the Overview tab for the role session.

    Figure 6: Navigating to the 'Overview: Role Session' page

    Figure 6: Navigating to the ‘Overview: Role Session’ page

  2. Once you’re on the Overview tab, navigate to the Overall API call volume panel.
    Figure 7: Navigating to the Overall API call volume panel

    Figure 7: Navigating to the ‘Overall API call volume’ panel

    This panel displays a chart of the successful and failed API calls that Sara has made while she assumes the AWSReservedSSO_AdministratorAccess_598c5f73f8b2b4e5 role. The chart shows a black rectangle around activities that were performed during the CloudTrail findings scope time. It also displays historical activities and shows a baseline across the chart so that you can understand how actively she uses the permissions granted to her by assuming this role.

  3. Choose the display details for scope time button to retrieve the details of the API calls that were invoked by Sara during the scope time, so that you can determine her actions after she disabled CloudTrail logging.
    Figure 8: Displaying details based on scope time

    Figure 8: Displaying details based on scope time

    You will now see the Overall API call volume panel expand to show you all the IP addresses, API calls, and access keys used by Sara during the scope time window of this finding.

  4. Choose the API method tab to see a list of all the API calls that were made.
    Figure 9: Viewing the API methods called

    Figure 9: Viewing the API methods called

    She invoked just two API calls during this scope time: the StopLogging and AssumeRole API calls. You were already aware that Sara disabled CloudTrail logging, but you weren’t aware that she assumed another role. When a user assumes a role while they have another one assumed, this is called role chaining. Although role chaining can be used because a user needs additional permissions, it can also be used to hide activities. Because we don’t know what other actions Sara performed after assuming this second role, let’s dig further. That may shed light on why she chose to disable CloudTrail logging.

Examine chained role assumptions

To find out more about Sara’s use of role chaining, let’s look at the other role that she assumed during this role session.

To view the user’s other role

  1. Navigate back to the top of the finding profile page. In the Role session details panel, choose AWSReservedSSO_AdministratorAccess_598c5f73f8b2b4e5.
    Figure 10: Locating the 'Assumed role' name

    Figure 10: Locating the ‘Assumed role’ name

    Detective displays the AWS Role profile page for this role, and you can now see the activity that has occurred across all resources that have assumed this role. In order to highlight information that’s relevant to the time frame of your investigation, Detective maintains your scope time as you move from the CloudTrailLoggingDisabled finding profile page to this role profile page.

  2. The goal for coming to this page is to determine which other role Sara assumed after assuming the AWSReservedSSO_AdministratorAccess_598c5f73f8b2b4e5 role, so choose the Resource interaction tab. On this tab, you will see the following three panels: Resources that assumed this role, Assumed roles, and Sessions involved.In Figure 11, you can see the Resources that assumed this role panel, which lists all the AWS resources that have assumed this role, their type (EC2 instance, federated or IAM user, IAM role), their account, and when they assumed the role for the first and last time. Sara is on this list, but Detective does not show an AWS account next to her because federated users aren’t tied to a specific account. The account field is populated for other resource types that are displayed on this panel and can be useful to understand cross-account role assumptions.

    Figure 11: Viewing resources that have assumed a role

    Figure 11: Viewing resources that have assumed a role

  3. On the same Resource Interaction tab, as you scroll down you will see the Assumed Roles panel, Figure 12, which helps you understand role chaining by listing the other roles that have been assumed by the AWSReservedSSO_AdministratorAccess_598c5f73f8b2b4e5 role. In this case, the role has assumed several other roles, including DemoRole1 during the same window of time when the CloudTrailLoggingDisabled finding occurred.

    Figure 12: Viewing the roles that have been assumed

    Figure 12: Viewing the roles that have been assumed

  4. In Figure 13, you can see the Sessions involved panel, which shows the role sessions for all the resources that have assumed this role, and role sessions where this role has assumed other roles within the current scope time. You see two role sessions with the session name sara, one where Sara assumed the AWSReservedSSO_AdministratorAccess_598c5f73f8b2b4e5 role and another where AWSReservedSSO_AdministratorAccess_598c5f73f8b2b4e5 assumed DemoRole1.

    Figure 13: Viewing the role sessions this role was involved with

    Figure 13: Viewing the role sessions this role was involved with

Now that you know that Sara also used the role DemoRole1 during her role session, let’s take a closer look at what actions she performed.

View API operations that were called within the chained role

In this step, we’ll view Sara’s activity within the DemoRole1 role, focusing on the API calls that were made.

To view the user’s activity in another role

  1. In the Sessions involved panel, in the Session name column, find the row where DemoRole1 is the Assumed Role value. Choose the session name in this row, sara, to go to the role session profile page.
  2. You will be most interested in the API methods that were called during this role session, and you can view those in the Overall API call volume panel. As shown in Figure 14, you can see that Sara has accessed DemoRole1 before, because there are calls graphed prior to the calls in our scope time.
  3. Choose the display details for scope time button on the Overall API call volume panel, and then choose the API method tab.

    Figure 14: Viewing the role session API method calls

    Figure 14: Viewing the role session API method calls

In Figure 14, you can see that calls were made to the DescribeInstances and RunInstances API methods. So you now know that Sara determined the type of Amazon Elastic Compute Cloud (Amazon EC2) instances that were running in your account and then successfully created an EC2 instance by calling the RunInstances API method. You can also see that successful and failed calls were made to the AttachRolePolicy API method as a part of the session. This could possibly be an attempt to elevate permissions in the account and would justify further investigation into the user’s actions.

As an investigator, you’ve determined that Sara was the user who disabled CloudTrail logging and that her access pattern was consistent with her past accesses. You’ve also determined the other actions she performed after she disabled logging and assumed a second role, but you can continue to investigate further by answering additional questions, such as:

  • What did Sara do with DemoRole1 when she assumed this role in the past? Are her current activities consistent with those past activities?
  • What activities are being performed across this account? Are those consistent with Sara’s activities?

By using Detective’s features that have been demonstrated in this post, you will be able to answer the questions like the ones listed above.

Summary

After you read this post, we hope you have a better understanding of the ways in which Amazon Detective collects, organizes, and presents log data to simplify your security investigations. All Detective service subscriptions include the new role session analysis capabilities. With these capabilities, you can quickly attribute activity performed under a role to a specific resource in your environment, understand cross-account role assumptions, determine role chaining behavior, and quickly see called APIs.

All customers receive a 30-day free trial when they enable Amazon Detective. See the AWS Regional Services page for all the Regions where Detective is available. To learn more, visit the Amazon Detective product page or see the additional resources at the end of this post to further expand your knowledge of Detective capabilities and features.

Additional resources

Amazon Detective features

Amazon Detective overview and demo

Amazon Detective FAQs

Amazon Detective Regions, endpoints, and quotas

Naming of individual IAM role sessions

If you have feedback about this post, submit comments in the Comments section below.

Want more AWS Security how-to content, news, and feature announcements? Follow us on Twitter.

Author

Sheldon Sides

Sheldon is a Senior Solutions Architect, focused on helping customers implement native AWS security services. He enjoys using his experience as a consultant and running a cloud security startup to help customers build secure AWS Cloud solutions. His interests include working out, software development, and learning about the latest technologies.

Author

Gagan Prakash

Gagan is a Product Manager on the Amazon Detective team and is passionate about ensuring that Detective’s new features and capabilities address the needs of our customers. He leverages his past experiences in cybersecurity startups and software companies to help drive product improvements. His interests include spending time with family, reading, and learning more about the world at large.

Use tags to manage and secure access to additional types of IAM resources

Post Syndicated from Michael Switzer original https://aws.amazon.com/blogs/security/use-tags-to-manage-and-secure-access-to-additional-types-of-iam-resources/

AWS Identity and Access Management (IAM) now enables Amazon Web Services (AWS) administrators to use tags to manage and secure access to more types of IAM resources, such as customer managed IAM policies, Security Assertion Markup Language (SAML) providers, and virtual multi-factor authentication (MFA) devices. A tag is an attribute that consists of a key and an optional value that you can attach to an AWS resource. With this launch, administrators can attach tags to additional IAM resources to identify resource owners and grant fine-grained access to these resources at scale using attribute-based access control. For example, a security administrator in an AWS organization can now attach tags to all customer managed policies and then create a single policy for local administrators within the member accounts, which grants them permissions to manage only those customer managed policies that have a matching tag.

In this post, I first discuss the additional IAM resources that now support tags. Then I walk you through two use cases that demonstrate how you can use tags to identify an IAM resource owner, and how you can further restrict access to AWS resources based on prefixes and tag values.

Which IAM resources now support tags?

In addition to IAM roles and IAM users that already support tags, you can now tag more types of IAM resources. The following table shows other IAM resources that now support tags. The table also highlights which of the IAM resources support tags on the IAM console level and at the API/CLI level.

IAM resources Support tagging at IAM console Support tagging at API and CLI level
Customer managed IAM policies Yes Yes
Instance profiles No Yes
OpenID Connect Provider Yes Yes
SAML providers Yes Yes
Server certificates No Yes
Virtual MFAs No Yes

Fine-grained resource ownership and access using tags

In the next sections, I will walk through two examples of how to use tagging to classify your IAM resources and define least-privileged access for your developers. In the first example, I explain how to use tags to allow your developers to declare ownership of a customer managed policy they create. In the second example, I explain how to use tags to enforce least privilege allowing developers to only pass IAM roles with Amazon Elastic Compute Cloud (Amazon EC2) instance profiles they create.

Example 1: Use tags to identify the owner of a customer managed policy

As an AWS administrator, you can require your developers to always tag the customer managed policies they create. You can then use the tag to identify which of your developers owns the customer managed policies.

For example, as an AWS administrator you can require that your developers in your organization to tag any customer managed policy they create. To achieve this, you can require the policy creator to enter their username as the value for the key titled Owner on resource tag creation. By enforcing tagging on customer managed policies, administrators can now easily identify the owner of these IAM policy types.

To enforce customer managed policy tagging, you first grant your developer the ability to create IAM customer managed policies, and include a conditional statement within the IAM policy that requires your developer to apply their AWS user name in the tag value field titled Owner when they create the policy.

Step 1: Create an IAM policy and attach it to your developer role

Following is a sample IAM policy (TagCustomerManagedPolicies.json) that you can assign to your developer. You can use this policy to follow along with this example in your own AWS account. For your own policies and commands, replace the instances of <AccountNumber> in this example with your own AWS account ID.

{
    "Version": "2012-10-17",
    "Statement": [
        {
            "Sid": "TagCustomerManagedPolicies",
            "Effect": "Allow",
            "Action": [
                "iam:CreatePolicy",
                "iam:TagPolicy"
            ],
            "Resource": "arn:aws:iam::: <AccountNumber>:policy/Developer-*",
            "Condition": {
                "StringEquals": {
                    "aws:RequestTag/Owner": "${aws:username}"
                }
            }
        }
    ]
} 

This policy requires the developer to enter their AWS user name as the tag value to declare AWS resource ownership during customer managed policy creation. The TagCustomerManagedPolicies.json also requires the developer to name any customer managed policy they create with the Developer- prefix.

Create the TagCustomerManagedPolicies.json file, then create a managed policy using the the following CLI command:

$aws iam create-policy --policy-name TagCustomerManagedPolicies --policy-document file://TagCustomerManagedPolicies.json

When you create the TagCustomerManagedPolicies.json policy, attach the policy to your developer with the following command. Assume your developer has an IAM user profile and their AWS user name is JohnA.

$aws iam attach-user-policy --policy-arn arn:aws:iam::<AccountNumber>:policy/TagCustomerManagedPolicies --user-name JohnA

Step 2: Ensure the developer uses appropriate tags when creating IAM policies

If your developer attempts to create a customer managed policy without applying their AWS user name as the value for the Owner tag and fails to name the customer managed policy with the required prefix Developer-, this IAM policy will not allow the developer to create this AWS resource. The error received by the developer is shown in the following example.

$ aws iam create-policy --policy-name TestPolicy --policy-document file://Developer-TestPolicy.json 

An error occurred (AccessDenied) when calling the CreatePolicy operation: User: arn:aws:iam::<AccountNumber>:user/JohnA is not authorized to perform: iam:CreatePolicy on resource: policy TestPolicy

However, if your developer applies their AWS user name as the value for the Owner tag and names the policy with the Developer- prefix, the IAM policy will enable your developer to successfully create the customer managed policy, as shown in the following example.

$aws iam create-policy --policy-name Developer-TestPolicy --policy-document file://Developer-TestPolicy.json --tags '{"Key": "Owner", "Value": "JohnA"}'

{
  "Policy": {
    "PolicyName": "Developer-Test_policy",
    "PolicyId": "<PolicyId>",
    "Arn": "arn:aws:iam::<AccountNumber>:policy/Developer-Test_policy",
    "Path": "/",
    "DefaultVersionId": "v1",
    "Tags": [
      {
        "Key": "Owner",
        "Value": "JohnA"
      }
    ],
    "AttachmentCount": 0,
    "PermissionsBoundaryUsageCount": 0,
    "IsAttachable": true,
    "CreateDate": "2020-07-27T21:18:10Z",
    "UpdateDate": "2020-07-27T21:18:10Z"
  }
}

Example 2: Use tags to control which IAM roles your developers attach to an instance profile

Amazon EC2 enables customers to run compute resources in the cloud. AWS developers use IAM instance profiles to associate IAM roles to EC2 instances hosting their applications. This instance profile is used to pass an IAM role to an EC2 instance to grant it privileges to invoke actions on behalf of an application hosted within it.

In this example, I show how you can use tags to control which IAM roles your developers can add to instance profiles. You can use this as a starting point for your own workloads, or follow along with this example as a learning exercise. For your own policies and commands, replace the instances of <AccountNumber> in this example with your own AWS account ID.

Let’s assume your developer is running an application on their EC2 instance that needs read and write permissions to objects within various developer owned Amazon Simple Storage Service (S3) buckets. To allow your application to perform these actions, you need to associate an IAM role with the required S3 permissions to an instance profile of your EC2 instance that is hosting your application.

To achieve this, you will do the following:

  1. Create a permissions boundary policy and require your developer to attach the permissions boundary policy to any IAM role they create. The permissions boundary policy defines the maximum permissions your developer can assign to any IAM role they create. For examples of how to use permissions boundary policies, see Add Tags to Manage Your AWS IAM Users and Roles.
  2. Grant your developer permissions to create and tag IAM roles and instance profiles. Your developer will use the instance profile to pass the IAM role to their EC2 instance hosting their application.
  3. Grant your developer permissions to create and apply IAM permissions to the IAM role they create.
  4. Grant your developer permissions to assign IAM roles to instance profiles of their EC2 instances based on the Owner tag they applied to the IAM role and instance profile they created.

Step 1: Create a permissions boundary policy

First, create the permissions boundary policy (S3ActionBoundary.json) that defines the maximum S3 permissions for the IAM role your developer creates. Following is an example of a permissions boundary policy.

{
    "Version": "2012-10-17",
    "Statement": [
        {
            "Sid": "S3ActionBoundary",
            "Effect": "Allow",
            "Action": [
                "S3:CreateBucket",
                "S3:ListAllMyBuckets",
                "S3:GetBucketLocation",
                "S3:PutObject",
                "S3:PutObjectAcl"
            ],
            "Resource": "arn:aws:s3:::Developer-*",
            "Condition": {
                "StringEquals": {
                    "aws:RequestedRegion": "us-east-1"
                }
            }
        }
    ]
}

When used as a permissions boundary, this policy enables your developers to grant permissions to some S3 actions, as long as two requirements are met. First, the S3 bucket must begin with the Developer prefix. Second, the region used to make the request must be US East (N. Virginia).

Similar to the previous example, you can create the S3ActionBoundary.json, then create a managed IAM policy using the following CLI command:

$aws iam create-policy --policy-name S3ActionBoundary --policy-document file://S3ActionBoundary.json

Step 2: Grant your developer permissions to create and tag IAM roles and instance profiles

Next, create the IAM permission (DeveloperCreateActions.json) that allows your developer to create IAM roles and instance profiles. Any roles they create will not be allowed to exceed the permissions of the boundary policy we created in step 1, and any resources they create must be tagged according to the guideline we established earlier. Following is an example DeveloperCreateActions.json policy.

{
    "Version": "2012-10-17",
    "Statement": [
        {
            "Sid": "CreateRole",
            "Effect": "Allow",
            "Action": "iam:CreateRole",
            "Resource": "arn:aws:iam::<AccountNumber>:role/Developer-*",
            "Condition": {
                "StringEquals": {
                    "aws:RequestTag/Owner": "${aws:username}",
                    "iam:PermissionsBoundary": "arn:aws:iam::<AccountNumber>:policy/S3ActionBoundary"
                }
            }
        },
        {
            "Sid": "CreatePolicyandInstanceProfile",
            "Effect": "Allow",
            "Action": [
                "iam:CreateInstanceProfile",
                "iam:CreatePolicy"
            ],
            "Resource": [
                "arn:aws:iam::<AccountNumber>:instance-profile/Developer-*",
                "arn:aws:iam::<AccountNumber>:policy/Developer-*"
            ],
            "Condition": {
                "StringEquals": {
                    "aws:RequestTag/Owner": "${aws:username}"
                }
            }
        },
        {
            "Sid": "TagActionsAndAttachActions",
            "Effect": "Allow",
            "Action": [
                "iam:TagInstanceProfile",
                "iam:TagPolicy",
                "iam:AttachRolePolicy",
                "iam:TagRole"
            ],
            "Resource": [
                "arn:aws:iam::<AccountNumber>:instance-profile/Developer-*",
                "arn:aws:iam::<AccountNumber>:policy/Developer-*",
                "arn:aws:iam::<AccountNumber>:role/Developer-*"
            ],
            "Condition": {
                "StringEquals": {
                    "aws:ResourceTag/Owner": "${aws:username}"
                }
            }
        }
    ]
}

I will walk through each statement in the policy to explain its function.

The first statement CreateRole allows creating IAM roles. The Condition element of the policy requires your developer to apply their AWS user name as the Owner tag to any IAM role or instance profile they create. It also requires your developer to attach the S3ActionBoundary as a permissions boundary policy to any IAM role they create.

The next statement CreatePolicyAndInstanceProfile allows creating IAM policies and instance profiles. The Condition element requires your developer to name any IAM role or instance profile they create with the Developer- prefix, and to attach the Owner tag to the resources they create.

The last statement TagActionsAndAttachActions allows tagging managed policies, instance profiles and roles with the Owner tag. It also allows attaching role policies, so they can configure the permissions for the roles they create. The Resource and Condition elements of the policy require the developer to use the Developer- prefix and their AWS user name as the Owner tag, respectively.

Once you create the DeveloperCreateActions.json file locally, you can create it as an IAM policy and attach it to your developer role using the following CLI commands:

$aws iam create-policy --policy-name DeveloperCreateActions --policy-document file://DeveloperCreateActions.json 

$aws iam attach-user-policy --policy-arn arn:aws:iam::<AccountNumber>:policy/DeveloperCreateActions --user-name JohnA

With the preceding policy, your developer can now create an instance profile, an IAM role, and the permissions they will attach to the IAM role. For example, if your developer creates an instance profile and doesn’t apply their AWS user name as the Owner tag, the IAM Policy will prevent the resource creation process from occurring render an error as shown in the following example.

$aws iam create-instance-profile --instance-profile-name Developer-EC2-InstanceProfile

An error occurred (AccessDenied) when calling the CreateInstanceProfile operation: User: arn:aws:iam::<AccountNumber>:user/JohnA is not authorized to perform: iam:CreateInstanceProfile on resource: arn:aws:iam::<AccountNumber>:instance-profile/Developer-EC2

When your developer names the instance profile with the prefix Developer- and includes their AWS user name as value for the Owner tag in the create request, the IAM policy allows the create action to occur as shown in the following example.

$aws iam create-instance-profile --instance-profile-name Developer-EC2-InstanceProfile --tags '{"Key": "Owner", "Value": "JohnA"}'

{
    "InstanceProfile": {
        "Path": "/",
        "InstanceProfileName":"Developer-EC2-InstanceProfile",
        "InstanceProfileId":" AIPAR3HKUNWB24NBA3HRC",
        "Arn": "arn:aws:iam::<AccountNumber>:instance-profile/Developer-EC2-InstanceProfile",
        "CreateDate": "2020-07-30T21:24:30Z",
        "Roles": [],
        "Tags": [
            {
                "Key": "Owner",
                "Value": "JohnA"
            }
        ]

    }
}

Let’s assume your developer creates an IAM role called Developer-EC2. The Developer-EC2 role has your developer’s AWS user name (JohnA) as the Owner tag. The developer has the S3ActionBoundaryPolicy.json as their permissions boundary policy and the Developer-ApplicationS3Access.json policy as the permissions policy that your developer will pass to their EC2 instance to allow it to call S3 on behalf of their application. This is shown in the following example.

<Details of the role trust policy – RoleTrustPolicy.json>
{
    "Version": "2012-10-17",
    "Statement": [
        {
            "Effect": "Allow",
            "Principal": {
                "Service": "ec2.amazonaws.com"
            },
            "Action": "sts:AssumeRole"
        }
    ]
}
<Details of IAM role permissions – Developer-ApplicationS3Access.json>

{
    "Version": "2012-10-17",
    "Statement": [
        {
            "Sid": "S3Access",
            "Effect": "Allow",
            "Action": [
                "S3:GetBucketLocation",
                "S3:PutObject",
                "S3:PutObjectAcl"
            ],
            "Resource": "arn:aws:s3:::Developer-*"
        }
    ]
}

<Your developer creates IAM role with a permissions boundary policy and a role trust policy>

$aws iam create-role --role-name Developer-EC2
--assume-role-policy-document file://RoleTrustPolicy.json
--permissions-boundary arn:aws:iam::<AccountNumber>:policy/S3ActionBoundary --tags '{"Key": "Owner", "Value": "JohnA"}'


<Your developer creates IAM policy for the newly created IAM role>
$aws iam create-policy –-policy-name Developer-ApplicationS3Access –-policy-document file://Developer-ApplicationS3Access.json --tags '{"Key": "Owner", "Value": "JohnA"}'

<Your developer attaches newly created IAM policy to the newly created IAM role >
$aws iam attach-role-policy --policy-arn arn:aws:iam::<AccountNumber>:policy/Developer-ApplicationS3Access --role-name Developer-EC2

Step 3: Grant your developer permissions to create and apply IAM permissions to the IAM role they create

By using the AddRoleAssociateInstanceProfile.json IAM Policy provided below, you are allowing your developers the permissions to pass their new IAM role to an instance profile they create. They need to follow these requirements because the DeveloperCreateActions.json permission, which you already assigned to your developer in an earlier step, allows your developer to only administer resources that are properly prefixed with Developer- and have their user name assigned to the resource tag. The following example shows details of the AddRoleAssociateInstanceProfile.json policy.

< AddRoleAssociateInstanceProfile.json>
{
    "Version": "2012-10-17",
    "Statement": [
        {
            "Sid": "AddRoleToInstanceProfile",
            "Effect": "Allow",
            "Action": [
                "iam:AddRoleToInstanceProfile",
                "iam:PassRole"
            ],
            "Resource": [
                "arn:aws:iam::<AccountNumber>:instance-profile/Developer-*",
                "arn:aws:iam::<AccountNumber>:role/Developer-*"
            ],
            "Condition": {
                "StringEquals": {
                    "aws:ResourceTag/Owner": "${aws:username}"
                }
            }
        },
        {
            "Sid": "AssociateInstanceProfile",
            "Effect": "Allow",
            "Action": "ec2:AssociateIamInstanceProfile",
            "Resource": "arn:aws:ec2:us-east-1:<AccountNumber>:instance/Developer-*"
        }
    ]
}

Once you create the DeveloperCreateActions.json file locally, you can create it as an IAM policy and attach it to your developer role using the following CLI commands:

$aws iam create-policy –-policy-name AddRoleAssociateInstanceProfile –-policy-document file://AddRoleAssociateInstanceProfile.json

$aws iam attach-user-policy –-policy-arn arn:aws:iam::<AccountNumber>:policy/ AddRoleAssociateInstanceProfile –-user-name Developer

If your developer’s AWS user name is the Owner tag for the Developer-EC2-InstanceProfile instance profile and the Developer-EC2 IAM role, then AWS allows your developer to add the Developer-EC2 role to the Developer-EC2-InstanceProfile instance profile. However, if your developer attempts to add the Developer-EC2 role to an instance profile they don’t own, AWS won’t allow the action, as shown in the following example.

aws iam add-role-to-instance-profile --instance-profile-name EC2-access-Profile --role-name Developer-EC2

An error occurred (AccessDenied) when calling the AddRoleToInstanceProfile operation: User: arn:aws:iam::<AccountNumber>:user/Developer is not authorized to perform: iam:AddRoleToInstanceProfile on resource: instance profile EC2-access-profile

When your developer adds the IAM role to the instance profile they own, the IAM policy allows the action, as shown in the following example.

aws iam add-role-to-instance-profile --instance-profile-name Developer-EC2-InstanceProfile --role-name Developer-EC2

You can verify this by checking which instance profiles contain the Developer-EC2 role, as follows.

$aws iam list-instance-profiles-for-role --role-name Developer-EC2


<Result>
{
    "InstanceProfiles": [
        {
            "InstanceProfileId": "AIDGPMS9RO4H3FEXAMPLE",
            "Roles": [
                {
                    "AssumeRolePolicyDocument": "<URL-encoded-JSON>",
                    "RoleId": "AIDACKCEVSQ6C2EXAMPLE",
                    "CreateDate": "2020-06-07T20: 42: 15Z",
                    "RoleName": "Developer-EC2",
                    "Path": "/",
                    "Arn":"arn:aws:iam::<AccountNumber>:role/Developer-EC2"
                }
            ],
            "CreateDate":"2020-06-07T21:05:24Z",
            "InstanceProfileName":"Developer-EC2-InstanceProfile",
            "Path": "/",
            "Arn":"arn:aws:iam::<AccountNumber>:instance-profile/Developer-EC2-InstanceProfile"
        }
    ]
}

Step 4: Grant your developer permissions to add IAM roles to instance profiles based on the Owner tag

Your developer can then associate the instance profile (Developer-EC2-InstanceProfile) to their EC2 instance running their application, by using the following command.

aws ec2 associate-iam-instance-profile --instance-id i-1234567890EXAMPLE --iam-instance-profile Name="Developer-EC2-InstanceProfile"

{
    "IamInstanceProfileAssociation": {
        "InstanceId": "i-1234567890EXAMPLE",
        "State": "associating",
        "AssociationId": "iip-assoc-0dbd8529a48294120",
        "IamInstanceProfile": {
            "Id": "AIDGPMS9RO4H3FEXAMPLE",
            "Arn": "arn:aws:iam::<AccountNumber>:instance-profile/Developer-EC2-InstanceProfile"
        }
    }
}

Summary

You can use tags to manage and secure access to IAM resources such as IAM roles, IAM users, SAML providers, server certificates, and virtual MFAs. In this post, I highlighted two examples of how AWS administrators can use tags to grant access at scale to IAM resources such as customer managed policies and instance profiles. For more information about the IAM resources that support tagging, see the AWS Identity and Access Management (IAM) User Guide.

If you have feedback about this post, submit comments in the Comments section below. If you have questions about this post, start a new thread on the AWS IAM forum or contact AWS Support.

Want more AWS Security how-to content, news, and feature announcements? Follow us on Twitter.

Author

Michael Switzer

Mike is the product manager for the Identity and Access Management service at AWS. He enjoys working directly with customers to identify solutions to their challenges, and using data-driven decision making to drive his work. Outside of work, Mike is an avid cyclist and outdoorsperson. He holds a master’s degree in computational mathematics from the University of Washington.


Contributor

Special thanks to Derrick Oigiagbe who made significant contributions to this post.

Use new account assignment APIs for AWS SSO to automate multi-account access

Post Syndicated from Akhil Aendapally original https://aws.amazon.com/blogs/security/use-new-account-assignment-apis-for-aws-sso-to-automate-multi-account-access/

In this blog post, we’ll show how you can programmatically assign and audit access to multiple AWS accounts for your AWS Single Sign-On (SSO) users and groups, using the AWS Command Line Interface (AWS CLI) and AWS CloudFormation.

With AWS SSO, you can centrally manage access and user permissions to all of your accounts in AWS Organizations. You can assign user permissions based on common job functions, customize them to meet your specific security requirements, and assign the permissions to users or groups in the specific accounts where they need access. You can create, read, update, and delete permission sets in one place to have consistent role policies across your entire organization. You can then provide access by assigning permission sets to multiple users and groups in multiple accounts all in a single operation.

AWS SSO recently added new account assignment APIs and AWS CloudFormation support to automate access assignment across AWS Organizations accounts. This release addressed feedback from our customers with multi-account environments who wanted to adopt AWS SSO, but faced challenges related to managing AWS account permissions. To automate the previously manual process and save your administration time, you can now use the new AWS SSO account assignment APIs, or AWS CloudFormation templates, to programmatically manage AWS account permission sets in multi-account environments.

With AWS SSO account assignment APIs, you can now build your automation that will assign access for your users and groups to AWS accounts. You can also gain insights into who has access to which permission sets in which accounts across your entire AWS Organizations structure. With the account assignment APIs, your automation system can programmatically retrieve permission sets for audit and governance purposes, as shown in Figure 1.

Figure 1: Automating multi-account access with the AWS SSO API and AWS CloudFormation

Figure 1: Automating multi-account access with the AWS SSO API and AWS CloudFormation

Overview

In this walkthrough, we’ll illustrate how to create permission sets, assign permission sets to users and groups in AWS SSO, and grant access for users and groups to multiple AWS accounts by using the AWS Command Line Interface (AWS CLI) and AWS CloudFormation.

To grant user permissions to AWS resources with AWS SSO, you use permission sets. A permission set is a collection of AWS Identity and Access Management (IAM) policies. Permission sets can contain up to 10 AWS managed policies and a single custom policy stored in AWS SSO.

A policy is an object that defines a user’s permissions. Policies contain statements that represent individual access controls (allow or deny) for various tasks. This determines what tasks users can or cannot perform within the AWS account. AWS evaluates these policies when an IAM principal (a user or role) makes a request.

When you provision a permission set in the AWS account, AWS SSO creates a corresponding IAM role on that account, with a trust policy that allows users to assume the role through AWS SSO. With AWS SSO, you can assign more than one permission set to a user in the specific AWS account. Users who have multiple permission sets must choose one when they sign in through the user portal or the AWS CLI. Users will see these as IAM roles.

To learn more about IAM policies, see Policies and permissions in IAM. To learn more about permission sets, see Permission Sets.

Assume you have a company, Example.com, which has three AWS accounts: an organization management account (ExampleOrgMaster), a development account (ExampleOrgDev), and a test account (ExampleOrgTest). Example.com uses AWS Organizations to manage these accounts and has already enabled AWS SSO.

Example.com has the IT security lead, Frank Infosec, who needs PowerUserAccess to the test account (ExampleOrgTest) and SecurityAudit access to the development account (ExampleOrgDev). Alice Developer, the developer, needs full access to Amazon Elastic Compute Cloud (Amazon EC2) and Amazon Simple Storage Service (Amazon S3) through the development account (ExampleOrgDev). We’ll show you how to assign and audit the access for Alice and Frank centrally with AWS SSO, using the AWS CLI.

The flow includes the following steps:

  1. Create three permission sets:
    • PowerUserAccess, with the PowerUserAccess policy attached.
    • AuditAccess, with the SecurityAudit policy attached.
    • EC2-S3-FullAccess, with the AmazonEC2FullAccess and AmazonS3FullAccess policies attached.
  2. Assign permission sets to the AWS account and AWS SSO users:
    • Assign the PowerUserAccess and AuditAccess permission sets to Frank Infosec, to provide the required access to the ExampleOrgDev and ExampleOrgTest accounts.
    • Assign the EC2-S3-FullAccess permission set to Alice Developer, to provide the required permissions to the ExampleOrgDev account.
  3. Retrieve the assigned permissions by using Account Entitlement APIs for audit and governance purposes.

    Note: AWS SSO Permission sets can contain either AWS managed policies or custom policies that are stored in AWS SSO. In this blog we attach AWS managed polices to the AWS SSO Permission sets for simplicity. To help secure your AWS resources, follow the standard security advice of granting least privilege access using AWS SSO custom policy while creating AWS SSO Permission set.

Figure 2: AWS Organizations accounts access for Alice and Frank

Figure 2: AWS Organizations accounts access for Alice and Frank

To help simplify administration of access permissions, we recommend that you assign access directly to groups rather than to individual users. With groups, you can grant or deny permissions to groups of users, rather than having to apply those permissions to each individual. For simplicity, in this blog you’ll assign permissions directly to the users.

Prerequisites

Before you start this walkthrough, complete these steps:

Use the AWS SSO API from the AWS CLI

In order to call the AWS SSO account assignment API by using the AWS CLI, you need to install and configure AWS CLI v2. For more information about AWS CLI installation and configuration, see Installing the AWS CLI and Configuring the AWS CLI.

Step 1: Create permission sets

In this step, you learn how to create EC2-S3FullAccess, AuditAccess, and PowerUserAccess permission sets in AWS SSO from the AWS CLI.

Before you create the permission sets, run the following command to get the Amazon Resource Name (ARN) of the AWS SSO instance and the Identity Store ID, which you will need later in the process when you create and assign permission sets to AWS accounts and users or groups.

aws sso-admin list-instances

Figure 3 shows the results of running the command.

Figure 3: AWS SSO list instances

Figure 3: AWS SSO list instances

Next, create the permission set for the security team (Frank) and dev team (Alice), as follows.

Permission set for Alice Developer (EC2-S3-FullAccess)

Run the following command to create the EC2-S3-FullAccess permission set for Alice, as shown in Figure 4.

aws sso-admin create-permission-set --instance-arn '<Instance ARN>' --name 'EC2-S3-FullAccess' --description 'EC2 and S3 access for developers'
Figure 4: Creating the permission set EC2-S3-FullAccess

Figure 4: Creating the permission set EC2-S3-FullAccess

Permission set for Frank Infosec (AuditAccess)

Run the following command to create the AuditAccess permission set for Frank, as shown in Figure 5.

aws sso-admin create-permission-set --instance-arn '<Instance ARN>' --name 'AuditAccess' --description 'Audit Access for security team on ExampleOrgDev account'
Figure 5: Creating the permission set AuditAccess

Figure 5: Creating the permission set AuditAccess

Permission set for Frank Infosec (PowerUserAccess)

Run the following command to create the PowerUserAccess permission set for Frank, as shown in Figure 6.

aws sso-admin create-permission-set --instance-arn '<Instance ARN>' --name 'PowerUserAccess' --description 'Power User Access for security team on ExampleOrgDev account'
Figure 6: Creating the permission set PowerUserAccess

Figure 6: Creating the permission set PowerUserAccess

Copy the permission set ARN from these responses, which you will need when you attach the managed policies.

Step 2: Assign policies to permission sets

In this step, you learn how to assign managed policies to the permission sets that you created in step 1.

Attach policies to the EC2-S3-FullAccess permission set

Run the following command to attach the amazonec2fullacess AWS managed policy to the EC2-S3-FullAccess permission set, as shown in Figure 7.

aws sso-admin attach-managed-policy-to-permission-set --instance-arn '<Instance ARN>' --permission-set-arn '<Permission Set ARN>' --managed-policy-arn 'arn:aws:iam::aws:policy/amazonec2fullaccess'
Figure 7: Attaching the AWS managed policy amazonec2fullaccess to the EC2-S3-FullAccess permission set

Figure 7: Attaching the AWS managed policy amazonec2fullaccess to the EC2-S3-FullAccess permission set

Run the following command to attach the amazons3fullaccess AWS managed policy to the EC2-S3-FullAccess permission set, as shown in Figure 8.

aws sso-admin attach-managed-policy-to-permission-set --instance-arn '<Instance ARN>' --permission-set-arn '<Permission Set ARN>' --managed-policy-arn 'arn:aws:iam::aws:policy/amazons3fullaccess'
Figure 8: Attaching the AWS managed policy amazons3fullaccess to the EC2-S3-FullAccess permission set

Figure 8: Attaching the AWS managed policy amazons3fullaccess to the EC2-S3-FullAccess permission set

Attach a policy to the AuditAccess permission set

Run the following command to attach the SecurityAudit managed policy to the AuditAccess permission set that you created earlier, as shown in Figure 9.

aws sso-admin attach-managed-policy-to-permission-set --instance-arn '<Instance ARN>' --permission-set-arn '<Permission Set ARN>' --managed-policy-arn 'arn:aws:iam::aws:policy/SecurityAudit'
Figure 9: Attaching the AWS managed policy SecurityAudit to the AuditAccess permission set

Figure 9: Attaching the AWS managed policy SecurityAudit to the AuditAccess permission set

Attach a policy to the PowerUserAccess permission set

The following command is similar to the previous command; it attaches the PowerUserAccess managed policy to the PowerUserAccess permission set, as shown in Figure 10.

aws sso-admin attach-managed-policy-to-permission-set --instance-arn '<Instance ARN>' --permission-set-arn '<Permission Set ARN>' --managed-policy-arn 'arn:aws:iam::aws:policy/PowerUserAccess'
Figure 10: Attaching AWS managed policy PowerUserAccess to the PowerUserAccess permission set

Figure 10: Attaching AWS managed policy PowerUserAccess to the PowerUserAccess permission set

In the next step, you assign users (Frank Infosec and Alice Developer) to their respective permission sets and assign permission sets to accounts.

Step 3: Assign permission sets to users and groups and grant access to AWS accounts

In this step, you assign the AWS SSO permission sets you created to users and groups and AWS accounts, to grant the required access for these users and groups on respective AWS accounts.

To assign access to an AWS account for a user or group, using a permission set you already created, you need the following:

  • The principal ID (the ID for the user or group)
  • The AWS account ID to which you need to assign this permission set

To obtain a user’s or group’s principal ID (UserID or GroupID), you need to use the AWS SSO Identity Store API. The AWS SSO Identity Store service enables you to retrieve all of your identities (users and groups) from AWS SSO. See AWS SSO Identity Store API for more details.

Use the first two commands shown here to get the principal ID for the two users, Alice (Alice’s user name is [email protected]) and Frank (Frank’s user name is [email protected]).

Alice’s user ID

Run the following command to get Alice’s user ID, as shown in Figure 11.

aws identitystore list-users --identity-store-id '<Identity Store ID>' --filter AttributePath='UserName',AttributeValue='[email protected]'
Figure 11: Retrieving Alice’s user ID

Figure 11: Retrieving Alice’s user ID

Frank’s user ID

Run the following command to get Frank’s user ID, as shown in Figure 12.

aws identitystore list-users --identity-store-id '<Identity Store ID>'--filter AttributePath='UserName',AttributeValue='[email protected]'
Figure 12: Retrieving Frank’s user ID

Figure 12: Retrieving Frank’s user ID

Note: To get the principal ID for a group, use the following command.

aws identitystore list-groups --identity-store-id '<Identity Store ID>' --filter AttributePath='DisplayName',AttributeValue='<Group Name>'

Assign the EC2-S3-FullAccess permission set to Alice in the ExampleOrgDev account

Run the following command to assign Alice access to the ExampleOrgDev account using the EC2-S3-FullAccess permission set. This will give Alice full access to Amazon EC2 and S3 services in the ExampleOrgDev account.

Note: When you call the CreateAccountAssignment API, AWS SSO automatically provisions the specified permission set on the account in the form of an IAM policy attached to the AWS SSO–created IAM role. This role is immutable: it’s fully managed by the AWS SSO, and it cannot be deleted or changed by the user even if the user has full administrative rights on the account. If the permission set is subsequently updated, the corresponding IAM policies attached to roles in your accounts won’t be updated automatically. In this case, you will need to call ProvisionPermissionSet to propagate these updates.

aws sso-admin create-account-assignment --instance-arn '<Instance ARN>' --permission-set-arn '<Permission Set ARN>' --principal-id '<user/group ID>' --principal-type '<USER/GROUP>' --target-id '<AWS Account ID>' --target-type AWS_ACCOUNT
Figure 13: Assigning the EC2-S3-FullAccess permission set to Alice on the ExampleOrgDev account

Figure 13: Assigning the EC2-S3-FullAccess permission set to Alice on the ExampleOrgDev account

Assign the AuditAccess permission set to Frank Infosec in the ExampleOrgDev account

Run the following command to assign Frank access to the ExampleOrgDev account using the EC2-S3- AuditAccess permission set.

aws sso-admin create-account-assignment --instance-arn '<Instance ARN>' --permission-set-arn '<Permission Set ARN>' --principal-id '<user/group ID>' --principal-type '<USER/GROUP>' --target-id '<AWS Account ID>' --target-type AWS_ACCOUNT
Figure 14: Assigning the AuditAccess permission set to Frank on the ExampleOrgDev account

Figure 14: Assigning the AuditAccess permission set to Frank on the ExampleOrgDev account

Assign the PowerUserAccess permission set to Frank Infosec in the ExampleOrgTest account

Run the following command to assign Frank access to the ExampleOrgTest account using the PowerUserAccess permission set.

aws sso-admin create-account-assignment --instance-arn '<Instance ARN>' --permission-set-arn '<Permission Set ARN>' --principal-id '<user/group ID>' --principal-type '<USER/GROUP>' --target-id '<AWS Account ID>' --target-type AWS_ACCOUNT
Figure 15: Assigning the PowerUserAccess permission set to Frank on the ExampleOrgTest account

Figure 15: Assigning the PowerUserAccess permission set to Frank on the ExampleOrgTest account

To view the permission sets provisioned on the AWS account, run the following command, as shown in Figure 16.

aws sso-admin list-permission-sets-provisioned-to-account --instance-arn '<Instance ARN>' --account-id '<AWS Account ID>'
Figure 16: View the permission sets (AuditAccess and EC2-S3-FullAccess) assigned to the ExampleOrgDev account

Figure 16: View the permission sets (AuditAccess and EC2-S3-FullAccess) assigned to the ExampleOrgDev account

To review the created resources in the AWS Management Console, navigate to the AWS SSO console. In the list of permission sets on the AWS accounts tab, choose the EC2-S3-FullAccess permission set. Under AWS managed policies, the policies attached to the permission set are listed, as shown in Figure 17.

Figure 17: Review the permission set in the AWS SSO console

Figure 17: Review the permission set in the AWS SSO console

To see the AWS accounts, where the EC2-S3-FullAccess permission set is currently provisioned, navigate to the AWS accounts tab, as shown in Figure 18.

Figure 18: Review permission set account assignment in the AWS SSO console

Figure 18: Review permission set account assignment in the AWS SSO console

Step 4: Audit access

In this step, you learn how to audit access assigned to your users and group by using the AWS SSO account assignment API. In this example, you’ll start from a permission set, review the permissions (AWS-managed policies or a custom policy) attached to the permission set, get the users and groups associated with the permission set, and see which AWS accounts the permission set is provisioned to.

List the IAM managed policies for the permission set

Run the following command to list the IAM managed policies that are attached to a specified permission set, as shown in Figure 19.

aws sso-admin list-managed-policies-in-permission-set --instance-arn '<Instance ARN>' --permission-set-arn '<Permission Set ARN>'
Figure 19: View the managed policies attached to the permission set

Figure 19: View the managed policies attached to the permission set

List the assignee of the AWS account with the permission set

Run the following command to list the assignee (the user or group with the respective principal ID) of the specified AWS account with the specified permission set, as shown in Figure 20.

aws sso-admin list-account-assignments --instance-arn '<Instance ARN>' --account-id '<Account ID>' --permission-set-arn '<Permission Set ARN>'
Figure 20: View the permission set and the user or group attached to the AWS account

Figure 20: View the permission set and the user or group attached to the AWS account

List the accounts to which the permission set is provisioned

Run the following command to list the accounts that are associated with a specific permission set, as shown in Figure 21.

aws sso-admin list-accounts-for-provisioned-permission-set --instance-arn '<Instance ARN>' --permission-set-arn '<Permission Set ARN>'
Figure 21: View AWS accounts to which the permission set is provisioned

Figure 21: View AWS accounts to which the permission set is provisioned

In this section of the post, we’ve illustrated how to create a permission set, assign a managed policy to the permission set, and grant access for AWS SSO users or groups to AWS accounts by using this permission set. In the next section, we’ll show you how to do the same using AWS CloudFormation.

Use the AWS SSO API through AWS CloudFormation

In this section, you learn how to use CloudFormation templates to automate the creation of permission sets, attach managed policies, and use permission sets to assign access for a particular user or group to AWS accounts.

Sign in to your AWS Management Console and create a CloudFormation stack by using the following CloudFormation template. For more information on how to create a CloudFormation stack, see Creating a stack on the AWS CloudFormation console.

//start of Template//
{
    "AWSTemplateFormatVersion": "2010-09-09",
  
    "Description": "AWS CloudFormation template to automate multi-account access with AWS Single Sign-On (Entitlement APIs): Create permission sets, assign access for AWS SSO users and groups to AWS accounts using permission sets. Before you use this template, we assume you have enabled AWS SSO for your AWS Organization, added the AWS accounts to which you want to grant AWS SSO access to your organization, signed in to the AWS Management Console with your AWS Organizations management account credentials, and have the required permissions to use the AWS SSO console.",
  
    "Parameters": {
      "InstanceARN" : {
        "Type" : "String",
        "AllowedPattern": "arn:aws:sso:::instance/(sso)?ins-[a-zA-Z0-9-.]{16}",
        "Description" : "Enter AWS SSO InstanceARN. Ex: arn:aws:sso:::instance/ssoins-xxxxxxxxxxxxxxxx",
        "ConstraintDescription": "must be the name of an existing AWS SSO InstanceARN associated with the management account."
      },
      "ExampleOrgDevAccountId" : {
        "Type" : "String",
        "AllowedPattern": "\\d{12}",
        "Description" : "Enter 12-digit Developer AWS Account ID. Ex: 123456789012"
        },
      "ExampleOrgTestAccountId" : {
        "Type" : "String",
        "AllowedPattern": "\\d{12}",
        "Description" : "Enter 12-digit AWS Account ID. Ex: 123456789012"
        },
      "AliceDeveloperUserId" : {
        "Type" : "String",
        "AllowedPattern": "^([0-9a-f]{10}-|)[A-Fa-f0-9]{8}-[A-Fa-f0-9]{4}-[A-Fa-f0-9]{4}-[A-Fa-f0-9]{4}-[A-Fa-f0-9]{12}$",
        "Description" : "Enter Developer UserId. Ex: 926703446b-f10fac16-ab5b-45c3-86c1-xxxxxxxxxxxx"
        },
        "FrankInfosecUserId" : {
            "Type" : "String",
            "AllowedPattern": "^([0-9a-f]{10}-|)[A-Fa-f0-9]{8}-[A-Fa-f0-9]{4}-[A-Fa-f0-9]{4}-[A-Fa-f0-9]{4}-[A-Fa-f0-9]{12}$",
            "Description" : "Enter Test UserId. Ex: 926703446b-f10fac16-ab5b-45c3-86c1-xxxxxxxxxxxx"
            }
    },
    "Resources": {
        "EC2S3Access": {
            "Type" : "AWS::SSO::PermissionSet",
            "Properties" : {
                "Description" : "EC2 and S3 access for developers",
                "InstanceArn" : {
                    "Ref": "InstanceARN"
                },
                "ManagedPolicies" : ["arn:aws:iam::aws:policy/amazonec2fullaccess","arn:aws:iam::aws:policy/amazons3fullaccess"],
                "Name" : "EC2-S3-FullAccess",
                "Tags" : [ {
                    "Key": "Name",
                    "Value": "EC2S3Access"
                 } ]
              }
        },  
        "SecurityAuditAccess": {
            "Type" : "AWS::SSO::PermissionSet",
            "Properties" : {
                "Description" : "Audit Access for Infosec team",
                "InstanceArn" : {
                    "Ref": "InstanceARN"
                },
                "ManagedPolicies" : [ "arn:aws:iam::aws:policy/SecurityAudit" ],
                "Name" : "AuditAccess",
                "Tags" : [ {
                    "Key": "Name",
                    "Value": "SecurityAuditAccess"
                 } ]
              }
        },    
        "PowerUserAccess": {
            "Type" : "AWS::SSO::PermissionSet",
            "Properties" : {
                "Description" : "Power User Access for Infosec team",
                "InstanceArn" : {
                    "Ref": "InstanceARN"
                },
                "ManagedPolicies" : [ "arn:aws:iam::aws:policy/PowerUserAccess"],
                "Name" : "PowerUserAccess",
                "Tags" : [ {
                    "Key": "Name",
                    "Value": "PowerUserAccess"
                 } ]
              }      
        },
        "EC2S3userAssignment": {
            "Type" : "AWS::SSO::Assignment",
            "Properties" : {
                "InstanceArn" : {
                    "Ref": "InstanceARN"
                },
                "PermissionSetArn" : {
                    "Fn::GetAtt": [
                        "EC2S3Access",
                        "PermissionSetArn"
                     ]
                },
                "PrincipalId" : {
                    "Ref": "AliceDeveloperUserId"
                },
                "PrincipalType" : "USER",
                "TargetId" : {
                    "Ref": "ExampleOrgDevAccountId"
                },
                "TargetType" : "AWS_ACCOUNT"
              }
          },
          "SecurityAudituserAssignment": {
            "Type" : "AWS::SSO::Assignment",
            "Properties" : {
                "InstanceArn" : {
                    "Ref": "InstanceARN"
                },
                "PermissionSetArn" : {
                    "Fn::GetAtt": [
                        "SecurityAuditAccess",
                        "PermissionSetArn"
                     ]
                },
                "PrincipalId" : {
                    "Ref": "FrankInfosecUserId"
                },
                "PrincipalType" : "USER",
                "TargetId" : {
                    "Ref": "ExampleOrgDevAccountId"
                },
                "TargetType" : "AWS_ACCOUNT"
              }
          },
          "PowerUserAssignment": {
            "Type" : "AWS::SSO::Assignment",
            "Properties" : {
                "InstanceArn" : {
                    "Ref": "InstanceARN"
                },
                "PermissionSetArn" : {
                    "Fn::GetAtt": [
                        "PowerUserAccess",
                        "PermissionSetArn"
                     ]
                },
                "PrincipalId" : {
                    "Ref": "FrankInfosecUserId"
                },
                "PrincipalType" : "USER",
                "TargetId" : {
                    "Ref": "ExampleOrgTestAccountId"
                },
                "TargetType" : "AWS_ACCOUNT"
              }
          }
    }
}
//End of Template//

When you create the stack, provide the following information for setting the example permission sets for Frank Infosec and Alice Developer, as shown in Figure 22:

  • The Alice Developer and Frank Infosec user IDs
  • The ExampleOrgDev and ExampleOrgTest account IDs
  • The AWS SSO instance ARN

Then launch the CloudFormation stack.

Figure 22: User inputs to launch the CloudFormation template

Figure 22: User inputs to launch the CloudFormation template

AWS CloudFormation creates the resources that are shown in Figure 23.

Figure 23: Resources created from the CloudFormation stack

Figure 23: Resources created from the CloudFormation stack

Cleanup

To delete the resources you created by using the AWS CLI, use these commands.

Run the following command to delete the account assignment.

delete-account-assignment --instance-arn '<Instance ARN>' --target-id '<AWS Account ID>' --target-type 'AWS_ACCOUNT' --permission-set-arn '<PermissionSet ARN>' --principal-type '<USER/GROUP>' --principal-id '<user/group ID>'

After the account assignment is deleted, run the following command to delete the permission set.

delete-permission-set --instance-arn '<Instance ARN>' --permission-set-arn '<PermissionSet ARN>'

To delete the resource that you created by using the CloudFormation template, go to the AWS CloudFormation console. Select the appropriate stack you created, and then choose delete. Deleting the CloudFormation stack cleans up the resources that were created.

Summary

In this blog post, we showed how to use the AWS SSO account assignment API to automate the deployment of permission sets, how to add managed policies to permission sets, and how to assign access for AWS users and groups to AWS accounts by using specified permission sets.

To learn more about the AWS SSO APIs available for you, see the AWS Single Sign-On API Reference Guide.

If you have feedback about this post, submit comments in the Comments section below. If you have questions about this post, start a new thread on the AWS SSO forum or contact AWS Support.

Want more AWS Security how-to content, news, and feature announcements? Follow us on Twitter.

Author

Akhil Aendapally

Akhil is a Solutions Architect at AWS focused on helping customers with their AWS adoption. He holds a master’s degree in Network and Computer Security. Akhil has 8+ years of experience working with different cloud platforms, infrastructure automation, and security.

Author

Yuri Duchovny

Yuri is a New York-based Solutions Architect specializing in cloud security, identity, and compliance. He supports cloud transformations at large enterprises, helping them make optimal technology and organizational decisions. Prior to his AWS role, Yuri’s areas of focus included application and networking security, DoS, and fraud protection. Outside of work, he enjoys skiing, sailing, and traveling the world.

Author

Ballu Singh

Ballu is a principal solutions architect at AWS. He lives in the San Francisco Bay area and helps customers architect and optimize applications on AWS. In his spare time, he enjoys reading and spending time with his family.

Author

Nir Ozeri

Nir is a Solutions Architect Manager with Amazon Web Services, based out of New York City. Nir specializes in application modernization, application delivery, and mobile architecture.

Techniques for writing least privilege IAM policies

Post Syndicated from Ben Potter original https://aws.amazon.com/blogs/security/techniques-for-writing-least-privilege-iam-policies/

In this post, I’m going to share two techniques I’ve used to write least privilege AWS Identity and Access Management (IAM) policies. If you’re not familiar with IAM policy structure, I highly recommend you read understanding how IAM works and policies and permissions.

Least privilege is a principle of granting only the permissions required to complete a task. Least privilege is also one of many Amazon Web Services (AWS) Well-Architected best practices that can help you build securely in the cloud. For example, if you have an Amazon Elastic Compute Cloud (Amazon EC2) instance that needs to access an Amazon Simple Storage Service (Amazon S3) bucket to get configuration data, you should only allow read access to the specific S3 bucket that contains the relevant data.

There are a number of ways to grant access to different types of resources, as some resources support both resource-based policies and IAM policies. This blog post will focus on demonstrating how you can use IAM policies to grant restrictive permissions to IAM principals to meet least privilege standards.

In AWS, an IAM principal can be a user, role, or group. These identities start with no permissions and you add permissions using a policy. In AWS, there are different types of policies that are used for different reasons. In this blog, I only give examples for identity-based policies that attach to IAM principals to grant permissions to an identity. You can create and attach multiple identity-based policies to your IAM principals, and you can reuse them across your AWS accounts. There are two types of managed policies. Customer managed policies are created and managed by you, the customer. AWS managed policies are provided as examples, cannot be modified, but can be copied, enhanced, and saved as Customer managed policies. The main elements of a policy statement are:

  • Effect: Specifies whether the statement will Allow or Deny an action.
  • Action: Describes a specific action or actions that will either be allowed or denied to run based on the Effect entered. API actions are unique to each service. For example, s3:ListBuckets is an Amazon S3 service API action that enables an IAM Principal to list all S3 buckets in the same account.
  • NotAction: Can be used as an alternative to using Action. This element will allow an IAM principal to invoke all API actions to a specific AWS service except those actions specified in this list.
  • Resource: Specifies the resources—for example, an S3 bucket or objects—that the policy applies to in Amazon Resource Name (ARN) format.
  • NotResource: Can be used instead of the Resource element to explicitly match every AWS resource except those specified.
  • Condition: Allows you to build expressions to match the condition keys and values in the policy against keys and values in the request context sent by the IAM principal. Condition keys can be service-specific or global. A global condition key can be used with any service. For example, a key of aws:CurrentTime can be used to allow access based on date and time.

Starting with the visual editor

The visual editor is my default starting place for building policies as I like the wizard and seeing all available services, actions, and conditions without looking at the documentation. If there is a complex policy with many services, I often look at the AWS managed policies as a starting place for the actions that are required, then use the visual editor to fine tune and check the resources and conditions.

The policy I’m going to walk you through creating is to grant an AWS Lambda function permission to get specific objects from Amazon S3, and put items in a specific table in Amazon DynamoDB. You can access the visual editor when you choose Create policy under policies in the IAM console, or add policies when viewing a role, group, or user as shown in Figure 1. If you’re not familiar with creating policies, you can follow the full instructions in the IAM documentation.

Figure 1: Use the visual editor to create a policy

Figure 1: Use the visual editor to create a policy

Begin by choosing the first service—S3—to grant access to as shown in Figure 2. You can only choose one service at a time, so you’ll need to add DynamoDB after.

Figure 2: Select S3 service

Figure 2: Select S3 service

Now you will see a list of access levels with the option to manually add actions. Expand the read access level to show all read actions that are supported by the Amazon S3 service. You can now see all read access level actions. For getting an object, check the box for GetObject. Selecting the ? next to an action expands information including a description, supported resource types, and supported condition keys as shown in Figure 3.

Figure 3: Expand Read in Access level, select GetObject, and select the ? next to GetObject

Figure 3: Expand Read in Access level, select GetObject, and select the ? next to GetObject

Expand Resources, you will see that the visual editor has listed object as that is the only resource supported by the GetObject action as shown in Figure 4.

Figure 4: Expand Resources

Figure 4: Expand Resources

Select Add ARN, which opens a dialogue to help you specify the ARN for the objects. Enter a bucket name—such as doc-example-bucket—and then the object name. For the object name you can use a wildcard (*) as a suffix. For example, to allow objects beginning with alpha you would enter alpha*. This is an important step. For this least privileged policy, you are restricting to a specific bucket, and an object prefix. You could even specify an individual object depending on your use case.

Figure 5: Enter bucket name and object name

Figure 5: Enter bucket name and object name

If you have multiple ARNs (bucket and objects) to allow, you can repeat the step.

Figure 6: ARN added for S3 object

Figure 6: ARN added for S3 object

The final step is to expand the request conditions, and choose Add condition. The Add request condition dialogue will open. Select the drop down next to Condition key to list the global condition keys, then the service level condition keys are listed after. You’ll see that there’s an s3:ExistingObjectTag condition that—as the name suggests—matches an existing object tag. You can use this condition key to allow the GetObject request only when the object tag meets your condition. That means you can tag your objects with a specific tag key and value pair, and your policy condition must match this key-value pair to allow the action to execute. When you’re using condition keys with multiple keys or values, you can use condition operators and evaluation logic. As shown in Figure 7, tag-key is entered directly below the condition key. This is the key of the tag to match. For the Operator, select StringEquals to match the tag exactly. Checking If exists tests at least one member of the set of request values, and at least one member of the set of condition key values. The Value to enter is the actual tag value: tag-value as shown in figure 7.

Figure 7: ARN added for S3 object

Figure 7: ARN added for S3 object

That’s it for adding the S3 action, as shown in figure 8.

Figure 8: S3 GetObject action with resource and conditions configured

Figure 8: S3 GetObject action with resource and conditions configured

Now you need to add the DynamoDB permissions by selecting Add additional permissions. Select Choose a service and then select DynamoDB. For actions, expand the Write access level, then choose PutItem.

Figure 9: Choose write access level

Figure 9: Choose write access level

Expand Resources and then select Add ARN. The dialogue that appears will help you build the ARN just like it did for the Amazon S3 service. Enter the Region, for example the ap-southeast-2 (Sydney) Region, the account ID, and the table name. Choosing Add will add the resource ARN to your policy.

Figure 10: Enter Region, account, and table name

Figure 10: Enter Region, account, and table name

Now it’s time to add conditions. Expand Request conditions and then choose Add condition.

There are many DynamoDB conditions that you could use, however you can choose dynamodb:LeadingKeys to represent the first key, or partition keys in a table. You can see from the documentation that a qualifier of For all values in request is recommend. For the Operator you can use StringEquals as your string is going to exactly match, then a Value can use a prefix with wildcard, such as alpha* as shown in figure 11.

Figure 11: Add request conditions

Figure 11: Add request conditions

Choosing Add will take you back to the main visual editor where you can choose Review policy to continue. Enter a name and description for the policy, and then choose Create policy.

You can now attach it to a role to test.

You can see in this example that a policy can use least privilege by using specific resources and conditions. Note that sometimes when you use the AWS Management Console, it requires additional permissions to provide information for the console experience.

Starting with AWS managed policies

AWS managed policies can be a good starting place to see the actions typically associated with a particular service or job function. For example, you can attach the AmazonS3ReadOnlyAccess policy to a role used by an Amazon EC2 instance that allows read-only access to all Amazon S3 buckets. It has an effect of Allow to allow access, and there are two actions that use wildcards (*) to allow all Get and List actions for S3—for example, s3:GetObject and s3:ListBuckets. The resource is a wildcard to allow all S3 buckets the account has access to. A useful feature of this policy is that it only allows read and list access to S3, but not to any other services or types of actions.

Let’s make our own custom IAM policy to make it least privilege. Starting with the action element, you can use the reference for Amazon S3 to see all actions, a description of what each action does, the resource type for each action, and condition keys for each action. Now let’s imagine this policy is used by an Amazon EC2 instance to fetch an application configuration object from within an S3 bucket. Looking at the descriptions for actions starting with Get you can see that the only action that we really need is GetObject. You can then use the resource element to restrict an action to a set of objects prefixed with config within a specific bucket.

         "Effect": "Allow",
         "Action": "s3:GetObject",
         "Resource": "arn:aws:s3::: <doc-example-bucket>/<config*>"

Now that you’ve reduced the scope of what this policy can do for service actions and resources, you can add a condition element that uses attribute based access control (ABAC) to define conditions based on attributes—in this case, a resource tag. In this example, when you’re reading objects from a single bucket, you can set specific conditions to further reduce the scope of permissions given to an IAM principal. There’s an s3:ExistingObjectTag condition that you can use to allow the GetObject request only when the object tag meets your condition. That means you can tag your objects with a specific tag key and value pair, and your IAM policy condition must match this key-value pair to allow the API action to successfully run. When you’re using condition keys with multiple keys or values, you can use condition operators and evaluation logic. You can see that ForAnyValue tests at least one member of the set of request values, and at least one member of the set of condition key values. Alternatively, you can use global condition keys that apply to all services:

         "Effect": "Allow",
         "Action": "s3:GetObject",
         "Resource": "arn:aws:s3:::<doc-example-bucket>/<config*>",
         "Condition": {
                "ForAnyValue:StringEquals": {
                    "s3:ExistingObjectTag/<tag-key>": "<tag-value>"
            }

In the preceding policy example, the condition element only allows s3:GetObject permissions if the object is tagged with a key of tag-key and a value of tag-value. While you’re experimenting, you can identify errors in your custom policies by using the IAM policy simulator or reviewing the errors messages recorded in AWS CloudTrail logs.

Conclusion

In this post, I’ve shown two different techniques that you can use to create least privilege policies for IAM. You can adapt these methods to create AWS Single Sign-On permission sets and AWS Organizations service control policies (SCPs). Starting with managed policies is a useful strategy when an AWS supplied managed policy already exists for your use case, and then to reduce the scope of what it can do through permissions. I tend to use the visual editor the most for editing policies because it saves looking up the resource and conditions for each action. I suggest that you start by reviewing the policies you’re already using. Start with policies that grant excessive permissions—like the example Administrator policy—and tie them back to the use case of the users or things that need the access. Use the last accessed information, IAM best practices, and look at the AWS Well-Architected best practices and AWS Well-Architected tool.

If you have feedback about this post, submit comments in the Comments section below.

Want more AWS Security how-to content, news, and feature announcements? Follow us on Twitter.

Author

Ben Potter

Ben is the global security leader for the AWS Well-Architected Framework and is responsible for sharing best practices in security with customers and partners. Ben is also an ambassador for the No More Ransom initiative helping fight cyber crime with Europol, McAfee, and law enforcement across the globe. You can learn more about him in this interview.

Automatically update security groups for Amazon CloudFront IP ranges using AWS Lambda

Post Syndicated from Yeshwanth Kottu original https://aws.amazon.com/blogs/security/automatically-update-security-groups-for-amazon-cloudfront-ip-ranges-using-aws-lambda/

Amazon CloudFront is a content delivery network that can help you increase the performance of your web applications and significantly lower the latency of delivering content to your customers. For CloudFront to access an origin (the source of the content behind CloudFront), the origin has to be publicly available and reachable. Anyone with the origin domain name or IP address could request content directly and bypass CloudFront. In this blog post, I describe an automated solution that uses security groups to permit only CloudFront to access the origin.

Amazon Simple Storage Service (Amazon S3) origins provide a feature called Origin Access Identity, which blocks public access to selected buckets, making them accessible only through CloudFront. When you use CloudFront to secure your web applications, it’s important to ensure that only CloudFront can access your origin (such as Amazon Elastic Cloud Compute (Amazon EC2) or Application Load Balancer (ALB)) and any direct access to origin is restricted. This blog post shows you how to create an AWS Lambda function to automatically update Amazon Virtual Private Cloud (Amazon VPC) security groups with CloudFront service IP ranges to permit only CloudFront to access the origin.

AWS publishes the IP ranges in JSON format for CloudFront and other AWS services. If your origin is an Elastic Load Balancer or an Amazon EC2 instance, you can use VPC security groups to allow only CloudFront IP ranges to access your applications. The IP ranges in the list are separated by service and Region, and you must specify only the IP ranges that correspond to CloudFront.

The IP ranges that AWS publishes change frequently and without an automated solution, you would need to retrieve this document frequently to understand the current IP ranges for CloudFront. Frequent polling is inefficient because there is no notice of when the IP ranges change, and if these IP ranges aren’t modified immediately, your client might see 504 errors when they access CloudFront. Additionally, there are numerous IP ranges for each service, performing the change manually isn’t an efficient way of updating these ranges. This means you need infrastructure to support the task. However, in that case you end up with another host to manage—complete with the typical patching, deployment, and monitoring. As you can see, a small task could quickly become more complicated than the problem you intended to solve.

An Amazon Simple Notification Service (Amazon SNS) message is sent to a topic whenever the AWS IP ranges change. Enabling you to build an event-driven, serverless solution that updates the IP ranges for your security groups, as needed by using a Lambda function that is triggered in response to the SNS notification.

Here are the steps we are going to take to implement the solution:

  1. Create your resources
    1. Create an IAM policy and execution role for the Lambda function
    2. Create your Lambda function
  2. Test your Lambda function
  3. Configure your Lambda function’s trigger

Create your resources

The first thing you need to do is create a Lambda function execution role and policy. Lambda function uses execution role to access or create AWS resources. This Lambda function is triggered by an SNS notification whenever there’s a change in the IP ranges document. Based on the number of IP ranges present for CloudFront and also the number of ports (for example, 80,443) that you want to whitelist on the origin, this Lambda function creates the required security groups. These security groups will allow only traffic from CloudFront to your ELB load balancers or EC2 instances.

Create an IAM policy and execution role for the Lambda function

When you create a Lambda function, it’s important to understand and properly define the security context for the Lambda function. Using AWS Identity and Access Management (IAM), you can create the Lambda execution role that determines the AWS service calls that the function is authorized to complete. (Learn more about the Lambda permissions model.)

To create the IAM policy for your role

  1. Log in to the IAM console with the user account that you will use to manage the Lambda function. This account must have administrator permissions.
  2. In the navigation pane, choose Policies.
  3. In the content pane, choose Create policy.
  4. Choose the JSON tab and copy the text from the following JSON policy document. Paste this text into the JSON text box.
    {
      "Version": "2012-10-17",
      "Statement": [
        {
          "Sid": "CloudWatchPermissions",
          "Effect": "Allow",
          "Action": [
            "logs:CreateLogGroup",
            "logs:CreateLogStream",
            "logs:PutLogEvents"
          ],
          "Resource": "arn:aws:logs:*:*:*"
        },
        {
          "Sid": "EC2Permissions",
          "Effect": "Allow",
          "Action": [
            "ec2:DescribeSecurityGroups",
            "ec2:AuthorizeSecurityGroupIngress",
            "ec2:RevokeSecurityGroupIngress",
            "ec2:CreateSecurityGroup",
            "ec2:DescribeVpcs",
    		"ec2:CreateTags",
            "ec2:ModifyNetworkInterfaceAttribute",
            "ec2:DescribeNetworkInterfaces"
            
          ],
          "Resource": "*"
        }
      ]
    }
    

  5. When you’re finished, choose Review policy.
  6. On the Review page, enter a name for the policy name (e.g. LambdaExecRolePolicy-UpdateSecurityGroupsForCloudFront). Review the policy Summary to see the permissions granted by your policy, and then choose Create policy to save your work.

To understand what this policy allows, let’s look closely at both statements in the policy. The first statement allows the Lambda function to create and write to CloudWatch Logs, which is vital for debugging and monitoring our function. The second statement allows the function to get information about existing security groups, get existing VPC information, create security groups, and authorize and revoke ingress permissions. It’s an important best practice that your IAM policies be as granular as possible, to support the principal of least privilege.

Now that you’ve created your policy, you can create the Lambda execution role that will use the policy.

To create the Lambda execution role

  1. In the navigation pane of the IAM console, choose Roles, and then choose Create role.
  2. For Select type of trusted entity, choose AWS service.
  3. Choose the service that you want to allow to assume this role. In this case, choose Lambda.
  4. Choose Next: Permissions.
  5. Search for the policy name that you created earlier and select the check box next to the policy.
  6. Choose Next: Tags.
  7. (Optional) Add metadata to the role by attaching tags as key-value pairs. For more information about using tags in IAM, see Tagging IAM Users and Roles.
  8. Choose Next: Review.
  9. For Role name (e.g. LambdaExecRole-UpdateSecurityGroupsForCloudFront), enter a name for your role.
  10. (Optional) For Role description, enter a description for the new role.
  11. Review the role, and then choose Create role.

Create your Lambda function

Now, create your Lambda function and configure the role that you created earlier as the execution role for this function.

To create the Lambda function

  1. Go to the Lambda console in N. Virginia region and choose Create function. On the next page, choose Author from scratch. (I’ll be providing the code for your Lambda function, but for other functions, the Use a blueprint option can be a great way to get started.)
  2. Give your Lambda function a name (e.g UpdateSecurityGroupsForCloudFront) and description, and select Python 3.8 from the Runtime menu.
  3. Choose or create an execution role: Select the execution role you created earlier by selecting the option Use an Existing Role.
  4. After confirming that your settings are correct, choose Create function.
  5. Paste the Lambda function code from here.
  6. Select Save.

Additionally, in the Basic Settings of the Lambda function, increase the timeout to 10 seconds.

To set the timeout value in the Lambda console

  1. In the Lambda console, choose the function you just created.
  2. Under Basic settings, choose Edit.
  3. For Timeout, select 10s.
  4. Choose Save.

By default, the Lambda function has these settings:

  • The Lambda function is configured to create security groups in the default VPC.
  • CloudFront IP ranges are updated as inbound rules on port 80.
  • The created security groups are tagged with the name prefix AUTOUPDATE.
  • Debug logging is turned off.
  • The service for which IP ranges are extracted is set to CloudFront.
  • The SDK client in the Lambda function set to us-east-1(N. Virginia).

If you want to customize these settings, set the following environment variables for the Lambda function. For more details, see Using AWS Lambda environment variables.

Action Key-value data
To create security groups in a specific VPC Key: VPC_ID
Value: vpc-id
To create security groups rules for a different port or multiple ports
 
The solution in this example supports a total of two ports. One can be used for HTTP and another for HTTPS.

Key: PORTS
Value: portnumber
or
Key: PORTS
Value: portnumber,portnumber
To customize the prefix name tag of your security groups Key: PREFIX_NAME
Value: custom-name
To enable debug logging to CloudWatch Key: DEBUG
Value: true
To extract IP ranges for a different service other than CloudFront Key: SERVICE
Value: servicename
To configure the Region for the SDK client used in the Lambda function
 
If the CloudFront origin is present in a different Region than N. Virginia, the security groups must be created in that region.
Key: REGION
Value: regionname

To set environment variables in the Lambda console

  1. In the Lambda console, choose the function you created.
  2. Under Environment variables, choose Edit.
  3. Choose Add environment variable.
  4. Enter a key and value.
  5. Choose Save.

Test your Lambda function

Now that you’ve created your function, it’s time to test it and initialize your security group.

To create your test event for the Lambda function

  1. In the Lambda console, on the Functions page, choose your function. In the drop-down menu next to Actions, choose Configure test events.
  2. Enter an Event Name (e.g. TriggerSNS)
  3. Replace the following as your sample event, which will represent an SNS notification and then select Create.
    {
        "Records": [
            {
                "EventVersion": "1.0",
                "EventSubscriptionArn": "arn:aws:sns:EXAMPLE",
                "EventSource": "aws:sns",
                "Sns": {
                    "SignatureVersion": "1",
                    "Timestamp": "1970-01-01T00:00:00.000Z",
                    "Signature": "EXAMPLE",
                    "SigningCertUrl": "EXAMPLE",
                    "MessageId": "95df01b4-ee98-5cb9-9903-4c221d41eb5e",
                    "Message": "{\"create-time\": \"yyyy-mm-ddThh:mm:ss+00:00\", \"synctoken\": \"0123456789\", \"md5\": \"7fd59f5c7f5cf643036cbd4443ad3e4b\", \"url\": \"https://ip-ranges.amazonaws.com/ip-ranges.json\"}",
                    "Type": "Notification",
                    "UnsubscribeUrl": "EXAMPLE",
                    "TopicArn": "arn:aws:sns:EXAMPLE",
                    "Subject": "TestInvoke"
                }
      		}
        ]
    }
    

  4. After you’ve added the test event, select Save and then select Test. Your Lambda function is then invoked, and you should see log output at the bottom of the console in Execution Result section, similar to the following.
    Updating from https://ip-ranges.amazonaws.com/ip-ranges.json
    MD5 Mismatch: got 2e967e943cf98ae998efeec05d4f351c expected 7fd59f5c7f5cf643036cbd4443ad3e4b: Exception
    Traceback (most recent call last):
      File "/var/task/lambda_function.py", line 29, in lambda_handler
        ip_ranges = json.loads(get_ip_groups_json(message['url'], message['md5']))
      File "/var/task/lambda_function.py", line 50, in get_ip_groups_json
        raise Exception('MD5 Missmatch: got ' + hash + ' expected ' + expected_hash)
    Exception: MD5 Mismatch: got 2e967e943cf98ae998efeec05d4f351c expected 7fd59f5c7f5cf643036cbd4443ad3e4b
    

  5. Edit the sample event again, and this time change the md5 value in the sample event to be the first MD5 hash provided in the log output. In this example, you would update the md5 value in the sample event configured earlier with the hash value seen in the error ‘2e967e943cf98ae998efeec05d4f351c’. Lambda code successfully executes only when the original hash of the IP ranges document and the hash received from the event trigger match. After you modify the hash value from the error message received earlier, the test event matches the hash of the IP ranges document.
  6. Select Save and test. This invokes your Lambda function.

After the function is invoked the second time with updated md5 has Lambda function should execute without any errors. You should be able to see the new security groups created and the IP ranges of CloudFront updated in the rules in the EC2 console, as shown in Figure 1.
 

Figure 1: EC2 console showing the security groups created

Figure 1: EC2 console showing the security groups created

In the initial successful run of this function, it created the total number of security groups required to update all the IP ranges of CloudFront for the ports mentioned. The function creates security groups based on the maximum number of rules that can be added to individual security groups. The new security groups can be identified from the EC2 console by the name AUTOUPDATE_random if you used the default configuration, or a custom name if you provided a PREFIX_NAME.

You can now attach these security groups to your Elastic LoadBalancer or EC2 instances. If your log output is different from what is described here, the output should help you identify the issue.

Configure your Lambda function’s trigger

After you’ve validated that your function is executing properly, it’s time to connect it to the SNS topic for IP changes. To do this, use the AWS Command Line Interface (CLI). Enter the following command, making sure to replace Lambda ARN with the Amazon Resource Name (ARN) of your Lambda function. You can find this ARN at the top right when viewing the configuration of your Lambda function.

aws sns subscribe - -topic-arn "arn:aws:sns:us-east-1:806199016981:AmazonIpSpaceChanged" - -region us-east-1 - -protocol lambda - -notification-endpoint "Lambda ARN"

You should receive the ARN of your Lambda function’s SNS subscription.

Now add a permission that allows the Lambda function to be invoked by the SNS topic. The following command also adds the Lambda trigger.

aws lambda add-permission - -function-name "Lambda ARN" - -statement-id lambda-sns-trigger - -region us-east-1 - -action lambda:InvokeFunction - -principal sns.amazonaws.com - -source-arn "arn:aws:sns:us-east-1:806199016981:AmazonIpSpaceChanged"

When AWS changes any of the IP ranges in the document, an SNS notification is sent and your Lambda function will be triggered. This Lambda function verifies the modified ranges in the document and efficiently updates the IP ranges on the existing security groups. Additionally, the function dynamically scales and creates additional security groups if the number of IP ranges for CloudFront is increased in future. Any newly created security groups are automatically attached to the network interface where the previous security groups are attached in order to avoid service interruption.

Summary

As you followed this blog post, you created a Lambda function to create a security groups and update the security group’s rules dynamically whenever AWS publishes new internal service IP ranges. This solution has several advantages:

  • The solution isn’t designed as a periodic poll, so it only runs when it needs to.
  • It’s automatic, so you don’t need to update security groups manually which lowers the operational cost.
  • It’s simple, because you have no extra infrastructure to maintain as the solution is completely serverless.
  • It’s cost effective, because the Lambda function runs only when triggered by the AmazonIpSpaceChanged SNS topic and only runs for a few seconds, this solution costs only pennies to operate.

If you have feedback about this post, submit comments in the Comments section below. If you have questions about this post, start a new thread on the Amazon CloudFront forum. If you have any other use cases for using Lambda functions to dynamically update security groups, or even other networking configurations such as VPC route tables or ACLs, we’d love to hear about them!

Want more AWS Security how-to content, news, and feature announcements? Follow us on Twitter.

Author

Yeshwanth Kottu

Yeshwanth is a Systems Development Engineer at AWS in Cupertino, CA. With a focus on CloudFront and Lambda@Edge, he enjoys helping customers tackle challenges through cloud-scale architectures. Yeshwanth has an MS in Computer Systems Networking and Telecommunications from Northeastern University. Outside of work, he enjoys travelling, visiting national parks, and playing cricket.

New! Streamline existing IAM Access Analyzer findings using archive rules

Post Syndicated from Andrea Nedic original https://aws.amazon.com/blogs/security/new-streamline-existing-iam-access-analyzer-findings-using-archive-rules/

AWS Identity and Access Management (IAM) Access Analyzer generates comprehensive findings to help you identify resources that grant public and cross-account access. Now, you can also apply archive rules to existing findings, so you can better manage findings and focus on the findings that need your attention most.

You can think of archive rules as similar to email rules. You define email rules to automatically organize emails. With IAM Access Analyzer, you can define archive rules to automatically mark findings as intended access. Now, those rules can apply to existing as well as new IAM Access Analyzer findings. This helps you focus on findings for potential unintended access to your resources. You can then easily track and resolve these findings by reducing access, helping you to work towards least privilege.

In this post, first I give a brief overview of IAM Access Analyzer. Then I show you an example of how to create an archive rule to automatically archive findings for intended access. Finally, I show you how to update an archive rule to mark existing active findings as intended.

IAM Access Analyzer overview

IAM Access Analyzer helps you determine which resources can be accessed publicly or from other accounts or organizations. IAM Access Analyzer determines this by mathematically analyzing access control policies attached to resources. This form of analysis—called automated reasoning—applies logic and mathematical inference to determine all possible access paths allowed by a resource policy. This is how IAM Access Analyzer uses provable security to deliver comprehensive findings for potential unintended bucket access. You can enable IAM Access Analyzer in the IAM console by creating an analyzer for an account or an organization. Once you’ve created your analyzer, you can review findings for resources that can be accessed publicly or from other AWS accounts or organizations.

Create an archive rule to automatically archive findings for intended access

When you review findings and discover common patterns for intended access, you can create archive rules to automatically archive those findings. This helps you focus on findings for unintended access to your resources, just like email rules help streamline your inbox.

To create an archive rule

In the IAM console, choose Archive rules under Access Analyzer. Then, choose Create archive rule to display the Create archive rule page shown in Figure 1. There, you find the option to name the rule or use the name generated by default. In the Rule section, you define criteria to match properties of findings you want to archive. Just like email rules, you can add multiple criteria to the archive rule. You can define each criterion by selecting a finding property, an operator, and a value. To help ensure a rule doesn’t archive findings for public access, the criterion Public access is false is suggested by default.
 

Figure 1: IAM Access Analyzer create archive rule page where you add criteria to create a new archive rule

Figure 1: IAM Access Analyzer create archive rule page where you add criteria to create a new archive rule

For example, I have a security audit role external to my account that I expect to have access to resources in my account. To mark that access as intended, I create a rule to archive all findings for Amazon S3 buckets in my account that can be accessed by the security audit role outside of the account. To do this, I include two criteria: Resource type matches S3 bucket, and the AWS Account value matches the security audit role ARN. Once I add these criteria, the Results section displays the list of existing active findings the archive rule matches, as shown in Figure 2.
 

Figure 2: A rule to archive all findings for S3 buckets in an account that can be accessed by the audit role outside of the account, with matching findings displayed

Figure 2: A rule to archive all findings for S3 buckets in an account that can be accessed by the audit role outside of the account, with matching findings displayed

When you’re done adding criteria for your archive rule, select Create and archive active findings to archive new and existing findings based on the rule criteria. Alternatively, you can choose Create rule to create the rule for new findings only. In the preceding example, I chose Create and archive active findings to archive all findings—existing and new—that match the criteria.

Update an archive rule to mark existing findings as intended

You can also update an archive rule to archive existing findings retroactively and streamline your findings. To edit an archive rule, choose Archive rules under Access Analyzer, then select an existing rule and choose Edit. In the Edit archive rule page, update the archive rule criteria and review the list of existing active findings the archive rule applies to. When you save the archive rule, you can apply it retroactively to existing findings by choosing Save and archive active findings as shown in Figure 3. Otherwise, you can choose Save rule to update the rule and apply it to new findings only.

Note: You can also use the new IAM Access Analyzer API operation ApplyArchiveRule to retroactively apply an archive rule to existing findings that meet the archive rule criteria.


Figure 3: IAM Access Analyzer edit archive rule page where you can apply the rule retroactively to existing findings by choosing Save and archive active findings

Figure 3: IAM Access Analyzer edit archive rule page where you can apply the rule retroactively to existing findings by choosing Save and archive active findings

Get started

To turn on IAM Access Analyzer at no additional cost, open the IAM console. IAM Access Analyzer is available at no additional cost in the IAM console and through APIs in all commercial AWS Regions, AWS China Regions, and AWS GovCloud (US). To learn more about IAM Access Analyzer and which resources it supports, visit the feature page.

If you have feedback about this post, submit comments in the Comments section below. If you have questions about this post, start a new thread on the AWS IAM forum or contact AWS Support.

Want more AWS Security how-to content, news, and feature announcements? Follow us on Twitter.

Author

Andrea Nedic

Andrea is a Sr. Tech Product Manager for AWS Identity and Access Management. She enjoys hearing from customers about how they build on AWS. Outside of work, Andrea likes to ski, dance, and be outdoors. She holds a PhD from Princeton University.

New IAMCTL tool compares multiple IAM roles and policies

Post Syndicated from Sudhir Reddy Maddulapally original https://aws.amazon.com/blogs/security/new-iamctl-tool-compares-multiple-iam-roles-and-policies/

If you have multiple Amazon Web Services (AWS) accounts, and you have AWS Identity and Access Management (IAM) roles among those multiple accounts that are supposed to be similar, those roles can deviate over time from your intended baseline due to manual actions performed directly out-of-band called drift. As part of regular compliance checks, you should confirm that these roles have no deviations. In this post, we present a tool called IAMCTL that you can use to extract the IAM roles and policies from two accounts, compare them, and report out the differences and statistics. We will explain how to use the tool, and will describe the key concepts.

Prerequisites

Before you install IAMCTL and start using it, here are a few prerequisites that need to be in place on the computer where you will run it:

To follow along in your environment, clone the files from the GitHub repository, and run the steps in order. You won’t incur any charges to run this tool.

Install IAMCTL

This section describes how to install and run the IAMCTL tool.

To install and run IAMCTL

  1. At the command line, enter the following command:
    pip3 install git+ssh://[email protected]/aws-samples/[email protected]
    

    You will see output similar to the following.

    Figure 1: IAMCTL tool installation output

    Figure 1: IAMCTL tool installation output

  2. To confirm that your installation was successful, enter the following command.
    iamctl –h
    

    You will see results similar to those in figure 2.

    Figure 2: IAMCTL help message

    Figure 2: IAMCTL help message

Now that you’ve successfully installed the IAMCTL tool, the next section will show you how to use the IAMCTL commands.

Example use scenario

Here is an example of how IAMCTL can be used to find differences in IAM roles between two AWS accounts.

A system administrator for a product team is trying to accelerate a product launch in the middle of testing cycles. Developers have found that the same version of their application behaves differently in the development environment as compared to the QA environment, and they suspect this behavior is due to differences in IAM roles and policies.

The application called “app1” primarily reads from an Amazon Simple Storage Service (Amazon S3) bucket, and runs on an Amazon Elastic Compute Cloud (Amazon EC2) instance. In the development (DEV) account, the application uses an IAM role called “app1_dev” to access the S3 bucket “app1-dev”. In the QA account, the application uses an IAM role called “app1_qa” to access the S3 bucket “app1-qa”. This is depicted in figure 3.

Figure 3: Showing the “app1” application in the development and QA accounts

Figure 3: Showing the “app1” application in the development and QA accounts

Setting up the scenario

To simulate this setup for the purpose of this walkthrough, you don’t have to create the EC2 instance or the S3 bucket, but just focus on the IAM role, inline policy, and trust policy.

As noted in the prerequisites, you will switch between the two AWS accounts by using the AWS CLI named profiles “dev-profile” and “qa-profile”, which are configured to point to the DEV and QA accounts respectively.

Start by using this command:

mkdir -p iamctl_test iamctl_test/dev iamctl_test/qa

The command creates a directory structure that looks like this:
Iamctl_test
|– qa
|– dev

Now, switch to the dev folder to run all the following example commands against the DEV account, by using this command:

cd iamctl_test/dev

To create the required policies, first create a file named “app1_s3_access_policy.json” and add the following policy to it. You will use this file’s content as your role’s inline policy.

{
    "Version": "2012-10-17",
    "Statement": [
        {
            "Effect": "Allow",
            "Action": [
                "s3:Get*",
                "s3:List*"
            ],
            "Resource": [
         "arn:aws:s3:::app1-dev/shared/*"
            ]
        }
    ]
}

Second, create a file called “app1_trust_policy.json” and add the following policy to it. You will use this file’s content as your role’s trust policy.

{
  "Version": "2012-10-17",
  "Statement": [
    {
      "Effect": "Allow",
      "Principal": {
        "Service": "ec2.amazonaws.com"
      },
      "Action": "sts:AssumeRole"
    }
  ]
}

Now use the two files to create an IAM role with the name “app1_dev” in the account by using these command(s), run in the same order as listed here:

#create role with trust policy

aws --profile dev-profile iam create-role --role-name app1_dev --assume-role-policy-document file://app1_trust_policy.json

#put inline policy to the role created above
 
aws --profile dev-profile iam put-role-policy --role-name app1_dev --policy-name s3_inline_policy --policy-document file://app1_s3_access_policy.json

In the QA account, the IAM role is named “app1_qa” and the S3 bucket is named “app1-qa”.

Repeat the steps from the prior example against the QA account by changing dev to qa where shown in bold in the following code samples. Change the directory to qa by using this command:

cd ../qa

To create the required policies, first create a file called “app1_s3_access_policy.json” and add the following policy to it.

{
    "Version": "2012-10-17",
    "Statement": [
        {
            "Effect": "Allow",
            "Action": [
                "s3:Get*",
                "s3:List*"
            ],
            "Resource": [
         "arn:aws:s3:::app1-qa/shared/*"
            ]
        }
    ]
}

Next, create a file, called “app1_trust_policy.json” and add the following policy.

{
  "Version": "2012-10-17",
  "Statement": [
    {
      "Effect": "Allow",
      "Principal": {
        "Service": "ec2.amazonaws.com"
      },
      "Action": "sts:AssumeRole"
    }
  ]
}

Now, use the two files created so far to create an IAM role with the name “app1_qa” in your QA account by using these command(s), run in the same order as listed here:

#create role with trust policy
aws --profile qa-profile iam create-role --role-name app1_qa --assume-role-policy-document file://app1_trust_policy.json

#put inline policy to the role create above
aws --profile qa-profile iam put-role-policy --role-name app1_qa --policy-name s3_inline_policy --policy-document file://app1_s3_access_policy.json

So far, you have two accounts with an IAM role created in each of them for your application. In terms of permissions, there are no differences other than the name of the S3 bucket resource the permission is granted against.

You can expect IAMCTL to generate a minimal set of differences between the DEV and QA accounts, assuming all other IAM roles and policies are the same, but to be sure about the current state of both accounts, in IAMCTL you can run a process called baselining.

Through the process of baselining, you will generate an equivalency dictionary that represents all the known string patterns that reduce the noise in the generated deviations list, and then you will introduce a change into one of the IAM roles in your QA account, followed by a final IAMCTL diff to show the deviations.

Baselining

Baselining is the process of bringing two accounts to an “equivalence” state for IAM roles and policies by establishing a baseline, which future diff operations can leverage. The process is as simple as:

  1. Run the iamctl diff command.
  2. Capture all string substitutions into an equivalence dictionary to remove or reduce noise.
  3. Save the generated detailed files as a snapshot.

Now you can go through these steps for your baseline.

Go ahead and run the iamctl diff command against these two accounts by using the following commands.

#change directory from qa to iamctl-test
cd ..

#run iamctl init
iamctl init

The results of running the init command are shown in figure 4.

Figure 4: Output of the iamctl init command

Figure 4: Output of the iamctl init command

If you look at the iamctl_test directory now, shown in figure 5, you can see that the init command created two files in the iamctl_test directory.

Figure 5: The directory structure after running the init command

Figure 5: The directory structure after running the init command

These two files are as follows:

  1. iam.jsonA reference file that has all AWS services and actions listed, among other things. IAMCTL uses this to map the resource listed in an IAM policy to its corresponding AWS resource, based on Amazon Resource Name (ARN) regular expression.
  2. equivalency_list.jsonThe default sample dictionary that IAMCTL uses to suppress false alarms when it compares two accounts. This is where the known string patterns that need to be substituted are added.

Note: A best practice is to make the directory where you store the equivalency dictionary and from which you run IAMCTL to be a Git repository. Doing this will let you capture any additions or modifications for the equivalency dictionary by using Git commits. This will not only give you an audit trail of your historical baselines but also gives context to any additions or modifications to the equivalency dictionary. However, doing this is not necessary for the regular functioning of IAMCTL.

Next, run the iamctl diff command:

#run iamctl diff
iamctl diff dev-profile dev qa-profile qa
Figure 6: Result of diff command

Figure 6: Result of diff command

Figure 6 shows the results of running the diff command. You can see that IAMCTL considers the app1_qa and app1_dev roles as unique to the DEV and QA accounts, respectively. This is because IAMCTL uses role names to decide whether to compare the role or tag the role as unique.

You will add the strings “dev” and “qa” to the equivalency dictionary to instruct IAMCTL to substitute occurrences of these two strings with “accountname” by adding the follow JSON to the equivalency_list.json file. You will also clean up some defaults already present in there.

echo “{“accountname”:[“dev”,”qa”]}” > equivalency_list.json

Figure 7 shows the equivalency dictionary before you take these actions, and figure 8 shows the dictionary after these actions.

Figure 7: Equivalency dictionary before

Figure 7: Equivalency dictionary before

Figure 8: Equivalency dictionary after

Figure 8: Equivalency dictionary after

There’s another thing to notice here. In this example, one common role was flagged as having a difference. To know which role this is and what the difference is, go to the detail reports folder listed at the bottom of the summary report. The directory structure of this folder is shown in figure 9.

Notice that the reports are created under your home directory with a folder structure that mimics the time stamp down to the second. IAMCTL does this to maintain uniqueness for each run.

tree /Users/<username>/aws-idt/output/2020/08/24/08/38/49/
Figure 9: Files written to the output reports directory

Figure 9: Files written to the output reports directory

You can see there is a file called common_roles_in_dev_with_differences.csv, and it lists a role called “AwsSecurity***Audit”.

You can see there is another file called dev_to_qa_common_role_difference_items.csv, and it lists the granular IAM items from the DEV account that belong to the “AwsSecurity***Audit” role as compared to QA, but which have differences. You can see that all entries in the file have the DEV account number in the resource ARN, whereas in the qa_to_dev_common_role_difference_items.csv file, all entries have the QA account number for the same role “AwsSecurity***Audit”.

Add both of the account numbers to the equivalency dictionary to substitute them with a placeholder number, because you don’t want this role to get flagged as having differences.

echo “{“accountname”:[“dev”,”qa”],”000000000000”:[“123456789012”,”987654321098”]}” > equivalency_list.json

Now, re-run the diff command.

#run iamctl diff
iamctl diff dev-profile dev qa-profile qa

As you can see in figure 10, you get back the result of the diff command that shows that the DEV account doesn’t have any differences in IAM roles as compared to the QA account.

Figure 10: Output showing no differences after completion of baselining

Figure 10: Output showing no differences after completion of baselining

This concludes the baselining for your DEV and QA accounts. Now you will introduce a change.

Introducing drift

Drift occurs when there is a difference in actual vs expected values in the definition or configuration of a resource. There are several reasons why drift occurs, but for this scenario you will use “intentional need to respond to a time-sensitive operational event” as a reason to mimic and introduce drift into what you have built so far.

To simulate this change, add “s3:PutObject” to the qa app1_s3_access_policy.json file as shown in the following example.

{
    "Version": "2012-10-17",
    "Statement": [
        {
            "Effect": "Allow",
            "Action": [
                "s3:Get*",
                "s3:List*",
                "s3:PutObject"
            ],
            "Resource": [
         "arn:aws:s3:::app1-qa/shared/*"
            ]
        }
    ]
}

Put this new inline policy on your existing role “app1_qa” by using this command:

aws --profile qa-profile iam put-role-policy --role-name app1_qa --policy-name s3_inline_policy --policy-document file://app1_s3_access_policy.json

The following table represents the new drift in the accounts.

Action Account-DEV
Role name: app1_dev
Account-QA
Role name: app1_qa
s3:Get* Yes Yes
s3:List* Yes Yes
s3: PutObject No Yes

Next, run the iamctl diff command to see how it picks up the drift from your previously baselined accounts.

#change directory from qa to iamctL-test
cd ..
iamctl diff dev-profile dev qa-profile qa
Figure 11: Output showing the one deviation that was introduced

Figure 11: Output showing the one deviation that was introduced

You can see that IAMCTL now shows that the QA account has one difference as compared to DEV, which is what we expect based on the deviation you’ve introduced.

Open up the file qa_to_dev_common_role_difference_items.csv to look at the one difference. Again, adjust the following path example with the output from the iamctl diff command at the bottom of the summary report in Figure 11.

cat /Users/<username>/aws-idt/output/2020/09/18/07/38/15/qa_to_dev_common_role_difference_items.csv

As shown in figure 12, you can see that the file lists the specific S3 action “PutObject” with the role name and other relevant details.

Figure 12: Content of file qa_to_dev_common_role_difference_items.csv showing the one deviation that was introduced

Figure 12: Content of file qa_to_dev_common_role_difference_items.csv showing the one deviation that was introduced

You can use this information to remediate the deviation by performing corrective actions in either your DEV account or QA account. You can confirm the effectiveness of the corrective action by re-baselining to make sure that zero deviations appear.

Conclusion

In this post, you learned how to use the IAMCTL tool to compare IAM roles between two accounts, to arrive at a granular list of meaningful differences that can be used for compliance audits or for further remediation actions. If you’ve created your IAM roles by using an AWS CloudFormation stack, you can turn on drift detection and easily capture the drift because of changes done outside of AWS CloudFormation to those IAM resources. For more information about drift detection, see Detecting unmanaged configuration changes to stacks and resources. Lastly, see the GitHub repository where the tool is maintained with documentation describing each of the subcommand concepts. We welcome any pull requests for issues and enhancements.

If you have feedback about this post, submit comments in the Comments section below. If you have questions about this post, start a new thread on the AWS IAM forum or contact AWS Support.

Want more AWS Security how-to content, news, and feature announcements? Follow us on Twitter.

Author

Sudhir Reddy Maddulapally

Sudhir is a Senior Partner Solution Architect who builds SaaS solutions for partners by day and is a tech tinkerer by night. He enjoys trips to state and national parks, and Yosemite is his favorite thus far!

Author

Soumya Vanga

Soumya is a Cloud Application Architect with AWS Professional Services in New York, NY, helping customers design solutions and workloads and to adopt Cloud Native services.

Enhance programmatic access for IAM users using a YubiKey for multi-factor authentication

Post Syndicated from Edouard Kachelmann original https://aws.amazon.com/blogs/security/enhance-programmatic-access-for-iam-users-using-yubikey-for-multi-factor-authentication/

Organizations are increasingly providing access to corporate resources from employee laptops and are required to apply the correct permissions to these computing devices to make sure that secrets and sensitive data are adequately protected. The combination of Amazon Web Services (AWS) long-term credentials and a YubiKey security token for multi-factor authentication (MFA) is an option for providing secure programmatic access to AWS for organizations that aren’t yet ready or able to use identity federation. For example, a user should be able to list AWS Identity and Access Management (IAM) roles with their default programmatic access, but would be required to provide MFA to assume an IAM role.

In this blog post, we show you how to use a YubiKey token for MFA with the AWS Command Line Interface (AWS CLI) to create temporary credentials with the permissions that developers need to perform tasks. The user will configure the long-term credentials and then temporarily assume a role with broader permissions by using MFA when needed. MFA adds extra security, because it requires users to provide second-factor authentication from an AWS-supported MFA mechanism in addition to static security credentials such as their user name and password.

The goal for any organization is to move to the recommended best practices for allowing individual programmatic access that include using temporary security credentials that aren’t stored with the user, but are generated dynamically and provided to the user when requested, such as identity federation due to the temporary nature of those credentials. If your organization uses AWS Single Sign-On (AWS SSO) along with an identity provider (IdP) such as Okta, Azure Active Directory (AD), or AWS Managed Microsoft AD, you can then use the instructions from this earlier blog post to leverage the AWS CLI v2 native integration with AWS SSO and take advantage of the multi-factor authentication support of your IdP.

Overview

This post describes the configuration of IAM users and roles and initialization of the YubiKey token as an MFA device by an administrator, and then how developers can use the YubiKey device to retrieve temporary credentials and assume a role with elevated permissions within the AWS CLI.

The overall process flow looks like this:

  1. Create an IAM user with programmatic access, MFA, and a policy that allows you to assume a more privileged IAM role. The user will retrieve a Time-based One-time Password (TOTP) token code by using a YubiKey as MFA.
  2. Assume the more privileged role, which is restricted by an MFA conditional, by using the TOTP token code.

Figure 1 shows the steps of the process.

Figure 1: A visual overview of the steps to assume roles with elevated permissions by using a YubiKey for MFA

Figure 1: A visual overview of the steps to assume roles with elevated permissions by using a YubiKey for MFA

Prerequisites

To get started you need:

  • An AWS account.
  • A YubiKey (available on Amazon.com). YubiKey 4 and 5 series are compatible, because they support the required OATH application.

    Note: The Yubico Security Keys (the blue tokens) aren’t supported, because they lack the OATH application. If you already have a corporate YubiKey device, this capability might have been disabled.

  • To complete the process for:

Notes:

  • AWS CLI v2 doesn’t yet support Universal 2nd factor (U2F) MFA. As a workaround, we use a YubiKey as a virtual device MFA.
  • OATH (Initiative for Open Authentication) is an organization that specifies two open authentication standards: TOTP and HMAC-based One-time Password (HOTP). For this solution, we use the TOTP standard.

Getting started

Initializing YubiKey for MFA

The following steps show you, as cloud administrator, how to initialize the YubiKey as a virtual MFA device and configure an IAM user that can assume a role with elevated permissions, on the condition that the user is using an MFA device. In this example, your developers will assume a role with permissions to access Amazon Elastic Compute Cloud (Amazon EC2).

To configure the IAM user and initialize the YubiKey device as MFA

  1. Create a role with elevated permissions that your developers can assume.
    1. Sign in to the AWS IAM console, and in the right-hand pane, choose Roles. Then choose Create role.

      Figure 2: Create a role in the IAM console

      Figure 2: Create a role in the IAM console

    2. For the type of trusted entity, choose Another AWS account. Enter your account ID, which you can find by using these methods, described in the IAM User Guide. Choose Next:Permissions.

      Figure 3: Select the type of trusted entity and provide the account ID

    3. Search for the AmazonEC2FullAccess policy, and select the check box next to it. Choose Next:Tags, and add relevant tags if needed. Choose Next:Review.
    4. Name the role developer-ec2-mfa, and then choose Create role.
    5. Go back to the role you just created. Change the maximum session duration value to limit how long the developer’s session can be valid after assuming the role. For this example, we set the duration to 1 hour (3,600 seconds) by using a custom value. Limit this duration to abide by your organization’s recommended authentication time.
    6. Take note of the Amazon Resource Name (ARN) for the new role as shown on the summary page.

      Figure 4: Summary page of the new role

      Figure 4: Summary page of the new role

  2. Create a new IAM policy that provides a limited scope of actions for users when they use their long-term credentials.
    1. Navigate to the AWS IAM console, and in the navigation pane, choose Policies. Choose Create policy.

      Figure 5: Create a policy in the IAM console

      Figure 5: Create a policy in the IAM console

    2. Because we’ve already written the policy in JSON, you don’t need to use the Visual Editor, so you can choose the JSON tab and paste the content of the following JSON policy document (remember to replace the placeholder for the role ARN).Following the least privilege approach, add only the Amazon Resource Names (ARNs) of the role or roles with required elevated permissions that the developer will be able to assume. In this case, use the developer-ec2-mfa ARN for the role that you created previously.
      {
         "Version": "2012-10-17",
         "Statement": [
            {
               "Sid": "",
               "Effect": "Allow",
               "Action": "sts:AssumeRole",
               "Resource": <Elevated Role ARN(s)>,
               "Condition": {
                  "Bool": {
                     "aws:multifactorAuthPresent": true
                  }
               }
            }
         ]
      }
      

      Note: The condition “aws:MultiFactorAuthPresent”: “true” requires that the user who assumes the role has been authenticated with an AWS MFA device.

    3. Choose Review policy.
    4. Name the policy yubi-policy-mfa-level-one. Choose Create policy.
  3. Create a new IAM group that lets you specify permissions for multiple users and makes it easier to manage the permissions for those users.
    1. Navigate to the IAM console, and in the navigation pane, choose Groups. Choose Create New Group.

      Figure 6: Create a group in the IAM console

      Figure 6: Create a group in the IAM console

    2. Enter developers-mfa as the group name. Choose Next Step.
    3. On the Attach Policy screen, in the filter box, search for the policy yubi-policy-mfa-level-one that you created in the previous step. Make sure you select the check box next to the policy, and then choose Next Step.

      Figure 7: Attach the policy to the IAM group

      Figure 7: Attach the policy to the IAM group

    4. Review the group information, and then choose Create Group.
  4. Create a user in IAM for the developer using the AWS CLI.
    1. Navigate to the IAM console and in the navigation pane, choose Users. Choose Add user.
    2. On the Add user screen, enter the name for your user. In this example, our developer is named JohnDoe. For Access type, select the check box next to Programmatic access. Choose Next: Permissions.

      Figure 8: Create an IAM user with programmatic access

      Figure 8: Create an IAM user with programmatic access

    3. For permissions, select Add user to group, and select the developers-mfa group. Choose Next: Tags.
    4. Add the relevant tags if needed, and then choose Next: Review.
    5. Review the user configuration, and then choose Create user.
    6. Make sure you save the access key ID and secret access key to share with your user. Choose Close.
  5. Assign an MFA device to the user.
    1. Go back to the Users section of the IAM console. Choose the IAM user that you created previously, and go to the Security credentials tab. For Assigned MFA device, choose Manage.

      Figure 9: Assign MFA device to the IAM user

      Figure 9: Assign MFA device to the IAM user

    2. Select Virtual MFA device, because the AWS CLI doesn’t yet support U2F MFA. Choose Continue.

      Figure 10: Select the Virtual MFA device type

      Figure 10: Select the Virtual MFA device type

    3. Instead of using the QR code, choose Show secret key.

      Note: The secret key is a randomly generated string shared between IAM and the physical YubiKey. It is used to generate a one-time password using a hash function with the current timestamp.


      Figure 11: Retrieve the secret key on the virtual MFA device configuration page

      Figure 11: Retrieve the secret key on the virtual MFA device configuration page

    4. Copy the secret key to use in the next step as the MFA_SECRET to configure the MFA device.
  6. To obtain the TOTP token codes from the YubiKey to synchronize the key with the IAM user, do the following.
    1. Insert the YubiKey token in your USB port, and verify that the OATH application is enabled for your YubiKey by running the following command and looking for Enabled USB interfaces: OTP+FIDO+CCID in the output.
      $ ykman info
      
      Device type: YubiKey 5 NFC
      Serial number: 123456789
      Firmware version: 5.2.4
      Form factor: Keychain (USB-A)
      Enabled USB interfaces: OTP+FIDO+CCID
      NFC interface is enabled.
      
      Applications USB NFC
      OTP Enabled Enabled
      FIDO U2F Enabled Enabled
      OpenPGP Enabled Enabled
      PIV Enabled Enabled
      OATH Enabled Enabled
      FIDO2 Enabled Enabled
      

    2. For each MFA device, you need to generate a unique identifier that will be used during the process. We recommend that you create this identifier based on the ARN of the IAM user, by using the following template.
      arn:aws:iam::<ACCOUNT_ID>:mfa/<IAM_USERNAME>
      

    3. Add a new credential to your YubiKey based on the MFA device ARN. Use the MFA_SECRET that you copied in the previous step (step 5).
      ykman oath add -t arn:aws:iam::<ACCOUNT_ID>:mfa/<IAM_USERNAME> <MFA_SECRET>
      

    4. Obtain two TOTP token codes by using the following command (remember to replace the placeholder for the <MFA device ARN>). Wait up to 30 seconds for the device to generate the second token code (you will be prompted to touch the token).
      ykman oath code <MFA device ARN>
      

    5. After obtaining each of the TOTP token codes, go back to the IAM console where you were setting up the virtual MFA device, and enter the code in the MFA code box. After entering the two MFA codes, choose Assign MFA.

      Figure 12: Enter the two consecutive YubiKey codes in the virtual MFA device configuration page

      Figure 12: Enter the two consecutive YubiKey codes in the virtual MFA device configuration page

  7. You can then provide the following information to your developer:
    1. The YubiKey device along with the generated MFA device ARN
    2. The ARNs for the roles that will be assumed
    3. The long-term AWS credentials

Assuming a role with the YubiKey as MFA

The following steps show how you, as a developer, can retrieve temporary credentials using the YubiKey device as MFA, and assume a role with wider permissions. You can do this after the YubiKey device, one or more role ARNs, and long-term credentials have been shared with you by the cloud administrator.

To assume a role with broader permissions by using YubiKey

  1. As part of the prerequisites, you should have the AWS CLI v2 already installed. Now configure the default profile with the long-term credentials provided by your cloud administrator, by using the following command.
    $ aws configure
    
    AWS Access Key ID [None]: <Enter your AWS access key>
    AWS Secret Access Key [None]: <Enter your AWS secret access key>
    Default region name [None]: <Enter your AWS default region>
    Default output format [None]: <Enter your output default format>
    

  2. Obtain a TOTP code from YubiKey (you will be prompted to touch the token). Submit your request immediately after generating the codes. If you generate the codes and then wait too long to submit the request, the code won’t be valid anymore.
    ykman oath code arn:aws:iam::<ACCOUNT_ID>:mfa/<IAM_USERNAME>
    

  3. Using the MFA token code you obtained by using the YubiKey, assume the relevant role that will provide access to larger permissions. In our example, the ARN is for the role developer-ec2-mfa that was provided by the IAM administrator. Enter a role session name that will uniquely identify a session when the same role is assumed by different principals.
    aws sts assume-role --role-arn <Role ARN> --role-session-name <Role Name> --serial-number <MFA device ARN> --token-code <token code> --duration-seconds 3600 
    

    Note: The user should only have access to sts:AssumeRole for a specific set of roles. Here we chose the session duration of one hour. You can edit the session duration so the developer can authenticate for the duration of a workday (the default value is 1 hour and can be up to 12 hours). Limit this duration to abide by your organization’s recommended authentication time.

    You should see the following output.

    {
       "AssumedRoleUser": {
          "AssumedRoleId": "ABCD123ABCDEFGHIJKLMN:<role-session-name>",
          "Arn": "arn:aws:sts::<ACCOUNT_ID>:assumed-role/developer-ec2-mfa/<role-session-name>"
       },
       "Credentials": {
          "SecretAccessKey": <aws_secret_access_key>,
          "SessionToken": <aws_session_token>,
          "Expiration": "2020-07-13T19:24:20Z",
          "AccessKeyId": <aws_access_key_id>
       }
    }
    

  4. Edit a new AWS CLI profile named johndoe-developer-role as seen following. Copy the access key and secret key that were retrieved as temporary credentials from the get-session-token command. Then set the additional parameter aws_session_token, which was returned along with the temporary credentials. Edit your CLI with the information for the new role.
    aws configure --profile johndoe-developer-role
    aws configure --profile johndoe-developer-role set aws_session_token <Session Token> 
    

  5. Attempt to make a call to relevant services that are allowed by the newly assumed role. Here’s an example using the Amazon EC2 API to describe the EC2 instances.
    aws --profile johndoe-developer-role ec2 describe-instances
    

The developer now has access to the larger permissions set through the assumed role for the next hour.

Summary

In this post, we introduced the capability to further secure long-term AWS credentials with a YubiKey for MFA, for organizations that are still using long-term credentials. These credentials are stored in the ~/.aws/credentials file. If an unauthorized user was able to retrieve these long-term credentials, they wouldn’t be able to use them, because the user needs to have the physical MFA in order to assume a role with broader permissions. The steps in this blog post can be converted to a script that your developers can use repeatedly to simplify the process.

In general, we recommend that all customers move away from using IAM users and static credentials and instead use IAM roles and temporary credentials wherever possible. An easy way to get started down that road is by using AWS SSO for identity federation.

If you have feedback about this post, submit comments in the Comments section below. If you have questions about this post, start a new thread on the AWS IAM forum or contact AWS Support.

Want more AWS Security how-to content, news, and feature announcements? Follow us on Twitter.

Author

Edouard Kachelmann

Edouard is an Enterprise Solutions Architect at Amazon Web Services. He is a passionate technology enthusiast who enjoys working with customers and helping them build innovative solutions. Prior to his work at AWS, Edouard worked for the French National Cybersecurity Agency, sharing its security expertise and assisting government departments and operators of vital importance. In his free time, Edouard likes to explore new places to eat, try new French recipes, and play with his kid.

Author

Anthony Pasquariello

Anthony is an Enterprise Solutions Architect based in New York City. He provides technical consultation to customers during their cloud journey, especially around security best practices. He has an MS and BS in electrical & computer engineering from Boston University. In his free time, he enjoys ramen, writing nonfiction, and philosophy.

How to use trust policies with IAM roles

Post Syndicated from Jonathan Jenkyn original https://aws.amazon.com/blogs/security/how-to-use-trust-policies-with-iam-roles/

November 3, 2022: We updated this post to fix some syntax errors in the policy statements and to add additional use cases.

August 30, 2021: This post is currently being updated. We will post another note when it’s complete.


AWS Identity and Access Management (IAM) roles are a significant component of the way that customers operate on Amazon Web Service (AWS). In this post, we will dive into the details of how role trust policies work and how you can use them to restrict how your roles are assumed.

There are several different scenarios where you might use IAM roles on AWS:

  • An AWS service or resource accesses another AWS resource in your account – When an AWS resource needs access to other AWS services, functions, or resources, you can create a role that has appropriate permissions for use by that AWS resource. Services like AWS Lambda and Amazon Elastic Container Service (Amazon ECS) assume roles to deliver temporary credentials to your code that’s running in them.
  • An AWS service generates AWS credentials to be used by devices running outside AWS
    AWS IAM Roles Anywhere, AWS IoT Core, and AWS Systems Manager hybrid instances can deliver role session credentials to applications, devices, and servers that don’t run on AWS.
  • An AWS account accesses another AWS account – This use case is commonly referred to as a cross-account role pattern. It allows human or machine IAM principals from one AWS account to assume this role and act on resources within a second AWS account. A role is assumed to enable this behavior when the resource in the target account doesn’t have a resource-based policy that could be used to grant cross-account access.
  • An end user authenticated with a web identity provider or OpenID Connect (OIDC) needs access to your AWS resources – This use case allows identities from Facebook or OIDC providers such as GitHub, Amazon Cognito, or other generic OIDC providers to assume a role to access resources in your AWS account.
  • A customer performs workforce authentication using SAML 2.0 federation – This occurs when customers federate their users into AWS from their corporate identity provider (IdP) such as Okta, Microsoft Azure Active Directory, or Active Directory Federation Services (ADFS), or from AWS Single Sign-On (AWS SSO).

An IAM role is an IAM principal whose entitlements are assumed in one of the preceding use cases. An IAM role differs from an IAM user as follows:

  • An IAM role can’t have long-term AWS credentials associated with it. Rather, an authorized principal (an IAM user, AWS service, or other authenticated identity) assumes the IAM role and inherits the permissions assigned to that role.
  • Credentials associated with an IAM role are temporary and expire.
  • An IAM role has a trust policy that defines which conditions must be met to allow other principals to assume it.

Managing access to IAM roles

Let’s dive into how you can control access to IAM roles by understanding the policy types that you can apply to an IAM role.

There are three circumstances where policies are used for an IAM role:

  • Trust policy – The trust policy defines which principals can assume the role, and under which conditions. A trust policy is a specific type of resource-based policy for IAM roles. The trust policy is the focus of the rest of this blog post.
  • Identity-based policies (inline and managed) – These policies define the permissions that the user of the role is able to perform (or is denied from performing), and on which resources.
  • Permissions boundary – A permissions boundary is an advanced feature for using a managed policy to set the maximum permissions for a role. A principal’s permissions boundary allows it to perform only the actions that are allowed by both its identity-based permissions policies and its permissions boundaries. You can use permissions boundaries to delegate permissions management tasks, such as IAM role creation, to non-administrators so that they can create roles in self-service.

For the rest of this post, you’ll learn how to enforce the conditions under which roles can be assumed by configuring their trust policies.

An example of a simple trust policy

A common use case is when you need to provide access to a role in account A to assume a role in Account B. To facilitate this, you add an entry in the role in account B’s trust policy that allows authenticated principals from account A to assume the role through the sts:AssumeRole API call.

Important: If you reference :root in an IAM role’s trust policy, you might allow more principals to assume your role than you intended, so it’s a best practice to use the Principal element or conditions to only allow specific principals or paths to assume a role. Later in this post, we show you how to limit this access to more specific principals.

{
  "Version": "2012-10-17",
  "Statement": [
    {
      "Effect": "Allow",
      "Principal": {
        "AWS": "arn:aws:iam::111122223333:root"
      },
      "Action": "sts:AssumeRole"
    }
  ]
}

This trust policy has the same structure as other IAM policies with Effect, Action, and Condition components. It also has the Principal element, but no Resource element. This is because the resource is the IAM role itself. For the same reason, the Action element will only ever be set to relevant actions for role assumption.

Note: The suffix :root in the policy’s Principal element equates to the principals in the account, not the root user of that account.

Using the Principal element to limit who can assume a role

In a trust policy, the Principal element indicates which other principals can assume the IAM role. In the preceding example, 111122223333 represents the AWS account number for the auditor’s AWS account. This allows a principal in the 111122223333 account with sts:AssumeRole permissions to assume this role.

To allow a specific IAM role to assume a role, you can add that role within the Principal element. For example, the following trust policy would allow only the IAM role LiJuan from the 111122223333 account to assume the role it is attached to.

{
  "Version": "2012-10-17",
  "Statement": [
    {
      "Effect": "Allow",
      "Principal": {
        "AWS": "arn:aws:iam::111122223333:role/LiJuan"
      },
      "Action": "sts:AssumeRole"
    }
  ]
}

The principals included in the Principal element can be a principal defined within the IAM documentation, and can refer to an AWS or a federated principal. You can’t use a wildcard (“*” or “?”) within the Principal element for a trust policy, other than one case which we will cover later. You must define precisely which principal you are referring to because there is a translation that occurs when you submit your trust policy that ties it to each principal’s ID. For more information, see Why is there an unknown principal format in my IAM resource-based policy?

If an IAM role has a principal from the same account in its trust policy directly, that principal doesn’t need an explicit entitlement in its identity-attached policy to assume the role.

Using the Condition element in a trust policy

The Condition element in a role trust policy sets additional requirements for the Principal trying to assume the role. The Condition element is a flexible way to reduce the set of users that are able to assume the role without necessarily specifying the principals.

Condition elements of role trust policies behave identically to condition elements in identity-based policies and other resource policies on AWS.

Using SAML identity federation on AWS

Federated users from a SAML 2.0 compliant IdP are given permissions to access AWS accounts through the use of IAM roles. The mapping of which enterprise users get which roles is established within the directory used by the SAML 2.0 IdP and is placed inside the signed SAML assertion by the IdP.

The Principal element of a role trust policy for SAML federation contains the ARN of the SAML IdP in the same AWS account. IdPs in other accounts can’t be referenced. Roles assumed by SAML federation can use SAML-specific condition keys in their role trust policy.

A role trust policy for a role to be assumed by SAML places the ARN of the SAML IDP in the Principal element, and checks the intended audience (SAML:aud) of the SAML assertion. Setting the audience condition is important because it means that only SAML assertions intended for AWS can be used to assume a role:

{
    "Version": "2012-10-17",
    "Statement": {
      "Effect": "Allow",
      "Action": "sts:AssumeRoleWithSAML",
      "Principal": {"Federated": "arn:aws:iam::account-id:saml-provider/PROVIDER-NAME"},
      "Condition": {"StringEquals": {"SAML:aud": "https://signin.aws.amazon.com/saml"}}
    }
  }

The AWS documentation covers creating roles for SAML 2.0 federation in detail. For information about how to manage the role trust policies of roles assumed by SAML from multiple AWS Regions for resiliency, see the blog post How to use regional SAML endpoints for failover.

For federating workforce access to AWS, you can use AWS IAM Identity Center (successor to AWS Single Sign-On) to broker access to IAM roles through SAML. Roles managed by IAM Identity Center can’t have their trust policy modified by IAM directly.

SAML IDPs used in a role trust policy must be in the same account as the role is.

Assuming a role with WebIdentity

Roles can also be assumed with tokens issued by web identity providers and OpenID Connect (OIDC) compliant providers.

After you’ve created an OpenID Connect identity provider in your account, you can configure roles to be assumed by that OpenID Connect identity provider.

The following is a trust policy that allows a role to be assumed by the identity provider auth.example.com where the value of the sub claim is equal to Administrator and the aud is equal to MyappWebIdentity.

{
    "Version": "2012-10-17",
    "Statement": [
        {
            "Effect": "Allow",
            "Principal": {
                "Federated": "arn:aws:iam::11112222333:oidc-provider/auth.example.com"
            },
            "Action": "sts:AssumeRoleWithWebIdentity",
            "Condition": {
                "StringEquals": {
                    "auth.example.com:sub": "Administrator",
  "auth.example.com:aud": "MyappWebIdentity"
                }
            }
        }
    ]
}

The condition keys used for roles assumed by OIDC identity providers are always prefixed with the name of the OIDC identity provider (for example, auth.example.com). So to use claims in the ID Token like aud, sub, and amr, they are prefixed to become auth.example.com:aud, auth.example.com:sub, and auth.example.com:amr, respectively, in a trust policy to be evaluated as a condition key. Only ID Token claims listed in the STS documentation can be used in role trust policies as condition keys.

It’s important to set the:aud condition in role trust policies to help verify that the tokens being used to assume roles in your AWS accounts are tokens that are intended to be used for that purpose, and are for your application or tenant if your web identity provider is a public or multi-tenant identity provider, such as Google or GitHub.

Amazon Elastic Kubernetes Service (Amazon EKS) clusters have OIDC identity provider capabilities and can be used to assume roles in AWS accounts.

OIDC identity providers used to assume a role must be in the same AWS account as the role.

Limiting role use based on an identifier

At times you might need to give a third-party access to your AWS resources. Suppose that you hired a third-party company, Example Corp, to monitor your AWS account and help optimize costs. To track your daily spending, Example Corp needs access to your AWS resources, so you allow them to assume an IAM role in your account. However, Example Corp also tracks spending for other customers, and there could be a configuration issue in the Example Corp environment that allows another customer to compel Example Corp to attempt to take an action in your AWS account, even though that customer should only be able to take the action in their own account. This is referred to as the cross-account confused deputy problem. This section shows you a way to mitigate this risk.

The following trust policy requires that principals from the Example Corp AWS account, 444455556666, have provided a special string, called an external ID, when making their request to assume the role. Adding this condition reduces the risk that someone from the 444455556666 account will assume this role by mistake. This string is configured by specifying an ExternalID conditional context key.

External IDs should be generated by the third-party assuming your role, like Example Corp, and associated with the other assume role calls to assume a given customer’s role by Example Corp. By doing this, other Example Corp customers won’t be able to compel Example Corp to assume your roles on their behalf because they can’t force Example Corp to use your external ID through their tenant even if they become aware of your external ID.

{
  "Version": "2012-10-17",
  "Statement": [
    {
      "Effect": "Allow",
      "Principal": {
        "AWS": "arn:aws:iam::444455556666:role/ExampleCorpRole"
      },
      "Action": "sts:AssumeRole",
      "Condition": {
        "StringEquals": {
          "sts:ExternalId": "ExampleUniquePhrase"
        }
      }
    }
  ]
}

The external IDs should be unique for every customer of a service provider. AWS doesn’t treat external IDs as secrets—they can be seen by anyone with entitlements to view a role’s trust policy.

If you assume roles in your customers’ accounts, it’s a best practice to generate unique external ID values on behalf of your customers and associate them with your customers, and you shouldn’t allow your customers to specify an external ID.

Roles with the sts:ExternalId condition can’t be assumed through the AWS console, unless there is another Allow statement without that condition.

Limiting role use based on IP addresses or CIDR ranges

You can put IP address conditions into a role trust policy to limit the networks from which a role can be assumed. For example, you can limit role assumption to a corporate network or VPN range. The following example trust policy will only allow the role to be assumed if the call is made from within the 203.0.113.0/24 CIDR range.

{
  "Version": "2012-10-17",
  "Statement": [
    {
      "Effect": "Allow",
      "Principal": {
        "AWS": "arn:aws:iam::111122223333:role/IpBoundedRole"
      },
      "Action": "sts:AssumeRole",
      "Condition": {
        "IpAddress": {
          "aws:SourceIp": "203.0.113.0/24"
        }
      }
    }
  ]
}

By using aws:SourceIP in the trust policy, you limit where the role can be assumed from, but this doesn’t limit where the credentials can be used from after they are assumed. To restrict where the credentials can be used from, you can use aws:SourceIP as a condition within the principal’s identity-based policy or the service control policies that apply to it. For more information on restricting where credentials can be used from, see Establishing a data perimeter on AWS.

Limiting role use based on tags

You can use IAM tagging capabilities to build flexible and adaptive trust policies. You can use an attribute-based access control (ABAC) model for assuming IAM roles in the same way that you can for accessing objects in an Amazon Simple Storage Service (Amazon S3) bucket. You can build trust policies that only permit principals that have already been tagged with a specific key and value to assume a specific role. The following example trust policy requires that IAM principals in the AWS account 111122223333 have the value of their principal tag department match the value of the IAM role’s tag owningDepartment.

{
  "Version": "2012-10-17",
  "Statement": [
    {
      "Effect": "Allow",
      "Principal": {
        "AWS": "arn:aws:iam::111122223333:root"
      },
      "Action": "sts:AssumeRole",
      "Condition": {
        "StringEquals": {
          "aws:PrincipalTag/department": "${aws:ResourceTag/owningDepartment}"
        }
      }
    }
  ]
}

As an example, in the preceding policy, if the role is tagged with an owningDepartment of finance, then only principals within account 111122223333 who have a tag department with a value of finance will be able to assume the role.

When using ABAC, it’s important to have governance around who can set tags on resources, principals, and sessions. If someone can change or modify tags on principals, resources, or sessions, they might be able to access resources that you didn’t intend them to. Principals from AWS accounts outside of your control might have different tag governance practices than your own organization, and you should take this into account when using principal tags as part of cross-account role assumption. You can use tag policies to help govern tags within your organization, and later in this blog post, we show how to manage tags set on assumption by using role trust policies.

For more information, see the Attribute-Based Access Control (ABAC) for AWS page.

Limiting role assumption to only principals within your organization

Since its announcement in 2016, the vast majority of enterprise customers that we work with use AWS Organizations. This AWS service allows you to create an organizational structure for your accounts by creating logical boundaries/organizational units that allow grouping of AWS accounts that need common guardrails applied. You can use the PrincipalOrgID condition key to limit the use of roles solely to principals within your organization in AWS Organizations.

The following example shows a policy that denies assumption of this role except by AWS services or by principals that are a member of the o-abcd12efg1 organization. This statement can be broadly applied to prevent someone outside your AWS organization from assuming your roles.

{
    "Version": "2012-10-17",
    "Statement": [
        {
            "Effect": "Deny",
            "Principal": {
                "AWS": "*"
            },
            "Action": "sts:AssumeRole",
            "Condition": {
                "StringNotEquals": {
                    "aws:PrincipalOrgID": "o-abcd12efg1"
                },
                "Bool": {
                    "aws:PrincipalIsAWSService": "false"
                }
            }
        }
    ]
}

In the preceding example, the StringNotEquals operator denies access to this role by a principal that doesn’t belong to a member account of the specified organization.

AWS roles that you intend to use with AWS services need to be able to be assumed by those AWS services. In the preceding example, we added the aws:PrincipalIsAWSService condition key so that an AWS service principal isn’t impacted by the explicit Deny statement. All principals, including AWS services, are still required to have an explicit Allow statement in a role’s trust policy to assume that role. Requests to customer resources by AWS service principals do so with the aws:PrincipalIsAWSService condition key set to a value of true, which means that the preceding Deny statement won’t apply to a service principal, but an Allow statement will let a service principal assume the role.

You can also use the aws:PrincipalOrgPaths condition key to limit role assumption to member accounts within a specific OU of an organization if you want role assumption to be more fine-grained.

Enforcing invariants with Deny statements

Only allowing principals in your organization to assume your roles is an example of a security invariant. Security invariants are security principles that you want to always apply. Deny statements are useful in trust policies to restrict conditions under which you would never want a role to be assumable. In AWS authorization, the presence of an applicable Deny statement overrides an applicable Allow statement. So having a Deny statement with conditions in it that should never be met such as allowing a role to be assumed by a principal outside of your organization is powerful.

Setting the source identity on role sessions to help trace actions in CloudTrail

You can configure a role session to have a source identity when assumed. This is most common when customers federate users into IAM through SAML2.0 or Web Identity/OpenID Connect to assume roles. You can configure your IdP to set the SourceIdentity attribute on the role session. Setting the source identity causes AWS CloudTrail logs for actions taken by this role session to contain the source identity so that you can trace actions taken by roles back to the user that assumed them. The SourceIdentity attribute also follows that role session if it assumes another role.

To set a source identity, you need to grant the IdP the sts:SetSourceIdentity entitlement in the role’s trust policy.

{
    "Version": "2012-10-17",
    "Statement": {
      "Effect": "Allow",
      "Action": ["sts:AssumeRoleWithSAML","sts:SetSourceIdentity"],
      "Principal": {"Federated": "arn:aws:iam::111122223333:saml-provider/PROVIDER-NAME"},
      "Condition": {"StringEquals": {"SAML:aud": "https://signin.aws.amazon.com/saml"}}
    }
  }

In order for a role session that has a SourceIdentity set to assume a second role, it must also have the sts:SetSourceIdentity entitlement in that second role’s trust policy. If it doesn’t, the first role won’t be able to assume the second role.

You can also use the sts:SourceIdentity condition key to enforce that the SourceIdentity attribute that is being set conforms to an expected standard:

            "Condition": {
                "StringLike": {"sts:SourceIdentity": "*@example.org"}
            }

In the preceding example, for the Condition element, all requests must contain @example.org.

Setting tags on role sessions

You can set tags on role sessions, which can then be used in IAM and resource policy authorization decisions. Tags on role sessions are evaluated with the same condition key that tags on IAM roles are: aws:PrincipalTag/TagKey. Tag values that are set when a role is assumed have precedence over tag values that are attached to the role.

If you’re basing authorization on principal tags in your AWS accounts, it’s important that you control who can set the session tags and principal tags in your accounts so that access isn’t granted to unintended parties.

The ability to tag a role session must be granted in a role’s trust policy using the sts:TagSession permission, and you can use conditions and condition keys to restrict which tags can be set to which values.

The following is an example statement for a role trust policy that allows a principal from account 111122223333 to assume the role and requires that the three session tags for Project, CostCenter and Department are set. The Department tag must have a value of either Engineering or Marketing. The third Condition statement allows the Project and Department tags to be set as transitive when the role is assumed. Because conditions for the tags are in the same Allow statement as the AssumeRole entitlement, these tags are required to be set.

        {
            "Effect": "Allow",
            "Action": ["sts:TagSession","sts:AssumeRole"],
            "Principal": {"AWS": "arn:aws:iam::111122223333:root"},
            "Condition": {
                "StringLike": {
                    "aws:RequestTag/Project": "*",
                    "aws:RequestTag/CostCenter": "*"
                },
                "StringEquals": {
                    "aws:RequestTag/Department": [
                        "Engineering",
                        "Marketing"
                    ]
                },
                "ForAllValues:StringEquals": {
                    "sts:TransitiveTagKeys": [
                        "Project",
                        "Department"
                    ]
                }
            }
        }

When a role session assumes another role, transitive tags from the calling role session are set to the same value within the subsequent role session. For more information, see Chaining roles with session tags.

You can use Deny statements with the sts:TagSession operation to restrict certain tags from being set. In the following example, attempts to tag a session with an Admin tag would be denied:

{
    "Effect": "Deny",
    "Action": "sts:TagSession",
    "Principal": {"AWS": "*"},
    "Condition": {
        "Null": {
            "aws:RequestTag/Admin": false
        }
    }
}

In the following example statements, we deny tagging operations on role sessions where the Team tag is equal to Admin, but we allow the setting of a different tag value.

{
    "Effect": "Deny",
    "Action": "sts:TagSession",
    "Principal": {"AWS": "*"},
    "Condition": {
        "StringEquals": {
            "aws:RequestTag/Team": "Admin"
        }
    }
},
{
    "Effect": "Allow",
    "Action": "sts:TagSession",
    "Principal": {"AWS": "*"},
    "Condition": {
        "StringLike": {
            "aws:RequestTag/Team": "*"
        }
    }
}

What happens when a role in a trust policy is deleted

When you specify a role in the Principal element of a trust policy, AWS uses that role’s unique RoleId to make the authorization decision. If the ExampleCorpRole role from the earlier policy examples was deleted and re-created in account 111122223333, then the unique RoleId would be different, and the new ExampleCorpRole wouldn’t be able to assume the roles that trusted it in the Principal element.

When a role is deleted, the trust policy of the remaining roles that referenced this now-deleted role will show the unique RoleId it trusted in the Principal element when viewed:

"Principal": {
				"AWS": "AROA1234567123456D"
			}

Because the policy references a now-invalid RoleID, it can’t be modified until the invalid RoleID is removed from it. You can retrieve the original role ARNs by looking at CloudTrail logs for UpdateAssumeRolePolicy and CreateRole events for a role and reading the trust policy from the log entries.

For more information about using the Principal element in policy statements, see IAM role principals.

Principals placed inside the Condition block of a trust policy statement are not referenced to their RoleID but instead use the ARN of the role. The following trust policy statement would allow the ExampleCorpRole to assume the role that trusted it, even if the ExampleCorpRole role was deleted and re-created.

  "Version": "2012-10-17",
  "Statement": [
    {
      "Effect": "Allow",
      "Principal": {
        "AWS": "arn:aws:iam::111122223333:root"
      },
      "Action": "sts:AssumeRole",
      "Condition": {
    "ArnEquals": {
      "aws:PrincipalArn": "arn:aws:iam::111122223333:role/ExampleCorpRole"
    }
  }
    }
  ]
}

When creating a role trust policy, you should determine the behavior that you want to occur when a role is deleted. Your organization’s security posture might dictate that a deleted and re-created role should no longer be able to assume a role in your account, so using a specific principal in the Principal element is appropriate. Or you might want to allow the role to be assumed in the event that a given principal is deleted and re-created.

If you use the aws:PrincipalArn condition with a principal of :root to allow role assumption within the same account, the principal doing the assuming will need the sts:AssumeRole action in its identity-based policy.

Wildcarding principals

Earlier we noted that wildcards can’t be placed in the Principal element of a policy as part of an ARN. However, wildcards can be used in the Condition block of a policy, so wildcarding is possible with the ArnLike and StringLike condition operators. This is useful when you don’t know the specific roles, but you do have other controls that limit the path where known roles are created, such as delegated administrator models. The following policy allows a role from account 111122223333 in the path OpsRoles to assume it.

  "Version": "2012-10-17",
  "Statement": [
    {
      "Effect": "Allow",
      "Principal": {
        "AWS": "arn:aws:iam::111122223333:root"
      },
      "Action": "sts:AssumeRole",
      "Condition": {
    "ArnLike": {
      "aws:PrincipalArn": "arn:aws:iam::111122223333:role/OpsRoles/*"
    }
  }
    }
  ]
}

It’s a best practice to restrict role assumption to specific paths or principals instead of allowing an entire account where possible.

Using multiple statements

So far, the examples in this post have been single policy statements. Trust policies, like other policies on AWS, can have multiple statements up to the quota for role trust policy length.

You can combine multiple statements together to create complex role trusts like the following, which allows ExampleRole to assume a role and tag the session, but only from the network range 203.0.113.0/24 while forbidding that the Admin tag be set:

{
    "Version": "2012-10-17",
    "Statement": [
        {
            "Effect": "Allow",
            "Principal": {
                "AWS": [
                    "arn:aws:iam::111122223333:role/ExampleRole"
                ]
            },
            "Action": [
                "sts:AssumeRole",
                "sts:TagSession"
            ],
            "Condition": {
                "IpAddress": {
                    "aws:SourceIp": "203.0.113.0/24"
                }
            }
        },
        {
            "Effect": "Deny",
            "Action": "sts:TagSession",
            "Principal": {
                "AWS": "*"
            },
            "Condition": {
                "Null": {
                    "aws:RequestTag/Admin": false 
                }
            }
        }
    ]
}

Although it’s possible to use multiple statements, it’s a best practice that you don’t use roles for unrelated purposes, and that you don’t share roles across different AWS services. It’s also a best practice to use different IAM roles for different use cases and AWS services, and to avoid situations where different principals have access to the same IAM role.

Working with services that deliver role-session credentials

IAM Roles Anywhere, AWS IoT Core, and Systems Manager can deliver AWS role session credentials to devices, servers, and applications running outside of AWS. These roles are assumed by AWS services and delivered to your devices, servers, and applications after they authenticate to their respective AWS services.

For more information about these services and their requirements, see the following documentation:

Role chaining

When a role assumes another role, it’s called role chaining. Sessions created by role chaining have a maximum lifetime of 1 hour regardless of the maximum session length that a role is configured to allow.

Roles that are assumed by other means are not considered role chaining and are not subject to this restriction.

Conclusion

In this post, you learned how to craft trust policies for your IAM roles to restrict their assumption by specific principals and under certain conditions, and to combine multiple statements with different conditions. You also learned how to use features like source identity and session tags, how to protect against the cross-account confused deputy problem, and the nuances of the Principal element. You now have the tools that you need to build robust and effective trust policies for roles in your organization.

If you have feedback about this post, submit comments in the Comments section below. If you have questions about this post, contact AWS Support.

Want more AWS Security news? Follow us on Twitter.

Author

Jonathan Jenkyn

Jonathan is a Senior Security Growth Strategies Consultant with AWS Professional Services. He’s an active member of the People with Disabilities affinity group, and has built several Amazon initiatives supporting charities and social responsibility causes. Since 1998, he has been involved in IT Security at many levels, from implementation of cryptographic primitives to managing enterprise security governance. Outside of work, he enjoys running, cycling, fund-raising for the BHF and Ipswich Hospital Charity, and spending time with his wife and 5 children.

Liam Wadman

Liam Wadman

Liam is a Solutions Architect with the Identity Solutions team. When he’s not building exciting solutions on AWS or helping customers, he’s often found in the hills of British Columbia on his Mountain Bike. Liam points out that you cannot spell LIAM without IAM.