We continue to listen to our customers, regulators, and stakeholders to understand their needs regarding audit, assurance, certification, and attestation programs at Amazon Web Services (AWS). We’re pleased to announce that Spring 2023 System and Organization Controls (SOC) 1, SOC 2, and SOC 3 reports are now available in Spanish. These translated reports will help drive greater engagement and alignment with customer and regulatory requirements across Latin America and Spain.
The Spanish language version of the reports don’t contain the independent opinions issued by the auditors or the control test results, but you can find this information in the English language version. Stakeholders should use the English version as a complement to the Spanish version.
Spanish-translated SOC reports are available to customers through AWS Artifact. Spanish-translated SOC reports will be published twice a year, in alignment with the Fall and Spring reporting cycles.
We value your feedback and questions—feel free to reach out to our team or give feedback about this post through the Contact Us page.
If you have feedback about this post, submit comments in the Comments section below.
Los informes SOC de Primavera de 2023 ahora están disponibles en español
Seguimos escuchando a nuestros clientes, reguladores y partes interesadas para comprender sus necesidades en relación con los programas de auditoría, garantía, certificación y atestación en Amazon Web Services (AWS). Nos complace anunciar que los informes SOC 1, SOC 2 y SOC 3 de AWS de Primavera de 2023 ya están disponibles en español. Estos informes traducidos ayudarán a impulsar un mayor compromiso y alineación con los requisitos regulatorios y de los clientes en las regiones de América Latina y España.
La versión en inglés de los informes debe tenerse en cuenta en relación con la opinión independiente emitida por los auditores y los resultados de las pruebas de controles, como complemento de las versiones en español.
Los informes SOC traducidos en español están disponibles en AWS Artifact. Los informes SOC traducidos en español se publicarán dos veces al año según los ciclos de informes de Otoño y Primavera.
Valoramos sus comentarios y preguntas; no dude en ponerse en contacto con nuestro equipo o enviarnos sus comentarios sobre esta publicación a través de nuestra página Contáctenos.
Si tienes comentarios sobre esta publicación, envíalos en la sección Comentarios a continuación.
¿Desea obtener más noticias sobre seguridad de AWS? Síguenos enTwitter.
With GitHub Actions, you can automate, customize, and run software development workflows directly within a repository. Workflows are defined using YAML and are stored alongside your code. I’ll discuss the specifics of how you can set up and use GitHub actions within a repository in the sections that follow.
The cfn-policy-validator tool is a command-line tool that takes an AWS CloudFormation template, finds and parses the IAM policies that are attached to IAM roles, users, groups, and resources, and then runs the policies through IAM Access Analyzerpolicy checks. Implementing IAM policy validation checks at the time of code check-in helps shift security to the left (closer to the developer) and shortens the time between when developers commit code and when they get feedback on their work.
Let’s walk through an example that checks the policies that are attached to an IAM role in a CloudFormation template. In this example, the cfn-policy-validator tool will find that the trust policy attached to the IAM role allows the role to be assumed by external principals. This configuration could lead to unintended access to your resources and data, which is a security risk.
Prerequisites
To complete this example, you will need the following:
A GitHub account
An AWS account, and an identity within that account that has permissions to create the IAM roles and resources used in this example
Step 1: Create a repository that will host the CloudFormation template to be validated
To begin with, you need to create a GitHub repository to host the CloudFormation template that is going to be validated by the cfn-policy-validator tool.
In the upper-right corner of the page, in the drop-down menu, choose New repository. For Repository name, enter a short, memorable name for your repository.
(Optional) Add a description of your repository.
Choose either the option Public (the repository is accessible to everyone on the internet) or Private (the repository is accessible only to people access is explicitly shared with).
Choose Initialize this repository with: Add a README file.
Choose Create repository. Make a note of the repository’s name.
Step 2: Clone the repository locally
Now that the repository has been created, clone it locally and add a CloudFormation template.
To clone the repository locally and add a CloudFormation template:
Open the command-line tool of your choice.
Use the following command to clone the new repository locally. Make sure to replace <GitHubOrg> and <RepositoryName> with your own values.
Change in to the directory that contains the locally-cloned repository.
cd <RepositoryName>
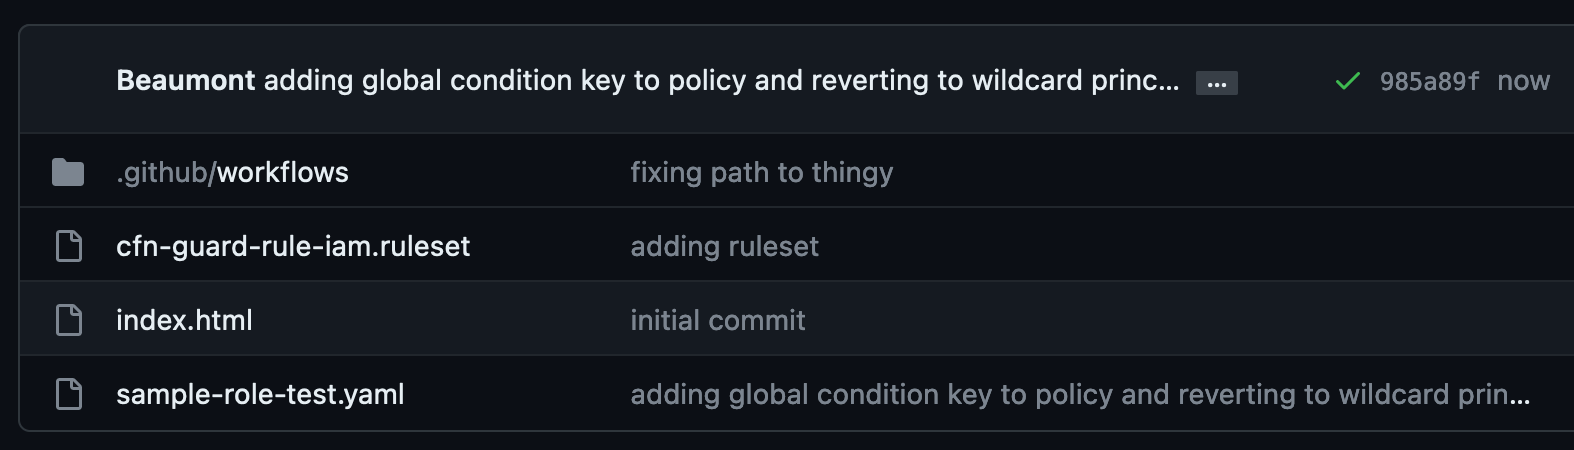
Now that the repository is locally cloned, populate the locally-cloned repository with the following sample CloudFormation template. This template creates a single IAM role that allows a principal to assume the role to perform the S3:GetObject action.
Use the following command to create the sample CloudFormation template file.
WARNING: This sample role and policy should not be used in production. Using a wildcard in the principal element of a role’s trust policy would allow any IAM principal in any account to assume the role.
Notice that AssumeRolePolicyDocument refers to a trust policy that includes a wildcard value in the principal element. This means that the role could potentially be assumed by an external identity, and that’s a risk you want to know about.
Step 3: Vend temporary AWS credentials for GitHub Actions workflows
In order for the cfn-policy-validator tool that’s running in the GitHub Actions workflow to use the IAM Access Analyzer API, the GitHub Actions workflow needs a set of temporary AWS credentials. The AWS Credentials for GitHub Actions action helps address this requirement. This action implements the AWS SDK credential resolution chain and exports environment variables for other actions to use in a workflow. Environment variable exports are detected by the cfn-policy-validator tool.
AWS Credentials for GitHub Actions supports four methods for fetching credentials from AWS, but the recommended approach is to use GitHub’s OpenID Connect (OIDC) provider in conjunction with a configured IAM identity provider endpoint.
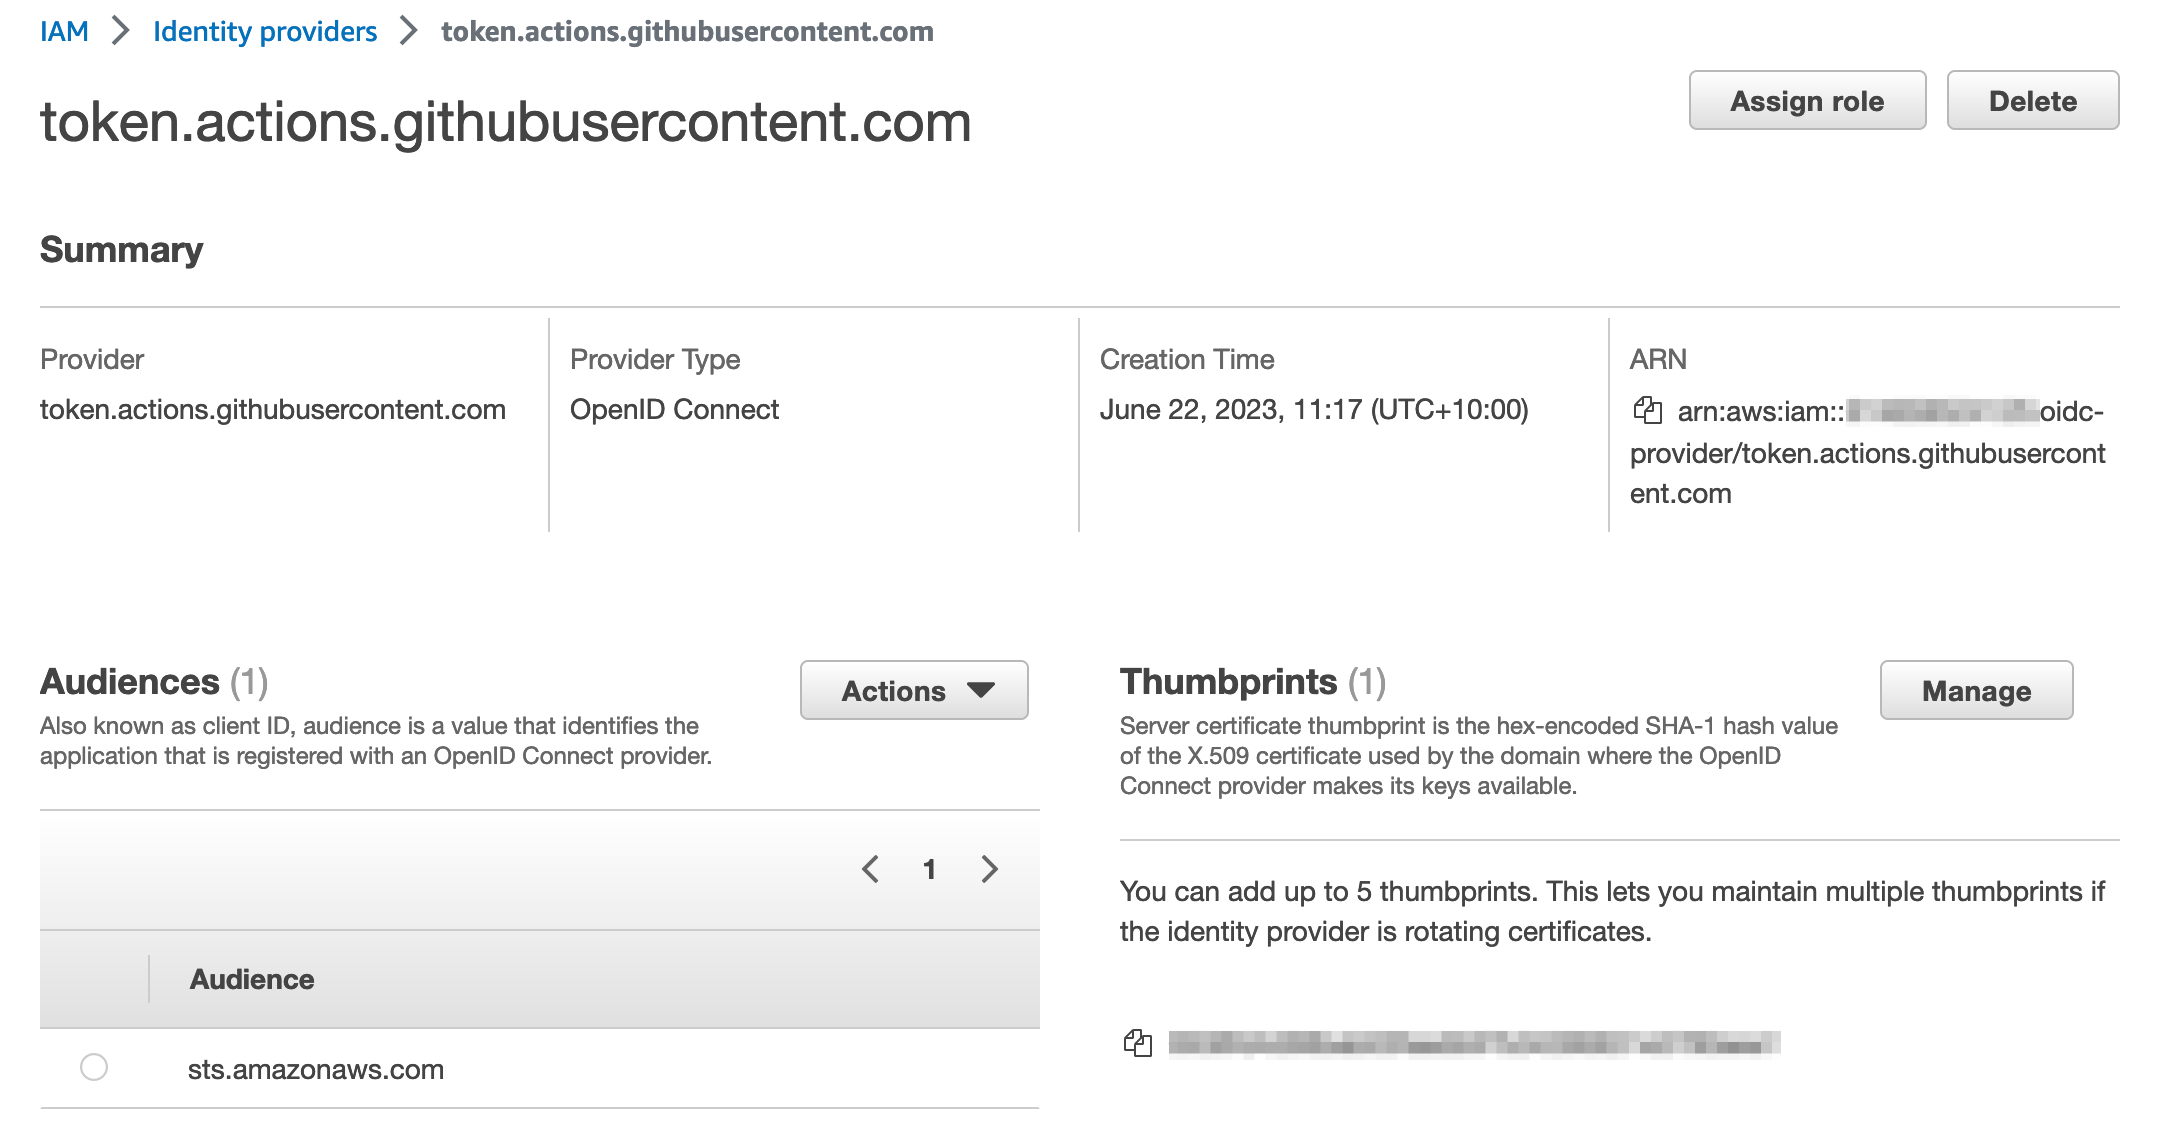
To configure an IAM identity provider endpoint for use in conjunction with GitHub’s OIDC provider:
In the left-hand menu, choose Identity providers, and then choose Add provider.
For Provider type, choose OpenID Connect.
For Provider URL, enter https://token.actions.githubusercontent.com
Choose Get thumbprint.
For Audiences, enter sts.amazonaws.com
Choose Add provider to complete the setup.
At this point, make a note of the OIDC provider name. You’ll need this information in the next step.
After it’s configured, the IAM identity provider endpoint should look similar to the following:
Figure 1: IAM Identity provider details
Step 4: Create an IAM role with permissions to call the IAM Access Analyzer API
In this step, you will create an IAM role that can be assumed by the GitHub Actions workflow and that provides the necessary permissions to run the cfn-policy-validator tool.
To create the IAM role:
In the IAM console, in the left-hand menu, choose Roles, and then choose Create role.
For Trust entity type, choose Web identity.
In the Provider list, choose the new GitHub OIDC provider that you created in the earlier step. For Audience, select sts.amazonaws.com from the list.
After you’ve attached the new policy, choose Next.
Note: For a full explanation of each of these actions and a CloudFormation template example that you can use to create this role, see the IAM Policy Validator for AWS CloudFormation GitHub project.
The default policy you just created allows GitHub Actions from organizations or repositories outside of your control to assume the role. To align with the IAM best practice of granting least privilege, let’s scope it down further to only allow a specific GitHub organization and the repository that you created earlier to assume it.
Replace the policy to look like the following, but don’t forget to replace {AWSAccountID}, {GitHubOrg} and {RepositoryName} with your own values.
At this point, you’ve created and configured the following resources:
A GitHub repository that has been locally cloned and filled with a sample CloudFormation template.
An IAM identity provider endpoint for use in conjunction with GitHub’s OIDC provider.
A role that can be assumed by GitHub actions, and a set of associated permissions that allow the role to make requests to IAM Access Analyzer to validate policies.
Step 5: Create a definition for the GitHub Actions workflow
The workflow runs steps on hosted runners. For this example, we are going to use Ubuntu as the operating system for the hosted runners. The workflow runs the following steps on the runner:
The workflow checks out the CloudFormation template by using the community actions/checkout action.
The workflow then uses the aws-actions/configure-aws-credentials GitHub action to request a set of credentials through the IAM identity provider endpoint and the IAM role that you created earlier.
The workflow runs a validation against the CloudFormation template by using the cfn-policy-validator tool.
The workflow is defined in a YAML document. In order for GitHub Actions to pick up the workflow, you need to place the definition file in a specific location within the repository: .github/workflows/main.yml. Note the “.” prefix in the directory name, indicating that this is a hidden directory.
To create the workflow:
Use the following command to create the folder structure within the locally cloned repository:
mkdir -p .github/workflows
Create the sample workflow definition file in the .github/workflows directory. Make sure to replace <AWSAccountID> and <AWSRegion> with your own information.
Push the local changes to the remote GitHub repository.
git push
After the changes are pushed to the remote repository, go back to https://github.com and open the repository that you created earlier. In the top-right corner of the repository window, there is a small orange indicator, as shown in Figure 2. This shows that your GitHub Actions workflow is running.
Figure 2: GitHub repository window with the orange workflow indicator
Because the sample CloudFormation template used a wildcard value “*” in the principal element of the policy as described in the section Step 2: Clone the repository locally, the orange indicator turns to a red x (shown in Figure 3), which signals that something failed in the workflow.
Figure 3: GitHub repository window with the red cross workflow indicator
Choose the red x to see more information about the workflow’s status, as shown in Figure 4.
Figure 4: Pop-up displayed after choosing the workflow indicator
Choose Details to review the workflow logs.
In this example, the Validate templates step in the workflow has failed. A closer inspection shows that there is a blocking finding with the CloudFormation template. As shown in Figure 5, the finding is labelled as EXTERNAL_PRINCIPAL and has a description of Trust policy allows access from external principals.
Figure 5: Details logs from the workflow showing the blocking finding
To remediate this blocking finding, you need to update the principal element of the trust policy to include a principal from your AWS account (considered a zone of trust). The resources and principals within your account comprises of the zone of trust for the cfn-policy-validator tool. In the initial version of sample-role.yaml, the IAM roles trust policy used a wildcard in the Principal element. This allowed principals outside of your control to assume the associated role, which caused the cfn-policy-validator tool to generate a blocking finding.
In this case, the intent is that principals within the current AWS account (zone of trust) should be able to assume this role. To achieve this result, replace the wildcard value with the account principal by following the remaining steps.
Open sample-role.yaml by using your preferred text editor, such as nano.
nano sample-role.yaml
Replace the wildcard value in the principal element with the account principal arn:aws:iam::<AccountID>:root. Make sure to replace <AWSAccountID> with your own AWS account ID.
Add the updated file, commit the changes, and push the updates to the remote GitHub repository.
git add sample-role.yaml
git commit -m ‘replacing wildcard principal with account principal’
git push
After the changes have been pushed to the remote repository, go back to https://github.com and open the repository. The orange indicator in the top right of the window should change to a green tick (check mark), as shown in Figure 6.
Figure 6: GitHub repository window with the green tick workflow indicator
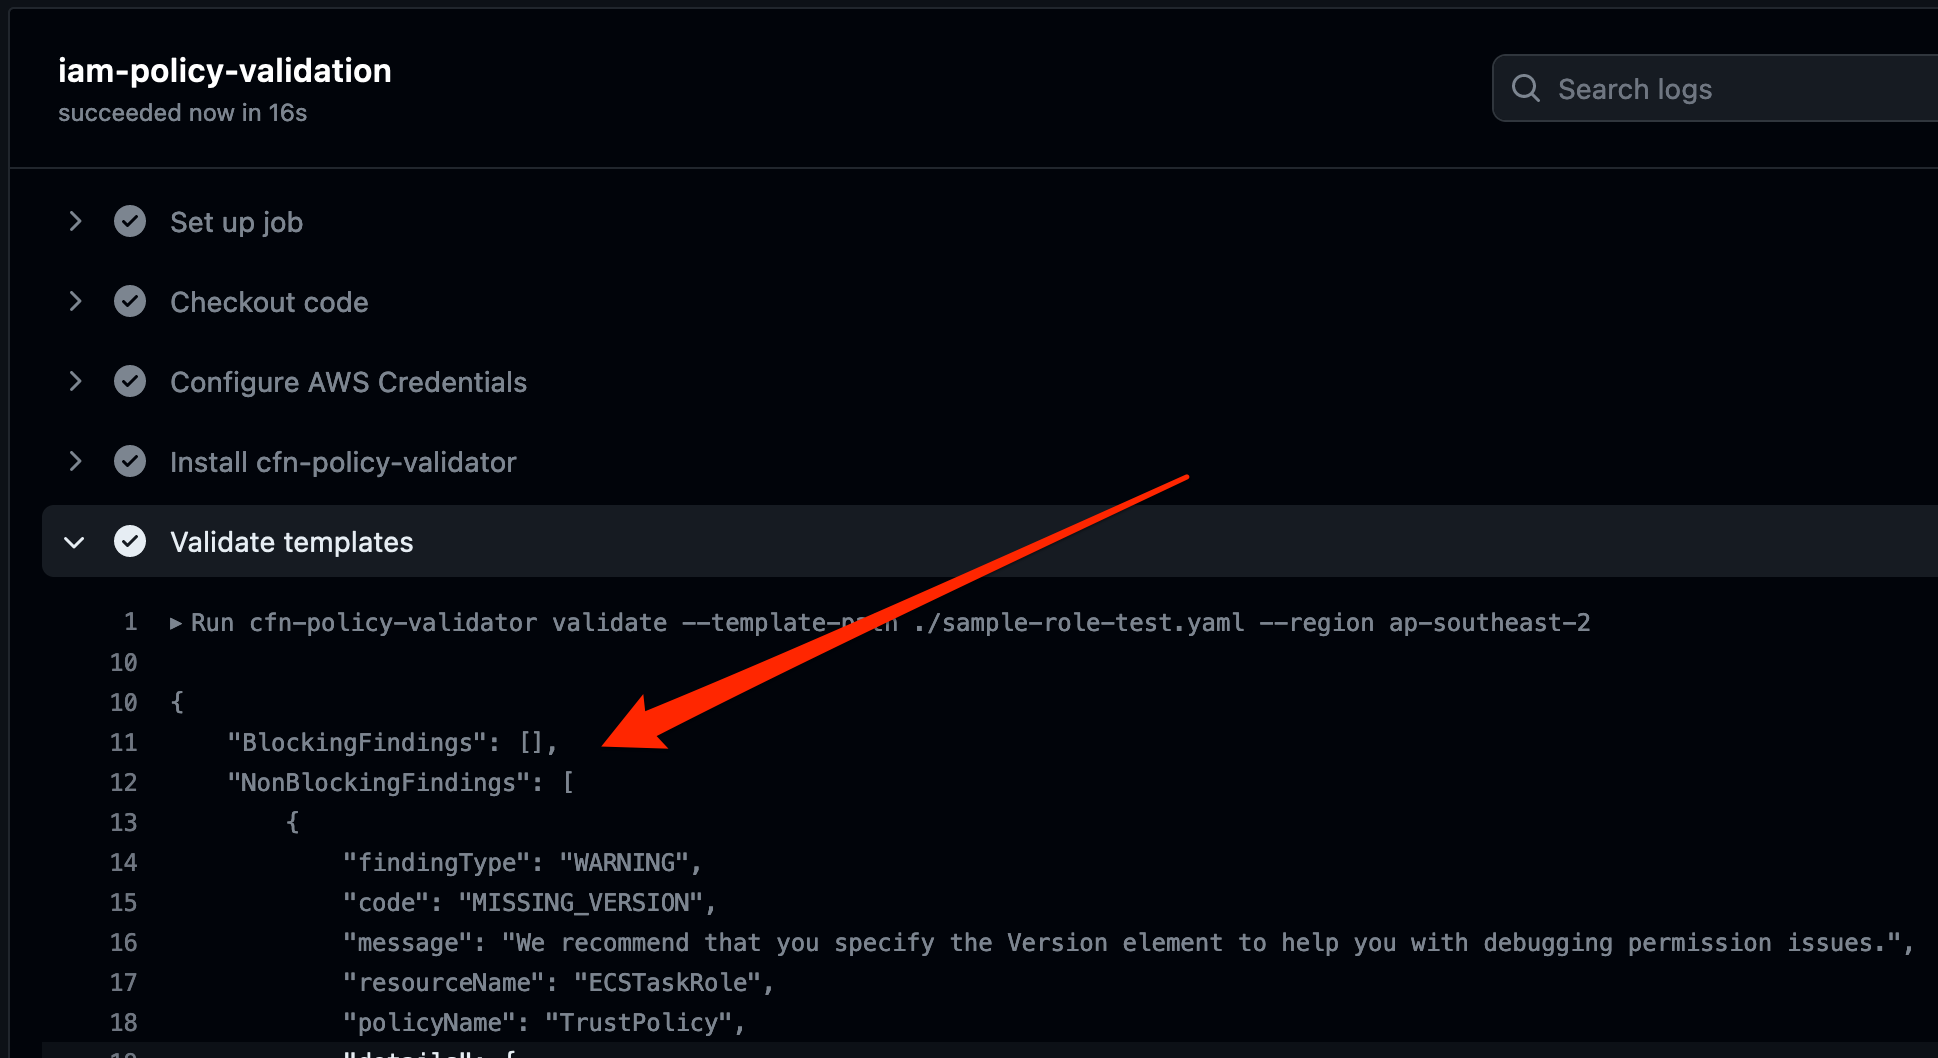
This indicates that no blocking findings were identified, as shown in Figure 7.
Figure 7: Detailed logs from the workflow showing no more blocking findings
Conclusion
In this post, I showed you how to automate IAM policy validation by using GitHub Actions and the IAM Policy Validator for CloudFormation. Although the example was a simple one, it demonstrates the benefits of automating security testing at the start of the development lifecycle. This is often referred to as shifting security left. Identifying misconfigurations early and automatically supports an iterative, fail-fast model of continuous development and testing. Ultimately, this enables teams to make security an inherent part of a system’s design and architecture and can speed up product development workflows.
In addition to the example I covered today, IAM Policy Validator for CloudFormation can validate IAM policies by using a range of IAM Access Analyzer policy checks. For more information about these policy checks, see Access Analyzer reference policy checks.
If you have feedback about this post, submit comments in the Comments section below. If you have questions about this post, contact AWS Support.
Want more AWS Security news? Follow us on Twitter.
Amazon Security Lake automatically centralizes the collection of security-related logs and events from integrated AWS and third-party services. With the increasing amount of security data available, it can be challenging knowing what data to focus on and which tools to use. You can use native AWS services such as Amazon QuickSight, Amazon OpenSearch, and Amazon SageMaker Studio to visualize, analyze, and interactively identify different areas of interest to focus on, and prioritize efforts to increase your AWS security posture.
In this post, we go over how to generate machine learning insights for Security Lake using SageMaker Studio. SageMaker Studio is a web integrated development environment (IDE) for machine learning that provides tools for data scientists to prepare, build, train, and deploy machine learning models. With this solution, you can quickly deploy a base set of Python notebooks focusing on AWS Security Hub findings in Security Lake, which can also be expanded to incorporate other AWS sources or custom data sources in Security Lake. After you’ve run the notebooks, you can use the results to help you identify and focus on areas of interest related to security within your AWS environment. As a result, you might implement additional guardrails or create custom detectors to alert on suspicious activity.
Prerequisites
Specify a delegated administrator account to manage the Security Lake configuration for all member accounts within your organization.
Security Lake has been enabled in the delegated administrator AWS account.
As part of the solution in this post, we focus on Security Hub as a data source. AWS Security Hub must be enabled for your AWS Organizations. When enabling Security Lake, select All log and event sources to include AWS Security Hub findings.
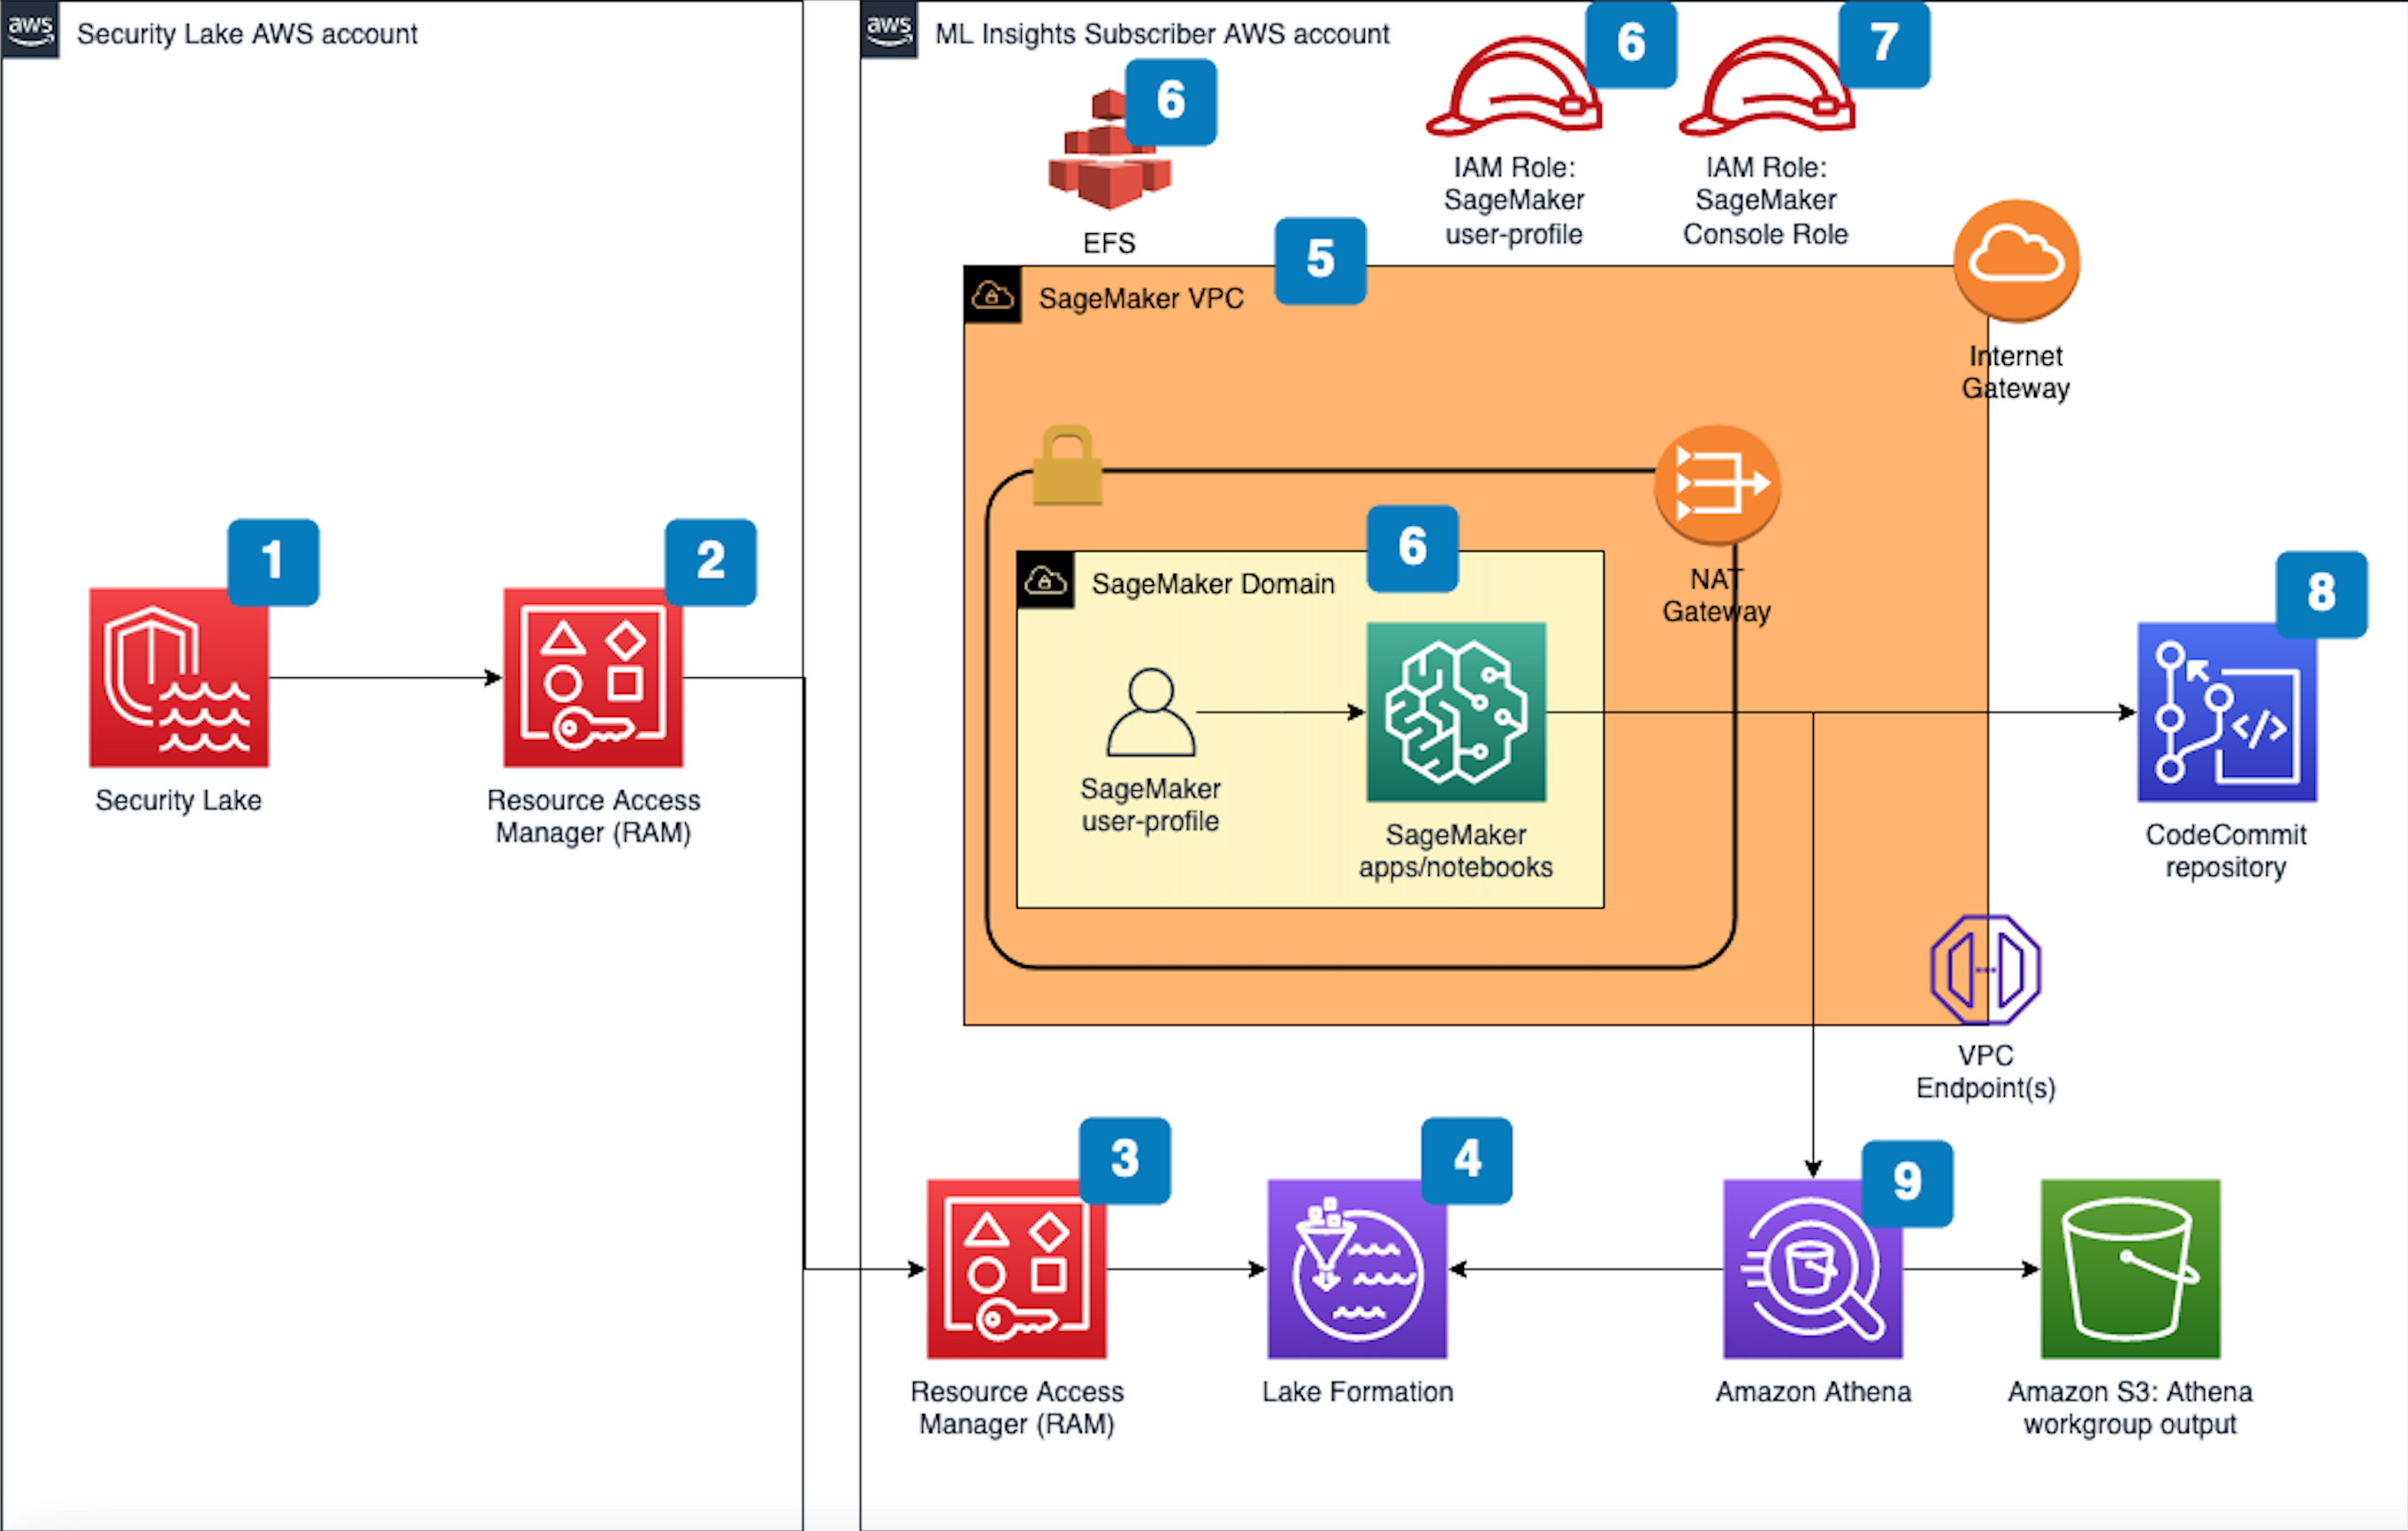
Figure 1 that follows depicts the architecture of the solution.
Figure 1 SageMaker machine learning insights architecture for Security Lake
The deployment builds the architecture by completing the following steps:
A Security Lake is set up in an AWS account with supported log sources — such as Amazon VPC Flow Logs, AWS Security Hub, AWS CloudTrail, and Amazon Route53 — configured.
Subscriber query access is created from the Security Lake AWS account to a subscriber AWS account.
Note: See Prerequisite #4 for more information.
The AWS RAM resource share request must be accepted in the subscriber AWS account where this solution is deployed.
Note: See Prerequisite #4 for more information.
A resource link database in Lake Formation is created in the subscriber AWS account and grants access for the Athena tables in the Security Lake AWS account.
VPC is provisioned for SageMaker with IGW, NAT GW, and VPC endpoints for the AWS services used in the solution. IGW and NAT are required to install external open-source packages.
A dedicated IAM role is created to restrict access to create and access the presigned URL for the SageMaker Domain from a specific CIDR for accessing the SageMaker notebook.
An AWS CodeCommit repository containing Python notebooks is used for the AI and ML workflow by the SageMaker user-profile.
An Athena workgroup is created for the Security Lake queries with an S3 bucket for output location (access logging configured for the output bucket).
Option 1: Deploy the solution with AWS CloudFormation using the console
Use the console to sign in to your subscriber AWS account and then choose the Launch Stack button to open the AWS CloudFormation console pre-loaded with the template for this solution. It takes approximately 10 minutes for the CloudFormation stack to complete.
Option 2: Deploy the solution by using the AWS CDK
To build the app when navigating to the project’s root folder, use the following commands:
npm install -g aws-cdk-lib
npm install
Update IAM_role_assumption_for_sagemaker_presigned_url and security_lake_aws_account default values in source/lib/sagemaker_domain.ts with their respective appropriate values.
Run the following commands in your terminal while authenticated in your subscriber AWS account. Be sure to replace <INSERT_AWS_ACCOUNT> with your account number and replace <INSERT_REGION> with the AWS Region that you want the solution deployed to.
Now that you’ve deployed the SageMaker solution, you must grant the SageMaker user profile in the subscriber AWS account query access to your Security Lake. You can Grant permission for the SageMaker user profile to Security Lake in Lake Formation in the subscriber AWS account.
Grant permission to the Security Lake database
Copy the SageMaker user-profile Amazon resource name (ARN) arn:aws:iam::<account-id>:role/sagemaker-user-profile-for-security-lake
Go to Lake Formation in the console.
Select the amazon_security_lake_glue_db_us_east_1 database.
From the Actions Dropdown, select Grant.
In GrantData Permissions, select SAML Users and Groups.
Paste the SageMaker user profile ARN from Step 1.
In Database Permissions, select Describe and then Grant.
Grant permission to Security Lake – Security Hub table
Copy the SageMaker user-profile ARN arn:aws:iam:<account-id>:role/sagemaker-user-profile-for-security-lake
Go to Lake Formation in the console.
Select the amazon_security_lake_glue_db_us_east_1 database.
Choose View Tables.
Select the amazon_security_lake_table_us_east_1_sh_findings_1_0 table.
From Actions Dropdown, select Grant.
In Grant Data Permissions, select SAML Users and Groups.
Paste the SageMaker user-profile ARN from Step 1.
In Table Permissions, select Describe and then Grant.
Launch your SageMaker Studio application
Now that you have granted permissions for a SageMaker user-profile, we can move on to launching the SageMaker application associated to that user-profile.
You’ll work primarily in the SageMaker user profile to create a data-science app to work in. As part of the solution deployment, we’ve created Python notebooks in CodeCommit that you will need to clone.
In the Stacks section, select the SageMakerDomainStack.
Select to the Outputs tab/
Copy the value for sagemakernotebookmlinsightsrepositoryURL. (For example: https://git-codecommit.us-east-1.amazonaws.com/v1/repos/sagemaker_ml_insights_repo)
Go back to your SageMaker app.
In Studio, in the left sidebar, choose the Git icon (identified by a diamond with two branches), then choose Clone a Repository.
Figure 3: SageMaker clone CodeCommit repository
Paste the CodeCommit repository link from Step 4 under the Git repository URL (git). After you paste the URL, select Clone “https://git-codecommit.us-east-1.amazonaws.com/v1/repos/sagemaker_ml_insights_repo”, then select Clone.
NOTE: If you don’t select from the auto-populated drop-down, SageMaker won’t be able to clone the repository.
Figure 4: SageMaker clone CodeCommit URL
Generating machine learning insights using SageMaker Studio
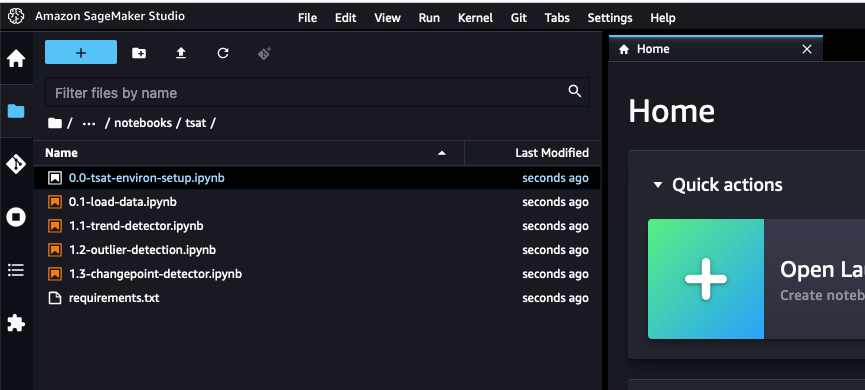
You’ve successfully pulled the base set of Python notebooks into your SageMaker app and they can be accessed at sagemaker_ml_insights_repo/notebooks/tsat/. The notebooks provide you with a starting point for running machine learning analysis using Security Lake data. These notebooks can be expanded to existing native or custom data sources being sent to Security Lake.
Figure 5: SageMaker cloned Python notebooks
Notebook #1 – Environment setup
The 0.0-tsat-environ-setup notebook handles the installation of the required libraries and dependencies needed for the subsequent notebooks within this blog. For our notebooks, we use an open-source Python library called Kats, which is a lightweight, generalizable framework to perform time series analysis.
Select the 0.0-tsat-environ-setup.ipynb notebook for the environment setup.
Note: If you have already provisioned a kernel, you can skip steps 2 and 3.
In the right-hand corner, select No Kernel
In the Set up notebook environment pop-up, leave the defaults and choose Select.
After the kernel has successfully started, choose the Terminal icon to open the image terminal.
Figure 7: SageMaker application terminal
To install open-source packages from https instead of http, you must update the sources.list file. After the terminal opens, send the following commands:
cd /etc/apt
sed -i 's/http:/https:/g' sources.list
Go back to the 0.0-tsat-environ-setup.ipynb notebook and select the Run drop-down and select Run All Cells. Alternatively, you can run each cell independently, but it’s not required. Grab a coffee! This step will take about 10 minutes.
IMPORTANT: If you complete the installation out of order or update the requirements.txt file, you might not be able to successfully install Kats and you will need to rebuild your environment by using a net-new SageMaker user profile.
After installing all the prerequisites, check the Kats version to determine if it was successfully installed.
Figure 8: Kats installation verification
Install PyAthena (Python DB API client for Amazon Athena) which is used to query your data in Security Lake.
You’ve successfully set up the SageMaker app environment! You can now load the appropriate dataset and create a time series.
Notebook #2 – Load data
The 0.1-load-data notebook establishes the Athena connection to query data in Security Lake and creates the resulting time series dataset. The time series dataset will be used for subsequent notebooks to identify trends, outliers, and change points.
Select the 0.1-load-data.ipynb notebook.
If you deployed the solution outside of us-east-1, update the con details to the appropriate Region. In this example, we’re focusing on Security Hub data within Security Lake. If you want to change the underlying data source, you can update the TABLE value.
Figure 9: SageMaker notebook load Security Lake data settings
In the Query section, there’s an Athena query to pull specific data from Security Hub, this can be expanded as needed to a subset or can include all products within Security Hub. The query below pulls Security Hub information after 01:00:00 1/1/2022 from the products listed in productname.
Figure 10: SageMaker notebook Athena query
After the values have been updated, you can create your time series dataset. For this notebook, we recommend running each cell individually instead of running all cells at once so you can get a bit more familiar with the process. Select the first cell and choose the Run icon.
Figure 11: SageMaker run Python notebook code
Follow the same process as Step 4 for the subsequent cells.
You’ve successfully loaded your data and created a timeseries! You can now move on to generating machine learning insights from your timeseries.
Notebook #3 – Trend detector
The 1.1-trend-detector.ipynb notebook handles trend detection in your data. Trend represents a directional change in the level of a time series. This directional change can be either upward (increase in level) or downward (decrease in level). Trend detection helps detect a change while ignoring the noise from natural variability. Each environment is different, and trends help us identify where to look more closely to determine why a trend is positive or negative.
Select 1.1-trend-detector.ipynb notebook for trend detection.
Slopes are created to identify the relationship between x (time) and y (counts).
Figure 12: SageMaker notebook slope view
If the counts are increasing with time, then it’s considered a positive slope and the reverse is considered a negative slope. A positive slope isn’t necessarily a good thing because in an ideal state we would expect counts of a finding type to come down with time.
Figure 13: SageMaker notebook trend view
Now you can plot the top five positive and negative trends to identify the top movers.
Figure 14: SageMaker notebook trend results view
Notebook #4 – Outlier detection
The 1.2-outlier-detection.ipynb notebook handles outlier detection. This notebook does a seasonal decomposition of the input time series, with additive or multiplicative decomposition as specified (default is additive). It uses a residual time series by either removing only trend or both trend and seasonality if the seasonality is strong. The intent is to discover useful, abnormal, and irregular patterns within data sets, allowing you to pinpoint areas of interest.
To start, it detects points in the residual that are over 5 times the inter-quartile range.
Inter-quartile range (IQR) is the difference between the seventy-fifth and twenty-fifth percentiles of residuals or the spread of data within the middle two quartiles of the entire dataset. IQR is useful in detecting the presence of outliers by looking at values that might lie outside of the middle two quartiles.
The IQR multiplier controls the sensitivity of the range and decision of identifying outliers. By using a larger value for the iqr_mult_thresh parameter in OutlierDetector, outliers would be considered data points, while a smaller value would identify data points as outliers.
Note: If you don’t have enough data, decrease iqr_mult_thresh to a lower value (for example iqr_mult_thresh=3).
Figure 15: SageMaker notebook outlier setting
Along with outlier detection plots, investigation SQL will be displayed as well, which can help with further investigation of the outliers.
In the diagram that follows, you can see that there are several outliers in the number of findings, related to failed AWS Firewall Manager policies, which have been identified by the vertical red lines within the line graph. These are outliers because they deviate from the normal behavior and number of findings on a day-to-day basis. When you see outliers, you can look at the resources that might have caused an unusual increase in Firewall Manager policy findings. Depending on the findings, it could be related to an overly permissive or noncompliant security group or a misconfigured AWS WAF rule group.
The 1.3-changepoint-detector.ipynb notebook handles the change point detection. Change point detection is a method to detect changes in a time series that persist over time, such as a change in the mean value. To detect a baseline to identify when several changes might have occurred from that point. Change points occur when there’s an increase or decrease to the average number of findings within a data set.
Along with identifying change points within the data set, the investigation SQL is generated to further investigate the specific change point if applicable.
In the following diagram, you can see there’s a change point decrease after July 27, 2022, with confidence of 99.9 percent. It’s important to note that change points differ from outliers, which are sudden changes in the data set observed. This diagram means there was some change in the environment that resulted in an overall decrease in the number of findings for S3 buckets with block public access being disabled. The change could be the result of an update to the CI/CD pipelines provisioning S3 buckets or automation to enable all S3 buckets to block public access. Conversely, if you saw a change point that resulted in an increase, it could mean that there was a change that resulted in a larger number of S3 buckets with a block public access configuration consistently being disabled.
Figure 17: SageMaker changepoint detector view
By now, you should be familiar with the set up and deployment for SageMaker Studio and how you can use Python notebooks to generate machine learning insights for your Security Lake data. You can take what you’ve learned and start to curate specific datasets and data sources within Security Lake, create a time series, detect trends, and identify outliers and change points. By doing so, you can answer a variety of security-related questions such as:
CloudTrail
Is there a large volume of Amazon S3 download or copy commands to an external resource? Are you seeing a large volume of S3 delete object commands? Is it possible there’s a ransomware event going on?
VPC Flow Logs
Is there an increase in the number of requests from your VPC to external IPs? Is there an increase in the number of requests from your VPC to your on-premises CIDR? Is there a possibility of internal or external data exfiltration occurring?
Route53
Which resources are making DNS requests that they haven’t typically made within the last 30–45 days? When did it start? Is there a potential command and control session occurring on an Amazon Elastic Compute Cloud (Amazon EC2) instance?
It’s important to note that this isn’t a solution to replace Amazon GuardDuty, which uses foundational data sources to detect communication with known malicious domains and IP addresses and identify anomalous behavior, or Amazon Detective, which provides customers with prebuilt data aggregations, summaries, and visualizations to help security teams conduct faster and more effective investigations. One of the main benefits of using Security Lake and SageMaker Studio is the ability to interactively create and tailor machine learning insights specific to your AWS environment and workloads.
Clean up
If you deployed the SageMaker machine learning insights solution by using the Launch Stack button in the AWS Management Console or the CloudFormation template sagemaker_ml_insights_cfn, do the following to clean up:
In the CloudFormation console for the account and Region where you deployed the solution, choose the SageMakerML stack.
Choose the option to Delete the stack.
If you deployed the solution by using the AWS CDK, run the command cdk destroy.
Conclusion
Amazon Security Lake gives you the ability to normalize and centrally store your security data from various log sources to help you analyze, visualize, and correlate appropriate security logs. You can then use this data to increase your overall security posture by implementing additional security guardrails or take appropriate remediation actions within your AWS environment.
In this blog post, you learned how you can use SageMaker to generate machine learning insights for your Security Hub findings in Security Lake. Although the example solution focuses on a single data source within Security Lake, you can expand the notebooks to incorporate other native or custom data sources in Security Lake.
There are many different use-cases for Security Lake that can be tailored to fit your AWS environment. Take a look at this blog post to learn how you can ingest, transform and deliver Security Lake data to Amazon OpenSearch to help your security operations team quickly analyze security data within your AWS environment. In supported Regions, new Security Lake account holders can try the service free for 15 days and gain access to its features.
If you have feedback about this post, submit comments in the Comments section below. If you have questions about this post, contact AWS Support.
Want more AWS Security news? Follow us on Twitter.
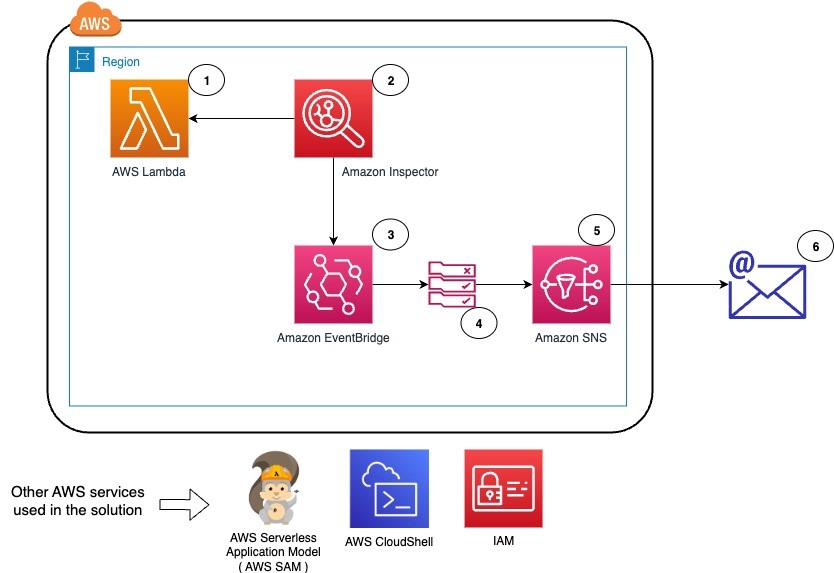
At AWS, we often hear from customers that they want expanded security coverage for the multiple services that they use on AWS. However, alert fatigue is a common challenge that customers face as we introduce new security protections. The challenge becomes how to operationalize, identify, and prioritize alerts that represent real risk.
In this post, we highlight recent enhancements to Amazon Detective finding groups visualizations. We show you how Detective automatically consolidates multiple security findings into a single security event—called finding groups—and how finding group visualizations help reduce noise and prioritize findings that present true risk. We incorporate additional services like Amazon GuardDuty, Amazon Inspector, and AWS Security Hub to highlight how effective findings groups is at consolidating findings for different AWS security services.
Overview of solution
This post uses several different services. The purpose is twofold: to show how you can enable these services for broader protection, and to show how Detective can help you investigate findings from multiple services without spending a lot of time sifting through logs or querying multiple data sources to find the root cause of a security event. These are the services and their use cases:
GuardDuty – a threat detection service that continuously monitors your AWS accounts and workloads for malicious activity. If potential malicious activity, such as anomalous behavior, credential exfiltration, or command and control (C2) infrastructure communication is detected, GuardDuty generates detailed security findings that you can use for visibility and remediation. Recently, GuardDuty released the following threat detections for specific services that we’ll show you how to enable for this walkthrough: GuardDuty RDS Protection, EKS Runtime Monitoring, and Lambda Protection.
Amazon Inspector – an automated vulnerability management service that continually scans your AWS workloads for software vulnerabilities and unintended network exposure. Like GuardDuty, Amazon Inspector sends a finding for alerting and remediation when it detects a software vulnerability or a compute instance that’s publicly available.
Security Hub – a cloud security posture management service that performs automated, continuous security best practice checks against your AWS resources to help you identify misconfigurations, and aggregates your security findings from integrated AWS security services.
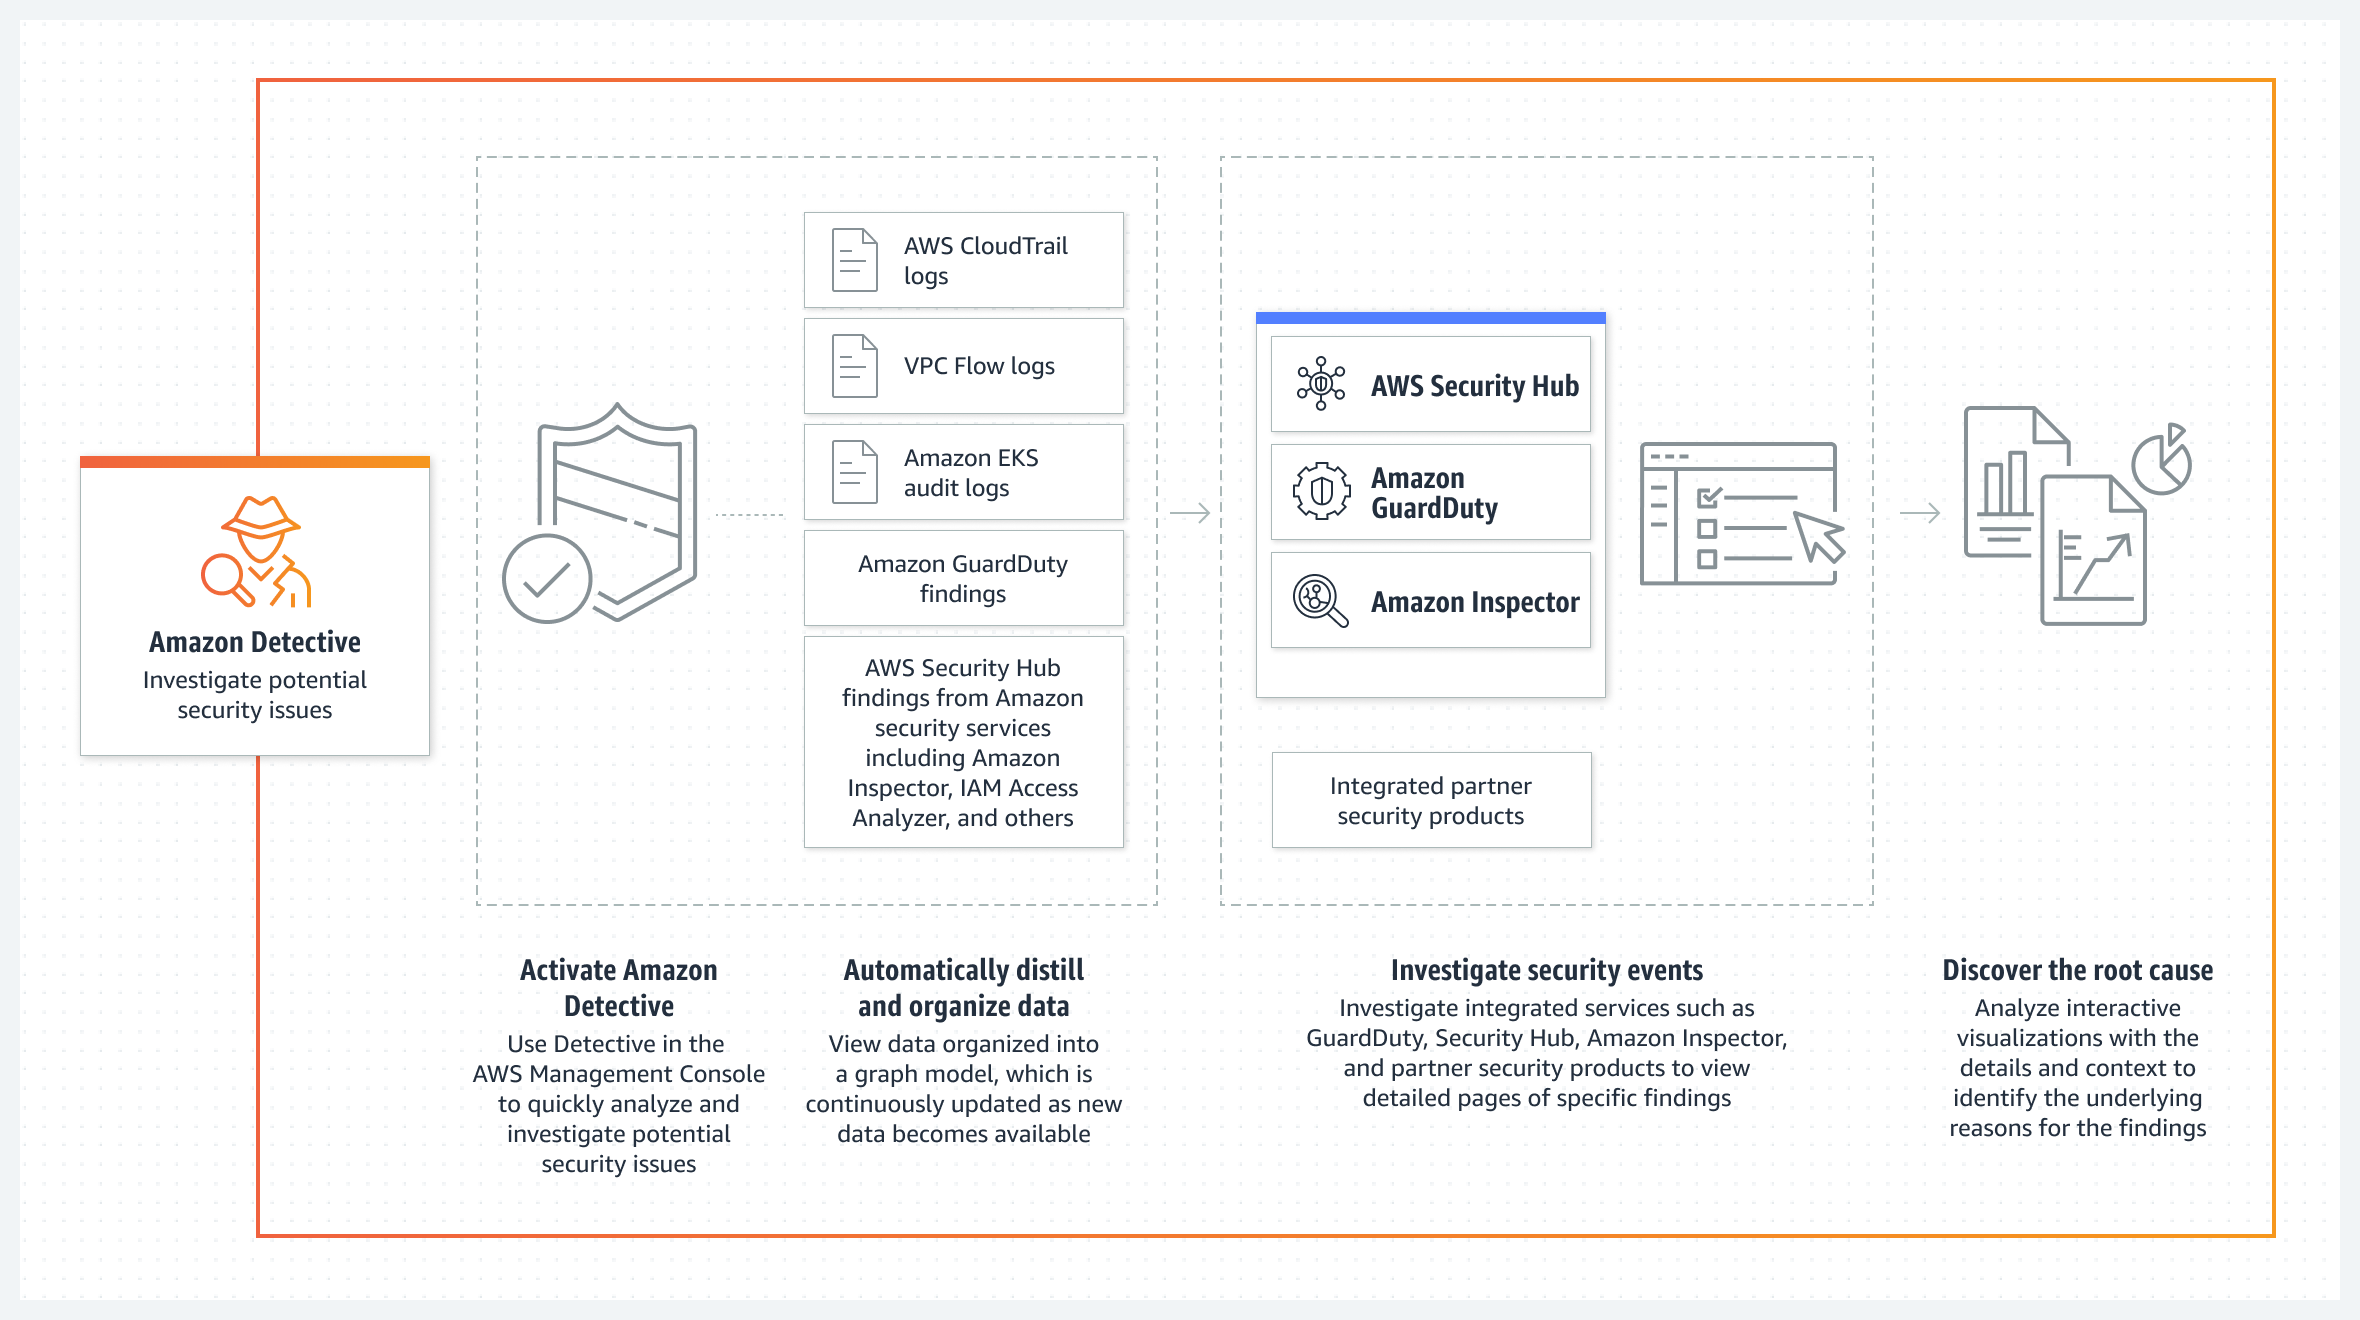
Detective – a security service that helps you investigate potential security issues. It does this by collecting log data from AWS CloudTrail, Amazon Virtual Private Cloud (Amazon VPC) flow logs, and other services. Detective then uses machine learning, statistical analysis, and graph theory to build a linked set of data called a security behavior graph that you can use to conduct faster and more efficient security investigations.
The following diagram shows how each service delivers findings along with log sources to Detective.
Figure 1: Amazon Detective log source diagram
Enable the required services
If you’ve already enabled the services needed for this post—GuardDuty, Amazon Inspector, Security Hub, and Detective—skip to the next section. For instructions on how to enable these services, see the following resources:
Each of these services offers a free 30-day trial and provides estimates on charges after your trial expires. You can also use the AWS Pricing Calculator to get an estimate.
To enable the services across multiple accounts, consider using a delegated administrator account in AWS Organizations. With a delegated administrator account, you can automatically enable services for multiple accounts and manage settings for each account in your organization. You can view other accounts in the organization and add them as member accounts, making central management simpler. For instructions on how to enable the services with AWS Organizations, see the following resources:
The next step is to enable the latest detections in GuardDuty and learn how Detective can identify multiple threats that are related to a single security event.
If you’ve already enabled the different GuardDuty protection plans, skip to the next section. If you recently enabled GuardDuty, the protections plans are enabled by default, except for EKS Runtime Monitoring, which is a two-step process.
For the next steps, we use the delegated administrator account in GuardDuty to make sure that the protection plans are enabled for each AWS account. When you use GuardDuty (or Security Hub, Detective, and Inspector) with AWS Organizations, you can designate an account to be the delegated administrator. This is helpful so that you can configure these security services for multiple accounts at the same time. For instructions on how to enable a delegated administrator account for GuardDuty, see Managing GuardDuty accounts with AWS Organizations.
To enable EKS Protection
Sign in to the GuardDuty console using the delegated administrator account, choose Protection plans, and then choose EKS Protection.
In the Delegated administrator section, choose Edit and then choose Enable for each scope or protection. For this post, select EKS Audit Log Monitoring, EKS Runtime Monitoring, and Manage agent automatically, as shown in Figure 2. For more information on each feature, see the following resources:
To enable these protections for current accounts, in the Active member accounts section, choose Edit and Enable for each scope of protection.
To enable these protections for new accounts, in the New account default configuration section, choose Edit and Enable for each scope of protection.
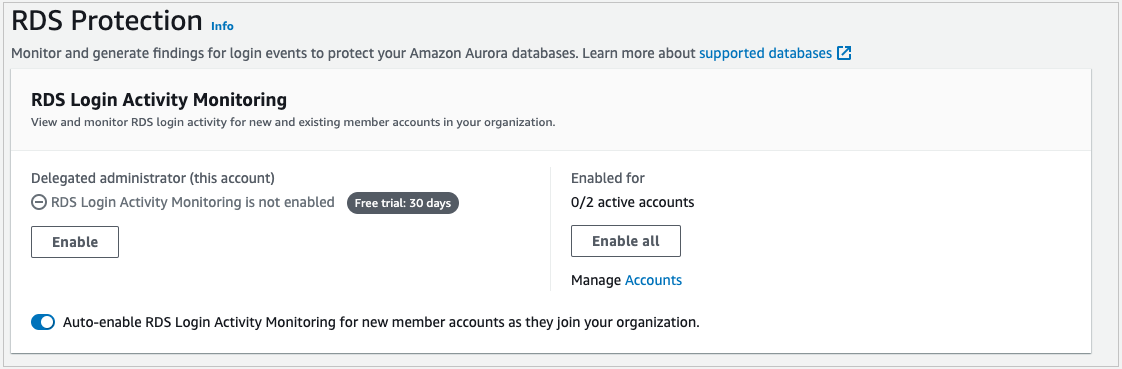
To enable RDS Protection
The next step is to enable RDS Protection. GuardDuty RDS Protection works by analysing RDS login activity for potential threats to your Amazon Aurora databases (MySQL-Compatible Edition and Aurora PostgreSQL-Compatible Editions). Using this feature, you can identify potentially suspicious login behavior and then use Detective to investigate CloudTrail logs, VPC flow logs, and other useful information around those events.
Navigate to the RDS Protection menu and under Delegated administrator (this account), select Enable and Confirm.
In the Enabled for section, select Enable all if you want RDS Protection enabled on all of your accounts. If you want to select a specific account, choose Manage Accounts and then select the accounts for which you want to enable RDS Protection. With the accounts selected, choose Edit Protection Plans, RDS Login Activity, and Enable for X selected account.
(Optional) For new accounts, turn on Auto-enable RDS Login Activity Monitoring for new member accounts as they join your organization.
Figure 2: Enable EKS Runtime Monitoring
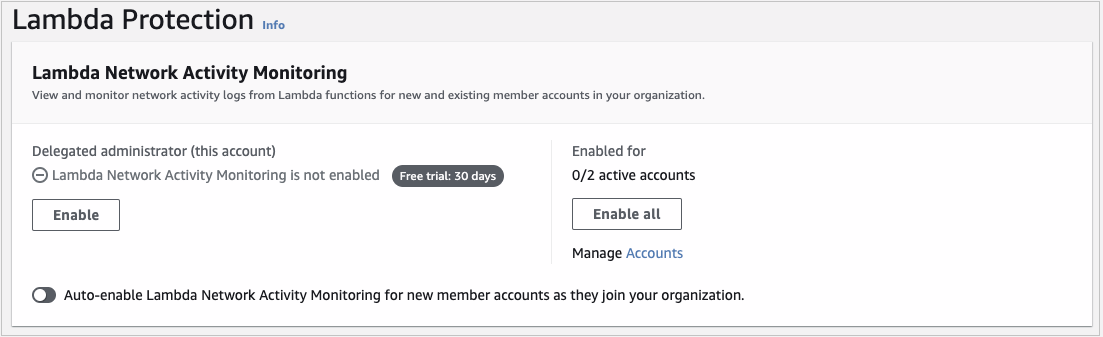
To enable Lambda Protection
The final step is to enable Lambda Protection. Lambda Protection helps detect potential security threats during the invocation of AWS Lambda functions. By monitoring network activity logs, GuardDuty can generate findings when Lambda functions are involved with malicious activity, such as communicating with command and control servers.
Navigate to the Lambda Protection menu and under Delegated administrator (this account), select Enable and Confirm.
In the Enabled for section, select Enable all if you want Lambda Protection enabled on all of your accounts. If you want to select a specific account, choose Manage Accounts and select the accounts for which you want to enable RDS Protection. With the accounts selected, choose Edit Protection Plans, Lambda Network Activity Monitoring, and Enable for X selected account.
(Optional) For new accounts, turn on Auto-enable Lambda Network Activity Monitoring for new member accounts as they join your organization.
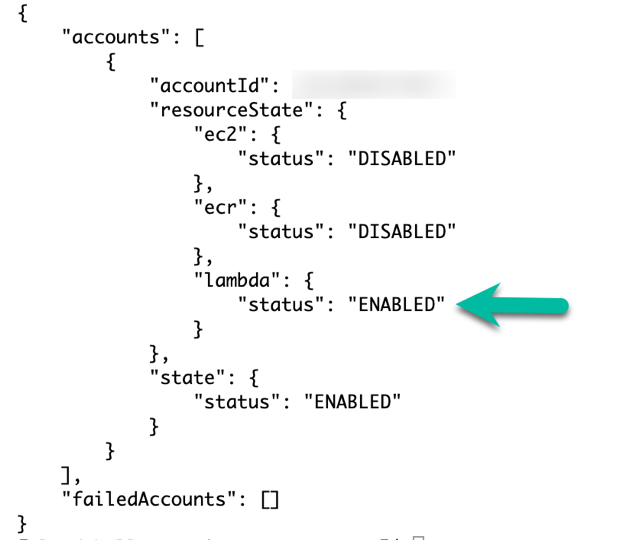
Now that you’ve enabled these new protections, GuardDuty will start monitoring EKS audit logs, EKS runtime activity, RDS login activity, and Lambda network activity. If GuardDuty detects suspicious or malicious activity for these log sources or services, it will generate a finding for the activity, which you can review in the GuardDuty console. In addition, you can automatically forward these findings to Security Hub for consolidation, and to Detective for security investigation.
Detective data sources
If you have Security Hub and other AWS security services such as GuardDuty or Amazon Inspector enabled, findings from these services are forwarded to Security Hub. With the exception of sensitive data findings from Amazon Macie, you’re automatically opted in to other AWS service integrations when you enable Security Hub. For the full list of services that forward findings to Security Hub, see Available AWS service integrations.
With each service enabled and forwarding findings to Security Hub, the next step is to enable the data source in Detective called AWS security findings, which are the findings forwarded to Security Hub. Again, we’re going to use the delegated administrator account for these steps to make sure that AWS security findings are being ingested for your accounts.
To enable AWS security findings
Sign in to the Detective console using the delegated administrator account and navigate to Settings and then General.
Choose Optional source packages, Edit, select AWS security findings, and then choose Save.
Figure 5: Enable AWS security findings
When you enable Detective, it immediately starts creating a security behavior graph for AWS security findings to build a linked dataset between findings and entities, such as RDS login activity from Aurora databases, EKS runtime activity, and suspicious network activity for Lambda functions. For GuardDuty to detect potential threats that affect your database instances, it first needs to undertake a learning period of up to two weeks to establish a baseline of normal behavior. For more information, see How RDS Protection uses RDS login activity monitoring. For the other protections, after suspicious activity is detected, you can start to see findings in both GuardDuty and Security Hub consoles. This is where you can start using Detective to better understand which findings are connected and where to prioritize your investigations.
Detective behavior graph
As Detective ingests data from GuardDuty, Amazon Inspector, and Security Hub, as well as CloudTrail logs, VPC flow logs, and Amazon Elastic Kubernetes Service (Amazon EKS) audit logs, it builds a behavior graph database. Graph databases are purpose-built to store and navigate relationships. Relationships are first-class citizens in graph databases, which means that they’re not computed out-of-band or by interfering with relationships through querying foreign keys. Because Detective stores information on relationships in your graph database, you can effectively answer questions such as “are these security findings related?”. In Detective, you can use the search menu and profile panels to view these connections, but a quicker way to see this information is by using finding groups visualizations.
Finding groups visualizations
Finding groups extract additional information out of the behavior graph to highlight findings that are highly connected. Detective does this by running several machine learning algorithms across your behavior graph to identify related findings and then statically weighs the relationships between those findings and entities. The result is a finding group that shows GuardDuty and Amazon Inspector findings that are connected, along with entities like Amazon Elastic Compute Cloud (Amazon EC2) instances, AWS accounts, and AWS Identity and Access Management (IAM) roles and sessions that were impacted by these findings. With finding groups, you can more quickly understand the relationships between multiple findings and their causes because you don’t need to connect the dots on your own. Detective automatically does this and presents a visualization so that you can see the relationships between various entities and findings.
Enhanced visualizations
Recently, we released several enhancements to finding groups visualizations to aid your understanding of security connections and root causes. These enhancements include:
Dynamic legend – the legend now shows icons for entities that you have in the finding group instead of showing all available entities. This helps reduce noise to only those entities that are relevant to your investigation.
Aggregated evidence and finding icons – these icons provide a count of similar evidence and findings. Instead of seeing the same finding or evidence repeated multiple times, you’ll see one icon with a counter to help reduce noise.
More descriptive side panel information – when you choose a finding or entity, the side panel shows additional information, such as the service that identified the finding and the finding title, in addition to the finding type, to help you understand the action that invoked the finding.
Label titles – you can now turn on or off titles for entities and findings in the visualization so that you don’t have to choose each to get a summary of what the different icons mean.
To use the finding groups visualization
Open the Detective console, choose Summary, and then choose View all finding groups.
Choose the title of an available finding group and scroll down to Visualization.
Under the Select layout menu, choose one of the layouts available, or choose and drag each icon to rearrange the layout according to how you’d like to see connections.
For a complete list of involved entities and involved findings, scroll down below the visualization.
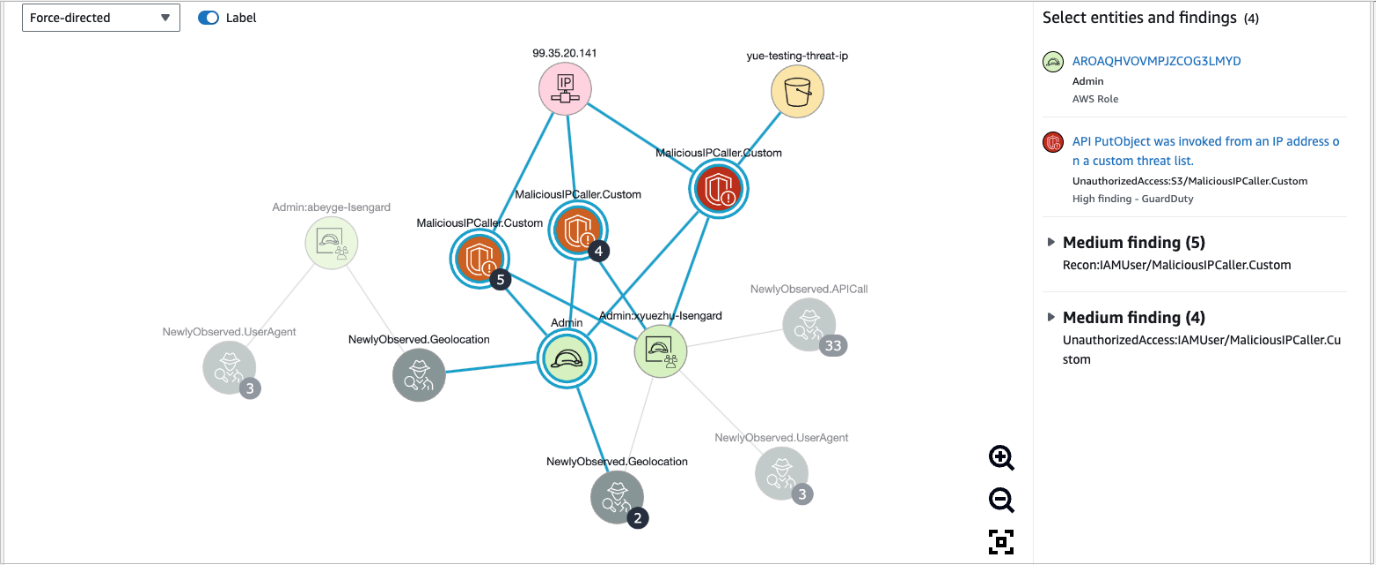
Figure 6 shows an example of how you can use finding groups visualization to help identify the root cause of findings quickly. In this example, an IAM role was connected to newly observed geolocations, multiple GuardDuty findings detected malicious API calls, and there were newly observed user agents from the IAM session. The visualization can give you high confidence that the IAM role is compromised. It also provides other entities that you can search against, such as the IP address, S3 bucket, or new user agents.
Figure 6: Finding groups visualization
Now that you have the new GuardDuty protections enabled along with the data source of AWS security findings, you can use finding groups to more quickly visualize which IAM sessions have had multiple findings associated with unauthorized access, or which EC2 instances are publicly exposed with a software vulnerability and active GuardDuty finding—these patterns can help you determine if there is an actual risk.
Conclusion
In this blog post, you learned how to enable new GuardDuty protections and use Detective, finding groups, and visualizations to better identify, operationalize, and prioritize AWS security findings that represent real risk. We also highlighted the new enhancements to visualizations that can help reduce noise and provide summaries of detailed information to help reduce the time it takes to triage findings. If you’d like to see an investigation scenario using Detective, watch the video Amazon Detective Security Scenario Investigation.
At AWS, we’re committed to helping our customers meet digital sovereignty requirements. Last year, I announced the AWS Digital Sovereignty Pledge, our commitment to offering all AWS customers the most advanced set of sovereignty controls and features available in the cloud. Our approach is to continue to make AWS sovereign-by-design—as it has been from day one.
I promised that our pledge was just the start, and that we would continue to innovate to meet the needs of our customers. As part of our promise, we pledged to invest in an ambitious roadmap of capabilities on data residency, granular access restriction, encryption, and resilience. Today, I’d like to update you on another milestone on our journey to continue to help our customers address their sovereignty needs.
Further control over the location of your data
Customers have always controlled the location of their data with AWS. For example, in Europe, customers have the choice to deploy their data into any of eight existing AWS Regions. These AWS Regions provide the broadest set of cloud services and features, enabling our customers to run the majority of their workloads. Customers can also use AWS Local Zones, a type of infrastructure deployment that makes AWS services available in more places, to help meet latency and data residency requirements, without having to deploy self-managed infrastructure. Customers who must comply with data residency regulations can choose to run their workloads in specific geographic locations where AWS Regions and Local Zones are available.
Announcing AWS Dedicated Local Zones
Our public sector and regulated industry customers have told us they want dedicated infrastructure for their most critical workloads to help meet regulatory or other compliance requirements. Many of these customers manage their own infrastructure on premises for workloads that require isolation. This forgoes the performance, innovation, elasticity, scalability, and resiliency benefits of the cloud.
To help our customers address these needs, I’m excited to announce AWS Dedicated Local Zones. Dedicated Local Zones are a type of AWS infrastructure that is fully managed by AWS, built for exclusive use by a customer or community, and placed in a customer-specified location or data center to help comply with regulatory requirements. Dedicated Local Zones can be operated by local AWS personnel and offer the same benefits of Local Zones, such as elasticity, scalability, and pay-as-you-go pricing, with added security and governance features. These features include data access monitoring and audit programs, controls to limit infrastructure access to customer-selected AWS accounts, and options to enforce security clearance or other criteria on local AWS operating personnel. With Dedicated Local Zones, we work with customers to configure their own Local Zones with the services and capabilities they need to meet their regulatory requirements.
Innovating with the Singapore Government’s Smart Nation and Digital Government Group
At AWS, we work closely with customers to understand their requirements for their most critical workloads. Our work with the Singapore Government’s Smart Nation and Digital Government Group (SNDGG) to build a Smart Nation for their citizens and businesses illustrates this approach. This group spearheads Singapore’s digital government transformation and development of the public sector’s engineering capabilities. SNDGG is the first customer to deploy Dedicated Local Zones.
“AWS is a strategic partner and has been since the beginning of our cloud journey. SNDGG collaborated with AWS to define and build Dedicated Local Zones to help us meet our stringent data isolation and security requirements, enabling Singapore to run more sensitive workloads in the cloud securely,” said Chan Cheow Hoe, Government Chief Digital Technology Officer of Singapore. “In addition to helping the Singapore government meet its cybersecurity requirements, the Dedicated Local Zones enable us to offer its agencies a seamless and consistent cloud experience.”
Our commitments to our customers
We remain committed to helping our customers meet evolving sovereignty requirements. We continue to innovate sovereignty features, controls, and assurances globally with AWS, without compromising on the full power of AWS.
To get started, you can visit the Dedicated Local Zones website, where you can contact AWS specialists to learn more about how Dedicated Local Zones can be configured to meet your regulatory needs.
If you have feedback about this post, submit comments in the Comments section below. If you have questions about this post, contact AWS Support.
Want more AWS Security news? Follow us on Twitter.
This post is a deep dive into the design of Cedar, an open source language for writing and evaluating authorization policies. Using Cedar, you can control access to your application’s resources in a modular and reusable way. You write Cedar policies that express your application’s permissions, and the application uses Cedar’s authorization engine to decide which access requests to allow. This decouples access control from the application logic, letting you write, update, audit, and reuse authorization policies independently of application code.
Cedar’s authorization engine is built to a high standard of performance and correctness. Application developers report typical authorization latencies of less than 1 ms, even with hundreds of policies. The resulting authorization decision — Allow or Deny — is provably correct, thanks to the use of verification-guided development. This high standard means your application can use Cedar with confidence, just like Amazon Web Services (AWS) does as part of the Amazon Verified Permissions and AWS Verified Access services.
Cedar’s design is based on three core tenets: usability, speed, and safety. Cedar policies are intuitive to read because they’re defined using your application’s vocabulary—for example, photos organized into albums for a photo-sharing application. Cedar’s policy structure reflects common authorization use cases and enables fast evaluation. Cedar’s semantics are intuitive and safer by default: policies combine to allow or deny access according to rules you already know from AWS Identity and Access Management (IAM).
This post shows how Cedar’s authorization semantics, data model, and policy syntax work together to make the Cedar language intuitive to use, fast, and safe. We cover each of these in turn and highlight how their design reflects our tenets.
The Cedar authorization semantics: Default deny, forbid wins, no ordering
We show how Cedar works on an example application for sharing photos, called PhotoFlash, illustrated in Figure 1.
Figure 1: An example PhotoFlash account. User Jane has two photos, four albums, and three user groups
PhotoFlash lets users like Jane upload photos to the cloud, tag them, and organize them into albums. Jane can also share photos with others, for example, letting her friends view photos in her trips album. PhotoFlash provides a point-and-click interface for users to share access, and then stores the resulting permissions as Cedar policies.
When a user attempts to perform an action on a resource (for example, view a photo), PhotoFlash calls the Cedar authorization engine to determine whether access is allowed. The authorizer evaluates the stored policies against the request and application-specific data (such as a photo’s tags) and returns Allow or Deny. If it returns Allow, PhotoFlash proceeds with the action. If it returns Deny, PhotoFlash reports that the action is not permitted.
Let’s look at some policies and see how Cedar evaluates them to authorize requests safely and simply.
Default deny
To let Jane’s friends view photos in her trips album, PhotoFlash generates and stores the following Cedar permit policy:
// Policy A: Jane's friends can view photos in Jane's trips album.
permit(
  principal in Group::"jane/friends",
  action == Action::"viewPhoto",
  resource in Album::"jane/trips");
Cedar policies define who (the principal) can do what (the action) on what asset (the resource). This policy allows the principal (a PhotoFlash User) in Jane’s friends group to view the resources (a Photo) in Jane’s trips album.
Cedar’s authorizer grants access only if a request satisfies a specific permit policy. This semantics is default deny: Requests that don’t satisfy any permit policy are denied.
Given only our example Policy A, the authorizer will allow Alice to view Jane’s flower.jpg photo. Alice’s request satisfies Policy A because Alice is one of Jane’s friends (see Figure 1). But the authorizer will deny John’s request to view this photo. That’s because John isn’t one of Jane’s friends, and there is no other permit that grants John access to Jane’s photos.
Forbid wins
While PhotoFlash allows individual users to choose their own permissions, it also enforces system-wide security rules.
For example, PhotoFlash wants to prevent users from performing actions on resources that are owned by someone else and tagged as private. If a user (Jane) accidentally permits someone else (Alice) to view a private photo (receipt.jpg), PhotoFlash wants to override the user-defined permission and deny the request.
In Cedar, such guardrails are expressed as forbid policies:
// Policy B: Users can't perform any actions on private resources they don't own.
forbid(principal, action, resource)
when {
  resource.tags.contains("private") &&
  !(resource in principal.account)
};
This PhotoFlash policy says that a principal is forbidden from taking an action on a resource when the resource is tagged as private and isn’t contained in the principal’s account.
Cedar’s authorizer makes sure that forbids override permits. If a request satisfies a forbid policy, it’s denied regardless of what permissions are satisfied.
For example, the authorizer will deny Alice’s request to view Jane’s receipt.jpg photo. This request satisfies Policy A because Alice is one of Jane’s friends. But it also satisfies the guardrail in Policy B because the photo is tagged as private. The guardrail wins, and the request is denied.
No ordering
Cedar’s authorization decisions are independent of the order the policies are evaluated in. Whether the authorizer evaluates Policy A first and then Policy B, or the other way around, doesn’t matter. As you’ll see later, the Cedar language design ensures that policies can be evaluated in any order to reach the same authorization decision. To understand the combined meaning of multiple Cedar policies, you need only remember that access is allowed if the request satisfies a permit policy and there are no applicable forbid policies.
Safe by default and intuitive
We’ve proved (using automated reasoning) that Cedar’s authorizer satisfies the default deny, forbids override permits, and order independence properties. These properties help make Cedar’s behavior safe by default and intuitive. Amazon IAM has the same properties. Cedar builds on more than a decade of IAM experience by formalizing and enforcing these properties as parts of its design.
Now that we’ve seen how Cedar authorizes requests, let’s look at how its data model and syntax support writing policies that are quick to read and evaluate.
The Cedar data model: entities with attributes, arranged in a hierarchy
Cedar policies are defined in terms of a vocabulary specific to your application. For example, PhotoFlash organizes photos into albums and users into groups while a task management application organizes tasks into lists. You reflect this vocabulary into Cedar’s data model, which organizes entities into a hierarchy. Entities correspond to objects within your application, such as photos and users. The hierarchy reflects grouping of entities, such as nesting of photos into albums. Think of it as a directed-acyclic graph. Figure 2 shows the entity hierarchy for PhotoFlash that matches Figure 1.
Figure 2: An example hierarchy for PhotoFlash, matching the illustration in Figure 1
Entities are stored objects that serve as principals, resources, and actions in Cedar policies. Policies refer to these objects using entity references, such as Album::”jane/art”.
Policies use the in operator to check if the hierarchy relates two entities. For example, Photo::”flower.jpg” in Account::”jane” is true for the hierarchy in Figure 2, but Photo::”flower.jpg” in Album::”jane/conference” is not. PhotoFlash can persist the entity hierarchy in a dedicated entity store, or compute the relevant parts as needed for an authorization request.
Each entity also has a record that maps named attributes to values. An attribute stores a Cedar value: an entity reference, record, string, 64-bit integer, boolean, or a set of values. For example, Photo::”flower.jpg” has attributes describing the photo’s metadata, such as tags, which is a set of strings, and raw, which is an entity reference to another Photo. Cedar supports a small collection of operators that can be applied to values; these operators are carefully chosen to enable efficient evaluation.
Built-in support for role and attribute-based access control
If the concepts you’ve seen so far seem familiar, that’s not surprising. Cedar’s data model is designed to allow you to implement time-tested access control models, including role-based and attribute-based access control (RBAC and ABAC). The entity hierarchy and the in operator support RBAC-style roles as groups, while entity records and the . operator let you express ABAC-style permissions using per-object attributes.
The Cedar syntax: Structured, loop-free, and stateless
Cedar uses a simple, structured syntax for writing policies. This structure makes Cedar policies simple to understand and fast to authorize at scale. Let’s see how by taking a closer look at Cedar’s syntax.
Structure for readability and scalable authorization
Figure 3 illustrates the structure of Cedar policies: an effect and scope, optionally followed by one or more conditions.
The effect of a policy is to either permit or forbid access. The scope can use equality (==) or membership (in) constraints to restrict the principals, actions, and resources to which the policy applies. Policy conditions are expressions that further restrict when the policy applies.
This structure makes policies straightforward to read and understand: The scope expresses an RBAC rule, and the conditions express ABAC rules. For example, PhotoFlash Policy A has no conditions and expresses a single RBAC rule. Policy B has an open (unconstrained) scope and expresses a single ABAC rule. A quick glance is enough to see if a policy is just an RBAC rule, just an ABAC rule, or a mix of both.
Figure 3: Cedar policy structure, illustrated on PhotoFlash Policy A and B
Scopes also enable scalable authorization for large policy stores through policy slicing. This is a property of Cedar that lets applications authorize a request against a subset of stored policies, supporting real-time decisions even for stores with thousands of policies. With slicing, an application needs to pass a policy to the authorizer only when the request’s principal and resource are descendants of the principal and resource entities specified in the policy’s scope. For example, PhotoFlash needs to include Policy A only for requests that involve the descendants of Group::”jane/friends” and Album::”jane/trips”. But Policy B must be included for all requests because of its open scope.
No loops or state for fast evaluation and intuitive decisions
Policy conditions are Boolean-valued expressions. The Cedar expression language has a familiar syntax that includes if-then-else expressions, short-circuiting Boolean operators (!, &&, ||), and basic operations on Cedar values. Notably, there is no way to express looping or to change the application state (for example, mutate an attribute).
Cedar excludes loops to bound authorization latency. With no loops or costly built-in operators, Cedar policies terminate in O(n2) steps in the worst case (when conditions contain certain set operations), or O(n) in the common case.
Cedar also excludes stateful operations for performance and understandability. Since policies can’t change the application state, their evaluation can be parallelized for better performance, and you can reason about them in any order to see what accesses are allowed.
Learn more
In this post, we explored how Cedar’s design supports intuitive, fast, and safe authorization. With Cedar, your application’s access control rules become standalone policies that are clear, auditable, and reusable. You enforce these policies by calling Cedar’s authorizer to decide quickly and safely which requests are allowed. To learn more, see how to use Cedar to secure your app, and how we built Cedar to a high standard of assurance. You can also visit the Cedar website and blog, try it out in the Cedar playground, and join us on Cedar’s Slack channel.
If you have feedback about this post, submit comments in the Comments section below. If you have questions about this post, contact AWS Support.
Want more AWS Security news? Follow us on Twitter.
We’re pleased to announce that we’ve launched a Landing Zone for the Baseline Informatiebeveiliging Overheid (BIO) framework to support our Dutch customers in their compliance needs with the BIO framework.
Amazon Web Services (AWS) customers across the Dutch public sector can use AWS certified services with confidence, knowing that the AWS services listed in the certificate adhere to the strict requirements imposed on the consumption of cloud-based services.
Baseline Informatiebeveiliging Overheid
The BIO framework is an information security framework that the four layers of the Dutch public sector are required to adhere to. This means that it’s mandatory for the Dutch central government, all provinces, municipalities, and regional water authorities to be compliant with the BIO framework.
To support AWS customers in demonstrating their compliance with the BIO framework, AWS developed a Landing Zone for the BIO framework. This Landing Zone for the BIO framework is a pre-configured AWS environment that includes a subset of the technical requirements of the BIO framework. It’s a helpful tool that provides a starting point from which customers can further build their own AWS environment.
In addition to the BIO framework, there’s another information security framework designed specifically for the use of cloud services. It is called BIO Thema-uitwerking Clouddiensten. The BIO Thema-uitwerking Clouddiensten is a guidance document for Dutch cloud service consumers to help them formulate controls and objectives when using cloud services. Consumers can view it as an additional control framework on top of the BIO framework.
AWS strives to continuously bring services into scope of its compliance programs to help you meet your architectural and regulatory needs.
To learn more about our compliance and security programs, see AWS Compliance Programs. As always, we value your feedback and questions; reach out to the AWS Compliance team through the Contact Us page.
If you have feedback about this post, submit comments in the Comments section below.
Want more AWS Security how-to content, news, and feature announcements? Follow us on Twitter.
Product security teams play a critical role to help ensure that new services, products, and features are built and shipped securely to customers. However, since security teams are in the product launch path, they can form a bottleneck if organizations struggle to scale their security teams to support their growing product development teams. In this post, we will share how Amazon Web Services (AWS) developed a mechanism to scale security processes and expertise by distributing security ownership between security teams and development teams. This mechanism has many names in the industry — Security Champions, Security Advocates, and others — and it’s often part of a shift-left approach to security. At AWS, we call this mechanism Security Guardians.
In many organizations, there are fewer security professionals than product developers. Our experience is that it takes much more time to hire a security professional than other technical job roles, and research conducted by (ISC)2 shows that the cybersecurity industry is short 3.4 million workers. When product development teams continue to grow at a faster rate than security teams, the disparity between security professionals and product developers continues to increase as well. Although most businesses understand the importance of security, frustration and tensions can arise when it becomes a bottleneck for the business and its ability to serve customers.
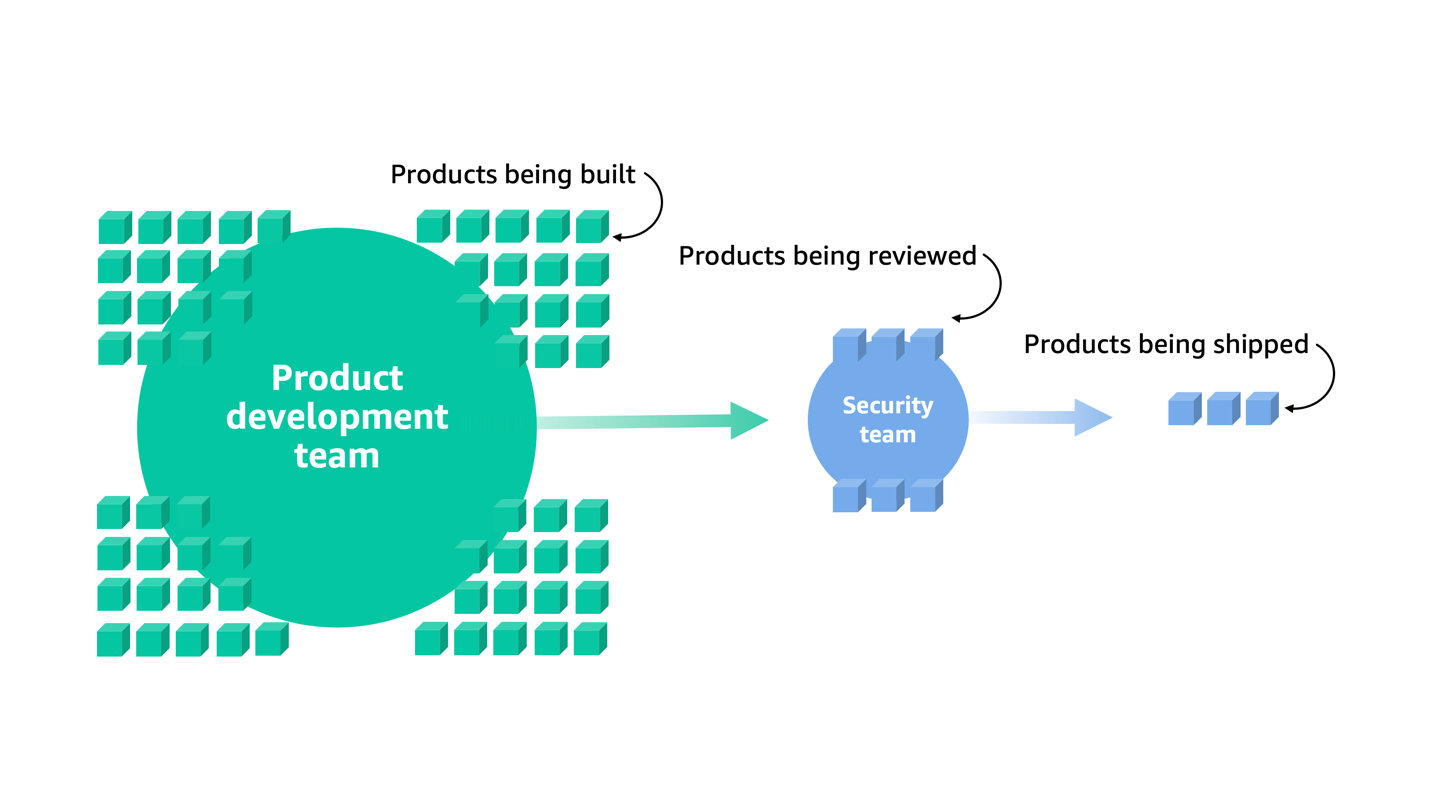
At AWS, we require the teams that build products to undergo an independent security review with an AWS application security engineer before launching. This is a mechanism to verify that new services, features, solutions, vendor applications, and hardware meet our high security bar. This intensive process impacts how quickly product teams can ship to customers. As shown in Figure 1, we found that as the product teams scaled, so did the problem: there were more products being built than the security teams could review and approve for launch. Because security reviews are required and non-negotiable, this could potentially lead to delays in the shipping of products and features.
Figure 1: More products are being developed than can be reviewed and shipped
How AWS builds a culture of security
Because of its size and scale, many customers look to AWS to understand how we scale our own security teams. To tell our story and provide insight, let’s take a look at the culture of security at AWS.
Security is a business priority
At AWS, security is a business priority. Business leaders prioritize building products and services that are designed to be secure, and they consider security to be an enabler of the business rather than an obstacle.
Leaders also strive to create a safe environment by encouraging employees to identify and escalate potential security issues. Escalation is the process of making sure that the right people know about the problem at the right time. Escalation encompasses “Dive Deep”, which is one of our corporate values at Amazon, because it requires owners and leaders to dive into the details of the issue. If you don’t know the details, you can’t make good decisions about what’s going on and how to run your business effectively.
This aspect of the culture goes beyond intention — it’s embedded in our organizational structure:
CISOs and IT leaders play a key role in demystifying what security and compliance represent for the business. At AWS, we made an intentional choice for the security team to report directly to the CEO. The goal was to build security into the structural fabric of how AWS makes decisions, and every week our security team spends time with AWS leadership to ensure we’re making the right choices on tactical and strategic security issues.
Because our leadership supports security, it’s understood within AWS that security is everyone’s job. Security teams and product development teams work together to help ensure that products are built and shipped securely. Despite this collaboration, the product teams own the security of their product. They are responsible for making sure that security controls are built into the product and that customers have the tools they need to use the product securely.
On the other hand, central security teams are responsible for helping developers to build securely and verifying that security requirements are met before launch. They provide guidance to help developers understand what security controls to build, provide tools to make it simpler for developers to implement and test controls, provide support in threat modeling activities, use mechanisms to help ensure that customers’ security expectations are met before launch, and so on.
This responsibility model highlights how security ownership is distributed between the security and product development teams. At AWS, we learned that without this distribution, security doesn’t scale. Regardless of the number of security experts we hire, product teams always grow faster. Although the culture around security and the need to distribute ownership is now well understood, without the right mechanisms in place, this model would have collapsed.
Mechanisms compared to good intentions
Mechanisms are the final pillar of AWS culture that has allowed us to successfully distribute security across our organization. A mechanism is a complete process, or virtuous cycle, that reinforces and improves itself as it operates. As shown in Figure 2, a mechanism takes controllable inputs and transforms them into ongoing outputs to address a recurring business challenge. At AWS, the business challenge that we’re facing is that security teams create bottlenecks for the business. The culture of security at AWS provides support to help address this challenge, but we needed a mechanism to actually do it.
Figure 2: AWS sees mechanisms as a complete process, or virtuous cycle
“Often, when we find a recurring problem, something that happens over and over again, we pull the team together, ask them to try harder, do better – essentially, we ask for good intentions. This rarely works… When you are asking for good intentions, you are not asking for a change… because people already had good intentions. But if good intentions don’t work, what does? Mechanisms work.
At AWS, we’ve learned that we can help solve the challenge of scaling security by distributing security ownership with a mechanism we call the Security Guardians program. Like other mechanisms, it has inputs and outputs, and transforms over time.
AWS distributes security ownership with the Security Guardians program
At AWS, the Security Guardians program trains, develops, and empowers developers to be security ambassadors, or Guardians, within the product teams. At a high level, Guardians make sure that security considerations for a product are made earlier and more often, helping their peers build and ship their product faster. They also work closely with the central security team to help ensure that the security bar at AWS is rising and the Security Guardians program is improving over time. As shown in Figure 3, embedding security expertise within the product teams helps products with Guardian involvement move through security review faster.
Figure 3: Security expertise is embedded in the product teams by Guardians
Guardians are informed, security-minded product builders who volunteer to be consistent champions of security on their teams and are deeply familiar with the security processes and tools. They provide security guidance throughout the development lifecycle and are stakeholders in the security of the products being shipped, helping their teams make informed decisions that lead to more secure, on-time launches. Guardians are the security points-of-contact for their product teams.
In this distributed security ownership model, accountability for product security sits with the product development teams. However, the Guardians are responsible for performing the first evaluation of a development team’s security review submission. They confirm the quality and completeness of the new service’s resources, design documents, threat model, automated findings, and penetration test readiness. The development teams, supported by the Guardian, submit their security review to AWS Application Security (AppSec) engineers for the final pre-launch review.
In practice, as part of this development journey, Guardians help ensure that security considerations are made early, when teams are assessing customer requests and the feature or product design. This can be done by starting the threat modeling processes. Next, they work to make sure that mitigations identified during threat modeling are developed. Guardians also play an active role in software testing, including security scans such as static application security testing (SAST) and dynamic application security testing (DAST). To close out the security review, security engineers work with Guardians to make sure that findings are resolved and the product is ready to ship.
Figure 4: Expedited security review process supported by Guardians
Guardians are, after all, Amazonians. Therefore, Guardians exemplify a number of the Amazon Leadership Principles and often have the following characteristics:
They are exemplary practitioners for security ownership and empower their teams to own the security of their service.
They hold a high security bar and exercise strong security judgement, don’t accept quick or easy answers, and drive continuous improvement.
They advocate for security needs in internal discussions with the product team.
They are thoughtful yet assertive to make customer security a top priority on their team.
They maintain and showcase their security knowledge to their peers, continuously building knowledge from many different sources to gain perspective and to stay up to date on the constantly evolving threat landscape.
They aren’t afraid to have their work independently validated by the central security team.
Expected outcomes
AWS has benefited greatly from the Security Guardians program. We’ve had 22.5 percent fewer medium and high severity security findings generated during the security review process and have taken about 26.9 percent less time to review a new service or feature. This data demonstrates that with Guardians involved we’re identifying fewer issues late in the process, reducing remediation work, and as a result securely shipping services faster for our customers. To help both builders and Guardians improve over time, our security review tool captures feedback from security engineers on their inputs. This helps ensure that our security ownership mechanism reinforces and improves itself over time.
AWS and other organizations have benefited from this mechanism because it generates specialized security resources and distributes security knowledge that scales without needing to hire additional staff.
A program such as this could help your business build and ship faster, as it has for AWS, while maintaining an appropriately high security bar that rises over time. By training builders to be security practitioners and advocates within your development cycle, you can increase the chances of identifying risks and security findings earlier. These findings, earlier in the development lifecycle, can reduce the likelihood of having to patch security bugs or even start over after the product has already been built. We also believe that a consistent security experience for your product teams is an important aspect of successfully distributing your security ownership. An experience with less confusion and friction will help build trust between the product and security teams.
If you’re an AWS customer and want to learn more about how AWS built the Security Guardians program, reach out to your local AWS solutions architect or account manager for more information.
If you have feedback about this post, submit comments in the Comments section below. If you have questions about this post, contact AWS Support.
Want more AWS Security news? Follow us on Twitter.
August 17, 2023: We updated the instructions and screenshots in this post to align with changes to the AWS Management Console.
April 25, 2023: We’ve updated this blog post to include more security learning resources.
AD Connector is designed to give you an easy way to establish a trusted relationship between your Active Directory and AWS. When AD Connector is configured, the trust allows you to:
Sign in to AWS applications such as Amazon WorkSpaces, Amazon WorkDocs, and Amazon WorkMail by using your Active Directory credentials.
Seamlessly join Windows instances to your Active Directory domain either through the Amazon EC2 launch wizard or programmatically through the EC2 Simple System Manager (SSM) API.
Provide federated sign-in to the AWS Management Console by mapping Active Directory identities to AWS Identity and Access Management (IAM) roles.
AD Connector cannot be used with your custom applications, as it is only used for secure AWS integration for the three use-cases mentioned above. Custom applications relying on your on-premises Active Directory should communicate with your domain controllers directly or utilize AWS Managed Microsoft AD rather than integrating with AD Connector. To learn more about which AWS Directory Service solution works best for your organization, see the service documentation.
With AD Connector, you can streamline identity management by extending your user identities from Active Directory. It also enables you to reuse your existing Active Directory security policies such as password expiration, password history, and account lockout policies. Also, your users will no longer need to remember yet another user name and password combination. Since AD Connector doesn’t rely on complex directory synchronization technologies or Active Directory Federation Services (AD FS), you can forego the added cost and complexity of hosting a SAML-based federation infrastructure. In sum, AD Connector helps foster a hybrid environment by allowing you to leverage your existing on-premises investments to control different facets of AWS.
This blog post will show you how AD Connector works as well as walk through how to enable federated console access, assign users to roles, and seamlessly join an EC2 instance to an Active Directory domain.
AD Connector – Under the Hood
AD Connector is a dual Availability Zone proxy service that connects AWS apps to your on-premises directory. AD Connector forwards sign-in requests to your Active Directory domain controllers for authentication and provides the ability for applications to query the directory for data. When you configure AD Connector, you provide it with service account credentials that are securely stored by AWS. This account is used by AWS to enable seamless domain join, single sign-on (SSO), and AWS Applications (WorkSpaces, WorkDocs, and WorkMail) functionality. Given AD Connector’s role as a proxy, it does not store or cache user credentials. Rather, authentication, lookup, and management requests are handled by your Active Directory.
In order to create an AD Connector, you must also provide a pair of DNS IP addresses during setup. These are used by AD Connector to retrieve Service (SRV) DNS records to locate the nearest domain controllers to route requests to. The AD connector proxy instances use an algorithm similar to the Active Directory domain controller locator process to decide which domain controllers to connect to for LDAP and Kerberos requests.
For authentication to AWS applications and the AWS Management Console, you can configure an access URL from the AWS Directory Service console. This access URL is in the format of https://<alias>.awsapps.com and provides a publicly accessible sign-in page. You can visit https://<alias>.awsapps.com/workdocs to sign in to WorkDocs, and https://<alias>.awsapps.com/console to sign in to the AWS Management Console. The following image shows the sign-in page for the AWS Management Console.
Figure 1: Login
For added security you can enable multi-factor authentication (MFA) for AD Connector, but you’ll need to have an existing RADIUS infrastructure in your on-premises network set up to leverage this feature. See AD Connector – Multi-factor Authentication Prerequisites for more information about requirements and configuration. With MFA enabled with AD Connector, the sign-in page hosted at your access URL will prompt users for an MFA code in addition to their standard sign-in credentials.
AD Connector comes in two sizes: small and large. A large AD Connector runs on more powerful compute resources and is more expensive than a small AD Connector. Depending on the volume of traffic to be proxied by AD Connector, you’ll want to select the appropriate size for your needs.
Figure 2: Directory size
AD Connector is highly available, meaning underlying hosts are deployed across multiple Availability Zones in the region you deploy. In the event of host-level failure, Directory Service will promptly replace failed hosts. Directory Service also applies performance and security updates automatically to AD Connector.
The following diagram illustrates the authentication flow and network path when you enable AWS Management Console access:
A user opens the secure custom sign-in page and supplies their Active Directory user name and password.
The authentication request is sent over SSL to AD Connector.
AD Connector performs LDAP authentication to Active Directory.
Note: AD Connector locates the nearest domain controllers by querying the SRV DNS records for the domain.
After the user has been authenticated, AD Connector calls the STS AssumeRole method to get temporary security credentials for that user. Using those temporary security credentials, AD Connector constructs a sign-in URL that users use to access the console.
Note: If a user is mapped to multiple roles, the user will be presented with a choice at sign-in as to which role they want to assume. The user session is valid for 1 hour.
Figure 3: Authentication flow and network path
Before getting started with configuring AD Connector for federated AWS Management Console access, be sure you’ve read and understand the prerequisites for AD Connector. For example, as shown in Figure 3 there must be a VPN or Direct Connect circuit in place between your VPC and your on-premises environment. Your domain also has to be running at Windows 2003 functional level or later. Also, various ports have to be opened between your VPC and your on-premises environment to allow AD Connector to communicate with your on-premises directory.
Configuring AD Connector for federated AWS Management Console access
Enable console access
To allow users to sign in with their Active Directory credentials, you need to explicitly enable console access. You can do this by opening the Directory Service console and clicking the Directory ID name (Figure 4).
This opens the Directory Details page, where you’ll find a dropdown menu on the Apps & Services tab to enable the directory for AWS Management Console access.
Figure 4: Directories
Choose the Application management tab as seen in Figure 5.
Figure 5: Application Management
Scroll down to AWS Management Console as shown in Figure 6, and choose Enable from the Actions dropdown list.
Figure 6: Enable console access
After enabling console access, you’re ready to start configuring roles and associating Active Directory users and groups with those roles.
Follow these steps to create a new role. When you create a new role through the Directory Service console, AD Connector automatically adds a trust relationship to Directory Service. The following code example shows the IAM trust policy for the role, after a role is created.
Now that AD Connector is configured and you’ve created a role, your next job is to assign users or groups to those IAM roles. Role mapping is what governs what resources a user has access to within AWS. To do this you’ll need to do the following steps:
In the search bar, type the name of the role you just created.
Select the role that you just created by choosing the name under the IAM role field.
Choose Add, and enter the name to be added to find users or groups for this role.
Choose Add, and the user or group is now assigned to the role.
When you’re finished, you should see the name of the user or group along with the corresponding ID for that object. It is also important to note that this list can be used to remove users or groups from the role. The next time the user signs in to the AWS Management Console from the custom sign-in page, they will be signed in under the EC2ReadOnly security role.
Seamlessly join an instance to an Active Directory domain
Another advantage to using AD Connector is the ability to seamlessly join Windows (EC2) instances to your Active Directory domain. This allows you to join a Windows Server to the domain while the instance is being provisioned instead of using a script or doing it manually. This section of this blog post will explain the steps necessary to enable this feature in your environment and how the service works.
Step 1: Create a role
Until recently you had to manually create an IAM policy to allow an EC2 instance to access the SSM, an AWS service that allows you to configure Windows instances while they’re running and on first launch. Now, there’s a managed policy called AmazonEC2RoleforSSM that you can use instead. The role you are about to create will be assigned to an EC2 instance when it’s provisioned, which will grant it permission to access the SSM service.
To create the role:
Open the IAM console.
Click Roles in the navigation pane.
Click Create Role.
Type a name for your role in the Role Name field.
Under AWS Service Roles, select Amazon EC2 and then click Select.
On the Attach Policy page, select AmazonEC2RoleforSSM and then click Next Step.
On the Review page, click Create Role.
If you click the role you created, you’ll see a trust policy for EC2, which looks like the following code example.
Step 2: Create a new Windows instance from the EC2 console
With this role in place, you can now join a Windows instance to your domain via the EC2 launch wizard. For a detailed explanation about how to do this, see Joining a Domain Using the Amazon EC2 Launch Wizard.
If you’re instantiating a new instance from the API, however, you will need to create an SSM configuration document and upload it to the SSM service beforehand. We’ll step through that process next.
Note: The instance will require internet access to communicate with the SSM service.
Figure 7: Configure instance details
When you create a new Windows instance from the EC2 launch wizard as shown in Figure 7, the wizard automatically creates the SSM configuration document from the information stored in AD Connector. Presently, the EC2 launch wizard doesn’t allow you to specify which organizational unit (OU) you want to deploy the member server into.
Step 3: Create an SSM document (for seamlessly joining a server to the domain through the AWS API)
If you want to provision new Windows instances from the AWS CLI or API or you want to specify the target OU for your instances, you will need to create an SSM configuration document. The configuration document is a JSON file that contains various parameters used to configure your instances. The following code example is a configuration document for joining a domain.
{
	"schemaVersion": "1.0",
	"description": "Sample configuration to join an instance to a domain",
	"runtimeConfig": {
	   "aws:domainJoin": {
	       "properties": {
	          "directoryId": "d-1234567890",
	          "directoryName": "test.example.com",
	          "directoryOU": "OU=test,DC=example,DC=com",
	          "dnsIpAddresses": [
	             "198.51.100.1",
	             "198.51.100.2"
	          ]
	       }
	   }
	}
}
In this configuration document:
directoryId is the ID for the AD Connector you created earlier.
directoryName is the name of the domain (for example, examplecompany.com).
directoryOU is the OU for the domain.
dnsIpAddresses are the IP addresses for the DNS servers you specified when you created the AD Connector.
For additional information, see aws:domainJoin. When you’re finished creating the file, save it as a JSON file.
Note: The name of the file has to be at least 1 character and at most 64 characters in length.
Step 4: Upload the configuration document to SSM
This step requires that the user have permission to use SSM to configure an instance. If you don’t have a policy that includes these rights, create a new policy by using the following JSON, and assign it to an IAM user or group.
Note: On Linux/Mac systems, you need to add a “/” at the beginning of the path (for example, file:///Users/username/temp).
This command uploads the configuration document you created to the SSM service, allowing you to reference it when creating a new Windows instance from either the AWS CLI or the EC2 launch wizard.
Conclusion
This blog post has shown you how you can simplify account management by federating with your Active Directory for AWS Management Console access. The post also explored how you can enable hybrid IT by using AD Connector to seamlessly join Windows instances to your Active Directory domain. Armed with this information you can create a trust between your Active Directory and AWS. In addition, you now have a quick and simple way to enable single sign-on without needing to replicate identities or deploy additional infrastructure on premises.
We’d love to hear more about how you are using Directory Service, and welcome any feedback about how we can improve the experience. You can post comments below, or visit the Directory Service forum to post comments and questions.
AWS IAM Identity Center (successor to AWS Single Sign-On) is widely used by organizations to centrally manage federated access to their Amazon Web Services (AWS) environment. As organizations grow, it’s crucial that they maintain control of access to their environment and conduct regular reviews of existing granted permissions to maintain a good security posture. With continuous movement of users among projects and teams within an organization, there are constant updates in groups and permission sets. Given the frequency of updates, it’s important for organizations to maintain the integrity of the identity entities and promote visibility into their associated permissions within IAM Identity Center.
Performing an audit of permissions assignment through the IAM Identity Center Management Console can be an arduous and time-consuming task, especially for customers managing a significant number of AWS accounts. This blog post addresses the following concerns faced by security administrators:
How to maintain control over permissions and efficiently conduct thorough audits.
How to regularly review granted permissions to uphold the principle of least privilege.
In this blog post, we show you how to automate your IAM Identity Center users and groups permission review process with AWS SDK and AWS serverless services. The solution also includes how to schedule the review process based on preferred frequency and generating a business-specific access and permission review report.
By using AWS serverless services and AWS SDK, you can create an automated workflow to retrieve the latest permission sets of your identities in IAM Identity Center and extract them as a report. Amazon EventBridge scheduling allows you to set customized schedules to launch the automation process. AWS Lambda functions are used in data retrieval, data transformation, and report generation, and Amazon DynamoDB tables are used for storing raw unstructured data.
The IAM Identity Center instance identityStoreId – example: d-xxxxxxxxxx
The IAM Identity Center instance instanceArn – example: arn:aws:sso:::instance/ssoins-xxxxxxxxxx
Access and permission to deploy the related AWS services mentioned previously in AWS CloudFormation.
Note: This solution is expected to deploy in the account where your IAM Identity Center instance is being set up. If you want to deploy in other accounts, you need to establish cross-account access for the IAM roles of the relevant services mentioned previously.
In this section, we discuss the steps to set up solution. We provide a CloudFormation template that you can use to set up the required services and Lambda functions. Figure 1 illustrates the architecture of the solution.
Figure 1: Architecture of the solution
The solution is deployed using AWS SAM, which is an open-sourced framework for building serverless applications. AWS SAM helps to organize related components and operate on a single stack. When used together with the SAM CLI, it’s a useful tool for developing, testing, and building serverless applications on AWS.
To generate the report, the solution uses the following steps:
The EventBridge Scheduler is configured to launch the Step Functions based on the frequency of the cron job stated. The user can also manually launch the review as needed.
After the Step Functions are launched, the dataExtractionFunction Lambda function retrieves data from IAM Identity Center and stores it in two separate DynamoDB tables, fullPermissionSetsWithGroupTable and userWithGroupTable.
Step Functions will then launch the dataTransformLoadFunction Lambda function, which retrieves the data from both DynamoDB tables to perform data transformation for report generation.
The permission review report is stored in an S3 bucket and notification of completion is sent to the stakeholders.
Clone the GitHub repository. Open a CLI window and run git clone https://github.com/aws-samples/aws-iam-identity-center-permission-policies-analyzer.git
Navigate to root directory of the GitHub repository by running cd aws-iam-identity-center-permission-policies-analyzer
Run sam deploy ‐‐guided and follow the step-by-step instructions to indicate the deployment details such as the desired CloudFormation stack name, AWS Region and other details as shown in Figure 2.
Figure 2: Configure SAM deploy
As shown in Figure 2, you receive confirmation that the required resources have been created. AWS SAM creates a default S3 bucket to store the necessary resources and then proceeds to the deployment prompt. Enter y to deploy and wait for deployment to complete.
After deployment is complete, you should see the following output: Successfully created/updated stack – {StackName} in {AWSRegion}. You can review the resources and stack in your CloudFormation console as shown in Figure 3.
Figure 3: CloudFormation console view of deployed stack
The CloudFormation template specifies the cron schedule on the first day of each month at 0800 UTC +8 by default. You can update the schedule based on your preference by following steps 7 and 8.
Open the EventBridge console. In the navigation pane, under Scheduler, choose Schedules. Check the box next to {StackName}-monthlySchedule-{RandomID} and choose Edit.
Figure 4: EventBridge schedule console
At Step 1, under the Schedule pattern segment, enter your preferred scheduling. To learn about the different types of EventBridge scheduling, see Schedule types on EventBridge Scheduler. For this example, you use a recurring type of schedule using cron expression. Update to your preferred schedule and time zone and choose Next.
Check the email address you entered during the deployment stage of this solution for an email sent by [email protected], similar to what you see in Figure 6. Follow the steps in the email to confirm the Amazon SNS topic subscription.
Figure 6: Example email from Amazon SNS for subscription confirmation
Manually launch the review
After you’ve updated the schedule, the review process runs on the specified timing and frequency. You can manually launch the review immediately after you’ve deployed the solution, or at a time outside of the schedule on an as-needed basis.
Note: The format and keyword format are important to run the Step Functions successfully.
Figure 8: Example input to start state machine execution
When the process starts, the execution page opens and you can follow the process. The flow turns green when each step has been completed successfully. You can also review Events and check the Lambda functions or logs if you need to troubleshoot or refer to the details.
Figure 9: State machine successful execution example
Notification from each successful review
After each successful execution, you should receive an email notification at the email you specified in the Amazon SNS topic. You can then retrieve the report from the S3 bucket with the bucket name {StackName}-monthlyre-{AccountID}. Your report is stored according to the object key name specified in the email. An example of the email notification is shown in Figure 10.
Figure 10: Example email notification
You can download the report in CSV format from the S3 bucket. The headers of the report are:
User:
Username
PrincipalId:
An identifier for an object in IAM Identity Center, such as a user or group
PrincipalType:
USER or GROUP
GroupName:
Group’s display name value (if PrincipalType is GROUP)
AccountIdAssignment:
Identifier of the AWS account assigned with the specified permission set
PermissionSetARN:
ARN of the permission set
PermissionSetName:
Name of the permission set
Inline Policy:
Inline policy that is attached to the permission set
Customer Managed Policy:
Specifies the names and paths of the customer managed policies that you have attached to your permission set
From the report, you can determine whether a user is assigned to an account individually or as part of a group, along with the corresponding permission sets. The report also includes details on inline policy, AWS managed policy, customer managed policy, and the permission boundaries attached to the permission set. Inline policies and AWS managed policies are presented in JSON format. However, for customer managed policies and permission boundaries, to keep the solution simple, the generated report provides only basic information on the policies that you’ve attached to the permission set. You can log in to the respective accounts to view the policies in full JSON format through the AWS IAM console.
[Optional] Customize the user notification email
If you want to customize the email notification subject and content, you can do so by editing the Lambda function {StackName}-dataTransformLoadFunction-{RandomID}. Scroll down to the bottom of the source code and edit the sns_message and Subject accordingly.
Figure 11: Customizing the notification email in dataTransformLoadFunction source code
Clean up the resources
To clean up the resources that you created for this example:
Empty your S3 bucket. Open the Amazon S3 console, search for the bucket name and choose Empty. Follow the instructions on screen to empty it.
Delete the CloudFormation stack by either:
Using the CloudFormation console to delete the stack, or
Using the AWS SAM CLI to run sam delete in your terminal. Follow the instructions and enter y when prompted to delete the stack.
Conclusion
In this post, you learned how to deploy a solution that simplifies the review and analysis of IAM permissions granted to IAM Identity Center with an automated flow. You also learned about customization that you can set up to fit your team’s needs and preferences.
Security is fundamental for each product and service you are building with. Whether you are working on the back-end or the data and machine learning components of a system, the solution should be securely built.
In 2022, we discussed security in our post Let’s Architect! Architecting for Security. Today, we take a closer look at general security practices for your cloud workloads to secure both networks and applications, with a mix of resources to show you how to architect for security using the services offered by Amazon Web Services (AWS).
In this edition of Let’s Architect!, we share some practices for protecting your workloads from the most common attacks, introduce the Zero Trust principle (you can learn how AWS itself is implementing it!), plus how to move to containers and/or alternative approaches for managing your secrets.
This session from AWS re:Invent, security engineers guide you through the most common threat vectors and vulnerabilities that AWS customers faced in 2022. For each possible threat, you can learn how it’s implemented by attackers, the weaknesses attackers tend to leverage, and the solutions offered by AWS to avert these security issues. We describe this as fundamental architecting for security: this implies adopting suitable services to protect your workloads, as well as follow architectural practices for security.
What is Zero Trust? It is a security model that produces higher security outcomes compared with the traditional network perimeter model.
How does Zero Trust work in practice, and how can you start adopting it? This AWS re:Invent 2022 session defines the Zero Trust models and explains how to implement one. You can learn how it is used within AWS, as well as how any architecture can be built with these pillars in mind. Furthermore, there is a practical use case to show you how Delphix put Zero Trust into production.
Nowadays, it’s vital to have a thorough understanding of a container’s underlying security layers. AWS services, like Amazon Elastic Kubernetes Service and Amazon Elastic Container Service, have harnessed these Linux security-layer protections, keeping a sharp focus on the principle of least privilege. This approach significantly minimizes the potential attack surface by limiting the permissions and privileges of processes, thus upholding the integrity of the system.
This re:Inforce 2023 session discusses best practices for securing containers for your distributed systems.
Secrets play a critical role in providing access to confidential systems and resources. Ensuring the secure and consistent management of these secrets, however, presents a challenge for many organizations.
Anti-patterns observed in numerous organizational secrets management systems include sharing plaintext secrets via unsecured means, such as emails or messaging apps, which can allow application developers to view these secrets in plaintext or even neglect to rotate secrets regularly. This detailed guidance walks you through the steps of discovering and classifying secrets, plus explains the implementation and migration processes involved in transferring secrets to AWS Secrets Manager.
When you’re designing a security strategy for your organization, firewalls provide the first line of defense against threats. Amazon Web Services (AWS) offers AWS Network Firewall, a stateful, managed network firewall that includes intrusion detection and prevention (IDP) for your Amazon Virtual Private Cloud (VPC).
Logging plays a vital role in any firewall policy, as emphasized by the National Institute of Standards and Technology (NIST) Guidelines on Firewalls and Firewall Policy. Logging enables organizations to take proactive measures to help prevent and recover from failures, maintain proper firewall security configurations, and gather insights for effectively responding to security incidents.
Determining the optimal logging approach for your organization should be approached on a case-by-case basis. It involves striking a balance between your security and compliance requirements and the costs associated with implementing solutions to meet those requirements.
This blog post walks you through logging configuration best practices, discusses three common architectural patterns for Network Firewall logging, and provides guidelines for optimizing the cost of your logging solution. This information will help you make a more informed choice for your organization’s use case.
Stateless and stateful rules engines logging
When discussing Network Firewall best practices, it’s essential to understand the distinction between stateful and stateless rules. Note that stateless rules don’t support firewall logging, which can make them difficult to work with in use cases that depend on logs.
To verify that traffic is forwarded to the stateful inspection engine that generates logs, you can add a custom-defined stateless rule group that covers the traffic you need to monitor, or you can set a default action for stateless traffic to be forwarded to stateful rule groups in the firewall policy, as shown in the following figure.
Figure 1: Set up stateless default actions to forward to stateful rule groups
Alert logs and flow logs
Network Firewall provides two types of logs:
Alert — Sends logs for traffic that matches a stateful rule whose action is set to Alert or Drop.
Flow — Sends logs for network traffic that the stateless engine forwards to the stateful rules engine.
To grasp the use cases of alert and flow logs, let’s begin by understanding what a flow is from the view of the firewall. For the network firewall, network flow is a one-way series of packets that share essential IP header information. It’s important to note that the Network Firewall flow log differs from the VPC flow log, as it captures the network flow from the firewall’s perspective and it is summarized in JSON format.
For example, the following sequence shows how an HTTP request passes through the Network Firewall.
Figure 2: HTTP request passes through Network Firewall
When you’re using a stateful rule to block egress HTTP traffic, the TCP connection will be established initially. When an HTTP request comes in, it will be evaluated by the stateful rule. Depending on the rule’s action, the firewall may send a TCP reset to the sender when a Reject action is configured, or it may drop the packets to block them if a Drop action is configured. In the case of a Drop action, shown in Figure 3, the Network Firewall decides not to forward the packets at the HTTP layer, and the closure of the connection is determined by the TCP timers on both the client and server sides.
Figure 3: HTTP request blocked by Network Firewall
In the given example, the Network Firewall generates a flow log that provides information like IP addresses, port numbers, protocols, timestamps, number of packets, and bytes of the traffic. However, it doesn’t include details about the stateful inspection, such as whether the traffic was blocked or allowed.
Figure 4 shows the inbound flow log.
Figure 4: Inbound flow log
Figure 5 shows the outbound flow log.
Figure 5: Outbound flow log
The alert log entry complements the flow log by containing stateful inspection details. The entry includes information about whether the traffic was allowed or blocked and also provides the hostname associated with the traffic. This additional information enhances the understanding of network activities and security events, as shown in Figure 6.
Figure 6: Alert log
In summary, flow logs provide stateless information and are valuable for identifying trends, like monitoring IP addresses that transmit the most data over time in your network. On the other hand, alert logs contain stateful inspection details, making them helpful for troubleshooting and threat hunting purposes.
Keep in mind that flow logs can become excessive. When you’re forwarding traffic to a stateful inspection engine, flow logs capture the network flows crossing your Network Firewall endpoints. Because log volume affects overall costs, it’s essential to choose the log type that suits your use case and security needs. If you don’t need flow logs for traffic flow trends, consider only enabling alert logs to help reduce expenses.
Effective logging with alert rules
When you write stateful rules using the Suricata format, set the alert rule to be evaluated before the pass rule to log allowed traffic. Be aware that:
You must enable strict rule evaluation order to allow the alert rule to be evaluated before the pass rule. Otherwise the order of evaluation by default is pass rules first, then drop, then alert. The engine stops processing rules when it finds a match.
When you use pass rules, it’s recommended to add a message to remind anyone looking at the policy that these rules do not generate messages. This will help when developing and troubleshooting your rules.
For example, the rules below will allow traffic to a target with a specific Server Name Indication (SNI) and log the traffic that was allowed. As you can see in the pass rule, it includes a message to remind the firewall policy maker that pass rules don’t alert. The alert rule evaluated before the pass rule logs a message to tell the log viewer which rule allows the traffic. This way you can see allowed domains in the logs.
 alert tls $HOME_NET any -> $EXTERNAL_NET any (tls.sni; content:"www.example.com"; nocase; startswith; endswith; msg:"Traffic allowed by rule 72912"; flow:to_server, established; sid:82912;)
 pass tls $HOME_NET any -> $EXTERNAL_NET any (tls.sni; content:"www.example.com"; nocase; startswith; endswith; msg:"Pass rules don't alert"; flow:to_server, established; sid:72912;)
This way you can see allowed domains in the alert logs.
Figure 7: Allowed domain in the alert log
Log destination considerations
Network Firewall supports the following log destinations:
You can select the destination that best fits your organization’s processes. In the next sections, we review the most common pattern for each log destination and walk you through the cost considerations, assuming a scenario in which you generate 15 TB Network Firewall logs in us-east-1 Region per month.
Amazon S3
Network Firewall is configured to inspect traffic and send logs to an S3 bucket in JSON format using Amazon CloudWatch vended logs, which are logs published by AWS services on behalf of the customer. Optionally, logs in the S3 bucket can then be queried using Amazon Athena for monitoring and analysis purposes. You can also create Amazon QuickSight dashboards with an Athena-based dataset to provide additional insight into traffic patterns and trends, as shown in Figure 8.
Note that Network Firewall logging charges for the pattern above are the combined charges for CloudWatch Logs vended log delivery to the S3 buckets and for using Amazon S3.
CloudWatch vended log pricing can influence overall costs significantly in this pattern, depending on the amount of logs generated by Network Firewall, so it’s recommended that your team be aware of the charges described in Amazon CloudWatch Pricing – Amazon Web Services (AWS). From the CloudWatch pricing page, navigate to Paid Tier, choose the Logs tab, select your Region and then under Vended Logs, see the information for Delivery to S3.
For Amazon S3, go to Amazon S3 Simple Storage Service Pricing – Amazon Web Services, choose the Storage & requests tab, and view the information for your Region in the Requests & data retrievals section. Costs will be dependent on storage tiers and usage patterns and the number of PUT requests to S3.
In our example, 15 TB is converted and compressed to approximately 380 GB in the S3 bucket. The total monthly cost in the us-east-1 Region is approximately $3800.
Long-term storage
There are additional features in Amazon S3 to help you save on storage costs:
If after implementing Network Firewall logging, you determine that your log files are larger than 128 KB, you can take advantage of S3 Intelligent-Tiering, which provides automatic cost savings for files with unknown access patterns. There is additional cost savings potential in the S3 Intelligent-Tiering optional Archive Access and Deep Archive Access tiers, depending on your usage patterns.
S3 Lifecycle management can help automatically move log files into cost-saving infrequent access storage tiers after a user-defined amount of time after creation.
Athena and QuickSight can be used for analytics and reporting:
Athena can perform SQL queries directly against data in the S3 bucket where Network Firewall logs are stored. In the Athena query editor, a single query can be run to set up the table that points to the Network Firewall logging bucket.
After data is available in Athena, you can use Athena as a data source for QuickSight dashboards. You can use QuickSight to visualize data from your Network Firewall logs, taking advantage of AWS serverless services.
Please note that using Athena to scan firewall data in S3 might increase costs, as can the number of authors, users, reports, alerts, and SPICE data used in QuickSight.
Amazon CloudWatch Logs
In this pattern, shown in Figure 9, Network Firewall is configured to send logs to Amazon CloudWatch as a destination. Once the logs are available in CloudWatch, CloudWatch Log Insights can be used to search, analyze, and visualize your logs to generate alerts, notifications, and alarms based on specific log query patterns.
Figure 9: Architecture diagram using CloudWatch for Network Firewall Logs
Cost considerations
Configuring Network Firewall to send logs to CloudWatch incurs charges based on the number of metrics configured, metrics collection frequency, the number of API requests, and the log size. See Amazon CloudWatch Pricing for additional details.
In our example of 15 TB logs, this pattern in the us-east-1 Region results in approximately $6900.
CloudWatch dashboards offers a mechanism to create customized views of the metrics and alarms for your Network Firewall logs. These dashboards incur an additional charge of $3 per month for each dashboard.
Contributor Insights and CloudWatch alarms are additional ways that you can monitor logs for a pre-defined query pattern and take necessary corrective actions if needed. Contributor Insights are charged per Contributor Insights rule. To learn more, go to the Amazon CloudWatch Pricing page, and under Paid Tier, choose the Contributor Insights tab. CloudWatch alarms are charged based on the number of metric alarms configured and the number of CloudWatch Insights queries analyzed. To learn more, navigate to the CloudWatch pricing page and navigate to the Metrics Insights tab.
Long-term storage
CloudWatch offers the flexibility to retain logs from 1 day up to 10 years. The default behavior is never expire, but you should consider your use case and costs before deciding on the optimal log retention period. For cost optimization, the recommendation is to move logs that need to be preserved long-term or for compliance from CloudWatch to Amazon S3. Additional cost optimization can be achieved through S3 tiering. To learn more, see Managing your storage lifecycle in the S3 User Guide.
AWS Lambda with Amazon EventBridge, as shown in the following sample code, can be used to create an export task to send logs from CloudWatch to Amazon S3 based on an event rule, pattern matching rule, or scheduled time intervals for long-term storage and other use cases.
Figure 10 shows how EventBridge is configured to trigger the Lambda function periodically.
Figure 10: EventBridge scheduler for daily export of CloudWatch logs
Analytics and reporting
CloudWatch Insights offers a rich query language that you can use to perform complex searches and aggregations on your Network Firewall log data stored in log groups as shown in Figure 11.
The query results can be exported to CloudWatch dashboard for visualization and operational decision making. This will help you quickly identify patterns, anomalies, and trends in the log data to create the alarms for proactive monitoring and corrective actions.
Figure 11: Network Firewall logs ingested into CloudWatch and analyzed through CloudWatch Logs Insights
Amazon Kinesis Data Firehose
For this destination option, Network Firewall sends logs to Amazon Kinesis Data Firehose. From there, you can choose the destination for your logs, including Amazon S3, Amazon Redshift, Amazon OpenSearch Service, and an HTTP endpoint that’s owned by you or your third-party service providers. The most common approach for this option is to deliver logs to OpenSearch, where you can index log data, visualize, and analyze using dashboards as shown in Figure 12.
The charge when using Kinesis Data Firehose as a log destination is for CloudWatch Logs vended log delivery. Ingestion pricing is tiered and billed per GB ingested in 5 KB increments. See Amazon Kinesis Data Firehose Pricing under Vended Logs as source. There are no additional Kinesis Data Firehose charges for delivery unless optional features are used.
For 15 TB of log data, the cost of CloudWatch delivery and Kinesis Data Firehose ingestion is approximately $5400 monthly in the us-east-1 Region.
For instance, allocating approximately 15 TB of UltraWarm storage in the us-east-1 Region will result in a monthly cost of $4700. Keep in mind that in addition to storage costs, you should also account for compute instances and hot storage.
In short, the estimated total cost for log ingestion and storage in the us-east-1 Region for this pattern is at least $10,100.
Leveraging OpenSearch will enable you to promptly investigate, detect, analyze, and respond to security threats.
Summary
The following table shows a summary of the expenses and advantages of each solution. Since storing logs is a fundamental aspect of log management, we use the monthly cost of using Amazon S3 as the log delivery destination as our baseline when making these comparisons.
Pattern
Log delivery and storage cost as a multiple of the baseline cost
Functionalities
Dependencies
Amazon S3, Athena, QuickSight
1
The most economical option for log analysis.
The solution requires security engineers to have a good analytics skillset. Familiarity with Athena query and query running time will impact the incident response time and the cost.
Amazon CloudWatch
1.8
Log analysis, dashboards, and reporting can be implemented from the CloudWatch console. No additional service is needed.
The solution requires security engineers to be comfortable with CloudWatch Logs Insights query syntax. The CloudWatch Logs Insights query will impact the incident response time and the cost.
Amazon Kinesis Data Firehose, OpenSearch
2.7+
Investigate, detect, analyze, and respond to security threats quickly with OpenSearch.
The solution requires you to invest in managing the OpenSearch cluster.
You have the flexibility to select distinct solutions for flow logs and alert logs based on your requirements. For flow logs, opting for Amazon S3 as the destination offers a cost-effective approach. On the other hand, for alert logs, using the Kinesis Data Firehose and OpenSearch solution allows for quick incident response. Minimizing the time required to address ongoing security challenges can translate to reduced business risk at different costs.
Conclusion
This blog post has explored various patterns for Network Firewall log management, highlighting the cost considerations associated with each approach. While cost is a crucial factor in designing an efficient log management solution, it’s important to consider other factors such as real-time requirements, solution complexity, and ownership. Ultimately, the key is to adopt a log management pattern that aligns with your operational needs and budgetary constraints. Network security is an iterative practice, and by optimizing your log management strategy, you can enhance your overall security posture while effectively managing costs.
On June 19, 2023, AWS Verified Access introduced improved logging functionality; Verified Access now logs more extensive user context information received from the trust providers. This improved logging feature simplifies administration and troubleshooting of application access policies while adhering to zero-trust principles.
In this blog post, we will show you how to manage the Verified Access logging configuration and how to use Verified Access logs to write and troubleshoot access policies faster. We provide an example showing the user context information that was logged before and after the improved logging functionality and how you can use that information to transform a high-level policy into a fine-grained policy.
Overview of AWS Verified Access
AWS Verified Access helps enterprises to provide secure access to their corporate applications without using a virtual private network (VPN). Using Verified Access, you can configure fine-grained access policies to help limit application access only to users who meet the specified security requirements (for example, user identity and device security status). These policies are written in Cedar, a new policy language developed and open-sourced by AWS.
Verified Access validates each request based on access policies that you set. You can use user context—such as user, group, and device risk score—from your existing third-party identity and device security services to define access policies. In addition, Verified Access provides you an option to log every access attempt to help you respond quickly to security incidents and audit requests. These logs also contain user context sent from your identity and device security services and can help you to match the expected outcomes with the actual outcomes of your policies. To capture these logs, you need to enable logging from the Verified Access console.
Figure 1: Overview of AWS Verified Access architecture showing Verified Access connected to an application
After a Verified Access administrator attaches a trust provider to a Verified Access instance, they can write policies using the user context information from the trust provider. This user context information is custom to an organization, and you need to gather it from different sources when writing or troubleshooting policies that require more extensive user context.
Now, with the improved logging functionality, the Verified Access logs record more extensive user context information from the trust providers. This eliminates the need to gather information from different sources. With the detailed context available in the logs, you have more information to help validate and troubleshoot your policies.
To improve the preceding policy and make it more granular, you can include checks for various user and device details. For example, you can check if the user belongs to a particular group, has a verified email, should be logging in from a device with an OS that has an assessment score greater than 50, and has an overall device score greater than 15.
Modify the Verified Access instance logging configuration
Open the Verified Access console and select Verified Access instances.
Select the instance that you want to modify, and then, on the Verified Access instance logging configuration tab, select Modify Verified Access instance logging configuration.
Under Update log version, select ocsf-1.0.0-rc.2, turn on Include trust context, and select where the logs should be delivered.
Figure 3: Verified Access log version and trust context
After you’ve completed the preceding steps, Verified Access will start logging more extensive user context information from the trust providers for every request that Verified Access receives. This context information can have sensitive information. To learn more about how to protect this sensitive information, see Protect Sensitive Data with Amazon CloudWatch Logs.
The following example log shows information received from the IAM Identity Center identity provider (IdP) and the device provider CrowdStrike.
The following example log shows the user context information received from the OpenID Connect (OIDC) trust provider Okta. You can see the difference in the information provided by the two different trust providers: IAM Identity Center and Okta.
The following is a sample policy written using the information received from the trust providers.
permit(principal,action,resource)
when {
  context.idcpolicy.groups has "<hr-group-id>" &&
  context.idcpolicy.user.email.address like "*@example.com" &&
  context.idcpolicy.user.email.verified == true &&
  context has "crdstrikepolicy" &&
  context.crdstrikepolicy.assessment.os > 50 &&
  context.crdstrikepolicy.assessment.overall > 15
};
This policy only grants access to users who belong to a particular group, have a verified email address, and have a corporate email domain. Also, users can only access the application from a device with an OS that has an assessment score greater than 50, and has an overall device score greater than 15.
Conclusion
In this post, you learned how to manage Verified Access logging configuration from the Verified Access console and how to use improved logging information to write AWS Verified Access policies. To get started with Verified Access, see the Amazon VPC console.
If you have feedback about this post, submit comments in the Comments section below. If you have questions about this post, contact AWS Support.
Want more AWS Security news? Follow us on Twitter.
Remek Hetman, Principal Solutions Architect on the Identity Solutions team
In this profile, I met with Ilya Epshteyn, Senior Manager of the AWS Identity Solutions team, to chat about his team and what they’re working on.
Let’s start with the basics. What does the Identity Solutions team do? We are a team of specialist solutions architects (SAs) who are in the AWS Identity organization. At AWS, we have SAs who directly support customers, and we have SAs who are embedded in internal engineering teams—we are the latter. As SAs, we work on complex customer scenarios, build solutions, and create deep technical content on identity topics, including identity and access management—like blog posts, workshops, and sessions at our global events. A significant portion of our time is spent working internally with AWS product and engineering teams to help bring the customer experience perspective. Identity touches everything — it’s the fabric of every AWS service — and we want to help achieve a consistent identity experience for customers. To help do this, we use different tooling to proactively identify challenges in customers’ experience with identity across AWS.
What is the mission of the Identity Solutions team? Our mission is to make it easier for customers to implement access controls that protect their data in a straightforward and consistent manner across AWS services. A consistent experience simplifies the implementation and validation of security controls. We help identify customer’s pain points and work with our service teams to improve their experiences. We also provide highly prescriptive guidance to customers around identity. We don’t want to just say, “here’s an option.” Our guidance comes from a place of knowing how it will be operationalized and implemented. We won’t recommend something to customers unless we’ve tried it ourselves.
In order to literally “try it ourselves,” we built and operate a large-scale AWS environment called Mirror World, in which we use AWS services from the perspective of an AWS customer. The environment allows us to create different controls and use them in conjunction with other tools and services, truly putting ourselves in the shoes of the customer. This is in line with our mission of “active empathy,” our #1 team tenet.
Interesting! Tell us more about Mirror World. There are three main use cases for Mirror World:
We use it to understand and proactively identify challenges with the customer experience for existing and new AWS services and features. As new features are launched, we get early access and test them out so that we can improve the documentation and prescriptive guidance that we provide to customers.
We vend accounts in it. Internal field teams can request accounts and get their hands on a large-scale AWS environment with real customer setups, including organization-wide security controls and networking.
AWS service teams use this environment to see how customers experience their AWS service.
What are your other major focus areas right now? Data perimeters — set of preventive guardrails in your AWS environment to help ensure that only your trusted identities are accessing trusted resources from expected networks — are a big focus for us. Because data perimeters touch so many different aspects of identity and access management, our team is helping to organize what the user experience will look like, and helping to define the future state of data perimeters. Team members Tatyana Yatskevich and Matt Luttrell went into more detail about this in their profiles.
What are some of the common questions you hear from customers? Customers who have already been operating in the cloud for several years often tell us that they’re looking for opportunities to optimize their environment at scale. They’re maturing and managing hundreds or even thousands of accounts, so they commonly ask us for ways to simplify and scale their environment. For customers earlier in their journey, a common question is what lessons we have learned while working with more experienced customers so that they can benefit from their journey. Like Andy Jassy says, “There is no compression algorithm for experience.”
What do you wish customers would ask about more? How to get rid of their long-term credentials to significantly reduce the chances of credentials becoming compromised. We realize that for some customers it’s an effort to move away from IAM users and long-term credentials. We’d love to hear from more customers how they’re moving away from them or what’s stopping them from doing so. We’ve done a better job setting newer customers on the right path with short-term credentials and IAM roles instead of users, but for more tenured customers, there’s still an opportunity to improve in this area.
Looking ahead, what are your goals for the team? We’re lucky that our team has individuals with diverse backgrounds and skillsets that have enabled us to deliver on our mission. But if we want to make a bigger impact, we need to scale. We will continue to utilize Mirror World, do more with automation, and expand our team collaboration to further the consistent identity experience for our customers. We also recently launched a repo containing recommended service control policies, which we plan to continue expanding. And we’re going to continue to build end-to-end solutions for identity use cases, such as IAM Policy Validator for AWS CloudFormation. We will also continue identity enablement on complex topics, such as the data perimeter blog series and workshop, so that we can reach even more customers with prescriptive guidance. Stay tuned for more blog posts from our team coming soon here! If you’re interested in any of the topics mentioned in this post and would like to start a conversation, please reach out to your account team.
If you have feedback about this post, submit comments in the Comments section below. If you have questions about this post, contact AWS Support.
Want more AWS Security news? Follow us on Twitter.
This blog post demonstrates how you can activate Amazon Inspector within one or more AWS accounts and be notified when a vulnerability is detected in an AWS Lambda function.
Only scanning your functions for vulnerabilities before deployment might not be enough since vulnerabilities can appear at any time, like the widespread Apache Log4j vulnerability. So it’s essential that workloads are continuously monitored and rescanned in near real time as new vulnerabilities are published or workloads are changed.
Amazon Inspector scans are intelligently initiated based on the updates to Lambda functions or when new Common Vulnerabilities and Exposures (CVEs) are published that are relevant to your function. No agents are needed for Amazon Inspector to work, which means you don’t need to install a library or agent in your Lambda functions or layers. When Amazon Inspector discovers a software vulnerability or network configuration issue, it creates a finding which describes the vulnerability, identifies the affected resource, rates the severity of the vulnerability, and provides remediation guidance.
In this blog post, you will learn how to do the following:
Activate Amazon Inspector in a single AWS account and AWS Region.
See how Amazon Inspector automated discovery and continuous vulnerability scanning works by deploying a new Lambda function with a vulnerable package dependency.
Receive a near real-time notification when a vulnerability with a specific severity is detected in a Lambda function with the help of EventBridge and Amazon Simple Notification Service (Amazon SNS).
Remediate the vulnerability by using the recommendation provided in the Amazon Inspector dashboard.
Activate Amazon Inspector in multiple accounts or Regions through AWS Organizations.
Solution architecture
Figure 1 shows the AWS services used in the solution and how they are integrated.
Amazon Inspector scans when a new vulnerability is published or when an update to an existing Lambda function or a new Lambda function is deployed. Vulnerabilities are identified in the deployed Lambda function.
Amazon EventBridge receives the events from Amazon Inspector and checks against the rules for specific events or filter conditions.
In this case, an EventBridge rule exists for the Amazon Inspector findings, and the target is defined as an SNS topic to send an email to the system operations team.
The EventBridge rule invokes the target SNS topic with the event data, and an email is sent to the confirmed subscribers in the SNS topic.
The system operations team receives an email with detailed information on the vulnerability, the fixed package versions, the Amazon Inspector score to prioritize, and the impacted Lambda functions. By using the remediation information from Amazon Inspector, the team can now prioritize actions and remediate.
Prerequisites
To follow along with this demo, we recommend that you have the following in place:
An AWS account.
A command line interface: AWS CloudShell or AWS CLI. In this post, we recommend the use of CloudShell because it already has Python and AWS SAM. However, you can also use your CLI with AWS CLI, SAM, and Python.
An IAM role in that account with administrator privileges.
The solution in this post includes the following AWS services: Amazon Inspector, AWS Lambda, Amazon EventBridge, AWS Identity and Access Management (IAM), Amazon SNS, AWS CloudShell and AWS Organizations for activating Amazon Inspector at scale (multi-accounts).
Step 1: Activate Amazon Inspector in a single account in the Region
The first step is to activate Amazon Inspector in your account in the Region you are using.
Open AWS CloudShell. CloudShell inherits the credentials and permissions of the IAM principal who is signed in to the AWS Management Console. CloudShell comes with the CLIs and runtimes that are needed for this demo (AWS CLI, AWS SAM, and Python).
Use the following command in CloudShell to get the status of the Amazon Inspector activation.
aws inspector2 batch-get-account-status
Use the following command to activate Inspector in the default Region for resource type LAMBDA. Other allowed values for resource types are EC2, ECR and LAMDA_CODE.
Use the following command to verify the status of the Amazon Inspector activation.
aws inspector2 batch-get-account-status
You should see a response that shows that Amazon Inspector is enabled for Lambda resources, as shown in Figure 2.
Figure 2: Amazon Inspector status after you enable Lambda scanning
Step 2: Create an SNS topic and subscription for notification
Next, create the SNS topic and the subscription so that you will be notified of each new Amazon Inspector finding.
To create the SNS topic and subscription
Use the following command in CloudShell to create the SNS topic and its subscription and replace <REGION_NAME>, <AWS_ACCOUNTID> and <[email protected]> by the relevant values.
Check the email inbox you entered for <[email protected]>, and in the email from Amazon SNS, choose Confirm subscription.
In the CloudShell console, use the following command to list the subscriptions, to verify the topic and email subscription.
aws sns list-subscriptions
You should see a response that shows subscription details like the email address and ARN, as shown in Figure 3.
Figure 3: Subscribed email address and SNS topic
Use the following command to send a test message to your subscribed email and verify that you receive the message by replacing <REGION_NAME> and <AWS_ACCOUNTID>.
Step 3: Set up Amazon EventBridge with a custom rule and the SNS topic as target
Create an EventBridge rule that will invoke your previously created SNS topic whenever Amazon Inspector finds a new vulnerability with a critical severity.
To set up the EventBridge custom rule
In the CloudShell console, use the following command to create an EventBridge rule named amazon-inspector-findings with filters InspectorScore greater than 8 and severity state set to CRITICAL.
To verify the rule creation, go to the EventBridge console and in the left navigation bar, choose Rules.
Choose the rule with the name amazon-inspector-findings. You should see the event pattern as shown in Figure 4.
Figure 4: Event pattern for the EventBridge rule to filter on CRITICAL vulnerabilities.
Add the SNS topic you previously created as the target to the EventBridge rule. Replace <REGION_NAME>, <AWS_ACCOUNTID>, and <RANDOM-UNIQUE-IDENTIFIER-VALUE> with the relevant values. For RANDOM-UNIQUE-IDENTIFIER-VALUE, create a memorable and unique string.
Step 4: Deploy the Lambda function to the AWS account by using AWS SAM
In this step, you will use Serverless Application Manager (SAM) quick state templates to build and deploy a Lambda function with a vulnerable library, in order to generate findings. Learn more about AWS SAM.
To deploy the Lambda function with a vulnerable library
In the CloudShell console, use a prebuilt “hello-world” AWS SAM template to deploy the Lambda function.
sam init --runtime python3.7 --dependency-manager pip --app-template hello-world --name sam-app
Use the following command to add the vulnerable package python-jwt==3.3.3 to the Lambda function.
cd sam-app;
echo -e 'requests\npython-jwt==3.3.3' > hello_world/requirements.txt
Use the following command to build the application.
sam build
Use the following command to deploy the application with the guided option.
sam deploy --guided
This command packages and deploys the application to your AWS account. It provides a series of prompts. You may respond to the prompts with the:
Stack name you want
Set the default options, except for the
HelloWorldFunction may not have authorization defined, Is this okay? [y/N]: prompt. Here, input y and press Enter and
Deploy this changeset? [y/N]: prompt. Here, input y and press Enter.
Step 5: View Amazon Inspector findings
Amazon Inspector will automatically generate findings when scanning the Lambda function previously deployed. To view those findings, follow the steps below.
To view Amazon Inspector findings for the vulnerability
In the left navigation menu, choose All findings to see all of the Active findings, as shown in Figure 5.
Due to the custom event pattern rule in Amazon EventBridge, even though there are multiple findings for the vulnerable package python-jwt==3.3.3, you will be notified only for the finding that has InspectorScore greater than 8 and severity CRITICAL.
Choose the title of each finding to see detailed information about the vulnerability.
Figure 5: Example of findings from the Amazon Inspector console
Step 6: Remediate the vulnerability by applying the fixed package version
Now you can remediate the vulnerability by updating the package version as suggested by Amazon Inspector.
To remediate the vulnerability
In the Amazon Inspector console, in the left navigation menu, choose All Findings.
Choose the title of the vulnerability to see the finding details and the remediation recommendations.
Figure 6: Amazon Inspector finding for python-jwt, with the associated remediation
To remediate, use the following command to update the package version to the fixed version as suggested by Amazon Inspector.
cd /home/cloudshell-user/sam-app;
echo -e "requests\npython-jwt==3.3.4" > hello_world/requirements.txt
Use the following command to build the application.
sam build
Use the following command to deploy the application with the guided option.
sam deploy --guided
This command packages and deploys the application to your AWS account. It provides a series of prompts. You may respond to the prompts with the
Stack name you want
Set the default options, except for the
HelloWorldFunction may not have authorization defined, Is this okay? [y/N]: prompt. Here, input y and press Enter and
Deploy this changeset? [y/N]: prompt. Here, input y and press Enter.
Amazon Inspector automatically rescans the function after its deployment and reevaluates the findings. At this point, you can navigate back to the Amazon Inspector console, and in the left navigation menu, choose All findings. In the Findings area, you can see that the vulnerabilities are moved from Active to Closed status.
Due to the custom event pattern rule in Amazon EventBridge, you will be notified by email with finding status as CLOSED.
Figure 7: Inspector rescan results, showing no open findings after remediation
(Optional) Step 7: Activate Amazon Inspector in multiple accounts and Regions
To benefit from Amazon Inspector scanning capabilities across the accounts that you have in AWS Organizations and in your selected Regions, use the following steps:
To activate Amazon Inspector in multiple accounts and Regions
In the CloudShell console, use the following command to clone the code from the aws-samples inspector2-enablement-with-cli GitHub repo.
cd /home/cloudshell-user;
git clone https://github.com/aws-samples/inspector2-enablement-with-cli.git;
cd inspector2-enablement-with-cli
Step 8: Delete the resources created in the previous steps
AWS offers a 15-day free trial for Amazon Inspector so that you can evaluate the service and estimate its cost.
To avoid potential charges, delete the AWS resources that you created in the previous steps of this solution (Lambda function, EventBridge target, EventBridge rule, and SNS topic), and deactivate Amazon Inspector.
To delete resources
In the CloudShell console, enter the sam-app folder.
cd /home/cloudshell-user/sam-app
Delete the Lambda function and confirm by typing “y” when prompted for confirmation.
sam delete
Remove the SNS target from the Amazon EventBridge rule.
Note: If you don’t remember the target ID, navigate to the Amazon EventBridge console, and in the left navigation menu, choose Rules. Select the rule that you want to delete. Choose CloudFormation, and copy the ID.
Follow the new few steps to roll back changes only if you have performed the activities listed in Step 7: Activate Amazon Inspector in multiple accounts and Regions.
In the CloudShell console, enter the folder inspector2-enablement-with-cli.
cd /home/cloudshell-user/inspector2-enablement-with-cli
Deactivate the resource types (EC2, ECR, LAMBDA) on your member accounts.
./inspector2_enablement_with_awscli.sh -a deactivate -t members -s all
Disassociate the member accounts.
./inspector2_enablement_with_awscli.sh -a disassociate -t members
Deactivate the delegated admin account.
./inspector2_enablement_with_awscli.sh -a deactivate -t <DA_ACCOUNT_ID> -s all
Remove the delegated account as the admin for Amazon Inspector.
./inspector2_enablement_with_awscli.sh -a remove_admin -da <DA_ACCOUNT_ID>
Conclusion
In this blog post, we discussed how you can use Amazon Inspector to continuously scan your Lambda functions, and how to configure an Amazon EventBridge rule and SNS to send out notification of Lambda function vulnerabilities in near real time. You can then perform remediation activities by using AWS Lambda or AWS Systems Manager. We also showed how to enable Amazon Inspector at scale, activating in both single and multiple accounts, in default and multiple Regions.
As of the writing this post, a new feature to perform code scans for Lambda functions is available. Amazon Inspector can now also scan the custom application code within a Lambda function for code security vulnerabilities such as injection flaws, data leaks, weak cryptography, or missing encryption, based on AWS security best practices. You can use this additional scanning functionality to further protect your workloads.
If you have feedback about this blog post, submit comments in the Comments section below. If you have question about this blog post, start a new thread on the Amazon Inspector forum or contact AWS Support.
Want more AWS Security news? Follow us on Twitter.
July 27, 2023: This post was originally published February 5, 2015, and received a major update July 31, 2023.
As an Amazon Web Services (AWS) administrator, it’s crucial for you to implement robust protective controls to maintain your security configuration. Employing a detective control mechanism to monitor changes to the configuration serves as an additional safeguard in case the primary protective controls fail. Although some changes are expected, you might want to review unexpected changes or changes made by a privileged user. AWS Identity and Access Management (IAM) is a service that primarily helps manage access to AWS services and resources securely. It does provide detailed logs of its activity, but it doesn’t inherently provide real-time alerts or notifications. Fortunately, you can use a combination of AWS CloudTrail, Amazon EventBridge, and Amazon Simple Notification Service (Amazon SNS) to alert you when changes are made to your IAM configuration. In this blog post, we walk you through how to set up EventBridge to initiate SNS notifications for IAM configuration changes. You can also have SNS push messages directly to ticketing or tracking services, such as Jira, Service Now, or your preferred method of receiving notifications, but that is not discussed here.
In any AWS environment, many activities can take place at every moment. CloudTrail records IAM activities, EventBridge filters and routes event data, and Amazon SNS provides notification functionality. This post will guide you through identifying and setting alerts for IAM changes, modifications in authentication and authorization configurations, and more. The power is in your hands to make sure you’re notified of the events you deem most critical to your environment. Here’s a quick overview of how you can invoke a response, shown in Figure 1.
Figure 1: Simple architecture diagram of actors and resources in your account and the process for sending notifications through IAM, CloudTrail, EventBridge, and SNS.
Log IAM changes with CloudTrail
Before we dive into implementation, let’s briefly understand the function of AWS CloudTrail. It records and logs activity within your AWS environment, tracking actions such as IAM role creation, deletion, or modification, thereby offering an audit trail of changes.
With this in mind, we’ll discuss the first step in tracking IAM changes: establishing a log for each modification. In this section, we’ll guide you through using CloudTrail to create these pivotal logs.
In this post, you’re going to start by creating a CloudTrail trail with the Management events type selected, and read and write API activity selected. If you already have a CloudTrail trail set up with those attributes, you can use that CloudTrail trail instead.
Figure 2: Use the CloudTrail dashboard to create a trail
In the Trail name field, enter a display name for your trail and then select Create a new S3 bucket. Leave the default settings for the remaining trail attributes.
Figure 3: Set the trail name and storage location
Under Event type, select Management events. Under API activity, select Read and Write.
Choose Next.
Figure 4: Choose which events to log
Set up notifications with Amazon SNS
Amazon SNS is a managed service that provides message delivery from publishers to subscribers. It works by allowing publishers to communicate asynchronously with subscribers by sending messages to a topic, a logical access point, and a communication channel. Subscribers can receive these messages using supported endpoint types, including email, which you will use in the blog example today.
Now that you’ve set up CloudTrail to log IAM changes, the next step is to establish a mechanism to notify you about these changes in real time.
To set up notifications
Open the Amazon SNS console and choose Topics.
Create a new topic. Under Type, select Standard and enter a name for your topic. Keep the defaults for the rest of the options, and then choose Create topic.
Figure 5: Select Standard as the topic type
Navigate to your topic in the topic dashboard, choose the Subscriptions tab, and then choose Create subscription.
Figure 6: Choose Create subscription
For Topic ARN, select the topic you created previously, then under Protocol, select Email and enter the email address you want the alerts to be sent to.
Figure 7: Select the topic ARN and add an endpoint to send notifications to
After your subscription is created, go to the mailbox you designated to receive notifications and check for a verification email from the service. Open the email and select Confirm subscription to verify the email address and complete setup.
Initiate events with EventBridge
Amazon EventBridge is a serverless service that uses events to connect application components. EventBridge receives an event (an indicator of a change in environment) and applies a rule to route the event to a target. Rules match events to targets based on either the structure of the event, called an event pattern, or on a schedule.
Events that come to EventBridge are associated with an event bus. Rules are tied to a single event bus, so they can only be applied to events on that event bus. Your account has a default event bus that receives events from AWS services, and you can create custom event buses to send or receive events from a different account or AWS Region.
In this part of our post, you’ll use EventBridge to devise a rule for initiating SNS notifications based on IAM configuration changes.
To create an EventBridge rule
Go to the EventBridge console and select EventBridge Rule, and then choose Create rule.
Figure 8: Use the EventBridge console to create a rule
Enter a name for your rule, keep the defaults for the rest of rule details, and then choose Next.
Figure 9: Rule detail screen
Under Target 1, select AWS service.
In the dropdown list for Select a target, select SNS topic, select the topic you created previously, and then choose Next.
Figure 10: Target with target type of AWS service and target topic of SNS topic selected
Under Event source, select AWS events or EventBridge partner events.
Figure 11: Event pattern with AWS events or EventBridge partner events selected
Under Event pattern, verify that you have the following selected.
For Event source, select AWS services.
For AWS service, select IAM.
For Event type, select AWS API Call via CloudTrail.
Select the radio button for Any operation.
Figure 12: Event pattern details selected
Now that you’ve set up EventBridge to monitor IAM changes, test it by creating a new user or adding a new policy to an IAM role and see if you receive an email notification.
Centralize EventBridge alerts by using cross-account alerts
If you have multiple accounts, you should be evaluating using AWS Organizations. (For a deep dive into best practices for using AWS Organizations, we recommend reading this AWS blog post.)
By standardizing the implementation to channel alerts from across accounts to a primary AWS notification account, you can use a multi-account EventBridge architecture. This allows aggregation of notifications across your accounts through sender and receiver accounts. Figure 13 shows how this works. Separate member accounts within an AWS organizational unit (OU) have the same mechanism for monitoring changes and sending notifications as discussed earlier, but send notifications through an EventBridge instance in another account.
Figure 13: Multi-account EventBridge architecture aggregating notifications between two AWS member accounts to a primary management account
In this blog post example, you monitor calls to IAM.
The filter pattern you selected while setting up EventBridge matches CloudTrail events for calls to the IAM service. Calls to IAM have a CloudTrail eventSource of iam.amazonaws.com, so IAM API calls will match this pattern. You will find this simple default filter pattern useful if you have minimal IAM activity in your account or to test this example. However, as your account activity grows, you’ll likely receive more notifications than you need. This is when filtering only the relevant events becomes essential to prioritize your responses. Effectively managing your filter preferences allows you to focus on events of significance and maintain control as your AWS environment grows.
Monitor changes to IAM
If you’re interested only in changes to your IAM account, you can modify the event pattern inside EventBridge, the one you used to set up IAM notifications, with an eventName filter pattern, shown following.
This filter pattern will only match events from the IAM service that begin with Add, Change, Create, Deactivate, Delete, Enable, Put, Remove, Update, or Upload. For more information about APIs matching these patterns, see the IAM API Reference.
To edit the filter pattern to monitor only changes to IAM
Open the EventBridge console, navigate to the Event pattern, and choose Edit pattern.
Figure 14: Modifying the event pattern
Add the eventName filter pattern from above to your event pattern.
Figure 15: Use the JSON editor to add the eventName filter pattern
Monitor changes to authentication and authorization configuration
Monitoring changes to authentication (security credentials) and authorization (policy) configurations is critical, because it can alert you to potential security vulnerabilities or breaches. For instance, unauthorized changes to security credentials or policies could indicate malicious activity, such as an attempt to gain unauthorized access to your AWS resources. If you’re only interested in these types of changes, use the preceding steps to implement the following filter pattern.
This filter pattern matches calls to IAM that modify policy or create, update, upload, and delete IAM elements.
Conclusion
Monitoring IAM security configuration changes allows you another layer of defense against the unexpected. Balancing productivity and security, you might grant a user broad permissions in order to facilitate their work, such as exploring new AWS services. Although preventive measures are crucial, they can potentially restrict necessary actions. For example, a developer may need to modify an IAM role for their task, an alteration that could pose a security risk. This change, while essential for their work, may be undesirable from a security standpoint. Thus, it’s critical to have monitoring systems alongside preventive measures, allowing necessary actions while maintaining security.
Create an event rule for IAM events that are important to you and have a response plan ready. You can refer to Security best practices in IAM for further reading on this topic.
In Part 1 of this series, we provided guidance on how to discover and classify secrets and design a migration solution for customers who plan to migrate secrets to AWS Secrets Manager. We also mentioned steps that you can take to enable preventative and detective controls for Secrets Manager. In this post, we discuss how teams should approach the next phase, which is implementing the migration of secrets to Secrets Manager. We also provide a sample solution to demonstrate migration.
Implement secrets migration
Application teams lead the effort to design the migration strategy for their application secrets. Once you’ve made the decision to migrate your secrets to Secrets Manager, there are two potential options for migration implementation. One option is to move the application to AWS in its current state and then modify the application source code to retrieve secrets from Secrets Manager. Another option is to update the on-premises application to use Secrets Manager for retrieving secrets. You can use features such as AWS Identity and Access Management (IAM) Roles Anywhere to make the application communicate with Secrets Manager even before the migration, which can simplify the migration phase.
If the application code contains hardcoded secrets, the code should be updated so that it references Secrets Manager. A good interim state would be to pass these secrets as environment variables to your application. Using environment variables helps in decoupling the secrets retrieval logic from the application code and allows for a smooth cutover and rollback (if required).
Cutover to Secrets Manager should be done in a maintenance window. This minimizes downtime and impacts to production.
Before you perform the cutover procedure, verify the following:
Application components can access Secrets Manager APIs. Based on your environment, this connectivity might be provisioned through interface virtual private cloud (VPC) endpoints or over the internet.
Secrets exist in Secrets Manager and have the correct tags. This is important if you are using attribute-based access control (ABAC).
Applications that integrate with Secrets Manager have the required IAM permissions.
Have a well-documented cutover and rollback plan that contains the changes that will be made to the application during cutover. These would include steps like updating the code to use environment variables and updating the application to use IAM roles or instance profiles (for apps that are being migrated to Amazon Elastic Compute Cloud (Amazon EC2)).
After the cutover, verify that Secrets Manager integration was successful. You can use AWS CloudTrail to confirm that application components are using Secrets Manager.
We recommend that you further optimize your integration by enabling automatic secrets rotation. If your secrets were previously widely accessible (for example, they were stored in your Git repositories), we recommend rotating as soon as possible when migrating .
Sample application to demo integration with Secrets Manager
In the next sections, we present a sample AWS Cloud Development Kit (AWS CDK) solution that demonstrates the implementation of the previously discussed guardrails, design, and migration strategy. You can use the sample solution as a starting point and expand upon it. It includes components that environment teams may deploy to help provide potentially secure access for application teams to migrate their secrets to Secrets Manager. The solution uses ABAC, a tagging scheme, and IAM Roles Anywhere to demonstrate regulated access to secrets for application teams. Additionally, the solution contains client-side utilities to assist application and migration teams in updating secrets. Teams with on-premises applications that are seeking integration with Secrets Manager before migration can use the client-side utility for access through IAM Roles Anywhere.
VPC endpoints for the AWS Key Management Service (AWS KMS) and Secrets Manager services to the sample VPC. The use of VPC endpoints means that calls to AWS KMS and Secrets Manager are not made over the internet and remain internal to the AWS backbone network.
An empty shell secret, tagged with the supplied attributes and an IAM managed policy that uses attribute-based access control conditions. This means that the secret is managed in code, but the actual secret value is not visible in version control systems like GitHub or in AWS CloudFormation parameter inputs.
An IAM Roles Anywhere infrastructure stack (created and owned by environment teams). This stack provisions the following resources:
An IAM Roles Anywhere public key infrastructure (PKI) trust anchor that uses AWS Private CA.
An IAM role for the on-premises application that uses the common environment infrastructure stack.
An IAM Roles Anywhere profile.
Note: You can choose to use your existing CAs as trust anchors. If you do not have a CA, the stack described here provisions a PKI for you. IAM Roles Anywhere allows migration teams to use Secrets Manager before the application is moved to the cloud. Post migration, you could consider updating the applications to use native IAM integration (like instance profiles for EC2 instances) and revoking IAM Roles Anywhere credentials.
A client-side utility (primarily used by application or migration teams). This is a shell script that does the following:
Assists in provisioning a certificate by using OpenSSL.
Assists application teams to access and update their application secrets after assuming an IAM role by using IAM Roles Anywhere.
A sample application stack (created and owned by the application/migration team). This is a sample serverless application that demonstrates the use of the solution. It deploys the following components, which indicate that your ABAC-based IAM strategy is working as expected and is effectively restricting access to secrets:
The sample application stack uses a VPC-deployed common environment infrastructure stack.
It deploys an Amazon Aurora MySQL serverless cluster in the PRIVATE_ISOLATED subnet and uses the secret that is created through a common environment infrastructure stack.
It deploys a sample Lambda function in the PRIVATE_WITH_NAT subnet.
It deploys two IAM roles for testing:
allowedRole (default role): When the application uses this role, it is able to use the GET action to get the secret and open a connection to the Aurora MySQL database.
Not allowedRole: When the application uses this role, it is unable to use the GET action to get the secret and open a connection to the Aurora MySQL database.
Prerequisites to deploy the sample solution
The following software packages need to be installed in your development environment before you deploy this solution:
Note: In this section, we provide examples of AWS CLI commands and configuration for Linux or macOS operating systems. For instructions on using AWS CLI on Windows, refer to the AWS CLI documentation.
Before deployment, make sure that the correct AWS credentials are configured in your terminal session. The credentials can be either in the environment variables or in ~/.aws. For more details, see Configuring the AWS CLI.
Next, use the following commands to set your AWS credentials to deploy the stack:
You can view the IAM credentials that are being used by your session by running the command aws sts get-caller-identity. If you are running the cdk command for the first time in your AWS account, you will need to run the following cdk bootstrap command to provision a CDK Toolkit stack that will manage the resources necessary to enable deployment of cloud applications with the AWS CDK.
cdk bootstrap aws://<AWS account number>/<Region> # Bootstrap CDK in the specified account and AWS Region
Select the applicable archetype and deploy the solution
This section outlines the design and deployment steps for two archetypes:
For customers with applications already migrated to AWS, we demonstrate a sample integration of Secrets Manager with AWS Lambda. (See the section Archetype 2: Application has migrated to AWS.)
Archetype 1: Application is currently on premises
Archetype 1 has the following requirements:
The application is currently hosted on premises.
The application would consume API keys, stored credentials, and other secrets in Secrets Manager.
The application, environment and security teams work together to define a tagging strategy that will be used to restrict access to secrets. After this, the proposed workflow for each persona is as follows:
The environment engineer deploys a common environment infrastructure stack (as described earlier in this post) to bootstrap the AWS account with secrets and IAM policy by using the supplied tagging requirement.
Additionally, the environment engineer deploys the IAM Roles Anywhere infrastructure stack.
The application developer updates the secrets required by the application by using the client-side utility (helper.sh).
The application developer uses the client-side utility to update the AWS CLI profile to consume the IAM Roles Anywhere role from the on-premises servers.
Figure 1 shows the workflow for Archetype 1.
Figure 1: Application on premises connecting to Secrets Manager
To deploy Archetype 1
(Actions by the application team persona) Clone the repository and update the tagging details at configs/tagconfig.json.
Note: Do not modify the tag/attributes name/key, only modify value.
(Actions by the environment team persona) Run the following command to deploy the common environment infrastructure stack. ./helper.sh prepare Then, run the following command to deploy the IAM Roles Anywhere infrastructure stack../helper.sh on-prem
(Actions by the application team persona) Update the secret value of the dummy secrets provided by the environment team, by using the following command. ./helper.sh update-secret
Note: This command will only update the secret if it’s still using the dummy value.
Then, run the following command to set up the client and server on premises../helper.sh client-profile-setup
Follow the command prompt. It will help you request a client certificate and update the AWS CLI profile.
Important: When you request a client certificate, make sure to supply at least one distinguished name, like CommonName.
The sample output should look like the following.
‐‐> This role can be used by the application by using the AWS CLI profile 'developer'.
‐‐> For instance, the following output illustrates how to access secret values by using the AWS CLI profile 'developer'.
‐‐> Sample AWS CLI: aws secretsmanager get-secret-value ‐‐secret-id $SECRET_ARN ‐‐profile developer
At this point, the client-side utility (helper.sh client-profile-setup) should have updated the AWS CLI configuration file with the following profile.
The application team can verify that the AWS CLI profile has been properly set up and is capable of retrieving secrets from Secrets Manager by running the following client-side utility command. ./helper.sh on-prem-test
This client-side utility (helper.sh) command verifies that the AWS CLI profile (for example, developer) has been set up for IAM Roles Anywhere and can run the GetSecretValue API action to retrieve the value of the secret stored in Secrets Manager.
The sample output should look like the following.
‐‐> Checking credentials ...
{
    "UserId": "AKIAIOSFODNN7EXAMPLE:EXAMPLE11111EXAMPLEEXAMPLE111111",
    "Account": "444455556666",
    "Arn": "arn:aws:sts::444455556666:assumed-role/RolesanywhereabacStack-onPremAppRole-1234567890ABC"
}
‐‐> Assume role worked for:
arn:aws:sts::444455556666:assumed-role/RolesanywhereabacStack-onPremAppRole-1234567890ABC
‐‐> This role can be used by the application by using the AWS CLI profile 'developer'.
‐‐> For instance, the following output illustrates how to access secret values by using the AWS CLI profile 'developer'.
‐‐> Sample AWS CLI: aws secretsmanager get-secret-value --secret-id $SECRET_ARN ‐‐profile $PROFILE_NAME
-------Output-------
{
  "password": "randomuniquepassword",
  "servertype": "testserver1",
  "username": "testuser1"
}
-------Output-------
Archetype 2: Application has migrated to AWS
Archetype 2 has the following requirement:
Deploy a sample application to demonstrate how ABAC authorization works for Secrets Manager APIs.
The application, environment, and security teams work together to define a tagging strategy that will be used to restrict access to secrets. After this, the proposed workflow for each persona is as follows:
The environment engineer deploys a common environment infrastructure stack to bootstrap the AWS account with secrets and an IAM policy by using the supplied tagging requirement.
The application developer updates the secrets required by the application by using the client-side utility (helper.sh).
The application developer tests the sample application to confirm operability of ABAC.
Figure 2 shows the workflow for Archetype 2.
Figure 2: Sample migrated application connecting to Secrets Manager
To deploy Archetype 2
(Actions by the application team persona) Clone the repository and update the tagging details at configs/tagconfig.json.
Note: Don’t modify the tag/attributes name/key, only modify value.
(Actions by the environment team persona) Run the following command to deploy the common platform infrastructure stack. ./helper.sh prepare
(Actions by the application team persona) Update the secret value of the dummy secrets provided by the environment team, using the following command. ./helper.sh update-secret
Note: This command will only update the secret if it is still using the dummy value.
Then, run the following command to deploy a sample app stack. ./helper.sh on-aws
Note: If your secrets were migrated from a system that did not have the correct access controls, as a best security practice, you should rotate them at least once manually.
At this point, the client-side utility should have deployed a sample application Lambda function. This function connects to a MySQL database by using credentials stored in Secrets Manager. It retrieves the secret values, validates them, and establishes a connection to the database. The function returns a message that indicates whether the connection to the database is working or not.
To test Archetype 2 deployment
The application team can use the following client-side utility (helper.sh) to invoke the Lambda function and verify whether the connection is functional or not. ./helper.sh on-aws-test
The sample output should look like the following.
‐‐> Check if AWS CLI is installed
‐‐> AWS CLI found
‐‐> Using tags to create Lambda function name and invoking a test
‐‐> Checking the Lambda invoke response.....
‐‐> The status code is 200
‐‐> Reading response from test function:
"Connection to the DB is working."
‐‐> Response shows database connection is working from Lambda function using secret.
Conclusion
Building an effective secrets management solution requires careful planning and implementation. AWS Secrets Manager can help you effectively manage the lifecycle of your secrets at scale. We encourage you to take an iterative approach to building your secrets management solution, starting by focusing on core functional requirements like managing access, defining audit requirements, and building preventative and detective controls for secrets management. In future iterations, you can improve your solution by implementing more advanced functionalities like automatic rotation or resource policies for secrets.
If you have feedback about this post, submit comments in the Comments section below. If you have questions about this post, start a new thread on the AWS Secrets Manager re:Post or contact AWS Support.
Want more AWS Security news? Follow us on Twitter.
“An ounce of prevention is worth a pound of cure.” – Benjamin Franklin
A secret can be defined as sensitive information that is not intended to be known or disclosed to unauthorized individuals, entities, or processes. Secrets like API keys, passwords, and SSH keys provide access to confidential systems and resources, but it can be a challenge for organizations to maintain secure and consistent management of these secrets. Commonly observed anti-patterns in organizational secrets management systems include sharing plaintext secrets in emails or messaging apps, allowing application developers to view secrets in plaintext, hard-coding secrets into applications and storing them in version control systems, failing to rotate secrets regularly, and not logging and monitoring access to secrets.
We have created a two-part Amazon Web Services (AWS) blog post that provides prescriptive guidance on how you can use AWS Secrets Manager to help you achieve a cloud-based and modern secrets management system. In this first blog post, we discuss approaches to discover and classify secrets. In Part 2 of this series, we elaborate on the implementation phase and discuss migration techniques that will help you migrate your secrets to AWS Secrets Manager.
Managing secrets: Best practices and personas
A secret’s lifecycle comprises four phases: create, store, use, and destroy. An effective secrets management solution protects the secret in each of these phases from unauthorized access. Besides being secure, robust, scalable, and highly available, the secrets management system should integrate closely with other tools, solutions, and services that are being used within the organization. Legacy secret stores may lack integration with privileged access management (PAM), logging and monitoring, DevOps, configuration management, and encryption and auditing, which leads to teams not having uniform practices for consuming secrets and creates discrepancies from organizational policies.
Secrets Manager is a secrets management service that helps you protect access to your applications, services, and IT resources. This is a non-exhaustive list of features that AWS Secrets Manager offers:
Access control through AWS Identity and Access Management (IAM) — Secrets Manager offers built-in integration with the AWS Identity and Access Management (IAM) service. You can attach access control policies to IAM principals or to secrets themselves (by using resource-based policies).
Logging and monitoring — Secrets Manager integrates with AWS logging and monitoring services such as AWS CloudTrail and Amazon CloudWatch. This means that you can use your existing AWS logging and monitoring stack to log access to secrets and audit their usage.
Secrets encryption at rest — Secrets Manager integrates with AWS Key Management Service (AWS KMS). Secrets are encrypted at rest by using an AWS-managed key or customer-managed key.
Framework to support the rotation of secrets securely — Rotation helps limit the scope of a compromise and should be an integral part of a modern approach to secrets management. You can use Secrets Manager to schedule automatic database credentials rotation for Amazon RDS, Amazon Redshift, and Amazon DocumentDB. You can use customized AWS Lambda functions to extend the Secrets Manager rotation feature to other secret types, such as API keys and OAuth tokens for on-premises and cloud resources.
Security, cloud, and application teams within an organization need to work together cohesively to build an effective secrets management solution. Each of these teams has unique perspectives and responsibilities when it comes to building an effective secrets management solution, as shown in the following table.
Persona
Responsibilities
What they want
What they don’t want
Security teams/security architect
Define control objectives and requirements from the secrets management system
Least privileged short-lived access, logging and monitoring, and rotation of secrets
Secrets sprawl
Cloud team/environment team
Implement controls, create guardrails, detect events of interest
Scalable, robust, and highly available secrets management infrastructure
Application teams reaching out to them to provision or manage app secrets
Developer/migration engineer
Migrate applications and their secrets to the cloud
Independent control and management of their app secrets
Dependency on external teams
To sum up the requirements from all the personas mentioned here: The approach to provision and consume secrets should be secure, governed, easily scalable, and self-service.
We’ll now discuss how to discover and classify secrets and design the migration in a way that helps you to meet these varied requirements.
Discovery — Assess and categorize existing secrets
The initial discovery phase involves running sessions aimed at discovering, assessing, and categorizing secrets. Migrating applications and associated infrastructure to the cloud requires a strategic and methodical approach to progressively discover and analyze IT assets. This analysis can be used to create high-confidence migration wave plans. You should treat secrets as IT assets and include them in the migration assessment planning.
For application-related secrets, arguably the most appropriate time to migrate a secret is when the application that uses the secret is being migrated itself. This lets you track and report the use of secrets as soon as the application begins to operate in the cloud. If secrets are left on-premises during an application migration, this often creates a risk to the availability of the application. The migrated application ends up having a dependency on the connectivity and availability of the on-premises secrets management system.
The activities performed in this phase are often handled by multiple teams. Depending on the purpose of the secret, this can be a mix of application developers, migration teams, and environment teams.
Following are some common secret types you might come across while migrating applications.
Type
Description
Application secrets
Secrets specific to an application
Client credentials
Cloud to on-premises credentials or OAuth tokens (such as Okta, Google APIs, and so on)
Database credentials
Credentials for cloud-hosted databases, for example, Amazon Redshift, Amazon RDS or Amazon Aurora, Amazon DocumentDB
Third-party credentials
Vendor application credentials or API keys
Certificate private keys
Custom applications or infrastructure that might require programmatic access to the private key
Cryptographic keys
Cryptographic keys used for data encryption or digital signatures
SSH keys
Centralized management of SSH keys can potentially make it easier to rotate, update, and track keys
AWS access keys
On-premises to cloud credentials (IAM)
Creating an inventory for secrets becomes simpler when organizations have an IT asset management (ITAM) or Identity and Access Management (IAM) tool to manage their IT assets (such as secrets) effectively. For organizations that don’t have an on-premises secrets management system, creating an inventory of secrets is a combination of manual and automated efforts. Application subject matter experts (SMEs) should be engaged to find the location of secrets that the application uses. In addition, you can use commercial tools to scan endpoints and source code and detect secrets that might be hardcoded in the application. Amazon CodeGuru is a service that can detect secrets in code. It also provides an option to migrate these secrets to Secrets Manager.
AWS has previously described seven common migration strategies for moving applications to the cloud. These strategies are refactor, replatform, repurchase, rehost, relocate, retain, and retire. For the purposes of migrating secrets, we recommend condensing these seven strategies into three: retire, retain, and relocate. You should evaluate every secret that is being considered for migration against a decision tree to determine which of these three strategies to use. The decision tree evaluates each secret against key business drivers like cost reduction, risk appetite, and the need to innovate. This allows teams to assess if a secret can be replaced by native AWS services, needs to be retained on-premises, migrated to Secrets Manager, or retired. Figure 1 shows this decision process.
Figure 1: Decision tree for assessing a secret for migration
Capture the associated details for secrets that are marked as RELOCATE. This information is essential and must remain confidential. Some secret metadata is transitive and can be derived from related assets, including details such as itsm-tier, sensitivity-rating, cost-center, deployment pipeline, and repository name. With Secrets Manager, you will use resource tags to bind this metadata with the secret.
You should gather at least the following information for the secrets that you plan to relocate and migrate to AWS Secrets Manager.
Metadata about secrets
Rationale for gathering data
Secrets team name or owner
Gathering the name or email address of the individual or team responsible for managing secrets can aid in verifying that they are maintained and updated correctly.
Secrets application name or ID
To keep track of which applications use which secrets, it is helpful to collect application details that are associated with these secrets.
Secrets environment name or ID
Gathering information about the environment to which secrets belong, such as “prod,” “dev,” or “test,” can assist in the efficient management and organization of your secrets.
Secrets data classification
Understanding your organization’s data classification policy can help you identify secrets that contain sensitive or confidential information. It is recommended to handle these secrets with extra care. This information, which may be labeled “confidential,” “proprietary,” or “personally identifiable information (PII),” can indicate the level of sensitivity associated with a particular secret according to your organization’s data classification policy or standard.
Secrets function or usage
If you want to quickly find the secrets you need for a specific task or project, consider documenting their usage. For example, you can document secrets related to “backup,” “database,” “authentication,” or “third-party integration.” This approach can allow you to identify and retrieve the necessary secrets within your infrastructure without spending a lot of time searching for them.
This is also a good time to decide on the rotation strategy for each secret. When you rotate a secret, you update the credentials in both Secrets Manager and the service to which that secret provides access (in other words, the resource). Secrets Manager supports automatic rotation of secrets based on a schedule.
Design the migration solution
In this phase, security and environment teams work together to onboard the Secrets Manager service to their organization’s cloud environment. This involves defining access controls, guardrails, and logging capabilities so that the service can be consumed in a regulated and governed manner.
As a starting point, use the following design principles mentioned in the Security Pillar of the AWS Well Architected Framework to design a migration solution:
Implement a strong identity foundation
Enable traceability
Apply security at all layers
Automate security best practices
Protect data at rest and in transit
Keep people away from data
Prepare for security events
The design considerations covered in the rest of this section will help you prepare your AWS environment to host production-grade secrets. This phase can be run in parallel with the discovery phase.
Design your access control system to establish a strong identity foundation
In this phase, you define and implement the strategy to restrict access to secrets stored in Secrets Manager. You can use the AWS Identity and Access Management (IAM) service to specify that identities (human and non-human IAM principals) are only able to access and manage secrets that they own. Organizations that organize their workloads and environments by using separate AWS accounts should consider using a combination of role-based access control (RBAC) and attribute-based access control (ABAC) to restrict access to secrets depending on the granularity of access that’s required.
You can use a scalable automation to deploy and update key IAM roles and policies, including the following:
Pipeline deployment policies and roles — This refers to IAM roles for CICD pipelines. These pipelines should be the primary mechanism for creating, updating, and deleting secrets in the organization.
IAM Identity Center permission sets — These allow human identities access to the Secrets Manager API. We recommend that you provision secrets by using infrastructure as code (IaC). However, there are instances where users need to interact directly with the service. This can be for initial testing, troubleshooting purposes, or updating a secret value when automatic rotation fails or is not enabled.
IAM permissions boundary — Boundary policies allow application teams to create IAM roles in a self-serviced, governed, and regulated manner.
Most organizations have Infrastructure, DevOps, or Security teams that deploy baseline configurations into AWS accounts. These solutions help these teams govern the AWS account and often have their own secrets. IAM policies should be created such that the IAM principals created by the application teams are unable to access secrets that are owned by the environment team, and vice versa. To enforce this logical boundary, you can use tagging and naming conventions on your secrets by using IAM.
A sample scheme for tagging your secrets can look like the following.
Tag key
Tag value
Notes
Policy elements
Secret tags
appname
Lowercase
Alphanumeric only
User friendly
Quickly identifiable
A user-friendly name for the application
PrincipalTag/ appname =<value> (applies to role) RequestTag/ appname =<value> (applies to caller) SecretManager:ResourceTag/ appname=<value> (applies to the secret)
appname:<value>
appid
Lowercase
Alphanumeric only
Unique across the organization
Fixed length (5–7 characters)
Uniquely identifies the application among other cloud-hosted apps
If you maintain a registry that documents details of your cloud-hosted applications, most of these tags can be derived from the registry.
It’s common to apply different security and operational policies for the non-production and production environments of a given workload. Although production environments are generally deployed in a dedicated account, it’s common to have less critical non-production apps and environments coexisting in the same AWS account. For operation and governance at scale in these multi-tenanted accounts, you can use attribute-based access control (ABAC) to manage secure access to secrets. ABAC enables you to grant permissions based on tags. The main benefits of using tag-based access control are its scalability and operational efficiency.
Figure 2 shows an example of ABAC in action, where an IAM policy allows access to a secret only if the appfunc, appenv, and appid tags on the secret match the tags on the IAM principal that is trying to access the secrets.
Figure 2: ABAC access control
ABAC works as follows:
Tags on a resource define who can access the resource. It is therefore important that resources are tagged upon creation.
For a create secret operation, IAM verifies whether the Principal tags on the IAM identity that is making the API call match the request tags in the request.
For an update, delete, or read operation, IAM verifies that the Principal tags on the IAM identity that is making the API call match the resource tags on the secret.
Regardless of the number of workloads or environments that coexist in the same account, you only need to create one ABAC-based IAM policy. This policy is the same for different kinds of accounts and can be deployed by using a capability like AWS CloudFormation StackSets. This is the reason that ABAC scales well for scenarios where multiple applications and environments are deployed in the same AWS account.
IAM roles can use a common IAM policy, such as the one described in the previous bullet point. You need to verify that the roles have the correct tags set on them, according to your tagging convention. This will automatically grant the roles access to the secrets that have the same resource tags.
Note that with this approach, tagging secrets and IAM roles becomes the most critical component for controlling access. For this reason, all tags on IAM roles and secrets on Secrets Manager must follow a standard naming convention at all times.
The following is an ABAC-based IAM policy that allows creation, updates, and deletion of secrets based on the tagging scheme described in the preceding table.
In addition to controlling access, this policy also enforces a naming convention. IAM principals will only be able to create a secret that matches the following naming scheme.
Secret name = value of tag-key (appid + appfunc + appenv + name)
For example, /ordersapp/api/prod/logisticsapi
You can choose to implement ABAC so that the resource name matches the principal tags or the resource tags match the principal tags, or both. These are just different types of ABAC. The sample policy provided here implements both types. It’s important to note that because ABAC-based IAM policies are shared across multiple workloads, potential misconfigurations in the policies will have a wider scope of impact.
You can also add checks in your pipeline to provide early feedback for developers. These checks may potentially assist in verifying whether appropriate tags have been set up in IaC resources prior to their creation. Your pipeline-based controls provide an additional layer of defense and complement or extend restrictions enforced by IAM policies.
Resource-based policies
Resource-based policies are a flexible and powerful mechanism to control access to secrets. They are directly associated with a secret and allow specific principals mentioned in the policy to have access to the secret. You can use these policies to grant identities (internal or external to the account) access to a secret.
If your organization uses resource policies, security teams should come up with control objectives for these policies. Controls should be set so that only resource-based policies meeting your organizations requirements are created. Control objectives for resource policies may be set as follows:
Allow statements in the policy to have allow access to the secret from the same application.
Allow statements in the policy to have allow access from organization-owned cross-account identities only if they belong to the same environment. Controls that meet these objectives can be preventative (checks in pipeline) or responsive (config rules and Amazon EventBridge invoked Lambda functions).
Environment teams can also choose to provision resource-based policies for application teams. The provision process can be manual, but is preferably automated. An example would be that these teams can allow application teams to tag secrets with specific values, like a cross-account IAM role Amazon Resource Number (ARN) that needs access. An automation invoked by EventBridge rules then asserts that the cross-account principal in the tag belongs to the organization and is in the same environment, and then provisions a resource-based policy for the application team. Using such mechanisms creates a self-service way for teams to create safe resource policies that meet common use cases.
Resource-based policies for Secrets Manager can be a helpful tool for controlling access to secrets, but it is important to consider specific situations where alternative access control mechanisms might be more appropriate. For example, if your access control requirements for secrets involve complex conditions or dependencies that cannot be easily expressed using the resource-based policy syntax, it may be challenging to manage and maintain the policies effectively. In such cases, you may want to consider using a different access control mechanism that better aligns with your requirements. For help determining which type of policy to use, see Identity-based policies and resource-based policies.
Design detective controls to achieve traceability, monitoring, and alerting
Prepare your environment to record and flag events of interest when Secrets Manager is used to store and update secrets. We recommend that you start by identifying risks and then formulate objectives and devise control measures for each identified risk, as follows:
Control objectives — What does the control evaluate, and how is it configured? Controls can be configured by using CloudTrail events invoked by Lambda functions, AWS config rules, or CloudWatch alarms. Controls can evaluate a misconfigured property in a secrets resource or report on an event of interest.
Target audience — Identify teams that should be notified if the event occurs. This can be a combination of the environment, security, and application teams.
Notification type — SNS, email, Slack channel notifications, or an ITIL ticket.
Criticality — Low, medium, or high, based on the criticality of the event.
The following is a sample matrix that can serve as a starting point for documenting detective controls for Secrets Manager. The column titled AWS services in the table offers some suggestions for implementation to help you meet your control objetves.
Risk
Control objective
Criticality
AWS services
A secret is created without tags that match naming and tagging schemes
Enforce least privilege
Establish logging and monitoring
Manage secrets
HIGH (if using ABAC)
CloudTrail invoked Lambda function or custom AWS config rule
IAM related tags on a secret are updated, removed
Manage secrets
Enforce least privilege
HIGH (if using ABAC)
CloudTrail invoked Lambda function or custom config rule
A resource policy is created when resource policies have not been onboarded to the environment
Manage secrets
Enforce least privilege
HIGH
Pipeline or CloudTrail invoked ¬Lambda function or custom config rule
A secret is marked for deletion from an unusual source — root user or admin break glass role
Improve availability
Protect configurations
Prepare for incident response
Manage secrets
HIGH
CloudTrail invoked Lambda function
A non-compliant resource policy was created — for example, to provide secret access to a foreign account
Enforce least privilege
Manage secrets
HIGH
CloudTrail invoked Lambda function or custom config rule
An AWS KMS key for secrets encryption is marked for deletion
Manage secrets
Protect configurations
HIGH
CloudTrail invoked Lambda function
A secret rotation failed
Manage secrets
Improve availability
MEDIUM
Managed config rule
A secret is inactive and is not being accessed for x number of days
Optimize costs
LOW
Managed config rule
Secrets are created that do not use KMS key
Encrypt data at rest
LOW
Managed config rule
Automatic rotation is not enabled
Manage secrets
LOW
Managed config rule
Successful create, update, and read events for secrets
Establish logging and monitoring
LOW
CloudTrail logs
We suggest that you deploy these controls in your AWS accounts by using a scalable mechanism, such as CloudFormation StackSets.
Design for additional protection at the network layer
You can use the guiding principles for Zero Trust networking to add additional mechanisms to control access to secrets. The best security doesn’t come from making a binary choice between identity-centric and network-centric controls, but by using both effectively in combination with each other.
VPC endpoints allow you to provide a private connection between your VPC and Secrets Manager API endpoints. They also provide the ability to attach a policy that allows you to enforce identity-centric rules at a logical network boundary. You can use global context keys like aws:PrincipalOrgID in VPC endpoint policies to allow requests to Secrets Manager service only from identities that belong to the same AWS organization. You can also use aws:sourceVpce and aws:sourceVpc IAM conditions to allow access to the secret only if the request originates from a specific VPC endpoint or VPC, respectively.
Design for least privileged access to encryption keys
To reduce unauthorized access, secrets should be encrypted at rest. Secrets Manager integrates with AWS KMS and uses envelope encryption. Every secret in Secrets Manager is encrypted with a unique data key. Each data key is protected by a KMS key. Whenever the secret value inside a secret changes, Secrets Manager generates a new data key to protect it. The data key is encrypted under a KMS key and stored in the metadata of the secret. To decrypt the secret, Secrets Manager first decrypts the encrypted data key by using the KMS key in AWS KMS.
The following is a sample AWS KMS policy that permits cryptographic operations to a KMS key only from the Secrets Manager service within an AWS account, and allows the AWS KMS decrypt action from a specific IAM principal throughout the organization.
{
    "Version": "2012-10-17",
    "Id": "secrets_manager_encrypt_org",
    "Statement": [
        {
            "Sid": "Root Access",
            "Effect": "Allow",
            "Principal": {
                "AWS": "arn:aws:iam::444455556666:root"
            },
            "Action": "kms:*",
            "Resource": "*"
        },
        {
            "Sid": "Allow access for Key Administrators",
            "Effect": "Allow",
            "Principal": {
                "AWS": [
             "arn:aws:iam::444455556666:role/platformRoles/KMS-key-admin-role",                    "arn:aws:iam::444455556666:role/platformRoles/KMS-key-automation-role"
                ]
            },
            "Action": [
                "kms:CancelKeyDeletion",
                "kms:Create*",
                "kms:Delete*",
                "kms:Describe*",
                "kms:Disable*",
                "kms:Enable*",
                "kms:Get*",
                "kms:List*",
                "kms:Put*",
                "kms:Revoke*",
                "kms:ScheduleKeyDeletion",
                "kms:TagResource",
                "kms:UntagResource",
                "kms:Update*"
            ],
            "Resource": "*"
        },
        {
            "Sid": "Allow Secrets Manager use of the KMS key for a specific account",
            "Effect": "Allow",
            "Principal": {
                "AWS": "*"
            },
            "Action": [
                "kms:Encrypt",
                "kms:Decrypt",
                "kms:ReEncrypt*",
                "kms:GenerateDataKey*",
                "kms:CreateGrant",
                "kms:ListGrants",
                "kms:DescribeKey"
            ],
            "Resource": "*",
            "Condition": {
                "StringEquals": {
                    "kms:CallerAccount": "444455556666",
                    "kms:ViaService": "secretsmanager.us-east-1.amazonaws.com"
                }
            }
        },
        {
            "Sid": "Allow use of Secrets Manager secrets from a specific IAM role (service account) throughout your org",
            "Effect": "Allow",
            "Principal": {
                "AWS": "*"
            },
            "Action": "kms:Decrypt",
            "Resource": "*",
            "Condition": {
                "StringEquals": {
                    "aws:PrincipalOrgID": "o-exampleorgid"
                },
                "StringLike": {
                    "aws:PrincipalArn": "arn:aws:iam::*:role/platformRoles/secretsAccessRole"
                }
            }
        }
    ]
}
Additionally, you can use the secretsmanager:KmsKeyId IAM condition key to allow secrets creation only when AWS KMS encryption is enabled for the secret. You can also add checks in your pipeline that allow the creation of a secret only when a KMS key is associated with the secret.
Design or update applications for efficient retrieval of secrets
In applications, you can retrieve your secrets by calling the GetSecretValue function in the available AWS SDKs. However, we recommend that you cache your secret values by using client-side caching. Caching secrets can improve speed, help to prevent throttling by limiting calls to the service, and potentially reduce your costs.
Secrets Manager integrates with the following AWS services to provide efficient retrieval of secrets:
For Amazon RDS, you can integrate with Secrets Manager to simplify managing master user passwords for Amazon RDS database instances. Amazon RDS can manage the master user password and stores it securely in Secrets Manager, which may eliminate the need for custom AWS Lambda functions to manage password rotations. The integration can help you secure your database by encrypting the secrets, using your own managed key or an AWS KMS key provided by Secrets Manager. As a result, the master user password is not visible in plaintext during the database creation workflow. This feature is available for the Amazon RDS and Aurora engines, and more information can be found in the Amazon RDS and Aurora User Guides.
For Amazon Elastic Kubernetes Service (Amazon EKS), you can use the AWS Secrets and Configuration Provider (ASCP) for the Kubernetes Secrets Store CSI Driver. This open-source project enables you to mount Secrets Manager secrets as Kubernetes secrets. The driver translates Kubernetes secret objects into Secrets Manager API calls, allowing you to access and manage secrets from within Kubernetes. After you configure the Kubernetes Secrets Store CSI Driver, you can create Kubernetes secrets backed by Secrets Manager secrets. These secrets are securely stored in Secrets Manager and can be accessed by your applications that are running in Amazon EKS.
For Amazon Elastic Container Service (Amazon ECS), sensitive data can be securely stored in Secrets Manager secrets and then accessed by your containers through environment variables or as part of the log configuration. This allows for a simple and potentially safe injection of sensitive data into your containers, making it a possible solution for your needs.
For AWS Lambda, you can use the AWS Parameters and Secrets Lambda Extension to retrieve and cache Secrets Manager secrets in Lambda functions without the need for an AWS SDK. It is noteworthy that retrieving a cached secret is faster compared to the standard method of retrieving secrets from Secrets Manager. Moreover, using a cache can be cost-efficient, because there is a charge for calling Secrets Manager APIs. For more details, see the Secrets Manager User Guide.
For additional information on how to use Secrets Manager secrets with AWS services, refer to the following resources:
Develop an incident response plan for security events
It is recommended that you prepare for unforeseeable incidents such as unauthorized access to your secrets. Developing an incident response plan can help minimize the impact of the security event, facilitate a prompt and effective response, and may help to protect your organization’s assets and reputation. The traceability and monitoring controls we discussed in the previous section can be used both during and after the incident.
The Computer Security Incident Handling Guide SP 800-61 Rev. 2, which was created by the National Institute of Standards and Technology (NIST), can help you create an incident response plan for specific incident types. It provides a thorough and organized approach to incident response, covering everything from initial preparation and planning to detection and analysis, containment, eradication, recovery, and follow-up. The framework emphasizes the importance of continual improvement and learning from past incidents to enhance the overall security posture of the organization.
Refer to the following documentation for further details and sample playbooks:
In this post, we discussed how organizations can take a phased approach to migrate their secrets to AWS Secrets Manager. Your teams can use the thought exercises mentioned in this post to decide if they would like to rehost, replatform, or retire secrets. We discussed what guardrails should be enabled for application teams to consume secrets in a safe and regulated manner. We also touched upon ways organizations can discover and classify their secrets.
In Part 2 of this series, we go into the details of the migration implementation phase and walk you through a sample solution that you can use to integrate on-premises applications with Secrets Manager.
If you have feedback about this post, submit comments in the Comments section below. If you have questions about this post, start a new thread on the AWS Secrets Manager re:Post or contact AWS Support.
Want more AWS Security news? Follow us on Twitter.
Thank you to everyone who participated in AWS re:Inforce 2023, both virtually and in-person. The conference featured a lineup of over 250 engaging sessions and hands-on labs, in collaboration with more than 80 AWS partner sponsors, over two days of immersive cloud security learning. The keynote was delivered by CJ Moses, AWS Chief Information Security Officer, Becky Weiss, AWS Senior Principal Engineer, and Debbie Wheeler, Delta Air Lines Chief Information Security Officer. They shared the latest innovations in cloud security from AWS and provided insights on how to foster a culture of security in your organization.
If you couldn’t join us or would like to revisit the insightful themes discussed, we’ve put together this blog post for you. It provides a comprehensive summary of all the key announcements made and includes information on where you can watch the keynote and sessions at your convenience.
Key announcements
Here are some of the top announcements that we made at AWS re:Inforce 2023:
Amazon Verified Permissions — Verified Permissions is a scalable permissions management and fine-grained authorization service for the applications you build. The service helps your developers build secure applications faster by externalizing authorization and centralizing policy management and administration. Developers can align their application access with Zero Trust principles by implementing least privilege and continual verification within applications. Security and audit teams can better analyze and audit who has access to what within applications. Amazon Verified Permissions uses Cedar, an open-source policy language for access control that empowers developers and admins to define policy-based access controls using roles and attributes for context-aware access control.
Amazon Inspector code scanning of Lambda functions —Amazon Inspector now supports code scanning of AWS Lambda functions, expanding the existing capability to scan Lambda functions and associated layers for software vulnerabilities in application package dependencies. Amazon Inspector code scanning of Lambda functions scans custom proprietary application code you write within Lambda functions for security vulnerabilities such as injection flaws, data leaks, weak cryptography, or missing encryption. Upon detecting code vulnerabilities within the Lambda function or layer, Amazon Inspector generates actionable security findings that provide several details, such as security detector name, impacted code snippets, and remediation suggestions to address vulnerabilities. The findings are aggregated in the Amazon Inspector console and integrated with AWS Security Hub and Amazon EventBridge for streamlined workflow automation.
Amazon Inspector SBOM export — Amazon Inspector now offers the ability to export a consolidated Software Bill of Materials (SBOMs) for resources that it monitors across your organization in multiple industry-standard formats, including CycloneDx and Software Package Data Exchange (SPDX). With this new capability, you can use automated and centrally managed SBOMs to gain visibility into key information about your software supply chain. This includes details about software packages used in the resource, along with associated vulnerabilities. SBOMs can be exported to an Amazon Simple Storage Service (Amazon S3) bucket and downloaded for analyzing with Amazon Athena or Amazon QuickSight to visualize software supply chain trends. This functionality is available with a few clicks in the Amazon Inspector console or using Amazon Inspector APIs.
Amazon CodeGuru Security —Amazon CodeGuru Security offers a comprehensive set of APIs that are designed to seamlessly integrate with your existing pipelines and tooling. CodeGuru Security serves as a static application security testing (SAST) tool that uses machine learning to help you identify code vulnerabilities and provide guidance you can use as part of remediation. CodeGuru Security also provides in-context code patches for certain classes of vulnerabilities, helping you reduce the effort required to fix code.
Amazon EC2 Instance Connect Endpoint — Amazon Elastic Compute Cloud (Amazon EC2) announced support for connectivity to instances using SSH or RDP in private subnets over the Amazon EC2 Instance Connect Endpoint (EIC Endpoint). With this capability, you can connect to your instances by using SSH or RDP from the internet without requiring a public IPv4 address.
AWS built-in partner solutions —AWS built-in partner solutions are co-built with AWS experts, helping to ensure that AWS Well-Architected security reference architecture guidelines and best security practices were rigorously followed. AWS built-in partner solutions can save you valuable time and resources by getting the building blocks of cloud development right when you begin a migration or modernization initiative. AWS built-in solutions also automate deployments and can reduce installation time from months or weeks to a single day. Customers often look to our partners for innovation and help with “getting cloud right.” Now, partners with AWS built-in solutions can help you be more efficient and drive business value for both partner software and AWS native services.
AWS Cyber Insurance Partners — AWS has worked with leading cyber insurance partners to help simplify the process of obtaining cyber insurance. You can now reduce business risk by finding and procuring cyber insurance directly from validated AWS cyber insurance partners. To reduce the amount of paperwork and save time, download and share your AWS Foundational Security Best Practices Standard detailed report from AWS Security Hub and share the report with the AWS Cyber Insurance Partner of your choice. With AWS vetted cyber insurance partners, you can have confidence that these insurers understand AWS security posture and are evaluating your environment according to the latest AWS Security Best Practices. Now you can get a full cyber insurance quote in just two business days.
AWS Global Partner Security Initiative — With the AWS Global Partner Security Initiative, AWS will jointly develop end-to-end security solutions and managed services, leveraging the capabilities, scale, and deep security knowledge of our Global System Integrators (GSI) partners.
Amazon Detective finding groups —Amazon Detective expands its finding groups capability to include Amazon Inspector findings, in addition to Amazon GuardDuty findings. Using machine learning, this extension of the finding groups feature significantly streamlines the investigation process, reducing the time spent and helping to improve identification of the root cause of security incidents. By grouping findings from Amazon Inspector and GuardDuty, you can use Detective to answer difficult questions such as “was this EC2 instance compromised because of a vulnerability?” or “did this GuardDuty finding occur because of unintended network exposure?” Furthermore, Detective maps the identified findings and their corresponding tactics, techniques, and procedures to the MITRE ATT&CK framework, enhancing the overall effectiveness and alignment of security measures.
[Pre-announce] AWS Private Certificate Authority Connector for Active Directory –—AWS Private CA will soon launch a Connector for Active Directory (AD). The Connector for AD will help to reduce upfront public key infrastructure (PKI) investment and ongoing maintenance costs with a fully managed serverless solution. This new feature will help reduce PKI complexity by replacing on-premises certificate authorities with a highly secure hardware security module (HSM)-backed AWS Private CA. You will be able to automatically deploy certificates using auto-enrollment to on-premises AD and AWS Directory Service for Microsoft Active Directory.
AWS Payment Cryptography — The day before re:Inforce, AWS Payment Cryptography launched with general availability. This service simplifies cryptography operations in cloud-hosted payment applications. AWS Payment Cryptography simplifies your implementation of the cryptographic functions and key management used to secure data and operations in payment processing in accordance with various PCI standards.
AWS WAF Fraud Control launches account creation fraud prevention — AWS WAF Fraud Control announces Account Creation Fraud Prevention, a managed protection for AWS WAF that’s designed to prevent creation of fake or fraudulent accounts. Fraudsters use fake accounts to initiate activities, such as abusing promotional and sign-up bonuses, impersonating legitimate users, and carrying out phishing tactics. Account Creation Fraud Prevention helps protect your account sign-up or registration pages by allowing you to continuously monitor requests for anomalous digital activity and automatically block suspicious requests based on request identifiers and behavioral analysis.
AWS Security Hub automation rules —AWS Security Hub, a cloud security posture management service that performs security best practice checks, aggregates alerts, and facilitates automated remediation, now features a capability to automatically update or suppress findings in near real time. You can now use automation rules to automatically update various fields in findings, suppress findings, update finding severity and workflow status, add notes, and more.
Amazon S3 announces dual-layer server-side encryption — Amazon S3 is the only cloud object storage service where you can apply two layers of encryption at the object level and control the data keys used for both layers. Dual-layer server-side encryption with keys stored in AWS Key Management Service (DSSE-KMS) is designed to adhere to National Security Agency Committee on National Security Systems Policy (CNSSP) 15 for FIPS compliance and Data-at-Rest Capability Package (DAR CP) Version 5.0 guidance for two layers of MFS U/00/814670-15 Commercial National Security Algorithm (CNSA) encryption.
AWS CloudTrail Lake dashboards — AWS CloudTrail Lake, a managed data lake that lets organizations aggregate, immutably store, visualize, and query their audit and security logs, announces the general availability of CloudTrail Lake dashboards. CloudTrail Lake dashboards provide out-of-the-box visualizations and graphs of key trends from your audit and security data directly within the CloudTrail console. It also offers the flexibility to drill down on additional details, such as specific user activity, for further analysis and investigation using CloudTrail Lake SQL queries.
AWS Well-Architected Profiles — AWS Well-Architected introduces Profiles, which allows you to tailor your Well-Architected reviews based on your business goals. This feature creates a mechanism for continuous improvement by encouraging you to review your workloads with certain goals in mind first, and then complete the remaining Well-Architected review questions.
Watch on demand
Leadership sessions — You can watch the leadership sessions to learn from AWS security experts as they talk about essential topics, including open source software (OSS) security, Zero Trust, compliance, and proactive security.
Breakout sessions, lightning talks, and more — Explore our content across these six tracks:
Application Security— Discover how AWS, customers, and AWS Partners move fast while understanding the security of the software they build.
Data Protection — Learn how AWS, customers, and AWS Partners work together to protect data. Get insights into trends in data management, cryptography, data security, data privacy, encryption, and key rotation and storage.
Governance, Risk, and Compliance — Dive into the latest hot topics in governance and compliance for security practitioners, and discover how to automate compliance tools and services for operational use.
Identity and Access Management — Learn how AWS, customers, and AWS Partners use AWS Identity Services to manage identities, resources, and permissions securely and at scale. Discover how to configure fine-grained access controls for your employees, applications, and devices and deploy permission guardrails across your organization.
Network and Infrastructure Security — Gain practical expertise on the services, tools, and products that AWS, customers, and partners use to protect the usability and integrity of their networks and data.
Threat Detection and Incident Response — Discover how AWS, customers, and AWS Partners get the visibility they need to improve their security posture, reduce the risk profile of their environments, identify issues before they impact business, and implement incident response best practices.
Session presentation downloads are also available on the AWS Events Content page. If you’re interested in further in-person security learning opportunities, consider registering for AWS re:Invent 2023, which will be held from November 27 to December 1 in Las Vegas, NV. We look forward to seeing you there!
If you would like to discuss how these new announcements can help your organization improve its security posture, AWS is here to help. Contact your AWS account team today.
If you have feedback about this post, submit comments in the Comments section below. If you have questions about this post, contact AWS Support.
We’re pleased to announce the completion of our annual Outsourced Service Provider’s Audit Report (OSPAR) audit cycle on July 1, 2023. The 2023 OSPAR certification cycle includes the addition of nine new services in scope, bringing the total number of services in scope to 153 in the AWS Asia Pacific (Singapore) Region.
Newly added services in scope include the following:
Issued by the Association of Banks in Singapore (ABS), the Guidelines on Control Objectives and Procedures for Outsourced Service Providers provide baseline control criteria that outsourced service providers (OSPs) operating in Singapore should have in place. Successful completion of the OSPAR assessment demonstrates that AWS has implemented a system of controls that meet the guidelines and our commitment to fulfil the security expectations for cloud service providers set by the financial services industry in Singapore.
Customers can use the OSPAR assessment to conduct due diligence and to help reduce the effort and costs required for compliance. An independent third-party auditor, selected from the ABS list of approved auditors, performs the OSPAR assessment.
As always, we’re committed to bringing new services into the scope of our OSPAR program based on your architectural, business, and regulatory needs. If you have questions about the OSPAR report, contact your AWS account team.
If you have feedback about this post, submit comments in the Comments section below.
Want more AWS Security how-to content, news, and feature announcements? Follow us on Twitter.
The collective thoughts of the interwebz
Manage Consent
To provide the best experiences, we use technologies like cookies to store and/or access device information. Consenting to these technologies will allow us to process data such as browsing behavior or unique IDs on this site. Not consenting or withdrawing consent, may adversely affect certain features and functions.
Functional
Always active
The technical storage or access is strictly necessary for the legitimate purpose of enabling the use of a specific service explicitly requested by the subscriber or user, or for the sole purpose of carrying out the transmission of a communication over an electronic communications network.
Preferences
The technical storage or access is necessary for the legitimate purpose of storing preferences that are not requested by the subscriber or user.
Statistics
The technical storage or access that is used exclusively for statistical purposes.The technical storage or access that is used exclusively for anonymous statistical purposes. Without a subpoena, voluntary compliance on the part of your Internet Service Provider, or additional records from a third party, information stored or retrieved for this purpose alone cannot usually be used to identify you.
Marketing
The technical storage or access is required to create user profiles to send advertising, or to track the user on a website or across several websites for similar marketing purposes.