Post Syndicated from Chris Munns original https://aws.amazon.com/blogs/compute/applying-spot-to-spot-consolidation-best-practices-with-karpenter/
This post is written by Robert Northard – AWS Container Specialist Solutions Architect, and Carlos Manzanedo Rueda – AWS WW SA Leader for Efficient Compute
Karpenter is an open source node lifecycle management project built for Kubernetes. In this post, you will learn how to use the new Spot-to-Spot consolidation functionality released in Karpenter v0.34.0, which helps further optimize your cluster. Amazon Elastic Compute Cloud (Amazon EC2) Spot Instances are spare Amazon EC2 capacity available for up to 90% off compared to On-Demand prices. One difference between On-Demand and Spot is that Spot Instances can be interrupted by Amazon EC2 when the capacity is needed back. Karpenter’s built-in support for Spot Instances allows users to seamlessly implement Spot best practices and helps users optimize the cost of stateless, fault tolerant workloads. For example, when Karpenter observes a Spot interruption, it automatically starts a new node in response.
Karpenter provisions nodes in response to unschedulable pods based on aggregated CPU, memory, volume requests, and other scheduling constraints. Over time, Karpenter has added functionality to simplify instance lifecycle configuration, providing a termination controller, instance expiration, and drift detection. Karpenter also helps optimize Kubernetes clusters by selecting the optimal instances while still respecting Kubernetes pod-to-node placement nuances, such as nodeSelector, affinity and anti-affinity, taints and tolerations, and topology spread constraints.
The Kubernetes scheduler assigns pods to nodes based on their scheduling constraints. Over time, as workloads are scaled out and scaled in or as new instances join and leave, the cluster placement and instance load might end up not being optimal. In many cases, it results in unnecessary extra costs. Karpenter has a consolidation feature that improves cluster placement by identifying and taking action in situations such as:
- when a node is empty
- when a node can be removed as the pods that are running on it can be rescheduled into other existing nodes
- when the number of pods in a node has gone down and the node can now be replaced with a lower-priced and rightsized variant (which is shown in the following figure)

Karpenter consolidation, replacing one 2xlarge Amazon EC2 Instance with an xlarge Amazon EC2 Instance.
Karpenter versions prior to v0.34.0 only supported consolidation for Amazon EC2 On-Demand Instances. On-Demand consolidation allowed consolidating from On-Demand into Spot Instances and to lower-priced On-Demand Instances. However, once a pod was placed on a Spot Instance, Spot nodes were only removed when the nodes were empty. In v0.34.0, you can enable the feature gate to use Spot-to-Spot consolidation.
Solution overview
When launching Spot Instances, Karpenter uses the price-capacity-optimized allocation strategy when calling the Amazon EC2 instant Fleet API (shown in the following figure) and passes in a selection of compute instance types based on the Karpenter NodePool configuration. The Amazon EC2 Fleet API in instant mode is a synchronous API call that immediately returns a list of instances that launched and any instance that could not be launched. For any instances that could not be launched, Karpenter might request alternative capacity or remove any soft Kubernetes scheduling constraints for the workload.

Karpenter instance orchestration
Spot-to-Spot consolidation needed an approach that was different from On-Demand consolidation. For On-Demand consolidation, rightsizing and lowest price are the main metrics used. For Spot-to-Spot consolidation to take place, Karpenter requires a diversified instance configuration (see the example NodePool defined in the walkthrough) with at least 15 instances types. Without this constraint, there would be a risk of Karpenter selecting an instance that has lower availability and, therefore, higher frequency of interruption.
Prerequisites
The following prerequisites are required to complete the walkthrough:
- Install an Amazon Elastic Kubernetes Service (Amazon EKS) cluster (version 1.29 or higher) with Karpenter (v0.34.0 or higher). The Karpenter Getting Started Guide provides steps for setting up an Amazon EKS cluster and adding Karpenter.
- Enable replacement with Spot consolidation through the SpotToSpotConsolidation feature gate. This can be enabled during a helm install of the Karpenter chart by adding –-set settings.featureGates.spotToSpotConsolidation=true argument.
- Install kubectl, the Kubernetes command line tool for communicating with the Kubernetes control plane API, and kubectl context configured with Cluster Operator and Cluster Developer permissions.
Walkthrough
The following walkthrough guides you through the steps for simulating Spot-to-Spot consolidation.
1. Create a Karpenter NodePool and EC2NodeClass
Create a Karpenter NodePool and EC2NodeClass. Replace the following with your own values. If you used the Karpenter Getting Started Guide to create your installation, then the value would be your cluster name.
- Replace <karpenter-discovery-tag-value> with your subnet tag for Karpenter subnet and security group auto-discovery.
- Replace <role-name> with the name of the AWS Identity and Access Management (IAM) role for node identity.
cat <<EOF > nodepool.yaml
apiVersion: karpenter.sh/v1beta1
kind: NodePool
metadata:
  name: default
spec:
  template:
    metadata:
      labels:
        intent: apps
    spec:
      nodeClassRef:
        name: default
      requirements:
        - key: karpenter.sh/capacity-type
          operator: In
          values: ["spot"]
        - key: karpenter.k8s.aws/instance-category
          operator: In
          values: ["c","m","r"]
        - key: karpenter.k8s.aws/instance-size
          operator: NotIn
          values: ["nano","micro","small","medium"]
        - key: karpenter.k8s.aws/instance-hypervisor
          operator: In
          values: ["nitro"]
  limits:
    cpu: 100
    memory: 100Gi
  disruption:
    consolidationPolicy: WhenUnderutilized
---
apiVersion: karpenter.k8s.aws/v1beta1
kind: EC2NodeClass
metadata:
  name: default
spec:
  amiFamily: Bottlerocket
  subnetSelectorTerms:
    - tags:
        karpenter.sh/discovery: "<karpenter-discovery-tag-value>"
  securityGroupSelectorTerms:
    - tags:
        karpenter.sh/discovery: "<karpenter-discovery-tag-value>"
  role: "<role-name>"
  tags:
    Name: karpenter.sh/nodepool/default
    IntentLabel: "apps"
EOF

kubectl apply -f nodepool.yaml
The NodePool definition demonstrates a flexible configuration with instances from the C, M, or R EC2 instance families. The configuration is restricted to use smaller instance sizes but is still diversified as much as possible. For example, this might be needed in scenarios where you deploy observability DaemonSets. If your workload has specific requirements, then see the supported well-known labels in the Karpenter documentation.
2. Deploy a sample workload
Deploy a sample workload by running the following command. This command creates a Deployment with five pod replicas using the pause container image:
cat <<EOF > inflate.yaml
apiVersion: apps/v1
kind: Deployment
metadata:
  name: inflate
spec:
  replicas: 5
  selector:
    matchLabels:
      app: inflate
  template:
    metadata:
      labels:
        app: inflate
    spec:
      nodeSelector:
        intent: apps
      containers:
        - name: inflate
          image: public.ecr.aws/eks-distro/kubernetes/pause:3.2
          resources:
            requests:
              cpu: 1
              memory: 1.5Gi
EOF
kubectl apply -f inflate.yaml
Next, check the Kubernetes nodes by running a kubectl get nodes CLI command. The capacity pool (instance type and Availability Zone) selected depends on any Kubernetes scheduling constraints and spare capacity size. Therefore, it might differ from this example in the walkthrough. You can see Karpenter launched a new node of instance type c6g.2xlarge, an AWS Graviton2-based instance, in the eu-west-1c Region:
$ kubectl get nodes -L karpenter.sh/nodepool -L node.kubernetes.io/instance-type -L topology.kubernetes.io/zone -L karpenter.sh/capacity-type

NAME                                     STATUS   ROLES    AGE   VERSION               NODEPOOL   INSTANCE-TYPE   ZONE         CAPACITY-TYPE
ip-10-0-12-17.eu-west-1.compute.internal Ready    <none>   80s   v1.29.0-eks-a5ec690   default    c6g.2xlarge     eu-west-1c   spot
3. Scale in a sample workload to observe consolidation
To invoke a Karpenter consolidation event scale, inflate the deployment to 1. Run the following command:
kubectl scale --replicas=1 deployment/inflate Tail the Karpenter logs by running the following command. If you installed Karpenter in a different Kubernetes namespace, then replace the name for the -n argument in the command:
kubectl -n karpenter logs -l app.kubernetes.io/name=karpenter --all-containers=true -f --tail=20After a few seconds, you should see the following disruption via consolidation message in the Karpenter logs. The message indicates the c6g.2xlarge Spot node has been targeted for replacement and Karpenter has passed the following 15 instance types—m6gd.xlarge, m5dn.large, c7a.xlarge, r6g.large, r6a.xlarge and 10 other(s)—to the Amazon EC2 Fleet API:
{"level":"INFO","time":"2024-02-19T12:09:50.299Z","logger":"controller.disruption","message":"disrupting via consolidation replace, terminating 1 candidates ip-10-0-12-181.eu-west-1.compute.internal/c6g.2xlarge/spot and replacing with spot node from types m6gd.xlarge, m5dn.large, c7a.xlarge, r6g.large, r6a.xlarge and 10 other(s)","commit":"17d6c05","command-id":"60f27cb5-98fa-40fb-8231-05b31fd41892"}Check the Kubernetes nodes by running the following kubectl get nodes CLI command. You can see that Karpenter launched a new node of instance type c6g.large:
$ kubectl get nodes -L karpenter.sh/nodepool -L node.kubernetes.io/instance-type -L topology.kubernetes.io/zone -L karpenter.sh/capacity-type

NAME                                      STATUS   ROLES    AGE   VERSION               NODEPOOL   INSTANCE-TYPE ZONE       CAPACITY-TYPE
ip-10-0-12-156.eu-west-1.compute.internal           Ready    <none>   2m1s   v1.29.0-eks-a5ec690   default    c6g.large       eu-west-1c   spot
Use kubectl get nodeclaims to list all objects of type NodeClaim and then describe the NodeClaim Kubernetes resource using kubectl get nodeclaim/<claim-name> -o yaml. In the NodeClaim .spec.requirements, you can also see the 15 instance types passed to the Amazon EC2 Fleet API:
apiVersion: karpenter.sh/v1beta1
kind: NodeClaim
...
spec:
  nodeClassRef:
    name: default
  requirements:
  ...
  - key: node.kubernetes.io/instance-type
    operator: In
    values:
    - c5.large
    - c5ad.large
    - c6g.large
    - c6gn.large
    - c6i.large
    - c6id.large
    - c7a.large
    - c7g.large
    - c7gd.large
    - m6a.large
    - m6g.large
    - m6gd.large
    - m7g.large
    - m7i-flex.large
    - r6g.large
...
What would happen if a Spot node could not be consolidated?
If a Spot node cannot be consolidated because there are not 15 instance types in the compute selection, then the following message will appear in the events for the NodeClaim object. You might get this event if you overly constrained your instance type selection:
Normal Unconsolidatable 31s karpenter SpotToSpotConsolidation requires 15 cheaper instance type options than the current candidate to consolidate, got 1Spot best practices with Karpenter
The following are some best practices to consider when using Spot Instances with Karpenter.
- Avoid overly constraining instance type selection: Karpenter selects Spot Instances using the price-capacity-optimized allocation strategy, which balances the price and availability of AWS spare capacity. Although a minimum of 15 instances are needed, you should avoid constraining instance types as much as possible. By not constraining instance types, there is a higher chance of acquiring Spot capacity at large scales with a lower frequency of Spot Instance interruptions at a lower cost.
- Gracefully handle Spot interruptions and consolidation actions: Karpenter natively handles Spot interruption notifications by consuming events from an Amazon Simple Queue Service (Amazon SQS) queue, which is populated with Spot interruption notifications through Amazon EventBridge. As soon as Karpenter receives a Spot interruption notification, it gracefully drains the interrupted node of any running pods while also provisioning a new node for which those pods can schedule. With Spot Instances, this process needs to complete within 2 minutes. For a pod with a termination period longer than 2 minutes, the old node will be interrupted prior to those pods being rescheduled. To test a replacement node, AWS Fault Injection Service (FIS) can be used to simulate Spot interruptions.
- Carefully configure resource requests and limits for workloads: Rightsizing and optimizing your cluster is a shared responsibility. Karpenter effectively optimizes and scales infrastructure, but the end result depends on how well you have rightsized your pod requests and any other Kubernetes scheduling constraints. Karpenter does not consider limits or resource utilization. For most workloads with non-compressible resources, such as memory, it is generally recommended to set requests==limits because if a workload tries to burst beyond the available memory of the host, an out-of-memory (OOM) error occurs. Karpenter consolidation can increase the probability of this as it proactively tries to reduce total allocatable resources for a Kubernetes cluster. For help with rightsizing your Kubernetes pods, consider exploring Kubecost, Vertical Pod Autoscaler configured in recommendation mode, or an open source tool such as Goldilocks.
- Configure metrics for Karpenter: Karpenter emits metrics in the Prometheus format, so consider using Amazon Managed Service for Prometheus to track interruptions caused by Karpenter Drift, consolidation, Spot interruptions, or other Amazon EC2 maintenance events. These metrics can be used to confirm that interruptions are not having a significant impact on your service’s availability and monitor NodePool usage and pod lifecycles. The Karpenter Getting Started Guide contains an example Grafana dashboard configuration.
You can learn more about other application best practices in the Reliability section of the Amazon EKS Best Practices Guide.
Cleanup
To avoid incurring future charges, delete any resources you created as part of this walkthrough. If you followed the Karpenter Getting Started Guide to set up a cluster and add Karpenter, follow the clean-up instructions in the Karpenter documentation to delete the cluster. Alternatively, if you already had a cluster with Karpenter, delete the resources created as part of this walkthrough:
kubectl delete -f inflate.yaml
kubectl delete -f nodepool.yaml
Conclusion
In this post, you learned how Karpenter can actively replace a Spot node with another more cost-efficient Spot node. Karpenter can consolidate Spot nodes that have the right balance between lower price and low-frequency interruptions when there are at least 15 selectable instances to balance price and availability.
To get started, check out the Karpenter documentation as well as Karpenter Blueprints, which is a repository including common workload scenarios following the best practices.
You can share your feedback on this feature by a raising a GitHub Issue.


 Milind Oke is a senior Redshift specialist solutions architect who has worked at Amazon Web Services for three years. He is an AWS-certified SA Associate, Security Specialty and Analytics Specialty certification holder, based out of Queens, New York.
 Aditya Samant is a relational database industry veteran with over 2 decades of experience working with commercial and open-source databases. He currently works at Amazon Web Services as a Principal Database Specialist Solutions Architect. In his role, he spends time working with customers designing scalable, secure and robust cloud native architectures. Aditya works closely with the service teams and collaborates on designing and delivery of the new features for Amazon’s managed databases.
 Pratik Patel is Sr. Technical Account Manager and streaming analytics specialist. He works with AWS customers and provides ongoing support and technical guidance to help plan and build solutions using best practices and proactively keep customers’ AWS environments operationally healthy.
 Amar is a Senior Solutions Architect at Amazon AWS in the UK. He works across power, utilities, manufacturing and automotive customers on strategic implementations, specializing in using AWS Streaming and advanced data analytics solutions, to drive optimal business outcomes.


 Sushanth Kothapally is a Solutions Architect at Amazon Web Services supporting Automotive and Manufacturing customers. He is passionate about designing technology solutions to meet business goals and has keen interest in serverless and event-driven architectures.
 Senthil Kamala Rathinam is a Solutions Architect at Amazon Web Services specializing in Data and Analytics. He is passionate about helping customers to design and build modern data platforms. In his free time, Senthil loves to spend time with his family and play badminton.


 Tony Stricker is a Principal Technologist on the Data Strategy team at AWS, where he helps senior executives adopt a data-driven mindset and align their people/process/technology in ways that foster innovation and drive towards specific, tangible business outcomes. He has a background as a data warehouse architect and data scientist and has delivered solutions in to production across multiple industries including oil and gas, financial services, public sector, and manufacturing. In his spare time, Tony likes to hang out with his dog and cat, work on home improvement projects, and restore vintage Airstream campers.


 Shoukat Ghouse is a Senior Big Data Specialist Solutions Architect at AWS. He helps customers around the world build robust, efficient and scalable data platforms on AWS leveraging AWS analytics services like AWS Glue, AWS Lake Formation, Amazon Athena and Amazon EMR.


 Alan Peaty is a Senior Partner Solutions Architect at AWS. Alan helps Global Systems Integrators (GSIs) and Global Independent Software Vendors (GISVs) solve complex customer challenges using AWS services. Prior to joining AWS, Alan worked as an architect at systems integrators to translate business requirements into technical solutions. Outside of work, Alan is an IoT enthusiast and a keen runner who loves to hit the muddy trails of the English countryside.
 Parag Srivastava is a Solutions Architect at AWS, helping enterprise customers with successful cloud adoption and migration. During his professional career, he has been extensively involved in complex digital transformation projects. He is also passionate about building innovative solutions around geospatial aspects of addresses.


 Jeremy Ber has been working in the telemetry data space for the past 10 years as a Software Engineer, Machine Learning Engineer, and most recently a Data Engineer. At AWS, he is a Streaming Specialist Solutions Architect, supporting both Amazon Managed Streaming for Apache Kafka (Amazon MSK) and Amazon Managed Service for Apache Flink.
 Lorenzo Nicora works as Senior Streaming Solution Architect at AWS, helping customers across EMEA. He has been building cloud-native, data-intensive systems for over 25 years, working in the finance industry both through consultancies and for FinTech product companies. He has leveraged open-source technologies extensively and contributed to several projects, including Apache Flink.


 Edvin Hallvaxhiu is a Senior Global Security Architect with AWS Professional Services and is passionate about cybersecurity and automation. He helps customers build secure and compliant solutions in the cloud. Outside work, he likes traveling and sports.
 Rahul Shaurya is a Principal Big Data Architect with AWS Professional Services. He helps and works closely with customers building data platforms and analytical applications on AWS. Outside of work, Rahul loves taking long walks with his dog Barney.
 Andrea Montanari is a Senior Big Data Architect with AWS Professional Services. He actively supports customers and partners in building analytics solutions at scale on AWS.
 María Guerra is a Big Data Architect with AWS Professional Services. Maria has a background in data analytics and mechanical engineering. She helps customers architecting and developing data related workloads in the cloud.
 Pushpraj Singh is a Senior Data Architect with AWS Professional Services. He is passionate about Data and DevOps engineering. He helps customers build data driven applications at scale.
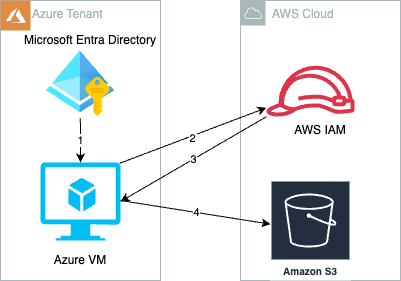


 Satya Adimula is a Senior Data Architect at AWS based in Boston. With over two decades of experience in data and analytics, Satya helps organizations derive business insights from their data at scale.


 Amy Tseng is a Managing Director of Data and Analytics(DnA) Integration at BMO. She is one of the AWS Data Hero. She has over 7 years of experiences in Data and Analytics Cloud migrations in AWS. Outside of work, Amy loves traveling and hiking.
 Jack Lin is a Director of Engineering on the Data Platform at BMO. He has over 20 years of experience working in platform engineering and software engineering. Outside of work, Jack loves playing soccer, watching football games and traveling.
 Regis Chow is a Director of DnA Integration at BMO. He has over 5 years of experience working in the cloud and enjoys solving problems through innovation in AWS. Outside of work, Regis loves all things outdoors, he is especially passionate about golf and lawn care.
 Nishchai JM is an Analytics Specialist Solutions Architect at Amazon Web services. He specializes in building Big-data applications and help customer to modernize their applications on Cloud. He thinks Data is new oil and spends most of his time in deriving insights out of the Data.
 Harshida Patel is a Principal Solutions Architect, Analytics with AWS.
 Raghu Kuppala is an Analytics Specialist Solutions Architect experienced working in the databases, data warehousing, and analytics space. Outside of work, he enjoys trying different cuisines and spending time with his family and friends.