The release of Amazon Q Developer and its ability to be integrated into AWS Chatbot allows users who use Microsoft Teams or Slack to stay within their communication platform and interact with a conversational generative artificial intelligence (AI) AWS expert.
Amazon Q Developer is a conversational generative AI chatbot that provides AWS assistance in the form of best practices, documentation, and answers your AWS related questions. AWS Chatbot is a service that lets you interact with AWS services directly from your communications platform such as Microsoft Teams, Amazon Chime, or Slack. Users can ask Q about best practices, building solutions, troubleshooting issues, and more, creating a productive and collaborative environment. Users can also interface with Chatbot to run AWS CLI commands or open support cases all within Slack.
In this post, we show you how you can leverage Q Developer and Chatbot in your Slack workspace by highlighting a number of use cases along with solution screenshots that can enhance a company’s AWS productivity. We will also showcase an architecture diagram, detailing the flow of actions and the use of different services. To learn more about how to implement Q Developer and Chatbot in Slack, refer to this documentation.
Disclaimer: The information and solutions provided by Q Developer are based on patterns from AWS-related data and best practices. While we strive to offer accurate and helpful guidance, please note that the suggestions may not always be fully accurate or applicable to every situation. It is essential to conduct additional research and verify the information with official AWS documentation or consult with AWS support before implementing any recommendations. Always use your judgment and consider the specific requirements of your environment when making decisions based on AI-generated advice.
Leveraging Q Developer and Chatbot
Q Developer and Chatbot serve a wide range of personas across an organization, catering to both AWS-savvy users and those with limited cloud expertise. Software engineers, for instance, can leverage Q Developer to quickly locate documentation, troubleshoot issues, or find best practices, streamlining their workflow. Security engineers can interact with Chatbot to monitor incidents and receive real-time alerts. Even non-technical users, like project managers or operations staff, can benefit from these tools without needing deep cloud knowledge. Together, these tools enhance productivity and collaboration across the company, regardless of technical expertise.
Use Cases
The use cases section is split into two categories, one for Q Developer, and the other for Chatbot. Both services provide unique abilities to interact with AWS to get the response you are looking for and can be accessed by sending a message to @aws on Slack. Q Developer allows users to ask questions in natural language and responds back with a response and a list of sources. Chatbot allows users to open support cases and to run a number of AWS CLI commands for services such as S3, Lambda, and CloudWatch.
Q Developer Use Cases
Q Developer is a versatile tool designed to assist teams for a number of AWS related use cases. In this post, we will focus on training and onboarding, troubleshooting issues, and implementing AWS best practices.
Training and Onboarding
Benefit: Q Developer can act as a virtual learning assistant, providing personalized training and learning paths for users based on their role, skill level, and current projects. It helps team members stay updated with the latest AWS features and best practices, enhances their skills, and ensures that they can leverage AWS services effectively and efficiently. By offering targeted resources, Q Developer supports continuous learning and helps users prepare for AWS certifications or new roles.
Use Case:AWS Beginner Recommendations. When a new employee joins the team, Q Developer can help them get up to speed by suggesting beginner-level tutorials and essential AWS concepts based on the team’s current tech stack and projects.
Figure 1 – AWS Beginner Recommendations
Use Case: Certification Guidance. An employee aims to get another AWS certification. They can ask Q Developer to provide a structured learning path with recommended courses, study guides, whitepapers, and practice exams to prepare effectively.
Figure 2 – Certification Guidance
Troubleshooting Issues
Benefit: Q Developer provides targeted troubleshooting guidance, helping users to diagnose and resolve issues efficiently. By leveraging AWS service documentation, best practices, and community discussions, Q Developer reduces the time spent on searching for solutions and allows users to focus on resolving issues faster. This improves operational efficiency and minimizes downtime or disruptions.
Use Case:Optimization Recommendations. A developer is facing an issue with running their application on EC2 during peak hours and is looking for recommendations to diagnose the issue.
Figure 3 – Optimizations Recommendations
Use Case:Service Troubleshooting. An engineer is working on configuring API Gateway with their application but receives a 504 Gateway Timeout error. Q Developer can look up HTTP response codes for specific services and recommend a plan to tackle the issue.
Figure 4 – Service Troubleshooting
Best Practices
Benefit: Q Developer provides access to AWS best practices, ensuring that users can build, manage, and maintain their cloud infrastructure effectively. By adhering to best practices, users can optimize their applications for performance, security, scalability, and cost-efficiency. Q Developer helps users stay informed about evolving best practices for using AWS services, ensuring their deployments are up-to-date and compliant with industry standards.
Use Case:Designing Resilient Architectures. A solutions architect is designing a new application on AWS and wants to ensure it’s highly available and fault-tolerant. By asking Q Developer for best practices, they can receive guidance on a number topics including region selection, software, architecture, and deployment strategies to maximize uptime and reliability.
Figure 5 – Designing Resilient Architectures
Use Case: Deploying Applications for Operational Excellence. An engineer is looking for best practices to deploy an application onto AWS Elastic Beanstalk. Q Developer can assist with providing specific tips for the job that conforms with AWS’ operational excellence pillar found in the AWS Well-Architected Framework.
Figure 6 – Operational Excellence
Chatbot Use Cases
Chatbot can be used to run AWS CLI commands, open support cases, and more within Slack. To learn more about how to get started with these commands, please visit Chatbot’s documentation and refer to this AWS Blog for additional information.
Using Chatbot and Q Developer Together
We can use Chatbot and Q Developer together to provide clarity in situations where an organization receives alerts on their Slack channel. For example, you can configure Chatbot to receive notifications using Amazon Simple Notification Service based off of rules set up within Amazon EventBridge and it will be delivered directly into your Slack channel. Given that an organization can have many types of notifications enabled for their AWS services, there may be times where the message that is being sent to Slack can be confusing and not well understood. You can take the message provided to you from the notification and provide that as context to Q Developer to help you dive deep into the situation and help figure out next steps. To learn more about setting up notifications and having them be sent to your Slack, please refer to this documentation.
Figure 7 – Chatbot Error Notification
Figure 8 – Q Developer Deep Dive into Chatbot Notification
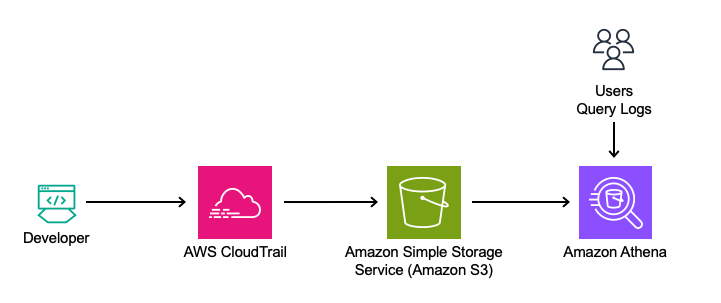
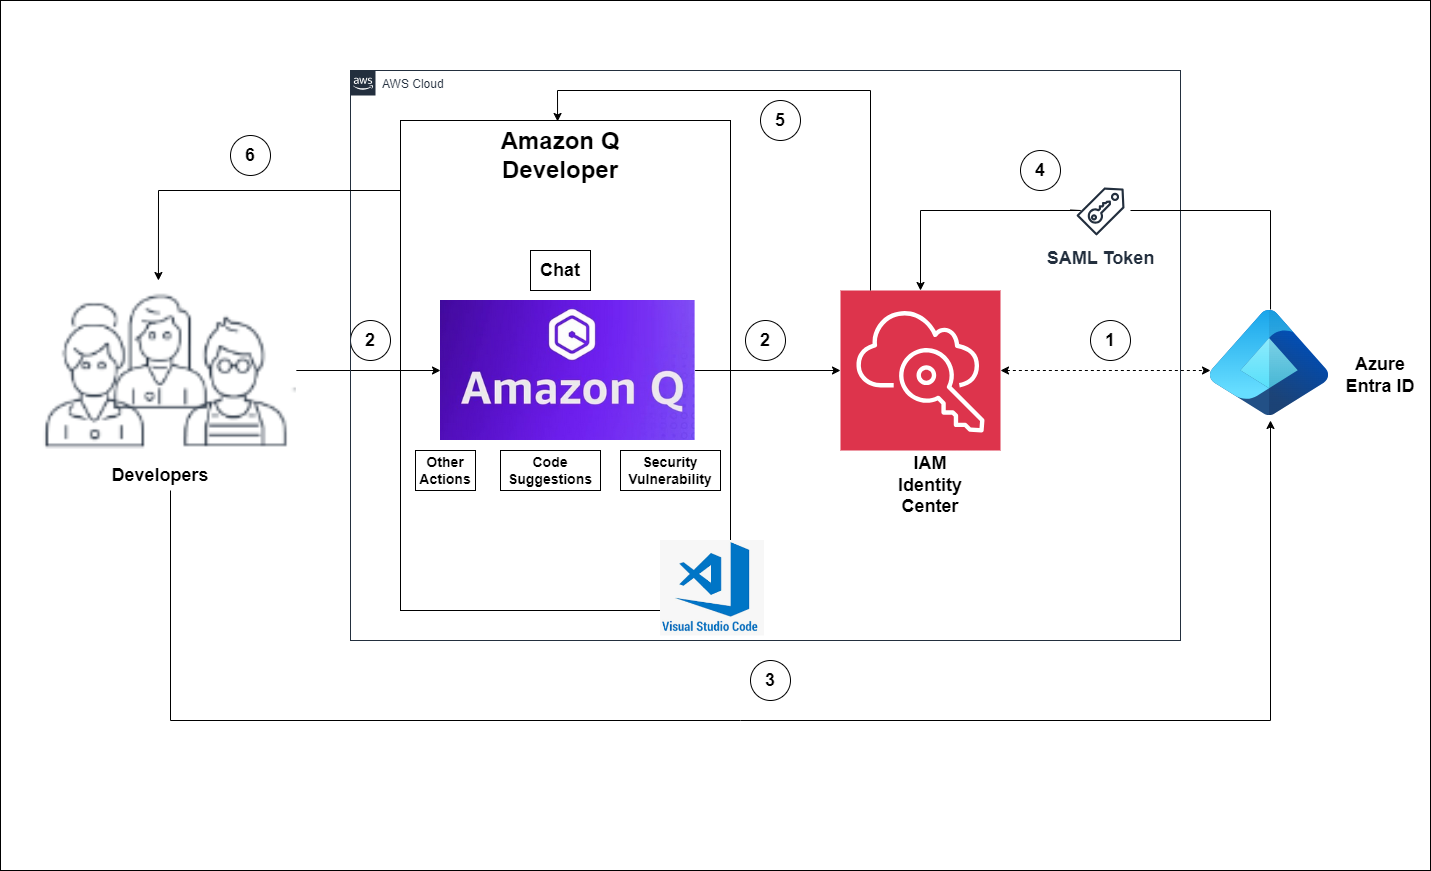
Architecture Diagram
Figure 9 – Solution Overview
A user logs into Slack and can either ask a question, run AWS command(s), or open a support case.
Slack sends the request to Chatbot which then validates that it can be processed from the channel role and associated guardrail policies, both of which are setup through AWS Identity and Access Management. If the request follows the Chatbot use case(s), we can disregard step 3 and move to step 4.
The request is forwarded to Q Developer where it is processed and formulates a response which is then sent back to Chatbot. Chatbot will then relay the response back to Slack which is displayed to the user.
Logs are captured from the original message and the response and can be located within Amazon CloudWatch
Next Steps
Refer to these AWS documentation links that cover how to get started with setting up Q Developer and Chatbot in Slack. It is important to follow the order of the listed documents and to adhere to each of the steps listed to be able to get started with using the solution.
AWS Chatbot Getting Started documentation outlines the steps to set up AWS Chatbot for interacting with AWS infrastructure. It covers steps such as setting up an AWS account, configuring IAM permissions, and setting up Amazon SNS topics for notifications.
This documentation shows how to integrate AWS Chatbot with Slack, enabling AWS notifications and interactions in Slack channels. It covers Slack client and channel configuration and testing notifications from AWS services to Slack. Once completed with setting up Slack with Chatbot, refer back to the main Chatbot documentation where you can additional links on monitoring AWS services, customizing Chatbot and performing CLI commands on the lefthand side.
After following the previous documentation steps,you can now integrate Amazon Q Developer with AWS Chatbot in Slack, allowing users to ask questions about AWS services directly in chat. It includes IAM role setup with managed policies and necessary configuration steps. Once completed, this will allow you to use Q Developer through Chatbot’s interface on Slack.
Conclusion
This post highlights how using Q Developer and Chatbot within Slack can boost productivity for a number of use cases. Individuals, teams, and organizations can use these two services’ capabilities to navigate the intricacies of AWS, troubleshoot ongoing issues, and provide real-time guidance all without leaving the familiarity of Slack.
Earlier today, Amazon Q Developer announced support for inline chat. Inline chat combines the benefits of in-IDE chat with the ability to directly update code, allowing developers to describe issues or ideas directly in the code editor, and receive AI-generated responses that are seamlessly integrated into their codebase. In this post, I will introduce the new inline chat and discuss when to use this new capability to get the most value from Amazon Q Developer.
Background
I started using Q Developer (previously called Amazon CodeWhisperer) when it first launched in June 2022. This initial release included support for inline suggestions, which automatically generated code completions based on existing code and comments. Inline suggestions resulted in significant productivity gains.
Later that year, OpenAI released ChatGPT, and generative AI-powered chat became a hot topic. Personally, I found the chat experience more helpful when I was unsure how to accomplish a task. The chat interface not only generated code, but also provided explanatory context. I preferred to use inline suggestions when I knew what I was doing, and chat when I was learning something new. Therefore, I was thrilled when Amazon Q Developer added chat to the IDE in 2023, as I could use it to explain coding concepts, generate code and tests, and improve existing code. Having chat in the IDE helps me stay on task and in a state of focus and flow.
I have been using both inline suggestions and chat for the past year equally. While I love both options, I still felt there was room for improvement. For example, when fixing a bug, inline suggestions excel at generating new code, but do not easily allow me to update the existing code. Chat allows me to update existing code, but the response is provided in the chat window rather than being directly integrated into my code. This is where inline chat aims to improve the workflow.
Introducing inline chat
Today, we are excited to announce inline chat for Visual Studio Code (VS Code) and JetBrains. Inline chat allows me to provide additional context, such as a description of the bug I’m trying to fix, directly in the code editor. The AI-generated response is then seamlessly merged into my existing code, rather than requiring me to copy and paste from a separate chat window. I can easily review the suggested changes and accept, or decline, them with minimal effort. This new capability is ideal for editing an existing file to fix issues, optimize code, refactor code, add comments. And, it’s included in Amazon Q Developer’s expansive Free tier.
Inline chat is really powerful and helps me do more complex things quickly and accurately. There’s a lot that goes into building an assistant, but one important component is the underlying model, and inline chat is the first Amazon Q Developer capability powered by the latest version of Anthropic’s Claude 3.5 Sonnet, which launched on October 22nd. This new model “shows wide-ranging improvements on industry benchmarks, with particularly strong gains in agentic coding.” As I write this, upgraded Claude 3.5 Sonnet is the top performing model on the SWE-bench, solving 49% of the verified dataset which consists of 500 real-world GitHub issues. This demonstrates the impressive capabilities of the latest Anthropic model.
Amazon Q Developer is built on Amazon Bedrock, a fully managed service for building generative AI applications that offers a choice of high-performing foundation models (FMs) from Amazon and leading AI companies. Amazon Q uses multiple FMs, including FMs from Amazon, and routes tasks to the FM that is the best fit for the job. Amazon Q is constantly getting better, and we regularly change or refine the underlying models to improve performance and take advantage of the latest technologies, as we have latest version of Anthropic’s Claude 3.5 Sonnet launching just a week ago.
By powering the new inline chat capability with this cutting-edge Anthropic model, Amazon Q Developer is delivering an AI assistant that can help you save time, while tackling your most complex coding challenges with unparalleled capabilities. And with the seamless model updates handled behind the scenes, you can be confident that your experience will only continue to improve over time. Let’s take a moment to see how inline chat works.
Refactoring code
Let’s see the inline chat in action. Imagine that I have a class that displays messages on a web page. It started simple, but over time I have added a few variants to change the color, display warning messages, and display error messages. I don’t want to continue adding more and more variants, so I will ask Amazon Q Developer to refactor them. I select all four methods, and press ⌘ + I on Mac or Ctrl + I on Windows. Then, I prompt Q Developer to “refactor these into a single method with optional parameters for the color and message type.”
As you can see in the previous video, Amazon Q Developer refactored my code into a single method. Note that Q is showing me which lines it will add, in green, and which lines it will remove, in red. I’m happy with this recommendation, so I will hit return to accept it. Q Developer then merges the changes into my code.
While I could have done this in the chat pane, I would have to copy the response, and merge it to my code manually. Inline chat returns a diff so I can see exactly which portions will be added and removed. Alternatively, I could have used inline suggestions to generate a new method. However, I would have been left to clean up the old methods manually. The new inline chat feature excels at updating code in place.
Adding documentation
I’ll demonstrate another practical use of inline chat. Recently, I was working on a complex data processing algorithm that I had written some time ago. While the code functioned correctly, it lacked proper documentation. Recognizing that this could hinder future maintenance and comprehension by the team, I decided to add comprehensive documentation.
I selected the entire function and activated the inline chat using ⌘ + I on Mac (or Ctrl + I on Windows). In the chat interface, I entered the prompt “Add documentation including descriptive comments throughout the code.” Q Developer swiftly analyzed the code and generated appropriate documentation. The suggestions appeared with new text highlighted in green, indicating additions.
Amazon Q Developer created a detailed comment block at the beginning of the script, including parameter descriptions and return value information. It also added inline comments throughout, explaining complex logic and calculations. After a thorough review of the suggested documentation, I accepted the changes by hitting return or clicking on “Accept”. Q Developer then integrated the new documentation seamlessly into the existing code.
This feature proves particularly useful when dealing with legacy code or preparing for new team members to join a project. It helps maintain consistency in documentation style across the codebase and significantly reduces the time required compared to manual documentation. The resulting well-documented code is self-explanatory, which can streamline the development process. Inline chat has made it more efficient to keep codebases well-documented and maintainable.
Conclusion
With the introduction of inline chat, Amazon Q Developer has taken the next leap in AI-powered development, combining the best of both worlds – combining the benefits of in-IDE chat with the ability to directly update code. This new capability, powered by Anthropic’s latest Claude 3.5 Sonnet, empowers developers to tackle complex coding challenges efficiently. Whether it’s generating new features, refactoring existing code, or adding comprehensive documentation, inline chat streamlines the workflow, eliminating the need to switch between separate chat and editor windows. By continuously integrating the latest advancements in AI language models, Amazon Q Developer ensures that developers always have access to the most advanced and capable generative AI-powered assistant, handling the undifferentiated heavy lifting and allowing them to focus on what they do best – writing high-quality, innovative code.
You can try it out today by updating or installing your Amazon Q Developer extension on VS Code or JetBrains. This update will help you unleash your productivity right in your IDE.
Two weeks ago, I had the wonderful opportunity to host subject matter experts from across Asia Pacific in the global 24 Hours of Amazon Q live stream event. This continuous 24-hour stream offered insights from AWS experts on Amazon Q Developer and Amazon Q Business, featuring use cases, product demos, and Q&A sessions.
The highlight for me was that I learned a lot from them. Since then, I’ve tried to integrate Amazon Q Business into my workflow. If you’re curious about what Amazon Q can do for you, check out the on-demand replay on Twitch.
Last week’s launches Here’s a recap of AWS launches that caught my attention last week:
Amazon Bedrock Custom Model Import now generally available — Amazon Bedrock now allows customers to import and use their customized models alongside existing foundation models through a single, unified API. This feature supports leveraging fine-tuned models or developing proprietary models based on popular open-source architectures without managing infrastructure or model lifecycle tasks.
EC2 Image Builder now supports building and testing macOS images — EC2 Image Builder adds support for creating and managing machine images for macOS workloads, in addition to existing Windows and Linux support. It streamlines image management processes and reduces the operational overhead of maintaining macOS images.
Amazon Connect now offers screen sharing — Amazon Connect introduces screen sharing capabilities for agents. This feature is available in multiple regions and can be easily integrated into existing voice and video calling setups. This feature gives you opportunity to personalize and improve customer experiences.
Amazon Aurora launches Global Database writer endpoint — Amazon Aurora now supports a highly available and fully managed Global Database writer endpoint. This feature simplifies routing for applications and eliminates the need for application code changes after initiating cross-region Global Database Switchover or Failover operations.
Gain deeper insights into Amazon Q Business with new analytics and conversation insights — Amazon Q Business now offers an analytics dashboard and integration with Amazon CloudWatch Logs. You now have comprehensive insights into the usage of Amazon Q Business application environments and Amazon Q Apps, facilitating monitoring, analysis, and optimization of usage.
Announcing the new Resiliency widget on myApplications — AWS introduces a new Resiliency widget on myApplications, offering enhanced visibility and control over application resilience. You can start a resilience assessment directly from the myApplications dashboard and gain actionable insights.
From community.aws Here’s my top 5 personal favorites posts from community.aws:
Upcoming AWS events Check your calendars and sign up for upcoming AWS and community events:
AWS GenAI Lofts – Gain deep insights, get your questions answered, and learn all you need to know to start building your next innovation at AWS GenAI Lofts: Seoul (October 30–November 6), São Paulo (through November 20), and Paris (through November 25).
AWS Community Days – Join community-led conferences that feature technical discussions, workshops, and hands-on labs. Upcoming AWS Community Days are in: Malta (November 8), Malaysia, Chile (November 9), Indonesia (November 23), Kochi, India (December 14).
AWS re:Invent – Registration is now open for the annual tech extravaganza, taking place December 2–6 in Las Vegas. Learn about new product launches, watch demos, and get behind-the-scenes insights during five headline-making keynotes.
AWS Lambda recently announced a new code editor based on Code-OSS. Like the previous version, the new editor includes Amazon Q Developer. Amazon Q Developer is a generative AI-powered assistant for software development that can help you build and debug Lambda functions more quickly. In this post, I provide an overview of Amazon Q Developer’s integration into the new built-in code editor.
Introduction
AWS Lambda first supported Amazon Q Developer in 2022 (previously known as Amazon CodeWhisperer). While Q Developer has added many features since 2022, the experience in the Lambda editor has remained mostly unchanged until recently. For example, the quality and length of recommendations has increased significantly over the past two years. The original blog post announcing support for Q Developer in the Lambda editor (then called CodeWhisperer) used a series of prompts such as “upload a file to an S3 bucket” or “send a notification using SNS” to incrementally build a Lambda function. While that was impressive at the time, Q Developer can now accept much longer and more complex prompts. For example, I asked Q Developer to create an image moderation function with the following comment. This comment will result in about seventy lines of Python code, including whitespace.
This function moderates images uploaded to S3. It is invoked by an S3 event notification when a new image is uploaded. First, it calls Rekognition image moderation. It also uses Rekognition to extract text from the image, and uses Comprehend to check for toxic content. Finally, it sends a message to the SQS queue identified in the env var QUEUE_URL if the image was moderated or if it contained toxic content. The env var MIN_SCORE allows configuration of the confidence score used as the threshold for both moderation and toxicity.
While I can use this comment in both the old and new editor, the experience in the new editor has significantly improved. Note that in the following image of the old editor, I can only see the first eight lines of the suggestion in a popup. I have to scroll to review the remaining 62 lines of code. The old editor experience did not anticipate that Q Developer would someday return 70 lines, or more, in a single response.
The experience in the new editor is much improved as shown in the following image. I can preview the entire suggestion in-line with my code, up to the size of my screen. This makes it much easier to evaluate the suggestion before deciding to accept or decline it.
Now that you have seen the new editor in action, let’s discuss how to configure and use it.
Inline completions in Lambda
Q Developer can provide you with code recommendations in real time. As you write code, Q Developer automatically generates suggestions based on your existing code and comments. Before I can use Q Developer in the Lambda console, I must first configure it as described in Using Amazon Q Developer with AWS Lambda. With that done, I am ready to start with a simple example.
While I love Python, I often find myself working with a dictionary object without knowledge of its structure. As a result, I waste time reading the documentation searching for the names of various keys. In Lambda, the event object is passed as a dictionary. In addition, each event type has a different structure. Q Developer can save me countless hours of reading documentation to find the structure of each event.
As an example, imagine that I have created a function that can be triggered by Amazon API Gateway, Application Load Balancer, and AWS AppSync. I need to get the IP address of the client that invoked my function. While this is available in the X-Forwarded-For header, the location and format of the header in the dictionary is subtly different in each event type. Q Developer can save me a trip to the documentation.
In the example below, Q Developer is making the correct suggestion for API Gateway based on the contextual clues in my file. Specifically, the comments on lines one and three. When I hit enter at the end of line three, Q Developer uses the context to recommend the code on line four. Note that it correctly recommends X-Forwarded-For with capitals for an API Gateway event.
However, in the next example, the comment on line one now mentions an Application Load Balancer. Note that Q Developer correctly recommends x-forwarded-for in lower-case for an Application Load Balancer event.
That trivial example just saved me a trip to the documentation that would have taken three to five minutes. If I can do that a few times every hour, it has a huge impact on my productivity and focus due to less context switching.
While the in-line completion experience is greatly improved in the new editor, Q Developer supports other capabilities in the Lambda console that I do not want to overlook. Let’s take a moment to review chat and troubleshooting, which are unchanged with the release of the new editor.
Chat in the Lambda console
Q Developer supports chat in the Lambda console. I can use this to ask questions rather than reading through the documentation. Returning to my original example, the image moderation function, remember that my function expects two environment variables, QUEUE_URL andMIN_SCORE.Imagine that I do not know how to configure an environment variable in the Lambda console. In the following example, I chat with Q Developer to ask for help.
Note that the response is aware of my position in the console. Q Developer says “It looks like you’re already in the function design.” Q Developer not only saves me a trip to the documentation, but it tailors the suggestion to my current position so I do not have to read unnecessary instructions. I will follow Q Developer’s instructions to configure the two required environment variables as shown below.
You can see how chat is able to help keep me on task and in a state of flow. Next, I will show you how Q Developer can help you troubleshoot issues in the console.
Troubleshooting in the Lambda console
With the environment variables configured, I am ready to test my function. However, when I run a test, I get an error message as shown in the following image. Note the “Diagnose with Amazon Q” button. Q Developer noticed that I am having issues, and is offering to help.
If I select the “Diagnose with Amazon Q” button, Q Developer will analyze the error. In the example below, you can see that it has identified that “the Lambda function is unable to access an object in S3.” Of course! I never granted the Lambda function permission to access the Amazon Simple Storage Service (Amazon S3) bucket.
I could go back to the chat pane I used earlier and ask Q Developer how to add permissions. However, notice that it already provides set-by-step instructions to fix the issue. So, I don’t even need to use the chat. Once I fix the permissions, my function is working as expected. Q Developer has saved me time and made me much more productive.
Cleanup
If you have been following along and deployed a Lambda function, please remember to delete it.
Conclusion
The new AWS Lambda built-in editor experience greatly improves the Q Developer inline suggestion experience for Lamba. This new editor, combined with the existing chat and troubleshooting capabilities can significantly improve your productivity. To learn more read Getting started with Amazon Q Developer and Using Amazon Q Developer with AWS Lambda.
AWS Lambda is introducing a new code editing experience in the AWS console based on the popular Code-OSS, Visual Studio Code Open Source code editor. This brings the familiar Visual Studio Code interface and many of the features directly into the Lambda console, allowing developers to use their preferred coding environment and tools in the cloud. The Lambda Code Editor displays larger function package sizes and also integrates with Amazon Q Developer. This is an AI-powered coding assistant that provides real-time suggestions and insights to help you write, understand, and troubleshoot your Lambda functions more efficiently.
Overview
Visual Studio Code is the most popular IDE among developers according to the 2023 Stack Overflow Developer Survey. Integrating Code-OSS into the Lambda Console brings a familiar, accessible, and customizable interface to the in-browser code editing capabilities. This provides a coding experience that is substantially similar to working with function code locally. You can install selected extensions, apply preferred themes and settings, and use your familiar keyboard shortcuts and coding preferences.
The new editing experience is included as part of the standard Lambda service, at no extra cost.
Accessibility
The update also addresses important accessibility needs. With features like high color contrast, keyboard-only navigation, and screen reader support, the Code-OSS integration ensures an inclusive and accessible coding experience for all developers.
Differences from Visual Studio Code IDE
The Lambda console’s Code-OSS integration complements, rather than fully replaces, local development workflows. You can view and edit function code that uses an interpreted language, not compiled languages, which is consistent with the previous Lambda console. The terminal window is also unavailable in Code-OSS.
AWS Toolkit for Visual Studio Code extensions
Deeper integration with the AWS Toolkit for VS Code extension provides access to a subset of AWS specific functionality, including Q Developer. This ensures that the Lambda code editing experience benefits from additional developer tooling enhancements provided through the AWS Toolkit.
Larger package sizes
With Lambda, the total package size for ZIP-based functions, including code and libraries, cannot exceed 50 MB. Previously Lambda imposed a 3MB limit for editing code in the console. Now you are able to view function package sizes up to 50 MB in the console, however, there is still a single file limit of 3 MB. This allows you to view function code even when you have larger dependencies.
Using the new features
Viewing code
To experience the new Lambda Code Editor, log into the AWS Management Console and navigate to the Lambda service. Create a new function or edit an existing one. The new Lambda Code Editor is ready to use, with no additional setup required.
This example shows editing an existing function, viewing the function code in the familiar Code-OSS editor.
Viewing function code in the Lambda Code Editor
Previously, the code was not viewable as the code package size was greater than 3 MB. The update allows you to view larger files. The following image shows a package size of 13.3 MB and the Code-OSS editor allows editing of the function handler.
Viewing larger package size
Environment variables
In the left pane, the environment variables are viewable for the function. Select the pencil icon to edit, add, and remove environment variables.
Viewing and editing environment variables
Creating test events
The new split-screen view allows you to test your function and see your code and test results side-by-side, simplifying test event configuration.
Select Create test event to open the panel.
Creating test event
You can create Private test events or Shareable test events for other builders to use with access to the account.
Generate an event using an event template for the Amazon API Gateway HTTP API event trigger that the function uses. Save the test event.
Creating API Gateway test event
Invoke function
Invoke the function by selecting the Invoke button
The function results appear in the Output panel, consistent with the local VS Code IDE experience.
Function invoke result
The function logs appear below the output.
Viewing function logs
This view allows you to view and edit your code, generate and use test events, and invoke your function, all visible within the familiar Lambda Code Editor interface.
Live Tail Logs
Lambda now natively supports Amazon CloudWatchLogs Live Tail. This is an interactive log streaming and analytics capability, which allows you to view and analyze your Lambda function logs in real time.
Select the Run and Debug icon in the Activity Bar on the left-hand side of the code editor in the Code tab.
Select Open CloudWatch Live Tail. This opens the CloudWatch Logs Live Tail bottom drawer.
Select Start to start a Live Tail session and view your Lambda function logs stream in real time.
Alternatively, navigate to the Test tab and select CloudWatch Logs Live Tail to start a Live Tail session.
CloudWatch Logs Live Tail
Keyboard shortcuts
In the left pane Extensions dialog, you can see the keyboard shortcuts are installed by default.
Viewing installed extensions
Select the Manage gear icon which shows which aspects are configurable.
Viewing configuration options
The Keyboard shortcuts dialog allows you to view and change the shortcuts.
Amending keyboard shortcuts
Command Palette
Viewing the Command Palette shows available commands.
Viewing Command Palette
Configuration settings
The Settings panel allows you to configure the Lambda Code Editor to match your local IDE environment if required.
Viewing Settings panel
Navigate to Themes | Color Themes to customize the theme, including dark mode.
Lambda Console Editor dark mode
Downloading function code and template
It is now easier to download the function code and an AWS Serverless Application Model (AWS SAM) template which represents the Cloudformation resources required to set up the function, policies, and triggers. This allows you to start in the console and more easily move to using infrastructure as code, which is a serverless best practice.
Navigate to the Activity Bar Run and Debug section.
Select Download code and SAM template.
Extract the .zip file and open the folder in your local VS Code IDE.
You can continue to edit the function in your local IDE experience, which is consistent with the Lambda Console Editor.
Local VS Code IDE to continue working on function
Using your local IDE terminal or AWS Toolkit for VS Code, you can update the existing function. You can also use AWS SAM functionality to build and deploy the template as a Cloudformation stack to the cloud.
Using Amazon Q
The Amazon Q Developer AI assistant integrates directly into the code editor. This reduces the need to consult external documentation or tutorials, streamlining your development workflow.
Amazon Q provides inline suggestions or by using keyboard shortcuts for common actions you take, such as initiating Amazon Q or accepting a recommendation.
This example below adds more functionality to a new Lambda function to download an object from S3 with the help of Amazon Q. Enter a comment explaining the functionality you need.
Asking Amazon Q a question
Select tab to accept the suggestion.
Accepting an Amazon Q suggestion
You can continue to invoke Q manually to keep adding more code suggestions.
Continue adding functionality with Amazon Q
Conclusion
Lambda is introducing a new AWS console code editing experience based on the popular Code-OSS, Visual Studio Code Open Source code editor. This brings the familiar VS Code IDE interface and features directly into the Lambda console so you can use your preferred coding environment and tools in the cloud. Invoke your function using a new split-screen view to see your code and test results side-by-side, simplifying test event configuration.
The code editor displays larger function package sizes, makes environment variables more visible, and also integrates with Amazon Q Developer. This provides real-time suggestions and insights to help you write, understand, and troubleshoot your Lambda functions more efficiently.
For more serverless learning resources, visit Serverless Land.
Agentic workflows are quickly becoming a cornerstone of AI innovation, enabling intelligent systems to autonomously handle and refine complex tasks in a way that mirrors human problem-solving. Last week, we launched Serverless Agentic Workflows with Amazon Bedrock, a new short course developed in collaboration with Dr. Andrew Ng and DeepLearning.AI.
This hands-on course, taught by my colleague Mike Chambers, teaches how to build serverless agents that can handle complex tasks without the hassle of managing infrastructure. You will learn everything you need to know about integrating tools, automating workflows, and deploying responsible agents with built-in guardrails on Amazon Web Services (AWS) with Amazon Bedrock. The hands-on labs provided with the course let you apply your knowledge directly in an AWS environment, hosted by AWS Partner Vocareum. Find more information and enroll for free on the DeepLearning.AI course page.
Now, let’s turn our attention to other exciting news in the AWS universe from last week.
Last week’s launches Here are some launches that got my attention:
Amazon Transcribe now supports streaming transcription in 30 additional languages – Amazon Transcribe has expanded its support to include 30 additional languages, bringing the total number of supported languages to 54. This enhancement helps you reach a broader global audience and improves accessibility across various industries, including contact centers, broadcasting, and e-learning. The expanded language support allows for more efficient content moderation, improved agent productivity, and automatic subtitling for live events and meetings.
AWS Lambda console now surfaces key function insights and supports real-time log analytics – The AWS Lambda console now features a built-in Amazon CloudWatch Metrics Insights dashboard and supports CloudWatch Logs Live Tail, providing instant visibility into critical function metrics and real-time log streaming. You can now identify and troubleshoot errors or performance issues for your Lambda functions without leaving the console, as well as view and analyze logs in real time as they become available. You can reduce context switching and accelerate the development and troubleshooting processes for serverless applications. Check out the launch post for more details.
Amazon Bedrock Model Evaluation now supports evaluating custom model import models – You can now evaluate custom models you’ve imported to Amazon Bedrock using the model evaluation feature. This helps you to complete the full cycle of selecting, customizing, and evaluating models before deploying them. To evaluate an imported model, select the custom model from the list of models to evaluate in the model selector tool when creating an evaluation job.
Amazon Q in AWS Supply Chain – You can now use Amazon Q, an interactive AI assistant, to analyze your supply chain data in AWS Supply Chain and get insights to operate your supply chain more efficiently. Amazon Q can answer your supply chain questions by diving into your data. This reduces the time spent searching for information and streamlines finding answers to improve your supply chain operations.
Upcoming AWS events Check your calendars and sign up for these AWS events:
AWS GenAI Lofts – AWS GenAI Lofts are about more than just the tech, they bring together startups, developers, investors, and industry experts. Whether you’re looking to gain deep insights, or get your questions answered by generative AI pros, our GenAI Lofts have you covered and provide everything you need to start building your next innovation. Join events in London (through October 25), Seoul (October 30–November 6), São Paulo (through November 20), and Paris (through November 25).
AWS Community Days – Join community-led conferences that feature technical discussions, workshops, and hands-on labs led by expert AWS users and industry leaders from around the world: Malta (November 8), Chile (November 9), and Kochi, India (December 14).
AWS re:Invent – Registration is now open for the annual tech extravaganza, taking place December 2–6 in Las Vegas. At re:Invent 2024, you’ll get a front row seat to hear real stories from customers and AWS leaders about navigating pressing topics, such as generative AI. Learn about new product launches, watch demos, and get behind-the-scenes insights during five headline-making keynotes.
Practical improvement and optimization of software quality requires expert-level knowledge across various subjects. As such, in this blog we shall look at how Amazon Q Developer can help improve your development team productivity and application stability by enabling automation around code optimization by improving your code’s quality, performance, application infrastructure specifications.
The blog will also look at sample prompts that can be used to discover optimization options, control the scope of modifications, choose improvements and iterate through code changes. Being a generative AI–powered software development assistant that integrates with your integrated development environment (IDE), Amazon Q Developer supports in code explanation, code generation, and code improvements such as debugging and optimization. Amazon Q Developer can be configured for IDEs such as Visual Studio Code or Jet Brains IDEs, using AWS Identity and Access Management (IAM) Identity Center or AWS Builder ID.
To illustrate the optimization techniques, we will use the quant-trading sample application from the github aws-samples repo, to look at optimizations across the following domains – 1) Portability 2) Complexity 3) Code Performance 4) Infrastructure 5) Architecture and non-functionals 6) Running on AWS
Please note that as Amazon Q Developer continues to evolve, and due to the non-deterministic nature of Generative AI, the outputs you see when trying this yourself may differ from the examples shown in this blog post.
Amazon Q Developer can assess your code, provide recommendations, and generate an optimized version based on your prompts. A prompt is a natural language text that requests the generative AI to perform a specific task. Among areas you can optimize are portability and complexity.
Portability optimization
To assess portability of your code base, Let us use Portfolio Generator python code from quant-trading sample.
In the Integrated development environment (IDE), select the entire code in the file, open Amazon Q Chat and type your prompt: “Is the selected code portable?”
Amazon Q Developer will generate an assessment of portability of your code, as shown in Figure 1. Any specific improvements possible will also be specified.
Figure 1: Optimize code quality. Assessment and recommendations
Add code snippets directly to the prompt as context, for further response improvements by:
Right click on the IDE
choose “Send to Amazon Q”
Select “Send to Prompt”.
Now, the context includes the code, its portability assessment and recommendations for further improvements.
Ask – “Rewrite code for maximum portability”
However, such a generic prompt would likely result in numerous code modifications chosen by Amazon Q Developer, as shown in Figure 2. To achieve a more specific and higher quality output, in addition to enriched context, the prompt must be more precise and targeted.
Figure 2: Specific optimization – externalizing config.
Ask Amazon Q Developer to perform optimization addressing only hardcoded path values in a specific way.
“Rewrite this code to be more portable. Move hardcoded file paths into a separate JSON configuration file under the node “file-paths”. Leave the rest of the file unchanged.”
Amazon Q Developer will now rewrite a few lines of the code and externalized configuration into a JSON file, as shown in Figure 3.
Figure 3: Specific optimization – externalizing config.
Note: Dialogue with Amazon Q Developer can span several iterations, allowing you to analyze and narrow down to a very specific aspect of your code. This approach will appear in line with pair programming, iteratively collaborating on a better solution.
Continue iterating for optimizations per your code. Examples are – ask “Use YAML format for config.” or “Use path names in config similar to their original values.” or “Add error handling when working with files.”
Such an iterative approach will allow you to gradually apply modifications while preserving control over the scope of changes.
Complexity Optimization
Now let’s analyze and reduce the complexity of the write_portfolio method:
Ask either:
“Can the selected code be simplified?”
“How can I reduce complexity of the selected code?”
Drill down into a specific, scoped optimization.
“Simplify loops, conditions and variables of the selected code.”
Be specific about the kind of optimizations you want Amazon Q Developer to apply (see Figure 4). Example, ask direct prompts such as – “Replace portfolio dictionary with JSON.”
Figure 4: Simplify code example
Code Performance optimization
To improve code performance, we shall leverage Amazon Q Developer’s “Optimize” feature. It initiates a dialogue for code performance optimization via the right-click menu or key shortcut (see Figure 5).
Figure 5: IDE “built-in” feature for code improvement. Amazon Q -> Optimize
The selected code is sent to Amazon Q Developer, which then provides recommendations and generates optimized code.
Let’s now look at how we can use Amazon Q Developer to improve the calculate_weights method.
As shown in Figure 5, Amazon Q Developer explains step-by-step every optimization it suggests. You can further follow-up with a more precise prompt, targeting a specific optimization for a specific code block. For instance, “Optimize only selected method and only avoid unnecessary type conversions. Leave the rest of code unchanged.”
Figure 6: Follow-up with a more specific prompt for performance optimization
You can copy-paste newly generated code or insert it directly at the cursor by choosing “Insert code”.
To achieve even higher precision, include in your prompt what not to do or to avoid.
Infrastructure optimization
Amazon Q Developer also supports Infrastructure as Code (IaC) out of the box, providing expert advice and code generation for CloudFormation, CDK, and Terraform. This allows you to leverage code optimization techniques and patterns for your infrastructure.
As a demonstration, let’s improve portability of the CDK code in lambda.ts by introducing environment variables to inject configurations into the runtime.
To begin,
Start a new chat with a broad question – “Could you recommend techniques to inject system variables into a Lambda container function?” Amazon Q Developer will generally provide options to inject environment variables into an AWS Lambda function.
Send function code to the prompt and ask Amazon Q Developer. This generates the code for injecting environment variables through Lambda runtime by using prompt – “Could you add some deployment variables into the tradingStartStopFunction function?”
Figure 7: Optimizing infrastructure code by introducing environment variables in a Lambda function
Send the entire function to the prompt and ask the following in sequence.
“What are the architecture implications if I call this lambda function daily?”
“How do I optimize this function to be called daily.”
Then, follow up with –“How do I optimize this function to be called every 1 second.”
Figure 8: NFRs and business rules impact architecture enhancements
Compare Amazon Q’s outputs to see how each use case impacts the architectural recommendations, such as introducing caching, batch processing, queues, or concurrency mechanisms.
Following the techniques discussed earlier, you can dive in more specific implementations of suggested architecture enhancements. For example, ask “Implement a mechanism to execute only one instance of lambda function at any given moment of time. Implement cache for SSM Parameter store value, but not for Portfolio table.”
Optimize code to run on AWS
As a versatile developer assistant, Amazon Q Developer excels at helping you adhere to AWS best practices and recommendations.
Let’s examine if our sample – IntradayMomentum Lambda function handler can be improved.
Send the code to the Amazon Q Developer prompt and ask – “Is this lambda handler following AWS recommended best practices?”
Figure 9: Optimize code to run on AWS. AWS-recommended best practices for the Lambda handler
The analysis generated by Amazon Q Developer is based on AWS code, best practices and documentation. Not only does it suggest improvements, but also highlights what’s been done correctly, reinforcing best practices.
Following an iterative technique described earlier, continue asking Amazon Q developer for further recommendations with more specific prompts. For example – “Add exception handling to the code.”
Figure 10: Rewrite code with Best Practices in place. Adding Exception Handling.
Conclusion
In this blog post, we discussed approaches for code optimization with the help of Amazon Q Developer. We explored code optimization from various perspectives, such as code quality, performance, application infrastructure, following best practices, and enhancing architecture. We saw the importance of prompt engineering and context when optimizing code with Amazon Q Developer – a generative AI coding assistant. Starting with open, generic prompts helps build the necessary context and discover optimization options. In contrast, precise and specific follow-up prompts help define the scope of changes and incrementally generate optimized code.
It has never been easier for developers to have a development assistant and start improving code with the help of natural language dialogue, provided by Amazon Q.
About the authors
Roman Martynenko is a Senior Solutions Architect at Amazon Web Services with over 20 years of experience in Software Engineering, Architecture and Cloud technologies. Roman is helping Canadian public sector customers with their cloud journey. He focuses on next-generation developer experience, helping organizations re-imagine the entire Software Development Lifecycle. Outside of work, he enjoys hiking, home automation, and DIY projects.
Karthik Chemudupati is a Principal Technical Account Manager (TAM) with AWS, focused on helping customers achieve cost optimization and operational excellence. He has more than 20 years of IT experience in software engineering, cloud operations and automations. Karthik joined AWS in 2016 as a TAM and worked with more than dozen Enterprise Customers across US-West. Outside of work, he enjoys spending time with his family.
Shardul Vaidya is a Worldwide Partner Solutions Architect with AWS, focused on helping partners and customers build and effectively use Generative AI powered developer experiences. Shardul joined AWS in 2020 as part of their early career talent Solutions Architect team and worked with over a hundred modernization and DevOps partners across the world. Outside of work, he’s a music lover and collects records.
Today, we are announcing the general availability (GA) of AWS Console-to-Code that makes it easy to convert AWS console actions to reusable code. You can use AWS Console-to-Code to record your actions and workflows in the console, such as launching an Amazon Elastic Compute Cloud (Amazon EC2) instance, and review the AWS Command Line Interface (AWS CLI) commands for your console actions. With just a few clicks, Amazon Q can generate code for you using the infrastructure-as-code (IaC) format of your choice, including AWS CloudFormation template (YAML or JSON), and AWS Cloud Development Kit (AWS CDK) (TypeScript, Python or Java). This can be used as a starting point for infrastructure automation and further customized for your production workloads, included in pipelines, and more.
Since we announced the preview last year, AWS Console-to-Code has garnered positive response from customers. It has now been improved further in this GA version, because we have continued to work backwards from customer feedback.
Simplified experience – The new user experience makes it easier for customers to manage the prototyping, recording and code generation workflows.
Preview code – The launch wizards for EC2 instances and Auto Scaling groups have been updated to allow customers to generate code for these resources without actually creating them.
Advanced code generation – AWS CDK and CloudFormation code generation is powered by Amazon Q machine learning models.
Getting started with AWS Console-to-Code Let’s begin with a simple scenario of launching an Amazon EC2 instance. Start by accessing the Amazon EC2 console. Locate the AWS Console-to-Code widget on the right and choose Start recording to initiate the recording.
Now, launch an Amazon EC2 instance using the launch instance wizard in the Amazon EC2 console. After the instance is launched, choose Stop to complete the recording.
In the Recorded actions table, review the actions that were recorded. Use the Type dropdown list to filter by write actions (Write). Choose the RunInstances action. Select Copy CLI to copy the corresponding AWS CLI command.
This is the CLI command that I got from AWS Console-to-Code:
This command can be easily modified. For this example, I updated it to launch two instances (--count 2) of type t3.micro (--instance-type). This is a simplified example, but the same technique can be applied to other workflows.
I executed the command using AWS CloudShell and it worked as expected, launching two t3.micro EC2 instances:
The single-click CLI code generation experience is based on the API commands that were used when actions were executed (while launching the EC2 instance). Its interesting to note that the companion screen surfaces recorded actions as you complete them in console. And thanks to the interactive UI with start and stop functionality, its easy to clearly scope actions for prototyping.
IaC generation using AWS CDK AWS CDK is an open-source framework for defining cloud infrastructure in code and provisioning it through AWS CloudFormation. With AWS Console-to-Code, you can generate AWS CDK code (currently in Java, Python and TypeScript) for your infrastructure workflows.
Lets continue with the EC2 launch instance use case. If you haven’t done it already, in the Amazon EC2 console, locate the AWS Console-to-Code widget on the right, choose Start recording, and launch an EC2 instance. After the instance is launched, choose Stop to complete the recording and choose the RunInstances action from the Recorded actions table.
To generate AWS CDK Python code, choose the Generate CDK Python button from the dropdown list.
You can use the code as a starting point, customizing it to make it production-ready for your specific use case.
I already had the AWS CDK installed, so I created a new Python CDK project:
mkdir c2c_cdk_demo
cd c2c_cdk_demo
cdk init app --language python
Then, I plugged in the generated code in the Python CDK project. For this example, I refactored the code into a AWS CDK Stack, changed the EC2 instance type, and made other minor changes to ensure that the code was correct. I successfully deployed it using cdk deploy.
I was able to go from the console action to launch an EC2 instance and then all the way to AWS CDK to reproduce the same result.
You can also generate CloudFormation template in YAML or JSON format:
Preview code You can also directly access AWS Console-to-Code from Preview code feature in Amazon EC2 and Amazon EC2 Auto Scaling group launch experience. This means that you don’t have to actually create the resource in order to get the infrastructure code.
To try this out, follow the steps to create an Auto Scaling group using a launch template. However, instead of Create Auto Scaling group, click Preview code. You should now see the options to generate infrastructure code or copy the AWS CLI command.
Things to know Here are a few things you should consider while using AWS Console-to-Code:
Anyone can use AWS Console-to-Code to generate AWS CLI commands for their infrastructure workflows. The code generation feature for AWS CDK and CloudFormation formats has a free quota of 25 generations per month, after which you will need an Amazon Q Developer subscription.
It’s recommended that you test and verify the generated IaC code code before deployment.
At GA, AWS Console-to-Code only records actions in Amazon EC2, Amazon VPC and Amazon RDS consoles.
The Recorded actions table in AWS Console-to-Code only display actions taken during the current session within the specific browser tab, and it does not retain actions from previous sessions or other tabs. Note that refreshing the browser tab will result in the loss of all recorded actions.
Last Friday, I had the privilege of attending China Engineer’s Day 2024(CED 2024) in Hangzhou as the Amazon Web Services (AWS) speaker. The event was organized by the China Computer Federation (CCF), one of the most influential professional developer communities in China.
At CED 2024, I spoke about how AI development tools can improve developer productivity. I was honored to receive a certificate of excellence from CCF, and Amazon Q garnered significant attention from the attendees.
Now, let’s turn to other exciting news in the AWS universe from last week.
Last week’s launches Here are some launches that got my attention:
NICE DCV renames to Amazon DCV – NICE DCV is rebranded to Amazon DCV. This high performance remote display protocol allows secure delivery of remote desktops and application streaming from any cloud or data center to any device, even over varying network conditions. Amazon DCV supports both Windows and major Linux distributions on the server side. Clients can use native DCV client for Windows, Linux, or macOS, as well as web browsers, to receive desktops and application streamings. The DCV server and client only transfer encrypted pixels, not data, ensuring no confidential information is downloaded. When using Amazon DCV on AWS with Amazon Elastic Compute Cloud (Amazon EC2), you can take advantage of the AWS 108 Availability Zones across the 33 geographic Regions and 31 local zones. The 2024.0 release now supports the latest Ubuntu 24.04 LTS. For more details, check out Sébastien Stormacq’snew launch blog post.
AWS re:Post launches re:Post Agent – AWS re:Post provides access to curated knowledge and a vibrant community that helps users become even more successful on AWS. re:Post Agent is a generative AI assistant designed to provide rapid, intelligent responses to questions in the re:Post community. It expands the available AWS knowledge base, and community experts will earn reputation points by reviewing the AI-generated answers.
A new stop ingestion API of Amazon Bedrock Knowledge Bases – This new API allows users to halt ongoing ingestion jobs at will. Providing greater control over data ingestion workflows, users can quickly stop accidental or unwanted ingestion processes without waiting for completion. By using the new StopIngestionJob API, you can respond rapidly to evolving needs and potentially reduce costs. This capability is available across all AWS Regions where Amazon Bedrock Knowledge Bases are offered.
Higher storage limit of Amazon AppStream 2.0 – Amazon AppStream 2.0 has expanded the default size limit for application settings persistence from 1 GB to 5 GB. This increase allows end users to store more application data and settings without manual intervention and without affecting performance or session setup time.
There were over 40 launches and releases last week. It was difficult for me to select the important ones. In addition to those already mentioned, here’s a list of potentially important feature updates:
For a full list of AWS announcements, be sure to keep an eye on AWS’s What’s New Feed page.
Other AWS news Here are some other noteworthy items from last week.
Amazon WorkSpaces Thin Client – Amazon WorkSpaces Thin Client inventory is now available to purchase in the UK on Amazon Business, in addition to the US, France, Germany, Italy, and Spain. It’s a sleek, cost-effective device that brings secure access to AWS end user computing services right to your fingertips. This nifty gadget is like a digital fortress, preventing unauthorized data storage and applications, while giving IT admins the tools to manage and monitor their fleet of thin clients with ease.
Helping communities impacted by Hurricane Helene – AWS Disaster Response team is working closely with local partners and humanitarian organizations to deliver critical supplies to those in need in the Southeast. We’re also deploying AWS technology to help with re-connectivity, aid relief operations on the ground, and support food distribution needs in the region.
The life of a prescription at Amazon Pharmacy – Read the Amazon Pharmacy AI use case to remove the complexity of the process of dispensing medications and improve patients’ experiences. The system transcribes raw prescription data into standardized formats, transforms medical abbreviations into full-text equivalents, and validates medication details against an industry database. This automated process, followed by pharmacist review, has reduced potential medication errors by 50 percent and improved processing speed by up to 90 percent, allowing pharmacists to focus on critical tasks and personalized care.
A thought leadership article on generative AI in the WIRED magazine – Read Antje‘s news column in Wired. It discusses how AWS opens the transformative power of AI to organizations of any size and level of experience. I recommend it to all AI enthusiasts and business innovators. AWS is on a mission to bring generative AI magic to businesses of all sizes, offering a buffet of AI tools for tech wizards and newcomers alike. Whether you’re a startup with big dreams or a corporate giant looking to stay ahead, AWS is rolling out the red carpet to the AI revolution. Don’t miss this chance to turn your wildest tech fantasies into reality!
Upcoming AWS events Check your calendars and sign up for these AWS events:
AWS re:Invent 2024 – Registration is now open for the annual tech extravaganza, taking place December 2 – 6 in Las Vegas. I’m eager to learn about the new launches and excited to contribute to two chalk talks focusing on security topics (Dev311 – Enhance code security with generative AI and SEC228 – Navigate multi-level protection scheme compliance in AWS China Regions).
AWS Community Days – Join community-led conferences featuring technical discussions, workshops, and hands-on labs led by expert AWS users and industry leaders from around the world. Don’t miss out on the AWS Community Days happening on October 12 in Sofia and October 19 in Vadodara, Spain, and Guatemala.
Generative AI is leading to many new features and capabilities. As a result, your employees may not know about all the new tools you are deploying. I was recently working with a customer that had deployed Amazon Q Developer for all their software developers. However, many developers didn’t know they had access to the productivity companion. In this post, I will show you how to retrieve the list of users that have not yet activated their subscription, so you can reach out to them individually and remind them of the value using a tool like Q can bring to their daily work.
Amazon Q recently launched a feature that provides administrators more details about user subscriptions and usage. This capability provides insight into which users are adopting the service, their subscription status (e.g., active, pending, under free trial, canceled), and their corresponding associations. To get started, I will navigate to the Amazon Q console.
Note: I am navigating to the Amazon Q console, rather than Amazon Q Developer console. The Amazon Q console is used to manage subscriptions for both Amazon Q Business and Amazon Q Developer. The Amazon Q Developer console is used to configure features unique to Q Developer, such as customizations.
Once in the Amazon Q console, I select Subscriptions from the navigation options on the left. Then I select the Users tab. This view lists all the users that have access to Amazon Q. In the following example, I am viewing the organization instance. Therefore, the report includes users from all the accounts in my organization. Notice that the subscription status column tells me if a user is active, pending, or canceled. A pending user is one that has been invited, but has not yet activated a subscription. A user is active if they have configured the Amazon Q Developer extension or plugin in their integrated development environment (IDE).
While I could filter the view using the search box, I prefer to click the Download the total users report button. This creates a comma-separated value (CSV) file that I will use in a mail merge. With the CSV file downloaded, I next create an email template used to send an email to all the pending users. Of course, I’ll use Generative AI to write the email. Amazon Q Business helped me create the following template that articulates the value proposition and includes a link to the Amazon Q Developer documentation to help the developer get started. You might prefer to include links to your internal wiki rather than the public documentation.
Subject: Activate Your Amazon Q Developer Subscription Today!
Dear Developer,
We hope this email finds you well. We noticed that you have an Amazon Q Developer subscription that hasn’t been activated yet. We wanted to remind you about this powerful tool and encourage you to start using it today!
Why Use Amazon Q Developer? Amazon Q Developer offers numerous benefits to streamline your development process:
AI-Powered Coding Assistance: Get real-time code suggestions and completions.
Intelligent Code Reviews: Receive automated feedback on your code quality and security.
Natural Language Query: Ask questions about your codebase in plain English.
Seamless Integration: Works with popular IDEs and the command line.
Don’t miss out on the opportunity to enhance your development workflow and increase your productivity. Activate your Amazon Q Developer subscription today and experience the future of AI-assisted coding!
If you have any questions or need assistance, please don’t hesitate to reach out to our support team at <insert email address>.
Happy coding!
Best regards, The Cloud Center of Excellence Team
Now, I can run a simple mail merge to inform users that they have access to an Amazon Q Developer subscription. Before I close, I want to note that this post only briefly describes the reporting available in Amazon Q Developer. If you would like to learn more, you can read about the developer dashboard, Amazon CloudWatch Metrics and AWS CloudTrail telemetry events provided by Amazon Q Developer.
Conclusion
Your employees may not know about all the new tools you are deploying. Amazon Q gives you the power you to discover which users have activated their subscription. In this post, I showed you how to download the list of users who are not actively using the productivity tool, so you can contact the users to increase subscription activation. To learn how to activate Amazon Q Developer for your developers, read managing subscriptions in the user guide.
In this blog, we will explore how Amazon Q Developer Agent for code transformation accelerates Java application upgrades. We will examine the benefits of this Generative AI-powered agent and outline strategies to achieve maximal acceleration, drawing from real-world success stories and best practices.
Benefits of using Amazon Q Developer to upgrade your applications
Amazon Q Developer addresses a critical challenge for organizations managing numerous Java applications, particularly as they face the approaching end of Long-Term-Support (LTS) for older Java versions. Upgrading to Java 17 enhances security, resolves vulnerabilities, and improves performance while ensuring long-term compatibility and access to modern features. Currently, Q Developer agent for code transformation supports upgrades from Java 8 and 11 to Java 17. Software developers can utilize Q Developer within their IDE (VS Code and JetBrains) to transform both single-module and multi-module applications. Q Developer will generate a plan that identifies necessary library upgrades and replacements for deprecated code in the application, proposing code changes with the goal of ensuring the transformed code compiles successfully in Java 17. Q Developer can significantly enhance the efficiency of your migration workflow, performing code transformations on applications in hours rather than weeks.
Customer success of using Q Developer to modernize legacy Java applications
Customers have used Q Developer to upgrade their Java applications successfully. Here is how two customers as well as Amazon internal teams use Q Developer to accelerate the migration process.
A large insurance company in North America strategically approached their Java upgrade initiative by identifying applications with dependencies that Q Developer could upgrade effectively. They focused on applications that rely on frameworks like Spring Boot, which can be time-consuming to upgrade manually. After leveraging Q Developer to transform 4 applications in pilot, they estimated a 36% acceleration in their upgrade process, indicating that Q Developer automatically completed over a third of the work that would have been required manually. While the remaining portion still necessitated manual intervention to ensure the code would build and run correctly, the effort acceleration was significant.
A major financial services firm’s experience with Q Developer proved equally compelling. In a focused two-day workshop, 20 developers successfully transformed 20 applications in production using the Amazon Q Developer agent. This results in 42% time savings using Q Developer compared to manual upgrade, saving on average 24 hours per application. They spent about 3 weeks to prepare for the transformation workshop. They identified first-party (1P) dependencies—internal libraries that other production applications rely on. Q developer does not guarantee upgrade of 1P dependencies. With a combination of Q Developer and manual work, the customer upgraded many of these common 1P dependencies leading up to the workshop. This step was crucial to gain maximum acceleration while using Q Developer for the upgrades.
Amazon uses Q Developer internally to upgrade Java applications following company-wide campaigns. The central team who owns the campaigns provides detailed guidance on which Java applications can be upgraded with Q developer most effectively. This team also manages Amazon’s internal build system and provides tooling to automate part of the manual efforts. They are able to achieve significant savings. Amazon was able to upgrade more than 50% of production applications in six months, 79% of the auto-generated code reviews were applied without additional changes.
Use Q Developer to upgrade your applications
To ensure that Q Developer is properly applied to the specific characteristics of their codebases, customers create and follow a transformation approach. Teams and individuals who understand the scope of the upgrade run campaigns across the company to effectively utilize Q Developer. To maximize the acceleration from Q Developer, these teams classify the applications which need to be upgraded, identify which ones can be upgraded using Q Developer, estimate the manual effort required, which provides a baseline to measure the value added by Q Developer agent for code transformation. The preparation phase is crucial before starting the execution phase of the upgrade. Each of the steps in the preparation phase plays an important role in maximizing the acceleration of Amazon Q in their upgrade processes.
Classifying the applications to upgrade: Q Developer supports the upgrade of 30 most common Java libraries. Q Developer’s performance on less common and internal libraries is lower compared to the common libraries. In this case, you can use a combination of Q Developer and manual steps. It’s recommended to include both production applications and internal dependencies in this step. You should also classify your applications and internal libraries based on if/how they are used by other applications, it will help prioritize the applications to upgrade first in campaigns. Classifying applications by libraries used can help you identify the best upgrade approach using Q Developer.
Defining baselines of efficiency: To measure the efficiency of the upgrade effort in your organization, it is crucial to establish baselines. Based on the classification of applications, use Q Developer in a pilot for each class to see which libraries are transformed correctly, and which ones have to be done manually. This helps you operationalize the process of using Q Developer and the manual steps required, and understand how this procedure accelerates the upgrade of a certain class of applications. Some customers use manual effort hours for each upgrade on dependency versions and deprecated code as baseline and compare the manual effort hours with time taken when completing the upgrade using Q Developer. For example, you can classify the applications based on the main frameworks used before upgrading applications using Q Developer. Compare the time taken by Q Developer with manual upgrade hours to understand which applications can be upgraded by Q Developer most effectively.
Identifying applications for migration: Decide which applications to use Q Developer for, and prioritize the applications to upgrade in waves based on expected acceleration and business value. You can prioritize the applications which are most used by other applications and upgrade them in the initial campaign, then upgrade the rest of the applications in the subsequent campaigns. By addressing the foundational components first, the overall upgrade process will be streamlined. In Amazon, a centralized internal team defines migration waves and identifies which packages would be included in the upgrade campaign. Additionally, this team conducted analysis of the apps to determine the likelihood of the upgrade being successful using Q developer, and provides an estimate of the remaining engineering effort needed to complete the upgrade. The team will use this information to select applications and uses an Amazon-internal tool to assign the upgrade tasks to the team owning the applications. While SDEs were free to run the upgrade on their own, following the campaign with a set deadline mobilized the application owner teams to complete the upgrade.
Use Q Developer to automate upgrade tasks
Once the preparation phase is completed, you can start the execution phase. Software developers can use Q Developer to accelerate many of the steps in execution phase.
Assessing the components of an application to upgrade. You can use Q Developer to start a transformation, at the beginning of the transformation, there will be a transformation plan generated for you to view which dependencies and deprecated code will be upgraded.
Research and update dependency versions compatible to the target version. Q Developer will analyze your app and attempt to update the dependencies to the versions compatible with target Java version and in some cases the latest version.
Replace deprecated methods and API calls which are not compatible to the target version. Q Developer will detect the deprecated code and attempt to update to what’s recommended in the compatible Java version.
Reviewing the modified code and address any conflicts or issues that may arise. Q Developer will return code changes to you at the end of the transformation. If the transformation is successful, the app will compile in Java 17. If the transformation is partially successful, Q Developer was able to upgrade library versions and make code changes but could not compile the transformed app successfully in Java 17. Check out this part of our documentation on how to handle partial transformations.
Test the upgraded application thoroughly to ensure correct functionality. Q Developer will run the unit tests and integration tests in your app when compiling in the target version.
Conclusion
As organizations face the pressing need to modernize their Java applications, Amazon Q Developer emerges as a powerful ally in this complex journey. The customer success stories demonstrate the tangible benefits of leveraging AI-assisted code transformation: significant time savings, reduced manual effort, and accelerated upgrade processes.
Q Developer not only addresses the technical challenges of Java upgrades, but also enables organizations to approach these initiatives strategically. By classifying applications, establishing baselines, and prioritizing upgrades, teams can maximize the efficiency of their modernization efforts. While Q Developer streamlines much of the upgrade process, it is important to note that some challenges may still arise. For a comprehensive understanding of potential challenges and detailed guidance on getting started with Q Developer, we encourage you to explore our public documentation.
The journey to Java 17 and beyond doesn’t have to be daunting. With Amazon Q Developer, you have a powerful tool at your disposal to accelerate your upgrade process, reduce costs, and ensure your applications remain secure, performant, and future-ready.
Take the first step towards modernizing your Java ecosystem today. Explore Amazon Q Developer and discover how it can transform your upgrade strategy. See Getting Started with Amazon Q Developer agent for code transformation for a how-to guide on using Q Developer to transform Java applications.
As organizations increasingly adopt Amazon Q Developer, understanding how developers use it is essential. Diving into specific telemetry events and user-level data clarifies how users interact with Amazon Q Developer, offering insights into feature usage and developer behaviors. This granular view, accessible through logs, is vital for identifying trends, optimizing performance, and enhancing the overall developer experience. This blog is intended to give visibility to key telemetry events logged by Amazon Q Developer and how to explore this data to gain insights.
To help you get started, the following sections will walk through several practical examples that showcase how to extract meaningful insights from AWS CloudTrail. By reviewing the logs, organizations can track usage patterns, identify top users, and empower them to train and mentor other developers, ultimately fostering broader adoption and engagement across teams.
Although the examples here focus on Amazon Athena for querying logs, the methods can be adapted to integrate with other tools like Splunk or Datadog for further analysis. Through this exploration, readers will learn how to query the log data to understand better how Amazon Q Developer is used within your organization.
Solution Overview
This solution leverages Amazon Q Developer’s logs from the Integrated Development Environment (IDE) and terminal, captured in AWS CloudTrail. The logs will be queried directly using Amazon Athena from Amazon Simple Storage Service (Amazon S3) to analyze feature usage, such as in-line code suggestions, chat interactions, and security scanning events.
Analyzing Telemetry Events in Amazon Q Developer
Amazon Athena is used to query the CloudTrail logs directly to analyze this data. By utilizing Athena, queries can be run on existing CloudTrail records, making it simple to extract insights from the data in its current format.
Ensuring CloudTrail is set up to log the data events.
Navigate to the AWS CloudTrail Console.
Edit an Existing Trail:
If you have a trail, verify it is configured to log data events for Amazon CodeWhisperer.
Note: As of 4/30/24, CodeWhisperer has been renamed to Amazon Q Developer. All the functionality previously provided by CodeWhisperer is now part of Amazon Q Developer. However, for consistency, the original API names have been retained.
Click on your existing trail in CloudTrail. Find the Data Events section and click edit.
For CodeWhisperer:
Data event type: CodeWhisperer
Log selector template: Log all events
Save your changes.
Note your “Trail log location.” This S3 bucket will be used in our Athena setup.
If you don’t have an existing trail, follow the instructions in the AWS CloudTrail User Guide to set up a new trail.
Below is a screenshot of the data events addition:
Steps to Create an Athena Table from CloudTrail Logs: This step aims to turn CloudTrail events into a queryable Athena table.
1. Navigate to the AWS Management Console > Athena > Editor.
2. Click on the plus to create a query tab.
3. Run the following query to create a database and table. Note to update the location to your S3 bucket.
-- Step 1: Create a new database (if it doesn't exist)
CREATE DATABASE IF NOT EXISTS amazon_q_metrics;

-- Step 2: Create the external table explicitly within the new database
CREATE EXTERNAL TABLE amazon_q_metrics.cloudtrail_logs (

    userIdentity STRUCT<
        accountId: STRING,
        onBehalfOf: STRUCT<
            userId: STRING,
            identityStoreArn: STRING
        >
    >,
    eventTime STRING,
    eventSource STRING,
    eventName STRING,
    requestParameters STRING,
    requestId STRING,
    eventId STRING,
    resources ARRAY<STRUCT<
        arn: STRING,
        accountId: STRING,
        type: STRING
    >>,
    recipientAccountId STRING

)
ROW FORMAT SERDE 'org.apache.hive.hcatalog.data.JsonSerDe'
STORED AS INPUTFORMAT 'com.amazon.emr.cloudtrail.CloudTrailInputFormat'
OUTPUTFORMAT 'org.apache.hadoop.hive.ql.io.HiveIgnoreKeyTextOutputFormat'
LOCATION 's3://{Insert Bucket Name from CloudTrail}/'
TBLPROPERTIES ('classification'='cloudtrail');
4. Click Run
5. Run a quick query to view the data.
SELECT
    eventTime,
    userIdentity.onBehalfOf.userId AS user_id,
    eventName,
    requestParameters
FROM
    amazon_q_metrics.cloudtrail_logs AS logs
WHERE
    eventName = 'SendTelemetryEvent'
LIMIT 10;
In this section, the significance of the telemetry events captured in the requestParameters field will be explained. The query begins by displaying key fields and their data, offering insights into how users interact with various features of Amazon Q Developer.
Query Breakdown:
eventTime: This field captures the time the event was recorded, providing insights into when specific user interactions took place.
userIdentity.onBehalfOf.userId: This extracts the userId of the user. This is critical for attributing interactions to the correct user, which will be covered in more detail later in the blog.
eventName: The query is filtered on SendTelemetryEvent. Telemetry events are triggered when the user interacts with particular features or when a developer uses the service.
requestParameters: The requestParameters field is crucial because it holds the details of the telemetry events. This field contains a rich set of information depending on the type of interaction and feature the developer uses, which programming languages are used, completion types, or code modifications.
In the context of the SendTelemetryEvent, various telemetry events are captured in the requestParameters field of CloudTrail logs. These events provide insights into user interactions, overall usage, and the effectiveness of Amazon Q Developer’s suggestions. Here are the key telemetry events along with their descriptions:
UserTriggerDecisionEvent
Description: This event is triggered when a user interacts with a suggestion made by Amazon Q Developer. It captures whether the suggestion was accepted or rejected, along with relevant metadata.
Key Fields:
completionType: Whether the completion was a block or a line.
suggestionState: Whether the user accepted, rejected, or discarded the suggestion.
programmingLanguage: The programming language associated with the suggestion.
generatedLine: The number of lines generated by the suggestion.
CodeScanEvent
Description: This event is logged when a code scan is performed. It helps track the scope and result of the scan, providing insights into security and code quality checks.
Key Fields:
codeAnalysisScope: Whether the scan was performed at the file level or the project level.
programmingLanguage: The language being scanned.
CodeScanRemediationsEvent
Description: This event captures user interactions with Amazon Q Developer’s remediation suggestions, such as applying fixes or viewing issue details.
Key Fields:
CodeScanRemediationsEventType: The type of remediation action taken (e.g., viewing details or applying a fix).
includesFix: A boolean indicating whether the user applied a fix.
ChatAddMessageEvent
Description: This event is triggered when a new message is added to an ongoing chat conversation. It captures the user’s intent which refers to the purpose or goal the user is trying to achieve with the chat message. The intent can include various actions, such as suggesting alternate implementations of the code, applying common best practices, improving the quality or performance of the code.
Key Fields:
conversationId: The unique identifier for the conversation.
messageId: The unique identifier for the chat message.
userIntent: The user’s intent, such as improving code or explaining code.
programmingLanguage: The language related to the chat message.
ChatInteractWithMessageEvent
Description: This event captures when users interact with chat messages, such as copying code snippets, clicking links, or hovering over references.
Key Fields:
interactionType: The type of interaction (e.g., copy, hover, click).
interactionTarget: The target of the interaction (e.g., a code snippet or a link).
acceptedCharacterCount: The number of characters from the message that were accepted.
acceptedSnippetHasReference: A boolean indicating if the accepted snippet included a reference.
TerminalUserInteractionEvent
Description: This event logs user interactions with terminal commands or completions in the terminal environment.
Key Fields:
terminalUserInteractionEventType: The type of interaction (e.g., terminal translation or code completion).
isCompletionAccepted: A boolean indicating whether the completion was accepted by the user.
terminal: The terminal environment in which the interaction occurred.
shell: The shell used for the interaction (e.g., Bash, Zsh).
Telemetry events are key to understanding how users engage with Amazon Q Developer. They track interactions such as code completion, security scans, and chat-based suggestions. Analyzing the data in the requestParameters field helps reveal usage patterns and behaviors that offer valuable insights.
By exploring events such as UserTriggerDecisionEvent, ChatAddMessageEvent, TerminalUserInteractionEvent, and others in the schema, organizations can assess the effectiveness of Amazon Q Developer and identify areas for improvement.
Example Queries for Analyzing Developer Engagement
To gain deeper insights into how developers interact with Amazon Q Developer, the following queries can help analyze key telemetry data from CloudTrail logs. These queries track in-line code suggestions, chat interactions, and code-scanning activities. By running these queries, you can uncover valuable metrics such as the frequency of accepted suggestions, the types of chat interactions, and the programming languages most frequently scanned. This analysis helps paint a clear picture of developer engagement and usage patterns, guiding efforts to enhance productivity.
These four examples only cover a sample set of the available telemetry events, but they serve as a starting point for further exploration of Amazon Q Developer’s capabilities.
SELECT
    eventTime,
    userIdentity.onBehalfOf.userId AS user_id,
    eventName,
    json_extract_scalar(requestParameters, '$.telemetryEvent.userTriggerDecisionEvent.suggestionState') AS suggestionState,
    json_extract_scalar(requestParameters, '$.telemetryEvent.userTriggerDecisionEvent.completionType') AS completionType
FROM
    amazon_q_metrics.cloudtrail_logs
WHERE
    eventName = 'SendTelemetryEvent'
    AND json_extract(requestParameters, '$.telemetryEvent.userTriggerDecisionEvent') IS NOT NULL
    AND json_extract_scalar(requestParameters, '$.telemetryEvent.userTriggerDecisionEvent.suggestionState') = 'ACCEPT';
Use Case:This use case focuses on how developers interact with in-line code suggestions by analyzing accepted snippets. It helps identify which users are accepting suggestions, the type of snippets being accepted (blocks or lines), and the programming languages involved. Understanding these patterns can reveal how well Amazon Q Developer aligns with the developers’ expectations.
Query Explanation: The query retrieves the event time, user ID, event name, suggestion state (filtered to show only ACCEPT), and completion type. TotalGeneratedLinesBlockAccept and totalGeneratedLinesLineAccept or discarded suggestions are not included, but this gives an idea of the developers using the service for in-line code suggestions and the lines or blocks they have accepted. Additionally, the programming language field can be extracted to see which languages are used during these interactions.
Query 2: Analyzing Chat Interactions
SELECT
    userIdentity.onBehalfOf.userId AS userId,
    json_extract_scalar(requestParameters, '$.telemetryEvent.chatInteractWithMessageEvent.interactionType') AS interactionType,
    COUNT(*) AS eventCount
FROM
    amazon_q_metrics.cloudtrail_logs
WHERE
    eventName = 'SendTelemetryEvent'
    AND json_extract(requestParameters, '$.telemetryEvent.chatInteractWithMessageEvent') IS NOT NULL
GROUP BY
    userIdentity.onBehalfOf.userId,
    json_extract_scalar(requestParameters, '$.telemetryEvent.chatInteractWithMessageEvent.interactionType')
ORDER BY
    eventCount DESC;
Use Case: This use case looks at how developers use chat options like upvoting, downvoting, and copying code snippets. Understanding the chat usage patterns shows which interactions are most used and how developers engage with Amazon Q Developer chat. As an organization, this insight can help support other developers in successfully leveraging this feature.
Query Explanation: The query provides insights into chat interactions within Amazon Q Developer by retrieving user IDs, interaction types, and event counts. This query aggregates data based on the interactionType field within chatInteractWithMessageEvent, showcasing various user actions such as UPVOTE, DOWNVOTE, INSERT_AT_CURSOR, COPY_SNIPPET, COPY, CLICK_LINK, CLICK_BODY_LINK, CLICK_FOLLOW_UP, and HOVER_REFERENCE.
This analysis highlights how users engage with the chat feature and the interactions, offering a view of interaction patterns. By focusing on the interactionType field, you can better understand how developers interact with the chat feature of Amazon Q Developer.
Query 3: Analyzing Code Scanning Jobs Across Programming Languages
SELECT
    userIdentity.onBehalfOf.userId AS userId,
    json_extract_scalar(requestParameters, '$.telemetryEvent.codeScanEvent.programmingLanguage.languageName') AS programmingLanguage,
    COUNT(json_extract_scalar(requestParameters, '$.telemetryEvent.codeScanEvent.codeScanJobId')) AS jobCount
FROM
    amazon_q_metrics.cloudtrail_logs
WHERE
    eventName = 'SendTelemetryEvent'
    AND json_extract(requestParameters, '$.telemetryEvent.codeScanEvent') IS NOT NULL
GROUP BY
    userIdentity.onBehalfOf.userId,
    json_extract_scalar(requestParameters, '$.telemetryEvent.codeScanEvent.programmingLanguage.languageName')
ORDER BY
    jobCount DESC;
Use Case: Amazon Q Developer includes security scanning, and this section helps determine how the security scanning feature is being used across different users and programming languages within the organization. Understanding these trends provides valuable insights into which users actively perform security scans and the specific languages targeted for these scans.
Query Explanation: The query provides insights into the distribution of code scanning jobs across different programming languages in Amazon Q Developer. It retrieves user IDs and the count of code-scanning jobs by programming language. This analysis focuses on the CodeScanEvent, aggregating data to show the total number of jobs executed per language.
By summing up the number of code scanning jobs per programming language, this query helps to understand which languages are most frequently analyzed. It provides a view of how users are leveraging the code-scanning feature. This can be useful for identifying trends in language usage and optimizing code-scanning practices.
Query 4: Analyzing User Activity across features.
SELECT
    userIdentity.onBehalfOf.userId AS user_id,
    COUNT(DISTINCT CASE
        WHEN json_extract(requestParameters, '$.telemetryEvent.userTriggerDecisionEvent') IS NOT NULL
        THEN eventId END) AS inline_suggestions_count,
    COUNT(DISTINCT CASE
        WHEN json_extract(requestParameters, '$.telemetryEvent.chatInteractWithMessageEvent') IS NOT NULL
        THEN eventId END) AS chat_interactions_count,
    COUNT(DISTINCT CASE
        WHEN json_extract(requestParameters, '$.telemetryEvent.codeScanEvent') IS NOT NULL
        THEN eventId END) AS security_scans_count,
    COUNT(DISTINCT CASE
        WHEN json_extract(requestParameters, '$.telemetryEvent.terminalUserInteractionEvent') IS NOT NULL
        THEN eventId END) AS terminal_interactions_count
FROM
    amazon_q_metrics.cloudtrail_logs
WHERE
    eventName = 'SendTelemetryEvent'
GROUP BY
    userIdentity.onBehalfOf.userId
Use Case:This use case looks at how developers use Amazon Q Developer across different features: in-line code suggestions, chat interactions, security scans, and terminal interactions. By tracking usage, organizations can see overall engagement and identify areas where developers may need more support or training. This helps optimize the use of Amazon Q Developer and helps teams get the most out of the tool.
Query Explanation: Let’s take the other events from the prior queries and additional events to get more detail overall and tie it all together. This expanded query provides a comprehensive view of user activity within Amazon Q Developer by tracking the number of in-line code suggestions, chat interactions, security scans, and terminal interactions performed by each user. By analyzing these events, organizations can gain a better understanding of how developers are using these key features.
By summing up the interactions for each feature, this query helps identify which users are most active in each category, offering insights into usage patterns and areas where additional training or support may be needed.
Enhancing Metrics with Display Names and Usernames
The previous queries had userid as a field; however, many customers would prefer to see a user alias (such as username or display name). The following section illustrates enhancing these metrics by augmenting user IDs with display names and usernames from the AWS IAM Identity Center. This will provide more human-readable user names.
In this example, the export is run locally to enhance user metrics with IAM Identity Center for simplicity. This method works well for demonstrating how to access and work with the data, but it provides a static snapshot of the users at the time of export. In a production environment, an automated solution would be preferable to capture newly added users continuously. For the purposes of this blog, this straightforward approach is used to focus on data access.
To proceed, install Python 3.8+ and Boto3, and configure AWS credentials via the CLI. Then, run the following Python script locally to export the data:
import boto3, csv
# replace this with the region of your IDC instance
RegionName='us-east-1'
# client creation
idstoreclient = boto3.client('identitystore', RegionName)
ssoadminclient = boto3.client('sso-admin', RegionName)

Instances= (ssoadminclient.list_instances()).get('Instances')
InstanceARN=Instances[0].get('InstanceArn')
IdentityStoreId=Instances[0].get('IdentityStoreId')

# query
UserDigestList = []
ListUserResponse = idstoreclient.list_users(IdentityStoreId=IdentityStoreId)
UserDigestList.extend([[user['DisplayName'], user['UserName'], user['UserId']] for user in ListUserResponse['Users']])
NextToken = None
if 'NextToken' in ListUserResponse.keys(): NextToken = ListUserResponse['NextToken']
while NextToken is not None:
    ListUserResponse = idstoreclient.list_users(IdentityStoreId=IdentityStoreId, NextToken=NextToken)
    UserDigestList.extend([[user['DisplayName'], user['UserName'], user['UserId']] for user in ListUserResponse['Users']])
    if 'NextToken' in ListUserResponse.keys(): NextToken = ListUserResponse['NextToken']
    else: NextToken = None

# write the query results to IDCUserInfo.csv
with open('IDCUserInfo.csv', 'w') as CSVFile:
    CSVWriter = csv.writer(CSVFile, quoting=csv.QUOTE_ALL)
    HeaderRow = ['DisplayName', 'UserName', 'UserId']
    CSVWriter.writerow(HeaderRow)
    for UserRow in UserDigestList:
        CSVWriter.writerow(UserRow)
This script will query the IAM Identity Center for all users and write the results to a CSV file, including DisplayName, UserName, and UserId. After generating the CSV file, upload it to an S3 bucket. Please make note of this S3 location.
Steps to Create an Athena Table from the above CSV output: Create a table in Athena to join the existing table with the user details.
1. Navigate to the AWS Management Console > Athena > Editor.
2. Click on the plus to create a query tab.
3. Run the following query to create our table. Note to update the location to your S3 bucket.
CREATE EXTERNAL TABLE amazon_q_metrics.user_data (
    DisplayName STRING,
    UserName STRING,
    UserId STRING
)
ROW FORMAT SERDE 'org.apache.hadoop.hive.serde2.OpenCSVSerde'
WITH SERDEPROPERTIES (
   'separatorChar' = ',',
   'quoteChar'     = '"'
)
STORED AS TEXTFILE
LOCATION 's3://{Update to your S3 object location}/'  -- Path containing CSV file
TBLPROPERTIES ('skip.header.line.count'='1');
4. Click Run
5. Now, let’s run a quick query to verify the data in the new table.
SELECT * FROM amazon_q_metrics.user_data limit 10;
The first query creates an external table in Athena from user data stored in a CSV file in S3. The user_data table has three fields: DisplayName, UserName, and UserId. To specify the correct parsing of the CSV, separatorChar is specified as a comma and quoteChar as a double quote. Additionally, the TBLPROPERTIES (‘skip.header.line.count’=’1’) flag skips the header row in the CSV file, ensuring that column names aren’t treated as data.
The user_data table holds key details: DisplayName (full name), UserName (username), and UserId (unique identifier). This table will be joined with the cloudtrail_q_metrics table using the userId field from the onBehalfOf struct, enriching the interaction logs with human-readable user names and display names instead of user IDs.
In the previous analysis of in-line code suggestions, the focus was on retrieving key metrics related to user interactions with Amazon Q Developer. The query below follows a similar structure but now includes a join with the user_data table to enrich insights with additional user details such as DisplayName and Username.
To include a join with the user_data table in the query, it is necessary to define a shared key between the cloudtrail_logs_amazon_q and user_data tables. For this example, user_id will be used.
SELECT
    logs.eventTime,
    user_data.displayname,  -- Additional field from user_data table
    user_data.username,     -- Additional field from user_data table
    json_extract_scalar(logs.requestParameters, '$.telemetryEvent.userTriggerDecisionEvent.suggestionState') AS suggestionState,
    json_extract_scalar(logs.requestParameters, '$.telemetryEvent.userTriggerDecisionEvent.completionType') AS completionType
FROM
    amazon_q_metrics.cloudtrail_logs AS logs  -- Specified database for cloudtrail_logs
JOIN
    amazon_q_metrics.user_data  -- Specified database for user_data
ON
    logs.userIdentity.onBehalfOf.userId = user_data.userid
WHERE
    logs.eventName = 'SendTelemetryEvent'
    AND json_extract_scalar(logs.requestParameters, '$.telemetryEvent.userTriggerDecisionEvent.suggestionState') = 'ACCEPT';
This approach allows for a deeper analysis by integrating user-specific information with the telemetry data, helping you better understand how different user roles interact with the in-line suggestions and other features of Amazon Q Developer.
Cleanup
If you have been following along with this workflow, it is important to clean up the resources to avoid unnecessary charges. You can perform the cleanup by running the following query in the Amazon Athena console:
-- Step 1: Drop the tables
DROP TABLE IF EXISTS amazon_q_metrics.cloudtrail_logs;
DROP TABLE IF EXISTS amazon_q_metrics.user_data;

-- Step 2: Drop the database after the tables are removed
DROP DATABASE IF EXISTS amazon_q_metrics CASCADE;
This query removes both the cloudtrail_logs and user_data tables, followed by the amazon_q_metrics database.
Remove the S3 objects used to store the CloudTrail logs and user data by navigating to the S3 console, selecting the relevant buckets or objects, and choosing “Delete.”
If a new CloudTrail trail was created, consider deleting it to stop further logging. For instructions, see Deleting a Trail. If an existing trail was used, remove the CodeWhisperer data events to prevent continued logging of those events.
Conclusion
By tapping into Amazon Q Developer’s logging capabilities, organizations can unlock detailed insights that drive better decision-making and boost developer productivity. The ability to analyze user-level interactions provides a deeper understanding of how the service is used.
Now that you have these insights, the next step is leveraging them to drive improvements. For example, organizations can use this data to identify opportunities for Proof of Concepts (PoCs) and pilot programs that further demonstrate the value of Amazon Q Developer. By focusing on areas where engagement is high, you can support the most engaged developers as champions to advocate for the tool across the organization, driving broader adoption.
The true potential of these insights lies in the “art of the possible.” With the data provided, it is up to you to explore how to query or visualize it further. Whether you’re examining metrics for in-line code suggestions, interactions, or security scanning, this foundational analysis is just the beginning.
As Amazon Q Developer continues to evolve, staying updated with emerging telemetry events is crucial for maintaining visibility into the available metrics. You can do this by regularly visiting the official Amazon Q Developer documentation and the Amazon Q Developer’s Changelog to stay up-to-date latest information and insights.
By Priya Mallya, Managing Director – Accenture, Sandeep Singh Bhatia, Sr Manager – Accenture
Vikas Purohit – Sr. Solutions Architect – AWS
Being able to internally setup and manage flexible, efficient infrastructure can be painful. Manually authoring your Infrastructure as Code (IaC) templates is error prone and time consuming. However, adoption of generative AI coding tools is changing the way infrastructure engineers can carry out their day-to-day activities. Accenture utilizing Amazon Q Developer to create IaC templates for one of their US based customer became a game changer.
We will discuss how Accenture used Amazon Q Developer to boost the productivity of their infrastructure team. They were responsible for deploying an Amazon Web Services (AWS) Control Tower based landing zone, central networking and security, and centralized service deployment using AWS Service Catalog for a large US-based financial client.
The Challenge
Accenture was working with a US-based financial client that was not using AWS and approached Accenture to support a green field deployment. They wanted help with:
AWS best practices for a multi-account strategy
Centralized logging
Networking and security
Setting up a infrastructure catalog managed by a central team
Distributing the catalog of newly managed services to their lines of business (LOBs)
Team involved decided on Hashicorp’s Terraform as the IaC language for this project.
The customer’s critical business needs drove a short time frame for the project. The customer wanted to build their infrastructure right from the outset, but typically manually creating Terraform scripts can be time intensive. Implementing infrastructure as code (IaC) is considered a best practice, as manual “click-ops” are error prone.
Solution Overview
In order to achieve adherence to the best deployment practices using IaC, as well as meeting the customer’s delivery timelines, Accenture decided to explore Amazon Q Developer for reducing the time to write the Terraform IaC code files.
Amazon Q Developer helps developers and IT professionals (IT pros) with all of their tasks across the software development lifecycle—from coding, testing, and upgrading, to troubleshooting, performing security scanning and fixes, optimizing AWS resources, and creating data engineering pipelines. It can help Terraform practitioners to focus on creating an end-to-end workflow. Amazon Q Developer features an open-source reference tracker and built-in security scans that are available while writing IaC code using Terraform. In order to generate high-quality code suggestions, HashiCorp and the Amazon Q Developer team worked together to ensure the generated code recommendations met the requirements of the Terraform practitioners.
Accenture team created a PoC to evaluate the accuracy of the recommendations generated by Amazon Q Developer. Upon successful completion of the POCs that delivered good quality code in quick timeframe, and seeking approvals from the customer, the Accenture team started writing Terraform IaC artifacts using Amazon Q Developer.
Amazon Q Developer was used to generate Terraform IaC artifacts for more than 50 AWS services as part of the project including AWS Control Tower, central networking using AWS Transit Gateway, AWS Network Firewall and Amazon Route 53 hosted zones. AWS Service Catalog products were created to manage central cataloging and deployment of products and services approved by the customer’s IT team.
Benefits observed by Accenture:
Using Amazon Q Developer resulted in accelerating the time to write the Terraform code by 30%.
Generated Terraform code had an accuracy of close to 99%, avoiding frequent context switching to reference the HashiCorp site to get the correct resource definition.
Using Amazon Q Developer, the Accenture team had a conversational interface to have queries on AWS services quickly answered further speeding up the development process.
Accenture also used Amazon Q Developer to identify and fix potential errors and edge cases.
Best Practices followed during project:
Temporarily writing variables in the local file helped Amazon Q Developer access all necessary information in the local file
AWS recommends a ‘human in the loop approach’, where a team member checks the code after it’s been generated. This code review process is a best practice regardless of which person or system created the code. This way, there were able to quickly catch and fix issues in the few instances they arose.
Conclusion
Amazon Q Developer helps developers and IT professionals (IT pros) with all of their tasks—from coding, testing, and upgrading, to troubleshooting, performing security scanning and fixes, optimizing AWS resources, and creating data engineering pipelines. We highlighted how Accenture used Amazon Q Developer for generating coding recommendations for Terraform, HashiCorp’s IaC language, to increase productivity and reduce the time for writing complex Terraform codes.
You can start using Amazon Q Developer in your IDE today to automatically build entire application features, find and fix security vulnerabilities and more. Visit Amazon Q Developer to get started.
Accenture is an AWS Premier Tier Services Partner and MSP that provides end-to-end solutions to migrate to and manage operations on AWS. By working with the Accenture AWS Business Group (AABG), a strategic collaboration by Accenture and AWS, organizations can accelerate the pace of innovation to deliver disruptive products and services.
Amazon Q Developer is the most capable AI-powered assistant for software development that reimagines the experience across the entire software development lifecycle, making it easier and faster to build, secure, manage, and optimize applications on AWS. Using your natural language input and your project context, Amazon Q Developer’s agent for software development autonomously implements multi-file features, bug fixes, and unit tests in your integrated development environment (IDE) workspace. For example, you can ask Amazon Q Developer to add a new checkout feature to your e-commerce app, and it will analyze your existing codebase, map out the implementation plan spanning multiple files, and upon your approval, execute all the required code changes and tests in minutes. To get started building with the Q Developer agent, install the Amazon Q extension and use the /dev command inside the chat window.
Amazon Q Developer is constantly improving and redefining what the state-of-the-art is for software development agents. The Amazon Q Developer agent for software development was one of the first agents to publish their results on the industry-recognized SWE-bench benchmark leaderboard. This benchmark is designed to measure the ability to solve real-world coding problems a Python software developer would encounter. This newest update to the Amazon Q Developer agent for software development out-performs the previous version released in May, resolving 51% more tasks on the SWE-bench verified dataset and 43% more on the full dataset. In just a few months, the agent’s scores have increased from 25.6% tasks resolved to 38.8% on the verified dataset and from 13.82% to 19.75% on the full dataset, making it the top performing agent on the leaderboard for 4 weeks. In our June 2024 blogpost, we provided an overview explaining how our first submission of Amazon Q Developer was able to top the benchmarks. Since then, the SWE-bench submission process has begun to require the publication of agent trajectories — meaning, a log of the steps taken by an agent to solve a given problem. We welcome this transparency as a critical ingredient of developer trust, so we are proud to share the trajectories of our newest agent.
This video demonstrates the kind of tasks you can now accomplish with the Amazon Q Developer agent for software development. For example, you can refactor a Lambda function to improve clarity and scalability of an app in mere minutes. In the prompt we provide a few specific requirements to the agent: split the logic into multiple Lambdas, avoid duplication of functionality, keep permissions locked down, and update the infrastructure as code to support the change. The agent gets to work and keeps you updated in real time about what it is doing. Once it is done, you can review the code and merge it with a single click.
We have reinvented our agent to take advantage of the new capabilities offered by state-of-the-art AI models, incorporate developer feedback, and bring together the results of dozens of experiments, with proven results. SWE-bench offers a tangible way to share performance measurements, but it is only one component of the way we evaluate the Amazon Q Developer agent for software development. The best way to measure the capabilities of the agent is to test it out for yourself on the tasks that you care about. This blog post shows you how to use the new agent and provides an overview of how the technology behind our reinvented agent works.
Getting started with the Amazon Q Developer agent
To get started, you need to have an AWS Builder ID or be part of an organization with an AWS IAM Identity Center instance set up that allows you to use Amazon Q. To use Amazon Q Developer agent for software development in Visual Studio Code, start by installing the Amazon Q extension. The extension is also available for JetBrains, Visual Studio (in preview), and in the Command Line on macOS. Find the latest version on the Amazon Q Developer page.
After authenticating, you can invoke the feature development agent by entering /dev in the chat field.
Let’s say you are exploring the amazon-science/auto-rag-eval GitHub repository. This repository contains a method to automatically evaluate retrieval-augmented language models as described in this amazon.science blog. This method constructs multiple choice questions based on the documents contained in a RAG index. Each question has a single correct answer and multiple incorrect answers, or distractors. You notice that the number of distractors is hard coded to be 3. You would like it to be a parameter instead, so you ask the agent to make this change.
The agent starts exploring your code base and shares updates in real-time summarizing its state, the changes that it is making, and the files being used. The agent starts by exploring the code base.
After a few steps, the agent has identified the key chunks of code to modify and how to modify them.
The agent iterates on implementing its modifications until it succeeds. At that point, you can see that one file auto-rag-eval/ExamGenerator/distractors_generator.py has been changed.
Once it is done, the agent shows you a list of the files that it has modified, here distractors_generator.py. Clicking on the file name opens a diff view in your IDE.
You can review the modifications in each file and decide whether to accept them. If the generated code could be improved, you can provide this feedback to the agent and request that it regenerates it.
Getting the most out of the AI-powered software development agent
The Amazon Q Developer agent for software development works at its best when requests are aimed and precise. This does not mean that you have to write very long requests, “add unit tests to MyMethod” is clear. When the task is more ambiguous, for example, when you want the agent to resolve a bug in your code, it is helpful to include an error trace. When you want the agent to develop new features, explaining the context, being specific about desired behavior, specifying where the change should be made when known, or even relevant snippets of code or pseudo-code helps the agent focus to achieve the best results.
How the improved Amazon Q Developer agent for software development works
The agent is continuously updated and improved to give you better performance. During the past months the ability of foundation models to drive agentic workflows and leverage large sets of tools to accomplish complex tasks has improved significantly. Guided by customer feedback, we have redesigned our agent to take advantage of these new abilities. Our inspiration is the workflow of experienced developers getting to work on an unfamiliar code base.
When developers want to accomplish a task on an unfamiliar code base, they start by getting a bird’s-eye view of the repository to obtain a general understanding of the project. They then dive deeper into the parts that are relevant to their task. Developers frequently rely on visual IDEs such as VSCode or IntelliJ to explore repositories and implement changes. Although some LLMs have the ability to interpret images, the fidelity of that interpretation, particularly for information-dense images, is far from what is required for an application as complex as software development agents.
AWS has developed a new framework for the Amazon Q Developer agent — textcode — which provides a text-based alternative to visual IDEs specifically designed for LLMs. It effectively equips the agent with its own IDE with which it interacts exclusively through text. The agent is able to use it similarly to how a developer would use a regular IDE to solve your tasks. textcode is designed to provide token-efficient text representations of code, code files, and code workspaces. It allows LLMs to interact with a code base in a similar manner to how a developer interacts with it in a visual IDE. This framework offers structured and efficient environment within which it is easy for the agent to use tools, take actions, and evaluate its progress towards the completion of the assigned task.
The agent is equipped with tools to explore the workspace, act on it, and evaluate its solutions. For example, the agent can open, create, and close files, select and deselect code chunks, find and replace code, and revert changes if needed. These tools allows the agent to navigate the workspace in order to identify and retain the critical pieces of information to solve your tasks while discarding superfluous code to not clog its context. We are continuously expanding the toolkit of the agent with more powerful tools.
When you use the \dev command in your IDE, the Q Developer agent for software development is initialized with your problem statement as well as some guidance on how to solve the problem and use the tools it is equipped with. The agent determines what actions to use on the workspace. It generally starts by exploring the workspace to discover the parts of the code relevant to solving your task. The agent takes action by using the tools it is equipped with. The response of the tools is incorporated in an updated prompt that is provided back to the LLM to decide its next actions.
The Q Developer agent is equipped with logic to prevent it from getting stuck in unproductive paths and help it progress towards a solution to your problem. The agent will autonomously decide that it has generated the appropriate changes (including writing unit tests and updating documentation) to fulfill your request. At that point, the agent exits its loop and returns the candidate code patches for your review. You can decide to accept them entirely or in part, or ask the agent to modify them. If you ask for modifications, the agent will resume its loop using your feedback as additional information about the problem statement.
Conclusion
This post introduced the updated Amazon Q Developer agent for software development. The agent autonomously implements features that you describe using natural language directly from your IDE. We gave you an overview of how the agent works behind the scenes and discussed its significantly increased accuracy.
You are now ready to explore the capabilities of Amazon Q Developer agent for software development and make it your AI coding assistant! Install the Amazon Q Developer extension in your IDE of choice and start using Amazon Q (including the agent for software development) for free using your AWS Builder ID or subscribe to Amazon Q Developer to unlock higher limits.
Generative artificial intelligence (AI) is now a household topic and popular across various public applications. Users enter prompts to get answers to questions, write code, create images, improve their writing, and synthesize information. As people become familiar with generative AI, businesses are looking for ways to apply these concepts to their enterprise use cases in a simple, scalable, and cost-effective way. These same needs are shared by a variety of security stakeholders. For example, if security directors want to summarize their security posture in natural language, a security architect will need to triage alerts or findings and investigate AWS CloudTrail logs to identify high priority remediation actions or detect potential threat actors by identifying potentially malicious activity. There are many ways to deploy solutions for these use cases.
In this blog post, we review a fully serverless solution for querying data stored in Amazon Security Lake using natural language (human language) with Amazon Q in QuickSight. This solution has multiple use cases, such as generating visualizations and querying vulnerability information for vulnerability management using tools such as Amazon Inspector that feed into AWS Security Hub. The solution helps reduce the time from detection to investigation by using natural language to query CloudTrail logs and Amazon Virtual Private Cloud (VPC) Flow Logs, resulting in quicker response to threats in your environment.
Amazon Security Lake is a fully managed security data lake service that automatically centralizes security data from AWS environments, software as a service (SaaS) providers, and on-premises and cloud sources into a purpose-built data lake that’s stored in your AWS account. The data lake is backed by Amazon Simple Storage Service (Amazon S3) buckets, and you retain ownership over your data. Security Lake converts ingested data into Apache Parquet format and a standard open source schema called the Open Cybersecurity Schema Framework (OCSF). With OCSF support, Security Lake normalizes and combines security data from AWS and a broad range of enterprise security data sources.
Amazon QuickSight is a cloud-scale business intelligence (BI) service that delivers insights to stakeholders, wherever they are. QuickSight connects to your data in the cloud and combines data from a variety of different sources. With QuickSight, users can meet varying analytic needs from the same source of truth through interactive dashboards, reports, natural language queries, and embedded analytics. With Amazon Q in QuickSight, business analysts and users can use natural language to build, discover, and share meaningful insights.
The recent announcements for Amazon Q in QuickSight, Security Lake, and the OCSF present a unique opportunity to apply generative AI to fully managed hybrid multi-cloud security related logs and findings from over 100 independent software vendors and partners.
Solution overview
The solution uses Security Lake as the data lake which has native ingestion for CloudTrail, VPC Flow Logs, and Security Hub findings as shown in Figure 1. Logs from these sources are sent to S3 buckets in your AWS account and are maintained by Security Lake. We then create Amazon Athena views from tables created by Security Lake for Security Hub findings, CloudTrail logs, and VPC Flow Logs to define the interesting fields from each of the log sources. Each of these views are ingested into a QuickSight dataset. From these datasets, we generate analyses and dashboards. We use Amazon Q topics to label columns in the dataset that are human-readable and create a named entity to present contextual and multi-visual answers in response to questions. After the topics are created, users can perform their analysis using Q topics, QuickSight analyses, or QuickSight dashboards.
Figure 1: Solution architecture
You can use the rollup AWS Region feature in Security Lake to aggregate logs from multiple Regions into a single Region. Specifying a rollup Region can help you adhere to regional compliance requirements. If you use rollup Regions, you must set up the solution described in this post for datasets only in rollup Regions. If you don’t use a rollup Region, you must deploy this solution for each Region you that want to collect data from.
Prerequisites
To implement the solution described in this post, you must meet the following requirements:
Basic understanding of Security Lake, Athena, and QuickSight.
Security Lake is already deployed and accepting CloudTrail management events, VPC Flow Logs, and Security Hub findings as sources. If you haven’t deployed Security Lake yet, we recommend following the best practices established in the security reference architecture.
This solution uses Security Lake data source version 2 to create the dashboards and visualizations. If you aren’t already using data source version 2, you will see a banner in your Security Lake console with instructions to update.
An existing QuickSight deployment that will be used to visualize Security Lake data or an account that is able to sign up for QuickSight to create visualizations.
QuickSight Author Pro and Reader Pro licenses are needed for using Amazon Q features in QuickSight. Non-pro Authors and Readers can still access Q topics if an Author Pro or Admin Pro user shares the topic with them. Non-pro Authors and Readers can also access data stories if a Reader Pro, Author Pro, or Admin Pro shares one with them. Review Generative AI features supported by each QuickSight licensing tiers.
In the following section, we walk through the steps to ingest Security Lake data into QuickSight using Athena views and then using Amazon Q in QuickSight to create visualizations and query data using natural language.
Provide cross-account query access
In alignment with our security reference architecture, it’s a best practice to isolate the Security Lake account from the accounts that are running the visualization and querying workloads. It’s recommended that QuickSight for security use cases be deployed in the security tooling account. See How to visualize Amazon Security Lake findings with Amazon QuickSight for information on how to set up cross-account query access. Follow the steps in the Configure a Security Lake subscriber section and configure Athena to visualize your data section.
When you get to the create resource link steps, create a resource link for data source version 2 for Security Hub, CloudTrail, and VPC flow log tables for a total of three resource links. The way to identify data source version 2 tables is by their name; it ends in _2_0. For example:
For the remainder of this post, we will be referencing the database name security_lake_visualization and the resource link names for Security Hub findings, CloudTrail logs, and VPC Flow Logs respectively, as shown in Figure 2:
We will call the QuickSight account the visualization account. If you plan to use same account as the Security Lake delegated administrator and QuickSight, then skip this step and go to the next section where you will create views in Athena.
Create views in Athena
A view in Athena is a logical table that helps simplify your queries by working with only a subset of the relevant data. Follow these steps to create three views in Athena, one each for Security Hub findings, CloudTrail logs, and the VPC Flow Logs in the visualization account.
These queries default to the previous week’s data starting from the previous day, but you can change the time frame by modifying the last line in the query from 8 to the number of days you prefer. Keep in mind that there is a limitation on the size of each SPICE table of 1 TB. If you want to limit the volume of data, you can delete the rows that you find unnecessary. We included the fields customers have identified as relevant to reduce the burden of writing the parsing details yourself.
To create views:
Sign in to the AWS Management Console in the visualization account and navigate to the Athena console.
If a Security Lake rollup Region is used, select the rollup Region.
Choose Launch Query Editor.
If this is the first time you’re using Athena, you will need to choose a bucket to store your query results.
Choose Edit Settings.
Choose Browse S3.
Search for your bucket name.
Select the radio button next to the name of your bucket.
Select Choose.
For Data Source, select AWSDataCatalog.
Select Database as security_lake_visualization. If you used a different name for the database for cross account query access, then select that database.
Figure 3: Athena database selection
Copy the query for the security_hub_view from the GitHub repo for this post. If you’re using a different name for the database and table resource link than the one specified in this post, edit the FROM statement at the bottom of the query to reflect the correct names.
Paste the query in the query editor and then choose Run. The name of the view is set in the first line of the query which is security_insights_security_hub_vw2.
To confirm this view was created correctly, choose the three dots next to the view that was created and select Preview View.
Figure 4: Previewing the view
Repeat steps 5–9 to create the CloudTrail and VPC Flow Logs views. The queries for each can be found in the GitHub repo.
Figure 5: Athena views
Create QuickSight dataset
Now that you’ve created the views, use Athena as the data source to create a dataset in QuickSight. Repeat these steps for the Security Hub findings, CloudTrail logs, and VPC Flow Logs. Start by creating a dataset for the Security Hub findings.
To configure permissions on tables:
Sign in to the QuickSight console in the visualization account. If a Security Lake rollup Region is used, select the rollup Region.
Although there are multiple ways to sign in to QuickSight, we used IAM based access to build the dashboards. To use QuickSight with Athena and Lake Formation, you first need to authorize connections through Lake Formation.
When using a cross-account configuration with AWS Glue Data Catalog, you need to configure permissions on tables that are shared through Lake Formation. For the use case in this post, use the following steps to grant access on the cross-account tables in the Glue Catalog. You must perform these steps for each of the Security Hub, CloudTrail, and VPC Flow Logs tables that you created in the preceding cross-account query access section. Because granting permissions on a resource link doesn’t grant permissions on the target (linked) database or table, you will grant permission twice, once to the target (linked table) and then to the resource link.
In the Lake Formation console, navigate to the Tables section and select the resource link for the Security Hub table. For example:
Select Actions. Under Permissions, select Grant on target.
For the next step, you need the Amazon Resource Name (ARN) of the QuickSight users or groups that need access to the table. To obtain the ARN through the AWS Command Line Interface (AWS CLI), run following commands (replacing account ID and Region with that of the visualization account.) You can use AWS CloudShell for this purpose.
After you have the ARN of the user or group, copy it and go back to the LakeFormation console Grant on Target page. For Principals, select SAML users and groups, and then add the QuickSight user’s ARN.
Figure 6: Selecting principals
For LF-Tags or catalog resources, keep the default settings.
Figure 7: Table grant on target permissions
For Table permissions, select Select for both Table Permissions and Grantable Permissions, and then choose Grant.
Figure 8: Selecting table permissions
Navigate back to the Tables section and select the resource link for the Security Hub table. For example:
Select Actions. This time under Permissions, and then choose Grant.
For Principals, select SAML users and groups, and then add the QuickSight user’s ARN captured earlier.
For the LF-Tags or catalog resources section, use the default settings.
For Resource link permissions choose Describe for both Table Permissions and Grantable Permissions.
Repeat steps a–k for the CloudTrail and VPC Flow Logs resource links.
To create datasets from views:
After permissions are in place, you create three datasets from the views created earlier. Because both Quicksight and Lake Formation are Regional services, verify that you’re using QuickSight in the same Region where Lake Formation is sharing the data. The simplest way to determine your Region is to check the QuickSight URL in your web browser. The Region will be at the beginning of the URL, such as us-east-1. To change the Region, select the settings icon in the top right of the QuickSight screen and select the correct Region from the list of available Regions in the drop-down menu.
Navigate back to the QuickSight console.
Select Datasets, and then choose New dataset.
Select Athena from the list of available data sources.
Enter a Data source name, for example security_lake_securityhub_dataset and leave the Athena workgroup as [primary]. Choose Create data source.
At the Choose your table prompt, for Catalog, select AwsDataCatalog. For Database, select security_lake_visualization. If you used a different name for the database for cross-account query access, then select that database. For Tables, select the view name security_insights_security_hub_vw2 to build your dashboards for Security Hub findings. Then choose Select.
Figure 9: Choose a table during QuickSight dataset creation
At the Finish dataset creation prompt, select Import to SPICE for quicker analytics. Choose Visualize. This will create a new dataset in QuickSight using the name of the Athena view, which is security_insights_security_hub_vw2. You will be taken to the Analysis page, exit out of it.
Go back to the QuickSight console and repeat steps 3–8 for the CloudTrail and VPC Flow Log datasets.
Create a topic
Now that you have created a dataset, you can create a topic. Q topics are collections of one or more datasets that represent a subject area for your business users to ask questions. Topics allow users to ask questions in natural language and to build visualizations using natural language.
To create a Q topic:
Navigate to the QuickSight console.
Choose Topics in the left navigation pane.
Figure 10: QuickSight navigation pane
Choose New topic. Create one topic each for the Security Hub findings, CloudTrail logs, and VPC Flow Logs
Figure 11: QuickSight topic creation
On the New topic page, do the following:
For Topic name, enter a descriptive name for the topic. Name the first one SecurityHubTopic. Your business users will identify the topic by this name and use it to ask questions.
For Description, enter a description for the topic. Your users can use this description to get more details about the topic.
Choose Continue.
On the Add data to topic page, choose the dataset you created in the Create a QuickSight dataset section. Start with the Security Hub dataset security_insights_security_hub_vw2.
Choose Continue. It will take a few minutes to create the topic.
Now that your topic has been created, navigate to the Data tab of the topic.
Your Data Fields sub-tab should be selected already. If not, choose Data Fields.
Figure 12: Topics data fields
For each of the fields in the list, turn on Include to make sure that all fields are included. For this example, we selected all fields, but you can adjust the included columns as needed for your use case. Note, you might see a banner at the top of the page indicating that the indexing is in progress. Depending on the size of your data, it might take some time for Q to make those fields available for querying. Most of the time, indexing is complete in less than 15 minutes.
Review the Synonyms column. These alternate representations of your column name are automatically generated by Amazon Q. You can add and remove synonyms as needed for your use case.
At this point, you’re ready to ask questions about your data using Amazon Q in QuickSight. Choose Ask a question about SecurityHubTopic at the top of the page.
Figure 13: Ask questions using Q
You can now ask questions about Security Hub findings in the prompt. Enter Show me findings with compliance status failed along with control id.
Figure 14: Q answers
Under the question, you will see how it was interpreted by QuickSight.
Repeat steps 1–13 to create CloudTrail and VPC Flow Log QuickSight topics.
Create named entities for your topics
Now that you’ve created your topics, you will now add named entities. Named entities are optional, but we’re using them in the solution to help make queries more effective. The information contained in named entities, the ordering of fields, and their ranking make it possible to present contextual, multi-visual answers in response to even vague questions.
To create a named entity:
In the QuickSight console, navigate to Topics.
Select the Security Hub topic that you created in the previous section.
Under the Data tab, select the Named Entity subtab, and choose Add Named Entity.
Figure 15: Named entity subtab
Enter Security Findings as the entity name.
Select the following datafields: Status, Metadata Product Name, Finding Info Title, Region, Severity, Cloud Account Uid, Time Dt, Compliance Status, and AccountId. The order of the fields helps Q to prioritize the data, so rearrange your data fields as needed.
Choose Save in the top right corner to save your results.
Repeat steps 1–6 with the CloudTrail dataset using the following datafields: API operation, Time Dt, Region, Status, AccountId, API Response Error, Actor User Credential Uid, Actor User Name, Actor User Type, Api Service Name, Actor Idp Name, Cloud Provider, Session Issuer, and Unmapped.
Figure 17: CloudTrail named entity creation
Repeat steps 1–6 with the VPC Flow Log dataset using the following datafields: Src Endpoint IP, Src Endpoint Port, Dst Endpoint IP, Dst Endpoint Port, Connection Info Direction, Traffic Bytes, Action, Accountid, Time Dt, and Region.
Figure 18: VPC Flow log named entity creation
Create visualizations using natural language
After your topic is done indexing, you can start creating visualizations using natural language. In QuickSight, an analysis is the same thing as a dashboard, but is only accessible by the authors. You can keep it private and make it as robust and detailed as you want. When you decide to publish it, the shared version is called a dashboard.
To create visualizations:
Open the QuickSight console and navigate to the Analysis tab.
In the top right, select New analysis.
Select the dataset you created previously, it will have the same naming convention as the Athena view. For reference, the Athena view query created a Security Hub dataset called security_insights_security_hub_vw2.
Validate the information about the data set you’re going to use in the analysis and choose USE IN ANALYSIS.
On the pop up, select the interactive sheet option and choose Create.
For datasets that have a corresponding Q topic, which you created in a previous step, choose Build visual at the top of the screen.
Figure 19: Build visual using natural language
Enter your prompt and choose BUILD. For example, enter findings with product security hub group by control id include count. Q automatically generates a visualization.
Figure 20: Q response
To add to your dashboard, choose ADD TO ANALYSIS to see your new visualization module in your current analysis.
The supplied questions are targeted towards a Security Hub findings topic, where you can ask questions about your security hub findings data. For example, show all Security Hub findings for critical severity for a specific resource or ARN.
If you use Amazon Inspector for software vulnerability management and you want to monitor top common vulnerabilities and exposures (CVEs) affecting your organization, choose Build visual and enter show all ACTIVE findings with product inspector group by Title add count in the prompt. We used the keyword ACTIVE because ACTIVE is a finding state in Security Hub that indicates the finding is still active as per the finding source and Amazon Inspector has not closed the finding yet. If Amazon Inspector has closed the finding, the finding will have a state of ARCHIVED.
Figure 21: Q Response for an Amazon Inspector findings question
To add the remaining datasets, which allows you to visualize data from multiple datasets in a single view, select the dropdown in the left navigation under Dataset.
Select Add a new dataset.
Search the name of the remaining datasets you created previously.
Select anywhere on the name of the dataset to make the radial button blue for the single dataset you want to add. Choose Select.
Repeat steps 7–12 in this section to add all the corresponding datasets you created previously.
Note: When you add additional datasets to the same Analysis and use Build visual to generate visualizations using natural language, the corresponding datasets with Q Topics are populated in the drop down under the prompt. Be sure to choose the correct dataset when asking questions.
Figure 22: Choosing a QuickSight dataset
To create dashboards:
After you’ve created the visual and are ready to publish the analysis as a dashboard, select PUBLISH in the top right corner.
Enter a name for your dashboard.
Choose Publish Dashboard.
After your dashboard is published, your users can ask questions about the data through the dashboard as well. This dashboard can be shared with other users. Users with QuickSight Reader Pro licenses can ask questions using Amazon Q.
To ask questions using the dashboard:
Navigate to the Dashboards section on the left navigation.
Select the dashboard you previously published.
Select Ask a question about [Topic Name] at the top of the screen. A module will open from the side of your screen. Questions can only be addressed to a single topic. To change the topic, select the name of the topic and a drop-down will appear. Select the name of the current topic to see other options and select the topic you want to ask a question about. For this example, select CloudTrailTopic.
Figure 23: Selecting a topic
Enter a question in the prompt. For this example, enter show top API operations in the last 24 hours with accessdenied.
Figure 24: CloudTrail question 1
Enter show all activity by user johndoe in the last 3 days.
Figure 25: CloudTrail question 2
Q will automatically build a small dashboard based on the questions provided.
Now change the topic to VPCFlowTopic as described in step 3.
Enter show me the top 5 dst ip by bytes for outbound traffic with dst port 443.
Figure 26: VPC Flow Log question
You can build executive summaries using QuickSight data stories, which also use generative AI. Data stories use Amazon Q prompts and visuals to produce a draft that incorporates the details that you provide. For example, you can create a data story about how a specific CVE affects your organization by asking Q questions, then add visuals from analyses you already created.
Conclusion
In this blog post, you learned how to use generative AI for your security use cases. We showed you how to use cross-account query access to allow a QuickSight visualization account to subscribe to Security Lake data for Security Hub findings, CloudTrail logs, and VPC Flow Logs. We then provided instructions for creating, Athena views, QuickSight datasets, Q topics, named entities, and for using natural language to build dashboards and query your data. You can customize the Athena views to create, update, or delete columns and column names as needed for your use case. You can also customize the Q topics and named entities to use naming conventions and structure responses based on your organization’s needs.
If you have feedback about this post, submit comments in the Comments section below. If you have questions about this post, contact AWS Support.
Amazon Q Developer is a generative artificial intelligence (AI) powered conversational assistant that can help you understand, build, extend, and operate AWS applications. You can ask questions about AWS architecture, your AWS resources, best practices, documentation, support, and more.
With Amazon Q Developer in your IDE, you can write a comment in natural language that outlines a specific task, such as, “Upload a file with server-side encryption.” Based on this information, Amazon Q Developer recommends one or more code snippets directly in the IDE that can accomplish the task. You can quickly and easily accept the top suggestions (tab key), view more suggestions (arrow keys), or continue writing your own code.
However, Amazon Q Developer in the IDE is more than just a code completion plugin. Amazon Q Developer is a generative AI (GenAI) powered assistant for software development that can be used to have a conversation about your code, get code suggestions, or ask questions about building software. This provides the benefits of collaborative paired programming, powered by GenAI models that have been trained on billions of lines of code, from the Amazon internal code-base and publicly available sources.
The challenge
At the 2024 AWS Summit in Sydney, an exhilarating code challenge took center stage, pitting a Blue Team against a Red Team, with approximately 10 to 15 challengers in each team, in a battle of coding prowess. The challenge consisted of 20 tasks, starting with basic math and string manipulation, and progressively escalating in difficulty to include complex algorithms and intricate ciphers.
The Blue Team had a distinct advantage, leveraging the powerful capabilities of Amazon Q Developer, the most capable generative AI-powered assistant for software development. With Q Developer’s guidance, the Blue Team navigated increasingly complex tasks with ease, tapping into Q Developer’s vast knowledge base and problem-solving abilities. In contrast, the Red Team competed without assistance, relying solely on their own coding expertise and problem-solving skills to tackle daunting challenges.
As the competition unfolded, the two teams battled it out, each striving to outperform the other. The Blue Team’s efficient use of Amazon Q Developer proved to be a game-changer, allowing them to tackle the most challenging tasks with remarkable speed and accuracy. However, the Red Team’s sheer determination and technical prowess kept them in the running, showcasing their ability to think outside the box and devise innovative solutions.
The culmination of the code challenge was a thrilling finale, with both teams pushing the boundaries of their skills and ultimately leaving the audience in a state of admiration for their remarkable achievements.
The graph shows the average completion time in which Team Blue “Q Developer” completed more questions across the board in less time than Team Red “Solo Coder”. Within the 1-hour time limit, Team Blue got all the way to Question 19, whereas Team Red only got to Question 16.
There are some assumptions and validations. People who consider themselves very experienced programmers were encouraged to choose team Red and not use AI, to test themselves against team Blue, those using AI. The code challenges were designed to test the output of applying logic. They were specifically designed to be passable without the use of Amazon Q Developer, to test the optimization of writing logical code with Amazon Q Developer. As a result, the code tasks worked well with Amazon Q Developer due to the nature of and underlying training of Amazon Q Developer models. Many people who attended the event were not Python Programmers (we constrained the challenge to Python only), and walked away impressed at how much of the challenge they could complete.
As an example of one of the more complex questions competitors were given to solve was:
Implement the rail fence cipher.
In the Rail Fence cipher, the message is written downwards on successive "rails" of an imaginary fence, then moving up when we get to the bottom (like a zig-zag). Finally the message is then read off in rows.

For example, using three "rails" and the message "WE ARE DISCOVERED FLEE AT ONCE", the cipherer writes out:

W . . . E . . . C . . . R . . . L . . . T . . . E
. E . R . D . S . O . E . E . F . E . A . O . C .
. . A . . . I . . . V . . . D . . . E . . . N . .

Then reads off: WECRLTEERDSOEEFEAOCAIVDEN

Given variable a. Use a three-rail fence cipher so that result is equal to the decoded message of variable a.
The questions were both algorithmic and logical in nature, which made them great for testing conversational natural language capability to solve questions using Amazon Q Developer, or by applying one’s own logic to write code to solve the question.
Top scoring individual per team:
Total Questions Complete
individual time (min)
With Q Developer (Blue Team)
19
30.46
Solo Coder (Red Team)
16
58.06
By comparing the top two competitors, and considering the solo coder was a highly experienced programmer versus the top Q Developer coder, who was a relatively new programmer not familiar with Python, you can see the efficiency gain when using Q Developer as an AI peer programmer. It took the entire 60 minutes for the solo coder to complete 16 questions, whereas the Q Developer coder got to the final question (Question 20, incomplete) in half of the time.
Summary
Integrating advanced IDE features and adopting paired programming have significantly improved coding efficiency and quality. However, the introduction of Amazon Q Developer has taken this evolution to new heights. By tapping into Q Developer’s vast knowledge base and problem-solving capabilities, the Blue Team was able to navigate complex coding challenges with remarkable speed and accuracy, outperforming the unassisted Red Team. This highlights the transformative impact of leveraging generative AI as a collaborative pair programmer in modern software development, delivering greater efficiency, problem-solving, and, ultimately, higher-quality code. Get started with Amazon Q Developer for your IDE by installing the plugin and enabling your builder ID today.
With the arrival of September, AWS re:Invent 2024 is now 3 months away and I am very excited for the new upcoming services and announcements at the conference. I remember attending re:Invent 2019, just before the COVID-19 pandemic. It was the biggest in-person re:Invent with 60,000+ attendees and it was my second one. It was amazing to be in that atmosphere! Registration is now open for AWS re:Invent 2024. Come join us in Las Vegas for five exciting days of keynotes, breakout sessions, chalk talks, interactive learning opportunities, and career-changing connections!
Now let’s look at the last week’s new announcements.
Last week’s launches Here are the launches that got my attention.
Announcing AWS Parallel Computing Service – AWS Parallel Computing Service (AWS PCS) is a new managed service that lets you run and scale high performance computing (HPC) workloads on AWS. You can build scientific and engineering models and run simulations using a fully managed Slurm scheduler with built-in technical support and a rich set of customization options. Tailor your HPC environment to your specific needs and integrate it with your preferred software stack. Build complete HPC clusters that integrates compute, storage, networking, and visualization resources, and seamlessly scale from zero to thousands of instances. To learn more, visit AWS Parallel Computing Service and read Channy’s blog post.
Amazon EC2 status checks now support reachability health of attached EBS volumes – You can now use Amazon EC2 status checks to directly monitor if the Amazon EBS volumes attached to your instances are reachable and able to complete I/O operations. With this new status check, you can quickly detect attachment issues or volume impairments that may impact the performance of your applications running on Amazon EC2 instances. You can further integrate these status checks within Auto Scaling groups to monitor the health of EC2 instances and replace impacted instances to ensure high availability and reliability of your applications. Attached EBS status checks can be used along with the instance status and system status checks to monitor the health of your instances. To learn more, refer to the Status checks for Amazon EC2 instances documentation.
Amazon QuickSight now supports sharing views of embedded dashboards – You can now share views of embedded dashboards in Amazon QuickSight. This feature allows you to enable more collaborative capabilities in your application with embedded QuickSight dashboards. Additionally, you can enable personalization capabilities such as bookmarks for anonymous users. You can share a unique link that displays only your changes while staying within the application, and use dashboard or console embedding to generate a shareable link to your application page with QuickSight’s reference encapsulated using the QuickSight Embedding SDK. QuickSight Readers can then send this shareable link to their peers. When their peer accesses the shared link, they are taken to the page on the application that contains the embedded QuickSight dashboard. For more information, refer to Embedded view documentation.
Amazon Q Business launches IAM federation for user identity authentication – Amazon Q Business is a fully managed service that deploys a generative AI business expert for your enterprise data. You can use the Amazon Q Business IAM federation feature to connect your applications directly to your identity provider to source user identity and user attributes for these applications. Previously, you had to sync your user identity information from your identity provider into AWS IAM Identity Center, and then connect your Amazon Q Business applications to IAM Identity Center for user authentication. At launch, Amazon Q Business IAM federation will support the OpenID Connect (OIDC) and SAML2.0 protocols for identity provider connectivity. To learn more, visit Amazon Q Business documentation.
Amazon Bedrock now supports cross-Region inference – Amazon Bedrock announces support for cross-Region inference, an optional feature that enables you to seamlessly manage traffic bursts by utilizing compute across different AWS Regions. If you are using on-demand mode, you’ll be able to get higher throughput limits (up to 2x your allocated in-Region quotas) and enhanced resilience during periods of peak demand by using cross-Region inference. By opting in, you no longer have to spend time and effort predicting demand fluctuations. Instead, cross-Region inference dynamically routes traffic across multiple Regions, ensuring optimal availability for each request and smoother performance during high-usage periods. You can control where your inference data flows by selecting from a pre-defined set of Regions, helping you comply with applicable data residency requirements and sovereignty laws. Find the list at Supported Regions and models for cross-Region inference. To get started, refer to the Amazon Bedrock documentation or this Machine Learning blog.
We launched existing services and instance types in additional Regions:
Amazon EC2 C6gd and R6gd instances are now available in AWS Europe (Spain) Region. C6gd instances are ideal for compute-intensive workloads such as high performance computing (HPC), batch processing, and CPU-based machine learning inference. R6gd instances are built for running memory-intensive workloads such as open-source databases, in-memory caches, and real time big data analytics.
AWS Config conformance packs now available in 12 additional AWS Regions. Conformance packs allow you to bundle AWS Config rules and their associated remediation actions into a single package, simplifying deployment at scale. These capabilities have been added to the following Regions: Asia Pacific (Jakarta), Africa (Cape Town), Middle East (UAE), Asia Pacific (Hyderabad), Asia Pacific (Osaka), Europe (Milan), Israel (Tel Aviv), Canada West (Calgary), Europe (Spain), Europe (Zurich), AWS GovCloud (US-East), and AWS GovCloud (US-West).
Other AWS events AWS GenAI Lofts are collaborative spaces and immersive experiences that showcase AWS’s cloud and AI expertise, while providing startups and developers with hands-on access to AI products and services, exclusive sessions with industry leaders, and valuable networking opportunities with investors and peers. Find a GenAI Loft location near you and don’t forget to register.
credit: Antje Barth
Upcoming AWS events Check your calendar and sign up for upcoming AWS events:
AWS Summits are free online and in-person events that bring the cloud computing community together to connect, collaborate, and learn about AWS. AWS Summits for this year are coming to an end. There are 3 more left that you can still register: Jakarta (September 5), Toronto (September 11), and Ottawa (October 9).
AWS Community Days feature technical discussions, workshops, and hands-on labs led by expert AWS users and industry leaders from around the world. While AWS Summits 2024 are almost over, AWS Community Days are in full swing. Upcoming AWS Community Days are in Belfast (September 6), SF Bay Area (September 13), where our own Antje Barth is a keynote speaker, Argentina (September 14), and Armenia (September 14).
According to the Well-Architected DevOps Guidance, “A peer review process for code changes is a strategy for ensuring code quality and shared responsibility. To support separation of duties in a DevOps environment, every change should be reviewed and approved by at least one other person before merging.” Development teams often implement the peer review process in their Software Development Lifecycle (SDLC) by leveraging Pull Requests (PRs). Amazon CodeCatalyst has recently released three new features to facilitate a robust peer review process. Pull Request Approval Rules enforce a minimum number of approvals to ensure multiple peers review a proposed change prior to a progressive deployment. Amazon Q pull request summaries can automatically summarize code changes in a PR, saving time for both the creator and reviewer. Lastly, Nested Comments allows teams to organize conversations and feedback left on a PR to ensure efficient resolution.
This blog will demonstrate how a DevOps lead can leverage new features available in CodeCatalyst to accomplish the following requirements covering best practices: 1. Require at least two people to review every PR prior to deployment, and 2. Reduce the review time to merge (RTTM).
Prerequisites
If you are using CodeCatalyst for the first time, you’ll need the following to follow along with the steps outlined in the blog post:
A Project in a CodeCatalyst Space. If you don’t have one, you can create a new space.
Approval rules can be configured for branches in a repository. When you create a PR whose destination branch has an approval rule configured for it, the requirements for the rule must be met before the PR can be merged.
In this section, you will implement approval rules on the default branch (main in this case) in the application’s repository to implement the new ask from leadership requiring that at least two people review every PR before deployment.
Step 1: Creating the application Pull Request approval rules work with every project but in this blog, we’ll leverage the Modern three-tier web application blueprint for simplicity to implement PR approval rules for merging to the main branch.
Figure 1: Creating a new Modern three-tier application Blueprint
First, within your space click “Create Project” and select the Modern three-tier web application CodeCatalyst Blueprint as shown above in Figure 1.
Enter a Project name and select: Lambda for the Compute Platform and Amplify Hosting for Frontend Hosting Options. Additionally, ensure your AWS account is selected along with creating a new IAM Role.
Finally, click Create Project and a new project will be created based on the Blueprint.
Once the project is successfully created, the application will deploy via a CodeCatalyst workflow, assuming the AWS account and IAM role were setup correctly. The deployed application will be similar to the Mythical Mysfits website.
Step 2: Creating an approval rule
Next, to satisfy the new requirement of ensuring at least two people review every PR before deployment, you will create the approval rule for members when they create a pull request to merge into the main branch.
Navigate to the project you created in the previous step.
In the navigation pane, choose Code, and then choose Source repositories.
Next, choose the mysfits repository that was created as part of the Blueprint.
On the overview page of the repository, choose Branches.
For the main branch, click View under the Approval Rules column.
In Minimum number of approvals, the number corresponds to the number of approvals required before a pull request can be merged to that branch.
Now, you’ll change the approval rule to satisfy the requirement to ensure at least 2 people review every PR. Choose Manage settings. On the settings page for the source repository, in Approval rules, choose Edit.
In Destination Branch, from the drop-down list, choose main as the name of the branch to configure an approval rule. In Minimum number of approvals, enter 2, and then choose Save.
Figure 2: Creating a new approval rule
Note: You must have the Project administrator role to create and manage approval rules in CodeCatalyst projects. You cannot create approval rules for linked repositories.
When implementing approval rules and branch restrictions in your repositories, ensure you take into consideration the following best practices:
For branches deemed critical or important, ensure only highly privileged users are allowed to Push to the Branch and Delete the Branch in the branch rules. This prevents accidental deletion of critical or important branches as well as ensuring any changes introduced to the branch are reviewed before deployment.
Ensure Pull Request approval rules are in place for branches your team considers critical or important. While there is no specific recommended number due to varying team size and project complexity, the minimum number of approvals is recommended to be at least one and research has found the optimal number to be two.
In this section, you walked through the steps to create a new approval rule to satisfy the requirement of ensuring at least two people review every PR before deployment on your CodeCatalyst repository.
Amazon Q pull request summaries
Now, you begin exploring ways that can help development teams reduce MTTR. You begin reading about Amazon Q pull request summaries and how this feature can automatically summarize code changes and start to explore this feature in further detail.
While creating a pull request, in Pull request description, you can leverage the Write description for me feature, as seen in Figure 5 below, to have Amazon Q create a description of the changes contained in the pull request.
Figure 3: Amazon Q write description for me feature
Once the description is generated, you can Accept and add to description, as seen in Figure 6 below. As a best practice, once Amazon Q has generated the initial PR summary, you should incorporate any specific organizational or team requirements into the summary before creating the PR. This allows developers to save time and reduce MTTR in generating the PR summary while ensuring all requirements are met.
Figure 4: PR Summary generated by Amazon Q
CodeCatalyst offers an Amazon Q feature that summarizes pull request comments, enabling developers to quickly grasp key points. When many comments are left by reviewers, it can be difficult to understand common themes in the feedback, or even be sure that you’ve addressed all the comments in all revisions. You can use the Create comment summary feature to have Amazon Q analyze the comments and provide a summary for you, as seen in Figure 5 below.
Figure 5: Comment summary
Nested Comments
When reviewing various PRs for the development teams, you notice that feedback and subsequent conversations often happen within disparate and separate comments. This makes reviewing, understanding and addressing the feedback cumbersome and time consuming for the individual developers. Nested Comments in CodeCatalyst can organize conversations and reduce MTTR.
You’ll leverage the existing project to walkthrough how to use the Nested Comments feature:
Step 1: Creating the PR
Click the mysifts repository, and on the overview page of the repository, choose More, and then choose Create branch.
Edit the file to update the text in the <title> block to Mythical Mysfits new title update! and Commit the changes.
Create a pull request by using test-branch as the Source branch and main as the Destination branch. Your PR should now look similar to Figure 6 below:
Figure 6: Pull Request with updated Title
Step 2: Review PR and add Comments
Review the PR, ensure you are on the Changes tab (similar to Figure 3), click the Comment icon and leave a comment. Normally this would be done by the Reviewer but you will simulate being both the Reviewer and Developer in this walkthrough.
With the comment still open, hit Reply and add another comment as a response to the initial comment. The PR should now look similar to Figure 7 below.
Figure 7: PR with Nested Comments
When leaving comments on PR in CodeCatalyst, ensure you take into consideration the following best practices :
Feedback or conversation focused on a specific topic or piece of code should leverage the nested comments feature. This will ensure the conversation can be easily followed and that context and intent are not lost in a sea of individual comments.
Author of the PR should address all comments by either making updates to the code or replying to the comment. This indicates to the reviewer that each comment was reviewed and addressed accordingly.
Feedback should be constructive in nature on PRs. Research has found that, “destructive criticism had a negative impact on participants’ moods and motivation to continue working.”
Clean-up
As part of following the steps in this blog post, if you upgraded your space to Standard or Enterprise tier, please ensure you downgrade to the Free tier to avoid any unwanted additional charges. Additionally, delete any projects you may have created during this walkthrough.
Conclusion
In today’s fast-paced software development environment, maintaining a high standard for code changes is crucial. With its recently introduced features, including Pull Request Approval Rules, Amazon Q pull request summaries, and nested comments, CodeCatalyst empowers development teams to ensure a robust pull request review process is in place. These features streamline collaboration, automate documentation tasks, and facilitate organized discussions, enabling developers to focus on delivering high-quality code while maximizing productivity. By leveraging these powerful tools, teams can confidently merge code changes into production, knowing that they have undergone rigorous review and meet the necessary standards for reliability and performance.
In this blog post, I’ll explain how to use a Microsoft Entra ID and Visual Studio Code editor to access Amazon Q developer service and speed up your development. Additionally, I’ll explain how to minimize the time spent on repetitive tasks and quickly integrate users from external identity sources so they can immediately use and explore Amazon Web Services (AWS).Generative AI on AWS holds great ability for businesses seeking to unlock new opportunities and drive innovation. AWS offers a robust suite of tools and capabilities that can revolutionize software development, generate valuable insights, and deliver enhanced customer value. AWS is committed to simplifying generative AI for businesses through services like Amazon Q, Amazon Bedrock, Amazon SageMaker, Data foundation & AI infrastructure.
Amazon Q Developer is a generative AI-powered assistant that helps developers and IT professionals with all of their tasks across the software development lifecycle. Amazon Q Developer assists with coding, testing, and upgrading to troubleshooting, performing security scanning and fixes, optimizing AWS resources, and creating data engineering pipelines.
A common request from Amazon Q Developer customers is to allow developer sign-ins using established identity providers (IdP) such as Entra ID. Amazon Q Developer offers authentication support through AWS Builder ID or AWS IAM Identity Center. AWS Builder ID is a personal profile for builders. IAM Identity Center is ideal for an enterprise developer working with Amazon Q and employed by organizations with an AWS account. When using the Amazon Q Developer Pro tier, the developer should authenticate with the IAM Identity Center. See the documentation, Understanding tiers of service for Amazon Q Developer for more information.
How it works
The flow for accessing Amazon Q Developer through the IAM Identity Center involves the authentication of Entra ID users using Security Assertion Markup Language (SAML) 2.0 authentication (Figure 1).
Figure 1 – Solution Overview
The flow for accessing Amazon Q Developer through the IAM Identity Center involves the authentication of Entra ID users using SAML 2.0 authentication. (Figure 1).
IAM Identity Center synchronizes users and groups information from Entra ID into IAM Identity Center using the System for Cross-domain Identity Management (SCIM) v2.0 protocol.
Developers with an Entra ID account connect to Amazon Q Developer through IAM Identity Center using the VS Code IDE.
If a developer isn’t already authenticated, they will be redirected to the Entra ID account login. The developer will sign in using their Entra ID credentials.
If the sign-in is successful, Entra ID processes the request and sends a SAML response containing the developer identity and authentication status to IAM Identity Center.
If the SAML response is valid and the developer is authenticated, IAM Identity Center grants access to Amazon Q Developer.
The developer can now securely access and use Amazon Q Developer.
Prerequisites
In order to perform the following procedure, make sure the following are in place.
Configure Entra ID and AWS IAM Identity Center integration
In this section, I will show how you can create a SAML base connection between Entra ID and AWS Identity Center so you can access AWS generative AI services using your Entra ID.
Note: You need to switch the console between Entra ID portal and AWS IAM Identity center. I recommend to open new browser tabs for each console.
Step 1 – Prepare your Microsoft tenant
Perform the below steps in the Entra identity provider section.
Navigate to Identity > Applications > Enterprise applications, and then choose New application.
On the Browse Microsoft Entra Gallery page, enter AWS IAM Identity Center in the search box.
Select AWS IAM Identity Center from the results area.
Choose Create.
Now you have created AWS IAM Identity Center application, set up single sign-on to enable users to sign into their applications using their Entra ID credentials. Select the Single sign-on tab from the left navigation plane and select Setup single sign on.
Step 2 – Collect required service provider metadata from IAM Identity Center
In this step, you will launch the Change identity source wizard from within the IAM Identity Center console and retrieve the metadata file and the AWS specific sign-in URL. You will need this to enter when configuring the connection with Entra ID in the next step.
IAM Identity Center.
You need to enable this in order to configure SSO.
Navigate to Services –> Security, Identity, & Compliance –> AWS IAM Identity Center.
Choose Enable (Figure 2).
Figure 2 – Get started with AWS IAM Identity Center
In the left navigation pane, choose Settings.
On the Settings page, find Identity source, select Actions pull-down menu, and select Change identity source.
On the Change identity source page, choose External identity provider (Figure 3).
Figure 3 – Select External identity provider
On the Configure external identity provider page, under Service provider metadata, select Download metadata file (XML file).
In the same section, locate the AWS access portal sign-in URL value and copy it. You will need to enter this value when prompted in the next step (Figure 4).
Figure 4 – Copy provider metadata URLs
Leave this page open, and move to the next step to configure the AWS IAM Identity Center enterprise application in Entra ID. Later, you will return to this page to complete the process.
Step 3 – Configure the AWS IAM Identity Center enterprise application in Entra ID
This procedure establishes one-half of the SAML connection on the Microsoft side using the values from the metadata file and Sign-On URL you obtained in the previous step.
In the Microsoft Entra admin center console, navigate to Identity > Applications > Enterprise applications and then choose AWS IAM Identity Center.
On the left, choose Single sign-on.
On the Set up Single sign on with SAML page, choose Upload metadata file, choose the folder icon, select the service provider metadata file that you downloaded in the previous step 2.6, and then choose Add.
On the Basic SAML Configuration page, verify that both the Identifier and Reply URL values now point to endpoints in AWS that start with https://<REGION>.signin.aws.amazon.com/platform/saml/.
Under Sign on URL (Optional), paste in the AWS access portal sign-in URL value you copied in the previous step (Step 2.7), choose Save, and then choose X to close the window.
If prompted to test single sign-on with AWS IAM Identity Center, choose No I’ll test later. You will do this verification in a later step.
On the Set up Single Sign-On with SAML page, in the SAML Certificates section, next to Federation Metadata XML, choose Download to save the metadata file to your system. You will need to upload this file when prompted in the next step.
Step 4 – Configure the Entra ID external IdP in AWS IAM Identity Center
Next you will return to the Change identity source wizard in the IAM Identity Center console to complete the second-half of the SAML connection in AWS.
Return to the browser session you left open in the IAM Identity Center console.
On the Configure external identity provider page, in the Identity provider metadata section, under IdP SAML metadata, choose the Choose file button, and select the identity provider metadata file that you downloaded from Microsoft Entra ID in the previous step, and then choose Open (Figure 5).
Figure 5 – AWS IAM Identity center metadata
Choose Next
After you read the disclaimer and are ready to proceed, enter ACCEPT
Choose Change identity source to apply your changes (Figure 6).
Figure 6 – AWS IAM Identity center metadata
Confirm the changes (Figure 7).
Figure 7 – AWS IAM Identity center metadata configuration changes progress console.
Step 5 – Configure and test your SCIM synchronization
In this step, you will set up automatic provisioning (synchronization) of user and group information from Microsoft Entra ID into IAM Identity Center using the SCIM v2.0 protocol. You configure this connection in Microsoft Entra ID using your SCIM endpoint for AWS IAM Identity Center and a bearer token that is created automatically by AWS IAM Identity Center.
To enable automatic provisioning of Entra ID users to IAM Identity Center, follow these steps using the IAM Identity Center application in Entra ID. For testing purposes, you can create a new user (TestUser) in Entra ID with details like First Name, Last Name, Email ID, Department, and more. Once you’ve configured SCIM synchronization, you can verify that this user and their relevant attributes were successfully synced to AWS IAM Identity Center.
In this procedure, you will use the IAM Identity Center console to enable automatic provisioning of users and groups coming from Entra ID into IAM Identity Center.
Open the IAM Identity Center console and Choose Setting in the left navigation pane.
On the Settings page, under the Identity source tab, notice that Provisioning method is set to Manual (Figure 8).
Figure 8 – AWS IAM Identity center console with provisioning method configuration details
Locate the Automatic provisioning information box, and then choose Enable. This immediately enables automatic provisioning in IAM Identity Center and displays the necessary SCIM endpoint and access token information.
In the Inbound automatic provisioning dialog box, copy each of the values for the following options. You will need to paste these in the next step when you configure provisioning in Entra ID.
SCIM endpoint – For example, https://scim.us-east-2.amazonaws.com/11111111111-2222-3333-4444-555555555555/scim/v2/
Access token – Choose Show token to copy the value (Figure 9).
Figure 9 – AWS IAM Identity center automatic provisioning info
Choose Close.
Under the Identity source tab, notice that Provisioning method is now set to SCIM.
Step 6 – Configure automatic provisioning in Entra ID
Now that you have your test user in place and have enabled SCIM in IAM Identity Center, you can proceed with configuring the SCIM synchronization settings in Entra ID.
In the Microsoft Entra admin center console, navigate to Identity > Applications > Enterprise applications and then choose AWS IAM Identity Center.
Choose Provisioning, under Manage, choose Provisioning
In Provisioning Mode select
For Admin Credentials, in Tenant URL paste in the SCIM endpoint URL value you copied earlier. In Secret Token, paste in the Access token value (Figure 10).
Figure 10 – Azure Enterprise AWS IAM Identity center application provisioning configuration tab
Choose Test Connection. You should see a message indicating that the tested credentials were successfully authorized to enable provisioning (Figure 11).
Figure 11 – Azure Enterprise AWS IAM Identity center application provisioning testing status
Choose Save.
Under Manage, choose Users and groups, and then choose Add user/group.
On the Add Assignment page, under Users, choose None Selected.
Select TestUser, and then choose Select.
On the Add Assignment page, choose
Choose Overview, and then choose Start provisioning (Figure 12).
Figure 12 – AWS IAM Identity center application Start provisioning tab
Note : The default provisioning interval is set to 40 minutes. Our users (Figure 13) are successfully provisioned and are now available in the AWS IAM Identity Center console.
In this section, you will verify that TestUser user was successfully provisioned and that all attributes are displayed in IAM Identity Center (Figure 13).
Figure 13 – AWS IAM Identity center application user console example
In the Identity source in IDC section, enable Identity-aware console sessions (Figure 14). This enables AWS IAM Identity Center user and session IDs to be included in users’ AWS console sessions when they sign in. For example, Amazon Q Developer Pro uses identity-aware console sessions to personalize the service experience.
I have completed Entra ID and AWS Identity Center configuration. You can see Entra ID identity synced successfully with AWS IAM identity center.
Step 7 – Set up AWS Toolkit with IAM Identity Center
To use Amazon Q Developer, you will now set up the AWS Toolkit within integrated development environments (IDE) to establish authentication with the IAM Identity Center.
AWS Toolkit for Visual Studio Code is an open-source plug-in for VS Code that makes it easier for developers by providing an integrated experience to create, debug, and deploy applications on AWS. Getting started with Amazon Q Developer in VS Code is simple.
Open the AWS Toolkit for Visual Studio Code extension in your VS Code IDE. Install AWS Toolkit for VS Code, which is available as a download from the VS Code Marketplace.
From the AWS Toolkit for Visual Studio Code extension in the VS Code Marketplace, choose Install to begin the installation process.
When prompted, choose to restart VS Code to complete the installation process.
Step 8 – Setup Amazon Q Developer service with VS Code using AWS IAM identity center.
After installing the Amazon Q extension or plugin, authenticate through IAM Identity Center or AWS Builder ID.
After your identity has been subscribed to Amazon Q Developer Pro, complete the following steps to authenticate.
Choose the Amazon Q icon from the sidebar in your IDE
Choose Use with Pro license and select Continue (Figure 15).
Figure 15 – Visual Studio code Amazon Q Developer extension
Enter the IAM Identity Center URL you previously copied into the Start URL
Set the appropriate region, example us-east-1, and select Continue
Click Copy Code and Proceed to copy the code from the resulting pop-up.
When prompted by the Do you want Code to open the external website? pop-up, select Open
Paste the code copied in Step 6 and select Next
Enter your Entra ID credentials and select Sign in
Select Allow Access toAWS IDE Extensions for VSCode to access Amazon Q Developer (Figure 16).
Figure 16 – Allow VS Code to access Amazon Q Developer
When the connection is complete, a notification indicates that it is safe to close your browser. Close the browser tab and return to your IDE.
You are now all set to use Amazon Q Developer from within IDE, authenticated with your Entra ID credentials.
Step 9 – Test configuration examples
Now you have configured IAM identity Center access with VS code now you can chat, get inline code suggestions, check for security vulnerabilities with Amazon Q Developer to learn about, build, and operate AWS applications. I have mentioned a few examples of Amazon Q Suggestions, Code suggestions, Security Vulnerabilities during development for your reference (Figures 17 ,18 ,19 ,20).
Figure 17 – Amazon Q suggestion examples
Example of developers get the recommendations using Amazon Q developer.
Figure 18 – Amazon Q Developer example
Figure 19 – Generate code, explain code, and get answers to questions about software development.
Example of integrating secure coding practices early in the software development lifecycle using Amazon Q developer.
Figure 20 – Analyze and fix security vulnerabilities in your project example
Cleanup
Configuring AWS and Azure services from this blog will provision resources which incur cost. It is a best practice to delete configurations and resources that you are no longer using so that you do not incur unintended charges.
Conclusion
In this blog post, you learned how to integrate AWS IAM Identity Center and Entra ID IdP for accessing Amazon Q Developer service using VS Code IDE, which speeds up development. Next, you set up the AWS Toolkit to establish a secure connection to AWS using Entra ID credentials, granting you access to the Amazon Q Developer Professional Tier. Using SCIM automatic provisioning for user provisioning and access assignment saves time and speeds up onboarding, allowing for immediate use of AWS services using you own identity. Using Amazon Q, developers get the recommendations and information within their working environment in the IDE, enabling them to integrate secure coding practices early in the software development lifecycle. Developers can proactively scan their existing code using Amazon Q and remediate the security vulnerabilities found in the code.
To provide the best experiences, we use technologies like cookies to store and/or access device information. Consenting to these technologies will allow us to process data such as browsing behavior or unique IDs on this site. Not consenting or withdrawing consent, may adversely affect certain features and functions.
Functional
Always active
The technical storage or access is strictly necessary for the legitimate purpose of enabling the use of a specific service explicitly requested by the subscriber or user, or for the sole purpose of carrying out the transmission of a communication over an electronic communications network.
Preferences
The technical storage or access is necessary for the legitimate purpose of storing preferences that are not requested by the subscriber or user.
Statistics
The technical storage or access that is used exclusively for statistical purposes.The technical storage or access that is used exclusively for anonymous statistical purposes. Without a subpoena, voluntary compliance on the part of your Internet Service Provider, or additional records from a third party, information stored or retrieved for this purpose alone cannot usually be used to identify you.
Marketing
The technical storage or access is required to create user profiles to send advertising, or to track the user on a website or across several websites for similar marketing purposes.


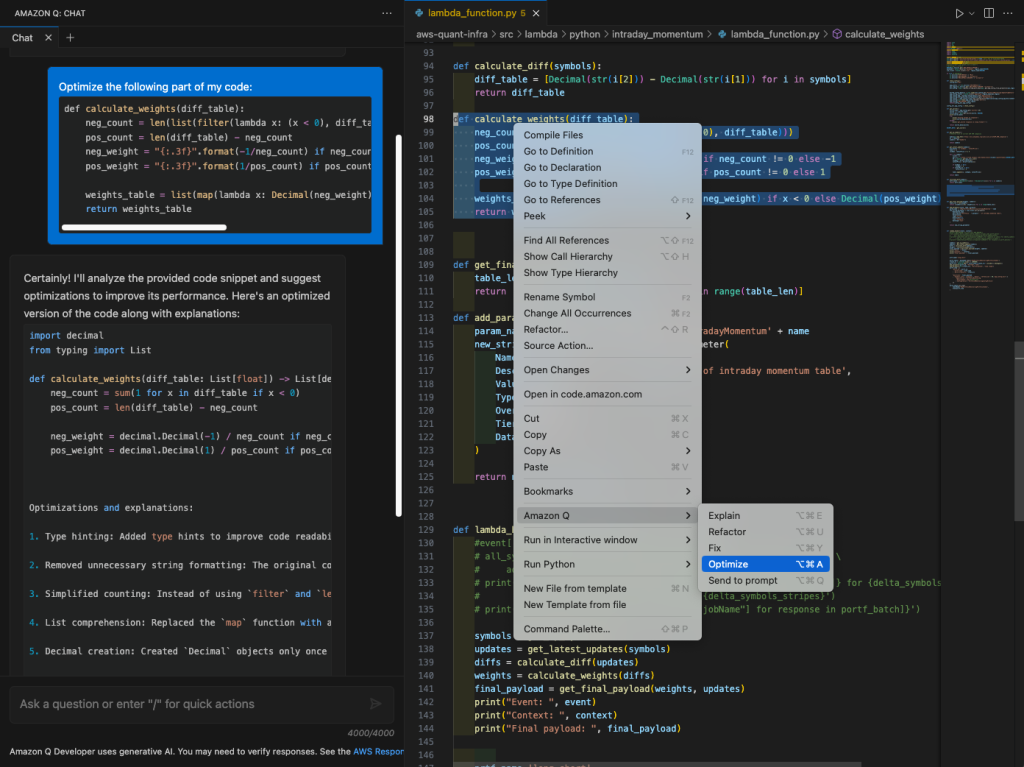


 Roman Martynenko is a Senior Solutions Architect at Amazon Web Services with over 20 years of experience in Software Engineering, Architecture and Cloud technologies. Roman is helping Canadian public sector customers with their cloud journey. He focuses on next-generation developer experience, helping organizations re-imagine the entire Software Development Lifecycle. Outside of work, he enjoys hiking, home automation, and DIY projects.
 Karthik Chemudupati is a Principal Technical Account Manager (TAM) with AWS, focused on helping customers achieve cost optimization and operational excellence. He has more than 20 years of IT experience in software engineering, cloud operations and automations. Karthik joined AWS in 2016 as a TAM and worked with more than dozen Enterprise Customers across US-West. Outside of work, he enjoys spending time with his family.
 Shardul Vaidya is a Worldwide Partner Solutions Architect with AWS, focused on helping partners and customers build and effectively use Generative AI powered developer experiences. Shardul joined AWS in 2020 as part of their early career talent Solutions Architect team and worked with over a hundred modernization and DevOps partners across the world. Outside of work, he’s a music lover and collects records.