Post Syndicated from Joshua Du Lac original https://aws.amazon.com/blogs/security/strategies-for-achieving-least-privilege-at-scale-part-1/
Least privilege is an important security topic for Amazon Web Services (AWS) customers. In previous blog posts, we’ve provided tactical advice on how to write least privilege policies, which we would encourage you to review. You might feel comfortable writing a few least privilege policies for yourself, but to scale this up to thousands of developers or hundreds of AWS accounts requires strategy to minimize the total effort needed across an organization.
At re:Inforce 2022, we recommended nine strategies for achieving least privilege at scale. Although the strategies we recommend remain the same, this blog series serves as an update, with a deeper discussion of some of the strategies. In this series, we focus only on AWS Identity and Access Management (IAM), not application or infrastructure identities. We’ll review least privilege in AWS, then dive into each of the nine strategies, and finally review some key takeaways. This blog post, Part 1, covers the first five strategies, while Part 2 of the series covers the remaining four.
Overview of least privilege
The principle of least privilege refers to the concept that you should grant users and systems the narrowest set of privileges needed to complete required tasks. This is the ideal, but it’s not so simple when change is constant—your staff or users change, systems change, and new technologies become available. AWS is continually adding new services or features, and individuals on your team might want to adopt them. If the policies assigned to those users were perfectly least privilege, then you would need to update permissions constantly as the users ask for more or different access. For many, applying the narrowest set of permissions could be too restrictive. The irony is that perfect least privilege can cause maximum effort.
We want to find a more pragmatic approach. To start, you should first recognize that there is some tension between two competing goals—between things you don’t want and things you do want, as indicated in Figure 1. For example, you don’t want expensive resources created, but you do want freedom for your builders to choose their own resources.

Figure 1: Tension between two competing goals
There’s a natural tension between competing goals when you’re thinking about least privilege, and you have a number of controls that you can adjust to securely enable agility. I’ve spoken with hundreds of customers about this topic, and many focus primarily on writing near-perfect permission policies assigned to their builders or machines, attempting to brute force their way to least privilege.
However, that approach isn’t very effective. So where should you start? To answer this, we’re going to break this question down into three components: strategies, tools, and mental models. The first two may be clear to you, but you might be wondering, “What is a mental model”? Mental models help us conceptualize something complex as something relatively simpler, though naturally this leaves some information out of the simpler model.
Teams
Teams generally differ based on the size of the organization. We recognize that each customer is unique, and that customer needs vary across enterprises, government agencies, startups, and so on. If you feel the following example descriptions don’t apply to you today, or that your organization is too small for this many teams to co-exist, then keep in mind that the scenarios might be more applicable in the future as your organization continues to grow. Before we can consider least privilege, let’s consider some common scenarios.
Customers who operate in the cloud tend to have teams that fall into one of two categories: decentralized and centralized. Decentralized teams might be developers or groups of developers, operators, or contractors working in your cloud environment. Centralized teams often consist of administrators. Examples include a cloud environment team, an infrastructure team, the security team, the network team, or the identity team.
Scenarios
To achieve least privilege in an organization effectively, teams must collaborate. Let’s consider three common scenarios:
- Creating default roles and policies (for teams and monitoring)
- Creating roles and policies for applications
- Verifying and refining existing permissions
The first scenario focuses on the baseline set of roles and permissions that are necessary to start using AWS. Centralized teams (such as a cloud environmentteam or identity and access management team) commonly create these initial default roles and policies that you deploy by using your account factory, IAM Identity Center, or through AWS Control Tower. These default permissions typically enable federation for builders or enable some automation, such as tools for monitoring or deployments.
The second scenario is to create roles and policies for applications. After foundational access and permissions are established, the next step is for your builders to use the cloud to build. Decentralized teams (software developers, operators, or contractors) use the roles and policies from the first scenario to then create systems, software, or applications that need their own permissions to perform useful functions. These teams often need to create new roles and policies for their software to interact with databases, Amazon Simple Storage Service (Amazon S3), Amazon Simple Queue Service (Amazon SQS) queues, and other resources.
Lastly, the third scenario is to verify and refine existing permissions, a task that both sets of teams should be responsible for.
Journeys
At AWS, we often say that least privilege is a journey, because change is a constant. Your builders may change, systems may change, you may swap which services you use, and the services you use may add new features that your teams want to adopt, in order to enable faster or more efficient ways of working. Therefore, what you consider least privilege today may be considered insufficient by your users tomorrow.
This journey is made up of a lifecycle of setting, verifying, and refining permissions. Cloud administrators and developers will set permissions, they will then verify permissions, and then they refine those permissions over time, and the cycle repeats as illustrated in Figure 2. This produces feedback loops of continuous improvement, which add up to the journey to least privilege.

Figure 2: Least privilege is a journey
Strategies for implementing least privilege
The following sections will dive into nine strategies for implementing least privilege at scale:
Part 1 (this post):
- (Plan) Begin with coarse-grained controls
- (Plan) Use accounts as strong boundaries around resources
- (Plan) Prioritize short-term credentials
- (Policy) Enforce broad security invariants
- (Policy) Identify the right tool for the job
- (Policy) Empower developers to author application policies
- (Process) Maintain well-written policies
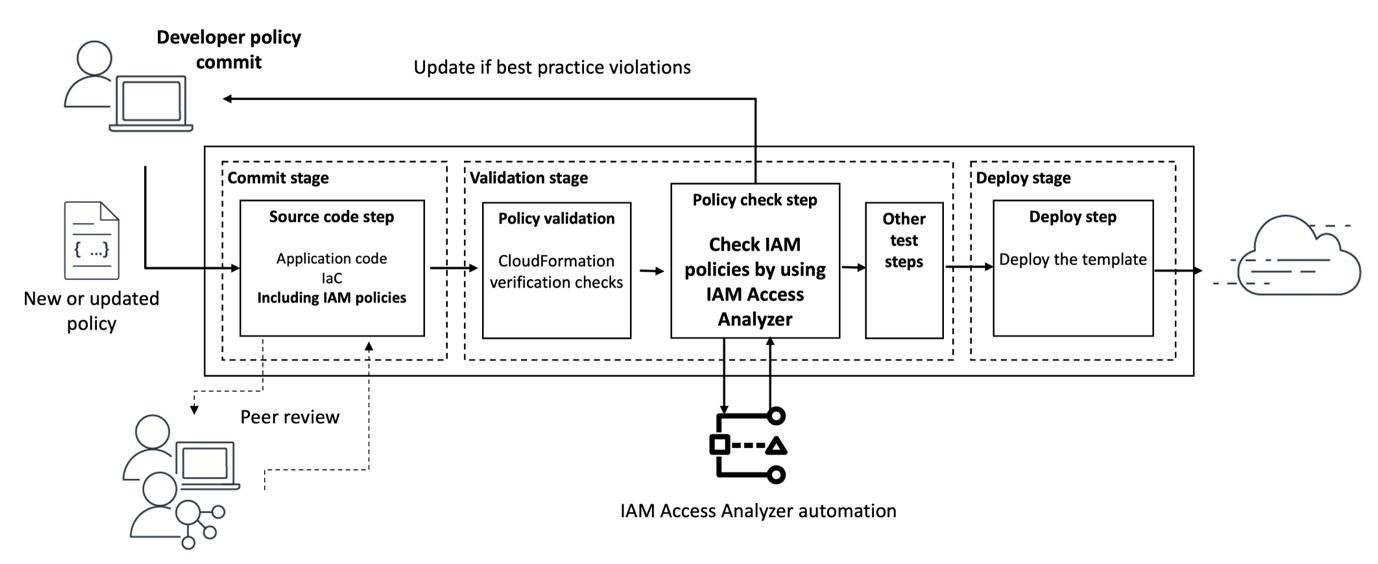
- (Process) Peer-review and validate policies
- (Process) Remove excess privileges over time
To provide some logical structure, the strategies can be grouped into three categories—plan, policy, and process. Plan is where you consider your goals and the outcomes that you want to achieve and then design your cloud environment to simplify those outcomes. Policy focuses on the fact that you will need to implement some of those goals in either the IAM policy language or as code (such as infrastructure-as-code). The Process category will look at an iterative approach to continuous improvement. Let’s begin.
1. Begin with coarse-grained controls
Most systems have relationships, and these relationships can be visualized. For example, AWS accounts relationships can be visualized as a hierarchy, with an organization’s management account and groups of AWS accounts within that hierarchy, and principals and policies within those accounts, as shown in Figure 3.

Figure 3: Icicle diagram representing an account hierarchy
When discussing least privilege, it’s tempting to put excessive focus on the policies at the bottom of the hierarchy, but you should reverse that thinking if you want to implement least privilege at scale. Instead, this strategy focuses on coarse-grained controls, which refer to a top-level, broader set of controls. Examples of these broad controls include multi-account strategy, service control policies, blocking public access, and data perimeters.
Before you implement coarse-grained controls, you must consider which controls will achieve the outcomes you desire. After the relevant coarse-grained controls are in place, you can tailor the permissions down the hierarchy by using more fine-grained controls along the way. The next strategy reviews the first coarse-grained control we recommend.
2. Use accounts as strong boundaries around resources
Although you can start with a single AWS account, we encourage customers to adopt a multi-account strategy. As customers continue to use the cloud, they often need explicit security boundaries, the ability to control limits, and billing separation. The isolation designed into an AWS account can help you meet these needs.
Customers can group individual accounts into different assortments (organizational units) by using AWS Organizations. Some customers might choose to align this grouping by environment (for example: Dev, Pre-Production, Test, Production) or by business units, cost center, or some other option. You can choose how you want to construct your organization, and AWS has provided prescriptive guidance to assist customers when they adopt a multi-account strategy.
Similarly, you can use this approach for grouping security controls. As you layer in preventative or detective controls, you can choose which groups of accounts to apply them to. When you think of how to group these accounts, consider where you want to apply your security controls that could affect permissions.
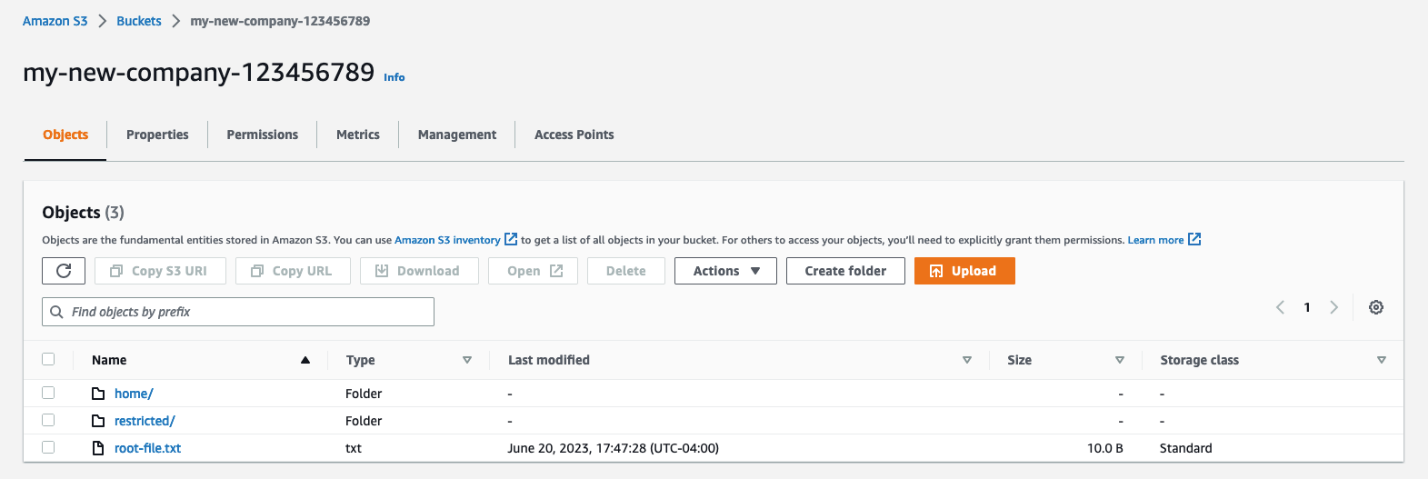
AWS accounts give you strong boundaries between accounts (and the entities that exist in those accounts). As shown in Figure 4, by default these principals and resources cannot cross their account boundary (represented by the red dotted line on the left).

Figure 4: Account hierarchy and account boundaries
In order for these accounts to communicate with each other, you need to explicitly enable access by adding narrow permissions. For use cases such as cross-account resource sharing, or cross-VPC networking, or cross-account role assumptions, you would need to explicitly enable the required access by creating the necessary permissions. Then you could review those permissions by using IAM Access Analyzer.
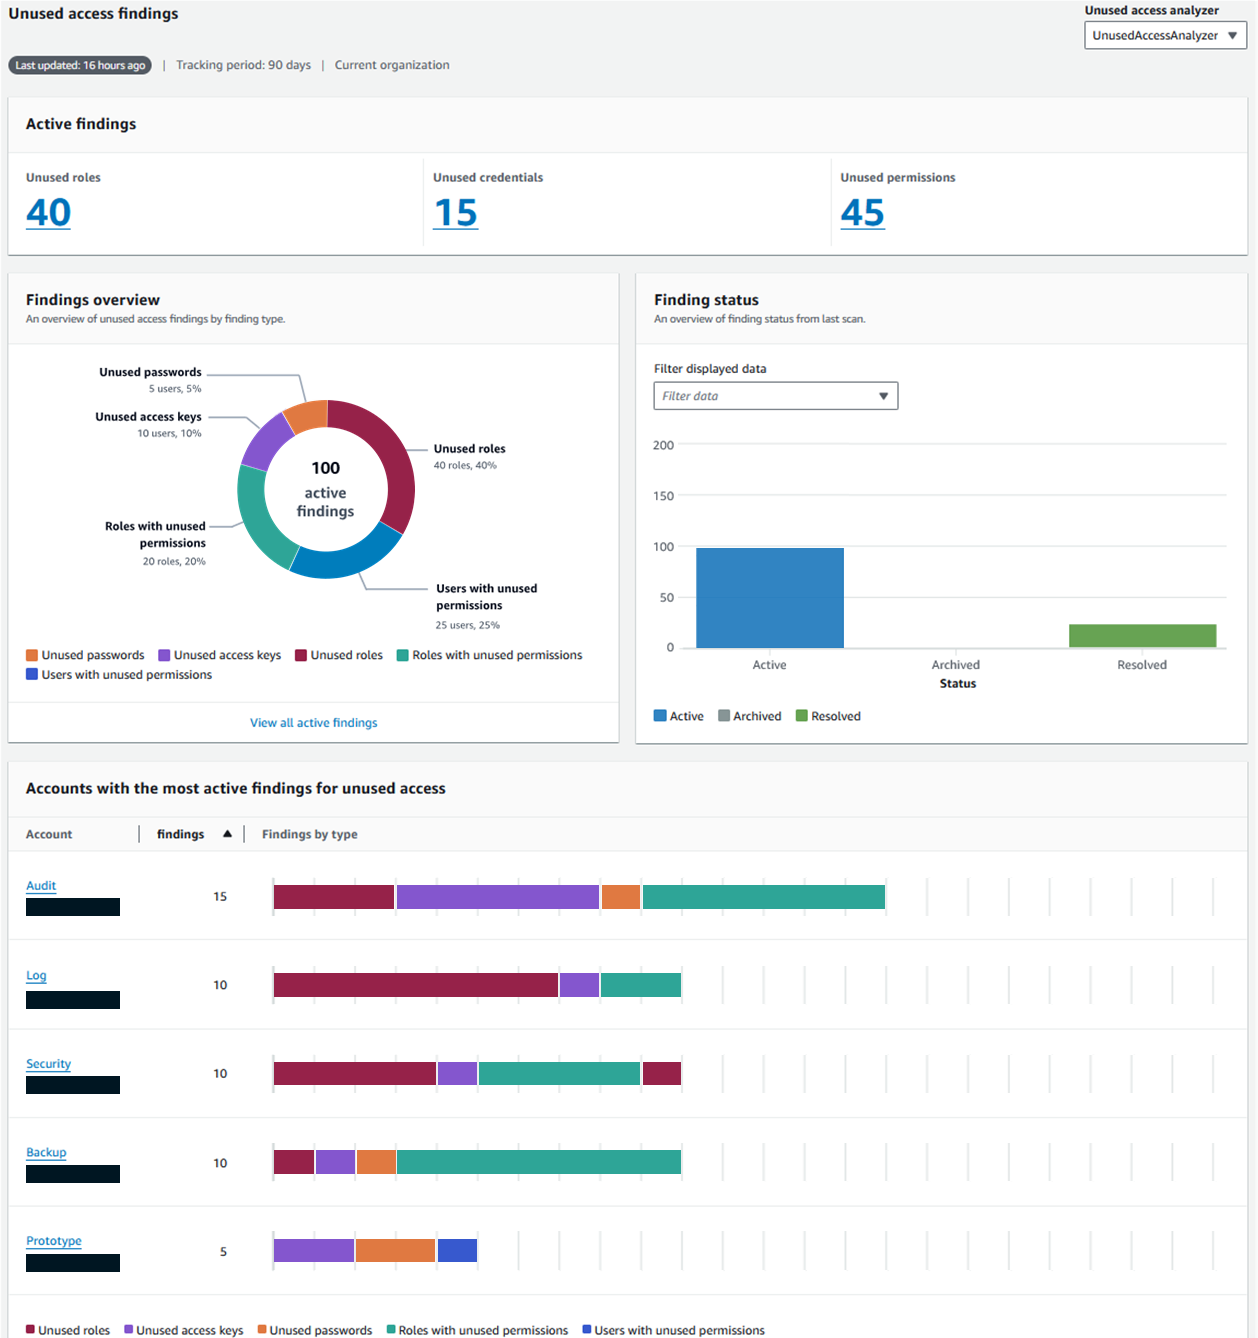
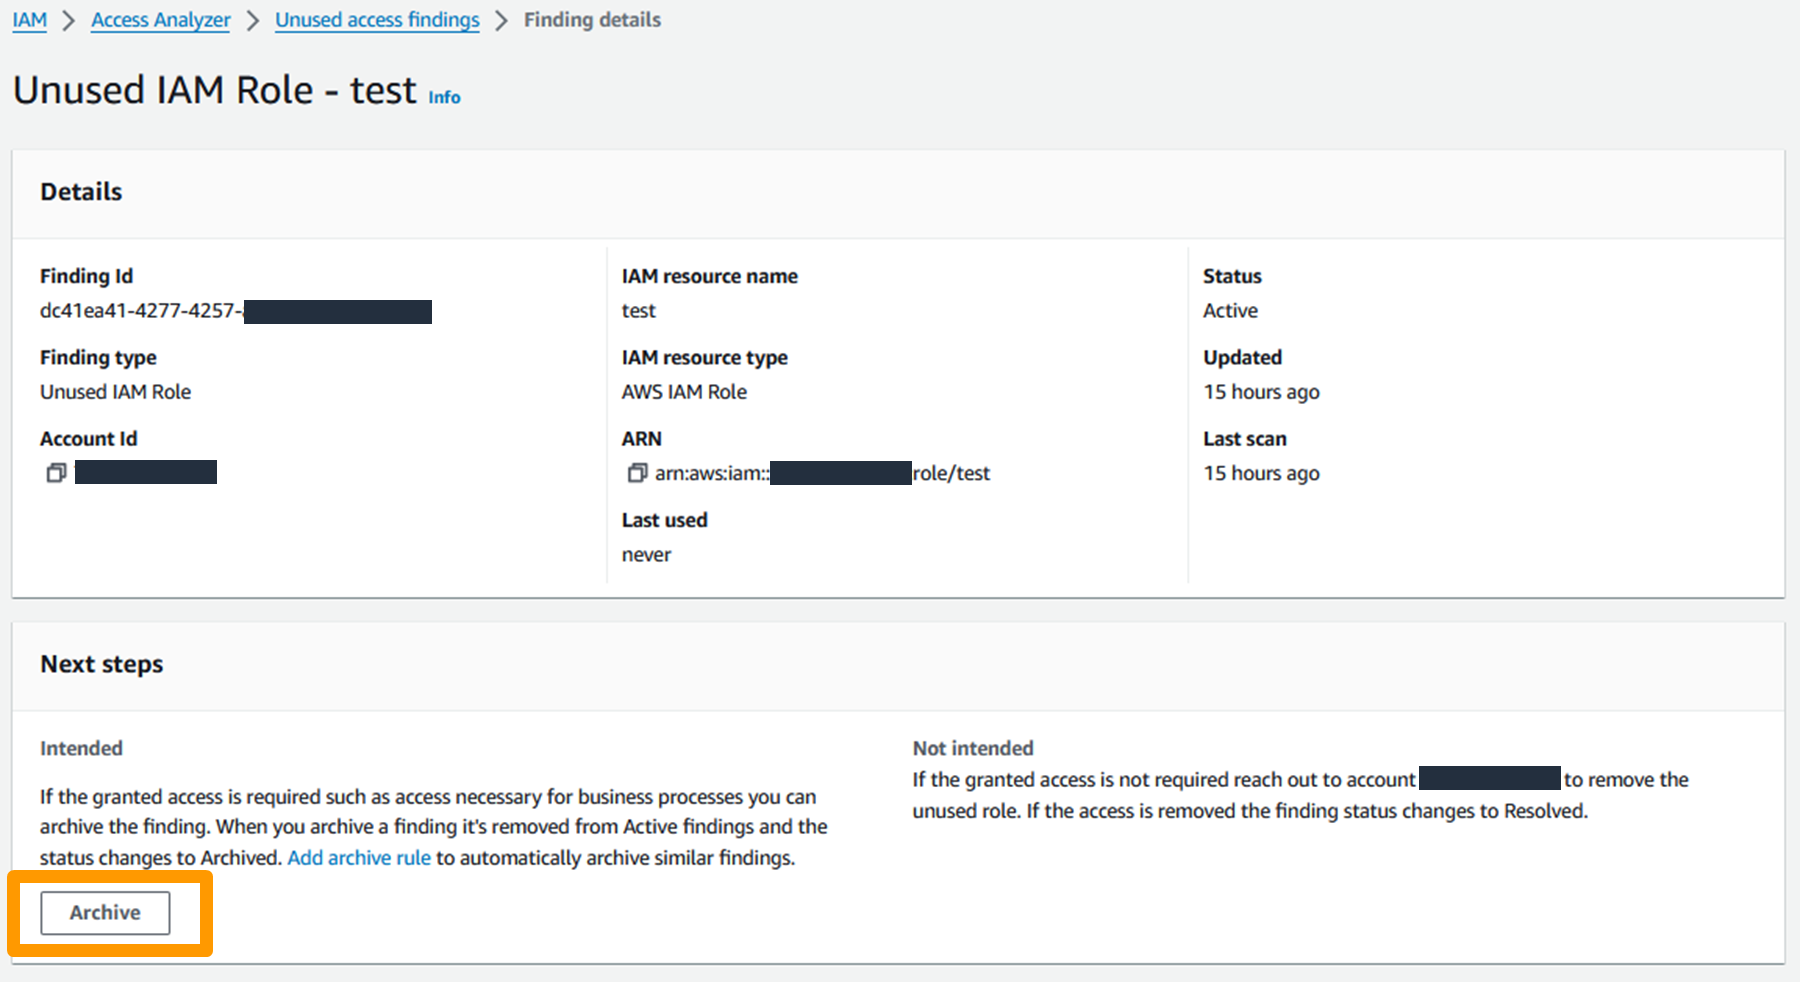
One type of analyzer within IAM Access Analyzer, external access, helps you identify resources (such as S3 buckets, IAM roles, SQS queues, and more) in your organization or accounts that are shared with an external entity. This helps you identify if there’s potential for unintended access that could be a security risk to your organization. Although you could use IAM Access Analyzer (external access) with a single account, we recommend using it at the organization level. You can configure an access analyzer for your entire organization by setting the organization as the zone of trust, to identify access allowed from outside your organization.
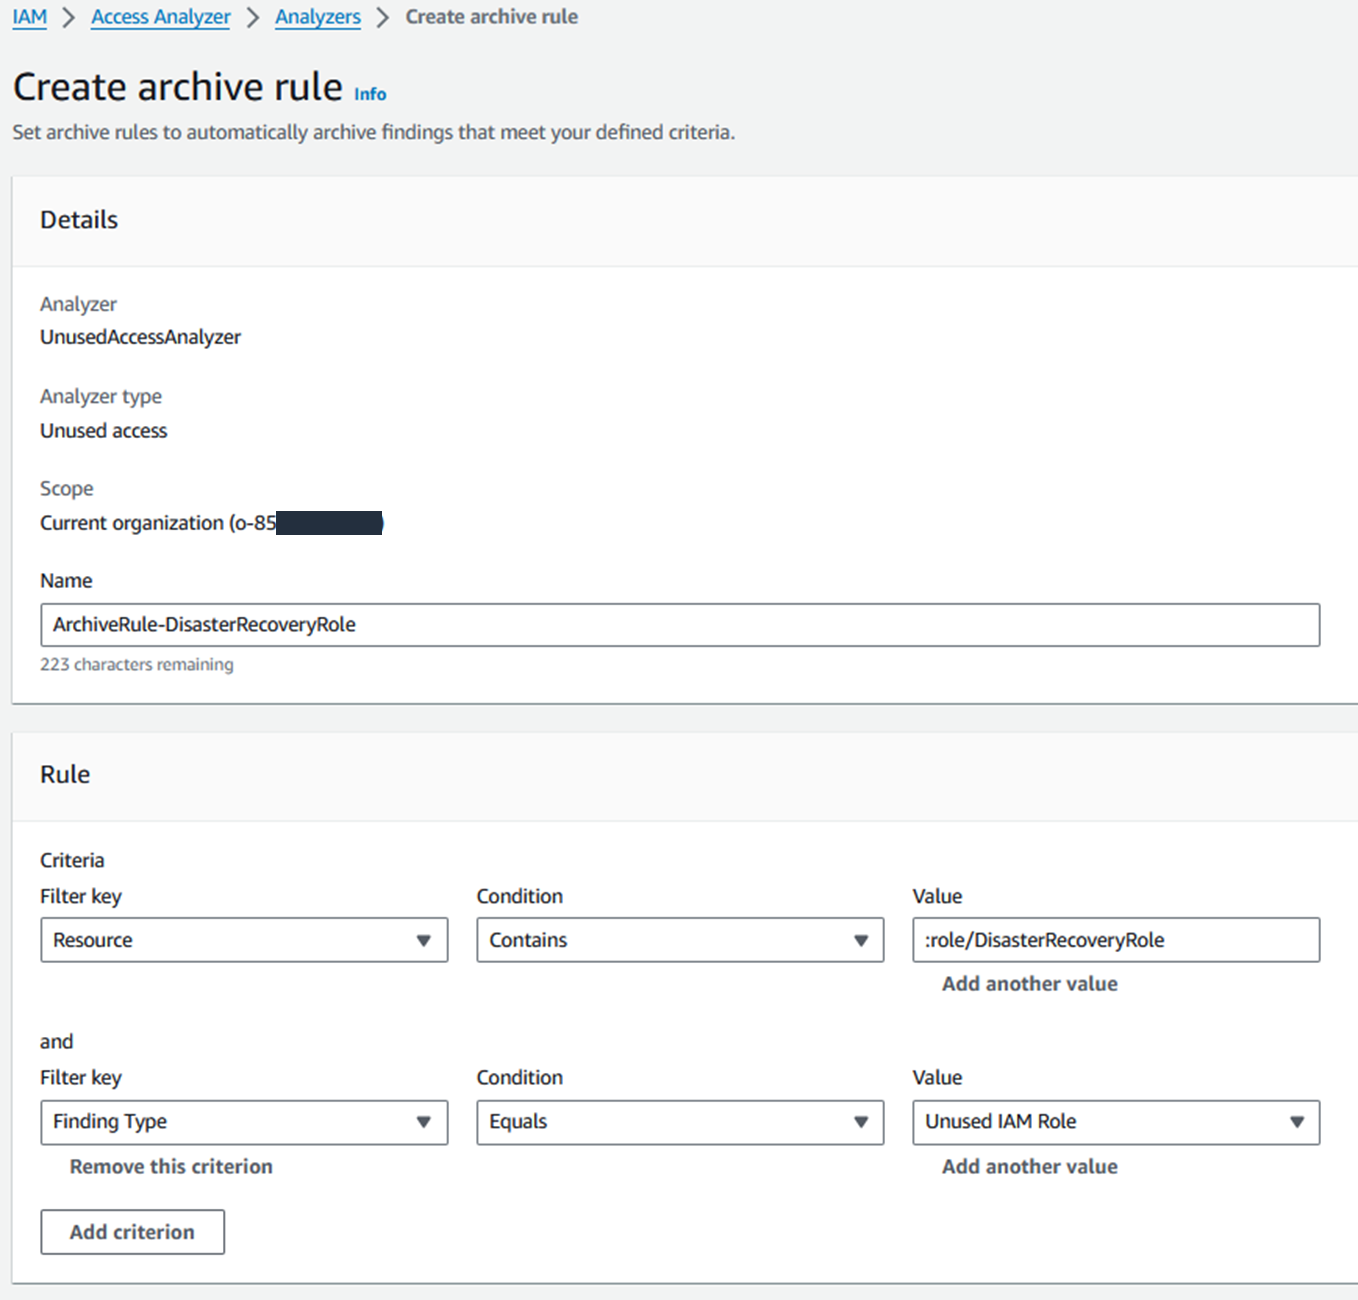
To get started, you create the analyzer and it begins analyzing permissions. The analysis may produce findings, which you can review for intended and unintended access. You can archive the intended access findings, but you’ll want to act quickly on the unintended access to mitigate security risks.
In summary, you should use accounts as strong boundaries around resources, and use IAM Access Analyzer to help validate your assumptions and find unintended access permissions in an automated way across the account boundaries.
3. Prioritize short-term credentials
When it comes to access control, shorter is better. Compared to long-term access keys or passwords that could be stored in plaintext or mistakenly shared, a short-term credential is requested dynamically by using strong identities. Because the credentials are being requested dynamically, they are temporary and automatically expire. Therefore, you don’t have to explicitly revoke or rotate the credentials, nor embed them within your application.
In the context of IAM, when we’re discussing short-term credentials, we’re effectively talking about IAM roles. We can split the applicable use cases of short-term credentials into two categories—short-term credentials for builders and short-term credentials for applications.
Builders (human users) typically interact with the AWS Cloud in one of two ways; either through the AWS Management Console or programmatically through the AWS CLI. For console access, you can use direct federation from your identity provider to individual AWS accounts or something more centralized through IAM Identity Center. For programmatic builder access, you can get short-term credentials into your AWS account through IAM Identity Center using the AWS CLI.
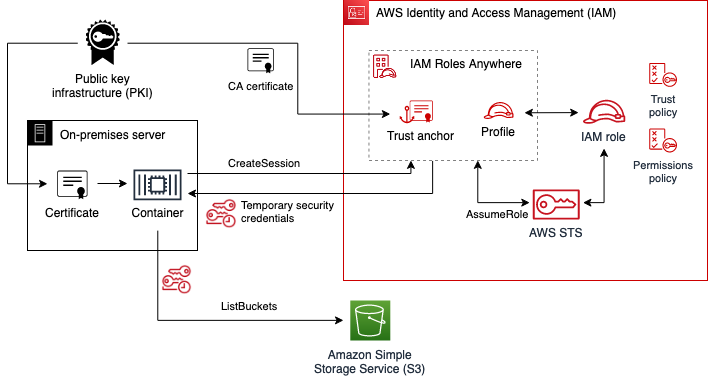
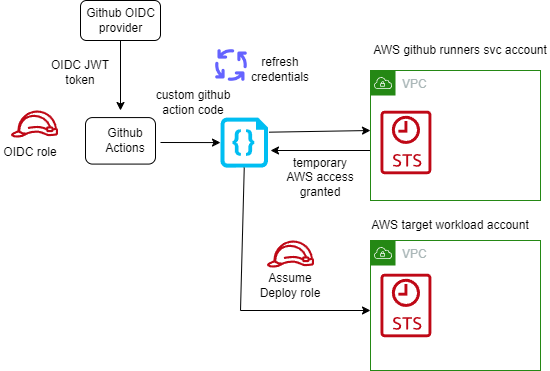
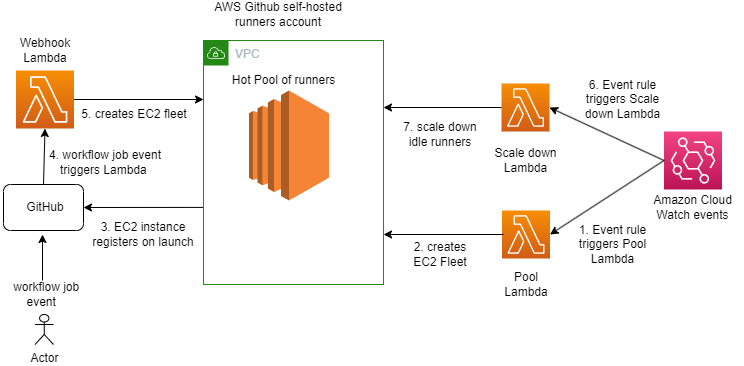
Applications created by builders need their own permissions, too. Typically, when we consider short-term credentials for applications, we’re thinking of capabilities such as IAM roles for Amazon Elastic Compute Cloud (Amazon EC2), IAM roles for Amazon Elastic Container Service (Amazon ECS) tasks, or AWS Lambda execution roles. You can also use IAM Roles Anywhere to obtain temporary security credentials for workloads and applications that run outside of AWS. Use cases that require cross-account access can also use IAM roles for granting short-term credentials.
However, organizations might still have long-term secrets, like database credentials, that need to be stored somewhere. You can store these secrets with AWS Secrets Manager, which will encrypt the secret by using an AWS KMS encryption key. Further, you can configure automatic rotation of that secret to help reduce the risk of those long-term secrets.
4. Enforce broad security invariants
Security invariants are essentially conditions that should always be true. For example, let’s assume an organization has identified some core security conditions that they want enforced:
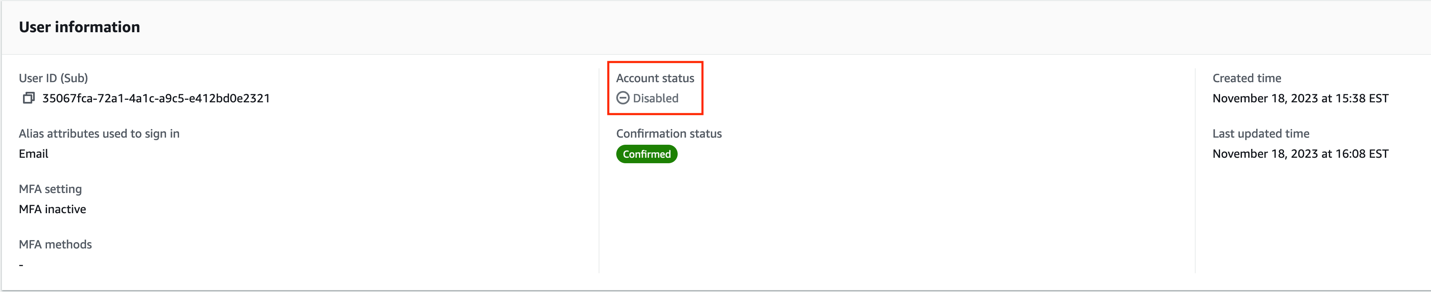
- Block access for the AWS account root user
- Disable access to unused AWS Regions
- Prevent the disabling of AWS logging and monitoring services (AWS CloudTrail or Amazon CloudWatch)
You can enable these conditions by using service control policies (SCPs) at the organization level for groups of accounts using an organizational unit (OU), or for individual member accounts.
Notice these words—block, disable, and prevent. If you’re considering these actions in the context of all users or all principals except for the administrators, that’s where you’ll begin to implement broad security invariants, generally by using service control policies. However, a common challenge for customers is identifying what conditions to apply and the scope. This depends on what services you use, the size of your organization, the number of teams you have, and how your organization uses the AWS Cloud.
Some actions have inherently greater risk, while others may have nominal risk or are more easily reversible. One mental model that has helped customers to consider these issues is an XY graph, as illustrated in the example in Figure 5.

Figure 5: Using an XY graph for analyzing potential risk versus frequency of use
The X-axis in this graph represents the potential risk associated with using a service functionality within a particular account or environment, while the Y-axis represents the frequency of use of that service functionality. In this representative example, the top-left part of the graph covers actions that occur frequently and are relatively safe—for example, read-only actions.
The functionality in the bottom-right section is where you want to focus your time. Consider this for yourself—if you were to create a similar graph for your environment—what are the actions you would consider to be high-risk, with an expected low or rare usage within your environment? For example, if you enable CloudTrail for logging, you want to make sure that someone doesn’t invoke the CloudTrail StopLogging API operation or delete the CloudTrail logs. Another high-risk, low-usage example could include restricting AWS Direct Connect or network configuration changes to only your network administrators.
Over time, you can use the mental model of the XY graph to decide when to use preventative guardrails for actions that should never happen, versus conditional or alternative guardrails for situational use cases. You could also move from preventative to detective security controls, while accounting for factors such as the user persona and the environment type (production, development, or testing). Finally, you could consider doing this exercise broadly at the service level before thinking of it in a more fine-grained way, feature-by-feature.
However, not all controls need to be custom to your organization. To get started quickly, here are some examples of documented SCPs as well as AWS Control Tower guardrail references. You can adopt those or tailor them to fit your environment as needed.
5. Identify the right tools for the job
You can think of IAM as a toolbox that offers many tools that provide different types of value. We can group these tools into two broad categories: guardrails and grants.
Guardrails are the set of tools that help you restrict or deny access to your accounts. At a high level, they help you figure out the boundary for the set of permissions that you want to retain. SCPs are a great example of guardrails, because they enable you to restrict the scope of actions that principals in your account or your organization can take. Permissions boundaries are another great example, because they enable you to safely delegate the creation of new principals (roles or users) and permissions by setting maximum permissions on the new identity.
Although guardrails help you restrict access, they don’t inherently grant any permissions. To grant permissions, you use either an identity-based policy or resource-based policy. Identity policies are attached to principals (roles or users), while resource-based policies are applied to specific resources, such as an S3 bucket.
A common question is how to decide when to use an identity policy versus a resource policy to grant permissions. IAM, in a nutshell, seeks to answer the question: who can access what? Can you spot the nuance in the following policy examples?
Policies attached to principals
Policies attached to resources
You likely noticed the difference here is that with identity-based (principal) policies, the principal is implicit (that is, the principal of the policy is the entity to which the policy is applied), while in a resource-based policy, the principal must be explicit (that is, the principal has to be specified in the policy). A resource-based policy can enable cross-account access to resources (or even make a resource effectively public), but the identity-based policies likewise need to allow the access to that cross-account resource. Identity-based policies with sufficient permissions can then access resources that are “shared.” In essence, both the principal and the resource need to be granted sufficient permissions.
When thinking about grants, you can address the “who” angle by focusing on the identity-based policies, or the “what” angle by focusing on resource-based policies. For additional reading on this topic, see this blog post. For information about how guardrails and grants are evaluated, review the policy evaluation logic documentation.
Lastly, if you’d like a detailed walkthrough on choosing the right tool for the job, we encourage you to read the IAM policy types: How and when to use them blog post.
Conclusion
This blog post walked through the first five (of nine) strategies for achieving least privilege at scale. For the remaining four strategies, see Part 2 of this series.
If you have feedback about this post, submit comments in the Comments section below. If you have questions about this post, contact AWS Support.


 Sid Wray is a Senior Product Manager at Salesforce based in the Pacific Northwest with nearly 20 years of experience in Digital Advertising, Data Analytics, Connectivity Integration and Identity and Access Management. He currently focuses on supporting ISV partners for Salesforce Data Cloud.
 Jade Koskela is a Principal Software Engineer at Salesforce. He has over a decade of experience building Tableau with a focus on areas including data connectivity, authentication, and identity federation.