Post Syndicated from James Beswick original https://aws.amazon.com/blogs/compute/building-a-difference-checker-with-amazon-s3-and-aws-lambda/
When saving different versions of files or objects, it can be useful to detect and log the differences between the versions automatically. A difference checker tool can detect changes in JSON files for configuration changes, or log changes in documents made by users.
This blog post shows how to build and deploy a scalable difference checker service using Amazon S3 and AWS Lambda. The example application uses the AWS Serverless Application Model (AWS SAM), enabling you to deploy the application more easily in your own AWS account.
This walkthrough creates resources covered in the AWS Free Tier but usage beyond the Free Tier allowance may incur cost. To set up the example, visit the GitHub repo and follow the instructions in the README.md file.
Overview
By default in S3, when you upload an object with the same name as an existing object, the new object overwrites the existing one. However, when you enable versioning in a S3 bucket, the service stores every version of an object. Versioning provides an effective way to recover objects in the event of accidental deletion or overwriting. It also provides a way to detect changes in objects, since you can compare the latest version to previous versions.
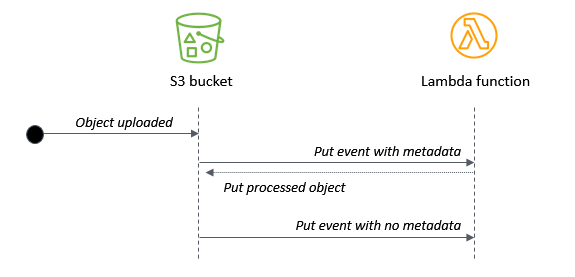
In the example application, the S3 bucket triggers a Lambda function every time an object version is unloaded. The Lambda function compares the latest version with the last version and then writes the differences to Amazon CloudWatch Logs.
Additionally, the application uses a configurable environment variable to determine how many versions of the object to retain. By default, it keeps the latest three versions. The Lambda function deletes versions that are earlier than the configuration allows, providing an effective way to implement object life cycling.
This shows the application flow when multiple versions of an object are uploaded:
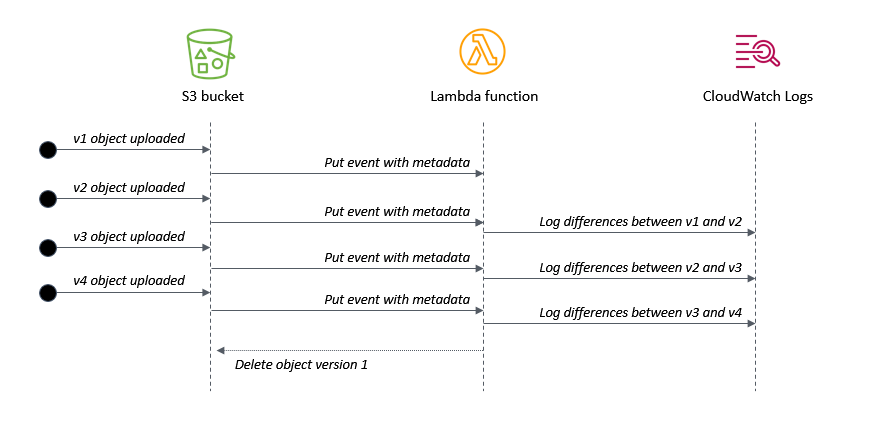
- When v1 is uploaded, there is no previous version to compare against.
- When v2 is uploaded, the Lambda function logs the differences compared with v1.
- When v3 is uploaded, the Lambda function logs the differences compared with v2.
- When v4 is uploaded, the Lambda function logs the differences compared with v3. It then deletes v1 of the object, since it is earlier than the configured setting.
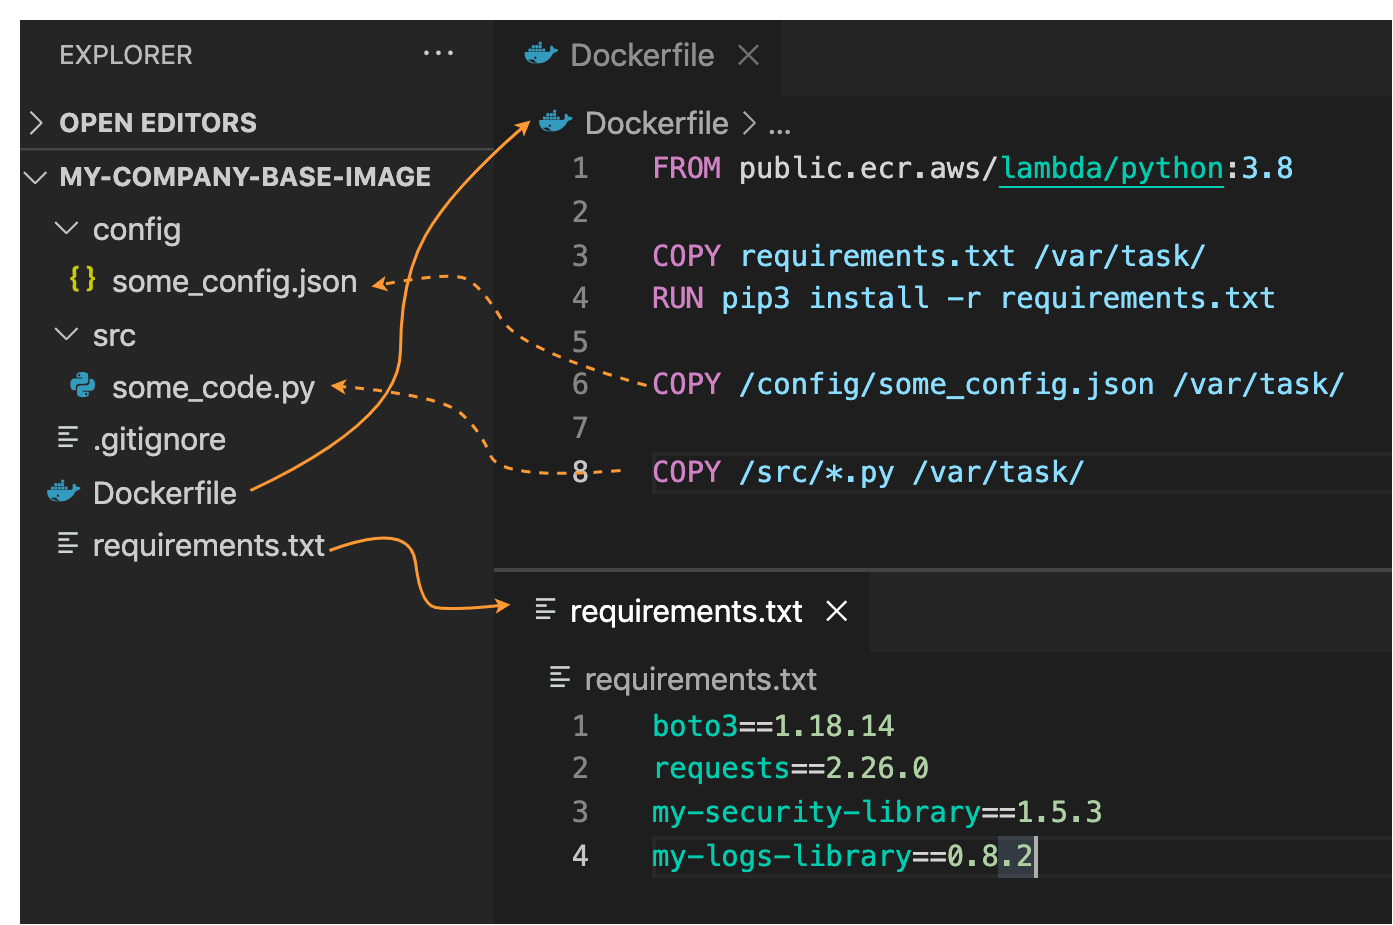
Understanding the AWS SAM template
The application’s AWS SAM template configures the bucket with versioning enabled using the VersioningConfiguration attribute:
  SourceBucket:
    Type: AWS::S3::Bucket
    Properties:
      BucketName: !Ref BucketName
      VersioningConfiguration:
        Status: Enabled
It defines the Lambda function with an environment variable KEEP_VERSIONS, which determines how many versions of an object to retain:
  S3ProcessorFunction:
    Type: AWS::Serverless::Function
    Properties:
      CodeUri: src/
      Handler: app.handler
      Runtime: nodejs14.x
      MemorySize: 128
      Environment:
        Variables:
          KEEP_VERSIONS: 3
The template uses an AWS SAM policy template to provide the Lambda function with an S3ReadPolicy to the objects in the bucket. The version handling logic requires s3:ListBucketVersions permission on the bucket and s3:DeleteObjectVersion permission on the objects in the bucket. It’s important to note which permissions apply to the bucket and which apply to the objects within the bucket. The template defines these three permission types in the function’s policy:
      Policies:
        - S3ReadPolicy:
            BucketName: !Ref BucketName
        - Statement:
          - Sid: VersionsPermission
            Effect: Allow
            Action:
            - s3:ListBucketVersions
            Resource: !Sub "arn:${AWS::Partition}:s3:::${BucketName}"
        - Statement:
          - Sid: DeletePermission
            Effect: Allow
            Action:
            - s3:DeleteObject
            - s3:DeleteObjectVersion
            Resource: !Sub "arn:${AWS::Partition}:s3:::${BucketName}/*"
The example application only works for text files but you can use the same logic to process other file types. The event definition ensures that only objects ending in ‘.txt’ invoke the Lambda function:
      Events:
        FileUpload:
          Type: S3
          Properties:
            Bucket: !Ref SourceBucket
            Events: s3:ObjectCreated:*
            Filter:
              S3Key:
                Rules:
                  - Name: suffix
                    Value: '.txt'
Processing events from the S3 bucket
S3 sends events to the Lambda function when objects are created. The event contains metadata about the objects but not the contents of the object. It’s good practice to separate the business logic of the function from the Lambda handler, so the generic handler in app.js iterates through the event’s records and calls the custom logic for each record:
const { processS3 } = require('./processS3')

exports.handler = async (event) => {
  console.log (JSON.stringify(event, null, 2))

  await Promise.all(
    event.Records.map(async (record) => {
      try {
        await processS3(record)
      } catch (err) {
        console.error(err)
      }
    })
  )
}
The processS3.js file contains a function that fetches the object versions in the bucket and sorts the event data received. The listObjectVersions method of the S3 API requires the s3:ListBucketVersions permission, as provided in the AWS SAM template:
    // Decode URL-encoded key
    const Key = decodeURIComponent(record.s3.object.key.replace(/\+/g, " "))

    // Get the list of object versions
    const data = await s3.listObjectVersions({
      Bucket: record.s3.bucket.name,
      Prefix: Key
    }).promise()

   // Sort versions by date (ascending by LastModified)
    const versions = data.Versions
    const sortedVersions = versions.sort((a,b) => new Date(a.LastModified) - new Date(b.LastModified))
Finally, the compareS3.js file contains a function that loads the latest two versions of the S3 object and uses the Diff npm library to compare:
const compareS3 = async (oldVersion, newVersion) => {
  try {
    console.log ({oldVersion, newVersion})

    // Get original text from objects
    const oldObject = await s3.getObject({ Bucket: oldVersion.BucketName, Key: oldVersion.Key }).promise()
    const newObject = await s3.getObject({ Bucket: newVersion.BucketName, Key: newVersion.Key }).promise()

    // Convert buffers to strings
    const oldFile = oldObject.Body.toString()
    const newFile = newObject.Body.toString()

    // Use diff library to compare files (https://www.npmjs.com/package/diff)
    return Diff.diffWords(oldFile, newFile)

  } catch (err) {
    console.error('compareS3: ', err)
  }
}
Life-cycling earlier versions of an S3 object
You can use an S3 Lifecycle configuration to apply rules automatically based on object transition actions. Using this approach, you can expire objects based upon age and the S3 service processes the deletion asynchronously. Lifecyling with rules is entirely managed by S3 and does not require any custom code. This implementation uses a different approach, using code to delete objects based on number of retained versions instead of age.
When versioning is enabled on a bucket, S3 adds a VersionId attribute to an object when it is created. This identifier is a random string instead of a sequential identifier. Listing the versions of an object also returns a LastModified attribute, which can be used to determine the order of the versions. The length of the response array also indicates the number of versions available for an object:
[
  {
    Key: 'test.txt',
    VersionId: 'IX_tyuQrgKpMFfq5YmLOlrtaleRBQRE',
    IsLatest: false,
    LastModified: 2021-08-01T18:48:50.000Z,
  },
  {
    Key: 'test.txt',
    VersionId: 'XNpxNgUYhcZDcI9Q9gXCO9_VRLlx1i.',
    IsLatest: false,
    LastModified: 2021-08-01T18:52:58.000Z,
  },
  {
    Key: 'test.txt',
    VersionId: 'RBk2BUIKcYYt4hNA5hrTVdNit.MDNMZ',
    IsLatest: true,
    LastModified: 2021-08-01T18:53:26.000Z,
  }
]
For convenience, this code adds a sequential version number attribute, determined by sorting the array by date. The deleteS3 function uses the deleteObjects method in the S3 API to delete multiple objects in one action. It builds a params object containing the list of keys for deletion, using the sequential version ID to flag versions for deletion:
const deleteS3 = async (versions) => {

  const params = {
    Bucket: versions[0].BucketName,
    Delete: {
     Objects: [ ]
    }
  }

  try {
    // Add keys/versions from objects that are process.env.KEEP_VERSIONS behind
    versions.map((version) => {
      if ((versions.length - version.VersionNumber) >= process.env.KEEP_VERSIONS ) {
        console.log(`Delete version ${version.VersionNumber}: versionId = ${version.VersionId}`)
        params.Delete.Objects.push({
          Key: version.Key,
          VersionId: version.VersionId
        })
      }
    })

    // Delete versions
    const result = await s3.deleteObjects(params).promise()
    console.log('Delete object result: ', result)

  } catch (err) {
    console.error('deleteS3: ', err)
  }
}
Testing the application
To test this example, upload a sample text file to the S3 bucket by using the AWS Management Console or with the AWS CLI:
aws s3 cp sample.txt s3://myS3bucketname
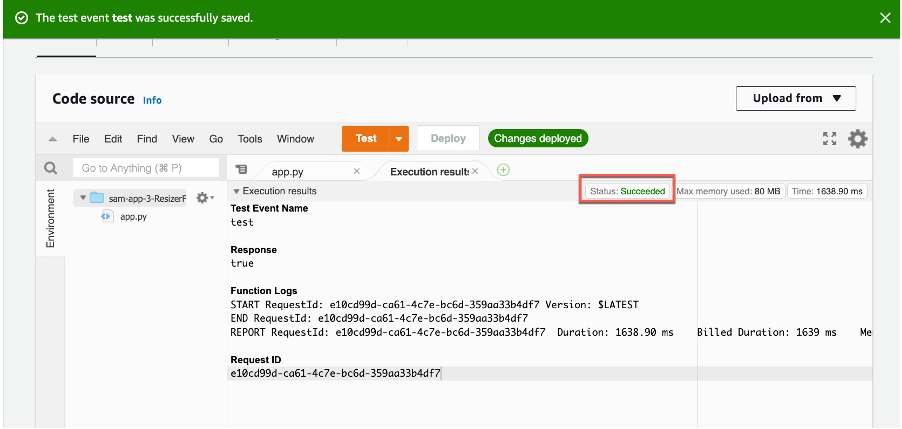
Modify the test file and then upload again using the same command. This creates a second version in the bucket. Repeat this process multiple times to create more versions of the object. The Lambda function’s log file shows the differences between versions and any deletion activity for earlier versions:

You can also test the object locally using the test.js function and supplying a test event. This can be useful for local debugging and testing.
Conclusion
This blog post shows how to create a scalable difference checking tool for objects stored in S3 buckets. The Lambda function is invoked when S3 writes new versions of an object to the bucket. This example also shows how to remove earlier versions of object and define a set number of versions to retain.
I walk through the AWS SAM template for deploying this example application and highlight important S3 API methods in the SDK used in the implementation. I explain how version IDs work in S3 and how to use this in combination with the LastModified date attribute to implement sequential versioning.
To learn more about best practices when using S3 to Lambda, see the Lambda Operator Guide. For more serverless learning resources, visit Serverless Land.


 Syed Ali Abbas Gardezi is a Sr. Solution Architect for AWS based in London, United Kingdom. He works with AWS GSI Partners architecting, designing and implementing various large-scale IT solution. Before joining AWS he worked in several Architecture roles in a tier 1 financial organisation in London.


 After stack creation, you see