Tag Archives: Developer Tools

Rapid and flexible Infrastructure as Code using the AWS CDK with AWS Solutions Constructs

Post Syndicated from Biff Gaut original https://aws.amazon.com/blogs/devops/rapid-flexible-infrastructure-with-solutions-constructs-cdk/

Introduction

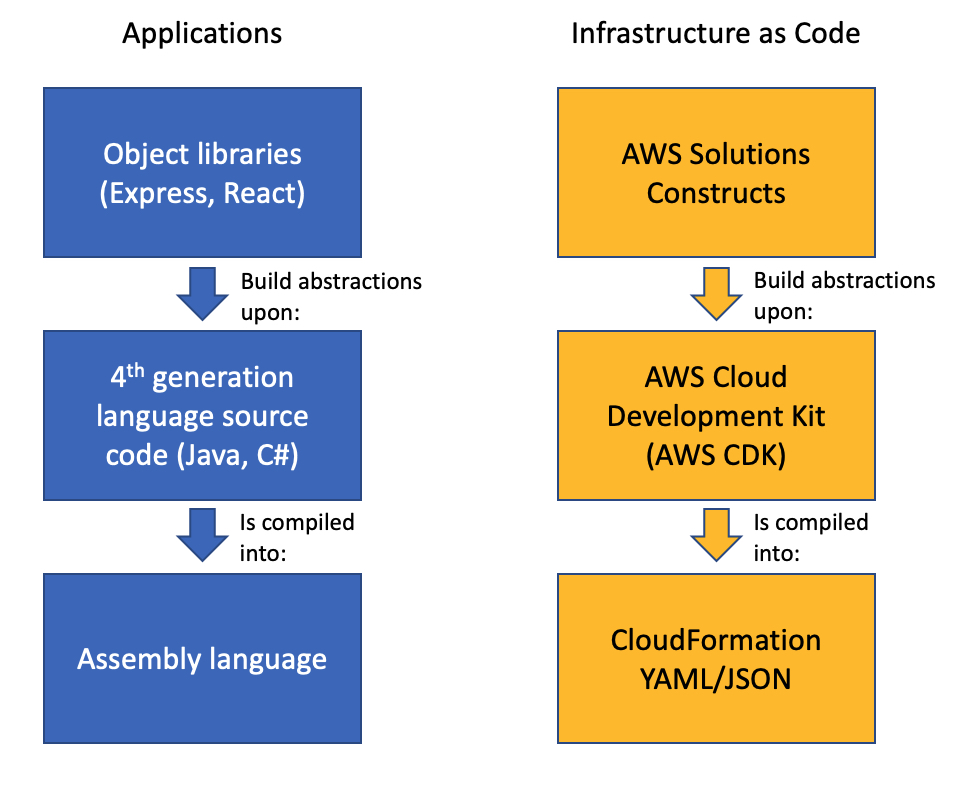
As workloads move to the cloud and all infrastructure becomes virtual, infrastructure as code (IaC) becomes essential to leverage the agility of this new world. JSON and YAML are the powerful, declarative modeling languages of AWS CloudFormation, allowing you to define complex architectures using IaC. Just as higher level languages like BASIC and C abstracted away the details of assembly language and made developers more productive, the AWS Cloud Development Kit (AWS CDK) provides a programming model above the native template languages, a model that makes developers more productive when creating IaC. When you instantiate CDK objects in your Typescript (or Python, Java, etc.) application, those objects “compile” into a YAML template that the CDK deploys as an AWS CloudFormation stack.

AWS Solutions Constructs take this simplification a step further by providing a library of common service patterns built on top of the CDK. These multi-service patterns allow you to deploy multiple resources with a single object, resources that follow best practices by default – both independently and throughout their interaction.

Comparison of an Application stack with Assembly Language, 4th generation language and Object libraries such as Hibernate with an IaC stack of CloudFormation, AWS CDK and AWS Solutions Constructs

Application Development Stack vs. IaC Development Stack

Solution overview

To demonstrate how using Solutions Constructs can accelerate the development of IaC, in this post you will create an architecture that ingests and stores sensor readings using Amazon Kinesis Data Streams, AWS Lambda, and Amazon DynamoDB.

An architecture diagram showing sensor readings being sent to a Kinesis data stream. A Lambda function will receive the Kinesis records and store them in a DynamoDB table.

Prerequisite – Setting up the CDK environment

Tip – If you want to try this example but are concerned about the impact of changing the tools or versions on your workstation, try running it on AWS Cloud9. An AWS Cloud9 environment is launched with an AWS Identity and Access Management (AWS IAM) role and doesn’t require configuring with an access key. It uses the current region as the default for all CDK infrastructure.

To prepare your workstation for CDK development, confirm the following:

  • Node.js 10.3.0 or later is installed on your workstation (regardless of the language used to write CDK apps).
  • You have configured credentials for your environment. If you’re running locally you can do this by configuring the AWS Command Line Interface (AWS CLI).
  • TypeScript 2.7 or later is installed globally (npm -g install typescript)

Before creating your CDK project, install the CDK toolkit using the following command:

npm install -g aws-cdk

Create the CDK project

  1. First create a project folder called stream-ingestion with these two commands:

mkdir stream-ingestion
cd stream-ingestion

  1. Now create your CDK application using this command:

npx [email protected] init app --language=typescript

Tip – This example will be written in TypeScript – you can also specify other languages for your projects.

At this time, you must use the same version of the CDK and Solutions Constructs. We’re using version 1.68.0 of both based upon what’s available at publication time, but you can update this with a later version for your projects in the future.

Let’s explore the files in the application this command created:

  • bin/stream-ingestion.ts – This is the module that launches the application. The key line of code is:

new StreamIngestionStack(app, 'StreamIngestionStack');

This creates the actual stack, and it’s in StreamIngestionStack that you will write the CDK code that defines the resources in your architecture.

  • lib/stream-ingestion-stack.ts – This is the important class. In the constructor of StreamIngestionStack you will add the constructs that will create your architecture.

During the deployment process, the CDK uploads your Lambda function to an Amazon S3 bucket so it can be incorporated into your stack.

  1. To create that S3 bucket and any other infrastructure the CDK requires, run this command:

cdk bootstrap

The CDK uses the same supporting infrastructure for all projects within a region, so you only need to run the bootstrap command once in any region in which you create CDK stacks.

  1. To install the required Solutions Constructs packages for our architecture, run the these two commands from the command line:

npm install @aws-solutions-constructs/[email protected]

Write the code

First you will write the Lambda function that processes the Kinesis data stream messages.

  1. Create a folder named lambda under stream-ingestion
  2. Within the lambda folder save a file called lambdaFunction.js with the following contents:
var AWS = require("aws-sdk");

// Create the DynamoDB service object
var ddb = new AWS.DynamoDB({ apiVersion: "2012-08-10" });

AWS.config.update({ region: process.env.AWS_REGION });

// We will configure our construct to 
// look for the .handler function
exports.handler = async function (event) {
  try {
    // Kinesis will deliver records 
    // in batches, so we need to iterate through
    // each record in the batch
    for (let record of event.Records) {
      const reading = parsePayload(record.kinesis.data);
      await writeRecord(record.kinesis.partitionKey, reading);
    };
  } catch (err) {
    console.log(`Write failed, err:\n${JSON.stringify(err, null, 2)}`);
    throw err;
  }
  return;
};

// Write the provided sensor reading data to the DynamoDB table
async function writeRecord(partitionKey, reading) {

  var params = {
    // Notice that Constructs automatically sets up 
    // an environment variable with the table name.
    TableName: process.env.DDB_TABLE_NAME,
    Item: {
      partitionKey: { S: partitionKey },  // sensor Id
      timestamp: { S: reading.timestamp },
      value: { N: reading.value}
    },
  };

  // Call DynamoDB to add the item to the table
  await ddb.putItem(params).promise();
}

// Decode the payload and extract the sensor data from it
function parsePayload(payload) {

  const decodedPayload = Buffer.from(payload, "base64").toString(
    "ascii"
  );

  // Our CLI command will send the records to Kinesis
  // with the values delimited by '|'
  const payloadValues = decodedPayload.split("|", 2)
  return {
    value: payloadValues[0],
    timestamp: payloadValues[1]
  }
}

We won’t spend a lot of time explaining this function – it’s pretty straightforward and heavily commented. It receives an event with one or more sensor readings, and for each reading it extracts the pertinent data and saves it to the DynamoDB table.

You will use two Solutions Constructs to create your infrastructure:

The aws-kinesisstreams-lambda construct deploys an Amazon Kinesis data stream and a Lambda function.

  • aws-kinesisstreams-lambda creates the Kinesis data stream and Lambda function that subscribes to that stream. To support this, it also creates other resources, such as IAM roles and encryption keys.

The aws-lambda-dynamodb construct deploys a Lambda function and a DynamoDB table.

  • aws-lambda-dynamodb creates an Amazon DynamoDB table and a Lambda function with permission to access the table.
  1. To deploy the first of these two constructs, replace the code in lib/stream-ingestion-stack.ts with the following code:
import * as cdk from "@aws-cdk/core";
import * as lambda from "@aws-cdk/aws-lambda";
import { KinesisStreamsToLambda } from "@aws-solutions-constructs/aws-kinesisstreams-lambda";

import * as ddb from "@aws-cdk/aws-dynamodb";
import { LambdaToDynamoDB } from "@aws-solutions-constructs/aws-lambda-dynamodb";

export class StreamIngestionStack extends cdk.Stack {
  constructor(scope: cdk.Construct, id: string, props?: cdk.StackProps) {
    super(scope, id, props);

    const kinesisLambda = new KinesisStreamsToLambda(
      this,
      "KinesisLambdaConstruct",
      {
        lambdaFunctionProps: {
          // Where the CDK can find the lambda function code
          runtime: lambda.Runtime.NODEJS_10_X,
          handler: "lambdaFunction.handler",
          code: lambda.Code.fromAsset("lambda"),
        },
      }
    );

    // Next Solutions Construct goes here
  }
}

Let’s explore this code:

  • It instantiates a new KinesisStreamsToLambda object. This Solutions Construct will launch a new Kinesis data stream and a new Lambda function, setting up the Lambda function to receive all the messages in the Kinesis data stream. It will also deploy all the additional resources and policies required for the architecture to follow best practices.
  • The third argument to the constructor is the properties object, where you specify overrides of default values or any other information the construct needs. In this case you provide properties for the encapsulated Lambda function that informs the CDK where to find the code for the Lambda function that you stored as lambda/lambdaFunction.js earlier.
  1. Now you’ll add the second construct that connects the Lambda function to a new DynamoDB table. In the same lib/stream-ingestion-stack.ts file, replace the line // Next Solutions Construct goes here with the following code:
    // Define the primary key for the new DynamoDB table
    const primaryKeyAttribute: ddb.Attribute = {
      name: "partitionKey",
      type: ddb.AttributeType.STRING,
    };

    // Define the sort key for the new DynamoDB table
    const sortKeyAttribute: ddb.Attribute = {
      name: "timestamp",
      type: ddb.AttributeType.STRING,
    };

    const lambdaDynamoDB = new LambdaToDynamoDB(
      this,
      "LambdaDynamodbConstruct",
      {
        // Tell construct to use the Lambda function in
        // the first construct rather than deploy a new one
        existingLambdaObj: kinesisLambda.lambdaFunction,
        tablePermissions: "Write",
        dynamoTableProps: {
          partitionKey: primaryKeyAttribute,
          sortKey: sortKeyAttribute,
          billingMode: ddb.BillingMode.PROVISIONED,
          removalPolicy: cdk.RemovalPolicy.DESTROY
        },
      }
    );

    // Add autoscaling
    const readScaling = lambdaDynamoDB.dynamoTable.autoScaleReadCapacity({
      minCapacity: 1,
      maxCapacity: 50,
    });

    readScaling.scaleOnUtilization({
      targetUtilizationPercent: 50,
    });

Let’s explore this code:

  • The first two const objects define the names and types for the partition key and sort key of the DynamoDB table.
  • The LambdaToDynamoDB construct instantiated creates a new DynamoDB table and grants access to your Lambda function. The key to this call is the properties object you pass in the third argument.
    • The first property sent to LambdaToDynamoDB is existingLambdaObj – by setting this value to the Lambda function created by KinesisStreamsToLambda, you’re telling the construct to not create a new Lambda function, but to grant the Lambda function in the other Solutions Construct access to the DynamoDB table. This illustrates how you can chain many Solutions Constructs together to create complex architectures.
    • The second property sent to LambdaToDynamoDB tells the construct to limit the Lambda function’s access to the table to write only.
    • The third property sent to LambdaToDynamoDB is actually a full properties object defining the DynamoDB table. It provides the two attribute definitions you created earlier as well as the billing mode. It also sets the RemovalPolicy to DESTROY. This policy setting ensures that the table is deleted when you delete this stack – in most cases you should accept the default setting to protect your data.
  • The last two lines of code show how you can use statements to modify a construct outside the constructor. In this case we set up auto scaling on the new DynamoDB table, which we can access with the dynamoTable property on the construct we just instantiated.

That’s all it takes to create the all resources to deploy your architecture.

  1. Save all the files, then compile the Typescript into a CDK program using this command:

npm run build

  1. Finally, launch the stack using this command:

cdk deploy

(Enter “y” in response to Do you wish to deploy all these changes (y/n)?)

You will see some warnings where you override CDK default values. Because you are doing this intentionally you may disregard these, but it’s always a good idea to review these warnings when they occur.

Tip – Many mysterious CDK project errors stem from mismatched versions. If you get stuck on an inexplicable error, check package.json and confirm that all CDK and Solutions Constructs libraries have the same version number (with no leading caret ^). If necessary, correct the version numbers, delete the package-lock.json file and node_modules tree and run npm install. Think of this as the “turn it off and on again” first response to CDK errors.

You have now deployed the entire architecture for the demo – open the CloudFormation stack in the AWS Management Console and take a few minutes to explore all 12 resources that the program deployed (and the 380 line template generated to created them).

Feed the Stream

Now use the CLI to send some data through the stack.

Go to the Kinesis Data Streams console and copy the name of the data stream. Replace the stream name in the following command and run it from the command line.

aws kinesis put-records \
--stream-name StreamIngestionStack-KinesisLambdaConstructKinesisStreamXXXXXXXX-XXXXXXXXXXXX \
--records \
PartitionKey=1301,'Data=15.4|2020-08-22T01:16:36+00:00' \
PartitionKey=1503,'Data=39.1|2020-08-22T01:08:15+00:00'

Tip – If you are using the AWS CLI v2, the previous command will result in an “Invalid base64…” error because v2 expects the inputs to be Base64 encoded by default. Adding the argument --cli-binary-format raw-in-base64-out will fix the issue.

To confirm that the messages made it through the service, open the DynamoDB console – you should see the two records in the table.

Now that you’ve got it working, pause to think about what you just did. You deployed a system that can ingest and store sensor readings and scale to handle heavy loads. You did that by instantiating two objects – well under 60 lines of code. Experiment with changing some property values and deploying the changes by running npm run build and cdk deploy again.

Cleanup

To clean up the resources in the stack, run this command:

cdk destroy

Conclusion

Just as languages like BASIC and C allowed developers to write programs at a higher level of abstraction than assembly language, the AWS CDK and AWS Solutions Constructs allow us to create CloudFormation stacks in Typescript, Java, or Python instead JSON or YAML. Just as there will always be a place for assembly language, there will always be situations where we want to write CloudFormation templates manually – but for most situations, we can now use the AWS CDK and AWS Solutions Constructs to create complex and complete architectures in a fraction of the time with very little code.

AWS Solutions Constructs can currently be used in CDK applications written in Typescript, Javascript, Java and Python and will be available in C# applications soon.

About the Author

Biff Gaut has been shipping software since 1983, from small startups to large IT shops. Along the way he has contributed to 2 books, spoken at several conferences and written many blog posts. He is now a Principal Solutions Architect at AWS working on the AWS Solutions Constructs team, helping customers deploy better architectures more quickly.

Building, bundling, and deploying applications with the AWS CDK

Post Syndicated from Cory Hall original https://aws.amazon.com/blogs/devops/building-apps-with-aws-cdk/

The AWS Cloud Development Kit (AWS CDK) is an open-source software development framework to model and provision your cloud application resources using familiar programming languages.

The post CDK Pipelines: Continuous delivery for AWS CDK applications showed how you can use CDK Pipelines to deploy a TypeScript-based AWS Lambda function. In that post, you learned how to add additional build commands to the pipeline to compile the TypeScript code to JavaScript, which is needed to create the Lambda deployment package.

In this post, we dive deeper into how you can perform these build commands as part of your AWS CDK build process by using the native AWS CDK bundling functionality.

If you’re working with Python, TypeScript, or JavaScript-based Lambda functions, you may already be familiar with the PythonFunction and NodejsFunction constructs, which use the bundling functionality. This post describes how to write your own bundling logic for instances where a higher-level construct either doesn’t already exist or doesn’t meet your needs. To illustrate this, I walk through two different examples: a Lambda function written in Golang and a static site created with Nuxt.js.

Concepts

A typical CI/CD pipeline contains steps to build and compile your source code, bundle it into a deployable artifact, push it to artifact stores, and deploy to an environment. In this post, we focus on the building, compiling, and bundling stages of the pipeline.

The AWS CDK has the concept of bundling source code into a deployable artifact. As of this writing, this works for two main types of assets: Docker images published to Amazon Elastic Container Registry (Amazon ECR) and files published to Amazon Simple Storage Service (Amazon S3). For files published to Amazon S3, this can be as simple as pointing to a local file or directory, which the AWS CDK uploads to Amazon S3 for you.

When you build an AWS CDK application (by running cdk synth), a cloud assembly is produced. The cloud assembly consists of a set of files and directories that define your deployable AWS CDK application. In the context of the AWS CDK, it might include the following:

  • AWS CloudFormation templates and instructions on where to deploy them
  • Dockerfiles, corresponding application source code, and information about where to build and push the images to
  • File assets and information about which S3 buckets to upload the files to

Use case

For this use case, our application consists of front-end and backend components. The example code is available in the GitHub repo. In the repository, I have split the example into two separate AWS CDK applications. The repo also contains the Golang Lambda example app and the Nuxt.js static site.

Golang Lambda function

To create a Golang-based Lambda function, you must first create a Lambda function deployment package. For Go, this consists of a .zip file containing a Go executable. Because we don’t commit the Go executable to our source repository, our CI/CD pipeline must perform the necessary steps to create it.

In the context of the AWS CDK, when we create a Lambda function, we have to tell the AWS CDK where to find the deployment package. See the following code:

new lambda.Function(this, 'MyGoFunction', {
  runtime: lambda.Runtime.GO_1_X,
  handler: 'main',
  code: lambda.Code.fromAsset(path.join(__dirname, 'folder-containing-go-executable')),
});

In the preceding code, the lambda.Code.fromAsset() method tells the AWS CDK where to find the Golang executable. When we run cdk synth, it stages this Go executable in the cloud assembly, which it zips and publishes to Amazon S3 as part of the PublishAssets stage.

If we’re running the AWS CDK as part of a CI/CD pipeline, this executable doesn’t exist yet, so how do we create it? One method is CDK bundling. The lambda.Code.fromAsset() method takes a second optional argument, AssetOptions, which contains the bundling parameter. With this bundling parameter, we can tell the AWS CDK to perform steps prior to staging the files in the cloud assembly.

Breaking down the BundlingOptions parameter further, we can perform the build inside a Docker container or locally.

Building inside a Docker container

For this to work, we need to make sure that we have Docker running on our build machine. In AWS CodeBuild, this means setting privileged: true. See the following code:

new lambda.Function(this, 'MyGoFunction', {
  code: lambda.Code.fromAsset(path.join(__dirname, 'folder-containing-source-code'), {
    bundling: {
      image: lambda.Runtime.GO_1_X.bundlingDockerImage,
      command: [
        'bash', '-c', [
          'go test -v',
          'GOOS=linux go build -o /asset-output/main',
      ].join(' && '),
    },
  })
  ...
});

We specify two parameters:

  • image (required) – The Docker image to perform the build commands in
  • command (optional) – The command to run within the container

The AWS CDK mounts the folder specified as the first argument to fromAsset at /asset-input inside the container, and mounts the asset output directory (where the cloud assembly is staged) at /asset-output inside the container.

After we perform the build commands, we need to make sure we copy the Golang executable to the /asset-output location (or specify it as the build output location like in the preceding example).

This is the equivalent of running something like the following code:

docker run \
  --rm \
  -v folder-containing-source-code:/asset-input \
  -v cdk.out/asset.1234a4b5/:/asset-output \
  lambci/lambda:build-go1.x \
  bash -c 'GOOS=linux go build -o /asset-output/main'

Building locally

To build locally (not in a Docker container), we have to provide the local parameter. See the following code:

new lambda.Function(this, 'MyGoFunction', {
  code: lambda.Code.fromAsset(path.join(__dirname, 'folder-containing-source-code'), {
    bundling: {
      image: lambda.Runtime.GO_1_X.bundlingDockerImage,
      command: [],
      local: {
        tryBundle(outputDir: string) {
          try {
            spawnSync('go version')
          } catch {
            return false
          }

          spawnSync(`GOOS=linux go build -o ${path.join(outputDir, 'main')}`);
          return true
        },
      },
    },
  })
  ...
});

The local parameter must implement the ILocalBundling interface. The tryBundle method is passed the asset output directory, and expects you to return a boolean (true or false). If you return true, the AWS CDK doesn’t try to perform Docker bundling. If you return false, it falls back to Docker bundling. Just like with Docker bundling, you must make sure that you place the Go executable in the outputDir.

Typically, you should perform some validation steps to ensure that you have the required dependencies installed locally to perform the build. This could be checking to see if you have go installed, or checking a specific version of go. This can be useful if you don’t have control over what type of build environment this might run in (for example, if you’re building a construct to be consumed by others).

If we run cdk synth on this, we see a new message telling us that the AWS CDK is bundling the asset. If we include additional commands like go test, we also see the output of those commands. This is especially useful if you wanted to fail a build if tests failed. See the following code:

$ cdk synth
Bundling asset GolangLambdaStack/MyGoFunction/Code/Stage...
✓  . (9ms)
✓  clients (5ms)

DONE 8 tests in 11.476s
✓  clients (5ms) (coverage: 84.6% of statements)
✓  . (6ms) (coverage: 78.4% of statements)

DONE 8 tests in 2.464s

Cloud Assembly

If we look at the cloud assembly that was generated (located at cdk.out), we see something like the following code:

$ cdk synth
Bundling asset GolangLambdaStack/MyGoFunction/Code/Stage...
✓  . (9ms)
✓  clients (5ms)

DONE 8 tests in 11.476s
✓  clients (5ms) (coverage: 84.6% of statements)
✓  . (6ms) (coverage: 78.4% of statements)

DONE 8 tests in 2.464s

It contains our GolangLambdaStack CloudFormation template that defines our Lambda function, as well as our Golang executable, bundled at asset.01cf34ff646d380829dc4f2f6fc93995b13277bde7db81c24ac8500a83a06952/main.

Let’s look at how the AWS CDK uses this information. The GolangLambdaStack.assets.json file contains all the information necessary for the AWS CDK to know where and how to publish our assets (in this use case, our Golang Lambda executable). See the following code:

{
  "version": "5.0.0",
  "files": {
    "01cf34ff646d380829dc4f2f6fc93995b13277bde7db81c24ac8500a83a06952": {
      "source": {
        "path": "asset.01cf34ff646d380829dc4f2f6fc93995b13277bde7db81c24ac8500a83a06952",
        "packaging": "zip"
      },
      "destinations": {
        "current_account-current_region": {
          "bucketName": "cdk-hnb659fds-assets-${AWS::AccountId}-${AWS::Region}",
          "objectKey": "01cf34ff646d380829dc4f2f6fc93995b13277bde7db81c24ac8500a83a06952.zip",
          "assumeRoleArn": "arn:${AWS::Partition}:iam::${AWS::AccountId}:role/cdk-hnb659fds-file-publishing-role-${AWS::AccountId}-${AWS::Region}"
        }
      }
    }
  }
}

The file contains information about where to find the source files (source.path) and what type of packaging (source.packaging). It also tells the AWS CDK where to publish this .zip file (bucketName and objectKey) and what AWS Identity and Access Management (IAM) role to use (assumeRoleArn). In this use case, we only deploy to a single account and Region, but if you have multiple accounts or Regions, you see multiple destinations in this file.

The GolangLambdaStack.template.json file that defines our Lambda resource looks something like the following code:

{
  "Resources": {
    "MyGoFunction0AB33E85": {
      "Type": "AWS::Lambda::Function",
      "Properties": {
        "Code": {
          "S3Bucket": {
            "Fn::Sub": "cdk-hnb659fds-assets-${AWS::AccountId}-${AWS::Region}"
          },
          "S3Key": "01cf34ff646d380829dc4f2f6fc93995b13277bde7db81c24ac8500a83a06952.zip"
        },
        "Handler": "main",
        ...
      }
    },
    ...
  }
}

The S3Bucket and S3Key match the bucketName and objectKey from the assets.json file. By default, the S3Key is generated by calculating a hash of the folder location that you pass to lambda.Code.fromAsset(), (for this post, folder-containing-source-code). This means that any time we update our source code, this calculated hash changes and a new Lambda function deployment is triggered.

Nuxt.js static site

In this section, I walk through building a static site using the Nuxt.js framework. You can apply the same logic to any static site framework that requires you to run a build step prior to deploying.

To deploy this static site, we use the BucketDeployment construct. This is a construct that allows you to populate an S3 bucket with the contents of .zip files from other S3 buckets or from a local disk.

Typically, we simply tell the BucketDeployment construct where to find the files that it needs to deploy to the S3 bucket. See the following code:

new s3_deployment.BucketDeployment(this, 'DeployMySite', {
  sources: [
    s3_deployment.Source.asset(path.join(__dirname, 'path-to-directory')),
  ],
  destinationBucket: myBucket
});

To deploy a static site built with a framework like Nuxt.js, we need to first run a build step to compile the site into something that can be deployed. For Nuxt.js, we run the following two commands:

  • yarn install – Installs all our dependencies
  • yarn generate – Builds the application and generates every route as an HTML file (used for static hosting)

This creates a dist directory, which you can deploy to Amazon S3.

Just like with the Golang Lambda example, we can perform these steps as part of the AWS CDK through either local or Docker bundling.

Building inside a Docker container

To build inside a Docker container, use the following code:

new s3_deployment.BucketDeployment(this, 'DeployMySite', {
  sources: [
    s3_deployment.Source.asset(path.join(__dirname, 'path-to-nuxtjs-project'), {
      bundling: {
        image: cdk.BundlingDockerImage.fromRegistry('node:lts'),
        command: [
          'bash', '-c', [
            'yarn install',
            'yarn generate',
            'cp -r /asset-input/dist/* /asset-output/',
          ].join(' && '),
        ],
      },
    }),
  ],
  ...
});

For this post, we build inside the publicly available node:lts image hosted on DockerHub. Inside the container, we run our build commands yarn install && yarn generate, and copy the generated dist directory to our output directory (the cloud assembly).

The parameters are the same as described in the Golang example we walked through earlier.

Building locally

To build locally, use the following code:

new s3_deployment.BucketDeployment(this, 'DeployMySite', {
  sources: [
    s3_deployment.Source.asset(path.join(__dirname, 'path-to-nuxtjs-project'), {
      bundling: {
        local: {
          tryBundle(outputDir: string) {
            try {
              spawnSync('yarn --version');
            } catch {
              return false
            }

            spawnSync('yarn install && yarn generate');

       fs.copySync(path.join(__dirname, ‘path-to-nuxtjs-project’, ‘dist’), outputDir);
            return true
          },
        },
        image: cdk.BundlingDockerImage.fromRegistry('node:lts'),
        command: [],
      },
    }),
  ],
  ...
});

Building locally works the same as the Golang example we walked through earlier, with one exception. We have one additional command to run that copies the generated dist folder to our output directory (cloud assembly).

Conclusion

This post showed how you can easily compile your backend and front-end applications using the AWS CDK. You can find the example code for this post in this GitHub repo. If you have any questions or comments, please comment on the GitHub repo. If you have any additional examples you want to add, we encourage you to create a Pull Request with your example!

Our code also contains examples of deploying the applications using CDK Pipelines, so if you’re interested in deploying the example yourself, check out the example repo.


About the author

Cory Hall

Cory is a Solutions Architect at Amazon Web Services with a passion for DevOps and is based in Charlotte, NC. Cory works with enterprise AWS customers to help them design, deploy, and scale applications to achieve their business goals.

Improving customer experience and reducing cost with CodeGuru Profiler

Post Syndicated from Rajesh original https://aws.amazon.com/blogs/devops/improving-customer-experience-and-reducing-cost-with-codeguru-profiler/

Amazon CodeGuru is a set of developer tools powered by machine learning that provides intelligent recommendations for improving code quality and identifying an application’s most expensive lines of code. Amazon CodeGuru Profiler allows you to profile your applications in a low impact, always on manner. It helps you improve your application’s performance, reduce cost and diagnose application issues through rich data visualization and proactive recommendations. CodeGuru Profiler has been a very successful and widely used service within Amazon, before it was offered as a public service. This post discusses a few ways in which internal Amazon teams have used and benefited from continuous profiling of their production applications. These uses cases can provide you with better insights on how to reap similar benefits for your applications using CodeGuru Profiler.

Inside Amazon, over 100,000 applications currently use CodeGuru Profiler across various environments globally. Over the last few years, CodeGuru Profiler has served as an indispensable tool for resolving issues in the following three categories:

  1. Performance bottlenecks, high latency and CPU utilization
  2. Cost and Infrastructure utilization
  3. Diagnosis of an application impacting event

API latency improvement for CodeGuru Profiler

What could be a better example than CodeGuru Profiler using itself to improve its own performance?
CodeGuru Profiler offers an API called BatchGetFrameMetricData, which allows you to fetch time series data for a set of frames or methods. We noticed that the 99th percentile latency (i.e. the slowest 1 percent of requests over a 5 minute period) metric for this API was approximately 5 seconds, higher than what we wanted for our customers.

Solution

CodeGuru Profiler is built on a micro service architecture, with the BatchGetFrameMetricData API implemented as set of AWS Lambda functions. It also leverages other AWS services such as Amazon DynamoDB to store data and Amazon CloudWatch to record performance metrics.

When investigating the latency issue, the team found that the 5-second latency spikes were happening during certain time intervals rather than continuously, which made it difficult to easily reproduce and determine the root cause of the issue in pre-production environment. The new Lambda profiling feature in CodeGuru came in handy, and so the team decided to enable profiling for all its Lambda functions. The low impact, continuous profiling capability of CodeGuru Profiler allowed the team to capture comprehensive profiles over a period of time, including when the latency spikes occurred, enabling the team to better understand the issue.
After capturing the profiles, the team went through the flame graphs of one of the Lambda functions (TimeSeriesMetricsGeneratorLambda) and learned that all of its CPU time was spent by the thread responsible to publish metrics to CloudWatch. The following screenshot shows a flame graph during one of these spikes.

TimeSeriesMetricsGeneratorLambda taking 100% CPU

As seen, there is a single call stack visible in the above flame graph, indicating all the CPU time was taken by the thread invoking above code. This helped the team immediately understand what was happening. Above code was related to the thread responsible for publishing the CloudWatch metrics. This thread was publishing these metrics in a synchronized block and as this thread took most of the CPU, it caused all other threads to wait and the latency to spike. To fix the issue, the team simply changed the TimeSeriesMetricsGeneratorLambda Lambda code, to publish CloudWatch metrics at the end of the function, which eliminated contention of this thread with all other threads.

Improvement

After the fix was deployed, the 5 second latency spikes were gone, as seen in the following graph.

Latency reduction for BatchGetFrameMetricData API

Cost, infrastructure and other improvements for CAGE

CAGE is an internal Amazon retail service that does royalty aggregation for digital products, such as Kindle eBooks, MP3 songs and albums and more. Like many other Amazon services, CAGE is also customer of CodeGuru Profiler.

CAGE was experiencing latency delays and growing infrastructure cost, and wanted to reduce them. Thanks to CodeGuru Profiler’s always-on profiling capabilities, rich visualization and recommendations, the team was able to successfully diagnose the issues, determine the root cause and fix them.

Solution

With the help of CodeGuru Profiler, the CAGE team identified several reasons for their degraded service performance and increased hardware utilization:

  • Excessive garbage collection activity – The team reviewed the service flame graphs (see the following screenshot) and identified that a lot of CPU time was spent getting garbage collection activities, 65.07% of the total service CPU.

Excessive garbage collection activities for CAGE

  • Metadata overhead – The team followed CodeGuru Profiler recommendation to identify that the service’s DynamoDB responses were consuming higher CPU, 2.86% of total CPU time. This was due to the response metadata caching in the AWS SDK v1.x HTTP client that was turned on by default. This was causing higher CPU overhead for high throughput applications such as CAGE. The following screenshot shows the relevant recommendation.

Response metadata recommendation for CAGE

  • Excessive logging – The team also identified excessive logging of its internal Amazon ION structures. The team initially added this logging for debugging purposes, but was unaware of its impact on the CPU cost, taking 2.28% of the overall service CPU. The following screenshot is part of the flame graph that helped identify the logging impact.

Excessive logging in CAGE service

The team used these flame graphs and CodeGuru Profiler provided recommendations to determine the root cause of the issues and systematically resolve them by doing the following:

  • Switching to a more efficient garbage collector
  • Removing excessive logging
  • Disabling metadata caching for Dynamo DB response

Improvements

After making these changes, the team was able to reduce their infrastructure cost by 25%, saving close to $2600 per month. Service latency also improved, with a reduction in service’s 99th percentile latency from approximately 2,500 milliseconds to 250 milliseconds in their North America (NA) region as shown below.

CAGE Latency Reduction

The team also realized a side benefit of having reduced log verbosity and saw a reduction in log size by 55%.

Event Analysis of increased checkout latency for Amazon.com

During one of the high traffic times, Amazon retail customers experienced higher than normal latency on their checkout page. The issue was due to one of the downstream service’s API experiencing high latency and CPU utilization. While the team quickly mitigated the issue by increasing the service’s servers, the always-on CodeGuru Profiler came to the rescue to help diagnose and fix the issue permanently.

Solution

The team analyzed the flame graphs from CodeGuru Profiler at the time of the event and noticed excessive CPU consumption (69.47%) when logging exceptions using Log4j2. See the following screenshot taken from an earlier version of CodeGuru Profiler user interface.

Excessive CPU consumption when logging exceptions using Log4j2

With CodeGuru Profiler flame graph and other metrics, the team quickly confirmed that the issue was due to excessive exception logging using Log4j2. This downstream service had recently upgraded to Log4j2 version 2.8, in which exception logging could be expensive, due to the way Log4j2 handles class-loading of certain stack frames. Log4j 2.x versions enabled class loading by default, which was disabled in 1.x versions, causing the increased latency and CPU utilization. The team was not able to detect this issue in pre-production environment, as the impact was observable only in high traffic situations.

Improvement

After they understood the issue, the team successfully rolled out the fix, removing the unnecessary exception trace logging to fix the issue. Such performance issues and many others are proactively offered as CodeGuru Profiler recommendations, to ensure you can proactively learn about such issues with your applications and quickly resolve them.

Conclusion

I hope this post provided a glimpse into various ways CodeGuru Profiler can benefit your business and applications. To get started using CodeGuru Profiler, see Setting up CodeGuru Profiler.
For more information about CodeGuru Profiler, see the following:

Investigating performance issues with Amazon CodeGuru Profiler

Optimizing application performance with Amazon CodeGuru Profiler

Find Your Application’s Most Expensive Lines of Code and Improve Code Quality with Amazon CodeGuru


Event-driven architecture for using third-party Git repositories as source for AWS CodePipeline

Post Syndicated from Kirankumar Chandrashekar original https://aws.amazon.com/blogs/devops/event-driven-architecture-for-using-third-party-git-repositories-as-source-for-aws-codepipeline/

In the post Using Custom Source Actions in AWS CodePipeline for Increased Visibility for Third-Party Source Control, we demonstrated using custom actions in AWS CodePipeline and a worker that periodically polls for jobs and processes further to get the artifact from the Git repository. In this post, we discuss using an event-driven architecture to trigger an AWS CodePipeline pipeline that has a third-party Git repository within the source stage that is part of a custom action.

Instead of using a worker to periodically poll for available jobs across all pipelines, we can define a custom source action on a particular pipeline to trigger an Amazon CloudWatch Events rule when the webhook on CodePipeline receives an event and puts it into an In Progress state. This works exactly like how CodePipeline works with natively supported Git repositories like AWS CodeCommit or GitHub as a source.

Solution architecture

The following diagram shows how you can use an event-driven architecture with a custom source stage that is associated with a third-party Git repository that isn’t supported by CodePipeline natively. For our use case, we use GitLab, but you can use any Git repository that supports Git webhooks.

3rdparty-gitblog-new.jpg

The architecture includes the following steps:

1. A user commits code to a Git repository.

2. The commit invokes a Git webhook.

3. This invokes a CodePipeline webhook.

4. The CodePipeline source stage is put into In Progress status.

5. The source stage action triggers a CloudWatch Events rule that indicates the stage started.

6. The CloudWatch event triggers an AWS Lambda function.

7. The function polls for the job details of the custom action.

8. The function also triggers AWS CodeBuild and passes all the job-related information.

9. CodeBuild gets the public SSH key stored in AWS Secrets Manager (or user name and password, if using HTTPS Git access).

10. CodeBuild clones the repository for a particular branch.

11. CodeBuild zips and uploads the archive to the CodePipeline artifact store Amazon Simple Storage Service (Amazon S3) bucket.

12. A Lambda function sends a success message to the CodePipeline source stage so it can proceed to the next stage.

Similarly, with the same setup, if you chose a release change for the pipeline that has custom source stage, a CloudWatch event is triggered, which triggers a Lambda function, and the same process repeats until it gets the artifact from the Git repository.

Solution overview

To set up the solution, you complete the following steps:

1. Create an SSH key pair for authenticating to the Git repository.

2. Publish the key to Secrets Manager.

3. Launch the AWS CloudFormation stack to provision resources.

4. Deploy a sample CodePipeline and test the custom action type.

5. Retrieve the webhook URL.

6. Create a webhook and add the webhook URL.

Creating an SSH key pair
You first create an SSH key pair to use for authenticating to the Git repository using ssh-keygen on your terminal. See the following code:

ssh-keygen -t rsa -b 4096 -C "[email protected]"

Follow the prompt from ssh-keygen and give a name for the key, for example codepipeline_git_rsa. This creates two new files in the current directory: codepipeline_git_rsa and codepipeline_git_rsa.pub.

Make a note of the contents of codepipeline_git_rsa.pub and add it as an authorized key for your Git user. For instructions, see Adding an SSH key to your GitLab account.

Publishing the key
Publish this key to Secrets Manager using the AWS Command Line Interface (AWS CLI):

export SecretsManagerArn=$(aws secretsmanager create-secret --name codepipeline_git \
--secret-string file://codepipeline_git_rsa --query ARN --output text)

Make a note of the ARN, which is required later.

Alternative, you can create a secret on the Secrets Manager console.

Make sure that the lines in the private key codepipeline_git are the same when the value to the secret is added.

Launching the CloudFormation stack

Clone the git repository aws-codepipeline-third-party-git-repositories that contains the AWS CloudFormation templates and AWS Lambda function code using the below command:

git clone https://github.com/aws-samples/aws-codepipeline-third-party-git-repositories.git .

Now you should have the below files in the cloned repository

cfn/
|--sample_pipeline_custom.yaml
`--third_party_git_custom_action.yaml
lambda/
`--lambda_function.py

Launch the CloudFormation stack using the template third_party_git_custom_action.yaml from the cfn directory. The main resources created by this stack are:

1. CodePipeline Custom Action Type. ResourceType: AWS::CodePipeline::CustomActionType
2. Lambda Function. ResourceType: AWS::Lambda::Function
3. CodeBuild Project. ResourceType: AWS::CodeBuild::Project
4. Lambda Execution Role. ResourceType: AWS::IAM::Role
5. CodeBuild Service Role. ResourceType: AWS::IAM::Role

These resources help uplift the logic for connecting to the Git repository, which for this post is GitLab.

Upload the Lambda function code to any S3 bucket in the same Region where the stack is being deployed. To create a new S3 bucket, use the following code (make sure to provide a unique name):

export ACCOUNT_ID=$(aws sts get-caller-identity --query Account --output text)
export S3_BUCKET_NAME=codepipeline-git-custom-action-${ACCOUNT_ID} 
aws s3 mb s3://${S3_BUCKET_NAME} --region us-east-1

Then zip the contents of the function and upload to the S3 bucket (substitute the appropriate bucket name):

export ZIP_FILE_NAME="codepipeline_git.zip"
zip -jr ${ZIP_FILE_NAME} ./lambda/lambda_function.py && \
aws s3 cp codepipeline_git.zip \
s3://${S3_BUCKET_NAME}/${ZIP_FILE_NAME}

If you don’t have a VPC and subnets that Lambda and CodeBuild require, you can create those by launching the following CloudFormation stack.

Run the following AWS CLI command to deploy the third-party Git source solution stack:

export vpcId="vpc-123456789"
export subnetId1="subnet-12345"
export subnetId2="subnet-54321"
export GIT_SOURCE_STACK_NAME="thirdparty-codepipeline-git-source"
aws cloudformation create-stack \
--stack-name ${GIT_SOURCE_STACK_NAME} \
--template-body file://$(pwd)/cfn/third_party_git_custom_action.yaml \
--parameters ParameterKey=SourceActionVersion,ParameterValue=1 \
ParameterKey=SourceActionProvider,ParameterValue=CustomSourceForGit \
ParameterKey=GitPullLambdaSubnet,ParameterValue=${subnetId1}\\,${subnetId2} \
ParameterKey=GitPullLambdaVpc,ParameterValue=${vpcId} \
ParameterKey=LambdaCodeS3Bucket,ParameterValue=${S3_BUCKET_NAME} \
ParameterKey=LambdaCodeS3Key,ParameterValue=${ZIP_FILE_NAME} \
--capabilities CAPABILITY_IAM

Alternatively, launch the stack by choosing Launch Stack:

cloudformation-launch-stack.png

For more information about the VPC requirements for Lambda and CodeBuild, see Internet and service access for VPC-connected functions and Use AWS CodeBuild with Amazon Virtual Private Cloud, respectively.

A custom source action type is now available on the account where you deployed the stack. You can check this on the CodePipeline console by attempting to create a new pipeline. You can see your source type listed under Source provider.

codepipeline-source-stage-dropdown.png

Testing the pipeline

We now deploy a sample pipeline and test the custom action type using the template sample_pipeline_custom.yaml from the cfn directory . You can run the following AWS CLI command to deploy the CloudFormation stack:

Note: Please provide the GitLab repository url to SSH_URL environment variable that you have access to or create a new GitLab project and repository. The example url "[email protected]:kirankumar15/test.git" is for illustration purposes only.

export SSH_URL="[email protected]:kirankumar15/test.git"
export SAMPLE_STACK_NAME="third-party-codepipeline-git-source-test"
aws cloudformation create-stack \
--stack-name ${SAMPLE_STACK_NAME}\
--template-body file://$(pwd)/cfn/sample_pipeline_custom.yaml \
--parameters ParameterKey=Branch,ParameterValue=master \
ParameterKey=GitUrl,ParameterValue=${SSH_URL} \
ParameterKey=SourceActionVersion,ParameterValue=1 \
ParameterKey=SourceActionProvider,ParameterValue=CustomSourceForGit \
ParameterKey=CodePipelineName,ParameterValue=sampleCodePipeline \
ParameterKey=SecretsManagerArnForSSHPrivateKey,ParameterValue=${SecretsManagerArn} \
ParameterKey=GitWebHookIpAddress,ParameterValue=34.74.90.64/28 \
--capabilities CAPABILITY_IAM

Alternatively, choose Launch stack:

cloudformation-launch-stack.png

Retrieving the webhook URL
When the stack creation is complete, retrieve the CodePipeline webhook URL from the stack outputs. Use the following AWS CLI command:

aws cloudformation describe-stacks \
--stack-name ${SAMPLE_STACK_NAME}\ 
--output text \
--query "Stacks[].Outputs[?OutputKey=='CodePipelineWebHookUrl'].OutputValue"

For more information about stack outputs, see Outputs.

Creating a webhook

You can use an existing GitLab repository or create a new GitLab repository and follow the below steps to add a webhook to it.
To create your webhook, complete the following steps:

1. Navigate to the Webhooks Settings section on the GitLab console for the repository that you want to have as a source for CodePipeline.

2. For URL, enter the CodePipeline webhook URL you retrieved in the previous step.

3. Select Push events and optionally enter a branch name.

4. Select Enable SSL verification.

5. Choose Add webhook.

gitlab-webhook.png

For more information about webhooks, see Webhooks.

We’re now ready to test the solution.

Testing the solution

To test the solution, we make changes to the branch that we passed as the branch parameter in the GitLab repository. This should trigger the pipeline. On the CodePipeline console, you can see the Git Commit ID on the source stage of the pipeline when it succeeds.

Note: Please provide the GitLab repository url that you have access to or create a new GitLab repository. and make sure that it has buildspec.yml in the contents to execute in AWS CodeBuild project in the Build stage. The example url "[email protected]:kirankumar15/test.git" is for illustration purposes only.

Enter the following code to clone your repository:

git clone [email protected]:kirankumar15/test.git .

Add a sample file to the repository with the name sample.txt, then commit and push it to the repository:

echo "adding a sample file" >> sample_text_file.txt
git add ./
git commit -m "added sample_test_file.txt to the repository"
git push -u origin master

The pipeline should show the status In Progress.

codepipeline_inprogress.png

After few minutes, it changes to Succeeded status and you see the Git Commit message on the source stage.

codepipeline_succeeded.png

You can also view the Git Commit message by choosing the execution ID of the pipeline, navigating to the timeline section, and choosing the source action. You should see the Commit message and Commit ID that correlates with the Git repository.

codepipeline-commit-msg.png

Troubleshooting

If the CodePipeline fails, check the Lambda function logs for the function with the name GitLab-CodePipeline-Source-${ACCOUNT_ID}. For instructions on checking logs, see Accessing Amazon CloudWatch logs for AWS Lambda.

If the Lambda logs has the CodeBuild build ID, then check the CodeBuild run logs for that build ID for errors. For instructions, see View detailed build information.

Cleaning up

Delete the CloudFormation stacks that you created. You can use the following AWS CLI commands:

aws cloudformation delete-stack --stack-name ${SAMPLE_STACK_NAME}

aws cloudformation delete-stack --stack-name ${GIT_SOURCE_STACK_NAME}

Alternatively, delete the stack on the AWS CloudFormation console.

Additionally, empty the S3 bucket and delete it. Locate the bucket in the ${SAMPLE_STACK_NAME} stack. Then use the following AWS CLI command:

aws s3 rb s3://${S3_BUCKET_NAME} --force

You can also delete and empty the bucket on the Amazon S3 console.

Conclusion

You can use the architecture in this post for any Git repository that supports webhooks. This solution also works if the repository is reachable only from on premises, and if the endpoints can be accessed from a VPC. This event-driven architecture works just like using any natively supported source for CodePipeline.


About the Author

kirankumar.jpeg Kirankumar Chandrashekar is a DevOps consultant at AWS Professional Services. He focuses on leading customers in architecting DevOps technologies. Kirankumar is passionate about Infrastructure as Code and DevOps. He enjoys music, as well as cooking and travelling.


Building a cross-account CI/CD pipeline for single-tenant SaaS solutions

Post Syndicated from Rafael Ramos original https://aws.amazon.com/blogs/devops/cross-account-ci-cd-pipeline-single-tenant-saas/

With the increasing demand from enterprise customers for a pay-as-you-go consumption model, more and more independent software vendors (ISVs) are shifting their business model towards software as a service (SaaS). Usually this kind of solution is architected using a multi-tenant model. It means that the infrastructure resources and applications are shared across multiple customers, with mechanisms in place to isolate their environments from each other. However, you may not want or can’t afford to share resources for security or compliance reasons, so you need a single-tenant environment.

To achieve this higher level of segregation across the tenants, it’s recommended to isolate the environments on the AWS account level. This strategy brings benefits, such as no network overlapping, no account limits sharing, and simplified usage tracking and billing, but it comes with challenges from an operational standpoint. Whereas multi-tenant solutions require management of a single shared production environment, single-tenant installations consist of dedicated production environments for each customer, without any shared resources across the tenants. When the number of tenants starts to grow, delivering new features at a rapid pace becomes harder to accomplish, because each new version needs to be manually deployed on each tenant environment.

This post describes how to automate this deployment process to deliver software quickly, securely, and less error-prone for each existing tenant. I demonstrate all the steps to build and configure a CI/CD pipeline using AWS CodeCommit, AWS CodePipeline, AWS CodeBuild, and AWS CloudFormation. For each new version, the pipeline automatically deploys the same application version on the multiple tenant AWS accounts.

There are different caveats to build such cross-account CI/CD pipelines on AWS. Because of that, I use AWS Command Line Interface (AWS CLI) to manually go through the process and demonstrate in detail the various configuration aspects you have to handle, such as artifact encryption, cross-account permission granting, and pipeline actions.

Single-tenancy vs. multi-tenancy

One of the first aspects to consider when architecting your SaaS solution is its tenancy model. Each brings their own benefits and architectural challenges. On multi-tenant installations, each customer shares the same set of resources, including databases and applications. With this mode, you can use the servers’ capacity more efficiently, which generally leads to significant cost-saving opportunities. On the other hand, you have to carefully secure your solution to prevent a customer from accessing sensitive data from another. Designing for high availability becomes even more critical on multi-tenant workloads, because more customers are affected in the event of downtime.

Because the environments are by definition isolated from each other, single-tenant solutions are simpler to design when it comes to security, networking isolation, and data segregation. Likewise, you can customize the applications per customer, and have different versions for specific tenants. You also have the advantage of eliminating the noisy-neighbor effect, and can plan the infrastructure for the customer’s scalability requirements. As a drawback, in comparison with multi-tenant, the single-tenant model is operationally more complex because you have more servers and applications to maintain.

Which tenancy model to choose depends ultimately on whether you can meet your customer needs. They might have specific governance requirements, be bound to a certain industry regulation, or have compliance criteria that influences which model they can choose. For more information about modeling your SaaS solutions, see SaaS on AWS.

Solution overview

To demonstrate this solution, I consider a fictitious single-tenant ISV with two customers: Unicorn and Gnome. It uses one central account where the tools reside (Tooling account), and two other accounts, each representing a tenant (Unicorn and Gnome accounts). As depicted in the following architecture diagram, when a developer pushes code changes to CodeCommit, Amazon CloudWatch Events  triggers the CodePipeline CI/CD pipeline, which automatically deploys a new version on each tenant’s AWS account. It ensures that the fictitious ISV doesn’t have the operational burden to manually re-deploy the same version for each end-customers.

Architecture diagram of a CI/CD pipeline for single-tenant SaaS solutions

For illustration purposes, the sample application I use in this post is an AWS Lambda function that returns a simple JSON object when invoked.

Prerequisites

Before getting started, you must have the following prerequisites:

Setting up the Git repository

Your first step is to set up your Git repository.

  1. Create a CodeCommit repository to host the source code.

The CI/CD pipeline is automatically triggered every time new code is pushed to that repository.

  1. Make sure Git is configured to use IAM credentials to access AWS CodeCommit via HTTP by running the following command from the terminal:
git config --global credential.helper '!aws codecommit credential-helper $@'
git config --global credential.UseHttpPath true
  1. Clone the newly created repository locally, and add two files in the root folder: index.js and application.yaml.

The first file is the JavaScript code for the Lambda function that represents the sample application. For our use case, the function returns a JSON response object with statusCode: 200 and the body Hello!\n. See the following code:

exports.handler = async (event) => {
    const response = {
        statusCode: 200,
        body: `Hello!\n`,
    };
    return response;
};

The second file is where the infrastructure is defined using AWS CloudFormation. The sample application consists of a Lambda function, and we use AWS Serverless Application Model (AWS SAM) to simplify the resources creation. See the following code:

AWSTemplateFormatVersion: '2010-09-09'
Transform: 'AWS::Serverless-2016-10-31'
Description: Sample Application.

Parameters:
    S3Bucket:
        Type: String
    S3Key:
        Type: String
    ApplicationName:
        Type: String
        
Resources:
    SampleApplication:
        Type: 'AWS::Serverless::Function'
        Properties:
            FunctionName: !Ref ApplicationName
            Handler: index.handler
            Runtime: nodejs12.x
            CodeUri:
                Bucket: !Ref S3Bucket
                Key: !Ref S3Key
            Description: Hello Lambda.
            MemorySize: 128
            Timeout: 10
  1. Push both files to the remote Git repository.

Creating the artifact store encryption key

By default, CodePipeline uses server-side encryption with an AWS Key Management Service (AWS KMS) managed customer master key (CMK) to encrypt the release artifacts. Because the Unicorn and Gnome accounts need to decrypt those release artifacts, you need to create a customer managed CMK in the Tooling account.

From the terminal, run the following command to create the artifact encryption key:

aws kms create-key --region <YOUR_REGION>

This command returns a JSON object with the key ARN property if run successfully. Its format is similar to arn:aws:kms:<YOUR_REGION>:<TOOLING_ACCOUNT_ID>:key/<KEY_ID>. Record this value to use in the following steps.

The encryption key has been created manually for educational purposes only, but it’s considered a best practice to have it as part of the Infrastructure as Code (IaC) bundle.

Creating an Amazon S3 artifact store and configuring a bucket policy

Our use case uses Amazon Simple Storage Service (Amazon S3) as artifact store. Every release artifact is encrypted and stored as an object in an S3 bucket that lives in the Tooling account.

To create and configure the artifact store, follow these steps in the Tooling account:

  1. From the terminal, create an S3 bucket and give it a unique name:
aws s3api create-bucket \
    --bucket <BUCKET_UNIQUE_NAME> \
    --region <YOUR_REGION> \
    --create-bucket-configuration LocationConstraint=<YOUR_REGION>
  1. Configure the bucket to use the customer managed CMK created in the previous step. This makes sure the objects stored in this bucket are encrypted using that key, replacing <KEY_ARN> with the ARN property from the previous step:
aws s3api put-bucket-encryption \
    --bucket <BUCKET_UNIQUE_NAME> \
    --server-side-encryption-configuration \
        '{
            "Rules": [
                {
                    "ApplyServerSideEncryptionByDefault": {
                        "SSEAlgorithm": "aws:kms",
                        "KMSMasterKeyID": "<KEY_ARN>"
                    }
                }
            ]
        }'
  1. The artifacts stored in the bucket need to be accessed from the Unicorn and Gnome Configure the bucket policies to allow cross-account access:
aws s3api put-bucket-policy \
    --bucket <BUCKET_UNIQUE_NAME> \
    --policy \
        '{
            "Version": "2012-10-17",
            "Statement": [
                {
                    "Action": [
                        "s3:GetBucket*",
                        "s3:List*"
                    ],
                    "Effect": "Allow",
                    "Principal": {
                        "AWS": [
                            "arn:aws:iam::<UNICORN_ACCOUNT_ID>:root",
                            "arn:aws:iam::<GNOME_ACCOUNT_ID>:root"
                        ]
                    },
                    "Resource": [
                        "arn:aws:s3:::<BUCKET_UNIQUE_NAME>"
                    ]
                },
                {
                    "Action": [
                        "s3:GetObject*"
                    ],
                    "Effect": "Allow",
                    "Principal": {
                        "AWS": [
                            "arn:aws:iam::<UNICORN_ACCOUNT_ID>:root",
                            "arn:aws:iam::<GNOME_ACCOUNT_ID>:root"
                        ]
                    },
                    "Resource": [
                        "arn:aws:s3:::<BUCKET_UNIQUE_NAME>/CrossAccountPipeline/*"
                    ]
                }
            ]
        }' 

This S3 bucket has been created manually for educational purposes only, but it’s considered a best practice to have it as part of the IaC bundle.

Creating a cross-account IAM role in each tenant account

Following the security best practice of granting least privilege, each action declared on CodePipeline should have its own IAM role.  For this use case, the pipeline needs to perform changes in the Unicorn and Gnome accounts from the Tooling account, so you need to create a cross-account IAM role in each tenant account.

Repeat the following steps for each tenant account to allow CodePipeline to assume role in those accounts:

  1. Configure a named CLI profile for the tenant account to allow running commands using the correct access keys.
  2. Create an IAM role that can be assumed from another AWS account, replacing <TENANT_PROFILE_NAME> with the profile name you defined in the previous step:
aws iam create-role \
    --role-name CodePipelineCrossAccountRole \
    --profile <TENANT_PROFILE_NAME> \
    --assume-role-policy-document \
        '{
            "Version": "2012-10-17",
            "Statement": [
                {
                    "Effect": "Allow",
                    "Principal": {
                        "AWS": "arn:aws:iam::<TOOLING_ACCOUNT_ID>:root"
                    },
                    "Action": "sts:AssumeRole"
                }
            ]
        }'
  1. Create an IAM policy that grants access to the artifact store S3 bucket and to the artifact encryption key:
aws iam create-policy \
    --policy-name CodePipelineCrossAccountArtifactReadPolicy \
    --profile <TENANT_PROFILE_NAME> \
    --policy-document \
        '{
            "Version": "2012-10-17",
            "Statement": [
                {
                    "Action": [
                        "s3:GetBucket*",
                        "s3:ListBucket"
                    ],
                    "Resource": [
                        "arn:aws:s3:::<BUCKET_UNIQUE_NAME>"
                    ],
                    "Effect": "Allow"
                },
                {
                    "Action": [
                        "s3:GetObject*",
                        "s3:Put*"
                    ],
                    "Resource": [
                        "arn:aws:s3:::<BUCKET_UNIQUE_NAME>/CrossAccountPipeline/*"
                    ],
                    "Effect": "Allow"
                },
                {
                    "Action": [ 
                        "kms:DescribeKey", 
                        "kms:GenerateDataKey*", 
                        "kms:Encrypt", 
                        "kms:ReEncrypt*", 
                        "kms:Decrypt" 
                    ], 
                    "Resource": "<KEY_ARN>",
                    "Effect": "Allow"
                }
            ]
        }'
  1. Attach the CodePipelineCrossAccountArtifactReadPolicy IAM policy to the CodePipelineCrossAccountRole IAM role:
aws iam attach-role-policy \
    --profile <TENANT_PROFILE_NAME> \
    --role-name CodePipelineCrossAccountRole \
    --policy-arn arn:aws:iam::<TENANT_ACCOUNT_ID>:policy/CodePipelineCrossAccountArtifactReadPolicy
  1. Create an IAM policy that allows to pass the IAM role CloudFormationDeploymentRole to CloudFormation and to perform CloudFormation actions on the application Stack:
aws iam create-policy \
    --policy-name CodePipelineCrossAccountCfnPolicy \
    --profile <TENANT_PROFILE_NAME> \
    --policy-document \
        '{
            "Version": "2012-10-17",
            "Statement": [
                {
                    "Action": [
                        "iam:PassRole"
                    ],
                    "Resource": "arn:aws:iam::<TENANT_ACCOUNT_ID>:role/CloudFormationDeploymentRole",
                    "Effect": "Allow"
                },
                {
                    "Action": [
                        "cloudformation:*"
                    ],
                    "Resource": "arn:aws:cloudformation:<YOUR_REGION>:<TENANT_ACCOUNT_ID>:stack/SampleApplication*/*",
                    "Effect": "Allow"
                }
            ]
        }'
  1. Attach the CodePipelineCrossAccountCfnPolicy IAM policy to the CodePipelineCrossAccountRole IAM role:
aws iam attach-role-policy \
    --profile <TENANT_PROFILE_NAME> \
    --role-name CodePipelineCrossAccountRole \
    --policy-arn arn:aws:iam::<TENANT_ACCOUNT_ID>:policy/CodePipelineCrossAccountCfnPolicy

Additional configuration is needed in the Tooling account to allow access, which you complete later on.

Creating a deployment IAM role in each tenant account

After CodePipeline assumes the CodePipelineCrossAccountRole IAM role into the tenant account, it triggers AWS CloudFormation to provision the infrastructure based on the template defined in the application.yaml file. For that, AWS CloudFormation needs to assume an IAM role that grants privileges to create resources into the tenant AWS account.

Repeat the following steps for each tenant account to allow AWS CloudFormation to create resources in those accounts:

  1. Create an IAM role that can be assumed by AWS CloudFormation:
aws iam create-role \
    --role-name CloudFormationDeploymentRole \
    --profile <TENANT_PROFILE_NAME> \
    --assume-role-policy-document \
        '{
            "Version": "2012-10-17",
            "Statement": [
                {
                    "Effect": "Allow",
                    "Principal": {
                        "Service": "cloudformation.amazonaws.com"
                    },
                    "Action": "sts:AssumeRole"
                }
            ]
        }'
  1. Create an IAM policy that grants permissions to create AWS resources:
aws iam create-policy \
    --policy-name CloudFormationDeploymentPolicy \
    --profile <TENANT_PROFILE_NAME> \
    --policy-document \
        '{
            "Version": "2012-10-17",
            "Statement": [
                {
                    "Action": "iam:PassRole",
                    "Resource": "arn:aws:iam::<TENANT_ACCOUNT_ID>:role/*",
                    "Effect": "Allow"
                },
                {
                    "Action": [
                        "iam:GetRole",
                        "iam:CreateRole",
                        "iam:DeleteRole",
                        "iam:AttachRolePolicy",
                        "iam:DetachRolePolicy"
                    ],
                    "Resource": "arn:aws:iam::<TENANT_ACCOUNT_ID>:role/*",
                    "Effect": "Allow"
                },
                {
                    "Action": "lambda:*",
                    "Resource": "*",
                    "Effect": "Allow"
                },
                {
                    "Action": "codedeploy:*",
                    "Resource": "*",
                    "Effect": "Allow"
                },
                {
                    "Action": [
                        "s3:GetObject*",
                        "s3:GetBucket*",
                        "s3:List*"
                    ],
                    "Resource": [
                        "arn:aws:s3:::<BUCKET_UNIQUE_NAME>",
                        "arn:aws:s3:::<BUCKET_UNIQUE_NAME>/*"
                    ],
                    "Effect": "Allow"
                },
                {
                    "Action": [
                        "kms:Decrypt",
                        "kms:DescribeKey"
                    ],
                    "Resource": "<KEY_ARN>",
                    "Effect": "Allow"
                },
                {
                    "Action": [
                        "cloudformation:CreateStack",
                        "cloudformation:DescribeStack*",
                        "cloudformation:GetStackPolicy",
                        "cloudformation:GetTemplate*",
                        "cloudformation:SetStackPolicy",
                        "cloudformation:UpdateStack",
                        "cloudformation:ValidateTemplate"
                    ],
                    "Resource": "arn:aws:cloudformation:<YOUR_REGION>:<TENANT_ACCOUNT_ID>:stack/SampleApplication*/*",
                    "Effect": "Allow"
                },
                {
                    "Action": [
                        "cloudformation:CreateChangeSet"
                    ],
                    "Resource": "arn:aws:cloudformation:<YOUR_REGION>:aws:transform/Serverless-2016-10-31",
                    "Effect": "Allow"
                }
            ]
        }'

The granted permissions in this IAM policy depend on the resources your application needs to be provisioned. Because the application in our use case consists of a simple Lambda function, the IAM policy only needs permissions over Lambda. The other permissions declared are to access and decrypt the Lambda code from the artifact store, use AWS CodeDeploy to deploy the function, and create and attach the Lambda execution role.

  1. Attach the IAM policy to the IAM role:
aws iam attach-role-policy \
    --profile <TENANT_PROFILE_NAME> \
    --role-name CloudFormationDeploymentRole \
    --policy-arn arn:aws:iam::<TENANT_ACCOUNT_ID>:policy/CloudFormationDeploymentPolicy

Configuring an artifact store encryption key

Even though the IAM roles created in the tenant accounts declare permissions to use the CMK encryption key, that’s not enough to have access to the key. To access the key, you must update the CMK key policy.

From the terminal, run the following command to attach the new policy:

aws kms put-key-policy \
    --key-id <KEY_ARN> \
    --policy-name default \
    --region <YOUR_REGION> \
    --policy \
        '{
             "Id": "TenantAccountAccess",
             "Version": "2012-10-17",
             "Statement": [
                {
                    "Sid": "Enable IAM User Permissions",
                    "Effect": "Allow",
                    "Principal": {
                        "AWS": "arn:aws:iam::<TOOLING_ACCOUNT_ID>:root"
                    },
                    "Action": "kms:*",
                    "Resource": "*"
                },
                {
                    "Effect": "Allow",
                    "Principal": {
                        "AWS": [
                            "arn:aws:iam::<GNOME_ACCOUNT_ID>:role/CloudFormationDeploymentRole",
                            "arn:aws:iam::<GNOME_ACCOUNT_ID>:role/CodePipelineCrossAccountRole",
                            "arn:aws:iam::<UNICORN_ACCOUNT_ID>:role/CloudFormationDeploymentRole",
                            "arn:aws:iam::<UNICORN_ACCOUNT_ID>:role/CodePipelineCrossAccountRole"
                        ]
                    },
                    "Action": [
                        "kms:Decrypt",
                        "kms:DescribeKey"
                    ],
                    "Resource": "*"
                }
             ]
         }'

Provisioning the CI/CD pipeline

Each CodePipeline workflow consists of two or more stages, which are composed by a series of parallel or serial actions. For our use case, the pipeline is made up of four stages:

  • Source – Declares CodeCommit as the source control for the application code.
  • Build – Using CodeBuild, it installs the dependencies and builds deployable artifacts. In this use case, the sample application is too simple and this stage is used for illustration purposes.
  • Deploy_Dev – Deploys the sample application on a sandbox environment. At this point, the deployable artifacts generated at the Build stage are used to create a CloudFormation stack and deploy the Lambda function.
  • Deploy_Prod – Similar to Deploy_Dev, at this stage the sample application is deployed on the tenant production environments. For that, it contains two actions (one per tenant) that are run in parallel. CodePipeline uses CodePipelineCrossAccountRole to assume a role on the tenant account, and from there, CloudFormationDeploymentRole is used to effectively deploy the application.

To provision your resources, complete the following steps from the terminal:

  1. Download the CloudFormation pipeline template:
curl -LO https://cross-account-ci-cd-pipeline-single-tenant-saas.s3.amazonaws.com/pipeline.yaml
  1. Deploy the CloudFormation stack using the pipeline template:
aws cloudformation deploy \
    --template-file pipeline.yaml \
    --region <YOUR_REGION> \
    --stack-name <YOUR_PIPELINE_STACK_NAME> \
    --capabilities CAPABILITY_IAM \
    --parameter-overrides \
        ArtifactBucketName=<BUCKET_UNIQUE_NAME> \
        ArtifactEncryptionKeyArn=<KMS_KEY_ARN> \
        UnicornAccountId=<UNICORN_TENANT_ACCOUNT_ID> \
        GnomeAccountId=<GNOME_TENANT_ACCOUNT_ID> \
        SampleApplicationRepositoryName=<YOUR_CODECOMMIT_REPOSITORY_NAME> \
        RepositoryBranch=<YOUR_CODECOMMIT_MAIN_BRANCH>

This is the list of the required parameters to deploy the template:

    • ArtifactBucketName – The name of the S3 bucket where the deployment artifacts are to be stored.
    • ArtifactEncryptionKeyArn – The ARN of the customer managed CMK to be used as artifact encryption key.
    • UnicornAccountId – The AWS account ID for the first tenant (Unicorn) where the application is to be deployed.
    • GnomeAccountId – The AWS account ID for the second tenant (Gnome) where the application is to be deployed.
    • SampleApplicationRepositoryName – The name of the CodeCommit repository where source changes are detected.
    • RepositoryBranch – The name of the CodeCommit branch where source changes are detected. The default value is master in case no value is provided.
  1. Wait for AWS CloudFormation to create the resources.

When stack creation is complete, the pipeline starts automatically.

For each existing tenant, an action is declared within the Deploy_Prod stage. The following code is a snippet of how these actions are configured to deploy the application on a different account:

RoleArn: !Sub arn:aws:iam::${UnicornAccountId}:role/CodePipelineCrossAccountRole
Configuration:
    ActionMode: CREATE_UPDATE
    Capabilities: CAPABILITY_IAM,CAPABILITY_AUTO_EXPAND
    StackName: !Sub SampleApplication-unicorn-stack-${AWS::Region}
    RoleArn: !Sub arn:aws:iam::${UnicornAccountId}:role/CloudFormationDeploymentRole
    TemplatePath: CodeCommitSource::application.yaml
    ParameterOverrides: !Sub | 
        { 
            "ApplicationName": "SampleApplication-Unicorn",
            "S3Bucket": { "Fn::GetArtifactAtt" : [ "ApplicationBuildOutput", "BucketName" ] },
            "S3Key": { "Fn::GetArtifactAtt" : [ "ApplicationBuildOutput", "ObjectKey" ] }
        }

The code declares two IAM roles. The first one is the IAM role assumed by the CodePipeline action to access the tenant AWS account, whereas the second is the IAM role used by AWS CloudFormation to create AWS resources in the tenant AWS account. The ParameterOverrides configuration declares where the release artifact is located. The S3 bucket and key are in the Tooling account and encrypted using the customer managed CMK. That’s why it was necessary to grant access from external accounts using a bucket and KMS policies.

Besides the CI/CD pipeline itself, this CloudFormation template declares IAM roles that are used by the pipeline and its actions. The main IAM role is named CrossAccountPipelineRole, which is used by the CodePipeline service. It contains permissions to assume the action roles. See the following code:

{
    "Action": "sts:AssumeRole",
    "Effect": "Allow",
    "Resource": [
        "arn:aws:iam::<TOOLING_ACCOUNT_ID>:role/<PipelineSourceActionRole>",
        "arn:aws:iam::<TOOLING_ACCOUNT_ID>:role/<PipelineApplicationBuildActionRole>",
        "arn:aws:iam::<TOOLING_ACCOUNT_ID>:role/<PipelineDeployDevActionRole>",
        "arn:aws:iam::<UNICORN_ACCOUNT_ID>:role/CodePipelineCrossAccountRole",
        "arn:aws:iam::<GNOME_ACCOUNT_ID>:role/CodePipelineCrossAccountRole"
    ]
}

When you have more tenant accounts, you must add additional roles to the list.

After CodePipeline runs successfully, test the sample application by invoking the Lambda function on each tenant account:

aws lambda invoke --function-name SampleApplication --profile <TENANT_PROFILE_NAME> --region <YOUR_REGION> out

The output should be:

{
    "StatusCode": 200,
    "ExecutedVersion": "$LATEST"
}

Cleaning up

Follow these steps to delete the components and avoid future incurring charges:

  1. Delete the production application stack from each tenant account:
aws cloudformation delete-stack --profile <TENANT_PROFILE_NAME> --region <YOUR_REGION> --stack-name SampleApplication-<TENANT_NAME>-stack-<YOUR_REGION>
  1. Delete the dev application stack from the Tooling account:
aws cloudformation delete-stack --region <YOUR_REGION> --stack-name SampleApplication-dev-stack-<YOUR_REGION>
  1. Delete the pipeline stack from the Tooling account:
aws cloudformation delete-stack --region <YOUR_REGION> --stack-name <YOUR_PIPELINE_STACK_NAME>
  1. Delete the customer managed CMK from the Tooling account:
aws kms schedule-key-deletion --region <YOUR_REGION> --key-id <KEY_ARN>
  1. Delete the S3 bucket from the Tooling account:
aws s3 rb s3://<BUCKET_UNIQUE_NAME> --force
  1. Optionally, delete the IAM roles and policies you created in the tenant accounts

Conclusion

This post demonstrated what it takes to build a CI/CD pipeline for single-tenant SaaS solutions isolated on the AWS account level. It covered how to grant cross-account access to artifact stores on Amazon S3 and artifact encryption keys on AWS KMS using policies and IAM roles. This approach is less error-prone because it avoids human errors when manually deploying the exact same application for multiple tenants.

For this use case, we performed most of the steps manually to better illustrate all the steps and components involved. For even more automation, consider using the AWS Cloud Development Kit (AWS CDK) and its pipeline construct to create your CI/CD pipeline and have everything as code. Moreover, for production scenarios, consider having integration tests as part of the pipeline.

Rafael Ramos

Rafael Ramos

Rafael is a Solutions Architect at AWS, where he helps ISVs on their journey to the cloud. He spent over 13 years working as a software developer, and is passionate about DevOps and serverless. Outside of work, he enjoys playing tabletop RPG, cooking and running marathons.

Integrating AWS CloudFormation Guard into CI/CD pipelines

Post Syndicated from Sergey Voinich original https://aws.amazon.com/blogs/devops/integrating-aws-cloudformation-guard/

In this post, we discuss and build a managed continuous integration and continuous deployment (CI/CD) pipeline that uses AWS CloudFormation Guard to automate and simplify pre-deployment compliance checks of your AWS CloudFormation templates. This enables your teams to define a single source of truth for what constitutes valid infrastructure definitions, to be compliant with your company guidelines and streamline AWS resources’ deployment lifecycle.

We use the following AWS services and open-source tools to set up the pipeline:

Solution overview

The CI/CD workflow includes the following steps:

  1. A code change is committed and pushed to the CodeCommit repository.
  2. CodePipeline automatically triggers a CodeBuild job.
  3. CodeBuild spins up a compute environment and runs the phases specified in the buildspec.yml file:
  4. Clone the code from the CodeCommit repository (CloudFormation template, rule set for CloudFormation Guard, buildspec.yml file).
  5. Clone the code from the CloudFormation Guard repository on GitHub.
  6. Provision the build environment with necessary components (rust, cargo, git, build-essential).
  7. Download CloudFormation Guard release from GitHub.
  8. Run a validation check of the CloudFormation template.
  9. If the validation is successful, pass the control over to CloudFormation and deploy the stack. If the validation fails, stop the build job and print a summary to the build job log.

The following diagram illustrates this workflow.

Architecture Diagram

Architecture Diagram of CI/CD Pipeline with CloudFormation Guard

Prerequisites

For this walkthrough, complete the following prerequisites:

Creating your CodeCommit repository

Create your CodeCommit repository by running a create-repository command in the AWS CLI:

aws codecommit create-repository --repository-name cfn-guard-demo --repository-description "CloudFormation Guard Demo"

The following screenshot indicates that the repository has been created.

CodeCommit Repository

CodeCommit Repository has been created

Populating the CodeCommit repository

Populate your repository with the following artifacts:

  1. A buildspec.yml file. Modify the following code as per your requirements:
version: 0.2
env:
  variables:
    # Definining CloudFormation Teamplate and Ruleset as variables - part of the code repo
    CF_TEMPLATE: "cfn_template_file_example.yaml"
    CF_ORG_RULESET:  "cfn_guard_ruleset_example"
phases:
  install:
    commands:
      - apt-get update
      - apt-get install build-essential -y
      - apt-get install cargo -y
      - apt-get install git -y
  pre_build:
    commands:
      - echo "Setting up the environment for AWS CloudFormation Guard"
      - echo "More info https://github.com/aws-cloudformation/cloudformation-guard"
      - echo "Install Rust"
      - curl https://sh.rustup.rs -sSf | sh -s -- -y
  build:
    commands:
       - echo "Pull GA release from github"
       - echo "More info https://github.com/aws-cloudformation/cloudformation-guard/releases"
       - wget https://github.com/aws-cloudformation/cloudformation-guard/releases/download/1.0.0/cfn-guard-linux-1.0.0.tar.gz
       - echo "Extract cfn-guard"
       - tar xvf cfn-guard-linux-1.0.0.tar.gz .
  post_build:
    commands:
       - echo "Validate CloudFormation template with cfn-guard tool"
       - echo "More information https://github.com/aws-cloudformation/cloudformation-guard/blob/master/cfn-guard/README.md"
       - cfn-guard-linux/cfn-guard check --rule_set $CF_ORG_RULESET --template $CF_TEMPLATE --strict-checks
artifacts:
  files:
    - cfn_template_file_example.yaml
  name: guard_templates
  1. An example of a rule set file (cfn_guard_ruleset_example) for CloudFormation Guard. Modify the following code as per your requirements:
#CFN Guard rules set example

#List of multiple references
let allowed_azs = [us-east-1a,us-east-1b]
let allowed_ec2_instance_types = [t2.micro,t3.nano,t3.micro]
let allowed_security_groups = [sg-08bbcxxc21e9ba8e6,sg-07b8bx98795dcab2]

#EC2 Policies
AWS::EC2::Instance AvailabilityZone IN %allowed_azs
AWS::EC2::Instance ImageId == ami-0323c3dd2da7fb37d
AWS::EC2::Instance InstanceType IN %allowed_ec2_instance_types
AWS::EC2::Instance SecurityGroupIds == ["sg-07b8xxxsscab2"]
AWS::EC2::Instance SubnetId == subnet-0407a7casssse558

#EBS Policies
AWS::EC2::Volume AvailabilityZone == us-east-1a
AWS::EC2::Volume Encrypted == true
AWS::EC2::Volume Size == 50 |OR| AWS::EC2::Volume Size == 100
AWS::EC2::Volume VolumeType == gp2
  1. An example of a CloudFormation template file (.yaml). Modify the following code as per your requirements:
AWSTemplateFormatVersion: "2010-09-09"
Description: "EC2 instance with encrypted EBS volume for AWS CloudFormation Guard Testing"

Resources:

 EC2Instance:
    Type: AWS::EC2::Instance
    Properties:
      ImageId: 'ami-0323c3dd2da7fb37d'
      AvailabilityZone: 'us-east-1a'
      KeyName: "your-ssh-key"
      InstanceType: 't3.micro'
      SubnetId: 'subnet-0407a7xx68410e558'
      SecurityGroupIds:
        - 'sg-07b8b339xx95dcab2'
      Volumes:
         - 
          Device: '/dev/sdf'
          VolumeId: !Ref EBSVolume
      Tags:
       - Key: Name
         Value: cfn-guard-ec2

 EBSVolume:
   Type: AWS::EC2::Volume
   Properties:
     Size: 100
     AvailabilityZone: 'us-east-1a'
     Encrypted: true
     VolumeType: gp2
     Tags:
       - Key: Name
         Value: cfn-guard-ebs
   DeletionPolicy: Snapshot

Outputs:
  InstanceID:
    Description: The Instance ID
    Value: !Ref EC2Instance
  Volume:
    Description: The Volume ID
    Value: !Ref  EBSVolume
AWS CodeCommit

Optional CodeCommit Repository Structure

The following screenshot shows a potential CodeCommit repository structure.

Creating a CodeBuild project

Our CodeBuild project orchestrates around CloudFormation Guard and runs validation checks of our CloudFormation templates as a phase of the CI process.

  1. On the CodeBuild console, choose Build projects.
  2. Choose Create build projects.
  3. For Project name, enter your project name.
  4. For Description, enter a description.
AWS CodeBuild

Create CodeBuild Project

  1. For Source provider, choose AWS CodeCommit.
  2. For Repository, choose the CodeCommit repository you created in the previous step.
AWS CodeBuild

Define the source for your CodeBuild Project

To setup CodeBuild environment we will use managed image based on Ubuntu 18.04

  1. For Environment Image, select Managed image.
  2. For Operating system, choose Ubuntu.
  3. For Service role¸ select New service role.
  4. For Role name, enter your service role name.
CodeBuild Environment

Setup the environment, the OS image and other settings for the CodeBuild

  1. Leave the default settings for additional configuration, buildspec, batch configuration, artifacts, and logs.

You can also use CodeBuild with custom build environments to help you optimize billing and improve the build time.

Creating IAM roles and policies

Our CI/CD pipeline needs two AWS Identity and Access Management (IAM) roles to run properly: one role for CodePipeline to work with other resources and services, and one role for AWS CloudFormation to run the deployments that passed the validation check in the CodeBuild phase.

Creating permission policies

Create your permission policies first. The following code is the policy in JSON format for CodePipeline:

{
    "Version": "2012-10-17",
    "Statement": [
        {
            "Sid": "VisualEditor0",
            "Effect": "Allow",
            "Action": [
                "codecommit:UploadArchive",
                "codecommit:CancelUploadArchive",
                "codecommit:GetCommit",
                "codecommit:GetUploadArchiveStatus",
                "codecommit:GetBranch",
                "codestar-connections:UseConnection",
                "codebuild:BatchGetBuilds",
                "codedeploy:CreateDeployment",
                "codedeploy:GetApplicationRevision",
                "codedeploy:RegisterApplicationRevision",
                "codedeploy:GetDeploymentConfig",
                "codedeploy:GetDeployment",
                "codebuild:StartBuild",
                "codedeploy:GetApplication",
                "s3:*",
                "cloudformation:*",
                "ec2:*"
            ],
            "Resource": "*"
        },
        {
            "Sid": "VisualEditor1",
            "Effect": "Allow",
            "Action": "iam:PassRole",
            "Resource": "*",
            "Condition": {
                "StringEqualsIfExists": {
                    "iam:PassedToService": [
                        "cloudformation.amazonaws.com",
                        "ec2.amazonaws.com"
                    ]
                }
            }
        }
    ]
}

To create your policy for CodePipeline, run the following CLI command:

aws iam create-policy --policy-name CodePipeline-Cfn-Guard-Demo --policy-document file://CodePipelineServiceRolePolicy_example.json

Capture the policy ARN that you get in the output to use in the next steps.

The following code is the policy in JSON format for AWS CloudFormation:

{
    "Version": "2012-10-17",
    "Statement": [
        {
            "Sid": "VisualEditor0",
            "Effect": "Allow",
            "Action": "iam:CreateServiceLinkedRole",
            "Resource": "*",
            "Condition": {
                "StringEquals": {
                    "iam:AWSServiceName": [
                        "autoscaling.amazonaws.com",
                        "ec2scheduled.amazonaws.com",
                        "elasticloadbalancing.amazonaws.com"
                    ]
                }
            }
        },
        {
            "Sid": "VisualEditor1",
            "Effect": "Allow",
            "Action": [
                "s3:GetObjectAcl",
                "s3:GetObject",
                "cloudwatch:*",
                "ec2:*",
                "autoscaling:*",
                "s3:List*",
                "s3:HeadBucket"
            ],
            "Resource": "*"
        }
    ]
}

Create the policy for AWS CloudFormation by running the following CLI command:

aws iam create-policy --policy-name CloudFormation-Cfn-Guard-Demo --policy-document file://CloudFormationRolePolicy_example.json

Capture the policy ARN that you get in the output to use in the next steps.

Creating roles and trust policies

The following code is the trust policy for CodePipeline in JSON format:

{
  "Version": "2012-10-17",
  "Statement": [
    {
      "Effect": "Allow",
      "Principal": {
        "Service": "codepipeline.amazonaws.com"
      },
      "Action": "sts:AssumeRole"
    }
  ]
}

Create your role for CodePipeline with the following CLI command:

aws iam create-role --role-name CodePipeline-Cfn-Guard-Demo-Role --assume-role-policy-document file://RoleTrustPolicy_CodePipeline.json

Capture the role name for the next step.

The following code is the trust policy for AWS CloudFormation in JSON format:

{
  "Version": "2012-10-17",
  "Statement": [
    {
      "Sid": "",
      "Effect": "Allow",
      "Principal": {
        "Service": "cloudformation.amazonaws.com"
      },
      "Action": "sts:AssumeRole"
    }
  ]
}

Create your role for AWS CloudFormation with the following CLI command:

aws iam create-role --role-name CF-Cfn-Guard-Demo-Role --assume-role-policy-document file://RoleTrustPolicy_CloudFormation.json

Capture the role name for the next step.


Finally, attach the permissions policies created in the previous step to the IAM roles you created:

aws iam attach-role-policy --role-name CodePipeline-Cfn-Guard-Demo-Role  --policy-arn "arn:aws:iam::<AWS Account Id >:policy/CodePipeline-Cfn-Guard-Demo"

aws iam attach-role-policy --role-name CF-Cfn-Guard-Demo-Role  --policy-arn "arn:aws:iam::<AWS Account Id>:policy/CloudFormation-Cfn-Guard-Demo"

Creating a pipeline

We can now create our pipeline to assemble all the components into one managed, continuous mechanism.

  1. On the CodePipeline console, choose Pipelines.
  2. Choose Create new pipeline.
  3. For Pipeline name, enter a name.
  4. For Service role, select Existing service role.
  5. For Role ARN, choose the service role you created in the previous step.
  6. Choose Next.
CodePipeline Setup

Setting Up CodePipeline environment

  1. In the Source section, for Source provider, choose AWS CodeCommit.
  2. For Repository name¸ enter your repository name.
  3. For Branch name, choose master.
  4. For Change detection options, select Amazon CloudWatch Events.
  5. Choose Next.
AWS CodePipeline Source

Adding CodeCommit to CodePipeline

  1. In the Build section, for Build provider, choose AWS CodeBuild.
  2. For Project name, choose the CodeBuild project you created.
  3. For Build type, select Single build.
  4. Choose Next.
CodePipeline Build Stage

Adding Build Project to Pipeline Stage

Now we will create a deploy stage in our CodePipeline to deploy CloudFormation templates that passed the CloudFormation Guard inspection in the CI stage.

  1. In the Deploy section, for Deploy provider, choose AWS CloudFormation.
  2. For Action mode¸ choose Create or update stack.
  3. For Stack name, choose any stack name.
  4. For Artifact name, choose BuildArtifact.
  5. For File name, enter the CloudFormation template name in your CodeCommit repository (In case of our demo it is cfn_template_file_example.yaml).
  6. For Role name, choose the role you created earlier for CloudFormation.
CodePipeline - Deploy Stage

Adding deploy stage to CodePipeline

22. In the next step review your selections for the pipeline to be created. The stages and action providers in each stage are shown in the order that they will be created. Click Create pipeline. Our CodePipeline is ready.

Validating the CI/CD pipeline operation

Our CodePipeline has two basic flows and outcomes. If the CloudFormation template complies with our CloudFormation Guard rule set file, the resources in the template deploy successfully (in our use case, we deploy an EC2 instance with an encrypted EBS volume).

CloudFormation Deployed

CloudFormation Console

If our CloudFormation template doesn’t comply with the policies specified in our CloudFormation Guard rule set file, our CodePipeline stops at the CodeBuild step and you see an error in the build job log indicating the resources that are non-compliant:

[EBSVolume] failed because [Encrypted] is [false] and the permitted value is [true]
[EC2Instance] failed because [t3.2xlarge] is not in [t2.micro,t3.nano,t3.micro] for [InstanceType]
Number of failures: 2

Note: To demonstrate the above functionality I changed my CloudFormation template to use unencrypted EBS volume and switched the EC2 instance type to t3.2xlarge which do not adhere to the rules that we specified in the Guard rule set file

Cleaning up

To avoid incurring future charges, delete the resources that we have created during the walkthrough:

  • CloudFormation stack resources that were deployed by the CodePipeline
  • CodePipeline that we have created
  • CodeBuild project
  • CodeCommit repository

Conclusion

In this post, we covered how to integrate CloudFormation Guard into CodePipeline and fully automate pre-deployment compliance checks of your CloudFormation templates. This allows your teams to have an end-to-end automated CI/CD pipeline with minimal operational overhead and stay compliant with your organizational infrastructure policies.

Standardizing CI/CD pipelines for .NET web applications with AWS Service Catalog

Post Syndicated from Borja Prado Miguelez original https://aws.amazon.com/blogs/devops/standardizing-cicd-pipelines-net-web-applications-aws-service-catalog/

As companies implement DevOps practices, standardizing the deployment of continuous integration and continuous deployment (CI/CD) pipelines is increasingly important. Your developer team may not have the ability or time to create your own CI/CD pipelines and processes from scratch for each new project. Additionally, creating a standardized DevOps process can help your entire company ensure that all development teams are following security and governance best practices.

Another challenge that large enterprise and small organization IT departments deal with is managing their software portfolio. This becomes even harder in agile scenarios working with mobile and web applications where you need to not only provision the cloud resources for hosting the application, but also have a proper DevOps process in place.

Having a standardized portfolio of products for your development teams enables you to provision the infrastructure resources needed to create development environments, and helps reduce the operation overhead and accelerate the overall development process.

This post shows you how to provide your end-users a catalog of resources with all the functionality a development team needs to check in code and run it in a highly scalable load balanced cloud compute environment.

We use AWS Service Catalog to provision a cloud-based AWS Cloud9 IDE, a CI/CD pipeline using AWS CodePipeline, and the AWS Elastic Beanstalk compute service to run the website. AWS Service Catalog allows organizations to keep control of the services and products that can be provisioned across the organization’s AWS account, and there’s an effective software delivery process in place by using CodePipeline to orchestrate the application deployment. The following diagram illustrates this architecture.

Architecture Diagram

You can find all the templates we use in this post on the AWS Service Catalog Elastic Beanstalk Reference architecture GitHub repo.

Provisioning the AWS Service Catalog portfolio

To get started, you must provision the AWS Service Catalog portfolio with AWS CloudFormation.

  1. Choose Launch Stack, which creates the AWS Service Catalog portfolio in your AWS account.Launch Stack action
  2. If you’re signed into AWS as an AWS Identity and Access Management (IAM) role, add your role name in the LinkedRole1 parameter.
  3. Continue through the stack launch screens using the defaults and choosing Next.
  4. Select the acknowledgements in the Capabilities box on the third screen.

When the stack is complete, a top-level CloudFormation stack with the default name SC-RA-Beanstalk-Portfolio, which contains five nested stacks, has created the AWS Service Catalog products with the services the development team needs to implement a CI/CD pipeline and host the web application. This AWS Service Catalog reference architecture provisions the AWS Service Catalog products needed to set up the DevOps pipeline and the application environment.

Cloudformation Portfolio Stack

When the portfolio has been created, you have completed the administrator setup. As an end-user (any roles you added to the LinkedRole1 or LinkedRole2 parameters), you can access the portfolio section on the AWS Service Catalog console and review the product list, which now includes the AWS Cloud9 IDE, Elastic Beanstalk application, and CodePipeline project that we will use for continuous delivery.

Service Catalog Products

On the AWS Service Catalog administrator section, inside the Elastic Beanstalk reference architecture portfolio, we can add and remove groups, roles, and users by choosing Add groups, roles, users on the Group, roles, and users tab. This lets us enable developers or other users to deploy the products from this portfolio.

Service Catalog Groups, Roles, and Users

Solution overview

The rest of this post walks you through how to provision the resources you need for CI/CD and web application deployment. You complete the following steps:

  1. Deploy the CI/CD pipeline.
  2. Provision the AWS Cloud9 IDE.
  3. Create the Elastic Beanstalk environment.

Deploying the CI/CD pipeline

The first product you need is the CI/CD pipeline, which manages the code and deployment process.

  1. Sign in to the AWS Service Catalog console in the same Region where you launched the CloudFormation stack earlier.
  2. On the Products list page, locate the CodePipeline product you created earlier.
    Service Catalog Products List
  3. Choose Launch product.

You now provision the CI/CI pipeline. For this post, we use some name examples for the pipeline name, Elastic Beanstalk application name, and code repository, which you can of course modify.

  1. Enter a name for the provisioned Codepipeline product.
  2. Select the Windows version and click Next.
  3. For the application and repository name, enter dotnetapp.
  4. Leave all other settings at their default and click Next.
  5. Choose Launch to start the provisioning of the CodePipeline product.

When you’re finished, the provisioned pipeline should appear on the Provisioned products list.

CodePipeline Product Provisioned

  1. Copy the CloneUrlHttp output to use in a later step.

You now have the CI/CD pipeline ready, with the code repository and the continuous integration service that compiles the code, runs tests, and generates the software bundle stored in Amazon Simple Storage Service (Amazon S3) ready to be deployed. The following diagram illustrates this architecture.

CodePipeline Configuration Diagram

When the Elastic Beanstalk environment is provisioned, the deploy stage takes care of deploying the bundle application stored in Amazon S3, so the DevOps pipeline takes care of the full software delivery as shown in the earlier architecture diagram.

The Region we use should support the WINDOWS_SERVER_2019_CONTAINER build image that AWS CodeBuild uses. You can modify the environment type or create a custom one by editing the CloudFormation template used for the CodePipeline for Windows.

Provisioning the AWS Cloud9 IDE

To show the full lifecycle of the deployment of a web application with Elastic Beanstalk, we use a .NET web application, but this reference architecture also supports Linux. To provision an AWS Cloud9 environment, complete the following steps:

  1. From the AWS Service Catalog product list, choose the AWS Cloud9 IDE.
  2. Click Launch product.
  3. Enter a name for the provisioned Cloud9 product and click Next.
  4. Enter an EnvironmentName and select the InstanceType.
  5. Set LinkedRepoPath to /dotnetapp.
  6. For LinkedRepoCloneUrl, enter the CloneUrlHttp from the previous step.
  7. Leave the default parameters for tagOptions and Notifications, and click Launch.
    Cloud9 Environment Settings

Now we download a sample ASP.NET MVC application in the AWS Cloud9 IDE, move it under the folder we specified in the previous step, and push the code.

  1. Open the IDE with the Cloud9Url link from AWS Service Catalog output.
  2. Get the sample .NET web application and move it under the dotnetapp. See the following code:
  3. cp -R aws-service-catalog-reference-architectures/labs/SampleDotNetApplication/* dotnetapp/
  1. Check in to the sample application to the CodeCommit repo:
  2. cd dotnetapp
    git add --all
    git commit -m "initial commit"
    git push

Now that we have committed the application to the code repository, it’s time to review the DevOps pipeline.

  1. On the CodePipeline console, choose Pipelines.

You should see the pipeline ElasticBeanstalk-ProductPipeline-dotnetapp running.

CodePipeline Execution

  1. Wait until the three pipeline stages are complete, this may take several minutes.

The code commitment and web application build stages are successful, but the code deployment stage fails because we haven’t provisioned the Elastic Beanstalk environment yet.

If you want to deploy your own sample or custom ASP.NET web application, CodeBuild requires the build specification file buildspec-build-dotnet.yml for the .NET Framework, which is located under the elasticbeanstalk/codepipeline folder in the GitHub repo. See the following example code:

version: 0.2
env:
  variables:
    DOTNET_FRAMEWORK: 4.6.1
phases:
  build:
    commands:
      - nuget restore
      - msbuild /p:TargetFrameworkVersion=v$env:DOTNET_FRAMEWORK /p:Configuration=Release /p:DeployIisAppPath="Default Web Site" /t:Package
      - dir obj\Release\Package
artifacts:
  files:
    - 'obj/**/*'
    - 'codepipeline/*'

Creating the Elastic Beanstalk environment

Finally, it’s time to provision the hosting system, an Elastic Beanstalk Windows-based environment, where the .NET sample web application runs. For this, we follow the same approach from the previous steps and provision the Elastic Beanstalk AWS Service Catalog product.

  1. On the AWS Service Catalog console, on the Product list page, choose the Elastic Beanstalk application product.
  2. Choose Launch product.
  3. Enter an environment name and click Next.
  4. Enter the application name.
  5. Enter the S3Bucket and S3SourceBundle that were generated (you can retrieve them from the Amazon S3 console).
  6. Set the SolutionStackName to 64bit Windows Server Core 2019 v2.5.8 running IIS 10.0. Follow this link for up to date platform names.
  7. Elastic Beanstalk Environment Settings
  1. Launch the product.
  2. To verify that you followed the steps correctly, review that the provisioned products are all available (AWS Cloud9 IDE, Elastic Beanstalk CodePipeline project, and Elastic Beanstalk application) and the recently created Elastic Beanstalk environment is healthy.

As in the previous step, if you’re planning to deploy your own sample or custom ASP.NET web application, AWS CodeDeploy requires the deploy specification file buildspec-deploy-dotnet.yml for the .NET Framework, which should be located under the codepipeline folder in the GitHub repo. See the following code:

version: 0.2
phases:
  pre_build:
    commands:          
      - echo application deploy started on `date`      
      - ls -l
      - ls -l obj/Release/Package
      - aws s3 cp ./obj/Release/Package/SampleWebApplication.zip s3://$ARTIFACT_BUCKET/$EB_APPLICATION_NAME-$CODEBUILD_BUILD_NUMBER.zip
  build:
    commands:
      - echo Pushing package to Elastic Beanstalk...      
      - aws elasticbeanstalk create-application-version --application-name $EB_APPLICATION_NAME --version-label v$CODEBUILD_BUILD_NUMBER --description "Auto deployed from CodeCommit build $CODEBUILD_BUILD_NUMBER" --source-bundle S3Bucket="$ARTIFACT_BUCKET",S3Key="$EB_APPLICATION_NAME-$CODEBUILD_BUILD_NUMBER.zip"
      - aws elasticbeanstalk update-environment --environment-name "EB-ENV-$EB_APPLICATION_NAME" --version-label v$CODEBUILD_BUILD_NUMBER

The same codepipeline folder contains some build and deploy specification files besides the .NET ones, which you could use if you prefer to use a different framework like Python to deploy a web application with Elastic Beanstalk.

  1. To complete the application deployment, go to the application pipeline and release the change, which triggers the pipeline with the application environment now ready.
    Deployment Succeeded

When you create the environment through the AWS Service Catalog, you can access the provisioned Elastic Beanstalk environment.

  1. In the Events section, locate the LoadBalancerURL, which is the public endpoint that we use to access the website.
    Elastic Beanstalk LoadBalancer URL
  1. In our preferred browser, we can check that the website has been successfully deployed.ASP.NET Sample Web Application

Cleaning up

When you’re finished, you should complete the following steps to delete the resources you provisioned to avoid incurring further charges and keep the account free of unused resources.

  1. The CodePipeline product creates an S3 bucket which you must empty from the S3 console.
  2. On the AWS Service Catalog console, end the provisioned resources from the Provisioned products list.
  3. As administrator, in the CloudFormation console, delete the stack SC-RA-Beanstalk-Portfolio.

Conclusions

This post has shown you how to deploy a standardized DevOps pipeline which was then used to manage and deploy a sample .NET application on Elastic Beanstalk using the Service Catalog Elastic Beanstalk reference architecture. AWS Service Catalog is the ideal service for administrators who need to centrally provision and manage the AWS services needed with a consistent governance model. Deploying web applications to Elastic Beanstalk is very simple for developers and provides built in scalability, patch maintenance, and self-healing for your applications.

The post includes the information and references on how to extend the solution with other programming languages and operating systems supported by Elastic Beanstalk.

About the Authors

Borja Prado
Borja Prado Miguelez

Borja is a Senior Specialist Solutions Architect for Microsoft workloads at Amazon Web Services. He is passionate about web architectures and application modernization, helping customers to build scalable solutions with .NET and migrate their Windows workloads to AWS.

Chris Chapman
Chris Chapman

Chris is a Partner Solutions Architect covering AWS Marketplace, Service Catalog, and Control Tower. Chris was a software developer and data engineer for many years and now his core mission is helping customers and partners automate AWS infrastructure deployment and provisioning.

Integrating Jenkins with AWS CodeArtifact to publish and consume Python artifacts

Post Syndicated from Matt Ulinski original https://aws.amazon.com/blogs/devops/using-jenkins-with-codeartifact/

Python packages are used to share and reuse code across projects. Centralized artifact storage allows sharing versioned artifacts across an organization. This post explains how you can set up two Jenkins projects. The first project builds the Python package and publishes it to AWS CodeArtifact using twine (Python utility for publishing packages), and the second project consumes the package using pip and deploys an application to AWS Fargate.

Solution overview

The following diagram illustrates this architecture.

Architecture Diagram


The solution consists of two GitHub repositories and two Jenkins projects. The first repository contains the source code of a Python package. Jenkins builds this package and publishes it to a CodeArtifact repository.

The second repository contains the source code of a Python Flask application that has a dependency on the package produced by the first repository. Jenkins builds a Docker image containing the application and its dependencies, pushes the image to an Amazon Elastic Container Registry (Amazon ECR) registry, and deploys it to AWS Fargate using AWS CloudFormation.

Prerequisites

For this walkthrough, you should have the following prerequisites:

To create a new Jenkins server that includes the required dependencies, complete the following steps:

  1. Launch a CloudFormation stack with the following link:
    Launch CloudFormation stack
  2. Choose Next.
  3. Enter the name for your stack.
  4. Select the Amazon Elastic Compute Cloud (Amazon EC2) instance type for your Jenkins server.
  5. Select the subnet and corresponding VPC.
  6. Choose Next.
  7. Scroll down to the bottom of the page and choose Next.
  8. Review the stack configuration and choose Create stack.

AWS CloudFormation creates the following resources:

  • JenkinsInstance – Amazon EC2 instance that Jenkins and its dependencies is installed on
  • JenkinsWaitCondition – CloudFormation wait condition that waits for Jenkins to be fully installed before finishing the deployment
  • JenkinsSecurityGroup – Security group attached to the EC2 instance that allows inbound traffic on port 8080

The stack takes a few minutes to deploy. When it’s fully deployed, you can find the URL and initial password for Jenkins on the Outputs tab of the stack.

CloudFormation outputs tab

Use the initial password to unlock the Jenkins installation, then follow the setup wizard to install the suggested plugins and create a new Jenkins user. After the user is created, the initial password no longer works.

On the Jenkins homepage, complete the following steps:

  1. Choose Manage Jenkins.
  2. Choose Manage Plugins.
  3. On the Available tab, search for “Docker Pipeline” and select it.
    Jenkins plugins available tab
  4. Choose Download now and install after restart.
  5. Select Restart Jenkins when installation is complete and no jobs are running.

Jenkins plugins installation complete

Jenkins is ready to use after it restarts. Log in with the user you created with the setup wizard.

Setting up a CodeArtifact repository

To get started, create a CodeArtifact repository to store the Python packages.

  1. On the CodeArtifact console, choose Create repository.
  2. For Repository name, enter a name (for this post, I use my-repository).
  3. For Public upstream repositories, choose pypi-store.
  4. Choose Next.
    AWS CodeArtifact repository wizard
  5. Choose This AWS account.
  6. If you already have a CodeArtifact domain, choose it from the drop-down menu. If you don’t already have a CodeArtifact domain, choose a name for your domain and the console creates it for you. For this post, I named my domain my-domain.
  7. Choose Next.
  8. Review the repository details and choose Create repository.
    CodeArtifact repository overview

You now have a CodeArtifact repository created, which you use to store and retrieve Python packages used by the application.

Configuring Jenkins: Creating an IAM user

  1. On the IAM console, choose User.
  2. Choose Add user.
  3. Enter a name for the user (for this post, I used the name Jenkins).
  4. Select Programmatic access as the access type.
  5. Choose Next: Permissions.
  6. Select Attach existing policies directly.
  7. Choose the following policies:
    1. AmazonEC2ContainerRegistryPowerUser – Allows Jenkins to push Docker images to ECR.
    2. AmazonECS_FullAccess – Allows Jenkins to deploy your application to AWS Fargate.
    3. AWSCloudFormationFullAccess – Allows Jenkins to update the CloudFormation stack.
    4. AWSCodeArtifactAdminAccessAllows Jenkins access to the CodeArtifact repository.
  8. Choose Next: Tags.
  9. Choose Next: Review.
  10. Review the configuration and choose Create user.
  11. Record the Access key ID and Secret access key; you need them to configure Jenkins.

Configuring Jenkins: Adding credentials

After you create your IAM user, you need to set up the credentials in Jenkins.

  1. Open Jenkins.
  2. From the left pane, choose Manage Jenkins
  3. Choose Manage Credentials.
  4. Hover over the (global) domain and expand the drop-down menu.
  5. Choose Add credentials.
    Jenkins credentials
  6. Enter the following credentials:
    1. Kind – User name with password.
    2. Scope – Global (Jenkins, nodes, items, all child items).
    3. Username – Enter the Access key ID for the Jenkins IAM user.
    4. Password – Enter the Secret access key for the Jenkins IAM user.
    5. ID – Name for the credentials (for this post, I used AWS).
  7. Choose OK.

You use the credentials to make API calls to AWS as part of the builds.

Publishing a Python package

To publish your Python package, complete the following steps:

  1. Create a new GitHub repo to store the source of the sample package.
  2. Clone the sample GitHub repo onto your local machine.
  3. Navigate to the package_src directory.
  4. Place its contents in your GitHub repo.
    Package repository contents

When your GitHub repo is populated with the sample package, you can create the first Jenkins project.

  1. On the Jenkins homepage, choose New Item.
  2. Enter a name for the project; for example, producer.
  3. Choose Freestyle project.
  4. Choose OK.
    Jenkins new project wizard
  5. In the Source Code Management section, choose Git.
  6. Enter the HTTP clone URL of your GitHub repo into the Repository URL
  7. To make sure that the workspace is clean before each build, under Additional Behaviors, choose Add and select Clean before checkout.
    Jenkins source code managnment
  8. To have builds start automatically when a change occurs in the repository, under Build Triggers, select Poll SCM and enter * * * * * in the Schedule
    Jenkins build triggers
  9. In the Build Environment section, select Use secret text(s) or file(s).
  10. Choose Add and choose Username and password (separated).
  11. Enter the following information:
    1. UsernameAWS_ACCESS_KEY_ID
    2. PasswordAWS_SECRET_ACCESS_KEY
    3. Credentials – Select Specific Credentials and from the drop-down menu and choose the previously created credentials.
      Jenkins credential binding
  12. In the Build section, choose Add build step.
  13. Choose Execute shell.
  14. Enter the following command and replace my-domain, my-repository, and my-region with the name of your CodeArtifact domain, repository, and Region:
    python3 setup.py sdist bdist_wheel
    aws codeartifact login --tool twine --domain my-domain --repository my-repository --region my-region
    python3 -m twine upload dist/* --repository codeartifact

    These commands do the following:

    • Build the Python package
    • Run the aws codeartifact login AWS Command Line Interface (AWS CLI) command, which retrieves the access token for CodeArtifact and configures the twine client
    • Use twine to publish the Python package to CodeArtifact
  15. Choose Save.
  16. Start a new build by choosing Build Now in the left pane.After a build starts, it shows in the Build History on the left pane. To view the build’s details, choose the build’s ID number.
    Jenkins project builds
  17. To view the results of the run commands, from the build details page, choose Console Output.
  18. To see that the package has been successfully published, check the CodeArtifact repository on the console.
    CodeArtifact console showing package

When a change is pushed to the repo, Jenkins will start a new build and attempt to publish the package. CodeArtifact will prevent publishing duplicates of the same package version, failing the Jenkins build.

If you want to publish a new version of the package, you will need to increment the version number.

The sample package uses semantic versioning (major.minor.maintenance), to change the version number modify the version='1.0.0' value in the setup.py file. You can do this manually before pushing any changes to the repo, or automatically as part of the build process by using the python-semantic-release package, or a similar solution.

Consuming a package and deploying an application

After you have a package published, you can use it in an application.

  1. Create a new GitHub repo for this application.
  2. Populate it with the contents of the application_src directory from the sample repo.
    Sample application repository

The version of the sample package used by the application is defined in the requirements.txt file. If you have published a new version of the package and want the application to use it modify the fantastic-ascii==1.0.0 value in this file.

After the repository created, you need to deploy the CloudFormation template application.yml. The template creates the following resources:

  • ECRRepository – Amazon ECR repository to store your Docker image.
  • ClusterAmazon Elastic Container Service (Amazon ECS) cluster that contains the service of your application.
  • TaskDefinition – ECS task definition that defines how your Docker image is deployed.
  • ExecutionRole – IAM role that Amazon ECS uses to pull the Docker image.
  • TaskRole – IAM role provided to the ECS task.
  • ContainerSecurityGroup – Security group that allows outbound traffic to ports 8080 and 80.
  • Service – Amazon ECS service that launches and manages your Docker containers.
  • TargetGroup – Target group used by the Load Balancer to send traffic to Docker containers.
  • Listener – Load Balancer Listener that listens for incoming traffic on port 80.
  • LoadBalancer – Load Balancer that sends traffic to the ECS task.
  1. Choose the following link to create the application’s CloudFormation stack:
    Launch CloudFormation stack
  2. Choose Next.
  3. Enter the following parameters:
    1. Stack name – Name for the CloudFormation stack. For this post, I use the name Consumer.
    2. Container Name – Name for your application (for this post, I use application).
    3. Image Tag – Leave this field blank. Jenkins populates it when you deploy the application.
    4. VPC – Choose a VPC in your account that contains two public subnets.
    5. SubnetA – Choose a public subnet from the previously chosen VPC.
    6. SubnetB – Choose a public subnet from the previously chosen VPC.
  4. Choose Next.
  5. Scroll down to the bottom of the page and choose Next.
  6. Review the configuration of the stack.
  7. Acknowledge the IAM resources warning to allow CloudFormation to create the TaskRole IAM role.
  8. Choose Create Stack.

After the stack is created, the Outputs tab contains information you can use to configure the Jenkins project.

Application stack outputs tab

To access the sample application, choose the ApplicationUrl link. Because the application has not yet been deployed, you receive an error message.

You can now create the second Jenkins project, which uses a configured through a Jenkinsfile stored in the source repository. The Jenkinsfile defines the steps that the build takes to build and deploy a Docker image containing your application.

The Jenkinsfile included in the sample instructs Jenkins to perform these steps:

  1. Get the authorization token for CodeArtifact:
    withCredentials([usernamePassword(
        credentialsId: CREDENTIALS_ID,
        passwordVariable: 'AWS_SECRET_ACCESS_KEY',
        usernameVariable: 'AWS_ACCESS_KEY_ID'
    )]) {
        authToken = sh(
                returnStdout: true,
                script: 'aws codeartifact get-authorization-token \
                --domain $AWS_CA_DOMAIN \
                --query authorizationToken \
                --output text \
                --duration-seconds 900'
        ).trim()
    }

  2. Start a Docker build and pass the authorization token as an argument to the build:
    sh ("""
        set +x
        docker build -t $CONTAINER_NAME:$BUILD_NUMBER \
        --build-arg CODEARTIFACT_TOKEN='$authToken' \
        --build-arg DOMAIN=$AWS_CA_DOMAIN-$AWS_ACCOUNT_ID \
        --build-arg REGION=$AWS_REGION \
        --build-arg REPO=$AWS_CA_REPO .
    """)

  3. Inside of Docker, the passed argument is used to configure pip to use CodeArtifact:
    RUN pip config set global.index-url "https://aws:$CODEARTIFACT_TOKEN@$DOMAIN.d.codeartifact.$REGION.amazonaws.com/pypi/$REPO/simple/"
    RUN pip install -r requirements.txt

  4. Test the image by starting a container and performing a simple GET request.
  5. Log in to the Amazon ECR repository and push the Docker image.
  6. Update the CloudFormation template and start a deployment of the application.

Look at the Jenkinsfile and Dockerfile in your repository to review the exact commands being used, then take the following steps to setup the second Jenkins projects:

  1. Change the variables defined in the environment section at the top of the Jenkinsfile:
    environment {
        AWS_ACCOUNT_ID = 'Your AWS Account ID'
        AWS_REGION = 'Region you used for this project'
        AWS_CA_DOMAIN = 'Name of your CodeArtifact domain'
        AWS_CA_REPO = 'Name of your CodeArtifact repository'
        AWS_STACK_NAME = 'Name of the CloudFormation stack'
        CONTAINER_NAME = 'Container name provided to CloudFormation'
        CREDENTIALS_ID = 'Jenkins credentials ID
    }
  2. Commit the changes to the GitHub repo.
  3. To create a new Jenkins project, on the Jenkins homepage, choose New Item.
  4. Enter a name for the project, for example, Consumer.
  5. Choose Pipeline.
  6. Choose OK.
    Jenkins pipeline wizard
  7. To have a new build start automatically when a change is detected in the repository, under Build Triggers, select Poll SCM and enter * * * * * in the Schedule field.
    Jenkins source polling configuration
  8. In the Pipeline section, choose Pipeline script from SCM from the Definition drop-down menu.
  9. Choose Git for the SCM
  10. Enter the HTTP clone URL of your GitHub repo into the Repository URL
  11. To make sure that your workspace is clean before each build, under Additional Behaviors, choose Add and select Clean before checkout.
    Jenkins source configuration
  12. Choose Save.

The Jenkins project is now ready. To start a new job, choose Build Now from the navigation pane. You see a visualization of the pipeline as it moves through the various stages, gathering the dependencies and deploying your application.

Jenkins application pipeline visualization

When the Deploy to ECS stage of the pipeline is complete, you can choose ApplicationUrl on the Outputs tab of the CloudFormation stack. You see a simple webpage that uses the Python package to display the current time.

Deployed application displaying in browser

Cleaning up

To avoid incurring future charges, delete the resources created in this post.

To empty the Amazon ECR repository:

  1. Open the application’s CloudFormation stack.
  2. On the Resources tab, choose the link next to the ECRRepository
  3. Select the check-box next to each of the images in the repository.
  4. Choose Delete.
  5. Confirm the deletion.

To delete the CloudFormation stacks:

  1. On the AWS CloudFormation console, select the application stack you deployed earlier.
  2. Choose Delete.
  3. Confirm the deletion.

If you created a Jenkins as part of this post, select the Jenkins stack and delete it.

To delete the CodeArtifact repository:

  1. On the CodeArtifact console, navigate to the repository you created.
  2. Choose Delete.
  3. Confirm the deletion.

If you’re not using the CodeArtifact domain for other repositories, you should follow the previous steps to delete the pypi-store repository, because it contains the public packages that were used by the application, then delete the CodeArtifact domain:

  1. On the CodeArtifact console, navigate to the domain you created.
  2. Choose Delete.
  3. Confirm the deletion.

Conclusion

In this post I showed how you can use Jenkins to publish and consume a Python package with Jenkins and CodeArtifact. I walked you through creating two Jenkins projects, a Jenkins freestyle project that built a package and published it to CodeArtifact, and a Jenkins pipeline project that built a Docker image that used the package in an application that was deployed to AWS Fargate.

About the author

Matt Ulinski is a Cloud Support Engineer with Amazon Web Services.


Cross-account and cross-region deployment using GitHub actions and AWS CDK

Post Syndicated from DAMODAR SHENVI WAGLE original https://aws.amazon.com/blogs/devops/cross-account-and-cross-region-deployment-using-github-actions-and-aws-cdk/

GitHub Actions is a feature on GitHub’s popular development platform that helps you automate your software development workflows in the same place you store code and collaborate on pull requests and issues. You can write individual tasks called actions, and combine them to create a custom workflow. Workflows are custom automated processes that you can set up in your repository to build, test, package, release, or deploy any code project on GitHub.

A cross-account deployment strategy is a CI/CD pattern or model in AWS. In this pattern, you have a designated AWS account called tools, where all CI/CD pipelines reside. Deployment is carried out by these pipelines across other AWS accounts, which may correspond to dev, staging, or prod. For more information about a cross-account strategy in reference to CI/CD pipelines on AWS, see Building a Secure Cross-Account Continuous Delivery Pipeline.

In this post, we show you how to use GitHub Actions to deploy an AWS Lambda-based API to an AWS account and Region using the cross-account deployment strategy.

Using GitHub Actions may have associated costs in addition to the cost associated with the AWS resources you create. For more information, see About billing for GitHub Actions.

Prerequisites

Before proceeding any further, you need to identify and designate two AWS accounts required for the solution to work:

  • Tools – Where you create an AWS Identity and Access Management (IAM) user for GitHub Actions to use to carry out deployment.
  • Target – Where deployment occurs. You can call this as your dev/stage/prod environment.

You also need to create two AWS account profiles in ~/.aws/credentials for the tools and target accounts, if you don’t already have them. These profiles need to have sufficient permissions to run an AWS Cloud Development Kit (AWS CDK) stack. They should be your private profiles and only be used during the course of this use case. So, it should be fine if you want to use admin privileges. Don’t share the profile details, especially if it has admin privileges. I recommend removing the profile when you’re finished with this walkthrough. For more information about creating an AWS account profile, see Configuring the AWS CLI.

Solution overview

You start by building the necessary resources in the tools account (an IAM user with permissions to assume a specific IAM role from the target account to carry out deployment). For simplicity, we refer to this IAM role as the cross-account role, as specified in the architecture diagram.

You also create the cross-account role in the target account that trusts the IAM user in the tools account and provides the required permissions for AWS CDK to bootstrap and initiate creating an AWS CloudFormation deployment stack in the target account. GitHub Actions uses the tools account IAM user credentials to the assume the cross-account role to carry out deployment.

In addition, you create an AWS CloudFormation execution role in the target account, which AWS CloudFormation service assumes in the target account. This role has permissions to create your API resources, such as a Lambda function and Amazon API Gateway, in the target account. This role is passed to AWS CloudFormation service via AWS CDK.

You then configure your tools account IAM user credentials in your Git secrets and define the GitHub Actions workflow, which triggers upon pushing code to a specific branch of the repo. The workflow then assumes the cross-account role and initiates deployment.

The following diagram illustrates the solution architecture and shows AWS resources across the tools and target accounts.

Architecture diagram

Creating an IAM user

You start by creating an IAM user called git-action-deployment-user in the tools account. The user needs to have only programmatic access.

  1. Clone the GitHub repo aws-cross-account-cicd-git-actions-prereq and navigate to folder tools-account. Here you find the JSON parameter file src/cdk-stack-param.json, which contains the parameter CROSS_ACCOUNT_ROLE_ARN, which represents the ARN for the cross-account role we create in the next step in the target account. In the ARN, replace <target-account-id> with the actual account ID for your designated AWS target account.                                             Replace <target-account-id> with designated AWS account id
  2. Run deploy.sh by passing the name of the tools AWS account profile you created earlier. The script compiles the code, builds a package, and uses the AWS CDK CLI to bootstrap and deploy the stack. See the following code:
cd aws-cross-account-cicd-git-actions-prereq/tools-account/
./deploy.sh "<AWS-TOOLS-ACCOUNT-PROFILE-NAME>"

You should now see two stacks in the tools account: CDKToolkit and cf-GitActionDeploymentUserStack. AWS CDK creates the CDKToolkit stack when we bootstrap the AWS CDK app. This creates an Amazon Simple Storage Service (Amazon S3) bucket needed to hold deployment assets such as a CloudFormation template and Lambda code package. cf-GitActionDeploymentUserStack creates the IAM user with permission to assume git-action-cross-account-role (which you create in the next step). On the Outputs tab of the stack, you can find the user access key and the AWS Secrets Manager ARN that holds the user secret. To retrieve the secret, you need to go to Secrets Manager. Record the secret to use later.

Stack that creates IAM user with its secret stored in secrets manager

Creating a cross-account IAM role

In this step, you create two IAM roles in the target account: git-action-cross-account-role and git-action-cf-execution-role.

git-action-cross-account-role provides required deployment-specific permissions to the IAM user you created in the last step. The IAM user in the tools account can assume this role and perform the following tasks:

  • Upload deployment assets such as the CloudFormation template and Lambda code package to a designated S3 bucket via AWS CDK
  • Create a CloudFormation stack that deploys API Gateway and Lambda using AWS CDK

AWS CDK passes git-action-cf-execution-role to AWS CloudFormation to create, update, and delete the CloudFormation stack. It has permissions to create API Gateway and Lambda resources in the target account.

To deploy these two roles using AWS CDK, complete the following steps:

  1. In the already cloned repo from the previous step, navigate to the folder target-account. This folder contains the JSON parameter file cdk-stack-param.json, which contains the parameter TOOLS_ACCOUNT_USER_ARN, which represents the ARN for the IAM user you previously created in the tools account. In the ARN, replace <tools-account-id> with the actual account ID for your designated AWS tools account.                                             Replace <tools-account-id> with designated AWS account id
  2. Run deploy.sh by passing the name of the target AWS account profile you created earlier. The script compiles the code, builds the package, and uses the AWS CDK CLI to bootstrap and deploy the stack. See the following code:
cd ../target-account/
./deploy.sh "<AWS-TARGET-ACCOUNT-PROFILE-NAME>"

You should now see two stacks in your target account: CDKToolkit and cf-CrossAccountRolesStack. AWS CDK creates the CDKToolkit stack when we bootstrap the AWS CDK app. This creates an S3 bucket to hold deployment assets such as the CloudFormation template and Lambda code package. The cf-CrossAccountRolesStack creates the two IAM roles we discussed at the beginning of this step. The IAM role git-action-cross-account-role now has the IAM user added to its trust policy. On the Outputs tab of the stack, you can find these roles’ ARNs. Record these ARNs as you conclude this step.

Stack that creates IAM roles to carry out cross account deployment

Configuring secrets

One of the GitHub actions we use is aws-actions/configure-aws-credentials@v1. This action configures AWS credentials and Region environment variables for use in the GitHub Actions workflow. The AWS CDK CLI detects the environment variables to determine the credentials and Region to use for deployment.

For our cross-account deployment use case, aws-actions/configure-aws-credentials@v1 takes three pieces of sensitive information besides the Region: AWS_ACCESS_KEY_ID, AWS_ACCESS_KEY_SECRET, and CROSS_ACCOUNT_ROLE_TO_ASSUME. Secrets are recommended for storing sensitive pieces of information in the GitHub repo. It keeps the information in an encrypted format. For more information about referencing secrets in the workflow, see Creating and storing encrypted secrets.

Before we continue, you need your own empty GitHub repo to complete this step. Use an existing repo if you have one, or create a new repo. You configure secrets in this repo. In the next section, you check in the code provided by the post to deploy a Lambda-based API CDK stack into this repo.

  1. On the GitHub console, navigate to your repo settings and choose the Secrets tab.
  2. Add a new secret with name as TOOLS_ACCOUNT_ACCESS_KEY_ID.
  3. Copy the access key ID from the output OutGitActionDeploymentUserAccessKey of the stack GitActionDeploymentUserStack in tools account.
  4. Enter the ID in the Value field.                                                                                                                                                                Create secret
  5. Repeat this step to add two more secrets:
    • TOOLS_ACCOUNT_SECRET_ACCESS_KEY (value retrieved from the AWS Secrets Manager in tools account)
    • CROSS_ACCOUNT_ROLE (value copied from the output OutCrossAccountRoleArn of the stack cf-CrossAccountRolesStack in target account)

You should now have three secrets as shown below.

All required git secrets

Deploying with GitHub Actions

As the final step, first clone your empty repo where you set up your secrets. Download and copy the code from the GitHub repo into your empty repo. The folder structure of your repo should mimic the folder structure of source repo. See the following screenshot.

Folder structure of the Lambda API code

We can take a detailed look at the code base. First and foremost, we use Typescript to deploy our Lambda API, so we need an AWS CDK app and AWS CDK stack. The app is defined in app.ts under the repo root folder location. The stack definition is located under the stack-specific folder src/git-action-demo-api-stack. The Lambda code is located under the Lambda-specific folder src/git-action-demo-api-stack/lambda/ git-action-demo-lambda.

We also have a deployment script deploy.sh, which compiles the app and Lambda code, packages the Lambda code into a .zip file, bootstraps the app by copying the assets to an S3 bucket, and deploys the stack. To deploy the stack, AWS CDK has to pass CFN_EXECUTION_ROLE to AWS CloudFormation; this role is configured in src/params/cdk-stack-param.json. Replace <target-account-id> with your own designated AWS target account ID.

Update cdk-stack-param.json in git-actions-cross-account-cicd repo with TARGET account id

Finally, we define the Git Actions workflow under the .github/workflows/ folder per the specifications defined by GitHub Actions. GitHub Actions automatically identifies the workflow in this location and triggers it if conditions match. Our workflow .yml file is named in the format cicd-workflow-<region>.yml, where <region> in the file name identifies the deployment Region in the target account. In our use case, we use us-east-1 and us-west-2, which is also defined as an environment variable in the workflow.

The GitHub Actions workflow has a standard hierarchy. The workflow is a collection of jobs, which are collections of one or more steps. Each job runs on a virtual machine called a runner, which can either be GitHub-hosted or self-hosted. We use the GitHub-hosted runner ubuntu-latest because it works well for our use case. For more information about GitHub-hosted runners, see Virtual environments for GitHub-hosted runners. For more information about the software preinstalled on GitHub-hosted runners, see Software installed on GitHub-hosted runners.

The workflow also has a trigger condition specified at the top. You can schedule the trigger based on the cron settings or trigger it upon code pushed to a specific branch in the repo. See the following code:

name: Lambda API CICD Workflow
# This workflow is triggered on pushes to the repository branch master.
on:
  push:
    branches:
      - master

# Initializes environment variables for the workflow
env:
  REGION: us-east-1 # Deployment Region

jobs:
  deploy:
    name: Build And Deploy
    # This job runs on Linux
    runs-on: ubuntu-latest
    steps:
      # Checkout code from git repo branch configured above, under folder $GITHUB_WORKSPACE.
      - name: Checkout
        uses: actions/checkout@v2
      # Sets up AWS profile.
      - name: Configure AWS credentials
        uses: aws-actions/configure-aws-credentials@v1
        with:
          aws-access-key-id: ${{ secrets.TOOLS_ACCOUNT_ACCESS_KEY_ID }}
          aws-secret-access-key: ${{ secrets.TOOLS_ACCOUNT_SECRET_ACCESS_KEY }}
          aws-region: ${{ env.REGION }}
          role-to-assume: ${{ secrets.CROSS_ACCOUNT_ROLE }}
          role-duration-seconds: 1200
          role-session-name: GitActionDeploymentSession
      # Installs CDK and other prerequisites
      - name: Prerequisite Installation
        run: |
          sudo npm install -g [email protected]
          cdk --version
          aws s3 ls
      # Build and Deploy CDK application
      - name: Build & Deploy
        run: |
          cd $GITHUB_WORKSPACE
          ls -a
          chmod 700 deploy.sh
          ./deploy.sh

For more information about triggering workflows, see Triggering a workflow with events.

We have configured a single job workflow for our use case that runs on ubuntu-latest and is triggered upon a code push to the master branch. When you create an empty repo, master branch becomes the default branch. The workflow has four steps:

  1. Check out the code from the repo, for which we use a standard Git action actions/checkout@v2. The code is checked out into a folder defined by the variable $GITHUB_WORKSPACE, so it becomes the root location of our code.
  2. Configure AWS credentials using aws-actions/configure-aws-credentials@v1. This action is configured as explained in the previous section.
  3. Install your prerequisites. In our use case, the only prerequisite we need is AWS CDK. Upon installing AWS CDK, we can do a quick test using the AWS Command Line Interface (AWS CLI) command aws s3 ls. If cross-account access was successfully established in the previous step of the workflow, this command should return a list of buckets in the target account.
  4. Navigate to root location of the code $GITHUB_WORKSPACE and run the deploy.sh script.

You can check in the code into the master branch of your repo. This should trigger the workflow, which you can monitor on the Actions tab of your repo. The commit message you provide is displayed for the respective run of the workflow.

Workflow for region us-east-1 Workflow for region us-west-2

You can choose the workflow link and monitor the log for each individual step of the workflow.

Git action workflow steps

In the target account, you should now see the CloudFormation stack cf-GitActionDemoApiStack in us-east-1 and us-west-2.

Lambda API stack in us-east-1 Lambda API stack in us-west-2

The API resource URL DocUploadRestApiResourceUrl is located on the Outputs tab of the stack. You can invoke your API by choosing this URL on the browser.

API Invocation Output

Clean up

To remove all the resources from the target and tools accounts, complete the following steps in their given order:

  1. Delete the CloudFormation stack cf-GitActionDemoApiStack from the target account. This step removes the Lambda and API Gateway resources and their associated IAM roles.
  2. Delete the CloudFormation stack cf-CrossAccountRolesStack from the target account. This removes the cross-account role and CloudFormation execution role you created.
  3. Go to the CDKToolkit stack in the target account and note the BucketName on the Output tab. Empty that bucket and then delete the stack.
  4. Delete the CloudFormation stack cf-GitActionDeploymentUserStack from tools account. This removes cross-account-deploy-user IAM user.
  5. Go to the CDKToolkit stack in the tools account and note the BucketName on the Output tab. Empty that bucket and then delete the stack.

Security considerations

Cross-account IAM roles are very powerful and need to be handled carefully. For this post, we strictly limited the cross-account IAM role to specific Amazon S3 and CloudFormation permissions. This makes sure that the cross-account role can only do those things. The actual creation of Lambda, API Gateway, and Amazon DynamoDB resources happens via the AWS CloudFormation IAM role, which AWS  CloudFormation assumes in the target AWS account.

Make sure that you use secrets to store your sensitive workflow configurations, as specified in the section Configuring secrets.

Conclusion

In this post we showed how you can leverage GitHub’s popular software development platform to securely deploy to AWS accounts and Regions using GitHub actions and AWS CDK.

Build your own GitHub Actions CI/CD workflow as shown in this post.

About the author


Damodar Shenvi Wagle is a Cloud Application Architect at AWS Professional Services. His areas of expertise include architecting serverless solutions, ci/cd and automation.

How Pushly Media used AWS to pivot and quickly spin up a StartUp

Post Syndicated from Eddie Moser original https://aws.amazon.com/blogs/devops/how-pushly-media-used-aws-to-pivot-and-quickly-spin-up-a-startup/

This is a guest post from Pushly. In their own words, “Pushly provides a scalable, easy-to-use platform designed to deliver targeted and timely content via web push notifications across all modern desktop browsers and Android devices.”

Introduction

As a software engineer at Pushly, I’m part of a team of developers responsible for building our SaaS platform.

Our customers are content publishers spanning the news, ecommerce, and food industries, with the primary goal of increasing page views and paid subscriptions, ultimately resulting in increased revenue.

Pushly’s platform is designed to integrate seamlessly into a publisher’s workflow and enables advanced features such as customizable opt-in flow management, behavioral targeting, and real-time reporting and campaign delivery analytics.

As developers, we face various challenges to make all this work seamlessly. That’s why we turned to Amazon Web Services (AWS). In this post, I explain why and how we use AWS to enable the Pushly user experience.

At Pushly, my primary focus areas are developer and platform user experience. On the developer side, I’m responsible for building and maintaining easy-to-use APIs and a web SDK. On the UX side, I’m responsible for building a user-friendly and stable platform interface.

The CI/CD process

We’re a cloud native company and have gone all in with AWS.

AWS CodePipeline lets us automate the software release process and release new features to our users faster. Rapid delivery is key here, and CodePipeline lets us automate our build, test, and release process so we can quickly and easily test each code change and fail fast if needed. CodePipeline is vital to ensuring the quality of our code by running each change through a staging and release process.

One of our use cases is continuous reiteration deployment. We foster an environment where developers can fully function in their own mindset while adhering to our company’s standards and the architecture within AWS.

We deploy code multiple times per day and rely on AWS services to run through all checks and make sure everything is packaged uniformly. We want to fully test in a staging environment before moving to a customer-facing production environment.

The development and staging environments

Our development environment allows developers to securely pull down applications as needed and access the required services in a development AWS account. After an application is tested and is ready for staging, the application is deployed to our staging environment—a smaller reproduction of our production environment—so we can test how the changes work together. This flow allows us to see how the changes run within the entire Pushly ecosystem in a secure environment without pushing to production.

When testing is complete, a pull request is created for stakeholder review and to merge the changes to production branches. We use AWS CodeBuild, CodePipeline, and a suite of in-house tools to ensure that the application has been thoroughly tested to our standards before being deployed to our production AWS account.

Here is a high level diagram of the environment described above:

Diagram showing at a high level the Pushly environment.Ease of development

Ease of development was—and is—key. AWS provides the tools that allow us to quickly iterate and adapt to ever-changing customer needs. The infrastructure as code (IaC) approach of AWS CloudFormation allows us to quickly and simply define our infrastructure in an easily reproducible manner and rapidly create and modify environments at scale. This has given us the confidence to take on new challenges without concern over infrastructure builds impacting the final product or causing delays in development.

The Pushly team

Although Pushly’s developers all have the skill-set to work on both front-end-facing and back-end-facing projects, primary responsibilities are split between front-end and back-end developers. Developers that primarily focus on front-end projects concentrate on public-facing projects and internal management systems. The back-end team focuses on the underlying architecture, delivery systems, and the ecosystem as a whole. Together, we create and maintain a product that allows you to segment and target your audiences, which ensures relevant delivery of your content via web push notifications.

Early on we ran all services entirely off of AWS Lambda. This allowed us to develop new features quickly in an elastic, cost efficient way. As our applications have matured, we’ve identified some services that would benefit from an always on environment and moved them to AWS Elastic Beanstalk. The capability to quickly iterate and move from service to service is a credit to AWS, because it allows us to customize and tailor our services across multiple AWS offerings.

Elastic Beanstalk has been the fastest and simplest way for us to deploy this suite of services on AWS; their blue/green deployments allow us to maintain minimal downtime during deployments. We can easily configure deployment environments with capacity provisioning, load balancing, autoscaling, and application health monitoring.

The business side

We had several business drivers behind choosing AWS: we wanted to make it easier to meet customer demands and continually scale as much as needed without worrying about the impact on development or on our customers.

Using AWS services allowed us to build our platform from inception to our initial beta offering in fewer than 2 months! AWS made it happen with tools for infrastructure deployment on top of the software deployment. Specifically, IaC allowed us to tailor our infrastructure to our specific needs and be confident that it’s always going to work.

On the infrastructure side, we knew that we wanted to have a staging environment that truly mirrored the production environment, rather than managing two entirely disparate systems. We could provide different sets of mappings based on accounts and use the templates across multiple environments. This functionality allows us to use the exact same code we use in our current production environment and easily spin up additional environments in 2 hours.

The need for speed

It took a very short time to get our project up and running, which included rewriting different pieces of the infrastructure in some places and completely starting from scratch in others.

One of the new services that we adopted is AWS CodeArtifact. It lets us have fully customized private artifact stores in the cloud. We can keep our in-house libraries within our current AWS accounts instead of relying on third-party services.

CodeBuild lets us compile source code, run test suites, and produce software packages that are ready to deploy while only having to pay for the runtime we use. With CodeBuild, you don’t need to provision, manage, and scale your own build servers, which saves us time.

The new tools that AWS is releasing are going to even further streamline our processes. We’re interested in the impact that CodeArtifact will have on our ability to share libraries in Pushly and with other business units.

Cost savings is key

What are we saving by choosing AWS? A lot. AWS lets us scale while keeping costs at a minimum. This was, and continues to be, a major determining factor when choosing a cloud provider.

By using Lambda and designing applications with horizontal scale in mind, we have scaled from processing millions of requests per day to hundreds of millions, with very little change to the underlying infrastructure. Due to the nature of our offering, our traffic patterns are unpredictable. Lambda allows us to process these requests elastically and avoid over-provisioning. As a result, we can increase our throughput tenfold at any time, pay for the few minutes of extra compute generated by a sudden burst of traffic, and scale back down in seconds.

In addition to helping us process these requests, AWS has been instrumental in helping us manage an ever-growing data warehouse of clickstream data. With Amazon Kinesis Data Firehose, we automatically convert all incoming events to Parquet and store them in Amazon Simple Storage Service (Amazon S3), which we can query directly using Amazon Athena within minutes of being received. This has once again allowed us to scale our near-real-time data reporting to a degree that would have otherwise required a significant investment of time and resources.

As we look ahead, one thing we’re interested in is Lambda custom stacks, part of AWS’s Lambda-backed custom resources. Amazon supports many languages, so we can run almost every language we need. If we want to switch to a language that AWS doesn’t support by default, they still provide a way for us to customize a solution. All we have to focus on is the code we’re writing!

The importance of speed for us and our customers is one of our highest priorities. Think of a news publisher in the middle of a briefing who wants to get the story out before any of the competition and is relying on Pushly—our confidence in our ability to deliver on this need comes from AWS services enabling our code to perform to its fullest potential.

Another way AWS has met our needs was in the ease of using Amazon ElastiCache, a fully managed in-memory data store and cache service. Although we try to be as horizontal thinking as possible, some services just can’t scale with the immediate elasticity we need to handle a sudden burst of requests. We avoid duplicate lookups for the same resources with ElastiCache. ElastiCache allows us to process requests quicker and protects our infrastructure from being overwhelmed.

In addition to caching, ElastiCache is a great tool for job locking. By locking messages by their ID as soon as they are received, we can use the near-unlimited throughput of Amazon Simple Queue Service (Amazon SQS) in a massively parallel environment without worrying that messages are processed more than once.

The heart of our offering is in the segmentation of subscribers. We allow building complex queries in our dashboard that calculate reach in real time and are available to use immediately after creation. These queries are often never-before-seen and may contain custom properties provided by our clients, operate on complex data types, and include geospatial conditions. No matter the size of the audience, we see consistent sub-second query times when calculating reach. We can provide this to our clients using Amazon Elasticsearch Service (Amazon ES) as the backbone to our subscriber store.

Summary

AWS has countless positives, but one key theme that we continue to see is overall ease of use, which enables us to rapidly iterate. That’s why we rely on so many different AWS services—Amazon API Gateway with Lambda integration, Elastic Beanstalk, Amazon Relational Database Service (Amazon RDS), ElastiCache, and many more.

We feel very secure about our future working with AWS and our continued ability to improve, integrate, and provide a quality service. The AWS team has been extremely supportive. If we run into something that we need to adjust outside of the standard parameters, or that requires help from the AWS specialists, we can reach out and get feedback from subject matter experts quickly. The all-around capabilities of AWS and its teams have helped Pushly get where we are, and we’ll continue to rely on them for the foreseeable future.


Introducing AWS X-Ray new integration with AWS Step Functions

Post Syndicated from Benjamin Smith original https://aws.amazon.com/blogs/compute/introducing-aws-x-ray-new-integration-with-aws-step-functions/

AWS Step Functions now integrates with AWS X-Ray to provide a comprehensive tracing experience for serverless orchestration workflows.

Step Functions allows you to build resilient serverless orchestration workflows with AWS services such as AWS Lambda, Amazon SNS, Amazon DynamoDB, and more. Step Functions provides a history of executions for a given state machine in the AWS Management Console or with Amazon CloudWatch Logs.

AWS X-Ray is a distributed tracing system that helps developers analyze and debug their applications. It traces requests as they travel through the individual services and resources that make up an application. This provides an end-to-end view of how an application is performing.

What is new?

The new Step Functions integration with X-Ray provides an additional workflow monitoring experience. Developers can now view maps and timelines of the underlying components that make up a Step Functions workflow. This helps to discover performance issues, detect permission problems, and track requests made to and from other AWS services.

The Step Functions integration with X-Ray can be analyzed in three constructs:

Service map: The service map view shows information about a Step Functions workflow and all of its downstream services. This enables developers to identify services where errors are occurring, connections with high latency, or traces for requests that are unsuccessful among the large set of services within their account. The service map aggregates data from specific time intervals from one minute through six hours and has a 30-day retention.

Trace map view: The trace map view shows in-depth information from a single trace as it moves through each service. Resources are listed in the order in which they are invoked.

Trace timeline: The trace timeline view shows the propagation of a trace through the workflow and is paired with a time scale called a latency distribution histogram. This shows how long it takes for a service to complete its requests. The trace is composed of segments and sub-segments. A segment represents the Step Functions execution. Subsegments each represent a state transition.

Getting Started

X-Ray tracing is enabled using AWS Serverless Application Model (AWS SAM), AWS CloudFormation or from within the AWS Management Console. To get started with Step Functions and X-Ray using the AWS Management Console:

  1. Go to the Step Functions page of the AWS Management Console.
  2. Choose Get Started, review the Hello World example, then choose Next.
  3. Check Enable X-Ray tracing from the Tracing section.

Workflow visibility

The following Step Functions workflow example is invoked via Amazon EventBridge when a new file is uploaded to an Amazon S3 bucket. The workflow uses Amazon Textract to detect text from an image file. It translates the text into multiple languages using Amazon Translate and saves the results into an Amazon DynamoDB table. X-Ray has been enabled for this workflow.

To view the X-Ray service map for this workflow, I choose the X-Ray trace map link at the top of the Step Functions Execution details page:

The service map is generated from trace data sent through the workflow. Toggling the Service Icons displays each individual service in this workload. The size of each node is weighted by traffic or health, depending on the selection.

This shows the error percentage and average response times for each downstream service. T/min is the number of traces sent per minute in the selected time range. The following map shows a 67% error rate for the Step Functions workflow.

Accelerated troubleshooting

By drilling down through the service map, to the individual trace map, I quickly pinpoint the error in this workflow. I choose the Step Functions service from the trace map. This opens the service details panel. I then choose View traces. The trace data shows that from a group of nine responses, 3 completed successfully and 6 completed with error. This correlates with the response times listed for each individual trace. Three traces complete in over 5 seconds, while 6 took less than 3 seconds.

Choosing one of the faster traces opens the trace timeline map. This illustrates the aggregate response time for the workflow and each of its states. It shows a state named Read text from image invoked by a Lambda Function. This takes 2.3 seconds of the workflow’s total 2.9 seconds to complete.

A warning icon indicates that an error has occurred in this Lambda function. Hovering the curser over the icon, reveals that the property “Blocks” is undefined. This shows that an error occurred within the Lambda function (no text was found within the image). The Lambda function did not have sufficient error handling to manage this error gracefully, so the workflow exited.

Here’s how that same state execution failure looks in the Step Functions Graph inspector.

Performance profiling

The visualizations provided in the service map are useful for estimating the average latency in a workflow, but issues are often indicated by statistical outliers. To help investigate these, the Response distribution graph shows a distribution of latencies for each state within a workflow, and its downstream services.

Latency is the amount of time between when a request starts and when it completes. It shows duration on the x-axis, and the percentage of requests that match each duration on the y-axis. Additional filters are applied to find traces by duration or status code. This helps to discover patterns and to identify specific cases and clients with issues at a given percentile.

Sampling

X-Ray applies a sampling algorithm to determine which requests to trace. A sampling rate of 100% is used for state machines with an execution rate of less than one per second. State machines running at a rate greater than one execution per second default to a 5% sampling rate. Configure the sampling rate to determine what percentage of traces to sample. Enable trace sampling with the AWS Command Line Interface (AWS CLI) using the CreateStateMachine and UpdateStateMachine APIs with the enable-Trace-Sampling attribute:

--enable-trace-sampling true

It can also be configured in the AWS Management Console.

Trace data retention and limits

X-Ray retains tracing data for up to 30 days with a single trace holding up to 7 days of execution data. The current minimum guaranteed trace size is 100Kb, which equates to approximately 80 state transitions.   The actual number of state transitions supported will depend on the upstream and downstream calls and duration of the workflow. When the trace size limit is reached, the trace cannot be updated with new segments or updates to existing segments. The traces that have reached the limit are indicated with a banner in the X-Ray console.

For a full service comparison of X-Ray trace data and Step Functions execution history, please refer to the documentation.

Conclusion

The Step Functions integration with X-Ray provides a single monitoring dashboard for workflows running at scale. It provides a high-level system overview of all workflow resources and the ability to drill down to view detailed timelines of workflow executions. You can now use the orchestration capabilities of Step Functions with the tracing, visualization, and debug capabilities of AWS X-Ray.

This enables developers to reduce problem resolution times by visually identifying errors in resources and viewing error rates across workflow executions. You can profile and improve application performance by identifying outliers while analyzing and debugging high latency and jitter in workflow executions.

This feature is available in all Regions where both AWS Step Functions and AWS X-Ray are available. View the AWS Regions table to learn more. For pricing information, see AWS X-Ray pricing.

To learn more about Step Functions, read the Developer Guide. For more serverless learning resources, visit https://serverlessland.com.

Using Lambda layers to simplify your development process

Post Syndicated from James Beswick original https://aws.amazon.com/blogs/compute/using-lambda-layers-to-simplify-your-development-process/

Serverless developers frequently import libraries and dependencies into their AWS Lambda functions. While you can zip these dependencies as part of the build and deployment process, in many cases it’s easier to use layers instead. In this post, I explain how layers work, and how you can build and include layers in your own applications.

This blog post references the Happy Path application, which shows how to build a flexible backend to a photo-processing web application. To learn more, refer to Using serverless backends to iterate quickly on web apps – part 1. This code in this post is available at this GitHub repo.

Overview of Lambda layers

A Lambda layer is an archive containing additional code, such as libraries, dependencies, or even custom runtimes. When you include a layer in a function, the contents are extracted to the /opt directory in the execution environment. You can include up to five layers per function, which count towards the standard Lambda deployment size limits.

Layers are deployed as immutable versions, and the version number increments each time you publish a new layer. When you include a layer in a function, you specify the layer version you want to use. Layers are automatically set as private, but they can be shared with other AWS accounts, or shared publicly. Permissions only apply to a single version of a layer.

Using layers can make it faster to deploy applications with the AWS Serverless Application Model (AWS SAM) or the Serverless framework. By moving runtime dependencies from your function code to a layer, this can help reduce the overall size of the archive uploaded during a deployment.

Creating a layer containing the AWS SDK

The AWS SDK allows you to interact programmatically with AWS services using one of the supported runtimes. The Lambda service includes the AWS SDK so you can use it without explicitly importing in your deployment package.

However, there is no guarantee of the version provided in the execution environment. The SDK is upgraded frequently to support new AWS services and features. As a result, the version may change at any time. You can see the current version used by Lambda by declaring an instance of the SDK and logging out the version method:

Logging out the version method

For production workloads, it’s best practice to lock the version of the AWS SDK used in your functions. You can achieve this by including the SDK with your code package. Once you include this library, your code always uses the version in the deployment package and not the version included in the Lambda service.

A serverless application may consist of many functions, which all use a common SDK version. Instead of bundling the SDK with each function deployment, you can create a layer containing the SDK. The effect of this is to reduce the size of the uploaded archive, which makes your deployments faster.

To create an AWS SDK layer:

  1. First, clone this blog post’s GitHub repo. From a terminal window, execute:
    git clone https://github.com/aws-samples/aws-lambda-layers-aws-sam-examples
    cd ./aws-sdk-layer
  2. This directory contains an AWS SAM template and Node.js package.json file. Install the package.json contents:
    npm install
  3. Create the layer directory defined in the AWS SAM template and the nodejs directory required by Lambda. Next, move the node_modules directory:
    mkdir -p ./layer/nodejs
    mv ./node_modules ./layer/nodejs
  4. Next, deploy the AWS SAM template to create the layer:
    sam deploy --guided
  5. For the Stack name, enter “aws-sdk-layer”. Enter your preferred AWS Region and accept the other defaults.
  6. After the deployment completes, the new Lambda layer is available to use. Run this command to see the available layers:aws lambda list-layersaws lambda list-layers output

After adding a layer to a function, you can use console.log to log out the AWS SDK version. This shows that the function is now using the SDK version in the layer instead of the version provided by the Lambda service:

Use the SDK layer instead of the bundled layer

Creating layers with OS-specific binaries

Many code libraries include binaries that are operating-system specific. When you build packages on your local development machine, by default the binaries for that operating system are used. These may not be the right binaries for Lambda, which runs on Amazon Linux. If you are not using a compatible operating system, you must ensure you include Linux binaries in the layer.

The simplest way to package these libraries correctly is to use AWS Cloud9. This is an IDE in the AWS Cloud, which runs on Amazon EC2. After creating an environment, you can clone a git repository directly to the local storage of the instance, and run the necessary build scripts.

The Happy Path application resizes images using the Sharp npm library. This library uses libvips, which is written in C, so the compilation is operating system-specific. By creating a layer containing this library, it simplifies the packaging and deployment of the consuming Lambda function.

To create a Sharp layer using AWS Cloud9:

  1. Navigate to the AWS Cloud9 console.
  2. Choose Create environment.
  3. Enter the name “My IDE” and choose Next step.
  4. Accept all the default and choose Next step.
  5. Review the settings and choose Create environment.
  6. In the terminal panel, enter:
    git clone https://github.com/aws-samples/aws-lambda-layers-aws-sam-examples
    cd ./aws-lambda-layers-aws-sam-examples/sharp-layer
    npm installCreating a layer in Cloud9
  7. From a terminal window, ensure you are in the directory where you cloned this post’s GitHub repo. Execute the following commands:cd ./sharp-layer
    npm install
    mkdir -p ./layer/nodejs
    mv ./node_modules ./layer/nodejsCreating the layer in Cloud9
  8. Next, deploy the AWS SAM template to create the layer:
    sam deploy --guided
  9. For the Stack name, enter “sharp-layer”. Enter your preferred AWS Region and accept the other defaults. After the deployment completes, the new Lambda layer is available to use.

In some runtimes, you can specify a local set of packages for development, and another set for production. For example, in Node.js, the package.json file allows you to specify two sections for dependencies. If your development machine uses a different operating system to Lambda, and therefore uses different binaries, you can use package.json to resolve this. In the Happy Path Resizer function, which uses the Sharp layer, the package.json refers to a local binary for development.

Adding development dependencies to package.json

AWS SAM defines Lambda functions with the AWS::Serverless::Function resource. Layers are defined as a property of functions, as a list of layer ARNs including the version:

  MyLambdaFunction:
    Type: AWS::Serverless::Function 
    Properties:
      CodeUri: myFunction/
      Handler: app.handler
      MemorySize: 128
      Layers:
        - !Ref SharpLayerARN

Sharing a layer

Layers are private to your account by default but you can optionally share with other AWS accounts or make a layer public. You cannot share layers via the AWS Management Console but instead use the AWS CLI.

To share a layer, use add-layer-version-permission, specifying the layer name, version, AWS Region, and principal:

aws lambda add-layer-version-permission \
  --layer-name node-sharp \
  --principal '*' \
  --action lambda:GetLayerVersion \
  --version-number 3 
  --statement-id public 
  --region us-east-1

In the principal parameter, specify an individual account ID or use an asterisk to make the layer public. The CLI responds with a RevisionId containing the current revision of the policy:

add-layer-version output

You can check the permissions associated with a layer version by calling get-layer-version-policy with the layer name and version:

aws lambda get-layer-version-policy \
  --layer-name node-sharp \
  --version-number 3 \
  --region us-east-1

get-layer-version-policy output

Similarly, you can delete permissions associated with a layer version by calling remove-layer-vesion-permission with the layer name, statement ID, and version:

aws lambda remove-layer-version-permission \
 -- layer-name node-sharp \
 -- statement-id public \
 -- version-number 3

Once the permissions are removed, calling get-layer-version-policy results in an error:

Error invoking after removal

Conclusion

Lambda layers provide a convenient and effective way to package code libraries for sharing with Lambda functions in your account. Using layers can help reduce the size of uploaded archives and make it faster to deploy your code.

Layers can contain packages using OS-specific binaries, providing a convenient way to distribute these to developers. While layers are private by default, you can share with other accounts or make a layer public. Layers are published as immutable versions, and deleting a layer has no effect on deployed Lambda functions already using that layer.

To learn more about using Lambda layers, visit the documentation, or see how layers are used in the Happy Path web application.

Jump-starting your serverless development environment

Post Syndicated from Benjamin Smith original https://aws.amazon.com/blogs/compute/jump-starting-your-serverless-development-environment/

Developers building serverless applications often wonder how they can jump-start their local development environment. This blog post provides a broad guide for those developers wanting to set up a development environment for building serverless applications.

serverless development environment

AWS and open source tools for a serverless development environment .

To use AWS Lambda and other AWS services, create and activate an AWS account.

Command line tooling

Command line tools are scripts, programs, and libraries that enable rapid application development and interactions from within a command line shell.

The AWS CLI

The AWS Command Line Interface (AWS CLI) is an open source tool that enables developers to interact with AWS services using a command line shell. In many cases, the AWS CLI increases developer velocity for building cloud resources and enables automating repetitive tasks. It is an important piece of any serverless developer’s toolkit. Follow these instructions to install and configure the AWS CLI on your operating system.

AWS enables you to build infrastructure with code. This provides a single source of truth for AWS resources. It enables development teams to use version control and create deployment pipelines for their cloud infrastructure. AWS CloudFormation provides a common language to model and provision these application resources in your cloud environment.

AWS Serverless Application Model (AWS SAM CLI)

AWS Serverless Application Model (AWS SAM) is an extension for CloudFormation that further simplifies the process of building serverless application resources.

It provides shorthand syntax to define Lambda functions, APIs, databases, and event source mappings. During deployment, the AWS SAM syntax is transformed into AWS CloudFormation syntax, enabling you to build serverless applications faster.

The AWS SAM CLI is an open source command line tool used to locally build, test, debug, and deploy serverless applications defined with AWS SAM templates.

Install AWS SAM CLI on your operating system.

Test the installation by initializing a new quick start project with the following command:

$ sam init
  1. Choose 1 for the “Quick Start Templates
  2. Choose 1 for the “Node.js runtime
  3. Use the default name.

The generated /sam-app/template.yaml contains all the resource definitions for your serverless application. This includes a Lambda function with a REST API endpoint, along with the necessary IAM permissions.

Resources:
  HelloWorldFunction:
    Type: AWS::Serverless::Function # More info about Function Resource: https://github.com/awslabs/serverless-application-model/blob/master/versions/2016-10-31.md#awsserverlessfunction
    Properties:
      CodeUri: hello-world/
      Handler: app.lambdaHandler
      Runtime: nodejs12.x
      Events:
        HelloWorld:
          Type: Api # More info about API Event Source: https://github.com/awslabs/serverless-application-model/blob/master/versions/2016-10-31.md#api
          Properties:
            Path: /hello
            Method: get

Deploy this application using the AWS SAM CLI guided deploy:

$ sam deploy -g

Local testing with AWS SAM CLI

The AWS SAM CLI requires Docker containers to simulate the AWS Lambda runtime environment on your local development environment. To test locally, install Docker Engine and run the Lambda function with following command:

$ sam local invoke "HelloWorldFunction" -e events/event.json

The first time this function is invoked, Docker downloads the lambci/lambda:nodejs12.x container image. It then invokes the Lambda function with a pre-defined event JSON file.

Helper tools

There are a number of open source tools and packages available to help you monitor, author, and optimize your Lambda-based applications. Some of the most popular tools are shown in the following list.

Template validation tooling

CloudFormation Linter is a validation tool that helps with your CloudFormation development cycle. It analyses CloudFormation YAML and JSON templates to resolve and validate intrinsic functions and resource properties. By analyzing your templates before deploying them, you can save valuable development time and build automated validation into your deployment release cycle.

Follow these instructions to install the tool.

Once, installed, run the cfn-lint command with the path to your AWS SAM template provided as the first argument:

cfn-lint template.yaml
AWS SAM template validation with cfn-lint

AWS SAM template validation with cfn-lint

The following example shows that the template is not valid because the !GettAtt function does not evaluate correctly.

IDE tooling

Use AWS IDE plugins to author and invoke Lambda functions from within your existing integrated development environment (IDE). AWS IDE toolkits are available for PyCharm, IntelliJ. Visual Studio.

The AWS Toolkit for Visual Studio Code provides an integrated experience for developing serverless applications. It enables you to invoke Lambda functions, specify function configurations, locally debug, and deploy—all conveniently from within the editor. The toolkit supports Node.js, Python, and .NET.

The AWS Toolkit for Visual Studio Code

From Visual Studio Code, choose the Extensions icon on the Activity Bar. In the Search Extensions in Marketplace box, enter AWS Toolkit and then choose AWS Toolkit for Visual Studio Code as shown in the following example. This opens a new tab in the editor showing the toolkit’s installation page. Choose the Install button in the header to add the extension.

AWS Toolkit extension for Visual Studio Code

AWS Toolkit extension for Visual Studio Code

AWS Cloud9

Another option to build a development environment without having to install anything locally is to use AWS Cloud9. AWS Cloud9 is a cloud-based integrated development environment (IDE) for writing, running, and debugging code from within the browser.

It provides a seamless experience for developing serverless applications. It has a preconfigured development environment that includes AWS CLI, AWS SAM CLI, SDKs, code libraries, and many useful plugins. AWS Cloud9 also provides an environment for locally testing and debugging AWS Lambda functions. This eliminates the need to upload your code to the Lambda console. It allows developers to iterate on code directly, saving time, and improving code quality.

Follow this guide to set up AWS Cloud9 in your AWS environment.

Advanced tooling

Efficient configuration of Lambda functions is critical when expecting optimal cost and performance of your serverless applications. Lambda allows you to control the memory (RAM) allocation for each function.

Lambda charges based on the number of function requests and the duration, the time it takes for your code to run. The price for duration depends on the amount of RAM you allocate to your function. A smaller RAM allocation may reduce the performance of your application if your function is running compute-heavy workloads. If performance needs outweigh cost, you can increase the memory allocation.

Cost and performance optimization tooling

AWS Lambda power tuner is an open source tool that uses an AWS Step Functions state machine to suggest cost and performance optimizations for your Lambda functions. It invokes a given function with multiple memory configurations. It analyzes the execution log results to determine and suggest power configurations that minimize cost and maximize performance.

To deploy the tool:

  1. Clone the repository as follows:
    $ git clone https://github.com/alexcasalboni/aws-lambda-power-tuning.git
  2. Create an Amazon S3 bucket and enter the deployment configurations in /scripts/deploy.sh:
    # config
    BUCKET_NAME=your-sam-templates-bucket
    STACK_NAME=lambda-power-tuning
    PowerValues='128,512,1024,1536,3008'
  3. Run the deploy.sh script from your terminal, this uses the AWS SAM CLI to deploy the application:
    $ bash scripts/deploy.sh
  4. Run the power tuning tool from the terminal using the AWS CLI:
    aws stepfunctions start-execution \
    --state-machine-arn arn:aws:states:us-east-1:0123456789:stateMachine:powerTuningStateMachine-Vywm3ozPB6Am \
    --input "{\"lambdaARN\": \"arn:aws:lambda:us-east-1:1234567890:function:testytest\", \"powerValues\":[128,256,512,1024,2048],\"num\":50,\"payload\":{},\"parallelInvocation\":true,\"strategy\":\"cost\"}" \
    --output json
  5. The Step Functions execution output produces a link to a visual summary of the suggested results:

    AWS Lambda power tuning results

    AWS Lambda power tuning results

Monitoring and debugging tooling

Sls-dev-tools is an open source serverless tool that delivers serverless metrics directly to the terminal. It provides developers with feedback on their serverless application’s metrics and key bindings that deploy, open, and manipulate stack resources. Bringing this data directly to your terminal or IDE, reduces context switching between the developer environment and the web interfaces. This can increase application development speed and improve user experience.

Follow these instructions to install the tool onto your development environment.

To open the tool, run the following command:

$ Sls-dev-tools

Follow the in-terminal interface to choose which stack to monitor or edit.

The following example shows how the tool can be used to invoke a Lambda function with a custom payload from within the IDE.

Invoke an AWS Lambda function with a custom payload using sls-dev-tools

Invoke an AWS Lambda function with a custom payload using sls-dev-tools

Serverless database tooling

NoSQL Workbench for Amazon DynamoDB is a GUI application for modern database development and operations. It provides a visual IDE tool for data modeling and visualization with query development features to help build serverless applications with Amazon DynamoDB tables. Define data models using one or more tables and visualize the data model to see how it works in different scenarios. Run or simulate operations and generate the code for Python, JavaScript (Node.js), or Java.

Choose the correct operating system link to download and install NoSQL Workbench on your development machine.

The following example illustrates a connection to a DynamoDB table. A data scan is built using the GUI, with Node.js code generated for inclusion in a Lambda function:

Connecting to an Amazon DynamoBD table with NoSQL Workbench for AmazonDynamoDB

Connecting to an Amazon DynamoDB table with NoSQL Workbench for Amazon DynamoDB

Generating query code with NoSQL Workbench for Amazon DynamoDB

Generating query code with NoSQL Workbench for Amazon DynamoDB

Conclusion

Building serverless applications allows developers to focus on business logic instead of managing and operating infrastructure. This is achieved by using managed services. Developers often struggle with knowing which tools, libraries, and frameworks are available to help with this new approach to building applications. This post shows tools that builders can use to create a serverless developer environment to help accelerate software development.

This list represents AWS and open source tools but does not include our APN Partners. For partner offers, check here.

Read more to start building serverless applications.