SMS codes for 2FAs have been discussed for a long time, and everyone knowledgeable in security knows they are not secure. What’s more – you should remove your phone number from sensitive services like Gmail, because if an attacker can fallback to SMS, the account is compromised.
Many authors have discussed how insecure SMS is, including Brian Krebbs, citing an example of NetNumber ID abuse, in addition to SIM Swap attacks and SS7 vulnerabilities.
Another aspect that I recently thought about is again related to intermediaries. Bulk SMS resellers integrate with various telecoms around the globe and accept outgoing SMS by API calls, which they then forward to a telecom in the relevant country. Global companies that send a lot of SMS try to look for cheap bulk deals (you are probably aware that Twitter/X recently decided to charge for SMS 2FA, because it was incurring high costs). These services are sometimes called a2p (application to person).
This means that intermediaries receive the 2FA code before it reaches the subscriber. A malicious insider or an attacker that compromises those intermediaries can thus have access to 2FA codes before they reach the subscriber.
I don’t know if this attack vector has been used, but it is a valid attack – if an attacker knows the intermediaries that a given service is using, they can either try to compromise the systems of the intermediaries, or gain access through a compromised insider. In either scenario, the victim’s 2FA code will be accessible to the attacker in real time.
This just reinforces the rule of thumb – don’t rely on SMS for two-factor authentication.
AWS re:Invent drew 52,000 attendees from across the globe to Las Vegas, Nevada, November 27 to December 1, 2023.
Now in its 12th year, the conference featured 5 keynotes, 17 innovation talks, and over 2,250 sessions and hands-on labs offering immersive learning and networking opportunities.
With dozens of service and feature announcements—and innumerable best practices shared by AWS executives, customers, and partners—the air of excitement was palpable. We were on site to experience all of the innovations and insights, but summarizing highlights isn’t easy. This post details three key security themes that caught our attention.
Security culture
When we think about cybersecurity, it’s natural to focus on technical security measures that help protect the business. But organizations are made up of people—not technology. The best way to protect ourselves is to foster a proactive, resilient culture of cybersecurity that supports effective risk mitigation, incident detection and response, and continuous collaboration.
In Sustainable security culture: Empower builders for success, AWS Global Services Security Vice President Hart Rossman and AWS Global Services Security Organizational Excellence Leader Sarah Currey presented practical strategies for building a sustainable security culture.
Rossman noted that many customers who meet with AWS about security challenges are attempting to manage security as a project, a program, or a side workstream. To strengthen your security posture, he said, you have to embed security into your business.
“You’ve got to understand early on that security can’t be effective if you’re running it like a project or a program. You really have to run it as an operational imperative—a core function of the business. That’s when magic can happen.” — Hart Rossman, Global Services Security Vice President at AWS
Three best practices can help:
Be consistently persistent. Routinely and emphatically thank employees for raising security issues. It might feel repetitive, but treating security events and escalations as learning opportunities helps create a positive culture—and it’s a practice that can spread to other teams. An empathetic leadership approach encourages your employees to see security as everyone’s responsibility, share their experiences, and feel like collaborators.
Brief the board. Engage executive leadership in regular, business-focused meetings. By providing operational metrics that tie your security culture to the impact that it has on customers, crisply connecting data to business outcomes, and providing an opportunity to ask questions, you can help build the support of executive leadership, and advance your efforts to establish a sustainable proactive security posture.
Have a mental model for creating a good security culture. Rossman presented a diagram (Figure 1) that highlights three elements of security culture he has observed at AWS: a student, a steward, and a builder. If you want to be a good steward of security culture, you should be a student who is constantly learning, experimenting, and passing along best practices. As your stewardship grows, you can become a builder, and progress the culture in new directions.
Figure 1: Sample mental model for building security culture
Thoughtful investment in the principles of inclusivity, empathy, and psychological safety can help your team members to confidently speak up, take risks, and express ideas or concerns. This supports an escalation-friendly culture that can reduce employee burnout, and empower your teams to champion security at scale.
Rodgers highlighted three pillars of progression (Figure 2)—aware, bolted-on, and embedded—that are based on meetings with more than 800 customers. As organizations mature from a reactive security posture to a proactive, security-first approach, he noted, security culture becomes a true business enabler.
“When organizations have a strong security culture and everyone sees security as their responsibility, they can move faster and achieve quicker and more secure product and service releases.” — Clarke Rodgers, Director of Enterprise Strategy at AWS
Figure 2: Shipping with a security-first mindset
Human-centric AI
CISOs and security stakeholders are increasingly pivoting to a human-centric focus to establish effective cybersecurity, and ease the burden on employees.
According to Gartner, by 2027, 50% of large enterprise CISOs will have adopted human-centric security design practices to minimize cybersecurity-induced friction and maximize control adoption.
As Amazon CSO Stephen Schmidt noted in Move fast, stay secure: Strategies for the future of security, focusing on technology first is fundamentally wrong. Security is a people challenge for threat actors, and for defenders. To keep up with evolving changes and securely support the businesses we serve, we need to focus on dynamic problems that software can’t solve.
Maintaining that focus means providing security and development teams with the tools they need to automate and scale some of their work.
“People are our most constrained and most valuable resource. They have an impact on every layer of security. It’s important that we provide the tools and the processes to help our people be as effective as possible.” — Stephen Schmidt, CSO at Amazon
Organizations can use artificial intelligence (AI) to impact all layers of security—but AI doesn’t replace skilled engineers. When used in coordination with other tools, and with appropriate human review, it can help make your security controls more effective.
Schmidt highlighted the internal use of AI at Amazon to accelerate our software development process, as well as new generative AI-powered Amazon Inspector, Amazon Detective, AWS Config, and Amazon CodeWhisperer features that complement the human skillset by helping people make better security decisions, using a broader collection of knowledge. This pattern of combining sophisticated tooling with skilled engineers is highly effective, because it positions people to make the nuanced decisions required for effective security that AI can’t make on its own.
In How security teams can strengthen security using generative AI, AWS Senior Security Specialist Solutions Architects Anna McAbee and Marshall Jones, and Principal Consultant Fritz Kunstler featured a virtual security assistant (chatbot) that can address common security questions and use cases based on your internal knowledge bases, and trusted public sources.
The generative AI-powered solution depicted in Figure 3—which includes Retrieval Augmented Generation (RAG) with Amazon Kendra, Amazon Security Lake, and Amazon Bedrock—can help you automate mundane tasks, expedite security decisions, and increase your focus on novel security problems.
It’s available on Github with ready-to-use code, so you can start experimenting with a variety of large and multimodal language models, settings, and prompts in your own AWS account.
Secure collaboration
Collaboration is key to cybersecurity success, but evolving threats, flexible work models, and a growing patchwork of data protection and privacy regulations have made maintaining secure and compliant messaging a challenge.
An estimated 3.09 billion mobile phone users access messaging apps to communicate, and this figure is projected to grow to 3.51 billion users in 2025.
The use of consumer messaging apps for business-related communications makes it more difficult for organizations to verify that data is being adequately protected and retained. This can lead to increased risk, particularly in industries with unique recordkeeping requirements.
In How the U.S. Army uses AWS Wickr to deliver lifesaving telemedicine, Matt Quinn, Senior Director at The U.S. Army Telemedicine & Advanced Technology Research Center (TATRC), Laura Baker, Senior Manager at Deloitte, and Arvind Muthukrishnan, AWS Wickr Head of Product highlighted how The TATRC National Emergency Tele-Critical Care Network (NETCCN) was integrated with AWS Wickr—a HIPAA-eligible secure messaging and collaboration service—and AWS Private 5G, a managed service for deploying and scaling private cellular networks.
During the session, Quinn, Baker, and Muthukrishnan described how TATRC achieved a low-resource, cloud-enabled, virtual health solution that facilitates secure collaboration between onsite and remote medical teams for real-time patient care in austere environments. Using Wickr, medics on the ground were able to treat injuries that exceeded their previous training (Figure 4) with the help of end-to-end encrypted video calls, messaging, and file sharing with medical professionals, and securely retain communications in accordance with organizational requirements.
“Incorporating Wickr into Military Emergency Tele-Critical Care Platform (METTC-P) not only provides the security and privacy of end-to-end encrypted communications, it gives combat medics and other frontline caregivers the ability to gain instant insight from medical experts around the world—capabilities that will be needed to address the simultaneous challenges of prolonged care, and the care of large numbers of casualties on the multi-domain operations (MDO) battlefield.” — Matt Quinn, Senior Director at TATRC
Figure 4: Telemedicine workflows using AWS Wickr
In a separate Chalk Talk titled Bolstering Incident Response with AWS Wickr and Amazon EventBridge, Senior AWS Wickr Solutions Architects Wes Wood and Charles Chowdhury-Hanscombe demonstrated how to integrate Wickr with Amazon EventBridge and Amazon GuardDuty to strengthen incident response capabilities with an integrated workflow (Figure 5) that connects your AWS resources to Wickr bots. Using this approach, you can quickly alert appropriate stakeholders to critical findings through a secure communication channel, even on a potentially compromised network.
Figure 5: AWS Wickr integration for incident response communications
Security is our top priority
AWS re:Invent featured many more highlights on a variety of topics, including adaptive access control with Zero Trust, AWS cyber insurance partners, Amazon CTO Dr. Werner Vogels’ popular keynote, and the security partnerships showcased on the Expo floor. It was a whirlwind experience, but one thing is clear: AWS is working hard to help you build a security-first mindset, so that you can meaningfully improve both technical and business outcomes.
It’s common to manage numerous workloads in an EKS cluster, each necessitating access to a distinct set of secrets. You can verify adherence to the principle of least privilege by creating separate permission policies for each workload to restrict their access. To scale and reduce overhead, Amazon Web Services (AWS) recommends using ABAC to manage workloads’ access to secrets. ABAC helps reduce the number of permission policies needed to scale with your environment.
What is ABAC?
In IAM, a traditional authorization approach is known as role-based access control (RBAC). RBAC sets permissions based on a person’s job function, commonly known as IAM roles. To enforce RBAC in IAM, distinct policies for various job roles are created. As a best practice, only the minimum permissions required for a specific role are granted (principle of least privilege), which is achieved by specifying the resources that the role can access. A limitation of the RBAC model is its lack of flexibility. Whenever new resources are introduced, you must modify policies to permit access to the newly added resources.
Attribute-based access control (ABAC) is an approach to authorization that assigns permissions in accordance with attributes, which in the context of AWS are referred to as tags. You create and add tags to your IAM resources. You then create and configure ABAC policies to permit operations requested by a principal when there’s a match between the tags of the principal and the resource. When a principal uses temporary credentials to make a request, its associated tags come from session tags, incoming transitive sessions tags, and IAM tags. The principal’s IAM tags are persistent, but session tags, and incoming transitive session tags are temporary and set when the principal assumes an IAM role. Note that AWS tags are attached to AWS resources, whereas session tags are only valid for the current session and expire with the session.
How External Secrets Operator works
External Secrets Operator (ESO) is a Kubernetes operator that integrates external secret management systems including Secrets Manager with Kubernetes. ESO provides Kubernetes custom resources to extend Kubernetes and integrate it with Secrets Manager. It fetches secrets and makes them available to other Kubernetes resources by creating Kubernetes Secrets. At a basic level, you need to create an ESO SecretStore resource and one or more ESO ExternalSecret resources. The SecretStore resource specifies how to access the external secret management system (Secrets Manager) and allows you to define ABAC related properties (for example, session tags and transitive tags).
You declare what data (secret) to fetch and how the data should be transformed and saved as a Kubernetes Secret in the ExternalSecret resource. The following figure shows an overview of the process for creating Kubernetes Secrets. Later in this post, we review the steps in more detail.
Figure 1: ESO process
How to use ESO for ABAC
Before creating any ESO resources, you must make sure that the operator has sufficient permissions to access Secrets Manager. ESO offers multiple ways to authenticate to AWS. For the purpose of this solution, you will use the controller’s pod identity. To implement this method, you configure the ESO service account to assume an IAM role for service accounts (IRSA), which is used by ESO to make requests to AWS.
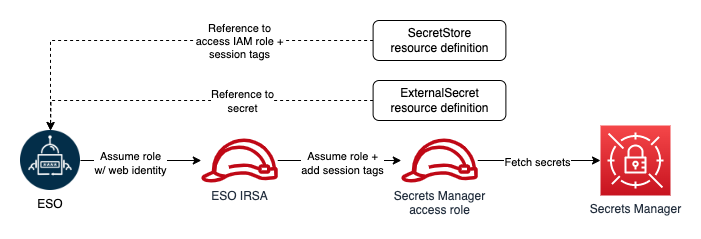
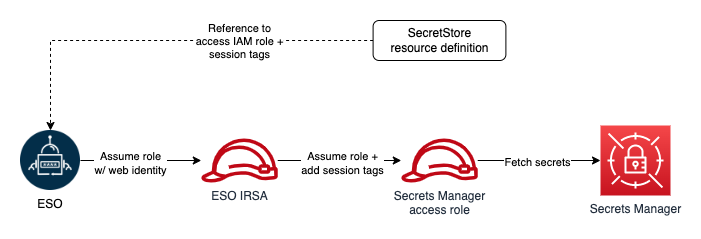
To adhere to the principle of least privilege and verify that each Kubernetes workload can access only its designated secrets, you will use ABAC policies. As we mentioned, tags are the attributes used for ABAC in the context of AWS. For example, principal and secret tags can be compared to create ABAC policies to deny or allow access to secrets. Secret tags are static tags assigned to secrets symbolizing the workload consuming the secret. On the other hand, principal (requester) tags are dynamically modified, incorporating workload specific tags. The only viable option to dynamically modifying principal tags is to use session tags and incoming transitive session tags. However, as of this writing, there is no way to add session and transitive tags when assuming an IRSA. The workaround for this issue is role chaining and passing session tags when assuming downstream roles. ESO offers role chaining, meaning that you can refer to one or more IAM roles with access to Secrets Manager in the SecretStore resource definition, and ESO will chain them with its IRSA to access secrets. It also allows you to define session tags and transitive tags to be passed when ESO assumes the IAM roles with its primary IRSA. The ability to pass session tags allows you to implement ABAC and compare principal tags (including session tags) with secret tags every time ESO sends a request to Secrets Manager to fetch a secret. The following figure shows ESO authentication process with role chaining in one Kubernetes namespace.
Figure 2: ESO AWS authentication process with role chaining (single namespace)
Architecture overview
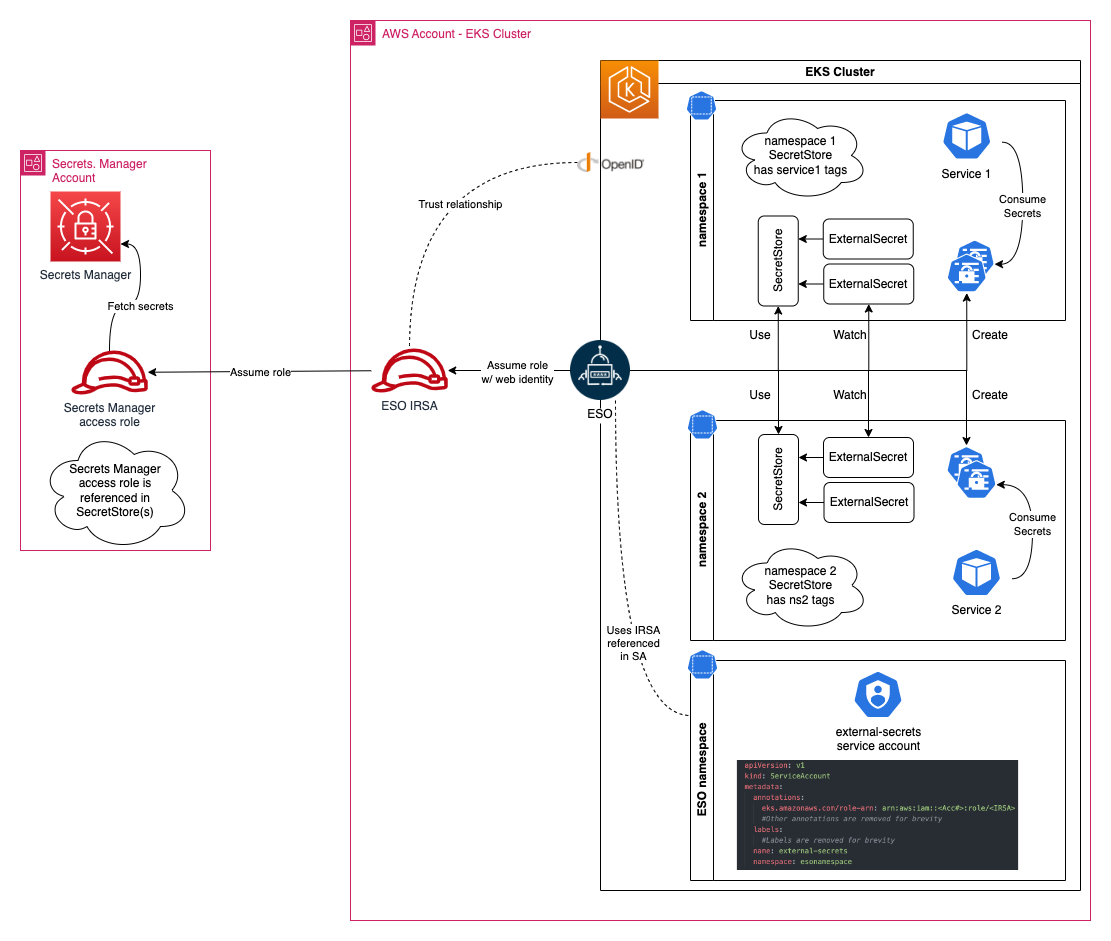
Let’s review implementing ABAC with a real-world example. When you have multiple workloads and services in your Amazon EKS cluster, each service is deployed in its own unique namespace, and service secrets are stored in Secrets Manager and tagged with a service name (key=service, value=service name). The following figure shows the required resources to implement ABAC with EKS and Secrets Manager.
Create an IAM role to access Secrets Manager secrets
You must create an IAM role with access to Secrets Manager secrets. Start by creating a customer managed policy to attach to your role. Your policy should allow reading secrets from Secrets Manager. The following example shows a policy that you can create for your role:
Secrets Manager uses an AWS managed key for Secrets Manager by default to encrypt your secrets. It’s recommended to specify another encryption key during secret creation and have separate keys for separate workloads. Modify the resource element of the second policy statement and replace <KMS Key ARN> with the KMS key ARNs used to encrypt your secrets. If you use the default key to encrypt your secrets, you can remove this statement.
The policy statement conditionally allows access to all secrets. The condition element permits access only when the value of the principal tag, identified by the key service, matches the value of the secret tag with the same key. You can include multiple conditions (in separate statements) to match multiple tags.
After you create your policy, follow the guide for Creating IAM roles to create your role, attaching the policy you created. Use the default value for your role’s trust relationship for now, you will update the trust relationship in the next step. Note the role’s ARN after creation.
Create an IAM role for the ESO service account
Use eksctl to create the IAM role for the ESO service account (IRSA). Before creating the role, you must create an IAM policy. ESO IRSA only needs permission to assume the Secrets Manager access role that you created in the previous step.
Use the following example of an IAM policy that you can create. Replace <Secrets Manager Access Role ARN> with the ARN of the role you created in the previous step and follow creating a customer managed policy to create the policy. After creating the policy, note the policy ARN.
Next, run the following command to get the account name of the ESO service. You will see a list of service accounts, pick the one that has the same name as your helm release, in this example, the service account is external-secrets.
kubectl get serviceaccounts -n external-secrets
Next, create an IRSA and configure an ESO service account to assume the role. Run the following command to create a new role and associate it with the ESO service account. Replace the variables in brackets (<example>) with your specific information:
eksctl create iamserviceaccount --name <ESO service account> \
--namespace <ESO namespace> --cluster <cluster name> \
--role-name <IRSA name> --override-existing-serviceaccounts \
--attach-policy-arn <policy arn you created earlier> --approve
You can validate the operation by following the steps listed in Configuring a Kubernetes service account to assume an IAM role. Note that you had to pass the ‑‑override-existing-serviceaccounts argument because the ESO service account was already created.
After you’ve validated the operation, run the following command to retrieve the IRSA ARN (replace <IRSA name> with the name you used in the previous step):
aws iam get-role --role-name <IRSA name> --query Role.Arn
Modify the trust relationship of the role you created previously and limit it to your newly created IRSA. The following should resemble your trust relationship. Replace <IRSA Arn> with the IRSA ARN returned in the previous step:
Note that you will be using session tags to implement ABAC. When using session tags, trust policies for all roles connected to the identity provider (IdP) passing the tags must have the sts:TagSession permission. For roles without this permission in the trust policy, the AssumeRole operation fails.
Moreover, the condition block of the second statement limits ESO’s ability to pass session tags with the key name ekssecret. We’re using this condition to verify that the ESO role can only create session tags used for accessing secrets manager, and doesn’t gain the ability to set principal tags that might be used for any other purpose. This way, you’re creating a namespace to help prevent further privilege escalations or escapes.
Create secrets in Secrets Manager
You can create two secrets in Secrets Manager and tag them.
Follow the steps in Create an AWS Secrets Manager secret to create two secrets named service1_secret and service2_secret. Add the following tags to your secrets:
service1_secret:
key=ekssecret, value=service1
service2_secret:
key=ekssecret, value=service2
Run the following command to verify both secrets are created and tagged properly:
Assume that service1-ns hosts service1 and service2-ns hosts service2. After creating the namespaces for your services, verify that each service is restricted to accessing secrets that are tagged with a specific key-value pair. In this example the key should be ekssecret and the value should match the name of the corresponding service. This means that service1 should only have access to service1_secret, while service2 should only have access to service2_secret. Next, declare session tags in SecretStore object definitions.
Edit the following command snippet using the text editor of your choice and replace every instance of <Secrets Manager Access Role ARN> with the ARN of the IAM role you created earlier to access Secrets Manager secrets. Copy and paste the edited command in your terminal and run it to create a .yaml file in your working directory that contains the SecretStore definitions. Make sure to change the AWS Region to reflect the Region of your Secrets Manager.
Create SecretStore objects by running the following command:
kubectl apply -f secretstore.yml
Validate object creation by running the following command:
kubectl describe secretstores.external-secrets.io -A
Check the status and events section for each object and make sure the store is validated.
Next, create two ExternalSecret objects requesting service1_secret and service2_secret. Copy and paste the following command in your terminal and run it. The command will create a .yaml file in your working directory that contains ExternalSecret definitions.
Verify the objects are created by running following command:
kubectl get externalsecrets.external-secrets.io -A
Each ExternalSecret object should create a Kubernetes secret in the same namespace it was created in. Kubernetes secrets are accessible to services in the same namespace. To demonstrate that both Service A and Service B has access to their secrets, run the following command.
kubectl get secrets -A
You should see service1-ns-secret1 created in service1-ns namespace which is accessible to Service 1, and service1-ns-secret2 created in service2-ns which is accessible to Service2.
Try creating an ExternalSecrets object in service1-ns referencing service2_secret. Notice that your object shows SecretSyncedError status. This is the expected behavior, because ESO passes different session tags for ExternalSecret objects in each namespace, and when the tag where key is ekssecret doesn’t match the secret tag with the same key, the request will be rejected.
What about AWS Secrets and Configuration Provider (ASCP)?
Today, customers who use AWS Fargate with Amazon EKS can’t use the ASCP method due to the incompatibility of daemonsets on Fargate. Kubernetes also doesn’t provide a mechanism to add specific claims to JSON web tokens (JWT) used to assume IAM roles. Today, when using ASCP in Kubernetes, which assumes IAM roles through IAM roles for service accounts (IRSA), there’s a constraint in appending session tags during the IRSA assumption due to JWT claim restrictions, limiting the ability to implement ABAC.
With ESO, you can create Kubernetes Secrets and have your pods retrieve secrets from them instead of directly mounting secrets as volumes in your pods. ESO is also capable of using its controller pod’s IRSA to retrieve secrets, so you don’t need to set up IRSA for each pod. You can also role chain and specify secondary roles to be assumed by ESO IRSA and pass session tags to be used with ABAC policies. ESO’s role chaining and ABAC capabilities help decrease the number of IAM roles required for secrets retrieval. See Leverage AWS secrets stores from EKS Fargate with External Secrets Operator on the AWS Containers blog to learn how to use ESO on an EKS Fargate cluster to consume secrets stored in Secrets Manager.
Conclusion
In this blog post, we walked you through how to implement ABAC with Amazon EKS and Secrets Manager using External Secrets Operator. Implementing ABAC allows you to create a single IAM role for accessing Secrets Manager secrets while implementing granular permissions. ABAC also decreases your team’s overhead and reduces the risk of misconfigurations. With ABAC, you require fewer policies and don’t need to update existing policies to allow access to new services and workloads.
If you have feedback about this post, submit comments in the Comments section below.
You may know Cloudflare as the company powering nearly 20% of the web. But powering and protecting websites and static content is only a fraction of what we do. In fact, well over half of the dynamic traffic on our network consists not of web pages, but of Application Programming Interface (API) traffic — the plumbing that makes technology work. This blog introduces and is a supplement to the API Security Report for 2024 where we detail exactly how we’re protecting our customers, and what it means for the future of API security. Unlike other industry API reports, our report isn’t based on user surveys — but instead, based on real traffic data.
If there’s only one thing you take away from our report this year, it’s this: many organizations lack accurate API inventories, even when they believe they can correctly identify API traffic. Cloudflare helps organizations discover all of their public-facing APIs using two approaches. First, customers configure our API discovery tool to monitor for identifying tokens present in their known API traffic. We then use a machine learning model that scans not just these known API calls, but all HTTP requests, identifying API traffic that may be going unaccounted for. The difference between these approaches is striking: we found 30.7% more API endpoints through machine learning-based discovery than the self-reported approach, suggesting that nearly a third of APIs are “Shadow APIs” — and may not be properly inventoried and secured.
Read on for extras and highlights from our inaugural API security report. In the full report, you’ll find updated statistics about the threats we see and prevent, along with our predictions for 2024. We predict that a lack of API security focus at organizations will lead to increased complexity and loss of control, and increased access to generative AI will lead to more API risk. We also anticipate an increase in API business logic attacks in 2024. Lastly, all of the above risks will necessitate growing governance around API security.
Hidden attack surfaces
How are web pages and APIs different? APIs are a quick and easy way for applications to retrieve data in the background, or ask that work be done from other applications. For example, anyone can write a weather app without being a meteorologist: a developer can write the structure of the page or mobile application and ask a weather API for the forecast using the user’s location. Critically, most end users don’t know that the data was provided by the weather API and not the app’s owner.
While APIs are the critical plumbing of the Internet, they’re also ripe for abuse. For example, flaws in API authentication and authorization at Optus led to a threat actor offering 10 million user records for sale, and government agencies have warned about these exact API attacks. Developers in an organization will often create Internet-facing APIs, used by their own applications to function more efficiently, but it’s on the security team to protect these new public interfaces. If the process of documenting APIs and bringing them to the attention of the security team isn’t clear, they become Shadow APIs — operating in production but without the organization’s knowledge. This is where the security challenge begins to emerge.
To help customers solve this problem, we shipped API Discovery. When we introduced our latest release, we mentioned how few organizations have accurate API inventories. Security teams sometimes are forced to adopt an “email and ask” approach to build an inventory, and in doing so responses are immediately stale upon the next application release when APIs change. Better is to track API changes by code base changes, keeping up with new releases. However, this still has a drawback of only inventorying actively maintained code. Legacy applications may not see new releases, despite receiving production traffic.
Cloudflare’s approach to API management involves creating a comprehensive, accurate API inventory using a blend of machine learning-based API discovery and network traffic inspection. This is integral to our API Gateway product, where customers can manage their Internet-facing endpoints and monitor API health. The API Gateway also allows customers to identify their API traffic using session identifiers (typically a header or cookie), which aids in specifically identifying API traffic for the discovery process.
As noted earlier, our analysis reveals that even knowledgeable customers often overlook significant portions of their API traffic. By comparing session-based API discovery (using API sessions to pinpoint traffic) with our machine learning-based API discovery (analyzing all incoming traffic), we found that the latter uncovers on average 30.7% more endpoints! Without broad traffic analysis, you may be missing almost a third of your API inventory.
If you aren’t a Cloudflare customer, you can still get started building an API inventory. APIs are typically cataloged in a standardized format called OpenAPI, and many development tools can build OpenAPI formatted schema files. If you have a file with that format, you can start to build an API inventory yourself by collecting these schemas. Here is an example of how you can pull the endpoints out of a schema file, assuming your have an OpenAPI v3 formatted file named my_schema.json:
import json
import csv
from io import StringIO

# Load the OpenAPI schema from a file
with open("my_schema.json", "r") as file:
    schema = json.load(file)

# Prepare CSV output
output = StringIO()
writer = csv.writer(output)

# Write CSV header
writer.writerow(["Server", "Path", "Method"])

# Extract and write data to CSV
servers = schema.get("servers", [])
for server in servers:
    url = server['url']
    for path, methods in schema['paths'].items():
        for method in methods.keys():
            writer.writerow([url, path, method])

# Get and print CSV string
csv_output = output.getvalue().strip()
print(csv_output)
Unless you have been generating OpenAPI schemas and tracking API inventory from the beginning of your application’s development process, you’re probably missing some endpoints across your production application API inventory.
Precise rate limits minimize attack potential
When it comes to stopping abuse, most practitioners’ thoughts first come to rate limiting. Implementing limits on your API is a valuable tool to keep abuse in check and prevent accidental overload of the origin. But how do you know if you’ve chosen the correct rate limiting approach? Approaches can vary, but they generally come down to the error code chosen, and the basis for the limit value itself.
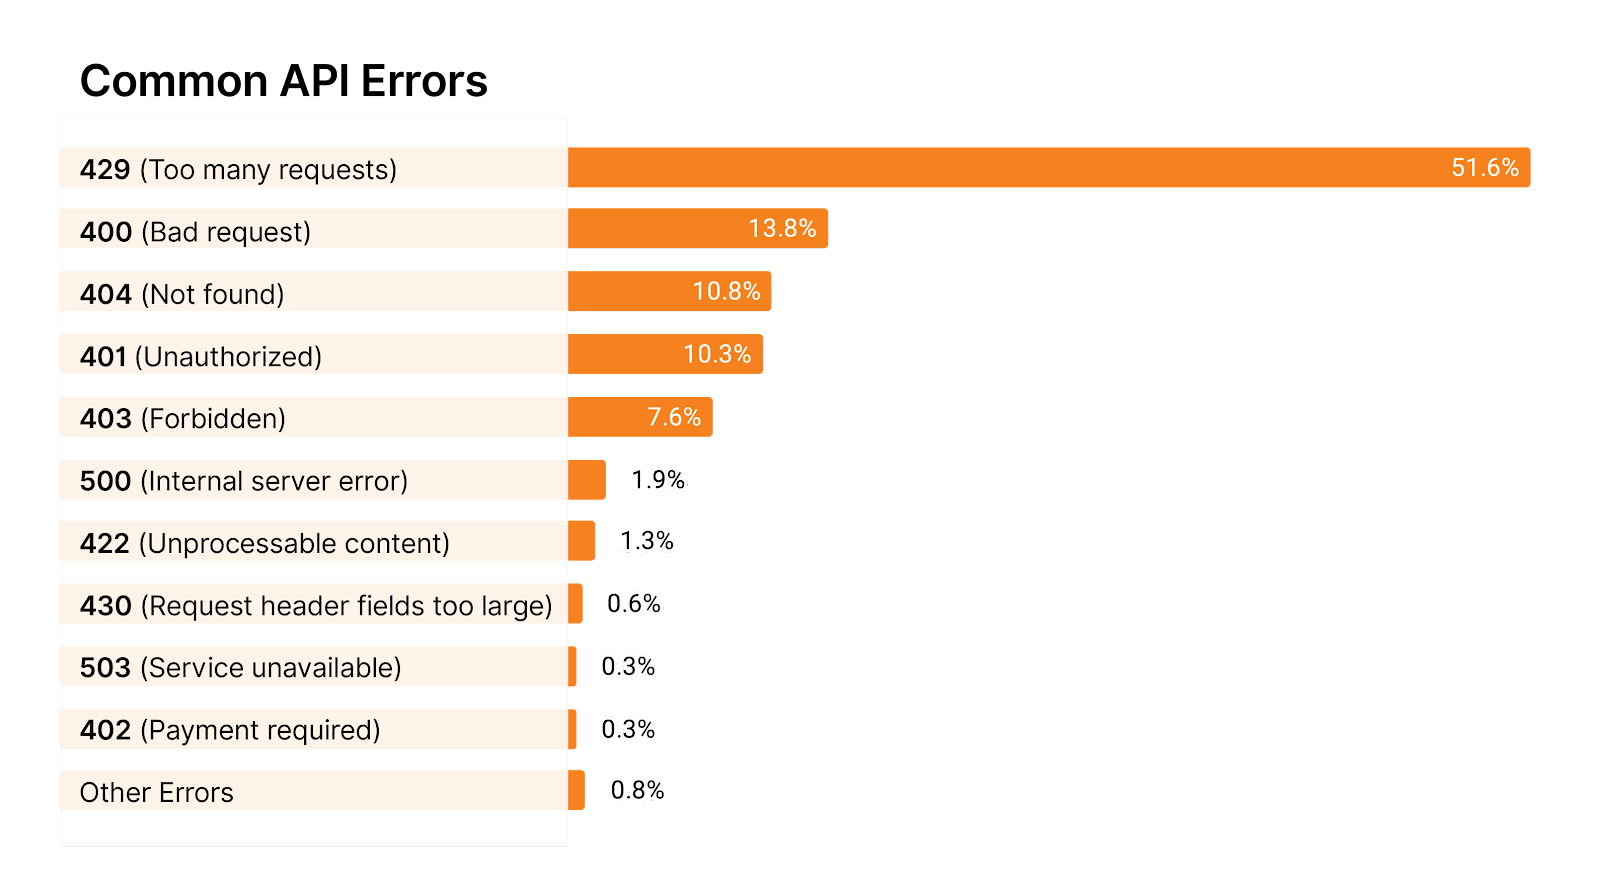
For some APIs, practitioners configure rate limiting errors to respond with an HTTP 403 (forbidden), while others will respond with HTTP 429 (too many requests). Using HTTP 403 sounds innocent enough until you realize that other security tools are also responding with 403 codes. When you’re under attack, it can be hard to decipher which tools are responsible for which errors / blocking.
Alternatively, if you utilize HTTP 429 for your rate limits, attackers will instantly know that they’ve been rate limited and can “surf” right under the limit without being detected. This can be OK if you’re only limiting requests to ensure your back-end stays alive, but it can tip your cards to attackers. In addition, attackers can “scale out” to more API clients to effectively request above the rate limit.
There are pros and cons to both approaches, but we find that by far most APIs respond with HTTP 429 out of all the 4xx and 5xx error messages (almost 52%).
What about the logic of the rate limit rule itself, not just the response code? Implementing request limits on IP addresses can be tempting, but we recommend you base the limit on a session ID as a best practice and only fall back to IP address (or IP + JA3 fingerprint) when session IDs aren’t available. Setting rate limits on user sessions instead of IPs will reliably identify your real users and minimize false positives due to shared IP space. Cloudflare’s Advanced Rate Limiting and API Gateway’s volumetric abuse protection make it easy to enforce these limits by profiling session traffic on each API endpoint and giving one-click solutions to set up the per-endpoint rate limits.
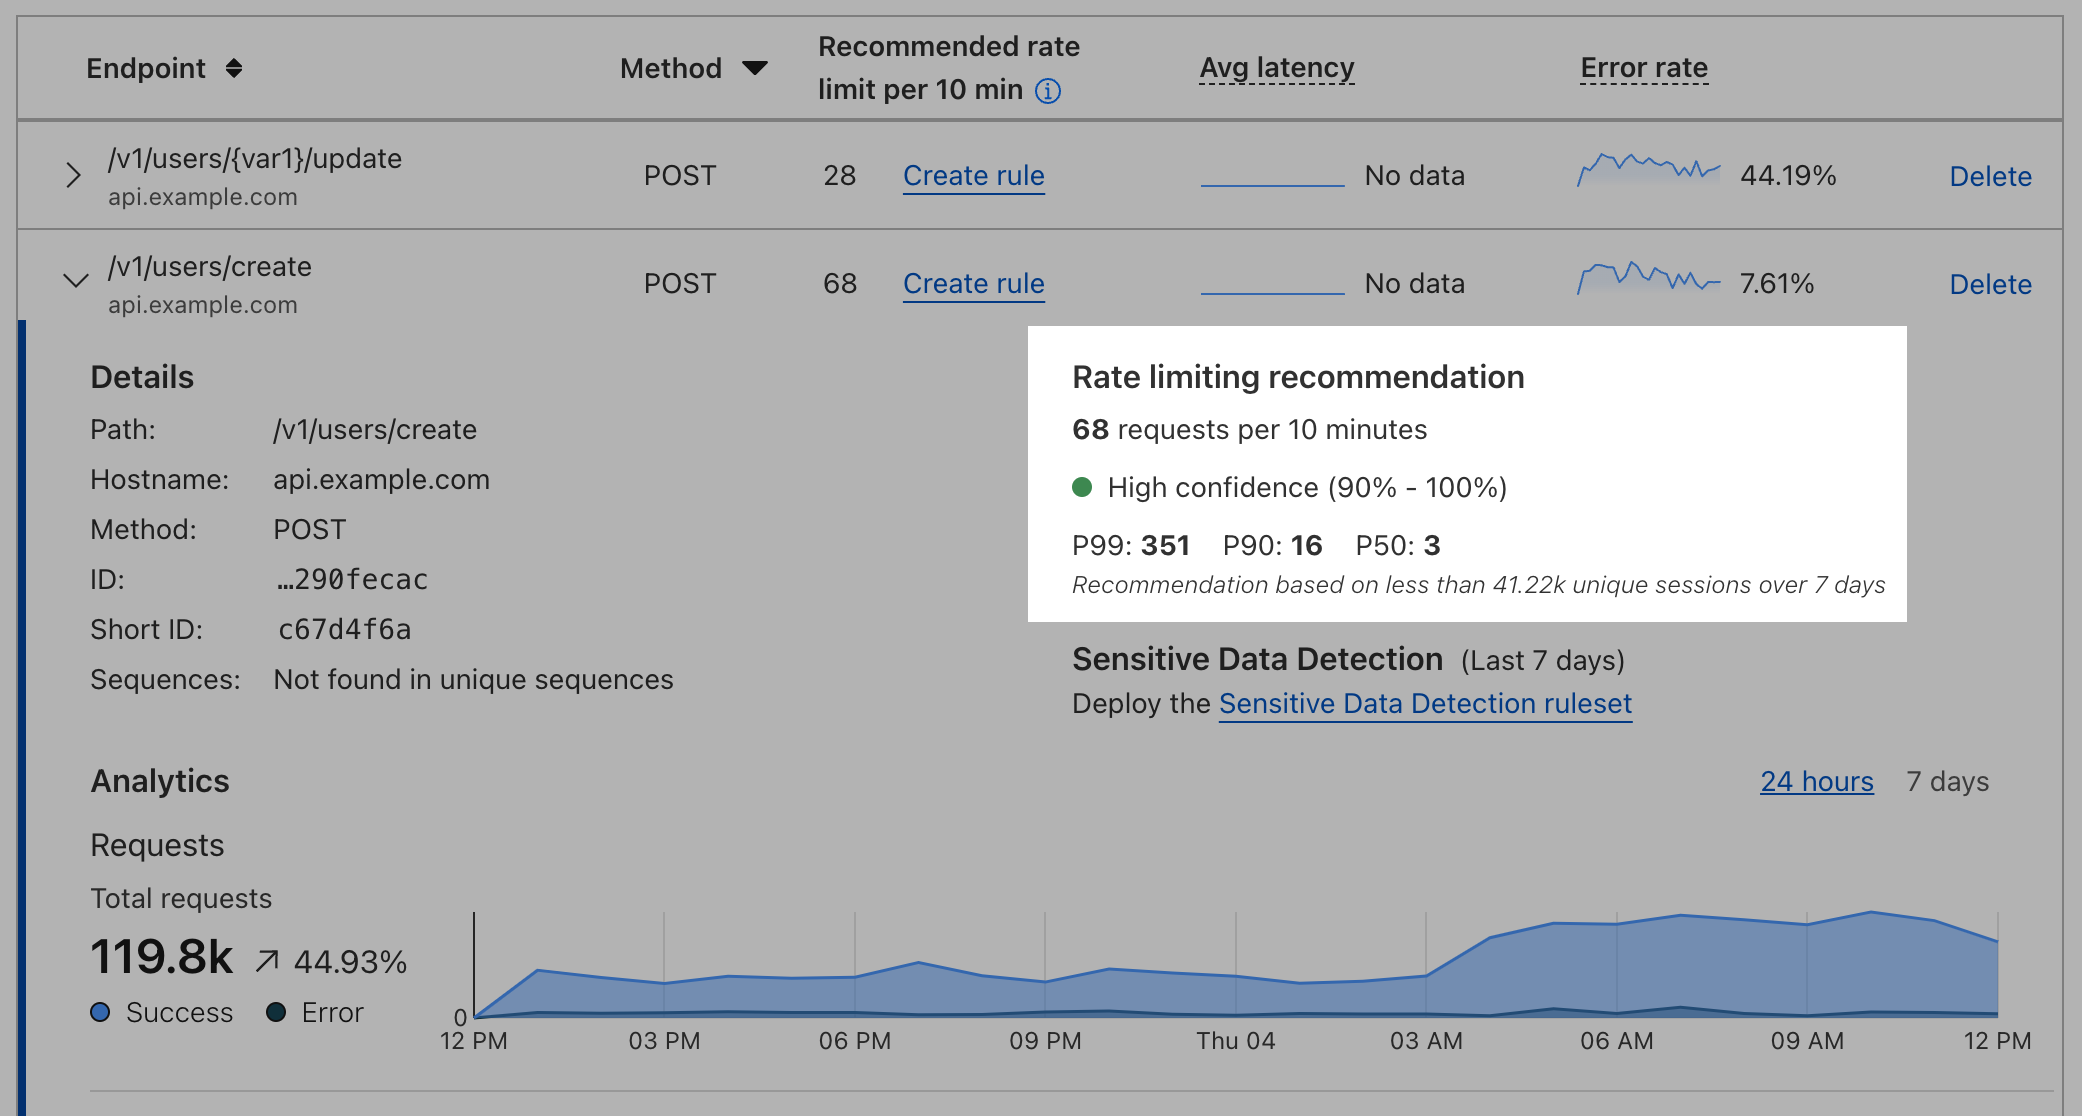
To find values for your rate limits, Cloudflare API Gateway computes session request statistics for you. We suggest a limit by looking at the distribution of requests per session across all sessions to your API as identified by the customer-configured API session identifier. We then compute statistical p-levels — which describe the request rates for different cohorts of traffic — for p50, p90, and p99 on this distribution and use the variance of the distribution to come up with a recommended threshold for every single endpoint in your API inventory. The recommendation might not match the p-levels, which is an important distinction and a reason not to use p-levels alone. Along with the recommendation, API Gateway informs users of our confidence in the recommendation. Generally, the more API sessions we’re able to collect, the more confident we’ll be in the recommendation.
Activating a rate limit is as easy as clicking the ‘create rule’ link, and API Gateway will automatically bring your session identifier over to the advanced rate limit rule creation page, ensuring your rules have pinpoint accuracy to defend against attacks and minimize false positives compared to traditional, overly broad limits.
APIs are also victim to web application attacks
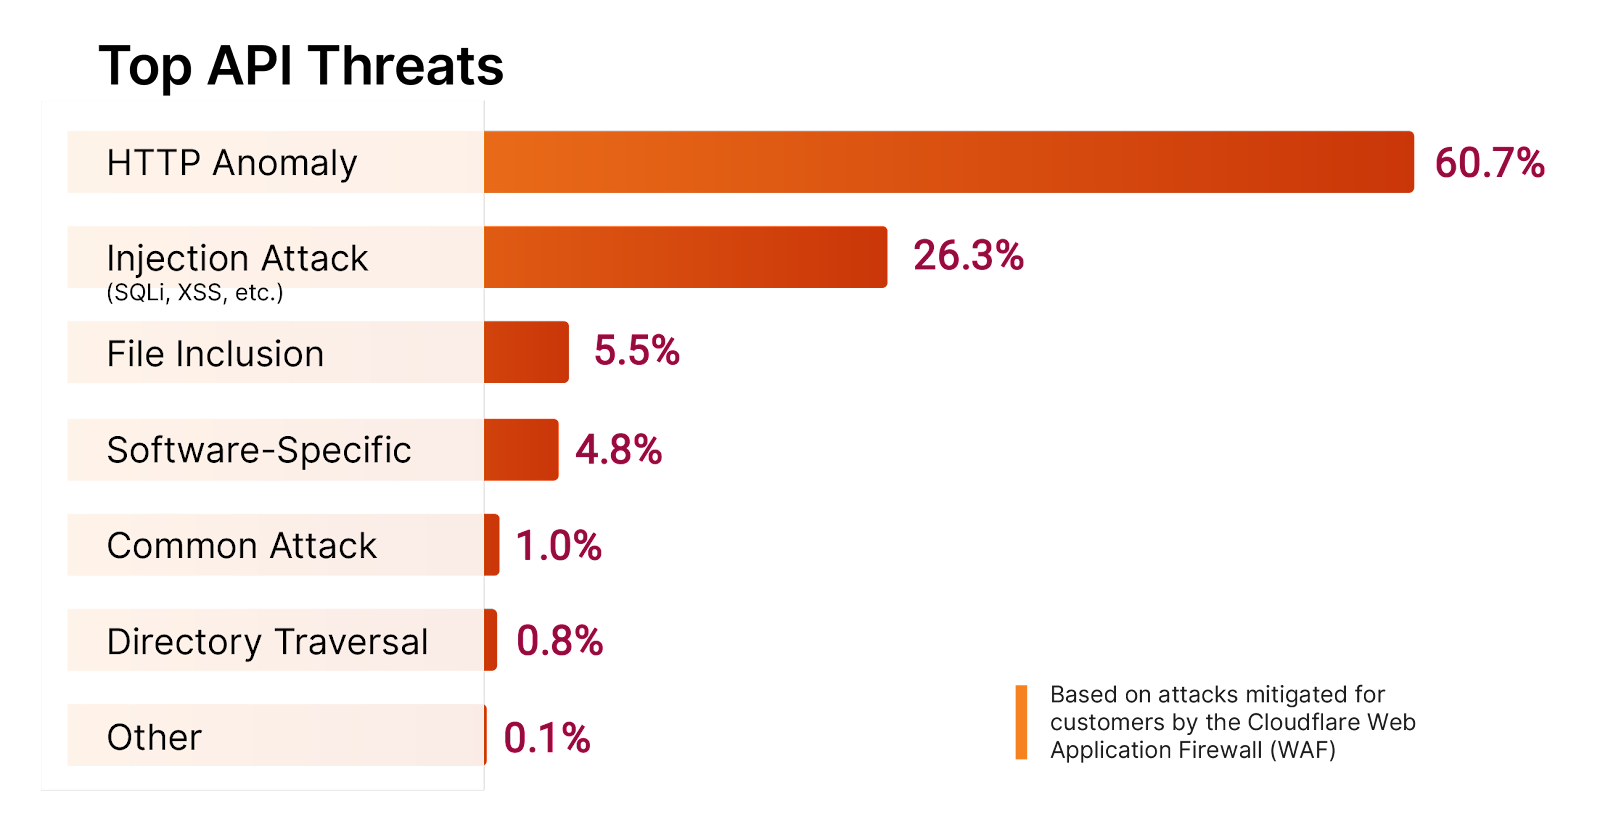
APIs aren’t immune from normal OWASP Top 10 style attacks like SQL injection. The body of API requests can also find its way as a database input just like a web page form input or URL argument. It’s important to ensure that you have a web application firewall (WAF) also protecting your API traffic to defend against these styles of attacks.
In fact, when we looked at Cloudflare’s WAF managed rules, injection attacks were the second most common threat vector Cloudflare saw carried out on APIs. The most common threat was HTTP Anomaly. Examples of HTTP anomalies include malformed method names, null byte characters in headers, non-standard ports or content length of zero with a POST request. Here are the stats on the other top threats we saw against APIs:
Absent from the chart is broken authentication and authorization. Broken authentication and authorization occur when an API fails to check whether the entity sending requests for information to an API actually has the permission to request that data or not. It can also happen when attacks try to forge credentials and insert less restricted permissions into their existing (valid) credentials that have more restricted permissions. OWASP categorizes these attacks in a few different ways, but the main categories are Broken Object Level Authorization (BOLA) and Broken Function Level Authorization (BFLA) attacks.
The root cause of a successful BOLA / BFLA attack lies in an origin API not checking proper ownership of database records against the identity requesting those records. Tracking these specific attacks can be difficult, as the permission structure may be simply absent, inadequate, or improperly implemented. Can you see the chicken-and-egg problem here? It would be easy to stop these attacks if we knew the proper permission structure, but if we or our customers knew the proper permission structure or could guarantee its enforcement, the attacks would be unsuccessful to begin with. Stay tuned for future API Gateway feature launches where we’ll use our knowledge of API traffic norms to automatically suggest security policies that highlight and stop BOLA / BFLA attacks.
Here are four ways to plug authentication loopholes that may exist for your APIs, even if you don’t have a fine-grained authorization policy available:
First, enforce authentication on each publicly accessible API unless there’s a business approved exception. Look to technologies like mTLS and JSON Web Tokens.
Limit the speed of API requests to your servers to slow down potential attackers.
Block abnormal volumes of sensitive data outflow.
Block attackers from skipping legitimate sequences of API requests.
APIs are surprisingly human driven, not machine driven anymore
If you’ve been around technology since the pre-smartphone days when fewer people were habitually online, it can be tempting to think of APIs as only used for machine-to-machine communication in something like an overnight batch job process. However, the truth couldn’t be more different. As we’ve discussed, many web and mobile applications are powered by APIs, which facilitate everything from authentication to transactions to serving media files. As people use these applications, there is a corresponding increase in API traffic volume.
We can illustrate this by looking at the API traffic patterns observed during holidays, when people gather around friends and family and spend more time socializing in person and less time online. We’ve annotated the following Worldwide API traffic graph with common holidays and promotions. Notice how traffic peaks around Black Friday and Cyber Monday around the +10% level when people shop online, but then traffic drops off for the festivities of Christmas and New Years days.
This pattern closely resembles what we observe in regular HTTP traffic. It’s clear that APIs are no longer just the realm of automated processes but are intricately linked with human behaviors and social trends.
Recommendations
There is no silver bullet for holistic API security. For the best effect, Cloudflare recommends four strategies for increasing API security posture:
Combine API application development, visibility, performance, and security with a unified control plane that can keep an up-to-date API inventory.
Use security tools that utilize machine learning technologies to free up human resources and reduce costs.
Adopt a positive security model for your APIs (see below for an explanation on positive and negative security models).
Measure and improve your organization’s API maturity level over time (also see below for an explanation of an API maturity level).
What do we mean by a ‘positive’ or ‘negative’ security model? In a negative model, security tools look for known signs of attack and take action to stop those attacks. In a positive model, security tools look for known good requests and only let those through, blocking all else. APIs are often so structured that positive security models make sense for the highest levels of security. You can also combine security models, such as using a WAF in a negative model sense, and using API Schema Validation in a positive model sense.
Here’s a quick way to gauge your organization’s API security maturity level over time: Novice organizations will get started by assembling their first API inventory, no matter how incomplete. More mature organizations will strive for API inventory accuracy and automatic updates. The most mature organizations will actively enforce security checks in a positive security model on their APIs, enforcing API schema, valid authentication, and checking behavior for signs of abuse.
Predictions
In closing, our top four predictions for 2024 and beyond:
Increased loss of control and complexity: we surveyed practitioners in the API Security and Management field and 73% responded that security requirements interfere with their productivity and innovation. Coupled with increasingly sprawling applications and inaccurate inventories, API risks and complexity will rise.
Easier access to AI leading to more API risks: the rise in generative AI brings potential risks, including AI models’ APIs being vulnerable to attack, but also developers shipping buggy, AI-written code. Forrester predicts that, in 2024, without proper guardrails, “at least three data breaches will be publicly blamed on insecure AI-generated code – either due to security flaws in the generated code itself or vulnerabilities in AI-suggested dependencies.”
Increase in business logic-based fraud attacks: professional fraudsters run their operations just like a business, and they have costs like any other. We anticipate attackers will run fraud bots efficiently against APIs even more than in previous years.
Growing governance: The first version of PCI DSS that directly addresses API security will go into effect in March 2024. Check your industry’s specific requirements with your audit department to be ready for requirements as they come into effect.
If you’re interested in the full report, you can download the 2024 API Security Report here, which includes full detail on our recommendations.
Cloudflare API Gateway is our API security solution, and it is available for all Enterprise customers. If you aren’t subscribed to API Gateway, click here to view your initial API Discovery results and start a trial in the Cloudflare dashboard. To learn how to use API Gateway to secure your traffic, click here to view our development docs and here for our getting started guide.
The US East (Ohio) Region first obtained GSMA certification in September 2021, and the Europe (Paris) Region first obtained GSMA certification in October 2021. This renewal demonstrates our continuous commitment to adhere to the heightened expectations for cloud service providers. AWS customers who provide an embedded Universal Integrated Circuit Card (eUICC) for mobile devices can run their remote provisioning applications with confidence in the AWS Cloud in the GSMA-certified Regions.
For up-to-date information related to the certification, see the AWS Compliance Program page and choose GSMA under Europe, Middle East & Africa.
AWS was evaluated by independent third-party auditors that GSMA selected. The Certificate of Compliance that shows AWS achieved GSMA compliance status is available on the GSMA website and through AWS Artifact. AWS Artifact is a self-service portal for on-demand access to AWS compliance reports. Sign in to AWS Artifact in the AWS Management Console, or learn more at Getting Started with AWS Artifact.
To learn more about our compliance and security programs, see AWS Compliance Programs. As always, we value your feedback and questions; reach out to the AWS Compliance team through the Contact Us page. If you have feedback about this post, submit comments in the Comments section below.
Want more AWS Security news? Follow us on Twitter.
AWS Signer is a fully managed code-signing service to help ensure the trust and integrity of your code. It helps you verify that the code comes from a trusted source and that an unauthorized party has not accessed it. AWS Signer manages code signing certificates and public and private keys, which can reduce the overhead of your public key infrastructure (PKI) management. It also provides a set of features to simplify lifecycle management of your keys and certificates so that you can focus on signing and verifying your code.
Containers and AWS Lambda functions are popular serverless compute solutions for applications built on the cloud. By using AWS Signer, you can verify that the software running in these workloads originates from a trusted source.
In this blog post, you will learn about the benefits of code signing for software security, governance, and compliance needs. Flexible continuous integration and continuous delivery (CI/CD) integration, management of signing identities, and native integration with other AWS services can help you simplify code security through automation.
Background
Code signing is an important part of the software supply chain. It helps ensure that the code is unaltered and comes from an approved source.
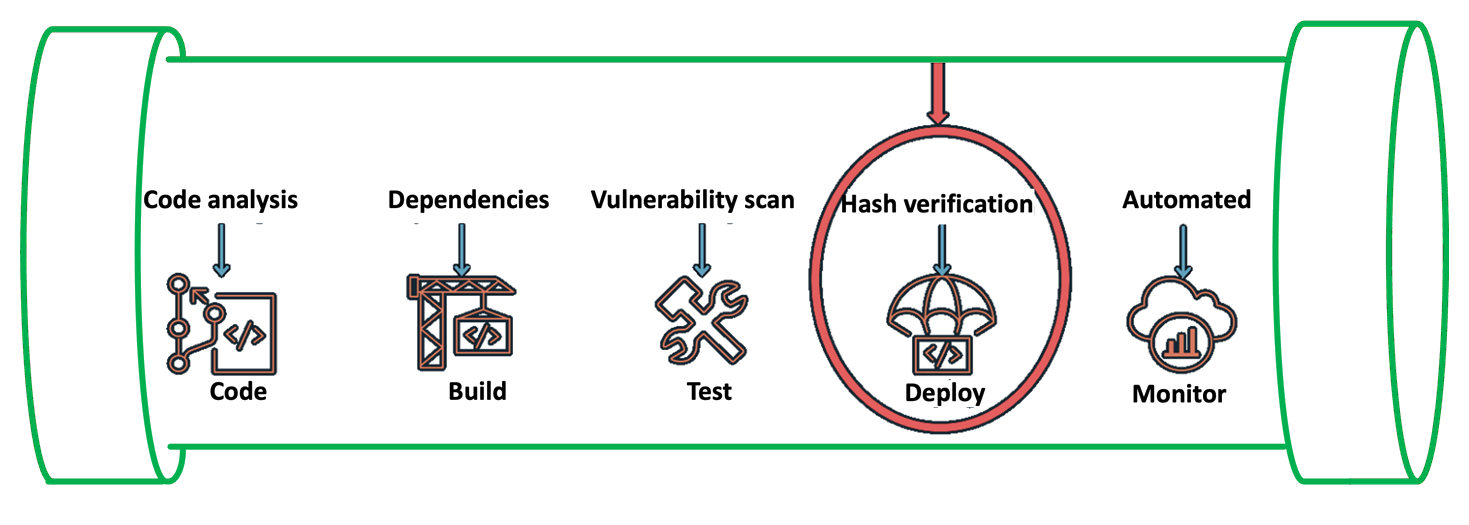
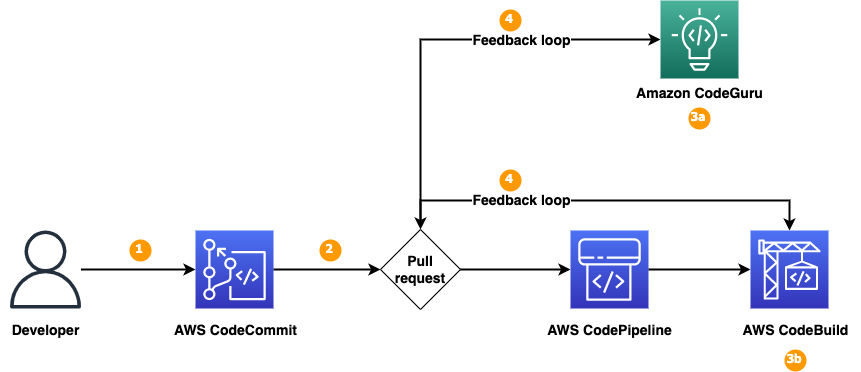
To automate software development workflows, organizations often implement a CI/CD pipeline to push, test, and deploy code effectively. You can integrate code signing into the workflow to help prevent untrusted code from being deployed, as shown in Figure 1. Code signing in the pipeline can provide you with different types of information, depending on how you decide to use the functionality. For example, you can integrate code signing into the build stage to attest that the code was scanned for vulnerabilities, had its software bill of materials (SBOM) approved internally, and underwent unit and integration testing. You can also use code signing to verify who has pushed or published the code, such as a developer, team, or organization. You can verify each of these steps separately by including multiple signing stages in the pipeline. For more information on the value provided by container image signing, see Cryptographic Signing for Containers.
Figure 1: Security IN the pipeline
In the following section, we will walk you through a simple implementation of image signing and its verification for Amazon Elastic Kubernetes Service (Amazon EKS) deployment. The signature attests that the container image went through the pipeline and came from a trusted source. You can use this process in more complex scenarios by adding multiple AWS CodeBuild code signing stages that make use of various AWS Signer signing profiles.
Services and tools
In this section, we discuss the various AWS services and third-party tools that you need for this solution.
CI/CD services
For the CI/CD pipeline, you will use the following AWS services:
AWS CodePipeline — a fully managed continuous delivery service that you can use to automate your release pipelines for fast and reliable application and infrastructure updates.
AWS Signer — a fully managed code-signing service that you can use to help ensure the trust and integrity of your code.
AWS CodeBuild — A fully managed continuous integration service that compiles source code, runs tests, and produces software packages that are ready to deploy.
Container services
You will use the following AWS services for containers for this walkthrough:
Amazon EKS — a managed Kubernetes service to run Kubernetes in the AWS Cloud and on-premises data centers.
Amazon ECR — a fully managed container registry for high-performance hosting, so that you can reliably deploy application images and artifacts anywhere.
Verification tools
The following are publicly available sign verification tools that we integrated into the pipeline for this post, but you could integrate other tools that meet your specific requirements.
Notation — A publicly available Notary project within the Cloud Native Computing Foundation (CNCF). With contributions from AWS and others, Notary is an open standard and client implementation that allows for vendor-specific plugins for key management and other integrations. AWS Signer manages signing keys, key rotation, and PKI management for you, and is integrated with Notation through a curated plugin that provides a simple client-based workflow.
Kyverno — A publicly available policy engine that is designed for Kubernetes.
Solution overview
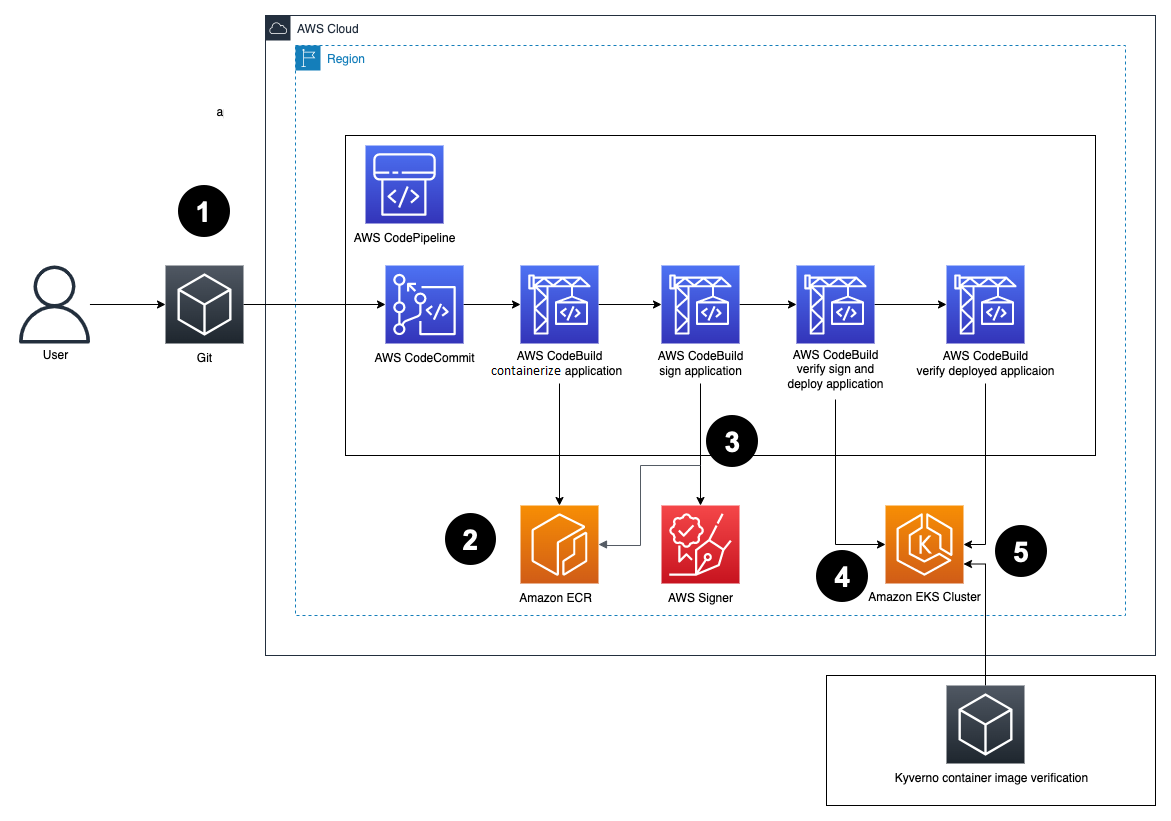
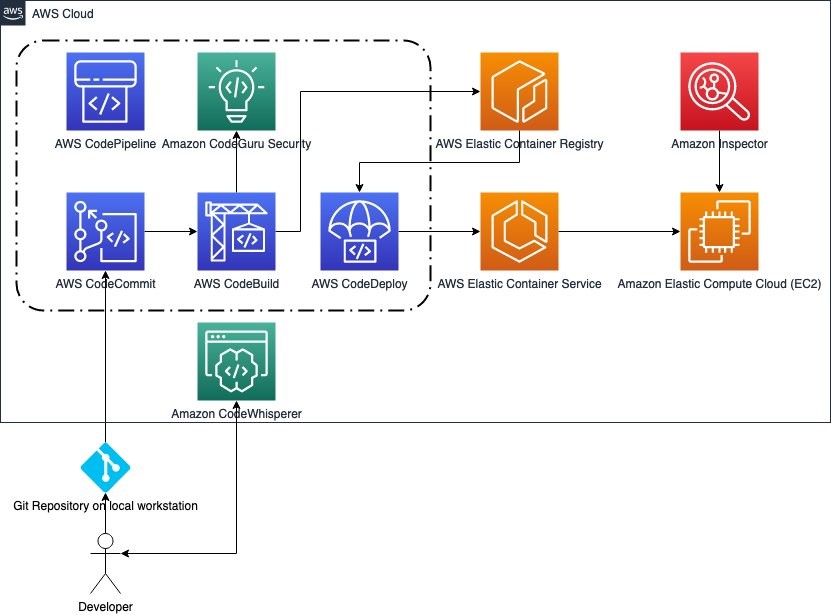
Figure 2: Solution architecture
Here’s how the solution works, as shown in Figure 2:
Developers push Dockerfiles and application code to CodeCommit. Each push to CodeCommit starts a pipeline hosted on CodePipeline.
CodeBuild packages the build, containerizes the application, and stores the image in the ECR registry.
CodeBuild retrieves a specific version of the image that was previously pushed to Amazon ECR. AWS Signer and Notation sign the image by using the signing profile established previously, as shown in more detail in Figure 3.
Figure 3: Signing images described
AWS Signer and Notation verify the signed image version and then deploy it to an Amazon EKS cluster.
If the image has not previously been signed correctly, the CodeBuild log displays an output similar to the following:
Error: signature verification failed: no signature is associated with "<AWS_ACCOUNT_ID>.dkr.ecr.<AWS_REGION>.amazonaws.com/hello-server@<DIGEST>" , make sure the artifact was signed successfully
If there is a signature mismatch, the CodeBuild log displays an output similar to the following:
Error: signature verification failed for all the signatures associated with <AWS_ACCOUNT_ID>.dkr.ecr.<AWS_REGION>.amazonaws.com/hello-server@<DIGEST>
Kyverno verifies the container image signature for use in the Amazon EKS cluster.
Figure 4 shows steps 4 and 5 in more detail.
Figure 4: Verification of image signature for Kubernetes
Prerequisites
Before getting started, make sure that you have the following prerequisites in place:
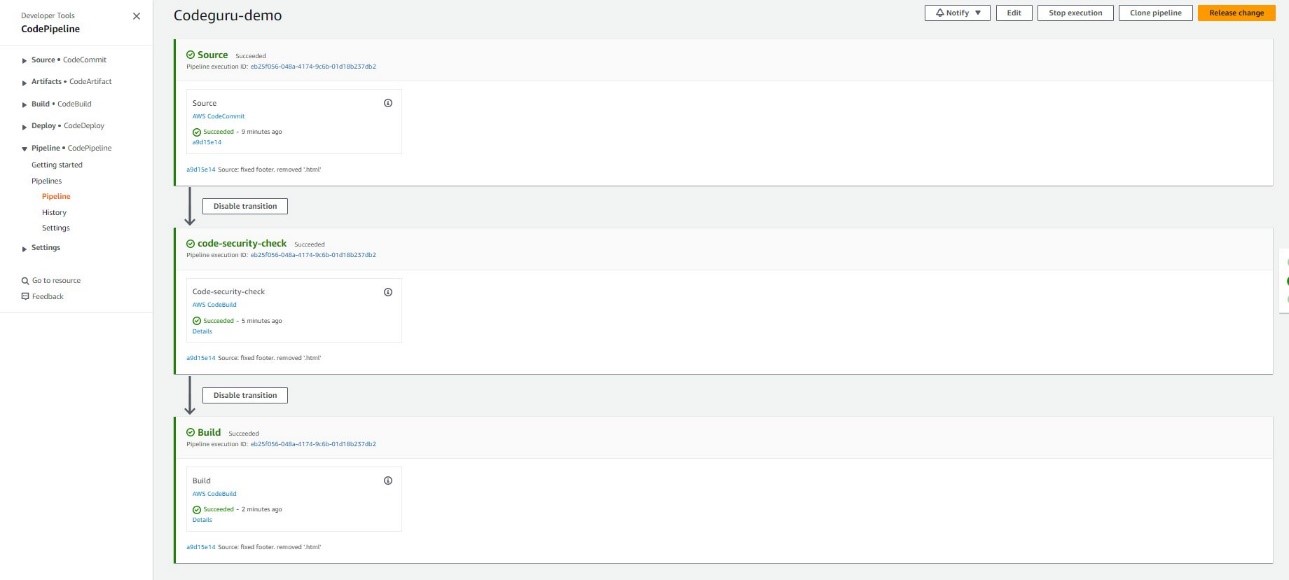
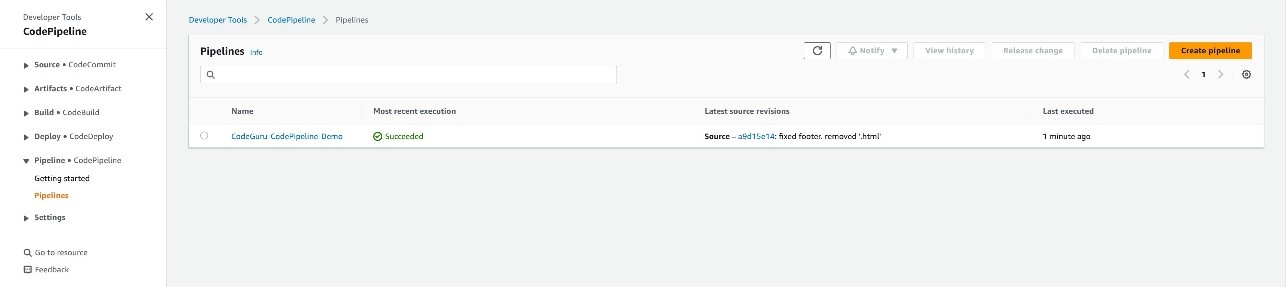
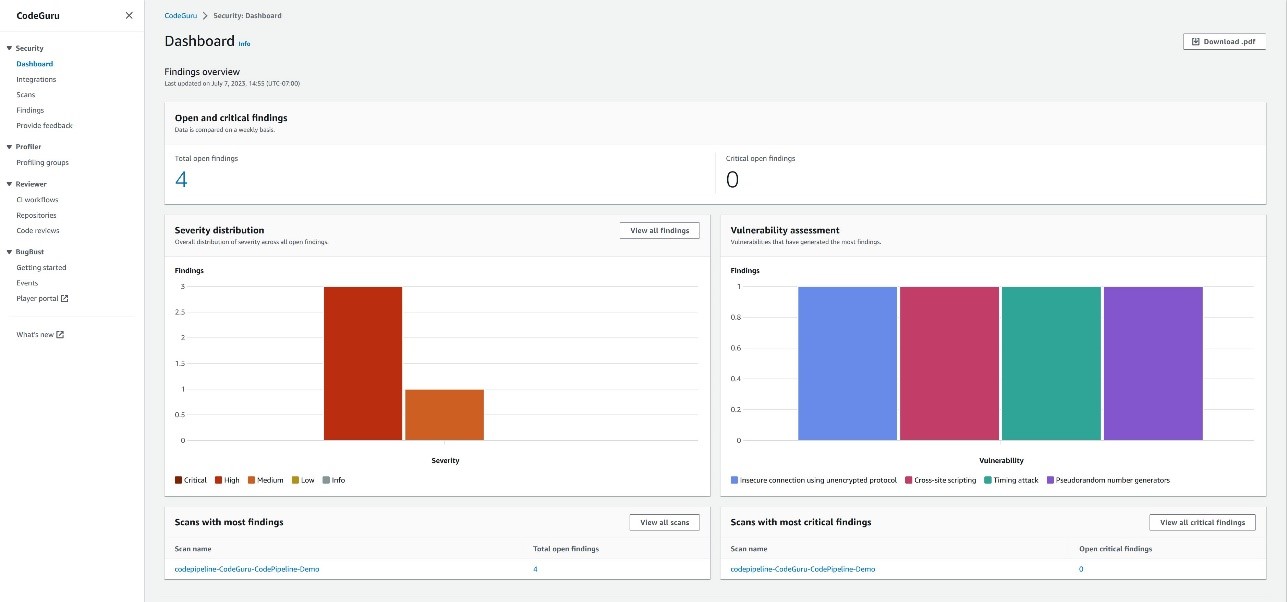
A CodePipeline pipeline deployed with the CodeCommit repository as the code source and four CodeBuild stages: Build, ApplicationSigning, ApplicationDeployment, and VerifyContainerSign. The CI/CD pipeline should look like that in Figure 5.
The commands in the buildspec.yaml configuration file do the following:
Sign you in to Amazon ECR to work with the Docker images.
Reference the specific image that will be signed by using the commit hash (or another versioning strategy that your organization uses). This gets the digest.
Sign the container image by using the notation sign command. This command uses the container image digest, instead of the image tag.
Install the Notation CLI. In this example, you use the installer for Linux. For a list of installers for various operating systems, see the AWS Signer Developer Guide,
Sign the image by using the notation sign command.
Inspect the signed image to make sure that it was signed successfully by using the notation inspect command.
To verify the signed image, use the notation verify command. The output should look similar to the following:
Successfully verified signature for <AWS_ACCOUNT_ID>.dkr.ecr.<AWS_REGION>.amazonaws.com/hello-server@<DIGEST>
(Optional) For troubleshooting, print the notation policy from the pipeline itself to check that it’s working as expected by running the notation policy show command:
notation policy show
For this, include the command in the pre_build phase after the notation version command in the buildspec.yaml configuration file.
After the notation policy show command runs, CodeBuild logs should display an output similar to the following:
To verify the image in Kubernetes, set up both Kyverno and the Kyverno-notation-AWS Signer in your EKS cluster. To get started with Kyverno and the Kyverno-notation-AWS Signer solution, see the installation instructions.
After you install Kyverno and Kyverno-notation-AWS Signer, verify that the controller is running—the STATUS should show Running:
$ kubectl get pods -n kyverno-notation-aws -w

NAME                                    READY   STATUS    RESTARTS   AGE
kyverno-notation-aws-75b7ddbcfc-kxwjh   1/1     Running   0          6h58m
Configure the CodeBuild buildspec.yaml configuration file to verify that the images deployed in the cluster have been previously signed. You can use the following code to configure the buildspec.yaml file.
The commands in the buildspec.yaml configuration file do the following:
Set up the environment variables, such as the ECR repository URI and the Commit hash, to build the image tag. The kubectl tool will use this later to reference the container image that will be deployed with the Kubernetes objects.
Use kubectl to connect to the EKS cluster and insert the container image reference in the deployment.yaml file.
After the container is deployed, you can observe the kyverno-notation-aws controller and access its logs. You can check if the deployed image is signed. If the logs contain an error, stop the pipeline run with an error code, do a rollback to a previous version, or delete the deployment if you detect that the image isn’t signed.
Decommission the AWS resources
If you no longer need the resources that you provisioned for this post, complete the following steps to delete them.
Delete the IAM roles and policies that you used for the configuration of IAM roles for service accounts.
Revoke the AWS Signer signing profile that you created and used for the signing process by running the following command in the AWS CLI:
$ aws signer revoke-signing-profile
Delete signatures from the Amazon ECR repository. Make sure to replace <AWS_ACCOUNT_ID> and <AWS_REGION> with your own information.
# Use oras CLI, with Amazon ECR Docker Credential Helper, to delete signature
$ oras manifest delete <AWS_ACCOUNT_ID>.dkr.ecr.<AWS_REGION>.amazonaws.com/pause@sha256:ca78e5f730f9a789ef8c63bb55275ac12dfb9e8099e6a0a64375d8a95ed501c4
Note: Using the ORAS project’s oras client, you can delete signatures and other reference type artifacts. It implements deletion by first removing the reference from an index, and then deleting the manifest.
Conclusion
In this post, you learned how to implement container image signing in a CI/CD pipeline by using AWS services such as CodePipeline, CodeBuild, Amazon ECR, and AWS Signer along with publicly available tools such as Notary and Kyverno. By implementing mandatory image signing in your pipelines, you can confirm that only validated and authorized container images are deployed to production. Automating the signing process and signature verification is vital to help securely deploy containers at scale. You also learned how to verify signed images both during deployment and at runtime in Kubernetes. This post provides valuable insights for anyone looking to add image signing capabilities to their CI/CD pipelines on AWS to provide supply chain security assurances. The combination of AWS managed services and publicly available tools provides a robust implementation.
If you have feedback about this post, submit comments in the Comments section below. If you have questions about this post, contact AWS Support.
Want more AWS Security news? Follow us on Twitter.
Starting today, Amazon Route 53 Resolver supports using the DNS over HTTPS (DoH) protocol for both inbound and outbound Resolver endpoints. As the name suggests, DoH supports HTTP or HTTP/2 over TLS to encrypt the data exchanged for Domain Name System (DNS) resolutions.
Using TLS encryption, DoH increases privacy and security by preventing eavesdropping and manipulation of DNS data as it is exchanged between a DoH client and the DoH-based DNS resolver.
This helps you implement a zero-trust architecture where no actor, system, network, or service operating outside or within your security perimeter is trusted and all network traffic is encrypted. Using DoH also helps follow recommendations such as those described in this memorandum of the US Office of Management and Budget (OMB).
DNS over HTTPS support in Amazon Route 53 Resolver You can use Amazon Route 53 Resolver to resolve DNS queries in hybrid cloud environments. For example, it allows AWS services access for DNS requests from anywhere within your hybrid network. To do so, you can set up inbound and outbound Resolver endpoints:
Inbound Resolver endpoints allow DNS queries to your VPC from your on-premises network or another VPC.
Outbound Resolver endpoints allow DNS queries from your VPC to your on-premises network or another VPC.
After you configure the Resolver endpoints, you can set up rules that specify the name of the domains for which you want to forward DNS queries from your VPC to an on-premises DNS resolver (outbound) and from on-premises to your VPC (inbound).
Now, when you create or update an inbound or outbound Resolver endpoint, you can specify which protocols to use:
DNS over port 53 (Do53), which is using either UDP or TCP to send the packets.
DNS over HTTPS (DoH), which is using TLS to encrypt the data.
Both, depending on which one is used by the DNS client.
For FIPS compliance, there is a specific implementation (DoH-FIPS) for inbound endpoints.
Let’s see how this works in practice.
Using DNS over HTTPS with Amazon Route 53 Resolver In the Route 53 console, I choose Inbound endpoints from the Resolver section of the navigation pane. There, I choose Create inbound endpoint.
I enter a name for the endpoint, select the VPC, the security group, and the endpoint type (IPv4, IPv6, or dual-stack). To allow using both encrypted and unencrypted DNS resolutions, I select Do53, DoH, and DoH-FIPS in the Protocols for this endpoint option.
After that, I configure the IP addresses for DNS queries. I select two Availability Zones and, for each, a subnet. For this setup, I use the option to have the IP addresses automatically selected from those available in the subnet.
After I complete the creation of the inbound endpoint, I configure the DNS server in my network to forward requests for the amazonaws.com domain (used by AWS service endpoints) to the inbound endpoint IP addresses.
Similarly, I create an outbound Resolver endpoint and and select both Do53 and DoH as protocols. Then, I create forwarding rules that tell for which domains the outbound Resolver endpoint should forward requests to the DNS servers in my network.
Now, when the DNS clients in my hybrid environment use DNS over HTTPS in their requests, DNS resolutions are encrypted. Optionally, I can enforce encryption and select only DoH in the configuration of inbound and outbound endpoints.
Things to know DNS over HTTPS support for Amazon Route 53 Resolver is available today in all AWS Regions where Route 53 Resolver is offered, including GovCloud Regions and Regions based in China.
DNS over port 53 continues to be the default for inbound or outbound Resolver endpoints. In this way, you don’t need to update your existing automation tooling unless you want to adopt DNS over HTTPS.
There is no additional cost for using DNS over HTTPS with Resolver endpoints. For more information, see Route 53 pricing.
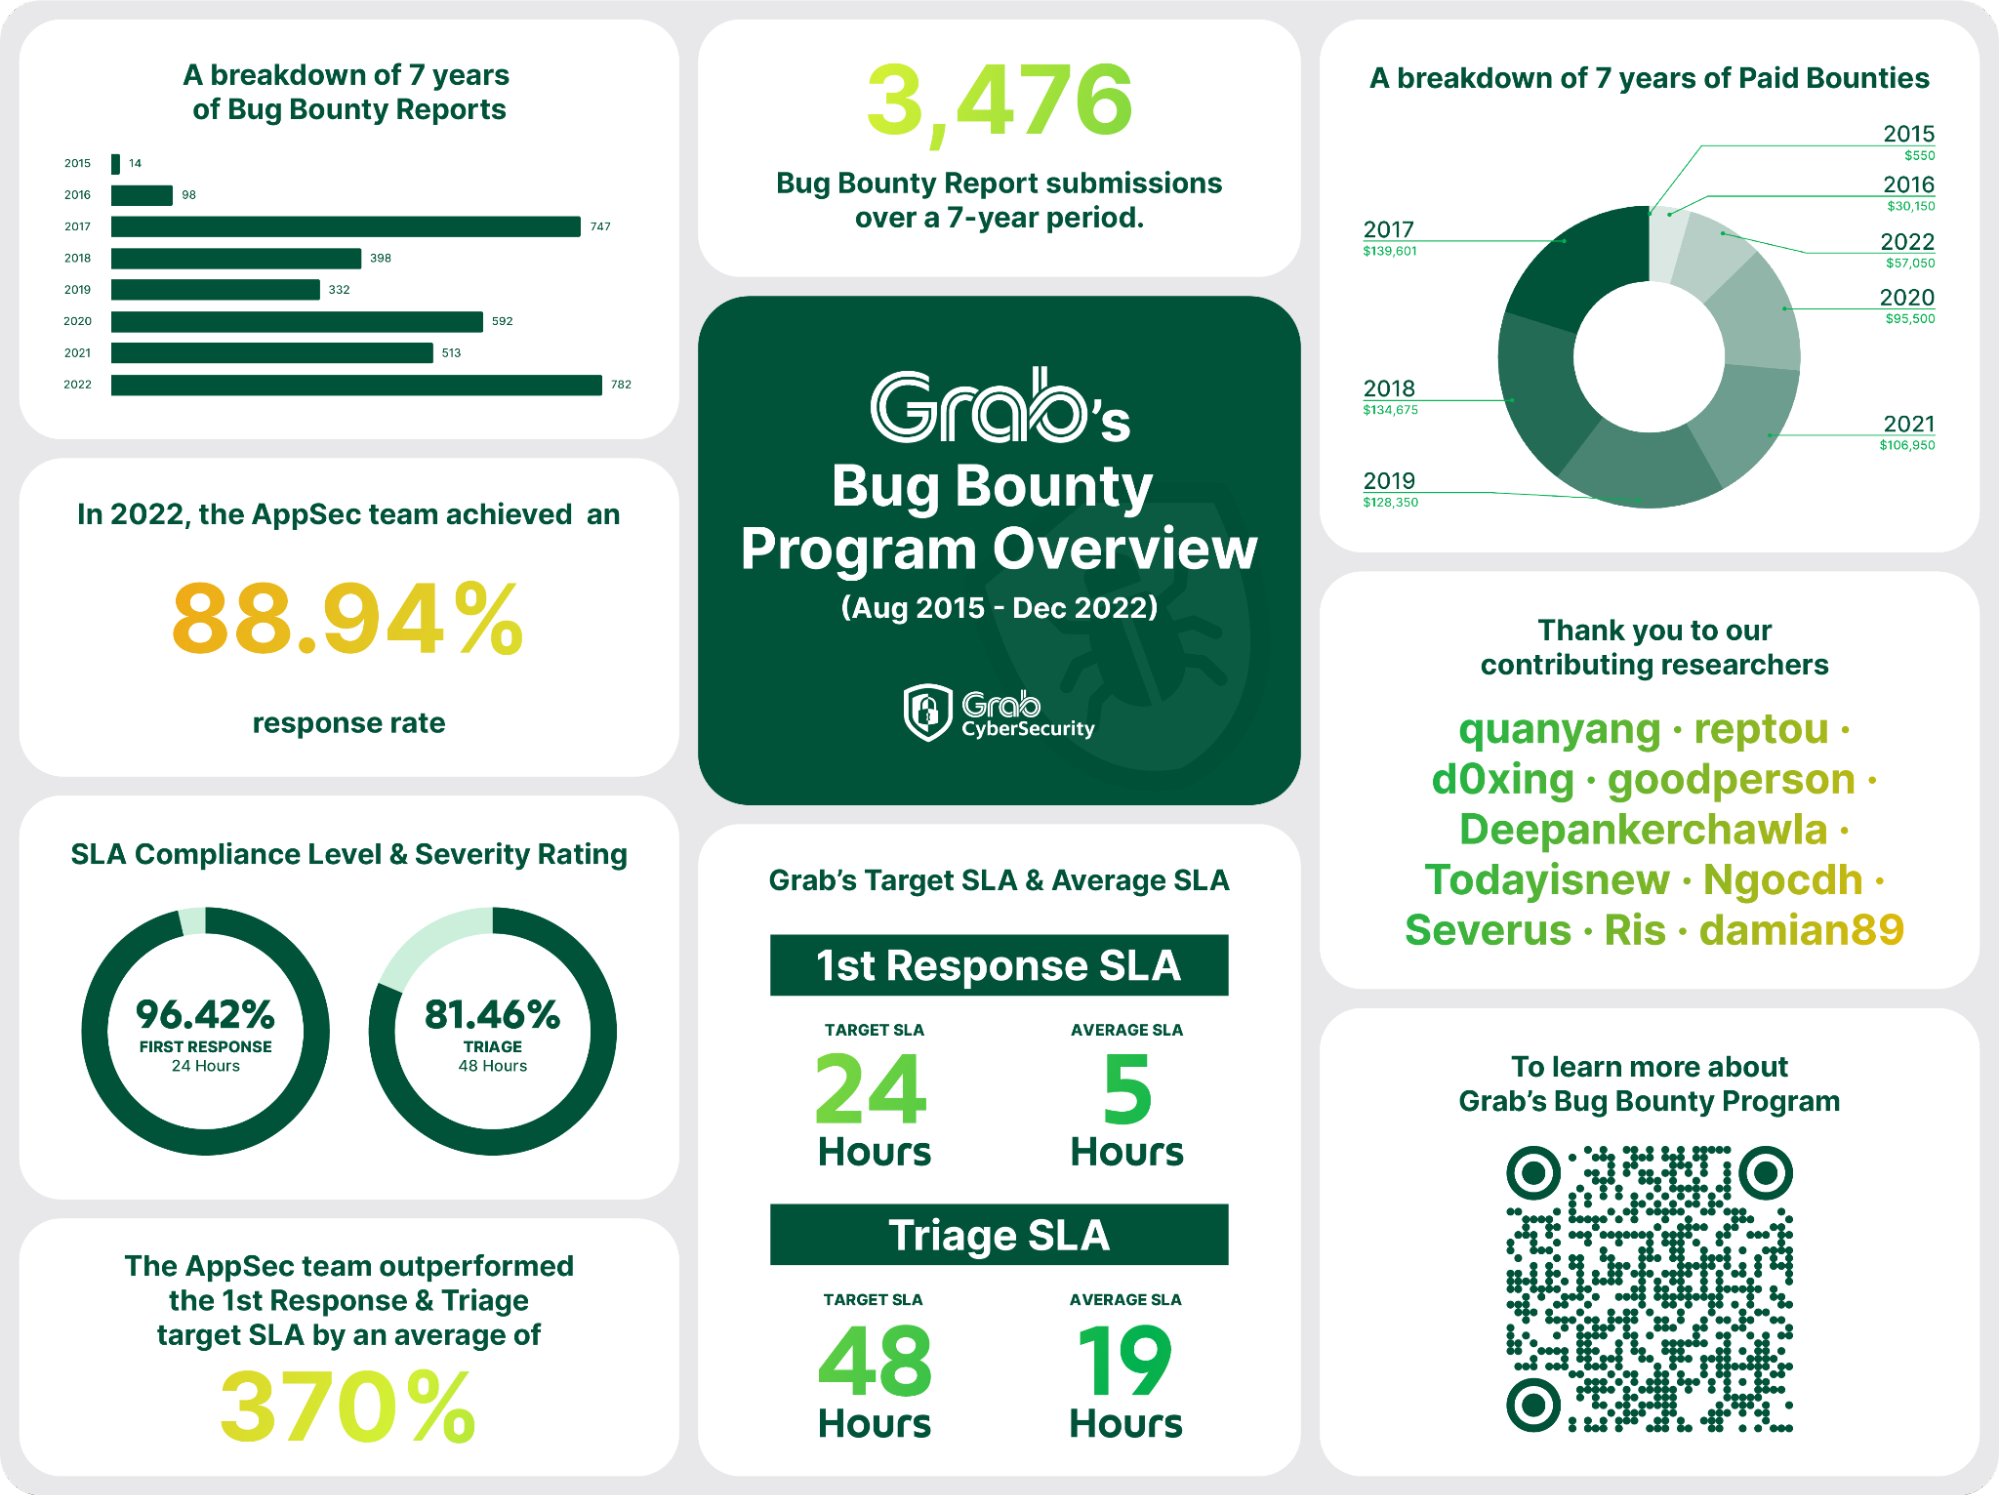
Launched in 2015, Grab’s Security bug bounty programme has achieved remarkable success and forged strong partnerships within a thriving bounty community. By holding quarterly campaigns with HackerOne, Grab has been dedicated to security and giving back to the global security community to research further. Over the years, Grab has paid over $700,000 in cumulative payments to committed security researchers, aiding their research.
Our journey doesn’t stop there – we’ve also expanded our internal bug bounty team, ensuring that we have the necessary resources to stay at the forefront of security challenges. As we continue to innovate and evolve, it’s critical that our team remains at the cutting edge of security developments.
Marking its eighth year in 2023, this initiative has achieved new milestones and continues to set the stage for an even more successful ninth year. In 2023, this included a special campaign in Threatcon Nepal, aimed at increasing our bounty engagements. A key development was the enrichment of monetary incentives to honour our hacker community’s remarkable contributions to our programme’s success.
Let’s look at the key takeaways we gained from the bug bounty programme in 2023.
Highlights from 2023
This year, we had some of the highest participation and engagement rates we’ve seen since the programme launched.
We’ve processed ~1000 submissions through our HackerOne bug bounty programme.
Impressive record of 400 submissions in the Q1 2023 campaign.
We’ve maintained a consistent schedule of campaigns and innovative efforts to enhance hacker engagement.
Released a comprehensive report of our seven-year bug bounty journey – check out some key highlights in the image below.
What’s next?
As Grab expands and transforms its product and service portfolio, we are dedicated to ensuring that our bug bounty programme reflects this growth. In our rigorous pursuit of boosting security, we regularly introduce new areas of focus to our scope. In 2024, expect the inclusion of new scopes, enhanced response times, heightened engagement from the hacker community, and more competitive rewards.
In the past year, we have incorporated Joint Ventures and Acquisitions into the scope of our bug bounty programme. By doing so, we proactively address emerging security challenges, while fortifying the safety and integrity of our expanding ecosystem. We remain fully dedicated to embracing change and growth as integral parts of our journey to provide a secure and seamless experience for our users.
On top of that, we continue to improve our methods of motivating researchers through the bug bounty programme. One recent change is to diversify our reward methods by incorporating both financial rewards and recognition. This allows us to cater to different researcher motivations, cultivate stronger relationships, and acknowledge researchers’ contributions.
That said, we recognise that there’s always room for improvement and the bug bounty programme is uniquely poised for substantial expansion. In the near future, we will be:
Introducing more elements to the scope of our bug bounty programme
Enhancing feedback loops on the HackerOne platform
With these improvements, we can drive continuous improvement efforts to provide a secure experience for our users while strengthening our connection with the security research community.
A word of thanks
2023 has been an exhilarating year for our team. We’re grateful for the continued support from all the security researchers who’ve actively participated in our programme.
As we head into our ninth year, we know there are new opportunities and challenges that await us. We strive to remain dedicated to the values of collaboration and continuous improvement, working hand in hand with the security community to enhance our superapp’s security and deliver an even safer experience for our users.
We’re gearing up for another exciting year ahead in our programme, and looking forward to interesting submissions from our participants. We extend an open invitation to all researchers to submit reports to our bug bounty programme. Your contributions hold immense value and have a significant impact on the safety and security of our products, our users, and the broader security community. For comprehensive information about the programme scope, rules, and rewards, visit our website.
Until next year, keep up the great work, and happy hacking!
Join us
Grab is the leading superapp platform in Southeast Asia, providing everyday services that matter to consumers. More than just a ride-hailing and food delivery app, Grab offers a wide range of on-demand services in the region, including mobility, food, package and grocery delivery services, mobile payments, and financial services across 428 cities in eight countries.
Powered by technology and driven by heart, our mission is to drive Southeast Asia forward by creating economic empowerment for everyone. If this mission speaks to you, join our team today!
Two months ago, we made Cloudflare Turnstile generally available — giving website owners everywhere an easy way to fend off bots, without ever issuing a CAPTCHA. Turnstile allows any website owner to embed a frustration-free Cloudflare challenge on their website with a simple code snippet, making it easy to help ensure that only human traffic makes it through. In addition to protecting a website’s frontend, Turnstile also empowers web administrators to harden browser-initiated (AJAX) API calls running under the hood. These APIs are commonly used by dynamic single-page web apps, like those created with React, Angular, Vue.js.
Today, we’re excited to announce that we have integrated Turnstile with the Cloudflare Web Application Firewall (WAF). This means that web admins can add the Turnstile code snippet to their websites, and then configure the Cloudflare WAF to manage these requests. This is completely customizable using WAF Rules; for instance, you can allow a user authenticated by Turnstile to interact with all of an application’s API endpoints without facing any further challenges, or you can configure certain sensitive endpoints, like Login, to always issue a challenge.
Challenging fetch requests in the Cloudflare WAF
Millions of websites protected by Cloudflare’s WAF leverage our JS Challenge, Managed Challenge, and Interactive Challenge to stop bots while letting humans through. For each of these challenges, Cloudflare intercepts the matching request and responds with an HTML page rendered by the browser, where the user completes a basic task to demonstrate that they’re human. When a user successfully completes a challenge, they receive a cf_clearance cookie, which tells Cloudflare that a user has successfully passed a challenge, the type of challenge, and when it was completed. A clearance cookie can’t be shared between users, and is only valid for the time set by the Cloudflare customer in their Security Settings dashboard.
This process works well, except when a browser receives a challenge on a fetch request and the browser has not previously passed a challenge. On a fetch request, or an XML HTTP Request (XHR), the browser expects to get back simple text (in JSON or XML formats) and cannot render the HTML necessary to run a challenge.
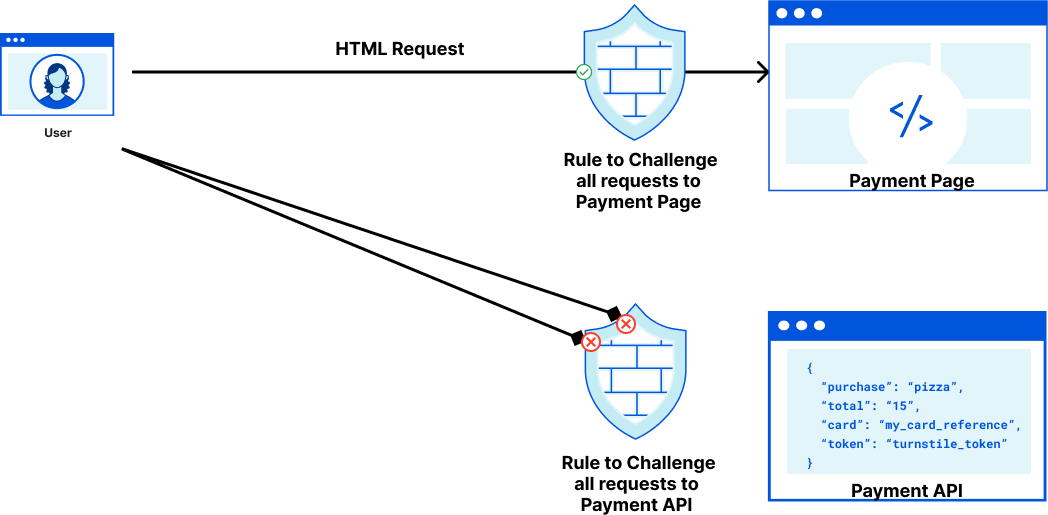
As an example, let’s imagine a pizzeria owner who built an online ordering form in React with a payment page that submits data to an API endpoint that processes payments. When a user views the web form to add their credit card details they can pass a Managed Challenge, but when the user submits their credit card details by making a fetch request, the browser won’t execute the code necessary for a challenge to run. The pizzeria owner’s only option for handling suspicious (but potentially legitimate) requests is to block them, which runs the risk of false positives that could cause the restaurant to lose a sale.
This is where Turnstile can help. Turnstile allows anyone on the Internet to embed a Cloudflare challenge anywhere on their website. Before today, the output of Turnstile was only a one-time use token. To enable customers to issue challenges for these fetch requests, Turnstile can now issue a clearance cookie for the domain that it’s embedded on. Customers can issue their challenge within the HTML page before a fetch request, pre-clearing thevisitor to interact with the Payment API.
Turnstile Pre-Clearance mode
Returning to our pizzeria example, the three big advantages of using Pre-Clearance to integrate Turnstile with the Cloudflare WAF are:
Improved user experience: Turnstile’s embedded challenge can run in the background while the visitor is entering their payment details.
Blocking more requests at the edge: Because Turnstile now issues a clearance cookie for the domain that it’s embedded on, our pizzeria owner can use a Custom Rule to issue a Managed Challenge for every request to the payment API. This ensures that automated attacks attempting to target the payment API directly are stopped by Cloudflare before they can reach the API.
(Optional) Securing the action and the user: No backend code changes are necessary to get the benefit of Pre-Clearance. However, further Turnstile integration will increase security for the integrated API. The pizzeria owner can adjust their payment form to validate the received Turnstile token, ensuring that every payment attempt is individually validated by Turnstile to protect their payment endpoint from session hijacking.
A Turnstile widget with Pre-Clearance enabled will still issue turnstile tokens, which gives customers the flexibility to decide if an endpoint is critical enough to require a security check on every request to it, or just once a session. Clearance cookies issued by a Turnstile widget are automatically applied to the Cloudflare zone the Turnstile widget is embedded on, with no configuration necessary. The clearance time the token is valid for is still controlled by the zone specific “Challenge Passage” time.
Implementing Turnstile with Pre-Clearance
Let’s make this concrete by walking through a basic implementation. Before we start, we’ve set up a simple demo application where we emulate a frontend talking to a backend on a /your-api endpoint.
We’ve created a button. Upon clicking, Cloudflare makes a fetch() request to the /your-api endpoint, showing the result in the response container.
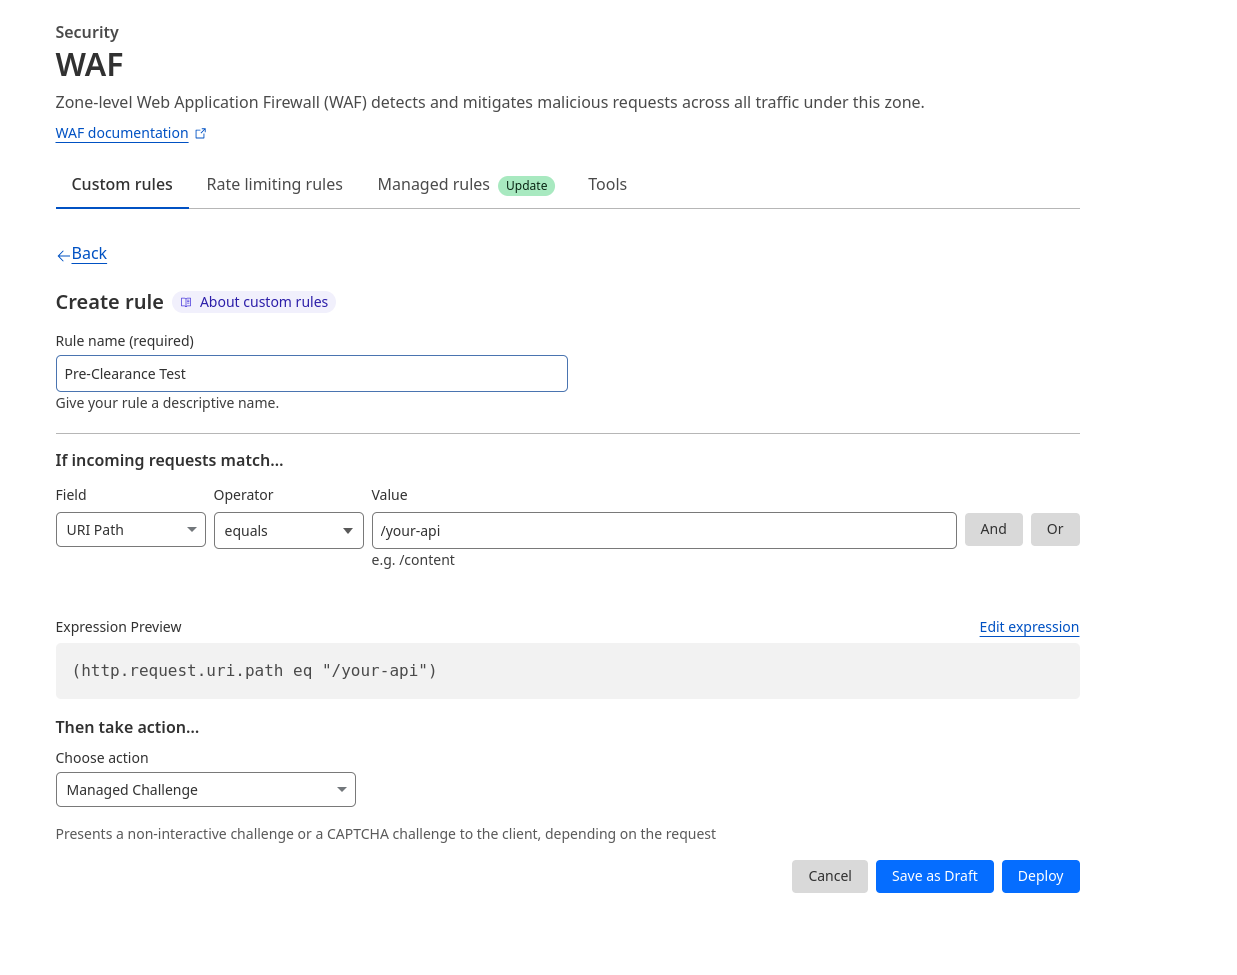
Now let’s consider that we have a Cloudflare WAF rule set up that protects the /your-api endpoint with a Managed Challenge.
Due to this rule, the app that we just wrote is going to fail for the reason described earlier (the browser is expecting a JSON response, but instead receives the challenge page as HTML).
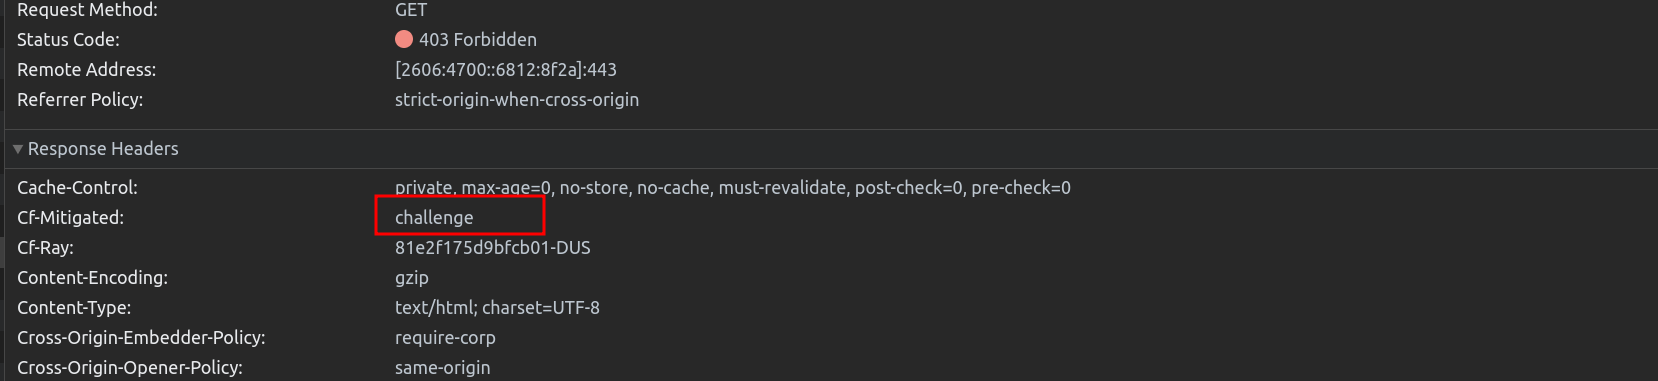
If we inspect the Network Tab, we can see that the request to /your-api has been given a 403 response.
Upon inspection, the Cf-Mitigated header shows that the response was challenged by Cloudflare’s firewall, as the visitor has not solved a challenge before.
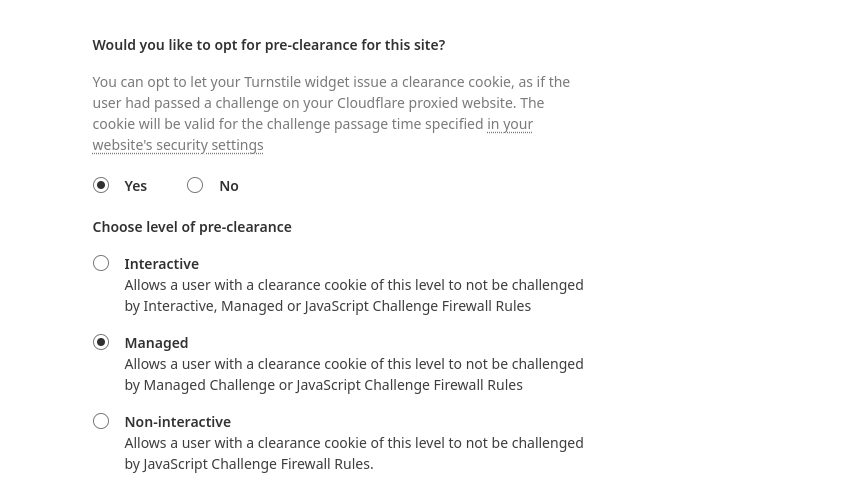
To address this problem in our app, we set up a Turnstile Widget in Pre-Clearance mode for the Turnstile sitekey that we want to use.
In our application, we override the fetch() function to invoke Turnstile once a Cf-Mitigated response has been received.
<script>
turnstileLoad = function () {
  // Save a reference to the original fetch function
  const originalFetch = window.fetch;

  // A simple modal to contain Cloudflare Turnstile
  const overlay = document.createElement('div');
  overlay.style.position = 'fixed';
  overlay.style.top = '0';
  overlay.style.left = '0';
  overlay.style.right = '0';
  overlay.style.bottom = '0';
  overlay.style.backgroundColor = 'rgba(0, 0, 0, 0.7)';
  overlay.style.border = '1px solid grey';
  overlay.style.zIndex = '10000';
  overlay.style.display = 'none';
  overlay.innerHTML =       '<p style="color: white; text-align: center; margin-top: 50vh;">One more step before you proceed...</p><div style=”display: flex; flex-wrap: nowrap; align-items: center; justify-content: center;” id="turnstile_widget"></div>';
  document.body.appendChild(overlay);

  // Override the native fetch function
  window.fetch = async function (...args) {
      let response = await originalFetch(...args);

      //If the original request was challenged...
      if (response.headers.has('cf-mitigated') && response.headers.get('cf-mitigated') === 'challenge') {
          //The request has been challenged...
          overlay.style.display = 'block';

          await new Promise((resolve, reject) => {
              turnstile.render('#turnstile_widget', {
                  'sitekey': ‘YOUR_TURNSTILE_SITEKEY',
                  'error-callback': function (e) {
                      overlay.style.display = 'none';
                      reject(e);
                  },
                  'callback': function (token, preClearanceObtained) {
                      if (preClearanceObtained) {
                          //The visitor successfully solved the challenge on the page.
                          overlay.style.display = 'none';
                          resolve();
                      } else {
                          reject(e);
                      }
                  },
              });
          });

          // Replay the original fetch request, this time it will have the cf_clearance Cookie
          response = await originalFetch(...args);
      }
      return response;
  };
};
</script>
<script src="https://challenges.cloudflare.com/turnstile/v0/api.js?onload=turnstileLoad" async defer></script>
There is a lot going on in the snippet above: First, we create a hidden overlay element and override the browser’s fetch() function. The fetch() function is changed to introspect the Cf-Mitigated header for ‘challenge’. If a challenge is issued, the initial result will be unsuccessful; instead, a Turnstile overlay (with Pre-Clearance enabled) will appear in our web application. Once the Turnstile challenge has been completed we will retry the previous request after Turnstile has obtained the cf_clearance cookie to get through the Cloudflare WAF.
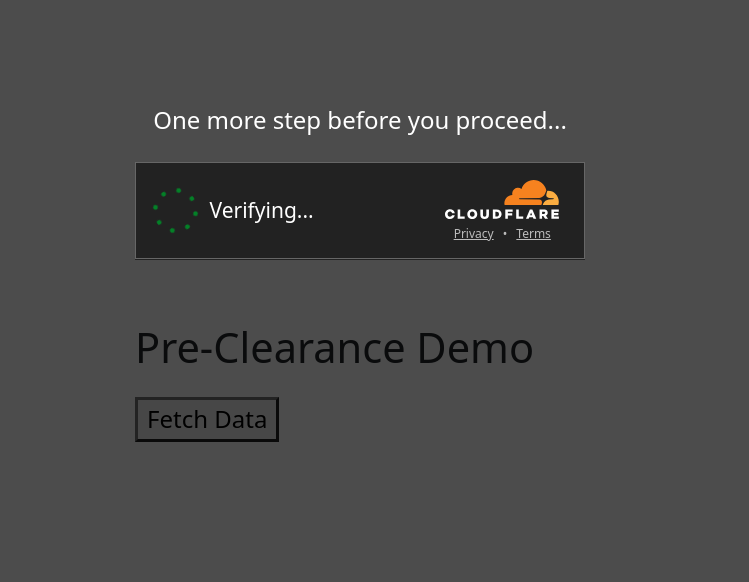
Upon solving the Turnstile widget, the overlay disappears, and the requested API result is shown successfully:
Pre-Clearance is available to all Cloudflare customers
Every Cloudflare user with a free plan or above can use Turnstile in managed mode free for an unlimited number of requests. If you’re a Cloudflare user looking to improve your security and user experience for your critical API endpoints, head over to our dashboard and create a Turnstile widget with Pre-Clearance today.
Amazon Web Services (AWS) is pleased to announce the successful renewal of the AWS CyberGRX cyber risk assessment report. This third-party validated report helps customers perform effective cloud supplier due diligence on AWS and enhances customers’ third-party risk management process.
With the increase in adoption of cloud products and services across multiple sectors and industries, AWS has become a critical component of customers’ environments. Regulated customers are held to high standards by regulators and auditors when it comes to exercising effective due diligence on third parties.
Many customers use third-party cyber risk management (TPCRM) services such as CyberGRX to better manage risks from their evolving third-party environments and to drive operational efficiencies. To help with such efforts, AWS has completed the CyberGRX assessment of its security posture. CyberGRX security analysts perform the assessment and validate the results annually.
The CyberGRX assessment applies a dynamic approach to third-party risk assessment. This approach integrates advanced analytics, threat intelligence, and sophisticated risk models with vendors’ responses to provide an in-depth view of how a vendor’s security controls help protect against potential threats.
Vendor profiles are continuously updated as the risk level of cloud service providers changes, or as AWS updates its security posture and controls. This approach eliminates outdated static spreadsheets for third-party risk assessments, in which the risk matrices are not updated in near real time.
In addition, AWS customers can use the CyberGRX Framework Mapper to map AWS assessment controls and responses to well-known industry standards and frameworks, such as National Institute of Standards and Technology (NIST) 800-53, NIST Cybersecurity Framework, International Organization for Standardization (ISO) 27001, Payment Card Industry Data Security Standard (PCI DSS), and the U.S. Health Insurance Portability and Assessment Act (HIPAA). This mapping can reduce customers’ third-party supplier due-diligence burden.
Customers can access the AWS CyberGRX report at no additional cost. Customers can request access to the report by completing an access request form, available on the AWS CyberGRX page.
As always, we value your feedback and questions. Reach out to the AWS Compliance team through the Contact Us page. If you have feedback about this post, submit comments in the Comments section below. To learn more about our other compliance and security programs, see AWS Compliance Programs.
Want more AWS Security news? Follow us on Twitter.
AWS Identity and Access Management (IAM) roles are a powerful way to manage permissions to resources in the Amazon Web Services (AWS) Cloud. IAM roles are useful when granting permissions to users whose workloads are static. However, for users whose access patterns are more dynamic, relying on roles can add complexity for administrators who are faced with provisioning roles and making sure the right people have the right access to the right roles.
The typical solution to handle dynamic workforce access is the OAuth 2.0 framework, which you can use to propagate an authenticated user’s identity to resource services. Resource services can then manage permissions based on the user—their attributes or permissions—rather than building a complex role management system. AWS IAM Identity Center recently introduced trusted identity propagation based on OAuth 2.0 to support dynamic access patterns.
With trusted identity propagation, your requesting application obtains OAuth tokens from IAM Identity Center and passes them to an AWS resource service. The AWS resource service trusts tokens that Identity Center generates and grants permissions based on the Identity Center tokens.
What happens if the application you want to deploy uses an external OAuth authorization server, such as Okta Universal Directory or Microsoft Entra ID, but the AWS service uses IAM Identity Center? How can you use the tokens from those applications with your applications that AWS hosts?
In this blog post, we show you how you can use IAM Identity Center trusted token issuers to help address these challenges. You also review the basics of Identity Center and OAuth and how Identity Center enables the use of external OAuth authorization servers.
IAM Identity Center and OAuth
IAM Identity Center acts as a central identity service for your AWS Cloud environment. You can bring your workforce users to AWS and authenticate them from an identity provider (IdP) that’s external to AWS (such as Okta or Microsoft Entra), or you can create and authenticate the users on AWS.
Trusted identity propagation in IAM Identity Center lets AWS workforce identities use OAuth 2.0, helping applications that need to share who’s using them with AWS services. In OAuth, a client application and a resource service both trust the same authorization server. The client application gets an OAuth token for the user and sends it to the resource service. Because both services trust the OAuth server, the resource service can identify the user from the token and set permissions based on their identity.
AWS supports two OAuth patterns:
AWS applications authenticate directly with IAM Identity Center: Identity Center redirects authentication to your identity source, which generates OAuth tokens that the AWS managed application uses to access AWS services. This is the default pattern because the AWS services that support trusted identity propagation use Identity Center as their OAuth authorization server.
Third-party, non-AWS applications authenticate outside of AWS (typically to your IdP) and access AWS resources: During authentication, these third-party applications obtain an OAuth token from an OAuth authorization server outside of AWS. In this pattern, the AWS services aren’t connected to the same OAuth authorization server as the client application. To enable this pattern, AWS introduced a model called the trusted token issuer.
Trusted token issuer
When AWS services use IAM Identity Center as their authentication service, directory, and OAuth authorization server, the AWS services that use OAuth tokens require that Identity Center issues the tokens. However, most third-party applications federate with an external IdP and obtain OAuth tokens from an external authorization server. Although the identities in Identity Center and the external authorization server might be for the same person, the identities exist in separate domains, one in Identity Center, the other in the external authorization server. This is required to manage authorization of workforce identities with AWS services.
The trusted token issuer (TTI) feature provides a way to securely associate one identity from the external IdP with the other identity in IAM Identity Center.
When using third-party applications to access AWS services, there’s an external OAuth authorization server for the third-party application, and IAM Identity Center is the OAuth authorization server for AWS services; each has its own domain of users. The Identity Center TTI feature connects these two systems so that tokens from the external OAuth authorization server can be exchanged for tokens from Identity Center that AWS services can use to identify the user in the AWS domain of users. A TTI is the external OAuth authorization server that Identity Center trusts to provide tokens that third-party applications use to call AWS services, as shown in Figure 1.
Figure 1: Conceptual model using a trusted token issuer and token exchange
How the trust model and token exchange work
There are two levels of trust involved with TTIs. First, the IAM Identity Center administrator must add the TTI, which makes it possible to exchange tokens. This involves connecting Identity Center to the Open ID Connect (OIDC) discovery URL of the external OAuth authorization server and defining an attribute-based mapping between the user from the external OAuth authorization server and a corresponding user in Identity Center. Second, the applications that exchange externally generated tokens must be configured to use the TTI. There are two models for how tokens are exchanged:
Managed AWS service-driven token exchange: A third-party application uses an AWS driver or API to access a managed AWS service, such as accessing Amazon Redshift by using Amazon Redshift drivers. This works only if the managed AWS service has been designed to accept and exchange tokens. The application passes the external token to the AWS service through an API call. The AWS service then makes a call to IAM Identity Center to exchange the external token for an Identity Center token. The service uses the Identity Center token to determine who the corresponding Identity Center user is and authorizes resource access based on that identity.
Third-party application-driven token exchange: A third-party application not managed by AWS exchanges the external token for an IAM Identity Center token before calling AWS services. This is different from the first model, where the application that exchanges the token is the managed AWS service. An example is a third-party application that uses Amazon Simple Storage Service (Amazon S3) Access Grants to access S3. In this model, the third-party application obtains a token from the external OAuth authorization server and then calls Identity Center to exchange the external token for an Identity Center token. The application can then use the Identity Center token to call AWS services that use Identity Center as their OAuth authorization server. In this case, the Identity Center administrator must register the third-party application and authorize it to exchange tokens from the TTI.
TTI trust details
When using a TTI, IAM Identity Center trusts that the TTI authenticated the user and authorized them to use the AWS service. This is expressed in an identity token or access token from the external OAuth authorization server (the TTI).
These are the requirements for the external OAuth authorization server (the TTI) and the token it creates:
The token must be a signed JSON Web Token (JWT). The JWT must contain a subject (sub) claim, an audience (aud) claim, an issuer (iss), a user attribute claim, and a JWT ID (JTI) claim.
The subject in the JWT is the authenticated user and the audience is a value that represents the AWS service that the application will use.
The audience claim value must match the value that is configured in the application that exchanges the token.
The issuer claim value must match the value configured in the issuer URL in the TTI.
There must be a claim in the token that specifies a user attribute that IAM Identity Center can use to find the corresponding user in the Identity Center directory.
The JWT token must contain the JWT ID claim. This claim is used to help prevent replay attacks. If a new token exchange is attempted after the initial exchange is complete, IAM Identity Center rejects the new exchange request.
The TTI must have an OIDC discovery URL that IAM Identity Center can use to obtain keys that it can use to verify the signature on JWTs created by your TTI. Identity Center appends the suffix /.well-known/openid-configuration to the provider URL that you configure to identify where to fetch the signature keys.
Note: Typically, the IdP that you use as your identity source for IAM Identity Center is your TTI. However, your TTI doesn’t have to be the IdP that Identity Center uses as an identity source. If the users from a TTI can be mapped to users in Identity Center, the tokens can be exchanged. You can have as many as 10 TTIs configured for a single Identity Center instance.
Details for applications that exchange tokens
Your OAuth authorization server service (the TTI) provides a way to authorize a user to access an AWS service. When a user signs in to the client application, the OAuth authorization server generates an ID token or an access token that contains the subject (the user) and an audience (the AWS services the user can access). When a third-party application accesses an AWS service, the audience must include an identifier of the AWS service. The third-party client application then passes this token to an AWS driver or an AWS service.
To use IAM Identity Center and exchange an external token from the TTI for an Identity Center token, you must configure the application that will exchange the token with Identity Center to use one or more of the TTIs. Additionally, as part of the configuration process, you specify the audience values that are expected to be used with the external OAuth token.
If the applications are managed AWS services, AWS performs most of the configuration process. For example, the Amazon Redshift administrator connects Amazon Redshift to IAM Identity Center, and then connects a specific Amazon Redshift cluster to Identity Center. The Amazon Redshift cluster exchanges the token and must be configured to do so, which is done through the Amazon Redshift administrative console or APIs and doesn’t require additional configuration.
If the applications are third-party and not managed by AWS, your IAM Identity Center administrator must register the application and configure it for token exchange. For example, suppose you create an application that obtains an OAuth token from Okta Universal Directory and calls S3 Access Grants. The Identity Center administrator must add this application as a customer managed application and must grant the application permissions to exchange tokens.
How to set up TTIs
To create new TTIs, open the IAM Identity Center console, choose Settings, and then choose Create trusted token issuer, as shown in Figure 2. In this section, I show an example of how to use the console to create a new TTI to exchange tokens with my Okta IdP, where I already created my OIDC application to use with my new IAM Identity Center application.
Figure 2: Configure the TTI in the IAM Identity Center console
TTI uses the issuer URL to discover the OpenID configuration. Because I use Okta, I can verify that my IdP discovery URL is accessible at https://{my-okta-domain}.okta.com/.well-known/openid-configuration. I can also verify that the OpenID configuration URL responds with a JSON that contains the jwks_uri attribute, which contains a URL that lists the keys that are used by my IdP to sign the JWT tokens. Trusted token issuer requires that both URLs are publicly accessible.
I then configure the attributes I want to use to map the identity of the Okta user with the user in IAM Identity Center in the Map attributes section. I can get the attributes from an OIDC identity token issued by Okta:
I’m requesting a token with an additional email scope, because I want to use this attribute to match against the email of my IAM Identity Center users. In most cases, your Identity Center users are synchronized with your central identity provider by using automatic provisioning with the SCIM protocol. In this case, you can use the Identity Center external ID attribute to match with oid or sub attributes. The only requirement for TTI is that those attributes create a one-to-one mapping between the two IdPs.
Now that I have created my TTI, I can associate it with my IAM Identity Center applications. As explained previously, there are two use cases. For the managed AWS service-driven token exchange use case, use the service-specific interface to do so. For example, I can use my TTI with Amazon Redshift, as shown in Figure 3:
Figure 3: Configure the TTI with Amazon Redshift
I selected Okta as the TTI to use for this integration, and I now need to configure the audclaim value that the application will use to accept the token. I can find it when creating the application from the IdP side–in this example, the value is 123456nqqVBTdtk7890, and I can obtain it by using the preceding example OIDC identity token.
I can also use the AWS Command Line Interface (AWS CLI) to configure the IAM Identity Center application with the appropriate application grants:
For AWS service-driven use cases, the token exchange between your IdP and IAM Identity Center is performed automatically by the service itself. For third-party application-driven token exchange, such as when building your own Identity Center application with S3 Access Grants, your application performs the token exchange by using the Identity Center OIDC API action CreateTokenWithIAM:
The value of the scope attribute varies depending on the IAM Identity Center application that you’re interacting with, because it defines the permissions associated with the application.
You can also inspect the idToken attribute because it’s JWT-encoded:
The AWS account and the IAM Identity Center instance and application that accepted the token exchange
The unique user ID of the user that was matched in IAM Identity Center (attribute sub)
AWS services can now use the STS Audit Context token (found in the attribute sts:audit_context) to create identity-aware sessions with the STS API. You can audit the API calls performed by the identity-aware sessions in AWS CloudTrail, by inspecting the attribute onBehalfOf within the field userIdentity. In this example, you can see an API call that was performed with an identity-aware session:
You can thus quickly filter actions that an AWS principal performs on behalf of your IAM Identity Center user.
Troubleshooting TTI
You can troubleshoot token exchange errors by verifying that:
The OpenID discovery URL is publicly accessible.
The OpenID discovery URL response conforms with the OpenID standard.
The OpenID keys URL referenced in the discovery response is publicly accessible.
The issuer URL that you configure in the TTI exactly matches the value of the iss scope that your IdP returns.
The user attribute that you configure in the TTI exists in the JWT that your IdP returns.
The user attribute value that you configure in the TTI matches exactly one existing IAM Identity Center user on the target attribute.
The aud scope exists in the token returned from your IdP and exactly matches what is configured in the requested IAM Identity Center application.
The jti claim exists in the token returned from your IdP.
If you use an IAM Identity Center application that requires user or group assignments, the matched Identity Center user is already assigned to the application or belongs to a group assigned to the application.
Note: When an IAM Identity Center application doesn’t require user or group assignments, the token exchange will succeed if the preceding conditions are met. This configuration implies that the connected AWS service requires additional security assignments. For example, Amazon Redshift administrators need to configure access to the data within Amazon Redshift. The token exchange doesn’t grant implicit access to the AWS services.
Conclusion
In this blog post, we introduced the trust token issuer feature of IAM Identity Center and what it offers, how it’s configured, and how you can use it to integrate your IdP with AWS services. You learned how to use TTI with AWS-managed applications and third-party applications by configuring the appropriate parameters. You also learned how to troubleshoot token-exchange issues and audit access through CloudTrail.
If you have feedback about this post, submit comments in the Comments section below. If you have questions about this post, start a new thread on the AWS IAM Identity Center re:Post or contact AWS Support.
As organizations expand their Amazon Web Services (AWS) environment and migrate workloads to the cloud, they find themselves dealing with many AWS Identity and Access Management (IAM) roles and policies. These roles and policies multiply because IAM fills a crucial role in securing and controlling access to AWS resources. Imagine you have a team creating an application. You create an IAM role to grant them access to the necessary AWS resources, such as Amazon Simple Storage Service (Amazon S3) buckets, Amazon Key Management Service (Amazon KMS) keys, and Amazon Elastic File Service (Amazon EFS) shares. With additional workloads and new data access patterns, the number of IAM roles and policies naturally increases. With the growing complexity of resources and data access patterns, it becomes crucial to streamline access and simplify the management of IAM policies and roles
In this blog post, we illustrate how you can use IAM paths to organize IAM policies and roles and provide examples you can use as a foundation for your own use cases.
How to use paths with your IAM roles and policies
When you create a role or policy, you create it with a default path. In IAM, the default path for resources is “/”. Instead of using a default path, you can create and use paths and nested paths as a structure to manage IAM resources. The following example shows an IAM role named S3Access in the path developer:
arn:aws:iam::111122223333:role/developer/S3Access
Service-linked roles are created in a reserved path /aws-service-role/. The following is an example of a service-linked role path.
By using IAM paths with roles and policies, you can create groupings and design a logical separation to simplify management. You can use these groupings to grant access to teams, delegate permissions, and control what roles can be passed to AWS services. In the following sections, we illustrate how to use IAM paths to create groupings of roles and policies by referencing a fictional company and its expansion of AWS resources.
The following is an example of an AWS CLI command that creates a role in an IAM path.
aws iam create-role --role-name <ROLE-NAME> --assume-role-policy-document file://assume-role-doc.json --path <PATH>
Replace <ROLE-NAME> and <PATH> in the command with your role name and role path respectively. Use a trust policy for the trust document that matches your use case. An example trust policy that allows Amazon Elastic Compute Cloud (Amazon EC2) instances to assume this role on your behalf is below:
The following is an example of an AWS CLI command that creates a policy in an IAM path.
aws iam create-policy --policy-name <POLICY-NAME> --path <PATH> --policy-document file://policy.json
IAM paths sample implementation
Let’s assume you’re a cloud platform architect at AnyCompany, a startup that’s planning to expand its AWS environment. By the end of the year, AnyCompany is going to expand from one team of developers to multiple teams, all of which require access to AWS. You want to design a scalable way to manage IAM roles and policies to simplify the administrative process to give permissions to each team’s roles. To do that, you create groupings of roles and policies based on teams.
Organize IAM roles with paths
AnyCompany decided to create the following roles based on teams.
Team name
Role name
IAM path
Has access to
Security
universal-security-readonly
/security/
All resources
Team A database administrators
DBA-role-A
/teamA/
TeamA’s databases
Team B database administrators
DBA-role-B
/teamB/
TeamB’s databases
The following are example Amazon Resource Names (ARNs) for the roles listed above. In this example, you define IAM paths to create a grouping based on team names.
Note: Role names must be unique within your AWS account regardless of their IAM paths. You cannot have two roles named DBA-role, even if they’re in separate paths.
Organize IAM policies with paths
After you’ve created roles in IAM paths, you will create policies to provide permissions to these roles. The same path structure that was defined in the IAM roles is used for the IAM policies. The following is an example of how to create a policy with an IAM path. After you create the policy, you can attach the policy to a role using the attach-role-policy command.
aws iam create-policy --policy-name <POLICY-NAME> --policy-document file://policy-doc.json --path <PATH>
Grant access to groupings of IAM roles with resource-based policies
Now that you’ve created roles and policies in paths, you can more readily define which groups of principals can access a resource. In this deny statement example, you allow only the roles in the IAM path /teamA/ to act on your bucket, and you deny access to all other IAM principals. Rather than use individual roles to deny access to the bucket, which would require you to list every role, you can deny access to an entire group of principals by path. If you create a new role in your AWS account in the specified path, you don’t need to modify the policy to include them. The path-based deny statement will apply automatically.
IAM paths can also enable teams to more safely create IAM roles and policies and allow teams to only use the roles and policies contained by the paths. Paths can help prevent teams from privilege escalation by denying the use of roles that don’t belong to their team.
Continuing the example above, AnyCompany established a process that allows each team to create their own IAM roles and policies, providing they’re in a specified IAM path. For example, AnyCompany allows team A to create IAM roles and policies for team A in the path /teamA/:
Using IAM paths, AnyCompany can allow team A to more safely create and manage their own IAM roles and policies and safely pass those roles to AWS services using the iam:PassRole permission.
At AnyCompany, four IAM policies using IAM paths allow teams to more safely create and manage their own IAM roles and policies. Following recommended best practices, AnyCompany uses infrastructure as code (IaC) for all IAM role and policy creation. The four path-based policies that follow will be attached to each team’s CI/CD pipeline role, which has permissions to create roles. The following example focuses on team A, and how these policies enable them to self-manage their IAM credentials.
Create a role in the path and modify inline policies on the role: This policy allows three actions: iam:CreateRole, iam:PutRolePolicy, and iam:DeleteRolePolicy. When this policy is attached to a principal, that principal is allowed to create roles in the IAM path /teamA/ and add and delete inline policies on roles in that IAM path.
Add and remove managed policies: The second policy example allows two actions: iam:AttachRolePolicy and iam:DetachRolePolicy. This policy allows a principal to attach and detach managed policies in the /teamA/ path to roles that are created in the /teamA/ path.
Delete roles, tag and untag roles, read roles: The third policy allows a principal to delete roles, tag and untag roles, and retrieve information about roles that are created in the /teamA/ path.
Policy management in IAM path: The final policy example allows access to create, modify, get, and delete policies that are created in the /teamA/ path. This includes creating, deleting, and tagging policies.
To pass a role to an AWS service, a principal must have the iam:PassRole permission. IAM paths are the recommended option to restrict which roles a principal can pass when granted the iam:PassRole permission. IAM paths help verify principals can only pass specific roles or groupings of roles to an AWS service.
At AnyCompany, the security team wants to allow team A to add IAM roles to an instance profile and attach it to Amazon EC2 instances, but only if the roles are in the /teamA/ path. The IAM action that allows team A to provide the role to the instance is iam:PassRole. The security team doesn’t want team A to be able to pass other roles in the account, such as an administrator role.
The policy that follows allows passing of a role that was created in the /teamA/ path and does not allow the passing of other roles such as an administrator role.
How to create preventative guardrails for sensitive IAM paths
You can use service control policies (SCP) to restrict access to sensitive roles and policies within specific IAM paths. You can use an SCP to prevent the modification of sensitive roles and policies that are created in a defined path.
You will see the IAM path under the resource and condition portion of the statement. Only the role named IAMAdministrator created in the /security/ path can create or modify roles in the security path. This SCP allows you to delegate IAM role and policy management to developers with confidence that they won’t be able to create, modify, or delete any roles or policies in the security path.
This next example shows you how you can safely exempt IAM roles created in the security path from specific controls in your organization. The policy denies all roles except the roles created in the /security/ IAM path to close member accounts.
You should be aware of some additional considerations when you start using IAM paths.
Paths are immutable for IAM roles and policies. To change a path, you must delete the IAM resource and recreate the IAM resource in the alternative path. Deleting roles or instance profiles has step-by-step instructions to delete an IAM resource.
You can only create IAM paths using AWS API or command line tools. You cannot create IAM paths with the AWS console.
IAM paths aren’t added to the uniqueness of the role name. Role names must be unique within your account without the path taken into consideration.
AWS reserves several paths including /aws-service-role/ and you cannot create roles in this path.
Conclusion
IAM paths provide a powerful mechanism for effectively grouping IAM resources. Path-based groupings can streamline access management across AWS services. In this post, you learned how to use paths with IAM principals to create structured access with IAM roles, how to delegate and segregate access within an account, and safely pass roles using iam:PassRole. These techniques can empower you to fine-tune your AWS access management and help improve security while streamlining operational workflows.
You can use the following references to help extend your knowledge of IAM paths. This post references the processes outlined in the user guides and blog post, and sources the IAM policies from the GitHub repositories.
Recently, AWS launched a new feature that allows deployment of account instances of AWS IAM Identity Center . With this launch, you can now have two types of IAM Identity Center instances: organization instances and account instances. An organization instance is the IAM Identity Center instance that’s enabled in the management account of your organization created with AWS Organizations. This instance is used to manage access to AWS accounts and applications across your entire organization. Organization instances are the best practice when deploying IAM Identity Center. Many customers have requested a way to enable AWS applications using test or sandbox identities. The new account instances are intended to support sand-boxed deployments of AWS managed applications such as Amazon CodeCatalyst and are only usable from within the account and AWS Region in which they were created. They can exist in a standalone account or in a member account within AWS Organizations.
In this blog post, we show you when to use each instance type, how to control the deployment of account instances, and how you can monitor, manage, and audit these instances at scale using the enhanced IAM Identity Center APIs.
IAM Identity Center instance types
IAM Identity Center now offers two deployment types, the traditional organization instance and an account instance, shown in Figure 1. In this section, we show you the differences between the two.
Figure 1: IAM Identity Center instance types
Organization instance of IAM Identity Center
An organization instance of IAM Identity Center is the fully featured version that’s available with AWS Organizations. This type of instance helps you securely create or connect your workforce identities and manage their access centrally across AWS accounts and applications in your organization. The recommended use of an organization instance of Identity Center is for workforce authentication and authorization on AWS for organizations of any size and type.
Using the organization instance of IAM Identity Center, your identity center administrator can create and manage user identities in the Identity Center directory, or connect your existing identity source, including Microsoft Active Directory, Okta, Ping Identity, JumpCloud, Google Workspace, and Azure Active Directory (Entra ID). There is only one organization instance of IAM Identity Center at the organization level. If you have enabled IAM Identity Center before November 15, 2023, you have an organization instance.
Account instances of IAM Identity Center
Account instances of IAM Identity Center provide a subset of the features of the organization instance. Specifically, account instances support user and group assignments initially only to Amazon CodeCatalyst. They are bound to a single AWS account, and you can deploy them in either member accounts of an organization or in standalone AWS accounts. You can only deploy one account instance per AWS account regardless of Region.
You can use account instances of IAM Identity Center to provide access to supported Identity Center enabled application if the application is in the same account and Region.
When should I use account instances of IAM Identity Center?
Account instances are intended for use in specific situations where organization instances are unavailable or impractical, including:
You want to run a temporary trial of a supported AWS managed application to determine if it suits your business needs. See Additional Considerations.
You are unable to deploy IAM Identity Center across your organization, but still want to experiment with one or more AWS managed applications. See Additional Considerations.
You have an organization instance of IAM Identity Center, but you want to deploy a supported AWS managed application to an isolated set of users that are distinct from those in your organization instance.
Additional considerations
When working with multiple instances of IAM Identity Center, you want to keep a number of things in mind:
Each instance of IAM Identity Center is separate and distinct from other Identity Center instances. That is, users and assignments are managed separately in each instance without a means to keep them in sync.
Migration between instances isn’t possible. This means that migrating an application between instances requires setting up that application from scratch in the new instance.
Account instances have the same considerations when changing your identity source as an organization instance. In general, you want to set up with the right identity source before adding assignments.
Automating assigning users to applications through the IAM Identity Center public APIs also requires using the applications APIs to ensure that those users and groups have the right permissions within the application. For example, if you assign groups to CodeCatalyst using Identity Center, you still have to assign the groups to the CodeCatalyst space from the Amazon CodeCatalyst page in the AWS Management Console. See the Setting up a space that supports identity federation documentation.
By default, account instances require newly added users to register a multi-factor authentication (MFA) device when they first sign in. This can be altered in the AWS Management Console for Identity Center for a specific instance.
Controlling IAM Identity Center instance deployments
If you’ve enabled IAM Identity Center prior to November 15, 2023 then account instance creation is off by default. If you want to allow account instance creation, you must enable this feature from the Identity Center console in your organization’s management account. This includes scenarios where you’re using IAM Identity Center centrally and want to allow deployment and management of account instances. See Enable account instances in the AWS Management Console documentation.
If you enable IAM Identity Center after November 15, 2023 or if you haven’t enabled Identity Center at all, you can control the creation of account instances of Identity Center through a service control policy (SCP). We recommend applying the following sample policy to restrict the use of account instances to all but a select set of AWS accounts. The sample SCP that follows will help you deny creation of account instances of Identity Center to accounts in the organization unless the account ID matches the one you specified in the policy. Replace <ALLOWED-ACCOUNT_ID> with the ID of the account that is allowed to create account instances of Identity Center:
If your organization has an existing log ingestion pipeline solution to collect logs and generate reports through AWS CloudTrail, then IAM Identity Center supported CloudTrail operations will automatically be present in your pipeline, including additional account instances of IAM Identity Center actions such as sso:CreateInstance.
To create a monitoring solution for IAM Identity Center events in your organization, you should set up monitoring through AWS CloudTrail. CloudTrail is a service that records events from AWS services to facilitate monitoring activity from those services in your accounts. You can create a CloudTrail trail that captures events across all accounts and all Regions in your organization and persists them to Amazon Simple Storage Service (Amazon S3).
After creating a trail for your organization, you can use it in several ways. You can send events to Amazon CloudWatch Logs and set up monitoring and alarms for Identity Center events, which enables immediate notification of supported IAM Identity Center CloudTrail operations. With multiple instances of Identity Center deployed within your organization, you can also enable notification of instance activity, including new instance creation, deletion, application registration, user authentication, or other supported actions.
The following is an example of a simple query that shows you a list of the Identity Center instances created and deleted, the account where they were created, and the user that created them. Replace <Event_data_store_ID> with your store ID.
SELECT
    userIdentity.arn AS userARN, eventName, userIdentity.accountId
FROM
    <Event_data_store_ID>
WHERE
    userIdentity.arn IS NOT NULL
    AND eventName = 'DeleteInstance'
    OR eventName = 'CreateInstance'
You can save your query result to an S3 bucket and download a copy of the results in CSV format. To learn more, follow the steps in Download your CloudTrail Lake saved query results. Figure 2 shows the CloudTrail Lake query results.
Figure 2: AWS CloudTrail Lake query results
If you want to automate the sourcing, aggregation, normalization, and data management of security data across your organization using the Open Cyber Security Framework (OCSF) standard, you will benefit from using Amazon Security Lake. This service helps make your organization’s security data broadly accessible to your preferred security analytics solutions to power use cases such like threat detection, investigation, and incident response. Learn more in What is Amazon Security Lake?
Instance management and discovery within an organization
You can create account instances of IAM Identity Center in a standalone account or in an account that belongs to your organization. Creation can happen from an API call (CreateInstance) from the Identity Center console in a member account or from the setup experience of a supported AWS managed application. Learn more about Supported AWS managed applications.
If you decide to apply the DenyCreateAccountInstances SCP shown earlier to accounts in your organization, you will no longer be able to create account instances of IAM Identity Center in those accounts. However, you should also consider that when you invite a standalone AWS account to join your organization, the account might have an existing account instance of Identity Center.
To identify existing instances, who’s using them, and what they’re using them for, you can audit your organization to search for new instances. The following script shows how to discover all IAM Identity Center instances in your organization and export a .csv summary to an S3 bucket. This script is designed to run on the account where Identity Center was enabled. Click here to see instructions on how to use this script.
. . .
. . .
accounts_and_instances_dict={}
duplicated_users ={}

main_session = boto3.session.Session()
sso_admin_client = main_session.client('sso-admin')
identity_store_client = main_session.client('identitystore')
organizations_client = main_session.client('organizations')
s3_client = boto3.client('s3')
logger = logging.getLogger()
logger.setLevel(logging.INFO)

#create function to list all Identity Center instances in your organization
def lambda_handler(event, context):
    application_assignment = []
    user_dict={}

    current_account = os.environ['CurrentAccountId']

    logger.info("Current account %s", current_account)

    paginator = organizations_client.get_paginator('list_accounts')
    page_iterator = paginator.paginate()
    for page in page_iterator:
        for account in page['Accounts']:
            get_credentials(account['Id'],current_account)
            #get all instances per account - returns dictionary of instance id and instances ARN per account
            accounts_and_instances_dict = get_accounts_and_instances(account['Id'], current_account)

def get_accounts_and_instances(account_id, current_account):
    global accounts_and_instances_dict

    instance_paginator = sso_admin_client.get_paginator('list_instances')
    instance_page_iterator = instance_paginator.paginate()
    for page in instance_page_iterator:
        for instance in page['Instances']:
            #send back all instances and identity centers
            if account_id == current_account:
                accounts_and_instances_dict = {current_account:[instance['IdentityStoreId'],instance['InstanceArn']]}
            elif instance['OwnerAccountId'] != current_account:
                accounts_and_instances_dict[account_id]= ([instance['IdentityStoreId'],instance['InstanceArn']])
    return accounts_and_instances_dict
  . . .
  . . .
  . . .
The following table shows the resulting IAM Identity Center instance summary report with all of the accounts in your organization and their corresponding Identity Center instances.
AccountId
IdentityCenterInstance
111122223333
d-111122223333
111122224444
d-111122223333
111122221111
d-111111111111
Duplicate user detection across multiple instances
A consideration of having multiple IAM Identity Center instances is the possibility of having the same person existing in two or more instances. In this situation, each instance creates a unique identifier for the same person and the identifier associates application-related data to the user. Create a user management process for incoming and outgoing users that is similar to the process you use at the organization level. For example, if a user leaves your organization, you need to revoke access in all Identity Center instances where that user exists.
The code that follows can be added to the previous script to help detect where duplicates might exist so you can take appropriate action. If you find a lot of duplication across account instances, you should consider adopting an organization instance to reduce your management overhead.
...
#determine if the member in IdentityStore have duplicate
def get_users(identityStoreId, user_dict):
    global duplicated_users
    paginator = identity_store_client.get_paginator('list_users')
    page_iterator = paginator.paginate(IdentityStoreId=identityStoreId)
    for page in page_iterator:
        for user in page['Users']:
            if ( 'Emails' not in user ):
                print("user has no email")
            else:
                for email in user['Emails']:
                    if email['Value'] not in user_dict:
                        user_dict[email['Value']] = identityStoreId
                    else:
                        print("Duplicate user found " + user['UserName'])
                        user_dict[email['Value']] = user_dict[email['Value']] + "," + identityStoreId
                        duplicated_users[email['Value']] = user_dict[email['Value']]
    return user_dict
...
The following table shows the resulting report with duplicated users in your organization and their corresponding IAM identity Center instances.
The full script for all of the above use cases is available in the multiple-instance-management-iam-identity-center GitHub repository. The repository includes instructions to deploy the script using AWS Lambda within the management account. After deployment, you can invoke the Lambda function to get .csv files of every IAM Identity center instance in your organization, the applications assigned to each instance, and the users that have access to those applications. With this function, you also get a report of users that exist in more than one local instance.
Conclusion
In this post, you learned the differences between an IAM Identity Center organization instance and an account instance, considerations for when to use an account instance, and how to use Identity Center APIs to automate discovery of Identity Center account instances in your organization.
If you have feedback about this post, submit comments in the Comments section below. If you have questions about this post, start a new thread on AWS IAM Identity Center re:Post or contact AWS Support.
Want more AWS Security news? Follow us on Twitter.
At Amazon Web Services (AWS), we are committed to providing continued assurance to our customers through assessments, certifications, and attestations that support the adoption of current and new AWS services and features. We are pleased to announce the availability of the 2023 Canadian Centre for Cyber Security (CCCS) assessment summary report for AWS. With this assessment, a total of 150 AWS services and features are assessed in the Canada (Central) Region, including 20 additional AWS services and features. The assessment report is available for review and download on demand through AWS Artifact.
The full list of services in scope for the CCCS assessment is available on the Services in Scope page. The 20 new services and features are the following:
The CCCS is Canada’s authoritative source of cyber security expert guidance for the Canadian government, industry, and the general public. Public and commercial sector organizations across Canada rely on CCCS’s rigorous Cloud Service Provider (CSP) IT Security (ITS) assessment in their decision to use CSP services. In addition, CCCS’s ITS assessment process is a mandatory requirement for AWS to provide cloud services to Canadian federal government departments and agencies.
The CCCS cloud service provider information technology security assessment process determines if the Government of Canada (GC) ITS requirements for the CCCS Medium cloud security profile (previously referred to as GC’s PROTECTED B/Medium Integrity/Medium Availability [PBMM] profile) are met as described in ITSG-33 (IT security risk management: A lifecycle approach, Annex 3 – Security control catalogue). As of November 2023, 150 AWS services in the Canada (Central) Region have been assessed by CCCS and meet the requirements for the Medium cloud security profile. Meeting the Medium cloud security profile is required to host workloads that are classified up to and including Medium categorization. On a periodic basis, CCCS assesses new or previously unassessed services and re-assesses the AWS services that were previously assessed to verify that they continue to meet the GC’s requirements. CCCS prioritizes the assessment of new AWS services based on their availability in Canada, and customer demand for the AWS services. The full list of AWS services that have been assessed by CCCS is available on our Services in Scope for CCCS Assessment page.
To learn more about the CCCS assessment or our other compliance and security programs, visit AWS Compliance Programs. As always, we value your feedback and questions; reach out to the AWS Compliance team through the Contact Us page.
If you have feedback about this post, submit comments in the Comments section below. If you have questions about this post, contact AWS Support.
Want more AWS Security news? Follow us on Twitter.
Early-feedback loops exist to provide developers with ongoing feedback through automated checks. This enables developers to take early remedial action while increasing the efficiency of the code review process and, in turn, their productivity.
Early-feedback loops help provide confidence to reviewers that fundamental security and compliance requirements were validated before review. As part of this process, common expectations of code standards and quality can be established, while shifting governance mechanisms to the left.
In this post, we will show you how to use AWS developer tools to implement a shift-left approach to security that empowers your developers with early feedback loops within their development practices. You will use AWS CodeCommit to securely host Git repositories, AWS CodePipeline to automate continuous delivery pipelines, AWS CodeBuild to build and test code, and Amazon CodeGuru Reviewer to detect potential code defects.
Why the shift-left approach is important
Developers today are an integral part of organizations, building and maintaining the most critical customer-facing applications. Developers must have the knowledge, tools, and processes in place to help them identify potential security issues before they release a product to production.
This is why the shift-left approach is important. Shift left is the process of checking for vulnerabilities and issues in the earlier stages of software development. By following the shift-left process (which should be part of a wider application security review and threat modelling process), software teams can help prevent undetected security issues when they build an application. The modern DevSecOps workflow continues to shift left towards the developer and their practices with the aim to achieve the following:
Drive accountability among developers for the security of their code
Empower development teams to remediate issues up front and at their own pace
Improve risk management by enabling early visibility of potential security issues through early feedback loops
You can use AWS developer tools to help provide this continual early feedback for developers upon each commit of code.
Solution prerequisites
To follow along with this solution, make sure that you have the following prerequisites in place:
Make sure that you have a general working knowledge of the listed services and DevOps practices.
Solution overview
The following diagram illustrates the architecture of the solution.
Figure 1: Solution overview
We will show you how to set up a continuous integration and continuous delivery (CI/CD) pipeline by using AWS developer tools—CodeCommit, CodePipeline, CodeBuild, and CodeGuru—that you will integrate with the code repository to detect code security vulnerabilities. As shown in Figure 1, the solution has the following steps:
The developer commits the new branch into the code repository.
The developer creates a pull request to the main branch.
CodeGuru Reviewer uses program analysis and machine learning to help detect potential defects in your Java and Python code, and provides recommendations to improve the code. CodeGuru Reviewer helps detect security vulnerabilities, secrets, resource leaks, concurrency issues, incorrect input validation, and deviation from best practices for using AWS APIs and SDKs.
You can configure the CodeBuild deployment with third-party tools, such as Bandit for Python to help detect security issues in your Python code.
CodeGuru Reviewer or CodeBuild writes back the findings of the code scans to the pull request to provide a single common place for developers to review the findings that are relevant to their specific code updates.
The following table presents some other tools that you can integrate into the early-feedback toolchain, depending on the type of code or artefacts that you are evaluating:
When you deploy the solution in your AWS account, you can review how Bandit for Python has been built into the deployment pipeline by using AWS CodeBuild with a configured buildspec file, as shown in Figure 2. You can implement the other tools in the table by using a similar approach.
Figure 2: Bandit configured in CodeBuild
Walkthrough
To deploy the solution, you will complete the following steps:
The first step is to deploy the required resources into your AWS environment by using CloudFormation.
To deploy the solution
Choose the following Launch Stack button to deploy the solution’s CloudFormation template:
The solution deploys in the AWS US East (N. Virginia) Region (us-east-1) by default because each service listed in the Prerequisites section is available in this Region. To deploy the solution in a different Region, use the Region selector in the console navigation bar and make sure that the services required for this walkthrough are supported in your newly selected Region. For service availability by Region, see AWS Services by Region.
On the Quick Create Stack screen, do the following:
Leave the provided parameter defaults in place.
Scroll to the bottom, and in the Capabilities section, select I acknowledge that AWS CloudFormation might create IAM resources with custom names.
Choose Create Stack.
When the CloudFormation template has completed, open the AWS Cloud9 console.
In the Environments table, for the provisioned shift-left-blog-cloud9-ide environment, choose Open, as shown in Figure 3.
Figure 3: Cloud9 environments
The provisioned Cloud9 environment opens in a new tab. Wait for Cloud9 to initialize the two sample code repositories: shift-left-sample-app-java and shift-left-sample-app-python, as shown in Figure 4. For this post, you will work only with the Python sample repository shift-left-sample-app-python, but the procedures we outline will also work for the Java repository.
Figure 4: Cloud9 IDE
Associate CodeGuru Reviewer with a code repository
The next step is to associate the Python code repository with CodeGuru Reviewer. After you associate the repository, CodeGuru Reviewer analyzes and comments on issues that it finds when you create a pull request.
To associate CodeGuru Reviewer with a repository
Open the CodeGuru console, and in the left navigation pane, under Reviewer, choose Repositories.
In the Repositories section, choose Associate repository and run analysis.
In the Associate repository section, do the following:
For Select source provider, select AWS CodeCommit.
For Repository location,select shift-left-sample-app-python.
In the Run a repository analysis section, do the following, as shown in Figure 5:
For Source branch, select main.
For Code review name – optional, enter a name.
For Tags – optional, leave the default settings.
Choose Associate repository and run analysis.
Figure 5: CodeGuru repository configuration
CodeGuru initiates the Full repository analysis and the status is Pending, as shown in Figure 6. The full analysis takes about 5 minutes to complete. Wait for the status to change from Pending to Completed.
Figure 6: CodeGuru full analysis pending
Create a pull request
The next step is to create a new branch and to push sample code to the repository by creating a pull request so that the code scan can be initiated by CodeGuru Reviewer and the CodeBuild job.
To create a new branch
In the Cloud9 IDE, locate the terminal and create a new branch by running the following commands.
cd ~/environment/shift-left-sample-app-python
git checkout -b python-test
Confirm that you are working from the new branch, which will be highlighted in the Cloud9 IDE terminal, as shown in Figure 7.
git branch -v
Figure 7: Cloud9 IDE terminal
To create a new file and push it to the code repository
Create a new file called sample.py.
touch sample.py
Copy the following sample code, paste it into the sample.py file, and save the changes, as shown in Figure 8.
import requests

data = requests.get("https://www.example.org/", verify = False)
print(data.status_code)
Figure 8: Cloud9 IDE noncompliant code
Commit the changes to the repository.
git status
git add -A
git commit -m "shift left blog python sample app update"
Note: if you receive a message to set your name and email address, you can ignore it because Git will automatically set these for you, and the Git commit will complete successfully.
Push the changes to the code repository, as shown in Figure 9.
git push origin python-test
Figure 9: Git push
To create a new pull request
Open the CodeCommit console and select the code repository called shift-left-sample-app-python.
From the Branches dropdown, select the new branch that you created and pushed, as shown in Figure 10.
Figure 10: CodeCommit branch selection
In your new branch, select the file sample.py, confirm that the file has the changes that you made, and then choose Create pull request, as shown in Figure 11.
Figure 11: CodeCommit pull request
A notification appears stating that the new code updates can be merged.
In the Source dropdown, choose the new branch python-test. In the Destination dropdown, choose the main branch where you intend to merge your code changes when the pull request is closed.
To have CodeCommit run a comparison between the main branch and your new branch python-test, choose Compare. To see the differences between the two branches, choose the Changes tab at the bottom of the page. CodeCommit also assesses whether the two branches can be merged automatically when the pull request is closed.
When you’re satisfied with the comparison results for the pull request, enter a Title and an optional Description, and then choose Create pull request. Your pull request appears in the list of pull requests for the CodeCommit repository, as shown in Figure 12.
Figure 12: Pull request
The creation of this pull request has automatically started two separate code scans. The first is a CodeGuru incremental code review and the second uses CodeBuild, which utilizes Bandit to perform a security code scan of the Python code.
Review code scan results and resolve detected security vulnerabilities
The next step is to review the code scan results to identify security vulnerabilities and the recommendations on how to fix them.
To review the code scan results
Open the CodeGuru console, and in the left navigation pane, under Reviewer, select Code reviews.
On the Incremental code reviews tab, make sure that you see a new code review item created for the preceding pull request.
Figure 13: CodeGuru Code review
After a few minutes, when CodeGuru completes the incremental analysis, choose the code review to review the CodeGuru recommendations on the pull request. Figure 14 shows the CodeGuru recommendations for our example.
Figure 14: CodeGuru recommendations
Open the CodeBuild console and select the CodeBuild job called shift-left-blog-pr-Python. In our example, this job should be in a Failed state.
Open the CodeBuild run, and under the Build history tab, select the CodeBuild job, which is in Failed state. Under the Build Logs tab, scroll down until you see the following errors in the logs. Note that the severity of the finding is High, which is why the CodeBuild job failed. You can review the Bandit scanning options in the Bandit documentation.
Test results:
>> Issue: [B501:request_with_no_cert_validation] Call to requests with verify=False disabling SSL certificate checks, security issue.
   Severity: High   Confidence: High
   CWE: CWE-295 (https://cwe.mitre.org/data/definitions/295.html)
   More Info: https://bandit.readthedocs.io/en/1.7.5/plugins/b501_request_with_no_cert_validation.html
   Location: sample.py:3:7

2
3   data = requests.get("https://www.example.org/", verify = False)
4   print(data.status_code)
Navigate to the CodeCommit console, and on the Activity tab of the pull request, review the CodeGuru recommendations. You can also review the results of the CodeBuild jobs that Bandit performed, as shown in Figure 15.
Figure 15: CodeGuru recommendations and CodeBuild logs
This demonstrates how developers can directly link the relevant information relating to security code scans with their code development and associated pull requests, hence shifting to the left the required security awareness for developers.
To resolve the detected security vulnerabilities
In the Cloud9 IDE, navigate to the file sample.py in the Python sample repository, as shown in Figure 16.
Figure 16: Cloud9 IDE sample.py
Copy the following code and paste it in the sample.py file, overwriting the existing code. Save the update.
import requests

data = requests.get("https://www.example.org", timeout=5)
print(data.status_code)
Commit the changes by running the following commands.
git status
git add -A
git commit -m "shift left python sample.py resolve security errors"
git push origin python-test
Open the CodeCommit console and choose the Activity tab on the pull request that you created earlier. You will see a banner indicating that the pull request was updated. You will also see new comments indicating that new code scans using CodeGuru and CodeBuild were initiated for the new pull request update.
In the CodeGuru console, on the Incremental code reviews page, check that a new code scan has begun. When the scans are finished, review the results in the CodeGuru console and the CodeBuild build logs, as described previously. The previously detected security vulnerability should now be resolved.
In the CodeCommit console, on the Activity tab, under Activity history, review the comments to verify that each of the code scans has a status of Passing, as shown in Figure 17.
Figure 17: CodeCommit activity history
Now that the security issue has been resolved, merge the pull request into the main branch of the code repository. Choose Merge, and under Merge strategy, select Fast Forward merge.
AWS account clean-up
Clean up the resources created by this solution to avoid incurring future charges.
To clean up your account
Start by deleting the CloudFormation stacks for the Java and Python sample applications that you deployed. In the CloudFormation console, in the Stacks section, select one of these stacks and choose Delete; then select the other stack and choose Delete.
Figure 18: Delete repository stack
To initiate deletion of the Cloud9 CloudFormation stack, select it and choose Delete.
Open the Amazon S3 console, and in the search box, enter shift-left to search for the S3 bucket that CodePipeline used.
Figure 19: Select CodePipeline S3 bucket
Select the S3 bucket, select all of the object folders in the bucket, and choose Delete
Figure 20: Select CodePipeline S3 objects
To confirm deletion of the objects, in the section Permanently delete objects?, enter permanently delete, and then choose Delete objects. A banner message that states Successfully deleted objects appears at the top confirming the object deletion.
Navigate back to the CloudFormation console, select the stack named shift-left-blog, and choose Delete.
Conclusion
In this blog post, we showed you how to implement a solution that enables early feedback on code development through status comments in the CodeCommit pull request activity tab by using Amazon CodeGuru Reviewer and CodeBuild to perform automated code security scans on the creation of a code repository pull request.
We configured CodeBuild with Bandit for Python to demonstrate how you can integrate third-party or open-source tools into the development cycle. You can use this approach to integrate other tools into the workflow.
Shifting security left early in the development cycle can help you identify potential security issues earlier and empower teams to remediate issues earlier, helping to prevent the need to refactor code towards the end of a build.
This solution provides a simple method that you can use to view and understand potential security issues with your newly developed code and thus enhances your awareness of the security requirements within your organization.
It’s simple to get started. Sign up for an AWS account, deploy the provided CloudFormation template through the Launch Stack button, commit your code, and start scanning for vulnerabilities.
If you have feedback about this post, submit comments in the Comments section below. If you have questions about this post, start a new thread on AWS re:Post or contact AWS Support.
Want more AWS Security news? Follow us on Twitter.
Sometimes you want to configure an AWS service to access your resource in another service. For example, you can configure AWS CloudTrail, a service that monitors account activity across your AWS infrastructure, to write log data to your bucket in Amazon Simple Storage Service (Amazon S3). When you do this, you want assurance that the service will only access your resource on your behalf—you don’t want an untrusted entity to be able to use the service to access your resource. Before today, you could achieve this by using the two AWS Identity and Access Management (IAM) condition keys, aws:SourceAccount and aws:SourceArn. You can use these condition keys to help make sure that a service accesses your resource only on behalf of specific accounts or resources that you trust. However, because these condition keys require you to specify individual accounts and resources, they can be difficult to manage at scale, especially in larger organizations.
Recently, IAM launched two new condition keys that can help you achieve this in a more scalable way that is simpler to manage within your organization:
aws:SourceOrgID — use this condition key to make sure that an AWS service can access your resources only when the request originates from a particular organization ID in AWS Organizations.
aws:SourceOrgPaths — use this condition key to make sure that an AWS service can access your resources only when the request originates from one or more organizational units (OUs) in your organization.
In this blog post, we describe how you can use the four available condition keys, including the two new ones, to help you control how AWS services access your resources.
Background
Imagine a scenario where you configure an AWS service to access your resource in another service. Let’s say you’re using Amazon CloudWatch to observe resources in your AWS environment, and you create an alarm that activates when certain conditions occur. When the alarm activates, you want it to publish messages to a topic that you create in Amazon Simple Notification Service (Amazon SNS) to generate notifications.
Figure 1 depicts this process.
Figure 1: Amazon CloudWatch publishing messages to an SNS topic
In this scenario, there’s a resource-based policy controlling access to your SNS topic. For CloudWatch to publish messages to it, you must configure the policy to allow access by CloudWatch. When you do this, you identify CloudWatch using an AWS service principal, in this case cloudwatch.amazonaws.com.
Cross-service access
This is an example of a common pattern known as cross-service access. With cross-service access, a calling service accesses your resource in a called service, and a resource-based policy attached to your resource grants access to the calling service. The calling service is identified using an AWS service principal in the form <SERVICE-NAME>.amazonaws.com, and it accesses your resource on behalf of an originating resource, such as a CloudWatch alarm.
Figure 2 shows cross-service access.
Figure 2: Cross-service access
When you configure cross-service access, you want to make sure that the calling service will access your resource only on your behalf. That means you want the originating resource to be controlled by someone whom you trust. If an untrusted entity creates their own CloudWatch alarm in their AWS environment, for example, then their alarm should not be able to publish messages to your SNS topic.
If an untrusted entity could use a calling service to access your resource on their behalf, it would be an example of what’s known as the confused deputy problem. The confused deputy problem is a security issue in which an entity that doesn’t have permission to perform an action coerces a more privileged entity (in this case, a calling service) to perform the action instead.
Use condition keys to help prevent cross-service confused deputy issues
AWS provides global condition keys to help you prevent cross-service confused deputy issues. You can use these condition keys to control how AWS services access your resources.
Before today, you could use the aws:SourceAccount or aws:SourceArn condition keys to make sure that a calling service accesses your resource only when the request originates from a specific account (with aws:SourceAccount) or a specific originating resource (with aws:SourceArn). However, there are situations where you might want to allow multiple resources or accounts to use a calling service to access your resource. For example, you might want to create many VPC flow logs in an organization that publish to a central S3 bucket. To achieve this using the aws:SourceAccount or aws:SourceArn condition keys, you must enumerate all the originating accounts or resources individually in your resource-based policies. This can be difficult to manage, especially in large organizations, and can potentially cause your resource-based policy documents to reach size limits.
Now, you can use the new aws:SourceOrgID or aws:SourceOrgPaths condition keys to make sure that a calling service accesses your resource only when the request originates from a specific organization (with aws:SourceOrgID) or a specific organizational unit (with aws:SourceOrgPaths). This helps avoid the need to update policies when accounts are added or removed, reduces the size of policy documents, and makes it simpler to create and review policy statements.
The following table summarizes the four condition keys that you can use to help prevent cross-service confused deputy issues. These keys work in a similar way, but with different levels of granularity.
Use case
Condition key
Value
Allowed operators
Single/multi valued
Example value
Allow a calling service to access your resource only on behalf of an organization that you trust.
Note: Only use these condition keys in resource-based policies that allow access by an AWS service. Don’t use them in other use cases, including identity-based policies and service control policies (SCPs), where these condition keys won’t be populated.
Use condition keys for defense in depth
AWS services use a variety of mechanisms to help prevent cross-service confused deputy issues, and the details vary by service. For example, where a calling service accesses an S3 bucket, some services use S3 prefixes to help prevent confused deputy issues. For more information, see the relevant service documentation.
Where supported by the service, AWS recommends that you use the condition keys we describe in this post regardless of whether the service has another mechanism in place to help prevent cross-service confused deputy issues. This helps to make your intentions explicit, provide defense in depth, and guard against misconfigurations.
Example use cases
Let’s walk through some example use cases to learn how to use these condition keys in practice.
First, imagine you’re using Amazon Virtual Private Cloud (Amazon VPC) to manage logically isolated virtual networks. In Amazon VPC, you can configure flow logs, which capture information about your network traffic. Let’s say you want a flow log to write data into an S3 bucket for later analysis. This process is depicted in Figure 3.
Figure 3: Amazon VPC writing flow logs to an S3 bucket
This constitutes another cross-service access scenario. In this case, Amazon VPC is the calling service, Amazon S3 is the called service, the VPC flow log is the originating resource, and the S3 bucket is your resource in the called service.
To allow access, the resource-based policy for your S3 bucket (known as a bucket policy) must allow Amazon VPC to put objects there. The Principal element in this policy specifies the AWS service principal of the service that will access the resource, which for VPC flow logs is delivery.logs.amazonaws.com.
Initial policy without confused deputy prevention
The following is an initial version of the bucket policy that allows Amazon VPC to put objects in the bucket but doesn’t yet provide confused deputy prevention. We’re showing this policy for illustration purposes; don’t use it in its current form.
Note: For simplicity, we only show one of the policy statements that you need to allow VPC flow logs to write to a bucket. In a real-life bucket policy for flow logs, you need two policy statements: one allowing actions on the bucket, and one allowing actions on the bucket contents. These are described in Publish flow logs to Amazon S3. Both policy statements work in the same way with respect to confused deputy prevention.
This policy statement allows Amazon VPC to put objects in the bucket. However, it allows Amazon VPC to do that on behalf of any flow log in any account. There’s nothing in the policy to tell Amazon VPC that it should access this bucket only if the flow log belongs to a specific organization, OU, account, or resource that you trust.
Let’s now update the policy to help prevent cross-service confused deputy issues. For the rest of this post, the remaining policy samples provide confused deputy protection, but at different levels of granularity.
Specify a trusted organization
Continuing with the previous example, imagine that you now have an organization in AWS Organizations, and you want to create VPC flow logs in various accounts within your organization that publish to a central S3 bucket. You want Amazon VPC to put objects in the bucket only if the request originates from a flow log that resides in your organization.
You can achieve this by using the new aws:SourceOrgID condition key. In a cross-service access scenario, this condition key evaluates to the ID of the organization that the request came from. You can use this condition key in the Condition element of a resource-based policy to allow actions only if aws:SourceOrgID matches the ID of a specific organization, as shown in the following example. In your own policy, make sure to replace <DOC-EXAMPLE-BUCKET> and <MY-ORGANIZATION-ID> with your own information.
The revised policy states that Amazon VPC can put objects in the bucket only if the request originates from a flow log in your organization. Now, if someone creates a flow log outside your organization and configures it to access your bucket, they will get an access denied error.
You can use aws:SourceOrgID in this way to allow a calling service to access your resource only if the request originates from a specific organization, as shown in Figure 4.
Figure 4: Specify a trusted organization using aws:SourceOrgID
Specify a trusted OU
What if you don’t want to trust your entire organization, but only part of it? Let’s consider a different scenario. Imagine that you want to send messages from Amazon SNS into a queue in Amazon Simple Queue Service (Amazon SQS) so they can be processed by consumers. This is depicted in Figure 5.
Figure 5: Amazon SNS sending messages to an SQS queue
Now imagine that you want your SQS queue to receive messages only if they originate from an SNS topic that resides in a specific organizational unit (OU) in your organization. For example, you might want to allow messages only if they originate from a production OU that is subject to change control.
You can achieve this by using the new aws:SourceOrgPaths condition key. As before, you use this condition key in a resource-based policy attached to your resource. In a cross-service access scenario, this condition key evaluates to the AWS Organizations entity path that the request came from. An entity path is a text representation of an entity within an organization.
You build an entity path for an OU by using the IDs of the organization, root, and all OUs in the path down to and including the OU. For example, consider the organizational structure shown in Figure 6.
Figure 6: Example organization structure
In this example, you can specify the Prod OU by using the following entity path:
Let’s now match the aws:SourceOrgPaths condition key against a specific entity path in the Condition element of a resource-based policy for an SQS queue. In your own policy, make sure to replace <MY-QUEUE-ARN> and <MY-ENTITY-PATH> with your own information.
Note:aws:SourceOrgPaths is a multivalued condition key, which means it’s capable of having multiple values in the request context. At the time of writing, it contains a single entity path if the request originates from an account in an organization, and a null value if the request originates from an account that’s not in an organization. Because this key is multivalued, you need to use both a set operator and a string operator to compare values.
In this policy, there are two conditions in the Condition block. The first uses the Null condition operator and compares with a false value to confirm that the condition key’s value is not null. The second uses set operator ForAllValues, which returns true if every condition key value in the request matches at least one value in your policy condition, and string operator StringEquals, which requires an exact match with a value specified in your policy condition.
Note: The reason for the null check is that set operator ForAllValuesreturns true when a condition key resolves to null. With an Allow effect and the null check in place, access is denied if the request originates from an account that’s not in an organization.
With this policy applied to your SQS queue, Amazon SNS can send messages to your queue only if the message came from an SNS topic in a specific OU.
You can use aws:SourceOrgPaths in this way to allow a calling service to access your resource only if the request originates from a specific organizational unit, as shown in Figure 7.
Figure 7: Specify a trusted OU using aws:SourceOrgPaths
Specify a trusted OU and its children
In the previous example, we specified a trusted OU, but that didn’t include its child OUs. What if you want to include its children as well?
You can achieve this by replacing the string operator StringEquals with StringLike. This allows you to use wildcards in the entity path. Using the organization structure from the previous example, the following Condition evaluates to true only if the condition key value is not null and the request originates from the Prod OU or any of its child OUs.
If you want to be more granular, you can allow a service to access your resource only if the request originates from a specific account. You can achieve this by using the aws:SourceAccount condition key. In a cross-service access scenario, this condition key evaluates to the ID of the account that the request came from.
The following Condition evaluates to true only if the request originates from the account that you specify in the policy. In your own policy, make sure to replace <MY-ACCOUNT-ID> with your own information.
You can use this condition element within a resource-based policy to allow a calling service to access your resource only if the request originates from a specific account, as shown in Figure 8.
Figure 8: Specify a trusted account using aws:SourceAccount
Specify a trusted resource
If you want to be even more granular, you can allow a service to access your resource only if the request originates from a specific resource. For example, you can allow Amazon SNS to send messages to your SQS queue only if the request originates from a specific topic within Amazon SNS.
You can achieve this by using the aws:SourceArn condition key. In a cross-service access scenario, this condition key evaluates to the Amazon Resource Name (ARN) of the originating resource. This provides the most granular form of cross-service confused deputy prevention.
The following Condition evaluates to true only if the request originates from the resource that you specify in the policy. In your own policy, make sure to replace <MY-RESOURCE-ARN> with your own information.
Note: AWS recommends that you use an ARN operator rather than a string operator when comparing ARNs. This example uses ArnEquals to match the condition key value against the ARN specified in the policy.
You can use this condition element within a resource-based policy to allow a calling service to access your resource only if the request comes from a specific originating resource, as shown in Figure 9.
Figure 9: Specify a trusted resource using aws:SourceArn
Specify multiple trusted resources, accounts, OUs, or organizations
The four condition keys allow you to specify multiple trusted entities by matching against an array of values. This allows you to specify multiple trusted resources, accounts, OUs, or organizations in your policies.
Conclusion
In this post, you learned about cross-service access, in which an AWS service communicates with another AWS service to access your resource. You saw that it’s important to make sure that such services access your resources only on your behalf in order to help avoid cross-service confused deputy issues.
We showed you how to help prevent cross-service confused deputy issues by using two new condition keys aws:SourceOrgID and aws:SourceOrgPaths, as well as the other available condition keys aws:SourceAccount and aws:SourceArn. You learned that you should use these condition keys in any resource-based policy statements that allow access by an AWS service, if the condition key is supported by the service. This helps make sure that a calling service can access your resource only when the request originates from a specific organization, OU, account, or resource that you trust.
If you have feedback about this post, submit comments in the Comments section below. If you have questions about this post, start a new thread on AWS IAM re:Post or contact AWS Support.
Want more AWS Security news? Follow us on Twitter.
Organizations are increasingly embracing a shift-left approach when it comes to security, actively integrating security considerations into their software development lifecycle (SDLC). This shift aligns seamlessly with modern software development practices such as DevSecOps and continuous integration and continuous deployment (CI/CD), making it a vital strategy in today’s rapidly evolving software development landscape. At its core, shift left promotes a security-as-code culture, where security becomes an integral part of the entire application lifecycle, starting from the initial design phase and extending all the way through to deployment. This proactive approach to security involves seamlessly integrating security measures into the CI/CD pipeline, enabling automated security testing and checks at every stage of development. Consequently, it accelerates the process of identifying and remediating security issues.
By identifying security vulnerabilities early in the development process, you can promptly address them, leading to significant reductions in the time and effort required for mitigation. Amazon Web Services (AWS) encourages this shift-left mindset, providing services that enable a seamless integration of security into your DevOps processes, fostering a more robust, secure, and efficient system. In this blog post we share how you can use Amazon CodeWhisperer, Amazon CodeGuru, and Amazon Inspector to automate and enhance code security.
CodeWhisperer is a versatile, artificial intelligence (AI)-powered code generation service that delivers real-time code recommendations. This innovative service plays a pivotal role in the shift-left strategy by automating the integration of crucial security best practices during the early stages of code development. CodeWhisperer is equipped to generate code in Python, Java, and JavaScript, effectively mitigating vulnerabilities outlined in the OWASP (Open Web Application Security Project) Top 10. It uses cryptographic libraries aligned with industry best practices, promoting robust security measures. Additionally, as you develop your code, CodeWhisperer scans for potential security vulnerabilities, offering actionable suggestions for remediation. This is achieved through generative AI, which creates code alternatives to replace identified vulnerable sections, enhancing the overall security posture of your applications.
Next, you can perform further vulnerability scanning of code repositories and supported integrated development environments (IDEs) with Amazon CodeGuru Security. CodeGuru Security is a static application security tool that uses machine learning to detect security policy violations and vulnerabilities. It provides recommendations for addressing security risks and generates metrics so you can track the security health of your applications. Examples of security vulnerabilities it can detect include resource leaks, hardcoded credentials, and cross-site scripting.
Finally, you can use Amazon Inspector to address vulnerabilities in workloads that are deployed. Amazon Inspector is a vulnerability management service that continually scans AWS workloads for software vulnerabilities and unintended network exposure. Amazon Inspector calculates a highly contextualized risk score for each finding by correlating common vulnerabilities and exposures (CVE) information with factors such as network access and exploitability. This score is used to prioritize the most critical vulnerabilities to improve remediation response efficiency. When started, it automatically discovers Amazon Elastic Compute Cloud (Amazon EC2) instances, container images residing in Amazon Elastic Container Registry (Amazon ECR), and AWS Lambda functions, at scale, and immediately starts assessing them for known vulnerabilities.
Figure 1: An architecture workflow of a developer’s code workflow
Amazon CodeWhisperer
CodeWhisperer is powered by a large language model (LLM) trained on billions of lines of code, including code owned by Amazon and open-source code. This makes it a highly effective AI coding companion that can generate real-time code suggestions in your IDE to help you quickly build secure software with prompts in natural language. CodeWhisperer can be used with four IDEs including AWS Toolkit for JetBrains, AWS Toolkit for Visual Studio Code, AWS Lambda, and AWS Cloud9.
As you use CodeWhisperer it filters out code suggestions that include toxic phrases (profanity, hate speech, and so on) and suggestions that contain commonly known code structures that indicate bias. These filters help CodeWhisperer generate more inclusive and ethical code suggestions by proactively avoiding known problematic content. The goal is to make AI assistance more beneficial and safer for all developers.
CodeWhisperer can also scan your code to highlight and define security issues in real time. For example, using Python and JetBrains, if you write code that would write unencrypted AWS credentials to a log — a bad security practice — CodeWhisperer will raise an alert. Security scans operate at the project level, analyzing files within a user’s local project or workspace and then truncating them to create a payload for transmission to the server side.
Figure 2: CodeWhisperer performing a security scan in Visual Studio Code
Furthermore, the CodeWhisperer reference tracker detects whether a code suggestion might be similar to particular CodeWhisperer open source training data. The reference tracker can flag such suggestions with a repository URL and project license information or optionally filter them out. Using CodeWhisperer, you improve productivity while embracing the shift-left approach by implementing automated security best practices at one of the principal layers—code development.
CodeGuru Security
Amazon CodeGuru Security significantly bolsters code security by harnessing the power of machine learning to proactively pinpoint security policy violations and vulnerabilities. This intelligent tool conducts a thorough scan of your codebase and offers actionable recommendations to address identified issues. This approach verifies that potential security concerns are corrected early in the development lifecycle, contributing to an overall more robust application security posture.
CodeGuru Security relies on a set of security and code quality detectors crafted to identify security risks and policy violations. These detectors empower developers to spot and resolve potential issues efficiently.
CodeGuru Security allows manual scanning of existing code and automating integration with popular code repositories like GitHub and GitLab. It establishes an automated security check pipeline through either AWS CodePipeline or Bitbucket Pipeline. Moreover, CodeGuru Security integrates with Amazon Inspector Lambda code scanning, enabling automated code scans for your Lambda functions.
Notably, CodeGuru Security doesn’t just uncover security vulnerabilities; it also offers insights to optimize code efficiency. It identifies areas where code improvements can be made, enhancing both security and performance aspects within your applications.
Initiating CodeGuru Security is a straightforward process, accessible through the AWS Management Console, AWS Command Line Interface (AWS CLI), AWS SDKs, and multiple integrations. This allows you to run code scans, review recommendations, and implement necessary updates, fostering a continuous improvement cycle that bolsters the security stance of your applications.
Use Amazon CodeGuru to scan code directly and in a pipeline
Use the following steps to create a scan in CodeGuru to scan code directly and to integrate CodeGuru with AWS CodePipeline.
Note: You must provide sample code to scan.
Scan code directly
Open the AWS Management Console using your organization management account and go to Amazon CodeGuru.
In the navigation pane, select Security and then select Scans.
Choose Create new scan to start your manual code scan.
Figure 3: Scans overview
On the Create Scan page:
Choose Choose file to upload your code.
Note: The file must be in .zip format and cannot exceed 5 GB.
Enter a unique name to identify your scan.
Choose Create scan.
Figure 4: Create scan
After you create the scan, the configured scan will automatically appear in the Scans table, where you see the Scan name, Status, Open findings, Date of last scan, and Revision number (you review these findings later in the Findings section of this post).
Figure 5: Scan update
Automated scan using AWS CodePipeline integration
Still in the CodeGuru console, in the navigation pane under Security, select Integrations. On the Integrations page, select Integration with AWS CodePipeline. This will allow you to have an automated security scan inside your CI/CD pipeline.
Figure 6: CodeGuru integrations
Next, choose Open template in CloudFormation to create a CodeBuild project to allow discovery of your repositories and run security scans.
Figure 7: CodeGuru and CodePipeline integration
The CloudFormation template is already entered. Select the acknowledge box, and then choose Create stack.
Figure 8: CloudFormation quick create stack
If you already have a pipeline integration, go to Step 2 and select CodePipeline console. If this is your first time using CodePipeline, this blog post explains how to integrate it with AWS CI/CD services.
Figure 9: Integrate with AWS CodePipeline
Choose Edit.
Figure 10: CodePipeline with CodeGuru integration
Choose Add stage.
Figure 11: Add Stage in CodePipeline
On the Edit action page:
Enter a stage name.
For the stage you just created, choose Add action group.
For Action provider, select CodeBuild.
For Input artifacts, select SourceArtifact.
For Project name, select CodeGuruSecurity.
Choose Done, and then choose Save.
Figure 12: Add action group
Test CodeGuru Security
You have now created a security check stage for your CI/CD pipeline. To test the pipeline, choose Release change.
Figure 13: CodePipeline with successful security scan
If your code was successfully scanned, you will see Succeeded in the Most recent execution column for your pipeline.
Figure 14: CodePipeline dashboard with successful security scan
Findings
To analyze the findings of your scan, select Findings under Security, and you will see the findings for the scans whether manually done or through integrations. Each finding will show the vulnerability, the scan it belongs to, the severity level, the status of an open case or closed case, the age, and the time of detection.
Figure 15: Findings inside CodeGuru security
Dashboard
To view a summary of the insights and findings from your scan, select Dashboard, under Security, and you will see high level summary of your findings overview and a vulnerability fix overview.
Figure 16:Findings inside CodeGuru dashboard
Amazon Inspector
Your journey with the shift-left model extends beyond code deployment. After scanning your code repositories and using tools like CodeWhisperer and CodeGuru Security to proactively reduce security risks before code commits to a repository, your code might still encounter potential vulnerabilities after being deployed to production. For instance, faulty software updates can introduce risks to your application. Continuous vigilance and monitoring after deployment are crucial.
This is where Amazon Inspector offers ongoing assessment throughout your resource lifecycle, automatically rescanning resources in response to changes. Amazon Inspector seamlessly complements the shift-left model by identifying vulnerabilities as your workload operates in a production environment.
Amazon Inspector continuously scans various components, including Amazon EC2, Lambda functions, and container workloads, seeking out software vulnerabilities and inadvertent network exposure. Its user-friendly features include enablement in a few clicks, continuous and automated scanning, and robust support for multi-account environments through AWS Organizations. After activation, it autonomously identifies workloads and presents real-time coverage details, consolidating findings across accounts and resources.
Distinguishing itself from traditional security scanning software, Amazon Inspector has minimal impact on your fleet’s performance. When vulnerabilities or open network paths are uncovered, it generates detailed findings, including comprehensive information about the vulnerability, the affected resource, and recommended remediation. When you address a finding appropriately, Amazon Inspector autonomously detects the remediation and closes the finding.
The findings you receive are prioritized according to a contextualized Inspector risk score, facilitating prompt analysis and allowing for automated remediation.
Additionally, Amazon Inspector provides robust management APIs for comprehensive programmatic access to the Amazon Inspector service and resources. You can also access detailed findings through Amazon EventBridge and seamlessly integrate them into AWS Security Hub for a comprehensive security overview.
Scan workloads with Amazon Inspector
Use the following examples to learn how to use Amazon Inspector to scan AWS workloads.
Open the Amazon Inspector console in your AWS Organizations management account. In the navigation pane, select Activate Inspector.
Under Delegated administrator, enter the account number for your desired account to grant it all the permissions required to manage Amazon Inspector for your organization. Consider using your Security Tooling account as delegated administrator for Amazon Inspector. Choose Delegate. Then, in the confirmation window, choose Delegate again. When you select a delegated administrator, Amazon Inspector is activated for that account. Now, choose Activate Inspector to activate the service in your management account.
Figure 17: Set the delegated administrator account ID for Amazon Inspector
You will see a green success message near the top of your browser window and the Amazon Inspector dashboard, showing a summary of data from the accounts.
Figure 18: Amazon Inspector dashboard after activation
Explore Amazon Inspector
From the Amazon Inspector console in your delegated administrator account, in the navigation pane, select Account management. Because you’re signed in as the delegated administrator, you can enable and disable Amazon Inspector in the other accounts that are part of your organization. You can also automatically enable Amazon Inspector for new member accounts.
In the navigation pane, select Findings. Using the contextualized Amazon Inspector risk score, these findings are sorted into several severity ratings.
The contextualized Amazon Inspector risk score is calculated by correlating CVE information with findings such as network access and exploitability.
This score is used to derive severity of a finding and prioritize the most critical findings to improve remediation response efficiency.
Figure 20: Findings in Amazon Inspector sorted by severity (default)
When you enable Amazon Inspector, it automatically discovers all of your Amazon EC2 and Amazon ECR resources. It scans these workloads to detect vulnerabilities that pose risks to the security of your compute workloads. After the initial scan, Amazon Inspector continues to monitor your environment. It automatically scans new resources and re-scans existing resources when changes are detected. As vulnerabilities are remediated or resources are removed from service, Amazon Inspector automatically updates the associated security findings.
In order to successfully scan EC2 instances, Amazon Inspector requires inventory collected by AWS Systems Manager and the Systems Manager agent. This is installed by default on many EC2 instances. If you find some instances aren’t being scanned by Amazon Inspector, this might be because they aren’t being managed by Systems Manager.
Select a findings title to see the associated report.
Each finding provides a description, severity rating, information about the affected resource, and additional details such as resource tags and how to remediate the reported vulnerability.
Amazon Inspector stores active findings until they are closed by remediation. Findings that are closed are displayed for 30 days.
Integrate CodeGuru Security with Amazon Inspector to scan Lambda functions
Amazon Inspector and CodeGuru Security work harmoniously together. CodeGuru Security is available through Amazon Inspector Lambda code scanning. After activating Lambda code scanning, you can configure automated code scans to be performed on your Lambda functions.
Use the following steps to configure Amazon CodeGuru Security with Amazon Inspector Lambda code scanning to evaluate Lambda functions.
Open the Amazon Inspector console and select Account management from the navigation pane.
Select the AWS account you want to activate Lambda code scanning in.
Figure 22: Activating AWS Lambda code scanning from the Amazon Inspector Account management console
Choose Activate and select AWS Lambda code scanning.
With Lambda code scanning activated, security findings for your Lambda function code will appear in the All findings section of Amazon Inspector.
Amazon Inspector plays a crucial role in maintaining the highest security standards for your resources. Whether you’re installing a new package on an EC2 instance, applying a software patch, or when a new CVE affecting a specific resource is disclosed, Amazon Inspector can assist with quick identification and remediation.
Conclusion
Incorporating security at every stage of the software development lifecycle is paramount and requires that security be a consideration from the outset. Shifting left enables security teams to reduce overall application security risks.
Using these AWS services — Amazon CodeWhisperer, Amazon CodeGuru and Amazon Inspector — not only aids in early risk identification and mitigation, it empowers your development and security teams, leading to more efficient and secure business outcomes.
In the AWS Security Profile series, we feature the people who work in Amazon Web Services (AWS) Security and help keep our customers safe and secure. This interview is with Tom Scholl, VP and Distinguished Engineer for AWS.
What do you do in your current role and how long have you been at AWS?
I’m currently a vice president and distinguished engineer in the infrastructure organization at AWS. My role includes working on the AWS global network backbone, as well as focusing on denial-of-service detection and mitigation systems. I’ve been with AWS for over 12 years.
What initially got you interested in networking and how did that lead you to the anti-abuse and distributed denial of service (DDoS) space?
My interest in large global network infrastructure started when I was a teenager in the 1990s. I remember reading a magazine at the time that cataloged all the large IP transit providers on the internet, complete with network topology maps and sizes of links. It inspired me to want to work on the engineering teams that supported that. Over time, I was fortunate enough to move from working at a small ISP to a telecom carrier where I was able to work on their POP and backbone designs. It was there that I learned about the internet peering ecosystem and started collaborating with network operators from around the globe.
For the last 20-plus years, DDoS was always something I had to deal with to some extent. Namely, from the networking lens of preventing network congestion through traffic-engineering and capacity planning, as well as supporting the integration of DDoS traffic scrubbers into network infrastructure.
About three years ago, I became especially intrigued by the network abuse and DDoS space after using AWS network telemetry to observe the size of malicious events in the wild. I started to be interested in how mitigation could be improved, and how to break down the problem into smaller pieces to better understand the true sources of attack traffic. Instead of merely being an observer, I wanted to be a part of the solution and make it better. This required me to immerse myself into the domain, both from the perspective of learning the technical details and by getting hands-on and understanding the DDoS industry and environment as a whole. Part of how I did this was by engaging with my peers in the industry at other companies and absorbing years of knowledge from them.
How do you explain your job to your non-technical friends and family?
I try to explain both areas that I work on. First, that I help build the global network infrastructure that connects AWS and its customers to the rest of the world. I explain that for a home user to reach popular destinations hosted on AWS, data has to traverse a series of networks and physical cables that are interconnected so that the user’s home computer or mobile phone can send packets to another part of the world in less than a second. All that requires coordination with external networks, which have their own practices and policies on how they handle traffic. AWS has to navigate that complexity and build and operate our infrastructure with customer availability and security in mind. Second, when it comes to DDoS and network abuse, I explain that there are bad actors on the internet that use DDoS to cause impairment for a variety of reasons. It could be someone wanting to disrupt online gaming, video conferencing, or regular business operations for any given website or company. I work to prevent those events from causing any sort of impairment and trace back the source to disrupt that infrastructure launching them to prevent it from being effective in the future.
Recently, you were awarded the J.D. Falk Award by the Messaging Malware Mobile Anti-Abuse Working Group (M3AAWG) for IP Spoofing Mitigation. Congratulations! Please tell us more about the efforts that led to this.
Basically, there are three main types of DDoS attacks we observe: botnet-based unicast floods, spoofed amplification/reflection attacks, and proxy-driven HTTP request floods. The amplification/reflection aspect is interesting because it requires DDoS infrastructure providers to acquire compute resources behind providers that permit IP spoofing. IP spoofing itself has a long history on the internet, with a request for comment/best current practice (RFC/BCP) first written back in 2000 recommending that providers prevent this from occurring. However, adoption of this practice is still spotty on the internet.
At NANOG76, there was a proposal that these sorts of spoofed attacks could be traced by network operators in the path of the pre-amplification/reflection traffic (before it bounced off the reflectors). I personally started getting involved in this effort about two years ago. AWS operates a large global network and has network telemetry data that would help me identify pre-amplification/reflection traffic entering our network. This would allow me to triangulate the source network generating this. I then started engaging various networks directly that we connect to and provided them timestamps, spoofed source IP addresses, and specific protocols and ports involved with the traffic, hoping they could use their network telemetry to identify the customer generating it. From there, they’d engage with their customer to get the source shutdown or, failing that, implement packet filters on their customer to prevent spoofing.
Initially, only a few networks were capable of doing this well. This meant I had to spend a fair amount of energy in educating various networks around the globe on what spoofed traffic is, how to use their network telemetry to find it, and how to handle it. This was the most complicated and challenging part because this wasn’t on the radar of many networks out there. Up to this time, frontline network operations and abuse teams at various networks, including some very large ones, were not proficient in dealing with this.
The education I did included a variety of engagements, including sharing drawings with the day-in-the-life of a spoofed packet in a reflection attack, providing instructions on how to use their network telemetry tools, connecting them with their network telemetry vendors to help them, and even going so far as using other more exotic methods to identify which of their customers were spoofing and pointing out who they needed to analyze more deeply. In the end, it’s about getting other networks to be responsive and take action and, in the best cases, find spoofing on their own and act upon it.
Incredible! How did it feel accepting the award at the M3AAWG General Meeting in Brooklyn?
It was an honor to accept it and see some acknowledgement for the behind-the-scenes work that goes on to make the internet a better place.
What’s next for you in your work to suppress IP spoofing?
Continue tracing exercises and engaging with external providers. In particular, some of the network providers that experience challenges in dealing with spoofing and how we can improve their operations. Also, determining more effective ways to educate the hosting providers where IP spoofing is a common issue and making them implement proper default controls to not allow this behavior. Another aspect is being a force multiplier to enable others to spread the word and be part of the education process.
Looking ahead, what are some of your other goals for improving users’ online experiences and security?
Continually focusing on improving our DDoS defense strategies and working with customers to build tailored solutions that address some of their unique requirements. Across AWS, we have many services that are architected in different ways, so a key part of this is how do we raise the bar from a DDoS defense perspective across each of them. AWS customers also have their own unique architecture and protocols that can require developing new solutions to address their specific needs. On the disruption front, we will continue to focus on disrupting DDoS-as-a-service provider infrastructure beyond disrupting spoofing to disrupting botnets and the infrastructure associated with HTTP request floods.
With HTTP request floods being much more popular than byte-heavy and packet-heavy threat methods, it’s important to highlight the risks open proxies on the internet pose. Some of this emphasizes why there need to be some defaults in software packages to prevent misuse, in addition to network operators proactively identifying open proxies and taking appropriate action. Hosting providers should also recognize when their customer resources are communicating with large fleets of proxies and consider taking appropriate mitigations.
What are the most critical skills you would advise people need to be successful in network security?
I’m a huge proponent of being hands-on and diving into problems to truly understand how things are operating. Putting yourself outside your comfort zone, diving deep into the data to understand something, and translating that into outcomes and actions is something I highly encourage. After you immerse yourself in a particular domain, you can be much more effective at developing strategies and rapid prototyping to move forward. You can make incremental progress with small actions. You don’t have to wait for the perfect and complete solution to make some progress. I also encourage collaboration with others because there is incredible value in seeking out diverse opinions. There are resources out there to engage with, provided you’re willing to put in the work to learn and determine how you want to give back. The best people I’ve worked with don’t do it for public attention, blog posts, or social media status. They work in the background and don’t expect anything in return. They do it because of their desire to protect their customers and, where possible, the internet at large.
Lastly, if you had to pick an industry outside of security for your career, what would you be doing?
I’m over the maximum age allowed to start as an air traffic controller, so I suppose an air transport pilot or a locomotive engineer would be pretty neat.
If you have feedback about this post, submit comments in the Comments section below. If you have questions about this post, contact AWS Support.
Want more AWS Security news? Follow us on Twitter.
November 14, 2023: We’ve updated this post to use IAM Identity Center and follow updated IAM best practices.
In this post, we discuss the concept of folders in Amazon Simple Storage Service (Amazon S3) and how to use policies to restrict access to these folders. The idea is that by properly managing permissions, you can allow federated users to have full access to their respective folders and no access to the rest of the folders.
Overview
Imagine you have a team of developers named Adele, Bob, and David. Each of them has a dedicated folder in a shared S3 bucket, and they should only have access to their respective folders. These users are authenticated through AWS IAM Identity Center (successor to AWS Single Sign-On).
In this post, you’ll focus on David. You’ll walk through the process of setting up these permissions for David using IAM Identity Center and Amazon S3. Before you get started, let’s first discuss what is meant by folders in Amazon S3, because it’s not as straightforward as it might seem. To learn how to create a policy with folder-level permissions, you’ll walk through a scenario similar to what many people have done on existing files shares, where every IAM Identity Center user has access to only their own home folder. With folder-level permissions, you can granularly control who has access to which objects in a specific bucket.
You’ll be shown a policy that grants IAM Identity Center users access to the same Amazon S3 bucket so that they can use the AWS Management Console to store their information. The policy allows users in the company to upload or download files from their department’s folder, but not to access any other department’s folder in the bucket.
After the policy is explained, you’ll see how to create an individual policy for each IAM Identity Center user.
Throughout the rest of this post, you will use a policy, which will be associated with an IAM Identity Center user named David. Also, you must have already created an S3 bucket.
Note: S3 buckets have a global namespace and you must change the bucket name to a unique name.
For this blog post, you will need an S3 bucket with the following structure (the example bucket name for the rest of the blog is “my-new-company-123456789”):
Figure 1: Screenshot of the root of the my-new-company-123456789 bucket
Your S3 bucket structure should have two folders, home and confidential, with a file root-file.txt in the main bucket directory. Inside confidential you will have no items or folders. Inside home there should be three sub-folders: Adele, Bob, and David.
Figure 2: Screenshot of the home/ directory of the my-new-company-123456789 bucket
A brief lesson about Amazon S3 objects
Before explaining the policy, it’s important to review how Amazon S3 objects are named. This brief description isn’t comprehensive, but will help you understand how the policy works. If you already know about Amazon S3 objects and prefixes, skip ahead to Creating David in Identity Center.
Amazon S3 stores data in a flat structure; you create a bucket, and the bucket stores objects. S3 doesn’t have a hierarchy of sub-buckets or folders; however, tools like the console can emulate a folder hierarchy to present folders in a bucket by using the names of objects (also known as keys). When you create a folder in S3, S3 creates a 0-byte object with a key that references the folder name that you provided. For example, if you create a folder named photos in your bucket, the S3 console creates a 0-byte object with the key photos/. The console creates this object to support the idea of folders. The S3 console treats all objects that have a forward slash (/) character as the last (trailing) character in the key name as a folder (for example, examplekeyname/)
To give you an example, for an object that’s named home/common/shared.txt, the console will show the shared.txt file in the common folder in the home folder. The names of these folders (such as home/ or home/common/) are called prefixes, and prefixes like these are what you use to specify David’s department folder in his policy. By the way, the slash (/) in a prefix like home/ isn’t a reserved character — you could name an object (using the Amazon S3 API) with prefixes such as home:common:shared.txt or home-common-shared.txt. However, the convention is to use a slash as the delimiter, and the Amazon S3 console (but not S3 itself) treats the slash as a special character for showing objects in folders. For more information on organizing objects in the S3 console using folders, see Organizing objects in the Amazon S3 console by using folders.
Creating David in Identity Center
IAM Identity Center helps you securely create or connect your workforce identities and manage their access centrally across AWS accounts and applications. Identity Center is the recommended approach for workforce authentication and authorization on AWS for organizations of any size and type. Using Identity Center, you can create and manage user identities in AWS, or connect your existing identity source, including Microsoft Active Directory, Okta, Ping Identity, JumpCloud, Google Workspace, and Azure Active Directory (Azure AD). For further reading on IAM Identity Center, see the Identity Center getting started page.
Begin by setting up David as an IAM Identity Center user. To start, open the AWS Management Console and go to IAM Identity Center and create a user.
Note: The following steps are for Identity Center without System for Cross-domain Identity Management (SCIM) turned on, the add user option won’t be available if SCIM is turned on.
From the left pane of the Identity Center console, select Users, and then choose Add user.
Figure 3: Screenshot of IAM Identity Center Users page.
Enter David as the Username, enter an email address that you have access to as you will need this later to confirm your user, and then enter a First name, Last name, and Display name.
Leave the rest as default and choose Add user.
Select Users from the left navigation pane and verify you’ve created the user David.
Figure 4: Screenshot of adding users to group in Identity Center.
Now that you’re verified the user David has been created, use the left pane to navigate to Permission sets, then choose Create permission set.
Figure 5: Screenshot of permission sets in Identity Center.
Select Custom permission set as your Permission set type, then choose Next.
Figure 6: Screenshot of permission set types in Identity Center.
David’s policy
This is David’s complete policy, which will be associated with an IAM Identity Center federated user named David by using the console. This policy grants David full console access to only his folder (/home/David) and no one else’s. While you could grant each user access to their own bucket, keep in mind that an AWS account can have up to 100 buckets by default. By creating home folders and granting the appropriate permissions, you can instead allow thousands of users to share a single bucket.
Now, copy and paste the preceding IAM Policy into the inline policy editor. In this case, you use the JSON editor. For information on creating policies, see Creating IAM policies.
Figure 7: Screenshot of the inline policy inside the permissions set in Identity Center.
Give your permission set a name and a description, then leave the rest at the default settings and choose Next.
Verify that you modify the policies to have the bucket name you created earlier.
After your permission set has been created, navigate to AWS accounts on the left navigation pane, then select Assign users or groups.
Figure 8: Screenshot of the AWS accounts in Identity Center.
Select the user David and choose Next.
Figure 9: Screenshot of the AWS accounts in Identity Center.
Select the permission set you created earlier, choose Next, leave the rest at the default settings and choose Submit.
Figure 10: Screenshot of the permission sets in Identity Center.
You’ve now created and attached the permissions required for David to view his S3 bucket folder, but not to view the objects in other users’ folders. You can verify this by signing in as David through the AWS access portal.
Figure 11: Screenshot of the settings summary in Identity Center.
Navigate to the dashboard in IAM Identity Center and go to the Settings summary, then choose the AWS access portal URL.
Figure 12: Screenshot of David signing into the console via the Identity Center dashboard URL.
Sign in as the user David with the one-time password you received earlier when creating David.
Figure 13: Second screenshot of David signing into the console through the Identity Center dashboard URL.
Open the Amazon S3 console.
Search for the bucket you created earlier.
Figure 14: Screenshot of my-new-company-123456789 bucket in the AWS console.
Navigate to David’s folder and verify that you have read and write access to the folder. If you navigate to other users’ folders, you’ll find that you don’t have access to the objects inside their folders.
David’s policy consists of four blocks; let’s look at each individually.
Before you begin identifying the specific folders David can have access to, you must give him two permissions that are required for Amazon S3 console access: ListAllMyBuckets and GetBucketLocation.
The ListAllMyBuckets action grants David permission to list all the buckets in the AWS account, which is required for navigating to buckets in the Amazon S3 console (and as an aside, you currently can’t selectively filter out certain buckets, so users must have permission to list all buckets for console access). The console also does a GetBucketLocation call when users initially navigate to the Amazon S3 console, which is why David also requires permission for that action. Without these two actions, David will get an access denied error in the console.
Block 2: Allow listing objects in root and home folders
Although David should have access to only his home folder, he requires additional permissions so that he can navigate to his folder in the Amazon S3 console. David needs permission to list objects at the root level of the my-new-company-123456789 bucket and to the home/ folder. The following policy grants these permissions to David:
Without the ListBucket permission, David can’t navigate to his folder because he won’t have permissions to view the contents of the root and home folders. When David tries to use the console to view the contents of the my-new-company-123456789 bucket, the console will return an access denied error. Although this policy grants David permission to list all objects in the root and home folders, he won’t be able to view the contents of any files or folders except his own (you specify these permissions in the next block).
This block includes conditions, which let you limit under what conditions a request to AWS is valid. In this case, David can list objects in the my-new-company-123456789 bucket only when he requests objects without a prefix (objects at the root level) and objects with the home/ prefix (objects in the home folder). If David tries to navigate to other folders, such as confidential/, David is denied access. Additionally, David needs permissions to list prefix home/David to be able to use the search functionality of the console instead of scrolling down the list of users’ folders.
To set these root and home folder permissions, I used two conditions: s3:prefix and s3:delimiter. The s3:prefix condition specifies the folders that David has ListBucket permissions for. For example, David can list the following files and folders in the my-new-company-123456789 bucket:
But David cannot list files or subfolders in the confidential/, home/Adele, or home/Bob folders.
Although the s3:delimiter condition isn’t required for console access, it’s still a good practice to include it in case David makes requests by using the API. As previously noted, the delimiter is a character—such as a slash (/)—that identifies the folder that an object is in. The delimiter is useful when you want to list objects as if they were in a file system. For example, let’s assume the my-new-company-123456789 bucket stored thousands of objects. If David includes the delimiter in his requests, he can limit the number of returned objects to just the names of files and subfolders in the folder he specified. Without the delimiter, in addition to every file in the folder he specified, David would get a list of all files in any subfolders.
Block 3: Allow listing objects in David’s folder
In addition to the root and home folders, David requires access to all objects in the home/David/ folder and any subfolders that he might create. Here’s a policy that allows this:
In the condition above, you use a StringLike expression in combination with the asterisk (*) to represent an object in David’s folder, where the asterisk acts as a wildcard. That way, David can list files and folders in his folder (home/David/). You couldn’t include this condition in the previous block (AllowRootAndHomeListingOfCompanyBucket) because it used the StringEquals expression, which would interpret the asterisk (*) as an asterisk, not as a wildcard.
In the next section, the AllowAllS3ActionsInUserFolder block, you’ll see that the Resource element specifies my-new-company/home/David/*, which looks like the condition that I specified in this section. You might think that you can similarly use the Resource element to specify David’s folder in this block. However, the ListBucket action is a bucket-level operation, meaning the Resource element for the ListBucket action applies only to bucket names and doesn’t take folder names into account. So, to limit actions at the object level (files and folders), you must use conditions.
Block 4: Allow all Amazon S3 actions in David’s folder
Finally, you specify David’s actions (such as read, write, and delete permissions) and limit them to just his home folder, as shown in the following policy:
For the Action element, you specified s3:*, which means David has permission to do all Amazon S3 actions. In the Resource element, you specified David’s folder with an asterisk (*) (a wildcard) so that David can perform actions on the folder and inside the folder. For example, David has permission to change his folder’s storage class. David also has permission to upload files, delete files, and create subfolders in his folder (perform actions in the folder).
An easier way to manage policies with policy variables
In David’s folder-level policy you specified David’s home folder. If you wanted a similar policy for users like Bob and Adele, you’d have to create separate policies that specify their home folders. Instead of creating individual policies for each IAM Identity Center user, you can use policy variables and create a single policy that applies to multiple users (a group policy). Policy variables act as placeholders. When you make a request to a service in AWS, the placeholder is replaced by a value from the request when the policy is evaluated.
For example, you can use the previous policy and replace David’s user name with a variable that uses the requester’s user name through attributes and PrincipalTag as shown in the following policy (copy this policy to use in the procedure that follows):
To implement this policy with variables, begin by opening the IAM Identity Center console using the main AWS admin account (ensuring you’re not signed in as David).
Select Settings on the left-hand side, then select the Attributes for access control tab.
Figure 15: Screenshot of Settings inside Identity Center.
Create a new attribute for access control, entering userName as the Key and ${path:userName} as the Value, then choose Save changes. This will add a session tag to your Identity Center user and allow you to use that tag in an IAM policy.
Figure 16: Screenshot of managing attributes inside Identity Center settings.
To edit David’s permissions, go back to the IAM Identity Center console and select Permission sets.
Figure 17: Screenshot of permission sets inside Identity Center with Davids-Permissions selected.
Select David’s permission set that you created previously.
Select Inline policy and then choose Edit to update David’s policy by replacing it with the modified policy that you copied at the beginning of this section, which will resolve to David’s username.
Figure 18: Screenshot of David’s policy inside his permission set inside Identity Center.
You can validate that this is set up correctly by signing in to David’s user through the Identity Center dashboard as you did before and verifying you have access to the David folder and not the Bob or Adele folder.
Figure 19: Screenshot of David’s S3 folder with access to a .jpg file inside.
Whenever a user makes a request to AWS, the variable is replaced by the user name of whoever made the request. For example, when David makes a request, ${aws:PrincipalTag/userName} resolves to David; when Adele makes the request, ${aws:PrincipalTag/userName} resolves to Adele.
It’s important to note that, if this is the route you use to grant access, you must control and limit who can set this username tag on an IAM principal. Anyone who can set this tag can effectively read/write to any of these bucket prefixes. It’s important that you limit access and protect the bucket prefixes and who can set the tags. For more information, see What is ABAC for AWS, and the Attribute-based access control User Guide.
Conclusion
By using Amazon S3 folders, you can follow the principle of least privilege and verify that the right users have access to what they need, and only to what they need.
See the following example policy that only allows API access to the buckets, and only allows for adding, deleting, restoring, and listing objects inside the folders:
Graph modelling is a highly effective technique for representing and analysing complex and interconnected data across various domains. By deciphering relationships between entities, graph modelling can reveal insights that might be otherwise difficult to identify using traditional data modelling approaches. In this article, we will explore what graph modelling is and guide you through a step-by-step process of implementing graph modelling to create a social network graph.
What is graph modelling?
Graph modelling is a method for representing real-world entities and their relationships using nodes, edges, and properties. It employs graph theory, a branch of mathematics that studies graphs, to visualise and analyse the structure and patterns within complex datasets. Common applications of graph modelling include social network analysis, recommendation systems, and biological networks.
Graph modelling process
Step 1: Define your domain
Before diving into graph modelling, it’s crucial to have a clear understanding of the domain you’re working with. This involves getting acquainted with the relevant terms, concepts, and relationships that exist in your specific field. To create a social network graph, familiarise yourself with terms like users, friendships, posts, likes, and comments.
Step 2: Identify entities and relationships
After defining your domain, you need to determine the entities (nodes) and relationships (edges) that exist within it. Entities are the primary objects in your domain, while relationships represent how these entities interact with each other. In a social network graph, users are entities, and friendships are relationships.
Step 3: Establish properties
Each entity and relationship may have a set of properties that provide additional information. In this step, identify relevant properties based on their significance to the domain. A user entity might have properties like name, age, and location. A friendship relationship could have a ‘since’ property to denote the establishment of the friendship.
Step 4: Choose a graph model
Once you’ve identified the entities, relationships, and properties, it’s time to choose a suitable graph model. Two common models are:
Property graph: A versatile model that easily accommodates properties on both nodes and edges. It’s well-suited for most applications.
Resource Description Framework (RDF): A World Wide Web Consortium (W3C) standard model, using triples of subject-predicate-object to represent data. It is commonly used in semantic web applications.
For a social network graph, a property graph model is typically suitable. This is because user entities have many attributes and features. Property graphs provide a clear representation of the relationships between people and their attribute profiles.
Figure 1 – Social network graph
Step 5: Develop a schema
Although not required, developing a schema can be helpful for large-scale projects and team collaborations. A schema defines the structure of your graph, including entity types, relationships, and properties. In a social network graph, you might have a schema that specifies the types of nodes (users, posts) and the relationships between them (friendships, likes, comments).
Step 6: Import or generate data
Next, acquire the data needed to populate your graph. This can come in the form of existing datasets or generated data from your application. For a social network graph, you can import user information from a CSV file and generate simulated friendships, posts, likes, and comments.
Step 7: Implement the graph using a graph database or other storage options
Finally, you need to store your graph data using a suitable graph database. Neo4j, Amazon Neptune, or Microsoft Azure Cosmos DB are examples of graph databases. Alternatively, depending on your specific requirements, you can use a non-graph database or an in-memory data structure to store the graph.
Step 8: Analyse and visualise the graph
After implementing the graph, you can perform various analyses using graph algorithms, such as shortest path, centrality, or community detection. In addition, visualising your graph can help you gain insights and facilitate communication with others.
Conclusion
By following these steps, you can effectively create and analyse graph models for your specific domain. Remember to adjust the steps according to your unique domain and requirements, and always ensure that confidential and sensitive data is properly protected.
Grab is the leading superapp platform in Southeast Asia, providing everyday services that matter to consumers. More than just a ride-hailing and food delivery app, Grab offers a wide range of on-demand services in the region, including mobility, food, package and grocery delivery services, mobile payments, and financial services across 428 cities in eight countries.
Powered by technology and driven by heart, our mission is to drive Southeast Asia forward by creating economic empowerment for everyone. If this mission speaks to you, join our team today!
The collective thoughts of the interwebz
Manage Consent
To provide the best experiences, we use technologies like cookies to store and/or access device information. Consenting to these technologies will allow us to process data such as browsing behavior or unique IDs on this site. Not consenting or withdrawing consent, may adversely affect certain features and functions.
Functional
Always active
The technical storage or access is strictly necessary for the legitimate purpose of enabling the use of a specific service explicitly requested by the subscriber or user, or for the sole purpose of carrying out the transmission of a communication over an electronic communications network.
Preferences
The technical storage or access is necessary for the legitimate purpose of storing preferences that are not requested by the subscriber or user.
Statistics
The technical storage or access that is used exclusively for statistical purposes.The technical storage or access that is used exclusively for anonymous statistical purposes. Without a subpoena, voluntary compliance on the part of your Internet Service Provider, or additional records from a third party, information stored or retrieved for this purpose alone cannot usually be used to identify you.
Marketing
The technical storage or access is required to create user profiles to send advertising, or to track the user on a website or across several websites for similar marketing purposes.