Tag Archives: Intermediate (200)

Automate Container Anomaly Monitoring of Amazon Elastic Kubernetes Service Clusters with Amazon DevOps Guru

Post Syndicated from Rahul Sharad Gaikwad original https://aws.amazon.com/blogs/devops/automate-container-anomaly-monitoring-of-amazon-elastic-kubernetes-service-clusters-with-amazon-devops-guru/

Observability in a container-centric environment presents new challenges for operators due to the increasing number of abstractions and supporting infrastructure. In many cases, organizations can have hundreds of clusters and thousands of services/tasks/pods running concurrently. This post will demonstrate new features in Amazon DevOps Guru to help simplify and expand the capabilities of the operator. The features include grouping anomalies by metric and container cluster to improve context and simplify access and support for additional Amazon CloudWatch Container Insight metrics. An example of these capabilities in action would be that Amazon DevOps Guru can now identify anomalies in CPU, memory, or networking within Amazon Elastic Kubernetes Service (EKS), notifying the operators and letting them more easily navigate to the affected cluster to examine the collected data.

Amazon DevOps Guru offers a fully managed AIOps platform service that lets developers and operators improve application availability and resolve operational issues faster. It minimizes manual effort by leveraging machine learning (ML) powered recommendations. Its ML models take advantage of the expertise of AWS in operating highly available applications for the world’s largest ecommerce business for over 20 years. DevOps Guru automatically detects operational issues, predicts impending resource exhaustion, details likely causes, and recommends remediation actions.

Solution Overview

In this post, we will demonstrate the new Amazon DevOps Guru features around cluster grouping and additionally supported Amazon EKS metrics. To demonstrate these features, we will show you how to create a Kubernetes cluster, instrument the cluster using AWS Distro for OpenTelemetry, and then configure Amazon DevOps Guru to automate anomaly detection of EKS metrics. A previous blog provides detail on the AWS Distro for OpenTelemetry collector that is employed here.

Prerequisites

EKS Cluster Creation

We employ the eksctl CLI tool to create an Amazon EKS. Using eksctl, you can provide details on the command line or specify a manifest file. The following manifest is used to create a single managed node using Amazon Elastic Compute Cloud (EC2), and this will be created and constrained to the specified Region via entry metadata/region and Availability Zones via the managedNodeGroups/availabilityZones entry. By default, this will create a new VPC with eight subnets.

# An example of ClusterConfig object using Managed Nodes
---
    apiVersion: eksctl.io/v1alpha5
    kind: ClusterConfig

    metadata:
      name: devopsguru-eks-cluster
      region: <SPECIFY_REGION_HERE>
      version: "1.21"

    availabilityZones: ["<FIRST_AZ>","<SECOND_AZ>"]
    managedNodeGroups:
      - name: managed-ng-private
        privateNetworking: true
        instanceType: t3.medium
        minSize: 1
        desiredCapacity: 1
        maxSize: 6
        availabilityZones: ["<SPECIFY_AVAILABILITY_ZONE(S)_HERE"]
        volumeSize: 20
        labels: {role: worker}
        tags:
          nodegroup-role: worker
    cloudWatch:
      clusterLogging:
        enableTypes:
          - "api"
  • To create an Amazon EKS cluster using eksctl and a manifest file, we use eksctl create as shown below. Note that this step will take 10 – 15 minutes to establish the cluster.
$ eksctl create cluster -f devopsguru-managed-node.yaml
2021-10-13 10:44:53 [i] eksctl version 0.69.0
…
2021-10-13 11:04:42 [✔] all EKS cluster resources for "devopsguru-eks-cluster" have been created
2021-10-13 11:04:44 [i] nodegroup "managed-ng-private" has 1 node(s)
2021-10-13 11:04:44 [i] node "<ip>.<region>.compute.internal" is ready
2021-10-13 11:04:44 [i] waiting for at least 1 node(s) to become ready in "managed-ng-private"
2021-10-13 11:04:44 [i] nodegroup "managed-ng-private" has 1 node(s)
2021-10-13 11:04:44 [i] node "<ip>.<region>.compute.internal" is ready
2021-10-13 11:04:47 [i] kubectl command should work with "/Users/<user>/.kube/config"
  • Once this is complete, you can use kubectl, the Kubernetes CLI, to access the managed nodes that are running.
$ kubectl get nodes
NAME STATUS ROLES AGE VERSION
<ip>.<region>.compute.internal Ready <none> 76m v1.21.4-eks-033ce7e

AWS Distro for OpenTelemetry Collector Installation

We will use AWS Distro for OpenTelemetry Collector to extract metrics from a pod running in Amazon EKS. This will collect metrics within the Kubernetes cluster and surface them to Amazon CloudWatch. We start by defining a policy to allow access. The following information comes from the post here.

Attach the CloudWatchAgentServerPolicy IAM Policy to worker node

  • Open the Amazon EC2 console.
  • Select one of the worker node instances, and choose the IAM role in the description.
  • On the IAM role page, choose Attach policies.
  • In the list of policies, select the check box next to CloudWatchAgentServerPolicy. You can use the search box to find this policy.
  • Choose Attach policies.

Deploy AWS OpenTelemetry Collector on Amazon EKS

Next, you will deploy the AWS Distro for OpenTelemetry using a GitHub hosted manifest.

  • Deploy the artifact to the Amazon EKS cluster using the following command:
$ curl https://raw.githubusercontent.com/aws-observability/aws-otel-collector/main/deployment-template/eks/otel-container-insights-infra.yaml | kubectl apply -f -
  • View the resources in the aws-otel-eks namespace.
$ kubectl get pods -l name=aws-otel-eks-ci -n aws-otel-eks
NAME READY STATUS RESTARTS AGE
aws-otel-eks-ci-jdf2w 1/1 Running 0 107m

View Container Insight Metrics in Amazon CloudWatch

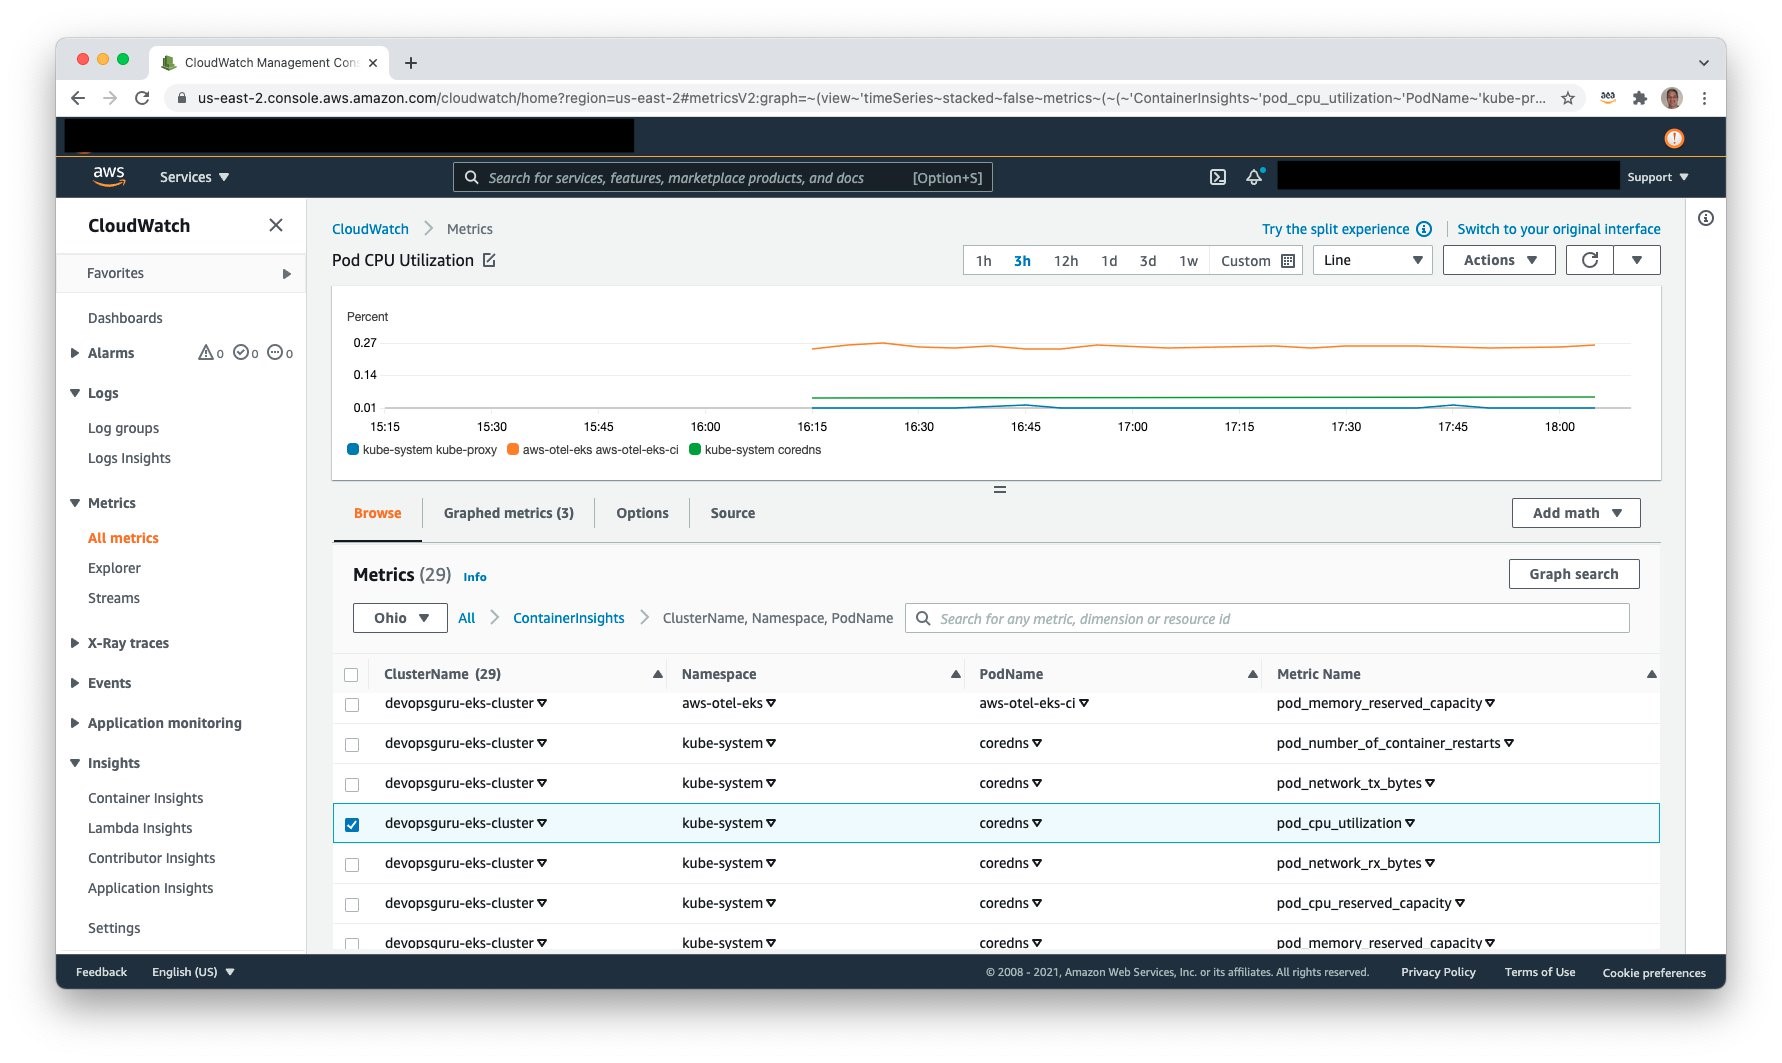
Access Amazon CloudWatch and select Metrics, All metrics to view the published metrics. Under Custom Namespaces, ContainerInsights is selectable. Under this, one can view metrics at the cluster, node, pod, namespace, and service granularity. The following example shows pod level metrics of CPU:

The AWS Console with Amazon Cloudwatch Container Insights Pod Level CPU Utilization.

Amazon Simple Notification Service

It is necessary to allow Amazon DevOps Guru access to Amazon SNS in order for Amazon SNS to publish events. During the setup process, an Amazon SNS Topic is created, and the following resource policy is applied:

{
    "Sid": "DevOpsGuru-added-SNS-topic-permissions",
    "Effect": "Allow",
    "Principal": {
        "Service": "region-id.devops-guru.amazonaws.com"
    },
    "Action": "sns:Publish",
    "Resource": "arn:aws:sns:region-id:topic-owner-account-id:my-topic-name",
    "Condition" : {
      "StringEquals" : {
        "AWS:SourceArn": "arn:aws:devops-guru:region-id:topic-owner-account-id:channel/devops-guru-channel-id",
        "AWS:SourceAccount": "topic-owner-account-id"
    }
  }
}

Amazon DevOps Guru

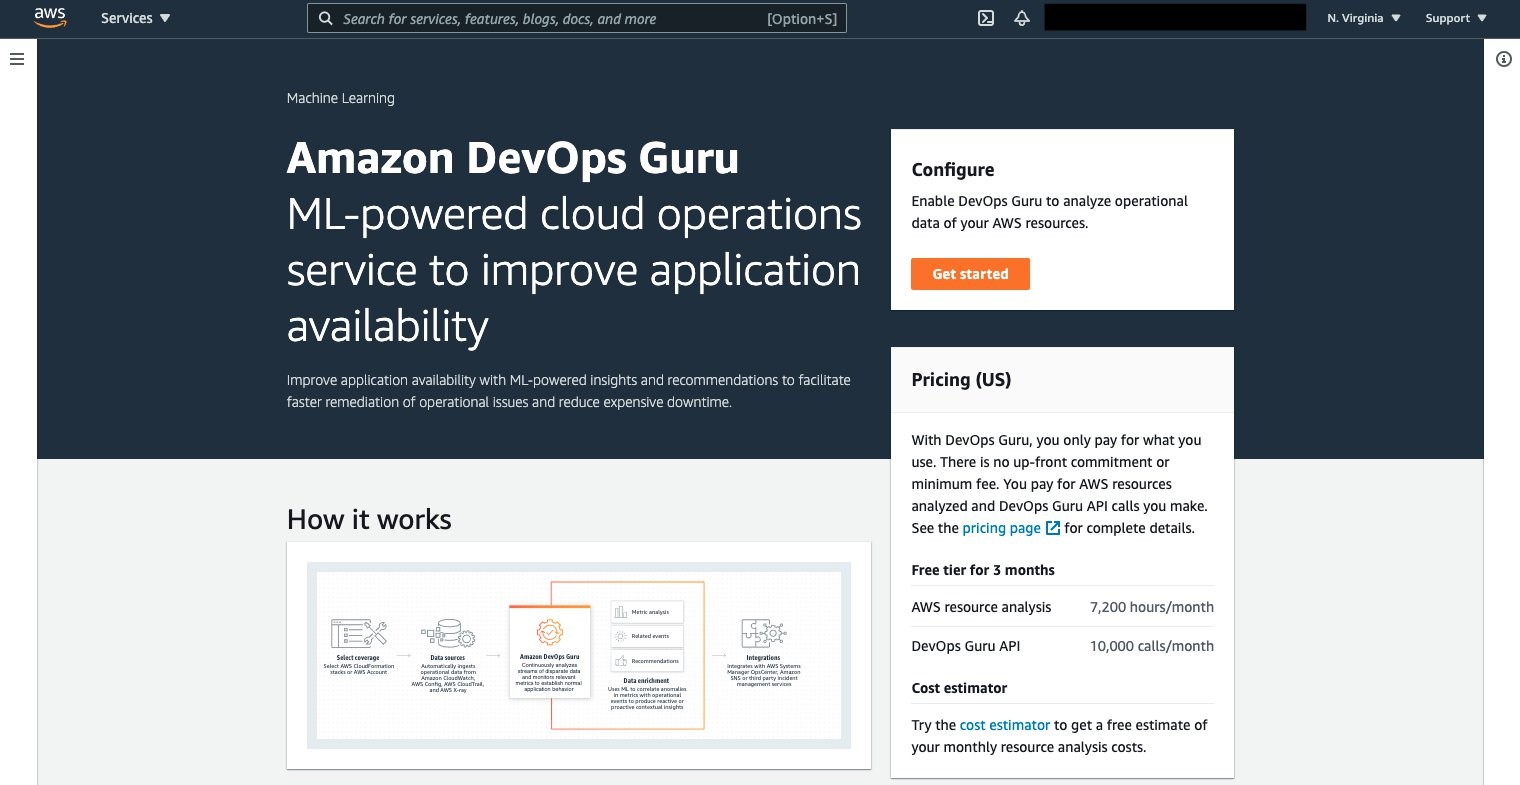
Amazon DevOps Guru can now be leveraged to monitor the Amazon EKS cluster and Managed Node Group. Select Amazon DevOps Guru, and select Get started as shown in the following figure to do this.

The Amazon DevOps Guru service via the AWS Console.

Once selected, the Get started console displays, letting you specify the IAM role for DevOps guru to access the appropriate resources.

The Get started dialog for Amazon DevOps Guru including instructions on how the service operates, IAM Role Permissions and Amazon DevOps Guru analysis coverage.

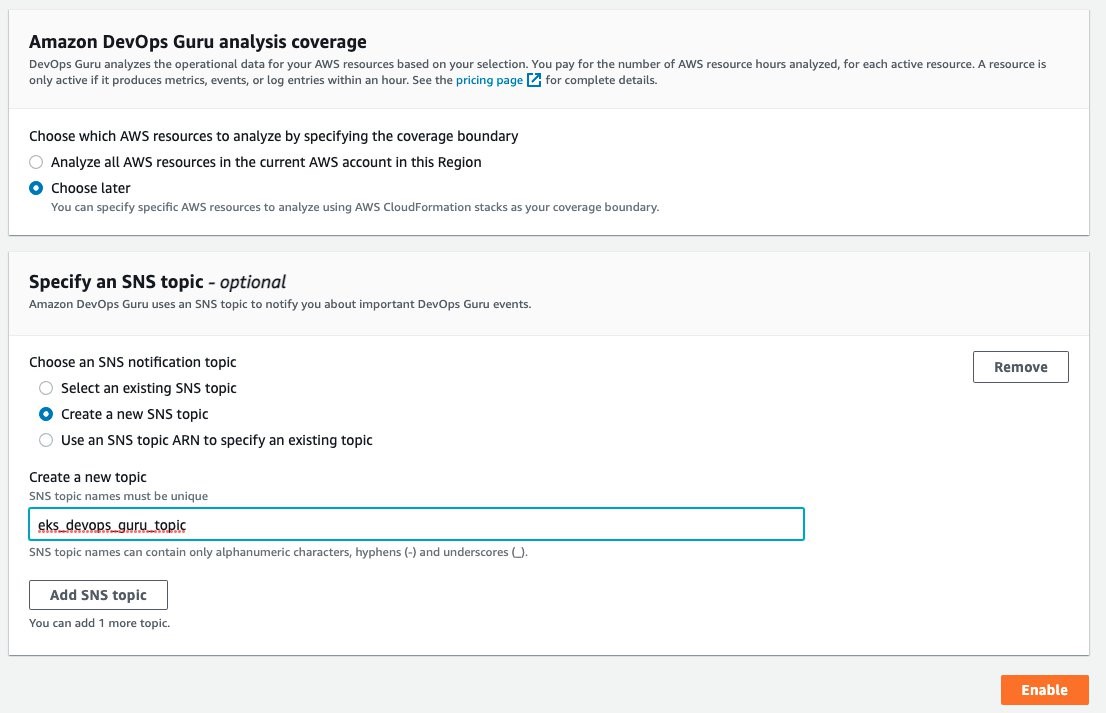
Under the Amazon DevOps Guru analysis coverage, Choose later is selected. This will let us specify the CloudFormation stacks to monitor. Select Create a new SNS topic, and provide a name. This will be used to collect notifications and allow for subscribers to then be notified. Select Enable when complete.

The Amazon DevOps Guru analysis coverage allowing the user to select all resources in a region or to choose later. In addition the image shows the dialog that requests the user specify an Amazon SNS topic for notification when insights occur.

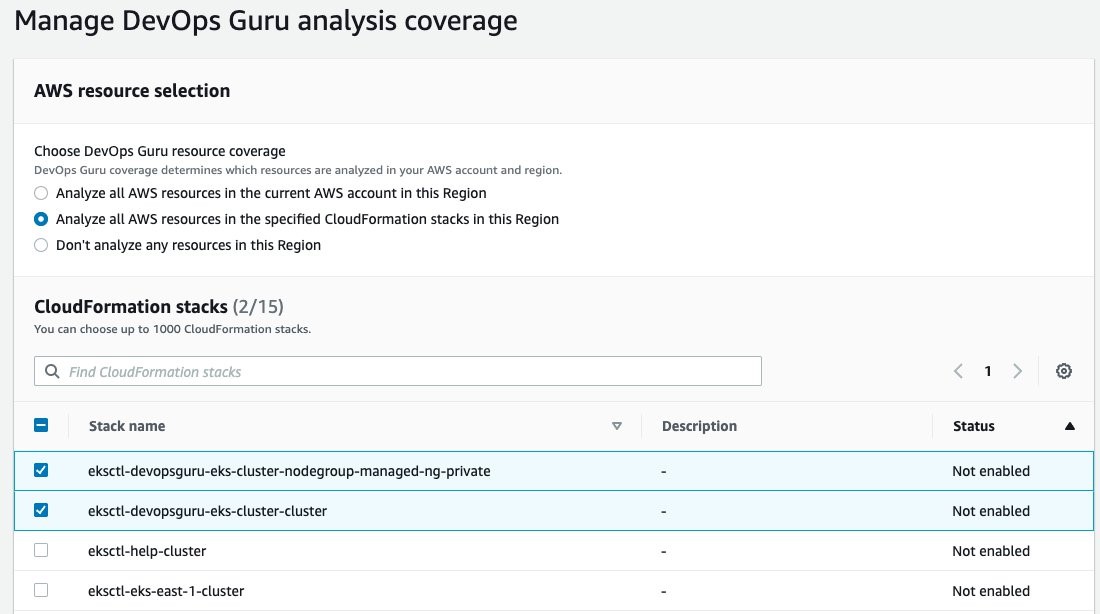
On the Manage DevOps Guru analysis coverage, select Analyze all AWS resources in the specified CloudFormation stacks in this Region. Then, select the cluster and managed node group AWS CloudFormation stacks so that DevOps Guru can monitor Amazon EKS.

A dialog where the user is able to specify the AWS CloudFormation stacks in a region for analysis coverage. Two stacks are select including the eks cluster and eks cluster managed node group.

Once this is selected, the display will update indicating that two CloudFormation stacks were added.

Amazon DevOps Guru Settings including DevOps Guru analysis coverage and Amazon SNS notifications.

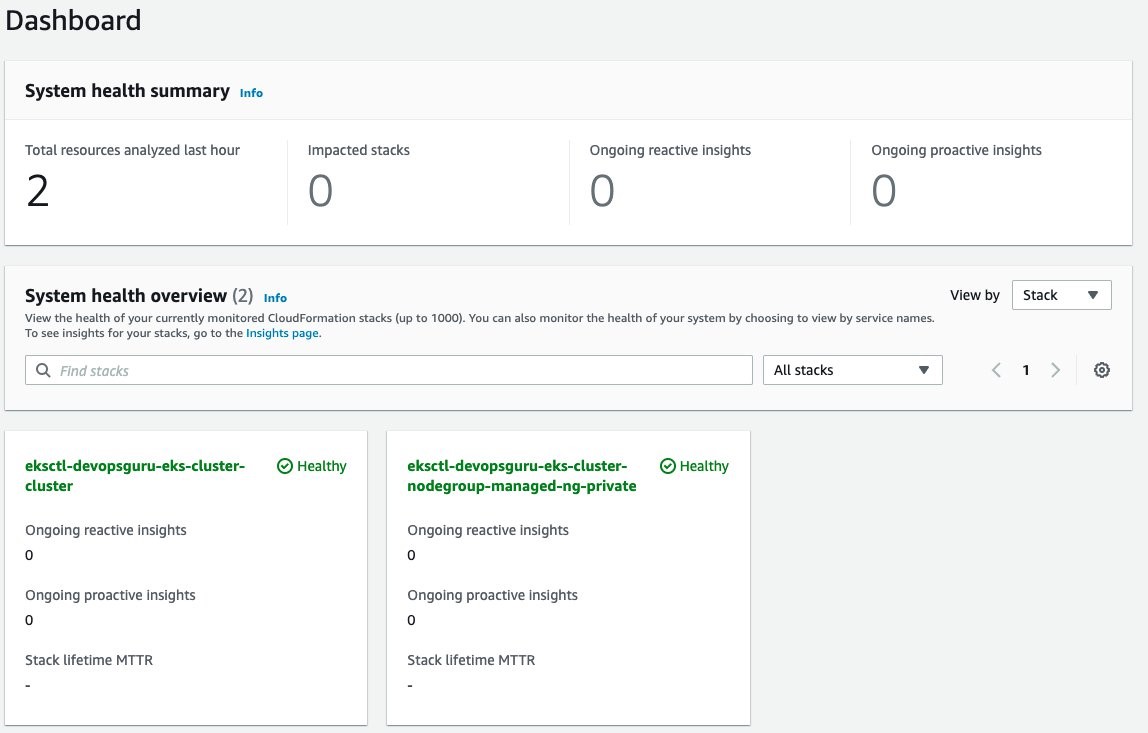
Amazon DevOps Guru will finally start analysis for those two stacks. This will take several hours to collect data and to identify normal operating conditions. Once this process is complete, the Dashboard will display that those resources have been analyzed, as shown in the following figure.

The completed analysis by DevOps guru of the two AWS Cloudformation stacks indicating a healthy status for both.

Enable Encryption on Amazon SNS Topic

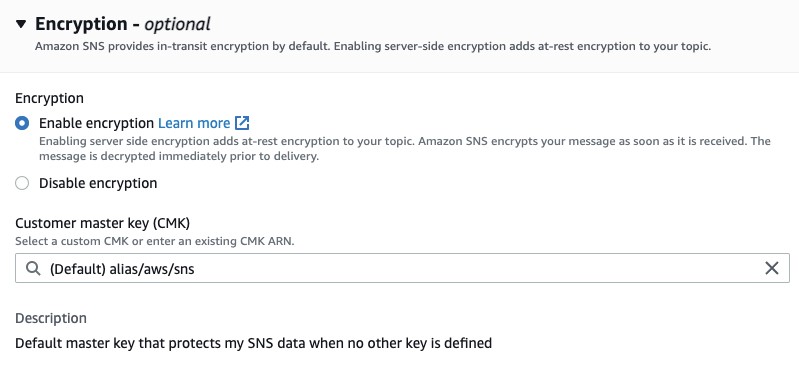
The Amazon SNS Topic created by Amazon DevOps Guru will not enable encryption by default. It is important to enable this feature to encrypt notifications at rest. Go to Amazon SNS, select the topic that is created and then Edit topic. Open the Encryption dialog box and enable encryption as shown in the following figure, specifying an alias, or accepting the default.

The Encryption dialog for Amazon SNS topic when it is Edited.

Deploy Sample Application on Amazon EKS To Trigger Insights

You will employ a sample application that is part of the AWS Distro for OpenTelemetry Collector to simulate failure. Using the following manifest, you will deploy a sample application that has pod resource limits for memory and CPU shares. These limits are artificially low and insufficient for the pod to run. The pod will exceed memory and will be identified for eviction by Amazon EKS. When it is evicted, it will attempt to be redeployed per the manifest requirement for a replica of one. In turn, this will repeat the process and generate memory and pod restart errors in Amazon CloudWatch. For this example, the deployment was left for over an hour, thereby causing the pod failure to repeat numerous times. The following is the manifest that you will create on the filesystem.

kind: Deployment
apiVersion: apps/v1
metadata:
  name: java-sample-app
  namespace: aws-otel-eks
  labels:
    name: java-sample-app
spec:
  replicas: 1
  selector:
    matchLabels:
      name: java-sample-app
  template:
    metadata:
      labels:
        name: java-sample-app
    spec:
      containers:
        - name: aws-otel-emitter
          image: aottestbed/aws-otel-collector-java-sample-app:0.9.0
          resources:
            limits:
              memory: "128Mi"
              cpu: "200m"
          ports:
          - containerPort: 4567
          env:
          - name: OTEL_OTLP_ENDPOINT
            value: "localhost:4317"
          - name: OTEL_RESOURCE_ATTRIBUTES
            value: "service.namespace=AWSObservability,service.name=CloudWatchEKSService"
          - name: S3_REGION
            value: "us-east-1"
          imagePullPolicy: Always

To deploy the application, use the following command:

$ kubectl apply -f <manifest file name>
deployment.apps/java-sample-app created

Scenario: Improved context from DevOps Guru Container Cluster Grouping and Increased Metrics

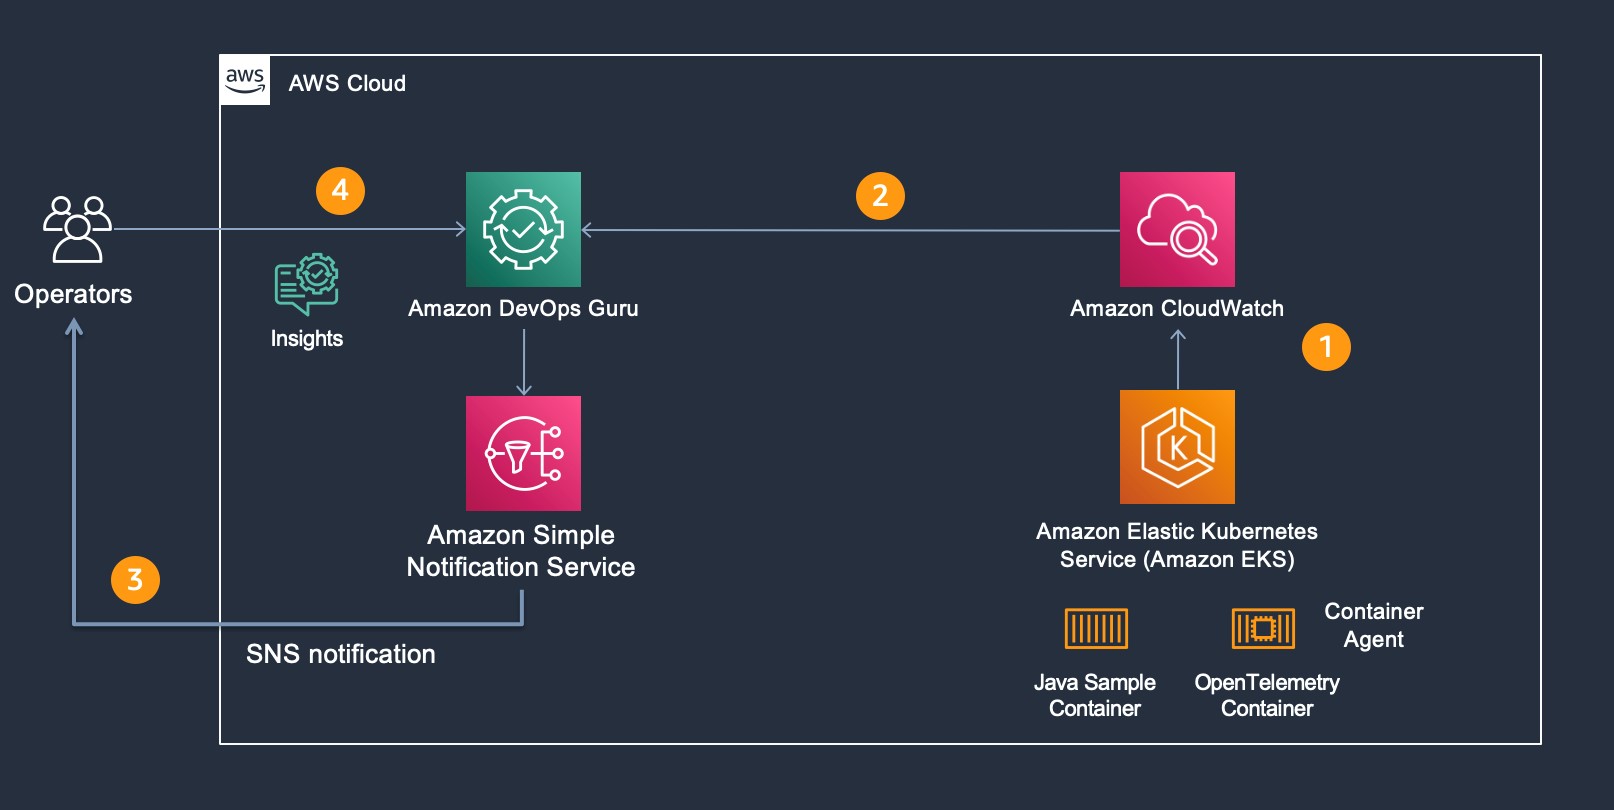
For our scenario, Amazon DevOps Guru is monitoring additional Amazon CloudWatch Container Insight Metrics for EKS. The following figure shows the flow of information and eventual notification of the operator, so that they can examine the Amazon DevOps Guru Insight. Starting at step 1, the container agent (AWS Distro for OpenTelemetry) forwards container metrics to Amazon CloudWatch. In step 2, Amazon DevOps Guru is continually consuming those metrics and performing anomaly detection. If an anomaly is detected, then this generates an Insight, thereby triggering Amazon SNS notification as shown in step 3. In step 4, the operators access Amazon DevOps Guru console to examine the insight. Then, the operators can leverage the new user interface capability displaying which cluster, namespace, and pod/service is impacted along with correlated Amazon EKS metric(s).

 The flow of information and eventual notification of the operator, so that they can examine the Amazon DevOps Guru Insight. Starting at step 1, the container agent (AWS Distro for OpenTelemetry) forwards container metrics to Amazon CloudWatch. In step 2, Amazon DevOps Guru is continually consuming those metrics and performing anomaly detection. If an anomaly is detected, then this generates an Insight, thereby triggering Amazon SNS notification as shown in step 3. In step 4, the operators access Amazon DevOps Guru console to examine the insight. Then, the operators can leverage the new user interface capability displaying which cluster, namespace, and pod/service is impacted along with correlated Amazon EKS metric(s).

New EKS Container Metrics in DevOps Guru

As part of the release, the following pod and node metrics are now tracked by DevOps Guru:

  • pod_number_of_container_restarts – number of times that a pod is restarted (e.g., image pull issues, container failure).
  • pod_memory_utilization_over_pod_limit – memory that exceeds the pod limit called out in resource memory limits.
  • pod_cpu_utilization_over_pod_limit – CPU shares that exceed the pod limit called out in resource CPU limits.
  • pod_cpu_utilization – percent CPU Utilization within an active pod.
  • pod_memory_utilization – percent memory utilization within an active pod.
  • node_network_total_bytes – total bytes over the network interface for the managed node (e.g., EC2 instance)
  • node_filesystem_utilization – percent file system utilization for the managed node (e.g., EC2 instance).
  • node_cpu_utilization – percent CPU Utilization within a managed node (e.g., EC2 instance).
  • node_memory_utilization – percent memory utilization within a managed node (e.g., EC2 instance).

Operator Scenario

The Kubernetes Operator in the following figure is informed of an insight via Amazon SNS. The Amazon SNS message content appears in the following code, showing the originator and information identifying the InsightDescription, InsightSeverity, name of the container metric, and the Pod / EKS Cluster:

{
 "AccountId": "XXXXXXX",
 "Region": "<REGION>",
 "MessageType": "NEW_INSIGHT",
 "InsightId": "ADFl69Pwq1Aa6M373DhU0zkAAAAAAAAABuZzSBHxeiNexxnLYD7Lhb0vuwY9hLtz",
 "InsightUrl": "https://<REGION>.console.aws.amazon.com/devops-guru/#/insight/reactive/ADFl69Pwq1Aa6M373DhU0zkAAAAAAAAABuZzSBHxeiNexxnLYD7Lhb0vuwY9hLtz",
 "InsightType": "REACTIVE",
 "InsightDescription": "ContainerInsights pod_number_of_container_restarts Anomalous In Stack eksctl-devopsguru-eks-cluster-cluster",
 "InsightSeverity": "high",
 "StartTime": 1636147920000,
 "Anomalies": [
 {
 "Id": "ALAGy5sIITl9e6i66eo6rKQAAAF88gInwEVT2WRSTV5wSTP8KWDzeCYALulFupOQ",
 "StartTime": 1636147800000,
 "SourceDetails": [
 {
 "DataSource": "CW_METRICS",
 "DataIdentifiers": {
 "name": "pod_number_of_container_restarts",
 "namespace": "ContainerInsights",
 "period": "60",
 "stat": "Average",
 "unit": "None",
 "dimensions": "{\"PodName\":\"java-sample-app\",\"ClusterName\":\"devopsguru-eks-cluster\",\"Namespace\":\"aws-otel-eks\"}"
 }
 ....
 "awsInsightSource": "aws.devopsguru"
}

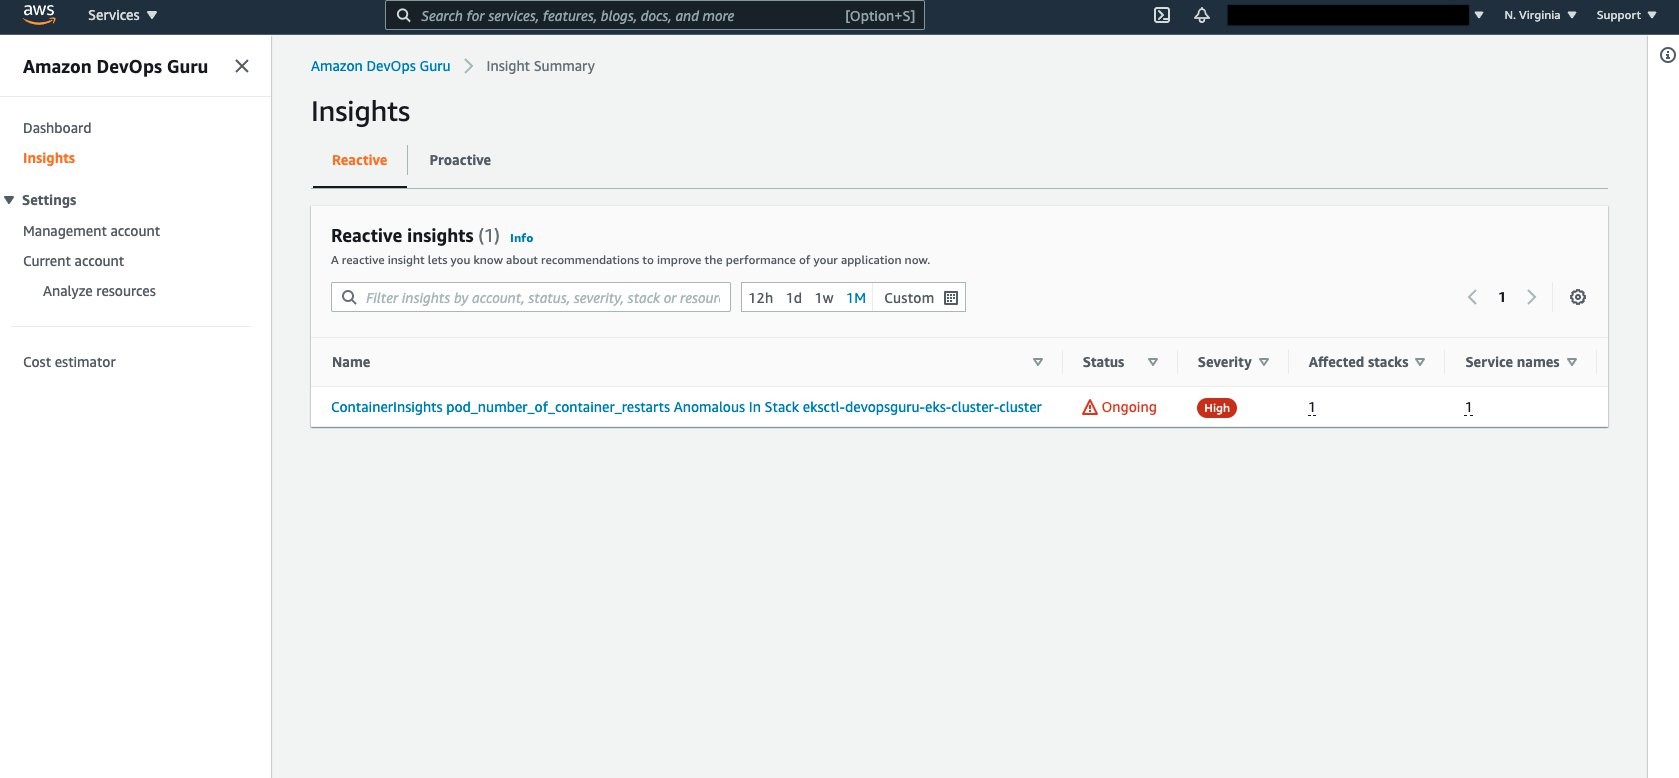
Amazon DevOps Guru Console collects the insights under the Insights selection as shown in the following figure. Select Insights to view the details.

Amazon DevOps Guru Insights. An insight is displayed with a status of Ongoing and Severity of High.

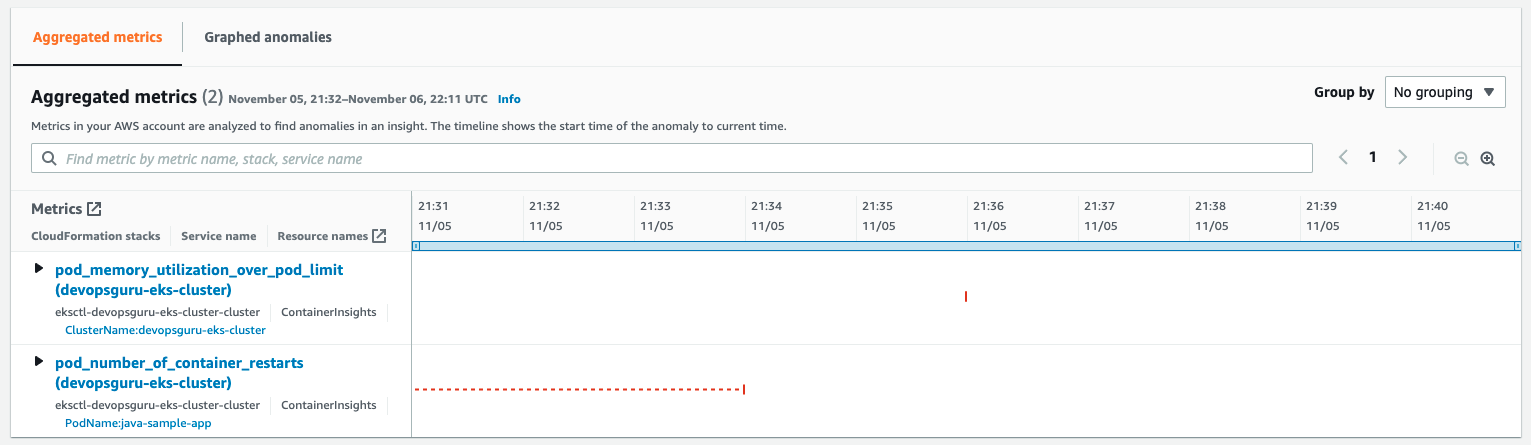
Aggregated Metrics provides the identification of the EKS Container Metrics that have errored. In this case, pod_memory_utilization_over_pod_limit and pod_number_of_container_restarts.

Aggregated Metrics panel with pod_memory_utilization_over_pod_limit and pod_number_of_container_restarts for the Amazon EKS cluster names devopsguru-eks-cluster. Graphically a timeline including time and date is displayed conveying the length of the anomaly.

Further details can be identified by selecting and expanding each insight as shown in the following figure.

Displays the ability to expand the cluster metrics providing further information on the PodName, Namespace and ClusterName. Furthermore, a search bar is provided to search on name, stack or service name.

Note that the display provides information around the Cluster, PodName, and Namespace. This helps operators maintaining large numbers of EKS Clusters to quickly isolate the offending Pod, its operating Namespace, and EKS Cluster to which it belongs. A search bar provides further filtering to isolate the name, stack, or service name displayed.

Cleaning Up

Follow the steps to delete the resources to prevent additional charges being posted to your account.

Amazon EKS Cluster Cleanup

Follow these steps to detach the customer managed policy and delete the cluster.

  • Detach customer managed policy, AWSDistroOpenTelemetryPolicy, via IAM Console.
  • Delete cluster using eksctl.
$ eksctl delete cluster devopsguru-eks-cluster --region <region>
2021-10-13 14:08:28 [i] eksctl version 0.69.0
2021-10-13 14:08:28 [i] using region <region>
2021-10-13 14:08:28 [i] deleting EKS cluster "devopsguru-eks-cluster"
2021-10-13 14:08:30 [i] will drain 0 unmanaged nodegroup(s) in cluster "devopsguru-eks-cluster"
2021-10-13 14:08:32 [i] deleted 0 Fargate profile(s)
2021-10-13 14:08:33 [✔] kubeconfig has been updated
2021-10-13 14:08:33 [i] cleaning up AWS load balancers created by Kubernetes objects of Kind Service or Ingress
2021-10-13 14:09:02 [i] 2 sequential tasks: { delete nodegroup "managed-ng-private", delete cluster control plane "devopsguru-eks-cluster" [async] }
2021-10-13 14:09:02 [i] will delete stack "eksctl-devopsguru-eks-cluster-nodegroup-managed-ng-private"
2021-10-13 14:09:02 [i] waiting for stack "eksctl-devopsguru-eks-cluster-nodegroup-managed-ng-private" to get deleted
2021-10-13 14:12:30 [i] will delete stack "eksctl-devopsguru-eks-cluster-cluster"
2021-10-13 14:12:30 [✔] all cluster resources were deleted

Conclusion

In the previous scenarios, demonstration of the new cluster organization and additional container metrics was performed. Both of these features further simplify and expand the ability for an operator to more easily identify issues within a container cluster when Amazon DevOps Guru detects anomalies. You can start building your own solutions that employ Amazon CloudWatch Agent / AWS Distro for OpenTelemetry Agent and Amazon DevOps Guru by reading the documentation. This provides a conceptual overview and practical examples to help you understand the features provided by Amazon DevOps Guru and how to use them.

About the authors

Rahul Sharad Gaikwad

Rahul Sharad Gaikwad is a Lead Consultant – DevOps with AWS. He helps customers and partners on their Cloud and DevOps adoption journey. He is passionate about technology and enjoys collaborating with customers. In his spare time, he focuses on his PhD Research work. He also enjoys gymming and spending time with his family.

Leo Da Silva

Leo Da Silva is a Partner Solution Architect Manager at AWS and uses his knowledge to help customers better utilize cloud services and technologies. Over the years, he had the opportunity to work in large, complex environments, designing, architecting, and implementing highly scalable and secure solutions to global companies. He is passionate about football, BBQ, and Jiu Jitsu — the Brazilian version of them all.

Chris Riley

Chris Riley is a Senior Solutions Architect working with Strategic Accounts providing support in Industry segments including Healthcare, Financial Services, Public Sector, Automotive and Manufacturing via Managed AI/ML Services, IoT and Serverless Services.

Integrate Okta to Extend Active Directory Infrastructure into AWS

Post Syndicated from Pavankumar Kasani original https://aws.amazon.com/blogs/architecture/integrate-okta-to-extend-active-directory-infrastructure-into-aws/

Are you ready to extend your on-premises Active Directory to Amazon Web Services (AWS) to remove undifferentiated heavy lifting? Would you like to maintain a highly available Directory Service for your applications? Companies who have already set up integration with Okta Identity Cloud for external or internal applications require Active Directory objects to be synced to Okta for authentication. To achieve centralized access for on-premises and cloud applications, you can extend your on-premises Active Directory to AWS Managed Microsoft Active Directory (AD) using a trust relationship.

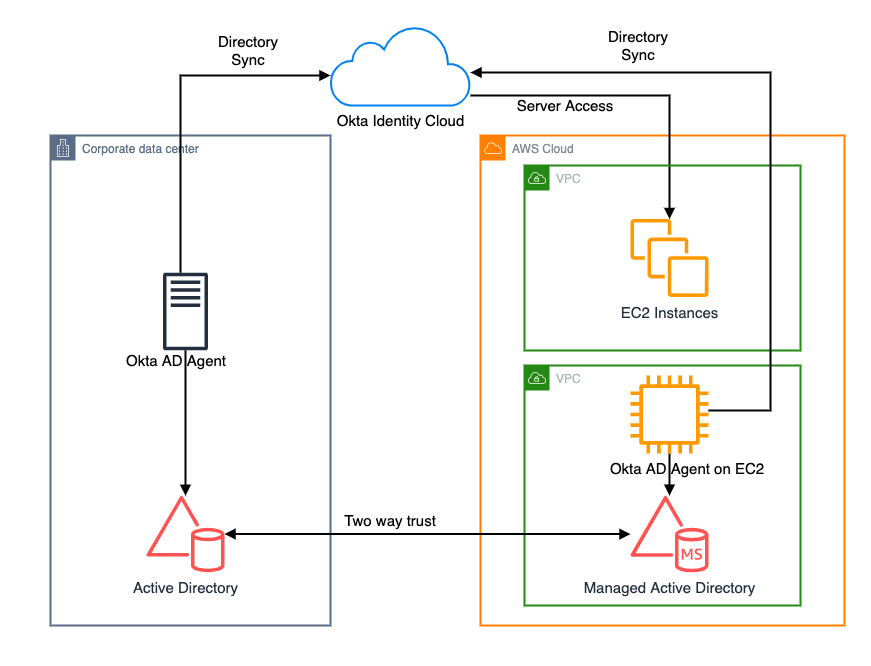
This blog shows an architecture pattern that you can use to synchronize your on-premises AD and AWS Managed AD objects. You can use Okta Identity Cloud using an Okta AD agent for syncing users and groups. The Okta AD agent can be installed and configured on a domain-joined on-premises server or an Amazon EC2 instance on AWS (see Figure 1).

AWS Directory Service lets you run Microsoft Active Directory (AD) as a managed service, and is powered by Windows Server 2012 R2. When you select and launch this directory type, it is created as a highly available pair of domain controllers connected to your Amazon Virtual Private Cloud (VPC). The domain controllers run in different Availability Zones in an AWS Region of your choice.

Okta is an enterprise-grade identity management service, which is compatible with many on-premises and cloud applications. The Okta AD agent enables you to integrate Okta with your on-premises AD. This way you can integrate your SaaS applications and your AD instances with Okta. You can simplify and centralize user management and share user credentials with other integrated cloud and on-premises applications.

Figure 1. Active Directory objects synchronization to Okta identity cloud

Figure 1. Active Directory objects synchronization to Okta identity cloud

Network connectivity between corporate data center and AWS Regions

Before getting started with configuring a trust relationship with on-premises AD and AWS managed AD, be sure you’ve read and understand the prerequisites for setting up trust. For example, it is highly recommended to have a VPN or AWS Direct Connect circuit in place between your VPC and your on-premises environment. To create a resilient VPN connection, refer to the Site-to-Site VPN User Guide.

AWS Site-to-Site VPN is a fully managed service that uses IP security (IPsec) tunnels to create a secure connection between your data center or branch office, and your AWS resources. When using Site-to-Site VPN, you can connect to Amazon VPC and also AWS Transit Gateway. Two tunnels per connection are used for increased redundancy. You can also create a dedicated or a hosted connection using AWS Direct Connect.

Trust relationship between on-premises AD and AWS Managed AD

A trust relationship is a link between two different domains. For example, a one-way trust scenario allows the user accounts from the trusted domain to access resources in the trusting domain. In a two-way trust scenario, user accounts and resources can be passed between the two domains bidirectionally. A two-way trust relationship is commonly set up between on-premises AD and AWS Managed AD to extend authentication. This is used for any directory-aware workloads in the AWS Cloud, providing users and groups access to resources in either domain using single sign-on (SSO).

AWS Managed Microsoft Active Directory (AD) supports external and forest trust relationships with your existing on-premises domain in all three trust relationship directions:

  • One-way incoming
  • One-way outgoing
  • Two-way bidirectional

To create a trust relationship, follow these steps:

  1. Prepare your on-premises domain for the trust relationship. This includes preparing your firewall configuration, enable Kerberos pre-authentication, and configuring conditional forwarders.
  2. Prepare your AWS Managed Microsoft AD for the trust relationship. This includes configuring your VPC subnets, security groups, and enabling Kerberos pre-authentication.
  3. Create the trust relationship between your on-premises AD and your AWS Managed Microsoft Active Directory (AD).

Install and configure Okta agent

Download and install Okta AD agent on your Amazon EC2 instance, which should be domain-joined with AWS Managed AD. One Okta AD agent can associate with multiple domains. Once the trust has been set up between on-premises AD and AWS Managed AD, you can associate multiple domains under the same Okta AD agent on Amazon EC2, instead of hosting and managing separate Okta AD agent servers in your own data center and AWS.

For a highly available architecture, a redundant Okta AD agent running in your corporate data center is recommended. This will help you avoid the impact of network connectivity failure between data centers and AWS Regions. Okta recommends installing multiple Okta AD agents on each domain server to achieve high availability and failover protection.

Read Okta AD integration step-by-step setup for installing and configuring Okta agent.

Validate AD objects

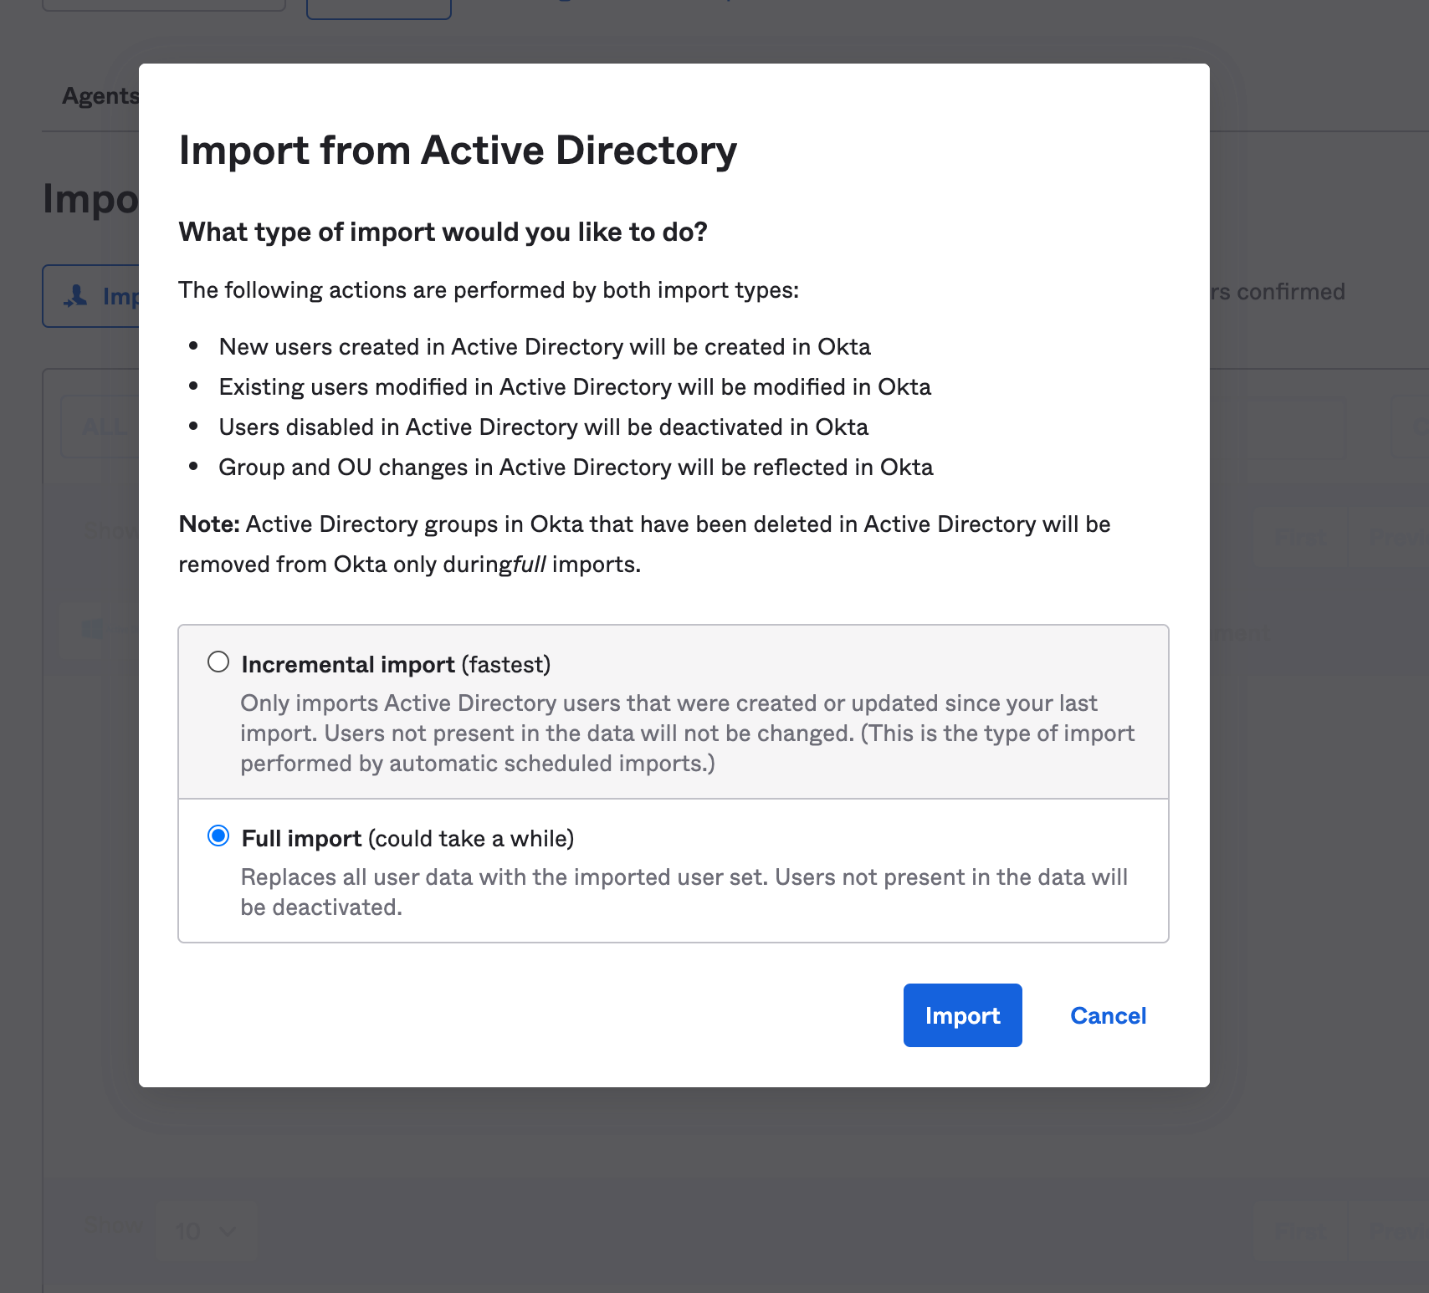
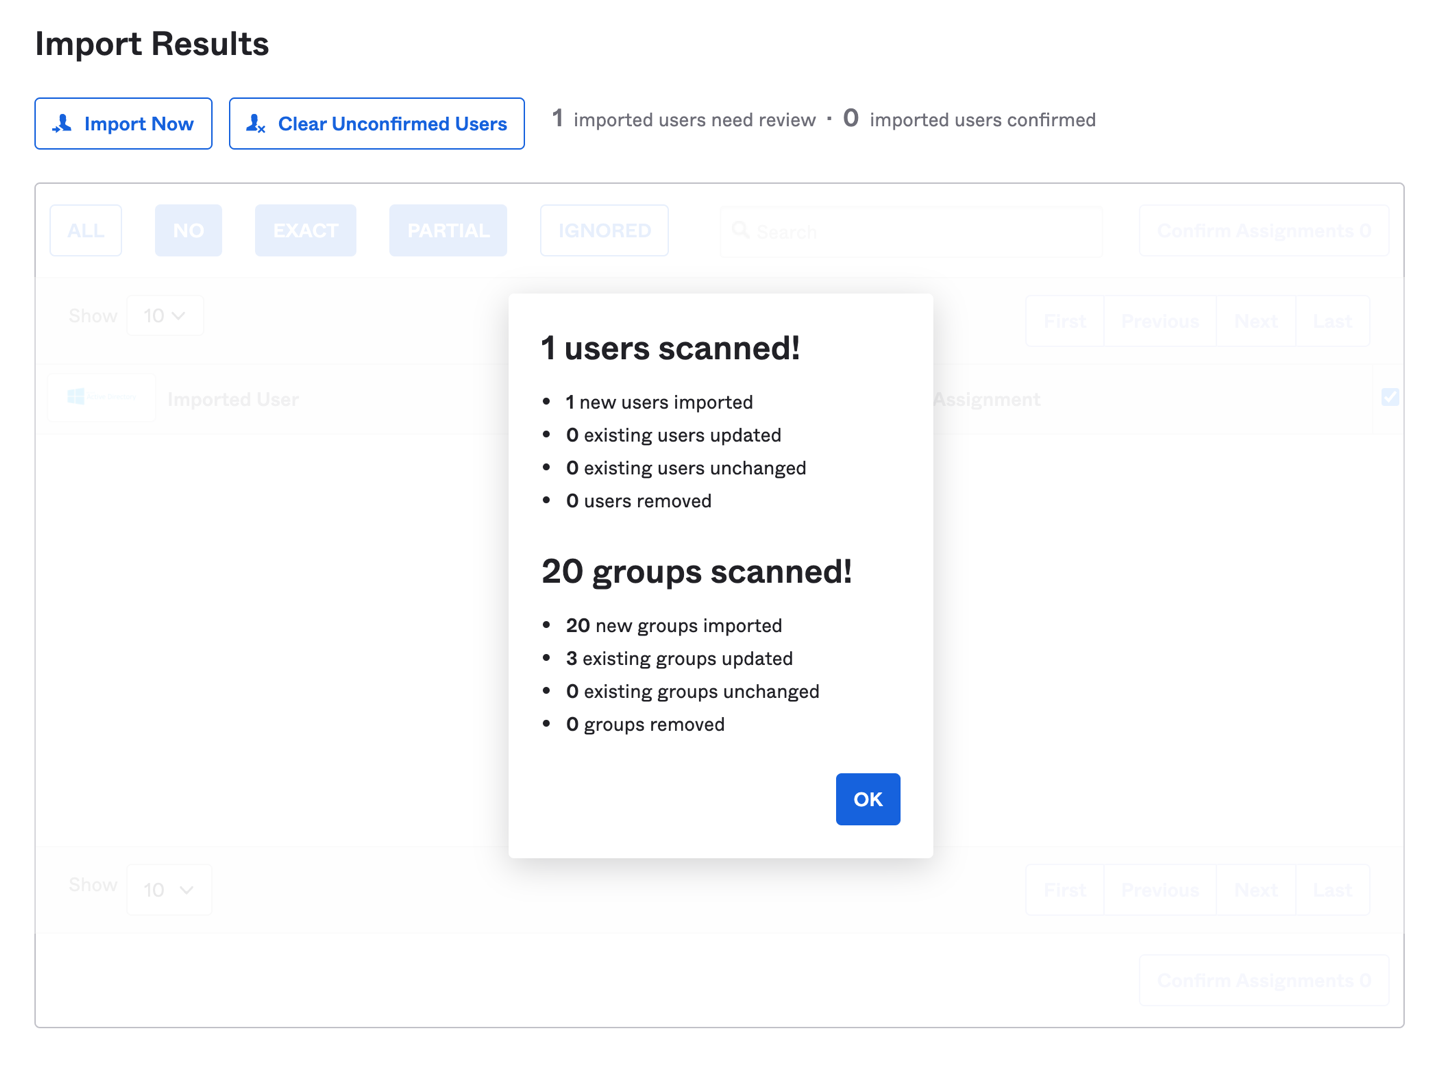
Once the Okta agent is installed and configured on the Amazon EC2 instance, log in to the Okta admin console. Under the provisioning to Okta tab, do a full import of users from AWS Managed AD (see Figure 2, Figure 3). The subsequent objects synchronization will be done through scheduled import with a minimum interval of one hour. After the import is done, if there are any user account overlaps between AWS Managed AD and Okta, manually assign the AD users to Okta users. You can create matching rules to automatically map the users from AD to Okta. Read Import AD users to Okta.

Figure 2. Import users under Okta admin console

Figure 2. Import users under Okta admin console

Figure 3. Import users results under Okta admin console

Figure 3. Import users results under Okta admin console

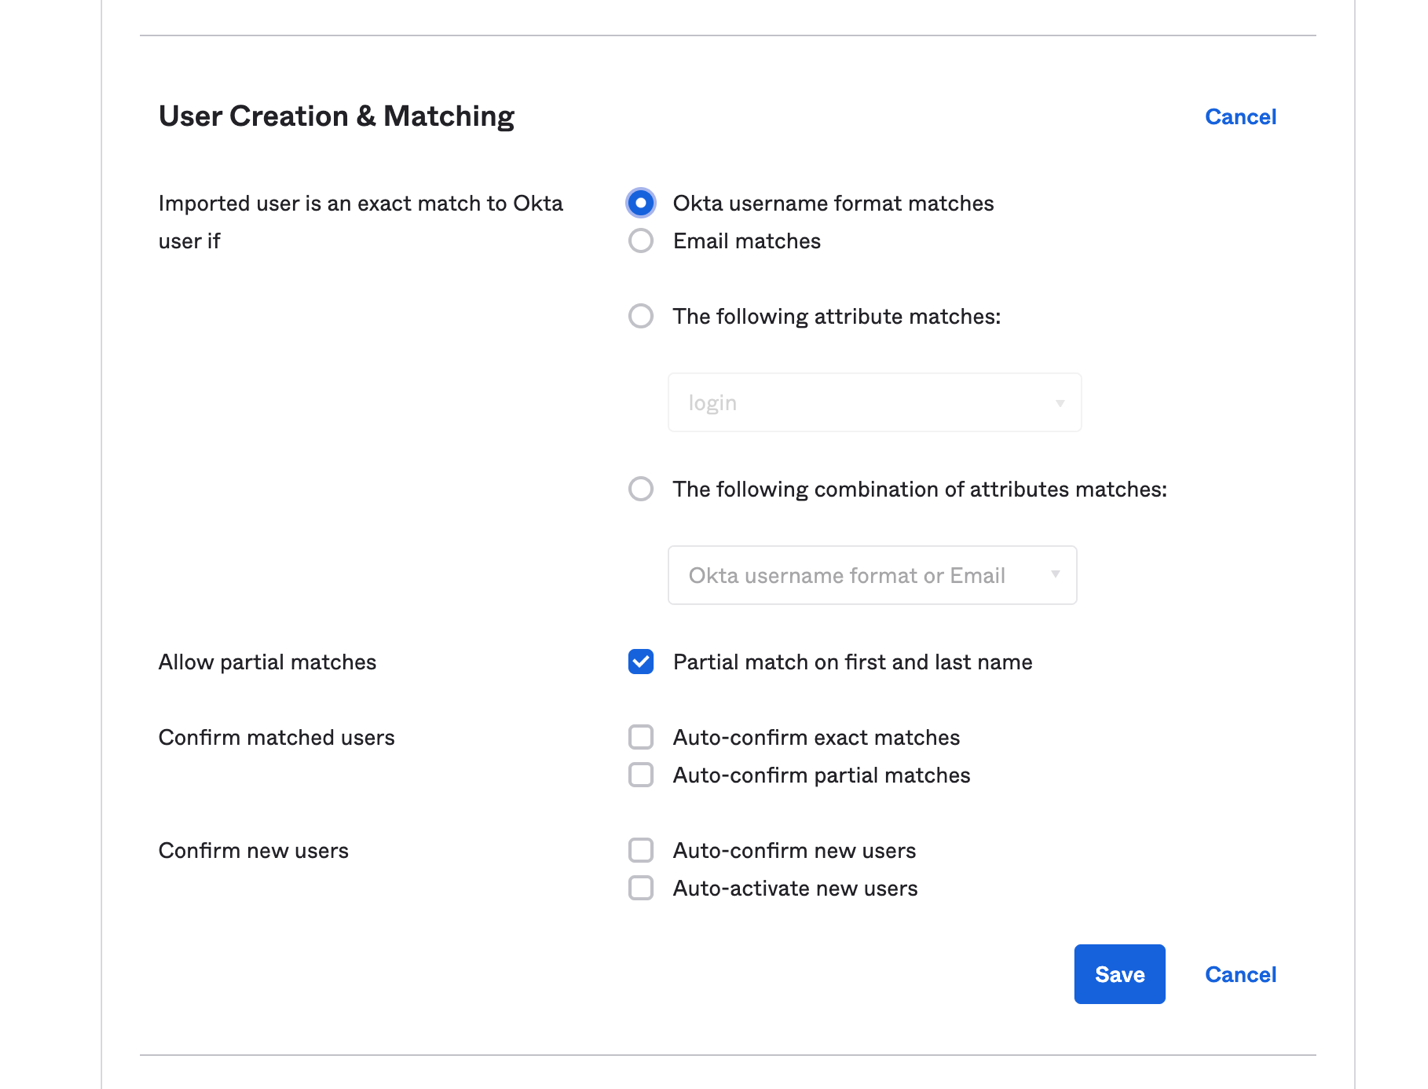
Matching rules are used in the import of users from all apps and directories that provide importing. If there is an existing Okta account, AD allows you to import and confirm users automatically (see Figure 4).

Figure 4. User creation and matching under Okta admin console

Figure 4. User creation and matching under Okta admin console

You can import groups from any forest or domain connected to Okta. The Okta AD Agent detects all groups in the domain or the organizational units (OUs) that you select. If you register an Okta AD Agent for more than one domain and you have the root OU selected for all domains, all groups will be imported. Read Import AD Groups to Okta to synchronize groups from AD to Okta.

Synchronize passwords to Okta

When you sign in to Okta using your organization’s AD credentials, the authentication process is delegated to the connected on-premises AD. Okta does not see or store the credentials.

In some cases, the credentials must be synchronized from a directory across Okta to an application. If a user changes the password stored in Active Directory and then tries to access applications using the same single sign-on session, they will receive a password error message. This is because the new password has not been synchronized to the application, so a new sign-in process is required for password validation.

To avoid a disruptive user experience, use the Okta AD Password Sync Agent to synchronize passwords from AD to Okta and to integrated apps. The Okta AD Password Sync Agent will track password changes in AD and then synchronize to Okta.

For more details on the password synchronization and password reset workflow, you can read step-by-step instructions on Synchronize passwords from Active Directory to Okta.

Summary

In this blog post, we discussed a way for synchronizing users and credentials from on-premises Active Directory and AWS Managed AD to Okta Identity Cloud. With synchronization, you can centralize access of cloud and on-premises applications and provide seamless access to AD-aware services within AWS.

Customers can also migrate on-premises AD to AWS using Active Directory Migration Tool (ADMT) along with the Password Export Server (PES) service.

Read more:

Ingesting PI Historian data to AWS Cloud using AWS IoT Greengrass and PI Web Services

Post Syndicated from Piyush Batwal original https://aws.amazon.com/blogs/architecture/ingesting-pi-historian-data-to-aws-cloud-using-aws-iot-greengrass-and-pi-web-services/

In process manufacturing, it’s important to fetch real-time data from data historians to support decisions-based analytics. Most manufacturing use cases require real-time data for early identification and mitigation of manufacturing issues. A limited set of commercial off-the-shelf (COTS) tools integrate with OSIsoft’s PI Historian for real-time data. However, each integration requires months of development effort, can lack full data integrity, and often doesn’t address data loss issues. In addition, these tools may not provide native connectivity to the Amazon Web Services (AWS) Cloud. Leveraging legacy COTS applications can limit your agility, both in initial setup and ongoing updates. This can impact time to value (TTV) for critical analytics.

In this blog post, we’ll illustrate how you can integrate your on-premises PI Historian with AWS services for your real-time manufacturing use cases. We will highlight the key connector features and a common deployment architecture for your multiple manufacturing use cases.

Scope of OSIsoft PI data historian use

OSIsoft’s PI System is a plant process historian. It collects machine data from various sensors and operational technology (OT) systems during the manufacturing process. PI Historian is the most widely used data historian in process industries such as Healthcare & Life Sciences (HCLS), Chemicals, and Food & Beverage. Large HCLS companies use the PI system extensively in their manufacturing plants.

The PI System usually contains years of historical data ranging from terabytes to petabytes. The data from the PI system can be used in preventive maintenance, bioreactor yield improvement, golden batch analysis, and other machine learning (ML) use cases. It can be a powerful tool when paired with AWS compute, storage, and AI/ML services.

Analyzing real-time and historical data can garner many business benefits. For example, your batch yield could improve by optimizing inputs or you could reduce downtime by proactive intervention and maintenance. You could improve overall equipment effectiveness (OEE) by improving productivity and reducing waste. This could give you the ability to conduct key analysis and deliver products to your end customers in a timely manner.

PI integration options

The data from the PI System can be ingested to AWS services in a variety of ways:

PI Connector for AWS IoT Greengrass

The PI Connector was developed by the AWS ProServe team as an extended AWS IoT Greengrass connector. The connector collects real-time and historical data from the PI system using PI Web Services. It publishes the data to various AWS services such as local ML models running at the edge, AWS IoT Core / AWS IoT SiteWise, and Amazon S3.

Connector requirements and design considerations

Specific requirements and design considerations were gathered in collaboration with various customers. These are essential for the most effective integration:

  • The connector should support reliable connectivity to the PI system for fetching real-time and historical data from the PI.
  • The connector should support subscription to various PI data modes like real-time, compressed/recorded, and interpolated, to support various use cases.
  • The initial setup and incremental updates to the PI tag configuration should be seamless without requiring any additional development effort.
  • The connector should support data contextualization in terms of asset/equipment hierarchy and process batch runs.
  • The connector should ensure full data integrity, reliable real-time data access, and support re-usability.
  • The connector should have support for handling data loss prevention scenarios for connectivity loss and/or maintenance/configuration updates.
  • The setup, deployment, and incremental updates should be fully automated.

Deployment architecture for PI Connector

The connector has been developed as part of AWS IoT Greengrass Connectivity Framework and can be deployed remotely on an edge machine. This can be running on-premises or in the AWS Cloud with access to the on-premises PI system. This machine can be run on a virtual machine (VM), a physical server, or a smaller device like a Raspberry Pi.

The connector incorporates a configuration file. You can specify connector functions such as authentication type, data access modes (polling or subscription), batch contextualization and validation on the data, or historical data access timeframe. It integrates with the PI Web APIs for subscription to real-time data for defined PI tags using secure WebSockets (wss). It can also invoke WebAPI calls for polling data with configured interval time.

The connector can be deployed as an AWS IoT Greengrass V1 AWS Lambda function or a Greengrass V2 component.

Figure 1. PI Connector architecture

Figure 1. PI Connector architecture

Connector features and benefits

  • The connector supports subscription to real-time and recorded data to track tag value changes in streaming mode. This is useful in situations where process parameter changes must be closely monitored for decision support, actions, and notifications. The connector supports data subscription for individual PI event tags, PI Asset Framework (AF), and PI Event Frames (EF).
  • The connector supports fetching recorded/compressed or interpolated data based on recorded timestamps or defined intervals, to sample all tags associated with an asset at those intervals.
  • The connector helps define asset hierarchy and batch tags as part of configuration, and contextualizes all asset data with hierarchy and batch context at the event level. This offloads heavy data post-processing for real-time use cases.
  • The connector initiates event processing at the edge and provides configurable options to push data to the Cloud. This occurs only when a valid batch is running and/or when a reported tag data quality attribute is good.
  • The connector ensures availability and data integrity by doing graceful reconnects in case of session closures from the PI side. It fetches, contextualizes, and pushes any missed data due to disconnections, maintenance, or update scenarios.
  • The connector accelerates the TTV for business by providing a reusable no-code, configuration-only PI integration capability.

Summary

The PI Connector developed by AWS Proserve makes your real-time, data ingestion from PI historian into AWS services fast, secure, scalable, and reliable. The connector can be configured and deployed into your edge network quickly.

With this connector, you can ingest data into many AWS services such as Amazon S3, AWS IoT Core, AWS IoT SiteWise, Amazon Timestream, and more. Try the PI Connector for your manufacturing use cases, and realize the full potential of OSI PI Historian data.

Further reading:

Get started with AWS DevOps Guru Multi-Account Insight Aggregation with AWS Organizations

Post Syndicated from Ifeanyi Okafor original https://aws.amazon.com/blogs/devops/get-started-with-aws-devops-guru-multi-account-insight-aggregation-with-aws-organizations/

Amazon DevOps Guru is a fully managed service that uses machine learning (ML) to continuously analyze and consolidate operational data streams from multiple sources, such as Amazon CloudWatch metrics, AWS Config, AWS CloudFormation, AWS X-Ray, and provide you with a single console dashboard. This dashboard helps customers improve operational performance and avoid expensive downtime by generating actionable insights that flag operational anomalies, identify the likely root cause, and recommend corrective actions.

As customers scale their AWS resources across multiple accounts and deploy DevOps Guru across applications and use cases on these accounts, they get a siloed view of the operational health of their applications. Now you can enable multi-account support with AWS Organizations and designate a member account to manage operational insights across your entire organization. This delegated administrator can get a holistic view of the operational health of their applications across the organization—without the need for any additional customization.

In this post, we will walk through the process of setting up a delegated administrator. We will also explore how to monitor insights across your entire organization from this account.

Overview of the multi-account environment

The multi-account environment operates based on the organizational hierarchy that your organization has defined in AWS Organizations. This AWS service helps you centrally manage and govern your cloud environment. For this reason, you must have an organization set up in AWS Organizations before you can implement multi-account insights visibility. AWS Organizations is available to all AWS customers at no additional charge, and the service user guide has instructions for creating and configuring an organization in your AWS environment.

Understanding the management account, a delegated administrator, and other member accounts is fundamental to the multi-account visibility functionality in DevOps Guru. Before proceeding further, let’s recap these terms.

  • A management account is the AWS account you use to create your organization. You can create other accounts in your organization, invite and manage invitations for other existing accounts to join your organization, and remove accounts from your organization. The management account has wide permissions and access to accounts within the organization. It should only be used for absolutely essential administrative tasks, such as managing accounts, OUs, and organization-level policies. You can refer to the AWS Organizations FAQ for more information on management accounts.
  • When the management account gives a member account service-level administrative permissions, it becomes a delegated administrator. Because the permissions are assigned at the service level, delegated administrator’s privileges are confined to the AWS service in question (DevOps Guru, in this case). The delegated administrator manages the service on behalf of the management account, leaving the management account to focus on administrative tasks, such as account and policy management. Currently, DevOps Guru supports a single delegated administrator, which operates at the root level (i.e., at the organization level). When elevating a member account to a delegated administrator, it must be in the organization. For more information about adding a member account to an organization, see inviting an AWS account to join your organization.
  • Member accounts are accounts without any administrative privilege. An account can be a member of only one organization at a time.

Prerequisites

You must have the following to enable multi-account visibility:

  • An organization already set up in AWS Organizations. AWS Organizations is available to all AWS customers at no additional charge, and the service user guide has instructions for creating and configuring an organization in your AWS environment.
  • A member account that is in your organization and already onboarded in DevOps Guru. This account will be registered as a delegated administrator. For more information about adding a member account to an organization, see inviting an AWS account to join your organization.

Setting up multi-account insights visibility in your organization

In line with AWS Organizations’ best practices, we recommend first assigning a delegated administrator. Although a management account can view DevOps Guru insights across the organization, management accounts should be reserved for organization-level management, while the delegated administrator manages at the service level.

Registering a Delegated Administrator

A delegated administrator must be registered by the management account. The steps below assume that you have a member account to register as a delegated administrator. If your preferred account is not yet in your organization, then invite the account to join your organization.

To register a delegated administrator

  1. Log in to the DevOps Guru Console with the management account.
  2. On the welcome page, under Set up type, select Monitor applications across your organizations. If you select Monitor applications in the current AWS account, then your dashboard will display insights for the management account.
  3. Under Delegated administrator, select Register a delegated administrator (Recommended).
  4. Select Register delegated administrator to complete the process.

Register a delegated administrator. Steps 1-4 highlighted in console screenshot.

To de-register a delegated administrator

  1. Log in to the DevOps Guru Console and navigate to the Management account
  2. On the Management account page, select De-register administrator.

De-register a delegated Administrator. Steps 1 and 2 highlighted on console.

Viewing insights as a Delegated Administrator

As the delegated administrator, you can choose to view insights from

  • specific accounts
  • specific OUs
  • the entire organization

To view insights from specific accounts

  1. Log in to the DevOps Guru console, and select Accounts from the dropdown menu on the dashboard.
  2. Select the search bar to display a list of member accounts.
  3. Select up to five accounts, and select anywhere outside the dropdown menu to apply your selection. Simply select the delegated administrator account from the dropdown menu to view insights from the delegated administrator account.

View Insights from specific account. Steps 1-3 highlighted on dashboard screenshot.

The system health summary now will display information for the selected accounts.

To view insights from specific organizational units

  1. Log in to the DevOps Guru console, and select Organizational Units from the dropdown menu on the dashboard.
  2. Select the search bar to display the list of OUs.
  3. Select up to five OUs, and select anywhere outside of the dropdown menu to apply your selection.

View insights from specific organizational units. Steps 1-3 highlighted in dashboard screenshot.

Now the system health summary will display information for the selected OUs. Nested OUs are currently not supported, so only the accounts directly under the OU are included when an OU is selected. Select the sub-OU in addition to the parent OU to include accounts in a sub-OU,.

To view insights across the entire organization

  1. Log in to the DevOps Guru console and navigate to the Insights
  2. On the Reactive tab, you can see a list of all the reactive insights in the organization. On the Proactive tab, you can also see a list of all the proactive insights in the organization. You will notice that the table displaying the insights now has an Account ID column (highlighted in the snapshot below). This table aggregates insights from different accounts in the organization.

View insights across the entire organization.

  1. Use one or more of the following filters to find the insights that you are looking for
    1. Choose the Reactive or Proactive
    2. In the search bar, you can add an account ID, status, severity, stack, or resource name to specify a filter.

View insights across the entire organization and filter. Steps 1-3 highlighted in Insights summary page.

    1. To search by account ID, select the search bar, select Account, then select an account ID in the submenu.
    2. Choose or specify a time range to filter by insight creation time. For example, 12h shows insights created in the past 12 hours, and 1d shows the insights of the previous day. 1w will show the past week’s insights, and 1m will show the last month’s insights. Custom lets you specify another time range. The maximum time range you can use to filter insights is 180 days.

View insights across the entire organization and fitler by time.

Viewing insights from the Management Account

Viewing insights from the management account is similar to viewing insights from the delegated administrator, so the process listed for the delegated administrator also applies to the management account. Although the management account can view insights across the organization, it should be reserved for running administrative tasks across various AWS services at an organization level.

Important notes

Multi-account insight visibility works at a region level, meaning that you can only view insights across the organization within a single AWS region. You must change the AWS region from the region dropdown menu at the top-right corner of the console to view insights from a different AWS region.

For data security reasons, the delegated administrator can only access insights generated across the organization after the selected member account became the delegated administrator. Insights generated across the organization before the delegated administrator registration will remain inaccessible to the delegated administrator.

Conclusion

The steps detailed above show how you can quickly enable multi-account visibility to monitor application health across your entire organization.

AWS Customers are now using AWS DevOps Guru to monitor and improve application performance, and you too can start monitoring your applications by following the instructions in the product documentation. Head over to the AWS DevOps Guru console to get started today.

About the authors

Ifeanyi Okafor

Ifeanyi Okafor is a Product Manager with AWS. He enjoys building products that solve customer problems at scale.

Haider Naqvi

Haider Naqvi is a Solutions Architect at AWS. He has extensive Software Development and Enterprise Architecture experience. He focuses on enabling customers re:Invent and achieve business outcome with AWS. He is based out of New York.

Nick Ardecky

Nick Ardecky is a Software Engineering working with the AWS DevOps Guru team. Nick enjoys building tools and visualizations that improve products and solve customer problems.

Everything you wanted to know about trusts with AWS Managed Microsoft AD

Post Syndicated from Jeremy Girven original https://aws.amazon.com/blogs/security/everything-you-wanted-to-know-about-trusts-with-aws-managed-microsoft-ad/

Many Amazon Web Services (AWS) customers use Active Directory to centralize user authentication and authorization for a variety of applications and services. For these customers, Active Directory is a critical piece of their IT infrastructure. AWS offers AWS Directory Service for Microsoft Active Directory, also known as AWS Managed Microsoft AD, to provide a highly available and resilient Active Directory service.

One of the most common AWS Managed Microsoft AD use cases is for customers who need to integrate their on-premises Active Directory domain or forest with AWS services like Amazon Relational Database Service (Amazon RDS), Amazon FSx, Amazon WorkSpaces, and other AWS applications and services. This type of integration can require a trust relationship. When it comes to trusts, there are some common misconceptions about what happens and doesn’t happen when a trust is created.

In this post, I’m going to dive deep into various aspects of Active Directory trusts and debunk some common myths along the way. This post will cover the following areas:

Starting with Kerberos

The first part of understanding how trusts work is to understand how authentication flows across a trust, particularly with Kerberos. Kerberos is a subject that, on the surface, is simple enough, but can quickly become much more complex. This post isn’t going to go into detail about Kerberos in Microsoft Windows. If you wish to look further into the topic, see the Microsoft Kerberos documentation. In this post, I’m just going to give you an overview of how Kerberos authentication works across trusts.
 

Figure 1: Kerberos authentication across trusts

Figure 1: Kerberos authentication across trusts

If you only remember one thing about Kerberos and trust, it should be referrals. Let’s look at the workflow in Figure 1, which shows a user from Domain A who is logged into a computer in Domain A and wants to access an Amazon FSx file share in Domain B. For simplicity’s sake, I’ll say there is a two-way trust between Domains A and B.

Note: When a trust is integrated with AWS Managed Microsoft AD, you need to enable Kerberos preauthentication for accounts that traverse the trusts. Disabling Kerberos preauthentication isn’t recommended, because a malicious user can directly send dummy requests for authentication. The key distribution center (KDC) will return an encrypted Ticket-Granting Ticket (TGT), which the malicious user can brute force offline. See Kerberos Pre-Authentication: Why It Should Not Be Disabled for more details.

The steps of the Kerberos authentication process over trusts are as follows:

1. Kerberos authentication service request (KRB_AS_REQ): The client contacts the authentication service (AS) of the KDC (which is running on a domain controller) for Domain A, which the client is a member of, for a short-lived ticket called a Ticket-Granting Ticket (TGT). The default lifetime of the TGT is 10 hours. For Windows clients this happens at logon, but Linux clients might need to run a kinit command.

2. Kerberos authentication service response (KRB_AS_REP): The AS constructs the TGT and creates a session key that the client can use to encrypt communication with the ticket-granting service (TGS). At the time that the client receives the TGT, the client has not been granted access to any resources, even to resources on the local computer.

3. Kerberos ticket-granting service request (KRB_TGS_REQ): The user’s Kerberos client sends a KRB_TGS_REQ message to a local KDC in Domain A, specifying fsx@domainb as the target. The Kerberos client compares the location with its own workstation’s domain. Because these values are different, the client sets a flag in the KDC Options field of the KRB_TGS_REQ message for NAME_CANONICALIZE, which indicates to the KDC that the server might be in another realm (domain).

4. Kerberos ticket-granting service response (KRB_TGS_REP): The user’s local KDC (for Domain A) receives the KRB_TGS_REQ and sends back a TGT referral ticket for Domain B. The TGT is issued for the next intervening domain along the shortest path to Domain B. The TGT also has a referral flag set, so that the KDC will be informed that the KRB_TGS_REQ is coming from another realm. This flag also tells the KDC to fill in the Transited Realms field. The referral ticket is encrypted with the interdomain key that is decrypted by Domain B’s TGS.

Note: When a trust is established between domains or forests, an interdomain key based on the trust password becomes available for authenticating KDC functions and is used to encrypt and decrypt Kerberos tickets.

5. Kerberos ticket-granting service request (KRB_TGS_REQ): The user’s Kerberos client sends a KRB_TGS_REQ along with the TGT it received from the Domain A KDC to a KDC in Domain B.

6. Kerberos ticket-granting service response (KRB_TGS_REP): The TGS in Domain B examines the TGT and the authenticator. If these are acceptable, the TGS creates a service ticket. The client’s identity is taken from the TGT and copied to the service ticket. Then the ticket is sent to the client.

For more details on the authenticator, see How the Kerberos Version 5 Authentication Protocol Works.

7. Application server service request (KRB_TGS_REQ): After the client has the service ticket, the client sends the ticket and a new authenticator to the target server, requesting access. The server will decrypt the ticket, validate the authenticator, and (for Windows services), create an access token for the user based on the SIDs in the ticket.

8. Application server service response (KRB_TGS_REP): Optionally, the client might request that the target server verify its own identity. This is called mutual authentication. If mutual authentication is requested, the target server takes the client computer’s timestamp from the authenticator, encrypts it with the session key the TGS provided for client-target server messages, and sends it to the client.

The basics of trust transitivity, direction, and types

Let’s start off by defining a trust. Active Directory trusts are a relationship between domains, which makes it possible for users in one domain to be authenticated by a domain controller in the other domain. Authenticated users, if given proper permissions, can access resources in the other domain.

Active Directory Domain Services supports four types of trusts: External (Domain), Forest, Realm, and Shortcut. Out of those four types of trusts, AWS Managed Microsoft AD supports the External (Domain) and Forest trust types. I’ll focus on External (Domain) and Forest trust types for this post.

Transitivity: What is it?

Before I dive into the types of trusts, it’s important to understand the concept of transitivity in trusts. A trust that is transitive allows authentication to flow through other domains (Child and Trees) in the trusted forests or domains. In contrast, a non-transitive trust is a point-to-point trust that allows authentication to flow exclusively between the trusted domains.
 

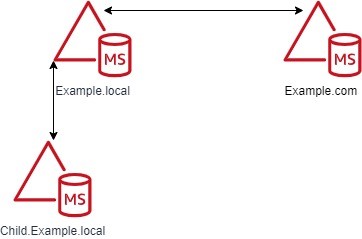
Figure 2: Forest trusts between the Example.local and Example.com forests

Figure 2: Forest trusts between the Example.local and Example.com forests

Don’t worry about the trust types at this point, because I’ll cover those shortly. The example in Figure 2 shows a Forest trust between Example.com and Example.local. The Example.local forest has a child domain named Child. With a transitive trust, users from the Example.local and Child.Example.local domain can be authenticated to resources in the Example.com domain.

If Figure 2 has an External trust, only users from Example.local can be authenticated to resources in the Example.com domain. Users from Child.Example.local cannot traverse the trust to access resources in the Example.com domain.

Trust direction

Two-way trusts are bidirectional trusts that allow authentication referrals from either side of the trust to give users access resources in either domain or forest. If you look in the Active Directory Domains and Trusts area of the Microsoft Management Console (MMC), which provides consoles to manage the hardware, software, and network components of Microsoft Windows operating system, you can see both an incoming and an outgoing trust for the trusted domain.

One-way trusts are a single-direction trust that allows authentication referrals from one side of the trust only. A one-way trust is either outgoing or incoming, but not both (that would be a two-way trust).

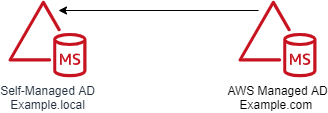
  • An outgoing trust allows users from the trusted domain (Example.com) to authenticate in this domain (Example.local).
  • An incoming trust allows users from this domain (Example.local) to authenticate in the trusted domain (Example.com).


Figure 3: One-way trust direction

Figure 3: One-way trust direction

Let’s use a diagram to further explain this concept. Figure 3 shows a one-way trust between Example.com and Example.local. This an outgoing trust from Example.com and an incoming trust on Example.local. Users from Example.local can authenticate and, if given proper permissions, access resources in Example.com. Users from Example.com cannot access or authenticate to resources in Example.local.

Trust types

In this section of the post, I’ll examine the various types of Active Directory trusts and their capabilities.

External trusts

This trust type is used to share resources between two domains. These can be individual domains within or external to a forest. Think of this as a point-to-point trust between two domains. See Understanding When to Create an External Trust for more details on this trust type.

  • Transitivity: Non-transitive
  • Direction: One-way or two-way
  • Authentication types: NTLM Only* (Kerberos is possible with caveats; see the Microsoft Windows Server documentation for details)
  • AWS Managed Microsoft AD support: Yes

Forest trusts

This trust type is used to share resources between two forests. This is the preferred trust model, because it works fully with Kerberos without any caveats. See Understanding When to Create a Forest Trust for more details.

  • Transitivity: Transitive
  • Direction: One-way or two-way
  • Authentication types: Kerberos and NTLM
  • AWS Managed Microsoft AD support: Yes

Realm trusts

This trust type is used to form a trust relationship between a non-Windows Kerberos realm and an Active Directory domain. See Understanding When to Create a Realm Trust for more details.

  • Transitivity: Non-transitive or transitive
  • Direction: One-way or two-way
  • Authentication types: Kerberos Only
  • AWS Managed Microsoft AD support: No

Shortcut trusts

This trust type is used to shorten the authentication path between domains within complex forests. See Understanding When to Create a Shortcut Trust for more details.

  • Transitivity: Transitive
  • Direction: One-way or two-way
  • Authentication types: Kerberos and NTLM
  • AWS Managed Microsoft AD support: No

User Principal Name suffixes

The default User Principal Name (UPN) suffix for a user account is the Domain Name System (DNS) domain name of the domain where the user account resides. In AWS Managed Microsoft AD and self-managed AD, alternative UPN suffixes are added to simplify administration and user logon processes by providing a single UPN suffix for all users. The UPN suffix is used within the Active Directory forest, and is not required to be a valid DNS domain name. See Adding User Principal Name Suffixes for the process to add UPN suffixes to a forest.

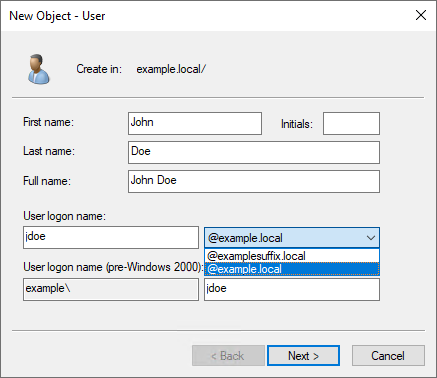
For example, if your domain is Example.local but you want your users to sign in with what appears to be another domain name (such as ExampleSuffix.local), you would need to add a new UPN suffix to the domain. Figure 4 shows a user being created with an alternate UPN suffix.
 

Figure 4: UPN selection on object creation

Figure 4: UPN selection on object creation

If you’re logged into a Windows system, you can use the whoami /upn command to see the UPN of the current user.

Forest trusts and name suffix routing

Name suffix routing manages how authentication requests are routed across forest trusts. A unique name suffix is a name suffix within a forest, such as a UPN suffix or DNS forest or domain tree name, that isn’t subordinate to any other name suffix. For example, the DNS forest name Example.com is a unique name suffix within the example.com forest.

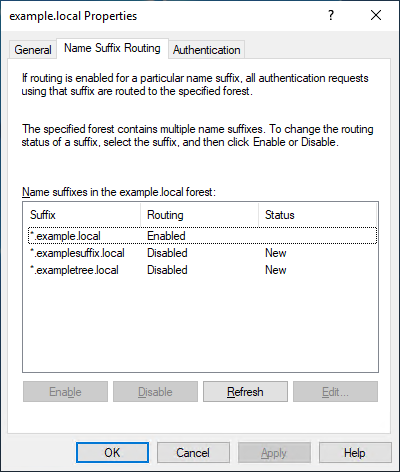
All names that are subordinate to unique name suffixes are routed implicitly. For example, if your forest root is named Example.local, authentication requests for all child domains of Example.local (Child.Example.local) will be routed because the child domains are subordinate to the Example.local name suffix. If you want to exclude members of a child domain from authenticating in the specified forest, you can disable name suffix routing for that name. You can also disable routing for the forest name itself, if necessary. With domain trees and additional UPN suffixes, name suffix routing by default is disabled and must be enabled if those suffixes are to be able to traverse the trust.

Note: In AWS Managed Microsoft AD, customers don’t have the ability to create or modify trusts by using the native Microsoft tools. If you need a name suffix route enabled for your trust, open a support case with Premium Support.

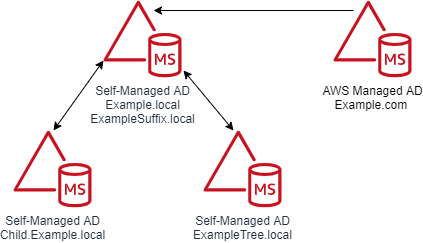
A couple of diagrams will make it easier to digest this information. Figure 5 shows the trust configuration. There is a one-way outgoing forest trust from Example.com to Example.local. Example.local has a UPN suffix named ExampleSuffix.local added to it. Example.local also has a child domain named Child and a tree domain named ExampleTree.local. By default, users in Example.local and Child.Example.local will be able to authenticate to resources in Example.com. Users in the ExampleTree.local domain will not be able to authenticate to resources in Example.com, unless the name suffix route for ExampleTree.local is enabled on the trust object in Example.com.
 

Figure 5: Multi-domain and suffix forest with a trust

Figure 5: Multi-domain and suffix forest with a trust

Figure 6 is from the trust properties dialog from the Example.com forest of a trust between Example.com and Example.local. As you can see, *.example.local is enabled. But the custom UPN suffix ExampleSuffix.local and the tree domain ExampleTree.local are disabled by default.
 

Figure 6: Example.local trusts details

Figure 6: Example.local trusts details

Selective authentication

With AWS Managed Microsoft AD and self-managed AD, you have the option of configuring Selective Authentication. This option restricts authentication access over a trust to only the users in a trusted domain or forest who have been explicitly given authentication permissions to computer objects that reside in the trusting domain or forest.

When you use domain or forest-wide authentication, depending on the trust direction, users can authenticate across the trust. Authentication by itself doesn’t provide access—users have to be delegated permissions to access resources. When Selective Authentication is enabled, you must set the Allowed to Authenticate permission on each computer object the trusted user will be accessing, in addition to any other permissions that are required to access the computer object.

While Selective Authentication is a way to provide additional hardening of trusts, it requires a significant amount of planning and delegation, because you have to set the Allowed to Authenticate permission on all computer objects that are being accessed. It can also make troubleshooting permissions and trust issues more difficult.

For more details on Selective Authentication, see Selective Authentication and Configuring Selective Authentication Settings in the Microsoft documentation.

SID filtering

I won’t spend a lot of time on the subject of SID filtering, since this feature is enabled in AWS Managed Microsoft AD and can’t be disabled. SID filtering prevents malicious users who have domain or enterprise administrator level access in a trusted forest from granting elevated user rights to a trusting forest. It does this by preventing misuse of the attributes containing SIDs on security principals in the trusted forest. For example, a malicious user with administrative credentials located in a trusted forest could, through various means, obtain the SID information of a domain or enterprise admin in the trusting forest. After obtaining the SID of an administrator from the trusting forest, a malicious user with administrative credentials can add that SID to the SID history attribute of a security principal in the trusted forest and attempt to gain full access to the trusting forest and the resources within it.

Keeping SID filtering disabled on your on-premises domain can open your domain up to risks from malicious users. We understand that during a domain migration, you may need to disable it to allow an object’s SID from the original domain to be used during the migration. But in AWS Managed Microsoft AD, this filtering cannot be disabled. See SID Filtering for more details.

Network ports that are required to create trusts

The following network ports are required to be open between domain controllers on both domains or forests prior to attempting to create a trust. Note, the Security Group used by your AWS Managed Microsoft AD directory already has these inbound ports open. You will need to adjust the outbound rules of the Security Group to let it communicate with the to be trusted domains or forests. The following table is based on Microsoft’s recommendations. Depending on your use case, some of these ports might not need to be opened. For example, if LDAP over SSL isn’t configured, then TCP 636 isn’t needed.

Port Protocol Service
53 TCP and UDP DNS
88 TCP and UDP Kerberos
123 UDP Windows Time
135 TCP Remote Procedure Call (RPC)
389 TCP and UDP Lightweight Directory Access Protocol (LDAP)
445 TCP Server Message Block (SMB)
464 TCP and UDP Kerberos Password Change
636 TCP LDAP over SSL
3268 TCP LDAP Global Catalog (GC)
3269 TCP LDAP GC over SSL
49152–65535 TCP and UDP RPC

Trust creation process overview

AWS Managed Microsoft AD is based on Windows Server Active Directory Domain Services, which means that Active Directory trusts function the same way they do with self-managed Active Directory. The only difference is how the trust is created. You use the AWS Management Console or APIs to create the trust for the AWS Managed Microsoft AD side. This process has been documented thoroughly in the AWS Directory Service Administration Guide, so I won’t go into detail on the steps.

The high-level overview of the process is:

  1. Ensure that network and DNS name resolution is available and functional between the domains.
  2. Create the trust on the on-premises Active Directory.
  3. Complete the trust on the AWS Managed Microsoft AD in the AWS Directory Service console.

Common trust scenarios with AWS Managed Microsoft AD

When you create trust between an on-premises domain and AWS Managed Microsoft AD, there are some items to take into consideration that will help you decide what direction of trust you need to deploy. In this post, I’ll cover a couple of the most common scenarios.

All scenarios: Selecting a trust type

Let’s start with the choice between a Forest or External trust. We generally recommend using a Forest trust type. The reason for that is that Forest trusts fully support Kerberos without any caveats. With that said, if you have a specific requirement to implement an External trust, you can do so—just be aware of these caveats.

Scenario 1: Use AWS Managed Microsoft AD as a resource forest for Amazon RDS, Amazon FSx for Windows File Server, or Amazon EC2 instances

In this scenario, you might want to use AWS Managed Microsoft AD as a resource forest for Amazon RDS, Amazon FSx for Windows File Server, or Amazon Elastic Compute Cloud (Amazon EC2). AWS Managed Microsoft AD is going to be a resource domain, and user accounts will reside on the on-premises side of the trust and need to be able to access the resources in the AWS Managed Microsoft AD side of the trust.

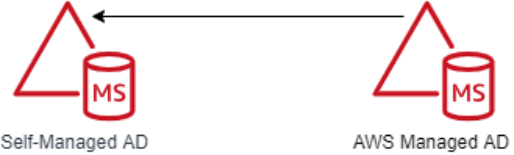
In this scenario, the AWS applications (Amazon RDS, Amazon FSx for Windows File Server, or Amazon EC2) don’t require a two-way trust to function, because they are natively integrated with Active Directory. This tells you that you only need authentication to flow one way. This scenario requires a one-way incoming trust on the on-premises domain and one-way outgoing trusts on the AWS Managed Microsoft AD domain. Figure 7 demonstrates this.
 

Figure 7: A one-way trust

Figure 7: A one-way trust

Scenario 2: Use AWS Managed Microsoft AD as a resource forest for all other supported AWS applications

In this scenario, you want to use AWS Managed Microsoft AD as a resource domain for all other supported AWS applications that aren’t included in Scenario 1. As the previous scenario stated, AWS Managed Microsoft AD will be a resource domain, and the user accounts will reside on the on-premises side of the trust and need to be able to access the resources in the AWS Managed Microsoft AD.

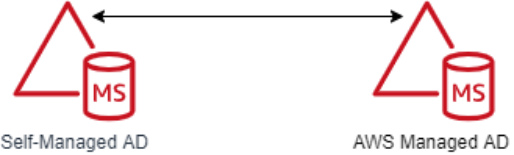
In this scenario, AWS applications (Amazon Chime, Amazon Connect, Amazon QuickSight, AWS Single Sign-On, Amazon WorkDocs, Amazon WorkMail, Amazon WorkSpaces, AWS Client VPN, AWS Management Console, and AWS Transfer Family) need to be able to look up objects from the on-premises domain in order for them to function. This tells you that authentication needs to flow both ways. This scenario requires a two-way trust between the on-premises and AWS Managed Microsoft AD domains. Figure 8 demonstrates this.
 

Figure 8: A two-way trust

Figure 8: A two-way trust

Common trust myths and misconceptions

I have had many conversations with customers concerning trusts between their on-premises domain and their AWS Managed Microsoft AD domain. These are some of the common myths and misconceptions we’ve come across in our conversations.

Trusts synchronize objects between each domain.

This is false. A trust between domains or forests acts as a bridge that allows validated authentication requests, in the form of Kerberos or NTLM traffic, to travel between domains or forests. Objects are not synchronized between the domains or forests. Only the trust password is synchronized, which is used for Kerberos.

My password is passed over the trust when authenticating.

This is false. As I showed earlier in the Starting with Kerberos section, when authenticating across trusts, the user’s password is not passed between domains. The only things passed between domains are the Ticket Granting Service (TGS) requests and responses, which are generated in real time, are single use, and expire within hours.

A one-way trust allows bidirectional authentication.

This is false. One-way trusts allow authentications to traverse in one direction only. Users or objects from the trusted domain are able to authenticate and, if they are delegated, to access resources in the trusting domain. Users in the trusting domain can’t authenticate into the trusted domain, and aren’t granted permissions to access resources. Let’s say there is an Amazon FSx file system in Example.local and a one-way trust between Example.com (outgoing trust direction) and Example.local (incoming trust direction). A user in Example.com can’t be delegated permission to the Amazon FSx file system Example.local with the current trust configuration. That’s the nature of a one-way trust.

Trusts are inherently insecure by default.

This is false, although an improperly configured trust can increase your risk and exposure. Trusts by themselves do very little to increase an Active Directory’s attack surface. You should always use best practices when creating a trust to minimize risk. For example, a trust without a purpose should be removed. You should disable the SID History unless you’re in the process of migrating domains. See Security Considerations for Trusts for more guidance on securing trusts.

Users in the trusted domain are granted permissions to my domain when a trust is created.

This is false. By default, with two-way trusts, objects have read-only permission to Active Directory in both directions. Objects are not delegated permissions or access to resources or servers by default. For example, if you want a user to log into a computer in another domain, you first must delegate the user access to the resource in the other domain. Without that delegation, the user won’t be able to access the resource.

Troubleshooting trusts

Based on our experience working with many customers, the vast majority of trust configuration issues are either DNS resolution or networking connectivity errors. These are some troubleshooting steps to help you resolve any of these common issues:

  • Check whether you allowed outbound networking traffic on the AWS Managed Microsoft AD. See Step 1: Set up your environment for trusts to learn how to find your directory’s security group and how to modify it.
  • If the DNS server or the network for your on-premises domain uses a public (non-RFC 1918) IP address space, follow these steps:
    1. In the AWS Directory Service console, go to the IP routing section for your directory, choose Actions, and then choose Add route.
    2. Enter the IP address block of your DNS server or on-premises network using CIDR format, for example 203.0.113.0/24.

      This step isn’t necessary if both your DNS server and your on-premises network are using RFC 1918 private IP address spaces.

  • After you verify the security group and check whether any applicable routes are required, launch a Windows Server instance and join it to the AWS Managed Microsoft AD directory. See Step 3: Deploy an EC2 instance to manage your AWS Managed Microsoft AD to learn how to do this. Once the instance is launched, do the following:
    • Run the following PowerShell command to test DNS connectivity:
      Resolve-DnsName -Name 'example.local' -DnsOnly
  • You should also look through the message explanations in the Trust creation status reasons guide in the AWS Directory Service documentation.

Summary of AWS Managed Microsoft AD trust considerations

In this blog post, I covered Kerberos authentication over Active Directory trusts and provided details on what Active Directory trusts are and how they function. Here’s a quick list of items that you should consider when you plan trust creation with AWS Managed Microsoft AD:

  • Ensure that you have a network connection and the appropriate network ports opened between both domains. Note, it is recommended all Active Directory traffic occur over private network connection like a VPN or Direct Connect.
  • Ensure that DNS resolution is working on both sides of the trust.
  • Decide whether you will implement selective authentication. If it will be used, plan your Active Directory access control list (ACL) delegation strategy before implementation.
  • As of this blog’s publication, keep in mind that AWS Managed Microsoft AD currently supports Forest trusts and External trusts only.
  • Ensure that Kerberos preauthentication is enabled for all objects that traverse trusts with AWS Managed Microsoft AD.
  • If you find that you need a name suffix route enabled for your trust, open a support case with AWS Support, requesting that the name suffix route be enabled.
  • Finally, review Security Considerations for Trusts: Domain and Forest Trusts for additional considerations for trust configuration.

If you have feedback about this post, submit comments in the Comments section below. If you have questions about this post, start a new thread on the AWS Directory Service forum.

Want more AWS Security how-to content, news, and feature announcements? Follow us on Twitter.

Author

Jeremy Girven

Jeremy is a solutions architect specializing in Microsoft workloads on AWS. He has over 15 years’ experience with Microsoft Active Directory and over 23 years of industry experience. One of his fun projects is using SSM to automate the Active Directory build processes in AWS. To see more, check out the Active Directory AWS QuickStart.

Anomaly Detection in AWS Lambda using Amazon DevOps Guru’s ML-powered insights

Post Syndicated from Harish Vaswani original https://aws.amazon.com/blogs/devops/anomaly-detection-in-aws-lambda-using-amazon-devops-gurus-ml-powered-insights/

Critical business applications are monitored in order to prevent anomalies from negatively impacting their operational performance and availability. Amazon DevOps Guru is a Machine Learning (ML) powered solution that aids operations by detecting anomalous behavior and providing insights and recommendations for how to address the root cause before it impacts the customer.

This post demonstrates how Amazon DevOps Guru can detect an anomaly following a critical AWS Lambda function deployment and its remediation recommendations to fix such behavior.

Solution Overview

Amazon DevOps Guru lets you monitor resources at the region or AWS CloudFormation level. This post will demonstrate how to deploy an AWS Serverless Application Model (AWS SAM) stack, and then enable Amazon DevOps Guru to monitor the stack.

You will utilize the following services:

  • AWS Lambda
  • Amazon EventBridge
  • Amazon DevOps Guru

The architecture diagram shows an AWS SAM stack containing AWS Lambda and Amazon EventBridge resources, as well as Amazon DevOps Guru monitoring the resources in the AWS SAM stack.

Figure 1: Amazon DevOps Guru monitoring the resources in an AWS SAM stack

The architecture diagram shows an AWS SAM stack containing AWS Lambda and Amazon EventBridge resources, as well as Amazon DevOps Guru monitoring the resources in the AWS SAM stack.

This post simulates a real-world scenario where an anomaly is introduced in the AWS Lambda function in the form of latency. While the AWS Lambda function execution time is within its timeout threshold, it is not at optimal performance. This anomalous execution time can result in larger compute times and costs. Furthermore, this post demonstrates how Amazon DevOps Guru identifies this anomaly and provides recommendations for remediation.

Here is an overview of the steps that we will conduct:

  1. First, we will deploy the AWS SAM stack containing a healthy AWS Lambda function with an Amazon EventBridge rule to invoke it on a regular basis.
  2. We will enable Amazon DevOps Guru to monitor the stack, which will show the AWS Lambda function as healthy.
  3. After waiting for a period of time, we will make changes to the AWS Lambda function in order to introduce an anomaly and redeploy the AWS SAM stack. This anomaly will be identified by Amazon DevOps Guru, which will mark the AWS Lambda function as unhealthy, provide insights into the anomaly, and provide remediation recommendations.
  4. After making the changes recommended by Amazon DevOps Guru, we will redeploy the stack and observe Amazon DevOps Guru marking the AWS Lambda function healthy again.

This post also explores utilizing Provisioned Concurrency for AWS Lambda functions and the best practice approach of utilizing Warm Start for variables reuse.

Pricing

Before beginning, note the costs associated with each resource. The AWS Lambda function will incur a fee based on the number of requests and duration, while Amazon EventBridge is free. With Amazon DevOps Guru, you only pay for the data analyzed. There is no upfront cost or commitment. Learn more about the pricing per resource here.

Prerequisites

To complete this post, you need the following prerequisites:

Getting Started

We will set up an application stack in our AWS account that contains an AWS Lambda and an Amazon EventBridge event. The event will regularly trigger the AWS Lambda function, which simulates a high-traffic application. To get started, please follow the instructions below:

  1. In your local terminal, clone the amazon-devopsguru-samples repository.
git clone https://github.com/aws-samples/amazon-devopsguru-samples.git
  1.  In your IDE of choice, open the amazon-devopsguru-samples repository.
  2. In your terminal, change directories into the repository’s subfolder amazon-devopsguru-samples/generate-lambda-devopsguru-insights.
cd amazon-devopsguru-samples/generate-lambda-devopsguru-insights
  1. Utilize the SAM CLI to conduct a guided deployment of lambda-template.yaml.
sam deploy --guided --template lambda-template.yaml
    Stack Name [sam-app]: DevOpsGuru-Sample-AnomalousLambda-Stack
    AWS Region [us-east-1]: us-east-1
    #Shows you resources changes to be deployed and require a 'Y' to initiate deploy
    Confirm changes before deploy [y/N]: y
    #SAM needs permission to be able to create roles to connect to the resources in your template
    Allow SAM CLI IAM role creation [Y/n]: y
    Save arguments to configuration file [Y/n]: y
    SAM configuration file [samconfig.toml]: y
    SAM configuration environment [default]: default

You should see a success message in your terminal, such as:

Successfully created/updated stack - DevOpsGuru-Sample-AnomalousLambda-Stack in us-east-1.

Enabling Amazon DevOps Guru

Now that we have deployed our application stack, we can enable Amazon DevOps Guru.

  1. Log in to your AWS Account.
  2. Navigate to the Amazon DevOps Guru service page.
  3. Click “Get started”.
  4. In the “Amazon DevOps Guru analysis coverage” section, select “Choose later”, then click “Enable”.

Amazon DevOps Guru analysis coverage menu which asks which AWS resources to analyze. The “Choose later” option is selected.

Figure 2.1: Amazon DevOps Guru analysis coverage menu

  1. On the left-hand menu, select “Settings”
  2. In the “DevOps Guru analysis coverage” section, click on “Manage”.
  3. Select the “Analyze all AWS resources in the specified CloudFormation stacks in this Region” radio button.
  4. The stack created in the previous section should appear. Select it, click “Save”, and then “Confirm”.

Amazon DevOps Guru analysis coverage menu which asks which AWS resources to analyze. The “Analyze all AWS resources in the specified CloudFormation stacks in this Region” option is selected and CloudFormation stacks are displayed to choose from.

Figure 2.2: Amazon DevOps Guru analysis coverage resource selection

Before moving on to the next section, we must allow Amazon DevOps Guru to baseline the resources and benchmark the application’s normal behavior. For our serverless stack with two resources, we recommend waiting two hours before carrying out the next steps. When enabled in a production environment, depending upon the number of resources selected for monitoring, it can take up to 24 hours for Amazon DevOps Guru to complete baselining.

Once baselining is complete, the Amazon DevOps Guru dashboard, an overview of the health of your resources, will display the application stack, DevOpsGuru-Sample-AnomalousLambda-Stack, and mark it as healthy, shown below.

Amazon DevOps Guru Dashboard displays the system health summary and system health overview of each CloudFormation stack. The DevOpsGuru-Sample-AnomalousLambda-Stack is marked as healthy with 0 reactive insights and 0 proactive insights.

Figure 2.3: Amazon DevOps Guru Healthy Dashboard

Enabling SNS

If you would like to set up notifications upon the detection of an anomaly by Amazon DevOps Guru, then please follow these additional instructions.

Amazon DevOps Guru Specify an SNS topic menu which enables notifications for important DevOps Guru events. No SNS topics are currently configured.

Figure 3: Amazon DevOps Guru Specify an SNS topic

Invoking an Anomaly

Once Amazon DevOps Guru has identified the stack as healthy, we will update the AWS Lambda function with suboptimal code. This update will simulate an update to critical business applications which are causing the anomalous performance.

  1. Open the amazon-devopsguru-samples repository in your IDE.
  2. Open the file generate-lambda-devopsguru-insights/lambda-code.py
  3. Uncomment lines 7-8 and save the file. These lines of code will produce an anomaly due to the function’s increased runtime.
  4. Deploy these updates to your stack by running:
cd generate-lambda-devopsguru-insights 
sam deploy --template lambda-template.yaml -stack-name DevOpsGuru-Sample-AnomalousLambda-Stack

Anomaly Overview

Shortly after, Amazon DevOps Guru will generate a reactive insight from the sample stack. This insight contains recommendations, metrics, and events related to anomalous behavior. View the unhealthy stack status in the Dashboard.

Amazon DevOps Guru Dashboard displays the system health summary and system health overview of each CloudFormation stack. The DevOpsGuru-Sample-AnomalousLambda-Stack is marked as unhealthy with 1 reactive insights and 0 proactive insights.

Figure 4.1: Amazon DevOps Guru Unhealthy Dashboard

By clicking on the “Ongoing reactive insight” within the tile, you will be brought to the Insight Details page. This page contains an array of useful information to help you understand and address anomalous behavior.

Insight overview

Utilize this section to get a high-level overview of the insight. You can see that the status of the insight is ongoing, 1 AWS CloudFormation stack is affected, the insight started on Sept-08-2021, it does not have an end time, and it was last updated on Sept-08-2021.

Amazon DevOps Guru Insight Details page has multiple information sections. The Insight overview is the first section which displays the status is ongoing, there is 1 affected stack, the start time and last updated time. The end time is empty as the insight is ongoing.

Figure 4.2: Amazon DevOps Guru Ongoing Reactive Insight Overview

Aggregated metrics

The Aggregated metrics tab displays metrics related to the insight. The table is grouped by AWS CloudFormation stacks and subsequent resources that created the metrics. In this example, the insight was a product of an anomaly in the “duration p50” metric generated by the “DevOpsGuruSample-AnomalousLambda” AWS Lambda function.

AWS Lambda duration metrics derive from a percentile statistic utilized to exclude outlier values that skew average and maximum statistics. The P50 statistic is typically a great middle estimate. It is defined as 50% of estimates exceed the P50 estimate and 50% of estimates are less than the P50 estimate.

The red lines on the timeline indicate spans of time when the “duration p50” metric emitted unusual values. Click the red line in the timeline in order to view detailed information.

  • Choose View in CloudWatch to see how the metric looks in the CloudWatch console. For more information, see Statistics and Dimensions in the Amazon CloudWatch User Guide.
  • Hover over the graph in order to view details about the anomalous metric data and when it occurred.
  • Choose the box with the downward arrow to download a PNG image of the graph.

Amazon DevOps Guru Insight Details page contains aggregated metrics. The Duration p50 metric is selected and displayed in graph form.

Figure 4.3: Amazon DevOps Guru Ongoing Reactive Insight Aggregated Metrics

Graphed anomalies

The Graphed anomalies tab displays detailed graphs for each of the insight’s anomalies. Because our insight was comprised of a single anomaly, there is one tile with details about unusual behavior detected in related metrics.

  • Choose View all statistics and dimensions in order to see details about the anomaly. In the window that opens, you can:
  • Choose View in CloudWatch in order to see how the metric looks in the CloudWatch console.
  • Hover over the graph to view details about the anomalous metric data and when it occurred.
  • Choose Statistics or Dimension in order to customize the graph’s display. For more information, see Statistics and Dimensions in the Amazon CloudWatch User Guide.

Amazon DevOps Guru Insight Details page contains Graphed anomalies. The p50 metric of the AWS/Lambda duration in displayed in graph form.

Figure 4.4: Amazon DevOps Guru Ongoing Reactive Insight Graphed Anomaly

Related events

In Related events, view AWS CloudTrail events related to your insight. These events help understand, diagnose, and address the underlying cause of the anomalous behavior. In this example, the events are:

  1. CreateFunction – when we created and deployed the AWS SAM template containing our AWS Lambda function.
  2. CreateChangeSet – when we pushed updates to our stack via the AWS SAM CLI.
  3. UpdateFunctionCode – when the AWS Lambda function code was updated.

Continuation of figure 4.4

Figure 4.5: Amazon DevOps Guru Ongoing Reactive Insight Related Events

Recommendations

The final section in the Insight Detail page is Recommendations. You can view suggestions that might help you resolve the underlying problem. When Amazon DevOps Guru detects anomalous behavior, it attempts to create recommendations. An insight might contain one, multiple, or zero recommendations.

In this example, the Amazon DevOps Guru recommendation matches the best resolution to our problem-provisioned concurrency.

Amazon DevOps Guru Insight Details page contains Recommendations. The suggested recommendation is to configure provisioned concurrency for the AWS Lambda.

Figure 4.6: Amazon DevOps Guru Ongoing Reactive Insight Recommendations

Understanding what happened

Amazon DevOps Guru recommends enabling Provisioned Concurrency for the AWS Lambda functions in order to help it scale better when responding to concurrent requests. As mentioned earlier, Provisioned Concurrency keeps functions initialized by creating the requested number of execution environments so that they can respond to invocations. This is a suggested best practice when building high-traffic applications, such as the one that this sample is mimicking.

In the anomalous AWS Lambda function, we have sample code that is causing delays. This is analogous to application initialization logic within the handler function. It is a best practice for this logic to live outside of the handler function. Because we are mimicking a high-traffic application, the expectation is to receive a large number of concurrent requests. Therefore, it may be advisable to turn on Provisioned Concurrency for the AWS Lambda function. For Provisioned Concurrency pricing, refer to the AWS Lambda Pricing page.

Resolving the Anomaly

To resolve the sample application’s anomaly, we will update the AWS Lambda function code and enable provisioned concurrency for the AWS Lambda infrastructure.

  1. Opening the sample repository in your IDE.
  2. Open the file generate-lambda-devopsguru-insights/lambda-code.py.
  3. Move lines 7-8, the code forcing the AWS Lambda function to respond slowly, above the lambda_handler function definition.
  4. Save the file.
  5. Open the file generate-lambda-devopsguru-insights/lambda-template.yaml.
  6. Uncomment lines 15-17, the code enabling provisioned concurrency in the sample AWS Lambda function.
  7. Save the file.
  8. Deploy these updates to your stack.
cd generate-lambda-devopsguru-insights 
sam deploy --template lambda-template.yaml --stack-name DevOpsGuru-Sample-AnomalousLambda-Stack       

After completing these steps, the duration P50 metric will emit more typical results, thereby causing Amazon DevOps Guru to recognize the anomaly as fixed, and then close the reactive insight as shown below.

Amazon DevOps Guru Insight Summary page displays the reactive insight has been closed.

Figure 5: Amazon DevOps Guru Closed Reactive Insight

Clean Up

When you are finished walking through this post, you will have multiple test resources in your AWS account that should be cleaned up or un-provisioned in order to avoid incurring any further charges.

  1. Opening the sample repository in your IDE.
  2. Run the below AWS SAM CLI command to delete the sample stack.
cd generate-lambda-devopsguru-insights 
sam delete --stack-name DevOpsGuru-Sample-AnomalousLambda-Stack 

Conclusion

As seen in the example above, Amazon DevOps Guru can detect anomalous behavior in an AWS Lambda function, tie it to relevant events that introduced that anomaly, and provide recommendations for remediation by using its pre-trained ML models. All of this was possible by simply enabling Amazon DevOps Guru to monitor the resources with minimal configuration changes and no previous ML expertise. Start using Amazon DevOps Guru today.

About the authors

Harish Vaswani

Harish Vaswani is a Senior Cloud Application Architect at Amazon Web Services. He specializes in architecting and building cloud native applications and enables customers with best practices in their cloud journey. He is a DevOps and Machine Learning enthusiast. Harish lives in New Jersey and enjoys spending time with this family, filmmaking and music production.

Caroline Gluck

Caroline Gluck is a Cloud Application Architect at Amazon Web Services based in New York City, where she helps customer design and build cloud native Data Science applications. Caroline is a builder at heart, with a passion for serverless architecture and Machine Learning. In her spare time, she enjoys traveling, cooking, and spending time with family and friends.

How Cimpress Built a Self-service, API-driven Data Platform Ingestion Service

Post Syndicated from Ethan Fahy original https://aws.amazon.com/blogs/architecture/how-cimpress-built-a-self-service-api-driven-data-platform-ingestion-service/

Cimpress is a global company that specializes in mass customization, empowering individuals and businesses to design, personalize and customize their own products – such as packaging, signage, masks, and clothing – and to buy those products affordably.

Cimpress is composed of multiple businesses that have the option to use the Cimpress data platform. To provide business autonomy and keep the central data platform team lean and nimble, Cimpress designed their data platform to be scalable, self-service, and API-driven. During a design update to River, the data platform’s data ingestion service, Cimpress engaged AWS to run an AWS Data Lab. In this post, we’ll show how River provides this data ingestion interface across all Cimpress businesses. If your company has a decentralized organizational structure and challenges with a centralized data platform, read on and consider how a self-service, API-driven approach might help.

Evaluating the legacy data ingestion platform and identifying requirements for its replacement

The collaboration process between AWS and Cimpress started with a discussion of pain points with the existing Cimpress data platform’s ingestion service:

  1. Changes were time consuming. The existing data ingestion service was built using Apache Kafka and Apache Spark. When a data stream owner needed new fields or changes in the stream payload schema, it could take weeks working with a data engineer. Spark configuration needed to be manually modified, tested, and then the Spark job had to be deployed to an operational platform.
  2. Scaling was not automated. The existing Spark clusters required large Amazon EC2 instances that were manually scaled. This led to an inefficient use of resources that was driving unnecessary cost.

Assessing these pain points led to the design of an improved data ingestion service that was:

  1. Fully automated and self-service via an API. This would reduce the dependency on engineering support from the central data platform team and decreased the time to production for new data streams.
  2. Serverless with automatic scaling. This would improve performance efficiency and cost optimization while freeing up engineering time.

The rearchitected Cimpress data platform ingestion service

Figure 1. River architecture diagram, depicting the flow of data from data producers through the River data ingestion service into Snowflake.

Figure 1. River architecture diagram, depicting the flow of data from data producers through the River data ingestion service into Snowflake.

The River data ingestion service provides data producers with a self-service mechanism to push their data into Snowflake, the Cimpress data platform’s data warehouse service. As seen in Figure 1, here are the steps involved in that process:

1. Data producers use the River API to create a new River data “stream.” Each Cimpress business is given its own Snowflake account in which they can create logically separated data ingestion “streams.” A River data stream can be configured with multiple data layers, fine-tuned permissions, entity tables, entry de-duplication, data delivery monitoring, and Snowflake data clustering.

2. Data producers get access to a River WebUI. In addition to the River API, end users are also able to access a web-based user interface for simplified configuration, monitoring, and management.

3. Data producers push data to the River API. The River RESTful API uses an Application Load Balancer (ALB) backed by AWS Lambda.

4. Data is processed by Amazon Kinesis Data Firehose.

5. Data is uploaded to Snowflake. Data objects that land on Amazon S3 initiate an event notification to Snowflake’s Snowpipe continuous data ingestion service. This loads the data from S3 into a Snowflake account.

All the AWS services used in the River architecture are serverless with automatic scaling. This means that the Cimpress data platform team can remain lean and agile. Engineering resources to infrastructure management tasks like capacity provisioning and patching are minimized. These AWS services also have pay-as-you-go pricing, so the cost scales predictably with the amount of data ingested.

Conclusions

The Cimpress data platform team redesigned their data ingestion service to be self-service, API-driven, and highly scalable. As usage of the Cimpress data platform has grown, Cimpress businesses operate more autonomously with speed and agility. As of today, the River data ingestion service reliably processes 2–3 billion messages per month across more than 1,000 different data streams. It drives data insights for more than 7,000 active users of the data platform across all of the Cimpress businesses.

Read more on the topics in this post and get started with building a data platform on AWS:

Enabling data classification for Amazon RDS database with Macie

Post Syndicated from Bruno Silveira original https://aws.amazon.com/blogs/security/enabling-data-classification-for-amazon-rds-database-with-amazon-macie/

Customers have been asking us about ways to use Amazon Macie data discovery on their Amazon Relational Database Service (Amazon RDS) instances. This post presents how to do so using AWS Database Migration Service (AWS DMS) to extract data from Amazon RDS, store it on Amazon Simple Storage Service (Amazon S3), and then classify the data using Macie. Macie’s resulting findings will also be made available to be queried with Amazon Athena by appropriate teams.

The challenge

Let’s suppose you need to find sensitive data in an RDS-hosted database using Macie, which currently only supports S3 as a data source. Therefore, you will need to extract and store the data from RDS in S3. In addition, you will need an interface for audit teams to audit these findings.

Solution overview

Figure 1: Solution architecture workflow

Figure 1: Solution architecture workflow

The architecture of the solution in Figure 1 can be described as:

  1. A MySQL engine running on RDS is populated with the Sakila sample database.
  2. A DMS task connects to the Sakila database, transforms the data into a set of Parquet compressed files, and loads them into the dcp-macie bucket.
  3. A Macie classification job analyzes the objects in the dcp-macie bucket using a combination of techniques such as machine learning and pattern matching to determine whether the objects contain sensitive data and to generate detailed reports on the findings.
  4. Amazon EventBridge routes the Macie findings reports events to Amazon Kinesis Data Firehose.
  5. Kinesis Data Firehose stores these reports in the dcp-glue bucket.
  6. S3 event notification triggers an AWS Lambda function whenever an object is created in the dcp-glue bucket.
  7. The Lambda function named Start Glue Workflow starts a Glue Workflow.
  8. Glue Workflow transforms the data from JSONL to Apache Parquet file format and places it in the dcp-athena bucket. This provides better performance during data query and optimized storage usage using a binary optimized columnar storage.
  9. Athena is used to query and visualize data generated by Macie.

Note: For better readability, the S3 bucket nomenclature omits the suffix containing the AWS Region and AWS account ID used to meet the global uniqueness naming requirement (for example, dcp-athena-us-east-1-123456789012).

The Sakila database schema consists of the following tables:

  • actor
  • address
  • category
  • city
  • country
  • customer

Building the solution

Prerequisites

Before configuring the solution, the AWS Identity and Access Management (IAM) user must have appropriate access granted for the following services:

You can find an IAM policy with the required permissions here.

Step 1 – Deploying the CloudFormation template

You’ll use CloudFormation to provision quickly and consistently the AWS resources illustrated in Figure 1. Through a pre-built template file, it will create the infrastructure using an Infrastructure-as-Code (IaC) approach.

  1. Download the CloudFormation template.
  2. Go to the CloudFormation console.
  3. Select the Stacks option in the left menu.
  4. Select Create stack and choose With new resources (standard).
  5. On Step 1 – Specify template, choose Upload a template file, select Choose file, and select the file template.yaml downloaded previously.
  6. On Step 2 – Specify stack details, enter a name of your preference for Stack name. You might also adjust the parameters as needed, like the parameter CreateRDSServiceRole to create a service role for RDS if it does not exist in the current account.
  7. On Step 3 – Configure stack options, select Next.
  8. On Step 4 – Review, check the box for I acknowledge that AWS CloudFormation might create IAM resources with custom names, and then select Create Stack.
  9. Wait for the stack to show status CREATE_COMPLETE.

Note: It is expected that provisioning will take around 10 minutes to complete.

Step 2 – Running an AWS DMS task

To extract the data from the Amazon RDS instance, you need to run an AWS DMS task. This makes the data available for Amazon Macie in an S3 bucket in Parquet format.

  1. Go to the AWS DMS console.
  2. In the left menu, select Database migration tasks.
  3. Select the task Identifier named rdstos3task.
  4. Select Actions.
  5. Select the option Restart/Resume.

When the Status changes to Load Complete the task has finished and you will be able to see migrated data in your target bucket (dcp-macie).

Inside each folder you can see parquet file(s) with names similar to LOAD00000001.parquet. Now you can use Macie to discover if you have sensitive data in your database contents as exported to S3.

Step 3 – Running a classification job with Amazon Macie

Now you need to create a data classification job so you can assess the contents of your S3 bucket. The job you create will run once and evaluate the complete contents of your S3 bucket to determine whether it can identify PII among the data. As mentioned earlier, this job only uses the managed identifiers available with Macie – you could also add your own custom identifiers.

  1. Go to the Macie console.
  2. Select the S3 buckets option in the left menu.
  3. Choose the S3 bucket dcp-macie containing the output data from the DMS task. You may need to wait a minute and select the Refresh icon if the bucket names do not display.

  4. Select Create job.
  5. Select Next to continue.
  6. Create a job with the following scope.
    1. Sensitive data Discovery options: One-time job
    2. Sampling Depth: 100%
    3. Leave all other settings with their default values
  7. Select Next to continue.
  8. Select Next again to skip past the Custom data identifiers section.
  9. Give the job a name and description.
  10. Select Next to continue.
  11. Verify the details of the job you have created and select Submit to continue.

You will see a green banner stating that The Job was successfully created. The job can take up to 15 minutes to conclude and the Status will change from Active to Complete. To open the findings from the job, select the job’s check box, choose Show results, and select Show findings.
 

Figure 2: Macie Findings screen

Figure 2: Macie Findings screen

Note: You can navigate in the findings and select each checkbox to see the details.

Step 4 – Enabling querying on classification job results with Amazon Athena

  1. Go to the Athena console and open the Query editor.
  2. If it’s your first-time using Athena you will see a message Before you run your first query, you need to set up a query result location in Amazon S3. Learn more. Select the link presented with this message.
  3. In the Settings window, choose Select and then choose the bucket dcp-assets to store the Athena query results.
  4. (Optional) To store the query results encrypted, check the box for Encrypt query results and select your preferred encryption type. To learn more about Amazon S3 encryption types, see Protecting data using encryption.
  5. Select Save.

Step 5 – Query Amazon Macie results with Amazon Athena.

It might take a few minutes for the data to complete the flow between Amazon Macie and AWS Glue. After it’s finished, you’ll be able to see in Athena’s console the table dcp_athena within the database dcp.

Then, select the three dots next to the table dcp_athena and select the Preview table option to see a data preview, or run your own custom queries.
 

Figure 3: Athena table preview

Figure 3: Athena table preview

As your environment grows, this blog post on Top 10 Performance Tuning Tips for Amazon Athena can help you apply partitioning of data and consolidate your data into larger files if needed.

Clean up

After you finish, to clean up the solution and avoid unnecessary expenses, complete the following steps:

  1. Go to the Amazon S3 console.
  2. Navigate to each of the buckets listed below and delete all its objects:
    • dcp-assets
    • dcp-athena
    • dcp-glue
    • dcp-macie
  3. Go to the CloudFormation console.
  4. Select the Stacks option in the left menu.
  5. Choose the stack you created in Step 1 – Deploying the CloudFormation template.
  6. Select Delete and then select Delete Stack in the pop-up window.

Conclusion

In this blog post, we show how you can find Personally Identifiable Information (PII), and other data defined as sensitive, in Macie’s Managed Data Identifiers in an RDS-hosted MySQL database. You can use this solution with other relational databases like PostgreSQL, SQL Server, or Oracle, whether hosted on RDS or EC2. If you’re using Amazon DynamoDB, you may also find useful the blog post Detecting sensitive data in DynamoDB with Macie.

By classifying your data, you can inform your management of appropriate data protection and handling controls for the use of that data.

If you have feedback about this post, submit comments in the Comments section below.

Want more AWS Security how-to content, news, and feature announcements? Follow us on Twitter.

Author

Bruno Silveira

Bruno is a Solutions Architect Manager in the Public Sector team with a focus on educational institutions in Brazil. His previous career was in government, financial services, utilities, and nonprofit institutions. Bruno is an enthusiast of cloud security and an appreciator of good rock’n roll with a good beer.

Author

Thiago Pádua

Thiago is Solutions Architect in the AWS Worldwide Public Sector team working in the development and support of partners. He is experienced in software development and systems integration, mainly in the telecommunications industry. He has a special interest in microservices, serverless, and containers.

Enable Security Hub PCI DSS standard across your organization and disable specific controls

Post Syndicated from Pablo Pagani original https://aws.amazon.com/blogs/security/enable-security-hub-pci-dss-standard-across-your-organization-and-disable-specific-controls/

At this time, enabling the PCI DSS standard from within AWS Security Hub enables this compliance framework only within the Amazon Web Services (AWS) account you are presently administering.

This blog post showcases a solution that can be used to customize the configuration and deployment of the PCI DSS standard compliance standard using AWS Security Hub across multiple AWS accounts and AWS Regions managed by AWS Organizations. It also demonstrates how to disable specific standards or controls that aren’t required by your organization to meet its compliance requirement. This solution can be used as a baseline for implementation when creating new AWS accounts through the use of AWS CloudFormation StackSets.

Solution overview

Figure 1 that follows shows a sample account setup using the automated solution in this blog post to enable PCI DSS monitoring and reporting across multiple AWS accounts using AWS Organizations. The hierarchy depicted is of one management account used to monitor two member accounts with infrastructure spanning across multiple Regions. Member accounts are configured to send their Security Hub findings to the designated Security Hub management account for centralized compliance management.

Figure 1: Security Hub deployment using AWS Organizations

Figure 1: Security Hub deployment using AWS Organizations

Prerequisites

The following prerequisites must be in place in order to enable the PCI DSS standard:

  1. A designated administrator account for Security Hub.
  2. Security Hub enabled in all the desired accounts and Regions.
  3. Access to the management account for the organization. The account must have the required permissions for stack set operations.
  4. Choose which deployment targets (accounts and Regions) you want to enable the PCI DSS standard. Typically, you set this on the accounts where Security Hub is already enabled, or on the accounts where PCI workloads reside.
  5. (Optional) If you find standards or controls that aren’t applicable to your organization, get the Amazon Resource Names (ARNs) of the desired standards or controls to disable.

Solution Resources

The CloudFormation template that you use in the following steps contains:

Solution deployment

To set up this solution for automated deployment, stage the following CloudFormation StackSet template for rollout via the AWS CloudFormation service. The stack set runs across the organization at the root or organizational units (OUs) level of your choice. You can choose which Regions to run this solution against and also to run it each time a new AWS account is created.

To deploy the solution

  1. Open the AWS Management Console.
  2. Download the sh-pci-enabler.yaml template and save it to an Amazon Simple Storage Services (Amazon S3) bucket on the management account. Make a note of the path to use later.
  3. Navigate to CloudFormation service on the management account. Select StackSets from the menu on the left, and then choose Create StackSet.
     
    Figure 2: CloudFormation – Create StackSet

    Figure 2: CloudFormation – Create StackSet

  4. On the Choose a template page, go to Specify template and select Amazon S3 URL and enter the path to the sh-pci-enabler.yaml template you saved in step 2 above. Choose Next.
     
    Figure 3: CloudFormation – Choose a template

    Figure 3: CloudFormation – Choose a template

  5. Enter a name and (optional) description for the StackSet. Choose Next.
     
    Figure 4: CloudFormation – enter StackSet details

    Figure 4: CloudFormation – enter StackSet details

  6. (Optional) On the Configure StackSet options page, go to Tags and add tags to identify and organize your stack set.
     
    Figure 5: CloudFormation – Configure StackSet options

    Figure 5: CloudFormation – Configure StackSet options

  7. Choose Next.
  8. On the Set deployment options page, select the desired Regions, and then choose Next.

    Figure 6: CloudFormation – Set deployment options

    Figure 6: CloudFormation – Set deployment options

  9. Review the definition and select I acknowledge that AWS CloudFormation might create IAM resources. Choose Submit.
     
    Figure 7: CloudFormation – Review, acknowledge, and submit

    Figure 7: CloudFormation – Review, acknowledge, and submit

  10. After you choose Submit, you can monitor the creation of the StackSet from the Operations tab to ensure that deployment is successful.
     
    Figure 8: CloudFormation – Monitor creation of the StackSet

    Figure 8: CloudFormation – Monitor creation of the StackSet

Disable standards that don’t apply to your organization

To disable a standard that isn’t required by your organization, you can use the same template and steps as described above with a few changes as explained below.

To disable standards

  1. Start by opening the SH-PCI-enabler.yaml template and saving a copy under a new name.
  2. In the template, look for sh.batch_enable_standards. Change it to sh.batch_disable_standards.
  3. Locate standardArn=f”arn:aws:securityhub:{region}::standards/pci-dss/v/3.2.1″ and change it to the desired ARN. To find the correct standard ARN, you can use the AWS Command Line Interface (AWS CLI) or AWS CloudShell to run the command aws securityhub describe-standards.
Figure 9: Describe Security Hub standards using CLI

Figure 9: Describe Security Hub standards using CLI

Note: Be sure to keep the f before the quotation marks and replace any Region you might get from the command with the {region} variable. If the CIS standard doesn’t have the Region defined, remove the variable.

Disable controls that don’t apply to your organization

When you enable a standard, all of the controls for that standard are enabled by default. If necessary, you can disable specific controls within an enabled standard.

When you disable a control, the check for the control is no longer performed, no additional findings are generated for that control, and the related AWS Config rules that Security Hub created are removed.

Security Hub is a regional service. When you disable or enable a control, the change is applied in the Region that you specify in the API request. Also, when you disable an entire standard, Security Hub doesn’t track which controls were disabled. If you enable the standard again later, all of the controls in that standard will be enabled.

To disable a list of controls

  1. Open the Security Hub console and select Security standards from the left menu. For each check you want to disable, select Finding JSON and make a note of each StandardsControlArn to add to your list.

    Note: Another option is to use the DescribeStandardsControls API to create a list of StandardsControlArn to be disabled.


    Figure 10: Security Hub console – finding JSON download option

    Figure 10: Security Hub console – finding JSON download option

  2. Download the StackSet SH-disable-controls.yaml template to your computer.
  3. Use a text editor to open the template file.
  4. Locate the list of controls to disable, and edit the template to replace the provided list of StandardsControlArn with your own list of controls to disable, as shown in the following example. Use a comma as the delimiter for each ARN.
    controls=f"arn:aws:securityhub:{region}:{account_id}:control/aws-foundational-security-best-practices/v/1.0.0/ACM.1, arn:aws:securityhub:{region}:{account_id}:control/aws-foundational-security-best-practices/v/1.0.0/APIGateway.1, arn:aws:securityhub:{region}:{account_id}:control/aws-foundational-security-best-practices/v/1.0.0/APIGateway.2"
    

  5. Save your changes to the template.
  6. Follow the same steps you used to deploy the PCI DSS standard, but use your edited template.

Note: The region and account_id are set as variables, so you decide in which accounts and Regions to disable the controls from the StackSet deployment options (step 8 in Deploy the solution).

Troubleshooting

The following are issues you might encounter when you deploy this solution:

  1. StackSets deployment errors: Review the troubleshooting guide for CloudFormation StackSets.
  2. Dependencies issues: To modify the status of any standard or control, Security Hub must be enabled first. If it’s not enabled, the operation will fail. Make sure you meet the prerequisites listed earlier in this blog post. Use CloudWatch logs to analyze possible errors from the Lambda function to help identify the cause.
  3. StackSets race condition error: When creating new accounts, the Organizations service enables Security Hub in the account, and invokes the stack sets during account creation. If the stack set runs before the Security Hub service is enabled, the stack set can’t enable the PCI standard. If this happens, you can fix it by adding the Amazon EventBridge rule as shown in SH-EventRule-PCI-enabler.yaml. The EventBridge rule invokes the SHLambdaFunctionEB Lambda function after Security Hub is enabled.

Conclusion

The AWS Security Hub PCI DSS standard is fundamental for any company involved with storing, processing, or transmitting cardholder data. In this post, you learned how to enable or disable a standard or specific controls in all your accounts throughout the organization to proactively monitor your AWS resources. Frequently reviewing failed security checks, prioritizing their remediation, and aiming for a Security Hub score of 100 percent can help improve your security posture.

Further reading

If you have feedback about this post, submit comments in the Comments section below. If you have questions, please start a new thread on the Security Hub forum.

Want more AWS Security how-to content, news, and feature announcements? Follow us on Twitter.
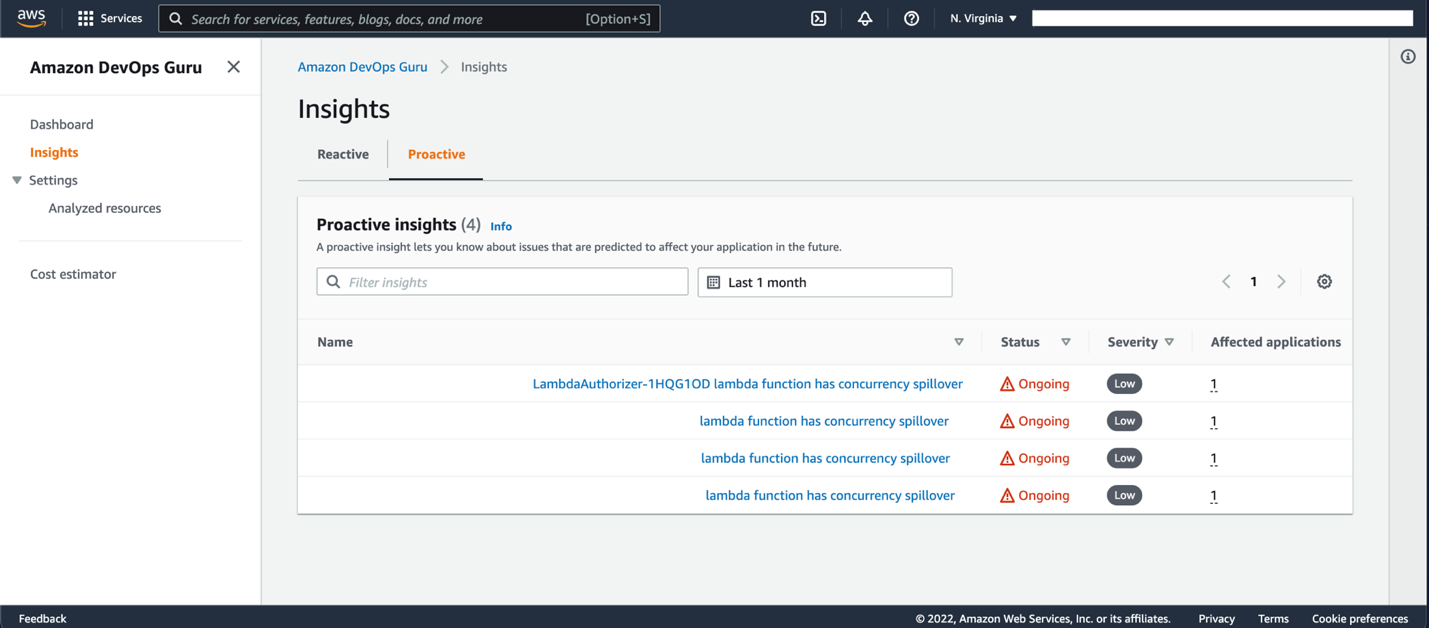
Author

Pablo Pagani

Pablo is the Latam Security Manager for AWS Professional Services based in Buenos Aires, Argentina. He developed his passion for computers while writing his first lines of code in BASIC using a Talent MSX.

Author

Rogerio Kasa

Rogerio is a Senior SRC Consultant based in Sao Paulo, Brazil. He has more than 20 years experience in information security, including 11 years in financial services as a local information security officer. As a security consultant, he helps customers improve their security posture by understanding business goals and creating controls aligned with their risk strategy.

Migrate Resources Between AWS Accounts

Post Syndicated from Ashok Srirama original https://aws.amazon.com/blogs/architecture/migrate-resources-between-aws-accounts/

Have you ever wondered how to move resources between Amazon Web Services (AWS) accounts? You can really view this as a migration of resources. Migrating resources from one AWS account to another may be desired or required due to your business needs. Following are a few scenarios where this may be of benefit:

  1. When you acquire, sell, or merge overseas operations from other businesses.
  2. When you move regional operations from one Managed Service Provider (MSP) to another.
  3. When you reorganize your AWS account and organizational structure.

This process may involve migrating the infrastructure either partially or completely.

In this blog, we will discuss various approaches to migrating resources based on type, configuration, and workload needs. Usually, the first consideration is infrastructure. What’s in your environment? What are the interdependencies? How will you migrate each resource?

Using this information, you can outline a plan on how you will approach migrating each of the resources in your portfolio, and in what order.

Here are some considerations to address for a typical migration:

Let’s look at each of these considerations in detail.

Migrating infrastructure

To migrate infrastructure that includes ephemeral resources, you can use one of the following Infrastructure as Code (IaC) approaches, shown in Figure 1. IaC templates are like programming scripts that automate the provisioning of IT resources.

Figure 1. Approaches to migrate infrastructure using IaC

Figure 1. Approaches to migrate infrastructure using IaC

1. If you are already using AWS CloudFormation templates, you can easily import the existing templates to the target AWS account.

AWS CloudFormation simplifies provisioning and management on AWS. You can create templates for quick and reliable provisioning of services or applications (called “stacks”).

2. You can use tools like Former2 to templatize your existing resources in the source AWS account and deploy them in the target account.

Former2 is an open-source project that allows you to generate IaC templates. For example, AWS CloudFormation or HashiCorp Terraform can be generated from the existing resources within your AWS account. Read Accelerate infrastructure as code development with open source Former2 for step-by-step guidance.

Migrating compute resources

To migrate compute resources that have a persistent state, you can use one of the following approaches, shown in Figure 2. These provide a virtual computing environment, allowing you to launch instances with a variety of operating systems.

Figure 2. Approaches to migrate compute resources

Figure 2. Approaches to migrate compute resources

1. If you are already using AWS Backup service and AWS Organizations to centrally manage backup policies, you can enable AWS Backup cross-account management feature. This manages, monitors, restores your backup, and copies jobs across AWS accounts. Ensure you have both accounts in same AWS Organization. Once the backups are available in the target account, you can restore EC2 instances. Follow detailed instructions at Creating backup copies across AWS accounts.

AWS Backup is a fully managed data protection service that centralizes and automates data across AWS services, in the cloud, and on-premises. You can configure backup policies and monitor activity for your AWS resources. You can automate and consolidate backup tasks that were previously performed service-by-service. This removes the need to create custom scripts and use manual processes.

2. Create an Amazon Machine Image of your EC2 instances and share it with the target account. You can launch new EC2 instances using the shared AMI. Follow step-by-step instructions: How do I transfer an Amazon EC2 instance or AMI to a different AWS account?

Amazon Machine Image (AMI) provides the information required to launch an instance. Specify an AMI and then launch multiple instances from a single AMI with the same configuration. You can use different AMIs to launch instances when you need instances with different configurations.

For migrating non-persistent compute resources, refer Migrating Infrastructure section.

Migrating storage resources

AWS offers various storage services including object, file, and block storage. To migrate objects from a S3 bucket, you can take the following approaches, shown in Figure 3a.

Figure 3a. Approaches to migrate S3 buckets

Figure 3a. Approaches to migrate S3 buckets

1. Use Amazon S3 command line interface (CLI) commands to copy the initial load of objects from the source account to the target account. Read How can I copy S3 objects from another AWS account? After the initial copy, you can enable Amazon S3 replication feature to continuously replicate object changes across accounts. Add a bucket policy to grant source bucket permission to replicate objects in destination bucket. Read this walkthrough on how to configure replications.

2. If the S3 bucket contains large number of objects, use Amazon S3 Batch operations to copy objects across AWS accounts in bulk. Read Cross-account bulk transfer of files using Amazon S3 Batch Operations.

To migrate files from an Amazon EFS file system, you can take the following approach, shown in Figure 3b.

Figure 3b. Approach to migrate EFS file systems

Figure 3b. Approach to migrate EFS file systems

Use AWS DataSync agent to transfer data from one EFS file system to another. AWS DataSync is an online transfer service that simplifies moving, copying, and synchronizing large amounts of data between on-premises storage systems and AWS storage services. Read Transferring file data across AWS Regions and accounts using AWS DataSync for step-by-step guidance.

Migrating database resources

AWS offers various purpose-built database engines. These include relational, key-value, document, in-memory, graph, time series, wide column, and ledger databases. To migrate relational databases, you can take one of the following approaches, shown in Figure 4.

Figure 4. Approaches to migrate relational database resources

Figure 4. Approaches to migrate relational database resources

1. If you want to continuously replicate data changes, use AWS Database Migration Service (AWS DMS) to replicate your data across AWS accounts with high availability. The source database remains fully operational during the migration, minimizing downtime to applications that rely on the database. You can set up a DMS task for either one-time migration or on-going replication. An on-going replication task keeps your source and target databases in sync. Once set up, the on-going replication task will continuously apply source changes to the target with minimal latency. Learn how to Set Up AWS DMS for Cross-Account Migration.

AWS DMS is a cloud service that streamlines the migration of relational databases, data warehouses, NoSQL databases, and other types of data stores. You can use AWS DMS to migrate your data into the AWS Cloud or between combinations of cloud and on-premises setups.

2. Use RDS Snapshots to create and share database backups across AWS accounts. Use the shared snapshots to launch new Amazon Relational Database Service (RDS) instances in the target account. Read step-by-step instructions: How can I share an encrypted Amazon RDS DB snapshot with another account?

3. Use AWS Backup to create backup policies that automatically back up your AWS resources. Use AWS Backup cross-account management feature to manage and monitor your backup, restore, and copy jobs across AWS accounts. Once the backups are available in the target account, you can restore RDS instances. Learn about Creating backup copies across AWS accounts.

In this section, we discussed relational databases migration. You can also use AWS DMS for migrating other databases. Read supported AWS DMS source and target databases.

Conclusion

In this blog post, we discussed various approaches you can take to migrate resources from one account to another depending upon the resource type and configuration. Additionally, you can also explore CloudEndure Migration for continuous data replication. Learn more about Migrating workloads across AWS Regions with CloudEndure Migration.

How to automate incident response to security events with AWS Systems Manager Incident Manager

Post Syndicated from Sumit Patel original https://aws.amazon.com/blogs/security/how-to-automate-incident-response-to-security-events-with-aws-systems-manager-incident-manager/

Incident response is a core security capability for organizations to develop, and a core element in the AWS Cloud Adoption Framework (AWS CAF). Responding to security incidents quickly is important to minimize their impacts. Automating incident response helps you scale your capabilities, rapidly reduce the scope of compromised resources, and reduce repetitive work by your security team.

In this post, I show you how to use Incident Manager, a capability of AWS Systems Manager, to build an effective automated incident management and response solution to security events.

You’ll walk through three common security-related events and how you can use Incident Manager to automate your response.

  • AWS account root user activity: An Amazon Web Services (AWS) account root user has full access to all your resources for all AWS services, including billing information. It’s therefore elemental to adhere to the best practice of using the root user only to create your first IAM user and securely lock away the root user credentials and use them to perform only a few account and service management tasks. And it is critical to be aware when root user activity occurs in your AWS account.
  • Amazon GuardDuty high severity findings: Amazon GuardDuty is a threat detection service that continuously monitors for malicious or unauthorized behavior to help protect your AWS accounts and workloads. In this blog post, you’ll learn how to initiate an incident response plan whenever a high severity finding is discovered.
  • AWS Config rule change and S3 bucket allowing public access: AWS Config enables continuous monitoring of your AWS resources, making it simple to assess, audit, and record resource configurations and changes. You will use AWS Config to monitor your Amazon Simple Storage Service (S3) bucket ACLs and policies for settings that allow public read or public write access.

Prerequisites

If this is your first time using Incident Manager, follow the initial onboarding steps in Getting prepared with Incident Manager.

Incident Manager can start managing incidents automatically using Amazon CloudWatch or Amazon EventBridge. For the solution in this blog post, you will use EventBridge to capture events and start an incident.

To complete the steps in this walkthrough, you need the following:

Create an Incident Manager response plan

A response plan ties together the contacts, escalation plan, and runbook. When an incident occurs, a response plan defines who to engage, how to engage, which runbook to initiate, and which metrics to monitor. By creating a well-defined response plan, you can save your security team time down the road.

Add contacts

Your contacts should include everyone who might be involved in the incident. Follow these steps to add a contact.

To add contacts

  1. Open the AWS Management Console, and then go to Systems Manager within the console, expand Operations Management, and then expand Incident Manager.
  2. Choose Contacts, and then choose Create contact.

    Figure 1: Adding contact details

    Figure 1: Adding contact details

  3. On Contact information, enter names and define contact channels for your contacts.
  4. Under Contact channel, you can select Email, SMS, or Voice. You can also add multiple contact channels.
  5. In Engagement plan, specify how fast to engage your responders. In the example illustrated below, the incident responder will be engaged through email immediately (0 minutes) when an incident is detected and then through SMS 10 minutes into an incident. Complete the fields and then choose Create.

    Figure 2: Engagement plan

    Figure 2: Engagement plan

Create a response plan

Once you’ve created your contacts, you can create a response plan to define how to respond to incidents. Refer to the Best Practices for Response Plans.

Note: (Optional) You can also create an escalation plan that lets you further define the escalation path for your contacts. You can learn more in Create an escalation plan.

To create a response plan

  1. Open the Incident Manager console, and choose Response plans in the left navigation pane.
  2. Choose Create response plan.
  3. Enter a unique and identifiable name for your response plan.
  4. Enter an incident title. The incident title helps to identify an incident on the incidents home page.
  5. Select an appropriate Impact based on the potential scope of the incident.

    Figure 3: Selecting your impact level

    Figure 3: Selecting your impact level

  6. (Optional) Choose a chat channel for the incident responders to interact in during an incident. For more information about chat channels, see Chat channels.
  7. (Optional) For Engagement, you can choose any number of contacts and escalation plans. For this solution, select the security team responder that you created earlier as one of your contacts.

    Figure 4: Adding engagements

    Figure 4: Adding engagements

  8. (Optional) You can also create a runbook that can drive the incident mitigation and response. For further information, refer to Runbooks and automation.
  9. Under Execution permissions, choose Create an IAM role using a template. Under Role name, select the IAM role you created in the prerequisites that allows Incident Manager to run SSM automation documents, and then choose Create response plan.

Monitor AWS account root activity

When you first create an AWS account, you begin with a single sign-in identity that has complete access to all AWS services and resources in the account. This identity is called the root user and is accessed by signing in with the email address and password that you used to create the account.

An AWS account root user has full access to all your resources for all AWS services, including billing information. It is critical to prevent root user access from unauthorized use and to be aware whenever root user activity occurs in your AWS account. For more information about AWS recommendations, see Security best practices in IAM.

To be certain that all root user activity is authorized and expected, it’s important to monitor root API calls to a given AWS account and to be notified when root user activity is detected.

Create an EventBridge rule

Create and validate an EventBridge rule to capture AWS account root activity.

To create an EventBridge rule

  1. Open the EventBridge console.
  2. In the navigation pane, choose Rules, and then choose Create rule.
  3. Enter a name and description for the rule.
  4. For Define pattern, choose Event pattern.
  5. Choose Custom pattern.
  6. Enter the following event pattern:
    {
      "detail-type": [
        "AWS API Call via CloudTrail",
        "AWS Console Sign In via CloudTrail"
      ],
      "detail": {
        "userIdentity": {
          "type": [
            "Root"
          ]
        }
      }
    }
    

  7. For Select targets, choose Incident Manager response plan.
  8. For Response plan, choose SecurityEventResponsePlan, which you created when you set up Incident Manager.
  9. To create an IAM role automatically, choose Create a new role for this specific resource. To use an existing IAM role, choose Use existing role.
  10. (Optional) Enter one or more tags for the rule.
  11. Choose Create.

To validate the rule

  1. Sign in using root credentials.
  2. This console login activity by a root user should invoke the Incident Manager response plan and show an open incident as illustrated below. The respective contact channels that you defined earlier in your Engagement Plan, will be engaged.
Figure 5: Incident Manager open incidents

Figure 5: Incident Manager open incidents

Watch for GuardDuty high severity findings

GuardDuty is a monitoring service that analyzes AWS CloudTrail management and Amazon S3 data events, Amazon Virtual Private Cloud (Amazon VPC) flow logs, and Amazon Route 53 DNS logs to generate security findings for your account. Once GuardDuty is enabled, it immediately starts monitoring your environment.

GuardDuty integrates with EventBridge, which can be used to send findings data to other applications and services for processing. With EventBridge, you can use GuardDuty findings to invoke automatic responses to your findings by connecting finding events to targets such as Incident Manager response plan.

Create an EventBridge rule

You’ll use an EventBridge rule to capture GuardDuty high severity findings.

To create an EventBridge rule

  1. Open the EventBridge console.
  2. In the navigation pane, select Rules, and then choose Create rule.
  3. Enter a name and description for the rule.
  4. For Define pattern, choose Event pattern.
  5. Choose Custom pattern
  6. Enter the following event pattern which will filter on GuardDuty high severity findings
    {
      "source": ["aws.guardduty"],
      "detail-type": ["GuardDuty Finding"],
      "detail": {
        "severity": [
          7.0,
          7.1,
          7.2,
          7.3,
          7.4,
          7.5,
          7.6,
          7.7,
          7.8,
          7.9,
          8,
          8.0,
          8.1,
          8.2,
          8.3,
          8.4,
          8.5,
          8.6,
          8.7,
          8.8,
          8.9
        ]
      }
    } 
    

  7. For Select targets, choose Incident Manager response plan.
  8. For Response plan, select SecurityEventResponsePlan, which you created when you set up Incident Manager.
  9. To create an IAM role automatically, choose Create a new role for this specific resource. To use an IAM role that you created before, choose Use existing role.
  10. (Optional) Enter one or more tags for the rule.
  11. Choose Create.

To validate the rule

To test and validate whether the above rule is now functional, you can generate sample findings within the GuardDuty console.

  1. Open the GuardDuty console.
  2. In the navigation pane, choose Settings.
  3. On the Settings page, under Sample findings, choose Generate sample findings.
  4. In the navigation pane, choose Findings. The sample findings are displayed on the Current findings page with the prefix [SAMPLE].

Once you have generated sample findings, your Incident Manager response plan will be invoked almost immediately and the engagement plan with your contacts will begin.

You can select an open incident in the Incident Manager console to see additional details from the GuardDuty finding. Figure 6 shows a high severity finding.

Figure 6: Incident Manager open incident for GuardDuty high severity finding

Figure 6: Incident Manager open incident for GuardDuty high severity finding

Monitor S3 bucket settings for public access

AWS Config enables continuous monitoring of your AWS resources, making it easier to assess, audit, and record resource configurations and changes. AWS Config does this through rules that define the desired configuration state of your AWS resources. AWS Config provides a number of AWS managed rules that address a wide range of security concerns such as checking that your Amazon Elastic Block Store (Amazon EBS) volumes are encrypted, your resources are tagged appropriately, and multi-factor authentication (MFA) is enabled for root accounts.

Set up AWS Config and EventBridge

You will use AWS Config to monitor your S3 bucket ACLs and policies for violations which could allow public read or public write access. If AWS Config finds a policy violation, it will initiate an AWS EventBridge rule to invoke your Incident Manager response plan.

To create the AWS Config rule to capture S3 bucket public access

  1. Sign in to the AWS Config console.
  2. If this is your first time in the AWS Config console, refer to the Getting Started guide for more information.
  3. Select Rules from the menu and choose Add Rule.
  4. On the AWS Config rules page, enter S3 in the search box and select the s3-bucket-public-read-prohibited and s3-bucket-public-write-prohibited rules, and then choose Next.

    Figure 7: AWS Config rules

    Figure 7: AWS Config rules

  5. Leave the Configure rules page as default and select Next.
  6. On the Review page, select Add Rule. AWS Config is now analyzing your S3 buckets, capturing their current configurations, and evaluating the configurations against the rules you selected.

To create the EventBridge rule

  1. Open the Amazon EventBridge console
  2. In the navigation pane, choose Rules, and then choose Create rule.
  3. Enter a name and description for the rule.
  4. For Define pattern, choose Event pattern.
  5. Choose Custom pattern
  6. Enter the following event pattern, which will filter on AWS Config rule s3-bucket-public-write-prohibited being non-compliant.
    {
      "source": ["aws.config"],
      "detail-type": ["Config Rules Compliance Change"],
      "detail": {
        "messageType": ["ComplianceChangeNotification"],
        "configRuleName": ["s3-bucket-public-write-prohibited", ""],
        "newEvaluationResult": {
          "complianceType": [
            "NON_COMPLIANT"
          ]
        }
      }
    }
    

  7. For Select targets, choose Incident Manager response plan.
  8. For Response plan, choose SecurityEventResponsePlan, which you created earlier when setting up Incident Manager.
  9. To create an IAM role automatically, choose Create a new role for this specific resource. To use an existing IAM role, choose Use existing role.
  10. (Optional) Enter one or more tags for the rule.
  11. Choose Create.

To validate the rule

  1. Create a compliant test S3 bucket with no public read or write access through either an ACL or a policy.
  2. Change the ACL of the bucket to allow public listing of objects so that the bucket is non-compliant.

    Figure 8: Amazon S3 console

    Figure 8: Amazon S3 console

  3. After a few minutes, you should see the AWS Config rule initiated which invokes the EventBridge rule and therefore your Incident Manager response plan.

Summary

In this post, I showed you how to use Incident Manager to monitor for security events and invoke a response plan via Amazon CloudWatch or Amazon EventBridge. AWS CloudTrail API activity (for a root account login), Amazon GuardDuty (for high severity findings), and AWS Config (to enforce policies like preventing public write access to an S3 bucket). I demonstrated how you can create an incident management and response plan to ensure you have used the power of cloud to create automations that respond to and mitigate security incidents in a timely manner. To learn more about Incident Manager, see What Is AWS Systems Manager Incident Manager in the AWS documentation.

If you have feedback about this post, submit comments in the comments section below. If you have questions about this post, start a new thread on the Systems Manager forum or contact AWS Support.

Want more AWS Security how-to content, news, and feature announcements? Follow us on Twitter.
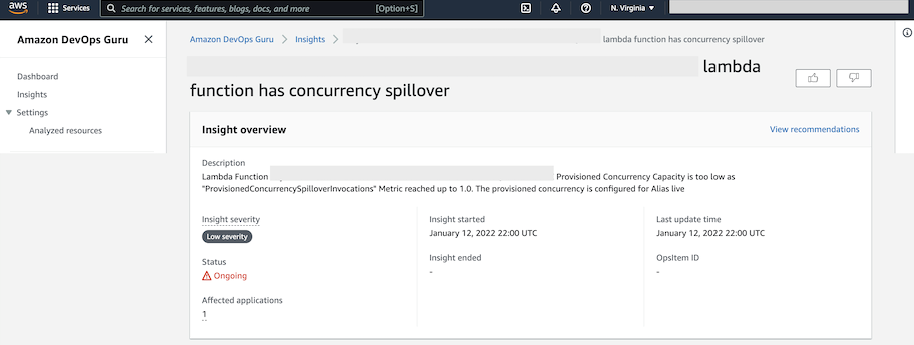
Author

Sumit Patel

As a Senior Solutions Architect at AWS, Sumit works with large enterprise customers helping them create innovative solutions to address their cloud challenges. Sumit uses his more than 15 years of enterprise experience to help customers navigate their cloud transformation journey and shape the right dynamics between technology and business.

How US federal agencies can use AWS to encrypt data at rest and in transit

Post Syndicated from Robert George original https://aws.amazon.com/blogs/security/how-us-federal-agencies-can-use-aws-to-encrypt-data-at-rest-and-in-transit/

This post is part of a series about how Amazon Web Services (AWS) can help your US federal agency meet the requirements of the President’s Executive Order on Improving the Nation’s Cybersecurity. You will learn how you can use AWS information security practices to meet the requirement to encrypt your data at rest and in transit, to the maximum extent possible.

Encrypt your data at rest in AWS

Data at rest represents any data that you persist in non-volatile storage for any duration in your workload. This includes block storage, object storage, databases, archives, IoT devices, and any other storage medium on which data is persisted. Protecting your data at rest reduces the risk of unauthorized access when encryption and appropriate access controls are implemented.

AWS KMS provides a streamlined way to manage keys used for at-rest encryption. It integrates with AWS services to simplify using your keys to encrypt data across your AWS workloads. It uses hardware security modules that have been validated under FIPS 140-2 to protect your keys. You choose the level of access control that you need, including the ability to share encrypted resources between accounts and services. AWS KMS logs key usage to AWS CloudTrail to provide an independent view of who accessed encrypted data, including AWS services that are using keys on your behalf. As of this writing, AWS KMS integrates with 81 different AWS services. Here are details on recommended encryption for workloads using some key services:

You can use AWS KMS to encrypt other data types including application data with client-side encryption. A client-side application or JavaScript encrypts data before uploading it to S3 or other storage resources. As a result, uploaded data is protected in transit and at rest. Customer options for client-side encryption include the AWS SDK for KMS, the AWS Encryption SDK, and use of third-party encryption tools.

You can also use AWS Secrets Manager to encrypt application passwords, connection strings, and other secrets. Database credentials, resource names, and other sensitive data used in AWS Lambda functions can be encrypted and accessed at run time. This increases the security of these secrets and allows for easier credential rotation.

KMS HSMs are FIPS 140-2 validated and accessible using FIPS validated endpoints. Agencies with additional requirements that require a FIPS 140-3 validated hardware security module (HSM) (for example, for securing third-party secrets managers) can use AWS CloudHSM.

For more information about AWS KMS and key management best practices, visit these resources:

Encrypt your data in transit in AWS

In addition to encrypting data at rest, agencies must also encrypt data in transit. AWS provides a variety of solutions to help agencies encrypt data in transit and enforce this requirement.

First, all network traffic between AWS data centers is transparently encrypted at the physical layer. This data-link layer encryption includes traffic within an AWS Region as well as between Regions. Additionally, all traffic within a virtual private cloud (VPC) and between peered VPCs is transparently encrypted at the network layer when you are using supported Amazon EC2 instance types. Customers can choose to enable Transport Layer Security (TLS) for the applications they build on AWS using a variety of services. All AWS service endpoints support TLS to create a secure HTTPS connection to make API requests.

AWS offers several options for agency-managed infrastructure within the AWS Cloud that needs to terminate TLS. These options include load balancing services (for example, Elastic Load Balancing, Network Load Balancer, and Application Load Balancer), Amazon CloudFront (a content delivery network), and Amazon API Gateway. Each of these endpoint services enable customers to upload their digital certificates for the TLS connection. Digital certificates then need to be managed appropriately to account for expiration and rotation requirements. AWS Certificate Manager (ACM) simplifies generating, distributing, and rotating digital certificates. ACM offers publicly trusted certificates that can be used in AWS services that require certificates to terminate TLS connections to the internet. ACM also provides the ability to create a private certificate authority (CA) hierarchy that can integrate with existing on-premises CAs to automatically generate, distribute, and rotate certificates to secure internal communication among customer-managed infrastructure.

Finally, you can encrypt communications between your EC2 instances and other AWS resources that are connected to your VPC, such as Amazon Relational Database Service (Amazon RDS) databases, Amazon Elastic File System (Amazon EFS) file systems, Amazon S3, Amazon DynamoDB, Amazon Redshift, Amazon EMR, Amazon OpenSearch Service, Amazon ElasticCache for Redis, Amazon FSx Windows File Server, AWS Direct Connect (DX) MACsec, and more.

Conclusion

This post has reviewed services that are used to encrypt data at rest and in transit, following the Executive Order on Improving the Nation’s Cybersecurity. I discussed the use of AWS KMS to manage encryption keys that handle the management of keys for at-rest encryption, as well as the use of ACM to manage certificates that protect data in transit.

Next steps

To learn more about how AWS can help you meet the requirements of the executive order, see the other posts in this series:

Subscribe to the AWS Public Sector Blog newsletter to get the latest in AWS tools, solutions, and innovations from the public sector delivered to your inbox, or contact us.

If you have feedback about this post, submit comments in the Comments section below.

Want more AWS Security how-to content, news, and feature announcements? Follow us on Twitter.

Author

Robert George

Robert is a Solutions Architect on the Worldwide Public Sector (WWPS) team who works with customers to design secure, high-performing, and cost-effective systems in the AWS Cloud. He has previously worked in cybersecurity roles focused on designing security architectures, securing enterprise systems, and leading incident response teams for highly regulated environments.

How US federal agencies can authenticate to AWS with multi-factor authentication

Post Syndicated from Kyle Hart original https://aws.amazon.com/blogs/security/how-us-federal-agencies-can-authenticate-to-aws-with-multi-factor-authentication/

This post is part of a series about how AWS can help your US federal agency meet the requirements of the President’s Executive Order on Improving the Nation’s Cybersecurity. We recognize that government agencies have varying degrees of identity management and cloud maturity and that the requirement to implement multi-factor, risk-based authentication across an entire enterprise is a vast undertaking. This post specifically focuses on how you can use AWS information security practices to help meet the requirement to “establish multi-factor, risk-based authentication and conditional access across the enterprise” as it applies to your AWS environment.

This post focuses on the best-practices for enterprise authentication to AWS – specifically federated access via an existing enterprise identity provider (IdP).

Many federal customers use authentication factors on their Personal Identity Verification (PIV) or Common Access Cards (CAC) to authenticate to an existing enterprise identity service which can support Security Assertion Markup Language (SAML), which is then used to grant user access to AWS. SAML is an industry-standard protocol and most IdPs support a range of authentication methods, so if you’re not using a PIV or CAC, the concepts will still work for your organization’s multi-factor authentication (MFA) requirements.

Accessing AWS with MFA

There are two categories we want to look at for authentication to AWS services:

  1. AWS APIs, which include access through the following:
  2. Resources you launch that are running within your AWS VPC, which can include database engines or operating system environments such as Amazon Elastic Compute Cloud (Amazon EC2) instances, Amazon WorkSpaces, or Amazon AppStream 2.0.

There is also a third category of services where authentication occurs in AWS that is beyond the scope of this post: applications that you build on AWS that authenticate internal or external end users to those applications. For this category, multi-factor authentication is still important, but will vary based on the specifics of the application architecture. Workloads that sit behind an AWS Application Load Balancer can use the ALB to authenticate users using either Open ID Connect or SAML IdP that enforce MFA upstream.

MFA for the AWS APIs

AWS recommends that you use SAML and an IdP that enforces MFA as your means of granting users access to AWS. Many government customers achieve AWS federated authentication with Active Directory Federation Services (AD FS). The IdP used by our federal government customers should enforce usage of CAC/PIV to achieve MFA and be the sole means of access to AWS.

Federated authentication uses SAML to assume an AWS Identity and Access Management (IAM) role for access to AWS resources. A role doesn’t have standard long-term credentials such as a password or access keys associated with it. Instead, when you assume a role, it provides you with temporary security credentials for your role session.

AWS accounts in all AWS Regions, including AWS GovCloud (US) Regions, have the same authentication options for IAM roles through identity federation with a SAML IdP. The AWS Single Sign-on (SSO) service is another way to implement federated authentication to the AWS APIs in regions where it is available.

MFA for AWS CLI access

In AWS Regions excluding AWS GovCloud (US), you can consider using the AWS CloudShell service, which is an interactive shell environment that runs in your web browser and uses the same authentication pipeline that you use to access the AWS Management Console—thus inheriting MFA enforcement from your SAML IdP.

If you need to use federated authentication with MFA for the CLI on your own workstation, you’ll need to retrieve and present the SAML assertion token. For information about how you can do this in Windows environments, see the blog post How to Set Up Federated API Access to AWS by Using Windows PowerShell. For information about how to do this with Python, see How to Implement a General Solution for Federated API/CLI Access Using SAML 2.0.

Conditional access

IAM permissions policies support conditional access. Common use cases include allowing certain actions only from a specified, trusted range of IP addresses; granting access only to specified AWS Regions; and granting access only to resources with specific tags. You should create your IAM policies to provide least-privilege access across a number of attributes. For example, you can grant an administrator access to launch or terminate an EC2 instance only if the request originates from a certain IP address and is tagged with an appropriate tag.

You can also implement conditional access controls using SAML session tags provided by their IdP and passed through the SAML assertion to be consumed by AWS. This means two separate users from separate departments can assume the same IAM role but have tailored, dynamic permissions. As an example, the SAML IdP can provide each individual’s cost center as a session tag on the role assertion. IAM policy statements can be written to allow the user from cost center A the ability to administer resources from cost center A, but not resources from cost center B.

Many customers ask about how to limit control plane access to certain IP addresses. AWS supports this, but there is an important caveat to highlight. Some AWS services, such as AWS CloudFormation, perform actions on behalf of an authorized user or role, and execute from within the AWS cloud’s own IP address ranges. See this document for an example of a policy statement using the aws:ViaAWSService condition key to exclude AWS services from your IP address restrictions to avoid unexpected authorization failures.

Multi-factor authentication to resources you launch

You can launch resources such as Amazon WorkSpaces, AppStream 2.0, Redshift, and EC2 instances that you configure to require MFA. The Amazon WorkSpaces Streaming Protocol (WSP) supports CAC/PIV authentication for pre-authentication, and in-session access to the smart card. For more information, see Use smart cards for authentication. To see a short video of it in action, see the blog post Amazon WorkSpaces supports CAC/PIV smart card authentication. Redshift and AppStream 2.0 support SAML 2.0 natively, so you can configure those services to work with your SAML IdP similarly to how you configure AWS Console access and inherit the MFA enforced by the upstream IdP.

MFA access to EC2 instances can occur via the existing methods and enterprise directories used in your on-premises environments. You can, of course, implement other systems that enforce MFA access to an operating system such as RADIUS or other third-party directory or MFA token solutions.

Shell access with Systems Manager Session Manager

An alternative method for MFA for shell access to EC2 instances is to use the Session Manager feature of AWS Systems Manager. Session Manager uses the Systems Manager management agent to provide role-based access to a shell (PowerShell on Windows) on an instance. Users can access Session Manager from the AWS Console or from the command line with the Session Manager AWS CLI plugin. Similar to using CloudShell for CLI access, accessing EC2 hosts via Session Manager uses the same authentication pipeline you use for accessing the AWS control plane. Your interactive session on that host can be configured for audit logging.

Security best practices in IAM

The focus of this blog is on integrating an agency’s existing MFA-enabled enterprise authentication service; but to make it easier for you to view the entire security picture, you might be interested in IAM security best practices. You can enforce these best-practice security configurations with AWS Organizations Service Control Policies.

Conclusion

This post covered methods your federal agency should consider in your efforts to apply the multi-factor authentication (MFA) requirements in the Executive Order on Improving the Nation’s Cybersecurity to your AWS environment. To learn more about how AWS can help you meet the requirements of the executive order, see the other posts in this series:

If you have feedback about this post, submit comments in the Comments section below.

Want more AWS Security how-to content, news, and feature announcements? Follow us on Twitter.
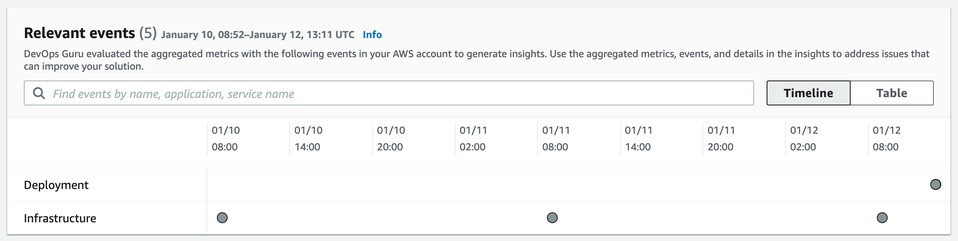
Author

Kyle Hart

Kyle is a Principal Solutions Architect supporting US federal government customers in the Washington, D.C. area.

Top 10 security best practices for securing data in Amazon S3

Post Syndicated from Megan O'Neil original https://aws.amazon.com/blogs/security/top-10-security-best-practices-for-securing-data-in-amazon-s3/

With more than 100 trillion objects in Amazon Simple Storage Service (Amazon S3) and an almost unimaginably broad set of use cases, securing data stored in Amazon S3 is important for every organization. So, we’ve curated the top 10 controls for securing your data in S3. By default, all S3 buckets are private and can be accessed only by users who are explicitly granted access through ACLs, S3 bucket policies, and identity-based policies. In this post, we review the latest S3 features and Amazon Web Services (AWS) services that you can use to help secure your data in S3, including organization-wide preventative controls such as AWS Organizations service control policies (SCPs). We also provide recommendations for S3 detective controls, such as Amazon GuardDuty for S3, AWS CloudTrail object-level logging, AWS Security Hub S3 controls, and CloudTrail configuration specific to S3 data events. In addition, we provide data protection options and considerations for encrypting data in S3. Finally, we review backup and recovery recommendations for data stored in S3. Given the broad set of use cases that S3 supports, you should determine the priority of controls applied in accordance with your specific use case and associated details.

Block public S3 buckets at the organization level

Designate AWS accounts for public S3 use and prevent all other S3 buckets from inadvertently becoming public by enabling S3 Block Public Access. Use Organizations SCPs to confirm that the S3 Block Public Access setting cannot be changed. S3 Block Public Access provides a level of protection that works at the account level and also on individual buckets, including those that you create in the future. You have the ability to block existing public access—whether it was specified by an ACL or a policy—and to establish that public access isn’t granted to newly created items. This allows only designated AWS accounts to have public S3 buckets while blocking all other AWS accounts. To learn more about Organizations SCPs, see Service control policies.

Use bucket policies to verify all access granted is restricted and specific

Check that the access granted in the Amazon S3 bucket policy is restricted to specific AWS principals, federated users, service principals, IP addresses, or VPCs that you provide. A bucket policy that allows a wildcard identity such as Principal “*” can potentially be accessed by anyone. A bucket policy that allows a wildcard action “*” can potentially allow a user to perform any action in the bucket. For more information, see Using bucket policies.

Ensure that any identity-based policies don’t use wildcard actions

Identity policies are policies assigned to AWS Identity and Access Management (IAM) users and roles and should follow the principle of least privilege to help prevent inadvertent access or changes to resources. Establishing least privilege identity policies includes defining specific actions such as S3:GetObject or S3:PutObject instead of S3:*. In addition, you can use predefined AWS-wide condition keys and S3‐specific condition keys to specify additional controls on specific actions. An example of an AWS-wide condition key commonly used for S3 is IpAddress: { aws:SourceIP: “10.10.10.10”}, where you can specify your organization’s internal IP space for specific actions in S3. See IAM.1 in Monitor S3 using Security Hub and CloudWatch Logs for detecting policies with wildcard actions and wildcard resources are present in your accounts with Security Hub.

Consider splitting read, write, and delete access. Allow only write access to users or services that generate and write data to S3 but don’t need to read or delete objects. Define an S3 lifecycle policy to remove objects on a schedule instead of through manual intervention— see Managing your storage lifecycle. This allows you to remove delete actions from your identity-based policies. Verify your policies with the IAM policy simulator. Use IAM Access Analyzer to help you identify, review, and design S3 bucket policies or IAM policies that grant access to your S3 resources from outside of your AWS account.

Enable S3 protection in GuardDuty to detect suspicious activities

In 2020, GuardDuty announced coverage for S3. Turning this on enables GuardDuty to continuously monitor and profile S3 data access events (data plane operations) and S3 configuration (control plane APIs) to detect suspicious activities. Activities such as requests coming from unusual geolocations, disabling of preventative controls, and API call patterns consistent with an attempt to discover misconfigured bucket permissions. To achieve this, GuardDuty uses a combination of anomaly detection, machine learning, and continuously updated threat intelligence. To learn more, including how to enable GuardDuty for S3, see Amazon S3 protection in Amazon GuardDuty.

Use Macie to scan for sensitive data outside of designated areas

In May of 2020, AWS re-launched Amazon Macie. Macie is a fully managed service that helps you discover and protect your sensitive data by using machine learning to automatically review and classify your data in S3. Enabling Macie organization wide is a straightforward and cost-efficient method for you to get a central, continuously updated view of your entire organization’s S3 environment and monitor your adherence to security best practices through a central console. Macie continually evaluates all buckets for encryption and access control, alerting you of buckets that are public, unencrypted, or shared or replicated outside of your organization. Macie evaluates sensitive data using a fully-managed list of common sensitive data types and custom data types you create, and then issues findings for any object where sensitive data is found.

Encrypt your data in S3

There are four options for encrypting data in S3, including client-side and server-side options. With server-side encryption, S3 encrypts your data at the object level as it writes it to disks in AWS data centers and decrypts it when you access it. As long as you authenticate your request and you have access permissions, there is no difference in the way you access encrypted or unencrypted objects.

The first two options use AWS Key Management Service (AWS KMS). AWS KMS lets you create and manage cryptographic keys and control their use across a wide range of AWS services and their applications. There are options for managing which encryption key AWS uses to encrypt your S3 data.

  • Server-side encryption with Amazon S3-managed encryption keys (SSE-S3). When you use SSE-S3, each object is encrypted with a unique key that’s managed by AWS. This option enables you to encrypt your data by checking a box with no additional steps. The encryption and decryption are handled for you transparently. SSE-S3 is a convenient and cost-effective option.
  • Server-side encryption with customer master keys (CMKs) stored in AWS KMS (SSE-KMS), is similar to SSE-S3, but with some additional benefits and costs compared to SSE-S3. There are separate permissions for the use of a CMK that provide added protection against unauthorized access of your objects in S3. SSE-KMS also provides you with an audit trail that shows when your CMK was used and by whom. SSE-KMS gives you control of the key access policy, which might provide you with more granular control depending on your use case.
  • In server-side encryption with customer-provided keys (SSE-C), you manage the encryption keys and S3 manages the encryption as it writes to disks and decryption when you access your objects. This option is useful if you need to provide and manage your own encryption keys. Keep in mind that you are responsible for the creation, storage, and tracking of the keys used to encrypt each object and AWS has no ability to recover customer-provided keys if they’re lost. The major thing to account for with SSE-C is that you must provide the customer-managed key every-time you PUT or GET an object.
  • Client-side encryption is another option to encrypt your data in S3. You can use a CMK stored in AWS KMS or use a master key that you store within your application. Client-side encryption means that you encrypt the data before you send it to AWS and that you decrypt it after you retrieve it from AWS. AWS doesn’t manage your keys and isn’t responsible for encryption or decryption. Usually, client-side encryption needs to be deeply embedded into your application to work.

Protect data in S3 from accidental deletion using S3 Versioning and S3 Object Lock

Amazon S3 is designed for durability of 99.999999999 percent of objects across multiple Availability Zones, is resilient against events that impact an entire zone, and designed for 99.99 percent availability over a given year. In many cases, when it comes to strategies to back up your data in S3, it’s about protecting buckets and objects from accidental deletion, in which case S3 Versioning can be used to preserve, retrieve, and restore every version of every object stored in your buckets. S3 Versioning lets you keep multiple versions of an object in the same bucket and can help you recover objects from accidental deletion or overwrite. Keep in mind this feature has costs associated. You may consider S3 Versioning in selective scenarios such as S3 buckets that store critical backup data or sensitive data.

With S3 Versioning enabled on your S3 buckets, you can optionally add another layer of security by configuring a bucket to enable multi-factor authentication (MFA) delete. With this configuration, the bucket owner must include two forms of authentication in any request to delete a version or to change the versioning state of the bucket.

S3 Object Lock is a feature that helps you mitigate data loss by storing objects using a write-once-read-many (WORM) model. By using Object Lock, you can prevent an object from being overwritten or deleted for a fixed time or indefinitely. Keep in mind that there are specific use cases for Object Lock, including scenarios where it is imperative that data is not changed or deleted after it has been written.

Enable logging for S3 using CloudTrail and S3 server access logging

Amazon S3 is integrated with CloudTrail. CloudTrail captures a subset of API calls, including calls from the S3 console and code calls to the S3 APIs. In addition, you can enable CloudTrail data events for all your buckets or for a list of specific buckets. Keep in mind that a very active S3 bucket can generate a large amount of log data and increase CloudTrail costs. If this is concern around cost then consider enabling this additional logging only for S3 buckets with critical data.

Server access logging provides detailed records of the requests that are made to a bucket. Server access logs can assist you in security and access audits.

Backup your data in S3

Although S3 stores your data across multiple geographically diverse Availability Zones by default, your compliance requirements might dictate that you store data at even greater distances. Cross-region replication (CRR) allows you to replicate data between distant AWS Regions to help satisfy these requirements. CRR enables automatic, asynchronous copying of objects across buckets in different AWS Regions. For more information on object replication, see Replicating objects. Keep in mind that this feature has costs associated, you might consider CCR in selective scenarios such as S3 buckets that store critical backup data or sensitive data.

Monitor S3 using Security Hub and CloudWatch Logs

Security Hub provides you with a comprehensive view of your security state in AWS and helps you check your environment against security industry standards and best practices. Security Hub collects security data from across AWS accounts, services, and supported third-party partner products and helps you analyze your security trends and identify the highest priority security issues.

The AWS Foundational Security Best Practices standard is a set of controls that detect when your deployed accounts and resources deviate from security best practices, and provides clear remediation steps. The controls contain best practices from across multiple AWS services, including S3. We recommend you enable the AWS Foundational Security Best Practices as it includes the following detective controls for S3 and IAM:

IAM.1: IAM policies should not allow full “*” administrative privileges.
S3.1: Block Public Access setting should be enabled
S3.2: S3 buckets should prohibit public read access
S3.3: S3 buckets should prohibit public write access
S3.4: S3 buckets should have server-side encryption enabled
S3.5: S3 buckets should require requests to use Secure Socket layer
S3.6: Amazon S3 permissions granted to other AWS accounts in bucket policies should be restricted
S3.8: S3 Block Public Access setting should be enabled at the bucket level

For details of each control, including remediation steps, please review the AWS Foundational Security Best Practices controls.

If there is a specific S3 API activity not covered above that you’d like to be alerted on, you can use CloudTrail Logs together with Amazon CloudWatch for S3 to do so. CloudTrail integration with CloudWatch Logs delivers S3 bucket-level API activity captured by CloudTrail to a CloudWatch log stream in the CloudWatch log group that you specify. You create CloudWatch alarms for monitoring specific API activity and receive email notifications when the specific API activity occurs.

Conclusion

By using the ten practices described in this blog post, you can build strong protection mechanisms for your data in Amazon S3, including least privilege access, encryption of data at rest, blocking public access, logging, monitoring, and configuration checks.

Depending on your use case, you should consider additional protection mechanisms. For example, there are security-related controls available for large shared datasets in S3 such as Access Points, which you can use to decompose one large bucket policy into separate, discrete access point policies for each application that needs to access the shared data set. To learn more about S3 security, see Amazon S3 Security documentation.

Now that you’ve reviewed the top 10 security best practices to make your data in S3 more secure, make sure you have these controls set up in your AWS accounts—and go build securely!

If you have feedback about this post, submit comments in the Comments section below. If you have questions about this post, start a new thread on the Amazon S3 forum or contact AWS Support.

Want more AWS Security how-to content, news, and feature announcements? Follow us on Twitter.

Author

Megan O’Neil

Megan is a Senior Specialist Solutions Architect focused on threat detection and incident response. Megan and her team enable AWS customers to implement sophisticated, scalable, and secure solutions that solve their business challenges.

Author

Temi Adebambo

Temi is the Senior Manager for the America’s Security and Network Solutions Architect team. His team is focused on working with customers on cloud migration and modernization, cybersecurity strategy, architecture best practices, and innovation in the cloud. Before AWS, he spent over 14 years as a consultant, advising CISOs and security leaders at some of the largest global enterprises.

How to improve visibility into AWS WAF with anomaly detection

Post Syndicated from Cyril Soler original https://aws.amazon.com/blogs/security/how-to-improve-visibility-into-aws-waf-with-anomaly-detection/

When your APIs are exposed on the internet, they naturally face unpredictable traffic. AWS WAF helps protect your application’s API against common web exploits, such as SQL injection and cross-site scripting. In this blog post, you’ll learn how to automatically detect anomalies in the AWS WAF metrics to improve your visibility into AWS WAF activity, identify malicious activity, and simplify your investigations. The service that this solution uses to detect anomalies is Amazon Lookout for Metrics.

Lookout for Metrics is a service you can use to monitor business or operational metrics such as successful or failed HTTP requests and detect anomalies by using machine learning (ML). You can configure Lookout for Metrics to monitor different data sources that contain AWS WAF metrics, including Amazon CloudWatch. Lookout for Metrics can also take actions such as publishing findings in AWS Security Hub.

Solution overview

The solution in this blog post uses Amazon API Gateway to serve a simple REST API. AWS WAF protects API Gateway with AWS Managed Rules for AWS WAF. Amazon Lookout for Metrics actively detects unusual patterns in AWS WAF rule actions and sends a finding to Security Hub when suspicious activity is detected. Figure 1 shows the solution architecture.

Because AWS WAF integrates with Application Load Balancer, Amazon CloudFront distributions, or AWS AppSync GraphQL APIs, this solution also applies to these services.
 

Figure 1: Solution architecture

Figure 1: Solution architecture

The workflow of the solution is as follows:

  1. An HTTP request reaches the API Gateway endpoint.
  2. AWS WAF analyzes the HTTP request using the configured rules.
  3. Amazon CloudWatch collects action metrics for each rule that is configured in AWS WAF.
  4. Amazon Lookout for Metrics monitors CloudWatch metrics, selects the best ML algorithm, and trains the ML model.
  5. Lookout for Metrics detects outliers and provides a severity score to diagnose the issue.
  6. Lookout for Metrics invokes an AWS Lambda function when an anomaly is detected.
  7. The Lambda function sends a finding to Security Hub for further analysis.

Let’s take a detailed look at the AWS services that you will use in this solution.

Amazon API Gateway

Amazon API Gateway is a serverless API management service that supports mock integrations for API methods. This is the easiest and the most cost-effective way to implement this solution. But you can also use Amazon CloudFront, AWS AppSync GraphQL API, and Application Load Balancer to implement this solution in your workload.

AWS WAF

AWS WAF is a web application firewall you can associate with API Gateway for REST APIs, Amazon CloudFront, AWS AppSync for GraphQL API, or Application Load Balancer. AWS WAF is integrated with other AWS services such as CloudWatch. AWS WAF uses rules to detect common web exploits in the incoming HTTP requests. You can configure your own rules, or use managed rulesets from AWS or from a third-party vendor. In this solution, you use AWS Managed Rules, which contains the CrossSiteScripting_QUERYARGUMENTS rule.

Amazon CloudWatch

Amazon CloudWatch is a monitoring and observability service. CloudWatch receives specific metrics from AWS WAF every 5 minutes. In particular, for each AWS WAF rule, CloudWatch provides PassedRequests, BlockedRequests, and CountedRequests metrics.

Amazon Lookout for Metrics

Amazon Lookout for Metrics uses machine learning (ML) algorithms to automatically detect and diagnose anomalies in your metrics. By using CloudWatch metrics as a data source for Lookout for Metrics, you can apply one of the Lookout for Metrics ML models to detect anomalies in a faster way. In addition, you can provide feedback on detected anomalies to help improve the model accuracy over time. Lookout for Metrics is available in the US East (Ohio), US East (N. Virginia), US West (Oregon), Asia Pacific (Singapore), Asia Pacific (Sydney), Asia Pacific (Tokyo), Europe (Frankfurt), Europe (Ireland), and Europe (Stockholm) AWS Regions.

AWS Lambda

In this solution, you use an AWS Lambda function as an alert mechanism for Lookout for Metrics. When the machine learning model detects an outlier, it invokes the Lambda function, which implements a custom code. The Lambda function then imports the anomaly as a finding to Security Hub.

AWS Security Hub

In this solution, you use AWS Security Hub as a centralized way to manage security findings. This integration has the advantage of providing a common place for the security team to diagnose security findings from various sources, and uniformly integrates with your existing Security Information and Event Management (SIEM) system.

Prerequisites

This solution uses Security Hub to collect anomaly detection findings. Before you deploy the solution, you need to enable Security Hub in your AWS account by following the instructions provided in to enable Security Hub manually. After you enable Security Hub, you can optionally select the security standards that are relevant for your workload, as shown in Figure 2.
 

Figure 2: Manually enabling Security Hub in the AWS Management Console

Figure 2: Manually enabling Security Hub in the AWS Management Console

Deploy the solution

A ready-to-use solution is provided as an AWS Cloud Development Kit (AWS CDK) application in the AWS WAF Anomaly Detection CDK project GitHub code repository. You can clone the GitHub repository and deploy the application by using the AWS CDK for Python.

Important: After you successfully deploy the solution, you should activate the Lookout for Metrics detector. This is not done as part of the CDK deployment. To activate the detector, in the AWS Management Console navigate to Amazon Lookout for Metrics, select the detector the solution created (WAFBlockingRequestDetector), and choose Activate. Alternatively, you can use the following AWS command to activate your detector.

aws lookoutmetrics activate-anomaly-detector --anomaly-detector-arn arn:aws:lookoutmetrics:<REGION_ID>:<ACCOUNT_ID>:AnomalyDetector:WAFBlockingRequestDetector

If you don’t want to run the CDK application, you can implement the same solution by using the AWS Management Console. In the following sections, I’ll go through the manual steps you can follow to achieve this.

Create an API to demonstrate the solution

First, you need an HTTP endpoint to protect. AWS WAF is integrated with CloudFront, Application Load Balancer, API Gateway, and AWS AppSync GraphQL API. In this blog post, I recommend a REST API Gateway because it’s a fully managed service to create and manage APIs. In addition, API Gateway provides a mechanism to implement mock APIs.

To build a REST API, follow the instructions for creating a REST API in Amazon API Gateway. After you create the API, create a GET method at the API root level and associate it to a mock endpoint, as shown in Figure 3. This is just enough to return an HTTP 200 status code to any GET requests.
 

Figure 3: Creating an API with mock integration

Figure 3: Creating an API with mock integration

Finally, deploy the API under the “prod” stage and keep all the default settings.

Create an AWS WAF web ACL to deploy the managed rules

Now that you’ve created an API in API Gateway, you need to create an AWS WAF web access control list (web ACL) by following the instructions in Creating a web ACL. A web ACL is the top-level configuration object of AWS WAF. This is the collection of AWS WAF rules that you will apply to your API. API Gateway is a regional service, so make sure to create a web ACL in the same AWS Region as the API. After you create the web ACL, add the Core rule set (CRS) rule group from AWS Managed Rules, also called AWSManagedRulesCommonRuleSet, as shown in Figure 4. This rule group contains the CrossSiteScripting_QUERYARGUMENTS rule, which you will use later to demonstrate the anomaly detection.
 

Figure 4: Adding AWSManagedRulesCommonRuleSet to the AWS WAF web ACL

Figure 4: Adding AWSManagedRulesCommonRuleSet to the AWS WAF web ACL

By observing Web ACL rule capacity units used, you can see that the Core rule set is consuming 700 web ACL capacity units (WCUs). The maximum capacity for a web ACL is 1,500, which is sufficient for most use cases. If you need more capacity, contact the AWS Support Center.

Associate the web ACL with the API deployment

After you create the web ACL, you associate it with the API. To do this, in the AWS WAF console, navigate to the web ACL you just created. On the Associated AWS resources tab, choose Add AWS resources. When prompted, choose the API you created earlier, and then choose Add.
 

Figure 5: Associating the web ACL with the API

Figure 5: Associating the web ACL with the API

Create a Lambda function to forward the anomaly to Security Hub

It’s useful to get visibility into the anomalies that are detected by the solution, and there are various ways to do that. In this solution, you provide such visibility as findings to Security Hub. Security Hub provides a centralized place to manage different findings from your AWS solutions. It also provides graphical tools to help with diagnostics.

You use a Lambda function that receives each anomaly and imports them into Security Hub. You can find the lookout_alarm Lambda function on GitHub, or follow the instructions to build a Lambda function with Python. You will use this Lambda function to provide additional context enrichment in the finding.

import boto3

securityHub = boto3.client('securityhub')

def lambda_handler(event, context):
    # submit the finding to Security Hub
    result = securityHub.batch_import_findings(Findings = [...])

Before you use this Lambda function, make sure you enable Security Hub.

Create the Lookout for Metrics detector, dataset, and alarm

Now you have an API that is protected by an AWS WAF web ACL. You also have configured a way to integrate with Security Hub through a Lambda function. The next step is to create a Lookout for Metrics detector and connect all these elements together. The key concepts and terminology of Lookout for Metrics are:

  • Detector – A Lookout for Metrics resource that monitors a dataset and identifies anomalies.
  • Dataset – The detector’s copy of the data that Lookout for Metrics is analyzing.
  • Alert – A mechanism to send a notification or initiate a processing workflow when the detector finds an anomaly.

First, follow the instructions to create a detector. The only information you need to provide is a name and an interval. The interval is the amount of time between two analyses. Your choice of the interval depends upon criteria such as the metrics you are processing, or the retention time of your data. For more information on the detector interval, see Lookout for Metrics quotas. In the example in Figure 6, I chose an interval of 5 minutes, which is the minimum.
 

Figure 6: Creating an Amazon Lookout for Metrics detector

Figure 6: Creating an Amazon Lookout for Metrics detector

After you create the detector, follow the instructions to configure a dataset that uses CloudWatch as a data source. Select Create a role in the service role, choose Next, and enter the following parameters:

  • For the CloudWatch namespace, choose AWS/WAFV2.
  • For Dimensions, choose Region, Rule, and WebACL.
  • For Measure, choose BlockedRequests.
  • For Aggregation function, choose SUM.

Figure 7 shows the data source fields that the detector will check for anomalies.
 

Figure 7: Creating an Amazon Lookout for Metrics dataset

Figure 7: Creating an Amazon Lookout for Metrics dataset

Next, create a Lookout for Metrics alert to invoke the Lambda function. To do so, follow the instructions for working with alerts. You provide a name, a channel (the Lambda function), and a severity threshold. One of the main advantages of Lookout for Metrics is the scoring of the detected anomaly, which indicates the severity. Anomalies have a score from 0 to 100. You can set up different alerts with different thresholds that are associated to the same detector. This way, you can provide alerts for different severity levels. In the example in Figure 8, I created a single alert with a severity threshold of 10.
 

Figure 8: Creating an Amazon Lookout for Metrics alert

Figure 8: Creating an Amazon Lookout for Metrics alert

The last steps are to activate the detector and configure Lookout for Metrics to select a ML model and train it. To do so, choose Activate on the detector details page.
 

Figure 9: Activating the Amazon Lookout for Metrics detector

Figure 9: Activating the Amazon Lookout for Metrics detector

Why does this solution use Lookout for Metrics anomaly detection?

Amazon CloudWatch offers native anomaly detection on a given metric. This function is useful to apply statistical and ML algorithms that continuously analyze metrics, determine normal baselines, and identify anomalies with minimal user intervention.

Lookout for Metrics provides a more sophisticated version of anomaly detection, which makes it the better choice for this solution. Lookout for Metrics automatically supports a collection of ML algorithms. For example, no one algorithm works for all kinds of data, so Lookout for Metrics inspects the data and applies the right ML algorithm to the right data to accurately detect anomalies. In addition, Lookout for Metrics groups concurrent anomalies into logical groups, and sends a single alert for the anomaly group rather than separate alerts, so you can see the full picture. Finally, Lookout for Metrics allows you to provide feedback on the detected anomalies, which AWS uses to continuously improve the accuracy and performance of the models.

Publish the value zero in CloudWatch metrics

The reporting criteria for AWS WAF metrics is a nonzero value. This means that the BlockedRequests metric isn’t updated if AWS WAF isn’t blocking any requests. In the absence of real HTTP traffic, typically in a testing environment, the value zero must be published. In production, because AWS WAF is actively blocking illegitimate requests, this publication is not required. To train the ML model in the absence of blocked requests, you need to publish the value zero by calling the PutMetricData CloudWatch API method every 5 minutes.

In my example, I selected a 5-minute period to be aligned with the Lookout for Metrics interval. It’s possible to publish a zero value every five minutes by using the CloudWatch metrics API, as shown following. The zero value doesn’t impact the SUM and ensures that at least one value is published every five minutes. You can use the cloudwatch_zero Lambda function on GitHub to publish the value zero by using the AWS SDK for Python.

import boto3

cloudwatch = boto3.client('cloudwatch')

def lambda_handler(event, context):

    result = cloudwatch.put_metric_data(
        Namespace='AWS/WAFV2',
        MetricData=[{
                'MetricName': 'BlockedRequests',
                'Dimensions': [...],
                'Value': 0
        }]
    )

To create a CloudWatch Events rule to schedule the call every 5 minutes

  1. Navigate to the CloudWatch Event console and choose Create Rule.
  2. Choose Schedule, keep the 5-minute default interval, and choose Add target.
  3. Select the name of the function you previously created, expand the Configure input section.
  4. Choose Constant (JSON text), as shown in Figure 10. In the text field, paste the following configuration:
    {"WebACLId":"WebACLForWAFDemo","RuleId":"AWS-AWSManagedRulesCommonRuleSet"}
    

  5. Choose Configure details.
  6. Enter a name for your rule, and then choose Create rule.


Figure 10: Creating a CloudWatch Events rule scheduled every 5 minutes

Figure 10: Creating a CloudWatch Events rule scheduled every 5 minutes

Training time

Before the activated detector attempts to find anomalies, it uses data from several intervals to learn. If no historical data is available, the training process takes approximately one day for a five-minute interval. When you first deploy this solution, you have no historical data in CloudWatch for your AWS WAF resources, and you’re facing a cold start of Lookout for Metrics anomaly detection. Because the Lookout for Metrics detector interval is set to 5 minutes, you have to wait for 25 hours before being able to detect an anomaly. If you deploy the solution against an AWS WAF resource that’s been in production for days, you’ll have a reduced training time.

Test the anomaly detection

After 25 hours, Lookout for Metrics correctly selects an ML model that fits your metrics behavior, and correctly trains it based on your actual data. You can then start to test the anomaly detection. You can use a simple curl command, injecting a JavaScript alert() call in a query parameter as described in the AWS WAF documentation, to invoke the CrossSiteScripting_QUERYARGUMENTS managed rule. Make sure to inject a significant number of requests to ensure detection of blocked requests anomalies.

for i in {1..150}
do
  curl https://<api_gateway_endpoint>?test=%3Cscript%3Ealert%28%22hello%22%29%3C%2Fscript%3E
done

After you run the injection script, wait for the system to detect the anomaly. The CloudWatch BlockedRequests metric takes up to 5 minutes to update, and Lookout for Metrics is configured to detect anomalies in the CloudWatch data every 5 minutes. For those reasons, it can take 10 minutes to detect the simulated anomaly.

After detection and processing time, the finding is visible in Security Hub. To view the finding, go to the AWS Management Console, choose Services, choose Security Hub, and then choose Findings.
 

Figure 11: AWS Security Hub findings

Figure 11: AWS Security Hub findings

In Figure 11, you can see the new finding, coming from Lookout for Metrics, with a Low severity and an anomaly score of 100. You can use the remediation field to open the Lookout for Metrics console, where you can give feedback on the anomaly detection to improve the model for future detections.
 

Figure 12: Lookout for Metrics console, Finding view

Figure 12: Lookout for Metrics console, Finding view

Figure 12 shows the Lookout for Metrics graphical interface, where you can see the metrics related to the finding. The previous injection script impacted only one metric, but the same setup works to observe anomalies that arise between two or more metrics together. This feature makes diagnosis of issues easier.

For each of the impacted metrics, to confirm that the anomaly is relevant, choose the Yes button next to Is this relevant? above the graph.

Extend the solution

The solution in this post detects anomalies in the AWS WAF blocked request behavior. But you can also configure AWS WAF rule actions to count your requests instead of blocking them. This is usually done on legacy systems or for some particular rules of a managed ruleset that present an incompatibility with your workload. When you configure the rule action as a count, you increase the need for a comprehensive observability approach. By implementing anomaly detection against counted requests, this solution will help you to achieve better observability for your system.

Concerning the remediation, it’s possible to modify this solution by integrating it with different AWS services. As an example, you can integrate the anomaly detection with your own SIEM system, or simply notify your security team distribution list by using Amazon Simple Notification Service (Amazon SNS).

AWS WAF provides additional information in its logs, such as the IP address for the client. To detect anomalies in AWS WAF logs, you can ingest the AWS WAF logs to Amazon Simple Storage Service (Amazon S3), and then use Lookout for Metrics with Amazon S3 as a data source.

Conclusion

AWS WAF is integrated with CloudWatch and provides metrics for passed requests, blocked requests, or counted requests. With Lookout for Metrics, you can detect unexpected behavior in CloudWatch metrics by using a machine learning (ML) model. In this blog, I showed you how to integrate both services to provide AWS WAF with an ML-based anomaly detection mechanism. ML is a way to gain more visibility into your AWS WAF behavior. In addition, you can easily be notified when the system detects abnormal levels of blocked (or counted) requests, in order to take the right remediation action.

If you have feedback about this post, submit comments in the Comments section below. If you have questions about this post, start a new thread on the AWS WAF forum or contact AWS Support.

Want more AWS Security how-to content, news, and feature announcements? Follow us on Twitter.

Author

Cyril Soler

Cyril is a Senior Solutions Architect at AWS, working with Spain-based enterprises. His interests include security and data protection. He has been passionate about computer science since he was 7. When he’s far from a keyboard, he enjoys mechanics. Cyril holds a Master’s degree from Polytech Marseille, School of Engineering.

Ransomware mitigation: Top 5 protections and recovery preparation actions

Post Syndicated from Brad Dispensa original https://aws.amazon.com/blogs/security/ransomware-mitigation-top-5-protections-and-recovery-preparation-actions/

In this post, I’ll cover the top five things that Amazon Web Services (AWS) customers can do to help protect and recover their resources from ransomware. This blog post focuses specifically on preemptive actions that you can take.

#1 – Set up the ability to recover your apps and data

In order for a traditional encrypt-in-place ransomware attempt to be successful, the actor responsible for the attempt must be able to prevent you from accessing your data, and then hold your data for ransom. The first thing that you should do to protect your account is to ensure that you have the ability to recover your data, regardless of how it was made inaccessible. Backup solutions protect and restore data, and disaster recovery (DR) solutions offer fast recovery of data and workloads.

AWS makes this process significantly easier for you with services like AWS Backup, or CloudEndure Disaster Recovery, which offer robust infrastructure DR. I’ll go over how you can use both of these services to help recover your data. When you choose a data backup solution, simply creating a snapshot of an Amazon Elastic Compute Cloud (Amazon EC2) instance isn’t enough. A powerful function of the AWS Backup service is that when you create a backup vault, you can use a different customer master key (CMK) in the AWS Key Management Service (AWS KMS). This is powerful because the CMK can have a key policy that allows AWS operators to use the key to encrypt the backup, but you can limit decryption to a completely different principal.

In Figure 1, I show an account that locally encrypted their EC2 Amazon Elastic Block Store (Amazon EBS) volume by using CMK A, but AWS Backup uses CMK B. If the user in account A with a decrypt grant on CMK A attempts to access the backup, even if the user is authorized by the AWS Identity and Access Management (IAM) principal access policy, the CMK policy won’t allow access to the encrypted data.
 

Figure 1: An account using AWS Backup that stores data in a separate account with different key material

Figure 1: An account using AWS Backup that stores data in a separate account with different key material

If you place the backup or replication into a separate account that is dedicated just for backup, this also helps to reduce the likelihood that a threat actor would be able to destroy or tamper with the backup. AWS Backup now natively supports this cross-account capability, which makes the backup process even easier. The AWS Backup Developer Guide provides instructions for using this functionality, as well as the policy that you will need to apply.

Make sure that you’re backing up your data in all supported services and that your backup schedule is based on your business recovery time objective (RTO) and recovery point objective (RPO).

Now, let’s take a look at how CloudEndure Disaster Recovery works.
 

Figure 2: An overview of how CloudEndure Disaster Recovery works

Figure 2: An overview of how CloudEndure Disaster Recovery works

The high-level architecture diagram in Figure 2 illustrates how CloudEndure Disaster Recovery keeps your entire on-premises environment in sync with replicas in AWS and ready to fail over to AWS at any time, with aggressive recovery objectives and significantly reduced total cost of ownership (TCO). On the left is the source environment, which can be composed of different types of applications—in this case, I give Oracle databases and SQL Servers as examples. And although I’m highlighting DR from on-premises to AWS in this example, CloudEndure Disaster Recovery can provide the same functionality and improved recovery performance between AWS Regions for your workloads that are already in AWS.

The CloudEndure Agent is deployed on the source machines without requiring any kind of reboot and without impacting performance. That initiates nearly continuous replication of that data into AWS. CloudEndure Disaster Recovery also provisions a low-cost staging area that helps reduce the cost of cloud infrastructure during replication, and until that machine actually needs to be spun up during failover or disaster recovery tests.

When a customer experiences an outage, CloudEndure Disaster Recovery launches the machines in the appropriate AWS Region VPC and target subnets of your choice. The dormant lightweight state, called the Staging Area, is now launched into the actual servers that have been migrated from the source environment (the Oracle databases and SQL Servers, in this example). One of the features of CloudEndure Disaster Recovery is point-in-time recovery, which is important in the event of a ransomware event, because you can use this feature to recover your environment to a previous consistent point in time of your choosing. In other words, you can go back to the environment you had prior to the event.

The machine conversion technology in CloudEndure Disaster Recovery means that those replicated machines can run natively within AWS, and the process typically takes just minutes for the machines to boot. You can also conduct frequent DR readiness tests without impacting replication or user activities.

Another service that’s useful for data protection is the AWS object storage service, Amazon Simple Storage Service (Amazon S3), where you can use features such as object versioning to help prevent objects from being overwritten with ransomware-encrypted files, or Object Lock, which provides a write once, read many (WORM) solution to help prevent objects from ever being modified or overwritten.

For more information on developing a DR plan and a business continuity plan, see the following pages:

#2 – Encrypt your data

In addition to holding data for ransom, more recent ransomware events increasingly use double extortion schemes. A double extortion is when the actor not only encrypts the data, but exfiltrates the data and threatens to release the data if the ransom isn’t paid.

To help protect your data, you should always enable encryption of the data and segment your workflow so that authorized systems and users have limited access to use the key material to decrypt the data.

As an example, let’s say that you have a web application that uses an API to write data objects into an S3 bucket. Rather than allowing the application to have full read and write permissions, limit the application to just a single operation (for example, PutObject). Smaller, more reusable code is also easier to manage, so segmenting the workflow also helps developers to be able to work more quickly. An example of this type of workflow, in which separate CMK policies are used for read operations and write operations to limit access, is laid out in Figure 3.
 

Figure 3: A serverless workflow that uses separate CMK policies for read operations and write operations

Figure 3: A serverless workflow that uses separate CMK policies for read operations and write operations

It’s important to note that although AWS managed CMKs can help you to meet regulatory requirements for data at rest encryption, they don’t support customer key policies. Customers who want to control how their key material is used must use a customer managed CMK.

For data that is stored locally on Amazon EBS, remember that while the blocks are encrypted by using AWS KMS, after the server boots, your data is unencrypted locally at the operating system level. If you have sensitive data that is being stored as part of your application locally, consider using tooling like the AWS Encryption SDK or Encryption CLI to store that data in an encrypted format.

As Amazon Chief Technology Officer Werner Vogels says, encrypt everything!
 

Figure 4: Amazon Chief Technology Officer Werner Vogels wants customers to encrypt everything

Figure 4: Amazon Chief Technology Officer Werner Vogels wants customers to encrypt everything

#3 – Apply critical patches

In order for an actor to get access to a system, they must take advantage of a vulnerability or misconfiguration. Although many organizations patch their infrastructure, some only do so on a weekly or monthly basis, and that can be inadequate for patching critical systems that require 24/7 operation. Increasingly, threat actors have the ability to reverse engineer patches or common vulnerability exposure (CVE) announcements in hours. You should deploy security-related patches, especially those that are high severity, with the least amount of delay possible.

AWS Systems Manager can help you to automate this process in the cloud and on premises. With Systems Manager patch baselines, you can apply patches based on machine tags (for example, development versus production) but also based on patch type. For example, the predefined patch baseline AWS-AmazonLinuxDefaultPatchBaseline approves all operating system patches that are classified as “Security” and that have a severity level of “Critical” or “Important.” Patches are auto-approved seven days after release. The baseline also auto-approves all patches with a classification of “Bugfix” seven days after release.

If you want a more aggressive patching posture, you can instead create a custom baseline. For example, in Figure 5, I’ve created a baseline for all Windows versions with a critical severity.
 

Figure 5: An example of the creation of a custom patch baseline for Systems Manager

Figure 5: An example of the creation of a custom patch baseline for Systems Manager

I can then set up an hourly scheduled event to scan all or part of my fleet and patch based on this baseline. In Figure 6, I show an example of this type of workflow taken from this AWS blog post, which gives an overview of the patch baseline process and covers how to use it in your cloud environment.
 

Figure 6: Example workflow showing how to scan, check, patch, and report by using Systems Manager

Figure 6: Example workflow showing how to scan, check, patch, and report by using Systems Manager

In addition, if you’re using AWS Organizations, this blog post will show you how you can apply this method organization-wide.

AWS offers many tools to make patching easier, and making sure that your servers are fully patched will greatly reduce your susceptibility to ransomware.

#4 – Follow a security standard

Don’t guess whether your environment is secure. Most commercial and public-sector customers are subject to some form of regulation or compliance standard. You should be measuring your security and risk posture against recognized standards in an ongoing practice. If you don’t have a framework that you need to follow, consider using the AWS Well-Architected Framework as your baseline.

With AWS Security Hub, you can view data from AWS security services and third-party tools in a single view and also benchmark your account against standards or frameworks like the CIS AWS Foundations Benchmark, the Payment Card Industry Data Security Standard (PCI DSS), and the AWS Foundational Security Best Practices. These are automated scans of your environment that can alert you when drifts in compliance occur. You can also choose to use AWS Config conformance packs to automate a subset of controls for NIST 800-53, Health Insurance Portability and Accountability Act (HIPAA), Korea – Information Security Management System (ISMS), as well as a growing list of over 60 conformance pack templates at the time of this publication.

Another important aspect of following best practices is to implement least privilege at all levels. In AWS, you can use IAM to write policies that enforce least privilege. These policies, when applied through roles, will limit the actor’s capability to advance in your environment. Access Analyzer is a new feature of IAM that allows you to more easily generate least privilege permissions, and it is covered in this blog post.

#5 – Make sure you’re monitoring and automating responses

Make sure you have robust monitoring and alerting in place. Each of the items I described earlier is a powerful tool to help you to protect against a ransomware event, but none will work unless you have strong monitoring in place to validate your assumptions.

Here, I want to provide some specific examples based on the examples earlier in this post.

If you’re backing up your data by using AWS Backup, as described in item #1 (Set up the ability to recover your apps and data), you should have Amazon CloudWatch set up to send alerts when a backup job fails. When an alert is triggered, you also need to act on it. If your response to an AWS alert email would be to re-run the job, you should automate that workflow by using AWS Lambda. If a subsequent failure occurs, open a ticket in your ticketing service automatically or page your operations team.

If you’re encrypting all of your data, as described in item #2 (Encrypt your data), are you watching AWS CloudTrail to see when AWS KMS denies permission to an operation?

Additionally, are you monitoring and acting on patch management baselines as described in item #3 (Apply critical patches) and responding when a patch isn’t able to successfully deploy?

Last, are you watching the compliance status of your Security Hub compliance reports and taking action on findings? You also need to monitor your environment for suspicious activity, investigate, and act quickly to mitigate risks. This is where Amazon GuardDuty, Security Hub, and Amazon Detective can be valuable.

AWS makes it easier to create automated responses to the alerts I mentioned earlier. The multi-account response solution in this blog post provides a good starting point that you can use to customize a response based on the needs of your workload.

Conclusion

In this blog post, I showed you the top five actions that you can take to protect and recover from a ransomware event.

In addition to the advice provided here, NIST has recently published guidance on the prevention of ransomware, which you can view in the NIST SP1800-25 publication.

If you have feedback about this post, submit comments in the Comments section below.

Want more AWS Security how-to content, news, and feature announcements? Follow us on Twitter.

Author

Brad Dispensa

Brad is a principal security specialist solutions architect for Amazon Web Services in the worldwide public sector group.

Scaling Data Analytics Containers with Event-based Lambda Functions

Post Syndicated from Brian Maguire original https://aws.amazon.com/blogs/architecture/scaling-data-analytics-containers-with-event-based-lambda-functions/

The marketing industry collects and uses data from various stages of the customer journey. When they analyze this data, they establish metrics and develop actionable insights that are then used to invest in customers and generate revenue.

If you’re a data scientist or developer in the marketing industry, you likely often use containers for services like collecting and preparing data, developing machine learning models, and performing statistical analysis. Because the types and amount of marketing data collected are quickly increasing, you’ll need a solution to manage the scale, costs, and number of required data analytics integrations.

In this post, we provide a solution that can perform and scale with dynamic traffic and is cost optimized for on-demand consumption. It uses synchronous container-based data science applications that are deployed with asynchronous container-based architectures on AWS Lambda. This serverless architecture automates data analytics workflows utilizing event-based prompts.

Synchronous container applications

Data science applications are often deployed to dedicated container instances, and their requests are routed by an Amazon API Gateway or load balancer. Typically, an Amazon API Gateway routes HTTP requests as synchronous invocations to instance-based container hosts.

The target of the requests is a container-based application running a machine learning service (SciLearn). The service container is configured with the required dependency packages such as scikit-learn, pandas, NumPy, and SciPy.

Containers are commonly deployed on different targets such as on-premises, Amazon Elastic Container Service (Amazon ECS), Amazon Elastic Compute Cloud (Amazon EC2), and AWS Elastic Beanstalk. These services run synchronously and scale through Amazon Auto Scaling groups and a time-based consumption pricing model.

Figure 1. Synchronous container applications diagram

Figure 1. Synchronous container applications diagram

Challenges with synchronous architectures

When using a synchronous architecture, you will likely encounter some challenges related to scale, performance, and cost:

  • Operation blocking. The sender does not proceed until Lambda returns, and failure processing, such as retries, must be handled by the sender.
  • No native AWS service integrations. You cannot use several native integrations with other AWS services such as Amazon Simple Storage Service (Amazon S3), Amazon EventBridge, and Amazon Simple Queue Service (Amazon SQS).
  • Increased expense. A 24/7 environment can result in increased expenses if resources are idle, not sized appropriately, and cannot automatically scale.

The New for AWS Lambda – Container Image Support blog post offers a serverless, event-based architecture to address these challenges. This approach is explained in detail in the following section.

Benefits of using Lambda Container Image Support

In our solution, we refactored the synchronous SciLearn application that was deployed on instance-based hosts as an asynchronous event-based application running on Lambda. This solution includes the following benefits:

  • Easier dependency management with Dockerfile. Dockerfile allows you to install native operating system packages and language-compatible dependencies or use enterprise-ready container images.
  • Similar tooling. The asynchronous and synchronous solutions use Amazon Elastic Container Registry (Amazon ECR) to store application artifacts. Therefore, they have the same build and deployment pipeline tools to inspect Dockerfiles. This means your team will likely spend less time and effort learning how to use a new tool.
  • Performance and cost. Lambda provides sub-second autoscaling that’s aligned with demand. This results in higher availability, lower operational overhead, and cost efficiency.
  • Integrations. AWS provides more than 200 service integrations to deploy functions as container images on Lambda, without having to develop it yourself so it can be deployed faster.
  • Larger application artifact up to 10 GB. This includes larger application dependency support, giving you more room to host your files and packages in oppose to hard limit of 250 MB of unzipped files for deployment packages.

Scaling with asynchronous events

AWS offers two ways to asynchronously scale processing independently and automatically: Elastic Beanstalk worker environments and asynchronous invocation with Lambda. Both options offer the following:

  • They put events in an SQS queue.
  • They can be designed to take items from the queue only when they have the capacity available to process a task. This prevents them from becoming overwhelmed.
  • They offload tasks from one component of your application by sending them to a queue and process them asynchronously.

These asynchronous invocations add default, tunable failure processing and retry mechanisms through “on failure” and “on success” event destinations, as described in the following section.

Integrations with multiple destinations

“On failure” and “on success” events can be logged in an SQS queue, Amazon Simple Notification Service (Amazon SNS) topic, EventBridge event bus, or another Lambda function. All four are integrated with most AWS services.

“On failure” events are sent to an SQS dead-letter queue because they cannot be delivered to their destination queues. They will be reprocessed them as needed, and any problems with message processing will be isolated.

Figure 2 shows an asynchronous Amazon API Gateway that has placed an HTTP request as a message in an SQS queue, thus decoupling the components.

The messages within the SQS queue then prompt a Lambda function. This runs the machine learning service SciLearn container in Lambda for data analysis workflows, which are integrated with another SQS dead letter queue for failures processing.

Figure 2. Example asynchronous-based container applications diagram

Figure 2. Example asynchronous-based container applications diagram

When you deploy Lambda functions as container images, they benefit from the same operational simplicity, automatic scaling, high availability, and native integrations. This makes it an appealing architecture for our data analytics use cases.

Design considerations

The following can be considered when implementing Docker Container Images with Lambda:

  • Lambda supports container images that have manifest files that follow these formats:
    • Docker image manifest V2, schema 2 (Docker version 1.10 and newer)
    • Open Container Initiative (OCI) specifications (v1.0.0 and up)
  • Storage in Lambda:
  • On create/update, Lambda will cache the image to speed up the cold start of functions during execution. Cold starts occur on an initial request to Lambda, which can lead to longer startup times. The first request will maintain an instance of the function for only a short time period. If Lambda has not been called during that period, the next invocation will create a new instance
  • Fine grain role policies are highly recommended for security purposes
  • Container images can use the Lambda Extensions API to integrate monitoring, security and other tools with the Lambda execution environment.

Conclusion

We were able to architect this synchronous service based on a previously deployed on instance-based hosts and design it to become asynchronous on Amazon Lambda.

By using the new support for container-based images in Lambda and converting our workload into an asynchronous event-based architecture, we were able to overcome these challenges:

  • Performance and security. With batch requests, you can scale asynchronous workloads and handle failure records using SQS Dead Letter Queues and Lambda destinations. Using Lambda to integrate with other services (such as EventBridge and SQS) and using Lambda roles simplifies maintaining a granular permission structure. When Lambda uses an Amazon SQS queue as an event source, it can scale up to 60 more instances per minute, with a maximum of 1,000 concurrent invocations.
  • Cost optimization. Compute resources are a critical component of any application architecture. Overprovisioning computing resources and operating idle resources can lead to higher costs. Because Lambda is serverless, it only incurs costs on when you invoke a function and the resources allocated for each request.

Authenticate AWS Client VPN users with AWS Single Sign-On

Post Syndicated from Sylvia Qi original https://aws.amazon.com/blogs/security/authenticate-aws-client-vpn-users-with-aws-single-sign-on/

AWS Client VPN is a managed client-based VPN service that enables users to use an OpenVPN-based client to securely access their resources in Amazon Web Services (AWS) and in their on-premises network from any location. In this blog post, we show you how you can integrate Client VPN with your existing AWS Single Sign-On via a custom SAML 2.0 application to authenticate and authorize your Client VPN connections and traffic.

Maintaining a separate set of credentials to authenticate users and authorize access for each resource is not only tedious, it’s not scalable. A common way to solve this challenge is to use a central identity store such as AWS SSO, which functions as your identity provider (IdP). You can then use Security Assertion Markup Language 2.0 (SAML 2.0) to integrate AWS SSO with each of your resources or applications, also known as service providers (SPs). The IdP authenticates users and passes their identity and security information to the SP via SAML. With SAML, you can enable a single sign-on experience for your users across many SAML-enabled applications and services. Users authenticate with the IdP once using a single set of credentials, and then have access to multiple applications and services without additional sign-ins.

Client VPN supports identity federation with SAML 2.0 for Client VPN endpoints. Deploying custom SAML applications can present some challenges, specifically around the mapping of attributes between what the SP expects to receive and what the IdP can provide. We’ve taken the guesswork out of the process and show you the exact mappings needed for the Client VPN to AWS SSO integration. The integration lets you use AWS SSO groups to not only grant access to create a Client VPN connection, but also to allow access to specific network ranges based upon group membership. We walk you through setting up all of the components required to implement the authentication workflow described in Figure 1. This consists of creating the custom SAML applications and tying them into AWS Identity and Access Management (IAM), creating and configuring the Client VPN endpoint, creating a Client VPN connection with an AWS SSO user, and testing your connectivity.
 

Figure 1: Authentication workflow

Figure 1: Authentication workflow

The steps illustrated in Figure 1 are:

  1. The user opens the AWS-provided VPN client on their device and initiates a connection to the Client VPN endpoint.
  2. The Client VPN endpoint sends an IdP URL and authentication request back to the client, based on the information that was provided in the IAM SAML provider.
  3. The AWS provided VPN client opens a new browser window on the user’s device. The browser makes a request to the IdP and displays a sign-in page. This is the same sign-in experience as the AWS SSO user portal, as the IdP URL points to a custom SAML application created within AWS SSO.
  4. The user enters their credentials on the sign-in page, and the IdP sends a signed SAML assertion back to the client in the form of an HTTP POST to the AWS provided VPN client.
  5. The SAML assertion is passed from the AWS provided VPN client to the Client VPN endpoint.
  6. The endpoint validates the assertion and either allows or denies access to the user.

Prerequisites

Here are the requirements to complete the VPN and SSO setup:

  • AWS SSO is configured to use the internal AWS SSO identity store. Refer to the AWS Single Sign-On Getting Started guide for help configuring AWS SSO. AWS SSO can exist in a different AWS account than the account where you deploy Client VPN endpoints. The steps outlined in this blog post are specific to the internal AWS SSO identity store, however they could be adapted to support other identity stores that support SAML 2.0.
  • Two AWS SSO users and two AWS SSO groups for testing. Each user should be a member of only one of the SSO groups. The purpose of this configuration is to demonstrate how access can be allowed or denied based upon group membership.
  • An Amazon Virtual Private Cloud (Amazon VPC) with an Amazon Elastic Compute Cloud (Amazon EC2) instance for connectivity testing.
  • An x.509 certificate imported into AWS Certificate Manager (ACM). You can generate a self-signed certificate for this walkthrough, however you should review the prerequisites for importing certificates into ACM. This certificate will be used for encrypted communication between the client VPN software and the client VPN endpoint.
  • Administrative access to your AWS environment, or at least sufficient access to create AWS SSO applications, ACM certificates, EC2 Instances, and Client VPN endpoints.
  • A client device running Windows or macOS with the latest version of Client VPN software installed. You can download it from the AWS Client VPN download.

Solution walkthrough

For this solution, you’ll complete the following steps:

  1. Establish trust with your IdP
  2. Create and configure Client VPN SAML applications in AWS SSO.
  3. Integrate the Client VPN SAML applications with IAM.
  4. Create and configure the Client VPN endpoint.
  5. Test the solution.
  6. Cleanup the test environment.

Establish trust with your IdP

In this walkthrough, Client VPN is the SAML SP and AWS SSO is the SAML IdP. One of the key steps to deploying this solution is to establish trust between the SP and IdP. This one-time configuration is done by creating custom SAML applications within AWS SSO and exporting application-specific metadata information from the applications. This metadata is then uploaded—in the form of IAM IdPs—into your AWS account where the Client VPN endpoint is created. IAM IdPs let you manage your user identities in a centralized identity store, such as AWS SSO, and grant those user identities permissions to AWS resources within your account. For organizations with multiple AWS accounts, the use of IAM IdPs resolves the management, scalability, and security issues associated with creating IAM users directly within each account.

Create and configure the Client VPN SAML applications in AWS SSO

Create two custom SAML 2.0 applications in AWS SSO. One will be the IdP for the Client VPN software, the other will be a self-service portal that allows users to download their Client VPN software and client configuration file.

To create the VPN client SAML application:

  1. In the AWS SSO console, select Applications from the left pane and select Add a new application.
  2. Select Add a custom SAML 2.0 application to use as the IdP for the Client VPN software.
     
    Figure 2: Add a SAML application

    Figure 2: Add a SAML application

  3. In the Details section, set Display name to VPN Client.
  4. In the Application Metadata section, select If you don’t have a metadata file, you can manually type your metadata values and enter the following values:
    • Application ACS URL: http://127.0.0.1:35001
    • Application SAML audience: urn:amazon:webservices:clientvpn
  5. Accept the default values for all other fields.
  6. Choose Save Changes.
  7. Select the Attribute mappings tab and configure the mappings as shown in the table and Figure 3 below.

    Note: For production environments, you should grant access to these applications via an AWS SSO group instead of individual users as shown in this walkthrough.

    User attribute in the application Maps to this string value or user attribute in AWS SSO Format
    Subject ${user:email} emailAddress
    Name ${user:email} unspecified
    FirstName ${user:givenName} unspecified
    LastName ${user:familyName} unspecified
    memberOf ${user:groups} unspecified
    Figure 3: VPN client attribute mappings

    Figure 3: VPN client attribute mappings

  8. On the Assign users tab, add your two test user accounts.
  9. On the application configuration page, choose the download link for AWS SSO SAML metadata. Save the file to use in a later step.

To create the VPN client self-service SAML application

  1. In the AWS SSO console, select Applications from the left pane and select Add a new application.
  2. Select Add a custom SAML 2.0 application to use as the application that will serve as the IdP for the Client VPN software.
     
    Figure 4: Add a SAML application

    Figure 4: Add a SAML application

  3. In the Details section, set Display name to VPN Client Self Service.
  4. In the Application Metadata section, select If you don’t have a metadata file, you can manually type your metadata values and enter the following values:
    • Application ACS URL: https://self-service.clientvpn.amazonaws.com/api/auth/sso/saml
    • Application SAML audience: urn:amazon:webservices:clientvpn
  5. Accept the default values for all other fields.
  6. Choose Save Changes.
  7. Choose the Attribute mappings tab and configure the mappings as shown in the following table and in Figure 5.

    Note: For production environments you should grant access to these applications via an AWS SSO group instead of individual users as shown in this walkthrough. For the purposes of this walkthrough, you grant individual users access to the SAML applications but grant network access via group membership. This is done to allow easier demonstration of the ability to grant or deny network specific access via groups when testing the solution.

    User attribute in the application Maps to this string value or user attribute in AWS SSO Format
    Subject ${user:email} emailAddress
    Name ${user:email} unspecified
    FirstName ${user:givenName} unspecified
    LastName ${user:familyName} unspecified
    memberOf ${user:groups} unspecified
    Figure 5: VPN Client self-service attribute mappings

    Figure 5: VPN Client self-service attribute mappings

  8. On the Assign users tab, add your two test user accounts.
  9. On the application’s Configuration page, choose the download link for AWS SSO SAML metadata. Save the file to use in a later step.

Integrate the Client VPN SAML applications with IAM

Client VPN requires a unique IdP definition in IAM. You must set up the IdP in the same AWS account where the Client VPN endpoint will be created.

To create the IAM IdP:

  1. In the IAM console, select Identity providers and Add provider. Name the provider aws-client-vpn and upload the metadata document that you downloaded from the VPN Client SAML application.
  2. Add a second provider, name the provider aws-client-vpn-self-service and upload the metadata document that you downloaded from the VPN Client Self Service SAML application.

Create and configure the Client VPN endpoint

All Client VPN sessions end at the Client VPN endpoint. You configure the Client VPN endpoint to manage and control all Client VPN sessions. In the following steps, you create a Client VPN endpoint and configure it to use the newly added IAM IdPs. You then associate the endpoint with a VPC and configure authorization rules to allow traffic into the VPC, then set up the Client VPN self-service portal.

To create the Client VPN endpoint

  1. Open the AWS VPC console and select Client VPN Endpoints and then select Create Client VPN endpoint.
  2. Enter a Name Tag and Description for the endpoint.
  3. Enter 172.16.0.0/22 for the Client IPv4 CIDR. This is the IP range that will be allocated to your VPN clients. It shouldn’t overlap the CIDR of your AWS VPCs or of the network that your client device is connected to and must be at least a /22 bitmask. You can adjust this value as needed for your specific network requirements. The Client IPv4 CIDR value can only be set during endpoint creation.

    Note: For production environments you should review the Client VPN documentation for scaling considerations before you create the endpoint.

  4. In the Server certificate ARN drop down menu, select the ACM certificate that you created for your VPN clients.
  5. Set the Authentication Options to Use user-based authentication with Federated authentication. Select the aws-client-vpn IAM IdP for the SAML provider ARN, and select the aws-client-vpn-self-service IAM IdP as the Self-service SAML provider ARN.
     
    Figure 6: Authentication settings

    Figure 6: Authentication settings

  6. For this walkthrough, set Connection Logging to No. Connection logging is a feature of Client VPN that enables you to capture connection logs for your Client VPN endpoint. Those logs are published to an Amazon CloudWatch Logs log group in your account. For production environments or for troubleshooting purposes, you can enable connection logging while or after you create the endpoint.
  7. Select the VPC ID to associate with the endpoint. This should be the VPC with an EC2 instance deployed that can be used to test connectivity. You can select an existing security group, or create a new one for the VPN endpoint. The only requirement for this walkthrough is that it has outbound rules that allow access to your test EC2 instance. For additional flexibility, you can create and apply multiple security groups that use different rulesets to the endpoint to provide fine-grained control of which resources can be accessed within the VPC.
  8. Select Enable self-service portal and—if desired—select Enable split-tunnel. Split tunneling is designed to ensure that only client traffic destined for the IP ranges configured on the Client VPN endpoint is routed to your VPC. By default, all traffic, including internet bound traffic, is routed through your VPC.
  9. Choose Create Client VPN endpoint.

To configure the Client VPN endpoint

  1. On the Client VPN endpoint Associations tab, select Associate. Select the same VPC that you chose when you set up the endpoint and select a subnet to associate. This creates an elastic network interface (ENI) in the selected subnet that will be the ingress point from VPN clients into your AWS VPC. For production environments, you should select at least two subnets based upon your redundancy requirements.
  2. Authorizing VPN ingress traffic from your users can be done either globally for all users or via group membership. When granting access via an AWS SSO group, you must use the group ID of the AWS SSO group, not the friendly name of the group. After selecting a group in the AWS SSO management console, you can find group ID in the Details section. You can also obtain the group ID by using AWS Command Line Interface (AWS CLI) to issue the following command, replacing the <AWSRegion>, <Identity Store ID>, and <AWS SSO Group Display Name> variables with your information. This command should be issued within the same AWS account where AWS SSO is configured. The identity store ID can be found in the AWS SSO console under Settings.
    aws identitystore list-groups --region <AWSRegion> --identity-store-id <Identity Store ID> --filter AttributePath=DisplayName,AttributeValue=<AWS SSO Group Display Name>
    

  3. Create an ingress authorization rule by selecting Authorize Ingress on the Authorization tab. Configure the destination network to enable as 0.0.0.0/0, set Grant access to: Allow access to users in a specific access group and enter the access group ID that you discovered in the previous step. This should be the group that contains one of your test user accounts. For production environments, you should follow the principle of least privilege and narrow the destination network range to only what is required. Ingress authorization rules can be used to restrict network access to specific network ranges based upon IdP group membership. You can use a client connection handler to enforce additional security policies on Client VPN connections. Refer to the Client VPN documentation for additional details.
    Figure 7: Add authorization rule

    Figure 7: Add authorization rule

  4. From the Client VPN Endpoint Summary tab, copy the Self-service portal URL to use in the next step.

To set up the Client VPN self-service portal

  1. Open the Client VPN self-service SAML application in the AWS SSO management console to edit the configuration.
  2. In the Application start URL textbox, paste the Client VPN endpoint self-service portal URL that you copied in the previous section. This ties the Client VPN self-service SAML application to the self-service portal URL for the specific Client VPN endpoint that you created, allowing users to download their AWS VPN Client configuration file.
     
    Figure 8: Client VPN self-service portal

    Figure 8: Client VPN self-service portal

Test the solution

During the testing phase, you download the VPN client configuration file and configure the VPN client application. You then create a Client VPN connection and validate that you have access to your target VPC. You also test the Client VPN connection with multiple user accounts in order to confirm that the ingress authorization rules are functioning as expected.

To test the Client VPN solution:

  1. Open an internet browser and sign in to your AWS SSO user portal as a user who has access to the VPN Client SAML applications and is a member of the AWS SSO group defined in the VPN endpoint ingress authorization rule. You should see two new SAML applications. Select the VPN client self-service application.
  2. In the VPN Client Self Service portal, you can download the AWS VPN Client software if you haven’t already done so. Select Download client configuration and save the file on your local device. Close the browser window that you used to sign in to the AWS SSO user portal.
  3. Open the AWS VPN Client application and configure a new profile, selecting the client configuration file that you downloaded in the previous step. Once your client profile has been created, select Connect.
     
    Figure 9: VPN Client ready to connect

    Figure 9: VPN Client ready to connect

  4. A new browser window should open automatically to an AWS SSO sign-in page. Enter the credentials of your test user who is a member of the AWS SSO group defined in your ingress authorization rule.
  5. Upon a successful connection through the VPN client, you can make a management connection (RDP, SSH, HTTP, or other) to one of the EC2 instances within your VPC. Connect to the private IPv4 address of your EC2 instance (rfc1918)—you should not attempt to connect to your EC2 instance through an EIP. You might need to adjust the security group rules on your EC2 instance to allow traffic from the subnets that you selected when you created the VPN endpoint associations.
  6. Once you have a successful connection to your test EC2 instance and you know that your Client VPN connectivity is working, you should also validate that access is denied for users who aren’t a member of the group specified in your ingress authorization rule.
    1. Disconnect from your Client VPN connection and close all browser windows.
    2. Depending upon your internet browser and its configuration, you might need to delete any cookies associated with your AWS SSO user portal in order to sign in as a different AWS SSO user.
    3. Initiate a new Client VPN connection and sign in as the test user account that is not a member of the AWS SSO group specified in the ingress authorization rule.
    4. You should be able to successfully establish the Client VPN connection, but not to access your test EC2 instance. This validates that the ingress authorization rule isn’t allowing Client VPN traffic from users who aren’t a member of the AWS SSO group to enter your VPC.

Troubleshooting

If you have any issues completing the walkthrough and testing, here are some things that you can check:

  • In the AWS VPC management console, review the Connections tab to verify that you see a connection from your test user account and that it’s active.
  • Confirm that your test user account is in the group that was defined in your ingress authorization rule.
  • Confirm that the access group ID specified in the ingress authorization rule is for the AWS SSO group that your test user is a member of.
  • Confirm that the AWS SSO group still exists and hasn’t been deleted. You might encounter an error message similar to the one shown in Figure 10 if you attempt a Client VPN connection but the AWS SSO group no longer exists.
     
    Figure 10: Error message

    Figure 10: Error message

  • If you receive a credential error when attempting to sign in to the AWS SSO browser window that’s launched by the VPN Client application, you might have an issue with the ACM certificate that you’re using. There can be authentication related issues if the root CA certificates aren’t correct or if any part of the certificate chain is missing.
  • Validate your EC2 instance security group rules and VPC route table configuration. From a routing perspective, your test EC2 instance must be accessible from the subnet that you selected when you created the Client VPN endpoint association.
  • If you want to see the SAML assertion that’s being sent to the AWS VPN client application. Sign in to the AWS SSO user portal, and hold down the Shift key while selecting the VPN client SAML application. A new browser tab will open with the SAML assertion visible. The SAML assertion contains the access group IDs of all groups that your test user is a member of. You can use this information to validate that the correct group memberships and group IDs are defined in your ingress authorization rules.
  • Make sure that TCP port 35001 is available on your client device. It shouldn’t be used by any other process or blocked by a firewall. Port 35001 only needs to be open on your localhost interface. The SAML assertion is sent to localhost on port 35001 as an HTTP POST from the browser window opened by the AWS VPN client application after a successful sign-in.

Clean up the test environment

To avoid charges for the use of AWS EC2, Client VPN, SSO, or ACM services, remove any components that were created as part of this walkthrough. Components that can be deleted if applicable are:

  1. The Client VPN endpoint. You must first remove all associations that were created for the endpoint.
  2. The EC2 instance and VPC.
  3. The test IdPs from IAM.
  4. The VPN client custom SAML applications from AWS SSO.
  5. AWS SSO users and groups.
  6. The ACM certificate.

Conclusion

In this blog post, we’ve shown how you can integrate Client VPN and AWS SSO to provide a familiar and seamless VPN connection experience to your users. By adding the Client VPN self-service portal, you can reduce the effort needed to deploy the solution by allowing users to perform their own VPN client application installation and configuration. We demonstrated the creation of IdPs using AWS SSO custom applications and then showed you how to configure a Client VPN endpoint to use SAML-based federated authentication and associate it with the IdPs. Client VPN users can then use their centralized credentials to connect to the Client VPN endpoint and access specific network ranges based upon their group membership or further refined through a client connection handler.

If you have feedback about this post, submit comments in the Comments section below.

Want more AWS Security how-to content, news, and feature announcements? Follow us on Twitter.

Author

Drew Marumoto

Drew is a DevOps Consultant with Aws Professional Service. A long time system administrator with a passion for automation and orchestration, he enjoys solving difficult problems for customers and helping them achieve their business goals.

Author

Sylvia Qi

Sylvia is a DevOps Consultant focusing on architecting and automating DevOps processes, helping customers through their DevOps transformation journey, and achieving their goals. In her spare time, she enjoyes biking, swimming, painting, and photograhy.

How to securely create and store your CRL for ACM Private CA

Post Syndicated from Tracy Pierce original https://aws.amazon.com/blogs/security/how-to-securely-create-and-store-your-crl-for-acm-private-ca/

In this blog post, I show you how to protect your Amazon Simple Storage Service (Amazon S3) bucket while still allowing access to your AWS Certificate Manager (ACM) Private Certificate Authority (CA) certificate revocation list (CRL).

A CRL is a list of certificates that have been revoked by the CA. Certificates can be revoked because they might have inadvertently been shared, or to discontinue their use, such as when someone leaves the company or an IoT device is decommissioned. In this solution, you use a combination of separate AWS accounts, Amazon S3 Block Public Access (BPA) settings, and a new parameter created by ACM Private CA called S3ObjectAcl to mark the CRL as private. This new parameter allows you to set the privacy of your CRL as PUBLIC_READ or BUCKET_OWNER_FULL_CONTROL. If you choose PUBLIC_READ, the CRL will be accessible over the internet. If you choose BUCKET_OWNER_FULL_CONTROL, then only the CRL S3 bucket owner can access it, and you will need to use Amazon CloudFront to serve the CRL stored in Amazon S3 using origin access identity (OAI). This is because most TLS implementations expect a public endpoint for access.

A best practice for Amazon S3 is to apply the principle of least privilege. To support least privilege, you want to ensure you have the BPA settings for Amazon S3 enabled. These settings deny public access to your S3 objects by using ACLs, bucket policies, or access point policies. I’m going to walk you through setting up your CRL as a private object in an isolated secondary account with BPA settings for access, and a CloudFront distribution with OAI settings enabled. This will confirm that access can only be made through the CloudFront distribution and not directly to your S3 bucket. This enables you to maintain your private CA in your primary account, accessible only by your public key infrastructure (PKI) security team.

As part of the private infrastructure setup, you will create a CloudFront distribution to provide access to your CRL. While not required, it allows access to private CRLs, and is helpful in the event you want to move the CRL to a different location later. However, this does come with an extra cost, so that’s something to consider when choosing to make your CRL private instead of public.

Prerequisites

For this walkthrough, you should have the following resources ready to use:

CRL solution overview

The solution consists of creating an S3 bucket in an isolated secondary account, enabling all BPA settings, creating a CloudFront OAI, and a CloudFront distribution.
 

Figure 1: Solution flow diagram

Figure 1: Solution flow diagram

As shown in Figure 1, the steps in the solution are as follows:

  1. Set up the S3 bucket in the secondary account with BPA settings enabled.
  2. Create the CloudFront distribution and point it to the S3 bucket.
  3. Create your private CA in AWS Certificate Manager (ACM).

In this post, I walk you through each of these steps.

Deploying the CRL solution

In this section, you walk through each item in the solution overview above. This will allow access to your CRL stored in an isolated secondary account, away from your private CA.

To create your S3 bucket

  1. Sign in to the AWS Management Console of your secondary account. For Services, select S3.
  2. In the S3 console, choose Create bucket.
  3. Give the bucket a unique name. For this walkthrough, I named my bucket example-test-crl-bucket-us-east-1, as shown in Figure 2. Because S3 buckets are unique across all of AWS and not just within your account, you must create your own unique bucket name when completing this tutorial. Remember to follow the S3 naming conventions when choosing your bucket name.
     
    Figure 2: Creating an S3 bucket

    Figure 2: Creating an S3 bucket

  4. Choose Next, and then choose Next again.
  5. For Block Public Access settings for this bucket, make sure the Block all public access check box is selected, as shown in Figure 3.
     
    Figure 3: S3 block public access bucket settings

    Figure 3: S3 block public access bucket settings

  6. Choose Create bucket.
  7. Select the bucket you just created, and then choose the Permissions tab.
  8. For Bucket Policy, choose Edit, and in the text field, paste the following policy (remember to replace each <user input placeholder> with your own value).
    {
      "Version": "2012-10-17",
      "Statement": [
        {
          "Effect": "Allow",
          "Principal": {
            "Service": "acm-pca.amazonaws.com"
          },
          "Action": [
            "s3:PutObject",
            "s3:PutObjectAcl",
            "s3:GetBucketAcl",
            "s3:GetBucketLocation"
          ],
          "Resource": [
              "arn:aws:s3:::<your-bucket-name>/*",
              "arn:aws:s3:::<your-bucket-name>"
          ]
        }
      ]
    }
    

  9. Choose Save changes.
  10. Next to Object Ownership choose Edit.
  11. Select Bucket owner preferred, and then choose Save changes.

To create your CloudFront distribution

  1. Still in the console of your secondary account, from the Services menu, switch to the CloudFront console.
  2. Choose Create Distribution.
  3. For Select a delivery method for your content, under Web, choose Get Started.
  4. On the Origin Settings page, do the following, as shown in Figure 4:
    1. For Origin Domain Name, select the bucket you created earlier. In this example, my bucket name is example-test-crl-bucket-us-east-1.s3.amazonaws.com.
    2. For Restrict Bucket Access, select Yes.
    3. For Origin Access Identity, select Create a New Identity.
    4. For Comment enter a name. In this example, I entered access-identity-crl.
    5. For Grant Read Permissions on Bucket, select Yes, Update Bucket Policy.
    6. Leave all other defaults.
       
      Figure 4: CloudFront <strong>Origin Settings</strong> page

      Figure 4: CloudFront Origin Settings page

  5. Choose Create Distribution.

To create your private CA

  1. (Optional) If you have already created a private CA, you can update your CRL pointer by using the update-certificate-authority API. You must do this step from the CLI because you can’t select an S3 bucket in a secondary account for the CRL home when you create the CRL through the console. If you haven’t already created a private CA, follow the remaining steps in this procedure.
  2. Use a text editor to create a file named ca_config.txt that holds your CA configuration information. In the following example ca_config.txt file, replace each <user input placeholder> with your own value.
    {
        "KeyAlgorithm": "<RSA_2048>",
        "SigningAlgorithm": "<SHA256WITHRSA>",
        "Subject": {
            "Country": "<US>",
            "Organization": "<Example LLC>",
            "OrganizationalUnit": "<Security>",
            "DistinguishedNameQualifier": "<Example.com>",
            "State": "<Washington>",
            "CommonName": "<Example LLC>",
            "Locality": "<Seattle>"
        }
    }
    

  3. From the CLI configured with a credential profile for your primary account, use the create-certificate-authority command to create your CA. In the following example, replace each <user input placeholder> with your own value.
    aws acm-pca create-certificate-authority --certificate-authority-configuration file://ca_config.txt --certificate-authority-type “ROOT” --profile <primary_account_credentials>
    

  4. With the CA created, use the describe-certificate-authority command to verify success. In the following example, replace each <user input placeholder> with your own value.
    aws acm-pca describe-certificate-authority --certificate-authority-arn <arn:aws:acm-pca:us-east-1:111122223333:certificate-authority/12345678-1234-1234-1234-123456789012> --profile <primary_account_credentials>
    

  5. You should see the CA in the PENDING_CERTIFICATE state. Use the get-certificate-authority-csr command to retrieve the certificate signing request (CSR), and sign it with your ACM private CA. In the following example, replace each <user input placeholder> with your own value.
    aws acm-pca get-certificate-authority-csr --certificate-authority-arn <arn:aws:acm-pca:us-east-1:111122223333:certificate-authority/12345678-1234-1234-1234-123456789012> --output text > <cert_1.csr> --profile <primary_account_credentials>
    

  6. Now that you have your CSR, use it to issue a certificate. Because this example sets up a ROOT CA, you will issue a self-signed RootCACertificate. You do this by using the issue-certificate command. In the following example, replace each <user input placeholder> with your own value. You can find all allowable values in the ACM PCA documentation.
    aws acm-pca issue-certificate --certificate-authority-arn <arn:aws:acm-pca:us-east-1:111122223333:certificate-authority/12345678-1234-1234-1234-123456789012> --template-arn arn:aws:acm-pca:::template/RootCACertificate/V1 --csr fileb://<cert_1.csr> --signing-algorithm SHA256WITHRSA --validity Value=365,Type=DAYS --profile <primary_account_credentials>
    

  7. Now that the certificate is issued, you can retrieve it. You do this by using the get-certificate command. In the following example, replace each <user input placeholder> with your own value.
    aws acm-pca get-certificate --certificate-authority-arn <arn:aws:acm-pca:us-east-1:111122223333:certificate-authority/12345678-1234-1234-1234-123456789012> --certificate-arn <arn:aws:acm-pca:us-east-1:111122223333:certificate-authority/12345678-1234-1234-1234-123456789012/certificate/6707447683a9b7f4055627ffd55cebcc> --output text --profile <primary_account_credentials> > ca_cert.pem
    

  8. Import the certificate ca_cert.pem into your CA to move it into the ACTIVE state for further use. You do this by using the import-certificate-authority-certificate command. In the following example, replace each <user input placeholder> with your own value.
    aws acm-pca import-certificate-authority-certificate --certificate-authority-arn <arn:aws:acm-pca:us-east-1:111122223333:certificate-authority/12345678-1234-1234-1234-123456789012> --certificate fileb://ca_cert.pem --profile <primary_account_credentials>
    

  9. Use a text editor to create a file named revoke_config.txt that holds your CRL information pointing to your CloudFront distribution ID. In the following example revoke_config.txt, replace each <user input placeholder> with your own value.
    {
        "CrlConfiguration": {
            "Enabled": <true>,
            "ExpirationInDays": <365>,
            "CustomCname": "<example1234.cloudfront.net>",
            "S3BucketName": "<example-test-crl-bucket-us-east-1>",
            "S3ObjectAcl": "<BUCKET_OWNER_FULL_CONTROL>"
        }
    }
    

  10. Update your CA CRL CNAME to point to the CloudFront distribution you created. You do this by using the update-certificate-authority command. In the following example, replace each <user input placeholder> with your own value.
    aws acm-pca update-certificate-authority --certificate-authority-arn <arn:aws:acm-pca:us-east-1:111122223333:certificate-authority/12345678-1234-1234-1234-123456789012> --revocation-configuration file://revoke_config.txt --profile <primary_account_credentials>
    

You can use the describe-certificate-authority command to verify that your CA is in the ACTIVE state. After the CA is active, ACM generates your CRL periodically for you, and places it into your specified S3 bucket. It also generates a new CRL list shortly after you revoke any certificate, so you have the most updated copy.

Now that the PCA, CRL, and CloudFront distribution are all set up, you can test to verify the CRL is served appropriately.

To test that the CRL is served appropriately

  1. Create a CSR to issue a new certificate from your PCA. In the following example, replace each <user input placeholder> with your own value. Enter a secure PEM password when prompted and provide the appropriate field data.

    Note: Do not enter any values for the unused attributes, just press Enter with no value.

    openssl req -new -newkey rsa:2048 -days 365 -keyout <test_cert_private_key.pem> -out <test_csr.csr>
    

  2. Issue a new certificate using the issue-certificate command. In the following example, replace each <user input placeholder> with your own value. You can find all allowable values in the ACM PCA documentation.
    aws acm-pca issue-certificate --certificate-authority-arn <arn:aws:acm-pca:us-east-1:111122223333:certificate-authority/12345678-1234-1234-1234-123456789012> --csr file://<test_csr.csr> --signing-algorithm <SHA256WITHRSA> --validity Value=<31>,Type=<DAYS> --idempotency-token 1 --profile <primary_account_credentials>
    

  3. After issuing the certificate, you can use the get-certificate command retrieve it, parse it, then get the CRL URL from the certificate just like a PKI client would. In the following example, replace each <user input placeholder> with your own value. This command uses the JQ package.
    aws acm-pca get-certificate --certificate-authority-arn <arn:aws:acm-pca:us-east-1:111122223333:certificate-authority/12345678-1234-1234-1234-123456789012> --certificate-arn <arn:aws:acm-pca:us-east-1:111122223333:certificate-authority/12345678-1234-1234-1234-123456789012/certificate/6707447683a9b7f4055example1234> | jq -r '.Certificate' > cert.pem openssl x509 -in cert.pem -text -noout | grep crl 
    

    You should see an output similar to the following, but with the domain names of your CloudFront distribution and your CRL file:

    http://<example1234.cloudfront.net>/crl/<7215e983-3828-435c-a458-b9e4dd16bab1.crl>
    

  4. Run the curl command to download your CRL file. In the following example, replace each <user input placeholder> with your own value.
    curl http://<example1234.cloudfront.net>/crl/<7215e983-3828-435c-a458-b9e4dd16bab1.crl>
    

Security best practices

The following are some of the security best practices for setting up and maintaining your private CA in ACM Private CA.

  • Place your root CA in its own account. You want your root CA to be the ultimate authority for your private certificates, limiting access to it is key to keeping it secure.
  • Minimize access to the root CA. This is one of the best ways of reducing the risk of intentional or unintentional inappropriate access or configuration. If the root CA was to be inappropriately accessed, all subordinate CAs and certificates would need to be revoked and recreated.
  • Keep your CRL in a separate account from the root CA. The reason for placing the CRL in a separate account is because some external entities—such as customers or users who aren’t part of your AWS organization, or external applications—might need to access the CRL to check for revocation. To provide access to these external entities, the CRL object and the S3 bucket need to be accessible, so you don’t want to place your CRL in the same account as your private CA.

For more information, see ACM Private CA best practices in the AWS Private CA User Guide.

Conclusion

You’ve now successfully set up your private CA and have stored your CRL in an isolated secondary account. You configured your S3 bucket with Block Public Access settings, created a custom URL through CloudFront, enabled OAI settings, and pointed your DNS to it by using Route 53. This restricts access to your S3 bucket through CloudFront and your OAI only. You walked through the setup of each step, from bucket configurations, hosted zone setup, distribution setup, and finally, private CA configuration and setup. You can now store your private CA in an account with limited access, while your CRL is hosted in a separate account that allows external entity access.

If you have feedback about this post, submit comments in the Comments section below. If you have questions about this post, start a new thread on the AWS Certificate Manager forum or contact AWS Support.

Want more AWS Security how-to content, news, and feature announcements? Follow us on Twitter.

Author

Tracy Pierce

Tracy is a Senior Security Consultant for Engagement Security. She enjoys the peculiar culture of Amazon and uses that to ensure that every day is exciting for her fellow engineers and customers alike. Customer obsession is her highest priority both internally and externally. She has her AS in Computer Security and Forensics from Sullivan College of Technology and Design, Systems Security Certified Practitioner (SSCP) certification, AWS Developer Associate certification, AWS Solutions Architect Associates certificate, and AWS Security Specialist certification. Outside of work, she enjoys time with friends, her fiancé, her Great Dane, and three cats. She also reads (a lot), builds Legos, and loves glitter.
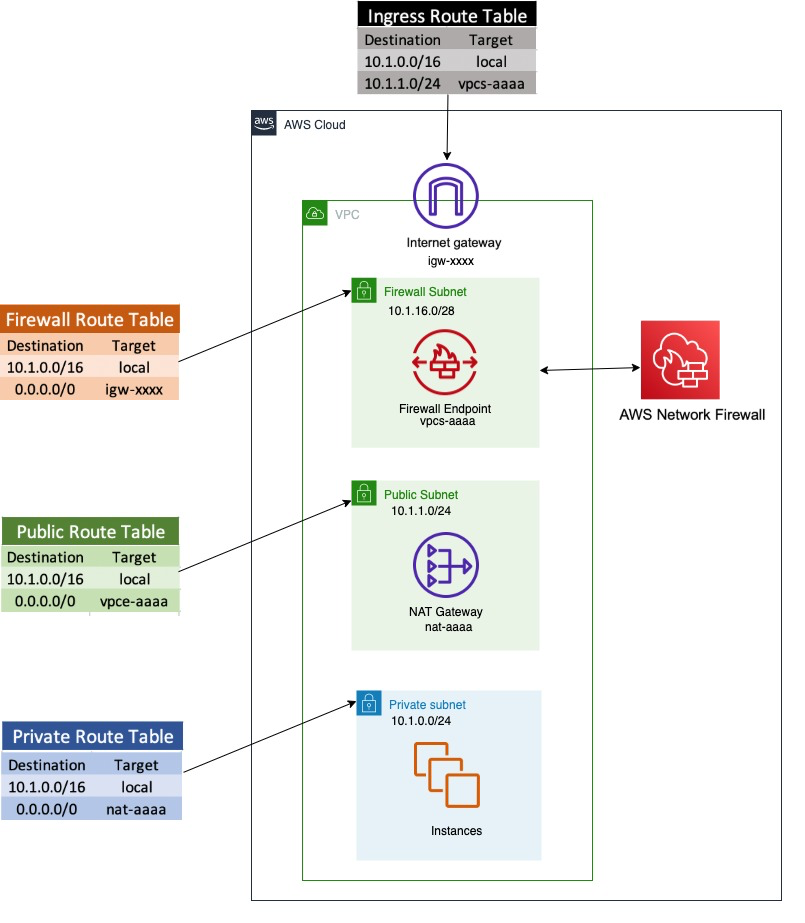
Augmenting VMware Cloud on AWS Workloads with Native AWS services

Post Syndicated from Talha Kalim original https://aws.amazon.com/blogs/architecture/augmenting-vmware-cloud-on-aws-workloads-with-native-aws-services/

VMware Cloud on AWS allows you to quickly migrate VMware workloads to a VMware-managed Software-Defined Data Center (SDDC) running in the AWS Cloud and extend your on-premises data centers without replatforming or refactoring applications.
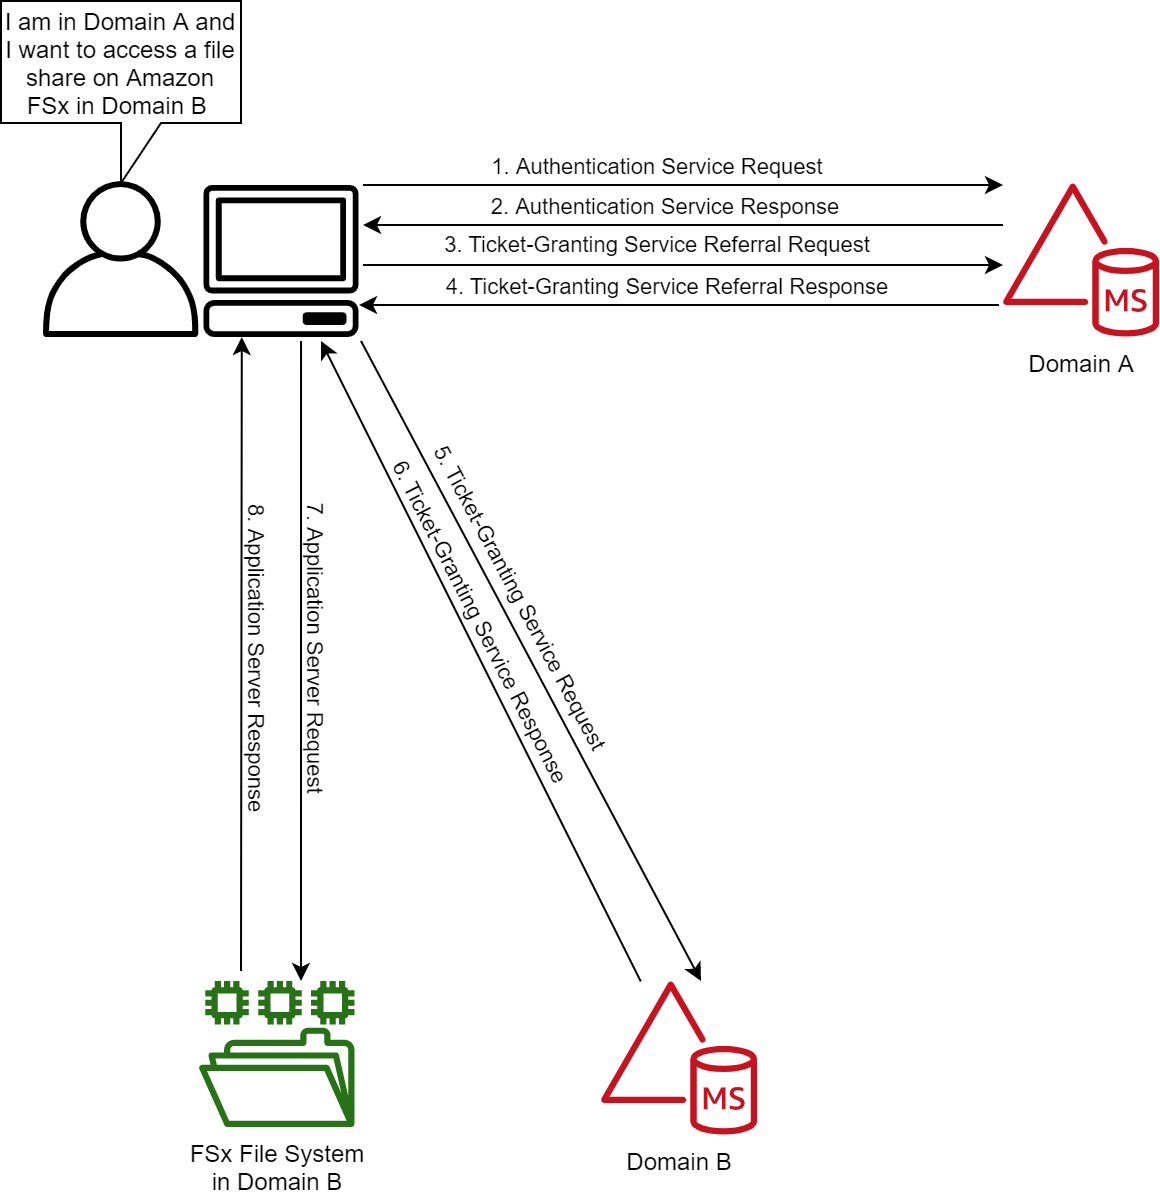
You can use native AWS services with Virtual Machines (VMs) in the SDDC, to reduce operational overhead and lower your Total Cost of Ownership (TCO) while increasing your workload’s agility and scalability.

This post covers patterns for connectivity between native AWS services and VMware workloads. We also explore common integrations, including using AWS Cloud storage from an SDDC, securing VM workloads using AWS networking services, and using AWS databases and analytics services with workloads running in the SDDC.

Networking between SDDC and native AWS services

Establishing robust network connectivity with VMware Cloud SDDC VMs is critical to successfully integrating AWS services. This section shows you different options to connect the VMware SDDC with your native AWS account.

The simplest way to get started is to use AWS services in the connected Amazon Virtual Private Cloud (VPC) that is selected during the SDDC deployment process. Figure 1 shows this connectivity, which is automatically configured and available once the SDDC is deployed.

Figure 1. SDDC to Customer Account VPC connectivity configured at deployment

Figure 1. SDDC to Customer Account VPC connectivity configured at deployment

The SDDC Elastic Network Interface (ENI) allows you to connect to native AWS services within the connected VPC, but it doesn’t provide transitive routing beyond the connected VPC. For example, it will not connect the SDDC to other VPCs and the internet.

If you’re looking to connect to native AWS services in multiple accounts and VPCs in the same AWS Region, you have two connectivity options. These are explained in the following sections.

Attaching VPCs to VMware Transit Connect

When you need high-throughput connectivity in a multi-VPC environment, use VMware Transit Connect (VTGW), as shown in Figure 2.

Figure 2. Multi-account VPC connectivity through VMware Transit Connect VPC attachments

Figure 2. Multi-account VPC connectivity through VMware Transit Connect VPC attachments

VTGW uses a VMware-managed AWS Transit Gateway to interconnect SDDCs within an SDDC group. It also allows you to attach your VPCs in the same Region to the VTGW by providing connectivity to any SDDC within the SDDC group.

Connecting through an AWS Transit Gateway

To connect to your VPCs through an existing Transit Gateway in your account, use IPsec virtual private network (VPN) connections from the SDDC with Border Gateway Protocol (BGP)-based routing, as shown in Figure 3. Multiple IPsec tunnels to the Transit Gateway use equal-cost multi-path routing, which increases bandwidth by load-balancing traffic.

Figure 3. Multi-account VPC connectivity through an AWS Transit Gateway

Figure 3. Multi-account VPC connectivity through an AWS Transit Gateway

For scalable, high throughput connectivity to an existing Transit Gateway, connect to the SDDC via a Transit VPC that is attached to the VTGW, as shown in Figure 3. You must manually configure the routes between the VPCs and SDDC for this architecture.

In the following sections, we’ll show you how to use some of these connectivity options for common native AWS services integrations with VMware SDDC workloads.

Reducing TCO with Amazon EFS, Amazon FSx, and Amazon S3

As you are sizing your VMware Cloud on AWS SDDC, consider using AWS Cloud storage for VMs that provide files services or require object storage. Migrating these workloads to cloud storage like Amazon Simple Storage Service (Amazon S3), Amazon Elastic File System (Amazon EFS), or Amazon FSx can reduce your overall TCO through optimized SDDC sizing.

Additionally, you can reduce the undifferentiated heavy lifting involved with deploying and managing complex architectures for file services in VM disks. Figure 4 shows how these services integrate with VMs in the SDDC.

Figure 4. Connectivity examples for AWS Cloud storage services

Figure 4. Connectivity examples for AWS Cloud storage services

We recommend connecting to your S3 buckets via the VPC gateway endpoint in the connected VPC. This is a more cost-effective approach because it avoids the data processing costs associated with a VTGW and AWS PrivateLink for Amazon S3.

Similarly, the recommended approach for Amazon EFS and Amazon FSx is to deploy the services in the connected VPC for VM access through the SDDC elastic network interface. You can also connect to existing Amazon EFS and Amazon FSx file shares in other accounts and VPCs using a VTGW, but consider the data transfer costs first.

Integrating AWS networking and content delivery services

Using various AWS networking and content delivery services with VMware Cloud on AWS workloads will provide robust traffic management, security, and fast content delivery. Figure 5 shows how AWS networking and content delivery services integrate with workloads running on VMs.

Figure 5. Connectivity examples for AWS networking and content delivery services

Figure 5. Connectivity examples for AWS networking and content delivery services

Deploy Elastic Load Balancing (ELB) services in a VPC subnet that has network reachability to the SDDC VMs. This includes the connected VPC over the SDDC elastic network interface, a VPC attached via VTGW, and VPCs attached to a Transit Gateway connected to the SDDC.

VTGW connectivity should be used when the design requires using existing networking services in other VPCs. For example, if you have a dedicated internet ingress/egress VPC. An internal ELB can also be used for load-balancing traffic between services running in SDDC VMs and services running within AWS VPCs.

Use Amazon CloudFront, a global content delivery service, to integrate with load balancers, S3 buckets for static content, or directly with publicly accessible SDDC VMs. Additionally, use Amazon Route 53 to provide public and private DNS services for VMware Cloud on AWS. Deploy services such as AWS WAF and AWS Shield to provide comprehensive network security for VMware workloads in the SDDC.

Integrating with AWS database and analytics services

Data is one the most valuable assets in an organization, and databases are often the most demanding and critical workloads running in on-premises VMware environments.

A common customer pattern to reduce TCO for storage-heavy or memory-intensive databases is to use purpose-built Databases on AWS like Amazon Relational Database Service (RDS). Amazon RDS lets you migrate on-premises relational databases to the cloud and integrate it with SDDC VMs. Using AWS databases also reduces operational overhead you may incur with tasks associated with managing availability, scalability, and disaster recovery (DR).

With AWS Analytics services integrations, you can take advantage of the close proximity of data within VMware Cloud on AWS data stores to gain meaningful insights from your business data. For example, you can use Amazon Redshift to create a data warehouse to run analytics at scale on relational data from transactional systems, operational databases, and line-of-business applications running within the SDDC.

Figure 6 shows integration options for AWS databases and analytics services with VMware Cloud on AWS VMs.

Figure 6. Connectivity examples for AWS Database and Analytics services

Figure 6. Connectivity examples for AWS Database and Analytics services

We recommend deploying and consuming database services in the connected VPC. If you have existing databases in other accounts or VPCs that require integration with VMware VMs, connect them using the VTGW.

Analytics services can involve ingesting large amounts of data from various sources, including from VMs within the SDDC, creating a significant amount of data traffic. In such scenarios, we recommend using the SDDC connected VPC to deploy any required interface endpoints for analytics services to achieve a cost-effective architecture.

Summary

VMware Cloud on AWS is one of the fastest ways to migrate on-premises VMware workloads to the cloud. In this blog post, we provided different architecture options for connecting the SDDC to native AWS services. This lets you evaluate your requirements to select the most cost-effective option for your workload.

The example integrations covered in this post are common AWS service integrations, including storage, network, and databases. They are a great starting point, but the possibilities are endless. Integrating services like Amazon Machine Learning (Amazon ML), and Serverless on AWS allows you to deliver innovative services to your users, often without having to re-factor existing application backends running on VMware Cloud on AWS.

Additional Resources

If you need to integrate VMware Cloud on AWS with an AWS service, explore the following resources and reach out to us at AWS.