Tag Archives: AWS CDK

Deploy data lake ETL jobs using CDK Pipelines

Post Syndicated from Ravi Itha original https://aws.amazon.com/blogs/devops/deploying-data-lake-etl-jobs-using-cdk-pipelines/

Many organizations are building data lakes on AWS, which provides the most secure, scalable, comprehensive, and cost-effective portfolio of services. Like any application development project, a data lake must answer a fundamental question: “What is the DevOps strategy?” Defining a DevOps strategy for a data lake requires extensive planning and multiple teams. This typically requires multiple development and test cycles before maturing enough to support a data lake in a production environment. If an organization doesn’t have the right people, resources, and processes in place, this can quickly become daunting.

What if your data engineering team uses basic building blocks to encapsulate data lake infrastructure and data processing jobs? This is where CDK Pipelines brings the full benefit of infrastructure as code (IaC). CDK Pipelines is a high-level construct library within the AWS Cloud Development Kit (AWS CDK) that makes it easy to set up a continuous deployment pipeline for your AWS CDK applications. The AWS CDK provides essential automation for your release pipelines so that your development and operations team remain agile and focus on developing and delivering applications on the data lake.

In this post, we discuss a centralized deployment solution utilizing CDK Pipelines for data lakes. This implements a DevOps-driven data lake that delivers benefits such as continuous delivery of data lake infrastructure, data processing, and analytical jobs through a configuration-driven multi-account deployment strategy. Let’s dive in!

Data lakes on AWS

A data lake is a centralized repository where you can store all of your structured and unstructured data at any scale. Store your data as is, without having to first structure it, and run different types of analytics—from dashboards and visualizations to big data processing, real-time analytics, and machine learning in order to guide better decisions. To further explore data lakes, refer to What is a data lake?

We design a data lake with the following elements:

  • Secure data storage
  • Data cataloging in a central repository
  • Data movement
  • Data analysis

The following figure represents our data lake.
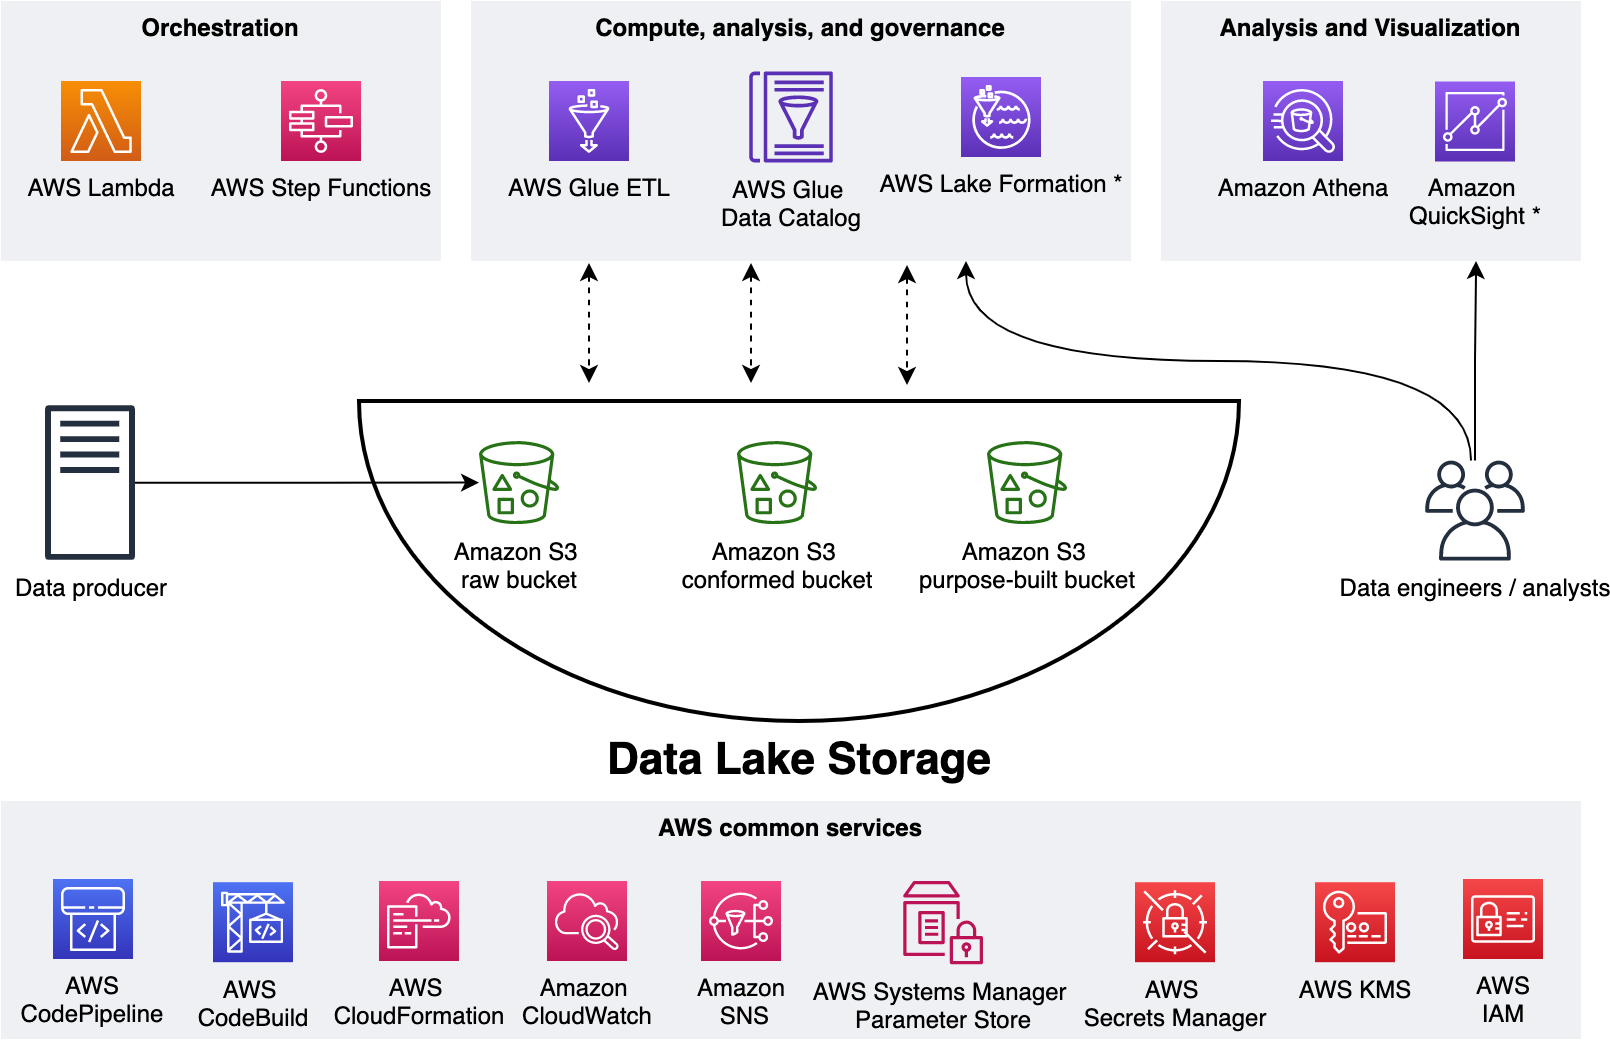
Data Lake on AWS

We use three Amazon Simple Storage Service (Amazon S3) buckets:

  • raw – Stores the input data in its original format
  • conformed – Stores the data that meets the data lake quality requirements
  • purpose-built – Stores the data that is ready for consumption by applications or data lake consumers

The data lake has a producer where we ingest data into the raw bucket at periodic intervals. We utilize the following tools: AWS Glue processes and analyzes the data. AWS Glue Data Catalog persists metadata in a central repository. AWS Lambda and AWS Step Functions schedule and orchestrate AWS Glue extract, transform, and load (ETL) jobs. Amazon Athena is used for interactive queries and analysis. Finally, we engage various AWS services for logging, monitoring, security, authentication, authorization, alerting, and notification.

A common data lake practice is to have multiple environments such as dev, test, and production. Applying the IaC principle for data lakes brings the benefit of consistent and repeatable runs across multiple environments, self-documenting infrastructure, and greater flexibility with resource management. The AWS CDK offers high-level constructs for use with all of our data lake resources. This simplifies usage and streamlines implementation.

Before exploring the implementation, let’s gain further scope of how we utilize our data lake.

The solution

Our goal is to implement a CI/CD solution that automates the provisioning of data lake infrastructure resources and deploys ETL jobs interactively. We accomplish this as follows: 1) applying separation of concerns (SoC) design principle to data lake infrastructure and ETL jobs via dedicated source code repositories, 2) a centralized deployment model utilizing CDK pipelines, and 3) AWS CDK enabled ETL pipelines from the start.

Data lake infrastructure

Our data lake infrastructure provisioning includes Amazon S3 buckets, S3 bucket policies, AWS Key Management Service (KMS) encryption keys, Amazon Virtual Private Cloud (Amazon VPC), subnets, route tables, security groups, VPC endpoints, and secrets in AWS Secrets Manager. The following diagram illustrates this.
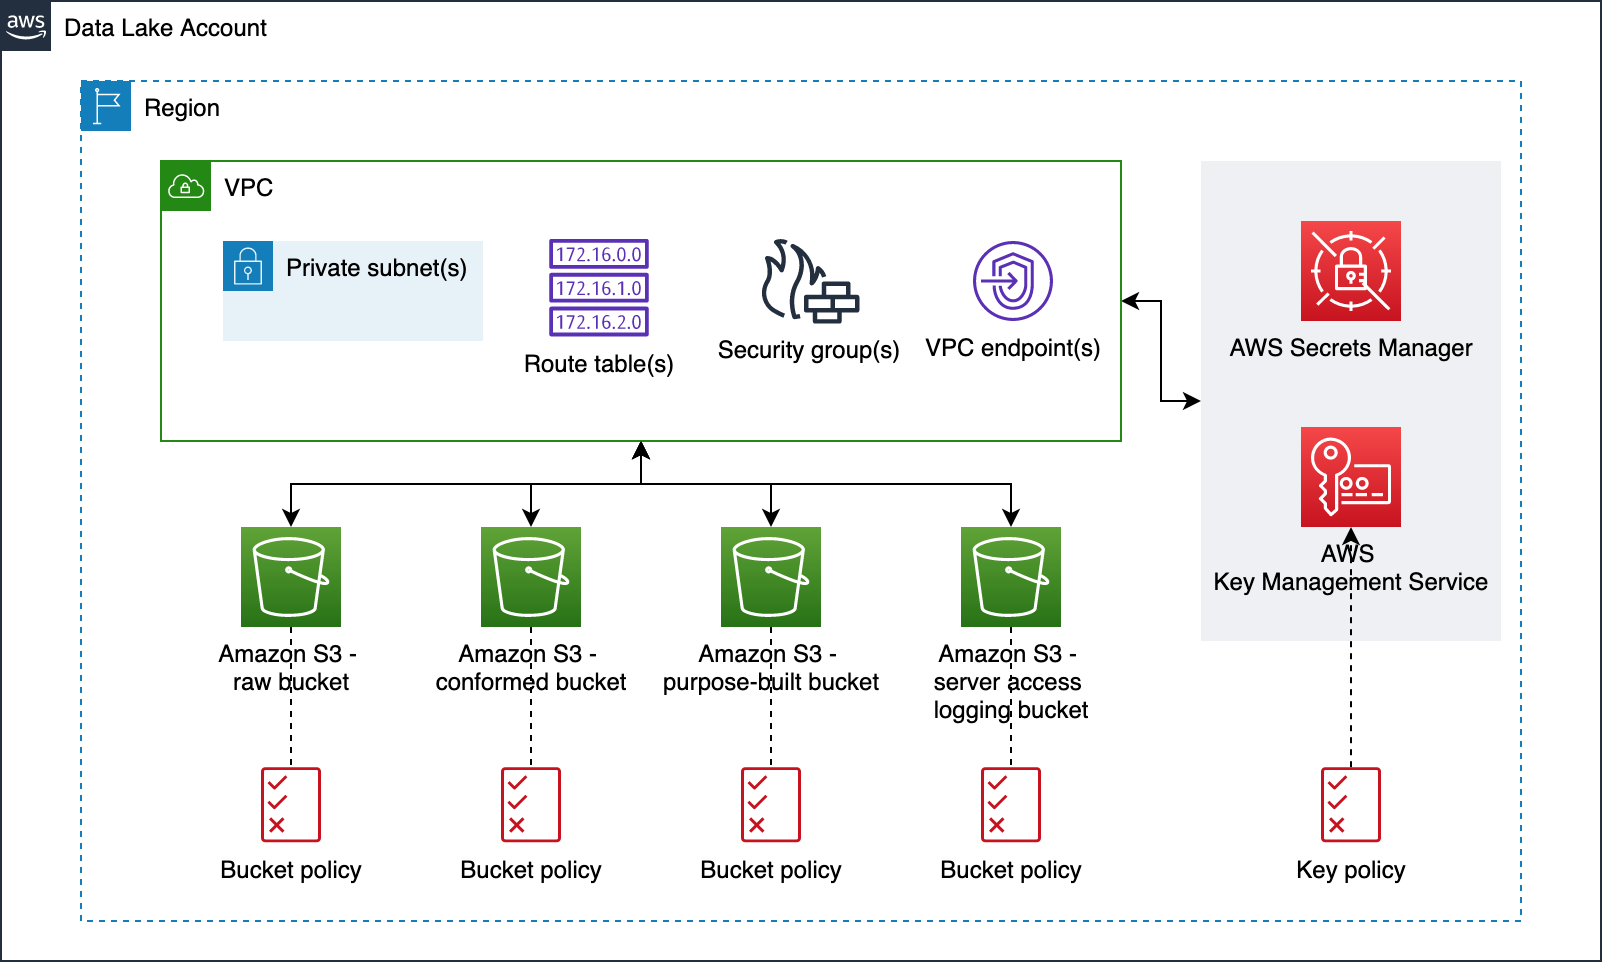
Data Lake Infrastructure

Data lake ETL jobs

For our ETL jobs, we process New York City TLC Trip Record Data. The following figure displays our ETL process, wherein we run two ETL jobs within a Step Functions state machine.
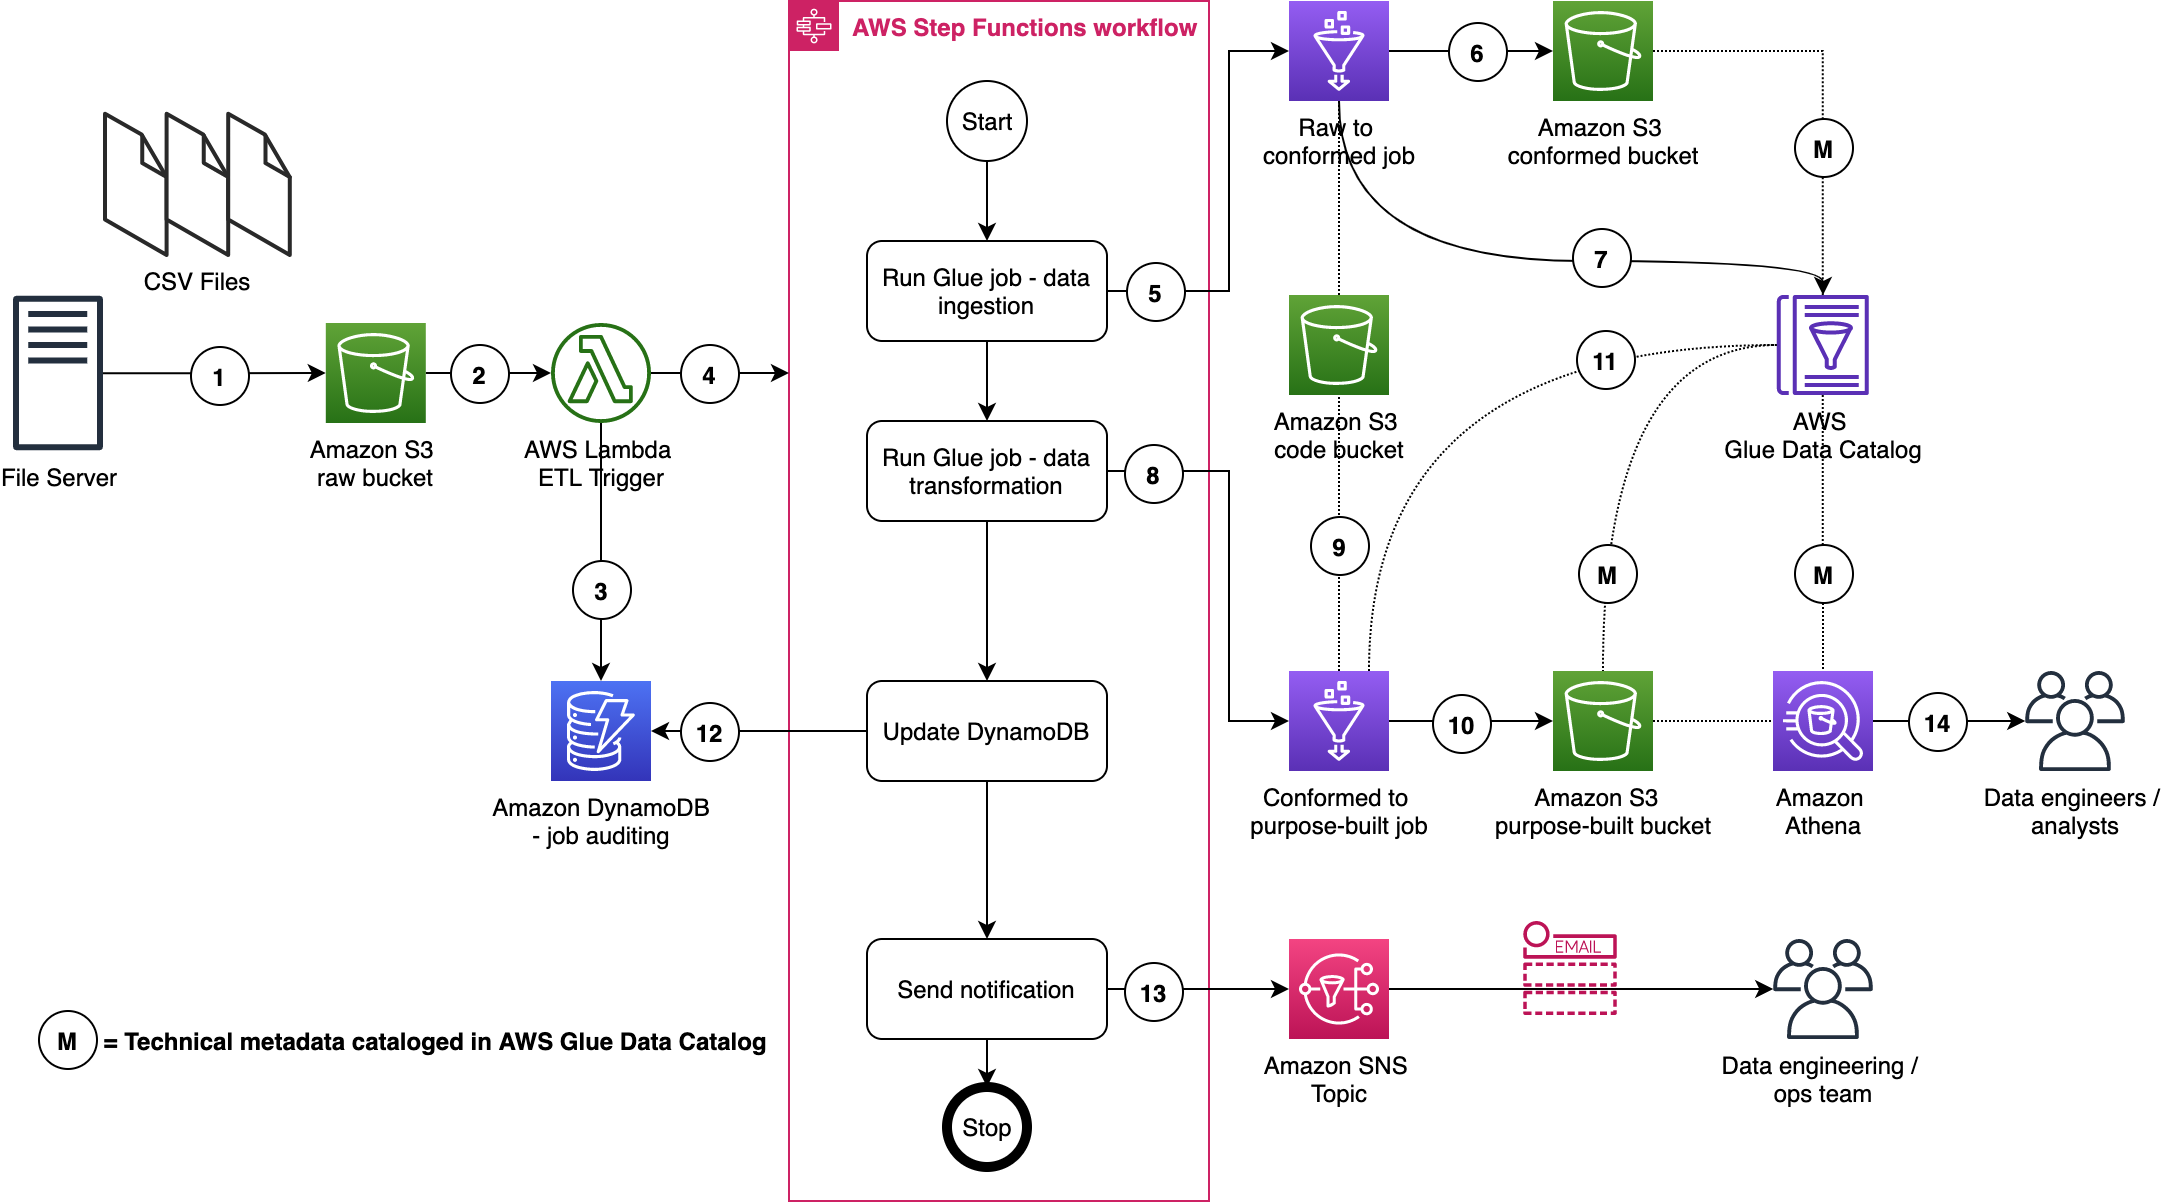
AWS Glue ETL Jobs

Here are a few important details:

  1. A file server uploads files to the S3 raw bucket of the data lake. The file server is a data producer and source for the data lake. We assume that the data is pushed to the raw bucket.
  2. Amazon S3 triggers an event notification to the Lambda function.
  3. The function inserts an item in the Amazon DynamoDB table in order to track the file processing state. The first state written indicates the AWS Step Function start.
  4. The function starts the state machine.
  5. The state machine runs an AWS Glue job (Apache Spark).
  6. The job processes input data from the raw zone to the data lake conformed zone. The job also converts CSV input data to Parquet formatted data.
  7. The job updates the Data Catalog table with the metadata of the conformed Parquet file.
  8. A second AWS Glue job (Apache Spark) processes the input data from the conformed zone to the purpose-built zone of the data lake.
  9. The job fetches ETL transformation rules from the Amazon S3 code bucket and transforms the input data.
  10. The job stores the result in Parquet format in the purpose-built zone.
  11. The job updates the Data Catalog table with the metadata of the purpose-built Parquet file.
  12. The job updates the DynamoDB table and updates the job status to completed.
  13. An Amazon Simple Notification Service (Amazon SNS) notification is sent to subscribers that states the job is complete.
  14. Data engineers or analysts can now analyze data via Athena.

We will discuss data formats, Glue jobs, ETL transformation logics, data cataloging, auditing, notification, orchestration, and data analysis in more detail in AWS CDK Pipelines for Data Lake ETL Deployment GitHub repository. This will be discussed in the subsequent section.

Centralized deployment

Now that we have data lake infrastructure and ETL jobs ready, let’s define our deployment model. This model is based on the following design principles:

  • A dedicated AWS account to run CDK pipelines.
  • One or more AWS accounts into which the data lake is deployed.
  • The data lake infrastructure has a dedicated source code repository. Typically, data lake infrastructure is a one-time deployment and rarely evolves. Therefore, a dedicated code repository provides a landing zone for your data lake.
  • Each ETL job has a dedicated source code repository. Each ETL job may have unique AWS service, orchestration, and configuration requirements. Therefore, a dedicated source code repository will help you more flexibly build, deploy, and maintain ETL jobs.

We organize our source code repo into three branches: dev (main), test, and prod. In the deployment account, we manage three separate CDK Pipelines and each pipeline is sourced from a dedicated branch. Here we choose a branch-based software development method in order to demonstrate the strategy in more complex scenarios where integration testing and validation layers require human intervention. As well, these may not immediately follow with a corresponding release or deployment due to their manual nature. This facilitates the propagation of changes through environments without blocking independent development priorities. We accomplish this by isolating resources across environments in the central deployment account, allowing for the independent management of each environment, and avoiding cross-contamination during each pipeline’s self-mutating updates. The following diagram illustrates this method.
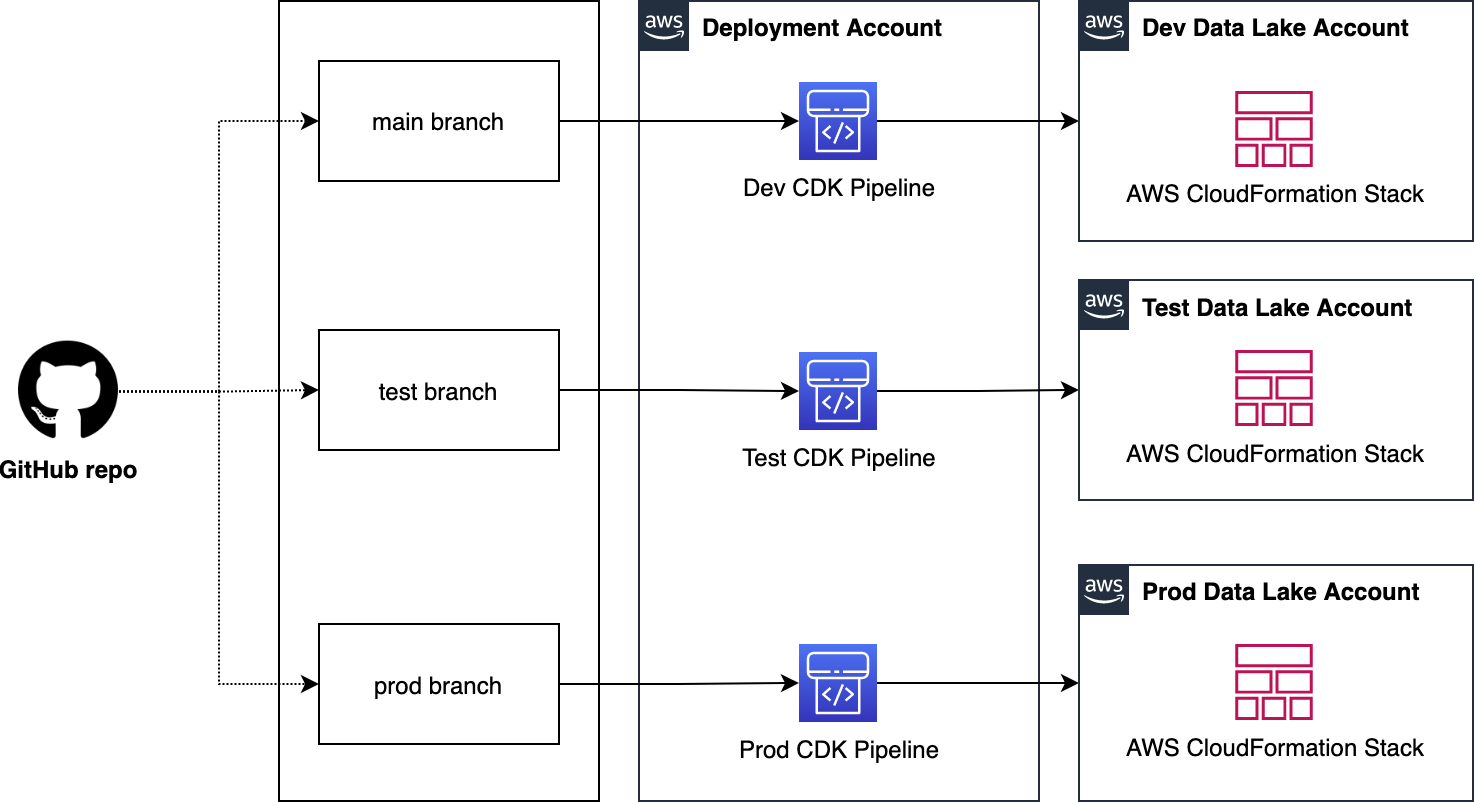
Centralized deployment


Note: This centralized deployment strategy can be adopted for trunk-based software development with minimal solution modification.

Deploying data lake ETL jobs

The following figure illustrates how we utilize CDK Pipelines to deploy data lake infrastructure and ETL jobs from a central deployment account. This model follows standard nomenclature from the AWS CDK. Each repository represents a cloud infrastructure code definition. This includes the pipelines construct definition. Pipelines have one or more actions, such as cloning the source code (source action) and synthesizing the stack into an AWS CloudFormation template (synth action). Each pipeline has one or more stages, such as testing and deploying. In an AWS CDK app context, the pipelines construct is a stack like any other stack. Therefore, when the AWS CDK app is deployed, a new pipeline is created in AWS CodePipeline.

This provides incredible flexibility regarding DevOps. In other words, as a developer with an understanding of AWS CDK APIs, you can harness the power and scalability of AWS services such as CodePipeline, AWS CodeBuild, and AWS CloudFormation.
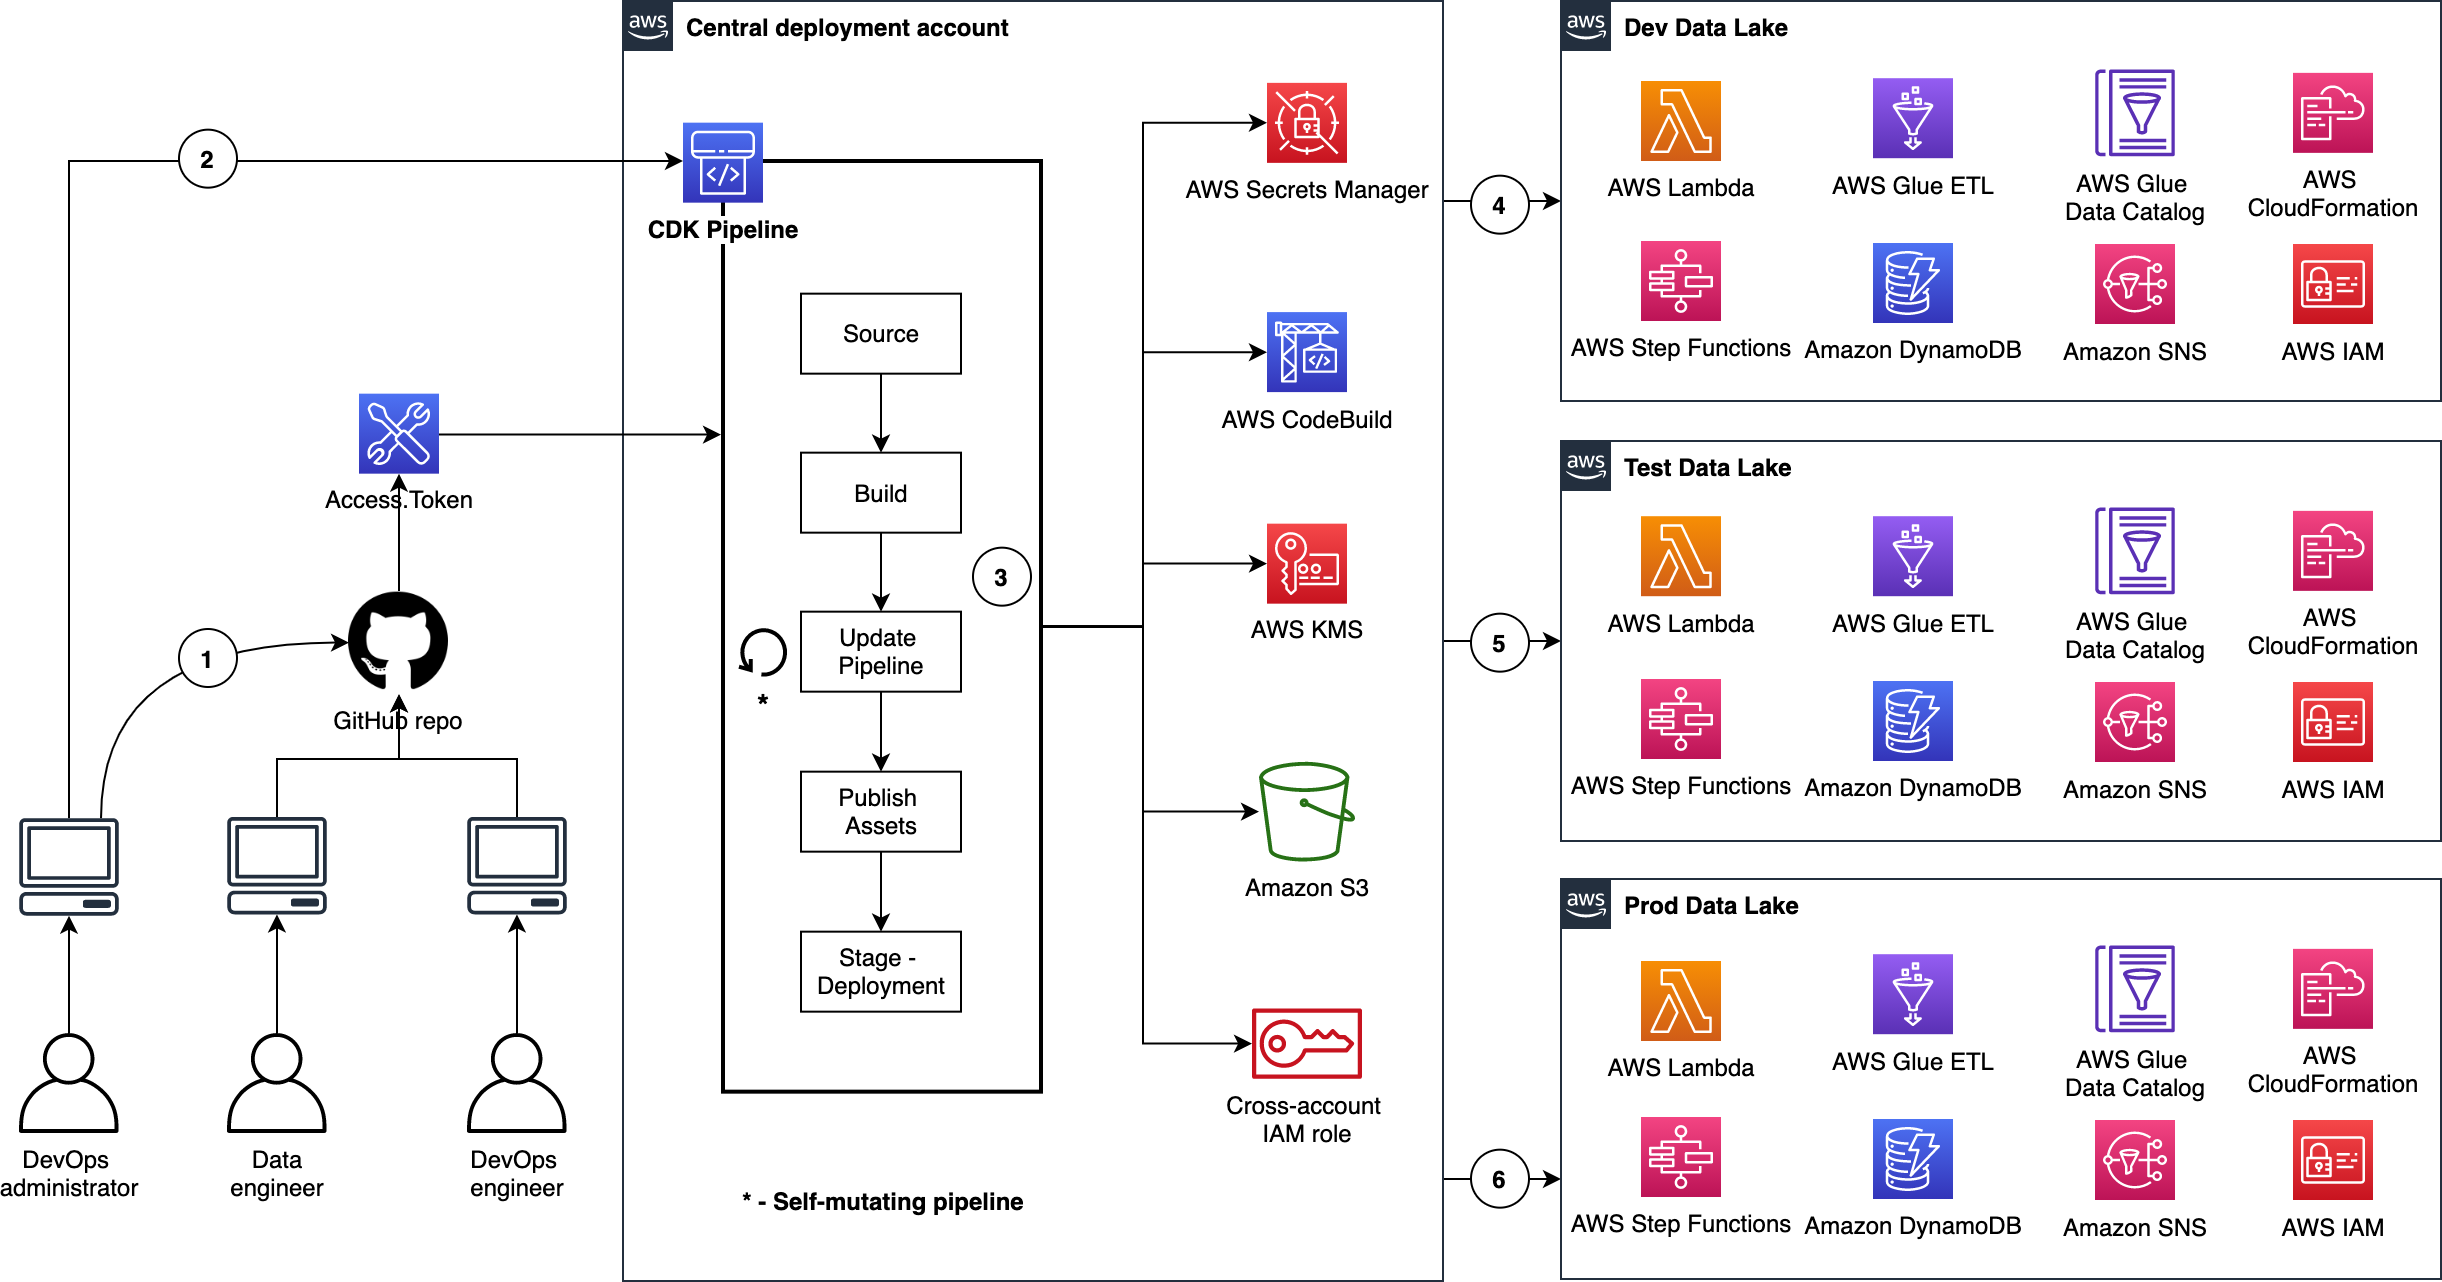
Deploying data lake ETL jobs using CDK Pipelines

Here are a few important details:

  1. The DevOps administrator checks in the code to the repository.
  2. The DevOps administrator (with elevated access) facilitates a one-time manual deployment on a target environment. Elevated access includes administrative privileges on the central deployment account and target AWS environments.
  3. CodePipeline periodically listens to commit events on the source code repositories. This is the self-mutating nature of CodePipeline. It’s configured to work with and can update itself according to the provided definition.
  4. Code changes made to the main repo branch are automatically deployed to the data lake dev environment.
  5. Code changes to the repo test branch are automatically deployed to the test environment.
  6. Code changes to the repo prod branch are automatically deployed to the prod environment.

CDK Pipelines starter kits for data lakes

Want to get going quickly with CDK Pipelines for your data lake? Start by cloning our two GitHub repositories. Here is a summary:

AWS CDK Pipelines for Data Lake Infrastructure Deployment

This repository contains the following reusable resources:

  • CDK Application
  • CDK Pipelines stack
  • CDK Pipelines deploy stage
  • Amazon VPC stack
  • Amazon S3 stack

It also contains the following automation scripts:

  • AWS environments configuration
  • Deployment account bootstrapping
  • Target account bootstrapping
  • Account secrets configuration (e.g., GitHub access tokens)

AWS CDK Pipelines for Data Lake ETL Deployment

This repository contains the following reusable resources:

  • CDK Application
  • CDK Pipelines stack
  • CDK Pipelines deploy stage
  • Amazon DynamoDB stack
  • AWS Glue stack
  • AWS Step Functions stack

It also contains the following:

  • AWS Lambda scripts
  • AWS Glue scripts
  • AWS Step Functions State machine script

Advantages

This section summarizes some of the advantages offered by this solution.

Scalable and centralized deployment model

We utilize a scalable and centralized deployment model to deliver end-to-end automation. This allows DevOps and data engineers to use the single responsibility principal while maintaining precise control over the deployment strategy and code quality. The model can readily be expanded to more accounts, and the pipelines are responsive to custom controls within each environment, such as a production approval layer.

Configuration-driven deployment

Configuration in the source code and AWS Secrets Manager allow deployments to utilize targeted values that are declared globally in a single location. This provides consistent management of global configurations and dependencies such as resource names, AWS account Ids, Regions, and VPC CIDR ranges. Similarly, the CDK Pipelines export outputs from CloudFormation stacks for later consumption via other resources.

Repeatable and consistent deployment of new ETL jobs

Continuous integration and continuous delivery (CI/CD) pipelines allow teams to deploy to production more frequently. Code changes can be safely and securely propagated through environments and released for deployment. This allows rapid iteration on data processing jobs, and these jobs can be changed in isolation from pipeline changes, resulting in reliable workflows.

Cleaning up

You may delete the resources provisioned by utilizing the starter kits. You can do this by running the cdk destroy command using AWS CDK Toolkit. For detailed instructions, refer to the Clean up sections in the starter kit README files.

Conclusion

In this post, we showed how to utilize CDK Pipelines to deploy infrastructure and data processing ETL jobs of your data lake in dev, test, and production AWS environments. We provided two GitHub repositories for you to test and realize the full benefits of this solution first hand. We encourage you to fork the repositories, bring your ETL scripts, bootstrap your accounts, configure account parameters, and continuously delivery your data lake ETL jobs.

Let’s stay in touch via the GitHub—AWS CDK Pipelines for Data Lake Infrastructure Deployment and AWS CDK Pipelines for Data Lake ETL Deployment.


About the authors

Ravi Itha

Ravi Itha is a Sr. Data Architect at AWS. He works with customers to design and implement Data Lakes, Analytics, and Microservices on AWS. He is an open-source committer and has published more than a dozen solutions using AWS CDK, AWS Glue, AWS Lambda, AWS Step Functions, Amazon ECS, Amazon MQ, Amazon SQS, Amazon Kinesis Data Streams, and Amazon Kinesis Data Analytics for Apache Flink. His solutions can be found at his GitHub handle. Outside of work, he is passionate about books, cooking, movies, and yoga.


Isaiah Grant

Isaiah Grant is a Cloud Consultant at 2nd Watch. His primary function is to design architectures and build cloud-based applications and services. He leads customer engagements and helps customers with enterprise cloud adoptions. In his free time, he is engaged in local community initiatives and enjoys being outdoors with his family.



Zahid Ali

Zahid Ali is a Data Architect at AWS. He helps customers design, develop, and implement data warehouse and Data Lake solutions on AWS. Outside of work he enjoys playing tennis, spending time outdoors, and traveling.
 

Use the Snyk CLI to scan Python packages using AWS CodeCommit, AWS CodePipeline, and AWS CodeBuild

Post Syndicated from BK Das original https://aws.amazon.com/blogs/devops/snyk-cli-scan-python-codecommit-codepipeline-codebuild/

One of the primary advantages of working in the cloud is achieving agility in product development. You can adopt practices like continuous integration and continuous delivery (CI/CD) and GitOps to increase your ability to release code at quicker iterations. Development models like these demand agility from security teams as well. This means your security team has to provide the tooling and visibility to developers for them to fix security vulnerabilities as quickly as possible.

Vulnerabilities in cloud-native applications can be roughly classified into infrastructure misconfigurations and application vulnerabilities. In this post, we focus on enabling developers to scan vulnerable data around Python open-source packages using the Snyk Command Line Interface (CLI).

The world of package dependencies

Traditionally, code scanning is performed by the security team; they either ship the code to the scanning instance, or in some cases ship it to the vendor for vulnerability scanning. After the vendor finishes the scan, the results are provided to the security team and forwarded to the developer. The end-to-end process of organizing the repositories, sending the code to security team for scanning, getting results back, and remediating them is counterproductive to the agility of working in the cloud.

Let’s take an example of package A, which uses package B and C. To scan package A, you scan package B and C as well. Similar to package A having dependencies on B and C, packages B and C can have their individual dependencies too. So the dependencies for each package get complex and cumbersome to scan over time. The ideal method is to scan all the dependencies in one go, without having manual intervention to understand the dependencies between packages.

Building on the foundation of GitOps and Gitflow

GitOps was introduced in 2017 by Weaveworks as a DevOps model to implement continuous deployment for cloud-native applications. It focuses on the developer ability to ship code faster. Because security is a non-negotiable piece of any application, this solution includes security as part of the deployment process. We define the Snyk scanner as declarative and immutable AWS Cloud Development Kit (AWS CDK) code, which instructs new Python code committed to the repository to be scanned.

Another continuous delivery practice that we base this solution on is Gitflow. Gitflow is a strict branching model that enables project release by enforcing a framework for managing Git projects. As a brief introduction on Gitflow, typically you have a main branch, which is the code sent to production, and you have a development branch where new code is committed. After the code in development branch passes all tests, it’s merged to the main branch, thereby becoming the code in production. In this solution, we aim to provide this scanning capability in all your branches, providing security observability through your entire Gitflow.

AWS services used in this solution

We use the following AWS services as part of this solution:

  • AWS CDK – The AWS CDK is an open-source software development framework to define your cloud application resources using familiar programming languages. In this solution, we use Python to write our AWS CDK code.
  • AWS CodeBuild – CodeBuild is a fully managed build service in the cloud. CodeBuild compiles your source code, runs unit tests, and produces artifacts that are ready to deploy. CodeBuild eliminates the need to provision, manage, and scale your own build servers.
  • AWS CodeCommit – CodeCommit is a fully managed source control service that hosts secure Git-based repositories. It makes it easy for teams to collaborate on code in a secure and highly scalable ecosystem. CodeCommit eliminates the need to operate your own source control system or worry about scaling its infrastructure. You can use CodeCommit to securely store anything from source code to binaries, and it works seamlessly with your existing Git tools.
  • AWS CodePipeline – CodePipeline is a continuous delivery service you can use to model, visualize, and automate the steps required to release your software. You can quickly model and configure the different stages of a software release process. CodePipeline automates the steps required to release your software changes continuously.
  • Amazon EventBridge – EventBridge rules deliver a near-real-time stream of system events that describe changes in AWS resources. With simple rules that you can quickly set up, you can match events and route them to one or more target functions or streams.
  • AWS Systems Manager Parameter Store – Parameter Store, a capability of AWS Systems Manager, provides secure, hierarchical storage for configuration data management and secrets management. You can store data such as passwords, database strings, Amazon Machine Image (AMI) IDs, and license codes as parameter values.

Prerequisites

Before you get started, make sure you have the following prerequisites:

  • An AWS account (use a Region that supports CodeCommit, CodeBuild, Parameter Store, and CodePipeline)
  • A Snyk account
  • An existing CodeCommit repository you want to test on

Architecture overview

After you complete the steps in this post, you will have a working pipeline that scans your Python code for open-source vulnerabilities.

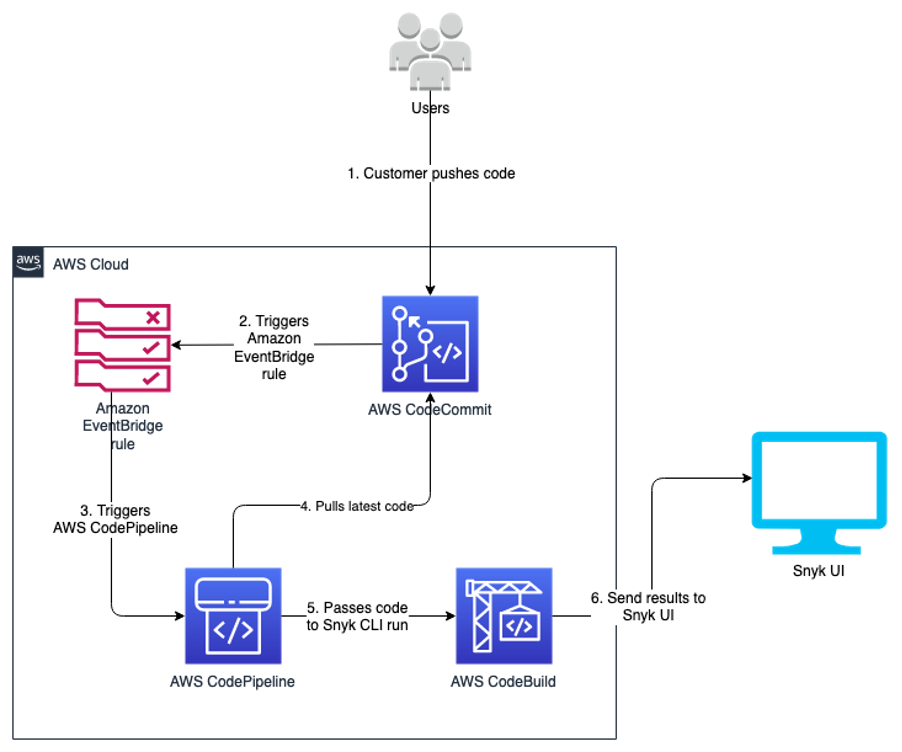
We use the Snyk CLI, which is available to customers on all plans, including the Free Tier, and provides the ability to programmatically scan repositories for vulnerabilities in open-source dependencies as well as base image recommendations for container images. The following reference architecture represents a general workflow of how Snyk performs the scan in an automated manner. The design uses DevSecOps principles of automation, event-driven triggers, and keeping humans out of the loop for its run.

As developers keep working on their code, they continue to commit their code to the CodeCommit repository. Upon each commit, a CodeCommit API call is generated, which is then captured using the EventBridge rule. You can customize this event rule for a specific event or feature branch you want to trigger the pipeline for.

When the developer commits code to the specified branch, that EventBridge event rule triggers a CodePipeline pipeline. This pipeline has a build stage using CodeBuild. This stage interacts with the Snyk CLI, and uses the token stored in Parameter Store. The Snyk CLI uses this token as authentication and starts scanning the latest code committed to the repository. When the scan is complete, you can review the results on the Snyk console.

This code is built for Python pip packages. You can edit the buildspec.yml to incorporate for any other language that Snyk supports.

The following diagram illustrates our architecture.

snyk architecture codepipeline

Code overview

The code in this post is written using the AWS CDK in Python. If you’re not familiar with the AWS CDK, we recommend reading Getting started with AWS CDK before you customize and deploy the code.

Repository URL: https://github.com/aws-samples/aws-cdk-codecommit-snyk

This AWS CDK construct uses the Snyk CLI within the CodeBuild job in the pipeline to scan the Python packages for open-source package vulnerabilities. The construct uses CodePipeline to create a two-stage pipeline: one source, and one build (the Snyk scan stage). The construct takes the input of the CodeCommit repository you want to scan, the Snyk organization ID, and Snyk auth token.

Resources deployed

This solution deploys the following resources:

For the deployment, we use the AWS CDK construct in the codebase cdk_snyk_construct/cdk_snyk_construct_stack.py in the AWS CDK stack cdk-snyk-stack. The construct requires the following parameters:

  • ARN of the CodeCommit repo you want to scan
  • Name of the repository branch you want to be monitored
  • Parameter Store name of the Snyk organization ID
  • Parameter Store name for the Snyk auth token

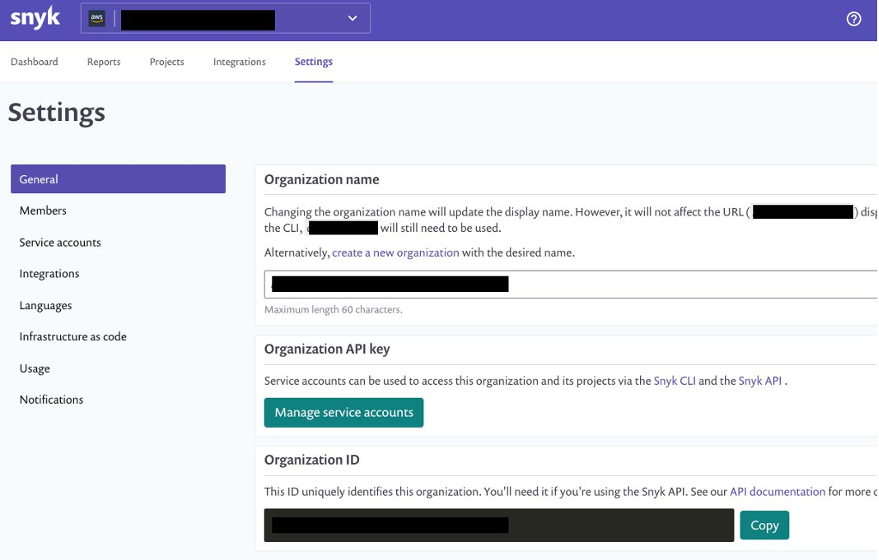
Set up the organization ID and auth token before deploying the stack. Because these are confidential and sensitive data, you should deploy them as a separate stack or manual process. In this solution, the parameters have been stored as a SecureString parameter type and encrypted using the AWS-managed KMS key.

You create the organization ID and auth token on the Snyk console. On the Settings page, choose General in the navigation page to add these parameters.

snyk settings console


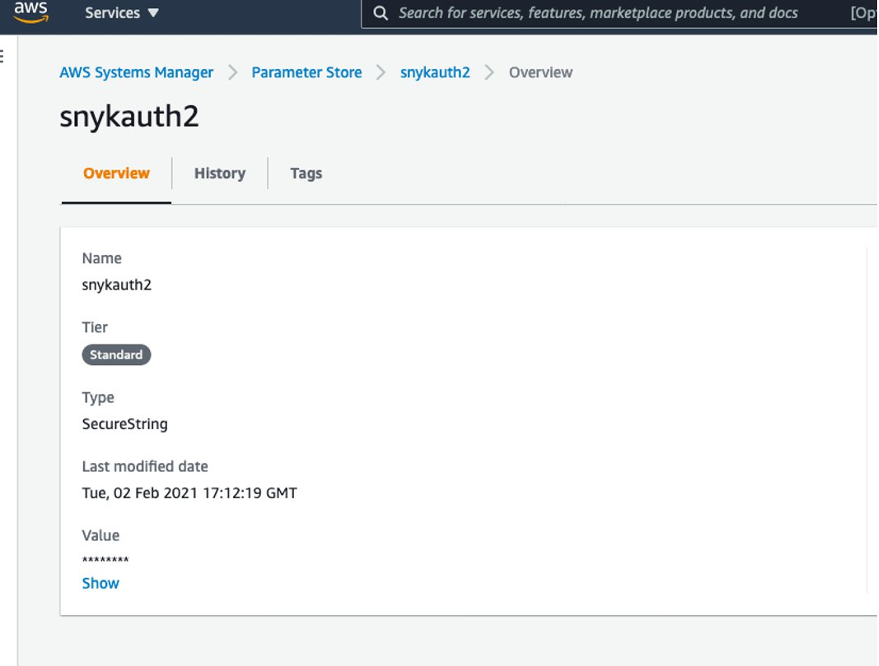
You can retrieve the names of the parameters on the Systems Manager console by navigating to Parameter Store and finding the name on the Overview tab.

SSM Parameter Store

Create a requirements.txt file in the CodeCommit repository

We now create a repository in CodeCommit to store the code. For simplicity, we primarily store the requirements.txt file in our repository. In Python, a requirements file stores the packages that are used. Having clearly defined packages and versions makes it easier for development, especially in virtual environments.

For more information on the requirements file in Python, see Requirement Specifiers.

To create a CodeCommit repository, run the following AWS Command Line Interface (AWS CLI) command in your AWS accounts:

aws codecommit create-repository --repository-name snyk-repo \
--repository-description "Repository for Snyk to scan Python packages"

Now let’s create a branch called main in the repository using the following command:

aws codecommit create-branch --repository-name snyk-repo \
--branch-name main

After you create the repository, commit a file named requirements.txt with the following content. The following packages are pinned to a particular version that they have a vulnerability with. This file is our hypothetical vulnerable set of packages that have been committed into your development code.

PyYAML==5.3.1
Pillow==7.1.2
pylint==2.5.3
urllib3==1.25.8


For instructions on committing files in CodeCommit, see Connect to an AWS CodeCommit repository.

When you store the Snyk auth token and organization ID in Parameter Store, note the parameter names—you need to pass them as parameters during the deployment step.

Now clone the CDK code from the GitHub repository with the command below:

git clone https://github.com/aws-samples/aws-cdk-codecommit-snyk.git

After the cloning is complete you should see a directory named aws-cdk-codecommit-snyk on your machine.

When you’re ready to deploy, enter the aws-cdk-codecommit-snyk directory, and run the following command with the appropriate values:

cdk deploy cdk-snyk-stack \
--parameters RepoName=<name-of-codecommit-repo> \
--parameters RepoBranch=<branch-to-be-scanned>  \
--parameters SnykOrgId=<value> \
--parameters SnykAuthToken=<value>

After the stack deployment is complete, you can see a new pipeline in your AWS account, which is configured to be triggered every time a commit occurs on the main branch.

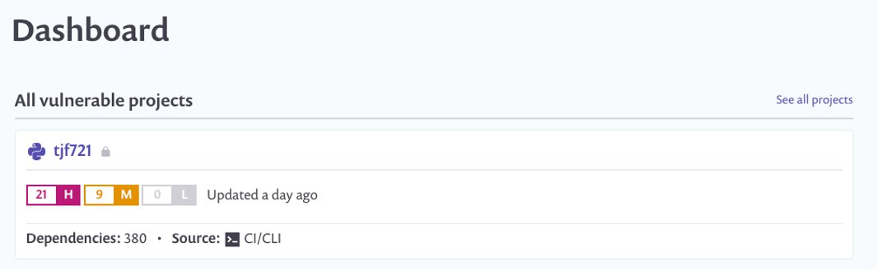
You can view the results of the scan on the Snyk console. After the pipeline runs, log in to snyk.io and you should see a project named as per your repository (see the following screenshot).

snyk dashboard


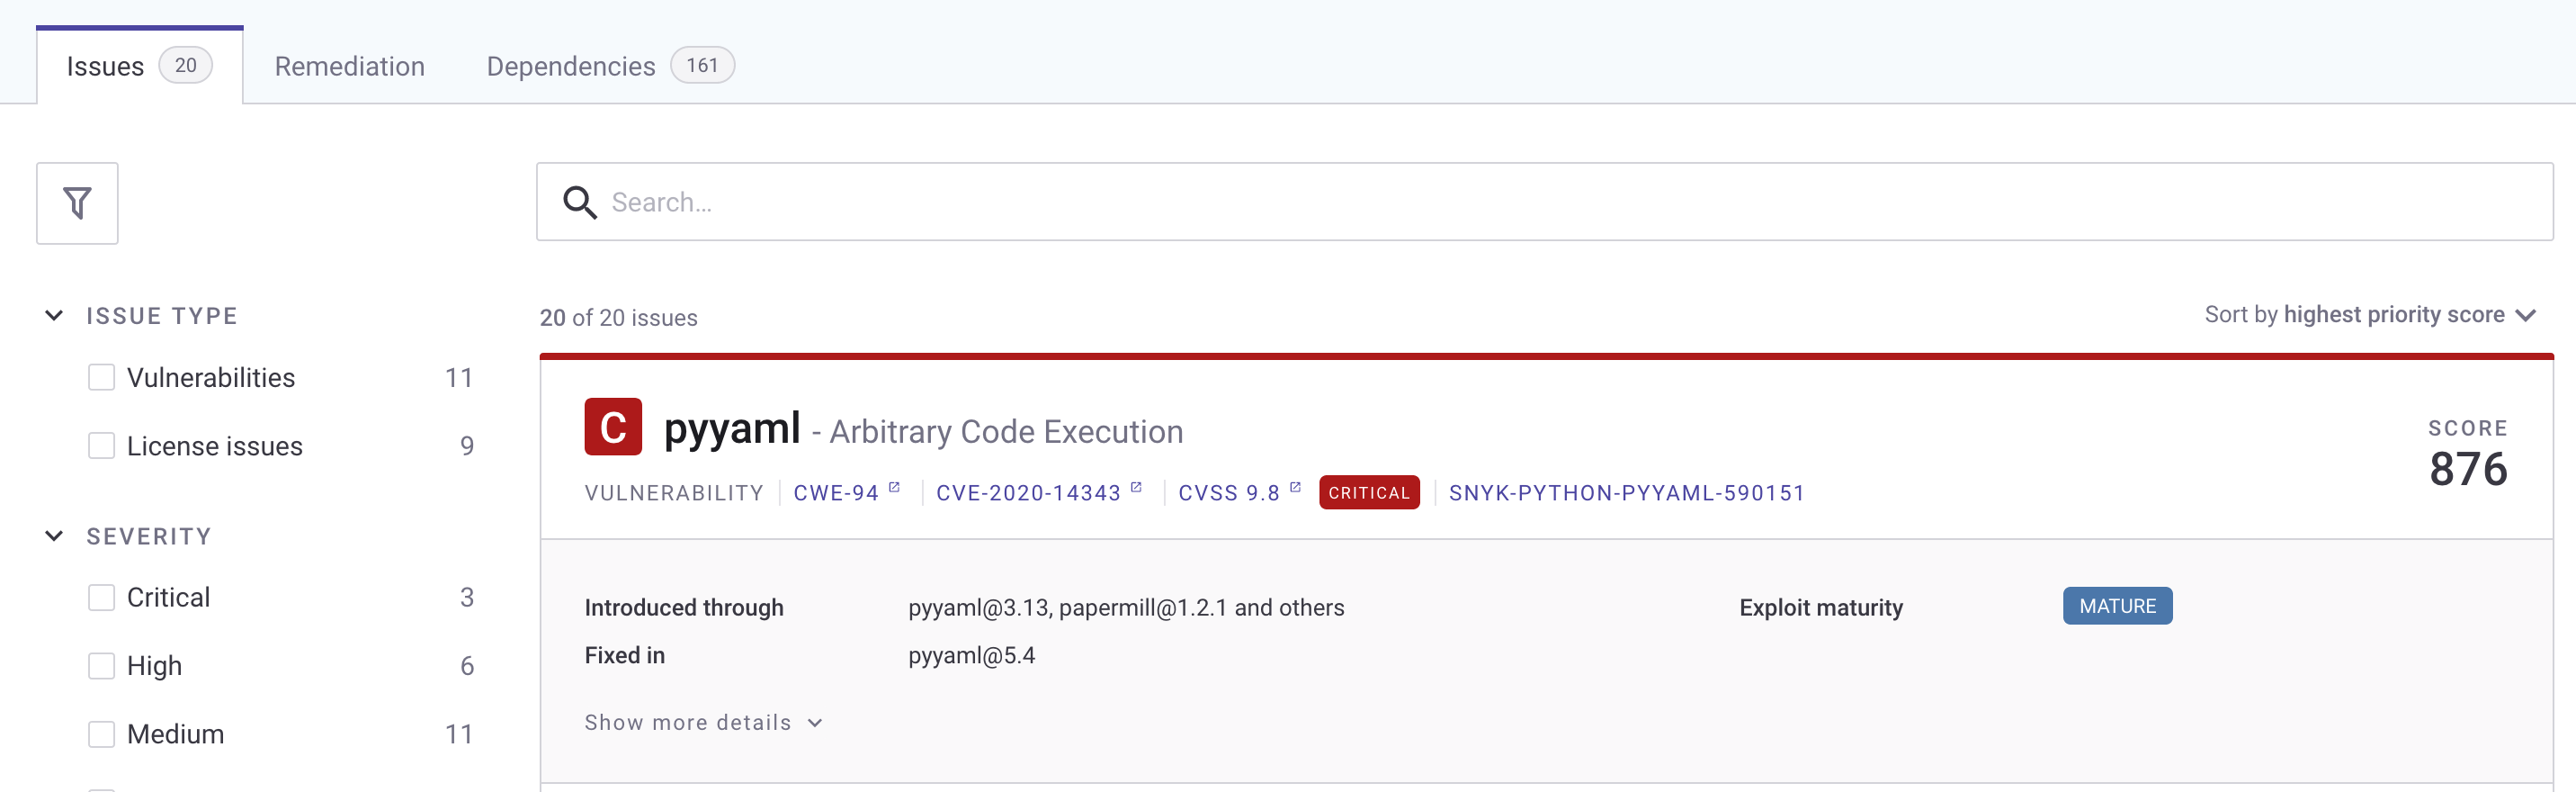
Choose the repo name to get a detailed view of the vulnerabilities found. Depending on what packages you put in your requirements.txt, your report will differ from the following screenshot.

snyk-vuln-details


To fix the vulnerability identified, you can change the version of these packages in the requirements.txt file. The edited requirements file should look like the following:

PyYAML==5.4
Pillow==8.2.0
pylint==2.6.1
urllib3==1.25.9

After you update the requirements.txt file in your repository, push your changes back to the CodeCommit repository you created earlier on the main branch. The push starts the pipeline again.

After the commit is performed to the targeted branch, you don’t see the vulnerability reported on the Snyk dashboard because the pinned version 5.4 doesn’t contain that vulnerability.

Clean up

To avoid accruing further cost for the resources deployed in this solution, run cdk destroy to remove all the AWS resources you deployed through CDK.

As the CodeCommit repository was created using AWS CLI, the following command deletes the CodeCommit repository:

aws codecommit delete-repository --repository-name snyk-repo

Conclusion

In this post, we provided a solution so developers can self- remediate vulnerabilities in their code by monitoring it through Snyk. This solution provides observability, agility, and security for your Python application by following DevOps principles.

A similar architecture has been used at NFL to shift-left the security of their code. According to the shift-left design principle, security should be moved closer to the developers to identify and remediate security issues earlier in the development cycle. NFL has implemented a similar architecture which made the total process, from committing code on the branch to remediating 15 times faster than their previous code scanning setup.

Here’s what NFL has to say about their experience:

“NFL used Snyk to scan Python packages for a service launch. Traditionally it would have taken 10days to scan the packages through our existing process but with Snyk we were able to follow DevSecOps principles and get the scans completed, and reviewed within matter of days. This simplified our time to market while maintaining visibility into our security posture.” – Joe Steinke (Director, Data Solution Architect)

Hosting Hugging Face models on AWS Lambda for serverless inference

Post Syndicated from Chris Munns original https://aws.amazon.com/blogs/compute/hosting-hugging-face-models-on-aws-lambda/

This post written by Eddie Pick, AWS Senior Solutions Architect – Startups and Scott Perry, AWS Senior Specialist Solutions Architect – AI/ML

Hugging Face Transformers is a popular open-source project that provides pre-trained, natural language processing (NLP) models for a wide variety of use cases. Customers with minimal machine learning experience can use pre-trained models to enhance their applications quickly using NLP. This includes tasks such as text classification, language translation, summarization, and question answering – to name a few.

First introduced in 2017, the Transformer is a modern neural network architecture that has quickly become the most popular type of machine learning model applied to NLP tasks. It outperforms previous techniques based on convolutional neural networks (CNNs) or recurrent neural networks (RNNs). The Transformer also offers significant improvements in computational efficiency. Notably, Transformers are more conducive to parallel computation. This means that Transformer-based models can be trained more quickly, and on larger datasets than their predecessors.

The computational efficiency of Transformers provides the opportunity to experiment and improve on the original architecture. Over the past few years, the industry has seen the introduction of larger and more powerful Transformer models. For example, BERT was first published in 2018 and was able to get better benchmark scores on 11 natural language processing tasks using between 110M-340M neural network parameters. In 2019, the T5 model using 11B parameters achieved better results on benchmarks such as summarization, question answering, and text classification. More recently, the GPT-3 model was introduced in 2020 with 175B parameters and in 2021 the Switch Transformers are scaling to over 1T parameters.

One consequence of this trend toward larger and more powerful models is an increased barrier to entry. As the number of model parameters increases, as does the computational infrastructure that is necessary to train such a model. This is where the open-source Hugging Face Transformers project helps.

Hugging Face Transformers provides over 30 pretrained Transformer-based models available via a straightforward Python package. Additionally, there are over 10,000 community-developed models available for download from Hugging Face. This allows users to use modern Transformer models within their applications without requiring model training from scratch.

The Hugging Face Transformers project directly addresses challenges associated with training modern Transformer-based models. Many customers want a zero administration ML inference solution that allows Hugging Face Transformers models to be hosted in AWS easily. This post introduces a low touch, cost effective, and scalable mechanism for hosting Hugging Face models for real-time inference using AWS Lambda.

Overview

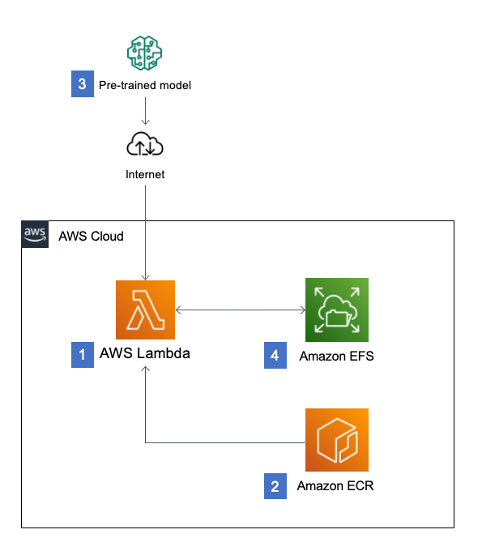
Our solution consists of an AWS Cloud Development Kit (AWS CDK) script that automatically provisions container image-based Lambda functions that perform ML inference using pre-trained Hugging Face models. This solution also includes Amazon Elastic File System (EFS) storage that is attached to the Lambda functions to cache the pre-trained models and reduce inference latency.Solution architecture

In this architectural diagram:

  1. Serverless inference is achieved by using Lambda functions that are based on container image
  2. The container image is stored in an Amazon Elastic Container Registry (ECR) repository within your account
  3. Pre-trained models are automatically downloaded from Hugging Face the first time the function is invoked
  4. Pre-trained models are cached within Amazon Elastic File System storage in order to improve inference latency

The solution includes Python scripts for two common NLP use cases:

  • Sentiment analysis: Identifying if a sentence indicates positive or negative sentiment. It uses a fine-tuned model on sst2, which is a GLUE task.
  • Summarization: Summarizing a body of text into a shorter, representative text. It uses a Bart model that was fine-tuned on the CNN / Daily Mail dataset.

For simplicity, both of these use cases are implemented using Hugging Face pipelines.

Prerequisites

The following is required to run this example:

Deploying the example application

  1. Clone the project to your development environment:
    git clone https://github.com/aws-samples/zero-administration-inference-with-aws-lambda-for-hugging-face.git
  2. Install the required dependencies:
    pip install -r requirements.txt
  3. Bootstrap the CDK. This command provisions the initial resources needed by the CDK to perform deployments:
    cdk bootstrap
  4. This command deploys the CDK application to its environment. During the deployment, the toolkit outputs progress indications:
    $ cdk deploy

Testing the application

After deployment, navigate to the AWS Management Console to find and test the Lambda functions. There is one for sentiment analysis and one for summarization.

To test:

  1. Enter “Lambda” in the search bar of the AWS Management Console:Console Search
  2. Filter the functions by entering “ServerlessHuggingFace”:Filtering functions
  3. Select the ServerlessHuggingFaceStack-sentimentXXXXX function:Select function
  4. In the Test event, enter the following snippet and then choose Test:Test function
{
   "text": "I'm so happy I could cry!"
}

The first invocation takes approximately one minute to complete. The initial Lambda function environment must be allocated and the pre-trained model must be downloaded from Hugging Face. Subsequent invocations are faster, as the Lambda function is already prepared and the pre-trained model is cached in EFS.Function test results

The JSON response shows the result of the sentiment analysis:

{
  "statusCode": 200,
  "body": {
    "label": "POSITIVE",
    "score": 0.9997532367706299
  }
}

Understanding the code structure

The code is organized using the following structure:

├── inference
│ ├── Dockerfile
│ ├── sentiment.py
│ └── summarization.py
├── app.py
└── ...

The inference directory contains:

  • The Dockerfile used to build a custom image to be able to run PyTorch Hugging Face inference using Lambda functions
  • The Python scripts that perform the actual ML inference

The sentiment.py script shows how to use a Hugging Face Transformers model:

import json
from transformers import pipeline

nlp = pipeline("sentiment-analysis")

def handler(event, context):
    response = {
        "statusCode": 200,
        "body": nlp(event['text'])[0]
    }
    return response

For each Python script in the inference directory, the CDK generates a Lambda function backed by a container image and a Python inference script.

CDK script

The CDK script is named app.py in the solution’s repository. The beginning of the script creates a virtual private cloud (VPC).

vpc = ec2.Vpc(self, 'Vpc', max_azs=2)

Next, it creates the EFS file system and an access point in EFS for the cached models:

        fs = efs.FileSystem(self, 'FileSystem',
                            vpc=vpc,
                            removal_policy=cdk.RemovalPolicy.DESTROY)
        access_point = fs.add_access_point('MLAccessPoint',
                                           create_acl=efs.Acl(
                                               owner_gid='1001', owner_uid='1001', permissions='750'),
                                           path="/export/models",
                                           posix_user=efs.PosixUser(gid="1001", uid="1001"))>

It iterates through the Python files in the inference directory:

docker_folder = os.path.dirname(os.path.realpath(__file__)) + "/inference"
pathlist = Path(docker_folder).rglob('*.py')
for path in pathlist:

And then creates the Lambda function that serves the inference requests:

            base = os.path.basename(path)
            filename = os.path.splitext(base)[0]
            # Lambda Function from docker image
            function = lambda_.DockerImageFunction(
                self, filename,
                code=lambda_.DockerImageCode.from_image_asset(docker_folder,
                                                              cmd=[
                                                                  filename+".handler"]
                                                              ),
                memory_size=8096,
                timeout=cdk.Duration.seconds(600),
                vpc=vpc,
                filesystem=lambda_.FileSystem.from_efs_access_point(
                    access_point, '/mnt/hf_models_cache'),
                environment={
                    "TRANSFORMERS_CACHE": "/mnt/hf_models_cache"},
            )

Adding a translator

Optionally, you can add more models by adding Python scripts in the inference directory. For example, add the following code in a file called translate-en2fr.py:

import json
from transformers 
import pipeline

en_fr_translator = pipeline('translation_en_to_fr')

def handler(event, context):
    response = {
        "statusCode": 200,
        "body": en_fr_translator(event['text'])[0]
    }
    return response

Then run:

$ cdk synth
$ cdk deploy

This creates a new endpoint to perform English to French translation.

Cleaning up

After you are finished experimenting with this project, run “cdk destroy” to remove all of the associated infrastructure.

Conclusion

This post shows how to perform ML inference for pre-trained Hugging Face models by using Lambda functions. To avoid repeatedly downloading the pre-trained models, this solution uses an EFS-based approach to model caching. This helps to achieve low-latency, near real-time inference. The solution is provided as infrastructure as code using Python and the AWS CDK.

We hope this blog post allows you to prototype quickly and include modern NLP techniques in your own products.

Continuous Compliance Workflow for Infrastructure as Code: Part 2

Post Syndicated from DAMODAR SHENVI WAGLE original https://aws.amazon.com/blogs/devops/continuous-compliance-workflow-for-infrastructure-as-code-part-2/

In the first post of this series, we introduced a continuous compliance workflow in which an enterprise security and compliance team can release guardrails in a continuous integration, continuous deployment (CI/CD) fashion in your organization.

In this post, we focus on the technical implementation of the continuous compliance workflow. We demonstrate how to use AWS Developer Tools to create a CI/CD pipeline that releases guardrails for Terraform application workloads.

We use the Terraform-Compliance framework to define the guardrails. Terraform-Compliance is a lightweight, security and compliance-focused test framework for Terraform to enable the negative testing capability for your infrastructure as code (IaC).

With this compliance framework, we can ensure that the implemented Terraform code follows security standards and your own custom standards. Currently, HashiCorp provides Sentinel (a policy as code framework) for enterprise products. AWS has CloudFormation Guard an open-source policy-as-code evaluation tool for AWS CloudFormation templates. Terraform-Compliance allows us to build a similar functionality for Terraform, and is open source.

This post is from the perspective of a security and compliance engineer, and assumes that the engineer is familiar with the practices of IaC, CI/CD, behavior-driven development (BDD), and negative testing.

Solution overview

You start by building the necessary resources as listed in the workload (application development team) account:

  • An AWS CodeCommit repository for the Terraform workload
  • A CI/CD pipeline built using AWS CodePipeline to deploy the workload
  • A cross-account AWS Identity and Access Management (IAM) role that gives the security and compliance account the permissions to pull the Terraform workload from the workload account repository for testing their guardrails in observation mode

Next, we build the resources in the security and compliance account:

  • A CodeCommit repository to hold the security and compliance standards (guardrails)
  • A CI/CD pipeline built using CodePipeline to release new guardrails
  • A cross-account role that gives the workload account the permissions to pull the activated guardrails from the main branch of the security and compliance account repository.

The following diagram shows our solution architecture.

solution architecture diagram

The architecture has two workflows: security and compliance (Steps 1–4) and application delivery (Steps 5–7).

  1. When a new security and compliance guardrail is introduced into the develop branch of the compliance repository, it triggers the security and compliance pipeline.
  2. The pipeline pulls the Terraform workload.
  3. The pipeline tests this compliance check guardrail against the Terraform workload in the workload account repository.
  4. If the workload is compliant, the guardrail is automatically merged into the main branch. This activates the guardrail by making it available for all Terraform application workload pipelines to consume. By doing this, we make sure that we don’t break the Terraform application deployment pipeline by introducing new guardrails. It also provides the security and compliance team visibility into the resources in the application workload that are noncompliant. The security and compliance team can then reach out to the application delivery team and suggest appropriate remediation before the new standards are activated. If the compliance check fails, the automatic merge to the main branch is stopped. The security and compliance team has an option to force merge the guardrail into the main branch if it’s deemed critical and they need to activate it immediately.
  5. The Terraform deployment pipeline in the workload account always pulls the latest security and compliance checks from the main branch of the compliance repository.
  6. Checks are run against the Terraform workload to ensure that it meets the organization’s security and compliance standards.
  7. Only secure and compliant workloads are deployed by the pipeline. If the workload is noncompliant, the security and compliance checks fail and break the pipeline, forcing the application delivery team to remediate the issue and recheck-in the code.

Prerequisites

Before proceeding any further, you need to identify and designate two AWS accounts required for the solution to work:

  • Security and Compliance – In which you create a CodeCommit repository to hold compliance standards that are written based on Terraform-Compliance framework. You also create a CI/CD pipeline to release new compliance guardrails.
  • Workload – In which the Terraform workload resides. The pipeline to deploy the Terraform workload enforces the compliance guardrails prior to the deployment.

You also need to create two AWS account profiles in ~/.aws/credentials for the tools and target accounts, if you don’t already have them. These profiles need to have sufficient permissions to run an AWS Cloud Development Kit (AWS CDK) stack. They should be your private profiles and only be used during the course of this use case. Therefore, it should be fine if you want to use admin privileges. Don’t share the profile details, especially if it has admin privileges. I recommend removing the profile when you’re finished with this walkthrough. For more information about creating an AWS account profile, see Configuring the AWS CLI.

In addition, you need to generate a cucumber-sandwich.jar file by following the steps in the cucumber-sandwich GitHub repo. The JAR file is needed to generate pretty HTML compliance reports. The security and compliance team can use these reports to make sure that the standards are met.

To implement our solution, we complete the following high-level steps:

  1. Create the security and compliance account stack.
  2. Create the workload account stack.
  3. Test the compliance workflow.

Create the security and compliance account stack

We create the following resources in the security and compliance account:

  • A CodeCommit repo to hold the security and compliance guardrails
  • A CI/CD pipeline to roll out the Terraform compliance guardrails
  • An IAM role that trusts the application workload account and allows it to pull compliance guardrails from its CodeCommit repo

In this section, we set up the properties for the pipeline and cross-account role stacks, and run the deployment scripts.

Set up properties for the pipeline stack

Clone the GitHub repo aws-continuous-compliance-for-terraform and navigate to the folder security-and-compliance-account/stacks. This contains the folder pipeline_stack/, which holds the code and properties for creating the pipeline stack.

The folder has a JSON file cdk-stack-param.json, which has the parameter TERRAFORM_APPLICATION_WORKLOADS, which represents the list of application workloads that the security and compliance pipeline pulls and runs tests against to make sure that the workloads are compliant. In the workload list, you have the following parameters:

  • GIT_REPO_URL – The HTTPS URL of the CodeCommit repository in the workload account against which the security and compliance check pipeline runs compliance guardrails.
  • CROSS_ACCOUNT_ROLE_ARN – The ARN for the cross-account role we create in the next section. This role gives the security and compliance account permissions to pull Terraform code from the workload account.

For CROSS_ACCOUNT_ROLE_ARN, replace <workload-account-id> with the account ID for your designated AWS workload account. For GIT_REPO_URL, replace <region> with AWS Region where the repository resides.

security and compliance pipeline stack parameters

Set up properties for the cross-account role stack

In the cloned GitHub repo aws-continuous-compliance-for-terraform from the previous step, navigate to the folder security-and-compliance-account/stacks. This contains the folder cross_account_role_stack/, which holds the code and properties for creating the cross-account role.

The folder has a JSON file cdk-stack-param.json, which has the parameter TERRAFORM_APPLICATION_WORKLOAD_ACCOUNTS, which represents the list of Terraform workload accounts that intend to integrate with the security and compliance account for running compliance checks. All these accounts are trusted by the security and compliance account and given permissions to pull compliance guardrails. Replace <workload-account-id> with the account ID for your designated AWS workload account.

security and compliance cross account role stack parameters

Run the deployment script

Run deploy.sh by passing the name of the AWS security and compliance account profile you created earlier. The script uses the AWS CDK CLI to bootstrap and deploy the two stacks we discussed. See the following code:

cd aws-continuous-compliance-for-terraform/security-and-compliance-account/
./deploy.sh "<AWS-COMPLIANCE-ACCOUNT-PROFILE-NAME>"

You should now see three stacks in the tools account:

  • CDKToolkit – AWS CDK creates the CDKToolkit stack when we bootstrap the AWS CDK app. This creates an Amazon Simple Storage Service (Amazon S3) bucket needed to hold deployment assets such as an AWS CloudFormation template and AWS Lambda code package.
  • cf-CrossAccountRoles – This stack creates the cross-account IAM role.
  • cf-SecurityAndCompliancePipeline – This stack creates the pipeline. On the Outputs tab of the stack, you can find the CodeCommit source repo URL from the key OutSourceRepoHttpUrl. Record the URL to use later.

security and compliance stack

Create a workload account stack

We create the following resources in the workload account:

  • A CodeCommit repo to hold the Terraform workload to be deployed
  • A CI/CD pipeline to deploy the Terraform workload
  • An IAM role that trusts the security and compliance account and allows it to pull Terraform code from its CodeCommit repo for testing

We follow similar steps as in the previous section to set up the properties for the pipeline stack and cross-account role stack, and then run the deployment script.

Set up properties for the pipeline stack

In the already cloned repo, navigate to the folder workload-account/stacks. This contains the folder pipeline_stack/, which holds the code and properties for creating the pipeline stack.

The folder has a JSON file cdk-stack-param.json, which has the parameter COMPLIANCE_CODE, which provides details on where to pull the compliance guardrails from. The pipeline pulls and runs compliance checks prior to deployment, to make sure that application workload is compliant. You have the following parameters:

  • GIT_REPO_URL – The HTTPS URL of the CodeCommit repositoryCode in the security and compliance account, which contains compliance guardrails that the pipeline in the workload account pulls to carry out compliance checks.
  • CROSS_ACCOUNT_ROLE_ARN – The ARN for the cross-account role we created in the previous step in the security and compliance account. This role gives the workload account permissions to pull the Terraform compliance code from its respective security and compliance account.

For CROSS_ACCOUNT_ROLE_ARN, replace <compliance-account-id> with the account ID for your designated AWS security and compliance account. For GIT_REPO_URL, replace <region> with Region where the repository resides.

workload pipeline stack config

Set up the properties for cross-account role stack

In the already cloned repo, navigate to folder workload-account/stacks. This contains the folder cross_account_role_stack/, which holds the code and properties for creating the cross-account role stack.

The folder has a JSON file cdk-stack-param.json, which has the parameter COMPLIANCE_ACCOUNT, which represents the security and compliance account that intends to integrate with the workload account for running compliance checks. This account is trusted by the workload account and given permissions to pull compliance guardrails. Replace <compliance-account-id> with the account ID for your designated AWS security and compliance account.

workload cross account role stack config

Run the deployment script

Run deploy.sh by passing the name of the AWS workload account profile you created earlier. The script uses the AWS CDK CLI to bootstrap and deploy the two stacks we discussed. See the following code:

cd aws-continuous-compliance-for-terraform/workload-account/
./deploy.sh "<AWS-WORKLOAD-ACCOUNT-PROFILE-NAME>"

You should now see three stacks in the tools account:

  • CDKToolkit –AWS CDK creates the CDKToolkit stack when we bootstrap the AWS CDK app. This creates an S3 bucket needed to hold deployment assets such as a CloudFormation template and Lambda code package.
  • cf-CrossAccountRoles – This stack creates the cross-account IAM role.
  • cf-TerraformWorkloadPipeline – This stack creates the pipeline. On the Outputs tab of the stack, you can find the CodeCommit source repo URL from the key OutSourceRepoHttpUrl. Record the URL to use later.

workload pipeline stack

Test the compliance workflow

In this section, we walk through the following steps to test our workflow:

  1. Push the application workload code into its repo.
  2. Push the security and compliance code into its repo and run its pipeline to release the compliance guardrails.
  3. Run the application workload pipeline to exercise the compliance guardrails.
  4. Review the generated reports.

Push the application workload code into its repo

Clone the empty CodeCommit repo from workload account. You can find the URL from the variable OutSourceRepoHttpUrl on the Outputs tab of the cf-TerraformWorkloadPipeline stack we deployed in the previous section.

  1. Create a new branch main and copy the workload code into it.
  2. Copy the cucumber-sandwich.jar file you generated in the prerequisites section into a new folder /lib.
  3. Create a directory called reports with an empty file dummy. The reports directory is where Terraform-Compliance framework create compliance reports.
  4. Push the code to the remote origin.

See the following sample script

git checkout -b main
# Copy the code from git repo location
# Create reports directory and a dummy file.
mkdir reports
touch reports/dummy
git add .
git commit -m “Initial commit”
git push origin main

The folder structure of workload code repo should match the structure shown in the following screenshot.

workload code folder structure

The first commit triggers the pipeline-workload-main pipeline, which fails in the stage RunComplianceCheck due to the security and compliance repo not being present (which we add in the next section).

Push the security and compliance code into its repo and run its pipeline

Clone the empty CodeCommit repo from the security and compliance account. You can find the URL from the variable OutSourceRepoHttpUrl on the Outputs tab of the cf-SecurityAndCompliancePipeline stack we deployed in the previous section.

  1. Create a new local branch main and check in the empty branch into the remote origin so that the main branch is created in the remote origin. Skipping this step leads to failure in the code merge step of the pipeline due to the absence of the main branch.
  2. Create a new branch develop and copy the security and compliance code into it. This is required because the security and compliance pipeline is configured to be triggered from the develop branch for the purposes of this post.
  3. Copy the cucumber-sandwich.jar file you generated in the prerequisites section into a new folder /lib.

See the following sample script:

cd security-and-compliance-code
git checkout -b main
git add .
git commit --allow-empty -m “initial commit”
git push origin main
git checkout -b develop main
# Here copy the code from git repo location
# You also copy cucumber-sandwich.jar into a new folder /lib
git add .
git commit -m “Initial commit”
git push origin develop

The folder structure of security and compliance code repo should match the structure shown in the following screenshot.

security and compliance code folder structure

The code push to the develop branch of the security-and-compliance-code repo triggers the security and compliance pipeline. The pipeline pulls the code from the workload account repo, then runs the compliance guardrails against the Terraform workload to make sure that the workload is compliant. If the workload is compliant, the pipeline merges the compliance guardrails into the main branch. If the workload fails the compliance test, the pipeline fails. The following screenshot shows a sample run of the pipeline.

security and compliance pipeline

Run the application workload pipeline to exercise the compliance guardrails

After we set up the security and compliance repo and the pipeline runs successfully, the workload pipeline is ready to proceed (see the following screenshot of its progress).

workload pipeline

The service delivery teams are now being subjected to the security and compliance guardrails being implemented (RunComplianceCheck stage), and their pipeline breaks if any resource is noncompliant.

Review the generated reports

CodeBuild supports viewing reports generated in cucumber JSON format. In our workflow, we generate reports in cucumber JSON and BDD XML formats, and we use this capability of CodeBuild to generate and view HTML reports. Our implementation also generates report directly in HTML using the cucumber-sandwich library.

The following screenshot is snippet of the script compliance-check.sh, which implements report generation.

compliance check script

The bug noted in the screenshot is in the radish-bdd library that Terraform-Compliance uses for the cucumber JSON format report generation. For more information, you can review the defect logged against radish-bdd for this issue.

After the script generates the reports, CodeBuild needs to be configured to access them to generate HTML reports. The following screenshot shows a snippet from buildspec-compliance-check.yml, which shows how the reports section is set up for report generation:

buildspec compliance check

For more details on how to set up buildspec file for CodeBuild to generate reports, see Create a test report.

CodeBuild displays the compliance run reports as shown in the following screenshot.

code build cucumber report

We can also view a trending graph for multiple runs.

code build cucumber report

The other report generated by the workflow is the pretty HTML report generated by the cucumber-sandwich library.

code build cucumber report

The reports are available for download from the S3 bucket <OutPipelineBucketName>/pipeline-security-an/report_App/<zip file>.

The cucumber-sandwich generated report marks scenarios with skipped tests as failed scenarios. This is the only noticeable difference between the CodeBuild generated HTML and cucumber-sandwich generated HTML reports.

Clean up

To remove all the resources from the workload account, complete the following steps in order:

  1. Go to the folder where you cloned the workload code and edit buildspec-workload-deploy.yml:
    • Comment line 44 (- ./workload-deploy.sh).
    • Uncomment line 45 (- ./workload-deploy.sh --destroy).
    • Commit and push the code change to the remote repo. The workload pipeline is triggered, which cleans up the workload.
  2. Delete the CloudFormation stack cf-CrossAccountRoles. This step removes the cross-account role from the workload account, which gives permission to the security and compliance account to pull the Terraform workload.
  3. Go to the CloudFormation stack cf-TerraformWorkloadPipeline and note the OutPipelineBucketName and OutStateFileBucketName on the Outputs tab. Empty the two buckets and then delete the stack. This removes pipeline resources from workload account.
  4. Go to the CDKToolkit stack and note the BucketName on the Outputs tab. Empty that bucket and then delete the stack.

To remove all the resources from the security and compliance account, complete the following steps in order:

  1. Delete the CloudFormation stack cf-CrossAccountRoles. This step removes the cross-account role from the security and compliance account, which gives permission to the workload account to pull the compliance code.
  2. Go to CloudFormation stack cf-SecurityAndCompliancePipeline and note the OutPipelineBucketName on the Outputs tab. Empty that bucket and then delete the stack. This removes pipeline resources from the security and compliance account.
  3. Go to the CDKToolkit stack and note the BucketName on the Outputs tab. Empty that bucket and then delete the stack.

Security considerations

Cross-account IAM roles are very powerful and need to be handled carefully. For this post, we strictly limited the cross-account IAM role to specific CodeCommit permissions. This makes sure that the cross-account role can only do those things.

Conclusion

In this post in our two-part series, we implemented a continuous compliance workflow using CodePipeline and the open-source Terraform-Compliance framework. The Terraform-Compliance framework allows you to build guardrails for securing Terraform applications deployed on AWS.

We also showed how you can use AWS developer tools to seamlessly integrate security and compliance guardrails into an application release cycle and catch noncompliant AWS resources before getting deployed into AWS.

Try implementing the solution in your enterprise as shown in this post, and leave your thoughts and questions in the comments.

About the authors

sumit mishra


Sumit Mishra is Senior DevOps Architect at AWS Professional Services. His area of expertise include IaC, Security in pipeline, CI/CD and automation.


Damodar Shenvi Wagle


Damodar Shenvi Wagle is a Cloud Application Architect at AWS Professional Services. His areas of expertise include architecting serverless solutions, CI/CD and automation.

Keeping up with your dependencies: building a feedback loop for shared libraries

Post Syndicated from Joerg Woehrle original https://aws.amazon.com/blogs/devops/keeping-up-with-your-dependencies-building-a-feedback-loop-for-shared-libraries/

In a microservices world, it’s common to share as little as possible between services. This enables teams to work independently of each other, helps to reduce wait times and decreases coupling between services.

However, it’s also a common scenario that libraries for cross-cutting-concerns (such as security or logging) are developed one time and offered to other teams for consumption. Although it’s vital to offer an opt-out of those libraries (namely, use your own code to address the cross-cutting-concern, such as when there is no version for a given language), shared libraries also provide the benefit of better governance and time savings.

To avoid these pitfalls when sharing artifacts, two points are important:

  • For consumers of shared libraries, it’s important to stay up to date with new releases in order to benefit from security, performance, and feature improvements.
  • For producers of shared libraries, it’s important to get quick feedback in case of an involuntarily added breaking change.

Based on those two factors, we’re looking for the following solution:

  • A frictionless and automated way to update consumer’s code to the latest release version of a given library
  • Immediate feedback to the library producer in case of a breaking change (the new version of the library breaks the build of a downstream system)

In this blog post I develop a solution that takes care of both those problems. I use Amazon EventBridge to be notified on new releases of a library in AWS CodeArtifact. I use an AWS Lambda function along with an AWS Fargate task to automatically create a pull request (PR) with the new release version on AWS CodeCommit. Finally, I use AWS CodeBuild to kick off a build of the PR and notify the library producer via EventBridge and Amazon Simple Notification Service (Amazon SNS) in case of a failure.

Overview of solution

Let’s start with a short introduction on the services I use for this solution:

  1. CodeArtifact – A fully managed artifact repository service that makes it easy for organizations of any size to securely store, publish, and share software packages used in their software development process. CodeArtifact works with commonly used package managers and build tools like Maven, Gradle, npm, yarn, twine, and pip.
  2. CodeBuild – A fully managed continuous integration service that compiles source code, runs tests, and produces software packages that are ready to deploy.
  3. CodeCommit – A fully-managed source control service that hosts secure Git-based repositories.
  4. EventBridge – A serverless event bus that makes it easy to connect applications together using data from your own applications, integrated software as a service (SaaS) applications, and AWS services. EventBridge makes it easy to build event-driven applications because it takes care of event ingestion and delivery, security, authorization, and error handling.
  5. Fargate – A serverless compute engine for containers that works with both Amazon Elastic Container Service (ECS) and Amazon Elastic Kubernetes Service (EKS). Fargate removes the need to provision and manage servers, lets you specify and pay for resources per application, and improves security through application isolation by design.
  6. Lambda – Lets you run code without provisioning or managing servers. You pay only for the compute time you consume.
  7. Amazon SNS – A fully managed messaging service for both application-to-application (A2A) and application-to-person (A2P) communication.

The resulting flow through the system looks like the following diagram.

Architecture Diagram


In my example, I look at two independent teams working in two different AWS accounts. Team A is the provider of the shared library, and Team B is the consumer.

Let’s do a high-level walkthrough of the involved steps and components:

  1. A new library version is released by Team A and pushed to CodeArtifact.
  2. CodeArtifact creates an event when the new version is published.
  3. I send this event to the default event bus in Team B’s AWS account.
  4. An EventBridge rule in Team B’s account triggers a Lambda function for further processing.
  5. The function filters SNAPSHOT releases (in Maven a SNAPSHOT represents an artifact still under development that doesn’t have a final release yet) and runs an Amazon ECS Fargate task for non-SNAPSHOT versions.
  6. The Fargate task checks out the source that uses the shared library, updates the library’s version in the pom.xml, and creates a pull request to integrate the change into the mainline of the code repository.
  7. The pull request creation results in an event being published.
  8. An EventBridge rule triggers the CodeBuild project of the downstream artifact.
  9. The result of the build is published as an event.
  10. If the build fails, this failure is propagated back to the event bus of Team A.
  11. The failure is forwarded to an SNS topic that notifies the subscribers of the failure.

Amazon EventBridge

A central component of the solution is Amazon EventBridge. I use EventBridge to receive and react on events emitted by the various AWS services in the solution (e.g., whenever a new version of an artifact gets uploaded to CodeArtifact, when a PR is created within CodeCommit or when a build fails in CodeBuild). Let’s have a high-level look on some of the central concepts of EventBridge:

  • Event Bus – An event bus is a pipeline that receives events. There is a default event bus in each account which receives events from AWS services. One can send events to an event bus via the PutEvents API.
  • Event – An event indicates a change in e.g., an AWS environment, a SaaS partner service or application or one of your applications.
  • Rule – A rule matches incoming events on an event bus and sends them to targets for processing. To react on a particular event, one creates a rule which matches this event. To learn more about the rule concept check out Rules on the EventBridge documentation.
  • Target – When an event matches the event pattern defined in a rule it is send to a target. There are currently more than 20 target types available in EventBridge. In this blog post I use the targets provided for: an event bus in a different account, a Lambda function, a CodeBuild project and an SNS topic. For a detailed list on available targets see Amazon EventBridge targets.

Solution Details:

In this section I walk through the most important parts of the solution. The complete code can be found on GitHub. For a detailed view on the resources created in each account please refer to the GitHub repository.

I use the AWS Cloud Development Kit (CDK) to create my infrastructure. For some of the resource types I create, no higher-level constructs are available yet (at the time of writing, I used AWS CDK version 1.108.1). This is why I sometimes use low-level AWS CloudFormation constructs or even use the provided escape hatches to use AWS CloudFormation constructs directly.

The code for the shared library producer and consumer is written in Java and uses Apache Maven for dependency management. However, the same concepts apply to e.g., Node.js and npm.

Notify another account of new releases

To send events from EventBridge to another account, the receiving account needs to specify an EventBusPolicy. The AWS CDK code on the consumer account looks like the following code:

new events.CfnEventBusPolicy(this, 'EventBusPolicy', {
    statementId: 'AllowCrossAccount',
    action: 'events:PutEvents',
    principal: consumerAccount
});

With that the producer account has the permission to publish events into the event bus of the consumer account.

I’m interested in CodeArtifact events that are published on the release of a new artifact. I first create a Rule which matches those events. Next, I add a target to the rule which targets the event bus of account B. As of this writing there is no CDK construct available to directly add another account as a target. That is why I use the underlying CloudFormation CfnRule to do that. This is called an escape hatch in CDK. For more information about escape hatches, see Escape hatches.

const onLibraryReleaseRule = new events.Rule(this, 'LibraryReleaseRule', {
  eventPattern: {
    source: [ 'aws.codeartifact' ],
    detailType: [ 'CodeArtifact Package Version State Change' ],
    detail: {
      domainOwner: [ this.account ],
      domainName: [ codeArtifactDomain.domainName ],
      repositoryName: [ codeArtifactRepo.repositoryName ],
      packageVersionState: [ 'Published' ],
      packageFormat: [ 'maven' ]
    }
  }
});
/* there is currently no CDK construct provided to add an event bus in another account as a target. 
That's why we use the underlying CfnRule directly */
const cfnRule = onLibraryReleaseRule.node.defaultChild as events.CfnRule;
cfnRule.targets = [ {arn: `arn:aws:events:${this.region}:${consumerAccount}:event-bus/default`, id: 'ConsumerAccount'} ];

For more information about event formats, see CodeArtifact event format and example.

Act on new releases in the consumer account

I established the connection between the events produced by Account A and Account B: The events now are available in Account B’s event bus. To use them, I add a rule which matches this event in Account B:

const onLibraryReleaseRule = new events.Rule(this, 'LibraryReleaseRule', {
  eventPattern: {
    source: [ 'aws.codeartifact' ],
    detailType: [ 'CodeArtifact Package Version State Change' ],
    detail: {
      domainOwner: [ producerAccount ],
      packageVersionState: [ 'Published' ],
      packageFormat: [ 'maven' ]
    }
  }
});

Add a Lambda function target

Now that I created a rule to trigger anytime a new package version is published, I will now add an EventBridge target which  triggers my runTaskLambda Lambda Function. The below CDK code shows how I add our Lambda function as a target to the onLibraryRelease rule. Notice how I extract information from the event’s payload and pass it into the Lambda function’s invocation event.

onLibraryReleaseRule.addTarget(
    new targets.LambdaFunction( runTaskLambda,{
      event: events.RuleTargetInput.fromObject({
        groupId: events.EventField.fromPath('$.detail.packageNamespace'),
        artifactId: events.EventField.fromPath('$.detail.packageName'),
        version: events.EventField.fromPath('$.detail.packageVersion'),
        repoUrl: codeCommitRepo.repositoryCloneUrlHttp,
        region: this.region
      })
    }));

Filter SNAPSHOT versions

Because I’m not interested in Maven SNAPSHOT versions (such as 1.0.1-SNAPSHOT), I have to find a way to filter those and only act upon non-SNAPSHOT versions. Even though content-based filtering on event patterns is supported by Amazon EventBridge, filtering on suffixes is not supported as of this writing. This is why the Lambda function filters SNAPSHOT versions and only acts upon real, non-SNAPSHOT, releases. For those, I start a custom Amazon ECS Fargate task by using the AWS JavaScript SDK. My function passes some environment overrides to the Fargate task in order to have the required information about the artifact available at runtime.

In the following function code, I pass all required information to create a pull request into the environment of the Fargate task:

const AWS = require('aws-sdk');

const ECS = new AWS.ECS();
exports.handler = async (event) => {
    console.log(`Received event: ${JSON.stringify(event)}`)
    const artifactVersion = event.version;
    const artifactId = event.artifactId;
    if ( artifactVersion.indexOf('SNAPSHOT') > -1 ) {
        console.log(`Skipping SNAPSHOT version ${artifactVersion}`)
    } else {
        console.log(`Triggering task to create pull request for version ${artifactVersion} of artifact ${artifactId}`);
        const params = {
            launchType: 'FARGATE',
            taskDefinition: process.env.TASK_DEFINITION_ARN,
            cluster: process.env.CLUSTER_ARN,
            networkConfiguration: {
                awsvpcConfiguration: {
                    subnets: process.env.TASK_SUBNETS.split(',')
                }
            },
            overrides: {
                containerOverrides: [ {
                    name: process.env.CONTAINER_NAME,
                    environment: [
                        {name: 'REPO_URL', value: process.env.REPO_URL},
                        {name: 'REPO_NAME', value: process.env.REPO_NAME},
                        {name: 'REPO_REGION', value: process.env.REPO_REGION},
                        {name: 'ARTIFACT_VERSION', value: artifactVersion},
                        {name: 'ARTIFACT_ID', value: artifactId}
                    ]
                } ]
            }
        };
        await ECS.runTask(params).promise();
    }
};

Create the pull request

With the environment set, I can use a simple bash script inside the container to create a new Git branch, update the pom.xml with the new dependency version, push the branch to CodeCommit, and use the AWS Command Line Interface (AWS CLI) to create the pull request. The Docker entrypoint looks like the following code:

#!/usr/bin/env bash
set -e

# clone the repository and create a new branch for the change
git clone --depth 1 $REPO_URL repo && cd repo
branch="library_update_$(date +"%Y-%m-%d_%H-%M-%S")"
git checkout -b "$branch"

# replace whatever version is currently used by the new version of the library
sed -i "s/<shared\.library\.version>.*<\/shared\.library\.version>/<shared\.library\.version>${ARTIFACT_VERSION}<\/shared\.library\.version>/g" pom.xml

# stage, commit and push the change
git add pom.xml
git -c "user.name=ECS Pull Request Creator" -c "[email protected]" commit -m "Update version of ${ARTIFACT_ID} to ${ARTIFACT_VERSION}"
git push --set-upstream origin "$branch"

# create pull request
aws codecommit create-pull-request --title "Update version of ${ARTIFACT_ID} to ${ARTIFACT_VERSION}" --targets repositoryName="$REPO_NAME",sourceReference="$branch",destinationReference=main --region "$REPO_REGION"

After a successful run, I can check the CodeCommit UI for the created pull request. The following screenshot shows the changes introduced by one of my pull requests during testing:

Screenshot of the Pull Request in AWS CodeCommit

Now that I have the pull request in place, I want to verify that the dependency update does not break my consumer code. I do this by triggering a CodeBuild project with the help of EventBridge.

Build the pull request

The ingredients I use are the same as with the CodeArtifact event. I create a rule that matches the event emitted by CodeCommit (limiting it to branches that match the prefix used by our Fargate task). Afterwards I add a target to the rule to start the CodeBuild project:

const onPullRequestCreatedRule = new events.Rule(this, 'PullRequestCreatedRule', {
  eventPattern: {
    source: [ 'aws.codecommit' ],
    detailType: [ 'CodeCommit Pull Request State Change' ],
    resources: [ codeCommitRepo.repositoryArn ],
    detail: {
      event: [ 'pullRequestCreated' ],
      sourceReference: [ {
        prefix: 'refs/heads/library_update_'
      } ],
      destinationReference: [ 'refs/heads/main' ]
    }
  }
});
onPullRequestCreatedRule.addTarget( new targets.CodeBuildProject(codeBuild, {
  event: events.RuleTargetInput.fromObject( {
    projectName: codeBuild.projectName,
    sourceVersion: events.EventField.fromPath('$.detail.sourceReference')
  })
}));

This triggers the build whenever a new pull request is created with a branch prefix of refs/head/library_update_.
You can easily add the build results as a comment back to CodeCommit. For more information, see Validating AWS CodeCommit Pull Requests with AWS CodeBuild and AWS Lambda.

My last step is to notify an SNS topic in in case of a failing build. The SNS topic is a resource in Account A. To target a resource in a different account I need to forward the event to this account’s event bus. From there I then target the SNS topic.

First, I forward the failed build event from Account B into the default event bus of Account A:

const onFailedBuildRule = new events.Rule(this, 'BrokenBuildRule', {
  eventPattern: {
    detailType: [ 'CodeBuild Build State Change' ],
    source: [ 'aws.codebuild' ],
    detail: {
      'build-status': [ 'FAILED' ]
    }
  }
});
const producerAccountTarget = new targets.EventBus(events.EventBus.fromEventBusArn(this, 'cross-account-event-bus', `arn:aws:events:${this.region}:${producerAccount}:event-bus/default`))
onFailedBuildRule.addTarget(producerAccountTarget);

Then I target the SNS topic in Account A to be notified of failures:

const onFailedBuildRule = new events.Rule(this, 'BrokenBuildRule', {
  eventPattern: {
    detailType: [ 'CodeBuild Build State Change' ],
    source: [ 'aws.codebuild' ],
    account: [ consumerAccount ],
    detail: {
      'build-status': [ 'FAILED' ]
    }
  }
});
onFailedBuildRule.addTarget(new targets.SnsTopic(notificationTopic));

See it in action

I use the cdk-assume-role-credential-plugin to deploy to both accounts, producer and consumer, with a single CDK command issued to the producer account. To do this I create roles for cross account access from the producer account in the consumer account as described here. I also make sure that the accounts are bootstrapped for CDK as described here. After that I run the following steps:

  1. Deploy the Stacks:
    cd cdk && cdk deploy --context region=<YOUR_REGION> --context producerAccount=<PRODUCER_ACCOUNT_NO> --context consumerAccount==<CONSUMER_ACCOUNT_NO>  --all && cd -
  2. After a successful deployment CDK prints a set of export commands. I set my environment from those Outputs:
    ❯ export CODEARTIFACT_ACCOUNT=<MY_PRODUCER_ACCOUNT>
    ❯ export CODEARTIFACT_DOMAIN=<MY_CODEARTIFACT_DOMAIN>
    ❯ export CODEARTIFACT_REGION=<MY_REGION>
    ❯ export CODECOMMIT_URL=<MY_CODECOMMIT_URL>
  3. Setup Maven to authenticate to CodeArtifact
    export CODEARTIFACT_TOKEN=$(aws codeartifact get-authorization-token --domain $CODEARTIFACT_DOMAIN --domain-owner $CODEARTIFACT_ACCOUNT --query authorizationToken --output text)
  4. Release the first version of the shared library to CodeArtifact:
    cd library_producer/library && mvn --settings ./settings.xml deploy && cd -
  5. From a console which is authenticated/authorized for CodeCommit in the Consumer Account
    1. Setup git to work with CodeCommit
    2. Push the code of the library consumer to CodeCommit:
      cd library_consumer/library && git init && git add . && git commit -m "Add consumer to codecommit" && git remote add codecommit $CODECOMMIT_URL && git push --set-upstream codecommit main && cd -
  6. Release a new version of the shared library:
    cd library_producer/library && sed -i '' 's/<version>1.0.0/<version>1.0.1/' pom.xml && mvn --settings settings.xml deploy && cd -
  7. After 1-3 minutes a Pull Request is created in the CodeCommit repo in the Consumer Account and a build is run to verify this PR:
    Screenshot of AWS CodeBuild running the build
  8. In case of a build failure, you can create a subscription to the SNS topic in Account A to act upon the broken build.

Clean up

In case you followed along with this blog post and want to prevent incurring costs you have to delete the created resources. Run cdk destroy --context region=<YOUR_REGION> --context producerAccount=<PRODUCER_ACCOUNT_NO> --context consumerAccount==<CONSUMER_ACCOUNT_NO> --all to delete the CloudFormation stacks.

Conclusion

In this post, I automated the manual task of updating a shared library dependency version. I used a workflow that not only updates the dependency version, but also notifies the library producer in case the new artifact introduces a regression (for example, an API incompatibility with an older version). By using Amazon EventBridge I’ve created a loosely coupled solution which can be used as a basis for a feedback loop between library creators and consumers.

What next?

To improve the solution, I suggest to look into possibilities of error handling for the Fargate task. What happens if the git operation fails? How do we signal such a failure? You might want to replace the AWS Fargate portion with a Lambda-only solution and use AWS Step Functions for better error handling.

As a next step, I could think of a solution that automates updates for libraries stored in Maven Central. Wouldn’t it be nice to never miss the release of a new Spring Boot version? A Fargate task run on a schedule and the following code should get you going:

curl -sS 'https://search.maven.org/solrsearch/select?q=g:org.springframework.boot%20a:spring-boot-starter&start=0&rows=1&wt=json' | jq -r '.response.docs[ 0 ].latestVersion'

Happy Building!

Author bio

Picture of the author: Joerg Woehrle Joerg is a Solutions Architect at AWS and works with manufacturing customers in Germany. As a former Developer, DevOps Engineer and SRE he enjoys building and automating things.


Build and deploy .NET web applications to ARM-powered AWS Graviton 2 Amazon ECS Clusters using AWS CDK

Post Syndicated from Matt Laver original https://aws.amazon.com/blogs/devops/build-and-deploy-net-web-applications-to-arm-powered-aws-graviton-2-amazon-ecs-clusters-using-aws-cdk/

With .NET providing first-class support for ARM architecture, running .NET applications on an AWS Graviton processor provides you with more choices to help optimize performance and cost. We have already written about .NET 5 with Graviton benchmarks; in this post, we explore how C#/.NET developers can take advantages of Graviton processors and obtain this performance at scale with Amazon Elastic Container Service (Amazon ECS).

In addition, we take advantage of infrastructure as code (IaC) by using the AWS Cloud Development Kit (AWS CDK) to define the infrastructure .

The AWS CDK is an open-source development framework to define cloud applications in code. It includes constructs for Amazon ECS resources, which allows you to deploy fully containerized applications to AWS.

Architecture overview

Our target architecture for our .NET application running in AWS is a load balanced ECS cluster, as shown in the following diagram.

Show load balanced Amazon ECS Cluster running .NET application

Figure: Show load balanced Amazon ECS Cluster running .NET application

We need to provision many components in this architecture, but this is where the AWS CDK comes in. AWS CDK is an open source-software development framework to define cloud resources using familiar programming languages. You can use it for the following:

  • A multi-stage .NET application container build
  • Create an Amazon Elastic Container Registry (Amazon ECR) repository and push the Docker image to it
  • Use IaC written in .NET to provision the preceding architecture

The following diagram illustrates how we use these services.

Show pplication and Infrastructure code written in .NET

Figure: Show Application and Infrastructure code written in .NET

Setup the development environment

To deploy this solution on AWS, we use the AWS Cloud9 development environment.

  1. On the AWS Cloud9 console, choose Create environment.
  2. For Name, enter a name for the environment.
  3. Choose Next step.
  4. On the Environment settings page, keep the default settings:
    1. Environment type – Create a new EC2 instance for the environment (direct access)
    2. Instance type – t2.micro (1 Gib RAM + 1 vCPU)
    3. Platform – Amazon Linux 2(recommended)
    Show Cloud9 Environment settings

    Figure: Show Cloud9 Environment settings

  5. Choose Next step.
  6. Choose Create environment.

When the Cloud9 environment is ready, proceed to the next section.

Install the .NET SDK

The AWS development tools we require will already be setup in the Cloud9 environment, however the .NET SDK will not be available.

Install the .NET SDK with the following code from the Cloud9 terminal:

curl -sSL https://dot.net/v1/dotnet-install.sh | bash /dev/stdin -c 5.0
export PATH=$PATH:$HOME/.local/bin:$HOME/bin:$HOME/.dotnet

Verify the expected version has been installed:

dotnet --version
Show installed .NET SDK version

Figure: Show installed .NET SDK version

Clone and explore the example code

Clone the example repository:

git clone https://github.com/aws-samples/aws-cdk-dotnet-graviton-ecs-example.git

This repository contains two .NET projects, the web application, and the IaC application using the AWS CDK.

The unit of deployment in the AWS CDK is called a stack. All AWS resources defined within the scope of a stack, either directly or indirectly, are provisioned as a single unit.

The stack for this project is located within /cdk/src/Cdk/CdkStack.cs. When we read the C# code, we can see how it aligns with the architecture diagram at the beginning of this post.

First, we create a virtual private cloud (VPC) and assign a maximum of two Availability Zones:

var vpc = new Vpc(this, "DotNetGravitonVpc", new VpcProps { MaxAzs = 2 });

Next, we define the cluster and assign it to the VPC:

var cluster = new Cluster(this, "DotNetGravitonCluster", new ClusterProp { Vpc = vpc });

The Graviton instance type (c6g.4xlarge) is defined in the cluster capacity options:

cluster.AddCapacity("DefaultAutoScalingGroupCapacity",
    new AddCapacityOptions
    {
        InstanceType = new InstanceType("c6g.4xlarge"),
        MachineImage = EcsOptimizedImage.AmazonLinux2(AmiHardwareType.ARM)
    });

Finally, ApplicationLoadBalancedEC2Service is defined, along with a reference to the application source code:

new ApplicationLoadBalancedEc2Service(this, "Service",
    new ApplicationLoadBalancedEc2ServiceProps
    {
        Cluster = cluster,
        MemoryLimitMiB = 8192,
        DesiredCount = 2,
        TaskImageOptions = new ApplicationLoadBalancedTaskImageOptions
        {
            Image = ContainerImage.FromAsset(Path.Combine(Directory.GetCurrentDirectory(), @"../app")),                        
        }                             
    });

With about 30 lines of AWS CDK code written in C#, we achieve the following:

  • Build and package a .NET application within a Docker image
  • Push the Docker image to Amazon Elastic Container Registry (Amazon ECR)
  • Create a VPC with two Availability Zones
  • Create a cluster with a Graviton c6g.4xlarge instance type that pulls the Docker image from Amazon ECR

The AWS CDK has several useful helpers, such as the FromAsset function:

Image =  ContainerImage.FromAsset(Path.Combine(Directory.GetCurrentDirectory(), @"../app")),  

The ContainerImage.FromAsset function instructs the AWS CDK to build the Docker image from a Dockerfile, automatically create an Amazon ECR repository, and upload the image to the repository.

For more information about the ContainerImage class, see ContainerImage.

Build and deploy the project with the AWS CDK Toolkit

The AWS CDK Toolkit, the CLI command cdk, is the primary tool for interaction with AWS CDK apps. It runs the app, interrogates the application model you defined, and produces and deploys the AWS CloudFormation templates generated by the AWS CDK.

If an AWS CDK stack being deployed uses assets such as Docker images, the environment needs to be bootstrapped. Use the cdk bootstrap command from the /cdk directory:

cdk bootstrap

Now you can deploy the stack into the AWS account with the deploy command:

cdk deploy

The AWS CDK Toolkit synthesizes fresh CloudFormation templates locally before deploying anything. The first time this runs, it has a changeset that reflects all the infrastructure defined within the stack and prompts you for confirmation before running.

When the deployment is complete, the load balancer DNS is in the Outputs section.

Show stack outputs

Figure: Show stack outputs

You can navigate to the load balancer address via a browser.

Browser navigating to .NET application

Figure: Show browser navigating to .NET application

Tracking the drift

Typically drift is a change that happens outside of the Infrastructure as Code, for example, code updates to the .NET application.

To support changes, the AWS CDK Toolkit queries the AWS account for the last deployed CloudFormation template for the stack and compares it with the locally generated template. Preview the changes with the following code:

cdk diff

If a simple text change within the application’s home page HTML is made (app/webapp/Pages/Index.cshtml), a difference is detected within the assets, but not all the infrastructure as per the first deploy.

Show cdk diff output

Figure: Show cdk diff output

Running cdk deploy again now rebuilds the Docker image, uploads it to Amazon ECR, and refreshes the containers within the ECS cluster.

cdk deploy
Show browser navigating to updated .NET application

Figure: Show browser navigating to updated .NET application

Clean up

Remove the resources created in this post with the following code:

cdk destroy

Conclusion

Using the AWS CDK to provision infrastructure in .NET provides rigor, clarity, and reliability in a language familiar to .NET developers. For more information, see Infrastructure as Code.

This post demonstrates the low barrier to entry for .NET developers wanting to apply modern application development practices while taking advantage of the price performance of ARM-based processors such as Graviton.

To learn more about building and deploying .NET applications on AWS visit our .NET Developer Center.

About the author

Author Matt Laver


Matt Laver is a Solutions Architect at AWS working with SMB customers in the UK. He is passionate about DevOps and loves helping customers find simple solutions to difficult problems.


Building an ARM64 Rust development environment using AWS Graviton2 and AWS CDK

Post Syndicated from Alistair McLean original https://aws.amazon.com/blogs/devops/building-an-arm64-rust-development-environment-using-aws-graviton2-and-aws-cdk/

2020 was the year that ARM chips made the headlines by moving from largely mobile form factors into the cloud thanks to AWS Graviton2, allowing you to have up to 40% better price performance over comparable current generation x86 Amazon Elastic Compute Cloud (Amazon EC2) and Amazon Relational Database Service (Amazon RDS) instances.

We speak to customers daily about Graviton2. One recurring question we hear is “Graviton2 is great, but how can my team develop for ARM natively without the complexity of cross-compilation or having to buy custom hardware on premises?” This post seeks to answer that question by setting up the Visual Studio Code-based Code Server IDE, running on a Graviton2 EC2 instance that enables native development in a cost-effective and secure manner accessed via your browser.

The Rust programming language has gained a huge amount of popularity recently. This post aims to show that you can use this environment for Rust development as well as hundreds of other supported languages. AWS has committed to supporting the Rust community and using the language to deliver fast and robust services to customers at scale, and we want to enable our customers to do the same.

We also include instructions for building and installing the rust-analyzer and CodeLLDB debugger plugins to add additional language features.

Solution overview

The following diagram illustrates our solution architecture.

Architecture of the solution showing components and their linkages

The solution consists of an EC2 Graviton2 instance located in a private VPC subnet routed through an AWS Global Accelerator accelerator to provide routing optimization and keep packet loss, jitter, and latency lower by up to 60%. An internal facing Application Load Balancer containing the AWS Certificate Manager certificate decrypts and forwards traffic to this instance.

Code Server queries AWS Secrets Manager to initially set the login password on startup and allow for continued password-based authentication and easy password rotation. The EC2 instance has access to the internet through a NAT gateway and has no public IP address or key pair associated, and is accessible only through AWS Systems Manager Session Manager.

Prerequisites

For this walkthrough, the following are prerequisites:

AWS CDK stack

In order to deploy our architecture, I use the AWS CDK. As a developer, it’s more intuitive to me to define my infrastructure using a language and tooling with which I am familiar. I can also do things like environment variable injection and scripting as part of the stack creation to add stack parameters and customization points.

The AWS CDK application is comprised of five stacks. Each stack defines a separate part of the architecture:

  • Networking – Defines a VPC across two Availability Zones with the CIDR range of your choice. The routing and public/private subnet creation is done for us as part of the default configuration.
  • Certificate – This is the reason for the domain prerequisite. It’s a best practice to encrypt web applications using TLS, and for that we need a certificate and therefore a domain. This stack creates a certificate for the subdomain you specify as part of the stack creation and DNS validation in Route 53.
  • Amazon EC2 configuration – This defines both our AMI and the instance type and configuration. In this case, we’re using Amazon Linux 2 ARM64 edition. Here we also set the instance-managed roles that allow Session Manager connectivity and Secrets Manager access.
  • ALB configuration – Here we define the internal load balancer and specify the listener, certificate, and target configuration. I have injected the Amazon EC2 configuration as part of the class constructor so that I can reference it directly as a target.
  • Global accelerator configuration – Finally, the accelerator is defined here with two ports open, the ALB we defined in the ALB stack as a target, and most importantly adds in a CNAME DNS entry pointing to the DNS name of the accelerator.

Walkthrough overview

This walkthrough uses the AWS CDK command line tools to deploy the stack. Session Manager is enabled to allow access to the EC2 instance and configure the Code Server application and associated plugins.

The walkthrough specifically covers the following steps:

  1. Deploy the AWS CDK stacks via CloudShell to build out the application infrastructure and associated IAM roles.
  2. Launch Code Server via the official Docker container with the commands to get and set the password stored in Secrets Manager.
  3. Log in and build the rust-analyzer and CodeLLDB plugins from a terminal to allow for debugging within a “Hello World” application.

Start CloudShell and install the appropriate tooling

In this section, I use dummy values for the domain, the VPC CIDR, AWS Region, and the secret password. You need to submit real values as appropriate.

Sign in to CloudShell and enter the following commands:

sudo yum groupinstall -y "Development Tools"
sudo npm install aws-cdk -g
git clone https://github.com/aws-samples/cdk-graviton2-alb-aga-route53.git
cd cdk-graviton2-alb-aga-route53
python3 -m venv .
source bin/activate
python -m pip install -r requirements.txt
export VPC_CIDR=”10.0.0.1/16” #Substitute your CIDR here.
export CDK_DEPLOY_ACCOUNT=`aws sts get-caller-identity | jq -r '.Account'`
export CDK_DEPLOY_REGION=$AWS_REGION
export R53_DOMAIN=”code-server.example.com” #Substitute your domain here.
cdk bootstrap aws://$CDK_DEPLOY_ACCOUNT/$CDK_DEPLOY_REGION
cdk deploy --all

The deploy step takes around 10-15 mins to run and prompts a couple of times to add resources like security groups and IAM roles.

Log in to the new instance using Session Manager

Install the latest version of the Session Manager plugin for the AWS CLI:

cd ~
curl "https://s3.amazonaws.com/session-manager-downloads/plugin/latest/linux_64bit/session-manager-plugin.rpm" -o "session-manager-plugin.rpm"
sudo yum install -y session-manager-plugin.rpm

Now start a session, logging into the newly created EC2 instance and log in as ec2-user:

aws ssm start-session --target i-1234xyz7890abc #Substitute the instance id we just created here
#Once session is active:
sudo su - ec2-user

Add the password as a secret and start the container

Enter the following code to add the password as a secret in Secrets Manager and start the container:

aws secretsmanager create-secret --name CodeServerProd --secret-string Password123abc # Substitute the appropriate password here.
sudo docker run -d --name=code-server -e PUID=1000 -e PGID=1000 -e PASSWORD=`aws secretsmanager get-secret-value --secret-id CodeServerProd | jq -r '.SecretString'` -p 8080:8080 -v /home/ec2-user/.config:/config --restart unless-stopped codercom/code-server

Access and configure the web application for Rust development

So far, we have accomplished the following:

  • Created the infrastructure in the diagram via AWS CDK deployment
  • Configured the EC2 instance to run Docker and added this to the systemctl startup scripts
  • Created a secret in Secrets Manager to use as the application login password
  • Instantiated a Docker container running Code Server

Next, we access the running container via the web interface and install the required development tools.

Log in to the Code Server web application

To log in to the Code Server web application, complete the following steps:

  1. Browse to https://code-server.example.com, where example.com is the name of the domain you supplied in the AWS CDK step.
  2. Log in using the password you created in Secrets Manager.
  3. Create a new terminal by choosing the hamburger icon and, under Terminal, choosing New Terminal.
  4. Issue the following commands into the terminal to install the Rust programming language:
bash
sudo apt update && sudo apt upgrade -y
sudo apt install -y build-essential npm clang lldb
curl --proto '=https' --tlsv1.2 -sSf https://sh.rustup.rs | sh
source $HOME/.cargo/env

Install the rust-analyzer plugin

Open the extensions panel and enter Rust Analyzer in the search bar. Then install the plugin.

Install the debugger

Go back to the extensions panel in the Code Server application and enter CodeLLDB into the search bar. Then install this extension.

Create a sample application and open it in the Code Server window

To create and use our sample application, complete the following steps:

  • In the existing Code Server terminal, enter the following:
mkdir -p ~/src/
cd ~/src
cargo new helloworld --bin
  • Open the newly created folder in Code Server verifying that the helloworld directory was successfully created.

Open File or Folder dialog in Code Server

  • Rust-analyzer runs when you open up src/main.rs and index the file.
  • You can run the program by choosing Run in the editor.

Main Code Server editor window showing helloworld Rust program code.

  • Similarly, to launch the debugger, choose Debug in the editor.

Code Server Debugger view

Troubleshooting

If the CloudShell session times out, you need to reset your environment variables in order to re-deploy, modify, and delete the stack deployment.

Clean up

This stack incurs an estimated monthly cost of $143.00.

To delete the stack, log in to CloudShell and enter the following commands:

cd cdk-graviton2-alb-aga-route53
source bin/activate

# Re-set the environment variables again if required
export VPC_CIDR=”10.0.0.1/16” #Substitute your CIDR here.
export CDK_DEPLOY_ACCOUNT=`aws sts get-caller-identity | jq -r '.Account'`
export CDK_DEPLOY_REGION=$AWS_REGION
export R53_DOMAIN=”code-server.example.com” #Substitute your domain here.
cdk destroy --all

This destroys all the resources created in the first step. You can verify this by browsing to the AWS CloudFormation console and noting the deletion of all the stacks.

Conclusion

AWS is a place where builders can reinvent the future. The future of development means supporting different chipsets depending on different business requirements. This post is designed to enable development targeting the ARM64 microarchitecture by utilizing AWS Graviton2. Happy building!

Author bio

Author portrait

Alistair is a Principal Solutions Architect at AWS focused on EdTech customers. Originally from the west coast of Scotland, Alistair now lives in Fairfield, Connecticut, with his wife and two daughters and enjoys spending time with his family, skiing, golfing, cycling, and using his pellet smoker.

CDK Corner – May 2021

Post Syndicated from Christian Weber original https://aws.amazon.com/blogs/devops/cdk-corner-may-2021/

Social – community engagement

According to Matt Coulter’s tweet, nearly 4000 people signed up for CDK Day to celebrate all things CDK on April 30. As a single-day, two-track event, there was a significant amount of content to learn from while having fun, and interacting with the CDK community.

Eric Johnson as the emcee, keynoted the first session of the morning, presenting “Better together: AWS CDK and AWS SAM.” This keynote was the announcement for the public preview of the AWS Serverless Application Model CLI (AWS SAM CLI). The AWS Serverless Application Model CLI includes support for local development and testing of AWS CDK projects.

To learn more, the blog post announcing the AWS SAM CLI public preview has more detail about the capabilities of the AWS SAM CLI.

If you missed CDK Day, fear not! CDK Day Track 1 and Track2 are available to watch online.

Great job and round of applause to the sign-language translators, the speakers, the organizers, and the hosts for making the second CDK Day a success! We can’t wait for CDK Day number 3!

Updates to the CDK

AWS CDK v2 developer preview

It’s here! The much-anticipated release of CDK v2’s developer preview is now available!

When using CDK previously, developers in JavaScript and TypeScript have faced challenges with the way that npm handles transitive dependencies; the dependencies that your dependencies rely on. For example, the aws-ec2 package.json file lists dependencies for other CDK construct libraries. If one of these transitive dependencies were updated, all of them would be need to be updated. Or you would run into dependency tree resolution errors, as seen in this StackOverflow thread.

With v2, all construct modules are now provided in a single package: aws-cdk-lib. All of the dependencies are now pinned to a single version of aws-cdk-lib, making it easier to manage. This also gives you the flexibility of having all CDK construct library modules available without having to run npm install each time you want to use a new construct library.

Another change to AWS CDK v2 is the removal of experimental modules. To help promote API stability and comply with semantic versioning, CDK v2 ships only with modules marked as stable.

Experimental modules aren’t going away completely, though. In v1, experimental modules and constructs will be provided together with no change. In v2, experimental modules are distributed and versioned separately from the aws-cdk-lib package, in their own dedicated package and namespace. Once a v2 construct is deemed stable, it is then merged into the aws-cdk-lib package.

The CDK team is still determining the best method of distributing experimental modules and constructs, so stay tuned for more information. Read more about the AWS CDK v2 developer preview in the What’s new blog post.

AWS CDK for Go developer preview

On April 7, the AWS CDK team announced support for golang. From the Go tracking issue on GitHub, nearly 900 members of the CDK community have requested for CDK to support golang, and we’re happy to see it become available! We are looking forward to helping out all the golang gophers out there build amazing CDK applications!

To learn more about Go and AWS CDK, read the AWS CDK for Go module API documentation on pkg.go.dev. You can also read the Go bindings for JSII RFC document on GitHub. Want to contribute to the success of Go and CDK? The project tracking board for Go’s General Availability has tasks and items which could use your help.

Construct modules promoted to General Availability

Many new construct modules were promoted to General Availability recently. General Availability indicates a module’s stability, giving confidence to run these modules in production workloads. In April, a total of 15 modules were promoted stable:

Notable new L2 constructs

In the @aws-cdk/route-53 module, name server (NS) records were previously defined with the route53.RecordType enum. In PR#13895, user stijnbrouwers introduces the NS record as its own L2 construct: route53.NSRecord. bringing it into company with other record type L2s, such as route53.ARecord. This makes managing NS records consistent with the other record types represented as L2 constructs.

Improving the @aws-cdk/aws-events-targets module, CDK community user hedrall submitted PR#13823. This change brings support for Amazon API Gateway as a target for an Amazon EventBridge event.

@aws-cdk/aws-codepipeline-actions now includes an L2 construct for AWS CodeStar Connections supporting BitBucket and GitHub. This construct lets you create a CDK application that uses AWS CodeStar with a source connection from either provider, thanks to PR#13781 from the CDK Team.

Level ups to existing CDK constructs

Amazon Elastic Inference makes available low-cost GPU-acceleration for deep-learning workloads. PR#13950 now lets you use the service via @aws-cdk/aws-ecs in Amazon Elastic Container Service tasks, from CDK community user upparekh.

In PR#13473, from pgarbe, the @aws-cdk/aws-lambda-nodejs module will now bundle AWS Lambda functions with Docker images sourced from the Amazon Elastic Container Registry (Amazon ECR) Public Registry, instead of DockerHub. Prior to this change, CDK used your DockerHub credentials to pull a Docker image for the Lambda function. If your account was in DockerHub’s free-tier account level, your account is throttled whenever it exceeds the API limit within a short time frame set by DockerHub. This can cause your AWS CDK deployment to be delayed until you are under DockerHub’s API limit. By moving to the Amazon ECR Public Registry, this removes the risk of being affected by DockerHub’s API rate limiting . You can read more in this blog post giving customers advice about DockerHub rate limits from last year.

With @aws-cdk/aws-codebuild, you can use concurrent build support to speed up your build process. Sometimes you’ll want to limit the number of builds that run concurrently, whether for cost reduction or reducing the complexity of your build process. PR#14185, authored by gmokki, adds the ability to define a concurrent build limit for an AWS CodeBuild project Stage.

It is common for customers to have applications or resources spanning multiple AWS Regions. If you’re using @aws-cdk/aws-secretsmanager, you can now replicate secrets to multiple Regions, with PR#14266 from the CDK team. Make sure you’re not setting your secret as “test123” for your production databases in multiple Regions!

For users of @aws-cdk/aws-eks, PR#12659 from anguslees lets you pass arguments from bootstrap.sh to avoid the DescribeCluster API call. This will speed up the time it takes nodes to join an EKS cluster.

PR#14250 from the CDK team gives developers using @aws-cdk/aws-ec2 the ability to set fixed IPs when defining NAT gateways. This change will now pre-create Elastic IP address allocations and assign them to the NAT gateway. This can be useful when managing links from an Amazon Virtual Private Cloud (VPC) to an on-premises data center that relies on fixed/static IP addresses.

@aws-cdk/aws-iam now lets you add AWS Identity and Access Management (AWS IAM) users to new or existing groups. For example, you might want to have a user in a specific group for the life of a deployed CDK application. And on stack deletion, revoke that membership. Thanks to PR#13698 from jogold, this is now possible.

Learning – Finds from across the internet

If you work with CDK parameters, you might be curious how parameters derive their names and values. Borislav Hadzhiev released a blog post about setting and using CDK parameters.

Ibrahim Cesar’s wrote an awesome blog post detailing the experience of discovering and working with CDK. It’s an enjoyable read of inspiration and animated gifs.

Twitter user edwin4_ released a tool for CDK automation called RocketCDK. From the project’s GitHub repository, this tool will initialize your CDK app, install your packages, and auto-import them into your stack. Neat! Anything that helps save time is a plus-one.

Community acknowledgments

And finally, congratulations and rounds of applause for these folks who had their first Pull Request merged to the CDK repository!

*These users’ Pull Requests were merged in April.

Thank you for joining us on this update of the CDK corner. See you next time!

CDK Corner – April 2021

Post Syndicated from Christian Weber original https://aws.amazon.com/blogs/devops/cdk-corner-april-2021/

Social – Community Engagement

We’re getting closer and closer to CDK Day, with the event receiving 75 CFP submissions. The cdkday schedule is now available to plan out your conference day.

Updates to the CDK

Constructs promoted to General Availability

Promoting a module to stable/General Availability is always a cause for celebration. Great job to all the folks involved who helped move aws-acmpca from Experimental to Stable. PR#13778 gives a peak into the work involved. If you’re interested in helping promote a module to G.A., or would like to learn more about the process, read the AWS Construct Library Module Lifecycle document. A big thanks to the CDK Community and team for their work!

Dead Letter Queues

Dead Letter Queues (“DLQs”) are a service implementation pattern that can queue messages when a service cannot process them. For example, if an email message can’t be delivered to a client, an email server could implement a DLQ holding onto that undeliverable message until the client can process the message. DLQs are supported by many AWS services, the community and CDK team have been working to support DLQs with CDK in various modules: aws-codebuild in PR#11228, aws-stepfunctions in PR#13450, and aws-lambda-targets in PR#11617.

Amazon API Gateway

Amazon API Gateway is a fully managed service to deploy APIs at scale. Here are the modules that have received updates to their support for API Gateway:

  • stepfunctions-tasks now supports API Gateway with PR#13033.

  • You can now specify regions when integrating Amazon API Gateway with other AWS services in PR#13251.

  • Support for websockets api in PR#13031 is now available in aws-apigatewayv2 as a Level 2 construct. To differentiate configuration between HTTP and websockets APIs, several of the HTTP API properties were renamed. More information about these changes can be found in the conversation section of PR#13031.

  • You can now set default authorizers in PR#13172. This lets you use an API Gateway HTTP, REST, or Websocket APIs with an authorizer and authorization scopes that cover all routes for a given API resource.

Notable new L2 constructs

AWS Global Accelerator is a networking service that lets users of your infrastructure hosted on AWS use the AWS global network infrastructure for traffic routing, improving speed and performance. Amazon Route 53 supports Global Accelerator and, thanks to PR#13407, you can now take advantage of this functionality in the aws-route-53-targets module as an L2 construct.

Amazon CloudWatch is an important part of monitoring AWS workloads. With PR#13281, the aws-cloudwatch-actions module now includes an Ec2Action construct, letting you programmatically set up observability of EC2-based workloads with CDK.

The aws-cognito module now supports Apple ID User Pools in PR#13160 allowing Developers to define workloads that use Apple IDs for identity management.

aws-iam received a new L2 construct with PR#13393, bringing SAML implementation support to CDK. SAML has become a preferred framework when implementing Single Sign On, and has been supported with IAM for sometime. Now, set it up with even more efficiency with the SamlProvider construct.

Amazon Neptune is a managed graph database service available as a construct in the aws-neptune module. PR#12763 adds L2 constructs to support Database Clusters and Database Instances.

Level ups to existing CDK constructs

Service discovery in AWS is provided by AWS CloudMap. With PR#13192, users of aws-ecs can now register an ECS Service with CloudMap.

aws-lambda has received two notable additions related to Docker: PR#13318, and PR#12258 add functionality to package Lambda function code with the output of a Docker build, or from a Docker build asset, respectively.

The aws-ecr module now supports Tag Mutability. Tags can denote a specific release for a piece of software. Setting the enum in the construct to IMMUTABLE will prevent tags from being overwritten by a later image, if that image uses a tag already present in the container repository.

Last year, AWS announced support for deployment circuit breakers in Amazon Elastic Container Service, enabling customers to perform auto-rollbacks on unhealthy service deployments without manual intervention. PR#12719 includes this functionality as part of the aws-ecs-patterns module, via the DeploymentCircuitBreaker interface. This interface is now available and can be used in constructs such as ApplicationLoadBalancedFargateService.

The aws-ec2 module received some nice quality of life upgrades to it: Support for multi-part user-data in PR#11843, client vpn endpoints in PR#12234, and non-numeric security protocols for security groups in PR#13593 all help improve the experience of using EC2 with CDK.

Learning – Finds from across the internet

On the AWS DevOps Blog, Eric Beard and Rico Huijbers penned a post detailing Best Practices for Developing Cloud Applications with AWS CDK.

Users of AWS Elastic Beanstalk wanting to deploy with AWS CDK can read about deploying Elastic Beanstalk applications with the AWS CDK and the aws-elasticbeanstalk module.

Deploying Infrastructure that is HIPAA and HiTrust compliant with AWS CDK can help customers move faster. This best practices guide for Hipaa and HiTrust environments goes into detail on deploying compliant architecture with the AWS CDK.

Community Acknowledgements

And finally, congratulations and rounds of applause for these folks who had their first Pull Request merged to the CDK Repository!*

*These users’ Pull Requests were merged between 2021-03-01 and 2021-03-31.

Thanks for reading this update of the CDK Corner. See you next time!

Mitigate data leakage through the use of AppStream 2.0 and end-to-end auditing

Post Syndicated from Chaim Landau original https://aws.amazon.com/blogs/security/mitigate-data-leakage-through-the-use-of-appstream-2-0-and-end-to-end-auditing/

Customers want to use AWS services to operate on their most sensitive data, but they want to make sure that only the right people have access to that data. Even when the right people are accessing data, customers want to account for what actions those users took while accessing the data.

In this post, we show you how you can use Amazon AppStream 2.0 to grant isolated access to sensitive data and decrease your attack surface. In addition, we show you how to achieve end-to-end auditing, which is designed to provide full traceability of all activities around your data.

To demonstrate this idea, we built a sample solution that provides a data scientist with access to an Amazon SageMaker Studio notebook using AppStream 2.0. The solution deploys a new Amazon Virtual Private Cloud (Amazon VPC) with isolated subnets, where the SageMaker notebook and AppStream 2.0 instances are set up.

Why AppStream 2.0?

AppStream 2.0 is a fully-managed, non-persistent application and desktop streaming service that provides access to desktop applications from anywhere by using an HTML5-compatible desktop browser.

Each time you launch an AppStream 2.0 session, a freshly-built, pre-provisioned instance is provided, using a prebuilt image. As soon as you close your session and the disconnect timeout period is reached, the instance is terminated. This allows you to carefully control the user experience and helps to ensure a consistent, secure environment each time. AppStream 2.0 also lets you enforce restrictions on user sessions, such as disabling the clipboard, file transfers, or printing.

Furthermore, AppStream 2.0 uses AWS Identity and Access Management (IAM) roles to grant fine-grained access to other AWS services such as Amazon Simple Storage Service (Amazon S3), Amazon Redshift, Amazon SageMaker, and other AWS services. This gives you both control over the access as well as an accounting, via Amazon CloudTrail, of what actions were taken and when.

These features make AppStream 2.0 uniquely suitable for environments that require high security and isolation.

Why SageMaker?

Developers and data scientists use SageMaker to build, train, and deploy machine learning models quickly. SageMaker does most of the work of each step of the machine learning process to help users develop high-quality models. SageMaker access from within AppStream 2.0 provides your data scientists and analysts with a suite of common and familiar data-science packages to use against isolated data.

Solution architecture overview

This solution allows a data scientist to work with a data set while connected to an isolated environment that doesn’t have an outbound path to the internet.

First, you build an Amazon VPC with isolated subnets and with no internet gateways attached. This ensures that any instances stood up in the environment don’t have access to the internet. To provide the resources inside the isolated subnets with a path to commercial AWS services such as Amazon S3, SageMaker, AWS System Manager you build VPC endpoints and attach them to the VPC, as shown in Figure 1.

Figure 1: Network Diagram

Figure 1: Network Diagram

You then build an AppStream 2.0 stack and fleet, and attach a security group and IAM role to the fleet. The purpose of the IAM role is to provide the AppStream 2.0 instances with access to downstream AWS services such as Amazon S3 and SageMaker. The IAM role design follows the least privilege model, to ensure that only the access required for each task is granted.

During the building of the stack, you will enable AppStream 2.0 Home Folders. This feature builds an S3 bucket where users can store files from inside their AppStream 2.0 session. The bucket is designed with a dedicated prefix for each user, where only they have access. We use this prefix to store the user’s pre-signed SagaMaker URLs, ensuring that no one user can access another users SageMaker Notebook.

You then deploy a SageMaker notebook for the data scientist to use to access and analyze the isolated data.

To confirm that the user ID on the AppStream 2.0 session hasn’t been spoofed, you create an AWS Lambda function that compares the user ID of the data scientist against the AppStream 2.0 session ID. If the user ID and session ID match, this indicates that the user ID hasn’t been impersonated.

Once the session has been validated, the Lambda function generates a pre-signed SageMaker URL that gives the data scientist access to the notebook.

Finally, you enable AppStream 2.0 usage reports to ensure that you have end-to-end auditing of your environment.

To help you easily deploy this solution into your environment, we’ve built an AWS Cloud Development Kit (AWS CDK) application and stacks, using Python. To deploy this solution, you can go to the Solution deployment section in this blog post.

Note: this solution was built with all resources being in a single AWS Region. The support of multi Region is possible but isn’t part of this blog post.

Solution requirements

Before you build a solution, you must know your security requirements. The solution in this post assumes a set of standard security requirements that you typically find in an enterprise environment:

  • User authentication is provided by a Security Assertion Markup Language (SAML) identity provider (IdP).
  • IAM roles are used to access AWS services such as Amazon S3 and SageMaker.
  • AWS IAM access keys and secret keys are prohibited.
  • IAM policies follow the least privilege model so that only the required access is granted.
  • Windows clipboard, file transfer, and printing to local devices is prohibited.
  • Auditing and traceability of all activities is required.

Note: before you will be able to integrate SAML with AppStream 2.0, you will need to follow the AppStream 2.0 Integration with SAML 2.0 guide. There are quite a few steps and it will take some time to set up. SAML authentication is optional, however. If you just want to prototype the solution and see how it works, you can do that without enabling SAML integration.

Solution components

This solution uses the following technologies:

  • Amazon VPC – provides an isolated network where the solution will be deployed.
  • VPC endpoints – provide access from the isolated network to commercial AWS services such as Amazon S3 and SageMaker.
  • AWS Systems Manager – stores parameters such as S3 bucket names.
  • AppStream 2.0 – provides hardened instances to run the solution on.
  • AppStream 2.0 home folders – store users’ session information.
  • Amazon S3 – stores application scripts and pre-signed SageMaker URLs.
  • SageMaker notebook – provides data scientists with tools to access the data.
  • AWS Lambda – runs scripts to validate the data scientist’s session, and generates pre-signed URLs for the SageMaker notebook.
  • AWS CDK – deploys the solution.
  • PowerShell – processes scripts on AppStream 2.0 Microsoft Windows instances.

Solution high-level design and process flow

The following figure is a high-level depiction of the solution and its process flow.

Figure 2: Solution process flow

Figure 2: Solution process flow

The process flow—illustrated in Figure 2—is:

  1. A data scientist clicks on an AppStream 2.0 federated or a streaming URL.
    1. If it’s a federated URL, the data scientist authenticates using their corporate credentials, as well as MFA if required.
    1. If it’s a streaming URL, no further authentication is required.
  2. The data scientist is presented with a PowerShell application that’s been made available to them.
  3. After starting the application, it starts the PowerShell script on an AppStream 2.0 instance.
  4. The script then:
    1. Downloads a second PowerShell script from an S3 bucket.
    2. Collects local AppStream 2.0 environment variables:
      1. AppStream_UserName
      2. AppStream_Session_ID
      3. AppStream_Resource_Name
    3. Stores the variables in the session.json file and copies the file to the home folder of the session on Amazon S3.
  5. The PUT event of the JSON file into the Amazon S3 bucket triggers an AWS Lambda function that performs the following:
    1. Reads the session.json file from the user’s home folder on Amazon S3.
    2. Performs a describe action against the AppStream 2.0 API to ensure that the session ID and the user ID match. This helps to prevent the user from manipulating the local environment variable to pretend to be someone else (spoofing), and potentially gain access to unauthorized data.
    3. If the session ID and user ID match, a pre-signed SageMaker URL is generated and stored in session_url.txt, and copied to the user’s home folder on Amazon S3.
    4. If the session ID and user ID do not match, the Lambda function ends without generating a pre-signed URL.
  6. When the PowerShell script detects the session_url.txt file, it opens the URL, giving the user access to their SageMaker notebook.

Code structure

To help you deploy this solution in your environment, we’ve built a set of code that you can use. The code is mostly written in Python and for the AWS CDK framework, and with an AWS CDK application and some PowerShell scripts.

Note: We have chosen the default settings on many of the AWS resources our code deploys. Before deploying the code, you should conduct a thorough code review to ensure the resources you are deploying meet your organization’s requirements.

AWS CDK application – ./app.py

To make this application modular and portable, we’ve structured it in separate AWS CDK nested stacks:

  • vpc-stack – deploys a VPC with two isolated subnets, along with three VPC endpoints.
  • s3-stack – deploys an S3 bucket, copies the AppStream 2.0 PowerShell scripts, and stores the bucket name in an SSM parameter.
  • appstream-service-roles-stack – deploys AppStream 2.0 service roles.
  • appstream-stack – deploys the AppStream 2.0 stack and fleet, along with the required IAM roles and security groups.
  • appstream-start-fleet-stack – builds a custom resource that starts the AppStream 2.0 fleet.
  • notebook-stack – deploys a SageMaker notebook, along with IAM roles, security groups, and an AWS Key Management Service (AWS KMS) encryption key.
  • saml-stack – deploys a SAML role as a placeholder for SAML authentication.

PowerShell scripts

The solution uses the following PowerShell scripts inside the AppStream 2.0 instances:

  • sagemaker-notebook-launcher.ps1 – This script is part of the AppStream 2.0 image and downloads the sagemaker-notebook.ps1 script.
  • sagemaker-notebook.ps1 – starts the process of validating the session and generating the SageMaker pre-signed URL.

Note: Having the second script reside on Amazon S3 provides flexibility. You can modify this script without having to create a new AppStream 2.0 image.

Deployment Prerequisites

To deploy this solution, your deployment environment must meet the following prerequisites:

Note: We used AWS Cloud9 with Amazon Linux 2 to test this solution, as it comes preinstalled with most of the prerequisites for deploying this solution.

Deploy the solution

Now that you know the design and components, you’re ready to deploy the solution.

Note: In our demo solution, we deploy two stream.standard.small AppStream 2.0 instances, using Windows Server 2019. This gives you a reasonable example to work from. In your own environment you might need more instances, a different instance type, or a different version of Windows. Likewise, we deploy a single SageMaker notebook instance of type ml.t3.medium. To change the AppStream 2.0 and SageMaker instance types, you will need to modify the stacks/data_sandbox_appstream.py and stacks/data_sandbox_notebook.py respectively.

Step 1: AppStream 2.0 image

An AppStream 2.0 image contains applications that you can stream to your users. It’s what allows you to curate the user experience by preconfiguring the settings of the applications you stream to your users.

To build an AppStream 2.0 image:

  1. Build an image following the Create a Custom AppStream 2.0 Image by Using the AppStream 2.0 Console tutorial.

    Note: In Step 1: Install Applications on the Image Builder in this tutorial, you will be asked to choose an Instance family. For this example, we chose General Purpose. If you choose a different Instance family, you will need to make sure the appstream_instance_type specified under Step 2: Code modification is of the same family.

    In Step 6: Finish Creating Your Image in this tutorial, you will be asked to provide a unique image name. Note down the image name as you will need it in Step 2 of this blog post.

  2. Copy notebook-launcher.ps1 to a location on the image. We recommend that you copy it to C:\AppStream.
  3. In Step 2—Create an AppStream 2.0 Application Catalog—of the tutorial, use C:\Windows\System32\Windowspowershell\v1.0\powershell.exe as the application, and the path to notebook-launcher.ps1 as the launch parameter.

Note: While testing your application during the image building process, the PowerShell script will fail because the underlying infrastructure is not present. You can ignore that failure during the image building process.

Step 2: Code modification

Next, you must modify some of the code to fit your environment.

Make the following changes in the cdk.json file:

  • vpc_cidr – Supply your preferred CIDR range to be used for the VPC.

    Note: VPC CIDR ranges are your private IP space and thus can consist of any valid RFC 1918 range. However, if the VPC you are planning on using for AppStream 2.0 needs to connect to other parts of your private network (on premise or other VPCs), you need to choose a range that does not conflict or overlap with the rest of your infrastructure.

  • appstream_Image_name – Enter the image name you chose when you built the Appstream 2.0 image in Step 1.a.
  • appstream_environment_name – The environment name is strictly cosmetic and drives the naming of your AppStream 2.0 stack and fleet.
  • appstream_instance_type – Enter the AppStream 2.0 instance type. The instance type must be part of the same instance family you used in Step 1 of the To build an AppStream 2.0 image section. For a list of AppStream 2.0 instances, visit https://aws.amazon.com/appstream2/pricing/.
  • appstream_fleet_type – Enter the fleet type. Allowed values are ALWAYS_ON or ON_DEMAND.
  • Idp_name – If you have integrated SAML with this solution, you will need to enter the IdP name you chose when creating the SAML provider in the IAM Console.

Step 3: Deploy the AWS CDK application

The CDK application deploys the CDK stacks.

The stacks include:

  • VPC with isolated subnets
  • VPC Endpoints for S3, SageMaker, and Systems Manager
  • S3 bucket
  • AppStream 2.0 stack and fleet
  • Two AppStream 2.0 stream.standard.small instances
  • A single SageMaker ml.t2.medium notebook

Run the following commands to deploy the AWS CDK application:

  1. Install the AWS CDK Toolkit.
    npm install -g aws-cdk
    

  2. Create and activate a virtual environment.
    python -m venv .datasandbox-env
    
    source .datasandbox-env/bin/activate
    

  3. Change directory to the root folder of the code repository.
  4. Install the required packages.
    pip install -r requirements.txt
    

  5. If you haven’t used AWS CDK in your account yet, run:
    cdk bootstrap
    

  6. Deploy the AWS CDK stack.
    cdk deploy DataSandbox
    

Step 4: Test the solution

After the stack has successfully deployed, allow approximately 25 minutes for the AppStream 2.0 fleet to reach a running state. Testing will fail if the fleet isn’t running.

Without SAML

If you haven’t added SAML authentication, use the following steps to test the solution.

  1. In the AWS Management Console, go to AppStream 2.0 and then to Stacks.
  2. Select the stack, and then select Action.
  3. Select Create streaming URL.
  4. Enter any user name and select Get URL.
  5. Enter the URL in another tab of your browser and test your application.

With SAML

If you are using SAML authentication, you will have a federated login URL that you need to visit.

If everything is working, your SageMaker notebook will be launched as shown in Figure 3.

Figure 3: SageMaker Notebook

Figure 3: SageMaker Notebook

Note: if you receive a web browser timeout, verify that the SageMaker notebook instance “Data-Sandbox-Notebook” is currently in InService status.

Auditing

Auditing for this solution is provided through AWS CloudTrail and AppStream 2.0 Usage Reports. Though CloudTrail is enabled by default, to collect and store the CloudTrail logs, you must create a trail for your AWS account.

The following logs will be available for you to use, to provide auditing.

Connecting the dots

To get an accurate idea of your users’ activity, you have to correlate some logs from different services. First, you collect the login information from CloudTrail. This gives you the user ID of the user who logged in. You then collect the Amazon S3 put from CloudTrail, which gives you the IP address of the AppStream 2.0 instance. And finally, you collect the AppStream 2.0 usage report which gives you the IP address of the AppStream 2.0 instance, plus the user ID. This allows you to connect the user ID to the activity on Amazon S3. For auditing & controlling exploration activities with SageMaker, please visit this GitHub repository.

Though the logs are automatically being collected, what we have shown you here is a manual way of sifting through those logs. For a more robust solution on querying and analyzing CloudTrail logs, visit Querying AWS CloudTrail Logs.

Costs of this Solution

The cost for running this solution will depend on a number of factors like the instance size, the amount of data you store, and how many hours you use the solution. AppStream 2.0 is charged per instance hour and there is one instance in this example solution. You can see details on the AppStream 2.0 pricing page. VPC endpoints are charged by the hour and by how much data passes through them. There are three VPC endpoints in this solution (S3, System Manager, and SageMaker). VPC endpoint pricing is described on the Privatelink pricing page. SageMaker Notebooks are charged based on the number of instance hours and the instance type. There is one SageMaker instance in this solution, which may be eligible for free tier pricing. See the SageMaker pricing page for more details. Amazon S3 storage pricing depends on how much data you store, what kind of storage you use, and how much data transfers in and out of S3. The use in this solution may be eligible for free tier pricing. You can see details on the S3 pricing page.

Before deploying this solution, make sure to calculate your cost using the AWS Pricing Calculator, and the AppStream 2.0 pricing calculator.

Conclusion

Congratulations! You have deployed a solution that provides your users with access to sensitive and isolated data in a secure manner using AppStream 2.0. You have also implemented a mechanism that is designed to prevent user impersonation, and enabled end-to-end auditing of all user activities.

To learn about how Amazon is using AppStream 2.0, visit the blog post How Amazon uses AppStream 2.0 to provide data scientists and analysts with access to sensitive data.

If you have feedback about this post, submit comments in the Comments section below.

Want more AWS Security how-to content, news, and feature announcements? Follow us on Twitter.

Author

Chaim Landau

As a Senior Cloud Architect at AWS, Chaim works with large enterprise customers, helping them create innovative solutions to address their cloud challenges. Chaim is passionate about his work, enjoys the creativity that goes into building solutions in the cloud, and derives pleasure from passing on his knowledge. In his spare time, he enjoys outdoor activities, spending time in nature, and immersing himself in his books.

Author

JD Braun

As a Data and Machine Learning Engineer, JD helps organizations design and implement modern data architectures to deliver value to their internal and external customers. In his free time, he enjoys exploring Minneapolis with his fiancée and black lab.

Developing enterprise application patterns with the AWS CDK

Post Syndicated from Krishnakumar Rengarajan original https://aws.amazon.com/blogs/devops/developing-application-patterns-cdk/

Enterprises often need to standardize their infrastructure as code (IaC) for governance, compliance, and quality control reasons. You also need to manage and centrally publish updates to your IaC libraries. In this post, we demonstrate how to use the AWS Cloud Development Kit (AWS CDK) to define patterns for IaC and publish them for consumption in controlled releases using AWS CodeArtifact.

AWS CDK is an open-source software development framework to model and provision cloud application resources in programming languages such as TypeScript, JavaScript, Python, Java, and C#/.Net. The basic building blocks of AWS CDK are called constructs, which map to one or more AWS resources, and can be composed of other constructs. Constructs allow high-level abstractions to be defined as patterns. You can synthesize constructs into AWS CloudFormation templates and deploy them into an AWS account.

AWS CodeArtifact is a fully managed service for managing the lifecycle of software artifacts. You can use CodeArtifact to securely store, publish, and share software artifacts. Software artifacts are stored in repositories, which are aggregated into a domain. A CodeArtifact domain allows organizational policies to be applied across multiple repositories. You can use CodeArtifact with common build tools and package managers such as NuGet, Maven, Gradle, npm, yarn, pip, and twine.

Solution overview

In this solution, we complete the following steps:

  1. Create two AWS CDK pattern constructs in Typescript: one for traditional three-tier web applications and a second for serverless web applications.
  2. Publish the pattern constructs to CodeArtifact as npm packages. npm is the package manager for Node.js.
  3. Consume the pattern construct npm packages from CodeArtifact and use them to provision the AWS infrastructure.

We provide more information about the pattern constructs in the following sections. The source code mentioned in this blog is available in GitHub.

Note: The code provided in this blog post is for demonstration purposes only. You must ensure that it meets your security and production readiness requirements.

Traditional three-tier web application construct

The first pattern construct is for a traditional three-tier web application running on Amazon Elastic Compute Cloud (Amazon EC2), with AWS resources consisting of Application Load Balancer, an Autoscaling group and EC2 launch configuration, an Amazon Relational Database Service (Amazon RDS) or Amazon Aurora database, and AWS Secrets Manager. The following diagram illustrates this architecture.


Traditional stack architecture

Serverless web application construct

The second pattern construct is for a serverless application with AWS resources in AWS Lambda, Amazon API Gateway, and Amazon DynamoDB.

Serverless application architecture

Publishing and consuming pattern constructs

Both constructs are written in Typescript and published to CodeArtifact as npm packages. A semantic versioning scheme is used to version the construct packages. After a package gets published to CodeArtifact, teams can consume them for deploying AWS resources. The following diagram illustrates this architecture.

Pattern constructs

Prerequisites

Before getting started, complete the following steps:

  1. Clone the code from the GitHub repository for the traditional and serverless web application constructs:
    git clone https://github.com/aws-samples/aws-cdk-developing-application-patterns-blog.git
    cd aws-cdk-developing-application-patterns-blog
  2. Configure AWS Identity and Access Management (IAM) permissions by attaching IAM policies to the user, group, or role implementing this solution. The following policy files are in the iam folder in the root of the cloned repo:
    • BlogPublishArtifacts.json – The IAM policy to configure CodeArtifact and publish packages to it.
    • BlogConsumeTraditional.json – The IAM policy to consume the traditional three-tier web application construct from CodeArtifact and deploy it to an AWS account.
    • PublishArtifacts.json – The IAM policy to consume the serverless construct from CodeArtifact and deploy it to an AWS account.

Configuring CodeArtifact

In this step, we configure CodeArtifact for publishing the pattern constructs as npm packages. The following AWS resources are created:

  • A CodeArtifact domain named blog-domain
  • Two CodeArtifact repositories:
    • blog-npm-store – For configuring the upstream NPM repository.
    • blog-repository – For publishing custom packages.

Deploy the CodeArtifact resources with the following code:

cd prerequisites/
rm -rf package-lock.json node_modules
npm install
cdk deploy --require-approval never
cd ..

Log in to the blog-repository. This step is needed for publishing and consuming the npm packages. See the following code:

aws codeartifact login \
     --tool npm \
     --domain blog-domain \
     --domain-owner $(aws sts get-caller-identity --output text --query 'Account') \
     --repository blog-repository

Publishing the pattern constructs

  1. Change the directory to the serverless construct:
    cd serverless
  2. Install the required npm packages:
    rm package-lock.json && rm -rf node_modules
    npm install
    
  3. Build the npm project:
    npm run build
  4. Publish the construct npm package to the CodeArtifact repository:
    npm publish

    Follow the previously mentioned steps for building and publishing a traditional (classic Load Balancer plus Amazon EC2) web app by running these commands in the traditional directory.

    If the publishing is successful, you see messages like the following screenshots. The following screenshot shows the traditional infrastructure.

    Successful publishing of Traditional construct package to CodeArtifact

    The following screenshot shows the message for the serverless infrastructure.

    Successful publishing of Serverless construct package to CodeArtifact

    We just published version 1.0.1 of both the traditional and serverless web app constructs. To release a new version, we can simply update the version attribute in the package.json file in the traditional or serverless folder and repeat the last two steps.

    The following code snippet is for the traditional construct:

    {
        "name": "traditional-infrastructure",
        "main": "lib/index.js",
        "files": [
            "lib/*.js",
            "src"
        ],
        "types": "lib/index.d.ts",
        "version": "1.0.1",
    ...
    }

    The following code snippet is for the serverless construct:

    {
        "name": "serverless-infrastructure",
        "main": "lib/index.js",
        "files": [
            "lib/*.js",
            "src"
        ],
        "types": "lib/index.d.ts",
        "version": "1.0.1",
    ...
    }

Consuming the pattern constructs from CodeArtifact

In this step, we demonstrate how the pattern constructs published in the previous steps can be consumed and used to provision AWS infrastructure.

  1. From the root of the GitHub package, change the directory to the examples directory containing code for consuming traditional or serverless constructs.To consume the traditional construct, use the following code:
    cd examples/traditional

    To consume the serverless construct, use the following code:

    cd examples/serverless
  2. Open the package.json file in either directory and note that the packages and versions we consume are listed in the dependencies section, along with their version.
    The following code shows the traditional web app construct dependencies:

    "dependencies": {
        "@aws-cdk/core": "1.30.0",
        "traditional-infrastructure": "1.0.1",
        "aws-cdk": "1.47.0"
    }

    The following code shows the serverless web app construct dependencies:

    "dependencies": {
        "@aws-cdk/core": "1.30.0",
        "serverless-infrastructure": "1.0.1",
        "aws-cdk": "1.47.0"
    }
  3. Install the pattern artifact npm package along with the dependencies:
    rm package-lock.json && rm -rf node_modules
    npm install
    
  4. As an optional step, if you need to override the default Lambda function code, build the npm project. The following commands build the Lambda function source code:
    cd ../override-serverless
    npm run build
    cd -
  5. Bootstrap the project with the following code:
    cdk bootstrap

    This step is applicable for serverless applications only. It creates the Amazon Simple Storage Service (Amazon S3) staging bucket where the Lambda function code and artifacts are stored.

  6. Deploy the construct:
    cdk deploy --require-approval never

    If the deployment is successful, you see messages similar to the following screenshots. The following screenshot shows the traditional stack output, with the URL of the Load Balancer endpoint.

    Traditional CloudFormation stack outputs

    The following screenshot shows the serverless stack output, with the URL of the API Gateway endpoint.

    Serverless CloudFormation stack outputs

    You can test the endpoint for both constructs using a web browser or the following curl command:

    curl <endpoint output>

    The traditional web app endpoint returns a response similar to the following:

    [{"app": "traditional", "id": 1605186496, "purpose": "blog"}]

    The serverless stack returns two outputs. Use the output named ServerlessStack-v1.Api. See the following code:

    [{"purpose":"blog","app":"serverless","itemId":"1605190688947"}]

  7. Optionally, upgrade to a new version of pattern construct.
    Let’s assume that a new version of the serverless construct, version 1.0.2, has been published, and we want to upgrade our AWS infrastructure to this version. To do this, edit the package.json file and change the traditional-infrastructure or serverless-infrastructure package version in the dependencies section to 1.0.2. See the following code example:

    "dependencies": {
        "@aws-cdk/core": "1.30.0",
        "serverless-infrastructure": "1.0.2",
        "aws-cdk": "1.47.0"
    }

    To update the serverless-infrastructure package to 1.0.2, run the following command:

    npm update

    Then redeploy the CloudFormation stack:

    cdk deploy --require-approval never

Cleaning up

To avoid incurring future charges, clean up the resources you created.

  1. Delete all AWS resources that were created using the pattern constructs. We can use the AWS CDK toolkit to clean up all the resources:
    cdk destroy --force

    For more information about the AWS CDK toolkit, see Toolkit reference. Alternatively, delete the stack on the AWS CloudFormation console.

  2. Delete the CodeArtifact resources by deleting the CloudFormation stack that was deployed via AWS CDK:
    cd prerequisites
    cdk destroy –force
    

Conclusion

In this post, we demonstrated how to publish AWS CDK pattern constructs to CodeArtifact as npm packages. We also showed how teams can consume the published pattern constructs and use them to provision their AWS infrastructure.

This mechanism allows your infrastructure for AWS services to be provisioned from the configuration that has been vetted for quality control and security and governance checks. It also provides control over when new versions of the pattern constructs are released, and when the teams consuming the constructs can upgrade to the newly released versions.

About the Authors

Usman Umar


Usman Umar is a Sr. Applications Architect at AWS Professional Services. He is passionate about developing innovative ways to solve hard technical problems for the customers. In his free time, he likes going on biking trails, doing car modifications, and spending time with his family.


Krishnakumar Rengarajan


Krishnakumar Rengarajan is a DevOps Consultant with AWS Professional Services. He enjoys working with customers and focuses on building and delivering automated solutions that enables customers on their AWS cloud journeys.

Rapid and flexible Infrastructure as Code using the AWS CDK with AWS Solutions Constructs

Post Syndicated from Biff Gaut original https://aws.amazon.com/blogs/devops/rapid-flexible-infrastructure-with-solutions-constructs-cdk/

Introduction

As workloads move to the cloud and all infrastructure becomes virtual, infrastructure as code (IaC) becomes essential to leverage the agility of this new world. JSON and YAML are the powerful, declarative modeling languages of AWS CloudFormation, allowing you to define complex architectures using IaC. Just as higher level languages like BASIC and C abstracted away the details of assembly language and made developers more productive, the AWS Cloud Development Kit (AWS CDK) provides a programming model above the native template languages, a model that makes developers more productive when creating IaC. When you instantiate CDK objects in your Typescript (or Python, Java, etc.) application, those objects “compile” into a YAML template that the CDK deploys as an AWS CloudFormation stack.

AWS Solutions Constructs take this simplification a step further by providing a library of common service patterns built on top of the CDK. These multi-service patterns allow you to deploy multiple resources with a single object, resources that follow best practices by default – both independently and throughout their interaction.

Comparison of an Application stack with Assembly Language, 4th generation language and Object libraries such as Hibernate with an IaC stack of CloudFormation, AWS CDK and AWS Solutions Constructs

Application Development Stack vs. IaC Development Stack

Solution overview

To demonstrate how using Solutions Constructs can accelerate the development of IaC, in this post you will create an architecture that ingests and stores sensor readings using Amazon Kinesis Data Streams, AWS Lambda, and Amazon DynamoDB.

An architecture diagram showing sensor readings being sent to a Kinesis data stream. A Lambda function will receive the Kinesis records and store them in a DynamoDB table.

Prerequisite – Setting up the CDK environment

Tip – If you want to try this example but are concerned about the impact of changing the tools or versions on your workstation, try running it on AWS Cloud9. An AWS Cloud9 environment is launched with an AWS Identity and Access Management (AWS IAM) role and doesn’t require configuring with an access key. It uses the current region as the default for all CDK infrastructure.

To prepare your workstation for CDK development, confirm the following:

  • Node.js 10.3.0 or later is installed on your workstation (regardless of the language used to write CDK apps).
  • You have configured credentials for your environment. If you’re running locally you can do this by configuring the AWS Command Line Interface (AWS CLI).
  • TypeScript 2.7 or later is installed globally (npm -g install typescript)

Before creating your CDK project, install the CDK toolkit using the following command:

npm install -g aws-cdk

Create the CDK project

  1. First create a project folder called stream-ingestion with these two commands:

mkdir stream-ingestion
cd stream-ingestion

  1. Now create your CDK application using this command:

npx [email protected] init app --language=typescript

Tip – This example will be written in TypeScript – you can also specify other languages for your projects.

At this time, you must use the same version of the CDK and Solutions Constructs. We’re using version 1.68.0 of both based upon what’s available at publication time, but you can update this with a later version for your projects in the future.

Let’s explore the files in the application this command created:

  • bin/stream-ingestion.ts – This is the module that launches the application. The key line of code is:

new StreamIngestionStack(app, 'StreamIngestionStack');

This creates the actual stack, and it’s in StreamIngestionStack that you will write the CDK code that defines the resources in your architecture.

  • lib/stream-ingestion-stack.ts – This is the important class. In the constructor of StreamIngestionStack you will add the constructs that will create your architecture.

During the deployment process, the CDK uploads your Lambda function to an Amazon S3 bucket so it can be incorporated into your stack.

  1. To create that S3 bucket and any other infrastructure the CDK requires, run this command:

cdk bootstrap

The CDK uses the same supporting infrastructure for all projects within a region, so you only need to run the bootstrap command once in any region in which you create CDK stacks.

  1. To install the required Solutions Constructs packages for our architecture, run the these two commands from the command line:

npm install @aws-solutions-constructs/[email protected]

Write the code

First you will write the Lambda function that processes the Kinesis data stream messages.

  1. Create a folder named lambda under stream-ingestion
  2. Within the lambda folder save a file called lambdaFunction.js with the following contents:
var AWS = require("aws-sdk");

// Create the DynamoDB service object
var ddb = new AWS.DynamoDB({ apiVersion: "2012-08-10" });

AWS.config.update({ region: process.env.AWS_REGION });

// We will configure our construct to 
// look for the .handler function
exports.handler = async function (event) {
  try {
    // Kinesis will deliver records 
    // in batches, so we need to iterate through
    // each record in the batch
    for (let record of event.Records) {
      const reading = parsePayload(record.kinesis.data);
      await writeRecord(record.kinesis.partitionKey, reading);
    };
  } catch (err) {
    console.log(`Write failed, err:\n${JSON.stringify(err, null, 2)}`);
    throw err;
  }
  return;
};

// Write the provided sensor reading data to the DynamoDB table
async function writeRecord(partitionKey, reading) {

  var params = {
    // Notice that Constructs automatically sets up 
    // an environment variable with the table name.
    TableName: process.env.DDB_TABLE_NAME,
    Item: {
      partitionKey: { S: partitionKey },  // sensor Id
      timestamp: { S: reading.timestamp },
      value: { N: reading.value}
    },
  };

  // Call DynamoDB to add the item to the table
  await ddb.putItem(params).promise();
}

// Decode the payload and extract the sensor data from it
function parsePayload(payload) {

  const decodedPayload = Buffer.from(payload, "base64").toString(
    "ascii"
  );

  // Our CLI command will send the records to Kinesis
  // with the values delimited by '|'
  const payloadValues = decodedPayload.split("|", 2)
  return {
    value: payloadValues[0],
    timestamp: payloadValues[1]
  }
}

We won’t spend a lot of time explaining this function – it’s pretty straightforward and heavily commented. It receives an event with one or more sensor readings, and for each reading it extracts the pertinent data and saves it to the DynamoDB table.

You will use two Solutions Constructs to create your infrastructure:

The aws-kinesisstreams-lambda construct deploys an Amazon Kinesis data stream and a Lambda function.

  • aws-kinesisstreams-lambda creates the Kinesis data stream and Lambda function that subscribes to that stream. To support this, it also creates other resources, such as IAM roles and encryption keys.

The aws-lambda-dynamodb construct deploys a Lambda function and a DynamoDB table.

  • aws-lambda-dynamodb creates an Amazon DynamoDB table and a Lambda function with permission to access the table.
  1. To deploy the first of these two constructs, replace the code in lib/stream-ingestion-stack.ts with the following code:
import * as cdk from "@aws-cdk/core";
import * as lambda from "@aws-cdk/aws-lambda";
import { KinesisStreamsToLambda } from "@aws-solutions-constructs/aws-kinesisstreams-lambda";

import * as ddb from "@aws-cdk/aws-dynamodb";
import { LambdaToDynamoDB } from "@aws-solutions-constructs/aws-lambda-dynamodb";

export class StreamIngestionStack extends cdk.Stack {
  constructor(scope: cdk.Construct, id: string, props?: cdk.StackProps) {
    super(scope, id, props);

    const kinesisLambda = new KinesisStreamsToLambda(
      this,
      "KinesisLambdaConstruct",
      {
        lambdaFunctionProps: {
          // Where the CDK can find the lambda function code
          runtime: lambda.Runtime.NODEJS_10_X,
          handler: "lambdaFunction.handler",
          code: lambda.Code.fromAsset("lambda"),
        },
      }
    );

    // Next Solutions Construct goes here
  }
}

Let’s explore this code:

  • It instantiates a new KinesisStreamsToLambda object. This Solutions Construct will launch a new Kinesis data stream and a new Lambda function, setting up the Lambda function to receive all the messages in the Kinesis data stream. It will also deploy all the additional resources and policies required for the architecture to follow best practices.
  • The third argument to the constructor is the properties object, where you specify overrides of default values or any other information the construct needs. In this case you provide properties for the encapsulated Lambda function that informs the CDK where to find the code for the Lambda function that you stored as lambda/lambdaFunction.js earlier.
  1. Now you’ll add the second construct that connects the Lambda function to a new DynamoDB table. In the same lib/stream-ingestion-stack.ts file, replace the line // Next Solutions Construct goes here with the following code:
    // Define the primary key for the new DynamoDB table
    const primaryKeyAttribute: ddb.Attribute = {
      name: "partitionKey",
      type: ddb.AttributeType.STRING,
    };

    // Define the sort key for the new DynamoDB table
    const sortKeyAttribute: ddb.Attribute = {
      name: "timestamp",
      type: ddb.AttributeType.STRING,
    };

    const lambdaDynamoDB = new LambdaToDynamoDB(
      this,
      "LambdaDynamodbConstruct",
      {
        // Tell construct to use the Lambda function in
        // the first construct rather than deploy a new one
        existingLambdaObj: kinesisLambda.lambdaFunction,
        tablePermissions: "Write",
        dynamoTableProps: {
          partitionKey: primaryKeyAttribute,
          sortKey: sortKeyAttribute,
          billingMode: ddb.BillingMode.PROVISIONED,
          removalPolicy: cdk.RemovalPolicy.DESTROY
        },
      }
    );

    // Add autoscaling
    const readScaling = lambdaDynamoDB.dynamoTable.autoScaleReadCapacity({
      minCapacity: 1,
      maxCapacity: 50,
    });

    readScaling.scaleOnUtilization({
      targetUtilizationPercent: 50,
    });

Let’s explore this code:

  • The first two const objects define the names and types for the partition key and sort key of the DynamoDB table.
  • The LambdaToDynamoDB construct instantiated creates a new DynamoDB table and grants access to your Lambda function. The key to this call is the properties object you pass in the third argument.
    • The first property sent to LambdaToDynamoDB is existingLambdaObj – by setting this value to the Lambda function created by KinesisStreamsToLambda, you’re telling the construct to not create a new Lambda function, but to grant the Lambda function in the other Solutions Construct access to the DynamoDB table. This illustrates how you can chain many Solutions Constructs together to create complex architectures.
    • The second property sent to LambdaToDynamoDB tells the construct to limit the Lambda function’s access to the table to write only.
    • The third property sent to LambdaToDynamoDB is actually a full properties object defining the DynamoDB table. It provides the two attribute definitions you created earlier as well as the billing mode. It also sets the RemovalPolicy to DESTROY. This policy setting ensures that the table is deleted when you delete this stack – in most cases you should accept the default setting to protect your data.
  • The last two lines of code show how you can use statements to modify a construct outside the constructor. In this case we set up auto scaling on the new DynamoDB table, which we can access with the dynamoTable property on the construct we just instantiated.

That’s all it takes to create the all resources to deploy your architecture.

  1. Save all the files, then compile the Typescript into a CDK program using this command:

npm run build

  1. Finally, launch the stack using this command:

cdk deploy

(Enter “y” in response to Do you wish to deploy all these changes (y/n)?)

You will see some warnings where you override CDK default values. Because you are doing this intentionally you may disregard these, but it’s always a good idea to review these warnings when they occur.

Tip – Many mysterious CDK project errors stem from mismatched versions. If you get stuck on an inexplicable error, check package.json and confirm that all CDK and Solutions Constructs libraries have the same version number (with no leading caret ^). If necessary, correct the version numbers, delete the package-lock.json file and node_modules tree and run npm install. Think of this as the “turn it off and on again” first response to CDK errors.

You have now deployed the entire architecture for the demo – open the CloudFormation stack in the AWS Management Console and take a few minutes to explore all 12 resources that the program deployed (and the 380 line template generated to created them).

Feed the Stream

Now use the CLI to send some data through the stack.

Go to the Kinesis Data Streams console and copy the name of the data stream. Replace the stream name in the following command and run it from the command line.

aws kinesis put-records \
--stream-name StreamIngestionStack-KinesisLambdaConstructKinesisStreamXXXXXXXX-XXXXXXXXXXXX \
--records \
PartitionKey=1301,'Data=15.4|2020-08-22T01:16:36+00:00' \
PartitionKey=1503,'Data=39.1|2020-08-22T01:08:15+00:00'

Tip – If you are using the AWS CLI v2, the previous command will result in an “Invalid base64…” error because v2 expects the inputs to be Base64 encoded by default. Adding the argument --cli-binary-format raw-in-base64-out will fix the issue.

To confirm that the messages made it through the service, open the DynamoDB console – you should see the two records in the table.

Now that you’ve got it working, pause to think about what you just did. You deployed a system that can ingest and store sensor readings and scale to handle heavy loads. You did that by instantiating two objects – well under 60 lines of code. Experiment with changing some property values and deploying the changes by running npm run build and cdk deploy again.

Cleanup

To clean up the resources in the stack, run this command:

cdk destroy

Conclusion

Just as languages like BASIC and C allowed developers to write programs at a higher level of abstraction than assembly language, the AWS CDK and AWS Solutions Constructs allow us to create CloudFormation stacks in Typescript, Java, or Python instead JSON or YAML. Just as there will always be a place for assembly language, there will always be situations where we want to write CloudFormation templates manually – but for most situations, we can now use the AWS CDK and AWS Solutions Constructs to create complex and complete architectures in a fraction of the time with very little code.

AWS Solutions Constructs can currently be used in CDK applications written in Typescript, Javascript, Java and Python and will be available in C# applications soon.

About the Author

Biff Gaut has been shipping software since 1983, from small startups to large IT shops. Along the way he has contributed to 2 books, spoken at several conferences and written many blog posts. He is now a Principal Solutions Architect at AWS working on the AWS Solutions Constructs team, helping customers deploy better architectures more quickly.
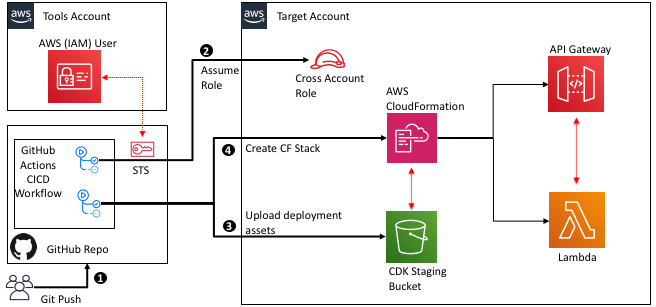
Building, bundling, and deploying applications with the AWS CDK

Post Syndicated from Cory Hall original https://aws.amazon.com/blogs/devops/building-apps-with-aws-cdk/

The AWS Cloud Development Kit (AWS CDK) is an open-source software development framework to model and provision your cloud application resources using familiar programming languages.

The post CDK Pipelines: Continuous delivery for AWS CDK applications showed how you can use CDK Pipelines to deploy a TypeScript-based AWS Lambda function. In that post, you learned how to add additional build commands to the pipeline to compile the TypeScript code to JavaScript, which is needed to create the Lambda deployment package.

In this post, we dive deeper into how you can perform these build commands as part of your AWS CDK build process by using the native AWS CDK bundling functionality.

If you’re working with Python, TypeScript, or JavaScript-based Lambda functions, you may already be familiar with the PythonFunction and NodejsFunction constructs, which use the bundling functionality. This post describes how to write your own bundling logic for instances where a higher-level construct either doesn’t already exist or doesn’t meet your needs. To illustrate this, I walk through two different examples: a Lambda function written in Golang and a static site created with Nuxt.js.

Concepts

A typical CI/CD pipeline contains steps to build and compile your source code, bundle it into a deployable artifact, push it to artifact stores, and deploy to an environment. In this post, we focus on the building, compiling, and bundling stages of the pipeline.

The AWS CDK has the concept of bundling source code into a deployable artifact. As of this writing, this works for two main types of assets: Docker images published to Amazon Elastic Container Registry (Amazon ECR) and files published to Amazon Simple Storage Service (Amazon S3). For files published to Amazon S3, this can be as simple as pointing to a local file or directory, which the AWS CDK uploads to Amazon S3 for you.

When you build an AWS CDK application (by running cdk synth), a cloud assembly is produced. The cloud assembly consists of a set of files and directories that define your deployable AWS CDK application. In the context of the AWS CDK, it might include the following:

  • AWS CloudFormation templates and instructions on where to deploy them
  • Dockerfiles, corresponding application source code, and information about where to build and push the images to
  • File assets and information about which S3 buckets to upload the files to

Use case

For this use case, our application consists of front-end and backend components. The example code is available in the GitHub repo. In the repository, I have split the example into two separate AWS CDK applications. The repo also contains the Golang Lambda example app and the Nuxt.js static site.

Golang Lambda function

To create a Golang-based Lambda function, you must first create a Lambda function deployment package. For Go, this consists of a .zip file containing a Go executable. Because we don’t commit the Go executable to our source repository, our CI/CD pipeline must perform the necessary steps to create it.

In the context of the AWS CDK, when we create a Lambda function, we have to tell the AWS CDK where to find the deployment package. See the following code:

new lambda.Function(this, 'MyGoFunction', {
  runtime: lambda.Runtime.GO_1_X,
  handler: 'main',
  code: lambda.Code.fromAsset(path.join(__dirname, 'folder-containing-go-executable')),
});

In the preceding code, the lambda.Code.fromAsset() method tells the AWS CDK where to find the Golang executable. When we run cdk synth, it stages this Go executable in the cloud assembly, which it zips and publishes to Amazon S3 as part of the PublishAssets stage.

If we’re running the AWS CDK as part of a CI/CD pipeline, this executable doesn’t exist yet, so how do we create it? One method is CDK bundling. The lambda.Code.fromAsset() method takes a second optional argument, AssetOptions, which contains the bundling parameter. With this bundling parameter, we can tell the AWS CDK to perform steps prior to staging the files in the cloud assembly.

Breaking down the BundlingOptions parameter further, we can perform the build inside a Docker container or locally.

Building inside a Docker container

For this to work, we need to make sure that we have Docker running on our build machine. In AWS CodeBuild, this means setting privileged: true. See the following code:

new lambda.Function(this, 'MyGoFunction', {
  code: lambda.Code.fromAsset(path.join(__dirname, 'folder-containing-source-code'), {
    bundling: {
      image: lambda.Runtime.GO_1_X.bundlingDockerImage,
      command: [
        'bash', '-c', [
          'go test -v',
          'GOOS=linux go build -o /asset-output/main',
      ].join(' && '),
    },
  })
  ...
});

We specify two parameters:

  • image (required) – The Docker image to perform the build commands in
  • command (optional) – The command to run within the container

The AWS CDK mounts the folder specified as the first argument to fromAsset at /asset-input inside the container, and mounts the asset output directory (where the cloud assembly is staged) at /asset-output inside the container.

After we perform the build commands, we need to make sure we copy the Golang executable to the /asset-output location (or specify it as the build output location like in the preceding example).

This is the equivalent of running something like the following code:

docker run \
  --rm \
  -v folder-containing-source-code:/asset-input \
  -v cdk.out/asset.1234a4b5/:/asset-output \
  lambci/lambda:build-go1.x \
  bash -c 'GOOS=linux go build -o /asset-output/main'

Building locally

To build locally (not in a Docker container), we have to provide the local parameter. See the following code:

new lambda.Function(this, 'MyGoFunction', {
  code: lambda.Code.fromAsset(path.join(__dirname, 'folder-containing-source-code'), {
    bundling: {
      image: lambda.Runtime.GO_1_X.bundlingDockerImage,
      command: [],
      local: {
        tryBundle(outputDir: string) {
          try {
            spawnSync('go version')
          } catch {
            return false
          }

          spawnSync(`GOOS=linux go build -o ${path.join(outputDir, 'main')}`);
          return true
        },
      },
    },
  })
  ...
});

The local parameter must implement the ILocalBundling interface. The tryBundle method is passed the asset output directory, and expects you to return a boolean (true or false). If you return true, the AWS CDK doesn’t try to perform Docker bundling. If you return false, it falls back to Docker bundling. Just like with Docker bundling, you must make sure that you place the Go executable in the outputDir.

Typically, you should perform some validation steps to ensure that you have the required dependencies installed locally to perform the build. This could be checking to see if you have go installed, or checking a specific version of go. This can be useful if you don’t have control over what type of build environment this might run in (for example, if you’re building a construct to be consumed by others).

If we run cdk synth on this, we see a new message telling us that the AWS CDK is bundling the asset. If we include additional commands like go test, we also see the output of those commands. This is especially useful if you wanted to fail a build if tests failed. See the following code:

$ cdk synth
Bundling asset GolangLambdaStack/MyGoFunction/Code/Stage...
✓  . (9ms)
✓  clients (5ms)

DONE 8 tests in 11.476s
✓  clients (5ms) (coverage: 84.6% of statements)
✓  . (6ms) (coverage: 78.4% of statements)

DONE 8 tests in 2.464s

Cloud Assembly

If we look at the cloud assembly that was generated (located at cdk.out), we see something like the following code:

$ cdk synth
Bundling asset GolangLambdaStack/MyGoFunction/Code/Stage...
✓  . (9ms)
✓  clients (5ms)

DONE 8 tests in 11.476s
✓  clients (5ms) (coverage: 84.6% of statements)
✓  . (6ms) (coverage: 78.4% of statements)

DONE 8 tests in 2.464s

It contains our GolangLambdaStack CloudFormation template that defines our Lambda function, as well as our Golang executable, bundled at asset.01cf34ff646d380829dc4f2f6fc93995b13277bde7db81c24ac8500a83a06952/main.

Let’s look at how the AWS CDK uses this information. The GolangLambdaStack.assets.json file contains all the information necessary for the AWS CDK to know where and how to publish our assets (in this use case, our Golang Lambda executable). See the following code:

{
  "version": "5.0.0",
  "files": {
    "01cf34ff646d380829dc4f2f6fc93995b13277bde7db81c24ac8500a83a06952": {
      "source": {
        "path": "asset.01cf34ff646d380829dc4f2f6fc93995b13277bde7db81c24ac8500a83a06952",
        "packaging": "zip"
      },
      "destinations": {
        "current_account-current_region": {
          "bucketName": "cdk-hnb659fds-assets-${AWS::AccountId}-${AWS::Region}",
          "objectKey": "01cf34ff646d380829dc4f2f6fc93995b13277bde7db81c24ac8500a83a06952.zip",
          "assumeRoleArn": "arn:${AWS::Partition}:iam::${AWS::AccountId}:role/cdk-hnb659fds-file-publishing-role-${AWS::AccountId}-${AWS::Region}"
        }
      }
    }
  }
}

The file contains information about where to find the source files (source.path) and what type of packaging (source.packaging). It also tells the AWS CDK where to publish this .zip file (bucketName and objectKey) and what AWS Identity and Access Management (IAM) role to use (assumeRoleArn). In this use case, we only deploy to a single account and Region, but if you have multiple accounts or Regions, you see multiple destinations in this file.

The GolangLambdaStack.template.json file that defines our Lambda resource looks something like the following code:

{
  "Resources": {
    "MyGoFunction0AB33E85": {
      "Type": "AWS::Lambda::Function",
      "Properties": {
        "Code": {
          "S3Bucket": {
            "Fn::Sub": "cdk-hnb659fds-assets-${AWS::AccountId}-${AWS::Region}"
          },
          "S3Key": "01cf34ff646d380829dc4f2f6fc93995b13277bde7db81c24ac8500a83a06952.zip"
        },
        "Handler": "main",
        ...
      }
    },
    ...
  }
}

The S3Bucket and S3Key match the bucketName and objectKey from the assets.json file. By default, the S3Key is generated by calculating a hash of the folder location that you pass to lambda.Code.fromAsset(), (for this post, folder-containing-source-code). This means that any time we update our source code, this calculated hash changes and a new Lambda function deployment is triggered.

Nuxt.js static site

In this section, I walk through building a static site using the Nuxt.js framework. You can apply the same logic to any static site framework that requires you to run a build step prior to deploying.

To deploy this static site, we use the BucketDeployment construct. This is a construct that allows you to populate an S3 bucket with the contents of .zip files from other S3 buckets or from a local disk.

Typically, we simply tell the BucketDeployment construct where to find the files that it needs to deploy to the S3 bucket. See the following code:

new s3_deployment.BucketDeployment(this, 'DeployMySite', {
  sources: [
    s3_deployment.Source.asset(path.join(__dirname, 'path-to-directory')),
  ],
  destinationBucket: myBucket
});

To deploy a static site built with a framework like Nuxt.js, we need to first run a build step to compile the site into something that can be deployed. For Nuxt.js, we run the following two commands:

  • yarn install – Installs all our dependencies
  • yarn generate – Builds the application and generates every route as an HTML file (used for static hosting)

This creates a dist directory, which you can deploy to Amazon S3.

Just like with the Golang Lambda example, we can perform these steps as part of the AWS CDK through either local or Docker bundling.

Building inside a Docker container

To build inside a Docker container, use the following code:

new s3_deployment.BucketDeployment(this, 'DeployMySite', {
  sources: [
    s3_deployment.Source.asset(path.join(__dirname, 'path-to-nuxtjs-project'), {
      bundling: {
        image: cdk.BundlingDockerImage.fromRegistry('node:lts'),
        command: [
          'bash', '-c', [
            'yarn install',
            'yarn generate',
            'cp -r /asset-input/dist/* /asset-output/',
          ].join(' && '),
        ],
      },
    }),
  ],
  ...
});

For this post, we build inside the publicly available node:lts image hosted on DockerHub. Inside the container, we run our build commands yarn install && yarn generate, and copy the generated dist directory to our output directory (the cloud assembly).

The parameters are the same as described in the Golang example we walked through earlier.

Building locally

To build locally, use the following code:

new s3_deployment.BucketDeployment(this, 'DeployMySite', {
  sources: [
    s3_deployment.Source.asset(path.join(__dirname, 'path-to-nuxtjs-project'), {
      bundling: {
        local: {
          tryBundle(outputDir: string) {
            try {
              spawnSync('yarn --version');
            } catch {
              return false
            }

            spawnSync('yarn install && yarn generate');

       fs.copySync(path.join(__dirname, ‘path-to-nuxtjs-project’, ‘dist’), outputDir);
            return true
          },
        },
        image: cdk.BundlingDockerImage.fromRegistry('node:lts'),
        command: [],
      },
    }),
  ],
  ...
});

Building locally works the same as the Golang example we walked through earlier, with one exception. We have one additional command to run that copies the generated dist folder to our output directory (cloud assembly).

Conclusion

This post showed how you can easily compile your backend and front-end applications using the AWS CDK. You can find the example code for this post in this GitHub repo. If you have any questions or comments, please comment on the GitHub repo. If you have any additional examples you want to add, we encourage you to create a Pull Request with your example!

Our code also contains examples of deploying the applications using CDK Pipelines, so if you’re interested in deploying the example yourself, check out the example repo.


About the author

Cory Hall

Cory is a Solutions Architect at Amazon Web Services with a passion for DevOps and is based in Charlotte, NC. Cory works with enterprise AWS customers to help them design, deploy, and scale applications to achieve their business goals.

Cross-account and cross-region deployment using GitHub actions and AWS CDK

Post Syndicated from DAMODAR SHENVI WAGLE original https://aws.amazon.com/blogs/devops/cross-account-and-cross-region-deployment-using-github-actions-and-aws-cdk/

GitHub Actions is a feature on GitHub’s popular development platform that helps you automate your software development workflows in the same place you store code and collaborate on pull requests and issues. You can write individual tasks called actions, and combine them to create a custom workflow. Workflows are custom automated processes that you can set up in your repository to build, test, package, release, or deploy any code project on GitHub.

A cross-account deployment strategy is a CI/CD pattern or model in AWS. In this pattern, you have a designated AWS account called tools, where all CI/CD pipelines reside. Deployment is carried out by these pipelines across other AWS accounts, which may correspond to dev, staging, or prod. For more information about a cross-account strategy in reference to CI/CD pipelines on AWS, see Building a Secure Cross-Account Continuous Delivery Pipeline.

In this post, we show you how to use GitHub Actions to deploy an AWS Lambda-based API to an AWS account and Region using the cross-account deployment strategy.

Using GitHub Actions may have associated costs in addition to the cost associated with the AWS resources you create. For more information, see About billing for GitHub Actions.

Prerequisites

Before proceeding any further, you need to identify and designate two AWS accounts required for the solution to work:

  • Tools – Where you create an AWS Identity and Access Management (IAM) user for GitHub Actions to use to carry out deployment.
  • Target – Where deployment occurs. You can call this as your dev/stage/prod environment.

You also need to create two AWS account profiles in ~/.aws/credentials for the tools and target accounts, if you don’t already have them. These profiles need to have sufficient permissions to run an AWS Cloud Development Kit (AWS CDK) stack. They should be your private profiles and only be used during the course of this use case. So, it should be fine if you want to use admin privileges. Don’t share the profile details, especially if it has admin privileges. I recommend removing the profile when you’re finished with this walkthrough. For more information about creating an AWS account profile, see Configuring the AWS CLI.

Solution overview

You start by building the necessary resources in the tools account (an IAM user with permissions to assume a specific IAM role from the target account to carry out deployment). For simplicity, we refer to this IAM role as the cross-account role, as specified in the architecture diagram.

You also create the cross-account role in the target account that trusts the IAM user in the tools account and provides the required permissions for AWS CDK to bootstrap and initiate creating an AWS CloudFormation deployment stack in the target account. GitHub Actions uses the tools account IAM user credentials to the assume the cross-account role to carry out deployment.

In addition, you create an AWS CloudFormation execution role in the target account, which AWS CloudFormation service assumes in the target account. This role has permissions to create your API resources, such as a Lambda function and Amazon API Gateway, in the target account. This role is passed to AWS CloudFormation service via AWS CDK.

You then configure your tools account IAM user credentials in your Git secrets and define the GitHub Actions workflow, which triggers upon pushing code to a specific branch of the repo. The workflow then assumes the cross-account role and initiates deployment.

The following diagram illustrates the solution architecture and shows AWS resources across the tools and target accounts.

Architecture diagram

Creating an IAM user

You start by creating an IAM user called git-action-deployment-user in the tools account. The user needs to have only programmatic access.

  1. Clone the GitHub repo aws-cross-account-cicd-git-actions-prereq and navigate to folder tools-account. Here you find the JSON parameter file src/cdk-stack-param.json, which contains the parameter CROSS_ACCOUNT_ROLE_ARN, which represents the ARN for the cross-account role we create in the next step in the target account. In the ARN, replace <target-account-id> with the actual account ID for your designated AWS target account.                                             Replace <target-account-id> with designated AWS account id
  2. Run deploy.sh by passing the name of the tools AWS account profile you created earlier. The script compiles the code, builds a package, and uses the AWS CDK CLI to bootstrap and deploy the stack. See the following code:
cd aws-cross-account-cicd-git-actions-prereq/tools-account/
./deploy.sh "<AWS-TOOLS-ACCOUNT-PROFILE-NAME>"

You should now see two stacks in the tools account: CDKToolkit and cf-GitActionDeploymentUserStack. AWS CDK creates the CDKToolkit stack when we bootstrap the AWS CDK app. This creates an Amazon Simple Storage Service (Amazon S3) bucket needed to hold deployment assets such as a CloudFormation template and Lambda code package. cf-GitActionDeploymentUserStack creates the IAM user with permission to assume git-action-cross-account-role (which you create in the next step). On the Outputs tab of the stack, you can find the user access key and the AWS Secrets Manager ARN that holds the user secret. To retrieve the secret, you need to go to Secrets Manager. Record the secret to use later.

Stack that creates IAM user with its secret stored in secrets manager

Creating a cross-account IAM role

In this step, you create two IAM roles in the target account: git-action-cross-account-role and git-action-cf-execution-role.

git-action-cross-account-role provides required deployment-specific permissions to the IAM user you created in the last step. The IAM user in the tools account can assume this role and perform the following tasks:

  • Upload deployment assets such as the CloudFormation template and Lambda code package to a designated S3 bucket via AWS CDK
  • Create a CloudFormation stack that deploys API Gateway and Lambda using AWS CDK

AWS CDK passes git-action-cf-execution-role to AWS CloudFormation to create, update, and delete the CloudFormation stack. It has permissions to create API Gateway and Lambda resources in the target account.

To deploy these two roles using AWS CDK, complete the following steps:

  1. In the already cloned repo from the previous step, navigate to the folder target-account. This folder contains the JSON parameter file cdk-stack-param.json, which contains the parameter TOOLS_ACCOUNT_USER_ARN, which represents the ARN for the IAM user you previously created in the tools account. In the ARN, replace <tools-account-id> with the actual account ID for your designated AWS tools account.                                             Replace <tools-account-id> with designated AWS account id
  2. Run deploy.sh by passing the name of the target AWS account profile you created earlier. The script compiles the code, builds the package, and uses the AWS CDK CLI to bootstrap and deploy the stack. See the following code:
cd ../target-account/
./deploy.sh "<AWS-TARGET-ACCOUNT-PROFILE-NAME>"

You should now see two stacks in your target account: CDKToolkit and cf-CrossAccountRolesStack. AWS CDK creates the CDKToolkit stack when we bootstrap the AWS CDK app. This creates an S3 bucket to hold deployment assets such as the CloudFormation template and Lambda code package. The cf-CrossAccountRolesStack creates the two IAM roles we discussed at the beginning of this step. The IAM role git-action-cross-account-role now has the IAM user added to its trust policy. On the Outputs tab of the stack, you can find these roles’ ARNs. Record these ARNs as you conclude this step.

Stack that creates IAM roles to carry out cross account deployment

Configuring secrets

One of the GitHub actions we use is aws-actions/configure-aws-credentials@v1. This action configures AWS credentials and Region environment variables for use in the GitHub Actions workflow. The AWS CDK CLI detects the environment variables to determine the credentials and Region to use for deployment.

For our cross-account deployment use case, aws-actions/configure-aws-credentials@v1 takes three pieces of sensitive information besides the Region: AWS_ACCESS_KEY_ID, AWS_ACCESS_KEY_SECRET, and CROSS_ACCOUNT_ROLE_TO_ASSUME. Secrets are recommended for storing sensitive pieces of information in the GitHub repo. It keeps the information in an encrypted format. For more information about referencing secrets in the workflow, see Creating and storing encrypted secrets.

Before we continue, you need your own empty GitHub repo to complete this step. Use an existing repo if you have one, or create a new repo. You configure secrets in this repo. In the next section, you check in the code provided by the post to deploy a Lambda-based API CDK stack into this repo.

  1. On the GitHub console, navigate to your repo settings and choose the Secrets tab.
  2. Add a new secret with name as TOOLS_ACCOUNT_ACCESS_KEY_ID.
  3. Copy the access key ID from the output OutGitActionDeploymentUserAccessKey of the stack GitActionDeploymentUserStack in tools account.
  4. Enter the ID in the Value field.                                                                                                                                                                Create secret
  5. Repeat this step to add two more secrets:
    • TOOLS_ACCOUNT_SECRET_ACCESS_KEY (value retrieved from the AWS Secrets Manager in tools account)
    • CROSS_ACCOUNT_ROLE (value copied from the output OutCrossAccountRoleArn of the stack cf-CrossAccountRolesStack in target account)

You should now have three secrets as shown below.

All required git secrets

Deploying with GitHub Actions

As the final step, first clone your empty repo where you set up your secrets. Download and copy the code from the GitHub repo into your empty repo. The folder structure of your repo should mimic the folder structure of source repo. See the following screenshot.

Folder structure of the Lambda API code

We can take a detailed look at the code base. First and foremost, we use Typescript to deploy our Lambda API, so we need an AWS CDK app and AWS CDK stack. The app is defined in app.ts under the repo root folder location. The stack definition is located under the stack-specific folder src/git-action-demo-api-stack. The Lambda code is located under the Lambda-specific folder src/git-action-demo-api-stack/lambda/ git-action-demo-lambda.

We also have a deployment script deploy.sh, which compiles the app and Lambda code, packages the Lambda code into a .zip file, bootstraps the app by copying the assets to an S3 bucket, and deploys the stack. To deploy the stack, AWS CDK has to pass CFN_EXECUTION_ROLE to AWS CloudFormation; this role is configured in src/params/cdk-stack-param.json. Replace <target-account-id> with your own designated AWS target account ID.

Update cdk-stack-param.json in git-actions-cross-account-cicd repo with TARGET account id

Finally, we define the Git Actions workflow under the .github/workflows/ folder per the specifications defined by GitHub Actions. GitHub Actions automatically identifies the workflow in this location and triggers it if conditions match. Our workflow .yml file is named in the format cicd-workflow-<region>.yml, where <region> in the file name identifies the deployment Region in the target account. In our use case, we use us-east-1 and us-west-2, which is also defined as an environment variable in the workflow.

The GitHub Actions workflow has a standard hierarchy. The workflow is a collection of jobs, which are collections of one or more steps. Each job runs on a virtual machine called a runner, which can either be GitHub-hosted or self-hosted. We use the GitHub-hosted runner ubuntu-latest because it works well for our use case. For more information about GitHub-hosted runners, see Virtual environments for GitHub-hosted runners. For more information about the software preinstalled on GitHub-hosted runners, see Software installed on GitHub-hosted runners.

The workflow also has a trigger condition specified at the top. You can schedule the trigger based on the cron settings or trigger it upon code pushed to a specific branch in the repo. See the following code:

name: Lambda API CICD Workflow
# This workflow is triggered on pushes to the repository branch master.
on:
  push:
    branches:
      - master

# Initializes environment variables for the workflow
env:
  REGION: us-east-1 # Deployment Region

jobs:
  deploy:
    name: Build And Deploy
    # This job runs on Linux
    runs-on: ubuntu-latest
    steps:
      # Checkout code from git repo branch configured above, under folder $GITHUB_WORKSPACE.
      - name: Checkout
        uses: actions/checkout@v2
      # Sets up AWS profile.
      - name: Configure AWS credentials
        uses: aws-actions/configure-aws-credentials@v1
        with:
          aws-access-key-id: ${{ secrets.TOOLS_ACCOUNT_ACCESS_KEY_ID }}
          aws-secret-access-key: ${{ secrets.TOOLS_ACCOUNT_SECRET_ACCESS_KEY }}
          aws-region: ${{ env.REGION }}
          role-to-assume: ${{ secrets.CROSS_ACCOUNT_ROLE }}
          role-duration-seconds: 1200
          role-session-name: GitActionDeploymentSession
      # Installs CDK and other prerequisites
      - name: Prerequisite Installation
        run: |
          sudo npm install -g [email protected]
          cdk --version
          aws s3 ls
      # Build and Deploy CDK application
      - name: Build & Deploy
        run: |
          cd $GITHUB_WORKSPACE
          ls -a
          chmod 700 deploy.sh
          ./deploy.sh

For more information about triggering workflows, see Triggering a workflow with events.

We have configured a single job workflow for our use case that runs on ubuntu-latest and is triggered upon a code push to the master branch. When you create an empty repo, master branch becomes the default branch. The workflow has four steps:

  1. Check out the code from the repo, for which we use a standard Git action actions/checkout@v2. The code is checked out into a folder defined by the variable $GITHUB_WORKSPACE, so it becomes the root location of our code.
  2. Configure AWS credentials using aws-actions/configure-aws-credentials@v1. This action is configured as explained in the previous section.
  3. Install your prerequisites. In our use case, the only prerequisite we need is AWS CDK. Upon installing AWS CDK, we can do a quick test using the AWS Command Line Interface (AWS CLI) command aws s3 ls. If cross-account access was successfully established in the previous step of the workflow, this command should return a list of buckets in the target account.
  4. Navigate to root location of the code $GITHUB_WORKSPACE and run the deploy.sh script.

You can check in the code into the master branch of your repo. This should trigger the workflow, which you can monitor on the Actions tab of your repo. The commit message you provide is displayed for the respective run of the workflow.

Workflow for region us-east-1 Workflow for region us-west-2

You can choose the workflow link and monitor the log for each individual step of the workflow.

Git action workflow steps

In the target account, you should now see the CloudFormation stack cf-GitActionDemoApiStack in us-east-1 and us-west-2.

Lambda API stack in us-east-1 Lambda API stack in us-west-2

The API resource URL DocUploadRestApiResourceUrl is located on the Outputs tab of the stack. You can invoke your API by choosing this URL on the browser.

API Invocation Output

Clean up

To remove all the resources from the target and tools accounts, complete the following steps in their given order:

  1. Delete the CloudFormation stack cf-GitActionDemoApiStack from the target account. This step removes the Lambda and API Gateway resources and their associated IAM roles.
  2. Delete the CloudFormation stack cf-CrossAccountRolesStack from the target account. This removes the cross-account role and CloudFormation execution role you created.
  3. Go to the CDKToolkit stack in the target account and note the BucketName on the Output tab. Empty that bucket and then delete the stack.
  4. Delete the CloudFormation stack cf-GitActionDeploymentUserStack from tools account. This removes cross-account-deploy-user IAM user.
  5. Go to the CDKToolkit stack in the tools account and note the BucketName on the Output tab. Empty that bucket and then delete the stack.

Security considerations

Cross-account IAM roles are very powerful and need to be handled carefully. For this post, we strictly limited the cross-account IAM role to specific Amazon S3 and CloudFormation permissions. This makes sure that the cross-account role can only do those things. The actual creation of Lambda, API Gateway, and Amazon DynamoDB resources happens via the AWS CloudFormation IAM role, which AWS  CloudFormation assumes in the target AWS account.

Make sure that you use secrets to store your sensitive workflow configurations, as specified in the section Configuring secrets.

Conclusion

In this post we showed how you can leverage GitHub’s popular software development platform to securely deploy to AWS accounts and Regions using GitHub actions and AWS CDK.

Build your own GitHub Actions CI/CD workflow as shown in this post.

About the author


Damodar Shenvi Wagle is a Cloud Application Architect at AWS Professional Services. His areas of expertise include architecting serverless solutions, ci/cd and automation.