Tag Archives: AWS CodeBuild

Building an InnerSource ecosystem using AWS DevOps tools

Post Syndicated from Debashish Chakrabarty original https://aws.amazon.com/blogs/devops/building-an-innersource-ecosystem-using-aws-devops-tools/

InnerSource is the term for the emerging practice of organizations adopting the open source methodology, albeit to develop proprietary software. This blog discusses the building of a model InnerSource ecosystem that leverages multiple AWS services, such as CodeBuild, CodeCommit, CodePipeline, CodeArtifact, and CodeGuru, along with other AWS services and open source tools.

What is InnerSource and why is it gaining traction?

Most software companies leverage open source software (OSS) in their products, as it is a great mechanism for standardizing software and bringing in cost effectiveness via the re-use of high quality, time-tested code. Some organizations may allow its use as-is, while others may utilize a vetting mechanism to ensure that the OSS adheres to the organization standards of security, quality, etc. This confidence in OSS stems from how these community projects are managed and sustained, as well as the culture of openness, collaboration, and creativity that they nurture.

Many organizations building closed source software are now trying to imitate these development principles and practices. This approach, which has been perhaps more discussed than adopted, is popularly called “InnerSource”. InnerSource serves as a great tool for collaborative software development within the organization perimeter, while keeping its concerns for IP & Legality in check. It provides collaboration and innovation avenues beyond the confines of organizational silos through knowledge and talent sharing. Organizations reap the benefits of better code quality and faster time-to-market, yet at only a fraction of the cost.

What constitutes an InnerSource ecosystem?

Infrastructure and processes that harbor collaboration stand at the heart of InnerSource ecology. These systems (refer Figure 1) would typically include tools supporting features such as code hosting, peer reviews, Pull Request (PR) approval flow, issue tracking, documentation, communication & collaboration, continuous integration, and automated testing, among others. Another major component of this system is an entry portal that enables the employees to discover the InnerSource projects and join the community, beginning as ordinary users of the reusable code and later graduating to contributors and committers.

A typical InnerSource ecosystem

Figure 1: A typical InnerSource ecosystem

More to InnerSource than meets the eye

This blog focuses on detailing a technical solution for establishing the required tools for an InnerSource system primarily to enable a development workflow and infrastructure. But the secret sauce of an InnerSource initiative in an enterprise necessitates many other ingredients.

InnerSource Roles & Use Cases

Figure 2: InnerSource Roles & Use Cases

InnerSource thrives on community collaboration and a low entry barrier to enable adoptability. In turn, that demands a cultural makeover. While strategically deciding on the projects that can be inner sourced as well as the appropriate licensing model, enterprises should bootstrap the initiative with a seed product that draws the community, with maintainers and the first set of contributors. Many of these users would eventually be promoted, through a meritocracy-based system, to become the trusted committers.

Over a set period, the organization should plan to move from an infra specific model to a project specific model. In a Project-specific InnerSource model, the responsibility for a particular software asset is owned by a dedicated team funded by other business units. Whereas in the Infrastructure-based InnerSource model, the organization provides the necessary infrastructure to create the ecosystem with code & document repositories, communication tools, etc. This enables anybody in the organization to create a new InnerSource project, although each project initiator maintains their own projects. They could begin by establishing a community of practice, and designating a core team that would provide continuing support to the InnerSource projects’ internal customers. Having a team of dedicated resources would clearly indicate the organization’s long-term commitment to sustaining the initiative. The organization should promote this culture through regular boot camps, trainings, and a recognition program.

Lastly, the significance of having a modular architecture in the InnerSource projects cannot be understated. This architecture helps developers understand the code better, as well as aids code reuse and parallel development, where multiple contributors could work on different code modules while avoiding conflicts during code merges.

A model InnerSource solution using AWS services

This blog discusses a solution that weaves various services together to create the necessary infrastructure for an InnerSource system. While it is not a full-blown solution, and it may lack some other components that an organization may desire in its own system, it can provide you with a good head start.

The ultimate goal of the model solution is to enable a developer workflow as depicted in Figure 3.

Typical developer workflow at InnerSource

Figure 3: Typical developer workflow at InnerSource

At the core of the InnerSource-verse is the distributed version control (AWS CodeCommit in our case). To maintain system transparency, openness, and participation, we must have a discovery mechanism where users could search for the projects and receive encouragement to contribute to the one they prefer (Step 1 in Figure 4).

Architecture diagram for the model InnerSource system

Figure 4: Architecture diagram for the model InnerSource system

For this purpose, the model solution utilizes an open source reference implantation of InnerSource Portal. The portal indexes data from AWS CodeCommit by using a crawler, and it lists available projects with associated metadata, such as the skills required, number of active branches, and average number of commits. For CodeCommit, you can use the crawler implementation that we created in the open source code repo at https://github.com/aws-samples/codecommit-crawler-innersource.

The major portal feature is providing an option to contribute to a project by using a “Contribute” link. This can present a pop-up form to “apply as a contributor” (Step 2 in Figure 4), which when submitted sends an email (or creates a ticket) to the project maintainer/committer who can create an IAM (Step 3 in Figure 4) user with access to the particular repository. Note that the pop-up form functionality is built into the open source version of the portal. However, it would be trivial to add one with an associated action (send an email, cut a ticket, etc.).

InnerSource portal indexes CodeCommit repos and provides a bird’s eye view

Figure 5: InnerSource portal indexes CodeCommit repos and provides a bird’s eye view

The contributor, upon receiving access, logs in to CodeCommit, clones the mainline branch of the InnerSource project (Step 4 in Figure 4) into a fix or feature branch, and starts altering/adding the code. Once completed, the contributor commits the code to the branch and raises a PR (Step 5 in Figure 4). A Pull Request is a mechanism to offer code to an existing repository, which is then peer-reviewed and tested before acceptance for inclusion.

The PR triggers a CodeGuru review (Step 6 in Figure 4) that adds the recommendations as comments on the PR. Furthermore, it triggers a CodeBuild process (Steps 7 to 10 in Figure 4) and logs the build result in the PR. At this point, the code can be peer reviewed by Trusted Committers or Owners of the project repository. The number of approvals would depend on the approval template rule configured in CodeCommit. The Committer(s) can approve the PR (Step 12 in Figure 4) and merge the code to the mainline branch – that is once they verify that the code serves its purpose, has passed the required tests, and doesn’t break the build. They could also rely on the approval vote from a sanity test conducted by a CodeBuild process. Optionally, a build process could deploy the latest mainline code (Step 14 in Figure 4) on the PR merge commit.

To maintain transparency in all communications related to progress, bugs, and feature requests to downstream users and contributors, a communication tool may be needed. This solution does not show integration with any Issue/Bug tracking tool out of the box. However, multiple of these tools are available at the AWS marketplace, with some offering forum and Wiki add-ons in order to elicit discussions. Standard project documentation can be kept within the repository by using the constructs of the README.md file to provide project mission details and the CONTRIBUTING.md file to guide the potential code contributors.

An overview of the AWS services used in the model solution

The model solution employs the following AWS services:

  • Amazon CodeCommit: a fully managed source control service to host secure and highly scalable private Git repositories.
  • Amazon CodeBuild: a fully managed build service that compiles source code, runs tests, and produces software packages that are ready to deploy.
  • Amazon CodeDeploy: a service that automates code deployments to any instance, including EC2 instances and instances running on-premises.
  • Amazon CodeGuru: a developer tool providing intelligent recommendations to improve code quality and identify an application’s most expensive lines of code.
  • Amazon CodePipeline: a fully managed continuous delivery service that helps automate release pipelines for fast and reliable application and infrastructure updates.
  • Amazon CodeArtifact: a fully managed artifact repository service that makes it easy to securely store, publish, and share software packages utilized in their software development process.
  • Amazon S3: an object storage service that offers industry-leading scalability, data availability, security, and performance.
  • Amazon EC2: a web service providing secure, resizable compute capacity in the cloud. It is designed to ease web-scale computing for developers.
  • Amazon EventBridge: a serverless event bus that eases the building of event-driven applications at scale by using events generated from applications and AWS services.
  • Amazon Lambda: a serverless compute service that lets you run code without provisioning or managing servers.

The journey of a thousand miles begins with a single step

InnerSource might not be the right fit for every organization, but is a great step for those wanting to encourage a culture of quality and innovation, as well as purge silos through enhanced collaboration. It requires backing from leadership to sponsor the engineering initiatives, as well as champion the establishment of an open and transparent culture granting autonomy to the developers across the org to contribute to projects outside of their teams. The organizations best-suited for InnerSource have already participated in open source initiatives, have engineering teams that are adept with CI/CD tools, and are willing to adopt OSS practices. They should start small with a pilot and build upon their successes.

Conclusion

Ever more enterprises are adopting the open source culture to develop proprietary software by establishing an InnerSource. This instills innovation, transparency, and collaboration that result in cost effective and quality software development. This blog discussed a model solution to build the developer workflow inside an InnerSource ecosystem, from project discovery to PR approval and deployment. Additional features, like an integrated Issue Tracker, Real time chat, and Wiki/Forum, can further enrich this solution.

If you need helping hands, AWS Professional Services can help adapt and implement this model InnerSource solution in your enterprise. Moreover, our Advisory services can help establish the governance model to accelerate OSS culture adoption through Experience Based Acceleration (EBA) parties.

References

About the authors

Debashish Chakrabarty

Debashish Chakrabarty

Debashish is a Senior Engagement Manager at AWS Professional Services, India managing complex projects on DevOps, Security and Modernization and help ProServe customers accelerate their adoption of AWS Services. He loves to keep connected to his technical roots. Outside of work, Debashish is a Hindi Podcaster and Blogger. He also loves binge-watching on Amazon Prime, and spending time with family.

Akash Verma

Akash Verma

Akash works as a Cloud Consultant for AWS Professional Services, India. He enjoys learning new technologies and helping customers solve complex technical problems and drive business outcomes by providing solutions using AWS products and services. Outside of work, Akash loves to travel, interact with new people and try different cuisines. He also enjoy gardening, watching Stand-up comedy, and listening to poetry.

Using AWS CodePipeline for deploying container images to AWS Lambda Functions

Post Syndicated from Kirankumar Chandrashekar original https://aws.amazon.com/blogs/devops/using-aws-codepipeline-for-deploying-container-images-to-aws-lambda-functions/

AWS Lambda launched support for packaging and deploying functions as container images at re:Invent 2020. In the post working with Lambda layers and extensions in container images, we demonstrated packaging Lambda Functions with layers while using container images. This post will teach you to use AWS CodePipeline to deploy docker images for microservices architecture involving multiple Lambda Functions and a common layer utilized as a separate container image. Lambda functions packaged as container images do not support adding Lambda layers to the function configuration. Alternatively, we can use a container image as a common layer while building other container images along with Lambda Functions shown in this post. Packaging Lambda functions as container images enables familiar tooling and larger deployment limits.

Here are some advantages of using container images for Lambda:

  • Easier dependency management and application building with container
    • Install native operating system packages
    • Install language-compatible dependencies
  • Consistent tool set for containers and Lambda-based applications
    • Utilize the same container registry to store application artifacts (Amazon ECR, Docker Hub)
    • Utilize the same build and pipeline tools to deploy
    • Tools that can inspect Dockerfile work the same
  • Deploy large applications with AWS-provided or third-party images up to 10 GB
    • Include larger application dependencies that previously were impossible

When using container images with Lambda, CodePipeline automatically detects code changes in the source repository in AWS CodeCommit, then passes the artifact to the build server like AWS CodeBuild and pushes the container images to ECR, which is then deployed to Lambda functions.

Architecture diagram


DevOps Architecture

Lambda-docker-images-DevOps-Architecture

Application Architecture

lambda-docker-image-microservices-app

In the above architecture diagram, two architectures are combined, namely 1, DevOps Architecture and 2, Microservices Application Architecture. DevOps architecture demonstrates the use of AWS Developer services such as AWS CodeCommit, AWS CodePipeline, AWS CodeBuild along with Amazon Elastic Container Repository (ECR) and AWS CloudFormation. These are used to support Continuous Integration and Continuous Deployment/Delivery (CI/CD) for both infrastructure and application code. Microservices Application architecture demonstrates how various AWS Lambda Functions that are part of microservices utilize container images for application code. This post will focus on performing CI/CD for Lambda functions utilizing container containers. The application code used in here is a simpler version taken from Serverless DataLake Framework (SDLF). For more information, refer to the AWS Samples GitHub repository for SDLF here.

DevOps workflow

There are two CodePipelines: one for building and pushing the common layer docker image to Amazon ECR, and another for building and pushing the docker images for all the Lambda Functions within the microservices architecture to Amazon ECR, as well as deploying the microservices architecture involving Lambda Functions via CloudFormation. Common layer container image functions as a common layer in all other Lambda Function container images, therefore its code is maintained in a separate CodeCommit repository used as a source stage for a CodePipeline. Common layer CodePipeline takes the code from the CodeCommit repository and passes the artifact to a CodeBuild project that builds the container image and pushes it to an Amazon ECR repository. This common layer ECR repository functions as a source in addition to the CodeCommit repository holding the code for all other Lambda Functions and resources involved in the microservices architecture CodePipeline.

Due to all or the majority of the Lambda Functions in the microservices architecture requiring the common layer container image as a layer, any change made to it should invoke the microservices architecture CodePipeline that builds the container images for all Lambda Functions. Moreover, a CodeCommit repository holding the code for every resource in the microservices architecture is another source to that CodePipeline to get invoked. This has two sources, because the container images in the microservices architecture should be built for changes in the common layer container image as well as for the code changes made and pushed to the CodeCommit repository.

Below is the sample dockerfile that uses the common layer container image as a layer:

ARG ECR_COMMON_DATALAKE_REPO_URL
FROM ${ECR_COMMON_DATALAKE_REPO_URL}:latest AS layer
FROM public.ecr.aws/lambda/python:3.8
# Layer Code
WORKDIR /opt
COPY --from=layer /opt/ .
# Function Code
WORKDIR /var/task
COPY src/lambda_function.py .
CMD ["lambda_function.lambda_handler"]

where the argument ECR_COMMON_DATALAKE_REPO_URL should resolve to the ECR url for common layer container image, which is provided to the --build-args along with docker build command. For example:

export ECR_COMMON_DATALAKE_REPO_URL="0123456789.dkr.ecr.us-east-2.amazonaws.com/dev-routing-lambda"
docker build --build-arg ECR_COMMON_DATALAKE_REPO_URL=$ECR_COMMON_DATALAKE_REPO_URL .

Deploying a Sample

  • Step1: Clone the repository Codepipeline-lambda-docker-images to your workstation. If using the zip file, then unzip the file to a local directory.
    • git clone https://github.com/aws-samples/codepipeline-lambda-docker-images.git
  • Step 2: Change the directory to the cloned directory or extracted directory. The local code repository structure should appear as follows:
    • cd codepipeline-lambda-docker-images

code-repository-structure

  • Step 3: Deploy the CloudFormation stack used in the template file CodePipelineTemplate/codepipeline.yaml to your AWS account. This deploys the resources required for DevOps architecture involving AWS CodePipelines for common layer code and microservices architecture code. Deploy CloudFormation stacks using the AWS console by following the documentation here, providing the name for the stack (for example datalake-infra-resources) and passing the parameters while navigating the console. Furthermore, use the AWS CLI to deploy a CloudFormation stack by following the documentation here.
  • Step 4: When the CloudFormation Stack deployment completes, navigate to the AWS CloudFormation console and to the Outputs section of the deployed stack, then note the CodeCommit repository urls. Three CodeCommit repo urls are available in the CloudFormation stack outputs section for each CodeCommit repository. Choose one of them based on the way you want to access it. Refer to the following documentation Setting up for AWS CodeCommit. I will be using the git-remote-codecommit (grc) method throughout this post for CodeCommit access.
  • Step 5: Clone the CodeCommit repositories and add code:
      • Common Layer CodeCommit repository: Take the value of the Output for the key oCommonLayerCodeCommitHttpsGrcRepoUrl from datalake-infra-resources CloudFormation Stack Outputs section which looks like below:

    commonlayercodeoutput

      • Clone the repository:
        • git clone codecommit::us-east-2://dev-CommonLayerCode
      • Change the directory to dev-CommonLayerCode
        • cd dev-CommonLayerCode
      •  Add contents to the cloned repository from the source code downloaded in Step 1. Copy the code from the CommonLayerCode directory and the repo contents should appear as follows:

    common-layer-repository

      • Create the main branch and push to the remote repository
        git checkout -b main
        git add ./
        git commit -m "Initial Commit"
        git push -u origin main
      • Application CodeCommit repository: Take the value of the Output for the key oAppCodeCommitHttpsGrcRepoUrl from datalake-infra-resources CloudFormation Stack Outputs section which looks like below:

    appcodeoutput

      • Clone the repository:
        • git clone codecommit::us-east-2://dev-AppCode
      • Change the directory to dev-CommonLayerCode
        • cd dev-AppCode
      • Add contents to the cloned repository from the source code downloaded in Step 1. Copy the code from the ApplicationCode directory and the repo contents should appear as follows from the root:

    app-layer-repository

    • Create the main branch and push to the remote repository
      git checkout -b main
      git add ./
      git commit -m "Initial Commit"
      git push -u origin main

What happens now?

  • Now the Common Layer CodePipeline goes to the InProgress state and invokes the Common Layer CodeBuild project that builds the docker image and pushes it to the Common Layer Amazon ECR repository. The image tag utilized for the container image is the value resolved for the environment variable available in the AWS CodeBuild project CODEBUILD_RESOLVED_SOURCE_VERSION. This is the CodeCommit git Commit Id in this case.
    For example, if the CommitId in CodeCommit is f1769c87, then the pushed docker image will have this tag along with latest
  • buildspec.yaml files appears as follows:
    version: 0.2
    phases:
      install:
        runtime-versions:
          docker: 19
      pre_build:
        commands:
          - echo Logging in to Amazon ECR...
          - aws --version
          - $(aws ecr get-login --region $AWS_DEFAULT_REGION --no-include-email)
          - REPOSITORY_URI=$ECR_COMMON_DATALAKE_REPO_URL
          - COMMIT_HASH=$(echo $CODEBUILD_RESOLVED_SOURCE_VERSION | cut -c 1-7)
          - IMAGE_TAG=${COMMIT_HASH:=latest}
      build:
        commands:
          - echo Build started on `date`
          - echo Building the Docker image...          
          - docker build -t $REPOSITORY_URI:latest .
          - docker tag $REPOSITORY_URI:latest $REPOSITORY_URI:$IMAGE_TAG
      post_build:
        commands:
          - echo Build completed on `date`
          - echo Pushing the Docker images...
          - docker push $REPOSITORY_URI:latest
          - docker push $REPOSITORY_URI:$IMAGE_TAG
  • Now the microservices architecture CodePipeline goes to the InProgress state and invokes all of the application image builder CodeBuild project that builds the docker images and pushes them to the Amazon ECR repository.
    • To improve the performance, every docker image is built in parallel within the codebuild project. The buildspec.yaml executes the build.sh script. This has the logic to build docker images required for each Lambda Function part of the microservices architecture. The docker images used for this sample architecture took approximately 4 to 5 minutes when the docker images were built serially. After switching to parallel building, it took approximately 40 to 50 seconds.
    • buildspec.yaml files appear as follows:
      version: 0.2
      phases:
        install:
          runtime-versions:
            docker: 19
          commands:
            - uname -a
            - set -e
            - chmod +x ./build.sh
            - ./build.sh
      artifacts:
        files:
          - cfn/**/*
        name: builds/$CODEBUILD_BUILD_NUMBER/cfn-artifacts
    • build.sh file appears as follows:
      #!/bin/bash
      set -eu
      set -o pipefail
      
      RESOURCE_PREFIX="${RESOURCE_PREFIX:=stg}"
      AWS_DEFAULT_REGION="${AWS_DEFAULT_REGION:=us-east-1}"
      ACCOUNT_ID=$(aws sts get-caller-identity --query Account --output text 2>&1)
      ECR_COMMON_DATALAKE_REPO_URL="${ECR_COMMON_DATALAKE_REPO_URL:=$ACCOUNT_ID.dkr.ecr.$AWS_DEFAULT_REGION.amazonaws.com\/$RESOURCE_PREFIX-common-datalake-library}"
      pids=()
      pids1=()
      
      PROFILE='new-profile'
      aws configure --profile $PROFILE set credential_source EcsContainer
      
      aws --version
      $(aws ecr get-login --region $AWS_DEFAULT_REGION --no-include-email)
      COMMIT_HASH=$(echo $CODEBUILD_RESOLVED_SOURCE_VERSION | cut -c 1-7)
      BUILD_TAG=build-$(echo $CODEBUILD_BUILD_ID | awk -F":" '{print $2}')
      IMAGE_TAG=${BUILD_TAG:=COMMIT_HASH:=latest}
      
      cd dockerfiles;
      mkdir ../logs
      function pwait() {
          while [ $(jobs -p | wc -l) -ge $1 ]; do
              sleep 1
          done
      }
      
      function build_dockerfiles() {
          if [ -d $1 ]; then
              directory=$1
              cd $directory
              echo $directory
              echo "---------------------------------------------------------------------------------"
              echo "Start creating docker image for $directory..."
              echo "---------------------------------------------------------------------------------"
                  REPOSITORY_URI=$ACCOUNT_ID.dkr.ecr.$AWS_DEFAULT_REGION.amazonaws.com/$RESOURCE_PREFIX-$directory
                  docker build --build-arg ECR_COMMON_DATALAKE_REPO_URL=$ECR_COMMON_DATALAKE_REPO_URL . -t $REPOSITORY_URI:latest -t $REPOSITORY_URI:$IMAGE_TAG -t $REPOSITORY_URI:$COMMIT_HASH
                  echo Build completed on `date`
                  echo Pushing the Docker images...
                  docker push $REPOSITORY_URI
              cd ../
              echo "---------------------------------------------------------------------------------"
              echo "End creating docker image for $directory..."
              echo "---------------------------------------------------------------------------------"
          fi
      }
      
      for directory in *; do 
         echo "------Started processing code in $directory directory-----"
         build_dockerfiles $directory 2>&1 1>../logs/$directory-logs.log | tee -a ../logs/$directory-logs.log &
         pids+=($!)
         pwait 20
      done
      
      for pid in "${pids[@]}"; do
        wait "$pid"
      done
      
      cd ../cfn/
      function build_cfnpackages() {
          if [ -d ${directory} ]; then
              directory=$1
              cd $directory
              echo $directory
              echo "---------------------------------------------------------------------------------"
              echo "Start packaging cloudformation package for $directory..."
              echo "---------------------------------------------------------------------------------"
              aws cloudformation package --profile $PROFILE --template-file template.yaml --s3-bucket $S3_BUCKET --output-template-file packaged-template.yaml
              echo "Replace the parameter 'pEcrImageTag' value with the latest built tag"
              echo $(jq --arg Image_Tag "$IMAGE_TAG" '.Parameters |= . + {"pEcrImageTag":$Image_Tag}' parameters.json) > parameters.json
              cat parameters.json
              ls -al
              cd ../
              echo "---------------------------------------------------------------------------------"
              echo "End packaging cloudformation package for $directory..."
              echo "---------------------------------------------------------------------------------"
          fi
      }
      
      for directory in *; do
          echo "------Started processing code in $directory directory-----"
          build_cfnpackages $directory 2>&1 1>../logs/$directory-logs.log | tee -a ../logs/$directory-logs.log &
          pids1+=($!)
          pwait 20
      done
      
      for pid in "${pids1[@]}"; do
        wait "$pid"
      done
      
      cd ../logs/
      ls -al
      for f in *; do
        printf '%s\n' "$f"
        paste /dev/null - < "$f"
      done
      
      cd ../
      

The function build_dockerfiles() loops through each directory within the dockerfiles directory and runs the docker build command in order to build the docker image. The name for the docker image and then the ECR repository is determined by the directory name in which the DockerFile is used from. For example, if the DockerFile directory is routing-lambda and the environment variables take the below values,

ACCOUNT_ID=0123456789
AWS_DEFAULT_REGION=us-east-2
RESOURCE_PREFIX=dev
directory=routing-lambda
REPOSITORY_URI=$ACCOUNT_ID.dkr.ecr.$AWS_DEFAULT_REGION.amazonaws.com/$RESOURCE_PREFIX-$directory

Then REPOSITORY_URI becomes 0123456789.dkr.ecr.us-east-2.amazonaws.com/dev-routing-lambda
And the docker image is pushed to this resolved REPOSITORY_URI. Similarly, docker images for all other directories are built and pushed to Amazon ECR.

Important Note: The ECR repository names match the directory names where the DockerFiles exist and was already created as part of the CloudFormation template codepipeline.yaml that was deployed in step 3. In order to add more Lambda Functions to the microservices architecture, make sure that the ECR repository name added to the new repository in the codepipeline.yaml template matches the directory name within the AppCode repository dockerfiles directory.

Every docker image is built in parallel in order to save time. Each runs as a separate operating system process and is pushed to the Amazon ECR repository. This also controls the number of processes that could run in parallel by setting a value for the variable pwait within the loop. For example, if pwait 20, then the maximum number of parallel processes is 20 at a given time. The image tag for all docker images used for Lambda Functions is constructed via the CodeBuild BuildId, which is available via environment variable $CODEBUILD_BUILD_ID, in order to ensure that a new image gets a new tag. This is required for CloudFormation to detect changes and update Lambda Functions with the new container image tag.

Once every docker image is built and pushed to Amazon ECR in the CodeBuild project, it builds every CloudFormation package by uploading all local artifacts to Amazon S3 via AWS Cloudformation package CLI command for the templates available in its own directory within the cfn directory. Moreover, it updates every parameters.json file for each directory with the ECR image tag to the parameter value pEcrImageTag. This is required for CloudFormation to detect changes and update the Lambda Function with the new image tag.

After this, the CodeBuild project will output the packaged CloudFormation templates and parameters files as an artifact to AWS CodePipeline so that it can be deployed via AWS CloudFormation in further stages. This is done by first creating a ChangeSet and then deploying it at the next stage.

Testing the microservices architecture

As stated above, the sample application utilized for microservices architecture involving multiple Lambda Functions is a modified version of the Serverless Data Lake Framework. The microservices architecture CodePipeline deployed every AWS resource required to run the SDLF application via AWS CloudFormation stages. As part of SDLF, it also deployed a set of DynamoDB tables required for the applications to run. I utilized the meteorites sample for this, thereby the DynamoDb tables should be added with the necessary data for the application to run for this sample.

Utilize the AWS console to write data to the AWS DynamoDb Table. For more information, refer to this documentation. The sample json files are in the utils/DynamoDbConfig/ directory.

1. Add the record below to the octagon-Pipelines-dev DynamoDB table:

{
"description": "Main Pipeline to Ingest Data",
"ingestion_frequency": "WEEKLY",
"last_execution_date": "2020-03-11",
"last_execution_duration_in_seconds": 4.761,
"last_execution_id": "5445249c-a097-447a-a957-f54f446adfd2",
"last_execution_status": "COMPLETED",
"last_execution_timestamp": "2020-03-11T02:34:23.683Z",
"last_updated_timestamp": "2020-03-11T02:34:23.683Z",
"modules": [
{
"name": "pandas",
"version": "0.24.2"
},
{
"name": "Python",
"version": "3.7"
}
],
"name": "engineering-main-pre-stage",
"owner": "Yuri Gagarin",
"owner_contact": "y.gagarin@",
"status": "ACTIVE",
"tags": [
{
"key": "org",
"value": "VOSTOK"
}
],
"type": "INGESTION",
"version": 127
}

2. Add the record below to the octagon-Pipelines-dev DynamoDB table:

{
"description": "Main Pipeline to Merge Data",
"ingestion_frequency": "WEEKLY",
"last_execution_date": "2020-03-11",
"last_execution_duration_in_seconds": 570.559,
"last_execution_id": "0bb30d20-ace8-4cb2-a9aa-694ad018694f",
"last_execution_status": "COMPLETED",
"last_execution_timestamp": "2020-03-11T02:44:36.069Z",
"last_updated_timestamp": "2020-03-11T02:44:36.069Z",
"modules": [
{
"name": "PySpark",
"version": "1.0"
}
],
"name": "engineering-main-post-stage",
"owner": "Neil Armstrong",
"owner_contact": "n.armstrong@",
"status": "ACTIVE",
"tags": [
{
"key": "org",
"value": "NASA"
}
],
"type": "TRANSFORM",
"version": 4
}

3. Add the record below to the octagon-Datsets-dev DynamoDB table:

{
"classification": "Orange",
"description": "Meteorites Name, Location and Classification",
"frequency": "DAILY",
"max_items_process": 250,
"min_items_process": 1,
"name": "engineering-meteorites",
"owner": "NASA",
"owner_contact": "[email protected]",
"pipeline": "main",
"tags": [
{
"key": "cost",
"value": "meteorites division"
}
],
"transforms": {
"stage_a_transform": "light_transform_blueprint",
"stage_b_transform": "heavy_transform_blueprint"
},
"type": "TRANSACTIONAL",
"version": 1
}


If you want to create these samples using AWS CLI, please refer to this documentation.

Record 1:

aws dynamodb put-item --table-name octagon-Pipelines-dev --item '{"description":{"S":"Main Pipeline to Merge Data"},"ingestion_frequency":{"S":"WEEKLY"},"last_execution_date":{"S":"2021-03-16"},"last_execution_duration_in_seconds":{"N":"930.097"},"last_execution_id":{"S":"e23b7dae-8e83-4982-9f97-5784a9831a14"},"last_execution_status":{"S":"COMPLETED"},"last_execution_timestamp":{"S":"2021-03-16T04:31:16.968Z"},"last_updated_timestamp":{"S":"2021-03-16T04:31:16.968Z"},"modules":{"L":[{"M":{"name":{"S":"PySpark"},"version":{"S":"1.0"}}}]},"name":{"S":"engineering-main-post-stage"},"owner":{"S":"Neil Armstrong"},"owner_contact":{"S":"n.armstrong@"},"status":{"S":"ACTIVE"},"tags":{"L":[{"M":{"key":{"S":"org"},"value":{"S":"NASA"}}}]},"type":{"S":"TRANSFORM"},"version":{"N":"8"}}'

Record 2:

aws dynamodb put-item --table-name octagon-Pipelines-dev --item '{"description":{"S":"Main Pipeline to Ingest Data"},"ingestion_frequency":{"S":"WEEKLY"},"last_execution_date":{"S":"2021-03-28"},"last_execution_duration_in_seconds":{"N":"1.75"},"last_execution_id":{"S":"7e0e04e7-b05e-41a6-8ced-829d47866a6a"},"last_execution_status":{"S":"COMPLETED"},"last_execution_timestamp":{"S":"2021-03-28T20:23:06.031Z"},"last_updated_timestamp":{"S":"2021-03-28T20:23:06.031Z"},"modules":{"L":[{"M":{"name":{"S":"pandas"},"version":{"S":"0.24.2"}}},{"M":{"name":{"S":"Python"},"version":{"S":"3.7"}}}]},"name":{"S":"engineering-main-pre-stage"},"owner":{"S":"Yuri Gagarin"},"owner_contact":{"S":"y.gagarin@"},"status":{"S":"ACTIVE"},"tags":{"L":[{"M":{"key":{"S":"org"},"value":{"S":"VOSTOK"}}}]},"type":{"S":"INGESTION"},"version":{"N":"238"}}'

Record 3:

aws dynamodb put-item --table-name octagon-Pipelines-dev --item '{"description":{"S":"Main Pipeline to Ingest Data"},"ingestion_frequency":{"S":"WEEKLY"},"last_execution_date":{"S":"2021-03-28"},"last_execution_duration_in_seconds":{"N":"1.75"},"last_execution_id":{"S":"7e0e04e7-b05e-41a6-8ced-829d47866a6a"},"last_execution_status":{"S":"COMPLETED"},"last_execution_timestamp":{"S":"2021-03-28T20:23:06.031Z"},"last_updated_timestamp":{"S":"2021-03-28T20:23:06.031Z"},"modules":{"L":[{"M":{"name":{"S":"pandas"},"version":{"S":"0.24.2"}}},{"M":{"name":{"S":"Python"},"version":{"S":"3.7"}}}]},"name":{"S":"engineering-main-pre-stage"},"owner":{"S":"Yuri Gagarin"},"owner_contact":{"S":"y.gagarin@"},"status":{"S":"ACTIVE"},"tags":{"L":[{"M":{"key":{"S":"org"},"value":{"S":"VOSTOK"}}}]},"type":{"S":"INGESTION"},"version":{"N":"238"}}'

Now upload the sample json files to the raw s3 bucket. The raw S3 bucket name can be obtained in the output of the common-cloudformation stack deployed as part of the microservices architecture CodePipeline. Navigate to the CloudFormation console in the region where the CodePipeline was deployed and locate the stack with the name common-cloudformation, navigate to the Outputs section, and then note the output bucket name with the key oCentralBucket. Navigate to the Amazon S3 Bucket console and locate the bucket for oCentralBucket, create two path directories named engineering/meteorites, and upload every sample json file to this directory. Meteorites sample json files are available in the utils/meteorites-test-json-files directory of the previously cloned repository. Wait a few minutes and then navigate to the stage bucket noted from the common-cloudformation stack output name oStageBucket. You can see json files converted into csv in pre-stage/engineering/meteorites folder in S3. Wait a few more minutes and then navigate to the post-stage/engineering/meteorites folder in the oStageBucket to see the csv files converted to parquet format.


Cleanup

Navigate to the AWS CloudFormation console, note the S3 bucket names from the common-cloudformation stack outputs, and empty the S3 buckets. Refer to Emptying the Bucket for more information.

Delete the CloudFormation stacks in the following order:
1. Common-Cloudformation
2. stagea
3. stageb
4. sdlf-engineering-meteorites
Then delete the infrastructure CloudFormation stack datalake-infra-resources deployed using the codepipeline.yaml template. Refer to the following documentation to delete CloudFormation Stacks: Deleting a stack on the AWS CloudFormation console or Deleting a stack using AWS CLI.


Conclusion

This method lets us use CI/CD via CodePipeline, CodeCommit, and CodeBuild, along with other AWS services, to automatically deploy container images to Lambda Functions that are part of the microservices architecture. Furthermore, we can build a common layer that is equivalent to the Lambda layer that could be built independently via its own CodePipeline, and then build the container image and push to Amazon ECR. Then, the common layer container image Amazon ECR functions as a source along with its own CodeCommit repository which holds the code for the microservices architecture CodePipeline. Having two sources for microservices architecture codepipeline lets us build every docker image. This is due to a change made to the common layer docker image that is referred to in other docker images, and another source that holds the code for other microservices including Lambda Function.


About the Author

kirankumar.jpeg Kirankumar Chandrashekar is a Sr.DevOps consultant at AWS Professional Services. He focuses on leading customers in architecting DevOps technologies. Kirankumar is passionate about DevOps, Infrastructure as Code, and solving complex customer issues. He enjoys music, as well as cooking and traveling.


Introducing public builds for AWS CodeBuild

Post Syndicated from Richard H Boyd original https://aws.amazon.com/blogs/devops/introducing-public-builds-for-aws-codebuild/

Using AWS CodeBuild, you can now share both the logs and the artifacts produced by CodeBuild projects. This blog post explains how to configure an existing CodeBuild project to enable public builds.

AWS CodeBuild is a fully managed continuous integration service that compiles source code, runs tests, and produces software packages that are ready to deploy. With CodeBuild, you don’t need to provision, manage, and scale your own build servers. With this new feature, you can now make the results of a CodeBuild project build publicly viewable. Public builds simplify the collaboration workflow for open source projects by allowing contributors to see the results of Continuous Integration (CI) tasks.

How public builds work

During a project build, CodeBuild will place build logs in either Amazon Simple Storage Service (Amazon S3) or Amazon CloudWatch, depending on how the customer has configured the project’s LogsConfig property. Optionally, a project build can produce artifacts that persist after the build has completed. During a project build that has public builds enabled, CodeBuild will set an environment variable named CODEBUILD_PUBLIC_BUILD_URL that supplies the URL for that build’s publicly viewable logs and artifacts. When a user navigates to that URL, CodeBuild will use an AWS Identity and Access Management (AWS IAM) Role (defined by the project maintainer) to fetch build logs and available artifacts and displays these.

To enable public builds for a project:

  1. Navigate to the resource page in the CodeBuild console for the project for which you want to enable public builds.
  2. In the Edit choose Project configuration.
  3. Select Enable public build access.
  4. Choose New service role.
  5. For Service role enter the role name you want this new role to have. For this post we will use the role name example-public-builds-role. This creates a new IAM role with the permissions defined in the next section of this blog post.
  6. Choose Update configuration to save the changes and return to the project’s resource page within the CodeBuild console.

Project builds will now have the build logs and artifacts made available at the URL listed in the Public project URL section of the Configuration panel within the project’s resource page.

Now the CI build statuses within pull requests for the GitHub repository will include a public link to the build results. When a pull request is created in the repository, CodeBuild will start a project build and provide commit status updates during the build with a link to the public build information. This link is available as a hyperlink from the Details section of the commit status message.

IAM role permissions

This new feature introduces a new IAM role for CodeBuild. The new role is assumed by the CodeBuild service and needs read access to the build logs and any potential artifacts you would like to make publicly available. In the previous example, we had configured the CodeBuild project to store logs in Amazon CloudWatch and placed our build artifacts in Amazon S3 (namespaced to the build ID). The following AWS CloudFormation template will create an IAM Role with the appropriate least-privilege policies for accessing the public build results.

Role template

Parameters:
  LogGroupName:
    Type: String
    Description: prefix for the CloudWatch log group name
  ArtifactBucketArn:
    Type: String
    Description: Arn for the Amazon S3 bucket used to store build artifacts.

Resources:
  PublicReadRole:
    Type: AWS::IAM::Role
    Properties:
      AssumeRolePolicyDocument:
        Statement:
        - Action: ['sts:AssumeRole']
          Effect: Allow
          Principal:
            Service: [codebuild.amazonaws.com]
        Version: '2012-10-17'
      Path: /

  PublicReadPolicy:
    Type: 'AWS::IAM::Policy'
    Properties:
      PolicyName: PublicBuildPolicy
      PolicyDocument:
        Version: "2012-10-17"
        Statement:
          - Effect: Allow
            Action:
              - "logs:GetLogEvents"
            Resource:
              - !Sub "arn:aws:logs:${AWS::Region}:${AWS::AccountId}:log-group:${LogGroupName}:*"
          - Effect: Allow
            Action:
              - "s3:GetObject"
              - "s3:GetObjectVersion"
            Resource:
              - !Sub "${ArtifactBucketArn}/*"
      Roles:
        - !Ref PublicReadRole

Creating a public build in AWS CloudFormation

Using AWS CloudFormation, you can provision CodeBuild projects using infrastructure as code (IaC). To update an existing CodeBuild project to enable public builds add the following two fields to your project definition:

  CodeBuildProject:
    Type: AWS::CodeBuild::Project
    Properties:
      ServiceRole: !GetAtt CodeBuildRole.Arn
      LogsConfig: 
        CloudWatchLogs:
          GroupName: !Ref LogGroupName
          Status: ENABLED
          StreamName: ServerlessRust
      Artifacts:
        Type: S3
        Location: !Ref ArtifactBucket
        Name: ServerlessRust
        NamespaceType: BUILD_ID
        Packaging: ZIP
      Environment:
        Type: LINUX_CONTAINER
        ComputeType: BUILD_GENERAL1_LARGE
        Image: aws/codebuild/standard:4.0
        PrivilegedMode: true
      Triggers:
        BuildType: BUILD
        Webhook: true
        FilterGroups:
          - - Type: EVENT
              Pattern: PULL_REQUEST_CREATED,PULL_REQUEST_UPDATED
      Source:
        Type: GITHUB
        Location: "https://github.com/richardhboyd/ServerlessRust.git"
        BuildSpec: |
          version: 0.2
          phases:
            build:
              commands:
                - sam build
          artifacts:
            files:
              - .aws-sam/build/**/*
            discard-paths: no
      Visibility: PUBLIC_READ
      ResourceAccessRole: !Ref PublicReadRole # Note that this references the role defined in the previous section.
 

Disabling public builds

If a project has public builds enabled and you would like to disable it, you can clear the check-box named Enable public build access in the project configuration or set the Visibility to PRIVATE in the CloudFormation definition for the project. To prevent any project in your AWS account from using public builds, you can set an AWS Organizations service control policy (SCP) to deny the IAM Action CodeBuild:UpdateProjectVisibility

Conclusion

With CodeBuild public builds, you can now share build information for your open source projects with all contributors without having to grant them direct access to your AWS account. This post explains how to enable public builds with AWS CodeBuild using both the console and CloudFormation, create a least-privilege IAM role for sharing the public build results, and how to disable public builds for a project.

CICD on Serverless Applications using AWS CodeArtifact

Post Syndicated from Anand Krishna original https://aws.amazon.com/blogs/devops/cicd-on-serverless-applications-using-aws-codeartifact/

Developing and deploying applications rapidly to users requires a working pipeline that accepts the user code (usually via a Git repository). AWS CodeArtifact was announced in 2020. It’s a secure and scalable artifact management product that easily integrates with other AWS products and services. CodeArtifact allows you to publish, store, and view packages, list package dependencies, and share your application’s packages.

In this post, I will show how we can build a simple DevOps pipeline for a sample JAVA application (JAR file) to be built with Maven.

Solution Overview

We utilize the following AWS services/Tools/Frameworks to set up our continuous integration, continuous deployment (CI/CD) pipeline:

The following diagram illustrates the pipeline architecture and flow:


aws-codeartifact-pipeline


Our pipeline is built on CodePipeline with CodeCommit as the source (CodePipeline Source Stage). This triggers the pipeline via a CloudWatch Events rule. Then the code is fetched from the CodeCommit repository branch (main) and sent to the next pipeline phase. This CodeBuild phase is specifically for compiling, packaging, and publishing the code to CodeArtifact by utilizing a package manager—in this case Maven.

After Maven publishes the code to CodeArtifact, the pipeline asks for a manual approval to be directly approved in the pipeline. It can also optionally trigger an email alert via Amazon Simple Notification Service (Amazon SNS). After approval, the pipeline moves to another CodeBuild phase. This downloads the latest packaged JAR file from a CodeArtifact repository and deploys to the AWS Lambda function.

Clone the Repository

Clone the GitHub repository as follows:

git clone https://github.com/aws-samples/aws-cdk-codeartifact-pipeline-sample.git

Code Deep Dive

After the Git repository is cloned, the directory structure is shown as in the following screenshot :

aws-codeartifact-pipeline-code

Let’s study the files and code to understand how the pipeline is built.

The directory java-events is a sample Java Maven project. Find numerous sample applications on GitHub. For this post, we use the sample application java-events.

To add your own application code, place the pom.xml and settings.xml files in the root directory for the AWS CDK project.

Let’s study the code in the file lib/cdk-pipeline-codeartifact-new-stack.ts of the stack CdkPipelineCodeartifactStack. This is the heart of the AWS CDK code that builds the whole pipeline. The stack does the following:

  • Creates a CodeCommit repository called ca-pipeline-repository.
  • References a CloudFormation template (lib/ca-template.yaml) in the AWS CDK code via the module @aws-cdk/cloudformation-include.
  • Creates a CodeArtifact domain called cdkpipelines-codeartifact.
  • Creates a CodeArtifact repository called cdkpipelines-codeartifact-repository.
  • Creates a CodeBuild project called JarBuild_CodeArtifact. This CodeBuild phase does all of the code compiling, packaging, and publishing to CodeArtifact into a repository called cdkpipelines-codeartifact-repository.
  • Creates a CodeBuild project called JarDeploy_Lambda_Function. This phase fetches the latest artifact from CodeArtifact created in the previous step (cdkpipelines-codeartifact-repository) and deploys to the Lambda function.
  • Finally, creates a pipeline with four phases:
    • Source as CodeCommit (ca-pipeline-repository).
    • CodeBuild project JarBuild_CodeArtifact.
    • A Manual approval Stage.
    • CodeBuild project JarDeploy_Lambda_Function.


CodeArtifact shows the domain-specific and repository-specific connection settings to mention/add in the application’s pom.xml and settings.xml files as below:

aws-codeartifact-repository-connections

Deploy the Pipeline

The AWS CDK code requires the following packages in order to build the CI/CD pipeline:

  • @aws-cdk/core
  • @aws-cdk/aws-codepipeline
  • @aws-cdk/aws-codepipeline-actions
  • @aws-cdk/aws-codecommit
  • @aws-cdk/aws-codebuild
  • @aws-cdk/aws-iam
  • @aws-cdk/cloudformation-include


Install the required AWS CDK packages as below:

npm i @aws-cdk/core @aws-cdk/aws-codepipeline @aws-cdk/aws-codepipeline-actions @aws-cdk/aws-codecommit @aws-cdk/aws-codebuild @aws-cdk/pipelines @aws-cdk/aws-iam @ @aws-cdk/cloudformation-include

Compile the AWS CDK code:

npm run build

Deploy the AWS CDK code:

cdk synth
cdk deploy

After the AWS CDK code is deployed, view the final output on the stack’s detail page on the AWS CloudFormation :

aws-codeartifact-pipeline-cloudformation-stack


How the pipeline works with artifact versions (using SNAPSHOTS)

In this demo, I publish SNAPSHOT to the repository. As per the documentation here and here, a SNAPSHOT refers to the most recent code along a branch. It’s a development version preceding the final release version. Identify a snapshot version of a Maven package by the suffix SNAPSHOT appended to the package version.

The application settings are defined in the pom.xml file. For this post, we define the following:

  • The version to be used, called 1.0-SNAPSHOT.
  • The specific packaging, called jar.
  • The specific project display name, called JavaEvents.
  • The specific group ID, called JavaEvents.

The screenshot below shows the pom.xml settings we utilised in the application:

aws-codeartifact-pipeline-pom-xml


You can’t republish a package asset that already exists with different content, as per the documentation here.

When a Maven snapshot is published, its previous version is preserved in a new version called a build. Each time a Maven snapshot is published, a new build version is created.

When a Maven snapshot is published, its status is set to Published, and the status of the build containing the previous version is set to Unlisted. If you request a snapshot, the version with status Published is returned. This is always the most recent Maven snapshot version.

For example, the image below shows the state when the pipeline is run for the FIRST RUN. The latest version has the status Published and previous builds are marked Unlisted.

aws-codeartifact-repository-package-versions


For all subsequent pipeline runs, multiple Unlisted versions will occur every time the pipeline is run, as all previous versions of a snapshot are maintained in its build versions.

aws-codeartifact-repository-package-versions


Fetching the Latest Code

Retrieve the snapshot from the repository in order to deploy the code to an AWS Lambda Function. I have used AWS CLI to list and fetch the latest asset of package version 1.0-SNAPSHOT.


Listing the latest snapshot

export ListLatestArtifact = `aws codeartifact list-package-version-assets —domain cdkpipelines-codeartifact --domain-owner $Account_Id --repository cdkpipelines-codeartifact-repository --namespace JavaEvents --format maven --package JavaEvents --package-version "1.0-SNAPSHOT"| jq ".assets[].name"|grep jar|sed ’s/“//g’`

NOTE : Please note the dynamic CDK variable $Account_Id which represents AWS Account ID.


Fetching the latest code using Package Version

aws codeartifact get-package-version-asset --domain cdkpipelines-codeartifact --repository cdkpipelines-codeartifact-repository --format maven --package JavaEvents --package-version 1.0-SNAPSHOT --namespace JavaEvents --asset $ListLatestArtifact demooutput

Notice that I’m referring the last code by using variable $ListLatestArtifact. This always fetches the latest code, and demooutput is the outfile of the AWS CLI command where the content (code) is saved.


Testing the Pipeline

Now clone the CodeCommit repository that we created with the following code:

git clone https://git-codecommit.<region>.amazonaws.com/v1/repos/codeartifact-pipeline-repository


Enter the following code to push the code to the CodeCommit repository:

cp -rp cdk-pipeline-codeartifact-new /* ca-pipeline-repository
cd ca-pipeline-repository
git checkout -b main
git add .
git commit -m “testing the pipeline”
git push origin main

Once the code is pushed to Git repository, the pipeline is automatically triggered by Amazon CloudWatch events.

The following screenshots shows the second phase (AWS CodeBuild Phase – JarBuild_CodeArtifact) of the pipeline, wherein the asset is successfully compiled and published to the CodeArtifact repository by Maven:

aws-codeartifact-pipeline-codebuild-jarbuild

aws-codeartifact-pipeline-codebuild-screenshot

aws-codeartifact-pipeline-codebuild-screenshot2


The following screenshots show the last phase (AWS CodeBuild Phase – Deploy-to-Lambda) of the pipeline, wherein the latest asset is successfully pulled and deployed to AWS Lambda Function.

Asset JavaEvents-1.0-20210618.131629-5.jar is the latest snapshot code for the package version 1.0-SNAPSHOT. This is the same asset version code that will be deployed to AWS Lambda Function, as seen in the screenshots below:

aws-codeartifact-pipeline-codebuild-jardeploy

aws-codeartifact-pipeline-codebuild-screenshot-jarbuild

The following screenshot of the pipeline shows a successful run. The code was fetched and deployed to the existing Lambda function (codeartifact-test-function).

aws-codeartifact-pipeline-codepipeline

Cleanup

To clean up, You can either delete the entire stack through the AWS CloudFormation console or use AWS CDK command like below –

cdk destroy

For more information on the AWS CDK commands, please check the here or sample here.

Summary

In this post, I demonstrated how to build a CI/CD pipeline for your serverless application with AWS CodePipeline by utilizing AWS CDK with AWS CodeArtifact. Please check the documentation here for an in-depth explanation regarding other package managers and the getting started guide.

Deploy data lake ETL jobs using CDK Pipelines

Post Syndicated from Ravi Itha original https://aws.amazon.com/blogs/devops/deploying-data-lake-etl-jobs-using-cdk-pipelines/

Many organizations are building data lakes on AWS, which provides the most secure, scalable, comprehensive, and cost-effective portfolio of services. Like any application development project, a data lake must answer a fundamental question: “What is the DevOps strategy?” Defining a DevOps strategy for a data lake requires extensive planning and multiple teams. This typically requires multiple development and test cycles before maturing enough to support a data lake in a production environment. If an organization doesn’t have the right people, resources, and processes in place, this can quickly become daunting.

What if your data engineering team uses basic building blocks to encapsulate data lake infrastructure and data processing jobs? This is where CDK Pipelines brings the full benefit of infrastructure as code (IaC). CDK Pipelines is a high-level construct library within the AWS Cloud Development Kit (AWS CDK) that makes it easy to set up a continuous deployment pipeline for your AWS CDK applications. The AWS CDK provides essential automation for your release pipelines so that your development and operations team remain agile and focus on developing and delivering applications on the data lake.

In this post, we discuss a centralized deployment solution utilizing CDK Pipelines for data lakes. This implements a DevOps-driven data lake that delivers benefits such as continuous delivery of data lake infrastructure, data processing, and analytical jobs through a configuration-driven multi-account deployment strategy. Let’s dive in!

Data lakes on AWS

A data lake is a centralized repository where you can store all of your structured and unstructured data at any scale. Store your data as is, without having to first structure it, and run different types of analytics—from dashboards and visualizations to big data processing, real-time analytics, and machine learning in order to guide better decisions. To further explore data lakes, refer to What is a data lake?

We design a data lake with the following elements:

  • Secure data storage
  • Data cataloging in a central repository
  • Data movement
  • Data analysis

The following figure represents our data lake.

Data Lake on AWS

We use three Amazon Simple Storage Service (Amazon S3) buckets:

  • raw – Stores the input data in its original format
  • conformed – Stores the data that meets the data lake quality requirements
  • purpose-built – Stores the data that is ready for consumption by applications or data lake consumers

The data lake has a producer where we ingest data into the raw bucket at periodic intervals. We utilize the following tools: AWS Glue processes and analyzes the data. AWS Glue Data Catalog persists metadata in a central repository. AWS Lambda and AWS Step Functions schedule and orchestrate AWS Glue extract, transform, and load (ETL) jobs. Amazon Athena is used for interactive queries and analysis. Finally, we engage various AWS services for logging, monitoring, security, authentication, authorization, alerting, and notification.

A common data lake practice is to have multiple environments such as dev, test, and production. Applying the IaC principle for data lakes brings the benefit of consistent and repeatable runs across multiple environments, self-documenting infrastructure, and greater flexibility with resource management. The AWS CDK offers high-level constructs for use with all of our data lake resources. This simplifies usage and streamlines implementation.

Before exploring the implementation, let’s gain further scope of how we utilize our data lake.

The solution

Our goal is to implement a CI/CD solution that automates the provisioning of data lake infrastructure resources and deploys ETL jobs interactively. We accomplish this as follows: 1) applying separation of concerns (SoC) design principle to data lake infrastructure and ETL jobs via dedicated source code repositories, 2) a centralized deployment model utilizing CDK pipelines, and 3) AWS CDK enabled ETL pipelines from the start.

Data lake infrastructure

Our data lake infrastructure provisioning includes Amazon S3 buckets, S3 bucket policies, AWS Key Management Service (KMS) encryption keys, Amazon Virtual Private Cloud (Amazon VPC), subnets, route tables, security groups, VPC endpoints, and secrets in AWS Secrets Manager. The following diagram illustrates this.

Data Lake Infrastructure

Data lake ETL jobs

For our ETL jobs, we process New York City TLC Trip Record Data. The following figure displays our ETL process, wherein we run two ETL jobs within a Step Functions state machine.

AWS Glue ETL Jobs

Here are a few important details:

  1. A file server uploads files to the S3 raw bucket of the data lake. The file server is a data producer and source for the data lake. We assume that the data is pushed to the raw bucket.
  2. Amazon S3 triggers an event notification to the Lambda function.
  3. The function inserts an item in the Amazon DynamoDB table in order to track the file processing state. The first state written indicates the AWS Step Function start.
  4. The function starts the state machine.
  5. The state machine runs an AWS Glue job (Apache Spark).
  6. The job processes input data from the raw zone to the data lake conformed zone. The job also converts CSV input data to Parquet formatted data.
  7. The job updates the Data Catalog table with the metadata of the conformed Parquet file.
  8. A second AWS Glue job (Apache Spark) processes the input data from the conformed zone to the purpose-built zone of the data lake.
  9. The job fetches ETL transformation rules from the Amazon S3 code bucket and transforms the input data.
  10. The job stores the result in Parquet format in the purpose-built zone.
  11. The job updates the Data Catalog table with the metadata of the purpose-built Parquet file.
  12. The job updates the DynamoDB table and updates the job status to completed.
  13. An Amazon Simple Notification Service (Amazon SNS) notification is sent to subscribers that states the job is complete.
  14. Data engineers or analysts can now analyze data via Athena.

We will discuss data formats, Glue jobs, ETL transformation logics, data cataloging, auditing, notification, orchestration, and data analysis in more detail in AWS CDK Pipelines for Data Lake ETL Deployment GitHub repository. This will be discussed in the subsequent section.

Centralized deployment

Now that we have data lake infrastructure and ETL jobs ready, let’s define our deployment model. This model is based on the following design principles:

  • A dedicated AWS account to run CDK pipelines.
  • One or more AWS accounts into which the data lake is deployed.
  • The data lake infrastructure has a dedicated source code repository. Typically, data lake infrastructure is a one-time deployment and rarely evolves. Therefore, a dedicated code repository provides a landing zone for your data lake.
  • Each ETL job has a dedicated source code repository. Each ETL job may have unique AWS service, orchestration, and configuration requirements. Therefore, a dedicated source code repository will help you more flexibly build, deploy, and maintain ETL jobs.

We organize our source code repo into three branches: dev (main), test, and prod. In the deployment account, we manage three separate CDK Pipelines and each pipeline is sourced from a dedicated branch. Here we choose a branch-based software development method in order to demonstrate the strategy in more complex scenarios where integration testing and validation layers require human intervention. As well, these may not immediately follow with a corresponding release or deployment due to their manual nature. This facilitates the propagation of changes through environments without blocking independent development priorities. We accomplish this by isolating resources across environments in the central deployment account, allowing for the independent management of each environment, and avoiding cross-contamination during each pipeline’s self-mutating updates. The following diagram illustrates this method.

Centralized deployment


Note: This centralized deployment strategy can be adopted for trunk-based software development with minimal solution modification.

Deploying data lake ETL jobs

The following figure illustrates how we utilize CDK Pipelines to deploy data lake infrastructure and ETL jobs from a central deployment account. This model follows standard nomenclature from the AWS CDK. Each repository represents a cloud infrastructure code definition. This includes the pipelines construct definition. Pipelines have one or more actions, such as cloning the source code (source action) and synthesizing the stack into an AWS CloudFormation template (synth action). Each pipeline has one or more stages, such as testing and deploying. In an AWS CDK app context, the pipelines construct is a stack like any other stack. Therefore, when the AWS CDK app is deployed, a new pipeline is created in AWS CodePipeline.

This provides incredible flexibility regarding DevOps. In other words, as a developer with an understanding of AWS CDK APIs, you can harness the power and scalability of AWS services such as CodePipeline, AWS CodeBuild, and AWS CloudFormation.

Deploying data lake ETL jobs using CDK Pipelines

Here are a few important details:

  1. The DevOps administrator checks in the code to the repository.
  2. The DevOps administrator (with elevated access) facilitates a one-time manual deployment on a target environment. Elevated access includes administrative privileges on the central deployment account and target AWS environments.
  3. CodePipeline periodically listens to commit events on the source code repositories. This is the self-mutating nature of CodePipeline. It’s configured to work with and can update itself according to the provided definition.
  4. Code changes made to the main repo branch are automatically deployed to the data lake dev environment.
  5. Code changes to the repo test branch are automatically deployed to the test environment.
  6. Code changes to the repo prod branch are automatically deployed to the prod environment.

CDK Pipelines starter kits for data lakes

Want to get going quickly with CDK Pipelines for your data lake? Start by cloning our two GitHub repositories. Here is a summary:

AWS CDK Pipelines for Data Lake Infrastructure Deployment

This repository contains the following reusable resources:

  • CDK Application
  • CDK Pipelines stack
  • CDK Pipelines deploy stage
  • Amazon VPC stack
  • Amazon S3 stack

It also contains the following automation scripts:

  • AWS environments configuration
  • Deployment account bootstrapping
  • Target account bootstrapping
  • Account secrets configuration (e.g., GitHub access tokens)

AWS CDK Pipelines for Data Lake ETL Deployment

This repository contains the following reusable resources:

  • CDK Application
  • CDK Pipelines stack
  • CDK Pipelines deploy stage
  • Amazon DynamoDB stack
  • AWS Glue stack
  • AWS Step Functions stack

It also contains the following:

  • AWS Lambda scripts
  • AWS Glue scripts
  • AWS Step Functions State machine script

Advantages

This section summarizes some of the advantages offered by this solution.

Scalable and centralized deployment model

We utilize a scalable and centralized deployment model to deliver end-to-end automation. This allows DevOps and data engineers to use the single responsibility principal while maintaining precise control over the deployment strategy and code quality. The model can readily be expanded to more accounts, and the pipelines are responsive to custom controls within each environment, such as a production approval layer.

Configuration-driven deployment

Configuration in the source code and AWS Secrets Manager allow deployments to utilize targeted values that are declared globally in a single location. This provides consistent management of global configurations and dependencies such as resource names, AWS account Ids, Regions, and VPC CIDR ranges. Similarly, the CDK Pipelines export outputs from CloudFormation stacks for later consumption via other resources.

Repeatable and consistent deployment of new ETL jobs

Continuous integration and continuous delivery (CI/CD) pipelines allow teams to deploy to production more frequently. Code changes can be safely and securely propagated through environments and released for deployment. This allows rapid iteration on data processing jobs, and these jobs can be changed in isolation from pipeline changes, resulting in reliable workflows.

Cleaning up

You may delete the resources provisioned by utilizing the starter kits. You can do this by running the cdk destroy command using AWS CDK Toolkit. For detailed instructions, refer to the Clean up sections in the starter kit README files.

Conclusion

In this post, we showed how to utilize CDK Pipelines to deploy infrastructure and data processing ETL jobs of your data lake in dev, test, and production AWS environments. We provided two GitHub repositories for you to test and realize the full benefits of this solution first hand. We encourage you to fork the repositories, bring your ETL scripts, bootstrap your accounts, configure account parameters, and continuously delivery your data lake ETL jobs.

Let’s stay in touch via the GitHub—AWS CDK Pipelines for Data Lake Infrastructure Deployment and AWS CDK Pipelines for Data Lake ETL Deployment.


About the authors

Ravi Itha

Ravi Itha is a Sr. Data Architect at AWS. He works with customers to design and implement Data Lakes, Analytics, and Microservices on AWS. He is an open-source committer and has published more than a dozen solutions using AWS CDK, AWS Glue, AWS Lambda, AWS Step Functions, Amazon ECS, Amazon MQ, Amazon SQS, Amazon Kinesis Data Streams, and Amazon Kinesis Data Analytics for Apache Flink. His solutions can be found at his GitHub handle. Outside of work, he is passionate about books, cooking, movies, and yoga.


Isaiah Grant

Isaiah Grant is a Cloud Consultant at 2nd Watch. His primary function is to design architectures and build cloud-based applications and services. He leads customer engagements and helps customers with enterprise cloud adoptions. In his free time, he is engaged in local community initiatives and enjoys being outdoors with his family.


Zahid Ali

Zahid Ali is a Data Architect at AWS. He helps customers design, develop, and implement data warehouse and Data Lake solutions on AWS. Outside of work he enjoys playing tennis, spending time outdoors, and traveling.


Secure and analyse your Terraform code using AWS CodeCommit, AWS CodePipeline, AWS CodeBuild and tfsec

Post Syndicated from César Prieto Ballester original https://aws.amazon.com/blogs/devops/secure-and-analyse-your-terraform-code-using-aws-codecommit-aws-codepipeline-aws-codebuild-and-tfsec/

Introduction

More and more customers are using Infrastructure-as-Code (IaC) to design and implement their infrastructure on AWS. This is why it is essential to have pipelines with Continuous Integration/Continuous Deployment (CI/CD) for infrastructure deployment. HashiCorp Terraform is one of the popular IaC tools for customers on AWS.

In this blog, I will guide you through building a CI/CD pipeline on AWS to analyze and identify possible configurations issues in your Terraform code templates. This will help mitigate security risks within our infrastructure deployment pipelines as part of our CI/CD. To do this, we utilize AWS tools and the Open Source tfsec tool, a static analysis security scanner for your Terraform code, including more than 90 preconfigured checks with the ability to add custom checks.

Solutions Overview

The architecture goes through a CI/CD pipeline created on AWS using AWS CodeCommit, AWS CodePipeline, AWS CodeBuild, and Amazon ECR.

Our demo has two separate pipelines:

  1. CI/CD Pipeline to build and push our custom Docker image to Amazon ECR
  2. CI/CD Pipeline where our tfsec analysis is executed and Terraform provisions infrastructure

The tfsec configuration and Terraform goes through a buildspec specification file defined within an AWS CodeBuild action. This action will calculate how many potential security risks we currently have within our Terraform templates, which will be displayed in our manual acceptance process for verification.

Architecture diagram

Provisioning the infrastructure

We have created an AWS Cloud Development Kit (AWS CDK) app hosted in a Git Repository written in Python. Here you can deploy the two main pipelines in order to manage this scenario. For a list of the deployment prerequisites, see the README.md file.

Clone the repo in your local machine. Then, bootstrap and deploy the CDK stack:

git clone https://github.com/aws-samples/aws-cdk-tfsec
cd aws-cdk-tfsec
pip install -r requirements.txt
cdk bootstrap aws://account_id/eu-west-1
cdk deploy --all

The infrastructure creation takes around 5-10 minutes due the AWS CodePipelines and referenced repository creation. Once the CDK has deployed the infrastructure, clone the two new AWS CodeCommit repos that have already been created and push the example code. First, one for the custom Docker image, and later for your Terraform code, like this:

git clone https://git-codecommit.eu-west-1.amazonaws.com/v1/repos/awsome-terraform-example-container
cd awsome-terraform-example-container
git checkout -b main
cp repos/docker_image/* .
git add .
git commit -am "First commit"
git push origin main

Once the Docker image is built and pushed to the Amazon ECR, proceed with Terraform repo. Check the pipeline process on the AWS CodePipeline console.

Screenshot of CI/CD Pipeline to build Docker Image

git clone https://git-codecommit.eu-west-1.amazonaws.com/v1/repos/awsome-terraform-example
cd awsome-terraform-example
git checkout -b main
cp -aR repos/terraform_code/* .
git add .
git commit -am "First commit"
git push origin main

The Terraform provisioning AWS CodePipeline has the following aspect:

Screenshot of CodePipeline to run security and orchestrate IaC

The pipeline has three main stages:

  • Source – AWS CodeCommit stores the Terraform repository infrastructure and every time we push code to the main branch the AWS CodePipeline will be triggered.
  • tfsec analysis – AWS CodeBuild looks for a buildspec to execute the tfsec actions configured on the same buildspec.

Screenshot showing tfsec analysis

The output shows the potential security issues detected by tfsec for our Terraform code. The output is linking to the different security issues already defined on tfsec. Check the security checks defined by tfsec here. After tfsec execution, a manual approval action is set up to decide if we should go for the next steps or if we reject and stop the AWS CodePipeline execution.

The URL for review is linking to our tfsec output console.

Screenshot of tfsec output


  • Terraform plan and Terraform apply – This will be applied to our infrastructure plan. After the Terraform plan command and before the Terraform apply, a manual action is set up to decide if we can apply the changes.

After going through all of the stages, our Terraform infrastructure should be created.

Clean up

After completing your demo, feel free to delete your stack using the CDK cli:

cdk destroy --all

Conclusion

At AWS, security is our top priority. This post demonstrates how to build a CI/CD pipeline by using AWS Services to automate and secure your infrastructure as code via Terraform and tfsec.

Learn more about tfsec through the official documentation: https://tfsec.dev/

About the authors


César Prieto Ballester is a DevOps Consultant at Amazon Web Services. He enjoys automating everything and building infrastructure using code. Apart from work, he plays electric guitar and loves riding his mountain bike.


Bruno Bardelli is a Senior DevOps Consultant at Amazon Web Services. He loves to build applications and in his free time plays video games, practices aikido, and goes on walks with his dog.

Blue/Green deployment with AWS Developer tools on Amazon EC2 using Amazon EFS to host application source code

Post Syndicated from Rakesh Singh original https://aws.amazon.com/blogs/devops/blue-green-deployment-with-aws-developer-tools-on-amazon-ec2-using-amazon-efs-to-host-application-source-code/

Many organizations building modern applications require a shared and persistent storage layer for hosting and deploying data-intensive enterprise applications, such as content management systems, media and entertainment, distributed applications like machine learning training, etc. These applications demand a centralized file share that scales to petabytes without disrupting running applications and remains concurrently accessible from potentially thousands of Amazon EC2 instances.

Simultaneously, customers want to automate the end-to-end deployment workflow and leverage continuous methodologies utilizing AWS developer tools services for performing a blue/green deployment with zero downtime. A blue/green deployment is a deployment strategy wherein you create two separate, but identical environments. One environment (blue) is running the current application version, and one environment (green) is running the new application version. The blue/green deployment strategy increases application availability by generally isolating the two application environments and ensuring that spinning up a parallel green environment won’t affect the blue environment resources. This isolation reduces deployment risk by simplifying the rollback process if a deployment fails.

Amazon Elastic File System (Amazon EFS) provides a simple, scalable, and fully-managed elastic NFS file system for use with AWS Cloud services and on-premises resources. It scales on demand, thereby eliminating the need to provision and manage capacity in order to accommodate growth. Utilize Amazon EFS to create a shared directory that stores and serves code and content for numerous applications. Your application can treat a mounted Amazon EFS volume like local storage. This means you don’t have to deploy your application code every time the environment scales up to multiple instances to distribute load.

In this blog post, I will guide you through an automated process to deploy a sample web application on Amazon EC2 instances utilizing Amazon EFS mount to host application source code, and utilizing a blue/green deployment with AWS code suite services in order to deploy the application source code with no downtime.

How this solution works

This blog post includes a CloudFormation template to provision all of the resources needed for this solution. The CloudFormation stack deploys a Hello World application on Amazon Linux 2 EC2 Instances running behind an Application Load Balancer and utilizes Amazon EFS mount point to store the application content. The AWS CodePipeline project utilizes AWS CodeCommit as the version control, AWS CodeBuild for installing dependencies and creating artifacts,  and AWS CodeDeploy to conduct deployment on EC2 instances running in an Amazon EC2 Auto Scaling group.

Figure 1 below illustrates our solution architecture.

Sample solution architecture

Figure 1: Sample solution architecture

The event flow in Figure 1 is as follows:

  1. A developer commits code changes from their local repo to the CodeCommit repository. The commit triggers CodePipeline execution.
  2. CodeBuild execution begins to compile source code, install dependencies, run custom commands, and create deployment artifact as per the instructions in the Build specification reference file.
  3. During the build phase, CodeBuild copies the source-code artifact to Amazon EFS file system and maintains two different directories for current (green) and new (blue) deployments.
  4. After successfully completing the build step, CodeDeploy deployment kicks in to conduct a Blue/Green deployment to a new Auto Scaling Group.
  5. During the deployment phase, CodeDeploy mounts the EFS file system on new EC2 instances as per the CodeDeploy AppSpec file reference and conducts other deployment activities.
  6. After successful deployment, a Lambda function triggers in order to store a deployment environment parameter in Systems Manager parameter store. The parameter stores the current EFS mount name that the application utilizes.
  7. The AWS Lambda function updates the parameter value during every successful deployment with the current EFS location.

Prerequisites

For this walkthrough, the following are required:

Deploy the solution

Once you’ve assembled the prerequisites, download or clone the GitHub repo and store the files on your local machine. Utilize the commands below to clone the repo:

mkdir -p ~/blue-green-sample/
cd ~/blue-green-sample/
git clone https://github.com/aws-samples/blue-green-deployment-pipeline-for-efs

Once completed, utilize the following steps to deploy the solution in your AWS account:

  1. Create a private Amazon Simple Storage Service (Amazon S3) bucket by using this documentation
    AWS S3 console view when creating a bucket

    Figure 2: AWS S3 console view when creating a bucket


  2. Upload the cloned or downloaded GitHub repo files to the root of the S3 bucket. the S3 bucket objects structure should look similar to Figure 3:
    AWS S3 bucket object structure after you upload the Github repo content

    Figure 3: AWS S3 bucket object structure


  3. Go to the S3 bucket and select the template name solution-stack-template.yml, and then copy the object URL.
  4. Open the CloudFormation console. Choose the appropriate AWS Region, and then choose Create Stack. Select With new resources.
  5. Select Amazon S3 URL as the template source, paste the object URL that you copied in Step 3, and then choose Next.
  6. On the Specify stack details page, enter a name for the stack and provide the following input parameter. Modify the default values for other parameters in order to customize the solution for your environment. You can leave everything as default for this walkthrough.
  • ArtifactBucket– The name of the S3 bucket that you created in the first step of the solution deployment. This is a mandatory parameter with no default value.
Defining the stack name and input parameters for the CloudFormation stack

Figure 4: Defining the stack name and input parameters for the CloudFormation stack

  1. Choose Next.
  2. On the Options page, keep the default values and then choose Next.
  3. On the Review page, confirm the details, acknowledge that CloudFormation might create IAM resources with custom names, and then choose Create Stack.
  4. Once the stack creation is marked as CREATE_COMPLETE, the following resources are created:
  • A virtual private cloud (VPC) configured with two public and two private subnets.
  • NAT Gateway, an EIP address, and an Internet Gateway.
  • Route tables for private and public subnets.
  • Auto Scaling Group with a single EC2 Instance.
  • Application Load Balancer and a Target Group.
  • Three security groups—one each for ALB, web servers, and EFS file system.
  • Amazon EFS file system with a mount target for each Availability Zone.
  • CodePipeline project with CodeCommit repository, CodeBuild, and CodeDeploy resources.
  • SSM parameter to store the environment current deployment status.
  • Lambda function to update the SSM parameter for every successful pipeline execution.
  • Required IAM Roles and policies.

      Note: It may take anywhere from 10-20 minutes to complete the stack creation.

Test the solution

Now that the solution stack is deployed, follow the steps below to test the solution:

  1. Validate CodePipeline execution status

After successfully creating the CloudFormation stack, a CodePipeline execution automatically triggers to deploy the default application code version from the CodeCommit repository.

  • In the AWS console, choose Services and then CloudFormation. Select your stack name. On the stack Outputs tab, look for the CodePipelineURL key and click on the URL.
  • Validate that all steps have successfully completed. For a successful CodePipeline execution, you should see something like Figure 5. Wait for the execution to complete in case it is still in progress.
CodePipeline console showing execution status of all stages

Figure 5: CodePipeline console showing execution status of all stages


  1. Validate the Website URL

After completing the pipeline execution, hit the website URL on a browser to check if it’s working.

  • On the stack Outputs tab, look for the WebsiteURL key and click on the URL.
  • For a successful deployment, it should open a default page similar to Figure 6.
Sample “Hello World” application (Green deployment)

Figure 6: Sample “Hello World” application (Green deployment)


  1. Validate the EFS share

After the website deployed successfully, we will get into the application server and validate the EFS mount point and the application source code directory.

  • Open the Amazon EC2 console, and then choose Instances in the left navigation pane.
  • Select the instance named bg-sample and choose
  • For Connection method, choose Session Manager, and then choose connect

After the connection is made, run the following bash commands to validate the EFS mount and the deployed content. Figure 7 shows a sample output from running the bash commands.

sudo df –h | grep efs
ls –la /efs/green
ls –la /var/www/
Sample output from the bash command (Green deployment)

Figure 7: Sample output from the bash command (Green deployment)


  1. Deploy a new revision of the application code

After verifying the application status and the deployed code on the EFS share, commit some changes to the CodeCommit repository in order to trigger a new deployment.

  • On the stack Outputs tab, look for the CodeCommitURL key and click on the corresponding URL.
  • Click on the file html.
  • Click on
  • Uncomment line 9 and comment line 10, so that the new lines look like those below after the changes:
background-color: #0188cc; 
#background-color: #90ee90;
  • Add Author name, Email address, and then choose Commit changes.

After you commit the code, the CodePipeline triggers and executes Source, Build, Deploy, and Lambda stages. Once the execution completes, hit the Website URL and you should see a new page like Figure 8.

New Application version (Blue deployment)

Figure 8: New Application version (Blue deployment)


On the EFS side, the application directory on the new EC2 instance now points to /efs/blue as shown in Figure 9.

Sample output from the bash command (Blue deployment)

Figure 9: Sample output from the bash command (Blue deployment)

Solution review

Let’s review the pipeline stages details and what happens during the Blue/Green deployment:

1) Build stage

For this sample application, the CodeBuild project is configured to mount the EFS file system and utilize the buildspec.yml file present in the source code root directory to run the build. Following is the sample build spec utilized in this solution:

version: 0.2
phases:
  install:
    runtime-versions:
      php: latest   
  build:
    commands:
      - current_deployment=$(aws ssm get-parameter --name $SSM_PARAMETER --query "Parameter.Value" --region $REGION --output text)
      - echo $current_deployment
      - echo $SSM_PARAMETER
      - echo $EFS_ID $REGION
      - if [[ "$current_deployment" == "null" ]]; then echo "this is the first GREEN deployment for this project" ; dir='/efs/green' ; fi
      - if [[ "$current_deployment" == "green" ]]; then dir='/efs/blue' ; else dir='/efs/green' ; fi
      - if [ ! -d $dir ]; then  mkdir $dir >/dev/null 2>&1 ; fi
      - echo $dir
      - rsync -ar $CODEBUILD_SRC_DIR/ $dir/
artifacts:
  files:
      - '**/*'

During the build job, the following activities occur:

  • Installs latest php runtime version.
  • Reads the SSM parameter value in order to know the current deployment and decide which directory to utilize. The SSM parameter value flips between green and blue for every successful deployment.
  • Synchronizes the latest source code to the EFS mount point.
  • Creates artifacts to be utilized in subsequent stages.

Note: Utilize the default buildspec.yml as a reference and customize it further as per your requirement. See this link for more examples.

2) Deploy Stage

The solution is utilizing CodeDeploy blue/green deployment type for EC2/On-premises. The deployment environment is configured to provision a new EC2 Auto Scaling group for every new deployment in order to deploy the new application revision. CodeDeploy creates the new Auto Scaling group by copying the current one. See this link for more details on blue/green deployment configuration with CodeDeploy. During each deployment event, CodeDeploy utilizes the appspec.yml file to run the deployment steps as per the defined life cycle hooks. Following is the sample AppSpec file utilized in this solution.

version: 0.0
os: linux
hooks:
  BeforeInstall:
    - location: scripts/install_dependencies
      timeout: 180
      runas: root
  AfterInstall:
    - location: scripts/app_deployment
      timeout: 180
      runas: root
  BeforeAllowTraffic :
     - location: scripts/check_app_status
       timeout: 180
       runas: root  

Note: The scripts mentioned in the AppSpec file are available in the scripts directory of the CodeCommit repository. Utilize these sample scripts as a reference and modify as per your requirement.

For this sample, the following steps are conducted during a deployment:

  • BeforeInstall:
    • Installs required packages on the EC2 instance.
    • Mounts the EFS file system.
    • Creates a symbolic link to point the apache home directory /var/www/html to the appropriate EFS mount point. It also ensures that the new application version deploys to a different EFS directory without affecting the current running application.
  • AfterInstall:
    • Stops apache web server.
    • Fetches current EFS directory name from Systems Manager.
    • Runs some clean up commands.
    • Restarts apache web server.
  • BeforeAllowTraffic:
    • Checks application status if running fine.
    • Exits the deployment with error if the app returns a non 200 HTTP status code. 

3) Lambda Stage

After completing the deploy stage, CodePipeline triggers a Lambda function in order to update the SSM parameter value with the updated EFS directory name. This parameter value alternates between “blue” and “green” to help CodePipeline identify the right EFS file system path during the next deployment.

CodeDeploy Blue/Green deployment

Let’s review the sequence of events flow during the CodeDeploy deployment:

  1. CodeDeploy creates a new Auto Scaling group by copying the original one.
  2. Provisions a replacement EC2 instance in the new Auto Scaling Group.
  3. Conducts the deployment on the new instance as per the instructions in the yml file.
  4. Sets up health checks and redirects traffic to the new instance.
  5. Terminates the original instance along with the Auto Scaling Group.
  6. After completing the deployment, it should appear as shown in Figure 10.
AWS CodeDeploy console view of a Blue/Green CodeDeploy deployment on Ec2

Figure 10: AWS console view of a Blue/Green CodeDeploy deployment on Ec2

Troubleshooting

To troubleshoot any service-related issues, see the following links:

More information

Now that you have tested the solution, here are some additional points worth noting:

  • The sample template and code utilized in this blog can work in any AWS region and are mainly intended for demonstration purposes. Utilize the sample as a reference and modify it further as per your requirement.
  • This solution works with single account, Region, and VPC combination.
  • For this sample, we have utilized AWS CodeCommit as version control, but you can also utilize any other source supported by AWS CodePipeline like Bitbucket, GitHub, or GitHub Enterprise Server

Clean up

Follow these steps to delete the components and avoid any future incurring charges:

  1. Open the AWS CloudFormation console.
  2. On the Stacks page in the CloudFormation console, select the stack that you created for this blog post. The stack must be currently running.
  3. In the stack details pane, choose Delete.
  4. Select Delete stack when prompted.
  5. Empty and delete the S3 bucket created during deployment step 1.

Conclusion

In this blog post, you learned how to set up a complete CI/CD pipeline for conducting a blue/green deployment on EC2 instances utilizing Amazon EFS file share as mount point to host application source code. The EFS share will be the central location hosting your application content, and it will help reduce your overall deployment time by eliminating the need for deploying a new revision on every EC2 instance local storage. It also helps to preserve any dynamically generated content when the life of an EC2 instance ends.

Author bio

Rakesh Singh

Rakesh is a Senior Technical Account Manager at Amazon. He loves automation and enjoys working directly with customers to solve complex technical issues and provide architectural guidance. Outside of work, he enjoys playing soccer, singing karaoke, and watching thriller movies.

Use the Snyk CLI to scan Python packages using AWS CodeCommit, AWS CodePipeline, and AWS CodeBuild

Post Syndicated from BK Das original https://aws.amazon.com/blogs/devops/snyk-cli-scan-python-codecommit-codepipeline-codebuild/

One of the primary advantages of working in the cloud is achieving agility in product development. You can adopt practices like continuous integration and continuous delivery (CI/CD) and GitOps to increase your ability to release code at quicker iterations. Development models like these demand agility from security teams as well. This means your security team has to provide the tooling and visibility to developers for them to fix security vulnerabilities as quickly as possible.

Vulnerabilities in cloud-native applications can be roughly classified into infrastructure misconfigurations and application vulnerabilities. In this post, we focus on enabling developers to scan vulnerable data around Python open-source packages using the Snyk Command Line Interface (CLI).

The world of package dependencies

Traditionally, code scanning is performed by the security team; they either ship the code to the scanning instance, or in some cases ship it to the vendor for vulnerability scanning. After the vendor finishes the scan, the results are provided to the security team and forwarded to the developer. The end-to-end process of organizing the repositories, sending the code to security team for scanning, getting results back, and remediating them is counterproductive to the agility of working in the cloud.

Let’s take an example of package A, which uses package B and C. To scan package A, you scan package B and C as well. Similar to package A having dependencies on B and C, packages B and C can have their individual dependencies too. So the dependencies for each package get complex and cumbersome to scan over time. The ideal method is to scan all the dependencies in one go, without having manual intervention to understand the dependencies between packages.

Building on the foundation of GitOps and Gitflow

GitOps was introduced in 2017 by Weaveworks as a DevOps model to implement continuous deployment for cloud-native applications. It focuses on the developer ability to ship code faster. Because security is a non-negotiable piece of any application, this solution includes security as part of the deployment process. We define the Snyk scanner as declarative and immutable AWS Cloud Development Kit (AWS CDK) code, which instructs new Python code committed to the repository to be scanned.

Another continuous delivery practice that we base this solution on is Gitflow. Gitflow is a strict branching model that enables project release by enforcing a framework for managing Git projects. As a brief introduction on Gitflow, typically you have a main branch, which is the code sent to production, and you have a development branch where new code is committed. After the code in development branch passes all tests, it’s merged to the main branch, thereby becoming the code in production. In this solution, we aim to provide this scanning capability in all your branches, providing security observability through your entire Gitflow.

AWS services used in this solution

We use the following AWS services as part of this solution:

  • AWS CDK – The AWS CDK is an open-source software development framework to define your cloud application resources using familiar programming languages. In this solution, we use Python to write our AWS CDK code.
  • AWS CodeBuild – CodeBuild is a fully managed build service in the cloud. CodeBuild compiles your source code, runs unit tests, and produces artifacts that are ready to deploy. CodeBuild eliminates the need to provision, manage, and scale your own build servers.
  • AWS CodeCommit – CodeCommit is a fully managed source control service that hosts secure Git-based repositories. It makes it easy for teams to collaborate on code in a secure and highly scalable ecosystem. CodeCommit eliminates the need to operate your own source control system or worry about scaling its infrastructure. You can use CodeCommit to securely store anything from source code to binaries, and it works seamlessly with your existing Git tools.
  • AWS CodePipeline – CodePipeline is a continuous delivery service you can use to model, visualize, and automate the steps required to release your software. You can quickly model and configure the different stages of a software release process. CodePipeline automates the steps required to release your software changes continuously.
  • Amazon EventBridge – EventBridge rules deliver a near-real-time stream of system events that describe changes in AWS resources. With simple rules that you can quickly set up, you can match events and route them to one or more target functions or streams.
  • AWS Systems Manager Parameter Store – Parameter Store, a capability of AWS Systems Manager, provides secure, hierarchical storage for configuration data management and secrets management. You can store data such as passwords, database strings, Amazon Machine Image (AMI) IDs, and license codes as parameter values.

Prerequisites

Before you get started, make sure you have the following prerequisites:

  • An AWS account (use a Region that supports CodeCommit, CodeBuild, Parameter Store, and CodePipeline)
  • A Snyk account
  • An existing CodeCommit repository you want to test on

Architecture overview

After you complete the steps in this post, you will have a working pipeline that scans your Python code for open-source vulnerabilities.

We use the Snyk CLI, which is available to customers on all plans, including the Free Tier, and provides the ability to programmatically scan repositories for vulnerabilities in open-source dependencies as well as base image recommendations for container images. The following reference architecture represents a general workflow of how Snyk performs the scan in an automated manner. The design uses DevSecOps principles of automation, event-driven triggers, and keeping humans out of the loop for its run.

As developers keep working on their code, they continue to commit their code to the CodeCommit repository. Upon each commit, a CodeCommit API call is generated, which is then captured using the EventBridge rule. You can customize this event rule for a specific event or feature branch you want to trigger the pipeline for.

When the developer commits code to the specified branch, that EventBridge event rule triggers a CodePipeline pipeline. This pipeline has a build stage using CodeBuild. This stage interacts with the Snyk CLI, and uses the token stored in Parameter Store. The Snyk CLI uses this token as authentication and starts scanning the latest code committed to the repository. When the scan is complete, you can review the results on the Snyk console.

This code is built for Python pip packages. You can edit the buildspec.yml to incorporate for any other language that Snyk supports.

The following diagram illustrates our architecture.

snyk architecture codepipeline

Code overview

The code in this post is written using the AWS CDK in Python. If you’re not familiar with the AWS CDK, we recommend reading Getting started with AWS CDK before you customize and deploy the code.

Repository URL: https://github.com/aws-samples/aws-cdk-codecommit-snyk

This AWS CDK construct uses the Snyk CLI within the CodeBuild job in the pipeline to scan the Python packages for open-source package vulnerabilities. The construct uses CodePipeline to create a two-stage pipeline: one source, and one build (the Snyk scan stage). The construct takes the input of the CodeCommit repository you want to scan, the Snyk organization ID, and Snyk auth token.

Resources deployed

This solution deploys the following resources:

For the deployment, we use the AWS CDK construct in the codebase cdk_snyk_construct/cdk_snyk_construct_stack.py in the AWS CDK stack cdk-snyk-stack. The construct requires the following parameters:

  • ARN of the CodeCommit repo you want to scan
  • Name of the repository branch you want to be monitored
  • Parameter Store name of the Snyk organization ID
  • Parameter Store name for the Snyk auth token

Set up the organization ID and auth token before deploying the stack. Because these are confidential and sensitive data, you should deploy them as a separate stack or manual process. In this solution, the parameters have been stored as a SecureString parameter type and encrypted using the AWS-managed KMS key.

You create the organization ID and auth token on the Snyk console. On the Settings page, choose General in the navigation page to add these parameters.

snyk settings console


You can retrieve the names of the parameters on the Systems Manager console by navigating to Parameter Store and finding the name on the Overview tab.

SSM Parameter Store

Create a requirements.txt file in the CodeCommit repository

We now create a repository in CodeCommit to store the code. For simplicity, we primarily store the requirements.txt file in our repository. In Python, a requirements file stores the packages that are used. Having clearly defined packages and versions makes it easier for development, especially in virtual environments.

For more information on the requirements file in Python, see Requirement Specifiers.

To create a CodeCommit repository, run the following AWS Command Line Interface (AWS CLI) command in your AWS accounts:

aws codecommit create-repository --repository-name snyk-repo \
--repository-description "Repository for Snyk to scan Python packages"

Now let’s create a branch called main in the repository using the following command:

aws codecommit create-branch --repository-name snyk-repo \
--branch-name main

After you create the repository, commit a file named requirements.txt with the following content. The following packages are pinned to a particular version that they have a vulnerability with. This file is our hypothetical vulnerable set of packages that have been committed into your development code.

PyYAML==5.3.1
Pillow==7.1.2
pylint==2.5.3
urllib3==1.25.8


For instructions on committing files in CodeCommit, see Connect to an AWS CodeCommit repository.

When you store the Snyk auth token and organization ID in Parameter Store, note the parameter names—you need to pass them as parameters during the deployment step.

Now clone the CDK code from the GitHub repository with the command below:

git clone https://github.com/aws-samples/aws-cdk-codecommit-snyk.git

After the cloning is complete you should see a directory named aws-cdk-codecommit-snyk on your machine.

When you’re ready to deploy, enter the aws-cdk-codecommit-snyk directory, and run the following command with the appropriate values:

cdk deploy cdk-snyk-stack \
--parameters RepoName=<name-of-codecommit-repo> \
--parameters RepoBranch=<branch-to-be-scanned>  \
--parameters SnykOrgId=<value> \
--parameters SnykAuthToken=<value>

After the stack deployment is complete, you can see a new pipeline in your AWS account, which is configured to be triggered every time a commit occurs on the main branch.

You can view the results of the scan on the Snyk console. After the pipeline runs, log in to snyk.io and you should see a project named as per your repository (see the following screenshot).

snyk dashboard


Choose the repo name to get a detailed view of the vulnerabilities found. Depending on what packages you put in your requirements.txt, your report will differ from the following screenshot.

snyk-vuln-details


To fix the vulnerability identified, you can change the version of these packages in the requirements.txt file. The edited requirements file should look like the following:

PyYAML==5.4
Pillow==8.2.0
pylint==2.6.1
urllib3==1.25.9

After you update the requirements.txt file in your repository, push your changes back to the CodeCommit repository you created earlier on the main branch. The push starts the pipeline again.

After the commit is performed to the targeted branch, you don’t see the vulnerability reported on the Snyk dashboard because the pinned version 5.4 doesn’t contain that vulnerability.

Clean up

To avoid accruing further cost for the resources deployed in this solution, run cdk destroy to remove all the AWS resources you deployed through CDK.

As the CodeCommit repository was created using AWS CLI, the following command deletes the CodeCommit repository:

aws codecommit delete-repository --repository-name snyk-repo

Conclusion

In this post, we provided a solution so developers can self- remediate vulnerabilities in their code by monitoring it through Snyk. This solution provides observability, agility, and security for your Python application by following DevOps principles.

A similar architecture has been used at NFL to shift-left the security of their code. According to the shift-left design principle, security should be moved closer to the developers to identify and remediate security issues earlier in the development cycle. NFL has implemented a similar architecture which made the total process, from committing code on the branch to remediating 15 times faster than their previous code scanning setup.

Here’s what NFL has to say about their experience:

“NFL used Snyk to scan Python packages for a service launch. Traditionally it would have taken 10days to scan the packages through our existing process but with Snyk we were able to follow DevSecOps principles and get the scans completed, and reviewed within matter of days. This simplified our time to market while maintaining visibility into our security posture.” – Joe Steinke (Director, Data Solution Architect)

Extending an AWS CodeBuild environment for CPP applications

Post Syndicated from Rucha Deshpande original https://aws.amazon.com/blogs/devops/extend-aws-codebuild-for-cpp-apps/

AWS CodeBuild is a fully managed build service that offers curated Docker images. These managed images provide build environments for programming languages and runtimes such as Android, Go, Java, Node.js, PHP, Python, Ruby, Docker, and .Net Core. However, there are a lot of existing CPP-based applications, and developers may have difficulties integrating these applications with the AWS CPP SDK. CodeBuild doesn’t provide Docker images to build CPP code. This requires building a custom Docker image to use with CodeBuild.

This post demonstrates how you can create a custom build environment to build CPP applications using aws-sdk-cpp. We provide an example Docker file to build a custom Docker image and demonstrate how CodeBuild can use it. We also provide a unit test that calls the data transfer manager API to transfer the data to an Amazon Simple Storage Service (Amazon S3) bucket using the custom Docker image. We hope this can help you extend any C++ applications with AWS functionalities by integrating the AWS CPP SDK in your applications.

Set up the Amazon ECR repository

Amazon Elastic Container Registry (Amazon ECR) manages public and private image repositories. You can push or pull images from it. In this section, we walk through setting up a repository.

  1. On the Amazon ECR console, create a private repository called cpp-blog.

Create ECR repository

  1. On the repository details page, choose Permissions.
  2. Choose Edit policy JSON.
  3. Add the following code so CodeBuild can push and pull images from the repository:
{
    "Version": "2012-10-17",
    "Statement": [{
        "Sid": "AllowPushPull",
        "Effect": "Allow",
        "Principal": {
            "Service": "codebuild.amazonaws.com"
        },
        "Action": [
            "ecr:BatchCheckLayerAvailability",
            "ecr:BatchGetImage",
            "ecr:CompleteLayerUpload",
            "ecr:GetDownloadUrlForLayer",
            "ecr:InitiateLayerUpload",
            "ecr:PutImage",
            "ecr:UploadLayerPart"
        ]
    }]
}

After we create the repository, we can create the custom CodeBuild image.

  1. Set up a CodeCommit repository cpp_custom_build_image.
  2. In the repository, create a file named Dockerfile and enter the following code.

Note here that we’re not building the entire aws-sdk-cpp. The -DBUILD_ONLY="s3;transfer" flag determines which packages you want to build. You can customize this flag according to your application’s needs.

# base image
FROM public.ecr.aws/lts/ubuntu:18.04_stable
ENV DEBIAN_FRONTEND=noninteractive
# build as root
USER 0
# install required build tools via packet manager
RUN apt-get update -y && apt-get install -y ca-certificates curl build-essential git cmake libz-dev libssl-dev libcurl4-openssl-dev
# AWSCPPSDK we build s3 and transfer manager
RUN git clone --recurse-submodules https://github.com/aws/aws-sdk-cpp \
    && mkdir sdk_build && cd sdk_build \
    && cmake ../aws-sdk-cpp/ -DCMAKE_BUILD_TYPE=Release -DBUILD_ONLY="s3;transfer" -DENABLE_TESTING=OFF -DBUILD_SHARED_LIBS=OFF \
    && make -j $(nproc) && make install \
    && cd .. \
    && rm -rf sdk_build
# finalize the build
WORKDIR /
  1. Create a file named buildspec.yaml and enter the following code to build the custom image and push it to the repository:
version: 0.2

phases:
  pre_build:
    commands:
      - echo "Logging in to Amazon ECR..."
      - aws ecr get-login-password --region $AWS_REGION | docker login --username AWS --password-stdin ${ECR_PATH}
  build:
    commands:
      - docker build -t cpp-blog:v1 .
      - docker tag cpp-blog:v1 ${ECR_REGISTRY}:v1      
      - docker push ${ECR_REGISTRY}:v1
  1. Create a CodeBuild project named cpp_custom_build.

Create CodeBuild project to build custom Docker Image

  1. For Source provider, choose AWS CodeCommit.
  2. For Repository, choose the repository you created (cpp_custom_build_image).
  3. For Reference type, select Branch.
  4. For Branch, choose main.

Create CodeBuild project - Source

  1. For Environment image, select Managed image.
  2. Choose the latest standard available image to you.
  3. Select Privileged to allow CodeBuild to build the Docker image.

Create CodeBuild project - Enviroment

  1. For Service role, select New service role.
  2. For Role name, enter cpp-custom-image-build-role.

Create CodeBuild project - Service Role

  1. Under Additional configuration, because we build Amazon S3 and transfer manager, select 7 GB memory (the AWS CPP SDK build requires at least 4 GB).
  2. Add the following environment variables:
    a. ECR_REGISTRY = <ACCOUNT_NUMBER>.ecr.<AWS_REGION>.amazonaws.com/cpp-blog
    b. ECR_PATH = <ACCOUNT_NUMBER>.ecr.<AWS_REGION>.amazonaws.com

Create CodeBuild project - Compute

Create CodeBuild project - Enviroment vars

  1. For Build specifications, select Use a buildspec file.
  2. Leave Buildspec name empty.

By default, it uses buildspec.yaml from the CodeCommit repository.

Create CodeBuild project - Buildspec

  1. Choose Create build project.

Next, you update the AWS Identity and Access Management (IAM) service role with permissions to push and pull images from Amazon ECR.

  1. On the IAM console, choose Roles.
  2. Search for and choose the role you created (cpp-custom-image-build-role).
  3. Choose Edit policy.
  4. On the JSON tab, add the following code: Here replace the <account_id> with your AWS account ID and us-east-1 with AWS region you are working in.
{
    "Version": "2012-10-17",
    "Statement": [
        {
            "Effect": "Allow",
            "Resource": [
                "arn:aws:logs:us-east-1:<account_id>:log-group:/aws/codebuild/cpp_custom_build",
                "arn:aws:logs:us-east-1:<account_id>:log-group:/aws/codebuild/cpp_custom_build:*"
            ],
            "Action": [
                "logs:CreateLogGroup",
                "logs:CreateLogStream",
                "logs:PutLogEvents"
            ]
        },
        {
            "Effect": "Allow",
            "Resource": [
                "arn:aws:codecommit:us-east-1:<account_id>:cpp_custom_build_image"
            ],
            "Action": [
                "codecommit:GitPull"
            ]
        },
        {
            "Effect": "Allow",
            "Action": [
                "codebuild:CreateReportGroup",
                "codebuild:CreateReport",
                "codebuild:UpdateReport",
                "codebuild:BatchPutTestCases",
                "codebuild:BatchPutCodeCoverages"
            ],
            "Resource": [
                "arn:aws:codebuild:us-east-1:<account_id>:report-group/cpp_custom_build-*"
            ]
        },
        {
            "Effect": "Allow",
            "Action": [
                "ecr:GetAuthorizationToken",
                "ecr:BatchCheckLayerAvailability",
                "ecr:GetDownloadUrlForLayer",
                "ecr:GetRepositoryPolicy",
                "ecr:DescribeRepositories",
                "ecr:ListImages",
                "ecr:DescribeImages",
                "ecr:BatchGetImage",
                "ecr:GetLifecyclePolicy",
                "ecr:GetLifecyclePolicyPreview",
                "ecr:ListTagsForResource",
                "ecr:DescribeImageScanFindings",
                "ecr:InitiateLayerUpload",
                "ecr:UploadLayerPart",
                "ecr:CompleteLayerUpload",
                "ecr:PutImage"
            ],
            "Resource": "*"
        }
    ]
}
  1. Choose Review policy and choose Save changes.
  2. Run the build project.
  3. Validate that the Amazon ECR repository has the newly created image.

Validate ECR repo for Docker Image

Test the custom CodeBuild image with a sample CPP application

Now we use a sample CPP application that calls transfer manager and Amazon S3 APIs from aws-sdk-cpp to test our custom image.

  1. Set up the CodeCommit repository sample_cpp_app.
  2. Create a file named s3_test.cpp and enter the following code into it.

We use transfer manager to test our image created in the previous step:

#include <aws/s3/S3Client.h>
#include <aws/core/Aws.h>
#include <aws/core/auth/AWSCredentialsProvider.h>
#include <aws/transfer/TransferManager.h>
#include <aws/transfer/TransferHandle.h>
#include <iostream>
#include <fstream>

/*
 *  usage: ./s3_test srcFile bucketName destFile region
 *  this function is using tranfer manager to copy a local file to the bucket
 */
int main(int argc, char *argv[])
{
    if(argc != 5){
        std::cout << "usage: ./s3_test srcFile bucketName destFile region\n";
        return 1;
    }
    std::string fileName = argv[1]; //local FileName to be uploaded to s3 bucket
    std::string bucketName = argv[2];  //bucketName, make sure that bucketName exists
    std::string objectName = argv[3];
    std::string region = argv[4];
    Aws::SDKOptions options;
    options.loggingOptions.logLevel = Aws::Utils::Logging::LogLevel::Info;
    Aws::InitAPI(options);

    Aws::Client::ClientConfiguration config;
    config.region = region;
  
    auto s3_client = std::make_shared<Aws::S3::S3Client>(config);

    auto thread_executor = Aws::MakeShared<Aws::Utils::Threading::DefaultExecutor>("s3_test");
    Aws::Transfer::TransferManagerConfiguration transferConfig(thread_executor.get());
    transferConfig.s3Client = s3_client;
    auto buffer = Aws::MakeShared<Aws::FStream>("PutObjectInputStream", fileName.c_str(), std::ios_base::in | std::ios_base::binary);

    auto transferManager = Aws::Transfer::TransferManager::Create(transferConfig);
    auto transferHandle = transferManager->UploadFile(buffer,
                            bucketName.c_str(), objectName.c_str(), "multipart/form-data",
                            Aws::Map<Aws::String, Aws::String>());
                                                          
    transferHandle->WaitUntilFinished();
    thread_executor = nullptr;
    Aws::ShutdownAPI(options);  
}
  1. Create a file named CMakeLists.txt and add the below code to it.

Because we only use Amazon S3 and transfer components from aws-sdk-cpp in our example, we use find_package to locate these two components:

cmake_minimum_required(VERSION 3.3)
project(s3_test)
set(CMAKE_CXX_STANDARD 11)
find_package(CURL REQUIRED)
find_package( AWSSDK  REQUIRED COMPONENTS s3 transfer)
add_executable(s3_test s3_test.cpp)
target_link_libraries(s3_test ${AWSSDK_LINK_LIBRARIES})
  1. Create a file named buildspec.yaml and enter the following code into it:
version: 0.2
phases:
  build:
    commands:
      # configure application executable, source files and linked libraries.
      - cmake .
      # build the application
      - make
      # unit test. we can test the s3_test executable by copying a local file, for example test_source.txt to an existing s3 bucket and name the file as test_dest.txt
      - ./s3_test $SOURCE_FILE $BUCKET_NAME $DEST_FILE $REGION
artifacts:
  files:
    - s3_test
  1. Create a file to be copied to Amazon S3 as part of testing the solution.

For example, we create test_source.txt in the sample_cpp_app CodeCommit repository.

sample_cpp_app repository directory structure

  1. After setting up the project, create an S3 bucket to use in the next step.
  2. Create another CodeBuild project called cpp-test.

Create CodeBuild project - cpp-test

  1. For Source provider, choose AWS CodeCommit.
  2. For Repository, enter the repository you created (sample_cpp_app).
  3. For Reference type, select Branch.
  4. For Branch, choose main.

Create CodeBuild project - cpp-test - Source

  1. In the Environment section, select Custom image.
  2. For Image registry, select Amazon ECR.
  3. For Amazon ECR repository, choose the cpp-blog repository.
  4. For Amazon ECR image, choose v1.
  5. For Image pull credentials, select AWS CodeBuild credentials.

Create CodeBuild project - cpp-test - Environment

  1. For Service role, select New service role.
  2. For Role name, enter cpp-test-role.

Create CodeBuild project - cpp-test - Service Role

  1. For Compute, select 3 GB memory.
  2. For Environment variables, enter the variables used to test sample_cpp_app.
  3. Add the value for BUCKET_NAME that you created earlier.

Create CodeBuild project - cpp-test - Environment vars

Now we update the IAM service role with permissions to push and pull images and to copy files to Amazon S3.

  1. On the IAM console, choose Policies.
  2. Choose Create policy.
  3. On the JSON tab, enter the following code:
{
    "Version": "2012-10-17",
    "Statement": [{
        "Effect": "Allow",
        "Action": "s3:PutObject",
        "Resource": "*"
    }]
}
  1. Review and create the policy, called S3WritePolicy.On the Roles page, locate the role cpp-test-role.S3WritePolicy
  2. Choose Attach policies.
  3. Add the following policies to the role.Create CodeBuild project - cpp-test-role
  4. Run the build project.
  5. Validate that the test_source.txt file was copied to the S3 bucket with the new name test_dest.txt.

s3 test bucket contents

Clean up

When you’ve completed all steps and are finished testing, follow these steps to delete resources to avoid incurring costs:

  1. On the ECR console, from Repositories, choose cpp-blog then Delete.
  2. On the CodeCommit console, choose Repositories.
  3. Choose cpp_custom_build_image repository and choose Delete repository;
  4. Choose sample_cpp_app repository and choose Delete repository.
  5. On the Amazon S3 console, choose the test bucket created, choose Empty.  Confirm the deletion by typing ‘permanently delete’. Choose Empty.
  6. Choose the test bucket created  and Delete.
  7. On the IAM console, choose Roles.
  8. Search for cpp-custom-image-build-role and Delete; Search for cpp-test-role and Delete.
  9. On the Policies page, choose S3WritePolicy and choose Policy Actions and Delete.
  10. Go to the CodeBuild console. From Build projects, choose cpp_custom_build, Choose Delete build project; Choose cpp-test and choose Delete build project.

Conclusion

In this post, we demonstrated how you can create a custom Docker image using CodeBuild and use it to build CPP applications. We also successfully tested the build image using a sample CPP application.

You can extend the Docker file used to build the custom image to include any specific libraries your applications may require. Also, you can build the libraries included in this Docker file from source if your application requires a specific version of the library.

About the authors

Rucha Deshpande

Rucha Deshpande

Rucha Deshpande is a Solutions Developer at Amazon Web Services. She works on architecture and implementation of microservices. In her free time, she enjoys reading, gardening and travelling.


Yunhua Koglin

Yunhua Koglin

Yunhua Koglin is a Software Dev Engineer at AWS working on OSDU in Houston, TX. She is passionate about software development and a nature lover.

Enforcing AWS CloudFormation scanning in CI/CD Pipelines at scale using Trend Micro Cloud One Conformity

Post Syndicated from Chris Dorrington original https://aws.amazon.com/blogs/devops/cloudformation-scanning-cicd-pipeline-cloud-conformity/

Integrating AWS CloudFormation template scanning into CI/CD pipelines is a great way to catch security infringements before application deployment. However, implementing and enforcing this in a multi team, multi account environment can present some challenges, especially when the scanning tools used require external API access.

This blog will discuss those challenges and offer a solution using Trend Micro Cloud One Conformity (formerly Cloud Conformity) as the worked example. Accompanying this blog is the end to end sample solution and detailed install steps which can be found on GitHub here.

We will explore explore the following topics in detail:

  • When to detect security vulnerabilities
    • Where can template scanning be enforced?
  • Managing API Keys for accessing third party APIs
    • How can keys be obtained and distributed between teams?
    • How easy is it to rotate keys with multiple teams relying upon them?
  • Viewing the results easily
    • How do teams easily view the results of any scan performed?
  • Solution maintainability
    • How can a fix or update be rolled out?
    • How easy is it to change scanner provider? (i.e. from Cloud Conformity to in house tool)
  • Enforcing the template validation
    • How to prevent teams from circumventing the checks?
  • Managing exceptions to the rules
    • How can the teams proceed with deployment if there is a valid reason for a check to fail?


When to detect security vulnerabilities

During the DevOps life-cycle, there are multiple opportunities to test cloud applications for best practice violations when it comes to security. The Shift-left approach is to move testing to as far left in the life-cycle, so as to catch bugs as early as possible. It is much easier and less costly to fix on a local developer machine than it is to patch in production.

Diagram showing Shift-left approach

Figure 1 – depicting the stages that an app will pass through before being deployed into an AWS account

At the very left of the cycle is where developers perform the traditional software testing responsibilities (such as unit tests), With cloud applications, there is also a responsibility at this stage to ensure there are no AWS security, configuration, or compliance vulnerabilities. Developers and subsequent peer reviewers looking at the code can do this by eye, but in this way it is hard to catch every piece of bad code or misconfigured resource.

For example, you might define an AWS Lambda function that contains an access policy making it accessible from the world, but this can be hard to spot when coding or peer review. Once deployed, potential security risks are now live. Without proper monitoring, these misconfigurations can go undetected, with potentially dire consequences if exploited by a bad actor.

There are a number of tools and SaaS offerings on the market which can scan AWS CloudFormation templates and detect infringements against security best practices, such as Stelligent’s cfn_nag, AWS CloudFormation Guard, and Trend Micro Cloud One Conformity. These can all be run from the command line on a developer’s machine, inside the IDE or during a git commit hook. These options are discussed in detail in Using Shift-Left to Find Vulnerabilities Before Deployment with Trend Micro Template Scanner.

Whilst this is the most left the testing can be moved, it is hard to enforce it this early on in the development process. Mandating that scan commands be integrated into git commit hooks or IDE tools can significantly increase the commit time and quickly become frustrating for the developer. Because they are responsible for creating these hooks or installing IDE extensions, you cannot guarantee that a template scan is performed before deployment, because the developer could easily turn off the scans or not install the tools in the first place.

Another consideration for very-left testing of templates is that when applications are written using AWS CDK or AWS Serverless Application Model (SAM), the actual AWS CloudFormation template that is submitted to AWS isn’t available in source control; it’s created during the build or package stage. Therefore, moving template scanning as far to the left is just not possible in these situations. Developers have to run a command such as cdk synth or sam package to obtain the final AWS CloudFormation templates.

If we now look at the far right of Figure 1, when an application has been deployed, real time monitoring of the account can pick up security issues very quickly. Conformity performs excellently in this area by providing central visibility and real-time monitoring of your cloud infrastructure with a single dashboard. Accounts are checked against over 400 best practices, which allows you to find and remediate non-compliant resources. This real time alerting is fast – you can be assured of an email stating non-compliance in no time at all! However, remediation does takes time. Following the correct process, a fix to code will need to go through the CI/CD pipeline again before a patch is deployed. Relying on account scanning only at the far right is sub-optimal.

The best place to scan templates is at the most left of the enforceable part of the process – inside the CI/CD pipeline. Conformity provides their Template Scanner API for this exact purpose. Templates can be submitted to the API, and the same Conformity checks that are being performed in real time on the account are run against the submitted AWS CloudFormation template. When integrated programmatically into a build, failing checks can prevent a deployment from occurring.

Whilst it may seem a simple task to incorporate the Template Scanner API call into a CI/CD pipeline, there are many considerations for doing this successfully in an enterprise environment. The remainder of this blog will address each consideration in detail, and the accompanying GitHub repo provides a working sample solution to use as a base in your own organization.


View failing checks as AWS CodeBuild test reports

Treating failing Conformity checks the same as unit test failures within the build will make the process feel natural to the developers. A failing unit test will break the build, and so will a failing Conformity check.

AWS CodeBuild provides test reporting for common unit test frameworks, such as NUnit, JUnit, and Cucumber. This allows developers to easily and very visually see what failing tests have occurred within their builds, allowing for quicker remediation than having to trawl through test log files. This same principle can be applied to failing Conformity checks—this allows developers to quickly see what checks have failed, rather than looking into AWS CodeBuild logs. However, the AWS CodeBuild test reporting feature doesn’t natively support the JSON schema that the Conformity Template Scanner API returns. Instead, you need custom code to turn the Conformity response into a usable format. Later in this blog we will explore how the conversion occurs.

Cloud conformity failed checks displayed as CodeBuild Reports

Figure 2 – Cloud Conformity failed checks appearing as failed test cases in AWS CodeBuild reports

Enterprise speed bumps

Teams wishing to use template scanning as part of their AWS CodePipeline currently need to create an AWS CodeBuild project that calls the external API, and then performs the custom translation code. If placed inside a buildspec file, it can easily become bloated with many lines of code, leading to maintainability issues arising as copies of the same buildspec file are distributed across teams and accounts. Additionally, third-party APIs such as Conformity are often authorized by an API key. In some enterprises, not all teams have access to the Conformity console, further compounding the problem for API key management.

Below are some factors to consider when implementing template scanning in the enterprise:

  • How can keys be obtained and distributed between teams?
  • How easy is it to rotate keys when multiple teams rely upon them?
  • How can a fix or update be rolled out?
  • How easy is it to change scanner provider? (i.e. From Cloud Conformity to in house tool)

Overcome scaling issues, use a centralized Validation API

An approach to overcoming these issues is to create a single AWS Lambda function fronted by Amazon API Gateway within your organization that runs the call to the Template Scanner API, and performs the transform of results into a format usable by AWS CodeBuild reports. A good place to host this API is within the Cloud Ops team account or similar shared services account. This way, you only need to issue one API key (stored in AWS Secrets Manager) and it’s not available for viewing by any developers. Maintainability for the code performing the Template Scanner API calls is also very easy, because it resides in one location only. Key rotation is now simple (due to only one key in one location requiring an update) and can be automated through AWS Secrets Manager

The following diagram illustrates a typical setup of a multi-account, multi-dev team scenario in which a team’s AWS CodePipeline uses a centralized Validation API to call Conformity’s Template Scanner.

architecture diagram central api for cloud conformity template scanning

Figure 3 – Example of an AWS CodePipeline utilizing a centralized Validation API to call Conformity’s Template Scanner


Providing a wrapper API around the Conformity Template Scanner API encapsulates the code required to create the CodeBuild reports. Enabling template scanning within teams’ CI/CD pipelines now requires only a small piece of code within their CodeBuild buildspec file. It performs the following three actions:

  1. Post the AWS CloudFormation templates to the centralized Validation API
  2. Write the results to file (which are already in a format readable by CodeBuild test reports)
  3. Stop the build if it detects failed checks within the results

The centralized Validation API in the shared services account can be hosted with a private API in Amazon API Gateway, fronted by a VPC endpoint. Using a private API denies any public access but does allow access from any internal address allowed by the VPC endpoint security group and endpoint policy. The developer teams can run their AWS CodeBuild validation phase within a VPC, thereby giving it access to the VPC endpoint.

A working example of the code required, along with an AWS CodeBuild buildspec file, is provided in the GitHub repository


Converting 3rd party tool results to CodeBuild Report format

With a centralized API, there is now only one place where the conversion code needs to reside (as opposed to copies embedded in each teams’ CodePipeline). AWS CodeBuild Reports are primarily designed for test framework outputs and displaying test case results. In our case, we want to display Conformity checks – which are not unit test case results. The accompanying GitHub repository to convert from Conformity Template Scanner API results, but we will discuss mappings between the formats so that bespoke conversions for other 3rd party tools, such as cfn_nag can be created if required.

AWS CodeBuild provides out of the box compatibility for common unit test frameworks, such as NUnit, JUnit and Cucumber. Out of the supported formats, Cucumber JSON is the most readable format to read and manipulate due to native support in languages such as Python (all other formats being in XML).

Figure 4 depicts where the Cucumber JSON fields will appear in the AWS CodeBuild reports page and Figure 5 below shows a valid Cucumber snippet, with relevant fields highlighted in yellow.

CodeBuild Reports page with fields highlighted that correspond to cucumber JSON fields

Figure 4 – AWS CodeBuild report test case field mappings utilized by Cucumber JSON


Cucumber JSON snippet showing CodeBuild Report field mappings

Figure 5 – Cucumber JSON with mappings to AWS CodeBuild report table


Note that in Figure 5, there are additional fields (eg. id, description etc) that are required to make the file valid Cucumber JSON – even though this data is not displayed in CodeBuild Reports page. However, raw reports are still available as AWS CodeBuild artifacts, and therefore it is useful to still populate these fields with data that could be useful to aid deeper troubleshooting.

Conversion code for Conformity results is provided in the accompanying GitHub repo, within file app.py, line 376 onwards


Making the validation phase mandatory in AWS CodePipeline

The Shift-Left philosophy states that we should shift testing as much as possible to the left. The furthest left would be before any CI/CD pipeline is triggered. Developers could and should have the ability to perform template validation from their own machines. However, as discussed earlier this is rarely enforceable – a scan during a pipeline deployment is the only true way to know that templates have been validated. But how can we mandate this and truly secure the validation phase against circumvention?

Preventing updates to deployed CI/CD pipelines

Using a centralized API approach to make the call to the validation API means that this code is now only accessible by the Cloud Ops team, and not the developer teams. However, the code that calls this API has to reside within the developer teams’ CI/CD pipelines, so that it can stop the build if failures are found. With CI/CD pipelines defined as AWS CloudFormation, and without any preventative measures in place, a team could move to disable the phase and deploy code without any checks performed.

Fortunately, there are a number of approaches to prevent this from happening, and to enforce the validation phase. We shall now look at one of them from the AWS CloudFormation Best Practices.

IAM to control access

Use AWS IAM to control access to the stacks that define the pipeline, and then also to the AWS CodePipeline/AWS CodeBuild resources within them.

IAM policies can generically restrict a team from updating a CI/CD pipeline provided to them if a naming convention is used in the stacks that create them. By using a naming convention, coupled with the wildcard “*”, these policies can be applied to a role even before any pipelines have been deployed..

For example, lets assume the pipeline depicted in Figure 6 is defined and deployed in AWS CloudFormation as follows:

  • Stack name is “cicd-pipeline-team-X”
  • AWS CodePipeline resource within the stack has logical name with prefix “CodePipelineCICD”
  • AWS CodeBuild Project for validation phase is prefixed with “CodeBuildValidateProject”

Creating an IAM policy with the statements below and attaching to the developer teams’ IAM role will prevent them from modifying the resources mentioned above. The AWS CloudFormation stack and resource names will match the wildcards in the statements and Deny the user to any update actions.

Example IAM policy highlighting how to deny updates to stacks and pipeline resources

Figure 6 – Example of how an IAM policy can restrict updates to AWS CloudFormation stacks and deployed resources


Preventing valid failing checks from being a bottleneck

When centralizing anything, and forcing developers to use tooling or features such as template scanners, it is imperative that it (or the team owning it) does not become a bottleneck and slow the developers down. This is just as true for our centralized API solution.

It is sometimes the case that a developer team has a valid reason for a template to yield a failing check. For instance, Conformity will report a HIGH severity alert if a load balancer does not have an HTTPS listener. If a team is migrating an older application which will only work on port 80 and not 443, the team may be able to obtain an exception from their cyber security team. It would not desirable to turn off the rule completely in the real time scanning of the account, because for other deployments this HIGH severity alert could be perfectly valid. The team faces an issue now because the validation phase of their pipeline will fail, preventing them from deploying their application – even though they have cyber approval to fail this one check.

It is imperative that when enforcing template scanning on a team that it must not become a bottleneck. Functionality and workflows must accompany such a pipeline feature to allow for quick resolution.

Screenshot of Trend Micro Cloud One Conformity rule from their website

Figure 7 – Screenshot of a Conformity rule from their website

Therefore the centralized validation API must provide a way to allow for exceptions on a case by case basis. Any exception should be tied to a unique combination of AWS account number + filename + rule ID, which ensures that exceptions are only valid for the specific instance of violation, and not for any other. This can be achieved by extending the centralized API with a set of endpoints to allow for exception request and approvals. These can then be integrated into existing or new tooling and workflows to be able to provide a self service method for teams to be able to request exceptions. Cyber security teams should be able to quickly approve/deny the requests.

The exception request/approve functionality can be implemented by extending the centralized private API to provide an /exceptions endpoint, and using DynamoDB as a data store. During a build and template validation, failed checks returned from Conformity are then looked up in the Dynamo table to see if an approved exception is available – if it is, then the check is not returned as a actual failing check, but rather an exempted check. The build can then continue and deploy to the AWS account.

Figure 8 and figure 9 depict the /exceptions endpoints that are provided as part of the sample solution in the accompanying GitHub repository.

screenshot of API gateway for centralized template scanner api

Figure 8 – Screenshot of API Gateway depicting the endpoints available as part of the accompanying solution


The /exceptions endpoint methods provides the following functionality:

Table containing HTTP verbs for exceptions endpoint

Figure 9 – HTTP verbs implementing exception functionality

Important note regarding endpoint authorization: Whilst the “validate” private endpoint may be left with no auth so that any call from within a VPC is accepted, the same is not true for the “exception” approval endpoint. It would be prudent to use AWS IAM authentication available in API Gateway to restrict approvals to this endpoint for certain users only (i.e. the cyber and cloud ops team only)

With the ability to raise and approve exception requests, the mandatory scanning phase of the developer teams’ pipelines is no longer a bottleneck.


Conclusion

Enforcing template validation into multi developer team, multi account environments can present challenges with using 3rd party APIs, such as Conformity Template Scanner, at scale. We have talked through each hurdle that can be presented, and described how creating a centralized Validation API and exception approval process can overcome those obstacles and keep the teams deploying without unwarranted speed bumps.

By shifting left and integrating scanning as part of the pipeline process, this can leave the cyber team and developers sure that no offending code is deployed into an account – whether they were written in AWS CDK, AWS SAM or AWS CloudFormation.

Additionally, we talked in depth on how to use CodeBuild reports to display the vulnerabilities found, aiding developers to quickly identify where attention is required to remediate.

Getting started

The blog has described real life challenges and the theory in detail. A complete sample for the described centralized validation API is available in the accompanying GitHub repo, along with a sample CodePipeline for easy testing. Step by step instructions are provided for you to deploy, and enhance for use in your own organization. Figure 10 depicts the sample solution available in GitHub.

https://github.com/aws-samples/aws-cloudformation-template-scanning-with-cloud-conformity

NOTE: Remember to tear down any stacks after experimenting with the provided solution, to ensure ongoing costs are not charged to your AWS account. Notes on how to do this are included inside the repo Readme.


example codepipeline architecture provided by the accompanying github solution

Figure 10 depicts the solution available for use in the accompanying GitHub repository


Find out more

Other blog posts are available that cover aspects when dealing with template scanning in AWS:

For more information on Trend Micro Cloud One Conformity, use the links below.

Trend Micro AWS Partner Network joint image

Avatar for Chris Dorrington

Chris Dorrington

Chris Dorrington is a Senior Cloud Architect with AWS Professional Services in Perth, Western Australia. Chris loves working closely with AWS customers to help them achieve amazing outcomes. He has over 25 years software development experience and has a passion for Serverless technologies and all things DevOps


Continuous Compliance Workflow for Infrastructure as Code: Part 2

Post Syndicated from DAMODAR SHENVI WAGLE original https://aws.amazon.com/blogs/devops/continuous-compliance-workflow-for-infrastructure-as-code-part-2/

In the first post of this series, we introduced a continuous compliance workflow in which an enterprise security and compliance team can release guardrails in a continuous integration, continuous deployment (CI/CD) fashion in your organization.

In this post, we focus on the technical implementation of the continuous compliance workflow. We demonstrate how to use AWS Developer Tools to create a CI/CD pipeline that releases guardrails for Terraform application workloads.

We use the Terraform-Compliance framework to define the guardrails. Terraform-Compliance is a lightweight, security and compliance-focused test framework for Terraform to enable the negative testing capability for your infrastructure as code (IaC).

With this compliance framework, we can ensure that the implemented Terraform code follows security standards and your own custom standards. Currently, HashiCorp provides Sentinel (a policy as code framework) for enterprise products. AWS has CloudFormation Guard an open-source policy-as-code evaluation tool for AWS CloudFormation templates. Terraform-Compliance allows us to build a similar functionality for Terraform, and is open source.

This post is from the perspective of a security and compliance engineer, and assumes that the engineer is familiar with the practices of IaC, CI/CD, behavior-driven development (BDD), and negative testing.

Solution overview

You start by building the necessary resources as listed in the workload (application development team) account:

  • An AWS CodeCommit repository for the Terraform workload
  • A CI/CD pipeline built using AWS CodePipeline to deploy the workload
  • A cross-account AWS Identity and Access Management (IAM) role that gives the security and compliance account the permissions to pull the Terraform workload from the workload account repository for testing their guardrails in observation mode

Next, we build the resources in the security and compliance account:

  • A CodeCommit repository to hold the security and compliance standards (guardrails)
  • A CI/CD pipeline built using CodePipeline to release new guardrails
  • A cross-account role that gives the workload account the permissions to pull the activated guardrails from the main branch of the security and compliance account repository.

The following diagram shows our solution architecture.

solution architecture diagram

The architecture has two workflows: security and compliance (Steps 1–4) and application delivery (Steps 5–7).

  1. When a new security and compliance guardrail is introduced into the develop branch of the compliance repository, it triggers the security and compliance pipeline.
  2. The pipeline pulls the Terraform workload.
  3. The pipeline tests this compliance check guardrail against the Terraform workload in the workload account repository.
  4. If the workload is compliant, the guardrail is automatically merged into the main branch. This activates the guardrail by making it available for all Terraform application workload pipelines to consume. By doing this, we make sure that we don’t break the Terraform application deployment pipeline by introducing new guardrails. It also provides the security and compliance team visibility into the resources in the application workload that are noncompliant. The security and compliance team can then reach out to the application delivery team and suggest appropriate remediation before the new standards are activated. If the compliance check fails, the automatic merge to the main branch is stopped. The security and compliance team has an option to force merge the guardrail into the main branch if it’s deemed critical and they need to activate it immediately.
  5. The Terraform deployment pipeline in the workload account always pulls the latest security and compliance checks from the main branch of the compliance repository.
  6. Checks are run against the Terraform workload to ensure that it meets the organization’s security and compliance standards.
  7. Only secure and compliant workloads are deployed by the pipeline. If the workload is noncompliant, the security and compliance checks fail and break the pipeline, forcing the application delivery team to remediate the issue and recheck-in the code.

Prerequisites

Before proceeding any further, you need to identify and designate two AWS accounts required for the solution to work:

  • Security and Compliance – In which you create a CodeCommit repository to hold compliance standards that are written based on Terraform-Compliance framework. You also create a CI/CD pipeline to release new compliance guardrails.
  • Workload – In which the Terraform workload resides. The pipeline to deploy the Terraform workload enforces the compliance guardrails prior to the deployment.

You also need to create two AWS account profiles in ~/.aws/credentials for the tools and target accounts, if you don’t already have them. These profiles need to have sufficient permissions to run an AWS Cloud Development Kit (AWS CDK) stack. They should be your private profiles and only be used during the course of this use case. Therefore, it should be fine if you want to use admin privileges. Don’t share the profile details, especially if it has admin privileges. I recommend removing the profile when you’re finished with this walkthrough. For more information about creating an AWS account profile, see Configuring the AWS CLI.

In addition, you need to generate a cucumber-sandwich.jar file by following the steps in the cucumber-sandwich GitHub repo. The JAR file is needed to generate pretty HTML compliance reports. The security and compliance team can use these reports to make sure that the standards are met.

To implement our solution, we complete the following high-level steps:

  1. Create the security and compliance account stack.
  2. Create the workload account stack.
  3. Test the compliance workflow.

Create the security and compliance account stack

We create the following resources in the security and compliance account:

  • A CodeCommit repo to hold the security and compliance guardrails
  • A CI/CD pipeline to roll out the Terraform compliance guardrails
  • An IAM role that trusts the application workload account and allows it to pull compliance guardrails from its CodeCommit repo

In this section, we set up the properties for the pipeline and cross-account role stacks, and run the deployment scripts.

Set up properties for the pipeline stack

Clone the GitHub repo aws-continuous-compliance-for-terraform and navigate to the folder security-and-compliance-account/stacks. This contains the folder pipeline_stack/, which holds the code and properties for creating the pipeline stack.

The folder has a JSON file cdk-stack-param.json, which has the parameter TERRAFORM_APPLICATION_WORKLOADS, which represents the list of application workloads that the security and compliance pipeline pulls and runs tests against to make sure that the workloads are compliant. In the workload list, you have the following parameters:

  • GIT_REPO_URL – The HTTPS URL of the CodeCommit repository in the workload account against which the security and compliance check pipeline runs compliance guardrails.
  • CROSS_ACCOUNT_ROLE_ARN – The ARN for the cross-account role we create in the next section. This role gives the security and compliance account permissions to pull Terraform code from the workload account.

For CROSS_ACCOUNT_ROLE_ARN, replace <workload-account-id> with the account ID for your designated AWS workload account. For GIT_REPO_URL, replace <region> with AWS Region where the repository resides.

security and compliance pipeline stack parameters

Set up properties for the cross-account role stack

In the cloned GitHub repo aws-continuous-compliance-for-terraform from the previous step, navigate to the folder security-and-compliance-account/stacks. This contains the folder cross_account_role_stack/, which holds the code and properties for creating the cross-account role.

The folder has a JSON file cdk-stack-param.json, which has the parameter TERRAFORM_APPLICATION_WORKLOAD_ACCOUNTS, which represents the list of Terraform workload accounts that intend to integrate with the security and compliance account for running compliance checks. All these accounts are trusted by the security and compliance account and given permissions to pull compliance guardrails. Replace <workload-account-id> with the account ID for your designated AWS workload account.

security and compliance cross account role stack parameters

Run the deployment script

Run deploy.sh by passing the name of the AWS security and compliance account profile you created earlier. The script uses the AWS CDK CLI to bootstrap and deploy the two stacks we discussed. See the following code:

cd aws-continuous-compliance-for-terraform/security-and-compliance-account/
./deploy.sh "<AWS-COMPLIANCE-ACCOUNT-PROFILE-NAME>"

You should now see three stacks in the tools account:

  • CDKToolkit – AWS CDK creates the CDKToolkit stack when we bootstrap the AWS CDK app. This creates an Amazon Simple Storage Service (Amazon S3) bucket needed to hold deployment assets such as an AWS CloudFormation template and AWS Lambda code package.
  • cf-CrossAccountRoles – This stack creates the cross-account IAM role.
  • cf-SecurityAndCompliancePipeline – This stack creates the pipeline. On the Outputs tab of the stack, you can find the CodeCommit source repo URL from the key OutSourceRepoHttpUrl. Record the URL to use later.

security and compliance stack

Create a workload account stack

We create the following resources in the workload account:

  • A CodeCommit repo to hold the Terraform workload to be deployed
  • A CI/CD pipeline to deploy the Terraform workload
  • An IAM role that trusts the security and compliance account and allows it to pull Terraform code from its CodeCommit repo for testing

We follow similar steps as in the previous section to set up the properties for the pipeline stack and cross-account role stack, and then run the deployment script.

Set up properties for the pipeline stack

In the already cloned repo, navigate to the folder workload-account/stacks. This contains the folder pipeline_stack/, which holds the code and properties for creating the pipeline stack.

The folder has a JSON file cdk-stack-param.json, which has the parameter COMPLIANCE_CODE, which provides details on where to pull the compliance guardrails from. The pipeline pulls and runs compliance checks prior to deployment, to make sure that application workload is compliant. You have the following parameters:

  • GIT_REPO_URL – The HTTPS URL of the CodeCommit repositoryCode in the security and compliance account, which contains compliance guardrails that the pipeline in the workload account pulls to carry out compliance checks.
  • CROSS_ACCOUNT_ROLE_ARN – The ARN for the cross-account role we created in the previous step in the security and compliance account. This role gives the workload account permissions to pull the Terraform compliance code from its respective security and compliance account.

For CROSS_ACCOUNT_ROLE_ARN, replace <compliance-account-id> with the account ID for your designated AWS security and compliance account. For GIT_REPO_URL, replace <region> with Region where the repository resides.

workload pipeline stack config

Set up the properties for cross-account role stack

In the already cloned repo, navigate to folder workload-account/stacks. This contains the folder cross_account_role_stack/, which holds the code and properties for creating the cross-account role stack.

The folder has a JSON file cdk-stack-param.json, which has the parameter COMPLIANCE_ACCOUNT, which represents the security and compliance account that intends to integrate with the workload account for running compliance checks. This account is trusted by the workload account and given permissions to pull compliance guardrails. Replace <compliance-account-id> with the account ID for your designated AWS security and compliance account.

workload cross account role stack config

Run the deployment script

Run deploy.sh by passing the name of the AWS workload account profile you created earlier. The script uses the AWS CDK CLI to bootstrap and deploy the two stacks we discussed. See the following code:

cd aws-continuous-compliance-for-terraform/workload-account/
./deploy.sh "<AWS-WORKLOAD-ACCOUNT-PROFILE-NAME>"

You should now see three stacks in the tools account:

  • CDKToolkit –AWS CDK creates the CDKToolkit stack when we bootstrap the AWS CDK app. This creates an S3 bucket needed to hold deployment assets such as a CloudFormation template and Lambda code package.
  • cf-CrossAccountRoles – This stack creates the cross-account IAM role.
  • cf-TerraformWorkloadPipeline – This stack creates the pipeline. On the Outputs tab of the stack, you can find the CodeCommit source repo URL from the key OutSourceRepoHttpUrl. Record the URL to use later.

workload pipeline stack

Test the compliance workflow

In this section, we walk through the following steps to test our workflow:

  1. Push the application workload code into its repo.
  2. Push the security and compliance code into its repo and run its pipeline to release the compliance guardrails.
  3. Run the application workload pipeline to exercise the compliance guardrails.
  4. Review the generated reports.

Push the application workload code into its repo

Clone the empty CodeCommit repo from workload account. You can find the URL from the variable OutSourceRepoHttpUrl on the Outputs tab of the cf-TerraformWorkloadPipeline stack we deployed in the previous section.

  1. Create a new branch main and copy the workload code into it.
  2. Copy the cucumber-sandwich.jar file you generated in the prerequisites section into a new folder /lib.
  3. Create a directory called reports with an empty file dummy. The reports directory is where Terraform-Compliance framework create compliance reports.
  4. Push the code to the remote origin.

See the following sample script

git checkout -b main
# Copy the code from git repo location
# Create reports directory and a dummy file.
mkdir reports
touch reports/dummy
git add .
git commit -m “Initial commit”
git push origin main

The folder structure of workload code repo should match the structure shown in the following screenshot.

workload code folder structure

The first commit triggers the pipeline-workload-main pipeline, which fails in the stage RunComplianceCheck due to the security and compliance repo not being present (which we add in the next section).

Push the security and compliance code into its repo and run its pipeline

Clone the empty CodeCommit repo from the security and compliance account. You can find the URL from the variable OutSourceRepoHttpUrl on the Outputs tab of the cf-SecurityAndCompliancePipeline stack we deployed in the previous section.

  1. Create a new local branch main and check in the empty branch into the remote origin so that the main branch is created in the remote origin. Skipping this step leads to failure in the code merge step of the pipeline due to the absence of the main branch.
  2. Create a new branch develop and copy the security and compliance code into it. This is required because the security and compliance pipeline is configured to be triggered from the develop branch for the purposes of this post.
  3. Copy the cucumber-sandwich.jar file you generated in the prerequisites section into a new folder /lib.

See the following sample script:

cd security-and-compliance-code
git checkout -b main
git add .
git commit --allow-empty -m “initial commit”
git push origin main
git checkout -b develop main
# Here copy the code from git repo location
# You also copy cucumber-sandwich.jar into a new folder /lib
git add .
git commit -m “Initial commit”
git push origin develop

The folder structure of security and compliance code repo should match the structure shown in the following screenshot.

security and compliance code folder structure

The code push to the develop branch of the security-and-compliance-code repo triggers the security and compliance pipeline. The pipeline pulls the code from the workload account repo, then runs the compliance guardrails against the Terraform workload to make sure that the workload is compliant. If the workload is compliant, the pipeline merges the compliance guardrails into the main branch. If the workload fails the compliance test, the pipeline fails. The following screenshot shows a sample run of the pipeline.

security and compliance pipeline

Run the application workload pipeline to exercise the compliance guardrails

After we set up the security and compliance repo and the pipeline runs successfully, the workload pipeline is ready to proceed (see the following screenshot of its progress).

workload pipeline

The service delivery teams are now being subjected to the security and compliance guardrails being implemented (RunComplianceCheck stage), and their pipeline breaks if any resource is noncompliant.

Review the generated reports

CodeBuild supports viewing reports generated in cucumber JSON format. In our workflow, we generate reports in cucumber JSON and BDD XML formats, and we use this capability of CodeBuild to generate and view HTML reports. Our implementation also generates report directly in HTML using the cucumber-sandwich library.

The following screenshot is snippet of the script compliance-check.sh, which implements report generation.

compliance check script

The bug noted in the screenshot is in the radish-bdd library that Terraform-Compliance uses for the cucumber JSON format report generation. For more information, you can review the defect logged against radish-bdd for this issue.

After the script generates the reports, CodeBuild needs to be configured to access them to generate HTML reports. The following screenshot shows a snippet from buildspec-compliance-check.yml, which shows how the reports section is set up for report generation:

buildspec compliance check

For more details on how to set up buildspec file for CodeBuild to generate reports, see Create a test report.

CodeBuild displays the compliance run reports as shown in the following screenshot.

code build cucumber report

We can also view a trending graph for multiple runs.

code build cucumber report

The other report generated by the workflow is the pretty HTML report generated by the cucumber-sandwich library.

code build cucumber report

The reports are available for download from the S3 bucket <OutPipelineBucketName>/pipeline-security-an/report_App/<zip file>.

The cucumber-sandwich generated report marks scenarios with skipped tests as failed scenarios. This is the only noticeable difference between the CodeBuild generated HTML and cucumber-sandwich generated HTML reports.

Clean up

To remove all the resources from the workload account, complete the following steps in order:

  1. Go to the folder where you cloned the workload code and edit buildspec-workload-deploy.yml:
    • Comment line 44 (- ./workload-deploy.sh).
    • Uncomment line 45 (- ./workload-deploy.sh --destroy).
    • Commit and push the code change to the remote repo. The workload pipeline is triggered, which cleans up the workload.
  2. Delete the CloudFormation stack cf-CrossAccountRoles. This step removes the cross-account role from the workload account, which gives permission to the security and compliance account to pull the Terraform workload.
  3. Go to the CloudFormation stack cf-TerraformWorkloadPipeline and note the OutPipelineBucketName and OutStateFileBucketName on the Outputs tab. Empty the two buckets and then delete the stack. This removes pipeline resources from workload account.
  4. Go to the CDKToolkit stack and note the BucketName on the Outputs tab. Empty that bucket and then delete the stack.

To remove all the resources from the security and compliance account, complete the following steps in order:

  1. Delete the CloudFormation stack cf-CrossAccountRoles. This step removes the cross-account role from the security and compliance account, which gives permission to the workload account to pull the compliance code.
  2. Go to CloudFormation stack cf-SecurityAndCompliancePipeline and note the OutPipelineBucketName on the Outputs tab. Empty that bucket and then delete the stack. This removes pipeline resources from the security and compliance account.
  3. Go to the CDKToolkit stack and note the BucketName on the Outputs tab. Empty that bucket and then delete the stack.

Security considerations

Cross-account IAM roles are very powerful and need to be handled carefully. For this post, we strictly limited the cross-account IAM role to specific CodeCommit permissions. This makes sure that the cross-account role can only do those things.

Conclusion

In this post in our two-part series, we implemented a continuous compliance workflow using CodePipeline and the open-source Terraform-Compliance framework. The Terraform-Compliance framework allows you to build guardrails for securing Terraform applications deployed on AWS.

We also showed how you can use AWS developer tools to seamlessly integrate security and compliance guardrails into an application release cycle and catch noncompliant AWS resources before getting deployed into AWS.

Try implementing the solution in your enterprise as shown in this post, and leave your thoughts and questions in the comments.

About the authors

sumit mishra


Sumit Mishra is Senior DevOps Architect at AWS Professional Services. His area of expertise include IaC, Security in pipeline, CI/CD and automation.


Damodar Shenvi Wagle


Damodar Shenvi Wagle is a Cloud Application Architect at AWS Professional Services. His areas of expertise include architecting serverless solutions, CI/CD and automation.

Keeping up with your dependencies: building a feedback loop for shared libraries

Post Syndicated from Joerg Woehrle original https://aws.amazon.com/blogs/devops/keeping-up-with-your-dependencies-building-a-feedback-loop-for-shared-libraries/

In a microservices world, it’s common to share as little as possible between services. This enables teams to work independently of each other, helps to reduce wait times and decreases coupling between services.

However, it’s also a common scenario that libraries for cross-cutting-concerns (such as security or logging) are developed one time and offered to other teams for consumption. Although it’s vital to offer an opt-out of those libraries (namely, use your own code to address the cross-cutting-concern, such as when there is no version for a given language), shared libraries also provide the benefit of better governance and time savings.

To avoid these pitfalls when sharing artifacts, two points are important:

  • For consumers of shared libraries, it’s important to stay up to date with new releases in order to benefit from security, performance, and feature improvements.
  • For producers of shared libraries, it’s important to get quick feedback in case of an involuntarily added breaking change.

Based on those two factors, we’re looking for the following solution:

  • A frictionless and automated way to update consumer’s code to the latest release version of a given library
  • Immediate feedback to the library producer in case of a breaking change (the new version of the library breaks the build of a downstream system)

In this blog post I develop a solution that takes care of both those problems. I use Amazon EventBridge to be notified on new releases of a library in AWS CodeArtifact. I use an AWS Lambda function along with an AWS Fargate task to automatically create a pull request (PR) with the new release version on AWS CodeCommit. Finally, I use AWS CodeBuild to kick off a build of the PR and notify the library producer via EventBridge and Amazon Simple Notification Service (Amazon SNS) in case of a failure.

Overview of solution

Let’s start with a short introduction on the services I use for this solution:

  1. CodeArtifact – A fully managed artifact repository service that makes it easy for organizations of any size to securely store, publish, and share software packages used in their software development process. CodeArtifact works with commonly used package managers and build tools like Maven, Gradle, npm, yarn, twine, and pip.
  2. CodeBuild – A fully managed continuous integration service that compiles source code, runs tests, and produces software packages that are ready to deploy.
  3. CodeCommit – A fully-managed source control service that hosts secure Git-based repositories.
  4. EventBridge – A serverless event bus that makes it easy to connect applications together using data from your own applications, integrated software as a service (SaaS) applications, and AWS services. EventBridge makes it easy to build event-driven applications because it takes care of event ingestion and delivery, security, authorization, and error handling.
  5. Fargate – A serverless compute engine for containers that works with both Amazon Elastic Container Service (ECS) and Amazon Elastic Kubernetes Service (EKS). Fargate removes the need to provision and manage servers, lets you specify and pay for resources per application, and improves security through application isolation by design.
  6. Lambda – Lets you run code without provisioning or managing servers. You pay only for the compute time you consume.
  7. Amazon SNS – A fully managed messaging service for both application-to-application (A2A) and application-to-person (A2P) communication.

The resulting flow through the system looks like the following diagram.

Architecture Diagram


In my example, I look at two independent teams working in two different AWS accounts. Team A is the provider of the shared library, and Team B is the consumer.

Let’s do a high-level walkthrough of the involved steps and components:

  1. A new library version is released by Team A and pushed to CodeArtifact.
  2. CodeArtifact creates an event when the new version is published.
  3. I send this event to the default event bus in Team B’s AWS account.
  4. An EventBridge rule in Team B’s account triggers a Lambda function for further processing.
  5. The function filters SNAPSHOT releases (in Maven a SNAPSHOT represents an artifact still under development that doesn’t have a final release yet) and runs an Amazon ECS Fargate task for non-SNAPSHOT versions.
  6. The Fargate task checks out the source that uses the shared library, updates the library’s version in the pom.xml, and creates a pull request to integrate the change into the mainline of the code repository.
  7. The pull request creation results in an event being published.
  8. An EventBridge rule triggers the CodeBuild project of the downstream artifact.
  9. The result of the build is published as an event.
  10. If the build fails, this failure is propagated back to the event bus of Team A.
  11. The failure is forwarded to an SNS topic that notifies the subscribers of the failure.

Amazon EventBridge

A central component of the solution is Amazon EventBridge. I use EventBridge to receive and react on events emitted by the various AWS services in the solution (e.g., whenever a new version of an artifact gets uploaded to CodeArtifact, when a PR is created within CodeCommit or when a build fails in CodeBuild). Let’s have a high-level look on some of the central concepts of EventBridge:

  • Event Bus – An event bus is a pipeline that receives events. There is a default event bus in each account which receives events from AWS services. One can send events to an event bus via the PutEvents API.
  • Event – An event indicates a change in e.g., an AWS environment, a SaaS partner service or application or one of your applications.
  • Rule – A rule matches incoming events on an event bus and sends them to targets for processing. To react on a particular event, one creates a rule which matches this event. To learn more about the rule concept check out Rules on the EventBridge documentation.
  • Target – When an event matches the event pattern defined in a rule it is send to a target. There are currently more than 20 target types available in EventBridge. In this blog post I use the targets provided for: an event bus in a different account, a Lambda function, a CodeBuild project and an SNS topic. For a detailed list on available targets see Amazon EventBridge targets.

Solution Details:

In this section I walk through the most important parts of the solution. The complete code can be found on GitHub. For a detailed view on the resources created in each account please refer to the GitHub repository.

I use the AWS Cloud Development Kit (CDK) to create my infrastructure. For some of the resource types I create, no higher-level constructs are available yet (at the time of writing, I used AWS CDK version 1.108.1). This is why I sometimes use low-level AWS CloudFormation constructs or even use the provided escape hatches to use AWS CloudFormation constructs directly.

The code for the shared library producer and consumer is written in Java and uses Apache Maven for dependency management. However, the same concepts apply to e.g., Node.js and npm.

Notify another account of new releases

To send events from EventBridge to another account, the receiving account needs to specify an EventBusPolicy. The AWS CDK code on the consumer account looks like the following code:

new events.CfnEventBusPolicy(this, 'EventBusPolicy', {
    statementId: 'AllowCrossAccount',
    action: 'events:PutEvents',
    principal: consumerAccount
});

With that the producer account has the permission to publish events into the event bus of the consumer account.

I’m interested in CodeArtifact events that are published on the release of a new artifact. I first create a Rule which matches those events. Next, I add a target to the rule which targets the event bus of account B. As of this writing there is no CDK construct available to directly add another account as a target. That is why I use the underlying CloudFormation CfnRule to do that. This is called an escape hatch in CDK. For more information about escape hatches, see Escape hatches.

const onLibraryReleaseRule = new events.Rule(this, 'LibraryReleaseRule', {
  eventPattern: {
    source: [ 'aws.codeartifact' ],
    detailType: [ 'CodeArtifact Package Version State Change' ],
    detail: {
      domainOwner: [ this.account ],
      domainName: [ codeArtifactDomain.domainName ],
      repositoryName: [ codeArtifactRepo.repositoryName ],
      packageVersionState: [ 'Published' ],
      packageFormat: [ 'maven' ]
    }
  }
});
/* there is currently no CDK construct provided to add an event bus in another account as a target. 
That's why we use the underlying CfnRule directly */
const cfnRule = onLibraryReleaseRule.node.defaultChild as events.CfnRule;
cfnRule.targets = [ {arn: `arn:aws:events:${this.region}:${consumerAccount}:event-bus/default`, id: 'ConsumerAccount'} ];

For more information about event formats, see CodeArtifact event format and example.

Act on new releases in the consumer account

I established the connection between the events produced by Account A and Account B: The events now are available in Account B’s event bus. To use them, I add a rule which matches this event in Account B:

const onLibraryReleaseRule = new events.Rule(this, 'LibraryReleaseRule', {
  eventPattern: {
    source: [ 'aws.codeartifact' ],
    detailType: [ 'CodeArtifact Package Version State Change' ],
    detail: {
      domainOwner: [ producerAccount ],
      packageVersionState: [ 'Published' ],
      packageFormat: [ 'maven' ]
    }
  }
});

Add a Lambda function target

Now that I created a rule to trigger anytime a new package version is published, I will now add an EventBridge target which  triggers my runTaskLambda Lambda Function. The below CDK code shows how I add our Lambda function as a target to the onLibraryRelease rule. Notice how I extract information from the event’s payload and pass it into the Lambda function’s invocation event.

onLibraryReleaseRule.addTarget(
    new targets.LambdaFunction( runTaskLambda,{
      event: events.RuleTargetInput.fromObject({
        groupId: events.EventField.fromPath('$.detail.packageNamespace'),
        artifactId: events.EventField.fromPath('$.detail.packageName'),
        version: events.EventField.fromPath('$.detail.packageVersion'),
        repoUrl: codeCommitRepo.repositoryCloneUrlHttp,
        region: this.region
      })
    }));

Filter SNAPSHOT versions

Because I’m not interested in Maven SNAPSHOT versions (such as 1.0.1-SNAPSHOT), I have to find a way to filter those and only act upon non-SNAPSHOT versions. Even though content-based filtering on event patterns is supported by Amazon EventBridge, filtering on suffixes is not supported as of this writing. This is why the Lambda function filters SNAPSHOT versions and only acts upon real, non-SNAPSHOT, releases. For those, I start a custom Amazon ECS Fargate task by using the AWS JavaScript SDK. My function passes some environment overrides to the Fargate task in order to have the required information about the artifact available at runtime.

In the following function code, I pass all required information to create a pull request into the environment of the Fargate task:

const AWS = require('aws-sdk');

const ECS = new AWS.ECS();
exports.handler = async (event) => {
    console.log(`Received event: ${JSON.stringify(event)}`)
    const artifactVersion = event.version;
    const artifactId = event.artifactId;
    if ( artifactVersion.indexOf('SNAPSHOT') > -1 ) {
        console.log(`Skipping SNAPSHOT version ${artifactVersion}`)
    } else {
        console.log(`Triggering task to create pull request for version ${artifactVersion} of artifact ${artifactId}`);
        const params = {
            launchType: 'FARGATE',
            taskDefinition: process.env.TASK_DEFINITION_ARN,
            cluster: process.env.CLUSTER_ARN,
            networkConfiguration: {
                awsvpcConfiguration: {
                    subnets: process.env.TASK_SUBNETS.split(',')
                }
            },
            overrides: {
                containerOverrides: [ {
                    name: process.env.CONTAINER_NAME,
                    environment: [
                        {name: 'REPO_URL', value: process.env.REPO_URL},
                        {name: 'REPO_NAME', value: process.env.REPO_NAME},
                        {name: 'REPO_REGION', value: process.env.REPO_REGION},
                        {name: 'ARTIFACT_VERSION', value: artifactVersion},
                        {name: 'ARTIFACT_ID', value: artifactId}
                    ]
                } ]
            }
        };
        await ECS.runTask(params).promise();
    }
};

Create the pull request

With the environment set, I can use a simple bash script inside the container to create a new Git branch, update the pom.xml with the new dependency version, push the branch to CodeCommit, and use the AWS Command Line Interface (AWS CLI) to create the pull request. The Docker entrypoint looks like the following code:

#!/usr/bin/env bash
set -e

# clone the repository and create a new branch for the change
git clone --depth 1 $REPO_URL repo && cd repo
branch="library_update_$(date +"%Y-%m-%d_%H-%M-%S")"
git checkout -b "$branch"

# replace whatever version is currently used by the new version of the library
sed -i "s/<shared\.library\.version>.*<\/shared\.library\.version>/<shared\.library\.version>${ARTIFACT_VERSION}<\/shared\.library\.version>/g" pom.xml

# stage, commit and push the change
git add pom.xml
git -c "user.name=ECS Pull Request Creator" -c "[email protected]" commit -m "Update version of ${ARTIFACT_ID} to ${ARTIFACT_VERSION}"
git push --set-upstream origin "$branch"

# create pull request
aws codecommit create-pull-request --title "Update version of ${ARTIFACT_ID} to ${ARTIFACT_VERSION}" --targets repositoryName="$REPO_NAME",sourceReference="$branch",destinationReference=main --region "$REPO_REGION"

After a successful run, I can check the CodeCommit UI for the created pull request. The following screenshot shows the changes introduced by one of my pull requests during testing:

Screenshot of the Pull Request in AWS CodeCommit

Now that I have the pull request in place, I want to verify that the dependency update does not break my consumer code. I do this by triggering a CodeBuild project with the help of EventBridge.

Build the pull request

The ingredients I use are the same as with the CodeArtifact event. I create a rule that matches the event emitted by CodeCommit (limiting it to branches that match the prefix used by our Fargate task). Afterwards I add a target to the rule to start the CodeBuild project:

const onPullRequestCreatedRule = new events.Rule(this, 'PullRequestCreatedRule', {
  eventPattern: {
    source: [ 'aws.codecommit' ],
    detailType: [ 'CodeCommit Pull Request State Change' ],
    resources: [ codeCommitRepo.repositoryArn ],
    detail: {
      event: [ 'pullRequestCreated' ],
      sourceReference: [ {
        prefix: 'refs/heads/library_update_'
      } ],
      destinationReference: [ 'refs/heads/main' ]
    }
  }
});
onPullRequestCreatedRule.addTarget( new targets.CodeBuildProject(codeBuild, {
  event: events.RuleTargetInput.fromObject( {
    projectName: codeBuild.projectName,
    sourceVersion: events.EventField.fromPath('$.detail.sourceReference')
  })
}));

This triggers the build whenever a new pull request is created with a branch prefix of refs/head/library_update_.
You can easily add the build results as a comment back to CodeCommit. For more information, see Validating AWS CodeCommit Pull Requests with AWS CodeBuild and AWS Lambda.

My last step is to notify an SNS topic in in case of a failing build. The SNS topic is a resource in Account A. To target a resource in a different account I need to forward the event to this account’s event bus. From there I then target the SNS topic.

First, I forward the failed build event from Account B into the default event bus of Account A:

const onFailedBuildRule = new events.Rule(this, 'BrokenBuildRule', {
  eventPattern: {
    detailType: [ 'CodeBuild Build State Change' ],
    source: [ 'aws.codebuild' ],
    detail: {
      'build-status': [ 'FAILED' ]
    }
  }
});
const producerAccountTarget = new targets.EventBus(events.EventBus.fromEventBusArn(this, 'cross-account-event-bus', `arn:aws:events:${this.region}:${producerAccount}:event-bus/default`))
onFailedBuildRule.addTarget(producerAccountTarget);

Then I target the SNS topic in Account A to be notified of failures:

const onFailedBuildRule = new events.Rule(this, 'BrokenBuildRule', {
  eventPattern: {
    detailType: [ 'CodeBuild Build State Change' ],
    source: [ 'aws.codebuild' ],
    account: [ consumerAccount ],
    detail: {
      'build-status': [ 'FAILED' ]
    }
  }
});
onFailedBuildRule.addTarget(new targets.SnsTopic(notificationTopic));

See it in action

I use the cdk-assume-role-credential-plugin to deploy to both accounts, producer and consumer, with a single CDK command issued to the producer account. To do this I create roles for cross account access from the producer account in the consumer account as described here. I also make sure that the accounts are bootstrapped for CDK as described here. After that I run the following steps:

  1. Deploy the Stacks:
    cd cdk && cdk deploy --context region=<YOUR_REGION> --context producerAccount=<PRODUCER_ACCOUNT_NO> --context consumerAccount==<CONSUMER_ACCOUNT_NO>  --all && cd -
  2. After a successful deployment CDK prints a set of export commands. I set my environment from those Outputs:
    ❯ export CODEARTIFACT_ACCOUNT=<MY_PRODUCER_ACCOUNT>
    ❯ export CODEARTIFACT_DOMAIN=<MY_CODEARTIFACT_DOMAIN>
    ❯ export CODEARTIFACT_REGION=<MY_REGION>
    ❯ export CODECOMMIT_URL=<MY_CODECOMMIT_URL>
  3. Setup Maven to authenticate to CodeArtifact
    export CODEARTIFACT_TOKEN=$(aws codeartifact get-authorization-token --domain $CODEARTIFACT_DOMAIN --domain-owner $CODEARTIFACT_ACCOUNT --query authorizationToken --output text)
  4. Release the first version of the shared library to CodeArtifact:
    cd library_producer/library && mvn --settings ./settings.xml deploy && cd -
  5. From a console which is authenticated/authorized for CodeCommit in the Consumer Account
    1. Setup git to work with CodeCommit
    2. Push the code of the library consumer to CodeCommit:
      cd library_consumer/library && git init && git add . && git commit -m "Add consumer to codecommit" && git remote add codecommit $CODECOMMIT_URL && git push --set-upstream codecommit main && cd -
  6. Release a new version of the shared library:
    cd library_producer/library && sed -i '' 's/<version>1.0.0/<version>1.0.1/' pom.xml && mvn --settings settings.xml deploy && cd -
  7. After 1-3 minutes a Pull Request is created in the CodeCommit repo in the Consumer Account and a build is run to verify this PR:
    Screenshot of AWS CodeBuild running the build
  8. In case of a build failure, you can create a subscription to the SNS topic in Account A to act upon the broken build.

Clean up

In case you followed along with this blog post and want to prevent incurring costs you have to delete the created resources. Run cdk destroy --context region=<YOUR_REGION> --context producerAccount=<PRODUCER_ACCOUNT_NO> --context consumerAccount==<CONSUMER_ACCOUNT_NO> --all to delete the CloudFormation stacks.

Conclusion

In this post, I automated the manual task of updating a shared library dependency version. I used a workflow that not only updates the dependency version, but also notifies the library producer in case the new artifact introduces a regression (for example, an API incompatibility with an older version). By using Amazon EventBridge I’ve created a loosely coupled solution which can be used as a basis for a feedback loop between library creators and consumers.

What next?

To improve the solution, I suggest to look into possibilities of error handling for the Fargate task. What happens if the git operation fails? How do we signal such a failure? You might want to replace the AWS Fargate portion with a Lambda-only solution and use AWS Step Functions for better error handling.

As a next step, I could think of a solution that automates updates for libraries stored in Maven Central. Wouldn’t it be nice to never miss the release of a new Spring Boot version? A Fargate task run on a schedule and the following code should get you going:

curl -sS 'https://search.maven.org/solrsearch/select?q=g:org.springframework.boot%20a:spring-boot-starter&start=0&rows=1&wt=json' | jq -r '.response.docs[ 0 ].latestVersion'

Happy Building!

Author bio

Picture of the author: Joerg Woehrle Joerg is a Solutions Architect at AWS and works with manufacturing customers in Germany. As a former Developer, DevOps Engineer and SRE he enjoys building and automating things.


Building a CI/CD pipeline to update an AWS CloudFormation StackSets

Post Syndicated from Karim Afifi original https://aws.amazon.com/blogs/devops/building-a-ci-cd-pipeline-to-update-an-aws-cloudformation-stacksets/

AWS CloudFormation StackSets can extend the functionality of CloudFormation Stacks by enabling you to create, update, or delete one or more stack across multiple accounts. As a developer working in a large enterprise or for a group that supports multiple AWS accounts, you may often find yourself challenged with updating AWS CloudFormation StackSets. If you’re building a CI/CD pipeline to automate the process of updating CloudFormation stacks, you can do so natively. AWS CodePipeline can initiate a workflow that builds and tests a stack, and then pushes it to production. The workflow can either create or manipulate an existing stack; however, working with AWS CloudFormation StackSets is currently not a supported action at the time of this writing.

You can update an existing CloudFormation stack using one of two methods:

  • Directly updating the stack – AWS immediately deploys the changes that you submit. You can use this method when you want to quickly deploy your updates.
  • Running change sets – You can preview the changes AWS CloudFormation will make to the stack, and decide whether to proceed with the changes.

You have several options when building a CI/CD pipeline to automate creating or updating a stack. You can create or update a stack, delete a stack, create or replace a change set, or run a change set. Creating or updating a CloudFormation StackSet, however, is not a supported action.

The following screenshot shows the existing actions supported by CodePipeline against AWS CloudFormation on the CodePipeline console.

CodePipeline console

This post explains how to use CodePipeline to update an existing CloudFormation StackSet. For this post, we update the StackSet’s parameters. Parameters enable you to input custom values to your template each time you create or update a stack.

Overview of solution

To implement this solution, we walk you through the following high-level steps:

  1. Update a parameter for a StackSet by passing a parameter key and its associated value via an AWS CodeCommit
  2. Create an AWS CodeBuild
  3. Build a CI/CD pipeline.
  4. Run your pipeline and monitor its status.

After completing all the steps in this post, you will have a fully functional CI/CD that updates the CloudFormation StackSet parameters. The pipeline starts automatically after you apply the intended changes into the CodeCommit repository.

The following diagram illustrates the solution architecture.

Solution Architecture

The solution workflow is as follows:

  1. Developers integrate changes into a main branch hosted within a CodeCommit repository.
  2. CodePipeline polls the source code repository and triggers the pipeline to run when a new version is detected.
  3. CodePipeline runs a build of the new revision in CodeBuild.
  4. CodeBuild runs the changes in the yml file, which includes the changes against the StackSets. (To update all the stack instances associated with this StackSet, do not specify DeploymentTargets or Regions in the buildspec.yml file.)
  5. Verify that the changes were applied successfully.

Prerequisites

To complete this tutorial, you should have the following prerequisites:

Retrieving your StackSet parameters

Your first step is to verify that you have a StackSet in the AWS account you intend to use. If not, create one before proceeding. For this post, we use an existing StackSet called StackSet-Test.

  1. Sign in to your AWS account.
  2. On the CloudFormation console, choose StackSets.
  3. Choose your StackSet.

StackSet

For this post, we modify the value of the parameter with the key KMSId.

  1. On the Parameters tab, note the value of the key KMSId.

Parameters

Creating a CodeCommit repository

To create your repository, complete the following steps:

  1. On the CodeCommit console, choose Repositories.
  2. Choose Create repository.

Repositories name

  1. For Repository name, enter a name (for example, Demo-Repo).
  2. Choose Create.

Repositories Description

  1. Choose Create file to populate the repository with the following artifacts.

Create file

A buildspec.yml file informs CodeBuild of all the actions that should be taken during a build run for our application. We divide the build run into separate predefined phases for logical organization, and list the commands that run on the provisioned build server performing a build job.

  1. Enter the following code in the code editor:

YAML

phases:

  pre_build:

    commands:

      - aws cloudformation update-stack-set --stack-set-name StackSet-Test --use-previous-template --parameters ParameterKey=KMSId,ParameterValue=newCustomValue

The preceding AWS CloudFormation command updates a StackSet with the name StackSet-Test. The command results in updating the parameter value of the parameter key KMSId to newCustomValue.

  1. Name the file yml.
  2. Provide an author name and email address.
  3. Choose Commit changes.

Creating a CodeBuild project

To create your CodeBuild project, complete the following steps:

  1. On the CodeBuild console, choose Build projects.
  2. Choose Create build project.

create build project

  1. For Project name, enter your project name (for example, Demo-Build).
  2. For Description, enter an optional description.

project name

  1. For Source provider, choose AWS CodeCommit.
  2. For Repository, choose the CodeCommit repository you created in the previous step.
  3. For Reference type, keep default selection Branch.
  4. For Branch, choose master.

Source configuration

To set up the CodeBuild environment, we use a managed image based on Amazon Linux 2.

  1. For Environment Image, select Managed image.
  2. For Operating system, choose Amazon Linux 2.
  3. For Runtime(s), choose Standard.
  4. For Image, choose amazonlinux2-aarch64-standard:1.0.
  5. For Image version, choose Always use the latest for this runtime version.

Environment

  1. For Service role¸ select New service role.
  2. For Role name, enter your service role name.

Service Role

  1. Chose Create build project.

Creating a CodePipeline pipeline

To create your pipeline, complete the following steps:

  1. On the CodePipeline console, choose Pipelines.
  2. Choose Create pipeline

Code Pipeline

  1. For Pipeline name, enter a name for the pipeline (for example, DemoPipeline).
  2. For Service role, select New service role.
  3. For Role name, enter your service role name.

Pipeline name

  1. Choose Next.
  2. For Source provider, choose AWS CodeCommit.
  3. For Repository name, choose the repository you created.
  4. For Branch name, choose master.

Source Configurations

  1. Choose Next.
  2. For Build provider, choose AWS CodeBuild.
  3. For Region, choose your Region.
  4. For Project name, choose the build project you created.

CodeBuild

  1. Choose Next.
  2. Choose Skip deploy stage.
  3. Choose Skip
  4. Choose Create pipeline.

The pipeline is now created successfully.

Running and monitoring your pipeline

We use the pipeline to release changes. By default, a pipeline starts automatically when it’s created and any time a change is made in a source repository. You can also manually run the most recent revision through your pipeline, as in the following steps:

  1. On the CodePipeline console, choose the pipeline you created.
  2. On the pipeline details page, choose Release change.

The following screenshot shows the status of the run from the pipeline.

Release change

  1. Under Build, choose Details to view build logs, phase details, reports, environment variables, and build details.

Build details

  1. Choose the Build logs tab to view the logs generated as a result of the build in more detail.

The following screenshot shows that we ran the AWS CloudFormation command that was provided in the buildspec.yml file. It also shows that all phases of the build process are successfully complete.


Phase Details

The StackSet parameter KMSId has been updated successfully with the new value newCustomValue as a result of running the pipeline.  Please note that we used the parameter KMSId as an example for demonstration purposes. Any other parameter that is part of your StackSet could have been used instead.

Cleaning up

You may delete the resources that you created during this post:

  • AWS CloudFormation StackSet.
  • AWS CodeCommit repository.
  • AWS CodeBuild project.
  • AWS CodePipeline.

Conclusion

In this post, we explored how to use CodePipeline, CodeBuild, and CodeCommit to update an existing CloudFormation StackSet. Happy coding!

About the author

Karim Afifi is a Solutions Architect Leader with Amazon Web Services. He is part of the Global Life Sciences Solution Architecture team. team. He is based out of New York, and enjoys helping customers throughout their journey to innovation.


Building an end-to-end Kubernetes-based DevSecOps software factory on AWS

Post Syndicated from Srinivas Manepalli original https://aws.amazon.com/blogs/devops/building-an-end-to-end-kubernetes-based-devsecops-software-factory-on-aws/

DevSecOps software factory implementation can significantly vary depending on the application, infrastructure, architecture, and the services and tools used. In a previous post, I provided an end-to-end DevSecOps pipeline for a three-tier web application deployed with AWS Elastic Beanstalk. The pipeline used cloud-native services along with a few open-source security tools. This solution is similar, but instead uses a containers-based approach with additional security analysis stages. It defines a software factory using Kubernetes along with necessary AWS Cloud-native services and open-source third-party tools. Code is provided in the GitHub repo to build this DevSecOps software factory, including the integration code for third-party scanning tools.

DevOps is a combination of cultural philosophies, practices, and tools that combine software development with information technology operations. These combined practices enable companies to deliver new application features and improved services to customers at a higher velocity. DevSecOps takes this a step further by integrating and automating the enforcement of preventive, detective, and responsive security controls into the pipeline.

In a DevSecOps factory, security needs to be addressed from two aspects: security of the software factory, and security in the software factory. In this architecture, we use AWS services to address the security of the software factory, and use third-party tools along with AWS services to address the security in the software factory. This AWS DevSecOps reference architecture covers DevSecOps practices and security vulnerability scanning stages including secret analysis, SCA (Software Composite Analysis), SAST (Static Application Security Testing), DAST (Dynamic Application Security Testing), RASP (Runtime Application Self Protection), and aggregation of vulnerability findings into a single pane of glass.

The focus of this post is on application vulnerability scanning. Vulnerability scanning of underlying infrastructure such as the Amazon Elastic Kubernetes Service (Amazon EKS) cluster and network is outside the scope of this post. For information about infrastructure-level security planning, refer to Amazon Guard Duty, Amazon Inspector, and AWS Shield.

You can deploy this pipeline in either the AWS GovCloud (US) Region or standard AWS Regions. All listed AWS services are authorized for FedRamp High and DoD SRG IL4/IL5.

Security and compliance

Thoroughly implementing security and compliance in the public sector and other highly regulated workloads is very important for achieving an ATO (Authority to Operate) and continuously maintain an ATO (c-ATO). DevSecOps shifts security left in the process, integrating it at each stage of the software factory, which can make ATO a continuous and faster process. With DevSecOps, an organization can deliver secure and compliant application changes rapidly while running operations consistently with automation.

Security and compliance are shared responsibilities between AWS and the customer. Depending on the compliance requirements (such as FedRamp or DoD SRG), a DevSecOps software factory needs to implement certain security controls. AWS provides tools and services to implement most of these controls. For example, to address NIST 800-53 security controls families such as access control, you can use AWS Identity Access and Management (IAM) roles and Amazon Simple Storage Service (Amazon S3) bucket policies. To address auditing and accountability, you can use AWS CloudTrail and Amazon CloudWatch. To address configuration management, you can use AWS Config rules and AWS Systems Manager. Similarly, to address risk assessment, you can use vulnerability scanning tools from AWS.

The following table is the high-level mapping of the NIST 800-53 security control families and AWS services that are used in this DevSecOps reference architecture. This list only includes the services that are defined in the AWS CloudFormation template, which provides pipeline as code in this solution. You can use additional AWS services and tools or other environmental specific services and tools to address these and the remaining security control families on a more granular level.

# NIST 800-53 Security Control Family – Rev 5 AWS Services Used (In this DevSecOps Pipeline)
1 AC – Access Control

AWS IAM, Amazon S3, and Amazon CloudWatch are used.

AWS::IAM::ManagedPolicy
AWS::IAM::Role
AWS::S3::BucketPolicy
AWS::CloudWatch::Alarm

2 AU – Audit and Accountability

AWS CloudTrail, Amazon S3, Amazon SNS, and Amazon CloudWatch are used.

AWS::CloudTrail::Trail
AWS::Events::Rule
AWS::CloudWatch::LogGroup
AWS::CloudWatch::Alarm
AWS::SNS::Topic

3 CM – Configuration Management

AWS Systems Manager, Amazon S3, and AWS Config are used.

AWS::SSM::Parameter
AWS::S3::Bucket
AWS::Config::ConfigRule

4 CP – Contingency Planning

AWS CodeCommit and Amazon S3 are used.

AWS::CodeCommit::Repository
AWS::S3::Bucket

5 IA – Identification and Authentication

AWS IAM is used.

AWS:IAM:User
AWS::IAM::Role

6 RA – Risk Assessment

AWS Config, AWS CloudTrail, AWS Security Hub, and third party scanning tools are used.

AWS::Config::ConfigRule
AWS::CloudTrail::Trail
AWS::SecurityHub::Hub
Vulnerability Scanning Tools (AWS/AWS Partner/3rd party)

7 CA – Assessment, Authorization, and Monitoring

AWS CloudTrail, Amazon CloudWatch, and AWS Config are used.

AWS::CloudTrail::Trail
AWS::CloudWatch::LogGroup
AWS::CloudWatch::Alarm
AWS::Config::ConfigRule

8 SC – System and Communications Protection

AWS KMS and AWS Systems Manager are used.

AWS::KMS::Key
AWS::SSM::Parameter
SSL/TLS communication

9 SI – System and Information Integrity

AWS Security Hub, and third party scanning tools are used.

AWS::SecurityHub::Hub
Vulnerability Scanning Tools (AWS/AWS Partner/3rd party)

10 AT – Awareness and Training N/A
11 SA – System and Services Acquisition N/A
12 IR – Incident Response Not implemented, but services like AWS Lambda, and Amazon CloudWatch Events can be used.
13 MA – Maintenance N/A
14 MP – Media Protection N/A
15 PS – Personnel Security N/A
16 PE – Physical and Environmental Protection N/A
17 PL – Planning N/A
18 PM – Program Management N/A
19 PT – PII Processing and Transparency N/A
20 SR – SupplyChain Risk Management N/A

Services and tools

In this section, we discuss the various AWS services and third-party tools used in this solution.

CI/CD services

For continuous integration and continuous delivery (CI/CD) in this reference architecture, we use the following AWS services:

  • AWS CodeBuild – A fully managed continuous integration service that compiles source code, runs tests, and produces software packages that are ready to deploy.
  • AWS CodeCommit – A fully managed source control service that hosts secure Git-based repositories.
  • AWS CodeDeploy – A fully managed deployment service that automates software deployments to a variety of compute services such as Amazon Elastic Compute Cloud (Amazon EC2), AWS Fargate, AWS Lambda, and your on-premises servers.
  • AWS CodePipeline – A fully managed continuous delivery service that helps you automate your release pipelines for fast and reliable application and infrastructure updates.
  • AWS Lambda – A service that lets you run code without provisioning or managing servers. You pay only for the compute time you consume.
  • Amazon Simple Notification Service – Amazon SNS is a fully managed messaging service for both application-to-application (A2A) and application-to-person (A2P) communication.
  • Amazon S3 – Amazon S3 is storage for the internet. You can use Amazon S3 to store and retrieve any amount of data at any time, from anywhere on the web.
  • AWS Systems Manager Parameter Store – Parameter Store provides secure, hierarchical storage for configuration data management and secrets management.

Continuous testing tools

The following are open-source scanning tools that are integrated in the pipeline for the purpose of this post, but you could integrate other tools that meet your specific requirements. You can use the static code review tool Amazon CodeGuru for static analysis, but at the time of this writing, it’s not yet available in AWS GovCloud and currently supports Java and Python.

  • Anchore (SCA and SAST) – Anchore Engine is an open-source software system that provides a centralized service for analyzing container images, scanning for security vulnerabilities, and enforcing deployment policies.
  • Amazon Elastic Container Registry image scanning – Amazon ECR image scanning helps in identifying software vulnerabilities in your container images. Amazon ECR uses the Common Vulnerabilities and Exposures (CVEs) database from the open-source Clair project and provides a list of scan findings.
  • Git-Secrets (Secrets Scanning) – Prevents you from committing sensitive information to Git repositories. It is an open-source tool from AWS Labs.
  • OWASP ZAP (DAST) – Helps you automatically find security vulnerabilities in your web applications while you’re developing and testing your applications.
  • Snyk (SCA and SAST) – Snyk is an open-source security platform designed to help software-driven businesses enhance developer security.
  • Sysdig Falco (RASP) – Falco is an open source cloud-native runtime security project that detects unexpected application behavior and alerts on threats at runtime. It is the first runtime security project to join CNCF as an incubation-level project.

You can integrate additional security stages like IAST (Interactive Application Security Testing) into the pipeline to get code insights while the application is running. You can use AWS partner tools like Contrast Security, Synopsys, and WhiteSource to integrate IAST scanning into the pipeline. Malware scanning tools, and image signing tools can also be integrated into the pipeline for additional security.

Continuous logging and monitoring services

The following are AWS services for continuous logging and monitoring used in this reference architecture:

Auditing and governance services

The following are AWS auditing and governance services used in this reference architecture:

  • AWS CloudTrail – Enables governance, compliance, operational auditing, and risk auditing of your AWS account.
  • AWS Config – Allows you to assess, audit, and evaluate the configurations of your AWS resources.
  • AWS Identity and Access Management – Enables you to manage access to AWS services and resources securely. With IAM, you can create and manage AWS users and groups, and use permissions to allow and deny their access to AWS resources.

Operations services

The following are the AWS operations services used in this reference architecture:

  • AWS CloudFormation – Gives you an easy way to model a collection of related AWS and third-party resources, provision them quickly and consistently, and manage them throughout their lifecycles, by treating infrastructure as code.
  • Amazon ECR – A fully managed container registry that makes it easy to store, manage, share, and deploy your container images and artifacts anywhere.
  • Amazon EKS – A managed service that you can use to run Kubernetes on AWS without needing to install, operate, and maintain your own Kubernetes control plane or nodes. Amazon EKS runs up-to-date versions of the open-source Kubernetes software, so you can use all of the existing plugins and tooling from the Kubernetes community.
  • AWS Security Hub – Gives you a comprehensive view of your security alerts and security posture across your AWS accounts. This post uses Security Hub to aggregate all the vulnerability findings as a single pane of glass.
  • AWS Systems Manager Parameter Store – Provides secure, hierarchical storage for configuration data management and secrets management. You can store data such as passwords, database strings, Amazon Machine Image (AMI) IDs, and license codes as parameter values.

Pipeline architecture

The following diagram shows the architecture of the solution. We use AWS CloudFormation to describe the pipeline as code.

Containers devsecops pipeline architecture

Kubernetes DevSecOps Pipeline Architecture

The main steps are as follows:

    1. When a user commits the code to CodeCommit repository, a CloudWatch event is generated, which triggers CodePipeline to orchestrate the events.
    2. CodeBuild packages the build and uploads the artifacts to an S3 bucket.
    3. CodeBuild scans the code with git-secrets. If there is any sensitive information in the code such as AWS access keys or secrets keys, CodeBuild fails the build.
    4. CodeBuild creates the container image and perform SCA and SAST by scanning the image with Snyk or Anchore. In the provided CloudFormation template, you can pick one of these tools during the deployment. Please note, CodeBuild is fully enabled for a “bring your own tool” approach.
      • (4a) If there are any vulnerabilities, CodeBuild invokes the Lambda function. The function parses the results into AWS Security Finding Format (ASFF) and posts them to Security Hub. Security Hub helps aggregate and view all the vulnerability findings in one place as a single pane of glass. The Lambda function also uploads the scanning results to an S3 bucket.
      • (4b) If there are no vulnerabilities, CodeBuild pushes the container image to Amazon ECR and triggers another scan using built-in Amazon ECR scanning.
    5. CodeBuild retrieves the scanning results.
      • (5a) If there are any vulnerabilities, CodeBuild invokes the Lambda function again and posts the findings to Security Hub. The Lambda function also uploads the scan results to an S3 bucket.
      • (5b) If there are no vulnerabilities, CodeBuild deploys the container image to an Amazon EKS staging environment.
    6. After the deployment succeeds, CodeBuild triggers the DAST scanning with the OWASP ZAP tool (again, this is fully enabled for a “bring your own tool” approach).
      • (6a) If there are any vulnerabilities, CodeBuild invokes the Lambda function, which parses the results into ASFF and posts it to Security Hub. The function also uploads the scan results to an S3 bucket (similar to step 4a).
    7. If there are no vulnerabilities, the approval stage is triggered, and an email is sent to the approver for action via Amazon SNS.
    8. After approval, CodeBuild deploys the code to the production Amazon EKS environment.
    9. During the pipeline run, CloudWatch Events captures the build state changes and sends email notifications to subscribed users through Amazon SNS.
    10. CloudTrail tracks the API calls and sends notifications on critical events on the pipeline and CodeBuild projects, such as UpdatePipeline, DeletePipeline, CreateProject, and DeleteProject, for auditing purposes.
    11. AWS Config tracks all the configuration changes of AWS services. The following AWS Config rules are added in this pipeline as security best practices:
      1. CODEBUILD_PROJECT_ENVVAR_AWSCRED_CHECK – Checks whether the project contains environment variables AWS_ACCESS_KEY_ID and AWS_SECRET_ACCESS_KEY. The rule is NON_COMPLIANT when the project environment variables contain plaintext credentials. This rule ensures that sensitive information isn’t stored in the CodeBuild project environment variables.
      2. CLOUD_TRAIL_LOG_FILE_VALIDATION_ENABLED – Checks whether CloudTrail creates a signed digest file with logs. AWS recommends that the file validation be enabled on all trails. The rule is noncompliant if the validation is not enabled. This rule ensures that pipeline resources such as the CodeBuild project aren’t altered to bypass critical vulnerability checks.

Security of the pipeline is implemented using IAM roles and S3 bucket policies to restrict access to pipeline resources. Pipeline data at rest and in transit is protected using encryption and SSL secure transport. We use Parameter Store to store sensitive information such as API tokens and passwords. To be fully compliant with frameworks such as FedRAMP, other things may be required, such as MFA.

Security in the pipeline is implemented by performing the Secret Analysis, SCA, SAST, DAST, and RASP security checks. Applicable AWS services provide encryption at rest and in transit by default. You can enable additional controls on top of these wherever required.

In the next section, I explain how to deploy and run the pipeline CloudFormation template used for this example. As a best practice, we recommend using linting tools like cfn-nag and cfn-guard to scan CloudFormation templates for security vulnerabilities. Refer to the provided service links to learn more about each of the services in the pipeline.

Prerequisites

Before getting started, make sure you have the following prerequisites:

  • An EKS cluster environment with your application deployed. In this post, we use PHP WordPress as a sample application, but you can use any other application.
  • Sysdig Falco installed on an EKS cluster. Sysdig Falco captures events on the EKS cluster and sends those events to CloudWatch using AWS FireLens. For implementation instructions, see Implementing Runtime security in Amazon EKS using CNCF Falco. This step is required only if you need to implement RASP in the software factory.
  • A CodeCommit repo with your application code and a Dockerfile. For more information, see Create an AWS CodeCommit repository.
  • An Amazon ECR repo to store container images and scan for vulnerabilities. Enable vulnerability scanning on image push in Amazon ECR. You can enable or disable the automatic scanning on image push via the Amazon ECR
  • The provided buildspec-*.yml files for git-secrets, Anchore, Snyk, Amazon ECR, OWASP ZAP, and your Kubernetes deployment .yml files uploaded to the root of the application code repository. Please update the Kubernetes (kubectl) commands in the buildspec files as needed.
  • A Snyk API key if you use Snyk as a SAST tool.
  • The Lambda function uploaded to an S3 bucket. We use this function to parse the scan reports and post the results to Security Hub.
  • An OWASP ZAP URL and generated API key for dynamic web scanning.
  • An application web URL to run the DAST testing.
  • An email address to receive approval notifications for deployment, pipeline change notifications, and CloudTrail events.
  • AWS Config and Security Hub services enabled. For instructions, see Managing the Configuration Recorder and Enabling Security Hub manually, respectively.

Deploying the pipeline

To deploy the pipeline, complete the following steps:

  1. Download the CloudFormation template and pipeline code from the GitHub repo.
  2. Sign in to your AWS account if you have not done so already.
  3. On the CloudFormation console, choose Create Stack.
  4. Choose the CloudFormation pipeline template.
  5. Choose Next.
  6. Under Code, provide the following information:
    1. Code details, such as repository name and the branch to trigger the pipeline.
    2. The Amazon ECR container image repository name.
  7. Under SAST, provide the following information:
    1. Choose the SAST tool (Anchore or Snyk) for code analysis.
    2. If you select Snyk, provide an API key for Snyk.
  8. Under DAST, choose the DAST tool (OWASP ZAP) for dynamic testing and enter the API token, DAST tool URL, and the application URL to run the scan.
  9. Under Lambda functions, enter the Lambda function S3 bucket name, filename, and the handler name.
  10. For STG EKS cluster, enter the staging EKS cluster name.
  11. For PRD EKS cluster, enter the production EKS cluster name to which this pipeline deploys the container image.
  12. Under General, enter the email addresses to receive notifications for approvals and pipeline status changes.
  13. Choose Next.
  14. Complete the stack.
  15. After the pipeline is deployed, confirm the subscription by choosing the provided link in the email to receive notifications.
Pipeline-CF-Parameters.png

Pipeline CloudFormation Parameters

The provided CloudFormation template in this post is formatted for AWS GovCloud. If you’re setting this up in a standard Region, you have to adjust the partition name in the CloudFormation template. For example, change ARN values from arn:aws-us-gov to arn:aws.

Running the pipeline

To trigger the pipeline, commit changes to your application repository files. That generates a CloudWatch event and triggers the pipeline. CodeBuild scans the code and if there are any vulnerabilities, it invokes the Lambda function to parse and post the results to Security Hub.

When posting the vulnerability finding information to Security Hub, we need to provide a vulnerability severity level. Based on the provided severity value, Security Hub assigns the label as follows. Adjust the severity levels in your code based on your organization’s requirements.

  • 0 – INFORMATIONAL
  • 1–39 – LOW
  • 40– 69 – MEDIUM
  • 70–89 – HIGH
  • 90–100 – CRITICAL

The following screenshot shows the progression of your pipeline.

DevSecOps-Pipeline.png

DevSecOps Kubernetes CI/CD Pipeline


Secrets analysis scanning

In this architecture, after the pipeline is initiated, CodeBuild triggers the Secret Analysis stage using git-secrets and the buildspec-gitsecrets.yml file. Git-Secrets looks for any sensitive information such as AWS access keys and secret access keys. Git-Secrets allows you to add custom strings to look for in your analysis. CodeBuild uses the provided buildspec-gitsecrets.yml file during the build stage.

SCA and SAST scanning

In this architecture, CodeBuild triggers the SCA and SAST scanning using Anchore, Snyk, and Amazon ECR. In this solution, we use the open-source versions of Anchore and Snyk. Amazon ECR uses open-source Clair under the hood, which comes with Amazon ECR for no additional cost. As mentioned earlier, you can choose Anchore or Snyk to do the initial image scanning.

Scanning with Anchore

If you choose Anchore as a SAST tool during the deployment, the build stage uses the buildspec-anchore.yml file to scan the container image. If there are any vulnerabilities, it fails the build and triggers the Lambda function to post those findings to Security Hub. If there are no vulnerabilities, it proceeds to next stage.

Anchore-lambda-codesnippet.png

Anchore Lambda Code Snippet

Scanning with Snyk

If you choose Snyk as a SAST tool during the deployment, the build stage uses the buildspec-snyk.yml file to scan the container image. If there are any vulnerabilities, it fails the build and triggers the Lambda function to post those findings to Security Hub. If there are no vulnerabilities, it proceeds to next stage.

Snyk-lambda-codesnippet.png

Snyk Lambda Code Snippet

Scanning with Amazon ECR

If there are no vulnerabilities from Anchore or Snyk scanning, the image is pushed to Amazon ECR, and the Amazon ECR scan is triggered automatically. Amazon ECR lists the vulnerability findings on the Amazon ECR console. To provide a single pane of glass view of all the vulnerability findings and for easy administration, we retrieve those findings and post them to Security Hub. If there are no vulnerabilities, the image is deployed to the EKS staging cluster and next stage (DAST scanning) is triggered.

ECR-lambda-codesnippet.png

ECR Lambda Code Snippet


DAST scanning with OWASP ZAP

In this architecture, CodeBuild triggers DAST scanning using the DAST tool OWASP ZAP.

After deployment is successful, CodeBuild initiates the DAST scanning. When scanning is complete, if there are any vulnerabilities, it invokes the Lambda function, similar to SAST analysis. The function parses and posts the results to Security Hub. The following is the code snippet of the Lambda function.

Zap-lambda-codesnippet.png

Zap Lambda Code Snippet

The following screenshot shows the results in Security Hub. The highlighted section shows the vulnerability findings from various scanning stages.

SecurityHub-vulnerabilities.png

Vulnerability Findings in Security Hub

We can drill down to individual resource IDs to get the list of vulnerability findings. For example, if we drill down to the resource ID of SASTBuildProject*, we can review all the findings from that resource ID.

Anchore-Vulnerability.png

SAST Vulnerabilities in Security Hub


If there are no vulnerabilities in the DAST scan, the pipeline proceeds to the manual approval stage and an email is sent to the approver. The approver can review and approve or reject the deployment. If approved, the pipeline moves to next stage and deploys the application to the production EKS cluster.

Aggregation of vulnerability findings in Security Hub provides opportunities to automate the remediation. For example, based on the vulnerability finding, you can trigger a Lambda function to take the needed remediation action. This also reduces the burden on operations and security teams because they can now address the vulnerabilities from a single pane of glass instead of logging into multiple tool dashboards.

Along with Security Hub, you can send vulnerability findings to your issue tracking systems such as JIRA, Systems Manager SysOps, or can automatically create an incident management ticket. This is outside the scope of this post, but is one of the possibilities you can consider when implementing DevSecOps software factories.

RASP scanning

Sysdig Falco is an open-source runtime security tool. Based on the configured rules, Falco can detect suspicious activity and alert on any behavior that involves making Linux system calls. You can use Falco rules to address security controls like NIST SP 800-53. Falco agents on each EKS node continuously scan the containers running in pods and send the events as STDOUT. These events can be then sent to CloudWatch or any third-party log aggregator to send alerts and respond. For more information, see Implementing Runtime security in Amazon EKS using CNCF Falco. You can also use Lambda to trigger and automatically remediate certain security events.

The following screenshot shows Falco events on the CloudWatch console. The highlighted text describes the Falco event that was triggered based on the default Falco rules on the EKS cluster. You can add additional custom rules to meet your security control requirements. You can also trigger responsive actions from these CloudWatch events using services like Lambda.

Falco alerts in CloudWatch

Falco alerts in CloudWatch

Cleanup

This section provides instructions to clean up the DevSecOps pipeline setup:

  1. Delete the EKS cluster.
  2. Delete the S3 bucket.
  3. Delete the CodeCommit repo.
  4. Delete the Amazon ECR repo.
  5. Disable Security Hub.
  6. Disable AWS Config.
  7. Delete the pipeline CloudFormation stack.

Conclusion

In this post, I presented an end-to-end Kubernetes-based DevSecOps software factory on AWS with continuous testing, continuous logging and monitoring, auditing and governance, and operations. I demonstrated how to integrate various open-source scanning tools, such as Git-Secrets, Anchore, Snyk, OWASP ZAP, and Sysdig Falco for Secret Analysis, SCA, SAST, DAST, and RASP analysis, respectively. To reduce operations overhead, I explained how to aggregate and manage vulnerability findings in Security Hub as a single pane of glass. This post also talked about how to implement security of the pipeline and in the pipeline using AWS Cloud-native services. Finally, I provided the DevSecOps software factory as code using AWS CloudFormation.

To get started with DevSecOps on AWS, see AWS DevOps and the DevOps blog.

Srinivas Manepalli is a DevSecOps Solutions Architect in the U.S. Fed SI SA team at Amazon Web Services (AWS). He is passionate about helping customers, building and architecting DevSecOps and highly available software systems. Outside of work, he enjoys spending time with family, nature and good food.

Choosing a CI/CD approach: AWS Services with BigHat Biosciences

Post Syndicated from Mike Apted original https://aws.amazon.com/blogs/devops/choosing-ci-cd-aws-services-bighat-biosciences/

Founded in 2019, BigHat Biosciences’ mission is to improve human health by reimagining antibody discovery and engineering to create better antibodies faster. Their integrated computational + experimental approach speeds up antibody design and discovery by combining high-speed molecular characterization with machine learning technologies to guide the search for better antibodies. They apply these design capabilities to develop new generations of safer and more effective treatments for patients suffering from today’s most challenging diseases. Their platform, from wet lab robots to cloud-based data and logistics plane, is woven together with rapidly changing BigHat-proprietary software. BigHat uses continuous integration and continuous deployment (CI/CD) throughout their data engineering workflows and when training and evaluating their machine learning (ML) models.


BigHat Biosciences Logo


In a previous post, we discussed the key considerations when choosing a CI/CD approach. In this post, we explore BigHat’s decisions and motivations in adopting managed AWS CI/CD services. You may find that your organization has commonalities with BigHat and some of their insights may apply to you. Throughout the post, considerations are informed and choices are guided by the best practices in the AWS Well-Architected Framework.

How did BigHat decide what they needed?

Making decisions on appropriate (CI/CD) solutions requires understanding the characteristics of your organization, the environment you operate in, and your current priorities and goals.

“As a company designing therapeutics for patients rather than software, the role of technology at BigHat is to enable a radically better approach to develop therapeutic molecules,” says Eddie Abrams, VP of Engineering at BigHat. “We need to automate as much as possible. We need the speed, agility, reliability and reproducibility of fully automated infrastructure to enable our company to solve complex problems with maximum scientific rigor while integrating best in class data analysis. Our engineering-first approach supports that.”

BigHat possesses a unique insight to an unsolved problem. As an early stage startup, their core focus is optimizing the fully integrated platform that they built from the ground-up to guide the design for better molecules. They respond to feedback from partners and learn from their own internal experimentation. With each iteration, the quality of what they’re creating improves, and they gain greater insight and improved models to support the next iteration. More than anything, they need to be able to iterate rapidly. They don’t need any additional complexity that would distract from their mission. They need uncomplicated and enabling solutions.

They also have to take into consideration the regulatory requirements that apply to them as a company, the data they work with and its security requirements; and the market segment they compete in. Although they don’t control these factors, they can control how they respond to them, and they want to be able to respond quickly. It’s not only speed that matters in designing for security and compliance, but also visibility and track-ability. These often overlooked and critical considerations are instrumental in choosing a CI/CD strategy and platform.

“The ability to learn faster than your competitors may be the only sustainable competitive advantage,” says Cindy Alvarez in her book Lean Customer Development.

The tighter the feedback loop, the easier it is to make a change. Rapid iteration allows BigHat to easily build upon what works, and make adjustments as they identify avenues that won’t lead to success.

Feature set

CI/CD is applicable to more than just the traditional use case. It doesn’t have to be software delivered in a classic fashion. In the case of BigHat, they apply CI/CD in their data engineering workflows and in training their ML models. BigHat uses automated solutions in all aspects of their workflow. Automation further supports taking what they have created internally and enabling advances in antibody design and development for safer, more effective treatments of conditions.

“We see a broadening of the notion of what can come under CI/CD,” says Abrams. “We use automated solutions wherever possible including robotics to perform scaled assays. The goal in tightening the loop is to improve precision and speed, and reduce latency and lag time.”

BigHat reached the conclusion that they would adopt managed service offerings wherever possible, including in their CI/CD tooling and other automation initiatives.

“The phrase ‘undifferentiated heavy lifting’ has always resonated,” says Abrams. “Building, scaling, and operating core software and infrastructure are hard problems, but solving them isn’t itself a differentiating advantage for a therapeutics company. But whether we can automate that infrastructure, and how we can use that infrastructure at scale on a rock solid control plane to provide our custom solutions iteratively, reliably and efficiently absolutely does give us an edge. We need an end-to-end, complete infrastructure solution that doesn’t force us to integrate a patchwork of solutions ourselves. AWS provides exactly what we need in this regard.”

Reducing risk

Startups can be full of risk, with the upside being potential future reward. They face risk in finding the right problem, in finding a solution to that problem, and in finding a viable customer base to buy that solution.

A key priority for early stage startups is removing risk from as many areas of the business as possible. Any steps an early stage startup can take to remove risk without commensurately limiting reward makes them more viable. The more risk a startup can drive out of their hypothesis the more likely their success, in part because they’re more attractive to customers, employees, and investors alike. The more likely their product solves their problem, the more willing a customer is to give it a chance. Likewise, the more attractive they are to investors when compared to alternative startups with greater risk in reaching their next major milestone.

Adoption of managed services for CI/CD accomplishes this goal in several ways. The most important advantage remains speed. The core functionality required can be stood up very quickly, as it’s an existing service. Customers have a large body of reference examples and documentation available to demonstrate how to use that service. They also insulate teams from the need to configure and then operate the underlying infrastructure. The team remains focused on their differentiation and their core value proposition.

“We are automated right up to the organizational level and because of this, running those services ourselves represents operational risk,” says Abrams. “The largest day-to-day infrastructure risk to us is having the business stalled while something is not working. Do I want to operate these services, and focus my staff on that? There is no guarantee I can just throw more compute at a self-managed software service I’m running and make it scale effectively. There is no guarantee that if one datacenter is having a network or electrical problem that I can simply switch to another datacenter. I prefer AWS manages those scale and uptime problems.”

Embracing an opinionated model

BigHat is a startup with a singular focus on using ML to reduce the time and difficulty of designing antibodies and other therapeutic proteins. By adopting managed services, they have removed the burden of implementing and maintaining CI/CD systems.

Accepting the opinionated guardrails of the managed service approach allows, and to a degree reinforces, the focus on what makes a startup unique. Rather than being focused on performance tuning, making decisions on what OS version to use, or which of the myriad optional puzzle pieces to put together, they can use a well-integrated set of tools built to work with each other in a defined fashion.

The opinionated model means best practices are baked into the toolchain. Instead of hiring for specialized administration skills they’re hiring for specialized biotech skills.

“The only degrees of freedom I care about are the ones that improve our technologies and reduce the time, cost, and risk of bringing a therapeutic to market,” says Abrams. “We focus on exactly where we can gain operational advantages by simply adopting managed services that already embrace the Well-Architected Framework. If we had to tackle all of these engineering needs with limited resources, we would be spending into a solved problem. Before AWS, startups just didn’t do these sorts of things very well. Offloading this effort to a trusted partner is pretty liberating.”

Beyond the reduction in operational concerns, BigHat can also expect continuous improvement of that service over time to be delivered automatically by the provider. For their use case they will likely derive more benefit for less cost over time without any investment required.

Overview of solution

BigHat uses the following key services:


BigHat Reference Architecture

Security

Managed services are supported, owned and operated by the provider . This allows BigHat to leave concerns like patching and security of the underlying infrastructure and services to the provider. BigHat continues to maintain ownership in the shared responsibility model, but their scope of concern is significantly narrowed. The surface area the’re responsible for is reduced, helping to minimize risk. Choosing a partner with best in class observability, tracking, compliance and auditing tools is critical to any company that manages sensitive data.

Cost advantages

A startup must also make strategic decisions about where to deploy the capital they have raised from their investors. The vendor managed services bring a model focused on consumption, and allow the startup to make decisions about where they want to spend. This is often referred to as an operational expense (OpEx) model, in other words “pay as you go”, like a utility. This is in contrast to a large upfront investment in both time and capital to build these tools. The lack of need for extensive engineering efforts to stand up these tools, and continued investment to evolve them, acts as a form of capital expenditure (CapEx) avoidance. Startups can allocate their capital where it matters most for them.

“This is corporate-level changing stuff,” says Abrams. “We engage in a weekly leadership review of cost budgets. Operationally I can set the spending knob where I want it monthly, weekly or even daily, and avoid the risks involved in traditional capacity provisioning.”

The right tool for the right time

A key consideration for BigHat was the ability to extend the provider managed tools, where needed, to incorporate extended functionality from the ecosystem. This allows for additional functionality that isn’t covered by the core managed services, while maintaining a focus on their product development versus operating these tools.

Startups must also ask themselves what they need now, versus what they need in the future. As their needs change and grow, they can augment, extend, and replace the tools they have chosen to meet the new requirements. Starting with a vendor-managed service is not a one-way door; it’s an opportunity to defer investment in building and operating these capabilities yourself until that investment is justified. The time to value in using managed services initially doesn’t leave a startup with a sunk cost that limits future options.

“You have to think about the degree you want to adopt a hybrid model for the services you run. Today we aren’t running any software or services that require us to run our own compute instances. It’s very rare we run into something that is hard to do using just the services AWS already provides. Where our needs are not met, we can communicate them to AWS and we can choose to wait for them on their roadmap, which we have done in several cases, or we can elect to do it ourselves,” says Abrams. “This freedom to tweak and expand our service model at will is incomparably liberating.”

Conclusion

BigHat Biosciences was able to make an informed decision by considering the priorities of the business at this stage of its lifecycle. They adopted and embraced opinionated and service provider-managed tooling, which allowed them to inherit a largely best practice set of technology and practices, de-risk their operations, and focus on product velocity and customer feedback. This maintains future flexibility, which delivers significantly more value to the business in its current stage.

“We believe that the underlying engineering, the underlying automation story, is an advantage that applies to every aspect of what we do for our customers,” says Abrams. “By taking those advantages into every aspect of the business, we deliver on operations in a way that provides a competitive advantage a lot of other companies miss by not thinking about it this way.”

About the authors

Mike is a Principal Solutions Architect with the Startup Team at Amazon Web Services. He is a former founder, current mentor, and enjoys helping startups live their best cloud life.


Sean is a Senior Startup Solutions Architect at AWS. Before AWS, he was Director of Scientific Computing at the Howard Hughes Medical Institute.

Choosing a Well-Architected CI/CD approach: Open-source software and AWS Services

Post Syndicated from Brian Carlson original https://aws.amazon.com/blogs/devops/choosing-well-architected-ci-cd-open-source-software-aws-services/

This series of posts discusses making informed decisions when choosing to implement open-source tools on AWS services, adopt managed AWS services to satisfy the same needs, or use a combination of both.

We look at key considerations for evaluating open-source software and AWS services using the perspectives of a startup company and a mature company as examples. You can use these two different points of view to compare to your own organization. To make this investigation easier we will use Continuous Integration (CI) and Continuous Delivery (CD) capabilities as the target of our investigation.

Startup Company rocket and Mature Company rocket

In two related posts, we follow two AWS customers, Iponweb and BigHat Biosciences, as they share their CI/CD journeys, their perspectives, the decisions they made, and why. To end the series, we explore an example reference architecture showing the benefits AWS provides regardless of your emphasis on open-source tools or managed AWS services.

Why CI/CD?

Until your creations are in the hands of your customers, investment in development has provided no return. The faster valuable changes enter production, the greater positive impact you can have on your customer. In today’s highly competitive world, the ability to frequently and consistently deliver value is a competitive advantage. The Operational Excellence (OE) pillar of the AWS Well-Architected Framework recognizes this impact and focuses on the capabilities of CI/CD in two dedicated sections.

The concepts in CI/CD originate from software engineering but apply equally to any form of content. The goal is to support development, integration, testing, deployment, and delivery to production. For example, making changes to an application, updating your machine learning (ML) models, changing your multimedia assets, or referring to the AWS Well-Architected Framework.

Adopting CI/CD and the best practices from the Operational Excellence pillar can help you address risks in your environment, and limit errors from manual processes. More importantly, they help free your teams from the related manual processes, so they can focus on satisfying customer needs, differentiating your organization, and accelerating the flow of valuable changes into production.

A red question mark sits on a field of chaotically arranged black question marks.

How do you decide what you need?

The first question in the Operational Excellence pillar is about understanding needs and making informed decisions. To help you frame your own decision-making process, we explore key considerations from the perspective of a fictional startup company and a fictional mature company. In our two related posts, we explore these same considerations with Iponweb and BigHat.

The key considerations include:

  • Functional requirements – Providing specific features and capabilities that deliver value to your customers.
  • Non-functional requirements – Enabling the safe, effective, and efficient delivery of the functional requirements. Non-functional requirements include security, reliability, performance, and cost requirements.
    • Without security, you can’t earn customer trust. If your customers can’t trust you, you won’t have customers.
    • Without reliability you aren’t available to serve your customers. If you can’t serve your customers, you won’t have customers.
    • Performance is focused on timely and efficient delivery of value, not delivering as fast as possible.
    • Cost is focused on optimizing the value received for the resources spent (for example, money, time, or effort), not minimizing expense.
  • Operational requirements – Enabling you to effectively and efficiently support, maintain, sustain, and improve the delivery of value to your customers. When you “Design with Ops in Mind,” you’re enabling effective and efficient support for your business outcomes.

These non-feature-related key considerations are why Operational Excellence, Security, Reliability, Performance Efficiency, and Cost Optimization are the five pillars of the AWS Well-Architected Framework.

The startup company

Any startup begins as a small team of inspired people working together to realize the unique solution they believe solves an unsolved problem.

For our fictional small team, everyone knows each other personally and all speak frequently. We share processes and procedures in discussions, and everyone know what needs to be done. Our team members bring their expertise and dedicate it, and the majority of their work time, to delivering our solution. The results of our efforts inform changes we make to support our next iteration.

However, our manual activities are error-prone and inconsistencies exist in the way we do them. Performing these tasks takes time away from delivering our solution. When errors occur, they have the potential to disrupt everyone’s progress.

We have capital available to make some investments. We would prefer to bring in more team members who can contribute directly to developing our solution. We need to iterate faster if we are to achieve a broadly viable product in time to qualify for our next round of funding. We need to decide what investments to make.

  • Goals – Reach the next milestone and secure funding to continue development
  • Needs – Reduce or eliminate the manual processes and associated errors
  • Priority – Rapid iteration
  • CI/CD emphasis – Baseline CI/CD capabilities and non-functional requirements are emphasized over a rich feature set

The mature company

Our second fictional company is a large and mature organization operating in a mature market segment. We’re focused on consistent, quality customer experiences to serve and retain our customers.

Our size limits the personal relationships between our service and development teams. The process to make requests, and the interfaces between teams and their systems, are well documented and understood.

However, the systems we have implemented over time, as needs were identified and addressed, aren’t well documented. Our existing tool chain includes some in-house scripting and both supported and unsupported versions of open-source tools. There are limited opportunities for us to acquire new customers.

When conditions change and new features are desired, we want to be able to rapidly implement and deploy those features as fast as possible. If we can differentiate our services, however briefly, we may be able to win customers away from our competitors. Our other path to improved profitability is to evolve our processes, maximizing integration and efficiencies, and capturing cost reductions.

  • Goals – Differentiate ourselves in the marketplace with desired new features
  • Needs – Address the risks of poorly documented systems and unsupported software
  • Priority – Evolve efficiency
  • CI/CD emphasis – Rich feature set and integrations are emphasized over improving the existing non-functional capabilities

Open-source tools on AWS vs. AWS services

The choice of open-source tools or AWS service is not binary. You can select the combination of solutions that provides the greatest value. You can implement open-source tools for their specific benefits where they outweigh the costs and operational burden, using underlying AWS services like Amazon Elastic Compute Cloud (Amazon EC2) to host them. You can then use AWS managed services, like AWS CodeBuild, for the undifferentiated features you need, without additional cost or operational burden.

A group of people sit around a table discussing the pieces of a puzzle and their ideas.

Feature Set

Our fictional organizations both want to accelerate the flow of beneficial changes into production and are evaluating CI/CD alternatives to support that outcome. Our startup company wants a working solution—basic capabilities, author/code, build, and deploy, so that they can focus on development. Our mature company is seeking every advantage—a rich feature set, extensive opportunities for customization, integration capabilities, and fine-grained control.

Open-source tools

Open-source tools often excel at meeting functional requirements. When a new functionality, capability, or integration is desired, any developer can implement it for themselves, and then contribute their code back to the project. As the user community for an open-source project expands the number of use cases and the features identified grows, so does the number of potential solutions and potential contributors. Developers are using these tools to support their efforts and implement new features that provide value to them.

However, features may be released in unsupported versions and then later added to the supported feature set. Non-functional requirements take time and are less appealing because they don’t typically bring immediate value to the product. Non-functional capabilities may lag behind the feature set.

Consider the following:

  • Open-source tools may have more features and existing integrations to other tools
  • The pace of feature set delivery may be extremely rapid
  • The features delivered are those desired and created by the active members of the community
  • You are free to implement the features your company desires
  • There is no commitment to long-term support for the project or any given feature
  • You can implement open-source tools on multiple cloud providers or on premises
  • If the project is abandoned, you’re responsible for maintaining your implementation

AWS services

AWS services are driven by customer needs. Services and features are supported by dedicated teams. These customer-obsessed teams focus on all customer needs, with security being their top priority. Both functional and non-functional requirements are addressed with an emphasis on enabling customer outcomes while minimizing the effort they expend to achieve them.

Consider the following:

  • The pace of delivery of feature sets is consistent
  • The feature roadmap is driven by customer need and customer requests
  • The AWS service team is dedicated to support of the service
  • AWS services are available on the AWS Cloud and on premises through AWS Outposts

Picture showing symbol of dollar

Cost Optimization

Why are we discussing cost after the feature set? Security and reliability are fundamentally more important. Leadership naturally gravitates to following the operational excellence best practice of evaluating trade-offs. Having looked at the potential benefits from the feature set, the next question is typically, “What is this going to cost?” Leadership defines the priorities and allocates the resources necessary (capital, time, effort). We review cost optimization second so that leadership can make a comparison of the expected benefits between CI/CD investments, and investments in other efforts, so they can make an informed decision.

Our organizations are both cost conscious. Our startup is working with finite capital and time. In contrast, our mature company can plan to make investments over time and budget for the needed capital. Early investment in a robust and feature-rich CI/CD tool chain could provide significant advantages towards the startup’s long-term success, but if the startup fails early, the value of that investment will never be realized. The mature company can afford to realize the value of their investment over time and can make targeted investments to address specific short-term needs.

Open-source tools

Open-source software doesn’t have to be purchased, but there are costs to adopt. Open-source tools require appropriate skills in order to be implemented, and to perform management and maintenance activities. Those skills must be gained through dedicated training of team members, team member self-study, or by hiring new team members with the existing skills. The availability of skilled practitioners of open-source tools varies with how popular a tool is and how long it has had an active community. Loss of skilled team members includes the loss of their institutional knowledge and intimacy with the implementation. Skills must be maintained with changes to the tools and as team members join or leave. Time is required from skilled team members to support management and maintenance activities. If commercial support for the tool is desired, it may be available through third-parties at an additional cost.

The time to value of an open-source implementation includes the time to implement and configure the resources and software. Additional value may be realized through investment of time configuring or implementing desired integrations and capabilities. There may be existing community-supported integrations or capabilities that reduce the level of effort to achieve these.

Consider the following:

  • No cost to acquire the software.
  • The availability of skill practitioners of open-source tools may be lower. Cost (capital and time) to acquire, establish, or maintain skill set may be higher.
  • There is an ongoing cost to maintain the team member skills necessary to support the open-source tools.
  • There is an ongoing cost of time for team members to perform management and maintenance activities.
  • Additional commercial support for open-source tools may be available at additional cost
  • Time to value includes implementation and configuration of resources and the open-source software. There may be more predefined community integrations.

AWS services

AWS services are provided pay-as-you-go with no required upfront costs. As of August 2020, more than 400,000 individuals hold active AWS Certifications, a number that grew more than 85% between August 2019 and August 2020.

Time to value for AWS services is extremely short and limited to the time to instantiate or configure the service for your use. Additional value may be realized through the investment of time configuring or implementing desired integrations. Predefined integrations for AWS services are added as part of the service development roadmap. However, there may be fewer existing integrations to reduce your level of effort.

Consider the following:

  • No cost to acquire the software; AWS services are pay-as-you-go for use.
  • AWS skill sets are broadly available. Cost (capital and time) to acquire, establish, or maintain skill sets may be lower.
  • AWS services are fully managed, and service teams are responsible for the operation of the services.
  • Time to value is limited to the time to instantiate or configure the service. There may be fewer predefined integrations.
  • Additional support for AWS services is available through AWS Support. Cost for support varies based on level of support and your AWS utilization.

Open-source tools on AWS services

Open-source tools on AWS services don’t impact these cost considerations. Migration off of either of these solutions is similarly not differentiated. In either case, you have to invest time in replacing the integrations and customizations you wish to maintain.

Picture showing a checkmark put on security

Security

Both organizations are concerned about reputation and customer trust. They both want to act to protect their information systems and are focusing on confidentiality and integrity of data. They both take security very seriously. Our startup wants to be secure by default and wants to trust the vendor to address vulnerabilities within the service. Our mature company has dedicated resources that focus on security, and the company practices defense in depth across internal organizations.

The startup and the mature company both want to know whether a choice is safe, secure, and can validate the security of their choice. They also want to understand their responsibilities and the shared responsibility model that applies.

Open-source tools

Open-source tools are the product of the contributors and may contain flaws or vulnerabilities. The entire community has access to the code to test and validate. There are frequently many eyes evaluating the security of the tools. A company or individual may perform a validation for themselves. However, there may be limited guidance on secure configurations. Controls in the implementer’s environment may reduce potential risk.

Consider the following:

  • You’re responsible for the security of the open-source software you implement
  • You control the security of your data within your open-source implementation
  • You can validate the security of the code and act as desired

AWS services

AWS service teams make security their highest priority and are able to respond rapidly when flaws are identified. There is robust guidance provided to support configuring AWS services securely.

Consider the following:

  • AWS is responsible for the security of the cloud and the underlying services
  • You are responsible for the security of your data in the cloud and how you configure AWS services
  • You must rely on the AWS service team to validate the security of the code

Open-source tools on AWS services

Open-source tools on AWS services combine these considerations; the customer is responsible for the open-source implementation and the configuration of the AWS services it consumes. AWS is responsible for the security of the AWS Cloud and the managed AWS services.

Picture showing global distribution for redundancy to depict reliability

Reliability

Everyone wants reliable capabilities. What varies between companies is their appetite for risk, and how much they can tolerate the impact of non-availability. The startup emphasized the need for their systems to be available to support their rapid iterations. The mature company is operating with some existing reliability risks, including unsupported open-source tools and in-house scripts.

The startup and the mature company both want to understand the expected reliability of a choice, meaning what percentage of the time it is expected to be available. They both want to know if a choice is designed for high availability and will remain available even if a portion of the systems fails or is in a degraded state. They both want to understand the durability of their data, how to perform backups of their data, and how to perform recovery in the event of a failure.

Both companies need to determine what is an acceptable outage duration, commonly referred to as a Recovery Time Objective (RTO), and for what quantity of elapsed time it is acceptable to lose transactions (including committing changes), commonly referred to as Recovery Point Objective (RPO). They need to evaluate if they can achieve their RTO and RPO objectives with each of the choices they are considering.

Open-source tools

Open-source reliability is dependent upon the effectiveness of the company’s implementation, the underlying resources supporting the implementation, and the reliability of the open-source software. Open-source tools are the product of the contributors and may or may not incorporate high availability features. Depending on the implementation and tool, there may be a requirement for downtime for specific management or maintenance activities. The ability to support RTO and RPO depends on the teams supporting the company system, the implementation, and the mechanisms implemented for backup and recovery.

Consider the following:

  • You are responsible for implementing your open-source software to satisfy your reliability needs and high availability needs
  • Open-source tools may have downtime requirements to support specific management or maintenance activities
  • You are responsible for defining, implementing, and testing the backup and recovery mechanisms and procedures
  • You are responsible for the satisfaction of your RTO and RPO in the event of a failure of your open-source system

AWS services

AWS services are designed to support customer availability needs. As managed services, the service teams are responsible for maintaining the health of the services.

Consider the following:

Open-source tools on AWS services

Open-source tools on AWS services combine these considerations; the customer is responsible for the open-source implementation (including data durability, backup, and recovery) and the configuration of the AWS services it consumes. AWS is responsible for the health of the AWS Cloud and the managed services.

Picture showing a graph depicting performance measurement

Performance

What defines timely and efficient delivery of value varies between our two companies. Each is looking for results before an engineer becomes idled by having to wait for results. The startup iterates rapidly based on the results of each prior iteration. There is limited other activity for our startup engineer to perform before they have to wait on actionable results. Our mature company is more likely to have an outstanding backlog or improvements that can be acted upon while changes moves through the pipeline.

Open-source tools

Open-source performance is defined by the resources upon which it is deployed. Open-source tools that can scale out can dynamically improve their performance when resource constrained. Performance can also be improved by scaling up, which is required when performance is constrained by resources and scaling out isn’t supported. The performance of open-source tools may be constrained by characteristics of how they were implemented in code or the libraries they use. If this is the case, the code is available for community or implementer-created improvements to address the limitation.

Consider the following:

  • You are responsible for managing the performance of your open-source tools
  • The performance of open-source tools may be constrained by the resources they are implemented upon; the code and libraries used; their system, resource, and software configuration; and the code and libraries present within the tools

AWS services

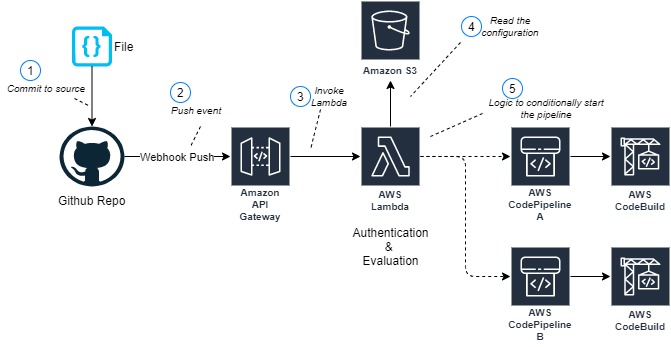
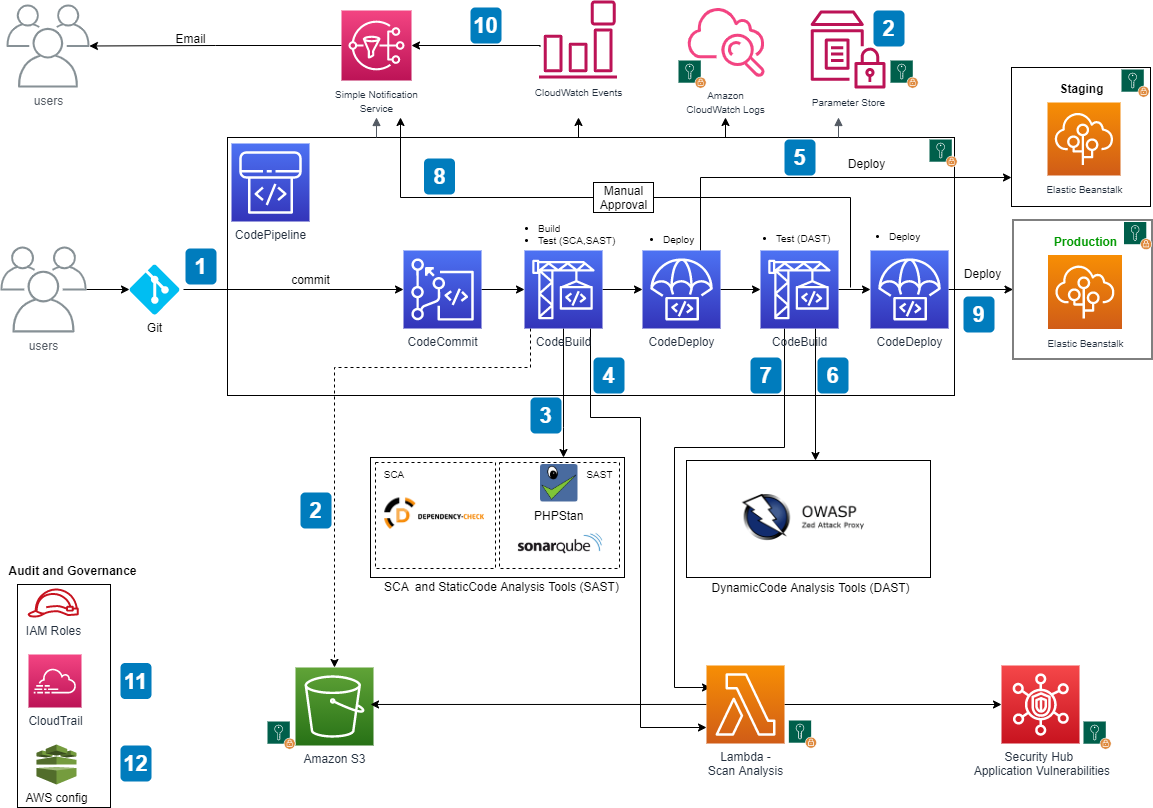
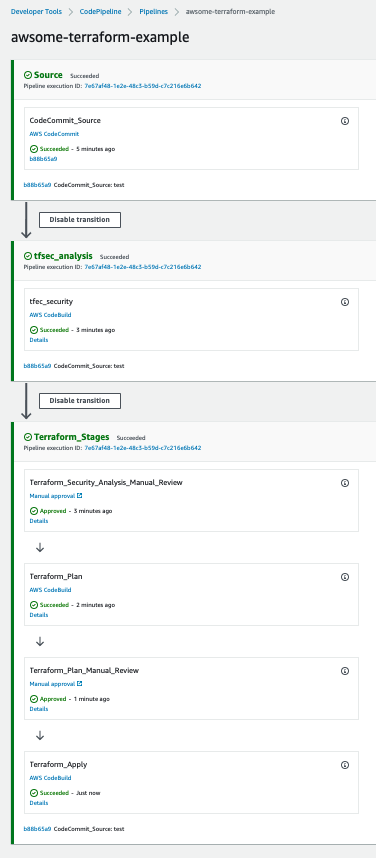
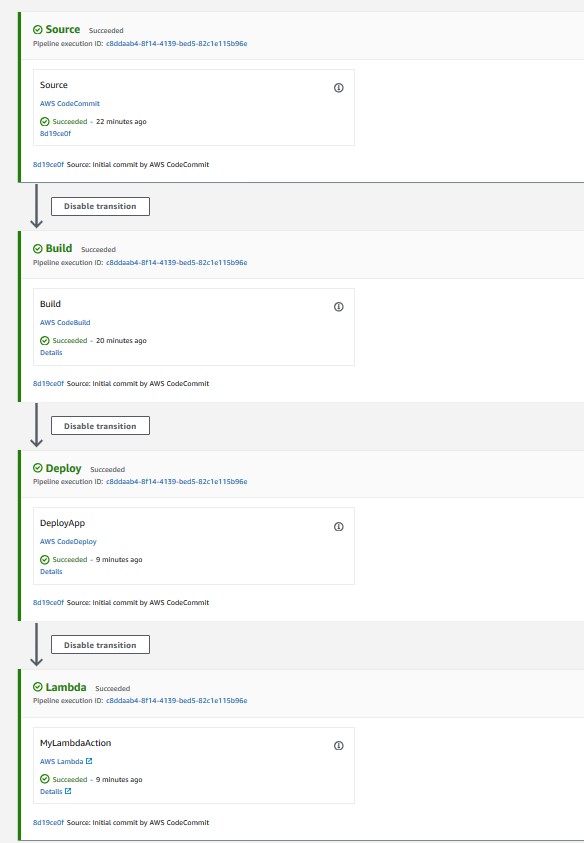
AWS services are designed to be highly scalable. CodeCommit has a highly scalable architecture, and CodeBuild scales up and down dynamically to meet your build volume. CodePipeline allows you to run actions in parallel in order to increase your workflow speeds.

Consider the following:

  • AWS services are fully managed, and service teams are responsible for the performance of the services.
  • AWS services are designed to scale automatically.
  • Your configuration of the services you consume can affect the performance of those services.
  • AWS services quotas exist to prevent unexpected costs. You can make changes to service quotas that may affect performance and costs.

Open-source tools on AWS services

Open-source tools on AWS services combine these considerations; the customer is responsible for the open-source implementation (including the selection and configuration of the AWS Cloud resources) and the configuration of the AWS services it consumes. AWS is responsible for the performance of the AWS Cloud and the managed AWS services.

Picture showing cart-wheels in motion, depicting operations

Operations

Our startup company wants to limit its operations burden as much as possible in order to focus on development efforts. Our mature company has an established and robust operations capability. In both cases, they perform the management and maintenance activities necessary to support their needs.

Open-source tools

Open-source tools are supported by their volunteer communities. That support is voluntary, without any obligation or commitment from the users. If either company adopts open-source tools, they’re responsible for the management and maintenance of the system. If they want additional support with an obligation and commitment to support their implementation, third parties may provide commercial support at additional cost.

Consider the following:

  • You are responsible for supporting your implementation.
  • The open-source community may provide volunteer support for the software.
  • There is no commitment to support the software by the open-source community.
  • There may be less documentation, or accepted best practices, available to support open-source tools.
  • Early adoption of open-source tools, or the use of development builds, includes the chance of encountering unidentified edge cases and unanticipated issues.
  • The complexity of an implementation and its integrations may increase the difficulty to support open-source tools. The time to identify contributing factors may be extended by the complexity during an incident. Maintaining a set of skilled team members with deep understanding of your implementation may help mitigate this risk.
  • You may be able to acquire commercial support through a third party.

AWS services

AWS services are committed to providing long-term support for their customers.

Consider the following:

  • There is long-term commitment from AWS to support the service
  • As a managed service, the service team maintains current documentation
  • Additional levels of support are available through AWS Support
  • Support for AWS is available through partners and third parties

Open-source tools on AWS services

Open-source tools on AWS services combine these considerations. The company is responsible for operating the open-source tools (for example, software configuration changes, updates, patching, and responding to faults). AWS is responsible for the operation of the AWS Cloud and the managed AWS services.

Conclusion

In this post, we discussed how to make informed decisions when choosing to implement open-source tools on AWS services, adopt managed AWS services, or use a combination of both. To do so, you must examine your organization and evaluate the benefits and risks.

A magnifying glass is focused on the single red figure in a group of otherwise blue paper figures standing on a white surface.

Examine your organization

You can make an informed decision about the capabilities you adopt. The insight you need can be gained by examining your organization to identify your goals, needs, and priorities, and discovering what your current emphasis is. Ask the following questions:

  • What is your organization trying to accomplish and why?
  • How large is your organization and how is it structured?
  • How are roles and responsibilities distributed across teams?
  • How well defined and understood are your processes and procedures?
  • How do you manage development, testing, delivery, and deployment today?
  • What are the major challenges your organization faces?
  • What are the challenges you face managing development?
  • What problems are you trying to solve with CI/CD tools?
  • What do you want to achieve with CI/CD tools?

Evaluate benefits and risk

Armed with that knowledge, the next step is to explore the trade-offs between open-source options and managed AWS services. Then evaluate the benefits and risks in terms of the key considerations:

  • Features
  • Cost
  • Security
  • Reliability
  • Performance
  • Operations

When asked “What is the correct answer?” the answer should never be “It depends.” We need to change the question to “What is our use case and what are our needs?” The answer will emerge from there.

Make an informed decision

A Well-Architected solution can include open-source tools, AWS Services, or any combination of both! A Well-Architected choice is an informed decision that evaluates trade-offs, balances benefits and risks, satisfies your requirements, and most importantly supports the achievement of your business outcomes.

Read the other posts in this series and take this journey with BigHat Biosciences and Iponweb as they share their perspectives, the decisions they made, and why.

Resources

Want to learn more? Check out the following CI/CD and developer tools on AWS:

Continuous integration (CI)
Continuous delivery (CD)
AWS Developer Tools

For more information about the AWS Well-Architected Framework, refer to the following whitepapers:

AWS Well-Architected Framework
AWS Well-Architected Operational Excellence pillar
AWS Well-Architected Security pillar
AWS Well-Architected Reliability pillar
AWS Well-Architected Performance Efficiency pillar
AWS Well-Architected Cost Optimization pillar

The 3 hexagons of the well architected logo appear to the right of the words AWS Well-Architected.

Author bio

portrait photo of Brian Carlson Brian is the global Operational Excellence lead for the AWS Well-Architected program. Formerly the technical lead for an international network, Brian works with customers and partners researching the operations best practices with the greatest positive impact and produces guidance to help you achieve your goals.


Integrate GitHub monorepo with AWS CodePipeline to run project-specific CI/CD pipelines

Post Syndicated from Vivek Kumar original https://aws.amazon.com/blogs/devops/integrate-github-monorepo-with-aws-codepipeline-to-run-project-specific-ci-cd-pipelines/

AWS CodePipeline is a continuous delivery service that enables you to model, visualize, and automate the steps required to release your software. With CodePipeline, you model the full release process for building your code, deploying to pre-production environments, testing your application, and releasing it to production. CodePipeline then builds, tests, and deploys your application according to the defined workflow either in manual mode or automatically every time a code change occurs. A lot of organizations use GitHub as their source code repository. Some organizations choose to embed multiple applications or services in a single GitHub repository separated by folders. This method of organizing your source code in a repository is called a monorepo.

This post demonstrates how to customize GitHub events that invoke a monorepo service-specific pipeline by reading the GitHub event payload using AWS Lambda.


Solution overview

With the default setup in CodePipeline, a release pipeline is invoked whenever a change in the source code repository is detected. When using GitHub as the source for a pipeline, CodePipeline uses a webhook to detect changes in a remote branch and starts the pipeline. When using a monorepo style project with GitHub, it doesn’t matter which folder in the repository you change the code, CodePipeline gets an event at the repository level. If you have a continuous integration and continuous deployment (CI/CD) pipeline for each of the applications and services in a repository, all pipelines detect the change in any of the folders every time. The following diagram illustrates this scenario.


GitHub monorepo folder structure


This post demonstrates how to customize GitHub events that invoke a monorepo service-specific pipeline by reading the GitHub event payload using Lambda. This solution has the following benefits:

  • Add customizations to start pipelines based on external factors – You can use custom code to evaluate whether a pipeline should be triggered. This allows for further customization beyond polling a source repository or relying on a push event. For example, you can create custom logic to automatically reschedule deployments on holidays to the next available workday.
  • Have multiple pipelines with a single source – You can trigger selected pipelines when multiple pipelines are listening to a single GitHub repository. This lets you group small and highly related but independently shipped artifacts such as small microservices without creating thousands of GitHub repos.
  • Avoid reacting to unimportant files – You can avoid triggering a pipeline when changing files that don’t affect the application functionality (such as documentation, readme, PDF, and .gitignore files).

In this post, we’re not debating the advantages or disadvantages of a monorepo versus a single repo, or when to create monorepos or single repos for each application or project.


Sample architecture

This post focuses on controlling running pipelines in CodePipeline. CodePipeline can have multiple stages like test, approval, and deploy. Our sample architecture considers a simple pipeline with two stages: source and build.


Github monorepo - CodePipeline Sample Architecture

This solution is made up of following parts:

  • An Amazon API Gateway endpoint (3) is backed by a Lambda function (5) to receive and authenticate GitHub webhook push events (2)
  • The same function evaluates incoming GitHub push events and starts the pipeline on a match
  • An Amazon Simple Storage Service (Amazon S3) bucket (4) stores the CodePipeline-specific configuration files
  • The pipeline contains a build stage with AWS CodeBuild


Normally, after you create a CI/CD pipeline, it automatically triggers a pipeline to release the latest version of your source code. From then on, every time you make a change in your source code, the pipeline is triggered. You can also manually run the last revision through a pipeline by choosing Release change on the CodePipeline console. This architecture uses the manual mode to run the pipeline. GitHub push events and branch changes are evaluated by the Lambda function to avoid commits that change unimportant files from starting the pipeline.


Creating an API Gateway endpoint

We need a single API Gateway endpoint backed by a Lambda function with the responsibility of authenticating and validating incoming requests from GitHub. You can authenticate requests using HMAC security or GitHub Apps. API Gateway only needs one POST method to consume GitHub push events, as shown in the following screenshot.


Creating an API Gateway endpoint


Creating the Lambda function

This Lambda function is responsible for authenticating and evaluating the GitHub events. As part of the evaluation process, the function can parse through the GitHub events payload, determine which files are changed, added, or deleted, and perform the appropriate action:

  • Start a single pipeline, depending on which folder is changed in GitHub
  • Start multiple pipelines
  • Ignore the changes if non-relevant files are changed

You can store the project configuration details in Amazon S3. Lambda can read this configuration to decide what needs to be done when a particular folder is matched from a GitHub event. The following code is an example configuration:

{

    "GitHubRepo": "SampleRepo",

    "GitHubBranch": "main",

    "ChangeMatchExpressions": "ProjectA/.*",

    "IgnoreFiles": "*.pdf;*.md",

    "CodePipelineName": "ProjectA - CodePipeline"

}

For more complex use cases, you can store the configuration file in Amazon DynamoDB.

The following is the sample Lambda function code in Python 3.7 using Boto3:

def lambda_handler(event, context):

    import json
    modifiedFiles = event["commits"][0]["modified"]
    #full path
    for filePath in modifiedFiles:
        # Extract folder name
        folderName = (filePath[:filePath.find("/")])
        break

    #start the pipeline
    if len(folderName)>0:
        # Codepipeline name is foldername-job. 
        # We can read the configuration from S3 as well. 
        returnCode = start_code_pipeline(folderName + '-job')

    return {
        'statusCode': 200,
        'body': json.dumps('Modified project in repo:' + folderName)
    }
    

def start_code_pipeline(pipelineName):
    client = codepipeline_client()
    response = client.start_pipeline_execution(name=pipelineName)
    return True

cpclient = None
def codepipeline_client():
    import boto3
    global cpclient
    if not cpclient:
        cpclient = boto3.client('codepipeline')
    return cpclient
   

Creating a GitHub webhook

GitHub provides webhooks to allow external services to be notified on certain events. For this use case, we create a webhook for a push event. This generates a POST request to the URL (API Gateway URL) specified for any files committed and pushed to the repository. The following screenshot shows our webhook configuration.

Creating a GitHub webhook2

Conclusion

In our sample architecture, two pipelines monitor the same GitHub source code repository. A Lambda function decides which pipeline to run based on the GitHub events. The same function can have logic to ignore unimportant files, for example any readme or PDF files.

Using API Gateway, Lambda, and Amazon S3 in combination serves as a general example to introduce custom logic to invoke pipelines. You can expand this solution for increasingly complex processing logic.


About the Author

Vivek Kumar

Vivek is a Solutions Architect at AWS based out of New York. He works with customers providing technical assistance and architectural guidance on various AWS services. He brings more than 23 years of experience in software engineering and architecture roles for various large-scale enterprises.


Gaurav-Sharma

Gaurav is a Solutions Architect at AWS. He works with digital native business customers providing architectural guidance on AWS services.


Nitin-Aggarwal

Nitin is a Solutions Architect at AWS. He works with digital native business customers providing architectural guidance on AWS services.


CDK Corner – April 2021

Post Syndicated from Christian Weber original https://aws.amazon.com/blogs/devops/cdk-corner-april-2021/

Social – Community Engagement

We’re getting closer and closer to CDK Day, with the event receiving 75 CFP submissions. The cdkday schedule is now available to plan out your conference day.

Updates to the CDK

Constructs promoted to General Availability

Promoting a module to stable/General Availability is always a cause for celebration. Great job to all the folks involved who helped move aws-acmpca from Experimental to Stable. PR#13778 gives a peak into the work involved. If you’re interested in helping promote a module to G.A., or would like to learn more about the process, read the AWS Construct Library Module Lifecycle document. A big thanks to the CDK Community and team for their work!

Dead Letter Queues

Dead Letter Queues (“DLQs”) are a service implementation pattern that can queue messages when a service cannot process them. For example, if an email message can’t be delivered to a client, an email server could implement a DLQ holding onto that undeliverable message until the client can process the message. DLQs are supported by many AWS services, the community and CDK team have been working to support DLQs with CDK in various modules: aws-codebuild in PR#11228, aws-stepfunctions in PR#13450, and aws-lambda-targets in PR#11617.

Amazon API Gateway

Amazon API Gateway is a fully managed service to deploy APIs at scale. Here are the modules that have received updates to their support for API Gateway:

  • stepfunctions-tasks now supports API Gateway with PR#13033.

  • You can now specify regions when integrating Amazon API Gateway with other AWS services in PR#13251.

  • Support for websockets api in PR#13031 is now available in aws-apigatewayv2 as a Level 2 construct. To differentiate configuration between HTTP and websockets APIs, several of the HTTP API properties were renamed. More information about these changes can be found in the conversation section of PR#13031.

  • You can now set default authorizers in PR#13172. This lets you use an API Gateway HTTP, REST, or Websocket APIs with an authorizer and authorization scopes that cover all routes for a given API resource.

Notable new L2 constructs

AWS Global Accelerator is a networking service that lets users of your infrastructure hosted on AWS use the AWS global network infrastructure for traffic routing, improving speed and performance. Amazon Route 53 supports Global Accelerator and, thanks to PR#13407, you can now take advantage of this functionality in the aws-route-53-targets module as an L2 construct.

Amazon CloudWatch is an important part of monitoring AWS workloads. With PR#13281, the aws-cloudwatch-actions module now includes an Ec2Action construct, letting you programmatically set up observability of EC2-based workloads with CDK.

The aws-cognito module now supports Apple ID User Pools in PR#13160 allowing Developers to define workloads that use Apple IDs for identity management.

aws-iam received a new L2 construct with PR#13393, bringing SAML implementation support to CDK. SAML has become a preferred framework when implementing Single Sign On, and has been supported with IAM for sometime. Now, set it up with even more efficiency with the SamlProvider construct.

Amazon Neptune is a managed graph database service available as a construct in the aws-neptune module. PR#12763 adds L2 constructs to support Database Clusters and Database Instances.

Level ups to existing CDK constructs

Service discovery in AWS is provided by AWS CloudMap. With PR#13192, users of aws-ecs can now register an ECS Service with CloudMap.

aws-lambda has received two notable additions related to Docker: PR#13318, and PR#12258 add functionality to package Lambda function code with the output of a Docker build, or from a Docker build asset, respectively.

The aws-ecr module now supports Tag Mutability. Tags can denote a specific release for a piece of software. Setting the enum in the construct to IMMUTABLE will prevent tags from being overwritten by a later image, if that image uses a tag already present in the container repository.

Last year, AWS announced support for deployment circuit breakers in Amazon Elastic Container Service, enabling customers to perform auto-rollbacks on unhealthy service deployments without manual intervention. PR#12719 includes this functionality as part of the aws-ecs-patterns module, via the DeploymentCircuitBreaker interface. This interface is now available and can be used in constructs such as ApplicationLoadBalancedFargateService.

The aws-ec2 module received some nice quality of life upgrades to it: Support for multi-part user-data in PR#11843, client vpn endpoints in PR#12234, and non-numeric security protocols for security groups in PR#13593 all help improve the experience of using EC2 with CDK.

Learning – Finds from across the internet

On the AWS DevOps Blog, Eric Beard and Rico Huijbers penned a post detailing Best Practices for Developing Cloud Applications with AWS CDK.

Users of AWS Elastic Beanstalk wanting to deploy with AWS CDK can read about deploying Elastic Beanstalk applications with the AWS CDK and the aws-elasticbeanstalk module.

Deploying Infrastructure that is HIPAA and HiTrust compliant with AWS CDK can help customers move faster. This best practices guide for Hipaa and HiTrust environments goes into detail on deploying compliant architecture with the AWS CDK.

Community Acknowledgements

And finally, congratulations and rounds of applause for these folks who had their first Pull Request merged to the CDK Repository!*

*These users’ Pull Requests were merged between 2021-03-01 and 2021-03-31.

Thanks for reading this update of the CDK Corner. See you next time!

Using AWS DevOps Tools to model and provision AWS Glue workflows

Post Syndicated from Nuatu Tseggai original https://aws.amazon.com/blogs/devops/provision-codepipeline-glue-workflows/

This post provides a step-by-step guide on how to model and provision AWS Glue workflows utilizing a DevOps principle known as infrastructure as code (IaC) that emphasizes the use of templates, source control, and automation. The cloud resources in this solution are defined within AWS CloudFormation templates and provisioned with automation features provided by AWS CodePipeline and AWS CodeBuild. These AWS DevOps tools are flexible, interchangeable, and well suited for automating the deployment of AWS Glue workflows into different environments such as dev, test, and production, which typically reside in separate AWS accounts and Regions.

AWS Glue workflows allow you to manage dependencies between multiple components that interoperate within an end-to-end ETL data pipeline by grouping together a set of related jobs, crawlers, and triggers into one logical run unit. Many customers using AWS Glue workflows start by defining the pipeline using the AWS Management Console and then move on to monitoring and troubleshooting using either the console, AWS APIs, or the AWS Command Line Interface (AWS CLI).

Solution overview

The solution uses COVID-19 datasets. For more information on these datasets, see the public data lake for analysis of COVID-19 data, which contains a centralized repository of freely available and up-to-date curated datasets made available by the AWS Data Lake team.

Because the primary focus of this solution showcases how to model and provision AWS Glue workflows using AWS CloudFormation and CodePipeline, we don’t spend much time describing intricate transform capabilities that can be performed in AWS Glue jobs. As shown in the Python scripts, the business logic is optimized for readability and extensibility so you can easily home in on the functions that aggregate data based on monthly and quarterly time periods.

The ETL pipeline reads the source COVID-19 datasets directly and writes only the aggregated data to your S3 bucket.

The solution exposes the datasets in the following tables:

Table Name Description Dataset location Provider
countrycode Lookup table for country codes s3://covid19-lake/static-datasets/csv/countrycode/ Rearc
countypopulation Lookup table for the population of each county s3://covid19-lake/static-datasets/csv/CountyPopulation/ Rearc
state_abv Lookup table for US state abbreviations s3://covid19-lake/static-datasets/json/state-abv/ Rearc
rearc_covid_19_nyt_data_in_usa_us_counties Data on COVID-19 cases at US county level s3://covid19-lake/rearc-covid-19-nyt-data-in-usa/csv/us-counties/ Rearc
rearc_covid_19_nyt_data_in_usa_us_states Data on COVID-19 cases at US state level s3://covid19-lake/rearc-covid-19-nyt-data-in-usa/csv/us-states/ Rearc
rearc_covid_19_testing_data_states_daily Data on COVID-19 cases at US state level s3://covid19-lake/rearc-covid-19-testing-data/csv/states_daily/ Rearc
rearc_covid_19_testing_data_us_daily US total test daily trend s3://covid19-lake/rearc-covid-19-testing-data/csv/us_daily/ Rearc
rearc_covid_19_testing_data_us_total_latest US total tests s3://covid19-lake/rearc-covid-19-testing-data/csv/us-total-latest/ Rearc
rearc_covid_19_world_cases_deaths_testing World total tests s3://covid19-lake/rearc-covid-19-world-cases-deaths-testing/ Rearc
rearc_usa_hospital_beds Hospital beds and their utilization in the US s3://covid19-lake/rearc-usa-hospital-beds/ Rearc
world_cases_deaths_aggregates Monthly and quarterly aggregate of the world s3://<your-S3-bucket-name>/covid19/world-cases-deaths-aggregates/ Aggregate

Prerequisites

This post assumes you have the following:

  • Access to an AWS account
  • The AWS CLI (optional)
  • Permissions to create a CloudFormation stack
  • Permissions to create AWS resources, such as AWS Identity and Access Management (IAM) roles, Amazon Simple Storage Service (Amazon S3) buckets, and various other resources
  • General familiarity with AWS Glue resources (triggers, crawlers, and jobs)

Architecture

The CloudFormation template glue-workflow-stack.yml defines all the AWS Glue resources shown in the following diagram.

architecture diagram showing ETL process

Figure: AWS Glue workflow architecture diagram

Modeling the AWS Glue workflow using AWS CloudFormation

Let’s start by exploring the template used to model the AWS Glue workflow: glue-workflow-stack.yml

We focus on two resources in the following snippet:

  • AWS::Glue::Workflow
  • AWS::Glue::Trigger

From a logical perspective, a workflow contains one or more triggers that are responsible for invoking crawlers and jobs. Building a workflow starts with defining the crawlers and jobs as resources within the template and then associating it with triggers.

Defining the workflow

This is where the definition of the workflow starts. In the following snippet, we specify the type as AWS::Glue::Workflow and the property Name as a reference to the parameter GlueWorkflowName.

Parameters:
  GlueWorkflowName:
    Type: String
    Description: Glue workflow that tracks all triggers, jobs, crawlers as a single entity
    Default: Covid_19

Resources:
  Covid19Workflow:
    Type: AWS::Glue::Workflow
    Properties: 
      Description: Glue workflow that tracks specified triggers, jobs, and crawlers as a single entity
      Name: !Ref GlueWorkflowName

Defining the triggers

This is where we define each trigger and associate it with the workflow. In the following snippet, we specify the property WorkflowName on each trigger as a reference to the logical ID Covid19Workflow.

These triggers allow us to create a chain of dependent jobs and crawlers as specified by the properties Actions and Predicate.

The trigger t_Start utilizes a type of SCHEDULED, which means that it starts at a defined time (in our case, one time a day at 8:00 AM UTC). Every time it runs, it starts the job with the logical ID Covid19WorkflowStarted.

The trigger t_GroupA utilizes a type of CONDITIONAL, which means that it starts when the resources specified within the property Predicate have reached a specific state (when the list of Conditions specified equals SUCCEEDED). Every time t_GroupA runs, it starts the crawlers with the logical ID’s CountyPopulation and Countrycode, per the Actions property containing a list of actions.

  TriggerJobCovid19WorkflowStart:
    Type: AWS::Glue::Trigger
    Properties:
      Name: t_Start
      Type: SCHEDULED
      Schedule: cron(0 8 * * ? *) # Runs once a day at 8 AM UTC
      StartOnCreation: true
      WorkflowName: !Ref GlueWorkflowName
      Actions:
        - JobName: !Ref Covid19WorkflowStarted

  TriggerCrawlersGroupA:
    Type: AWS::Glue::Trigger
    Properties:
      Name: t_GroupA
      Type: CONDITIONAL
      StartOnCreation: true
      WorkflowName: !Ref GlueWorkflowName
      Actions:
        - CrawlerName: !Ref CountyPopulation
        - CrawlerName: !Ref Countrycode
      Predicate:
        Conditions:
          - JobName: !Ref Covid19WorkflowStarted
            LogicalOperator: EQUALS
            State: SUCCEEDED

Provisioning the AWS Glue workflow using CodePipeline

Now let’s explore the template used to provision the CodePipeline resources: codepipeline-stack.yml

This template defines an S3 bucket that is used as the source action for the pipeline. Any time source code is uploaded to a specified bucket, AWS CloudTrail logs the event, which is detected by an Amazon CloudWatch Events rule configured to start running the pipeline in CodePipeline. The pipeline orchestrates CodeBuild to get the source code and provision the workflow.

For more information on any of the available source actions that you can use with CodePipeline, such as Amazon S3, AWS CodeCommit, Amazon Elastic Container Registry (Amazon ECR), GitHub, GitHub Enterprise Server, GitHub Enterprise Cloud, or Bitbucket, see Start a pipeline execution in CodePipeline.

We start by deploying the stack that sets up the CodePipeline resources. This stack can be deployed in any Region where CodePipeline and AWS Glue are available. For more information, see AWS Regional Services.

Cloning the GitHub repo

Clone the GitHub repo with the following command:

$ git clone https://github.com/aws-samples/provision-codepipeline-glue-workflows.git

Deploying the CodePipeline stack

Deploy the CodePipeline stack with the following command:

$ aws cloudformation deploy \
--stack-name codepipeline-covid19 \
--template-file cloudformation/codepipeline-stack.yml \
--capabilities CAPABILITY_NAMED_IAM \
--no-fail-on-empty-changeset \
--region <AWS_REGION>

When the deployment is complete, you can view the pipeline that was provisioned on the CodePipeline console.

CodePipeline console showing the deploy pipeline in failed state

Figure: CodePipeline console

The preceding screenshot shows that the pipeline failed. This is because we haven’t uploaded the source code yet.

In the following steps, we zip and upload the source code, which triggers another (successful) run of the pipeline.

Zipping the source code

Zip the source code containing Glue scripts, CloudFormation templates, and Buildspecs file with the following command:

$ zip -r source.zip . -x images/\* *.history* *.git* *.DS_Store*

You can omit *.DS_Store* from the preceding command if you are not a Mac user.

Uploading the source code

Upload the source code with the following command:

$ aws s3 cp source.zip s3://covid19-codepipeline-source-<AWS_ACCOUNT_ID>-<AWS_REGION>

Make sure to provide your account ID and Region in the preceding command. For example, if your AWS account ID is 111111111111 and you’re using Region us-west-2, use the following command:

$ aws s3 cp source.zip s3://covid19-codepipeline-source-111111111111-us-west-2

Now that the source code has been uploaded, view the pipeline again to see it in action.

CodePipeline console showing the deploy pipeline in success state

Figure: CodePipeline console displaying stage “Deploy” in-progress

Choose Details within the Deploy stage to see the build logs.

CodeBuild console displaying build logs

Figure: CodeBuild console displaying build logs

To modify any of the commands that run within the Deploy stage, feel free to modify: deploy-glue-workflow-stack.yml

Try uploading the source code a few more times. Each time it’s uploaded, CodePipeline starts and runs another deploy of the workflow stack. If nothing has changed in the source code, AWS CloudFormation automatically determines that the stack is already up to date. If something has changed in the source code, AWS CloudFormation automatically determines that the stack needs to be updated and proceeds to run the change set.

Viewing the provisioned workflow, triggers, jobs, and crawlers

To view your workflows on the AWS Glue console, in the navigation pane, under ETL, choose Workflows.

Glue console showing workflows

Figure: Navigate to Workflows

To view your triggers, in the navigation pane, under ETL, choose Triggers.

Glue console showing triggers

Figure: Navigate to Triggers

To view your crawlers, under Data Catalog, choose Crawlers.

Glue console showing crawlers

Figure: Navigate to Crawlers

To view your jobs, under ETL, choose Jobs.

Glue console showing jobs

Figure: Navigate to Jobs

Running the workflow

The workflow runs automatically at 8:00 AM UTC. To start the workflow manually, you can use either the AWS CLI or the AWS Glue console.

To start the workflow with the AWS CLI, enter the following command:

$ aws glue start-workflow-run --name Covid_19 --region <AWS_REGION>

To start the workflow on the AWS Glue console, on the Workflows page, select your workflow and choose Run on the Actions menu.

Glue console run workflow

Figure: AWS Glue console start workflow run

To view the run details of the workflow, choose the workflow on the AWS Glue console and choose View run details on the History tab.

Glue console view run details of a workflow

Figure: View run details

The following screenshot shows a visual representation of the workflow as a graph with your run details.

Glue console showing visual representation of the workflow as a graph.

Figure: AWS Glue console displaying details of successful workflow run

Cleaning up

To avoid additional charges, delete the stack created by the CloudFormation template and the contents of the buckets you created.

1. Delete the contents of the covid19-dataset bucket with the following command:

$ aws s3 rm s3://covid19-dataset-<AWS_ACCOUNT_ID>-<AWS_REGION> --recursive

2. Delete your workflow stack with the following command:

$ aws cloudformation delete-stack --stack-name glue-covid19 --region <AWS_REGION>

To delete the contents of the covid19-codepipeline-source bucket, it’s simplest to use the Amazon S3 console because it makes it easy to delete multiple versions of the object at once.

3. Navigate to the S3 bucket named covid19-codepipeline-source-<AWS_ACCOUNT_ID>- <AWS_REGION>.

4. Choose List versions.

5. Select all the files to delete.

6. Choose Delete and follow the prompts to permanently delete all the objects.

S3 console delete all object versions

Figure: AWS S3 console delete all object versions

7. Delete the contents of the covid19-codepipeline-artifacts bucket:

$ aws s3 rm s3://covid19-codepipeline-artifacts-<AWS_ACCOUNT_ID>-<AWS-REGION> --recursive

8. Delete the contents of the covid19-cloudtrail-logs bucket:

$ aws s3 rm s3://covid19-cloudtrail-logs-<AWS_ACCOUNT_ID>-<AWS-REGION> --recursive

9. Delete the pipeline stack:

$ aws cloudformation delete-stack --stack-name codepipeline-covid19 --region <AWS-REGION>

Conclusion

In this post, we stepped through how to use AWS DevOps tooling to model and provision an AWS Glue workflow that orchestrates an end-to-end ETL pipeline on a real-world dataset.

You can download the source code and template from this Github repository and adapt it as you see fit for your data pipeline use cases. Feel free to leave comments letting us know about the architectures you build for your environment. To learn more about building ETL pipelines with AWS Glue, see the AWS Glue Developer Guide and the AWS Data Analytics learning path.

About the Authors

Nuatu Tseggai

Nuatu Tseggai is a Cloud Infrastructure Architect at Amazon Web Services. He enjoys working with customers to design and build event-driven distributed systems that span multiple services.

Suvojit Dasgupta

Suvojit Dasgupta is a Sr. Customer Data Architect at Amazon Web Services. He works with customers to design and build complex data solutions on AWS.

Building end-to-end AWS DevSecOps CI/CD pipeline with open source SCA, SAST and DAST tools

Post Syndicated from Srinivas Manepalli original https://aws.amazon.com/blogs/devops/building-end-to-end-aws-devsecops-ci-cd-pipeline-with-open-source-sca-sast-and-dast-tools/

DevOps is a combination of cultural philosophies, practices, and tools that combine software development with information technology operations. These combined practices enable companies to deliver new application features and improved services to customers at a higher velocity. DevSecOps takes this a step further, integrating security into DevOps. With DevSecOps, you can deliver secure and compliant application changes rapidly while running operations consistently with automation.

Having a complete DevSecOps pipeline is critical to building a successful software factory, which includes continuous integration (CI), continuous delivery and deployment (CD), continuous testing, continuous logging and monitoring, auditing and governance, and operations. Identifying the vulnerabilities during the initial stages of the software development process can significantly help reduce the overall cost of developing application changes, but doing it in an automated fashion can accelerate the delivery of these changes as well.

To identify security vulnerabilities at various stages, organizations can integrate various tools and services (cloud and third-party) into their DevSecOps pipelines. Integrating various tools and aggregating the vulnerability findings can be a challenge to do from scratch. AWS has the services and tools necessary to accelerate this objective and provides the flexibility to build DevSecOps pipelines with easy integrations of AWS cloud native and third-party tools. AWS also provides services to aggregate security findings.

In this post, we provide a DevSecOps pipeline reference architecture on AWS that covers the afore-mentioned practices, including SCA (Software Composite Analysis), SAST (Static Application Security Testing), DAST (Dynamic Application Security Testing), and aggregation of vulnerability findings into a single pane of glass. Additionally, this post addresses the concepts of security of the pipeline and security in the pipeline.

You can deploy this pipeline in either the AWS GovCloud Region (US) or standard AWS Regions. As of this writing, all listed AWS services are available in AWS GovCloud (US) and authorized for FedRAMP High workloads within the Region, with the exception of AWS CodePipeline and AWS Security Hub, which are in the Region and currently under the JAB Review to be authorized shortly for FedRAMP High as well.

Services and tools

In this section, we discuss the various AWS services and third-party tools used in this solution.

CI/CD services

For CI/CD, we use the following AWS services:

  • AWS CodeBuild – A fully managed continuous integration service that compiles source code, runs tests, and produces software packages that are ready to deploy.
  • AWS CodeCommit – A fully managed source control service that hosts secure Git-based repositories.
  • AWS CodeDeploy – A fully managed deployment service that automates software deployments to a variety of compute services such as Amazon Elastic Compute Cloud (Amazon EC2), AWS Fargate, AWS Lambda, and your on-premises servers.
  • AWS CodePipeline – A fully managed continuous delivery service that helps you automate your release pipelines for fast and reliable application and infrastructure updates.
  • AWS Lambda – A service that lets you run code without provisioning or managing servers. You pay only for the compute time you consume.
  • Amazon Simple Notification Service – Amazon SNS is a fully managed messaging service for both application-to-application (A2A) and application-to-person (A2P) communication.
  • Amazon Simple Storage Service – Amazon S3 is storage for the internet. You can use Amazon S3 to store and retrieve any amount of data at any time, from anywhere on the web.
  • AWS Systems Manager Parameter Store – Parameter Store gives you visibility and control of your infrastructure on AWS.

Continuous testing tools

The following are open-source scanning tools that are integrated in the pipeline for the purposes of this post, but you could integrate other tools that meet your specific requirements. You can use the static code review tool Amazon CodeGuru for static analysis, but at the time of this writing, it’s not yet available in GovCloud and currently supports Java and Python (available in preview).

  • OWASP Dependency-Check – A Software Composition Analysis (SCA) tool that attempts to detect publicly disclosed vulnerabilities contained within a project’s dependencies.
  • SonarQube (SAST) – Catches bugs and vulnerabilities in your app, with thousands of automated Static Code Analysis rules.
  • PHPStan (SAST) – Focuses on finding errors in your code without actually running it. It catches whole classes of bugs even before you write tests for the code.
  • OWASP Zap (DAST) – Helps you automatically find security vulnerabilities in your web applications while you’re developing and testing your applications.

Continuous logging and monitoring services

The following are AWS services for continuous logging and monitoring:

Auditing and governance services

The following are AWS auditing and governance services:

  • AWS CloudTrail – Enables governance, compliance, operational auditing, and risk auditing of your AWS account.
  • AWS Identity and Access Management – Enables you to manage access to AWS services and resources securely. With IAM, you can create and manage AWS users and groups, and use permissions to allow and deny their access to AWS resources.
  • AWS Config – Allows you to assess, audit, and evaluate the configurations of your AWS resources.

Operations services

The following are AWS operations services:

  • AWS Security Hub – Gives you a comprehensive view of your security alerts and security posture across your AWS accounts. This post uses Security Hub to aggregate all the vulnerability findings as a single pane of glass.
  • AWS CloudFormation – Gives you an easy way to model a collection of related AWS and third-party resources, provision them quickly and consistently, and manage them throughout their lifecycles, by treating infrastructure as code.
  • AWS Systems Manager Parameter Store – Provides secure, hierarchical storage for configuration data management and secrets management. You can store data such as passwords, database strings, Amazon Machine Image (AMI) IDs, and license codes as parameter values.
  • AWS Elastic Beanstalk – An easy-to-use service for deploying and scaling web applications and services developed with Java, .NET, PHP, Node.js, Python, Ruby, Go, and Docker on familiar servers such as Apache, Nginx, Passenger, and IIS. This post uses Elastic Beanstalk to deploy LAMP stack with WordPress and Amazon Aurora MySQL. Although we use Elastic Beanstalk for this post, you could configure the pipeline to deploy to various other environments on AWS or elsewhere as needed.

Pipeline architecture

The following diagram shows the architecture of the solution.

AWS DevSecOps CICD pipeline architecture

AWS DevSecOps CICD pipeline architecture


The main steps are as follows:

  1. When a user commits the code to a CodeCommit repository, a CloudWatch event is generated which, triggers CodePipeline.
  2. CodeBuild packages the build and uploads the artifacts to an S3 bucket. CodeBuild retrieves the authentication information (for example, scanning tool tokens) from Parameter Store to initiate the scanning. As a best practice, it is recommended to utilize Artifact repositories like AWS CodeArtifact to store the artifacts, instead of S3. For simplicity of the workshop, we will continue to use S3.
  3. CodeBuild scans the code with an SCA tool (OWASP Dependency-Check) and SAST tool (SonarQube or PHPStan; in the provided CloudFormation template, you can pick one of these tools during the deployment, but CodeBuild is fully enabled for a bring your own tool approach).
  4. If there are any vulnerabilities either from SCA analysis or SAST analysis, CodeBuild invokes the Lambda function. The function parses the results into AWS Security Finding Format (ASFF) and posts it to Security Hub. Security Hub helps aggregate and view all the vulnerability findings in one place as a single pane of glass. The Lambda function also uploads the scanning results to an S3 bucket.
  5. If there are no vulnerabilities, CodeDeploy deploys the code to the staging Elastic Beanstalk environment.
  6. After the deployment succeeds, CodeBuild triggers the DAST scanning with the OWASP ZAP tool (again, this is fully enabled for a bring your own tool approach).
  7. If there are any vulnerabilities, CodeBuild invokes the Lambda function, which parses the results into ASFF and posts it to Security Hub. The function also uploads the scanning results to an S3 bucket (similar to step 4).
  8. If there are no vulnerabilities, the approval stage is triggered, and an email is sent to the approver for action.
  9. After approval, CodeDeploy deploys the code to the production Elastic Beanstalk environment.
  10. During the pipeline run, CloudWatch Events captures the build state changes and sends email notifications to subscribed users through SNS notifications.
  11. CloudTrail tracks the API calls and send notifications on critical events on the pipeline and CodeBuild projects, such as UpdatePipeline, DeletePipeline, CreateProject, and DeleteProject, for auditing purposes.
  12. AWS Config tracks all the configuration changes of AWS services. The following AWS Config rules are added in this pipeline as security best practices:
  13. CODEBUILD_PROJECT_ENVVAR_AWSCRED_CHECK – Checks whether the project contains environment variables AWS_ACCESS_KEY_ID and AWS_SECRET_ACCESS_KEY. The rule is NON_COMPLIANT when the project environment variables contains plaintext credentials.
  14. CLOUD_TRAIL_LOG_FILE_VALIDATION_ENABLED – Checks whether CloudTrail creates a signed digest file with logs. AWS recommends that the file validation be enabled on all trails. The rule is noncompliant if the validation is not enabled.

Security of the pipeline is implemented by using IAM roles and S3 bucket policies to restrict access to pipeline resources. Pipeline data at rest and in transit is protected using encryption and SSL secure transport. We use Parameter Store to store sensitive information such as API tokens and passwords. To be fully compliant with frameworks such as FedRAMP, other things may be required, such as MFA.

Security in the pipeline is implemented by performing the SCA, SAST and DAST security checks. Alternatively, the pipeline can utilize IAST (Interactive Application Security Testing) techniques that would combine SAST and DAST stages.

As a best practice, encryption should be enabled for the code and artifacts, whether at rest or transit.

In the next section, we explain how to deploy and run the pipeline CloudFormation template used for this example. Refer to the provided service links to learn more about each of the services in the pipeline. If utilizing CloudFormation templates to deploy infrastructure using pipelines, we recommend using linting tools like cfn-nag to scan CloudFormation templates for security vulnerabilities.

Prerequisites

Before getting started, make sure you have the following prerequisites:

Deploying the pipeline

To deploy the pipeline, complete the following steps: Download the CloudFormation template and pipeline code from GitHub repo.

  1. Log in to your AWS account if you have not done so already.
  2. On the CloudFormation console, choose Create Stack.
  3. Choose the CloudFormation pipeline template.
  4. Choose Next.
  5. Provide the stack parameters:
    • Under Code, provide code details, such as repository name and the branch to trigger the pipeline.
    • Under SAST, choose the SAST tool (SonarQube or PHPStan) for code analysis, enter the API token and the SAST tool URL. You can skip SonarQube details if using PHPStan as the SAST tool.
    • Under DAST, choose the DAST tool (OWASP Zap) for dynamic testing and enter the API token, DAST tool URL, and the application URL to run the scan.
    • Under Lambda functions, enter the Lambda function S3 bucket name, filename, and the handler name.
    • Under STG Elastic Beanstalk Environment and PRD Elastic Beanstalk Environment, enter the Elastic Beanstalk environment and application details for staging and production to which this pipeline deploys the application code.
    • Under General, enter the email addresses to receive notifications for approvals and pipeline status changes.

CF Deploymenet - Passing parameter values

CloudFormation deployment - Passing parameter values

CloudFormation template deployment

After the pipeline is deployed, confirm the subscription by choosing the provided link in the email to receive the notifications.

The provided CloudFormation template in this post is formatted for AWS GovCloud. If you’re setting this up in a standard Region, you have to adjust the partition name in the CloudFormation template. For example, change ARN values from arn:aws-us-gov to arn:aws.

Running the pipeline

To trigger the pipeline, commit changes to your application repository files. That generates a CloudWatch event and triggers the pipeline. CodeBuild scans the code and if there are any vulnerabilities, it invokes the Lambda function to parse and post the results to Security Hub.

When posting the vulnerability finding information to Security Hub, we need to provide a vulnerability severity level. Based on the provided severity value, Security Hub assigns the label as follows. Adjust the severity levels in your code based on your organization’s requirements.

  • 0 – INFORMATIONAL
  • 1–39 – LOW
  • 40– 69 – MEDIUM
  • 70–89 – HIGH
  • 90–100 – CRITICAL

The following screenshot shows the progression of your pipeline.

CodePipeline stages

CodePipeline stages

SCA and SAST scanning

In our architecture, CodeBuild trigger the SCA and SAST scanning in parallel. In this section, we discuss scanning with OWASP Dependency-Check, SonarQube, and PHPStan. 

Scanning with OWASP Dependency-Check (SCA)

The following is the code snippet from the Lambda function, where the SCA analysis results are parsed and posted to Security Hub. Based on the results, the equivalent Security Hub severity level (normalized_severity) is assigned.

Lambda code snippet for OWASP Dependency-check

Lambda code snippet for OWASP Dependency-check

You can see the results in Security Hub, as in the following screenshot.

SecurityHub report from OWASP Dependency-check scanning

SecurityHub report from OWASP Dependency-check scanning

Scanning with SonarQube (SAST)

The following is the code snippet from the Lambda function, where the SonarQube code analysis results are parsed and posted to Security Hub. Based on SonarQube results, the equivalent Security Hub severity level (normalized_severity) is assigned.

Lambda code snippet for SonarQube

Lambda code snippet for SonarQube

The following screenshot shows the results in Security Hub.

SecurityHub report from SonarQube scanning

SecurityHub report from SonarQube scanning

Scanning with PHPStan (SAST)

The following is the code snippet from the Lambda function, where the PHPStan code analysis results are parsed and posted to Security Hub.

Lambda code snippet for PHPStan

Lambda code snippet for PHPStan

The following screenshot shows the results in Security Hub.

SecurityHub report from PHPStan scanning

SecurityHub report from PHPStan scanning

DAST scanning

In our architecture, CodeBuild triggers DAST scanning and the DAST tool.

If there are no vulnerabilities in the SAST scan, the pipeline proceeds to the manual approval stage and an email is sent to the approver. The approver can review and approve or reject the deployment. If approved, the pipeline moves to next stage and deploys the application to the provided Elastic Beanstalk environment.

Scanning with OWASP Zap

After deployment is successful, CodeBuild initiates the DAST scanning. When scanning is complete, if there are any vulnerabilities, it invokes the Lambda function similar to SAST analysis. The function parses and posts the results to Security Hub. The following is the code snippet of the Lambda function.

Lambda code snippet for OWASP-Zap

Lambda code snippet for OWASP-Zap

The following screenshot shows the results in Security Hub.

SecurityHub report from OWASP-Zap scanning

SecurityHub report from OWASP-Zap scanning

Aggregation of vulnerability findings in Security Hub provides opportunities to automate the remediation. For example, based on the vulnerability finding, you can trigger a Lambda function to take the needed remediation action. This also reduces the burden on operations and security teams because they can now address the vulnerabilities from a single pane of glass instead of logging into multiple tool dashboards.

Conclusion

In this post, I presented a DevSecOps pipeline that includes CI/CD, continuous testing, continuous logging and monitoring, auditing and governance, and operations. I demonstrated how to integrate various open-source scanning tools, such as SonarQube, PHPStan, and OWASP Zap for SAST and DAST analysis. I explained how to aggregate vulnerability findings in Security Hub as a single pane of glass. This post also talked about how to implement security of the pipeline and in the pipeline using AWS cloud native services. Finally, I provided the DevSecOps pipeline as code using AWS CloudFormation. For additional information on AWS DevOps services and to get started, see AWS DevOps and DevOps Blog.


Srinivas Manepalli is a DevSecOps Solutions Architect in the U.S. Fed SI SA team at Amazon Web Services (AWS). He is passionate about helping customers, building and architecting DevSecOps and highly available software systems. Outside of work, he enjoys spending time with family, nature and good food.