We recommend that you enable your corresponding Security Hub third-party partner product integrations when you use these partner solutions. By centralizing findings across your AWS and partner solutions in Security Hub, you can get a holistic cross-account and cross-Region view of your security risks. In this way, you can move beyond security reporting and start implementing automations on top of Security Hub that help improve your overall security posture and reduce manual efforts. For example, you can configure your third-party partner offerings to send findings to Security Hub and build standardized enrichment, escalation, and remediation solutions by using Security Hub automation rules, or other AWS services such as AWS Lambda or AWS Step Functions.
To enable partner integrations, you must configure the integration in each AWS Region and AWS account across your organization in AWS Organizations. In this blog post, we’ll show you how to set up a Security Hub partner integration across your entire organization by using AWS CloudFormation StackSets.
Overview
Figure 1 shows the architecture of the solution. The main steps are as follows:
The deployment script creates a CloudFormation template that deploys a stack set across your AWS accounts.
The Lambda function iterates through target Regions and invokes the Security Hub boto3 method enable_import_findings_for_product to enable the corresponding partner integration.
When you add new accounts to the organizational units (OUs), StackSets deploys the CloudFormation stack and the partner integration is enabled.
Figure 1: Diagram of the solution
Prerequisites
To follow along with this walkthrough, make sure that you have the following prerequisites in place:
Security Hub enabled across an organization in the Regions where you want to deploy the partner integration.
Trusted access with AWS Organizations enabled so that you can deploy CloudFormation StackSets across your organization. For instructions on how to do this, see Activate trusted access with AWS Organizations.
Permissions to deploy CloudFormation StackSets in a delegated administrator account for your organization.
Open the parameters.json file and configure the following values:
ProductName — Name of the product that you want to enable.
ProductArn — The unique Amazon Resource Name (ARN) of the Security Hub partner product. For example, the product ARN for Palo Alto PRISMA Cloud Enterprise, is arn:aws:securityhub:<REGION>:188619942792:product/paloaltonetworks/redlock; and for Prowler, it’s arn:aws:securityhub:<REGION>::product/prowler/prowler. To find a product ARN, see Available third-party partner product integrations.
DeploymentTargets — List of the IDs of the OUs of the AWS accounts that you want to configure. For example, use the unique identifier (ID) for the root to deploy across your entire organization.
DeploymentRegions — List of the Regions in which you’ve enabled Security Hub, and for which the partner integration should be enabled.
Save the changes and close the file.
Step 3: Deploy the solution
Open a command line terminal of your preference.
Set up your AWS_REGION (for example, export AWS_REGION=eu-west-1) and make sure that your credentials are configured for the delegated administrator account.
Enter the following command to deploy:
./setup.sh deploy
Step 4: Verify Security Hub partner integration
To test that the product integration is enabled, run the following command in one of the accounts in the organization. Replace <TARGET-REGION> with one of the Regions where you enabled Security Hub.
Step 5: (Optional) Manage new partners, Regions, and OUs
To add or remove the partner integration in certain Regions or OUs, update the parameters.json file with your desired Regions and OU IDs and repeat Step 3 to redeploy changes to your Security Hub partner integration. You can also directly update the CloudFormation parameters for the securityhub-integration-<PARTNER-NAME> from the CloudFormation console.
To enable new partner integrations, create a new parameters.json file version with the partner’s product name and product ARN to deploy a new stack using the deployment script from Step 3. In the next step, we show you how to disable the partner integrations.
Step 6: Clean up
If needed, you can remove the partner integrations by destroying the stack deployed. To destroy the stack, use the command line terminal configured with the credentials for the AWS StackSets delegated administrator account and run the following command:
./setup.sh destroy
You can also directly delete the stack mentioned in Step 5 from the CloudFormation console by accessing the stack page from the CloudFormation console, selecting the stack securityhub-integration-<PARTNER-NAME>, and then choosing Delete.
Conclusion
In this post, you learned how you to enable Security Hub partner integrations across your organization. Now you can configure the partner product of your choice to send, update, or receive Security Hub findings.
Developer teams can opt in to configure their own chatbot in AWS Chatbot to receive notifications in Amazon Chime, Slack, or Microsoft Teams channels. Lastly, security teams can use existing bidirectional integrations with Jira Service Management or Jira Core to escalate severe findings to their developer teams.
At AWS, we often hear from customers that they want expanded security coverage for the multiple services that they use on AWS. However, alert fatigue is a common challenge that customers face as we introduce new security protections. The challenge becomes how to operationalize, identify, and prioritize alerts that represent real risk.
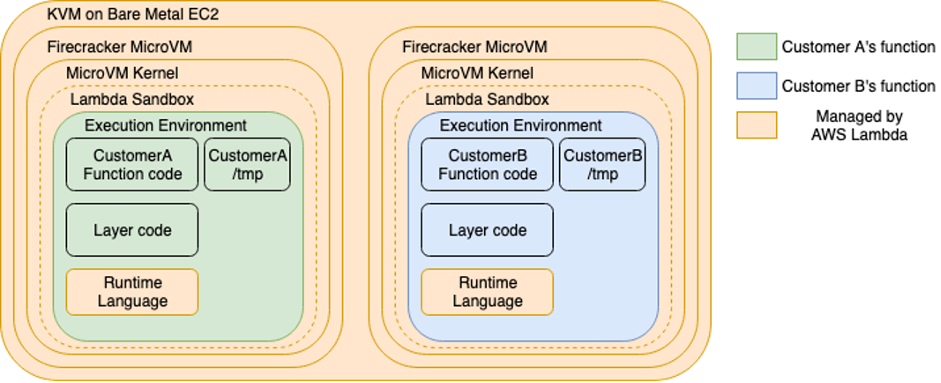
In this post, we highlight recent enhancements to Amazon Detective finding groups visualizations. We show you how Detective automatically consolidates multiple security findings into a single security event—called finding groups—and how finding group visualizations help reduce noise and prioritize findings that present true risk. We incorporate additional services like Amazon GuardDuty, Amazon Inspector, and AWS Security Hub to highlight how effective findings groups is at consolidating findings for different AWS security services.
Overview of solution
This post uses several different services. The purpose is twofold: to show how you can enable these services for broader protection, and to show how Detective can help you investigate findings from multiple services without spending a lot of time sifting through logs or querying multiple data sources to find the root cause of a security event. These are the services and their use cases:
GuardDuty – a threat detection service that continuously monitors your AWS accounts and workloads for malicious activity. If potential malicious activity, such as anomalous behavior, credential exfiltration, or command and control (C2) infrastructure communication is detected, GuardDuty generates detailed security findings that you can use for visibility and remediation. Recently, GuardDuty released the following threat detections for specific services that we’ll show you how to enable for this walkthrough: GuardDuty RDS Protection, EKS Runtime Monitoring, and Lambda Protection.
Amazon Inspector – an automated vulnerability management service that continually scans your AWS workloads for software vulnerabilities and unintended network exposure. Like GuardDuty, Amazon Inspector sends a finding for alerting and remediation when it detects a software vulnerability or a compute instance that’s publicly available.
Security Hub – a cloud security posture management service that performs automated, continuous security best practice checks against your AWS resources to help you identify misconfigurations, and aggregates your security findings from integrated AWS security services.
Detective – a security service that helps you investigate potential security issues. It does this by collecting log data from AWS CloudTrail, Amazon Virtual Private Cloud (Amazon VPC) flow logs, and other services. Detective then uses machine learning, statistical analysis, and graph theory to build a linked set of data called a security behavior graph that you can use to conduct faster and more efficient security investigations.
The following diagram shows how each service delivers findings along with log sources to Detective.
Figure 1: Amazon Detective log source diagram
Enable the required services
If you’ve already enabled the services needed for this post—GuardDuty, Amazon Inspector, Security Hub, and Detective—skip to the next section. For instructions on how to enable these services, see the following resources:
Each of these services offers a free 30-day trial and provides estimates on charges after your trial expires. You can also use the AWS Pricing Calculator to get an estimate.
To enable the services across multiple accounts, consider using a delegated administrator account in AWS Organizations. With a delegated administrator account, you can automatically enable services for multiple accounts and manage settings for each account in your organization. You can view other accounts in the organization and add them as member accounts, making central management simpler. For instructions on how to enable the services with AWS Organizations, see the following resources:
The next step is to enable the latest detections in GuardDuty and learn how Detective can identify multiple threats that are related to a single security event.
If you’ve already enabled the different GuardDuty protection plans, skip to the next section. If you recently enabled GuardDuty, the protections plans are enabled by default, except for EKS Runtime Monitoring, which is a two-step process.
For the next steps, we use the delegated administrator account in GuardDuty to make sure that the protection plans are enabled for each AWS account. When you use GuardDuty (or Security Hub, Detective, and Inspector) with AWS Organizations, you can designate an account to be the delegated administrator. This is helpful so that you can configure these security services for multiple accounts at the same time. For instructions on how to enable a delegated administrator account for GuardDuty, see Managing GuardDuty accounts with AWS Organizations.
To enable EKS Protection
Sign in to the GuardDuty console using the delegated administrator account, choose Protection plans, and then choose EKS Protection.
In the Delegated administrator section, choose Edit and then choose Enable for each scope or protection. For this post, select EKS Audit Log Monitoring, EKS Runtime Monitoring, and Manage agent automatically, as shown in Figure 2. For more information on each feature, see the following resources:
To enable these protections for current accounts, in the Active member accounts section, choose Edit and Enable for each scope of protection.
To enable these protections for new accounts, in the New account default configuration section, choose Edit and Enable for each scope of protection.
To enable RDS Protection
The next step is to enable RDS Protection. GuardDuty RDS Protection works by analysing RDS login activity for potential threats to your Amazon Aurora databases (MySQL-Compatible Edition and Aurora PostgreSQL-Compatible Editions). Using this feature, you can identify potentially suspicious login behavior and then use Detective to investigate CloudTrail logs, VPC flow logs, and other useful information around those events.
Navigate to the RDS Protection menu and under Delegated administrator (this account), select Enable and Confirm.
In the Enabled for section, select Enable all if you want RDS Protection enabled on all of your accounts. If you want to select a specific account, choose Manage Accounts and then select the accounts for which you want to enable RDS Protection. With the accounts selected, choose Edit Protection Plans, RDS Login Activity, and Enable for X selected account.
(Optional) For new accounts, turn on Auto-enable RDS Login Activity Monitoring for new member accounts as they join your organization.
Figure 2: Enable EKS Runtime Monitoring
To enable Lambda Protection
The final step is to enable Lambda Protection. Lambda Protection helps detect potential security threats during the invocation of AWS Lambda functions. By monitoring network activity logs, GuardDuty can generate findings when Lambda functions are involved with malicious activity, such as communicating with command and control servers.
Navigate to the Lambda Protection menu and under Delegated administrator (this account), select Enable and Confirm.
In the Enabled for section, select Enable all if you want Lambda Protection enabled on all of your accounts. If you want to select a specific account, choose Manage Accounts and select the accounts for which you want to enable RDS Protection. With the accounts selected, choose Edit Protection Plans, Lambda Network Activity Monitoring, and Enable for X selected account.
(Optional) For new accounts, turn on Auto-enable Lambda Network Activity Monitoring for new member accounts as they join your organization.
Now that you’ve enabled these new protections, GuardDuty will start monitoring EKS audit logs, EKS runtime activity, RDS login activity, and Lambda network activity. If GuardDuty detects suspicious or malicious activity for these log sources or services, it will generate a finding for the activity, which you can review in the GuardDuty console. In addition, you can automatically forward these findings to Security Hub for consolidation, and to Detective for security investigation.
Detective data sources
If you have Security Hub and other AWS security services such as GuardDuty or Amazon Inspector enabled, findings from these services are forwarded to Security Hub. With the exception of sensitive data findings from Amazon Macie, you’re automatically opted in to other AWS service integrations when you enable Security Hub. For the full list of services that forward findings to Security Hub, see Available AWS service integrations.
With each service enabled and forwarding findings to Security Hub, the next step is to enable the data source in Detective called AWS security findings, which are the findings forwarded to Security Hub. Again, we’re going to use the delegated administrator account for these steps to make sure that AWS security findings are being ingested for your accounts.
To enable AWS security findings
Sign in to the Detective console using the delegated administrator account and navigate to Settings and then General.
Choose Optional source packages, Edit, select AWS security findings, and then choose Save.
Figure 5: Enable AWS security findings
When you enable Detective, it immediately starts creating a security behavior graph for AWS security findings to build a linked dataset between findings and entities, such as RDS login activity from Aurora databases, EKS runtime activity, and suspicious network activity for Lambda functions. For GuardDuty to detect potential threats that affect your database instances, it first needs to undertake a learning period of up to two weeks to establish a baseline of normal behavior. For more information, see How RDS Protection uses RDS login activity monitoring. For the other protections, after suspicious activity is detected, you can start to see findings in both GuardDuty and Security Hub consoles. This is where you can start using Detective to better understand which findings are connected and where to prioritize your investigations.
Detective behavior graph
As Detective ingests data from GuardDuty, Amazon Inspector, and Security Hub, as well as CloudTrail logs, VPC flow logs, and Amazon Elastic Kubernetes Service (Amazon EKS) audit logs, it builds a behavior graph database. Graph databases are purpose-built to store and navigate relationships. Relationships are first-class citizens in graph databases, which means that they’re not computed out-of-band or by interfering with relationships through querying foreign keys. Because Detective stores information on relationships in your graph database, you can effectively answer questions such as “are these security findings related?”. In Detective, you can use the search menu and profile panels to view these connections, but a quicker way to see this information is by using finding groups visualizations.
Finding groups visualizations
Finding groups extract additional information out of the behavior graph to highlight findings that are highly connected. Detective does this by running several machine learning algorithms across your behavior graph to identify related findings and then statically weighs the relationships between those findings and entities. The result is a finding group that shows GuardDuty and Amazon Inspector findings that are connected, along with entities like Amazon Elastic Compute Cloud (Amazon EC2) instances, AWS accounts, and AWS Identity and Access Management (IAM) roles and sessions that were impacted by these findings. With finding groups, you can more quickly understand the relationships between multiple findings and their causes because you don’t need to connect the dots on your own. Detective automatically does this and presents a visualization so that you can see the relationships between various entities and findings.
Enhanced visualizations
Recently, we released several enhancements to finding groups visualizations to aid your understanding of security connections and root causes. These enhancements include:
Dynamic legend – the legend now shows icons for entities that you have in the finding group instead of showing all available entities. This helps reduce noise to only those entities that are relevant to your investigation.
Aggregated evidence and finding icons – these icons provide a count of similar evidence and findings. Instead of seeing the same finding or evidence repeated multiple times, you’ll see one icon with a counter to help reduce noise.
More descriptive side panel information – when you choose a finding or entity, the side panel shows additional information, such as the service that identified the finding and the finding title, in addition to the finding type, to help you understand the action that invoked the finding.
Label titles – you can now turn on or off titles for entities and findings in the visualization so that you don’t have to choose each to get a summary of what the different icons mean.
To use the finding groups visualization
Open the Detective console, choose Summary, and then choose View all finding groups.
Choose the title of an available finding group and scroll down to Visualization.
Under the Select layout menu, choose one of the layouts available, or choose and drag each icon to rearrange the layout according to how you’d like to see connections.
For a complete list of involved entities and involved findings, scroll down below the visualization.
Figure 6 shows an example of how you can use finding groups visualization to help identify the root cause of findings quickly. In this example, an IAM role was connected to newly observed geolocations, multiple GuardDuty findings detected malicious API calls, and there were newly observed user agents from the IAM session. The visualization can give you high confidence that the IAM role is compromised. It also provides other entities that you can search against, such as the IP address, S3 bucket, or new user agents.
Figure 6: Finding groups visualization
Now that you have the new GuardDuty protections enabled along with the data source of AWS security findings, you can use finding groups to more quickly visualize which IAM sessions have had multiple findings associated with unauthorized access, or which EC2 instances are publicly exposed with a software vulnerability and active GuardDuty finding—these patterns can help you determine if there is an actual risk.
Conclusion
In this blog post, you learned how to enable new GuardDuty protections and use Detective, finding groups, and visualizations to better identify, operationalize, and prioritize AWS security findings that represent real risk. We also highlighted the new enhancements to visualizations that can help reduce noise and provide summaries of detailed information to help reduce the time it takes to triage findings. If you’d like to see an investigation scenario using Detective, watch the video Amazon Detective Security Scenario Investigation.
While I enjoyed a few days off in California to get a dose of vitamin sea, a lot has happened in the AWS universe. Let’s take a look together!
Last Week’s Launches Here are some launches that got my attention:
Amazon MWAA now supports Apache Airflow version 2.6 – Amazon Managed Workflows for Apache Airflow (Amazon MWAA) is a managed orchestration service for Apache Airflow that you can use to set up and operate end-to-end data pipelines in the cloud. Apache Airflow version 2.6 introduces important security updates and bug fixes that enhance the security and reliability of your workflows. If you’re currently running Apache Airflow version 2.x, you can now seamlessly upgrade to version 2.6.3. Check out this AWS Big Data Blog post to learn more.
Amazon EMR Studio adds support for AWS Lake Formation fine-grained access control – Amazon EMR Studio is a web-based integrated development environment (IDE) for fully managed Jupyter notebooks that run on Amazon EMR clusters. When you connect to EMR clusters from EMR Studio workspaces, you can now choose the AWS Identity and Access Management (IAM) role that you want to connect with. Apache Spark interactive notebooks will access only the data and resources permitted by policies attached to this runtime IAM role. When data is accessed from data lakes managed with AWS Lake Formation, you can enforce table and column-level access using policies attached to this runtime role. For more details, have a look at the Amazon EMR documentation.
Other AWS News Here are some additional blog posts and news items that you might find interesting:
AWS recognized as a Leader in 2023 Gartner Magic Quadrant for Contact Center as a Service with Amazon Connect – AWS was named a Leader for the first time since Amazon Connect, our flexible, AI-powered cloud contact center, was launched in 2017. Read the full story here.
Generate creative advertising using generative AI – This AWS Machine Learning Blog post shows how to generate captivating and innovative advertisements at scale using generative AI. It discusses the technique of inpainting and how to seamlessly create image backgrounds, visually stunning and engaging content, and reducing unwanted image artifacts.
AWS open-source news and updates – My colleague Ricardo writes this weekly open-source newsletter in which he highlights new open-source projects, tools, and demos from the AWS Community.
Upcoming AWS Events Check your calendars and sign up for these AWS events:
Build On Generative AI – Your favorite weekly Twitch show about all things generative AI is back for season 2 today! Every Monday, 9:00 US PT, my colleagues Emily and Darko look at new technical and scientific patterns on AWS, inviting guest speakers to demo their work and show us how they built something new to improve the state of generative AI.
AWS NLP Conference 2023 – Join this in-person event on September 13–14 in London to hear about the latest trends, ground-breaking research, and innovative applications that leverage natural language processing (NLP) capabilities on AWS. This year, the conference will primarily focus on large language models (LLMs), as they form the backbone of many generative AI applications and use cases. Register here.
AWS Global Summits – The 2023 AWS Summits season is almost coming to an end with the last two in-person events in Mexico City (August 30) and Johannesburg (September 26).
AWS Community Days – Join a community-led conference run by AWS user group leaders in your region: West Africa (August 19), Taiwan (August 26), Aotearoa (September 6), Lebanon (September 9), and Munich (September 14).
AWS re:Invent (November 27 – December 1) – Join us to hear the latest from AWS, learn from experts, and connect with the global cloud community. Registration is now open.
P.S. We’re focused on improving our content to provide a better customer experience, and we need your feedback to do so. Take this quick survey to share insights on your experience with the AWS Blog. Note that this survey is hosted by an external company, so the link doesn’t lead to our website. AWS handles your information as described in the AWS Privacy Notice.
AWS Security Hub is a cloud security posture management service that performs security best practice checks, aggregates security findings from Amazon Web Services (AWS) and third-party security services, and enables automated remediation. Most of the checks Security Hub performs on AWS resources happen as soon as there is a configuration change, giving you nearly immediate visibility of non-compliant resources in your environment, compared to checks that run on a periodic basis. This near real-time finding and reporting of non-compliant resources helps you to quickly respond to infrastructure misconfigurations and reduce risk. Security Hub offers these continuous security checks through its integration with the AWS Config configuration recorder.
By default, AWS Config enables recording for more than 300 resource types in your account. Today, Security Hub has controls that cover approximately 60 of those resource types. If you’re using AWS Config only for Security Hub, you can optimize the configuration of the configuration recorder to track only the resources you need, helping to reduce the costs related to monitoring those resources in AWS Config and the amount of data produced, stored, and analyzed by AWS Config. This blog post walks you through how to set up and optimize the AWS Config recorder when it is used for controls in Security Hub.
Using AWS Config and Security Hub for continuous security checks
When you enable Security Hub, you’re alerted to first enable resource recording in AWS Config, as shown in Figure 1. AWS Config continually assesses, audits, and evaluates the configurations and relationships of your resources on AWS, on premises, and in other cloud environments. Security Hub uses this capability to perform change-initiated security checks. Security Hub checks that use periodic rules don’t depend on the AWS Config recorder. You must enable AWS Config resource recording for all the accounts and in all AWS Regions where you plan to enable Security Hub standards and controls. AWS Config charges for the configuration items that are recorded, separately from Security Hub.
Figure 1: Security Hub alerts you to first enable resource recording in AWS Config
When you get started with AWS Config, you’re prompted to set up the configuration recorder, as shown in Figure 2. AWS Config uses the configuration recorder to detect changes in your resource configurations and capture these changes as configuration items. Using the AWS Config configuration recorder not only allows for continuous security checks, it also minimizes the need to query for the configurations of the individual services, saving your service API quotas for other use cases. By default, the configuration recorder records the supported resources in the Region where the recorder is running.
Recording global resources as well as current and future resources in AWS Config is more than what is necessary to enable Security Hub controls. If you’re using the configuration recorder only for Security Hub controls, and you want to cost optimize your use of AWS Config or reduce the amount of data produced, stored, and analyzed by AWS Config, you only need to record the configurations of approximately 60 resource types, as described in AWS Config resources required to generate control findings.
This template can be used in any Region that supports AWS Config (see AWS Services by Region). Although resource coverage varies by Region (Resource Coverage by Region Availability), you can still use this template in every Region. If a resource type is supported by AWS Config in at least one Region, you can enable the recording of that resource type in all Regions supported by AWS Config. For the Regions that don’t support the specified resource type, the recorder will be enabled but will not record any configuration items until AWS Config supports the resource type in the Region.
Security Hub regularly releases new controls that might rely on recording additional resource types in AWS Config. When you use this template, you can subscribe to Security Hub announcements with Amazon Simple Notification Service (SNS) to get information about newly released controls that might require you to update the resource types recorded by AWS Config (and listed in the CloudFormation template). The CloudFormation template receives periodic updates in GitHub, but you should validate that it’s up to date before using it. You can also use AWS CloudFormation StackSets to deploy, update, or delete the template across multiple accounts and Regions with a single operation. If you don’t enable the recording of all resources in AWS Config, the Security Hub control, Config.1 AWS Config should be enabled, will fail. If you take this approach, you have the option to disable the Config.1 Security Hub control or suppress its findings using the automation rules feature in Security Hub.
Customizing for your use cases
You can modify the CloudFormation template depending on your use cases for AWS Config and Security Hub. If your use case for AWS Config extends beyond your use of Security Hub controls, consider what additional resource types you will need to record the configurations of for your use case. For example, AWS Firewall Manager, AWS Backup, AWS Control Tower, AWS Marketplace, and AWS Trusted Advisor require AWS Config recording. Additionally, if you use other features of AWS Config, such as custom rules that depend on recording specific resource types, you can add these resource types in the CloudFormation script. You can see the results of AWS Config rule evaluations as findings in Security Hub.
Another customization example is related to the AWS Config configuration timeline. By default, resources evaluated by Security Hub controls include links to the associated AWS Config rule and configuration timeline in AWS Config for that resource, as shown in Figure 3.
Figure 3: Link from Security Hub control to the configuration timeline for the resource in AWS Config
The AWS Config configuration timeline, as illustrated in Figure 4, shows you the history of compliance changes for the resource, but it requires the AWS::Config::ResourceCompliance resource type to be recorded. If you need to track changes in compliance for resources and use the configuration timeline in AWS Config, you must add the AWS::Config::ResourceCompliance resource type to the CloudFormation template provided in the preceding section. In this case, Security Hub may change the compliance of the Security Hub managed AWS Config rules, which are recorded as configuration items for the AWS::Config::ResourceCompliance resource type, incurring additional AWS Config recorder charges.
Figure 4: Config resource timeline
Summary
You can use the CloudFormation template provided in this post to optimize the AWS Config configuration recorder for Security Hub to reduce your AWS Config costs and to reduce the amount of data produced, stored, and analyzed by AWS Config. Alternatively, you can run AWS Config with the default settings or use the AWS Config console or scripts to further customize your configuration to fit your use case. Visit Getting started with AWS Security Hub to learn more about managing your security alerts.
If you have feedback about this post, submit comments in the Comments section below. If you have questions about this post, contact AWS Support.
Want more AWS Security news? Follow us on Twitter.
In this blog post, we focus on two recently released features of AWS Security Hub: the consolidated controls view and consolidated control findings. You can use these features to manage controls across standards and to consolidate findings, which can help you significantly reduce finding noise and administrative overhead.
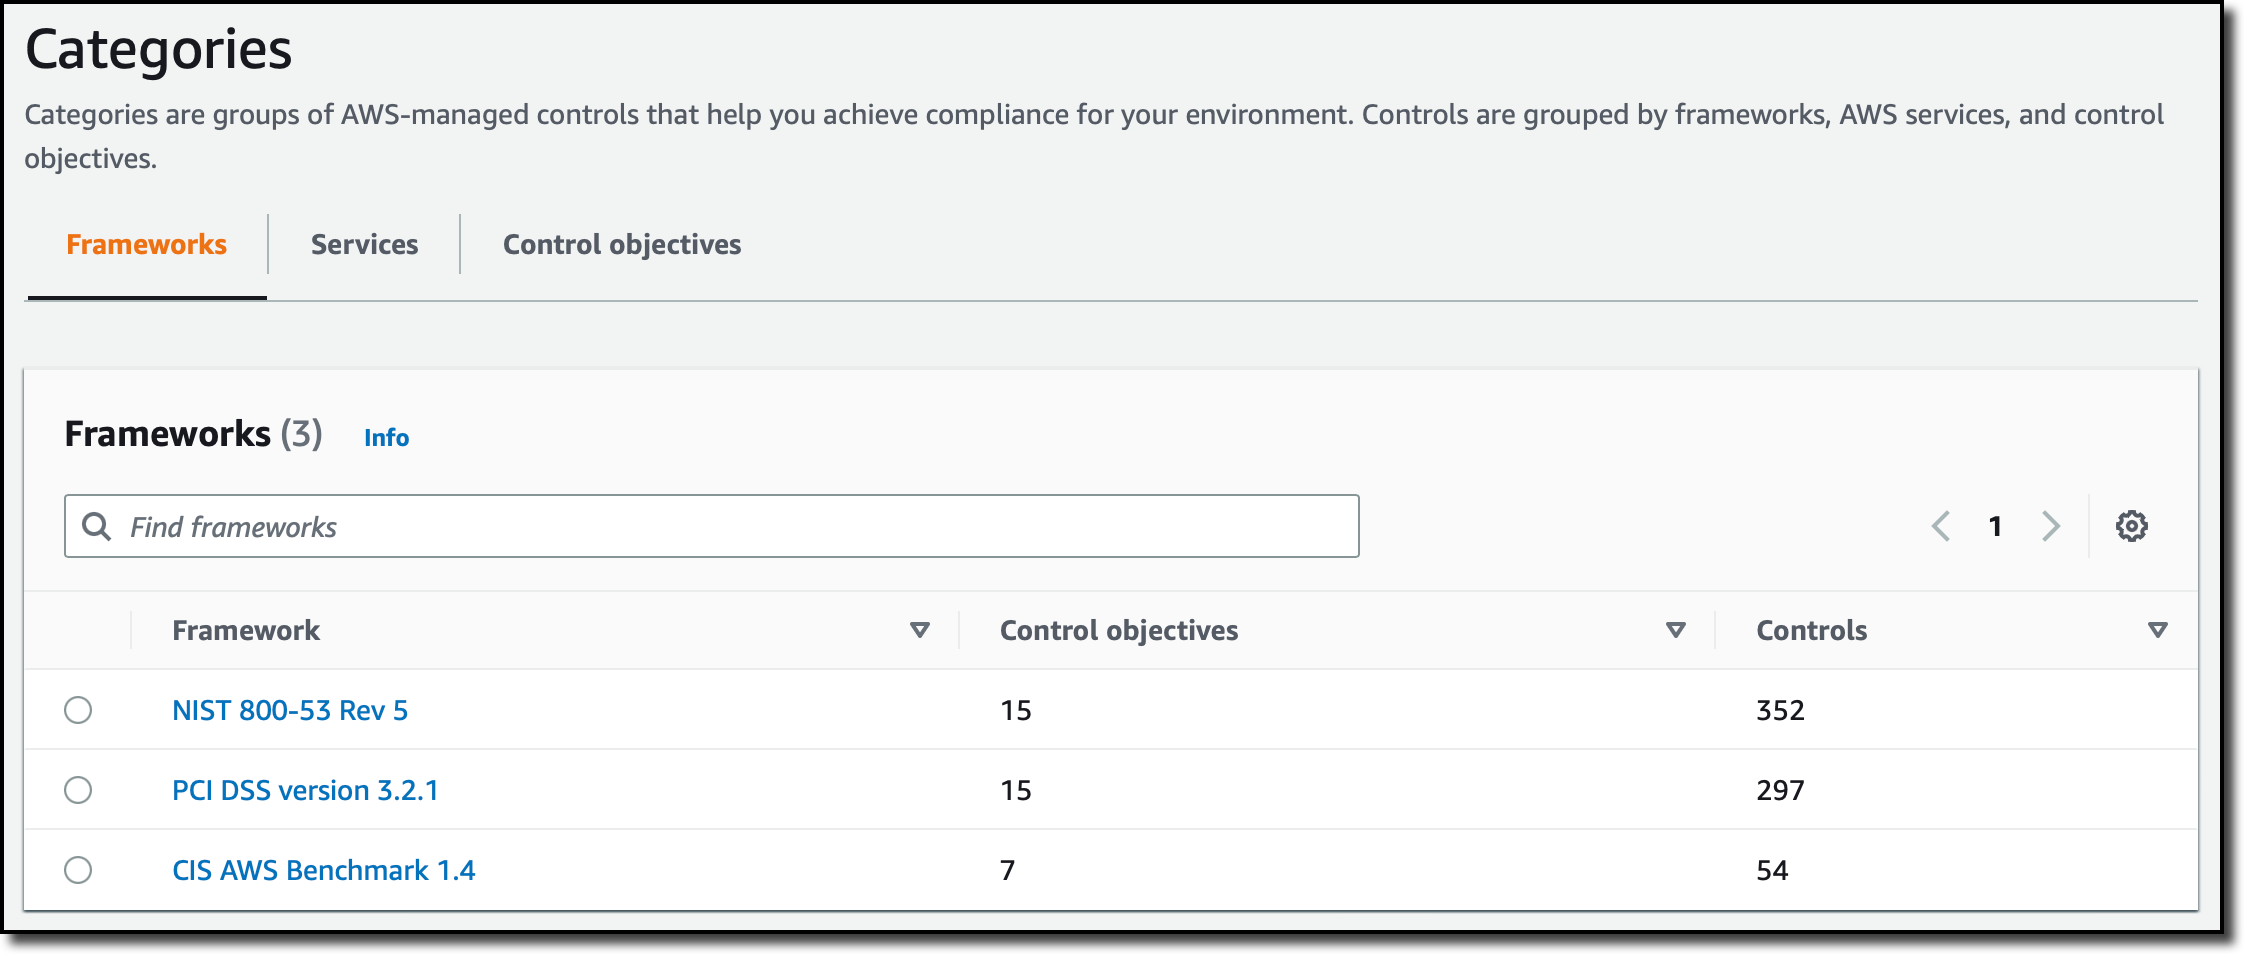
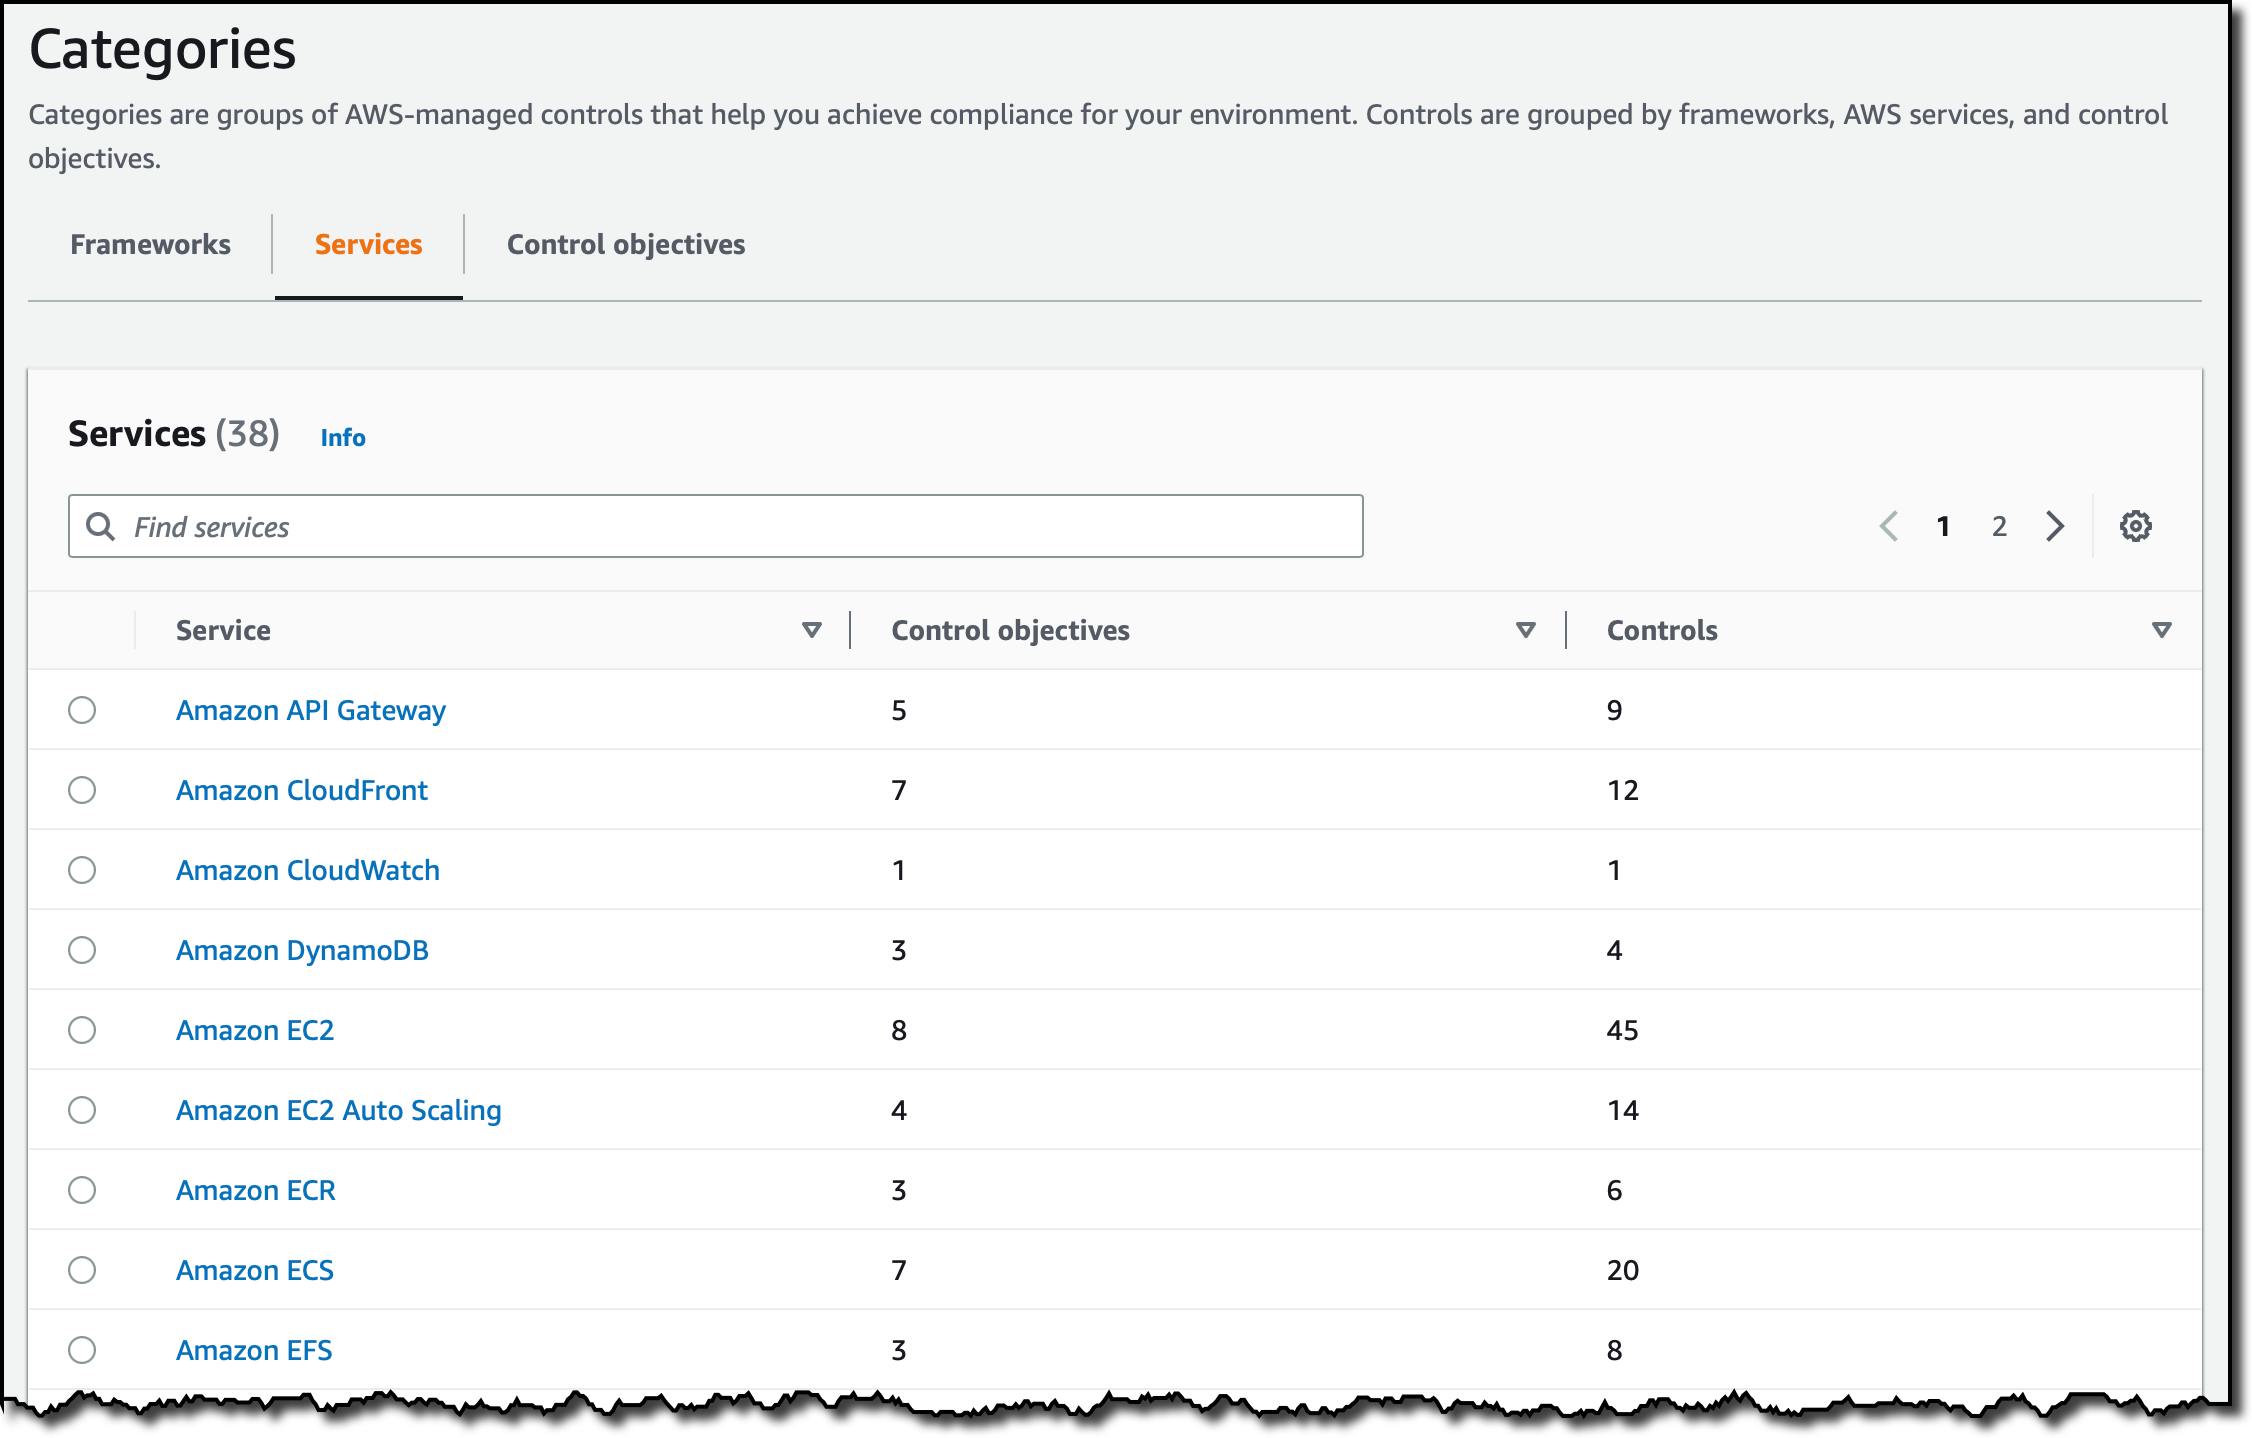
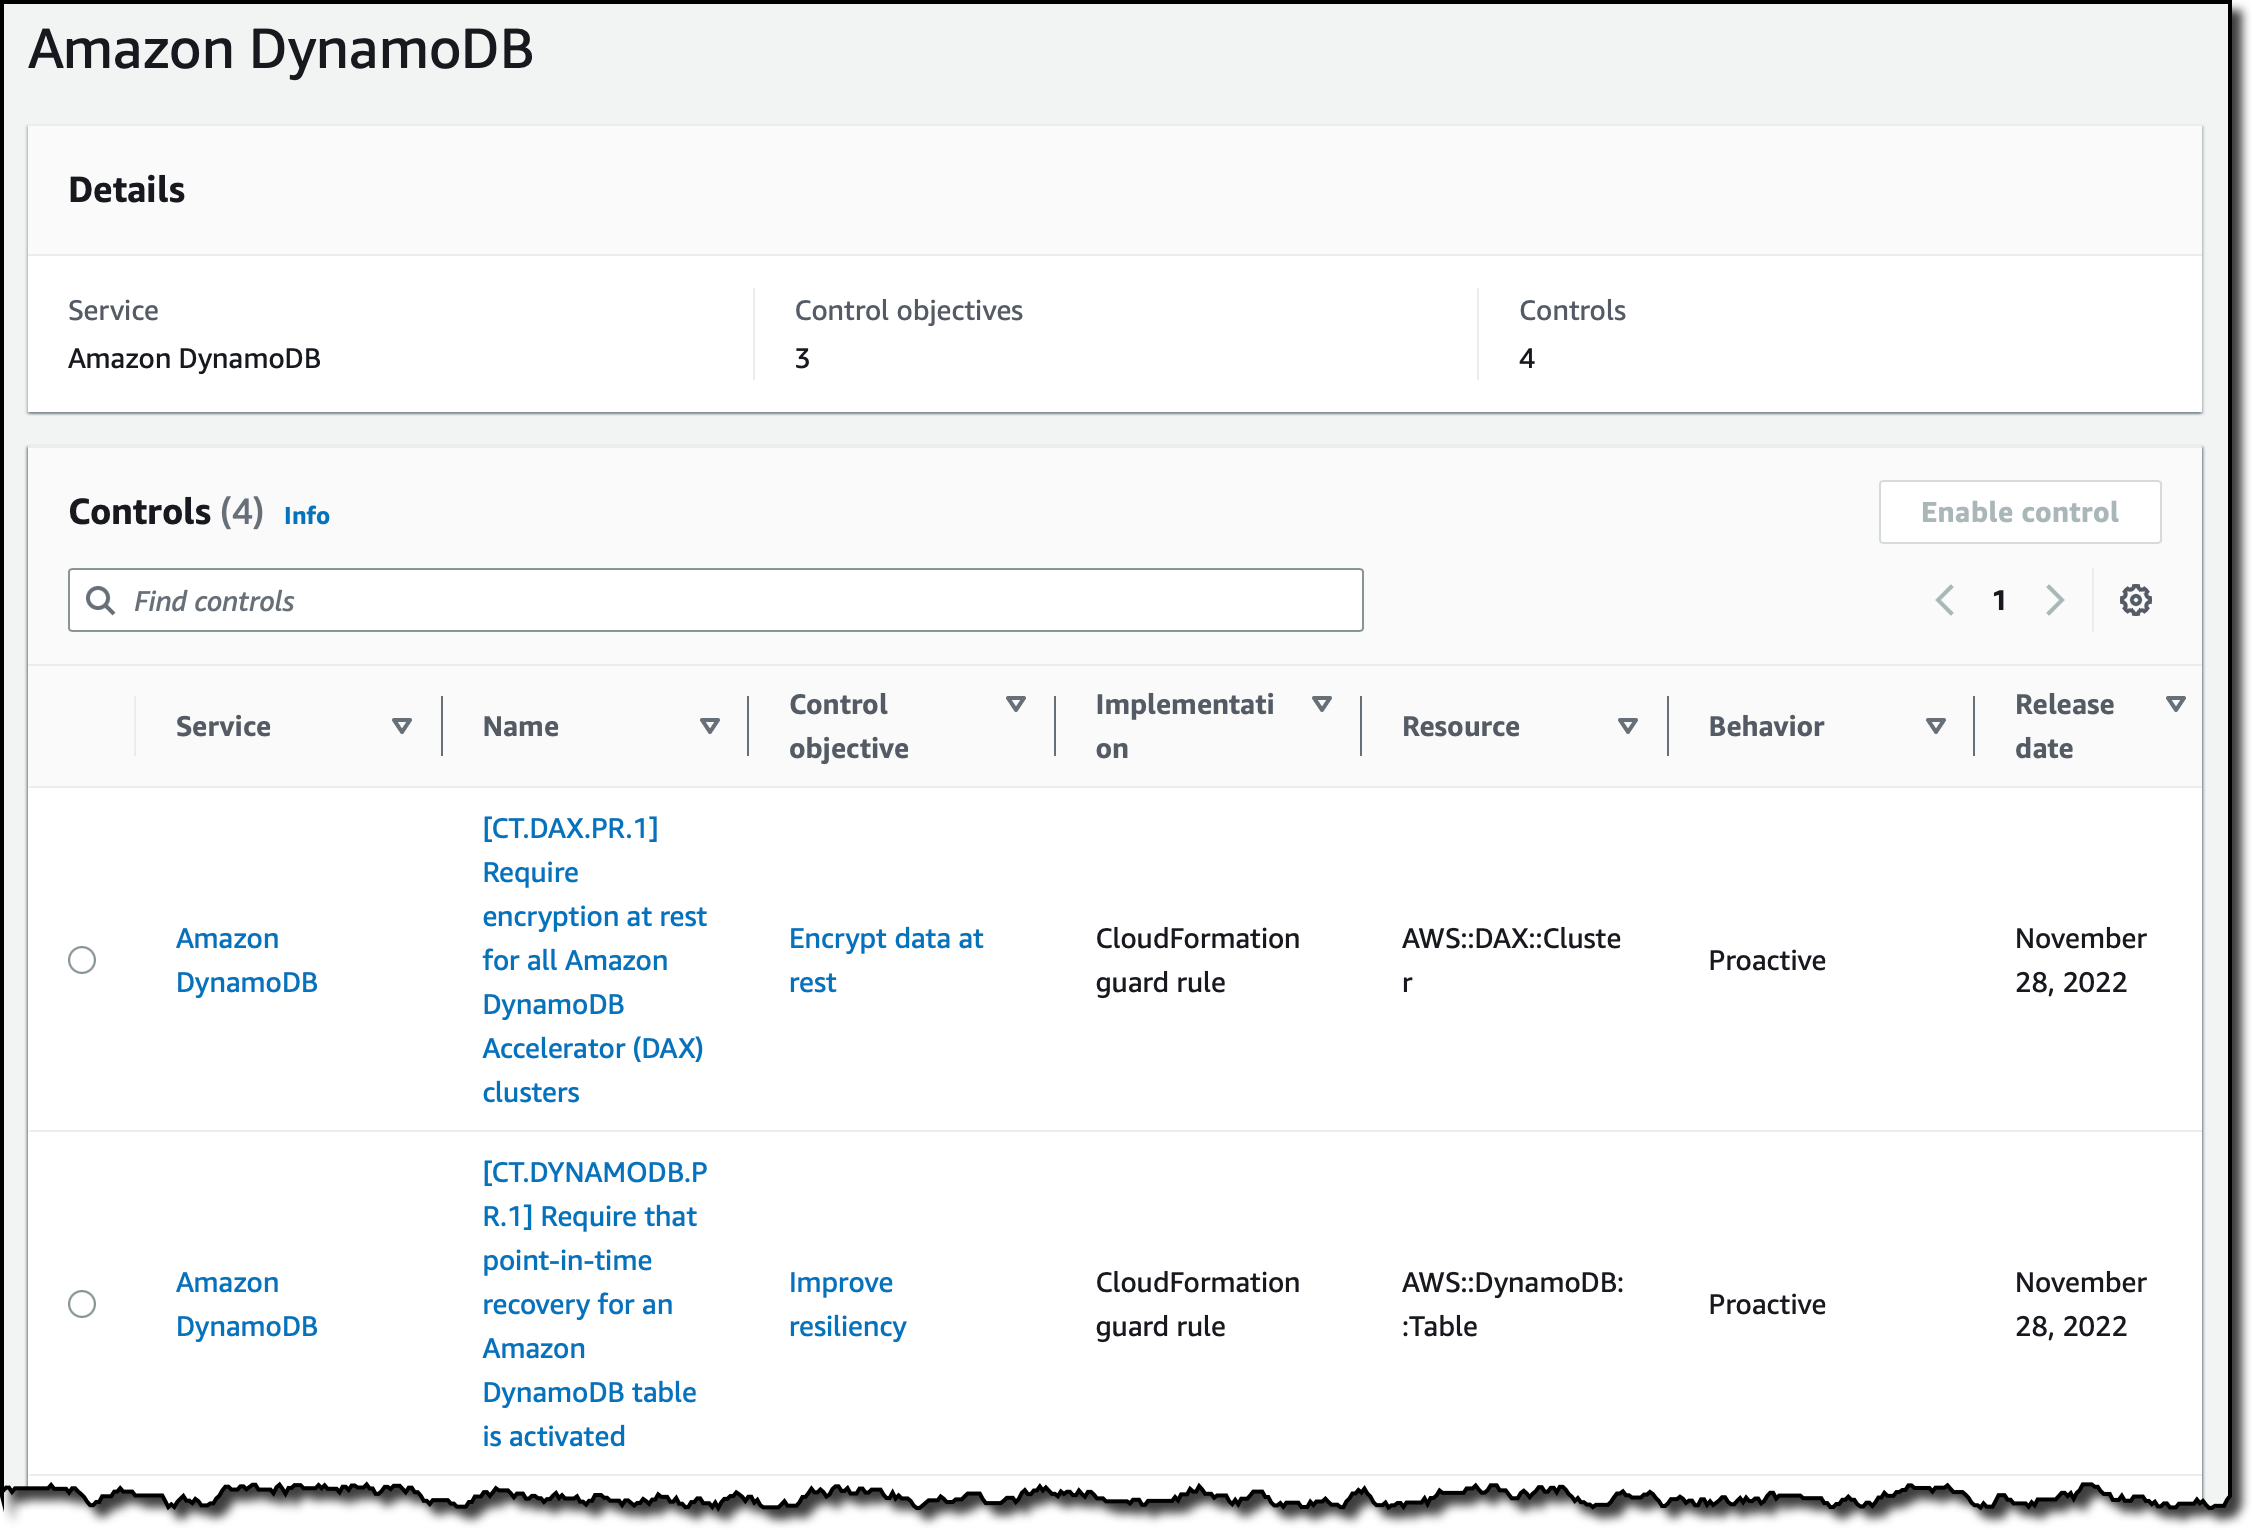
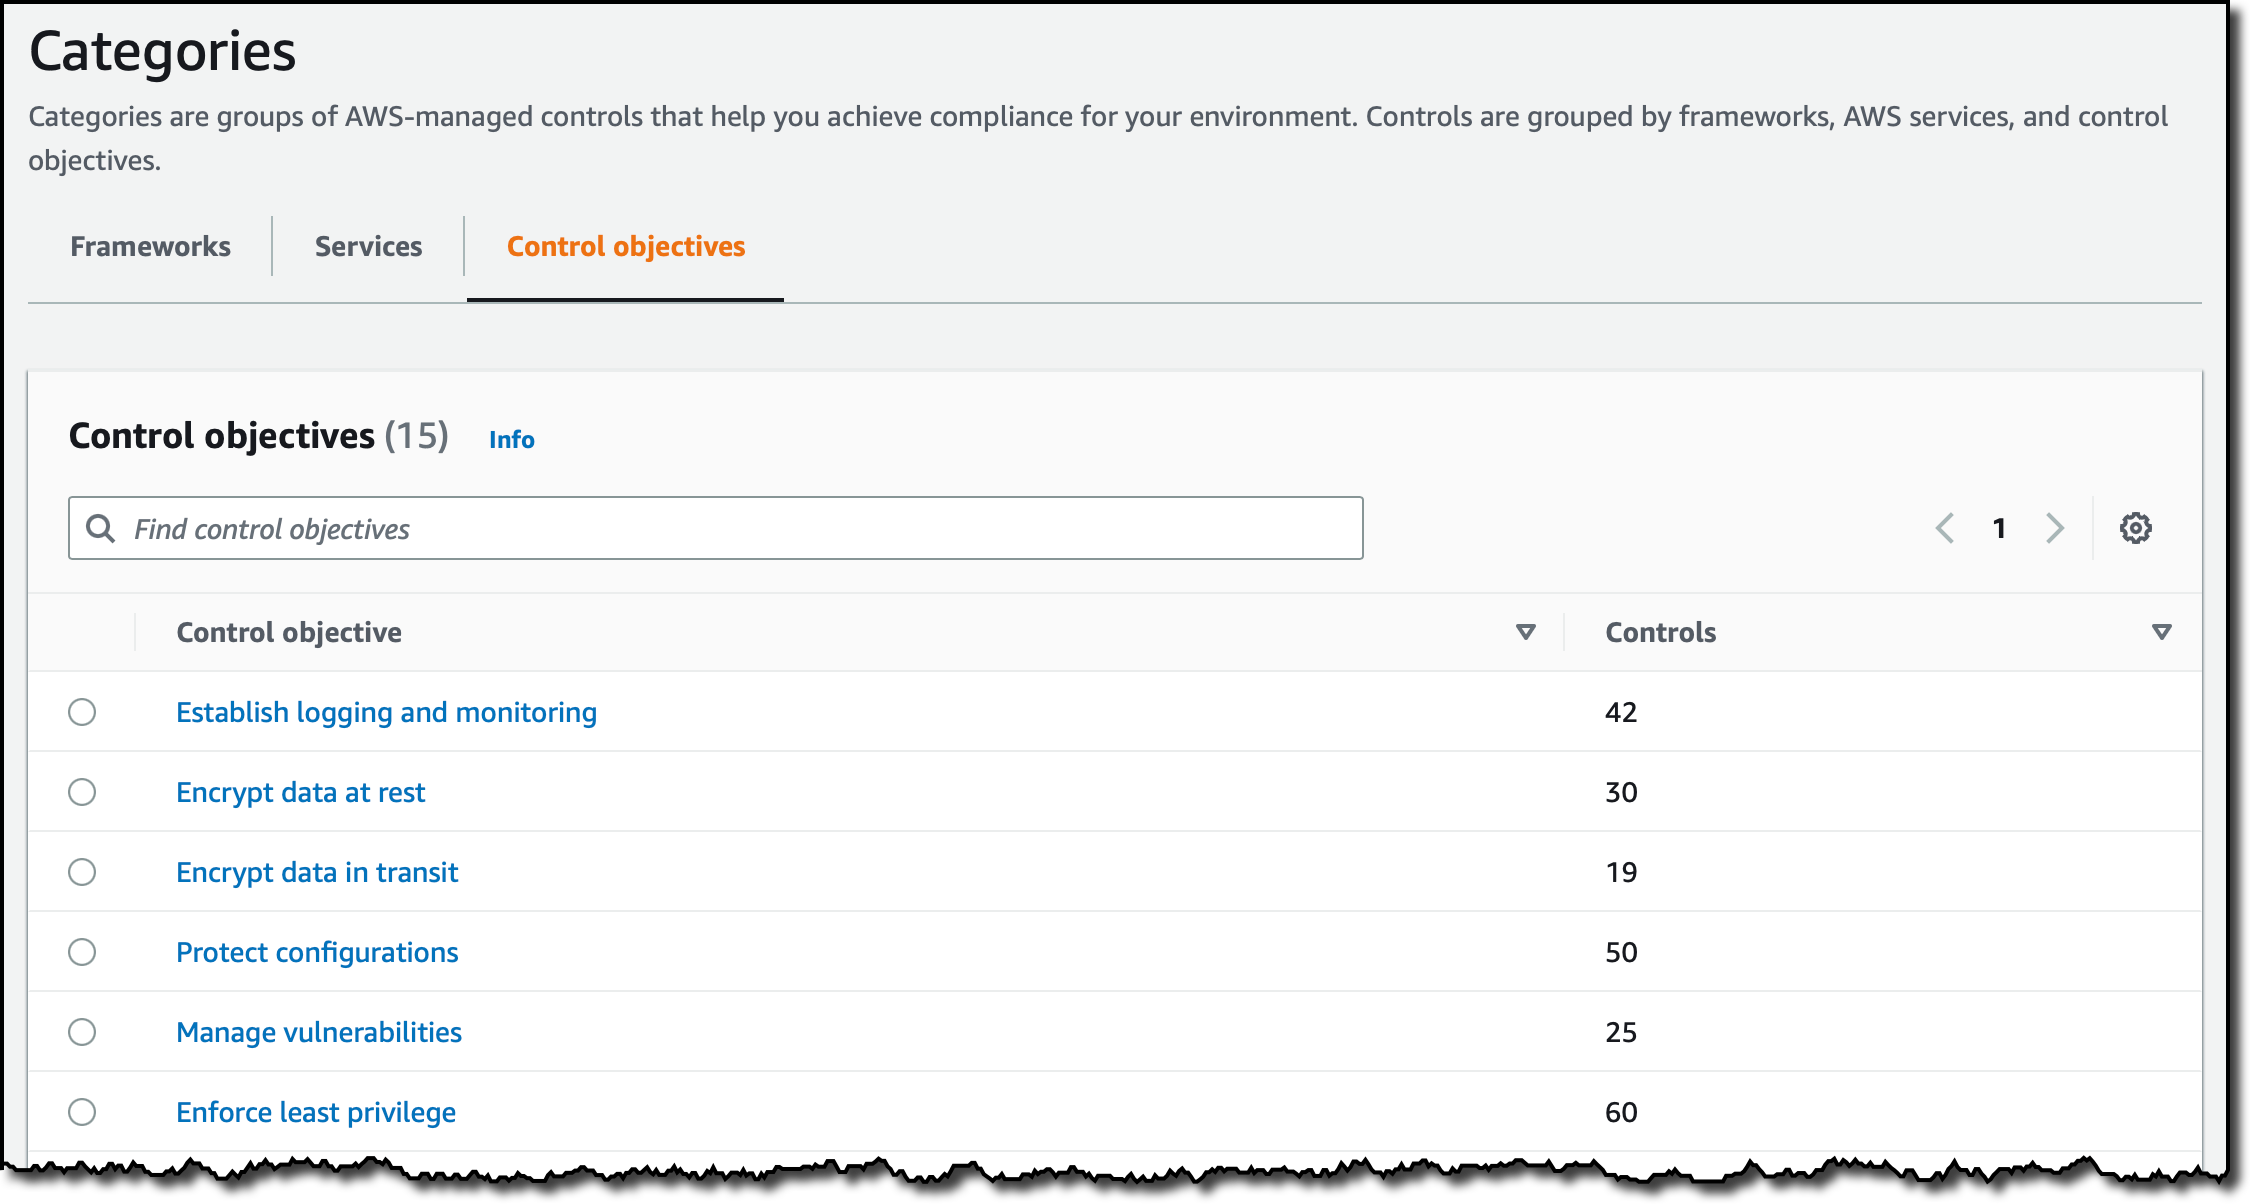
Security Hub is a cloud security posture management service that you can use to apply security best practice controls, such as “EC2 instances should not have a public IP address.” With Security Hub, you can check that your environment is properly configured and that your existing configurations don’t pose a security risk. Security Hub has more than 200 controls that cover more than 30 AWS services, such as Amazon Elastic Compute Cloud (Amazon EC2), Amazon Simple Storage Service (Amazon S3), and AWS Lambda. In addition, Security Hub has integrations with more than 85 partner products. Security Hub can centralize findings across your AWS accounts and AWS Regions into a single delegated administrator account in your aggregation Region of choice, creating a single pane of glass to view findings. This can help you to triage, investigate, and respond to findings in a simpler way and improve your security posture.
The Security Hub controls are grouped into the following security standards:
With the new features — consolidated controls view and consolidated control findings—you can now do the following:
Enable or disable controls across standards in a single action. Previously, if you wanted to maintain the same enablement status of controls between standards, you had to take the same action across multiple standards (up to six times!).
If you choose to turn on consolidated control findings, you will receive only a single finding for a security check, even if the security check is enabled across several standards. This reduces the number of findings and helps you focus on the most important misconfigured resources in your AWS environment. It allows you to apply actions and updates (such as suppressing the finding or changing its severity) one time rather than having to do so multiple times across non-consolidated findings.
Overview of new features
Now we’ll discuss some of the details of how you can use the two new features to streamline the management of controls.
The new consolidated controls view
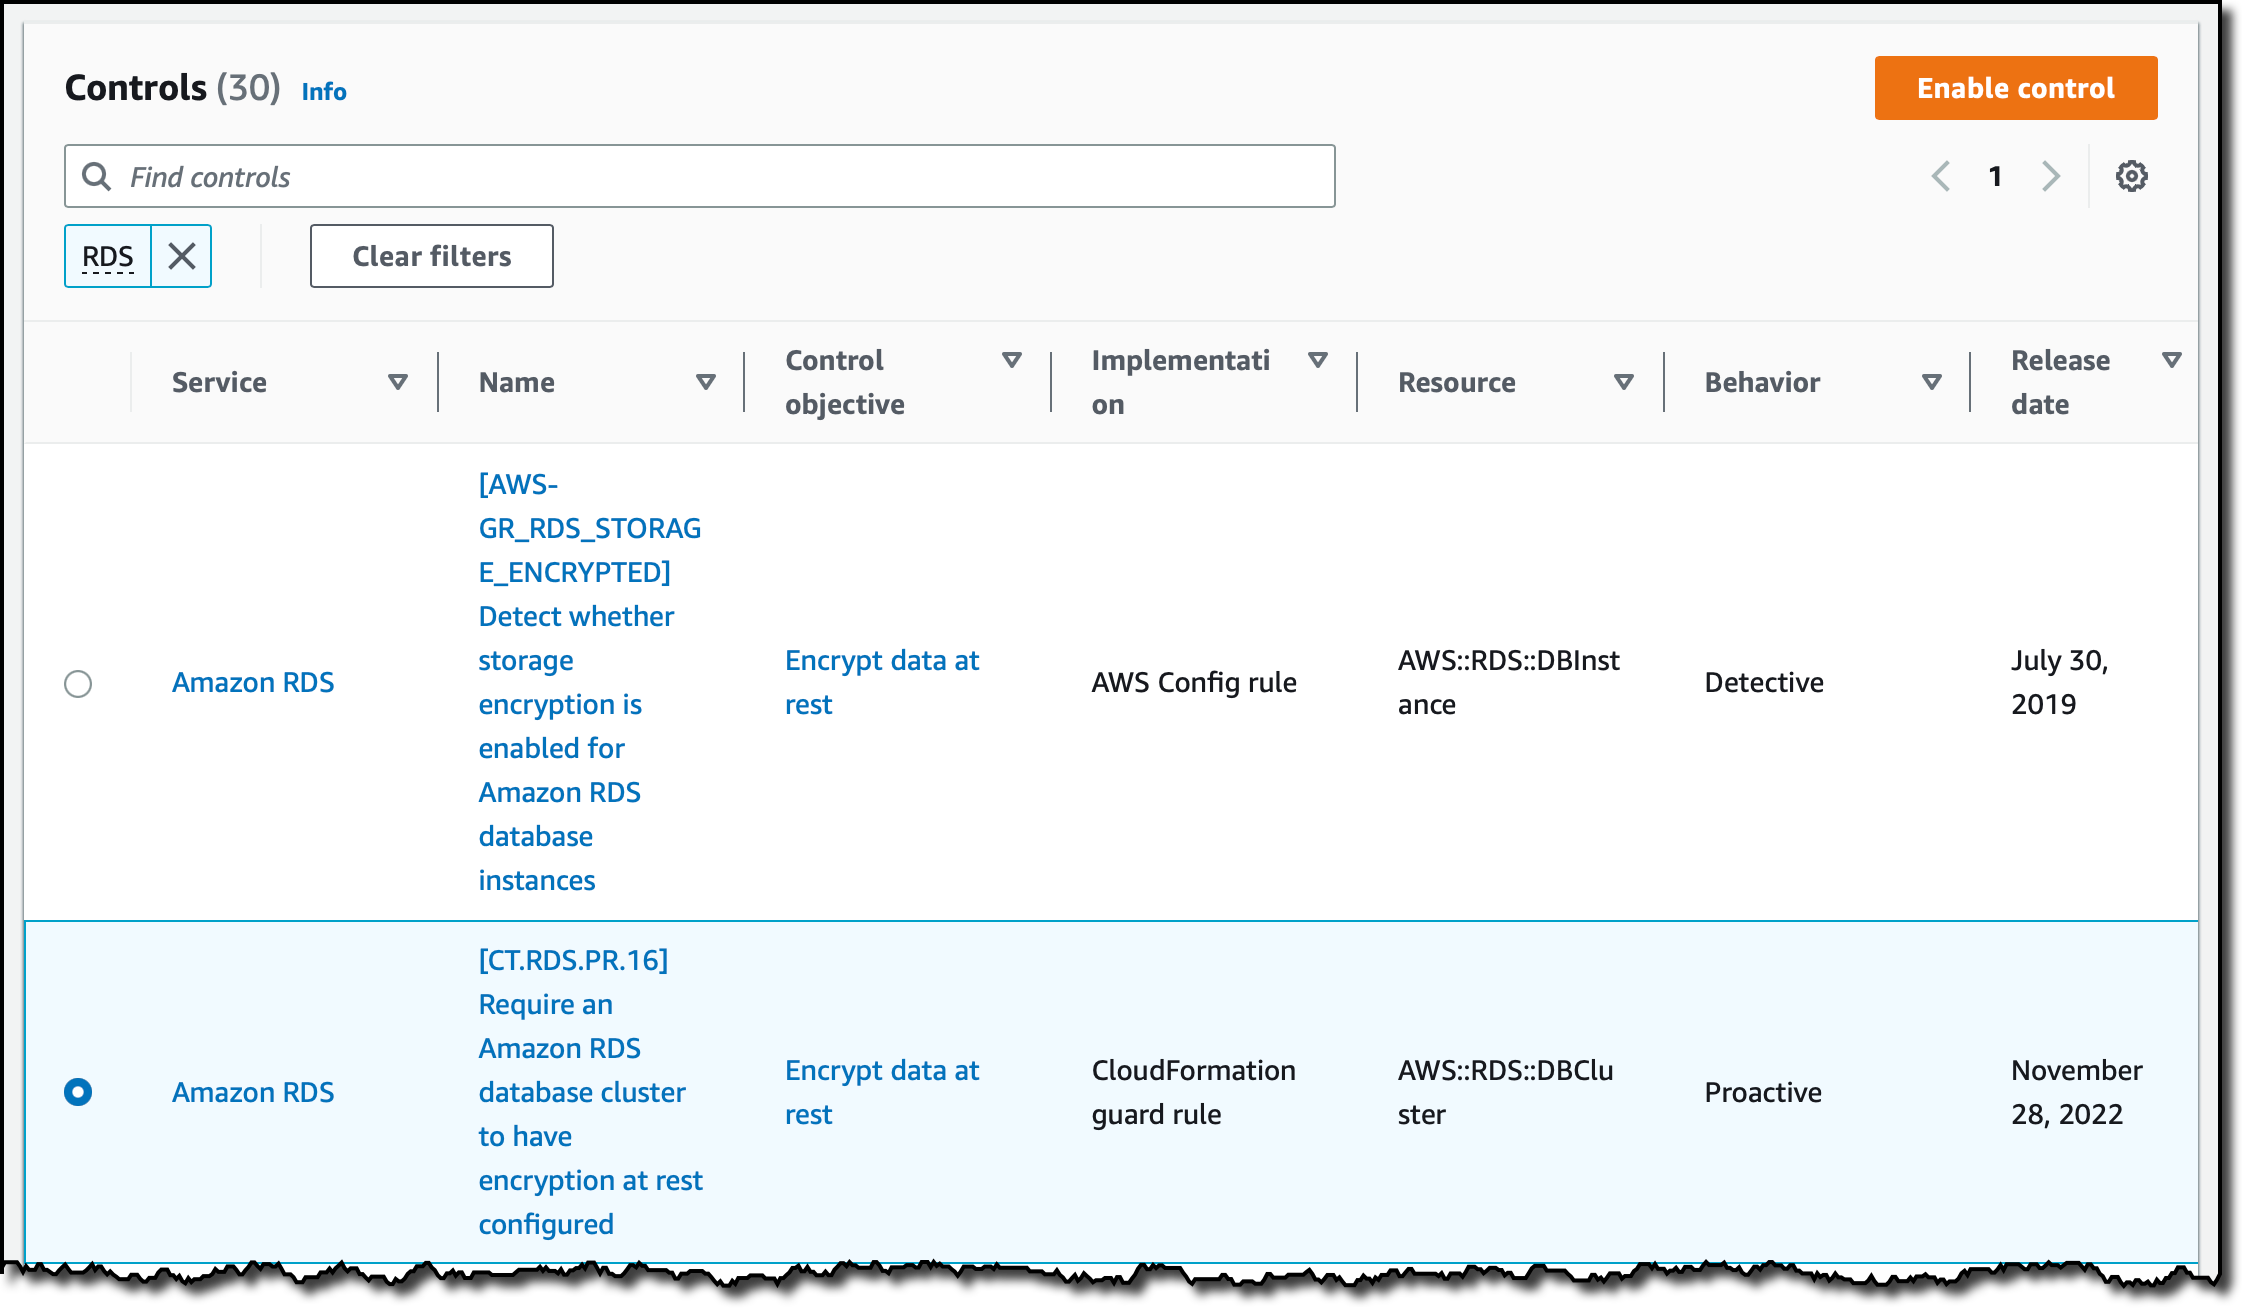
On the new Controls page, now available in the Security Hub console as shown in Figure 1, you can view and configure security controls across standards from one central location.
Figure 1: Security Hub Controls page
Before this release, controls had to be managed within the context of individual security standards. Even if the same control was part of multiple standards, the control had different IDs in each of them. With this recent release, Security Hub now assigns controls a unique security control ID across standards, so that it’s simpler for you to reference the controls and view their findings. Following the current naming convention of the AWS FSBP standard, the consolidated control IDs start with the relevant service in scope for the control. In fact, whenever possible, the new consolidated control ID is the same as the previous FSBP control ID.
For example, before this release, control IAM.6 in FSBP was also referenced as 1.14 in CIS 1.2, and 1.6 in CIS 1.4, PCI.IAM.4, and CT.IAM.6. After the release, the control is now referenced as IAM.6 in the Security Hub standards. This change does not affect the pre-existing API calls for Security Hub, such as UpdateStandardsControl, where you can still provide the previous StandardControlARN in order to make the call.
By using the new Controls view, you can understand the status of controls across your system, view control findings, and prioritize next steps without context switching. The following information is available on the Controls page of the Security Hub console:
An overall security score, which is based on the proportion of passed controls to the total number of enabled controls.
A breakdown of security checks across controls, with the percentage of failed security checks highlighted. Because many controls can contain multiple security checks and multiple findings, this value might be different from the security score, which considers controls as a single object. You can use this metric, as well as your security score, to monitor your progress as you work to remediate findings.
A list of controls that are categorized into different tabs based on enablement and compliance status. If you are an administrator of an organization within Security Hub, the enablement and compliance status will reflect the aggregate status of the entire organization. In your finding aggregation Region, the status will also be aggregated across linked Regions.
From the controls page, you can select a control to view its details (including its title and the standards it belongs to), and view and act on the findings generated by the control.
Security Hub also offers new API operations that match the capabilities of the controls page. Unlike the pre-existing API operations, these new API operations use the consolidated control IDs (also known as security control IDs) to provide a way to know and manage the relationship between controls and standards. You can use these API operations to manage each Security Hub control across standards, to make sure that the status of controls in the standards is aligned. The new API operations include the following:
BatchGetSecurityControls — Given a list of security control IDs, returns the full definition of those controls.
BatchGetStandardsControlAssociations — Given a list of security control IDs and standards, returns whether each control is turned on in the relevant standard or not.
We also provide an example script that makes use of these API calls and applies them across accounts and Regions so that your configuration is consistent. You can use our script to enable or disable Security Hub controls across your various accounts or Regions.
Consolidating control findings between standards
Before we released the consolidated control findings feature, Security Hub generated separate findings per standard for each related control. Now, you can turn on consolidated control findings, and after doing so, Security Hub will produce a single finding per security check, even when the underlying control is shared across multiple standards. Having a single finding per check across standards will help you investigate, update, and remediate failed findings more quickly, while also reducing finding noise.
As an example, we can look at control CloudTrail.2, which is shared between standards supported by Security Hub. Before you turn on this capability, you might potentially receive up to six findings for each security check generated by this control—with one finding for each security standard. After you turn on consolidated control findings, these older findings will be archived and Security Hub will generate one finding per security check in this control, regardless of how many security standards you have enabled. For an example of how the standard-specific findings compare to the new consolidated finding, see Sample control findings. The following is an example of a consolidated finding for the CloudTrial.2 control; we’ve highlighted the part that shows this finding is shared across standards.
{
"SchemaVersion": "2018-10-08",
"Id": "arn:aws:securityhub:us-east-2:123456789012:security-control/CloudTrail.2/finding/a1b2c3d4-5678-90ab-cdef-EXAMPLE11111",
"ProductArn": "arn:aws:securityhub:us-east-2::product/aws/securityhub",
"ProductName": "Security Hub",
"CompanyName": "AWS",
"Region": "us-east-2",
"GeneratorId": "security-control/CloudTrail.2",
"AwsAccountId": "123456789012",
"Types": [
"Software and Configuration Checks/Industry and Regulatory Standards"
],
"FirstObservedAt": "2022-10-06T02:18:23.076Z",
"LastObservedAt": "2022-10-28T16:10:06.956Z",
"CreatedAt": "2022-10-06T02:18:23.076Z",
"UpdatedAt": "2022-10-28T16:10:00.093Z",
"Severity": {
"Label": "MEDIUM",
"Normalized": "40",
"Original": "MEDIUM"
},
"Title": "CloudTrail should have encryption at-rest enabled",
"Description": "This AWS control checks whether AWS CloudTrail is configured to use the server-side encryption (SSE) AWS Key Management Service (AWS KMS) customer master key (CMK) encryption. The check will pass if the KmsKeyId is defined.",
"Remediation": {
"Recommendation": {
"Text": "For directions on how to correct this issue, consult the AWS Security Hub controls documentation.",
"Url": "https://docs.aws.amazon.com/console/securityhub/CloudTrail.2/remediation"
}
},
"ProductFields": {
"RelatedAWSResources:0/name": "securityhub-cloud-trail-encryption-enabled-fe95bf3f",
"RelatedAWSResources:0/type": "AWS::Config::ConfigRule",
"aws/securityhub/ProductName": "Security Hub",
"aws/securityhub/CompanyName": "AWS",
"Resources:0/Id": "arn:aws:cloudtrail:us-east-2:123456789012:trail/AWSMacieTrail-DO-NOT-EDIT",
"aws/securityhub/FindingId": "arn:aws:securityhub:us-east-2::product/aws/securityhub/arn:aws:securityhub:us-east-2:123456789012:security-control/CloudTrail.2/finding/a1b2c3d4-5678-90ab-cdef-EXAMPLE11111"
}
"Resources": [
{
"Type": "AwsCloudTrailTrail",
"Id": "arn:aws:cloudtrail:us-east-2:123456789012:trail/AWSMacieTrail-DO-NOT-EDIT",
"Partition": "aws",
"Region": "us-east-2"
}
],
"Compliance": {
"Status": "FAILED",
"RelatedRequirements": [
"PCI DSS v3.2.1/3.4",
"CIS AWS Foundations Benchmark v1.2.0/2.7",
"CIS AWS Foundations Benchmark v1.4.0/3.7"
],
"SecurityControlId": "CloudTrail.2","AssociatedStandards": [ { "StandardsId": "standards/aws-foundational-security-best-practices/v/1.0.0"}, { "StandardsId": "standards/pci-dss/v/3.2.1"}, { "StandardsId": "ruleset/cis-aws-foundations-benchmark/v/1.2.0"}, { "StandardsId": "standards/cis-aws-foundations-benchmark/v/1.4.0"}, { "StandardsId": "standards/service-managed-aws-control-tower/v/1.0.0"}, ]},
"WorkflowState": "NEW",
"Workflow": {
"Status": "NEW"
},
"RecordState": "ACTIVE",
"FindingProviderFields": {
"Severity": {
"Label": "MEDIUM",
"Normalized": "40",
"Original": "MEDIUM"
},
"Types": [
"Software and Configuration Checks/Industry and Regulatory Standards"
]
}
}
In the left navigation pane, choose Settings, and then choose the General tab.
Under Controls, turn on Consolidated control findings, and then choose Save.
Figure 2: Turn on consolidated control findings
If you are using the Security Hub integration with AWS Organizations or have invited member accounts through a manual invitation process, consolidated control findings can only be turned on by the administrator account. When this action is taken in the administrator account, the action will also be reflected in each member account in the current Region. It can take up to 18 hours for Security Hub to archive existing standard-specific findings and generate the new, standard-agnostic, findings.
You can also enable consolidated control findings by using the API (calling the UpdateSecurityHubConfiguration API with the ControlFindingGenerator parameter equal to SECURITY_CONTROL), or by using the AWS CLI (running the update-security-hub-configuration command with control-finding-generator equal to SECURITY_CONTROL), as in the following example.
aws securityhub ‐‐region <Region of choice> update-security-hub-configuration ‐‐control-finding-generator SECURITY_CONTROL
Much like the console behavior, if you have an organizational setup in Security Hub, this API action can only be taken by the administrator, and it will be reflected in each member account in the same Region.
What to expect when you enable consolidated control findings
To allow for these new capabilities to be launched, changes to the AWS Security Finding Format (ASFF) are required. This format is used by Security Hub for findings it generates from its controls or ingests from external providers. When you turn on finding consolidation, Security Hub will archive old standard-specific findings and generate standard-agnostic findings instead. This action will only affect control findings that Security Hub generates, and it will not affect findings ingested from partner products. However, in Security Hub findings, turning on consolidated control findings might cause some updates that you previously made to findings to be archived. Despite this one-time change, after the migration is complete (it can take up to 18 hours), you will be able to update finding fields in a single action and the updates will apply across standards, without the need to make multiple updates.
One field affected by the new capabilities is the Workflow field, which provides information about the status of the investigation into a finding. Manipulating this field can also update the overall compliance status of the control that the finding is related to. For example, if you have a control with one failed finding (and the rest have passed), and the failed finding comes from a resource for which you’d like to make an exception, you can decide to suppress that failed finding by updating the Workflow field. If you suppress failed findings in a control, its compliance status can change to pass.
Before turning on consolidated control findings, if you want to maintain an aligned compliance status in controls that belong to multiple standards, you have to update the Workflow status of findings in each standard. After turning on finding consolidation, you will only have to update the Workflow status once, and the suppression will be applied across standards, helping you to reduce the number of steps needed to suppress the same findings across standards.
As mentioned earlier, when you turn on this new capability, some updates made to the previous, standard-specific findings will be archived and will not be included in the new consolidated control findings generated by Security Hub. In the case of the Workflow status, the new consolidated findings will be created with a value of NEW (for failed findings) or RESOLVED (for new findings) in the Workflow field. However, after you have onboarded to the new finding format, you can update the value of the Workflow field, as well as other fields, and this value will be maintained without requiring you to make continuous updates. For the full list of fields that can be affected by the migration to the consolidated finding format, see Consolidated control findings – ASFF changes. Before you turn on finding consolidation, we suggest that you check if your custom automations refer to those affected fields. If they do, you can update your automations and test them by using the Sample control findings in the documentation.
Conclusion
This blog post covers new Security Hub features that make it simpler for you to manage controls across standards. With the new consolidated control findings feature, you can focus on the most relevant findings and reduce noise, which is why we recommend that you review the new feature and its associated changes and turn it on at your earliest convenience.
If you have feedback about this blog post, submit comments in the Comments section below. If you have questions about this blog post, start a new thread on the Security Hub forum or contact AWS Support.
Want more AWS Security news? Follow us on Twitter.
The threat detection and incident response track showcased how AWS customers can get the visibility they need to help improve their security posture, identify issues before they impact business, and investigate and respond quickly to security incidents across their environment.
With dozens of service and feature announcements—and innumerable best practices shared by AWS experts, customers, and partners—distilling highlights is a challenge. From an incident response perspective, three key themes emerged.
Proactively detect, contextualize, and visualize security events
When it comes to effectively responding to security events, rapid detection is key. Among the launches announced during the keynote was the expansion of Amazon Detective finding groups to include Amazon Inspector findings in addition to Amazon GuardDuty findings.
Detective, GuardDuty, and Inspector are part of a broad set of fully managed AWS security services that help you identify potential security risks, so that you can respond quickly and confidently.
Using machine learning, Detective finding groups can help you conduct faster investigations, identify the root cause of events, and map to the MITRE ATT&CK framework to quickly run security issues to ground. The finding group visualization panel shown in the following figure displays findings and entities involved in a finding group. This interactive visualization can help you analyze, understand, and triage the impact of finding groups.
Figure 1: Detective finding groups visualization panel
With the expanded threat and vulnerability findings announced at re:Inforce, you can prioritize where to focus your time by answering questions such as “was this EC2 instance compromised because of a software vulnerability?” or “did this GuardDuty finding occur because of unintended network exposure?”
In the session Streamline security analysis with Amazon Detective, AWS Principal Product Manager Rich Vorwaller, AWS Senior Security Engineer Rima Tanash, and AWS Program Manager Jordan Kramer demonstrated how to use graph analysis techniques and machine learning in Detective to identify related findings and resources, and investigate them together to accelerate incident analysis.
In addition to Detective, you can also use Amazon Security Lake to contextualize and visualize security events. Security Lake became generally available on May 30, 2023, and several re:Inforce sessions focused on how you can use this new service to assist with investigations and incident response.
As detailed in the following figure, Security Lake automatically centralizes security data from AWS environments, SaaS providers, on-premises environments, and cloud sources into a purpose-built data lake stored in your account. Security Lake makes it simpler to analyze security data, gain a more comprehensive understanding of security across an entire organization, and improve the protection of workloads, applications, and data. Security Lake automates the collection and management of security data from multiple accounts and AWS Regions, so you can use your preferred analytics tools while retaining complete control and ownership over your security data. Security Lake has adopted the Open Cybersecurity Schema Framework (OCSF), an open standard. With OCSF support, the service normalizes and combines security data from AWS and a broad range of enterprise security data sources.
Figure 2: How Security Lake works
To date, 57 AWS security partners have announced integrations with Security Lake, and we now have more than 70 third-party sources, 16 analytics subscribers, and 13 service partners.
In Gaining insights from Amazon Security Lake, AWS Principal Solutions Architect Mark Keating and AWS Security Engineering Manager Keith Gilbert detailed how to get the most out of Security Lake. Addressing questions such as, “How do I get access to the data?” and “What tools can I use?,” they demonstrated how analytics services and security information and event management (SIEM) solutions can connect to and use data stored within Security Lake to investigate security events and identify trends across an organization. They emphasized how bringing together logs in multiple formats and normalizing them into a single format empowers security teams to gain valuable context from security data, and more effectively respond to events. Data can be queried with Amazon Athena, or pulled by Amazon OpenSearch Service or your SIEM system directly from Security Lake.
Build your security data lake with Amazon Security Lake featured AWS Product Manager Jonathan Garzon, AWS Product Solutions Architect Ross Warren, and Global CISO of Interpublic Group (IPG) Troy Wilkinson demonstrating how Security Lake helps address common challenges associated with analyzing enterprise security data, and detailing how IPG is using the service. Wilkinson noted that IPG’s objective is to bring security data together in one place, improve searches, and gain insights from their data that they haven’t been able to before.
“With Security Lake, we found that it was super simple to bring data in. Not just the third-party data and Amazon data, but also our on-premises data from custom apps that we built.” — Troy Wilkinson, global CISO, Interpublic Group
Use automation and machine learning to reduce mean time to response
Incident response automation can help free security analysts from repetitive tasks, so they can spend their time identifying and addressing high-priority security issues.
LLA operates in over 20 countries across Latin America and the Caribbean. After completing multiple acquisitions, LLA needed a centralized security operations team to handle incidents and notify the teams responsible for each AWS account. They used GuardDuty, Security Hub, and Systems Manager Incident Manager to automate and streamline detection and response, and they configured the services to initiate alerts whenever there was an issue requiring attention.
Speaking alongside AWS Principal Solutions Architect Jesus Federico and AWS Principal Product Manager Sarah Holberg, LLA Senior Manager of Cloud Services Joaquin Cameselle noted that when GuardDuty identifies a critical issue, it generates a new finding in Security Hub. This finding is then forwarded to Systems Manager Incident Manager through an Amazon EventBridge rule. This configuration helps ensure the involvement of the appropriate individuals associated with each account.
“We have deployed a security framework in Liberty Latin America to identify security issues and streamline incident response across over 180 AWS accounts. The framework that leverages AWS Systems Manager Incident Manager, Amazon GuardDuty, and AWS Security Hub enabled us to detect and respond to incidents with greater efficiency. As a result, we have reduced our reaction time by 90%, ensuring prompt engagement of the appropriate teams for each AWS account and facilitating visibility of issues for the central security team.” — Joaquin Cameselle, senior manager, cloud services, Liberty Latin America
After describing the four phases of the incident response process — preparation and prevention; detection and analysis; containment, eradication, and recovery; and post-incident activity—AWS ProServe Global Financial Services Senior Engagement Manager Harikumar Subramonion noted that, to fully benefit from the cloud, you need to embrace automation. Automation benefits the third phase of the incident response process by speeding up containment, and reducing mean time to response.
Citibank Head of Cloud Security Operations Elvis Velez and Vice President of Cloud Security Damien Burks described how Citi built the Cloud Containment Automation Framework (CCAF) from the ground up by using AWS Step Functions and AWS Lambda, enabling them to respond to events 24/7 without human error, and reduce the time it takes to contain resources from 4 hours to 15 minutes. Velez described how Citi uses adversary emulation exercises that use the MITRE ATT&CK Cloud Matrix to simulate realistic attacks on AWS environments, and continuously validate their ability to effectively contain incidents.
Innovate and do more with less
Security operations teams are often understaffed, making it difficult to keep up with alerts. According to data from CyberSeek, there are currently 69 workers available for every 100 cybersecurity job openings.
Effectively evaluating security and compliance posture is critical, despite resource constraints. In Centralizing security at scale with Security Hub and Intuit’s experience, AWS Senior Solutions Architect Craig Simon, AWS Senior Security Hub Product Manager Dora Karali, and Intuit Principal Software Engineer Matt Gravlin discussed how to ease security management with Security Hub. Fortune 500 financial software provider Intuit has approximately 2,000 AWS accounts, 10 million AWS resources, and receives 20 million findings a day from AWS services through Security Hub. Gravlin detailed Intuit’s Automated Compliance Platform (ACP), which combines Security Hub and AWS Config with an internal compliance solution to help Intuit reduce audit timelines, effectively manage remediation, and make compliance more consistent.
“By using Security Hub, we leveraged AWS expertise with their regulatory controls and best practice controls. It helped us keep up to date as new controls are released on a regular basis. We like Security Hub’s aggregation features that consolidate findings from other AWS services and third-party providers. I personally call it the super aggregator. A key component is the Security Hub to Amazon EventBridge integration. This allowed us to stream millions of findings on a daily basis to be inserted into our ACP database.” — Matt Gravlin, principal software engineer, Intuit
At AWS re:Inforce, we launched a new Security Hub capability for automating actions to update findings. You can now use rules to automatically update various fields in findings that match defined criteria. This allows you to automatically suppress findings, update the severity of findings according to organizational policies, change the workflow status of findings, and add notes. With automation rules, Security Hub provides you a simplified way to build automations directly from the Security Hub console and API. This reduces repetitive work for cloud security and DevOps engineers and can reduce mean time to response.
In Continuous innovation in AWS detection and response services, AWS Worldwide Security Specialist Senior Manager Himanshu Verma and GuardDuty Senior Manager Ryan Holland highlighted new features that can help you gain actionable insights that you can use to enhance your overall security posture. After mapping AWS security capabilities to the core functions of the NIST Cybersecurity Framework, Verma and Holland provided an overview of AWS threat detection and response services that included a technical demonstration.
Bolstering incident response with AWS Wickr enterprise integrations highlighted how incident responders can collaborate securely during a security event, even on a compromised network. AWS Senior Security Specialist Solutions Architect Wes Wood demonstrated an innovative approach to incident response communications by detailing how you can integrate the end-to-end encrypted collaboration service AWS Wickr Enterprise with GuardDuty and AWS WAF. Using Wickr Bots, you can build integrated workflows that incorporate GuardDuty and third-party findings into a more secure, out-of-band communication channel for dedicated teams.
If you’ve had discussions with a security organization recently, there’s a high probability that the word automation has come up. As organizations scale and consume the benefits the cloud has to offer, it’s important to factor in and understand how the additional cloud footprint will affect operations. Automation is a key enabler for efficient operations and can help drive down the number of repetitive tasks that the operational teams have to perform.
Alert fatigue is caused when humans work on the same repetitive tasks day in and day out and also have a large volume of alerts that need to be addressed. The repetitive nature of these tasks can cause analysts to become numb to the importance of the task or make errors due to manual processing. This can lead to misclassification of security alerts or higher-severity alerts being overlooked due to investigation times. Automation is key here to reduce the number of repetitive tasks and give analysts time to focus on other areas of importance.
In this blog post, we’ll walk you through new capabilities within AWS Security Hub that you can use to take automated actions to update findings. We’ll show you some example scenarios that use this capability and set you up with the knowledge you need to get started with creating automation rules.
Previously, Security Hub could take automated actions on findings, but this involved going to the Amazon EventBridge console or API, creating an EventBridge rule, and then building an AWS Lambda function, an AWS Systems Manager Automation runbook, or an AWS Step Functions step as the target of that rule. If you wanted to set up these automated actions in the administrator account and home AWS Region and run them in member accounts and in linked Regions, you would also need to deploy the correct IAM permissions to enable the actions to run across accounts and Regions. After setting up the automation flow, you would need to maintain the EventBridge rule, Lambda function, and IAM roles. Such maintenance could include upgrading the Lambda versions, verifying operational efficiency, and checking that everything is running as expected.
With Security Hub, you can now use rules to automatically update various fields in findings that match defined criteria. This allows you to automatically suppress findings, update findings’ severities according to organizational policies, change findings’ workflow status, and add notes. As findings are ingested, automation rules look for findings that meet defined criteria and update the specified fields in findings that meet the criteria. For example, a user can create a rule that automatically sets the finding’s severity to “Critical” if the finding account ID is of a known business-critical account. A user could also automatically suppress findings for a specific control in an account where the finding represents an accepted risk.
With automation rules, Security Hub provides you a simplified way to build automations directly from the Security Hub console and API. This reduces repetitive work for cloud security and DevOps engineers and can reduce the mean time to response.
Use cases
In this section, we’ve put together some examples of how Security Hub automation rules can help you. There’s a lot of flexibility in how you can use the rules, and we expect there will be many variations that your organization will use when contextual information about security risk has been added.
Scenario 1: Elevate finding severity for specific controls based on account IDs
Security Hub offers protection by using hundreds of security controls that create findings that have a severity associated with them. Sometimes, you might want to elevate that severity according to your organizational policies or according to the context of the finding, such as the account it relates to. With automation rules, you can now automatically elevate the severity for specific controls when they are in a specific account.
For example, the AWS Foundational Security Best Practices control GuardDuty.1 has a “High” severity by default. But you might consider such a finding to have “Critical” severity if it occurs in one of your top production accounts. To change the severity automatically, you can choose GeneratorId as a criteria and check that it’s equal to aws-foundational-security-best-practices/v/1.0.0/GuardDuty.1, and also add AwsAccountId as a criteria and check that it’s equal to YOUR_ACCOUNT_IDs. Then, add an action to update the severity to “Critical,” and add a note to the person who will look at the finding that reads “Urgent — look into these production accounts.”
You can set up this automation rule through the AWS CLI, the console, the Security Hub API, or the AWS SDK for Python (Boto3), as follows.
To set up the automation rule for Scenario 1 (AWS CLI)
In the AWS CLI, run the following command to create a new automation rule with a specific Amazon Resource Name (ARN). Note the different modifiable parameters:
Rule-name — The name of the rule that will be created.
Rule-status — An optional parameter. Specify whether you want Security Hub to activate and start applying the rule to findings after creation. If no value is specified, the default value is ENABLED. A value of DISABLED means that the rule will be paused after creation.
Rule-order — Provide the processing order for the rule. Security Hub applies rules with a lower numerical value for this parameter first.
Criteria — Provide the criteria that you want Security Hub to use to filter your findings. The rule action will be applied to findings that match the criteria. For a list of supported criteria, see Criteria and actions for automation rules. In this example, the criteria are placeholders and should be replaced.
Actions — Provide the actions that you want Security Hub to take when there’s a match between a finding and your defined criteria. For a list of supported actions, see Criteria and actions for automation rules. In this example, the actions are placeholders and should be replaced.
aws securityhub create-automation-rule \—rule-name "Elevate severity for findings in production accounts - GuardDuty.1" \—rule-status "ENABLED"" \—rule-order 1 \—description "Elevate severity for findings in production accounts - GuardDuty.1" \—criteria '{"GeneratorId": [{"Value": "aws-foundational-security-best-practices/v/1.0.0/GuardDuty.1","Comparison": "EQUALS"}, "AwsAccountId": [{"Value": "<111122223333>","Comparison": "EQUALS"},]}' \—actions '[{"Type": "FINDING_FIELDS_UPDATE","FindingFieldsUpdate": {"Severity": {"Label": "CRITICAL"},"Note": {"Text": "Urgent – look into these production accounts","UpdatedBy": "sechub-automation"}}}]' \—region us-east-1
To set up the automation rule for Scenario 1 (console)
Open the Security Hub console, and in the left navigation pane, choose Automations.
Figure 1: Automation rules in the Security Hub console
Choose Create rule, and then choose Create a custom rule to get started with creating a rule of your choice. Add a rule name and description.
Figure 2: Create a new custom rule
Under Criteria, add the following information.
Key 1
Key = GeneratorID
Operator = EQUALS
Value = aws-foundational-security-best-practices/v/1.0.0/GuardDuty.1
Key 2
Key = AwsAccountId
Operator = EQUALS
Value = Your AWS account ID
Figure 3: Information added for the rule criteria
You can preview which findings will match the criteria by looking in the preview section.
Figure 4: Preview section
Next, under Automated action, specify which finding value to update automatically when findings match your criteria.
Figure 5: Automated action to be taken against the findings that match the criteria
For Rule status, choose Enabled, and then choose Create rule.
Figure 6: Set the rule status to Enabled
After you choose Create rule, you will see the newly created rule within the Automations portal.
Figure 7: Newly created rule within the Security Hub Automations page
Note: In figure 7, you can see multiple automation rules. When you create automation rules, you assign each rule an order number. This determines the order in which Security Hub applies your automation rules. This becomes important when multiple rules apply to the same finding or finding field. When multiple rule actions apply to the same finding field, the rule with the highest numerical value for rule order is applied last and has the ultimate effect on that field.
Additionally, if your preferred deployment method is to use the API or AWS SDK for Python (Boto3), we have information on how you can use these means of deployment in our public documentation.
Scenario 2: Change the finding severity to high if a resource is important, based on resource tags
Imagine a situation where you have findings associated to a wide range of resources. Typically, organizations will attempt to prioritize which findings to remediate first. You can achieve this prioritization through Security Hub and the contextual fields that are available for you to use — for example, by using the severity of the finding or the account ID the resource is sitting in. You might also have your own prioritization based on other factors. You could add this additional context to findings by using a tagging strategy. With automation rules, you can now automatically elevate the severity for specific findings based on the tag value associated to the resource.
For example, if a finding comes into Security Hub with the severity rating “Medium,” but the resource in question is critical to the business and has the tag production associated to it, you could automatically raise the severity rating to “High.”
Note: This will work only for findings where there is a resource tag associated with the finding.
Scenario 3: Suppress GuardDuty findings with a severity of “Informational”
GuardDuty provides an overarching view of the state of threats to deployed resources in your organization’s cloud environment. After evaluation, GuardDuty produces findings related to these threats. The findings produced by GuardDuty have different severities, to help organizations with prioritization. Some of these findings will be given an “Informational” severity. “Informational” indicates that no issue was found and the content of the finding is purely to give information. After you have evaluated the context of the finding, you might want to suppress any additional findings that match the same criteria.
For example, you might want to set up a rule so that new findings with the generator ID that produced “Informational” findings are suppressed, keeping only the findings that need action.
Templates
When you create a new rule, you can also choose to create a rule from a template. These templates are regularly updated with use cases that are applicable for many customers.
To set up an automation rule by using a template from the console
In the Security Hub console, choose Automations, and then choose Create rule.
Choose Create a rule from a template to get started with creating a rule of your choice.
Select a rule template from the drop-down menu.
Figure 8: Select an automation rule template
(Optional) If necessary, modify the Rule, Criteria, and Automated action sections.
For Rule status, choose whether you want the rule to be enabled or disabled after it’s created.
(Optional) Expand the Additional settings section. Choose Ignore subsequent rules for findings that match these criteria if you want this rule to be the last rule applied to findings that match the rule criteria.
(Optional) For Tags, add tags as key-value pairs to help you identify the rule.
Choose Create rule.
Multi-Region deployment
For organizations that operate in multiple AWS Regions, we’ve provided a solution that you can use to replicate rules created in your central Security Hub admin account into these additional Regions. You can find the sample code for this solution in our GitHub repo.
Conclusion
In this blog post, we’ve discussed the importance of automation and its ability to help organizations scale operations within the cloud. We’ve introduced a new capability in AWS Security Hub, automation rules, that can help reduce the repetitive tasks your operational teams may be facing, and we’ve showcased some example use cases to get you started. Start using automation rules in your environment today. We’re excited to see what use cases you will solve with this feature and as always, are happy to receive any feedback.
With Amazon Detective, you can analyze and visualize security data to investigate potential security issues. Detective collects and analyzes events that describe IP traffic, AWS management operations, and malicious or unauthorized activity from AWS CloudTrail logs, Amazon Virtual Private Cloud (Amazon VPC)Flow Logs, Amazon GuardDuty findings, and, since last year, Amazon Elastic Kubernetes Service (EKS) audit logs. Using this data, Detective constructs a graph model that distills log data using machine learning, statistical analysis, and graph theory to build a linked set of data for your security investigations.
Starting today, Detective offers investigation support for findings in AWS Security Hub in addition to those detected by GuardDuty. Security Hub is a service that provides you with a view of your security state in AWS and helps you check your environment against security industry standards and best practices. If you’ve turned on Security Hub and another integrated AWS security services, those services will begin sending findings to Security Hub.
Enabling AWS Security Findings in the Amazon Detective Console When you enable Detective for the first time, Detective now identifies findings coming from both GuardDuty and Security Hub, and automatically starts ingesting them along with other data sources. Note that you don’t need to enable or publish these log sources for Detective to start its analysis because this is managed directly by Detective.
If you are an existing Detective customer, you can enable investigation of AWS Security Findings as a data source with one click in the Detective Management Console. I already have Detective enabled, so I add the source package.
In the Detective console, in the Settings section of the navigation pane, I choose General. There, I choose Edit in the Optional source packages section to enable Detective for AWS Security Findings.
Once enabled, Detective starts analyzing all the relevant data to identify connections between disparate events and activities. To start your investigation process, you can get a visualization of these connections, including resource behavior and activities. Historical baselines, which you can use to provide comparisons against recent activity, are established after two weeks.
Investigating AWS Security Findings in the Amazon Detective Console I start in the Security Hub console and choose Findings in the navigation pane. There, I filter findings to only see those where the Product name is Inspector and Severity label is HIGH.
The first one looks suspicious, so I choose its Title (CVE-2020-36223 – openldap). The Security Hub console provides me with information about the corresponding Common Vulnerabilities and Exposures (CVE) ID and where and how it was found. At the bottom, I have the option to Investigate in Amazon Detective. I follow the Investigate finding link, and the Detective console opens in another browser tab.
Here, I see the entities related to this Inspector finding. First, I open the profile of the AWS account to see all the findings associated with this resource, the overall API call volume issued by this resource, and the container clusters in this account.
For example, I look at the successful and failed API calls to have a better understanding of the impact of this finding.
Then, I open the profile for the container image. There, I see the images that are related to this image (because they have the same repository or registry as this image), the containers running from this image during the scope time (managed by Amazon EKS), and the findings associated with this resource.
Depending on the finding, Detective helps me correlate information from different sources such as CloudTrail logs, VPC Flow Logs, and EKS audit logs. This information makes it easier to understand the impact of the finding and if the risk has become an incident. For Security Hub, Detective only ingests findings for configuration checks that failed. Because configuration checks that passed have little security value, we’re filtering these outs.
Availability and Pricing Amazon Detective investigation support for AWS Security Findings is available today for all existing and new Detective customers in all AWS Regions where Detective is available, including the AWS GovCloud (US) Regions. For more information, see the AWS Regional Services List.
Amazon Detective is priced based on the volume of data ingested. By enabling investigation of AWS Security Findings, you can increase the volume of ingested data. For more information, see Amazon Detective pricing.
When GuardDuty and Security Hub provide a finding, they also suggest the remediation. On top of that, Detective helps me investigate if the vulnerability has been exploited, for example, using logs and network traffic as proof.
Currently, findings coming from Security Hub are not included in the Finding groups section of the Detective console. Our plan is to expand Finding groups to cover the newly integrated AWS security services. Stay tuned!
At the end of this week, I’m flying to Seattle to take part in the AWS Serverless Innovation Day. Along with many customers and colleagues from AWS, we are going to be live on May 17 at a virtual free event. During the AWS Serverless Innovation Day we will share best practices related to building event-driven applications and using serverless functions and containers. Get a calendar reminder and check the full agenda at the event site.
Last Week’s Launches Here are some launches that got my attention during the previous week.
New Local Zones in Auckland – AWS Local Zones allow you to deliver applications that require single-digit millisecond latency or local data processing. Starting last week, AWS Local Zones is available in Auckland, New Zealand.
AWS AppSync– Now AWS AppSync GraphQL APIs support Private API. With Private APIs, you can now create GraphQL APIs that can only be accessed from your Amazon Virtual Private Cloud (Amazon VPC).
Other AWS News Some other updates and news that you may have missed:
Responsible AI in the Generative Era – Amazon Science published a very interesting blog post this week about the special challenges raised by building a responsible generative AI and the different things builders of applications can do in order to solve these challenges.
Patterns for Building an API to Upload Files to AmazonS3 – Amazon S3 is one of the most used services by our customers, and applications often require a way for users to upload files. In this article, Thomas Moore shows different ways to do this in a secure way.
The Official AWS Podcast– Listen each week for updates on the latest AWS news and deep dives into exciting use cases. There are also official AWS podcasts in your local languages. Check out the ones in French, German, Italian, and Spanish.
AWS Open-Source News and Updates – This is a newsletter curated by my colleague Ricardo to bring you the latest open-source projects, posts, events, and more.
Upcoming AWS Events Check your calendars and sign up for these AWS events:
AWS Serverless Innovation Day – Join us on May 17 for a virtual and free event about AWS Serverless. We will have talks and fireside chats with customers related to AWS Lambda, Amazon ECS with Fargate, AWS Step Functions, and Amazon EventBridge.
AWS re:Inforce 2023 – You can now register for AWS re:Inforce, happening in Anaheim, California, on June 13–14.
AWS Community Day – Join a community-led conference run by AWS user group leaders in your region: Warsaw (June 1), Chicago (June 15), Manila (June 29–30), and Munich (September 14).
AWS User Group Peru Conference – The local AWS User Group announced a one-day cloud event in Spanish and English in Lima on September 23. Seb, Jeff, and I will be attending the event from the AWS News blog team. Register today!
That’s all for this week. Check back next Monday for another Week in Review!
In today’s evolving security threat landscape, security teams increasingly require tools to detect and track security findings to protect their organizations’ assets. One objective of cloud security posture management is to identify and address security findings in a timely and effective manner. AWS Security Hub aggregates, organizes, and prioritizes security alerts and findings from various AWS services and supported security solutions from the AWS Partner Network.
As the volume of findings increases, tracking the changes and actions that have been taken on each finding becomes more difficult, as well as more important to perform timely and effective investigations. In this post, we will show you how to use the new Finding History feature in Security Hub to track and understand the history of a security finding.
Updates to findings occur when finding providers update certain fields, such as resource details, by using the BatchImportFindings API. You, as a user, can update certain fields, such as workflow status, in the AWS Management Console or through the BatchUpdateFindings API. Ticketing, incident management, security information and event management (SIEM), and automatic remediation solutions can also use the BatchUpdateFindings API to update findings. This new capability highlights these various changes and when they occurred so that you don’t need to investigate this yourself.
Finding History
The new Finding History feature in Security Hub helps you understand the state of a finding by providing an immutable history of changes within the finding details. By using this feature, you can track the history of each finding, including the before and after values of the fields that were changed, who or what made the changes, and when the changes were made. This simplifies how you operate on a finding by giving you visibility into the changes made to a finding over time, alongside the rest of the finding details, which removes the need for separate tooling or additional processes. This feature is available at no additional cost in AWS Regions where Security Hub is available, and appears by default for new or updated findings. Finding History is also available through the Security Hub APIs.
To try out this new feature, open the Security Hub console, select a finding, and choose the History tab. There you will see a chronological list of changes that have been made to the finding. The transparency of the finding history helps you quickly assess the status of the finding, understand actions already taken, and take the necessary actions to mitigate risk. For example, upon resolving a finding, you can add a note to the finding to indicate why you resolved it. Both the resolved status and note will appear in the history.
In the following example, the finding was updated and then resolved with an explanatory note left by the person that reviewed the finding. With Finding History, you can see the previous updates and events in the finding’s History tab.
Figure 1: Finding History shows recent updates to the finding
In addition, you can still view the current state of the finding in its Details tab.
Figure 2: Finding Details shows the record of a security check or security-related detection
Conclusion
With the new Finding History feature in Security Hub, you have greater visibility into the activity and updates on each finding, allowing for more efficient investigation and response to potential security risks. Next time that you start work to investigate and respond to a security finding in Security Hub, begin by checking the finding history.
The AWS Summit season has started. AWS Summits are free technical and business conferences happening in large cities across the planet. This week, we were happy to welcome our customers and partners in Sydney and Paris. In France, 9,973 customers and partners joined us for the day to meet and exchange ideas but also to attend one of the more than 145 technical breakout sessions and the keynote. This is the largest cloud computing event in France, and I can’t resist sharing a picture from the main room during the opening keynote.
There are AWS Summits on all continents ; you can find the list and the links for registration here https://aws.amazon.com/events/summits. The next on my agenda are listed at the end of this post.
AWS Lambda response streaming – Response streaming is a new invocation pattern that lets functions progressively stream response payloads back to clients. You can use Lambda response payload streaming to send response data to callers as it becomes available. Response streaming also allows you to build functions that return larger payloads and perform long-running operations while reporting incremental progress (within the 15 minutes execution period). My colleague Julian wrote an incredibly detailed blog post to help you to get started.
AWS Supply Chain Now Generally Available – AWS Supply Chain is a cloud application that mitigates risk and lowers costs with unified data and built-in contextual collaboration. It connects to your existing enterprise resource planning (ERP) and supply chain management systems to bring you ML-powered actionable insights into your supply chain.
AWS Service Catalog Supports Terraform Templates – With AWS Service Catalog, you can create, govern, and manage a catalog of infrastructure as code (IaC) templates that are approved for use on AWS. You can now define AWS Service Catalog products and their resources using either AWS CloudFormation or Hashicorp Terraform and choose the tool that better aligns with your processes and expertise.
Amazon S3 enforces two security best practices and brings new visibility into object replication status – As announced on December 13, 2022, Amazon S3 is now deploying two new default bucket security settings by automatically enabling S3 Block Public Access and disabling S3 access control lists (ACLs) for all new S3 buckets. Amazon S3 also adds a new Amazon CloudWatch metric that can be used to diagnose and correct S3 Replication configuration issues more quickly. The OperationFailedReplication metric, available in both the Amazon S3 console and in Amazon CloudWatch, gives you per-minute visibility into the number of objects that did not replicate to the destination bucket for each of your replication rules.
AWS Cloud Operation Competency Partners – AWS Cloud Operations covers five fundamental solution areas: Cloud Governance, Cloud Financial Management, Monitoring and Observability, Compliance and Auditing, and Operations Management. The new competency enables customers to select validated AWS Partners who offer comprehensive solutions with an integrated approach across multiple areas.
Amplify Library for Swift on macOS – Amplify is an open-source, client-side library making it easier to access a cloud backend from your front-end application code. It provides language-specific constructs to abstract low-level details of the cloud API. It helps you to integrate services such as analytics, object storage, REST or GraphQL APIs, user authentication, geolocation and mapping, and push notifications. You can now write beautiful macOS applications that connect to the same cloud backend as their iOS counterparts.
X in Y Jeff started this section a while ago to list the expansion of new services and capabilities to additional Regions. I noticed 11 Regional expansions this week:
Upcoming AWS Events And to finish this post, I recommend you check your calendars and sign up for these AWS-led events:
.Net Developer Day – .NET Enterprise Developer Day EMEA 2023 (April 25) is a free, one-day virtual conference providing enterprise developers with the most relevant information to swiftly and efficiently migrate and modernize their .NET applications and workloads on AWS.
AWS re:Inforce 2023 – Now register AWS re:Inforce, in Anaheim, California, June 13–14. AWS Chief Information Security Officer CJ Moses will share the latest innovations in cloud security and what AWS Security is focused on. The breakout sessions will provide real-world examples of how security is embedded into the way businesses operate. To learn more and get the limited discount code to register, see CJ’s blog post of Gain insights and knowledge at AWS re:Inforce 2023 in the AWS Security Blog.
AWS Global Summits – Check your calendars and sign up for the AWS Summit close to where you live or work: Seoul (May 3–4), Berlin and Singapore (May 4), Stockholm (May 11), Hong Kong (May 23), Amsterdam (June 1), London (June 7), Madrid (June 15), and Milano (June 22).
AWS Community Day – Join community-led conferences driven by AWS user group leaders close to your city: Lima (April 15), Helsinki (April 20), Chicago (June 15), Manila (June 29–30), and Munich (September 14). Recently, we have been bringing together AWS user groups from around the world into Meetup Pro accounts. Find your group and its meetups in your city!
The Official AWS Podcast – Listen each week for updates on the latest AWS news and deep dives into exciting use cases. There are also official AWS podcasts in your local languages. Check out the ones in French, German, Italian, and Spanish.
Currently, AWS Security Hub identifies controls and generates control findings in the context of security standards. Security Hub is aiming to release two new features in the first quarter of 2023 that will decouple controls from standards and streamline how you view and receive control findings.
The new features to be released are consolidated controls view and consolidated control findings. Consolidated controls view will provide you with a comprehensive view within the Security Hub console of your controls across security standards. This feature will also introduce a single unique identifier for each control across security standards.
Consolidated control findings will streamline your control findings. When this feature is turned on, Security Hub will produce a single finding for a security check even when a check is shared across multiple standards. This will reduce finding noise and help you focus on misconfigured resources in your AWS environment.
In this blog post, I’ll summarize the upcoming features, the benefit they bring to your organization, and how you can take advantage of them upon release.
Feature 1: Consolidated controls view
Currently, controls are identified, viewed, and managed in the context of individual security standards. In the Security Hub console, you first have to navigate to a specific standard to see a list of controls for that standard. Within the AWS Foundational Security Best Practices (FSBP) standard, Security Hub identifies controls by the impacted AWS service and a unique number (for example, IAM.1). For other standards, Security Hub includes the standard as part of the control identifier (for example, CIS 1.1 or PCI.AutoScaling.1).
After the release of consolidated controls view, you will be able to see a consolidated list of your controls from a new Controls page in the Security Hub console. Security Hub will also assign controls a consistent security control ID across standards. Following the current naming convention of the AWS FSBP standard, control IDs will include the relevant service and a unique number.
For example, the control AWS Config should be enabled is currently identified as Config.1 in the AWS FSBP standard, CIS 2.5 in the Center for Internet Security (CIS) AWS Foundations Benchmark v1.2.0, CIS 3.5 in the CIS AWS Foundations Benchmark v1.4.0, and PCI.Config.1 in the Payment Card Industry Data Security Standard (PCI DSS). After this release, this control will have a single identifier called Config.1 across standards. The single Controls page and consistent identifier will help you rapidly discover misconfigurations with minimal context-switching.
You’ll be able to enable a control for one or more enabled standards that include the control. You’ll also be able to disable a control for one or more enabled standards. As before, you can enable the standards that apply to your business case.
Changes to control finding fields and values after the release of consolidated controls view
After the release of consolidated controls view, note the following changes to control finding fields and values in the AWS Security Finding Format (ASFF).
ASFF field
What changes after consolidated controls view release
Example value before consolidated controls view release
Example value after consolidated controls view release
Compliance.SecurityControlId
A single control ID will apply across standards. ProductFields.ControlId will still provide the standards-based control ID.
Not applicable (new field)
EC2.2
Compliance.AssociatedStandards
Will show the standards that a control is enabled for.
Currently, multiple standards contain separate controls for the same security check. Security Hub generates a separate finding per standard for each related control that is evaluated by the same security check.
After release of the consolidated control findings feature, you’ll be able to unify control findings across standards and reduce finding noise. This, in turn, will help you more quickly investigate and remediate failed findings. When you turn on consolidated control findings, Security Hub will generate a single finding or finding update for each security check of a control, even if the check is shared across multiple standards.
For example, after you turn on the feature, you will receive a single finding for a security check of Config.1 even if you’ve enabled this control for the AWS FSBP standard, CIS AWS Foundations Benchmark v1.2.0, CIS AWS Foundations Benchmark v1.4.0, and PCI DSS. If you don’t turn on consolidated control findings, you will receive four separate findings for a security check of Config.1 if you’ve enabled this control for the AWS FSBP standard, CIS AWS Foundations Benchmark v1.2.0, CIS AWS Foundations Benchmark v1.4.0, and PCI DSS.
Changes to control finding fields and values after turning on consolidated control findings
If you turn on consolidated control findings, note the following changes to control finding fields and values in the ASFF. These changes are in addition to the changes previously described for consolidated controls view.
ASFF field
What changes after consolidated controls view release
Example value before consolidated controls view release
Example value after consolidated controls view release
New values for customer-provided finding fields after turning on consolidated control findings
When you turn on consolidated control findings, Security Hub will archive the existing findings and generate new findings. To view archived findings, you can visit the Findings page of the Security Hub console with the Record state filter set to ARCHIVED, or use the GetFindings API action. Updates you’ve made to the original finding fields in the Security Hub console or by using the BatchUpdateFindings API action will not be preserved in the new findings (if needed, you can recover this data by referring to the archived findings).
Note the following changes to customer-provided control finding fields when you turn on consolidated control findings.
Customer-provided ASFF field
Description of change after turning on consolidated control findings
Confidence
Will reset to empty state.
Criticality
Will reset to empty state.
Note
Will reset to empty state.
RelatedFindings
Will reset to empty state.
Severity
The default severity of the finding (matches the severity of the control).
Types
Will reset to standard-agnostic value.
UserDefinedFields
Will reset to empty state.
VerificationState
Will reset to empty state.
Workflow
New failed findings will have a default value of NEW. New passed findings will have a default value of RESOLVED.
How to turn consolidated control findings on and off
Follow these instructions to turn consolidated control findings on and off.
New accounts
If you enable Security Hub for an AWS account for the first time on or after the time when consolidated control findings is released, by default consolidated control findings will be turned on for your account. You can turn it off at any time. However, we recommend keeping it turned on to minimize finding noise.
If you use the Security Hub integration with AWS Organizations, consolidated control findings will be turned on for new member accounts if the administrator account has turned on the feature. If the administrator account has turned it off, it will be turned off for new subordinate AWS accounts (member accounts) as well.
Existing accounts
If your Security Hub account already existed before consolidated control findings is released, your account will have consolidated control findings turnedoff by default. You can turn it on at any time. We recommend turning it on to minimize finding noise. If you use AWS Organizations, consolidated control findings will be turned on or off for existing member accounts based on the settings of the administrator account.
To turn consolidated control findings on and off (Security Hub console)
In the navigation pane, choose Settings.
Choose the General tab.
For Controls, turn on Consolidated control findings. Turn it off to receive multiple findings for each standard.
Choose Save.
To turn consolidated control findings on and off (Security Hub API)
Run the UpdateSecurityHubConfiguration API action. Use the new ControlFindingGenerator attribute to change whether an account uses consolidated control findings:
To turn on consolidated control findings, set ControlFindingGenerator equal to SECURITY_CONTROL.
To turn it off, set ControlFindingGenerator equal to STANDARD_CONTROL.
To turn consolidated control findings on and off (AWS CLI)
In the AWS CLI, run the update-security-hub-configuration command. Use the new control-finding-generator attribute to change whether an account uses consolidated control findings:
To turn on consolidated control findings, set control-finding-generator equal to SECURITY_CONTROL.
To turn it off, set control-finding-generator equal to STANDARD_CONTROL.
API permissions for consolidated control findings
You’ll need AWS Identity and Access Management (IAM) permissions for the following new API operations in order for consolidated control findings to work as expected:
BatchGetSecurityControls – Returns account and Region-specific data about a batch of controls.
ListSecurityControlDefinitions – Returns information about controls that apply to a specified standard.
ListStandardsControlAssociations – Identifies whether a control is currently associated with or dissociated from each enabled standard.
BatchGetStandardsControlAssociations – For a batch of controls, identifies whether each control is currently associated with or dissociated from a specified standard.
BatchUpdateStandardsControlAssociations – Used to associate a control with enabled standards that include the control, or to dissociate a control from enabled standards. This is a batch substitute for the UpdateStandardsControl API action if an administrator doesn’t want to allow member accounts to associate or dissociate controls.
BatchGetControlEvaluations (private API) – Retrieves the enablement and compliance status of a control, the findings count for a control, and the overall security score for controls.
How to prepare for control finding field and value changes
If your workflows don’t rely on the specific format of any control finding fields, no action is required to prepare for the feature releases. We recommend that you immediately turn on consolidated control findings.
Consider waiting to turn on consolidated control findings if you currently rely on the Automated Security Response on AWS solution for predefined response and remediation actions. That solution does not yet support consolidated control findings. If you turn consolidated control findings on now, actions you deployed using the Automated Security Response solution will no longer work.
If you rely on the specific format of any control finding fields (for example, for custom automation), carefully review the upcoming finding field and value changes to ensure that your workflows will continue to function as intended. Note that the changes noted in the first table in this post might impact you if you rely on the specified control finding fields and values.
The changes noted in the second table and third table in this post will only impact you if you turn on consolidated control findings. For example, if you rely on ProductFields.ControlId, GeneratorId, or Title, you’ll be impacted if you turn on consolidated control findings. As another example, if you’ve created an Amazon CloudWatch Events rule that initiates an action for a specific control ID (such as invoking an AWS Lambda function if the control ID equals CIS 2.7), you’ll need to update the rule to use CloudTrail.2, the new Compliance.SecurityControlId field for that control.
If you’ve created custom insights by using the control finding fields or values that will change (see previous tables), we recommend updating those insights to use the new fields or values.
Conclusion
This post covered the control finding fields and values that will change in Security Hub after release of the consolidated controls view and consolidated control findings features. We recommend that you carefully review the changes and update your workflows to start using the new fields and values as soon as the features become available.
Security teams use Amazon Macie to discover and protect sensitive data, such as names, payment card data, and AWS credentials, in Amazon Simple Storage Service (Amazon S3). When Macie discovers sensitive data, these teams will want to see examples of the actual sensitive data found. Reviewing a sampling of the discovered data helps them quickly confirm that the object is truly sensitive according to their data protection and privacy policies.
In this post, we walk you through how your data security teams are able to use a new capability in Amazon Macie to retrieve up to 10 examples of sensitive data found in your S3 objects, so that you are able to confirm the nature of the data at a glance. Additionally, we will discuss how you are able to control who is able to use this capability, so that only authorized personnel have permissions to view these examples.
The challenge customers face
After a Macie sensitive data discovery job is run, security teams start their work. The security team will review the Macie findings to investigate the discovered sensitive data and decide what actions to take to protect such data. The findings provide details that include the severity of the finding, information on the affected S3 object, and a summary of the type, location, and amount of sensitive data found. However, Macie findings only contain pointers to data that Macie found in the object. In order to complete their investigation, customers in the past had to do additional work to extract the contents of a sensitive object, such as navigating to a different AWS account where the object is located, downloading and manually searching for keywords in a file editor, or writing and refining SQL queries by using Amazon S3 Select. The investigations are further slowed down when the object type is one that is not easily readable without additional tooling, such as big-data file types like Avro and Parquet. By using the Macie capability to retrieve sensitive data samples, you are able to review the discovered data and make decisions concerning the finding remediation.
Prerequisites
To implement the ability to retrieve and reveal samples of sensitive data, you’ll need the following prerequisites:
Note: The detailed classification results contain a record for each Amazon S3 object that you configure the job to analyze, and include the location of up to 1,000 occurrences of each type of sensitive data that Macie found in an object. Macie uses the location information in the detailed classification results to retrieve the examples of sensitive data. The detailed classification results are stored in an S3 bucket of your choice. In this post, we will refer to this bucket as DOC-EXAMPLE-BUCKET1.
Create an S3 bucket that contains sensitive data in Account B. In this post, we will refer to this bucket as DOC-EXAMPLE-BUCKET2.
(Optional) Add sensitive data to DOC-EXAMPLE-BUCKET2. This post uses a sample dataset that contains fake sensitive data. You are able to download this sample dataset, unarchive the .zip folder, and follow these steps to upload the objects to S3. This is a synthetic dataset generated by AWS that we will use for the examples in this post. All data in this blog post has been artificially created by AWS for demonstration purposes and has not been collected from any individual person. Similarly, such data does not relate back to any individual person, nor is it intended to.
Create and run a sensitive data discovery job from Account A to analyze the contents of DOC-EXAMPLE-BUCKET2.
Configure Macie to retrieve and reveal examples of sensitive data
In this section, we’ll describe how to configure Macie so that you are able to retrieve and view examples of sensitive data from Macie findings.
To configure Macie (console)
In the AWS Management Console, in the Macie delegated administrator account (Account A), follow these steps from the Amazon Macie User Guide.
To configure Macie (AWS CLI)
Confirm that you have Macie enabled.
	$ aws macie2 get-macie-session --query 'status'
	// The expected response is "ENABLED"
Confirm that you have configured the detailed classification results bucket.
$ aws macie2 get-classification-export-configuration
// The expected response is:
{"configuration": {
"s3Destination": {"bucketName": " DOC-EXAMPLE-BUCKET1 ",
"kmsKeyArn": "arn:aws:kms:<YOUR-REGION>:<YOUR-ACCOUNT-ID>:key/<KEY-USED-TO-ENCRYPT-DOC-EXAMPLE-BUCKET1>"}}}
Create a new KMS key to encrypt the retrieved examples of sensitive data. Make sure that the key is created in the same AWS Region where you are operating Macie.
Enable the feature in Macie and configure it to encrypt the data by using REVEAL-KMS-KEY. You do not specify a key policy for your new KMS key in this step. The key policy will be discussed later in the post.
Control access to read sensitive data and protect data displayed in Macie
This new Macie capability uses the AWS Identity and Access Management (IAM) policies, S3 bucket policies, and AWS KMS key policies that you have defined in your accounts. This means that in order to see examples through the Macie console or by invoking the Macie API, the IAM principal needs to have read access to the S3 object and to decrypt the object if it is server-side encrypted. It’s important to note that Macie uses the IAM permissions of the AWS principal to locate, retrieve, and reveal the samples and does not use the Macie service-linked role to perform these tasks.
Using the setup discussed in the previous section, you will walk through how to control access to the ability to retrieve and reveal sensitive data examples. To recap, you created and ran a discovery job from the Amazon Macie delegated administrator account (Account A) to analyze the contents of DOC-EXAMPLE-BUCKET2 in a member account (Account B). You configured Macie to retrieve examples and to encrypt the examples of sensitive data with the REVEAL-KMS-KEY.
The next step is to create and use an IAM role that will be assumed by other users in Account A to retrieve and reveal examples of sensitive data discovered by Macie. In this post, we’ll refer to this role as MACIE-REVEAL-ROLE.
To apply the principle of least privilege and allow only authorized personnel to view the sensitive data samples, grant the following permissions so that Macie users who assume MACIE-REVEAL-ROLE will be able to successfully retrieve and reveal examples of sensitive data:
Step 1 – Update the IAM policy for MACIE-REVEAL-ROLE.
Step 2 – Update the KMS key policy for REVEAL-KMS-KEY.
Step 3 – Update the S3 bucket policy for DOC-EXAMPLE-BUCKET2 and the KMS key policy used for its server-side encryption in Account B.
After you grant these permissions, MACIE-REVEAL-ROLE is succcesfully able to retrieve and reveal examples of sensitive data in DOC-EXAMPLE-BUCKET2, as shown in Figure 1.
Figure 1: Macie runs the discovery job from the delegated administrator account in a member account, and MACIE-REVEAL-ROLE retrieves examples of sensitive data
Step 1: Update the IAM policy
Provide the following required permissions to MACIE-REVEAL-ROLE:
Allow GetObject from DOC-EXAMPLE-BUCKET2 in Account B.
Allow decryption of DOC-EXAMPLE-BUCKET2 if it is server-side encrypted with a customer managed key (SSE-KMS).
Allow GetObject from DOC-EXAMPLE-BUCKET1.
Allow decryption of the Macie discovery results.
Allow the necessary Macie actions to retrieve and reveal sensitive data examples.
To set up the required permissions
Use the following commands to provide the permissions. Make sure to replace the placeholders with your own data.
Next, update the KMS key policy that is used to encrypt sensitive data samples that you retrieve and reveal in your delegated administrator account.
To update the key policy
Allow the MACIE-REVEAL-ROLE access to the KMS key that you created for protecting the retrieved sensitive data, using the following commands. Make sure to replace the placeholders with your own data.
Use the following commands to update the bucket policy of DOC-EXAMPLE-BUCKET2 to allow cross-account access for MACIE-REVEAL-ROLE to get objects from this bucket.
Now that you’ve put in place the necessary permissions, users who assume MACIE-REVEAL-ROLE will be able to conveniently retrieve and reveal sensitive data samples.
To retrieve and reveal sensitive data samples
In the Macie console, in the left navigation pane, choose Findings, and select a specific finding. Under Sensitive Data, choose Review.
Figure 2: The finding details panel
On the Reveal sensitive data page, choose Reveal samples.
Figure 3: The Reveal sensitive data page
Under Sensitive data, you will be able to view up to 10 examples of the sensitive data found by Amazon Macie.
Figure 4: Examples of sensitive data revealed in the Amazon Macie console
You are able to find additional information on setting up the Macie Reveal function in the Amazon Macie User Guide.
Conclusion
In this post, we showed how you are to retrieve and review examples of sensitive data that were found in Amazon S3 using Amazon Macie. This capability will make it easier for your data protection teams to review the sensitive contents found in S3 buckets across the accounts in your AWS environment. With this information, security teams are able to quickly take remediation actions, such as updating the configuration of sensitive buckets, quarantining files with sensitive information, or sending a notification to the owner of the account where the sensitive data resides. In certain cases, you are able to add the examples to an allow list in Macie if you don’t want Macie to report those as sensitive data (for example, corporate addresses or sample data that is used for testing).
The following are links to additional resources that you will be able to use to expand your knowledge of Amazon Macie capabilities and features:
If you have feedback about this post, submit comments in the Comments section below. If you have questions about this post, start a new thread on Amazon Macie re:Post.
Want more AWS Security news? Follow us on Twitter.
Today, customers in regulated industries face the challenge of defining and enforcing controls needed to meet compliance and security requirements while empowering engineers to make their design choices. In addition to addressing risk, reliability, performance, and resiliency requirements, organizations may also need to comply with frameworks and standards such as PCI DSS and NIST 800-53.
Building controls that account for service relationships and their dependencies is time-consuming and expensive. Sometimes customers restrict engineering access to AWS services and features until their cloud architects identify risks and implement their own controls.
To make that easier, today we are launching comprehensive controls management in AWS Control Tower. You can use it to apply managed preventative, detective, and proactive controls to accounts and organizational units (OUs) by service, control objective, or compliance framework. AWS Control Tower does the mapping between them on your behalf, saving time and effort.
With this new capability, you can now also use AWS Control Tower to turn on AWS Security Hub detective controls across all accounts in an OU. In this way, Security Hub controls are enabled in every AWS Region that AWS Control Tower governs.
Let’s see how this works in practice.
Using AWS Control Tower Comprehensive Controls Management In the AWS Control Tower console, there is a new Controls library section. There, I choose All controls. There are now more than three hundred controls available. For each control, I see which AWS service it is related to, the control objective this control is part of, the implementation (such as AWS Config rule or AWS CloudFormationGuard rule), the behavior (preventive, detective, or proactive), and the frameworks it maps to (such as NIST 800-53 or PCI DSS).
In the Find controls search box, I look for a preventive control called CT.CLOUDFORMATION.PR.1. This control uses a service control policy (SCP) to protect controls that use CloudFormation hooks and is required by the control that I want to turn on next. Then, I choose Enable control.
Then, I select the OU for which I want to enable this control.
Now that I have set up this control, let’s see how controls are presented in the console in categories. I choose Categories in the navigation pane. There, I can browse controls grouped as Frameworks, Services, and Control objectives. By default, the Frameworks tab is selected.
I select a framework (for example, PCI DSS version 3.2.1) to see all the related controls and control objectives. To implement a control, I can select the control from the list and choose Enable control.
I can also manage controls by AWS service. When I select the Services tab, I see a list of AWS services and the related control objectives and controls.
I choose Amazon DynamoDB to see the controls that I can turn on for this service.
I select the Control objectives tab. When I need to assess a control objective, this is where I have access to the list of related controls to turn on.
I choose Encrypt data at rest to see and search through the available controls for that control objective. I can also check which services are covered in this specific case. I type RDS in the search bar to find the controls related to Amazon Relational Database Service (RDS) for this control objective.
I choose CT.RDS.PR.16 – Require an Amazon RDS database cluster to have encryption at rest configured and then Enable control.
I select the OU for which I want to enable the control for, and I proceed. All the AWS accounts in this organization’s OU will have this control enabled in all the Regions that AWS Control Tower governs.
After a few minutes, the AWS Control Tower setup is updated. Now, the accounts in this OU have proactive control CT.RDS.PR.16 turned on. When an account in this OU deploys a CloudFormation stack, any Amazon RDS database cluster has to have encryption at rest configured. Because this control is proactive, it’ll be checked by a CloudFormation hook before the deployment starts. This saves a lot of time compared to a detective control that would find the issue only when the CloudFormation deployment is in progress or has terminated. This also improves my security posture by preventing something that’s not allowed as opposed to reacting to it after the fact.
Availability and Pricing Comprehensive controls management is available in preview today in all AWS Regions where AWS Control Tower is offered. These enhanced control capabilities reduce the time it takes you to vet AWS services from months or weeks to minutes. They help you use AWS by undertaking the heavy burden of defining, mapping, and managing the controls required to meet the most common control objectives and regulations.
There is no additional charge to use these new capabilities during the preview. However, when you set up AWS Control Tower, you will begin to incur costs for AWS services configured to set up your landing zone and mandatory controls. For more information, see AWS Control Tower pricing.
As Amazon Web Services (AWS) Security Solutions Architects, we get to talk to customers of all sizes and industries about how they want to improve their security posture and get visibility into their AWS resources. This blog post identifies the top three most commonly used Security Hub usage patterns and describes how you can use these to improve your strategy for identifying and managing findings.
Customers have told us they want to provide security and compliance visibility to the application owners in an AWS account or to the teams that use the account; others want a single-pane-of-glass view for their security teams; and other customers want to centralize everything into a security information and event management (SIEM) system, most often due to being in a hybrid scenario.
Security Hub findings are normalized into the AWS Security Findings Format (ASFF) so that users can review them in a standardized format. This reduces the need for time-consuming data conversion efforts and allows for flexible and consistent filtering of findings based on the attributes provided in the finding, as well as the use of customizable responsive actions. Partners who have integrations with Security Hub also send their findings to AWS using the ASFF to allow for consistent attribute definition and enforced criticality ratings, meaning that findings in Security Hub have a measurable rating. This helps to simplify the complexity of managing multiple findings from different providers.
Overview of the usage patterns
In this section, we outline the objectives for each usage pattern, list the typical stakeholders we have seen these patterns support, and discuss the value of deploying each one.
Usage pattern 1: Dashboard for application owners
Use Security Hub to provide visibility to application workload owners regarding the security and compliance posture of their AWS resources.
The application owner is often responsible for the security and compliance posture of the resources they have deployed in AWS. In our experience however, it is common for large enterprises to have a separate team responsible for defining security-related privileges and to not grant application owners the ability to modify configuration settings on the AWS account that is designated as the centralized Security Hub administration account. We’ll walk through how you can enable read-only access for application owners to use Security Hub to see the overall security posture of their AWS resources.
Stakeholders: Developers and cloud teams that are responsible for the security posture of their AWS resources. These individuals are often required to resolve security events and non-compliance findings that are captured with Security Hub.
Value adds for customers: Some organizations we have worked with put the onus on workload owners to own their security findings, because they have a better understanding of the nuances of the engineering, the business needs, and the overall risk that the security findings represent. This usage pattern gives the applications owners clear visibility into the security and compliance status of their workloads in the AWS accounts so that they can define appropriate mitigation actions with consideration to their business needs and risk.
Usage pattern 2: A single pane of glass for security professionals
Use Security Hub as a single pane of glass to view, triage, and take action on AWS security and compliance findings across accounts and AWS Regions.
Security Hub generates findings by running continuous, automated security checks based on supported industry standards. Additionally, Security Hub integrates with other AWS services to collect and correlate findings and uses over 60 partner integrations to simplify and prioritize findings. With these features, security professionals can use Security Hub to manage findings across their AWS landscape.
Stakeholders: Security operations, incident responders, and threat hunters who are responsible for monitoring compliance, as well as security events.
Value adds for customers: This pattern benefits customers who don’t have a SIEM but who are looking for a centralized model of security operations. By using Security Hub and aggregating findings across Regions into a single Security Hub dashboard, they get oversight of their AWS resources without the cost and complexity of managing a SIEM.
Usage pattern 3: Centralized routing to a SIEM solution
Use AWS Security Hub as a single aggregation point for security and compliance findings across AWS accounts and Regions, and route those findings in a normalized format to a centralized SIEM or log management tool.
Customers who have an existing SIEM capability and complex environments typically deploy this usage pattern. By using Security Hub, these customers gather security and compliance-related findings across the workloads in all their accounts, ingest those into their SIEM, and investigate findings or take response and remediation actions directly within their SIEM console. This mechanism also enables customers to define use cases for threat detection and analysis in a single environment, providing a holistic view of their risk.
Stakeholders: Security operations teams, incident responders, and threat hunters. This pattern supports a centralized model of security operations, where the responsibilities for monitoring and identifying both non-compliance with defined practice, as well as security events, fall within single teams within the organization.
Value adds for customers: When Security Hub aggregates the findings from workloads across accounts and Regions in a single place, those finding are normalized by using the ASFF. This means that findings are already normalized under a single format when they are sent to the SIEM. This enables faster analytics, use case definition, and dashboarding because analysts don’t have to create multi-tiered use cases for different finding structures across vendors and services.
The ASFF also enables streamlined response through security orchestration, automation, response (SOAR) tools or AWS native orchestration tools such as AWS EventBridge. With the ASFF, you can effortlessly parse and filter events based on an attribute and customize automation.
Overall, this usage pattern helps to improve the typical key performance indicators (KPIs) the SecOps function is measured against, such as Mean Time to Detect (MTTD) or Mean Time to Respond (MTTR) in the AWS environment.
Setting up each usage pattern
In this section, we’ll go over the steps for setting up each usage pattern
Usage pattern 1: Dashboard for application owners
Use the following steps to set up a Security Hub dashboard for an account owner, where the owner can view and take action on security findings.
Assign the AWS managed permission policy AWSSecurityHubReadOnlyAccess to the principal who will be assuming the role. Figure 1 shows an image of the permission statement.
Figure 1: Assign permissions
(Optional) Create custom insights in Security Hub. Using custom insights can provide a view of areas of interest for an application owner; however, creating a new insights view is not allowed unless the following additional set of permissions are granted to the application owner role or user.
Pattern 1 walkthrough: View the application owner’s security findings
After the read-only IAM policy has been created and applied, the application owner can access Security Hub to view the dashboard, which provides the application owner with a view of the overall security posture of their AWS resources. In this section, we’ll walk through the steps that the application owner can take to quickly view and assess the compliance and security of their AWS resources.
To view the application owner’s dashboard in Security Hub
Sign into the AWS Management Console and navigate to the AWS Security Hub service page. You will be presented with a summary of the findings. Then, depending on the security standards that are enabled, you will be presented with a view similar to the one shown in Figure 2.
Figure 2: Summary of aggregated Security Hub standard score
Security Hub generates its own findings by running automated and continuous checks against the rules in a set of supported security standards. On the Summary page, the Security standards card displays the security scores for each enabled standard. It also displays a consolidated security score that represents the proportion of passed controls to enabled controls across the enabled standards.
Choose the hyperlink of a security standard to get an additional summarized view, as shown in Figure 3.
Figure 3: Security Hubs standards summarized view
As you choose the hyperlinks for the specific findings, you will get additional details, along with recommended remediation instructions to take.
Figure 4: Example of finding details view
In the left menu of the Security Hub console, choose Findings to see the findings ranked according to severity. Choose the link text of the finding title to drill into the details and view additional information on possible remediation actions.
Figure 5: Findings example
In the left menu of the Security Hub console, choose Insights. You will be presented with a collection of related findings. Security Hub provides several managed insights to get you started with assessing your security posture. As shown in Figure 6, you can quickly see if your Amazon Simple Storage Service (Amazon S3) buckets have public write or read permissions. This is just one example of managed insights that help you quickly identify risks.
Figure 6: Insights view
You can create custom insights to track issues and resources that are specific to your environment. Note that creating custom insights requires IAM permissions, as described earlier in the Prerequisites for Pattern 1 section. Use the following steps to create a custom insight for compliance status.
To create a custom insight, use the Group By filter and select how you want your insights to be grouped together:
In the left menu of the Security Hub console, choose Insights, and then choose Create insight in the upper right corner.
By default, there will be filters included in the filter bar. Put the cursor in the filter bar, choose Group By, choose Compliance Status, and then choose Apply.
Figure 7: Creating a custom insight
For Insight name, enter a relevant name for your insight, and then choose Create insight. Your custom insight will be created.
In this scenario, you learned how application owners can quickly assess the resources in an AWS account and get details about security risks and recommended remediation steps. For a more hands-on walkthrough that covers how to use Security Hub, consider spending 2–3 hours going through this AWS Security Hub workshop.
Usage pattern 2: A single pane of glass for security professionals
To use Security Hub as a centralized source of security insight, we recommend that you choose to accept security data from the available integrated AWS services and third-party products that generate findings. Check the lists of available integrations often, because AWS continues to release new services that integrate with Security Hub. Figure 8 shows the Integrations page in Security Hub, where you can find information on how to accept findings from the many integrations that are available.
Figure 8: Security Hub integrations page
Solution architecture and workflow for pattern 2
As Figure 9 shows, you can visualize Security Hub as the centralized security dashboard. Here, Security Hub can act as both the consumer and issuer of findings. Additionally, if you have security findings you want sent to Security Hub that aren’t provided by a AWS Partner or AWS service, you can create a custom provider to provide the central visibility you need.
Figure 9: Security Hub findings flow
Because Security Hub is integrated with many AWS services and partner solutions, customers get improved security visibility across their AWS landscape. With the integration of Amazon Detective, it’s convenient for security analysts to use Security Hub as the centralized incident triage starting point. Amazon Detective is a security incident response service that can be used to analyze, investigate, and quickly identify the root cause of potential security issues or suspicious activities by collecting log data from AWS resources. To learn how to get started with Amazon Detective, we recommend watching this video.
Programmatically remediate high-volume workflows
Security teams increasingly rely on monitoring and automation to scale and keep up with the demands of their business. Using Security Hub, customers can configure automatic responses to findings based upon preconfigured rules. Security Hub gives you the option to create your own automated response and remediation solution or use the AWS provided solution, Security Hub Automated Response and Remediation (SHARR). SHARR is an extensible solution that provides predefined response and remediation actions (playbooks) based on industry compliance standards and best practices for security threats. For step-by-step instructions for setting up SHARR, refer to this blog post.
Routing to alerting and ticketing systems
For incidents you cannot or do not want to automatically remediate, either because the incident happened in an account with a production workload or some change control process must be followed, routing to an incident management environment may be necessary. The primary goal of incident response is reducing the time to resolution for critical incidents. Customers who use alerting or incident management systems can integrate Security Hub to streamline the time it takes to resolve incidents. ServiceNow ITSM, Slack and PagerDuty are examples of products that integrate with Security Hub. This allows for workflow processing, escalations, and notifications as required.
Additionally, Incident Manager, a capability of AWS Systems Manager, also provides response plans, an escalation path, runbook automation, and active collaboration to recover from incidents. By using runbooks, customers can set up and run automation to recover from incidents. This blog post walks through setting up runbooks.
Usage pattern 3: Centralized routing to a SIEM solution
Here, we will describe how to use Splunk as an AWS Partner SIEM solution. However, note that there are many other SIEM partners available in the marketplace; the instructions to route findings to those partners’ platforms will be available in their documentation.
Solution architecture and workflow for pattern 3
Figure 10: Security Hub findings ingestion to Splunk
Figure 10 shows the use of a Security Hub delegated administrator that aggregates findings across multiple accounts and Regions, as well as other AWS services such as GuardDuty, Amazon Macie, and Inspector. These findings are then sent to Splunk through a combination of Amazon EventBridge, AWS Lambda, and Amazon Kinesis Data Firehose.
Prerequisites for pattern 3
This solution has the following prerequisites:
Enable Security Hub in your accounts, with one account defined as the delegated admin for other accounts within AWS Organizations, and enable cross-Region aggregation.
Generate and deploy a CloudFormation template from Splunk’s automation, provided by Project Trumpet.
Enable cross-Region replication. This action can only be performed from within the delegated administrator account, or from within a standalone account that is not controlled by a delegated administrator. The aggregation Region must be a Region that is enabled by default.
Pattern 3 walkthrough: Set up centralized routing to a SIEM
To get started, first designate a Security Hub delegated administrator and configure cross-Region replication. Then you can configure integration with Splunk.
To designate a delegated administrator and configure cross-Region replication
Perform these steps to configure cross-Region replication:
Sign in to the account to which you delegated Security Hub administration, and in the console, navigate to the Security Hub dashboard in your desired aggregation Region. You must have the correct permissions to access Security Hub and make this change.
Choose Settings, choose Regions, and then choose Configure finding aggregation.
Select the radio button that displays the Region you are currently in, and then choose Save.
You will then be presented with all available Regions in which you can aggregate findings. Select the Regions you want to be part of the aggregation. You also have the option to automatically link future Regions that Security Hub becomes enabled in.
Choose Save.
You have now enabled multi-Region aggregation. Navigate back to the dashboard, where findings will start to be replicated into a single view. The time it takes to replicate the findings from the Regions will vary. We recommend waiting 24 hours for the findings to be replicated into your aggregation Region.
To configure integration with Splunk
Note: These actions require that you have appropriate permissions to deploy a CloudFormation template.
Navigate to https://splunktrumpet.github.io/ and enter your HEC details: the endpoint URL and HEC token. Leave Automatically generate the required HTTP Event Collector tokens on your Splunk environment unselected.
Under AWS data source configuration, select only AWS CloudWatch Events, with the Security Hub findings – Imported filter applied.
Download the CloudFormation template to your local machine.
Sign in to the AWS Management Console in the account and Region where your Security Hub delegated administrator and Region aggregation are configured.
Navigate to the CloudFormation console and choose Create stack.
Choose Template is ready, and then choose Upload a template file. Upload the CloudFormation template you previously downloaded from the Splunk Trumpet page.
In the CloudFormation console, on the Specify Details page, enter a name for the stack. Keep all the default settings, and then choose Next.
Keep all the default settings for the stack options, and then choose Next to review.
On the review page, scroll to the bottom of the page. Select the check box under the Capabilities section, next to the acknowledgment that AWS CloudFormation might create IAM resources with custom names.
The CloudFormation template will take approximately 15–20 minutes to complete.
Test the solution for pattern 3
If you have GuardDuty enabled in your account, you can generate sample findings. Security Hub will ingest these findings and invoke the EventBridge rule to push them into Splunk. Alternatively, you can wait for findings to be generated from the periodic checks that are performed by Security Hub. Figure 11 shows an example of findings displayed in the Security Hub dashboard in Splunk.
Figure 11: Example of the Security Hub dashboard in Splunk
Conclusion
AWS Security Hub provides multiple ways you can use to quickly assess and prioritize your security alerts and security posture. In this post, you learned about three different usage patterns that we have seen our customers implement to take advantage of the benefits and integrations offered by Security Hub. Note that these usage patterns are not mutually exclusive, but can be used together as needed.
To extend these solutions further, you can enrich Security Hub metadata with additional context by using tags, as described in this post. Configure Security Hub to ingest findings from a variety of AWS Partners to provide additional visibility and context to the overall status of your security posture. To start your 30-day free trial of Security Hub, visit AWS Security Hub.
If you have feedback about this blog post, submit comments in the Comments section below. If you have questions about this blog post, please start a new thread on the Security Hub forum or contact AWS Support.
Want more AWS Security news? Follow us on Twitter.
AWS Step Functions now has 14 new intrinsic functions that help you process data more efficiently and make it easier to perform data processing tasks such as array manipulation, JSON object manipulation, and math functions within your workflows without having to invoke downstream services or add Task states.
Amazon QuickSight launches a new user interface for dataset management that replaces the existing popup dialog modal with a full-page experience, providing a clearer breakdown of dataset management categories.
AWS GameKit adds Unity support. With this release for Unity, you can integrate cloud-based game features into Win64, MacOS, Android, or iOS games from both the Unreal and Unity engines with just a few clicks.
AWS and VMware announce VMware Cloud on AWS integration with Amazon FSx for NetApp ONTAP. Read more in Veliswa‘s blog post.
The AWS Region in the United Arab Emirates (UAE) is now open. More info in Marcia‘s blog post.
Other AWS News A few more blog posts you might have missed:
Easy analytics and cost-optimization with Amazon Redshift Serverless – Four different use cases of Redshift Serverless are discussed in this post.
Building cost-effective AWS Step Functions workflows – In this blog post, Ben explains the difference between Standard and Express Workflows, including costs, migrating from Standard to Express, and some interesting ways of using both together.
For AWS open-source news and updates, here’s the latest newsletter curated by Ricardo to bring you the most recent updates on open-source projects, posts, events, and more.
Upcoming AWS Events Depending on where you are on this planet, there are many opportunities to meet and learn:
AWS Summits – Come together to connect, collaborate, and learn about AWS. Registration is open for the following in-person AWS Summits: Ottawa (September 8), New Delhi (September 9), Mexico City (September 21–22), Bogotá (October 4), and Singapore (October 6).
With AWS Security Hub you are able to manage your security posture in AWS, perform security best practice checks, aggregate alerts, and automate remediation. Now you are able to use Amazon Simple Notification Service (Amazon SNS) to subscribe to the new Security Hub Announcements topic to receive updates about new Security Hub services and features, newly supported standards and controls, and other Security Hub changes.
Introducing the Security Hub Announcements topic
Amazon SNS follows the publish/subscribe (pub/sub) messaging model, in which notifications are delivered to you by using a push mechanism that eliminates the need for you to periodically check or poll for new information and updates. You can now use this push mechanism to receive notifications about Security Hub by subscribing to the dedicated Security Hub Announcements topic.
The Security Hub Announcements topic publishes the following types of notifications:
General notifications
Upcoming standards and controls
New AWS Regions supported
New standards and controls
Updated standards and controls
Retired standards and controls
Updates to the AWS Security Finding Format (ASFF)
New integrations
New features
Changes to existing features
How to use the Security Hub Announcements topic
You can subscribe to the SNS topic for Security Hub Announcements to receive notification messages about newly released finding types, updates to the existing finding types, and other functionality changes. By subscribing to the SNS topic, you will receive Security Hub Announcements messages as soon as they are published. The notifications are available in all protocols that Amazon SNS supports, such as email and SMS. For more information about supported protocols in Amazon SNS, see Subscribing to an Amazon SNS topic.
The Security Hub Announcements topic is available in all AWS Regions in the aws and aws-cn partitions, but is not yet available in the AWS GovCloud (US) Regions (the aws-us-gov partition). Later in this post, we’ll show you how to subscribe to the Security Hub Announcements topic in a specific AWS Region by using the topic Amazon Resource Name (ARN) for that Region. The SNS topic messages are the same across Regions in a partition, so you can choose to subscribe to only one Region in a partition to avoid receiving duplicate information.
However, if you want to invoke an AWS Lambda function in reaction to a Security Hub Announcements message, you must subscribe to the topic ARN that is in the same Region as the Lambda function. The Lambda function can receive the SNS topic message payload as an input parameter and manipulate the information in the message, publish the message to other SNS topics, or send the message to other AWS services. For more information, see Subscribing a function to a topic in the Amazon SNS Developer Guide.
The same is true if you want to subscribe an Amazon Simple Queue Service (Amazon SQS) queue to the Security Hub Announcements topic, you must use a topic ARN that is in the same Region as the SQS queue. The SQS queue can be used to persist announcement SNS topic messages in the queue for other applications to process at a later time. For more information, see Subscribing an Amazon SQS queue to an Amazon SNS topic in the Amazon SQS Developer Guide.
IAM permissions
Your user account must have sns::subscribe AWS Identity and Access Management (IAM) permissions to subscribe to an SNS topic. For more information on IAM permissions for Amazon SNS, see Using identity-based policies with Amazon SNS.
Subscribe to the Security Hub Announcements topic
The following is the list of Security Hub Announcements topic ARNs for each currently supported Region. The examples in this post use the US West (Oregon) Region (us-west-2), but you can update the procedures with one of the following ARNs to use a different supported Region.
The two procedures that follow show you how to subscribe an email address to the Security Hub Announcements topic by using the AWS Management Console and the AWS CLI.
To subscribe an email address to the Security Hub Announcements topic (console)
For Endpoint, enter an email address that you can use to receive the notification.
Choose Create subscription.
In your email application, open the message from AWS Notifications and open the link to confirm your subscription. Your web browser displays a confirmation response from Amazon SNS, similar to that shown in Figure 1.
The following steps show you how to subscribe an email address to the Security Hub Announcements topic by using the AWS Command Line Interface (AWS CLI).
To subscribe an email address to the Security Hub Announcements topic (AWS CLI)
Run the following command in the AWS CLI, replacing <[email protected]> with your email address, and optionally replacing the ARN and reference to us-west-2 if you want to use a different Region: aws sns --region us-west-2 subscribe --topic-arn arn:aws:sns:us-west-2:393883065485:SecurityHubAnnouncements --protocol email --notification-endpoint<[email protected]>
In your email application, open the message from AWS Notifications and open the link to confirm your subscription.
Your web browser displays a confirmation response from Amazon SNS, similar to that shown in Figure 1.
Example subscription responses
The following sections contain examples of a message announcing new standard controls supported by Security Hub in email and sqs protocol types.
Example message from an email subscription (protocol type: email)
{"AnnouncementType":"NEW_STANDARDS_CONTROLS", “Title”:”[New Controls] 36 new Security Hub controls added to the AWS Foundational Security Best Practices standard”, "Description":"We have added 36 new controls to the AWS Foundational Security Best Practices standard. These include controls for Amazon Auto Scaling (AutoScaling.3, AutoScaling.4, AutoScaling.6), AWS CloudFormation (CloudFormation.1), Amazon CloudFront (CloudFront.10), Amazon Elastic Compute Cloud (Amazon EC2) (EC2.23, EC2.24, EC2.27), Amazon Elastic Container Registry (Amazon ECR) (ECR.1, ECR.2), Amazon Elastic Container Service (Amazon ECS) (ECS.3, ECS.4, ECS.5, ECS.8, ECS.10, ECS.12), Amazon Elastic File System (Amazon EFS) (EFS.3, EFS.4), Amazon Elastic Kubernetes Service (Amazon EKS) (EKS.2), Elastic Load Balancing (ELB.12, ELB.13, ELB.14), Amazon Kinesis (Kinesis.1), AWS Network Firewall (NetworkFirewall.3, NetworkFirewall.4, NetworkFirewall.5), Amazon OpenSearch Service (Opensearch.7), Amazon Redshift (Redshift.9), Amazon Simple Storage Service (Amazon S3) (S3.13), Amazon Simple Notification Service (SNS.2), AWF WAF (WAF.2, WAF.3, WAF.4, WAF.6, WAF.7, WAF.8). If you enabled the AWS Foundational Security Best Practices standard in an account and configured Security Hub to automatically enable new controls, these controls are enabled by default. Availability of controls can vary by Region."}
Example message from an SQS queue subscription (protocol type: sqs)
The following message shows the additional metadata included with an SQS subscription to the Security Hub Announcements topic. For more information about the metadata included in an SNS topic message delivered to an SQS queue, see Fanout to Amazon SQS Queues.
{
  "Type" : "Notification",
  "MessageId" : "c9c03e46-69df-5c3c-84e9-6520708ac394",
  "TopicArn" : "arn:aws:sns:us-west-2:393883065485:SecurityHubAnnouncements",
  "Message" : "{\"AnnouncementType\":\"NEW_STANDARDS_CONTROLS\",\"Title\":\"[New Controls] 36 new Security Hub controls added to the AWS Foundational Security Best Practices standard\",\"Description\":\"We have added 36 new controls to the AWS Foundational Security Best Practices standard. These include controls for Amazon Auto Scaling (AutoScaling.3, AutoScaling.4, AutoScaling.6), AWS CloudFormation (CloudFormation.1), Amazon CloudFront (CloudFront.10), Amazon Elastic Compute Cloud (Amazon EC2) (EC2.23, EC2.24, EC2.27), Amazon Elastic Container Registry (Amazon ECR) (ECR.1, ECR.2), Amazon Elastic Container Service (Amazon ECS) (ECS.3, ECS.4, ECS.5, ECS.8, ECS.10, ECS.12), Amazon Elastic File System (Amazon EFS) (EFS.3, EFS.4), Amazon Elastic Kubernetes Service (Amazon EKS) (EKS.2), Elastic Load Balancing (ELB.12, ELB.13, ELB.14), Amazon Kinesis (Kinesis.1), AWS Network Firewall (NetworkFirewall.3, NetworkFirewall.4, NetworkFirewall.5), Amazon OpenSearch Service (Opensearch.7), Amazon Redshift (Redshift.9), Amazon Simple Storage Service (Amazon S3) (S3.13), Amazon Simple Notification Service (SNS.2), AWF WAF (WAF.2, WAF.3, WAF.4, WAF.6, WAF.7, WAF.8). If you enabled the AWS Foundational Security Best Practices standard in an account and configured Security Hub to automatically enable new controls, these controls are enabled by default. Availability of controls can vary by Region. \"}",
  "Timestamp" : "2022-08-04T18:59:33.319Z",
  "SignatureVersion" : "1",
  "Signature" : "GdKokPEUexpKZn5da5u/p5eZF1cE3JUyL0uPVKmPnDzd3orkk5jJ211VsOflUFi6V9lSXF/V6RBpQN/9f3+JBFBprng7BRQwT9I4jSa1xOn1L3xKXEVGvWI6nl1oDqBl21Pj3owV+NZ+Exd2W0dpgg8B1LG4bYq5T73MjHjWGtelcBa15TpIz/+rynqanXCKCvc/50V/XZLjA5M7gU6Dzs9CULIjkdEpCsw5FvSxbtkEd6Ktx4LH7Zq6FlPKNli3EaEHRKh9uYPo6sR/yvF4RWg3E9O4dVsK7A8uTdR+pwVCU1M601KMRxO1OWF8VIdvyPINJND8Nu/70GRA2L+MRA==",
  "SigningCertURL" : "https://sns.us-west-2.amazonaws.com/SimpleNotificationService-56e67fcb41f6fec09b0196692625d385.pem",
  "UnsubscribeURL" : "https://sns.us-west-2.amazonaws.com/?Action=Unsubscribe&SubscriptionArn=arn:aws:sns:us-west-2:393883065485:SecurityHubAnnouncements:1eb29a83-8726-4366-891c-293ad5e35a53"
}
Note: You need to set up the SQS access policy in order for SNS to push message to the SNS queue. For more information, see Basic examples of Amazon SQS policies.
Available now
The SNS topic for Security Hub Announcements is available today in the Regions described in this post. Subscribe now to stay informed of Security Hub updates. With Amazon SNS, there is no minimum fee, and you pay only for what you use. For more information, see the Amazon SNS pricing page.
If you have feedback about this post, submit comments in the Comments section below. If you have questions about this post, contact AWS Support. You can also start a new thread on AWS Security Hub re:Post to get answers from the community.
Want more AWS Security news? Follow us on Twitter.
AWS Security Hub is a central dashboard for security, risk management, and compliance findings from AWS Audit Manager, AWS Firewall Manager, Amazon GuardDuty, IAM Access Analyzer, Amazon Inspector, and many other AWS and third-party services. You can use the insights from Security Hub to get an understanding of your compliance posture across multiple AWS accounts. It is not unusual for a single AWS account to have more than a thousand Security Hub findings. Multi-account and multi-Region environments may have tens or hundreds of thousands of findings. With so many findings, it is important for you to get a summary of the most important ones. Navigating through duplicate findings, false positives, and benign positives can take time.
In this post, we demonstrate how to export those findings to comma separated values (CSV) formatted files in an Amazon Simple Storage Service (Amazon S3) bucket. You can analyze those files by using a spreadsheet, database applications, or other tools. You can use the CSV formatted files to change a set of status and workflow values to align with your organizational requirements, and update many or all findings at once in Security Hub.
The solution described in this post, called CSV Manager for Security Hub, uses an AWS Lambda function to export findings to a CSV object in an S3 bucket, and another Lambda function to update Security Hub findings by modifying selected values in the downloaded CSV file from an S3 bucket. You use an Amazon EventBridge scheduled rule to perform periodic exports (for example, once a week). CSV Manager for Security Hub also has an update function that allows you to update the workflow, customer-specific notation, and other customer-updatable values for many or all findings at once. If you’ve set up a Region aggregator in Security Hub, you should configure the primary CSV Manager for Security Hub stack to export findings only from the aggregator Region. However, you may configure other CSV Manager for Security Hub stacks that export findings from specific Regions or from all applicable Regions in specific accounts. This allows application and account owners to view their own Security Hub findings without having access to other findings for the organization.
How it works
CSV Manager for Security Hub has two main features:
Export Security Hub findings to a CSV object in an S3 bucket
Update Security Hub findings from a CSV object in an S3 bucket
Overview of the export function
The overview of the export function CsvExporter is shown in Figure 1.
Figure 1: Architecture diagram of the export function
Figure 1 shows the following numbered steps:
In the AWS Management Console, you invoke the CsvExporter Lambda function with a test event.
The export function calls the Security Hub GetFindings API action and gets a list of findings to export from Security Hub.
The export function converts the most important fields to identify and sort findings to a 37-column CSV format (which includes 12 updatable columns) and writes to an S3 bucket.
Overview of the update function
To update existing Security Hub findings that you previously exported, you can use the update function CsvUpdater to modify the respective rows and columns of the CSV file you exported, as shown in Figure 2. There are 12 modifiable columns out of 37 (any changes to other columns are ignored), which are described in more detail in Step 3: View or update findings in the CSV file later in this post.
Figure 2: Architecture diagram of the update function
Figure 2 shows the following numbered steps:
You download the CSV file that the CsvExporter function generated from the S3 bucket and update as needed.
You upload the CSV file that contains your updates to the S3 bucket.
In the AWS Management Console, you invoke the CsvUpdater Lambda function with a test event containing the URI of the CSV file.
CsvUpdater reads the updated CSV file from the S3 bucket.
CsvUpdater identifies the minimum set of updates and invokes the Security Hub BatchUpdateFindings API action.
Step 1: Use the CloudFormation template to deploy the solution
You can find the latest code in the aws-security-hub-csv-manager GitHub repository, where you can also contribute to the sample code. The following commands show how to deploy the solution by using the AWS CDK. First, the AWS CDK initializes your environment and uploads the AWS Lambda assets to an S3 bucket. Then, you deploy the solution to your account by using the following commands. Replace <INSERT_AWS_ACCOUNT> with your account number, and replace <INSERT_REGION> with the AWS Region that you want the solution deployed to, for example us-east-1.
Choose the following Launch Stack button to open the AWS CloudFormation console pre-loaded with the template for this solution:
In the Parameters section, as shown in Figure 3, enter your values.
Figure 3: CloudFormation template variables
For What folder for CSV Manager for Security Hub Lambda code, leave the default Code. For What folder for CSV Manager for Security Hub exports, leave the default Findings.
These are the folders within the S3 bucket that the CSV Manager for Security Hub CloudFormation template creates to store the Lambda code, as well as where the findings are exported by the Lambda function.
For Frequency, for this solution you can leave the default value cron(0 8 ? * SUN *). This default causes automatic exports to occur every Sunday at 8:00 AM local time using an EventBridge scheduled rule. For more information about how to update this value to meet your needs, see Schedule Expressions for Rules in the Amazon CloudWatch Events User Guide.
The values you enter for the Regions field depend on whether you have configured an aggregation Region in Security Hub.
If you have configured an aggregation Region, enter only that Region code, for example eu-north-1, as shown in Figure 3.
If you haven’t configured an aggregation Region, enter a comma-separated list of Regions in which you have enabled Security Hub, for example us-east-1, eu-west-1, eu-west-2.
If you would like to export findings from all Regions where Security Hub is enabled, leave the Regions field blank. Regions where Security Hub is not enabled will generate a message and will be skipped.
Choose Next.
The CloudFormation stack deploys the necessary resources, including an EventBridge scheduling rule, AWS System Managers Automation documents, an S3 bucket, and Lambda functions for exporting and updating Security Hub findings.
After you deploy the CloudFormation stack
After you create the CSV Manager for Security Hub stack, you can do the following:
Perform a bulk update of Security Hub findings by following the instructions in Step 3: View or update findings in the CSV file later in this post. You can make changes to one or more of the 12 updatable columns of the CSV file, and perform the update function to update some or all Security Hub findings.
Step 2: Export Security Hub findings to a CSV file
You can export Security Hub findings from the AWS Lambda console. To do this, you create a test event and invoke the CsvExporter Lambda function. CsvExporter exports all Security Hub findings from all applicable Regions to a single CSV file in the S3 bucket for CSV Manager for Security Hub.
To export Security Hub findings to a CSV file
In the AWS Lambda console, find the CsvExporter Lambda function and select it.
On the Code tab, choose the down arrow at the right of the Test button, as shown in Figure 4, and select Configure test event.
Figure 4: The down arrow at the right of the Test button
To create an empty test event, on the Configure test event page, do the following:
Choose Create a new event.
Enter an event name; in this example we used testEvent.
For Template, leave the default hello-world.
For Event JSON, enter the JSON object {} as shown in Figure 5.
Figure 5: Creating an empty test event
Choose Save to save the empty test event.
To invoke the Lambda function, choose the Test button, as shown in Figure 6.
Figure 6: Test button to invoke the Lambda function
On the Execution Results tab, note the following details, which you will need for the next step.
Locate the CSV object that matches the value of “exportKey” (in this example, DOC-EXAMPLE-OBJECT) in the S3 bucket that matches the value of “bucket” (in this example, DOC-EXAMPLE-BUCKET).
Now you can view or update the findings in the CSV file, as described in the next section.
Step 3: (Optional) Using filters to limit CSV results
In your test event, you can specify any filter that is accepted by the GetFindings API action. You do this by adding a filter key to your test event. The filter key can either contain the word HighActive (which is a predefined filter configured as a default for selecting active high-severity and critical findings, as shown in Figure 8), or a JSON filter object.
Figure 8 depicts an example JSON filter that performs the same filtering as the HighActive predefined filter.
To use filters to limit CSV results
In the AWS Lambda console, find the CsvExporter Lambda function and select it.
On the Code tab, choose the down arrow at the right of the Test button, as shown in Figure 7, and select Configure test event.
Figure 7: The down arrow at the right of the Test button
To create a test event containing a filter, on the Configure test event page, do the following:
Choose Create a new event.
Enter an event name; in this example we used filterEvent.
For Template, select testEvent,
For Event JSON, enter the following JSON object, as shown in Figure 8.
Locate the CSV object that matches the value of “exportKey” (in this example, DOC-EXAMPLE-OBJECT) in the S3 bucket that matches the value of “bucket” (in this example, DOC-EXAMPLE-BUCKET).
The results in this CSV file should be a filtered set of Security Hub findings according to the filter you specified above. You can now proceed to step 4 if you want to view or update findings.
Step 4: View or update findings in the CSV file
You can use any program that allows you to view or edit CSV files, such as Microsoft Excel. The first row in the CSV file are the column names. These column names correspond to fields in the JSON objects that are returned by the GetFindings API action.
Warning: Do not modify the first two columns, Id (column A) or ProductArn (column B). If you modify these columns, Security Hub will not be able to locate the finding to update, and any other changes to that finding will be discarded.
You can locally modify any of the columns in the CSV file, but only 12 columns out of 37 columns will actually be updated if you use CsvUpdater to update Security Hub findings. The following are the 12 columns you can update. These correspond to columns C through N in the CSV file.
Column name
Spreadsheet column
Description
Criticality
C
An integer value between 0 and 100.
Confidence
D
An integer value between 0 and 100.
NoteText
E
Any text you wish
NoteUpdatedBy
F
Automatically updated with your AWS principal user ID.
CustomerOwner*
G
Information identifying the owner of this finding (for example, email address).
CustomerIssue*
H
A Jira issue or another identifier tracking a specific issue.
CustomerTicket*
I
A ticket number or other trouble/problem tracking identification.
ProductSeverity**
J
A floating-point number from 0.0 to 99.9.
NormalizedSeverity**
K
An integer between 0 and 100.
SeverityLabel
L
One of the following:
INFORMATIONAL
LOW
MEDIUM
HIGH
HIGH
CRITICAL
VerificationState
M
One of the following:
UNKNOWN — Finding has not been verified yet.
TRUE_POSITIVE — This is a valid finding and should be treated as a risk.
FALSE_POSITIVE — This an incorrect finding and should be ignored or suppressed.
BENIGN_POSITIVE — This is a valid finding, but the risk is not applicable or has been accepted, transferred, or mitigated.
Workflow
N
One of the following:
NEW — This is a new finding that has not been reviewed.
NOTIFIED — The responsible party or parties have been notified of this finding.
RESOLVED — The finding has been resolved.
SUPPRESSED — A false or benign finding has been suppressed so that it does not appear as a current finding in Security Hub.
* These columns are stored inside the UserDefinedFields field of the updated findings. The column names imply a certain kind of information, but you can put any information you wish.
** These columns are stored inside the Severity field of the updated findings. These values have a fixed format and will be rejected if they do not meet that format.
Columns with fixed text values (L, M, N) in the previous table can be specified in mixed case and without underscores—they will be converted to all uppercase and underscores added in the CsvUpdater Lambda function. For example, “false positive” will be converted to “FALSE_POSITIVE”.
Step 5: Create a test event and update Security Hub by using the CSV file
If you want to update Security Hub findings, make your changes to columns C through N as described in the previous table. After you make your changes in the CSV file, you can update the findings in Security Hub by using the CSV file and the CsvUpdater Lambda function.
Use the following procedure to create a test event and run the CsvUpdater Lambda function.
To create a test event and run the CsvUpdaterLambda function
In the AWS Lambda console, find the CsvUpdater Lambda function and select it.
On the Code tab, choose the down arrow to the right of the Test button, as shown in Figure 10, and select Configure test event.
Figure 10: The down arrow to the right of the Test button
To create a test event as shown in Figure 11, on the Configure test event page, do the following:
Choose Create a new event.
Enter an event name; in this example we used testEvent.
Replace <s3ObjectUri> with the full URI of the S3 object where the updated CSV file is located.
Replace <aggregationRegionName> with your Security Hub aggregation Region, or the primary Region in which you initially enabled Security Hub.
Figure 11: Create and save a test event for the CsvUpdater Lambda function
Choose Save.
Choose the Test button, as shown in Figure 12, to invoke the Lambda function.
Figure 12: Test button to invoke the Lambda function
To verify that the Lambda function ran successfully, on the Execution Results tab, review the results for “message”: “Success”, as shown in the following example. Note that the results may be thousands of lines long.
The processed array lists every successfully updated finding by Id and ProductArn.
If any of the findings were not successfully updated, their Id and ProductArn appear in the unprocessed array. In the previous example, no findings were unprocessed.
The value s3://DOC-EXAMPLE-BUCKET/DOC-EXAMPLE-OBJECT is the URI of the S3 object from which your updates were read.
Cleaning up
To avoid incurring future charges, first delete the CloudFormation stack that you deployed in Step 1: Use the CloudFormation template to deploy the solution. Next, you need to manually delete the S3 bucket deployed with the stack. For instructions, see Deleting a bucket in the Amazon Simple Storage Service User Guide.
Conclusion
In this post, we showed you how you can export Security Hub findings to a CSV file in an S3 bucket and update the exported findings by using CSV Manager for Security Hub. We showed you how you can automate this process by using AWS Lambda, Amazon S3, and AWS Systems Manager. Full documentation for CSV Manager for Security Hub is available in the aws-security-hub-csv-manager GitHub repository. You can also investigate other ways to manage Security Hub findings by checking out our blog posts about Security Hub integration with Amazon OpenSearch Service, Amazon QuickSight, Slack, PagerDuty, Jira, or ServiceNow.
If you have feedback about this post, submit comments in the Comments section below. If you have questions about this post, start a new thread on the Security Hub re:Post. To learn more or get started, visit AWS Security Hub.
Want more AWS Security news? Follow us on Twitter.
When building serverless applications using AWS Lambda, there are a number of considerations regarding security, governance, and compliance. This post highlights how Lambda, as a serverless service, simplifies cloud security and compliance so you can concentrate on your business logic. It covers controls that you can implement for your Lambda workloads to ensure that your applications conform to your organizational requirements.
The Shared Responsibility Model
The AWS Shared Responsibility Model distinguishes between what AWS is responsible for and what customers are responsible for with cloud workloads. AWS is responsible for “Security of the Cloud” where AWS protects the infrastructure that runs all the services offered in the AWS Cloud. Customers are responsible for “Security in the Cloud”, managing and securing their workloads. When building traditional applications, you take on responsibility for many infrastructure services, including operating systems and network configuration.
Traditional application shared responsibility
One major benefit when building serverless applications is shifting more responsibility to AWS so you can concentrate on your business applications. AWS handles managing and patching the underlying servers, operating systems, and networking as part of running the services.
Serverless application shared responsibility
For Lambda, AWS manages the application platform where your code runs, which includes patching and updating the managed language runtimes. This reduces the attack surface while making cloud security simpler. You are responsible for the security of your code and AWS Identity and Access Management (IAM) to the Lambda service and within your function.
Lambda functions run in separate isolated AWS accounts that are dedicated to the Lambda service. Lambda invokes your code in a secure and isolated runtime environment within the Lambda service account. A runtime environment is a collection of resources running in a dedicated hardware-virtualized Micro Virtual Machines (MVM) on a Lambda worker node.
Lambda workers are bare metalEC2 Nitro instances, which are managed and patched by the Lambda service team. They have a maximum lease lifetime of 14 hours to keep the underlying infrastructure secure and fresh. MVMs are created by Firecracker, an open source virtual machine monitor (VMM) that uses Linux’s Kernel-based Virtual Machine (KVM) to create and manage MVMs securely at scale.
MVMs maintain a strong separation between runtime environments at the virtual machine hardware level, which increases security. Runtime environments are never reused across functions, function versions, or AWS accounts.
Isolation model for AWS Lambda workers
Network security
Lambda functions always run inside secure Amazon Virtual Private Cloud (Amazon VPCs) owned by the Lambda service. This gives the Lambda function access to AWS services and the public internet. There is no direct network inbound access to Lambda workers, runtime environments, or Lambda functions. All inbound access to a Lambda function only comes via the Lambda Invoke API, which sends the event object to the function handler.
You can configure a Lambda function to connect to private subnets in a VPC in your account if necessary, which you can control with IAM condition keys . The Lambda function still runs inside the Lambda service VPC but sends all network traffic through your VPC. Function outbound traffic comes from your own network address space.
AWS Lambda service VPC with VPC-to-VPC NAT to customer VPC
To give your VPC-connected function access to the internet, route outbound traffic to a NAT gateway in a public subnet. Connecting a function to a public subnet doesn’t give it internet access or a public IP address, as the function is still running in the Lambda service VPC and then routing network traffic into your VPC.
All internal AWS traffic uses the AWS Global Backbone rather than traversing the internet. You do not need to connect your functions to a VPC to avoid connectivity to AWS services over the internet. VPC connected functions allow you to control and audit outbound network access.
You can use security groups to control outbound traffic for VPC-connected functions and network ACLs to block access to CIDR IP ranges or ports. VPC endpoints allow you to enable private communications with supported AWS services without internet access.
You can use VPC Flow Logs to audit traffic going to and from network interfaces in your VPC.
Runtime environment re-use
Each runtime environment processes a single request at a time. After Lambda finishes processing the request, the runtime environment is ready to process an additional request for the same function version. For more information on how Lambda manages runtime environments, see Understanding AWS Lambda scaling and throughput.
Data can persist in the local temporary filesystem path, in globally scoped variables, and in environment variables across subsequent invocations of the same function version. Ensure that you only handle sensitive information within individual invocations of the function by processing it in the function handler, or using local variables. Do not re-use files in the local temporary filesystem to process unencrypted sensitive data. Do not put sensitive or confidential information into Lambda environment variables, tags, or other freeform fields such as Name fields.
AWS recommends using multiple accounts to isolate your resources because they provide natural boundaries for security, access, and billing. Use AWS Organizations to manage and govern individual member accounts centrally. You can use AWS Control Tower to automate many of the account build steps and apply managed guardrails to govern your environment. These include preventative guardrails to limit actions and detective guardrails to detect and alert on non-compliance resources for remediation.
Lambda access controls
Lambda permissions define what a Lambda function can do, and who or what can invoke the function. Consider the following areas when applying access controls to your Lambda functions to ensure least privilege:
Execution role
Lambda functions have permission to access other AWS resources using execution roles. This is an AWS principal that the Lambda service assumes which grants permissions using identity policy statements assigned to the role. The Lambda service uses this role to fetch and cache temporary security credentials, which are then available as environment variables during a function’s invocation. It may re-use them across different runtime environments that use the same execution role.
Ensure that each function has its own unique role with the minimum set of permissions..
Identity/user policies
IAM identity policies are attached to IAM users, groups, or roles. These policies allow users or callers to perform operations on Lambda functions. You can restrict who can create functions, or control what functions particular users can manage.
Resource policies
Resource policies define what identities have fine-grained inbound access to managed services. For example, you can restrict which Lambda function versions can add events to a specific Amazon EventBridge event bus. You can use resource-based policies on Lambda resources to control what AWS IAM identities and event sources can invoke a specific version or alias of your function. You also use a resource-based policy to allow an AWS service to invoke your function on your behalf. To see which services support resource-based policies, see “AWS services that work with IAM”.
Attribute-based access control (ABAC)
With attribute-based access control (ABAC), you can use tags to control access to your Lambda functions. With ABAC, you can scale an access control strategy by setting granular permissions with tags without requiring permissions updates for every new user or resource as your organization scales. You can also use tag policies with AWS Organizations to standardize tags across resources.
Permissions boundaries
Permissions boundaries are a way to delegate permission management safely. The boundary places a limit on the maximum permissions that a policy can grant. For example, you can use boundary permissions to limit the scope of the execution role to allow only read access to databases. A builder with permission to manage a function or with write access to the applications code repository cannot escalate the permissions beyond the boundary to allow write access.
Service control policies
When using AWS Organizations, you can use Service control policies (SCPs) to manage permissions in your organization. These provide guardrails for what actions IAM users and roles within the organization root or OUs can do. For more information, see the AWS Organizations documentation, which includes example service control policies.
Code signing
As you are responsible for the code that runs in your Lambda functions, you can ensure that only trusted code runs by using code signing with the AWS Signer service. AWS Signer digitally signs your code packages and Lambda validates the code package before accepting the deployment, which can be part of your automated software deployment process.
Auditing Lambda configuration, permissions and access
You should audit access and permissions regularly to ensure that your workloads are secure. Use the IAM console to view when an IAM role was last used.
IAM last used
IAM access advisor
Use IAM access advisor on the Access Advisor tab in the IAM console to review when was the last time an AWS service was used from a specific IAM user or role. You can use this to remove IAM policies and access from your IAM roles.
You can validate policies using IAM Access Analyzer, which provides over 100 policy checks with security warnings for overly permissive policies. To learn more about policy checks provided by IAM Access Analyzer, see “IAM Access Analyzer policy validation”.
You can also generate IAM policies based on access activity from CloudTrail logs, which contain the permissions that the role used in your specified date range.
IAM Access Analyzer
AWS Config
AWS Config provides you with a record of the configuration history of your AWS resources. AWS Config monitors the resource configuration and includes rules to alert when they fall into a non-compliant state.
For Lambda, you can track and alert on changes to your function configuration, along with the IAM execution role. This allows you to gather Lambda function lifecycle data for potential audit and compliance requirements. For more information, see the Lambda Operators Guide.
Lambda makes cloud security simpler by taking on more responsibility using the AWS Shared Responsibility Model. Lambda implements strict workload security at scale to isolate your code and prevent network intrusion to your functions. This post provides guidance on assessing and implementing best practices and tools for Lambda to improve your security, governance, and compliance controls. These include permissions, access controls, multiple accounts, and code security. Learn how to audit your function permissions, configuration, and access to ensure that your applications conform to your organizational requirements.
For more serverless learning resources, visit Serverless Land.
With Amazon GuardDuty, you can monitor your AWS accounts and workloads to detect malicious activity. Today, we are adding to GuardDuty the capability to detect malware. Malware is malicious software that is used to compromise workloads, repurpose resources, or gain unauthorized access to data. When you have GuardDuty Malware Protection enabled, a malware scan is initiated when GuardDuty detects that one of your EC2 instances or container workloads running on EC2 is doing something suspicious. For example, a malware scan is triggered when an EC2 instance is communicating with a command-and-control server that is known to be malicious or is performing denial of service (DoS) or brute-force attacks against other EC2 instances.
GuardDuty supports many file system types and scans file formats known to be used to spread or contain malware, including Windows and Linux executables, PDF files, archives, binaries, scripts, installers, email databases, and plain emails.
When potential malware is identified, actionable security findings are generated with information such as the threat and file name, the file path, the EC2 instance ID, resource tags and, in the case of containers, the container ID and the container image used. GuardDuty supports container workloads running on EC2, including customer-managed Kubernetes clusters or individual Docker containers. If the container is managed by Amazon Elastic Kubernetes Service (EKS) or Amazon Elastic Container Service (Amazon ECS), the findings also include the cluster name and the task or pod ID so application and security teams can quickly find the affected container resources.
As with all other GuardDuty findings, malware detections are sent to the GuardDuty console, pushed through Amazon EventBridge, routed to AWS Security Hub, and made available in Amazon Detective for incident investigation.
How GuardDuty Malware Protection Works When you enable malware protection, you set up an AWS Identity and Access Management (IAM)service-linked role that grants GuardDuty permissions to perform malware scans. When a malware scan is initiated for an EC2 instance, GuardDuty Malware Protection uses those permissions to take a snapshot of the attached Amazon Elastic Block Store (EBS) volumes that are less than 1 TB in size and then restore the EBS volumes in an AWS service account in the same AWS Region to scan them for malware. You can use tagging to include or exclude EC2 instances from those permissions and from scanning. In this way, you don’t need to deploy security software or agents to monitor for malware, and scanning the volumes doesn’t impact running workloads. The EBS volumes in the service account and the snapshots in your account are deleted after the scan. Optionally, you can preserve the snapshots when malware is detected.
The service-linked role grants GuardDuty access to AWS Key Management Service (AWS KMS) keys used to encrypt EBS volumes. If the EBS volumes attached to a potentially compromised EC2 instance are encrypted with a customer-managed key, GuardDuty Malware Protection uses the same key to encrypt the replica EBS volumes as well. If the volumes are not encrypted, GuardDuty uses its own key to encrypt the replica EBS volumes and ensure privacy. Volumes encrypted with EBS-managed keys are not supported.
Security in cloud is a shared responsibility between you and AWS. As a guardrail, the service-linked role used by GuardDuty Malware Protection cannot perform any operation on your resources (such as EBS snapshots and volumes, EC2 instances, and KMS keys) if it has the GuardDutyExcluded tag. Once you mark your snapshots with GuardDutyExcluded set to true, the GuardDuty service won’t be able to access these snapshots. The GuardDutyExcluded tag supersedes any inclusion tag. Permissions also restrict how GuardDuty can modify your snapshot so that they cannot be made public while shared with the GuardDuty service account.
The EBS volumes created by GuardDuty are always encrypted. GuardDuty can use KMS keys only on EBS snapshots that have a GuardDuty scan ID tag. The scan ID tag is added by GuardDuty when snapshots are created after an EC2 finding. The KMS keys that are shared with GuardDuty service account cannot be invoked from any other context except the Amazon EBS service. Once the scan completes successfully, the KMS key grant is revoked and the volume replica in GuardDuty service account is deleted, making sure GuardDuty service cannot access your data after completing the scan operation.
Enabling Malware Protection for an AWS Account If you’re not using GuardDuty yet, Malware Protection is enabled by default when you activate GuardDuty for your account. Because I am already using GuardDuty, I need to enable Malware Protection from the console. If you’re using AWS Organizations, your delegated administrator accounts can enable this for existing member accounts and configure if new AWS accounts in the organization should be automatically enrolled.
In the GuardDuty console, I choose Malware Protection under Settings in the navigation pane. There, I choose Enable and then Enable Malware Protection.
Snapshots are automatically deleted after they are scanned. In General settings, I have the option to retain in my AWS account the snapshots where malware is detected and have them available for further analysis.
In Scan options, I can configure a list of inclusion tags, so that only EC2 instances with those tags are scanned, or exclusion tags, so that EC2 instances with tags in the list are skipped.
Testing Malware Protection GuardDuty Findings To generate several Amazon GuardDuty findings, including the new Malware Protection findings, I clone the Amazon GuardDuty Tester repo:
First, I create an AWS CloudFormation stack using the guardduty-tester.template file. When the stack is ready, I follow the instructions to configure my SSH client to log in to the tester instance through the bastion host. Then, I connect to the tester instance:
$ ssh tester
From the tester instance, I start the guardduty_tester.sh script to generate the findings:
$ ./guardduty_tester.sh

***********************************************************************
* Test #1 - Internal port scanning                                    *
* This simulates internal reconaissance by an internal actor or an   *
* external actor after an initial compromise. This is considered a    *
* low priority finding for GuardDuty because its not a clear indicator*
* of malicious intent on its own.                                     *
***********************************************************************


Starting Nmap 6.40 ( http://nmap.org ) at 2022-05-19 09:36 UTC
Nmap scan report for ip-172-16-0-20.us-west-2.compute.internal (172.16.0.20)
Host is up (0.00032s latency).
Not shown: 997 filtered ports
PORT     STATE  SERVICE
22/tcp   open   ssh
80/tcp   closed http
5050/tcp closed mmcc
MAC Address: 06:25:CB:F4:E0:51 (Unknown)

Nmap done: 1 IP address (1 host up) scanned in 4.96 seconds

-----------------------------------------------------------------------

***********************************************************************
* Test #2 - SSH Brute Force with Compromised Keys                     *
* This simulates an SSH brute force attack on an SSH port that we    *
* can access from this instance. It uses (phony) compromised keys in  *
* many subsequent attempts to see if one works. This is a common      *
* techique where the bad actors will harvest keys from the web in     *
* places like source code repositories where people accidentally leave*
* keys and credentials (This attempt will not actually succeed in     *
* obtaining access to the target linux instance in this subnet)       *
***********************************************************************

2022-05-19 09:36:29 START
2022-05-19 09:36:29 Crowbar v0.4.3-dev
2022-05-19 09:36:29 Trying 172.16.0.20:22
2022-05-19 09:36:33 STOP
2022-05-19 09:36:33 No results found...
2022-05-19 09:36:33 START
2022-05-19 09:36:33 Crowbar v0.4.3-dev
2022-05-19 09:36:33 Trying 172.16.0.20:22
2022-05-19 09:36:37 STOP
2022-05-19 09:36:37 No results found...
2022-05-19 09:36:37 START
2022-05-19 09:36:37 Crowbar v0.4.3-dev
2022-05-19 09:36:37 Trying 172.16.0.20:22
2022-05-19 09:36:41 STOP
2022-05-19 09:36:41 No results found...
2022-05-19 09:36:41 START
2022-05-19 09:36:41 Crowbar v0.4.3-dev
2022-05-19 09:36:41 Trying 172.16.0.20:22
2022-05-19 09:36:45 STOP
2022-05-19 09:36:45 No results found...
2022-05-19 09:36:45 START
2022-05-19 09:36:45 Crowbar v0.4.3-dev
2022-05-19 09:36:45 Trying 172.16.0.20:22
2022-05-19 09:36:48 STOP
2022-05-19 09:36:48 No results found...
2022-05-19 09:36:49 START
2022-05-19 09:36:49 Crowbar v0.4.3-dev
2022-05-19 09:36:49 Trying 172.16.0.20:22
2022-05-19 09:36:52 STOP
2022-05-19 09:36:52 No results found...
2022-05-19 09:36:52 START
2022-05-19 09:36:52 Crowbar v0.4.3-dev
2022-05-19 09:36:52 Trying 172.16.0.20:22
2022-05-19 09:36:56 STOP
2022-05-19 09:36:56 No results found...
2022-05-19 09:36:56 START
2022-05-19 09:36:56 Crowbar v0.4.3-dev
2022-05-19 09:36:56 Trying 172.16.0.20:22
2022-05-19 09:37:00 STOP
2022-05-19 09:37:00 No results found...
2022-05-19 09:37:00 START
2022-05-19 09:37:00 Crowbar v0.4.3-dev
2022-05-19 09:37:00 Trying 172.16.0.20:22
2022-05-19 09:37:04 STOP
2022-05-19 09:37:04 No results found...
2022-05-19 09:37:04 START
2022-05-19 09:37:04 Crowbar v0.4.3-dev
2022-05-19 09:37:04 Trying 172.16.0.20:22
2022-05-19 09:37:08 STOP
2022-05-19 09:37:08 No results found...
2022-05-19 09:37:08 START
2022-05-19 09:37:08 Crowbar v0.4.3-dev
2022-05-19 09:37:08 Trying 172.16.0.20:22
2022-05-19 09:37:12 STOP
2022-05-19 09:37:12 No results found...
2022-05-19 09:37:12 START
2022-05-19 09:37:12 Crowbar v0.4.3-dev
2022-05-19 09:37:12 Trying 172.16.0.20:22
2022-05-19 09:37:16 STOP
2022-05-19 09:37:16 No results found...
2022-05-19 09:37:16 START
2022-05-19 09:37:16 Crowbar v0.4.3-dev
2022-05-19 09:37:16 Trying 172.16.0.20:22
2022-05-19 09:37:20 STOP
2022-05-19 09:37:20 No results found...
2022-05-19 09:37:20 START
2022-05-19 09:37:20 Crowbar v0.4.3-dev
2022-05-19 09:37:20 Trying 172.16.0.20:22
2022-05-19 09:37:23 STOP
2022-05-19 09:37:23 No results found...
2022-05-19 09:37:23 START
2022-05-19 09:37:23 Crowbar v0.4.3-dev
2022-05-19 09:37:23 Trying 172.16.0.20:22
2022-05-19 09:37:27 STOP
2022-05-19 09:37:27 No results found...
2022-05-19 09:37:27 START
2022-05-19 09:37:27 Crowbar v0.4.3-dev
2022-05-19 09:37:27 Trying 172.16.0.20:22
2022-05-19 09:37:31 STOP
2022-05-19 09:37:31 No results found...
2022-05-19 09:37:31 START
2022-05-19 09:37:31 Crowbar v0.4.3-dev
2022-05-19 09:37:31 Trying 172.16.0.20:22
2022-05-19 09:37:34 STOP
2022-05-19 09:37:34 No results found...
2022-05-19 09:37:35 START
2022-05-19 09:37:35 Crowbar v0.4.3-dev
2022-05-19 09:37:35 Trying 172.16.0.20:22
2022-05-19 09:37:38 STOP
2022-05-19 09:37:38 No results found...
2022-05-19 09:37:38 START
2022-05-19 09:37:38 Crowbar v0.4.3-dev
2022-05-19 09:37:38 Trying 172.16.0.20:22
2022-05-19 09:37:42 STOP
2022-05-19 09:37:42 No results found...
2022-05-19 09:37:42 START
2022-05-19 09:37:42 Crowbar v0.4.3-dev
2022-05-19 09:37:42 Trying 172.16.0.20:22
2022-05-19 09:37:46 STOP
2022-05-19 09:37:46 No results found...

-----------------------------------------------------------------------

***********************************************************************
* Test #3 - RDP Brute Force with Password List                        *
* This simulates an RDP brute force attack on the internal RDP port  *
* of the windows server that we installed in the environment.  It uses*
* a list of common passwords that can be found on the web. This test  *
* will trigger a detection, but will fail to get into the target      *
* windows instance.                                                   *
***********************************************************************

Sending 250 password attempts at the windows server...
Hydra v9.4-dev (c) 2022 by van Hauser/THC & David Maciejak - Please do not use in military or secret service organizations, or for illegal purposes (this is non-binding, these *** ignore laws and ethics anyway).

Hydra (https://github.com/vanhauser-thc/thc-hydra) starting at 2022-05-19 09:37:46
[WARNING] rdp servers often don't like many connections, use -t 1 or -t 4 to reduce the number of parallel connections and -W 1 or -W 3 to wait between connection to allow the server to recover
[INFO] Reduced number of tasks to 4 (rdp does not like many parallel connections)
[WARNING] the rdp module is experimental. Please test, report - and if possible, fix.
[DATA] max 4 tasks per 1 server, overall 4 tasks, 1792 login tries (l:7/p:256), ~448 tries per task
[DATA] attacking rdp://172.16.0.24:3389/
[STATUS] 1099.00 tries/min, 1099 tries in 00:01h, 693 to do in 00:01h, 4 active
1 of 1 target completed, 0 valid password found
Hydra (https://github.com/vanhauser-thc/thc-hydra) finished at 2022-05-19 09:39:23

-----------------------------------------------------------------------

***********************************************************************
* Test #4 - CryptoCurrency Mining Activity                            *
* This simulates interaction with a cryptocurrency mining pool which *
* can be an indication of an instance compromise. In this case, we are*
* only interacting with the URL of the pool, but not downloading      *
* any files. This will trigger a threat intel based detection.        *
***********************************************************************

Calling bitcoin wallets to download mining toolkits

-----------------------------------------------------------------------

***********************************************************************
* Test #5 - DNS Exfiltration                                          *
* A common exfiltration technique is to tunnel data out over DNS      *
* to a fake domain.  Its an effective technique because most hosts    *
* have outbound DNS ports open.  This test wont exfiltrate any data,  *
* but it will generate enough unusual DNS activity to trigger the     *
* detection.                                                          *
***********************************************************************

Calling large numbers of large domains to simulate tunneling via DNS

***********************************************************************
* Test #6 - Fake domain to prove that GuardDuty is working            *
* This is a permanent fake domain that customers can use to prove that*
* GuardDuty is working.  Calling this domain will always generate the *
* Backdoor:EC2/C&CActivity.B!DNS finding type                         *
***********************************************************************

Calling a well known fake domain that is used to generate a known finding

; <<>> DiG 9.11.4-P2-RedHat-9.11.4-26.P2.amzn2.5.2 <<>> GuardDutyC2ActivityB.com any
;; global options: +cmd
;; Got answer:
;; ->>HEADER<<- opcode: QUERY, status: NOERROR, id: 11495
;; flags: qr rd ra; QUERY: 1, ANSWER: 8, AUTHORITY: 0, ADDITIONAL: 1

;; OPT PSEUDOSECTION:
; EDNS: version: 0, flags:; udp: 4096
;; QUESTION SECTION:
;GuardDutyC2ActivityB.com.	IN	ANY

;; ANSWER SECTION:
GuardDutyC2ActivityB.com. 6943	IN	SOA	ns1.markmonitor.com. hostmaster.markmonitor.com. 2018091906 86400 3600 2592000 172800
GuardDutyC2ActivityB.com. 6943	IN	NS	ns3.markmonitor.com.
GuardDutyC2ActivityB.com. 6943	IN	NS	ns5.markmonitor.com.
GuardDutyC2ActivityB.com. 6943	IN	NS	ns7.markmonitor.com.
GuardDutyC2ActivityB.com. 6943	IN	NS	ns2.markmonitor.com.
GuardDutyC2ActivityB.com. 6943	IN	NS	ns4.markmonitor.com.
GuardDutyC2ActivityB.com. 6943	IN	NS	ns6.markmonitor.com.
GuardDutyC2ActivityB.com. 6943	IN	NS	ns1.markmonitor.com.

;; Query time: 27 msec
;; SERVER: 172.16.0.2#53(172.16.0.2)
;; WHEN: Thu May 19 09:39:23 UTC 2022
;; MSG SIZE  rcvd: 238


*****************************************************************************************************
Expected GuardDuty Findings

Test 1: Internal Port Scanning
Expected Finding: EC2 Instance  i-011e73af27562827b  is performing outbound port scans against remote host. 172.16.0.20
Finding Type: Recon:EC2/Portscan

Test 2: SSH Brute Force with Compromised Keys
Expecting two findings - one for the outbound and one for the inbound detection
Outbound:  i-011e73af27562827b  is performing SSH brute force attacks against  172.16.0.20
Inbound:  172.16.0.25  is performing SSH brute force attacks against  i-0bada13e0aa12d383
Finding Type: UnauthorizedAccess:EC2/SSHBruteForce

Test 3: RDP Brute Force with Password List
Expecting two findings - one for the outbound and one for the inbound detection
Outbound:  i-011e73af27562827b  is performing RDP brute force attacks against  172.16.0.24
Inbound:  172.16.0.25  is performing RDP brute force attacks against  i-0191573dec3b66924
Finding Type : UnauthorizedAccess:EC2/RDPBruteForce

Test 4: Cryptocurrency Activity
Expected Finding: EC2 Instance  i-011e73af27562827b  is querying a domain name that is associated with bitcoin activity
Finding Type : CryptoCurrency:EC2/BitcoinTool.B!DNS

Test 5: DNS Exfiltration
Expected Finding: EC2 instance  i-011e73af27562827b  is attempting to query domain names that resemble exfiltrated data
Finding Type : Trojan:EC2/DNSDataExfiltration

Test 6: C&C Activity
Expected Finding: EC2 instance  i-011e73af27562827b  is querying a domain name associated with a known Command & Control server.
Finding Type : Backdoor:EC2/C&CActivity.B!DNS
After a few minutes, the findings appear in the GuardDuty console. At the top, I see the malicious files found by the new Malware Protection capability. One of the findings is related to an EC2 instance, the other to an ECS cluster.
First, I select the finding related to the EC2 instance. In the panel, I see the information on the instance and the malicious file, such as the file name and path. In the Malware scan details section, the Trigger finding ID points to the original GuardDuty finding that triggered the malware scan. In my case, the original finding was that this EC2 instance was performing RDP brute force attacks against another EC2 instance.
Here, I choose Investigate with Detective and, directly from the GuardDuty console, I go to the Detective console to visualize AWS CloudTrail and Amazon Virtual Private Cloud (Amazon VPC) flow data for the EC2 instance, the AWS account, and the IP address affected by the finding. Using Detective, I can analyze, investigate, and identify the root cause of suspicious activities found by GuardDuty.
When I select the finding related to the ECS cluster, I have more information on the resource affected, such as the details of the ECS cluster, the task, the containers, and the container images.
Using the GuardDuty tester scripts makes it easier to test the overall integration of GuardDuty with other security frameworks you use so that you can be ready when a real threat is detected.
Comparing GuardDuty Malware Protection with Amazon Inspector At this point, you might ask yourself how GuardDuty Malware Protection relates to Amazon Inspector, a service that scans AWS workloads for software vulnerabilities and unintended network exposure. The two services complement each other and offer different layers of protection:
Amazon Inspector offers proactive protection by identifying and remediating known software and application vulnerabilities that serve as an entry point for attackers to compromise resources and install malware.
GuardDuty Malware Protection detects malware that is found to be present on actively running workloads. At that point, the system has already been compromised, but GuardDuty can limit the time of an infection and take action before a system compromise results in a business-impacting event.
Availability and Pricing Amazon GuardDuty Malware Protection is available today in all AWS Regions where GuardDuty is available, excluding the AWS China (Beijing), AWS China (Ningxia), AWS GovCloud (US-East), and AWS GovCloud (US-West) Regions.
At launch, GuardDuty Malware Protection is integrated with these partner offerings:
With GuardDuty, you don’t need to deploy security software or agents to monitor for malware. You only pay for the amount of GB scanned in the file systems (not for the size of the EBS volumes) and for the EBS snapshots during the time they are kept in your account. All EBS snapshots created by GuardDuty are automatically deleted after they are scanned unless you enable snapshot retention when malware is found. For more information, see GuardDuty pricing and EBS pricing. Note that GuardDuty only scans EBS volumes less than 1 TB in size. To help you control costs and avoid repeating alarms, the same volume is not scanned more often than once every 24 hours.
To provide the best experiences, we use technologies like cookies to store and/or access device information. Consenting to these technologies will allow us to process data such as browsing behavior or unique IDs on this site. Not consenting or withdrawing consent, may adversely affect certain features and functions.
Functional
Always active
The technical storage or access is strictly necessary for the legitimate purpose of enabling the use of a specific service explicitly requested by the subscriber or user, or for the sole purpose of carrying out the transmission of a communication over an electronic communications network.
Preferences
The technical storage or access is necessary for the legitimate purpose of storing preferences that are not requested by the subscriber or user.
Statistics
The technical storage or access that is used exclusively for statistical purposes.The technical storage or access that is used exclusively for anonymous statistical purposes. Without a subpoena, voluntary compliance on the part of your Internet Service Provider, or additional records from a third party, information stored or retrieved for this purpose alone cannot usually be used to identify you.
Marketing
The technical storage or access is required to create user profiles to send advertising, or to track the user on a website or across several websites for similar marketing purposes.
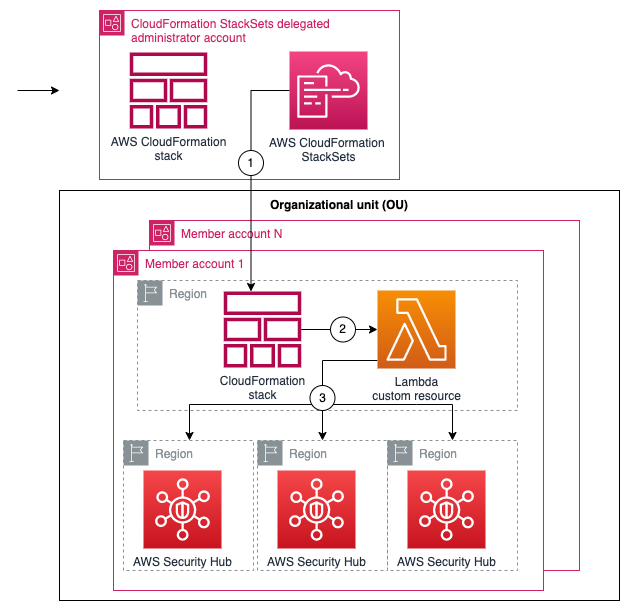
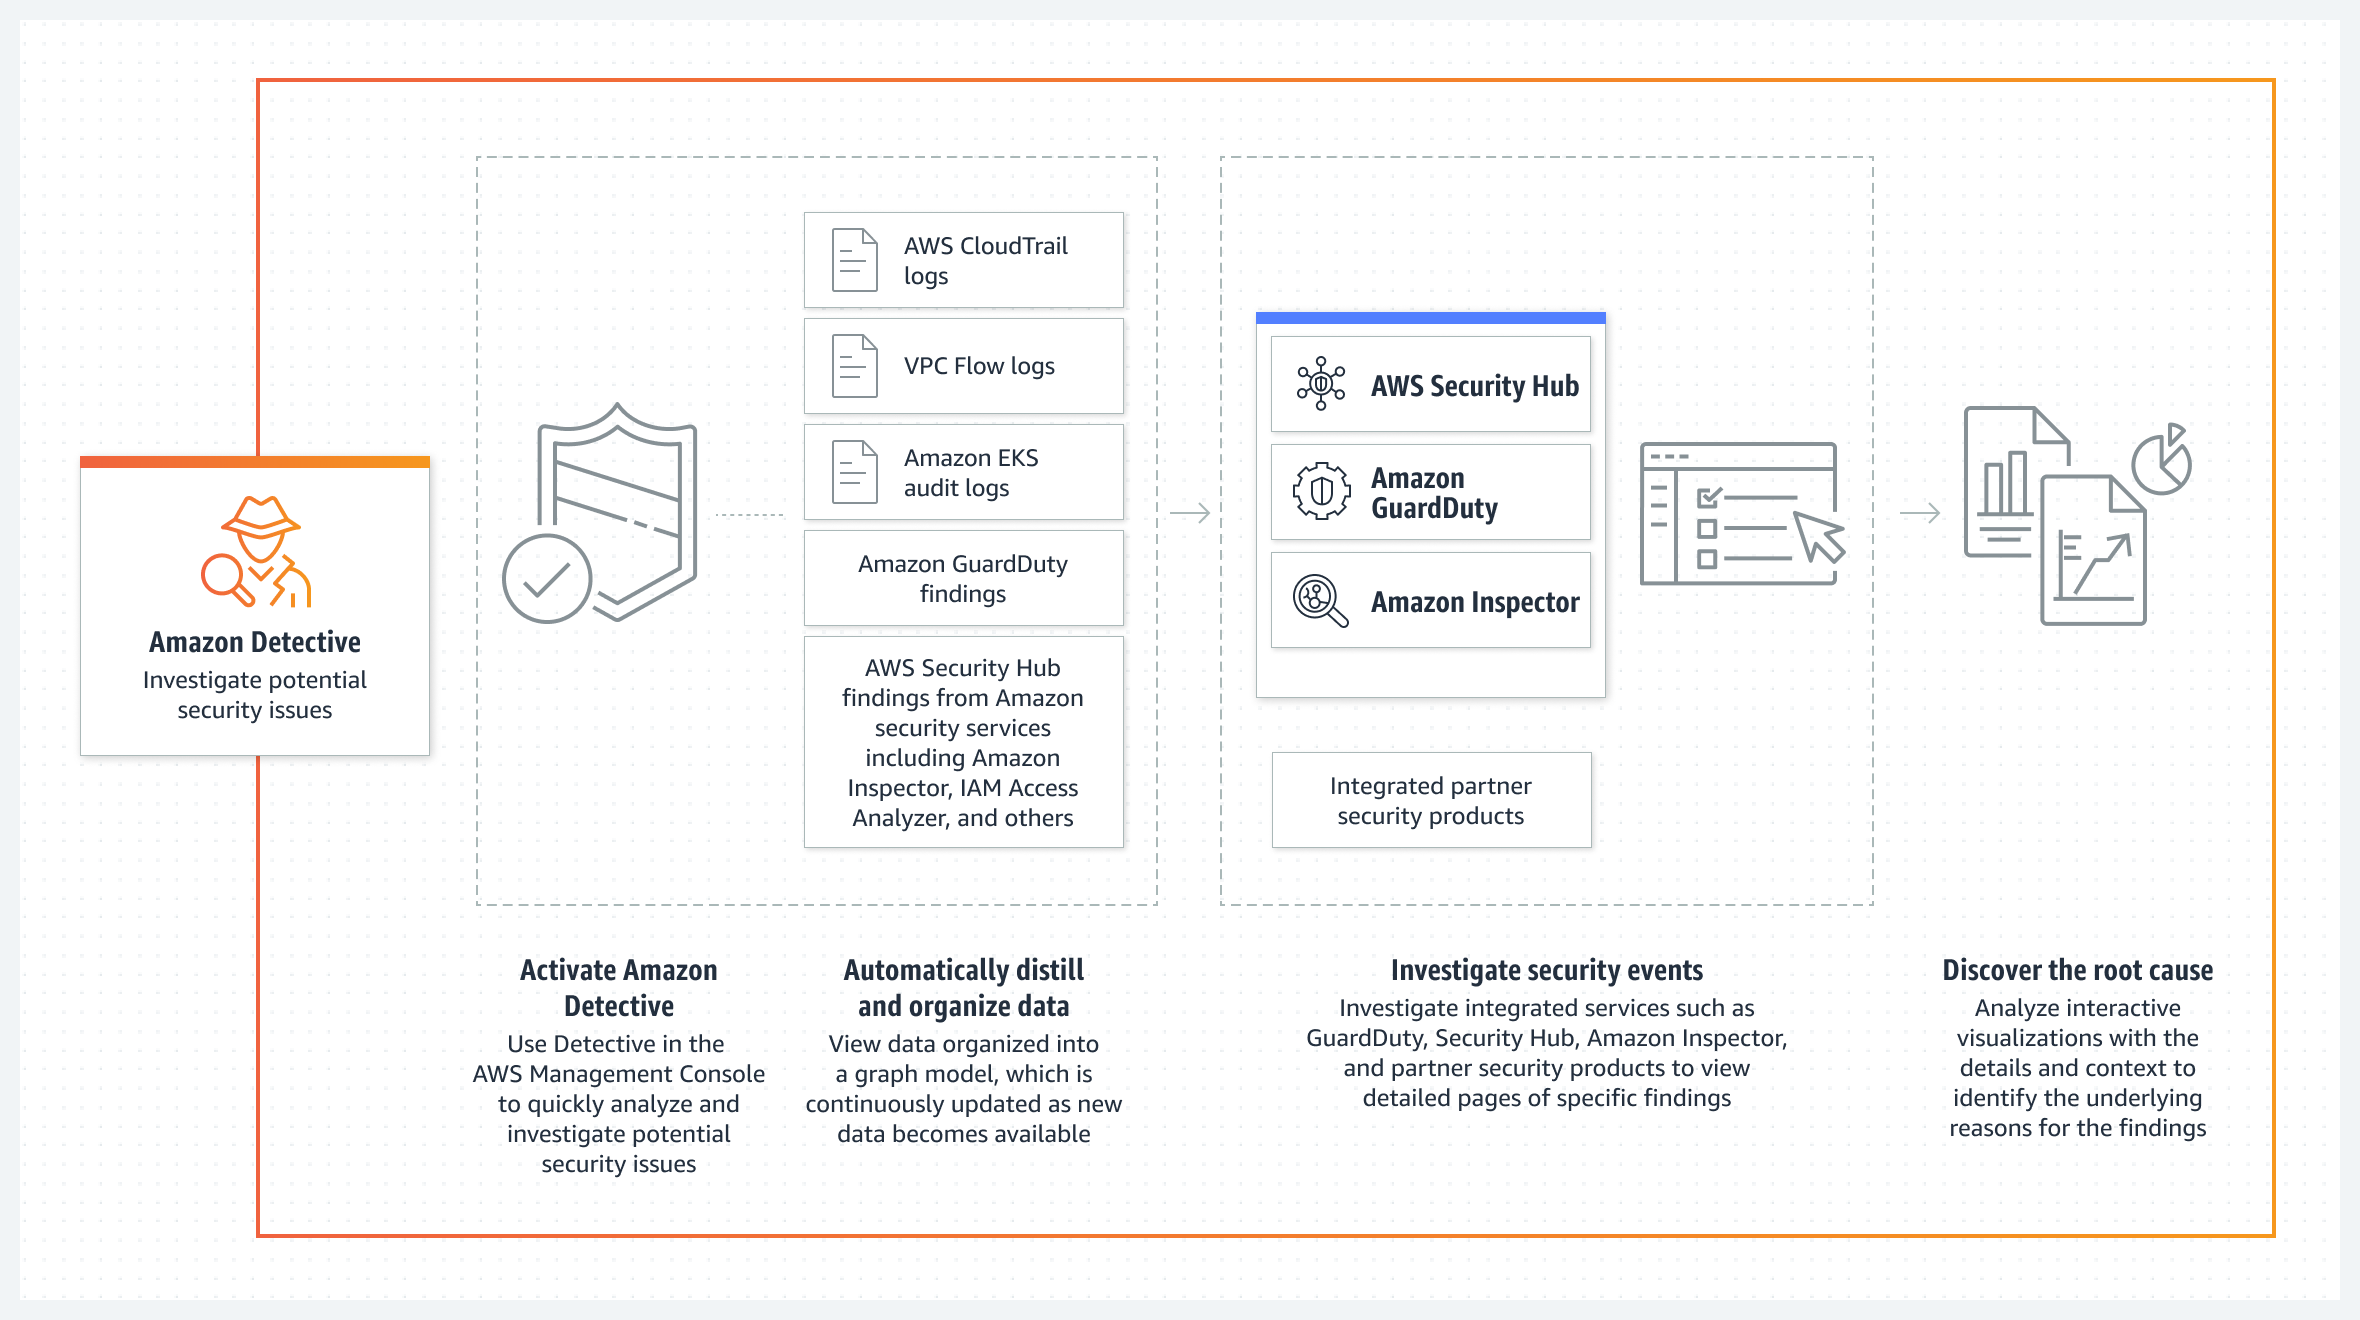

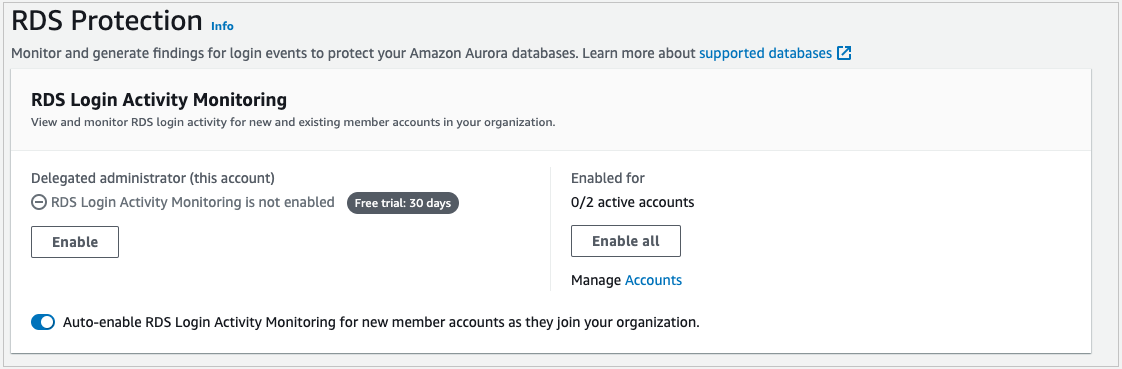
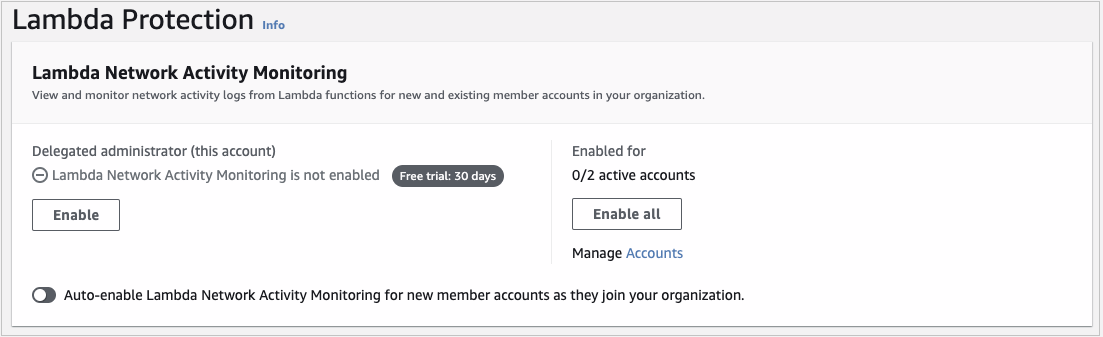

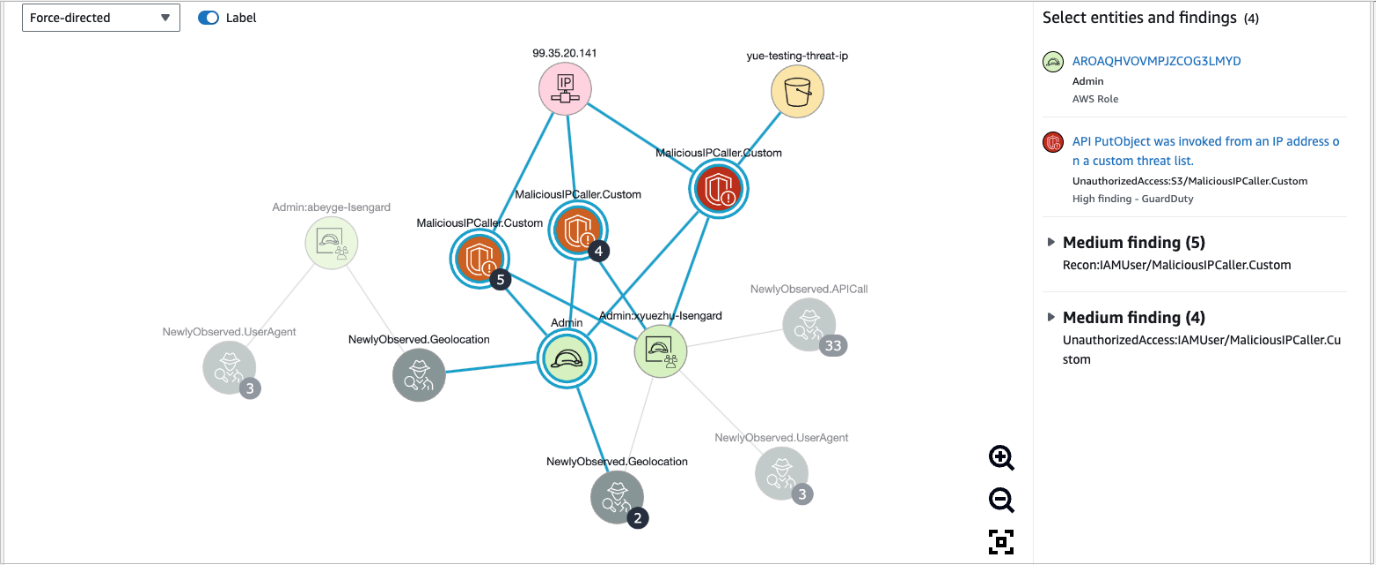

 AWS Global Summits – The 2023 AWS Summits season is almost coming to an end with the last two in-person events in


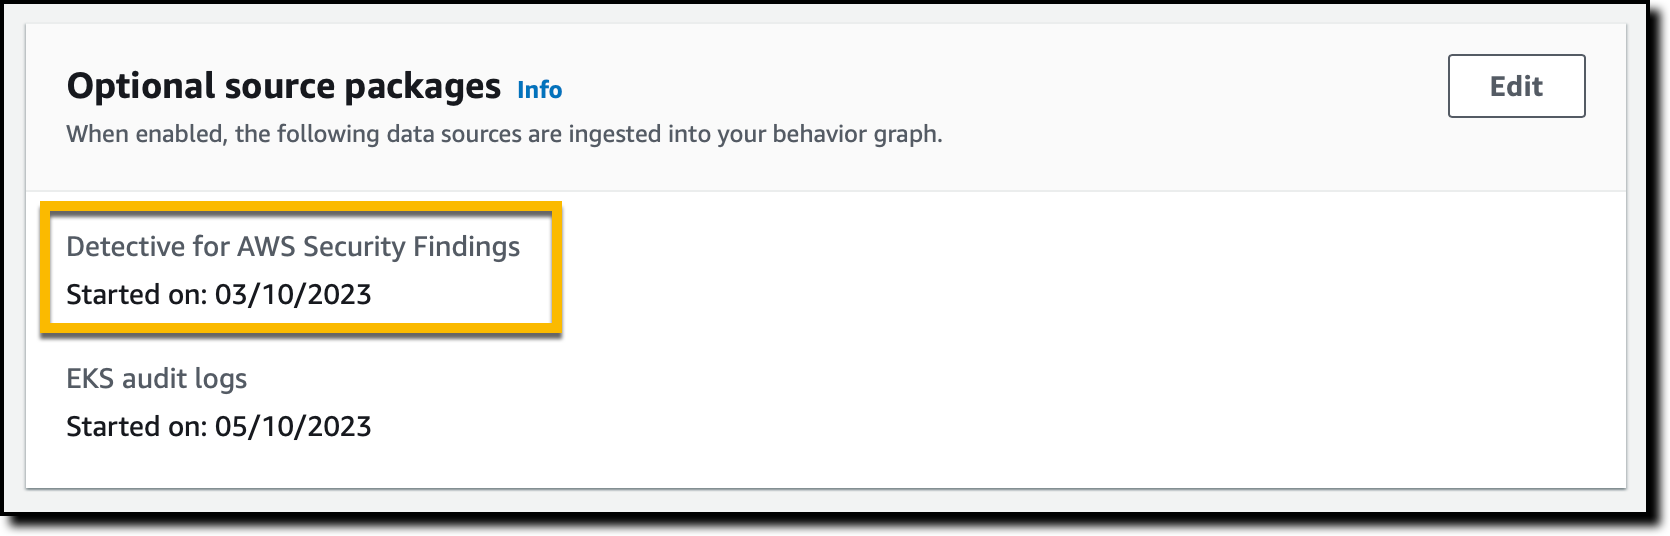


 .Net Developer Day –