The new IRAP report includes an additional six AWS services, as well as the new AWS Melbourne Region, that are now assessed at the PROTECTED level under IRAP. This brings the total number of services assessed at the PROTECTED level to 139.
The following are the six newly assessed services:
AWS has developed an IRAP documentation pack to assist Australian government agencies and their partners to plan, architect, and assess risk for their workloads when they use AWS Cloud services.
The IRAP pack on AWS Artifact also includes newly updated versions of the AWS Consumer Guide and the whitepaper Reference Architectures for ISM PROTECTED Workloads in the AWS Cloud.
Reach out to your AWS representatives to let us know which additional services you would like to see in scope for upcoming IRAP assessments. We strive to bring more services into scope at the PROTECTED level under IRAP to support your requirements.
If you have feedback about this post, submit comments in the Comments section below. If you have questions about this post, contact AWS Support.
Want more AWS Security news? Follow us on Twitter.
Today AWS launched two new global condition context keys that make it simpler for you to write policies in which Amazon Elastic Compute Cloud (Amazon EC2) instance credentials work only when used on the instance to which they are issued. These new condition keys are available today in all AWS Regions, as well as AWS GovCloud and China partitions.
Using these new condition keys, you can write service control policies (SCPs) or AWS Identity and Access Management (IAM) policies that restrict the virtual private clouds (VPCs) and private IP addresses from which your EC2 instance credentials can be used, without hard-coding VPC IDs or IP addresses in the policy. Previously, you had to list specific VPC IDs and IP addresses in the policy if you wanted to use it to restrict where EC2 credentials were used. With this new approach, you can use less policy space and reduce the time spent on updates when your list of VPCs and network ranges changes.
In this blog post, we will show you how to use these new condition keys in an SCP and a resource policy to help ensure that the IAM role credentials assigned to your EC2 instances can only be used from the instances to which they were issued.
New global condition keys
The two new condition keys are as follows:
aws:EC2InstanceSourceVPC — This single-valued condition key contains the VPC ID to which an EC2 instance is deployed.
aws:EC2InstanceSourcePrivateIPv4 — This single-valued condition key contains the primary IPv4 address of an EC2 instance.
These new conditions are available only for use with credentials issued to an EC2 instance. You don’t have to make configuration changes to activate the new condition keys.
Let’s start by reviewing some existing IAM conditions and how to combine them with the new conditions. When requests are made to an AWS service over a VPC endpoint, the value of the aws:SourceVpc condition key is the ID of the VPC into which the endpoint is deployed. The value of the aws:VpcSourceIP condition key is the IP address from which the endpoint receives the request. The aws:SourceVpc and aws:VpcSourceIP keys are null when requests are made through AWS public service endpoints. These condition keys relate to dynamic properties of the network path by which your AWS Signature Version 4-signed request reached the API endpoint. For a list of AWS services that support VPC endpoints, see AWS services that integrate with AWS PrivateLink.
The two new condition keys relate to dynamic properties of the EC2 role credential itself. By using the two new credential-relative condition keys with the existing network path-relative aws:SourceVPC and aws:VpcSourceIP condition keys, you can create SCPs to help ensure that credentials for EC2 instances are only used from the EC2 instances to which they were issued. By writing policies that compare the two sets of dynamic values, you can configure your environment such that requests signed with an EC2 instance credential are denied if they are used anywhere other than the EC2 instance to which they were issued.
Policy examples
In the following SCP example, access is denied if the value of aws:SourceVpc is not equal to the value of aws:ec2InstanceSourceVPC, or if the value of aws:VpcSourceIp is not equal to the value of aws:ec2InstanceSourcePrivateIPv4. The policy uses aws:ViaAWSService to allow certain AWS services to take action on your behalf when they use your role’s identity to call services, such as when Amazon Athena queries Amazon Simple Storage Service (Amazon S3).
Because we encase aws:SourceVpc and aws:VpcSourceIp in “${}” in these policies, they are treated as a variable using the value in the request being made. However, in the IAM policy language, the operator on the left side of a comparison is implicitly treated as a variable, while the operator on the right side must be explicitly declared as a variable. The “Null” operator on the ec2:SourceInstanceARN condition key is designed to ensure that this policy only applies to EC2 instance roles, and not roles used for other purposes, such as those used in AWS Lambda functions.
The two deny statements in this example form a logical “or” statement, such that either a request from a different VPC or a different IP address evaluates in a deny. But functionally, they act in an “and” fashion. To be allowed, a request must satisfy both the VPC-based and the IP-based conditions because failure of either denies the call. Because VPC IDs are globally unique values, it’s reasonable to use the VPC-based condition without the private IP condition. However, you should avoid evaluating only the private IP condition without also evaluating the VPC condition. Private IPs can be the same across different environments, so aws:ec2InstanceSourcePrivateIPv4 is safe to use only in conjunction with the VPC-based condition.
If you have specific EC2 instance roles that you want to exclude from the statement, you can apply exception logic through tags or role names.
The following example applies to roles used as EC2 instance roles, except those with a tag of exception-to-vpc-ip where the value is equal to true by using the aws:PrincipalTag condition key. The three condition operators (StringNotEquals, Null, and BoolIfExists) in the same condition block are evaluated with a logical AND operation, and if either of the tests doesn’t evaluate, then the deny statement doesn’t apply. Hence, EC2 instance roles with a principal tag of exception-to-vpc-ip equal to true are not subject to this SCP.
You can apply exception logic to other attributes of your IAM roles. For example, you can use the aws:PrincipalArn condition key to exempt certain roles based on their AWS account. You can also specify where you want this SCP to be applied in your AWS Organizations organization. You can apply SCPs directly to accounts, organizational units, or organizational roots. For more information about inheritance when applying SCPs in Organizations, see Understanding policy inheritance.
You can also apply exception logic to your SCP statements at the IAM Action. The following example statement restricts an EC2 instance’s credential usage to only the instance from which it was issued, except for calls to IAM by using a NotAction element. You should use this exception logic if an AWS service doesn’t have a VPC endpoint, or if you don’t want to use VPC endpoints to access a particular service.
Because these new condition keys are global condition keys, you can use the keys in all relevant AWS policy types, such as the following policy for an S3 bucket. When using this as a bucket policy, make sure to replace <DOC-EXAMPLE-BUCKET> with the ARN of your S3 bucket.
This policy restricts access to your S3 bucket to EC2 instance roles that are used only from the instance to which they were vended. Like the previous policy examples, there are two deny statements in this example to form a logical “or” statement but a functional “and” statement, because a request must come from the same VPC and same IP address of the instance that it was issued to, or else it evaluates to a deny.
Conclusion
In this blog post, you learned about the newly launchedaws:ec2InstanceSourceVPC and aws:ec2InstanceSourcePrivateIPv4 condition keys. You also learned how to use them with SCPs and resource policies to limit the usage of your EC2 instance roles to the instances from which they originated when requests are made over VPC endpoints. Because these new condition keys are global condition keys, you can use them in all relevant AWS policy types. These new condition keys are available today in all Regions, as well as AWS GovCloud and China partitions.
Amazon Simple Queue Service (Amazon SQS) is a fully-managed message queueing service that enables you to decouple and scale microservices, distributed systems, and serverless applications. Amazon SQS provides authentication mechanisms so that you can control who has access to the queue. It also provides encryption in transit with HTTP over SSL or TLS, and it supports server-side encryption using AWS Key Management Service (AWS KMS) to help protect the data passing through Amazon SQS. These controls allow you to use Amazon SQS to exchange sensitive data between applications. With the integration of Amazon SQS and AWS KMS, you can centrally-manage the keys that protect Amazon SQS, as well as the keys that protect your other AWS resources.
AWS services, such as Amazon Simple Storage Service (Amazon S3) and Amazon Simple Notification Service (Amazon SNS), can act as event sources that send events to Amazon SQS. To enable an event source to access an encrypted SQS queue, you will need to configure the queue with a customer managed key in AWS KMS, and then use the key policy to allow the event source to use the required AWS KMS API methods. The event source also requires permissions to authenticate access to the queue to send events. You can achieve this by using an SQS policy, which is a resource-based policy that you can use to control access to the SQS queue and its data.
In this post, we will walk you through a common use case to illustrate how you can build the key policy and the SQS queue policy. This use case is shown in Figure 1.
Figure 1: Architecture to publish Amazon SNS messages to Amazon SQS
As shown in Figure 1, the solution has the following steps:
The message producer is an Amazon SNS topic. The topic is configured to send messages to an encrypted Amazon SQS queue. The queue is encrypted by using an AWS KMS customer-managed key.
The SQS queue is configured to send failed messages to a dead-letter queue (DLQ). This can help you debug your application or messaging system because DLQs let you isolate unconsumed messages to determine why their processing didn’t succeed.
The SQS policy defined in this post doesn’t support redriving messages directly to the same or a different SQS queue.
Prerequisites
This post contains only the required IAM permissions in the form of policy statements. To construct the policy, you need to add the statements to your SQS policy or your AWS KMS key policy. This post doesn’t walk you through how to create the SQS queue or the AWS KMS key. Therefore, to use the policies included in this post, make sure that you’ve completed the following prerequisites:
Set up an SQS queue. For instructions, see Create a queue (console) in the Amazon SQS documentation.
Create an AWS KMS key. For instructions, see Creating keys in the AWS KMS documentation.
Least-privilege key policy for Amazon SQS
In this section, we describe the required least-privilege permissions in AWS KMS for the customer-managed key that you use to encrypt your SQS queue. With these permissions, you can limit access to only the intended entities while implementing least privilege. The key policy must consist of the following policy statements, which we describe in detail below:
Grant administrator permissions to the KMS key
Grant read-only access to the key metadata
Grant AWS KMS permissions to Amazon SNS to publish messages to the queue
Allow consumers to decrypt messages from the queue
Grant administrator permissions to the KMS key
To create an AWS KMS key, you need to provide AWS KMS administrator permissions to the IAM role that you use to deploy the KMS key. These administrator permissions are defined in the AllowKeyAdminPermissions policy statement that follows. When you add this statement to your key policy, make sure to replace <admin-role ARN> with the Amazon Resource Name (ARN) of the IAM role used to deploy the KMS key, manage the KMS key, or both. This can be the IAM role of your deployment pipeline or the administrator role for your organization in AWS Organizations.
Note: In a key policy, the value of the Resource element needs to be “*”, which means “this KMS key”. The asterisk (“*”) identifies the KMS key to which the key policy is attached.
Grant read-only access to the key metadata
To grant other IAM roles read-only access to your key metadata, add the following AllowReadAccessToKeyMetaData statement to your key policy. This statement allows you, for example, to list the KMS keys in your account for auditing purposes. The statement grants the AWS account root user read-only access to the key metadata. Therefore, an IAM principal in the account can have access to the key metadata when their identity-based policies have the following permissions listed in the statement: kms:Describe*, kms:Get*, and kms:List*. Make sure to replace <account-ID> with your own information.
Grant AWS KMS permissions to Amazon SNS to publish messages to the queue
To allow your SNS topic to publish messages to your encrypted SQS queue, add the following AllowSNSToSendToSQS policy statement to your key policy. This statement grants Amazon SNS permissions to use the KMS key to publish to your SQS queue. Make sure to replace <account-id> with your own information.
Note: The Condition element limits access to the SNS service in the same AWS account where the SNS topic exists.
Allow consumers to decrypt messages from the queue
The following AllowConsumersToReceiveFromTheQueue statement grants the SQS message consumer the required permissions to decrypt messages received from the encrypted SQS queue. When you attach the policy statement, replace <consumer’s runtime role ARN> with the ARN for the IAM runtime role of the message consumer.
In this section, we will walk you through least-privilege SQS queue policies to help you send Amazon SNS messages to Amazon SQS. The defined policy is designed to prevent unintended access by using a mix of both allow and deny statements. The allow statements grant access to the intended entity or entities. The deny statements prevent other unintended entities from accessing the SQS queue, while excluding the intended entity within the policy condition. The SQS policy includes the following statements, which we describe in detail below:
Restrict Amazon SQS management permissions
Restrict SQS queue actions from the specified organization
Grant SQS permissions to consumers
Enforce encryption in transit
Restrict message transmission to a specific SNS topic
(Optional) Restrict message reception to a specific VPC endpoint
Restrict Amazon SQS management permissions
The following RestrictAdminQueueActions policy statement restricts the Amazon SQS management permissions to only the IAM role or roles that you use to deploy the queue, manage the queue, or both.
Make sure to replace the <placeholder values> with your own information. Specify the ARN of the IAM role used to deploy the SQS queue, as well as the ARNs of each administrator role that should have SQS management permissions. For the Resource element, you can specify either “*” or the ARN of the SQS queue.
Restrict SQS queue actions from the specified organization
To help protect your Amazon SQS resources from external access (that is, access by an entity outside your AWS Organizations organization), use the following statement. The statement limits SQS queue access to the organization that you specify in the Condition element. Make sure to replace <org-id> with your organization ID. For the Resource element, you can specify either “*” or the ARN of the SQS queue.
To receive messages from the SQS queue, you need to provide the message consumer with the necessary permissions. The following policy statement grants the consumer, which you specify, the required permissions to consume messages from the SQS queue. When adding the statement to your SQS policy, make sure to replace <consumer’s IAM runtime role ARN> with the ARN of the IAM runtime role used by the consumer. For the Resource element, you can specify either “*” or the ARN of the SQS queue.
To prevent other entities from receiving messages from the SQS queue, add the following DenyOtherConsumersFromReceiving statement to the SQS queue policy. This statement restricts message consumption to the consumer that you specify—allowing no other consumer to have access, even when their identity permissions would grant them access. Make sure to replace <consumer’s runtime role ARN> with your own information. For the Resource element, you can specify either “*” or the ARN of the SQS queue.
The following DenyUnsecureTransport policy statement enforces the consumers and producers to use secure channels (TLS connections) to send and receive messages to and from the SQS queue. For the Resource element, you can specify either “*” or the ARN of the SQS queue.
Restrict message transmission to a specific SNS topic
The following AllowSNSToSendToTheQueue policy statement allows the specified SNS topic to send messages to the SQS queue. Make sure to replace <SNS topic ARN> with the SNS topic ARN. For the Resource element, you can specify either “*” or the ARN of the SQS queue.
The following DenyAllProducersExceptSNSFromSending policy statement prevents other producers from sending messages to the queue. Replace <SNS topic ARN> with your own information. For the Resource element, you can specify either “*” or the ARN of the SQS queue.
(Optional) Restrict message reception to a specific VPC endpoint
To restrict the receipt of messages to only a specific VPC endpoint, add the following DenyReceivingIfNotThroughVPCE policy statement to your SQS queue policy. This statement prevents a message consumer from receiving messages from the queue unless the messages are from the desired VPC endpoint. Replace <vpce_id> with the ID of the VPC endpoint that you created for your SQS queue. For the Resource element, you can specify either “*” or the ARN of the SQS queue.
In this section, we will walk you through how to manage access to your SQS queue when you are using it as a dead-letter queue (DLQ) for another SQS queue.
Add policy statements to your DLQ access policy
Add the following policy statements, identified by their statement ID, to your DLQ access policy. These are the same policy statements introduced earlier in this post.
RestrictAdminQueueActions
DenyQueueActionsOutsideOrg
AllowConsumersToReceiveFromTheQueue
DenyOtherConsumersFromReceiving
DenyUnsecureTransport
In addition to adding the preceding policy statements to your DLQ access policy, you should add a statement to restrict message transmission to SQS queues, which we describe in the next section.
Restrict message transmission to SQS queues
To restrict access to only SQS queues from the same account, add the following DenyAnyProducersExceptSQS policy statement to the DLQ access policy. This statement doesn’t limit message transmission to a specific queue because you need to deploy the DLQ before you create the main queue, so you won’t know the SQS queue ARN when you create the DLQ. If you need to limit access to only one SQS queue, modify the aws:SourceArn in the Condition element with the ARN of your SQS source queue when you know it.
Important: The SQS queue policies defined in this post don’t restrict the sqs:PurgeQueue action to a certain IAM role or roles. The sqs:PurgeQueue action enables you to delete all messages in the SQS queue. You can also use this action to make changes to the message format without replacing the SQS queue. When debugging an application, you can clear the SQS queue to remove potentially erroneous messages. When testing the application, you can drive a high message volume through the SQS queue and then purge the queue to start fresh before entering production. The reason for not restricting this action to a certain role is that this role might not be known when deploying the SQS queue. You will need to add this permission to the role’s identity-based policy to be able to purge the queue.
Prevent the cross-service confused deputy problem
The confused deputy problem is a security issue where an entity that doesn’t have permission to perform an action can coerce a more privileged entity to perform the action. To help prevent this problem, AWS provides tools that help you protect your account if you provide third parties (known as cross-account) or other AWS services (known as cross-service) access to resources in your account. The policy statements in this post can help you prevent the cross-service confused deputy problem.
Cross-service impersonation can occur when one service (the calling service) calls another service (the called service). The calling service can be manipulated to use its permissions to act on another customer’s resources in a way it shouldn’t otherwise have permission to access. To help protect against this issue, the resource-based policies defined in this post use the aws:SourceArn, aws:SourceAccount, and aws:PrincipalOrgID global IAM condition context keys. These limit the permissions that a service has to a specific resource, a specific account, or a specific organization in AWS Organizations.
For example, the following AllowS3ToSendToTheQueue policy statement allows Amazon S3 to deliver messages to your Amazon SQS queue; the aws:SourceArn condition in this policy grants access to a specific S3 bucket only.
If a bad actor creates an S3 bucket to try to deliver messages to your Amazon SQS queue, the source ARN will not match that of the S3 bucket specified in this policy, so the policy will deny access. Without the aws:SourceArn condition, the unauthorized S3 bucket would be granted access unintentionally because any S3 bucket would be granted to deliver messages to our queue through the S3 service principal. Adding the aws:SourceArn condition prevents cross-service impersonation.
Use IAM Access Analyzer to review cross-account access
You can use IAM Access Analyzer to review your SQS queue policies and AWS KMS key policies and alert you when an SQS queue or a KMS key grants access to an external entity. IAM Access Analyzer helps identify resources in your organization and accounts that are shared with an entity outside the zone of trust. This zone of trust can be either an AWS account or the organization within AWS Organizations that you specify when you enable IAM Access Analyzer.
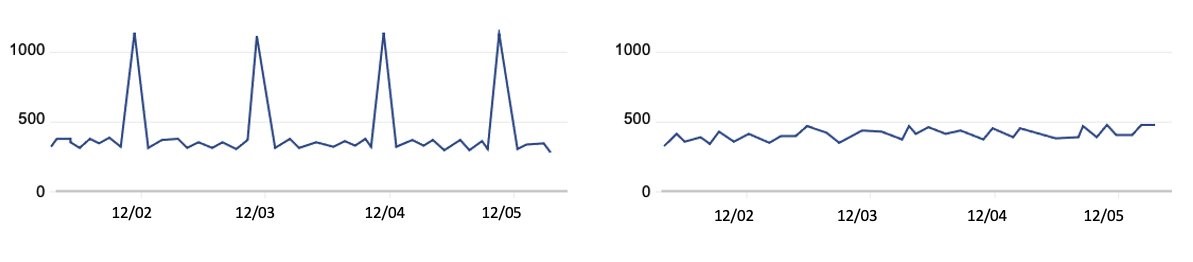
IAM Access Analyzer also helps identify resources shared with external principals by using logic-based reasoning to analyze the resource-based policies in your AWS environment. For each instance of a resource shared outside of your zone of trust, IAM Access Analyzer generates a finding. Figure 2 shows an IAM Access Analyzer finding, in which a sqs:SendMessage API call was made to our SQS queue from an account that is outside of our zone of trust.
Figure 2: IAM Access Analyzer example finding for an Amazon SQS queue
Findings include information about the access and the external principal granted to it. To determine whether the access is intended and safe, or unintended and a security risk, review the findings. For unintended access, review the affected policy and modify it by using the policy statements introduced in this blog post to further restrict access. For more information on how IAM Access Analyzer identifies unintended access to your AWS resources, see the blog post Identify Unintended Resource Access with IAM Access Analyzer.
Conclusion
In this post, you learned how to manage access to your encrypted Amazon SQS queue to help you achieve least privilege. We presented an SQS queue policy and an AWS KMS key policy so that you can use Amazon SQS to receive messages from an SNS topic. We addressed the confused deputy problem, specifying the exact source allowed to emit events. You also learned how to use IAM Access Analyzer to review the external access provided by your existing SQS queue policies and key policies.
You can follow the instructions in this post to resolve findings based on your SQS use case. You can also use the provided policies for newly created SQS queues and their KMS keys, or to modify existing queues (for example, to address IAM Access Analyzer findings). For more use cases, see the AWS SQS documentation.
If you own a domain that you use for email, you want to maintain the reputation and goodwill of your domain’s brand. Several industry-standard mechanisms can help prevent your domain from being used as part of a phishing attack. In this post, we’ll show you how to deploy three of these mechanisms, which visually authenticate emails sent from your domain to users and verify that emails are encrypted in transit. It can take as little as 15 minutes to deploy these mechanisms on Amazon Web Services (AWS), and the result can help to provide immediate and long-term improvements to your organization’s email security.
Phishing through email remains one of the most common ways that bad actors try to compromise computer systems. Incidents of phishing and related crimes far outnumber the incidents of other categories of internet crime, according to the most recent FBI Internet Crime Report. Phishing has consistently led to large annual financial losses in the US and globally.
Brand Indicators for Message Identification (BIMI) – This standard allows you to associate a logo with your email domain, which some email clients will display to users in their inbox. Visit the BIMI Group’s Where is my BIMI Logo Displayed? webpage to see how logos are displayed in the user interfaces of BIMI-supporting mailbox providers; Figure 1 shows a mock-up of a typical layout that contains a logo.
Mail Transfer Agent Strict Transport Security (MTA-STS) – This standard helps ensure that email servers always use TLS encryption and certificate-based authentication when they send messages to your domain, to protect the confidentiality and integrity of email in transit.
SMTP TLS reporting – This reporting allows you to receive reports and monitor your domain’s TLS security posture, identify problems, and learn about attacks that might be occurring.
Figure 1: A mock-up of how BIMI enables branded logos to be displayed in email user interfaces
These three standards require your Domain Name System (DNS) to publish specific records, for example by using Amazon Route 53, that point to web pages that have additional information. You can host this information without having to maintain a web server by storing it in Amazon Simple Storage Service (Amazon S3) and delivering it through Amazon CloudFront, secured with a certificate provisioned from AWS Certificate Manager (ACM).
Note: This AWS solution works for DKIM, BIMI, and DMARC, regardless of what you use to serve the actual email for your domains, which services you use to send email, and where you host DNS. For purposes of clarity, this post assumes that you are using Route 53 for DNS. If you use a different DNS hosting provider, you will manually configure DNS records in your existing hosting provider.
Solution architecture
The architecture for this solution is depicted in Figure 2.
Figure 2: The architecture diagram showing how the solution components interact
As described in more detail in the BIMI section of this blog post, the Verified Mark Certificate is obtained from a BIMI-qualified certificate authority and stored in the S3 bucket.
When an external email system receives a message claiming to be from your domain, it looks up BIMI records for your domain in DNS. As depicted in the diagram, a DNS request is sent to Route 53.
To retrieve the BIMI logo image and Verified Mark Certificate, the external email system will make HTTPS requests to a URL published in the BIMI DNS record. In this solution, the URL points to the CloudFront distribution, which has a TLS certificate provisioned with ACM.
A few important warnings
Email is a complex system of interoperating technologies. It is also brittle: a typo or a missing DNS record can make the difference between whether an email is delivered or not. Pay close attention to your email server and the users of your email systems when implementing the solution in this blog post. The main indicator that something is wrong is the absence of email. Instead of seeing an error in your email server’s log, users will tell you that they’re expecting to receive an email from somewhere and it’s not arriving. Or they will tell you that they sent an email, and their recipient can’t find it.
The DNS uses a lot of caching and time-out values to improve its efficiency. That makes DNS records slow and a little unpredictable as they propagate across the internet. So keep in mind that as you monitor your systems, it can be hours or even more than a day before the DNS record changes have an effect that you can detect.
This solution uses AWS Cloud Development Kit (CDK) custom resources, which are supported by AWS Lambda functions that will be created as part of the deployment. These functions are configured to use CDK-selected runtimes, which will eventually pass out of support and require you to update them.
Prerequisites
You will need permission in an AWS account to create and configure the following resources:
An Amazon S3 bucket to store the files and access logs
A CloudFront distribution to publicly deliver the files from the S3 bucket
A TLS certificate in ACM
An origin access identity in IAM that CloudFront will use to access files in Amazon S3
Lambda functions, IAM roles, and IAM policies created by CDK custom resources
You might also want to enable these optional services:
Amazon Route 53 for setting the necessary DNS records. If your domain is hosted by another DNS provider, you will set these DNS records manually.
Amazon SES or an Amazon WorkMail organization with a single mailbox. You can configure either service with a subdomain (for example, [email protected]) such that the existing domain is not disrupted, or you can create new email addresses by using your existing email mailbox provider.
BIMI has some additional requirements:
BIMI requires an email domain to have implemented a strong DMARC policy so that recipients can be confident in the authenticity of the branded logos. Your email domain must have a DMARC policy of p=quarantine or p=reject. Additionally, the domain’s policy cannot have sp=none or pct<100.
Note: Do not adjust the DMARC policy of your domain without careful testing, because this can disrupt mail delivery.
You must have your brand’s logo in Scaled Vector Graphics (SVG) format that conforms to the BIMI standard. For more information, see Creating BIMI SVG Logo Files on the BIMI Group website.
Purchase a Verified Mark Certificate (VMC) issued by a third-party certificate authority. This certificate attests that the logo, organization, and domain are associated with each other, based on a legal trademark registration. Many email hosting providers require this additional certificate before they will show your branded logo to their users. Others do not currently support BIMI, and others might have alternative mechanisms to determine whether to show your logo. For more information about purchasing a Verified Mark Certificate, see the BIMI Group website.
Note: If you are not ready to purchase a VMC, you can deploy this solution and validate that BIMI is correctly configured for your domain, but your branded logo will not display to recipients at major email providers.
What gets deployed in this solution?
This solution deploys the DNS records and supporting files that are required to implement BIMI, MTA-STS, and SMTP TLS reporting for an email domain. We’ll look at the deployment in more detail in the following sections.
Brand Indicators for Message Identification (BIMI) permits Domain Owners to coordinate with Mail User Agents (MUAs) to display brand-specific Indicators next to properly authenticated messages. There are two aspects of BIMI coordination: a scalable mechanism for Domain Owners to publish their desired Indicators, and a mechanism for Mail Transfer Agents (MTAs) to verify the authenticity of the Indicator. This document specifies how Domain Owners communicate their desired Indicators through the BIMI Assertion Record in DNS and how that record is to be interpreted by MTAs and MUAs. MUAs and mail-receiving organizations are free to define their own policies for making use of BIMI data and for Indicator display as they see fit.
If your organization has a trademark-protected logo, you can set up BIMI to have that logo displayed to recipients in their email inboxes. This can have a positive impact on your brand and indicates to end users that your email is more trustworthy. The BIMI Group shows examples of how brand logos are displayed in user inboxes, as well as a list of known email service providers that support the display of BIMI logos.
As a domain owner, you can implement BIMI by publishing the relevant DNS records and hosting the relevant files. To have your logo displayed by most email hosting providers, you will need to purchase a Verified Mark Certificate from a BIMI-qualified certificate authority.
This solution will deploy a valid BIMI record in Route 53 (or tell you what to publish in the DNS if you’re not using Route 53) and will store your provided SVG logo and Verified Mark Certificate files in Amazon S3, to be delivered through CloudFront with a valid TLS certificate from ACM.
To support BIMI, the solution makes the following changes to your resources:
A DNS record of type TXT is published at the following host: default._bimi.<your-domain>. The value of this record is: v=BIMI1; l=<url-of-your-logo> a=<url-of-verified-mark-certificate>. The value of <your-domain> refers to the domain that is used in the From header of messages that your organization sends.
The logo and optional Verified Mark Certificate are hosted publicly at the HTTPS locations defined by <url-of-your-logo> and <url-of-verified-mark-certificate>, respectively.
SMTP (Simple Mail Transport Protocol) MTA Strict Transport Security (MTA-STS) is a mechanism enabling mail service providers to declare their ability to receive Transport Layer Security (TLS) secure SMTP connections and to specify whether sending SMTP servers should refuse to deliver to MX hosts that do not offer TLS with a trusted server certificate.
Put simply, MTA-STS helps ensure that email servers always use encryption and certificate-based authentication when sending email to your domains, so that message integrity and confidentiality are preserved while in transit across the internet. MTA-STS also helps to ensure that messages are only sent to authorized servers.
This solution will deploy a valid MTA-STS policy record in Route 53 (or tell you what value to publish in the DNS if you’re not using Route 53) and will create an MTA-STS policy document to be hosted on S3 and delivered through CloudFront with a valid TLS certificate from ACM.
To support MTA-STS, the solution makes the following changes to your resources:
A DNS record of type TXT is published at the following host: _mta-sts.<your-domain>. The value of this record is: v=STSv1; id=<unique value used for cache invalidation>.
The MTA-STS policy document is hosted at and obtained from the following location: https://mta-sts.<your-domain>/.well-known/mta-sts.txt.
The value of <your-domain> in both cases is the domain that is used for routing inbound mail to your organization and is typically the same domain that is used in the From header of messages that your organization sends externally. Depending on the complexity of your organization, you might receive inbound mail for multiple domains, and you might choose to publish MTA-STS policies for each domain.
Is it ever bad to encrypt everything?
In the example MTA-STS policy file provided in the GitHub repository and explained later in this post, the MTA-STS policy mode is set to testing. This means that your email server is advertising its willingness to negotiate encrypted email connections, but it does not require TLS. Servers that want to send mail to you are allowed to connect and deliver mail even if there are problems in the TLS connection, as long as you’re in testing mode. You should expect reports when servers try to connect through TLS to your mail server and fail to do so.
Be fully prepared before you change the MTA-STS policy to enforce. After this policy is set to enforce, servers that follow the MTA-STS policy and that experience an enforceable TLS-related error when they try to connect to your mail server will not deliver mail to your mail server. This is a difficult situation to detect. You will simply stop receiving email from servers that comply with the policy. You might receive reports from them indicating what errors they encountered, but it is not guaranteed. Be sure that the email address you provide in SMTP TLS reporting (in the following section) is functional and monitored by people who can take action to fix issues. If you miss TLS failure reports, you probably won’t receive email. If the TLS certificate that you use on your email server expires, and your MTA-STS policy is set to enforce, this will become an urgent issue and will disrupt the flow of email until it is fixed.
A number of protocols exist for establishing encrypted channels between SMTP Mail Transfer Agents (MTAs), including STARTTLS, DNS-Based Authentication of Named Entities (DANE) TLSA, and MTA Strict Transport Security (MTA-STS). These protocols can fail due to misconfiguration or active attack, leading to undelivered messages or delivery over unencrypted or unauthenticated channels. This document describes a reporting mechanism and format by which sending systems can share statistics and specific information about potential failures with recipient domains. Recipient domains can then use this information to both detect potential attacks and diagnose unintentional misconfigurations.
As you gain the security benefits of MTA-STS, SMTP TLS reporting will allow you to receive reports from other internet email providers. These reports contain information that is valuable when monitoring your TLS security posture, identifying problems, and learning about attacks that might be occurring.
This solution will deploy a valid SMTP TLS reporting record on Route 53 (or provide you with the value to publish in the DNS if you are not using Route 53).
To support SMTP TLS reporting, the solution makes the following changes to your resources:
A DNS record of type TXT is published at the following host: _smtp._tls.<your-domain>. The value of this record is: v=TLSRPTv1; rua=mailto:<report-receiver-email-address>
The value of <report-receiver-email-address> might be an address in your domain or in a third-party provider. Automated systems that process these reports must be capable of processing GZIP compressed files and parsing JSON.
Deploy the solution with the AWS CDK
In this section, you’ll learn how to deploy the solution to create the previously described AWS resources in your account.
Clone the following GitHub repository:
git clone https://github.com/aws-samples/serverless-mail
 cd serverless-mail/email-security-records
Edit CONFIG.py to reflect your desired settings, as follows:
If no Verified Mark Certificate is provided, set VMC_FILENAME = None.
If your DNS zone is not hosted on Route 53, or if you do not want this app to manage Route 53 DNS records, set ROUTE_53_HOSTED = False. In this case, you will need to set TLS_CERTIFICATE_ARN to the Amazon Resource Name (ARN) of a certificate hosted on ACM in us-east-1. This certificate is used by CloudFront and must support two subdomains: mta-sts and your configured BIMI_ASSET_SUBDOMAIN.
Finalize the preparation, as follows:
Place your BIMI logo and Verified Mark Certificate files in the assets folder.
Create an MTA-STS policy file at assets/.well-known/mta-sts.txt to reflect your mail exchange (MX) servers and policy requirements. An example file is provided at assets/.well-known/mta-sts.txt.example
Deploy the solution, as follows:
Open a terminal in the email-security-records folder.
(Recommended) Create and activate a virtual environment by running the following commands. python3 -m venv .venv source .venv/bin/activate
Install the Python requirements in your environment with the following command. pip install -r requirements.txt
Assume a role in the target account that has the permissions outlined in the Prerequisites section of this post.
Using AWS CDK version 2.17.0 or later, deploy the bootstrap in the target account by running the following command. To learn more, see Bootstrapping in the AWS CDK Developer Guide. cdk bootstrap
Run the following command to synthesize the CloudFormation template. Review the output of this command to verify what will be deployed. cdk synth
Run the following command to deploy the CloudFormation template. You will be prompted to accept the IAM changes that will be applied to your account. cdk deploy
Note: If you use Route53, these records are created and activated in your DNS zones as soon as the CDK finishes deploying. As the records propagate through the DNS, they will gradually start affecting the email in the affected domains.
If you’re not using Route53 and instead are using a third-party DNS provider, create the CNAME and TXT records as indicated. In this case, your email is not affected by this solution until you create the records in DNS.
Testing and troubleshooting
After you have deployed the CDK solution, you can test it to confirm that the DNS records and web resources are published correctly.
BIMI
Query the BIMI DNS TXT record for your domain by using the dig or nslookup command in your terminal.
In your web browser, open the URL from that response (for example, https://bimi-assets.<your-domain.example>/logo.svg) to verify that the logo is available and that the HTTPS certificate is valid.
The BIMI group provides a tool to validate your BIMI configuration. This tool will also validate your VMC if you have purchased one.
MTA-STS
Query the MTA-STS DNS TXT record for your domain.
dig +short TXT _mta-sts.<your-domain.example>
The value of this record is as follows:
v=STSv1; id=<unique value used for cache invalidation>
You can load the MTA-STS policy document using your web browser. For example, https://mta-sts.<your-domain.example>/.well-known/mta-sts.txt
You can also use third party tools to examine your MTA-STS configuration, such as MX Toolbox.
TLS reporting
Query the TLS reporting DNS TXT record for your domain.
dig +short TXT _smtp._tls.<your-domain.example>
Verify the response. For example:
"v=TLSRPTv1; rua=mailto:<your email address>"
You can also use third party tools to examine your TLS reporting configuration, such as Easy DMARC.
Depending on which domains you communicate with on the internet, you will begin to see TLS reports arriving at the email address that you have defined in the TLS reporting DNS record. We recommend that you closely examine the TLS reports, and use automated analytical techniques over an extended period of time before changing the default testing value of your domain’s MTA-STS policy. Not every email provider will send TLS reports, but examining the reports in aggregate will give you a good perspective for making changes to your MTA-STS policy.
Cleanup
To remove the resources created by this solution:
Open a terminal in the cdk-email-security-records folder.
Assume a role in the target account with permission to delete resources.
Run cdk destroy.
Note: The asset and log buckets are automatically emptied and deleted by the cdk destroy command.
Conclusion
When external systems send email to or receive email from your domains they will now query your new DNS records and will look up your domain’s BIMI, MTA-STS, and TLS reporting information from your new CloudFront distribution. By adopting the email domain security mechanisms outlined in this post, you can improve the overall security posture of your email environment, as well as the perception of your brand.
If you have feedback about this post, submit comments in the Comments section below. If you have questions about this post, contact AWS Support.
Want more AWS Security news? Follow us on Twitter.
Welcome back. If you’re joining this series for the first time, we recommend that you read the first blog post in this series, Considerations for security operations in the cloud, for some context on what we will discuss and deploy in this blog post. In the earlier post, we talked through the different operating models (centralized, decentralized, or hybrid) that you can deploy for a Security Operations Center (SOC) function when you operate in the cloud. We covered the advantages of each model and some of the potential drawbacks you might see when you start to scale up operations within the cloud.
This post will focus on the Amazon Web Services (AWS) native security service, AWS Security Hub, that you can use to deploy in different SOC operating models. AWS Security Hub is a cloud security posture management service that SOC teams can use to perform security best practice checks and aggregate alerts. AWS Security Hub accepts findings from multiple sources, whether native to AWS, from the pre-built integrations, or from your own sources converted into the AWS Security Finding Format (ASFF). The data collected in Security Hub facilitates response and remediation actions.
Although the models we describe here use services that are native to AWS, the reference architectures that correspond to each operating model can be applied to a variety of deployments, including multi-cloud and traditional on-premises deployments. The majority of this post will focus on the decentralized and hybrid models—the centralized model is well documented and has reference architectures already available for you today.
Each organization is different, and no one operating model will fit everyone. You should choose the model that works best for your organizational landscape, with an understanding that the landscape will change and evolve over time. Using feedback loops and being open to change is important to help you meet the continued needs of your business. Additional factors to consider include, but are not limited to: staff skills, compliance requirements, previous operating model, and budget.
The centralized model
The centralized operating model for the SOC is well documented and frequently discussed, both at AWS and in the security community. According to AWS best practices, typically you designate a central security tooling account that is dedicated to operating security services, monitoring AWS accounts, and automating security alerting and response. The security tooling account serves as the administrator account for security services that are managed in an administrator/member structure across your AWS accounts. The key objectives for establishing a security tooling account are the following:
Provide a dedicated enclave with controlled access for managing security guardrails, monitoring, and response.
Maintain the appropriate centralized security infrastructure to monitor security operations data and maintain traceability across the security lifecycle.
Figure 1 demonstrates the variety of AWS security services that you can deploy in the central security account. For example, Security Hub within the security tooling account can act as the administrator to enable Security Hub in the member accounts, as well as view findings, view insights, and set security standards across member accounts, which can help simplify security posture management across your existing and future accounts.
Figure 1: Reference architecture for the security tooling account in a centralized model
As mentioned earlier, you can enable Security Hub to administer and enable member accounts. This is achieved by using AWS Organizations and the delegated administrator functionality. In addition, you can use Security Hub cross-Region aggregation within the delegated administrator account to aggregate findings, finding updates, insights, control compliance statuses, and security scores from multiple Regions to a single aggregation Region. You can then manage this data from the aggregation Region. Figure 2 shows the reference architecture for this functionality.
Figure 2: Reference architecture for Security Hub in the delegated administrator model
The AWS Security Reference Architecture (AWS SRA) is a great starting point for establishing the centralized security operations model. The AWS SRA is a holistic set of guidelines for deploying the full complement of AWS security services in a multi-account environment. You can use it to help design, implement, and manage AWS security services so that they align with AWS best practices. The AWS SRA’s Security Hub Organization solution provides deployable templates and examples that automate the process of enabling Security Hub by delegating administration to an account and configuring Security Hub for the existing and future AWS Organizations accounts.
The decentralized and hybrid models
As mentioned in Considerations for security operations in the cloud, the decentralized and hybrid SOC models provide many benefits for organizations. The flexibility of these operating models allows organizational units (OUs) to control how they deal with security-related incidents while still having organization-wide visibility into security posture. This flexibility is important as organizations start to scale up activities within the cloud.
The reference architecture in Figure 3 shows how the benefits we discussed in our earlier blog post can be architected in the decentralized and hybrid operating models in the AWS Cloud.
Figure 3: Reference architecture for the decentralized and hybrid operating models in AWS
The key features of this architecture are as follows:
Dedicated accounts have been created for each OU for the Security Hub administration. The model we will use for this deployment is the invite model. In this reference architecture and as an example, we’re using Amazon GuardDuty to flow findings into Security Hub. When you use this model, each OU can manage findings for that OU. This gives you flexibility to work from the Security Hub admin with full visibility of the OU and accounts associated with that OU, or to work in each member account and view findings for that account only.
(Optional, for use with the hybrid model) Each OU’s Security Hub member accounts first send events to their Security Hub admin account. The Security Hub admin account will then send events for that OU to the local Amazon EventBridge bus. You can then set up rules to forward events to a central EventBridge bus in a dedicated AWS account. In the architecture in Figure 3, this account is named SecAnalytics. This step will follow a similar flow as the one described in this AWS Cloud Operations & Migrations blog post.
(Optional, for use with the hybrid model) After the OUs have sent data to the central bus, you can use a capability similar to the one in this AWS Architecture Blog post to start organizing the findings and gain organization-wide visibility. The solution in the earlier post used Amazon QuickSight to visualize the data, but you can use another tool or pre-existing data pipeline.
Items 3 and 4 labeled with (Optional) are capabilities that enable the hybrid model; these are not required if you only want to enable the decentralized model.
Considerations for all deployments
Keep the following considerations in mind for all deployments:
Steady state operations should be considered for whichever model you deploy in. For the centralized model, you can use functionality within AWS Organizations to automatically enable Security Hub for accounts within the organization. In the decentralized and hybrid models, you will need to build out this capability or use a similar capability as described in this repo.
Alert fatigue happens when humans work on the same repetitive tasks’ day in and day out. To help reduce this, within the reference architecture and solution overview, we’ve added the capability described in this Security Blog post to automatically suppress findings based on criteria set by you. For the centralized model, you can add this capability in the delegated admin account for Security Hub. For the decentralized and hybrid models, we recommend that you put the auto-suppression capability in the Security Hub admin account, and then centralize the rules for suppression for that OU at the Security Hub admin level. This will reduce the overhead for deploying suppression rules multiple times and give a single location where rules are placed for that OU.
Context is key. Within the reference architecture and solution overview for decentralized and hybrid deployments, we’ve added the capability described in this Security Blog post. This capability will add additional context, such as the account name, the OU associated with the account, security contact information, and account tags. This information is pulled from AWS Organizations to enrich Security Hub findings. This additional context can also be used in the centralized model.
Deploy the decentralized and hybrid models
In this section, we’ll walk you through the deployment that reflects the reference architecture for the decentralized and hybrid models. Figure 4 shows the solution architecture, including the solution that needs to be deployed in the Security Hub admin account and in the aggregation Region for each business unit within the organization. The solution provides the capability to suppress Security Hub findings, enrich the findings, and propagate findings to central security accounts.
Figure 4: Reference architecture for the decentralized and hybrid deployment
The solution architecture consists of the following:
An EventBridge rule to invoke a Lambda function (Suppression Lambda) as the target to suppress any findings based on specific generator IDs within specific member accounts.
Note: The Security Hub Generator IDs and AWS Account IDs in the EventBridge rule are left as placeholders so that you can fill based on your needs.
An EventBridge rule to invoke a Lambda function (Enrichment Lambda) as the target to enrich the findings with AWS account and OU related metadata, along with alternate contact information to better prioritize the findings. The API calls to AWS Organizations and AWS account management services are optimized by caching the metadata in an Amazon DynamoDB table with a time-to-live (TTL) value of 24 hours.
An EventBridge rule to post the enriched findings that were not suppressed to a custom EventBridge event bus in the organization-level Security Tooling/SecAnalytics account.
Prerequisites
The following are the prerequisites for this deployment:
AWS Organizations is utilized across the business. In this scenario, AWS Organizations will be used to group AWS accounts into OUs, as well as to provide enrichment data for Security Hub findings.
Alternative contacts for AWS accounts have been filled out with the most up-to-date information. This is a best practice recommendation. This information will be used for enrichment of the Security Hub findings.
Your organization already has a pipeline in place for indexing Security Hub findings and visualizing them.
Security Hub is set up in the invite model. OU-level Security Hub accounts have been invited and accepted to be managed by the OU-level Security Hub admin account.
The grouping of findings across multiple OU-level Security Hub admin accounts uses Amazon EventBridge to forward events to a centralized bus. You should have the event bus set up ready for this deployment.
Deploy the solution
This solution deployment consists of two parts:
Create an IAM role in your Organizations management account that allows BU-level Security Hub admin to access account metadata, as described in the Create the IAM role procedure that follows.
Deploy the Enrichment Lambda function, the Suppression Lambda function, and the associated EventBridge event rules within the BU-level Security Hub administrator account.
Create the IAM role
Follow the instructions in Creating a role to delegate permissions to an IAM user to create an IAM role by using the IAM console, AWS Command Line Interface (AWS CLI), or AWS API. Create the role in the AWS Organizations management account with the role name as account-contact-readonly, based on the following trust and permission policy templates. You will need the account ID of your BU-level Security Hub administrator account.
The IAM trust policy allows the Security Hub administrator account to assume the role in your Organizations management account.
Note: The following trust policy shows only one BU Security admin account. You will need to add all BU Security admin accounts to the trust policy.
Note: Replace <BU SecHubAdmin Account ID> with the account ID of your decentralized BU-level Security Hub administrator account. After the solution is deployed, you should update the principal in the preceding trust policy to use the new IAM role created for the solution.
The IAM permission policy allows the Security Hub administrator account to look up the alternate contact information for the member accounts.
Make a note of the role Amazon Resource Name (ARN) for the IAM role, which will be similar to this format: arn:aws:iam::<Org Management Account ID>:role/account-contact-readonly.
You will need this ARN when you deploy the solution in the next procedure.
Deploy the solution to your BU-level Security Hub administrator account
After you have the IAM role created, you can deploy the solution either from the AWS Management Console, or from our GitHub repository by using the AWS SAM CLI.
Note: If you’ve designated an aggregation Region within the BU-level Security Hub administrator account, you can deploy this solution only in the aggregation Region. Otherwise, you need to deploy this solution separately in each Region of the BU-level Security Hub administrator account where Security Hub is enabled.
To deploy the solution by using the AWS Management Console
In your Security Hub administrator account, launch the template by choosing the following Launch Stack button, which creates the stack the in us-east-1 Region.
Note: If your Security Hub aggregation Region is different than us-east-1 or you want to deploy the solution in a different AWS Region, you can deploy the solution from the GitHub repository described in the next section.
On the Quick create stack page, for Stack name, enter a unique stack name for this account; for example, aws-security-hub-decentralized-deployment-stack.
Figure 5: Quick create CloudFormation stack for the solution
For SecurityToolingAccountEventBus, provide the EventBus ARN in the security tooling account to post the Security Hub findings from the BU-level Security Hub administrator account.
For OrgManagementAccountContactRole, enter the role ARN of the role you created previously in the Create IAM role procedure.
Choose Create stack.
After the stack is created, go to the Resources tab and take note of the name of the IAM role that was created.
Update the principal element of the IAM role trust policy that you previously created in the Organizations management account in the Create the IAM role procedure, replacing the existing value with the role name you noted down.
Download or clone the GitHub repository by using the following commands.
git clone https://github.com/aws-samples/aws-securityhub-decentralized-operations-solution.git
 cd aws-securityhub-decentralized-operations-solution
Update the content of the profile.txt file with the profile name you want to use for the deployment.
To create a new bucket for deployment artifacts, run create-bucket.sh by specifying the Region as argument.
$ ./create-bucket.sh us-east-1
Deploy the solution to the account by running the deploy.sh script by specifying the Region as argument.
$ ./deploy.sh us-east-1
After the stack is created, go to the Resources tab and take note of the name of the IAM role that was created.
Update the principal element of the IAM role trust policy that you previously created in the Organizations management account in the Create the IAM role procedure, replacing it with the role name you noted down.
"AWS": "arn:aws:iam::<BU SH Delegated Account ID>: role/<Role Name>"
Note: The EventBridge rule to invoke the findings suppression Lambda function uses placeholders for the generator IDs and AWS account IDs. You need to update the EventBridge rule to meet your specific organizational requirements.
Further enhancements and conclusion
Beyond what is described in the decentralized and hybrid models, you can extend the solution to include the following aspects to meet your security operational needs:
In Considerations for security operations in the cloud, we spoke about the role of ChatOps. AWS Chatbot can enable OUs to set up rules to post notifications directly into chat rooms such as Amazon Chime or Slack. You can define rules to send only certain severity notifications or findings that are important to your OU to the chat room.
SCPs give organizations a level of control and governance. See this blog post for some best practices for deploying SCPs, as well as example policies that could be beneficial for your organization in any model you operate in.
We’ve performed testing of the decentralized and hybrid models in the reference architecture within one AWS Region. Although we don’t see any reason why this solution would not work in multiple Regions, if you do operate in multiple Regions you would need to deploy the CloudFormation template in each Region that you operate in. At this stage, you can keep findings within a Region or choose to centralize across multiple Regions by sending to the single central bus in Amazon EventBridge—the flexibility is yours.
The decentralized and hybrid models can also be extended if you operate in multiple organizations in AWS Organizations or have standalone accounts outside of your organization that you want to monitor. Interesting use cases could be in mergers and acquisitions scenarios, when newly acquired accounts need to be monitored to understand their posture before bringing them fully into the organization.
Throughout this two-part blog series, we’ve explored the role of the Security Operations Center (SOC) function, both traditionally in an on-premises environment and in the cloud. We’ve explored different operating models, from the traditional centralized deployment to the decentralized and hybrid models. We’ve also demonstrated, with reference architectures and deployable solutions, how you can achieve the different operating models in the AWS Cloud by using native AWS services. In the end, you should choose the model that works best for your environment and the security landscape you work in.
If you have feedback about this post, submit comments in the Comments section below. If you have questions about this post, contact AWS Support.
Want more AWS Security news? Follow us on Twitter.
We know that maintaining security and resiliency to keep critical data and infrastructure safe is a top priority for the Australian Government and all our customers in Australia. The Strategic Certification of both the existing Sydney and the new Melbourne Regions reinforces our ongoing commitment to meet security expectations for cloud service providers and means Australian citizens can now have even greater confidence that the Government is securing their data.
The HCF provides guidance to government customers to identify cloud providers that meet enhanced privacy, sovereignty, and security requirements. The expanded scope of the AWS HCF Strategic Certification gives Australian Government customers additional architectural options, including the ability to store backup data in geographically separated locations within Australia.
Our AWS infrastructure is custom-built for the cloud and designed to meet the most stringent security requirements in the world, and is monitored 24/7 to help support the confidentiality, integrity, and availability of customers’ data. All data flowing across the AWS global network that interconnects our data centers and Regions is automatically encrypted at the physical layer before it leaves our secured facilities. We will continue to expand the scope of our security assurance programs at AWS and are pleased that Australian Government customers can continue to innovate at a rapid pace and be confident AWS meets the Government’s requirements to support the secure management of government systems and data.
The Melbourne Region was officially added to the AWS HCF Strategic Certification on December 21, 2022, and the Sydney Region was certified in October 2021. AWS compliance status is available on the HCF Certified Service Providers website, and the Certificate of Compliance is available through AWS Artifact. AWS Artifact is a self-service portal for on-demand access to AWS compliance reports. Sign in to AWS Artifact in the AWS Management Console, or learn more at Getting Started with AWS Artifact. AWS has also achieved many international certifications and accreditations, demonstrating compliance with third-party assurance frameworks such as ISO 27017 for cloud security, ISO 27018 for cloud privacy, and SOC 1, SOC 2, and SOC 3.
To learn more about our compliance and security programs, see AWS Compliance Programs. As always, we value your feedback and questions; reach out to the AWS Compliance team through the Contact Us page.
Please reach out to your AWS account team if you have questions or feedback about HCF compliance.
If you have feedback about this post, submit comments in the Comments section below.
Want more AWS Security how-to content, news, and feature announcements? Follow us on Twitter.
A couple days ago, I had the honor of doing a live stream on generative AI, discussing recent innovations and concepts behind the current generation of large language and vision models and how we got there. In today’s roundup of news and announcements, I will share some additional information—including an expanded partnership to make generative AI more accessible, a blog post about diffusion models, and our weekly Twitch show on Generative AI. Let’s dive right into it!
Last Week’s Launches Here are some launches that got my attention during the previous week:
Integrated Private Wireless on AWS – The Integrated Private Wireless on AWS program is designed to provide enterprises with managed and validated private wireless offerings from leading communications service providers (CSPs). The offerings integrate CSPs’ private 5G and 4G LTE wireless networks with AWS services across AWS Regions, AWS Local Zones, AWS Outposts, and AWS Snow Family. For more details, read this Industries Blog post and check out this eBook. And, if you’re attending the Mobile World Congress Barcelona this week, stop by the AWS booth at the Upper Walkway, South Entrance, at the Fira Barcelona Gran Via, to learn more.
AWS Glue Crawlers – Now integrate with Lake Formation. AWS Glue Crawlers are used to discover datasets, extract schema information, and populate the AWS Glue Data Catalog. With this Glue Crawler and Lake Formation integration, you can configure a crawler to use Lake Formation permissions to access an S3 data store or a Data Catalog table with an underlying S3 location within the same AWS account or another AWS account. You can configure an existing Data Catalog table as a crawler’s target if the crawler and the Data Catalog table reside in the same account. To learn more, check out this Big Data Blog post.
Amazon SageMaker Model Monitor – You can now launch and configure Amazon SageMaker Model Monitor from the SageMaker Model Dashboard using a code-free point-and-click setup experience. SageMaker Model Dashboard gives you unified monitoring across all your models by providing insights into deviations from expected behavior, automated alerts, and troubleshooting to improve model performance. Model Monitor can detect drift in data quality, model quality, bias, and feature attribution and alert you to take remedial actions when such changes occur.
Amazon EKS – Now supports Kubernetes version 1.25. Kubernetes 1.25 introduced several new features and bug fixes, and you can now use Amazon EKS and Amazon EKS Distro to run Kubernetes version 1.25. You can create new 1.25 clusters or upgrade your existing clusters to 1.25 using the Amazon EKS console, the eksctl command line interface, or through an infrastructure-as-code tool. To learn more about this release named “Combiner,” check out this Containers Blog post.
Amazon Detective –New self-paced workshop available. You can now learn to use Amazon Detective with a new self-paced workshop in AWS Workshop Studio. AWS Workshop Studio is a collection of self-paced tutorials designed to teach practical skills and techniques to solve business problems. The Amazon Detective workshop is designed to teach you how to use the primary features of Detective through a series of interactive modules that cover topics such as security alert triage, security incident investigation, and threat hunting. Get started with the Amazon Detective Workshop.
Other AWS News Here are some additional news items and blog posts that you may find interesting:
AWS and Hugging Face collaborate to make generative AI more accessible and cost-efficient – This previous week, we announced an expanded collaboration between AWS and Hugging Face to accelerate the training, fine-tuning, and deployment of large language and vision models used to create generative AI applications. Generative AI applications can perform a variety of tasks, including text summarization, answering questions, code generation, image creation, and writing essays and articles. For more details, read this Machine Learning Blog post.
If you are interested in generative AI, I also recommend reading this blog post on how to Fine-tune text-to-image Stable Diffusion models with Amazon SageMaker JumpStart. Stable Diffusion is a deep learning model that allows you to generate realistic, high-quality images and stunning art in just a few seconds. This blog post discusses how to make design choices, including dataset quality, size of training dataset, choice of hyperparameter values, and applicability to multiple datasets.
AWS open-source news and updates – My colleague Ricardo writes this weekly open-source newsletter in which he highlights new open-source projects, tools, and demos from the AWS Community. Read edition #146 here.
Upcoming AWS Events Check your calendars and sign up for these AWS events:
#BuildOn Generative AI – Join our weekly live Build On Generative AI Twitch show. Every Monday morning, 9:00 US PT, my colleagues Emily and Darko take a look at aspects of generative AI. They host developers, scientists, startup founders, and AI leaders and discuss how to build generative AI applications on AWS.
In today’s episode, my colleague Chris walked us through an end-to-end ML pipeline from data ingestion to fine-tuning and deployment of generative AI models. You can watch the video here.
AWS Pi Day – Join me on March 14 for the third annual AWS Pi Day live, virtual event hosted on the AWS On Air channel on Twitch as we celebrate the 17th birthday of Amazon S3 and the cloud.
We will discuss the latest innovations across AWS Data services, from storage to analytics and AI/ML. If you are curious about how AI can transform your business, register here and join my session.
AWS Innovate Data and AI/ML edition – AWS Innovate is a free online event to learn the latest from AWS experts and get step-by-step guidance on using AI/ML to drive fast, efficient, and measurable results. Register now for EMEA (March 9) and the Americas (March 14).
In November 2022, AWS introduced support for granular geographic (geo) match conditions in AWS WAF. This blog post demonstrates how you can use this new feature to customize your AWS WAF implementation and improve the security posture of your protected application.
AWS WAF provides inline inspection of inbound traffic at the application layer. You can use AWS WAF to detect and filter common web exploits and bots that could affect application availability or security, or consume excessive resources. Inbound traffic is inspected against web access control list (web ACL) rules. A web ACL rule consists of rule statements that instruct AWS WAF on how to inspect a web request.
The AWS WAF geographic match rule statement functionality allows you to restrict application access based on the location of your viewers. This feature is crucial for use cases like licensing and legal regulations that limit the delivery of your applications outside of specific geographic areas.
AWS recently released a new feature that you can use to build precise geographic rules based on International Organization for Standardization (ISO) 3166 country and area codes. With this release, you can now manage access at the ISO 3166 region level. This capability is available across AWS Regions where AWS WAF is offered and for all AWS WAF supported services. In this post, you will learn how to use this new feature with Amazon CloudFront and Elastic Load Balancing (ELB) origin types.
Summary of concepts
Before we discuss use cases and setup instructions, make sure that you are familiar with the following AWS services and concepts:
Amazon CloudFront: CloudFront is a web service that gives businesses and web application developers a cost-effective way to distribute content with low latency and high data transfer speeds.
Amazon Simple Storage Service (Amazon S3):Amazon S3 is an object storage service built to store and retrieve large amounts of data from anywhere.
AWS WAF labels: Labels contain metadata that can be added to web requests when a rule is matched. Labels can alter the behavior or default action of managed rules.
ISO (International Organization for Standardization) 3166 codes:ISO codes are internationally recognized codes that designate for every country and most of the dependent areas a two- or three-letter combination. Each code consists of two parts, separated by a hyphen. For example, in the code AU-QLD, AU is the ISO 3166 alpha-2 code for Australia, and QLD is the subdivision code of the state or territory—in this case, Queensland.
How granular geo labels work
Previously, geo match statements in AWS WAF were used to allow or block access to applications based on country of origin of web requests. With updated geographic match rule statements, you can control access at the region level.
In a web ACL rule with a geo match statement, AWS WAF determines the country and region of a request based on its IP address. After inspection, AWS WAF adds labels to each request to indicate the ISO 3166 country and region codes. You can use labels generated in the geo match statement to create a label match rule statement to control access.
AWS WAF generates two types of labels based on origin IP or a forwarded IP configuration that is defined in the AWS WAF geo match rule. These labels are the country and region labels.
By default, AWS WAF uses the IP address of the web request’s origin. You can instruct AWS WAF to use an IP address from an alternate request header, like X-Forwarded-For, by enabling forwarded IP configuration in the rule statement settings. For example, the country label for the United States with origin IP and forwarded IP configuration are awswaf:clientip:geo:country:US and awswaf:forwardedip:geo:country:US, respectively. Similarly, the region labels for a request originating in Oregon (US) with origin and forwarded IP configuration are awswaf:clientip:geo:region:US-OR and awswaf:forwardedip:geo:region:US-OR, respectively.
To demonstrate this AWS WAF feature, we will outline two distinct use cases.
Use case 1: Restrict content for copyright compliance using AWS WAF and CloudFront
Licensing agreements might prevent you from distributing content in some geographical locations, regions, states, or entire countries. You can deploy the following setup to geo-block content in specific regions to help meet these requirements.
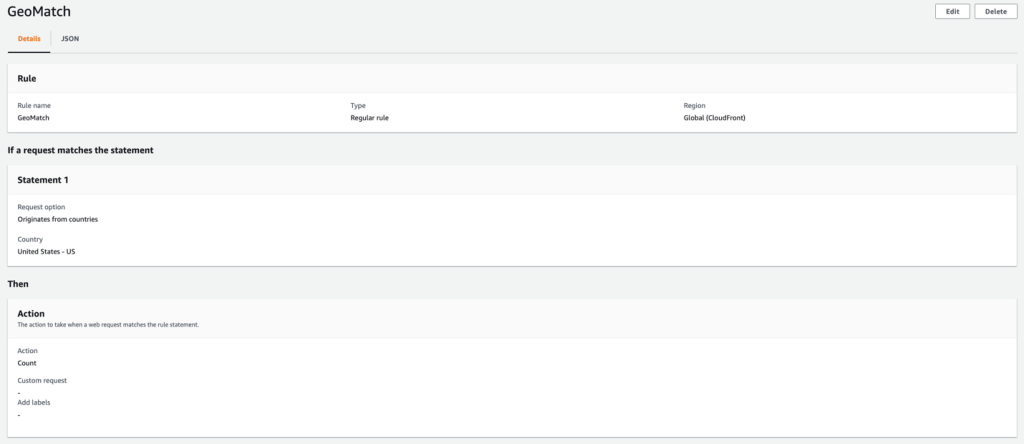
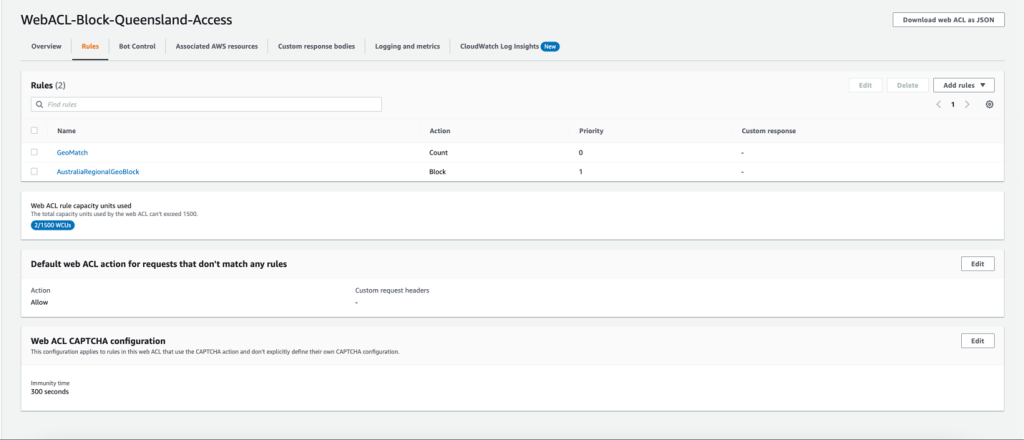
In this example, we will use an AWS WAF web ACL that is applied to a CloudFront distribution with an S3 bucket origin. The web ACL contains a geo match rule to tag requests from Australia with labels, followed by a label match rule to block requests from the Queensland region. All other requests with source IP originating from Australia are allowed.
To configure the AWS WAF web ACL rule for granular geo restriction
In the navigation pane, choose Web ACLs, select Global (CloudFront) from the dropdown list, and then choose Create web ACL.
For Name, enter a name to identify this web ACL.
For Resource type, choose the CloudFront distribution that you created in step 1, and then choose Add.
Choose Next.
Choose Add rules, and then choose Add my own rules and rule groups.
For Name, enter a name to identify this rule.
For Rule type, choose Regular rule.
Configure a rule statement for a request that matches the statement Originates from a Country and select the Australia (AU) country code from the dropdown list.
Set the IP inspection configuration parameter to Source IP address.
Under Action, choose Count, and then choose Add Rule.
Create a new rule by following the same actions as in step 7 and enter a name to identify the rule.
For Rule type, choose Regular rule.
Configure a rule statement for a request that matches the statement Has a Label and enter awswaf:clientip:geo:region:AU-QLD for the match key.
Set the action to Block and choose Add rule.
For Actions, keep the default action of Allow.
For Amazon CloudWatch metrics, select the AWS WAF rules that you created in steps 8 and 14.
For Request sampling options, choose Enable sampled requests, and then choose Next.
Review and create the web ACL rule.
After the web ACL is created, you should see the web ACL configuration, as shown in the following figures. Figure 1 shows the geo match rule configuration.
Figure 1: Web ACL rule configuration
Figure 2 shows the Queensland regional geo restriction.
Figure 2: Queensland regional geo restriction – web ACL configuration<
The setup is now complete—you have a web ACL with two regular rules. The first rule matches requests that originate from Australia and adds geographic labels automatically. The label match rule statement inspects requests with Queensland granular geo labels and blocks them. To understand where requests are originating from, you can configure logging on the AWS WAF web ACL.
You can test this setup by making requests from Queensland, Australia, to the DNS name of the CloudFront distribution to invoke a block. CloudFront will return a 403 error, similar to the following example.
As shown in these test results, requests originating from Queensland, Australia, are blocked.
Use case 2: Allow incoming traffic from specific regions with AWS WAF and Application Load Balancer
We recently had a customer ask us how to allow traffic from only one region, and deny the traffic from other regions within a country. You might have similar requirements, and the following section will explain how to achieve that. In the example, we will show you how to allow only visitors from Washington state, while disabling traffic from the rest of the US.
This example uses an AWS WAF web ACL applied to an application load balancer in the US East (N. Virginia) Region with an Amazon EC2 instance as the target. The web ACL contains a geo match rule to tag requests from the US with labels. After we enable forwarded IP configuration, we will inspect the X-Forwarded-For header to determine the origin IP of web requests. Next, we will add a label match rule to allow requests from the Washington region. All other requests from the United States are blocked.
To configure the AWS WAF web ACL rule for granular geo restriction
After the application load balancer is created, open the AWS WAF console.
In the navigation pane, choose Web ACLs, and then choose Create web ACL in the US east (N. Virginia) Region.
For Name, enter a name to identify this web ACL.
For Resource type, choose the application load balancer that you created in step 1 of this section, and then choose Add.
Choose Next.
Choose Add rules, and then choose Add my own rules and rule groups.
For Name, enter a name to identify this rule.
For Rule type, choose Regular rule.
Configure a rule statement for a request that matches the statement Originates from a Country in, and then select the United States (US) country code from the dropdown list.
Set the IP inspection configuration parameter to IP address in Header.
Enter the Header field name as X-Forwarded-For.
For Match, choose Fallback for missing IP address. Web requests without a valid IP address in the header will be treated as a match and will be allowed.
Under Action, choose Count, and then choose Add Rule.
Create a new rule by following the same actions as in step 7 of this section, and enter a name to identify the rule.
For Rule type, choose Regular rule.
Configure a rule statement for a request that matches the statement Has a Label, and for the match key, enter awswaf:forwardedip:geo:region:US-WA.
Set the action to Allow and add choose Add Rule.
For Default web ACL action for requests that don’t match any rules, set the Action to Block.
For Amazon CloudWatch metrics, select the AWS WAF rules that you created in steps 8 and 14 of this section.
For Request sampling options, choose Enable sampled requests, and then choose Next.
Review and create the web ACL rule.
After the web ACL is created, you should see the web ACL configuration, as shown in the following figures. Figure 3 shows the geo match rule
Figure 3: Geo match rule
Figure 4 shows the Washington regional geo restriction.
Figure 4: Washington regional geo restriction – web ACL configuration
The following is a JSON representation of the rule:
The setup is now complete—you have a web ACL with two regular rules. The first rule matches requests that originate from the US after inspecting the origin IP in the X-Forwarded-For header, and adds geographic labels. The label match rule statement inspects requests with the Washington region granular geo labels and allows these requests.
If a user makes a web request from outside of the Washington region, the request will be blocked and a HTTP 403 error response will be returned, similar to the following.
AWS WAF now supports the ability to restrict traffic based on granular geographic labels. This gives you further control based on geographic location within a country.
In this post, we demonstrated two different use cases that show how this feature can be applied with CloudFront distributions and application load balancers. Note that, apart from CloudFront and application load balancers, this feature is supported by other origin types that are supported by AWS WAF, such as Amazon API Gateway and Amazon Cognito.
If you have feedback about this post, submit comments in the Comments section below. If you have questions about this post, start a new thread on the AWS WAF re:Post or contact AWS Support.
Want more AWS Security news? Follow us on Twitter.
In this post, we continue with our recommendations for using AWS Identity and Access Management (IAM) APIs. In part 1 of this two-part series, we described how you could create IAM resources and use them soon after for authorization decisions. We also described options for monitoring and responding to IAM resource changes for entire accounts. Now, in part 2 of this post, we’ll cover the API throttling behavior of IAM and AWS Security Token Service (AWS STS) and how you can effectively plan your usage of these APIs. We’ll also cover the features of IAM that enable you to right-size the permissions granted to principals in your organization and assess external access to your resources.
Increase your usage of IAM APIs
If you’re a developer or a security engineer, you might find yourself writing more and more automation that interacts with IAM APIs. Other engineers, teams, or applications might also call the IAM APIs within the same account or cross-account. Over time, anyone calling the APIs in your account incrementally increases the number of requests per second. If so, IAM might send a “Rate exceeded” error that indicates you have exceeded a certain threshold of API calls per second. This is called API throttling.
Understand IAM API throttling
API throttling occurs when you exceed the call rate limits for an API. AWS uses API throttling to limit requests to a service. Like many AWS services, IAM limits API requests to maintain the performance of the service, and to ensure fair usage across customers. IAM and AWS STS independently implement a token bucket algorithm for throttling, in which a bucket of virtual tokens is refilled every second. Each token represents a non-throttled API call that you can make. The number of tokens that a bucket holds and the refill rate depends on the API. For each IAM API, a number of token buckets might apply.
We refer to this simply as rate-limiting criteria. Essentially, there are several rate-limiting criteria that are considered when evaluating whether a customer is generating more traffic than the service allows. The following are some examples of these criteria:
The account where the API is called
The account for read or write APIs (depending on whether the API is a read or write operation)
The account from which AssumeRole was called prior to the API call (for example, third-party cross-account calls)
The account from which AssumeRole was called prior to the API call for read APIs
The API and organization where the API is called
Understand STS API throttling
Although IAM has criteria pertaining to the account from which AssumeRole was called, IAM has its own API rate limits that are distinct from AWS STS. Therefore, the preceding criteria are IAM-specific and are separate from the throttling that can occur if you call STS APIs. IAM is also a global service, and the limits are not Region-aware. In contrast, while STS has a single global endpoint, every Region has its own STS endpoint with its own limits.
The STS rate-limiting criteria pertain to each account and endpoint for API calls. For example, if you call the AssumeRole API against the sts.ap-northeast-1.amazonaws.com endpoint, STS will evaluate the rate-limiting criteria associated with that account and the ap-northeast-1 endpoint. Other STS API requests that you perform under the same account and endpoint will also count towards these criteria. However, if you make a request from the same account to a different regional endpoint or the global endpoint, that request will count against different criteria.
Note: AWS recommends that you use the STS regional endpoints instead of the STS global endpoint. Regional endpoints have several benefits, including redundancy and reduced latency. To learn more about other benefits, see Managing AWS STS in an AWS Region.
How multiple criteria affect throttling
The preceding examples show the different ways that IAM and STS can independently limit requests. Limits might be applied at the account level and across read or write APIs. More than one rate-limiting criterion is typically associated with an API call, with each request counted against each rate-limiting criterion independently. This means that if the requests-per-second exceeds the applicable criteria, then API throttling occurs and returns a rate-limiting error.
How to address IAM and STS API throttling
In this section, we’ll walk you through some strategies to reduce IAM and STS API throttling.
Query for top callers
With AWS CloudTrail Lake, your organization can aggregate, store, and query events recorded by CloudTrail for auditing, security investigation, and operational troubleshooting. To monitor API throttling, you can run a simple query that identifies the top callers of IAM and STS.
For example, you can make a SQL-based query in the CloudTrail console to identify the top callers of IAM, as shown in Figure 1. This query includes the API count, API event name, and more that are made to IAM (shown under eventSource). In this example, the top result is a call to GetServiceLastAccessedDetails, which occurred 163 times. The result includes the account ID and principal ID that made those requests.
To reduce call throttling, you need to know when you exceed a rate limit. You can identify when you are being throttled by catching the RateLimitExceeded exception in your API calls. Or, you can send your application logs to Amazon CloudWatch Logs and then configure a metric filter to record each time that throttling occurs, for later analysis or notification. Ideally, you should do this across your applications, and log this information centrally so that you can investigate whether calls from a specific account (such as your central monitoring account) are affecting API availability across your other accounts by exceeding a rate-limiting criterion in those accounts.
Call your APIs with a less aggressive retry strategy
In the AWS SDKs, you can use the existing retry library and provide a custom base for the initial sleep done between API calls. For example, you can set a custom configuration for the backoff or edit the defaults directly. The default SDK_DEFAULT_THROTTLED_BASE_DELAY is 500 milliseconds (ms) in the relevant Java SDK file, but if you’re experiencing throttling consistently, we recommend a minimum 1000 ms for the throttled base delay. You can change this value or implement a custom configuration through the PredefinedBackoffStrategies.SDKDefaultBackoffStrategy() class, which is referenced in the same file. As another example, in the Javascript SDK, you can edit the base retry of the retryDelayOptions configuration in the AWS.Config class, as described in the documentation.
The difference between making these changes and using the SDK defaults is that the custom base provides a less aggressive retry. You shouldn’t retry multiple requests that are throttled during the same one-second window. If the API has other applicable rate-limiting criteria, you can potentially exceed those limits as well, preventing other calls in your account from performing requests. Lastly, be careful that you don’t implement your own retry or backoff logic on top of the SDK retry or backoff logic because this could make throttling worse — instead, you should override the SDK defaults.
Reduce the number of requests by using max items
For some APIs, you can increase the number of items returned by a single API call. Consider the example of the GetServiceLastAccessedDetails API. This API returns a lot of data, but the results are truncated by default to 100 items, ordered alphabetically by the service namespace. If the number of items returned is greater than 100, then the results are paginated, and you need to make multiple requests to retrieve the paginated results individually. But if you increase the value of the MaxItems parameter, you can decrease the number of requests that you need to make to obtain paginated results.
AWS has hundreds of services, so you should set the value of the MaxItems parameter no higher than your application can handle (the response size could be large). At the time of our testing, the results were no longer truncated when this value was 300. For this particular API, IAM might return fewer results, even when more results are available. This means that your code still needs to check whether the results are paginated and make an additional request if paginated results are available.
Consistent use of the MaxItems parameter across AWS APIs can help reduce your total number of API requests. The MaxItems parameter is also available through the GetOrganizationsAccessReport operation, which defaults to 100 items but offers a maximum of 1000 items, with the same caveat that fewer results might be returned, so check for paginated results.
Smooth your high burst traffic
In the table from part 1 of this post, we stated that you should evaluate IAM resources every 24 hours. However, if you use a simple script to perform this check, you could initiate a throttling event. Consider the following fictional example:
As a member of ExampleCorp’s Security team, you are working on a task to evaluate the company’s IAM resources through some custom evaluation scripts. The scripts run in a central security account. ExampleCorp has 1000 accounts. You write automation that assumes a role in every account to run the GetAccountAuthorizationDetails API call. Everything works fine during development on a few accounts, but you later build a dashboard to graph the data. To get the results faster for the dashboard, you update your code to run concurrently every hour. But after this change, you notice that many requests result in the throttling error “Rate exceeded.” Other security teams see “Rate exceeded” errors in their application logs, too.
Can you guess what happened? When you tried to make the requests faster, you used concurrency to make the requests run in parallel. By initiating this large number of requests simultaneously, you exceeded the rate-limiting criteria for the security account from which the sts:AssumeRole action was called prior to the GetAccountAuthorizationDetails API call.
To address scenarios like this, we recommend that you set your own client-side limitations when you need to make a large number of API requests. You can spread these calls out so that they happen sequentially and avoid large spikes. For example, if you run checks every 24 hours, make sure that the calls don’t happen at exactly midnight. Figure 2 shows two different ways to distribute API volume over time:
Figure 2: Call volume that periodically spikes compared to evenly-distributed call volume
The graph on the left represents a large, recurring API call volume, with calls occurring at roughly the same time each day—such as 1000 requests at midnight every 24 hours. However, if you intend to make these 1000 requests consistently every 24 hours, you can spread them out over the 24-hour period. This means that you could make about 41 requests every hour, so that 41 accounts are queried at 00:00 UTC, another 41 the next hour, and so on. By using this strategy, you can make these requests blend into your other traffic, as shown in the graph on the right, rather than create large spikes. In summary, your automation scheduler should avoid large spikes and distribute API requests evenly over the 24-hour period. Using queues such as those provided by Amazon Simple Queue Service (Amazon SQS) can also help, and when errors are identified, you can put them in a dead letter queue to try again later.
Some IAM APIs have rate-limiting criteria for API requests made from the account from which the AssumeRole was called prior to the call. We recommend that you serially iterate over the accounts in your organization to avoid throttling. To continue with our example, you should iterate the 41 accounts one-by-one each hour, rather than running 41 calls at once, to reduce spikes in your request rates.
Recommendations specific to STS
You can adjust how you use AWS STS to reduce your number of API calls. When you write code that calls the AssumeRole API, you can reuse the returned credentials for future requests because the credentials might still be valid. Imagine that you have an event-driven application running in a central account that assumes a role in a target account and does an API call for each event that occurs in that account. You should consider reusing the credentials returned by the AssumeRole call for each subsequent call in the target account, especially if calls in the central accounts are being throttled. You can do this for AssumeRole calls because there is no service-side limit to the number of credentials that you can create and use. Whether it’s one credential or many, you need to use and store these carefully. You can also adjust the role session duration, which determines how long the role’s credentials are valid. This value can be up to 12 hours, depending on the maximum session duration configured on the role. If you reuse short-term credentials or adjust the session duration, make sure that you evaluate these changes from a security perspective as you optimize your use of STS to reduce API call volume.
Use case #3: Pare down permissions for least-privileged access
Let’s assume that you want to evaluate your organization’s IAM resources with some custom evaluation scripts. AWS has native functionality that can reduce your need for a custom solution. Let’s take a look at some of these that can help you accomplish these goals.
Identify unintended external sharing
To identify whether resources in your accounts, such as IAM roles and S3 buckets, have been shared with external entities, you can use IAM Access Analyzer instead of writing your own checks. With IAM Access Analyzer, you can identify whether resources are accessible outside your account or even your entire organization. Not only can you identify these resources on-demand, but IAM Access Analyzer proactively re-analyzes resources when their policies change, and reports new findings. This can help you feel confident that you will be notified of new external sharing of supported resources, so that you can act quickly to investigate. For more details, see the IAM Access Analyzer user guide.
Right-size permissions
You can also use IAM Access Analyzer to help right-size the permissions policies for key roles in your accounts. IAM Access Analyzer has a policy generation feature that allows you to generate a policy by analyzing your CloudTrail logs to identify actions used from over 140 services. You can compare this generated policy with the existing policy to see if permissions are unused, and if so, remove them.
You can perform policy generation through the API or the IAM console. For example, you can use the console to navigate to the role that you want to analyze, and then choose Generate policy to start analyzing the actions used over a specified period. Actions that are missing from the generated policy are permissions that can be potentially removed from the existing policy, after you confirm your changes with those who administer the IAM role. To learn more about generating policies based on CloudTrail activity, see IAM Access Analyzer makes it easier to implement least privilege permissions by generating IAM policies based on access activity.
Conclusion
In this two-part series, you learned more about how to use IAM so that you can test and query IAM more efficiently. In this post, you learned about the rate-limiting criteria for IAM and STS, to help you address API throttling when increasing your usage of these services. You also learned how IAM Access Analyzer helps you identify unintended resource sharing while also generating policies that serve as a baseline for principals in your account. In part 1, you learned how to quickly create IAM resources and use them when refining permissions. You also learned how to get information about IAM resources and respond to IAM changes through the various services integrated with IAM. Lastly, when calling IAM directly, you learned about bulk APIs, which help you efficiently retrieve the state of your principals and policies. We hope these posts give you valuable insights about IAM to help you better monitor, review, and secure access to your AWS cloud environment!
In this two-part blog post, we’ll provide recommendations for using AWS Identity and Access Management (IAM) APIs, and we’ll share useful details on how IAM works so that you can use it more effectively. For example, you might be creating new IAM resources such as roles and policies through automation and notice a delay for resource propagations. Or you might be building a custom cloud security monitoring solution that uses IAM APIs to evaluate the security and compliance of your AWS accounts, and you want to know how to do that without exceeding limits. Although these are just a few example use cases, the insights described in this post are intended to help you avoid anti-patterns when building scalable cloud services that use IAM APIs.
In this post, we describe how to create IAM resources and use them soon after for authorization decisions. We also describe options for monitoring and responding to IAM resource changes for entire accounts. In part 2, we’ll cover the API throttling behavior of IAM and AWS Security Token Service (AWS STS) and how you can effectively plan your usage of these APIs. Let’s dive in!
Use case 1: Create IAM resources and attempt to use them immediately
If you’re a cloud developer, you create and use IAM resources when you develop applications on AWS. For your application to interact with AWS services, you need to grant IAM permissions to your application. Your application—whether it runs on AWS Lambda, Amazon Elastic Compute Cloud (Amazon EC2), or another service—will need an associated IAM role and policy that provide the necessary permissions.
Imagine that you want to create least privilege policies for your application. You begin by deploying new or updated IAM resources, such as roles and policies, along with your application updates, and you automate this process to speed up testing and development.
During development, you begin removing unnecessary policy permissions, with your automation testing the updated permissions. However, you notice that some of your updates do not immediately take effect. The following sections address why this occurs and provide insights to help you architect for other scenarios.
Understand the IAM control plane and data plane
Let’s first learn more about the control plane and data plane in IAM. The control plane involves operations to create, read, update, and delete IAM resources, and it’s how you get the current state of IAM. When you invoke IAM APIs, you interact with the control plane. This includes any API that falls under the iam:* namespace. The data plane, in contrast, consists of the authorization system that is used at scale to grant access to the broader set of AWS services and resources. This includes the AWS STS APIs, which have their own sts:* namespace.
When you call the IAM control plane APIs to create, update, or delete resources, you can expect a read-after-write consistent response. This means that you can retrieve (read) the resource and its latest updates immediately after it’s written. In contrast, the IAM data plane, where authorizations occur, is eventually consistent. This means that there will be a delay for IAM resource changes, such as updates to roles and policies, to propagate and reflect in the authorizations that follow. The delay can be several seconds or longer. Because of this, you need to allow for propagation time when you test changes to IAM resources. To learn more about the control plane and data plane of IAM, see Resilience in AWS Identity and Access Management.
Note: Because calls to AWS APIs rely on IAM to check permissions, the availability and scalability of the data plane are paramount. In 2011, the “can the caller do this?” function handled a couple of thousand requests per second. Today, as new services continue to launch and the number of AWS customers increases, AWS Identity handles over half a billion API calls per second worldwide, and the number is growing. Eventually consistent design enables the IAM data plane to maintain the high availability and low latency needed to evaluate permissions on AWS.
This is why when architecting your application, we recommend that you don’t depend on control plane actions such as resource updates for critical parts of your application’s workflow. Instead, you should architect to take advantage of the data plane, which includes STS and the authorization system of IAM. In the next section, we describe how you can do this.
Test permissions with STS scope-down policies
IAM role sessions have a feature called a session policy, which takes effect immediately when a role is assumed. This is an optional policy that you can provide to scope down the role’s existing identity policies, with the permissions being the intersection of the role’s identity-based policies and the session policy. By using session policies, you get specific, scoped-down credentials from a single pre-existing role without having to create new roles or identity policies for each particular session’s use case. You can use session policies for your application or when you test which least privilege policies are best for your application.
Let’s walk through an example of when to use session policies for permissions testing. Imagine that you need permissions that require very specific, fine-grained conditions to attain your ideal least privilege policy. You might iterate on the policy several times, making updates and testing the changes over and over again. If you update a policy attached to a role, you need to wait for these changes to propagate to the IAM data plane. But if you instead specify a scope-down policy when assuming the pre-existing role prior to testing, you can immediately test and observe the effects of your permissions changes. Immediate testing is possible because your role and its original policy have already propagated to the data plane, enabling you to iterate over various scoped-down session policies that operate against the IAM data plane.
Use STS session policies to assume a role with the AWS CLI
There are two ways to provide a session policy during the AssumeRole process: you can provide an inline policy document or the Amazon Resource Names (ARNs) of managed session policies. The following example shows how to do this through the AWS Command Line Interface (AWS CLI), by passing in a policy document along with the AssumeRole call. If you use this example policy, make sure to replace <123456789012> and <DOC-EXAMPLE-BUCKET> with your own information.
In this example, we provide a previously created role ARN named s3-full-access, which provides full access to Amazon Simple Storage Service (Amazon S3). We can further restrict the role’s permissions by supplying a policy with the optional --policy option. The inline policy document only allows the GetObject request against the S3 bucket named <DOC-EXAMPLE-BUCKET>. The effective permissions for the returned session are the intersection of the role’s identity-based policies and our provided session policy. Therefore, the role session’s permissions are limited to only performing the GetObject request against the <DOC-EXAMPLE-BUCKET>.
Note: The combined size of the passed inline policy document and all passed managed policy ARN characters cannot exceed 2,048 characters. You can reduce the size of the JSON policy document by removing unnecessary whitespace and shortening or removing tags associated with your session.
Use case 2: Monitor and respond to IAM resources for entire accounts
You might need to periodically audit the state of your IAM resources, such as roles and policies, including whether these IAM resources have changed, in a single account or across your entire organization. For example, you might want to check whether roles have overly broad access to actions and resources. Or you might want to monitor IAM resource creation and updates to respond to security-relevant permission changes. In this section, you will learn how to choose the right tool for auditing and monitoring IAM resources across accounts. You will learn about the AWS services that support this use case, the benefits of polling compared to event-based architectures, and powerful APIs that aggregate common information.
Respond to configuration changes with an event-driven approach
Sometimes you might need to perform actions relatively quickly based on IAM changes. For example, you might need to check if a trust policy for a newly created or updated role allows cross-account access. In cases like this, you can use AWS Config rules, AWS CloudTrail, or Amazon EventBridge to detect state changes and perform actions based on these state changes. You can use AWS Config rules to evaluate whether a resource complies with the conditions that you specify. If it doesn’t comply, you can provide a workflow to remediate the non-compliance. With CloudTrail, you can monitor your account’s API calls, and log API calls for your accounts with AWS Organizations integration. EventBridge works closely with CloudTrail and helps you create rules that match incoming events and send them to targets, such as Lambda, where your code can perform analysis or automated remediation. You can even filter out events from your accounts and send them to a central account’s event bus for processing. For an example of how to use EventBridge with IAM Access Analyzer to remediate cross-account access in a role’s trust policy, see Automate resolution for IAM Access Analyzer cross-account access findings on IAM roles. Which feature you choose depends on whether you need to monitor one account or all accounts in your organization, as well as which solution you are more comfortable building with.
One caveat to an event-driven approach is that if many events occur over a short period and your application responds to each event with an IAM API call of its own, you could eventually be throttled by IAM. To address this, you can queue up your responding API calls, distribute them over a longer period, or aggregate them to reduce API call volume. For example, if some of your calls are write APIs (such as UpdateAssumeRolePolicy or CreatePolicyVersion) or read APIs (such as GetRole or GetRolePolicy), you can call them serially with a delay between calls. If you need the latest status on a large number of principals and policies, you can call IAM bulk APIs such as GetAccountAuthorizationDetails, which will return data to you for principals and policies and their relationships in your organization. This approach helps you avoid throttling and querying the IAM control plane with unnecessary and redundant API calls. You will learn more about throttling and how to address it in part two of this post.
Retrieve point-in-time resource information with AWS Config
AWS Config helps you assess, audit, and evaluate the configuration of your AWS resources. It also offers multi-account, multi-Region data aggregation and is integrated with AWS Organizations. With AWS Config, you can create rules that detect and respond to changes. AWS Config also keeps an inventory of AWS resource configurations that you can query through its API, so that you don’t need to make direct API calls to each resource’s service. AWS Config also offers the ability to return the status of resources from multiple accounts and AWS Regions. As shown in Figure 1, you can use the AWS Config console to run a simple SQL-like statement for details on the IAM roles in your entire organization.
Figure 1: Run a query on IAM roles in AWS Config
The preceding results also show associated resources, such as the inline and attached policies for the IAM roles. Alternatively, you can obtain these results from the SDK or CLI. The following query that uses the CLI is equivalent to the preceding query that uses the console. If you use this query, make sure to replace DOC-EXAMPLE-CONFIG-AGGREGATOR> with your AWS Config aggregator.
The preceding command returns the details of roles in your organization’s accounts, including the full policy document for the associated inline policy. It also returns the customer-managed policy names and their ARNs, for which you can view the policy documents and versions by using the BatchGetResourceConfig API. Note that AWS Config doesn’t provide the AWS-managed policy documents. However, these are common across accounts, and we will show you how to query that data later in this section.
To query the status of roles in your organization, you need to have AWS Config enabled in each account. You also need an aggregator to monitor your accounts with your organization’s management account or a delegated administrator account. For more details on how to set up AWS Config, see the AWS Config developer guide. After you set up AWS Config, you can periodically call the AWS Config APIs to get a snapshot of the current or prior state of your resources. Furthermore, you can periodically pull the snapshot records and evaluate this information in other tools outside of AWS Config. So before you directly use the IAM APIs to get IAM information, consider using AWS Config—this is what it’s for!
Retrieve IAM resource information directly from IAM
As previously noted, AWS Config can give you a bulk view of your AWS and IAM resources. Additionally, CloudTrail and EventBridge can detect AWS and IAM resource changes and help you act on them. If you need data from IAM beyond what these services offer, you can query the IAM APIs directly to get the latest information on your resources.
A few key APIs can help you audit IAM resources more efficiently, especially in bulk. The first is GetAccountAuthorizationDetails, which enables you to retrieve the principals in your account, their associated inline policy documents (if any), attached managed policies, and their relationships to each other. This API reduces the need to individually call ListRolePolicies and ListAttachedRolePolicies for each role in an account. GetAccountAuthorizationDetails also returns the role trust policy document for roles in the results. Finally, GetAccountAuthorizationDetails allows you to filter the result set. For example, if you don’t need information relating to groups or AWS managed policies, you can exclude these from the API response. You can do this by using the filter parameter to only include the details that you need at the time.
Another useful API is GenerateServiceLastAccessedDetails. This API gives you details about when an IAM resource (user, group, role, or policy) was last used in an attempt to access AWS services. You can use this API to identify roles that are unused and remove them if you don’t need them. IAM Access Analyzer, which you will learn about later in this post, also uses the same information.
The following table summarizes the key APIs that you can use, rather than building your own code that loops for this information individually.
Submit a job through the GenerateServiceLastAccessedDetails API which returns a JobId; then retrieve the results after the job completes. Pass ACTION_LEVEL as the required Granularity parameter.
Spread total number of requests evenly across 24 hours
Note: In the table, we suggest that you perform some of these API requests once every 24 hours as a starting point. You might prefer to perform your own analysis at a longer time interval, such as every 48 hours, but we don’t recommend requesting it more often than every 24 hours because these resources (and therefore the details in the responses) don’t change often. These APIs are suitable for periodic, point-in-time collection of information. If you need faster detection of information from GetAccountAuthorizationDetails, consider whether AWS Config rules or EventBridge will fit your needs. For GetServiceLastAccessedDetails, recent activity usually appears within four hours, so more frequent requests are unlikely to provide much value.
Use of these APIs can help you avoid writing code that loops through results to make individual read API calls for each principal, policy, and policy version in an account, which could result in tens of thousands of API requests and call throttling. Instead of iterating over each resource, you should use solutions that return bulk data, such as GetAccountAuthorizationDetails, AWS Config, or an AWS Partner Network solution. However, if you’re experiencing throttling, you will learn some practical considerations on how to handle that later in this post.
Inspect IAM resources across multiple accounts and organizations
Your use case might require that you inspect IAM resources across multiple accounts in your organization. Or perhaps you are an independent software vendor and need to build a software-as-a-service tool to evaluate IAM resources across many organizations. The following considerations can help you address use cases like these.
AWS Organizations integration
Previously, you learned of the benefits of the “service last accessed data” that the GenerateServiceLastAccessedDetails and GetServiceLastAccessedDetails APIs provide. But what if you want to pull this data for multiple accounts in your organization? IAM has bulk APIs that support querying this data across your entire organization, so you don’t need to assume a role in each account to generate the request. To generate a report for entities (organization root, organizational unit, or account) or policies in your organization, use the GenerateOrganizationsAccessReport operation, which returns a JobId that is passed as a parameter to the GetOrganizationsAccessReport operation to check if the report has been generated. When the job status is marked complete, you can retrieve the report.
AWS managed policies
Many customers use AWS managed policies because they align to common job functions. AWS creates and administers these policies, which have their own ARNs, such as arn:aws:iam::aws:policy/AWSCodeCommitPowerUser. AWS managed policies are available for every account, and they are the same for every account. AWS updates them when new services and API operations are introduced. Updated policies are recorded and visible as a new version, so you only need to query for the current AWS managed policies once per evaluation cycle, rather than once per account. Therefore, if you’re evaluating hundreds or thousands of accounts, you shouldn’t include the AWS managed policies and their policy versions in your query. Doing so would result in thousands of redundant API requests and could cause throttling. Instead, you can query the AWS managed policies once and then reuse the results across your analysis and evaluation by caching the results for a period of time (for example, every 24 hours) in your application before requesting them again to check for updates. Because AWS managed policies are available through the GetAccountAuthorizationDetails API, you don’t need to query for the AWS managed policies or their versions as a separate action.
Multi-account limits
The preceding table lists the frequency of API requests as “per account” in many places. If you’re calling IAM APIs by assuming a role in other accounts from a central account, some IAM APIs have rate-limiting criteria that apply to API requests performed from the assuming account (the central account). To query data from multiple accounts, we recommend that you serially iterate over the accounts one-by-one to avoid throttling. You’ll learn more about this strategy, as well as throttling, in part 2 of this blog post.
Conclusion
In this post, you learned about different aspects of IAM and best practices to test and query IAM efficiently. With STS session policies, you can test different policies to help achieve least privilege access. With AWS Config, EventBridge, CloudTrail, and CloudTrail Lake, you can audit your IAM resources and respond to changes while reducing the number of IAM API calls that you make. If you need to call IAM directly, you can use IAM bulk APIs for more efficient retrieval of your resource state. You can learn more about IAM and best practices in part 2 of blog post: How to monitor and query IAM resources at scale – Part 2.
Given the pace of Amazon Web Services (AWS) innovation, it can be challenging to stay up to date on the latest AWS service and feature launches. AWS provides services and tools to help you protect your data, accounts, and workloads from unauthorized access. AWS data protection services provide encryption capabilities, key management, and sensitive data discovery. Last year, we saw growth and evolution in AWS data protection services as we continue to give customers features and controls to help meet their needs. Protecting data in the AWS Cloud is a top priority because we know you trust us to help protect your most critical and sensitive asset: your data. This post will highlight some of the key AWS data protection launches in the last year that security professionals should be aware of.
AWS Key Management Service Create and control keys to encrypt or digitally sign your data
In April, AWS Key Management Service (AWS KMS) launched hash-based message authentication code (HMAC) APIs. This feature introduced the ability to create AWS KMS keys that can be used to generate and verify HMACs. HMACs are a powerful cryptographic building block that incorporate symmetric key material within a hash function to create a unique keyed message authentication code. HMACs provide a fast way to tokenize or sign data such as web API requests, credit card numbers, bank routing information, or personally identifiable information (PII). This technology is used to verify the integrity and authenticity of data and communications. HMACs are often a higher performing alternative to asymmetric cryptographic methods like RSA or elliptic curve cryptography (ECC) and should be used when both message senders and recipients can use AWS KMS.
At AWS re:Invent in November, AWS KMS introduced the External Key Store (XKS), a new feature for customers who want to protect their data with encryption keys that are stored in an external key management system under their control. This capability brings new flexibility for customers to encrypt or decrypt data with cryptographic keys, independent authorization, and audit in an external key management system outside of AWS. XKS can help you address your compliance needs where encryption keys for regulated workloads must be outside AWS and solely under your control. To provide customers with a broad range of external key manager options, AWS KMS developed the XKS specification with feedback from leading key management and hardware security module (HSM) manufacturers as well as service providers that can help customers deploy and integrate XKS into their AWS projects.
AWS Nitro System A combination of dedicated hardware and a lightweight hypervisor enabling faster innovation and enhanced security
In November, we published The Security Design of the AWS Nitro System whitepaper. The AWS Nitro System is a combination of purpose-built server designs, data processors, system management components, and specialized firmware that serves as the underlying virtualization technology that powers all Amazon Elastic Compute Cloud (Amazon EC2) instances launched since early 2018. This new whitepaper provides you with a detailed design document that covers the inner workings of the AWS Nitro System and how it is used to help secure your most critical workloads. The whitepaper discusses the security properties of the Nitro System, provides a deeper look into how it is designed to eliminate the possibility of AWS operator access to a customer’s EC2 instances, and describes its passive communications design and its change management process. Finally, the paper surveys important aspects of the overall system design of Amazon EC2 that provide mitigations against potential side-channel vulnerabilities that can exist in generic compute environments.
AWS Secrets Manager Centrally manage the lifecycle of secrets
In February, AWS Secrets Manager added the ability to schedule secret rotations within specific time windows. Previously, Secrets Manager supported automated rotation of secrets within the last 24 hours of a specified rotation interval. This new feature added the ability to limit a given secret rotation to specific hours on specific days of a rotation interval. This helps you avoid having to choose between the convenience of managed rotations and the operational safety of application maintenance windows. In November, Secrets Manager also added the capability to rotate secrets as often as every four hours, while providing the same managed rotation experience.
In May, Secrets Manager started publishing secrets usage metrics to Amazon CloudWatch. With this feature, you have a streamlined way to view how many secrets you are using in Secrets Manager over time. You can also set alarms for an unexpected increase or decrease in number of secrets.
At the end of December, Secrets Manager added support for managed credential rotation for service-linked secrets. This feature helps eliminate the need for you to manage rotation Lambda functions and enables you to set up rotation without additional configuration. Amazon Relational Database Service (Amazon RDS) has integrated with this feature to streamline how you manage your master user password for your RDS database instances. Using this feature can improve your database’s security by preventing the RDS master user password from being visible during the database creation workflow. Amazon RDS fully manages the master user password’s lifecycle and stores it in Secrets Manager whenever your RDS database instances are created, modified, or restored. To learn more about how to use this feature, see Improve security of Amazon RDS master database credentials using AWS Secrets Manager.
AWS Private Certificate Authority Create private certificates to identify resources and protect data
In September, AWS Private Certificate Authority (AWS Private CA) launched as a standalone service. AWS Private CA was previously a feature of AWS Certificate Manager (ACM). One goal of this launch was to help customers differentiate between ACM and AWS Private CA. ACM and AWS Private CA have distinct roles in the process of creating and managing the digital certificates used to identify resources and secure network communications over the internet, in the cloud, and on private networks. This launch coincided with the launch of an updated console for AWS Private CA, which includes accessibility improvements to enhance screen reader support and additional tab key navigation for people with motor impairment.
In October, AWS Private CA introduced a short-lived certificate mode, a lower-cost mode of AWS Private CA that is designed for issuing short-lived certificates. With this new mode, public key infrastructure (PKI) administrators, builders, and developers can save money when issuing certificates where a validity period of 7 days or fewer is desired. To learn more about how to use this feature, see How to use AWS Private Certificate Authority short-lived certificate mode.
Additionally, AWS Private CA supported the launches of certificate-based authentication with Amazon AppStream 2.0 and Amazon WorkSpaces to remove the logon prompt for the Active Directory domain password. AppStream 2.0 and WorkSpaces certificate-based authentication integrates with AWS Private CA to automatically issue short-lived certificates when users sign in to their sessions. When you configure your private CA as a third-party root CA in Active Directory or as a subordinate to your Active Directory Certificate Services enterprise CA, AppStream 2.0 or WorkSpaces with AWS Private CA can enable rapid deployment of end-user certificates to seamlessly authenticate users. To learn more about how to use this feature, see How to use AWS Private Certificate Authority short-lived certificate mode.
AWS Certificate Manager Provision and manage SSL/TLS certificates with AWS services and connected resources
In early November, ACM launched the ability to request and use Elliptic Curve Digital Signature Algorithm (ECDSA) P-256 and P-384 TLS certificates to help secure your network traffic. You can use ACM to request ECDSA certificates and associate the certificates with AWS services like Application Load Balancer or Amazon CloudFront. Previously, you could only request certificates with an RSA 2048 key algorithm from ACM. Now, AWS customers who need to use TLS certificates with at least 120-bit security strength can use these ECDSA certificates to help meet their compliance needs. The ECDSA certificates have a higher security strength—128 bits for P-256 certificates and 192 bits for P-384 certificates—when compared to 112-bit RSA 2048 certificates that you can also issue from ACM. The smaller file footprint of ECDSA certificates makes them ideal for use cases with limited processing capacity, such as small Internet of Things (IoT) devices.
Amazon Macie Discover and protect your sensitive data at scale
Amazon Macie introduced two major features at AWS re:Invent. The first is a new capability that allows for one-click, temporary retrieval of up to 10 samples of sensitive data found in Amazon Simple Storage Service (Amazon S3). With this new capability, you can more readily view and understand which contents of an S3 object were identified as sensitive, so you can review, validate, and quickly take action as needed without having to review every object that a Macie job returned. Sensitive data samples captured with this new capability are encrypted by using customer-managed AWS KMS keys and are temporarily viewable within the Amazon Macie console after retrieval.
Additionally, Amazon Macie introduced automated sensitive data discovery, a new feature that provides continual, cost-efficient, organization-wide visibility into where sensitive data resides across your Amazon S3 estate. With this capability, Macie automatically samples and analyzes objects across your S3 buckets, inspecting them for sensitive data such as personally identifiable information (PII) and financial data; builds an interactive data map of where your sensitive data in S3 resides across accounts; and provides a sensitivity score for each bucket. Macie uses multiple automated techniques, including resource clustering by attributes such as bucket name, file types, and prefixes, to minimize the data scanning needed to uncover sensitive data in your S3 buckets. This helps you continuously identify and remediate data security risks without manual configuration and lowers the cost to monitor for and respond to data security risks.
Support for new open source encryption libraries
In February, we announced the availability of s2n-quic, an open source Rust implementation of the QUIC protocol, in our AWS encryption open source libraries. QUIC is a transport layer network protocol used by many web services to provide lower latencies than classic TCP. AWS has long supported open source encryption libraries for network protocols; in 2015 we introduced s2n-tls as a library for implementing TLS over HTTP. The name s2n is short for signal to noise and is a nod to the act of encryption—disguising meaningful signals, like your critical data, as seemingly random noise. Similar to s2n-tls, s2n-quic is designed to be small and fast, with simplicity as a priority. It is written in Rust, so it has some of the benefits of that programming language, such as performance, threads, and memory safety.
Cryptographic computing for AWS Clean Rooms (preview)
At re:Invent, we also announced AWS Clean Rooms, currently in preview, which includes a cryptographic computing feature that allows you to run a subset of queries on encrypted data. Clean rooms help customers and their partners to match, analyze, and collaborate on their combined datasets—without sharing or revealing underlying data. If you have data handling policies that require encryption of sensitive data, you can pre-encrypt your data by using a common collaboration-specific encryption key so that data is encrypted even when queries are run. With cryptographic computing, data that is used in collaborative computations remains encrypted at rest, in transit, and in use (while being processed).
With AWS, you control your data by using powerful AWS services and tools to determine where your data is stored, how it is secured, and who has access to it. In 2023, we will further the AWS Digital Sovereignty Pledge, our commitment to offering AWS customers the most advanced set of sovereignty controls and features available in the cloud.
You can join us at our security learning conference, AWS re:Inforce 2023, in Anaheim, CA, June 13–14, for the latest advancements in AWS security, compliance, identity, and privacy solutions.
AWS Private Certificate Authority (AWS Private CA) is a highly available, fully managed private certificate authority (CA) service that you can use to create CA hierarchies and issue private X.509 certificates. You can use these private certificates to establish endpoints for TLS encryption, cryptographically sign code, authenticate users, and more.
Based on customer feedback for prorated certificate pricing options, AWS Private CA now offers short-lived certificate mode, a lower cost mode of AWS Private CA that is designed to issue short-lived certificates. In this blog post, we will compare the original general-purpose and new short-lived CA modes and discuss use cases for each of them.
The general-purpose mode of AWS Private CA supports certificates of any validity period. The addition of short-lived CA mode is intended to facilitate use cases where you want certificates with a short validity period, defined as 7 days or less. Keep in mind this doesn’t mean that the root CA certificate must also be short lived. Although a typical root CA certificate is valid for 10 years, you can customize the certificate validity period for CAs in either mode when you install the CA certificate.
You select the CA mode when you create a certificate authority. The CA mode cannot be changed for an existing CA. Both modes (general-purpose and short-lived) have distinct pricing for the different use cases that they support.
The short-lived CA mode offers an accessible pricing model for customers who need to issue certificates with a short-term validity period. You can use these short-lived certificates for on-demand AWS workloads and align the validity of the certificate with the lifetime of the certificate holder. For example, if you’re using certificate-based authentication for a virtual workstation that is rebuilt each day, you can configure your certificates to expire after 24 hours.
In this blog post, we will compare the two CA modes, examine their pricing models, and discuss several potential use cases for short-lived certificates. We will also provide a walkthrough that shows you how to create a short-lived mode CA by using the AWS Command Line Interface (AWS CLI). To create a short-lived mode CA using the AWS Management Console, see Procedure for creating a CA (console).
Comparing general-purpose mode CAs to short-lived mode CAs
You might be wondering, “How is the short-lived CA mode different from the general-purpose CA mode? I can already create certificates with a short validity period by using AWS Private CA.” The key difference between these two CA modes is cost. Short-lived CA mode is priced to better serve use cases where you reissue private certificates frequently, such as for certificate-based authentication (CBA).
With CBA, users can authenticate once and then seamlessly access resources, including Amazon WorkSpaces and Amazon AppStream 2.0, without re-entering their credentials. This use case demonstrates the security value of short-lived certificates. A short validity period for the certificate reduces the impact of a compromised certificate because the certificate can only be used for authentication during a small window before it’s automatically invalidated. This method of authentication is useful for customers who are looking to adopt a Zero Trust security strategy.
Before the release of the short-lived CA mode, using AWS Private CA for CBA could be cost prohibitive for some customers. This is because CBA needs a new certificate for each user at regular intervals, which can require issuing a high volume of certificates. The best practice for CBA is to use short-lived CA mode, which can issue certificates at a lower cost that can be used to authenticate a user and then expire shortly afterward.
Let’s take a closer look at the pricing models for the two CA modes that are available when you use AWS Private CA.
Pricing model comparison
You can issue short-lived certificates from both the general-purpose and short-lived CA modes of AWS Private CA. However, the general-purpose mode CAs incur a monthly charge of $400 per CA. The cost of issuing certificates from a general-purpose mode CA is based on the number of certificates that you issue per month, per AWS Region.
The following table shows the pricing tiers for certificates issued by AWS Private CA by using a general-purpose mode CA.
Number of private certificates created each month (per Region)
Price (per certificate)
1–1,000
$0.75 USD
1,001–10,000
$0.35 USD
10,001 and above
$0.001 USD
The short-lived mode CA will only incur a monthly charge of $50 per CA. The cost of issuing certificates from a short-lived mode CA is the same regardless of the volume of certificates issued: $0.058 per certificate. This pricing structure is more cost effective than general-purpose mode if you need to frequently issue new, short-lived certificates for a use case like certificate-based authentication. Figure 1 compares costs between modes at different certificate volumes.
Figure 1: Cost comparison of AWS Private CA modes
It’s important to note that if you already issue a high volume of certificates each month from AWS Private CA, the short-lived CA mode might not be more cost effective than the general-purpose mode. Consider a customer who has one CA and issues 80,000 certificates per month using the general-purpose CA mode: This will incur a total monthly cost of $4,370. A breakdown of the total cost per month in this scenario is as follows.
1 private CA x 400 USD per month = 400 USD per month for operation of AWS Private CA
Tiered price for 80,000 issued certificates: 1,000 issued certificates x 0.75 USD = 750 USD 9,000 issued certificates x 0.35 USD = 3,150 USD 70,000 issued certificates x 0.001 USD = 70 USD Total tier cost: 750 USD + 3,150 USD + 70 USD = 3,970 USD per month for certificates issued 400 USD for instances + 3,970 USD for certificate issued = 4,370 USD Total cost (monthly): 4,370 USD
Now imagine that same customer chose to use a short-lived mode CA to issue the same number of private certificates. Although the cost per month of the short-lived mode CA instance is lower, the price of issuing short-lived certificates would still be greater than the 70,000 certificates issued at a cost of $0.001 with the general-purpose mode CA. The total cost of issuing this many certificates from a single short-lived mode CA is $4,690. A breakdown of the total cost per month in this scenario is as follows.
1 private CA x 50 USD per month = 50 USD per month for operation of AWS Private CA (short-lived CA mode)
Price for 80,000 issued certificates (short-lived CA mode): 80,000 issued certificates x 0.058 USD = 4,640 USD 50 USD for instances + 4,640 USD for certificate issued = 4,690 USD Total cost (monthly): 4,690 USD
At very high volumes of certificate issuance, the short-lived CA mode is not as cost effective as the general-purpose CA mode. It’s important to consider the volume of certificates that your organization will be issuing when you decide which CA mode to use. Figure 1 shows the cost difference at various volumes of certificate issuance. This difference will vary based on the number of certificates issued, as well as the number of CAs that your organization used.
You should also evaluate the various use cases that your organization has for using private certificates. For example, private certificates that are used to terminate TLS traffic typically have a validity of a year or more, meaning that the short-lived CA mode could not facilitate this use case. The short-lived CA mode can only issue certificates with a validity of 7 days or less.
However, you can create multiple private CAs and select the appropriate certificate authority mode for each CA based on your requirements. We recommend that you evaluate your use cases and estimate your certificate volume when you consider which CA mode to use.
In general, you should use the new short-lived CA mode for use cases where you require certificates with a short validity period (less than 7 days) and you are not planning to issue more than 75,000 certificates per month. You should use the general-purpose CA mode for scenarios where you need to issue certificates with a validity period of more than 7 days, or when you need short-lived certificates but will be issuing very high volumes of certificates each month (for example, over 75,000).
For customers who use AWS Identity and Access Management (IAM) Roles Anywhere, you might want to reduce the time period for which a certificate can be used to retrieve temporary credentials to assume an IAM role. If you frequently issue X.509 certificates to servers outside of AWS for use with IAM Roles Anywhere, and you want to use short-lived certificates, the pricing model for short-lived CA mode will be more cost effective in most cases (see Figure 1).
Short-lived credentials are useful for administrative personas that have broad permissions to AWS resources. For instance, you might use IAM Roles Anywhere to allow an entity outside AWS to assume an IAM role with the AdministratorAccess AWS managed policy attached. To help manage the risk of this access pattern, we want the certificate to expire relatively quickly, which reduces the time period during which a compromised certificate could potentially be used to authenticate to a highly privileged IAM role.
Furthermore, IAM Roles Anywhere requires that you manually upload a certificate revocation list (CRL), and does not support the CRL and Online Certificate Status Protocol (OCSP) mechanisms that are native to AWS Private CA. Using short-lived certificates is a way to reduce the impact of a potential credential compromise without needing to configure revocation for IAM Roles Anywhere. The need for certificate revocation is greatly reduced if the certificates are only valid for a single day and can’t be used to retrieve temporary credentials to assume an IAM role after the certificate expires.
Mutual TLS between workloads
Consider a highly sensitive workload running on Amazon Elastic Kubernetes Service (Amazon EKS). AWS Private CA supports an open-source plugin for cert-manager, a widely adopted solution for TLS certificate management in Kubernetes, that offers a more secure CA solution for Kubernetes containers. You can use cert-manager and AWS Private CA to issue certificates to identify cluster resources and encrypt data in transit with TLS.
If you use mutual TLS (mTLS) to protect network traffic between Kubernetes pods, you might want to align the validity period of the private certificates with the lifetime of the pods. For example, if you rebuild the worker nodes for your EKS cluster each day, you can issue certificates that expire after 24 hours and configure your application to request a new short-lived certificate before the current certificate expires.
This enables resource identification and mTLS between pods without requiring frequent revocation of certificates that were issued to resources that no longer exist. As stated previously, this method of issuing short-lived certificates is possible with the general-purpose CA mode—but using the new short-lived CA mode makes this use case more cost effective for customers who issue fewer than 75,000 certificates each month.
Create a short-lived mode CA by using the AWS CLI
In this section, we show you how to use the AWS CLI to create a new private certificate authority with the usage mode set to SHORT_LIVED_CERTIFICATE. If you don’t specify a usage mode, AWS Private CA creates a general-purpose mode CA by default. We won’t use a form of revocation, because the short-lived CA mode makes revocation less useful. The certificates expire quickly as part of normal operations. For more examples of how to create CAs with the AWS CLI, see Procedure for creating a CA (CLI). For instructions to create short-lived mode CAs with the AWS console, see Procedure for creating a CA (Console).
This walkthrough has the following prerequisites:
A terminal with the .aws configuration directory set up with a valid default Region, endpoint, and credentials. For information about configuring your AWS CLI environment, see Configuration and credential file settings.
A certificate authority configuration file to supply when you create the CA. This file provides the subject details for the CA certificate, as well as the key and signing algorithm configuration.
Note: We provide an example CA configuration file, but you will need to modify this example to meet your requirements.
To use the create-certificate-authority command with the AWS CLI
We will use the following ca_config.txt file to create the certificate authority. You will need to modify this example to meet your requirements.
Use the describe-certificate-authority command to view the status of your new root CA. The status will show Pending_Certificate, until you install a self-signed root CA certificate. You will need to replace the certificate authority Amazon Resource Name (ARN) in the following command with your own CA ARN.
Generate a certificate signing request for your root CA certificate by running the following command. Make sure to replace the certificate authority ARN in the command with your own CA ARN.
Using the ca.csr file from the previous step as the argument for the --csr parameter, issue the root certificate with the following command. Make sure to replace the certificate authority ARN in the command with your own CA ARN.
The response will include the CertificateArn for the issued root CA certificate. Next, use your CA ARN and the certificate ARN provided in the response to retrieve the certificate by using the get-certificate CLI command, as follows.
Notice that we created a new file, cert.pem, that contains the certificate we retrieved in the previous command. We will import this certificate to our short-lived mode root CA by running the following command. Make sure to replace the certificate authority ARN in the command with your own CA ARN.
Check the status of your short-lived mode CA again by using the describe-certificate-authority command. Make sure to replace the certificate authority ARN in the following command with your own CA ARN.
Great! As shown in the output from the preceding command, the new short-lived mode root CA has a status of ACTIVE, meaning it can now issue certificates. This certificate authority will be able to issue end-entity certificates that have a validity period of up to 7 days, as shown in the UsageMode: SHORT_LIVED_CERTIFICATE parameter.
Conclusion
In this post, we introduced the short-lived CA mode that is offered by AWS Private CA, explained how it differs from the general-purpose CA mode, and compared the pricing models for both CA modes. We also provided some recommendations for choosing the appropriate CA mode based on your certificate issuance volume and use cases. Finally, we showed you how to create a short-lived mode CA by using the AWS CLI.
If you have feedback about this post, submit comments in the Comments section below. If you have questions about this post, start a new thread on the AWS Certificate Manager re:Post or contact AWS Support.
Want more AWS Security news? Follow us on Twitter.
We are excited to announce that Amazon Web Services (AWS) has completed its annual Collaborative Cloud Audit Group (CCAG) Cloud Community audit with European financial service institutions (FSIs).
Security at AWS is the highest priority. As customers embrace the scalability and flexibility of AWS, we are helping them evolve security, identity, and compliance into key business enablers. At AWS, we are obsessed with earning and maintaining customer trust, and providing our FSI customers and their regulatory bodies with the assurance that AWS has the necessary controls in place to protect their most sensitive material and regulated workloads. The AWS Compliance Program helps customers understand the robust controls that are in place at AWS. By tying together governance-focused, audit-friendly service features with applicable compliance or audit standards, AWS Compliance helps customers to set up and operate in an AWS security control environment.
An example of how AWS supports customers’ risk management and regulatory efforts is our annual audit engagement with the CCAG. For the fourth year, the CCAG pooled audit thoroughly assessed the AWS controls that enable us to help protect our customers’ data and material workloads, while satisfying strict European and national regulatory obligations. CCAG currently represents more than 50 leading European FSIs and has grown steadily since its inception in 2017. Given the importance of cloud computing for the operations of FSI customers, the financial industry is coming under greater regulatory scrutiny. Similar to prior years, the CCAG 2022 audit was conducted based on customers’ right to conduct an audit of their service providers under European Banking Authority (EBA) outsourcing recommendations to cloud service providers (CSPs). The EBA suggests using pooled audits to use audit resources more efficiently and to decrease the organizational burden on both the clients and the CSP. Figure 1 illustrates the improved cost-effectiveness of pooled audits as compared to individual audits.
Figure 1: Efforts and costs are shared and reduced when a collaborative approach is followed
CCAG audit process
Although there are many security frameworks available, CCAG uses the Cloud Controls Matrix (CCM) of the Cloud Security Alliance (CSA) as the framework of reference for their CSP audits. The CSA is a not-for-profit organization with a mission, as stated on its website, to “promote the use of best practices for providing security assurance within cloud computing, and to provide education on the uses of cloud computing to help secure all other forms of computing.” CCM is specifically designed to provide fundamental security principles to guide cloud vendors and to assist cloud customers in assessing the overall security risk of a cloud provider.
Between February and December 2022, CCAG audited the AWS controls environment by following a hybrid approach, remotely and onsite in Seattle (USA), Dublin (IRL), and Frankfurt (DEU). For the scope of the 2022 CCAG audit, the participating auditors assessed AWS measures with regards to (1) keeping customer data sovereign, secure, and private, (2) effectively managing threats and vulnerabilities, (3) offering a highly available and resilient infrastructure, (4) preventing and responding rapidly to security events, and (5) enforcing strong authentication mechanisms and strict identity and access management constraint conditions to grant access to resources only under the need-to-know and need-to-have principles.
The scope of the audit encompassed individual services provided by AWS, and the policies, controls, and procedures for (and practice of) managing and maintaining them. Customers will still need to have their auditors assess the environments they create by using these services, and their policies and procedures for (and practices of) managing and maintaining these environments, on their side of the shared responsibility lines of demarcation for the AWS services involved.
CCAG audit results
CCAG members expressed their gratitude to AWS for the audit experience:
“The AWS Security Assurance team provided CCAG auditors with the needed logistical and technical assistance, by navigating the AWS organization to find the required information, performing advocacy of the CCAG audit rights, creating awareness and education, as well as exercising constant pressure for the timely delivery of information.”
The results of the CCAG pooled audit are available to the participants and their respective regulators only, and provide CCAG members with assurance regarding the AWS controls environment, enabling members to work to remove compliance blockers, accelerate their adoption of AWS services, and obtain confidence and trust in the security controls of AWS.
If you have feedback about this post, submit comments in the Comments section below. If you have questions about this post, contact AWS Support.
Want more AWS Security news? Follow us on Twitter.
We continue to expand the scope of our assurance programs at Amazon Web Services (AWS) and are pleased to announce that our Middle East (UAE) Region is now certified by the Dubai Electronic Security Centre (DESC) to operate as a Tier 1 cloud service provider (CSP). This alignment with DESC requirements demonstrates our continuous commitment to adhere to the heightened expectations for CSPs. AWS government customers can run their applications in the AWS Cloud certified Regions in confidence.
AWS was evaluated by independent third-party auditor BSI on behalf of DESC on January 23, 2023. The Certificate of Compliance illustrating the AWS compliance status is available through AWS Artifact. AWS Artifact is a self-service portal for on-demand access to AWS compliance reports. Sign in to AWS Artifact in the AWS Management Console, or learn more at Getting Started with AWS Artifact.
As of this writing, 62 services offered in the Middle East (UAE) Region are in scope of this certification. For up-to-date information, including when additional services are added, visit the AWS Services in Scope by Compliance Program webpage and choose DESC CSP.
AWS strives to continuously bring services into scope of its compliance programs to help you meet your architectural and regulatory needs. Please reach out to your AWS account team if you have questions or feedback about DESC compliance.
To learn more about our compliance and security programs, see AWS Compliance Programs. As always, we value your feedback and questions; reach out to the AWS Compliance team through the Contact Us page.
If you have feedback about this post, submit comments in the Comments section below.
Want more AWS Security how-to content, news, and feature announcements? Follow us on Twitter.
In the AWS Security Profile series, we interview Amazon Web Services (AWS) thought leaders who help keep our customers safe and secure. This interview features Jana Kay, Cloud Security Strategist. Jana shares her unique career journey, insights on the Security and Resiliency of the Cloud Tabletop Exercise (TTX) program, thoughts on the data protection and cloud security landscape, and more.
How long have you been at AWS and what do you do in your current role? I’ve been at AWS a little over four years. I started in 2018 as a Cloud Security Strategist, and in my opinion, I have one of the coolest jobs at AWS. I get to help customers think through how to use the cloud to address some of their most difficult security challenges, by looking at trends and emerging and evolving issues, and anticipating those that might still be on the horizon. I do this through various means, such as whitepapers, short videos, and tabletop exercises. I love working on a lot of different projects, which all have an impact on customers and give me the opportunity to learn new things myself all the time!
How did you get started in the security space? What about it piqued your interest? After college, I worked in the office of a United States senator, which led me to apply to the Harvard Kennedy School for a graduate degree in public policy. When I started graduate school, I wasn’t sure what my focus would be, but my first day of class was September 11, 2001, which obviously had a tremendous impact on me and my classmates. I first heard about the events of September 11 while I was in an international security policy class, taught by the late Dr. Ash Carter. My classmates and I came from a range of backgrounds, cultures, and professions, and Dr. Carter challenged us to think strategically and objectively—but compassionately—about what was unfolding in the world and our responsibility to effect change. That experience led me to pursue a career in security. I concentrated in international security and political economy, and after graduation, accepted a Presidential Management Fellowship in the Office of the Secretary of Defense at the Pentagon, where I worked for 16 years before coming to AWS.
What’s been the most dramatic change you’ve seen in the security industry? From the boardroom to builder teams, the understanding that security has to be integrated into all aspects of an organization’s ecosystem has been an important shift. Acceptance of security as foundational to the health of an organization has been evolving for a while, and a lot of organizations have more work to do, but overall there is prioritization of security within organizations.
What are your thoughts on the security of the cloud today? There are a lot of great technologies—such as AWS Data Protection services—that can help you with data protection, but it’s equally important to have the right processes in place and to create a strong culture of data protection. Although one of the biggest shifts I’ve seen in the industry is recognition of the importance of security, we still have a ways to go for people to understand that security and data protection is everyone’s job, not just the job of security experts. So when we talk about data protection and privacy issues, a lot of the conversation focuses on things like encryption, but the conversation shouldn’t end there because ultimately, security is only as good as the processes and people who implement it.
Do you have a favorite AWS Security service and why? I like anything that helps simplify my life, so AWS Control Tower is one of my favorites. It has so much functionality. Not only does AWS Control Tower help you set up multi-account AWS environments, you can use it to help identify which of your resources are compliant. The dashboard, which allows for visibility of provisioned accounts, controls enabled policy enforcement and can help you detect noncompliant resources.
What are you currently working on that you’re excited about? Currently, my focus is the Security and Resiliency of the Cloud Tabletop Exercise (TTX). It’s a 3-hour interactive event about incident response in which participants discuss how to prevent, detect, contain, and eradicate a simulated cyber incident. I’ve had the opportunity to conduct the TTX in South America, the Middle East, Europe, and the US, and it’s been so much fun meeting customers and hearing the discussions during the TTX and how much participants enjoy the experience. It scales well for groups of different sizes—and for a single customer or industry or for multiple customers or industries—and it’s been really interesting to see how the conversations change depending on the participants.
How does the Security and Resiliency of the Cloud Tabletop Exercise help security professionals hone their skills? One of the great things about the tabletop is that it involves interacting with other participants. So it’s an opportunity for security professionals and business leaders to learn from their peers, hear different perspectives, and understand all facets of the problem and potential solutions. Often our participants range from CISOs to policymakers to technical experts, who come to the exercise with different priorities for data protection and different ideas on how to solve the scenarios that we present. The TTX isn’t a technical exercise, but participants link their collective understanding of what capabilities are needed in a given scenario to what services are available to them and then finally how to implement those services. One of the things that I hope participants leave with is a better understanding of the AWS tools and services that are available to them.
How can customers learn more about the Security and Resiliency of the Cloud Tabletop Exercise? To learn more about the TTX, reach out to your account manager.
Is there something you wish customers would ask you about more often? I wish they’d ask more about what they should be doing to prepare for a cyber incident. It’s one thing to have an incident response plan; it’s another thing to be confident that it’s going to work if you ever need it. If you don’t practice the plan, how do you know that it’s effective, if it has gaps, or if everyone knows their role in an incident?
How about outside of work—any hobbies? I’m the mother of a teenager and tween, so between keeping up with their activities, I wish I had more time for hobbies! But someday soon, I’d like to get back to traveling more for leisure, reading for fun, and playing tennis.
If you have feedback about this post, submit comments in the Comments section below. If you have questions about this post, contact AWS Support.
Want more AWS Security news? Follow us on Twitter.
In this blog post, we show you how to create an Amazon QuickSight dashboard to visualize the policy validation findings from AWS Identity and Access Management (IAM) Access Analyzer. You can use this dashboard to better understand your policies and how to achieve least privilege by periodically validating your IAM roles against IAM best practices. This blog post walks you through the deployment for a multi-account environment using AWS Organizations.
Policy validation is a feature of IAM Access Analyzer that guides you to author and validate secure and functional policies with more than 100 policy checks. You can use these checks when creating new policies or to validate existing policies. To learn how to use IAM Access Analyzer policy validation APIs when creating new policies, see Validate IAM policies in CloudFormation templates using IAM Access Analyzer. In this post, we focus on how to validate existing IAM policies.
Approach to visualize IAM Access Analyzer findings
As shown in Figure 1, there are four high-level steps to build the visualization.
Figure 1: Steps to visualize IAM Access Analyzer findings
Collect IAM policies
To validate your IAM policies with IAM Access Analyzer in your organization, start by periodically sending the content of your IAM policies (inline and customer-managed) to a central account, such as your Security Tooling account.
Validate IAM policies
After you collect the IAM policies in a central account, run an IAM Access Analyzer ValidatePolicy API call on each policy. The API calls return a list of findings. The findings can help you identify issues, provide actionable recommendations to resolve the issues, and enable you to author functional policies that can meet security best practices. The findings are stored in an Amazon Simple Storage Service (Amazon S3) bucket. To learn about different findings, see Access Analyzer policy check reference.
Visualize findings
IAM Access Analyzer policy validation findings are stored centrally in an S3 bucket. The S3 bucket is owned by the central (hub) account of your choosing. You can use Amazon Athena to query the findings from the S3 bucket, and then create a QuickSight analysis to visualize the findings.
Publish dashboards
Finally, you can publish a shareable QuickSight dashboard. Figure 2 shows an example of the dashboard.
Figure 2: Dashboard overview
Design overview
This implementation is a serverless job initiated by Amazon EventBridge rules. It collects IAM policies into a hub account (such as your Security Tooling account), validates the policies, stores the validation results in an S3 bucket, and uses Athena to query the findings and QuickSight to visualize them. Figure 3 gives a design overview of our implementation.
Figure 3: Design overview of the implementation
As shown in Figure 3, the implementation includes the following steps:
A time-based rule is set to run daily. The rule triggers an AWS Lambda function that lists the IAM policies of the AWS account it is running in.
When new messages are received, the Amazon SQS queue initiates the second Lambda function. For each message, the Lambda function extracts the policy document and validates it by using the IAM Access Analyzer ValidatePolicy API call.
The Lambda function stores validation results in an S3 bucket.
An AWS Glue table contains the schema for the IAM Access Analyzer findings. Athena natively uses the AWS Glue Data Catalog.
Athena queries the findings stored in the S3 bucket.
QuickSight uses Athena as a data source to visualize IAM Access Analyzer findings.
Benefits of the implementation
By implementing this solution, you can achieve the following benefits:
Store your IAM Access Analyzer policy validation results in a scalable and cost-effective manner with Amazon S3.
Add scalability and fault tolerance to your validation workflow with Amazon SQS.
Partition your evaluation results in Athena and restrict the amount of data scanned by each query, helping to improve performance and reduce cost.
Gain insights from IAM Access Analyzer policy validation findings with QuickSight dashboards. You can use the dashboard to identify IAM policies that don’t comply with AWS best practices and then take action to correct them.
Prerequisites
Before you implement the solution, make sure you’ve completed the following steps:
If you plan to deploy the implementation in a multi-account environment using Organizations, enable all features and enable trusted access with Organizations to operate a service-managed stack set.
Note: This implementation works in accounts that don’t have AWS Lake Formation enabled. If Lake Formation is enabled in your account, you might need to grant Lake Formation permissions in addition to the implementation IAM permissions. For details, see Lake Formation access control overview.
Walkthrough
In this section, we will show you how to deploy an AWS CloudFormation template to your central account (such as your Security Tooling account), which is the hub for IAM Access Analyzer findings. The central account collects, validates, and visualizes your findings.
To deploy the implementation to your multi-account environment
Deploy the CloudFormation stack to your central account.
In your central account, run the following commands in a terminal. These commands clone the GitHub repository and deploy the CloudFormation stack to your central account.
# A) Clone the repository
git clone https://github.com/aws-samples/visualize-iam-access-analyzer-policy-validation-findings.git # B) Switch to the repository's directory
cd visualize-iam-access-analyzer-policy-validation-findings # C) Deploy the CloudFormation stack to your central security account (hub). For<AWSRegion>enter your AWS Region without quotes.
make deploy-hub aws-region=<AWSRegion>
If you want to send IAM policies from other member accounts to your central account, you will need to make note of the CloudFormation stack outputs for SQSQueueUrl and KMSKeyArn when the deployment is complete.
make describe-hub-outputs aws-region=<AWSRegion>
Switch to your organization’s management account and deploy the stack sets to the member accounts. For <SQSQueueUrl> and <KMSKeyArn>, use the values from the previous step.
# Create a CloudFormation stack set to deploy the resources to the member accounts.

make deploy-members SQSQueueUrl=<SQSQueueUrl> KMSKeyArn=<KMSKeyArn< aws-region=<AWSRegion>
To deploy the QuickSight dashboard to your central account
Make sure that QuickSight is using the IAM role aws-quicksight-service-role.
In QuickSight, in the navigation bar at the top right, choose your account (indicated by a person icon) and then choose Manage QuickSight.
On the Manage QuickSight page, in the menu at the left, choose Security & Permissions.
On the Security & Permissions page, under QuickSight access to AWS services, choose Manage.
For IAM role, choose Use an existing role, and then do one of the following:
If you see a list of existing IAM roles, choose the role
# <aws-region> your Quicksight main Region, for example eu-west-1
# <account-id> The ID of your account, for example 123456789012
# <namespace-name> Quicksight namespace, for example default.
# You can list the namespaces by using aws quicksight list-namespaces --aws-account-id<account-id>
aws quicksight list-users --region <aws-region> --aws-account-id <account-id> --namespace <namespace-name>
Make a note of the user’s ARN that you want to grant permissions to list, describe, or update the QuickSight dashboard. This information is found in the arn element. For example, arn:aws:quicksight:us-east-1:111122223333:user/default/User1
To launch the deployment stack for the QuickSight dashboard, run the following command. Replace <quicksight-user-arn> with the user’s ARN from the previous step.
make deploy-dashboard-hub aws-region=<AWSRegion> quicksight-user-arn=<quicksight-user-arn>
Publish and share the QuickSight dashboard with the policy validation findings
You can publish your QuickSight dashboard and then share it with other QuickSight users for reporting purposes. The dashboard preserves the configuration of the analysis at the time that it’s published and reflects the current data in the datasets used by the analysis.
To publish the QuickSight dashboard
In the QuickSight console, choose Analyses and then choose access-analyzer-validation-findings.
In your analysis, in the application bar at the upper right, choose Share, and then choose Publish dashboard.
On the Publish dashboard page, choose Publish new dashboard as and enter IAM Access Analyzer Policy Validation.
Choose Publish dashboard. The dashboard is now published.
On the QuickSight start page, choose Dashboards.
Select the IAM Access Analyzer Policy Validation dashboard. IAM Access Analyzer policy validation findings will appear within the next 24 hours.
Note: If you don’t want to wait until the Lambda function is initiated automatically, you can invoke the function that lists customer-managed policies and inline policies by using the aws lambda invoke AWS CLI command on the hub account and wait one to two minutes to see the policy validation findings:
In the QuickSight console, choose Dashboards and then choose IAM Access Analyzer Policy Validation.
In your dashboard, in the application bar at the upper right, choose Share, and then choose Share dashboard.
On the Share dashboard page that opens, do the following:
For Invite users and groups to dashboard on the left pane, enter a user email or group name in the search box. Users or groups that match your query appear in a list below the search box. Only active users and groups appear in the list.
For the user or group that you want to grant access to the dashboard, choose Add. Then choose the level of permissions that you want them to have.
After you grant users access to a dashboard, you can copy a link to it and send it to them.
Your teams can use this dashboard to better understand their IAM policies and how to move toward least-privilege permissions, as outlined in the section Validate your IAM roles of the blog post Top 10 security items to improve in your AWS account.
Clean up
To avoid incurring additional charges in your accounts, remove the resources that you created in this walkthrough.
Before deleting the CloudFormation stacks and stack sets in your accounts, make sure that the S3 buckets that you created are empty. To delete everything (including old versioned objects) in a versioned bucket, we recommend emptying the bucket through the console. Before deleting the CloudFormation stack from the central account, delete the Athena workgroup.
To delete remaining resources from your AWS accounts
Delete the CloudFormation stack from your central account by running the following command. Make sure to replace <AWSRegion> with your own Region.
make delete-stackset-instances aws-region=<AWSRegion>

# Wait for the operation to finish. You can check its progress on the CloudFormation console.

make delete-stackset aws-region=<AWSRegion>
Delete the QuickSight dashboard by running the following command using the central account credentials. Make sure to replace <AWSRegion> with your own Region.
In this post, you learned how to validate your existing IAM policies by using the IAM Access Analyzer ValidatePolicy API and visualizing the results with AWS analytics tools. By using the implementation, you can better understand your IAM policies and work to reach least privilege in a scalable, fault-tolerant, and cost-effective way. This will help you identify opportunities to tighten your permissions and to grant the right fine-grained permissions to help enhance your overall security posture.
If you have feedback about this post, submit comments in the Comments section below. If you have questions about this post, start a new thread on the AWS Security, Identity, & Compliance re:Post.
Want more AWS Security news? Follow us on Twitter.
Amazon Web Services is excited to announce that we’ve updated the AWS ebook, Protecting your AWS environment from ransomware. The new ebook includes the top 10 best practices for ransomware protection and covers new services and features that have been released since the original published date in April 2020.
We know that customers care about ransomware. Security teams across the board are ramping up their protective, detective, and reactive measures. AWS serves all customers, including those most sensitive to disruption like teams responsible for critical infrastructure, healthcare organizations, manufacturing, educational institutions, and state and local governments. We want to empower our customers to protect themselves against ransomware by using a range of security capabilities. These capabilities provide unparalleled visibility into your AWS environment, as well as the ability to update and patch efficiently, to seamlessly and cost-effectively back up your data, and to templatize your environment, enabling a rapid return to a known good state. Keep in mind that there is no single solution or quick fix to mitigate ransomware. In fact, the mitigations and controls outlined in this document are general security best practices. We hope you find this information helpful and take action.
For example, to help protect against a security event that impacts stored backups in the source account, AWS Backup supports cross-account backups and the ability to centrally define backup policies for accounts in AWS Organizations by using the management account. Also, AWS Backup Vault Lock enforces write-once, read-many (WORM) backups to help protect backups (recovery points) in your backup vaults from inadvertent or malicious actions. You can copy backups to a known logically isolated destination account in the organization, and you can restore from the destination account or, alternatively, to a third account. This gives you an additional layer of protection if the source account experiences disruption from accidental or malicious deletion, disasters, or ransomware.
Learn more about solutions like these by checking out our Protecting against ransomware webpage, which discusses security resources that can help you secure your AWS environments from ransomware.
Amazon RDS now offers integration with Secrets Manager to manage master database credentials. You no longer have to manage master database credentials, such as creating a secret in Secrets Manager or setting up rotation, because Amazon RDS does it for you.
In this blog post, you will learn how to set up an Amazon RDS database instance and use the Secrets Manager integration to manage master database credentials. You will also learn how to set up alternating users rotation for application credentials.
Benefits of the integration
Managing Amazon RDS master database credentials with Secrets Manager provides the following benefits:
Amazon RDS automatically generates and helps secure master database credentials, so that you don’t have to do the heavy lifting of securely managing credentials.
Amazon RDS automatically stores and manages database credentials in Secrets Manager.
Amazon RDS rotates database credentials regularly without requiring application changes.
Secrets Manager helps to secure database credentials from human access and plaintext view.
Secrets Manager allows retrieval of database credentials using its API or the console.
In this blog post, we’ll show you how to use the console to do the following:
Manage master database credentials for new Amazon RDS instances in Secrets Manager. We will use the MySQL engine, but you can also use this process for other Amazon RDS database engines.
Use the managed master database secret to set up alternating users rotation for a new database user.
Manage Amazon RDS master database credentials in Secrets Manager
In this section, you will create a database instance with Secrets Manager integration.
To manage Amazon RDS master database credentials in Secrets Manager:
For Choose a database creation method, choose Standard create.
In Engine options, for Engine type, choose MySQL.
In Settings, under Credentials Settings, select Manage master credentials in AWS Secrets Manager.
Figure 1: Select Secrets Manager integration
You will have the option to encrypt the managed master database credentials. In this example, we will use the default KMS key.
Figure 2: Choose KMS key
(Optional) Choose other settings to meet your requirements. For more information, see Settings for DB instances.
Choose Create Database, and wait a few minutes for the database to be created.
After the database is created, from the Instances dashboard in the Amazon RDS console, navigate to your new Amazon RDS instance.
Choose the Configuration tab, and under Master Credentials ARN, you will find the secret that contains your master database credentials.
Create a new database user by using the master database credentials
In this section you will learn how to create and secure a credential that could be used in your application to connect to the database. You will learn how to access the master database credentials and use the master database credentials to create and set up rotation on child (application) credentials.
To create a new database user by using the master database credentials
Retrieve the master database credentials from Secrets Manager as follows:
Choose the Configuration tab of your RDS instance dashboard, and under Master Credentials ARN, choose Manage in Secrets Manager to open your managed master database secret in Secrets Manager.
Figure 3: View DB configuration
You can see that Amazon RDS has added some system tags to the secret and that rotation is turned on by default.
Figure 4: View secret details
To see the password, in the Secret value section, choose Retrieve secret value.
For the master database, create a new database user with the permissions that you want by running the following SQL command. Make sure to replace <password> with your own information, and make sure to use a strong password.
For Secret type, select Credentials for Amazon RDS database.
In the Credentials section, enter the username and password of the new database user.
In the Database section, select your Amazon RDS instance, and then choose Next, as shown in Figure 5.
Figure 5: Select the RDS instance
On the Configure secret page, give the secret a name and description. No other configuration is needed.
On the Configure rotation – optional page, turn on Automatic rotation.
Figure 6: Select automatic rotation
In the Rotation schedule section, configure the rotation schedule according to your needs.
In the Rotation function section, do the following:
Enter a descriptive name for the Lambda function that will be created.
For Use separate credentials to rotate this secret, select Yes.
For Secrets, choose the master database secret that was created by Amazon RDS.
Note: To find the name of your master database secret, in the Amazon RDS console, on your Amazon RDS instance details page, choose the Configuration tab and then see the Master Credentials ARN.
Figure 7: Select separate credentials for rotation
Choose Next, and then on the Review page, choose Store.
It will take a few minutes for the Secrets Manager workflow to set up the rotation Lambda function before the new database user secret is ready to be rotated.
To check that rotation is enabled
In the Secrets Manager console, navigate to the new database user secret.
Figure 8: View the child secret
In the Rotation configuration section, verify that Rotation status is Enabled.
In the Rotation configuration section, choose the Lambda rotation function.
Figure 12: View the rotation function
In the Lambda console, under Application, select the application.
Figure 13: Open application
On the Deployments tab, choose CloudFormation stack.
Choose Delete and then follow the Delete menu steps. You might need to navigate to the root stack and choose Delete again. You might also need to disable termination protection for the stack. The console will guide you through that.
Figure 14: Choose delete
Now that you have cleaned up rotation for the new database user secret, you need to delete the child secret. Navigate to the Secrets Manager console and select the secret that you want to delete.
In the Actions dropdown, select Delete secret to delete the secret.
Figure 15: Delete child secret
Summary
Amazon RDS integration with Secrets Manager helps you better secure and manage master DB credentials. This integration helps you store the credentials when the DB instances are created and eliminates the effort for you to set up credential rotation.
In this blog post, you learned how to do the following:
Set up an Amazon RDS instance that uses Secrets Manager to store the master database credentials
View the credentials in Secrets Manager and confirm that rotation is set up
Use the master database credentials to create database user credentials
Set up alternating users rotation on database user credentials
Additional resources
For instructions on how to create database users for other Amazon RDS engine types, see the following resources:
Ransomware events have significantly increased over the past several years and captured worldwide attention. Traditional ransomware events affect mostly infrastructure resources like servers, databases, and connected file systems. However, there are also non-traditional events that you may not be as familiar with, such as ransomware events that target data stored in Amazon Simple Storage Service (Amazon S3). There are important steps you can take to help prevent these events, and to identify possible ransomware events early so that you can take action to recover. The goal of this post is to help you learn about the AWS services and features that you can use to protect against ransomware events in your environment, and to investigate possible ransomware events if they occur.
Ransomware is a type of malware that bad actors can use to extort money from entities. The actors can use a range of tactics to gain unauthorized access to their target’s data and systems, including but not limited to taking advantage of unpatched software flaws, misuse of weak credentials or previous unintended disclosure of credentials, and using social engineering. In a ransomware event, a legitimate entity’s access to their data and systems is restricted by the bad actors, and a ransom demand is made for the safe return of these digital assets. There are several methods actors use to restrict or disable authorized access to resources including a) encryption or deletion, b) modified access controls, and c) network-based Denial of Service (DoS) attacks. In some cases, after the target’s data access is restored by providing the encryption key or transferring the data back, bad actors who have a copy of the data demand a second ransom—promising not to retain the data in order to sell or publicly release it.
In the next sections, we’ll describe several important stages of your response to a ransomware event in Amazon S3, including detection, response, recovery, and protection.
After a bad actor has obtained credentials, they use AWS API actions that they iterate through to discover the type of access that the exposed IAM principal has been granted. Bad actors can do this in multiple ways, which can generate different levels of activity. This activity might alert your security teams because of an increase in API calls that result in errors. Other times, if a bad actor’s goal is to ransom S3 objects, then the API calls will be specific to Amazon S3. If access to Amazon S3 is permitted through the exposed IAM principal, then you might see an increase in API actions such as s3:ListBuckets, s3:GetBucketLocation, s3:GetBucketPolicy, and s3:GetBucketAcl.
Analysis
In this section, we’ll describe where to find the log and metric data to help you analyze this type of ransomware event in more detail.
When a ransomware event targets data stored in Amazon S3, often the objects stored in S3 buckets are deleted, without the bad actor making copies. This is more like a data destruction event than a ransomware event where objects are encrypted.
There are several logs that will capture this activity. You can enable AWS CloudTrail event logging for Amazon S3 data, which allows you to review the activity logs to understand read and delete actions that were taken on specific objects.
In addition, if you have enabled Amazon CloudWatch metrics for Amazon S3 prior to the ransomware event, you can use the sum of the BytesDownloaded metric to gain insight into abnormal transfer spikes.
Another way to gain information is to use the region-DataTransfer-Out-Bytes metric, which shows the amount of data transferred from Amazon S3 to the internet. This metric is enabled by default and is associated with your AWS billing and usage reports for Amazon S3.
Next, we’ll walk through how to respond to the unintended disclosure of IAM access keys. Based on the business impact, you may decide to create a second set of access keys to replace all legitimate use of those credentials so that legitimate systems are not interrupted when you deactivate the compromised access keys. You can deactivate the access keys by using the IAM console or through automation, as defined in your incident response plan. However, you also need to document specific details for the event within your secure and private incident response documentation so that you can reference them in the future. If the activity was related to the use of an IAM role or temporary credentials, you need to take an additional step and revoke any active sessions. To do this, in the IAM console, you choose the Revoke active session button, which will attach a policy that denies access to users who assumed the role before that moment. Then you can delete the exposed access keys.
In addition, you can use the AWS CloudTrail dashboard and event history (which includes 90 days of logs) to review the IAM related activities by that compromised IAM user or role. Your analysis can show potential persistent access that might have been created by the bad actor. In addition, you can use the IAM console to look at the IAM credential report (this report is updated every 4 hours) to review activity such as access key last used, user creation time, and password last used. Alternatively, you can use Amazon Athena to query the CloudTrail logs for the same information. See the following example of an Athena query that will take an IAM user Amazon Resource Number (ARN) to show activity for a particular time frame.
SELECT eventtime, eventname, awsregion, sourceipaddress, useragent
FROM cloudtrail
WHERE useridentity.arn = 'arn:aws:iam::1234567890:user/Name' AND
-- Enter timeframe
(event_date >= '2022/08/04' AND event_date <= '2022/11/04')
ORDER BY eventtime ASC
Recovery
After you’ve removed access from the bad actor, you have multiple options to recover data, which we discuss in the following sections. Keep in mind that there is currently no undelete capability for Amazon S3, and AWS does not have the ability to recover data after a delete operation. In addition, many of the recovery options require configuration upon bucket creation.
S3 Versioning
Using versioning in S3 buckets is a way to keep multiple versions of an object in the same bucket, which gives you the ability to restore a particular version during the recovery process. You can use the S3 Versioning feature to preserve, retrieve, and restore every version of every object stored in your buckets. With versioning, you can recover more easily from both unintended user actions and application failures. Versioning-enabled buckets can help you recover objects from accidental deletion or overwrite. For example, if you delete an object, Amazon S3 inserts a delete marker instead of removing the object permanently. The previous version remains in the bucket and becomes a noncurrent version. You can restore the previous version. Versioning is not enabled by default and incurs additional costs, because you are maintaining multiple copies of the same object. For more information about cost, see the Amazon S3 pricing page.
AWS Backup
Using AWS Backup gives you the ability to create and maintain separate copies of your S3 data under separate access credentials that can be used to restore data during a recovery process. AWS Backup provides centralized backup for several AWS services, so you can manage your backups in one location. AWS Backup for Amazon S3 provides you with two options: continuous backups, which allow you to restore to any point in time within the last 35 days; and periodic backups, which allow you to retain data for a specified duration, including indefinitely. For more information, see Using AWS Backup for Amazon S3.
Protection
In this section, we’ll describe some of the preventative security controls available in AWS.
S3 Object Lock
You can add another layer of protection against object changes and deletion by enabling S3 Object Lock for your S3 buckets. With S3 Object Lock, you can store objects using a write-once-read-many (WORM) model and can help prevent objects from being deleted or overwritten for a fixed amount of time or indefinitely.
AWS Backup Vault Lock
Similar to S3 Object lock, which adds additional protection to S3 objects, if you use AWS Backup you can consider enabling AWS Backup Vault Lock, which enforces the same WORM setting for all the backups you store and create in a backup vault. AWS Backup Vault Lock helps you to prevent inadvertent or malicious delete operations by the AWS account root user.
Amazon S3 Inventory
To make sure that your organization understands the sensitivity of the objects you store in Amazon S3, you should inventory your most critical and sensitive data across Amazon S3 and make sure that the appropriate bucket configuration is in place to protect and enable recovery of your data. You can use Amazon S3 Inventory to understand what objects are in your S3 buckets, and the existing configurations, including encryption status, replication status, and object lock information. You can use resource tags to label the classification and owner of the objects in Amazon S3, and take automated action and apply controls that match the sensitivity of the objects stored in a particular S3 bucket.
MFA delete
Another preventative control you can use is to enforce multi-factor authentication (MFA) delete in S3 Versioning. MFA delete provides added security and can help prevent accidental bucket deletions, by requiring the user who initiates the delete action to prove physical or virtual possession of an MFA device with an MFA code. This adds an extra layer of friction and security to the delete action.
Use IAM roles for short-term credentials
Because many ransomware events arise from unintended disclosure of static IAM access keys, AWS recommends that you use IAM roles that provide short-term credentials, rather than using long-term IAM access keys. This includes using identity federation for your developers who are accessing AWS, using IAM roles for system-to-system access, and using IAM Roles Anywhere for hybrid access. For most use cases, you shouldn’t need to use static keys or long-term access keys. Now is a good time to audit and work toward eliminating the use of these types of keys in your environment. Consider taking the following steps:
Create an inventory across all of your AWS accounts and identify the IAM user, when the credentials were last rotated and last used, and the attached policy.
Disable and delete all AWS account root access keys.
Rotate the credentials and apply MFA to the user.
Re-architect to take advantage of temporary role-based access, such as IAM roles or IAM Roles Anywhere.
Review attached policies to make sure that you’re enforcing least privilege access, including removing wild cards from the policy.
Server-side encryption with customer managed KMS keys
Another protection you can use is to implement server-side encryption with AWS Key Management Service (SSE-KMS) and use customer managed keys to encrypt your S3 objects. Using a customer managed key requires you to apply a specific key policy around who can encrypt and decrypt the data within your bucket, which provides an additional access control mechanism to protect your data. You can also centrally manage AWS KMS keys and audit their usage with an audit trail of when the key was used and by whom.
GuardDuty protections for Amazon S3
You can enable Amazon S3 protection in Amazon GuardDuty. With S3 protection, GuardDuty monitors object-level API operations to identify potential security risks for data in your S3 buckets. This includes findings related to anomalous API activity and unusual behavior related to your data in Amazon S3, and can help you identify a security event early on.
Conclusion
In this post, you learned about ransomware events that target data stored in Amazon S3. By taking proactive steps, you can identify potential ransomware events quickly, and you can put in place additional protections to help you reduce the risk of this type of security event in the future.
Leading modern application platform space OutSystems is a low-code platform that provides tools for companies to develop, deploy, and manage omnichannel enterprise applications.
Security is a top priority at OutSystems. Their Security Operations Center (SOC) deals with thousands of incidents a year, each with a set of response actions that need to be executed as quickly as possible. Providing security at such large scale is a challenge, even for the most well-prepared organizations. Manual and repetitive tasks account for the majority of the response time involved in this process, and decreasing this key metric requires orchestration and automation.
Security orchestration, automation, and response (SOAR) systems are designed to translate security analysts’ manual procedures into automated actions, making them faster and more scalable.
In this blog post, we’ll explore how OutSystems lowered their incident response time by 99 percent by designing and deploying a custom SOAR using Serverless services on AWS.
Solution architecture
Security incidents happen with unknown frequency, making serverless services a natural fit to boost security at OutSystems because of their increased agility and capability to scale to zero.
There are two ways to trigger SOAR actions in this architecture:
Automatically through Security Information and Event Management (SIEM) security incident findings
On-demand through chat application
Using the first method, when a security incident is detected by the SIEM, an event is published to Amazon Simple Notification Service (Amazon SNS). This triggers an AWS Lambda function that creates a ticket in an internal ticketing system. Then the Lambda Playbooks function triggers to decide which playbook to run depending on the incident details.
Each playbook is a set of actions that are executed in response to a trigger. Playbooks are the key component behind automated tasks. OutSystems uses AWS Step Functions to orchestrate the actions and Lambda functions to execute them.
But this solution does not exist in isolation. Depending on the playbook, Step Functions interacts with other components such as AWS Secrets Manager or external APIs.
Using the second method, the on-demand trigger for OutSystems SOAR relies on a chat application. This application calls a Lambda function URL that interacts with the playbooks we just discussed.
Figure 1 represents the high-level architecture of OutSystems’ custom SOAR.
This same IaC architecture is used when new playbooks or updates to existing ones are made. Code changes that are committed to a source control repository trigger the CodePipeline which uses AWS CodeBuild and CloudFormation change sets to deploy the updates to the affected resources.
Use cases
The use cases that OutSystems has deployed playbooks for to date include:
SQL injection
Unauthorized access to credentials
Issuance of new certificates
Login brute forces
Impossible travel
Let’s explore the Impossible travel use case. Impossible travel happens when a user logs in from one location, and then later logs in from a different location that would be impossible to travel between within the elapsed time.
When the SIEM identifies this behavior, it triggers an alert and the following actions are performed:
A ticket is created
An IP address check is performed in reputation databases, such as AbuseIPDB or VirusTotal
An IP address check is performed in the internal database, and the IP address is added if it is not found
A search is performed for past events with the same IP address
Recent logins of the user are identified in the SIEM, along with all related information
All of this information is automatically added to the ticket. Every step listed here was previously performed manually; a task that took an average of 15 minutes. Now, the process takes just 8 seconds—a 99.1% incident response time improvement.
The following remediation actions can also be automated, along with many others:
Some of these remediation actions are already in place, while others are in development.
Conclusion
At OutSystems, much like at AWS, security is considered “job zero.” It is not only important to be proactive in preventing security incidents, but when they happen, the response must be quick, effective, and as immune to human error as possible.
With the implementation of this custom SOAR, OutSystems reduced the average response time to security incidents by 99%. Tasks that previously took 76 hours of analysts’ time are now accomplished automatically within 31 minutes.
During the evaluation period, SOAR addressed hundreds of real-world incidents with some threat intel use cases being executed thousands of times.
An architecture composed of serverless services ensures OutSystems does not pay for systems that are standing by waiting for work, and at the same time, not compromising on performance.
To provide the best experiences, we use technologies like cookies to store and/or access device information. Consenting to these technologies will allow us to process data such as browsing behavior or unique IDs on this site. Not consenting or withdrawing consent, may adversely affect certain features and functions.
Functional
Always active
The technical storage or access is strictly necessary for the legitimate purpose of enabling the use of a specific service explicitly requested by the subscriber or user, or for the sole purpose of carrying out the transmission of a communication over an electronic communications network.
Preferences
The technical storage or access is necessary for the legitimate purpose of storing preferences that are not requested by the subscriber or user.
Statistics
The technical storage or access that is used exclusively for statistical purposes.The technical storage or access that is used exclusively for anonymous statistical purposes. Without a subpoena, voluntary compliance on the part of your Internet Service Provider, or additional records from a third party, information stored or retrieved for this purpose alone cannot usually be used to identify you.
Marketing
The technical storage or access is required to create user profiles to send advertising, or to track the user on a website or across several websites for similar marketing purposes.
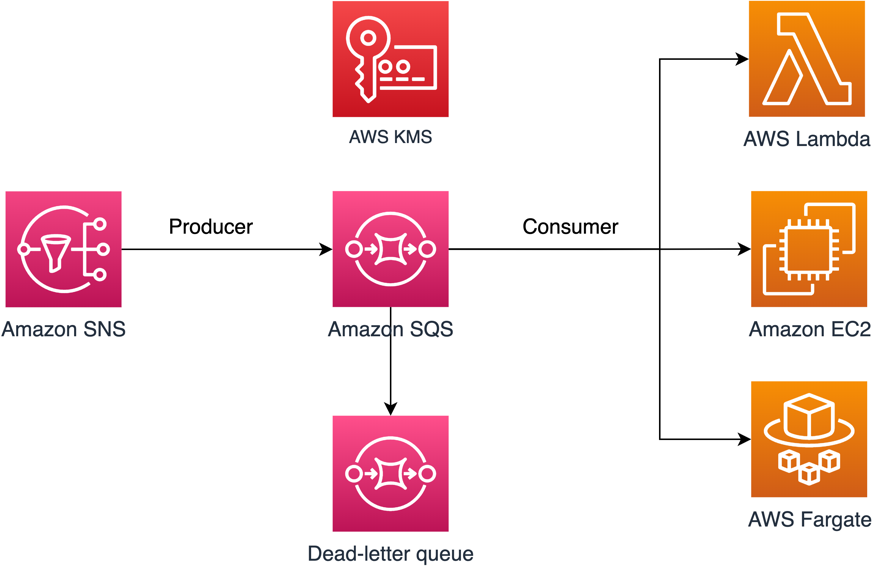


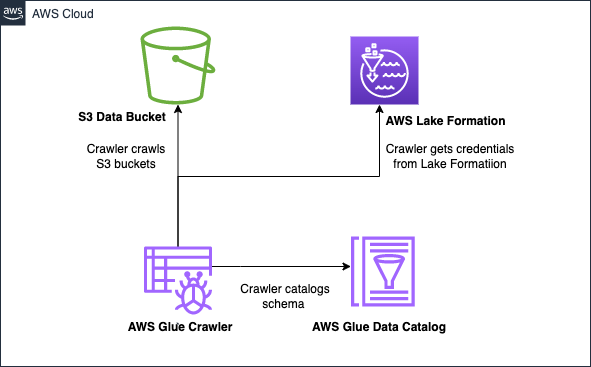


 AWS and Hugging Face collaborate to make generative AI more accessible and cost-efficient – This previous week, we announced an expanded collaboration between AWS and
 AWS Pi Day – Join me on March 14 for the third annual