In the AWS Security Profile series, I interview some of the humans who work in Amazon Web Services Security and help keep our customers safe and secure. In this profile, I interviewed Matt Luttrell, Principal Solutions Architect for AWS Identity.
How long have you been at AWS and what do you do in your current role?
I’ve been at AWS around five years and have worked in a variety of roles from Professional Services consulting as an application architect to a solutions architect. In my current role, I work on the Identity Solutions team, which is a group of solutions architects who are embedded directly in the Identity and Control Services team. We have both internal-facing and external-facing functions. Internally, we work with product managers, drive concepts like data perimeters, and generally act as the voice of the customer to our product teams. Externally, we have conversations with customers, present at events, and so on.
How did you get started in security?
My background is in software development. I’ve always had a side interest in security and have always worked for very security-conscious companies. Early in my career, I became CISSP certified and that’s what got me kickstarted in security-specific domains and conversations. At AWS, being involved in security isn’t an optional thing. So, even before I joined the Identity Solutions team, I spent a lot of time working on identity and AWS Identity and Access Management (IAM) in particular, as well as AWS IAM Access Analyzer, while working with security-conscious customers in the financial services industry. As I got involved in that, I was able to dive deep in the security elements of AWS, but I’ve always had a background in security.
How do you explain your job to non-technical friends and family?
I typically tell them that I work in the cloud computing division at Amazon and that my job title is Solutions Architect. Naturally, the next question is, “what does a solutions architect do? I’ve never heard of that.” I explain that I work with customers to figure out how to put the building blocks together that we offer them. We offer a bunch of different services and features, and my job is to teach customers how they all work and interact with each other.
What are you currently working on that you’re excited about?
One of the things our team is working on is data perimeters. Our customers will see continued guidance on data perimeters. We’ve done a lot of work in this space—workshops and presentations at some of our big conferences, as well as blog posts and example repositories.
I’m also putting together some videos that go in depth on IAM policy evaluation and offer prescriptive guidance on writing IAM policies.
In your opinion, what’s one of the coolest things happening in identity right now?
I might be biased here, but I think there’s been a shift in the security industry at large from network-based perimeters in the traditional on-premises world to identity-based perimeters in the cloud. This is where the concept of data perimeters comes into play. Because your resources and identities are distributed, you can no longer look at your server and touch your server that’s sitting right next to you. This really puts an extra emphasis on your authentication and authorization controls, as well as the need for visibility into those controls. I think there’s a lot of innovation happening in the identity world because of this increased focus on identity perimeters. You’re hearing about concepts in this area like zero trust, data perimeters, and general identity awareness in all levels of the application and infrastructure stacks. You have services like IAM Access Analyzer to help give you that visibility into your AWS environment and what your identities are doing in terms of who can access what. I think we’ll continue to see growth in these areas because workloads are not becoming less distributed over time.
Tell me about something fun that you’ve done recently at AWS.
Roberto Migli and I presented a 400-level workshop at re:Invent 2022 on IAM policy evaluation, AWS Identity and Access Management (IAM) policy evaluation in action. This workshop introduced a new mental model for thinking about policy evaluation and walked attendees through a number of different policy evaluation scenarios. The idea behind the workshop is that we introduce a scenario and have the attendee try to figure out what the result of the evaluation would be. It spends some extra time comparing how the evaluation of resource-based policies differs from that of identity-based policies. I hope attendees walked away with a better understanding of how policy evaluations work at a deeper level and how they can write better, more secure IAM policies. We presented practical advice on how to structure different types of IAM policies and the different tradeoffs when writing a policy one way compared to another. I hope the mental model we introduced helps customers better reason about how policies will evaluate when they write them in their environment.
What is your favorite Amazon Leadership Principle and why?
This is an easy one. For me, it’s definitely Learn and Be Curious. Something I try to do is put myself in uncomfortable situations because I feel that when I’m uncomfortable, I’m learning and growing because it means I don’t know something. I find comfortable situations boring at times, so I’m always trying to dig in and learn how things work. This can sometimes be distracting, too, because there’s so much to learn and understand in the identity world.
What’s the thing you’re most proud of in your career?
There’s no particular project that I can point to and say, “this is what I’m most proud of.” I’m proud to be a part of the team I’m on now. For my team, Customer Obsession is more than just a slogan. We really advocate on behalf of the customer, listen to the voice of the customer, and push back on features that might not be the best thing for the customer. I think it’s awesome that I get to work for a company that really does advocate on behalf of the customer, and that my voice is heard when I’m trying to be that advocate. That aspect of working at AWS and with my team is what I’m most proud of.
I’m also proud of the mentoring and teaching that I get to do within AWS and within my role specifically. It’s really fulfilling to watch somebody grow and realize that career growth is not a zero-sum game—just because someone else succeeds does not mean that I have to fail.
If you had to pick an industry outside of security, what would you want to do?
I’d probably choose to be a ski instructor. I’m a big fan of skiing, but I don’t get to ski very often because of where I live. I love being out on the mountains, skiing, and teaching. I’m looking for any excuse to spend my days in the mountains.
If you have feedback about this post, submit comments in the Comments section below. If you have questions about this post, contact AWS Support.
Want more AWS Security news? Follow us on Twitter.
Navigating data protection laws around the world is no simple task. Today, I’m pleased to announce that AWS is expanding the scope of the AWS Data Processing Addendum (Global AWS DPA) so that it applies globally whenever customers use AWS services to process personal data, regardless of which data protection laws apply to that processing. AWS is proud to be the first major cloud provider to adopt this global approach to help you meet your compliance needs for data protection.
The Global AWS DPA is designed to help you satisfy requirements under data protection laws worldwide, without having to create separate country-specific data processing agreements for every location where you use AWS services. By introducing this global, one-stop addendum, we are simplifying contracting procedures and helping to reduce the time that you spend assessing contractual data privacy requirements on a country-by-country basis.
If you have signed a copy of the previous AWS General Data Protection Regulation (GDPR) DPA, then you do not need to take any action and can continue to rely on that addendum to satisfy data processing requirements. AWS is always innovating to help you meet your compliance obligations wherever you operate. We’re confident that this expanded Global AWS DPA will help you on your journey. If you have questions or need more information, see Data Protection & Privacy at AWS and GDPR Center.
If you have feedback about this post, submit comments in the Comments section below. If you have questions about this post, contact AWS Support.
Want more AWS Security news? Follow us on Twitter.
To respond to emerging threats, you will often need to sort through large datasets rapidly to prioritize security findings. Amazon Detective recently released two new features to help you do this. New visualizations in Detective show the connections between entities related to multiple Amazon GuardDuty findings, and a new export data feature helps you use the data from Detective in your other tools and automated workflows.
In this post, we’ll show you how you can use these new features to help reduce the time it takes to assess, investigate, and prioritize a security incident.
If GuardDuty detects potential malicious activity, such as anomalous behavior, credential exfiltration, or command and control (C2) infrastructure communication, it generates detailed security incidents called findings.
Depending on the severity and complexity of the GuardDuty finding, the resolution might require deep investigation. Consider an example that involves cryptocurrency mining. If you frequently see a cryptocurrency finding on your EC2 instances, you might have a recurring malware issue that has enabled a backdoor. If a threat actor is attempting to compromise your AWS environment, they typically perform a sequence of actions that lead to multiple findings and unusual behavior. When security findings are investigated in isolation, it can lead to a misinterpretation of their significance and difficulty in finding the root cause. When you need more context around a finding, Detective can help.
Detective automatically collects log data and events from sources like CloudTrail logs, Amazon VPC Flow Logs, GuardDuty findings, and Amazon EKS audit logs and maintains up to a year of aggregated data for analysis. Detective uses machine learning to create a behavioral graph for these data sources that helps show how security issues have evolved. It highlights what AWS resources might be compromised and flags unusual activity like new API calls, new user agents, and new AWS Regions.
The search capabilities work across AWS workloads, providing the information required to show the potential impact of an incident. Detective helps you answer questions like: How did this security incident happen? What AWS resources were affected? How can we prevent this from happening again?
Finding groups help connect the dots of an incident
You can use finding groups, a recent feature of Detective, to help with your investigations. A finding group is a collection of entities related to a single potential security incident that should be investigated together. An entity can be an AWS resource like an EC2 instance, IAM role, or GuardDuty finding, but it can also be an IP address or user agent. For a full list of entities collected, see Searching for a finding or entity in the Detective User Guide.
Grouping these entities together helps provide context and a more complete understanding of the threat landscape. This makes it simpler for you to identify relationships between different events and to assess the overall impact of a potential threat.
In the cryptocurrency mining example described previously, finding groups could show the relationship between the cryptocurrency mining finding and a C2 finding so that you know the two are related and the AWS resources affected. To learn more about working with Detective finding groups, see How to improve security incident investigations using Amazon Detective finding groups.
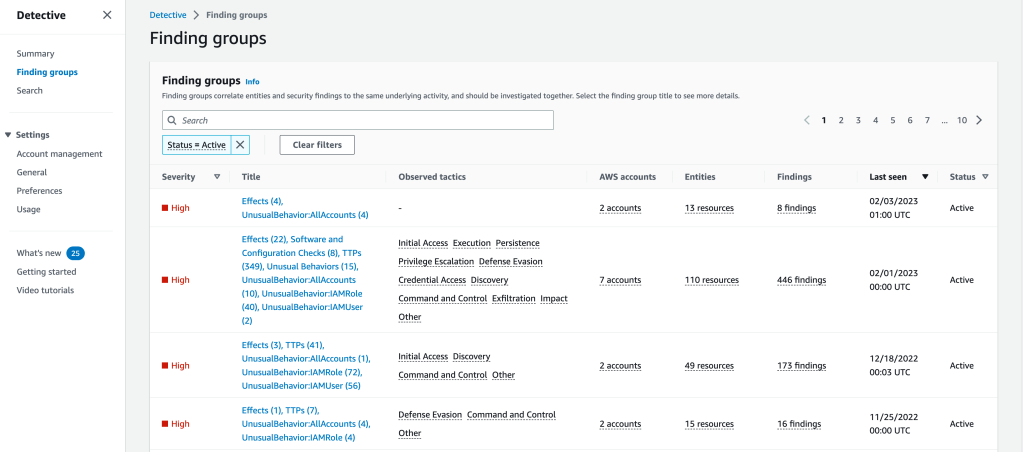
Figure 1 shows the finding groups overview page on the Detective console, with a list of finding groups filtered by status. The dashboard also shows the severity, title, observed tactics, accounts, entities, and the total number of findings for each finding group. For more information about the attributes of finding groups, see Analyzing finding groups.
Figure 1: Finding groups overview
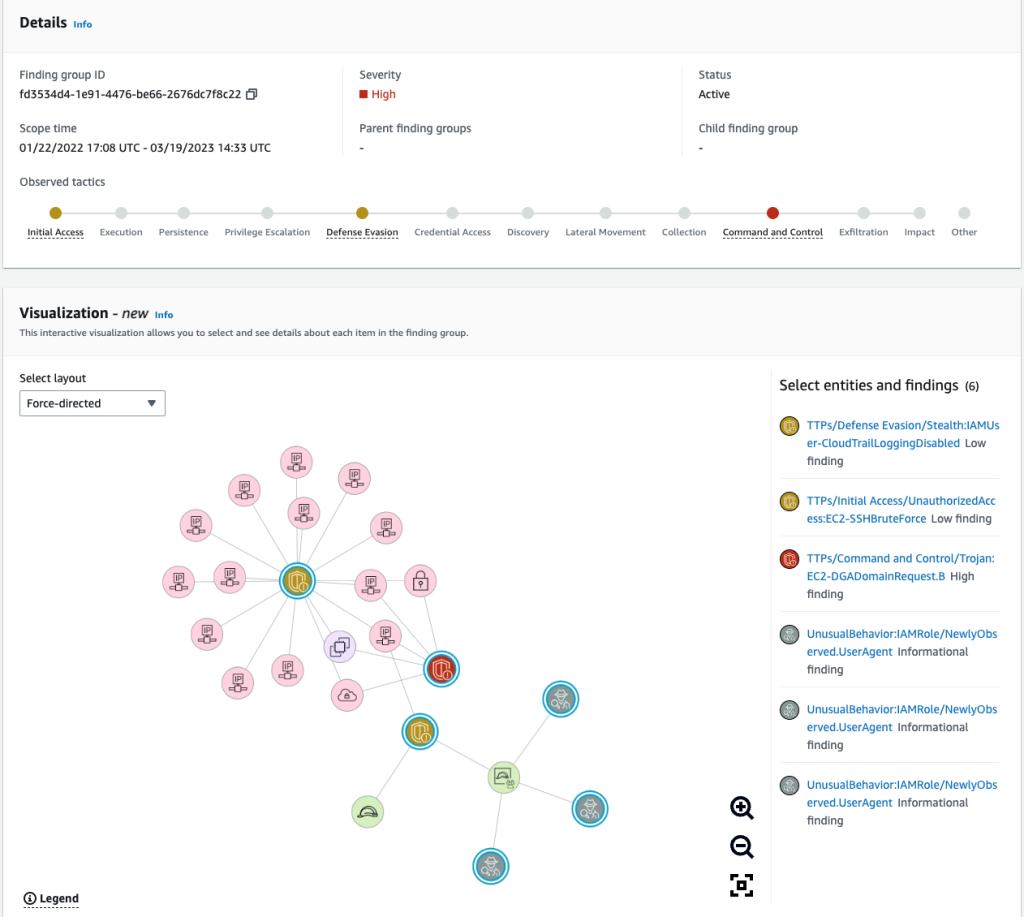
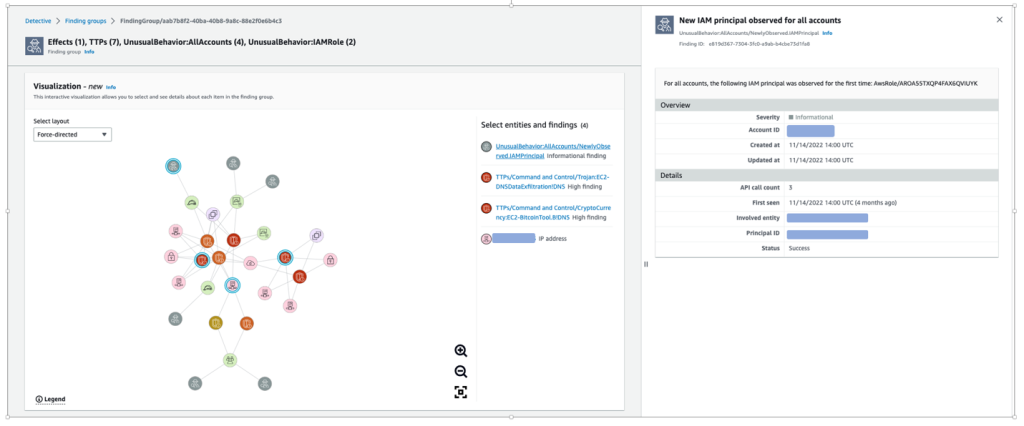
To see details about the finding group, select the title of the finding group to access the details page, which includes Details, Visualization, Involved entities, and Involved findings. On this panel, you can view entities and findings included in a finding group and interact with them. The information presented is the same in the Visualization panel, the Involved entities panel, and the Involved findings panel. The different views allow you to view the information in the way that is helpful for you. Figure 2 shows an example of the Details and Visualization for a specific finding group.
Figure 2: Details and Visualization
Note: Finding groups with over 100 nodes (findings and entities) do not include a graph visualization.
Visualizations to show you the situation
The new visualizations in Detective provide three layouts that display the same information from finding groups, but allow you to choose and arrange the different entities so that you can focus on the highest priority finding or resources.
To determine what each visual element represents, choose the Legend in the bottom left corner of the panel. You can change the placement of findings in the Visualization panel by selecting a different layout from the Select layout dropdown menu. Figure 2 in the preceding section shows the Force-directed layout, where the positioning of entities and findings presents an even distribution of links with minimal overlap, while maintaining consistent distance between items.
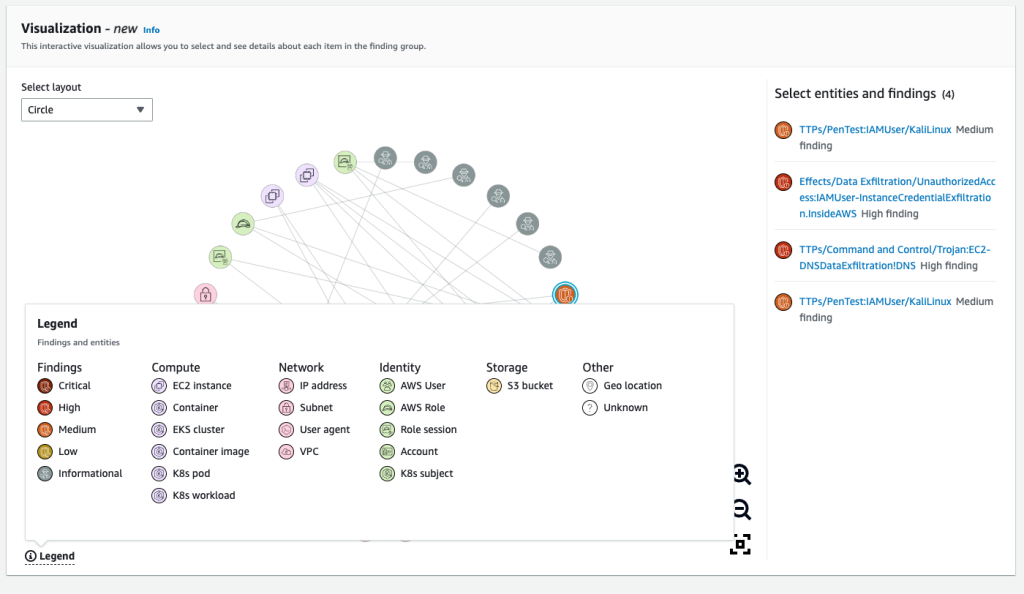
Figure 3 shows the Visualization panel with the Circle layout, where nodes are displayed in a circular layout. You can use the Legend to understand the different categories of Findings, Compute, Network, Identity, Storage, or Other.
Figure 3: Visualization panel with Circle layout and Legend
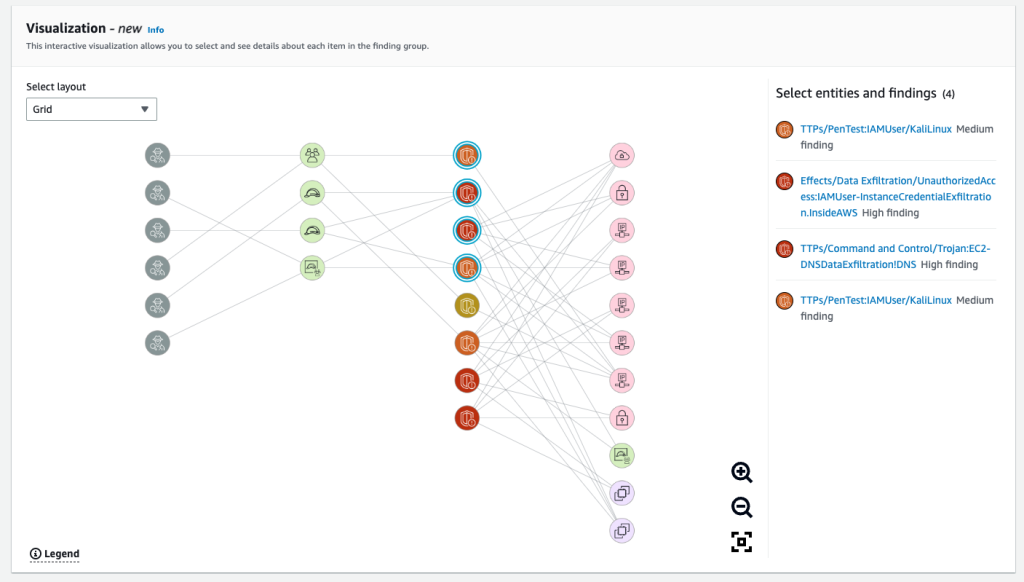
Figure 4 shows the Visualization panel with the Grid layout, where nodes are divided into four different columns: evidence, identity entities, GuardDuty findings, and other entities (compute, network, and storage).
Figure 4: Visualization panel with Grid layout
In the Visualization panel, you can select one or more (using ctrl/cmd+click) nodes. Selected nodes are listed next to the graph, and you can select each node’s title for more information. Selecting an entity’s title opens a new page that displays detailed information about that entity, whereas selecting a finding or evidence expands the right sidebar to show details on the selected finding or evidence.
You can rearrange chosen entities and findings as needed to help improve your understanding of their connections. This can help speed up your assessment of findings. Figure 5 shows the Visualization panel with four nodes selected and the sidebar displaying information relevant to the selected finding.
Figure 5: Visualization panel with evidence selected
Finding groups and visualizations provide an overview of the entities and resources related to a security activity. Presenting the information in this way highlights the interconnections between various activities. This means that you no longer have to use multiple tools or query different services to collect information or investigate entities and resources. This can help you reduce triage and scoping times and make your investigations faster and more comprehensive.
Increased flexibility for investigation with simpler data access
To expand the scope of your investigation or confirm if a security incident has taken place, you might want to combine data from Detective with your own tools or different services. This is where export data comes into play.
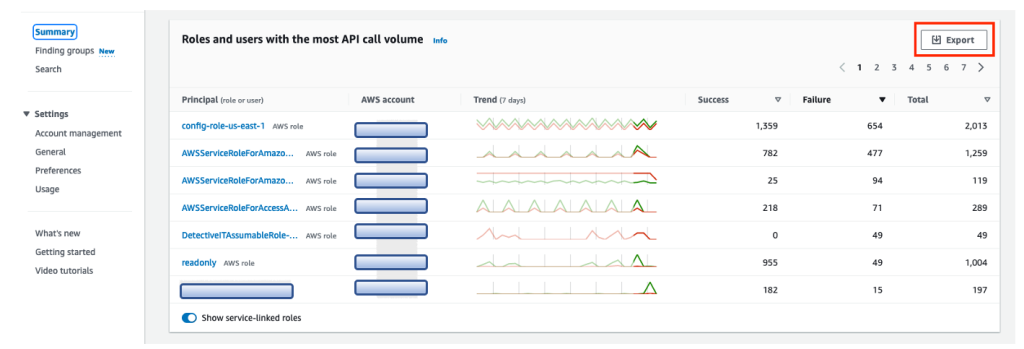
Detective has several Summary page panels that you can use as a starting point for your investigations because they highlight potentially suspicious activity. The panels include roles and users with the most API call volume, EC2 instances with the most traffic volume, and EKS clusters with the most Kubernetes pods created.
With export data, you can now export these panels as common-separated values (CSV) files and import the data into other AWS services or third-party applications, or manipulate the data with spreadsheet programs.
Export from the Detective console Summary screen
In the Detective console, on the Summary page, you will see an Export option on several summary panes. This is enabled and available for anyone with access to Detective. Figure 6 shows summary information for the roles and users with the most API call volume.
Figure 6: Detective console Summary screen
Choose Export to download a CSV file containing the data for the summary information. The file is downloaded to your browser’s default download folder on your local device. When you view the data, it will look something like the spreadsheet in Figure 7:
Figure 7: Example CSV data export from Detective console Summary
Export from the Detective console Search screen
You can also export data using the Search capability of Detective. After you apply specific filters to search for findings or entities based on your use case, an Export button appears at the top of the search results in Detective. Figure 8 shows an example of filtering for a particular CIDR range. Choose Export to download the CSV file containing the filtered data.
Figure 8: Detective search results filtering for a CIDR range
Conclusion
In this blog post, you learned how to use the two new features of Detective to visualize findings and export data. By using these new features, you and your teams can investigate an incident in the way that best fits your workflow. New visualizations show the entities involved in an issue and surface nuanced connections that can be difficult to find when you’re faced with line after line of log data. The new data export feature makes it simpler to integrate the insights discovered in Detective with the tools and automations that your team is already using.
These features are automatically enabled for both existing and new customers in AWS Regions that support Detective. There is no additional charge for finding groups. If you don’t currently use Detective, you can start a free 30-day trial. For more information on finding groups, see Analyzing finding groups in the Amazon Detective User Guide.
AWS Network Firewall is a managed service that provides a convenient way to deploy essential network protections for your virtual private clouds (VPCs). In this blog, we are going to cover how to leverage the TLS inspection configuration with AWS Network Firewall and perform Deep Packet Inspection for encrypted traffic. We shall also discuss key considerations and possible architectures.
Today, the majority of internet traffic is SSL/TLS encrypted to maintain privacy and secure communications between applications. Deep packet inspection (DPI) refers to the method of examining the full content of data packets as they traverse a network perimeter firewall. However, the lack of visibility into encrypted traffic presents a challenge to organizations that do not have the resources to decrypt and inspect network traffic. TLS encryption can hide malware, conceal data theft, or mask data leakage of sensitive information such as credit card numbers or passwords. Additionally, TLS decryption is compute-intensive and cryptographic standards are constantly evolving. Organizations that want to decrypt and inspect network traffic typically use a combination of hardware and software solutions from multiple vendors, which adds operational complexity and implementation challenges around capacity planning, scaling issues, and latency concerns. This forces some organizations to make adverse decisions to reduce the complexity of inspecting their network traffic such as blocking access to popular websites to mitigate performance problems.
There are multiple options you can use to perform DPI for encrypted traffic in your AWS environment, based on the use case. These include using AWS WAF or implementing third-party security appliances (next generation firewalls). The addition of new services like Gateway Load Balancer gives you more flexibility in designing your firewall architectures and the ability to perform DPI on AWS.
With this release, Network Firewall also becomes an option to support Deep Packet Inspection on encrypted payloads.
Considerations for deep packet inspection
The following are some key factors to consider when you enable TLS decryption functionality on Network Firewall.
DPI and performance. DPI is processor-intensive, because it not only looks into individual packets, but it also looks into traffic flows (a flow is a collection of related packets). This is combined with the fact that inspection needs to be done in real time with minimal impact to latency. Also, because many firewalls perform other advanced functions (for example, stateful packet inspection, NAT, virtual private network (VPN), and malware threat prevention), adding DPI increases the complexity of the entire system and impacts performance. However, because Network Firewall is an AWS managed service, the bandwidth performance of 100 gigabits per second (Gbps) per firewall endpoint is not impacted, even after you enable TLS inspection configuration. Single digit millisecond latency is expected at initial connection due to the TCP and TLS handshake before data can flow to the firewall. We recommend that you conduct your own testing for the rule sets to verify that the service meets your performance expectations.
DPI and encryption. Encryption has particularly been a challenge to DPI. Effective decisions can’t be made if the contents of the packets aren’t known. As more applications and websites use encryption, it is important that you implement the right TLS decryption technique. With Network Firewall, you can chose which traffic to decrypt by using your available certificates in AWS Certificate Manager (ACM). You can then apply the TLS configurations across the stateful rule groups, thereby authorizing Network Firewall to act as a go-between. For more information on how AWS Network Firewall handles privacy, please read the Network Firewall documentation.
AWS Network Firewall deployment architectures
There are three main architecture patterns for Network Firewall deployments. You can refer to the Deployment models for AWS Network Firewall blog post, which provides details on these, as well as key considerations. The three main models are as follows:
Distributed deployment model — Network Firewall is deployed into each individual VPC.
Centralized deployment model — Network Firewall is deployed into a centralized VPC for East-West (VPC-to-VPC) or North-South (inbound and outbound from internet, on-premises) traffic. We refer to this VPC as the inspection VPC throughout this blog post.
Combined deployment model — Network Firewall is deployed into a centralized inspection VPC for East-West (VPC-to-VPC) and a subset of North-South (on-premises, egress) traffic. Internet ingress is distributed to VPCs that require dedicated inbound access from the internet, and Network Firewall is deployed accordingly.
Each of these architectures is still valid for TLS inspection functionality. Today, AWS Network Firewall supports TLS inspection only for the ingress (inbound) traffic coming into the VPC.
In this section, we will highlight a deployment architecture with AWS Network Firewall and the process for deep packet inspection.
AWS Network Firewall – prior to TLS inspection configuration
Below figure 1 shows how Network Firewall performs inspection when the TLS inspection feature isn’t enabled. The workflow is as follows:
The ingress traffic enters the VPC. Ingress routing enables the internet traffic to be inspected by AWS Network Firewall.
The traffic from the firewall endpoint to the Network Firewall:
Network Firewall inspects the packet first through a stateless engine. Network Firewall makes a drop/pass decision by applying the rules that are present in the stateless engine.
If there is no match on the set of stateless rules present, the traffic is then forwarded to the stateful engine. Again, a drop/pass decision is made by applying the set of stateful rules.
If the decision is to pass traffic, then the firewall endpoint present in the firewall subnet sends the traffic to the customer subnet through the routes present in the VPC subnet route table.
AWS Network Firewall — after TLS inspection configuration
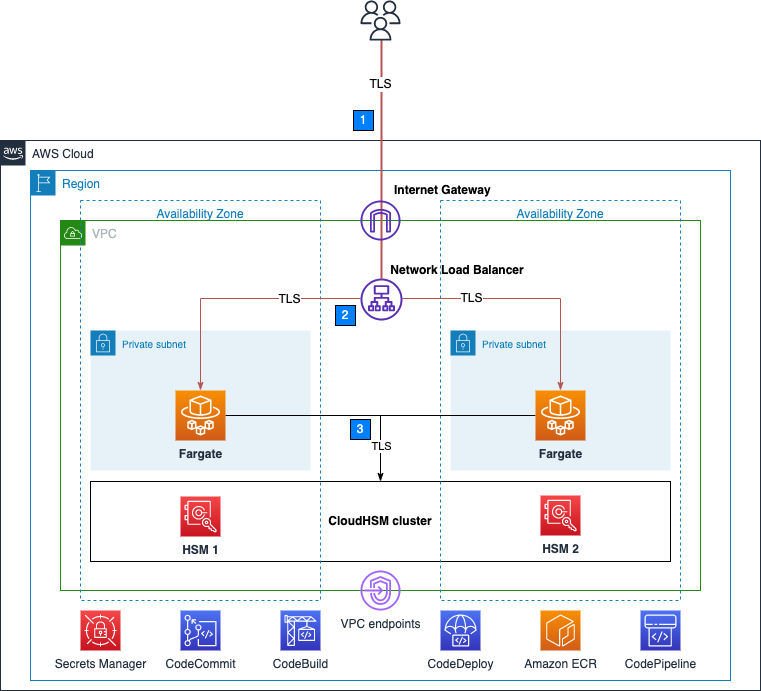
After you enable the TLS inspection capability in Network Firewall, the traffic flow changes slightly, as shown in Figure 2. Because the ingress data you want to inspect is encrypted, it first needs to be decrypted before it is sent to the firewall stateful engine.
In Figure 2, you can see the ingress traffic flow, which has the following steps:
The ingress traffic enters the VPC. Ingress routing enables the internet traffic to be inspected by AWS Network Firewall.
The traffic from the firewall endpoint to the Network Firewall:
Network Firewall inspects the packet first through a stateless engine. Network Firewall makes a drop/pass decision by applying the rules present in the stateless engine.
If there is no match on the set of stateless rules present, the traffic is then forwarded to the stateful engine. However, before the traffic passes to the stateful engine, if there is no match and the traffic is in the scope of the TLS encryption configuration, the traffic is forwarded for the decrypt operation.
After decryption, the traffic is then forwarded to the firewall stateful engine for inspection. Again, Network Firewall makes a drop/pass decision by applying the set of stateful rules.
If the decision is to pass traffic, then the firewall endpoint present in the firewall subnet sends the traffic to the customer subnet through the routes present in the VPC subnet route table.
Note: Customers must trust this certificate for the TLS inspection configuration to function properly.
Let’s look at how to implement TLS inspection when you create a new network firewall in AWS Network Firewall. A TLS inspection configuration contains one or more references to a valid AWS Certificate Manager (ACM) SSL/TLS certificate that Network Firewall uses to decrypt ingress (inbound) traffic. Network Firewall supports a variety of certificate types supported in addition to wildcard certificates. You can optionally define a scope (5-tuple based) to decrypt traffic by source and destination IP or port. To follow this procedure, you must have at least one valid certificate type supported by Network Firewall in ACM that’s accessible by your AWS account.
To create a TLS inspection configuration (console)
In the navigation pane, under Network Firewall, choose TLS inspection configurations.
Choose Create TLS inspection configuration.
Figure 3: TLS inspection configuration for AWS Network Firewall
On the Associate SSL/TLS certificates page, in the search box, select the ACM certificate to use in the TLS inspection configuration, and then choose Add certificate. You can use as many as 10 certificates for a single configuration.
Figure 4: SSL/TLS certificate as part of Network Firewall inspection configuration
Choose Next to go to the TLS inspection configuration’s Describe TLS inspection configuration page.
For Name, enter a name to identify this TLS inspection configuration, and optionally enter a description for the TLS inspection configuration.
Choose Next to go to the TLS inspection configuration’s Define scope page.
Figure 5: Description for Network Firewall inspection configuration
Note that you can’t change the name after you create the TLS inspection configuration.
In the Scope configuration pane, you can optionally define one or more 5-tuple scopes for the domains that you want Network Firewall to decrypt. Network Firewall uses the corresponding SSL/TLS certificates in your TLS inspection configuration to decrypt the SSL/TLS traffic that matches the scope criteria.
Figure 6: Define scope for Network Firewall to decrypt
For Protocol, choose the protocol to decrypt and inspect for. Network Firewall currently supports only TCP.
For Source, choose the source IP addresses and ranges to decrypt and inspect for. You can inspect for either Custom IP addresses or Any IPv4 address. (IPv6 is currently not supported.)
For Source port, choose the source ports and source port ranges to decrypt and inspect for. You can inspect for either Custom port ranges or Any port.
For Destination, choose the destination IP addresses and ranges to decrypt and inspect for. You can inspect for either Custom IP addresses or Any IPv4 address.
For Destination port, choose the destination ports and destination port ranges to decrypt and inspect for. You can inspect for either Custom port ranges or Any port.
After you’ve set the scope criteria, choose Add scope configuration, and then choose Next.
On the next page, Select encryption options, determine whether you want to use the AWS managed key or customize encryption settings (advanced). Here we use the default key that AWS owns and manages on your behalf, choose Next.
Figure 7: Select the encryption options
On the Add tags page, choose Next. Tags are optional but are recommended as a best practice. Tags help you organize and manage your AWS resources. For more information about tagging your resources, see Tagging AWS Network Firewall resources.
On the Review and confirm page, check the TLS inspection configuration settings. Choose Create TLS inspection configuration. Your TLS inspection configuration is now ready for use.
Figure 8: Validate the TLS inspection configuration
Update an existing network firewall with TLS inspection configuration
There are two methods that you can use modify an existing firewall configuration for TLS inspection, depending on your scenario.
Scenario 1: Add TLS inspection to an existing network firewall. In this scenario, you only need to consider the scope that TLS inspection applies to. After you have followed steps 1 through 12 outlined in the procedure in this post, and created the TLS inspection configuration, ingress (inbound) traffic will be decrypted and then sent to the stateful engine for inspection that uses your existing firewall policies.
Scenario 2: Modify an existing firewall with TLS inspection configured. In this scenario, where TLS configuration has already been added and you just need to modify the configuration, you can use the following steps. Note that you can’t change the name of a TLS inspection configuration after creation, but you can change other details.
AWS Network Firewall lets you inspect traffic at scale in a variety of use cases. In this blog post, we looked into the recently launched TLS inspection configuration for ingress inspection architectures and discussed considerations for enabling this feature. We showed how you can enable and update the TLS inspection feature on Network Firewall. To learn more about the TLS inspection feature, check out the AWS Network Firewall Developer Guide. We hope this post is helpful and look forward to hearing about how you use the latest feature.
If you have feedback about this post, submit comments in the Comments section below. If you have questions about this post, contact AWS Support.
Want more AWS Security news? Follow us on Twitter.
Effective security incident response depends on adequate logging, as described in the AWS Security Incident Response Guide. If you have the proper logs and the ability to query them, you can respond more rapidly and effectively to security events. If a security event occurs, you can use various log sources to validate what occurred and understand the scope. Then, you can use the results of your analysis to take remediation actions. To learn more about logging best practices, see Configure service and application logging and Analyze logs, findings, and metrics centrally.
In this blog post, we will show you how to achieve an effective strategy for logging for security incident response. We will share logging options across the typical cloud application stack, log analysis options, and sample queries. AWS offers managed services, such as Amazon GuardDuty for threat detection and Amazon Detective for incident analysis. If you want to collect additional logs or perform custom analysis, then you should consider the options described in this blog post.
Selection of logs
To select the appropriate logs for security incident response, you should start with the common cloud application stack, which consists of the components and layers of your application deployed on AWS. For each component, we will describe the logging sources that you have. For each log source, we will describe why you should log it for security incident response, how to enable the logs, and what your log storage options are.
To select the logs for security incident response, first consider the following questions:
What are your compliance and regulatory requirements for logging?
Note: Make sure that you comply with the log retention requirements of compliance standards relevant to your organization, as well as your organization’s incident response strategy.
What AWS services do you commonly use?
What AWS services have access to or contain sensitive data?
What threats are most relevant to you?
Note: Performing a threat model of your cloud architectures can help you answer this question. For more information, see How to approach threat modelling.
Considering these questions can help you develop requirements for logging that will guide your selection of the following log sources.
AWS account logs
An AWS account is the first, fundamental component of an application deployed on AWS. The account is a container for your AWS resources. You create and manage your AWS resources in this account, and the account provides administrative capabilities for access and billing.
AWS CloudTrail
Within an account, each action performed is an API call. From a console sign-in to the deployment of each resource in an AWS CloudFormation stack, events are generated to provide transparency on what has occurred in the account. With AWS CloudTrail, you can log, continuously monitor, and retain account activity related to actions across supported AWS services. CloudTrail provides the event history of your account activity, including actions taken through the AWS Management Console, AWS SDKs, command line tools, and other AWS services. CloudTrail logs API calls as three types of events:
Management events(also known as control plane operations) show management operations that are performed on resources in your account. This includes actions like creating an Amazon Simple Storage Service (Amazon S3) bucket and setting up logging.
Data events(also known as data plane operations) show the resource operations performed on or within resources in your account. These operations are often high-volume activities, such as Amazon S3 object-level API activity (for example, GetObject, DeleteObject, and PutObject API operations) and AWS Lambda function invocation activity.
Insights events capture unusual API call rate or error rate activity in your account. You must enable these events on a trail in order to capture them, and they are logged to a different folder prefix in the destination S3 bucket for your trail. Insights events provide you with information such as the type of event, the incident time period, the associated API, the error code, and statistics to help you understand and respond effectively to unusual activity.
For security investigations, CloudTrail provides context on the creation, modification, and deletion of AWS resources. Therefore, CloudTrail is one of your most important log sources for security incident response in an AWS environment. You have three primary ways to set up CloudTrail:
CloudTrail Event history — CloudTrail is enabled by default with 90-day retention of management events that you can retrieve through the CloudTrail Event history facility using the console, AWS Command line Interface (AWS CLI), or AWS SDK. You don’t need to take any action to get started using the Event history feature.
CloudTrail trail — For longer retention and visibility of data events, you need to create a CloudTrail trail and associate it with an S3 bucket and optionally with an Amazon CloudWatch log group. If you use AWS Organizations, you can create an organization trail that will log events for each account in the organization. By default, trails are multi-Region, so you don’t need to enable CloudTrail logs in each AWS Region.
AWS CloudTrail Lake — You can create a CloudTrail lake, which retains CloudTrail logs for up to seven years and provides a SQL-based querying facility. You don’t need to have a trail configured in your account to use CloudTrail Lake.
Amazon Security Lake — You can use Security Lake to ingest CloudTrail events, which include management and data events. You can further analyze these events with Amazon QuickSight or another other third-party security information and event management (SIEM) tool.
AWS Config
Creating and modifying resources is an integral part of your account use. Tracking resource configuration changes made by calling the AWS API helps you review changes throughout the resource lifecycle. AWS Config provides a detailed view of the configuration of AWS resources in your account, examines the resource configurations periodically, and tracks configuration changes that were not initiated by the API. This includes how the resources are related to one another and how they were configured in the past so that you can see how configurations and relationships change over time.
You should enable AWS Config in each Region where you have resources deployed, and you should configure an S3 bucket to receive configuration history and configuration snapshot files, which contain details on the resources that AWS Config records. You can then review configuration compliance and analyze activities performed before, during, and after an event using the configuration history in S3. You should centralize AWS Config resource tracking across multiple accounts in the same organization by setting up an aggregator. You can use AWS Control Tower to automate the setup.
During a security investigation, you might want to understand how a resource configuration has changed over time. For example, you might want to investigate the changes to an S3 bucket policy before and after a security event that involves an S3 bucket. AWS Config provides a configuration history for resources that can help you track activities performed during a security event.
Operating system and application logs
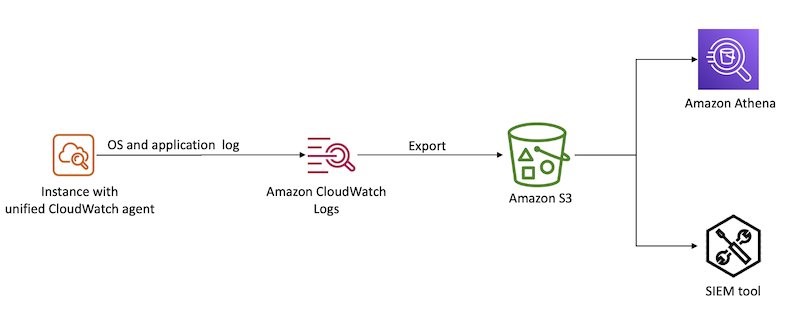
To record interactions with applications, you must capture operating system (OS) and application logs, especially custom logs generated by the application development framework. OS and local application logs are relevant for security events that involve an Amazon Elastic Compute Cloud (Amazon EC2) instance. These instances could be standalone, in an auto scaling group behind a load balancer, or compute workloads for Amazon Elastic Container Service (Amazon ECS) or an Amazon Elastic Kubernetes Service (Amazon EKS) cluster. OS logs track privileged use, processes, login events, access to directory services, and file system activity on a server. To analyze a potential compromise to an EC2 instance, you will want to review the security event logs for Windows OS and the system logs for Linux-based OS.
With the unified CloudWatch agent, you can collect metrics and logs from EC2 instances and on-premises servers. The CloudWatch agent aggregates log data into CloudWatch logs, which can then be exported to Amazon S3 for long-term retention and analyzed with a SIEM tool of your choice or Amazon Athena, as shown in Figure 1.
Figure 1: Aggregate OS and application logs using CloudWatch Logs
Database logs
With SQL databases, you can log transactions to help track modifications to the databases, such as additions or deletions. After an engine or system failure, you will need transaction logs to restore a database to a consistent state. Transaction logs are designed to be secure, and they require additional processing to access valuable information. It’s important that you understand data interactions during a security investigation, especially if your databases hold personally identifiable information (PII), financial and payments information, or other information subject to regulatory controls.
The goal of logging network activity is to gain insight into the communications that traverse your network. You might need this data for a variety of reasons, such as network troubleshooting or for use in a forensic investigation of suspected malware activity within your network.
In the AWS Cloud, you can log network activity by creating a proxy that logs network traffic or by using Traffic Mirroring to send a copy of network traffic to a logging server. You can adopt cloud-native approaches to capture this type of data using Amazon Route 53 DNS query logs and Amazon VPC Flow Logs.
There are also a variety of third-party networking solutions available like Palo Alto Networks and Fortinet, so you can continue to use the network logging mechanisms that you might have used in an on-premises environment.
Route 53 DNS query logs
You can configure Amazon Route 53 to log Domain Name System (DNS) queries. These logs are categorized into two groups:
Public DNS query logging
Resolver query logging
Logging public DNS queries against domains that you have hosted in Route 53 provides query information, such as the domain or subdomain requested, date and time stamp of the request, DNS record type, Route 53 edge location that responded, and response code.
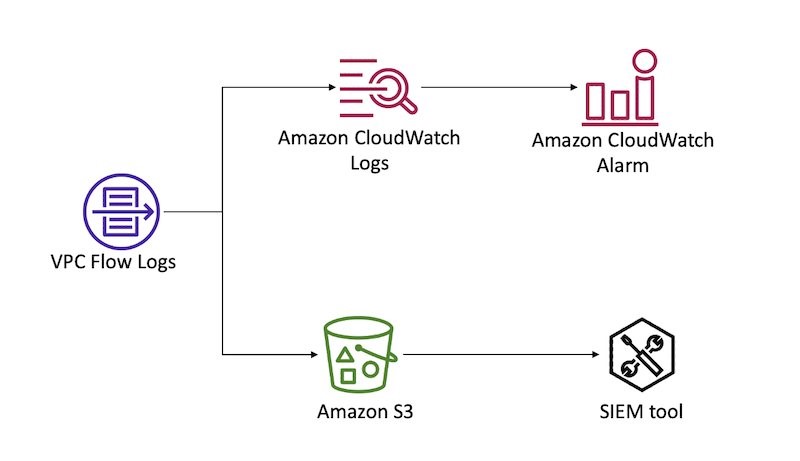
You can configure VPC Flow Logs for a VPC in your account to capture traffic that enters and moves around your VPC network, without the addition of instances or products. From these logs, you can review information, such as source and destination IP, ports, timestamps, protocol, account ID, and whether the traffic was accepted or rejected. For a complete list of the fields available for flow log records, see Available fields. You can create a flow log for a VPC, a subnet, or a network interface. If you create a flow log for a subnet or VPC, IP traffic going to and from each network interface in that subnet or VPC will be logged. For more details on VPC Flow Logs, see Logging IP traffic using VPC Flow Logs.
You can forward flow logs to Amazon CloudWatch Logs to create CloudWatch alarms based on metric filters. You can also forward flow logs to an S3 bucket for long-term retention and further analysis. Figure 2 demonstrates these configurations.
Figure 2: Sending VPC Flow logs to CloudWatch Logs and S3
Access logs
To identify access patterns for accessible endpoints, especially public endpoints, you should use access logs. Access logs capture detailed information about requests sent to your load balancer. Each log contains information such as the time the request was received, the client’s IP address, latencies, request paths, and server responses. With services built in layers behind a load balancer, unless you track the X-Forwarded-For request header, the requestor’s context is lost. Access logs help bridge that gap during investigations and analysis.
Amazon S3 server access logs
Access logs are critical to track object level access when using S3 buckets to store confidential or sensitive data. You can also turn on CloudTrail to capture S3 data events. You can store access logs in S3 buckets for long-term storage for compliance purposes and to run analyses during and after an event.
Load balancing logs
Elastic Load Balancing provides access logs that capture detailed information about requests sent to load balancers. Each log contains information such as the time the request was received, the client’s IP address, latencies, request paths, and server responses. You can use this log to analyze traffic patterns and to troubleshoot issues.
Access logs is an optional feature of Elastic Load Balancing that is turned off by default. To enable access logs for load balancers, see Access logs for your Application Load Balancer.
If you implement your own reverse proxy for load balancing needs, make sure that you capture the reverse proxy access logs. You can use the unified CloudWatch agent to forward the logs to CloudWatch. As with OS logs, you can export CloudWatch logs to an S3 bucket for long-term retention and analysis.
If you use an Amazon CloudFront distribution as the public endpoint for end users with load balancers as the custom origin, then load balancing access logs will represent the CloudFront distribution as the requestor, rather than the actual end user. If this information doesn’t add value to your incident handling process, then you can use CloudFront access logs as the log source that provides end user request details.
CloudFront access logs
You should enable standard logs, also known as access logs, when using CloudFront. Specify an S3 bucket where you want CloudFront to save the files.
CloudFront access logs are delivered on a best-effort basis. For information about requests made to a distribution in real time, use real-time logs that are delivered within seconds of receiving the requests. You should use real-time logs to monitor, analyze, and take action based on content delivery performance. For more details on the fields available from these logs, see the CloudFront standard log file format.
AWS WAF logs
When associated with a supported resource like a CloudFront distribution, Amazon API Gateway REST API, Application Load Balancer, AWS AppSync GraphQL API, Amazon Cognito user pool, or AWS App Runner, AWS WAF can help you monitor HTTP and HTTPS requests that are forwarded to the resource. You should configure web access control lists (ACLs) to gain fine-grained control over the requests, and enable logging for such ACLs to get detailed information about traffic that is analyzed by AWS WAF. Log information includes time of the request being received by AWS WAF from the AWS resource, details about the request, and the AWS WAF rules that the request matched. You can use this log information to monitor access patterns of public endpoints and configure rules to inspect requests in detail. For more information about AWS WAF logging, see Logging web ACL traffic.
Serverless logs
Serverless computing has become increasingly popular in the cloud-computing space. It provides on-demand compute power in a relatively short burst, meaning that cloud-based instances don’t need to be provisioned and kept around, idle, when there are no tasks to be completed. Although more and more compute tasks are being moved to serverless solutions, the need to log has not changed, but how the logs are generated has. In a serverless environment, security investigations not only benefit from logs that demonstrate the interactions and changes made by the code deployed, but that also document changes to the deployed code itself and access permissions of the Lambda execution role that is granting privileged access.
AWS Lambda
The logging of Lambda functions involves two components: how the function itself is operating, and what is happening inside the function (what your code is actually doing).
The logging of a Lambda function itself occurs through data events captured by CloudTrail. As noted earlier in this post, you must configure data events on a trail created in CloudTrail. During configuration, you will need to specify the function from which logs will be captured by your trail, and the destination S3 bucket where they will be stored. These logs contain details on the invocation of the function and help identify the IAM principals that called the Invoke API for Lambda.
AWS Lambda automatically monitors Lambda functions on your behalf and sends logs to CloudWatch. Your Lambda function comes with a CloudWatch Logs log group and a log stream for each instance of your function. The Lambda runtime environment sends details about each invocation to the log stream, and relays logs and other output from your function’s code. For more details on how to monitor Lambda functions, see Accessing Amazon CloudWatch logs for AWS Lambda.
Log analysis
For incident response, you need to be able to analyze and query your logs to validate what occurred and to understand the scope.
To begin, you can aggregate logs from various sources in S3 buckets for long-term storage, and you can integrate that data with query tools for further investigation. Logs can be exported and either parsed through directly, or ingested by another tool to help with the analysis. The following are some options that you can use to query these logs:
Amazon Athena — You can directly query CloudTrail events stored in S3 with Athena using SQL commands, specifying the LOCATION of the log files. You would generally use this approach if you have advanced queries to run, and you don’t have a SIEM. To set up Athena to query logs, you can use this open-source solution from AWS.
Amazon OpenSearch Service — OpenSearch is a distributed search and log analytics suite. Because it’s open source, it can ingest logs from more than just AWS log sources. To set this up, you can use this open-source SIEM solution from AWS.
CloudTrail Event History — Either from the console, or programmatically, you can query CloudTrail management events from the last 90-day period. This is ideal for when you have simple queries to make within the last 90 days, and you don’t need stored logs or more complex queries.
AWS CloudTrail Lake — Either from the console, or programmatically, you can query stored events in your configured CloudTrail Lake from the time of its configuration, up until the maximum storage duration of 2,557 days (7 years) from the time that you make your query. This approach allows for SQL-based queries, and it is ideal for when you need to make more complex queries against events, but don’t require the additional features of a SIEM solution.
Parse through raw JSON using CLI — This is achieved programmatically and parsed through terminal commands. It’s more a legacy method of parsing through logs. You might choose to use this approach for analysis if another service or solution isn’t feasible (for example, if you can’t use the service due to your corporate security policy).
Third-party SIEM — A third-party SIEM might be ideal if you already have a SIEM solution on AWS or elsewhere, and you don’t need a duplicated solution elsewhere. Typically, SIEM solutions will import logs from an S3 bucket and process and index events for analysis. To learn more about SIEM options, see the SIEM solutions in the AWS Marketplace, or the AWS Security Competency Partners for a partner local to you with threat detection and incident response (TDIR) expertise.
Sample queries
In this section, we provide samples of SQL queries. Both Athena and CloudTrail Lake accept SQL queries, but the following samples have been tested for use in Athena only. This is because some samples are for VPC Flow Logs, which you can’t query from CloudTrail Lake. To query CloudTrail logs in Athena, you must first create a table definition that points to the location of your logs stored in S3. You can do this from the CloudTrail Events console by using a hyperlinked suggestion, or from the Athena console directly. Alternatively, for Athena, you can use the AWS Security Analytics Bootstrap.
For each of these queries, you might need to modify some of the fields, such as the time frame that you are investigating, the IAM entity involved, and the account and Region in scope. For example, you might want to modify the time frame based on the current time and when you believe the security event began. This often involves expanding the time frame after running additional queries and learning more about the scope and timeline.
By using partitions for tables, you can restrict the amount of data scanned by each Athena query, helping to improve performance and reduce cost. For example, you can partition your CloudTrail Athena table manually or by using partition projection. You can include the partition column (for example, the timestamp) in your queries to limit the amount of data scanned.
Unauthorized attempts
When a security event occurs, you might want to review API calls that were attempted but failed due to the IAM principal not having access to perform the action on that resource. To discover this activity, run the following query (be sure to modify the time window first):
SELECT *
FROM cloudtrail
WHERE errorcode IN ('Client.UnauthorizedOperation','Client.InvalidPermission.NotFound','Client.OperationNotPermitted','AccessDenied')
AND useridentity.arn LIKE '%iam%'
AND eventtime >= '2023-01-01T00:00:00Z'
AND eventtime < '2023-03-01T00:00:00Z'
ORDER BY eventtime desc
This sample query can help you identify whether certain IAM principals have a significant amount of unauthorized API calls, which can indicate that an IAM principal is compromised.
Rejected TCP connections
During a security event, the unauthorized user that is interacting with the resources in your account is probably trying to establish persistence through the network layer. To get a list of rejected TCP connections and extract from it the day that these events occurred, run the following query:
SELECT day_of_week(date) AS
day,date,interface_id,srcaddr,action,protocol
FROM vpc_flow_logs
WHERE action = 'REJECT' AND protocol = 6
LIMIT 100;
Connections over older TLS versions
You might want to see how many calls to AWS APIs were made using older versions of the TLS protocol, as part of a forensic follow-up or a discovery job after a risk analysis. You can get this data by querying CloudTrail logs.
SELECT eventSource
COUNT(*) AS numOutdatedTlsCalls FROM cloudtrail WHERE tlsDetails.tlsVersion IN ('TLSv1', 'TLSv1.1') AND eventTime > '2023-01-01 00:00:00' GROUP BY eventSource ORDER BY numOutdatedTlsCalls DESC
Filter connections from an IP
With an IP address that you’d like to investigate, as a part of your forensic analysis, you might want to see the connections made to resources in a VPC. You can obtain this information by querying VPC Flow Logs. As with the server access logs, if you’re using Athena, you will first need to create a new table.
SELECT day_of_week(date) AS
day, date, srcaddr, dstaddr, action, protocol
FROM vpc_flow_logs
WHERE day >= '2023/01/01' AND day < '2023/03/01' AND srcaddr LIKE '172.50.%'
ORDER BY day DESC
LIMIT 100
Investigate user actions
If you have identified a user who has been compromised, or that you suspect has been compromised, you might want to know the API calls that they made over a specific time period. Understanding the activity of a user can help you understand the scope of impact during an incident, as well as the reach of user permissions when you design your access management strategy.
SELECT eventID, eventName, eventSource, eventTime, userIdentity.arn
AS user
FROM cloudtrail
WHERE userIdentity.arn = '%<username>%' AND eventTime > '2022-12-05 00:00:00' AND eventTime < '2022-12-08 00:00:00'
Conclusion
It is essential that you capture logs from various layers within your application architecture, so that you can effectively respond to a security event at various layers of the application stack. If a security event occurs, logs can help provide a clear picture of what happened and the scope of the affected resources. This post helps you build a logging strategy for security incident response by understanding what logs you want to analyze, where you want to store those logs, and how you will analyze them.
August 13, 2018: Date this post was first published, on the Front-End Web and Mobile Blog. We updated the CloudFormation template, provided additional clarification on implementation steps, and revised to account for the new Amazon Cognito UI.
User authentication and authorization can be challenging when you’re building web and mobile apps. The challenges include handling user data and passwords, token-based authentication, federating identities from external identity providers (IdPs), managing fine-grained permissions, scalability, and more.
In this blog post, we will show you how to federate identities from Windows Server Active Directory to authenticate users into your web app by using AWS services. The main AWS service that we’ll use for this purpose is Amazon Cognito.
With Amazon Cognito user pools, you can add user sign-up and sign-in to your mobile and web apps by using a secure and scalable user directory. In addition, you can federate users from a SAML IdP with Amazon Cognito user pools, map these users to a user directory, and get standard authentication tokens from a user pool after the user authenticates with a SAML IdP.
This post explains how to integrate Amazon Cognito user pools with Microsoft Active Directory Federation Services (AD FS) to obtain JSON web tokens (JWTs) in your web app—which in turn can be used for downstream authentication. To demonstrate the complete authentication flow, we’ve created a simple REST API that’s built on Amazon API Gateway. The REST API retrieves data from an Amazon DynamoDB table with the help of an AWS Lambda function. We’ll use the JWT tokens that are vended from user pools to authenticate to the REST API, which is hosted on API Gateway.
A benefit of using Amazon Cognito user pools to federate users from a SAML provider is that a user pool supports SAML 2.0 post-binding endpoints. This helps eliminate the need for client-side parsing of the SAML assertion response, and the user pool directly receives the SAML response from your IdP through a user agent.
As part of the SAML federation feature, the user pool acts as a service provider on behalf of your application. The user pool becomes a single point of identity management for your application, and your application doesn’t need to integrate with multiple SAML IdPs.
Solution overview
Figure 1 shows the authentication flow that we present throughout this blog post.
Figure 1: Authentication flow with Amazon Cognito user pool
As shown in the figure, the authentication flow involves the following steps:
The app starts the sign-up and sign-in process by directing the user to the Cognito user pools hosted web UI. For a mobile app, you can use a web view to show the hosted web UI. For this post, you will use a web app that is hosted on Amazon Simple Storage Service (Amazon S3) fronted by Amazon CloudFront.
The Amazon Cognito user pool determines the appropriate IdP based on your configuration. For AD FS, the IdP is determined by the metadata file or metadata endpoint URL from your SAML IdP. For example, if you use AD FS, the metadata URL looks like the following: https://<yourservername>/FederationMetadata/2007-06/FederationMetadata.xml
The user is redirected to the IdP—in this case, Active Directory.
The IdP authenticates the user if necessary. If the IdP recognizes that the user has an active session, then the IdP skips the authentication to provide a single sign-on experience.
The IdP sends the SAML assertion to Amazon Cognito.
The user’s profile is created in the user pool.
After verifying the SAML assertion and collecting the user attributes (claims) from the assertion, Amazon Cognito returns OIDC tokens (ID, access, and refresh tokens) to the app for the user who is now signed in.
The app then makes a GET request to API Gateway, passing along the JWT token for authorization. If authorized, the request is forwarded to Lambda for data retrieval from DynamoDB.
Installation and configuration walkthrough
To build the authentication flow that we described in the previous section, complete the following steps.
Step 1: Install Active Directory and AD FS
Step 2: Create an Amazon Cognito user pool
Step 3: Configure Active Directory and AD FS
Step 4: Complete the Amazon Cognito configuration
Step 5: Deploy and configure the web app
Step 1: Install Active Directory and AD FS
You will need to set up Active Directory and AD FS. For instructions on how to install both with an AWS CloudFormation template, see Enabling Federation to AWS Using Windows Active Directory, ADFS, and SAML 2.0. To complete the walkthrough in this blog post, you will need to have a working Active Directory service and AD FS service, and a user created within Active Directory. For this walkthrough, we created a user named bob with an email address of [email protected].
If you have an existing user pool, in the left navigation pane, choose User pools and then choose Create user pool to create a new user pool for this walkthrough.
If you don’t have an existing user pool, you will see a landing page. Keep the dropdown list as default and choose Create user pool.
In the Configure sign-in experience section, for Cognito user pool sign-in options, select Email, and then choose Next.
In the Configure security requirements section, under Multi-factor authentication, select No MFA, leave the other fields as default, and then choose Next.
In the Configure sign-up experience section, under Attribute verification and user account confirmation, deselect Allow Cognito to automatically send messages to verifyandconfirm, and choose Next.
In the Configure message delivery section, under Email, select Send email with Cognito, leave the other fields as default, and then choose Next.
In the Integrate your app section, enter a user pool name, select Use the Cognito Hosted UI, and create a domain name using a Cognito domain.
In the Initial app client section as shown in Figure 2, for App client name, enter SAML-IdP; and for Allowed callback URLs, enter https://localhost. Then choose Next.
Figure 2: Set up the initial app client to create the Cognito user pool
In the Review and create section, review all settings, and then scroll to the bottom of the page and choose Create user pool.
Step 3: Configure Active Directory and AD FS
Now that you’ve created an Amazon Cognito user pool, you need to set up Amazon Cognito as a relying party in the SAML identity provider (in this case, AD FS). After you configure AD FS, you will return to Amazon Cognito to complete the final configurations for the application to work.
Connect to the Windows Server instance where you installed AD FS as an administrator through the remote desktop protocol (RDP).
Open the AD FS 2.0 console.
To make sure that the user you created in Step 1 has an email address, in the user property window for your user, choose General. Figure 3 shows our user named bob in Active Directory with an email address of [email protected].
Figure 3: User properties of bob in the Active Directory
Determine the Uniform Resource Name (URN) for the Amazon Cognito user pool. The form of the URN is urn:amazon:cognito:sp:<user-pool-id>. You can find the user pool ID in the General settings tab.
Configure AD FS as follows to work with the Amazon Cognito user pool:
Go to Trust Relationships > Relying Party Trusts > Add relying party trusts. This will start a wizard.
Select Enter data about the relying party manually.
Enter a display name for the relying party configuration.
On the next screen, do not configure a certificate.
Enable support for the SAML 2.0 single sign-on service URL.
Add the Amazon Cognito user pool URN as the relying party trust identifier.
Configure the SAML POST binding. The SAML 2.0 post-binding endpoint (also known as the assertion consumer URL) for the Amazon Cognito user pool is https://<domain-prefix>.auth.<<region>.amazoncognito.com/saml2/idpresponse. You configured this as the domain name in Step 2.6.
Select Permit all users to access this relying party.
Choose Finish.
Navigate to Trust Relationships > Relying Party Trusts. You should see that the URN of Amazon Cognito is configured as the relying party, as shown in Figure 4:
Figure 4: Amazon Cognito trusted as the relying party
In a SAML federation, the IdP can pass various attributes about the user, the authentication method, or other points of context to the service provider (in this case, Amazon Cognito) in the form of SAML attributes. In AD FS, claim rules are used to assemble these required attributes using a combination of Active Directory lookups, simple transformations, and regular expression-based custom rules. In this example, you will configure two claim rules: Name ID and E-Mail.
The Edit Claim Rules window should already be open. If it isn’t, select your relying party trust from the Trust Relationships > Relying Party Trusts screen, and then, in the Actions tab on the right side, choose Edit Claim Rules.
On the Configure Claim Rule page, enter the following values for each configuration element, and then choose OK.
Claim rule name: Name ID
Incoming claim type: Windows account name
Outgoing claim type: Name ID
Outgoing name ID format: Persistent identifier
Repeat the preceding steps for the E-mail claim:
Claim rule name: Email
Attribute Directory: Active Directory
LDAP Attributes: Email Addresses
Outgoing Claim Type:Email Address
Before leaving the AD FS configuration, download the metadata file for the AD FS. The metadata URL for AD FS looks like the following: https://<servername>/FederationMetadata/2007-06/FederationMetadata.xmlM. The metadata file describes the endpoint of your SAML IdP (the AD FS service) to the service provider (Amazon Cognito).
Select the Amazon Cognito user pool that you created earlier, navigate to Sign-in experience > Federated identity provider sign-in, and choose Add identity provider, as shown in Figure 5.
Figure 5: Add a federated identity provider in the Amazon Cognito console
Choose SAML as the identity provider.
As shown in Figure 6, enter a name for your identity provider, choose Select file, and then upload the FederationMetadata.xml file that you downloaded at the end of Step 3.
Figure 6: Set up SAML federation with the user pool
Provide the SAML attribute to map attributes between your SAML provider and your user pool as follows:
For User pool attribute, select email.
For SAML attribute, enter http://schemas.xmlsoap.org/ws/2005/05/identity/claims/emailaddress
These mappings map the claims from the SAML assertion from AD FS to the user pool attributes. You configured an E-mail claim in AD FS, so you need to map this with the appropriate attribute in the user pool.
Choose Add identity provider.
Step 5: Deploy and configure a web app
To reduce the number of steps required for this walkthrough, we have provided a CloudFormation template that you can use to complete the deployment, which deploys the architecture shown in Figure 7:
Figure 7: Web app architecture deployed by the CloudFormation template
This architecture is essentially the same as step 8 from the authentication flow diagram (Figure 1) earlier in this post. In Figure 7, we have added Amazon S3 and Amazon CloudFront to the diagram, which is where your static website is hosted. Complete the following steps for this walkthrough:
Step 5.1: Create the AWS CloudFormation stack
Step 5.2: Manually integrate Amazon Cognito user pools with API Gateway
Step 5.3: Update the configuration for Amazon Cognito
Step 5.4: Update the configuration for the client-side application and upload to Amazon S3
Step 5.5: Insert a row into a DynamoDB table to help you test the application
Step 5.1: Create the AWS CloudFormation stack
Let’s deploy this infrastructure:
Download the code repository, which includes the CloudFormation template named prerequisites.yaml and the sample code for a web app named DataManager.
Navigate to the CloudFormation console in the Region where you deployed the user pool, and choose Create Stack.
To upload the template to Amazon S3, choose Browse and select prerequisites.yaml in the folder where you downloaded it.
Provide a Stack name and a unique Bucket name.
Note: S3 bucket names should not contain uppercase characters.
Choose Next, and select I acknowledge that AWS CloudFormation might create IAM resources with custom names.
Choose Create and then wait for the resources to be deployed.
Note: If the deployment fails with the error message API: s3:CreateBucket Access Denied, review the IAM permissions available for the IAM user or the role used and make sure that the s3:CreateBucket permission has been granted.
Step 5.2: Manually integrate the Amazon Cognito user pool with API Gateway
Open the API Gateway console. You should see that an API named DataManager has been created by CloudFormation, as shown in Figure 8:
Figure 8: APIs in the API Gateway console
Under APIs, choose DataManager, and then choose Authorizers.
Choose Create new Authorizer, and then populate the relevant details:
For Name, enter SamlAuthorizer (Make sure that the name of the user pool is the same as the one that you created).
For Type, select Cognito.
For Cognito user pool, enter Samlfederation.
For Token source, enter Authorization.
With this configuration, you use the user pools authorizer to authenticate Get requests to your Rest API that’s hosted on API Gateway. In the dropdown for Cognito User Pool, add the user pool that you created in Step 2: Create an Amazon Cognito user pool. Choose Create.
Navigate back to APIs > Resources, choose GET, and then choose Method Request.
To add the authorizer that you just created, under Settings, in the Authorization dropdown, choose your authorizer. Remember to save the setting by choosing the small tick symbol on the right side. If you don’t see the Cognito authorizer, just wait for several minutes for updates from API Gateway.
Figure 9: Add the Cognito authorizer for the API GET method
Step 5.3: Update the configuration for Amazon Cognito
Now you need to update the Amazon Cognito configuration based on the CloudFront distribution that you deployed using the CloudFormation template in Step 5.1.
Navigate to the CloudFormation console and locate the CloudFormation stack that was deployed. As shown in Figure 10, in the Outputs tab, copy the values for CloudfrontEndpoint and DataManagerApiInvokeUrl because you will need them later.
Figure 10: Outputs of the CloudFormation template deployment
Navigate to the Amazon Cognito console and go to your user pool. Choose the App integration tab, scroll to the bottom of the page, and for App client name, choose the App client that you added during user pool creation.
On the page for your App client, in the Hosted UI section, choose Edit, and then do the following:
For both the Allowed callback URLs and Allowed sign-out URLs, enter the CloudFront endpoint.
For OAuth grant types, select Implicit grant.
For OpenID Connect scopes, select Email and OpenID.
Figure 11: Configure the hosted UI for the app client
The Amazon Cognito hosted UI provides an OAuth 2.0 compliant authorization server. It includes the default implementation of end user flows, such as registration and authentication. Because the application interacts with Amazon Cognito through an OAuth 2.0 implicit flow, which requires a redirect, the website needs to use HTTPS.
Note: In a production scenario, instead of implicit flow, an authorization code grant is the preferred method in the OAuth 2.0 framework because it’s more secure.
To have an HTTPS endpoint for the Amazon S3 static website, you can use the CloudFront distribution that was deployed by the CloudFormation template in Step 5.1.
When one of your users successfully logs in to the Active Directory infrastructure, the user is automatically redirected to the callback URL. In this case, this is a CloudFront distribution URL with an Amazon Cognito ID token, access token, and refresh token.
Step 5.4: Update the configuration for your client-side application, and upload it to Amazon S3
Navigate to the code that you previously cloned in Step 5.1, and perform the following steps:
With a file manager, navigate to the folder where the cloned content is located. Open the DataManager directory.
Open the js folder. Using a text editor, open the config.js file.
From the Amazon Cognito console, copy the client app application ID as the value of the userPoolClientId property. You can find the application ID in the App clients menu of the Amazon Cognito console.
Change the value of the Region property to the Region that you are using (for example, us-east-2)
While you are still in the Amazon Cognito console, open the Domain name page, and copy the custom prefix into the value for the authDomainPrefix property.
Open the CloudFormation console and choose the stack that was created in Step 5.1. With the stack selected, open the Outputs tab.
Copy the value of the CloudfrontEndpoint output variable to the redirect_uri property.
Copy the value of the DataManagerApiInvokeUrl output variable to the invokeUri property.
Step 5.5: Insert a row into the DynamoDB table to help test your application
The CloudFormation template that you used in Step 5.1 created a DynamoDB table that you can use to test your application. Now you need to add a row to the table (as shown in the Items returned section of Figure 12), so that you can get some results when you test your application. To add a row, in the left menu, choose Tables > Update settings to find the table, and then choose Actions > Create item.
The Lambda function that retrieves data from the ADFSSecretData DynamoDB table only retrieves data from rows where the email matches the one used to log in to Active Directory. To achieve this, you pass the event.requestContext.authorizer.claims.email.object within the Lambda function. This object contains the email that you used to log in to Active Directory.
Figure 12: Search result of DynamoDB table
Now you’re ready to test the application.
Open the CloudFront URL in your browser and choose Enter. This should immediately take you to the web app landing page. From there, you’re automatically redirected to the Amazon Cognito hosted UI. You should see a screen similar to the following that says Sign in with your corporate ID:
Figure 13: Cognito hosted UI sign-in page
After you choose your SAML provider, you are redirected to your AD FS infrastructure that shows a login screen similar to the following:
Figure 14: AD FS sign-in page
Note: If there’s an error, make sure that there’s a mapping in the host file for your AD FS server, with the appropriate hostname or public IP address of the EC2 instance where the AD FS infrastructure is hosted
On the login screen, for Username, enter the user’s email address (in our example, that’s Bob’s email address), and for Password, enter the password that you defined in Active Directory, as shown in Figure 14. If the login is successful, you’re redirected back to the web app with a valid ID and access tokens.
Figure 15: Sample web app home page
Choose Refresh to see the data that you stored in DynamoDB.
Figure 16: Retrieval of the data from DynamoDB
Summary
In this walkthrough, you federated users from AD FS, and successfully authenticated those users to our REST API that’s hosted on API Gateway.
The SAML federation feature in Amazon Cognito helps you set up and integrate your apps with multiple SAML IdPs. By using the SAML federation capabilities of Amazon Cognito, your apps don’t need to handle the type of SAML IdP that they are interacting with. Amazon Cognito takes care of it on behalf of your application.
This article was originally written by Adrian Hall, who was an AWS Solutions Architect when he wrote it.
If you have feedback about this post, submit comments in the Comments section below. If you have questions about this post, contact AWS Support.
Want more AWS Security news? Follow us on Twitter.
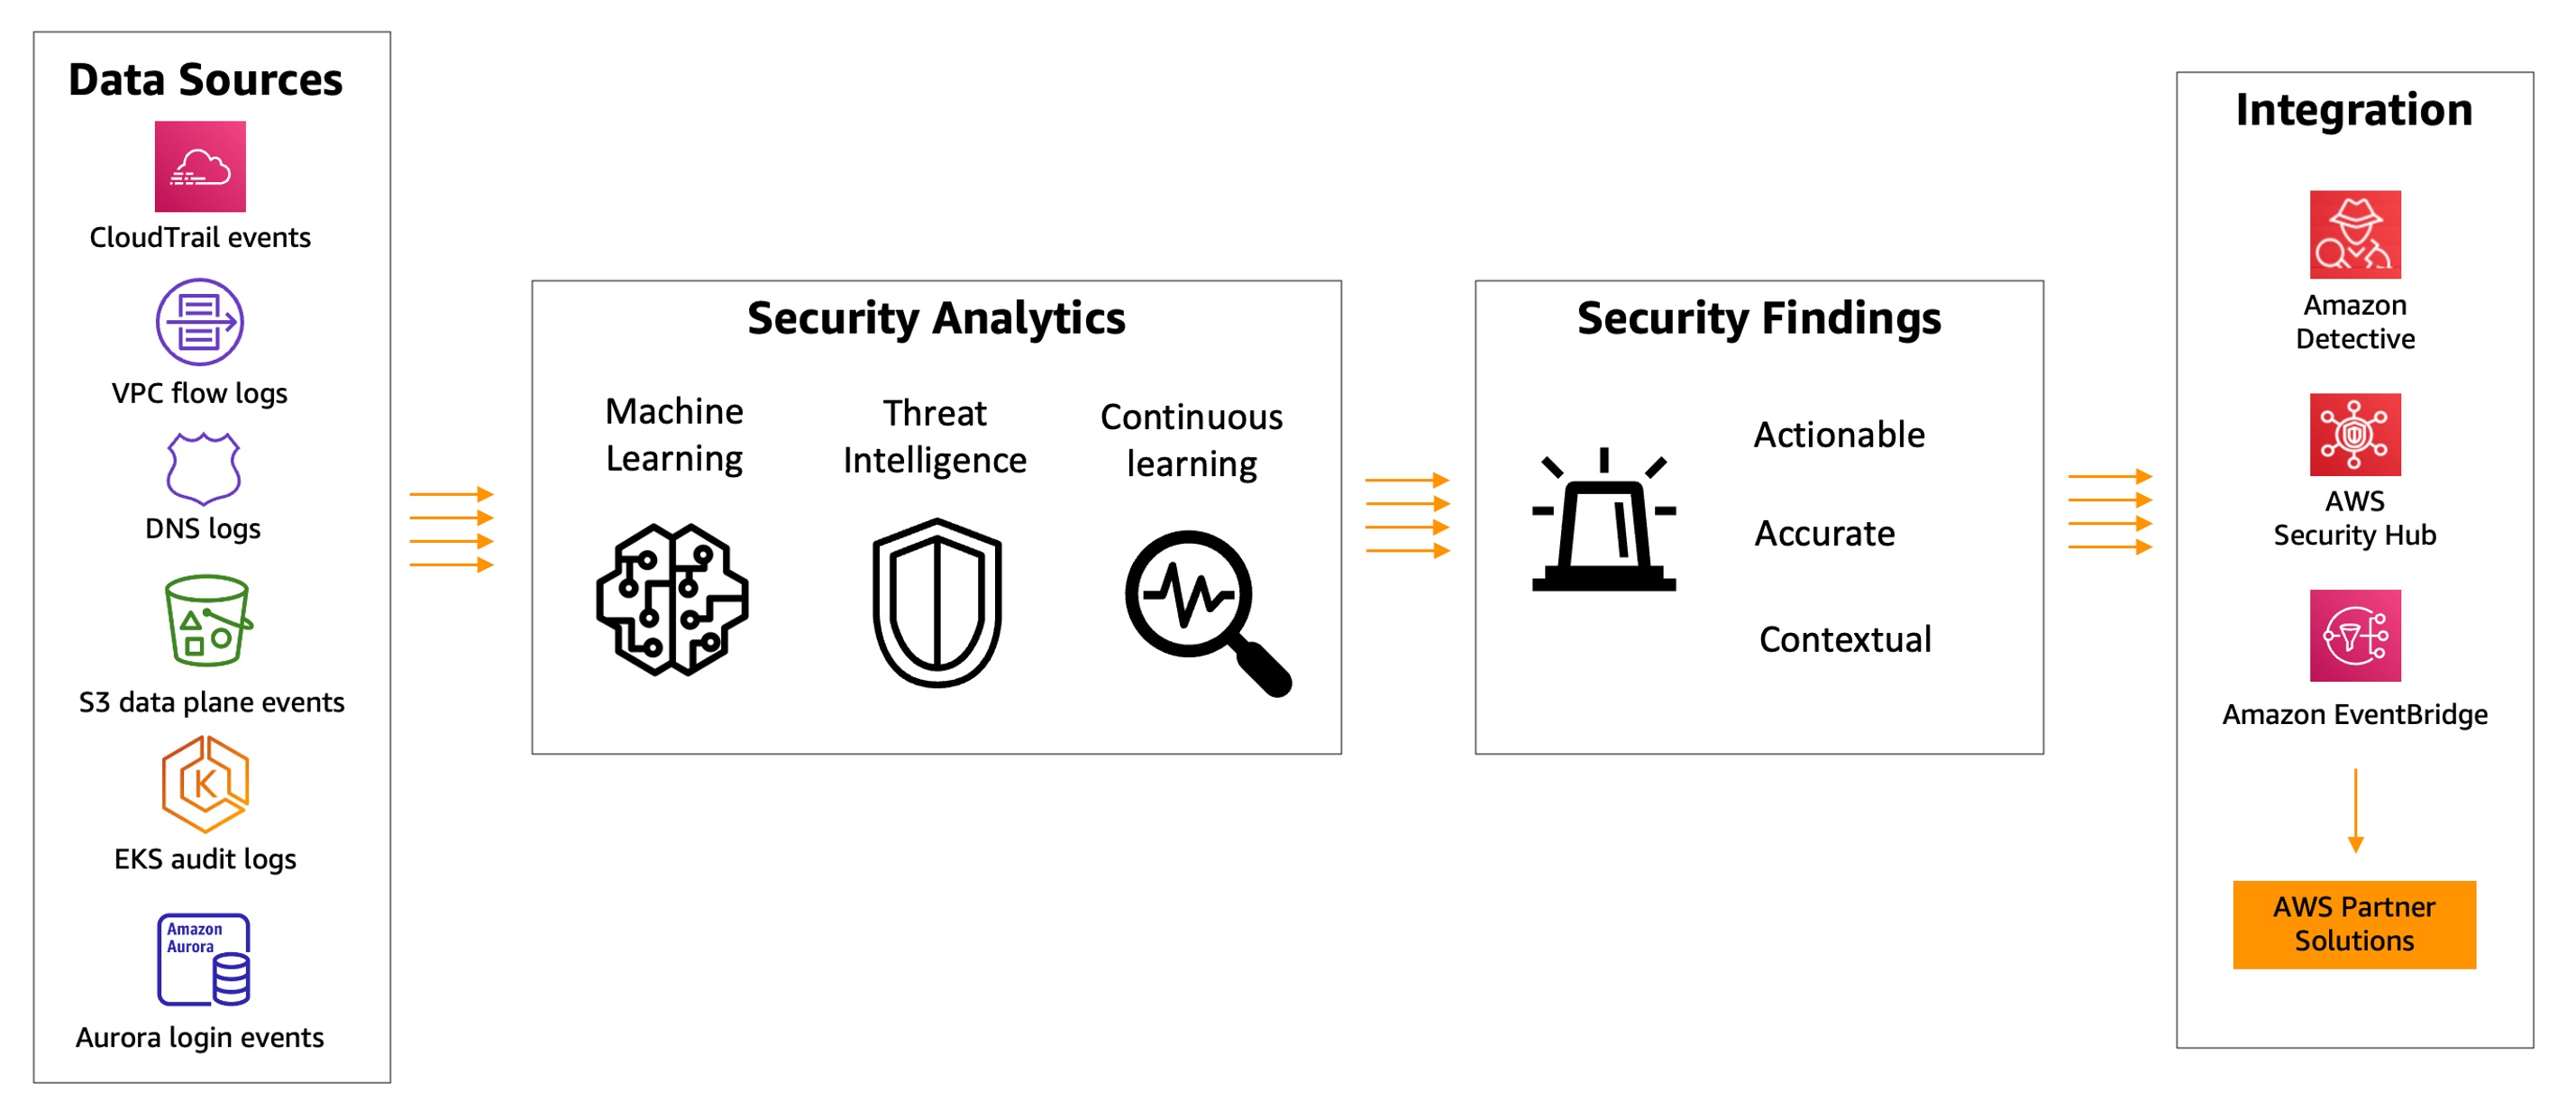
GuardDuty combines machine learning (ML), anomaly detection, network monitoring, and malicious file discovery using various AWS data sources. When threats are detected, GuardDuty automatically sends security findings to AWS Security Hub, Amazon EventBridge, and Amazon Detective. These integrations help centralize monitoring for AWS and partner services, automate responses to malware findings, and perform security investigations from GuardDuty.
Today, we are announcing the general availability of Amazon GuardDuty EKS Runtime Monitoring to detect runtime threats from over 30 security findings to protect your EKS clusters. The new EKS Runtime Monitoring uses a fully managed EKS add-on that adds visibility into individual container runtime activities, such as file access, process execution, and network connections.
GuardDuty can now identify specific containers within your EKS clusters that are potentially compromised and detect attempts to escalate privileges from an individual container to the underlying Amazon EC2 host and the broader AWS environment. GuardDuty EKS Runtime Monitoring findings provide metadata context to identify potential threats and contain them before they escalate.
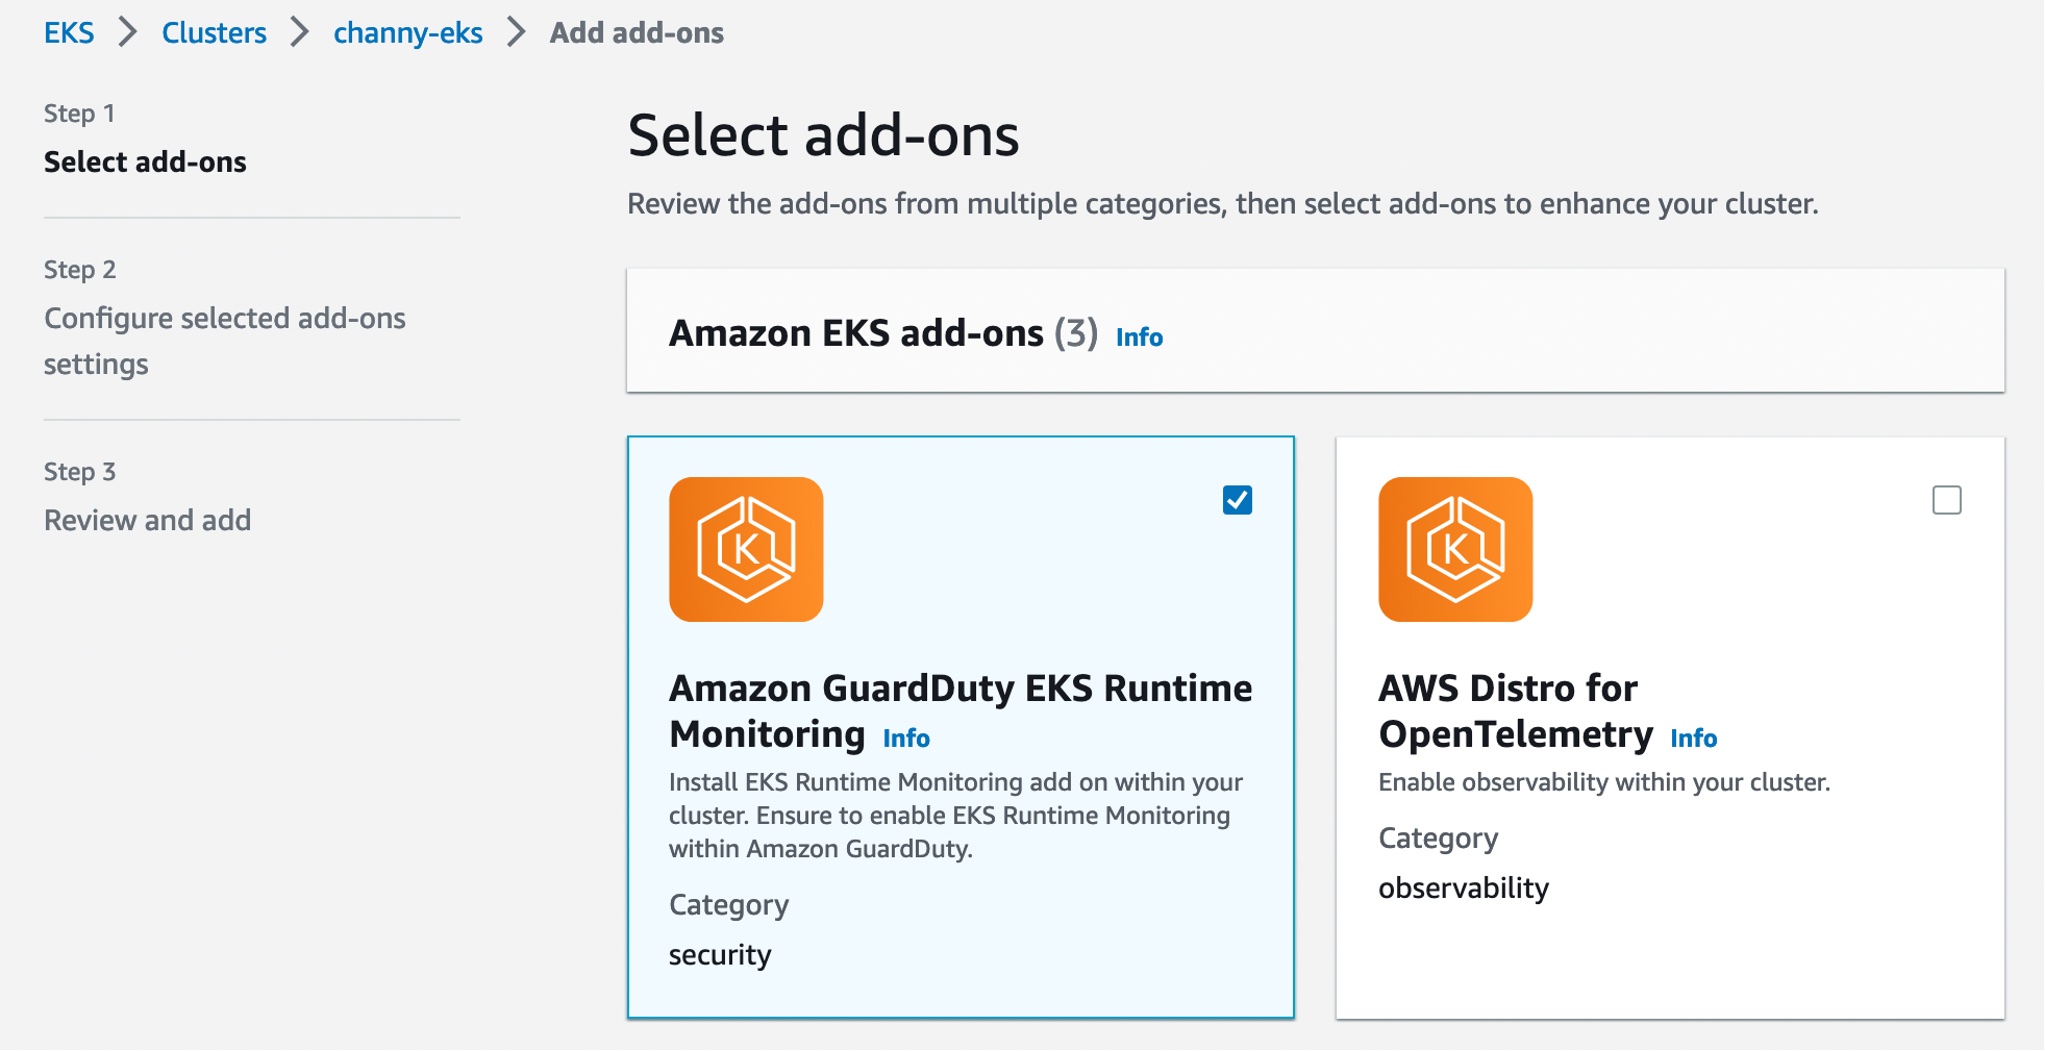
Configure EKS Runtime Monitoring in GuardDuty To get started, first enable EKS Runtime Monitoring with just a few clicks in the GuardDuty console.
Once you enable EKS Runtime Monitoring, GuardDuty can start monitoring and analyzing the runtime-activity events for all the existing and new EKS clusters for your accounts. If you want GuardDuty to deploy and update the required EKS-managed add-on for all the existing and new EKS clusters in your account, choose Manage agent automatically. This will also create a VPC endpoint through which the security agent delivers the runtime events to GuardDuty.
If you configure EKS Audit Log Monitoring and runtime monitoring together, you can achieve optimal EKS protection both at the cluster control plane level, and down to the individual pod or container operating system level. When used together, threat detection will be more contextual to allow quick prioritization and response. For example, a runtime-based detection on a pod exhibiting suspicious behavior can be augmented by an audit log-based detection, indicating the pod was unusually launched with elevated privileges.
These options are default, but they are configurable, and you can uncheck one of the boxes in order to disable EKS Runtime Monitoring. When you disable EKS Runtime Monitoring, GuardDuty immediately stops monitoring and analyzing the runtime-activity events for all the existing EKS clusters. If you had configured automated agent management through GuardDuty, this action also removes the security agent that GuardDuty had deployed.
Manage GuardDuty Agent Manually If you want to manually deploy and update the EKS managed add-on, including the GuardDuty agent, per cluster in your account, uncheck Manage agent automatically in the EKS protection configuration.
When managing the add-on manually, you are also responsible for creating the VPC endpoint through which the security agent delivers the runtime events to GuardDuty. In the VPC endpoint console, choose Create endpoint. In the step, choose Other endpoint services for Service category, enter com.amazonaws.us-east-1.guardduty-data for Service name in the US East (N. Virginia) Region, and choose Verify service.
After the service name is successfully verified, choose VPC and subnets where your EKS cluster resides. Under Additional settings, choose Enable DNS name. Under Security groups, choose a security group that has the in-bound port 443 enabled from your VPC (or your EKS cluster).
Add the following policy to restrict VPC endpoint usage to the specified account only:
Now, you can install the Amazon GuardDuty EKS Runtime Monitoring add-on for your EKS clusters. Select this add-on in the Add-ons tab in your EKS cluster profile on the Amazon EKS console.
When you enable EKS Runtime Monitoring in GuardDuty and deploy the Amazon EKS add-on for your EKS cluster, you can view the new pods with the prefix amazon-guardduty-agent. GuardDuty now starts to consume runtime-activity events from all EC2 hosts and containers in the cluster. GuardDuty then analyzes these events for potential threats.
These pods collect various event types and send them to the GuardDuty backend for threat detection and analysis. When managing the add-on manually, you need to go through these steps for each EKS cluster that you want to monitor, including new EKS clusters. To learn more, see Managing GuardDuty agent manually in the AWS documentation.
Checkout EKS Runtime Security Findings When GuardDuty detects a potential threat and generates a security finding, you can view the details of the corresponding findings. These security findings indicate either a compromised EC2 instance, container workload, an EKS cluster, or a set of compromised credentials in your AWS environment.
If you want to generate EKS Runtime Monitoring sample findings for testing purposes, see Generating sample findings in GuardDuty in the AWS documentation. Here is an example of potential security issues: a newly created or recently modified binary file in an EKS cluster has been executed.
The ResourceType for an EKS Protection finding type could be an Instance, EKSCluster, or Container. If the Resource type in the finding details is EKSCluster, it indicates that either a pod or a container inside an EKS cluster is potentially compromised. Depending on the potentially compromised resource type, the finding details may contain Kubernetes workload details, EKS cluster details, or instance details.
The Runtime details such as process details and any required context describe information about the observed process, and the runtime context describes any additional information about the potentially suspicious activity.
Now Available You can now use Amazon GuardDuty for EKS Runtime Monitoring. For a full list of Regions where EKS Runtime Monitoring is available, visit region-specific feature availability.
The first 30 days of GuardDuty for EKS Runtime Monitoring are available at no additional charge for existing GuardDuty accounts. If you enabled GuardDuty for the first time, EKS Runtime Monitoring is not enabled by default, and needs to be enabled as described above. After the trial period ends in the GuardDuty, you can see the estimated cost of EKS Runtime Monitoring. To learn more, see the GuardDuty pricing page.
I’d like to personally invite you to attend the Amazon Web Services (AWS) security conference, AWS re:Inforce 2023, in Anaheim, CA on June 13–14, 2023. You’ll have access to interactive educational content to address your security, compliance, privacy, and identity management needs. Join security experts, peers, leaders, and partners from around the world who are committed to the highest security standards, and learn how your business can stay ahead in the rapidly evolving security landscape.
As Chief Information Security Officer of AWS, my primary job is to help you navigate your security journey while keeping the AWS environment secure. AWS re:Inforce offers an opportunity for you to dive deep into how to use security to drive adaptability and speed for your business. With headlines currently focused on the macroeconomy and broader technology topics such as the intersection between AI and security, this is your chance to learn the tactical and strategic lessons that will help you develop a security culture that facilitates business innovation.
Here are a few reasons I’m especially looking forward to this year’s program:
Sharing my keynote, including the latest innovations in cloud security and what AWS Security is focused on
AWS re:Inforce 2023 will kick off with my keynote on Tuesday, June 13, 2023 at 9 AM PST. I’ll be joined by Steve Schmidt, Chief Security Officer (CSO) of Amazon, and other industry-leading guest speakers. You’ll hear all about the latest innovations in cloud security from AWS and learn how you can improve the security posture of your business, from the silicon to the top of the stack. Take a look at my most recent re:Invent presentation, What we can learn from customers: Accelerating innovation at AWS Security and the latest re:Inforce keynote for examples of the type of content to expect.
Engaging sessions with real-world examples of how security is embedded into the way businesses operate
AWS re:Inforce offers an opportunity to learn how to prioritize and optimize your security investments, be more efficient, and respond faster to an evolving landscape. Using the Security pillar of the AWS Well-Architected Framework, these sessions will demonstrate how you can build practical and prescriptive measures to protect your data, systems, and assets.
Sessions are offered at all levels and all backgrounds. Depending on your interests and educational needs, AWS re:Inforce is designed to meet you where you are on your cloud security journey. There are learning opportunities in several hundred sessions across six tracks: Data Protection; Governance, Risk & Compliance; Identity & Access Management; Network & Infrastructure Security, Threat Detection & Incident Response; and, this year, Application Security—a brand-new track. In this new track, discover how AWS experts, customers, and partners move fast while maintaining the security of the software they are building. You’ll hear from AWS leaders and get hands-on experience with the tools that can help you ship quickly and securely.
Shifting security into the “department of yes”
Rather than being seen as the proverbial “department of no,” IT teams have the opportunity to make security a business differentiator, especially when they have the confidence and tools to do so. AWS re:Inforce provides unique opportunities to connect with and learn from AWS experts, customers, and partners who share insider insights that can be applied immediately in your everyday work. The conference sessions, led by AWS leaders who share best practices and trends, will include interactive workshops, chalk talks, builders’ sessions, labs, and gamified learning. This means you’ll be able to work with experts and put best practices to use right away.
Our Expo offers opportunities to connect face-to-face with AWS security solution builders who are the tip of the spear for security. You can ask questions and build solutions together. AWS Partners that participate in the Expo have achieved security competencies and are there to help you find ways to innovate and scale your business.
A full conference pass is $1,099. Register today with the code ALUMwrhtqhv to receive a limited time $300 discount, while supplies last.
I’m excited to see everyone at re:Inforce this year. Please join us for this unique event that showcases our commitment to giving you direct access to the latest security research and trends. Our teams at AWS will continue to release additional details about the event on our website, and you can get real-time updates by following @awscloud and @AWSSecurityInfo.
I look forward to seeing you in Anaheim and providing insight into how we prioritize security at AWS to help you navigate your cloud security investments.
If you have feedback about this post, submit comments in the Comments section below. If you have questions about this post, contact AWS Support.
Want more AWS Security news? Follow us on Twitter.
Under the umbrella of this alliance, the CNI-CCN will benefit from the help of AWS in defining the security roadmap of public administrations with different maturity levels and help the CNI-CCN comply with their security requirements and the National Security Scheme.
In addition, CNI-CCN and AWS will collaborate in various areas of cloud security. First, they will work together on cybersecurity training and awareness-raising focused on government institutions, through education, training, and certification programs for professionals who are experts in technology and security. Second, both organizations will collaborate in creating security guidelines for the use of cloud technology, incorporating the shared security model in the AWS cloud and contributing their experience and knowledge to help organizations with the challenges they face. Third, CNI-CCN and AWS will take part in joint events that demonstrate best practices for the deployment and secure use of the cloud, both for public and private sector organizations. Finally, AWS will support cybersecurity operations centers that are responsible for surveillance, early warning, and response to security incidents in public administrations.
Today, AWS has achieved certification in the National Security Scheme (ENS) High category and has been the first cloud provider to accredit several security services in the CNI-CCN’s STIC Products and Services catalog (CPSTIC), meaning that its infrastructure meets the highest levels of security and compliance for state agencies and public organizations in Spain. All of this gives Spanish organizations, including startups, large companies, and the public sector, access to AWS infrastructure that allows them to make use of advanced technologies such as data analysis, artificial intelligence, databases, Internet of Things (IoT), machine learning, and mobile or serverless services, to promote innovation.
In addition, the new cloud infrastructure of AWS in Spain, the AWS Europe (Spain) Region, allows customers who have data residency requirements to store their content in Spain, with the assurance that they maintain full control over the location of their data. This is a critical element for those who have data residency requirements. The launch of the AWS Europe (Spain) Region provides customers building applications that comply with General Data Protection Regulation (GDPR) access to another secure AWS Region in the European Union (EU) that helps meet the highest levels of security, compliance, and data protection. AWS is also Esquema Nacional de Seguridad (ENS) High certified, meaning its infrastructure meets the highest levels of security and compliance for government agencies and public organizations in Spain.
El Centro Nacional de Inteligencia de España y AWS colaboran para promover la ciberseguridad en el sector público
Bajo el paraguas de esta alianza, el CNI-CCN se beneficiará de la ayuda de AWS en definir la hoja de ruta de seguridad de las administraciones públicas, con distintos niveles de madurez y ayudar al CNI-CCN en el cumplimiento de sus requisitos de seguridad y el Esquema Nacional de Seguridad.
Además, CNI-CCN y AWS colaborarán en diversos ámbitos en materia de seguridad en la nube. En primer lugar, trabajarán conjuntamente en formación y concienciación en ciberseguridad enfocadas a instituciones gubernamentales, a través de programas de educación, capacitación y certificación de profesionales expertos en tecnología y seguridad. En segundo lugar, ambas organizaciones colaborarán en la creación de guías de seguridad para el uso de tecnología en la nube, incorporando el modelo de seguridad compartida en la nube de AWS y aportando su experiencia y conocimiento para ayudar a las organizaciones con los desafíos a los que se enfrentan. En tercer lugar, CNI-CCN y AWS participarán en eventos conjuntos que demuestren las mejores prácticas de despliegue y uso seguro de la nube, tanto para organizaciones del sector público como privado. Finalmente, AWS apoyará a los centros de operaciones de ciberseguridad encargados de la vigilancia, alerta temprana y respuesta a incidentes de seguridad en las administraciones públicas.
Hoy AWS cuenta con la certificación del Esquema Nacional de Seguridad (ENS) categoría Alta y ha sido el primer proveedor de la nube en acreditar varios servicios de seguridad en el catálogo de Productos y Servicios STIC (CPSTIC) del CNI-CCN, los cual significa que su infraestructura cumple con los más altos niveles de seguridad y cumplimiento para agencias estatales y organizaciones públicas en España. Todo ello concede a las organizaciones españolas, incluyendo a startups, grandes empresas, así como al sector público, acceso a infraestructura de AWS que les permita hacer uso de tecnologías avanzadas como análisis de datos, inteligencia artificial, bases de datos, Internet de las Cosas (IoT), aprendizaje automático, y servicios móviles o serverless, para impulsar la innovación.
Además, la nueva infraestructura de nube de AWS en España, la Región AWS Europa (España) permite a los clientes almacenar su contenido en España, con la seguridad de que mantienen el control total sobre la localización de sus datos. Esto es un elemento crítico para quienes tienen requisitos de residencia de datos. Los clientes que desarrollan aplicaciones en cumplimiento con el Reglamento General de Protección de Datos (RGPD) tendrán acceso a otra región de infraestructura segura de AWS en la Unión Europea (UE), respetando los más altos estándares de seguridad, cumplimiento normativo y protección de datos. Hoy AWS también cuenta con la certificación del Esquema Nacional de Seguridad (ENS) categoría Alta, lo cual significa que su infraestructura cumple con los más altos niveles de seguridad y cumplimiento para agencias estatales y organizaciones públicas en España.
If you have feedback about this post, submit comments in the Comments section below. If you have questions about this post, contact AWS Support.
Want more AWS Security news? Follow us on Twitter.
In this post, we’ll share an automation pattern that you can use to automatically detect and block suspicious hosts that are attempting to access your Amazon Web Services (AWS) resources. The automation will rely on Amazon GuardDuty to generate findings about the suspicious hosts, and then you can respond to those findings by programmatically updating AWS WAF to block the host from accessing your workloads.
You should implement security measures across your AWS resources by using a holistic approach that incorporates controls across multiple areas. In the AWS CAF Security Perspective section of the AWS Security Incident Response Guide, we define these controls across four categories:
Directive controls — Establish the governance, risk, and compliance models the environment will operate within
Preventive controls — Protect your workloads and mitigate threats and vulnerabilities
Detective controls — Provide full visibility and transparency over the operation of your deployments in AWS
Responsive controls — Drive remediation of potential deviations from your security baselines
Security automation is a key principle outlined in the Response Guide. It helps reduce operational overhead and creates repeatable, predictable approaches to monitoring and responding to events. AWS services provide the building blocks to create powerful patterns for the automated detection and remediation of threats against your AWS environments. You can configure automated flows that use both detective and responsive controls and might also feed into preventative controls to help mitigate risks in the future. Depending on the type of source event, you can automatically invoke specific actions, such as modifying access controls, terminating instances, or revoking credentials.
The patterns highlighted in this post provide an example of how to automatically remediate detected threats. You should modify these patterns to suit your defined requirements, and test and validate them before deploying them in a production environment.
AWS services used for the example pattern
Amazon GuardDuty is a continuous security monitoring and threat detection service that incorporates threat intelligence, anomaly detection, and machine learning to help protect your AWS resources, including your AWS accounts. Amazon EventBridge delivers a near-real-time stream of system events that describe changes in AWS resources. Amazon GuardDuty sends events to Amazon CloudWatch when a change in the findings takes place. In the context of GuardDuty, such changes include newly generated findings and subsequent occurrences of these findings. You can quickly set up rules to match events generated by GuardDuty findings in EventBridge events and route those events to one or more target actions. The pattern in this post routes matched events to AWS Lambda, which then updates AWS WAFweb access control lists (web ACLs) and Amazon Virtual Private Cloud (Amazon VPC)network access control lists (network ACLs). AWS WAF is a web application firewall that helps protect your web applications from common web exploits that could affect application availability, security, or excess resource consumption. It supports both managed rules as well as a powerful rule language for custom rules. A network ACL is stateless and is an optional layer of security for your VPC that helps you restrict specific inbound and outbound traffic at the subnet level.
Pattern overview
This example pattern assumes that Amazon GuardDuty is enabled in your AWS account. If it isn’t enabled, you can learn more about the free trial and pricing, and follow the steps in the GuardDuty documentation to configure the service and start monitoring your account. The example code will only work in the us-east-1 AWS Region due to the use of Amazon CloudFront and web ACLs within the template.
Figure 1 shows how the AWS CloudFormation template creates the sample pattern.
Figure 1: How the CloudFormation template works
Here’s how the pattern works, as shown in the diagram:
A GuardDuty finding is generated due to suspected malicious activity.
An EventBridge event is configured to filter for GuardDuty finding types by using event patterns.
A Lambda function is invoked by the EventBridge event and parses the GuardDuty finding.
The Lambda function checks the Amazon DynamoDB state table for an existing entry that matches the identified host. If state data is not found in the table for the identified host, a new entry is created in the Amazon DynamoDB state table.
The Lambda function creates a web ACL rule inside AWS WAF and updates a subnet network ACL.
A second Lambda function runs on a 5-minute recurring schedule and removes entries that are past the configurable retention period from AWS WAF IPSets (an IPSet is a list that contains the blocklisted IPs or CIDRs), VPC network ACLs, and the DynamoDB table.
GuardDuty prefix patterns and findings
The EventBridge event rule provided by the example automation uses the following seven prefix patterns, which allow coverage for 36 GuardDuty finding types. These specific finding types are of a network nature, and so we can use AWS WAF to block them. Be sure to read through the full list of finding types in the GuardDuty documentation to better understand what GuardDuty can report findings for. The covered findings are as follows:
UnauthorizedAccess:EC2
UnauthorizedAccess:EC2/MaliciousIPCaller.Custom
UnauthorizedAccess:EC2/MetadataDNSRebind
UnauthorizedAccess:EC2/RDPBruteForce
UnauthorizedAccess:EC2/SSHBruteForce
UnauthorizedAccess:EC2/TorClient
UnauthorizedAccess:EC2/TorRelay
Recon:EC2
Recon:EC2/PortProbeEMRUnprotectedPort
Recon:EC2/PortProbeUnprotectedPort
Recon:EC2/Portscan
Trojan:EC2
Trojan:EC2/BlackholeTraffic
Trojan:EC2/BlackholeTraffic!DNS
Trojan:EC2/DGADomainRequest.B
Trojan:EC2/DGADomainRequest.C!DNS
Trojan:EC2/DNSDataExfiltration
Trojan:EC2/DriveBySourceTraffic!DNS
Trojan:EC2/DropPoint
Trojan:EC2/DropPoint!DNS
Trojan:EC2/PhishingDomainRequest!DNS
Backdoor:EC2
Backdoor:EC2/C&CActivity.B
Backdoor:EC2/C&CActivity.B!DNS
Backdoor:EC2/DenialOfService.Dns
Backdoor:EC2/DenialOfService.Tcp
Backdoor:EC2/DenialOfService.Udp
Backdoor:EC2/DenialOfService.UdpOnTcpPorts
Backdoor:EC2/DenialOfService.UnusualProtocol
Backdoor:EC2/Spambot
Impact:EC2
Impact:EC2/AbusedDomainRequest.Reputation
Impact:EC2/BitcoinDomainRequest.Reputation
Impact:EC2/MaliciousDomainRequest.Reputation
Impact:EC2/PortSweep
Impact:EC2/SuspiciousDomainRequest.Reputation
Impact:EC2/WinRMBruteForce
CryptoCurrency:EC2
CryptoCurrency:EC2/BitcoinTool.B
CryptoCurrency:EC2/BitcoinTool.B!DNS
Behavior:EC2
Behavior:EC2/NetworkPortUnusual
Behavior:EC2/TrafficVolumeUnusual
When activity occurs that generates one of these GuardDuty finding types and is then matched by the EventBridge event rule, an entry is created in the target web ACLs and subnet network ACLs to deny access from the suspicious host, and then a notification is sent to an email address by this pattern’s Lambda function. Blocking traffic from the suspicious host helps to mitigate potential threats while you perform additional investigation and remediation. For more information, see Remediating a compromised EC2 instance.
Solution deployment
To deploy the solution, you’ll do the following steps. Each step is described in more detail in the sections that follow.
Upload the .zip files guardduty_to_acl_lambda_wafv2.zip and prune_old_entries_wafv2.zip that you saved to your local file system in Step 1 to the newly created S3 bucket.
Step 3: Deploy the CloudFormation template
For this step, deploy the CloudFormation template only to the us-east-1 Region within the AWS account where GuardDuty findings are to be monitored.
Choose Create stack, and then choose With new resources (standard).
When the Create stack landing page is presented, make sure that Template is ready is selected in the Prepare template section. In the Template source section, choose Upload a template file.
Choose the Choose file button and browse to the location where the guarddutytoacl.template file was saved on your local file system. Select the file, choose Open, and then choose Next.
On the Specify stack details page, provide the following input parameters. You can modify the default values to customize the pattern for your environment.
Input parameter
Input parameter description
Notification email
The email address to receive notifications. Must be a valid email address.
Retention time, in minutes
How long to retain IP addresses in the blocklist (in minutes). The default is 12 hours.
S3 bucket for artifacts
The S3 bucket with artifact files (Lambda functions, templates, HTML files, and so on). Keep the default value for deployment into the N. Virginia Region.
S3 path to artifacts
The path in the S3 bucket that contains artifact files. Keep the default value for deployment into the N. Virginia Region.
CloudFrontWebACL
Create CloudFront Web ACL? If set to true, a CloudFront IP set will be created automatically.
RegionalWebACL
Create Regional Web ACL? If set to true, a Regional IP set will be created automatically.
Figure 2 shows an example of the values entered on this page.
Figure 2: CloudFormation parameters on the Specify stack details page
Enter values for all of the input parameters, and then choose Next.
On the Configure stack options page, accept the defaults, and then choose Next.
On the Review page, confirm the details, check the box acknowledging that the template will require capabilities for AWS::IAM::Role, and then choose Create Stack.
The stack normally requires no more than 3–5 minutes to complete.
While the stack is being created, check the email inbox that you specified for the Notification email address parameter. Look for an email message with the subject “AWS Notification – Subscription Confirmation”. Choose the link in the email to confirm the subscription to the SNS topic. You should see a message similar to the following.
Figure 3: Subscription confirmation
When the Status field for the CloudFormation stack changes to CREATE_COMPLETE, as shown in Figure 4, the pattern is implemented and is ready for testing.
Figure 4: The stack status is CREATE_COMPLETE
Step 4: Create and test the Lambda function for a GuardDuty finding event
After the CloudFormation stack has completed deployment, you can test the functionality by using a Lambda test event.
To create and run a Lambda GuardDuty finding test event
In the AWS Management Console, choose Services > VPC > Subnets and locate a subnet that is suitable for testing the pattern.
On the Details tab, copy the subnet ID to the clipboard or to a text editor.
Figure 5: The subnet ID value on the Details tab
In the AWS Management Console, choose Services > CloudFormation > GuardDutytoACL stack. On the Outputs tab for the stack, look for the GuardDutytoACLLambda entry.
Figure 6: The GuardDutytoACLLambda entry on the Outputs tab
Choose the link for the entry, and you’ll be redirected to the Lambda console, with the Lambda Code source page already open.
Figure 7: The Lambda function open in the Lambda console
In the middle of the Code source menu, in the Test dropdown list, locate and select the Configure test event option.
Figure 8: Select Configure test event from the dropdown list
To facilitate testing, we’ve provided a test event file. On the Configure test event page, do the following:
For Event name, enter a name.
In the body of the Event JSON field, paste the provided test event JSON, overwriting the existing contents.
Update the value of SubnetId key (line 35) to the value of the subnet ID that you chose in Step 1 of this procedure.
Choose Save.
Figure 9: Update the value of the subnetId key
Choose Test to invoke the Lambda function with the test event. You should see the message “Status: succeeded” at the top of the execution results, similar to what is shown in Figure 10.
Figure 10: The Test button and the “succeeded” message
Step 5: Confirm the entry in the VPC network ACL
In this step, you’ll confirm that the DENY entry was created in the network ACL. This pattern is configured to create up to 10 entries in an ACL, ranging between rule numbers 71 and 80. Because network ACL rules are processed in order, it’s important that the DENY rule is placed before the ALLOW rule.
To confirm the entry in the VPC network ACL
In the AWS Management Console, choose Services > VPC > Subnets, and locate the subnet you provided for the test event.
Choose the network ACL link and confirm that the new DENY entry was generated from the test event.
Figure 11: Check the entry from the test event on the Network tab
Note that VPC network ACL entries are created in the rule number range between 71 and 80. Older entries are aged out to create a “sliding window” of blocked hosts.
Step 6: Confirm the entry in the AWS WAF IP sets and blocklists
Next, verify that the entry was added to the CloudFront AWS WAF IP set and to the Application Load Balancer (ALB) AWS WAF IP set.
To confirm the entry in the AWS WAF IP set and blocklist
In the AWS Management Console, choose Services > WAF & Shield > Web ACLs, and then set the selected Region to Global (CloudFront).
Find and select the web ACL name that starts with CloudFrontBlockListWeb. In the Rule view, on the Rules tab, select the rule named CloudFrontBlocklistIPSetRule. Note that 198.51.100.0/32 appears as an entry in the rule.
Figure 12: Confirm that the IP address was added
In the AWS Management Console, on the left navigation menu, choose Web ACLs, and then set the selected Region to US East (N. Virginia).
Find and select the web ACL name that starts with RegionalBlocklistACL. In the Rule view, on the Rules tab, select the rule named RegionalBlocklistIPSetRule. Note that 198.51.100.0/32 appears as an entry in the rule.
Figure 13: Make sure that the IP address was added
There might be specific host addresses that you want to prevent from being added to the blocklist. You can do this within GuardDuty by using a trusted IP list. Trusted IP lists consist of IP addresses that you have allowlisted for secure communication with your AWS infrastructure and applications. GuardDuty doesn’t generate findings for IP addresses on trusted IP lists. For more information, see Working with trusted IP lists and threat lists.
Step 7: Confirm the SNS notification email
Finally, verify that the SNS notification was sent to the email address you set up.
To confirm receipt of the SNS notification email
Review the email inbox that you specified for the AdminEmail parameter and look for a message with the subject line “AWS GD2ACL Alert”. The contents of the message from SNS should be similar to the following.
Figure 14: SNS message example
Step 8: Apply the AWS WAF web ACLs to resources
The final task is to associate the web ACL with the CloudFront distributions and Application Load Balancers that you want to automatically update with this pattern. To learn how to do this, see Associating or disassociating a web ACL with an AWS resource.
You can also use AWS Firewall Manager to associate the web ACLs. AWS Firewall Manager can simplify your AWS WAF administration and maintenance tasks across multiple accounts and resources. With Firewall Manager, you set up your firewall rules just once. The service automatically applies your rules across your accounts and resources, even as you add new resources.
Conclusion
In this post, you’ve learned how to use Lambda to automatically update AWS WAF and VPC network ACLs in response to GuardDuty findings. With just a few steps, you can use this sample pattern to help mitigate threats by blocking communication with suspicious hosts. You can explore additional possible patterns by using GuardDuty finding types and Amazon EventBridge target actions. This pattern’s code is available on GitHub. Feel free to play around with the code to add more GuardDuty findings to this pattern and also to build bigger and better patterns! Make sure to modify the patterns in this post to suit your defined requirements, and test and validate them before deploying them in a production environment.
If you have comments about this blog post, you can submit them in the Comments section below. If you have questions about using this pattern, start a thread in the GuardDuty, AWS WAF, or CloudWatch forums, or contact AWS Support.
Want more AWS Security news? Follow us on Twitter.
In Finland, where I live, spring has arrived. The snow has melted, and the trees have grown their first buds. But I don’t get my hopes high, as usually around Easter we have what is called takatalvi. Takatalvi is a Finnish world that means that the winter returns unexpectedly in the spring.
Last Week’s Launches Here are some launches that got my attention during the previous week.
AWS Batch – AWS Batch now allows you to configure ephemeral storage up to 200GiB on AWS Fargate type jobs. With this launch, you no longer need to limit the size of your data sets or the size of the Docker images to run machine learning inference.
Application Load Balancer – Application Load Balancer (ALB) now supports Transport Layer Security (TLS) protocol version 1.3, enabling you to optimize the performance of your application while keeping it secure. TLS 1.3 on ALB works by offloading encryption and decryption of TLS traffic from your application server to the load balancer.
Other AWS News Some other updates and news that you may have missed:
I read the post Implementing an event-driven serverless story generation application with ChatGPT and DALL-E a few days ago, and since then I have been reading my child a lot of AI-generated stories. In this post, David Boyne, explains step by step how you can create an event-driven serverless story generation application. This application produces a brand-new story every day at bedtime with images, which can be played in audio format.
Podcast Charlas Técnicas de AWS – If you understand Spanish, this podcast is for you. Podcast Charlas Técnicas is one of the official AWS podcasts in Spanish, and every other week there is a new episode. The podcast is meant for builders, and it shares stories about how customers have implemented and learned AWS services, how to architect applications, and how to use new services. You can listen to all the episodes directly from your favorite podcast app or at AWS Podcasts en español.
AWS open-source news and updates – The open source newsletter is curated by my colleague Ricardo Sueiras to bring you the latest open-source projects, posts, events, and more.
Upcoming AWS Events Check your calendars and sign up for the AWS Summit closest to your city. AWS Summits are free events that bring the local community together, where you can learn about different AWS services.
Customers who require private keys for their TLS certificates to be stored in FIPS 140-2 Level 3 certified hardware security modules (HSMs) can use AWS CloudHSM to store their keys for websites hosted in the cloud. In this blog post, we will show you how to automate the deployment of a web application using NGINX in AWS Fargate, with full integration with CloudHSM. You will also use AWS CodeDeploy to manage the deployment of changes to your Amazon Elastic Container Service (Amazon ECS) service.
CloudHSM offers FIPS 140-2 Level 3 HSMs that you can integrate with NGINX or Apache HTTP Server through the OpenSSL Dynamic Engine. The CloudHSM Client SDK 5 includes the OpenSSL Dynamic Engine to allow your web server to use a private key stored in the HSM with TLS versions 1.2 and 1.3 to support applications that are required to use FIPS 140-2 Level 3 validated HSMs.
CloudHSM uses the private key in the HSM as part of the server verification step of the TLS handshake that occurs every time that a new HTTPS connection is established between the client and server. Using the exchanged symmetric key, OpenSSL software performs the key exchange and bulk encryption. For more information about this process and how CloudHSM fits in, see How SSL/TLS offload with AWS CloudHSM works.
Solution overview
This blog post uses the AWS Cloud Development Kit (AWS CDK) to deploy the solution infrastructure. The AWS CDK allows you to define your cloud application resources using familiar programming languages.
Figure 1 shows an overview of the overall architecture deployed in this blog. This solution contains three CDK stacks: The TlsOffloadContainerBuildStack CDK stack deploys the CodeCommit, CodeBuild, and AmazonECR resources. The TlsOffloadEcsServiceStack CDK stack deploys the ECS Fargate service along with the required VPC resources. The TlsOffloadPipelineStack CDK stack deploys the CodePipeline resources to automate deployments of changes to the service configuration.
Figure 1: Overall architecture
At a high level, here’s how the solution in Figure 1 works:
Clients make an HTTPS request to the public IP address exposed by Network Load Balancer to connect to the web server and establish a secure connection that uses TLS.
Network Load Balancer routes the request to one of the ECS hosts running in private virtual private cloud (VPC) subnets, which are connected to the CloudHSM cluster.
The NGINX web server that is running on ECS containers performs a TLS handshake by using the private key stored in the HSM to establish a secure connection with the requestor.
Note: Although we don’t focus on perimeter protection in this post, AWS has a number of services that help provide layered perimeter protection for your internet-facing applications, such as AWS Shield and AWS WAF.
Figure 2 shows an overview of the automation infrastructure that is deployed by the TlsOffloadContainerBuildStack and TlsOffloadPipelineStack CDK stacks.
Figure 2: Deployment pipeline
At a high level, here’s how the solution in Figure 2 works:
A developer makes changes to the service configuration and commits the changes to the AWS CodeCommit repository.
An RSA private key in the HSM with a corresponding fake PEM file and certificate signed by a trusted Certificate Authority for the web server. Fake PEM files are PEM-encoded key files that store a reference to the key on the HSM instead of storing the private key information. For instructions on how to generate this file, see Generate or import a private key and SSL/TLS certificate.
An environment configured with AWS CDK to deploy the CDK stacks with the relevant resources. For instructions on how to set up this environment, see Getting started with the AWS CDK.
Step 1: Store secrets in Secrets Manager
As with other container projects, you need to decide what to build statically into the container (for example, libraries, code, or packages) and what to set as runtime parameters, to be pulled from a parameter store. In this walkthrough, we use Secrets Manager to store sensitive parameters and use the integration of Amazon ECS with Secrets Manager to securely retrieve them when the container is launched.
Important: You need to store the following information in Secrets Manager as plaintext, not as key/value pairs.
The web server certificate – In this example, the name of the secret for the web server certificate is tls/servercert. It will look similar to the following:
Figure 4: Store the web server certificate
The fake PEM file for the private key stored in the HSM that you generated in the Prerequisites section. In this example, the name of the secret for the fake PEM file is tls/fakepem.
Figure 5: Store the fake PEM
The HSM pin used to authenticate with the HSMs in your cluster. In this example, the name of the secret for the HSM pin is tls/pin.
Figure 6: Store the HSM pin
After you’ve stored your secrets, you should see output similar to the following:
Figure 7: List of required secrets
Step 2: Download and configure the CDK app
This post uses the AWS CDK to deploy the solution infrastructure. In this section, you will download the CDK app and configure it.
Run the following command to build the CDK stacks from the root of the project directory.
npm run build
To view the stacks that are available to deploy, run the following command from the root of the project directory.
cdk ls
You should see the following stacks available to deploy:
TlsOffloadContainerBuildStack — Deploys the CodeCommit, CodeBuild, and ECR repository that builds the ECS container image.
TlsOffloadEcsServiceStack — Deploys the ECS Fargate service along with the required VPC resources.
TlsOffloadPipelineStack — Deploys the CodePipeline that automates the deployment of updates to the service.
Step 3: Deploy the container build stack
In this step, you will deploy the container build stack, and then create a build and verify that the image was built successfully.
To deploy the container build stack
Deploy the TlsOffloadContainerBuildStack stack that we described in Figure 2 to your AWS account. In your CDK environment, run the following command:
cdk deploy TlsOffloadContainerBuildStack
The command line interface (CLI) will prompt you to approve the changes. After you approve them, you will see the following resources deployed to your newly created CodeCommit repository.
Dockerfile — This file provides a containerized environment for each of the Fargate containers to run. It downloads and installs necessary dependencies to run the NGINX web server with CloudHSM.
nginx.conf — This file provides NGINX with the configuration settings to run an HTTPS web server with CloudHSM configured as the SSL engine that performs the TLS handshake. The following nginx.conf values have already been configured in the file; if you want to make changes, update the file before deployment:
ssl_engine is set to cloudhsm
the environment variable is env CLOUDHSM_PIN
error_log is set to stderr so that the Fargate container can capture the logs in CloudWatch
the server section is set up to listen on port 443
ssl_ciphers are configured for a server with an RSA private key
run.sh — This script configures the CloudHSM OpenSSL Dynamic Engine on the Fargate task before the NGINX server is started.
nginx.service — This file specifies the configuration settings that systemd uses to run the NGINX service. Included in this file is a reference to the file that contains the environment variables for the NGINX service. This provides the HSM pin to the OpenSSL Engine.
index.html — This file is a sample HTML file that is displayed when you navigate to the HTTPS endpoint of the load balancer in your browser.
dhparam.pem — This file provides sample Diffie-Hellman parameters for demonstration purposes, but AWS recommends that you generate your own. You can generate your own Diffie-Hellman parameters by running the following command with the OpenSSL CLI. These parameters are not required for TLS but are recommended to provide perfect forward secrecy in your encrypted messages.
openssl dhparam -out ./dhparam.pem 2048
Your repository should look like the following:
Figure 8: CodeCommit repository
Before you deploy the Amazon ECS service, you need to build your first Docker image to populate the ECR repository. To successfully deploy the service, you need to have at least one image already present in the repository.
To create a build and verify the image was built successfully
Find the CodeBuild project that was created by the CDK deployment and select it.
Choose Start Build to initiate a new build.
Wait for the build to complete successfully, and then open the Amazon ECR console.
Select the repository that the CDK deployment created.
You should now see an image in your repository, similar to the following:
Figure 9: ECR repository
Step 4: Deploy the Amazon ECS service
Now that you have successfully built an ECR image, you can deploy the Amazon ECS service. This step deploys the following resources to your account:
VPC endpoints for the required AWS services that your ECS task needs to communicate with, including the following:
Amazon ECR
Secrets Manager
CloudWatch
CloudHSM
Network Load Balancer, which load balances HTTPS traffic to your ECS tasks.
A CloudWatch Logs log group to host the logs for the ECS tasks.
An ECS cluster with ECS tasks using your previously built Docker image that hosts the NGINX service.
To deploy the Amazon ECS service with the CDK
In your CDK environment, run the following command:
cdk deploy TlsOffloadEcsServiceStack
The CLI will prompt you to approve the changes. After you approve them, you will see these resources deploy to your account.
Checkpoint
At this point, you should have a working service. To confirm that you do, in your browser, navigate using HTTPS to the public address associated with the Network Load Balancer. While not covered in this blog, you can additionally configure DNS routing using Amazon Route53 to setup a custom domain name for your web service. You should see a screen similar to the following.
Figure 10: The sample website
Step 5: Use CodePipeline to automate the deployment of changes to the web server
Now that you have deployed a preliminary version of the application, you can take a few steps to automate further releases of the web server. As you maintain this application in production, you might need to update one or more of the following items:
Your website HTML source and other required libraries (for example, CSS or JavaScript)
Your Docker environment, such as the OpenSSL libraries, operating system and CloudHSM packages, and NGINX version.
Re-deploy the service after rotating your web server private key and certificate in Secrets Manager
Next, you will set up a CodePipeline project that orchestrates the end-to-end deployment of a change to the application—from an update to the code in our CodeCommit repo to the deployment of updated container images and the redirection of user traffic by the load balancer to the updated application.
This step deploys to your account a deployment pipeline that connects your CodeCommit, CodeBuild, and Amazon ECS services.
Deploy the CodePipeline stack with CDK
In your CDK environment, run the following command:
cdk deploy TlsOffloadPipelineStack
The CLI will prompt you to approve the changes. After you approve them, you will see the resources deploy to your account.
Start a deployment
To verify that your automation is working correctly, start a new deployment in your CodePipeline by making a change to your source repository. If everything works, the CodeBuild project will build the latest version of the Dockerfile located in your CodeCommit repository and push it to Amazon ECR. Then, the CodeDeploy application will create a new version of the ECS task definition and deploy new tasks while spinning down the existing tasks.
View your website
Now that the deployment is complete, you should again be able to view your website in your browser by navigating to the website for your application. If you made changes to the source code, such as changes to your index.html file, you should see these changes now.
Verify that the web server is properly configured by checking that the website’s certificate matches the one that you created in the Prerequisites section. Figure 11 shows an example of a certificate.
Figure 11: Certificate for the application
To verify that your NGINX service is using your CloudHSM cluster to offload the TLS handshake, you can view the CloudHSM client logs for this application in CloudWatch in the log group that you specified when you configured the ECS task definition.
Select the log group corresponding to your CloudHSM cluster. The log group has the following format: /aws/cloudhsm/<cluster-id>.
You can see entries similar to the following, which indicates that the NGINX application is connecting and logging in to the HSM to perform cryptographic operations.
Time: 02/04/23 17:45:40.333033, usecs:1675532740333033
Version No : 1.0
Sequence No : 0x2
Reboot counter : 0x8
Opcode : CN_LOGIN (0xd)
Command Type(hex) : CN_MGMT_CMD (0x0)
User id : 3
Session Handle : 0x15010002
Response : 0x0:HSM Return: SUCCESS
Log type : USER_AUTH_LOG (2)
User Name : crypto_user
User Type : CN_CRYPTO_USER (1)
Conclusion
In this post, you learned how to set up a NGINX web server on Fargate in a secure, private subnet that offloads the TLS termination to a FIPS 140-2 Level 3 HSM environment that uses the CloudHSM OpenSSL Dynamic Engine. You also learned how to set up a deployment pipeline to automate the Fargate deployments when updates are made.
You can expand this solution to fit your individual use case. For example, you can use the NGINX web server as a reverse proxy for additional servers in your internal network, and set up mutual TLS between these internal servers.
If you have feedback about this post, submit comments in the Comments section below. If you have questions about this post, start a new thread on the AWS CloudHSM re:Post or contact AWS Support.
Want more AWS Security news? Follow us on Twitter.
Over the past three years, AWS CIRT has supported customers with security events in their AWS accounts. These include the unauthorized use of AWS Identity and Access Management (IAM) credentials, ransomware, and data deletion in an AWS account.
In this post, I will walk you through key AWS services and features that provide backup and recovery solutions to restore your data based upon the lessons our team has learned when supporting customers experiencing security events.
Backup and recovery configuration are a part of the customer’s side of the shared responsibility model. AWS doesn’t have the ability to recover a deleted resource. It doesn’t matter how quickly the event is reported to AWS. The inability to recover resources includes actions by the AWS account root user or an IAM principal in the account.
Customers are also responsible for managing their data (including encryption options), classifying their assets, and using IAM tools to apply the appropriate permissions. AWS strives to make it simple for customers to back up and restore their data. We recommend that you compare the risk and costs associated with losing data to the available solutions to make the best decision for your data and business use cases.
Why do you need backups?
The National Institute of Technology (NIST) Computer Security Incident Handling Guide SP 800-61 Rev. 2 defines a computer security incident as “a violation or imminent threat of violation of computer security policies, acceptable use policies, or standard security practices.” AWS recently updated the AWS Security Incident Response Guide as a resource to help customers throughout the incident response life cycle.
Backup and restore processes help you restore data to a point in time before unauthorized actions. Unauthorized actions can be accidental or part of a security event. Implementing backup and restore processes can help you reduce costs by limiting the number of resources that need backups, associated storage, and overall timelines associated with acceptable Recovery Time Objectives (RTOs) and Recovery Point Objectives (RPOs). For additional guidance on backup solutions and programs, see Top 10 security best practices for securing backups in AWS
How does AWS help?
AWS provides several solutions for backups to integrate with your operational and security incident recovery procedures which I describe in more detail in this section. For additional information, see AWS Backup & Restore.
Amazon EC2
Amazon EC2 provides scalable computing capacity in the AWS Cloud. Using Amazon EC2 can help eliminate your need to invest in hardware up front, helping you to develop and deploy applications faster.
EBS volumes are the primary persistent storage option for Amazon EC2. Use this block storage for structured data, such as databases, or unstructured data, such as files in a file system on a volume. An EBS snapshot takes a copy of the EBS volume and places it in Amazon S3, where it is stored redundantly in multiple Availability Zones.
Create a golden image by preloading needed software and configuration on an EC2 instance, and then creating an image of that. Then, use the resulting image to launch new instances, with updates needed only for the period after image creation.
Amazon FSx for Windows File Server provides fully-managed Microsoft Windows file servers, backed by a fully native Windows file system. To help ensure file system consistency, Amazon FSx uses the Volume Shadow Copy Service (VSS) in Microsoft Windows. Each FSx for Windows File Server backup contains the information that is needed to create a new file system from the backup, effectively restoring a point-in-time snapshot of the file system. For more information, see Amazon FSx: Working with backups.
Amazon EC2 Recycle Bin is a data recovery feature that enables you to restore Amazon EBS snapshots and EBS-backed AMIs that were accidentally deleted. If your resources are deleted, they are retained in the Recycle Bin for a period that you specify, before they are permanently deleted.
Transactional databases
In cloud computing, the ideal scenario is to keep persistent transactional states in databases so that those resources are the only things that actively require backups. When used in conjunction with AWS compute services, this minimizes the volume of data that you need to back up. Everything else is restored from a golden image or equivalent through auto scaling or a continuous integration and continuous delivery (CI/CD) pipeline. To estimate costs associated with service usage and the use of backup storage, use the AWS Pricing Calculator. Work backwards from your critical data that requires backups to help limit costs associated with your overall backup solution.
Amazon Aurora backups are continuous and incremental so that you can quickly restore to any point within the backup retention period. You can specify a backup retention period of 1 to 35 days when you create or modify a database cluster. Aurora backups are stored in Amazon S3.
Amazon DynamoDB allows you to back up your table data continuously by using point-in-time recovery (PITR). When you use PITR, DynamoDB backs up your table data automatically with per-second granularity to restore to any second in the preceding 35 days. For more information, see DynamoDB PITR.
Amazon Neptune is a fast, reliable, fully managed graph database service. The core of Neptune is a purpose-built, high-performance graph database engine. Neptune backups are continuous and incremental so that you can quickly restore to any point within the backup retention period. You can specify a backup retention period, from 1 to 35 days, when you create or modify a DB cluster.
Amazon Relational Database Service (Amazon RDS) creates and saves automated backups of your DB instance during the backup window of your DB instance. Amazon RDS creates a storage volume snapshot of your DB instance, backing up the entire DB instance and not just individual databases. Amazon RDS saves the automated backups of your DB instance according to the backup retention period that you specify between 0 and 35 days. If necessary, you can recover your database to any point in time during the backup retention period.
Amazon Elastic File System
Amazon Elastic File System (Amazon EFS) provides serverless, fully elastic file storage to help you share file data without provisioning or managing storage capacity and performance. The service manages the file storage infrastructure for you to avoid the complexity of deploying, patching, and maintaining complex file system configurations.
The EFS-to-EFS Backup solution is suitable for Amazon EFS file systems in each AWS Region. It includes an AWS CloudFormation template that launches, configures, and runs the AWS services required to deploy the solution. This solution follows AWS best practices for security and availability.
If you need a backup strategy for multiple services or to manage backups from a single solution, consider using AWS Backup. AWS Backup is a fully-managed service that makes it simple to centralize and automate data protection across AWS services in the cloud, and on premises. For a list of supported services and resource feature availability, see the AWS Backup Developer Guide.
AWS Backup provides for centralized, policy-based data protection. Your backup data is encrypted using encryption keys managed by AWS Key Management Service (KMS), reducing your need to build and maintain a key management infrastructure. With AWS Backup, you can do the following:
Set backup retention policies that automatically retain and expire backups, minimizing backup storage costs.
Copy backups across different AWS Regions and accounts from a central console to help you meet your compliance and disaster recovery needs.
Create data protection policies and use AWS Organizations to enforce the protection policies throughout the accounts in that organization.
Set resource-based access policies on backup vaults. Use resource-based access policies to control access to backups in a backup vault across users, rather than having to define permissions for each user.
AWS Backup can help you align with your data protection needs with real-time analytics and insights, as follows:
You can audit and report on the compliance of your data protection policies to help meet your business and regulatory needs with AWS Backup Audit Manager.
AWS Backup supports legal hold, which is used when an organization must retain certain data either for preservation, auditing, or as evidence in legal proceedings and e-Discovery.
You can choose your controls. For information on the available controls, their customizable parameters, and their AWS Config recording resource types, see Choosing your controls. Every control requires the recording resource type AWS Config: resource compliance because this type records your compliance status with either the AWS Backup Framework or a custom framework that you define.
How much will this cost?
To estimate costs for individual services and features, use the AWS Pricing Calculator. For additional cost information, see the feature page for each service at AWS Cloud Products.
Conclusion
In this blog post, you learned about several AWS services and features to help you back up and restore your data. By analyzing and configuring backup and restore capabilities, you can enable resilience from an accidental deletion or security event.
AWS Network Firewall is a stateful, managed, network firewall and intrusion detection and prevention service for your Amazon VPC. With Network Firewall, you can filter inbound and outbound traffic to or from internet gateways; AWS Direct Connect gateways; AWS PrivateLink, AWS Site-to-Site VPN, and AWS Client VPN gateways; NAT gateways; and even between other attached VPCs and subnets.
You can use Network Firewall to help prevent your VPC from accessing unauthorized domains, to block IP addresses, and to perform deep packet inspection or protocol filtering. However, it can be time consuming to update your firewall’s rule groups to add, remove, or modify the list of IP addresses across multiple Network Firewall instances that can be deployed in distributed, centralized, or combined deployment models.
With prefix lists, you can group one or more CIDR blocks into a single object. Therefore, you can group IP addresses that you frequently use in a prefix list, and reference this list in Network Firewall rule groups. With this approach, you don’t need to update individual firewall rules when scaling the network to add new IP addresses, and the Network Firewall rule groups that reference the prefix list are automatically updated.
In this post, we will show you how to build an example configuration in your test environment that uses customer-managed prefix lists in a Network Firewall rule group.
In this post, we will show you how to create a simple architecture in a VPC to create three different VPC prefix lists for private and public subnets and provide protection by restricting traffic flow to the firewall subnet. Then you will create a stateful Network Firewall rule group to include IP set references that are mapped to VPC prefix lists. Figure 1 illustrates the architecture of a protected VPC.
Figure 1: Simple architecture of a protected VPC
In this example, the following three subnets are in the protected VPC:
Firewall subnet: 10.1.0.0/28 This subnet is dedicated for use by Network Firewall. The Network Firewall endpoint is deployed into a dedicated subnet of the VPC.
Public subnet (protected subnet): 10.1.2.0/28 The resources are designed to be internet-facing, so this subnet needs to communicate with the internet gateway. The NAT gateway and load balancer are also hosted on this subnet.
Private subnet (protected workload subnet): 10.1.3.0/28 This is the subnet where you host your private workload that doesn’t accept incoming traffic from the internet (in our example, this is the webservers). The private workload can send requests to the internet through the NAT gateway.
Deploy the CloudFormation template
The following AWS CloudFormation template deploys a network firewall and related resources in a distributed architecture across two Availability Zones. In production, AWS recommends that you use multiple Availability Zones to help ensure high availability and improve fault tolerance. To simplify the instructions, we will focus on a single Availability Zone for this blog post.
To deploy the CloudFormation template
Choose the following Launch Stack button.
Launch the CloudFormation template in the Region of your choice. Make sure that the Region that you choose supports Network Firewall. Select the Availability Zone or Zones to be used for this deployment, and leave the rest of the options as default.
Create the VPC prefix lists
In this section, we will show you how to define your requirements and implement them within Network Firewall to only enable Secure Shell (SSH) traffic from a trusted IP range (an authorized public subnet on the protected VPC) to the private subnet. We will also show you how to block Internet Control Message Protocol (ICMP) traffic from another IP range (with CIDR 10.0.1.0/24).
You will create the following VPC prefix lists:
Public-ip-list — includes the protected subnet: 10.1.2.0/28
Private-deny-list — includes a CIDR block from the other VPC: 10.0.1.0/24
Private-allow-list — includes the protected workload subnet: 10.1.3.0/28
Choose Create prefix list, and then do the following, as shown in Figure 2:
For Prefix list name, enter a name for the prefix list. In our example, the name is Public-ip-list.
For Max entries, enter the maximum number of entries for the prefix list. In our example, this number is 10.
For Address family, select the prefix list that supports IPv4 entries.
Note: Network Firewall currently supports only references to IPv4 prefix lists.
For Prefix list entries, choose Add new entry, and then enter the CIDR block and a description for the entry. In our example, the CIDR block is 10.1.2.0/28.
Choose Create prefix list.
Figure 2: Example of managed prefix lists
Repeat the preceding steps for the two remaining prefix lists: Private-deny-list and Private-allow-list.
When you’ve finished creating the prefix lists, you can view them under Managed prefix lists, as shown in Figure 3.
Figure 3: Example of VPC prefix lists
Create a Network Firewall rule group
The next step is to create a Network Firewall rule group. A Network Firewall rule group is a reusable set of criteria for inspecting and handling network traffic. As part of this configuration, we will take advantage of customer-managed VPC prefix lists as a variable to simplify the management of the rules.
To create a Network Firewall rule group
In the Amazon VPC console, in the left navigation pane, choose Network Firewall rule groups.
From the Rule groups tab, select Create Network Firewall rule group, and then do the following, as shown in Figure 4:
For Rule group type, select Stateful rule group.
For Name, enter your network firewall rule group.
For Capacity, enter 25 or another appropriate value.
For Stateful rule group options, select 5-tuple.
Under Stateful rule order, select Default.
Figure 4: Network Firewall rule group
In the IP set references section, do the following, as shown in Figure 5:
For IP set preference variable name, enter new variable names for each of your VPC prefix lists.
From the IP set resource ID dropdown, select an IP set.
In this example, you are creating three IP set references that are mapped to the VPC prefix lists that you configured in the previous sections, as shown in the following table.
IP set references variable name
Mapped VPC prefix list name to IP set references
CIDR block
IP_list_Allow_ssh_subnets
public-ip-list
10.1.2.0/28
IP_list_Private_Deny
private-deny-list
10.0.1.0/24
IP_list_private_subnets
private-allow-list
10.1.3.0/28
Figure 5: Example of IP set references
In the Add rule section, do the following, as shown in Figure 6:
Select the protocol.
For Source, select Custom and then enter the IP set reference variable name for the source IP address with the following format: <@Your_ip_set_reference_name>. In our example, the name is @IP_list_Allow_ssh_subnets.
For Source port, select Custom and enter the appropriate port number.
For Destination, choose Custom and then enter the IP set reference variable name for the destination IP address with the following format: <@Your_ip_set_reference_name>. In our example, the name is @IP_list_Private_subnets.
For Destination port, choose Custom and enter the appropriate port number.
For Traffic direction, select Any.
For Action, select Pass.
Choose Add rule.
Figure 6: Example of a Network Firewall rule group with custom IP set references
For the next set of rules, repeat the preceding steps and choose the appropriate protocol, source, destination, traffic direction, and action, as shown in the following table.
Protocol
Source
Destination
Source port
Destination port
Direction
Action
SSH
@IP_list_Allow_ssh_subnets
@IP_list_private_subnets
22
22
Forward
Pass
SSH
Any
@IP_list_private_subnets
Any
22
Forward
Drop
ICMP
@IP_list_Private_Deny
Any
Any
Any
Forward
Drop
After completion, you will have a set of stateful rules, as shown in Figure 7.
Figure 7: Example list of Network Firewall rules
Congratulations! You have configured Network Firewall rule groups by using VPC prefix lists for a simplified management to allow SSH traffic only from authorized subnets and to deny ICMP traffic from unauthorized subnets.
For the next steps, you can test your configuration by trying to use protocols such as SSH or ICMP from unauthorized subnets to your private subnets and reviewing the behavior. You can also test your configuration by doing the same from authorized subnets and comparing the results. Furthermore, you can create logging and monitoring solutions in Network Firewall to review the dropped or allowed packets from your Network Firewall log groups in CloudWatch Logs or use contributor insights to analyze Network Firewall logs.
Clean up the resources
To clean up the resources that you created for this walkthrough, do the following:
In this post, you learned how to use Amazon VPC managed prefix lists to simplify management of IP addresses within Network Firewall rule groups. IP set preferences that are mapped to your VPC prefix lists are a great tool to help simplify your firewall rules and reduce operational overhead and administration as you scale your network.
A new week starts, and Spring is almost here! If you’re curious about AWS news from the previous seven days, I got you covered.
Last Week’s Launches Here are the launches that got my attention last week:
Amazon S3 – Last week there was AWS Pi Day 2023 celebrating 17 years of innovation since Amazon S3 was introduced on March 14, 2006. For the occasion, the team released many new capabilities:
Amazon S3 has also simplified private connectivity from on-premises networks: with private DNS for S3, on-premises applications can use AWS PrivateLink to access S3 over an interface endpoint, while requests from your in-VPC applications access S3 using gateway endpoints.
We released Mountpoint for Amazon S3, a high performance open source file client. Read more in the blog. Note that Mountpoint isn’t a general-purpose networked file system, and comes with some restrictions on file operations.
Amazon Neptune – Now offers a graph summary API to help understand important metadata about property graphs (PG) and resource description framework (RDF) graphs. Neptune added support for Slow Query Logs to help identify queries that need performance tuning.
Amazon OpenSearch Service – The team introduced security analytics that provides new threat monitoring, detection, and alerting features. The service now supports OpenSearchversion 2.5 that adds several new features such as support for Point in Time Search and improvements to observability and geospatial functionality.
AWS Lake Formation and Apache Hive on Amazon EMR – Introduced fine-grained access controls that allow data administrators to define and enforce fine-grained table and column level security for customers accessing data via Apache Hive running on Amazon EMR.
Amazon Macie is a fully managed data security service that uses machine learning and pattern matching to discover and help protect your sensitive data, such as personally identifiable information (PII), payment card data, and Amazon Web Services (AWS) credentials. Analyzing large volumes of data for the presence of sensitive information can be expensive, due to the nature of compute-intensive operations involved in the process.
Macie offers several capabilities to help customers reduce the cost of discovering sensitive data, including automated data discovery, which can reduce your spend with new data sampling techniques that are custom-built for Amazon Simple Storage Service (Amazon S3). In this post, we will walk through such Macie capabilities and best practices so that you can cost-efficiently discover sensitive data with Macie.
Overview of the Macie pricing plan
Let’s do a quick recap of how customers pay for the Macie service. With Macie, you are charged based on three dimensions: the number of S3 buckets evaluated for bucket inventory and monitoring, the number of S3 objects monitored for automated data discovery, and the quantity of data inspected for sensitive data discovery. You can read more about these dimensions on the Macie pricing page.
The majority of the cost incurred by customers is driven by the quantity of data inspected for sensitive data discovery. For this reason, we will limit the scope of this post to techniques that you can use to optimize the quantity of data that you scan with Macie.
Not all security use cases require the same quantity of data for scanning
Broadly speaking, you can choose to scan your data in two ways—run full scans on your data or sample a portion of it. When to use which method depends on your use cases and business objectives. Full scans are useful when customers have identified what they want to scan. A few examples of such use cases are: scanning buckets that are open to the internet, monitoring a bucket for unintentionally added sensitive data by scanning every new object, or performing analysis on a bucket after a security incident.
The other option is to use sampling techniques for sensitive data discovery. This method is useful when security teams want to reduce data security risks. For example, just knowing that an S3 bucket contains credit card numbers is enough information to prioritize it for remediation activities.
Macie offers both options, and you can discover sensitive data either by creating and running sensitive data discovery jobs that perform full scans on targeted locations, or by configuring Macie to perform automated sensitive data discovery for your account or organization. You can also use both options simultaneously in Macie.
Use automated data discovery as a best practice
Automated data discovery in Macie minimizes the quantity of data scanning that is needed to a fraction of your S3 estate.
When you enable Macie for the first time, automated data discovery is enabled by default. When you already use Macie in your organization, you can enable automatic data discovery in the management console of the Amazon Macie administrator account. This Macie capability automatically starts discovering sensitive data in your S3 buckets and builds a sensitive data profile for each bucket. The profiles are organized in a visual, interactive data map, and you can use the data map to identify data security risks that need immediate attention.
Automated data discovery in Macie starts to evaluate the level of sensitivity of each of your buckets by using intelligent and fully managed data sampling techniques to minimize the quantity of data scanning needed. During evaluation, objects are organized with similar S3 metadata, such as bucket names, object-key prefixes, file-type extensions, and storage class, into groups that are likely to have similar content. Macie then selects small, but representative, samples from each identified group of objects and scans them to detect the presence of sensitive data. Macie has a feedback loop that uses the results of previously scanned samples to prioritize the next set of samples to inspect.
The automated sensitive data discovery feature is designed to detect sensitive data at scale across hundreds of buckets and accounts, which makes it easier to identify the S3 buckets that need to be prioritized for more focused scanning. Because the amount of data that needs to be scanned is reduced, this task can be done at fraction of the cost of running a full data inspection across all your S3 buckets. The Macie console displays the scanning results as a heat map (Figure 1), which shows the consolidated information grouped by account, and whether a bucket is sensitive, not sensitive, or not analyzed yet.
Figure 1: A heat map showing the results of automated sensitive data discovery
There is a 30-day free trial period when you enable automatic data discovery on your AWS account. During the trial period, in the Macie console, you can see the estimated cost of running automated sensitive data discovery after the trial period ends. After the evaluation period, we charge based on the total quantity of S3 objects in your account, as well as the bytes that are scanned for sensitive content. Charges are prorated per day. You can disable this capability at any time.
Tune your monthly spend on automated sensitive data discovery
To further reduce your monthly spend on automated sensitive data, Macie allows you to exclude buckets from automated discovery. For example, you might consider excluding buckets that are used for storing operational logs, if you’re sure they don’t contain any sensitive information. Your monthly spend is reduced roughly by the percentage of data in those excluded buckets compared to your total S3 estate.
Figure 2 shows the setting in the heatmap area of the Macie console that you can use to exclude a bucket from automated discovery.
Figure 2: Excluding buckets from automated sensitive data discovery from the heatmap
You can also use the automated data discovery settings page to specify multiple buckets to be excluded, as shown in Figure 3.
Figure 3: Excluding buckets from the automated sensitive data discovery settings page
How to run targeted, cost-efficient sensitive data discovery jobs
Making your sensitive data discovery jobs more targeted make them more cost-efficient, because it reduces the quantity of data scanned. Consider using the following strategies:
Make your sensitive data discovery jobs as targeted and specific as possible in their scope by using the Object criteria settings on the Refine the scope page, shown in Figure 4.
Figure 4: Adjusting the scope of a sensitive data discovery job
Options to make discovery jobs more targeted include:
Include objects by using the “last modified” criterion — If you are aware of the frequency at which your classifiable S3-hosted objects get modified, and you want to scan the resources that changed at a particular point in time, include in your scope the objects that were modified at a certain date or time by using the “last modified” criterion.
Consider using random object sampling — With this option, you specify the percentage of eligible S3 objects that you want Macie to analyze when a sensitive data discovery job runs. If this value is less than 100%, Macie selects eligible objects to analyze at random, up to the specified percentage, and analyzes the data in those objects. If your data is highly consistent and you want to determine whether a specific S3 bucket, rather than each object, contains sensitive information, adjust the sampling depth accordingly.
Include objects with specific extensions, tags, or storage size — To fine tune the scope of a sensitive data discovery job, you can also define custom criteria that determine which S3 objects Macie includes or excludes from a job’s analysis. These criteria consist of one or more conditions that derive from properties of S3 objects. You can exclude objects with specific file name extensions, exclude objects by using tags as the criterion, and exclude objects on the basis of their storage size. For example, you can use a criteria-based job to scan the buckets associated with specific tag key/value pairs such as Environment: Production.
Specify S3 bucket criteria in your job — Use a criteria-based job to scan only buckets that have public read/write access. For example, if you have 100 buckets with 10 TB of data, but only two of those buckets containing 100 GB are public, you could reduce your overall Macie cost by 99% by using a criteria-based job to classify only the public buckets.
Consider scheduling jobs based on how long objects live in your S3 buckets. Running jobs at a higher frequency than needed can result in unnecessary costs in cases where objects are added and deleted frequently. For example, if you’ve determined that the S3 objects involved contain high velocity data that is expected to reside in your S3 bucket for a few days, and you’re concerned that sensitive data might remain, scheduling your jobs to run at a lower frequency will help in driving down costs. In addition, you can deselect the Include existing objects checkbox to scan only new objects.
Figure 5: Specifying the frequency of a sensitive data discovery job
As a best practice, review your scheduled jobs periodically to verify that they are still meaningful to your organization. If you aren’t sure whether one of your periodic jobs continues to be fit for purpose, you can pause it so that you can investigate whether it is still needed, without incurring potentially unnecessary costs in the meantime. If you determine that a periodic job is no longer required, you can cancel it completely.
Figure 6: Pausing a scheduled sensitive data discovery job
If you don’t know where to start to make your jobs more targeted, use the results of Macie automated data discovery to plan your scanning strategy. Start with small buckets and the ones that have policy findings associated with them.
In multi-account environments, you can monitor Macie’s usage across your organization in AWS Organizations through the usage page of the delegated administrator account. This will enable you to identify member accounts that are incurring higher costs than expected, and you can then investigate and take appropriate actions to keep expenditure low.
Take advantage of the Macie pricing calculator so that you get an estimate of your Macie fees in advance.
Conclusion
In this post, we highlighted the best practices to keep in mind and configuration options to use when you discover sensitive data with Amazon Macie. We hope that you will walk away with a better understanding of when to use the automated data discovery capability and when to run targeted sensitive data discovery jobs. You can use the pointers in this post to tune the quantity of data you want to scan with Macie, so that you can continuously optimize your Macie spend.
If you have feedback about this post, submit comments in the Comments section below. If you have questions about this post, start a new thread on Amazon Macie re:Post.
Want more AWS Security news? Follow us on Twitter.
This blog post was written by Abeer Naffa’, Sr. Solutions Architect, Solutions Builder AWS, David Filiatrault, Principal Security Consultant, AWS and Jared Thompson, Hybrid Edge SA Specialist, AWS.
In this post, we will explore how organizations can use AWS Control Tower landing zone and AWS Organizations custom guardrails to enable compliance with data residency requirements on AWS Outposts rack. We will discuss how custom guardrails can be leveraged to limit the ability to store, process, and access data and remain isolated in specific geographic locations, how they can be used to enforce security and compliance controls, as well as, which prerequisites organizations should consider before implementing these guardrails.
Data residency is a critical consideration for organizations that collect and store sensitive information, such as Personal Identifiable Information (PII), financial, and healthcare data. With the rise of cloud computing and the global nature of the internet, it can be challenging for organizations to make sure that their data is being stored and processed in compliance with local laws and regulations.
One potential solution for addressing data residency challenges with AWS is to use Outposts rack, which allows organizations to run AWS infrastructure on premises and in their own data centers. This lets organizations store and process data in a location of their choosing. An Outpost is seamlessly connected to an AWS Region where it has access to the full suite of AWS services managed from a single plane of glass, the AWS Management Console or the AWS Command Line Interface (AWS CLI). Outposts rack can be configured to utilize landing zone to further adhere to data residency requirements.
The landing zones are a set of tools and best practices that help organizations establish a secure and compliant multi-account structure within a cloud provider. A landing zone can also include Organizations to set policies – guardrails – at the root level, known as Service Control Policies (SCPs) across all member accounts. This can be configured to enforce certain data residency requirements.
When leveraging Outposts rack to meet data residency requirements, it is crucial to have control over the in-scope data movement from the Outposts. This can be accomplished by implementing landing zone best practices and the suggested guardrails. The main focus of this blog post is on the custom policies that restrict data snapshots, prohibit data creation within the Region, and limit data transfer to the Region.
Prerequisites
Landing zone best practices and custom guardrails can help when data needs to remain in a specific locality where the Outposts rack is also located. This can be completed by defining and enforcing policies for data storage and usage within the landing zone organization that you set up. The following prerequisites should be considered before implementing the suggested guardrails:
1. AWS Outposts rack
AWS has installed your Outpost and handed off to you. An Outpost may comprise of one or more racks connected together at the site. This means that you can start using AWS services on the Outpost, and you can manage the Outposts rack using the same tools and interfaces that you use in AWS Regions.
2. Landing Zone Accelerator on AWS
We recommend using Landing Zone Accelerator on AWS (LZA) to deploy a landing zone for your organization. Make sure that the accelerator is configured for the appropriate Region and industry. To do this, you must meet the following prerequisites:
A clear understanding of your organization’s compliance requirements, including the specific Region and industry rules in which you operate.
Knowledge of the different LZAs available and their capabilities, such as the compliance frameworks with which you align.
Have the necessary permissions to deploy the LZAs and configure it for your organization’s specific requirements.
Note that LZAs are designed to help organizations quickly set up a secure, compliant multi-account environment. However, it’s not a one-size-fits-all solution, and you must align it with your organization’s specific requirements.
3. Set up the data residency guardrails
Using Organizations, you must make sure that the Outpost is ordered within a workload account in the landing zone.
Figure 1: Landing Zone Accelerator – Outposts workload on AWS high level Architecture
Utilizing Outposts rack for regulated components
When local regulations require regulated workloads to stay within a specific boundary, or when an AWS Region or AWS Local Zone isn’t available in your jurisdiction, you can still choose to host your regulated workloads on Outposts rack for a consistent cloud experience. When opting for Outposts rack, note that, as part of the shared responsibility model, customers are responsible for attesting to physical security, access controls, and compliance validation regarding the Outposts, as well as, environmental requirements for the facility, networking, and power. Utilizing Outposts rack requires that you procure and manage the data center within the city, state, province, or country boundary for your applications’ regulated components, as required by local regulations.
Procuring two or more racks in the diverse data centers can help with the high availability for your workloads. This is because it provides redundancy in case of a single rack or server failure. Additionally, having redundant network paths between Outposts rack and the parent Region can help make sure that your application remains connected and continue to operate even if one network path fails.
However, for regulated workloads with strict service level agreements (SLA), you may choose to spread Outposts racks across two or more isolated data centers within regulated boundaries. This helps make sure that your data remains within the designated geographical location and meets local data residency requirements.
In this post, we consider a scenario with one data center, but consider the specific requirements of your workloads and the regulations that apply to determine the most appropriate high availability configurations for your case.
Outposts rack workload data residency guardrails
Organizations provide central governance and management for multiple accounts. Central security administrators use SCPs with Organizations to establish controls to which all AWS Identity and Access Management (IAM) principals (users and roles) adhere.
Now, you can use SCPs to set permission guardrails. A suggested preventative controls for data residency on Outposts rack that leverage the implementation of SCPs are shown as follows. SCPs enable you to set permission guardrails by defining the maximum available permissions for IAM entities in an account. If an SCP denies an action for an account, then none of the entities in the account can take that action, even if their IAM permissions let them. The guardrails set in SCPs apply to all IAM entities in the account, which include all users, roles, and the account root user.
Upon finalizing these prerequisites, you can create the guardrails for the Outposts Organization Unit (OU).
Note that while the following guidelines serve as helpful guardrails – SCPs – for data residency, you should consult internally with legal and security teams for specific organizational requirements.
To exercise better control over workloads in the Outposts rack and prevent data transfer from Outposts to the Region or data storage outside the Outposts, consider implementing the following guardrails. Additionally, local regulations may dictate that you set up these additional guardrails.
When your data residency requirements require restricting data transfer/saving to the Region, consider the following guardrails:
If your data residency requirements mandate restrictions on data storage in the Region, consider implementing this guardrail to prevent the use of S3 in the Region.
c. If your data residency requirements mandate restrictions on data storage in the Region, consider implementing “DenyDirectTransferToRegion” guardrail.
Out of Scope is metadata such as tags, or operational data such as KMS keys.
If your data residency requirements require limitations on data storage in the Region, consider implementing this guardrail “DenySnapshotsToRegion” and “DenySnapshotsNotOutposts” to restrict the use of snapshots in the Region.
a. Deny creating snapshots of your Outpost data in the Region “DenySnapshotsToRegion”
Make sure to update the Outposts “<outpost_arn_pattern>”.
b. Deny copying or modifying Outposts Snapshots “DenySnapshotsNotOutposts”
Make sure to update the Outposts “<outpost_arn_pattern>”.
Note: “<outpost_arn_pattern>” default is arn:aws:outposts:*:*:outpost/*
This guardrail helps to prevent the launch of Amazon EC2 instances or creation of network interfaces in non-Outposts subnets. It is advisable to keep data residency workloads within the Outposts rather than the Region to ensure better control over regulated workloads. This approach can help your organization achieve better control over data residency workloads and improve governance over your AWS Organization.
Make sure to update the Outposts subnets “<outpost_subnet_arns>”.
When implementing data residency guardrails on Outposts rack, consider backup and disaster recovery strategies to make sure that your data is protected in the event of an outage or other unexpected events. This may include creating regular backups of your data, implementing disaster recovery plans and procedures, and using redundancy and failover systems to minimize the impact of any potential disruptions. Additionally, you should make sure that your backup and disaster recovery systems are compliant with any relevant data residency regulations and requirements. You should also test your backup and disaster recovery systems regularly to make sure that they are functioning as intended.
Additionally, the provided SCPs for Outposts rack in the above example do not block the “logs:PutLogEvents”. Therefore, even if you implemented data residency guardrails on Outpost, the application may log data to CloudWatch logs in the Region.
Highlights
By default, application-level logs on Outposts rack are not automatically sent to Amazon CloudWatch Logs in the Region. You can configure CloudWatch logs agent on Outposts rack to collect and send your application-level logs to CloudWatch logs.
logs: PutLogEvents does transmit data to the Region, but it is not blocked by the provided SCPs, as it’s expected that most use cases will still want to be able to use this logging API. However, if blocking is desired, then add the action to the first recommended guardrail. If you want specific roles to be allowed, then combine with the ArnNotLike condition example referenced in the previous highlight.
Conclusion
The combined use of Outposts rack and the suggested guardrails via AWS Organizations policies enables you to exercise better control over the movement of the data. By creating a landing zone for your organization, you can apply SCPs to your Outposts racks that will help make sure that your data remains within a specific geographic location, as required by the data residency regulations.
Note that, while custom guardrails can help you manage data residency on Outposts rack, it’s critical to thoroughly review your policies, procedures, and configurations to make sure that they are compliant with all relevant data residency regulations and requirements. Regularly testing and monitoring your systems can help make sure that your data is protected and your organization stays compliant.
We’ve launched a new AWS Security Blog homepage! While we currently have no plans to deprecate our existing list-view homepage, we have recently launched a new, security-centered homepage to provide readers with more blog info and easy access to the rest of AWS Security. Please bookmark the new page, and let us know what you think, by adding a comment, below.
The new AWS Security Blog homepage
If you have feedback about this post, submit comments in the Comments section below.
Want more AWS Security news? Follow us on Twitter.
Companies that store and process data on Amazon Web Services (AWS) want to prevent transfers of that data to or from locations outside of their company’s control. This is to support security strategies, such as data loss prevention, or to comply with the terms and conditions set forth by various regulatory and privacy agreements. On AWS, a resource perimeter is a set of AWS Identity and Access Management (IAM) features and capabilities that you can use to build your defense-in-depth protection against unintended data transfers. In this third blog post of the Establishing a data perimeter on AWS series, we review the benefits and implementation considerations when you define your resource perimeter.
The resource perimeter is one of the three perimeters in the data perimeter framework on AWS and has the following two control objectives:
My identities can access only trusted resources – This helps to ensure that IAM principals that belong to your AWS Organizations organization can access only the resources that you trust.
Only trusted resources can be accessed from my network – This helps to ensure that only resources that you trust can be accessed through expected networks, regardless of the principal that is making the API call.
Trusted resources are the AWS resources, such as Amazon Simple Storage Service (Amazon S3) buckets and objects or Amazon Simple Notification Service (Amazon SNS) topics, that are owned by your organization and in which you store and process your data. Additionally, there are resources outside your organization that your identities or AWS services acting on your behalf might need to access. You will need to consider these access patterns when you define your resource perimeter.
Security risks addressed by the resource perimeter
The resource perimeter helps address three main security risks.
Unintended data disclosure through use of corporate credentials — Your developers might have a personal AWS account that is not part of your organization. In that account, they could configure a resource with a resource-based policy that allows their corporate credentials to interact with the resource. For example, they could write an S3 bucket policy that allows them to upload objects by using their corporate credentials. This could allow the intentional or unintentional transfer of data from your corporate environment — your on-premises network or virtual private cloud (VPC) — to their personal account. While you advance through your least privilege journey, you should make sure that access to untrusted resources is prohibited, regardless of the permissions granted by identity-based policies that are attached to your IAM principals. Figure 1 illustrates an unintended access pattern where your employee uses an identity from your organization to move data from your on-premises or AWS environment to an S3 bucket in a non-corporate AWS account.
Figure 1: Unintended data transfer to an S3 bucket outside of your organization by your identities
Unintended data disclosure through non-corporate credentials usage — There is a risk that developers could introduce personal IAM credentials to your corporate network and attempt to move company data to personal AWS resources. We discussed this security risk in a previous blog post: Establishing a data perimeter on AWS: Allow only trusted identities to access company data. In that post, we described how to use the aws:PrincipalOrgID condition key to prevent the use of non-corporate credentials to move data into an untrusted location. In the current post, we will show you how to implement resource perimeter controls as a defense-in-depth approach to mitigate this risk.
Unintended data infiltration — There are situations where your developers might start the solution development process using commercial datasets, tooling, or software and decide to copy them from repositories, such as those hosted on public S3 buckets. This could introduce malicious components into your corporate environment, your on-premises network, or VPCs. Establishing the resource perimeter to only allow access to trusted resources from your network can help mitigate this risk. Figure 2 illustrates the access pattern where an employee with corporate credentials downloads assets from an S3 bucket outside of your organization.
Figure 2: Unintended data infiltration
Implement the resource perimeter
To achieve the resource perimeter control objectives, you can implement guardrails in your AWS environment by using the following AWS policy types:
Service control policies (SCPs) – Organization policies that are used to centrally manage and set the maximum available permissions for your IAM principals. SCPs help you ensure that your accounts stay within your organization’s access control guidelines. In the context of the resource perimeter, you will use SCPs to help prevent access to untrusted resources from AWS principals that belong to your organization.
VPC endpoint policy – An IAM resource-based policy that is attached to a VPC endpoint to control which principals, actions, and resources can be accessed through a VPC endpoint. In the context of the resource perimeter, VPC endpoint policies are used to validate that the resource the principal is trying to access belongs to your organization.
The condition key used to constrain access to resources in your organization is aws:ResourceOrgID. You can set this key in an SCP or VPC endpoint policy. The following table summarizes the relationship between the control objectives and the AWS capabilities used to implement the resource perimeter.
Control objective
Implemented by using
Primary IAM capability
My identities can access only trusted resources
SCPs
aws:ResourceOrgID
Only trusted resources can be accessed from my network
VPC endpoint policies
aws:ResourceOrgID
In the next section, you will learn how to use the IAM capabilities listed in the preceding table to implement each control objective of the resource perimeter.
My identities can access only trusted resources
The following is an example of an SCP that limits all actions to only the resources that belong to your organization. Replace <MY-ORG-ID> with your information.
In this policy, notice the use of the negated condition key StringNotEqualsIfExists. This means that this condition will evaluate to true and the policy will deny API calls if the organization identifier of the resource that is being accessed differs from the one specified in the policy. It also means that this policy will deny API calls if the resource being accessed belongs to a standalone account, which isn’t part of an organization. The negated condition operators in the Deny statement mean that the condition still evaluates to true if the key is not present in the request; however, as a best practice, I added IfExists to the end of the StringNotEquals operator to clearly express the intent in the policy.
Note that for a permission to be allowed for a specific account, a statement that allows access must exist at every level of the hierarchy of your organization.
Only trusted resources can be accessed from my network
You can achieve this objective by combining the SCP we just reviewed with the use of aws:PrincipalOrgID in your VPC endpoint policies, as shown in the Establishing a data perimeter on AWS: Allow only trusted identities to access company data blog post. However, as a defense in depth, you can also apply resource perimeter controls on your networks by using aws:ResourceOrgID in your VPC endpoint policies.
The following is an example of a VPC endpoint policy that allows access to all actions but limits access to only trusted resources and identities that belong to your organization. Replace <MY-ORG-ID> with your information.
The preceding VPC endpoint policy uses the StringEquals condition operator. To invoke the Allow effect, the principal making the API call and the resource they are trying to access both need to belong to your organization. Compared to the SCP example that we reviewed earlier, your intent for this policy is different — you want to make sure that the Allow condition evaluates to true only if the specified key exists in the request. Additionally, VPC endpoint policies apply to principals, as long as their request flows through the VPC endpoint.
In VPC endpoint policies, you do not grant permissions; rather, you define the maximum allowed access through the network. Therefore, this policy uses an Allow effect.
Extend your resource perimeter
The previous two policies help you ensure that your identities and networks can only be used to access AWS resources that belong to your organization. However, your company might require that you extend your resource perimeter to also include AWS owned resources — resources that do not belong to your organization and that are accessed by your principals or by AWS services acting on your behalf. For example, if you use the AWS Service Catalog in your environment, the service creates and uses Amazon S3 buckets that are owned by the service to store products. To allow your developers to successfully provision AWS Service Catalog products, your resource perimeter needs to account for this access pattern. The following statement shows how to account for the service catalog access pattern. Replace <MY-ORG-ID> with your information.
Note that the EnforceResourcePerimeter statement in the SCP was modified to exclude s3:GetObject, s3:PutObject, and s3:PutObjectAcl actions from its effect (NotAction element). This is because these actions are performed by the Service Catalog to access service-owned S3 buckets. These actions are then restricted in the ExtendResourcePerimeter statement, which includes two negated condition keys. The second statement denies the previously mentioned S3 actions unless the resource that is being accessed belongs to your organization (StringNotEqualsIfExists with aws:ResourceOrgID), or the actions are performed by Service Catalog on your behalf (ForAllValues:StringNotEquals with aws:CalledVia). The aws:CalledVia condition key compares the services specified in the policy with the services that made requests on behalf of the IAM principal by using that principal’s credentials. In the case of the Service Catalog, the credentials of a principal who launches a product are used to access S3 buckets that are owned by the Service Catalog.
It is important to highlight that we are purposely not using the aws:ViaAWSService condition key in the preceding policy. This is because when you extend your resource perimeter, we recommend that you restrict access to only calls to buckets that are accessed by the service you are using.
You might also need to extend your resource perimeter to include the third-party resources of your partners. For example, you could be working with business partners that require your principals to upload or download data to or from S3 buckets that belong to their account. In this case, you can use the aws:ResourceAccount condition key in your resource perimeter policy to specify resources that belong to the trusted third-party account.
The following is an example of an SCP that accounts for access to the Service Catalog and third-party partner resources. Replace <MY-ORG-ID> and <THIRD-PARTY-ACCOUNT> with your information.
To account for access to trusted third-party account resources, the condition StringNotEqualsIfExists in the ExtendResourcePerimeter statement now also contains the condition key aws:ResourceAccount. Now, the second statement denies the previously mentioned S3 actions unless the resource that is being accessed belongs to your organization (StringNotEqualsIfExists with aws:ResourceOrgID), to a trusted third-party account (StringNotEqualsIfExists with aws:ResourceAccount), or the actions are performed by Service Catalog on your behalf (ForAllValues:StringNotEquals with aws:CalledVia).
The next policy example demonstrates how to extend your resource perimeter to permit access to resources that are owned by your trusted third parties through the networks that you control. This is required if applications running in your VPC or on-premises need to be able to access a dataset that is created and maintained in your business partner AWS account. Similar to the SCP example, you can use the aws:ResourceAccount condition key in your VPC endpoint policy to account for this access pattern. Replace <MY-ORG-ID>, <THIRD-PARTY-ACCOUNT>, and <THIRD-PARTY-RESOURCE-ARN> with your information.
The second statement, AllowRequestsByOrgsIdentitiesToThirdPartyResources, in the updated VPC endpoint policy allows s3:GetObject, s3:PutObject, and s3:PutObjectAcl actions on trusted third-party resources (StringEquals with aws:ResourceAccount) by principals that belong to your organization (StringEquals with aws:PrincipalOrgID).
Note that you do not need to modify your VPC endpoint policy to support the previously discussed Service Catalog operations. This is because calls to Amazon S3 made by Service Catalog on your behalf originate from the Service Catalog service network and do not traverse your VPC endpoint. However, you should consider access patterns that are similar to the Service Catalog example when defining your trusted resources. To learn about services with similar access patterns, see the IAM policy samples section later in this post.
Our GitHub repository contains policy examples that illustrate how to implement perimeter controls for a variety of AWS services. The policy examples in the repository are for reference only. You will need to tailor them to suit the specific needs of your AWS environment.
Conclusion
In this blog post, you learned about the resource perimeter, the control objectives achieved by the perimeter, and how to write SCPs and VPC endpoint policies that help achieve these objectives for your organization. You also learned how to extend your perimeter to include AWS service-owned resources and your third-party partner-owned resources.
For additional learning opportunities, see the Data perimeters on AWS page. This information resource provides additional materials such as a data perimeter workshop, blog posts, whitepapers, and webinar sessions.
If you have questions, comments, or concerns, contact AWS Support or browse AWS re:Post. If you have feedback about this post, submit comments in the Comments section below.
Want more AWS Security news? Follow us on Twitter.
The new IRAP report includes an additional six AWS services, as well as the new AWS Melbourne Region, that are now assessed at the PROTECTED level under IRAP. This brings the total number of services assessed at the PROTECTED level to 139.
The following are the six newly assessed services:
AWS has developed an IRAP documentation pack to assist Australian government agencies and their partners to plan, architect, and assess risk for their workloads when they use AWS Cloud services.
The IRAP pack on AWS Artifact also includes newly updated versions of the AWS Consumer Guide and the whitepaper Reference Architectures for ISM PROTECTED Workloads in the AWS Cloud.
Reach out to your AWS representatives to let us know which additional services you would like to see in scope for upcoming IRAP assessments. We strive to bring more services into scope at the PROTECTED level under IRAP to support your requirements.
If you have feedback about this post, submit comments in the Comments section below. If you have questions about this post, contact AWS Support.
Want more AWS Security news? Follow us on Twitter.
The collective thoughts of the interwebz
Manage Consent
To provide the best experiences, we use technologies like cookies to store and/or access device information. Consenting to these technologies will allow us to process data such as browsing behavior or unique IDs on this site. Not consenting or withdrawing consent, may adversely affect certain features and functions.
Functional
Always active
The technical storage or access is strictly necessary for the legitimate purpose of enabling the use of a specific service explicitly requested by the subscriber or user, or for the sole purpose of carrying out the transmission of a communication over an electronic communications network.
Preferences
The technical storage or access is necessary for the legitimate purpose of storing preferences that are not requested by the subscriber or user.
Statistics
The technical storage or access that is used exclusively for statistical purposes.The technical storage or access that is used exclusively for anonymous statistical purposes. Without a subpoena, voluntary compliance on the part of your Internet Service Provider, or additional records from a third party, information stored or retrieved for this purpose alone cannot usually be used to identify you.
Marketing
The technical storage or access is required to create user profiles to send advertising, or to track the user on a website or across several websites for similar marketing purposes.