Post Syndicated from Otavio Ferreira original https://aws.amazon.com/blogs/security/mask-and-redact-sensitive-data-published-to-amazon-sns-using-managed-and-custom-data-identifiers/
Today, we’re announcing a new capability for Amazon Simple Notification Service (Amazon SNS) message data protection. In this post, we show you how you can use this new capability to create custom data identifiers to detect and protect domain-specific sensitive data, such as your company’s employee IDs. Previously, you could only use managed data identifiers to detect and protect common sensitive data, such as names, addresses, and credit card numbers.
Overview
Amazon SNS is a serverless messaging service that provides topics for push-based, many-to-many messaging for decoupling distributed systems, microservices, and event-driven serverless applications. As applications become more complex, it can become challenging for topic owners to manage the data flowing through their topics. These applications might inadvertently start sending sensitive data to topics, increasing regulatory risk. To mitigate the risk, you can use message data protection to protect sensitive application data using built-in, no-code, scalable capabilities.
To discover and protect data flowing through SNS topics with message data protection, you can associate data protection policies to your topics. Within these policies, you can write statements that define which types of sensitive data you want to discover and protect. Within each policy statement, you can then define whether you want to act on data flowing inbound to an SNS topic or outbound to an SNS subscription, the AWS accounts or specific AWS Identity and Access Management (IAM) principals the statement applies to, and the actions you want to take on the sensitive data found.
Now, message data protection provides three actions to help you protect your data. First, the audit operation reports on the amount of sensitive data found. Second, the deny operation helps prevent the publishing or delivery of payloads that contain sensitive data. Third, the de-identify operation can mask or redact the sensitive data detected. These no-code operations can help you adhere to a variety of compliance regulations, such as Health Insurance Portability and Accountability Act (HIPAA), Federal Risk and Authorization Management Program (FedRAMP), General Data Protection Regulation (GDPR), and Payment Card Industry Data Security Standard (PCI DSS).
This message data protection feature coexists with the message data encryption feature in SNS, both contributing to an enhanced security posture of your messaging workloads.
Managed and custom data identifiers
After you add a data protection policy to your SNS topic, message data protection uses pattern matching and machine learning models to scan your messages for sensitive data, then enforces the data protection policy in real time. The types of sensitive data are referred to as data identifiers. These data identifiers can be either managed by Amazon Web Services (AWS) or custom to your domain.
Managed data identifiers (MDI) are organized into five categories:
- Personally identifiable information (PII) includes data identifiers such as name, home address, email address, and social security number
- Protected health information (PHI) examples include healthcare card number, prescription drug code, and healthcare procedure code
- Financial information examples include bank account number, credit card number, and credit card magnetic strip data
- Credential information examples include AWS secret access key, SSH private key, and PGP private key
- Device information examples include IP addresses
In a data protection policy statement, you refer to a managed data identifier using its Amazon Resource Name (ARN), as follows:
Custom data identifiers (CDI), on the other hand, enable you to define custom regular expressions in the data protection policy itself, then refer to them from policy statements. Using custom data identifiers, you can scan for business-specific sensitive data, which managed data identifiers can’t. For example, you can use a custom data identifier to look for company-specific employee IDs in SNS message payloads. Internally, SNS has guardrails to make sure custom data identifiers are safe and that they add only low single-digit millisecond latency to message processing.
In a data protection policy statement, you refer to a custom data identifier using only the name that you have given it, as follows:
Note that custom data identifiers can be used in conjunction with managed data identifiers, as part of the same data protection policy statement. In the preceding example, both MyCompanyEmployeeId and CreditCardNumber are in scope.
For more information, see Data Identifiers, in the SNS Developer Guide.
Inbound and outbound data directions
In addition to the DataIdentifier property, each policy statement also sets the DataDirection property (whose value can be either Inbound or Outbound) as well as the Principal property (whose value can be any combination of AWS accounts, IAM users, and IAM roles).
When you use message data protection for data de-identification and set DataDirection to Inbound, instances of DataIdentifier published by the Principal are masked or redacted before the payload is ingested into the SNS topic. This means that every endpoint subscribed to the topic receives the same modified payload.
When you set DataDirection to Outbound, on the other hand, the payload is ingested into the SNS topic as-is. Then, instances of DataIdentifier are either masked, redacted, or kept as-is for each subscribing Principal in isolation. This means that each endpoint subscribed to the SNS topic might receive a different payload from the topic, with different sensitive data de-identified, according to the data access permissions of its Principal.
The following snippet expands the example data protection policy to include the DataDirection and Principal properties.
In this example, ReportingApplicationRole is the authenticated IAM principal that called the SNS Subscribe API at subscription creation time. For more information, see How do I determine the IAM principals for my data protection policy? in the SNS Developer Guide.
Operations for data de-identification
To complete the policy statement, you need to set the Operation property, which informs the SNS topic of the action that it should take when it finds instances of DataIdentifer in the outbound payload.
The following snippet expands the data protection policy to include the Operation property, in this case using the Deidentify object, which in turn supports masking and redaction.
In this example, the MaskConfig object instructs the SNS topic to mask instances of CreditCardNumber in Outbound messages to subscriptions created by ReportingApplicationRole, using the MaskWithCharacter value, which in this case is the hash symbol (#). Alternatively, you could have used the RedactConfig object instead, which would have instructed the SNS topic to simply cut the sensitive data off the payload.
The following snippet shows how the outbound payload is masked, in real time, by the SNS topic.
For more information, see Data Protection Policy Operations, in the SNS Developer Guide.
Applying data de-identification in a use case
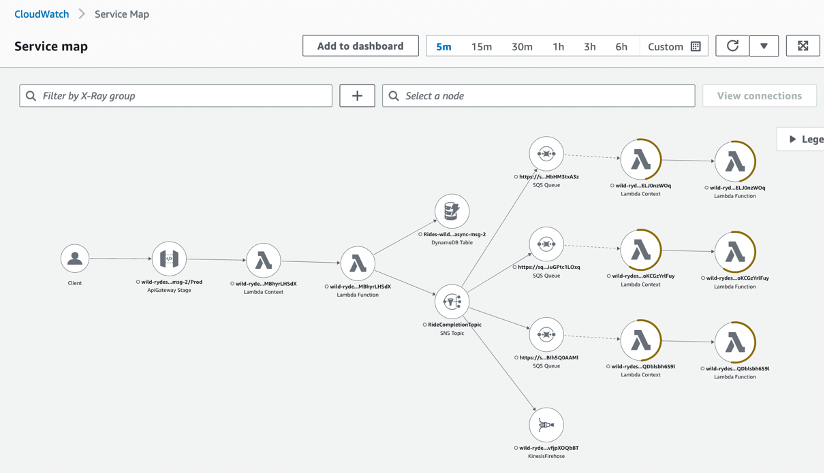
Consider a company where managers use an internal expense report management application where expense reports from employees can be reviewed and approved. Initially, this application depended only on an internal payment application, which in turn connected to an external payment gateway. However, this workload eventually became more complex, because the company started also paying expense reports filed by external contractors. At that point, the company built a mobile application that external contractors could use to view their approved expense reports. An important business requirement for this mobile application was that specific financial and PII data needed to be de-identified in the externally displayed expense reports. Specifically, both the credit card number used for the payment and the internal employee ID that approved the payment had to be masked.

Figure 1: Expense report processing application
To distribute the approved expense reports to both the payment application and the reporting application that backed the mobile application, the company used an SNS topic with a data protection policy. The policy has only one statement, which masks credit card numbers and employee IDs found in the payload. This statement applies only to the IAM role that the company used for subscribing the AWS Lambda function of the reporting application to the SNS topic. This access permission configuration enabled the Lambda function from the payment application to continue receiving the raw data from the SNS topic.
The data protection policy from the previous section addresses this use case. Thus, when a message representing an expense report is published to the SNS topic, the Lambda function in the payment application receives the message as-is, whereas the Lambda function in the reporting application receives the message with the financial and PII data masked.
Deploying the resources
You can apply a data protection policy to an SNS topic using the AWS Management Console, AWS Command Line Interface (AWS CLI), AWS SDK, or AWS CloudFormation.
To automate the provisioning of the resources and the data protection policy of the example expense management use case, we’re going to use CloudFormation templates. You have two options for deploying the resources:
- Run the /templates/message_data_protection_cdi/deploy script in the aws-sns-samples repository in GitHub.
- Alternatively, use the following four CloudFormation templates, in order. Allow time for each stack to complete before deploying the next stack.
Deploy using the individual CloudFormation templates in sequence
- Prerequisites template: This first template provisions two IAM roles with a managed policy that enables them to create SNS subscriptions and configure the subscriber Lambda functions. You will use these provisioned IAM roles in steps 3 and 4 that follow.
- Topic owner template: The second template provisions the SNS topic along with its access policy and data protection policy.
- Payment subscriber template: The third template provisions the Lambda function and the corresponding SNS subscription that comprise of the Payment application stack. When prompted, select the PaymentApplicationRole in the Permissions panel before running the template. Moreover, the CloudFormation console will require you to acknowledge that a CloudFormation transform might require access capabilities.
- Reporting subscriber template: The final template provisions the Lambda function and the SNS subscription that comprise of the Reporting application stack. When prompted, select the ReportingApplicationRole in the Permissions panel, before running the template. Moreover, the CloudFormation console will require, once again, that you acknowledge that a CloudFormation transform might require access capabilities.

Figure 2: Select IAM role
Now that the application stacks have been deployed, you’re ready to start testing.
Testing the data de-identification operation
Use the following steps to test the example expense management use case.
- In the Amazon SNS console, select the ApprovalTopic, then choose to publish a message to it.
- In the SNS message body field, enter the following message payload, representing an external contractor expense report, then choose to publish this message:
- In the CloudWatch console, select the log group for the PaymentLambdaFunction, then choose to view its latest log stream. Now look for the log stream entry that shows the message payload received by the Lambda function. You will see that no data has been masked in this payload, as the payment application requires raw financial data to process the credit card transaction.
- Still in the CloudWatch console, select the log group for the ReportingLambdaFunction, then choose to view its latest log stream. Now look for the log stream entry that shows the message payload received by this Lambda function. You will see that the values for properties credit_card_number and employee_id have been masked, protecting the financial data from leaking into the external reporting application.
As shown, different subscribers received different versions of the message payload, according to their sensitive data access permissions.
Cleaning up the resources
After testing, avoid incurring usage charges by deleting the resources that you created. Open the CloudFormation console and delete the four CloudFormation stacks that you created during the walkthrough.
Conclusion
This post showed how you can use Amazon SNS message data protection to discover and protect sensitive data published to or delivered from your SNS topics. The example use case shows how to create a data protection policy that masks messages delivered to specific subscribers if the payloads contain financial or personally identifiable information.
For more details, see message data protection in the SNS Developer Guide. For information on costs, see SNS pricing.
If you have feedback about this post, submit comments in the Comments section below. If you have questions about this post, start a new thread on AWS re:Post or contact AWS Support.
Want more AWS Security how-to content, news, and feature announcements? Follow us on Twitter.


 Virendhar (Viru) Sivaraman is a strategic Senior Big Data & Analytics Architect with Amazon Web Services. He is passionate about building scalable big data and analytics solutions in the cloud. Besides work, he enjoys spending time with family, hiking & mountain biking.
 Vivek Shrivastava is a Principal Data Architect, Data Lake in AWS Professional Services. He is a Bigdata enthusiast and holds 14 AWS Certifications. He is passionate about helping customers build scalable and high-performance data analytics solutions in the cloud. In his spare time, he loves reading and finds areas for home automation.