Post Syndicated from Jehu Gray original https://aws.amazon.com/blogs/devops/enhancing-resource-isolation-in-aws-cdk-with-the-app-staging-synthesizer/
AWS Cloud Development Kit (CDK) has become a powerful tool for defining and provisioning AWS cloud resources. While CDK simplifies the process of infrastructure as code, managing resources across different projects and environments can still present challenges. In this blog post, we’ll explore a new experimental library, the App Staging Synthesizer, that enhances resource isolation and provides finer control over staging resources in CDK applications.
Background: The CDK Bootstrapping Model
Let’s consider a scenario where a company has two projects in the same account, Project A and Project B. Both projects are developed using the AWS CDK and deploy various AWS resources. However, the company wants to ensure that resources used in Project A are not discoverable or accessible to Project B. Prior to the introduction of the App Staging Synthesizer library in CDK, the default bootstrapping process created shared staging resources, such as a single Amazon S3 bucket and Amazon ECR repository, which are used by all CDK applications deployed in the CDK environment. In AWS CDK, a combination of region and an account is considered to be an environment. The traditional CDK bootstrapping method offers simplicity and consistency by providing a standardized set of shared staging resources for all CDK applications in an environment, which can be cost-effective for multiple applications. This shared model makes it challenging to control access and visibility between the projects in the same account, particularly in scenarios where resource isolation is crucial between different projects. In such scenarios, AWS recommends a best practice of separating projects that need critical isolation into different AWS accounts. However, it is recognized that there might be organizational or practical reasons preventing the immediate adoption of this recommendation. In such cases, mechanisms like the App Staging Synthesizer can provide a valuable workaround.
Introducing the App Staging Synthesizer:
Today, a growing trend among customers is the consolidation of their cloud accounts driven by the desire to optimize costs, bolster security and enhance compliance control. However, while consolidation offers several advantages, it can sometimes limit the flexibility to align ownership and decision making with individual accounts. This can lead to dependencies and conflicts in how workloads across accounts are secured and managed. The App Staging Synthesizer which is an experimental library designed to provide a more flexible approach to resource management and staging in CDK applications was designed to address these challenges. The AppStagingSynthesizer enhances resource isolation and cleanup control by creating separate staging resources for each application, reducing the risk of conflicts between resources and providing more granular management. It also enables better asset lifecycle management and customization of roles and resource handling, offering CDK developers a flexible and organized approach to resource deployment. Let’s delve into some of the advantages and key features of this library.
Advantages and Outcomes:
- Isolation and Access Control: The resources created for Project A are now completely isolated from Project B. Project B doesn’t have visibility or access to the staging resources of Project A, and vice versa. This ensures a higher level of data and resource security.
- Easier Resource Cleanup: When cleaning up or deleting resources, the Staging Stack specific to each project can be removed independently. This allows for a more streamlined and controlled cleanup process, mitigating the risk of inadvertently affecting other projects.
- Lifecycle Management: With separate ECR repositories for each CDK application, the company can apply lifecycle rules independently for retention and cost management. For example, they can configure each ECR repository to retain only the most recent 5 images, effectively cutting down on storage costs.
- Reduced Bootstrapping Complexity: As the only shared resources required are global Roles, the company now only needs to bootstrap every account in one Region instead of bootstrapping every Region. This simplifies the bootstrapping process, making it easier to manage with CloudFormation StackSets.
Key Features of the App Staging Synthesizer:
- IStagingResources Interface: The App Staging Synthesizer introduces the
IStagingResources interface, offering a framework to manage app-level bootstrap stacks. These stacks handle file assets and Docker assets for CDK applications.
- DefaultStagingStack: Included in the library, the
DefaultStagingStack is a pre-built implementation of the IStagingResources It comes with default configurations for staging resources, making it easier to get started.
- AppStagingSynthesizer: This is a new CDK synthesizer that orchestrates the creation of staging resources for each CDK application. It seamlessly integrates with the application deployment process.
- Deployment Roles: In addition to creating staging resources, the CDK App Staging Synthesizer also manages deployment roles. These roles are crucial for secure and controlled resource deployment, ensuring that only authorized processes can modify or access the resources.
Implementation:
Let’s explore practical examples of using the App Staging Synthesizer within a CDK application.
Prerequisite:
For this walkthrough, you should have the following prerequisites:
- An AWS account
- Install AWS CDK version 2.73.0 or later
- A basic understanding of CDK. Please go through cdkworkshop.com to get hands-on learning about CDK and related concepts.
- NOTE: To utilize the
AppStagingSynthesizer, you should have an existing CDK application or should be working on a CDK application.
Using Default Staging Resources:
When configuring your CDK application to use deployment identities with the old bootstrap stack, it’s important to note that the existing staging resources, including the global S3 bucket and ECR repository, will still be created as part of the bootstrapping process. However, they will remain unused by this specific application, thanks to the App Staging Synthesizer.
While we won’t delve into the removal of these unused resources in this blogpost, it’s worth mentioning that for a more streamlined resource setup, you have the option to customize the bootstrap template to remove these resources if desired. This can help reduce clutter and ensure that only the necessary resources are retained within your CDK environment.
To get started, update your CDK App with the following code snippet:
const app = new App({
defaultStackSynthesizer: AppStagingSynthesizer.defaultResources({
appId: 'my-app-id',
// The following line is optional. By default, it is assumed you have bootstrapped in the same region(s) as the stack(s) you are deploying.
deploymentIdentities: DeploymentIdentities.defaultBootstrapRoles({ bootstrapRegion: 'us-east-1' }),
}),
});
This code snippet creates a DefaultStagingStack for a CDK App, allowing you to manage staging resources more effectively.
Customizing Roles:
You can customize roles for the synthesizer, which can be useful for several reasons such as:
- Reuse of existing roles: In many AWS environments, organizations have existing IAM roles with specific permissions and policies that are aligned with their security and compliance requirements. Rather than creating new roles from scratch, you might want to leverage these existing roles to maintain consistency and adhere to established security practices.
- Compatibility: In scenarios where you have pre-existing IAM roles that are being used across various AWS services or applications, customizing roles within the CDK App Staging Synthesizer allows you to seamlessly integrate CDK deployments into your existing IAM role management strategy.
Overall, customizing roles provides flexibility and control over resources used during CDK application deployments, enabling you to align CDK-based infrastructure with the organization’s policies. An example is:
const app = new App({
defaultStackSynthesizer: AppStagingSynthesizer.defaultResources({
appId: 'my-app-id',
deploymentIdentities: DeploymentIdentities.specifyRoles({
cloudFormationExecutionRole: BootstrapRole.fromRoleArn('arn:aws:iam::123456789012:role/Execute'),
deploymentRole: BootstrapRole.fromRoleArn('arn:aws:iam::123456789012:role/Deploy'),
}),
}),
});
This code snippet illustrates how you can specify custom roles for different stages of the deployment process.
Deploy Time S3 Assets:
Deploy-time S3 assets can be classified into two categories, each serving a distinct purpose:
- Assets Used Only During Deployment: These assets are instrumental in handing off substantial data to other services for private copying during deployment. They play a vital role during initial deployment, and afterwards are retained solely for potential future rollbacks
- Assets Accessed Throughout Application Lifespan: In contrast, some assets are accessed continuously throughout the runtime of your application. These could include script files utilized in CodeBuild projects, startup scripts for EC2 instances, or, in the case of CDK applications, ECR images that persist throughout the application’s life.
Marking Lambda Assets as Deploy-Time:
By default, Lambda assets are marked as deploy-time assets in the CDK App Staging Synthesizer. This means they fall into the first category mentioned above, serving as essential components during deployment. For instance, consider the following code snippet:
declare const stack: Stack;
new lambda.Function(stack, 'lambda', {
code: lambda.AssetCode.fromAsset(path.join(__dirname, 'assets')), // Lambda code bundle marked as deploy-time
handler: 'index.handler',
runtime: lambda.Runtime.PYTHON_3_9,
});
In this example, the Lambda code bundle is automatically identified as a deploy-time asset. This distinction ensures that it’s cleaned up after the configurable rollback window.
Creating Custom Deploy-Time Assets:
CDK offers the flexibility needed to create custom deploy-time assets. This can be achieved by utilizing the Asset construct from the AWS CDK library:
import { Asset } from 'aws-cdk-lib/aws-s3-assets';
declare const stack: Stack;
const asset = new Asset(stack, 'deploy-time-asset', {
deployTime: true, // Marking the asset as deploy-time
path: path.join(__dirname, './deploy-time-asset'),
});
By setting deployTime to true, the asset is explicitly marked as deploy-time. This allows you to maintain control over the lifecycle of these assets, ensuring they are retained for as long as needed. However, it is important to note that deploy-time assets eventually become eligible for cleanup.
Configuring Asset Lifecycles:
By default, the CDK retains deploy-time assets for a period of 30 days. However, there is flexibility to adjust this duration according to custom requirements. This can be achieved by specifying deployTimeFileAssetLifetime. The value set here determines how long you can roll back to a previous application version without the need for rebuilding and republishing assets:
const app = new App({
defaultStackSynthesizer: AppStagingSynthesizer.defaultResources({
appId: 'my-app-id',
deployTimeFileAssetLifetime: Duration.days(100), // Adjusting the asset retention period to 100 days
}),
});
By fine-tuning the lifecycle of deploy-time S3 assets, you gain more control over CDK deployments and ensure that CDK applications are equipped to handle rollbacks and updates with ease.
Optimizing ECR Repository Management with Lifecycle Rules:
The AWS CDK App Staging Synthesizer provides you with the capability to control the lifecycle of container images by leveraging lifecycle rules within ECR repositories. Let’s explore how this feature can help streamline your CDK workflows.
ECR repositories can accumulate numerous versions of Docker images over time. While retaining some historical versions is essential for rollback scenarios and reference, an unregulated growth of image versions can lead to increased storage costs and management complexity.
The AWS CDK App Staging Synthesizer offers a default configuration that stores a maximum of 3 revisions for a given Docker image asset. This ensures that you maintain access to previous image versions, facilitating seamless rollback operations. When more than 3 revisions of an asset exist in the ECR repository, the oldest one is purged.
Although by default, it’s set to 3, you can also adjust this value using the imageAssetVersionCount property:
const app = new App({
defaultStackSynthesizer: AppStagingSynthesizer.defaultResources({
appId: 'my-app-id',
imageAssetVersionCount: 10, // Customizing the image version count to retain up to 10 revisions
}),
});
By increasing or decreasing the imageAssetVersionCount, you can strike a balance between storage efficiency and the need to access historical image versions. This ensures that ECR repositories are optimized to the CDK application’s requirements.
Streamlining Cleanup: Auto Delete Staging Assets on Stack Deletion
Efficiently managing resources throughout the lifecycle of your CDK applications is essential, and this includes handling the cleanup of staging assets when stacks are deleted. The AWS CDK App Staging Synthesizer simplifies this process by providing an auto-delete feature for staging resources. In this section, we’ll explore how this feature works and how you can customize it according to your needs.
The Default Cleanup Behavior:
By default, the AWS CDK App Staging Synthesizer is designed to facilitate the cleanup of staging resources automatically when a stack is deleted. This means that associated resources, such as S3 buckets and ECR repositories, are configured with a RemovalPolicy.DESTROY and have autoDeleteObjects (for S3 buckets) or autoDeleteImages (for ECR repositories) turned on. Under the hood, custom resources are created to ensure a seamless cleanup process.
Customizing Cleanup Behavior:
While automatic cleanup is convenient for many scenarios, there may be situations where you want to retain staging resources even after stack deletion. This can be useful when you intend to reuse these resources or when you have specific cleanup processes outside of the default behavior. To retain staging assets and disable the auto-delete feature, you can specify autoDeleteStagingAssets: as false when configuring the AWS CDK App Staging Synthesizer:
const app = new App({
defaultStackSynthesizer: AppStagingSynthesizer.defaultResources({
appId: 'my-app-id',
autoDeleteStagingAssets: false, // Disabling auto-delete of staging assets
}),
});
By setting autoDeleteStagingAssets to false, you have full control over the cleanup of staging resources. This allows you to retain and manage these resources independently, giving you the flexibility to align CDK workflows with the organization’s specific practices.
Using an Existing Staging Stack:
While the AWS CDK App Staging Synthesizer offers powerful tools for managing staging resources, there may be scenarios where you already have a meticulously crafted staging stack in place. In such cases, you can seamlessly integrate the existing stack with the AppStagingSynthesizer using the customResources() method. Let’s explore how you can make the most of your pre-existing staging infrastructure.
The process is straightforward—supply your existing staging stack as a resource to the AppStagingSynthesizer using the customResources() method. It’s crucial to ensure that the custom stack adheres to the requirements of the IStagingResources interface for smooth integration.
Here’s an example:
// Create a new CDK App
const resourceApp = new App();

//Instantiate your custom staging stack (make sure it implements IstagingResources)
const resources = new CustomStagingStack(resourceApp, 'CustomStagingStack', {});

//Configure your CDK App to use the App Staging Synthesizer with your custom staging stack
const app = new App({
defaultStackSynthesizer: AppStagingSynthesizer.customResources({
resources,
}),
});
In this example, CustomStagingStack represents the pre-existing staging infrastructure. By providing it as a resource to the App Staging Synthesizer, you seamlessly integrate it into the CDK application’s deployment workflow.
Crafting Custom Staging Stacks for Environment Control:
For those seeking precise control over resource management in different environments, the AWS CDK App Staging Synthesizer offers a robust solution – custom staging stacks. This feature allows you to tailor resource configurations, permissions, and behaviors to meet the unique demands of each environment within the CDK application.
Subclassing DefaultStagingStack for a Quick Start:
If your customization requirements align with the available properties, you can start by subclassing DefaultStagingStack. This streamlined approach lets you inherit existing functionalities while tweaking specific behaviors as needed. Here’s how you can dive right in:
//Define custom staging stack
interface CustomStagingStackOptions extends DefaultStagingStackOptions {}

//Subclass DefaultStagingStack to create the custom stgaing stack
class CustomStagingStack extends DefaultStagingStack {
// Implement customizations here
}
Building Staging Resources from Scratch:
For more granular control, consider building the staging resources entirely from scratch. This approach allows you to define every aspect of the staging stack, from the ground up, by implementing the “IStagingResources” interface. Here’s an example:
// Define custom staging stack properties(if needed)
interface CustomStagingStackProps extends StackProps {}

//Create your custom staging stack that implements IStagingResources
class CustomStagingStack extends Stack implements IStagingResources {
constructor(scope: Construct, id: string, props: CustomStagingStackProps) {
super(scope, id, props);
}

// Implement methods to define your custom staging resources
public addFile(asset: FileAssetSource): FileStagingLocation {
return {
bucketName: 'myBucket',
assumeRoleArn: 'myArn',
dependencyStack: this,
};
}
public addDockerImage(asset: DockerImageAssetSource): ImageStagingLocation {
return {
repoName: 'myRepo',
assumeRoleArn: 'myArn',
dependencyStack: this,
};
}
}
Creating Custom Staging Resources:
Implementing custom staging resources also involves crafting a CustomFactory class to facilitate the creation of these resources in every environment where your CDK App is deployed. This approach offers a high level of customization while ensuring consistency across deployments. Here’s how it works:
// Define a custom factory for your staging resources
class CustomFactory implements IStagingResourcesFactory {
public obtainStagingResources(stack: Stack, context: ObtainStagingResourcesContext) {
const myApp = App.of(stack);

// Create a custom staging stack instance for the current environment
return new CustomStagingStack(myApp!, `CustomStagingStack-${context.environmentString}`, {});
}
}

//Incorporate your custom staging resources into the Application using the customer factory
const app = new App({
defaultStackSynthesizer: AppStagingSynthesizer.customFactory({
factory: new CustomFactory(),
oncePerEnv: true, // by default
}),
});
With this setup, you can create custom staging stacks for each environment, ensuring resource management tailored to your specific needs. Whether you choose to subclass DefaultStagingStack for a quick start or build resources from scratch, custom staging stacks empower you to achieve fine-grained control and consistency across CDK deployments.
Conclusion:
The App Staging Synthesizer introduces a powerful approach to managing staging resources in AWS CDK applications. With enhanced resource isolation and lifecycle control, it addresses the limitations of the default bootstrapping model. By integrating the App Staging Synthesizer into CDK applications, you can achieve better resource management, cleaner cleanup processes, and more control over cloud infrastructure.
Explore this experimental library and unleash the potential of fine-tuned resource management in CDK projects.
For more information and code examples, refer to the official documentation provided by AWS.
About the Authors:


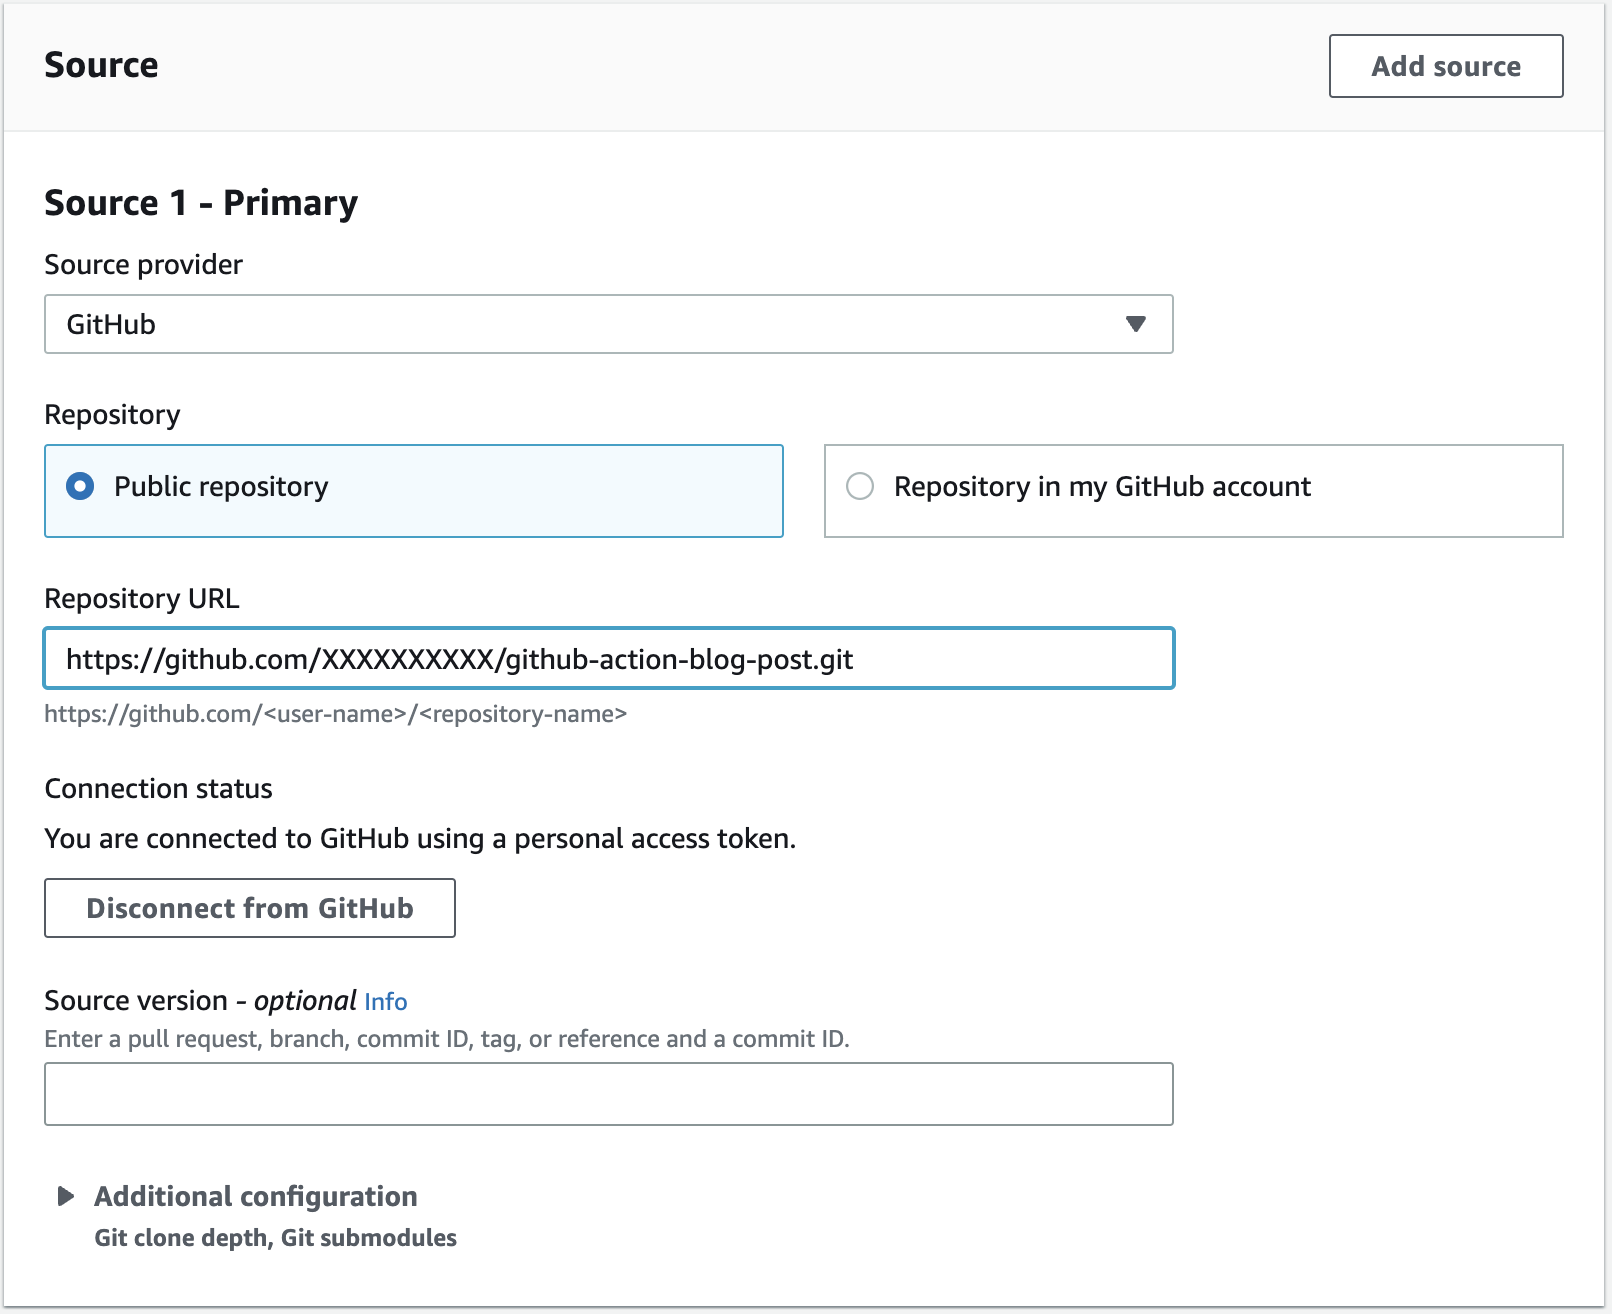


 Fig 5. Terraform state file buckets and state lock tables per environment in the central tooling account.
 Fig 6. Terraform state files per account and Region for each environment in the central tooling account
 Fig 7. Git tags and the respective Terraform state files.
 Fig 8. Multi-Region CI/CD with Terraform state resources stored in the same Region as the workload account resources for the respective Region
