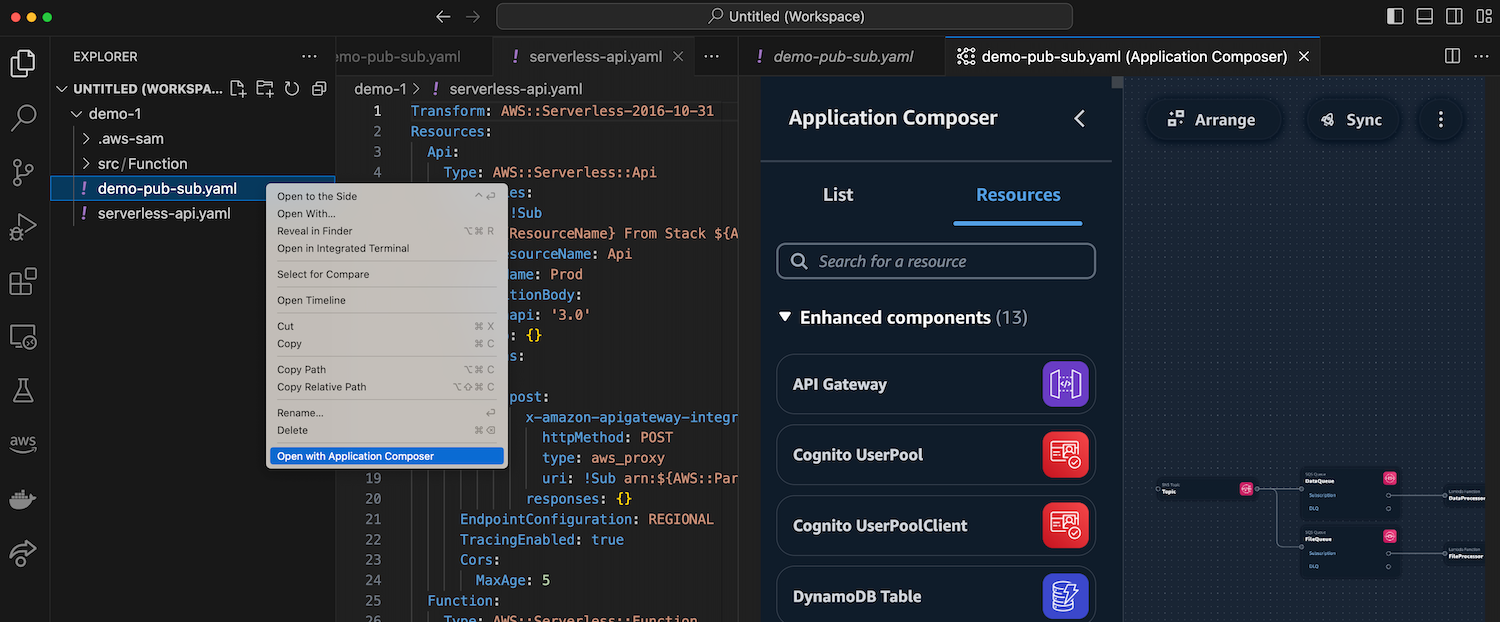
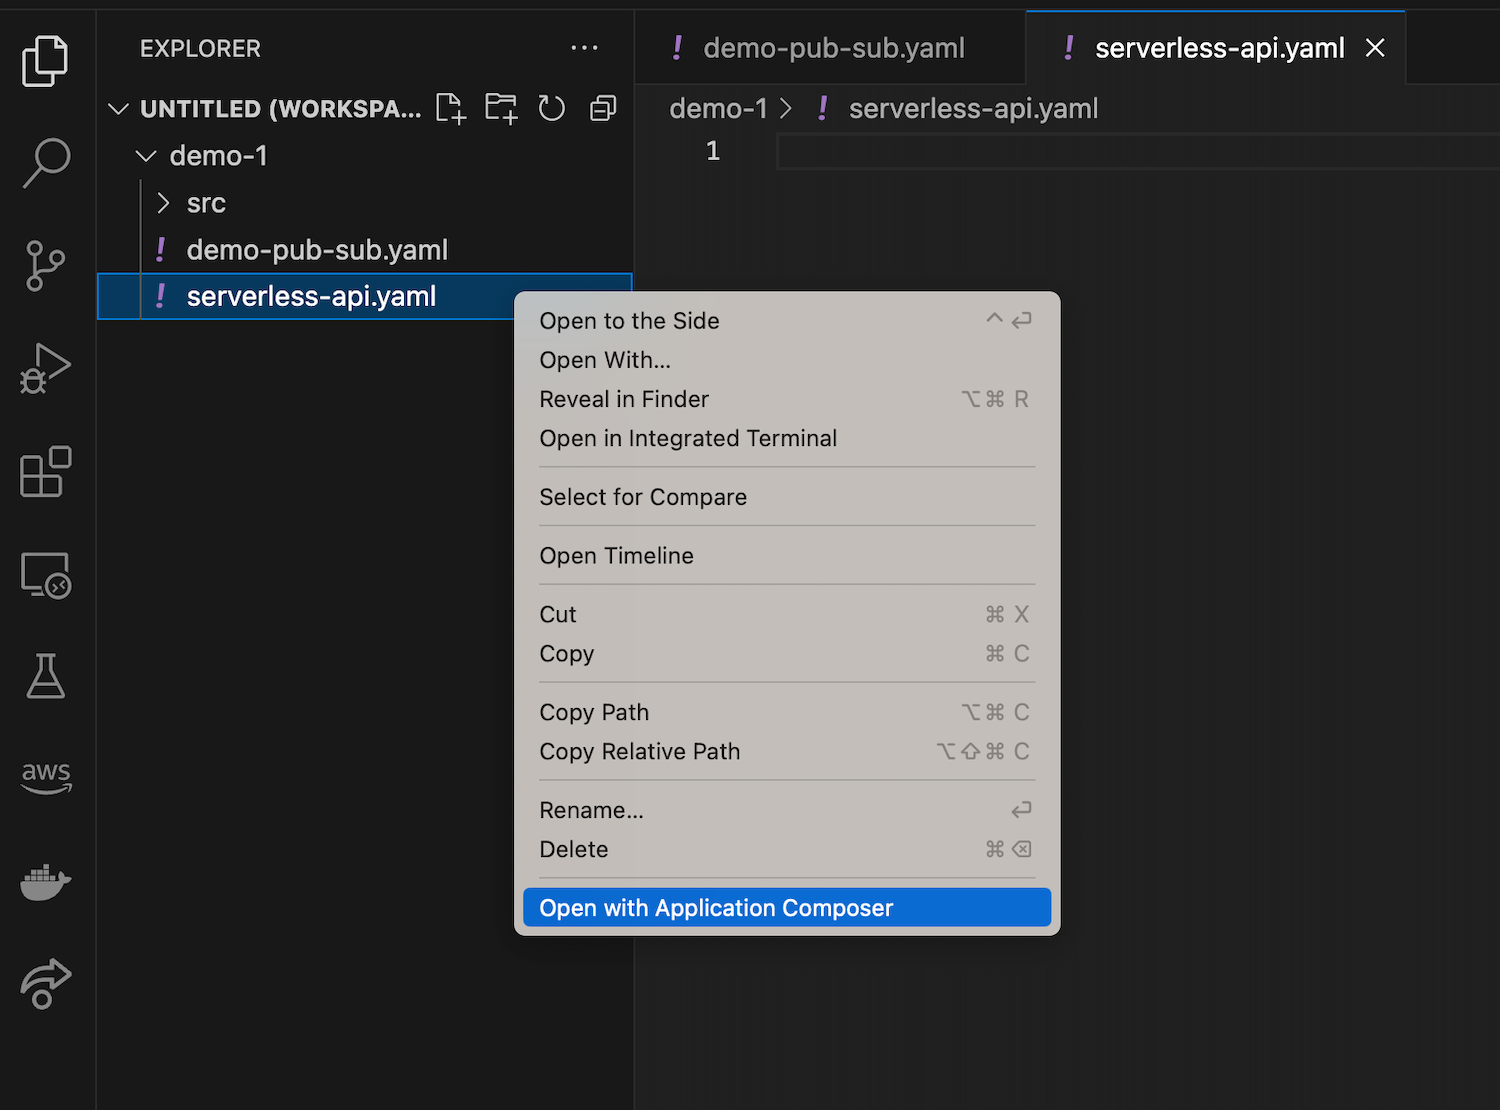
Last week, my alma mater Standard Bank Group (SBG) hosted a Software Engineering Conference and invited me to be one of the keynote speakers. SBG has presence throughout Africa and this hybrid conference was attended by almost 2,000 engineers from across the continent. It was amazing to reconnect with long-time friends and former colleagues, and to make new friends.
Last week’s launches Here are some launches that got my attention during the previous week.
Passkey multi-factor authentication (MFA) for root and IAM users – We’ve added passkeys to the list of supported multi-factor authentication (MFA) for your root and AWS Identity and Access Management (IAM) users, to give you the convenience of use and easy recoverability. A passkey is a pair of cryptographic keys generated on your client device when you register for a service or a website. Passkeys can be used to replace passwords. However, for this initial release, we choose to use passkeys as a second factor authentication, in addition to your password.
Amazon GuardDuty Malware Protection for Amazon S3 – At AWS re:Inforce 2024 this past week, we announced general availability of Amazon GuardDuty Malware Protection for Amazon Simple Storage Service (Amazon S3). This is an expansion of GuardDuty Malware Protection to detect malicious file uploads to selected S3 buckets. Benefits include the ability to fully manage malware detection without managing compute infrastructure, and coverage summary for all protected buckets in your organization, to name a few. Read more in the post published last week detailing Amazon GuardDuty Malware Protection for Amazon S3.
IAM Access Analyzer Update – More goodness out of AWS re:Inforce 2024 last week! We announced an IAM Access Analyzer Update, which allows you to extend custom policy checks and also includes a guided revocation. This gives you guidance that you can share with your developers so that they can revoke unneeded permissions. My colleague Jeff Barr writes about it in more detail in this post.
Other AWS news AWS open source news and updates – My colleague Ricardo writes this weekly open source newsletter in which he highlights new open source projects, tools, and demos from the AWS Community.
The .Net developer community remains close to our hearts here at AWS. I’m inspired by my colleagues Brandon Minnick and Francois Bouteruche who support this community, resulting in the AWS and the Azure engineering teams working together to create delightful .NET developer experiences. At the recently held NDC Oslo, which is part of the NDC Conferences hosted around the world, VP of Azure Developer Experience, Scott Hunter, talked about this collaboration during his keynote. Make sure to catch the keynote on the NDC Conferences YouTube Channel as soon as it’s published.
Upcoming AWS events AWS Summits – These are free online and in-person events that bring the cloud computing community together to connect, collaborate, and learn about AWS. Whether you’re in the Americas, Asia Pacific & Japan, or EMEA region, learn here about future AWS Summit events happening in your area.
Amazon CodeCatalyst is a modern software development service that empowers teams to deliver software on AWS easily and quickly. Amazon CodeCatalyst provides one place where you can plan, code, and build, test, and deploy your container applications with continuous integration/continuous delivery (CI/CD) tools.
CodeCatalyst recently announced the teams feature, which simplifies management of space and project access. Enterprises can now use this feature to organize CodeCatalyst space members into teams using single sign-on (SSO) with IAM Identity Center. You can also assign SSO groups to a team, to centralize your CodeCatalyst user management. CodeCatalyst space admins can create teams made up any members of the space and assign them to unique roles per project, such as read-only or contributor.
Introduction:
In this post, we will demonstrate how enterprises can enable access to CodeCatalyst with their workforce identities configured in AWS IAM Identity Center, and also easily manage which team members have access to CodeCatalyst spaces and projects. With AWS IAM Identity Center, you can connect a self-managed directory in Active Directory (AD) or a directory in AWS Managed Microsoft AD by using AWS Directory Service. You can also connect other external identity providers (IdPs) like Okta or OneLogin to authenticate identities from the IdPs through the Security Assertion Markup Language (SAML) 2.0 standard. This enables your users to sign in to the AWS access portal with their corporate credentials.
Pre-requisites:
To get started with CodeCatalyst, you need the following prerequisites. Please review them and ensure you have completed all steps before proceeding:
1. Set up an CodeCatalyst space. To join a space, you will need to either:
Create an Amazon CodeCatalyst space that supports identity federation. If you are creating the space, you will need to specify an AWS account ID for billing and provisioning of resources. If you have not created an AWS account, follow the AWS documentation to create one
2. Create an AWS Identity and Access Management (IAM) role. Amazon CodeCatalyst will need an IAM role to have permissions to deploy the infrastructure to your AWS account. Follow the documentation for steps how to create an IAM role via the Amazon CodeCatalyst console.
3. Once the above steps are completed, you can go ahead and create projects in the space using the available blueprints or custom blueprints.
Walkthrough:
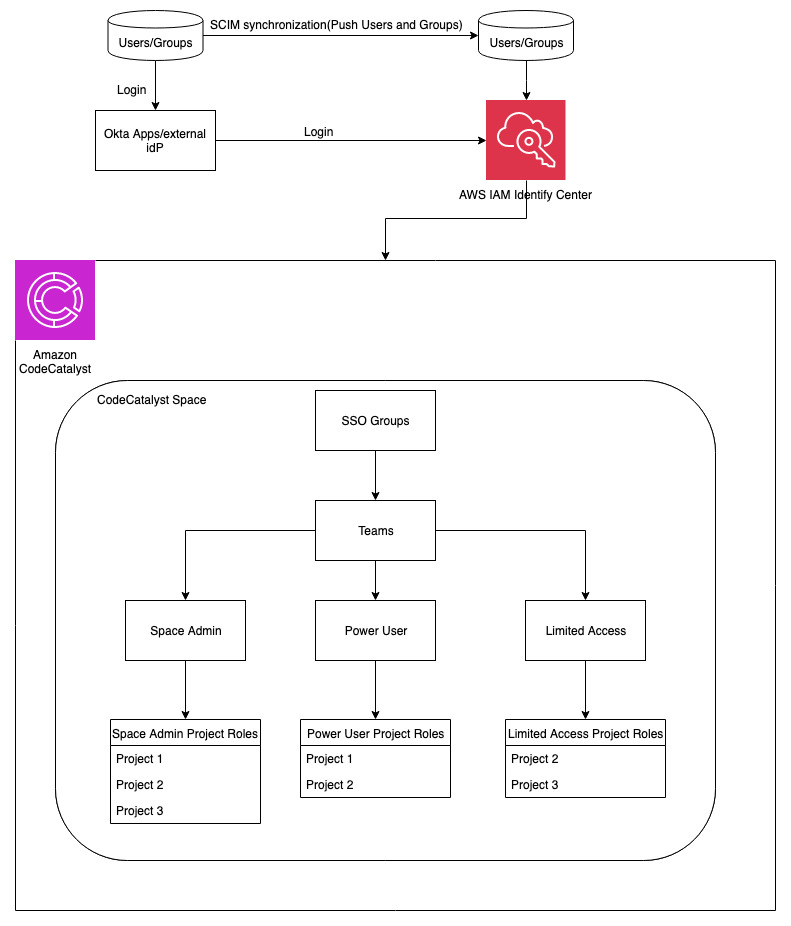
The emphasis of this post, will be on how to manage IAM identity center (SSO) groups with CodeCatalyst teams. At the end of the post, our workflow will look like the one below:
Figure 2: Architectural Diagram
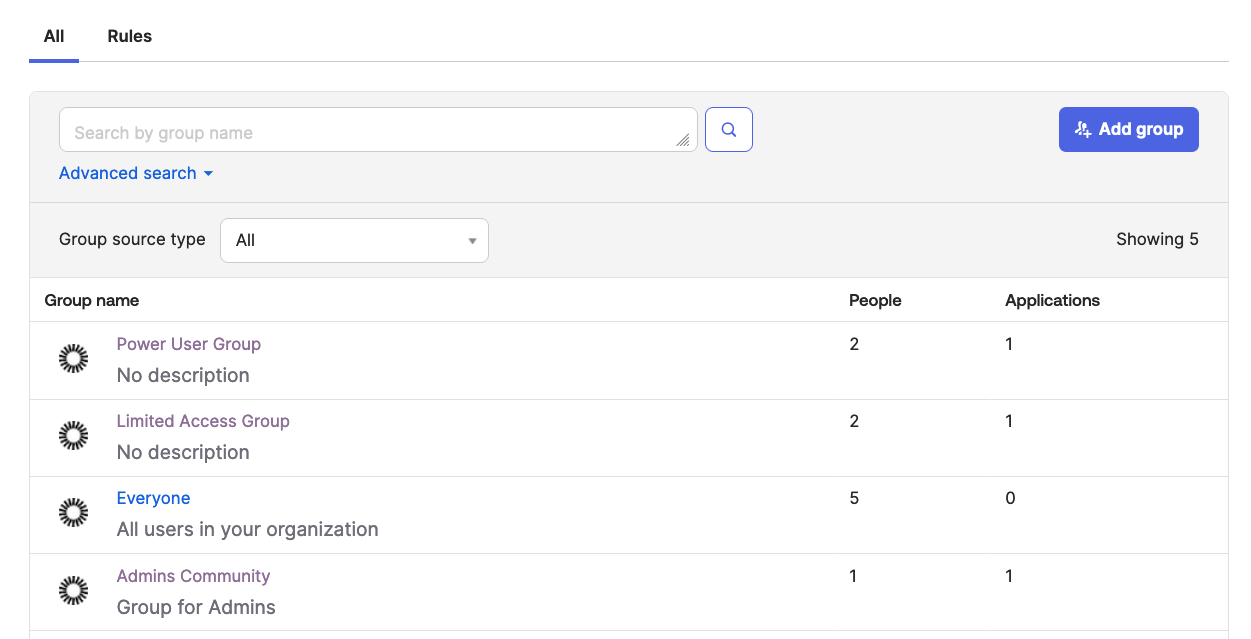
For the purpose of this walkthrough, I have used an external identity provider Okta to federate with AWS IAM Identity Center to manage access to CodeCatalyst.
Figure 3: Okta Groups from Admin Console
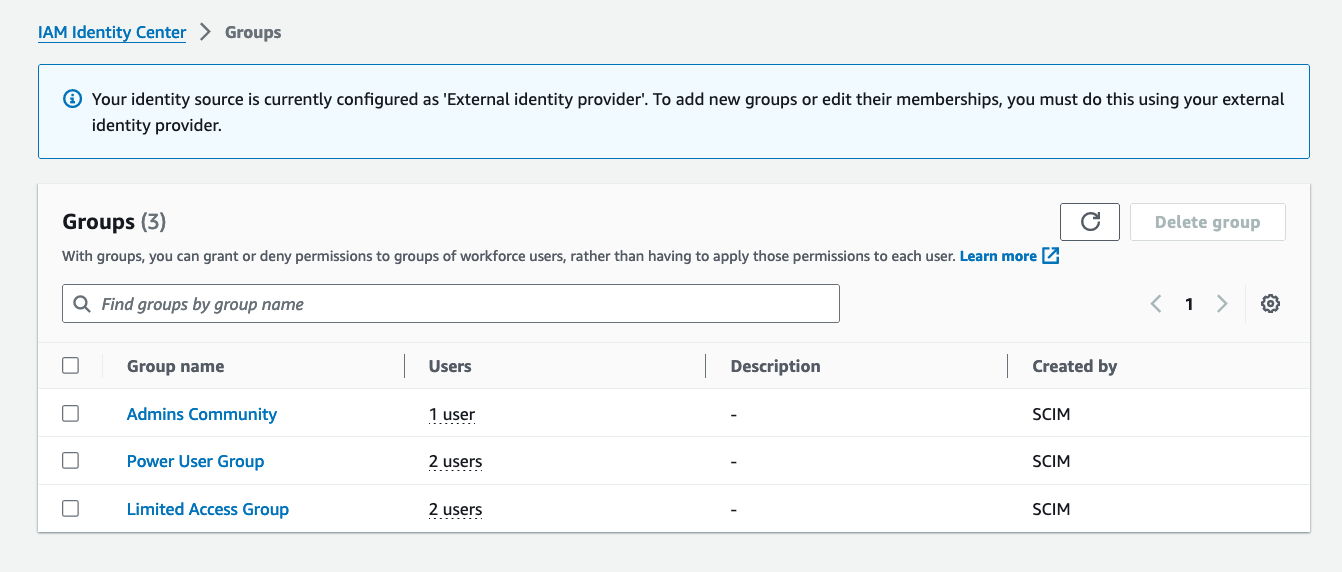
You can also see the same Groups are synced with the IAM Identity Center instance from the figure below. Please note Groups and member management must be done only via external identity providers.
Figure 4: IAM Identity Center Groups created via SCIM synch
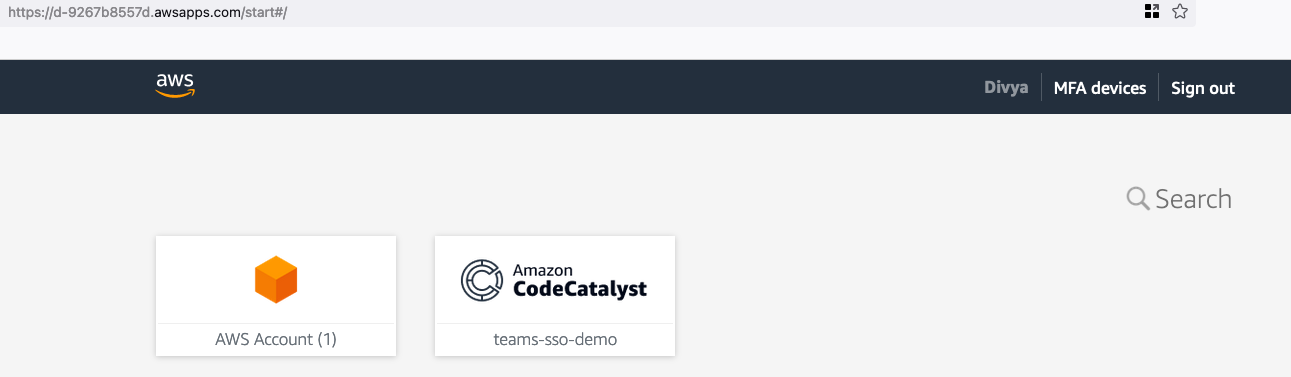
Now, if you go to your Okta apps and click on ‘AWS IAM Identity Center’, the AWS account ID and CodeCatalyst space that you created as part of prerequisites should be automatically configured for you via single sign-on. Developers and Administrators of the space can easily login using this integration.
Figure 5: CodeCatalyst Space via SSO
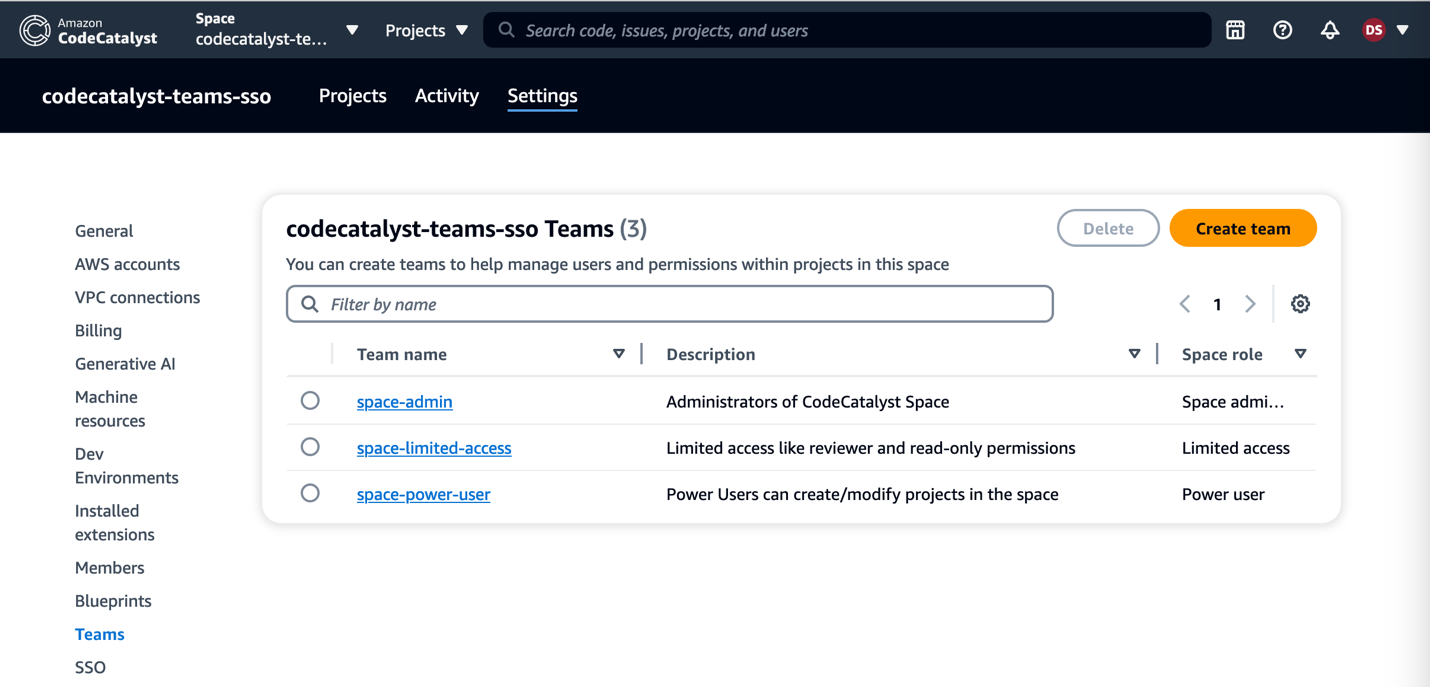
Once you are in the CodeCatalyst space, you can organize CodeCatalyst space members into teams, and configure the default roles for them. You can choose one of the three roles from the list of space roles available in CodeCatalyst that you want to assign to the team. The role will be inherited by all members of the team:
Space administrator – The Space administrator role is the most powerful role in Amazon CodeCatalyst. Only assign the Space administrator role to users who need to administer every aspect of a space, because this role has all permissions in CodeCatalyst. For details, see Space administrator role.
Power user – The Power user role is the second-most powerful role in Amazon CodeCatalyst spaces, but it has no access to projects in a space. It is designed for users who need to be able to create projects in a space and help manage the users and resources for the space. For details, see Power user role.
Limited access – It is the role automatically assigned to users when they accept an invitation to a project in a space. It provides the limited permissions they need to work within the space that contains that project. For details, see Limited access role.
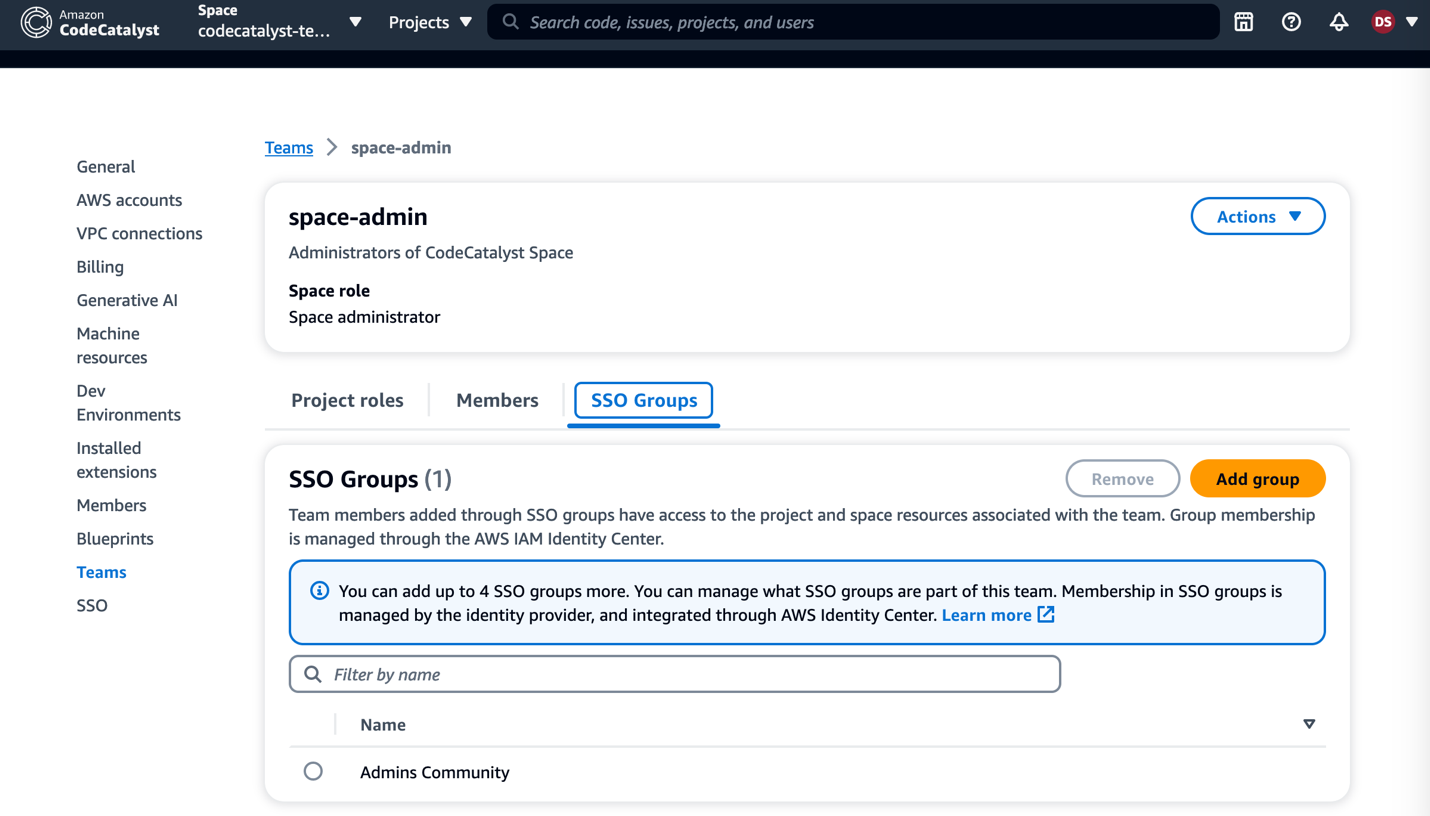
In this example here, if I go into the ‘space-admin’ team, I can view the SSO group associated with it through IAM Identity Center.
Figure 7: SSO Group association with Teams
You can now use these teams from the CodeCatalyst space to help manage users and permissions for the projects in that space. There are four project roles available in CodeCatalyst:
Project administrator — The Project administrator role is the most powerful role in an Amazon CodeCatalyst project. Only assign this role to users who need to administer every aspect of a project, including editing project settings, managing project permissions, and deleting projects. For details, see Project administrator role.
Contributor — The Contributor role is intended for the majority of members in an Amazon CodeCatalyst project. Assign this role to users who need to be able to work with code, workflows, issues, and actions in a project. For details, see Contributor role.
Reviewer — The Reviewer role is intended for users who need to be able to interact with resources in a project, such as pull requests and issues, but not create and merge code, create workflows, or start or stop workflow runs in an Amazon CodeCatalyst project. For details, see Reviewer role.
Read only — The Read only role is intended for users who need to view the resources and status of resources but not interact with them or contribute directly to the project. Users with this role cannot create resources in CodeCatalyst, but they can view them and copy them, such as cloning repositories and downloading attachments to issues to a local computer. For details, see Read only role.
For the purpose of this demonstration, I have created projects from the default blueprints (I chose the modern three-tier web application blueprint) and assigned Teams to it with specific roles. You can also create a project using a default blueprint in CodeCatalyst space if you don’t already have an existing project.
Figure 8: Teams in Project Settings
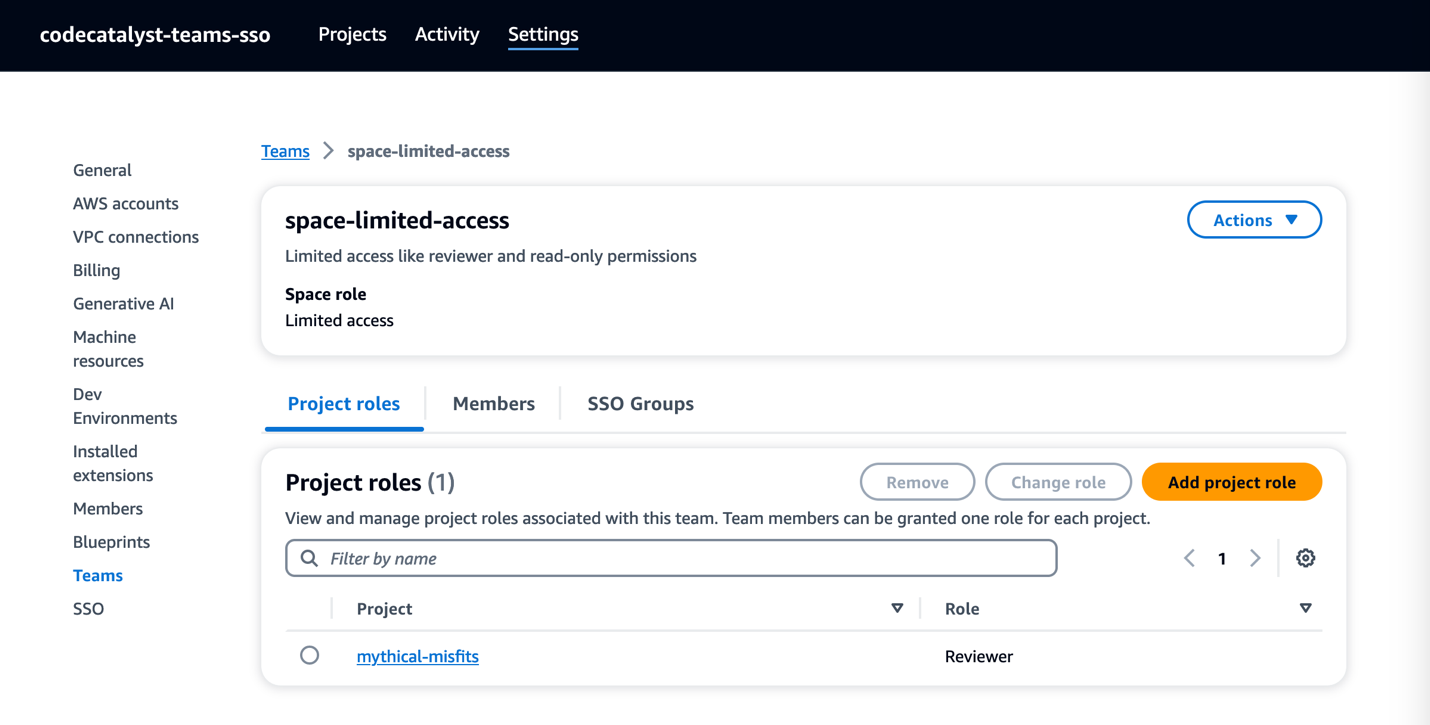
You can also view the roles assigned to each of the teams in the CodeCatalyst Space settings.
Figure 9: Project roles in Space settings
Clean up your Environment:
If you have been following along with this workflow, you should delete the resources you deployed so you do not continue to incur charges. First, delete the two stacks that CDK deployed using the AWS CloudFormation console in the AWS account you associated when you launched the blueprint. If you had launched the Modern three-tier web application just like I did, these stacks will have names like mysfitsXXXXXWebStack and mysfitsXXXXXAppStack. Second, delete the project from CodeCatalyst by navigating to Project settings and choosing Delete project.
Conclusion:
In this post, you learned how to add Teams to a CodeCatalyst space and projects using SSO Groups. I used Okta for my external identity provider to connect with IAM Identity Center, but you can use your Organizations idP or any other IDP that supports SAML. You also learned how easy it is to maintain SSO group members in the CodeCatalyst space by assigning the necessary roles and restricting access when not necessary.
Today, we are pleased to announce the general availability of the Terraform AWS Cloud Control (AWS CC) Provider, enabling our customers to take advantage of AWS innovations faster. AWS has been continually expanding its services to support virtually any cloud workload; supporting over 200 fully featured services and delighting customers through its rapid pace of innovation with over 3,400 significant new features in 2023. Our customers use Infrastructure as Code (IaC) tools such as HashiCorp Terraform among others as a best-practice to provision and manage these AWS features and services as part of their cloud infrastructure at scale. With the Terraform AWS CC Provider launch, AWS customers using Terraform as their IaC tool can now benefit from faster time-to-market by building cloud infrastructure with the latest AWS innovations that are typically available on the Terraform AWS CC Provider on the day of launch. For example, AWS customer Meta’s Oculus Studios was able to quickly leverage Amazon GameLift to support their game development. “AWS and Hashicorp have been great partners in helping Oculus Studios standardize how we deploy our GameLift infrastructure using industry best practices.” said Mick Afaneh, Meta’s Oculus Studios Central Technology.
The Terraform AWS CC Provider leverages AWS Cloud Control API to automatically generate support for hundreds of AWS resource types, such as Amazon EC2 instances and Amazon S3 buckets. Since the AWS CC provider is automatically generated, new features and services on AWS can be supported as soon as they are available on AWS Cloud Control API, addressing any coverage gaps in the existing Terraform AWS standard provider. This automated process allows the AWS CC provider to deliver new resources faster because it does not have to wait for the community to author schema and resource implementations for each new service. Today, the AWS CC provider supports 950+ AWS resources and data sources, with more support being added as AWS service teams continue to adopt the Cloud Control API standard.
As a Terraform practitioner, using the AWS CC Provider would feel familiar to the existing workflow. You can employ the configuration blocks shown below, while specifying your preferred region.
During Terraform plan or apply, the AWS CC Terraform provider interacts with AWS Cloud Control API to provision the resources by calling its consistent Create, Read, Update, Delete, or List (CRUD-L) APIs.
AWS Cloud Control API
AWS service teams own, publish, and maintain resources on the AWS CloudFormation Registry using a standardized resource model. This resource model uses uniform JSON schemas and provisioning logic that codifies the expected behavior and error handling associated with CRUD-L operations. This resource model enables AWS service teams to expose their service features in an easily discoverable, intuitive, and uniform format with standardized behavior. Launched in September 2021, AWS Cloud Control API exposes these resources through a set of five consistent CRUD-L operations without any additional work from service teams. Using Cloud Control API, developers can manage the lifecycle of hundreds of AWS and third-party resources with consistent resource-oriented API instead of using distinct service-specific APIs. Furthermore, Cloud Control API is up-to-date with the latest AWS resources as soon as they are available on the CloudFormation Registry, typically on the day of launch. You can read more on launch day requirement for Cloud Control API in this blog post. This enables AWS Partners such as HashiCorp to take advantage of consistent CRUD-L API operations and integrate Terraform with Cloud Control API just once, and then automatically access new AWS resources without additional integration work.
History and Evolution of the Terraform AWS CC Provider
The general availability of Terraform AWS CC Provider project is a culmination of 4+ years of collaboration between AWS and HashiCorp. Our teams partnered across the Product, Engineering, Partner, and Customer Support functions in influencing, shaping, and defining the customer experience leading up to the the technical preview announcement of the AWS CC provider in September 2021. At technical preview, the provider supported more than 300 resources. Since then, we have added an additional 600+ resources to the provider, bringing the total to 950+ supported resources at general availability.
Beyond just increasing resource coverage, we gathered additional signals from customer feedback during the technical preview and rolled out several improvements since September 2021. Customers care deeply about the user experience on the providers available on the Terraform registry. Customers sought practical examples in the form of sample HCL configurations for each resource that they could use to immediately test in order to confidently start using the provider. This prompted us to enrich the AWS CC provider with hundreds of practical examples for popular AWS CC provider resources in the Terraform registry. This was made possible by contributions of hundreds of Amazonians who became early adopters of the AWS CC provider. We also published a how-to guide for anyone interested in contributing to AWS CC provider examples. Furthermore, customers also wanted to minimize context switching by moving between Terraform and AWS service documentation on what each attribute of a resource signified and the type of values it needed as part of configuration. This empowered us to prioritize augmenting the provider with rich resource attribute description with information taken from AWS documentation. The documentation provides detailed information of how to use the attributes, enumerations of the accepted attribute values and other relevant information for dozens of popularly used AWS resources.
We also worked with HashiCorp on various bug fixes and feature enhancements for the AWS CC provider, as well as the upstream Cloud Control API dependencies. We improved handling for resources with complex nested attribute schemas, implemented various bug fixes to resolve unintended resource replacement, and refined provider behavior under various conditions to support the idempotency expected by Terraform practitioners. While this are not an exhaustive list of improvements, we continue to listen to customer feedback and iterate on improving the experience. We encourage you to try out the provider and share feedback on the AWS CC provider’s GitHub page.
Using the AWS CC Provider
Let’s take an example of a recently introduced service, Amazon Q Business, a fully managed, generative AI-powered assistant that you can configure to answer questions, provide summaries, generate content, and complete tasks based on your enterprise data. Amazon Q Business resources were available in AWS CC provider shortly after the April 30th 2024 launch announcement. In the following example, we’ll create a demo Amazon Q Business application and deploy the web experience.
As you see in this example, you can use both the AWS and AWS CC providers in the same configuration file. This allows you to easily incorporate new resources available in the AWS CC provider into your existing configuration with minimal changes. The AWS CC provider also accepts the same authentication method and provider-level features available in the AWS provider. This means you don’t have to add additional configuration in your CI/CD pipeline to start using the AWS CC provider. In addition, you can also add custom agent information inside the provider block as described in this documentation.
Things to know
The AWS CC provider is unique due to how it was developed and its dependencies with Cloud Control API and AWS resource model in the CloudFormation registry. As such, there are things that you should know before you start using the AWS CC provider.
The AWS CC provider is generated from the latest CloudFormation schemas, and will release weekly containing all new AWS services and enhancements added to Cloud Control API.
Certain resources available in the CloudFormation schema are not compatible with the AWS CC provider due to nuances in the schema implementation. You can find them on the GitHub issue list here. We are actively working to add these resources to the AWS CC provider.
The AWS CC provider requires Terraform CLI version 1.0.7 or higher.
Every AWS CC provider resource includes a top-level attribute `id` that acts as the resource identifier. If the CloudFormation resource schema also has a similarly named top-level attribute `id`, then that property is mapped to a new attribute named `<type>_id`. For example `web_experience_id` for `awscc_qbusiness_web_experience` resource.
If a resource attribute is not defined in the Terraform configuration, the AWS CC provider will honor the default values specified in the CloudFormation resource schema. If the resource schema does not include a default value, AWS CC provider will use attribute value stored in the Terraform state (taken from Cloud Control API GetResponse after resource was created).
In correlation to the default value behavior as stated above, when an attribute value is removed from the Terraform configuration (e.g. by commenting the attribute), the AWS CC provider will use the previous attribute value stored in the Terraform state. As such, no drift will be detected on the resource configuration when you run Terraform plan / apply.
The AWS CC provider data sources are either plural or singular with filters based on `id` attribute. Currently there is no native support for metadata sources such as `aws_region` or `aws_caller_identity`. You can continue to leverage the AWS provider data sources to complement your Terraform configuration.
If you want to dive deeper into AWS CC provider resource behavior, we encourage you to check the documentation here.
Conclusion
The AWS CC provider is now generally available and will be the fastest way for customers to access newly launched AWS features and services using Terraform. We will continue to add support for more resources, additional examples and enriching the schema descriptions. You can start using the AWS CC provider alongside your existing AWS standard provider. To learn more about the AWS CC provider, please check the HashiCorp announcement blog post. You can also follow the workshop on how to get started with AWS CC provider. If you are interested in contributing with practical examples for AWS CC provider resources, check out the how-to guide. For more questions or if you run into any issues with the new provider, don’t hesitate to submit your issue in the AWS CC provider GitHub repository.
Software development teams are constantly looking for ways to accelerate their software development lifecycle (SDLC) to release quality software faster. Amazon Q, a generative AI–powered assistant, can help software development teams work more efficiently throughout the SDLC—from research to maintenance.
Software development teams spend significant time on undifferentiated tasks while analyzing requirements, building, testing, and operating applications. Trained on 17 years’ worth of AWS expertise, Amazon Q can transform how you build, deploy, and operate applications and workloads on AWS. By automating mundane tasks, Amazon Q enables development teams to spend more innovating and building. Amazon Q can speed up on-boarding, reduce context switching, and accelerate development of applications on AWS.
This blog post explores how Amazon Q can accelerate development tasks across the SDLC using an example To-Do API project. Throughout this blog, we will navigate through the various phases of the SDLC while implementing To-Do API by leveraging Amazon Q Business and Amazon Q Developer. We will walk through common use cases for Amazon Q Business in the planning and research phases, and Amazon Q Developer in the research, design, development, testing, and maintenance phases.
Planning
As a product owner, you spend significant time on requirements analysis and user story development. You research internal documents like functional specifications and business requirements to understand the desired functionalities and objectives. Manually sifting through documentation is time consuming. You can leverage Amazon Q Business to quickly extract relevant information from your internal documents or wikis, such as Confluence. Amazon Q Business quickly connects to your business data, information, and systems so that you can have tailored conversations, solve problems, generate content, and take actions relevant to your business. Amazon Q Business offers over 40 built-in connectors to popular enterprise applications and document repositories, including Amazon Simple Storage Service (Amazon S3), Confluence, Salesforce and more, enabling you to create a generative AI solution with minimal configuration. Amazon Q Business also provides plugins to interact with third-party applications. These plugins support read and write actions that can help boost end user productivity.
So, instead of digging through the internal documentations, you can simply ask Amazon Q Business about requirements using natural language and it will provide immediate and relevant information to the users, and helps streamline tasks and accelerate problem solving.
For our To-Do API example, let’s consider the business requirements are documented in Confluence, and Jira is utilized for issue management. You can configure Amazon Q Business with Confluence and Jira through the Confluence connector and Jira plugin, respectively. To understand requirements, you may ask Amazon Q Business for an overview of the use case, business drivers, non-functional requirements, and other related questions. Amazon Q Business then pulls the relevant details from the Confluence documents and presents them to you in a clear and concise manner. This allows you to save time gathering requirements and focus more on developing user stories.
Once you have a good understanding of the requirements, you can ask Amazon Q Business to write a user story and even create a Jira issue for you. For the To-Do API use case, Amazon Q Business generates the user stories tailored to the requirements and creates the corresponding Jira ticket ready for your team, saving you time and ensuring efficiency in the project workflow.
Research and Design
Let’s consider a scenario where the above mentioned user story is assigned to you and you have to implement it based on the technology stacks described in the confluence page.
First, you ask Amazon Q Business to gain insights into the technology stacks aligning with the organization’s development guidelines. Amazon Q Business promptly provides you with details sourced from the internal development guidelines document hosted on Confluence along with references and citations.
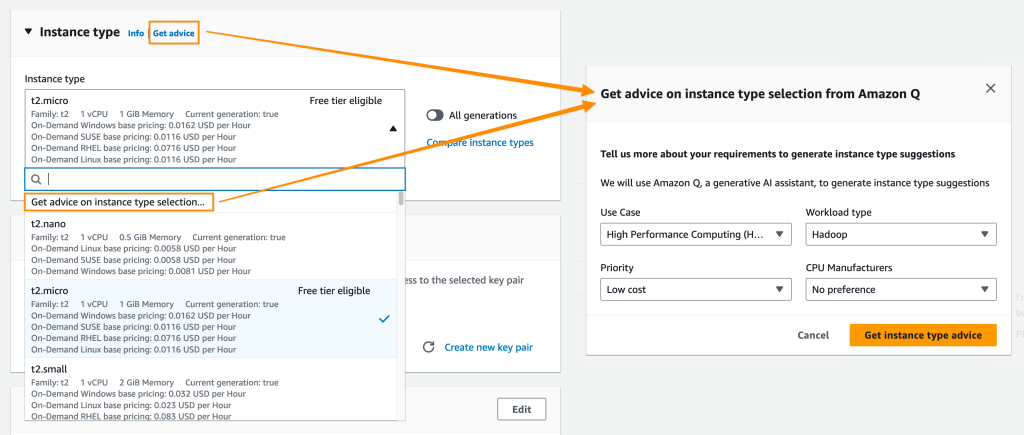
As a developer, you can use Amazon Q Developer in your integrated development environment (IDE) to get software development assistance, including code explanation, code generation, and code improvements such as debugging and optimization. Amazon Q Developer can help by analyzing the requirements, assessing different approaches, and creating an implementation plan and sample code. It can investigate options, weigh tradeoffs, recommend best practices, and even brainstorm with you to optimize the design.
Let’s see how Amazon Q Developer can help analyze the user story, design, and brainstorm with you arrive at an implementation plan.
Let us further refine the design with adding non-functional requirements such as security and performance.
Develop and Test
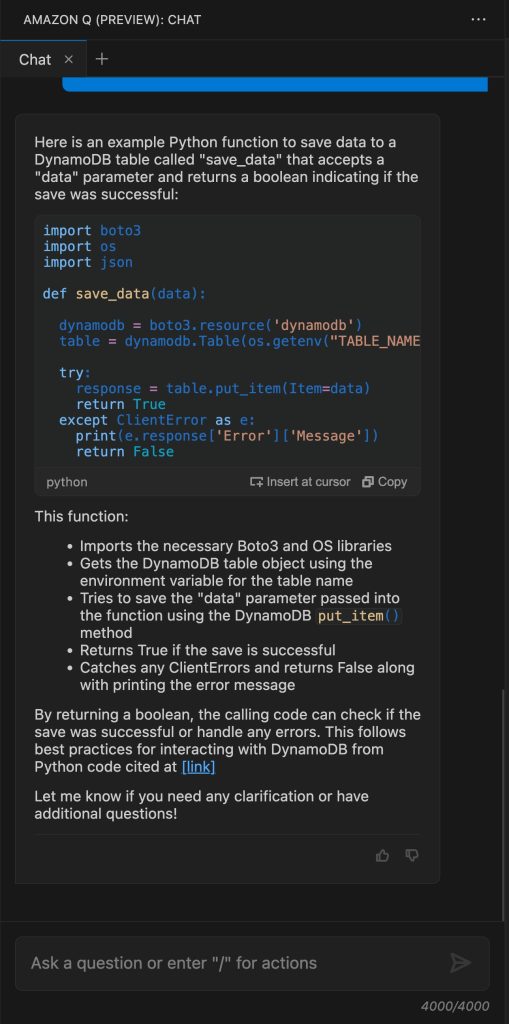
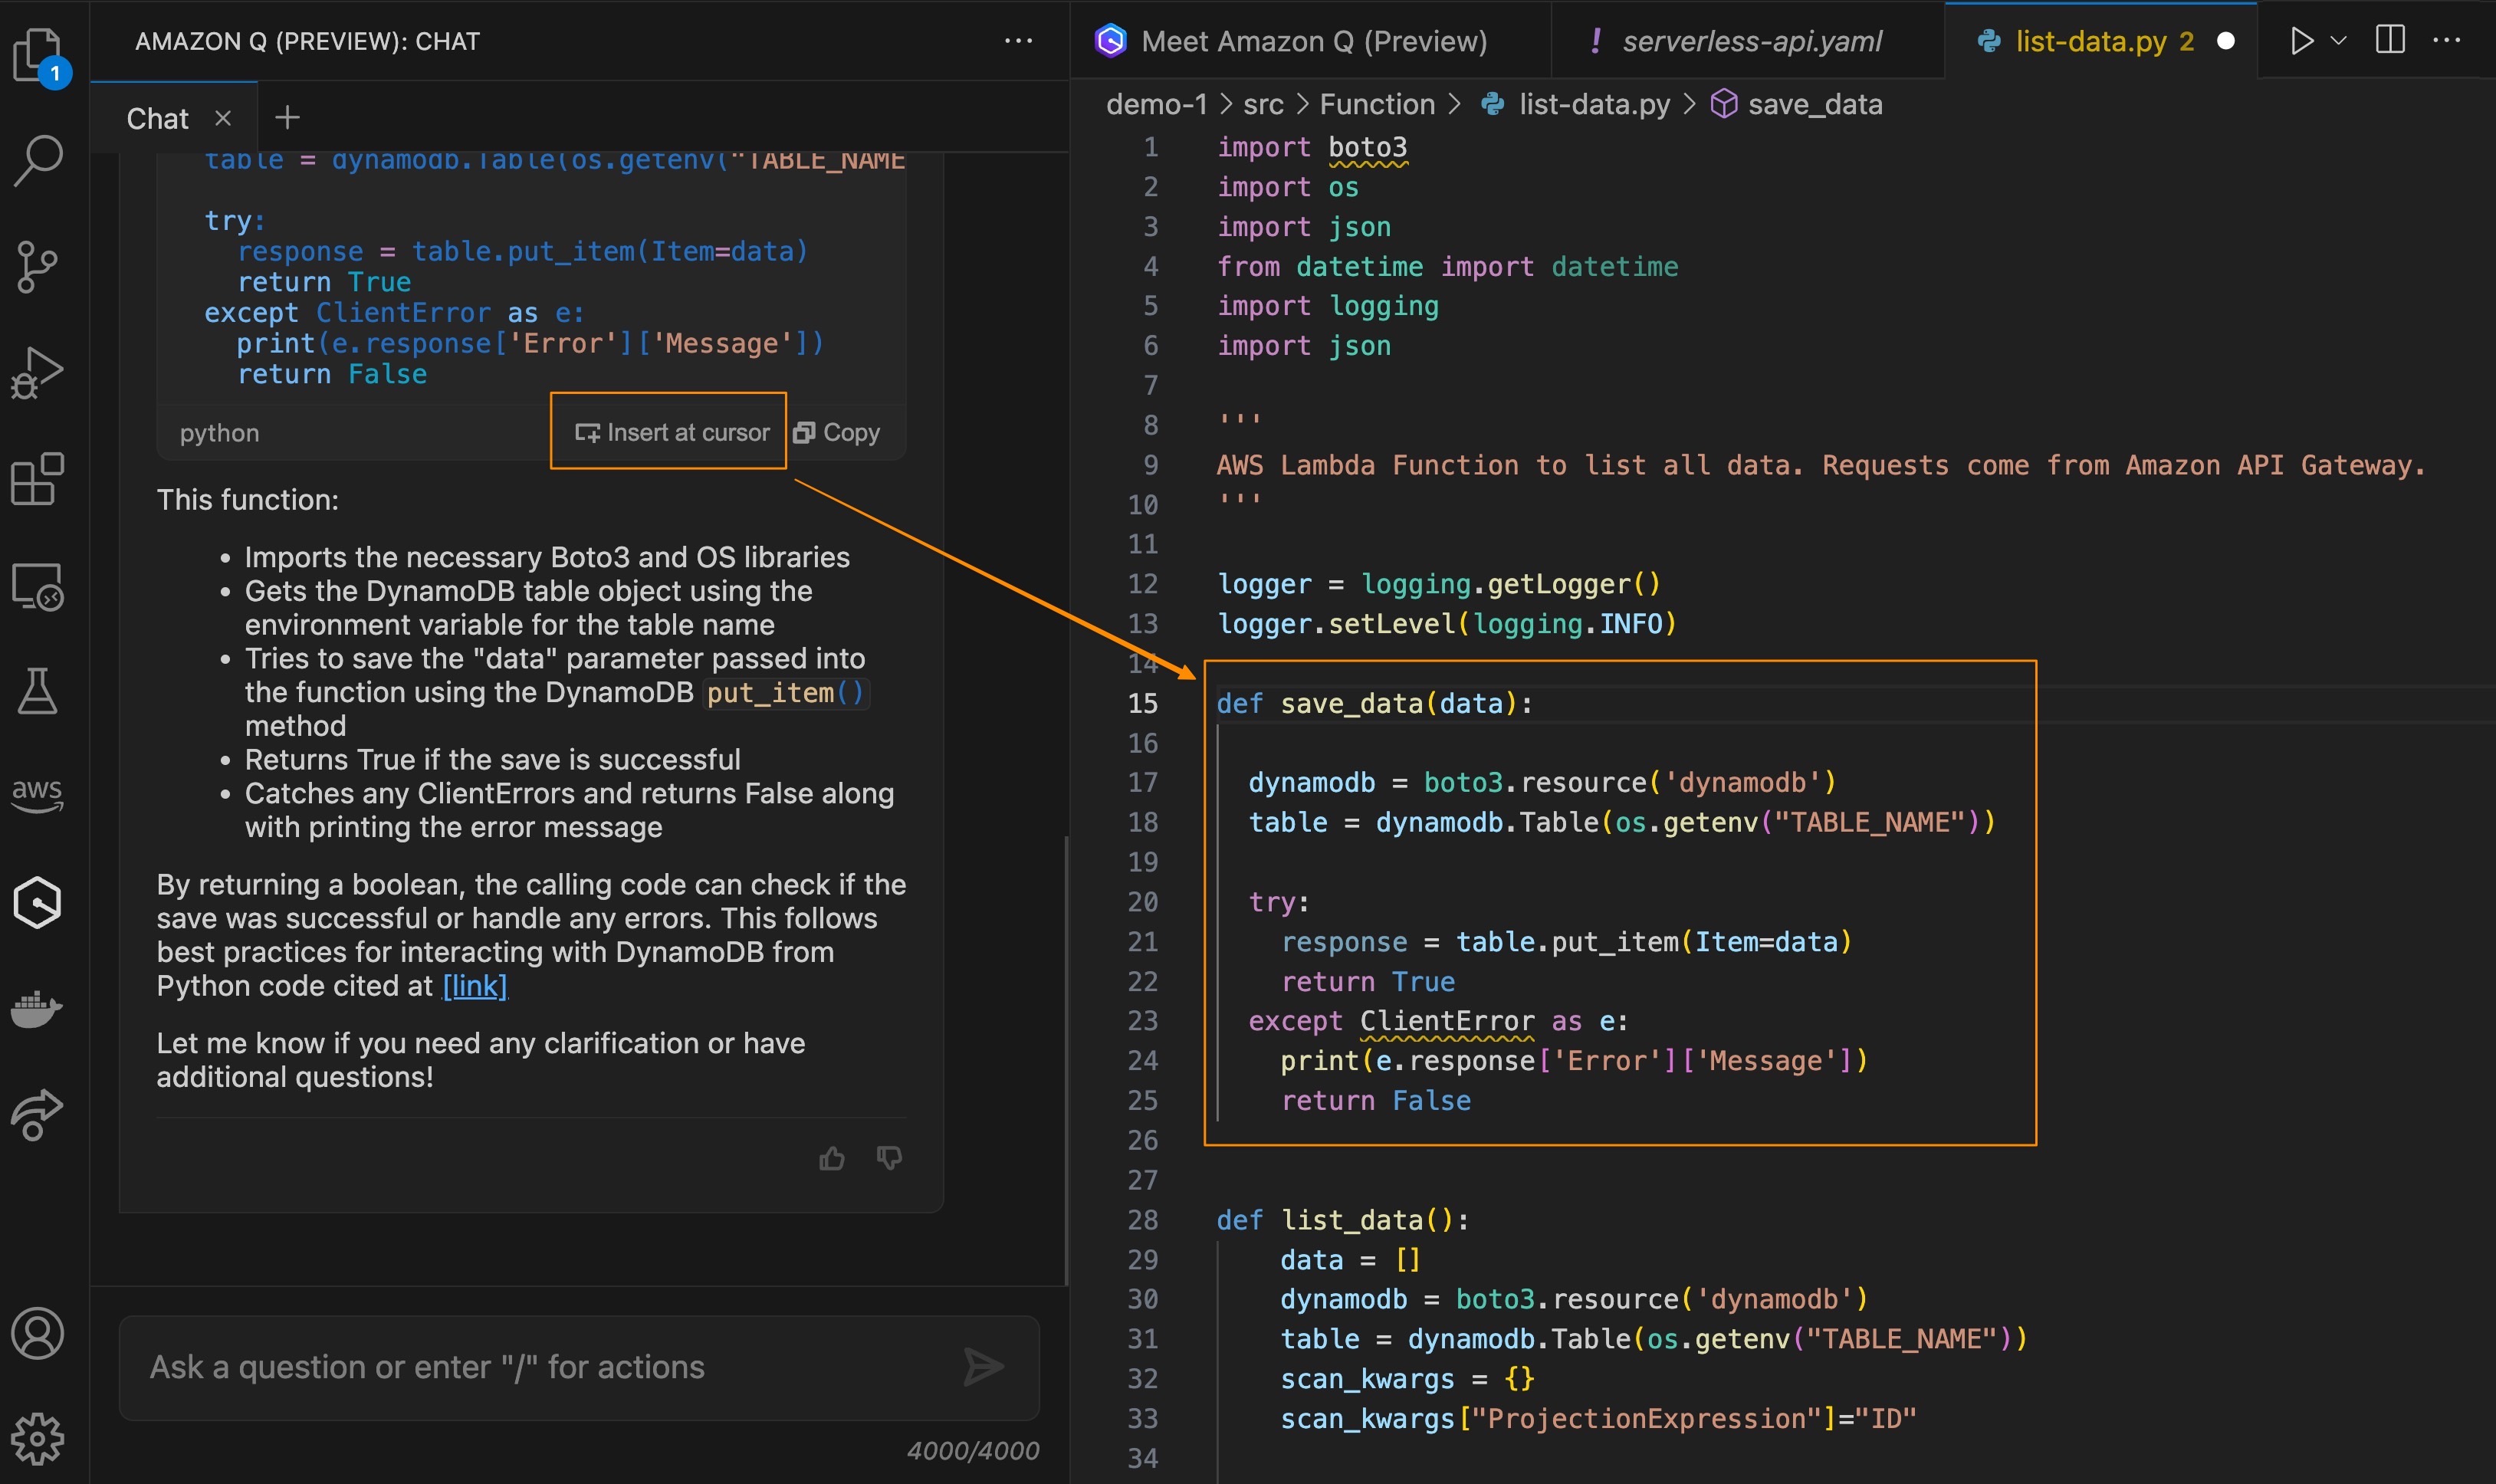
Amazon Q Developer can generate code snippets that meet your specified business and technical needs. You can review the auto-generated code, manually copy, and paste it into your editor, or use the Insert at cursor option to directly incorporate it into your source code. This allows you to rapidly prototype and iterate on new capabilities for your application. Amazon Q Developer uses the context of your conversation to inform future responses for the duration of your conversation. This makes it easy to help you focus on building applications because you don’t have to leave your IDE to get answers and context-specific coding guidance.
Amazon Q Developer is particularly useful for answering questions related to the following areas:
Building on AWS, including AWS service selection, limits, and best practices.
General software development concepts, including programming language syntax and application development.
Writing code, including explaining code, debugging code, and writing unit tests.
Expanding on the same user story design generated by Amazon Q Developer, you can ask Amazon Q Developer to implement the API and refine based on additional requirements and parameters. Let’s collaborate with Amazon Q Developer, to expand our design to implementation. You can leverage Amazon Q Developer’s expertise to ideate, evaluate options, and arrive at an optimal solution. Amazon Q Developer can have an intelligent discussion to brainstorm creative new test cases based on the requirements. It can then help construct an implementation plan, suggesting ways to efficiently add robust, comprehensive tests that cover edge cases.
Let’s ask Amazon Q Developer to generate code based on the design.
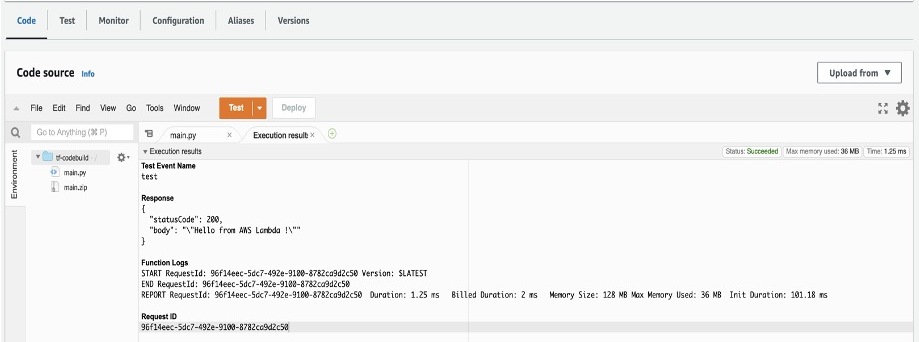
Now, let’s ask Amazon Q Developer to implement the AWS Lambda function.
Amazon Q Developer can provide code examples and snippets that show how to implement the design. You can review the code, get Amazon Q Developer’s feedback, and seamlessly integrate it into the project. Collaborating with Amazon Q Developer allows you to amplify your productivity by leveraging its knowledge to quickly iterate and enrich our application capabilities.
Amazon Q Developer can also review the code and find opportunities for improvements, optimization based on performance and other parameters. Let us ask Amazon Q Developer to find any opportunities for improvements on the code for our To-do API.
Debugging and Troubleshooting
Amazon Q Developer can assist you with troubleshooting and debugging your code. For unfamiliar error codes or exception types, you can ask Amazon Q Developer to research their meaning and common resolutions. Amazon Q Developer can also help by analyzing your applications’ debug logs, highlighting any anomalies, errors, or warnings that could indicate potential issues.
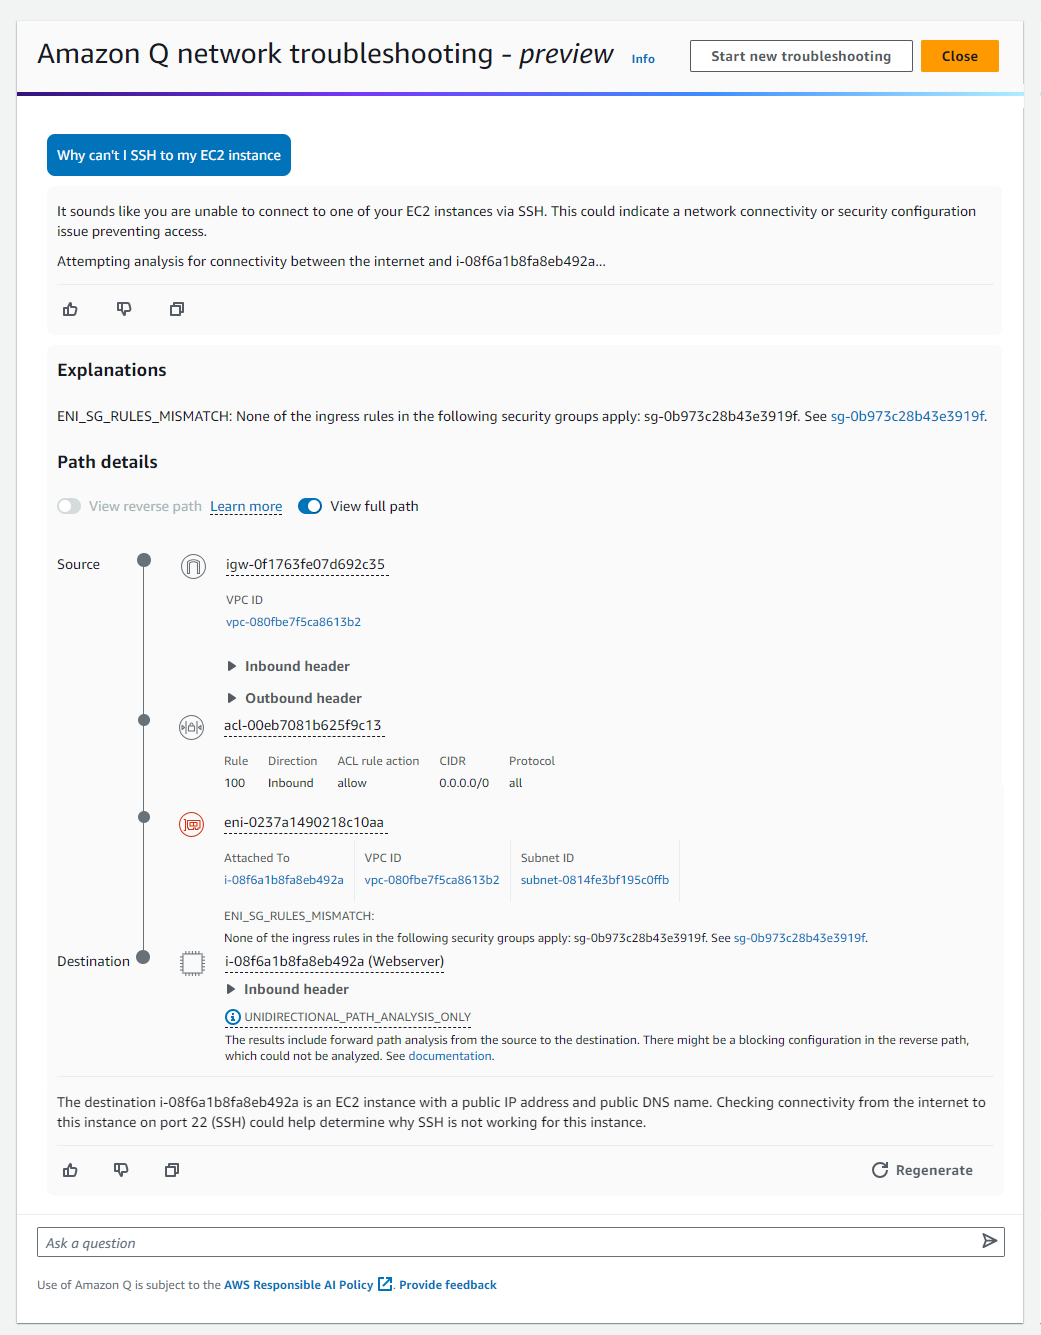
Amazon Q Developer can troubleshoot network connectivity issues caused by misconfiguration, providing concise problem analysis and resolution suggestions. Amazon Q Developer can also research AWS best practices to identify areas not aligned with recommendations. For code issues, it can answer questions and debug problems within supported IDEs. Leveraging its knowledge of AWS services and their interactions, Amazon Q Developer can provide service-specific guidance. In the AWS Management Console, Amazon Q Developer can troubleshoot errors you receive while working with AWS services such as insufficient permissions, incorrect configuration, and exceeding service limits.
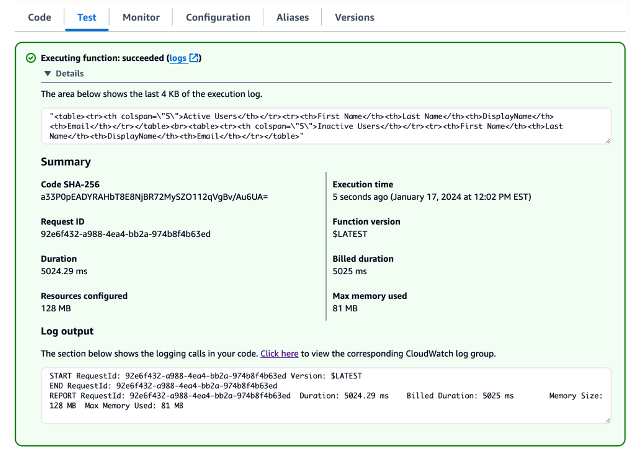
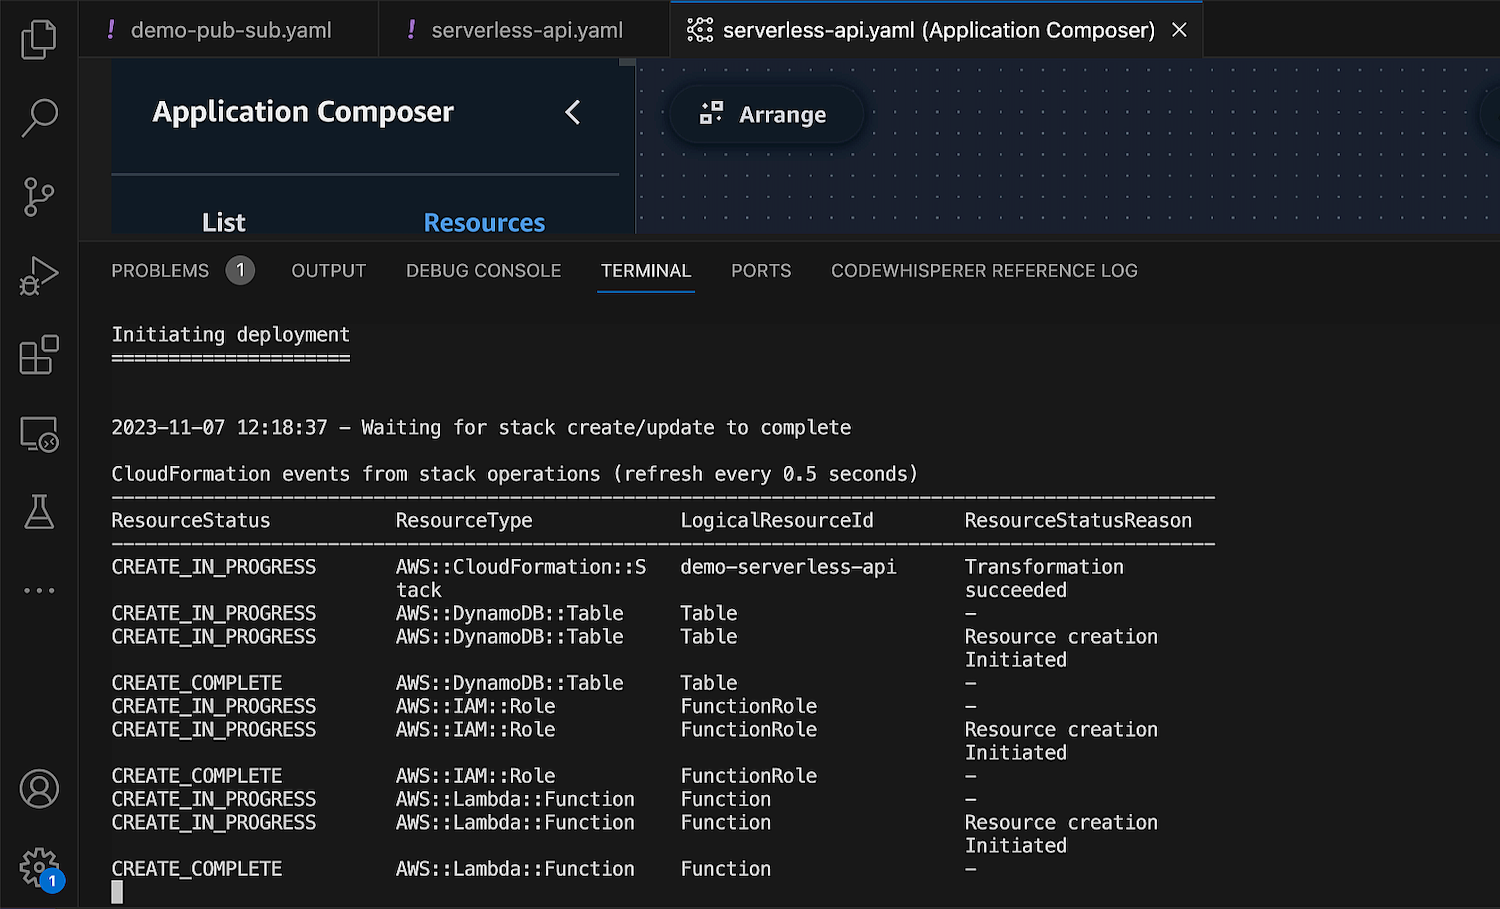
Let’s test our To-Do API by hitting the Amazon API Gateway endpoint using cURL.
The API Gateway endpoint invokes the Lambda function to insert records in the Amazon DynamoDB table. Since it throws Internal Server Error, let’s go to the Lambda console to troubleshoot this further and test the function directly by creating a test event for the POST method. You can troubleshoot different console errors with Amazon Q Developer, directly in the AWS Management Console. For the above error, Amazon Q analyzes the issue and helps find the resolution. Amazon Q explains how to fix this error directly on the console by adding an environment variable for DynamoDB table name.
Now, let’s ask Amazon Q Developer in IDE to generate code to fix this error. Amazon Q Developer then generates a code snippet to set the desired environment variable in the AWS Cloud Development Kit (AWS CDK) code for Lambda function.
Conclusion
In this post, you learned how to leverage Amazon Q Business and Amazon Q Developer to streamline SDLC and accelerate time-to-market. With its deep understanding of code and AWS resources, Amazon Q Developer enables development teams to work efficiently throughout the research, design, development, testing, and review phases. By automating mundane tasks, offering expert guidance, generating code snippets, optimizing implementations, and troubleshooting issues, Amazon Q Developer allows developers to redirect their focus towards higher-value activities that drive innovation. Moreover, through Amazon Q Business, teams can leverage the power of generative AI to expedite the requirements planning and research phases.
Ruby developers can now use AWS CodeArtifact to securely store and retrieve their gems. CodeArtifact integrates with standard developer tools like gem and bundler.
Applications often use numerous packages to speed up development by providing reusable code for common tasks like network access, cryptography, or data manipulation. Developers also embed SDKs–such as the AWS SDKs–to access remote services. These packages may come from within your organization or from third parties like open source projects. Managing packages and dependencies is integral to software development. Languages like Java, C#, JavaScript, Swift, and Python have tools for downloading and resolving dependencies, and Ruby developers typically use gem and bundler.
However, using third-party packages presents legal and security challenges. Organizations must ensure package licenses are compatible with their projects and don’t violate intellectual property. They must also verify that the included code is safe and doesn’t introduce vulnerabilities, a tactic known as a supply chain attack. To address these challenges, organizations typically use private package servers. Developers can only use packages vetted by security and legal teams made available through private repositories.
CodeArtifact is a managed service that allows the safe distribution of packages to internal developer teams without managing the underlying infrastructure. CodeArtifact now supports Ruby gems in addition to npm, PyPI, Maven, NuGet, SwiftPM, and generic formats.
You can publish and download Ruby gem dependencies from your CodeArtifact repository in the AWS Cloud, working with existing tools such as gem and bundler. After storing packages in CodeArtifact, you can reference them in your Gemfile. Your build system will then download approved packages from the CodeArtifact repository during the build process.
How to get started Imagine I’m working on a package to be shared with other development teams in my organization.
Now that I have the repository endpoint and an authentication token, gem will use these environment variable values to connect to my private package repository.
I create a very simple project, build it, and send it to the package repository.
I verify in the console that the package is available.
Now that the package is available, I can use it in my projects as usual. This involves configuring the local ~/.gemrc file on my machine. I follow the instructions provided by the console, and I make sure I replace ${CODEARTIFACT_AUTH_TOKEN} with its actual value.
Once ~/.gemrc is correctly configured, I can install gems as usual. They will be downloaded from my private gem repository.
$ gem install hola-codeartifact

Fetching hola-codeartifact-0.0.0.gem
Successfully installed hola-codeartifact-0.0.0
Parsing documentation for hola-codeartifact-0.0.0
Installing ri documentation for hola-codeartifact-0.0.0
Done installing documentation for hola-codeartifact after 0 seconds
1 gem installed
Install from upstream I can also associate my repository with an upstream source. It will automatically fetch gems from upstream when I request one.
To associate the repository with rubygems.org, I use the console, or I type
Once associated, I can pull any gems through CodeArtifact. It will automatically fetch packages from upstream when not locally available.
$ gem install rake

Fetching rake-13.2.1.gem
Successfully installed rake-13.2.1
Parsing documentation for rake-13.2.1
Installing ri documentation for rake-13.2.1
Done installing documentation for rake after 0 seconds
1 gem installed
I use the console to verify the rake package is now available in my repo.
Things to know There are some things to keep in mind before uploading your first Ruby packages.
Be sure to update to the latest version of the AWS CLI before trying any command shown in the preceding instructions. Only the latest version of the CLI knows about Ruby repositories in CodeArtifact.
The authentication token expires after 12 hours. We suggest writing a script to automate its renewal or using a scheduled AWS Lambda function and securely storing the token in AWS Secrets Manager (for example).
Pricing and availability CodeArtifact costs for Ruby packages are the same as for the other package formats already supported. CodeArtifact billing depends on three metrics: the storage (measured in GB per month), the number of requests, and the data transfer out to the internet or to other AWS Regions. Data transfer to AWS services in the same Region is not charged, meaning you can run your continuous integration and delivery (CI/CD) jobs on Amazon Elastic Compute Cloud (Amazon EC2) or AWS CodeBuild, for example, without incurring a charge for the CodeArtifact data transfer. As usual, the pricing page has the details.
When Amazon Web Services (AWS) launched Amazon Q Developer as a preview last year, it changed my experience of interacting with AWS services and, at the same time, maximizing the potential of AWS services on a daily basis. Trained on 17 years of AWS knowledge and experience, this generative artificial intelligence (generative AI)–powered assistant helps me build applications on AWS, research best practices, perform troubleshooting, and resolve errors.
Today, we are announcing the general availability of Amazon Q Developer. In this announcement, we have a few updates, including new capabilities. Let’s get started.
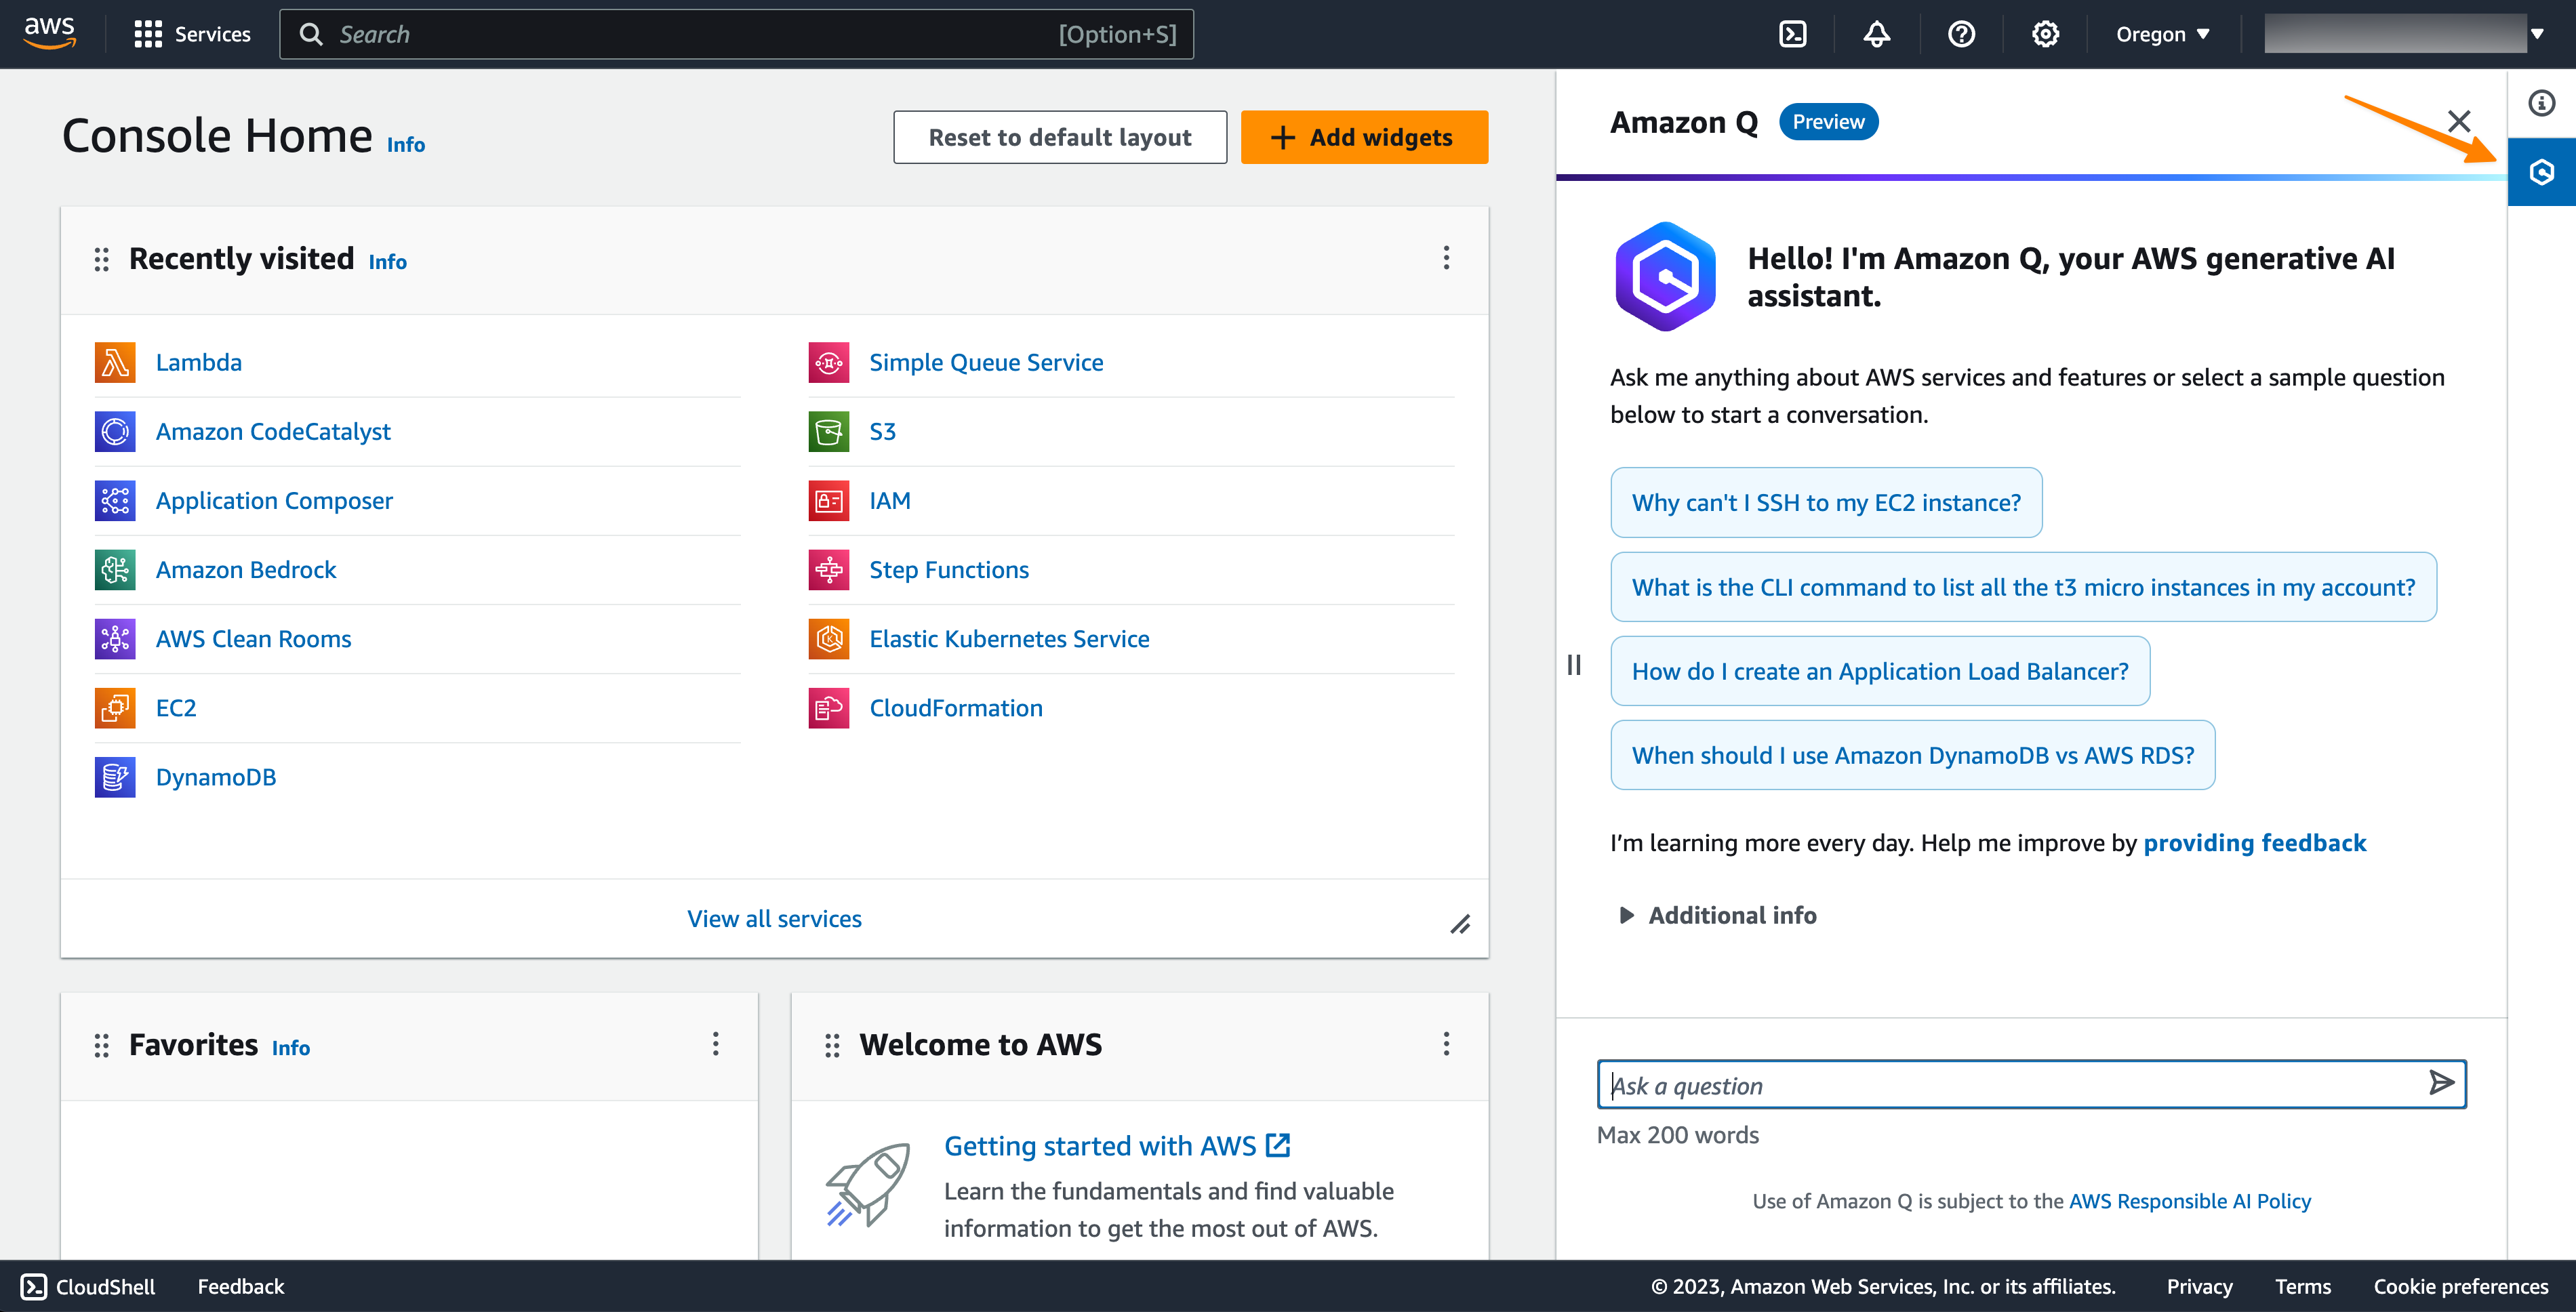
New: Amazon Q Developer has knowledge of your AWS account resources This new capability helps you understand and manage your cloud infrastructure on AWS. With this capability, you can list and describe your AWS resources using natural language prompts, minimizing friction in navigating the AWS Management Console and compiling all information from documentation pages.
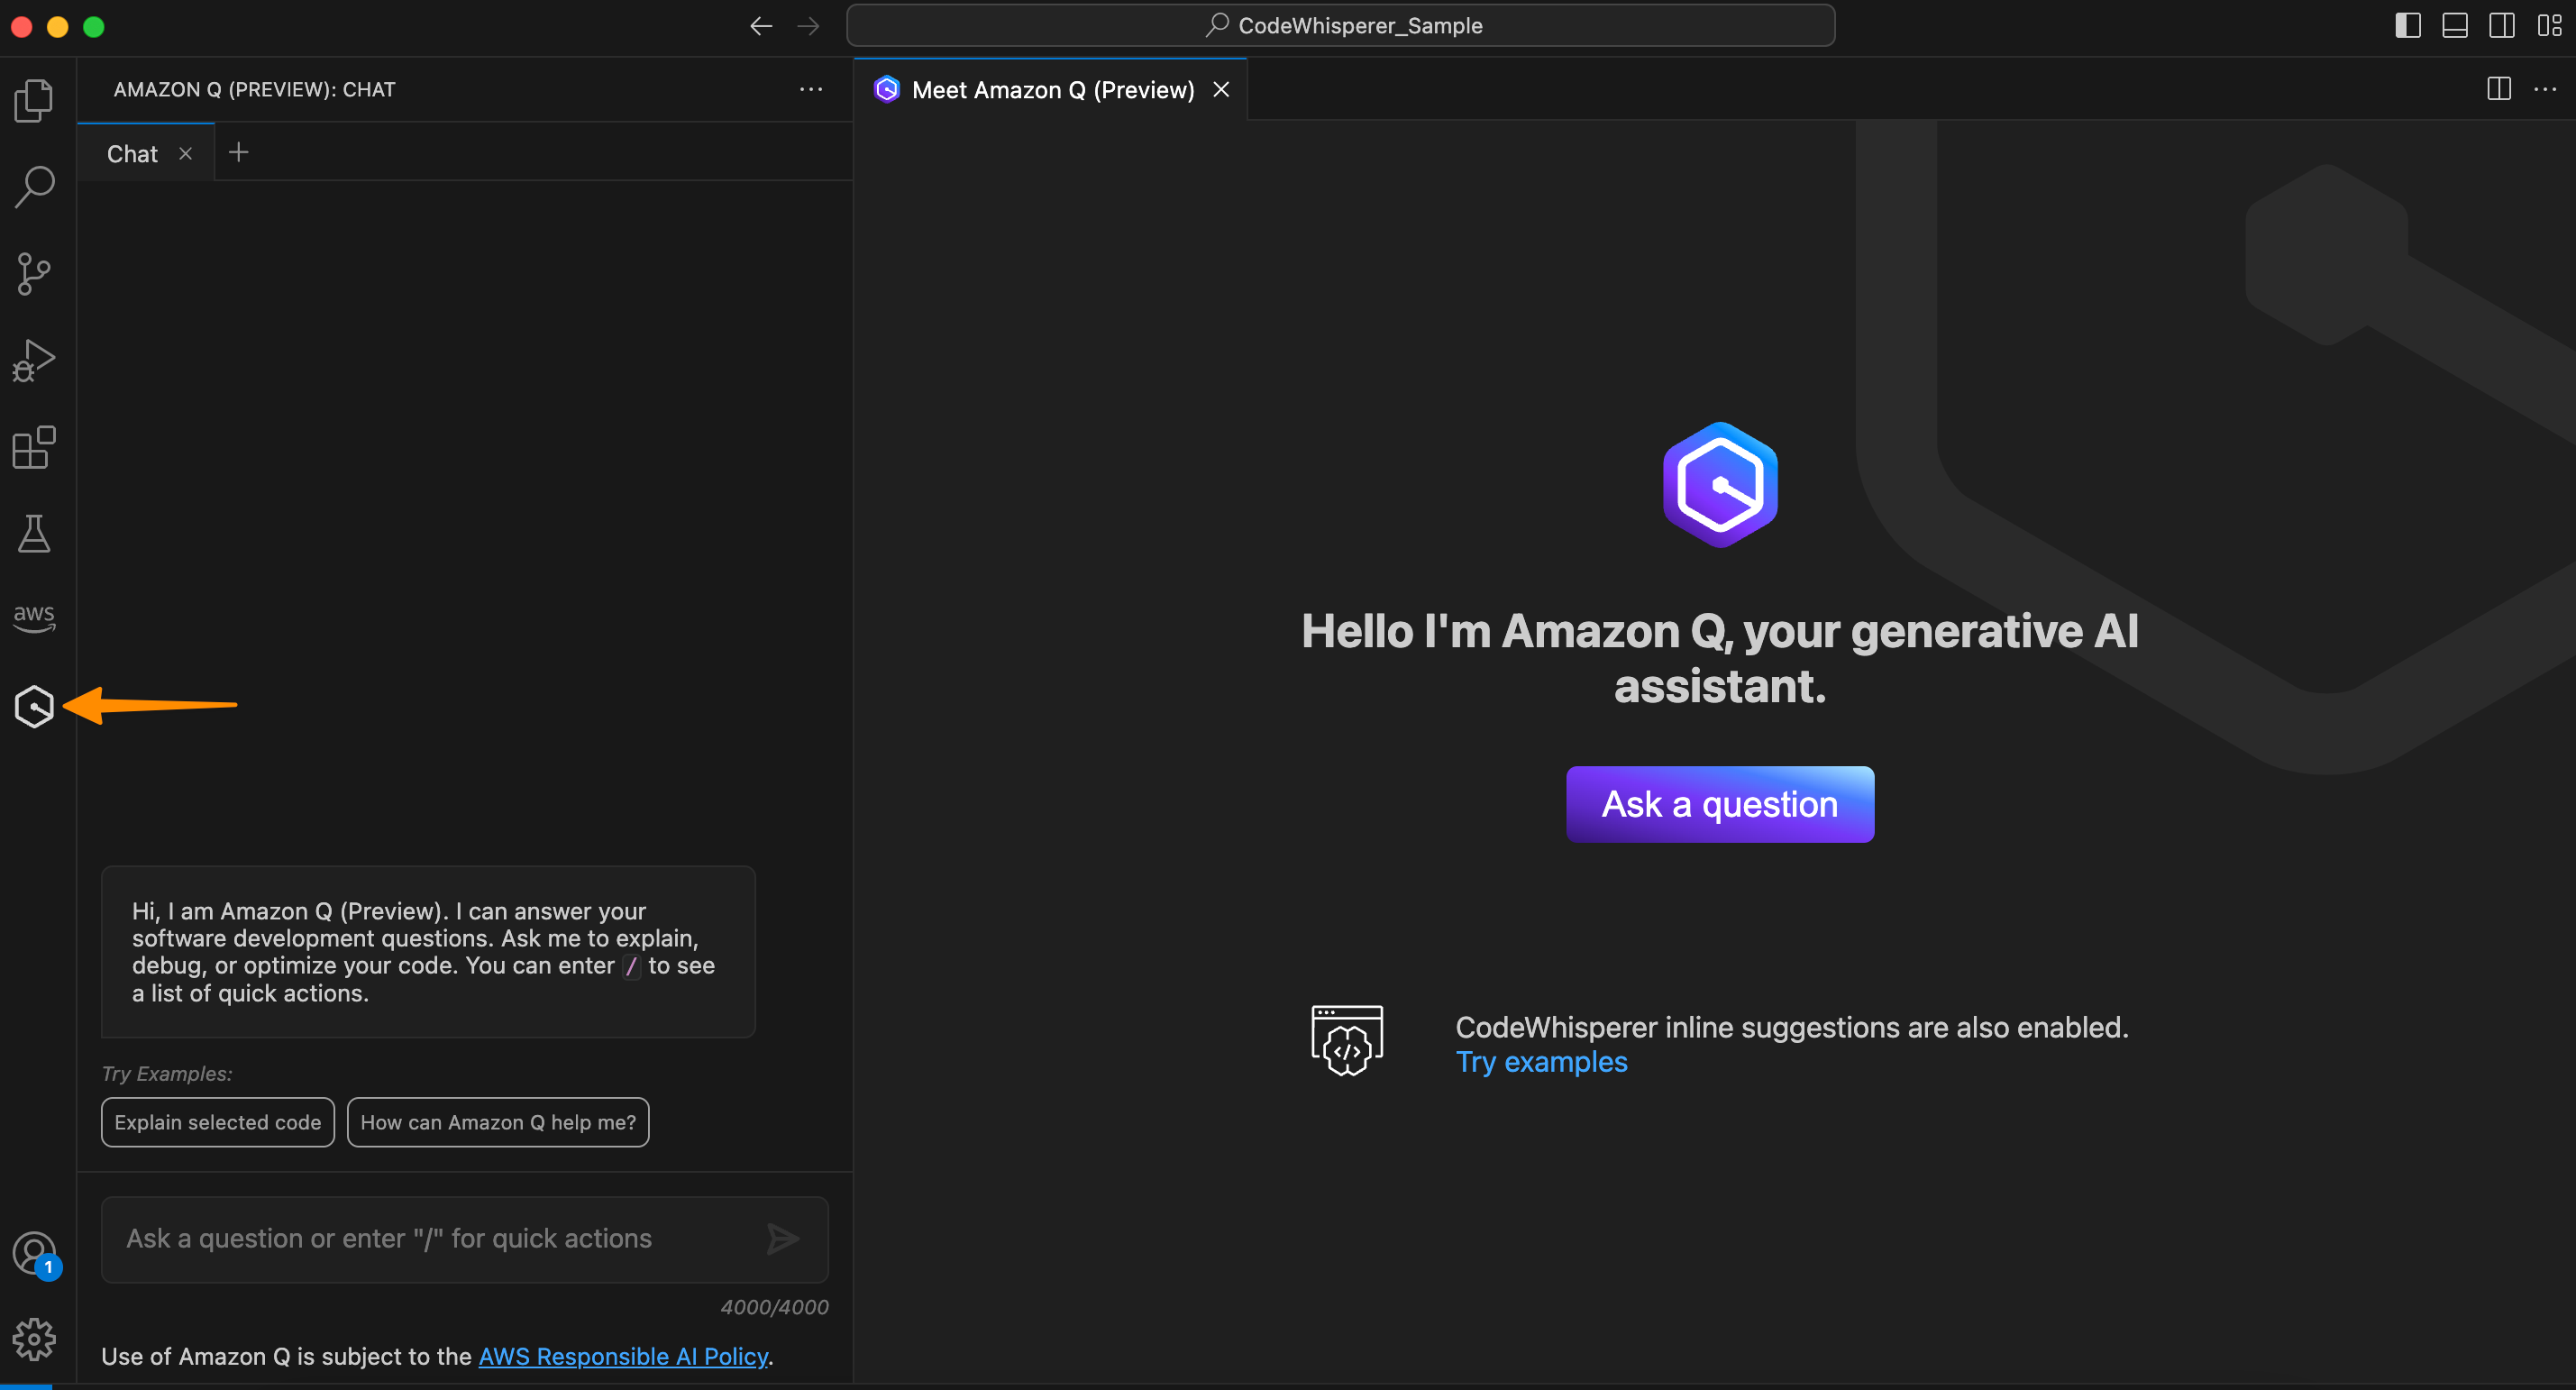
To get started, you can navigate to the AWS Management Console and select the Amazon Q Developer icon.
With this new capability, I can ask Amazon Q Developer to list all of my AWS resources. For example, if I ask Amazon Q Developer, “List all of my Lambda functions,” Amazon Q Developer returns the response with a set of my AWS Lambda functions as requested, as well as deep links so I can navigate to each resource easily.
Prompt for you to try: List all of my Lambda functions.
I can also list my resources residing in other AWS Regions without having to navigate through the AWS Management Console.
Prompt for you to try: List my Lambda functions in the Singapore Region.
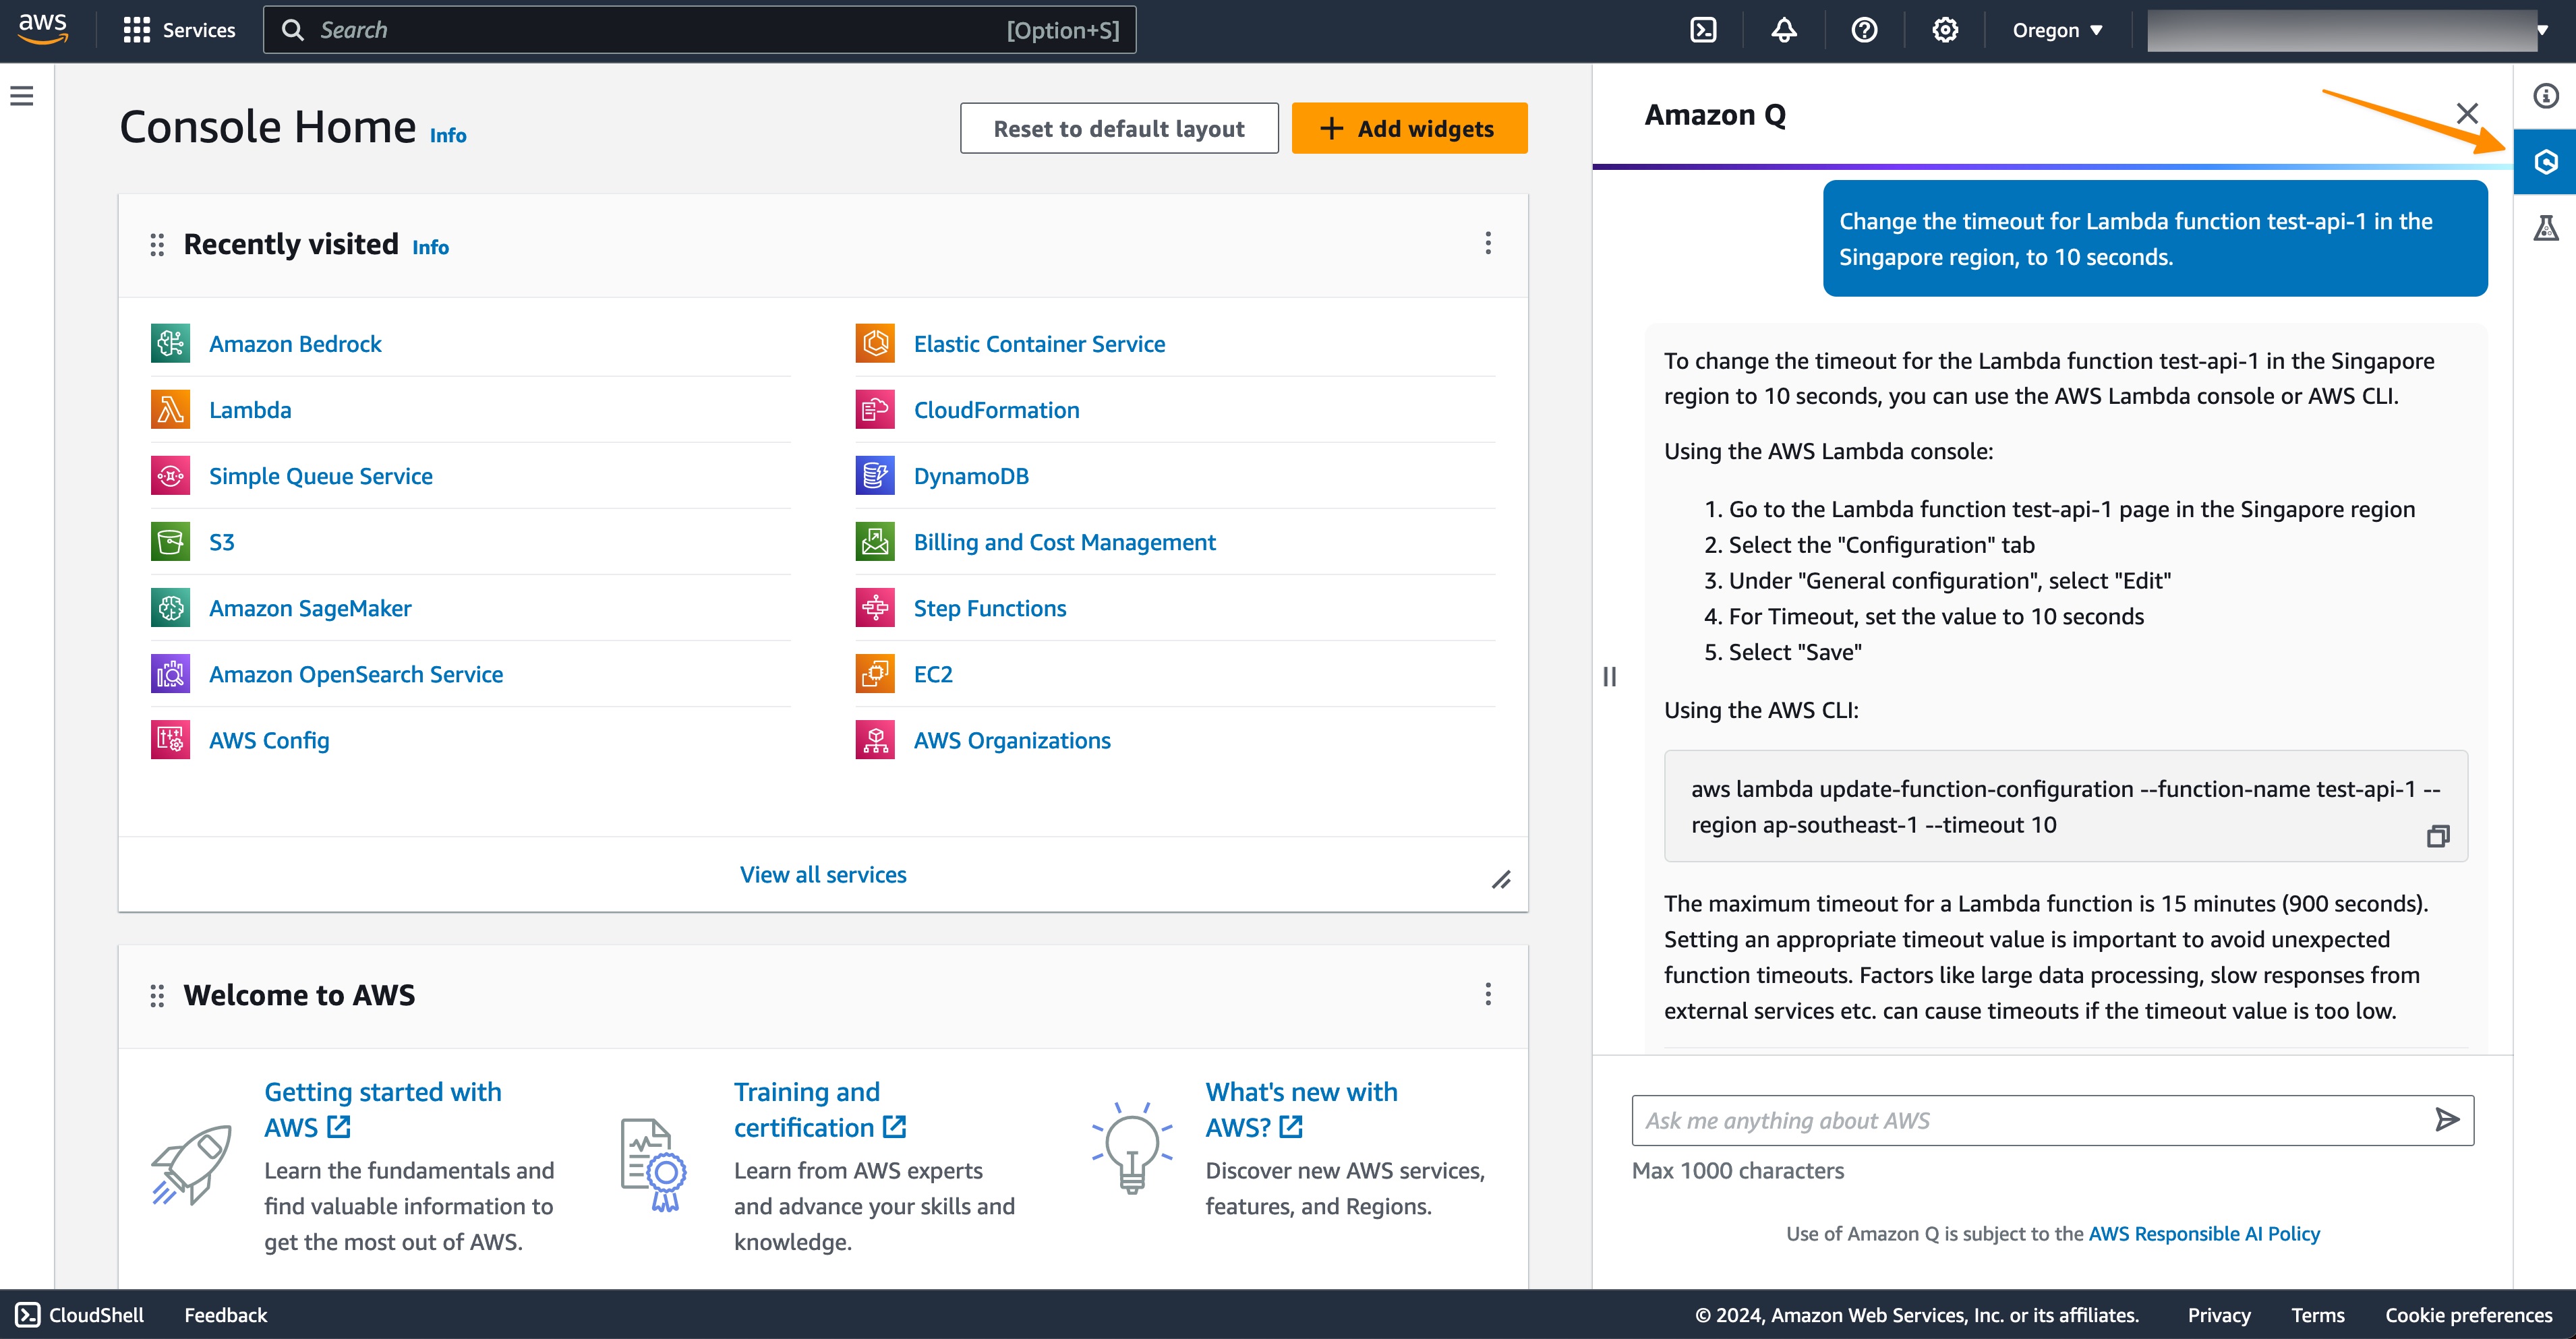
Not only that, this capability can also generate AWS Command Line Interface (AWS CLI) commands so I can make changes immediately. Here, I ask Amazon Q Developer to change the timeout configuration for my Lambda function.
Prompt for you to try: Change the timeout for Lambda function <NAME of AWS LAMBDA FUNCTION> in the Singapore Region to 10 seconds.
I can see Amazon Q Developer generated an AWS CLI command for me to perform the action. Next, I can copy and paste the command into my terminal to perform the change.
What I really like about this capability is that it minimizes the time and effort needed to get my account information in the AWS Management Console and generate AWS CLI commands so I can immediately implement any changes that I need. This helps me focus on my workflow to manage my AWS resources.
Amazon Q Developer can now help you understand your costs (preview) To fully maximize the value of cloud spend, I need to have a thorough understanding of my cloud costs. With this capability, I can get answers to AWS cost-related questions using natural language. This capability works by retrieving and analyzing cost data from AWS Cost Explorer.
Recently, I’ve been building a generative AI demo using Amazon SageMaker JumpStart, and this is the right timing because I need to know the total spend. So, I ask Amazon Q Developer the following prompt to know my spend in Q1 this year.
Prompt for you to try: What were the top three highest-cost services in Q1?
From the Amazon Q response, I can further investigate this result by selecting the Cost Explorer URL, which will bring me to the AWS Cost Explorer dashboard. Then, I can follow up with this prompt:
Prompt for you to try: List services in my account which have the most increment month over month. Provide details and analysis.
In short, this capability makes it easier for me to develop a deep understanding and get valuable insights into my cloud spending.
Amazon Q extension for IDEs As part of the update, we also released an Amazon Q integrated development environment (IDE) extension for Visual Studio Code and JetBrains IDEs. Now, you will see two extensions in the IDE marketplaces: (1) Amazon Q and (2) AWS Toolkit.
If you’re a new user, after installing the Amazon Q extension, you will see a sign-in page in the IDE with two options: using AWS Builder ID or single sign-on. You can continue to use Amazon Q normally.
For existing users, you will need to update the AWS Toolkit extension in your IDEs. Once you’ve finished the update, if you have existing Amazon Q and Amazon CodeWhisperer connections, even if they’re expired, the new Amazon Q extension will be automatically installed for you.
Free access for advanced capabilities in IDE As you might know, you can use AWS Builder ID to start using Amazon Q Developer in your preferred IDEs. Now, with this announcement, you have free access to two existing advanced capabilities of Amazon Q Developer in IDE, Amazon Q Developer Agent for software development and Amazon Q Developer Agent for code transformation. I’m really excited about this update!
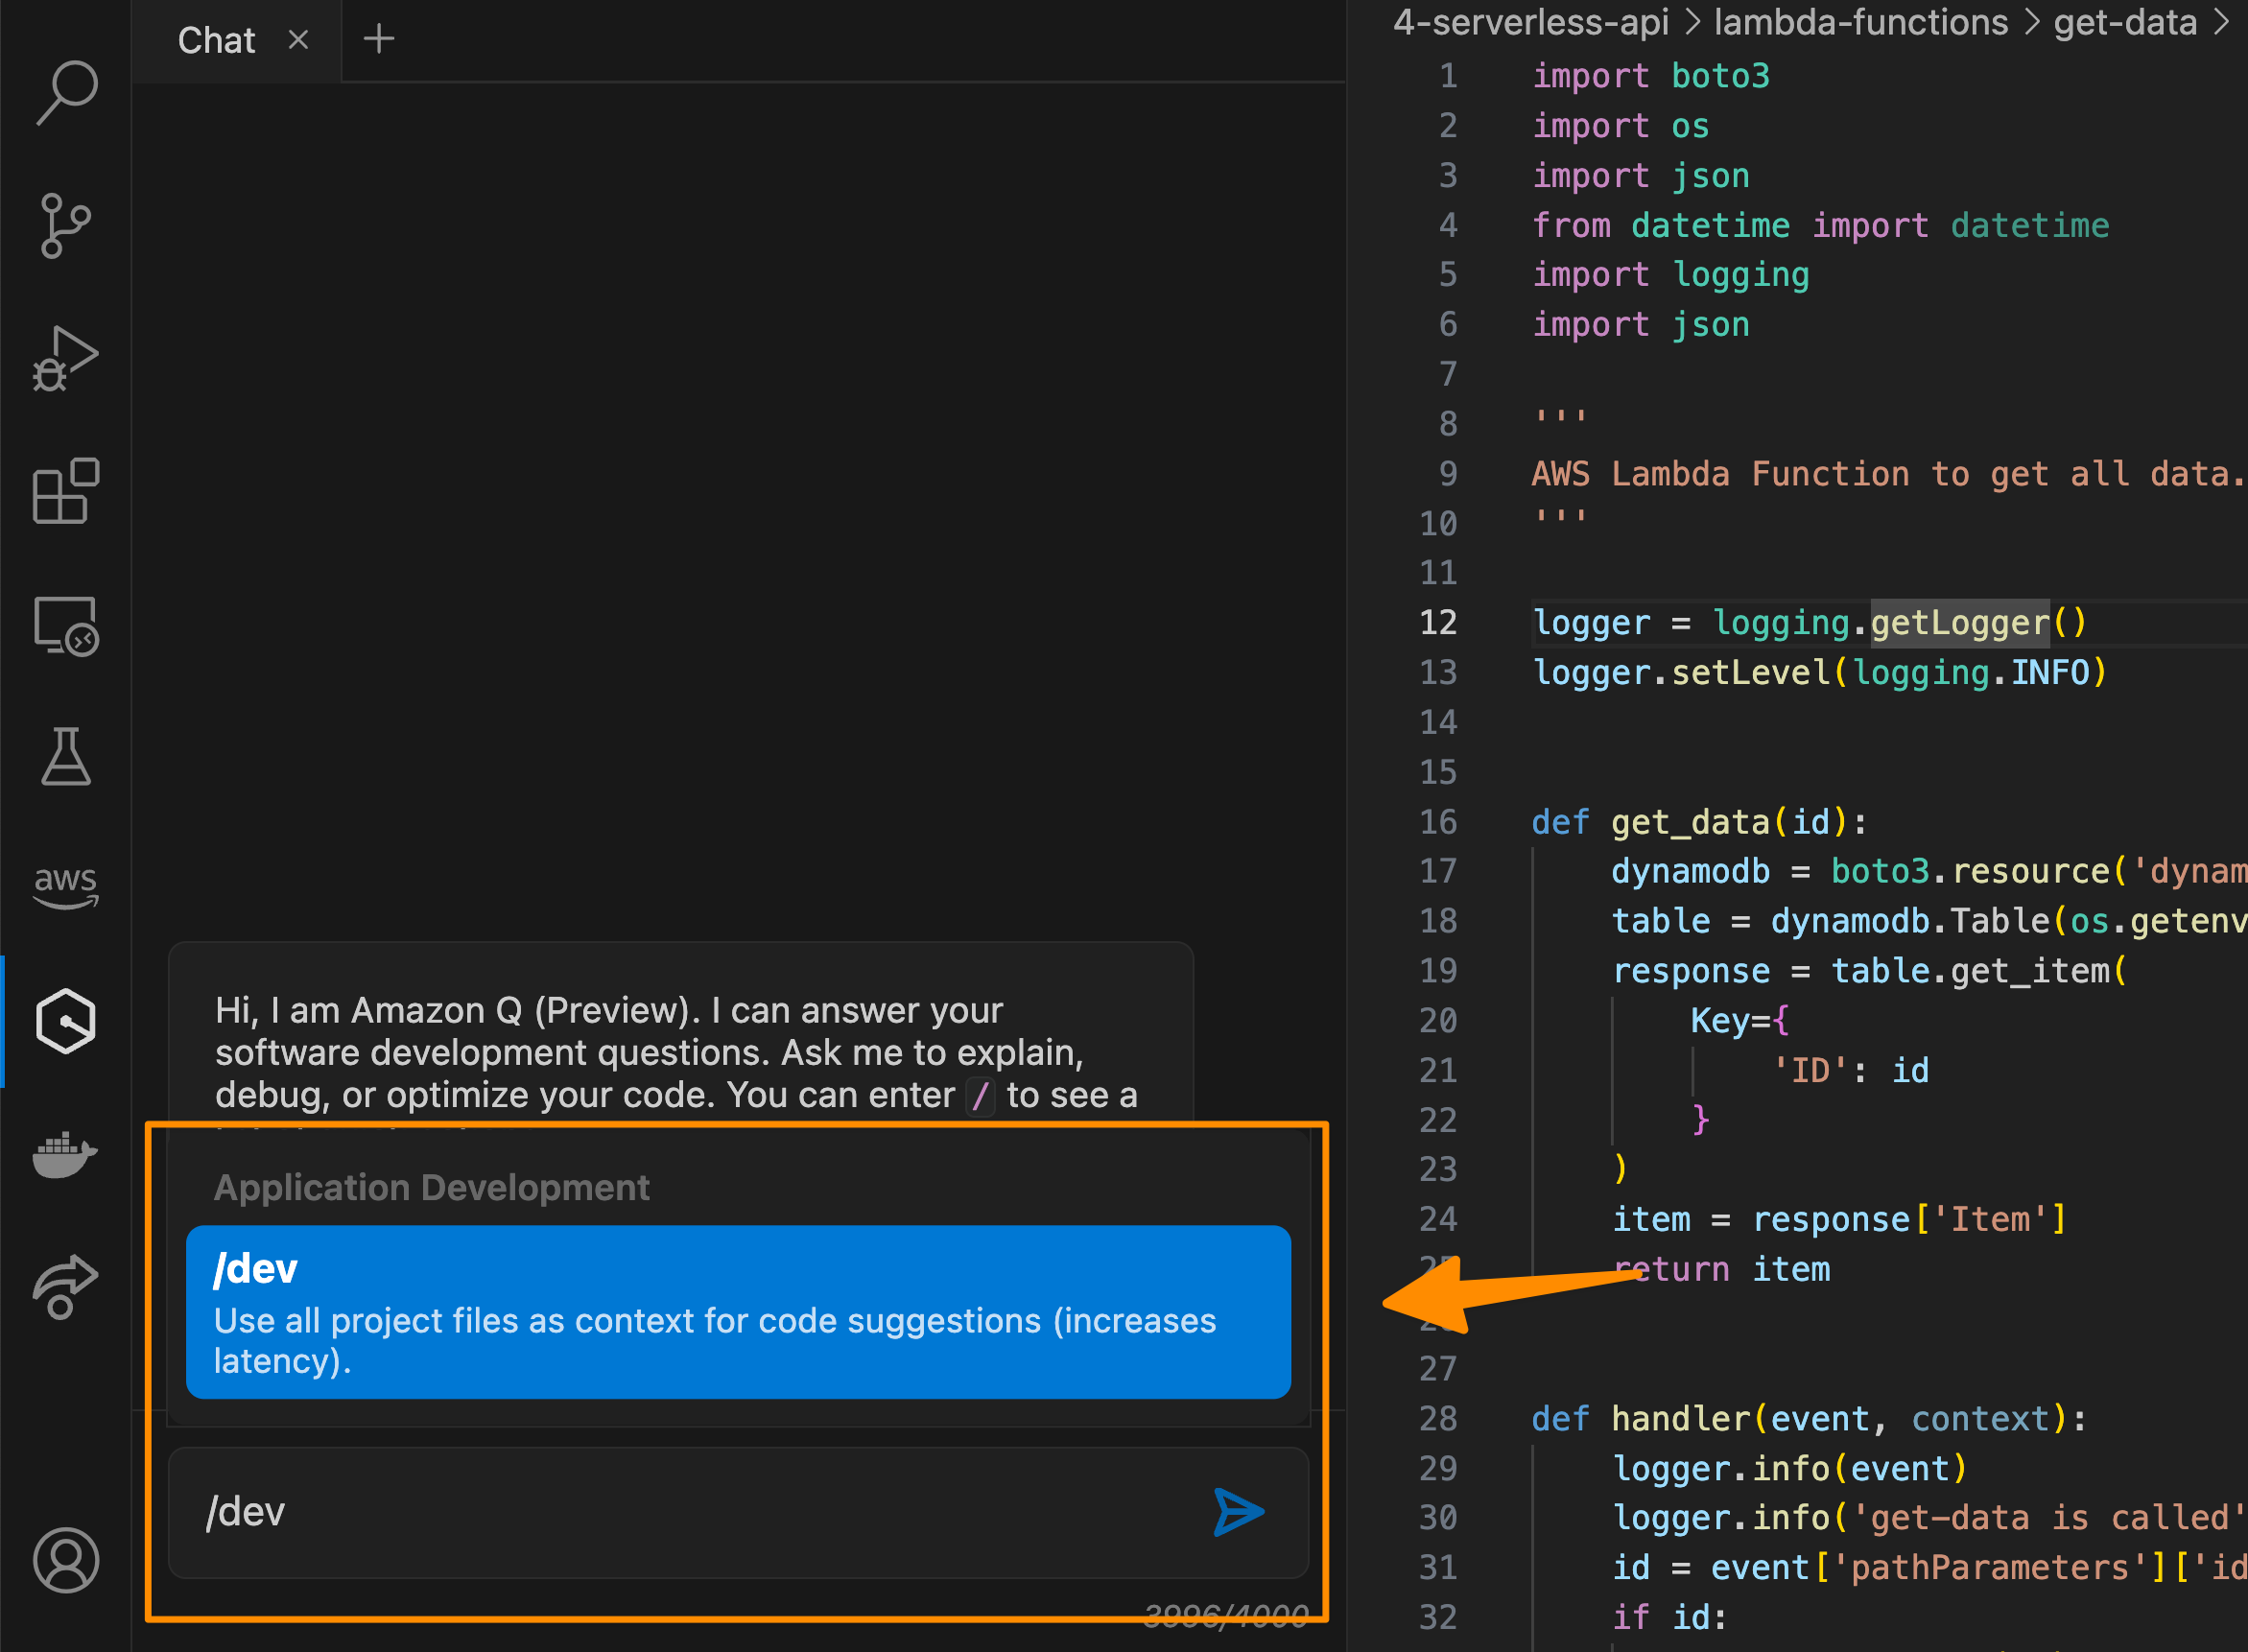
With the Amazon Q Developer Agent for software development, Amazon Q Developer can help you develop code features for projects in your IDE. To get started, you enter /dev in the Amazon Q Developer chat panel. My colleague Séb shared with me the following screenshot when he was using this capability for his support case project. He used the following prompt to generate an implementation plan for creating a new API in AWS Lambda:
Prompt for you to try: Add an API to list all support cases. Expose this API as a new Lambda function
Amazon Q Developer then provides an initial plan and you can keep on iterating this plan until you’re sure mostly everything is covered. Then, you can accept the plan and select Insert code.
The other capability you can access using AWS Builder ID is Developer Agent for code transformation. This capability will help you in upgrading your Java applications in IntelliJ or Visual Studio Code. Danilo described this capability last year, and you can see his thorough journey in Upgrade your Java applications with Amazon Q Code Transformation (preview).
Improvements in Amazon Q Developer Agent for Code Transformation The new transformation plan provides details specific to my applications to help me understand the overall upgrade process. To get started, I enter /transform in the Amazon Q Developer chat and provide the necessary details for Amazon Q to start upgrading my java project.
In the first step, Amazon Q identifies and provides details on the Java Development Kit (JDK) version, dependencies, and related code that needs to be updated. The dependencies upgrades now include upgrading popular frameworks to their latest major versions. For example, if you’re building with Spring Boot, it now gets upgraded to version 3 as part of the Java 17 upgrade.
In this step, if Amazon Q identifies any deprecated code that Java language specifications recommend replacing, it will make those updates automatically during the upgrade. This is a new enhancement to Amazon Q capabilities and is available now.
In the third step, this capability will build and run unit tests on the upgraded code, including fixing any issues to ensure the code compilation process will run smoothly after the upgrade.
With this capability, you can upgrade Java 8 and 11 applications that are built using Apache Maven to Java version 17. To get started with the Amazon Q Developer Agent for code transformation capability, you can read and follow the steps at Upgrade language versions with Amazon Q Code Transformation. We also have sample code for you to try this capability.
Things to know
Availability — To learn more about the availability of Amazon Q Developer capabilities, please visit Amazon Q Developer FAQs page.
Pricing — Amazon Q Developer now offers two pricing tiers – Free (free), and Pro, at $19/month/user.
Free self-paced course on AWS Skill Builder — Amazon Q Introduction is a 15-minute course that provides a high-level overview of Amazon Q, a generative AI–powered assistant, and the use cases and benefits of using it. This course is part of Amazon’s AI Ready initiative to provide free AI skills training to 2 million people globally by 2025.
Visit our Amazon Q Developer Center to find deep-dive technical content and to discover how you can speed up your software development work.
Amazon Q feature development enables teams using Amazon CodeCatalyst to scale with AI to assist developers in completing everyday software development tasks. Developers can now go from an idea in an issue to a fully tested, merge-ready, running application code in a Pull Request (PR) with natural language inputs in a few clicks. Developers can also provide feedback to Amazon Q directly on the published pull request and ask it to generate a new revision. If the code change falls short of expectations, a new development environment can be created directly from the pull request, necessary adjustments can be made manually, a new revision published, and proceed with the merge upon approval.
In this blog, we will walk through a use case leveraging the Modern three-tier web application blueprint, and adding a feature to the web application. We’ll leverage Amazon Q feature development to quickly go from Idea to PR. We also suggest following the steps outlined below in this blog in your own application so you can gain a better understanding of how you can use this feature in your daily work.
Solution Overview
Amazon Q feature development is integrated into CodeCatalyst. Figure 1 details how users can assign Amazon Q an issue. When assigning the issue, users answer a few preliminary questions and Amazon Q outputs the proposed approach, where users can either approve or provide additional feedback to Amazon Q. Once approved, Amazon Q will generate a PR where users can review, revise, and merge the PR into the repository.
Figure 1: Amazon Q feature development workflow
Prerequisites
Although we will walk through a sample use case in this blog using a Blueprint from CodeCatalyst, after, we encourage you to try this with your own application so you can gain hands-on experience with utilizing this feature. If you are using CodeCatalyst for the first time, you’ll need:
Amazon Q feature development in CodeCatalyst is currently in preview. To access this feature, ensure that you are using the Standard or Enterprise tier and the generative AI feature is enabled in your Space
Walkthrough
Step 1: Creating the blueprint
In this blog, we’ll leverage the Modern three-tier web application blueprint to walk through a sample use case. This blueprint creates a Mythical Mysfits three-tier web application with modular presentation, application, and data layers.
Figure 2: Creating a new Modern three-tier application blueprint
First, within your space click “Create Project” and select the Modern three-tier web application CodeCatalyst Blueprint as shown above in Figure 2.
Enter a Project name and select: Lambda for the Compute Platform and Amplify Hosting for Frontend Hosting Options. Additionally, ensure your AWS account is selected along with creating a new IAM Role.
Once the project is finished creating, the application will deploy via a CodeCatalyst workflow, assuming the AWS account and IAM role were setup correctly. The deployed application will be similar to the Mythical Mysfits website.
Step 2: Create a new issue
The Product Manager (PM) has asked us to add a feature to the newly created application, which entails creating the ability to add new mythical creatures. The PM has provided a detailed description to get started.
In the Issues section of our new project, click Create Issue
For the Issue title, enter “Ability to add a new mythical creature” and for the Description enter “Users should be able to add a new mythical creature to the website. There should be a new Add button on the UI, when prompted should allow the user to fill in Name, Age, Description, Good/Evil, Lawful/Chaotic, Species, Profile Image URI and thumbnail Image URI for the new creature. When the user clicks save, the application should leverage the existing API in app.py to save the new creature to the DynamoDB table.”
Furthermore, click Assign to Amazon Q as shown below in Figure 3.
Figure 3: Assigning a new issue to Amazon Q
Lastly, enable the Require Amazon Q to stop after each step and await review of its work. In this use case, we do not anticipate having any changes to our workflow files to support this new feature so we will leave the Allow Amazon Q to modify workflow files disabled as shown below in Figure 4. Click Create Issue and Amazon Q will get started.
Figure 4: Configurations for assigning Amazon Q
Step 3: Review Amazon Qs Approach
After a few minutes, Amazon Q will generate its understanding of the project in the Background section as well as an Approach to make the changes for the issue you created as show in Figure 5 below
(**Note: The Background and Approach generated for you may be different than what is shown in Figure 5 below).
We have the option to proceed as is or can reply to the Approach via a Comment to provide feedback so Amazon Q can refine it to align better with the use case.
Figure 5: Reviewing Amazon Qs Background and Approach
In the approach, we notice Amazon Q is suggesting it will create a new method to create and save the new item to the table, but we already have an existing method. We decide to leave feedback as show in Figure 6 letting Amazon Q know the existing method should be leveraged.
Figure 6: Provide feedback to Approach
Amazon Q will now refine the approach based on the feedback provided. The refined approach generated by Amazon Q meets our requirements, including unit tests, so we decide to click Proceed as shown in Figure 7 below.
Figure 7: Confirm approach and click Proceed
Now, Amazon Q will generate the code for implementation & create a PR with code changes that can be reviewed.
Step 4: Review the PR
Within our project, under Code on the left panel click on Pull requests. You should see the new PR created by Amazon Q.
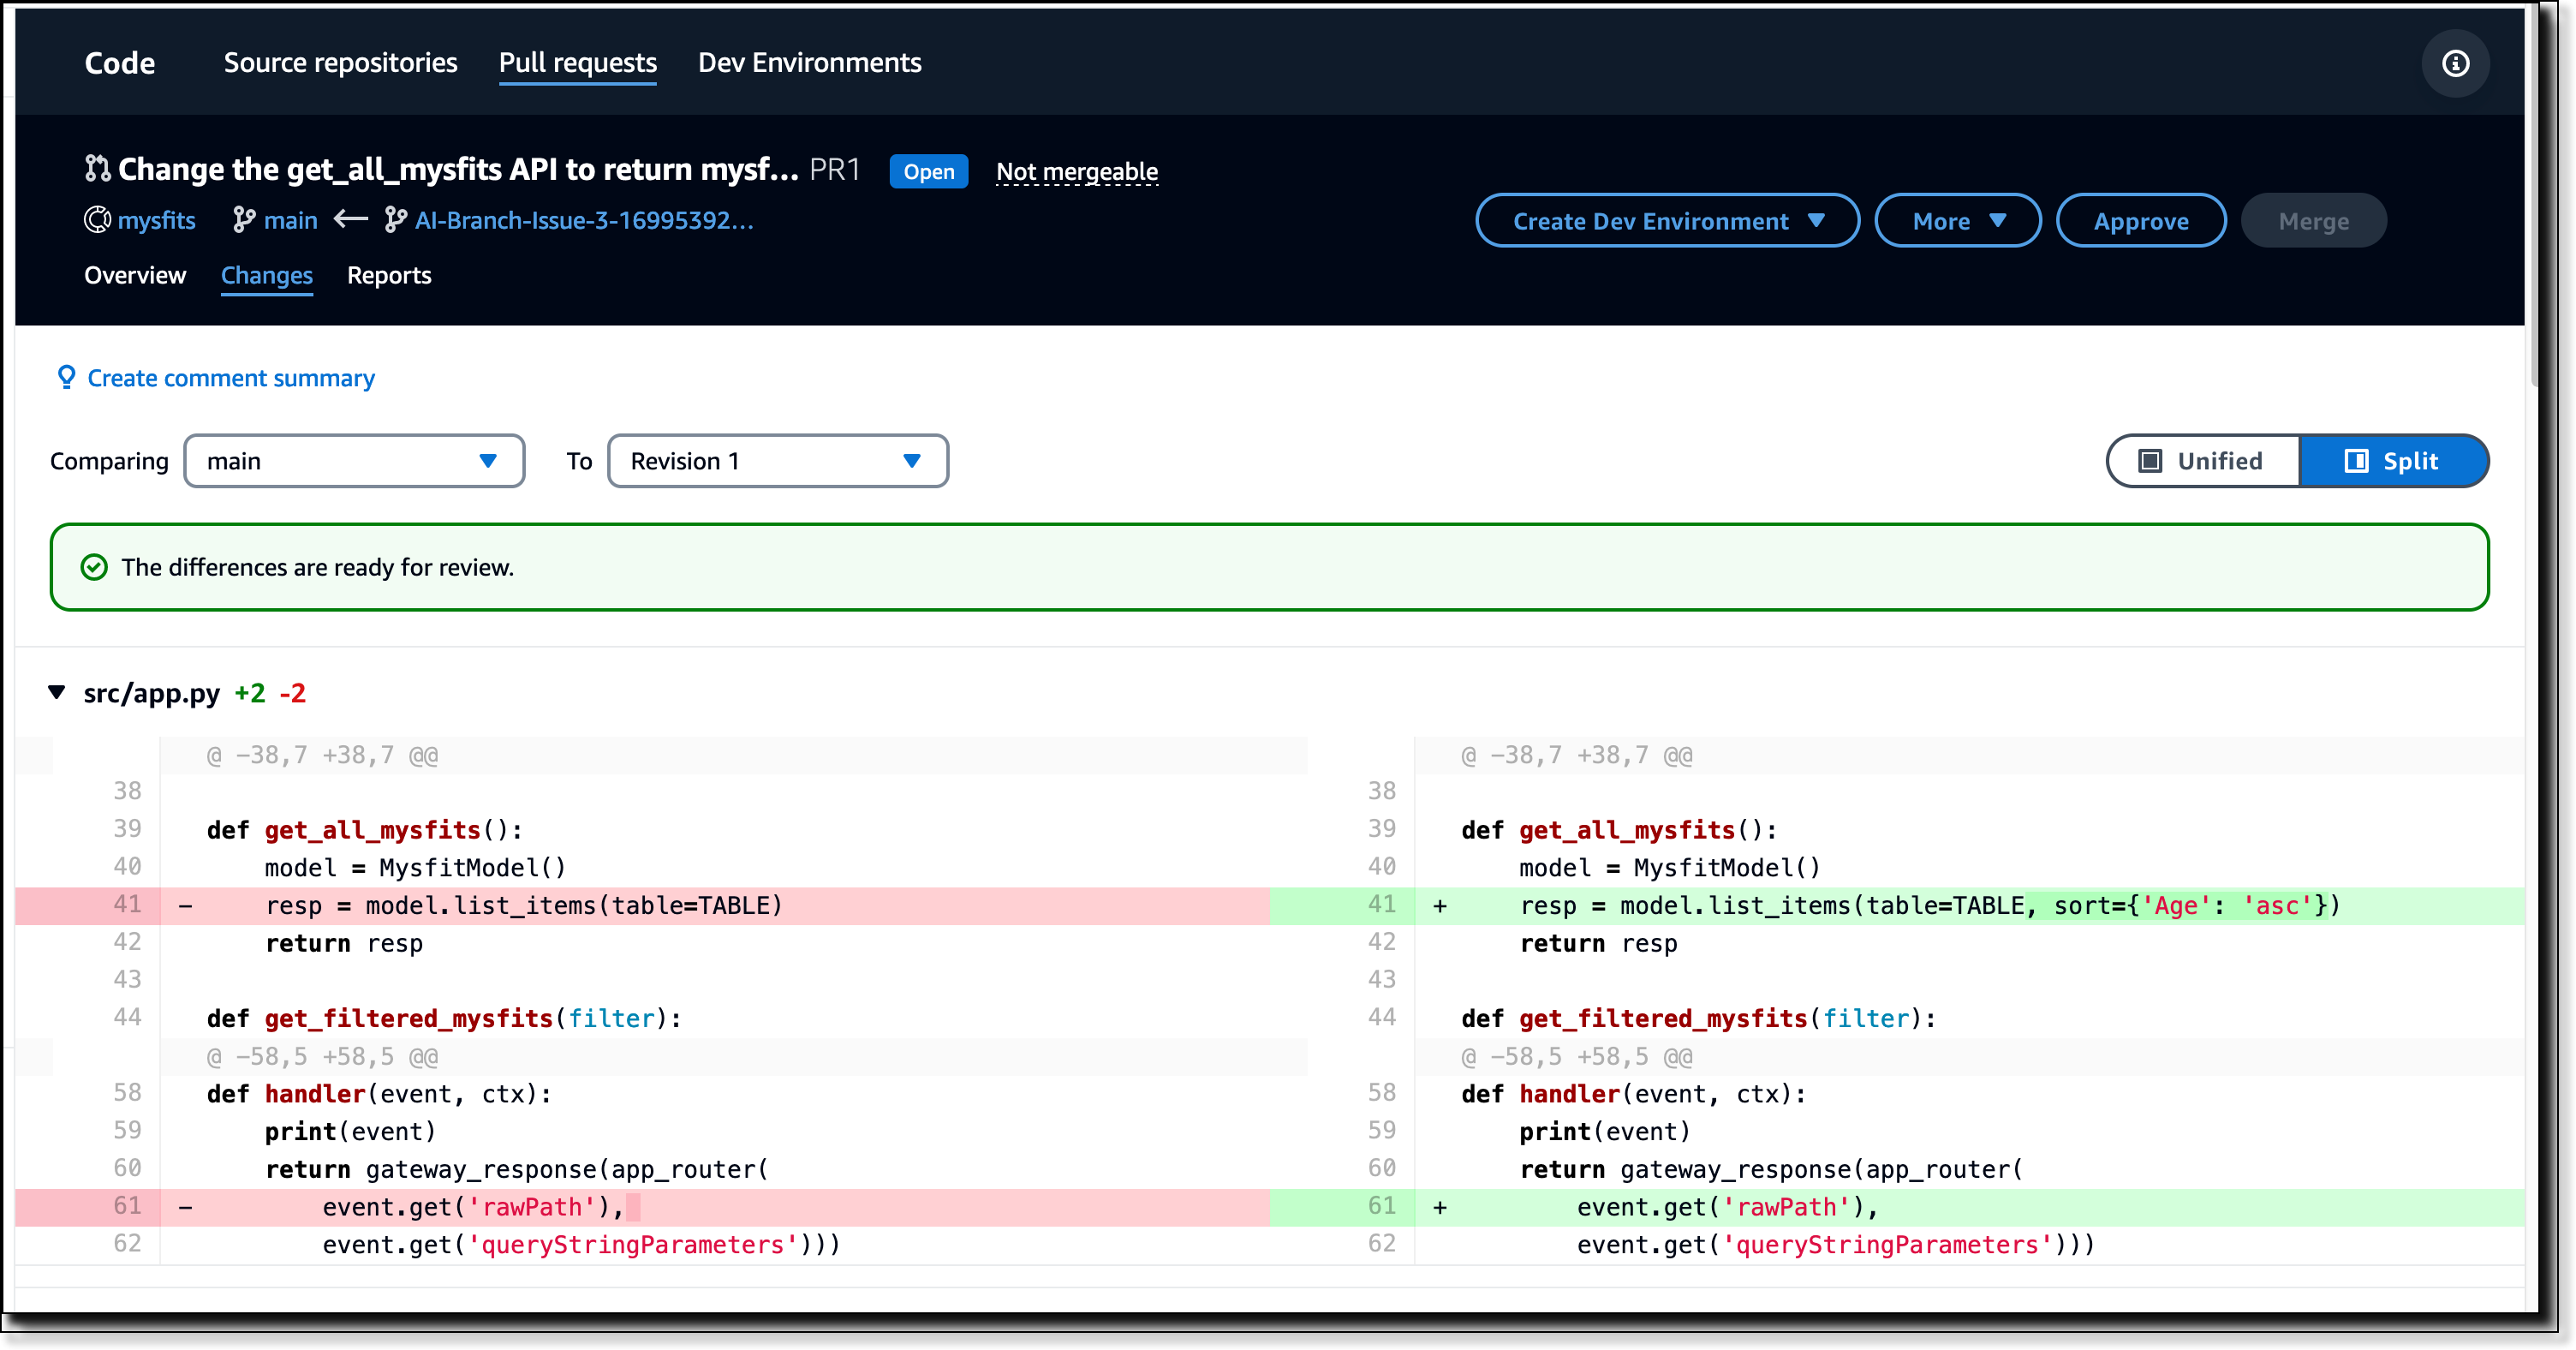
The PR description contains the approach that Amazon Q took to generate the code. This is helpful to reviewers who want to gain a high-level understanding of the changes included in the PR before diving into the details. You will also be able to review all changes made to the code as shown below in Figure 8.
Figure 8: Changes within PR
Step 5 (Optional): Provide feedback on PR
After reviewing the changes in the PR, I leave comments on a few items that can be improved. Notably, all fields on the new input form for creating a new creature should be required. After I complete leaving comments, I hit the Create Revision button. Amazon Q will take my comments, update the code accordingly and create a new revision of the PR as shown in Figure 9 below.
Figure 9: PR Revision created.
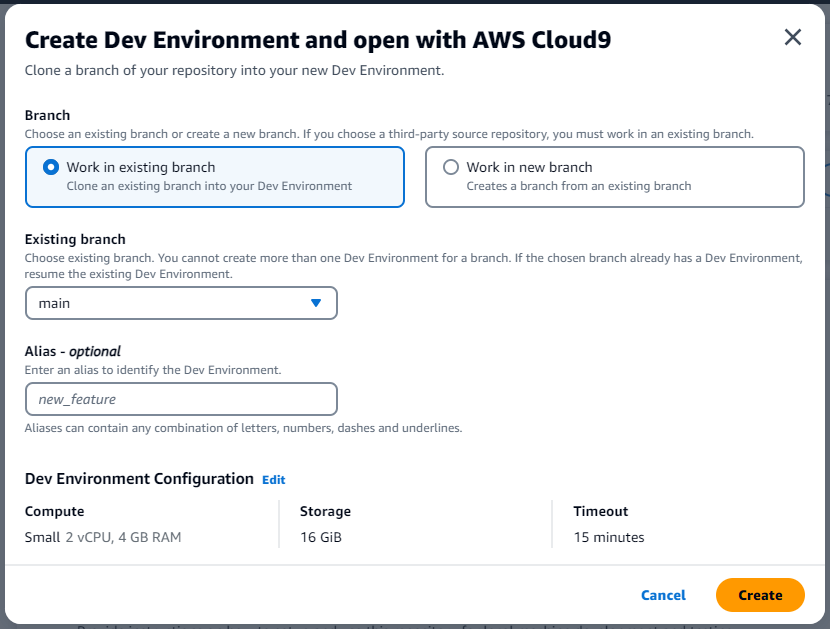
After reviewing the latest revision created by Amazon Q, I am happy with the changes and proceed with testing the changes directly from CodeCatalyst by utilizing Dev Environments. Once I have completed testing of the new feature and everything works as expected, we will let our peers review the PR to provide feedback and approve the pull request.
As part of following the steps in this blog post, if you upgraded your Space to Standard or Enterprise tier, please ensure you downgrade to the Free tier to avoid any unwanted additional charges. Additionally, delete the project and any associated resources deployed in the walkthrough.
Unassign Amazon Q from any issues no longer being worked on. If Amazon Q has finished its work on an issue or could not find a solution, make sure to unassign Amazon Q to avoid reaching the maximum quota for generative AI features. For more information, see Managing generative AI features and Pricing.
Best Practices for using Amazon Q Feature Development
You can follow a few best practices to ensure you experience the best results when using Amazon Q feature development:
When describing your feature or issue, provide as much context as possible to get the best result from Amazon Q. Being too vague or unclear may not produce ideal results for your use case.
Changes and new features should be as focused as possible. You will likely not experience the best results when making large and complex changes in a single issue. Instead, break the changes or feature up into smaller, more manageable issues where you will see better results.
Leverage the feedback feature to practice giving input on approaches Amazon Q takes to ensure it gets to a similar outcome as highlighted in the blog.
Conclusion
In this post, you’ve seen how you can quickly go from Idea to PR using the Amazon Q Feature development capability in CodeCatalyst. You can leverage this new feature to start building new features in your applications. Check out Amazon CodeCatalyst feature development today.
Organizations often use Terraform Modules to orchestrate complex resource provisioning and provide a simple interface for developers to enter the required parameters to deploy the desired infrastructure. Modules enable code reuse and provide a method for organizations to standardize deployment of common workloads such as a three-tier web application, a cloud networking environment, or a data analytics pipeline. When building Terraform modules, it is common for the module author to start with manual testing. Manual testing is performed using commands such as terraform validate for syntax validation, terraform plan to preview the execution plan, and terraform apply followed by manual inspection of resource configuration in the AWS Management Console. Manual testing is prone to human error, not scalable, and can result in unintended issues. Because modules are used by multiple teams in the organization, it is important to ensure that any changes to the modules are extensively tested before the release. In this blog post, we will show you how to validate Terraform modules and how to automate the process using a Continuous Integration/Continuous Deployment (CI/CD) pipeline.
Terraform Test
Terraform test is a new testing framework for module authors to perform unit and integration tests for Terraform modules. Terraform test can create infrastructure as declared in the module, run validation against the infrastructure, and destroy the test resources regardless if the test passes or fails. Terraform test will also provide warnings if there are any resources that cannot be destroyed. Terraform test uses the same HashiCorp Configuration Language (HCL) syntax used to write Terraform modules. This reduces the burden for modules authors to learn other tools or programming languages. Module authors run the tests using the command terraform test which is available on Terraform CLI version 1.6 or higher.
Module authors create test files with the extension *.tftest.hcl. These test files are placed in the root of the Terraform module or in a dedicated tests directory. The following elements are typically present in a Terraform tests file:
Provider block: optional, used to override the provider configuration, such as selecting AWS region where the tests run.
Variables block: the input variables passed into the module during the test, used to supply non-default values or to override default values for variables.
Run block: used to run a specific test scenario. There can be multiple run blocks per test file, Terraform executes run blocks in order. In each run block you specify the command Terraform (plan or apply), and the test assertions. Module authors can specify the conditions such as: length(var.items) != 0. A full list of condition expressions can be found in the HashiCorp documentation.
Terraform tests are performed in sequential order and at the end of the Terraform test execution, any failed assertions are displayed.
Basic test to validate resource creation
Now that we understand the basic anatomy of a Terraform tests file, let’s create basic tests to validate the functionality of the following Terraform configuration. This Terraform configuration will create an AWS CodeCommit repository with prefix name repo-.
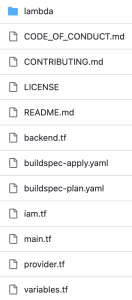
Now we create a Terraform test file in the tests directory. See the following directory structure as an example:
├── main.tf
└── tests
└── basic.tftest.hcl
For this first test, we will not perform any assertion except for validating that Terraform execution plan runs successfully. In the tests file, we create a variable block to set the value for the variable repository_name. We also added the run block with command = plan to instruct Terraform test to run Terraform plan. The completed test should look like the following:
# basic.tftest.hcl

variables {
  repository_name = "MyRepo"
}

run "test_resource_creation" {
  command = plan
}
Now we will run this test locally. First ensure that you are authenticated into an AWS account, and run the terraform init command in the root directory of the Terraform module. After the provider is initialized, start the test using the terraform test command.
❯ terraform test
tests/basic.tftest.hcl... in progress
run "test_resource_creation"... pass
tests/basic.tftest.hcl... tearing down
tests/basic.tftest.hcl... pass
Our first test is complete, we have validated that the Terraform configuration is valid and the resource can be provisioned successfully. Next, let’s learn how to perform inspection of the resource state.
Create resource and validate resource name
Re-using the previous test file, we add the assertion block to checks if the CodeCommit repository name starts with a string repo- and provide error message if the condition fails. For the assertion, we use the startswith function. See the following example:
# basic.tftest.hcl

variables {
  repository_name = "MyRepo"
}

run "test_resource_creation" {
  command = plan

  assert {
    condition = startswith(aws_codecommit_repository.test.repository_name, "repo-")
    error_message = "CodeCommit repository name ${var.repository_name} did not start with the expected value of ‘repo-****’."
  }
}
Now, let’s assume that another module author made changes to the module by modifying the prefix from repo- to my-repo-. Here is the modified Terraform module.
We can catch this mistake by running the the terraform test command again.
❯ terraform test
tests/basic.tftest.hcl... in progress
run "test_resource_creation"... fail
╷
│ Error: Test assertion failed
│
│ on tests/basic.tftest.hcl line 9, in run "test_resource_creation":
│ 9: condition = startswith(aws_codecommit_repository.test.repository_name, "repo-")
│ ├────────────────
│ │ aws_codecommit_repository.test.repository_name is "my-repo-MyRepo"
│
│ CodeCommit repository name MyRepo did not start with the expected value 'repo-***'.
╵
tests/basic.tftest.hcl... tearing down
tests/basic.tftest.hcl... fail

Failure! 0 passed, 1 failed.
We have successfully created a unit test using assertions that validates the resource name matches the expected value. For more examples of using assertions see the Terraform Tests Docs. Before we proceed to the next section, don’t forget to fix the repository name in the module (revert the name back to repo- instead of my-repo-) and re-run your Terraform test.
Testing variable input validation
When developing Terraform modules, it is common to use variable validation as a contract test to validate any dependencies / restrictions. For example, AWS CodeCommit limits the repository name to 100 characters. A module author can use the length function to check the length of the input variable value. We are going to use Terraform test to ensure that the variable validation works effectively. First, we modify the module to use variable validation.
# main.tf

variable "repository_name" {
  type = string
  validation {
    condition = length(var.repository_name) <= 100
    error_message = "The repository name must be less than or equal to 100 characters."
  }
}

resource "aws_codecommit_repository" "test" {
  repository_name = format("repo-%s", var.repository_name)
  description = "Test repository."
}
By default, when variable validation fails during the execution of Terraform test, the Terraform test also fails. To simulate this, create a new test file and insert the repository_name variable with a value longer than 100 characters.
# var_validation.tftest.hcl

variables {
  repository_name = “this_is_a_repository_name_longer_than_100_characters_7rfD86rGwuqhF3TH9d3Y99r7vq6JZBZJkhw5h4eGEawBntZmvy”
}

run “test_invalid_var” {
  command = plan
}
Notice on this new test file, we also set the command to Terraform plan, why is that? Because variable validation runs prior to Terraform apply, thus we can save time and cost by skipping the entire resource provisioning. If we run this Terraform test, it will fail as expected.
❯ terraform test
tests/basic.tftest.hcl… in progress
run “test_resource_creation”… pass
tests/basic.tftest.hcl… tearing down
tests/basic.tftest.hcl… pass
tests/var_validation.tftest.hcl… in progress
run “test_invalid_var”… fail
╷
│ Error: Invalid value for variable
│
│ on main.tf line 1:
│ 1: variable “repository_name” {
│ ├────────────────
│ │ var.repository_name is “this_is_a_repository_name_longer_than_100_characters_7rfD86rGwuqhF3TH9d3Y99r7vq6JZBZJkhw5h4eGEawBntZmvy”
│
│ The repository name must be less than or equal to 100 characters.
│
│ This was checked by the validation rule at main.tf:3,3-13.
╵
tests/var_validation.tftest.hcl… tearing down
tests/var_validation.tftest.hcl… fail

Failure! 1 passed, 1 failed.
For other module authors who might iterate on the module, we need to ensure that the validation condition is correct and will catch any problems with input values. In other words, we expect the validation condition to fail with the wrong input. This is especially important when we want to incorporate the contract test in a CI/CD pipeline. To prevent our test from failing due introducing an intentional error in the test, we can use the expect_failures attribute. Here is the modified test file:
# var_validation.tftest.hcl

variables {
  repository_name = “this_is_a_repository_name_longer_than_100_characters_7rfD86rGwuqhF3TH9d3Y99r7vq6JZBZJkhw5h4eGEawBntZmvy”
}

run “test_invalid_var” {
  command = plan

  expect_failures = [
    var.repository_name
  ]
}
Now if we run the Terraform test, we will get a successful result.
❯ terraform test
tests/basic.tftest.hcl… in progress
run “test_resource_creation”… pass
tests/basic.tftest.hcl… tearing down
tests/basic.tftest.hcl… pass
tests/var_validation.tftest.hcl… in progress
run “test_invalid_var”… pass
tests/var_validation.tftest.hcl… tearing down
tests/var_validation.tftest.hcl… pass

Success! 2 passed, 0 failed.
As you can see, the expect_failures attribute is used to test negative paths (the inputs that would cause failures when passed into a module). Assertions tend to focus on positive paths (the ideal inputs). For an additional example of a test that validates functionality of a completed module with multiple interconnected resources, see this example in the Terraform CI/CD and Testing on AWS Workshop.
Orchestrating supporting resources
In practice, end-users utilize Terraform modules in conjunction with other supporting resources. For example, a CodeCommit repository is usually encrypted using an AWS Key Management Service (KMS) key. The KMS key is provided by end-users to the module using a variable called kms_key_id. To simulate this test, we need to orchestrate the creation of the KMS key outside of the module. In this section we will learn how to do that. First, update the Terraform module to add the optional variable for the KMS key.
# main.tf

variable "repository_name" {
  type = string
  validation {
    condition = length(var.repository_name) <= 100
    error_message = "The repository name must be less than or equal to 100 characters."
  }
}

variable "kms_key_id" {
  type = string
  default = ""
}

resource "aws_codecommit_repository" "test" {
  repository_name = format("repo-%s", var.repository_name)
  description = "Test repository."
  kms_key_id = var.kms_key_id != "" ? var.kms_key_id : null
}
In a Terraform test, you can instruct the run block to execute another helper module. The helper module is used by the test to create the supporting resources. We will create a sub-directory called setup under the tests directory with a single kms.tf file. We also create a new test file for KMS scenario. See the updated directory structure:
The new test will use two separate run blocks. The first run block (setup) executes the helper module to generate a KMS key. This is done by assigning the command apply which will run terraform apply to generate the KMS key. The second run block (codecommit_with_kms) will then use the KMS key ARN output of the first run as the input variable passed to the main module.
# with_kms.tftest.hcl

run "setup" {
  command = apply
  module {
    source = "./tests/setup"
  }
}

run "codecommit_with_kms" {
  command = apply

  variables {
    repository_name = "MyRepo"
    kms_key_id = run.setup.kms_key_id
  }

  assert {
    condition = aws_codecommit_repository.test.kms_key_id != null
    error_message = "KMS key ID attribute value is null"
  }
}
Go ahead and run the Terraform init, followed by Terraform test. You should get the successful result like below.
❯ terraform test
tests/basic.tftest.hcl... in progress
run "test_resource_creation"... pass
tests/basic.tftest.hcl... tearing down
tests/basic.tftest.hcl... pass
tests/var_validation.tftest.hcl... in progress
run "test_invalid_var"... pass
tests/var_validation.tftest.hcl... tearing down
tests/var_validation.tftest.hcl... pass
tests/with_kms.tftest.hcl... in progress
run "create_kms_key"... pass
run "codecommit_with_kms"... pass
tests/with_kms.tftest.hcl... tearing down
tests/with_kms.tftest.hcl... pass

Success! 4 passed, 0 failed.
We have learned how to run Terraform test and develop various test scenarios. In the next section we will see how to incorporate all the tests into a CI/CD pipeline.
Terraform Tests in CI/CD Pipelines
Now that we have seen how Terraform Test works locally, let’s see how the Terraform test can be leveraged to create a Terraform module validation pipeline on AWS. The following AWS services are used:
AWS CodeCommit – a secure, highly scalable, fully managed source control service that hosts private Git repositories.
AWS CodeBuild – a fully managed continuous integration service that compiles source code, runs tests, and produces ready-to-deploy software packages.
AWS CodePipeline – a fully managed continuous delivery service that helps you automate your release pipelines for fast and reliable application and infrastructure updates.
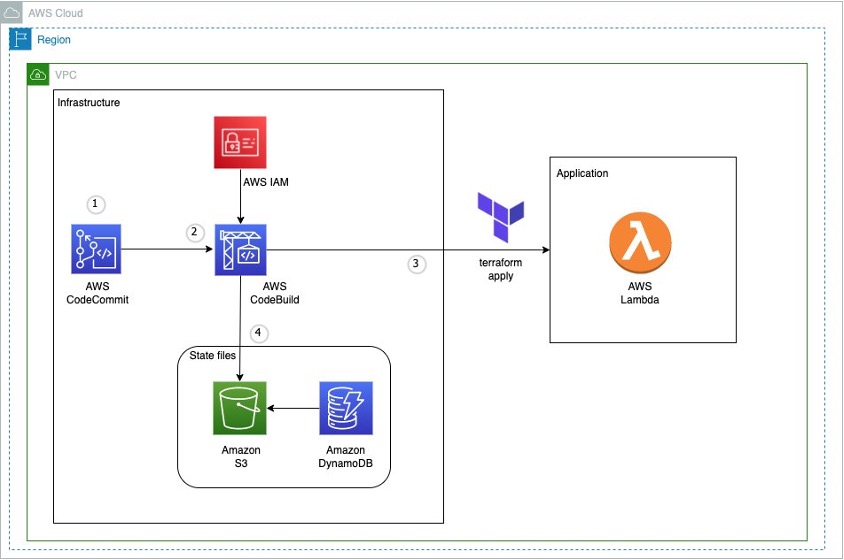
In the above architecture for a Terraform module validation pipeline, the following takes place:
A developer pushes Terraform module configuration files to a git repository (AWS CodeCommit).
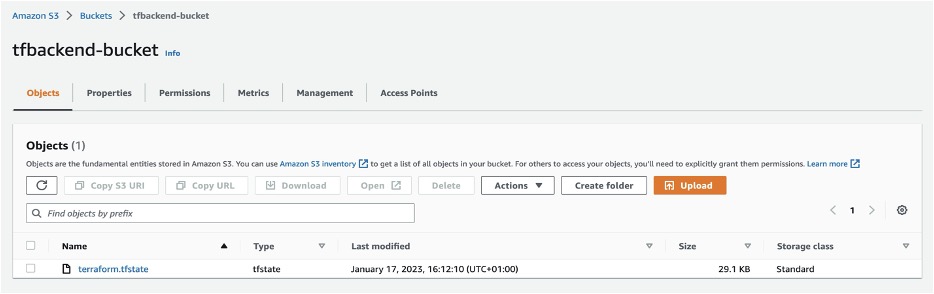
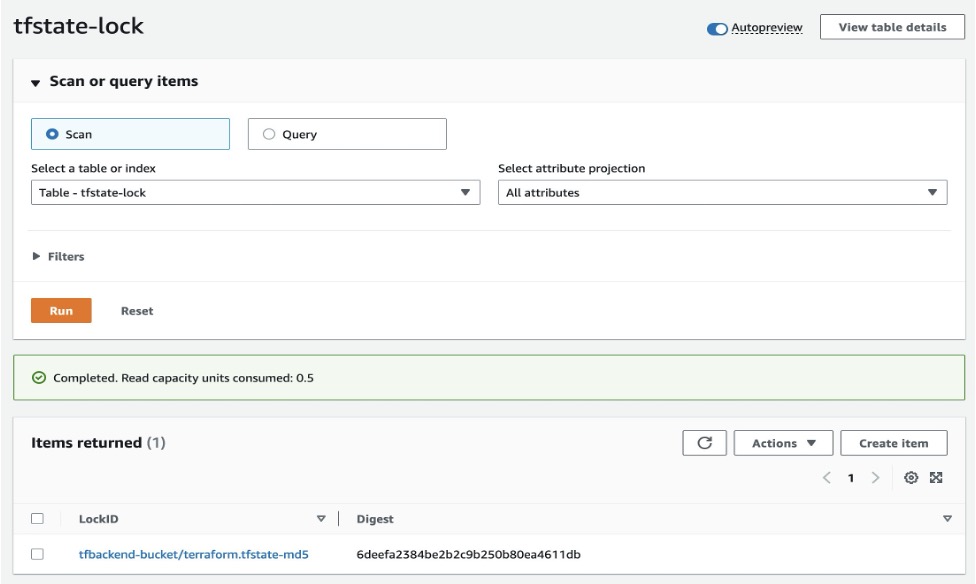
AWS CodePipeline begins running the pipeline. The pipeline clones the git repo and stores the artifacts to an Amazon S3 bucket.
An AWS CodeBuild project configures a compute/build environment with Checkov installed from an image fetched from Docker Hub. CodePipeline passes the artifacts (Terraform module) and CodeBuild executes Checkov to run static analysis of the Terraform configuration files.
Another CodeBuild project configured with Terraform from an image fetched from Docker Hub. CodePipeline passes the artifacts (repo contents) and CodeBuild runs Terraform command to execute the tests.
CodeBuild uses a buildspec file to declare the build commands and relevant settings. Here is an example of the buildspec files for both CodeBuild Projects:
In the above buildspec, Checkov is run against the root directory of the cloned CodeCommit repository. This directory contains the configuration files for the Terraform module. Checkov also saves the output to a file named checkov.result.txt for further review or handling if needed. If Checkov fails, the pipeline will fail.
# Terraform Test
version: 0.1
phases:
  pre_build:
    commands:
      - terraform init
      - terraform validate

  build:
    commands:
      - terraform test
In the above buildspec, the terraform init and terraform validate commands are used to initialize Terraform, then check if the configuration is valid. Finally, the terraform test command is used to run the configured tests. If any of the Terraform tests fails, the pipeline will fail.
For a full example of the CI/CD pipeline configuration, please refer to the Terraform CI/CD and Testing on AWS workshop. The module validation pipeline mentioned above is meant as a starting point. In a production environment, you might want to customize it further by adding Checkov allow-list rules, linting, checks for Terraform docs, or pre-requisites such as building the code used in AWS Lambda.
Choosing various testing strategies
At this point you may be wondering when you should use Terraform tests or other tools such as Preconditions and Postconditions, Check blocks or policy as code. The answer depends on your test type and use-cases. Terraform test is suitable for unit tests, such as validating resources are created according to the naming specification. Variable validations and Pre/Post conditions are useful for contract tests of Terraform modules, for example by providing error warning when input variables value do not meet the specification. As shown in the previous section, you can also use Terraform test to ensure your contract tests are running properly. Terraform test is also suitable for integration tests where you need to create supporting resources to properly test the module functionality. Lastly, Check blocks are suitable for end to end tests where you want to validate the infrastructure state after all resources are generated, for example to test if a website is running after an S3 bucket configured for static web hosting is created.
When developing Terraform modules, you can run Terraform test in command = plan mode for unit and contract tests. This allows the unit and contract tests to run quicker and cheaper since there are no resources created. You should also consider the time and cost to execute Terraform test for complex / large Terraform configurations, especially if you have multiple test scenarios. Terraform test maintains one or many state files within the memory for each test file. Consider how to re-use the module’s state when appropriate. Terraform test also provides test mocking, which allows you to test your module without creating the real infrastructure.
Conclusion
In this post, you learned how to use Terraform test and develop various test scenarios. You also learned how to incorporate Terraform test in a CI/CD pipeline. Lastly, we also discussed various testing strategies for Terraform configurations and modules. For more information about Terraform test, we recommend the Terraform test documentation and tutorial. To get hands on practice building a Terraform module validation pipeline and Terraform deployment pipeline, check out the Terraform CI/CD and Testing on AWS Workshop.
At re:Invent in 2023, AWS announced Infrastructure as Code (IaC) support for Amazon CodeWhisperer. CodeWhisperer is an AI-powered productivity tool for the IDE and command line that helps software developers to quickly and efficiently create cloud applications to run on AWS. Languages currently supported for IaC are YAML and JSON for AWS CloudFormation, Typescript and Python for AWS CDK, and HCL for HashiCorp Terraform. In addition to providing code recommendations in the editor, CodeWhisperer also features a security scanner that alerts the developer to potentially insecure infrastructure code, and offers suggested fixes than can be applied with a single click.
In this post, we will walk you through some common scenarios and show you how to get the most out of CodeWhisperer in the IDE. CodeWhisperer is supported by several IDEs, such as Visual Studio Code and JetBrains. For the purposes of this post, we’ll focus on Visual Studio Code. There are a few things that you need to follow along with the examples, listed in the prerequisites section below.
Now that you have the toolkit configured, open a new source file with the yaml extension. Since YAML files can represent a wide variety of different configuration file types, it helps to add the AWSTemplateFormatVersion: '2010-09-09' header to the file to let CodeWhisperer know that you are editing a CloudFormation file. Just typing the first few characters of that header is likely to result in a recommendation from CodeWhisperer. Press TAB to accept recommendations and Escape to ignore them.
AWSTemplateFormatVersion header
If you have a good idea about the various resources you want to include in your template, include them in a top level Description field. This will help CodeWhisperer to understand the relationships between the resources you will create in the file. In the example below, we describe the stack we want as a “VPC with public and private subnets”. You can be more descriptive if you want, using a multi-line YAML string to add more specific details about the resources you want to create.
Creating a CloudFormation template with a description
After accepting that recommendation for the parameters, you can continue to create resources.
Creating CloudFormation resources
You can also trigger recommendations with inline comments and descriptive logical IDs if you want to create one resource at a time. The more code you have in the file, the more CodeWhisperer will understand from context what you are trying to achieve.
CDK
It’s also possible to create CDK code using CodeWhisperer. In the example below, we started with a CDK project using cdk init, wrote a few lines of code to create a VPC in a TypeScript file, and CodeWhisperer proposed some code suggestions using what we started to write. After accepting the suggestion, it is possible to customize the code to fit your needs. CodeWhisperer will learn from your coding style and make more precise suggestions as you add more code to the project.
Create a CDK stack
You can choose whether you want to get suggestions that include code with references with the professional version of CodeWhisperer. If you choose to get the references, you can find them in the Code Reference Log. These references let you know when the code recommendation was a near exact match for code in an open source repository, allowing you to inspect the license and decide if you want to use that code or not.
References
Terraform HCL
After a close collaboration between teams at Hashicorp and AWS, Terraform HashiCorp Configuration Language (HCL) is also supported by CodeWhisperer. CodeWhisperer recommendations are triggered by comments in the file. In this example, we repeat a prompt that is similar to what we used with CloudFormation and CDK.
Terraform code suggestion
Security Scanner
In addition to CodeWhisperer recommendations, the toolkit configuration also includes a built in security scanner. Considering that the resulting code can be edited and combined with other preexisting code, it’s good practice to scan the final result to see if there are any best-practice security recommendations that can be applied.
Expand the CodeWhisperer section of the AWS Toolkit to see the “Run Security Scan” button. Click it to initiate a scan, which might take up to a minute to run. In the example below, we defined an S3 bucket that can be read by anyone on the internet.
Security scanner
Once the security scan completes, the code with issues is underlined and each suggestion is added to the ‘Problems’ tab. Click on any of those to get more details.
Scan results
CodeWhisperer provides a clickable link to get more information about the vulnerability, and what you can do to fix it.
Scanner Link
Conclusion
The integration of generative AI tools like Amazon CodeWhisperer are transforming the landscape of cloud application development. By supporting Infrastructure as Code (IaC) languages such as CloudFormation, CDK, and Terraform HCL, CodeWhisperer is expanding its reach beyond traditional development roles. This advancement is pivotal in merging runtime and infrastructure code into a cohesive unit, significantly enhancing productivity and collaboration in the development process. The inclusion of IaC enables a broader range of professionals, especially Site Reliability Engineers (SREs), to actively engage in application development, automating and optimizing infrastructure management tasks more efficiently.
CodeWhisperer’s capability to perform security scans on the generated code aligns with the critical objectives of system reliability and security, essential for both developers and SREs. By providing insights into security best practices, CodeWhisperer enables robust and secure infrastructure management on the AWS cloud. This makes CodeWhisperer a valuable tool not just for developers, but as a comprehensive solution that bridges different technical disciplines, fostering a collaborative environment for innovation in cloud-based solutions.
Bio
Eric Beard is a Solutions Architect at AWS specializing in DevOps, CI/CD, and Infrastructure as Code, the author of the AWS Sysops Cookbook, and an editor for the AWS DevOps blog channel. When he’s not helping customers to design Well-Architected systems on AWS, he is usually playing tennis or watching tennis.
Amar Meriche is a Sr Technical Account Manager at AWS in Paris. He helps his customers improve their operational posture through advocacy and guidance, and is an active member of the DevOps and IaC community at AWS. He’s passionate about helping customers use the various IaC tools available at AWS following best practices.
Maximizing the value from Enterprise Software tools requires an understanding of who and how users interact with those tools. As we have worked with builders rolling out Amazon CodeWhisperer to their enterprises, identifying usage patterns has been critical.
This blog post is a result of that work, builds on Introducing Amazon CodeWhisperer Dashboard blog and Amazon CloudWatch metrics and enables customers to build dashboards to support their rollouts. Note that these features are only available in CodeWhisperer Professional plan.
Organizations have leveraged the existing Amazon CodeWhisperer Dashboard to gain insights into developer usage. This blog explores how we can supplement the existing dashboard with detailed user analytics. Identifying leading contributors has accelerated tool usage and adoption within organizations. Acknowledging and incentivizing adopters can accelerate a broader adoption.
The architecture diagram outlines a streamlined process for tracking and analyzing Amazon CodeWhisperer usage events. It begins with logging these events in CodeWhisperer and AWS CloudTrail and then forwarding them to Amazon CloudWatch Logs. Configuring AWS CloudTrail involves using Amazon S3 for storage and AWS Key Management Service (KMS) for log encryption. An AWS Lambda function analyzes the logs, extracting information about user activity. This blog also introduces a AWS CloudFormation template that simplifies the setup process, including creating the CloudTrail with an S3 bucket KMS key and the Lambda function. The template also configures AWS IAM permissions, ensuring the Lambda function has access rights to interact with other AWS services.
Configuring CloudTrail for CodeWhisperer User Tracking
This section details the process for monitoring user interactions while using Amazon CodeWhisperer. The aim is to utilize AWS CloudTrail to record instances where users receive code suggestions from CodeWhisperer. This involves setting up a new CloudTrail trail tailored to log events related to these interactions. By accomplishing this, you lay a foundational framework for capturing detailed user activity data, which is crucial for the subsequent steps of analyzing and visualizing this data through a custom AWS Lambda function and an Amazon CloudWatch dashboard.
Setup CloudTrail for CodeWhisperer
1. Navigate to AWS CloudTrail Service.
2. Create Trail
3. Choose Trail Attributes
a. Click on Create Trail
b. Provide a Trail Name, for example, “cwspr-preprod-cloudtrail”
c. Choose Enable for all accounts in my organization
d. Choose Create a new Amazon S3 bucket to configure the Storage Location
e. For Trail log bucket and folder, note down the given unique trail bucket name in order to view the logs at a future point.
f. Check Enabled to encrypt log files with SSE-KMS encryption
j. Enter an AWS Key Management Service alias for log file SSE-KMS encryption, for example, “cwspr-preprod-cloudtrail”
h. Select Enabled for CloudWatch Logs
i. Select New
j. Copy the given CloudWatch Log group name, you will need this for the testing the Lambda function in a future step.
k. Provide a Role Name, for example, “CloudTrailRole-cwspr-preprod-cloudtrail”
l. Click Next.
4. Choose Log Events
a. Check “Management events“ and ”Data events“
b. Under Management events, keep the default options under API activity, Read and Write
c. Under Data event, choose CodeWhisperer for Data event type
d. Keep the default Log all events under Log selector template
e. Click Next
f. Review and click Create Trail
Please Note: The logs will need to be included on the account which the management account or member accounts are enabled.
Gathering Application ARN for CodeWhisperer application
Step 1: Access AWS IAM Identity Center
1. Locate and click on the Services dropdown menu at the top of the console.
Step 2: Find the Application ARN for CodeWhisperer application
1. In the IAM Identity Center dashboard, click on Application Assignments. -> Applications in the left-side navigation pane.
2. Locate the application with Service as CodeWhisperer and click on it
3. Copy the Application ARN and store it in a secure place. You will need this ID to configure your Lambda function’s JSON event.
User Activity Analysis in CodeWhisperer with AWS Lambda
This section focuses on creating and testing our custom AWS Lambda function, which was explicitly designed to analyze user activity within an Amazon CodeWhisperer environment. This function is critical in extracting, processing, and organizing user activity data. It starts by retrieving detailed logs from CloudWatch containing CodeWhisperer user activity, then cross-references this data with the membership details obtained from the AWS Identity Center. This allows the function to categorize users into active and inactive groups based on their engagement within a specified time frame.
The Lambda function’s capability extends to fetching and structuring detailed user information, including names, display names, and email addresses. It then sorts and compiles these details into a comprehensive HTML output. This output highlights the CodeWhisperer usage in an organization.
Creating and Configuring Your AWS Lambda Function
1. Navigate to the Lambda service.
2. Click on Create function.
3. Choose Author from scratch.
4. Enter a Function name, for example, “AmazonCodeWhispererUserActivity”.
5. Choose Python 3.11 as the Runtime.
6. Click on ‘Create function’ to create your new Lambda function.
7. Access the Function: After creating your Lambda function, you will be directed to the function’s dashboard. If not, navigate to the Lambda service, find your function “AmazonCodeWhispererUserActivity”, and click on it.
8. Copy and paste your Python code into the inline code editor on the function’s dashboard. The lambda function code can be found here.
9. Click ‘Deploy’ to save and deploy your code to the Lambda function.
10. You have now successfully created and configured an AWS Lambda function with our Python code.
Updating the Execution Role for Your AWS Lambda Function
After you’ve created your Lambda function, you need to ensure it has the appropriate permissions to interact with other AWS services like CloudWatch Logs and AWS Identity Store. Here’s how you can update the IAM role permissions:
Locate the Execution Role:
1. Open Your Lambda Function’s Dashboard in the AWS Management Console.
2. Click on the ‘Configuration’ tab located near the top of the dashboard.
3. Set the Time Out setting to 15 minutes from the default 3 seconds
4. Select the ‘Permissions’ menu on the left side of the Configuration page.
5. Find the ‘Execution role’ section on the Permissions page.
6. Click on the Role Name to open the IAM (Identity and Access Management) role associated with your Lambda function.
7. In the IAM role dashboard, click on the Policy Name under the Permissions policies.
8. Edit the existing policy: Replace the policy with the following JSON.
9. Save the changes to the policy.
{
   "Version":"2012-10-17",
   "Statement":[
      {
         "Action":[
            "logs:CreateLogGroup",
            "logs:CreateLogStream",
            "logs:PutLogEvents",
            "logs:StartQuery",
            "logs:GetQueryResults",
            "sso:ListInstances",
            "sso:ListApplicationAssignments"
            "identitystore:DescribeUser",
            "identitystore:ListUsers",
            "identitystore:ListGroupMemberships"
         ],
         "Resource":"*",
         "Effect":"Allow"
      },
      {
         "Action":[
            "cloudtrail:DescribeTrails",
            "cloudtrail:GetTrailStatus"
         ],
         "Resource":"*",
         "Effect":"Allow"
      }
   ]
} Your AWS Lambda function now has the necessary permissions to execute and interact with CloudWatch Logs and AWS Identity Store.
Testing Lambda Function with custom input
1. On your Lambda function’s dashboard.
2. On the function’s dashboard, locate the Test button near the top right corner.
3. Click on Test. This opens a dialog for configuring a new test event.
4. In the dialog, you’ll see an option to create a new test event. If it’s your first test, you’ll be prompted automatically to create a new event.
5. For Event name, enter a descriptive name for your test, such as “TestEvent”.
6. In the event code area, replace the existing JSON with your specific input:
a. log_group_name: The name of the log group in CloudWatch Logs.
b. start_date: The start date and time for the query, formatted as “YYYY-MM-DD HH:MM:SS”.
c. end_date: The end date and time for the query, formatted as “YYYY-MM-DD HH:MM:SS”.
e. codewhisperer_application_arn: The ARN of the Code Whisperer Application in the AWS Identity Store.
f. identity_store_region: The region of the AWS Identity Store.
f. codewhisperer_region: The region of where Amazon CodeWhisperer is configured.
8. Click on Save to store this test configuration.
9. With the test event selected, click on the Test button again to execute the function with this event.
10. The function will run, and you’ll see the execution result at the top of the page. This includes execution status, logs, and output.
11. Check the Execution result section to see if the function executed successfully.
Visualizing CodeWhisperer User Activity with Amazon CloudWatch Dashboard
This section focuses on effectively visualizing the data processed by our AWS Lambda function using a CloudWatch dashboard. This part of the guide provides a step-by-step approach to creating a “CodeWhispererUserActivity” dashboard within CloudWatch. It details how to add a custom widget to display the results from the Lambda Function. The process includes configuring the widget with the Lambda function’s ARN and the necessary JSON parameters.
1.Navigate to the Amazon CloudWatch service from within the AWS Management Console
2. Choose the ‘Dashboards’ option from the left-hand navigation panel.
3. Click on ‘Create dashboard’ and provide a name for your dashboard, for example: “CodeWhispererUserActivity”.
4. Click the ‘Create Dashboard’ button.
5. Select “Other Content Types” as your ‘Data sources types’ option before choosing “Custom Widget” for your ‘Widget Configuration’ and then click ‘Next’.
6. On the “Create a custom widget” page click the ‘Next’ button without making a selection from the dropdown.
7. On the ‘Create a custom widget’ page:
a. Enter your Lambda function’s ARN (Amazon Resource Name) or use the dropdown menu to find and select your “CodeWhispererUserActivity” function.
b. Add the JSON parameters that you provided in the test event, without including the start and end dates.
{ "log_group_name": "{Insert Log Group Name}", “codewhisperer_application_arn”:”{Insert Codewhisperer Application ARN}”, "identity_store_region": "{Insert identity Store Region}", "codewhisperer_region": "{Insert Codewhisperer Region}" }
8. Click the ‘Add widget’ button. The dashboard will update to include your new widget and will run the Lambda function to retrieve initial data. You’ll need to click the “Execute them all” button in the upper banner to let CloudWatch run the initial Lambda retrieval.
9. Customize Your Dashboard: Arrange the dashboard by dragging and resizing widgets for optimal organization and visibility. Adjust the time range and refresh settings as needed to suit your monitoring requirements.
10. Save the Dashboard Configuration: After setting up and customizing your dashboard, click ‘Save dashboard’ to preserve your layout and settings.
CloudFormation Deployment for the CodeWhisperer Dashboard
The blog post concludes with a detailed AWS CloudFormation template designed to automate the setup of the necessary infrastructure for the Amazon CodeWhisperer User Activity Dashboard. This template provisions AWS resources, streamlining the deployment process. It includes the configuration of AWS CloudTrail for tracking user interactions, setting up CloudWatch Logs for logging and monitoring, and creating an AWS Lambda function for analyzing user activity data. Additionally, the template defines the required IAM roles and permissions, ensuring the Lambda function has access to the needed AWS services and resources.
The blog post also provides a JSON configuration for the CloudWatch dashboard. This is because, at the time of writing, AWS CloudFormation does not natively support the creation and configuration of CloudWatch dashboards. Therefore, the JSON configuration is necessary to manually set up the dashboard in CloudWatch, allowing users to visualize the processed data from the Lambda function. The CloudFormation template can be found here.
Create a CloudWatch Dashboard and import the JSON below.
In this blog, we detail a comprehensive process for establishing a user activity dashboard for Amazon CodeWhisperer to deliver data to support an enterprise rollout. The journey begins with setting up AWS CloudTrail to log user interactions with CodeWhisperer. This foundational step ensures the capture of detailed activity events, which is vital for our subsequent analysis. We then construct a tailored AWS Lambda function to sift through CloudTrail logs. Then, create a dashboard in AWS CloudWatch. This dashboard serves as a central platform for displaying the user data from our Lambda function in an accessible, user-friendly format.
You can reference the existing CodeWhisperer dashboard for additional insights. The Amazon CodeWhisperer Dashboard offers a view summarizing data about how your developers use the service.
Overall, this dashboard empowers you to track, understand, and influence the adoption and effective use of Amazon CodeWhisperer in your organizations, optimizing the tool’s deployment and fostering a culture of informed data-driven usage.
Today customers want to reduce manual operations for deploying and maintaining their infrastructure. The recommended method to deploy and manage infrastructure on AWS is to follow Infrastructure-As-Code (IaC) model using tools like AWS CloudFormation, AWS Cloud Development Kit (AWS CDK) or Terraform.
One of the critical components in terraform is managing the state file which keeps track of your configuration and resources. When you run terraform in an AWS CI/CD pipeline the state file has to be stored in a secured, common path to which the pipeline has access to. You need a mechanism to lock it when multiple developers in the team want to access it at the same time.
In this blog post, we will explain how to manage terraform state files in AWS, best practices on configuring them in AWS and an example of how you can manage it efficiently in your Continuous Integration pipeline in AWS when used with AWS Developer Tools such as AWS CodeCommit and AWS CodeBuild. This blog post assumes you have a basic knowledge of terraform, AWS Developer Tools and AWS CI/CD pipeline. Let’s dive in!
Challenges with handling state files
By default, the state file is stored locally where terraform runs, which is not a problem if you are a single developer working on the deployment. However if not, it is not ideal to store state files locally as you may run into following problems:
When working in teams or collaborative environments, multiple people need access to the state file
Data in the state file is stored in plain text which may contain secrets or sensitive information
Local files can get lost, corrupted, or deleted
Best practices for handling state files
The recommended practice for managing state files is to use terraform’s built-in support for remote backends. These are:
Remote backend on Amazon Simple Storage Service (Amazon S3): You can configure terraform to store state files in an Amazon S3 bucket which provides a durable and scalable storage solution. Storing on Amazon S3 also enables collaboration that allows you to share state file with others.
Remote backend on Amazon S3 with Amazon DynamoDB: In addition to using an Amazon S3 bucket for managing the files, you can use an Amazon DynamoDB table to lock the state file. This will allow only one person to modify a particular state file at any given time. It will help to avoid conflicts and enable safe concurrent access to the state file.
There are other options available as well such as remote backend on terraform cloud and third party backends. Ultimately, the best method for managing terraform state files on AWS will depend on your specific requirements.
When deploying terraform on AWS, the preferred choice of managing state is using Amazon S3 with Amazon DynamoDB.
AWS configurations for managing state files
Create an Amazon S3 bucket using terraform. Implement security measures for Amazon S3 bucket by creating an AWS Identity and Access Management (AWS IAM) policy or Amazon S3 Bucket Policy. Thus you can restrict access, configure object versioning for data protection and recovery, and enable AES256 encryption with SSE-KMS for encryption control.
Next create an Amazon DynamoDB table using terraform with Primary key set to LockID. You can also set any additional configuration options such as read/write capacity units. Once the table is created, you will configure the terraform backend to use it for state locking by specifying the table name in the terraform block of your configuration.
For a single AWS account with multiple environments and projects, you can use a single Amazon S3 bucket. If you have multiple applications in multiple environments across multiple AWS accounts, you can create one Amazon S3 bucket for each account. In that Amazon S3 bucket, you can create appropriate folders for each environment, storing project state files with specific prefixes.
Now that you know how to handle terraform state files on AWS, let’s look at an example of how you can configure them in a Continuous Integration pipeline in AWS.
Architecture
Figure 1: Example architecture on how to use terraform in an AWS CI pipeline
This diagram outlines the workflow implemented in this blog:
The AWS CodeCommit repository contains the application code
The AWS CodeBuild job contains the buildspec files and references the source code in AWS CodeCommit
The AWS Lambda function contains the application code created after running terraform apply
Amazon S3 contains the state file created after running terraform apply. Amazon DynamoDB locks the state file present in Amazon S3
Implementation
Pre-requisites
Before you begin, you must complete the following prerequisites:
Install the latest version of AWS Command Line Interface (AWS CLI)
After cloning, you could see the following folder structure:
Figure 2: AWS CodeCommit repository structure
Let’s break down the terraform code into 2 parts – one for preparing the infrastructure and another for preparing the application.
Preparing the Infrastructure
The main.tf file is the core component that does below:
It creates an Amazon S3 bucket to store the state file. We configure bucket ACL, bucket versioning and encryption so that the state file is secure.
It creates an Amazon DynamoDB table which will be used to lock the state file.
It creates two AWS CodeBuild projects, one for ‘terraform plan’ and another for ‘terraform apply’.
Note – It also has the code block (commented out by default) to create AWS Lambda which you will use at a later stage.
AWS CodeBuild projects should be able to access Amazon S3, Amazon DynamoDB, AWS CodeCommit and AWS Lambda. So, the AWS IAM role with appropriate permissions required to access these resources are created via iam.tf file.
Next you will find two buildspec files named buildspec-plan.yaml and buildspec-apply.yaml that will execute terraform commands – terraform plan and terraform apply respectively.
Modify AWS region in the provider.tf file.
Update Amazon S3 bucket name, Amazon DynamoDB table name, AWS CodeBuild compute types, AWS Lambda role and policy names to required values using variable.tf file. You can also use this file to easily customize parameters for different environments.
With this, the infrastructure setup is complete.
You can use your local terminal and execute below commands in the same order to deploy the above-mentioned resources in your AWS account.
terraform init
terraform validate
terraform plan
terraform apply
Once the apply is successful and all the above resources have been successfully deployed in your AWS account, proceed with deploying your application.
Preparing the Application
In the cloned repository, use the backend.tf file to create your own Amazon S3 backend to store the state file. By default, it will have below values. You can override them with your required values.
bucket = "tfbackend-bucket"
key    = "terraform.tfstate"
region = "eu-central-1"
The repository has sample python code stored in main.py that returns a simple message when invoked.
In the main.tf file, you can find the below block of code to create and deploy the Lambda function that uses the main.py code (uncomment these code blocks).
Now you can deploy the application using AWS CodeBuild instead of running terraform commands locally which is the whole point and advantage of using AWS CodeBuild.
Run the two AWS CodeBuild projects to execute terraform plan and terraform apply again.
Once successful, you can verify your deployment by testing the code in AWS Lambda. To test a lambda function (console):
Open AWS Lambda console and select your function “tf-codebuild”
In the navigation pane, in Code section, click Test to create a test event
Provide your required name, for example “test-lambda”
Accept default values and click Save
Click Test again to trigger your test event “test-lambda”
It should return the sample message you provided in your main.py file. In the default case, it will display “Hello from AWS Lambda !” message as shown below.
Figure 3: Sample Amazon Lambda function response
To verify your state file, go to Amazon S3 console and select the backend bucket created (tfbackend-bucket). It will contain your state file.
Figure 4: Amazon S3 bucket with terraform state file
Open Amazon DynamoDB console and check your table tfstate-lock and it will have an entry with LockID.
Figure 5: Amazon DynamoDB table with LockID
Thus, you have securely stored and locked your terraform state file using terraform backend in a Continuous Integration pipeline.
Cleanup
To delete all the resources created as part of the repository, run the below command from your terminal.
terraform destroy
Conclusion
In this blog post, we explored the fundamentals of terraform state files, discussed best practices for their secure storage within AWS environments and also mechanisms for locking these files to prevent unauthorized team access. And finally, we showed you an example of how efficiently you can manage them in a Continuous Integration pipeline in AWS.
Today we are announcing the general availability to connect and query your existing MySQL and PostgreSQL databases with support for AWS Cloud Development Kit (AWS CDK), a new feature to create a real-time, secure GraphQL API for your relational database within or outside Amazon Web Services (AWS). You can now generate the entire API for all relational database operations with just your database endpoint and credentials. When your database schema changes, you can run a command to apply the latest table schema changes.
In 2021, we announced AWS Amplify GraphQL Transformer version 2, enabling developers to develop more feature-rich, flexible, and extensible GraphQL-based app backends even with minimal cloud expertise. This new GraphQL Transformer was redesigned from the ground up to generate extensible pipeline resolvers to route a GraphQL API request, apply business logic, such as authorization, and communicate with the underlying data source, such as Amazon DynamoDB.
However, customers wanted to use relational database sources for their GraphQL APIs such as their Amazon RDS or Amazon Aurora databases in addition to Amazon DynamoDB. You can now use @model types of Amplify GraphQL APIs for both relational database and DynamoDB data sources. Relational database information is generated to a separate schema.sql.graphql file. You can continue to use the regular schema.graphql files to create and manage DynamoDB-backed types.
When you simply provide any MySQL or PostgreSQL database information, whether behind a virtual private cloud (VPC) or publicly accessible on the internet, AWS Amplify automatically generates a modifiable GraphQL API that securely connects to your database tables and exposes create, read, update, or delete (CRUD) queries and mutations. You can also rename your data models to be more idiomatic for the frontend. For example, a database table is called “todos” (plural, lowercase) but is exposed as “ToDo” (singular, PascalCase) to the client.
With one line of code, you can add any of the existing Amplify GraphQL authorization rules to your API, making it seamless to build use cases such as owner-based authorization or public read-only patterns. Because the generated API is built on AWS AppSync‘ GraphQL capabilities, secure real-time subscriptions are available out of the box. You can subscribe to any CRUD events from any data model with a few lines of code.
Getting started with your MySQL database in AWS CDK The AWS CDK lets you build reliable, scalable, cost-effective applications in the cloud with the considerable expressive power of a programming language. To get started, install the AWS CDK on your local machine.
$ npm install -g aws-cdk
Run the following command to verify the installation is correct and print the version number of the AWS CDK.
$ cdk –version
Next, create a new directory for your app:
$ mkdir amplify-api-cdk
$ cd amplify-api-cdk
Initialize a CDK app by using the cdk init command.
$ cdk init app --language typescript
Install Amplify’s GraphQL API construct in the new CDK project:
$ npm install @aws-amplify/graphql-api-construct
Open the main stack file in your CDK project (usually located in lib/<your-project-name>-stack.ts). Import the necessary constructs at the top of the file:
import {
    AmplifyGraphqlApi,
    AmplifyGraphqlDefinition
} from '@aws-amplify/graphql-api-construct';
Generate a GraphQL schema for a new relational database API by executing the following SQL statement on your MySQL database. Make sure to output the results to a .csv file, including column headers, and replace <database-name> with the name of your database, schema, or both.
SELECT
  INFORMATION_SCHEMA.COLUMNS.TABLE_NAME,
  INFORMATION_SCHEMA.COLUMNS.COLUMN_NAME,
  INFORMATION_SCHEMA.COLUMNS.COLUMN_DEFAULT,
  INFORMATION_SCHEMA.COLUMNS.ORDINAL_POSITION,
  INFORMATION_SCHEMA.COLUMNS.DATA_TYPE,
  INFORMATION_SCHEMA.COLUMNS.COLUMN_TYPE,
  INFORMATION_SCHEMA.COLUMNS.IS_NULLABLE,
  INFORMATION_SCHEMA.COLUMNS.CHARACTER_MAXIMUM_LENGTH,
  INFORMATION_SCHEMA.STATISTICS.INDEX_NAME,
  INFORMATION_SCHEMA.STATISTICS.NON_UNIQUE,
  INFORMATION_SCHEMA.STATISTICS.SEQ_IN_INDEX,
  INFORMATION_SCHEMA.STATISTICS.NULLABLE
      FROM INFORMATION_SCHEMA.COLUMNS
      LEFT JOIN INFORMATION_SCHEMA.STATISTICS ON INFORMATION_SCHEMA.COLUMNS.TABLE_NAME=INFORMATION_SCHEMA.STATISTICS.TABLE_NAME AND INFORMATION_SCHEMA.COLUMNS.COLUMN_NAME=INFORMATION_SCHEMA.STATISTICS.COLUMN_NAME
      WHERE INFORMATION_SCHEMA.COLUMNS.TABLE_SCHEMA = '<database-name>';
Run the following command, replacing <path-schema.csv> with the path to the .csv file created in the previous step.
$ npx @aws-amplify/cli api generate-schema \
    --sql-schema <path-to-schema.csv> \
    --engine-type mysql –out lib/schema.sql.graphql
You can open schema.sql.graphql file to see the imported data model from your MySQL database schema.
If you haven’t already done so, go to the Parameter Store in the AWS Systems Manager console and create a parameter for the connection details of your database, such as hostname/url, database name, port, username, and password. These will be required in the next step for Amplify to successfully connect to your database and perform GraphQL queries or mutations against it.
In the main stack class, add the following code to define a new GraphQL API. Replace the dbConnectionConfg options with the parameter paths created in the previous step.
This configuration assums that your database is accessible from the internet. Also, the default authorization mode is set to Api Key for AWS AppSync and the sandbox mode is enabled to allow public access on all models. This is useful for testing your API before adding more fine-grained authorization rules.
Finally, deploy your GraphQL API to AWS Cloud.
$ cdk deploy
You can now go to the AWS AppSync console and find your created GraphQL API.
Choose your project and the Queries menu. You can see newly created GraphQL APIs compatible with your tables of MySQL database, such as getMeals to get one item or listRestaurants to list all items.
For example, when you select items with fields of address, city, name, phone_number, and so on, you can see a new GraphQL query. Choose the Run button and you can see the query results from your MySQL database.
When you query your MySQL database, you can see the same results.
How to customize your GraphQL schema for your database To add a custom query or mutation in your SQL, open the generated schema.sql.graphql file and use the @sql(statement: "") pass in parameters using the :<variable> notation.
type Query {
     listRestaurantsInState(state: String): Restaurants @sql("SELECT * FROM Restaurants WHERE state = :state;”)
}
For longer, more complex SQL queries, you can reference SQL statements in the customSqlStatements config option. The reference value must match the name of a property mapped to a SQL statement. In the following example, a searchPosts property on customSqlStatements is being referenced:
type Query {
      searchPosts(searchTerm: String): [Post]
      @sql(reference: "searchPosts")
}
Here is how the SQL statement is mapped in the API definition.
new AmplifyGraphqlApi(this, "MyAmplifyGraphQLApi", {
    apiName: "MySQLApi",
    definition: AmplifyGraphqlDefinition.fromFilesAndStrategy( [path.join(__dirname, "schema.sql.graphql")],
    {
        name: "MyAmplifyGraphQLSchema",
        dbType: "MYSQL",
        dbConnectionConfig: {
        //	...ssmPaths,
     }, customSqlStatements: {
        searchPosts: // property name matches the reference value in schema.sql.graphql
        "SELECT * FROM posts WHERE content LIKE CONCAT('%', :searchTerm, '%');",
     },
    }
  ),
//...
});
The SQL statement will be executed as if it were defined inline in the schema. The same rules apply in terms of using parameters, ensuring valid SQL syntax, and matching return types. Using a reference file keeps your schema clean and allows the reuse of SQL statements across fields. It is best practice for longer, more complicated SQL queries.
Or you can change a field and model name using the @refersTo directive. If you don’t provide the @refersTo directive, AWS Amplify assumes that the model name and field name exactly match the database table and column names.
type Todo @model @refersTo(name: "todos") {
     content: String
     done: Boolean
}
When you want to create relationships between two database tables, use the @hasOne and @hasMany directives to establish a 1:1 or 1:M relationship. Use the @belongsTo directive to create a bidirectional relationship back to the relationship parent. For example, you can make a 1:M relationship between a restaurant and its meals menus.
Whenever you make any change to your GraphQL schema or database schema in your DB instances, you should deploy your changes to the cloud:
Whenever you make any change to your GraphQL schema or database schema in your DB instances, you should re-run the SQL script and export to .csv step mentioned earlier in this guide to re-generate your schema.sql.graphql file and then deploy your changes to the cloud:
Now available The relational database support for AWS Amplify now works with any MySQL and PostgreSQL databases hosted anywhere within Amazon VPC or even outside of AWS Cloud.
Amazon CodeCatalyst is a modern software development service that empowers teams to deliver software on AWS easily and quickly. Amazon CodeCatalyst provides one place where you can plan, code, and build, test, and deploy your container applications with continuous integration/continuous delivery (CI/CD) tools.
In this post, we will walk-through how you can configure Blue/Green and canary deployments for your container workloads within Amazon CodeCatalyst.
Pre-requisites
To follow along with the instructions, you’ll need:
An AWS account. If you don’t have one, you can create a new AWS account.
An Amazon Elastic Container Service (Amazon ECS) service using the Blue/Green deployment type. If you don’t have one, follow the Amazon ECS tutorial and complete steps 1-5.
An Amazon Elastic Container Registry (Amazon ECR) repository named codecatalyst-ecs-image-repo. Follow the Amazon ECR user guide to create one.
An Amazon CodeCatalyst space, with an empty Amazon CodeCatalyst project named codecatalyst-ecs-project and an Amazon CodeCatalyst environment called codecatalyst-ecs-environment. Follow the Amazon CodeCatalyst tutorial to set these up.
Now that you have setup an Amazon ECS cluster and configured Amazon CodeCatalyst to perform deployments, you can configure Blue/Green deployment for your workload. Here are the high-level steps:
Collect details of the Amazon ECS environment that you created in the prerequisites step.
Add source files for the containerized application to Amazon CodeCatalyst.
Create Amazon CodeCatalyst Workflow.
Validate the setup.
Step 1: Collect details from your ECS service and Amazon CodeCatalyst role
In this step, you will collect information from your prerequisites that will be used in the Blue/Green Amazon CodeCatalyst configuration further down this post.
If you followed the prerequisites tutorial, below are AWS CLI commands to extract values that are used in this post. You can run this on your local workstation or with AWS CloudShell in the same region you created your Amazon ECS cluster.
Note down the values of Account_ID, EcsRegionName, EcsClusterArn, EcsServiceName, TaskDefinitionArn and TaskExecutionRoleArn. You will need these values in later steps.
Step 2: Add Amazon IAM roles to Amazon CodeCatalyst
In this step, you will create a role called CodeCatalystWorkflowDevelopmentRole-spacename to provide Amazon CodeCatalyst service permissions to build and deploy applications. This role is only recommended for use with development accounts and uses the AdministratorAccess AWS managed policy, giving it full access to create new policies and resources in this AWS account.
In Amazon CodeCatalyst, navigate to your space. Choose the Settings tab.
In the Navigation page, select AWS accounts. A list of account connections appears. Choose the account connection that represents the AWS account where you created your build and deploy roles.
Choose Manage roles from AWS management console.
The Add IAM role to Amazon CodeCatalyst space page appears. You might need to sign in to access the page.
Choose Create CodeCatalyst development administrator role in IAM. This option creates a service role that contains the permissions policy and trust policy for the development role.
Note down the role name. Choose Create development role.
In this step, you will create a source repository in CodeCatalyst. This repository stores the tutorial’s source files, such as the task definition file.
In Amazon CodeCatalyst, navigate to your project.
In the navigation pane, choose Code, and then choose Source repositories.
Choose Add repository, and then choose Create repository.
In Repository name, enter:
codecatalyst-advanced-deployment
Choose Create.
Step 4: Create Amazon CodeCatalyst Dev Environment
In this step, you will create a Amazon CodeCatalyst Dev environment to work on the sample application code and configuration in the codecatalyst-advanced-deployment repository. Learn more about Amazon CodeCatalyst dev environments in Amazon CodeCatalyst user guide.
In Amazon CodeCatalyst, navigate to your project.
In the navigation pane, choose Code, and then choose Source repositories.
Choose the source repository for which you want to create a dev environment.
Choose Create Dev Environment.
Choose AWS Cloud9 from the drop-down menu.
In Create Dev Environment and open with AWS Cloud9 page (Figure 1), choose Create to create a Cloud9 development environment.
Figure 1: Create Dev Environment in Amazon CodeCatalyst
AWS Cloud9 IDE opens on a new browser tab. Stay in AWS Cloud9 window to continue with Step 5.
Step 5: Add Source files to Amazon CodeCatalyst source repository
In this step, you will add source files from a sample application from GitHub to Amazon CodeCatalyst repository. You will be using this application to configure and test blue-green deployments.
On the menu bar at the top of the AWS Cloud9 IDE, choose Window, New Terminal or use an existing terminal window.
Download the Github project as a zip file, un-compress it and move it to your project folder by running the below commands in the terminal.
Update the task definition file for the sample application. Open task.json in the current directory. Find and replace “<arn:aws:iam::<account_ID>:role/AppRole> with the value collected from step 1: <TaskExecutionRoleArn>.
Amazon CodeCatalyst works with AWS CodeDeploy to perform Blue/Green deployments on Amazon ECS. You will create an Application Specification file, which will be used by CodeDeploy to manage the deployment. Create a file named appspec.yaml inside the codecatalyst-advanced-deployment directory. Update the <TaskDefinitionArn> with value from Step 1.
In this step, you will create the Amazon CodeCatalyst workflow which will automatically build your source code when changes are made. A workflow is an automated procedure that describes how to build, test, and deploy your code as part of a continuous integration and continuous delivery (CI/CD) system. A workflow defines a series of steps, or actions, to take during a workflow run.
In the navigation pane, choose CI/CD, and then choose Workflows.
Choose Create workflow. Select codecatalyst-advanced-deployment from the Source repository dropdown.
Choose main in the branch. Select Create (Figure 2). The workflow definition file appears in the Amazon CodeCatalyst console’s YAML editor.
Figure 2: Create workflow page in Amazon CodeCatalyst
Update the workflow by replacing the contents in the YAML editor with the below. Replace <Account_ID> with your AWS account ID. Replace <EcsRegionName>, <EcsClusterArn>, <EcsServiceName> with values from Step 1. Replace <CodeCatalyst-Dev-Admin-Role> with the Role Name from Step 3.
Whenever a code change is pushed to the repository, a Build action is triggered. The Build action builds a container image and pushes the image to the Amazon ECR repository created in Step 1.
Once the Build stage is complete, the Amazon ECS task definition is updated with the new ECR repository image.
The DeploytoECS action then deploys the new image to Amazon ECS using Blue/Green Approach.
To confirm everything was configured correctly, choose the Validate button. It should add a green banner with The workflow definition is valid at the top.
Select Commit to add the workflow to the repository (Figure 3)
Figure 3: Commit workflow page in Amazon CodeCatalyst
The workflow file is stored in a ~/.codecatalyst/workflows/ folder in the root of your source repository. The file can have a .yml or .yaml extension.
Let’s review our work, using the load balancer’s URL that you created during prerequisites, paste it into your browser. Your page should look similar to (Figure 4).
Figure 4: Sample Application (Blue version)
Step 7: Validate the setup
To validate the setup, you will make a small change to the sample application.
Open Amazon CodeCatalyst dev environment that you created in Step 4.
Update your local copy of the repository. In the terminal run the command below.
git pull
In the terminal, navigate to /templates folder. Open index.html and search for “Las Vegas”. Replace the word with “New York”. Save the file.
Commit the change to the repository using the commands below.
git add . git commit -m "Updating the city to New York" git push
After the change is committed, the workflow should start running automatically. You can monitor of the workflow run in Amazon CodeCatalyst console (Figure 5)
Figure 5: Blue/Green Deployment Progress on Amazon CodeCatalyst
You can also see the deployment status on the AWS CodeDeploy deployment page (Figure 6)
Going back to the AWS console.
In the upper left search bar, type in “CodeDeploy”.
In the left hand menu, select Deployments.
Figure 6: Blue/Green Deployment Progress on AWS CodeDeploy
Let’s review our update, using the load balancer’s URL that you created during pre-requisites, paste it into your browser. Your page should look similar to (Figure 7).
Figure 7: Sample Application (Green version)
Cleanup
If you have been following along with this workflow, you should delete the resources you deployed so you do not continue to incur charges.
Delete the Amazon ECS service and Amazon ECS cluster from AWS console.
Manually delete Amazon CodeCatalyst dev environment, source repository and project from your CodeCatalyst Space.
Delete the AWS CodeDeploy application through console or CLI.
Conclusion
In this post, we demonstrated how you can configure Blue/Green deployments for your container workloads using Amazon CodeCatalyst workflows. The same approach can be used to configure Canary deployments as well. Learn more about AWS CodeDeploy configuration for advanced container deployments in AWS CodeDeploy user guide.
Today, I’m happy to share the integrated development environment (IDE) extension for AWS Application Composer. Now you can use AWS Application Composer directly in your IDE to visually build modern applications and iteratively develop your infrastructure as code templates with Amazon CodeWhisperer.
Announced as preview at AWS re:Invent 2022 and generally available in March 2023, Application Composer is a visual builder that makes it easier for developers to visualize, design, and iterate on an application architecture by dragging, grouping, and connecting AWS services on a visual canvas. Application Composer simplifies building modern applications by providing an easy-to-use visual drag-and-drop interface and generates IaC templates in real time.
Building modern applications with modern tools The IDE extension for AWS Application Composer provides you with the same visual drag-and-drop experience and functionality as what it offers you in the console. Utilizing the visual canvas in your IDE means you can quickly prototype your ideas and focus on your application code.
With Application Composer running in your IDE, you can also use the various tools available in your IDE. For example, you can seamlessly integrate IaC templates generated real-time by Application Composer with AWS Serverless Application Model (AWS SAM) to manage and deploy your serverless applications.
In addition to making Application Composer available in your IDE, you can create generative AI powered code suggestions in the CloudFormation template in real time while visualizing the application architecture in split view. You can pair and synchronize Application Composer’s visualization and CloudFormation template editing side by side in the IDE without context switching between consoles to iterate on their designs. This minimizes hand coding and increase your productivity.
Using AWS Application Composer in Visual Studio Code First, I need to install the latest AWS Toolkit for Visual Studio Code plugin. If you already have the AWS Toolkit plugin installed, you only need to update the plugin to start using Application Composer.
To start using Application Composer, I don’t need to authenticate into my AWS account. With Application Composer available on my IDE, I can open my existing AWS CloudFormation or AWS SAM templates.
Another method is to create a new blank file, then right-click on the file and select Open with Application Composer to start designing my application visually.
This will provide me with a blank canvas. Here I have both code and visual editors at the same time to build a simple serverless API using Amazon API Gateway, AWS Lambda, and Amazon DynamoDB. Any changes that I make on the canvas will also be reflected in real time on my IaC template.
I get consistent experiences, such as when I use the Application Composer console. For example, if I make some modifications to my AWS Lambda function, it will also create relevant files in my local folder.
With IaC templates available in my local folder, it’s easier for me to manage my applications with AWS SAM CLI. I can create continuous integration and continuous delivery (CI/CD) with sam pipeline or deploy my stack with sam deploy.
One of the features that accelerates my development workflow is the built-in Sync feature that seamlessly integrates with AWS SAM command sam sync. This feature syncs my local application changes to my AWS account, which is helpful for me to do testing and validation before I deploy my applications into a production environment.
Developing IaC templates with generative AI With this new capability, I can use generative AI code suggestions to quickly get started with any of CloudFormation’s 1000+ resources. This also means that it’s now even easier to include standard IaC resources to extend my architecture.
For example, I need to use Amazon MQ, which is a standard IaC resource, and I need to modify some configurations for its AWS CloudFormation resource using Application Composer. In the Resource configuration section, change some values if needed, then choose Generate. Application Composer provides code suggestions that I can accept and incorporate into my IaC template.
This capability helps me to improve my development velocity by eliminating context switching. I can design my modern applications using AWS Application Composer canvas and use various tools such as Amazon CodeWhisperer and AWS SAM to accelerate my development workflow.
Things to know Here are a couple of things to note:
Supported IDE – At launch, this new capability is available for Visual Studio Code.
Pricing – The IDE extension for AWS Application Composer is available at no charge.
As our applications age, it takes more and more effort just to keep them secure and running smoothly. Developers managing the upgrades must spend time relearning the intricacies and nuances of breaking changes and performance optimizations others have already discovered in past upgrades. As a result, it’s difficult to balance the focus between new features and essential maintenance work.
Today, we are introducing in preview Amazon Q Code Transformation. This new capability simplifies upgrading and modernizing existing application code using Amazon Q, a new type of assistant powered by generative artificial intelligence (AI). Amazon Q is specifically designed for work and can be tailored to your business.
Amazon Q Code Transformation can perform Java application upgrades now, from version 8 and 11 to version 17, a Java Long-Term Support (LTS) release, and it will soon be able to transform Windows-based .NET Framework applications to cross-platform .NET.
Previously, developers could spend two to three days upgrading each application. Our internal testing shows that the transformation capability can upgrade an application in minutes compared to the days or weeks typically required for manual upgrades, freeing up time to focus on new business requirements. For example, an internal Amazon team of five people successfully upgraded one thousand production applications from Java 8 to 17 in 2 days. It took, on average, 10 minutes to upgrade applications, and the longest one took less than an hour.
Amazon Q Code Transformation automatically analyzes the existing code, generates a transformation plan, and completes the transformation tasks suggested by the plan. While doing so, it identifies and updates package dependencies and refactors deprecated and inefficient code components, switching to new language frameworks and incorporating security best practices. Once complete, you can review the transformed code, complete with build and test results, before accepting the changes.
In this way, you can keep applications updated and supported in just a few steps, gain performance benefits, and remove vulnerabilities from using unsupported versions, freeing up time to focus on new business requirements. Let’s see how this works in practice.
I open an old project that I never had the time to update to a more recent version of Java. The project is using Apache Maven to manage the build. The project object model (POM) file (pom.xml), an XML representation of the project, is in the root directory.
First, in the project settings, I check that the project is configured to use the correct SDK version (1.8 in this case). I choose AWS Toolkit on the left pane and then the Amazon Q + CodeWhisperer tab. In the Amazon Q (Preview) section, I choose Transform.
This opens a dialog where I check that the correct Maven module is selected for the upgrade before proceeding with the transformation.
I follow the progress in the Transformation Hub window. The upgrade completes in a few minutes for my small application, while larger ones might take more than an hour to complete.
The end-to-end application upgrade consists of three steps:
Identifying and analyzing the application – The code is copied to a managed environment in the cloud where the build process is set up based on the instructions in the repository. At this stage, the components to be upgraded are identified.
Creating a transformation plan – The code is analyzed to create a transformation plan that lists the steps that Amazon Q Code Transformation will take to upgrade the code, including updating dependencies, building the upgraded code, and then iteratively fixing any build errors encountered during the upgrade.
Code generation, build testing, and finalization – The transformation plan is followed iteratively to update existing code and configuration files, generate new files where needed, perform build validation using the tests provided with the code, and fix issues identified in failed builds.
After a few minutes, the transformation terminates successfully. From here, I can open the plan and a summary of the transformation. I choose View diff to see the proposed changes. In the Apply Patch dialog, I see a recap of the files that have been added, modified, or deleted.
First, I select the pom.xml file and then choose Show Difference (the icon with the left/right arrows) to have a side-by-side view of the current code in the project and the proposed changes. For example, I see that the version of one of the dependencies (Project Lombok) has been increased for compatibility with the target Java version.
In the Java file, the annotations used by the upgraded dependency have been updated. With the new version, @With has been promoted, and @Wither (which was experimental) deprecated. These changes are reflected in the import statements.
There is also a summary file that I keep in the code repo to quickly look up the changes made to complete the upgrade.
I spend some time reviewing the files. Then, I choose OK to accept all changes.
Now the patch has been successfully applied, and the proposed changes merged with the code. I commit changes to my repo and move on to focus on business-critical changes that have been waiting for the migration to be completed.
There is no additional cost for using Amazon Q Code Transformation during the preview. You can upgrade Java 8 and 11 applications that are built using Apache Maven to Java version 17. The project must have the POM file (pom.xml) in the root directory. We’ll soon add the option to transform Windows-based .NET Framework applications to cross-platform .NET and help accelerate migrations to Linux.
Once a transformation job is complete, you can use a diff view to verify and accept the proposed changes. The final transformation summary provides details of the dependencies updated and code files changed by Amazon Q Code Transformation. It also provides details of any build failures encountered in the final build of the upgraded code that you can use to fix the issues and complete the upgrade.
Combining Amazon’s long-term investments in automated reasoning and static code analysis with the power of generative AI, Amazon Q Code Transformation incorporates foundation models that we found to be essential for context-specific code transformations that often require updating a long tail of Java libraries with backward-incompatible changes.
In addition to generative AI-powered code transformations built by AWS, Amazon Q Code Transformation uses parts of OpenRewrite to further accelerate Java upgrades for customers. At AWS, many of our services are built with open source components and promoting the long-term sustainability of these communities is critical to us and our customers. That is why it’s important for us to contribute back to communities like OpenRewrite, helping ensure the whole industry can continue to benefit from their innovations. AWS plans to contribute to OpenRewrite recipes and improvements developed as part of Amazon Q Code Transformation to open source.
“The ability for software to adapt at a much faster pace is one of the most fundamental advantages any business can have. That’s why we’re excited to see AWS using OpenRewrite, the open source automated code refactoring technology, as a component of their service,” said Jonathan Schneider, CEO and Co-founder of Moderne (the sponsor of OpenRewrite). “We’re happy to have AWS join the OpenRewrite community and look forward to their contributions to make it even easier to migrate frameworks, patch vulnerabilities, and update APIs.”
Today, we are announcing the preview of Amazon Q, a new type of generative artificial intelligence (AI) powered assistant that is specifically for work and can be tailored to a customer’s business.
Amazon Q brings a set of capabilities to support developers and IT professionals. Now you can use Amazon Q to get started building applications on AWS, research best practices, resolve errors, and get assistance in coding new features for your applications. For example, Amazon Q Code Transformation can perform Java application upgrades now, from version 8 and 11 to version 17.
Amazon Q is available in multiple areas of AWS to provide quick access to answers and ideas wherever you work. Here’s a quick look at Amazon Q, including in integrated development environment (IDE):
Building applications together with Amazon Q Application development is a journey. It involves a continuous cycle of researching, developing, deploying, optimizing, and maintaining. At each stage, there are many questions—from figuring out the right AWS services to use, to troubleshooting issues in the application code.
Trained on 17 years of AWS knowledge and best practices, Amazon Q is designed to help you at each stage of development with a new experience for building applications on AWS. With Amazon Q, you minimize the time and effort you need to gain the knowledge required to answer AWS questions, explore new AWS capabilities, learn unfamiliar technologies, and architect solutions that fuel innovation.
Let us show you some capabilities of Amazon Q.
1. Conversational Q&A capability You can interact with the Amazon Q conversational Q&A capability to get started, learn new things, research best practices, and iterate on how to build applications on AWS without needing to shift focus away from the AWS console.
To start using this feature, you can select the Amazon Q icon on the right-hand side of the AWS Management Console.
For example, you can ask, “What are AWS serverless services to build serverless APIs?” Amazon Q provides concise explanations along with references you can use to follow up on your questions and validate the guidance. You can also use Amazon Q to follow up on and iterate your questions. Amazon Q will show more deep-dive answers for you with references.
There are times when we have questions for a use case with fairly specific requirements. With Amazon Q, you can elaborate on your use cases in more detail to provide context.
For example, you can ask Amazon Q, “I’m planning to create serverless APIs with 100k requests/day. Each request needs to lookup into the database. What are the best services for this workload?” Amazon Q responds with a list of AWS services you can use and tries to limit the answer results to those that are accurately referenceable and verified with best practices.
Here is some additional information that you might want to note:
Amazon Q conversational Q&A capability is currently in preview in all commercial AWS Regions.
2. Optimize Amazon EC2 instance selection Choosing the right Amazon Elastic Compute Cloud (Amazon EC2) instance type for your workload can be challenging with all the options available. Amazon Q aims to make this easier by providing personalized recommendations.
To use this feature, you can ask Amazon Q, “Which instance families should I use to deploy a Web App Server for hosting an application?” This feature is also available when you choose to launch an instance in the Amazon EC2 console. In Instance type, you can select Get advice on instance type selection. This will show a dialog to define your requirements.
Your requirements are automatically translated into a prompt on the Amazon Q chat panel. Amazon Q returns with a list of suggestions of EC2 instances that are suitable for your use cases. This capability helps you pick the right instance type and settings so your workloads will run smoothly and more cost-efficiently.
This capability to provide EC2 instance type recommendations based on your use case is available in preview in all commercial AWS Regions.
3. Troubleshoot and solve errors directly in the console Amazon Q can also help you to solve errors for various AWS services directly in the console. With Amazon Q proposed solutions, you can avoid slow manual log checks or research.
Let’s say that you have an AWS Lambda function that tries to interact with an Amazon DynamoDB table. But, for an unknown reason (yet), it fails to run. Now, with Amazon Q, you can troubleshoot and resolve this issue faster by selecting Troubleshoot with Amazon Q.
Amazon Q provides concise analysis of the error which helps you to understand the root cause of the problem and the proposed resolution. With this information, you can follow the steps described by Amazon Q to fix the issue.
4. Network troubleshooting assistance You can also ask Amazon Q to assist you in troubleshooting network connectivity issues caused by network misconfiguration in your current AWS account. For this capability, Amazon Q works with Amazon VPC Reachability Analyzer to check your connections and inspect your network configuration to identify potential issues.
This makes it easy to diagnose and resolve AWS networking problems, such as “Why can’t I SSH to my EC2 instance?” or “Why can’t I reach my web server from the Internet?” which you can ask Amazon Q.
Then, on the response text, you can select preview experience here, which will provide explanations to help you to troubleshoot network connectivity-related issues.
Here are a few things you need to know:
This capability is currently available in preview in the US East (N. Virginia).
5. Integration and conversational capabilities within your IDEs As we mentioned, Amazon Q is also available in supported IDEs. This allows you to ask questions and get help within your IDE by chatting with Amazon Q or invoking actions by typing / in the chat box.
To get started, you need to install or update the latest AWS Toolkit and sign in to Amazon CodeWhisperer. Once you’re signed in to Amazon CodeWhisperer, it will automatically activate the Amazon Q conversational capability in the IDE. With Amazon Q enabled, you can now start chatting to get coding assistance.
You can ask Amazon Q to describe your source code file.
From here, you can improve your application, for example, by integrating it with Amazon DynamoDB. You can ask Amazon Q, “Generate code to save data into DynamoDB table called save_data() accepting data parameter and return boolean status if the operation successfully runs.”
Once you’ve reviewed the generated code, you can do a manual copy and paste into the editor. You can also select Insert at cursor to place the generated code into the source code directly.
This feature makes it really easy to help you focus on building applications because you don’t have to leave your IDE to get answers and context-specific coding guidance. You can try the preview of this feature in Visual Studio Code and JetBrains IDEs.
6. Feature development capability Another exciting feature that Amazon Q provides is guiding you interactively from idea to building new features within your IDE and Amazon CodeCatalyst. You can go from a natural language prompt to application features in minutes, with interactive step-by-step instructions and best practices, right from your IDE. With a prompt, Amazon Q will attempt to understand your application structure and break down your prompt into logical, atomic implementation steps.
To use this capability, you can start by invoking an action command /dev in Amazon Q and describe the task you need Amazon Q to process.
Then, from here, you can review, collaborate and guide Amazon Q in the chat for specific areas that need to be implemented.
Additional capabilities to help you ship features faster with complete pull requests are available if you’re using Amazon CodeCatalyst. In Amazon CodeCatalyst, you can assign a new or an existing issue to Amazon Q, and it will process an end-to-end development workflow for you. Amazon Q will review the existing code, propose a solution approach, seek feedback from you on the approach, generate merge-ready code, and publish a pull request for review. All you need to do after is to review the proposed solutions from Amazon Q.
The following screenshots show a pull request created by Amazon Q in Amazon CodeCatalyst.
Here are a couple of things that you should know:
Amazon Q feature development capability is currently in preview in Visual Studio Code and Amazon CodeCatalyst
To use this capability in IDE, you need to have the Amazon CodeWhisperer Professional tier. Learn more on the Amazon CodeWhisperer pricing page.
7. Upgrade applications with Amazon Q Code Transformation With Amazon Q, you can now upgrade an entire application within a few hours by starting a guided code transformation. This capability, called Amazon Q Code Transformation, simplifies maintaining, migrating, and upgrading your existing applications.
To start, navigate to the CodeWhisperer section and then select Transform. Amazon Q Code Transformation automatically analyzes your existing codebase, generates a transformation plan, and completes the key transformation tasks suggested by the plan.
Some additional information about this feature:
Amazon Q Code Transformation is available in preview today in the AWS Toolkit for IntelliJ IDEA and the AWS Toolkit for Visual Studio Code.
To use this capability, you need to have the Amazon CodeWhisperer Professional tier during the preview.
During preview, you can can upgrade Java 8 and 11 applications to version 17, a Java Long-Term Support (LTS) release.
Get started with Amazon Q today With Amazon Q, you have an AI expert by your side to answer questions, write code faster, troubleshoot issues, optimize workloads, and even help you code new features. These capabilities simplify every phase of building applications on AWS.
Amazon Q lets you engage with AWS Support agents directly from the Q interface if additional assistance is required, eliminating any dead ends in the customer’s self-service experience. The integration with AWS Support is available in the console and will honor the entitlements of your AWS Support plan.
Your DevOps and Developer Productivity guide to re:Invent 2023
ICYMI – AWS re:Invent is less than a week away! We can’t wait to join thousands of builders in person and virtually for another exciting event. Still need to save your spot? You can register here.
With so much planned for the DevOps and Developer Productivity (DOP) track at re:Invent, we’re highlighting the most exciting sessions for technology leaders and developers in this post. Sessions span intermediate (200) through expert (400) levels of content in a mix of interactive chalk talks, hands-on workshops, and lecture-style breakout sessions.
You will experience the future of efficient development at the DevOps and Developer Productivity track and get a chance to talk to AWS experts about exciting services, tools, and new AI capabilities that optimize and automate your software development lifecycle. Attendees will leave re:Invent with the latest strategies to accelerate development, use generative AI to improve developer productivity, and focus on high-value work and innovation.
How to reserve a seat in the sessions
Reserved seating is available for registered attendees to secure seats in the sessions of their choice. Reserve a seat by signing in to the attendee portal and navigating to Event, then Sessions.
Do not miss the Innovation Talk led by Vice President of AWS Generative Builders, Adam Seligman. In DOP225-INT Build without limits: The next-generation developer experience at AWS, Adam will provide updates on the latest developer tools and services, including generative AI-powered capabilities, low-code abstractions, cloud development, and operations. He’ll also welcome special guests to lead demos of key developer services and showcase how they integrate to increase productivity and innovation.
DevOps and Developer Productivity breakout sessions
What are breakout sessions?
AWS re:Invent breakout sessions are lecture-style and 60 minutes long. These sessions are delivered by AWS experts and typically reserve 10–15 minutes for Q&A at the end. Breakout sessions are recorded and made available on-demand after the event.
Level 200 — Intermediate
DOP201 | Best practices for Amazon CodeWhisperer Generative AI can create new content and ideas, including conversations, stories, images, videos, and music. Learning how to interact with generative AI effectively and proficiently is a skill worth developing. Join this session to learn about best practices for engaging with Amazon CodeWhisperer, which uses an underlying foundation model to radically improve developer productivity by generating code suggestions in real time.
DOP202 |Realizing the developer productivity benefits of Amazon CodeWhisperer Developers spend a significant amount of their time writing undifferentiated code. Amazon CodeWhisperer radically improves productivity by generating code suggestions in real time to alleviate this burden. In this session, learn how CodeWhisperer can “write” much of this undifferentiated code, allowing developers to focus on business logic and accelerate the pace of their innovation.
DOP205 |Accelerate development with Amazon CodeCatalyst In this session, explore the newest features in Amazon CodeCatalyst. Learn firsthand how these practical additions to CodeCatalyst can simplify application delivery, improve team collaboration, and speed up the software development lifecycle from concept to deployment.
DOP206 |AWS infrastructure as code: A year in review AWS provides services that help with the creation, deployment, and maintenance of application infrastructure in a programmatic, descriptive, and declarative way. These services help provide rigor, clarity, and reliability to application development. Join this session to learn about the new features and improvements for AWS infrastructure as code with AWS CloudFormation and AWS Cloud Development Kit (AWS CDK) and how they can benefit your team.
DOP207 |Build and run it: Streamline DevOps with machine learning on AWS While organizations have improved how they deliver and operate software, development teams still run into issues when performing manual code reviews, looking for hard-to-find defects, and uncovering security-related problems. Developers have to keep up with multiple programming languages and frameworks, and their productivity can be impaired when they have to search online for code snippets. Additionally, they require expertise in observability to successfully operate the applications they build. In this session, learn how companies like Fidelity Investments use machine learning–powered tools like Amazon CodeWhisperer and Amazon DevOps Guru to boost application availability and write software faster and more reliably.
DOP208 |Continuous integration and delivery for AWS AWS provides one place where you can plan work, collaborate on code, build, test, and deploy applications with continuous integration/continuous delivery (CI/CD) tools. In this session, learn about how to create end-to-end CI/CD pipelines using infrastructure as code on AWS.
DOP209 |Governance and security with infrastructure as code In this session, learn how to use AWS CloudFormation and the AWS CDK to deploy cloud applications in regulated environments while enforcing security controls. Find out how to catch issues early with cdk-nag, validate your pipelines with cfn-guard, and protect your accounts from unintended changes with CloudFormation hooks.
DOP210 | Scale your application development with Amazon CodeCatalyst Amazon CodeCatalyst brings together everything you need to build, deploy, and collaborate on software into one integrated software development service. In this session, discover the ways that CodeCatalyst helps developers and teams build and ship code faster while spending more time doing the work they love.
DOP211 |Boost developer productivity with Amazon CodeWhisperer Generative AI is transforming the way that developers work. Writing code is already getting disrupted by tools like Amazon CodeWhisperer, which enhances developer productivity by providing real-time code completions based on natural language prompts. In this session, get insights into how to evaluate and measure productivity with the adoption of generative AI–powered tools. Learn from the AWS Disaster Recovery team who uses CodeWhisperer to solve complex engineering problems by gaining efficiency through longer productivity cycles and increasing velocity to market for ongoing fixes. Hear how integrating tools like CodeWhisperer into your workflows can boost productivity.
DOP212 |New AWS generative AI features and tools for developers Explore how generative AI coding tools are changing the way developers and companies build software. Generative AI–powered tools are boosting developer and business productivity by automating tasks, improving communication and collaboration, and providing insights that can inform better decision-making. In this session, see the newest AWS tools and features that make it easier for builders to solve problems with minimal technical expertise and that help technical teams boost productivity. Walk through how organizations like FINRA are exploring generative AI and beginning their journey using these tools to accelerate their pace of innovation.
DOP220 | Simplify building applications with AWS SDKs AWS SDKs play a vital role in using AWS services in your organization’s applications and services. In this session, learn about the current state and the future of AWS SDKs. Explore how they can simplify your developer experience and unlock new capabilities. Discover how SDKs are evolving, providing a consistent experience in multiple languages and empowering you to do more with high-level abstractions to make it easier to build on AWS. Learn how AWS SDKs are built using open source tools like Smithy, and how you can use these tools to build your own SDKs to serve your customers’ needs.
DevOps and Developer Productivity chalk talks
What are chalk talks?
Chalk Talks are highly interactive sessions with a small audience. Experts lead you through problems and solutions on a digital whiteboard as the discussion unfolds. Each begins with a short lecture (10–15 minutes) delivered by an AWS expert, followed by a 45- or 50-minute Q&A session with the audience.
Level 300 — Advanced
DOP306 | Streamline DevSecOps with a complete software development service Security is not just for application code—the automated software supply chains that build modern software can also be exploited by attackers. In this chalk talk, learn how you can use Amazon CodeCatalyst to incorporate security tests into every aspect of your software development lifecycle while maintaining a great developer experience. Discover how CodeCatalyst’s flexible actions-based CI/CD workflows streamline the process of adapting to security threats.
DOP309-R | AI for DevOps: Modernizing your DevOps operations with AWS As more organizations move to microservices architectures to scale their businesses, applications increasingly have become distributed, requiring the need for even greater visibility. IT operations professionals and developers need more automated practices to maintain application availability and reduce the time and effort required to detect, debug, and resolve operational issues. In this chalk talk, discover how you can use AWS services, including Amazon CodeWhisperer, Amazon CodeGuru and Amazon DevOps Guru, to start using AI for DevOps solutions to detect, diagnose, and remedy anomalous application behavior.
DOP310-R | Better together: GitHub Actions, Amazon CodeCatalyst, or AWS CodeBuild Learn how combining GitHub Actions with Amazon CodeCatalyst or AWS CodeBuild can maximize development efficiency. In this chalk talk, learn about the tradeoffs of using GitHub Actions runners hosted on Amazon EC2 or Amazon ECS with GitHub Actions hosted on CodeCatalyst or CodeBuild. Explore integration with other AWS services to enhance workflow automation. Join this talk to learn how GitHub Actions on AWS can take your development processes to the next level.
DOP311 | Building infrastructure as code with AWS CloudFormation AWS CloudFormation helps you manage your AWS infrastructure as code, increasing automation and supporting infrastructure-as-code best practices. In this chalk talk, learn the fundamentals of CloudFormation, including templates, stacks, change sets, and stack dependencies. See a demo of how to describe your AWS infrastructure in a template format and provision resources in an automated, repeatable way.
DOP312 | Creating custom constructs with AWS CDK Join this chalk talk to get answers to your questions about creating, publishing, and sharing your AWS CDK constructs publicly and privately. Learn about construct levels, how to test your constructs, how to discover and use constructs in your AWS CDK projects, and explore Construct Hub.
DOP313-R | Multi-account and multi-Region deployments at scale Many AWS customers are implementing multi-account strategies to more easily manage their cloud infrastructure and improve their security and compliance postures. In this chalk talk, learn about various options for deploying resources into multiple accounts and AWS Regions using AWS developer tools, including AWS CodePipeline, AWS CodeDeploy, and Amazon CodeCatalyst.
DOP314 | Simplifying cloud infrastructure creation with the AWS CDK The AWS Cloud Development Kit (AWS CDK) is an open source software development framework for defining cloud infrastructure in code and provisioning it through AWS CloudFormation. In this chalk talk, get an introduction to the AWS CDK and see a demo of how it can simplify infrastructure creation. Through code examples and diagrams, see how the AWS CDK lets you use familiar programming languages for declarative infrastructure definition. Also learn how it provides higher-level abstractions and constructs over native CloudFormation.
DOP317 | Applying Amazon’s DevOps culture to your team In this chalk talk, learn how Amazon helps its developers rapidly release and iterate software while maintaining industry-leading standards on security, reliability, and performance. Learn about the culture of two-pizza teams and how to maintain a culture of DevOps in a large enterprise. Also, discover how you can help build such a culture at your own organization.
DOP318 | Testing for resilience with AWS Fault Injection Simulator As cloud-based systems grow in scale and complexity, there is increased need to test distributed systems for resiliency. AWS Fault Injection Simulator (FIS) allows you to stress test your applications to understand failure modes and build more resilient services. Through code examples and diagrams, see how to set up and run fault injection experiments on AWS. By the end of this session, understand how FIS helps identify weaknesses and validate improvements to build more resilient cloud-based systems.
DOP319-R | Zero-downtime deployment strategies AWS services support a wealth of deployment options to meet your needs, ranging from in-place updates to blue/green deployment to continuous configuration with feature flags. In this chalk talk, hear about multiple options for deploying changes to Amazon EC2, Amazon ECS, and AWS Lambda compute platforms using AWS CodeDeploy, AWS AppConfig, AWS CloudFormation, AWS Cloud Development Kit (AWS CDK), and Amazon CodeCatalyst.
DOP320 | Build a path to production with Amazon CodeCatalyst blueprints Amazon CodeCatalyst uses blueprints to configure your software projects in the service. Blueprints instruct CodeCatalyst on how to set up a code repository with working sample code, define cloud infrastructure, and run pre-configured CI/CD workflows for your project. In this session, learn how blueprints in CodeCatalyst can give developers a compliant software service they’ll want to use on AWS.
DOP321-R | Code faster with Amazon CodeWhisperer Traditionally, building applications requires developers to spend a lot of time manually writing code and trying to learn and keep up with new frameworks, SDKs, and libraries. In the last three years, AI models have grown exponentially in complexity and sophistication, enabling the creation of tools like Amazon CodeWhisperer that can generate code suggestions in real time based on a natural language description of the task. In this session, learn how CodeWhisperer can accelerate and enhance your software development with code generation, reference tracking, security scans, and more.
DOP324 | Accelerating application development with AWS client-side tools Did you know AWS has more than just services? There are dozens of AWS client-side tools and libraries designed to make developing quality applications easier. In this chalk talk, explore some of the tools available in your development workspace. Learn more about command line tooling (AWS CLI), libraries (AWS SDK), IDE integrations, and application frameworks that can accelerate your AWS application development. The audience helps set the agenda so there’s sure to be something for every builder.
DevOps and Developer Productivity workshops
What are workshops?
Workshops are two-hour interactive learning sessions where you work in small group teams to solve problems using AWS services. Each workshop starts with a short lecture (10–15 minutes) by the main speaker, and the rest of the time is spent working as a group.
Level 300 — Advanced
DOP301 | Boost your application availability with AIOps on AWS As applications become increasingly distributed and complex, developers and IT operations teams can benefit from more automated practices to maintain application availability and reduce the time and effort spent detecting, debugging, and resolving operational issues manually. In this workshop, learn how AWS AIOps solutions can help you make the shift toward more automation and proactive mechanisms so your IT team can innovate faster. The workshop includes use cases spanning multiple AWS services such as AWS Lambda, Amazon DynamoDB, Amazon API Gateway, Amazon RDS, and Amazon EKS. Learn how you can reduce MTTR and quickly identify issues within your AWS infrastructure. You must bring your laptop to participate.
DOP302 | Build software faster with Amazon CodeCatalyst In this workshop, learn about creating continuous integration and continuous delivery (CI/CD) pipelines using Amazon CodeCatalyst. CodeCatalyst is a unified software development service on AWS that brings together everything teams need to plan, code, build, test, and deploy applications with continuous CI/CD tools. You can utilize AWS services and integrate AWS resources into your projects by connecting your AWS accounts. With all of the stages of an application’s lifecycle in one tool, you can deliver quality software quickly and confidently. You must bring your laptop to participate.
DOP303-R | Continuous integration and delivery on AWS In this workshop, learn to create end-to-end continuous integration and continuous delivery (CI/CD) pipelines using AWS Cloud Development Kit (AWS CDK). Review the fundamental concepts of continuous integration, continuous deployment, and continuous delivery. Then, using TypeScript/Python, define an AWS CodePipeline, AWS CodeBuild, and AWS CodeCommit workflow. You must bring your laptop to participate.
DOP304 | Develop AWS CDK resources to deploy your applications on AWS In this workshop, learn how to build and deploy applications using infrastructure as code with AWS Cloud Development Kit (AWS CDK). Create resources using AWS CDK and learn maintenance and operations tips. In addition, get an introduction to building your own constructs. You must bring your laptop to participate.
DOP305 | Develop AWS CloudFormation templates to manage your infrastructure In this workshop, learn how to develop and test AWS CloudFormation templates. Create CloudFormation templates to deploy and manage resources and learn about CloudFormation language features that allow you to reuse and extend templates for many scenarios. Explore testing tools that can help you validate your CloudFormation templates, including cfn-lint and CloudFormation Guard. You must bring your laptop to participate.
DOP307-R | Hands-on with Amazon CodeWhisperer In this workshop, learn how to build applications faster and more securely with Amazon CodeWhisperer. The workshop begins with several examples highlighting how CodeWhisperer incorporates your comments and existing code to produce results. Then dive into a series of challenges designed to improve your productivity using multiple languages and frameworks. You must bring your laptop to participate.
DOP308 | Enforcing development standards with Amazon CodeCatalyst In this workshop, learn how Amazon CodeCatalyst can accelerate the application development lifecycle within your organization. Discover how your cloud center of excellence (CCoE) can provide standardized code and workflows to help teams get started quickly and securely. In addition, learn how to update projects as organization standards evolve. You must bring your laptop to participate.
Level 400 — Expert
DOP401 | Get better at building AWS CDK constructs In this workshop, dive deep into how to design AWS CDK constructs, which are reusable and shareable cloud components that help you meet your organization’s security, compliance, and governance requirements. Learn how to build, test, and share constructs representing a single AWS resource, as well as how to create higher-level abstractions that include built-in defaults and allow you to provision multiple AWS resources. You must bring your laptop to participate.
DevOps and Developer Productivity builders’ sessions
What are builders’ sessions?
These 60-minute group sessions are led by an AWS expert and provide an interactive learning experience for building on AWS. Builders’ sessions are designed to create a hands-on experience where questions are encouraged.
Level 300 — Advanced
DOP322-R | Accelerate data science coding with Amazon CodeWhisperer Generative AI removes the heavy lifting that developers experience today by writing much of the undifferentiated code, allowing them to build faster. Helping developers code faster could be one of the most powerful uses of generative AI that we will see in the coming years—and this framework can also be applied to data science projects. In this builders’ session, explore how Amazon CodeWhisperer accelerates the completion of data science coding tasks with extensions for JupyterLab and Amazon SageMaker. Learn how to build data processing pipeline and machine learning models with the help of CodeWhisperer and accelerate data science experiments in Python. You must bring your laptop to participate.
Level 400 — Expert
DOP402-R | Manage dev environments at scale with Amazon CodeCatalyst Amazon CodeCatalyst Dev Environments are cloud-based environments that you can use to quickly work on the code stored in the source repositories of your project. They are automatically created with pre-installed dependencies and language-specific packages so you can work on a new or existing project right away. In this session, learn how to create secure, reproducible, and consistent environments for VS Code, AWS Cloud9, and JetBrains IDEs. You must bring your laptop to participate.
DOP403-R | Hands-on with Amazon CodeCatalyst: Automating security in CI/CD pipelines In this session, learn how to build a CI/CD pipeline with Amazon CodeCatalyst and add the necessary steps to secure your pipeline. Learn how to perform tasks such as secret scanning, software composition analysis (SCA), static application security testing (SAST), and generating a software bill of materials (SBOM). You must bring your laptop to participate.
DevOps and Developer Productivity lightning talks
What are lightning talks?
Lightning talks are short, 20-minute demos led from a stage.
DOP221 | Amazon CodeCatalyst in real time: Deploying to production in minutes In this follow-up demonstration to DOP210, see how you can use an Amazon CodeCatalyst blueprint to build a production-ready application that is set up for long-term success. See in real time how to create a project using a CodeCatalyst Dev Environment and deploy it to production using a CodeCatalyst workflow.
DevOps and Developer Productivity code talks
What are code talks?
Code talks are 60-minute, highly-interactive discussions featuring live coding. Attendees are encouraged to dig in and ask questions about the speaker’s approach.
DOP203 | The future of development on AWS This code talk includes a live demo and an open discussion about how builders can use the latest AWS developer tools and generative AI to build production-ready applications in minutes. Starting at an Amazon CodeCatalyst blueprint and using integrated AWS productivity and security capabilities, see a glimpse of what the future holds for developing on AWS.
DOP204 | Tips and tricks for coding with Amazon CodeWhisperer Generative AI tools that can generate code suggestions, such as Amazon CodeWhisperer, are growing rapidly in popularity. Join this code talk to learn how CodeWhisperer can accelerate and enhance your software development with code generation, reference tracking, security scans, and more. Learn best practices for prompt engineering, and get tips and tricks that can help you be more productive when building applications.
Want to stay connected?
Get the latest updates for DevOps and Developer Productivity by following us on Twitter and visiting the AWS devops blog.
With Amazon SQS, you can send and receive messages between software components at any scale. It was one of the first AWS services I used and as a Solutions Architect, I helped many customers take advantage of asynchronous communications using message queues. In fact, Amazon SQS has been generally available since July 2006 and, under the hood, has always used the same wire protocol based on XML that we call AWS Query protocol.
Today, I am happy to announce that Amazon SQS now supports a JSON-based wire protocol for all APIs. The AWS JSON protocol avoids many of the shortcomings of AWS Query protocol.
AWS JSON is more efficient than the previous XML-based protocol and can reduce both latency and client-side CPU usage when sending and receiving SQS messages. For example, for a request that sends a simple “hello world” message, the response body size using the old AWS Query protocol is about 400 bytes. The content length of the same SendMessage response using the new AWS JSON protocol is less than 1/3 of the previous size.
Using the New JSON-Based Protocol with Amazon SQS This is the nicest part of this launch! To benefit from the AWS JSON protocol, you just need to update the AWS SDK to the latest version. While building this new capability, the SQS team was careful so that no code changes are needed to use the new JSON-based wire protocol.
For example, we ran a benchmark using the AWS SDK for Java to compare the old and new wire protocols. We expect similar results from the other AWS SDKs. Based on AWS performance tests for a 5KB message payload, JSON protocol for Amazon SQS reduces end-to-end message processing latency by up to 23 percent and reduces application client side CPU and memory usage. These numbers depend on the actual implementation and can differ from what you’ll see for your own applications.
Availability and Pricing Amazon SQS support for the new JSON protocol is available today in all AWS Regions where SQS is offered. All generally available AWS SDKs now support AWS JSON for SQS APIs. To get the benefits of this optimization, you just need to update the AWS SDK to the latest version available.
There is no change in pricing when using the AWS JSON protocol. For more information, see Amazon SQS pricing.
If you’re interested in more details on how AWS protocols work, you can have a look at Smithy, the language we use at AWS for defining services and SDKs.
The year is coming to an end, and there are only 50 days until Christmas and 21 days to AWS re:Invent! If you are in Las Vegas, come and say hi to me. I will be around the Serverlesspresso booth most of the time.
Last week’s launches Here are some launches that got my attention during the previous week.
Amazon EC2 – Amazon EC2 announced Capacity Blocks for ML. This means that you can now reserve GPU compute capacity for your short-duration ML workloads. Learn more about this launch on the feature page and announcement blog post.
Finch – Finch is now generally available. Finch is an open source tool for local container development on macOS (using Intel or Apple Silicon). It provides a command line developer tool for building, running, and publishing Linux containers on macOS. Learn more about Finch in this blog post written by Phil Estes or on the Finch website.
AWS IAM– IAM increased the actions last accessed to 60 more services. This functionality is very useful when fine-tuning the permissions of the roles, identifying unused permissions, and granting the least amount of permissions that your roles need.
Other AWS news Some other news and blog posts that you may have missed:
AWS Compute Blog – Daniel Wirjo and Justin Plock wrote a very interesting article about how you can send and receive webhooks on AWS using different AWS serverless services. This is a good read if you are working with webhooks on your application, as it not only shows you how to build these solutions but also what considerations you should have when building them.
Amazon Science Blog – David Fan wrote an article about how to build better foundation models for video representation. This article is based on a paper that Prime Video presented at a conference about this topic.
The Official AWS Podcast – Listen each week for updates on the latest AWS news and deep dives into exciting use cases. There are also official AWS podcasts in several languages. Check out the ones in French, German, Italian, and Spanish.
AWS open-source news and updates – This is a newsletter curated by my colleague Ricardo to bring you the latest open source projects, posts, events, and more.
Upcoming AWS events Check your calendars and sign up for these AWS events:
AWS Community Days – Join a community-led conference run by AWS user group leaders in your region: Ecuador (November 7), Mexico (November 11), Montevideo (November 14), Central Asia (Kazakhstan, Uzbekistan, Kyrgyzstan, and Mongolia on November 17–18), and Guatemala (November 18).
An AI coding companion, such as Amazon CodeWhisperer, aims to improve developers’ productivity by helping them write code quickly and securely. However, in particular cases, developers need to have code recommendations based on their internal libraries and APIs they extensively use every day.
As most of the existing AI coding companion tools are trained only on open-source codes, they lack the capability to customize the code recommendations using private code repositories. This limitation presents a variety of challenges for developers. Developers have a difficulty learning how to use internal libraries correctly and avoid security problems. For large codebases, it requires hours of reading documentation to understand what code needs to be written to complete the task.
Now in Preview — Amazon CodeWhisperer Customization Capability Today, I’m excited to announce Amazon CodeWhisperer customization capability (in preview) that enables organizations to customize CodeWhisperer to generate specific code recommendations from private code repositories. With this feature, developers who are part of Amazon CodeWhisperer Professional tier can now receive real-time code recommendations that include their internal libraries, APIs, packages, classes, and methods.
Let’s say that you’re a developer working for a hypothetical food delivery company called AnyCompany. You’re given a task to process a list of unassigned food deliveries around the driver’s current location. Previously, with CodeWhisperer, it would not know the correct internal APIs to process unassigned food deliveries or getting driver’s current location as this isn’t publicly available information.
Now, with customization capability, you can ask CodeWhisperer to provide recommendations that include specific code related to the company’s internal services. The following screenshot shows how CodeWhisperer generates codes based on the internal codebase just by writing a set of comments.
With the customization capability of utilizing your internal codebase, CodeWhisperer now understands the intent, determines which internal and public APIs are best suited to the task, and generates code recommendations.
How It Works The explanation above described how you can use CodeWhisperer customization capability as a developer. Now, let me share how it works and how you can get started.
To create a customization, you need to complete the following steps as a CodeWhisperer administrator.
Connect to existing repositories. You can connect one or more code repositories in your GitHub, GitLab, or BitBucket account using AWS CodeStar Connections or manually upload all of your codes into an Amazon Simple Storage Service (Amazon S3) bucket.
Create a customization. CodeWhisperer will customize its model based on your codebase.
Activate the customization for your team members. Once the customization is created, you can review and manually activate the customization to make it available automatically in your team members’ IDEs.
This capability provides two main advantages: providing real-time customized code recommendations that are specific to organizations and ensuring the protection of valuable intellectual property. Organizations can now promote the use of code that meets their quality and security standards based on their codes in existing repositories.
Furthermore, CodeWhisperer helps to ensure the security of your codes by providing the option to encrypt your customization data using customer managed keys in AWS Key Management Service (AWS KMS). This customization data will be deleted once the customization job finishes.
Let’s Get Started Let me show you how you can use the Amazon CodeWhisperer customization capability.
To get started, I need to create a customization. I need to have administrator access to navigate to the Create customization page on the Amazon CodeWhisperer dashboard.
On the Create customization page, I can connect the desired private code repositories I want CodeWhisperer to train. Currently, CodeWhisperer customization capability supports connection to GitHub, GitLab, and Bitbucket via AWS CodeStar Connections. If I have codes that are not in any code repositories, I can also manually upload my codes into an S3 bucket and define the Amazon S3 URI.
The following screenshot shows that I have existing connections with my code repositories using AWS CodeStar Connections. I can also create a new connection by selecting Create new connection.
Then, I can select Create Customization so CodeWhisperer can start training the model based on the codes available in the connection. The duration to complete this process depends on the size of the code repositories.
When the customization is ready, CodeWhisperer will not activate it automatically. This gives me the flexibility to activate the customizations just when I need them. But before I demonstrate that, I’d like to explain the evaluation score.
In short, the evaluation score helps me to measure the customization’s accuracy in predicting and providing code recommendations based on the codes in my code repositories. It provides a score in one of three categories: 1) Very Good, with a score ranging from 7–10; 2) Fair, with a score ranging from 4–7; and 3) Poor, with a score ranging from 0–4. It’s recommended to activate the customization if the evaluation score is 6 or higher. If the evaluation score is less than desired, I need to make sure that I’m providing enough codes for customization and provide a new code dataset that extensively contains references to internal APIs.
Here, I can see the Evaluation score for my customization is 8, and I’m happy with this result. Then, I can select Activate to start using this customization.
Once I have activated the customizations, I can define the access to selected customizations by selecting Add users. Now, I can give access to the customizations for selected team members who have been added as users for Amazon CodeWhisperer Professional tier. To do that, I can follow the guide from the Administering end users page.
Then, once my team members sign in via AWS Toolkit in their IDEs, they will see the available customizations and can start using them.
With Amazon CodeWhisperer, I can create multiple customizations by providing different code repositories. This feature is useful if I want to build customizations for code recommendations for certain teams.
As administrator, I can also monitor the performance of each of the customizations by navigating to the CodeWhisperer dashboard page. This page summarizes useful data such as user activity, how many lines of code were suggested by CodeWhisperer and accepted by my team members, and how many security scans have successfully been run from IDEs.
Amazon CodeWhisperer customization capability also follows the supported IDEs as part of AWS Toolkit by Amazon CodeWhisperer, such as Visual Studio Code, IntelliJ JetBrains, Visual Studio, and AWS Cloud9. This feature also provides support for most popular programming languages, including Python, Java, JavaScript, TypeScript, and C#.
Join the Public Preview By securely leveraging customer’s internal codebase, Amazon CodeWhisperer unlocks the full potential of generative AI-powered coding that is customized to your unique requirements.
To provide the best experiences, we use technologies like cookies to store and/or access device information. Consenting to these technologies will allow us to process data such as browsing behavior or unique IDs on this site. Not consenting or withdrawing consent, may adversely affect certain features and functions.
Functional
Always active
The technical storage or access is strictly necessary for the legitimate purpose of enabling the use of a specific service explicitly requested by the subscriber or user, or for the sole purpose of carrying out the transmission of a communication over an electronic communications network.
Preferences
The technical storage or access is necessary for the legitimate purpose of storing preferences that are not requested by the subscriber or user.
Statistics
The technical storage or access that is used exclusively for statistical purposes.The technical storage or access that is used exclusively for anonymous statistical purposes. Without a subpoena, voluntary compliance on the part of your Internet Service Provider, or additional records from a third party, information stored or retrieved for this purpose alone cannot usually be used to identify you.
Marketing
The technical storage or access is required to create user profiles to send advertising, or to track the user on a website or across several websites for similar marketing purposes.