Last Friday was International Women’s Day (IWD), and I want to take a moment to appreciate the amazing ladies in the cloud computing space that are breaking the glass ceiling by reaching technical leadership positions and inspiring others to go and build, as our CTO Werner Vogels says.
Last week’s launches Here are some launches that got my attention during the previous week.
Amazon Bedrock – Now supports Anthropic’s Claude 3 Sonnet foundational model. Claude 3 Sonnet is two times faster and has the same level of intelligence as Anthropic’s highest-performing models, Claude 2 and Claude 2.1. My favorite characteristic is that Sonnet is better at producing JSON outputs, making it simpler for developers to build applications. It also offers vision capabilities. You can learn more about this foundation model (FM) in the post that Channy wrote early last week.
AWS re:Post – Launched last week! AWS re:Post Live is a weekly Twitch livestream show that provides a way for the community to reach out to experts, ask questions, and improve their skills. The show livestreams every Monday at 11 AM PT.
AWS Partners – Last week, we announced the AWS Generative AI Competency Partners. This new specialization features AWS Partners that have shown technical proficiency and a track record of successful projects with generative artificial intelligence (AI) powered by AWS.
Other AWS news Some other updates and news that you may have missed:
One of the articles that caught my attention recently compares different design approaches for building serverless microservices. This article, written by Luca Mezzalira and Matt Diamond, compares the three most common designs for serverless workloads and explains the benefits and challenges of using one over the other.
And if you are interested in the serverless space, you shouldn’t miss the Serverless Office Hours, which airs live every Tuesday at 10 AM PT. Join the AWS Serverless Developer Advocates for a weekly chat on the latest from the serverless space.
The Official AWS Podcast – Listen each week for updates on the latest AWS news and deep dives into exciting use cases. There are also official AWS podcasts in several languages. Check out the ones in French, German, Italian, and Spanish.
AWS Open Source News and Updates – This is a newsletter curated by my colleague Ricardo to bring you the latest open source projects, posts, events, and more.
Upcoming AWS events Check your calendars and sign up for these AWS events:
AWS Summit season is about to start. The first ones are Paris (April 3), Amsterdam (April 9), and London (April 24). AWS Summits are free events that you can attend in person and learn about the latest in AWS technology.
GOTO x AWS EDA Day London 2024 – On May 14, AWS partners with GOTO bring to you the event-driven architecture (EDA) day conference. At this conference, you will get to meet experts in the EDA space and listen to very interesting talks from customers, experts, and AWS.
For many network security operators, protecting application uptime can be a time-consuming challenge of baselining network traffic, investigating suspicious senders, and determining how best to mitigate risks. Simplifying this process and understanding network security posture at all times is the goal of most IT organizations that are trying to scale their applications without also needing to scale their security operations center staff. To help you with this challenge, AWS WAF introduced traffic overview dashboards so that you can make informed decisions about your security posture when your application is protected by AWS WAF.
In this post, we introduce the new dashboards and delve into a few use cases to help you gain better visibility into the overall security of your applications using AWS WAF and make informed decisions based on insights from the dashboards.
Introduction to traffic overview dashboards
The traffic overview dashboard in AWS WAF displays an overview of security-focused metrics so that you can identify and take action on security risks in a few clicks, such as adding rate-based rules during distributed denial of service (DDoS) events. The dashboards include near real-time summaries of the Amazon CloudWatch metrics that AWS WAF collects when it evaluates your application web traffic.
These dashboards are available by default and require no additional setup. They show metrics—total requests, blocked requests, allowed requests, bot compared to non-bot requests, bot categories, CAPTCHA solve rate, top 10 matched rules, and more—for each web access control list (web ACL) that you monitor with AWS WAF.
You can access default metrics such as the total number of requests, blocked requests, and common attacks blocked, or you can customize your dashboard with the metrics and visualizations that are most important to you.
These dashboards provide enhanced visibility and help you answer questions such as these:
What percent of the traffic that AWS WAF inspected is getting blocked?
What are the top originating countries for the traffic that’s getting blocked?
What are common attacks that AWS WAF detects and protects me from?
How do my traffic patterns from this week compare with last week?
The dashboard has native and out-of-the-box integration with CloudWatch. Using this integration, you can navigate back and forth between the dashboard and CloudWatch; for example, you can get a more granular metric overview by viewing the dashboard in CloudWatch. You can also add existing CloudWatch widgets and metrics to the traffic overview dashboard, bringing your tried-and-tested visibility structure into the dashboard.
With the introduction of the traffic overview dashboard, one AWS WAF tool—Sampled requests—is now a standalone tab inside a web ACL. In this tab, you can view a graph of the rule matches for web requests that AWS WAF has inspected. Additionally, if you have enabled request sampling, you can see a table view of a sample of the web requests that AWS WAF has inspected.
The sample of requests contains up to 100 requests that matched the criteria for a rule in the web ACL and another 100 requests for requests that didn’t match rules and thus had the default action for the web ACL applied. The requests in the sample come from the protected resources that have received requests for your content in the previous three hours.
The following figure shows a typical layout for the traffic overview dashboard. It categorizes inspected requests with a breakdown of each of the categories that display actionable insights, such as attack types, client device types, and countries. Using this information and comparing it with your expected traffic profile, you can decide whether to investigate further or block the traffic right away. For the example in Figure 1, you might want to block France-originating requests from mobile devices if your web application isn’t supposed to receive traffic from France and is a desktop-only application.
Figure 1: Dashboard with sections showing multiple categories serves as a single pane of glass
Use case 1: Analyze traffic patterns with the dashboard
In addition to visibility into your web traffic, you can use the new dashboard to analyze patterns that could indicate potential threats or issues. By reviewing the dashboard’s graphs and metrics, you can spot unusual spikes or drops in traffic that deserve further investigation.
The top-level overview shows the high-level traffic volume and patterns. From there, you can drill down into the web ACL metrics to see traffic trends and metrics for specific rules and rule groups. The dashboard displays metrics such as allowed requests, blocked requests, and more.
Notifications or alerts about a deviation from expected traffic patterns provide you a signal to explore the event. During your exploration, you can use the dashboard to understand the broader context and not just the event in isolation. This makes it simpler to detect a trend in anomalies that could signify a security event or misconfigured rules. For example, if you normally get 2,000 requests per minute from a particular country, but suddenly see 10,000 requests per minute from it, you should investigate. Using the dashboard, you can look at the traffic across various dimensions. The spike in requests alone might not be a clear indication of a threat, but if you see an additional indicator, such as an unexpected device type, this could be a strong reason for you to take follow-up action.
The following figure shows the actions taken by rules in a web ACL and which rule matched the most.
Figure 2: Multidimensional overview of the web requests
The dashboard also shows the top blocked and allowed requests over time. Check whether unusual spikes in blocked requests correspond to spikes in traffic from a particular IP address, country, or user agent. That could indicate attempted malicious activity or bot traffic.
The following figure shows a disproportionately larger number of matches to a rule indicating that a particular vector is used against a protected web application.
Figure 3: The top terminating rule could indicate a particular vector of an attack
Likewise, review the top allowed requests. If you see a spike in traffic to a specific URL, you should investigate whether your application is working properly.
Next steps after you analyze traffic
After you’ve analyzed the traffic patterns, here are some next steps to consider:
Tune your AWS WAF rules to better match legitimate or malicious traffic based on your findings. You might be able to fine-tune rules to reduce false positives or false negatives. Tune rules that are blocking legitimate traffic by adjusting regular expressions or conditions.
Configure AWS WAF logging, and if you have a dedicated security information and event management (SIEM) solution, integrate the logging to enable automated alerting for anomalies.
Set up AWS WAF to automatically block known malicious IPs. You can maintain an IP block list based on identified threat actors. Additionally, you can use the Amazon IP reputation list managed rule group, which the Amazon Threat Research Team regularly updates.
If you see spikes in traffic to specific pages, check that your web applications are functioning properly to rule out application issues driving unusual patterns.
Add new rules to block new attack patterns that you spot in the traffic flows. Then review the metrics to help confirm the impact of the new rules.
Monitor source IPs for DDoS events and other malicious spikes. Use AWS WAF rate-based rules to help mitigate these spikes.
If you experience traffic floods, implement additional layers of protection by using CloudFront with DDoS protection.
The new dashboard gives you valuable insight into the traffic that reaches your applications and takes the guesswork out of traffic analysis. Using the insights that it provides, you can fine-tune your AWS WAF protections and block threats before they affect availability or data. Analyze the data regularly to help detect potential threats and make informed decisions about optimizing.
As an example, if you see an unexpected spike of traffic, which looks conspicuous in the dashboard compared to historical traffic patterns, from a country where you don’t anticipate traffic originating from, you can create a geographic match rule statement in your web ACL to block this traffic and prevent it from reaching your web application.
The dashboard is a great tool to gain insights and to understand how AWS WAF managed rules help protect your traffic.
Use case 2: Understand bot traffic during onboarding and fine-tune your bot control rule group
With AWS WAF Bot Control, you can monitor, block, or rate limit bots such as scrapers, scanners, crawlers, status monitors, and search engines. If you use the targeted inspection level of the rule group, you can also challenge bots that don’t self-identify, making it harder and more expensive for malicious bots to operate against your website.
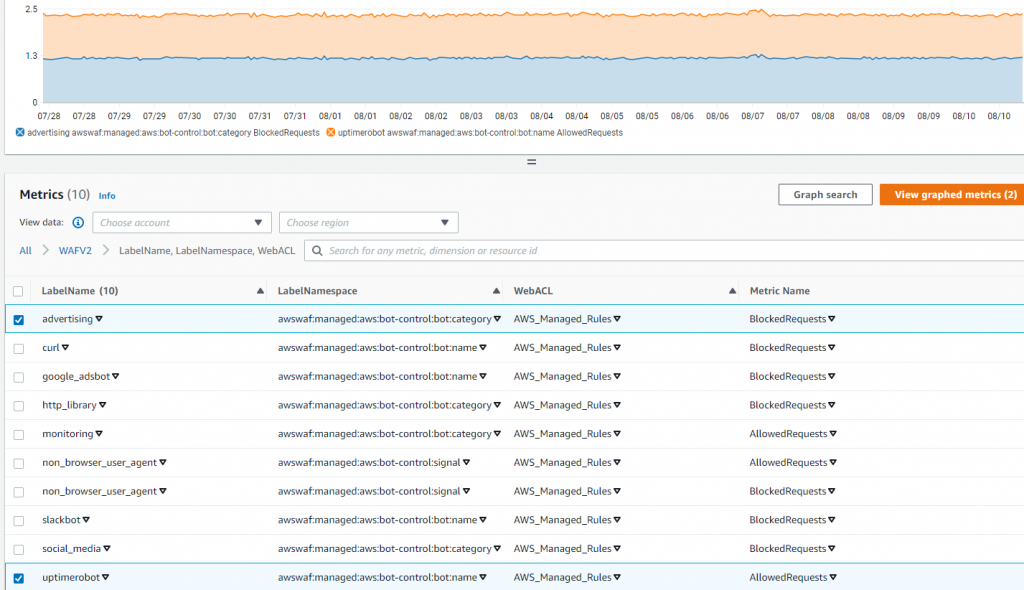
On the traffic overview dashboard, under the Bot Control overview tab, you can see how much of your current traffic is coming from bots, based on request sampling (if you don’t have Bot Control enabled) and real-time CloudWatch metrics (if you do have Bot Control enabled).
During your onboarding phase, use this dashboard to monitor your traffic and understand how much of it comes from various types of bots. You can use this as a starting point to customize your bot management. For example, you can enable common bot control rule groups in count mode and see if desired traffic is being mislabeled. Then you can add rule exceptions, as described in AWS WAF Bot Control example: Allow a specific blocked bot.
The following figure shows a collection of widgets that visualize various dimensions of requests detected as generated by bots. By understanding categories and volumes, you can make an informed decision to either investigate by further delving into logs or block a specific category if it’s clear that it’s unwanted traffic.
Figure 4: Collection of bot-related metrics on the dashboard
After you get started, you can use the same dashboard to monitor your bot traffic and evaluate adding targeted detection for sophisticated bots that don’t self-identify. Targeted protections use detection techniques such as browser interrogation, fingerprinting, and behavior heuristics to identify bad bot traffic. AWS WAF tokens are an integral part of these enhanced protections.
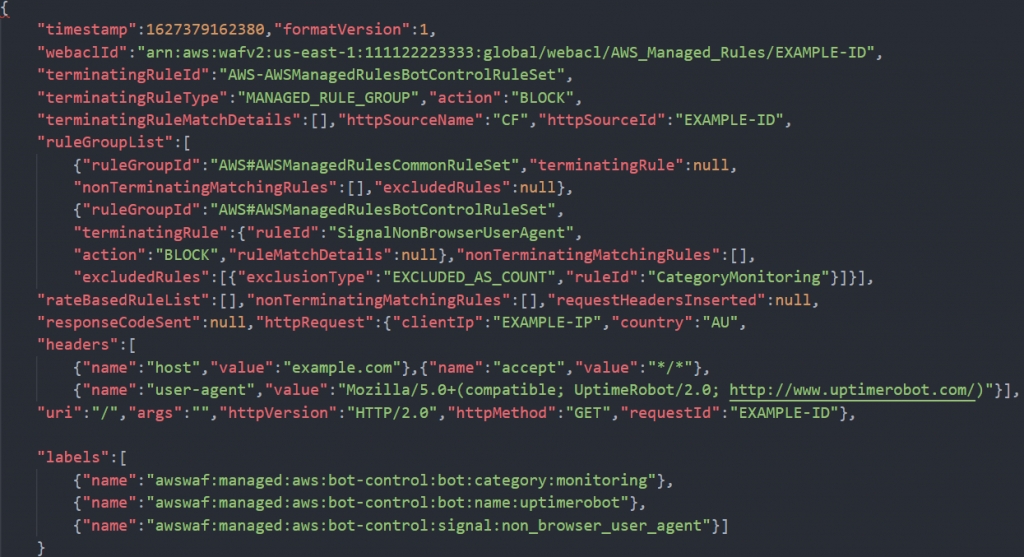
AWS WAF creates, updates, and encrypts tokens for clients that successfully respond to silent challenges and CAPTCHA puzzles. When a client with a token sends a web request, it includes the encrypted token, and AWS WAF decrypts the token and verifies its contents.
In the Bot Control dashboard, the token status pane shows counts for the various token status labels, paired with the rule action that was applied to the request. The IP token absent thresholds pane shows data for requests from IPs that sent too many requests without a token. You can use this information to fine-tune your AWS WAF configuration.
For example, within a Bot Control rule group, it’s possible for a request without a valid token to exit the rule group evaluation and continue to be evaluated by the web ACL. To block requests that are missing their token or for which the token is rejected, you can add a rule to run immediately after the managed rule group to capture and block requests that the rule group doesn’t handle for you. Using the Token status pane, illustrated in Figure 5, you can also monitor the volume of requests that acquire tokens and decide if you want to rate limit or block such requests.
Figure 5: Token status enables monitoring of the volume of requests that acquire tokens
Comparison with CloudFront security dashboard
The AWS WAF traffic overview dashboard provides enhanced overall visibility into web traffic reaching resources that are protected with AWS WAF. In contrast, the CloudFront security dashboard brings AWS WAF visibility and controls directly to your CloudFront distribution. If you want the detailed visibility and analysis of patterns that could indicate potential threats or issues, then the AWS WAF traffic overview dashboard is the best fit. However, if your goal is to manage application delivery and security in one place without navigating between service consoles and to gain visibility into your application’s top security trends, allowed and blocked traffic, and bot activity, then the CloudFront security dashboard could be a better option.
Availability and pricing
The new dashboards are available in the AWS WAF console, and you can use them to better monitor your traffic. These dashboards are available by default, at no cost, and require no additional setup. CloudWatch logging has a separate pricing model and if you have full logging enabled you will incur CloudWatch charges. See here for more information about CloudWatch charges. You can customize the dashboards if you want to tailor the displayed data to the needs of your environment.
Conclusion
With the AWS WAF traffic overview dashboard, you can get actionable insights on your web security posture and traffic patterns that might need your attention to improve your perimeter protection.
In this post, you learned how to use the dashboard to help secure your web application. You walked through traffic patterns analysis and possible next steps. Additionally, you learned how to observe traffic from bots and follow up with actions related to them according to the needs of your application.
The AWS WAF traffic overview dashboard is designed to meet most use cases and be a go-to default option for security visibility over web traffic. However, if you’d prefer to create a custom solution, see the guidance in the blog post Deploy a dashboard for AWS WAF with minimal effort.
If you have feedback about this post, submit comments in the Comments section below. If you have questions about this post, contact AWS Support.
Happy Lunar New Year! Wishing you a year filled with joy, success, and endless opportunities! May the Year of the Dragon bring uninterrupted connections and limitless growth
In case you missed it, here’s outstanding news you need to know as you plan your year in early 2024.
Last Week’s Launches Here are some launches that got my attention:
A new Local Zone in Houston, Texas – Local Zones are an AWS infrastructure deployment that places compute, storage, database, and other select services closer to large population, industry, and IT centers where no AWS Region exists. AWS Local Zones are available in the US in 15 other metro areas and globally in an additional 17 metros areas, allowing you to deliver low-latency applications to end users worldwide. You can enable the new Local Zone in Houston (us-east-1-iah-2a) from the Zones tab in the Amazon EC2 console settings.
AWS CloudFormation IaC generator – You can generate a template using AWS resources provisioned in your account that are not already managed by CloudFormation. With this launch, you can onboard workloads to Infrastructure as Code (IaC) in minutes, eliminating weeks of manual effort. You can then leverage the IaC benefits of automation, safety, and scalability for the workloads. Use the template to import resources into CloudFormation or replicate resources in a new account or Region. See the user guide and blog post to learn more.
A new look-and-feel of Amazon Bedrock console – Amazon Bedrock now offers an enhanced console experience with updated UI improves usability, responsiveness, and accessibility with more seamless support for dark mode. To get started with the new experience, visit the Amazon Bedrock console.
One-click WAF integration on ALB – Application Load Balancer (ALB) now supports console integration with AWS WAF that allows you to secure your applications behind ALB with a single click. This integration enables AWS WAF protections as a first line of defense against common web threats for your applications that use ALB. You can use this one-click security protection provided by AWS WAF from the integrated services section of the ALB console for both new and existing load balancers.
Up to 49% price reduction for AWS Fargate Windows containers on Amazon ECS – Windows containers running on Fargate are now billed per second for infrastructure and Windows Server licenses that their containerized application requests. Along with the infrastructure pricing for on-demand, we are also reducing the minimum billing duration for Windows containers to 5 minutes (from 15 minutes) for any Fargate Windows tasks starting February 1st, 2024 (12:00am UTC). The infrastructure pricing and minimum billing period changes will automatically reflect in your monthly AWS bill. For more information on the specific price reductions, see our pricing page.
Introducing Amazon Data Firehose – We are renaming Amazon Kinesis Data Firehose to Amazon Data Firehose. Amazon Data Firehose is the easiest way to capture, transform, and deliver data streams into Amazon S3, Amazon Redshift, Amazon OpenSearch Service, Splunk, Snowflake, and other 3rd party analytics services. The name change is effective in the AWS Management Console, documentations, and product pages.
Other AWS News Some other updates and news that you might have missed:
NFL’s digital athlete in the Super Bowl – AWS is working with the National Football League (NFL) to take player health and safety to the next level. Using AI and machine learning, they are creating a precise picture of each player in training, practice, and games. You could see this technology in action, especially with the Super Bowl on the last Sunday!
Amazon’s commiting the responsible AI – On February 7, Amazon joined the U.S. Artificial Intelligence Safety Institute Consortium, established by the National Institute of Standards of Technology (NIST), to further our government and industry collaboration to advance safe and secure artificial intelligence (AI). Amazon will contribute compute credits to help develop tools to evaluate AI safety and help the institute set an interoperable and trusted foundation for responsible AI development and use.
Compliance updates in South Korea – AWS has completed the 2023 South Korea Cloud Service Providers (CSP) Safety Assessment Program, also known as the Regulation on Supervision on Electronic Financial Transactions (RSEFT) Audit Program. AWS is committed to helping our customers adhere to applicable regulations and guidelines, and we help ensure that our financial customers have a hassle-free experience using the cloud. Also, AWS has successfully renewed certification under the Korea Information Security Management System (K-ISMS) standard (effective from December 16, 2023, to December 15, 2026).
Join AWS Cloud Clubs Captains – AWS Cloud Clubs are student-led user groups for post-secondary level students and independent learners. Interested in founding or co-founding a Cloud Club in your university or region? We are accepting applications from February 5-18, 2024.
Upcoming AWS Events Check your calendars and sign up for upcoming AWS events:
AWS Innovate AI/ML and Data Edition – Join our free online conference to learn how you and your organization can leverage the latest advances in generative AI. You can register upcoming AWS Innovate Online event that fits your timezone in Asia Pacific & Japan (February 22), EMEA (February 29), and Americas (March 14).
AWS Public Sector events – Join us at the AWS Public Sector Symposium Brussels (March 12) to discover how the AWS Cloud can help you improve resiliency, develop sustainable solutions, and achieve your mission. AWS Public Sector Day London (March 19) gathers professionals from government, healthcare, and education sectors to tackle pressing challenges in United Kingdom public services.
Kicking off AWS Global Summits– AWS Summits are a series of free online and in-person events that bring the cloud computing community together to connect, collaborate, and learn about AWS. Below is a list of available AWS Summit events taking place in April:
At Amazon Web Services (AWS), security is our top priority. Security is deeply embedded into our culture, processes, and systems; it permeates everything we do. What does this mean for you? We believe customers can benefit from learning more about what AWS is doing to prevent and mitigate customer-impacting security events.
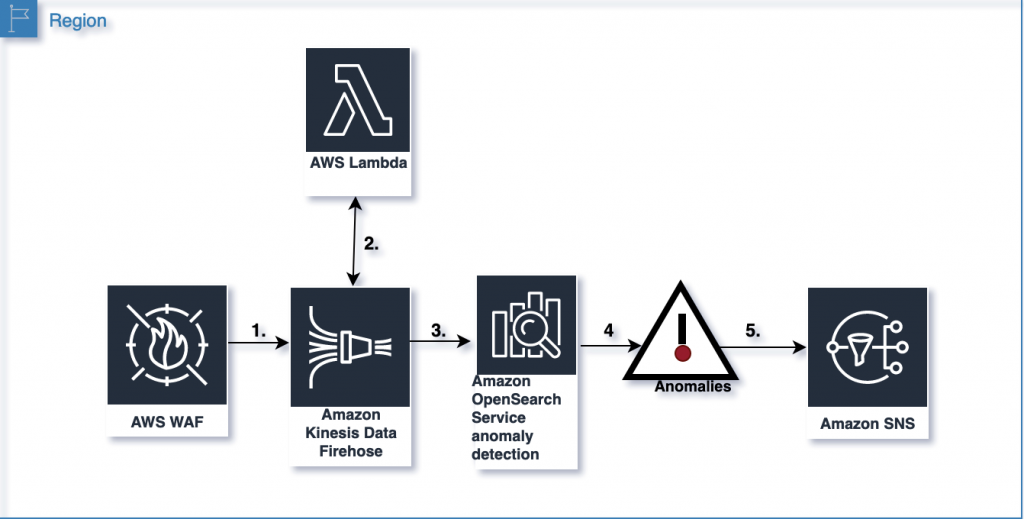
Since late August 2023, AWS has detected and been protecting customer applications from a new type of distributed denial of service (DDoS) event. DDoS events attempt to disrupt the availability of a targeted system, such as a website or application, reducing the performance for legitimate users. Examples of DDoS events include HTTP request floods, reflection/amplification attacks, and packet floods. The DDoS events AWS detected were a type of HTTP/2 request flood, which occurs when a high volume of illegitimate web requests overwhelms a web server’s ability to respond to legitimate client requests.
Between August 28 and August 29, 2023, proactive monitoring by AWS detected an unusual spike in HTTP/2 requests to Amazon CloudFront, peaking at over 155 million requests per second (RPS). Within minutes, AWS determined the nature of this unusual activity and found that CloudFront had automatically mitigated a new type of HTTP request flood DDoS event, now called an HTTP/2 rapid reset attack. Over those two days, AWS observed and mitigated over a dozen HTTP/2 rapid reset events, and through the month of September, continued to see this new type of HTTP/2 request flood. AWS customers who had built DDoS-resilient architectures with services like Amazon CloudFront and AWS Shield were able to protect their applications’ availability.
Figure 1. Global HTTP requests per second, September 13 – 16
Overview of HTTP/2 rapid reset attacks
HTTP/2 allows for multiple distinct logical connections to be multiplexed over a single HTTP session. This is a change from HTTP 1.x, in which each HTTP session was logically distinct. HTTP/2 rapid reset attacks consist of multiple HTTP/2 connections with requests and resets in rapid succession. For example, a series of requests for multiple streams will be transmitted followed up by a reset for each of those requests. The targeted system will parse and act upon each request, generating logs for a request that is then reset, or cancelled, by a client. The system performs work generating those logs even though it doesn’t have to send any data back to a client. A bad actor can abuse this process by issuing a massive volume of HTTP/2 requests, which can overwhelm the targeted system, such as a website or application.
Keep in mind that HTTP/2 rapid reset attacks are just a new type of HTTP request flood. To defend against these sorts of DDoS attacks, you can implement an architecture that helps you specifically detect unwanted requests as well as scale to absorb and block those malicious HTTP requests.
Building DDoS resilient architectures
As an AWS customer, you benefit from both the security built into the global cloud infrastructure of AWS as well as our commitment to continuously improve the security, efficiency, and resiliency of AWS services. For prescriptive guidance on how to improve DDoS resiliency, AWS has built tools such as the AWS Best Practices for DDoS Resiliency. It describes a DDoS-resilient reference architecture as a guide to help you protect your application’s availability. While several built-in forms of DDoS mitigation are included automatically with AWS services, your DDoS resilience can be improved by using an AWS architecture with specific services and by implementing additional best practices for each part of the network flow between users and your application.
For example, you can use AWS services that operate from edge locations, such as Amazon CloudFront, AWS Shield, Amazon Route 53, and Route 53 Application Recovery Controller to build comprehensive availability protection against known infrastructure layer attacks. These services can improve the DDoS resilience of your application when serving any type of application traffic from edge locations distributed around the world. Your application can be on-premises or in AWS when you use these AWS services to help you prevent unnecessary requests reaching your origin servers. As a best practice, you can run your applications on AWS to get the additional benefit of reducing the exposure of your application endpoints to DDoS attacks and to protect your application’s availability and optimize the performance of your application for legitimate users. You can use Amazon CloudFront (and its HTTP caching capability), AWS WAF, and Shield Advanced automatic application layer protection to help prevent unnecessary requests reaching your origin during application layer DDoS attacks.
Putting our knowledge to work for AWS customers
AWS remains vigilant, working to help prevent security issues from causing disruption to your business. We believe it’s important to share not only how our services are designed, but also how our engineers take deep, proactive ownership of every aspect of our services. As we work to defend our infrastructure and your data, we look for ways to help protect you automatically. Whenever possible, AWS Security and its systems disrupt threats where that action will be most impactful; often, this work happens largely behind the scenes. We work to mitigate threats by combining our global-scale threat intelligence and engineering expertise to help make our services more resilient against malicious activities. We’re constantly looking around corners to improve the efficiency and security of services including the protocols we use in our services, such as Amazon CloudFront, as well as AWS security tools like AWS WAF, AWS Shield, and Amazon Route 53 Resolver DNS Firewall.
In addition, our work extends security protections and improvements far beyond the bounds of AWS itself. AWS regularly works with the wider community, such as computer emergency response teams (CERT), internet service providers (ISP), domain registrars, or government agencies, so that they can help disrupt an identified threat. We also work closely with the security community, other cloud providers, content delivery networks (CDNs), and collaborating businesses around the world to isolate and take down threat actors. For example, in the first quarter of 2023, we stopped over 1.3 million botnet-driven DDoS attacks, and we traced back and worked with external parties to dismantle the sources of 230 thousand L7/HTTP DDoS attacks. The effectiveness of our mitigation strategies relies heavily on our ability to quickly capture, analyze, and act on threat intelligence. By taking these steps, AWS is going beyond just typical DDoS defense, and moving our protection beyond our borders. To learn more behind this effort, please read How AWS threat intelligence deters threat actors.
If you have feedback about this post, submit comments in the Comments section below. If you have questions about this post, contact AWS Support.
Want more AWS Security news? Follow us on Twitter.
Every day across the Amazon Web Services (AWS) cloud infrastructure, we detect and successfully thwart hundreds of cyberattacks that might otherwise be disruptive and costly. These important but mostly unseen victories are achieved with a global network of sensors and an associated set of disruption tools. Using these capabilities, we make it more difficult and expensive for cyberattacks to be carried out against our network, our infrastructure, and our customers. But we also help make the internet as a whole a safer place by working with other responsible providers to take action against threat actors operating within their infrastructure. Turning our global-scale threat intelligence into swift action is just one of the many steps that we take as part of our commitment to security as our top priority. Although this is a never-ending endeavor and our capabilities are constantly improving, we’ve reached a point where we believe customers and other stakeholders can benefit from learning more about what we’re doing today, and where we want to go in the future.
Global-scale threat intelligence using the AWS Cloud
With the largest public network footprint of any cloud provider, our scale at AWS gives us unparalleled insight into certain activities on the internet, in real time. Some years ago, leveraging that scale, AWS Principal Security Engineer Nima Sharifi Mehr started looking for novel approaches for gathering intelligence to counter threats. Our teams began building an internal suite of tools, given the moniker MadPot, and before long, Amazon security researchers were successfully finding, studying, and stopping thousands of digital threats that might have affected its customers.
MadPot was built to accomplish two things: first, discover and monitor threat activities and second, disrupt harmful activities whenever possible to protect AWS customers and others. MadPot has grown to become a sophisticated system of monitoring sensors and automated response capabilities. The sensors observe more than 100 million potential threat interactions and probes every day around the world, with approximately 500,000 of those observed activities advancing to the point where they can be classified as malicious. That enormous amount of threat intelligence data is ingested, correlated, and analyzed to deliver actionable insights about potentially harmful activity happening across the internet. The response capabilities automatically protect the AWS network from identified threats, and generate outbound communications to other companies whose infrastructure is being used for malicious activities.
Systems of this sort are known as honeypots—decoys set up to capture threat actor behavior—and have long served as valuable observation and threat intelligence tools. However, the approach we take through MadPot produces unique insights resulting from our scale at AWS and the automation behind the system. To attract threat actors whose behaviors we can then observe and act on, we designed the system so that it looks like it’s composed of a huge number of plausible innocent targets. Mimicking real systems in a controlled and safe environment provides observations and insights that we can often immediately use to help stop harmful activity and help protect customers.
Of course, threat actors know that systems like this are in place, so they frequently change their techniques—and so do we. We invest heavily in making sure that MadPot constantly changes and evolves its behavior, continuing to have visibility into activities that reveal the tactics, techniques, and procedures (TTPs) of threat actors. We put this intelligence to use quickly in AWS tools, such as AWS Shield and AWS WAF, so that many threats are mitigated early by initiating automated responses. When appropriate, we also provide the threat data to customers through Amazon GuardDuty so that their own tooling and automation can respond.
Three minutes to exploit attempt, no time to waste
Within approximately 90 seconds of launching a new sensor within our MadPot simulated workload, we can observe that the workload has been discovered by probes scanning the internet. From there, it takes only three minutes on average before attempts are made to penetrate and exploit it. This is an astonishingly short amount of time, considering that these workloads aren’t advertised or part of other visible systems that would be obvious to threat actors. This clearly demonstrates the voracity of scanning taking place and the high degree of automation that threat actors employ to find their next target.
As these attempts run their course, the MadPot system analyzes the telemetry, code, attempted network connections, and other key data points of the threat actor’s behavior. This information becomes even more valuable as we aggregate threat actor activities to generate a more complete picture of available intelligence.
Disrupting attacks to maintain business as usual
In-depth threat intelligence analysis also happens in MadPot. The system launches the malware it captures in a sandboxed environment, connects information from disparate techniques into threat patterns, and more. When the gathered signals provide high enough confidence in a finding, the system acts to disrupt threats whenever possible, such as disconnecting a threat actor’s resources from the AWS network. Or, it could entail preparing that information to be shared with the wider community, such as a computer emergency response team (CERT), internet service provider (ISP), a domain registrar, or government agency so that they can help disrupt the identified threat.
As a major internet presence, AWS takes on the responsibility to help and collaborate with the security community when possible. Information sharing within the security community is a long-standing tradition and an area where we’ve been an active participant for years.
In the first quarter of 2023:
We used 5.5B signals from our internet threat sensors and 1.5B signals from our active network probes in our anti-botnet security efforts.
We stopped over 1.3M outbound botnet-driven DDoS attacks.
We shared our security intelligence findings, including nearly a thousand botnet C2 hosts, with relevant hosting providers and domain registrars.
We traced back and worked with external parties to dismantle the sources of 230k L7/HTTP(S) DDoS attacks.
Three examples of MadPot’s effectiveness: Botnets, Sandworm, and Volt Typhoon
Recently, MadPot detected, collected, and analyzed suspicious signals that uncovered a distributed denial of service (DDoS) botnet that was using the domain free.bigbots.[tld] (the top-level domain is omitted) as a command and control (C2) domain. A botnet is made up of compromised systems that belong to innocent parties—such as computers, home routers, and Internet of Things (IoT) devices—that have been previously compromised, with malware installed that awaits commands to flood a target with network packets. Bots under this C2 domain were launching 15–20 DDoS attacks per hour at a rate of about 800 million packets per second.
As MadPot mapped out this threat, our intelligence revealed a list of IP addresses used by the C2 servers corresponding to an extremely high number of requests from the bots. Our systems blocked those IP addresses from access to AWS networks so that a compromised customer compute node on AWS couldn’t participate in the attacks. AWS automation then used the intelligence gathered to contact the company that was hosting the C2 systems and the registrar responsible for the DNS name. The company whose infrastructure was hosting the C2s took them offline in less than 48 hours, and the domain registrar decommissioned the DNS name in less than 72 hours. Without the ability to control DNS records, the threat actor could not easily resuscitate the network by moving the C2s to a different network location. In less than three days, this widely distributed malware and the C2 infrastructure required to operate it was rendered inoperable, and the DDoS attacks impacting systems throughout the internet ground to a halt.
MadPot is effective in detecting and understanding the threat actors that target many different kinds of infrastructure, not just cloud infrastructure, including the malware, ports, and techniques that they may be using. Thus, through MadPot we identified the threat group called Sandworm—the cluster associated with Cyclops Blink, a piece of malware used to manage a botnet of compromised routers. Sandworm was attempting to exploit a vulnerability affecting WatchGuard network security appliances. With close investigation of the payload, we identified not only IP addresses but also other unique attributes associated with the Sandworm threat that were involved in an attempted compromise of an AWS customer. MadPot’s unique ability to mimic a variety of services and engage in high levels of interaction helped us capture additional details about Sandworm campaigns, such as services that the actor was targeting and post-exploitation commands initiated by that actor. Using this intelligence, we notified the customer, who promptly acted to mitigate the vulnerability. Without this swift action, the actor might have been able to gain a foothold in the customer’s network and gain access to other organizations that the customer served.
For our final example, the MadPot system was used to help government cyber and law enforcement authorities identify and ultimately disrupt Volt Typhoon, the widely-reported state-sponsored threat actor that focused on stealthy and targeted cyber espionage campaigns against critical infrastructure organizations. Through our investigation inside MadPot, we identified a payload submitted by the threat actor that contained a unique signature, which allowed identification and attribution of activities by Volt Typhoon that would otherwise appear to be unrelated. By using the data lake that stores a complete history of MadPot interactions, we were able to search years of data very quickly and ultimately identify other examples of this unique signature, which was being sent in payloads to MadPot as far back as August 2021. The previous request was seemingly benign in nature, so we believed that it was associated with a reconnaissance tool. We were then able to identify other IP addresses that the threat actor was using in recent months. We shared our findings with government authorities, and those hard-to-make connections helped inform the research and conclusions of the Cybersecurity and Infrastructure Security Agency (CISA) of the U.S. government. Our work and the work of other cooperating parties resulted in their May 2023 Cybersecurity advisory. To this day, we continue to observe the actor probing U.S. network infrastructure, and we continue to share details with appropriate government cyber and law enforcement organizations.
Putting global-scale threat intelligence to work for AWS customers and beyond
At AWS, security is our top priority, and we work hard to help prevent security issues from causing disruption to your business. As we work to defend our infrastructure and your data, we use our global-scale insights to gather a high volume of security intelligence—at scale and in real time—to help protect you automatically. Whenever possible, AWS Security and its systems disrupt threats where that action will be most impactful; often, this work happens largely behind the scenes. As demonstrated in the botnet case described earlier, we neutralize threats by using our global-scale threat intelligence and by collaborating with entities that are directly impacted by malicious activities. We incorporate findings from MadPot into AWS security tools, including preventative services, such as AWS WAF, AWS Shield, AWS Network Firewall, and Amazon Route 53 Resolver DNS Firewall, and detective and reactive services, such as Amazon GuardDuty, AWS Security Hub, and Amazon Inspector, putting security intelligence when appropriate directly into the hands of our customers, so that they can build their own response procedures and automations.
But our work extends security protections and improvements far beyond the bounds of AWS itself. We work closely with the security community and collaborating businesses around the world to isolate and take down threat actors. In the first half of this year, we shared intelligence of nearly 2,000 botnet C2 hosts with relevant hosting providers and domain registrars to take down the botnets’ control infrastructure. We also traced back and worked with external parties to dismantle the sources of approximately 230,000 Layer 7 DDoS attacks. The effectiveness of our mitigation strategies relies heavily on our ability to quickly capture, analyze, and act on threat intelligence. By taking these steps, AWS is going beyond just typical DDoS defense, and moving our protection beyond our borders.
We’re glad to be able to share information about MadPot and some of the capabilities that we’re operating today. For more information, see this presentation from our most recent re:Inforce conference: How AWS threat intelligence becomes managed firewall rules, as well as an overview post published today, Meet MadPot, a threat intelligence tool Amazon uses to protect customers from cybercrime, which includes some good information about the AWS security engineer behind the original creation of MadPot. Going forward, you can expect to hear more from us as we develop and enhance our threat intelligence and response systems, making both AWS and the internet as a whole a safer place.
If you have feedback about this post, submit comments in the Comments section below. If you have questions about this post, contact AWS Support.
Want more AWS Security news? Follow us on Twitter.
You can now deploy AWS WAF managed rules as part of the Security Automations for AWS WAF solution. In this post, we show you how to get started and set up monitoring for this automated solution with additional recommendations.
This article discusses AWS WAF, a service that assists you in protecting against typical web attacks and bots that might disrupt availability, compromise security, or consume excessive resources. As requests for your websites are received by the underlying service, they’re forwarded to AWS WAF for inspection against your rules. AWS WAF informs the underlying service to either block, allow, or take another configured action when a request fulfills the criteria stated in your rules. AWS WAF is tightly integrated with Amazon CloudFront, Application Load Balancer (ALB), Amazon API Gateway, and AWS AppSync—all of which are routinely used by AWS customers to provide content for their websites and applications.
To provide a simple, purpose-driven deployment approach, our solutions builder teams developed Security Automations for AWS WAF, a solution that can help organizations that don’t have dedicated security teams to quickly deploy an AWS WAF that filters common web-based malicious activity. Security Automations for AWS WAF deploys a set of preconfigured rules to help you protect your applications from common web exploits.
This solution can be installed in your AWS accounts by launching the provided AWS CloudFormation template.
Security Automations for AWS WAF provides the following features and benefits:
Helps secure your web applications with AWS managed rule groups
Provide layer 7 flood protection with a predefined HTTP flood custom rule
Helps block exploitation of vulnerabilities with a predefined scanners and probes custom rule
Detect and deflect intrusion from bots with a honeypot endpoint using a bad bot custom rule
Helps block malicious IP addresses based on AWS and external IP reputation lists
Figure 1: Design overview of the new Security Automations for AWS WAF solution
Getting started
Many customers begin their proofs of concept (POC) by using the AWS Management Console for AWS WAF to set up their very first AWS WAF, but quickly realize the benefits of automation, such as increased productivity, enforcing best practices, avoiding repetition, and so on. Manually managing AWS WAF can be time-consuming, especially if you want to duplicate complicated automations across multiple environments.
You can deploy this solution for new and existing supported AWS WAF resources. The implementation guide discusses architectural considerations, configuration steps, and operational best practices for deploying this solution in the AWS Cloud. It includes links to AWS CloudFormation templates and stacks that launch, configure, and run the AWS security, compute, storage, and other services required to deploy this solution on AWS, using AWS best practices for security and availability.
Before you launch the CloudFormation template, review the architecture and configuration considerations discussed in this guide. The template takes about 15 minutes to deploy and includes three basic steps:
Associate your CloudFront web distributions or ALBs with the web ACL that this solution generates. You can associate as many distributions or load balancers as you want.
Turn on web access logging for your CloudFront web distributions or ALBs, and send the log files to the appropriate Amazon Simple Storage Service (Amazon S3) bucket. Save the logs in a folder matching the user-defined prefix. If no user-defined prefix is used, save the logs to AWSLogs (default log prefix AWSLogs/).
Customize the solution
This solution provides an example of how to use AWS WAF and other services to build security automations on the AWS Cloud. You can download the open source code from GitHub to apply customizations or build your own security automations that fit your needs. The solution builder team is planning to release a Terraform version for this solution in the near future.
Monitor the solution
This solution includes a Service Catalog AppRegistry resource to register the CloudFormation template and underlying resources as an application in both the Service Catalog AppRegistry and Systems Manager Application Manager. You can monitor the costs and operations data in the Systems Manager console, as shown in Figure 2 that follows.
Figure 2: Example of the application view for the Security Automations for AWS WAF stack in Application Manager
CloudWatch dashboards are customizable home pages in the CloudWatch console that you can use to monitor your resources in a single view, including visualizing AWS WAF logs as shown in Figure 3 that follows. The solution creates a simple dashboard that you can customize to monitor additional metrics, alarms and logs. If suspicious activity is reported, you can use the visuals to understand the traffic in more detail and drive incident response actions as needed. From here, you can investigate further by using specific queries with CloudWatch Logs Insights.
Figure 3: Example of an enhanced AWS WAF CloudWatch dashboard that can be built for monitoring your site traffic
Conclusion
In this post, you learned about using the AWS Security Automation template to quickly deploy AWS WAF. If you prefer a simpler solution, we recommend using the one-click CloudFront AWS WAF setup, which offers a simple way to deploy AWS WAF for your CloudFront distribution. By choosing the approach that aligns with your requirements, you can enhance the security of your web applications and safeguard them against potential threats.
For most organizations, protecting their high value assets is a top priority. AWS Web Application Firewall (AWS WAF) is an industry leading solution that protects web applications from the evolving threat landscape, which includes common web exploits and bots. These threats affect availability, compromise security, or can consume excessive resources. Though AWS WAF is a managed service, the operating model of this critical first layer of defence is often overlooked.
Operating models for a core service like AWS WAF differ depending on your company’s technology footprint, and use cases are dependent on workloads. While some businesses were born in the public cloud and have modern applications, many large established businesses have classic and legacy workloads across their business units. We will examine three distinct operating models using AWS WAF, AWS Firewall Manager service (AWS FMS), AWS Organizations, and other AWS services.
Operating Models
I. Centralized
The centralized model works well for organizations where the applications to be protected by AWS WAF are similar, and rules can be consistent. With multi-tenant environments (where tenants share the same infrastructure or application), AWS WAF can be deployed with the same web access control lists (web ACLs) and rules for consistent security. Content management systems (CMS) also benefit from this model, since consistent web ACL and rules can protect multiple websites hosted on their CMS platform. This operating model provides uniform protection against web-based attacks and centralized administration across multiple AWS accounts. For managing all your accounts and applications in AWS Organizations, use AWS Firewall Manager.
AWS Firewall Manager simplifies your AWS WAF administration and helps you enforce AWS WAF rules on the resources in all accounts in an AWS Organization, by using AWS Config in the background. The compliance dashboard gives you a simplified view of the security posture. A centralized information security (IS) team can configure and manage AWS WAF’s managed and custom rules.
AWS Managed Rules are designed to protect against common web threats, providing an additional layer of security for your applications. By leveraging AWS Managed Rules and their pre-configured rule groups, you can streamline the management of WAF configurations. This reduces the need for specialized teams to handle these complex tasks and thereby alleviates undifferentiated heavy lifting.
A centralized operating pattern (see Figure 1) requires IS teams to construct an AWS WAF policy by using AWS FMS and then implement it at scale in each and every account. Keeping current on the constantly changing threat landscape can be time-consuming and expensive. Security teams will have the option of selecting one or more rule groups from AWS Managed Rules or an AWS Marketplace subscription for each web ACL, along with any custom rule needed.
Figure 1. Centralized operating model for AWS WAF
AWS Config managed rule sets ensure AWS WAF logging, rule groups, web ACLs, and regional and global AWS WAF deployments have no empty rule sets. Managed rule sets simplify compliance monitoring and reporting, while assuring security and compliance. AWS CloudTrail monitors changes to AWS WAF configurations, providing valuable auditing capability of your operating environment.
This model places the responsibility for defining, enforcing, and reviewing security policies, as well as remediating any issues, squarely on the security administrator and IS team. While comprehensive, this approach may require careful management to avoid potential bottlenecks, especially in larger-scale operations.
II. Distributed
Many organizations start their IT operations on AWS from their inception. These organizations typically have multi-skilled infrastructure and development teams and a lean operating model. The distributed model shown in Figure 2 is a good fit for them. In this case, the application team understands the underlying infrastructure components and the Infrastructure as Code (IaC) that provisions them. It makes sense for these development teams to also manage the interconnected application security components, like AWS WAF.
The application teams own the deployment of AWS WAF and the setup of the Web ACLs for their respective applications. Typically, the Web ACL will be a combination of baseline rule groups and use case specific rule groups, both deployed and managed by the application team.
One of the challenges that comes with the distributed deployment is the inconsistency in rules’ deployment which can result in varying levels of protection. Conflicting priorities within application teams can sometimes compromise the focus on security, prioritizing feature rollouts over comprehensive risk mitigation, for example. A strong governance model can be very helpful in situations like these, where the security team might not be responsible for deploying the AWS WAF rules, but do need security posture visibility. AWS Security services like Security Hub and Config rules can help set these parameters. For example, some of the managed Config rules and Security Hub controls check if AWS WAF is enabled for Application Load Balancer (ALB) and Amazon API Gateway, and also if the associated Web ACL is empty.
Figure 2. Distributed operating model for AWS WAF
III. Hybrid
An organization that has a diverse range of customer-facing applications hosted in a number of different AWS accounts can benefit from a hybrid deployment operating model. Organizations whose infrastructure is managed by a combination of an in-house security team, third-party vendors, contractors, and a managed cybersecurity operations center (CSOC) can also use this model. In this case, the security team can build and enforce a core AWS WAF rule set using AWS Firewall Manager. Application teams, can build and manage additional rules based on the requirements of the application. For example, use case specific rule groups will be different for PHP applications as compared to WordPress-based applications.
Information security teams can specify how core rule groups are ordered. The application administrator has the ability to add rules and rule groups that will be executed between the two rule group sets. This approach ensures that adequate security is applied to all legacy and modern applications, and developers can still write and manage custom rules for enhanced protection.
Organizations should adopt a collaborative DevSecOps model of development, where both the security team and the application development teams will build, manage, and deploy security rules. This can also be considered a hybrid approach combining the best of the central and distributed models, as shown in Figure 3.
Figure 3. Hybrid operating model for AWS WAF
Governance is shared between the centralized security team responsible for baseline rules sets deployed across all AWS accounts, and the individual application team responsible for AWS WAF custom rule sets. To maintain security and compliance, AWS Config checksAmazon CloudFront,AWS AppSync, Amazon API Gateway, and ALB for AWS WAF association with managed rule sets. AWS Security Hub combines and prioritizes AWS Firewall Manager security findings, enabling visibility into AWS WAF rule conformance across AWS accounts and resources. This model requires close coordination between the two teams to ensure that security policies are consistent and all security issues are effectively addressed.
The AWS WAF incident response strategy includes detecting, investigating, containing, and documenting incidents, alerting personnel, developing response plans, implementing mitigation measures, and continuous improvement based on lessons learned. Threat modelling for AWS WAF involves identifying assets, assessing threats and vulnerabilities, defining security controls, testing and monitoring, and staying updated on threats and AWS WAF updates.
Conclusion
Using the appropriate operating model is key to ensuring that the right web application security controls are implemented. It accounts for the needs of both business and application owners. In the majority of implementations, the centralized and hybrid model works well, by providing a stratified policy enforcement. However, the distributed method can be used to manage specific use cases. Amazon Firewall Manager services can be used to streamline the management of centralized and hybrid operating models across AWS Organizations.
In 2017, AWS announced the release of Rate-based Rules for AWS WAF, a new rule type that helps protect websites and APIs from application-level threats such as distributed denial of service (DDoS) attacks, brute force log-in attempts, and bad bots. Rate-based rules track the rate of requests for each originating IP address and invokes a rule action on IPs with rates that exceed a set limit.
While rate-based rules are useful to detect and mitigate a broad variety of bad actors, threats have evolved to bypass request-rate limit rules. For example, one bypass technique is to send a high volumes of requests by spreading them across thousands of unique IP addresses.
In May 2023, AWS announced AWS WAF enhancements to the existing rate-based rules feature that you can use to create more dynamic and intelligent rules by using additional HTTP request attributes for request rate limiting. For example, you can now choose from the following predefined keys to configure your rules: label namespace, header, cookie, query parameter, query string, HTTP method, URI path and source IP Address or IP Address in a header. Additionally, you can combine up to five composite keys as parameters for stronger rule development. These rule definition enhancements help improve perimeter security measures against sophisticated application-layer DDoS attacks using AWS WAF. For more information about the supported request attributes, see Rate-based rule statement in the AWS WAF Developer Guide.
In this blog post, you will learn more about these new AWS WAF feature enhancements and how you can use alternative request attributes to create more robust and granular sets of rules. In addition, you’ll learn how to combine keys to create a composite aggregation key to uniquely identify a specific combination of elements to improve rate tracking.
Getting started
Configuring advanced rate-based rules is similar to configuring simple rate-based rules. The process starts with creating a new custom rule of type rate-based rule, entering the rate limit value, selecting custom keys, choosing the key from the request aggregation key dropdown menu, and adding additional composite keys by choosing Add a request aggregation key as shown in Figure 1.
Figure 1: Creating an advanced rate-based rule with two aggregation keys
For existing rules, you can update those rate-based rules to use the new functionality by editing them. For example, you can add a header to be aggregated with the source IP address, as shown in Figure 2. Note that previously created rules will not be modified.
Figure 2: Add a second key to an existing rate-based rule
You still can set the same rule action, such as block, count, captcha, or challenge. Optionally, you can continue applying a scope-down statement to limit rule action. For example, you can limit the scope to a certain application path or requests with a specified header. You can scope down the inspection criteria so that only certain requests are counted towards rate limiting, and use certain keys to aggregate those requests together. A technique would be to count only requests that have /api at the start of the URI, and aggregate them based on their SessionId cookie value.
Target use cases
Now that you’re familiar with the foundations of advanced rate-based rules, let’s explore how they can improve your security posture using the following use cases:
Enhanced Application (Layer 7) DDoS protection
Improved API security
Enriched request throttling
Use case 1: Enhance Layer 7 DDoS mitigation
The first use case that you might find beneficial is to enhance Layer 7 DDoS mitigation. An HTTP request flood is the most common vector of DDoS attacks. This attack type aims to affect application availability by exhausting available resources to run the application.
Before the release of these enhancements to AWS WAF rules, rules were limited by aggregating requests based on the IP address from the request origin or configured to use a forwarded IP address in an HTTP header such as X-Forwarded-For. Now you can create a more robust rate-based rule to help protect your web application from DDoS attacks by tracking requests based on a different key or a combination of keys. Let’s examine some examples.
To help detect pervasive bots, such as scrapers, scanners, and crawlers, or common bots that are distributed across many unique IP addresses, a rule can look for static request data like a custom header — for example, User-Agent.
To uniquely identity users behind a NAT gateway, you can use a cookie in addition to an IP address. Before the aggregation keys feature, it was difficult to identify users who connected from a single IP address. Now, you can use the session cookie to aggregate requests by their session identifier and IP address.
Note that for Layer 7 DDoS mitigation, tracking by session ID in cookies can be circumvented, because bots might send random values or not send any cookie at all. It’s a good idea to keep an IP-based blanket rate-limiting rule to block offending IP addresses that reach a certain high rate, regardless of their request attributes. In that case, the keys would look like:
Key 1: Session cookie
Key 2: IP address
You can reduce false positives when using AWS Managed Rules (AMR) IP reputation lists by rate limiting based on their label namespace. Labelling functionality is a powerful feature that allows you to map the requests that match a specific pattern and apply custom rules to them. In this case, you can match the label namespace provided by the AMR IP reputation list that includes AWSManagedIPDDoSList, which is a list of IP addresses that have been identified as actively engaging in DDoS activities.
You might want to be cautious about using this group list in block mode, because there’s a chance of blocking legitimate users. To mitigate this, use the list in count mode and create an advanced rate-based rule to aggregate all requests with the label namespace awswaf:managed:aws:amazon-ip-list:, targeting captcha as the rule action. This lets you reduce false positives without compromising security. Applying captcha as an action for the rule reduces serving captcha to all users and instead only applies it when the rate of requests exceeds the defined limit. The key for this rule would be:
Labels (AMR IP reputation lists).
Use case 2: API security
In this second use case, you learn how to use an advanced rate-based rule to improve the security of an API. Protecting an API with rate-limiting rules helps ensure that requests aren’t being sent too frequently in a short amount of time. Reducing the risk from misusing an API helps to ensure that only legitimate requests are handled and not denied due to an overload of requests.
Now, you can create advanced rate-based rules that track API requests based on two aggregation keys. For example, HTTP method to differentiate between GET, POST, and other requests in combination with a custom header like Authorization to match a JSON Web Token (JWT). JWTs are not decrypted by AWS WAF, and AWS WAF only aggregates requests with the same token. This can help to ensure that a token is not being used maliciously or to bypass rate-limiting rules. An additional benefit of this configuration is that requests with no authorization headers are being aggregated together towards the rate limiting threshold. The keys for this use case are:
Key 1: HTTP method
Key 2: Custom header (Authorization)
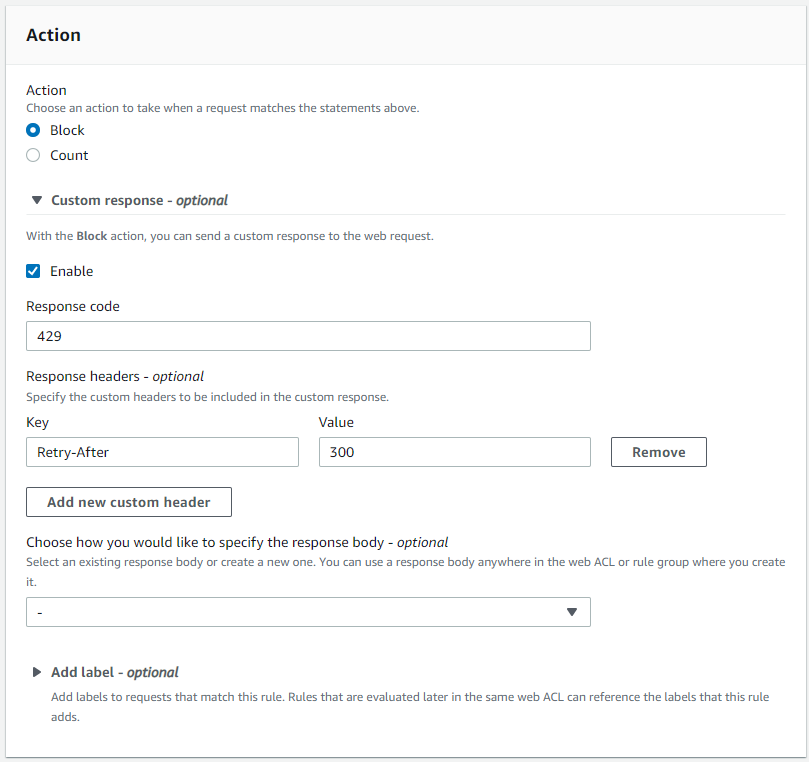
In addition, you can configure a rule to block and add a custom response when the requests limit is reached. For example, by returning HTTP error code 429 (too many requests) with a Retry-After header indicating the requester should wait 900 seconds (15 minutes) before making a new request.
There are many situations where throttling should be considered. For example, if you want to maintain the performance of a service API by providing fair usage for all users, you can have different rate limits based on the type or purpose of the API, such as mutable or non-mutable requests. To achieve this, you can create two advanced rate-based rules using aggregation keys like IP address, combined with an HTTP request parameter for either mutable or non-mutable that indicates the type of request. Each rule will have its own HTTP request parameter, and you can set different maximum values for the rate limit. The keys for this use case are:
Key 1: HTTP request parameter
Key 2: IP address
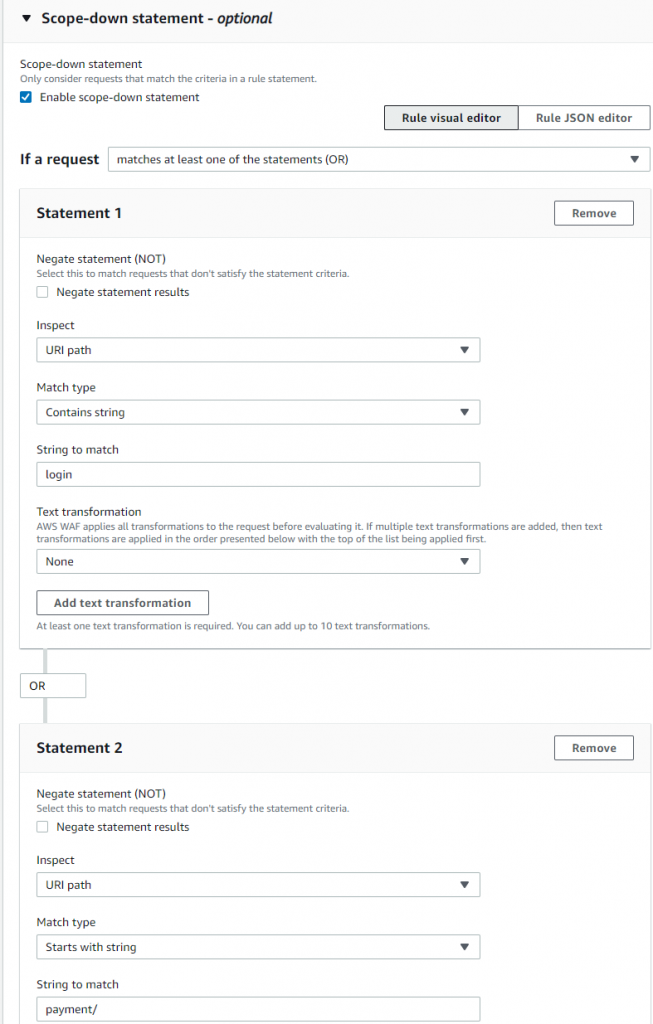
Another example where throttling can be helpful is for a multi-tenant application where you want to track requests made by each tenant’s users. Let’s say you have a free tier but also a paying subscription model for which you want to allow a higher request rate. For this use case, it’s recommended to use two different URI paths to verify that the two tenants are kept separated. Additionally, it is advised to still use a custom header or query string parameter to differentiate between the two tenants, such as a tenant-id header or parameter that contains a unique identifier for each tenant. To implement this type of throttling using advanced rate-based rules, you can create two rules using an IP address in combination with the custom header as aggregation keys. Each rule can have its own maximum value for rate limiting, as well as a scope-down statement that matches requests for each URI path. The keys and scope-down statement for this use case are:
Key 1: Custom header (tenant-id)
Key 2: IP address
Scope down statement (URI path)
As a third example, you can rate-limit web applications based on the total number of requests that can be handled. For this use case, you can use the new Count all as aggregation option. The option counts and rate-limits the requests that match the rule’s scope-down statement, which is required for this type of aggregation. One option is to scope down and inspect the URI path to target a specific functionality like a /history-search page. An option when you need to control how many requests go to a specific domain is to scope down a single header to a specific host, creating one rule for a.example.com and another rule for b.example.com.
Request Aggregation: Count all
Scope down statement (URI path | Single header)
For these examples, you can block with a custom response when the requests exceed the limit. For example, by returning the same HTTP error code and header, but adding a custom response body with a message like “You have reached the maximum number of requests allowed.”
Logging
The AWS WAF logs now include additional information about request keys used for request-rate tracking and the values of matched request keys. In addition to the existing IP or Forwarded_IP values, you can see the updated log fieldslimitKey and customValue, where the limitKey field now shows either CustomKeys for custom aggregate key settings or Constant for count all requests. CustomValues shows an array of keys, names, and values.
Figure 3: Example log output for the advanced rate-based rule showing updated limitKey and customValues fields
As mentioned in the first use case, to get more detailed information about the traffic that’s analyzed by the web ACL, consider enabling logging. If you choose to enable Amazon CloudWatch Logs as the log destination, you can use CloudWatch Logs Insights and advanced queries to interactively search and analyze logs.
For example, you can use the following query to get the request information that matches rate-based rules, including the updated keys and values, directly from the AWS WAF console.
Figure 4 shows the CloudWatch Log Insights query and the logs output including custom keys, names, and values fields.
Figure 4: The CloudWatch Log Insights query and the logs output
Pricing
There is no additional cost for using advanced rate-base rules; standard AWS WAF pricing applies when you use this feature. For AWS WAF pricing information, see AWS WAF Pricing. You only need to be aware that using aggregation keys will increase AWS WAF web ACL capacity units (WCU) usage for the rule. WCU usage is calculated based on how many keys you want to use for rate limiting. The current model of 2 WCUs plus any additional WCUs for a nested statement is being updated to 2 WCUs as a base, and 30 WCUs for each custom aggregation key that you specify. For example, if you want to create aggregation keys with an IP address in combination with a session cookie, this will use 62 WCUs, and aggregation keys with an IP address, session cookie, and customer header will use 92 WCUs. For more details about the WCU-based cost structure, visit Rate-based rule statement in the AWS WAF Developer Guide.
Conclusion
In this blog post, you learned about AWS WAF enhancements to existing rate-based rules that now support request parameters in addition to IP addresses. Additionally, these enhancements allow you to create composite keys based on up to five request parameters. This new capability allows you to be either more coarse in aggregating requests (such as all the requests that have an IP reputation label associated with them) or finer (such as aggregate requests for a specific session ID, not its IP address).
For more rule examples that include JSON rule configuration, visit Rate-based rule examples in the AWS WAF Developer Guide.
If you have feedback about this post, submit comments in the Comments section below. If you have questions about this post, contact AWS Support.
Want more AWS Security news? Follow us on Twitter.
As Amazon Web Services (AWS) customers build new applications, APIs have been key to driving the adoption of these offerings. APIs simplify client integration and provide for efficient operations and management of applications by offering standard contracts for data exchange. APIs are also the front door to hosted applications that need to be effectively secured, monitored, and metered to provide resilient infrastructure.
In this post, we will discuss how to help protect your APIs by building a perimeter protection layer with Amazon CloudFront, AWS WAF, and AWS Shield and putting it in front of Amazon API Gateway endpoints. Amazon API Gateway is a fully managed AWS service that you can use to create, publish, maintain, monitor, and secure REST, HTTP, and WebSocket APIs at any scale.
Solution overview
CloudFront, AWS WAF, and Shield provide a layered security perimeter that co-resides at the AWS edge and provides scalable, reliable, and high-performance protection for applications and content. For more information, see the AWS Best Practices for DDoS Resiliency whitepaper.
By using CloudFront as the front door to APIs that are hosted on API Gateway, globally distributed API clients can get accelerated API performance. API Gateway endpoints that are hosted in an AWS Region gain access to scaled distributed denial of service (DDoS) mitigation capacity across the AWS global edge network.
When you protect CloudFront distributions with AWS WAF, you can protect your API Gateway API endpoints against common web exploits and bots that can affect availability, compromise security, or consume excessive resources. AWS Managed Rules for AWS WAF help provide protection against common application vulnerabilities or other unwanted traffic, without the need for you to write your own rules. AWS WAF rate-based rules automatically block traffic from source IPs when they exceed the thresholds that you define, which helps to protect your application against web request floods, and alerts you to sudden spikes in traffic that might indicate a potential DDoS attack.
Shield mitigates infrastructure layer DDoS attacks against CloudFront distributions in real time, without observable latency. When you protect a CloudFront distribution with Shield Advanced, you gain additional detection and mitigation against large and sophisticated DDoS attacks, near real-time visibility into attacks, and integration with AWS WAF. When you configure Shield Advanced automatic application layer DDoS mitigation, Shield Advanced responds to application layer (layer 7) attacks by creating, evaluating, and deploying custom AWS WAF rules.
To take advantage of the perimeter protection layer built with CloudFront, AWS WAF, and Shield, and to help avoid exposing API Gateway endpoints directly, you can use the following approaches to restrict API access through CloudFront only. For more information about these approaches, see the Security Overview of Amazon API Gateway whitepaper.
Although the X-API-Key header approach is straightforward to implement at a lower cost, it’s only applicable to customers who are using REST API endpoints. If the X-API-Key header already exists, CloudFront will overwrite it. The custom header approach addresses this limitation, but it has an additional cost due to the use of the Lambda authorizer. With both approaches, there is an operational overhead for managing keys and rotating the keys periodically. Also, it isn’t a security best practice to use long-term secrets for authorization.
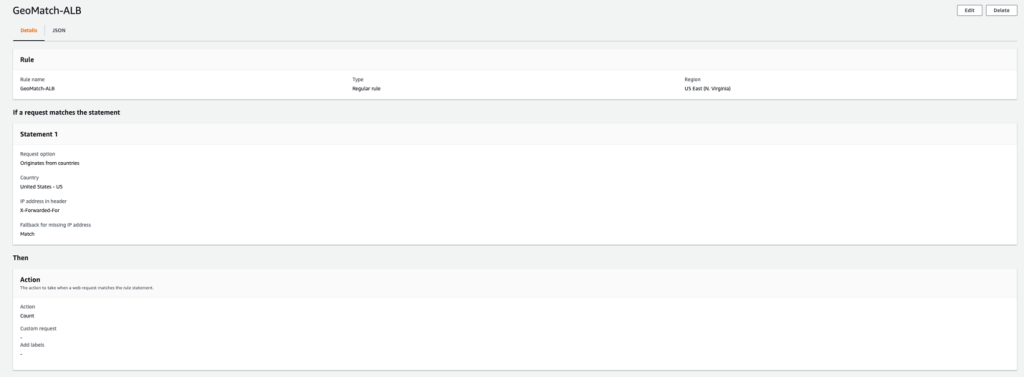
By using the AWS Signature Version 4 approach, you can minimize this type of operational overhead through the use of requests signed with Signature Version 4 in Lambda@Edge. The signing uses temporary credentials that AWS Security Token Service (AWS STS) provides, and built-in API Gateway IAM authorization performs the request signature validation. There is an additional Lambda@Edge cost in this approach. This approach supports the three API endpoint types available in API Gateway — REST, HTTP, and WebSocket — and it helps secure requests by verifying the identity of the requester, protecting data in transit, and protecting against potential replay attacks. We describe this approach in detail in the next section.
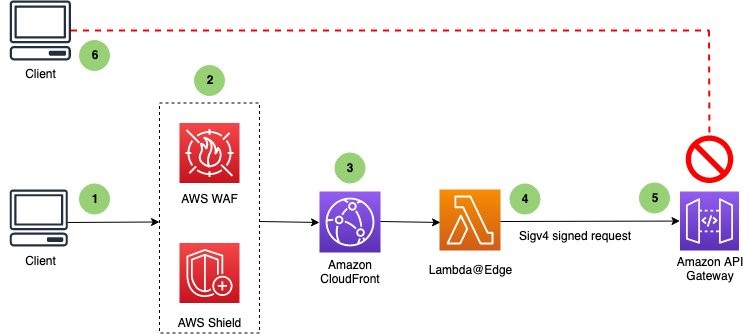
Solution architecture
Figure 1 shows the architecture of the Signature Version 4 solution.
Figure 1: High-level flow of a client request with sequence of events
The sequence of events that occurs when the client sends a request is as follows:
A client sends a request to an API endpoint that is fronted by CloudFront.
AWS WAF inspects the request at the edge location according to the web access control list (web ACL) rules that you configured. With Shield Advanced automatic application-layer mitigation enabled, when Shield Advanced detects a DDoS attack and identifies the attack signatures, Shield Advanced creates AWS WAF rules inside an associated web ACL to mitigate the attack.
CloudFront handles the request and invokes the Lambda@Edge function before sending the request to API Gateway.
The Lambda@Edge function signs the request with Signature Version 4 by adding the necessary headers.
API Gateway verifies the Lambda@Edge function with the necessary permissions and sends the request to the backend.
An unauthorized client sends a request to an API Gateway endpoint, and it receives the HTTP 403 Forbidden message.
Solution deployment
The sample solution contains the following main steps:
Preparation
Deploy the CloudFormation template
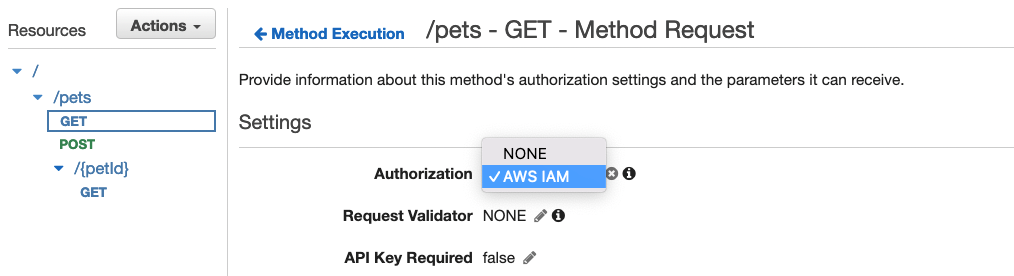
Enable IAM authorization in API Gateway
Confirm successful viewer access to the CloudFront URL
Confirm that direct access to the API Gateway API URL is blocked
Review the CloudFront configuration
Review the Lambda@Edge function and its IAM role
Review the AWS WAF web ACL configuration
(Optional) Protect the CloudFront distribution with Shield Advanced
Step 1: Preparation
Before you deploy the solution, you will first need to create an API Gateway endpoint.
To create an API Gateway endpoint
Choose the following Launch Stack button to launch a CloudFormation stack in your account.
Note: The stack will launch in the US East (N. Virginia) Region (us-east-1). To deploy the solution to another Region, download the solution’s CloudFormation template, and deploy it to the selected Region.
When you launch the stack, it creates an API called PetStoreAPI that is deployed to the prod stage.
In the Stages navigation pane, expand the prod stage, select GET on /pets/{petId}, and then copy the Invoke URL value of https://api-id.execute-api.region.amazonaws.com/prod/pets/{petId}. {petId} stands for a path variable.
In the address bar of a browser, paste the Invoke URL value. Make sure to replace {petId} with your own information (for example, 1), and press Enter to submit the request. A 200 OK response should return with the following JSON payload:
{
  "id": 1,
  "type": "dog",
  "price": 249.99
}
In this post, we will refer to this API Gateway endpoint as the CloudFront origin.
Step 2: Deploy the CloudFormation template
The next step is to deploy the CloudFormation template of the solution.
The CloudFormation template includes the following:
A CloudFront distribution that uses an API Gateway endpoint as the origin
An AWS WAF web ACL that is associated with the CloudFront distribution
A Lambda@Edge function that is used to sign the request with Signature Version 4 and that the CloudFront distribution invokes before the request is forwarded to the origin on the CloudFront distribution
An IAM role for the Lambda@Edge function
To deploy the CloudFormation template
Choose the following Launch Stack button to launch a CloudFormation stack in your account.
Note: The stack will launch in the US East N. Virginia Region (us-east-1). To deploy the solution to another Region, download the solution’s CloudFormation template, provide the required parameters, and deploy it to the selected Region.
On the Specify stack details page, update with the following:
For Stack name, enter APIProtection
For the parameter APIGWEndpoint, enter the API Gateway endpoint in the following format. Make sure to replace <Region> with your own information.
{api-id}.execute-api.<Region>.amazonaws.com
Choose Next to continue the stack deployment.
It takes a couple of minutes to finish the deployment. After it finishes, the Output tab lists the CloudFront domain URL, as shown in Figure 2.
Figure 2: CloudFormation template output
Step 3: Enable IAM authorization in API Gateway
Before you verify the solution, you will enable IAM authorization on the API endpoint first, which enforces Signature Version 4 verification at API Gateway. The following steps are applied for a REST API; you could also enable IAM authorization on an HTTP API or WebSocket API.
On the stack Outputs tab, copy the value for the CFDistribution entry and append /prod/pets to it, then open the URL in a new browser tab or window. The result should look similar to the following, which confirms successful viewer access through CloudFront.
Figure 4: Successful API response when accessing API through CloudFront distribution
Step 5: Confirm that direct access to the API Gateway API URL is blocked
Next, verify whether direct access to the API Gateway API endpoint is blocked.
Copy your API Gateway endpoint URL and append /prod/pets to it, then open the URL in a new browser tab or window. The result should look similar to the following, which confirms that direct viewer access through API Gateway is blocked.
Figure 5: API error response when attempting to access API Gateway directly
Step 6: Review CloudFront configuration
Now that you’ve confirmed that access to the API Gateway endpoint is restricted to CloudFront only, you will review the CloudFront configuration that enables this restriction.
To review the CloudFront configuration
In the CloudFormation console, choose the APIProtection stack. On the stack Resources tab, under the CFDistribution entry, copy the distribution ID.
In the CloudFront console, select the distribution that has the distribution ID that you noted in the preceding step. On the Behaviors tab, select the behavior with path pattern Default (*).
Choose Edit and scroll to the Cache key and origin requests section. You can see that Origin request policy is set to AllViewerExceptHostHeader, which allows CloudFront to forward viewer headers, cookies, and query strings to origins except the Host header. This policy is intended for use with the API Gateway origin.
Scroll down to the Function associations – optional section.
Figure 6: CloudFront configuration – Function association with origin request
You can see that a Lambda@Edge function is associated with the origin request event; CloudFront invokes this function before forwarding requests to the origin. You can also see that the Include body option is selected, which exposes the request body to Lambda@Edge for HTTP methods like POST/PUT, and the request payload hash will be used for Signature Version 4 signing in the Lambda@Edge function.
Step 7: Review the Lambda@Edge function and its IAM role
In this step, you will review the Lambda@Edge function code and its IAM role, and learn how the function signs the request with Signature Version 4 before forwarding to API Gateway.
To review the Lambda@Edge function code
In the CloudFormation console, choose the APIProtection stack.
On the stack Resources tab, choose the Sigv4RequestLambdaFunction link to go to the Lambda function, and review the function code. You can see that it follows the Signature Version 4 signing process and uses an AWS access key to calculate the signature. The AWS access key is a temporary security credential provided when the IAM role for Lambda is being assumed.
To review the IAM role for Lambda
In the CloudFormation console, choose the APIProtection stack.
On the stack Resources tab, choose the Sigv4RequestLambdaFunctionExecutionRole link to go to the IAM role. Expand the permission policy to review the permissions. You can see that the policy allows the API Gateway endpoint to be invoked.
Because IAM authorization is enabled, when API Gateway receives the request, it checks whether the client has execute-api:Invoke permission for the API and route before handling the request.
Step 8: Review AWS WAF web ACL configuration
In this step, you will review the web ACL configuration in AWS WAF.
AWS Managed Rules for AWS WAF helps provide protection against common application vulnerabilities or other unwanted traffic. The web ACL for this solution includes several AWS managed rule groups as an example. The Amazon IP reputation list managed rule group helps to mitigate bots and reduce the risk of threat actors by blocking problematic IP addresses. The Core rule set (CRS) managed rule group helps provide protection against exploitation of a wide range of vulnerabilities, including some of the high risk and commonly occurring vulnerabilities described in the OWASP Top 10. The Known bad inputs managed rule group helps to reduce the risk of threat actors by blocking request patterns that are known to be invalid and that are associated with exploitation or discovery of vulnerabilities, like Log4J.
AWS WAF supports rate-based rules to block requests originating from IP addresses that exceed the set threshold per 5-minute time span, until the rate of requests falls below the threshold. We have used one such rule in the following example, but you could layer the rules for better security posture. You can configure multiple rate-based rules, each with a different threshold and scope (like URI, IP list, or country) for better protection. For more information on best practices for AWS WAF rate-based rules, see The three most important AWS WAF rate-based rules.
To review the web ACL configuration
In the CloudFormation console, choose the APIProtection stack.
On the stack Outputs tab, choose the EdgeLayerWebACL link to go to the web ACL configuration, and then choose the Rules tab to review the rules for this web ACL. On the Rules tab, you can see that the web ACL includes the following rule and rule groups.
Figure 7: AWS WAF web ACL configuration
Choose the Associated AWS resources tab. You should see that the CloudFront distribution is associated to this web ACL.
Step 9: (Optional) Protect the CloudFront distribution with Shield Advanced
In this optional step, you will protect your CloudFront distribution with Shield Advanced. This adds additional protection on top of the protection provided by AWS WAF managed rule groups and rate-based rules in the web ACL that is associated with the CloudFront distribution.
Note: Proceed with this step only if you have subscribed to an annual subscription to Shield Advanced.
AWS Shield is a managed DDoS protection service that is offered in two tiers: AWS Shield Standard and AWS Shield Advanced. All AWS customers benefit from the automatic protection of Shield Standard, at no additional cost. Shield Standard helps defend against the most common, frequently occurring network and transport layer DDoS attacks that target your website or applications. AWS Shield Advanced is a paid service that requires a 1-year commitment—you pay one monthly subscription fee, plus usage fees based on gigabytes (GB) of data transferred out. Shield Advanced provides expanded DDoS attack protection for your applications.
Besides providing visibility and additional detection and mitigation against large and sophisticated DDoS attacks, Shield Advanced also gives you 24/7 access to the Shield Response Team (SRT) and cost protection against spikes in your AWS bill that might result from a DDoS attack against your protected resources. When you use both Shield Advanced and AWS WAF to help protect your resources, AWS waives the basic AWS WAF fees for web ACLs, rules, and web requests for your protected resources. You can grant permission to the SRT to act on your behalf, and also configure proactive engagement so that SRT contacts you directly when the availability and performance of your application is impacted by a possible DDoS attack.
Shield Advanced automatic application-layer DDoS mitigation compares current traffic patterns to historic traffic baselines to detect deviations that might indicate a DDoS attack. When you enable automatic application-layer DDoS mitigation, if your protected resource doesn’t yet have a history of normal application traffic, we recommend that you set to Count mode until a history of normal application traffic has been established. Shield Advanced establishes baselines that represent normal traffic patterns after protecting resources for at least 24 hours and is most accurate after 30 days. To mitigate against application layer attacks automatically, change the AWS WAF rule action to Block after you’ve established a normal traffic baseline.
To help protect your CloudFront distribution with Shield Advanced
In the WAF & Shield console, in the AWS Shield section, choose Protected Resources, and then choose Add resources to protect.
For Resource type, select CloudFront distribution, and then choose Load resources.
In the Select resources section, select the CloudFront distribution that you used in Step 6 of this post. Then choose Protect with Shield Advanced.
In the Automatic application layer DDoS mitigation section, choose Enable. Leave the AWS WAF rule action as Count, and then choose Next.
(Optional, but recommended) Under Associated health check, choose one Amazon Route 53 health check to associate with the protection, and then choose Next. The Route 53 health check is used to enable health-based detection, which can improve responsiveness and accuracy in attack detection and mitigation. Associating the protected resource with a Route 53 health check is also one of the prerequisites to be protected with proactive engagement. You can create the health check by following these best practices.
(Optional) In the Select SNS topic to notify for DDoS detected alarms section, select the SNS topic that you want to use for notification for DDoS detected alarms, then choose Next.
Choose Finish configuration.
With automatic application-layer DDoS mitigation configured, Shield Advanced creates a rule group in the web ACL that you have associated with your resource. Shield Advanced depends on the rule group for automatic application-layer DDoS mitigation.
To review the rule group created by Shield Advanced
In the CloudFormation console, choose the APIProtection stack. On the stack Outputs tab, look for the EdgeLayerWebACL entry.
Choose the EdgeLayerWebACL link to go to the web ACL configuration.
Choose the Rules tab, and look for the rule group with the name that starts with ShieldMitigationRuleGroup, at the bottom of the rule list. This rule group is managed by Shield Advanced, and is not viewable.
Figure 8: Shield Advanced created rule group for DDoS mitigation
Considerations
Here are some further considerations as you implement this solution:
Lambda@Edge functions are run in a regional edge cache, which is usually in the AWS Region closest to the CloudFront edge location that is reached by the client. You must pay attention to the scaling limit of Lambda@Edge, and request a higher quota if needed.
Conclusion
In this blog post, we introduced managing public-facing APIs through API Gateway, and helping protect API Gateway endpoints by using CloudFront and AWS perimeter protection services (AWS WAF and Shield Advanced). We walked through the steps to add Signature Version 4 authentication information to the CloudFront originated API requests, providing trusted access to the APIs. Together, these actions present a best practice approach to build a DDoS-resilient architecture that helps protect your application’s availability by preventing many common infrastructure and application layer DDoS attacks.
If you have feedback about this post, submit comments in the Comments section below. If you have questions about this post, contact AWS Support.
Want more AWS Security news? Follow us on Twitter.
Threat actors use sign-up pages and login pages to carry out account fraud, including taking unfair advantage of promotional and sign-up bonuses, publishing fake reviews, and spreading malware.
You can now get comprehensive account fraud prevention by combining AWS WAF Account Creation Fraud Prevention and Account Takeover Prevention in your AWS WAF web access control list (web ACL). In this post, we will show you how to set up AWS WAF with ACFP for your application sign-up pages.
Overview of Account Creation Fraud Prevention for AWS WAF
ACFP helps protect your account sign-up pages by continuously monitoring requests for anomalous digital activity and automatically blocking suspicious requests based on request identifiers, behavioral analysis, and machine learning.
ACFP uses multiple capabilities to help detect and block fake account creation requests at the network edge before they reach your application. An automated vetting process for account creation requests uses rules based on reputation and risk to protect your registration pages against use of stolen credentials and disposable email domains. ACFP uses silent challenges and CAPTCHA challenges to identify and respond to sophisticated bots that are designed to actively evade detection.
ACFP is an AWS Managed Rules rule group. If you already use AWS WAF, you can configure ACFP without making architectural changes. On a single configuration page, you specify the registration page request inspection parameters that ACFP uses to detect fake account creation requests, including user identity, address, and phone number.
ACFP uses session tokens to separate legitimate client sessions from those that are not. These tokens allow ACFP to verify that the client applications that sign up for an account are legitimate. The AWS WAF Javascript SDK automatically generates these tokens during the frontend application load. We recommend that you integrate the AWS WAF Javascript SDK into your application, particularly for single-page applications where you don’t want page refreshes.
Walkthrough
In this walkthrough, we will show you how to set up ACFP for AWS WAF to help protect your account sign-up pages against account creation fraud. This walkthrough has two main steps:
Set up an AWS managed rule group for ACFP in the AWS WAF console.
Add the AWS WAF JavaScript SDK to your application pages.
Set up Account Creation Fraud Prevention
The first step is to set up ACFP by creating a web ACL or editing an existing one. You will add the ACFP rule group to this web ACL.
The ACFP rule group requires that you provide your registration page path, account creation path, and optionally the sign-up request fields that map to user identity, address, and phone number. ACFP uses this configuration to detect fraudulent sign-up requests and then decide an appropriate action, including blocking, challenging interstitial during the frontend application load, or requiring a CAPTCHA.
To edit an existing web ACL, choose the name of the ACL.
On the Rules tab, for the Add Rules dropdown, select Add managed rule groups.
Add the Account creation fraud prevention rule set to the web ACL. Then, choose Edit to edit the rule configuration.
For Rule group configuration, provide the following information that the ACFP rule group requires to inspect account creation requests, as shown in Figure 1.
For Registration page path, enter the path for the registration page website for your application.
For Account creation path, enter the path of the endpoint that accepts the completed registration form.
For Request inspection, select whether the endpoint that you specified in Account creation path accepts JSON or FORM_ENCODED payload types.
(Optional): Provide Field names used in submitted registration forms, as shown in Figure 2. This helps ACFP more accurately identify requests that contain information that is considered stolen, or with a bad reputation. For each field, provide the relevant information that was included in your account creation request. For this walkthrough, we use JSON pointer syntax.
For Account creation fraud prevention rules, review the actions taken on each category of account creation fraud, and optionally customize them for your web applications. For this walkthrough, we leave the default rule action for each category set to the default action, as shown in Figure 3. If you want to customize the rules, you can select different actions for each category based on your application security needs:
Allow — Allows the request to be sent to the protected resource.
Block — Blocks the request, returning an HTTP 403 (Forbidden) response.
Count — Allows the request to be sent to the protected resource while counting detections. The count shows you bot activity that is occurring without blocking or challenging. When you turn on rules for the first time, this information can help you see what the detections are, before you change the actions.
CAPTCHA and Challenge — use CAPTCHA puzzles and silent challenges with tokens to track successful client responses.
Figure 3: Account creation fraud prevention – Select actions for each category
To save the configuration, choose Save.
To add the ACFP rule group to your web ACL, choose Add rules.
(Optional) Include additional rules in your web ACL, as described in the Best practices section that follows.
To create or edit your web ACL, proceed through the remaining configuration pages.
Add the AWS WAF JavaScript SDK to your application pages
The next step is to find the AWS WAF JavaScript SDK and add it to your application pages.
The SDK injects a token in the requests that you send to your protected resources. You must use the SDK integration to fully enable ACFP detections.
To add the SDK to your application pages
In the AWS WAF console, in the left navigation pane, choose Application integration.
Under Web ACLs that are enabled for application integration, choose the name of the web ACL that you created previously.
Under JavaScript SDK, copy the provided code snippet. This code snippet allows for creation of the cryptographic token in the background when the application loads for the first time. Figure 4 shows the SDK link.
Figure 4: Application integration – Add JavaScript SDK link to application pages
Add the code snippet to your pages. For example, paste the provided script code within the <head> section of the HTML. For ACFP, you only need to add the code snippet to the registration page, but if you are using other AWS WAF managed rules such as Account Takeover Protection or Targeted Bots on other pages, you will also need to add the code snippet to those pages.
To validate that your application obtains tokens correctly, load your application in a browser and verify that a cookie named aws-waf-token has been set during page load.
Review metrics
Now that you’ve set up the web ACL and integrated the SDK with the application, you can use the bot visualization dashboard in AWS WAF to review fraudulent account creation traffic patterns. ACFP rules emit metrics that correspond to their labels, helping you identify which rule within the ACFP rule group initiated an action. You can also use labels and rule actions to filter AWS WAF logs so that you can further examine a request.
To view AWS WAF metrics for the distribution
In the AWS WAF console, in the left navigation pane, select Web ACLs.
Select the web ACL for which ACFP is enabled, and then choose the Bot Control tab to view the metrics.
In the Filter metrics by dropdown, select Account creation fraud prevention to see the ACFP metrics for your web ACL.
In this section, we share best practices for your ACFP rule group setup.
Limit the requests that ACFP evaluates to help lower costs
ACFP evaluates web ACL rules in priority order and takes the action associated with the first rule that a request matches. Requests that match and are blocked by a rule will not be evaluated against lower priority rules. ACFP only evaluates an ACFP rule group if a request matches the registration and account creation URI paths that are specified in the configuration.
You will incur additional fees for requests that ACFP evaluates. To help reduce ACFP costs, use higher priority rules to block requests before the ACFP rule group evaluates them. For example, you can add a higher priority AWS Managed Rules IP reputation rule group to block account creation requests from bots and other threats before ACFP evaluates them. Rate-based rules with a higher priority than the ACFP rule group can help mitigate volumetric account creation attempts by limiting the number of requests that a single IP can make in a five-minute period. For further guidance on rate-based rules, see The three most important AWS WAF rate-based rules.
If you are using the AWS WAF Bot Control rule group, give it a higher priority than the ACFP rule group because it’s less expensive to evaluate.
Use SDK integration
ACFP requires the tokens that the SDK generates. The SDK can generate these tokens silently rather than requiring a redirect or CAPTCHA. Both AWS WAF Bot Control and AWS WAF Fraud Control use the same SDK if both rule groups are in the same web ACL.
These tokens have a default immunity time (otherwise knowns as a timeout) of 5 minutes, after which AWS WAF requires the client to be challenged again. You can use the AWS WAF integration fetch wrapper in your single-pane application to help ensure that the token retrieval completes before the client sends requests to your account creation API without requiring a page refresh. Alternatively, you can use the getToken operation if you are not using fetch.
You can continue to use the CAPTCHA JavaScript API instead if you’ve already integrated this into your application.
Use both ACFP and ATP for comprehensive account fraud prevention
You can help prevent account fraud for both sign-up and login pages by enabling the ATP rule group in the same web ACL as ACFP.
Test ACFP before you deploy it to production
Test and tune your ACFP implementation in a staging or testing environment to help avoid negatively impacting legitimate users. We recommend that you start by deploying your rules in count mode in production to understand potential impact to your traffic before switching them back to the default rule actions. Use the default ACFP rule group actions when you deploy the web ACL to production. For further guidance, see Testing and Deploying ACFP.
Pricing and availability
ACFP is available today on Amazon CloudFront and in 22 AWS Regions. For information on availability and pricing, see AWS WAF Pricing.
Conclusion
In this post, we showed you how to use ACFP to protect your application’s sign-up pages against fake account creation. You can now combine ACFP with ATP managed rules in a single web ACL for comprehensive account fraud prevention. For more information and to get started today, see the AWS WAF Developer Guide.
A new week has begun. Last week, there was a lot of news related to AWS. I have compiled a few announcements you need to know. Let’s get started right away!
Last Week’s Launches Let’s take a look at some launches from the last week that I want to remind you of:
New Amazon EC2 I4g Instances – Powered by AWS Graviton2 processors, Amazon Elastic Compute Cloud (Amazon EC2) I4g instances improve real-time storage performance up to 2x compared to prior generation storage-optimized instances. Based on AWS Nitro SSDs that are custom-built by AWS and reduce both latency and latency variability, I4g instances are optimized for workloads that perform a high mix of random read/write and require very low I/O latency, such as transactional databases and real-time analytics. To learn more, see Jeff’s post.
Amazon Aurora I/O-Optimized – You can now choose between two storage configurations for Amazon Aurora DB clusters: Aurora Standard or Aurora I/O-Optimized. For applications with low-to-moderate I/Os, Aurora Standard is a cost-effective option.
For applications with high I/Os, Aurora I/O-Optimized provides improved price performance, predictable pricing, and up to 40 percent costs savings. To learn more, see my full blog post.
AWS Management Console Private Access – This is a new security feature that allows you to limit access to the AWS Management Console from your Virtual Private Cloud (VPC) or connected networks to a set of trusted AWS accounts and organizations. It is built on VPC endpoints, which use AWS PrivateLink to establish a private connection between your VPC and the console.
AWS Management Console Private Access is useful when you want to prevent users from signing in to unexpected AWS accounts from within your network. To learn more, see the AWS Management Console getting started guide.
One-Click Security Protection on the Amazon CloudFront Console – You can now secure your web applications and APIs with AWS WAF with a single click on the Amazon CloudFront console. CloudFront handles creating and configuring AWS WAF for you with out-of-the-box protections recommended by AWS and this simple and convenient way to protect applications at the time you create or edit your distribution.
You may continue to select a preconfigured AWS WAF web access control list (ACL) when you prefer to use an existing web ACL. To learn more, see Using AWS WAF to control access to your content in the AWS documentation.
Tracing AWS Lambda SnapStart Functions with AWS X-Ray – You can use AWS X-Ray traces to gain deeper visibility into your function’s performance and execution lifecycle, helping you identify errors and performance bottlenecks for your latency-sensitive Java applications built using SnapStart-enabled functions.
With X-Ray support for SnapStart-enabled functions, you can now see trace data about the restoration of the execution environment and execution of your function code. You can enable X-Ray for Java-based SnapStart-enabled Lambda functions running on Amazon Corretto 11 or 17. To learn more about X-Ray for SnapStart-enabled functions, visit the Lambda Developer Guide or read Marcia’s blog post.
For a full list of AWS announcements, be sure to keep an eye on the What’s New at AWS page.
Open Source Updates Last week, we introduced new open-source projects and significant roadmap contributions to the Jupyter community.
Snapchange – Snapchange is a new open-source project to make fuzzing of a memory snapshot easier using KVM written by Rust. Snapchange enables a target binary to be fuzzed with minimal modifications, providing useful introspection that aids in fuzzing. Snapchange utilizes the features of the Linux kernel’s built-in virtual machine manager known as kernel virtual machine or KVM. To learn more, see the announcement post and GitHub repository.
Cedar – Cedar is a new open-source language for defining permissions as policies, which describes who should have access to what, and evaluating those policies. You can use Cedar to control access to resources such as photos in a photo-sharing app, compute nodes in a microservices cluster, or components in a workflow automation system. Cedar is also authorization-policy language used by the Amazon Verified Permissions, a scalable, fine-grained permissions management and authorization service for custom applications and AWS Verified Access managed services to validate each application request before granting access. To learn more, see the announcement post , Amazon Science blog post and Cedar playground to test sample policies.
Jupyter Community Contributions – We announced new contributions to Jupyter community to democratize generative artificial intelligence (AI) and scale machine learning (ML) workloads. We contributed two Jupyter extensions – Jupyter AI to bring generative AI to Jupyter notebooks and Amazon CodeWhisperer Jupyter extension to generate code suggestions for Python notebooks in JupyterLab. We also contributed three new capabilities to help you scale ML development faster: notebooks scheduling, SageMaker open-source distribution, and Amazon CodeGuru Jupyter extension. To learn more, see the announcement post and Jupyter on AWS.
Upcoming AWS Events Check your calendars and sign up for these AWS-led events:
AWS Serverless Innovation Day on May 17 – Join us for a free full-day virtual event to learn about AWS Serverless technologies and event-driven architectures from customers, experts, and leaders. Marcia outlined the agenda and main topics of this event in her post. You can register on the event page.
AWS Data Insights Day on May 24 – Join us for another virtual event to discover ways to innovate faster and more cost-effectively with data. Whether your data is stored in operational data stores, data lakes, streaming engines, or within your data warehouse, Amazon Redshift helps you achieve the best performance with the lowest spend. This event focuses on customer voices, deep-dive sessions, and best practices of Amazon Redshift. You can register on the event page.
AWS Silicon Innovation Day on June 21 – Join AWS leaders and experts showcasing AWS innovations in custom-designed EC2 chips built for high performance and scale in the cloud. AWS has designed and developed purpose-built silicon specifically for the cloud. You can understand AWS Silicons and how they can use AWS’s unique EC2 chip offerings to their benefit. You can register on the event page.
AWS re:Inforce 2023 – You can still register for AWS re:Inforce, in Anaheim, California, June 13–14.
AWS Community Day – Join community-led conferences driven by AWS user group leaders closest to your city: Chicago (June 15), and Philippines (June 29–30).
In this post, we’ll share an automation pattern that you can use to automatically detect and block suspicious hosts that are attempting to access your Amazon Web Services (AWS) resources. The automation will rely on Amazon GuardDuty to generate findings about the suspicious hosts, and then you can respond to those findings by programmatically updating AWS WAF to block the host from accessing your workloads.
You should implement security measures across your AWS resources by using a holistic approach that incorporates controls across multiple areas. In the AWS CAF Security Perspective section of the AWS Security Incident Response Guide, we define these controls across four categories:
Directive controls — Establish the governance, risk, and compliance models the environment will operate within
Preventive controls — Protect your workloads and mitigate threats and vulnerabilities
Detective controls — Provide full visibility and transparency over the operation of your deployments in AWS
Responsive controls — Drive remediation of potential deviations from your security baselines
Security automation is a key principle outlined in the Response Guide. It helps reduce operational overhead and creates repeatable, predictable approaches to monitoring and responding to events. AWS services provide the building blocks to create powerful patterns for the automated detection and remediation of threats against your AWS environments. You can configure automated flows that use both detective and responsive controls and might also feed into preventative controls to help mitigate risks in the future. Depending on the type of source event, you can automatically invoke specific actions, such as modifying access controls, terminating instances, or revoking credentials.
The patterns highlighted in this post provide an example of how to automatically remediate detected threats. You should modify these patterns to suit your defined requirements, and test and validate them before deploying them in a production environment.
AWS services used for the example pattern
Amazon GuardDuty is a continuous security monitoring and threat detection service that incorporates threat intelligence, anomaly detection, and machine learning to help protect your AWS resources, including your AWS accounts. Amazon EventBridge delivers a near-real-time stream of system events that describe changes in AWS resources. Amazon GuardDuty sends events to Amazon CloudWatch when a change in the findings takes place. In the context of GuardDuty, such changes include newly generated findings and subsequent occurrences of these findings. You can quickly set up rules to match events generated by GuardDuty findings in EventBridge events and route those events to one or more target actions. The pattern in this post routes matched events to AWS Lambda, which then updates AWS WAFweb access control lists (web ACLs) and Amazon Virtual Private Cloud (Amazon VPC)network access control lists (network ACLs). AWS WAF is a web application firewall that helps protect your web applications from common web exploits that could affect application availability, security, or excess resource consumption. It supports both managed rules as well as a powerful rule language for custom rules. A network ACL is stateless and is an optional layer of security for your VPC that helps you restrict specific inbound and outbound traffic at the subnet level.
Pattern overview
This example pattern assumes that Amazon GuardDuty is enabled in your AWS account. If it isn’t enabled, you can learn more about the free trial and pricing, and follow the steps in the GuardDuty documentation to configure the service and start monitoring your account. The example code will only work in the us-east-1 AWS Region due to the use of Amazon CloudFront and web ACLs within the template.
Figure 1 shows how the AWS CloudFormation template creates the sample pattern.
Figure 1: How the CloudFormation template works
Here’s how the pattern works, as shown in the diagram:
A GuardDuty finding is generated due to suspected malicious activity.
An EventBridge event is configured to filter for GuardDuty finding types by using event patterns.
A Lambda function is invoked by the EventBridge event and parses the GuardDuty finding.
The Lambda function checks the Amazon DynamoDB state table for an existing entry that matches the identified host. If state data is not found in the table for the identified host, a new entry is created in the Amazon DynamoDB state table.
The Lambda function creates a web ACL rule inside AWS WAF and updates a subnet network ACL.
A second Lambda function runs on a 5-minute recurring schedule and removes entries that are past the configurable retention period from AWS WAF IPSets (an IPSet is a list that contains the blocklisted IPs or CIDRs), VPC network ACLs, and the DynamoDB table.
GuardDuty prefix patterns and findings
The EventBridge event rule provided by the example automation uses the following seven prefix patterns, which allow coverage for 36 GuardDuty finding types. These specific finding types are of a network nature, and so we can use AWS WAF to block them. Be sure to read through the full list of finding types in the GuardDuty documentation to better understand what GuardDuty can report findings for. The covered findings are as follows:
UnauthorizedAccess:EC2
UnauthorizedAccess:EC2/MaliciousIPCaller.Custom
UnauthorizedAccess:EC2/MetadataDNSRebind
UnauthorizedAccess:EC2/RDPBruteForce
UnauthorizedAccess:EC2/SSHBruteForce
UnauthorizedAccess:EC2/TorClient
UnauthorizedAccess:EC2/TorRelay
Recon:EC2
Recon:EC2/PortProbeEMRUnprotectedPort
Recon:EC2/PortProbeUnprotectedPort
Recon:EC2/Portscan
Trojan:EC2
Trojan:EC2/BlackholeTraffic
Trojan:EC2/BlackholeTraffic!DNS
Trojan:EC2/DGADomainRequest.B
Trojan:EC2/DGADomainRequest.C!DNS
Trojan:EC2/DNSDataExfiltration
Trojan:EC2/DriveBySourceTraffic!DNS
Trojan:EC2/DropPoint
Trojan:EC2/DropPoint!DNS
Trojan:EC2/PhishingDomainRequest!DNS
Backdoor:EC2
Backdoor:EC2/C&CActivity.B
Backdoor:EC2/C&CActivity.B!DNS
Backdoor:EC2/DenialOfService.Dns
Backdoor:EC2/DenialOfService.Tcp
Backdoor:EC2/DenialOfService.Udp
Backdoor:EC2/DenialOfService.UdpOnTcpPorts
Backdoor:EC2/DenialOfService.UnusualProtocol
Backdoor:EC2/Spambot
Impact:EC2
Impact:EC2/AbusedDomainRequest.Reputation
Impact:EC2/BitcoinDomainRequest.Reputation
Impact:EC2/MaliciousDomainRequest.Reputation
Impact:EC2/PortSweep
Impact:EC2/SuspiciousDomainRequest.Reputation
Impact:EC2/WinRMBruteForce
CryptoCurrency:EC2
CryptoCurrency:EC2/BitcoinTool.B
CryptoCurrency:EC2/BitcoinTool.B!DNS
Behavior:EC2
Behavior:EC2/NetworkPortUnusual
Behavior:EC2/TrafficVolumeUnusual
When activity occurs that generates one of these GuardDuty finding types and is then matched by the EventBridge event rule, an entry is created in the target web ACLs and subnet network ACLs to deny access from the suspicious host, and then a notification is sent to an email address by this pattern’s Lambda function. Blocking traffic from the suspicious host helps to mitigate potential threats while you perform additional investigation and remediation. For more information, see Remediating a compromised EC2 instance.
Solution deployment
To deploy the solution, you’ll do the following steps. Each step is described in more detail in the sections that follow.
Upload the .zip files guardduty_to_acl_lambda_wafv2.zip and prune_old_entries_wafv2.zip that you saved to your local file system in Step 1 to the newly created S3 bucket.
Step 3: Deploy the CloudFormation template
For this step, deploy the CloudFormation template only to the us-east-1 Region within the AWS account where GuardDuty findings are to be monitored.
Choose Create stack, and then choose With new resources (standard).
When the Create stack landing page is presented, make sure that Template is ready is selected in the Prepare template section. In the Template source section, choose Upload a template file.
Choose the Choose file button and browse to the location where the guarddutytoacl.template file was saved on your local file system. Select the file, choose Open, and then choose Next.
On the Specify stack details page, provide the following input parameters. You can modify the default values to customize the pattern for your environment.
Input parameter
Input parameter description
Notification email
The email address to receive notifications. Must be a valid email address.
Retention time, in minutes
How long to retain IP addresses in the blocklist (in minutes). The default is 12 hours.
S3 bucket for artifacts
The S3 bucket with artifact files (Lambda functions, templates, HTML files, and so on). Keep the default value for deployment into the N. Virginia Region.
S3 path to artifacts
The path in the S3 bucket that contains artifact files. Keep the default value for deployment into the N. Virginia Region.
CloudFrontWebACL
Create CloudFront Web ACL? If set to true, a CloudFront IP set will be created automatically.
RegionalWebACL
Create Regional Web ACL? If set to true, a Regional IP set will be created automatically.
Figure 2 shows an example of the values entered on this page.
Figure 2: CloudFormation parameters on the Specify stack details page
Enter values for all of the input parameters, and then choose Next.
On the Configure stack options page, accept the defaults, and then choose Next.
On the Review page, confirm the details, check the box acknowledging that the template will require capabilities for AWS::IAM::Role, and then choose Create Stack.
The stack normally requires no more than 3–5 minutes to complete.
While the stack is being created, check the email inbox that you specified for the Notification email address parameter. Look for an email message with the subject “AWS Notification – Subscription Confirmation”. Choose the link in the email to confirm the subscription to the SNS topic. You should see a message similar to the following.
Figure 3: Subscription confirmation
When the Status field for the CloudFormation stack changes to CREATE_COMPLETE, as shown in Figure 4, the pattern is implemented and is ready for testing.
Figure 4: The stack status is CREATE_COMPLETE
Step 4: Create and test the Lambda function for a GuardDuty finding event
After the CloudFormation stack has completed deployment, you can test the functionality by using a Lambda test event.
To create and run a Lambda GuardDuty finding test event
In the AWS Management Console, choose Services > VPC > Subnets and locate a subnet that is suitable for testing the pattern.
On the Details tab, copy the subnet ID to the clipboard or to a text editor.
Figure 5: The subnet ID value on the Details tab
In the AWS Management Console, choose Services > CloudFormation > GuardDutytoACL stack. On the Outputs tab for the stack, look for the GuardDutytoACLLambda entry.
Figure 6: The GuardDutytoACLLambda entry on the Outputs tab
Choose the link for the entry, and you’ll be redirected to the Lambda console, with the Lambda Code source page already open.
Figure 7: The Lambda function open in the Lambda console
In the middle of the Code source menu, in the Test dropdown list, locate and select the Configure test event option.
Figure 8: Select Configure test event from the dropdown list
To facilitate testing, we’ve provided a test event file. On the Configure test event page, do the following:
For Event name, enter a name.
In the body of the Event JSON field, paste the provided test event JSON, overwriting the existing contents.
Update the value of SubnetId key (line 35) to the value of the subnet ID that you chose in Step 1 of this procedure.
Choose Save.
Figure 9: Update the value of the subnetId key
Choose Test to invoke the Lambda function with the test event. You should see the message “Status: succeeded” at the top of the execution results, similar to what is shown in Figure 10.
Figure 10: The Test button and the “succeeded” message
Step 5: Confirm the entry in the VPC network ACL
In this step, you’ll confirm that the DENY entry was created in the network ACL. This pattern is configured to create up to 10 entries in an ACL, ranging between rule numbers 71 and 80. Because network ACL rules are processed in order, it’s important that the DENY rule is placed before the ALLOW rule.
To confirm the entry in the VPC network ACL
In the AWS Management Console, choose Services > VPC > Subnets, and locate the subnet you provided for the test event.
Choose the network ACL link and confirm that the new DENY entry was generated from the test event.
Figure 11: Check the entry from the test event on the Network tab
Note that VPC network ACL entries are created in the rule number range between 71 and 80. Older entries are aged out to create a “sliding window” of blocked hosts.
Step 6: Confirm the entry in the AWS WAF IP sets and blocklists
Next, verify that the entry was added to the CloudFront AWS WAF IP set and to the Application Load Balancer (ALB) AWS WAF IP set.
To confirm the entry in the AWS WAF IP set and blocklist
In the AWS Management Console, choose Services > WAF & Shield > Web ACLs, and then set the selected Region to Global (CloudFront).
Find and select the web ACL name that starts with CloudFrontBlockListWeb. In the Rule view, on the Rules tab, select the rule named CloudFrontBlocklistIPSetRule. Note that 198.51.100.0/32 appears as an entry in the rule.
Figure 12: Confirm that the IP address was added
In the AWS Management Console, on the left navigation menu, choose Web ACLs, and then set the selected Region to US East (N. Virginia).
Find and select the web ACL name that starts with RegionalBlocklistACL. In the Rule view, on the Rules tab, select the rule named RegionalBlocklistIPSetRule. Note that 198.51.100.0/32 appears as an entry in the rule.
Figure 13: Make sure that the IP address was added
There might be specific host addresses that you want to prevent from being added to the blocklist. You can do this within GuardDuty by using a trusted IP list. Trusted IP lists consist of IP addresses that you have allowlisted for secure communication with your AWS infrastructure and applications. GuardDuty doesn’t generate findings for IP addresses on trusted IP lists. For more information, see Working with trusted IP lists and threat lists.
Step 7: Confirm the SNS notification email
Finally, verify that the SNS notification was sent to the email address you set up.
To confirm receipt of the SNS notification email
Review the email inbox that you specified for the AdminEmail parameter and look for a message with the subject line “AWS GD2ACL Alert”. The contents of the message from SNS should be similar to the following.
Figure 14: SNS message example
Step 8: Apply the AWS WAF web ACLs to resources
The final task is to associate the web ACL with the CloudFront distributions and Application Load Balancers that you want to automatically update with this pattern. To learn how to do this, see Associating or disassociating a web ACL with an AWS resource.
You can also use AWS Firewall Manager to associate the web ACLs. AWS Firewall Manager can simplify your AWS WAF administration and maintenance tasks across multiple accounts and resources. With Firewall Manager, you set up your firewall rules just once. The service automatically applies your rules across your accounts and resources, even as you add new resources.
Conclusion
In this post, you’ve learned how to use Lambda to automatically update AWS WAF and VPC network ACLs in response to GuardDuty findings. With just a few steps, you can use this sample pattern to help mitigate threats by blocking communication with suspicious hosts. You can explore additional possible patterns by using GuardDuty finding types and Amazon EventBridge target actions. This pattern’s code is available on GitHub. Feel free to play around with the code to add more GuardDuty findings to this pattern and also to build bigger and better patterns! Make sure to modify the patterns in this post to suit your defined requirements, and test and validate them before deploying them in a production environment.
If you have comments about this blog post, you can submit them in the Comments section below. If you have questions about using this pattern, start a thread in the GuardDuty, AWS WAF, or CloudWatch forums, or contact AWS Support.
Want more AWS Security news? Follow us on Twitter.
In November 2022, AWS introduced support for granular geographic (geo) match conditions in AWS WAF. This blog post demonstrates how you can use this new feature to customize your AWS WAF implementation and improve the security posture of your protected application.
AWS WAF provides inline inspection of inbound traffic at the application layer. You can use AWS WAF to detect and filter common web exploits and bots that could affect application availability or security, or consume excessive resources. Inbound traffic is inspected against web access control list (web ACL) rules. A web ACL rule consists of rule statements that instruct AWS WAF on how to inspect a web request.
The AWS WAF geographic match rule statement functionality allows you to restrict application access based on the location of your viewers. This feature is crucial for use cases like licensing and legal regulations that limit the delivery of your applications outside of specific geographic areas.
AWS recently released a new feature that you can use to build precise geographic rules based on International Organization for Standardization (ISO) 3166 country and area codes. With this release, you can now manage access at the ISO 3166 region level. This capability is available across AWS Regions where AWS WAF is offered and for all AWS WAF supported services. In this post, you will learn how to use this new feature with Amazon CloudFront and Elastic Load Balancing (ELB) origin types.
Summary of concepts
Before we discuss use cases and setup instructions, make sure that you are familiar with the following AWS services and concepts:
Amazon CloudFront: CloudFront is a web service that gives businesses and web application developers a cost-effective way to distribute content with low latency and high data transfer speeds.
Amazon Simple Storage Service (Amazon S3):Amazon S3 is an object storage service built to store and retrieve large amounts of data from anywhere.
AWS WAF labels: Labels contain metadata that can be added to web requests when a rule is matched. Labels can alter the behavior or default action of managed rules.
ISO (International Organization for Standardization) 3166 codes:ISO codes are internationally recognized codes that designate for every country and most of the dependent areas a two- or three-letter combination. Each code consists of two parts, separated by a hyphen. For example, in the code AU-QLD, AU is the ISO 3166 alpha-2 code for Australia, and QLD is the subdivision code of the state or territory—in this case, Queensland.
How granular geo labels work
Previously, geo match statements in AWS WAF were used to allow or block access to applications based on country of origin of web requests. With updated geographic match rule statements, you can control access at the region level.
In a web ACL rule with a geo match statement, AWS WAF determines the country and region of a request based on its IP address. After inspection, AWS WAF adds labels to each request to indicate the ISO 3166 country and region codes. You can use labels generated in the geo match statement to create a label match rule statement to control access.
AWS WAF generates two types of labels based on origin IP or a forwarded IP configuration that is defined in the AWS WAF geo match rule. These labels are the country and region labels.
By default, AWS WAF uses the IP address of the web request’s origin. You can instruct AWS WAF to use an IP address from an alternate request header, like X-Forwarded-For, by enabling forwarded IP configuration in the rule statement settings. For example, the country label for the United States with origin IP and forwarded IP configuration are awswaf:clientip:geo:country:US and awswaf:forwardedip:geo:country:US, respectively. Similarly, the region labels for a request originating in Oregon (US) with origin and forwarded IP configuration are awswaf:clientip:geo:region:US-OR and awswaf:forwardedip:geo:region:US-OR, respectively.
To demonstrate this AWS WAF feature, we will outline two distinct use cases.
Use case 1: Restrict content for copyright compliance using AWS WAF and CloudFront
Licensing agreements might prevent you from distributing content in some geographical locations, regions, states, or entire countries. You can deploy the following setup to geo-block content in specific regions to help meet these requirements.
In this example, we will use an AWS WAF web ACL that is applied to a CloudFront distribution with an S3 bucket origin. The web ACL contains a geo match rule to tag requests from Australia with labels, followed by a label match rule to block requests from the Queensland region. All other requests with source IP originating from Australia are allowed.
To configure the AWS WAF web ACL rule for granular geo restriction
In the navigation pane, choose Web ACLs, select Global (CloudFront) from the dropdown list, and then choose Create web ACL.
For Name, enter a name to identify this web ACL.
For Resource type, choose the CloudFront distribution that you created in step 1, and then choose Add.
Choose Next.
Choose Add rules, and then choose Add my own rules and rule groups.
For Name, enter a name to identify this rule.
For Rule type, choose Regular rule.
Configure a rule statement for a request that matches the statement Originates from a Country and select the Australia (AU) country code from the dropdown list.
Set the IP inspection configuration parameter to Source IP address.
Under Action, choose Count, and then choose Add Rule.
Create a new rule by following the same actions as in step 7 and enter a name to identify the rule.
For Rule type, choose Regular rule.
Configure a rule statement for a request that matches the statement Has a Label and enter awswaf:clientip:geo:region:AU-QLD for the match key.
Set the action to Block and choose Add rule.
For Actions, keep the default action of Allow.
For Amazon CloudWatch metrics, select the AWS WAF rules that you created in steps 8 and 14.
For Request sampling options, choose Enable sampled requests, and then choose Next.
Review and create the web ACL rule.
After the web ACL is created, you should see the web ACL configuration, as shown in the following figures. Figure 1 shows the geo match rule configuration.
Figure 1: Web ACL rule configuration
Figure 2 shows the Queensland regional geo restriction.
Figure 2: Queensland regional geo restriction – web ACL configuration<
The setup is now complete—you have a web ACL with two regular rules. The first rule matches requests that originate from Australia and adds geographic labels automatically. The label match rule statement inspects requests with Queensland granular geo labels and blocks them. To understand where requests are originating from, you can configure logging on the AWS WAF web ACL.
You can test this setup by making requests from Queensland, Australia, to the DNS name of the CloudFront distribution to invoke a block. CloudFront will return a 403 error, similar to the following example.
As shown in these test results, requests originating from Queensland, Australia, are blocked.
Use case 2: Allow incoming traffic from specific regions with AWS WAF and Application Load Balancer
We recently had a customer ask us how to allow traffic from only one region, and deny the traffic from other regions within a country. You might have similar requirements, and the following section will explain how to achieve that. In the example, we will show you how to allow only visitors from Washington state, while disabling traffic from the rest of the US.
This example uses an AWS WAF web ACL applied to an application load balancer in the US East (N. Virginia) Region with an Amazon EC2 instance as the target. The web ACL contains a geo match rule to tag requests from the US with labels. After we enable forwarded IP configuration, we will inspect the X-Forwarded-For header to determine the origin IP of web requests. Next, we will add a label match rule to allow requests from the Washington region. All other requests from the United States are blocked.
To configure the AWS WAF web ACL rule for granular geo restriction
After the application load balancer is created, open the AWS WAF console.
In the navigation pane, choose Web ACLs, and then choose Create web ACL in the US east (N. Virginia) Region.
For Name, enter a name to identify this web ACL.
For Resource type, choose the application load balancer that you created in step 1 of this section, and then choose Add.
Choose Next.
Choose Add rules, and then choose Add my own rules and rule groups.
For Name, enter a name to identify this rule.
For Rule type, choose Regular rule.
Configure a rule statement for a request that matches the statement Originates from a Country in, and then select the United States (US) country code from the dropdown list.
Set the IP inspection configuration parameter to IP address in Header.
Enter the Header field name as X-Forwarded-For.
For Match, choose Fallback for missing IP address. Web requests without a valid IP address in the header will be treated as a match and will be allowed.
Under Action, choose Count, and then choose Add Rule.
Create a new rule by following the same actions as in step 7 of this section, and enter a name to identify the rule.
For Rule type, choose Regular rule.
Configure a rule statement for a request that matches the statement Has a Label, and for the match key, enter awswaf:forwardedip:geo:region:US-WA.
Set the action to Allow and add choose Add Rule.
For Default web ACL action for requests that don’t match any rules, set the Action to Block.
For Amazon CloudWatch metrics, select the AWS WAF rules that you created in steps 8 and 14 of this section.
For Request sampling options, choose Enable sampled requests, and then choose Next.
Review and create the web ACL rule.
After the web ACL is created, you should see the web ACL configuration, as shown in the following figures. Figure 3 shows the geo match rule
Figure 3: Geo match rule
Figure 4 shows the Washington regional geo restriction.
Figure 4: Washington regional geo restriction – web ACL configuration
The following is a JSON representation of the rule:
The setup is now complete—you have a web ACL with two regular rules. The first rule matches requests that originate from the US after inspecting the origin IP in the X-Forwarded-For header, and adds geographic labels. The label match rule statement inspects requests with the Washington region granular geo labels and allows these requests.
If a user makes a web request from outside of the Washington region, the request will be blocked and a HTTP 403 error response will be returned, similar to the following.
AWS WAF now supports the ability to restrict traffic based on granular geographic labels. This gives you further control based on geographic location within a country.
In this post, we demonstrated two different use cases that show how this feature can be applied with CloudFront distributions and application load balancers. Note that, apart from CloudFront and application load balancers, this feature is supported by other origin types that are supported by AWS WAF, such as Amazon API Gateway and Amazon Cognito.
If you have feedback about this post, submit comments in the Comments section below. If you have questions about this post, start a new thread on the AWS WAF re:Post or contact AWS Support.
Want more AWS Security news? Follow us on Twitter.
This post is written by Madhu Singh (Solutions Architect), and Krupanidhi Jay (Solutions Architect).
Lambda function URLs is a dedicated HTTPs endpoint for a AWS Lambda function. You can configure a function URL to have two methods of authentication: IAM and NONE. IAM authentication means that you are restricting access to the function URL (and in-turn access to invoke the Lambda function) to certain AWS principals (such as roles or users). Authentication type of NONE means that the Lambda function URL has no authentication and is open for anyone to invoke the function.
This blog shows how to use Lambda function URLs with an authentication type of NONE and use custom authorization logic as part of the function code, and to only allow requests that present valid Amazon Cognito credentials when invoking the function. You also learn ways to protect Lambda function URL against common security threats like DDoS using AWS WAF and Amazon CloudFront.
Lambda function URLs provides a simpler way to invoke your function using HTTP calls. However, it is not a replacement for Amazon API Gateway, which provides advanced features like request validation and rate throttling.
Solution overview
There are four core components in the example.
1. A Lambda function with function URLs enabled
At the core of the example is a Lambda function with the function URLs feature enabled with the authentication type of NONE. This function responds with a success message if a valid authorization code is passed during invocation. If not, it responds with a failure message.
2. Amazon Cognito User Pool
Amazon Cognito user pools enable user authentication on websites and mobile apps. You can also enable publicly accessible Login and Sign-Up pages in your applications using Amazon Cognito user pools’ feature called the hosted UI.
In this example, you use a user pool and the associated Hosted UI to enable user login and sign-up on the website used as entry point. This Lambda function validates the authorization code against this Amazon Cognito user pool.
3. CloudFront distribution using AWS WAF
CloudFront is a content delivery network (CDN) service that helps deliver content to end users with low latency, while also improving the security posture for your applications.
AWS WAF is a web application firewall that helps protect your web applications or APIs against common web exploits and bots and AWS Shield is a managed distributed denial of service (DDoS) protection service that safeguards applications running on AWS. AWS WAF inspects the incoming request according to the configured Web Access Control List (web ACL) rules.
Adding CloudFront in front of your Lambda function URL helps to cache content closer to the viewer, and activating AWS WAF and AWS Shield helps in increasing security posture against multiple types of attacks, including network and application layer DDoS attacks.
4. Public website that invokes the Lambda function
The example also creates a public website built on React JS and hosted in AWS Amplify as the entry point for the demo. This website works both in authenticated mode and in guest mode. For authentication, the website uses Amazon Cognito user pools hosted UI.
Solution architecture
This shows the architecture of the example and the information flow for user requests.
In the request flow:
The entry point is the website hosted in AWS Amplify. In the home page, when you choose “sign in”, you are redirected to the Amazon Cognito hosted UI for the user pool.
Upon successful login, Amazon Cognito returns the authorization code, which is stored as a cookie with the name “code”. The user is redirected back to the website, which has an “execute Lambda” button.
When the user choose “execute Lambda”, the value from the “code” cookie is passed in the request body to the CloudFront distribution endpoint.
The AWS WAF web ACL rules are configured to determine whether the request is originating from the US or Canada IP addresses and to determine if the request should be allowed to invoke Lambda function URL origin.
Allowed requests are forwarded to the CloudFront distribution endpoint.
CloudFront is configured to allow CORS headers and has the origin set to the Lambda function URL. The request that CloudFront receives is passed to the function URL.
This invokes the Lambda function associated with the function URL, which validates the token.
The function code does the following in order:
Exchange the authorization code in the request body (passed as the event object to Lambda function) to access_token using Amazon Cognito’s token endpoint (check the documentation for more details).
Amazon Cognito user pool’s attributes like user pool URL, Client ID and Secret are retrieved from AWS Systems Manager Parameter Store (SSM Parameters).
These values are stored in SSM Parameter Store at the time these resources are deployed via AWS CDK (see “how to deploy” section)
The access token is then verified to determine its authenticity.
If valid, the Lambda function returns a message stating user is authenticated as <username> and execution was successful.
If either the authorization code was not present, for example, the user was in “guest mode” on the website, or the code is invalid or expired, the Lambda function returns a message stating that the user is not authorized to execute the function.
The webpage displays the Lambda function return message as an alert.
Getting started
Pre-requisites:
Before deploying the solution, please follow the README from the GitHub repository and take the necessary steps to fulfill the pre-requisites.
Deploy the sample solution
1. From the code directory, download the dependencies:
$ npm install
2. Start the deployment of the AWS resources required for the solution:
$ cdk deploy
Note:
optionally pass in the –profile argument if needed
The deployment can take up to 15 minutes
3. Once the deployment completes, the output looks similar to this:
Open the amplifyAppUrl from the output in your browser. This is the URL for the demo website. If you don’t see the “Welcome to Compute Blog” page, the Amplify app is still building, and the website is not available yet. Retry in a few minutes. This website works either in an authenticated or unauthenticated state.
Test the authenticated flow
To test the authenticated flow, choose “Sign In”.
2. In the sign-in page, choose on sign-up (for the first time) and create a user name and password.
3. To use an existing an user name and password, enter those credentials and choose login.
4. Upon successful sign-in or sign up, you are redirected back to the webpage with “Execute Lambda” button.
5. Choose this button. In a few seconds, an alert pop-up shows the logged in user and that the Lambda execution is successful.
Testing the unauthenticated flow
1. To test the unauthenticated flow, from the Home page, choose “Continue”.
2. Choose “Execute Lambda” and in a few seconds, you see a message that you are not authorized to execute the Lambda function.
Testing the geo-block feature of AWS WAF
1. Access the website from a Region other than US or Canada. If you are physically in the US or Canada, you may use a VPN service to connect to a Region other than US or Canada.
2. Choose the “Execute Lambda” button. In the Network trace of browser, you can see the call to invoke Lambda function was blocked with Forbidden response.
3. To try either the authenticated or unauthenticated flow again, choose “Return to Home Page” to go back to the home page with “Sign In” and “Continue” buttons.
Cleaning up
To delete the resources provisioned, run the cdk destroy command from the AWS CDK CLI.
Conclusion
In this blog, you create a Lambda function with function URLs enabled with NONE as the authentication type. You then implemented a custom authentication mechanism as part of your Lambda function code. You also increased the security of your Lambda function URL by setting it as Origin for the CloudFront distribution and using AWS WAF Geo and IP limiting rules for protection against common web threats, like DDoS.
For more serverless learning resources, visit Serverless Land.
In Part 1 of this two-part series, we shared an overview of some of the most important 2021 Amazon Web Services (AWS) Security service and feature launches. In this follow-up, we’ll dive deep into additional launches that are important for security professionals to be aware of and understand across all AWS services. There have already been plenty in the first half of 2022, so we’ll highlight those soon, as well.
AWS Identity
You can use AWS Identity Services to build Zero Trust architectures, help secure your environments with a robust data perimeter, and work toward the security best practice of granting least privilege. In 2021, AWS expanded the identity source options, AWS Region availability, and support for AWS services. There is also added visibility and power in the permission management system. New features offer new integrations, additional policy checks, and secure resource sharing across AWS accounts.
AWS Single Sign-On
For identity management, AWS Single Sign-On (AWS SSO) is where you create, or connect, your workforce identities in AWS once and manage access centrally across your AWS accounts in AWS Organizations. In 2021, AWS SSO announced new integrations for JumpCloud and CyberArk users. This adds to the list of providers that you can use to connect your users and groups, which also includes Microsoft Active Directory Domain Services, Okta Universal Directory, Azure AD, OneLogin, and Ping Identity.
For access management, there have been a range of feature launches with AWS Identity and Access Management (IAM) that have added up to more power and visibility in the permissions management system. Here are some key examples.
IAM made it simpler to relate a user’s IAM role activity to their corporate identity. By setting the new source identity attribute, which persists through role assumption chains and gets logged in AWS CloudTrail, you can find out who is responsible for actions that IAM roles performed.
IAM added support for policy conditions, to help manage permissions for AWS services that access your resources. This important feature launch of service principal conditions helps you to distinguish between API calls being made on your behalf by a service principal, and those being made by a principal inside your account. You can choose to allow or deny the calls depending on your needs. As a security professional, you might find this especially useful in conjunction with the aws:CalledVia condition key, which allows you to scope permissions down to specify that this account principal can only call this API if they are calling it using a particular AWS service that’s acting on their behalf. For example, your account principal can’t generally access a particular Amazon Simple Storage Service (Amazon S3) bucket, but if they are accessing it by using Amazon Athena, they can do so. These conditions can also be used in service control policies (SCPs) to give account principals broader scope across an account, organizational unit, or organization; they need not be added to individual principal policies or resource policies.
Another very handy new IAM feature launch is additional information about the reason for an access denied error message. With this additional information, you can now see which of the relevant access control policies (for example, IAM, resource, SCP, or VPC endpoint) was the cause of the denial. As of now, this new IAM feature is supported by more than 50% of all AWS services in the AWS SDK and AWS Command Line Interface, and a fast-growing number in the AWS Management Console. We will continue to add support for this capability across services, as well as add more features that are designed to make the journey to least privilege simpler.
IAM Access Analyzer also launched the ability to generate fine-grained policies based on analyzing past AWS CloudTrail activity. This feature provides a great new capability for DevOps teams or central security teams to scope down policies to just the permissions needed, making it simpler to implement least privilege permissions. IAM Access Analyzer launched further enhancements to expand policy checks, and the ability to generate a sample least-privilege policy from past activity was expanded beyond the account level to include an analysis of principal behavior within the entire organization by analyzing log activity stored in AWS CloudTrail.
AWS Resource Access Manager
AWS Resource Access Manager (AWS RAM) helps you securely share your resources across unrelated AWS accounts within your organization or organizational units (OUs) in AWS Organizations. Now you can also share your resources with IAM roles and IAM users for supported resource types. This update enables more granular access using managed permissions that you can use to define access to shared resources. In addition to the default managed permission defined for each shareable resource type, you now have more flexibility to choose which permissions to grant to whom for resource types that support additional managed permissions. Additionally, AWS RAM added support for global resource types, enabling you to provision a global resource once, and share that resource across your accounts. A global resource is one that can be used in multiple AWS Regions; the first example of a global resource is found in AWS Cloud WAN, currently in preview as of this publication. AWS RAM helps you more securely share an AWS Cloud WAN core network, which is a managed network containing AWS and on-premises networks. With AWS RAM global resource sharing, you can use the Cloud WAN core network to centrally operate a unified global network across Regions and accounts.
AWS Directory Service
AWS Directory Service for Microsoft Active Directory, also known as AWS Managed Microsoft Active Directory (AD), was updated to automatically provide domain controller and directory utilization metrics in Amazon CloudWatch for new and existing directories. Analyzing these utilization metrics helps you quantify your average and peak load times to identify the need for additional domain controllers. With this, you can define the number of domain controllers to meet your performance, resilience, and cost requirements.
Amazon Cognito
Amazon Cognitoidentity pools (federated identities) was updated to enable you to use attributes from social and corporate identity providers to make access control decisions and simplify permissions management in AWS resources. In Amazon Cognito, you can choose predefined attribute-tag mappings, or you can create custom mappings using the attributes from social and corporate providers’ access and ID tokens, or SAML assertions. You can then reference the tags in an IAM permissions policy to implement attribute-based access control (ABAC) and manage access to your AWS resources. Amazon Cognito also launched a new console experience for user pools and now supports targeted sign out through refresh token revocation.
Governance, control, and logging services
There were a number of important releases in 2021 in the areas of governance, control, and logging services.
This approach provides a powerful new middle ground between the older security models of prevention (which provide developers only an access denied message, and often can’t distinguish between an acceptable and an unacceptable use of the same API) and a detect and react model (when undesired states have already gone live). The Cfn-Guard 2.0 model gives builders the freedom to build with IaC, while allowing central teams to have the ability to reject infrastructure configurations or changes that don’t conform to central policies—and to do so with completely custom error messages that invite dialog between the builder team and the central team, in case the rule is unnuanced and needs to be refined, or if a specific exception needs to be created.
For example, a builder team might be allowed to provision and attach an internet gateway to a VPC, but the team can do this only if the routes to the internet gateway are limited to a certain pre-defined set of CIDR ranges, such as the public addresses of the organization’s branch offices. It’s not possible to write an IAM policy that takes into account the CIDR values of a VPC route table update, but you can write a Cfn-Guard 2.0 rule that allows the creation and use of an internet gateway, but only with a defined and limited set of IP addresses.
AWS Systems Manager Incident Manager
An important launch that security professionals should know about is AWS Systems Manager Incident Manager. Incident Manager provides a number of powerful capabilities for managing incidents of any kind, including operational and availability issues but also security issues. With Incident Manager, you can automatically take action when a critical issue is detected by an Amazon CloudWatch alarm or Amazon EventBridge event. Incident Manager runs pre-configured response plans to engage responders by using SMS and phone calls, can enable chat commands and notifications using AWS Chatbot, and runs automation workflows with AWS Systems Manager Automation runbooks. The Incident Manager console integrates with AWS Systems Manager OpsCenter to help you track incidents and post-incident action items from a central place that also synchronizes with third-party management tools such as Jira Service Desk and ServiceNow. Incident Manager enables cross-account sharing of incidents using AWS RAM, and provides cross-Region replication of incidents to achieve higher availability.
Amazon Simple Storage Service (Amazon S3) is one of the most important services at AWS, and its steady addition of security-related enhancements is always big news. Here are the 2021 highlights.
Access Points aliases
Amazon S3 introduced a new feature, Amazon S3 Access Points aliases. With Amazon S3 Access Points aliases, you can make the access points backwards-compatible with a large amount of existing code that is programmed to interact with S3 buckets rather than access points.
To understand the importance of this launch, we have to go back to 2019 to the launch of Amazon S3 Access Points. Access points are a powerful mechanism for managing S3 bucket access. They provide a great simplification for managing and controlling access to shared datasets in S3 buckets. You can create up to 1,000 access points per Region within each of your AWS accounts. Although bucket access policies remain fully enforced, you can delegate access control from the bucket to its access points, allowing for distributed and granular control. Each access point enforces a customizable policy that can be managed by a particular workgroup, while also avoiding the problem of bucket policies needing to grow beyond their maximum size. Finally, you can also bind an access point to a particular VPC for its lifetime, to prevent access directly from the internet.
With the 2021 launch of Access Points aliases, Amazon S3 now generates a unique DNS name, or alias, for each access point. The Access Points aliases look and acts just like an S3 bucket to existing code. This means that you don’t need to make changes to older code to use Amazon S3 Access Points; just substitute an Access Points aliases wherever you previously used a bucket name. As a security team, it’s important to know that this flexible and powerful administrative feature is backwards-compatible and can be treated as a drop-in replacement in your various code bases that use Amazon S3 but haven’t been updated to use access point APIs. In addition, using Access Points aliases adds a number of powerful security-related controls, such as permanent binding of S3 access to a particular VPC.
S3 Bucket Keys were launched at the end of 2020, another great launch that security professionals should know about, so here is an overview in case you missed it. S3 Bucket Keys are data keys generated by AWS KMS to provide another layer of envelope encryption in which the outer layer (the S3 Bucket Key) is cached by S3 for a short period of time. This extra key layer increases performance and reduces the cost of requests to AWS KMS. It achieves this by decreasing the request traffic from Amazon S3 to AWS KMS from a one-to-one model—one request to AWS KMS for each object written to or read from Amazon S3—to a one-to-many model using the cached S3 Bucket Key. The S3 Bucket Key is never stored persistently in an unencrypted state outside AWS KMS, and so Amazon S3 ultimately must always return to AWS KMS to encrypt and decrypt the S3 Bucket Key, and thus, the data. As a result, you still retain control of the key hierarchy and resulting encrypted data through AWS KMS, and are still able to audit Amazon S3 returning periodically to AWS KMS to refresh the S3 Bucket Keys, as logged in CloudTrail.
Returning to our review of 2021, S3 Bucket Keys gained the ability to use Amazon S3 Inventory and Amazon S3 Batch Operations automatically to migrate objects from the higher cost, slightly lower-performance SSE-KMS model to the lower-cost, higher-performance S3 Bucket Keys model.
To understand this launch, we need to go in time to the origins of Amazon S3, which is one of the oldest services in AWS, created even before IAM was launched in 2011. In those pre-IAM days, a storage system like Amazon S3 needed to have some kind of access control model, so Amazon S3 invented its own: Amazon S3 access control lists (ACLs). Using ACLs, you could add access permissions down to the object level, but only with regard to access by other AWS account principals (the only kind of identity that was available at the time), or public access (read-only or read-write) to an object. And in this model, objects were always owned by the creator of the object, not the bucket owner.
After IAM was introduced, Amazon S3 added the bucket policy feature, a type of resource policy that provides the rich features of IAM, including full support for all IAM principals (users and roles), time-of-day conditions, source IP conditions, ability to require encryption, and more. For many years, Amazon S3 access decisions have been made by combining IAM policy permissions and ACL permissions, which has served customers well. But the object-writer-is-owner issue has often caused friction. The good news for security professionals has been that a deny by either type of access control type overrides an allow by the other, so there were no security issues with this bi-modal approach. The challenge was that it could be administratively difficult to manage both resource policies—which exist at the bucket and access point level—and ownership and ACLs—which exist at the object level. Ownership and ACLs might potentially impact the behavior of only a handful of objects, in a bucket full of millions or billions of objects.
With the features released in 2021, Amazon S3 has removed these points of friction, and now provides the features needed to reduce ownership issues and to make IAM-based policies the only access control system for a specified bucket. The first step came in 2020 with the ability to make object ownership track bucket ownership, regardless of writer. But that feature applied only to newly-written objects. The final step is the 2021 launch we’re highlighting here: the ability to disable at the bucket level the evaluation of all existing ACLs—including ownership and permissions—effectively nullifying all object ACLs. From this point forward, you have the mechanisms you need to govern Amazon S3 access with a combination of S3 bucket policies, S3 access point policies, and (within the same account) IAM principal policies, without worrying about legacy models of ACLs and per-object ownership.
Additional database and storage service features
AWS Backup Vault Lock
AWS Backup added an important new additional layer for backup protection with the availability of AWS Backup Vault Lock. A vault lock feature in AWS is the ability to configure a storage policy such that even the most powerful AWS principals (such as an account or Org root principal) can only delete data if the deletion conforms to the preset data retention policy. Even if the credentials of a powerful administrator are compromised, the data stored in the vault remains safe. Vault lock features are extremely valuable in guarding against a wide range of security and resiliency risks (including accidental deletion), notably in an era when ransomware represents a rising threat to data.
ACM Private CA achieved FedRAMP authorization for six additional AWS Regions in the US.
Additional certificate customization now allows administrators to tailor the contents of certificates for new use cases, such as identity and smart card certificates; or to securely add information to certificates instead of relying only on the information present in the certificate request.
Additional capabilities were added for sharing CAs across accounts by using AWS RAM to help administrators issue fully-customized certificates, or revoke them, from a shared CA.
Integration with Kubernetes provides a more secure certificate authority solution for Kubernetes containers.
Online Certificate Status Protocol (OCSP) provides a fully-managed solution for notifying endpoints that certificates have been revoked, without the need for you to manage or operate infrastructure yourself.
Network and application protection
We saw a lot of enhancements in network and application protection in 2021 that will help you to enforce fine-grained security policies at important network control points across your organization. The services and new capabilities offer flexible solutions for inspecting and filtering traffic to help prevent unauthorized resource access.
AWS WAF
AWS WAF launched AWS WAF Bot Control, which gives you visibility and control over common and pervasive bots that consume excess resources, skew metrics, cause downtime, or perform other undesired activities. The Bot Control managed rule group helps you monitor, block, or rate-limit pervasive bots, such as scrapers, scanners, and crawlers. You can also allow common bots that you consider acceptable, such as status monitors and search engines. AWS WAF also added support for custom responses, managed rule group versioning, in-line regular expressions, and Captcha. The Captcha feature has been popular with customers, removing another small example of “undifferentiated work” for customers.
AWS Shield Advanced
AWS Shield Advanced now automatically protects web applications by blocking application layer (L7) DDoS events with no manual intervention needed by you or the AWS Shield Response Team (SRT). When you protect your resources with AWS Shield Advanced and enable automatic application layer DDoS mitigation, Shield Advanced identifies patterns associated with L7 DDoS events and isolates this anomalous traffic by automatically creating AWS WAF rules in your web access control lists (ACLs).
Amazon CloudFront
In other edge networking news, Amazon CloudFront added support for response headers policies. This means that you can now add cross-origin resource sharing (CORS), security, and custom headers to HTTP responses returned by your CloudFront distributions. You no longer need to configure your origins or use custom Lambda@Edge or CloudFront Functions to insert these headers.
Following Route 53 Resolver’s much-anticipated launch of DNS logging in 2020, the big news for 2021 was the launch of its DNS Firewall capability. Route 53 Resolver DNS Firewall lets you create “blocklists” for domains you don’t want your VPC resources to communicate with, or you can take a stricter, “walled-garden” approach by creating “allowlists” that permit outbound DNS queries only to domains that you specify. You can also create alerts for when outbound DNS queries match certain firewall rules, allowing you to test your rules before deploying for production traffic. Route 53 Resolver DNS Firewall launched with two managed domain lists—malware domains and botnet command and control domains—enabling you to get started quickly with managed protections against common threats. It also integrated with Firewall Manager (see the following section) for easier centralized administration.
AWS Network Firewall and Firewall Manager
Speaking of AWS Network Firewall and Firewall Manager, 2021 was a big year for both. Network Firewall added support for AWS Managed Rules, which are groups of rules based on threat intelligence data, to enable you to stay up to date on the latest security threats without writing and maintaining your own rules. AWS Network Firewall features a flexible rules engine enabling you to define firewall rules that give you fine-grained control over network traffic. As of the launch in late 2021, you can enable managed domain list rules to block HTTP and HTTPS traffic to domains identified as low-reputation, or that are known or suspected to be associated with malware or botnets. Prior to that, another important launch was new configuration options for rule ordering and default drop, making it simpler to write and process rules to monitor your VPC traffic. Also in 2021, Network Firewall announced a major regional expansion following its initial launch in 2020, and a range of compliance achievements and eligibility including HIPAA, PCI DSS, SOC, and ISO.
Elastic Load Balancing now supports forwarding traffic directly from Network Load Balancer (NLB) to Application Load Balancer (ALB). With this important new integration, you can take advantage of many critical NLB features such as support for AWS PrivateLink and exposing static IP addresses for applications that still require ALB.
The AWS Networking team also made Amazon VPC private NAT gateways available in both AWS GovCloud (US) Regions. The expansion into the AWS GovCloud (US) Regions enables US government agencies and contractors to move more sensitive workloads into the cloud by helping them to address certain regulatory and compliance requirements.
Compute
Security professionals should also be aware of some interesting enhancements in AWS compute services that can help improve their organization’s experience in building and operating a secure environment.
Amazon Elastic Compute Cloud (Amazon EC2) launched the Global View on the console to provide visibility to all your resources across Regions. Global View helps you monitor resource counts, notice abnormalities sooner, and find stray resources. A few days into 2022, another simple but extremely useful EC2 launch was the new ability to obtain instance tags from the Instance Metadata Service (IMDS). Many customers run code on Amazon EC2 that needs to introspect about the EC2 tags associated with the instance and then change its behavior depending on the content of the tags. Prior to this launch, you had to associate an EC2 role and call the EC2 API to get this information. That required access to API endpoints, either through a NAT gateway or a VPC endpoint for Amazon EC2. Now, that information can be obtained directly from the IMDS, greatly simplifying a common use case.
Amazon EC2 launched sharing of Amazon Machine Images (AMIs) with AWS Organizations and Organizational Units (OUs). Previously, you could share AMIs only with specific AWS account IDs. To share AMIs within AWS Organizations, you had to explicitly manage sharing of AMIs on an account-by-account basis, as they were added to or removed from AWS Organizations. With this new feature, you no longer have to update your AMI permissions because of organizational changes. AMI sharing is automatically synchronized when organizational changes occur. This feature greatly helps both security professionals and governance teams to centrally manage and govern AMIs as you grow and scale your AWS accounts. As previously noted, this feature was also added to EC2 Image Builder. Finally, Amazon Data Lifecycle Manager, the tool that manages all your EBS volumes and AMIs in a policy-driven way, now supports automatic deprecation of AMIs. As a security professional, you will find this helpful as you can set a timeline on your AMIs so that, if the AMIs haven’t been updated for a specified period of time, they will no longer be considered valid or usable by development teams.
Looking ahead
In 2022, AWS continues to deliver experiences that meet administrators where they govern, developers where they code, and applications where they run. We will continue to summarize important launches in future blog posts. If you’re interested in learning more about AWS services, join us for AWS re:Inforce, the AWS conference focused on cloud security, identity, privacy, and compliance. AWS re:Inforce 2022 will take place July 26–27 in Boston, MA. Registration is now open. Register now with discount code SALxUsxEFCw to get $150 off your full conference pass to AWS re:Inforce. For a limited time only and while supplies last. We look forward to seeing you there!
To stay up to date on the latest product and feature launches and security use cases, be sure to read the What’s New with AWS announcements (or subscribe to the RSS feed) and the AWS Security Blog.
If you have feedback about this post, submit comments in the Comments section below. If you have questions about this post, contact AWS Support.
Want more AWS Security news? Follow us on Twitter.
It’s the beginning of a new week, and I’d like to start with a recap of the most significant AWS news from the previous 7 days. Last week was special because I had the privilege to be at the very first EMEA AWS Heroes Summit in Milan, Italy. It was a great opportunity of mutual learning as this community of experts shared their thoughts with AWS developer advocates, product managers, and technologists on topics such as containers, serverless, and machine learning.
Last Week’s Launches Here are the launches that got my attention last week:
Private IP VPNs with AWS Site-to-Site VPN – You can now deploy AWS Site-to-Site VPN connections over AWS Direct Connectusing private IP addresses. This way, you can encrypt traffic between on-premises networks and AWS via Direct Connect connections without the need for public IP addresses.
AWS Center for Quantum Networking – Research and development of quantum computers have the potential to revolutionize science and technology. To address fundamental scientific and engineering challenges and develop new hardware, software, and applications for quantum networks, we announced the AWS Center for Quantum Networking.
Synthetic data generation with Amazon SageMaker Ground Truth – Generate labeled synthetic image data that you can combine with real-world data to create more complete training datasets for your ML models.
Large object storage strategies for Amazon DynamoDB – A blog post showing different options for handling large objects within DynamoDB and the benefits and disadvantages of each approach.
This post was co-written with Geoff Baskwill, member of the Architecture Enabling Team at Trend Micro. At Trend Micro, we use AWS technologies to build secure solutions to help our customers improve their security posture.
We’ll build on the idea of passing calls to Amazon Cognito through a lightweight proxy. This pattern allows you to augment identity flows in your system with additional processing without having to change the client or the backend. For example, you can use the proxy layer to protect public clients as explained in the original post. You can also use this layer to apply additional fraud detection logic to prevent fraudulent sign up, propagate events to downstream systems for monitoring or enhanced logging, and replicate certain events to another AWS Region (for example, to build high availability and multi-Region capabilities).
The solution in the original post used Amazon CloudFront, Lambda@Edge, and AWS WAF to implement protection of public clients, and hinted that there are multiple ways to do it. In this post, we explore one of these alternatives by using Amazon API Gateway and a proxy AWS Lambda function to implement the proxy to Amazon Cognito. This alternative offers improved performance and full access to request and response elements.
Solution overview
The focus of this solution is to protect public clients of the Amazon Cognito user pool.
The workflow is shown in Figure 1 and works as follows:
Configure the client application (mobile or web client) to use the API Gateway endpoint as a proxy to an Amazon Cognito regional endpoint. You also create an application client in Amazon Cognito with a secret. This means that any unauthenticated API call must have the secret hash.
Use a Lambda function to add a secret hash to the relevant incoming requests before passing them on to the Amazon Cognito endpoint. This function can also be used for other purposes like logging, propagation of events, or additional validation.
In the Lambda function, you must have the app client secret to be able to calculate the secret hash and add it to the request. We recommend that you keep the secret in AWS Secrets Manager and cache it for the lifetime of the function.
Use AWS WAF with API Gateway to enforce rate limiting, implement allow and deny lists, and apply other rules according to your security requirements.
Clients that send unauthenticated API calls to the Amazon Cognito endpoint directly are blocked and dropped because of the missing secret.
Not shown: You may want to set up a custom domain and certificate for your API Gateway endpoint.
Figure 1. A proxy solution to the Amazon Cognito regional endpoint
Deployment steps
You can use the following AWS CloudFormation template to deploy this proxy pattern for your existing Amazon Cognito user pool.
Note: This template references a Lambda code package from a bucket in the us-east-1 Region. For that reason, the template can be only created in us-east-1. If you need to create the proxy solution in another Region, download the template and Lambda code package, update the template to reference another Amazon Simple Storage Service (Amazon S3) bucket that you own in the desired Region, and upload the code package to that S3 bucket. Then you can deploy your modified template in the desired Region.
This template requires the user pool ID as input and will create several resources in your AWS account to support the following proxy pattern:
A new application client with a secret will be added to your Amazon Cognito user pool
The secret will be stored in Secrets Manager and will be read from the proxy Lambda function
The proxy Lambda function will be used to intercept Amazon Cognito API calls and attach client-secret to applicable requests
The API Gateway project provides the custom proxy endpoint that is used as the Amazon Cognito endpoint in your client applications
An AWS WAF WebACL provides firewall protection to the API Gateway endpoint. The WebACL includes placeholder rules for Allow and Deny lists of IPs. It also includes a rate limiting rule that will block requests from IP addresses that exceed the number of allowed requests within a five-minute period (rate limit value is provided as input to the template)
Several helper resources will also be created like Lambda functions, necessary AWS IAM policies, and roles to allow the solution to function properly
After you create a successful stack, you can find the endpoint URL in the outputs section of your CloudFormation stack. This is the URL we use in the next section with client applications.
Note: The template and code has been simplified for demonstration purposes. If you plan to deploy this solution in production, make sure to review these resources for compliance with your security and performance requirements. For example, you might need to enable certain logs or log encryption or use a customer managed key for encryption.
Integrating your client with proxy solution
Integrate the client application with the proxy by changing the endpoint in your client application to use the endpoint URL for the proxy API Gateway. The endpoint URL and application client ID are located in the Outputs section of the CloudFormation stack.
Next, edit your client-side code to forward calls to Amazon Cognito through the proxy endpoint and use the new application client ID. For example, if you’re using the Identity SDK, you should change this property as follows.
If you’re using AWS Amplify, change the endpoint in the aws-exports.js file by overriding the property aws_cognito_endpoint. Or, if you configure Amplify Auth in your code, you can provide the endpoint as follows.
If you have a mobile application that uses the Amplify mobile SDK, override the endpoint in your configuration as follows (don’t include AppClientSecret parameter in your configuration).
Note that the Endpoint value contains the domain name only, not the full URL. This feature is available in the latest releases of the iOS and Android SDKs.
"CognitoUserPool": { "Default": { "AppClientId": "<APP-CLIENT-ID>", "Endpoint": "<APIGATEWAY-DOMAIN-NAME>", "PoolId": "<USER-POOL-ID>", "Region": "<REGION>" } } WARNING: If you do an amplify push or amplify pull operation, the Amplify CLI overwrites customizations to the awsconfiguration.json and amplifyconfiguration.json files. You must manually re-apply the Endpoint customization and remove the AppClientSecret if you use the CLI to modify your cloud backend.
When to use this pattern
The same guidance for using this pattern applies as in the original post.
You may prefer this solution if you are familiar with API Gateway or if you want to take advantage of the following:
Use CloudWatch metrics from API Gateway to monitor the behavior and health of your Amazon Cognito user pool.
Find and examine logs from your Lambda proxy function in the Region where you have deployed this solution.
Deploy your proxy function into an Amazon Virtual Private Cloud (Amazon VPC) and access sensitive data or services in the Amazon VPC or through Amazon VPC endpoints.
Have full access to request and response in the proxy Lambda function
Extend the proxy features
Now that you are intercepting all of the API requests to Amazon Cognito, add features to your identity layer:
Emit events using Amazon EventBridge when user data changes. You can do this when the proxy function receives mutating actions like UpdateUserAttribute (among others) and Amazon Cognito processes the request successfully.
Implement more complex rate limiting than what AWS WAF supports, like per-user rate limits regardless of where IP address requests are coming from. This can also be extended to include fraud detection, request input validation, and integration with third-party security tools.
Build a geo-redundant user pool that transparently mitigates regional failures by replicating mutating actions to an Amazon Cognito user pool in another Region.
Limitations
This solution has the same limitations highlighted in the original post. Keep in mind that resourceful authenticated users can still make requests to the Amazon Cognito API directly using the access token they obtained from authentication. If you want to prevent this from happening, adjust the proxy to avoid returning the access token to clients or return an encrypted version of the token.
Conclusion
In this post, we explored an alternative solution that implements a thin proxy to Amazon Cognito endpoint. This allows you to protect your application against unwanted requests and enrich your identity flows with additional logging, event propagation, validations, and more.
As the world’s largest fantasy sports platforms with more than 120 million registered users, Dream11 runs multiple contests simultaneously while processing millions of user requests per minute. Their user-centric and data-driven teams make it a priority to ensure that the Dream11 application (app) remains protected against all kinds of threats and vulnerabilities.
Introduction to AWS WAF Security Automations
AWS WAF is a web application firewall that helps protect apps and APIs against common web exploits and bots. These attacks may affect availability, compromise security, or consume excessive resources. AWS WAF gives you control over how traffic reaches your applications. You can create security rules that control bot traffic and block common attack patterns, such as SQL injection or cross-site scripting (XSS.)
In this blog post, we will explain how Dream11 uses AWS WAF Security Automations to protect its application from scanners and probes attacks.
Scanner and probe automation
To understand the scanner and probe automation, let’s look at a realistic attack scenario for a standard app that is protected by AWS WAF. Let’s assume that a malicious user is trying to scan the app and identify loopholes using their custom tool. They plan to conduct injection attacks (such as SQLi, XSS) or directory brute force attacks.
The app, secured by AWS WAF, has rules in place to block requests if certain signatures and patterns are matched. AWS WAF cannot have all possible payload lists for each attack vector. This means that after some trial and errors, an attacker may find the payload that doesn’t get blocked by AWS WAF and try to exploit the vulnerability.
In this case, what if AWS WAF can detect the behavior of malicious user IPs and block it for a certain time period? Wouldn’t it be great if AWS WAF blocks the IP of a malicious user after receiving a couple of malicious requests? That way, new requests coming from that IP will be blocked without AWS WAF having to check all the rules in the web ACL. Any successful bypass attempts will also get blocked from that IP. Rather than permanently blocking the IP, this feature blocks the offending IP for a certain time period, discouraging the attacker from any further attempts. It acts as a first step of incident response. Here’s where automation can help.
Scanner and probe automation monitors Amazon CloudFront logs and analyses HTTP status codes for requests coming from different IPs. Based on the configured threshold of HTTP status codes, scanner and probe automation will update the malicious IP directly to the AWS WAF rule IPSet. It then blocks subsequent requests from that IP for a configured period of time.
The AWS WAF Security Automations solution creates an AWS WAF rule, an AWS Lambda function, and a Scanner and Probes Amazon Athena query. The Athena query parses Amazon CloudFront or Application Load Balancer access logs at regular intervals. It counts the number of bad requests per minute from unique source IP addresses. The Lambda function updates the AWS WAF IPSet rule to block further scans from IP addresses with a high error rate.
Scanner and probe solution
Figure 1. Solution architecture for scanner and probe automation (xxx represents the numbers as defined by the use case)
The workflow of the solution is as follows, shown in Figure 1:
CloudFront logs are pushed to the Amazon S3 bucket
Log Parser Lambda will run the Athena query to find the error code threshold for each unique IP
If the HTTP error threshold is crossed for any IP, the Lambda function will update the IP into an AWS WAF IPSet for a certain time
The IPSet is unblocked automatically after the time period is over
Customizing the AWS WAF Security Automation solution
Scanner and probe automation with rules will block traffic if the error rate for a particular IP crosses the threshold. It then adds the IP in the blocked IPSet. This IP is blocked for a configurable amount of time (for example, 12 hours, 2 days, 1 week).
During the customization of AWS WAF for Dream11, there were instances which required exceptions to the preceding rule. One was to prevent internal services/gateway IPs from getting blocked by the security automation. We needed to customize the rules for these predefined thresholds. For example: the solution should block the external traffic, but exclude any internal IP addresses.
The Dream11 Security team customized the Lambda logic to approve all internal NAT gateway IPs. Scanner and probe automation ignores these IPs even if there is a high number of errors from the approved IPs. Sample code is as follows:
log.info("[update_ip_set] \tIgnore the approved IP ")
if ip_type == "IPV4" and source_ip not in outstanding_requesters['ApprovedIPs']: addresses_v4.append(source_ip) elif ip_type == "IPV6" and source_ip not in outstanding_requesters['ApprovedIPs']: addresses_v6.append(source_ip)
Note: Create a JSON file with list of approved IPs and store it in APP_ACCESS_LOG_BUCKET We will use the same S3 bucket to put our office-approved IPs as xyz.json file where we store our CloudFront access logs. This is configurable during CloudFormation template for Security Automation.
Code explanation:
The custom code first validates the particular IP for which the error threshold is crossed against the approved IPs.
If the IP belongs to the IPV4 or IPV6 format and isn’t an approved IP, it will be appended to the blocked IPSet for a certain period of time.
The customization of the Lambda function provides a security automation solution that doesn’t block any legitimate request. At the same time, it provides protection against scanner and probe attacks. AWS WAF security automation is an open-source solution and is hosted on GitHub.
Conclusion
In this blog post, we’ve given a brief overview of how you can reduce attacks by using AWS WAF Security Automations against scanners and probes. We’ve also illustrated the customization implemented by the Dream11 security team.
By automating your security operations, you will improve effective incident response. You can prioritize threats and handle cyber attacks automatically with automated courses of action. This reduces the need for human intervention, reduces response time, and addresses security issues without manual effort.
After implementing this at Dream11, we were able to create custom, application-specific rules that blocked attack patterns. This has provided application availability, secure resources, and has prevented excessive resource consumption. With this solution, we are able to provide the best fantasy sports experience for over 120 million users.
A few years ago at Sydney Summit, I had an excellent question from one of our attendees. She asked me to help her design a cost-effective, reliable, and not overcomplicated solution for protection against simple bots for her web-facing resources on Amazon Web Services (AWS). I remember the occasion because with the release of AWS WAF Bot Control, I can now address the question with an elegant solution. The Bot Control feature now makes this a matter of switching it on to start filtering out common and pervasive bots that generate over 50 percent of the traffic against typical web applications.
Reduce Unwanted Traffic on Your Website with New AWS WAF Bot Control introduced AWS WAF Bot Control and some of its capabilities. That blog post covers everything you need to know about where to start and what elements it uses for configuration and protection. This post unpacks closely-related functionalities, and shares key considerations, best practices, and how to customize for common use cases. Use cases covered include:
Limiting the crawling rate of a bot leveraging labels and AWS WAF response headers
Enabling Bot Control only for certain parts of your application with scope down statements
Prioritizing verified bots or allowing only specific ones using labels
Inserting custom headers into requests from certain bots based on their labels
Key elements of AWS WAF Bot Control fine-tuning
Before moving on to precise configuration of the bot mitigation capability, it is important to understand the components that go into the process.
Labels
Although labels aren’t unique to Bot Control, the feature takes advantage of them, and many configurations use labels as the main input. A label is a string value that is applied to a request based on matching a rule statement. One way of thinking about them is as tags that belong to the specific request. The request acquires them after being processed by a rule statement, and can be used as identification of similar requests in all subsequent rules within the same web ACL. Labels enable you to act on a group of requests that meets specific criteria. That’s because the subsequent rules in the same web ACL have access to the generated labels and can match against them.
Labels go beyond just a mechanism for matching a rule. Labels are independent of a rule’s action, as they can be generated for Block, Allow, and Count. That opens up opportunities to filter or construct queries against records in AWS WAF logs based on labels, and so implement sophisticated analytics.
A label is a string made up of a prefix, optional namespace, and a name delimited by a colon. For example: prefix:[namespace:]name. The prefix is automatically added by AWS WAF.
AWS WAF Bot Control includes various labels and namespaces:
bot:category: Type of bot. For example, search_engine, content_fetcher
bot:name: Name of a specific bot (if available). For example, scrapy, mauibot, crawler4j
bot:verified: Verified bots are generally safe for web applications. For example, googlebot and linkedin. Bot Control performs validation to confirm that such bots come from the source that they claim, using the bot confirmation detection logic described later in this section.
By default, verified bots are not blocked by Bot Control, but you can use a label to block them with a custom rule.
signal: attributes of the request indicate a bot activity. For example, non_browser_user_agent, automated_browser
These labels are added through managed bot detection logic, and Bot Control uses them to perform the following:
Known bot categorization: Comparing the request user-agent to known bots to categorize and allow customers to block by category. Bots are categorized by their function, such as scrapers, search engines, social media.
Bot confirmation: Most respectable bots provide a way to validate beyond the user-agent, typically by doing a reverse DNS lookup of the IP address to confirm the validity of domain and host names. These automatic checks will help you to ensure that only legitimate bots are allowed, and provide a signal to flag requests to downstream systems for bot detection.
Header validation: Request headers validation is performed against a series of checks to look for missing headers, malformed headers, or invalid headers.
Browser signature matching: TLS handshake data and request headers can be deconstructed and partially recombined to create a browser signature that identifies browser and OS combinations. This signature can be validated against the user-agent to confirm they match, and checked against lists of known-good browser known-bad browser signatures.
Below are a few examples of labels that Bot Control has. You can obtain the full list by calling the DescribeManagedRuleGroup API.
Although Bot Control can be enabled and start protecting your web resources with the default Block action, you can switch all rules in the rule group into a Count action at the beginning. This accomplishes the following:
Avoids false positives with requests that might match one of the rules in Bot Control but still be a valid bot for your resource.
Allows you to accumulate enough data points in the form of labels and actions on requests with them, if some of the requests matched rules in Bot Control. That enables you to make informed decisions on constructing rules for each desired bot or category and when switching them into a default action is appropriate.
Labels can be looked up in Amazon CloudWatch metrics and AWS WAF logs, and as soon as you have them, you can start planning whether exceptions or any custom rules are needed to cater for a specific scenario. This blog post explores examples of such use cases in the Common use cases sections below.
Additionally, as AWS WAF processes rules in sequential order, you should consider where the Bot Control rule group is located in your web ACL. To filter out requests that you confidently consider unwanted, you can place AWS Managed Rules rule groups—such as the Amazon IP reputation list—before the Bot Control rule group in the evaluation order. This decreases the number of requests processed by Bot Control, and makes it more cost effective. Simultaneously, Bot Control should be early enough in the rules to:
Enable label generation for downstream rules. That also provides higher visibility as a side benefit.
Decrease false positives by not blocking desired bots before they reach Bot Control.
AWS WAF Bot Control fine-tuning wouldn’t be complete and configurable without a set of recently released features and capabilities of AWS WAF. Let’s unpack them.
How to work with labels in CloudWatch metrics and AWS WAF logs
Generated labels generate CloudWatch metrics and are placed into AWS WAF logs. It enables you to see what bots and categories hit your website, and the labels associated with them that you can use for fine tuning.
CloudWatch metrics are generated with the following dimensions and metrics.
Region dimension is available for all Regions except Amazon CloudFront. When web ACL is associated with CloudFront, metrics are in the Northern Virginia Region.
WebACL dimension is the name of the WebACL
Namespace is the fully qualified namespace, including the prefix
LabelValue is the label name
Action is the terminating action (for example, Allow, Block, Count)
AWS WAF includes a shortcut to associated CloudWatch metrics at the top of the Overview page, as shown in Figure 1.
Figure 1: Title and description of the chart in AWS WAF with a shortcut to CloudWatch
Alternatively, you can find them in the WAFV2 service category of the CloudWatch Metrics section.
CloudWatch displays generated labels and the volume across dates and times, so you can evaluate and make informed decisions to structure the rules or address false positives. Figure 2 illustrates what labels were generated for requests from bots that hit my website. This example configured only a couple of explicit Allow actions, so most of them were blocked. The top section of the figure 2 shows the load from two selected labels.
Figure 2: WAFV2 CloudWatch metrics for generated Label Namespaces
In AWS WAF logs, generated labels are included in an array under the field labels. Figure 3 shows an example request with the labels array at the bottom.
Figure 3: An example of an AWS WAF log record
This example shows three labels generated for the same request. Uptimerobot follows the monitoring category label, and combining these two labels is useful to provide flexibility for configurations based on them. You can use the whole category, or be laser-focused using the label of the specific bot. You will see how and why that matters later in this blog post. The third label, non_browser_user_agent, is a signal of forwarded requests that have extra headers. For protection from bots in conjunction with labels, you can construct extra scanning in your application for certain requests.
Scope-down statements
Given that Bot Control is a premium feature and is a paid AWS Managed Rules, the ability to keep your costs in control is crucial. The scope-down statement allows you to optimize for cost by filtering out any traffic that doesn’t require inspection by Bot Control.
To address this goal, you can use scope down statements that can be applied to two broad scenarios.
You can exclude certain parts of your resource from scanning by Bot Control. Think of parts of your web site that you don’t mind being accessed by bots, typically that would be static content, such as images and CSS files. Leaving protection on everything else, such as APIs and login pages. You can also exclude IP ranges that can be considered safe from bot management. For example, traffic that’s known to come from your organization or viewers that belong to your partners or customers.
Alternatively, you can look at this from a different angle, and only apply bot management to a small section of your resources. For example, you can use Bot Control to protect a login page, or certain sensitive APIs, leaving everything else outside of your bot management.
With all of these tools in our toolkit let’s put them into perspective and dive deep into use cases and scenarios.
Common use cases for AWS WAF Bot Control fine-tuning
There are several methods for fine tuning Bot Control to better meet your needs. In this section, you’ll see some of the methods you can use.
Limit the crawling rate
In some cases, it is necessary to allow bots access to your websites. A good example is search engine bots, that crawl the web and create an index. If optimization for search engines is important for your business, but you notice excessive load from too many requests hitting your web resource, you might face a dilemma of how to slow crawlers down without unnecessarily blocking them. You can solve this with a combination of Bot Control detection logic and a rate-based rule with a response status code and header to communicate your intention back to crawlers. Most crawlers that are deemed useful have a built-in mechanism to decrease their crawl rate when you detect and respond to increased load.
To customize bot mitigation and set the crawl rate below limits that might negatively affect your web resource
In the AWS WAF console, select Web ACLs from the left menu. Open your web ACL or follow the steps to create a web ACL.
Choose the Rules tab and select Add rules. Select Add managed rule groups and proceed with the following settings:
In the AWS managed rule groups section, select the switch Add to web ACL to enable Bot Control in the web ACL. This also gives you labels that you can use in other rules later in the evaluation process inside the web ACL.
Select Add rules and choose Save
In the same web ACL, select Add rules menu and select Add my own rules and rule groups.
Using the provided Rule builder, configure the following settings:
Enter a preferred name for the rule and select Rate-based rule.
Enter a preferred rate limit for the rule. For example, 500.
Note: The rate limit is the maximum number of requests allowed from a single IP address in a five-minute period.
Select Only consider requests that match the criteria in a rule statement to enable the scope-down statement to narrow the scope of the requests that the rule evaluates.
Under the Inspect menu, select Has a label to focus only on certain types of bots.
In the Match key field, enter one of the following labels to match based on broad categories, such as verified bots or all bots identified as scraping as illustrated on Figure 4:
Alternatively, you can narrow down to a specific bot using its label:
awswaf:managed:aws:bot-control:bot:name:Googlebot
Figure 4: Label match rule statement in a rule builder with a specific match key
In the Action section, configure the following settings:
Select Custom response to enable it.
Enter 429 as the Response code to indicate and communicate back to the bot that it has sent too many requests in a given amount of time.
Select Add new custom header and enter Retry-After in the Key field and a value in seconds for the Value field. The value indicates how many seconds a bot must wait before making a new request.
Select Add rule.
It’s important to place the rule after the Bot Control rule group inside your web ACL, so that the label is available in this custom rule.
In the Set rule priority section, check that the new rate-based rule is under the existing Bot Control rule set and if not, choose the newly created rule and select Move up or Move down until the rule is located after it.
Select Save.
Figure 5: AWS WAF rule action with a custom response code
With the preceding configuration, Bot Control sets required labels, which you then use in the scope-down statement in a rate-based rule to not only establish a ceiling of how many requests you will allow from specific bots, but also communicate to bots when their crawling rate is too high. If they don’t respect the response and lower their rate, the rule will temporarily block them, protecting your web resource from being overwhelmed.
Note: If you use a category label, such as scraping_framework, all bots that have that label will be counted by your rate-based rule. To avoid unintentional blocking of bots that use the same label, you can either narrow down to a specific bot with a precise bot:name: label, or select a higher rate limit to allow a greater margin for the aggregate.
Enable Bot Control only for certain parts of your application
As mentioned earlier, excluding parts of your web resource from Bot Control protection is a mechanism to reduce the cost of running the feature by focusing only on a subset of the requests reaching a resource. There are a few common scenarios that take advantage of this approach.
To run Bot Control only on dynamic parts of your traffic
In the AWS WAF console, select Web ACLs from the left menu. Open a web ACL that you have, or follow the steps to create a web ACL.
Choose the Rules tab and select Add rules. Then select Add managed rule groups to proceed with the following settings:
In the AWS managed rule groups section, select Add to web ACL to enable Bot Control in the web ACL.
Select Edit.
Select Scope-down statement – optional and select Enable Scope-down statement.
In If a request, select doesn’t match the statement (NOT).
In the Statement section, configure the following settings:
Choose URI path in the Inspect field.
For the Match type, choose Starts with string.
Depending on the structure of your resource, you can enter a whole URI string—such as images/—in the String to match field. The string will be excluded from Bot Control evaluation.
Figure 6: A scope-down statement to match based on a string that a URI path starts with
Select Save rule.
An alternative to using string matching
As an alternative to a string match type, you can use a regex pattern set. If you don’t have a regex pattern set, create one using the following guide.
Note: This pattern matches most common file extensions associated with static files for typical web resources. You can customize the pattern set if you have different file types.
Follow steps 1-4 of the previous procedure.
In the Statement section, configure the following settings:
Choose URI path in the Inspect field.
For the Match type, choose Matches pattern from regex pattern set and select your created set in the Regex pattern set. as illustrated in Figure 7.
In Regex pattern set, enter the pattern (?i)\.(jpe?g|gif|png|svg|ico|css|js|woff2?)$
Figure 7: A scope-down statement to match based on a regex pattern set as part of a URI path
To run Bot Control only on the most sensitive parts of your application.
Another option is to exclude almost everything, by only enabling the Bot Control on the most sensitive part of your application. For example, a login page.
Note: The actual URI path depends on the structure of your application.
Inside the Scope-down statement, in the If a request menu, select matches the statement.
In the Statement section:
In the Inspect field, select URI path.
For the Match type, select Contains string.
In the String to match field, enter the string you want to match. For example, login as shown in the Figure 8.
Choose Save rule.
Figure 8: A scope-down statement to match based on a string within a URI path
To exclude more than one part of your application from Bot Control.
If you have more than one part to exclude, you can use an OR logical statement to list each part in a scope-down statement.
Inside the Scope-down statement, in the If a request menu, select matches at least one of the statements (OR).
In the Statement 1 section, configure the following settings:
Choose URI path in the Inspect field.
For the Match type choose Contains string.
In the String to match field enter a preferred value. For example, login.
In the Statement 2 section, configure the following settings:
Choose URI path in the Inspect field.
For the Match type choose Starts with string.
In the String to match field enter a preferred URI value. For example, payment/.
Select Save rule.
Figure 9 builds on the previous example of an exact string match by adding an OR statement to protect an API named payment.
Figure 9: A scope-down statement with OR logic for more sophisticated matching
Note: The visual editor on the console supports up to five statements. To add more, edit the JSON representation of the rule on the console or use the APIs.
Prioritize verified bots that you don’t want to block
Since verified bots aren’t blocked by default, in most cases there is no need to apply extra logic to allow them through. However, there are scenarios where other AWS WAF rules might match some aspects of requests from verified bots and block them. That can hurt some metrics for SEO, or prevent links from your website from properly propagating and displaying in social media resources. If this is important for your business, then you might want to ensure you protect verified bots by explicitly allowing them in AWS WAF.
To prioritize the verified bots category
In the AWS WAF menu, select Web ACLs from the left menu. Open a web ACL that you have, or follow the steps to create a web ACL. The next steps assume you already have a Bot Control rule group enabled inside the web ACL.
In the web ACL, select Add rules, and then select Add my own rules and rule groups.
Using the provided Rule builder, configure the following settings:
Enter a name for the rule in the Name field.
Under the Inspect menu, select Has a label.
In the Match key field, enter the following label to match based on the label that each verified bot has:
awswaf:managed:aws:bot-control:bot:verified
In the Action section, select Allow to confirm the action on a request match
Select Add rule. It’s important to place the rule after the Bot Control rule group inside your web ACL, so that the bot:verified label is available in this custom rule. To complete this, configure the following steps:
In the Set rule priority section, check that the rule you just created is listed immediately after the existing Bot Control rule set. If it’s not, choose the newly created rule and select Move up or Move down until the rule is located immediately after the existing Bot Control rule set.
Select Save.
Figure 10: Label match rule statement in a Rule builder with a specific match key
Allow a specific bot
Labels also enable you to single out the bot you don’t want to block from the category that is blocked. One of the common examples are third-party bots that perform monitoring of your web resources.
Let’s take a look at a scenario where UptimeRobot is used to allow a specific bot. The bot falls into a category that’s being blocked by default—bot:category:monitoring. You can either exclude the whole category, which can have a wider impact on resource than you want, or allow only UptimeRobot.
To explicitly allow a specific bot
Analyze CloudWatch metrics or AWS WAF logs to find the bot that is being blocked and its associated labels. Unless you want to allow the whole category, the label you would be looking for is bot:name: The example that follows is based on the label awswaf:managed:aws:bot-control:bot:name:uptimerobot.
From the logs, you can also verify which category the bot belongs to, which is useful for configuring Scope-down statements.
In the AWS WAF console, select Web ACLs from the left menu. Open a web ACL that you have, or follow the steps to create a web ACL. For the next steps, it’s assumed that you already have a Bot Control rule group enabled inside the webACL.
Open the Bot Control rule set in the list inside your web ACL and choose Edit
From the list of Rules find CategoryMonitoring and set to Count. This will prevent the default block action of the category.
Select Scope-down statement – optional andselect Scope-down statement. Then configure the following settings:
Inside the Scope-down statement, in the If a request menu, choose matches all the statements (AND). This will allow you to construct the complex logic necessary to block the category but allow a specified bot.
In the Statement 1 section under the Inspect menu select Has a label.
In the Match key field, enter the label of the broad category that you set to count in step number 4. In this example, it is monitoring. This configuration will keep other bots from the category blocked:
In the Statement 2 section, select Negate statement results to allow you to exclude a specific bot.
Under the Inspect menu, select Has a label.
In the Match key field, enter the label that will uniquely identify the bot you want to explicitly allow. In this example, it’s uptimerobot with the following label:
Figure 11: Label match rule statement with AND logic to single out a specific bot name from a category
Note: This approach is the best practice for analyzing and, if necessary, addressing false positives situations. You can apply exclusion to any bot, or multiple bots, based on the unique bot:name: label.
Insert custom headers into requests from certain bots
There are situations when you want to further process or analyze certain requests. or implement logic that is provided by systems in the downstream. In such cases, you can use AWS WAF Bot Control to categorize the requests. Applications later in the process can then apply the intended logic on either a broad group of requests, such as all bots within a category, or as narrow as a certain bot.
To insert a custom header
In the AWS WAF console, select Web ACLs from the left menu. Open a web ACL that you have, or follow the steps to create a web ACL. The next steps assume that you already have Bot Control rule group enabled inside the webACL.
Open the Bot Control rule set in the list inside your web ACL and choose Edit.
From the list of Rules set the targeted category to Count.
Choose Save rule.
In the same web ACL, choose the Add rules menu and select Add my own rules and rule groups.
Using the provided Rule builder, configure the following settings:
Enter a name for the rule in the Name field.
Under the Inspect menu, select Has a label.
In the Match key field, enter the label to match either a targeted category or a bot. This example uses the security category label: awswaf:managed:aws:bot-control:bot:category:security
In the Action section, select Count
Open Custom request – optional and select Add new custom header
Enter values in the Key and Value fields that correspond to the inserted custom header key-value pair that you want to use in downstream systems. The example in Figure 12 shows this configuration.
Choose Add rule.
AWS WAF prefixes your custom header names with x-amzn-waf- when it inserts them, so when you add abc-category, your downstream system sees it as x-amzn-waf-abc-category.
Figure 12: AWS WAF rule action with a custom header inserted by the service
The custom rule located after Bot Control now inserts the header into any request that it labeled as coming from bots within the security category. Then the security appliance that is after AWS WAF acts on the requests based on the header, and processes them accordingly.
This implementation can serve other scenarios. For example, using your custom headers to communicate to your Origin to append headers that will explicitly prevent caching certain content. That makes bots always get it from the Origin. Inserted headers are accessible within AWS Lambda@Edge functions and CloudFront Functions, this opens up advanced processing scenarios.
Conclusion
This post describes the primary building blocks for using Bot Control, and how you can combine and customize them to address different scenarios. It’s not an exhaustive list of the use cases that Bot Control can be fine-tuned for, but hopefully the examples provided here inspire and provide you with ideas for other implementations.
If you already have AWS WAF associated with any of your web-facing resources, you can view current bot traffic estimates for your applications based on a sample of requests currently processed by the service. Visit the AWS WAF console to view the bot overview dashboard. That’s a good starting point to consider implementing learnings from this blog to improve your bot protection.
It is early days for the feature, and it will keep gaining more capabilities, stay tuned!
If you have feedback about this blog post, submit comments in the Comments section below. If you have questions about this blog post, start a new thread on AWS WAF re:Post or contact AWS Support.
Want more AWS Security news? Follow us on Twitter.
This blog post shows you how to use the machine learning capabilities of Amazon OpenSearch Service (successor to Amazon Elasticsearch Service) to detect and visualize anomalies in AWS WAF logs. AWS WAF logs are streamed to Amazon OpenSearch Service using Amazon Kinesis Data Firehose. Kinesis Data Firehose invokes an AWS Lambda function to transform incoming source data and deliver the transformed data to Amazon OpenSearch Service. You can implement this solution without any machine learning expertise. AWS WAF logs capture a number of attributes about the incoming web request, and you can analyze these attributes to detect anomalous behavior. This blog post focuses on the following two scenarios:
Identifying anomalous behavior based on a high number of web requests coming from an unexpected country (Country Code is one of the request fields captured in AWS WAF logs).
Identifying anomalous behavior based on HTTP method for a read-heavy application like a content media website that receives unexpected write requests.
Log analysis is essential for understanding the effectiveness of any security solution. It helps with day-to-day troubleshooting, and also with long-term understanding of how your security environment is performing.
AWS WAF is a web application firewall that helps protect your web applications from common web exploits which could affect application availability, compromise security, or consume excessive resources. AWS WAF gives you control over which traffic sent to your web applications is allowed or blocked, by defining customizable web security rules. AWS WAF lets you define multiple types of rules to block unauthorized traffic.
Machine learning can assist in identifying unusual or unexpected behavior. Amazon OpenSearch Service is one of the commonly used services which offer log analytics for monitoring service logs, using dashboards and alerting mechanisms. Static, rule‑based analytics approaches are slow to adapt to evolving workloads, and can miss critical issues. With the announcement of real-time anomaly detection support in Amazon OpenSearch Service, you can use machine learning to detect anomalies in real‑time streaming data, and identify issues as they evolve so you can mitigate them quickly. Real‑time anomaly detection support uses Random Cut Forest (RCF), an unsupervised algorithm, which continuously adapts to evolving data patterns. Simply stated, RCF takes a set of random data points, divides them into multiple groups, each with the same number of points, and then builds a collection of models. As an unsupervised algorithm, RCF uses cluster analysis to detect spikes in time series data, breaks in periodicity or seasonality, and data point exceptions. The anomaly detection feature is lightweight, with the computational load distributed across Amazon OpenSearch Service nodes. Figure 1 shows the architecture of the solution described in this blog post.
Figure 1: End-to-end architecture
The architecture flow shown in Figure 1 includes the following high-level steps:
Figure 2 shows examples of both an original and a modified AWS WAF log. The solution in this blog post focuses on Country and httpMethod. It uses a Lambda function to transform the AWS WAF log by adding fields, as shown in the snippet on the right side. The values of the newly added fields are evaluated based on the values of country and httpMethod in the AWS WAF log.
Figure 2: Sample processing done by a Lambda function
In this solution, you will use a Lambda function to introduce new fields to the incoming AWS WAF logs through Kinesis Data Firehose. You will introduce additional fields by using one-hot encoding to represent the incoming linear values as a “1” or “0”.
Scenario 1
In this scenario, the goal is to detect traffic from unexpected countries when serving user traffic expected to be from the US and UK. The function adds three new fields:
usTraffic ukTraffic otherTraffic
As shown in the lambda function inline code, we use the traffic_from_country function, in which we only want actions that ALLOW the traffic. Once we have that, we use conditions to check the country code. If the value of the country field in the web request captured in AWS WAF log is US, the usTraffic field in the transformed data will be assigned the value 1 while otherTraffic and ukTraffic will be assigned the value 0. The other two fields are transformed as shown in Table 1.
Original AWS WAF log
Transformed AWS WAF log with new fields after one-hot encoding
Country
usTraffic
ukTraffic
otherTraffic
US
1
0
0
UK
0
1
0
All other country codes
0
0
1
Table 1: One-hot encoding field mapping for country
Scenario 2
In the second scenario, you detect anomalous requests that use POST HTTP method.
As shown in the lambda function inline code, we use the filter_http_request_method function, in which we only want actions that ALLOW the traffic. Once we have that, we use conditions to check the HTTP _request method. If the value of the HTTP method in the AWS WAF log is GET, the getHttpMethod field is assigned the value 1 while headHttpMethod and postHttpMethod are assigned the value 0. The other two fields are transformed as shown in Table 2.
Original AWS WAF log
Transformed AWS WAF log with new fields after one-hot encoding
HTTP method
getHttpMethod
headHttpMethod
postHttpMethod
GET
1
0
0
HEAD
0
1
0
POST
0
0
1
Table 2: One-hot encoding field mapping for HTTP method
The transformed record must contain the same original record ID as is received from the Kinesis Data Firehose.
result
The status of the data transformation of the record (the status can be OK or Dropped).
data
The transformed data payload.
AWS WAF logs are JSON files, and this anomaly detection feature works only on numeric data. This means that to use this feature for detecting anomalies in logs, you must pre-process your logs using a Lambda function.
Lambda function for one-hot encoding
Use the following Lambda function to transform the AWS WAF log by adding new attributes, as explained in Scenario 1 and Scenario 2.
import base64
import json

def lambda_handler(event,context):
    output = []

    try:
        # loop through records in incoming Event
        for record in event["records"]:
            # extract message
            message = json.loads(base64.b64decode(event["records"][0]["data"]))

            print('Country: ', message["httpRequest"]["country"])
            print('Action: ', message["action"])
            print('User Agent: ', message["httpRequest"]["headers"][1]["value"])

            timestamp = message["timestamp"]
            action = message["action"]
            country = message["httpRequest"]["country"]
            user_agent = message["httpRequest"]["headers"][1]["value"]
            http_method = message["httpRequest"]["httpMethod"]

            mobileUserAgent, browserUserAgent = filter_user_agent(user_agent)
            usTraffic, ukTraffic, otherTraffic = traffic_from_country(country, action)
            getHttpMethod, headHttpMethod, postHttpMethod = filter_http_request_method(http_method, action)

            # append new fields in message dict
            message["usTraffic"] = usTraffic
            message["ukTraffic"] = ukTraffic
            message["otherTraffic"] = otherTraffic
            message["mobileUserAgent"] = mobileUserAgent
            message["browserUserAgent"] = browserUserAgent
            message["getHttpMethod"] = getHttpMethod
            message["headHttpMethod"] = headHttpMethod
            message["postHttpMethod"] = postHttpMethod

            # base64-encoding
            data = base64.b64encode(json.dumps(message).encode('utf-8'))

            output_record = {
                "recordId": record['recordId'], # retain same record id from the Kinesis data Firehose
                "result": "Ok",
                "data": data.decode('utf-8')
            }
            output.append(output_record)
        return {"records": output}
    except Exception as e:
        print(e)

def filter_user_agent(user_agent):
    # returns one hot encoding based on user agent
    if "Mobile" in user_agent:
        mobile_user_agent = True
        return (1, 0)
    else:
        mobile_user_agent = False
        return (0, 1) # anomaly recorded

def traffic_from_country(country_code, action):
    # returns one hot encoding based on allowed traffic from countries
    if action == "ALLOW":
        if "US" in country_code:
            allowed_country_traffic = True
            return (1, 0, 0)
        elif "UK" in country_code:
            allowed_country_traffic = True
            return (0, 1, 0)
        else:
            allowed_country_traffic = False
            return (0, 0, 1) # anomaly recorded

def filter_http_request_method(http_method, action):
    # returns one hot encoding based on allowed http method type
    if action == "ALLOW":
        if "GET" in http_method:
            return (1, 0, 0)
        elif "HEAD" in http_method:
            return (0, 1, 0)
        elif "POST" in http_method:
            return (0, 0, 1) # anomaly recorded
After the transformation, the data that’s delivered to Amazon OpenSearch Service will have additional fields, as described in Table 1 and Table 2 above. You can configure an anomaly detector in Amazon OpenSearch Service to monitor these additional fields. The algorithm computes an anomaly grade and confidence score value for each incoming data point. Anomaly detection uses these values to differentiate an anomaly from normal variations in your data. Anomaly detection and alerting are plugins that are included in the available set of Amazon OpenSearch Service plugins. You can use these two plugins to generate a notification as soon as an anomaly is detected.
Deployment steps
In this section, you complete five high-level steps to deploy the solution. In this blog post, we are deploying this solution in the us-east-1 Region. The solution assumes you already have an active web application protected by AWS WAF rules. If you’re looking for details on creating AWS WAF rules, refer to Working with web ACLs and sample examples for more information.
Note: When you associate a web ACL with Amazon CloudFront as a protected resource, make sure that the Kinesis Firehose Delivery Stream is deployed in the us-east-1 Region.
On the Specify template page, choose Upload a template file. Then select Choose File, and select the template file that you downloaded in step 1.
Choose Next.
Provide the Parameters:
Enter a unique name for your CloudFormation stack.
Update the email address for UserEmail with the address you want alerts sent to.
Choose Next.
Review and choose Create stack.
When the CloudFormation stack status changes to CREATE_COMPLETE, go to the Outputs tab and make note of the DashboardLinkOutput value. Also note the credentials you’ll receive by email (Subject: Your temporary password) and subscribe to the SNS topic for which you’ll also receive an email confirmation request.
Enable AWS WAF logs
Before enabling the AWS WAF logs, you should have AWS WAF web ACLs set up to protect your web application traffic. From the console, open the AWS WAF service and choose your existing web ACL. Open your web ACL resource, which can either be deployed on an Amazon CloudFront distribution or on an Application Load Balancer.
To enable AWS WAF logs
From the AWS WAF home page, choose Create web ACL.
From the AWS WAF home page, choose Logging and metrics
From the AWS WAF home page, choose the web ACL for which you want to enable logging, as shown in Figure 3:
Figure 3 – Enabling WAF logging
Go to the Logging and metrics tab, and then choose Enable Logging. The next page displays all the delivery streams that start with aws-waf-logs. Choose the Kinesis Data Firehose delivery stream that was created by the Cloud Formation template, as shown in Figure 3 (in this example, aws-waf-logs-useast1). Don’t redact any fields or add filters. Select Save.
Create an Index template
Index templates lets you initialize new indices with predefined mapping. For example, in this case you predefined mapping for timestamp.
To create an Index template
Log into the Kibana dashboard. You can find the Kibana dashboard link in the Outputs tab of the CloudFormation stack. You should have received the username and temporary password (Ignore the period (.) at the end of the temporary password) by email, at the email address you entered as part of deploying the CloudFormation template. You will be logged in to the Kibana dashboard after setting a new password.
Choose Dev Tools in the left menu panel to access Kibana’s console.
The left pane in the console is the request pane, and the right pane is the response pane.
Select the green arrow at the end of the command line to execute the following PUT command.
The command creates a template named awswaf and applies it to any new index name that matches the regular expression awswaf-*
Create an anomaly detector
A detector is an individual anomaly detection task. You can create multiple detectors, and all the detectors can run simultaneously, with each analyzing data from different sources.
To create an anomaly detector
Select Anomaly Detection from the menu bar, select Detectors and Create Detector.
Figure 4- Home page view with menu bar on the left
To create a detector, enter the following values and features:
Name and description
Name:
aws-waf-country
Description:
Detect anomalies on other country values apart from “US” and “UK“
Data Source
Index:
awswaf*
Timestamp field:
timestamp
Data filter:
Visual editor
Figure 5 – Detector features and their values
For Detector operationsettings, enter a value in minutes for the Detector interval to set the time interval at which the detector collects data. To add extra processing time for data collection, set a Window delay value (also in minutes). This tells the detector that the data isn’t ingested into Amazon OpenSearch Service in real time, but with a delay. The example in Figure 6 uses a 1-minute interval and a 2-minute delay.
Figure 6 – Detector operation settings
Next, select Create.
Once you create a detector, select Configure Model and add the following values to Model configuration:
Feature Name:
waf-country-other
Feature State:
Enable feature
Find anomalies based on:
Field value
Aggregation method:
sum()
Field:
otherTraffic
The aggregation method determines what constitutes an anomaly. For example, if you choose min(), the detector focuses on finding anomalies based on the minimum values of your feature. If you choose average(), the detector finds anomalies based on the average values of your feature. For this scenario, you will use sum().The value otherTraffic for Field is the transformed field in the Amazon OpenSearch Service logs that was added by the Lambda function.
Figure 7 – Detector Model configuration
Under Advanced Settings on the Model configuration page, update the Window size to an appropriate interval (1 equals 1 minute) and choose Save and Start detector and Automatically start detector.
We recommend you choose this value based on your actual data. If you expect missing values in your data, or if you want the anomalies based on the current value, choose 1. If your data is continuously ingested and you want the anomalies based on multiple intervals, choose a larger window size.
Note: The detector takes 4 to 5 minutes to start.
Figure 8 – Detector window size
Set up alerts
You’ll use Amazon SNS as a destination for alerts from Amazon OpenSearch Service.
Note: A destination is a reusable location for an action.
To set up alerts:
Go to the Kibana main menu bar and select Alerting, and then navigate to the Destinations tab.
Select Add destination and enter a unique name for the destination.
For Type, choose Amazon SNS and provide the topic ARN that was created as part of the CloudFormation resources (captured in the Outputs tab).
Provide the ARN for an IAM role that was created as part of the CloudFormation outputs (SNSAccessIAMRole-********) that has the following trust relationship and permissions (at a minimum):
A monitor can be defined as a job that runs on a defined schedule and queries Amazon OpenSearch Service. The results of these queries are then used as input for one or more triggers.
To create a monitor for the alert
Select Alerting on the Kibana main menu and navigate to the Monitors tab. Select Create monitor
Create a new record with the following values:
Monitor Name:
aws-waf-country-monitor
Method of definition:
Define using anomaly detector
Detector:
aws-waf-country
Monitor schedule:
Every 2 minutes
Select Create.
Figure 10 – Create monitor
Choose Create Trigger to connect monitoring alert with the Amazon SNS topic using the below values:
Trigger Name:
SNS_Trigger
Severity Level:
1
Trigger Type:
Anomaly Detector grade and confidence
Under Configure Actions, set the following values:
Action Name:
SNS-alert
Destination:
select the destination name you chose when you created the Alert above
Message Subject:
“Anomaly detected – Country”
Message:
<Use the default message displayed>
Select Create to create the trigger.
Figure 11 – Create trigger
Figure 12 – Configure actions
Test the solution
Now that you’ve deployed the solution, the AWS WAF logs will be sent to Amazon OpenSearch Service.
Kinesis Data Generator sample template
When testing the environment covered in this blog outside a production context, we used Kinesis Data Generator to generate sample user traffic with the template below, changing the country strings in different runs to reflect expected records or anomalous ones. Other tools are also available.
You will receive an email alert via Amazon SNS if the traffic contains any anomalous data. You should also be able to view the anomalies recorded in Amazon OpenSearch Service by selecting the detector and choosing Anomaly results for the detector, as shown in Figure 13.
Figure 13 – Anomaly results
Conclusion
In this post, you learned how you can discover anomalies in AWS WAF logs across parameters like Country and httpMethod defined by the attribute values. You can further expand your anomaly detection use cases with application logs and other AWS Service logs. To learn more about this feature with Amazon OpenSearch Service, we suggest reading the Amazon OpenSearch Service documentation. We look forward to hearing your questions, comments, and feedback.
If you have feedback about this post, submit comments in the Comments section below.
Want more AWS Security news? Follow us on Twitter.
The collective thoughts of the interwebz
Manage Consent
To provide the best experiences, we use technologies like cookies to store and/or access device information. Consenting to these technologies will allow us to process data such as browsing behavior or unique IDs on this site. Not consenting or withdrawing consent, may adversely affect certain features and functions.
Functional
Always active
The technical storage or access is strictly necessary for the legitimate purpose of enabling the use of a specific service explicitly requested by the subscriber or user, or for the sole purpose of carrying out the transmission of a communication over an electronic communications network.
Preferences
The technical storage or access is necessary for the legitimate purpose of storing preferences that are not requested by the subscriber or user.
Statistics
The technical storage or access that is used exclusively for statistical purposes.The technical storage or access that is used exclusively for anonymous statistical purposes. Without a subpoena, voluntary compliance on the part of your Internet Service Provider, or additional records from a third party, information stored or retrieved for this purpose alone cannot usually be used to identify you.
Marketing
The technical storage or access is required to create user profiles to send advertising, or to track the user on a website or across several websites for similar marketing purposes.


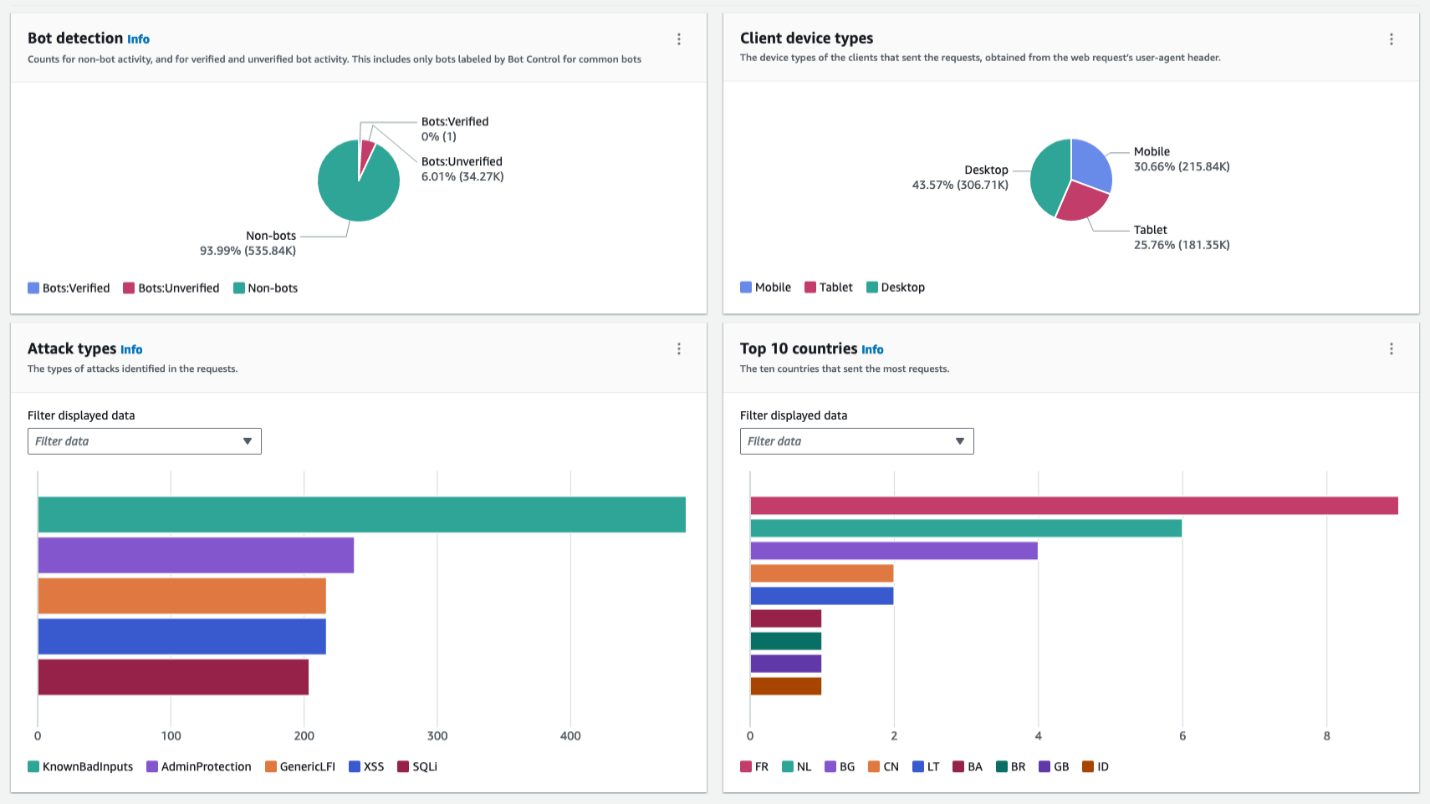


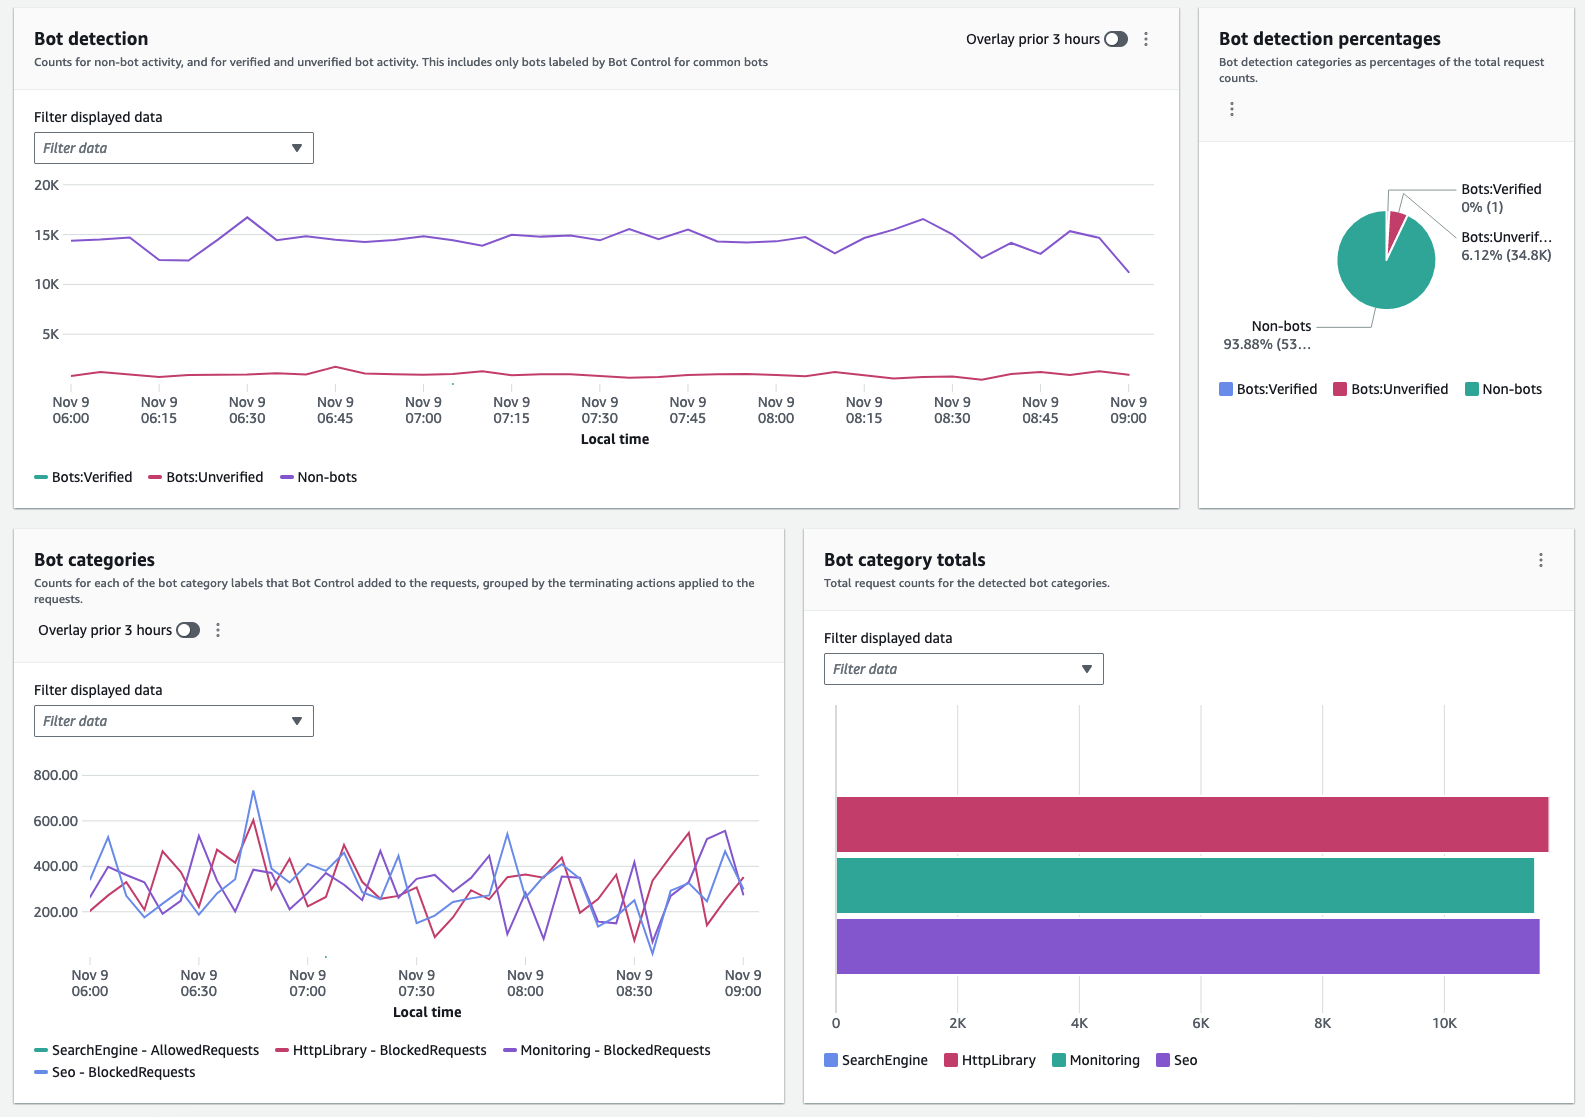
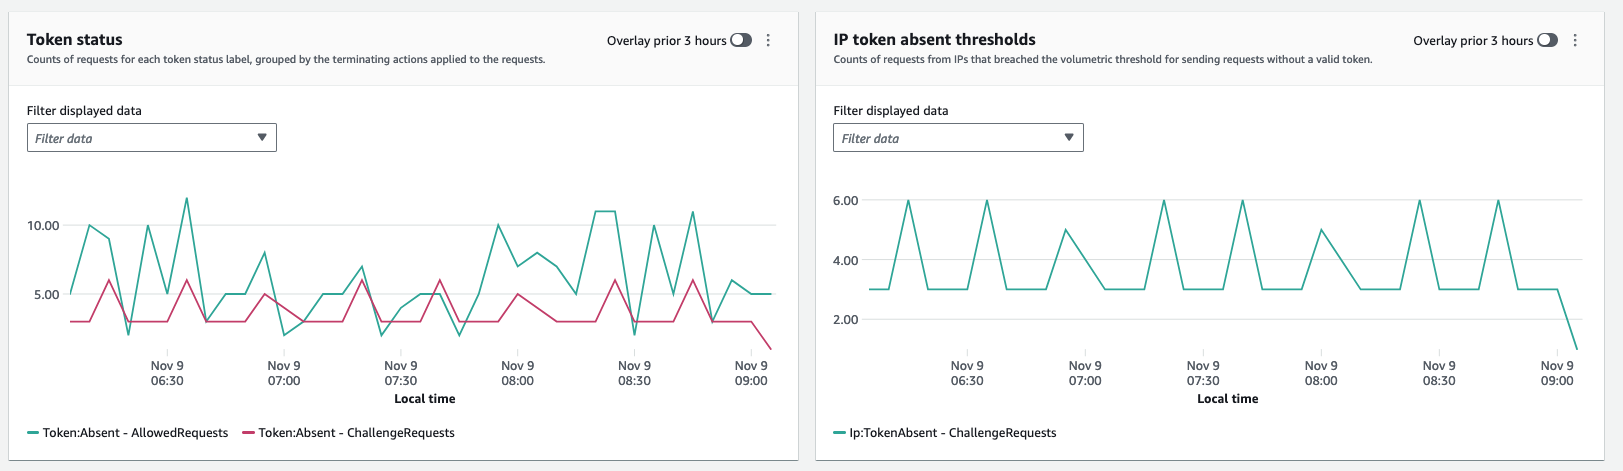
 Happy Lunar New Year! Wishing you a year filled with joy, success, and endless opportunities! May the Year of the Dragon bring uninterrupted connections and limitless growth