With the introduction of trusted identity propagation, applications can now propagate a user’s workforce identity from their identity provider (IdP) to applications running in Amazon Web Services (AWS) and to storage services backing those applications, such as Amazon Simple Storage Service (Amazon S3) or AWS Glue. Since access to applications and data can now be granted directly to a workforce identity, a seamless single sign-on experience can be achieved, eliminating the need for users to be aware of different AWS Identity and Access Management (IAM) roles to assume to access data or use of local database credentials.
While AWS managed applications such as Amazon QuickSight, AWS Lake Formation, or Amazon EMR Studio offer a native setup experience with trusted identity propagation, there are use cases where custom integrations must be built. You might want to integrate your workforce identities into custom applications storing data in Amazon S3 or build an interface on top of existing applications using Java Database Connectivity (JDBC) drivers, allowing these applications to propagate those identities into AWS to access resources on behalf of their users. AWS resource owners can manage authorization directly in their AWS applications such as Lake Formation or Amazon S3 Access Grants.
This blog post introduces a sample command-line interface (CLI) application that enables users to access AWS services using their workforce identity from IdPs such as Okta or Microsoft Entra ID.
The solution relies on users authenticating with their chosen IdP using standard OAuth 2.0 authentication flows to receive an identity token. This token can then be exchanged against AWS Security Token Service (AWS STS) and AWS IAM Identity Center to access data on behalf of the workforce identity that was used to sign in to the IdP.
Finally, an integration with the AWS Command Line Interface (AWS CLI) is provided, enabling native access to AWS services on behalf of the signed-in identity.
In this post, you will learn how to build and use the CLI application to access data on S3 Access Grants, query Amazon Athena tables, and programmatically interact with other AWS services that support trusted identity propagation.
Before moving into the actual deployment, let’s talk about the architecture of the CLI and how it facilitates token exchange between different parties.
Users, such as developers and data scientists, run the CLI on their machine without AWS security credentials pre-configured. To perform a token exchange of the OAuth 2.0 credentials vended by a source IdP towards IAM Identity Center by using the CreateTokenWithIAM API, AWS security credentials are required. To fulfill this requirement, the solution uses IAM OpenID Connect (OIDC) federation to first create an IAM role session using the AssumeRoleWithWebIdentity API with the initial IdP token—because this API doesn’t require credentials—and then uses the resulting IAM role to request the necessary single sign-on OIDC token.
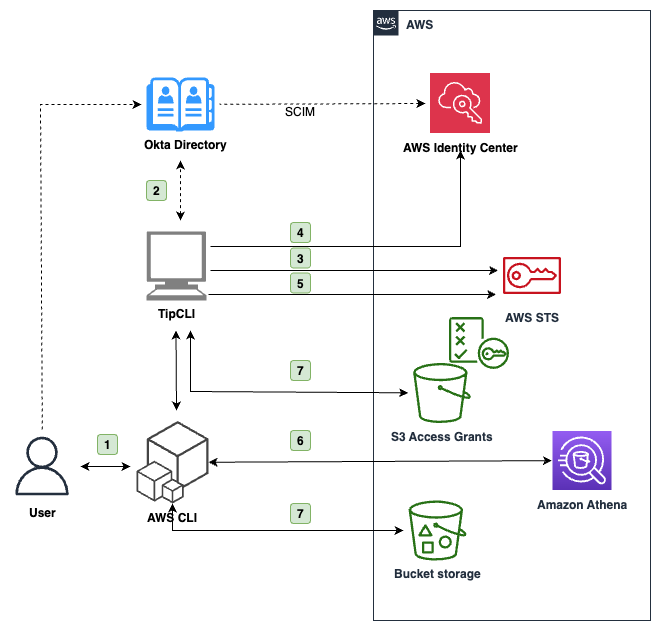
The process flow is shown in Figure 1:
Figure 1: Architecture diagram of the application
At a high level, the interaction flow shown in Figure 1 is the following:
The user is asked to sign in through their browser with the source IdP they configured in the CLI, for example Okta.
If the authorization is successful, the CLI receives a JSON Web Token (JWT) and uses it to assume an IAM role through OIDC federation using AssumeRoleWithWebIdentity.
With this temporary IAM role session, the CLI exchanges the IdP token token with the IAM Identity Center customer managed application on behalf of the user for another token using the CreateTokenWithIAM API.
If successful, the CLI uses the token returned from Identity Center to create an identity-enhanced IAM role session and returns the corresponding IAM credentials to the AWS CLI.
The AWS CLI uses the credentials to call AWS services that support the trusted identity propagation that has been configured in the Identity Center customer managed application. For example, to query Athena. See Specify trusted applications in the Identity Center documentation to learn more.
If you need access to S3 Access Grants, the CLI also provides automatic credentials requests to S3 GetDataAccess with the identity-enhanced IAM role session previously created.
Because both the Okta OAuth token and the identity-enhanced IAM role session credentials are short lived, the CLI provides functionality to refresh authentication automatically.
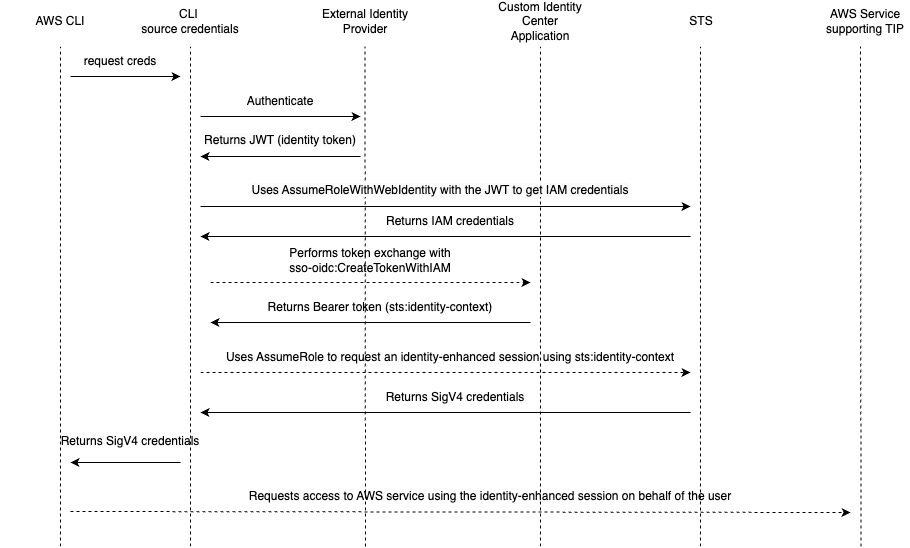
Figure 2 is a swimlane diagram of the requests described in the preceding flow and depicted in Figure 1.
Figure 2: Swimlane diagram of the application token exchange. Dashed lines show SigV4 signed requests
Account prerequisites
In the following procedure, you will use two AWS accounts: one is the application account, where required IAM roles and OIDC federation will be deployed and where users will be granted access to Amazon S3 objects. This account already has S3 Access Grants and an Athena workgroup configured with IAM Identity Center. If you don’t have these already configured, see Getting started with S3 Access Grants and Using IAM Identity Center enabled Athena workgroups.
The other account is the Identity Center admin account which has IAM Identity Center set up with users and groups synchronized through SCIM with your IdP of choice, in this case Okta directory. The application also supports Entra ID and Amazon Cognito.
You don’t need to have permission sets configured with IAM Identity Center, because you will grant access through a customer managed application Identity Center. Users authenticate with the source IdP and don’t interact with an AWS account or IAM policy directly.
To configure this application, you’ll complete the following steps:
Create an OIDC application in Okta
Create a customer managed application in IAM Identity Center
Install and configure the application with the AWS CLI
Create an OIDC application in Okta
Start by creating a custom application in Okta, which will act as the source IdP, and configuring it as a trusted token issuer in IAM Identity Center.
To create an OIDC application
Sign in to your Okta administrator panel, go to the Applications section in the navigation pane, and choose Create App Integration. Because you’re using a CLI, select OIDC as the sign-in method and Native Application as the application type. Choose Next.
Figure 3: Okta screen to create a new application
In the Grant Type section, the authorization code is selected by default. Make sure to also select Refresh Token. The CLI application uses the refresh tokens if available to generate new access tokens without requiring the user to re-authenticate. Otherwise, the users will have to authenticate again when the token expires.
Change the sign-in redirect URIs to http://localhost:8090/callback. The application uses OAuth 2.0 Authorization Code with PKCE Flow and waits for confirmation of authentication by listening locally on port 8090. The IdP will redirect your browser to this URL to send authentication information after successful sign-in.
Select the directory groups that you want to have access to this application. If you don’t want to restrict access to the application, choose Allow Everyone. Leave the remaining settings as-is.
Note: You must also assign and authorize users in AWS to allow access to the downstream AWS services.
Figure 4: Configure the general settings of the Okta application
When done, choose Save and your Okta custom application will be created and you will see a detail page of your application. Note the Okta Client ID value to use in later steps.
Create a customer managed application in IAM Identity Center
After setting everything up in Okta, move on to creating the custom OAuth 2.0 application in IAM Identity Center. The CLI will use this application to exchange the tokens issued by Okta.
To create a customer managed application
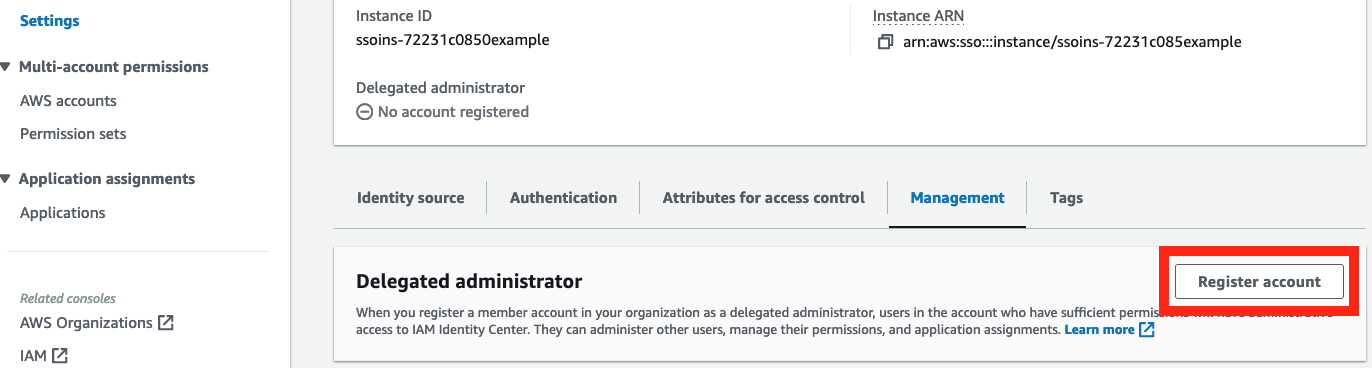
Sign in to the AWS Management Console of the account where you already have configured IAM Identity Center and go to the Identity Center console.
In the navigation pane, select Applications under Application assignments.
Choose Add application in the upper
Select I have an application I want to set up and select the OAuth 2.0 type.
Enter a display name and description.
For User and group assignment method, select Do not require assignments (because you already configured your user and group assignments to this application in Okta). You can leave the Application URL field empty and select Not Visible under Application visibility in AWS access portal, because you won’t access the application from the Identity Center AWS access portal URL.
On the next screen, select the Trusted Token Issuer you set up in the prerequisites, and enter your Okta client ID from the Okta application you created in the previous section as the Aud claim. This will make sure your Identity Center custom application only accepts tokens issued by Okta for your Okta custom application.
Note: Automatically refresh user authentication for active application sessions isn’t needed for this application because the CLI application already refreshes tokens with Okta.
Figure 5: Trusted token issuer configuration of the custom application
Select Edit the application policy and edit the policy to specify the application account AWS Account ID as the allowed principal to perform the token exchange. You will update the application policy with the Amazon Resource Name (ARN) of the correct role after deploying the rest of the solution.
Continue to the next page to review the application configuration and finalize the creation process.
Figure 6: Configuration of the application policy
Grant the application permission to call other AWS services on the users’ behalf. This step is necessary because the application will use a custom application to exchange tokens that will then be used with specific AWS services. Select the Customer managed tab, browse to the application you just created, and choose Specify trusted applications at the bottom of the page.
For this example, select All applications for service with same access, and then select Athena, S3 Access Grants, and Lake Formation and AWS Glue data catalog as trusted services because they’re supported by the sample application. If you don’t plan to use your CLI with S3 or Athena and Lake Formation, you can skip this step.
Figure 7: Configure application user propagation
You have completed the setup within IAM Identity Center. Switch to your application account to complete the next steps, which will deploy the backend application.
Application installation and configuration with the AWS CLI
The sample code for the application can be found on GitHub. Follow the instructions in the README file to install the command-line application. You can use the CLI to generate an AWS CloudFormation template to create the required IAM roles for the token exchange process.
To install and configure the application
You will need your Okta OAuth issuer URI and your Okta application client ID. The issuer URI can be found by going to your Okta Admin page, and on the left navigation pane, go to the API page under the Security section. Here you will see your Authorization servers and their Issuer URI. The application client ID is the same as you used earlier for the Aud claim in IAM Identity Center.
In your CLI, use the following commands to generate and deploy the CloudFormation template:
After the template is created, update the customer managed application policy you configured in step 2 to allow only the IAM role that CloudFormation just created to use the application. You can find this in your CloudFormation console, or by using aws cloudformation describe-stacks --stack-name tip-blog-iam-stack in your terminal.
Configure the CLI by running tip-cli configure idp and entering the IAM roles’ ARN and Okta information.
Test your configuration by running the tip-cli auth command to start the authorization with the configured IdP by opening your default browser and requesting to sign in. In the background, the application will wait for Okta to callback the browser on port 8090 to retrieve the authentication information, and if successful request an Okta OAuth 2.0 token.
You can then run tip-cli auth get-iam-credentials to exchange the token through your trusted IAM role and your Identity Center application for a set of identity-enhanced IAM role session credentials. These expire in 1 hour by default, but you can configure the expiration period by configuring the IAM role used to create the identity-enhanced IAM session accordingly. After you test the setup, you won’t need the CLI anymore because authentication, token refresh, and credentials refresh will be managed automatically through the AWS CLI.
Note: Follow the README instructions on configuring your AWS CLI to use the tip-cli application to source credentials. The advantage of the solution is that the AWS CLI will automatically handle the refresh of tokens and credentials using this application.
Now that the AWS CLI is configured, you can use it to call AWS services representing your Okta identity. In the following examples, we configured the AWS CLI to use the application to source credentials for the AWS CLI profile my-tti-profile.
For example, you can query Athena tables through workgroups configured with trusted identity propagation and authorized through Lake Formation:
The IAM role used by the backend application to create the identity-enhanced IAM session is allowed by default to use only Athena and Amazon S3. You can extend it to allow access to other services, such as Amazon Q Business. After you create an Amazon Q Business application and assign users to it, you can update the custom application you created earlier in IAM Identity Center and enable trusted identity propagation to your Amazon Q Business application.
You can then, for example, retrieve conversations of the user for an Amazon Q business application with ID a1b2c3d4-5678-90ab-cdef-EXAMPLE11111 as follows:
The application also provides simplified access to S3 Access Grants. After you have configured the AWS CLI as documented in the README file, you can access S3 objects as follows:
aws s3 ls s3://<my-test-bucket-with-path> --profile my-tti-profile-s3ag
In this example, the AWS CLI uses the custom credential source to request data access to a specific S3 URI to the account instance of S3 Access Grants you want to target. If there’s a matching grant for the requested URI and your user identity or group, S3 Access Grants will return a new set of short-lived IAM credentials. The tip-cli application will cache these credentials for you and prompt you to refresh them whenever needed. You can review the list of credentials generated by the application with the command tip-cli s3ag list-credentials, and clear them with the command tip-cli s3ag clear-credentials.
Conclusion
In this post we showed you how a sample CLI application using trusted identity propagation works, enabling business users to bring their workforce identities for delegated access into AWS without needing IAM credentials or cloud backends.
You set up custom applications within Okta (as the directory service) and IAM Identity Center and deployed the required application IAM roles and federation into your AWS account. You learned the architecture of this solution and how to use it in an application.
Through this setup, you can use the AWS CLI to interact with AWS services such as S3 Access Grants or Athena on behalf of the directory user without the having to configure an IAM user or credentials for them.
The code used in this post is also published as an AWS Sample, which can be found on GitHub and is meant to serve as inspiration for integrating custom or third-party applications with trusted identity propagation.
If you have feedback about this post, submit comments in the Comments section below. If you have questions about this post, contact AWS Support.
Password reuse is a real problem. When people use the same password across multiple services, it creates a risk that a breach of one service will give attackers access to a different, apparently unrelated, service. Attackers know people reuse passwords and build giant lists of known passwords and known usernames or email addresses.
If you got to the end of that paragraph and realized you’ve reused the same password multiple places, stop reading and go change those passwords. We’ll wait.
To help protect Cloudflare customers who have used a password attackers know about, we are releasing a feature to improve the security of the Cloudflare dashboard for all our customers by automatically checking whether their Cloudflare user password has appeared in an attacker’s list. Cloudflare will securely check a customer’s password against threat intelligence sources that monitor data breaches in other services.
If a customer logs in to Cloudflare with a password that was leaked in a breach elsewhere on the Internet, Cloudflare will alert them and ask them to choose a new password.
For some customers, the news that their password was known to hackers will come as a surprise – no one wants to intentionally use passwords that they know have been leaked elsewhere. To help customers avoid being locked out when they urgently need to use their Cloudflare dashboard, the leaked password check will provide a warning to the customer for the first three login attempts. After those three attempts, Cloudflare will require that the customer reset their password.
Resetting a leaked password is just the first step in Internet account security. The best way to protect your Cloudflare account, or any account, is to add two-factor authentication, such as using a hardware security key or an authenticator application, or to rely on a single sign-on integration. Cloudflare makes it easy for any user to add two-factor authentication security to their account through app-based codes, hardware keys, or passkeys. Cloudflare account Super Administrators can also require that all members enable two-factor authentication.
Whether or not a user has been impacted in a data breach, we encourage everyone to add two-factor authentication security to their Cloudflare account.
How do credentials leak?
Each time you authenticate to a service on the Internet with a username and password, that service can take a range of steps to protect your credentials.
More secure providers will hash the passwords. Hashing uses a cryptographic algorithm to convert the password into a random string of characters. Some platforms will layer on additional safeguards like a salt mechanism that introduces a random value to each password before the hashing process to ensure that two identical passwords do not have identical hashes.
These protections, combined with rate limits on login attempts, prevent brute force attacks. However, even for providers that adopt these best practices, users can still become victims of determined attackers when bad actors gain access to breached password databases. Attackers can collect compromised email password pairs to gain access to user accounts elsewhere as part of targeted attacks.
When vendors discover these kinds of compromised accounts, in many cases they will quickly force a password reset. However, resetting a leaked password in one application can still leave you vulnerable in other applications if you reused that password in other places and do not change your credentials everywhere.
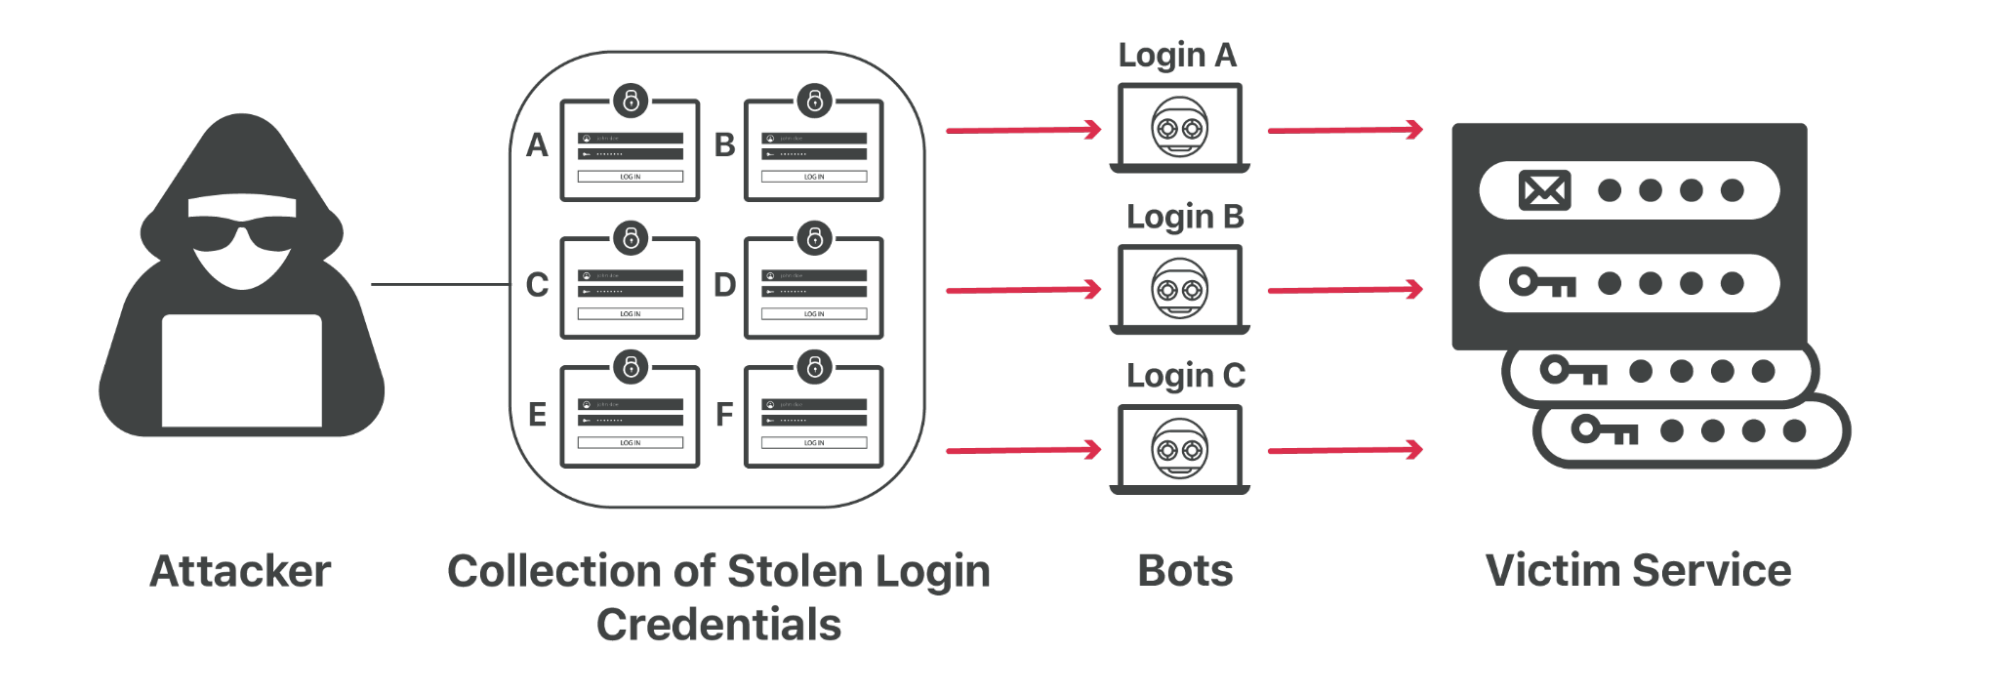
That kind of password reuse means that an attacker can steal your credentials from one Internet service and try them against dozens of other popular destinations to see where you reuse the same password.
These so-called credential stuffing attacks have become more prevalent as breaches pile up. Attackers can sit on large troves of credentials for months or years, waiting to sell them to another bad actor or to use them in targeted attacks. For customers who want to protect themselves from these and other attacks that can compromise their end customer’s accounts, Cloudflare has solutions like bot management, exposed credential checks, and rate limiting available to help defend against these kinds of attacks
How can customers protect against the impact of leaked credentials?
If every password you use is unique, then a data breach in one vendor will be limited to just that particular system. For that reason, we encourage users to adopt a password manager that can create and remember unique passwords for each service that you use. Thankfully, the most popular operating systems now include password managers by default, and multiplatform third party options also make it easy for users to adopt this practice.
However, unique passwords are still vulnerable to phishing attacks. The best way to protect any Internet account is to add two-factor authentication (2FA). Two-factor authentication provides a comprehensive defense against credential stuffing attacks. When using two-factor authentication to log in, you must use your password and, for example, a one-time code from an app or a tap on a physical hardware key. The password alone is not enough to access your account.
Adoption of two-factor authentication, specifically hardware keys, has been shown to be able to eliminate 99.9% of account takeovers, since the attacker must also get access to your second factor in addition to your password. In the case of hardware keys, they need to physically obtain the key.
How does Cloudflare check for leaked credentials?
When a user attempts to log into Cloudflare, we will check if the password used has been leaked in a known data breach of another service or application on the Internet. We maintain data on breaches of Internet services that we can use to search against. Because we use password hashes, scrambled versions of the original password that can’t be easily reversed, we compare a hash of the password to hashes of compromised passwords found in these lists from other attacks. An additional benefit, beside the security of hashes, is the ability to perform fast lookups, much faster than plaintext searches. This means that we can perform these checks without adding significant latency to the login process for users.
Because of the potential impact of a Cloudflare account being compromised, we opt for a more secure approach of disallowing leaked credentials regardless of whether they were associated with the specific user’s email or not. Unfortunately, data breaches are likely to continue to happen. Therefore, being proactive helps reduce the risk of new breaches that contain the email and password pair allowing for an account to be compromised before the data is available to us.
If we detect a match, the user will be prompted with the following warning. We will also send an email notification with instructions on what to do and a unique link in order to reset the password.
At this point, the user will still be able to log in to their Cloudflare account. We strongly encourage users to reset their password immediately. However, we know that in some cases you need to reach the Cloudflare dashboard immediately or do not have convenient access to the email used for the account. Cloudflare will allow two additional login attempts to succeed with the same compromised password before forcing the user to reset their password.
To reset a password in Cloudflare Dashboard, navigate to the Authentication page in My Profile. From here, select Change Password and enter both the current password to authenticate and a new, non-compromised password. Alternatively, for those whose password was leaked, upon login an email will be sent with a unique link to reset the password.
What’s next?
Forcing users to reset compromised credentials helps prevent attacks from spreading on the Internet, but it’s just a small piece of improved account security. We know that adding the next step, second factor authentication, can be cumbersome. We have committed to CISA’s Secure by Design Pledge, which includes working to increase 2FA adoption across the industry. We will share our plans on how we will be implementing the pledge by mid-2025.
Adding multifactor authentication to every one of your accounts on the Internet can still be a chore, no matter how much the experience is improved. It’s much easier if you can just do it with one account and use that account to authenticate into other services and applications – a single-sign on (SSO) flow. Right now, our SSO feature is limited to enterprise accounts, and we plan to change that. We will allow users to access Cloudflare through other providers like Google, GitHub, and more. Allowing users to reduce how many unique password and 2FA combinations they have to keep track of helps to reduce the likelihood of being impacted by future password breaches.
Security experts develop CIS Amazon Linux Benchmarks collaboratively, providing guidelines to enhance the security of Amazon Linux-based images. Through a consensus-based process that includes input from a global community of security professionals, these benchmarks are comprehensive and reflective of current cybersecurity challenges and best practices.
When running your container workloads on Amazon EKS, it’s essential to understand the shared responsibility model to clearly know which components fall under your purview to secure. This awareness is essential because it delineates the security responsibilities between you and AWS; although AWS secures the infrastructure, you are responsible for protecting your applications and data. Applying CIS benchmarks to Amazon EKS nodes represents a strategic approach to security enhancements, operational optimizations, and considerations for container host security. This strategy includes updating systems, adhering to modern cryptographic policies, configuring secure filesystems, and disabling unnecessary kernel modules among other recommendations.
Before implementing these benchmarks, I recommend conducting a thorough threat analysis to identify security risks within your environment. This proactive step makes sure that the application of CIS benchmarks is targeted and effective, addressing specific vulnerabilities and threats. Understanding the unique risks in your environment allows you to use the benchmarks strategically to mitigate these risks. This approach helps you to not blindly implement the benchmarks, but to interpret and use them intelligently, tailoring your application to best suit their specific needs. CIS benchmarks should be viewed as a critical tool in your security toolbox, intended for use alongside a broader understanding of your cybersecurity landscape. This balanced and informed application verifies an effective security posture, emphasizing that while CIS benchmarks are an excellent starting point, understanding your environment’s specific security risks is equally important for a comprehensive security strategy.
The benchmarks are widely available, enabling organizations of any size to adopt security measures without significant financial outlays. Furthermore, applying the CIS benchmarks aids in aligning with various security and privacy regulations such as National Institute of Standards and Technology (NIST), Health Insurance Portability and Accountability Act (HIPAA), and Payment Card Industry Data Security Standard (PCI DSS), simplifying compliance efforts.
In this solution, you’ll be implementing the recommendations outlined in the CIS Amazon Linux 2 Benchmark v2.0.0 or Amazon Linux 2023 v1.0.0. To apply the Benchmark’s guidance, you’ll use the Ansible role for the Amazon Linux 2 CIS Baseline, and the Ansible role for Amazon2023 CIS Baseline provided by Ansible Lockdown.
Solution overview
EC2 Image Builder is a fully managed AWS service designed to automate the creation, management and deployment of secure, up-to-date base images. In this solution, we’ll use Image Builder to apply the CIS Amazon Linux Benchmark to an Amazon EKS-optimized Amazon Machine Image (AMI). The resulting AMI will then be used to update your EKS clusters’ node groups. This approach is customizable, allowing you to choose specific security controls to harden your base AMI. However, it’s advisable to review the specific controls offered by this solution and consider how they may interact with your existing workloads and applications to maintain seamless integration and uninterrupted functionality.
Therefore, it’s crucial to understand each security control thoroughly and select those that align with your operational needs and compliance requirements without causing interference.
Additionally, you can specify cluster tags during the deployment of the AWS CloudFormation template. These tags help filter EKS clusters included in the node group update process. I have provided an CloudFormation template to facilitate the provisioning of the necessary resources.
Figure 1: Amazon EKS node group update workflow
As shown in Figure 1, the solution involves the following steps:
Image Builder
The AMI image pipeline clones the Ansible role from the GitHub base on the parent image you specify in the CloudFormation template and applies the controls to the base image.
The pipeline publishes the hardened AMI.
The pipeline validates the benchmarks applied to the base image and publishes the results to an Amazon Simple Storage Service (Amazon S3) bucket. It also invokes Amazon Inspector to run a vulnerability scan on the published image.
The State machine initiation Lambda function extracts the image ID of the published AMI and uses it as the input to initiate the state machine.
State machine
The first state gathers information related to Amazon EKS clusters’ node groups. It creates a new launch template version with the hardened AMI image ID for the node groups that are launched with custom launch template.
The second state uses the new launch template to initiate a node group update on EKS clusters’ node groups.
Image update reminder
A weekly scheduled rule invokes the Image update reminder Lambda function.
The Image update reminder Lambda function retrieves the value for LatestEKSOptimizedAMI from the CloudFormation template and extracts the last modified date of the Amazon EKS-optimized AMI used as the parent image in the Image Builder pipeline. It compares the last modified date of the AMI with the creation date of the latest AMI published by the pipeline. If a new base image is available, it publishes a message to the Image update reminder SNS topic.
The Image update reminder SNS topic sends a message to subscribers notifying them of a new base image. You need to create a new version of your image recipe to update it with the new AMI.
Prerequisites
To follow along with this walkthrough, make sure that you have the following prerequisites in place or the CloudFormation deployment might fail:
In this step, deploy the solution’s resources by creating a CloudFormation stack using the provided CloudFormation template. Sign in to your account and choose an AWS Region where you want to create the stack. Make sure that the Region you choose supports the services used by this solution. To create the stack, follow the steps in Creating a stack on the AWS CloudFormation console. Note that you need to provide values for the parameters defined in the template to deploy the stack. The following table lists the parameters that you need to provide.
Note: To make sure that the AWS Task Orchestrator and Executor (AWSTOE) application functions correctly within Image Builder, and to enable updated nodes with the hardened image to join your EKS cluster, it’s necessary to pass the following minimum Ansible parameters:
Amazon Simple Notification Service (Amazon SNS) is a web service that coordinates and manages the sending and delivery of messages to subscribing endpoints or clients. An SNS topic is a logical access point that acts as a communication channel.
The solution in this post creates two Amazon SNS topics to keep you informed of each step of the process. The following is a list of the topics that the solution creates and their purpose.
AMI status topic – a message is published to this topic upon successful creation of an AMI.
Image update reminder topic – a message is published to this topic if a newer version of the base Amazon EKS-optimized AMI is published by AWS.
You need to manually modify the subscriptions for each topic to receive messages published to that topic.
To modify the subscriptions for the topics created by the CloudFormation template
In the left navigation pane, choose Subscriptions.
On the Subscriptions page, choose Create subscription.
On the Create subscription page, in the Details section, do the following:
For Topic ARN, choose the Amazon Resource Name (ARN) of one of the topics that the CloudFormation topic created.
For Protocol, choose Email.
For Endpoint, enter the endpoint value. In this example, the endpoint is an email address, such as the email address of a distribution list.
Choose Create subscription.
Repeat the preceding steps for the other topic.
Step 4: Run the pipeline
The Image Builder pipeline that the solution creates consists of an image recipe with one component, an infrastructure configuration, and a distribution configuration. I’ve set up the image recipe to create an AMI, select a parent image, and choose components. There’s only one component where building and testing steps are defined. For the building step, the solution applies the CIS Amazon Linux 2 Benchmark Ansible playbook and cleans up the unnecessary files and folders. In the test step, the solution runs Amazon Inspector, a continuous assessment service that scans your AWS workloads for software vulnerabilities and unintended network exposure, and Audit configuration for Amazon Linux 2 CIS. Optionally, you can create your own components and associate them with the image recipe to make further modifications to the base image.
The following is a process overview of the image hardening and instance refresh:
Image hardening – when you start the pipeline, Image Builder creates the required infrastructure to build your AMI, applies the Ansible role (CIS Amazon Linux 2 or Amazon Linux 2023 Benchmark) to the base AMI, and publishes the hardened AMI. A message is published to the AMI status topic as well.
Image testing – after publishing the AMI, Image Builder scans the newly created AMI with Amazon Inspector and reports the findings back. For Amazon Linux 2 parent images, It also runs Audit configuration for Amazon Linux 2 CIS to verify the changes that the Ansible role made to the base AMI and publishes the results to an S3 bucket.
State machine initiation – after a new AMI is successfully published, the AMI status topic invokes the State machine initiation Lambda function. The Lambda function invokes the EKS node group update state machine and passes on the AMI info.
Update node groups – the EKS update node group state machine has two steps:
Gathering node group information – a Lambda function gathers information regarding EKS clusters and their associated Amazon EC2 managed node groups. It only selects and processes node groups launched with custom launch templates that are in Active state. For each node group, the Lambda function creates a new launch template version including the hardened AMI ID published by the pipeline, and user data including bootstrap.sh arguments required for bootstrapping. View Customizing managed nodes with launch templates to learn more about requirements of specifying an AMI ID in the imageId field of EKS node group’s launch template. When you create the CloudFormation stack, if you pass a tag or a list of tags, only clusters with matching tags are processed in this step.
Node group update – the state machine uses the output of the first Lambda function (first state) and starts updating node groups in parallel (second state).
This solution also creates an EventBridge rule that’s invoked weekly. This rule invokes the Image update reminder Lambda function and notifies you if a new version of your base AMI has been published by AWS so that you can run the pipeline and update your hardened AMI. You can check this EventBridge rule by getting it’s Physical ID on the CloudFormation Resources output, identified by ImageUpdateReminderEventBridgeRule.
After the build is finished the Image status will transition to Available in the EC2 Image Builder console, and you will be able to check the new AMI details by choosing the version link, and validate the security findings. The image will then be ready to be distributed across your environment.
Conclusion
In this blog post, I showed you how to create a workflow to harden Amazon EKS-optimized AMIs by using the CIS Amazon Linux 2 or Amazon Linux 2023 Benchmark and to automate the update of EKS node groups. This automated workflow has several advantages. First, it helps ensure a consistent and standardized process for image hardening, reducing potential human errors and inconsistencies. By automating the entire process, you can apply security and compliance standards across your instances. Second, the tight integration with AWS Step Functions enables smooth, orchestrated updates to the EKS node groups, enhancing the reliability and predictability of deployments. This automation also reduces manual intervention, helping you save time so that your teams can focus on more value-driven tasks. Moreover, this systematic approach helps to enhance the security posture of your Amazon EKS workloads because you can address vulnerabilities rapidly and systematically, helping to keep the environment resilient against potential threats.
If you have feedback about this post, submit comments in the Comments section below. If you have questions about this post, contact AWS Support.
Amazon Web Services (AWS) provides tools that simplify automation and monitoring for compliance with security standards, such as the NIST SP 800-53 Rev. 5 Operational Best Practices. Organizations can set preventative and proactive controls to help ensure that noncompliant resources aren’t deployed. Detective and responsive controls notify stakeholders of misconfigurations immediately and automate fixes, thus minimizing the time to resolution (TTR).
By layering the solutions outlined in this blog post, you can increase the probability that your deployments stay continuously compliant with the National Institute of Standards and Technology (NIST) SP 800-53 security standard, and you can simplify reporting on that compliance. In this post, we walk you through the following tools to get started on your continuous compliance journey:
This post covers quite a few solutions, and these solutions operate in different parts of the security pillar of the AWS Well-Architected Framework. It might take some iterations to get your desired results, but we encourage you to start small, find your focus areas, and implement layered iterative changes to address them.
For example, if your organization has experienced events involving public Amazon Simple Storage Service (Amazon S3) buckets that can lead to data exposure, focus your efforts across the different control types to address that issue first. Then move on to other areas. Those steps might look similar to the following:
Use Security Hub and Prowler to find your public buckets and monitor patterns over a predetermined time period to discover trends and perhaps an organizational root cause.
Apply IAM policies and SCPs to specific organizational units (OUs) and principals to help prevent the creation of public buckets and the changing of AWS account-level controls.
Set up Automated Security Response (ASR) on AWS and then test and implement the automatic remediation feature for only S3 findings.
Remove direct human access to production accounts and OUs. Require infrastructure as code (IaC) to pass through a pipeline where CloudFormation Guard scans IaC for misconfigurations before deployment into production environments.
Detective controls
Implement your detective controls first. Use them to identify misconfigurations and your priority areas to address. Detective controls are security controls that are designed to detect, log, and alert after an event has occurred. Detective controls are a foundational part of governance frameworks. These guardrails are a second line of defense, notifying you of security issues that bypassed the preventative controls.
Security Hub NIST SP 800-53 security standard
Security Hub consumes, aggregates, and analyzes security findings from various supported AWS and third-party products. It functions as a dashboard for security and compliance in your AWS environment. Security Hub also generates its own findings by running automated and continuous security checks against rules. The rules are represented by security controls. The controls might, in turn, be enabled in one or more security standards. The controls help you determine whether the requirements in a standard are being met. Security Hub provides controls that support specific NIST SP 800-53 requirements. Unlike other frameworks, NIST SP 800-53 isn’t prescriptive about how its requirements should be evaluated. Instead, the framework provides guidelines, and the Security Hub NIST SP 800-53 controls represent the service’s understanding of them.
Using this step-by-step guide, enable Security Hub for your organization in AWS Organizations. Configure the NIST SP 800-53 security standard for all accounts, in all AWS Regions that are required to be monitored for compliance, in your organization by using the new centralized configuration feature; or if your organization uses AWS GovCloud (US), by using this multi-account script. Use the findings from the NIST SP 800-53 security standard in your delegated administrator account to monitor NIST SP 800-53 compliance across your entire organization, or a list of specific accounts.
Figure 1 shows the Security Standard console page, where users of the Security Hub Security Standard feature can see an overview of their security score against a selected security standard.
Figure 1: Security Hub security standard console
On this console page, you can select each control that is checked by a Security Hub Security Standard, such as the NIST 800-53 Rev. 5 standard, to find detailed information about the check and which NIST controls it maps to, as shown in Figure 2.
Figure 2: Security standard check detail
After you enable Security Hub with the NIST SP 800-53 security standard, you can link responsive controls such as the Automated Security Response (ASR), which is covered later in this blog post, to Amazon EventBridge rules to listen for Security Hub findings as they come in.
Prowler
Prowler is an open source security tool that you can use to perform assessments against AWS Cloud security recommendations, along with audits, incident response, continuous monitoring, hardening, and forensics readiness. The tool is a Python script that you can run anywhere that an up-to-date Python installation is located—this could be a workstation, an Amazon Elastic Compute Cloud (Amazon EC2) instance, AWS Fargate or another container, AWS CodeBuild, AWS CloudShell, AWS Cloud9, or another compute option.
Figure 3 shows Prowler being used to perform a scan.
Figure 3: Prowler CLI in action
Prowler works well as a complement to the Security Hub NIST SP 800-53 Rev. 5 security standard. The tool has a native Security Hub integration and can send its findings to your Security Hub findings dashboard. You can also use Prowler as a standalone compliance scanning tool in partitions where Security Hub or the security standards aren’t yet available.
At the time of writing, Prowler has over 300 checks across 64 AWS services.
In addition to integrations with Security Hub and computer-based outputs, Prowler can produce fully interactive HTML reports that you can use to sort, filter, and dive deeper into findings. You can then share these compliance status reports with compliance personnel. Some organizations run automatically recurring Prowler reports and use Amazon Simple Notification Service (Amazon SNS) to email the results directly to their compliance personnel.
Get started with Prowler by reviewing the Prowler Open Source documentation that contains tutorials for specific providers and commands that you can copy and paste.
Preventative controls
Preventative controls are security controls that are designed to prevent an event from occurring in the first place. These guardrails are a first line of defense to help prevent unauthorized access or unwanted changes to your network. Service control policies (SCPs) and IAM controls are the best way to help prevent principals in your AWS environment (whether they are human or nonhuman) from creating noncompliant or misconfigured resources.
IAM
In the ideal environment, principals (both human and nonhuman) have the least amount of privilege that they need to reach operational objectives. Ideally, humans would at the most only have read-only access to production environments. AWS resources would be created through IaC that runs through a DevSecOps pipeline where policy-as-code checks review resources for compliance against your policies before deployment. DevSecOps pipeline roles should have IAM policies that prevent the deployment of resources that don’t conform to your organization’s compliance strategy. Use IAM conditions wherever possible to help ensure that only requests that match specific, predefined parameters are allowed.
The following policy is a simple example of a Deny policy that uses Amazon Relational Database Service (Amazon RDS) condition keys to help prevent the creation of unencrypted RDS instances and clusters. Most AWS services support condition keys that allow for evaluating the presence of specific service settings. Use these condition keys to help ensure that key security features, such as encryption, are set during a resource creation call.
You can use an SCP to specify the maximum permissions for member accounts in your organization. You can restrict which AWS services, resources, and individual API actions the users and roles in each member account can access. You can also define conditions for when to restrict access to AWS services, resources, and API actions. If you haven’t used SCPs before and want to learn more, see How to use service control policies to set permission guardrails across accounts in your AWS Organization.
Use SCPs to help prevent common misconfigurations mapped to NIST SP 800-53 controls, such as the following:
Prevent governed accounts from leaving the organization or turning off security monitoring services.
Build protections and contextual access controls around privileged principals.
Mitigate the risk of data mishandling by enforcing data perimeters and requiring encryption on data at rest.
Although SCPs aren’t the optimal choice for preventing every misconfiguration, they can help prevent many of them. As a feature of AWS Organizations, SCPs provide inheritable controls to member accounts of the OUs that they are applied to. For deployments in Regions where AWS Organizations isn’t available, you can use IAM policies and permissions boundaries to achieve preventative functionality that is similar to what SCPs provide.
The following is an example of policy mapping statements to NIST controls or control families. Note the placeholder values, which you will need to replace with your own information before use. Note that the SIDs map to Security Hub NIST 800-53 Security Standard control numbers or NIST control families.
For a collection of SCP examples that are ready for your testing, modification, and adoption, see the service-control-policy-examples GitHub repository, which includes examples of Region and service restrictions.
You should thoroughly test SCPs against development OUs and accounts before you deploy them against production OUs and accounts.
Proactive controls
Proactive controls are security controls that are designed to prevent the creation of noncompliant resources. These controls can reduce the number of security events that responsive and detective controls handle. These controls help ensure that deployed resources are compliant before they are deployed; therefore, there is no detection event that requires response or remediation.
CloudFormation Guard
CloudFormation Guard (cfn-guard) is an open source, general-purpose, policy-as-code evaluation tool. Use cfn-guard to scan Information as Code (IaC) against a collection of policies, defined as JSON, before deployment of resources into an environment.
Cfn-guard can scan CloudFormation templates, Terraform plans, Kubernetes configurations, and AWS Cloud Development Kit (AWS CDK) output. Cfn-guard is fully extensible, so your teams can choose the rules that they want to enforce, and even write their own declarative rules in a YAML-based format. Ideally, the resources deployed into a production environment on AWS flow through a DevSecOps pipeline. Use cfn_guard in your pipeline to define what is and is not acceptable for deployment, and help prevent misconfigured resources from deploying. Developers can also use cfn_guard on their local command line, or as a pre-commit hook to move the feedback timeline even further “left” in the development cycle.
Use policy as code to help prevent the deployment of noncompliant resources. When you implement policy as code in the DevOps cycle, you can help shorten the development and feedback cycle and reduce the burden on security teams. The CloudFormation team maintains a GitHub repo of cfn-guard rules and mappings, ready for rapid testing and adoption by your teams.
Figure 4 shows how you can use Guard with the NIST 800-53 cfn_guard Rule Mapping to scan infrastructure as code against NIST 800-53 mapped rules.
Figure 4: CloudFormation Guard scan results
You should implement policy as code as pre-commit checks so that developers get prompt feedback, and in DevSecOps pipelines to help prevent deployment of noncompliant resources. These checks typically run as Bash scripts in a continuous integration and continuous delivery (CI/CD) pipeline such as AWS CodeBuild or GitLab CI. To learn more, see Integrating AWS CloudFormation Guard into CI/CD pipelines.
Many other third-party policy-as-code tools are available and include NIST SP 800-53 compliance policies. If cfn-guard doesn’t meet your needs, or if you are looking for a more native integration with the AWS CDK, for example, see the NIST-800-53 rev 5 rules pack in cdk-nag.
Responsive controls
Responsive controls are designed to drive remediation of adverse events or deviations from your security baseline. Examples of technical responsive controls include setting more stringent security group rules after a security group is created, setting a public access block on a bucket automatically if it’s removed, patching a system, quarantining a resource exhibiting anomalous behavior, shutting down a process, or rebooting a system.
Automated Security Response on AWS
The Automated Security Response on AWS (ASR) is an add-on that works with Security Hub and provides predefined response and remediation actions based on industry compliance standards and current recommendations for security threats. This AWS solution creates playbooks so you can choose what you want to deploy in your Security Hub administrator account (which is typically your Security Tooling account, in our recommended multi-account architecture). Each playbook contains the necessary actions to start the remediation workflow within the account holding the affected resource. Using ASR, you can resolve common security findings and improve your security posture on AWS. Rather than having to review findings and search for noncompliant resources across many accounts, security teams can view and mitigate findings from the Security Hub console of the delegated administrator.
The architecture diagram in Figure 5 shows the different portions of the solution, deployed into both the Administrator account and member accounts.
Figure 5: ASR architecture diagram
The high-level process flow for the solution components deployed with the AWS CloudFormation template is as follows:
Detect – AWS Security Hub provides customers with a comprehensive view of their AWS security state. This service helps them to measure their environment against security industry standards and best practices. It works by collecting events and data from other AWS services, such as AWS Config, Amazon GuardDuty, and AWS Firewall Manager. These events and data are analyzed against security standards, such as the CIS AWS Foundations Benchmark. Exceptions are asserted as findings in the Security Hub console. New findings are sent as Amazon EventBridge events.
Initiate – You can initiate events against findings by using custom actions, which result in Amazon EventBridge events. Security Hub Custom Actions and EventBridge rules initiate Automated Security Response on AWS playbooks to address findings. One EventBridge rule is deployed to match the custom action event, and one EventBridge event rule is deployed for each supported control (deactivated by default) to match the real-time finding event. Automated remediation can be initiated through the Security Hub Custom Action menu, or, after careful testing in a non-production environment, automated remediations can be activated. This can be activated per remediation—it isn’t necessary to activate automatic initiations on all remediations.
Orchestrate – Using cross-account IAM roles, Step Functions in the admin account invokes the remediation in the member account that contains the resource that produced the security finding.
Log – The playbook logs the results to an Amazon CloudWatch Logs group, sends a notification to an Amazon SNS topic, and updates the Security Hub finding. An audit trail of actions taken is maintained in the finding notes. On the Security Hub dashboard, the finding workflow status is changed from NEW to either NOTIFIED or RESOLVED. The security finding notes are updated to reflect the remediation that was performed.
The NIST SP 800-53 Playbook contains 52 remediations to help security and compliance teams respond to misconfigured resources. Security teams have a choice between launching these remediations manually, or enabling the associated EventBridge rules to allow the automations to bring resources back into a compliant state until further action can be taken on them. When a resource doesn’t align with the Security Hub NIST SP 800-53 security standard automated checks and the finding appears in Security Hub, you can use ASR to move the resource back into a compliant state. Remediations are available for 17 of the common core services for most AWS workloads.
Figure 6 shows how you can remediate a finding with ASR by selecting the finding in Security Hub and sending it to the created custom action.
Figure 6: ASR Security Hub custom action
Findings generated from the Security Hub NIST SP 800-53 security standard are displayed in the Security Hub findings or security standard dashboards. Security teams can review the findings and choose which ones to send to ASR for remediation. The general architecture of ASR consists of EventBridge rules to listen for the Security Hub custom action, an AWS Step Functions workflow to control the process and implementation, and several AWS Systems Manager documents (SSM documents) and AWS Lambda functions to perform the remediation. This serverless, step-based approach is a non-brittle, low-maintenance way to keep persistent remediation resources in an account, and to pay for their use only as needed. Although you can choose to fork and customize ASR, it’s a fully developed AWS solution that receives regular bug fixes and feature updates.
To get started, see the ASR Implementation Guide, which will walk you through configuration and deployment.
Several options are available to concisely gather results into digestible reports that compliance professionals can use as artifacts during the Risk Management Framework (RMF) process when seeking an Authorization to Operate (ATO). By automating reporting and delegating least-privilege access to compliance personnel, security teams may be able to reduce time spent reporting compliance status to auditors or oversight personnel.
Let your compliance folks in
Remove some of the burden of reporting from your security engineers, and give compliance teams read-only access to your Security Hub dashboard in your Security Tooling account. Enabling compliance teams with read-only access through AWS IAM Identity Center (or another sign-on solution) simplifies governance while still maintaining the principle of least privilege. By adding compliance personnel to the AWSSecurityAudit managed permission set in IAM Identity Center, or granting this policy to IAM principals, these users gain visibility into operational accounts without the ability to make configuration changes. Compliance teams can self-serve the security posture details and audit trails that they need for reporting purposes.
Meanwhile, administrative teams are freed from regularly gathering and preparing security reports, so they can focus on operating compliant workloads across their organization. The AWSSecurityAudit permission set grants read-only access to security services such as Security Hub, AWS Config, Amazon GuardDuty, and AWS IAM Access Analyzer. This provides compliance teams with wide observability into policies, configuration history, threat detection, and access patterns—without the privilege to impact resources or alter configurations. This ultimately helps to strengthen your overall security posture.
For more information about AWS managed policies, such as the AWSSecurityAudit managed policy, see the AWS managed policies.
To learn more about permission sets in IAM Identity Center, see Permission sets.
AWS Audit Manager
AWS Audit Manager helps you continually audit your AWS usage to simplify how you manage risk and compliance with regulations and industry standards. Audit Manager automates evidence collection so you can more easily assess whether your policies, procedures, and activities—also known as controls—are operating effectively. When it’s time for an audit, Audit Manager helps you manage stakeholder reviews of your controls. This means that you can build audit-ready reports with much less manual effort.
Audit Manager provides prebuilt frameworks that structure and automate assessments for a given compliance standard or regulation, including NIST 800-53 Rev. 5. Frameworks include a prebuilt collection of controls with descriptions and testing procedures. These controls are grouped according to the requirements of the specified compliance standard or regulation. You can also customize frameworks and controls to support internal audits according to your specific requirements.
For more information about using Audit Manager to generate automated compliance reports, see the AWS Audit Manager User Guide.
Security Hub Compliance Analyzer (SHCA)
Security Hub is the premier security information aggregating tool on AWS, offering automated security checks that align with NIST SP 800-53 Rev. 5. This alignment is particularly critical for organizations that use the Security Hub NIST SP 800-53 Rev. 5 framework. Each control within this framework is pivotal for documenting the compliance status of cloud environments, focusing on key aspects such as:
Related requirements – For example, NIST.800-53.r5 CM-2 and NIST.800-53.r5 CM-2(2)
Severity – Assessment of potential impact
Description – Detailed control explanation
Remediation – Strategies for addressing and mitigating issues
Such comprehensive information is crucial in the accreditation and continuous monitoring of cloud environments.
To further augment the utility of this data for customers seeking to compile artifacts and articulate compliance status, the AWS ProServe team has introduced the Security Hub Compliance Analyzer (SHCA).
SHCA is engineered to streamline the RMF process. It reduces manual effort, delivers extensive reports for informed decision making, and helps assure continuous adherence to NIST SP 800-53 standards. This is achieved through a four-step methodology:
Active findings collection – Compiles ACTIVE findings from Security Hub that are assessed using NIST SP 800-53 Rev. 5 standards.
Results transformation – Transforms these findings into formats that are both user-friendly and compatible with RMF tools, facilitating understanding and utilization by customers.
Data analysis and compliance documentation – Performs an in-depth analysis of these findings to pinpoint compliance and security shortfalls. Produces comprehensive compliance reports, summaries, and narratives that accurately represent the status of compliance for each NIST SP 800-53 Rev. 5 control.
Findings archival – Assembles and archives the current findings for downloading and review by customers.
The diagram in Figure 7 shows the SHCA steps in action.
Figure 7: SHCA steps
By integrating these steps, SHCA simplifies compliance management and helps enhance the overall security posture of AWS environments, aligning with the rigorous standards set by NIST SP 800-53 Rev. 5.
The following is a list of the artifacts that SHCA provides:
RMF-ready controls – Controls in full compliance (as per AWS Config) with AWS Operational Recommendations for NIST SP 800-53 Rev. 5, ready for direct import into RMF tools.
Controls needing attention – Controls not fully compliant with AWS Operational Recommendations for NIST SP 800-53 Rev. 5, indicating areas that require improvement.
Control compliance summary (CSV) – A detailed summary, in CSV format, of NIST SP 800-53 controls, including their compliance percentages and comprehensive narratives for each control.
Security Hub NIST 800-53 Analysis Summary – This automated report provides an executive summary of the current compliance posture, tailored for leadership reviews. It emphasizes urgent compliance concerns that require immediate action and guides the creation of a targeted remediation strategy for operational teams.
Original Security Hub findings – The raw JSON file from Security Hub, captured at the last time that the SHCA state machine ran.
User-friendly findings summary –A simplified, flattened version of the original findings, formatted for accessibility in common productivity tools.
As shown in Figure 8, the Security Hub NIST 800-53 Analysis Summary adopts an OpenSCAP-style format akin to Security Technical Implementation Guides (STIGs), which are grounded in the Department of Defense’s (DoD) policy and security protocols.
Organizations can use AWS security and compliance services to help maintain compliance with the NIST SP 800-53 standard. By implementing preventative IAM and SCP policies, organizations can restrict users from creating noncompliant resources. Detective controls such as Security Hub and Prowler can help identify misconfigurations, while proactive tools such as CloudFormation Guard can scan IaC to help prevent deployment of noncompliant resources. Finally, the Automated Security Response on AWS can automatically remediate findings to help resolve issues quickly. With this layered security approach across the organization, companies can verify that AWS deployments align to the NIST framework, simplify compliance reporting, and enable security teams to focus on critical issues. Get started on your continuous compliance journey today. Using AWS solutions, you can align deployments with the NIST 800-53 standard. Implement the tips in this post to help maintain continuous compliance.
Amazon Web Services (AWS) is designed to be the most secure place for customers to run their workloads. From day one, we pioneered secure by design and secure by default practices in the cloud. Today, we’re taking another step to enhance our customers’ options for strong authentication by launching support for FIDO2 passkeys as a method for multi-factor authentication (MFA) as we expand our MFA capabilities. Passkeys deliver a highly secure, user-friendly option to enable MFA for many of our customers.
What’s changing
In October 2023, we first announced we would begin requiring MFA for the most privileged users in an AWS account, beginning with AWS Organizations management account root users before expanding to other use cases. Beginning in July 2024, root users of standalone accounts (those that aren’t managed with AWS Organizations) will be required to use MFA when signing in to the AWS Management Console. Just as with management accounts, this change will start with a small number of customers and increase gradually over a period of months. Customers will have a grace period to enable MFA, which is displayed as a reminder at sign-in. This change does not apply to the root users of member accounts in AWS Organizations. We will share more information about MFA requirements for remaining root user use cases, such as member accounts, later in 2024 as we prepare to launch additional features to help our customers manage MFA for larger numbers of users at scale.
As we prepare to expand this program over the coming months, today we are launching support for FIDO2 passkeys as an MFA method to help customers align with their MFA requirements and enhance their default security posture. Customers already use passkeys on billions of computers and mobile devices across the globe, using only a security mechanism such as a fingerprint, facial scan, or PIN built in to their device. For example, you could configure Apple Touch ID on your iPhone or Windows Hello on your laptop as your authenticator, then use that same passkey as your MFA method as you sign in to the AWS console across multiple other devices you own.
There has been a lot of discussion about passkeys in the industry over the past year, so in this blog post, I’ll address some common questions about passkeys and share reflections about how they can fit into your security strategy.
What are passkeys, anyway?
Passkeys are a new name for a familiar technology: Passkeys are FIDO2 credentials, which use public key cryptography to provide strong, phishing-resistant authentication. Syncable passkeys are an evolution of FIDO2 implementation by credential providers—such as Apple, 1Password, Google, Dashlane, Microsoft, and others—that enable FIDO keys to be backed up and synced across devices and operating systems rather than being stored on physical devices like a USB-based key.
These changes are substantial enhancements for customers who prioritize usability and account recovery, but the changes required no modifications to the specifications that make up FIDO2. Passkeys possess the same fundamental cryptographically secure, phishing-resistant properties FIDO2 has had from the start. As a member company of the FIDO Alliance, we continue to work with FIDO to support the evolution and growth of strong authentication technologies, and are excited to enable this new experience for FIDO technology that provides a good balance between usability and strong security.
Who should use passkeys?
Before describing who should use passkeys, I want to emphasize that any type of MFA is better than no MFA at all. MFA is one of the simplest but most effective security controls you can apply to your account, and everyone should be using some form of MFA. Still, it’s useful to understand some of the key differences between types of MFA when making a decision about what to use personally or to deploy at your company.
We recommend phishing-resistant forms of MFA, such as passkeys and other FIDO2 authenticators. In recent years, as credential-based exploits increased, so did phishing and social engineering exploits that target users who utilize one-time PINs (OTPs) for MFA. As an example, a user of an OTP device must read the PIN from the device and enter it manually, so bad actors could attempt to get unsuspecting users to read the OTP to them instead, thereby bypassing the value of MFA. Although passkeys are a clear improvement above password-only authentication, like any kind of MFA, in many cases passkeys are both more user friendly and also more secure than OTP-based MFA. This is why passkeys are such an important tool in the Secure by Design strategy: Usable security is essential to effective security. For this reason, passkeys are a great option to balance user experience and security for most people. It’s not always easy to find security mechanisms that are both more secure and yet easier to use, but compared to OTP-based MFA, passkeys are one of those nice exceptions.
If you’re already using another form of MFA like a non-syncable FIDO2 hardware security key or authenticator app, the question of whether or not you should migrate to syncable passkeys is dependent on your or your organizations’ uses and requirements. Because their credentials are bound only to the device that created them, FIDO2 security keys provide the highest level of security assurance for customers whose regulatory or security requirements demand the strongest forms of authentication, such as FIPS-certified devices. It’s also important to understand that the passkey providers’ security model, such as what requirements the provider places for accessing or recovering access to the key vault, are now important considerations in your overall security model when you decide what kinds of MFA to deploy or to use going forward.
Increasing the use of MFA
At the RSA Conference last month, we made the decision to sign on to the Cybersecurity and Infrastructure Security Agency’s (CISA’s) Secure by Design pledge, a voluntary pledge for enterprise software products and services, in line with CISA’s Secure by Design principles. One key element of the pledge is to increase the use of MFA, one of the simplest and most effective ways to enhance account security.
When used as MFA, passkeys provide enhanced security for human authentication in a user-friendly manner. You can register and use passkeys today to enhance the security of your AWS console access. This will help you to adhere to AWS default MFA security requirements as those roll out to a larger group of customers starting in July. We’ll cover more about our status and progress regarding other elements of the Secure by Design pledge in subsequent communications. Meanwhile, we strongly encourage you adopt some form of MFA anywhere you’re signing in today, and especially phishing-resistant MFA, which we’re excited to enhance with FIDO2 passkeys.
If you have feedback about this post, submit comments in the Comments section below. If you have questions about this post, contact AWS Support.
Security is our top priority at Amazon Web Services (AWS), and today, we’re launching two capabilities to help you strengthen the security posture of your AWS accounts:
Second, we started to enforce MFA on your root users, starting with the most sensitive one: the root user of your management account in an AWS Organization. We will continue to roll out this change on your other accounts during the rest of the year.
MFA is one of the simplest and most effective ways to enhance account security, offering an additional layer of protection to help prevent unauthorized individuals from gaining access to systems or data.
MFA with passkey for your root and IAM users Passkey is a general term used for the credentials created for FIDO2 authentication.
A passkey is a pair of cryptographic keys generated on your client device when you register for a service or a website. The key pair is bound to the web service domain and unique for each one.
The public part of the key is sent to the service and stored on their end. The private part of the key is either stored in a secured device, such as a security key, or securely shared across your devices connected to your user account when you use cloud services, such as iCloud Keychain, Google accounts, or a password manager such as 1Password.
Typically, the access to the private part of the key is protected by a PIN code or a biometric authentication, such as Apple Face ID or Touch ID or Microsoft Hello, depending on your devices.
When I try to authenticate on a service protected with passkeys, the service sends a challenge to my browser. The browser then requests my device sign the challenge with my private key. This triggers a PIN or biometric authentication to access the secured storage where the private key is stored. The browser returns the signature to the service. When the signature is valid, it confirms I own the private key that matches the public key stored on the service, and the authentication succeeds.
Passkeys can be used to replace passwords. However, for this initial release, we choose to use passkeys as a second factor authentication, in addition to your password. The password is something you know, and the passkey is something you have.
Passkeys are more resistant to phishing attacks than passwords. First, it’s much harder to gain access to a private key protected by your fingerprint, face, or a PIN code. Second, passkeys are bound to a specific web domain, reducing the scope in case of unintentional disclosure.
As an end user, you will benefit from the convenience of use and easy recoverability. You can use the built-in authenticators in your phones and laptops to unlock a cryptographically secured credential to your AWS sign-in experience. And when using a cloud service to store the passkey (such as iCloud keychain, Google accounts, or 1Password), the passkey can be accessed from any of your devices connected to your passkey provider account. This helps you to recover your passkey in the unfortunate case of losing a device.
How to enable passkey MFA for an IAM user To enable passkey MFA, I navigate to the AWS Identity and Access Management (IAM) section of the console. I select a user, and I scroll down the page to the Multi-factor authentication (MFA) section. Then, I select Assign MFA device.
On the next page, I enter an MFA device name, and I select Passkey or security key. Then, I select next.
When using a password manager application that supports passkeys, it will pop up and ask if you want to generate and store a passkey using that application. Otherwise, your browser will present you with a couple of options. The exact layout of the screen depends on the operating system (macOS or Windows) and the browser you use. Here is the screen I see on macOS with a Chromium-based browser.
The rest of the experience depends on your selection. iCloud Keychain will prompt you for a Touch ID to generate and store the passkey.
In the context of this demo, I want to show you how to bootstrap the passkey on another device, such as a phone. I therefore select Use a phone, tablet, or security key instead. The browser presents me with a QR code. Then, I use my phone to scan the QR code. The phone authenticates me with Face ID and generates and stores the passkey.
This QR code-based flow allows a passkey from one device to be used to sign in on another device (a phone and my laptop in my demo). It is defined by the FIDO specification and known as cross device authentication (CDA).
When everything goes well, the passkey is now registered with the IAM user.
Note that we don’t recommend using IAM users to authenticate human beings to the AWS console. We recommend configuring single sign-on (SSO) with AWS IAM Identity Center instead.
What’s the sign-in experience? Once MFA is enabled and configured with a passkey, I try to sign in to my account.
The user experience differs based on the operating system, browser, and device you use.
For example, on macOS with iCloud Keychain enabled, the system prompts me for a touch on the Touch ID key. For this demo, I registered the passkey on my phone using CDA. Therefore, the system asks me to scan a QR code with my phone. Once scanned, the phone authenticates me with Face ID to unlock the passkey, and the AWS console terminates the sign-in procedure.
Verifying that the most privileged users in AWS are protected with MFA is just the latest step in our commitment to continuously enhance the security posture of AWS customers.
We started with your most sensitive account: your management account for AWS Organizations. The deployment of the policy is progressive, with just a few thousand accounts at a time. Over the coming months, we will progressively deploy the MFA enforcement policy on root users for the majority of the AWS accounts.
When you don’t have MFA enabled on your root user account, and your account is updated, a new message will pop up when you sign in, asking you to enable MFA. You will have a grace period, after which the MFA becomes mandatory.
You can start to use passkeys for multi-factor authentication today in all AWS Regions, except in China.
We’re enforcing the use of multi-factor authentication in all AWS Regions, except for the two regions in China (Beijing, Ningxia) and for AWS GovCloud (US), because the AWS accounts in these Regions have no root user.
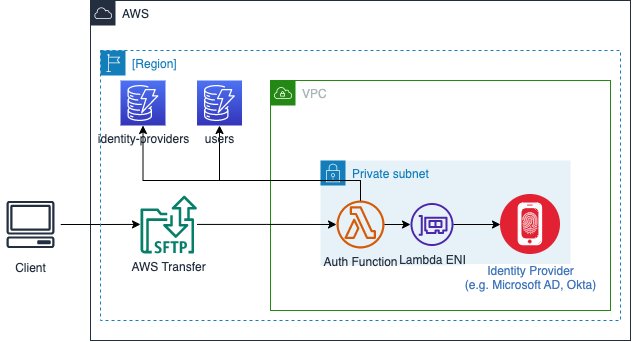
July 28, 2025: This post has been updated and expanded into a comprehensive two-part series covering multiple AWS file sharing solutions. This new series provides in-depth analysis of security and cost considerations to help you make informed decisions based on your requirements.
Note: This is Part 1 of a two-part post. You can read Part 2 here.
Sharing files with an outside entity—to share data between business partners or facilitate customer access to files—is a common use case for Amazon Web Services (AWS) customers. Organizations must balance security, cost, and usability. In a business-to-business data sharing scenario, these challenges become even more complex because human interaction is often minimal or absent, requiring robust automated solutions. Many AWS services offer multiple options for granting access. The one that’s best for your use case depends on multiple factors.
This post helps you decide which AWS services to use to implement a file sharing approach that suits your business needs. We focus on security controls and cost implications, describe some of the trade-offs, and highlight key differences to help you make an informed decision based on your specific requirements. We go through each option, highlighting their strengths and limitations, and provide guidance on choosing the right solution for your use case.
Understand your needs first
The first step in designing an AWS file sharing solution is to develop a clear understanding of your requirements and constraints. Because there are several possible design patterns and a number of different AWS services to consider, you need to start by identifying and prioritizing the features that you need. Gather the following information to guide your approach:
Access patterns and scale
When planning for access patterns and scale, there are a few key factors to keep in mind. First, consider how files are shared—machine-to-machine, human-to-machine, or human-to-human—because that impacts security and performance. Then, think about transfer frequency—are files exchanged only once a day, or are thousands moving every hour? If download control matters, setting limits on how often a file can be accessed might be necessary. File sizes also play a role, from typical everyday transfers to the largest files you need to support. Finally, total data volume shapes how much information you’ll be transferring on a regular basis.
Technical requirements
Your choice of solution will be influenced by technical constraints and capabilities. Protocol requirements often drive initial decisions, such as whether you need SFTP, FTPS, or HTTPS access. Consider existing systems that must interface with your solution and how they’ll connect. Performance considerations span several dimensions: acceptable latency for file transfers, geographic distribution of your users, bandwidth requirements, and whether you need built-in retry mechanisms for failed transfers. Additionally, think about how many simultaneous transfers your solution needs to support.
Security and compliance
Security and compliance requirements will definitely influence your file sharing strategy. Consider who controls encryption keys—whether managed by AWS or your organization—and what key rotation policies are needed. Authentication needs often vary—you might be authenticating individual users, specific systems, or entire business entities, using methods ranging from passwords to API keys, multi-factor authentication, or certificates. Your audit requirements will influence your choices in logging and monitoring capabilities. You might have geographic considerations like data sovereignty requirements, storage location restrictions, and access controls that consider the recipient’s location. If your data is subject to a law, like GDPR in Europe or HIPAA in the United States, or if your data is regulated by a standard like the Payment Card Industry’s Data Security Standard (PCI-DSS), you will need to consult with your own legal and compliance advisors to see what is required. When assessing risk tolerance, consider the security triad of confidentiality, integrity, and availability—some use cases might tolerate brief periods of unavailability but cannot risk data exposure, while others prioritize continuous availability.
Operational requirements
Day-to-day operations bring their own set of considerations. File retention policies determine how long data needs to be kept, while auto-deletion capabilities might be necessary for managing storage and compliance. Consider what kind of reporting and monitoring of file transfer activities you need. Do you need monthly reports, daily reports or perhaps detailed real-time tracking of transfer activities. By adding handling and notification systems, you can help make sure that problems are caught and addressed promptly. Disaster recovery requirements, expressed through recovery point objectives (RPO) and recovery time objectives (RTO), help determine the resilience needed in your solution.
Business constraints
Your solution must operate within your business constraints, such as budget limitations, technical limitations, timelines, available expertise, and service level agreements (SLAs). Budget limitations include initial implementation costs and ongoing operational expenses. Consider other parties’ technical limitations—they might use specific protocols such as SFTP, require mobile device compatibility, or operate older systems that have limited cryptographic capabilities. Implementation timelines influence choices between managed services that can be deployed quickly and custom solutions that require more time and expertise. The expertise available for solution maintenance is also a consideration. SLAs for file transfers might specify availability and performance requirements that you’re obligated to meet. To meet these constraints, you must estimate how much your file sharing needs will grow over time and determine if you need a regional or a global solution.
By carefully considering these aspects, you’ll be better prepared to evaluate different AWS file sharing solutions and select the one that best fits your use case. Understanding your requirements for uploads and downloads will help determine if your use case can be supported through a single AWS service or needs a combination of services.
Solutions
Let’s start by looking at the various file sharing mechanisms that AWS supports. The following table identifies the key AWS services needed for each solution, describes the security and cost implications of the solutions, and describes their complexity and protocol support capabilities. The following table shows the solutions described in this post.
Solution
AWS services
Security features
Cost*
Region control
AWS Transfer Family
Transfer Family, Amazon S3, API Gateway, and Lambda
Managed security, encryption in transit and at rest, IAM integration, and custom authentication
$0.30 per hour per protocol, data transfer fees, and storage costs
Can deploy to specific AWS Regions, can only transfer files to and from S3 buckets in the same Region
Transfer Family web apps
Transfer Family, S3, and CloudFront
Browser-based access, IAM Identity Center integration, and S3 Access Grants
Pay-per-file operation, CloudFront costs, and storage costs
Uses CloudFront (global) for web access, but backend components can be Region-specific
Amazon S3 pre-signed URLs
S3
Time-limited URLs, IAM controls for URL generation, and HTTPS
S3 request and data transfer fees
Can be restricted to specific Regions
Serverless application with Amazon S3 presigned URLs
S3, AWS Lambda, and API Gateway
Time-limited URLs, HTTPS, IAM controls, customizable authentication
Pay per request and minimal infrastructure cost
Components can be Region-specific
The following table shows the solutions described in Part 2.
Solution
AWS services
Security features
Cost*
Region control
CloudFront signed URLs
CloudFront, Amazon S3, and Lambda
Optional edge security using AWS Lambda@Edge, AWS WAF integration, SSL/TLS, geo restrictions, and AWS Shield Standard (included automatically)
Content delivery network (CDN) costs, request pricing, and data transfer fees
Global service by design; origin can be AWS Region-specific
Amazon VPC endpoint service
PrivateLink, VPC, and NLB
Complete network isolation, private connectivity, and multi-layer security
Endpoint hourly charges, NLB costs, and data processing fees
Service endpoints are strictly Region-specific; must create endpoints in each Region where access is needed
S3 Access Points
S3, IAM, VPC (for VPC-specific access points)
Dedicated IAM policies per access point
VPC-only access restrictions available
Works with bucket policies for layered security
Supports AWS PrivateLink for private network access
Compatible with S3 Block Public Access settings
No additional charge for S3 Access Points
Standard S3 request pricing applies
Data transfer fees apply based on standard S3 rates
VPC endpoint charges apply when using VPC endpoints with access points
Access points are Region-specific
Each access point is created in the same Region as its S3 bucket
Cross-Region access requires separate access points in each Region
VPC-specific access points are limited to the VPC’s Region
* Pricing information provided is based on AWS service rates at the time of publication and is intended as an estimation only. Additional costs may be incurred depending on your specific implementation and usage patterns. For the most current and accurate pricing details, please consult the official AWS pricing pages for each service mentioned.
As shown in Figure 1, when a user initiates a file transfer, Transfer Family authenticates them through the configured identity provider using API Gateway and Lambda. After authentication succeeds, the service maps the user to an AWS Identity and Access Management (IAM) role that defines their S3 bucket access permissions. The service encrypts data in transit using TLS 1.2 and data at rest using S3 server-side encryption.
Figure 1: AWS Transfer Family architecture
Transfer Family automatically handles scaling from zero to thousands of concurrent users, manages high availability across Availability Zones, and minimizes infrastructure management. It records detailed metrics and logs in Amazon CloudWatch for monitoring and auditing, supporting compliance requirements with activity tracking.
It’s important to note that Transfer Family also offers service-managed authentication. This simpler setup stores user credentials (passwords or SSH keys) directly in Transfer Family, minimizing the need for external identity providers. Service-managed authentication is best suited if you have a small number of users or no existing identity management system, or when you want to have a disconnected identity system and don’t want to give external partners an account in your identity provider system.
Pros
One of the biggest advantages of Transfer Family is how it provides the reliability and scalability of Amazon S3 for storing your data, while keeping that data available to existing client applications and workflows. The service integrates with existing authentication systems through custom identity providers, while maintaining security through IAM policies. Its auto-scaling capabilities handle variable workloads, from occasional transfers to high-volume scenarios.
Transfer Family also offers detailed CloudWatch logging and audit trails for file transfer activities, which should be sufficient for most logging and audit needs. It encrypts data in transit using TLS 1.2 and at rest using Amazon S3 server-side encryption. You can implement fine-grained access controls through IAM roles and integrate with AWS Organizations for multi-account management. The service supports VPC endpoints for secure internal access and custom domain names for branded endpoints.
Because data is stored in S3, some of your requirements will be fulfilled by configuring S3, not the Transfer Family services. Data retention (for example, avoiding deletion and scheduling deletion) is achieved through S3 Object Lock and S3 Lifecycle Events.
Cons
The pricing structure of Transfer Family includes $0.30 per hour for each protocol you enable and data transfer fees based on data volume. There can be additional charges for custom domain names. If you use VPC endpoints for secure internal access to Amazon S3, there will also be VPC data charges. If you have high-volume transfers or multiple endpoints across AWS Regions, you will face increased costs. Because the data ultimately lives in S3; S3 storage and request pricing applies as well.
Custom identity provider implementations (such as SAML or OAuth) add latency to authentication processes, affecting transfer initiation times. This authentication process requires additional configuration and introduces extra steps and latency during transfer initiation compared to service-managed authentication.
The Regional nature of Transfer Family means you must choose between deploying in a single Region (simpler management but potential latency for global users) or multiple Regions (better performance but higher costs at $0.30 per protocol per hour per Region). Multi-Region can serve as a disaster recovery strategy or when Regional data isolation is needed.
Transfer Family web apps
Transfer Family web apps provide browser-based access to Amazon S3, enabling users to upload and download files through a web interface. With the web apps, you can create a branded, secure, and highly available portal for your users to browse, upload, and download data in S3. Web apps are built using Storage Browser for S3 and offer the same user functionalities in a fully managed offering without having to write code or host your own application.
When a user accesses the web application, authentication occurs through AWS IAM Identity Center, and S3 Access Grants determine their permissions to specific S3 buckets or prefixes. The access grant permissions can be either read-only or read and write. After authentication succeeds, users can upload or download files directly through the web interface. The service uses Amazon CloudFront for content delivery and implements SSL/TLS encryption for data transfers, while S3 provides server-side encryption for data at rest. Figure 2 shows a simplified Transfer Family web app architecture.
Figure 2: Simplified Transfer Family web app architecture
The web application automatically scales to accommodate varying numbers of users and provides high availability through the CloudFront global edge network. It minimizes the need for custom web application development and provides logging through AWS CloudTrail and CloudWatch. You can customize the user experience by implementing custom domains through CloudFront distributions.
Transfer Family web apps support multiple authentication methods, with IAM Identity Center being one of the primary options. While Identity Center provides simplified user management and integration with existing identity providers. It also provides useful mechanisms such as multi-factor authentication (MFA), strong password policies, and resetting lost passwords. It’s not the only authentication method available; you can also use custom identity providers for authentication, providing flexibility in how you manage user access to the web application.
Pros
Transfer Family web apps minimize the need to build and maintain custom web interfaces for Amazon S3 file sharing. It provides seamless integration with IAM Identity Center for user management and authentication, enabling you to use existing identity providers. The service offers fine-grained access control through S3 Access Grants, allowing precise permission management at the bucket and prefix level. Its integration with CloudFront provides global availability and enhanced performance, while CloudTrail logging offers audit capabilities.
The service provides robust security features including SSL/TLS encryption, CORS policy management, and optional integration with AWS WAF for protection against bots, web scrapers, DDoS events, and more. You can implement custom domains for branded experiences and use CloudFront security features including DDoS protection using AWS Shield. The web interface offers intuitive file management capabilities without requiring client software or that users have technical expertise.
Cons
Transfer Family web apps require using IAM Identity Center, which might require additional setup and configuration if you’re not currently using this service. The web interface currently requires the Identity Center identities to live in the same AWS account as the S3 buckets. That might create design challenges if you want to keep identities in one AWS account and data storage in another. Implementation requires careful cross-origin resource sharing (CORS) configuration for each S3 bucket.
The service incurs costs for both Transfer Family and associated services, including CloudFront distribution and data transfer fees. Custom domain implementation requires additional configuration and SSL certificate management through AWS Certificate Manager (ACM). The web interface is well suited for humans to upload or download, but it’s not as good for automated workflows that transfer files from machine to machine. You must carefully manage user assignments and access grants to maintain security, adding administrative overhead.
S3 pre-signed URLs
Amazon S3 pre-signed URLs enable secure, time-limited access to objects in S3 without requiring the file recipient to have an identity in your identity systems. The URLs are generated using the AWS SDK or AWS Command Line Interface (AWS CLI), granting specific permissions (GET, PUT) that are valid for up to seven days. When accessing files, S3 validates the cryptographically signed parameters in these URLs before permitting access to objects. This provides a direct method for secure file sharing through HTTPS endpoints.
The solution requires only an S3 bucket and appropriate IAM permissions for URL generation. S3 handles the authentication of the pre-signed URL parameters and manages access to objects. File transfers occur directly between users and S3 through HTTPS endpoints, with the pre-signed URL controlling the access patterns.
Amazon S3 provides security features including server-side encryption, access logging, and CloudTrail integration. The security of pre-signed URLs is primarily managed through expiration times and specific operation permissions defined during URL generation.
Pros
Amazon S3 pre-signed URLs follow a straightforward pay-per-use pricing model, charging only for S3 storage, requests, and data transfers. For example, if you create pre-signed URLs but the object isn’t actually downloaded, you pay storage costs as usual, but you don’t pay transfer costs. The solution uses the native scalability of S3 to handle varying numbers of concurrent users without additional infrastructure. you can implement granular access controls through URL expiration times and specific operation permissions (GET, PUT, DELETE).
Access is controlled through URL expiration enforcement. Amazon S3 server access logging and CloudTrail integration enable audit capabilities. The solution’s simplicity makes it ideal for basic file sharing needs while maintaining security and scalability.
Cons
A pre-signed URL can be used by anyone who has access to the URL. That’s the goal of this design: You don’t need to have an identity for the user. Pre-signed URLs can be reused an unlimited number of times until they expire. To improve security, short expiration times can limit the potential for URL re-use. Shorter expiration times, however, require the recipient to download the file soon after the URL is created.
When implementing this solution, you should establish processes for secure URL generation and distribution. Set your URL expiration times based on realistic expectations about how quickly your recipients will download the files. A web or mobile app where the user selects a link to download something (such as a document, an image, a data file) and they expect the download to start immediately is a good candidate for this design.
The solution works with files up to 5 GB for single operations. To share a file larger than 5 GB, you must split the file into multiple parts, issue multiple pre-signed URLs, and then the recipient must download all the parts and join the parts together correctly. This isn’t a good solution for sharing large files. Also, distributing large files as a single download can be difficult if the recipient doesn’t have good connectivity. Amazon S3 can start an object download from the middle of the object, but selecting a pre-signed URL cannot. So, if the recipient transfers 1 GB out of a 2 GB download, and then their connection is disrupted, they cannot pick up where they left off. They will restart from the beginning, which is undesirable. Overall, this design is unsuitable for transmitting large files over unreliable internet connections.
You should enable appropriate monitoring through Amazon S3 access logs and CloudTrail to track usage patterns and meet security compliance.
This solution is particularly effective if you’re seeking straightforward, secure file sharing capabilities where the files are small enough to download in one request, and where you have a secure mechanism to share the download URLs.
Serverless web application with S3 presigned URLs
Amazon S3 presigned URLs combined with a custom web application enable secure, time-limited access to S3 objects. The application generates URLs that grant specific S3 permissions (GET, PUT) for between one minute and seven days. When requesting file access, the application authenticates users and generates presigned URLs using the AWS SDK with defined permissions and expiration times.
The web application uses API Gateway and Lambda functions for authentication and URL generation. Amazon S3 validates the cryptographically signed parameters in these URLs before permitting access to objects. File transfers occur directly between users and S3 through HTTPS endpoints, with the application controlling the access patterns. The architecture is shown in Figure 3.
Figure 3: Amazon S3 pre-signed URLs architecture
The web application can implement security controls including request logging, rate limiting (requests per second), and authentication workflows. CloudWatch logs record API access patterns and Lambda execution metrics, while Amazon S3 access logging records object-level operations.
Pros
Amazon S3 presigned URLs follow a pay-per-use pricing model. This solution charges only for API Gateway requests, Lambda executions, and S3 operations performed. The serverless architecture scales automatically from zero to thousands of concurrent users without infrastructure management. You can implement custom security controls and business logic for specific access requirements through API Gateway authorizers (using custom identity solutions or Amazon Cognito) and Lambda functions.
The solution enforces security through URL expiration (maximum seven days), IAM policies restricting URL generation permissions, and HTTPS encryption for data transfers. Custom authentication workflows integrate with existing identity providers (SAML, OIDC). Additional security features include IP-based restrictions, required request headers, and request validation through AWS WAF. This solution would be good, for example, if you have a variety of files or a variety of buckets and you’re trying to build a unified front-end where people can download various files without knowing which bucket the files are stored in or what URL expiration time is appropriate. You can configure the frontend to look at tags on objects, tags on buckets, object names, or another attribute that fits your use case, and then choose a URL expiration time based on that attribute. For example, objects from buckets tagged Data Classification: Restricted might expire after 1 minute, whereas objects from buckets tagged Data Classification: Public might be valid for 7 days.
Cons
Building a custom web application requires developing and maintaining the code for URL generation, authentication, and error handling logic. The application must track URL expiration times and implement mechanisms that permit retries for failed transfers. Monitoring systems must track URL usage, detect abuse patterns, and send alerts for security violations through CloudWatch metrics and logs.
One limitation of this solution is the 10 MB size limit imposed by API Gateway. This affects how your application handles file uploads and downloads. For uploads, files under 10 MB can be uploaded directly through API Gateway. Larger files require implementing multipart uploads, where the client splits the file into chunks and sends each chunk separately. For downloads, files under 10 MB can be downloaded directly through API Gateway but for larger files, your application should generate a pre-signed URL for direct Amazon S3 access, bypassing API Gateway.
URL generation errors or misconfigured IAM permissions can expose objects to unauthorized access. The HTTPS-only protocol limits integration with SFTP and FTPS clients. Files larger than 5 GB require multipart upload implementation, and network interruptions need custom resume logic. This design will incur some extra charges if the number of file transfers are the millions. Lambda functions cost $0.20 per million requests, and API Gateway costs $1.00 per million requests. Analyze your expected access patterns to determine whether these extra costs will be significant and if they’re worth the additional flexibility of custom transfer logic.
Decision matrix: When to use each solution
The following table summarizes the characteristics of the solutions presented in the two parts of this post. See Part 2 for full descriptions of the solutions not covered in Part 1.
Characteristics
Transfer Family
Transfer Family web app
S3 pre-signed URLs (Direct)
Serverless web application with S3 pre-signed URL
CloudFront signed URLs (Part 2)
VPC endpoint service (Part 2)
S3 Object Lambda (Part 2)
Protocol support
SFTP, FTPS, and AS2
HTTPS (web-based)
HTTPS
HTTPS
HTTPS with CDN
A TCP-based protocol
HTTPS
Global distribution
Global endpoint support
CloudFront integration
Global S3 access
Global S3 access
Global edge network acceleration
Direct AWS backbone access
Global S3 access with Regional endpoints
Pricing model
Hourly service rate and usage
Pay per file operation
Pay-per-request
Pay-per-request and application costs
Pay-per-request with caching savings
Hourly endpoint rate and usage
No additional charge for access points; standard S3 request pricing applies
Content processing
Direct S3 integration
Built-in web interface
Direct S3 access
Custom app processing
Edge-based file processing
Access files through private network
Direct S3 access with customized permissions per access point
Authentication options
Custom IdP and service-managed
IAM Identity Center
IAM
Custom authentication possible
IAM, custom authentication, and edge validation
VPC security controls and custom authentication
IAM policies, VPC endpoint policies, resource-based policies
Upload capabilities
Unlimited file size
Web interface upload
Up to 5 GB direct and multipart for larger
Up to 10 MB using API Gateway
Optimized for global ingestion
Unlimited file size over private connection
Same as standard S3
Download capabilities
Unlimited file size
Browser-based downloads
Up to 5 GB using a single URL
Up to 10 MB using API Gateway
Accelerated downloads using global edge locations
Unlimited file size over private connection
Same as standard S3 with customized access controls
Example use cases
Enterprise file transfer systems
B2B data exchange
Compliance-focused transfers
Browser-based file sharing
Internal document management
Client portals
Simple direct S3 access
Temporary file sharing
Mobile app backend
Custom file sharing systems
Integrated web applications
Enhanced S3 access control
Global content delivery
Media distribution
Web application assets
Private network transfers
Custom protocol support
Secure enterprise data exchange
Simplified data access management at scale
Multi-application access to shared datasets
VPC-restricted data access
The following list gives you a quick overview of the strengths of each solution presented in the two parts of this post.
Transfer Family is the optimal choice for organizations that require legacy file transfer protocols such as SFTP, FTPS, or AS2 protocols, and you must integrate with existing authentication systems. It’s ideal for scenarios with strict compliance and audit requirements, where operational overhead needs to be minimized. While the solution comes with higher costs because of its managed service nature, it’s often the lowest-friction option to support existing enterprise use cases that depend on these protocols.
Transfer Family web apps suit organizations that need browser-based file sharing without custom development. They integrate with IAM Identity Center for user authentication and uses Amazon S3 Access Grants for permission management. The solution works well for internal document sharing, client portals, and scenarios requiring a branded web interface. While limited to web browser access, they provide built-in features like MFA and password management without infrastructure maintenance.
Amazon S3 pre-signed URLs excel in scenarios where simplicity, cost-effectiveness, and temporary access are key requirements. This solution is ideal if you’re seeking a straightforward file sharing mechanism without the need for custom application development or additional infrastructure. This approach shines in environments that require a quick implementation of secure file sharing and cost-effective solutions with minimal overhead.
Serverless web application with S3 presigned URLs best serves scenarios where cost optimization is paramount and the HTTPS protocol meets your requirements. This solution shines in environments that need simple, direct file sharing capabilities with quick implementation timelines. It’s particularly effective for moderate usage patterns where serverless architecture can provide cost benefits. The solution’s simplicity makes it ideal for web applications and scenarios where complex file transfer protocols aren’t necessary, though careful consideration must be given to its 10 MB file size limitation for single operations using API Gateway.
In Part 2:
CloudFront signed URLs excel in situations that demand global content distribution with high performance requirements. This solution is the clear choice when your architecture needs built-in DDoS protection and performance optimization through caching. It’s particularly valuable when content delivery speed is crucial and you require security at edge locations. The solution’s global reach and caching capabilities make it cost-effective for large-scale content distribution, though it’s primarily optimized for download scenarios rather than uploads.
Amazon VPC endpoint service is the preferred choice if you require complete network isolation and maximum security. This solution is ideal when you need support for custom protocols while maintaining private network connectivity. It’s particularly suitable for scenarios with extremely high security requirements and when you have the necessary resources to managed networking configurations. While this solution requires significant expertise and investment, it provides the highest level of security and control for sensitive data transfers.
S3 Access Points are best suited for scenarios that require simplified data access management at scale. This solution excels when you need to provide different access patterns to the same underlying data for multiple applications or user groups. It’s ideal if you prefer a structured approach to permissions and need network-level access controls. While primarily focused on simplifying complex access scenarios without modifying bucket policies, it offers unique capabilities for VPC-restricted access and granular permissions management, though subject to certain service limits and configuration requirements.
Conclusion
In this first part of a two-part post, you’ve learned about multiple solutions for secure file sharing using AWS services and the pros and cons of each. You can find additional options in Part 2. The optimal solution depends on your specific organizational requirements, technical capabilities, and budget constraints. You don’t have to choose just one option, you can implement multiple solutions to address different use cases, creating a file sharing strategy that balances security, cost, and operational efficiency.
We’re excited to announce that BastionZero, a Zero Trust infrastructure access platform, has joined Cloudflare. This acquisition extends our Zero Trust Network Access (ZTNA) flows with native access management for infrastructure like servers, Kubernetes clusters, and databases.
Security teams often prioritize application and Internet access because these are the primary vectors through which users interact with corporate resources and external threats infiltrate networks. Applications are typically the most visible and accessible part of an organization’s digital footprint, making them frequent targets for cyberattacks. Securing application access through methods like Single Sign-On (SSO) and Multi-Factor Authentication (MFA) can yield immediate and tangible improvements in user security.
However, infrastructure access is equally critical and many teams still rely on castle-and-moat style network controls and local resource permissions to protect infrastructure like servers, databases, Kubernetes clusters, and more. This is difficult and fraught with risk because the security controls are fragmented across hundreds or thousands of targets. Bad actors are increasingly focusing on targeting infrastructure resources as a way to take down huge swaths of applications at once or steal sensitive data. We are excited to extend Cloudflare One’s Zero Trust Network Access to natively protect infrastructure with user- and device-based policies along with multi-factor authentication.
Application vs. infrastructure access
Application access typically involves interacting with web-based or client-server applications. These applications often support modern authentication mechanisms such as Single Sign-On (SSO), which streamline user authentication and enhance security. SSO integrates with identity providers (IdPs) to offer a seamless and secure login experience, reducing the risk of password fatigue and credential theft.
Infrastructure access, on the other hand, encompasses a broader and more diverse range of systems, including servers, databases, and network devices. These systems often rely on protocols such as SSH (Secure Shell), RDP (Remote Desktop Protocol), and Kubectl (Kubernetes) for administrative access. The nature of these protocols introduces additional complexities that make securing infrastructure access more challenging.
SSH Authentication: SSH is a fundamental tool for accessing Linux and Unix-based systems. SSH access is typically facilitated through public key authentication, through which a user is issued a public/private key pair that a target system is configured to accept. These keys must be distributed to trusted users, rotated frequently, and monitored for any leakage. If a key is accidentally leaked, it can grant a bad actor direct control over the SSH-accessible resource.
RDP Authentication: RDP is widely used for remote access to Windows-based systems. While RDP supports various authentication methods, including password-based and certificate-based authentication, it is often targeted by brute force and credential stuffing attacks.
Kubernetes Authentication: Kubernetes, as a container orchestration platform, introduces its own set of authentication challenges. Access to Kubernetes clusters involves managing roles, service accounts, and kubeconfig files along with user certificates.
Infrastructure access with Cloudflare One today
Cloudflare One facilitates Zero Trust Network Access (ZTNA) for infrastructure resources with an approach superior to traditional VPNs. An administrator can define a set of identity, device, and network-aware policies that dictate if a user can access a specific IP address, hostname, and/or port combination. This allows you to create policies like “Only users in the identity provider group ‘developers’ can access resources over port 22 (default SSH port) in our corporate network,” which is already much finer control than a VPN with basic firewall policies would allow.
However, this approach still has limitations, as it relies on a set of assumptions about how corporate infrastructure is provisioned and managed. If an infrastructure resource is configured outside of the assumed network structure, e.g. SSH over a non-standard port is allowed, all network-level controls may be bypassed. This leaves only the native authentication protections of the specific protocol protecting that resource and is often how leaked SSH keys or database credentials can lead to a wider system outage or breach.
Many organizations will leverage more complex network structures like a bastion host model or complex Privileged Access Management (PAM) solutions as an added defense-in-depth strategy. However, this leads to significantly more cost and management overhead for IT security teams and sometimes complicates challenges related to least-privileged access. Tools like bastion hosts or PAM solutions end up eroding least-privilege over time because policies expand, change, or drift from a company’s security stance. This leads to users incorrectly retaining access to sensitive infrastructure.
How BastionZero fits in
While our goal for years has been to help organizations of any size replace their VPNs as simply and quickly as possible, BastionZero expands the scope of Cloudflare’s VPN replacement solution beyond apps and networks to provide the same level of simplicity for extending Zero Trust controls to infrastructure resources. This helps security teams centralize the management of even more of their hybrid IT environment, while using standard Zero Trust practices to keep DevOps teams productive and secure. Together, Cloudflare and BastionZero can help organizations replace not only VPNs but also bastion hosts; SSH, Kubernetes, or database key management systems; and redundant PAM solutions.
BastionZero provides native integration to major infrastructure access protocols and targets like SSH, RDP, Kubernetes, database servers, and more to ensure that a target resource is configured to accept connections for that specific user, instead of relying on network level controls. This allows administrators to think in terms of resources and targets, not IP addresses and ports. Additionally, BastionZero leverages OpenPubKey, an open source library that uses two forms of authentication to generate an OpenID Connect (OIDC) token, which avoids single point of failure risks inherent to a standalone Identity Provider.
BastionZero will add the following capabilities to Cloudflare’s SASE platform:
The elimination of long-lived keys/credentials through frictionless infrastructure privileged access management (PAM) capabilities that modernize credential management (e.g., SSH keys, kubeconfig files, database passwords) through a new ephemeral, decentralized approach.
A DevOps-based approach for securing SSH connections to support least privilege access that records sessions and logs every command for better visibility to support compliance requirements. Teams can operate in terms of auto-discovered targets, not IP addresses or networks, as they define just-in-time access policies and automate workflows.
Clientless RDP to support access to desktop environments without the overhead and hassle of installing a client on a user’s device.
What’s next for BastionZero
The BastionZero team will be focused on integrating their infrastructure access controls directly into Cloudflare One. During the third and fourth quarters of this year, we will be announcing a number of new features to facilitate Zero Trust infrastructure access via Cloudflare One. All functionality delivered this year will be included in the Cloudflare One free tier for organizations less than 50 users. We believe that everyone should have access to world-class security controls.
We are looking for early beta testers and teams to provide feedback about what they would like to see with respect to infrastructure access. If you are interested in learning more, please sign up here.
In part two of this series, we’ll walk through an example to show you how to use Security Lake and other AWS services and tools to drive an incident to resolution.
NIST SP 800-61 describes a set of steps you use to resolve an incident. These include preparation (Stage 1), detection and analysis (Stage 2), containment, eradication and recovery (Stage 3), and finally post-incident activities (Stage 4).
Figure 1 shows the workflow of incident response defined by NIST SP 800-61. The response flows from Stage 1 through Stage 4, with Stages 2 and 3 often being an iterative process. We will discuss the value of Security Lake at each stage of the NIST incident response handling process, with a focus on preparation, detection, and analysis.
Preparation helps you ensure that tools, processes, and people are prepared for incident response. In some cases, preparation can also help you identify systems, networks, and applications that might not be sufficiently secure. For example, you might determine you need certain system logs for incident response, but discover during preparation that those logs are not enabled.
Figure 2 shows how Security Lake can accelerate the preparation stage during the incident response process. Through native integration with various security data sources from both AWS services and third-party tools, Security Lake simplifies the integration and concentration of security data, which also facilitates training and rehearsal for incident response.
Figure 2: Amazon Security Lake data consolidation for IR preparation
Some challenges in the preparation stage include the following:
Insufficient incident response planning, training, and rehearsal – Time constraints or insufficient resources can slow down preparation.
Complexity of system integration and data sources – An increasing number of security data sources and integration points require additional integration effort, or increase risk that some log sources are not integrated.
Centralized log repository for mixed environments – Customers with both on-premises and cloud infrastructure told us that consolidating logs for those mixed environments was a challenge.
Security Lake can help you deal with these challenges in the following ways:
Simplify system integration with security data normalization
Security Lake provides a central repository to store your security log data from various data sources with less integration effort.
Streamline data consolidation across mixed environments
Security Lake supports multiple log sources, including AWS native services and custom sources, which include third-party partner solutions, other cloud platforms and your on-premises log sources. For example, see this blog post to learn how to ingest Microsoft Azure activity logs into Security Lake.
Facilitate IR planning and testing
Security Lake reduces the undifferentiated heavy lifting needed to get security data into tooling so teams spend less time on configuration and data extract, transform, and load (ETL) work and more time on preparedness.
With a purpose-built security data lake and data retention policies that you define, security teams can integrate data-driven decision making into their planning and testing, answering questions such as “which incident handling capabilities do we prioritize?” and running Well-Architected game days.
Stages 2 and 3: Detection and Analysis, Containment, Eradication and Recovery
The Detection and Analysis stage (Stage 2) should lead you to understand the immediate cause of the incident and what steps need to be taken to contain it. Once contained, it’s critical to fully eradicate the issue. These steps form Stage 3 of the incident response cycle. You want to ensure that those malicious artifacts or exploits are removed from systems and verify that the impacted service has recovered from the incident.
Figure 3 shows how Security Lake can enable effective detection and analysis. Doing so enables teams to quickly contain, eradicate, and recover from the incident. Security Lake natively integrates with other AWS analytics services, such as Amazon Athena, Amazon QuickSight, and Amazon OpenSearch Service, which makes it easier for your security team to generate insights on the nature of the incident and to take relevant remediation steps.
Figure 3: Amazon Security Lake accelerates IR Detection and Analysis, Containment, Eradication, and Recovery
Common challenges present in stages 2 and 3 include the following:
Challenges generating insights from disparate data sources
Inability to generate insights from security data means teams are less likely to discover an incident, as opposed to having the breach revealed to them by a third party (such as a threat actor).
Breaches disclosed by a threat actor might involve higher costs than incidents discovered by the impacted organizations themselves, because typically the unintended access has progressed for longer and impacted more resources and data than if the impacted organization discovered it sooner.
Inconsistency of data visibility and data siloing
Security log data silos may slow IR data analysis because it’s challenging to gather and correlate the necessary information to understand the full scope and impact of an incident. This can lead to delays in identifying the root cause, assessing the damage, and taking remediation steps.
Data silos might also mean additional permissions management overhead for administrators.
Disparate data sources add barriers to adopting new technology, such as AI-driven security analytics tools
AI-driven security analysis requires a large amount of security data from various data sources, which might be in disparate formats. Without a centralized security data repository, you might need to make additional effort to ingest and normalize data for model training.
Security Lake offers native support for log ingestion for a range of AWS security services, including AWS CloudTrail, AWS Security Hub, and VPC Flow Logs. Additionally, you can configure Security Lake to ingest external sources. This helps enrich findings and alerts.
Security Lake addresses the preceding challenges as follows:
Unleash security detection capability by centralizing detection data
With a purpose-built security data lake with a standard object schema, organizations can centrally access their security data—AWS and third-party—using the same set of IR tools. This can help you investigate incidents that involve multiple resources and complex timelines, which could require access logs, network logs, and other security findings. For example, use Amazon Athena to query all your security data. You can also build a centralized security finding dashboard with Amazon QuickSight.
Reduce management burden
With Security Lake, permissions complexity is reduced. You use the same access controls in AWS Identity and Access Management (IAM) to make sure that only the right people and systems have access to sensitive security data.
See this blog post for more details on generating machine learning insights for Security Lake data by using Amazon SageMaker.
Stage 4: Post-Incident Activity
Continuous improvement helps customers to further develop their IR capabilities. Teams should integrate lessons learned into their tools, policies, and processes. You decide on lifecycle policies for your security data. You can then retroactively review event data for insight and to support lessons learned. You can also share security telemetry at levels of granularity you define. Your organization can then establish distributed data views for forensic purposes and other purposes, while enforcing least privilege for data governance.
Figure 4 shows how Security Lake can accelerate the post-incident activity stage during the incident response process. Security Lake natively integrates with AWS Organizations to enable data sharing across various OUs within the organization, which further unleashes the power of machine learning to automatically create insights for incident response.
Figure 4: Security Lake accelerates post-incident activity
Having covered some advantages of working with your data in Security Lake, we will now demonstrate best practices for getting Security Lake set up.
Setting up for success with Security Lake
Most of the customers we work with run multiple AWS accounts, usually with AWS Organizations. With that in mind, we’re going to show you how to set up Security Lake and related tooling in line with guidance in the AWS Security Reference Architecture (AWS SRA). The AWS SRA provides guidance on how to deploy AWS security services in a multi-account environment. You will have one AWS account for security tooling and a different account to centralize log storage. You’ll run Security Lake in this log storage account.
If you just want to use Security Lake in a standalone account, follow these instructions.
Set up Security Lake in your logging account
Most of the instructions we link to in this section describe the process using either the console or AWS CLI tools. Where necessary, we’ve described the console experience for illustrative purposes.
The AmazonSecurityLakeAdministrator AWS managed IAM policy grants the permissions needed to set up Security Lake and related services. Note that you may want to further refine permissions, or remove that managed policy after Security Lake and the related services are set up and running.
To set up Security Lake in your logging account
Note down the AWS account number that will be your delegated administrator account. This will be your centralized archive logs account. In the AWS Management Console, sign in to your Organizations management account and set up delegated administration for Security Lake.
Sign in to the delegated administrator account, go to the Security Lake console, and choose Get started. Then follow these instructions from the Security Lake User Guide. While you’re setting this up, note the following specific guidance (this will make it easier to follow the second blog post in this series):
Define source objective: For Sources to ingest, we recommend that you select Ingest the AWS default sources. However, if you want to include S3 data events, you’ll need to select Ingest specific AWS sources and then select CloudTrail – S3 data events. Note that we use these events for responding to the incident in blog post part 2, when we really drill down into user activity.
Figure 5 shows the configuration of sources to ingest in Security Lake.
Figure 5: Sources to ingest in Security Lake
We recommend leaving the other settings on this page as they are.
Define target objective: We recommend that you choose Add rollup Region and add multiple AWS Regions to a designated rollup Region. The rollup Region is the one to which you will consolidate logs. The contributing Region is the one that will contribute logs to the rollup Region.
Figure 6 shows how to select the rollup regions.
Figure 6: Select rollup Regions
You now have Security Lake enabled, and in the background, additional services such as AWS Lake Formation and AWS Glue have been configured to organize your Security Lake data.
Subscribers are specific to a Region, so you want to make sure that you set up your subscriber in the same Region as your rollup Region.
You will also set up an External ID. This is a value you define, and it’s used by the IAM role to prevent the confused deputy problem. Note that the subscriber will be your security tooling account.
You will select Lake Formation for Data access, which will create shares in AWS Resource Access Manager (AWS RAM) that will be shared with the account that you specified in Subscriber credentials.
If you’ve already set up Security Lake at some time in the past, you should select Specific log and event sources and confirm the source and version you want the subscriber to access. If it’s a new implementation, we recommend using version 2.0 or greater.
There’s a note in the console that says the subscribing account will need to accept the RAM resource shares. However, if you’re using AWS Organizations, you don’t need to do that; the resource share will already list a status of Active when you select the Shared with me >> Resource shares in the subscriber (security tooling) account RAM console.
Note: If you prefer a visual guide, you can refer to this video to set up Security Lake in AWS Organizations.
Set up Amazon Athena and AWS Lake Formation in the security tooling account
Go to the Lake Formation console in the security tooling account and follow the instructions to create resource links for the shared Security Lake tables. You’ll most likely use the Default database and will see your tables there. The table names in that database start with amazon_security_lake_table. You should expect to see about eight tables there.
Figure 7 shows the shared tables in the Lake Formation service console.
Figure 7: Shared tables in Lake Formation
You will need to create resource links for each table, as described in the instructions from the Lake Formation Developer Guide.
Figure 8 shows the resource link creation process.
Figure 8: Creating resource links
Next, go to Amazon Athena in the same Region. If Athena is not set up, follow the instructions to get it set up for SQL queries. Note that you won’t need to create a database—you’re going to use the “default” database that already exists. Select it from the Database drop-down menu in the Query editor view.
In the Tables section, you should see all your Security Lake tables (represented by whatever names you gave them when you created the resource links in step 1, earlier).
Get your incident response playbooks ready
Incident response playbooks are an important tool that enable responders to work more effectively and consistently, and enable the organization to get incidents resolved more quickly. We’ve created some ready-to-go templates to get you started. You can further customize these templates to meet your needs. In part two of this post, you’ll be using the Unintended Data Access to an Amazon Simple Storage Service (Amazon S3) bucket playbook to resolve an incident. You can download that playbook so that you’re ready to follow it to get that incident resolved.
Conclusion
This is the first post in a two-part series about accelerating security incident response with Security Lake. We highlighted common challenges that decelerate customers’ incident responses across the stages outlined by NIST SP 800-61 and how Security Lake can help you address those challenges. We also showed you how to set up Security Lake and related services for incident response.
In the second part of this series, we’ll walk through a specific security incident—unintended data access—and share prescriptive guidance on using Security Lake to accelerate your incident response process.
If you have feedback about this post, submit comments in the Comments section below. If you have questions about this post, contact AWS Support.
Want more AWS Security news? Follow us on Twitter.
A full conference pass is $1,099. Register today with the code flashsale150 to receive a limited time $150 discount, while supplies last.
We’re counting down to AWS re:Inforce, our annual cloud security event! We are thrilled to invite security enthusiasts and builders to join us in Philadelphia, PA, from June 10–12 for an immersive two-and-a-half-day journey into cloud security learning. This year, we’ve expanded the event by half a day to give you more opportunities to delve into the latest security trends and technologies. At AWS re:Inforce, you’ll have the chance to explore the breadth of the Amazon Web Services (AWS) security landscape, learn how to operationalize security services, and enhance your skills and confidence in cloud security to improve your organization’s security posture. As an attendee, you will have access to over 250 sessions across multiple topic tracks, including data protection; identity and access management; threat detection and incident response; network and infrastructure security; generative AI; governance, risk, and compliance; and application security. Plus, get ready to be inspired by our lineup of customer speakers, who will share their firsthand experiences of innovating securely on AWS.
In this post, we’ll provide an overview of the key sessions that include lecture-style presentations featuring real-world use cases from our customers, as well as the interactive small-group sessions led by AWS experts that guide you through practical problems and solutions.
The threat detection and incident response track is designed to demonstrate how to detect and respond to security risks to help protect workloads at scale. AWS experts and customers will present key topics such as threat detection, vulnerability management, cloud security posture management, threat intelligence, operationalization of AWS security services, container security, effective security investigation, incident response best practices, and strengthening security through the use of generative AI and securing generative AI workloads.
Breakout sessions, chalk talks, and lightning talks
TDR201 | Breakout session | How NatWest uses AWS services to manage vulnerabilities at scale As organizations move to the cloud, rapid change is the new normal. Safeguarding against potential security threats demands continuous monitoring of cloud resources and code that are constantly evolving. In this session, NatWest shares best practices for monitoring their AWS environment for software and configuration vulnerabilities at scale using AWS security services like Amazon Inspector and AWS Security Hub. Learn how security teams can automate the identification and prioritization of critical security insights to manage alert fatigue and swiftly collaborate with application teams for remediation.
TDR301 | Breakout session | Developing an autonomous framework with Security Lake & Torc Robotics Security teams are increasingly seeking autonomy in their security operations. Amazon Security Lake is a powerful solution that allows organizations to centralize their security data across AWS accounts and Regions. In this session, learn how Security Lake simplifies centralizing and operationalizing security data. Then, hear from Torc Robotics, a leading autonomous trucking company, as they share their experience and best practices for using Security Lake to establish an autonomous security framework.
TDR302 | Breakout session | Detecting and responding to threats in generative AI workloads While generative AI is an emerging technology, many of the same services and concepts can be used for threat detection and incident response. In this session, learn how you can build out threat detection and incident response capabilities for a generative AI workload that uses Amazon Bedrock. Find out how to effectively monitor this workload using Amazon Bedrock, Amazon GuardDuty, and AWS Security Hub. The session also covers best practices for responding to and remediating security issues that may come up.
TDR303 | Breakout session | Innovations in AWS detection and response services In this session, learn about the latest advancements and recent AWS launches in the field of detection and response. This session focuses on use cases like threat detection, workload protection, automated and continual vulnerability management, centralized monitoring, continuous cloud security posture management, unified security data management, and discovery and protection of workloads and data. Through these use cases, gain a deeper understanding of how you can seamlessly integrate AWS detection and response services to help protect your workloads at scale, enhance your security posture, and streamline security operations across your entire AWS environment.
TDR304 | Breakout session | Explore cloud workload protection with GuardDuty, feat. Booking.com Monitoring your workloads at runtime allows you to detect unexpected activity sooner—before it escalates to broader business-impacting security issues. Amazon GuardDuty Runtime Monitoring offers fully managed threat detection that gives you end-to-end visibility across your AWS environment. GuardDuty’s unique detection capabilities are guided by AWS’s visibility into the cloud threat landscape. In this session, learn why AWS built the Runtime Monitoring feature and how it works. Also discover how Booking.com used GuardDuty for runtime protection, supporting their mission to make it easier for everyone to experience the world.
TDR305 | Breakout session | Cyber threat intelligence sharing on AWS Real-time, contextual, and comprehensive visibility into security issues is essential for resilience in any organization. In this session, join the Australian Cyber Security Centre (ACSC) as they present their Cyber Threat Intelligence Sharing (CTIS) program, built on AWS. With the aim to improve the cyber resilience of the Australian community and help make Australia the most secure place to connect online, the ACSC protects Australia from thousands of threats every day. Learn the technical fundamentals that can help you apply best practices for real-time, bidirectional sharing of threat intelligence across all sectors.
TDR331 | Chalk talk | Unlock OCSF: Turn raw logs into insights with generative AI So, you have security data stored using the Open Cybersecurity Schema Framework (OCSF)—now what? In this chalk talk, learn how to use AWS analytics tools to mine data stored using the OCSF and leverage generative AI to consume insights. Discover how services such as Amazon Athena, Amazon Q in QuickSight, and Amazon Bedrock can extract, process, and visualize security insights from OCSF data. Gain practical skills to identify trends, detect anomalies, and transform your OCSF data into actionable security intelligence that can help your organization respond more effectively to cybersecurity threats.
TDR332 | Chalk talk | Anatomy of a ransomware event targeting data within AWS Ransomware events can interrupt operations and cost governments, nonprofits, and businesses billions of dollars. Early detection and automated responses are important mechanisms that can help mitigate your organization’s exposure. In this chalk talk, learn about the anatomy of a ransomware event targeting data within AWS including detection, response, and recovery. Explore the AWS services and features that you can use to protect against ransomware events in your environment, and learn how you can investigate possible ransomware events if they occur.
TDR333 | Chalk talk | Implementing AWS security best practices: Insights and strategies Have you ever wondered if you are using AWS security services such as Amazon GuardDuty, AWS Security Hub, AWS WAF, and others to the best of their ability? Do you want to dive deep into common use cases to better operationalize AWS security services through insights developed via thousands of deployments? In this chalk talk, learn tips and tricks from AWS experts who have spent years talking to users and documenting guidance outlining AWS security services best practices.
TDR334 | Chalk talk | Unlock your security superpowers with generative AI Generative AI can accelerate and streamline the process of security analysis and response, enhancing the impact of your security operations team. Its unique ability to combine natural language processing with large existing knowledge bases and agent-based architectures that can interact with your data and systems makes it an ideal tool for augmenting security teams during and after an event. In this chalk talk, explore how generative AI will shape the future of the SOC and lead to new capabilities in incident response and cloud security posture management.
TDR431 | Chalk talk | Harnessing generative AI for investigation and remediation To help businesses move faster and deliver security outcomes, modern security teams need to identify opportunities to automate and simplify their workflows. One way of doing so is through generative AI. Join this chalk talk to learn how to identify use cases where generative AI can help with investigating, prioritizing, and remediating findings from Amazon GuardDuty, Amazon Inspector, and AWS Security Hub. Then find out how you can develop architectures from these use cases, implement them, and evaluate their effectiveness. The talk offers tenets for generative AI and security that can help you safely use generative AI to reduce cognitive load and increase focus on novel, high-value opportunities.
TDR432 | Chalk talk | New tactics and techniques for proactive threat detection This insightful chalk talk is led by the AWS Customer Incident Response Team (CIRT), the team responsible for swiftly responding to security events on the customer side of the AWS Shared Responsibility Model. Discover the latest trends in threat tactics and techniques observed by the CIRT, along with effective detection and mitigation strategies. Gain valuable insights into emerging threats and learn how to safeguard your organization’s AWS environment against evolving security risks.
TDR433 | Chalk talk | Incident response for multi-account and federated environments In this chalk talk, AWS security experts guide you through the lifecycle of a compromise involving federation and third-party identity providers. Learn how AWS detects unauthorized access and which approaches can help you respond to complex situations involving organizations with multiple accounts. Discover insights into how you can contain and recover from security events and discuss strong IAM policies, appropriately restrictive service control policies, and resource termination for security event containment. Also, learn how to build resiliency in an environment with IAM permission refinement, organizational strategy, detective controls, chain of custody, and IR break-glass models.
TDR227 | Lightning talk | How Razorpay scales threat detection using AWS Discover how Razorpay, a leading payment aggregator solution provider authorized by the Reserve Bank of India, efficiently manages millions of business transactions per minute through automated security operations using AWS security services. Join this lightning talk to explore how Razorpay’s security operations team uses AWS Security Hub, Amazon GuardDuty, and Amazon Inspector to monitor their critical workloads on AWS. Learn how they orchestrate complex workflows, automating responses to security events, and reduce the time from detection to remediation.
TDR321 | Lightning talk | Scaling incident response with AWS developer tools In incident response, speed matters. Responding to incidents at scale can be challenging as the number of resources in your AWS accounts increases. In this lightning talk, learn how to use SDKs and the AWS Command Line Interface (AWS CLI) to rapidly run commands across your estate so you can quickly retrieve data, identify issues, and resolve security-related problems.
TDR322 | Lightning talk | How Snap Inc. secures its services with Amazon GuardDuty In this lightning talk, discover how Snap Inc. established a secure multi-tenant compute platform on AWS and mitigated security challenges within shared Kubernetes clusters. Snap uses Amazon GuardDuty and the OSS tool Falco for runtime protection across build time, deployment time, and runtime phases. Explore Snap’s techniques for facilitating one-time cluster access through AWS IAM Identity Center. Find out how Snap has implemented isolation strategies between internal tenants using the Pod Security Standards (PSS) and network policies enforced by the Amazon VPC Container Network Interface (CNI) plugin.
TDR326 | Lightning talk | Streamlining security auditing with generative AI For identifying and responding to security-related events, collecting and analyzing logs is only the first step. Beyond this initial phase, you need to utilize tools and services to parse through logs, understand baseline behaviors, identify anomalies, and create automated responses based on the type of event. In this lightning talk, learn how to effectively parse security logs, identify anomalies, and receive response runbooks that you can implement within your environment.
Interactive sessions (builders’ sessions, code talks, and workshops)
TDR351 | Builders’ session | Accelerating incident remediation with IR playbooks & Amazon Detective In this builders’ session, learn how to investigate incidents more effectively and discover root cause with Amazon Detective. Amazon Detective provides finding-group summaries by using generative AI to automatically analyze finding groups. Insights in natural language then help you accelerate security investigations. Find out how you can create your own incident response playbooks and test them by handling multi-event security issues.
TDR352 | Builders’ session | How to automate containment and forensics for Amazon EC2 Automated Forensics Orchestrator for Amazon EC2 deploys a mechanism that uses AWS services to orchestrate and automate key digital forensics processes and activities for Amazon EC2 instances in the event of a potential security issue being detected. In this builders’ session, learn how to deploy and scale this self-service AWS solution. Explore the prerequisites, learn how to customize it for your environment, and experience forensic analysis on live artifacts to identify what potential unauthorized users could do in your environment.
TDR353 | Builders’ session | Preventing top misconfigurations associated with security events Have you ever wondered how you can prevent top misconfigurations that could lead to a security event? Join this builders’ session, where the AWS Customer Incident Response Team (CIRT) reviews some of the most commonly observed misconfigurations that can lead to security events. Then learn how to build mechanisms using AWS Security Hub and other AWS services that can help detect and prevent these issues.
TDR354 | Builders’ session | Insights in your inbox: Build email reporting with AWS Security Hub AWS Security Hub provides you with a comprehensive view of the security state of your AWS resources by collecting security data from across AWS accounts, AWS Regions, and AWS services. In this builders’ session, learn how to set up a customizable and automated summary email that distills security posture information, insights, and critical findings from Security Hub. Get hands-on with the Security Hub console and discover easy-to-implement code examples that you can use in your own organization to drive security improvements.
TDR355 | Builders’ session | Detecting ransomware and suspicious activity in Amazon RDS In this builders’ session, acquire skills that can help you detect and respond to threats targeting AWS databases. Using services such as AWS Cloud9 and AWS CloudFormation, simulate real-world intrusions on Amazon RDS and Amazon Aurora and use Amazon Athena to detect unauthorized activities. The session also covers strategies from the AWS Customer Incident Response Team (CIRT) for rapid incident response and configuring essential security settings to enhance your database defenses. The session provides practical experience in configuring audit logging and enabling termination protection to ensure robust database security measures.
TDR451 | Builders’ session | Create a generative AI runbook to resolve security findings Generative AI has the potential to accelerate and streamline security analysis, response, and recovery, enhancing the effectiveness of human engagement. In this builders’ session, learn how to use Amazon SageMaker notebooks and Amazon Bedrock to quickly resolve security findings in your AWS account. You rely on runbooks for the day-to-day operations, maintenance, and troubleshooting of AWS services. With generative AI, you can gain deeper insights into security findings and take the necessary actions to streamline security analysis and response.
TDR441 | Code talk | How to use generative AI to gain insights in Amazon Security Lake In this code talk, explore how you can use generative AI to gather enhanced security insights within Amazon Security Lake by integrating Amazon SageMaker Studio and Amazon Bedrock. Learn how AI-powered analytics can help rapidly identify and respond to security threats. By using large language models (LLMs) within Amazon Bedrock to process natural language queries and auto-generate SQL queries, you can expedite security investigations, focusing on relevant data sources within Security Lake. The talk includes a threat analysis exercise to demonstrate the effectiveness of LLMs in addressing various security queries. Learn how you can streamline security operations and gain actionable insights to strengthen your security posture and mitigate risks effectively within AWS environments.
TDR442 | Code talk | Security testing, the practical way Join this code talk for a practical demonstration of how to test security capabilities within AWS. The talk can help you evaluate and quantify your detection and response effectiveness against key metrics like mean time to detect and mean time to resolution. Explore testing techniques that use open source tools alongside AWS services such as Amazon GuardDuty and AWS WAF. Gain insights into testing your security configurations in your environment and uncover best practices tailored to your testing scenarios. This talk equips you with actionable strategies to enhance your security posture and establish robust defense mechanisms within your AWS environment.
TDR443 | Code talk | How to conduct incident response in your Amazon EKS environment Join this code talk to gain insights from both adversaries’ and defenders’ perspectives as AWS experts simulate a live security incident within an application across multiple Amazon EKS clusters, invoking an alert in Amazon GuardDuty. Witness the incident response process as experts demonstrate detection, containment, and recovery procedures in near real time. Through this immersive experience, learn how you can effectively respond to and recover from Amazon EKS–specific incidents, and gain valuable insights into incident handling within cloud environments. Don’t miss this opportunity to enhance your incident response capabilities and learn how to more effectively safeguard your AWS infrastructure.
TDR444 | Code talk | Identity forensics in the realm of short-term credentials AWS Security Token Service (AWS STS) is a common way for users to access AWS services and allows you to utilize role chaining for navigating AWS accounts. When investigating security incidents, understanding the history and potential impact is crucial. Examining a single session is often insufficient because the initial abused credential may be different than the one that precipitated the investigation, and other tokens might be generated. Also, a single session investigation may not encompass all permissions that the adversary controls, due to trust relationships between the roles. In this code talk, learn how you can construct identity forensics capabilities using Amazon Detective and create a custom graph database using Amazon Neptune.
TDR371-R | Workshop | Threat detection and response on AWS Join AWS experts for an immersive threat detection and response workshop using Amazon GuardDuty, Amazon Inspector, AWS Security Hub, and Amazon Detective. This workshop simulates security events for different types of resources and behaviors and illustrates both manual and automated responses with AWS Lambda. Dive in and learn how to improve your security posture by operationalizing threat detection and response on AWS.
TDR372-R | Workshop | Container threat detection and response with AWS security services Join AWS experts for an immersive container security workshop using AWS threat detection and response services. This workshop simulates scenarios and security events that may arise while using Amazon ECS and Amazon EKS. The workshop also demonstrates how to use different AWS security services to detect and respond to potential security threats, as well as suggesting how you can improve your security practices. Dive in and learn how to improve your security posture when running workloads on AWS container orchestration services.
TDR373-R | Workshop | Vulnerability management with Amazon Inspector and Jenkins Join AWS experts for an immersive vulnerability management workshop using Amazon Inspector and Jenkins for continuous integration and continuous delivery (CI/CD). This workshop takes you through approaches to vulnerability management with Amazon Inspector for EC2 instances, container images residing in Amazon ECR and within CI/CD tools, and AWS Lambda functions. Explore the integration of Amazon Inspector with Jenkins, and learn how to operationalize vulnerability management on AWS.
Browse the full re:Inforce catalog to learn more about sessions in other tracks, plus gamified learning, innovation sessions, partner sessions, and labs.
Our comprehensive track content is designed to help arm you with the knowledge and skills needed to securely manage your workloads and applications on AWS. Don’t miss out on the opportunity to stay updated with the latest best practices in threat detection and incident response. Join us in Philadelphia for re:Inforce 2024 by registering today. We can’t wait to welcome you!
If you have feedback about this post, submit comments in the Comments section below. If you have questions about this post, contact AWS Support.
In the preceding scenario, neither single-user rotation nor alternating-user rotation would meet your security or compliance standards. Single-user rotation uses database user credentials in the secret to rotate itself (assuming the user has change-password permissions). Alternating-user rotation uses Amazon RDS admin credentials from another secret to create and update a _clone user credential, which means there are two valid user credentials with identical permissions.
In this post, you will learn how to implement a modified alternating-user solution that uses Amazon RDS admin user credentials to rotate database credentials while not creating an identical _clone user. This modified rotation strategy creates a short lag between when the password in the database changes and when the secret is updated. During this brief lag before the new password is updated, database calls using the old credentials might be denied. Test this in your environment to determine if the lag is within an acceptable range.
Walkthrough
In this walkthrough, you will learn how to implement the modified rotation strategy by modifying the existing alternating-user rotation template. To accomplish this, you need to complete the following:
Configure alternating-user rotation on the database credential secret for which you want to implement the modified rotation strategy.
Modify your AWS Lambda rotation function template code to implement the modified rotation strategy.
Test the modified rotation strategy on your database credential secret and verify that the secret was rotated while also not creating a _clone user.
To configure alternating-user rotation on the database credential secret
When configuring rotation for the database user secret in the Secrets Manager console, clear the checkbox for Rotate immediately when the secret is stored. The next rotation will begin on your schedule in the Rotation schedule tab. Make sure that no _clone user is created by the default alternating-user rotation code through your database’s user tables.
Figure 1: Clear the checkbox for Rotate immediately when the secret is stored
To modify your Lambda function rotation Lambda template to implement the modified rotation strategy
In the Secrets Manager console, select the Secrets menu from the left pane. Then, select the new database user secret’s name from the Secret name column.
Figure 2: Select the new database user secret
Select the Rotation tab on the Secrets page, and then choose the link under Lambda rotation function.
Figure 3: Select the Lambda rotation function
From the rotation Lambda menu, Download select Download function code.zip.
Figure 4: Select Download function code .zip from Download
Unzip the .zip file. Open the lambda_function.py file in a code editor and make the following code changes to implement the modified rotation strategy.
The following code changes show how to modify a rotation function for the MySQL alternating-user rotation code template. You must make similar changes in the CreateSecret and SetSecret steps of the alternating-user rotation code template for your database’s engine type.
To make the needed changes, remove the lines of code that are in grey italic and add the lines of code that are bold.
Consider using AWS Lambda function versions to enable reverting your Lambda function to previous iterations in case this modified rotation strategy goes wrong.
In create_secret()
The following code suggestion removes the creation of _clone-suffixed usernames.
Remove:
-- # Get the alternate username swapping between the original user and the user with _clone appended to it
-- current_dict['username'] = get_alt_username(current_dict['username'])
In set_secret()
The following code suggestions remove the creation of _clone-suffixed usernames and subsequent checks for such usernames in conditional logic.
Keep:
# Get username character limit from environment variable
username_limit = int(os.environ.get('USERNAME_CHARACTER_LIMIT', '16'))
Remove:
-- # Get the alternate username swapping between the original user and the user with _clone appended to it
-- current_dict['username'] = get_alt_username(current_dict['username'])
Keep:
# Check that the username is within correct length requirements for version
Remove:
-- if current_dict['username'].endswith('_clone') and len(current_dict['username']) > username_limit:
Add:
++ if len(current_dict[‘username’]) > username_limit:
Keep:
raise ValueError("Unable to clone user, username length with _clone appended would exceed %s character
s" % username_limit)
# Make sure the user from current and pending match
Remove:
-- if get_alt_username(current_dict['username']) != pending_dict['username']:
Add:
++ if current_dict['username'] != pending_dict['username']:
Remove:
-- def get_alt_username(current_username):
--   """Gets the alternate username for the current_username passed in
--
--   This helper function gets the username for the alternate user based on the passed in current username.
--
--   Args:
--       current_username (client): The current username
--
--   Returns:
--      AlternateUsername: Alternate username
--
--   Raises:
--      ValueError: If the new username length would exceed the maximum allowed
--
--   """
--   clone_suffix = "_clone"
--   if current_username.endswith(clone_suffix):
--       return current_username[:(len(clone_suffix) * -1)]
--   else:
--       return current_username + clone_suffix
--
The following code suggestions remove the logic of creating a new _clone user within the database, and rotates the existing user’s password.
Keep:
with conn.cursor() as cur:
Remove:
--   cur.execute("SELECT User FROM mysql.user WHERE User = %s", pending_dict['username'])
--   # Create the user if it does not exist
--   if cur.rowcount == 0:
--      cur.execute("CREATE USER %s IDENTIFIED BY %s", (pending_dict['username'], pending_dict['password']))
--
--   # Copy grants to the new user
--   cur.execute("SHOW GRANTS FOR %s", current_dict['username'])
--   for row in cur.fetchall():
--       grant = row[0].split(' TO ')
--       new_grant_escaped = grant[0].replace('%', '%%')  # % is a special character in Python format strings.
--       cur.execute(new_grant_escaped + " TO %s", (pending_dict['username'],))
Keep:
    # Get the version of MySQL
    cur.execute("SELECT VERSION()")
    ver = cur.fetchone()[0]
Remove:
--   # Copy TLS options to the new user
--   escaped_encryption_statement = get_escaped_encryption_statement(ver)
--   cur.execute("SELECT ssl_type, ssl_cipher, x509_issuer, x509_subject FROM mysql.user WHERE User = %s", current_dict['username'])
--   tls_options = cur.fetchone()
--   ssl_type = tls_options[0]
--   if not ssl_type:
--       cur.execute(escaped_encryption_statement + " NONE", pending_dict['username'])
--   elif ssl_type == "ANY":
--       cur.execute(escaped_encryption_statement + " SSL", pending_dict['username'])
--   elif ssl_type == "X509":
--       cur.execute(escaped_encryption_statement + " X509", pending_dict['username'])
--   else:
--       cur.execute(escaped_encryption_statement + " CIPHER %s AND ISSUER %s AND SUBJECT %s", (pending_dict['username'], tls_options[1], tls_options[2], tls_options[3]))
Keep:
    # Set the password for the user and commit
    password_option = get_password_option(ver)
    cur.execute("SET PASSWORD FOR %s = " + password_option, (pending_dict['username'], pending_dict['password']))
    conn.commit()
    logger.info("setSecret: Successfully set password for %s in MySQL DB for secret arn %s." % (pending_dict['username'], arn))
Re-zip the folder with the local code changes. From the rotation Lambda menu, under the Code tab, choose Upload from and select .zip file. Upload the new .zip file.
Figure 5: Use Upload from to upload the new .zip file as the Code source
To test the modified rotation strategy
During the next scheduled rotation for the new database user secret, the modified rotation code will run. To test this immediately, select the Rotation tab within the Secrets menu and choose Rotate secret immediately in the Rotation configuration section.
Figure 6: Choose Rotate secret immediately to test the new rotation strategy
To verify that the modified rotation strategy worked, verify the sign-in details in both the secret and the database itself.
To verify the Secrets Manager secret, select the Secrets menu in the Secrets Manager console and choose Retrieve secret value under the Overview tab. Verify that the username doesn’t have a _clone suffix and that there is a new password. Alternatively, make a get-secret-value call on the secret through the AWS Command Line Interface (AWS CLI) and verify the username and password details.
Figure 7: Use the secret details page for the database user secret to verify that the value of the username key is unchanged
To verify the sign-in details in the database, sign in to the database with admin credentials. Run the following database command to verify that no users with a _clone suffix exist: SELECT * FROM mysql.user;. Make sure to use the commands appropriate for your database engine type.
Also, verify that the new sign-in credentials in the secret work by signing in to the database with the credentials.
Clean up the resources
Follow the Clean up the resources section from the AWS Security Blog post used at the start of this walkthrough.
Conclusion
In this post, you’ve learned how to configure rotation of Amazon RDS database users using a modified alternating-users rotation strategy to help meet more specific security and compliance standards. The modified strategy ensures that database users don’t rotate themselves and that there are no duplicate users created in the database.
If you have feedback about this post, submit comments in the Comments section below. If you have questions about this post, start a new thread on AWS Secrets Manager re:Post or contact AWS Support.
Join us in Philadelphia, Pennsylvania on June 10–12, 2024 for AWS re:Inforce, a security learning conference where you can gain skills and confidence in cloud security, compliance, identity, and privacy. As an attendee, you have access to hundreds of technical and non-technical sessions, an Expo featuring Amazon Web Services (AWS) experts and AWS Security Competency Partners, and keynote and leadership sessions featuring Security leadership.
AWS re:Inforce features content in the following six areas:
Data Protection
Governance, Risk, and Compliance
Identity and Access Management
Network and Infrastructure Security
Threat Detection and Incident Response
Application Security
This post will highlight some of the Data Protection sessions that you can add to your agenda. The data protection content showcases best practices for data in transit, at rest, and in use. Learn how AWS, customers, and AWS Partners work together to protect data across industries like financial services, healthcare, and the public sector. You will learn from AWS leaders about how customers innovate in the cloud, use the latest generative AI tools, and raise the bar on data security, resilience, and privacy.
Breakout sessions, chalk talks, and lightning talks
DAP221: Secure your healthcare generative AI workloads on Amazon EKS Many healthcare organizations have been modernizing their applications using containers on Amazon EKS. Today, they are increasingly adopting generative AI models to innovate in areas like patient care, drug discovery, and medical imaging analysis. In addition, these organizations must comply with healthcare security and privacy regulations. In this lightning talk, learn how you can work backwards from expected healthcare data protection outcomes. This talk offers guidance on extending healthcare organizations’ standardization of containerized applications on Amazon EKS to build more secure and resilient generative AI workloads.
DAP232: Innovate responsibly: Deep dive into data protection for generative AI AWS solutions such as Amazon Bedrock and Amazon Q are helping organizations across industries boost productivity and create new ways of operating. Despite all of the excitement, organizations often pause to ask, “How do these new services handle and manage our data?” AWS has designed these services with data privacy in mind and many security controls enabled by default, such as encryption of data at rest and in transit. In this chalk talk, dive into the data flows of these new generative AI services to learn how AWS prioritizes security and privacy for your sensitive data requirements.
DAP301: Building resilient event-driven architectures, feat. United Airlines United Airlines plans to accept a delivery of 700 new planes by 2032. With this growing fleet comes more destinations, passengers, employees, and baggage—and a big increase in data, the lifeblood of airline operations. United Airlines is using event-driven architecture (EDA) to build a system that scales with their operations and evolves with their hybrid cloud throughout this journey. In this session, learn how United Airlines built a hybrid operations management system by modernizing from mainframes to AWS. Using Amazon MSK, Amazon DynamoDB, AWS KMS, and event mesh AWS ISV Partner Solace, they were able to design a well-crafted EDA to address their needs.
DAP302: Capital One’s approach for secure and resilient applications Join this session to learn about Capital One’s strategic AWS Secrets Manager implementation that has helped ensure unified security across environments. Discover the key principles that can guide consistent use, with real-world examples to showcase the benefits and challenges faced. Gain insights into achieving reliability and resilience in financial services applications on AWS, including methods for maintaining system functionality amidst failures and scaling operations safely. Find out how you can implement chaos engineering and site reliability engineering using multi-Region services such as Amazon Route 53, AWS Auto Scaling, and Amazon DynamoDB.
DAP321: Securing workloads using data protection services, feat. Fannie Mae Join this lightning talk to discover how Fannie Mae employs a comprehensive suite of AWS data protection services to securely manage their own keys, certificates, and application secrets. Fannie Mae demonstrates how they utilized services such as AWS Secrets Manager, AWS KMS, and AWS Private Certificate Authority to empower application teams to build securely and align with their organizational and compliance expectations.
DAP331: Encrypt everything: How different AWS services help you protect data Encryption is supported by every AWS service that stores data. However, not every service implements encryption and key management identically. In this chalk talk, learn in detail how different AWS services such as Amazon S3 or Amazon Bedrock use encryption and manage keys. These insights can help you model threats to your applications and be better prepared to respond to questions about adherence to security standards and compliance requirements. Also, find out about some of the methodologies AWS uses when designing for encryption and key management at scale in a diverse set of services.
Hands-on sessions (builders’ sessions, code talks, and workshops)
DAP251: Build a privacy-enhancing healthcare data collaboration solution In this builders’ session, learn how to build a privacy-enhanced environment to analyze datasets from multiple sources using AWS Clean Rooms. Build a solution for a fictional life sciences company that is researching a new drug and needs to perform analyses with a hospital system. Find out how you can help protect sensitive data using SQL query controls to limit how the data can be queried, Cryptographic Computing for Clean Rooms (C3R) to keep the data encrypted at all times, and differential privacy to quantifiably safeguard patients’ personal information in the datasets. You must bring your laptop to participate.
DAP341: Data protection controls for your generative AI applications on AWS Generative AI is one of the most disruptive technologies of our generation and has the potential to revolutionize all industries. Cloud security data protection strategies need to evolve to meet the changing needs of businesses as they adopt generative AI. In this code talk, learn how you can implement various data protection security controls for your generative AI applications using Amazon Bedrock and AWS data protection services. Discover best practices and reference architectures that can help you enforce fine-grained data protection controls to scale your generative AI applications on AWS.
DAP342: Leveraging developer platforms to improve secrets management at scale In this code talk, learn how you can leverage AWS Secrets Manager and Backstage.io to give developers the freedom to deploy secrets close to their applications while maintaining organizational standards. Explore how using a developer portal can remove the undifferentiated heavy lifting of creating secrets that have consistent naming, tagging, access controls, and encryption. This talk touches on cross-Region replication, cross-account IAM permissions and policies, and access controls and integration with AWS KMS. Also find out about secrets rotation as well as new AWS Secrets Manager features such as BatchGetSecretValue and managed rotation.
DAP371: Encryption in transit Encryption in transit is a fundamental aspect of data protection. In this workshop, walk through multiple ways to accomplish encryption in transit on AWS. Find out how to enable HTTPS connections between microservices on Amazon ECS and AWS Lambda via Amazon VPC Lattice, enforce end-to-end encryption in Amazon EKS, and use AWS Private Certificate Authority to issue TLS certificates for private applications. You must bring your laptop to participate.
If these sessions look interesting to you, join us in Philadelphia by registering for re:Inforce 2024. We look forward to seeing you there!
If you have feedback about this post, submit comments in the Comments section below. If you have questions about this post, contact AWS Support.
Amazon Web Services (AWS) customers have been adopting the approach of using AWS PrivateLink to have secure communication to AWS services, their own internal services, and third-party services in the AWS Cloud. As these environments scale, the number of PrivateLink connections outbound to external services and inbound to internal services increase and are spread out across multiple accounts in virtual private clouds (VPCs). While AWS Identity and Access Management (IAM) policies allow you to control access to individual PrivateLink services, customers want centralized governance for the use of PrivateLink in adherence with organizational standards and security needs.
This post provides an approach for centralized governance for PrivateLink based services across your multi-account environment. It provides a way to create preventative controls through the use of service control policies (SCPs) and detective controls through event-driven automation. This allows your application teams to consume internal and external services while adhering to organization policies and provides a mechanism for centralized control as your AWS environment grows.
Scenarios faced by customers
Figure 1 shows an example customer environment comprising a multi-account structure created through AWS Organizations or using AWS Control Tower. There are separate organizational units (OUs) pertaining to different business units (BUs) with respective accounts. The business services’ account hosts several backend services that are utilized by consuming applications for their functionality. Since these services provide functionality to more than one internal application and will require access across VPC and account boundaries, these are exposed through AWS PrivateLink. One such service is shown in the business services account.
The customer has partners that provide services for integration with the customer’s application stack. The approved partner account provides a service that is approved for use by the cloud administration team. The NotApproved partner account provides services that are not approved within the customer’s organization. The customer has another OU dedicated to application teams. The application 1 account has an application that consumes the business service of the approved partner account. It is also planning to use the service from the NotApproved partner, which should be blocked. The application in the application 2 account is planning on using AWS services through interface endpoints as well as the approved partner account through PrivateLink integration.
Note: Throughout this post, “organization” is used to refer to an organization that you create and manage through AWS Organizations.
Figure 1: A multi-account customer environment
Current challenges
Access to individual PrivateLink connections can be controlled through IAM policies. At scale, however, different teams use and adopt PrivateLink for incoming and outgoing connections, and the number of VPC endpoint policies to create and manage increases. As mentioned in the problem statement presented in the introduction, as the customer environment scales and the number of PrivateLink connections increases, customers want centralized guardrails to manage PrivateLink resources at scale. For our example, the customer would like to put the following controls in place:
Preventative controls:
Use case 1:
Allow creation of VPC endpoints and allow access only to PrivateLink enabled AWS services.
Allow creation of VPC endpoints and initiating connection only to approved PrivateLink enabled third-party services.
Allow creation of VPC endpoints and initiating connection only to internal business services owned by accounts in the same organization.
Use case 2:
Allow only a cloud admin role to add permissions to connect to an endpoint service to prevent connections from external clients to internal VPC endpoint services.
Detective controls:
Use case 3:
Detect if connections are made to PrivateLink services exposed by AWS accounts not belonging to the customer’s organization.
Use case 4:
Detect if connections are made by external AWS accounts (not belonging to the customer’s organization) to PrivateLink services exposed for internal use by the customer’s AWS accounts.
This post presents a solution that uses SCPs, AWS CloudTrail, and AWS Config to achieve governance. When the solution is deployed in your account, the following components are created as part of the architecture, as shown in Figure 2.
Figure 2: Resources deployed in the customer environment by the solution
The following architecture is now in place:
SCPs to provide preventative controls for the PrivateLink connections.
Amazon EventBridge rules that are configured to trigger based on events from API calls captured by CloudTrail in specified accounts within specified OUs.
EventBridge rules in member accounts to send events to the event bus in the Audit account, and a central EventBridge rule in that account to trigger an AWS Lambda function based on PrivateLink related API calls.
A Lambda function that receives the events and validates if the VPC endpoint API call is allowed for the PrivateLink service and notifies a cloud administrator if a policy is violated.
An AWS Config rule that checks if PrivateLink enabled VPC endpoint services created within your AWS accounts have enabled auto accept of client connections and disabled notifications.
Use cases and solution approach
This section walks through each use case and how the solution components are used to address each use case.
Preventative control
Use case 1: Allowing the creation of a VPC endpoint connection to only AWS services and approved internal and third-party PrivateLink services
This solution allows creating a VPC endpoint for only approved partner PrivateLink services, PrivateLink services internal to the organization, and AWS services. This is implemented using an SCP and can be enforced at the individual account or OU. The approved partner services as well as the internal accounts that can host allowed PrivateLink services can be specified during the solution deployment. Application teams operating in AWS accounts within the customer environment can then create VPC endpoints to PrivateLink services of approved partners or AWS services. However, they will not be able to create a VPC endpoint to an unapproved PrivateLink service, for example. This is shown in Figure 3.
Figure 3: Allowed and disallowed paths in PrivateLink connections by SCP
The SCP that allows you to do this preventative control is shown in the following code snippet. In this example SCP policy, AllowedPrivateLinkPartnerService-ServiceName refers to the service name of the allowed partner PrivateLink. Also, the SCP allows the creation of VPC endpoints to internal PrivateLink services that are hosted in AllowedPrivateLinkAccount. Make sure that this SCP does not interfere with the other policies you created within your organization. The solution currently uses ec2:VpceServiceName and ec2:VpceServiceOwner conditions to identify the PrivateLink service of AWS services or a third-party partner. These conditions can be used in an SCP to control the creation of VPC endpoints:
Use case 2: Allow only a cloud admin role to add permissions to connect to an endpoint service
This solution makes sure that PrivateLink services that are owned and created in AWS accounts of the customer cannot be connected to consumers unless it is allowed by the cloud administrator role. The cloud administrator can then make sure that only legitimate internal AWS accounts are allowed access to that service and restrict access from other accounts outside of the customer’s organization. This is achieved through the use of a service control policy that will restrict modifications of permissions of the PrivateLink endpoint service. This makes sure that individual teams are not able to use the Allow principals configuration to open access to other entities directly, and only a cloud administrator role with the right permissions can make that change.
This policy can help in achieving the access control, as shown in Figure 4. The cloud administrator uses the Allow principals configuration of the business services PrivateLink service to provide access only to the application 1 account. The SCP allows only the cloud administrator to make the modification and does not allow another member of the team from bypassing that process and adding a nonapproved client application account to access the internal PrivateLink service.
Figure 4: Centralized control on access to the internal PrivateLink service to the customer’s own accounts
Detective controls
For detective controls, we discuss two use cases that are deployed as part of the solution and can be enabled and disabled based on the test that you want to perform.
Use case 3: Detecting if connections are made by external AWS accounts (not belonging to the customer’s organization) to PrivateLink services exposed by the customer’s AWS accounts
In this use case, the customer would like to detect if connections are made to their business services from accounts outside of its organization. The solution uses individual member account trails for capturing API calls across the multi-account structure and cross-account EventBridge integration. CloudTrail events from member accounts capture events when a PrivateLink service connection is accepted through the API call event AcceptVPCConnectionEndpoint and sent to the event bus in the audit account. This triggers a Lambda function that then captures the information of the entity requesting the connection and details of the PrivateLink service and sends a notification to the cloud administrator. This is shown in Figure 5.
Figure 5: Detecting the creation of a VPC endpoint or accepting a PrivateLink service connection using CloudTrail events in EventBridge
Custom AWS Config rule for detective control
This detective control mechanism works in cases where PrivateLink services are configured to manually accept client connections. If the endpoint is configured to automatically accept connections, CloudTrail will not generate an event when a connection is accepted. AWS PrivateLink allows customers to configure connection notifications to send connection notification events to an Amazon Simple Notification Service (Amazon SNS) topic. Cloud administrators can get the notifications if they are subscribed to the SNS topic. However, if the notification configuration is removed by the member account, there is no way for the cloud administrator to have visibility for new connections and effectively apply governance requirements.
This solution employs an AWS Config rule to detect if PrivateLink services are created with the Auto Accept Connections setting enabled or without a connection notification configuration and flag it as noncompliant.
This is depicted in Figure 6.
Figure 6: Custom AWS Config rule and SNS notification deployed as part of the solution
When a PrivateLink service is created by one of the business services teams, an AWS Config organization rule in the audit account will detect the event, and the custom Lambda function will check if the connection notification configuration is present. If not, then the AWS Config rule will flag the resource as noncompliant. Cloud administrators can view these in the AWS Config dashboard or receive notifications configured through AWS Config.
Use case 4: Detecting if connections are made to PrivateLink services exposed by AWS accounts not belonging to the customer’s organization.
Using the same approach as presented in use case 3, connections made to PrivateLink services exposed by AWS accounts outside of the customer’s organization can be detected through the API call event from CloudTrail CreateVPCEndpoint. This event is sent to the centralized event bus and the Lambda function to check against the criteria and provide notifications to the cloud administrator.
Deploy and test the solution
This section walks through how to deploy and test our recommended solution.
Identify an account in your organization to serve as the audit account and set it up as a delegated administrator for CloudFormation, AWS Config, and CloudTrail. Follow these steps to perform this step:
The solution uses the deployment of CloudFormation StackSets with self-managed permissions to set up the resources in the audit account. In order to enable this, create AWSCloudFormationStackSetAdministrationRole in the management account and AWSCloudFormationStackSetExecutionRole in the audit account by using the steps in the topic Grant self-managed permissions.
In a separate AWS account that is different than your multi-account environment, create two PrivateLink VPC endpoint services as explained in the documentation. You can use this template to create a test PrivateLink VPC endpoint service. These will serve as two partner services, one of which is allowed, and another is untrusted and not allowed. Make note of their service names.
Figure 7: Simulated partner services (approved and not approved) in a separate test account
Deploying the solution
Go to the management account of your AWS Organizations multi-account environment and use this CloudFormation template to deploy the solution, or choose the following Launch Stack button:
This initially displays the Create stack page. Leave the details entered by default, and then choose Next.
On the Specify stack details page, enter the details for the input parameters for this solution. The following table shows the details that you will provide when setting up the CloudFormation template on the Specify stack details page on the CloudFormation console.
AWSOrganizationsId
Identifier for your organization. This can be obtained from your management account as described in the AWS Organizations User Guide.
AdminRoleArn
Role of the persona who is allowed to modify PrivateLink endpoint permissions.
AllowedPrivateLinkAccounts
AWS account IDs of accounts in your OU that host PrivateLink services.
AllowedPrivateLinkPartnerServices
Specify the service name of the approved PrivateLink services from partners. If you want to test with a simulated partner PrivateLink, take the service name of PrivateLink services created in Step 4 of the prerequisites as the partner services to which connections should be allowed. The unique service name of the partner’s PrivateLink service is provided by the partner to the customer so that they can connect to it.
AuditAccountId
AWS account ID of the audit account in your multi-account environment.
PLOrganizationUnit
OU identifier for the organizational unit where the solution will perform preventative and detective control.
Figure 8: CloudFormation template input parameters for the solution as it appears on the console
Choose Next and keep the defaults for the rest of the fields. Then, on the Review and create page, choose Submit to finish deploying the solution.
Testing the solution
Once the solution is deployed successfully, follow these steps to test the solution:
Sign in to a member account within the OU that you specified in the CloudFormation template.
From the member account, create a VPC endpoint connection to the internal PrivateLink service created in the account from Step 1. This connection will set up successfully because it is internal to the organization and therefore allowed by the SCP policy, and is not flagged to the cloud administrator as violating organization policy.
From the member account, create a VPC endpoint connection to the AWS service that is supporting PrivateLink, such as AWS Key Management Service (AWS KMS). This connection will set up successfully because it is internal to the organization and therefore allowed by the SCP policy, and is not flagged to the cloud administrator as violating organization policy.
From the member account, create a VPC endpoint connection to the PrivateLink service created in Step 4 of the prerequisites. This connection will set up successfully because it is internal to the organization and therefore allowed by the SCP policy, and is not flagged to the cloud administrator as violating organization policy.
From the member account, create a VPC endpoint connection to the PrivateLink service created in Step 4 of the prerequisites and that is not an allowed partner service. This connection will fail because it is not allowed by the SCP policy.
From an account outside of your organization, create a VPC endpoint connection to the internal PrivateLink service created in Step 1. The connection setup is successful, but the cloud administrator will see the internal PrivateLink service as NOT COMPLIANT because the connection from external clients is considered to be not compliant with organization requirements in this solution. This information allows the cloud admin to quickly find the noncompliant resource and work with the PrivateLink service owner team to remediate the issue.
From the member account, create another VPC endpoint service without configuring the notification configuration, and leave the Acceptance required field unchecked. Navigate to the AWS Config console in the audit account and go to Aggregator->Rules. Check the evaluation of the rule starting with “OrgConfigRule-pl-governance-rule….” Once the evaluation is complete, it will indicate that this VPC endpoint service is NOT COMPLIANT, whereas the service created in Step 1 will show as COMPLIANT.
Considerations
The solution described here takes the approach of allowing all VPC endpoint connections from within a customer’s organization to the PrivateLink services in specified accounts and detecting and notifying all external ones. This can be modified based on your specific use cases and requirements.
The solution uses AWS Config rules that are applied to specific accounts of your organization, even though the solution is applied at an OU level. The AWS Config rules created in this solution are scoped to evaluate VPC endpoint services and should incur charges accordingly. Refer to the AWS Config pricing page to understand usage-based pricing for the service.
Other services, such AWS Lambda and Amazon EventBridge, also incur usage-based charges. Please verify that these are deleted to prevent incurring unnecessary charges.
SCP policies only affect member accounts. They do not apply to the management account, so actions denied through an SCP policy multi-account will still be allowed in the management account.
Cleanup
You can delete the solution by following these steps to avoid unnecessary charges:
Delete the CloudFormation stack created as part of Step 4 of the prerequisites.
Delete the CloudFormation stack of the main solution deployed in the management account as part of the Deploying the solution section.
Delete the CloudFormation stack created as part of Step 1 of Testing the solution.
Summary
As customers adopt AWS PrivateLink throughout their environment, the mechanisms discussed in this post provide a way for administrators to govern and secure their PrivateLink services at scale. This approach can help you create a scalable solution where interconnections are aligned to the organization’s guidelines and security requirements. While this solution presents an approach to governance, customers can tailor this solution to their unique organizational requirements.
If you have feedback about this post, submit comments in the Comments section below. If you have questions about this post, contact AWS Support.
Want more AWS Security news? Follow us on Twitter.
AWS IAM Identity Center is the preferred way to provide workforce access to Amazon Web Services (AWS) accounts, and enables you to provide workforce access to many AWS managed applications, such as Amazon Q Developer (Formerly known as Code Whisperer).
As we continue to release more AWS managed applications, customers have told us they want to onboard to IAM Identity Center to use AWS managed applications, but some aren’t ready to migrate their existing IAM federation for AWS account management to Identity Center.
In this blog post, I’ll show you how you can enable Identity Center and use AWS managed applications—such as Amazon Q Developer—without migrating existing IAM federation flows to Identity Center.
A recap on AWS managed applications and trusted identity propagation
Just before re:Invent 2023, AWS launched trusted identity propagation, a technology that allows you to use a user’s identity and groups when accessing AWS services. This allows you to assign permissions directly to users or groups, rather than model entitlements in AWS Identity and Access Management (IAM). This makes permissions management simpler for users. For example, with trusted identity propagation, you can grant users and groups access to specific Amazon Redshift clusters without modeling all possible unique combinations of permissions in IAM. Trusted identity propagation is available today for Redshift and Amazon Simple Storage Service (Amazon S3), with more services and features coming over time.
In 2023, we released Amazon Q Developer, which is integrated with IAM Identity Center, generally available as an AWS managed application. When you’re using Amazon Q Developer outside of AWS in integrated development environments (IDEs) such as Microsoft Visual Studio Code, Identity Center is used to sign in to Amazon Q Developer.
Amazon Q Developer is one of many AWS managed applications that are integrated with the OAuth 2.0 functionality of IAM Identity Center, and it doesn’t use IAM credentials to access the Q Developer service from within your IDEs. AWS managed applications and trusted identity propagation don’t require you to use the permission sets feature of Identity Center and instead use OpenID Connect to grant your workforce access to AWS applications and features.
IAM Identity Center for AWS application access only
In the following section, we use IAM Identity Center to sign in to Amazon Q Developer as an example of an AWS managed application.
Prerequisites
The steps in this post require that you have administrative level access to an organization in AWS Organizations.
Step 1: Enable an organization instance of IAM Identity Center
To begin, you must enable an organization instance of IAM Identity Center. While it’s possible to use IAM Identity Center without an AWS Organizations organization, we generally recommend that customers operate with such an organization.
The IAM Identity Center documentation provides the steps to enable an organizational instance of IAM Identity Center, as well as prerequisites and considerations. One consideration I would emphasize here is the identity source. We recommend, wherever possible, that you integrate with an external identity provider (IdP), because this provides the most flexibility and allows you to take advantage of the advanced security features of modern identity platforms.
IAM Identity Center is available at no additional cost.
Note: In late 2023, AWS launched account instances for IAM Identity Center. Account instances allow you to create additional Identity Center instances within member accounts of your organization. Wherever possible, we recommend that customers use an organization instance of IAM Identity Center to give them a centralized place to manage their identities and permissions. AWS recommends account instances when you want to perform a proof of concept using Identity Center, when there isn’t a central IdP or directory that contains all the identities you want to use on AWS and you want to use AWS managed applications with distinct directories, or when your AWS account is a member of an organization in AWS Organizations that is managed by another party and you don’t have access to set up an organization instance.
Step 2: Set up your IdP and synchronize identities and groups
After you’ve enabled your IAM Identity Center instance, you need to set up your instance to work with your chosen IdP and synchronize your identities and groups. The IAM Identity Center documentation includes examples of how to do this with many popular IdPs.
After your identity source is connected, IAM Identity Center can act as the single source of identity and authentication for AWS managed applications, bridging your external identity source and AWS managed applications. You don’t have to create a bespoke relationship between each AWS application and your IdP, and you have a single place to manage user permissions.
Step 3: Set up delegated administration for IAM Identity Center
As a best practice, we recommend that you only access the management account of your AWS Organizations organization when absolutely necessary. IAM Identity Center supports delegated administration, which allows you to manage Identity Center from a member account of your organization.
To set up delegated administration
Go to the AWS Management Console and navigate to IAM Identity Center.
In the left navigation pane, select Settings. Then select the Management tab and choose Register account.
From the menu that follows, select the AWS account that will be used for delegated administration for IAM Identity Center. Ideally, this member account is dedicated solely to the purpose of administrating IAM Identity Center and is only accessible to users who are responsible for maintaining IAM Identity Center.
Figure 1: Set up delegated administration
Step 4: Configure Amazon Q Developer
You now have IAM Identity Center set up with the users and groups from your directory, and you’re ready to configure AWS managed applications with IAM Identity Center. From a member account within your organization, you can now enable Amazon Q Developer. This can be any member account in your organization and should not be the one where you set up delegated administration of IAM Identity Center, or the management account.
Note: If you’re doing this step immediately after configuring IAM Identity Center with an external IdP with SCIM synchronization, be aware that the users and groups from your external IdP might not yet be synchronized to Identity Center by your external IdP. Identity Center updates user information and group membership as soon as the data is received from your external IdP. How long it takes to finish synchronizing after the data is received depends on the number of users and groups being synchronized to Identity Center.
To enable Amazon Q Developer
Open the Amazon Q Developer console. This will take you to the setup for Amazon Q Developer.
Figure 2: Open the Amazon Q Developer console
Choose Subscribe to Amazon Q.
Figure 3: The Amazon Q developer console
You’ll be taken to the Amazon Q console. Choose Subscribe to subscribe to Amazon Q Developer Pro.
Figure 4: Subscribe to Amazon Q Developer Pro
After choosing Subscribe, you will be prompted to select users and groups you want to enroll for Amazon Q Developer. Select the users and groups you want and then choose Assign.
Figure 5: Assign user and group access to Amazon Q Developer
After you perform these steps, the setup of Amazon Q Developer as an AWS managed application is complete, and you can now use Amazon Q Developer. No additional configuration is required within your external IdP or on-premises Microsoft Active Directory, and no additional user profiles have to be created or synchronized to Amazon Q Developer.
Note: There are charges associated with using the Amazon Q Developer service.
In their IDE, a user can sign in to Amazon Q Developer by entering the start URL and AWS Region and choosing Sign in. Figure 6 shows what this looks like in Visual Studio Code. The Amazon Q extension for Visual Studio Code is available to download within Visual Studio Code.
Figure 6: Signing in to the Amazon Q Developer extension in Visual Studio Code
After choosing Use with Pro license, and entering their Identity Center’s start URL and Region, the user will be directed to authenticate with IAM Identity Center and grant the Amazon Q Developer application access to use the Amazon Q Developer service.
When this is successful, the user will have the Amazon Q Developer functionality available in their IDE. This was achieved without migrating existing federation or AWS account access patterns to IAM Identity Center.
Clean up
If you don’t wish to continue using IAM Identity Center or Amazon Q Developer, you can delete the Amazon Q Developer Profile and Identity Center instance within their respective consoles, within the AWS account they are deployed into. Deleting your Identity Center instance won’t make changes to existing federation or AWS account access that is not done through IAM Identity Center.
Conclusion
In this post, we talked about some recent significant launches of AWS managed applications and features that integrate with IAM Identity Center and discussed how you can use these features without migrating your AWS account management to permission sets. We also showed how you can set up Amazon Q Developer with IAM Identity Center. While the example in this post uses Amazon Q Developer, the same approach and guidance applies to Amazon Q Business and other AWS managed applications integrated with Identity Center.
Most organizations prioritize protecting their web applications that are exposed to the internet. Using the AWS WAF service, you can create rules to control bot traffic, help prevent account takeover fraud, and block common threat patterns such as SQL injection or cross-site scripting (XSS). Further, for those customers managing multi-account environments, it is possible to enforce security baselines for AWS WAF access control lists (ACLs) across the whole organization by using AWS Firewall Manager.
In a previous AWS Security Blog post, there is a good explanation about how to create Firewall Manager policies to deploy AWS WAF ACLs across multiple accounts. In addition, this AWS Architecture Blog post goes deeper, describing operating models for web applications security governance in Amazon Web Services (AWS). This post will show, in a central or hybrid operating model, how to create a policy to enforce a security baseline in your AWS WAF ACLs while still allowing application administrators or developers to apply specific ACL rules for their particular use case.
Centrally manage firewall policies
It’s a common scenario that a security team in an organization wants to implement a security baseline, consisting of a set of rules, across multiple applications that are distributed in multiple accounts. Those rules are not always applicable for all workloads because different applications might have different needs for protection or exposure to the public. Furthermore, sometimes local teams responsible for managing applications have permissions to create their own rules and decide not to follow policies mandated by the organization.
AWS Firewall Manager solves this problem by allowing you to centrally configure and manage firewall policies, deploy preconfigured AWS WAF rules across your organization, and automatically enforce them in existing and newly created resources.
The following architecture diagram describes how you can design a Firewall Manager policy from a central security account, establishing a security baseline that will be enforced within other member accounts in your organization. To do so, you create a managed AWS WAF ACL with the first and last group rules not editable, but allowing a custom rule group to be modified by administrators of member accounts.
At the time of writing this post, Firewall Manager supports up to 10 administrators who can manage firewall resources in your organization by applying scope conditions. For example, you can define an administrator for specific accounts or even a complete organization unit (OU), AWS Region, or policy type. Using this feature, you can enforce the principle of least privilege access, in addition to assigning administrators to enforce security baselines for your AWS ACL rules across your organization in a more granular way. This delegation needs to be completed from the AWS Organizations management account, as shown in Figure 2.
A Firewall Manager policy contains the rule groups that will be applied to your protected resources. The service creates a web ACL in each account where the policy is enforced. Account administrators can add rules or rule groups to the resulting web ACL in addition to the rules groups defined by the Firewall Manager policy.
Rules groups
AWS WAF ACLs that are managed by Firewall Manager policies contain three sets of rules that provide a higher level of prioritization in the ACL. AWS WAF evaluates rule groups in the following order:
Rule groups that are defined in the Firewall Manager policy with the highest priority
Rules that are defined by the account administrator in the web ACL after the first rule group
Rule groups that are defined in Firewall Manager to be evaluated at the end
Within each rule set, AWS WAF evaluates rules according to their priority settings, evaluating the rules from the lowest number up until either finds a match that terminates the evaluation or exhausts all of the rules.
Security baseline policy
Figure 3 shows an example of a Firewall Manager policy that will serve as the security web ACL baseline across your organization. This policy should be created in a delegated administrator account and enforced across all or specific accounts in your organization where the administrator has permissions. Refer to the service documentation for additional guidance on setting up this type of policy.
Figure 3: AWS Firewall Manager policy rules acting as the security baseline
First rule group
The first rule group in the policy will contain the following:
Organization-level blocked list – Known bad IP addresses by organization.
AWS IP reputation list – Recommended AWS managed rules for IP addresses with a bad reputation.
AWS Anonymous IP list – Recommended AWS managed rules for anonymous IP addresses.
Organization-level rate limit – A high-level rate limit defined by the organization.
Last rule group
The last rule group in the policy will contain the following:
Organization-level allowed list – Even if these are well-known IP addresses, they still need to be evaluated against the set of rules enforced by the organization and specific rules per application. If a “good” IP address is supplanted, it might hide the real source identity, bypassing AWS WAF rules.
AWS bot control – Recommended if you want to enforce bot control across your organization or a set of accounts managed by an administrator.
This configuration will allow individual account administrators to define and include their own rules to protect applications based on specific use cases and the expected number of requests.
When designing your own security baselines, take into consideration that some managed rules, such as bot control, might have additional cost, and enforcing them across your organization would increase the overall cost of the service.
Policy scope
The policy scope for your security baseline defines where the policy applies. It can apply to all accounts and resources in your organization or just a subset of accounts and resources. Based on the settings selected, Firewall Manager will apply policy for accounts in scope by using the following options:
All accounts in your organization
Only a specific list of accounts and organization units
All accounts and OUs except a specific list of those to exclude
On the other hand, when selecting the scope for resources, you can use the following options:
All resources
Resources that have all of the specified tags
All resources except those that have all the specified tags
For delegated administrators, scope definition will apply only for accounts, Regions, or OUs defined during the delegation process. Figure 4 shows an example of the scope definition for a policy.
Figure 4: Firewall Manager scope definition
Use case–specific rule groups
Figure 5 is an example of a specific use case, where AWS WAF administrators in a member account within the Firewall Manager policy scope want to protect their web application by using the following rules.
Figure 5: Web ACL managed by Firewall Manager containing rules in a member account
Middle rule group
The middle rule group is configured in each account within the ACL deployed by Firewall Manager. The examples from Figure 5 are rules oriented to apply protection that is specific for the application where the ACL is assigned:
App-level blocked list – Known IP addresses blocked by the administrator.
App-level rate limit – The rate limit supported by the application.
Core rule set – The recommended rule set, focused on OWASP Top Ten vulnerabilities.
Technology-specific protection – An example for PHP applications.
App-level allowed list – Well-known IP addresses that still need to be evaluated against some rules but bypass others, such as fraud prevention.
Account takeover prevention – This managed rule needs specific configuration per application to work as expected. However, it is recommended that you use it after the bot control managed rule to optimize cost. Take that into consideration when building your own security baseline.
This rule group will be second priority between the first and the last rule groups coming from the Firewall Manager policy. This configuration provides account administrators the ability to design their set of rules to cover the specific use case for their application and also the possibility to override rules evaluated in a lower priority (last rule group). For example, having a higher rate limit in the app-level rule than the org-level rule would have no impact on the traffic being filtered, since the org-level rule in the first group of the policy will have priority. However, having more granular bot control rules at the app-level will supersede the org-level rules contained in the last group of the policy. Take that logic into consideration when you decide which rules need to be in the first and last groups of your Firewall Manager policies.
Recommended approach for testing
Before you deploy your web ACL implementation for production, test and tune it in a staging or testing environment until you are comfortable with the potential impact on your traffic. Then, test and tune the rules in count mode with your production traffic before enabling them.
Prepare the environment for testing:
Enable logging and web request sampling for your ACL.
Configure mitigation rules such as false positive, matching, scope-down, and label match.
Enable protection in production:
Remove any additional rules that are no longer needed.
Enable rules in production accounts.
Closely monitor your application behavior to be sure requests are being handled as expected.
Cleanup
To avoid unexpected charges in your accounts, delete any unnecessary policies and resources. You can do that from the console by following these steps.
On the Firewall Manager policies page, choose the radio button next to the policy name, and then choose Delete.
In the Delete confirmation box, select Delete all policy resources, and then choose Delete again.
AWS WAF removes the policy and any associated resources, like web ACLs, that it created in your account. The changes might take a few minutes to propagate to all accounts.
Conclusion
By using Firewall Manager, you can take advantage of native cloud features to enforce security baseline configurations for your AWS WAF rules in a multi-account environment across your organization. It is possible to centrally design policies with broad rule groups to protect workloads from a high-level perspective while allowing application administrators to design custom rules to protect, for instance, web applications from specific use cases such as OWASP Top Ten or technology-related vulnerabilities.
The examples provided in this post can be further customized and adapted to align with your organization’s needs. Design policies to comply with security requirements and specific use cases to protect your workloads.
If you want to learn more, visit the Automations for AWS Firewall Manager webpage, which provides a solution with preset rules to create a quick security baseline to protect against distributed denial of service (DDoS).
If you have feedback about this post, submit comments in the Comments section below. If you have questions about this post, contact AWS Support.
Grab has an in-house Risk Management platform called GrabDefence which relies on ingesting large amounts of data gathered from upstream services to power our heuristic risk rules and data science models in real time.
Fig 1. GrabDefence aggregates data from different upstream services
As Grab’s business grows, so does the amount of data. It becomes imperative that the data which fuels our risk systems is of reliable quality as any data discrepancy or missing data could impact fraud detection and prevention capabilities.
We need to quickly detect any data anomalies, which is where data observability comes in.
Data observability as a solution
Data observability is a type of data operation (DataOps; similar to DevOps) where teams build visibility over the health and quality of their data pipelines. This enables teams to be notified of data quality issues, and allows teams to investigate and resolve these issues faster.
We needed a solution that addresses the following issues:
Alerts for any data quality issues as soon as possible – so this means the observability tool had to work in real time.
With hundreds of data points to observe, we needed a neat and scalable solution which allows users to quickly pinpoint which data points were having issues.
A consistent way to compare, analyse, and compute data that might have different formats.
Hence, we decided to use Flink to standardise data transformations, compute, and observe data trends quickly (in real time) and scalably.
Utilising Flink for real-time computations at scale
What is Flink?
Flink SQL is a powerful, flexible tool for performing real-time analytics on streaming data. It allows users to query continuous data streams using standard SQL syntax, enabling complex event processing and data transformation within the Apache Flink ecosystem, which is particularly useful for scenarios requiring low-latency insights and decisions.
How we used Flink to compute data output
In Grab, data comes from multiple sources and while most of the data is in JSON format, the actual JSON structure differs between services. Because of JSON’s nested and dynamic data structure, it is difficult to consistently analyse the data – posing a significant challenge for real-time analysis.
To help address this issue, Apache Flink SQL has the capability to manage such intricacies with ease. It offers specialised functions tailored for parsing and querying JSON data, ensuring efficient processing.
Another standout feature of Flink SQL is the use of custom table functions, such as JSONEXPLOAD, which serves to deconstruct and flatten nested JSON structures into tabular rows. This transformation is crucial as it enables subsequent aggregation operations. By implementing a 5-minute tumbling window, Flink SQL can easily aggregate these now-flattened data streams. This technique is pivotal for monitoring, observing, and analysing data patterns and metrics in near real-time.
Now that data is aggregated by Flink for easy analysis, we still needed a way to incorporate comprehensive monitoring so that teams could be notified of any data anomalies or discrepancies in real time.
How we interfaced the output with Datadog
Datadog is the observability tool of choice in Grab, with many teams using Datadog for their service reliability observations and alerts. By aggregating data from Apache Flink and integrating it with Datadog, we can harness the synergy of real-time analytics and comprehensive monitoring. Flink excels in processing and aggregating data streams, which, when pushed to Datadog, can be further analysed and visualised. Datadog also provides seamless integration with collaboration tools like Slack, which enables teams to receive instant notifications and alerts.
With Datadog’s out-of-the-box features such as anomaly detection, teams can identify and be alerted to unusual patterns or outliers in their data streams. Taking a proactive approach to monitoring is crucial in maintaining system health and performance as teams can be alerted, then collaborate quickly to diagnose and address anomalies.
This integrated pipeline—from Flink’s real-time data aggregation to Datadog’s monitoring and Slack’s communication capabilities—creates a robust framework for real-time data operations. It ensures that any potential issues are quickly traced and brought to the team’s attention, facilitating a rapid response. Such an ecosystem empowers organisations to maintain high levels of system reliability and performance, ultimately enhancing the overall user experience.
Organising monitors and alerts using out-of-the-box solutions from Datadog
Once we integrated Flink data into Datadog, we realised that it could become unwieldy to try to identify the data point with issues from hundreds of other counters.
Fig 2. Hundreds of data points on a graph make it hard to decipher which ones have issues
We decided to organise the counters according to the service stream it was coming from, and create individual monitors for each service stream. We used Datadog’s Monitor Summary tool to help visualise the total number of service streams we are reading from and the number of underlying data points within each stream.
Fig 3. Data is grouped according to their source stream
Within each individual stream, we used Datadog’s Anomaly Detection feature to create an alert whenever a data point from the stream exceeds a predefined threshold. This can be configured by the service teams on Datadog.
Fig 4. Datadog’s built-in Anomaly Detection function triggers alerts whenever a data point exceeds a threshold
These alerts are then sent to a Slack channel where the Data team is informed when a data point of interest starts throwing anomalous values.
Fig 5. Datadog integration with Slack to help alert users
Impact
Since the deployment of this data observability tool, we have seen significant improvement in the detection of anomalous values. If there are any anomalies or issues, we now get alerts within the same day (or hour) instead of days to weeks later.
Organising the alerts according to source streams have also helped simplify the monitoring load and allows users to quickly narrow down and identify which pipeline has failed.
What’s next?
At the moment, this data observability tool is only implemented on selected checkpoints in GrabDefence. We plan to expand the observability tool’s coverage to include more checkpoints, and continue to refine the workflows to detect and resolve these data issues.
Join us
Grab is the leading superapp platform in Southeast Asia, providing everyday services that matter to consumers. More than just a ride-hailing and food delivery app, Grab offers a wide range of on-demand services in the region, including mobility, food, package and grocery delivery services, mobile payments, and financial services across 428 cities in eight countries.
Powered by technology and driven by heart, our mission is to drive Southeast Asia forward by creating economic empowerment for everyone. If this mission speaks to you, join our team today!
Our customers depend on Amazon Web Services (AWS) for their mission-critical applications and most sensitive data. Every day, the world’s fastest-growing startups, largest enterprises, and most trusted governmental organizations are choosing AWS as the place to run their technology infrastructure. They choose us because security has been our top priority from day one. We designed AWS from its foundation to be the most secure way for our customers to run their workloads, and we’ve built our internal culture around security as a business imperative.
While technical security measures are important, organizations are made up of people. A recent report from the Cyber Safety Review Board (CSRB) makes it clear that a deficient security culture can be a root cause for avoidable errors that allow intrusions to succeed and remain undetected.
Security is our top priority
Our security culture starts at the top, and it extends through every part of our organization. Over eight years ago, we made the decision for our security team to report directly to our CEO. This structural design redefined how we build security into the culture of AWS and informs everyone at the company that security is our top priority by providing direct visibility to senior leadership. We empower our service teams to fully own the security of their services and scale security best practices and programs so our customers have the confidence to innovate on AWS.
We believe that there are four key principles to building a strong culture of security:
Security is built into our organizational structure
At AWS, we view security as a core function of our business, deeply connected to our mission objectives. This goes beyond good intentions—it’s embedded directly into our organizational structure. At Amazon, we make an intentional choice for all our security teams to report directly to the CEO while also being deeply embedded in our respective business units. The goal is to build security into the structural fabric of how we make decisions. Every week, the AWS leadership team, led by our CEO, meets with my team to discuss security and ensure we’re making the right choices on tactical and strategic security issues and course-correcting when needed. We report internally on operational metrics that tie our security culture to the impact that it has on our customers, connecting data to business outcomes and providing an opportunity for leadership to engage and ask questions. This support for security from the top levels of executive leadership helps us reinforce the idea that security is accelerating our business outcomes and improving our customers’ experiences rather than acting as a roadblock.
Security is everyone’s job
AWS operates with a strong ownership model built around our culture of security. Ownership is one of our key Leadership Principles at Amazon. Employees in every role receive regular training and reinforcement of the message that security is everyone’s job. Every service and product team is fully responsible for the security of the service or capability that they deliver. Security is built into every product roadmap, engineering plan, and weekly stand-up meeting, just as much as capabilities, performance, cost, and other core responsibilities of the builder team. The best security is not something that can be “bolted on” at the end of a process or on the outside of a system; rather, security is integral and foundational.
AWS business leaders prioritize building products and services that are designed to be secure. At the same time, they strive to create an environment that encourages employees to identify and escalate potential security concerns even when uncertain about whether there is an actual issue. Escalation is a normal part of how we work in AWS, and our practice of escalation provides a “security reporting safe space” to everyone. Our teams and individuals are encouraged to report and escalate any possible security issues or concerns with a high-priority ticket to the security team. We would much rather hear about a possible security concern and investigate it, regardless of whether it is unlikely or not. Our employees know that we welcome reports even for things that turn out to be nonissues.
Distributing security expertise and ownership across AWS
Our central AWS Security team provides a number of critical capabilities and services that support and enable our engineering and service teams to fulfill their security responsibilities effectively. Our central team provides training, consultation, threat-modeling tools, automated code-scanning frameworks and tools, design reviews, penetration testing, automated API test frameworks, and—in the end—a final security review of each new service or new feature. The security reviewer is empowered to make a go or no-go decision with respect to each and every release. If a service or feature does not pass the security review process in the first review, we dive deep to understand why so we can improve processes and catch issues earlier in development. But, releasing something that’s not ready would be an even bigger failure, so we err on the side of maintaining our high security bar and always trying to deliver to the high standards that our customers expect and rely on.
One important mechanism to distribute security ownership that we’ve developed over the years is the Security Guardians program. The Security Guardians program trains, develops, and empowers service team developers in each two-pizza team to be security ambassadors, or Guardians, within the product teams. At a high level, Guardians are the “security conscience” of each team. They make sure that security considerations for a product are made earlier and more often, helping their peers build and ship their product faster, while working closely with the central security team to help ensure the security bar remains high at AWS. Security Guardians feel empowered by being part of a cross-organizational community while also playing a critical role for the team and for AWS as a whole.
Scaling security through innovation
Another way we scale security across our culture at AWS is through innovation. We innovate to build tools and processes to help all of our people be as effective as possible and maintain focus. We use artificial intelligence (AI) to accelerate our secure software development process, as well as new generative AI–powered features in Amazon Inspector, Amazon Detective, AWS Config, and Amazon CodeWhisperer that complement the human skillset by helping people make better security decisions, using a broader collection of knowledge. This pattern of combining sophisticated tooling with skilled engineers is highly effective because it positions people to make the nuanced decisions required for effective security.
For large organizations, it can take years to assess every scenario and prove systems are secure. Even then, their systems are constantly changing. Our automated reasoning tools use mathematical logic to answer critical questions about infrastructure to detect misconfigurations that could potentially expose data. This provable security provides higher assurance in the security of the cloud and in the cloud. We apply automated reasoning in key service areas such as storage, networking, virtualization, identity, and cryptography. Amazon scientists and engineers also use automated reasoning to prove the correctness of critical internal systems. We process over a billion mathematical queries per day that power AWS Identity and Access Management Access Analyzer, Amazon Simple Storage Service (Amazon S3) Block Public Access, and other security offerings. AWS is the first and only cloud provider to use automated reasoning at this scale.
Advancing the future of cloud security
At AWS, we care deeply about our culture of security. We’re consistently working backwards from our customers and investing in raising the bar on our security tools and capabilities. For example, AWS enables encryption of everything. AWS Key Management Service (AWS KMS) is the first and only highly scalable, cloud-native key management system that is also FIPS 140-2 Level 3 certified. No one can retrieve customer plaintext keys, not even the most privileged admins within AWS. With the AWS Nitro System, which is the foundation of the AWS compute service Amazon Elastic Compute Cloud (Amazon EC2), we designed and delivered first-of-a-kind and still unique in the industry innovation to maximize the security of customers’ workloads. The Nitro System provides industry-leading privacy and isolation for all their compute needs, including GPU-based computing for the latest generative AI systems. No one, not even the most privileged admins within AWS, can access a customer’s workloads or data in Nitro-based EC2 instances.
We continue to innovate on behalf of our customers so they can move quickly, securely, and with confidence to enable their businesses, and our track record in the area of cloud security is second to none. That said, cybersecurity challenges continue to evolve, and while we’re proud of our achievements to date, we’re committed to constant improvement as we innovate and advance our technologies and our culture of security.
If you have feedback about this post, submit comments in the Comments section below. If you have questions about this post, contact AWS Support.
In an ever-changing security landscape, teams must be able to quickly remediate security risks. Many organizations look for ways to automate the remediation of security findings that are currently handled manually. Amazon CodeWhisperer is an artificial intelligence (AI) coding companion that generates real-time, single-line or full-function code suggestions in your integrated development environment (IDE) to help you quickly build software. By using CodeWhisperer, security teams can expedite the process of writing security automation scripts for various types of findings that are aggregated in AWS Security Hub, a cloud security posture management (CSPM) service.
In this post, we present some of the current challenges with security automation and walk you through how to use CodeWhisperer, together with Amazon EventBridge and AWS Lambda, to automate the remediation of Security Hub findings. Before reading further, please read the AWS Responsible AI Policy.
Current challenges with security automation
Many approaches to security automation, including Lambda and AWS Systems Manager Automation, require software development skills. Furthermore, the process of manually writing code for remediation can be a time-consuming process for security professionals. To help overcome these challenges, CodeWhisperer serves as a force multiplier for qualified security professionals with development experience to quickly and effectively generate code to help remediate security findings.
Security professionals should still cultivate software development skills to implement robust solutions. Engineers should thoroughly review and validate any generated code, as manual oversight remains critical for security.
Solution overview
Figure 1 shows how the findings that Security Hub produces are ingested by EventBridge, which then invokes Lambda functions for processing. The Lambda code is generated with the help of CodeWhisperer.
Figure 1: Diagram of the solution
Security Hub integrates with EventBridge so you can automatically process findings with other services such as Lambda. To begin remediating the findings automatically, you can configure rules to determine where to send findings. This solution will do the following:
Ingest an Amazon Security Hub finding into EventBridge.
Use an EventBridge rule to invoke a Lambda function for processing.
Use CodeWhisperer to generate the Lambda function code.
It is important to note that there are two types of automation for Security Hub finding remediation:
Partial automation, which is initiated when a human worker selects the Security Hub findings manually and applies the automated remediation workflow to the selected findings.
End-to-end automation, which means that when a finding is generated within Security Hub, this initiates an automated workflow to immediately remediate without human intervention.
Important: When you use end-to-end automation, we highly recommend that you thoroughly test the efficiency and impact of the workflow in a non-production environment first before moving forward with implementation in a production environment.
Prerequisites
To follow along with this walkthrough, make sure that you have the following prerequisites in place:
In this scenario, you have been tasked with making sure that versioning is enabled across all Amazon Simple Storage Service (Amazon S3) buckets in your AWS account. Additionally, you want to do this in a way that is programmatic and automated so that it can be reused in different AWS accounts in the future.
To do this, you will perform the following steps:
Generate the remediation script with CodeWhisperer
Create the Lambda function
Integrate the Lambda function with Security Hub by using EventBridge
Create a custom action in Security Hub
Create an EventBridge rule to target the Lambda function
Run the remediation
Generate a remediation script with CodeWhisperer
The first step is to use VS Code to create a script so that CodeWhisperer generates the code for your Lambda function in Python. You will use this Lambda function to remediate the Security Hub findings generated by the [S3.14] S3 buckets should use versioning control.
Note: The underlying model of CodeWhisperer is powered by generative AI, and the output of CodeWhisperer is nondeterministic. As such, the code recommended by the service can vary by user. By modifying the initial code comment to prompt CodeWhisperer for a response, customers can change the corresponding output to help meet their needs. Customers should subject all code generated by CodeWhisperer to typical testing and review protocols to verify that it is free of errors and is in line with applicable organizational security policies. To learn about best practices on prompt engineering with CodeWhisperer, see this AWS blog post.
To generate the remediation script
Open a new VS Code window, and then open or create a new folder for your file to reside in.
Create a Python file called cw-blog-remediation.py as shown in Figure 2.
Figure 2: New VS Code file created called cw-blog-remediation.py
Add the following imports to the Python file.
import json
import boto3
Because you have the context added to your file, you can now prompt CodeWhisperer by using a natural language comment. In your file, below the import statements, enter the following comment and then press Enter.
# Create lambda function that turns on versioning for an S3 bucket after the function is triggered from Amazon EventBridge
Accept the first recommendation that CodeWhisperer provides by pressing Tab to use the Lambda function handler, as shown in Figure 3. &ngsp;
Figure 3: Generation of Lambda handler
To get the recommendation for the function from CodeWhisperer, press Enter. Make sure that the recommendation you receive looks similar to the following. CodeWhisperer is nondeterministic, so its recommendations can vary.
import json
import boto3
# Create lambda function that turns on versioning for an S3 bucket after function is triggered from Amazon EventBridgedef lambda_handler(event, context):
s3 = boto3.client('s3')
bucket = event['detail']['requestParameters']['bucketName']
response = s3.put_bucket_versioning(
Bucket=bucket,
VersioningConfiguration={
'Status': 'Enabled'
}
)
print(response)
return {
'statusCode': 200,
'body': json.dumps('Versioning enabled for bucket ' + bucket)
}
You can change the function body to fit your use case. To get the Amazon Resource Name (ARN) of the S3 bucket from the EventBridge event, replace the bucket variable with the following line:
To prompt CodeWhisperer to extract the bucket name from the bucket ARN, use the following comment:
# Take the S3 bucket name from the ARN of the S3 bucket
Your function code should look similar to the following:
import json
import boto3
# Create lambda function that turns on versioning for an S3 bucket after function is triggered from Amazon EventBridgedef lambda_handler(event, context):
s3 = boto3.client('s3')
bucket = event['detail']['findings'][0]['Resources'][0]['Id']
# Take the S3 bucket name from the ARN of the S3 bucket
bucket = bucket.split(':')[5]
response = s3.put_bucket_versioning(
Bucket=bucket,
VersioningConfiguration={
'Status': 'Enabled'
}
)
print(response)
return {
'statusCode': 200,
'body': json.dumps('Versioning enabled for bucket ' + bucket)
}
Create a .zip file for cw-blog-remediation.py. Find the file in your local file manager, right-click the file, and select compress/zip. You will use this .zip file in the next section of the post.
Create the Lambda function
The next step is to use the automation script that you generated to create the Lambda function that will enable versioning on applicable S3 buckets.
In the left navigation pane, choose Functions, and then choose Create function.
Select Author from Scratch and provide the following configurations for the function:
For Function name, select sec_remediation_function.
For Runtime, select Python 3.12.
For Architecture, select x86_64.
For Permissions, select Create a new role with basic Lambda permissions.
Choose Create function.
To upload your local code to Lambda, select Upload from and then .zip file, and then upload the file that you zipped.
Verify that you created the Lambda function successfully. In the Code source section of Lambda, you should see the code from the automation script displayed in a new tab, as shown in Figure 4.
Figure 4: Source code that was successfully uploaded
Choose the Code tab.
Scroll down to the Runtime settings pane and choose Edit.
For Handler, enter cw-blog-remediation.lambda_handler for your function handler, and then choose Save, as shown in Figure 5.
Figure 5: Updated Lambda handler
For security purposes, and to follow the principle of least privilege, you should also add an inline policy to the Lambda function’s role to perform the tasks necessary to enable versioning on S3 buckets.
In the Lambda console, navigate to the Configuration tab and then, in the left navigation pane, choose Permissions. Choose the Role name, as shown in Figure 6.
Figure 6: Lambda role in the AWS console
In the Add permissions dropdown, select Create inline policy.
Figure 7: Create inline policy
Choose JSON, add the following policy to the policy editor, and then choose Next.
In the left navigation pane, choose Settings, and then choose Custom actions.
Choose Create custom action.
Provide the following information, as shown in Figure 8:
For Name, enter TurnOnS3Versioning.
For Description, enter Action that will turn on versioning for a specific S3 bucket.
For Custom action ID, enter TurnOnS3Versioning.
Figure 8: Create a custom action in Security Hub
Choose Create custom action.
Make a note of the Custom action ARN. You will need this ARN when you create a rule to associate with the custom action in EventBridge.
Create an EventBridge rule to target the Lambda function
The next step is to create an EventBridge rule to capture the custom action. You will define an EventBridge rule that matches events (in this case, findings) from Security Hub that were forwarded by the custom action that you defined previously.
On the Define rule detail page, give your rule a name and description that represents the rule’s purpose—for example, you could use the same name and description that you used for the custom action. Then choose Next.
Scroll down to Event pattern, and then do the following:
For Event source, make sure that AWS services is selected.
For AWS service, select Security Hub.
For Event type, select Security Hub Findings – Custom Action.
Select Specific custom action ARN(s) and enter the ARN for the custom action that you created earlier.
Figure 9: Specify the EventBridge event pattern for the Security Hub custom action workflow
As you provide this information, the Event pattern updates.
Choose Next.
On the Select target(s) step, in the Select a target dropdown, select Lambda function. Then from the Function dropdown, select sec_remediation_function.
Choose Next.
On the Configure tags step, choose Next.
On the Review and create step, choose Create rule.
Run the automation
Your automation is set up and you can now test the automation. This test covers a partial automation workflow, since you will manually select the finding and apply the remediation workflow to one or more selected findings.
Important: As we mentioned earlier, if you decide to make the automation end-to-end, you should assess the impact of the workflow in a non-production environment. Additionally, you may want to consider creating preventative controls if you want to minimize the risk of event occurrence across an entire environment.
To run the automation
In the Security Hub console, on the Findings tab, add a filter by entering Title in the search box and selecting that filter. Select IS and enter S3 general purpose buckets should have versioning enabled (case sensitive). Choose Apply.
In the filtered list, choose the Title of an active finding.
Before you start the automation, check the current configuration of the S3 bucket to confirm that your automation works. Expand the Resources section of the finding.
Under Resource ID, choose the link for the S3 bucket. This opens a new tab on the S3 console that shows only this S3 bucket.
In your browser, go back to the Security Hub tab (don’t close the S3 tab—you will need to return to it), and on the left side, select this same finding, as shown in Figure 10.
Figure 10: Filter out Security Hub findings to list only S3 bucket-related findings
In the Actions dropdown list, choose the name of your custom action.
Figure 11: Choose the custom action that you created to start the remediation workflow
When you see a banner that displays Successfully started action…, go back to the S3 browser tab and refresh it. Verify that the S3 versioning configuration on the bucket has been enabled as shown in figure 12.
Figure 12: Versioning successfully enabled
Conclusion
In this post, you learned how to use CodeWhisperer to produce AI-generated code for custom remediations for a security use case. We encourage you to experiment with CodeWhisperer to create Lambda functions that remediate other Security Hub findings that might exist in your account, such as the enforcement of lifecycle policies on S3 buckets with versioning enabled, or using automation to remove multiple unused Amazon EC2 elastic IP addresses. The ability to automatically set public S3 buckets to private is just one of many use cases where CodeWhisperer can generate code to help you remediate Security Hub findings.
To sum up, CodeWhisperer acts as a tool that can help boost the productivity of security experts who have coding abilities, assisting them to swiftly write code to address security issues. However, security specialists should continue building their software development capabilities to implement robust solutions. Engineers should carefully review and test any generated code, since human oversight is still vital for security.
If you have feedback about this post, submit comments in the Comments section below. If you have questions about this post, contact AWS Support.
Today, AWS Key Management Service (AWS KMS) is introducing faster options for automatic symmetric key rotation. We’re also introducing rotate on-demand, rotation visibility improvements, and a new limit on the price of all symmetric keys that have had two or more rotations (including existing keys). In this post, I discuss all those capabilities and changes. I also present a broader overview of how symmetric cryptographic key rotation came to be, and cover our recommendations on when you might need rotation and how often to rotate your keys. If you’ve ever been curious about AWS KMS automatic key rotation—why it exists, when to enable it, and when to use it on-demand—read on.
How we got here
There are longstanding reasons for cryptographic key rotation. If you were Caesar in Roman times and you needed to send messages with sensitive information to your regional commanders, you might use keys and ciphers to encrypt and protect your communications. There are well-documented examples of using cryptography to protect communications during this time, so much so that the standard substitution cipher, where you swap each letter for a different letter that is a set number of letters away in the alphabet, is referred to as Caesar’s cipher. The cipher is the substitution mechanism, and the key is the number of letters away from the intended letter you go to find the substituted letter for the ciphertext.
The challenge for Caesar in relying on this kind of symmetric key cipher is that both sides (Caesar and his field generals) needed to share keys and keep those keys safe from prying eyes. What happens to Caesar’s secret invasion plans if the key used to encipher his attack plan was secretly intercepted in transmission down the Appian Way? Caesar had no way to know. But if he rotated keys, he could limit the scope of which messages could be read, thus limiting his risk. Messages sent under a key created in the year 52 BCE wouldn’t automatically work for messages sent the following year, provided that Caesar rotated his keys yearly and the newer keys weren’t accessible to the adversary. Key rotation can reduce the scope of data exposure (what a threat actor can see) when some but not all keys are compromised. Of course, every time the key changed, Caesar had to send messengers to his field generals to communicate the new key. Those messengers had to ensure that no enemies intercepted the new keys without their knowledge – a daunting task.
Figure 1: The state of the art for secure key rotation and key distribution in 52 BC.
Fast forward to the 1970s–2000s
In modern times, cryptographic algorithms designed for digital computer systems mean that keys no longer travel down the Appian Way. Instead, they move around digital systems, are stored in unprotected memory, and sometimes are printed for convenience. The risk of key leakage still exists, therefore there is a need for key rotation. During this period, more significant security protections were developed that use both software and hardware technology to protect digital cryptographic keys and reduce the need for rotation. The highest-level protections offered by these techniques can limit keys to specific devices where they can never leave as plaintext. In fact, the US National Institute of Standards and Technologies (NIST) has published a specific security standard, FIPS 140, that addresses the security requirements for these cryptographic modules.
Modern cryptography also has the risk of cryptographic key wear-out
Besides addressing risks from key leakage, key rotation has a second important benefit that becomes more pronounced in the digital era of modern cryptography—cryptographic key wear-out. A key can become weaker, or “wear out,” over time just by being used too many times. If you encrypt enough data under one symmetric key, and if a threat actor acquires enough of the resulting ciphertext, they can perform analysis against your ciphertext that will leak information about the key. Current cryptographic recommendations to protect against key wear-out can vary depending on how you’re encrypting data, the cipher used, and the size of your key. However, even a well-designed AES-GCM implementation with robust initialization vectors (IVs) and large key size (256 bits) should be limited to encrypting no more than 4.3 billion messages (232), where each message is limited to about 64 GiB under a single key.
Figure 2: Used enough times, keys can wear out.
During the early 2000s, to help federal agencies and commercial enterprises navigate key rotation best practices, NIST formalized several of the best practices for cryptographic key rotation in the NIST SP 800-57 Recommendation for Key Management standard. It’s an excellent read overall and I encourage you to examine Section 5.3 in particular, which outlines ways to determine the appropriate length of time (the cryptoperiod) that a specific key should be relied on for the protection of data in various environments. According to the guidelines, the following are some of the benefits of setting cryptoperiods (and rotating keys within these periods):
5.3 Cryptoperiods
A cryptoperiod is the time span during which a specific key is authorized for use by legitimate entities or the keys for a given system will remain in effect. A suitably defined cryptoperiod:
Limits the amount of information that is available for cryptanalysis to reveal the key (e.g. the number of plaintext and ciphertext pairs encrypted with the key);
Limits the amount of exposure if a single key is compromised;
Limits the use of a particular algorithm (e.g., to its estimated effective lifetime);
Limits the time available for attempts to penetrate physical, procedural, and logical access mechanisms that protect a key from unauthorized disclosure;
Limits the period within which information may be compromised by inadvertent disclosure of a cryptographic key to unauthorized entities; and
Limits the time available for computationally intensive cryptanalysis.
Sometimes, cryptoperiods are defined by an arbitrary time period or maximum amount of data protected by the key. However, trade-offs associated with the determination of cryptoperiods involve the risk and consequences of exposure, which should be carefully considered when selecting the cryptoperiod (see Section 5.6.4).
One of the challenges in applying this guidance to your own use of cryptographic keys is that you need to understand the likelihood of each risk occurring in your key management system. This can be even harder to evaluate when you’re using a managed service to protect and use your keys.
Fast forward to the 2010s: Envisioning a key management system where you might not need automatic key rotation
When we set out to build a managed service in AWS in 2014 for cryptographic key management and help customers protect their AWS encryption workloads, we were mindful that our keys needed to be as hardened, resilient, and protected against external and internal threat actors as possible. We were also mindful that our keys needed to have long-term viability and use built-in protections to prevent key wear-out. These two design constructs—that our keys are strongly protected to minimize the risk of leakage and that our keys are safe from wear out—are the primary reasons we recommend you limit key rotation or consider disabling rotation if you don’t have compliance requirements to do so. Scheduled key rotation in AWS KMS offers limited security benefits to your workloads.
Specific to key leakage, AWS KMS keys in their unencrypted, plaintext form cannot be accessed by anyone, even AWS operators. Unlike Caesar’s keys, or even cryptographic keys in modern software applications, keys generated by AWS KMS never exist in plaintext outside of the NIST FIPS 140-2 Security Level 3 fleet of hardware security modules (HSMs) in which they are used. See the related post AWS KMS is now FIPS 140-2 Security Level 3. What does this mean for you? for more information about how AWS KMS HSMs help you prevent unauthorized use of your keys. Unlike many commercial HSM solutions, AWS KMS doesn’t even allow keys to be exported from the service in encrypted form. Why? Because an external actor with the proper decryption key could then expose the KMS key in plaintext outside the service.
This hardened protection of your key material is salient to the principal security reason customers want key rotation. Customers typically envision rotation as a way to mitigate a key leaking outside the system in which it was intended to be used. However, since KMS keys can be used only in our HSMs and cannot be exported, the possibility of key exposure becomes harder to envision. This means that rotating a key as protection against key exposure is of limited security value. The HSMs are still the boundary that protects your keys from unauthorized access, no matter how many times the keys are rotated.
If we decide the risk of plaintext keys leaking from AWS KMS is sufficiently low, don’t we still need to be concerned with key wear-out? AWS KMS mitigates the risk of key wear-out by using a key derivation function (KDF) that generates a unique, derived AES 256-bit key for each individual request to encrypt or decrypt under a 256-bit symmetric KMS key. Those derived encryption keys are different every time, even if you make an identical call for encrypt with the same message data under the same KMS key. The cryptographic details for our key derivation method are provided in the AWS KMS Cryptographic Details documentation, and KDF operations use the KDF in counter mode, using HMAC with SHA256. These KDF operations make cryptographic wear-out substantially different for KMS keys than for keys you would call and use directly for encrypt operations. A detailed analysis of KMS key protections for cryptographic wear-out is provided in the Key Management at the Cloud Scale whitepaper, but the important take-away is that a single KMS key can be used for more than a quadrillion (250) encryption requests without wear-out risk.
In fact, within the NIST 800-57 guidelines is consideration that when the KMS key (key-wrapping key in NIST language) is used with unique data keys, KMS keys can have longer cryptoperiods:
“In the case of these very short-term key-wrapping keys, an appropriate cryptoperiod (i.e., which includes both the originator and recipient-usage periods) is a single communication session. It is assumed that the wrapped keys will not be retained in their wrapped form, so the originator-usage period and recipient-usage period of a key-wrapping key is the same. In other cases, a key-wrapping key may be retained so that the files or messages encrypted by the wrapped keys may be recovered later. In such cases, the recipient-usage period may be significantly longer than the originator-usage period of the key-wrapping key, and cryptoperiods lasting for years may be employed.”
Source: NIST 800-57 Recommendations for Key Management, section 5.3.6.7.
So why did we build key rotation in AWS KMS in the first place?
Although we advise that key rotation for KMS keys is generally not necessary to improve the security of your keys, you must consider that guidance in the context of your own unique circumstances. You might be required by internal auditors, external compliance assessors, or even your own customers to provide evidence of regular rotation of all keys. A short list of regulatory and standards groups that recommend key rotation includes the aforementioned NIST 800-57, Center for Internet Security (CIS) benchmarks, ISO 27001, System and Organization Controls (SOC) 2, the Payment Card Industry Data Security Standard (PCI DSS), COBIT 5, HIPAA, and the Federal Financial Institutions Examination Council (FFIEC) Handbook, just to name a few.
Customers in regulated industries must consider the entirety of all the cryptographic systems used across their organizations. Taking inventory of which systems incorporate HSM protections, which systems do or don’t provide additional security against cryptographic wear-out, or which programs implement encryption in a robust and reliable way can be difficult for any organization. If a customer doesn’t have sufficient cryptographic expertise in the design and operation of each system, it becomes a safer choice to mandate a uniform scheduled key rotation.
That is why we offer an automatic, convenient method to rotate symmetric KMS keys. Rotation allows customers to demonstrate this key management best practice to their stakeholders instead of having to explain why they chose not to.
Figure 3 details how KMS appends new key material within an existing KMS key during each key rotation.
Figure 3: KMS key rotation process
We designed the rotation of symmetric KMS keys to have low operational impact to both key administrators and builders using those keys. As shown in Figure 3, a keyID configured to rotate will append new key material on each rotation while still retaining and keeping the existing key material of previous versions. This append method achieves rotation without having to decrypt and re-encrypt existing data that used a previous version of a key. New encryption requests under a given keyID will use the latest key version, while decrypt requests under that keyID will use the appropriate version. Callers don’t have to name the version of the key they want to use for encrypt/decrypt, AWS KMS manages this transparently.
Some customers assume that a key rotation event should forcibly re-encrypt any data that was ever encrypted under the previous key version. This is not necessary when AWS KMS automatically rotates to use a new key version for encrypt operations. The previous versions of keys required for decrypt operations are still safe within the service.
We’ve offered the ability to automatically schedule an annual key rotation event for many years now. Lately, we’ve heard from some of our customers that they need to rotate keys more frequently than the fixed period of one year. We will address our newly launched capabilities to help meet these needs in the final section of this blog post.
More options for key rotation in AWS KMS (with a price reduction)
After learning how we think about key rotation in AWS KMS, let’s get to the new options we’ve launched in this space:
Configurable rotation periods: Previously, when using automatic key rotation, your only option was a fixed annual rotation period. You can now set a rotation period from 90 days to 2,560 days (just over seven years). You can adjust this period at any point to reset the time in the future when rotation will take effect. Existing keys set for rotation will continue to rotate every year.
On-demand rotation for KMS keys: In addition to more flexible automatic key rotation, you can now invoke on-demand rotation through the AWS Management Console for AWS KMS, the AWS Command Line Interface (AWS CLI), or the AWS KMS API using the new RotateKeyOnDemand API. You might occasionally need to use on-demand rotation to test workloads, or to verify and prove key rotation events to internal or external stakeholders. Invoking an on-demand rotation won’t affect the timeline of any upcoming rotation scheduled for this key.
Note: We’ve set a default quota of 10 on-demand rotations for a KMS key. Although the need for on-demand key rotation should be infrequent, you can ask to have this quota raised. If you have a repeated need for testing or validating instant key rotation, consider deleting the test keys and repeating this operation for RotateKeyOnDemand on new keys.
Improved visibility: You can now use the AWS KMS console or the new ListKeyRotations API to view previous key rotation events. One of the challenges in the past is that it’s been hard to validate that your KMS keys have rotated. Now, every previous rotation for a KMS key that has had a scheduled or on-demand rotation is listed in the console and available via API.
Figure 4: Key rotation history showing date and type of rotation
Price cap for keys with more than two rotations: We’re also introducing a price cap for automatic key rotation. Previously, each annual rotation of a KMS key added $1 per month to the price of the key. Now, for KMS keys that you rotate automatically or on-demand, the first and second rotation of the key adds $1 per month in cost (prorated hourly), but this price increase is capped at the second rotation. Rotations after your second rotation aren’t billed. Existing customers that have keys with three or more annual rotations will see a price reduction for those keys to $3 per month (prorated) per key starting in the month of May, 2024.
Summary
In this post, I highlighted the more flexible options that are now available for key rotation in AWS KMS and took a broader look into why key rotation exists. We know that many customers have compliance needs to demonstrate key rotation everywhere, and increasingly, to demonstrate faster or immediate key rotation. With the new reduced pricing and more convenient ways to verify key rotation events, we hope these new capabilities make your job easier.
Flexible key rotation capabilities are now available in all AWS Regions, including the AWS GovCloud (US) Regions. To learn more about this new capability, see the Rotating AWS KMS keys topic in the AWS KMS Developer Guide.
If you have feedback about this post, submit comments in the Comments section below. If you have questions about this post, contact AWS Support.
Let’s Encrypt, a publicly trusted certificate authority (CA) that Cloudflare uses to issue TLS certificates, has been relying on two distinct certificate chains. One is cross-signed with IdenTrust, a globally trusted CA that has been around since 2000, and the other is Let’s Encrypt’s own root CA, ISRG Root X1. Since Let’s Encrypt launched, ISRG Root X1 has been steadily gaining its own device compatibility.
On September 30, 2024, Let’s Encrypt’s certificate chain cross-signed with IdenTrust will expire. After the cross-sign expires, servers will no longer be able to serve certificates signed by the cross-signed chain. Instead, all Let’s Encrypt certificates will use the ISRG Root X1 CA.
Most devices and browser versions released after 2016 will not experience any issues as a result of the change since the ISRG Root X1 will already be installed in those clients’ trust stores. That’s because these modern browsers and operating systems were built to be agile and flexible, with upgradeable trust stores that can be updated to include new certificate authorities.
The change in the certificate chain will impact legacy devices and systems, such as devices running Android version 7.1.1 (released in 2016) or older, as those exclusively rely on the cross-signed chain and lack the ISRG X1 root in their trust store. These clients will encounter TLS errors or warnings when accessing domains secured by a Let’s Encrypt certificate. We took a look at the data ourselves and found that, of all Android requests, 2.96% of them come from devices that will be affected by the change. That’s a substantial portion of traffic that will lose access to the Internet. We’re committed to keeping those users online and will modify our certificate pipeline so that we can continue to serve users on older devices without requiring any manual modifications from our customers.
A better Internet, for everyone
In the past, we invested in efforts like “No Browsers Left Behind” to help ensure that we could continue to support clients as SHA-1 based algorithms were being deprecated. Now, we’re applying the same approach for the upcoming Let’s Encrypt change.
We have made the decision to remove Let’s Encrypt as a certificate authority from all flows where Cloudflare dictates the CA, impacting Universal SSL customers and those using SSL for SaaS with the “default CA” choice.
Starting in June 2024, one certificate lifecycle (90 days) before the cross-sign chain expires, we’ll begin migrating Let’s Encrypt certificates that are up for renewal to use a different CA, one that ensures compatibility with older devices affected by the change. That means that going forward, customers will only receive Let’s Encrypt certificates if they explicitly request Let’s Encrypt as the CA.
The change that Let’s Encrypt is making is a necessary one. For us to move forward in supporting new standards and protocols, we need to make the Public Key Infrastructure (PKI) ecosystem more agile. By retiring the cross-signed chain, Let’s Encrypt is pushing devices, browsers, and clients to support adaptable trust stores.
However, we’ve observed changes like this in the past and while they push the adoption of new standards, they disproportionately impact users in economically disadvantaged regions, where access to new technology is limited.
Our mission is to help build a better Internet and that means supporting users worldwide. We previously published a blog post about the Let’s Encrypt change, asking customers to switch their certificate authority if they expected any impact. However, determining the impact of the change is challenging. Error rates due to trust store incompatibility are primarily logged on clients, reducing the visibility that domain owners have. In addition, while there might be no requests incoming from incompatible devices today, it doesn’t guarantee uninterrupted access for a user tomorrow.
Cloudflare’s certificate pipeline has evolved over the years to be resilient and flexible, allowing us to seamlessly adapt to changes like this without any negative impact to our customers.
How Cloudflare has built a robust TLS certificate pipeline
Today, Cloudflare manages tens of millions of certificates on behalf of customers. For us, a successful pipeline means:
Customers can always obtain a TLS certificate for their domain
CA related issues have zero impact on our customer’s ability to obtain a certificate
The best security practices and modern standards are utilized
Optimizing for future scale
Supporting a wide range of clients and devices
Every year, we introduce new optimizations into our certificate pipeline to maintain the highest level of service. Here’s how we do it…
Ensuring customers can always obtain a TLS certificate for their domain
Since the launch of Universal SSL in 2014, Cloudflare has been responsible for issuing and serving a TLS certificate for every domain that’s protected by our network. That might seem trivial, but there are a few steps that have to successfully execute in order for a domain to receive a certificate:
Domain owners need to complete Domain Control Validation for every certificate issuance and renewal.
The certificate authority needs to verify the Domain Control Validation tokens to issue the certificate.
CAA records, which dictate which CAs can be used for a domain, need to be checked to ensure only authorized parties can issue the certificate.
The certificate authority must be available to issue the certificate.
Each of these steps requires coordination across a number of parties — domain owners, CDNs, and certificate authorities. At Cloudflare, we like to be in control when it comes to the success of our platform. That’s why we make it our job to ensure each of these steps can be successfully completed.
We ensure that every certificate issuance and renewal requires minimal effort from our customers. To get a certificate, a domain owner has to complete Domain Control Validation (DCV) to prove that it does in fact own the domain. Once the certificate request is initiated, the CA will return DCV tokens which the domain owner will need to place in a DNS record or an HTTP token. If you’re using Cloudflare as your DNS provider, Cloudflare completes DCV on your behalf by automatically placing the TXT token returned from the CA into your DNS records. Alternatively, if you use an external DNS provider, we offer the option to Delegate DCV to Cloudflare for automatic renewals without any customer intervention.
Once DCV tokens are placed, Certificate Authorities (CAs) verify them. CAs conduct this verification from multiple vantage points to prevent spoofing attempts. However, since these checks are done from multiple countries and ASNs (Autonomous Systems), they may trigger a Cloudflare WAF rule which can cause the DCV check to get blocked. We made sure to update our WAF and security engine to recognize that these requests are coming from a CA to ensure they’re never blocked so DCV can be successfully completed.
Some customers have CA preferences, due to internal requirements or compliance regulations. To prevent an unauthorized CA from issuing a certificate for a domain, the domain owner can create a Certification Authority Authorization (CAA) DNS record, specifying which CAs are allowed to issue a certificate for that domain. To ensure that customers can always obtain a certificate, we check the CAA records before requesting a certificate to know which CAs we should use. If the CAA records block all of the CAs that are available in Cloudflare’s pipeline and the customer has not uploaded a certificate from the CA of their choice, then we add CAA records on our customers’ behalf to ensure that they can get a certificate issued. Where we can, we optimize for preference. Otherwise, it’s our job to prevent an outage by ensuring that there’s always a TLS certificate available for the domain, even if it does not come from a preferred CA.
Today, Cloudflare is not a publicly trusted certificate authority, so we rely on the CAs that we use to be highly available. But, 100% uptime is an unrealistic expectation. Instead, our pipeline needs to be prepared in case our CAs become unavailable.
Ensuring that CA-related issues have zero impact on our customer’s ability to obtain a certificate
At Cloudflare, we like to think ahead, which means preventing incidents before they happen. It’s not uncommon for CAs to become unavailable — sometimes this happens because of an outage, but more commonly, CAs have maintenance periods every so often where they become unavailable for some period of time.
It’s our job to ensure CA redundancy, which is why we always have multiple CAs ready to issue a certificate, ensuring high availability at all times. If you’ve noticed different CAs issuing your Universal SSL certificates, that’s intentional. We evenly distribute the load across our CAs to avoid any single point of failure. Plus, we keep a close eye on latency and error rates to detect any issues and automatically switch to a different CA that’s available and performant. You may not know this, but one of our CAs has around 4 scheduled maintenance periods every month. When this happens, our automated systems kick in seamlessly, keeping everything running smoothly. This works so well that our internal teams don’t get paged anymore because everything just works.
Adopting best security practices and modern standards
Security has always been, and will continue to be, Cloudflare’s top priority, and so maintaining the highest security standards to safeguard our customer’s data and private keys is crucial.
Over the past decade, the CA/Browser Forum has advocated for reducing certificate lifetimes from 5 years to 90 days as the industry norm. This shift helps minimize the risk of a key compromise. When certificates are renewed every 90 days, their private keys remain valid for only that period, reducing the window of time that a bad actor can make use of the compromised material.
We fully embrace this change and have made 90 days the default certificate validity period. This enhances our security posture by ensuring regular key rotations, and has pushed us to develop tools like DCV Delegation that promote automation around frequent certificate renewals, without the added overhead. It’s what enables us to offer certificates with validity periods as low as two weeks, for customers that want to rotate their private keys at a high frequency without any concern that it will lead to certificate renewal failures.
Cloudflare has always been at the forefront of new protocols and standards. It’s no secret that when we support a new protocol, adoption skyrockets. This month, we will be adding ECDSA support for certificates issued from Google Trust Services. With ECDSA, you get the same level of security as RSA but with smaller keys. Smaller keys mean smaller certificates and less data passed around to establish a TLS connection, which results in quicker connections and faster loading times.
Optimizing for future scale
Today, Cloudflare issues almost 1 million certificates per day. With the recent shift towards shorter certificate lifetimes, we continue to improve our pipeline to be more robust. But even if our pipeline can handle the significant load, we still need to rely on our CAs to be able to scale with us. With every CA that we integrate, we instantly become one of their biggest consumers. We hold our CAs to high standards and push them to improve their infrastructure to scale. This doesn’t just benefit Cloudflare’s customers, but it helps the Internet by requiring CAs to handle higher volumes of issuance.
And now, with Let’s Encrypt shortening their chain of trust, we’re going to add an additional improvement to our pipeline — one that will ensure the best device compatibility for all.
Supporting all clients — legacy and modern
The upcoming Let’s Encrypt change will prevent legacy devices from making requests to domains or applications that are protected by a Let’s Encrypt certificate. We don’t want to cut off Internet access from any part of the world, which means that we’re going to continue to provide the best device compatibility to our customers, despite the change.
Because of all the recent enhancements, we are able to reduce our reliance on Let’s Encrypt without impacting the reliability or quality of service of our certificate pipeline. One certificate lifecycle (90 days) before the change, we are going to start shifting certificates to use a different CA, one that’s compatible with the devices that will be impacted. By doing this, we’ll mitigate any impact without any action required from our customers. The only customers that will continue to use Let’s Encrypt are ones that have specifically chosen Let’s Encrypt as the CA.
What to expect of the upcoming Let’s Encrypt change
Let’s Encrypt’s cross-signed chain will expire on September 30th, 2024. Although Let’s Encrypt plans to stop issuing certificates from this chain on June 6th, 2024, Cloudflare will continue to serve the cross-signed chain for all Let’s Encrypt certificates until September 9th, 2024.
90 days or one certificate lifecycle before the change, we are going to start shifting Let’s Encrypt certificates to use a different certificate authority. We’ll make this change for all products where Cloudflare is responsible for the CA selection, meaning this will be automatically done for customers using Universal SSL and SSL for SaaS with the “default CA” choice.
Any customers that have specifically chosen Let’s Encrypt as their CA will receive an email notification with a list of their Let’s Encrypt certificates and information on whether or not we’re seeing requests on those hostnames coming from legacy devices.
After September 9th, 2024, Cloudflare will serve all Let’s Encrypt certificates using the ISRG Root X1 chain. Here is what you should expect based on the certificate product that you’re using:
Universal SSL
With Universal SSL, Cloudflare chooses the CA that is used for the domain’s certificate. This gives us the power to choose the best certificate for our customers. If you are using Universal SSL, there are no changes for you to make to prepare for this change. Cloudflare will automatically shift your certificate to use a more compatible CA.
Advanced Certificates
With Advanced Certificate Manager, customers specifically choose which CA they want to use. If Let’s Encrypt was specifically chosen as the CA for a certificate, we will respect the choice, because customers may have specifically chosen this CA due to internal requirements, or because they have implemented certificate pinning, which we highly discourage.
If we see that a domain using an Advanced certificate issued from Let’s Encrypt will be impacted by the change, then we will send out email notifications to inform those customers which certificates are using Let’s Encrypt as their CA and whether or not those domains are receiving requests from clients that will be impacted by the change. Customers will be responsible for changing the CA to another provider, if they chose to do so.
SSL for SaaS
With SSL for SaaS, customers have two options: using a default CA, meaning Cloudflare will choose the issuing authority, or specifying which CA to use.
If you’re leaving the CA choice up to Cloudflare, then we will automatically use a CA with higher device compatibility.
If you’re specifying a certain CA for your custom hostnames, then we will respect that choice. We will send an email out to SaaS providers and platforms to inform them which custom hostnames are receiving requests from legacy devices. Customers will be responsible for changing the CA to another provider, if they chose to do so.
Custom Certificates
If you directly integrate with Let’s Encrypt and use Custom Certificates to upload your Let’s Encrypt certs to Cloudflare then your certificates will be bundled with the cross-signed chain, as long as you choose the bundle method “compatible” or “modern” and upload those certificates before September 9th, 2024. After September 9th, we will bundle all Let’s Encrypt certificates with the ISRG Root X1 chain. With the “user-defined” bundle method, we always serve the chain that’s uploaded to Cloudflare. If you upload Let’s Encrypt certificates using this method, you will need to ensure that certificates uploaded after September 30th, 2024, the date of the CA expiration, contain the right certificate chain.
In addition, if you control the clients that are connecting to your application, we recommend updating the trust store to include the ISRG Root X1. If you use certificate pinning, remove or update your pin. In general, we discourage all customers from pinning their certificates, as this usually leads to issues during certificate renewals or CA changes.
Conclusion
Internet standards will continue to evolve and improve. As we support and embrace those changes, we also need to recognize that it’s our responsibility to keep users online and to maintain Internet access in the parts of the world where new technology is not readily available. By using Cloudflare, you always have the option to choose the setup that’s best for your application.
For additional information regarding the change, please refer to our developer documentation.
The collective thoughts of the interwebz
Manage Consent
To provide the best experiences, we use technologies like cookies to store and/or access device information. Consenting to these technologies will allow us to process data such as browsing behavior or unique IDs on this site. Not consenting or withdrawing consent, may adversely affect certain features and functions.
Functional
Always active
The technical storage or access is strictly necessary for the legitimate purpose of enabling the use of a specific service explicitly requested by the subscriber or user, or for the sole purpose of carrying out the transmission of a communication over an electronic communications network.
Preferences
The technical storage or access is necessary for the legitimate purpose of storing preferences that are not requested by the subscriber or user.
Statistics
The technical storage or access that is used exclusively for statistical purposes.The technical storage or access that is used exclusively for anonymous statistical purposes. Without a subpoena, voluntary compliance on the part of your Internet Service Provider, or additional records from a third party, information stored or retrieved for this purpose alone cannot usually be used to identify you.
Marketing
The technical storage or access is required to create user profiles to send advertising, or to track the user on a website or across several websites for similar marketing purposes.