Tag Archives: Containers

Using container image support for AWS Lambda with AWS SAM

Post Syndicated from Eric Johnson original https://aws.amazon.com/blogs/compute/using-container-image-support-for-aws-lambda-with-aws-sam/

At AWS re:Invent 2020, AWS Lambda released Container Image Support for Lambda functions. This new feature allows developers to package and deploy Lambda functions as container images of up to 10 GB in size. With this release, AWS SAM also added support to manage, build, and deploy Lambda functions using container images.

In this blog post, I walk through building a simple serverless application that uses Lambda functions packaged as container images with AWS SAM. I demonstrate creating a new application and highlight changes to the AWS SAM template specific to container image support. I then cover building the image locally for debugging in addition to eventual deployment. Finally, I show using AWS SAM to handle packaging and deploying Lambda functions from a developer’s machine or a CI/CD pipeline.

Push to invoke lifecycle

Push to invoke lifecycle

The process for creating a Lambda function packaged as a container requires only a few steps. A developer first creates the container image and tags that image with the appropriate label. The image is then uploaded to an Amazon Elastic Container Registry (ECR) repository using docker push.

During the Lambda create or update process, the Lambda service pulls the image from ECR, optimizes the image for use, and deploys the image to the Lambda service. Once this, and any other configuration processes are complete, the Lambda function is then in Active status and ready to be invoked. The AWS SAM CLI manages most of these steps for you.

Prerequisites

The following tools are required in this walkthrough:

Create the application

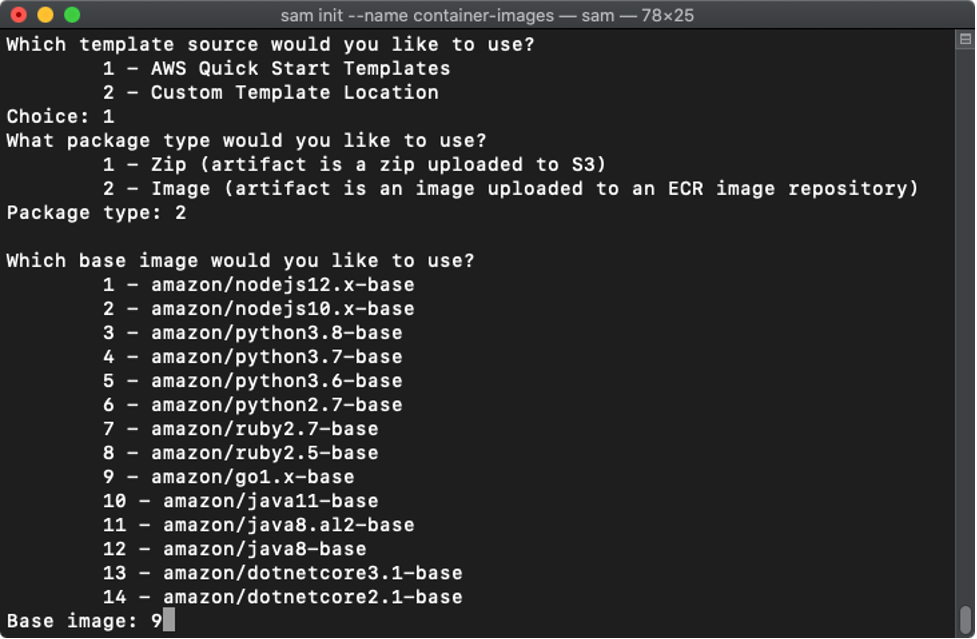
Use the terminal and follow these steps to create a serverless application:

  1. Enter sam init.
  2. For Template source, select option one for AWS Quick Start Templates.
  3. For Package type, choose option two for Image.
  4. For Base image, select option one for amazon/nodejs12.x-base.
  5. Name the application demo-app.
Demonstration of sam init

Demonstration of sam init

Exploring the application

Open the template.yaml file in the root of the project to see the new options available for container image support. The AWS SAM template has two new values that are required when working with container images. PackageType: Image tells AWS SAM that this function is using container images for packaging.

AWS SAM template

AWS SAM template

The second set of required data is in the Metadata section that helps AWS SAM manage the container images. When a container is created, a new tag is added to help identify that image. By default, Docker uses the tag, latest. However, AWS SAM passes an explicit tag name to help differentiate between functions. That tag name is a combination of the Lambda function resource name, and the DockerTag value found in the Metadata. Additionally, the DockerContext points to the folder containing the function code and Dockerfile identifies the name of the Dockerfile used in building the container image.

In addition to changes in the template.yaml file, AWS SAM also uses the Docker CLI to build container images. Each Lambda function has a Dockerfile that instructs Docker how to construct the container image for that function. The Dockerfile for the HelloWorldFunction is at hello-world/Dockerfile.

Local development of the application

AWS SAM provides local development support for zip-based and container-based Lambda functions. When using container-based images, as you modify your code, update the local container image using sam build. AWS SAM then calls docker build using the Dockerfile for instructions.

Dockerfile for Lambda function

Dockerfile for Lambda function

In the case of the HelloWorldFunction that uses Node.js, the Docker command:

  1. Pulls the latest container base image for nodejs12.x from the Amazon Elastic Container Registry Public.
  2. Copies the app.js code and package.json files to the container image.
  3. Installs the dependencies inside the container image.
  4. Sets the invocation handler.
  5. Creates and tags new version of the local container image.

To build your application locally on your machine, enter:

sam build

The results are:

Results for sam build

Results for sam build

Now test the code by locally invoking the HelloWorldFunction using the following command:

sam local invoke HelloWorldFunction

The results are:

Results for sam local invoke

Results for sam local invoke

You can also combine these commands and add flags for cached and parallel builds:

sam build --cached --parallel && sam local invoke HelloWorldFunction

Deploying the application

There are two ways to deploy container-based Lambda functions with AWS SAM. The first option is to deploy from AWS SAM using the sam deploy command. The deploy command tags the local container image, uploads it to ECR, and then creates or updates your Lambda function. The second method is the sam package command used in continuous integration and continuous delivery or deployment (CI/CD) pipelines, where the deployment process is separate from the artifact creation process.

AWS SAM package tags and uploads the container image to ECR but does not deploy the application. Instead, it creates a modified version of the template.yaml file with the newly created container image location. This modified template is later used to deploy the serverless application using AWS CloudFormation.

Deploying from AWS SAM with the guided flag

Before you can deploy the application, use the AWS CLI to create a new ECR repository to store the container image for the HelloWorldFunction.

Run the following command from a terminal:

aws ecr create-repository --repository-name demo-app-hello-world \
--image-tag-mutability IMMUTABLE --image-scanning-configuration scanOnPush=true

This command creates a new ECR repository called demo-app-hello-world. The –image-tag-mutability IMMUTABLE option prevents overwriting tags. The –image-scanning-configuration scanOnPush=true enables automated vulnerability scanning whenever a new image is pushed to the repository. The output is:

Amazon ECR creation output

Amazon ECR creation output

Make a note of the repositoryUri as you need it in the next step.

Before you can push your images to this new repository, ensure that you have logged in to the managed Docker service that ECR provides. Update the bracketed tokens with your information and run the following command in the terminal:

aws ecr get-login-password --region <region> | docker login --username AWS \
--password-stdin <account id>.dkr.ecr.<region>.amazonaws.com

You can also install the Amazon ECR credentials helper to help facilitate Docker authentication with Amazon ECR.

After building the application locally and creating a repository for the container image, you can deploy the application. The first time you deploy an application, use the guided version of the sam deploy command and follow these steps:

  1. Type sam deploy --guided, or sam deploy -g.
  2. For Stack Name, enter demo-app.
  3. Choose the same Region that you created the ECR repository in.
  4. Enter the Image Repository for the HelloWorldFunction (this is the repositoryUri of the ECR repository).
  5. For Confirm changes before deploy and Allow SAM CLI IAM role creation, keep the defaults.
  6. For HelloWorldFunction may not have authorization defined, Is this okay? Select Y.
  7. Keep the defaults for the remaining prompts.
Results of sam deploy --guided

Results of sam deploy –guided

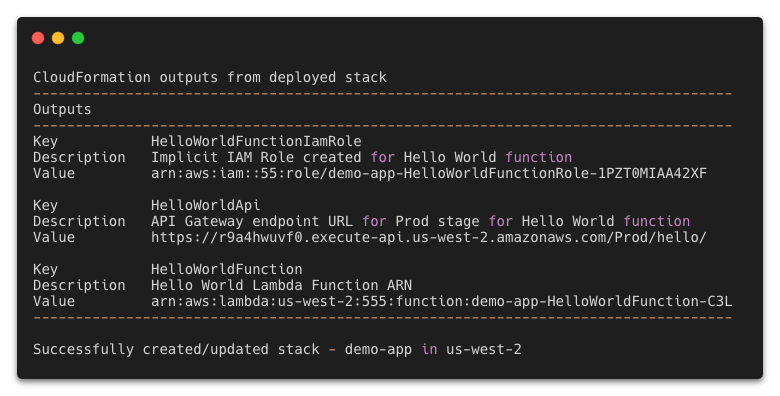
AWS SAM uploads the container images to the ECR repo and deploys the application. During this process, you see a changeset along with the status of the deployment. When the deployment is complete, the stack outputs are then displayed. Use the HelloWorldApi endpoint to test your application in production.

Deploy outputs

Deploy outputs

When you use the guided version, AWS SAM saves the entered data to the samconfig.toml file. For subsequent deployments with the same parameters, use sam deploy. If you want to make a change, use the guided deployment again.

This example demonstrates deploying a serverless application with a single, container-based Lambda function in it. However, most serverless applications contain more than one Lambda function. To work with an application that has more than one Lambda function, follow these steps to add a second Lambda function to your application:

  1. Copy the hello-world directory using the terminal command cp -R hello-world hola-world
  2. Replace the contents of the template.yaml file with the following
    AWSTemplateFormatVersion: '2010-09-09'
    Transform: AWS::Serverless-2016-10-31
    Description: demo app
      
    Globals:
      Function:
        Timeout: 3
    
    Resources:
      HelloWorldFunction:
        Type: AWS::Serverless::Function
        Properties:
          PackageType: Image
          Events:
            HelloWorld:
              Type: Api
              Properties:
                Path: /hello
                Method: get
        Metadata:
          DockerTag: nodejs12.x-v1
          DockerContext: ./hello-world
          Dockerfile: Dockerfile
          
      HolaWorldFunction:
        Type: AWS::Serverless::Function
        Properties:
          PackageType: Image
          Events:
            HolaWorld:
              Type: Api
              Properties:
                Path: /hola
                Method: get
        Metadata:
          DockerTag: nodejs12.x-v1
          DockerContext: ./hola-world
          Dockerfile: Dockerfile
    
    Outputs:
      HelloWorldApi:
        Description: "API Gateway endpoint URL for Prod stage for Hello World function"
        Value: !Sub "https://${ServerlessRestApi}.execute-api.${AWS::Region}.amazonaws.com/Prod/hello/"
      HolaWorldApi:
        Description: "API Gateway endpoint URL for Prod stage for Hola World function"
        Value: !Sub "https://${ServerlessRestApi}.execute-api.${AWS::Region}.amazonaws.com/Prod/hola/"
  3. Replace the contents of hola-world/app.js with the following
    let response;
    exports.lambdaHandler = async(event, context) => {
        try {
            response = {
                'statusCode': 200,
                'body': JSON.stringify({
                    message: 'hola world',
                })
            }
        }
        catch (err) {
            console.log(err);
            return err;
        }
        return response
    };
  4. Create an ECR repository for the HolaWorldFunction
    aws ecr create-repository --repository-name demo-app-hola-world \
    --image-tag-mutability IMMUTABLE --image-scanning-configuration scanOnPush=true
  5. Run the guided deploy to add the second repository:
    sam deploy -g

The AWS SAM guided deploy process allows you to provide the information again but prepopulates the defaults with previous values. Update the following:

  1. Keep the same stack name, Region, and Image Repository for HelloWorldFunction.
  2. Use the new repository for HolaWorldFunction.
  3. For the remaining steps, use the same values from before. For Lambda functions not to have authorization defined, enter Y.
Results of sam deploy --guided

Results of sam deploy –guided

Deploying in a CI/CD pipeline

Companies use continuous integration and continuous delivery (CI/CD) pipelines to automate application deployment. Because the process is automated, using an interactive process like a guided AWS SAM deployment is not possible.

Developers can use the packaging process in AWS SAM to prepare the artifacts for deployment and produce a separate template usable by AWS CloudFormation. The package command is:

sam package --output-template-file packaged-template.yaml \
--image-repository 5555555555.dkr.ecr.us-west-2.amazonaws.com/demo-app

For multiple repositories:

sam package --output-template-file packaged-template.yaml \ 
--image-repositories HelloWorldFunction=5555555555.dkr.ecr.us-west-2.amazonaws.com/demo-app-hello-world \
--image-repositories HolaWorldFunction=5555555555.dkr.ecr.us-west-2.amazonaws.com/demo-app-hola-world

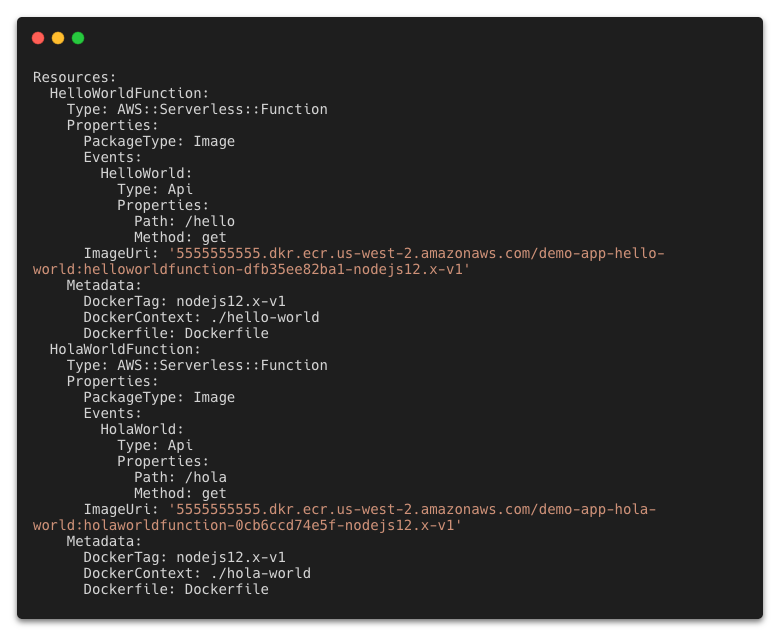
Both cases create a file called packaged-template.yaml. The Lambda functions in this template have an added tag called ImageUri that points to the ECR repository and a tag for the Lambda function.

Packaged template

Packaged template

Using sam package to generate a separate CloudFormation template enables developers to separate artifact creation from application deployment. The deployment process can then be placed in an isolated stage allowing for greater customization and observability of the pipeline.

Conclusion

Container image support for Lambda enables larger application artifacts and the ability to use container tooling to manage Lambda images. AWS SAM simplifies application management by bringing these tools into the serverless development workflow.

In this post, you create a container-based serverless application in using command lines in the terminal. You create ECR repositories and associate them with functions in the application. You deploy the application from your local machine and package the artifacts for separate deployment in a CI/CD pipeline.

To learn more about serverless and AWS SAM, visit the Sessions with SAM series at s12d.com/sws and find more resources at serverlessland.com.

#ServerlessForEveryone

Field Notes: Managing an Amazon EKS Cluster Using AWS CDK and Cloud Resource Property Manager

Post Syndicated from Raj Seshadri original https://aws.amazon.com/blogs/architecture/field-notes-managing-an-amazon-eks-cluster-using-aws-cdk-and-cloud-resource-property-manager/

This post is contributed by Bill Kerr and Raj Seshadri

For most customers, infrastructure is hardly done with CI/CD in mind. However, Infrastructure as Code (IaC) should be a best practice for DevOps professionals when they provision cloud-native assets. Microservice apps that run inside an Amazon EKS cluster often use CI/CD, so why not the cluster and related cloud infrastructure as well?

This blog demonstrates how to spin up cluster infrastructure managed by CI/CD using CDK code and Cloud Resource Property Manager (CRPM) property files. Managing cloud resources is ultimately about managing properties, such as instance type, cluster version, etc. CRPM helps you organize all those properties by importing bite-sized YAML files, which are stitched together with CDK. It keeps all of what’s good about YAML in YAML, and places all of the logic in beautiful CDK code. Ultimately this improves productivity and reliability as it eliminates manual configuration steps.

Architecture Overview

In this architecture, we create a six node Amazon EKS cluster. The Amazon EKS cluster has a node group spanning private subnets across two Availability Zones. There are two public subnets in different Availability Zones available for use with an Elastic Load Balancer.

EKS architecture diagram

Changes to the primary (master) branch triggers a pipeline, which creates CloudFormation change sets for an Amazon EKS stack and a CI/CD stack. After human approval, the change sets are initiated (executed).

CloudFormation sets

Prerequisites

Get ready to deploy the CloudFormation stacks with CDK

First, to get started with CDK you spin up a AWS Cloud9 environment, which gives you a code editor and terminal that runs in a web browser. Using AWS Cloud9 is optional but highly recommended since it speeds up the process.

Create a new AWS Cloud9 environment

  1. Navigate to Cloud9 in the AWS Management Console.
  2. Select Create environment.
  3. Enter a name and select Next step.
  4. Leave the default settings and select Next step again.
  5. Select Create environment.

Download and install the dependencies and demo CDK application

In a terminal, let’s review the code used in this article and install it.

# Install TypeScript globally for CDK
npm i -g typescript

# If you are running these commands in Cloud9 or already have CDK installed, then
skip this command
npm i -g aws-cdk

# Clone the demo CDK application code
git clone https://github.com/shi/crpm-eks

# Change directory
cd crpm-eks

# Install the CDK application
npm i

Create the IAM service role

When creating an EKS cluster, the IAM role that was used to create the cluster is also the role that will be able to access it afterwards.

Deploy the CloudFormation stack containing the role

Let’s deploy a CloudFormation stack containing a role that will later be used to create the cluster and also to access it. While we’re at it, let’s also add our current user ARN to the role, so that we can assume the role.

# Deploy the EKS management role CloudFormation stack
cdk deploy role --parameters AwsArn=$(aws sts get-caller-identity --query Arn --output text)

# It will ask, "Do you wish to deploy these changes (y/n)?"
# Enter y and then press enter to continue deploying

Notice the Outputs section that shows up in the CDK deploy results, which contains the role name and the role ARN. You will need to copy and paste the role ARN (ex. arn:aws:iam::123456789012:role/eks-role-us-east-
1) from your Outputs when deploying the next stack.

Example Outputs:
role.ExportsOutputRefRoleFF41A16F = eks-role-us-east-1
role.ExportsOutputFnGetAttRoleArnED52E3F8 = arn:aws:iam::123456789012:role/eksrole-us-east-1

Create the EKS cluster

Now that we have a role created, it’s time to create the cluster using that role.

Deploy the stack containing the EKS cluster in a new VPC

Expect it to take over 20 minutes for this stack to deploy.

# Deploy the EKS cluster CloudFormation stack
# REPLACE ROLE_ARN WITH ROLE ARN FROM OUTPUTS IN ROLE STACK CREATED ABOVE
cdk deploy eks -r ROLE_ARN

# It will ask, "Do you wish to deploy these changes (y/n)?"
# Enter y and then press enter to continue deploying

Notice the Outputs section, which contains the cluster name (ex. eks-demo) and the UpdateKubeConfigCommand. The UpdateKubeConfigCommand is useful if you already have kubectl installed somewhere and would rather use your own to interact with the cluster instead of using Cloud9’s.

Example Outputs:
eks.ExportsOutputRefControlPlane70FAD3FA = eks-demo
eks.UpdateKubeConfigCommand = aws eks update-kubeconfig --name eks-demo --region
us-east-1 --role-arn arn:aws:iam::123456789012:role/eks-role-us-east-1
eks.FargatePodExecutionRoleArn = arn:aws:iam::123456789012:role/eks-cluster-
FargatePodExecutionRole-U495K4DHW93M

Navigate to this page in the AWS console if you would like to see your cluster, which is now ready to use.

Configure kubectl with access to cluster

If you are following along in Cloud9, you can skip configuring kubectl.

If you prefer to use kubectl installed somewhere else, now would be a good time to configure access to the newly created cluster by running the UpdateKubeConfigCommand mentioned in the Outputs section above. It requires that you have the AWS CLI installed and configured.

aws eks update-kubeconfig --name eks-demo --region us-east-1 --role-arn
arn:aws:iam::123456789012:role/eks-role-us-east-1

# Test access to cluster
kubectl get nodes

Leveraging Infrastructure CI/CD

Now that the VPC and cluster have been created, it’s time to turn on CI/CD. This will create a cloned copy of github.com/shi/crpm-eks in CodeCommit. Then, an AWS CloudWatch Events rule will start watching the CodeCommit repo for changes and triggering a CI/CD pipeline that builds and validates CloudFormation templates, and executes CloudFormation change sets.

Deploy the stack containing the code repo and pipeline

# Deploy the CI/CD CloudFormation stack
cdk deploy cicd

# It will ask, "Do you wish to deploy these changes (y/n)?"
# Enter y and then press enter to continue deploying

Notice the Outputs section, which contains the CodeCommit repo name (ex. eks-ci-cd). This is where the code now lives that is being watched for changes.

Example Outputs:
cicd.ExportsOutputFnGetAttLambdaRoleArn275A39EB =
arn:aws:iam::774461968944:role/eks-ci-cd-LambdaRole-6PFYXVSLTQ0D
cicd.ExportsOutputFnGetAttRepositoryNameC88C868A = eks-ci-cd

Review the pipeline for the first time

Navigate to this page in the AWS console and you should see a new pipeline in progress. The pipeline is automatically run for the first time when it is created, even though no changes have been made yet. Open the pipeline and scroll down to the Review stage. You’ll see that two change sets were created in parallel (one for the EKS stack and the other for the CI/CD stack).

CICD image

  • Select Review to open an approval popup where you can enter a comment.
  • Select Reject or Approve. Following the Review button, the blue link to the left of Fetch: Initial commit by AWS CodeCommit can be selected to see the infrastructure code changes that triggered the pipeline.

review screen

Go ahead and approve it.

Clone the new AWS CodeCommit repo

Now that the golden source that is being watched for changes lives in a AWS CodeCommit repo, we need to clone that repo and get rid of the repo we’ve been using up to this point.

If you are following along in AWS Cloud9, you can skip cloning the new repo because you are just going to discard the old AWS Cloud9 environment and start using a new one.

Now would be a good time to clone the newly created repo mentioned in the preceding Outputs section Next, delete the old repo that was cloned from GitHub at the beginning of this blog. You can visit this repository to get the clone URL for the repo.

Review this documentation for help with accessing your private AWS CodeCommit repo using HTTPS.

Review this documentation for help with accessing your repo using SSH.

# Clone the CDK application code (this URL assumes the us-east-1 region)
git clone https://git-codecommit.us-east-1.amazonaws.com/v1/repos/eks-ci-cd

# Change directory
cd eks-ci-cd

# Install the CDK application
npm i

# Remove the old repo
rm -rf ../crpm-eks

Deploy the stack containing the Cloud9 IDE with kubectl and CodeCommit repo

If you are NOT using Cloud9, you can skip this section.

To make life easy, let’s create another Cloud9 environment that has kubectl preconfigured and ready to use, and also has the new CodeCommit repo checked out and ready to edit.

# Deploy the IDE CloudFormation stack
cdk deploy ide

Configuring the new Cloud9 environment

Although kubectl and the code are now ready to use, we still have to manually configure Cloud9 to stop using AWS managed temporary credentials in order for kubectl to be able to access the cluster with the management role. Here’s how to do that and test kubectl:

1. Navigate to this page in the AWS console.
2. In Your environments, select Open IDE for the newly created environment (possibly named eks-ide).
3. Once opened, navigate at the top to AWS Cloud9 -> Preferences.
4. Expand AWS SETTINGS, and under Credentials, disable AWS managed temporary credentials by selecting the toggle button. Then, close the Preferences tab.
5. In a terminal in Cloud9, enter aws configure. Then, answer the questions by leaving them set to None and pressing enter, except for Default region name. Set the Default region name to the current region that you created everything in. The output should look similar to:

AWS Access Key ID [None]:
AWS Secret Access Key [None]:
Default region name [None]: us-east-1
Default output format [None]:

6. Test the environment

kubectl get nodes

If everything is working properly, you should see two nodes appear in the output similar to:

NAME                           STATUS ROLES  AGE   VERSION
ip-192-168-102-69.ec2.internal Ready  <none> 4h50m v1.17.11-ekscfdc40
ip-192-168-69-2.ec2.internal   Ready  <none> 4h50m v1.17.11-ekscfdc40

You can use kubectl from this IDE to control the cluster. When you close the IDE browser window, the Cloud9 environment will automatically shutdown after 30 minutes and remain offline until the next time you reopen it from the AWS console. So, it’s a cheap way to have a kubectl terminal ready when needed.

Delete the old Cloud9 environment

If you have been following along using Cloud9 the whole time, then you should have two Cloud9 environments running at this point (one that was used to initially create everything from code in GitHub, and one that is now ready to edit the CodeCommit repo and control the cluster with kubectl). It’s now a good time to delete the old Cloud9 environment.

  1. Navigate to this page in the AWS console.
  2. In Your environments, select the radio button for the old environment (you named it when creating it) and select Delete.
  3. In the popup, enter the word Delete and select Delete.

Now you should be down to having just one AWS Cloud9 environment that was created when you deployed the ide stack.

Trigger the pipeline to change the infrastructure

Now that we have a cluster up and running that’s defined in code stored in a AWS CodeCommit repo, it’s time to make some changes:

  • We’ll commit and push the changes, which will trigger the pipeline to update the infrastructure.
  • We’ll go ahead and make one change to the cluster nodegroup and another change to the actual CI/CD build process, so that both the eks-cluster stack as well as the eks-ci-cd stack get changed.

1.     In the code that was checked out from AWS CodeCommit, open up res/compute/eks/nodegroup/props.yaml. At the bottom of the file, try changing minSize from 1 to 4, desiredSize from 2 to 6, and maxSize from 3 to 6 as seen in the following screenshot. Then, save the file and close it. The res (resource) directory is your well organized collection of resource properties files.

AWS Cloud9 screenshot

2.     Next, open up res/developer-tools/codebuild/project/props.yaml and find where it contains computeType: ‘BUILD_GENERAL1_SMALL’. Try changing BUILD_GENERAL1_SMALL to BUILD_GENERAL1_MEDIUM. Then, save the file and close it.

3.     Commit and push the changes in a terminal.

cd eks-ci-cd
git add .
git commit -m "Increase nodegroup scaling config sizes and use larger build
environment"
git push

4.     Visit https://console.aws.amazon.com/codesuite/codepipeline/pipelines in the AWS console and you should see your pipeline in progress.

5.     Wait for the Review stage to become Pending.

a.       Following the Approve action box, click the blue link to the left of “Fetch: …” to see the infrastructure code changes that triggered the pipeline. You should see the two code changes you committed above.

3.     After reviewing the changes, go back and select Review to open an approval popup.

4.     In the approval popup, enter a comment and select Approve.

5.     Wait for the pipeline to finish the Deploy stage as it executes the two change sets. You can refresh the page until you see it has finished. It should take a few minutes.

6.     To see that the CodeBuild change has been made, scroll up to the Build stage of the pipeline and click on the AWS CodeBuild link as shown in the following screenshot.

AWS Codebuild screenshot

7.     Next,  select the Build details tab, and you should determine that your Compute size has been upgraded to 7 GB memory, 4 vCPUs as shown in the following screenshot.

project config


8.     By this time, the cluster nodegroup sizes are probably updated. You can confirm with kubectl in a terminal.

# Get nodes
kubectl get nodes

If everything is ready, you should see six (desired size) nodes appear in the output similar to:

NAME                            STATUS   ROLES     AGE     VERSION
ip-192-168-102-69.ec2.internal  Ready    <none>    5h42m   v1.17.11-ekscfdc40
ip-192-168-69-2.ec2.internal    Ready    <none>    5h42m   v1.17.11-ekscfdc40
ip-192-168-43-7.ec2.internal    Ready    <none>    10m     v1.17.11-ekscfdc40
ip-192-168-27-14.ec2.internal   Ready    <none>    10m     v1.17.11-ekscfdc40
ip-192-168-36-56.ec2.internal   Ready    <none>    10m     v1.17.11-ekscfdc40
ip-192-168-37-27.ec2.internal   Ready    <none>    10m     v1.17.11-ekscfdc40

Cluster is now manageable by code

You now have a cluster than can be maintained by simply making changes to code! The only resources not being managed by CI/CD in this demo, are the management role, and the optional AWS Cloud9 IDE. You can log into the AWS console and edit the role, adding other Trust relationships in the future, so others can assume the role and access the cluster.

Clean up

Do not try to delete all of the stacks at once! Wait for the stack(s) in a step to finish deleting before moving onto the next step.

1. Navigate to this page in the AWS console.
2. Delete the two IDE stacks first (the ide stack spawned another stack).
3. Delete the ci-cd stack.
4. Delete the cluster stack (this one takes a long time).
5. Delete the role stack.

Additional resources

Cloud Resource Property Manager (CRPM) is an open source project maintained by SHI, hosted on GitHub, and available through npm.

Conclusion

In this blog, we demonstrated how you can spin up an Amazon EKS cluster managed by CI/CD using CDK code and Cloud Resource Property Manager (CRPM) property files. Making updates to this cluster is easy as modifying the property files and updating the AWS CodePipline. Using CRPM can improve productivity and reliability because it eliminates manual configurations steps.

Field Notes provides hands-on technical guidance from AWS Solutions Architects, consultants, and technical account managers, based on their experiences in the field solving real-world business problems for customers
Bill Kerr

Bill Kerr

Bill Kerr is a senior developer at Stratascale who has worked at startup and Fortune 500 companies. He’s the creator of CRPM and he’s a super fan of CDK and cloud infrastructure automation.

Working with Lambda layers and extensions in container images

Post Syndicated from Julian Wood original https://aws.amazon.com/blogs/compute/working-with-lambda-layers-and-extensions-in-container-images/

In this post, I explain how to use AWS Lambda layers and extensions with Lambda functions packaged and deployed as container images.

Previously, Lambda functions were packaged only as .zip archives. This includes functions created in the AWS Management Console. You can now also package and deploy Lambda functions as container images.

You can use familiar container tooling such as the Docker CLI with a Dockerfile to build, test, and tag images locally. Lambda functions built using container images can be up to 10 GB in size. You push images to an Amazon Elastic Container Registry (ECR) repository, a managed AWS container image registry service. You create your Lambda function, specifying the source code as the ECR image URL from the registry.

Lambda container image support

Lambda container image support

Lambda functions packaged as container images do not support adding Lambda layers to the function configuration. However, there are a number of solutions to use the functionality of Lambda layers with container images. You take on the responsible for packaging your preferred runtimes and dependencies as a part of the container image during the build process.

Understanding how Lambda layers and extensions work as .zip archives

If you deploy function code using a .zip archive, you can use Lambda layers as a distribution mechanism for libraries, custom runtimes, and other function dependencies.

When you include one or more layers in a function, during initialization, the contents of each layer are extracted in order to the /opt directory in the function execution environment. Each runtime then looks for libraries in a different location under /opt, depending on the language. You can include up to five layers per function, which count towards the unzipped deployment package size limit of 250 MB. Layers are automatically set as private, but they can be shared with other AWS accounts, or shared publicly.

Lambda Extensions are a way to augment your Lambda functions and are deployed as Lambda layers. You can use Lambda Extensions to integrate functions with your preferred monitoring, observability, security, and governance tools. You can choose from a broad set of tools provided by AWS, AWS Lambda Ready Partners, and AWS Partners, or create your own Lambda Extensions. For more information, see “Introducing AWS Lambda Extensions – In preview.”

Extensions can run in either of two modes, internal and external. An external extension runs as an independent process in the execution environment. They can start before the runtime process, and can continue after the function invocation is fully processed. Internal extensions run as part of the runtime process, in-process with your code.

Lambda searches the /opt/extensions directory and starts initializing any extensions found. Extensions must be executable as binaries or scripts. As the function code directory is read-only, extensions cannot modify function code.

It helps to understand that Lambda layers and extensions are just files copied into specific file paths in the execution environment during the function initialization. The files are read-only in the execution environment.

Understanding container images with Lambda

A container image is a packaged template built from a Dockerfile. The image is assembled or built from commands in the Dockerfile, starting from a parent or base image, or from scratch. Each command then creates a new layer in the image, which is stacked in order on top of the previous layer. Once built from the packaged template, a container image is immutable and read-only.

For Lambda, a container image includes the base operating system, the runtime, any Lambda extensions, your application code, and its dependencies. Lambda provides a set of open-source base images that you can use to build your container image. Lambda uses the image to construct the execution environment during function initialization. You can use the AWS Serverless Application Model (AWS SAM) CLI or native container tools such as the Docker CLI to build and test container images locally.

Using Lambda layers in container images

Container layers are added to a container image, similar to how Lambda layers are added to a .zip archive function.

There are a number of ways to use container image layering to add the functionality of Lambda layers to your Lambda function container images.

Use a container image version of a Lambda layer

A Lambda layer publisher may have a container image format equivalent of a Lambda layer. To maintain the same file path as Lambda layers, the published container images must have the equivalent files located in the /opt directory. An image containing an extension must include the files in the /opt/extensions directory.

An example Lambda function, packaged as a .zip archive, is created with two layers. One layer contains shared libraries, and the other layer is a Lambda extension from an AWS Partner.

aws lambda create-function –region us-east-1 –function-name my-function \

aws lambda create-function --region us-east-1 --function-name my-function \  
    --role arn:aws:iam::123456789012:role/lambda-role \
    --layers \
        "arn:aws:lambda:us-east-1:123456789012:layer:shared-lib-layer:1" \
        "arn:aws:lambda:us-east-1:987654321987:extensions-layer:1" \
    …

The corresponding Dockerfile syntax for a function packaged as a container image includes the following lines. These pull the container image versions of the Lambda layers and copy them into the function image. The shared library image is pulled from ECR and the extension image is pulled from Docker Hub.

FROM public.ecr.aws/myrepo/shared-lib-layer:1 AS shared-lib-layer
# Layer code
WORKDIR /opt
COPY --from=shared-lib-layer /opt/ .

FROM aws-partner/extensions-layer:1 as extensions-layer
# Extension  code
WORKDIR /opt/extensions
COPY --from=extensions-layer /opt/extensions/ .

Copy the contents of a Lambda layer into a container image

You can use existing Lambda layers, and copy the contents of the layers into the function container image /opt directory during docker build.

You need to build a Dockerfile that includes the AWS Command Line Interface to copy the layer files from Amazon S3.

The Dockerfile to add two layers into a single image includes the following lines to copy the Lambda layer contents.

FROM alpine:latest

ARG AWS_DEFAULT_REGION=${AWS_DEFAULT_REGION:-"us-east-1"}
ARG AWS_ACCESS_KEY_ID=${AWS_ACCESS_KEY_ID:-""}
ARG AWS_SECRET_ACCESS_KEY=${AWS_SECRET_ACCESS_KEY:-""}
ENV AWS_DEFAULT_REGION=${AWS_DEFAULT_REGION}
ENV AWS_ACCESS_KEY_ID=${AWS_ACCESS_KEY_ID}
ENV AWS_SECRET_ACCESS_KEY=${AWS_SECRET_ACCESS_KEY}

RUN apk add aws-cli curl unzip

RUN mkdir -p /opt

RUN curl $(aws lambda get-layer-version-by-arn --arn arn:aws:lambda:us-east-1:1234567890123:layer:shared-lib-layer:1 --query 'Content.Location' --output text) --output layer.zip
RUN unzip layer.zip -d /opt
RUN rm layer.zip

RUN curl $(aws lambda get-layer-version-by-arn --arn arn:aws:lambda:us-east-1:987654321987:extensions-layer:1 --query 'Content.Location' --output text) --output layer.zip
RUN unzip layer.zip -d /opt
RUN rm layer.zip

To run the AWS CLI, specify your AWS_ACCESS_KEY, and AWS_SECRET_ACCESS_KEY, and include the required AWS_DEFAULT_REGION as command-line arguments.

docker build . -t layer-image1:latest \
--build-arg AWS_DEFAULT_REGION=us-east-1 \
--build-arg AWS_ACCESS_KEY_ID=AKIAIOSFODNN7EXAMPLE \
--build-arg AWS_SECRET_ACCESS_KEY=wJalrXUtnFEMI/K7MDENG/bPxRfiCYEXAMPLEKEY

This creates a container image containing the existing Lambda layer and extension files. This can be pushed to ECR and used in a function.

Build a container image from a Lambda layer

You can repackage and publish Lambda layer file content as container images. Creating separate container images for different layers allows you to add them to multiple functions, and share them in a similar way as Lambda layers.

You can create a separate container image containing the files from a single layer, or combine the files from multiple layers into a single image. If you create separate container images for layer files, you then add these images into your function image.

There are two ways to manage language code dependencies. You can pre-build the dependencies and copy the files into the container image, or build the dependencies during docker build.

In this example, I migrate an existing Python application. This comprises a Lambda function and extension, from a .zip archive to separate function and extension container images. The extension writes logs to S3.

You can choose how to store images in repositories. You can either push both images to the same ECR repository with different image tags, or push to different repositories. In this example, I use separate ECR repositories.

To set up the example, visit the GitHub repo and follow the instructions in the README.md file.

The existing example extension uses a makefile to install boto3 using pip install with a requirements.txt file. This is migrated to the docker build process. I must add a Python runtime to be able to run pip install as part of the build process. I use python:3.8-alpine as a minimal base image.

I create separate Dockerfiles for the function and extension. The extension Dockerfile contains the following lines.

FROM python:3.8-alpine AS installer
#Layer Code
COPY extensionssrc /opt/
COPY extensionssrc/requirements.txt /opt/
RUN pip install -r /opt/requirements.txt -t /opt/extensions/lib

FROM scratch AS base
WORKDIR /opt/extensions
COPY --from=installer /opt/extensions .

I build, tag, login, and push the extension container image to an existing ECR repository.

docker build -t log-extension-image:latest  .
docker tag log-extension-image:latest 123456789012.dkr.ecr.us-east-1.amazonaws.com/log-extension-image:latest
aws ecr get-login-password --region us-east-1 | docker login --username AWS --password-stdin 123456789012.dkr.ecr.us-east-1.amazonaws.com
docker push 123456789012.dkr.ecr.us-east-1.amazonaws.com/log-extension-image:latest

The function Dockerfile contains the following lines, which add the files from the previously created extension image to the function image. There is no need to run pip install for the function as it does not require any additional dependencies.

FROM 123456789012.dkr.ecr.us-east-1.amazonaws.com/log-extension-image:latest AS layer
FROM public.ecr.aws/lambda/python:3.8
# Layer code
WORKDIR /opt
COPY --from=layer /opt/ .
# Function code
WORKDIR /var/task
COPY app.py .
CMD ["app.lambda_handler"]

I build, tag, and push the function container image to a separate existing ECR repository. This creates an immutable image of the Lambda function.

docker build -t log-extension-function:latest  .
docker tag log-extension-function:latest 123456789012.dkr.ecr.us-east-1.amazonaws.com/log-extension-function:latest
docker push 123456789012.dkr.ecr.us-east-1.amazonaws.com/log-extension-function:latest

The function requires a unique S3 bucket to store the logs files, which I create in the S3 console. I create a Lambda function from the ECR repository image, and specify the bucket name as a Lambda environment variable.

aws lambda create-function --region us-east-1  --function-name log-extension-function \
--package-type Image --code ImageUri=123456789012.dkr.ecr.us-east-1.amazonaws.com/log-extension-function:latest \
--role "arn:aws:iam:: 123456789012:role/lambda-role" \
--environment  "Variables": {"S3_BUCKET_NAME": "s3-logs-extension-demo-logextensionsbucket-us-east-1"}

For subsequent extension code changes, I need to update both the extension and function images. If only the function code changes, I need to update the function image. I push the function image as the :latest image to ECR. I then update the function code deployment to use the updated :latest ECR image.

aws lambda update-function-code --function-name log-extension-function --image-uri 123456789012.dkr.ecr.us-east-1.amazonaws.com/log-extension-function:latest

Using custom runtimes with container images

With .zip archive functions, custom runtimes are added using Lambda layers. With container images, you no longer need to copy in Lambda layer code for custom runtimes.

You can build your own custom runtime images starting with AWS provided base images for custom runtimes. You can add your preferred runtime, dependencies, and code to these images. To communicate with Lambda, the image must implement the Lambda Runtime API. We provide Lambda runtime interface clients for all supported runtimes, or you can implement your own for additional runtimes.

Running extensions in container images

A Lambda extension running in a function packaged as a container image works in the same way as a .zip archive function. You build a function container image including the extension files, or adding an extension image layer. Lambda looks for any external extensions in the /opt/extensions directory and starts initializing them. Extensions must be executable as binaries or scripts.

Internal extensions modify the Lambda runtime startup behavior using language-specific environment variables, or wrapper scripts. For language-specific environment variables, you can set the following environment variables in your function configuration to augment the runtime command line.

  • JAVA_TOOL_OPTIONS (Java Corretto 8 and 11)
  • NODE_OPTIONS (Node.js 10 and 12)
  • DOTNET_STARTUP_HOOKS (.NET Core 3.1)

An example Lambda environment variable for JAVA_TOOL_OPTIONS:

-javaagent:"/opt/ExampleAgent-0.0.jar"

Wrapper scripts delegate the runtime start-up to a script. The script can inject and alter arguments, set environment variables, or capture metrics, errors, and other diagnostic information. The following runtimes support wrapper scripts: Node.js 10 and 12, Python 3.8, Ruby 2.7, Java 8 and 11, and .NET Core 3.1

You specify the script by setting the value of the AWS_LAMBDA_EXEC_WRAPPER environment variable as the file system path of an executable binary or script, for example:

/opt/wrapper_script

Conclusion

You can now package and deploy Lambda functions as container images in addition to .zip archives. Lambda functions packaged as container images do not directly support adding Lambda layers to the function configuration as .zip archives do.

In this post, I show a number of solutions to use the functionality of Lambda layers and extensions with container images, including example Dockerfiles.

I show how to migrate an existing Lambda function and extension from a .zip archive to separate function and extension container images. Follow the instructions in the README.md file in the GitHub repository.

For more serverless learning resources, visit https://serverlessland.com.

New for AWS Lambda – Container Image Support

Post Syndicated from Danilo Poccia original https://aws.amazon.com/blogs/aws/new-for-aws-lambda-container-image-support/

With AWS Lambda, you upload your code and run it without thinking about servers. Many customers enjoy the way this works, but if you’ve invested in container tooling for your development workflows, it’s not easy to use the same approach to build applications using Lambda.

To help you with that, you can now package and deploy Lambda functions as container images of up to 10 GB in size. In this way, you can also easily build and deploy larger workloads that rely on sizable dependencies, such as machine learning or data intensive workloads. Just like functions packaged as ZIP archives, functions deployed as container images benefit from the same operational simplicity, automatic scaling, high availability, and native integrations with many services.

We are providing base images for all the supported Lambda runtimes (Python, Node.js, Java, .NET, Go, Ruby) so that you can easily add your code and dependencies. We also have base images for custom runtimes based on Amazon Linux that you can extend to include your own runtime implementing the Lambda Runtime API.

You can deploy your own arbitrary base images to Lambda, for example images based on Alpine or Debian Linux. To work with Lambda, these images must implement the Lambda Runtime API. To make it easier to build your own base images, we are releasing Lambda Runtime Interface Clients implementing the Runtime API for all supported runtimes. These implementations are available via native package managers, so that you can easily pick them up in your images, and are being shared with the community using an open source license.

We are also releasing as open source a Lambda Runtime Interface Emulator that enables you to perform local testing of the container image and check that it will run when deployed to Lambda. The Lambda Runtime Interface Emulator is included in all AWS-provided base images and can be used with arbitrary images as well.

Your container images can also use the Lambda Extensions API to integrate monitoring, security and other tools with the Lambda execution environment.

To deploy a container image, you select one from an Amazon Elastic Container Registry repository. Let’s see how this works in practice with a couple of examples, first using an AWS-provided image for Node.js, and then building a custom image for Python.

Using the AWS-Provided Base Image for Node.js
Here’s the code (app.js) for a simple Node.js Lambda function generating a PDF file using the PDFKit module. Each time it is invoked, it creates a new mail containing random data generated by the faker.js module. The output of the function is using the syntax of the Amazon API Gateway to return the PDF file.

const PDFDocument = require('pdfkit');
const faker = require('faker');
const getStream = require('get-stream');

exports.lambdaHandler = async (event) => {

    const doc = new PDFDocument();

    const randomName = faker.name.findName();

    doc.text(randomName, { align: 'right' });
    doc.text(faker.address.streetAddress(), { align: 'right' });
    doc.text(faker.address.secondaryAddress(), { align: 'right' });
    doc.text(faker.address.zipCode() + ' ' + faker.address.city(), { align: 'right' });
    doc.moveDown();
    doc.text('Dear ' + randomName + ',');
    doc.moveDown();
    for(let i = 0; i < 3; i++) {
        doc.text(faker.lorem.paragraph());
        doc.moveDown();
    }
    doc.text(faker.name.findName(), { align: 'right' });
    doc.end();

    pdfBuffer = await getStream.buffer(doc);
    pdfBase64 = pdfBuffer.toString('base64');

    const response = {
        statusCode: 200,
        headers: {
            'Content-Length': Buffer.byteLength(pdfBase64),
            'Content-Type': 'application/pdf',
            'Content-disposition': 'attachment;filename=test.pdf'
        },
        isBase64Encoded: true,
        body: pdfBase64
    };
    return response;
};

I use npm to initialize the package and add the three dependencies I need in the package.json file. In this way, I also create the package-lock.json file. I am going to add it to the container image to have a more predictable result.

$ npm init
$ npm install pdfkit
$ npm install faker
$ npm install get-stream

Now, I create a Dockerfile to create the container image for my Lambda function, starting from the AWS provided base image for the nodejs12.x runtime:

FROM amazon/aws-lambda-nodejs:12
COPY app.js package*.json ./
RUN npm install
CMD [ "app.lambdaHandler" ]

The Dockerfile is adding the source code (app.js) and the files describing the package and the dependencies (package.json and package-lock.json) to the base image. Then, I run npm to install the dependencies. I set the CMD to the function handler, but this could also be done later as a parameter override when configuring the Lambda function.

I use the Docker CLI to build the random-letter container image locally:

$ docker build -t random-letter .

To check if this is working, I start the container image locally using the Lambda Runtime Interface Emulator:

$ docker run -p 9000:8080 random-letter:latest

Now, I test a function invocation with cURL. Here, I am passing an empty JSON payload.

$ curl -XPOST "http://localhost:9000/2015-03-31/functions/function/invocations" -d '{}'

If there are errors, I can fix them locally. When it works, I move to the next step.

To upload the container image, I create a new ECR repository in my account and tag the local image to push it to ECR. To help me identify software vulnerabilities in my container images, I enable ECR image scanning.

$ aws ecr create-repository --repository-name random-letter --image-scanning-configuration scanOnPush=true
$ docker tag random-letter:latest 123412341234.dkr.ecr.sa-east-1.amazonaws.com/random-letter:latest
$ aws ecr get-login-password | docker login --username AWS --password-stdin 123412341234.dkr.ecr.sa-east-1.amazonaws.com
$ docker push 123412341234.dkr.ecr.sa-east-1.amazonaws.com/random-letter:latest

Here I am using the AWS Management Console to complete the creation of the function. You can also use the AWS Serverless Application Model, that has been updated to add support for container images.

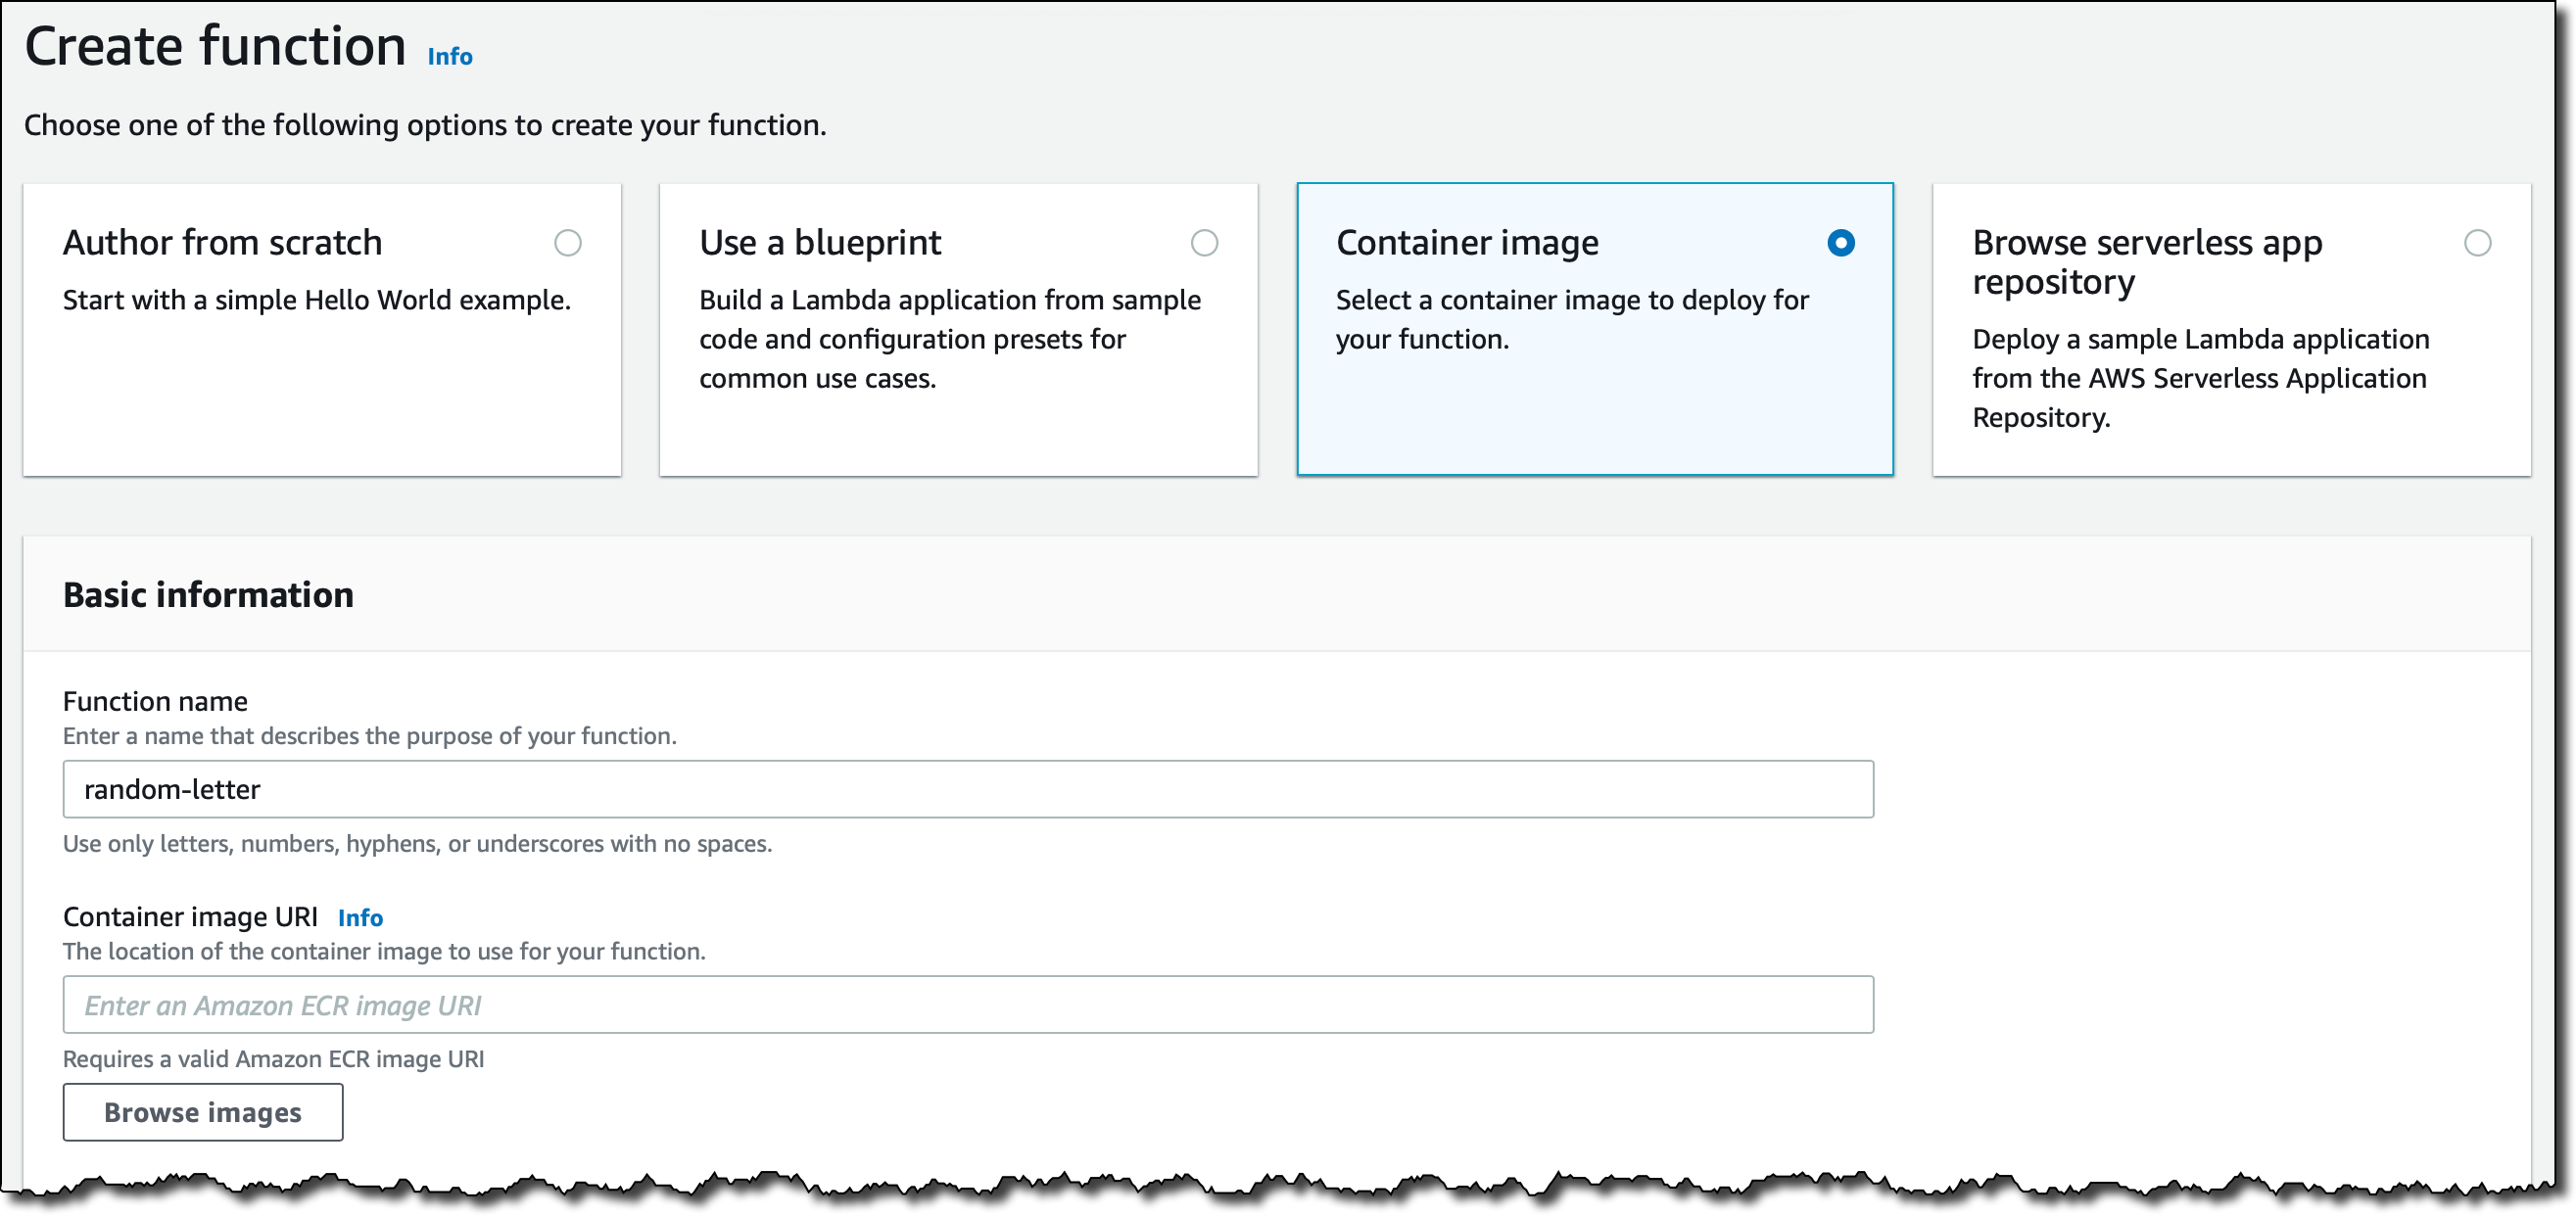
In the Lambda console, I click on Create function. I select Container image, give the function a name, and then Browse images to look for the right image in my ECR repositories.

Screenshot of the console.

After I select the repository, I use the latest image I uploaded. When I select the image, the Lambda is translating that to the underlying image digest (on the right of the tag in the image below). You can see the digest of your images locally with the docker images --digests command. In this way, the function is using the same image even if the latest tag is passed to a newer one, and you are protected from unintentional deployments. You can update the image to use in the function code. Updating the function configuration has no impact on the image used, even if the tag was reassigned to another image in the meantime.

Screenshot of the console.

Optionally, I can override some of the container image values. I am not doing this now, but in this way I can create images that can be used for different functions, for example by overriding the function handler in the CMD value.

Screenshot of the console.

I leave all other options to their default and select Create function.

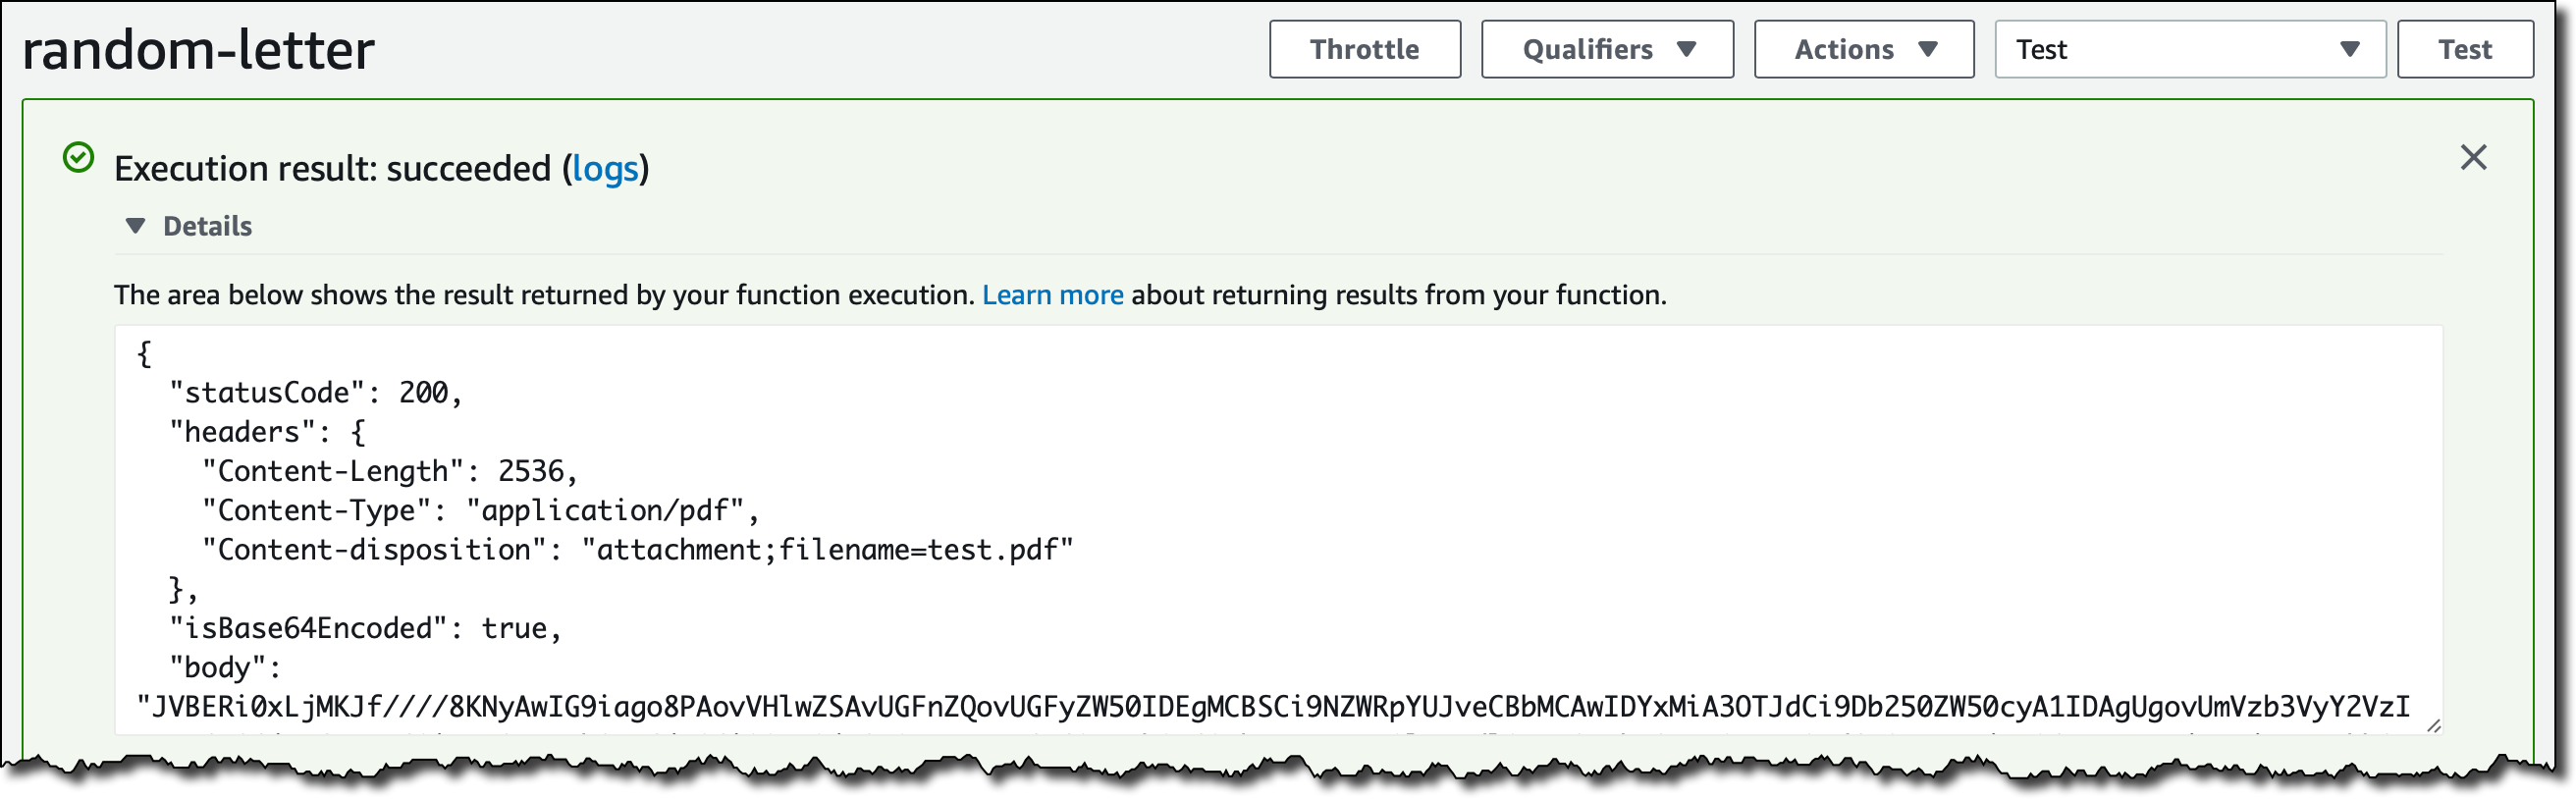
When creating or updating the code of a function, the Lambda platform optimizes new and updated container images to prepare them to receive invocations. This optimization takes a few seconds or minutes, depending on the size of the image. After that, the function is ready to be invoked. I test the function in the console.

Screenshot of the console.

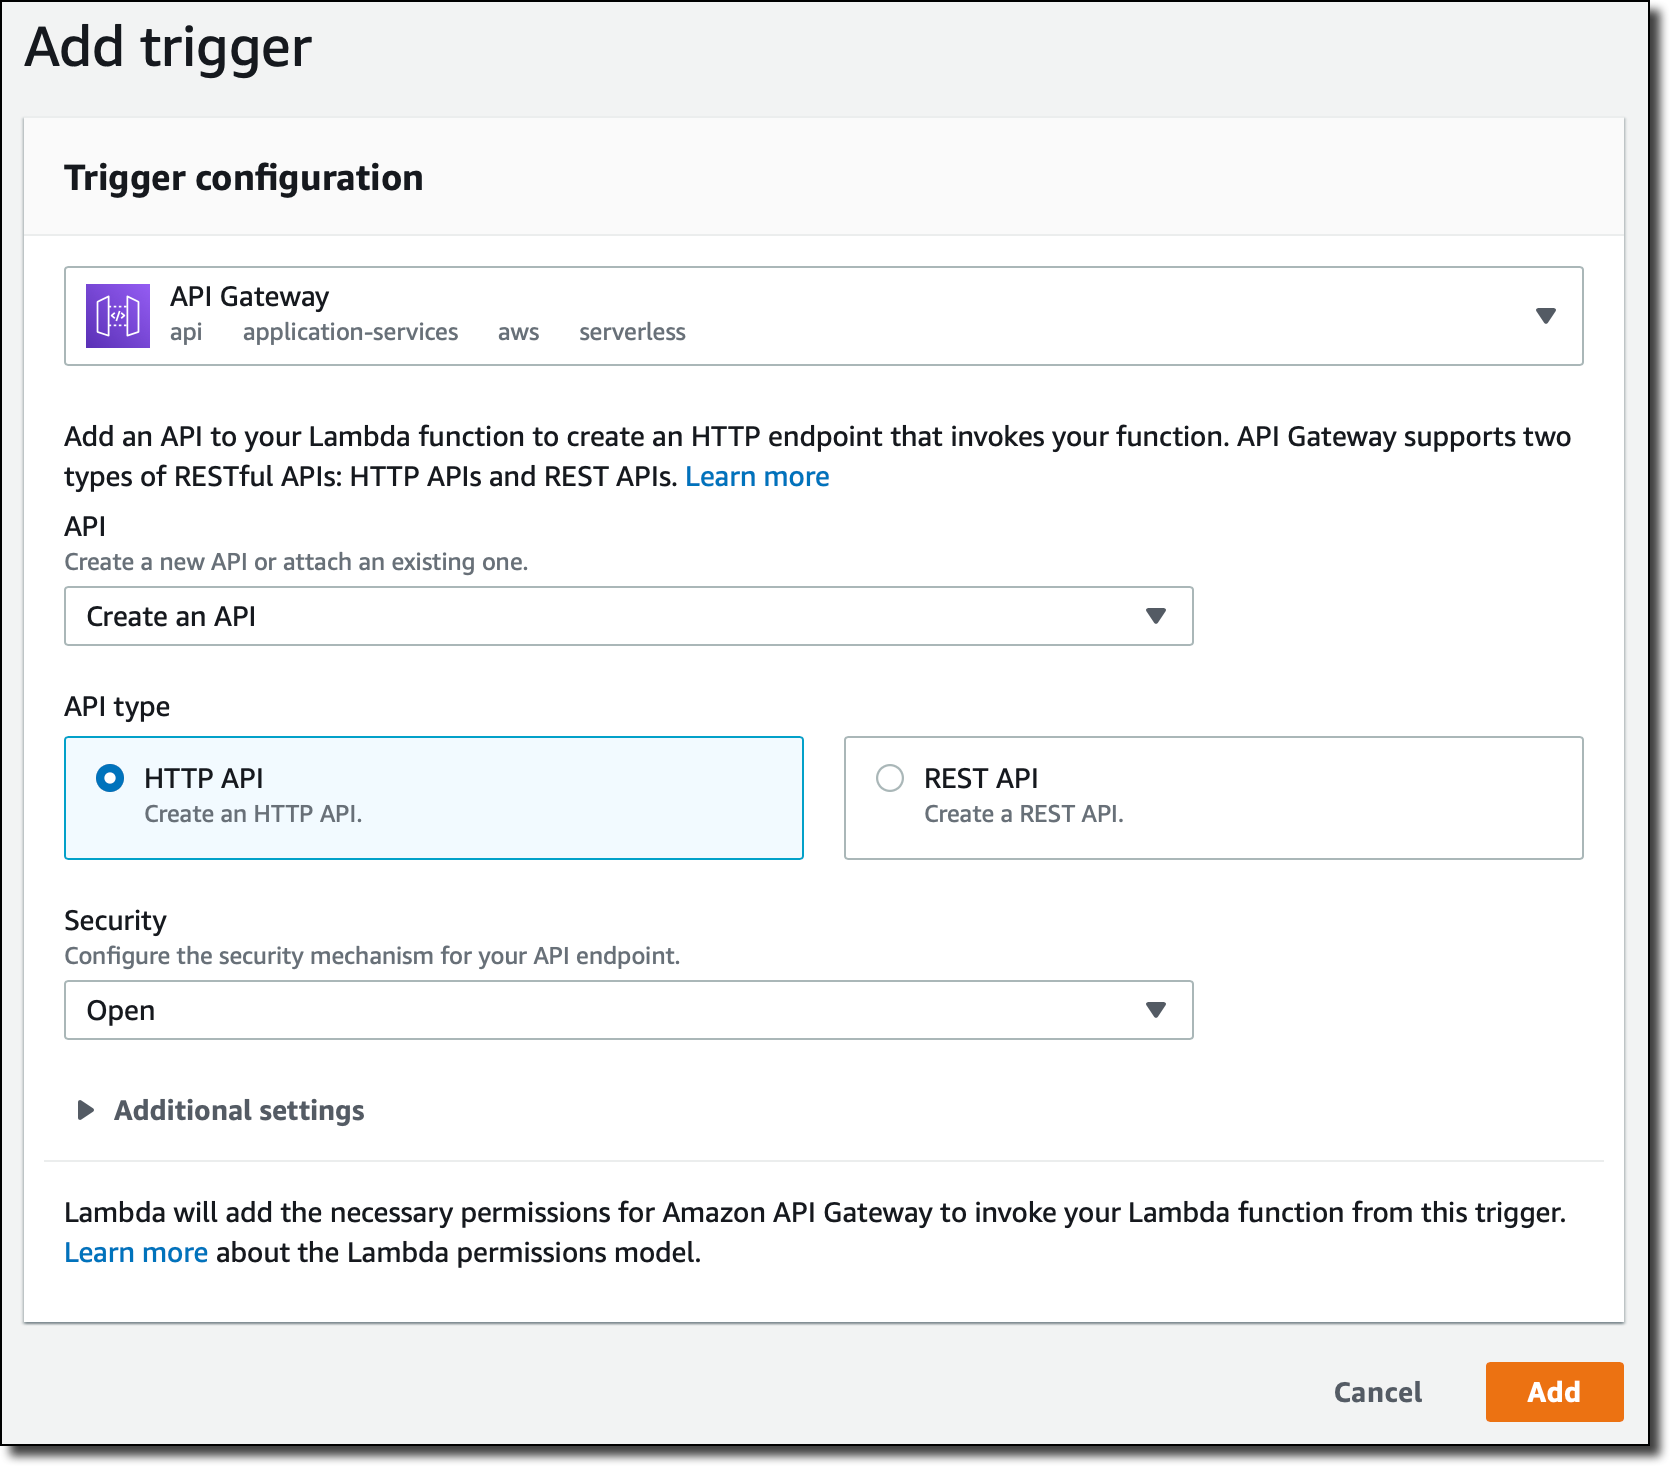
It’s working! Now let’s add the API Gateway as trigger. I select Add Trigger and add the API Gateway using an HTTP API. For simplicity, I leave the authentication of the API open.

Screenshot of the console.

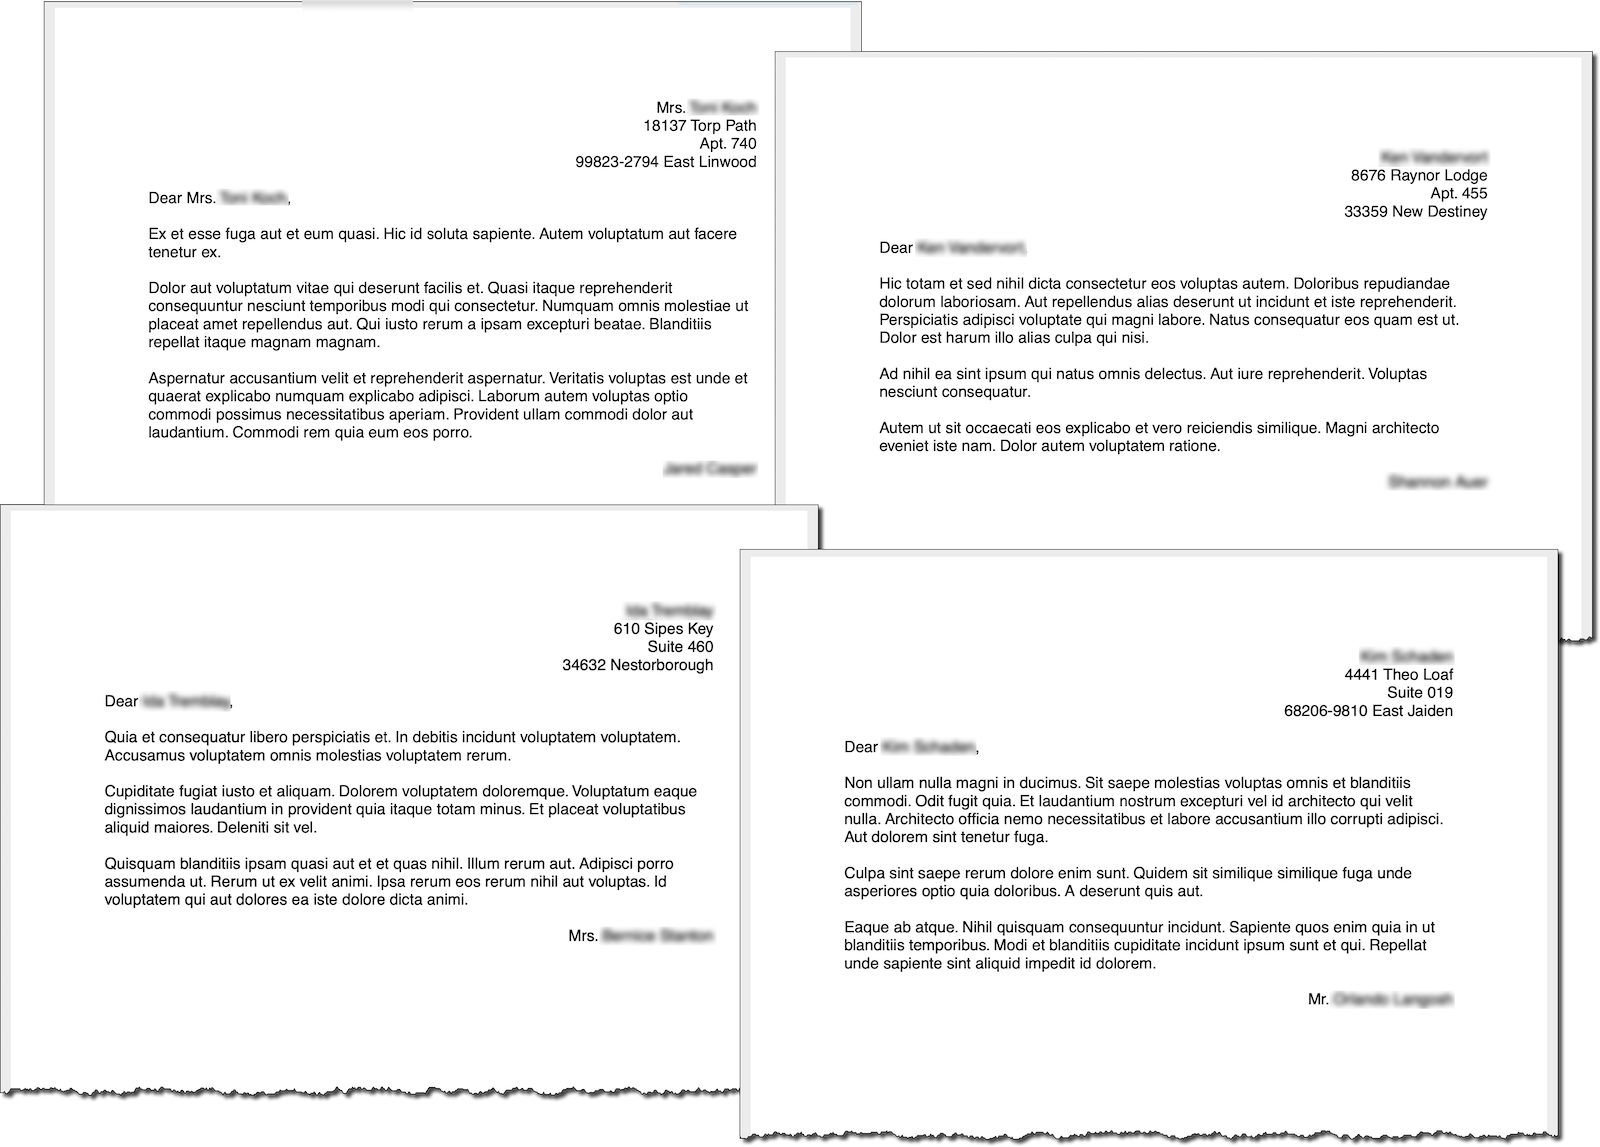
Now, I click on the API endpoint a few times and download a few random mails.

Screenshot of the console.

It works as expected! Here are a few of the PDF files that are generated with random data from the faker.js module.

Output of the sample application.


Building a Custom Image for Python
Sometimes you need to use your custom container images, for example to follow your company guidelines or to use a runtime version that we don’t support.

In this case, I want to build an image to use Python 3.9. The code (app.py) of my function is very simple, I just want to say hello and the version of Python that is being used.

import sys
def handler(event, context): 
    return 'Hello from AWS Lambda using Python' + sys.version + '!'

As I mentioned before, we are sharing with you open source implementations of the Lambda Runtime Interface Clients (which implement the Runtime API) for all the supported runtimes. In this case, I start with a Python image based on Alpine Linux. Then, I add the Lambda Runtime Interface Client for Python (link coming soon) to the image. Here’s the Dockerfile:

# Define global args
ARG FUNCTION_DIR="/home/app/"
ARG RUNTIME_VERSION="3.9"
ARG DISTRO_VERSION="3.12"

# Stage 1 - bundle base image + runtime
# Grab a fresh copy of the image and install GCC
FROM python:${RUNTIME_VERSION}-alpine${DISTRO_VERSION} AS python-alpine
# Install GCC (Alpine uses musl but we compile and link dependencies with GCC)
RUN apk add --no-cache \
    libstdc++

# Stage 2 - build function and dependencies
FROM python-alpine AS build-image
# Install aws-lambda-cpp build dependencies
RUN apk add --no-cache \
    build-base \
    libtool \
    autoconf \
    automake \
    libexecinfo-dev \
    make \
    cmake \
    libcurl
# Include global args in this stage of the build
ARG FUNCTION_DIR
ARG RUNTIME_VERSION
# Create function directory
RUN mkdir -p ${FUNCTION_DIR}
# Copy handler function
COPY app/* ${FUNCTION_DIR}
# Optional – Install the function's dependencies
# RUN python${RUNTIME_VERSION} -m pip install -r requirements.txt --target ${FUNCTION_DIR}
# Install Lambda Runtime Interface Client for Python
RUN python${RUNTIME_VERSION} -m pip install awslambdaric --target ${FUNCTION_DIR}

# Stage 3 - final runtime image
# Grab a fresh copy of the Python image
FROM python-alpine
# Include global arg in this stage of the build
ARG FUNCTION_DIR
# Set working directory to function root directory
WORKDIR ${FUNCTION_DIR}
# Copy in the built dependencies
COPY --from=build-image ${FUNCTION_DIR} ${FUNCTION_DIR}
# (Optional) Add Lambda Runtime Interface Emulator and use a script in the ENTRYPOINT for simpler local runs
COPY https://github.com/aws/aws-lambda-runtime-interface-emulator/releases/latest/download/aws-lambda-rie /usr/bin/aws-lambda-rie
RUN chmod 755 /usr/bin/aws-lambda-rie
COPY entry.sh /
ENTRYPOINT [ "/entry.sh" ]
CMD [ "app.handler" ]

The Dockerfile this time is more articulated, building the final image in three stages, following the Docker best practices of multi-stage builds. You can use this three-stage approach to build your own custom images:

  • Stage 1 is building the base image with the runtime, Python 3.9 in this case, plus GCC that we use to compile and link dependencies in stage 2.
  • Stage 2 is installing the Lambda Runtime Interface Client and building function and dependencies.
  • Stage 3 is creating the final image adding the output from stage 2 to the base image built in stage 1. Here I am also adding the Lambda Runtime Interface Emulator, but this is optional, see below.

I create the entry.sh script below to use it as ENTRYPOINT. It executes the Lambda Runtime Interface Client for Python. If the execution is local, the Runtime Interface Client is wrapped by the Lambda Runtime Interface Emulator.

#!/bin/sh
if [ -z "${AWS_LAMBDA_RUNTIME_API}" ]; then
    exec /usr/bin/aws-lambda-rie /usr/local/bin/python -m awslambdaric
else
    exec /usr/local/bin/python -m awslambdaric
fi

Now, I can use the Lambda Runtime Interface Emulator to check locally if the function and the container image are working correctly:

$ docker run -p 9000:8080 lambda/python:3.9-alpine3.12

Not Including the Lambda Runtime Interface Emulator in the Container Image
It’s optional to add the Lambda Runtime Interface Emulator to a custom container image. If I don’t include it, I can test locally by installing the Lambda Runtime Interface Emulator in my local machine following these steps:

  • In Stage 3 of the Dockerfile, I remove the commands copying the Lambda Runtime Interface Emulator (aws-lambda-rie) and the entry.sh script. I don’t need the entry.sh script in this case.
  • I use this ENTRYPOINT to start by default the Lambda Runtime Interface Client:
    ENTRYPOINT [ "/usr/local/bin/python", “-m”, “awslambdaric” ]
  • I run these commands to install the Lambda Runtime Interface Emulator in my local machine, for example under ~/.aws-lambda-rie:
mkdir -p ~/.aws-lambda-rie
curl -Lo ~/.aws-lambda-rie/aws-lambda-rie https://github.com/aws/aws-lambda-runtime-interface-emulator/releases/latest/download/aws-lambda-rie
chmod +x ~/.aws-lambda-rie/aws-lambda-rie

When the Lambda Runtime Interface Emulator is installed on my local machine, I can mount it when starting the container. The command to start the container locally now is (assuming the Lambda Runtime Interface Emulator is at ~/.aws-lambda-rie):

docker run -d -v ~/.aws-lambda-rie:/aws-lambda -p 9000:8080 \
       --entrypoint /aws-lambda/aws-lambda-rie lambda/python:3.9-alpine3.12
       /lambda-entrypoint.sh app.handler

Testing the Custom Image for Python
Either way, when the container is running locally, I can test a function invocation with cURL:

curl -XPOST "http://localhost:9000/2015-03-31/functions/function/invocations" -d '{}'

The output is what I am expecting!

"Hello from AWS Lambda using Python3.9.0 (default, Oct 22 2020, 05:03:39) \n[GCC 9.3.0]!"

I push the image to ECR and create the function as before. Here’s my test in the console:

Screenshot of the console.

My custom container image based on Alpine is running Python 3.9 on Lambda!

Available Now
You can use container images to deploy your Lambda functions today in US East (N. Virginia), US East (Ohio), US West (Oregon), Asia Pacific (Tokyo), Asia Pacific (Singapore), Europe (Ireland), Europe (Frankfurt), South America (São Paulo). We are working to add support in more Regions soon. The container image support is offered in addition to ZIP archives and we will continue to support the ZIP packaging format.

There are no additional costs to use this feature. You pay for the ECR repository and the usual Lambda pricing.

You can use container image support in AWS Lambda with the console, AWS Command Line Interface (CLI), AWS SDKs, AWS Serverless Application Model, and solutions from AWS Partners, including Aqua Security, Datadog, Epsagon, HashiCorp Terraform, Honeycomb, Lumigo, Pulumi, Stackery, Sumo Logic, and Thundra.

This new capability opens up new scenarios, simplifies the integration with your development pipeline, and makes it easier to use custom images and your favorite programming platforms to build serverless applications.

Learn more and start using container images with AWS Lambda.

Danilo

Preview: AWS Proton – Automated Management for Container and Serverless Deployments

Post Syndicated from Alex Casalboni original https://aws.amazon.com/blogs/aws/preview-aws-proton-automated-management-for-container-and-serverless-deployments/

Today, we are excited to announce the public preview of AWS Proton, a new service that helps you automate and manage infrastructure provisioning and code deployments for serverless and container-based applications.

Maintaining hundreds – or sometimes thousands – of microservices with constantly changing infrastructure resources and configurations is a challenging task for even the most capable teams.

AWS Proton enables infrastructure teams to define standard templates centrally and make them available for developers in their organization. This allows infrastructure teams to manage and update infrastructure without impacting developer productivity.

How AWS Proton Works
The process of defining a service template involves the definition of cloud resources, continuous integration and continuous delivery (CI/CD) pipelines, and observability tools. AWS Proton will integrate with commonly used CI/CD pipelines and observability tools such as CodePipeline and CloudWatch. It also provides curated templates that follow AWS best practices for common use cases such as web services running on AWS Fargate or stream processing apps built on AWS Lambda.

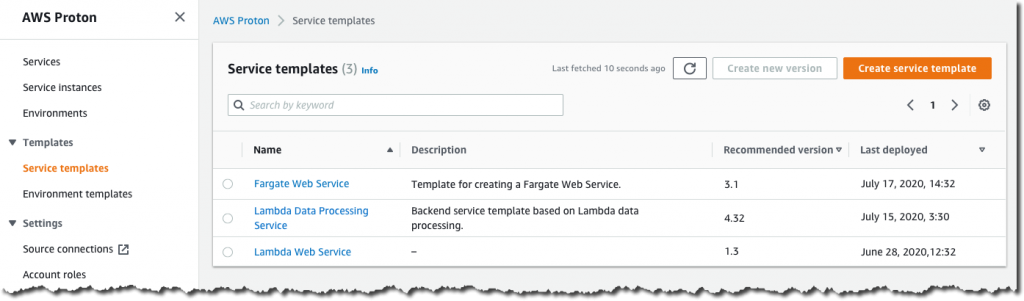
Infrastructure teams can visualize and manage the list of service templates in the AWS Management Console.

This is what the list of templates looks like.

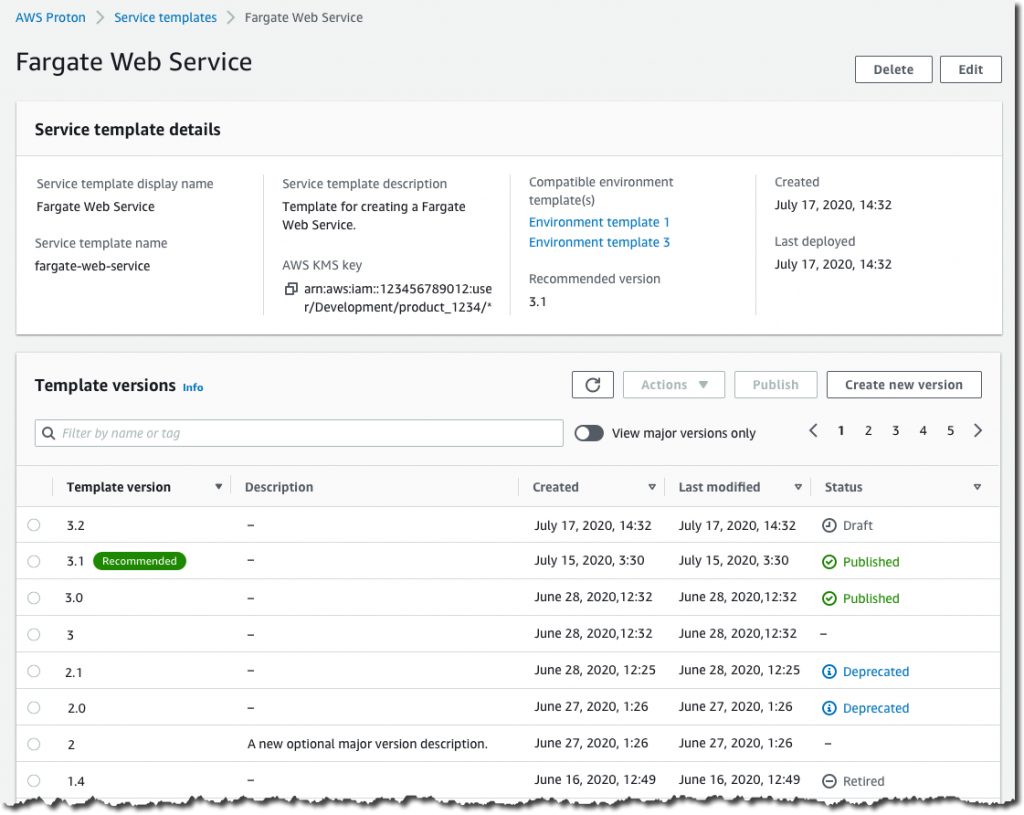
AWS Proton also collects information about the deployment status of the application such as the last date it was successfully deployed. When a template changes, AWS Proton identifies all the existing applications using the old version and allows infrastructure teams to upgrade them to the most recent definition, while monitoring application health during the upgrade so it can be rolled-back in case of issues.

This is what a service template looks like, with its versions and running instances.

Once service templates have been defined, developers can select and deploy services in a self-service fashion. AWS Proton will take care of provisioning cloud resources, deploying the code, and health monitoring, while providing visibility into the status of all the deployed applications and their pipelines.

This way, developers can focus on building and shipping application code for serverless and container-based applications without having to learn, configure, and maintain the underlying resources.

This is what the list of deployed services looks like.

Available in Preview
AWS Proton is now available in preview in US East (N. Virginia), US East (Ohio), US West (Oregon), Asia Pacific (Tokyo), and Europe (Ireland); it’s free of charge, as you only pay for the underlying services and resources. Check out the technical documentation.

You can get started using the AWS Management Console here.

Alex

Amazon Elastic Container Registry Public: A New Public Container Registry

Post Syndicated from Martin Beeby original https://aws.amazon.com/blogs/aws/amazon-ecr-public-a-new-public-container-registry/

In November, we announced that we intended to create a public container registry, and today at AWS re:Invent, we followed through on that promise and launched Amazon Elastic Container Registry Public (ECR Public).

ECR Public allows you to store, manage, share, and deploy container images for anyone to discover and download globally. You have long been able to host private container images on AWS with Amazon Elastic Container Registry, and now with the release of ECR Public, you can host public ones too, enabling anyone (with or without an AWS account) to browse and pull your published container artifacts.

As part of the announcement, a new website allows you to browse and search for public container images, view developer provided details, and discover the commands you need to pull containers.

If you check the website out now, you will see we have hosted some of our container images on the registry, including including the Amazon EKS Distro images. We also have hundreds of images from partners such as Bitnami, Canonical and HashiCorp.

Publishing A Container
Before I can upload a container, I need to create a repository. There is now a Public tab in the Repositories section of the Elastic Container Registry console. In this tab, I click the button Create repository.

I am taken to the Create repository screen, where I select that I would like the repository to be public.

I give my repository the name news-blog and upload a logo that will be used on the gallery details page. I provide a description and select Linux as the Content type, There is also an option to select the CPU architectures that the image supports, if you have a multi-architecture image you can select more than one architecture type. The content types are used for filtering on the gallery website, this will enable people using the gallery to filter their searches by architecture and operating system support.

I enter some markdown in the About section. The text I enter here will be displayed on the gallery page and would ordinarily explain what’s included in the repository, any licensing details, or other relevant information. There is also a Usage section where I enter some sample text to explain how to use my image and that I created the repository for a demo. Finally, I click Create repository.

Back at the repository page, I now have one public repository. There is also a button that says View push commands. I click on this so I can learn more about how to push containers to the repository.

I follow the four steps contained in this section. The first step helps me authenticate with ECR Public so that I can push containers to my repository. Steps two, three, and four show me how to build, tag, and push my container to ECR Public.

The application that I have containerized is a simple app that runs and outputs a terminal message. I use the docker CLI to push my container to my repository, it’s quite a small container, so it only takes a minute or two.

Once complete, I head over to the ECR Public gallery and can see that my image is now publicly available for anyone to pull.

Pulling A Container
You pull containers from ECR Public using the familiar docker pull command with the URL of the image.

You can easily find this URL on the ECR Public website, where the image URL is displayed along with other published information. Clicking on the URL copies the image URL to your clipboard for an easy copy-paste.

ECR Public image URLs are in the format public.ecr.aws/<namespace>/<image>:<tag>

For example, if I wanted to pull the image I uploaded earlier, I would open my terminal and run the following command (please note: you will need docker installed locally to run these commands).

docker pull public.ecr.aws/r6g9m2o3/news-blog:latest

I have now download the Docker Image onto my machine, and I can run the container using the following command:

docker run public.ecr.aws/r6g9m2o3/news-blog:latest

My application runs and writes a message from Jeff Barr. If you are wondering about the switches and parameters I have used on my docker run command, it’s to make sure that the log is written in color because we wouldn’t want to miss out on Jeff’s glorious purple hair.

Nice to Know
ECR Public automatically replicates container images across two AWS Regions to reduce download times and improve availability. Therefore, using public images directly from ECR Public may simplify your build process if you were previously creating and managing local copies. ECR Public caches image layers in Amazon CloudFront, to improve pull performance for a global audience, especially for popular images.

ECR Public also has some nice integrations that will make working with containers easier on AWS. For example, ECR Public will automatically notify services such as AWS CodeBuild to rebuild an application when a public container image changes.

Pricing
All AWS customers will get 50 GB of free storage each month, and if you exceed that limit, you will pay nominal charges. Check out the pricing page for details.

Anyone who pulls images anonymously will get 500 GB of free data bandwidth each month, after which they can sign up or sign in to an AWS account to get more. Simply authenticating with an AWS account increases free data bandwidth up to 5 TB each month when pulling images from the internet.

Finally, workloads running in AWS will get unlimited data bandwidth from any region when pulling publicly shared images from ECR Public.

Verification and Namespaces
You can create a custom namespace such as your organization or project name to be used in a ECR Public URL subdomain unless it’s a reserved namespace. Namespaces such as sagemaker and eks that identify AWS services are reserved. Namespaces that identify AWS Marketplace sellers are also reserved.

Available Today
ECR Public is available today and you can find out more over on the product page. Visit the gallery to explore and use available public container software and log into the ECR Console to share containers publicly.

Happy Containerizing!

— Martin

Automate thousands of mainframe tests on AWS with the Micro Focus Enterprise Suite

Post Syndicated from Kevin Yung original https://aws.amazon.com/blogs/devops/automate-mainframe-tests-on-aws-with-micro-focus/

Micro Focus – AWS Advanced Technology Parnter, they are a global infrastructure software company with 40 years of experience in delivering and supporting enterprise software.

We have seen mainframe customers often encounter scalability constraints, and they can’t support their development and test workforce to the scale required to support business requirements. These constraints can lead to delays, reduce product or feature releases, and make them unable to respond to market requirements. Furthermore, limits in capacity and scale often affect the quality of changes deployed, and are linked to unplanned or unexpected downtime in products or services.

The conventional approach to address these constraints is to scale up, meaning to increase MIPS/MSU capacity of the mainframe hardware available for development and testing. The cost of this approach, however, is excessively high, and to ensure time to market, you may reject this approach at the expense of quality and functionality. If you’re wrestling with these challenges, this post is written specifically for you.

To accompany this post, we developed an AWS prescriptive guidance (APG) pattern for developer instances and CI/CD pipelines: Mainframe Modernization: DevOps on AWS with Micro Focus.

Overview of solution

In the APG, we introduce DevOps automation and AWS CI/CD architecture to support mainframe application development. Our solution enables you to embrace both Test Driven Development (TDD) and Behavior Driven Development (BDD). Mainframe developers and testers can automate the tests in CI/CD pipelines so they’re repeatable and scalable. To speed up automated mainframe application tests, the solution uses team pipelines to run functional and integration tests frequently, and uses systems test pipelines to run comprehensive regression tests on demand. For more information about the pipelines, see Mainframe Modernization: DevOps on AWS with Micro Focus.

In this post, we focus on how to automate and scale mainframe application tests in AWS. We show you how to use AWS services and Micro Focus products to automate mainframe application tests with best practices. The solution can scale your mainframe application CI/CD pipeline to run thousands of tests in AWS within minutes, and you only pay a fraction of your current on-premises cost.

The following diagram illustrates the solution architecture.

Mainframe DevOps On AWS Architecture Overview, on the left is the conventional mainframe development environment, on the left is the CI/CD pipelines for mainframe tests in AWS

Figure: Mainframe DevOps On AWS Architecture Overview


Best practices

Before we get into the details of the solution, let’s recap the following mainframe application testing best practices:

  • Create a “test first” culture by writing tests for mainframe application code changes
  • Automate preparing and running tests in the CI/CD pipelines
  • Provide fast and quality feedback to project management throughout the SDLC
  • Assess and increase test coverage
  • Scale your test’s capacity and speed in line with your project schedule and requirements

Automated smoke test

In this architecture, mainframe developers can automate running functional smoke tests for new changes. This testing phase typically “smokes out” regression of core and critical business functions. You can achieve these tests using tools such as py3270 with x3270 or Robot Framework Mainframe 3270 Library.

The following code shows a feature test written in Behave and test step using py3270:

# home_loan_calculator.feature
Feature: calculate home loan monthly repayment
  the bankdemo application provides a monthly home loan repayment caculator 
  User need to input into transaction of home loan amount, interest rate and how many years of the loan maturity.
  User will be provided an output of home loan monthly repayment amount

  Scenario Outline: As a customer I want to calculate my monthly home loan repayment via a transaction
      Given home loan amount is <amount>, interest rate is <interest rate> and maturity date is <maturity date in months> months 
       When the transaction is submitted to the home loan calculator
       Then it shall show the monthly repayment of <monthly repayment>

    Examples: Homeloan
      | amount  | interest rate | maturity date in months | monthly repayment |
      | 1000000 | 3.29          | 300                     | $4894.31          |


# home_loan_calculator_steps.py
import sys, os
from py3270 import Emulator
from behave import *

@given("home loan amount is {amount}, interest rate is {rate} and maturity date is {maturity_date} months")
def step_impl(context, amount, rate, maturity_date):
    context.home_loan_amount = amount
    context.interest_rate = rate
    context.maturity_date_in_months = maturity_date

@when("the transaction is submitted to the home loan calculator")
def step_impl(context):
    # Setup connection parameters
    tn3270_host = os.getenv('TN3270_HOST')
    tn3270_port = os.getenv('TN3270_PORT')
	# Setup TN3270 connection
    em = Emulator(visible=False, timeout=120)
    em.connect(tn3270_host + ':' + tn3270_port)
    em.wait_for_field()
	# Screen login
    em.fill_field(10, 44, 'b0001', 5)
    em.send_enter()
	# Input screen fields for home loan calculator
    em.wait_for_field()
    em.fill_field(8, 46, context.home_loan_amount, 7)
    em.fill_field(10, 46, context.interest_rate, 7)
    em.fill_field(12, 46, context.maturity_date_in_months, 7)
    em.send_enter()
    em.wait_for_field()    

    # collect monthly replayment output from screen
    context.monthly_repayment = em.string_get(14, 46, 9)
    em.terminate()

@then("it shall show the monthly repayment of {amount}")
def step_impl(context, amount):
    print("expected amount is " + amount.strip() + ", and the result from screen is " + context.monthly_repayment.strip())
assert amount.strip() == context.monthly_repayment.strip()

To run this functional test in Micro Focus Enterprise Test Server (ETS), we use AWS CodeBuild.

We first need to build an Enterprise Test Server Docker image and push it to an Amazon Elastic Container Registry (Amazon ECR) registry. For instructions, see Using Enterprise Test Server with Docker.

Next, we create a CodeBuild project and uses the Enterprise Test Server Docker image in its configuration.

The following is an example AWS CloudFormation code snippet of a CodeBuild project that uses Windows Container and Enterprise Test Server:

  BddTestBankDemoStage:
    Type: AWS::CodeBuild::Project
    Properties:
      Name: !Sub '${AWS::StackName}BddTestBankDemo'
      LogsConfig:
        CloudWatchLogs:
          Status: ENABLED
      Artifacts:
        Type: CODEPIPELINE
        EncryptionDisabled: true
      Environment:
        ComputeType: BUILD_GENERAL1_LARGE
        Image: !Sub "${EnterpriseTestServerDockerImage}:latest"
        ImagePullCredentialsType: SERVICE_ROLE
        Type: WINDOWS_SERVER_2019_CONTAINER
      ServiceRole: !Ref CodeBuildRole
      Source:
        Type: CODEPIPELINE
        BuildSpec: bdd-test-bankdemo-buildspec.yaml

In the CodeBuild project, we need to create a buildspec to orchestrate the commands for preparing the Micro Focus Enterprise Test Server CICS environment and issue the test command. In the buildspec, we define the location for CodeBuild to look for test reports and upload them into the CodeBuild report group. The following buildspec code uses custom scripts DeployES.ps1 and StartAndWait.ps1 to start your CICS region, and runs Python Behave BDD tests:

version: 0.2
phases:
  build:
    commands:
      - |
        # Run Command to start Enterprise Test Server
        CD C:\
        .\DeployES.ps1
        .\StartAndWait.ps1

        py -m pip install behave

        Write-Host "waiting for server to be ready ..."
        do {
          Write-Host "..."
          sleep 3  
        } until(Test-NetConnection 127.0.0.1 -Port 9270 | ? { $_.TcpTestSucceeded } )

        CD C:\tests\features
        MD C:\tests\reports
        $Env:Path += ";c:\wc3270"

        $address=(Get-NetIPAddress -AddressFamily Ipv4 | where { $_.IPAddress -Match "172\.*" })
        $Env:TN3270_HOST = $address.IPAddress
        $Env:TN3270_PORT = "9270"
        
        behave.exe --color --junit --junit-directory C:\tests\reports
reports:
  bankdemo-bdd-test-report:
    files: 
      - '**/*'
    base-directory: "C:\\tests\\reports"

In the smoke test, the team may run both unit tests and functional tests. Ideally, these tests are better to run in parallel to speed up the pipeline. In AWS CodePipeline, we can set up a stage to run multiple steps in parallel. In our example, the pipeline runs both BDD tests and Robot Framework (RPA) tests.

The following CloudFormation code snippet runs two different tests. You use the same RunOrder value to indicate the actions run in parallel.

#...
        - Name: Tests
          Actions:
            - Name: RunBDDTest
              ActionTypeId:
                Category: Build
                Owner: AWS
                Provider: CodeBuild
                Version: 1
              Configuration:
                ProjectName: !Ref BddTestBankDemoStage
                PrimarySource: Config
              InputArtifacts:
                - Name: DemoBin
                - Name: Config
              RunOrder: 1
            - Name: RunRbTest
              ActionTypeId:
                Category: Build
                Owner: AWS
                Provider: CodeBuild
                Version: 1
              Configuration:
                ProjectName : !Ref RpaTestBankDemoStage
                PrimarySource: Config
              InputArtifacts:
                - Name: DemoBin
                - Name: Config
              RunOrder: 1  
#...

The following screenshot shows the example actions on the CodePipeline console that use the preceding code.

Screenshot of CodePipeine parallel execution tests using a same run order value

Figure – Screenshot of CodePipeine parallel execution tests

Both DBB and RPA tests produce jUnit format reports, which CodeBuild can ingest and show on the CodeBuild console. This is a great way for project management and business users to track the quality trend of an application. The following screenshot shows the CodeBuild report generated from the BDD tests.

CodeBuild report generated from the BDD tests showing 100% pass rate

Figure – CodeBuild report generated from the BDD tests

Automated regression tests

After you test the changes in the project team pipeline, you can automatically promote them to another stream with other team members’ changes for further testing. The scope of this testing stream is significantly more comprehensive, with a greater number and wider range of tests and higher volume of test data. The changes promoted to this stream by each team member are tested in this environment at the end of each day throughout the life of the project. This provides a high-quality delivery to production, with new code and changes to existing code tested together with hundreds or thousands of tests.

In enterprise architecture, it’s commonplace to see an application client consuming web services APIs exposed from a mainframe CICS application. One approach to do regression tests for mainframe applications is to use Micro Focus Verastream Host Integrator (VHI) to record and capture 3270 data stream processing and encapsulate these 3270 data streams as business functions, which in turn are packaged as web services. When these web services are available, they can be consumed by a test automation product, which in our environment is Micro Focus UFT One. This uses the Verastream server as the orchestration engine that translates the web service requests into 3270 data streams that integrate with the mainframe CICS application. The application is deployed in Micro Focus Enterprise Test Server.

The following diagram shows the end-to-end testing components.

Regression Test the end-to-end testing components using ECS Container for Exterprise Test Server, Verastream Host Integrator and UFT One Container, all integration points are using Elastic Network Load Balancer

Figure – Regression Test Infrastructure end-to-end Setup

To ensure we have the coverage required for large mainframe applications, we sometimes need to run thousands of tests against very large production volumes of test data. We want the tests to run faster and complete as soon as possible so we reduce AWS costs—we only pay for the infrastructure when consuming resources for the life of the test environment when provisioning and running tests.

Therefore, the design of the test environment needs to scale out. The batch feature in CodeBuild allows you to run tests in batches and in parallel rather than serially. Furthermore, our solution needs to minimize interference between batches, a failure in one batch doesn’t affect another running in parallel. The following diagram depicts the high-level design, with each batch build running in its own independent infrastructure. Each infrastructure is launched as part of test preparation, and then torn down in the post-test phase.

Regression Tests in CodeBuoild Project setup to use batch mode, three batches running in independent infrastructure with containers

Figure – Regression Tests in CodeBuoild Project setup to use batch mode

Building and deploying regression test components

Following the design of the parallel regression test environment, let’s look at how we build each component and how they are deployed. The followings steps to build our regression tests use a working backward approach, starting from deployment in the Enterprise Test Server:

  1. Create a batch build in CodeBuild.
  2. Deploy to Enterprise Test Server.
  3. Deploy the VHI model.
  4. Deploy UFT One Tests.
  5. Integrate UFT One into CodeBuild and CodePipeline and test the application.

Creating a batch build in CodeBuild

We update two components to enable a batch build. First, in the CodePipeline CloudFormation resource, we set BatchEnabled to be true for the test stage. The UFT One test preparation stage uses the CloudFormation template to create the test infrastructure. The following code is an example of the AWS CloudFormation snippet with batch build enabled:

#...
        - Name: SystemsTest
          Actions:
            - Name: Uft-Tests
              ActionTypeId:
                Category: Build
                Owner: AWS
                Provider: CodeBuild
                Version: 1
              Configuration:
                ProjectName : !Ref UftTestBankDemoProject
                PrimarySource: Config
                BatchEnabled: true
                CombineArtifacts: true
              InputArtifacts:
                - Name: Config
                - Name: DemoSrc
              OutputArtifacts:
                - Name: TestReport                
              RunOrder: 1
#...

Second, in the buildspec configuration of the test stage, we provide a build matrix setting. We use the custom environment variable TEST_BATCH_NUMBER to indicate which set of tests runs in each batch. See the following code:

version: 0.2
batch:
  fast-fail: true
  build-matrix:
    static:
      ignore-failure: false
    dynamic:
      env:
        variables:
          TEST_BATCH_NUMBER:
            - 1
            - 2
            - 3 
phases:
  pre_build:
commands:
#...

After setting up the batch build, CodeBuild creates multiple batches when the build starts. The following screenshot shows the batches on the CodeBuild console.

Regression tests Codebuild project ran in batch mode, three batches ran in prallel successfully

Figure – Regression tests Codebuild project ran in batch mode

Deploying to Enterprise Test Server

ETS is the transaction engine that processes all the online (and batch) requests that are initiated through external clients, such as 3270 terminals, web services, and websphere MQ. This engine provides support for various mainframe subsystems, such as CICS, IMS TM and JES, as well as code-level support for COBOL and PL/I. The following screenshot shows the Enterprise Test Server administration page.

Enterprise Server Administrator window showing configuration for CICS

Figure – Enterprise Server Administrator window

In this mainframe application testing use case, the regression tests are CICS transactions, initiated from 3270 requests (encapsulated in a web service). For more information about Enterprise Test Server, see the Enterprise Test Server and Micro Focus websites.

In the regression pipeline, after the stage of mainframe artifact compiling, we bake in the artifact into an ETS Docker container and upload the image to an Amazon ECR repository. This way, we have an immutable artifact for all the tests.

During each batch’s test preparation stage, a CloudFormation stack is deployed to create an Amazon ECS service on Windows EC2. The stack uses a Network Load Balancer as an integration point for the VHI’s integration.

The following code is an example of the CloudFormation snippet to create an Amazon ECS service using an Enterprise Test Server Docker image:

#...
  EtsService:
    DependsOn:
    - EtsTaskDefinition
    - EtsContainerSecurityGroup
    - EtsLoadBalancerListener
    Properties:
      Cluster: !Ref 'WindowsEcsClusterArn'
      DesiredCount: 1
      LoadBalancers:
        -
          ContainerName: !Sub "ets-${AWS::StackName}"
          ContainerPort: 9270
          TargetGroupArn: !Ref EtsPort9270TargetGroup
      HealthCheckGracePeriodSeconds: 300          
      TaskDefinition: !Ref 'EtsTaskDefinition'
    Type: "AWS::ECS::Service"

  EtsTaskDefinition:
    Properties:
      ContainerDefinitions:
        -
          Image: !Sub "${AWS::AccountId}.dkr.ecr.us-east-1.amazonaws.com/systems-test/ets:latest"
          LogConfiguration:
            LogDriver: awslogs
            Options:
              awslogs-group: !Ref 'SystemsTestLogGroup'
              awslogs-region: !Ref 'AWS::Region'
              awslogs-stream-prefix: ets
          Name: !Sub "ets-${AWS::StackName}"
          cpu: 4096
          memory: 8192
          PortMappings:
            -
              ContainerPort: 9270
          EntryPoint:
          - "powershell.exe"
          Command: 
          - '-F'
          - .\StartAndWait.ps1
          - 'bankdemo'
          - C:\bankdemo\
          - 'wait'
      Family: systems-test-ets
    Type: "AWS::ECS::TaskDefinition"
#...

Deploying the VHI model

In this architecture, the VHI is a bridge between mainframe and clients.

We use the VHI designer to capture the 3270 data streams and encapsulate the relevant data streams into a business function. We can then deliver this function as a web service that can be consumed by a test management solution, such as Micro Focus UFT One.

The following screenshot shows the setup for getCheckingDetails in VHI. Along with this procedure we can also see other procedures (eg calcCostLoan) defined that get generated as a web service. The properties associated with this procedure are available on this screen to allow for the defining of the mapping of the fields between the associated 3270 screens and exposed web service.

example of VHI designer to capture the 3270 data streams and encapsulate the relevant data streams into a business function getCheckingDetails

Figure – Setup for getCheckingDetails in VHI

The following screenshot shows the editor for this procedure and is initiated by the selection of the Procedure Editor. This screen presents the 3270 screens that are involved in the business function that will be generated as a web service.

VHI designer Procedure Editor shows the procedure

Figure – VHI designer Procedure Editor shows the procedure

After you define the required functional web services in VHI designer, the resultant model is saved and deployed into a VHI Docker image. We use this image and the associated model (from VHI designer) in the pipeline outlined in this post.

For more information about VHI, see the VHI website.

The pipeline contains two steps to deploy a VHI service. First, it installs and sets up the VHI models into a VHI Docker image, and it’s pushed into Amazon ECR. Second, a CloudFormation stack is deployed to create an Amazon ECS Fargate service, which uses the latest built Docker image. In AWS CloudFormation, the VHI ECS task definition defines an environment variable for the ETS Network Load Balancer’s DNS name. Therefore, the VHI can bootstrap and point to an ETS service. In the VHI stack, it uses a Network Load Balancer as an integration point for UFT One test integration.

The following code is an example of a ECS Task Definition CloudFormation snippet that creates a VHI service in Amazon ECS Fargate and integrates it with an ETS server:

#...
  VhiTaskDefinition:
    DependsOn:
    - EtsService
    Type: AWS::ECS::TaskDefinition
    Properties:
      Family: systems-test-vhi
      NetworkMode: awsvpc
      RequiresCompatibilities:
        - FARGATE
      ExecutionRoleArn: !Ref FargateEcsTaskExecutionRoleArn
      Cpu: 2048
      Memory: 4096
      ContainerDefinitions:
        - Cpu: 2048
          Name: !Sub "vhi-${AWS::StackName}"
          Memory: 4096
          Environment:
            - Name: esHostName 
              Value: !GetAtt EtsInternalLoadBalancer.DNSName
            - Name: esPort
              Value: 9270
          Image: !Ref "${AWS::AccountId}.dkr.ecr.us-east-1.amazonaws.com/systems-test/vhi:latest"
          PortMappings:
            - ContainerPort: 9680
          LogConfiguration:
            LogDriver: awslogs
            Options:
              awslogs-group: !Ref 'SystemsTestLogGroup'
              awslogs-region: !Ref 'AWS::Region'
              awslogs-stream-prefix: vhi

#...

Deploying UFT One Tests

UFT One is a test client that uses each of the web services created by the VHI designer to orchestrate running each of the associated business functions. Parameter data is supplied to each function, and validations are configured against the data returned. Multiple test suites are configured with different business functions with the associated data.

The following screenshot shows the test suite API_Bankdemo3, which is used in this regression test process.

the screenshot shows the test suite API_Bankdemo3 in UFT One test setup console, the API setup for getCheckingDetails

Figure – API_Bankdemo3 in UFT One Test Editor Console

For more information, see the UFT One website.

Integrating UFT One and testing the application

The last step is to integrate UFT One into CodeBuild and CodePipeline to test our mainframe application. First, we set up CodeBuild to use a UFT One container. The Docker image is available in Docker Hub. Then we author our buildspec. The buildspec has the following three phrases:

  • Setting up a UFT One license and deploying the test infrastructure
  • Starting the UFT One test suite to run regression tests
  • Tearing down the test infrastructure after tests are complete

The following code is an example of a buildspec snippet in the pre_build stage. The snippet shows the command to activate the UFT One license:

version: 0.2
batch: 
# . . .
phases:
  pre_build:
    commands:
      - |
        # Activate License
        $process = Start-Process -NoNewWindow -RedirectStandardOutput LicenseInstall.log -Wait -File 'C:\Program Files (x86)\Micro Focus\Unified Functional Testing\bin\HP.UFT.LicenseInstall.exe' -ArgumentList @('concurrent', 10600, 1, ${env:AUTOPASS_LICENSE_SERVER})        
        Get-Content -Path LicenseInstall.log
        if (Select-String -Path LicenseInstall.log -Pattern 'The installation was successful.' -Quiet) {
          Write-Host 'Licensed Successfully'
        } else {
          Write-Host 'License Failed'
          exit 1
        }
#...

The following command in the buildspec deploys the test infrastructure using the AWS Command Line Interface (AWS CLI)

aws cloudformation deploy --stack-name $stack_name `
--template-file cicd-pipeline/systems-test-pipeline/systems-test-service.yaml `
--parameter-overrides EcsCluster=$cluster_arn `
--capabilities CAPABILITY_IAM

Because ETS and VHI are both deployed with a load balancer, the build detects when the load balancers become healthy before starting the tests. The following AWS CLI commands detect the load balancer’s target group health:

$vhi_health_state = (aws elbv2 describe-target-health --target-group-arn $vhi_target_group_arn --query 'TargetHealthDescriptions[0].TargetHealth.State' --output text)
$ets_health_state = (aws elbv2 describe-target-health --target-group-arn $ets_target_group_arn --query 'TargetHealthDescriptions[0].TargetHealth.State' --output text)          

When the targets are healthy, the build moves into the build stage, and it uses the UFT One command line to start the tests. See the following code:

$process = Start-Process -Wait  -NoNewWindow -RedirectStandardOutput UFTBatchRunnerCMD.log `
-FilePath "C:\Program Files (x86)\Micro Focus\Unified Functional Testing\bin\UFTBatchRunnerCMD.exe" `
-ArgumentList @("-source", "${env:CODEBUILD_SRC_DIR_DemoSrc}\bankdemo\tests\API_Bankdemo\API_Bankdemo${env:TEST_BATCH_NUMBER}")

The next release of Micro Focus UFT One (November or December 2020) will provide an exit status to indicate a test’s success or failure.

When the tests are complete, the post_build stage tears down the test infrastructure. The following AWS CLI command tears down the CloudFormation stack:


#...
	post_build:
	  finally:
	  	- |
		  Write-Host "Clean up ETS, VHI Stack"
		  #...
		  aws cloudformation delete-stack --stack-name $stack_name
          aws cloudformation wait stack-delete-complete --stack-name $stack_name

At the end of the build, the buildspec is set up to upload UFT One test reports as an artifact into Amazon Simple Storage Service (Amazon S3). The following screenshot is the example of a test report in HTML format generated by UFT One in CodeBuild and CodePipeline.

UFT One HTML report shows regression testresult and test detals

Figure – UFT One HTML report

A new release of Micro Focus UFT One will provide test report formats supported by CodeBuild test report groups.

Conclusion

In this post, we introduced the solution to use Micro Focus Enterprise Suite, Micro Focus UFT One, Micro Focus VHI, AWS developer tools, and Amazon ECS containers to automate provisioning and running mainframe application tests in AWS at scale.

The on-demand model allows you to create the same test capacity infrastructure in minutes at a fraction of your current on-premises mainframe cost. It also significantly increases your testing and delivery capacity to increase quality and reduce production downtime.

A demo of the solution is available in AWS Partner Micro Focus website AWS Mainframe CI/CD Enterprise Solution. If you’re interested in modernizing your mainframe applications, please visit Micro Focus and contact AWS mainframe business development at [email protected].

References

Micro Focus


Peter Woods

Peter Woods

Peter has been with Micro Focus for almost 30 years, in a variety of roles and geographies including Technical Support, Channel Sales, Product Management, Strategic Alliances Management and Pre-Sales, primarily based in Europe but for the last four years in Australia and New Zealand. In his current role as Pre-Sales Manager, Peter is charged with driving and supporting sales activity within the Application Modernization and Connectivity team, based in Melbourne.

Leo Ervin

Leo Ervin

Leo Ervin is a Senior Solutions Architect working with Micro Focus Enterprise Solutions working with the ANZ team. After completing a Mathematics degree Leo started as a PL/1 programming with a local insurance company. The next step in Leo’s career involved consulting work in PL/1 and COBOL before he joined a start-up company as a technical director and partner. This company became the first distributor of Micro Focus software in the ANZ region in 1986. Leo’s involvement with Micro Focus technology has continued from this distributorship through to today with his current focus on cloud strategies for both DevOps and re-platform implementations.

Kevin Yung

Kevin Yung

Kevin is a Senior Modernization Architect in AWS Professional Services Global Mainframe and Midrange Modernization (GM3) team. Kevin currently is focusing on leading and delivering mainframe and midrange applications modernization for large enterprise customers.

Creating multi-architecture Docker images to support Graviton2 using AWS CodeBuild and AWS CodePipeline

Post Syndicated from Tyler Lynch original https://aws.amazon.com/blogs/devops/creating-multi-architecture-docker-images-to-support-graviton2-using-aws-codebuild-and-aws-codepipeline/

This post provides a clear path for customers who are evaluating and adopting Graviton2 instance types for performance improvements and cost-optimization.

Graviton2 processors are custom designed by AWS using 64-bit Arm Neoverse N1 cores. They power the T4g*, M6g*, R6g*, and C6g* Amazon Elastic Compute Cloud (Amazon EC2) instance types and offer up to 40% better price performance over the current generation of x86-based instances in a variety of workloads, such as high-performance computing, application servers, media transcoding, in-memory caching, gaming, and more.

More and more customers want to make the move to Graviton2 to take advantage of these performance optimizations while saving money.

During the transition process, a great benefit AWS provides is the ability to perform native builds for each architecture, instead of attempting to cross-compile on homogenous hardware. This has the benefit of decreasing build time as well as reducing complexity and cost to set up.

To see this benefit in action, we look at how to build a CI/CD pipeline using AWS CodePipeline and AWS CodeBuild that can build multi-architecture Docker images in parallel to aid you in evaluating and migrating to Graviton2.

Solution overview

With CodePipeline and CodeBuild, we can automate the creation of architecture-specific Docker images, which can be pushed to Amazon Elastic Container Registry (Amazon ECR). The following diagram illustrates this architecture.

Solution overview architectural diagram

The steps in this process are as follows:

  1. Create a sample Node.js application and associated Dockerfile.
  2. Create the buildspec files that contain the commands that CodeBuild runs.
  3. Create three CodeBuild projects to automate each of the following steps:
    • CodeBuild for x86 – Creates a x86 Docker image and pushes to Amazon ECR.
    • CodeBuild for arm64 – Creates a Arm64 Docker image and pushes to Amazon ECR.
    • CodeBuild for manifest list – Creates a Docker manifest list, annotates the list, and pushes to Amazon ECR.
  4. Automate the orchestration of these projects with CodePipeline.

Prerequisites

The prerequisites for this solution are as follows:

  • The correct AWS Identity and Access Management (IAM) role permissions for your account allowing for the creation of the CodePipeline pipeline, CodeBuild projects, and Amazon ECR repositories
  • An Amazon ECR repository named multi-arch-test
  • A source control service such as AWS CodeCommit or GitHub that CodeBuild and CodePipeline can interact with
  • The source code repository initialized and cloned locally

Creating a sample Node.js application and associated Dockerfile

For this post, we create a sample “Hello World” application that self-reports the processor architecture. We work in the local folder that is cloned from our source repository as specified in the prerequisites.

  1. In your preferred text editor, add a new file with the following Node.js code:

# Hello World sample app.
const http = require('http');

const port = 3000;

const server = http.createServer((req, res) => {
  res.statusCode = 200;
  res.setHeader('Content-Type', 'text/plain');
  res.end(`Hello World. This processor architecture is ${process.arch}`);
});

server.listen(port, () => {
  console.log(`Server running on processor architecture ${process.arch}`);
});
  1. Save the file in the root of your source repository and name it app.js.
  2. Commit the changes to Git and push the changes to our source repository. See the following code:

git add .
git commit -m "Adding Node.js sample application."
git push

We also need to create a sample Dockerfile that instructs the docker build command how to build the Docker images. We use the default Node.js image tag for version 14.

  1. In a text editor, add a new file with the following code:

# Sample nodejs application
FROM node:14
WORKDIR /usr/src/app
COPY package*.json app.js ./
RUN npm install
EXPOSE 3000
CMD ["node", "app.js"]
  1. Save the file in the root of the source repository and name it Dockerfile. Make sure it is Dockerfile with no extension.
  2. Commit the changes to Git and push the changes to our source repository:

git add .
git commit -m "Adding Dockerfile to host the Node.js sample application."
git push

Creating a build specification file for your application

It’s time to create and add a buildspec file to our source repository. We want to use a single buildspec.yml file for building, tagging, and pushing the Docker images to Amazon ECR for both target native architectures, x86, and Arm64. We use CodeBuild to inject environment variables, some of which need to be changed for each architecture (such as image tag and image architecture).

A buildspec is a collection of build commands and related settings, in YAML format, that CodeBuild uses to run a build. For more information, see Build specification reference for CodeBuild.

The buildspec we add instructs CodeBuild to do the following:

  • install phase – Update the yum package manager
  • pre_build phase – Sign in to Amazon ECR using the IAM role assumed by CodeBuild
  • build phase – Build the Docker image using the Docker CLI and tag the newly created Docker image
  • post_build phase – Push the Docker image to our Amazon ECR repository

We first need to add the buildspec.yml file to our source repository.

  1. In a text editor, add a new file with the following build specification:

version: 0.2
phases:
    install:
        commands:
            - yum update -y
    pre_build:
        commands:
            - echo Logging in to Amazon ECR...
            - $(aws ecr get-login --no-include-email --region $AWS_DEFAULT_REGION)
    build:
        commands:
            - echo Build started on `date`
            - echo Building the Docker image...          
            - docker build -t $IMAGE_REPO_NAME:$IMAGE_TAG .
            - docker tag $IMAGE_REPO_NAME:$IMAGE_TAG $AWS_ACCOUNT_ID.dkr.ecr.$AWS_DEFAULT_REGION.amazonaws.com/$IMAGE_REPO_NAME:$IMAGE_TAG      
    post_build:
        commands:
            - echo Build completed on `date`
            - echo Pushing the Docker image...
            - docker push $AWS_ACCOUNT_ID.dkr.ecr.$AWS_DEFAULT_REGION.amazonaws.com/$IMAGE_REPO_NAME:$IMAGE_TAG
  1. Save the file in the root of the repository and name it buildspec.yml.

Because we specify environment variables in the CodeBuild project, we don’t need to hard code any values in the buildspec file.

  1. Commit the changes to Git and push the changes to our source repository:

git add .
git commit -m "Adding CodeBuild buildspec.yml file."
git push

Creating a build specification file for your manifest list creation

Next we create a buildspec file that instructs CodeBuild to create a Docker manifest list, and associate that manifest list with the Docker images that the buildspec file builds.

A manifest list is a list of image layers that is created by specifying one or more (ideally more than one) image names. You can then use it in the same way as an image name in docker pull and docker run commands, for example. For more information, see manifest create.

As of this writing, manifest creation is an experimental feature of the Docker command line interface (CLI).

Experimental features provide early access to future product functionality. These features are intended only for testing and feedback because they may change between releases without warning or be removed entirely from a future release. Experimental features must not be used in production environments. For more information, Experimental features.

When creating the CodeBuild project for manifest list creation, we specify a buildspec file name override as buildspec-manifest.yml. This buildspec instructs CodeBuild to do the following:

  • install phase – Update the yum package manager
  • pre_build phase – Sign in to Amazon ECR using the IAM role assumed by CodeBuild
  • build phase – Perform three actions:
    • Set environment variable to enable Docker experimental features for the CLI
    • Create the Docker manifest list using the Docker CLI
    • Annotate the manifest list to add the architecture-specific Docker image references
  • post_build phase – Push the Docker image to our Amazon ECR repository and use docker manifest inspect to echo out the contents of the manifest list from Amazon ECR

We first need to add the buildspec-manifest.yml file to our source repository.

  1. In a text editor, add a new file with the following build specification:

version: 0.2
# Based on the Docker documentation, must include the DOCKER_CLI_EXPERIMENTAL environment variable
# https://docs.docker.com/engine/reference/commandline/manifest/    

phases:
    install:
        commands:
            - yum update -y
    pre_build:
        commands:
            - echo Logging in to Amazon ECR...
            - $(aws ecr get-login --no-include-email --region $AWS_DEFAULT_REGION)
    build:
        commands:
            - echo Build started on `date`
            - echo Building the Docker manifest...   
            - export DOCKER_CLI_EXPERIMENTAL=enabled       
            - docker manifest create $AWS_ACCOUNT_ID.dkr.ecr.$AWS_DEFAULT_REGION.amazonaws.com/$IMAGE_REPO_NAME $AWS_ACCOUNT_ID.dkr.ecr.$AWS_DEFAULT_REGION.amazonaws.com/$IMAGE_REPO_NAME:latest-arm64v8 $AWS_ACCOUNT_ID.dkr.ecr.$AWS_DEFAULT_REGION.amazonaws.com/$IMAGE_REPO_NAME:latest-amd64    
            - docker manifest annotate --arch arm64 $AWS_ACCOUNT_ID.dkr.ecr.$AWS_DEFAULT_REGION.amazonaws.com/$IMAGE_REPO_NAME $AWS_ACCOUNT_ID.dkr.ecr.$AWS_DEFAULT_REGION.amazonaws.com/$IMAGE_REPO_NAME:latest-arm64v8
            - docker manifest annotate --arch amd64 $AWS_ACCOUNT_ID.dkr.ecr.$AWS_DEFAULT_REGION.amazonaws.com/$IMAGE_REPO_NAME $AWS_ACCOUNT_ID.dkr.ecr.$AWS_DEFAULT_REGION.amazonaws.com/$IMAGE_REPO_NAME:latest-amd64

    post_build:
        commands:
            - echo Build completed on `date`
            - echo Pushing the Docker image...
            - docker manifest push $AWS_ACCOUNT_ID.dkr.ecr.$AWS_DEFAULT_REGION.amazonaws.com/$IMAGE_REPO_NAME
            - docker manifest inspect $AWS_ACCOUNT_ID.dkr.ecr.$AWS_DEFAULT_REGION.amazonaws.com/$IMAGE_REPO_NAME
  1. Save the file in the root of the repository and name it buildspec-manifest.yml.
  2. Commit the changes to Git and push the changes to our source repository:

git add .
git commit -m "Adding CodeBuild buildspec-manifest.yml file."
git push

Setting up your CodeBuild projects

Now we have created a single buildspec.yml file for building, tagging, and pushing the Docker images to Amazon ECR for both target native architectures: x86 and Arm64. This file is shared by two of the three CodeBuild projects that we create. We use CodeBuild to inject environment variables, some of which need to be changed for each architecture (such as image tag and image architecture). We also want to use the single Docker file, regardless of the architecture. We also need to ensure any third-party libraries are present and compiled correctly for the target architecture.

For more information about third-party libraries and software versions that have been optimized for Arm, see the Getting started with AWS Graviton GitHub repo.

We use the same environment variable names for the CodeBuild projects, but each project has specific values, as detailed in the following table. You need to modify these values to your numeric AWS account ID, the AWS Region where your Amazon ECR registry endpoint is located, and your Amazon ECR repository name. The instructions for adding the environment variables in the CodeBuild projects are in the following sections.

Environment Variable x86 Project values Arm64 Project values manifest Project values
1 AWS_DEFAULT_REGION us-east-1 us-east-1 us-east-1
2 AWS_ACCOUNT_ID 111111111111 111111111111 111111111111
3 IMAGE_REPO_NAME multi-arch-test multi-arch-test multi-arch-test
4 IMAGE_TAG latest-amd64 latest-arm64v8 latest

The image we use in this post uses architecture-specific tags with the term latest. This is for demonstration purposes only; it’s best to tag the images with an explicit version or another meaningful reference.

CodeBuild for x86

We start with creating a new CodeBuild project for x86 on the CodeBuild console.

CodeBuild looks for a file named buildspec.yml by default, unless overridden. For these first two CodeBuild projects, we rely on that default and don’t specify the buildspec name.

  1. On the CodeBuild console, choose Create build project.
  2. For Project name, enter a unique project name for your build project, such as node-x86.
  3. To add tags, add them under Additional Configuration.
  4. Choose a Source provider (for this post, we choose GitHub).
  5. For Environment image, choose Managed image.
  6. Select Amazon Linux 2.
  7. For Runtime(s), choose Standard.
  8. For Image, choose aws/codebuild/amazonlinux2-x86_64-standard:3.0.

This is a x86 build image.

  1. Select Privileged.
  2. For Service role, choose New service role.
  3. Enter a name for the new role (one is created for you), such as CodeBuildServiceRole-nodeproject.

We reuse this same service role for the other CodeBuild projects associated with this project.

  1. Expand Additional configurations and move to the Environment variables
  2. Create the following Environment variables:
Name Value Type
1 AWS_DEFAULT_REGION us-east-1 Plaintext
2 AWS_ACCOUNT_ID 111111111111 Plaintext
3 IMAGE_REPO_NAME multi-arch-test Plaintext
4 IMAGE_TAG latest-amd64 Plaintext
  1. Choose Create build project.

Attaching the IAM policy

Now that we have created the CodeBuild project, we need to adjust the new service role that was just created and attach an IAM policy so that it can interact with the Amazon ECR API.

  1. On the CodeBuild console, choose the node-x86 project
  2. Choose the Build details
  3. Under Service role, choose the link that looks like arn:aws:iam::111111111111:role/service-role/CodeBuildServiceRole-nodeproject.

A new browser tab should open.

  1. Choose Attach policies.
  2. In the Search field, enter AmazonEC2ContainerRegistryPowerUser.
  3. Select AmazonEC2ContainerRegistryPowerUser.
  4. Choose Attach policy.

CodeBuild for arm64

Now we move on to creating a new (second) CodeBuild project for Arm64.

  1. On the CodeBuild console, choose Create build project.
  2. For Project name, enter a unique project name, such as node-arm64.
  3. If you want to add tags, add them under Additional Configuration.
  4. Choose a Source provider (for this post, choose GitHub).
  5. For Environment image, choose Managed image.
  6. Select Amazon Linux 2.
  7. For Runtime(s), choose Standard.
  8. For Image, choose aws/codebuild/amazonlinux2-aarch64-standard:2.0.

This is an Arm build image and is different from the image selected in the previous CodeBuild project.

  1. Select Privileged.
  2. For Service role, choose Existing service role.
  3. Choose CodeBuildServiceRole-nodeproject.
  4. Select Allow AWS CodeBuild to modify this service role so it can be used with this build project.
  5. Expand Additional configurations and move to the Environment variables
  6. Create the following Environment variables:
Name Value Type
1 AWS_DEFAULT_REGION us-east-1 Plaintext
2 AWS_ACCOUNT_ID 111111111111 Plaintext
3 IMAGE_REPO_NAME multi-arch-test Plaintext
4 IMAGE_TAG latest-arm64v8 Plaintext
  1. Choose Create build project.

CodeBuild for manifest list

For the last CodeBuild project, we create a Docker manifest list, associating that manifest list with the Docker images that the preceding projects create, and pushing the manifest list to ECR. This project uses the buildspec-manifest.yml file created earlier.

  1. On the CodeBuild console, choose Create build project.
  2. For Project name, enter a unique project name for your build project, such as node-manifest.
  3. If you want to add tags, add them under Additional Configuration.
  4. Choose a Source provider (for this post, choose GitHub).
  5. For Environment image, choose Managed image.
  6. Select Amazon Linux 2.
  7. For Runtime(s), choose Standard.
  8. For Image, choose aws/codebuild/amazonlinux2-x86_64-standard:3.0.

This is a x86 build image.

  1. Select Privileged.
  2. For Service role, choose Existing service role.
  3. Choose CodeBuildServiceRole-nodeproject.
  4. Select Allow AWS CodeBuild to modify this service role so it can be used with this build project.
  5. Expand Additional configurations and move to the Environment variables
  6. Create the following Environment variables:
Name Value Type
1 AWS_DEFAULT_REGION us-east-1 Plaintext
2 AWS_ACCOUNT_ID 111111111111 Plaintext
3 IMAGE_REPO_NAME multi-arch-test Plaintext
4 IMAGE_TAG latest Plaintext
  1. For Buildspec name – optional, enter buildspec-manifest.yml to override the default.
  2. Choose Create build project.

Setting up CodePipeline

Now we can move on to creating a pipeline to orchestrate the builds and manifest creation.

  1. On the CodePipeline console, choose Create pipeline.
  2. For Pipeline name, enter a unique name for your pipeline, such as node-multi-architecture.
  3. For Service role, choose New service role.
  4. Enter a name for the new role (one is created for you). For this post, we use the generated role name CodePipelineServiceRole-nodeproject.
  5. Select Allow AWS CodePipeline to create a service role so it can be used with this new pipeline.
  6. Choose Next.
  7. Choose a Source provider (for this post, choose GitHub).
  8. If you don’t have any existing Connections to GitHub, select Connect to GitHub and follow the wizard.
  9. Choose your Branch name (for this post, I choose main, but your branch might be different).
  10. For Output artifact format, choose CodePipeline default.
  11. Choose Next.

You should now be on the Add build stage page.

  1. For Build provider, choose AWS CodeBuild.
  2. Verify the Region is your Region of choice (for this post, I use US East (N. Virginia)).
  3. For Project name, choose node-x86.
  4. For Build type, select Single build.
  5. Choose Next.

You should now be on the Add deploy stage page.

  1. Choose Skip deploy stage.

A pop-up appears that reads Your pipeline will not include a deployment stage. Are you sure you want to skip this stage?

  1. Choose Skip.
  2. Choose Create pipeline.

CodePipeline immediately attempts to run a build. You can let it continue without worry if it fails. We are only part of the way done with the setup.

Adding an additional build step

We need to add the additional build step for the Arm CodeBuild project in the Build stage.

  1. On the CodePipeline console, choose node-multi-architecture pipeline
  2. Choose Edit to start editing the pipeline stages.

You should now be on the Editing: node-multi-architecture page.

  1. For the Build stage, choose Edit stage.
  2. Choose + Add action.

Editing node-multi-architecture

  1. For Action name, enter Build-arm64.
  2. For Action provider, choose AWS CodeBuild.
  3. Verify your Region is correct.
  4. For Input artifacts, select SourceArtifact.
  5. For Project name, choose node-arm64.
  6. For Build type, select Single build.
  7. Choose Done.
  8. Choose Save.

A pop-up appears that reads Saving your changes cannot be undone. If the pipeline is running when you save your changes, that execution will not complete.

  1. Choose Save.

Updating the first build action name

This step is optional. The CodePipeline wizard doesn’t allow you to enter your Build action name during creation, but you can update the Build stage’s first build action to have consistent naming.

  1. Choose Edit to start editing the pipeline stages.
  2. Choose the Edit icon.
  3. For Action name, enter Build-x86.
  4. Choose Done.
  5. Choose Save.

A pop-up appears that says Saving your changes cannot be undone. If the pipeline is running when you save your changes, that execution will not complete.

  1. Choose Save.

Adding the project

Now we add the CodeBuild project for manifest creation and publishing.

  1. On the CodePipeline console, choose node-multi-architecture pipeline.
  2. Choose Edit to start editing the pipeline stages.
  3. Choose +Add stage below the Build
  4. Set the Stage name to Manifest
  5. Choose +Add action group.
  6. For Action name, enter Create-manifest.
  7. For Action provider, choose AWS CodeBuild.
  8. Verify your Region is correct.
  9. For Input artifacts, select SourceArtifact.
  10. For Project name, choose node-manifest.
  11. For Build type, select Single build.
  12. Choose Done.
  13. Choose Save.

A pop-up appears that reads Saving your changes cannot be undone. If the pipeline is running when you save your changes, that execution will not complete.

  1. Choose Save.

Testing the pipeline

Now let’s verify everything works as planned.

  1. In the pipeline details page, choose Release change.

This runs the pipeline in stages. The process should take a few minutes to complete. The pipeline should show each stage as Succeeded.

Pipeline visualization

Now we want to inspect the output of the Create-manifest action that runs the CodeBuild project for manifest creation.

  1. Choose Details in the Create-manifest

This opens the CodeBuild pipeline.

  1. Under Build logs, we should see the output from the manifest inspect command we ran as the last step in the buildspec-manifest.yml See the following sample log:

[Container] 2020/10/07 16:47:39 Running command docker manifest inspect $AWS_ACCOUNT_ID.dkr.ecr.$AWS_DEFAULT_REGION.amazonaws.com/$IMAGE_REPO_NAME
{
   "schemaVersion": 2,
   "mediaType": "application/vnd.docker.distribution.manifest.list.v2+json",
   "manifests": [
      {
         "mediaType": "application/vnd.docker.distribution.manifest.v2+json",
         "size": 1369,
         "digest": "sha256:238c2762212ff5d7e0b5474f23d500f2f1a9c851cdd3e7ef0f662efac508cd04",
         "platform": {
            "architecture": "amd64",
            "os": "linux"
         }
      },
      {
         "mediaType": "application/vnd.docker.distribution.manifest.v2+json",
         "size": 1369,
         "digest": "sha256:0cc9e96921d5565bdf13274e0f356a139a31d10e95de9ad3d5774a31b8871b05",
         "platform": {
            "architecture": "arm64",
            "os": "linux"
         }
      }
   ]
}

Cleaning up

To avoid incurring future charges, clean up the resources created as part of this post.

  1. On the CodePipeline console, choose the pipeline node-multi-architecture.
  2. Choose Delete pipeline.
  3. When prompted, enter delete.
  4. Choose Delete.
  5. On the CodeBuild console, choose the Build project node-x86.
  6. Choose Delete build project.
  7. When prompted, enter delete.
  8. Choose Delete.
  9. Repeat the deletion process for Build projects node-arm64 and node-manifest.

Next we delete the Docker images we created and pushed to Amazon ECR. Be careful to not delete a repository that is being used for other images.

  1. On the Amazon ECR console, choose the repository multi-arch-test.

You should see a list of Docker images.

  1. Select latest, latest-arm64v8, and latest-amd64.
  2. Choose Delete.
  3. When prompted, enter delete.
  4. Choose Delete.

Finally, we remove the IAM roles that we created.

  1. On the IAM console, choose Roles.
  2. In the search box, enter CodePipelineServiceRole-nodeproject.
  3. Select the role and choose Delete role.
  4. When prompted, choose Yes, delete.
  5. Repeat these steps for the role CodeBuildServiceRole-nodeproject.

Conclusion

To summarize, we successfully created a pipeline to create multi-architecture Docker images for both x86 and arm64. We referenced them via annotation in a Docker manifest list and stored them in Amazon ECR. The Docker images were based on a single Docker file that uses environment variables as parameters to allow for Docker file reuse.

For more information about these services, see the following:

About the Authors


Tyler Lynch photo

Tyler Lynch
Tyler Lynch is a Sr. Solutions Architect focusing on EdTech at AWS.


Alistair McLean photo

Alistair McLean

Alistair is a Principal Solutions Architect focused on State and Local Government and K12 customers at AWS.


Snowflake: Running Millions of Simulation Tests with Amazon EKS

Post Syndicated from Keith Joelner original https://aws.amazon.com/blogs/architecture/snowflake-running-millions-of-simulation-tests-with-amazon-eks/

This post was co-written with Brian Nutt, Senior Software Engineer and Kao Makino, Principal Performance Engineer, both at Snowflake.

Transactional databases are a key component of any production system. Maintaining data integrity while rows are read and written at a massive scale is a major technical challenge for these types of databases. To ensure their stability, it’s necessary to test many different scenarios and configurations. Simulating as many of these as possible allows engineers to quickly catch defects and build resilience. But the Holy Grail is to accomplish this at scale and within a timeframe that allows your developers to iterate quickly.

Snowflake has been using and advancing FoundationDB (FDB), an open-source, ACID-compliant, distributed key-value store since 2014. FDB, running on Amazon Elastic Cloud Compute (EC2) and Amazon Elastic Block Storage (EBS), has proven to be extremely reliable and is a key part of Snowflake’s cloud services layer architecture. To support its development process of creating high quality and stable software, Snowflake developed Project Joshua, an internal system that leverages Amazon Elastic Kubernetes Service (EKS), Amazon Elastic Container Registry (ECR), Amazon EC2 Spot Instances, and AWS PrivateLink to run over one hundred thousand of validation and regression tests an hour.

About Snowflake

Snowflake is a single, integrated data platform delivered as a service. Built from the ground up for the cloud, Snowflake’s unique multi-cluster shared data architecture delivers the performance, scale, elasticity, and concurrency that today’s organizations require. It features storage, compute, and global services layers that are physically separated but logically integrated. Data workloads scale independently from one another, making it an ideal platform for data warehousing, data lakes, data engineering, data science, modern data sharing, and developing data applications.

Snowflake architecture

Developing a simulation-based testing and validation framework

Snowflake’s cloud services layer is composed of a collection of services that manage virtual warehouses, query optimization, and transactions. This layer relies on rich metadata stored in FDB.

Prior to the creation of the simulation framework, Project Joshua, FDB developers ran tests on their laptops and were limited by the number they could run. Additionally, there was a scheduled nightly job for running further tests.

Joshua at Snowflake

Amazon EKS as the foundation

Snowflake’s platform team decided to use Kubernetes to build Project Joshua. Their focus was on helping engineers run their workloads instead of spending cycles on the management of the control plane. They turned to Amazon EKS to achieve their scalability needs. This was a crucial success criterion for Project Joshua since at any point in time there could be hundreds of nodes running in the cluster. Snowflake utilizes the Kubernetes Cluster Autoscaler to dynamically scale worker nodes in minutes to support a tests-based queue of Joshua’s requests.

With the integration of Amazon EKS and Amazon Virtual Private Cloud (Amazon VPC), Snowflake is able to control access to the required resources. For example: the database that serves Joshua’s test queues is external to the EKS cluster. By using the Amazon VPC CNI plugin, each pod receives an IP address in the VPC and Snowflake can control access to the test queue via security groups.

To achieve its desired performance, Snowflake created its own custom pod scaler, which responds quicker to changes than using a custom metric for pod scheduling.

  • The agent scaler is responsible for monitoring a test queue in the coordination database (which, coincidentally, is also FDB) to schedule Joshua agents. The agent scaler communicates directly with Amazon EKS using the Kubernetes API to schedule tests in parallel.
  • Joshua agents (one agent per pod) are responsible for pulling tests from the test queue, executing, and reporting results. Tests are run one at a time within the EKS Cluster until the test queue is drained.

Achieving scale and cost savings with Amazon EC2 Spot

A Spot Fleet is a collection—or fleet—of Amazon EC2 Spot instances that Joshua uses to make the infrastructure more reliable and cost effective. ​ Spot Fleet is used to reduce the cost of worker nodes by running a variety of instance types.

With Spot Fleet, Snowflake requests a combination of different instance types to help ensure that demand gets fulfilled. These options make Fleet more tolerant of surges in demand for instance types. If a surge occurs it will not significantly affect tasks since Joshua is agnostic to the type of instance and can fall back to a different instance type and still be available.

For reservations, Snowflake uses the capacity-optimized allocation strategy to automatically launch Spot Instances into the most available pools by looking at real-time capacity data and predicting which are the most available. This helps Snowflake quickly switch instances reserved to what is most available in the Spot market, instead of spending time contending for the cheapest instances, at the cost of a potentially higher price.

Overcoming hurdles

Snowflake’s usage of a public container registry posed a scalability challenge. When starting hundreds of worker nodes, each node needs to pull images from the public registry. This can lead to a potential rate limiting issue when all outbound traffic goes through a NAT gateway.

For example, consider 1,000 nodes pulling a 10 GB image. Each pull request requires each node to download the image across the public internet. Some issues that need to be addressed are latency, reliability, and increased costs due to the additional time to download an image for each test. Also, container registries can become unavailable or may rate-limit download requests. Lastly, images are pulled through public internet and other services in the cluster can experience pulling issues.

​For anything more than a minimal workload, a local container registry is needed. If an image is first pulled from the public registry and then pushed to a local registry (cache), it only needs to pull once from the public registry, then all worker nodes benefit from a local pull. That’s why Snowflake decided to replicate images to ECR, a fully managed docker container registry, providing a reliable local registry to store images. Additional benefits for the local registry are that it’s not exclusive to Joshua; all platform components required for Snowflake clusters can be cached in the local ECR Registry. For additional security and performance Snowflake uses AWS PrivateLink to keep all network traffic from ECR to the workers nodes within the AWS network. It also resolved rate-limiting issues from pulling images from a public registry with unauthenticated requests, unblocking other cluster nodes from pulling critical images for operation.

Conclusion

Project Joshua allows Snowflake to enable developers to test more scenarios without having to worry about the management of the infrastructure. ​ Snowflake’s engineers can schedule thousands of test simulations and configurations to catch bugs faster. FDB is a key component of ​the Snowflake stack and Project Joshua helps make FDB more stable and resilient. Additionally, Amazon EC2 Spot has provided non-trivial cost savings to Snowflake vs. running on-demand or buying reserved instances.

If you want to know more about how Snowflake built its high performance data warehouse as a Service on AWS, watch the This is My Architecture video below.

Lightsail Containers: An Easy Way to Run your Containers in the Cloud

Post Syndicated from Sébastien Stormacq original https://aws.amazon.com/blogs/aws/lightsail-containers-an-easy-way-to-run-your-containers-in-the-cloud/

When I am delivering an introduction to the AWS Cloud for developers, I usually spend a bit of time to mention and to demonstrate Amazon Lightsail. It is by far the easiest way to get started on AWS. It allows you to get your application running on your own virtual server in a matter of minutes. Today, we are adding the possibility to deploy your container-based workloads on Amazon Lightsail. You can now deploy your container images to the cloud with the same simplicity and the same bundled pricing Amazon Lightsail provides for your virtual servers.

Amazon Lightsail is an easy-to-use cloud service that offers you everything needed to deploy an application or website, for a cost effective and easy to understand monthly plan. It is ideal to deploy simple workloads, websites, or to get started with AWS. The typical Lightsail customers range from developers to small businesses or startups who are looking to get quickly started in the cloud and AWS. At any time, you can later adopt the broad AWS Services when you are getting more familiar with the AWS cloud.

Under the hood, Lightsail is powered by Amazon Elastic Compute Cloud (EC2), Amazon Relational Database Service (RDS), Application Load Balancer, and other AWS services. It offers the level of security, reliability, and scalability you are expecting from AWS.

When deploying to Lightsail, you can choose between six operating systems (4 Linux distributions, FreeBSD, or Windows), seven applications (such as WordPress, Drupal, Joomla, Plesk…), and seven stacks (such as Node.js, Lamp, GitLab, Django…). But what about Docker containers?

Starting today, Amazon Lightsail offers an simple way for developers to deploy their containers to the cloud. All you need to provide is a Docker image for your containers and we automatically containerize it for you. Amazon Lightsail gives you an HTTPS endpoint that is ready to serve your application running in the cloud container. It automatically sets up a load balanced TLS endpoint, and take care of the TLS certificate. It replaces unresponsive containers for you automatically, it assigns a DNS name to your endpoint, it maintains the old version till the new version is healthy and ready to go live, and more.

Let’s see how it works by deploying a simple Python web app as a container. I assume you have the AWS Command Line Interface (CLI) and Docker installed on your laptop. Python is not required, it will be installed in the container only.

I first create a Python REST API, using the Flask simple application framework. Any programming language and any framework that can run inside a container works too. I just choose Python and Flask because they are simple and elegant.

You can safely copy /paste the following commands:

mkdir helloworld-python
cd helloworld-python
# create a simple Flask application in helloworld.py
echo "

from flask import Flask, request
from flask_restful import Resource, Api

app = Flask(__name__)
api = Api(app)

class Greeting (Resource):
   def get(self):
      return { "message" : "Hello Flask API World!" }
api.add_resource(Greeting, '/') # Route_1

if __name__ == '__main__':
   app.run('0.0.0.0','8080')

"  > helloworld.py

Then I create a Dockerfile that contains the steps and information required to build the container image:

# create a Dockerfile
echo '
FROM python:3
ADD helloworld.py /
RUN pip install flask
RUN pip install flask_restful
EXPOSE 8080
CMD [ "python", "./helloworld.py"]
 '  > Dockerfile

Now I can build my container:

docker build -t lightsail-hello-world .

The build command outputs many lines while it builds the container, it eventually terminates with the following message (actual ID differs):

Successfully built 7848e055edff
Successfully tagged lightsail-hello-world:latest

I test the container by launching it on my laptop:

docker run -it --rm -p 8080:8080 lightsail-hello-world

and connect a browser to localhost:8080

Testing Flask API in the container

When I am satisfied with my app, I push the container to Docker Hub.

docker tag lightsail-hello-world sebsto/lightsail-hello-world
docker login
docker push sebsto/lightsail-hello-world

Now that I have a container ready on Docker Hub, let’s create a Lightsail Container Service.

I point my browser to the Amazon Lightsail console. I can see container services already deployed and I can manage them. To create a new service, I click Create container service:Lighsail Container Console

On the next screen, I select the size of the container I want to use, in terms of vCPU and memory available to my application. I also select the number of container instances I want to run in parallel for high availability or scalability reasons. I can change the number of container instances or their power (vCPU and RAM) at any time, without interrupting the service. Both these parameters impact the price AWS charges you per month. The price is indicated and dynamically adjusted on the screen, as shown on the following video.

Lightsail choose capacity

Slightly lower on the screen, I choose to skip the deployment for now. I give a name for the service (“hello-world“). I click Create container service.

Lightsail container name

Once the service is created, I click Create your first deployment to create a deployment. A deployment is a combination of a specific container image and version to be deployed on the service I just created.

I chose a name for my image and give the address of the image on Docker Hub, using the format user/<my container name>:tag. This is also where I have the possibility to enter environment variables, port mapping, or a launch command.

My container is offering a network service on port TCP 8080, so I add that port to the deployment configuration. The Open Ports configuration specifies which ports and protocols are open to other systems in my container’s network. Other containers or virtual machines can only connect to my container when the port is explicitly configured in the console or EXPOSE‘d in my Dockerfile. None of these ports are exposed to the public internet.

But in this example, I also want Lightsail to route the traffic from the public internet to this container. So, I add this container as an endpoint of the hello-world service I just created. The endpoint is automatically configured for TLS, there is no certificate to install or manage.

I can add up to 10 containers for one single deployment. When ready, I click Save and deploy.

Lightsail Deployment

After a while, my deployment is active and I can test the endpoint.

Lightsail Deployment Active

The endpoint DNS address is available on the top-right side of the console. If I must, I can configure my own DNS domain name.

Lightsail endpoint DNSI open another tab in my browser and point it at the https endpoint URL:

Testing Container DeploymentWhen I must deploy a new version, I use the console again to modify the deployment. I spare you the details of modifying the application code, build, and push a new version of the container. Let’s say I have my second container image version available under the name sebsto/lightsail-hello-world:v2. Back to Amazon Lightsail console, I click Deployments, then Modify your Deployments. I enter the full name, including the tag, of the new version of the container image and click Save and Deploy.

Lightsail Deploy updated VersionAfter a while, the new version is deployed and automatically activated.

Lightsail deployment sucesful

I open a new tab in my browser and I point it to the endpoint URI available on the top-right corner of Amazon Lightsail console. I observe the JSON version is different. It now has a version attribute with a value of 2.

lightsail v2 is deployed

When something goes wrong during my deployment, Amazon Lightsail automatically keeps the last deployment active, to avoid any service interruption. I can also manually activate a previous deployment version to reverse any undesired changes.

I just deployed my first container image from Docker Hub. I can also manage my services and deploy local container images from my laptop using the AWS Command Line Interface (CLI). To push container images to my Amazon Lightsail container service directly from my laptop, I must install the LightSail Controler Plugin. (TL;DR curl, cp and chmod are your friends here, I also maintain a DockerFile to use the CLI inside a container.)

To create, list, or delete a container service, I type:

aws lightsail create-container-service --service-name myservice --power nano --scale 1

aws lightsail get-container-services
{
   "containerServices": [{
      "containerServiceName": "myservice",
      "arn": "arn:aws:lightsail:us-west-2:012345678901:ContainerService/1b50c121-eac7-4ee2-9078-425b0665b3d7",
      "createdAt": "2020-07-31T09:36:48.226999998Z",
      "location": {
         "availabilityZone": "all",
         "regionName": "us-west-2"
      },
      "resourceType": "ContainerService",
      "power": "nano",
      "powerId": "",
      "state": "READY",
      "scale": 1,
      "privateDomainName": "",
      "isDisabled": false,
      "roleArn": ""
   }]
}

aws lightsail delete-container-service --service myservice

I can also use the CLI to deploy container images directly from my laptop. Be sure lightsailctl is installed.

# Build the new version of my image (v3)
docker build -t sebsto/lightsail-hello-world:v3 .

# Push the new image.
aws lightsail push-container-image --service-name hello-world --label hello-world --image sebsto/lightsail-hello-world:v3

After a while, I see the output:

Image "sebsto/lightsail-hello-world:v3" registered.
Refer to this image as ":hello-world.hello-world.1" in deployments.

I create a lc.json file to hold the details of the deployment configuration. it is aligned to the options I see on the console. I report the name given by the previous command on the image property:

{
  "serviceName": "hello-world",
  "containers": {
     "hello-world": {
        "image": ":hello-world.hello-world.1",
        "ports": {
           "8080": "HTTP"
        }
     }
  },
  "publicEndpoint": {
     "containerName": "hello-world",
     "containerPort": 8080
  }
}

Finally, I create a new service version with:
aws lightsail create-container-service-deployment --cli-input-json file://lc.json

I can query the deployment status with
aws lightsail get-container-services

...
"nextDeployment": {
   "version": 4,
   "state": "ACTIVATING",
   "containers": {
      "hello-world": {
      "image": ":hello-world.hello-world.1",
      "command": [],
      "environment": {},
      "ports": {
         "8080": "HTTP"
      }
     }
},
...

After a while, the status  becomes  ACTIVE, and I can test my endpoint.

curl https://hello-world.nxxxxxxxxxxx.lightsail.ec2.aws.dev/
{"message": "Hello Flask API World!", "version": 3}

If you plan to later deploy your container to Amazon ECS or Amazon Elastic Kubernetes Service, no changes are required. You can pull the container image from your repository, just like you do with Amazon Lightsail.

You can deploy your containers on Lightsail in all AWS Regions where Amazon Lightsail is available. As of today, this is US East (Ohio), US East (N. Virginia), US West (Oregon), Asia Pacific (Mumbai), Asia Pacific (Seoul), Asia Pacific (Singapore), Asia Pacific (Sydney), Asia Pacific (Tokyo), Canada (Central), Europe (Frankfurt), Europe (Ireland), Europe (London), and Europe (Paris).

As usual when using Amazon Lightsail, pricing is easy to understand and predictable. Amazon Lightsail Containers have a fixed price per month per container, depending on the size of the container (the vCPU/memory combination you use). You are charged on the prorated hours you keep the service running. The price per month is the maximum price you will be charged for running your service 24h/7. The prices are identical in all AWS Regions. They are ranging from $7 / month for a Nano container (512MB memory and 0.25 vCPU) to $160 / month for a X-Large container (8GB memory and 4 vCPU cores). This price not only includes the container itself, but also the load balancer, the DNS, and a generous data transfer tier. The details and prices for other AWS Regions are on the Lightsail pricing page.

I can’t wait to discover what solutions you will build and deploy on Amazon Lightsail Containers!

— seb

Register for the Modern Applications Online Event

Post Syndicated from Rachel Richardson original https://aws.amazon.com/blogs/compute/register-for-the-modern-applications-online-event/

Earlier this year we hosted the first serverless themed virtual event, the Serverless-First Function. We enjoyed the opportunity to virtually connect with our customers so much that we want to do it again. This time, we’re expanding the scope to feature serverless, containers, and front-end development content. The Modern Applications Online Event is scheduled for November 4-5, 2020.

This free, two-day event addresses how to build and operate modern applications at scale across your organization, enabling you to become more agile and respond to change faster. The event covers topics including serverless application development, containers best practices, front-end web development and more. If you missed the containers or serverless virtual events earlier this year, this is great opportunity to watch the content and interact directly with expert moderators. The full agenda is listed below.

Register now

Organizational Level Operations

Wednesday, November 4, 2020, 9:00 AM – 1:00 PM PT

Move fast and ship things: Using serverless to increase speed and agility within your organization
In this session, Adrian Cockcroft demonstrates how you can use serverless to build modern applications faster than ever. Cockcroft uses real-life examples and customer stories to debunk common misconceptions about serverless.

Eliminating busywork at the organizational level: Tips for using serverless to its fullest potential 
In this session, David Yanacek discusses key ways to unlock the full benefits of serverless, including building services around APIs and using service-oriented architectures built on serverless systems to remove the roadblocks to continuous innovation.

Faster Mobile and Web App Development with AWS Amplify
In this session, Brice Pellé, introduces AWS Amplify, a set of tools and services that enables mobile and front-end web developers to build full stack serverless applications faster on AWS. Learn how to accelerate development with AWS Amplify’s use-case centric open-source libraries and CLI, and its fully managed web hosting service with built-in CI/CD.

Built Serverless-First: How Workgrid Software transformed from a Liberty Mutual project to its own global startup
Connected through a central IT team, Liberty Mutual has embraced serverless since AWS Lambda’s inception in 2014. In this session, Gillian McCann discusses Workgrid’s serverless journey—from internal microservices project within Liberty Mutual to independent business entity, all built serverless-first. Introduction by AWS Principal Serverless SA, Sam Dengler.

Market insights: A conversation with Forrester analyst Jeffrey Hammond & Director of Product for Lambda Ajay Nair
In this session, guest speaker Jeffrey Hammond and Director of Product for AWS Lambda, Ajay Nair, discuss the state of serverless, Lambda-based architectural approaches, Functions-as-a-Service platforms, and more. You’ll learn about the high-level and enduring enterprise patterns and advancements that analysts see driving the market today and determining the market in the future.

AWS Fargate Platform Version 1.4
In this session we will go through a brief introduction of AWS Fargate, what it is, its relation to EKS and ECS and the problems it addresses for customers. We will later introduce the concept of Fargate “platform versions” and we will then dive deeper into the new features that the new platform version 1.4 enables.
Persistent Storage on Containers
Containerizing applications that require data persistence or shared storage is often challenging since containers are ephemeral in nature, are scaled in and out dynamically, and typically clear any saved state when terminated. In this session you will learn about Amazon Elastic File System (EFS), a fully managed, elastic, highly-available, scalable, secure, high-performance, cloud native, shared file system that enables data to be persisted separately from compute for your containerized applications.

Security Best Practices on Amazon ECR
In this session, we will cover best practices with securing your container images using ECR. Learn how user access controls, image assurance, and image scanning contribute to securing your images.

Application Level Design

Thursday, November 5, 2020, 9:00 AM – 1:00 PM PT

Building a Live Streaming Platform with Amplify Video
In this session, learn how to build a live-streaming platform using Amplify Video and the platform powering it, AWS Elemental Live. Amplify video is an open source plugin for the Amplify CLI that makes it easy to incorporate video streaming into your mobile and web applications powered by AWS Amplify.

Building Serverless Web Applications
In this session, follow along as Ben Smith shows you how to build and deploy a completely serverless web application from scratch. The application will span from a mobile friendly front end to complex business logic on the back end.

Automating serverless application development workflows
In this talk, Eric Johnson breaks down how to think about CI/CD when building serverless applications with AWS Lambda and Amazon API Gateway. This session will cover using technologies like AWS SAM to build CI/CD pipelines for serverless application back ends.

Observability for your serverless applications
In this session, Julian Wood walks you through how to add monitoring, logging, and distributed tracing to your serverless applications. Join us to learn how to track platform and business metrics, visualize the performance and operations of your application, and understand which services should be optimized to improve your customer’s experience.

Happy Building with AWS Copilot
The hard part’s done. You and your team have spent weeks pouring over pull requests, building micro-services and containerizing them. Congrats! But what do you do now? How do you get those services on AWS? Copilot is a new command line tool that makes building, developing and operating containerized apps on AWS a breeze. In this session, we’ll talk about how Copilot helps you and your team set up modern applications that follow AWS best practices

CDK for Kubernetes
The CDK for Kubernetes (cdk8s) is a new open-source software development framework for defining Kubernetes applications and resources using familiar programming languages. Applications running on Kubernetes are composed of dozens of resources maintained through carefully maintained YAML files. As applications evolve and teams grow, these YAML files become harder and harder to manage. It’s also really hard to reuse and create abstractions through config files — copying & pasting from previous projects is not the solution! In this webinar, the creators of cdk8s show you how to define your first cdk8s application, define reusable components called “constructs” and generally say goodbye (and thank you very much) to writing in YAML.

Machine Learning on Amazon EKS
Amazon EKS has quickly emerged as a leading choice for machine learning workloads. In this session, we’ll walk through some of the recent ML related enhancements the Kubernetes team at AWS has released. We will then dive deep with walkthroughs of how to optimize your machine learning workloads on Amazon EKS, including demos of the latest features we’ve contributed to popular open source projects like Spark and Kubeflow

Deep Dive on Amazon ECS Capacity Providers
In this talk, we’ll dive into the different ways that ECS Capacity Providers can enable teams to focus more on their core business, and less on the infrastructure behind the scenes. We’ll look at the benefits and discuss scenarios where Capacity Providers can help solve the problems that customers face when using container orchestration. Lastly, we’ll review what features have been released with Capacity Providers, as well as look ahead at what’s to come.

Register now